
前言
ThingsBoard 是目前 Github 上最流行的开源物联网平台(14.6k Star),可以实现物联网项目的快速开发、管理和扩展, 是中小微企业物联网平台的不二之选。

本文介绍如何在 ThingsBoard 前端项目中开发轮播图部件。
产品需求
最近接到产品经理一个需求,在 TB 仪表板中添加轮播图部件,支持基本的轮播图管理和设置,可以点击跳转等。
我一想这简单啊,轮播图是一种比较常见前端组件,直接拿来引用改改就好,可大跌我眼镜(好吧,我不带眼镜)的是 TB 使用的前端 UI 框架 Material 竟然没有轮播图组件,是的!没有!我看两边是真的没有!实在是想不通难道老外不习惯轮播图这种方式么- -。
解决方案
没办法只得引用三方轮播图插件了,这里我踩了个坑- -,之前我开发导航菜单部件时引用了 NG-ZORRO 前端框架,正好在这个框架中找到了 Carousel 走马灯组件。但开发完后发现了个很奇怪的问题。从仪表板库列表进入仪表板轮播图不显示,改变下窗口大小就好了,效果如下:
这个问题我 Debug 了好久,最终只能是认定兼容问题,遂放弃 NG-ZORRO。轮播图最有名的插件莫过于 swiper,但遗憾我引入出现了问题,没有成功。最终在第三次尝试终于成功了,它就是大名鼎鼎的 Layui。
轮播图部件
高级设置
首先还是开发部件的高级设置功能。
首先我将轮播图部件定义为 Cards 部件库的一种,所以我在 ui-ngx\src\app\modules\home\components\widget\lib\settings\cards 目录下创建部件设置文件 carousel-widget-settings.component.html、carousel-widget-settings.component.ts 和 carousel-widget-settings.component.scss。
首先讲解 carousel-widget-settings.component.ts 文件的代码:
1
2
3
4
5
6
7
8
9
10
11
12
13
14
15
16
17
18
19
20
21
22
23
24
25
26
27
28
29
30
31
32
33
34
35
36
37
38
39
40
41
42
43
44
45
46
47
48
49
50
51
52
53
54
55
56
57
58
59
60
61
62
63
64
65
66
67
68
69
70
71
72
73
74
75
76
77
78
79
80
81
82
83
84
85
86
87
88
89
90
91
92
93
94
95
96
97
98
99
100
101
102
103
104
105
106
import { Component, OnInit } from '@angular/core';
import { WidgetSettings, WidgetSettingsComponent } from '@shared/models/widget.models';
import { AbstractControl, FormArray, FormBuilder, FormGroup } from '@angular/forms';
import { Store } from '@ngrx/store';
import { AppState } from '@core/core.state';
import { CdkDragDrop } from '@angular/cdk/drag-drop';
import { UtilsService } from '@core/services/utils.service';

@Component({
  selector: 'tb-carousel-widget-settings',
  templateUrl: './carousel-widget-settings.component.html',
  styleUrls: ['./../widget-settings.scss', './carousel-widget-settings.scss']
})
export class CarouselWidgetSettingsComponent extends WidgetSettingsComponent implements OnInit {

  /*FormGroup表单*/
  carouselWidgetSettingsForm: FormGroup;

  constructor(protected store: Store<AppState>,
              private utils: UtilsService,
              private fb: FormBuilder) {
    super(store);
  }

  protected settingsForm(): FormGroup {
    return this.carouselWidgetSettingsForm;
  }

  /*初始化数据字段*/
  protected defaultSettings(): WidgetSettings {
    return {
      carousels: [],
      autoPlaySpeed: 3000
    };
  }

  /*数据字段设置*/
  protected onSettingsSet(settings: WidgetSettings) {
    this.carouselWidgetSettingsForm = this.fb.group({
      carousels: this.prepareCarouselsFormArray(settings.carousels),
      autoPlaySpeed: [settings.autoPlaySpeed, []],
    });
  }


  protected doUpdateSettings(settingsForm: FormGroup, settings: WidgetSettings) {
    settingsForm.setControl('carousels', this.prepareCarouselsFormArray(settings.carousels), {emitEvent: false});
  }


  private prepareCarouselsFormArray(carousels: any | undefined): FormArray {
    const carouselsControls: Array<AbstractControl> = [];
    if (carousels) {
      carousels.forEach((item) => {
        console.log('item', item);
        /*处理数据*/
        const tempFormGroup = this.fb.group({
          name: item.name,
          navId: item.navId,
          expanded: item.expanded,
          carouselId: item.carouselId,
          imageUrl: item.imageUrl
        });
        carouselsControls.push(tempFormGroup);
      });
    }
    return this.fb.array(carouselsControls);
  }

  /*获取轮播图*/
  carouselsFormArray(): FormArray {
    return this.carouselWidgetSettingsForm.get('carousels') as FormArray;
  }

  public trackByCarouselControl(index: number, carouselControl: AbstractControl): any {
    return carouselControl;
  }

  /*删除轮播图*/
  public removeCarousel(index) {
    (this.carouselWidgetSettingsForm.get('carousels') as FormArray).removeAt(index);
  }

  /*添加轮播图*/
  public addCarousel() {
    const carouselsArray = this.carouselWidgetSettingsForm.get('carousels') as FormArray;
    const carouselGroup = this.fb.group({
      name: '',
      carouselId: 'carousel-' + this.utils.guid(),
      expanded: true,
      imageUrl: ''
    });
    carouselsArray.push(carouselGroup);
    console.log('carouselsArray', carouselsArray);
    this.carouselWidgetSettingsForm.updateValueAndValidity();
  }

  /*轮播图拖动排序*/
  carouselDrop(event: CdkDragDrop<string[]>) {
    const carouselsArray = this.carouselWidgetSettingsForm.get('carousels') as FormArray;
    const label = carouselsArray.at(event.previousIndex);
    carouselsArray.removeAt(event.previousIndex);
    carouselsArray.insert(event.currentIndex, label);
  }

}
请原谅我大幅粘贴- -,以上为完整代码,下面讲解代码核心内容。
首先在 defaultSettings() 在函数中声明两个重要变量,carousels: [] 用来存储轮播图片,autoPlaySpeed: 3000 用来设置轮播切换时间,默认 3 秒。
在 prepareCarouselsFormArray() 函数中对 carousels 数据进行格式处理,创建新的 FormGroup 实例以便在模板文件中获取。
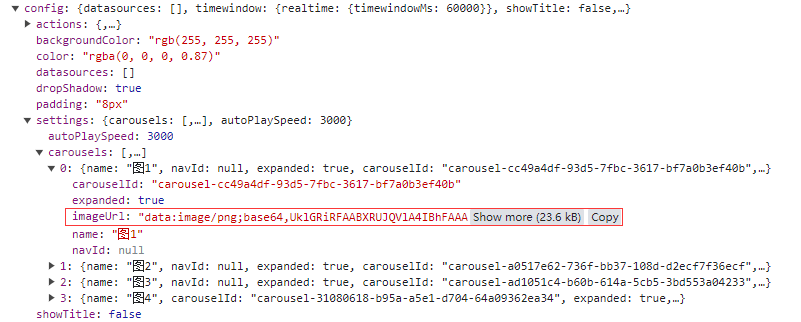
新增轮播图 addCarousel() 函数,先获取 carousels 变量,插入新的轮播图 FormGroup,包含轮播图名称:name。轮播图 ID:carouselId,新增 id 是为了后面添加动作相关功能会使用到。展开标识:expanded,默认为 true 展开。轮播图链接:imageUrl,这里使用 TB 自带的组件,图片会以 base64 文本形式保存。
最后记得将 Class CarouselWidgetSettingsComponent 在部件设置模块文件 widget-settings.module.ts 中引入声明和导出。
1
2
3
4
5
6
7
8
9
10
11
12
13
14
15
16
17
18
19
20
21
import {
  CarouselWidgetSettingsComponent
} from '@home/components/widget/lib/settings/cards/carousel-widget-settings.component';

@NgModule({
  declarations: [
  ...
  CarouselWidgetSettingsComponent
  ],
  exports: [
  ...
  CarouselWidgetSettingsComponent
  ]

export class WidgetSettingsModule {
}

export const widgetSettingsComponentsMap: {[key: string]: Type<IWidgetSettingsComponent>} = {
  ...
  'tb-carousel-widget-settings': CarouselWidgetSettingsComponent
};
接下来是 carousel-widget-settings.component.html 文件:
1
2
3
4
5
6
7
8
9
10
11
12
13
14
15
16
17
18
19
20
21
22
23
24
25
26
27
28
29
30
31
32
33
34
35
36
37
38
39
40
41
42
43
44
45
46
47
48
49
50
51
52
53
54
55
56
57
58
59
60
61
62
63
64
65
66
67
68
69
70
71
72
73
<section class="tb-widget-settings" [formGroup]="carouselWidgetSettingsForm">

  <fieldset class="fields-group" >
    <legend class="group-title" translate>widgets.carousel.carousel-item</legend>
    <div fxLayout="column">
      <div class="tb-control-list tb-drop-list" cdkDropList cdkDropListOrientation="vertical"
           (cdkDropListDropped)="carouselDrop($event)">
        <div cdkDrag class="tb-draggable" *ngFor="let carouselControl of carouselsFormArray().controls; trackBy: trackByCarouselControl; let $index = index; last as isLast;"
             fxLayout="column" [ngStyle]="!isLast ? {paddingBottom: '8px'} : {}">
          <mat-expansion-panel class="carousel-item" [formGroup]="carouselControl" [expanded]="carouselControl.get('expanded').value">
            <mat-expansion-panel-header>
              <div fxFlex fxLayout="row" fxLayoutAlign="start center">
                <mat-panel-title>
                  <div fxLayout="row" fxFlex fxLayoutAlign="start center">

                  </div>
                </mat-panel-title>
                <span fxFlex></span>
                <button mat-icon-button style="min-width: 40px;"
                        type="button"
                        (click)="removeCarousel($index)"
                        matTooltip="action.remove"
                        matTooltipPosition="above">
                  <mat-icon>delete</mat-icon>
                </button>
              </div>
            </mat-expansion-panel-header>

            <ng-template matExpansionPanelContent>
              <div fxLayout="column" fxLayoutGap="0.5em">
                <mat-divider></mat-divider>
                <section class="tb-widget-settings" fxLayout="column">
                  <mat-form-field style="padding-bottom: 16px;">
                    <mat-label translate>widgets.carousel.name</mat-label>
                    <input required matInput formControlName="name">
                  </mat-form-field>
                  <tb-image-input required
                                  label="widgets.carousel.imageUrl"
                                  formControlName="imageUrl">
                  </tb-image-input>
                </section>
              </div>
            </ng-template>
          </mat-expansion-panel>

        </div>
      </div>
      <div *ngIf="!carouselsFormArray().controls.length">
      <span translate fxLayoutAlign="center center"
            class="tb-prompt">widgets.carousel.no-carousels</span>
      </div>
      <div style="padding-top: 16px;">
        <button mat-raised-button color="primary"
                type="button"
                (click)="addCarousel()">
          <span translate>widgets.carousel.add-carousel</span>
        </button>
      </div>
    </div>
  </fieldset>

  <fieldset class="fields-group" >
    <legend class="group-title" translate>widgets.carousel.carousel-settings</legend>
    <div fxLayout="column">
      <!--切换时间(毫秒)-->
      <mat-form-field fxFlex>
        <mat-label translate>widgets.carousel.autoPlaySpeed</mat-label>
        <input matInput type="number" min="0" formControlName="autoPlaySpeed">
      </mat-form-field>
    </div>
  </fieldset>
</section>
高级设置 html 文件展示分为两个区域 <fieldset>,轮播图管理和设置。
通过 [formGroup]="carouselWidgetSettingsForm" 指令管理一个表单组。通过 formControlName="key" 指令将 FormGroup 中的 FormControl 按名称同步到一个表单控制元素。
因为轮播图需要支持拖动排序,所以使用 cdkDrag 指令完成。
使用 <tb-image-input> 内置的组件上传轮播图片。
*ngFor="let carouselControl of carouselsFormArray().controls; 遍历所有的轮播图,并通过 carouselControl.get(key).value 的方式获取轮播图的各属性。
最后是 carousel-widget-settings.component.scss 文件:
1
2
3
4
5
6
7
8
9
:host {
  display: block;
  .mat-expansion-panel {
    box-shadow: none;
    &.carousel-item {
      border: 1px groove rgba(0, 0, 0, .25);
    }
  }
}
样式主要是将拖动模块设置上边框,更加美观。

轮播图展示
轮播图展示我最终使用到的是 layui 插件,首先我们引入它。
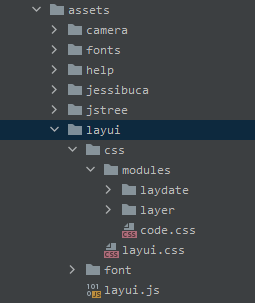
在 ui-ngx/src/assets 目录下创建 layui 文件夹,将 layui 官网上下载的插件拖进来。
在入口文件 index.html 中通过标签的方式引入 css 和 js 文件。
1
2
3
4
<head>
  <link rel="stylesheet" href="./assets/layui/css/layui.css" />
  <script src="./assets/layui/layui.js"></script>
</head>
这是第一步,我们在创建轮播图展示文件,在 ui-ngx\src\app\modules\home\components\widget\lib\ 目录下创建 carousel.models.ts、carousel-widget.component.html、carousel-widget.component.scss 和 carousel-widget.component.ts。
在 carousel.models.ts 文件中声明导入导出。
1
2
3
4
5
6
7
8
9
10
11
12
13
14
15
16
17
18
19
20
21
import { NgModule } from '@angular/core';
import { CarouselWidgetComponent } from '@home/components/widget/lib/carousel-widget.component';
import { RouterModule } from '@angular/router';
import { CommonModule } from '@angular/common';
import { SharedModule } from '@app/shared/shared.module';

@NgModule({
  declarations:
    [
      CarouselWidgetComponent
    ],
  imports: [
    RouterModule,
    CommonModule,
    SharedModule
  ],
  exports: [
    CarouselWidgetComponent
  ]
})
export class CarouselModule {}
和高级设置文件一样,Class CarouselModule 需要在部件模块文件 widget-components.module.ts 中引入声明和导出。
1
2
3
4
5
6
7
8
9
10
11
12
13
14
import { CarouselModule } from '@home/components/widget/lib/carousel.models';

@NgModule({
  declarations: [
  ...
  CarouselModule
  ],
  exports: [
  ...
  CarouselModule
  ]

export class WidgetComponentsModule {
}
然后是 carousel-widget.component.ts 文件:
1
2
3
4
5
6
7
8
9
10
11
12
13
14
15
16
17
18
19
20
21
22
23
24
25
26
27
28
29
30
31
32
33
34
35
36
37
38
39
40
41
42
43
44
45
46
47
48
49
50
51
52
53
54
55
56
57
58
59
import { ChangeDetectorRef, Component, Input, OnInit, AfterViewInit } from '@angular/core';
import { PageComponent } from '@shared/components/page.component';
import { WidgetContext } from '@home/models/widget-component.models';
import { Store } from '@ngrx/store';
import { AppState } from '@core/core.state';
declare const layui: any;

interface CarouselWidgetSettings {
  carousels: Array<any>;
  autoPlaySpeed: number;
}

@Component({
  selector: 'tb-carousel-widget',
  templateUrl: './carousel-widget.component.html',
  styleUrls: ['./carousel-widget.component.scss']
})
export class CarouselWidgetComponent extends PageComponent implements OnInit, AfterViewInit {

  settings: CarouselWidgetSettings;

  @Input()
  ctx: WidgetContext;

  constructor(protected store: Store<AppState>,
              protected cd: ChangeDetectorRef) {
    super(store);
  }

  ngOnInit(): void {
    this.ctx.$scope.imageWidget = this;
    this.settings = this.ctx.settings;
  }

  ngAfterViewInit() {
    layui.use(['carousel'], () => {
      const carousel = layui.carousel;
      // 常规轮播
      carousel.render({
        elem: '#my-carousel',
        arrow: 'hover',
        width: '100%',
        height: '100%',
        interval: this.settings.autoPlaySpeed,
      });
    });

    setTimeout(() => {
      /*添加轮播图动作事件*/
      this.ctx.customCarouselActions.forEach((action, index) => {
        const ele = document.querySelector('#' + action.descriptor.carouselId.substr(16));
        ele.addEventListener('click', () => {
          action.onAction(event);
        });
      });
    }, 50);
  }
}
因为 layui 不是 TypeScript 编写的,并且 TypeScript 可能无法识别 layui 的类型。所以我们使用 declare const layui: any这样的方式绕过。
声明选择器 tb-carousel-widget,这个一会创建新部件要用到。
所有的高级设置都在 this.settings 对象中,在 ngAfterViewInit() 页面加载完成后,进行轮播图渲染和点击事件绑定操作。
carousel.render({...}) 渲染轮播图,对应 id 为 my-carousel 的容器,arrow: 'hover' 设置轮播图前后箭头在鼠标悬浮后显示,轮播时间 interval 为高级设置中的 autoPlaySpeed 字段值。
后面的绑定事件需要通过 this.ctx.customCarouselActions 获取自定义事件,绑定到对应轮播图 id 上,这个在下文的轮播图添加动作中介绍。
carousel-widget.component.html 文件:
1
2
3
4
5
6
7
<div class="layui-carousel" id="my-carousel" lay-filter="my-carousel">
  <div carousel-item="">
    <div *ngFor="let item of settings.carousels">
      <img class="carousel-img" id="" src="" alt="">
    </div>
  </div>
</div>
根据 layui 轮播图写法,遍历所有轮播图数据 *ngFor="let item of settings.carousels"。
carousel-widget.component.scss 文件:
1
2
3
4
5
:host {
  display: flex;
  width: 100%;
  height: 100%;
}
没什么好说的,将轮播图片全部铺满展示。
导入部件部
想要看到最终效果,我们需要先将轮播图部件添加到部件库中,登录系统管理员账号 sysadmin@thingsboard.org / sysadmin,登录系统管理员账号操作是因为添加后会默认显示为系统部件包。
打开部件库菜单,打开 Cards 部件包,右下角点击添加新的部件类型->创建新的部件类型->静态部件,进行轮播图部件初始化设置:
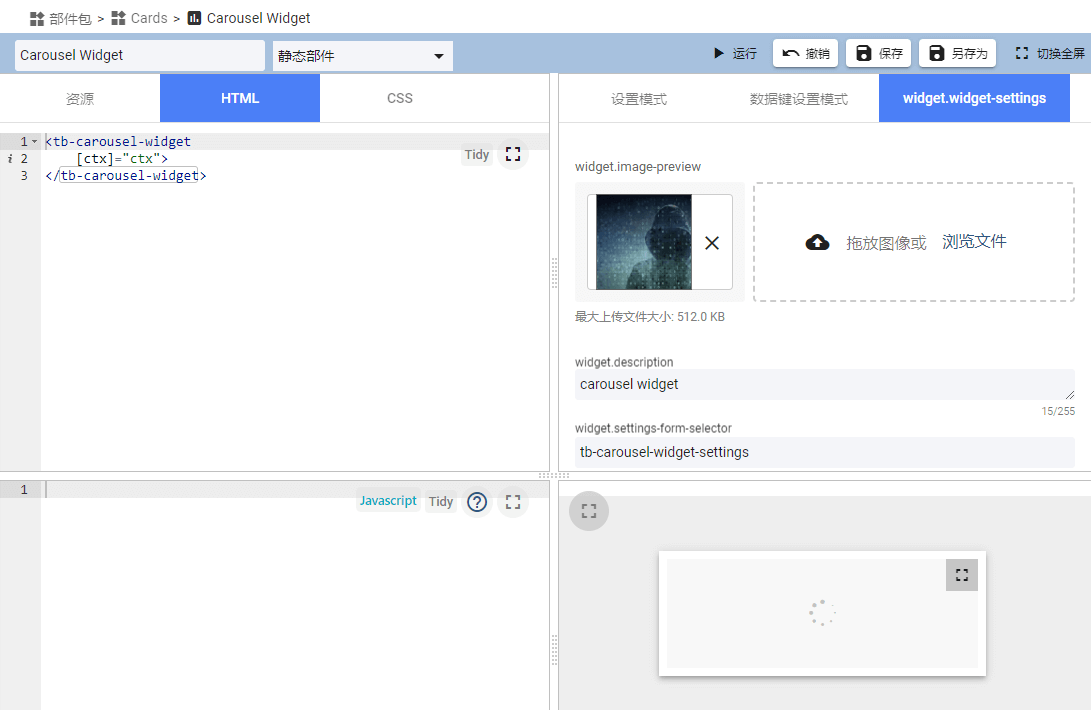
- 设置部件标题,如“Carousel Widget”
- 设置 HTML :
<tb-carousel-widget [ctx]="ctx"></tb-carousel-widget> - 清空 JavaScript 内容
- widget.widget-settings 中 widget.settings-form-selector 设置为
tb-carousel-widget-settings
其中第 2 项中 [ctx]="ctx" 为组件传值必须项,不能省略;第 4 项的 tb-carousel-widget-settings 为部件高级设置选择器,不能填错。
添加好部件好,我们在仪表板中添加该部件。切换回 tenant@thingsboard.org / tenant 用户,仪表板中添加轮播图部件,添加轮播图图片。
最终效果如下:
添加动作
好了,难点来了,需求要求轮播图可以点击支持跳转,TB 部件内置支持只支部件顶部按钮添加跳转,但具体的每个内容点击跳转并不支持。

所以需要开发这部分内容,可以参考部件顶部按钮跳转功能。
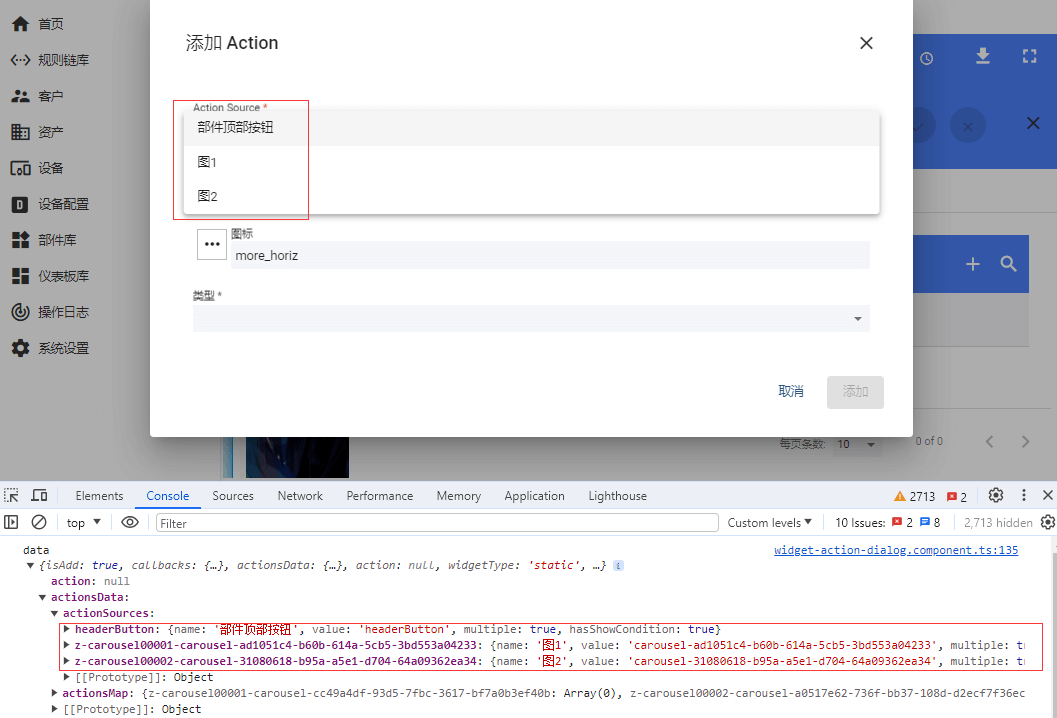
首先在 widget-action-dialog.component.ts 部件添加动作窗口增加轮播图动作源:
1
2
3
4
5
6
7
8
9
10
11
12
13
14
15
16
17
18
19
20
21
22
23
24
25
constructor(...) {
    console.log('data', data, this.widgetSettings);
    // 轮播图部件动作源
    if (this.widgetSettings.carousels) {
      let pre = 0;
      this.widgetSettings.carousels.forEach((item) => {
        pre ++;
        // z- 目的是为了排序在headerButton 部件顶部按钮之后
        this.data.actionsData.actionSources[this.dealPreFix(pre, 'z-carousel') + '-' + item.carouselId] = {
          name: item.name,
          value: item.carouselId,
          multiple: true,
          hasShowCondition: true
        };
      });
    }
}

dealPreFix(pre, str): string {
    let preString = pre.toString();
    while (preString.length < 5) {
      preString = '0' + preString;
    }
    return str + preString;
  }
dealPreFix() 函数目的是为了使动作源排序正常,因为默认是按照字符串排序会比较奇怪。这样我们就可以在 actionSources 中添加所有的动作源。效果如下:
我们还需要改写下动作源添加后的列表名称显示,在 manage-widget-actions.component.ts 文件中新增:
1
2
3
4
5
6
7
8
9
10
11
12
13
14
15
16
17
18
ngOnInit(): void {
    // 轮播图部件动作源名称
    if (this.widgetSettings.carousels) {
      this.widgetSettings.carousels.forEach((item) => {
        this.widgetService.carouselIdTranslate[item.carouselId] = item.name;
      });
    }
    console.log('carouselIdTranslate', this.widgetService.carouselIdTranslate);
  }
}

actionSourceName(actionSourceId): string {
    if (actionSourceId.indexOf('carousel-') !== -1){
      return this.widgetService.carouselIdTranslate[actionSourceId.slice(16)];
    }else {
      return actionSourceId;
    }
  }
carouselIdTranslate 打印输出如下:

然后在 manage-widget-actions.component.html 模板文件中输出:
1
2
3
4
5
6
7
8
9
10
11
12
<div fxFlex class="table-container">
      <table mat-table [dataSource]="dataSource"
                 matSort [matSortActive]="pageLink.sortOrder.property" [matSortDirection]="pageLink.sortDirection()" matSortDisableClear>
        <ng-container matColumnDef="actionSourceName">
          <mat-header-cell *matHeaderCellDef mat-sort-header style="width: 20%"> widget-config.action-source </mat-header-cell>
          <mat-cell *matCellDef="let action">
            <!--修改处-->

          </mat-cell>
        </ng-container>
    </table>
</div>
动作列表显示如下:

具体的轮播图添加动作的逻辑在文件 widget.component.ts:
1
2
3
4
5
6
7
8
9
10
11
12
13
14
15
16
17
18
19
20
21
22
23
24
25
26
27
28
29
30
31
32
33
34
35
36
37
38
39
40
41
42
43
44
45
46
47
48
49
50
51
52
53
54
55
56
57
58
59
/*轮播图动作*/
this.widgetContext.customCarouselActions = [];
const carouselActionsDescriptors = this.getCarouselActionDescriptors(this.widgetContext);
console.log('carouselActionsDescriptors', carouselActionsDescriptors);
carouselActionsDescriptors.forEach((descriptor) =>
{
let useShowWidgetCarouselActionFunction = descriptor.useShowWidgetActionFunction || false;
let showWidgetCarouselActionFunction: ShowWidgetCarouselActionFunction = null;
if (useShowWidgetCarouselActionFunction && isNotEmptyStr(descriptor.showWidgetActionFunction)) {
try {
showWidgetCarouselActionFunction =
new Function('widgetContext', 'data', descriptor.showWidgetActionFunction) as ShowWidgetCarouselActionFunction; // TODO
} catch (e) {
useShowWidgetCarouselActionFunction = false;
}
}
const carouselAction: WidgetCarouselAction = {
name: descriptor.name,
displayName: descriptor.displayName,
icon: descriptor.icon,
descriptor,
useShowWidgetCarouselActionFunction,
showWidgetCarouselActionFunction,
onAction: $event => {
const entityInfo = this.getActiveEntityInfo();
const entityId = entityInfo ? entityInfo.entityId : null;
const entityName = entityInfo ? entityInfo.entityName : null;
const entityLabel = entityInfo ? entityInfo.entityLabel : null;
console.log('carouselAction', descriptor);
this.handleWidgetAction($event, descriptor, entityId, entityName, null, entityLabel);
}
};
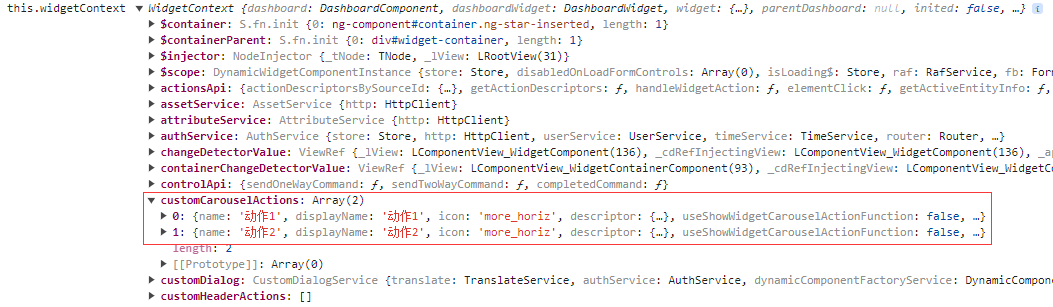
this.widgetContext.customCarouselActions.push(carouselAction);
console.log('this.widgetContext', this.widgetContext);
});
private getCarouselActionDescriptors(widgetContext): Array<WidgetActionDescriptor> {
let result = [];
console.log('widgetContext', widgetContext.widget.config.actions);
const allActions = widgetContext.widget.config.actions;
for (const key in allActions) {
if (allActions.hasOwnProperty(key)) {
// console.log(key, allActions[key]);
// 轮播图动作
if (key.indexOf('carousel-') !== -1 && allActions[key].length !== 0) {
allActions[key].forEach((item, index) => {
allActions[key][index].displayName = allActions[key][index].name;
allActions[key][index].carouselId = key;
});
result.push(allActions[key][allActions[key].length - 1]);
}
}
}
if (!result) {
result = [];
}
console.log('getCarouselActionDescriptors', result);
return result;
}
上述代码功能为将所有的轮播图动作 carouselAction 添加到自定义的轮播图动作数组 customCarouselActions 中,模仿原顶部动作 customHeaderActions 的写法。
最后在轮播图展示页面 carousel-widget.component.ts 中,通过绑定某一轮播图,点击触发其动作。
1
2
3
4
5
6
this.ctx.customCarouselActions.forEach((action, index) => {
        const ele = document.querySelector('#' + action.descriptor.carouselId.substr(16));
        ele.addEventListener('click', () => {
          action.onAction(event);
        });
      });
最终效果如下:
大功告成,Nice~
结语
本文展示了 99% 的实现源码,省略了部分中英翻译、变量声明等部分,大家可以自行补充。
由于 TB 的受众面很小,所以如果你没研究过 TB 看不懂这篇文章也是很正常的- -,跳过就好,TB 的相关文章更多的是作为本人的一个工作知识记录,如果能对一小部分人有所帮助那就更好啦~
好啦,以上就是 ThingsBoard 前端项目轮播图部件开发的全部内容,希望对你有所帮助,如有问题可通过我的博客 https://echeverra.cn 或微信公众号 echeverra 联系我。
你学“废”了么?
(完)
文章首发于我的博客 https://echeverra.cn/tb4,原创文章,转载请注明出处。
欢迎关注我的微信公众号 echeverra,一起学习进步!不定时会有资源和福利相送哦!
