- Introduction
- Prerequisites
- Uplink and Downlink Converters
- Custom Integration Setup
- Custom Integration Application
- Next steps
Introduction
Custom integration is only executed remotely from the main ThingsBoard instance. It allows to create integration with custom configuration that will use any transport protocol for communication with your devices.
This guide contains step-by-step instructions on how to create and launch ThingsBoard custom integration. For example, we will launch custom integration that uses TCP transport protocol to stream data from devices and pushes the converted data to thingsboard.cloud.
Before we start, you can find the full code of custom integration example that we will use in this guide here.
Prerequisites
We assume you already have a tenant administrator account on your own ThingsBoard PE v2.4.1+ instance or thingsboard.cloud.
Let’s assume that we have a sensor which is sending current temperature, humidity and battery level readings respectively in the following format: “25,40,94”.
Uplink and Downlink Converters
Before setting up a custom integration, you need to create an Uplink and a Downlink converters.
Uplink Converter
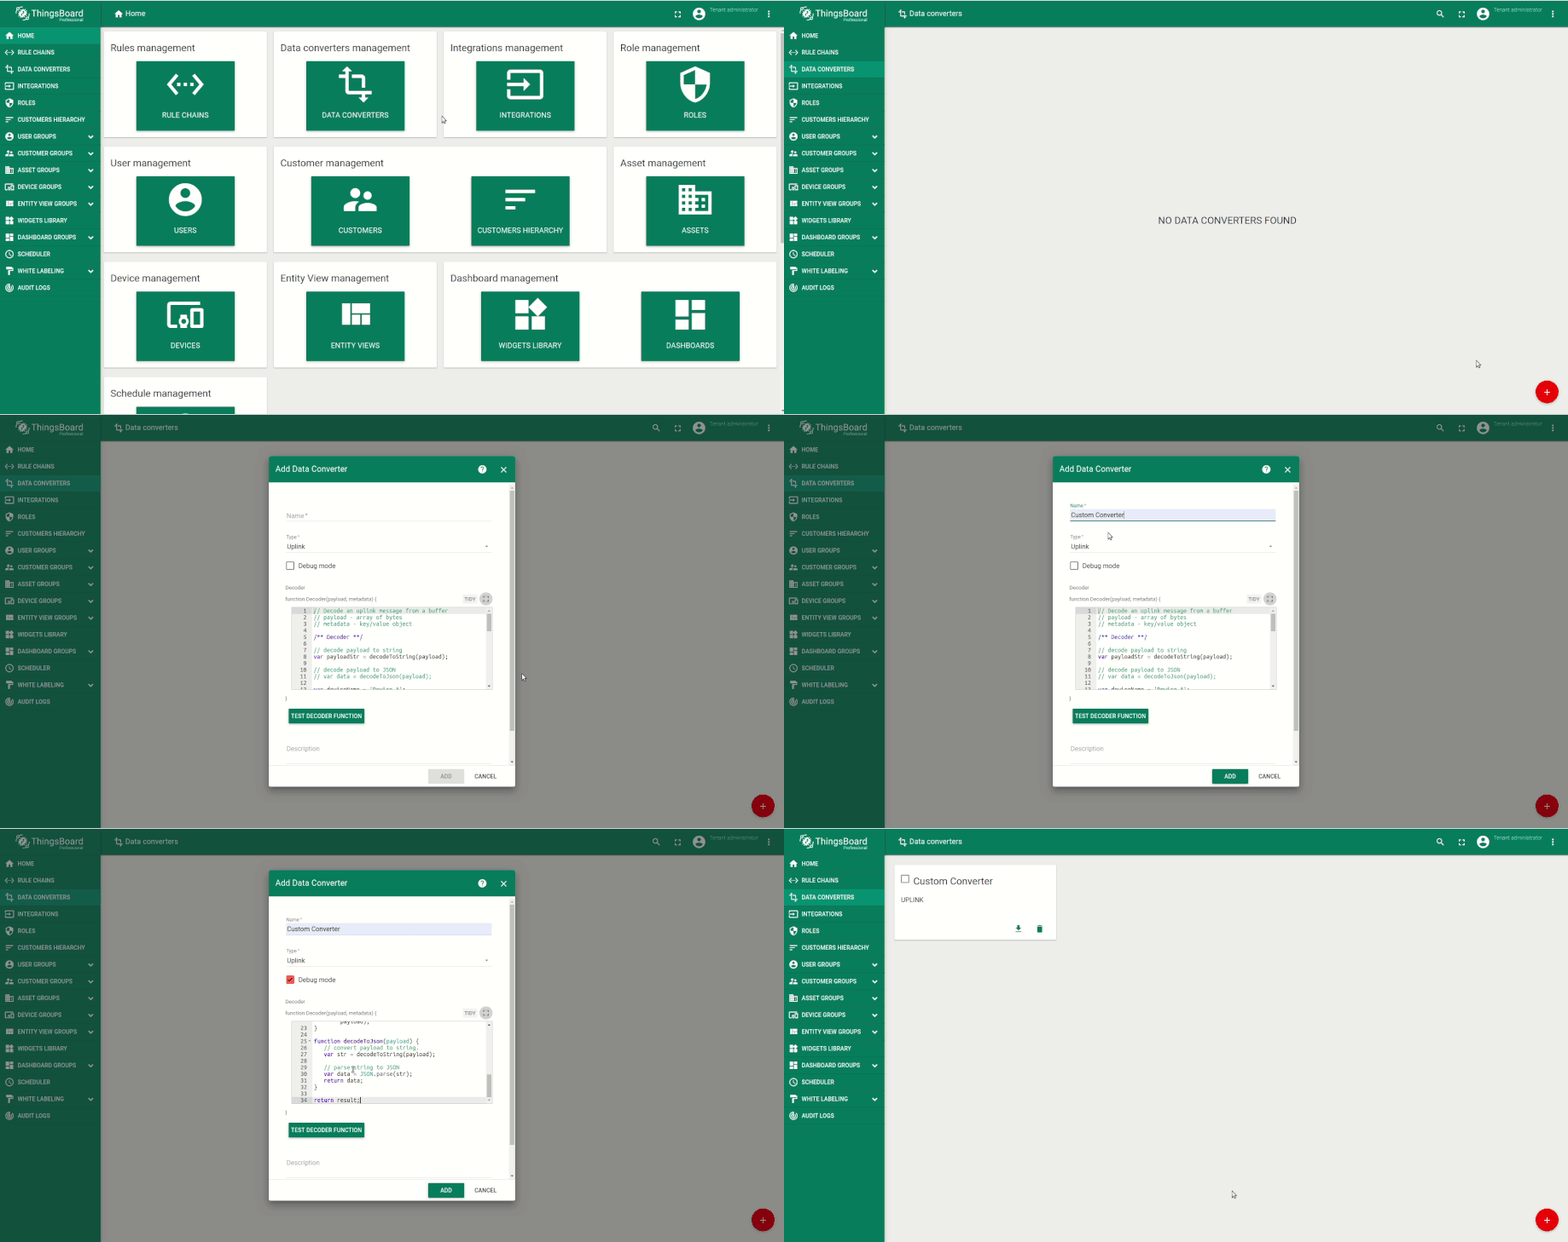
Let’s create uplink converter.

NOTE: Although the Debug mode is very useful for development and troubleshooting, leaving it enabled in production mode may tremendously increase the disk space, used by the database, because all the debugging data is stored there. It is highly recommended to turn the Debug mode off when done debugging.
See the following script that is pasted to the Decoder function section:
1
2
3
4
5
6
7
8
9
10
11
12
13
14
15
16
17
18
19
20
21
22
23
24
25
26
27
28
29
30
31
32
33
34
/** Decoder **/

// decode payload to string
var decodedString = decodeToString(payload);
// remove unnecessary [\"] and split by [,] to get an array
var payloadArray = decodedString.replace(/\"/g, "").split(',');
var result = {
    deviceName: "Device A",
    deviceType: "type",
    telemetry: {
        // get each reading from the array and convert the string value to a number
        temperature: Number(payloadArray[0]),
        humidity: Number(payloadArray[1]),
        batteryLevel: Number(payloadArray[2])
    },
    attributes: {}
};

/** Helper functions **/

function decodeToString(payload) {
    return String.fromCharCode.apply(String, payload);
}

function decodeToJson(payload) {
   // convert payload to string.
   var str = decodeToString(payload);

   // parse string to JSON
   var data = JSON.parse(str);
   return data;
}

return result;
The purpose of the decoder function is to parse the incoming data and metadata to a format that ThingsBoard can consume. deviceName and deviceType are required, while attributes and telemetry are optional. Attributes and telemetry are flat key-value objects. Nested objects are not supported.
Downlink Converter
We will not use the Downlink converter in this guide so there is no need to create one. In case you have another use case, please refer to the following instructions.
Custom Integration Setup
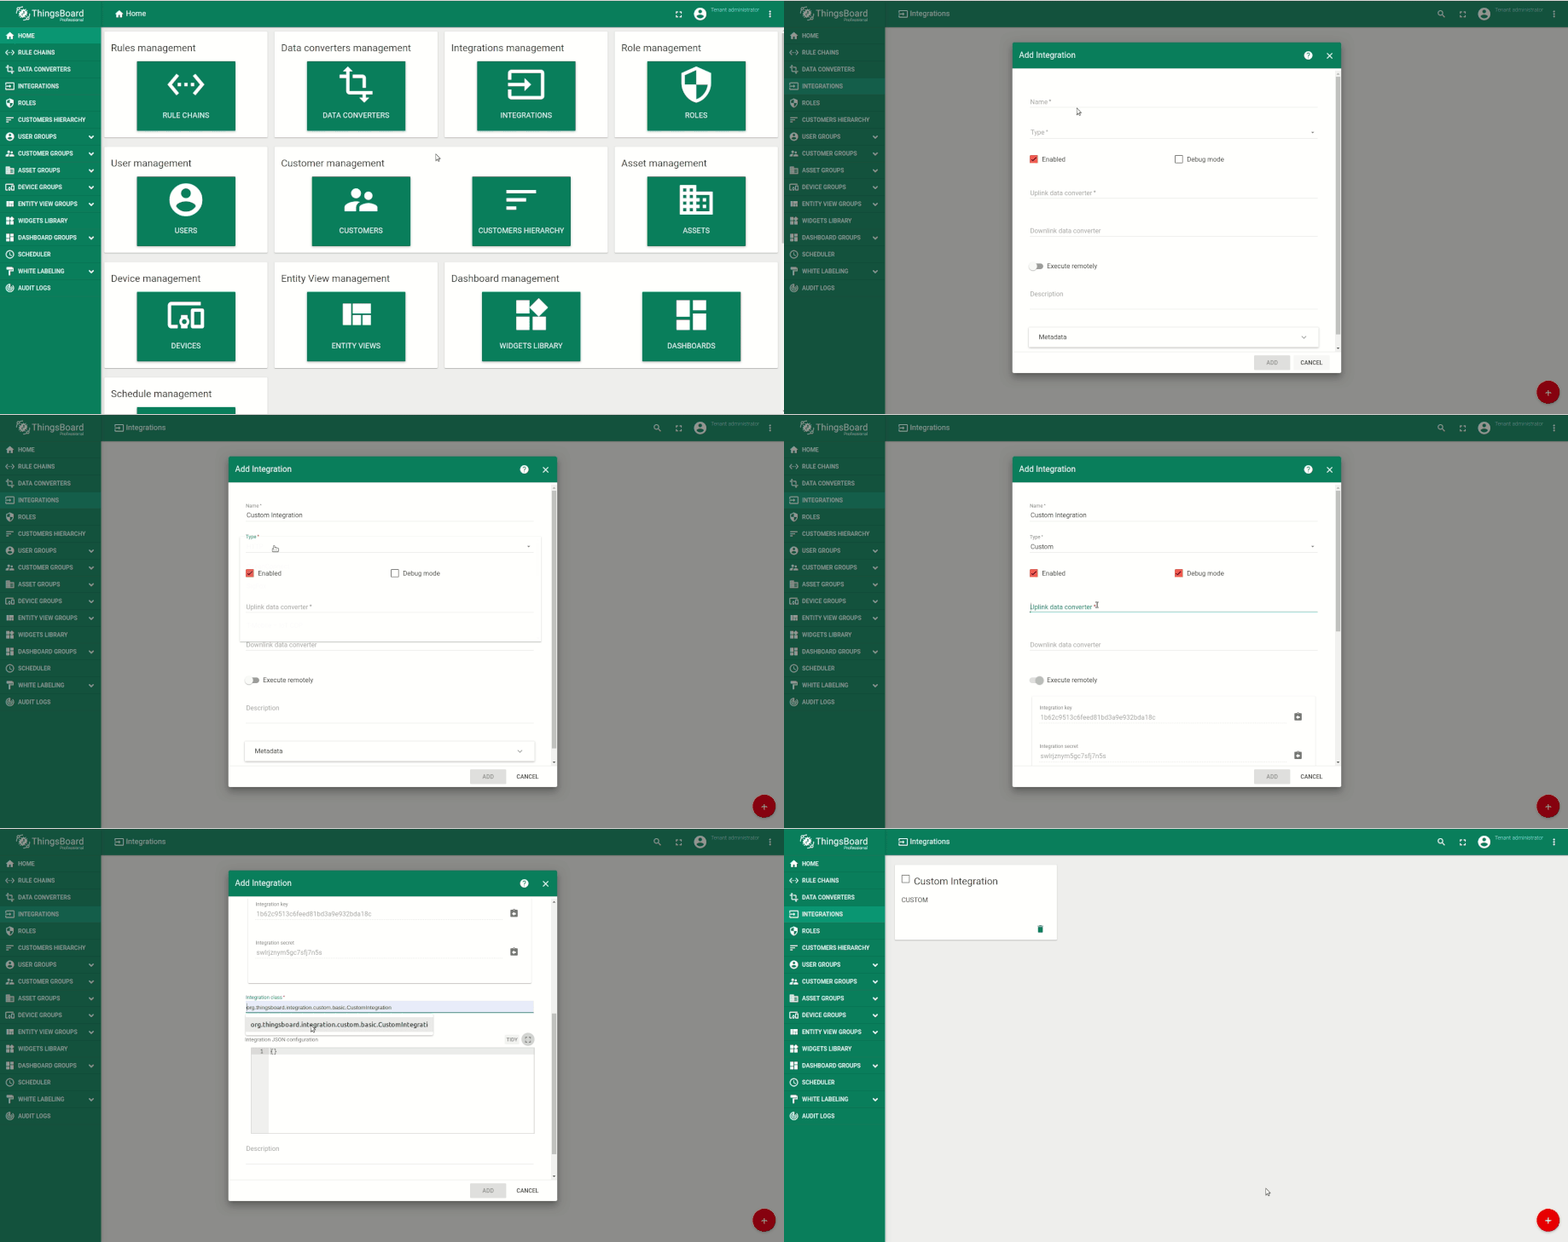
Let’s create custom integration.

Notice that Execute remotely is enabled automatically when we choose Custom type and we enable Debug mode.
Integration class is used to create an instance of the integration using the Java reflective method.
The Integration JSON configuration is the custom configuration that has two fields in our case:
- port, which will be used to bind the TCP server-client communication
- msgGenerationIntervalMs, the interval between generating the messages
We will get back to this later in this guide.
Custom Integration Application
Download the sample application
Feel free to grab the code from the ThingsBoard repository and build the project with maven:
1
mvn clean install
Go ahead and add that maven project to your favorite IDE.
Dependencies review
Main dependencies that are used in the project:
1
2
3
4
5
6
7
8
9
10
11
12
13
14
15
16
17
18
<!-- Api ThingsBoard provides to create custom integration -->
<dependency>
    <groupId>org.thingsboard.common.integration</groupId>
    <artifactId>remote-integration-api</artifactId>
    <version>${thingsboard.version}</version>
</dependency>
<!-- Netty for TCP client-server implementation -->
<dependency>
    <groupId>io.netty</groupId>
    <artifactId>netty-all</artifactId>
    <version>${netty.version}</version>
</dependency>
<!-- Grpc transport between remote integration and ThingsBoard -->
<dependency>
    <groupId>io.grpc</groupId>
    <artifactId>grpc-netty</artifactId>
    <version>${grpc.version}</version>
</dependency>
Source code review
Main source code is the CustomIntegration Java class. Integration is expecting “Hello to ThingsBoard” message from the TCP client and replies with the “Hello from ThingsBoard!”. Once the client emulator receives “Hello from ThingsBoard!” , it will start sending auto-generated data to ThingsBoard in the following format: “25,40,94”. The Integration will pass the incoming message as-is to the uplink converter and push data to ThingsBoard.
Note: starting from ThingsBoard version 3.3.1 a new required configuration property was added to tb-remote-integration.yml:
1
2
service:
  type: "${TB_SERVICE_TYPE:tb-integration}"
In case that you are using custom remote integration of the older version, and plan to upgrade your custom integration to the 3.3.1 version be sure that you have that property added to the tb-remote-integration.yml file.
Next steps
-
入门指南 - 快速学习ThingsBoard相关功能。
-
安装指南 - 学习如何在各种操作系统上安装ThingsBoard。
-
可 视 化 - 学习如何配置复杂的ThingsBoard仪表板说明。
-
数据处理 - 学习如何使用ThingsBoard规则引擎。
-
数据分析 - 学习如何使用规则引擎执行基本的分析任务。
-
硬件样品 - 学习如何将各种硬件平台连接到ThingsBoard。
-
高级功能 - 学习高级ThingsBoard功能。

