- 前置条件
- 步骤 1. 创建设备
- 步骤 2. 连接设备
- 步骤 3. 创建仪表盘
- 步骤 4. 配置告警规则
- 步骤 5. 创建告警
- 步骤 6. 告警通知
- 步骤 7. 将设备和仪表盘分配至客户
- 下一步
- 您的反馈
本指南演示 ThingsBoard 常用功能的基本用法。您将学习如何:
- 将设备连接至 ThingsBoard
- 从设备向 ThingsBoard 推送数据
- 构建实时仪表盘
- 创建客户并分配仪表盘
- 定义阈值并触发告警
- 设置通知
为简化说明,我们将以温度传感器数据为例进行可视化。
前置条件
您需要一台运行中的 ThingsBoard 服务器:
- ThingsBoard Cloud:零配置快速开始。可选择北美或欧洲地区区域(链接指向托管服务版快速入门)。
- 自托管安装:可按 Windows (Docker) 或 Linux 与 MacOS (Docker) 指南手动安装。
步骤 1. 创建设备
添加一个向 ThingsBoard 发送温度数据的设备:
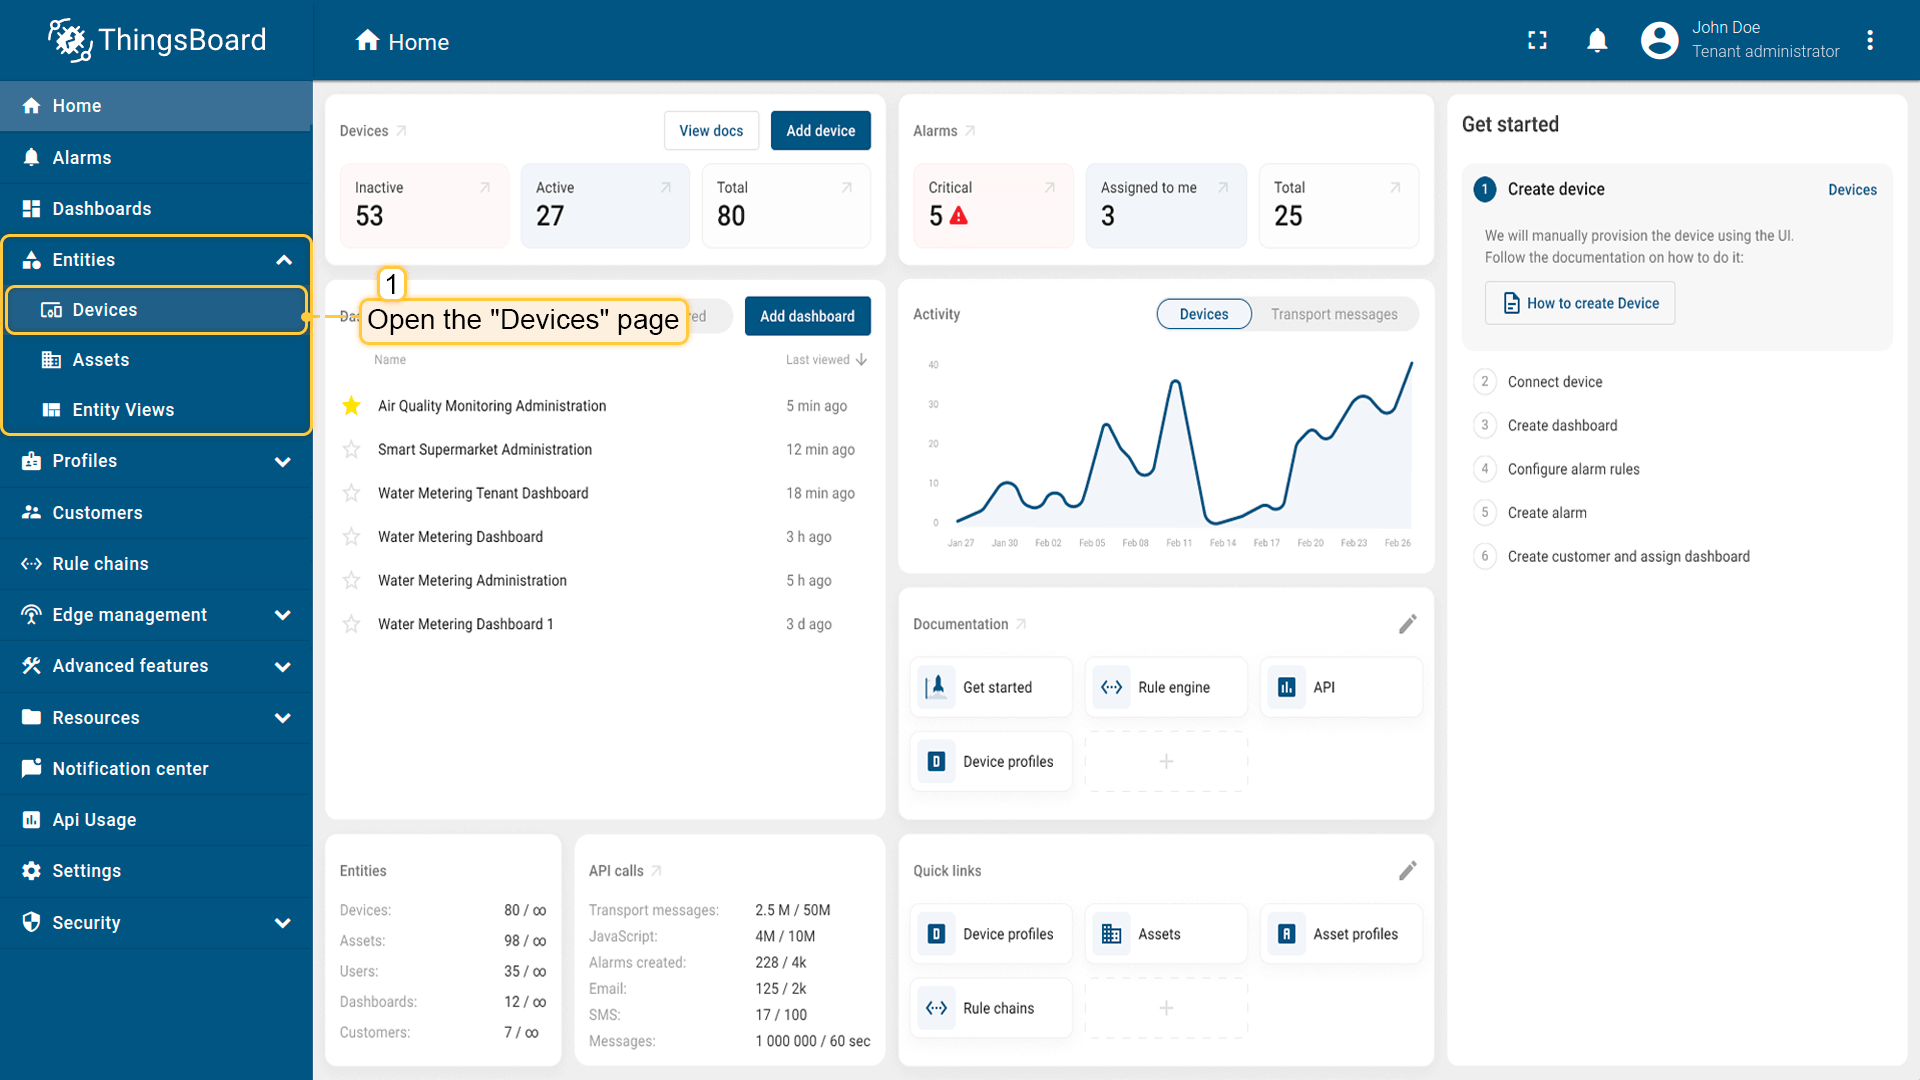
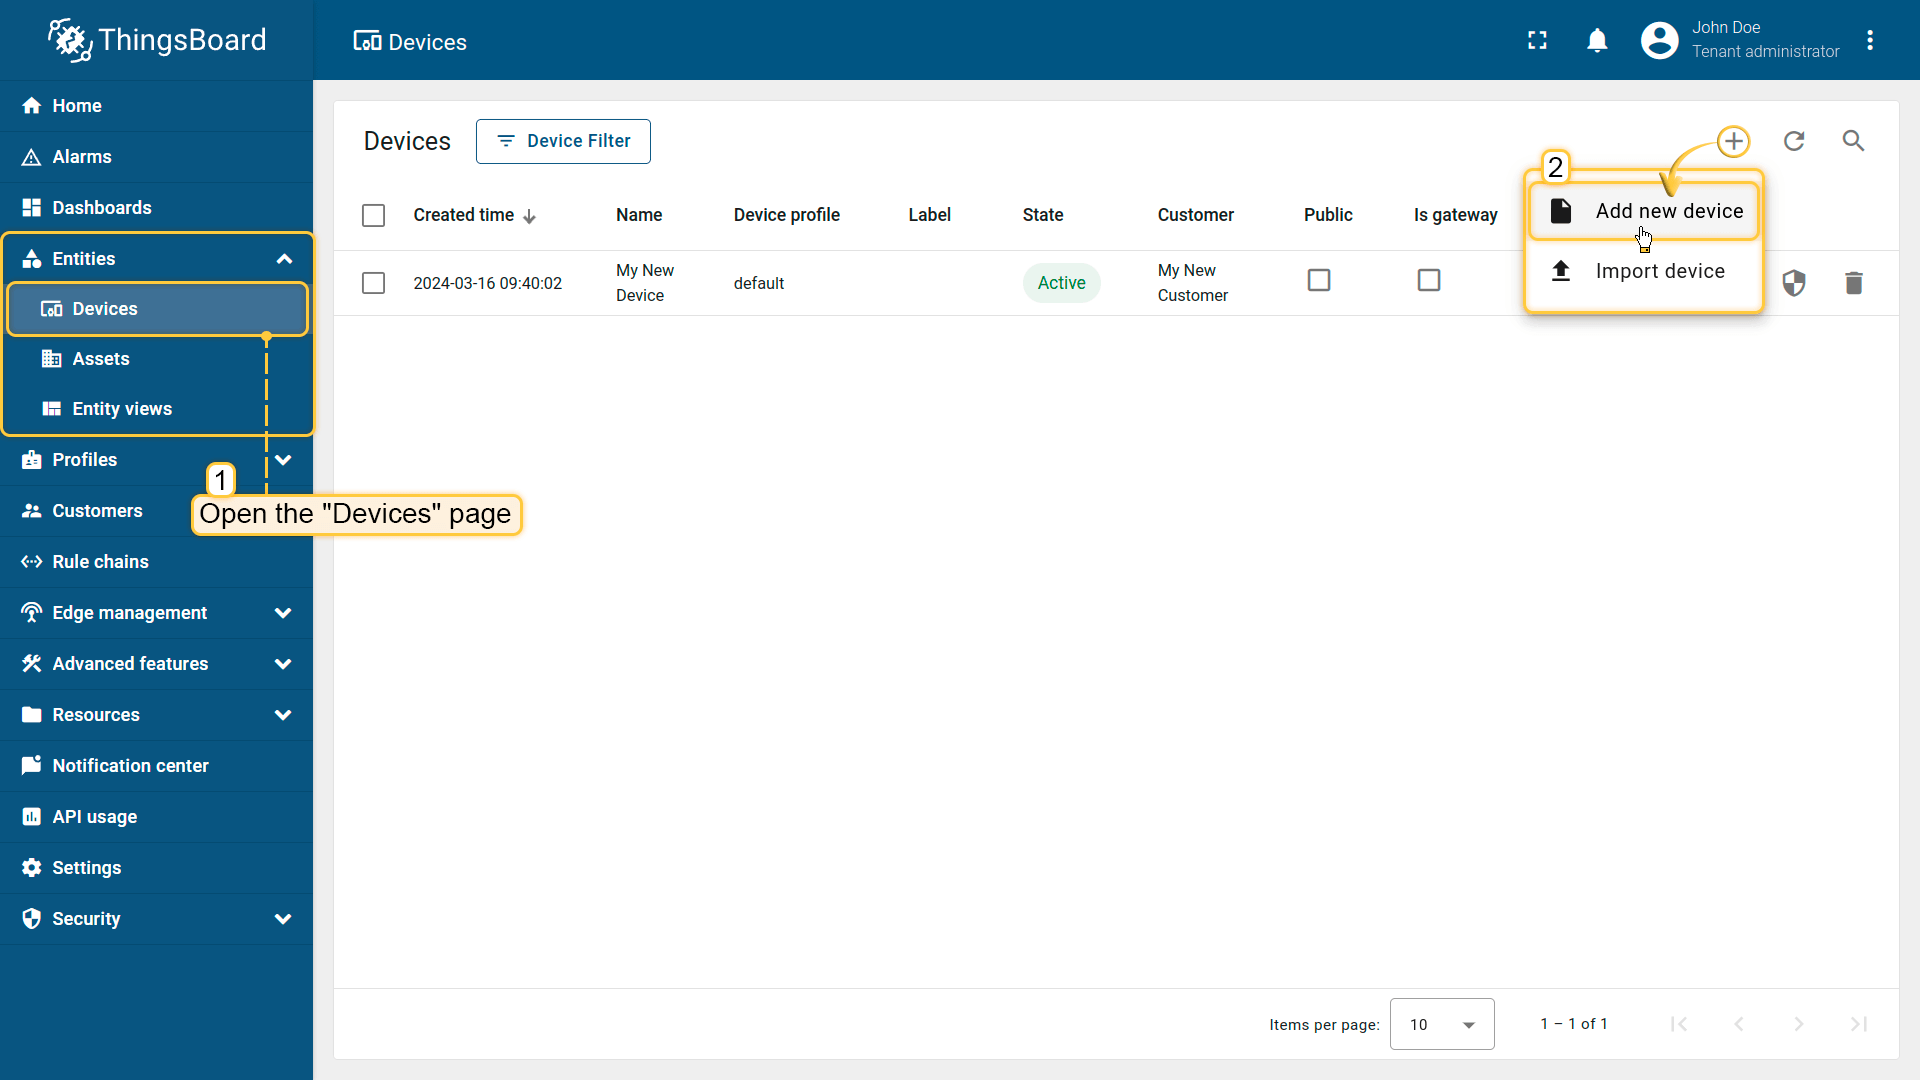
- 登录 ThingsBoard 并进入「实体」下的「设备」页面。
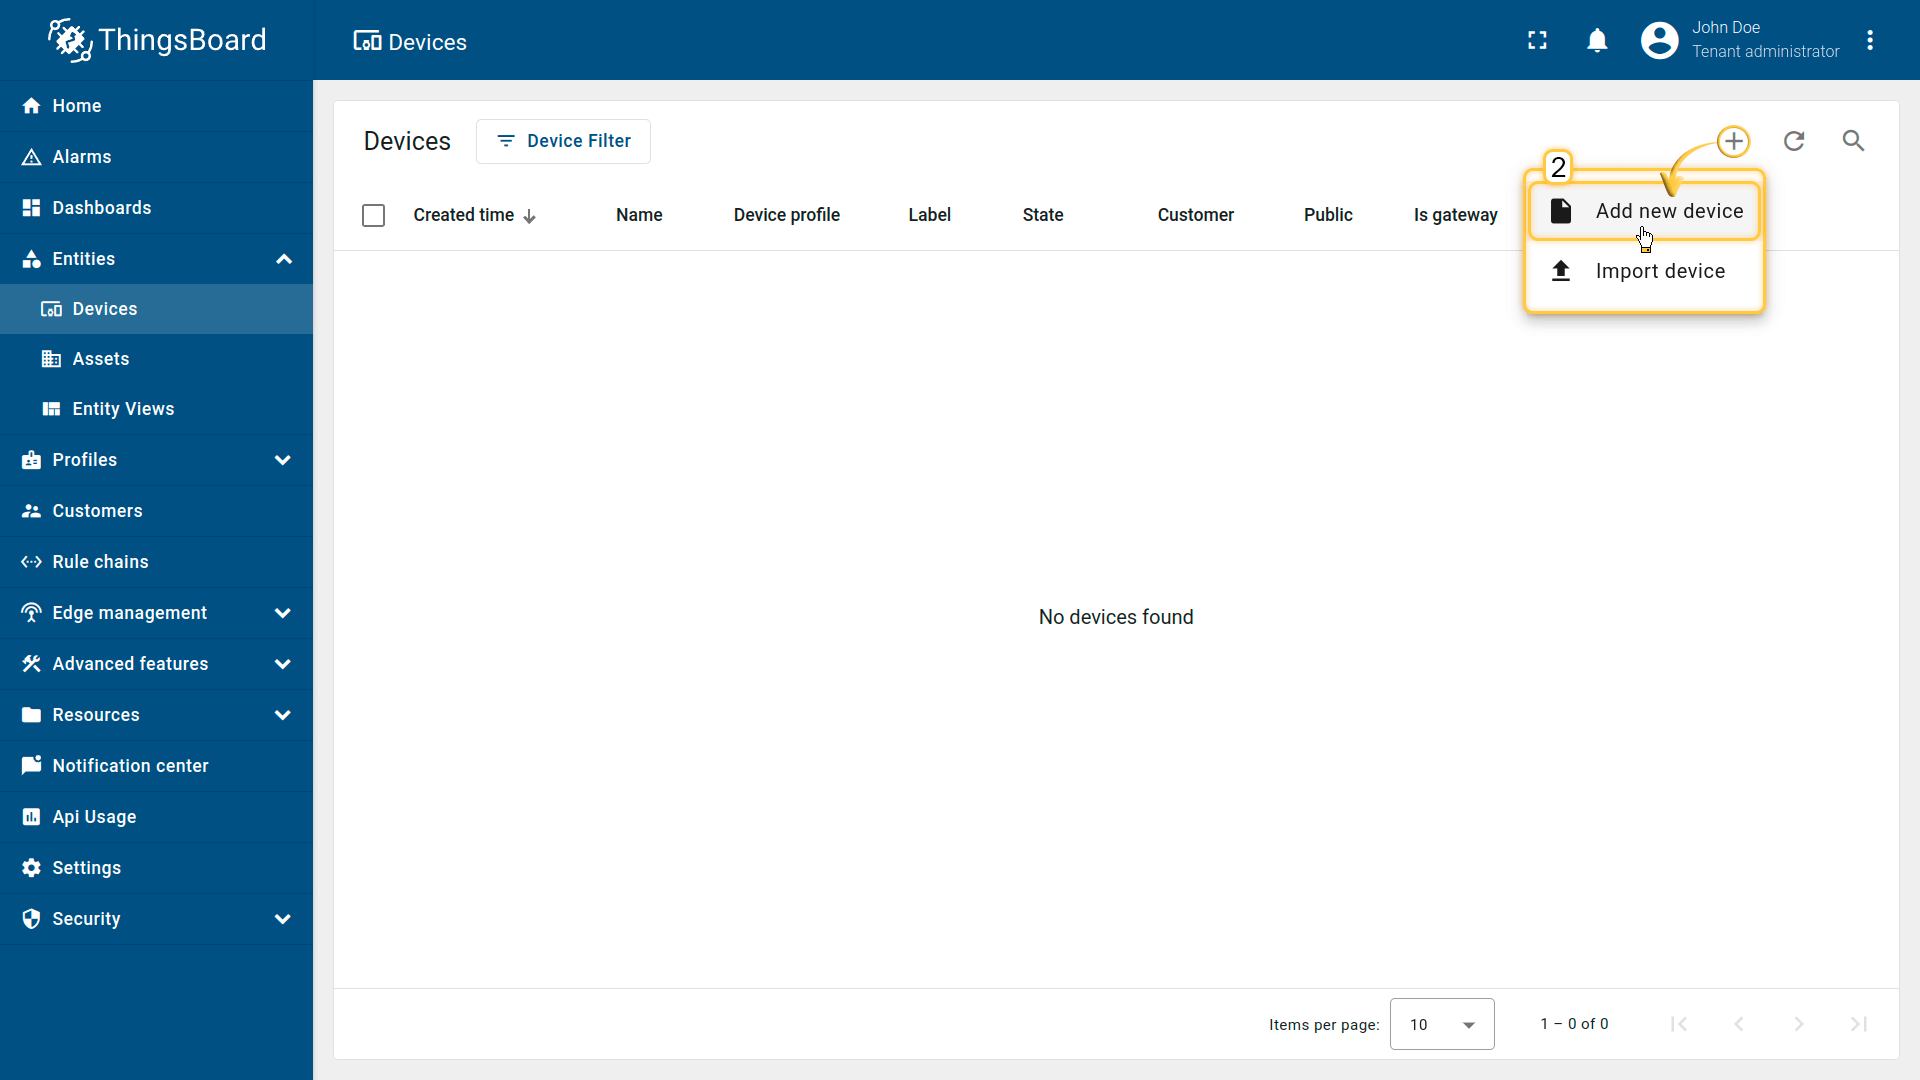
- 点击表格右上角的「+」图标,从下拉菜单中选择「添加新设备」。
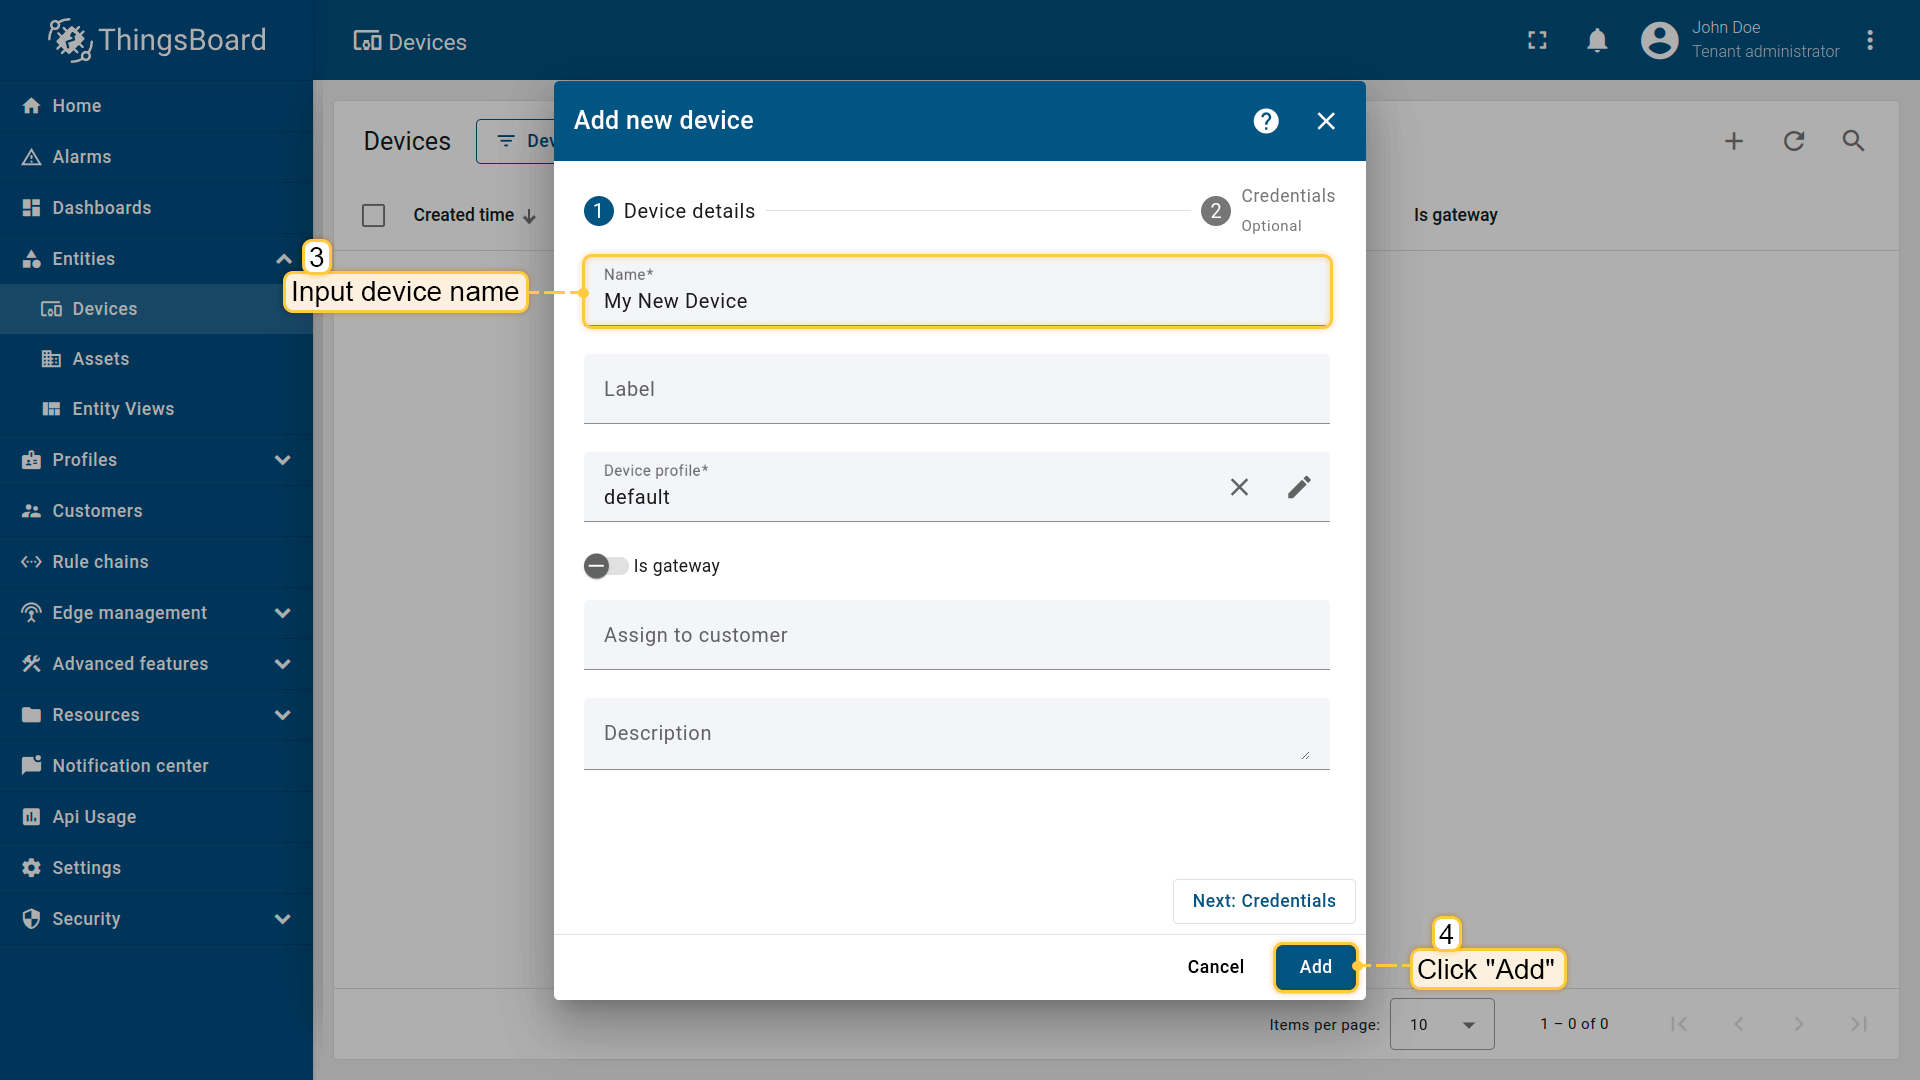
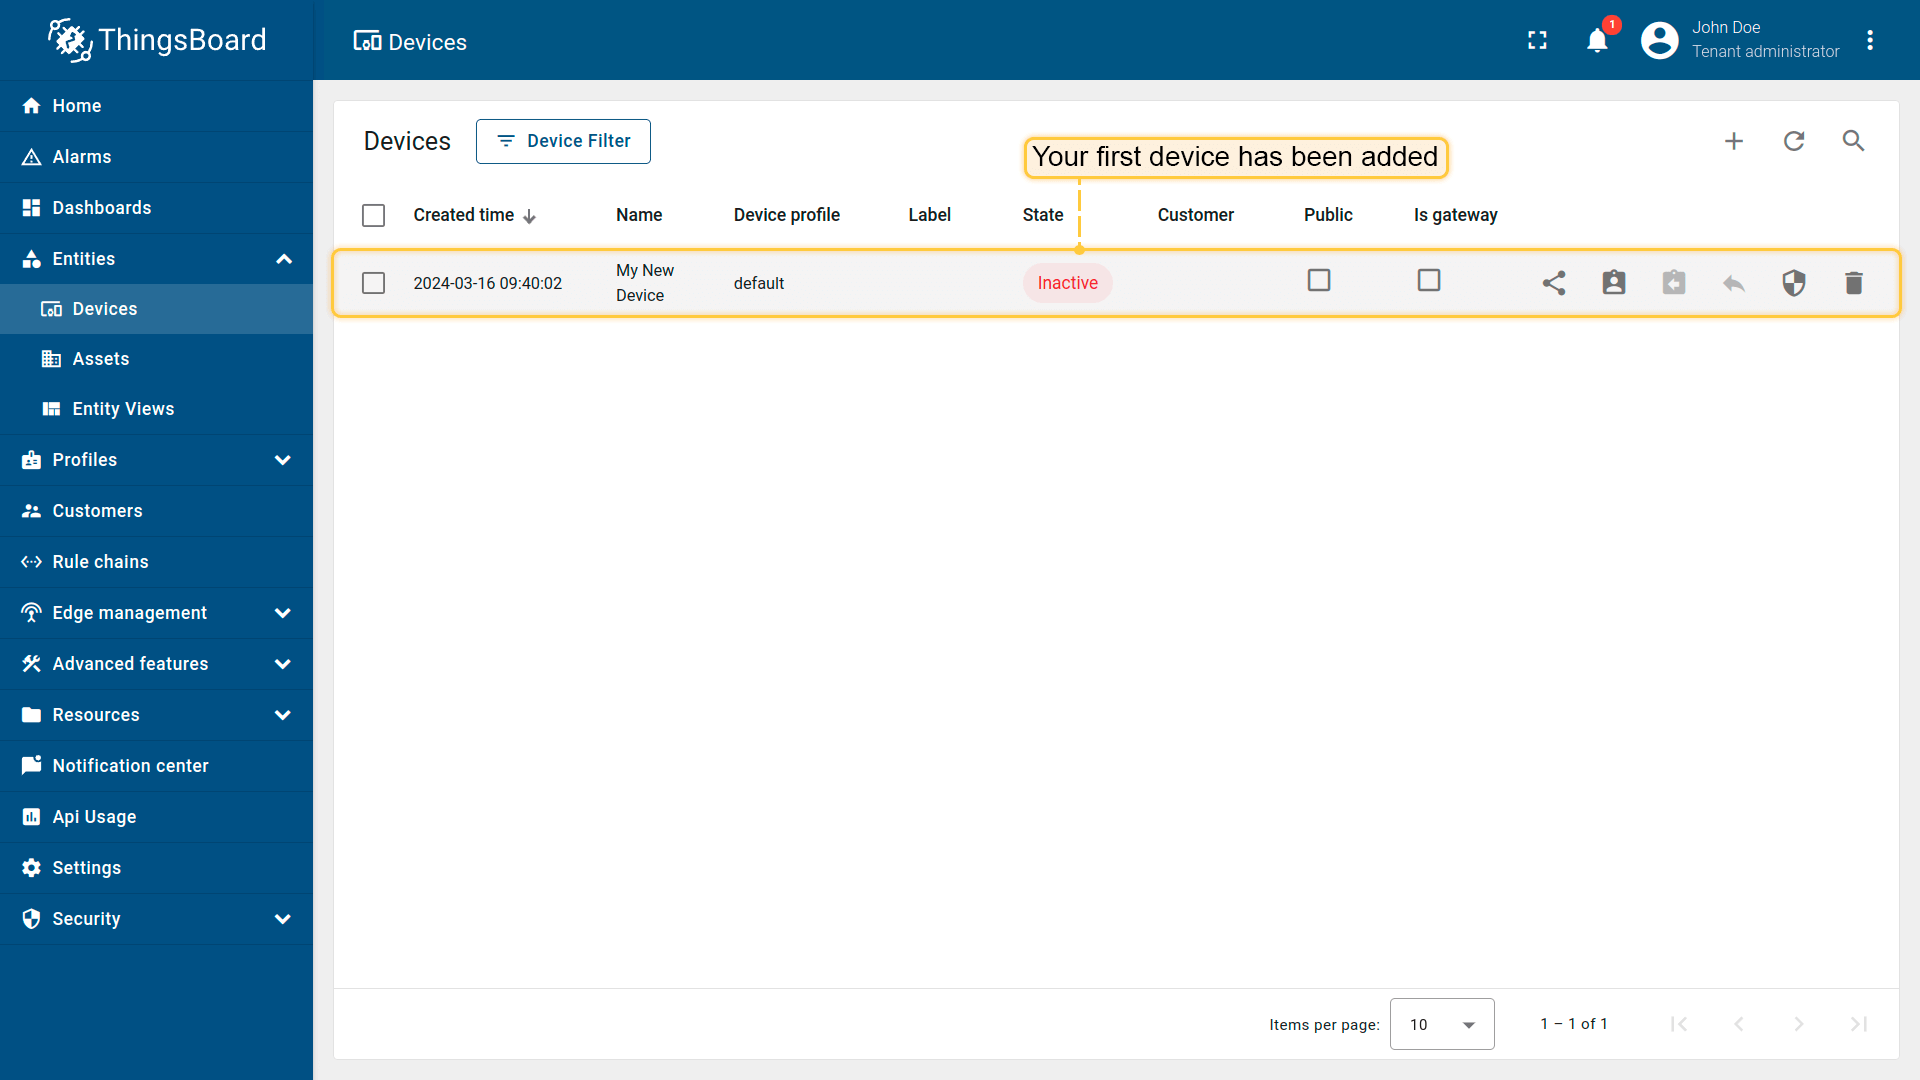
- 输入设备名称(如「My New Device」),其他保持默认。点击「添加」。
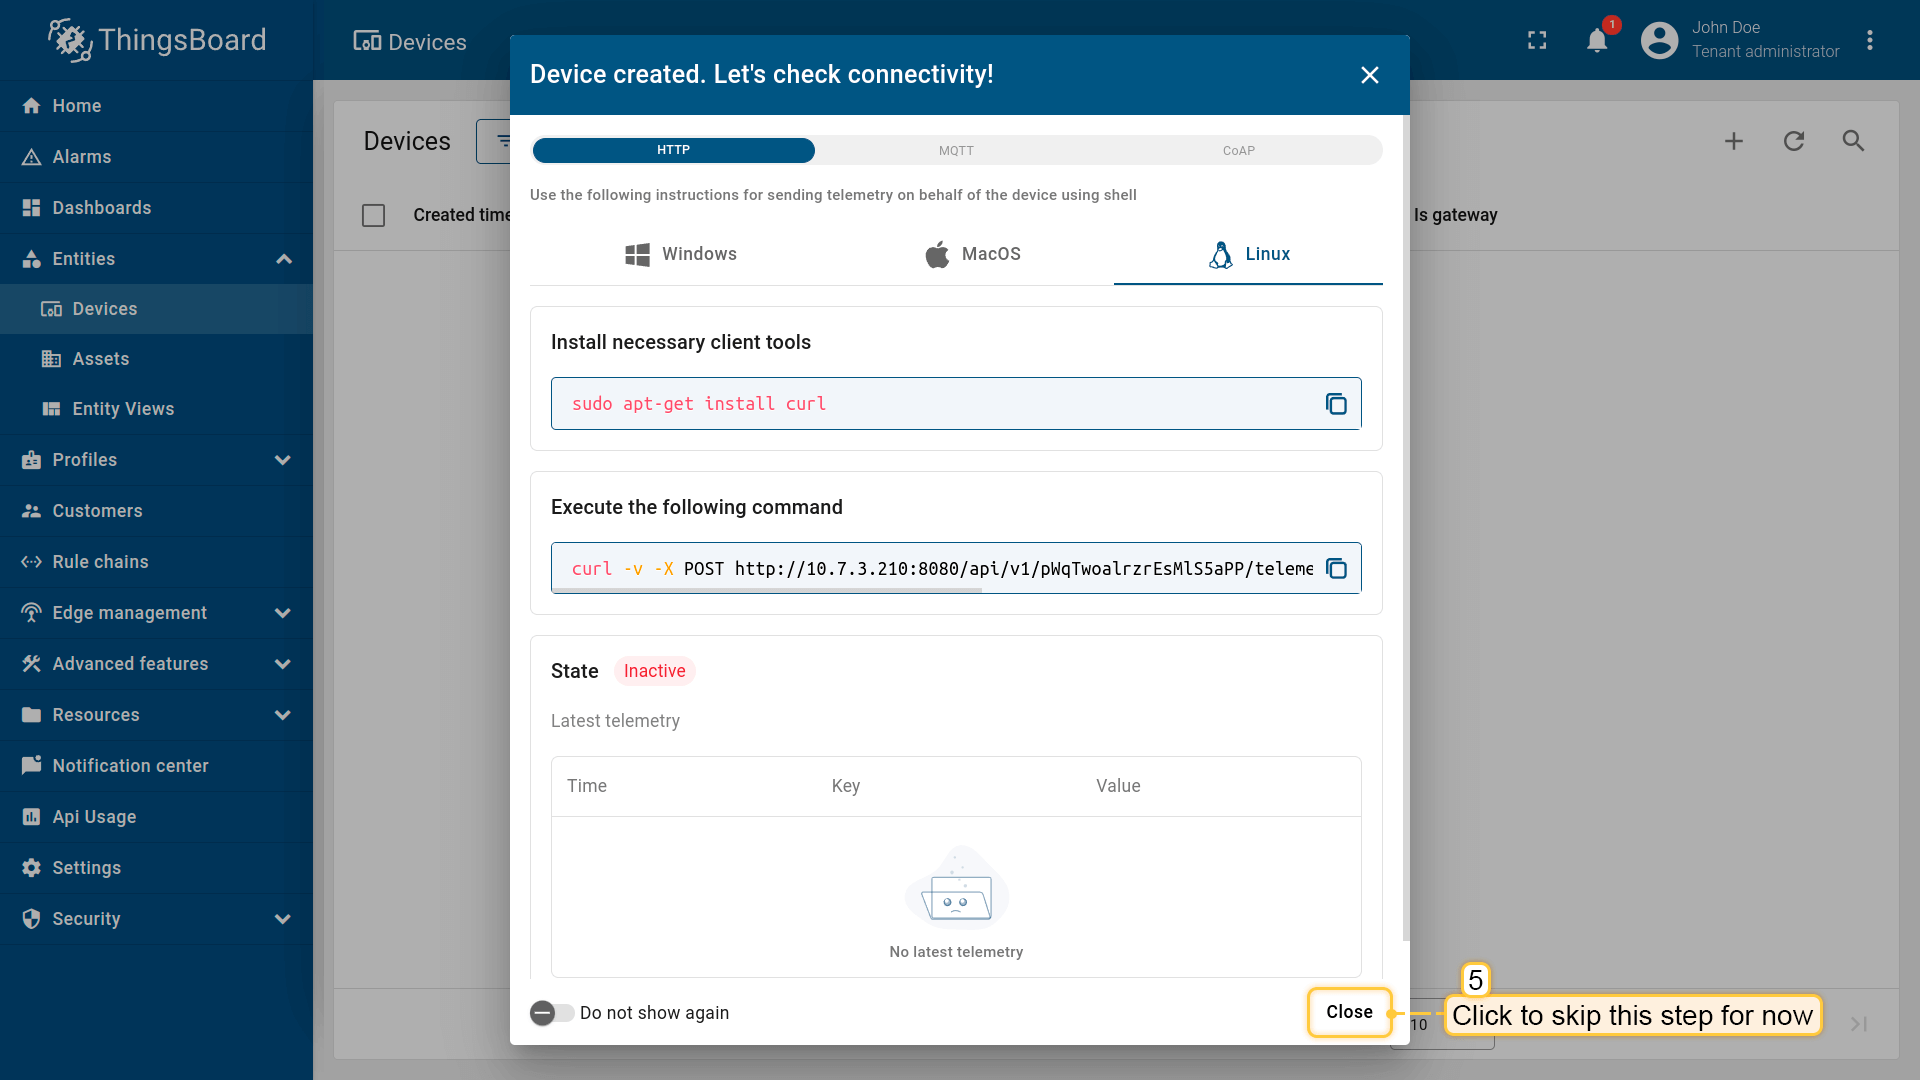
- 将打开设备连接检查窗口——我们暂时跳过此步,下一步再检查连接。
- 恭喜,您已添加第一个设备!后续添加的设备将出现在表格顶部,表格按创建时间自动排序,最新在最前。
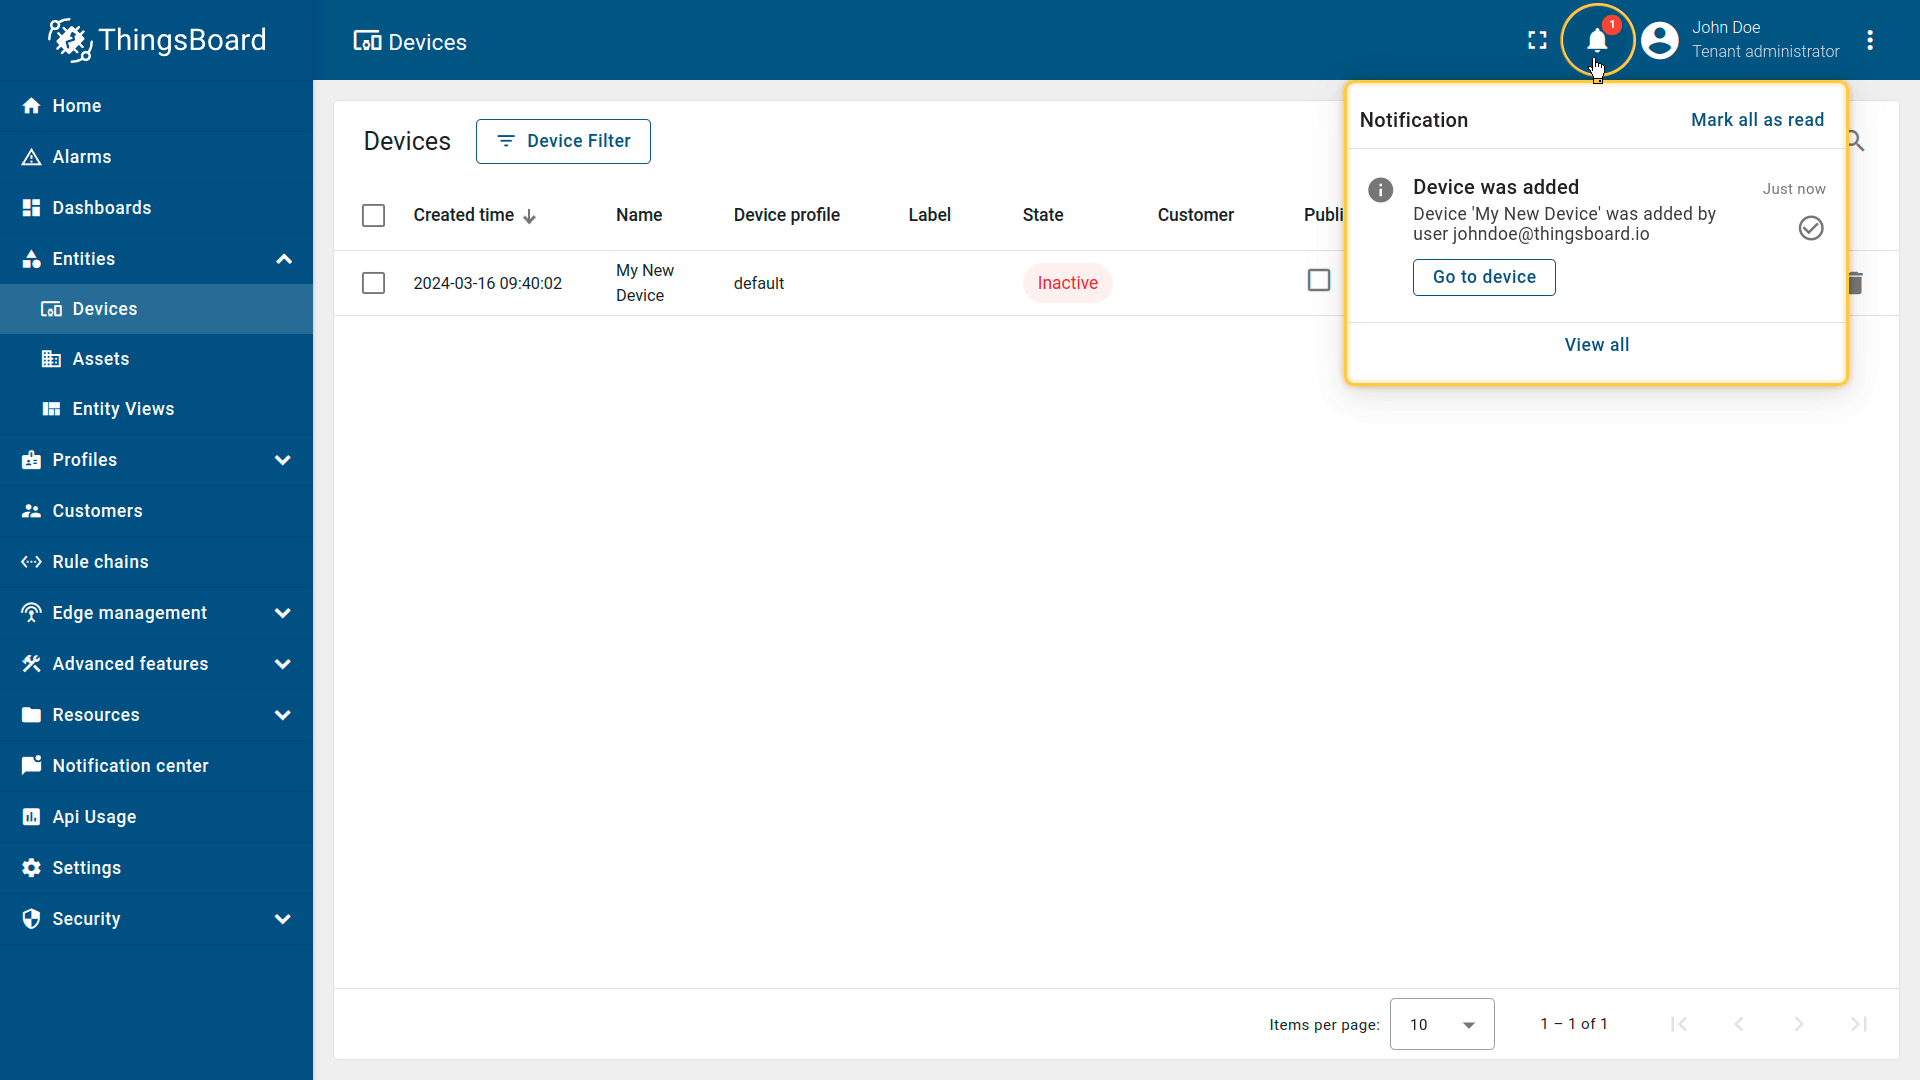
添加设备后您会收到通知,点击右上角铃铛图标查看。
其他创建设备方式
- 批量 provisioning:通过 UI 以 CSV 批量导入设备。
- 设备 provisioning:配置设备自动自助注册。
- REST API provisioning:通过 API 编程管理设备。
步骤 2. 连接设备
验证设备与 ThingsBoard 的连接:
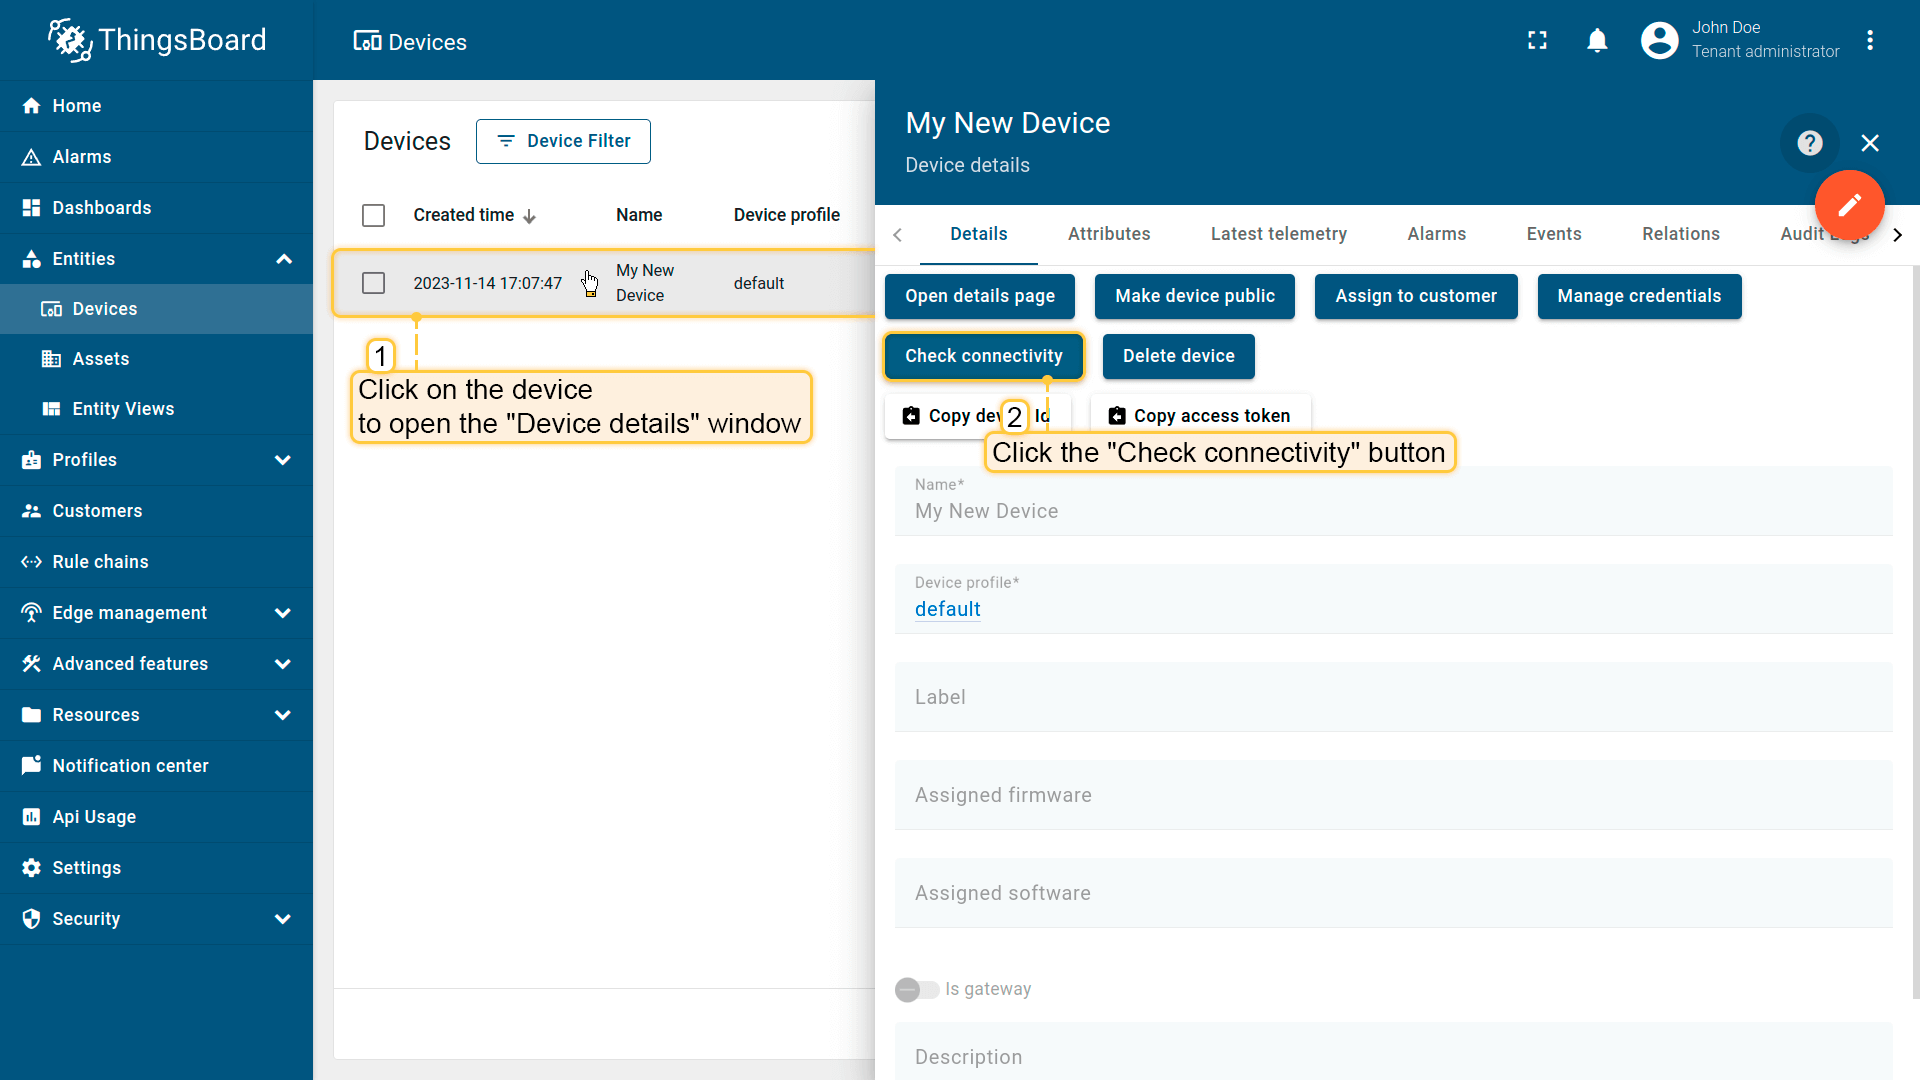
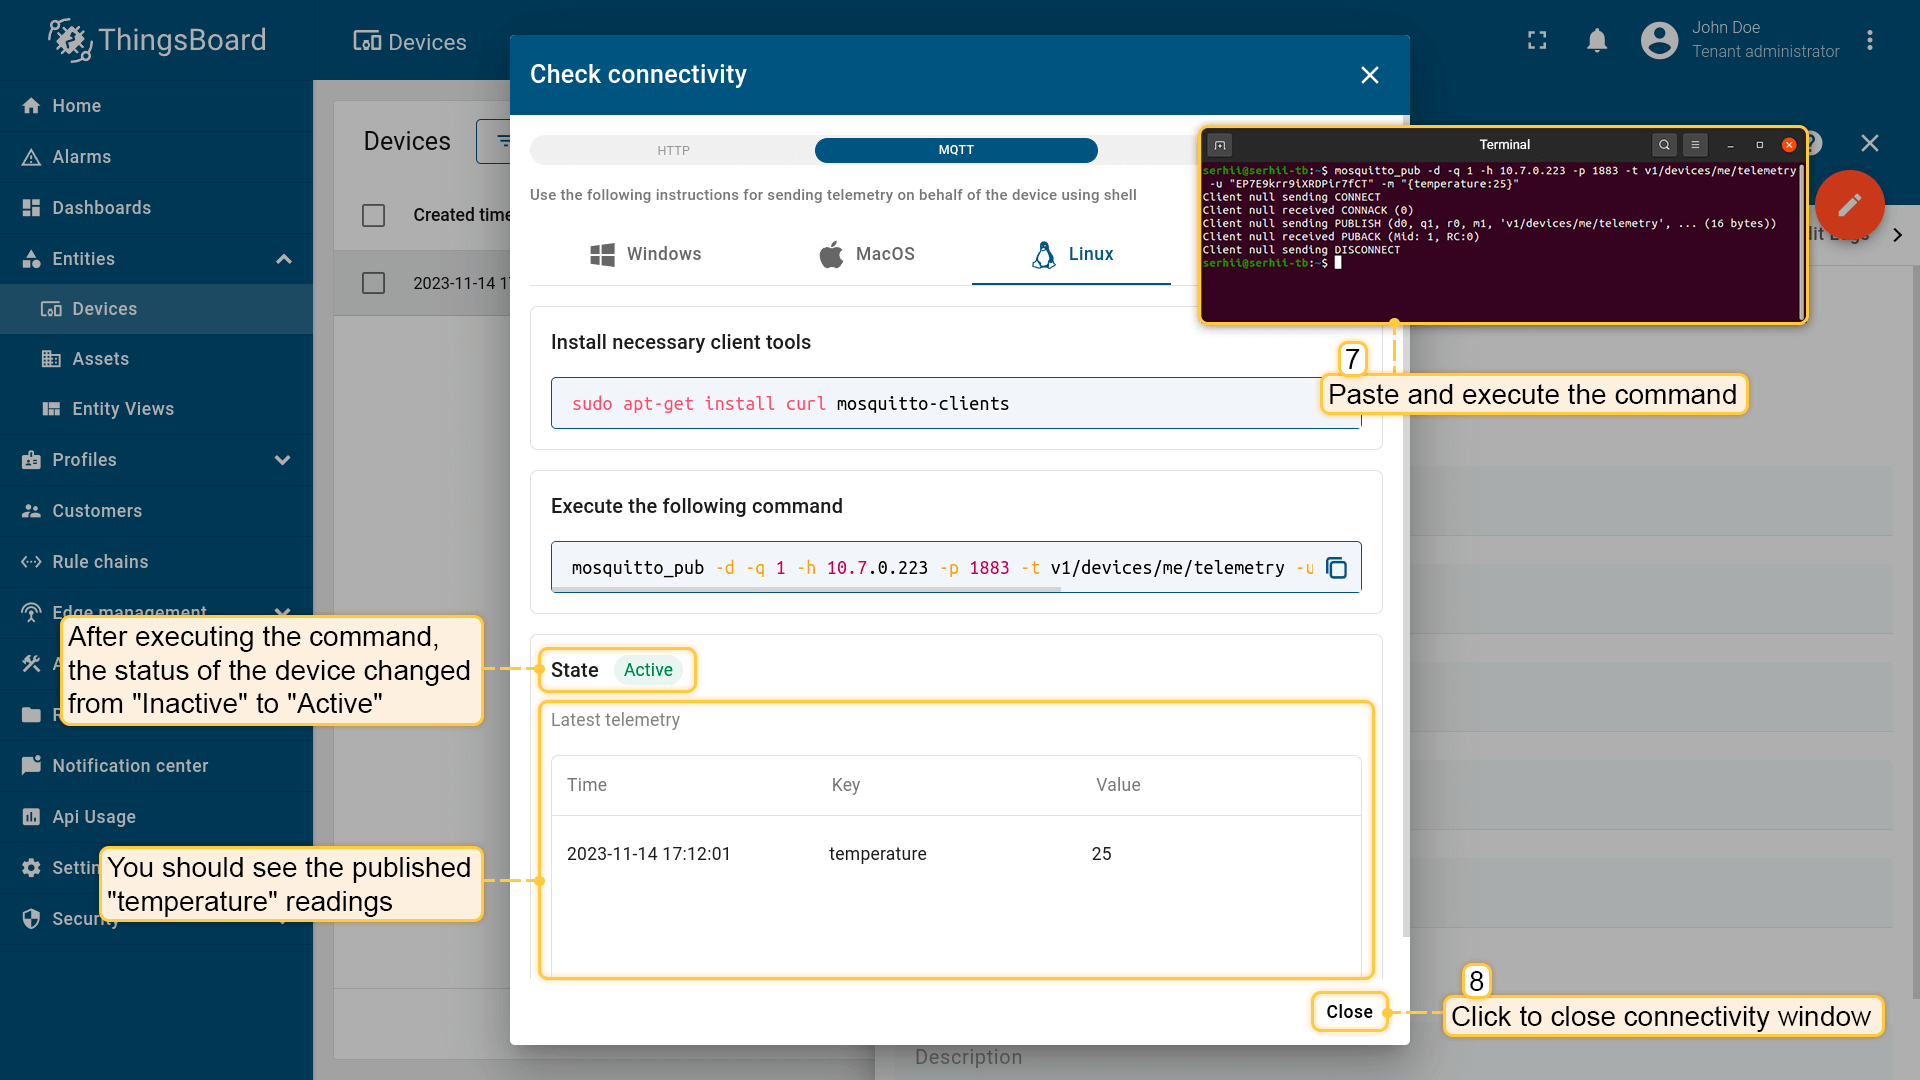
- 点击您的设备,在「设备详情」窗口中点击「检查连接」按钮。
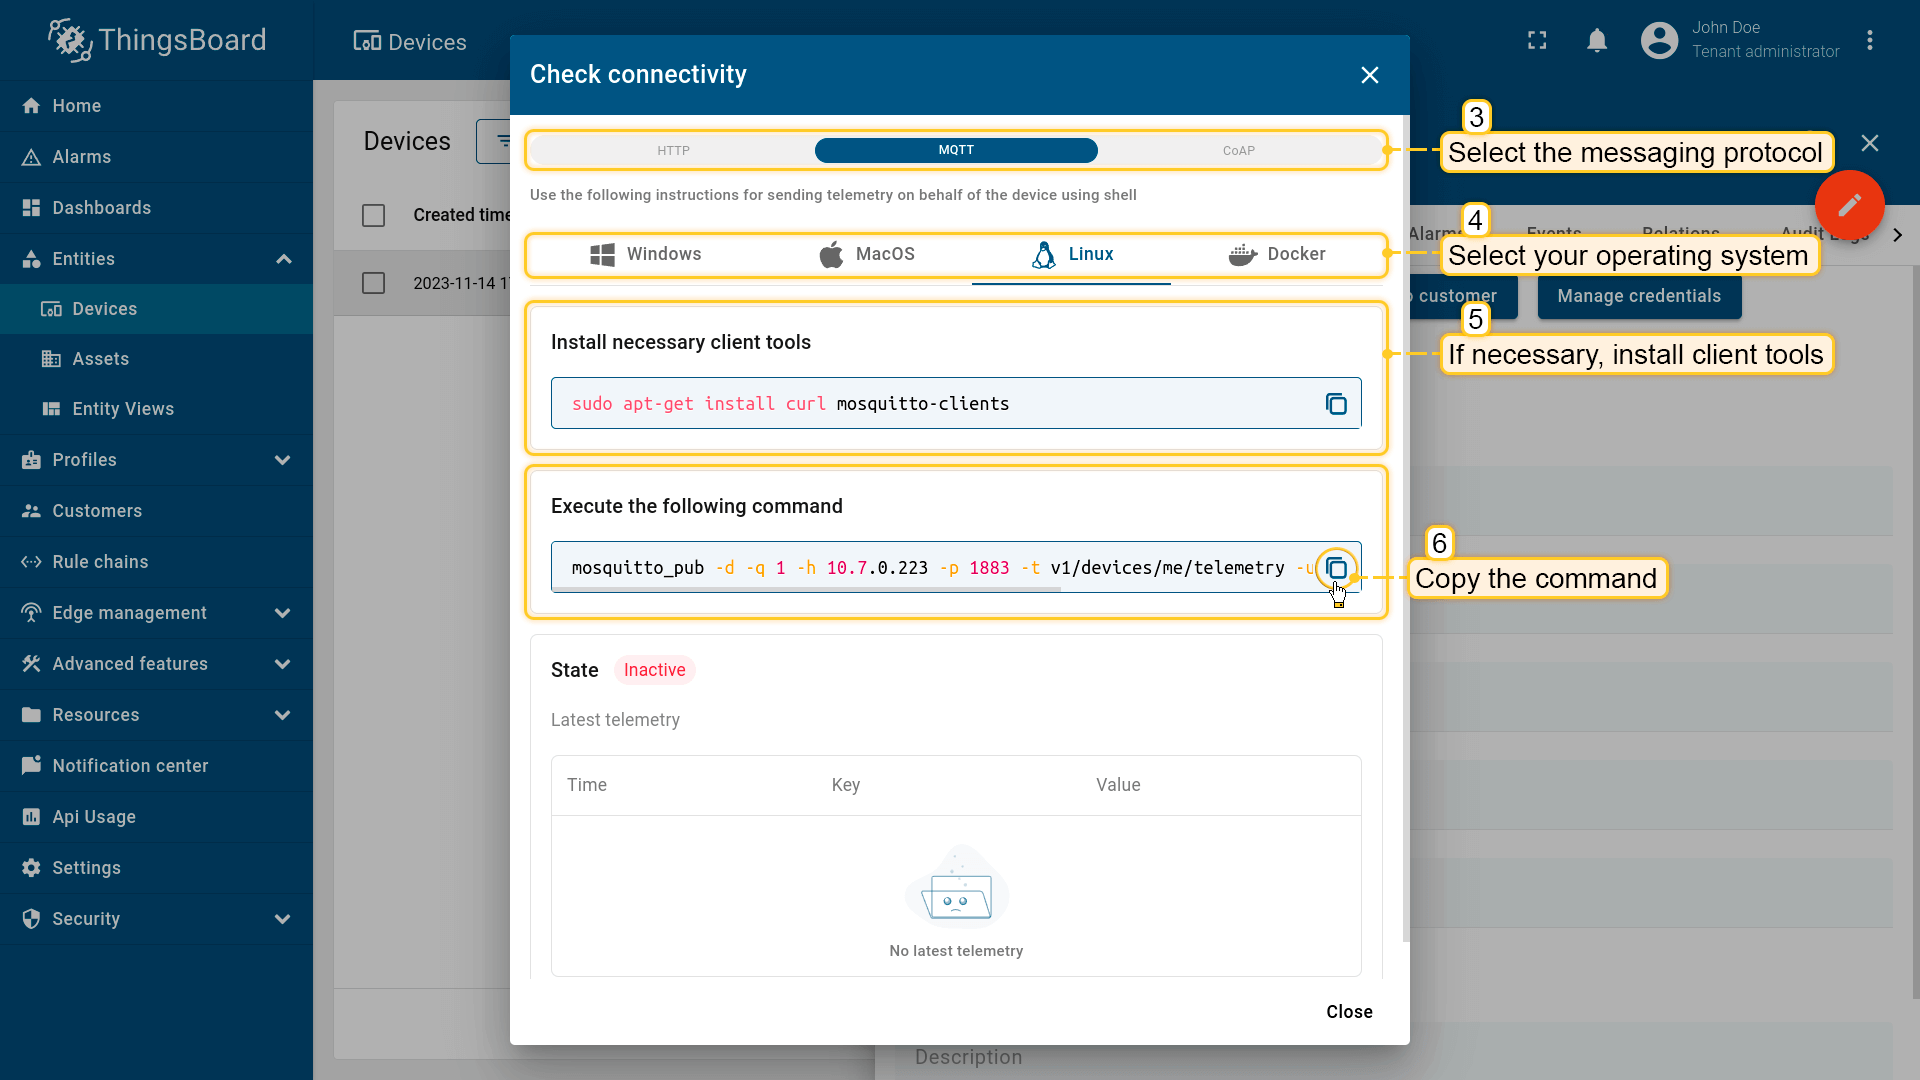
- 在打开的窗口中选择消息协议和操作系统,安装所需客户端工具并复制提供的命令。
- 在终端中执行复制的命令。遥测数据(如温度读数)成功发布后,设备状态将从「非活动」变为「活动」,并显示数据。此时可关闭连接窗口。
查看 ThingsBoard API 参考,了解更多设备连接支持协议详情。
步骤 3. 创建仪表盘
ThingsBoard 中的仪表盘用于可视化和监控来自 IoT 设备的数据。
创建仪表盘并添加三个部件,展示实体列表及其最新值,以及指定实体的告警。
步骤 3.1 创建空仪表盘
按以下步骤创建新仪表盘:
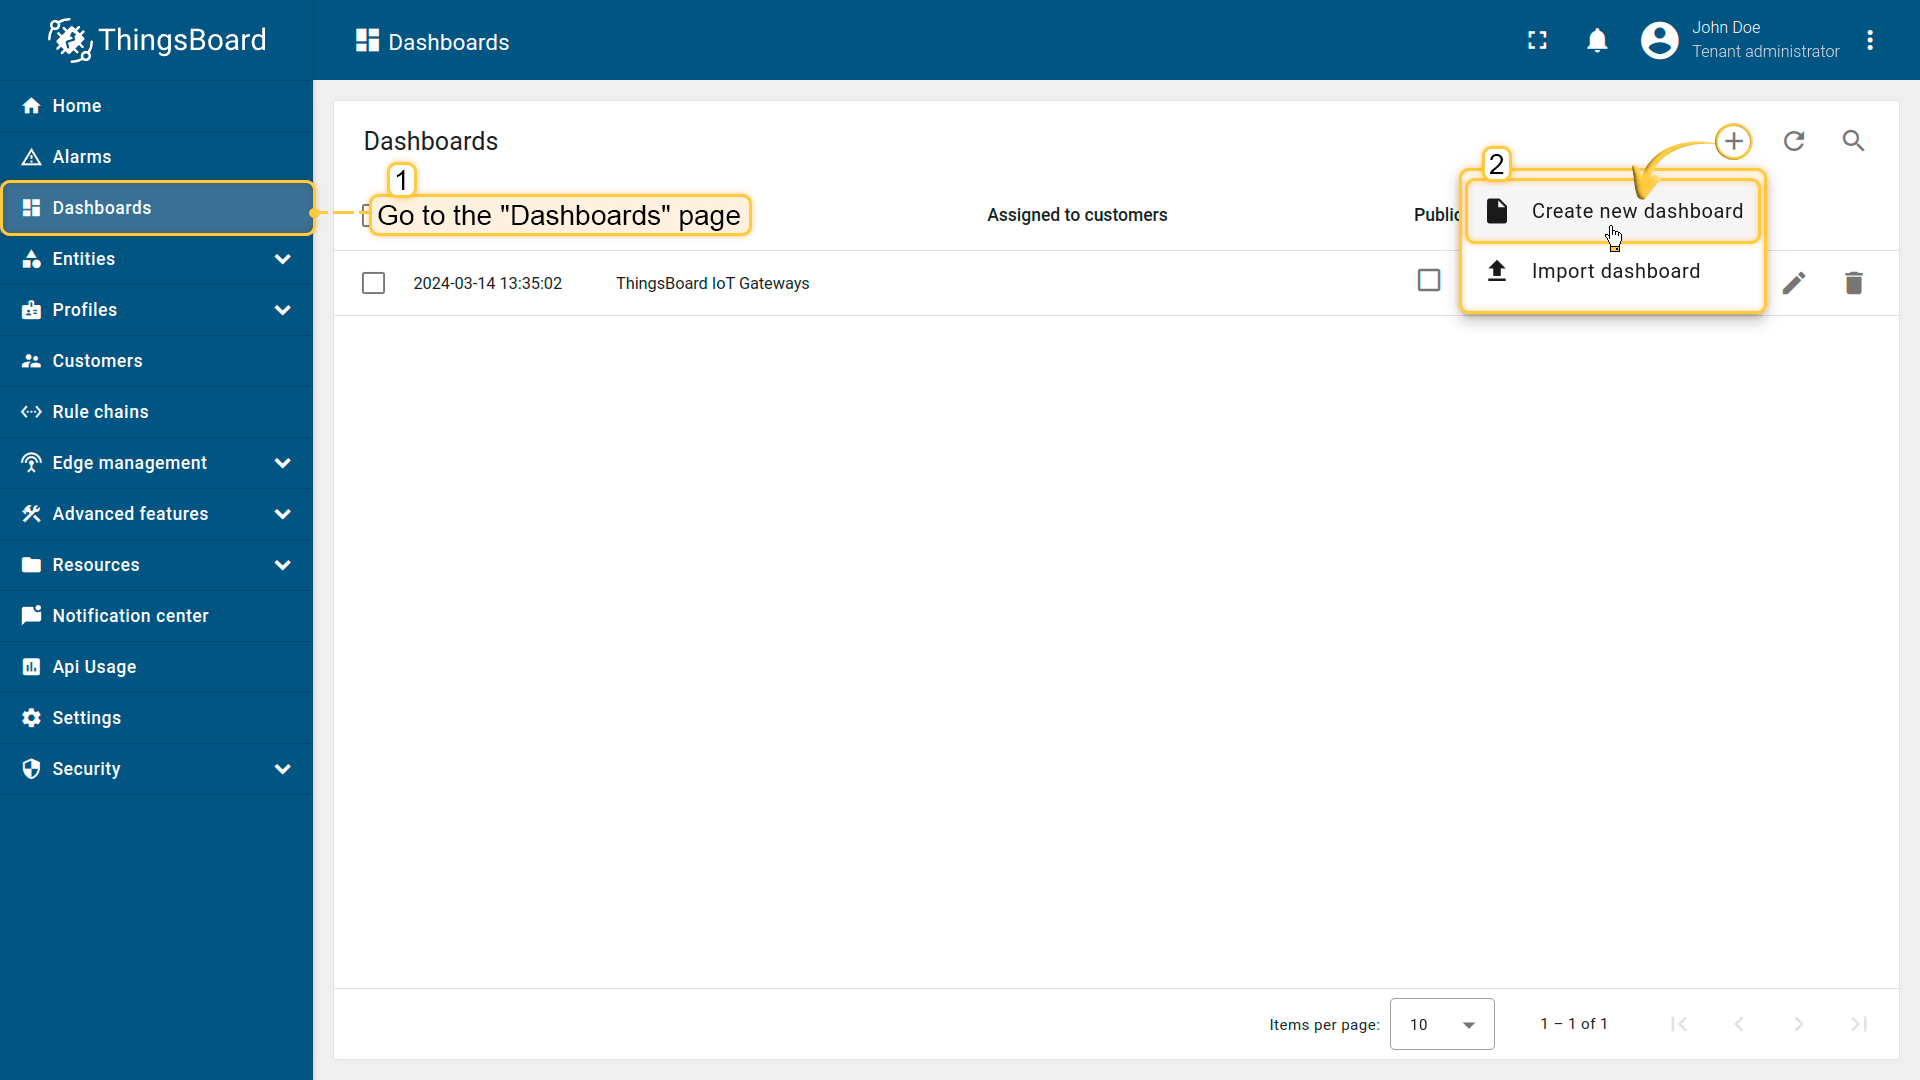
- 通过屏幕左侧主菜单进入「仪表盘」页面,点击右上角「+」并从下拉菜单选择「创建新仪表盘」。
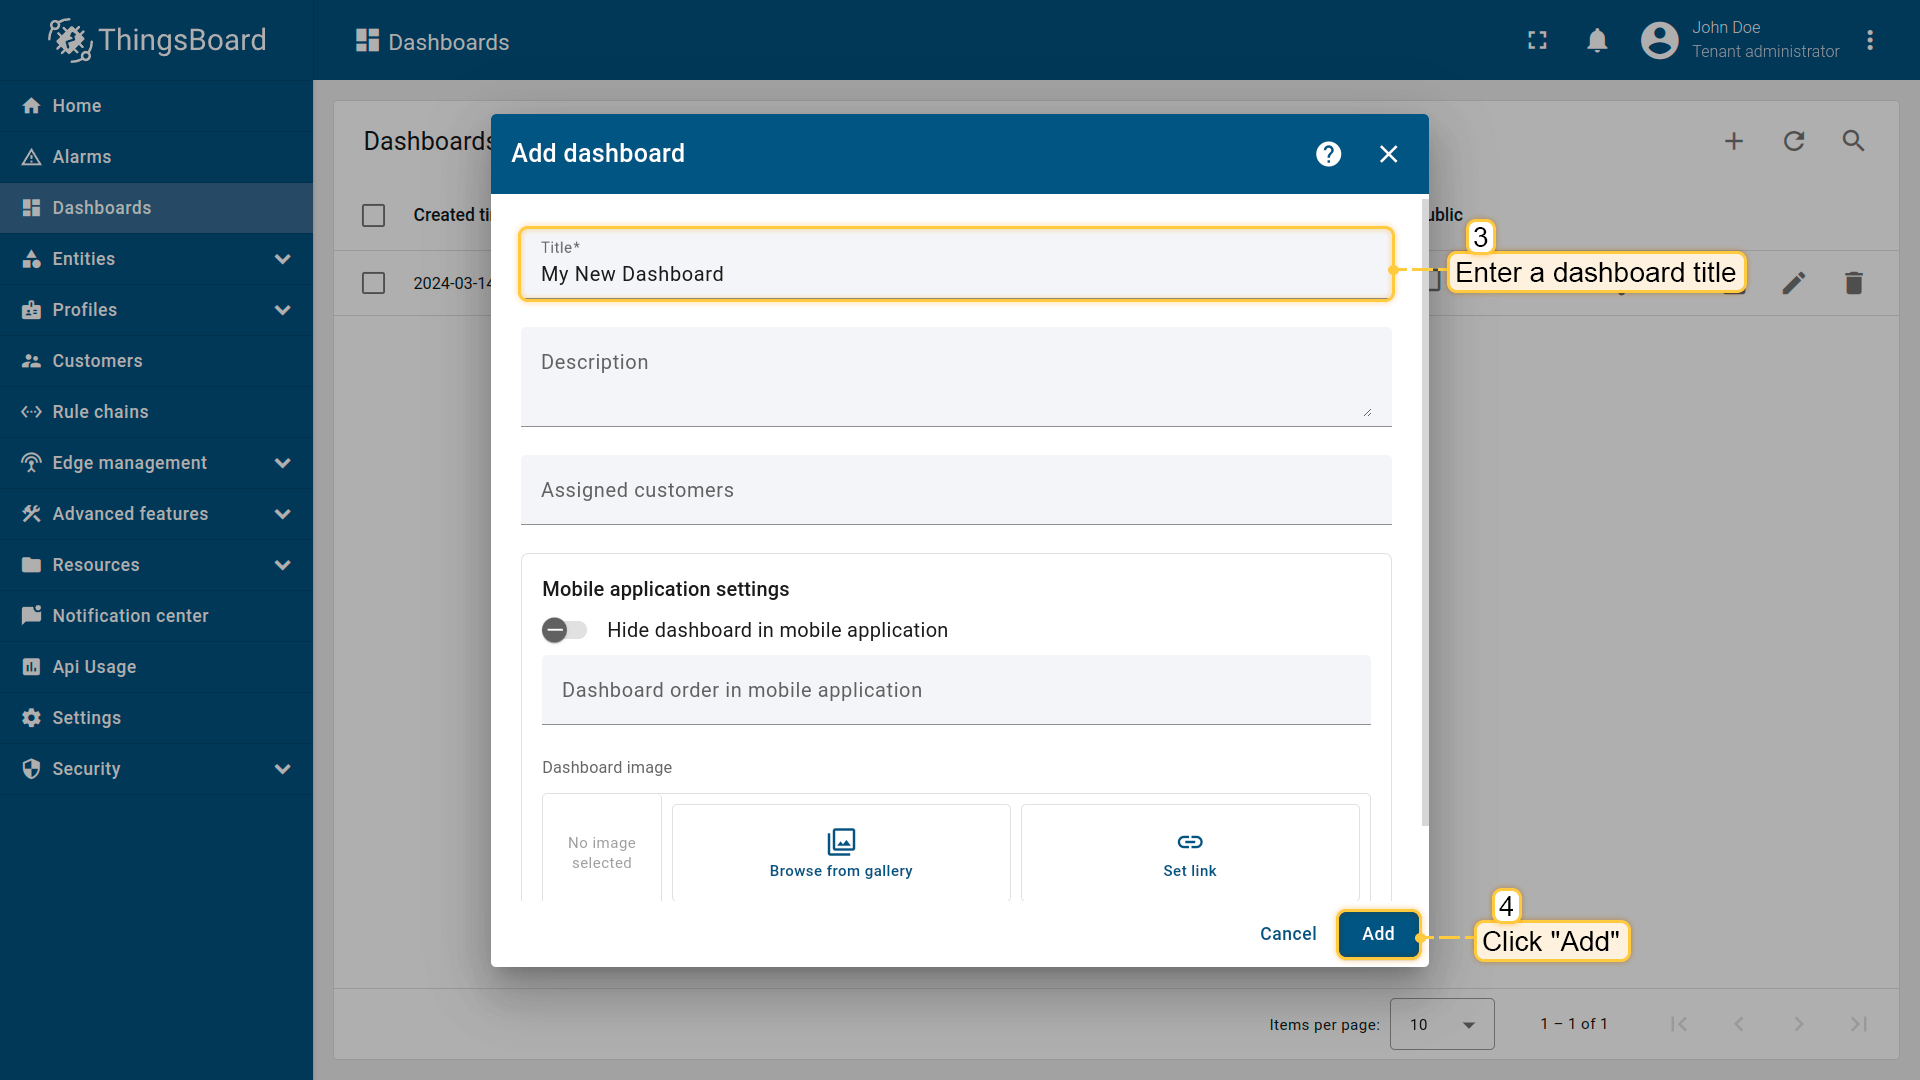
- 在打开的对话框中输入仪表盘标题,描述可选。点击「添加」。
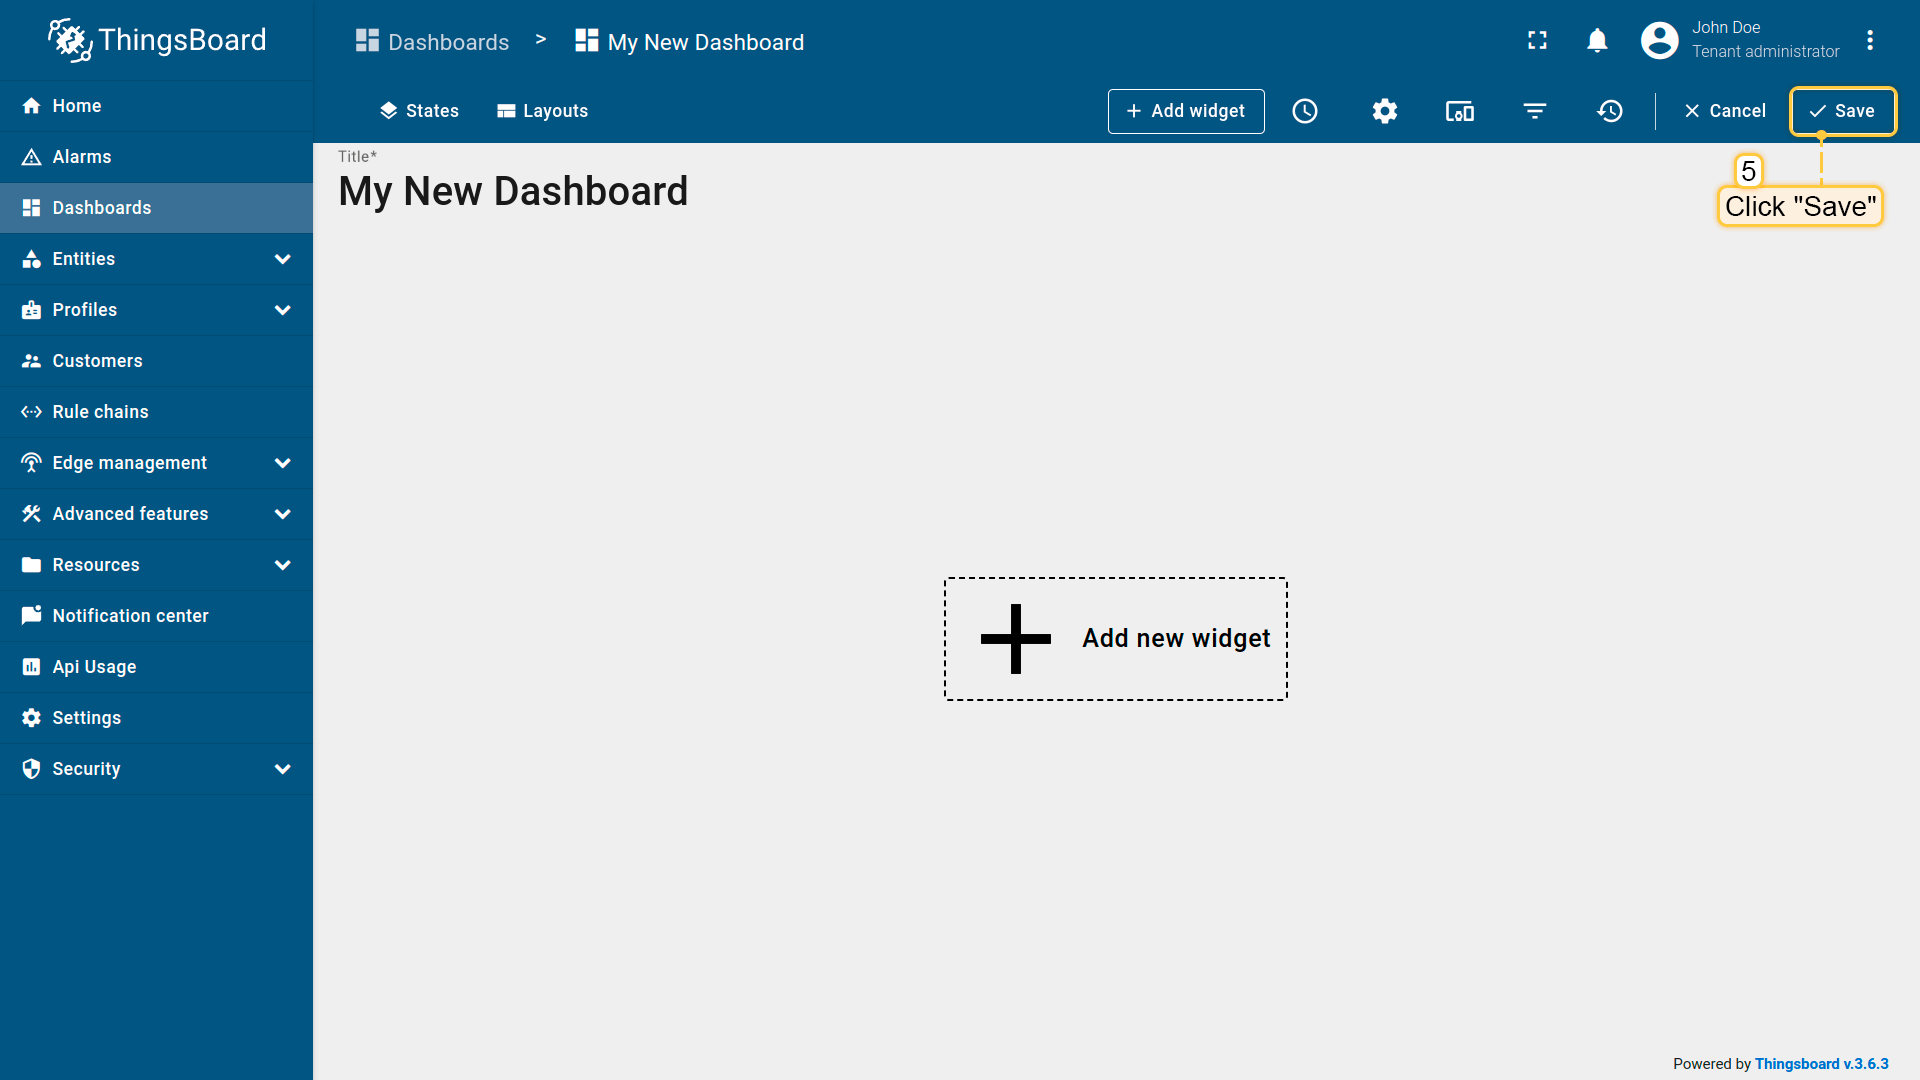
- 创建后仪表盘会自动打开,可立即添加部件。点击右上角「保存」按钮保存仪表盘。
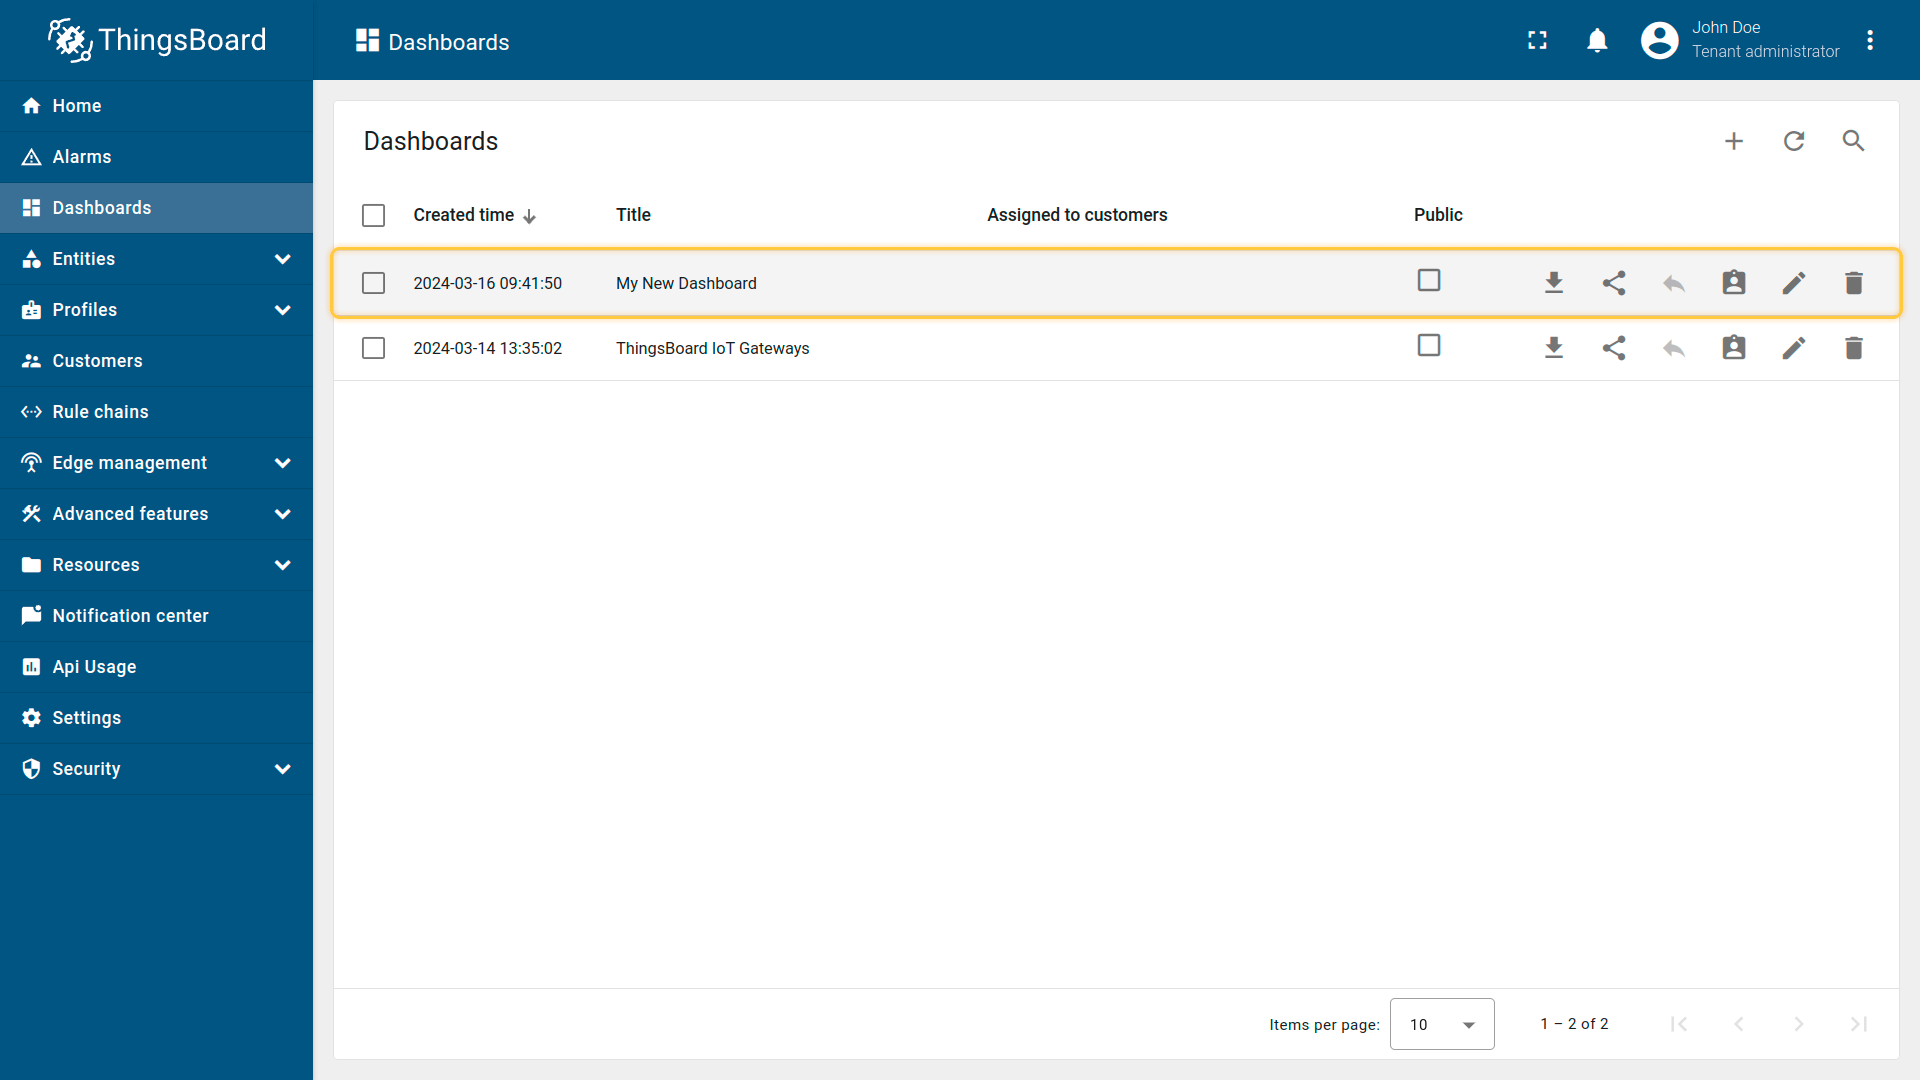
- 首个仪表盘创建成功。新仪表盘将出现在列表顶部,默认按创建时间排序。
步骤 3.2 添加实体表格部件
「实体表格」部件展示实体列表及其最新值,对应所选设备或其他实体,并支持全文搜索和分页。
从部件库选择表格部件。部件按部件组归类,每个部件有数据源,用于决定显示的数据。 要显示步骤 2 发送的「temperature」最新值,需配置数据源。
添加第一个部件:
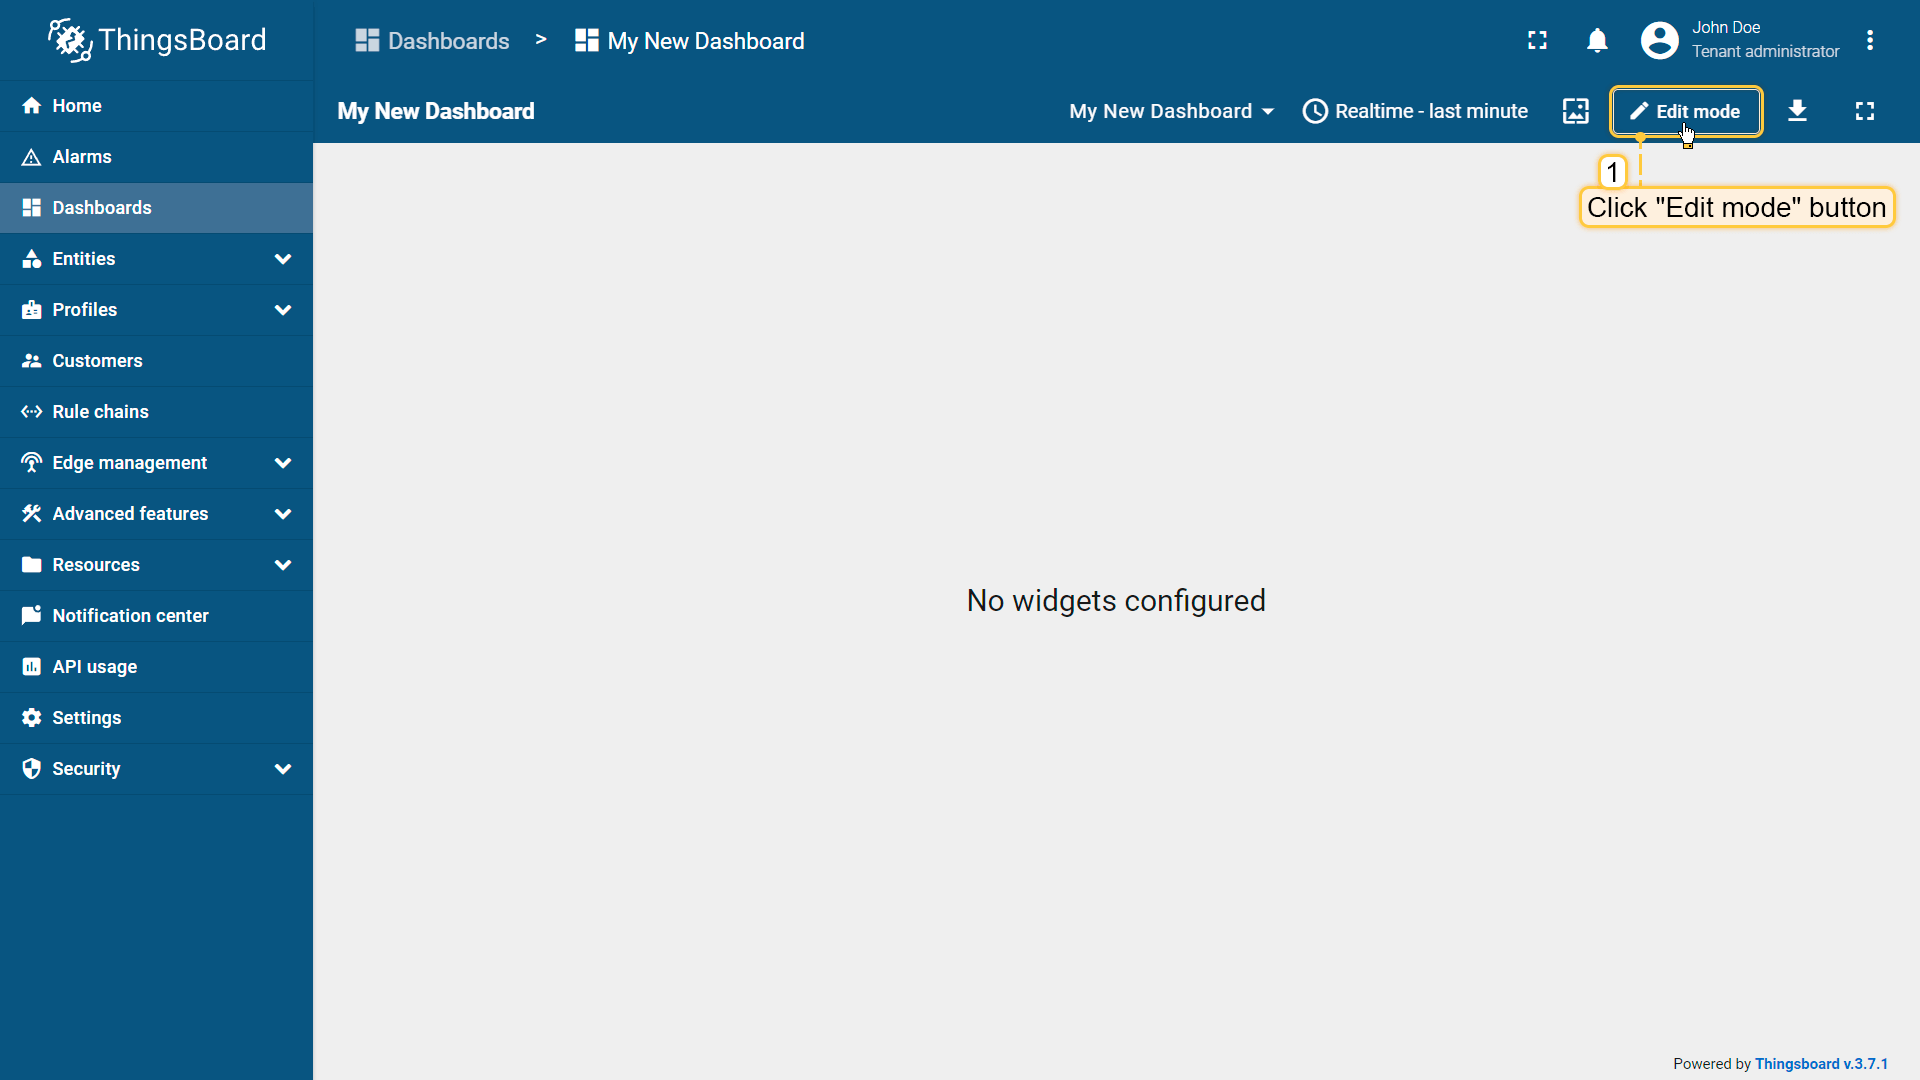
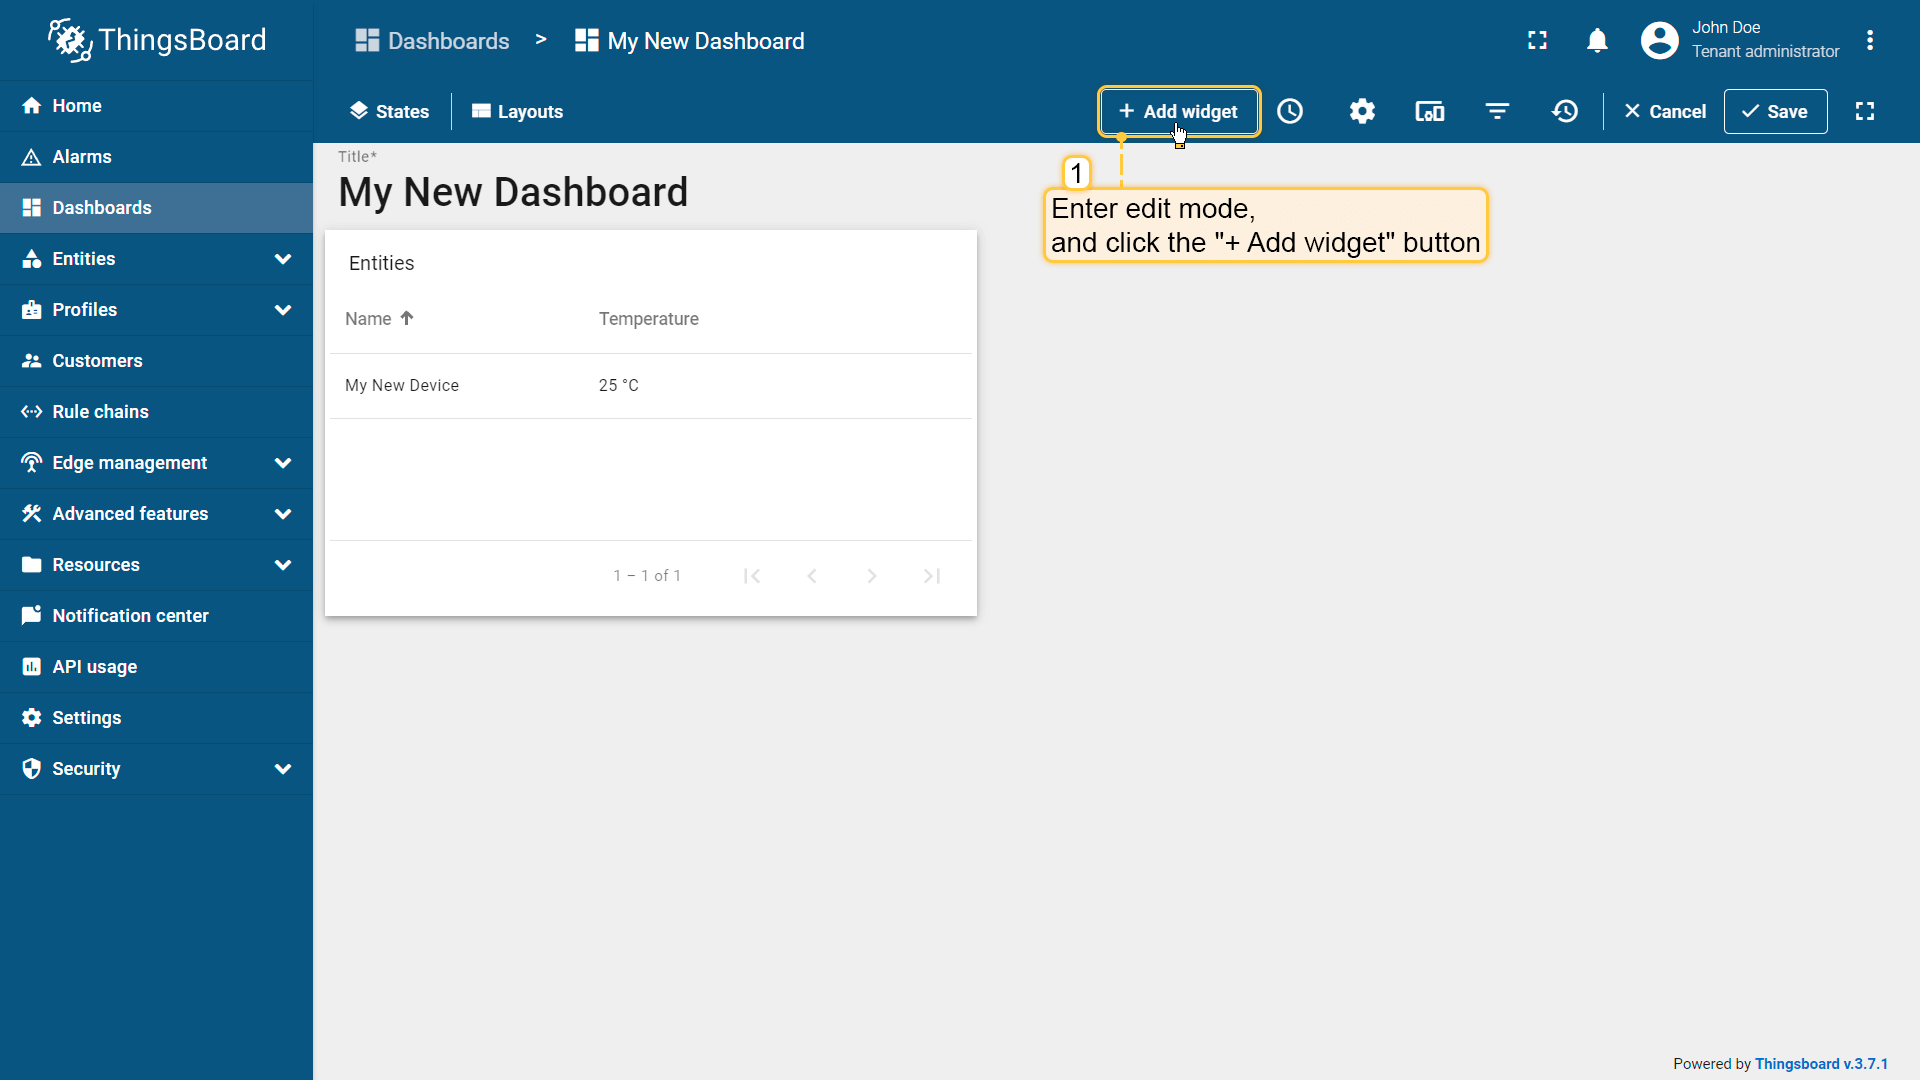
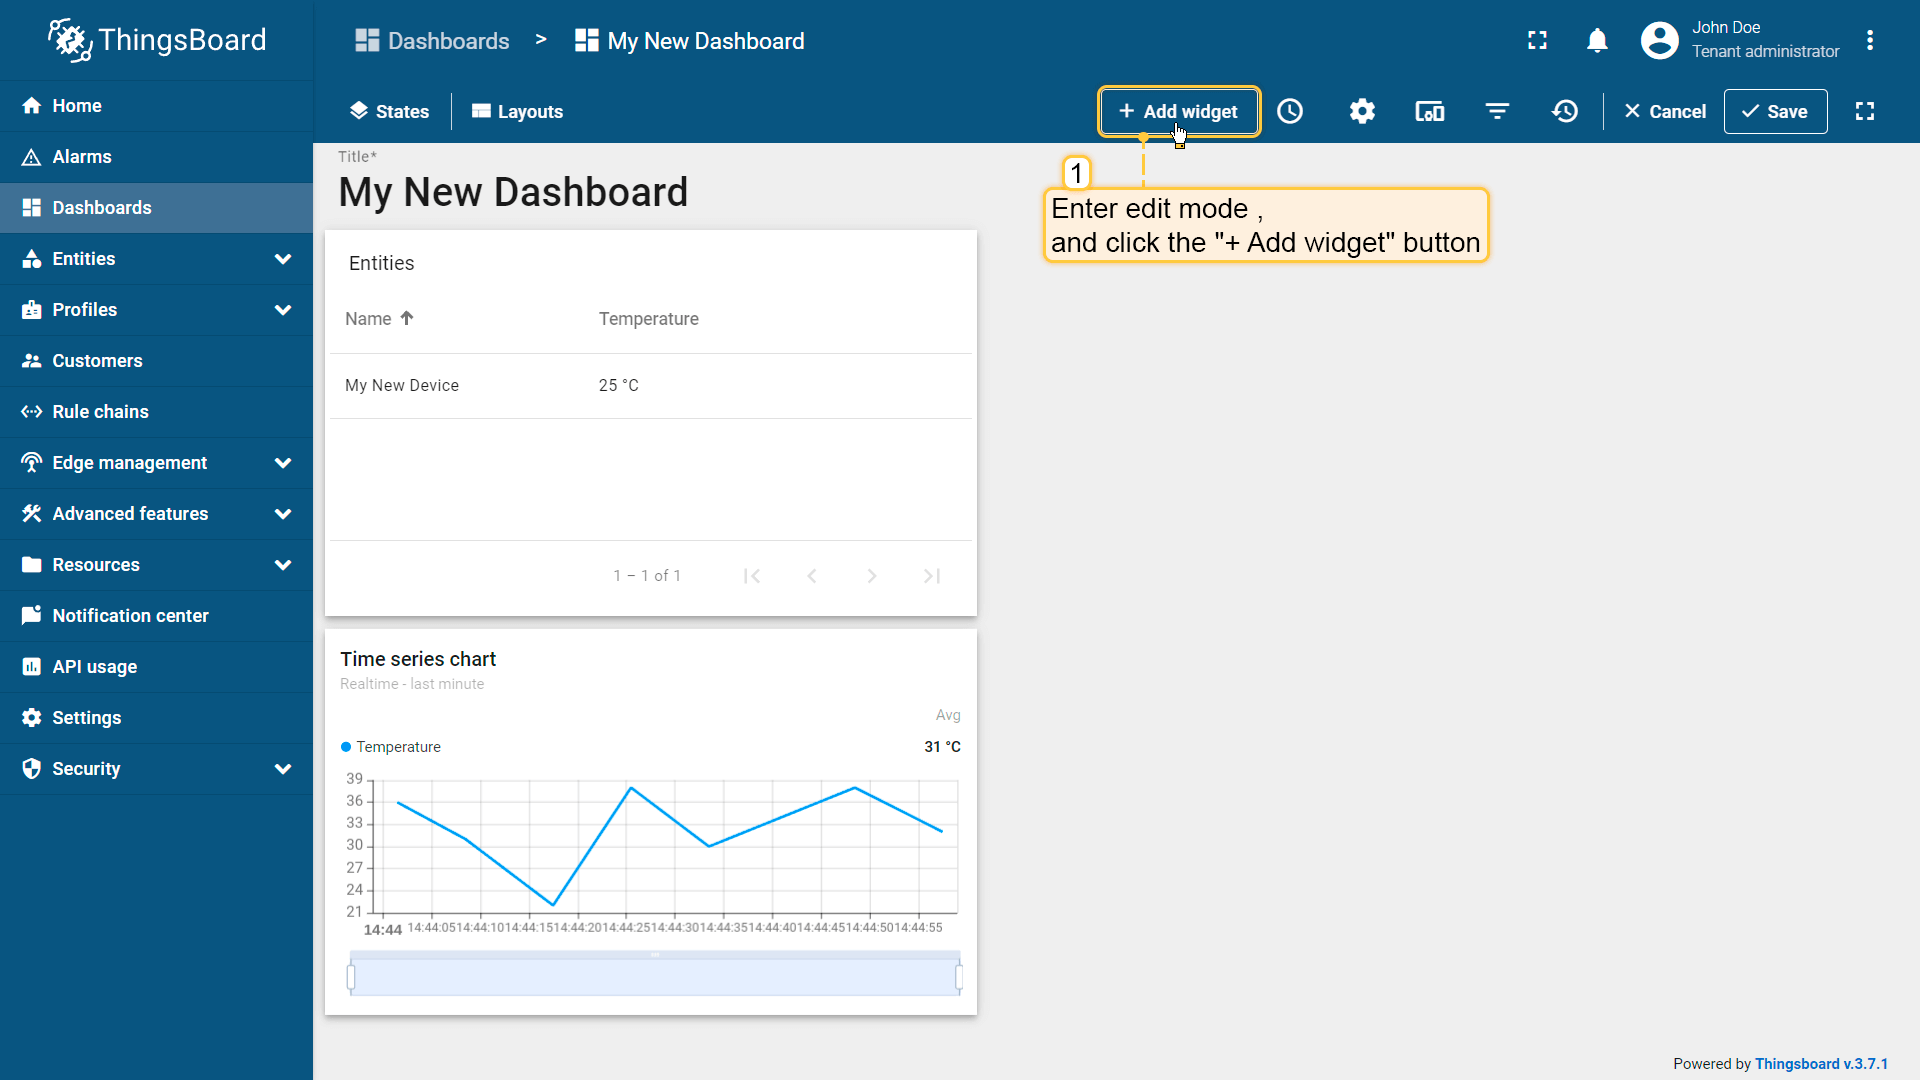
- 进入仪表盘编辑模式,打开仪表盘并点击屏幕右上角「编辑模式」按钮;
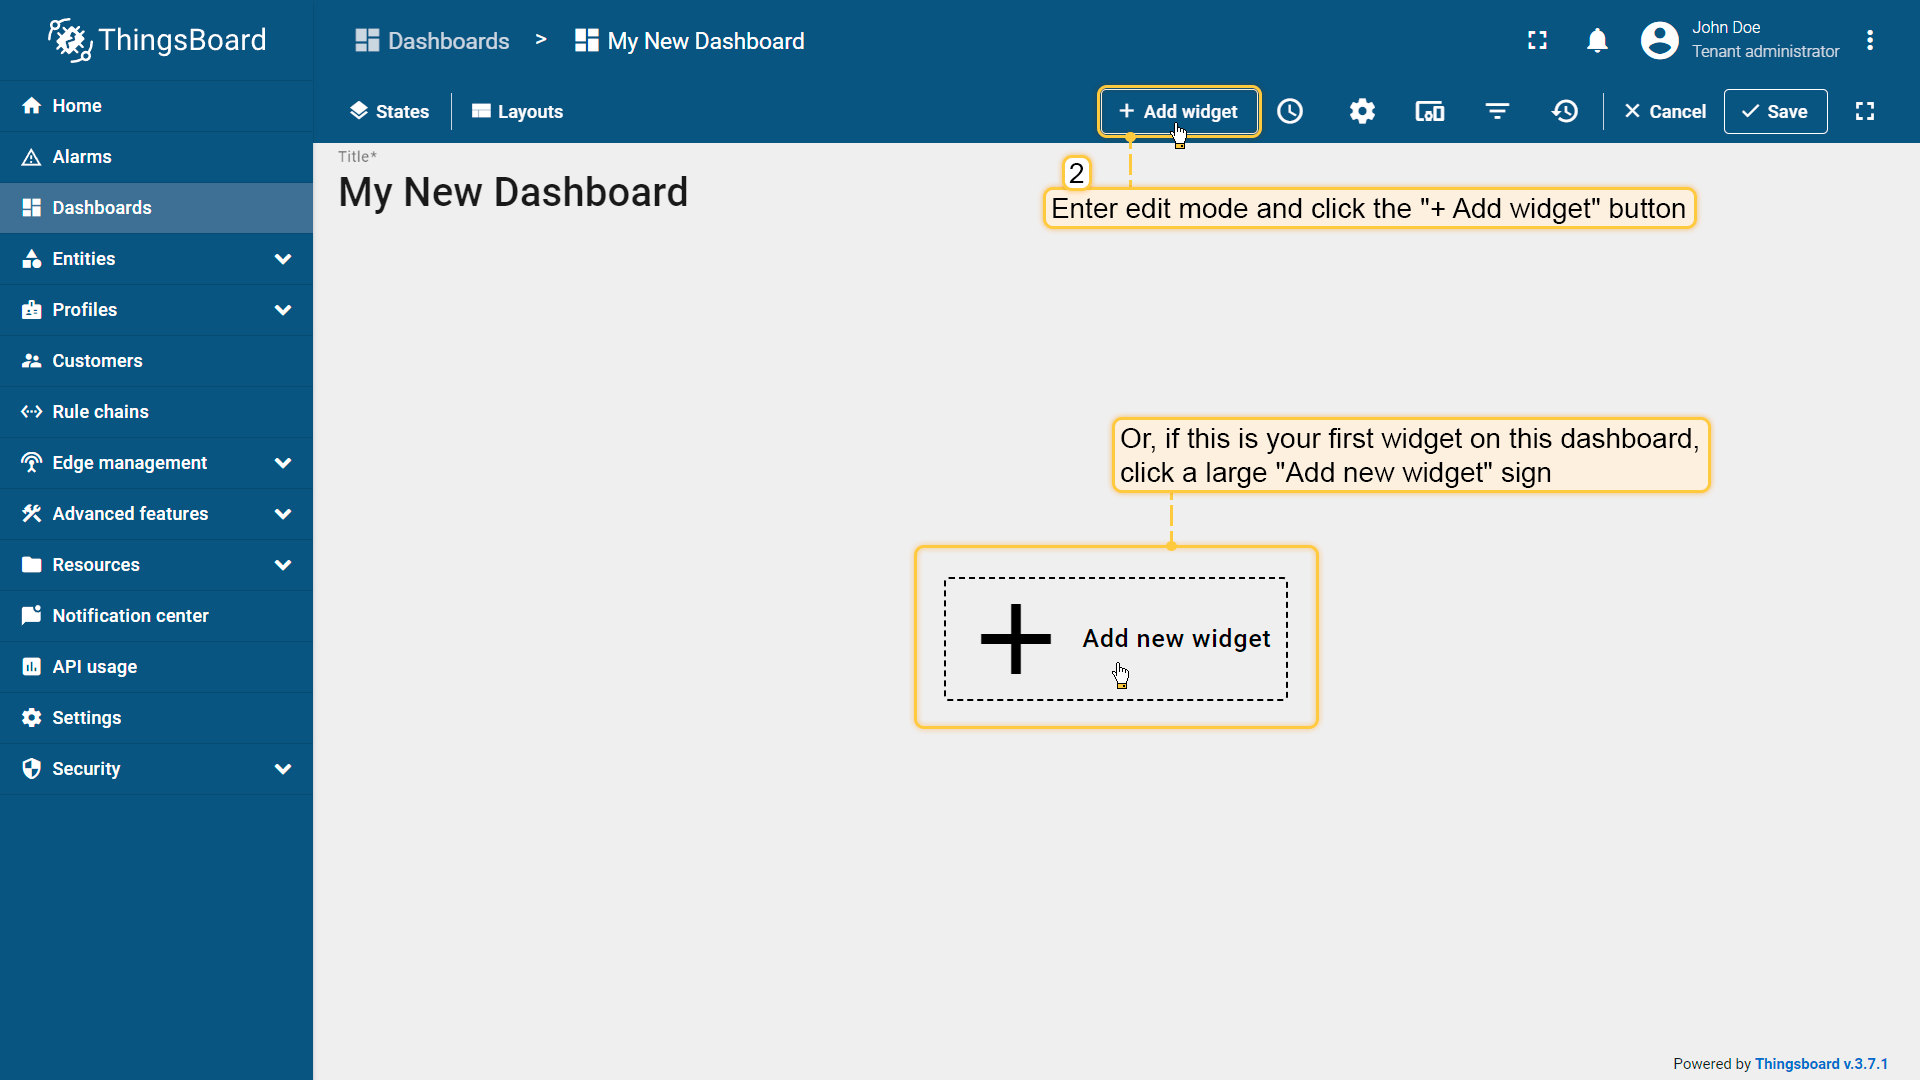
- 点击屏幕顶部的「添加部件」按钮或中央的「添加新部件」大图标(若为仪表盘首个部件);
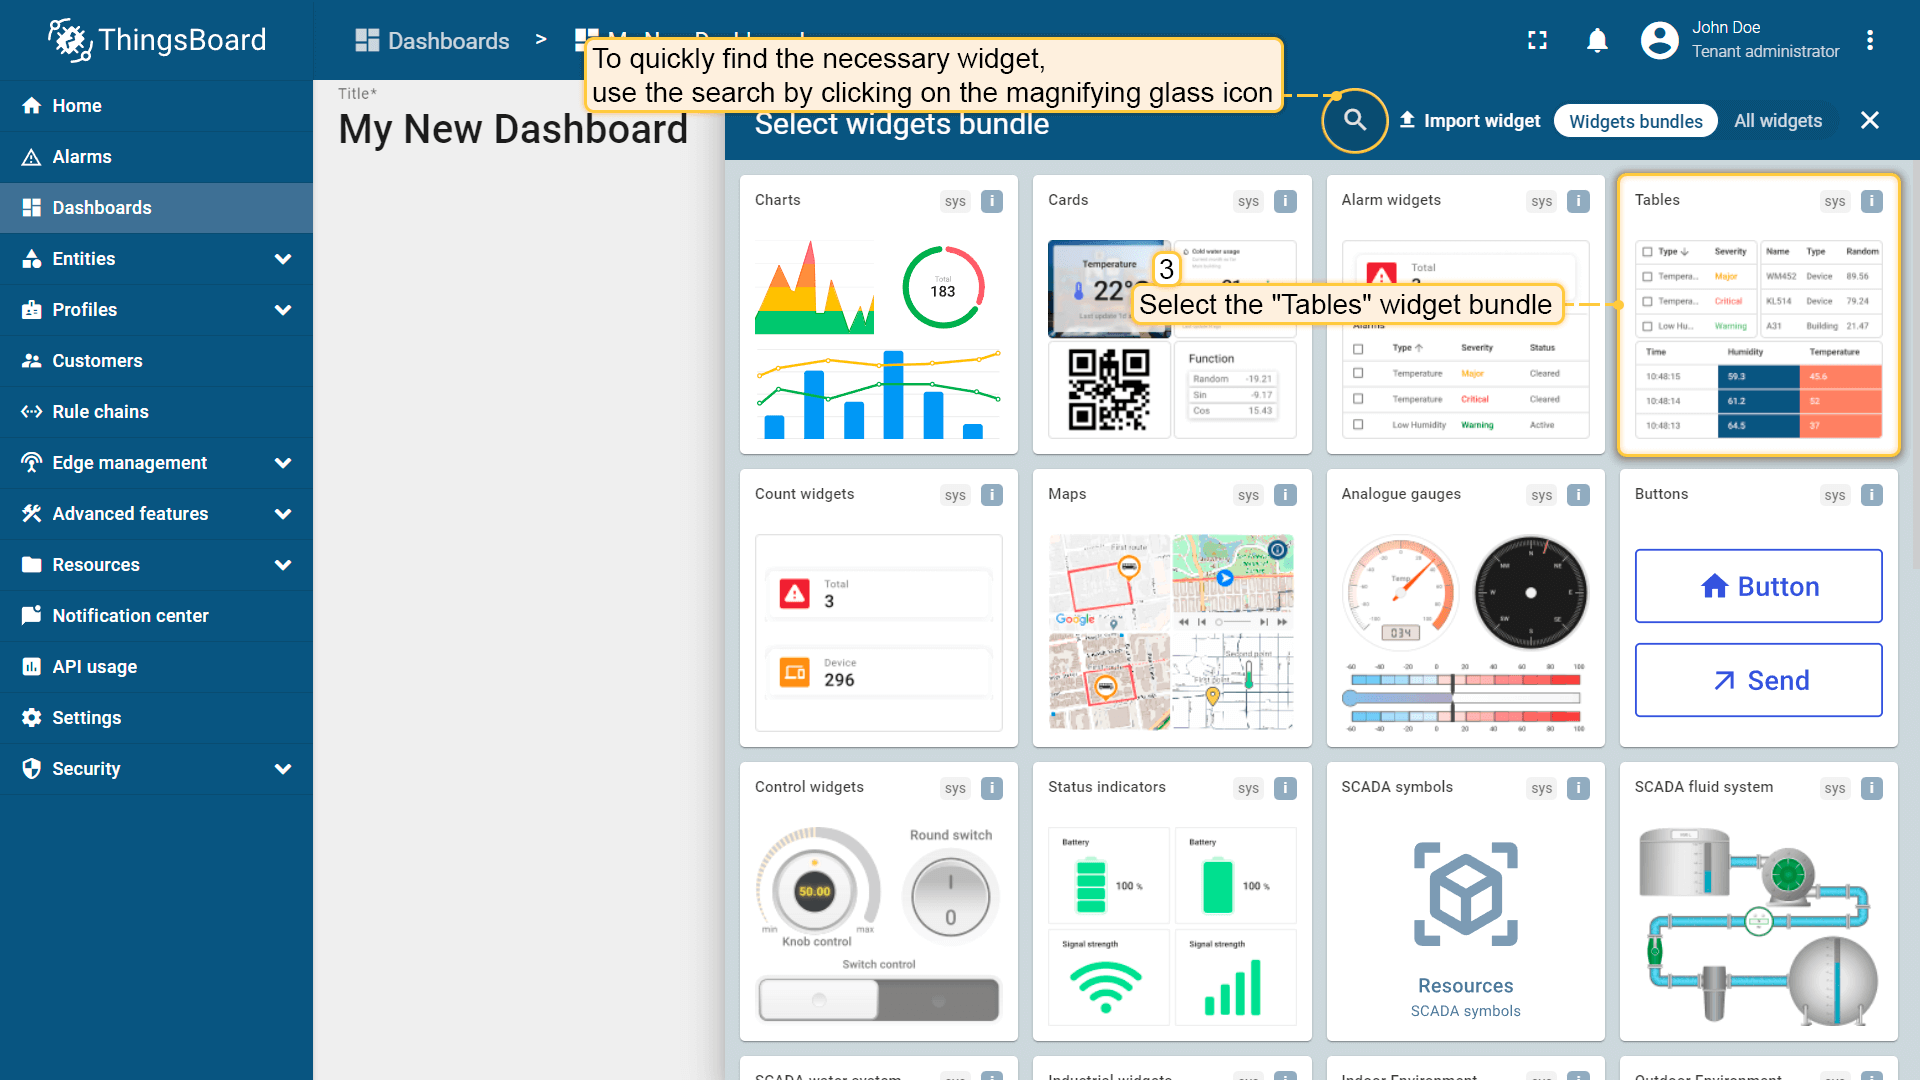
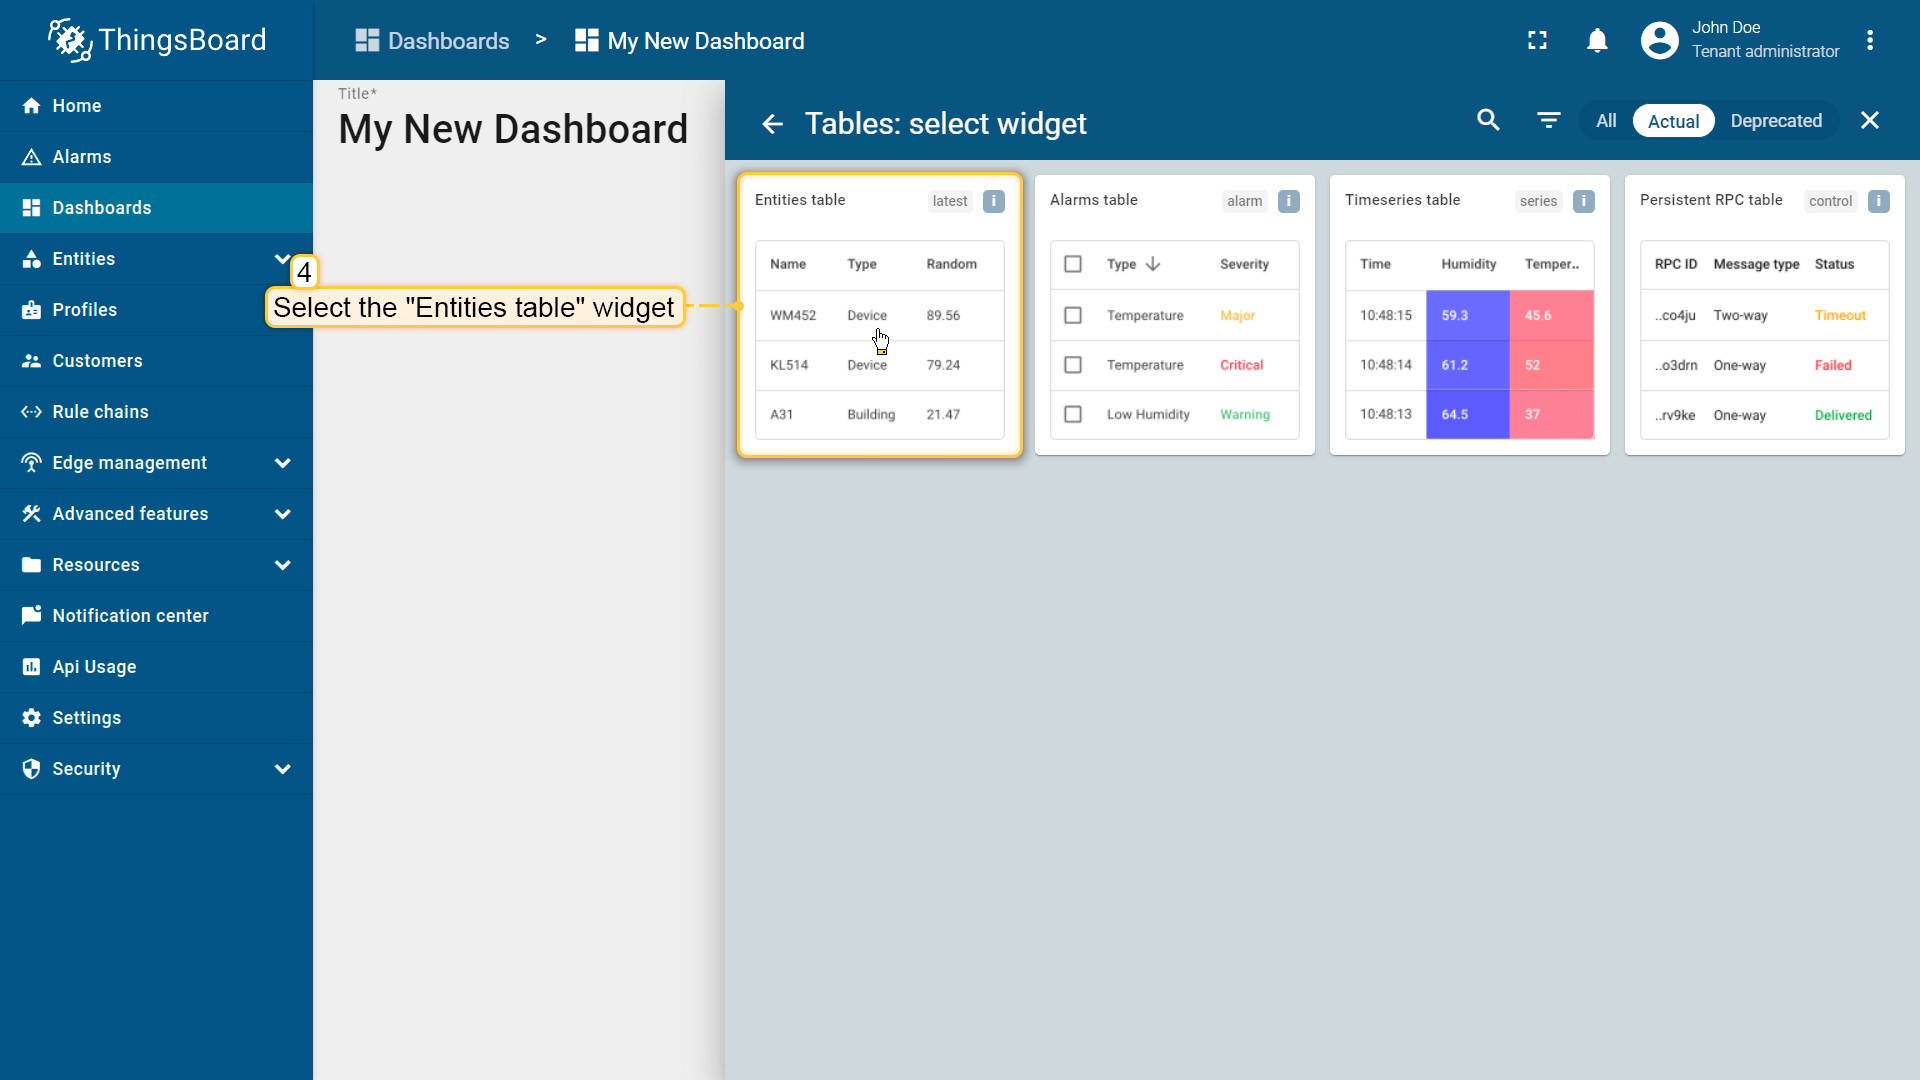
- 找到「表格」部件组并点击;
- 选择「实体表格」部件;
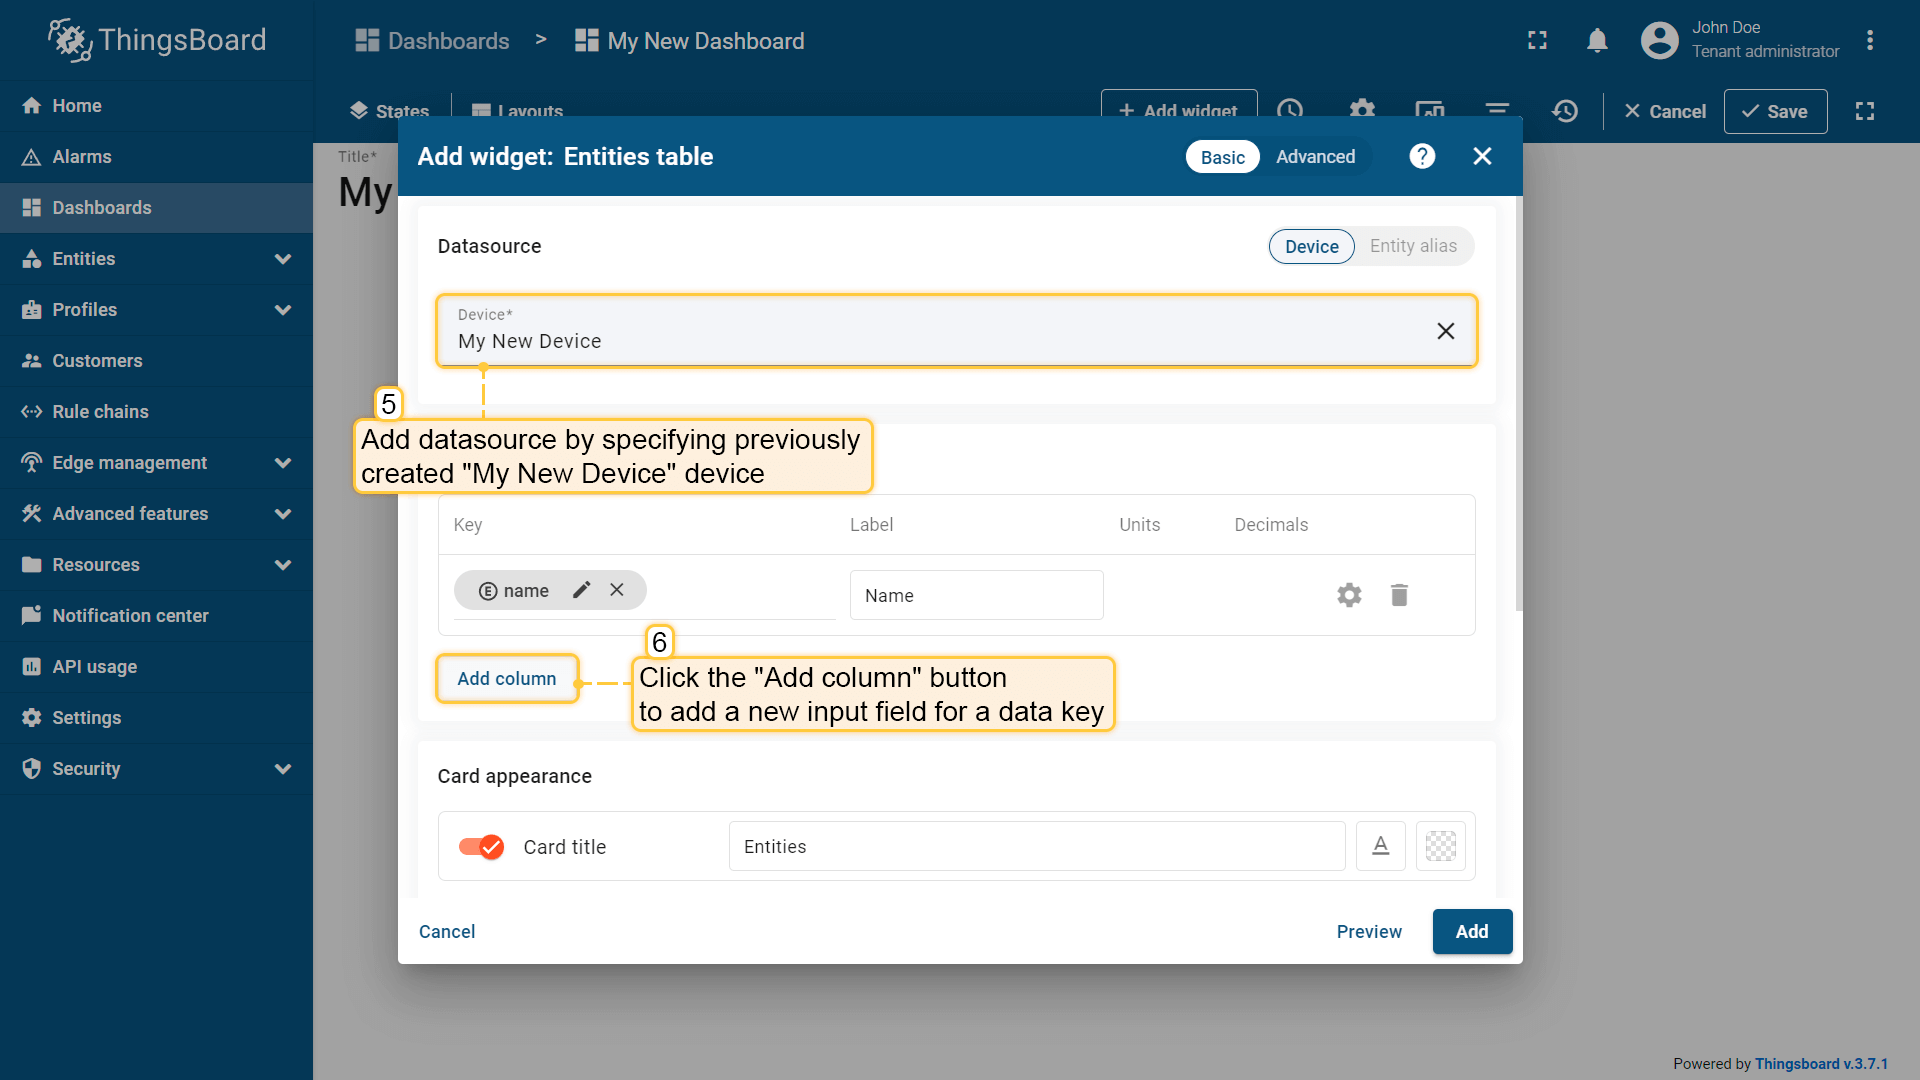
- 将出现「添加部件」窗口。在「设备」字段中指定之前创建设备「My New Device」作为数据源。「name」键已添加至「列」区域,用于显示设备名称。需再添加一列显示「temperature」键的值,点击「添加列」添加数据键字段;
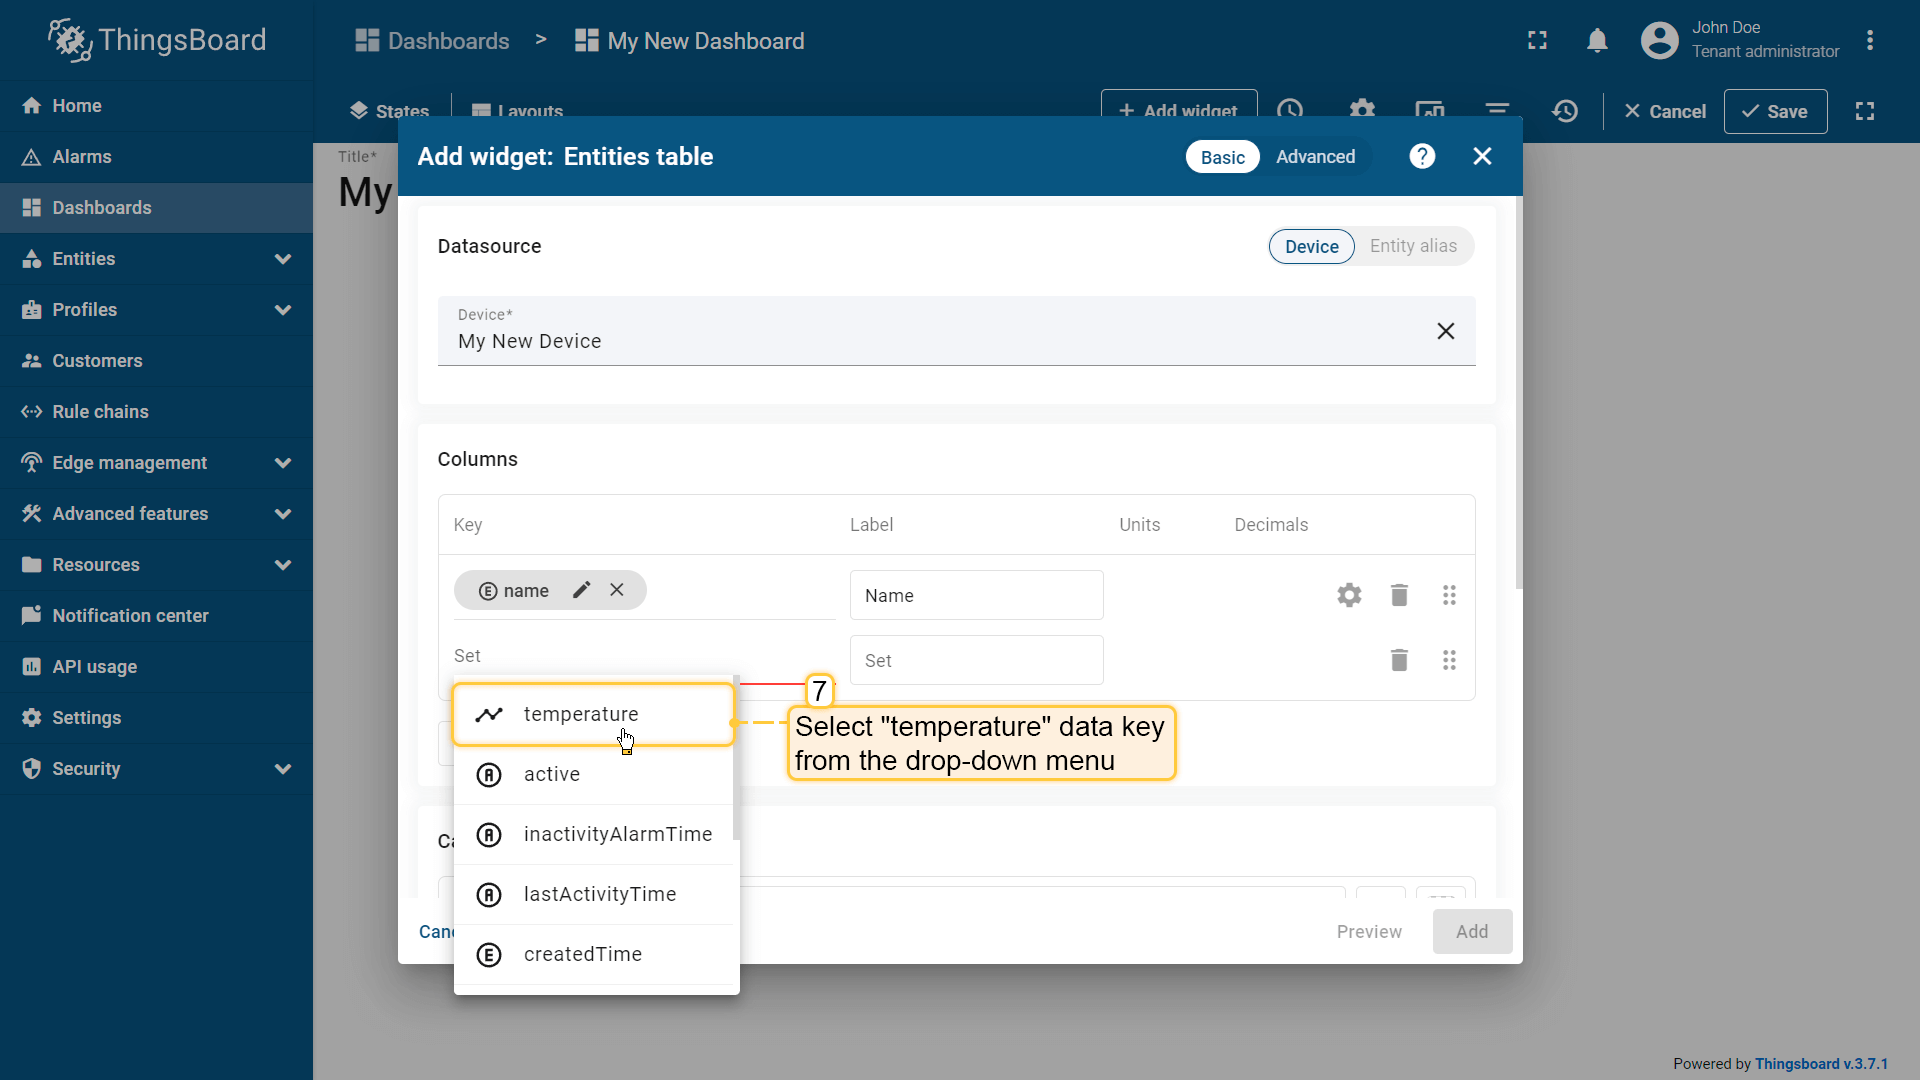
- 点击新出现的数据键输入框,将列出可用数据键,选择「temperature」;
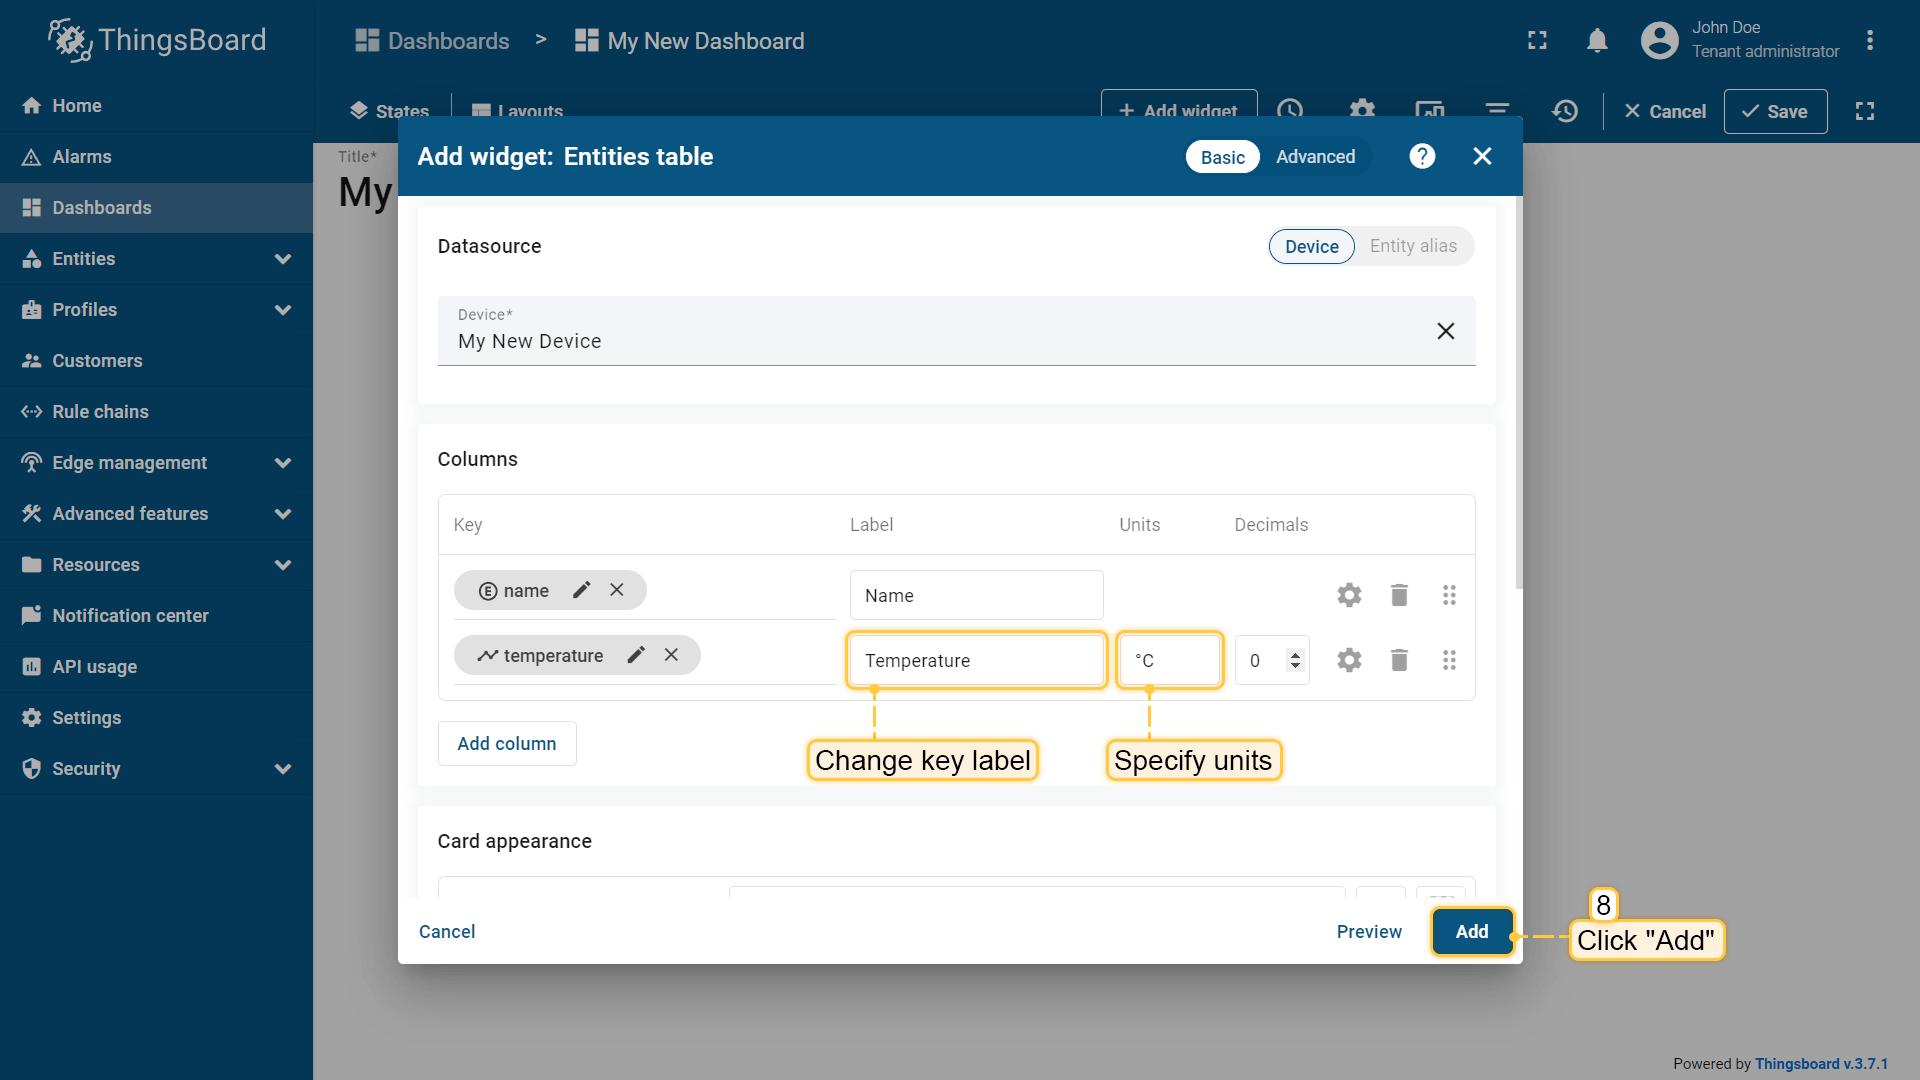
- 点击部件右下角「添加」按钮完成添加。
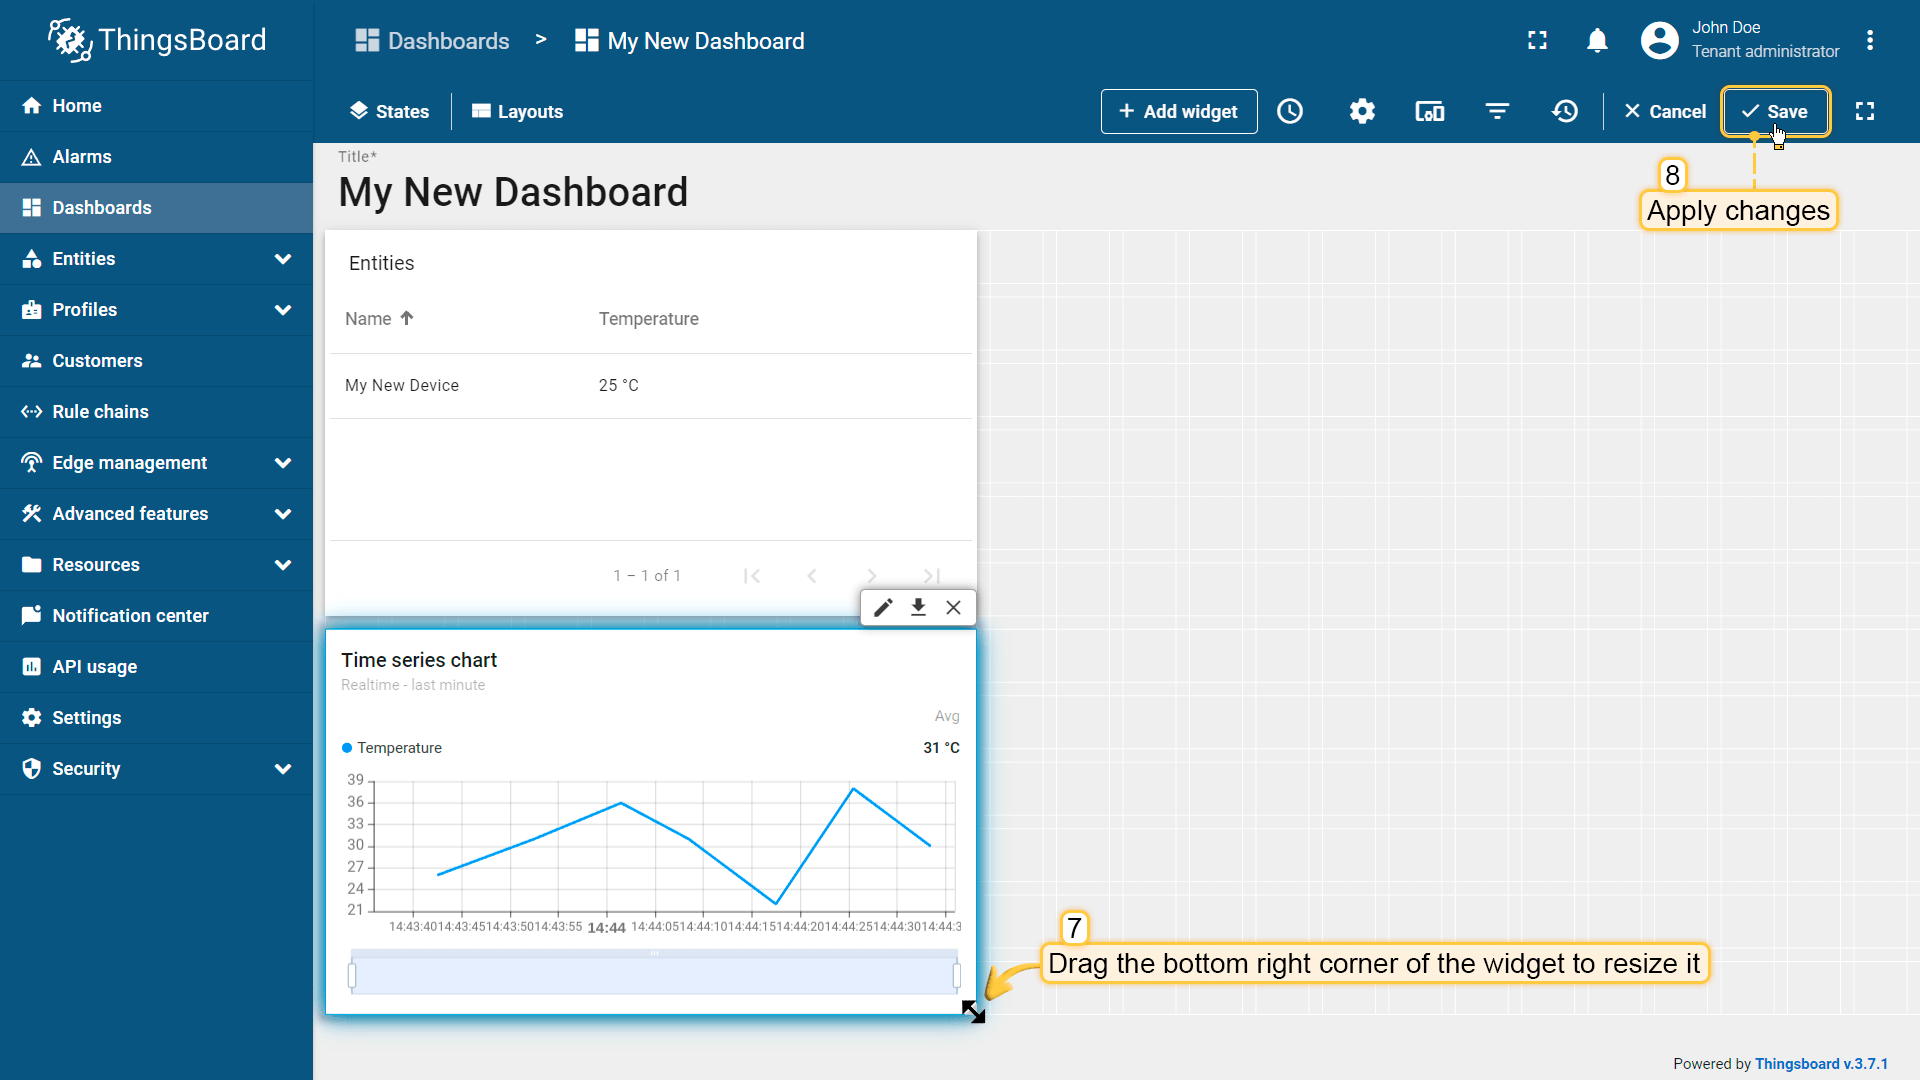
- 可拖拽部件右下角放大。调整满意后点击「保存」保存仪表盘更改。
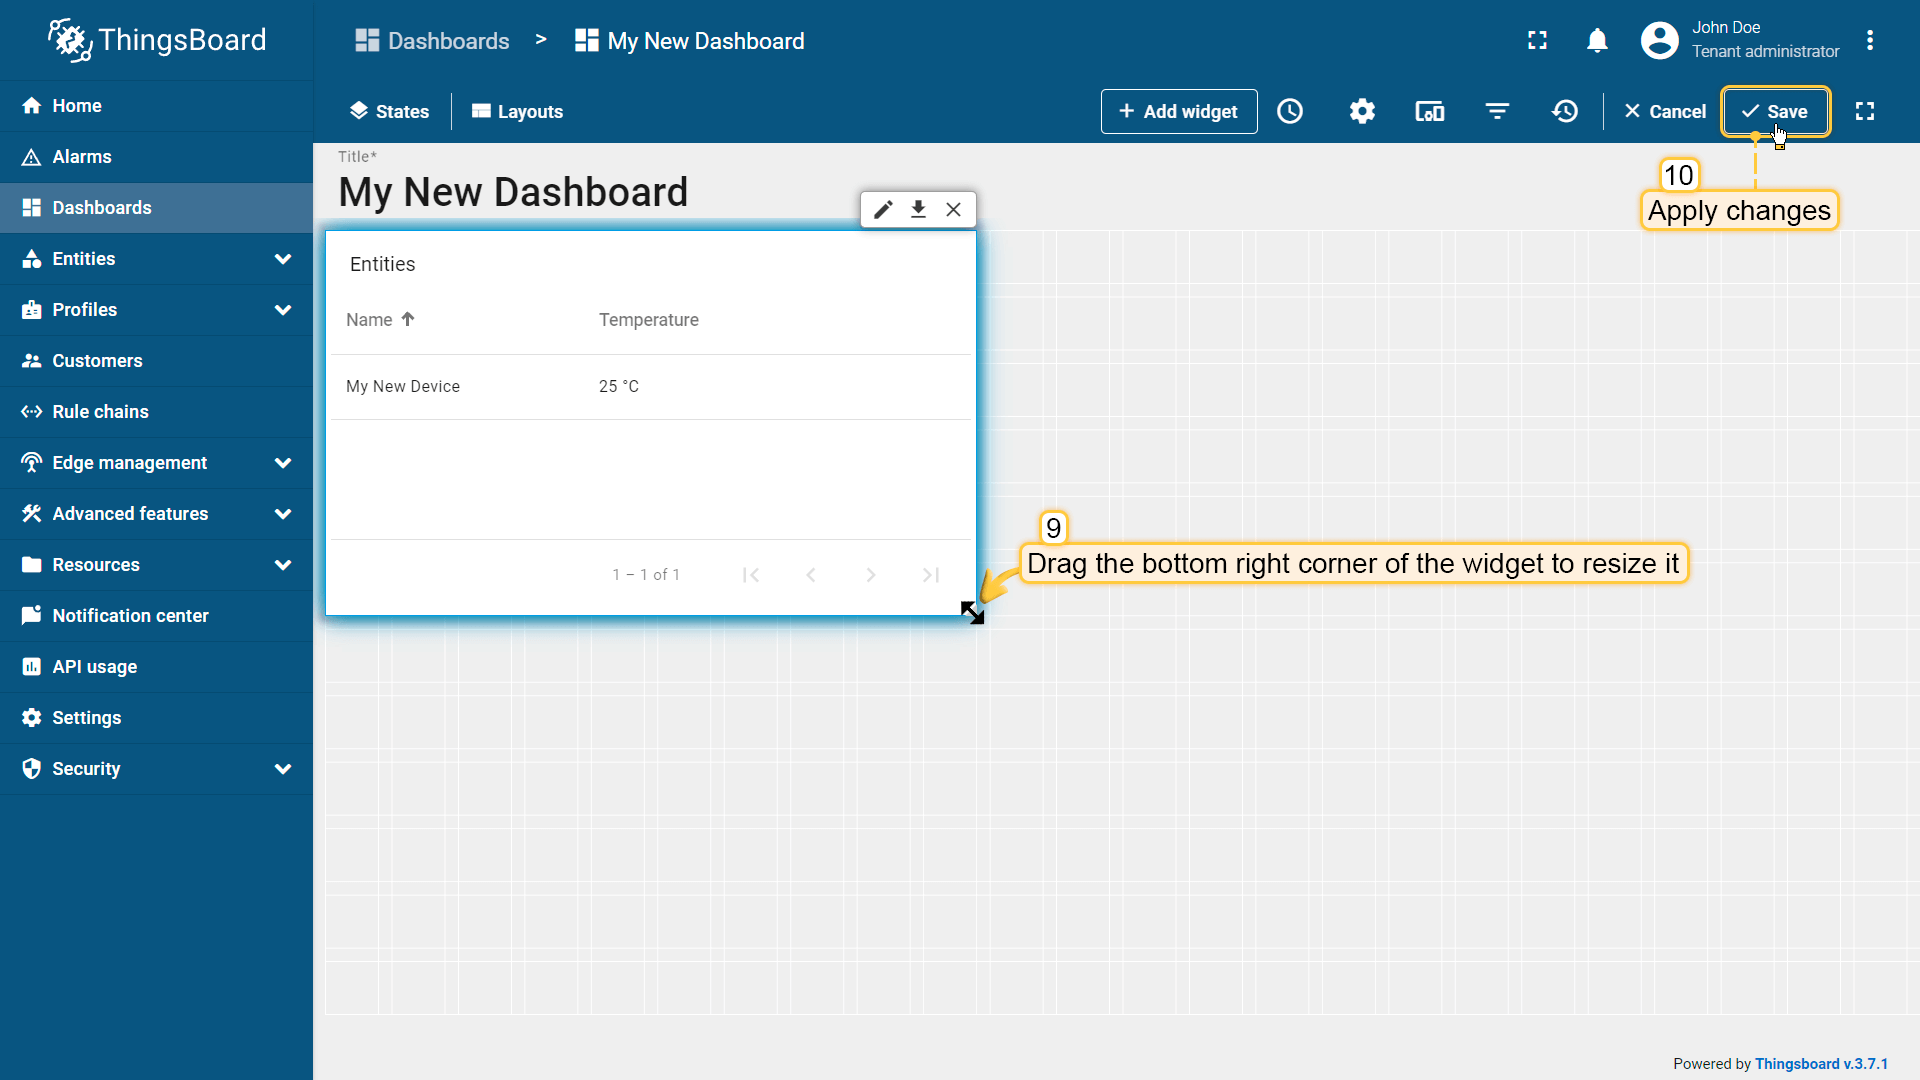
恭喜,您已添加第一个部件。
「实体表格」部件有两列:第一列显示设备名称,第二列显示「temperature」键的值(设备遥测)。每列对应一个已添加的键。
现在可发送新的遥测读数(如步骤 1),会立即显示在表格中。
步骤 3.3 添加图表部件
图表部件用于以可定制折线图、柱状图展示时序数据。
从部件库选择图表部件。图表显示同一数据键(此处为「temperature」)的多个历史值。 使用图表部件时还需配置时间窗口。
- 进入编辑模式,点击屏幕顶部「添加新部件」按钮;
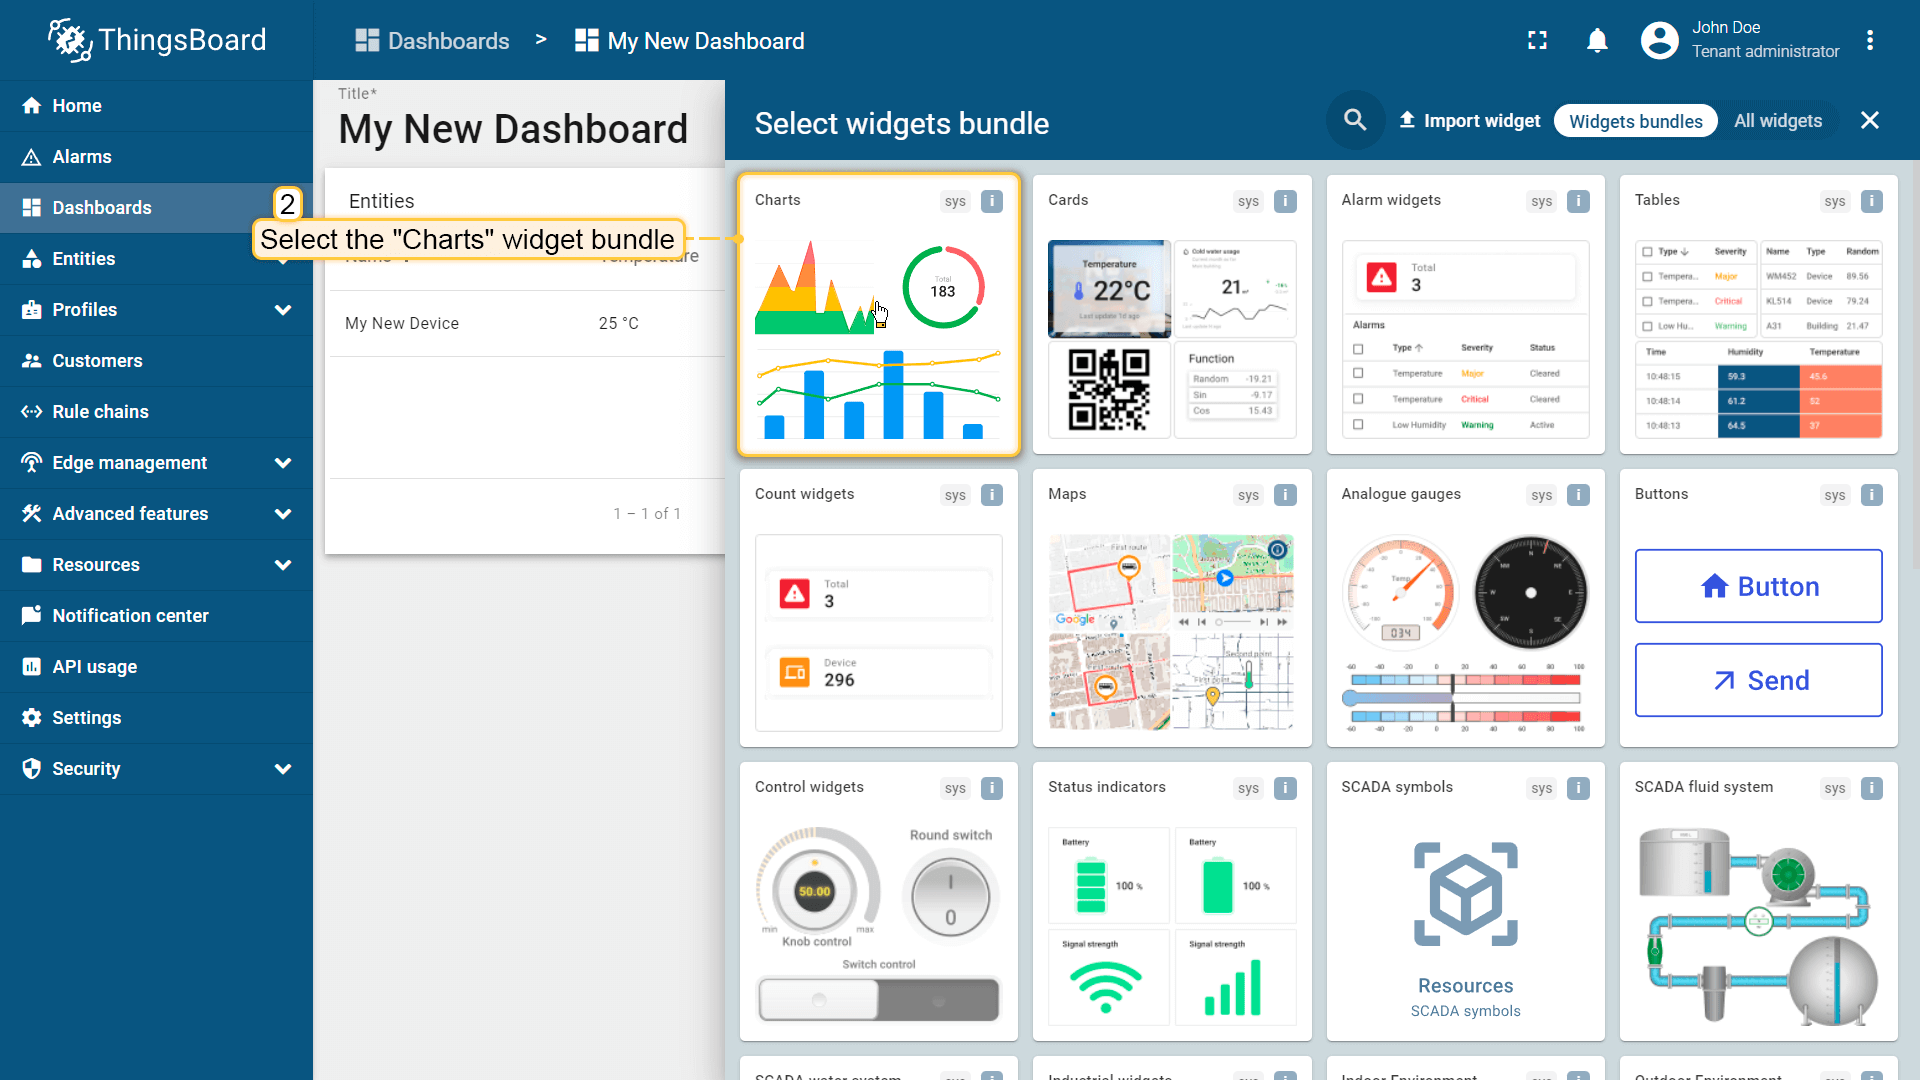
- 找到「图表」部件组并点击;
- 选择「时间序列图表」部件;
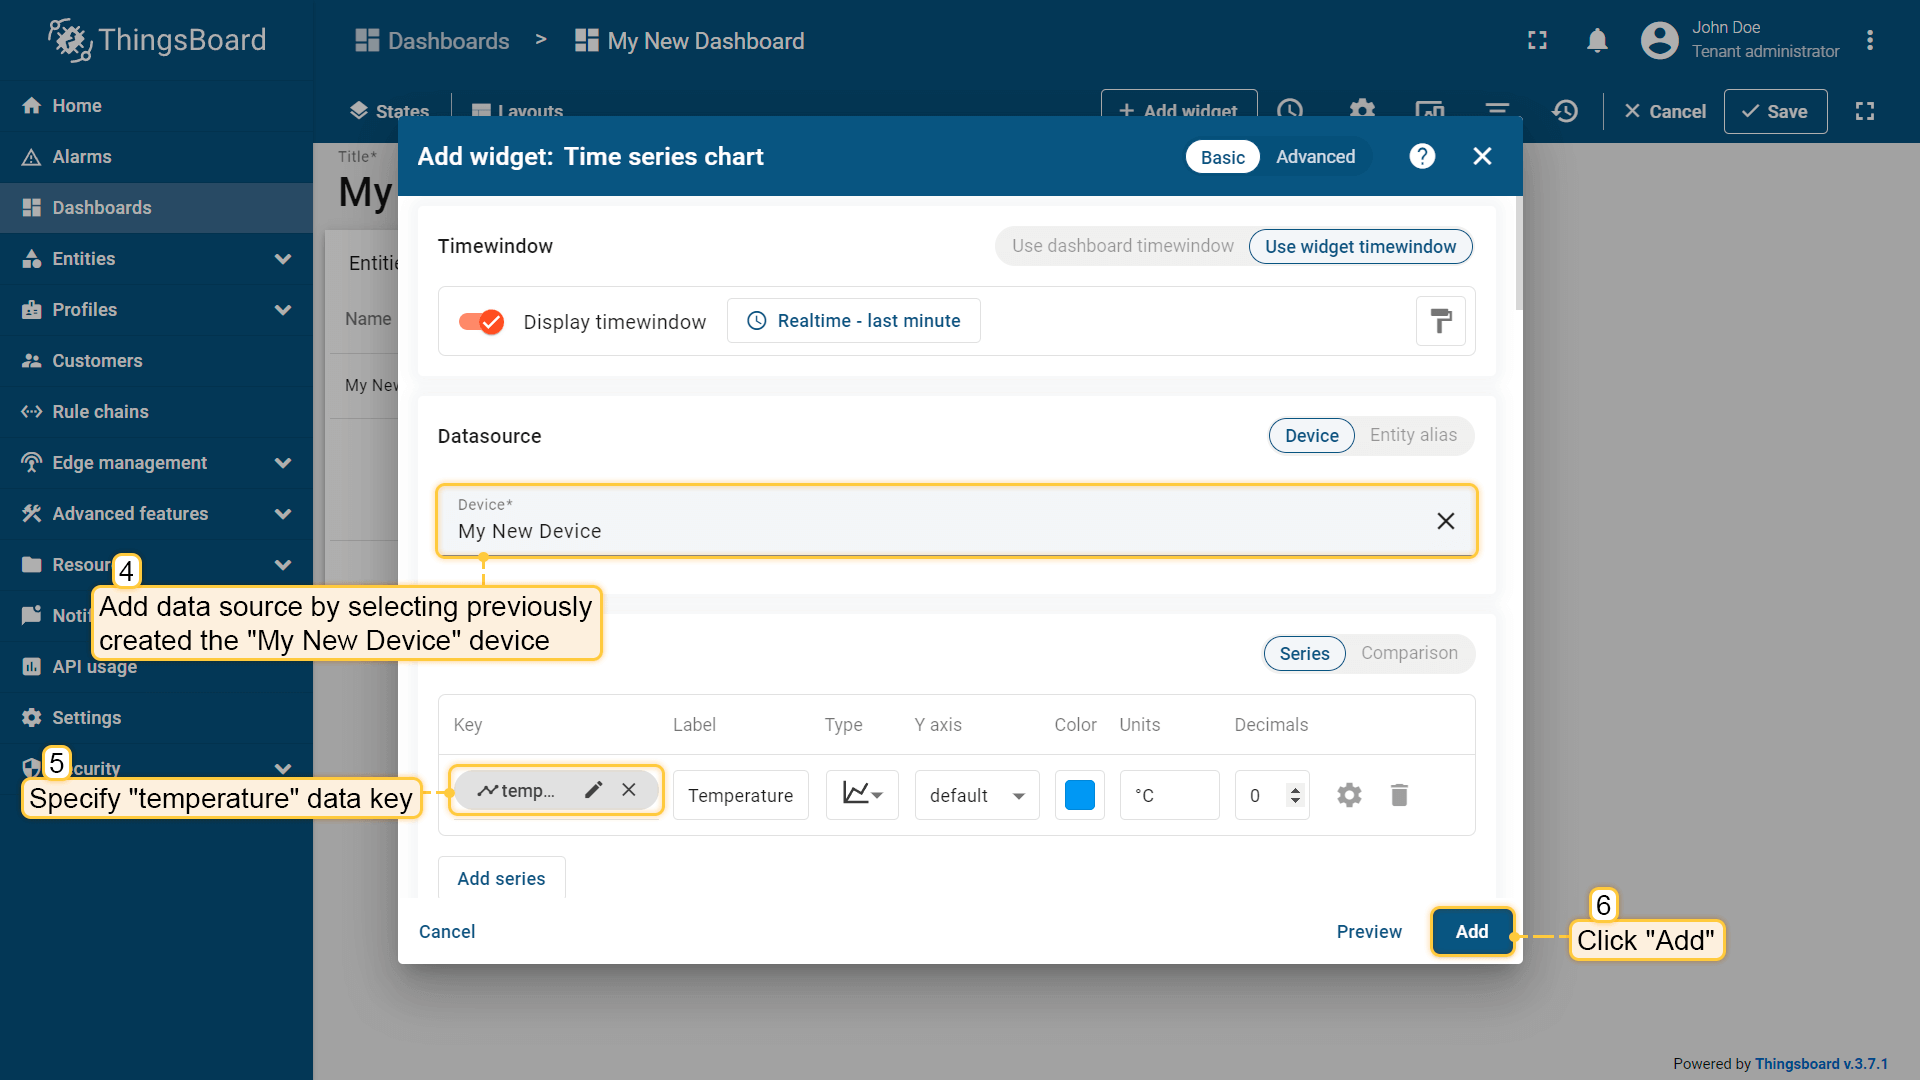
- 在「设备」字段指定之前创建设备「My New Device」为数据源。在「系列」中指定数据键「temperature」以监控设备温度。然后点击「添加」;
- 调整部件大小并应用更改。如步骤 2 多次发布不同遥测值。注意默认仅显示一分钟数据。点击「保存」应用更改;

恭喜,图表部件已添加。发送新遥测读数后,将立即显示在图表中。
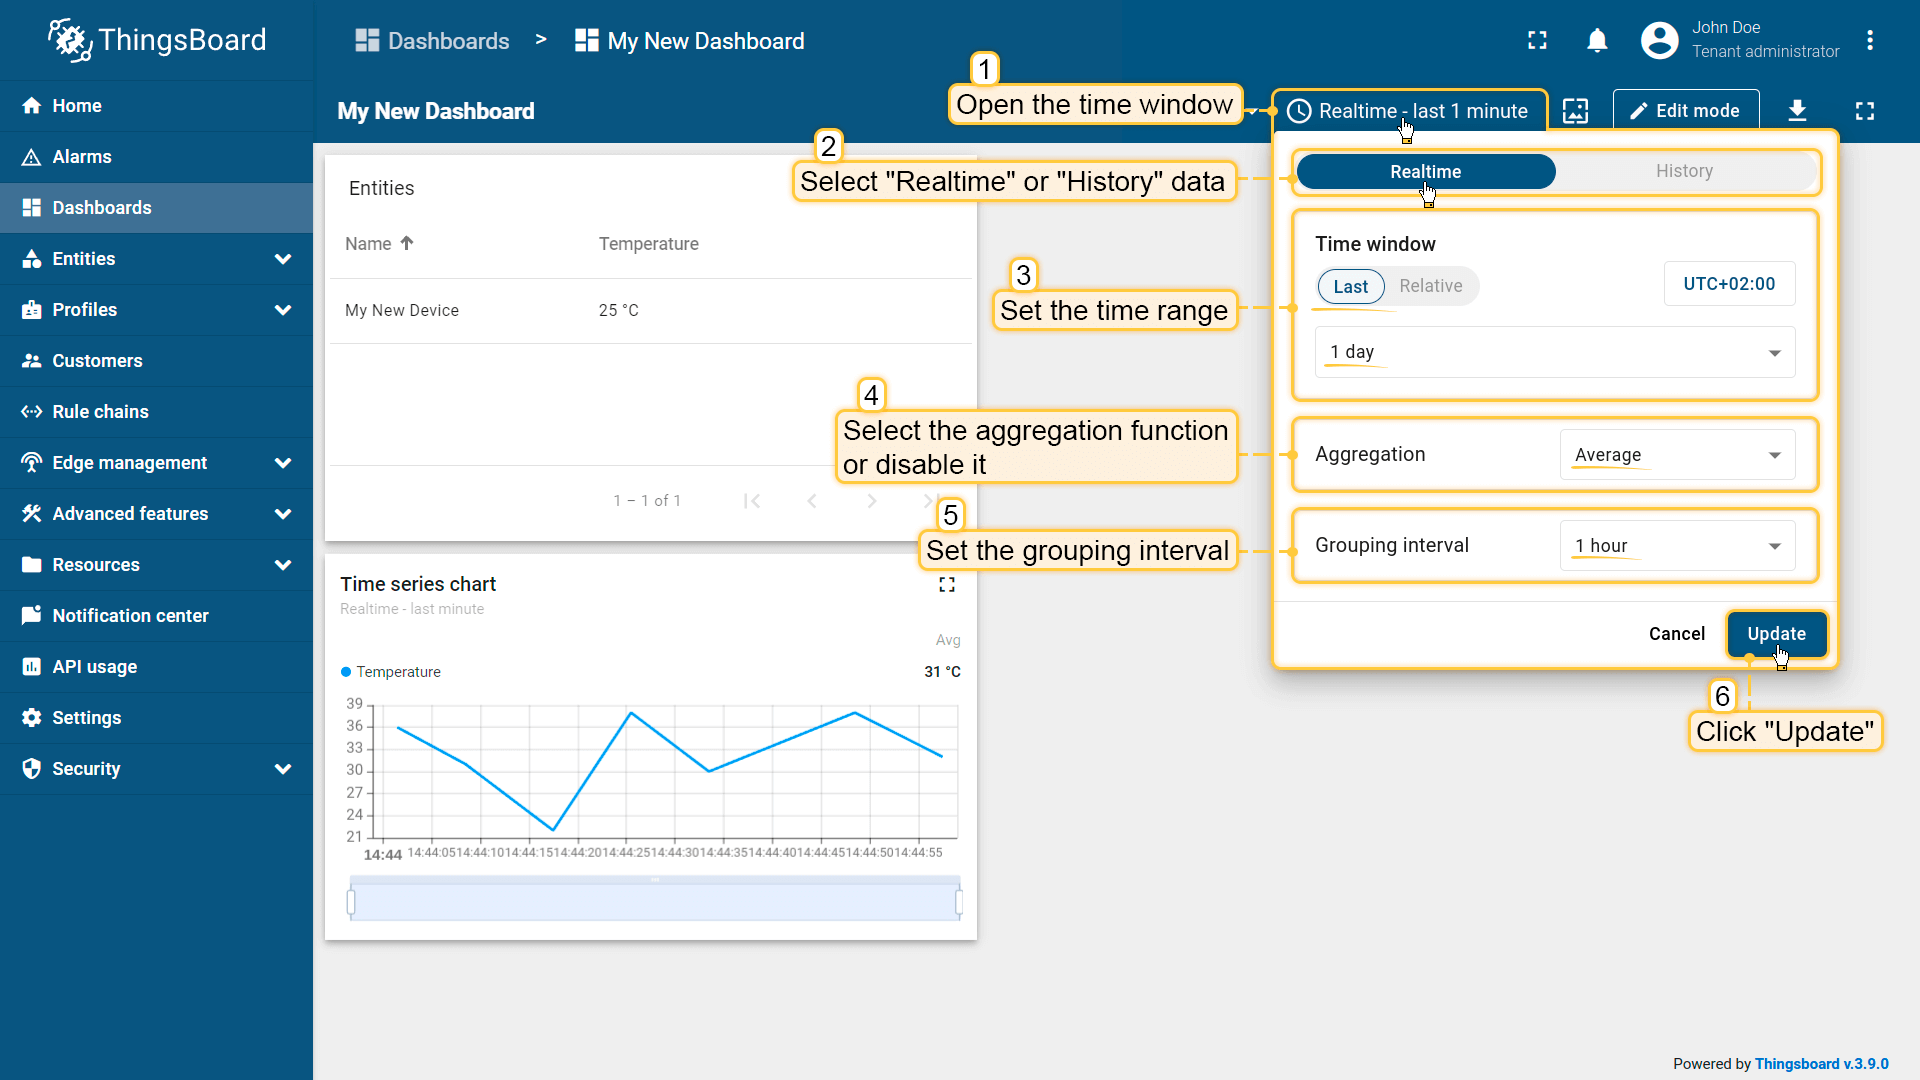
也可调整部件数据展示时间间隔、聚合函数及分组间隔。 打开时间窗口进行设置,点击「更新」按钮应用。
步骤 3.4 添加告警表格部件
告警表格部件在指定时间窗口内显示与指定实体相关的告警。 通过指定实体为告警源及对应告警字段来配置告警部件。
- 进入编辑模式,点击屏幕顶部「添加新部件」按钮;
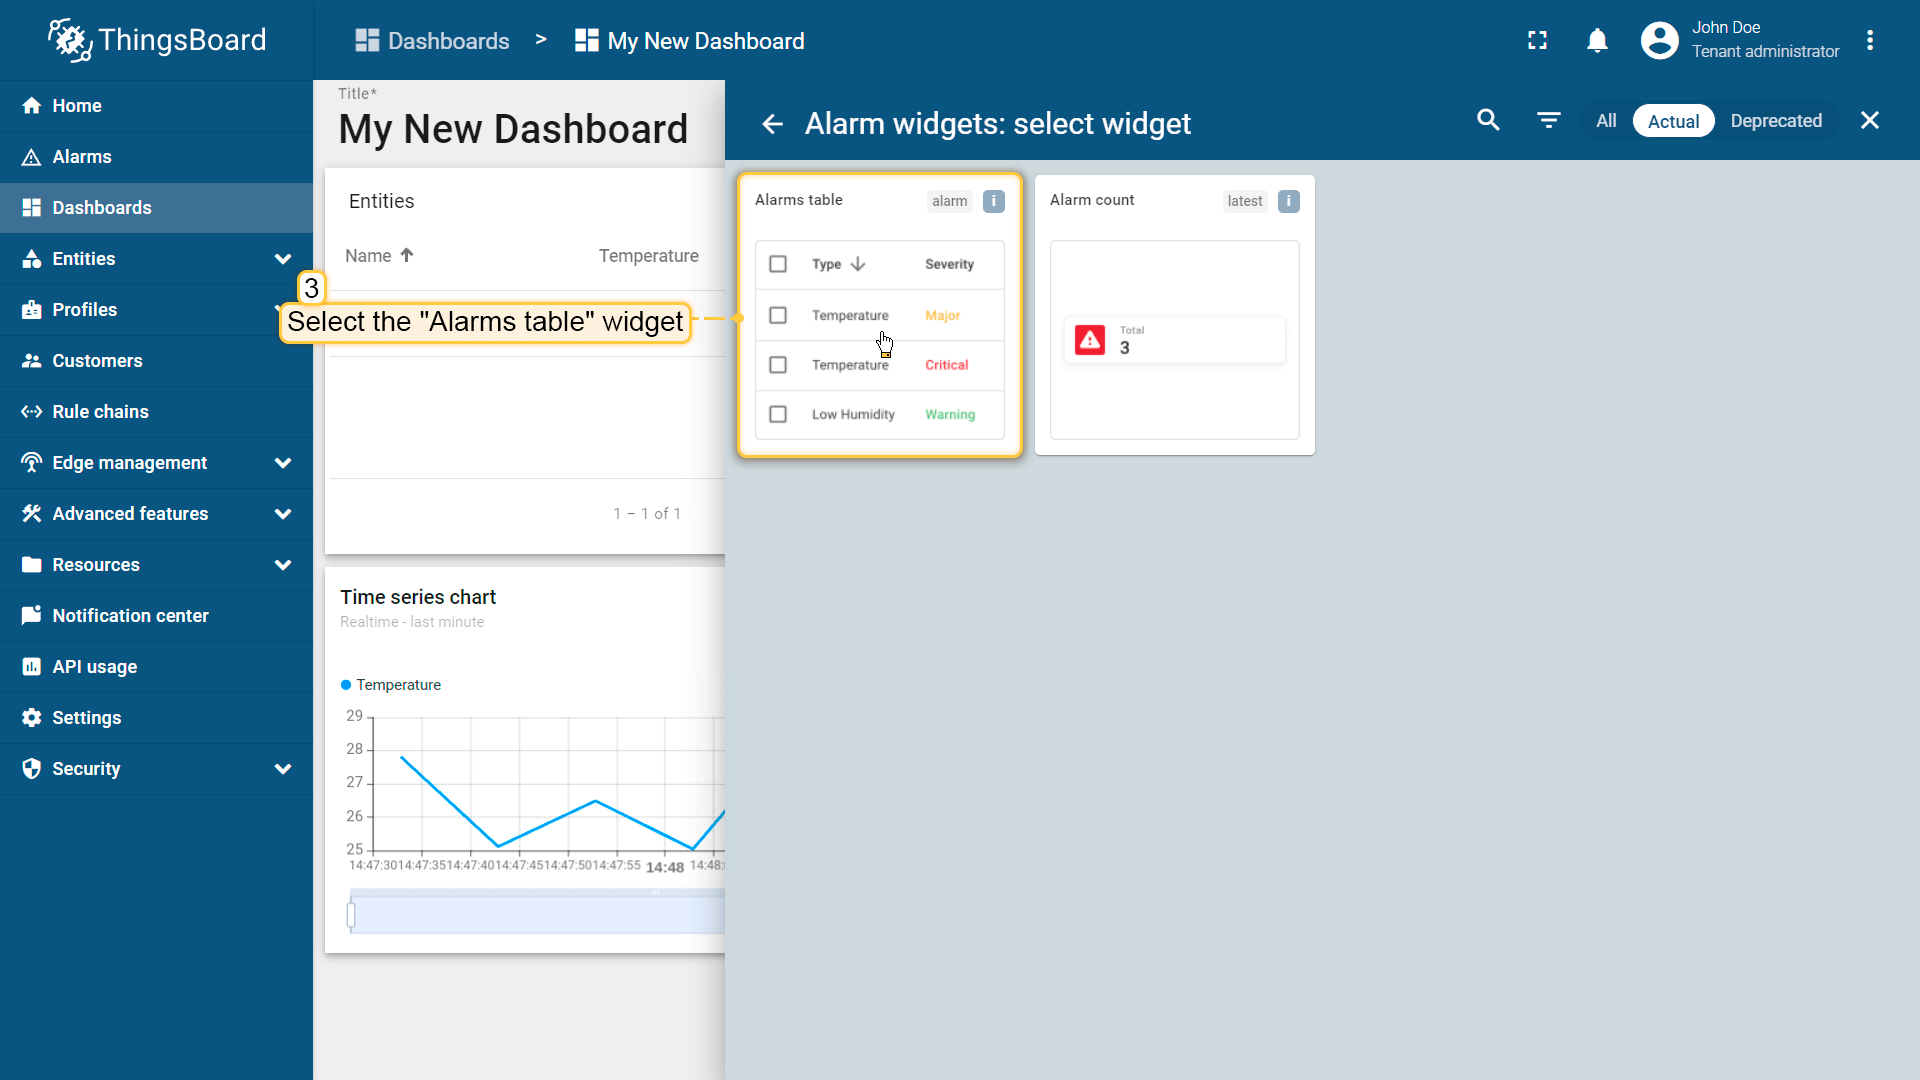
- 找到「告警部件」组并点击;
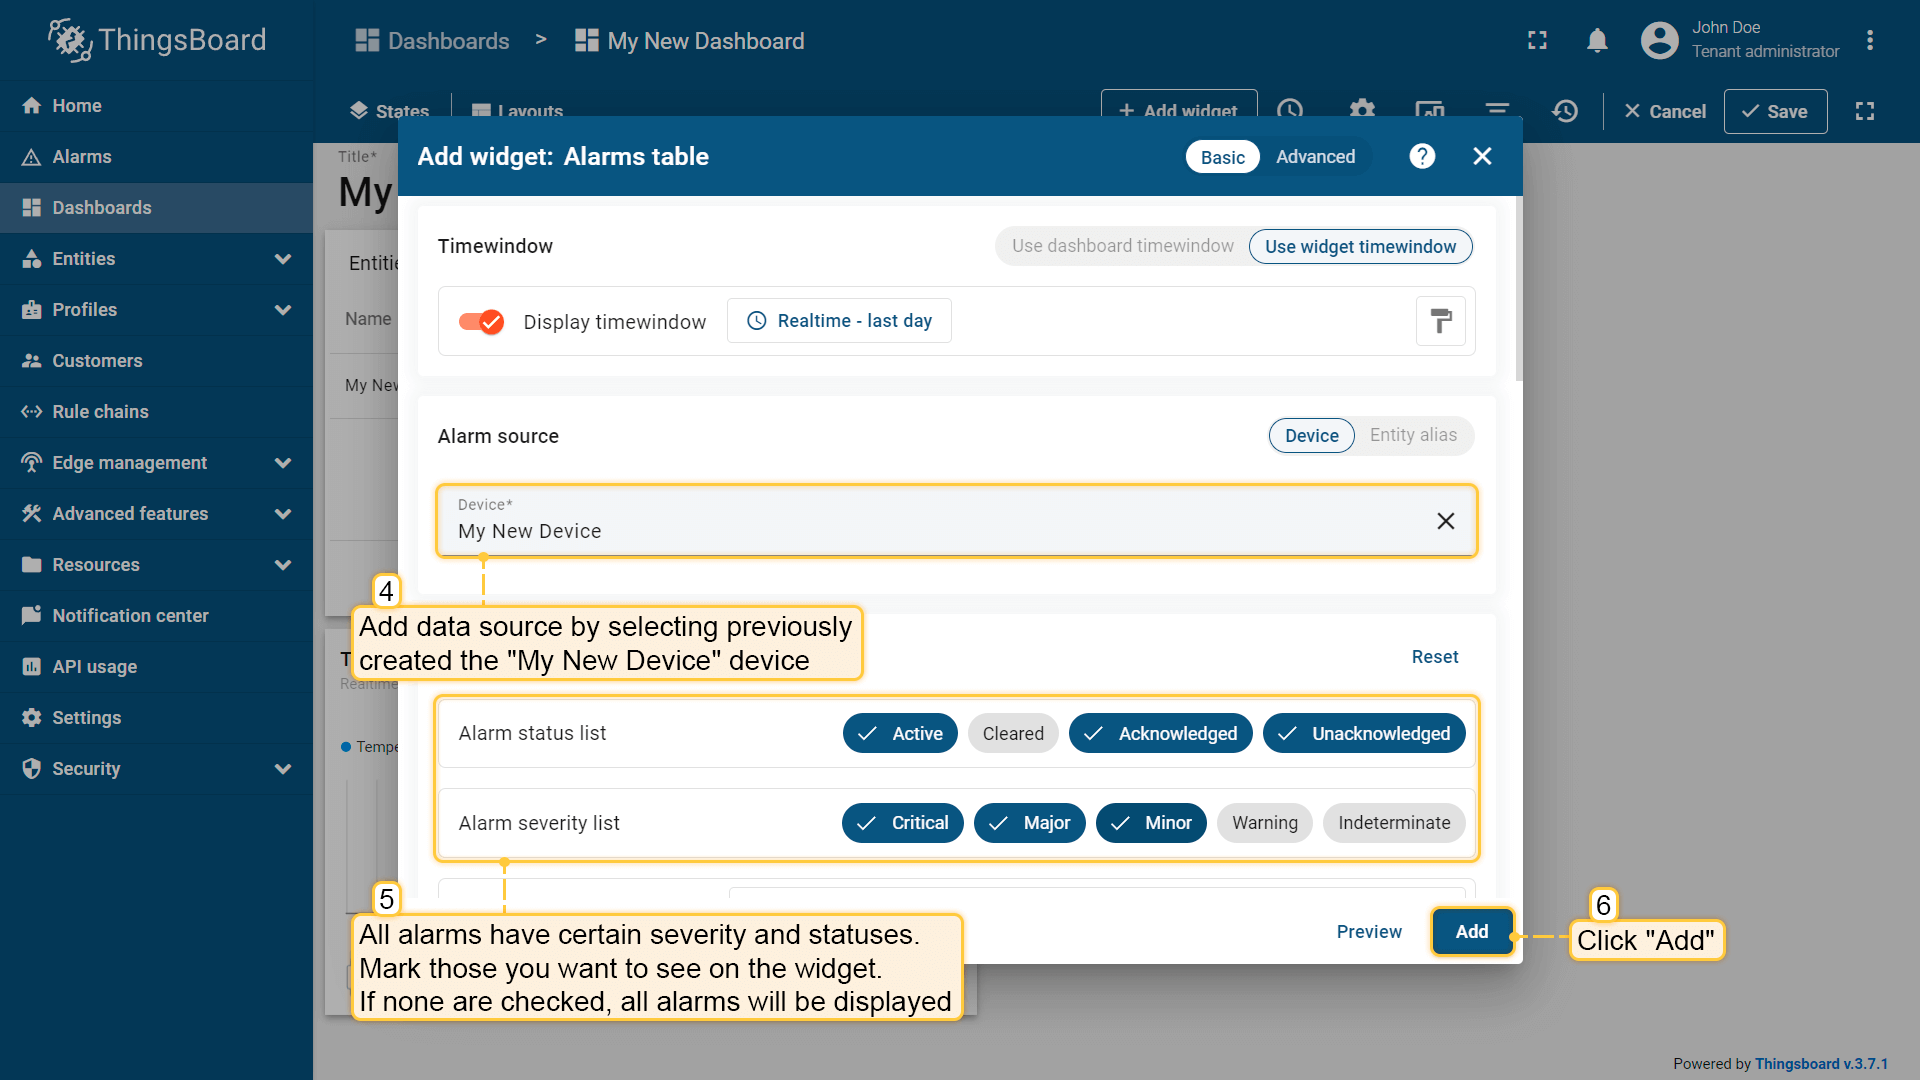
- 选择「告警表格」部件;
- 在「设备」字段指定「My New Device」为数据源。配置筛选器:所有告警有严重程度和状态,勾选要在部件中显示的。若不勾选则显示全部;
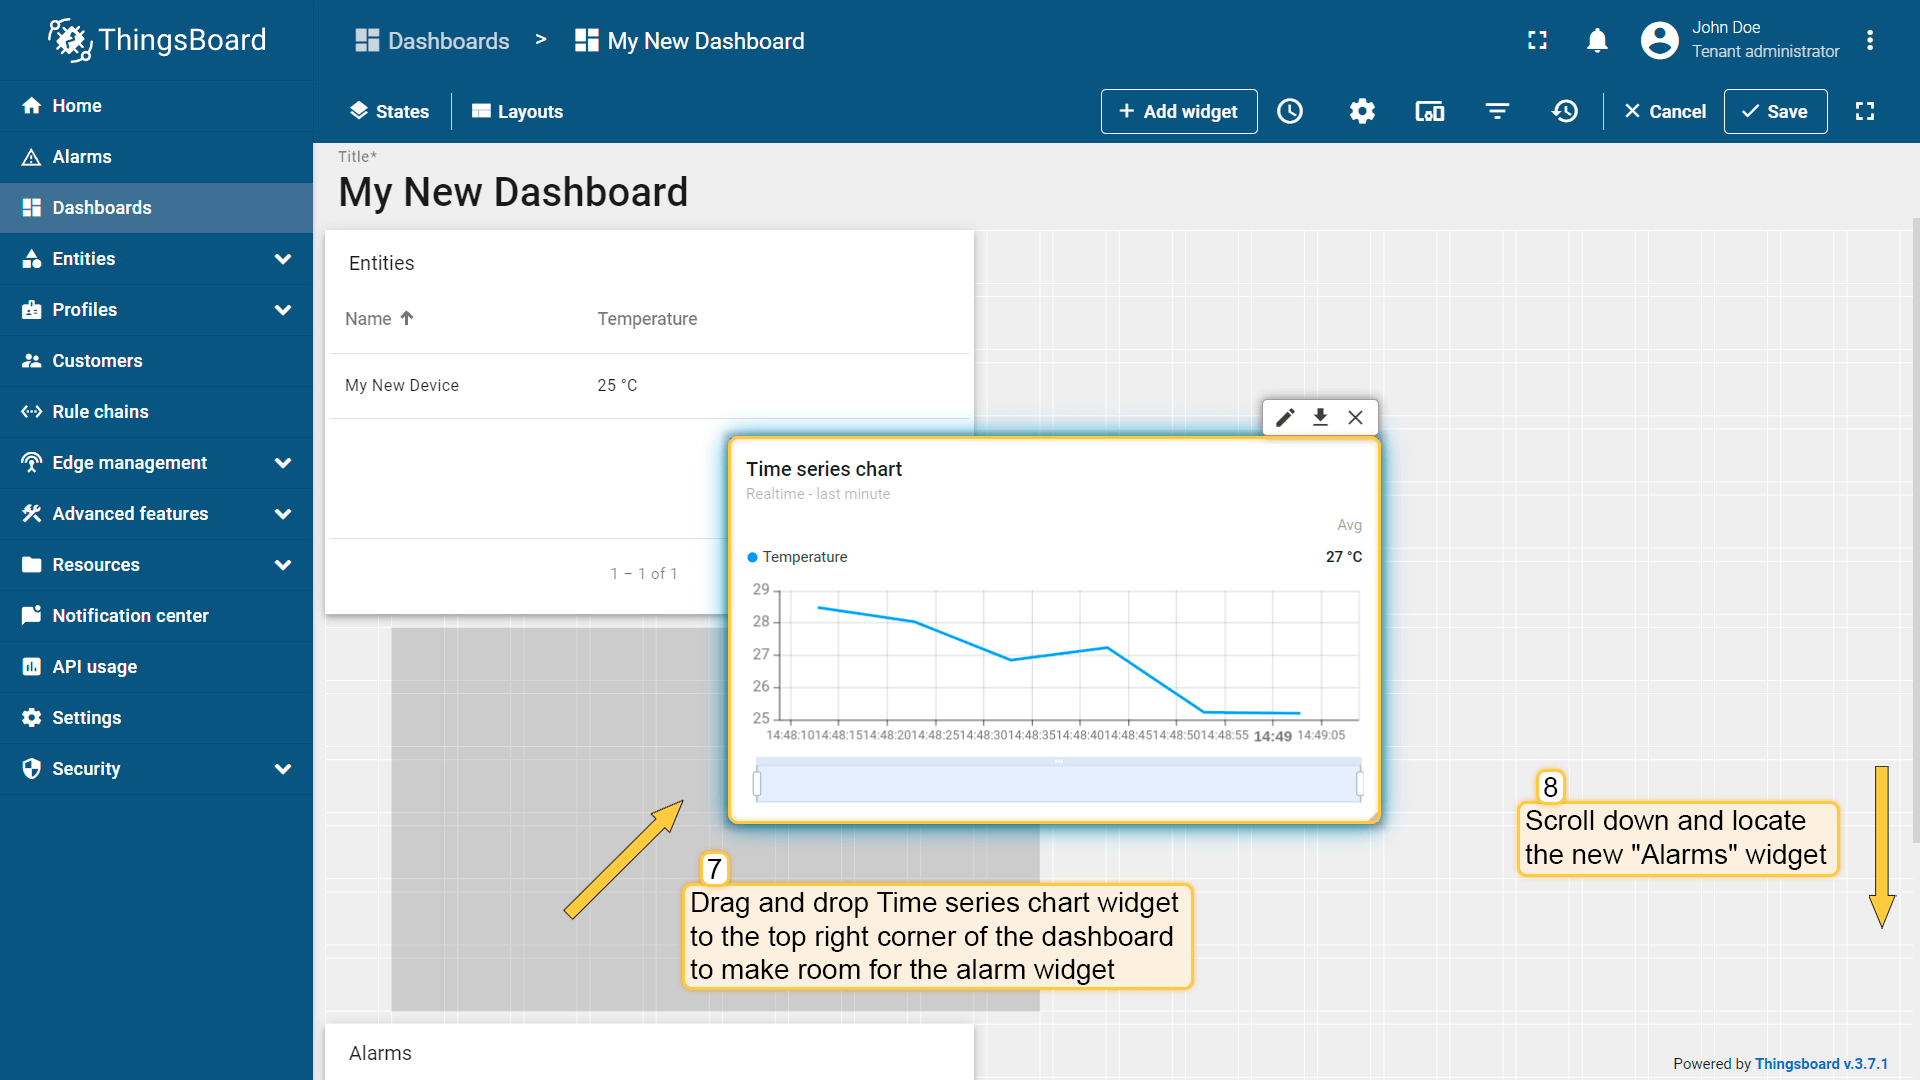
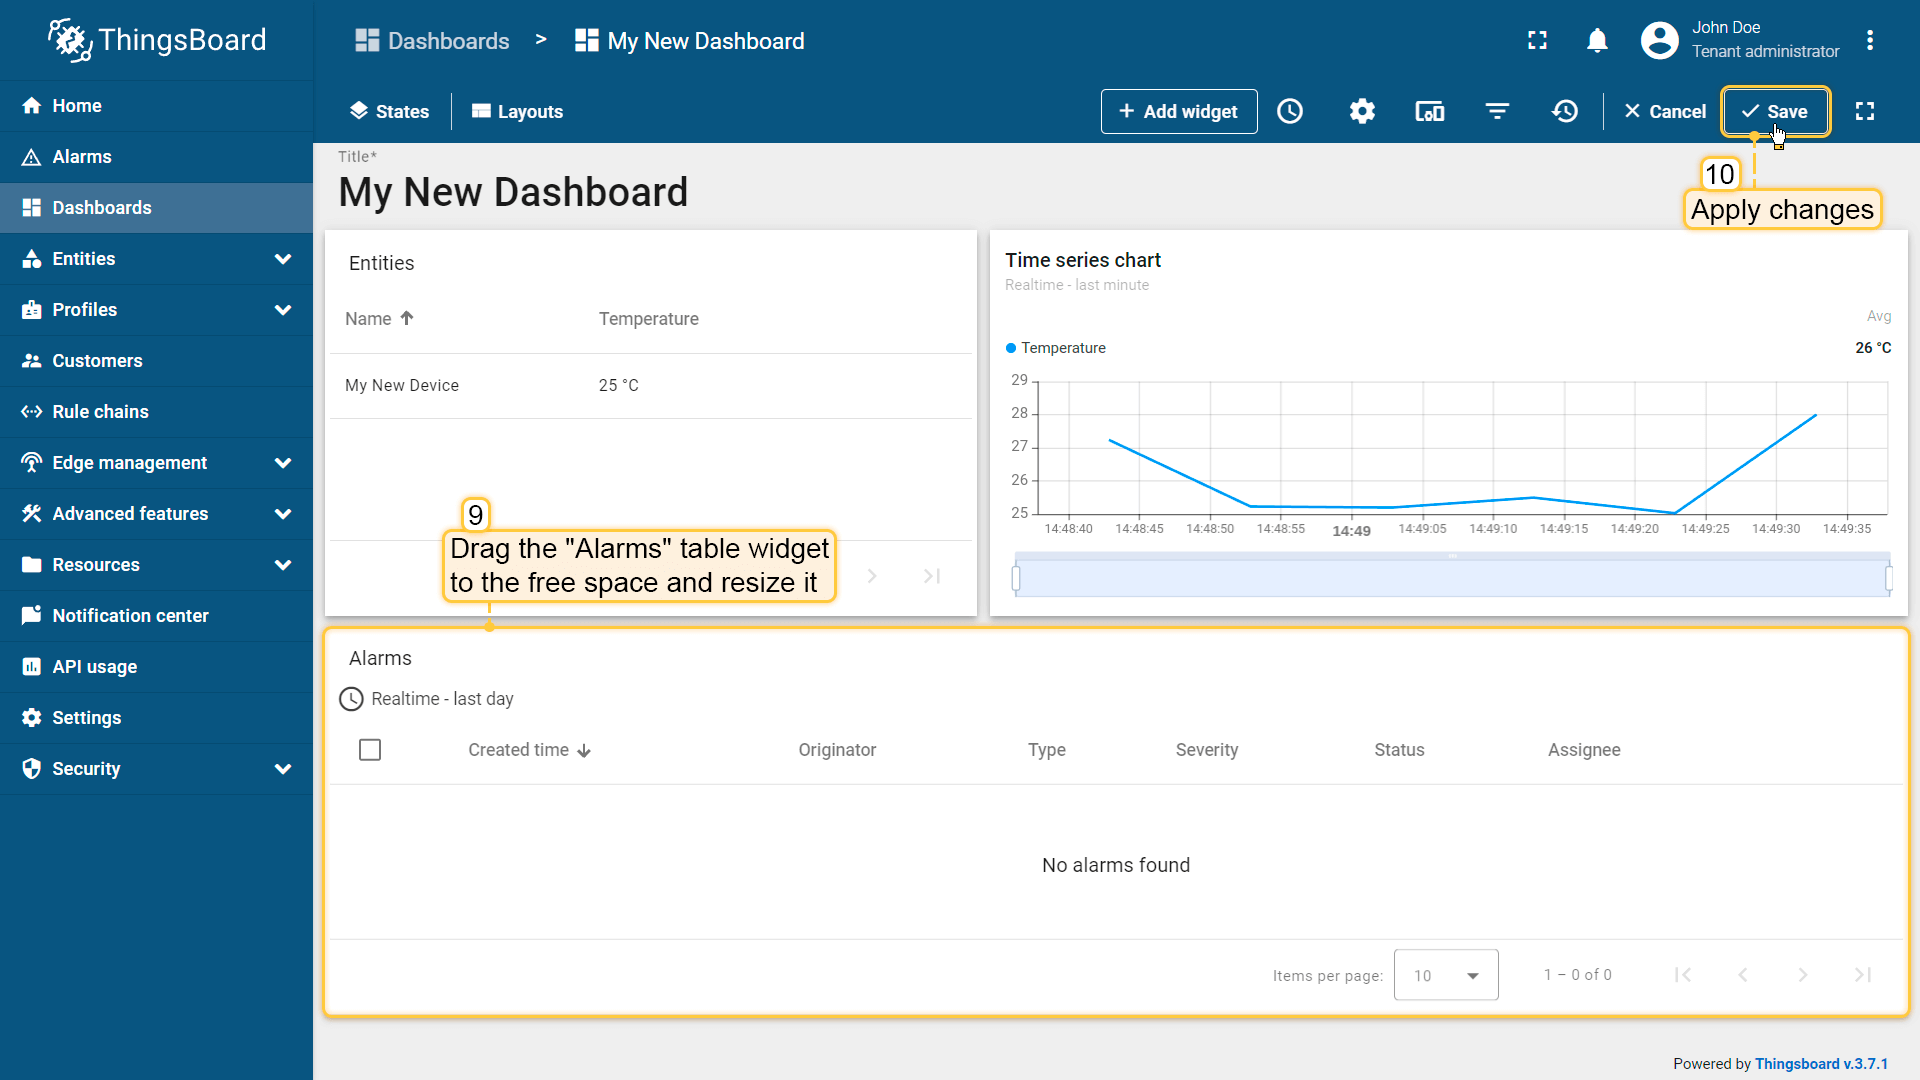
- 恭喜,已添加告警部件!默认新部件自上而下堆叠。拖拽「时间序列图表」部件到右上角,为「告警表格」腾出空间;
- 向下滚动找到「告警表格」部件,拖至空闲区域并调整大小。完成后点击「保存」。

接下来配置告警规则并触发告警。
说明:本文档以单一设备作为部件数据源。若要以动态实体(如某类型设备或某资产相关设备)为数据源,需使用 alias。Alias 是部件中使用的单个实体或实体组的引用。更多见不同 alias 说明。
步骤 4. 配置告警规则
使用告警规则功能定义温度超过 25°C 时触发的规则。 告警规则可在设备级别或目标设备所用的设备 profile 级别配置。
建议:若同一规则需应用于多台设备,请在 Device profile 级别创建,便于集中管理告警逻辑、简化维护并避免重复配置。
本例中,我们直接在设备「My New Device」上配置告警规则。
步骤 4.1 打开设备设置
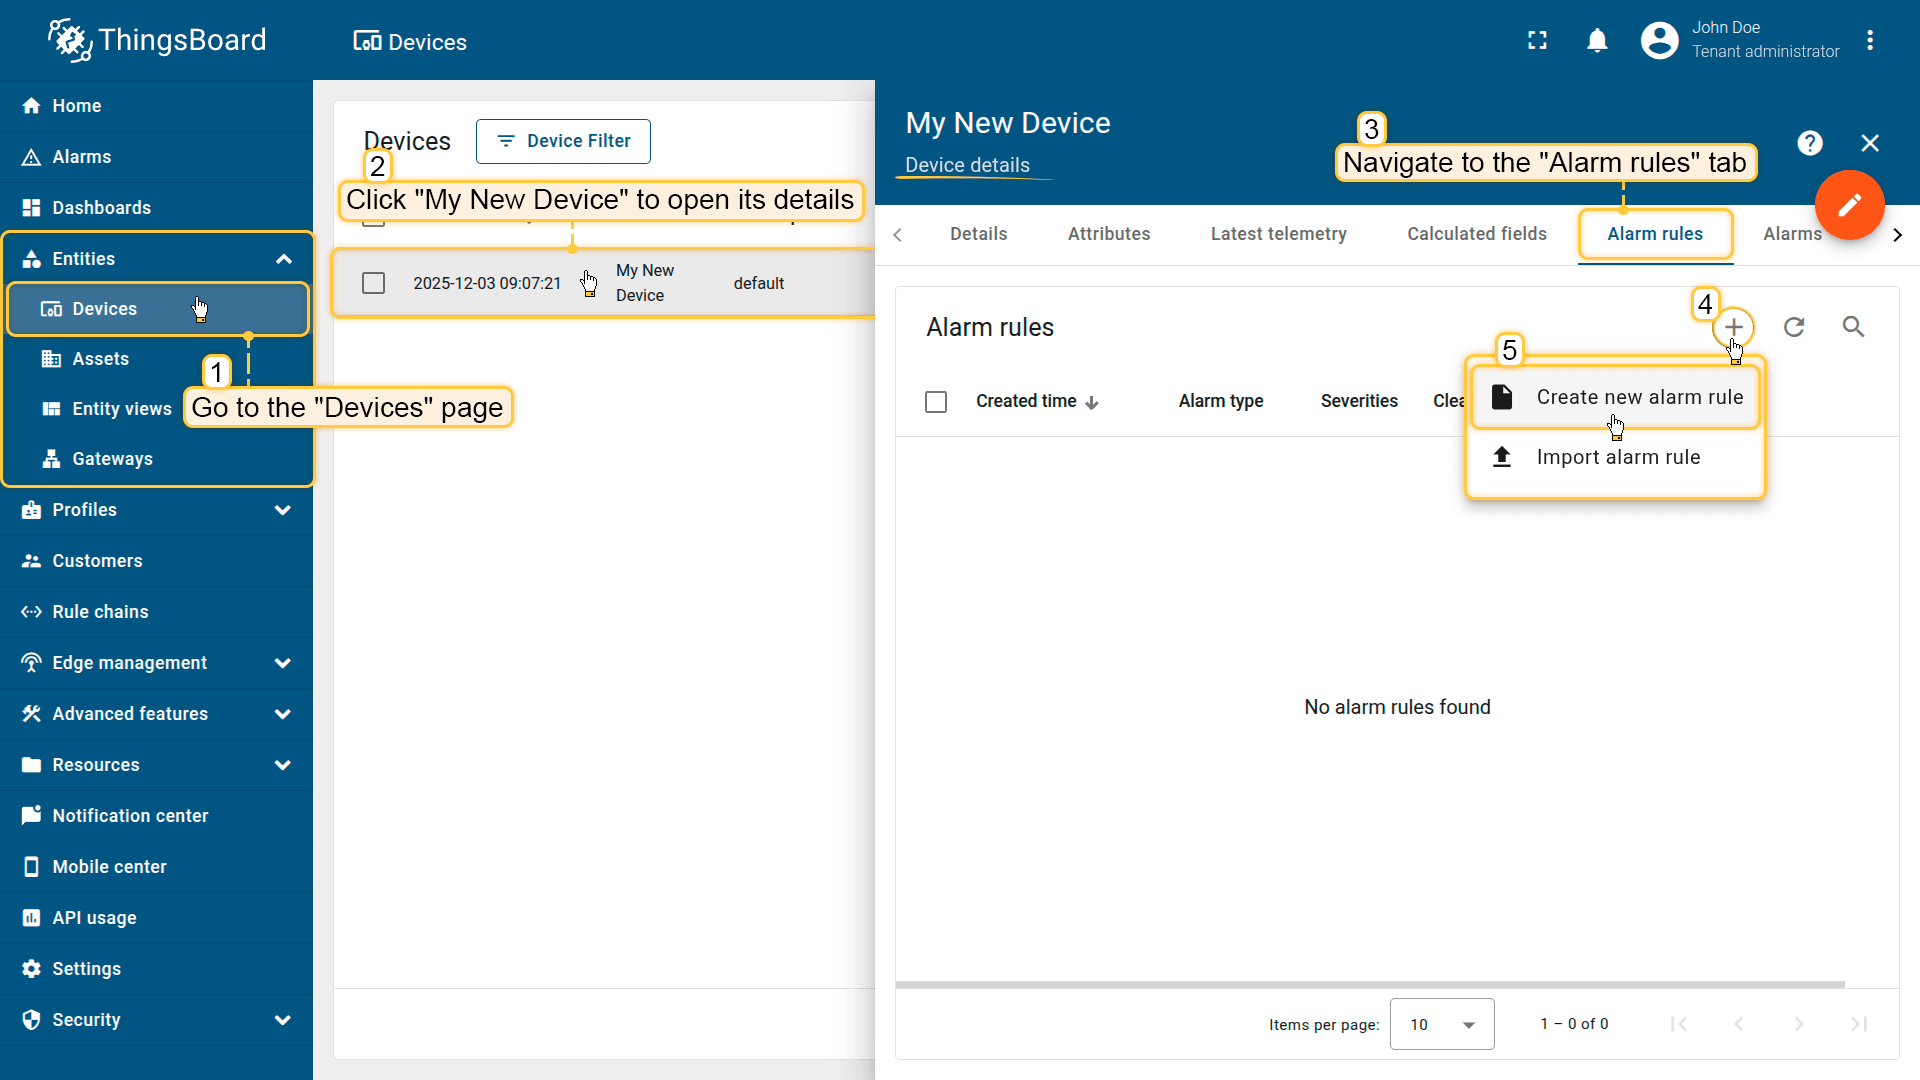
- 进入实体下的设备页面。
- 点击My New Device打开详情。
- 进入告警规则标签。
- 点击「+」按钮,选择创建新告警规则。
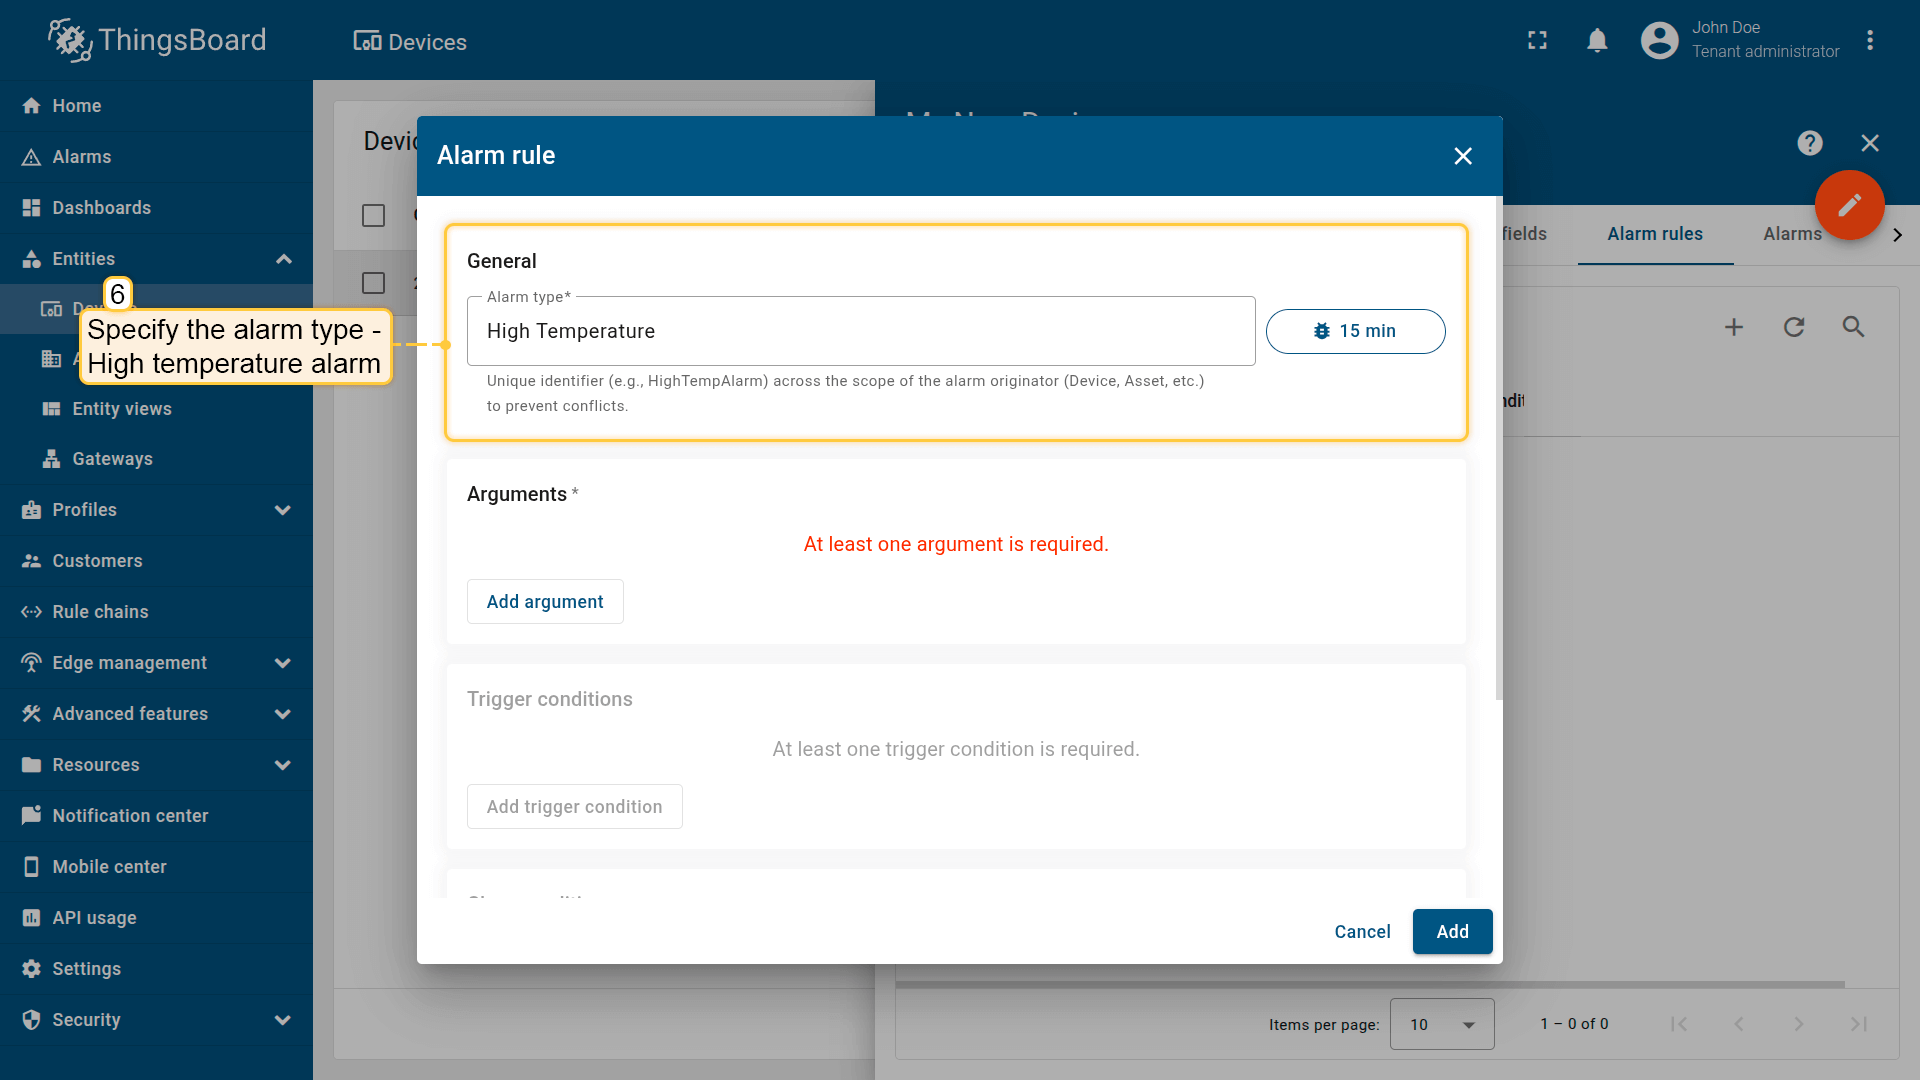
步骤 4.2 配置常规参数
在常规区域指定告警类型——High temperature(或任意名称)——作为告警名称和唯一标识。
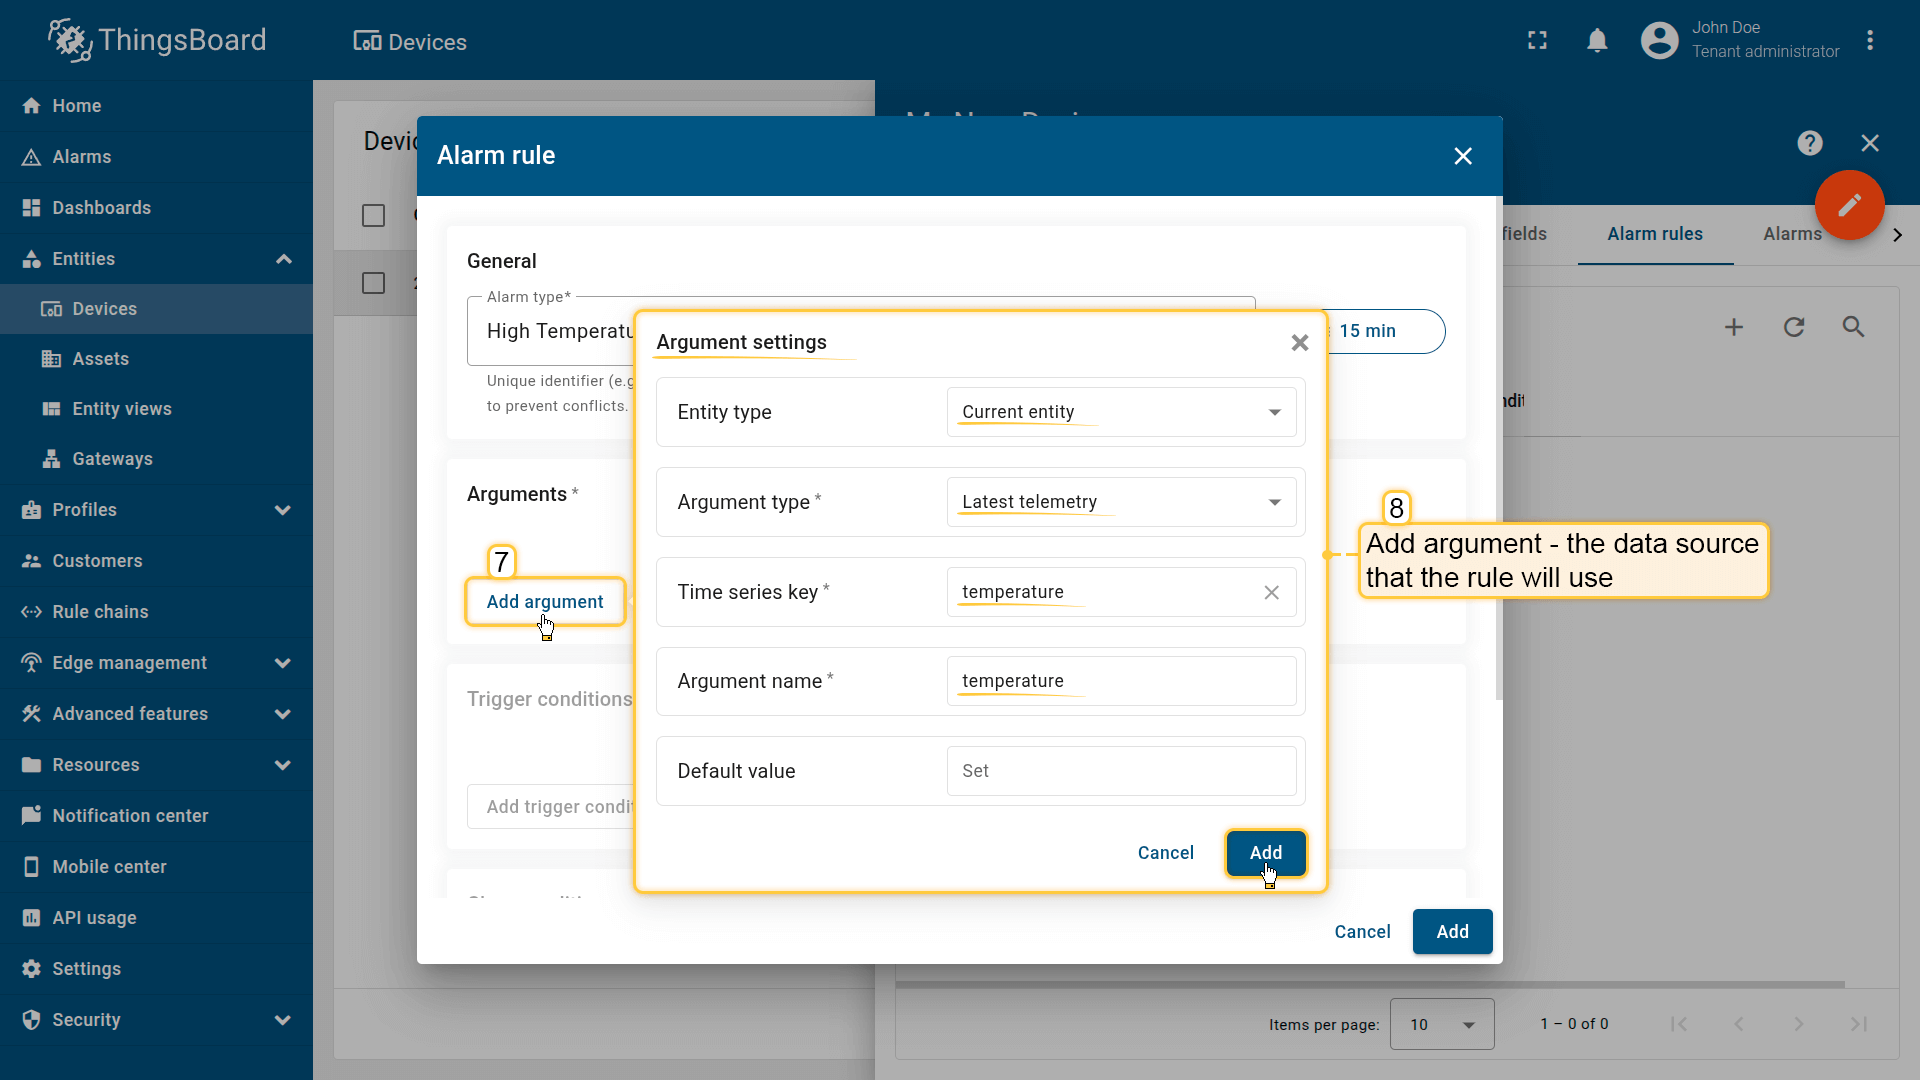
步骤 4.3 添加参数
在定义告警触发条件前,需至少添加一个参数——规则使用的数据源。
在参数区域点击添加参数,填写:
- 实体类型:当前实体
- 参数类型:最新遥测
- 时序键:temperature
- 参数名称:temperature
- 点击添加。
将创建用于告警条件的 temperature 变量。
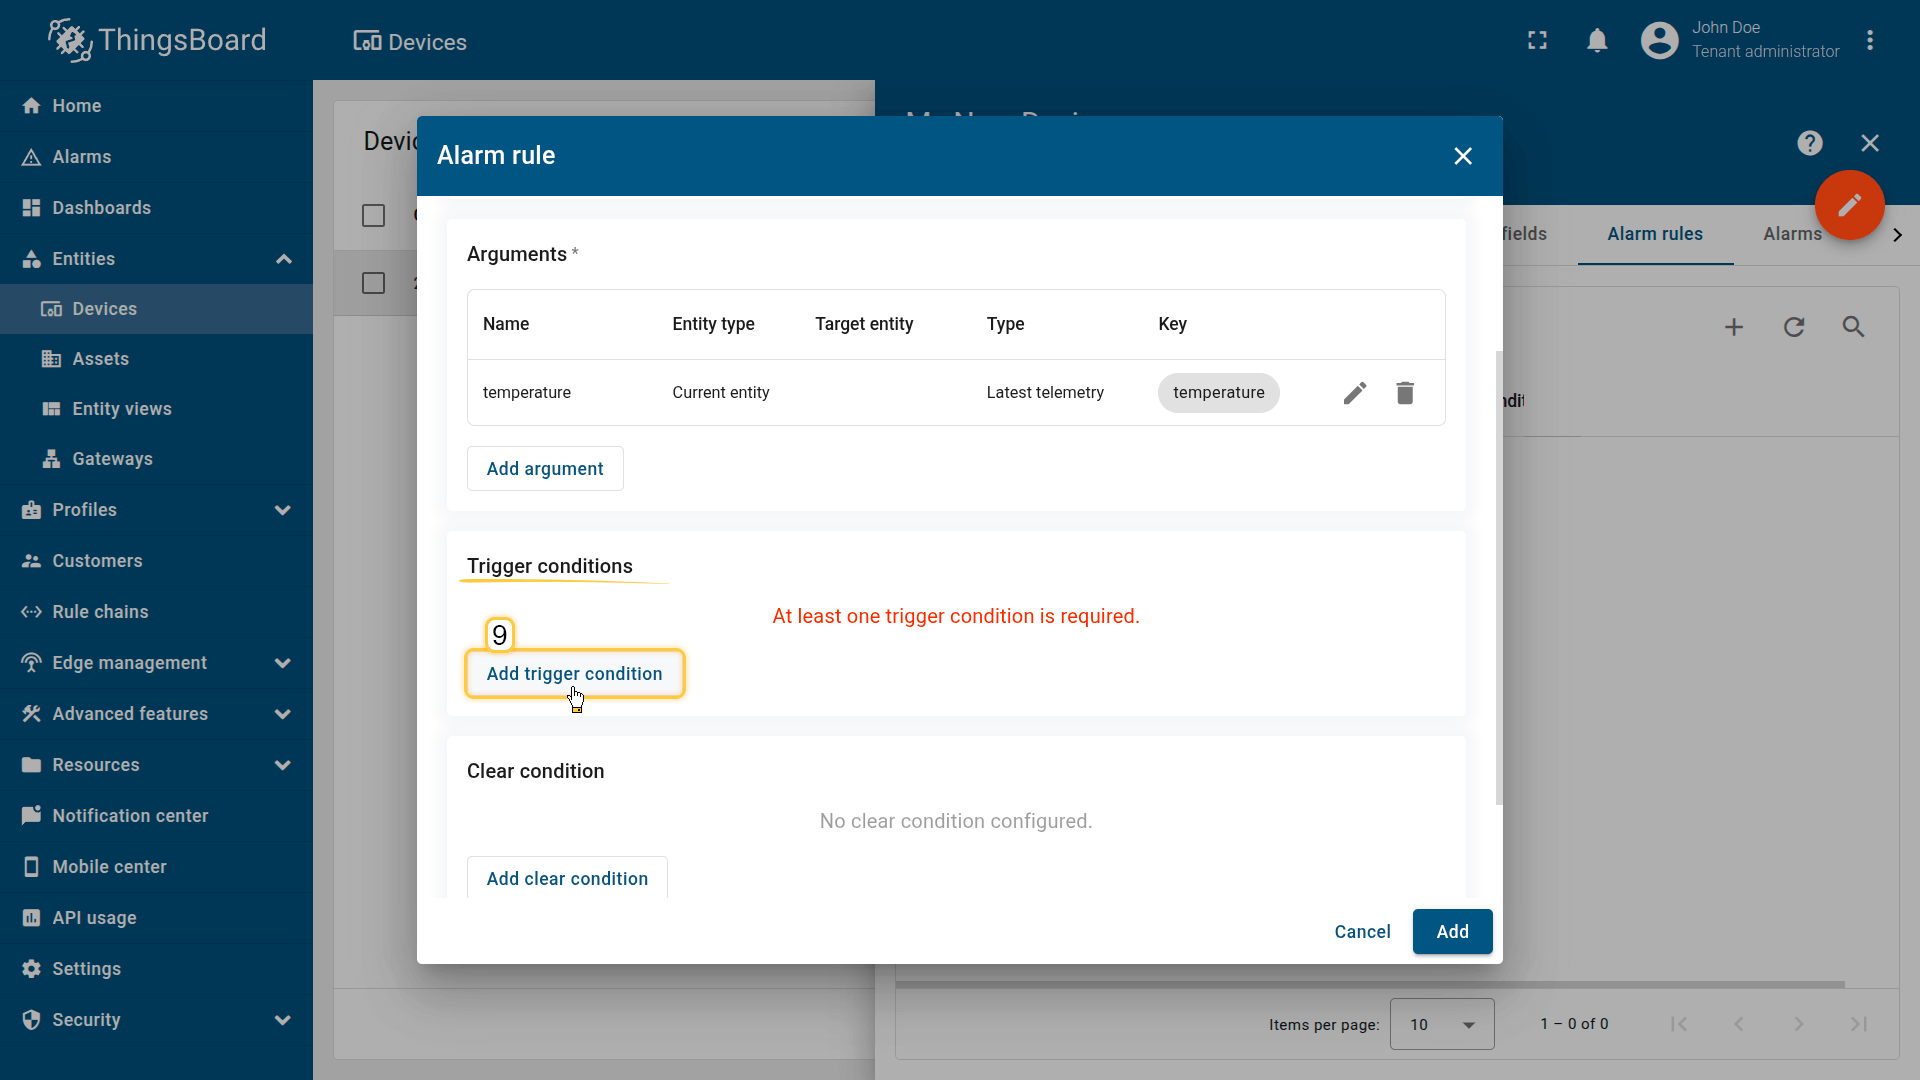
步骤 4.4 配置告警触发条件
在触发条件区域点击添加触发条件。
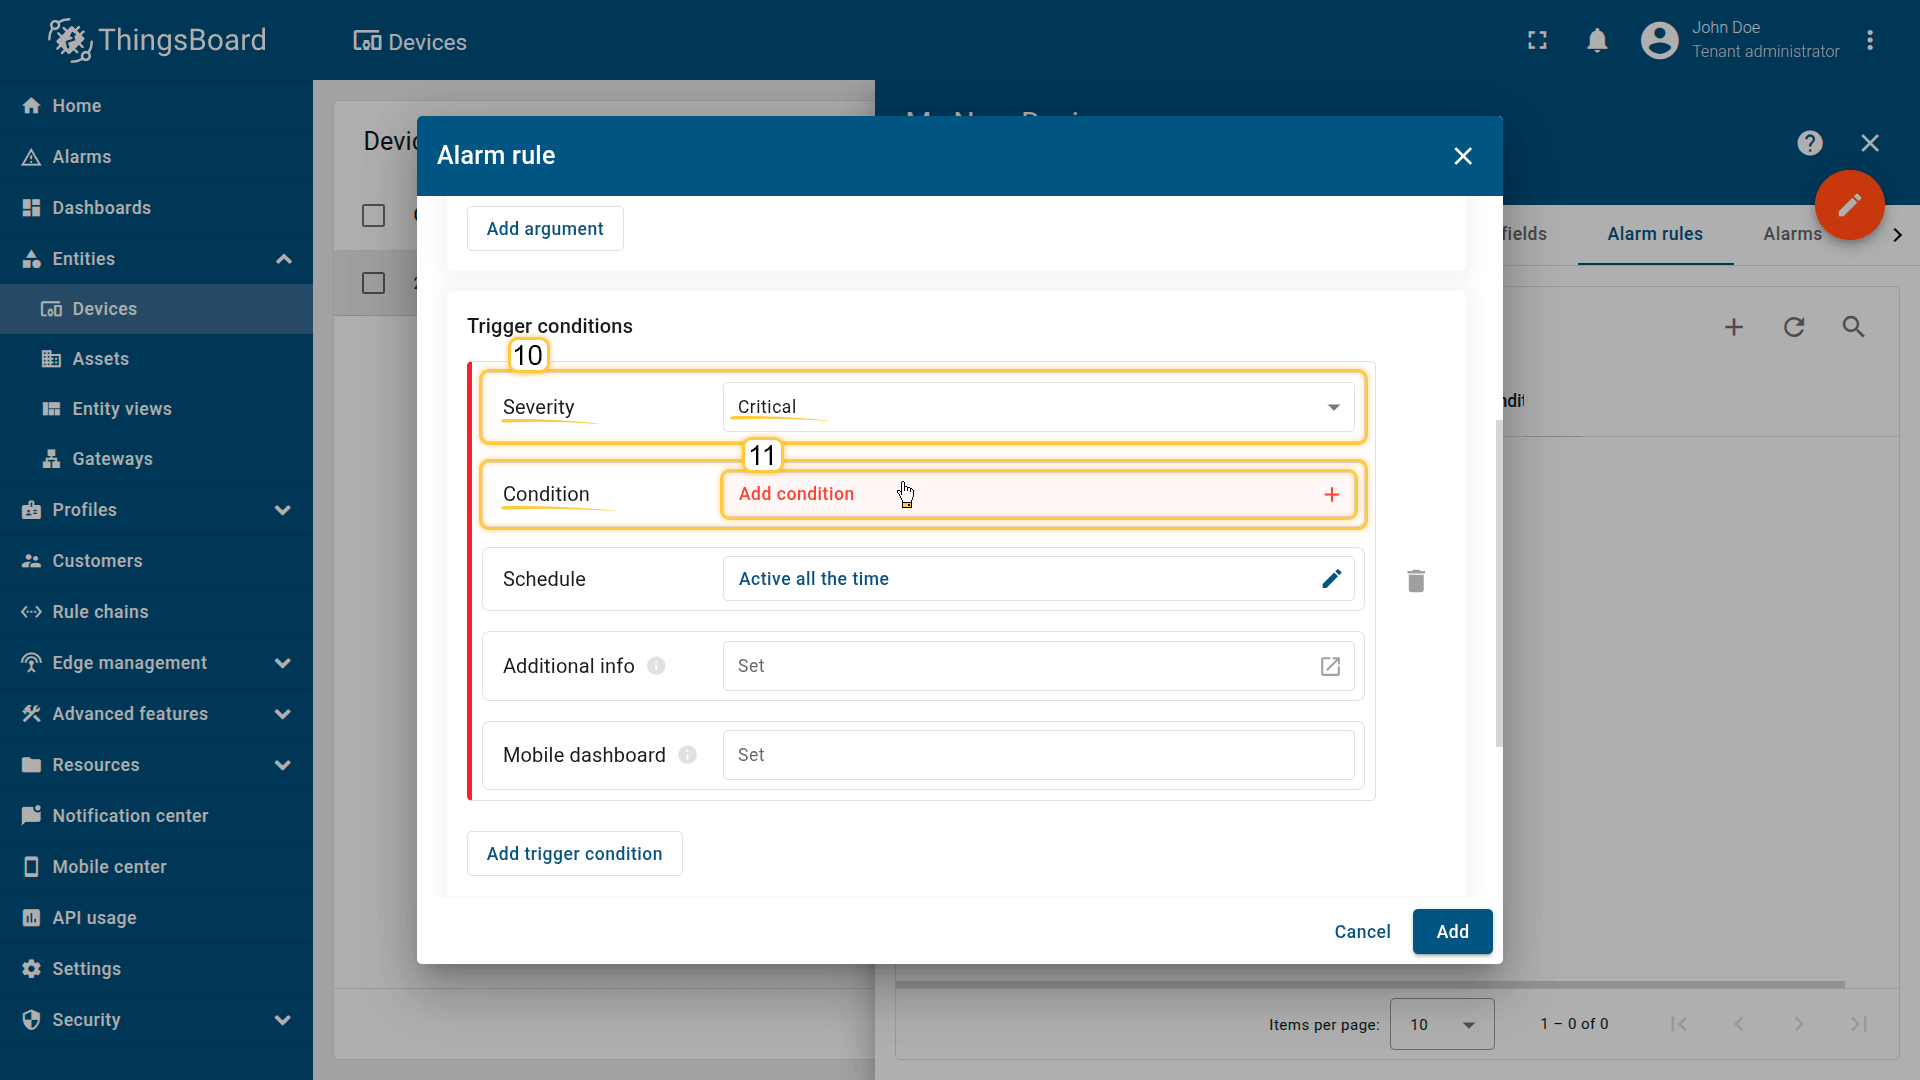
- 严重程度:严重
- 条件
- 点击添加条件。
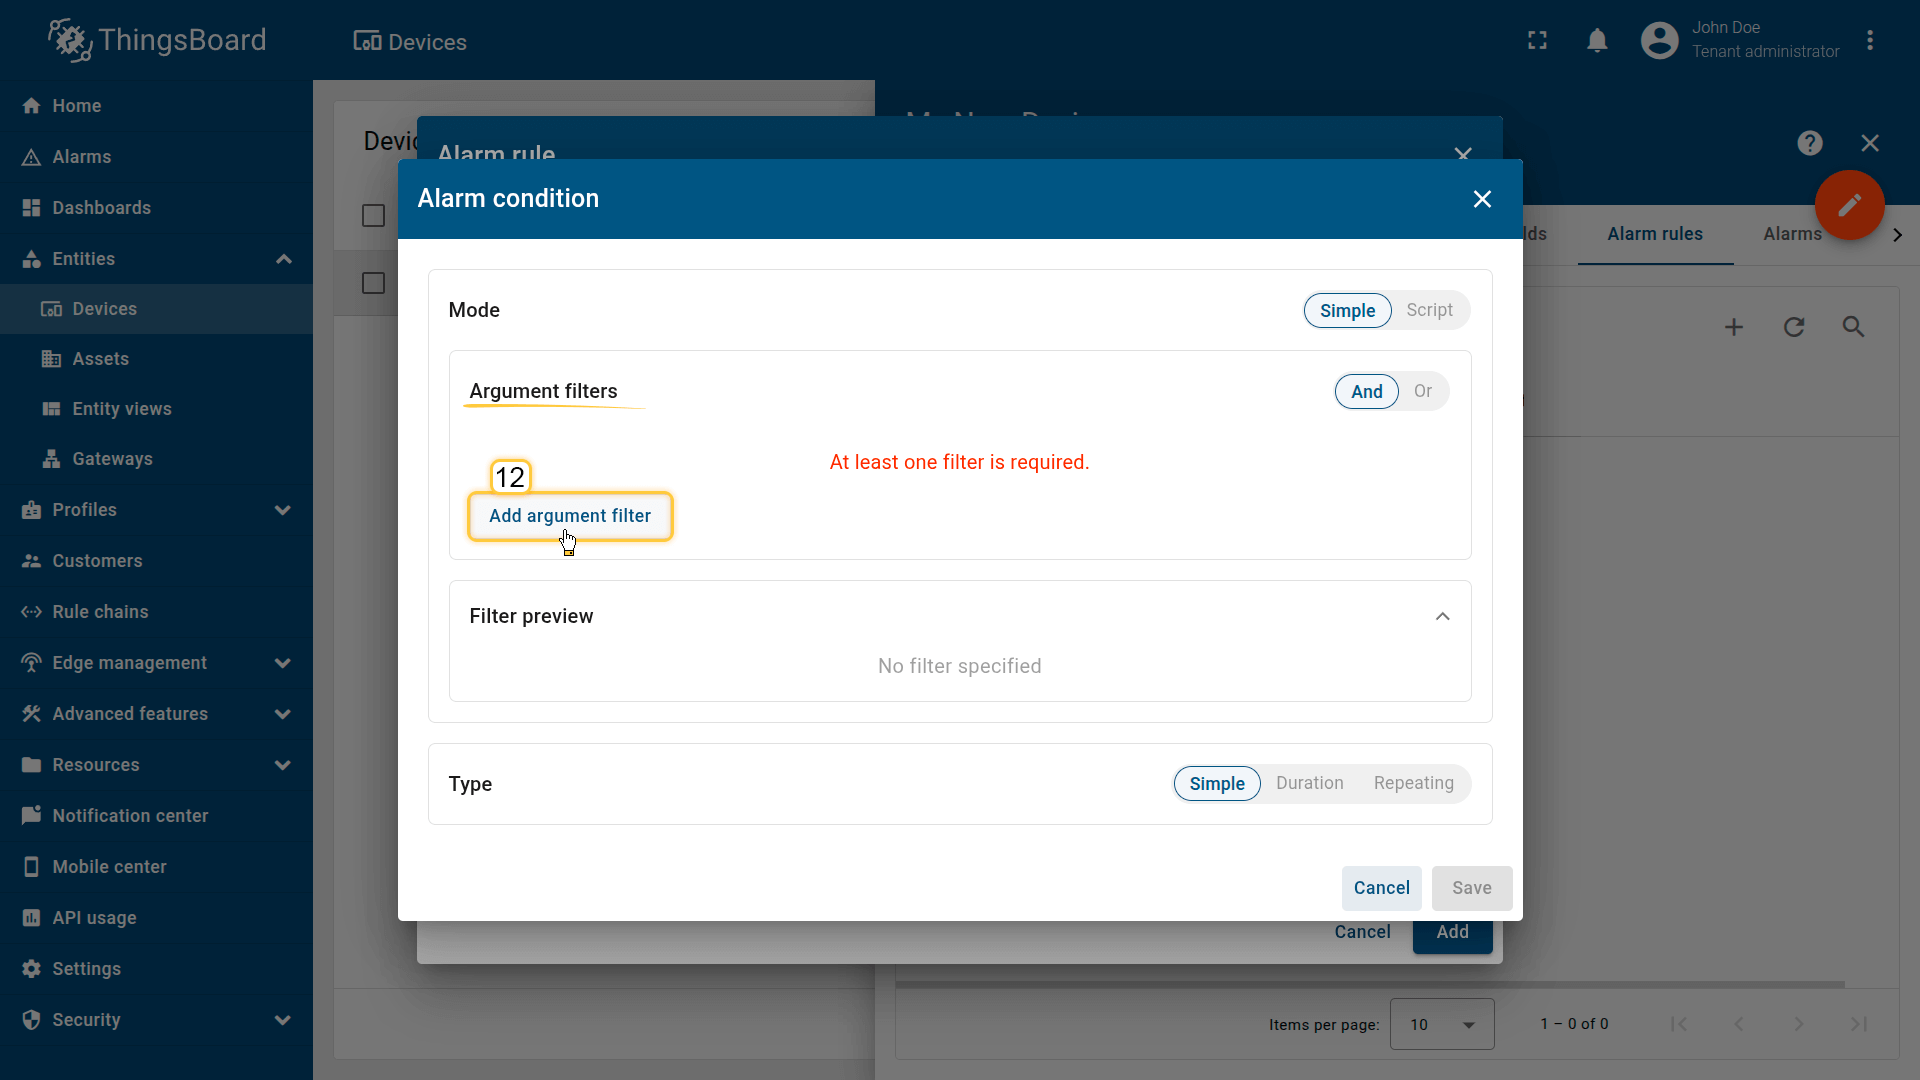
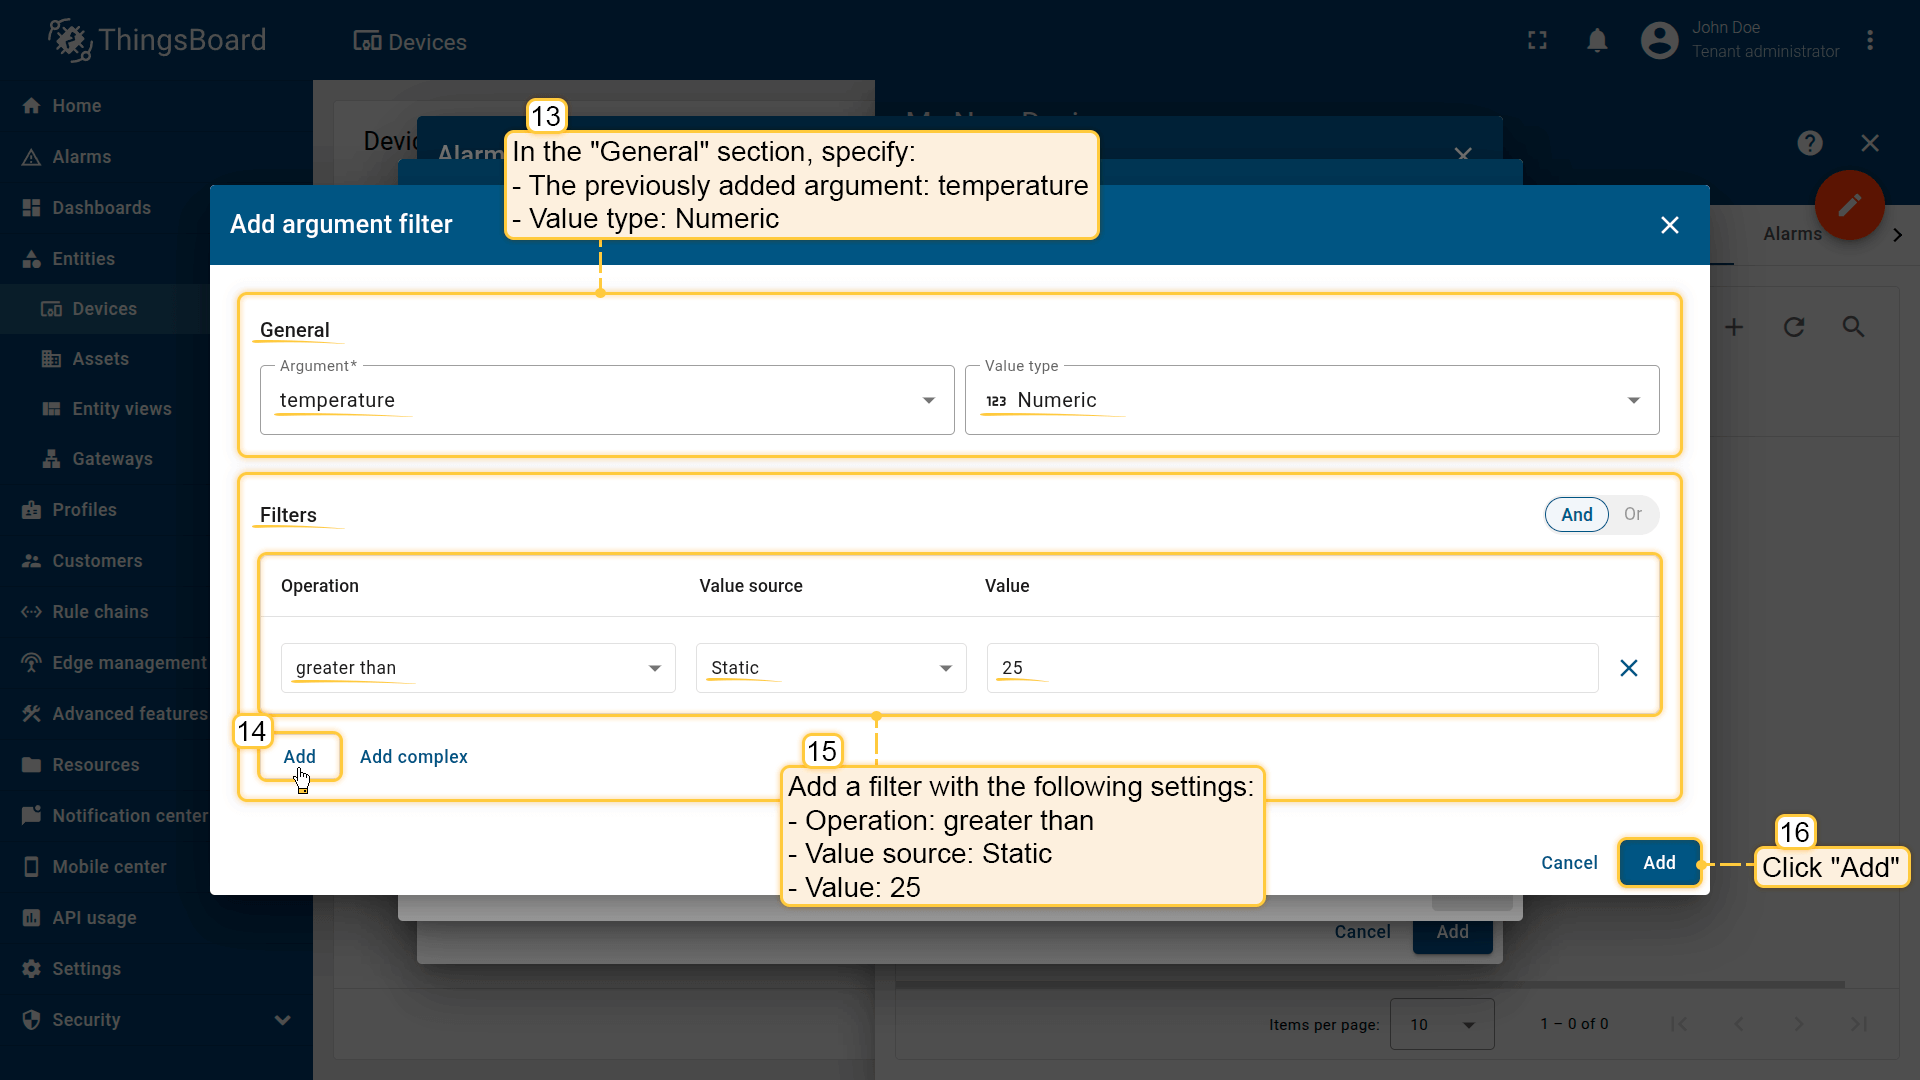
- 在配置窗口中点击添加参数筛选并指定:
- 常规块:参数:temperature(之前添加的);值类型:数值
- 筛选块:点击添加;操作:大于;值来源:静态;值:25
- 点击添加。
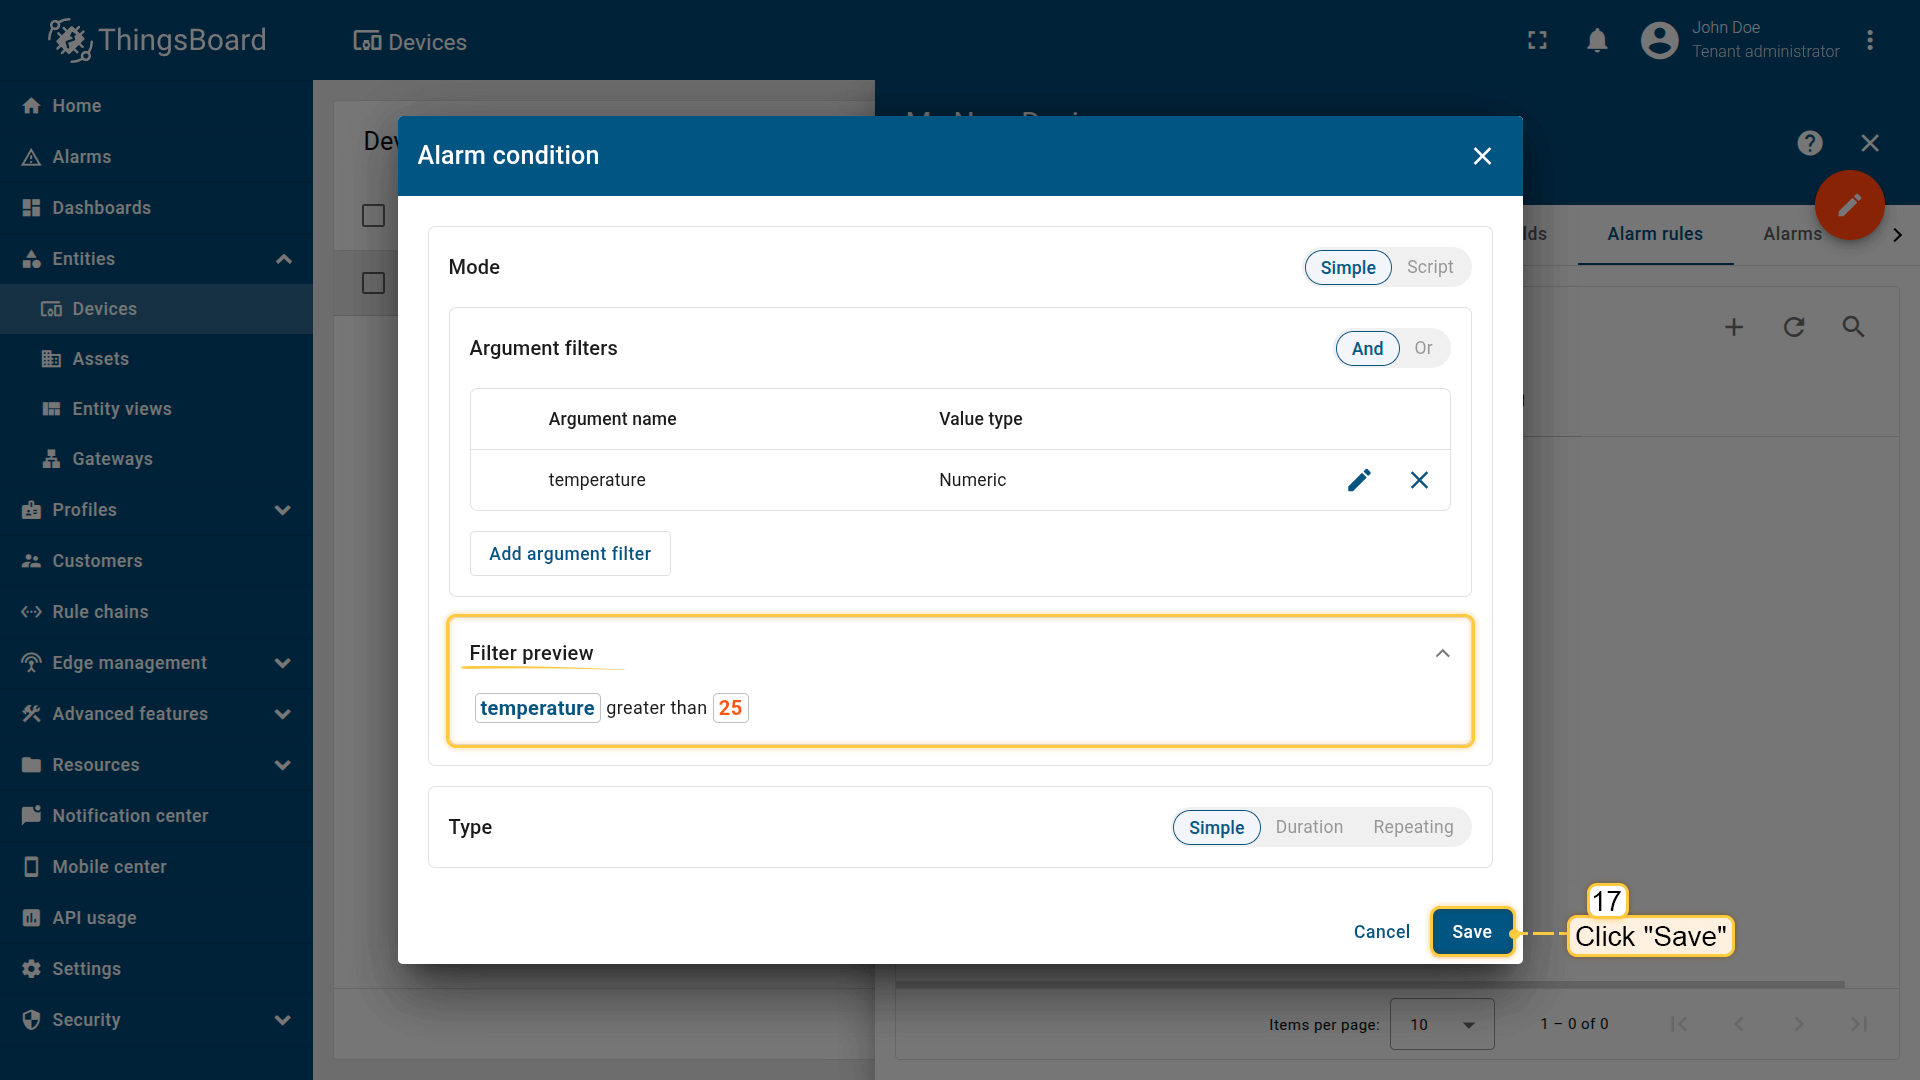
- 类型:简单
- 点击保存。
当温度超过 25°C 时,告警将立即触发。
保存规则
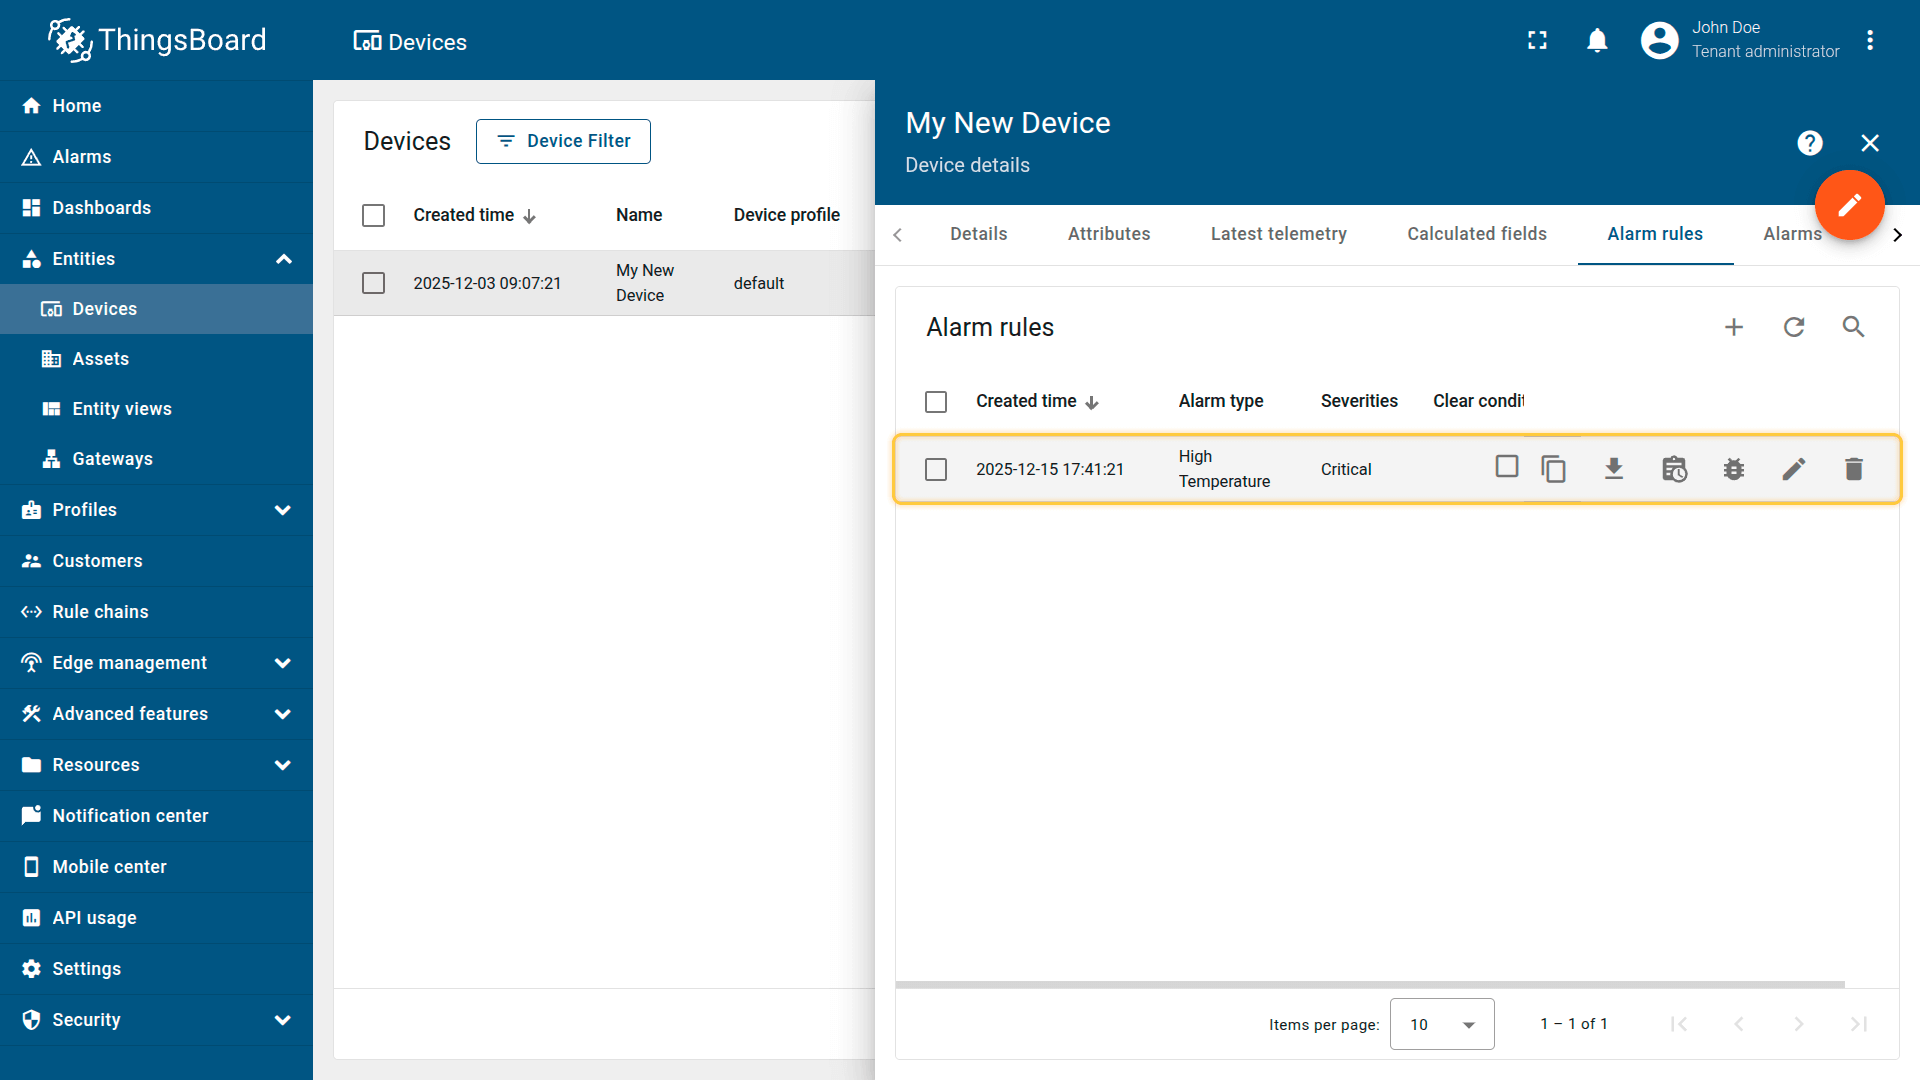
点击添加按钮保存新告警规则。
规则保存后立即生效。
点击My New Device打开详情,进入告警规则标签。
点击「+」按钮,选择创建新告警规则。
筛选:点击添加;操作:大于;值来源:静态;值:25。
点击添加。
保存条件。

建议参阅告警规则配置示例
步骤 5. 创建告警
告警规则已激活(见步骤 4),需从设备发送新遥测(见步骤 2)以触发告警。
重要:仅当温度超过告警创建条件中定义的 25°C 阈值时才会创建告警。
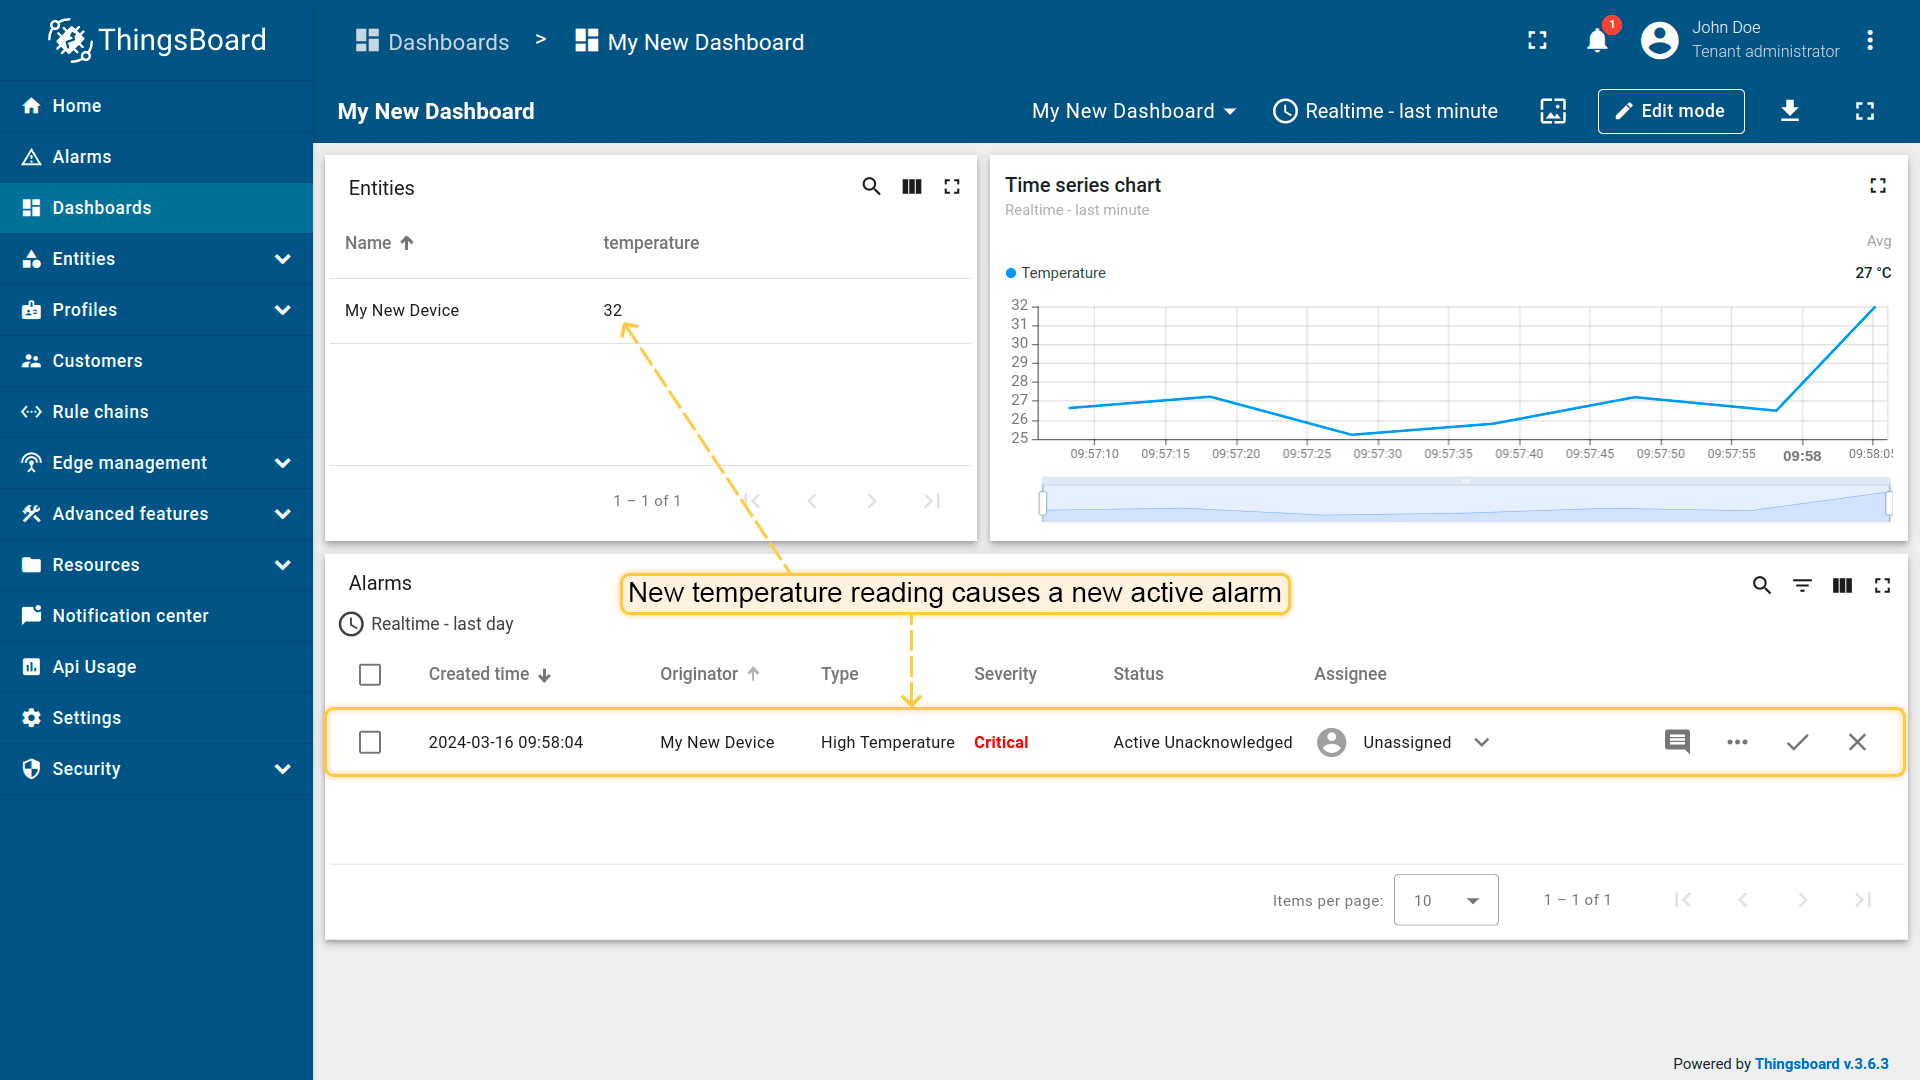
发送遥测后发生的变化
- 当新temperature值超过阈值时,仪表盘将出现新的活动告警。
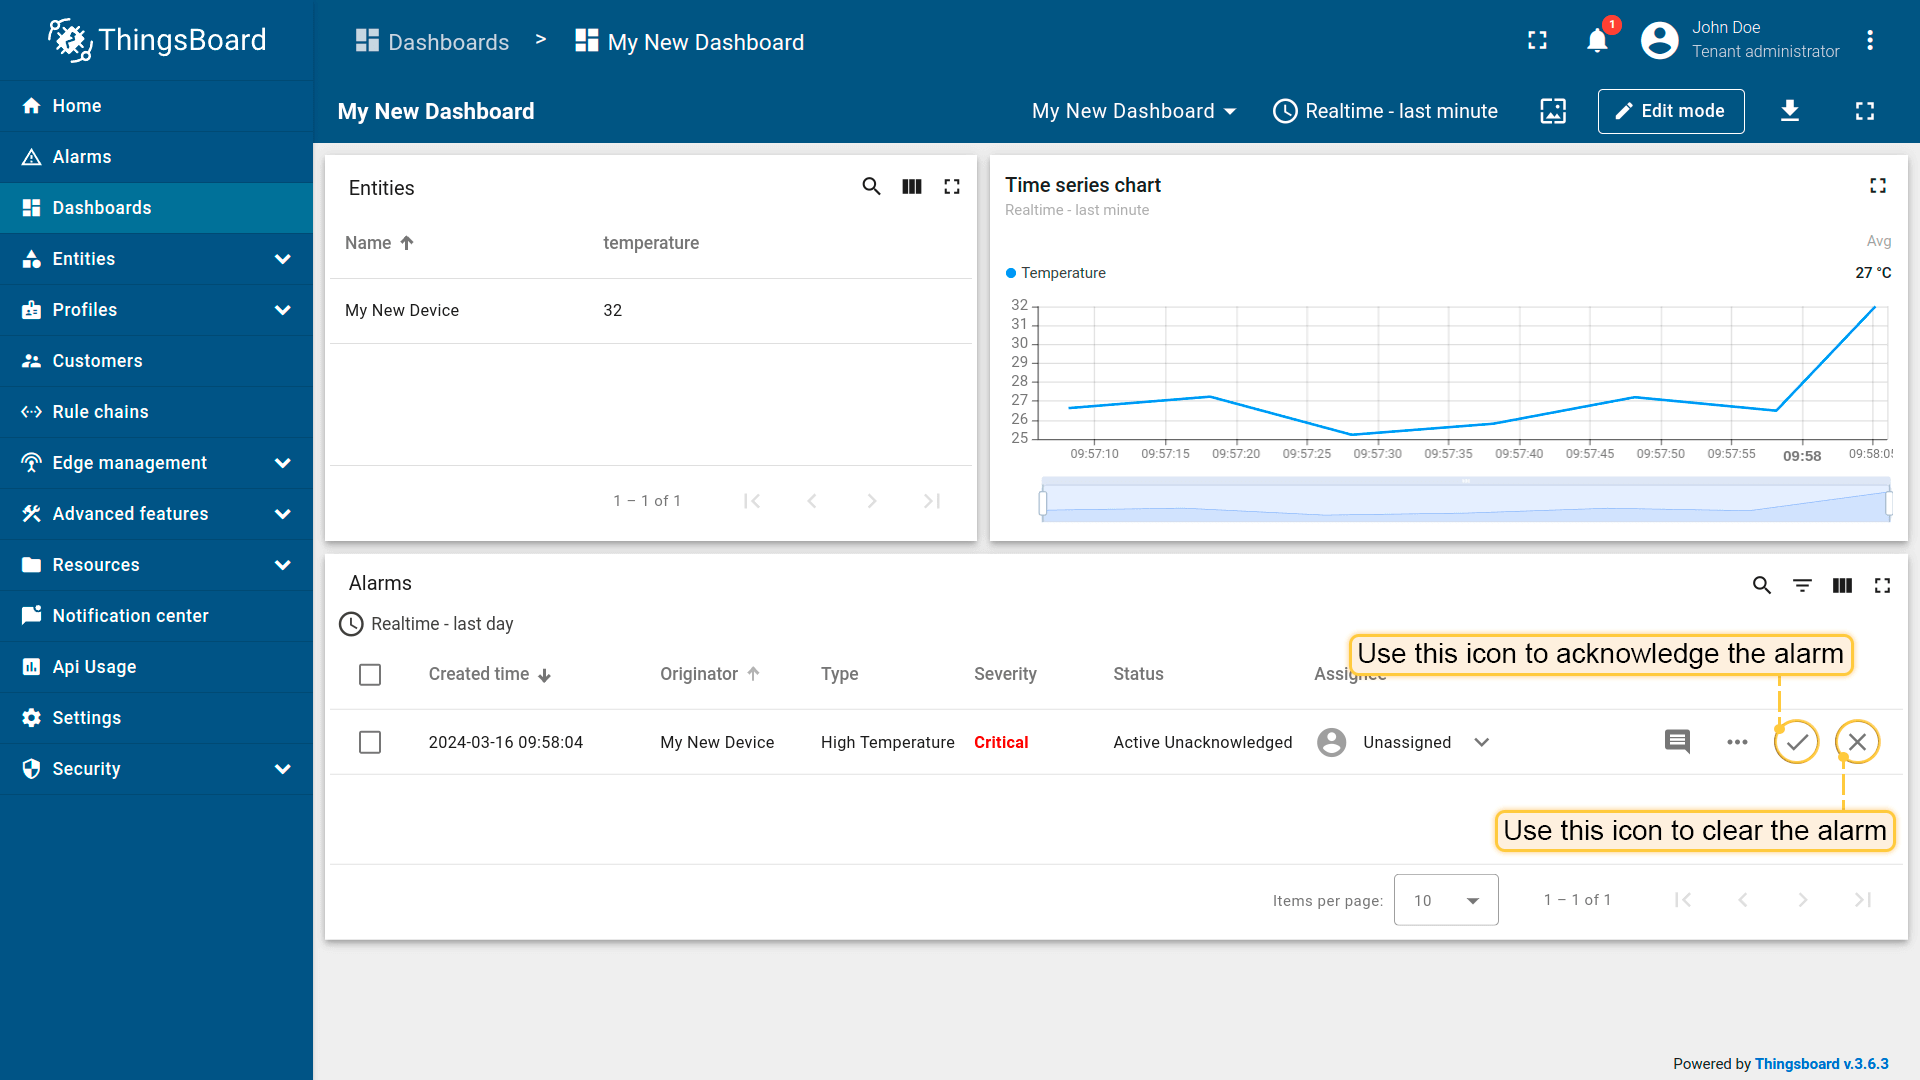
- 可使用告警表格部件确认和清除告警。
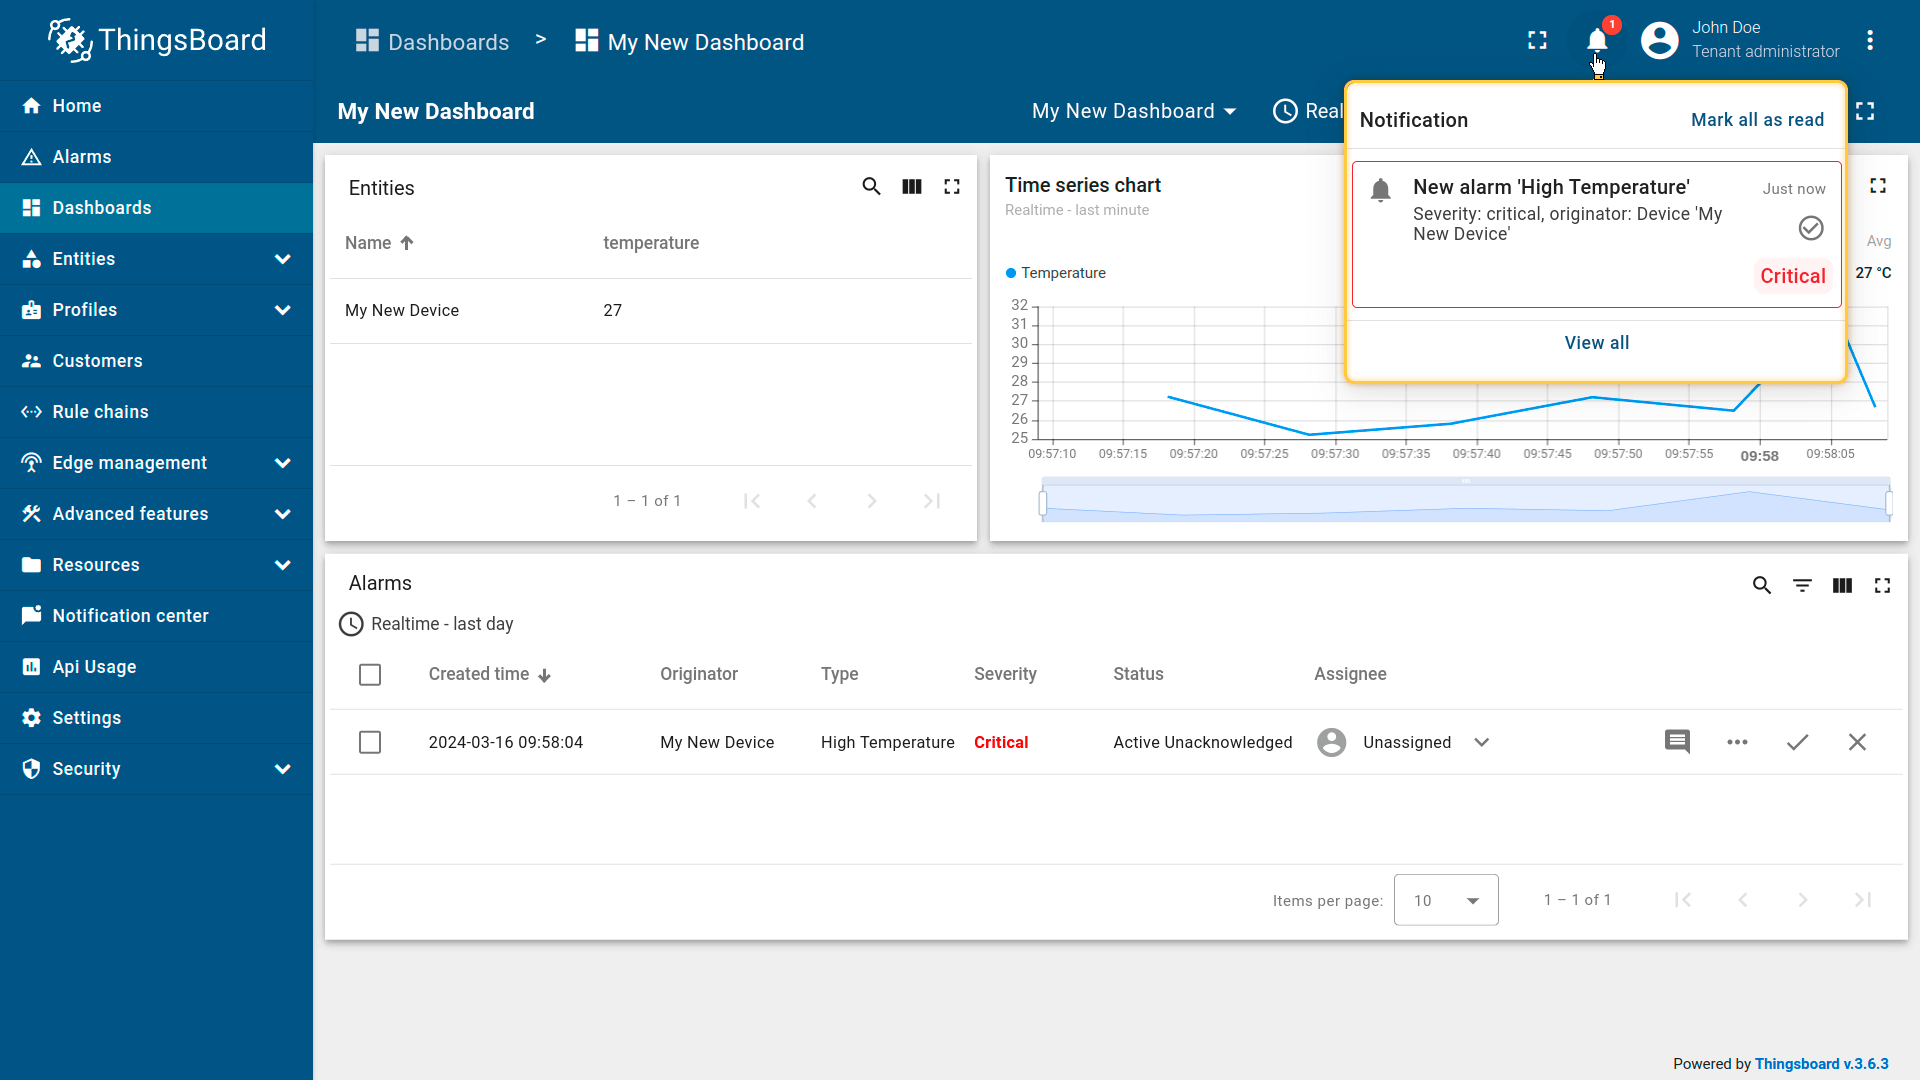
- 告警创建后,通知中心会收到通知。点击右上角铃铛图标查看最新通知。
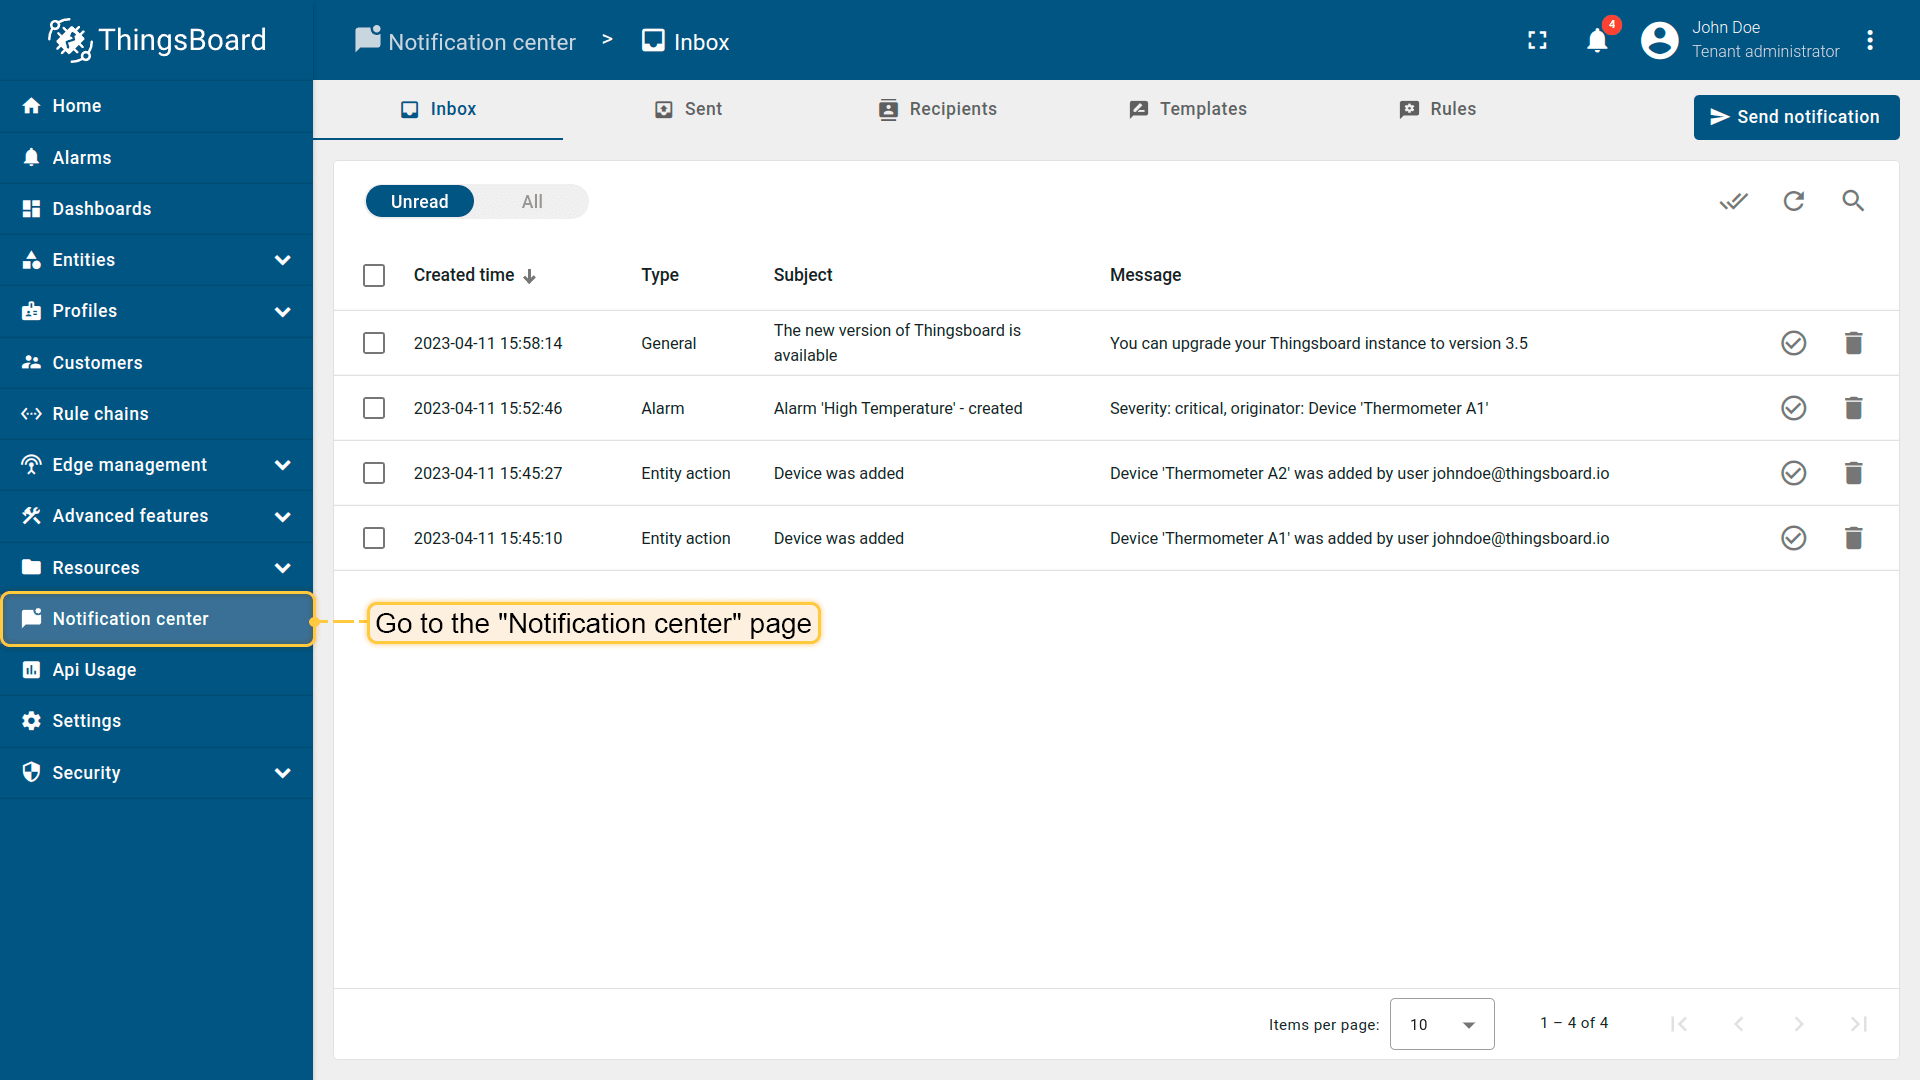
步骤 6. 告警通知
ThingsBoard 通知中心可向最终用户发送关于设备活动、环境变化或 IoT 生态中事件的个性化通知。 通知可通过邮件、短信或集成第三方系统送达。
此外,ThingsBoard 移动应用可向手机推送即时通知,确保您随时掌握关键事件。
按本指南安装 ThingsBoard 移动应用并配置通知。
祝您探索愉快!
步骤 7. 将设备和仪表盘分配至客户
ThingsBoard 的重要功能之一是将仪表盘分配至客户。 可将不同设备分配给不同客户,创建仪表盘并分配给多名客户。 每位客户用户只能看到自己的设备,无法查看其他客户的数据。
我们已创建设备(见步骤 1)和仪表盘(见步骤 3)。 接下来创建客户及客户用户,确保其能访问设备数据和仪表盘。
步骤 7.1 创建客户
创建标题为「My New Customer」的客户,操作如下:
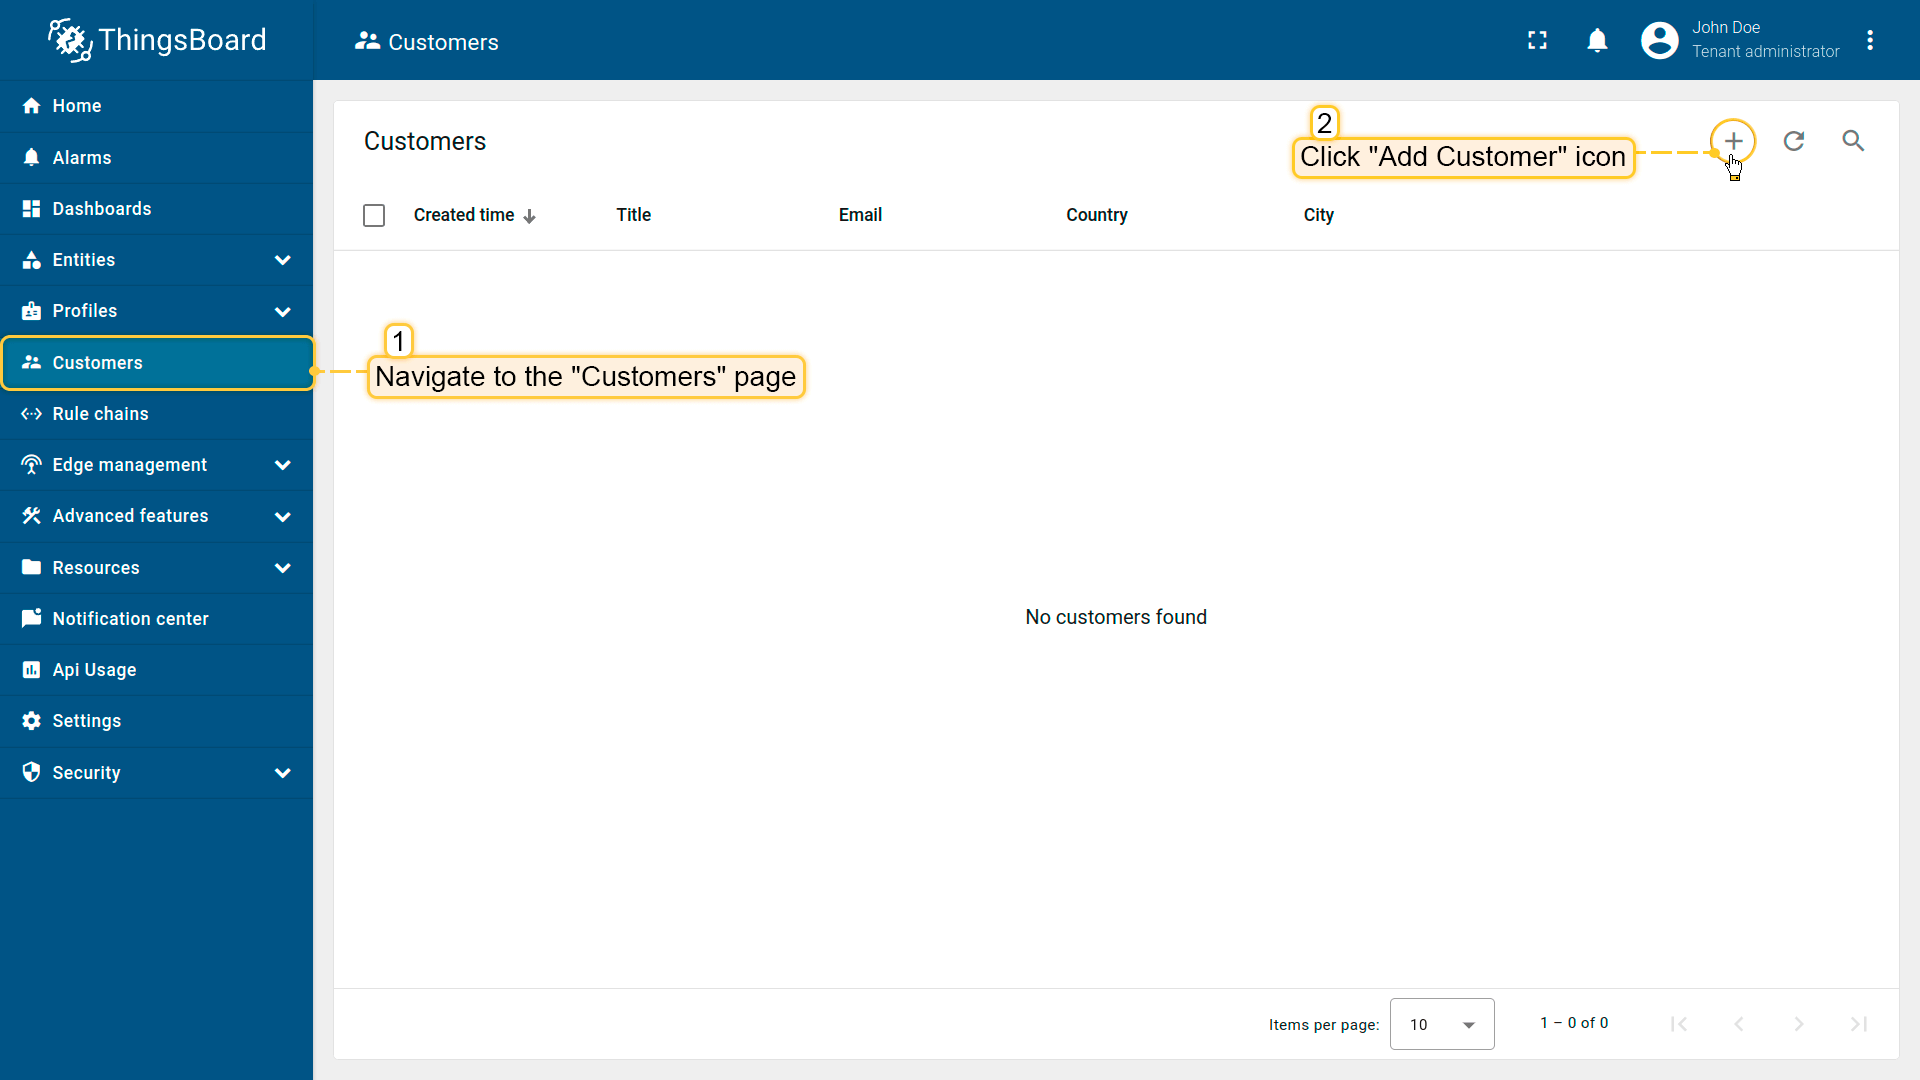
- 进入客户页面,点击「+」添加客户;
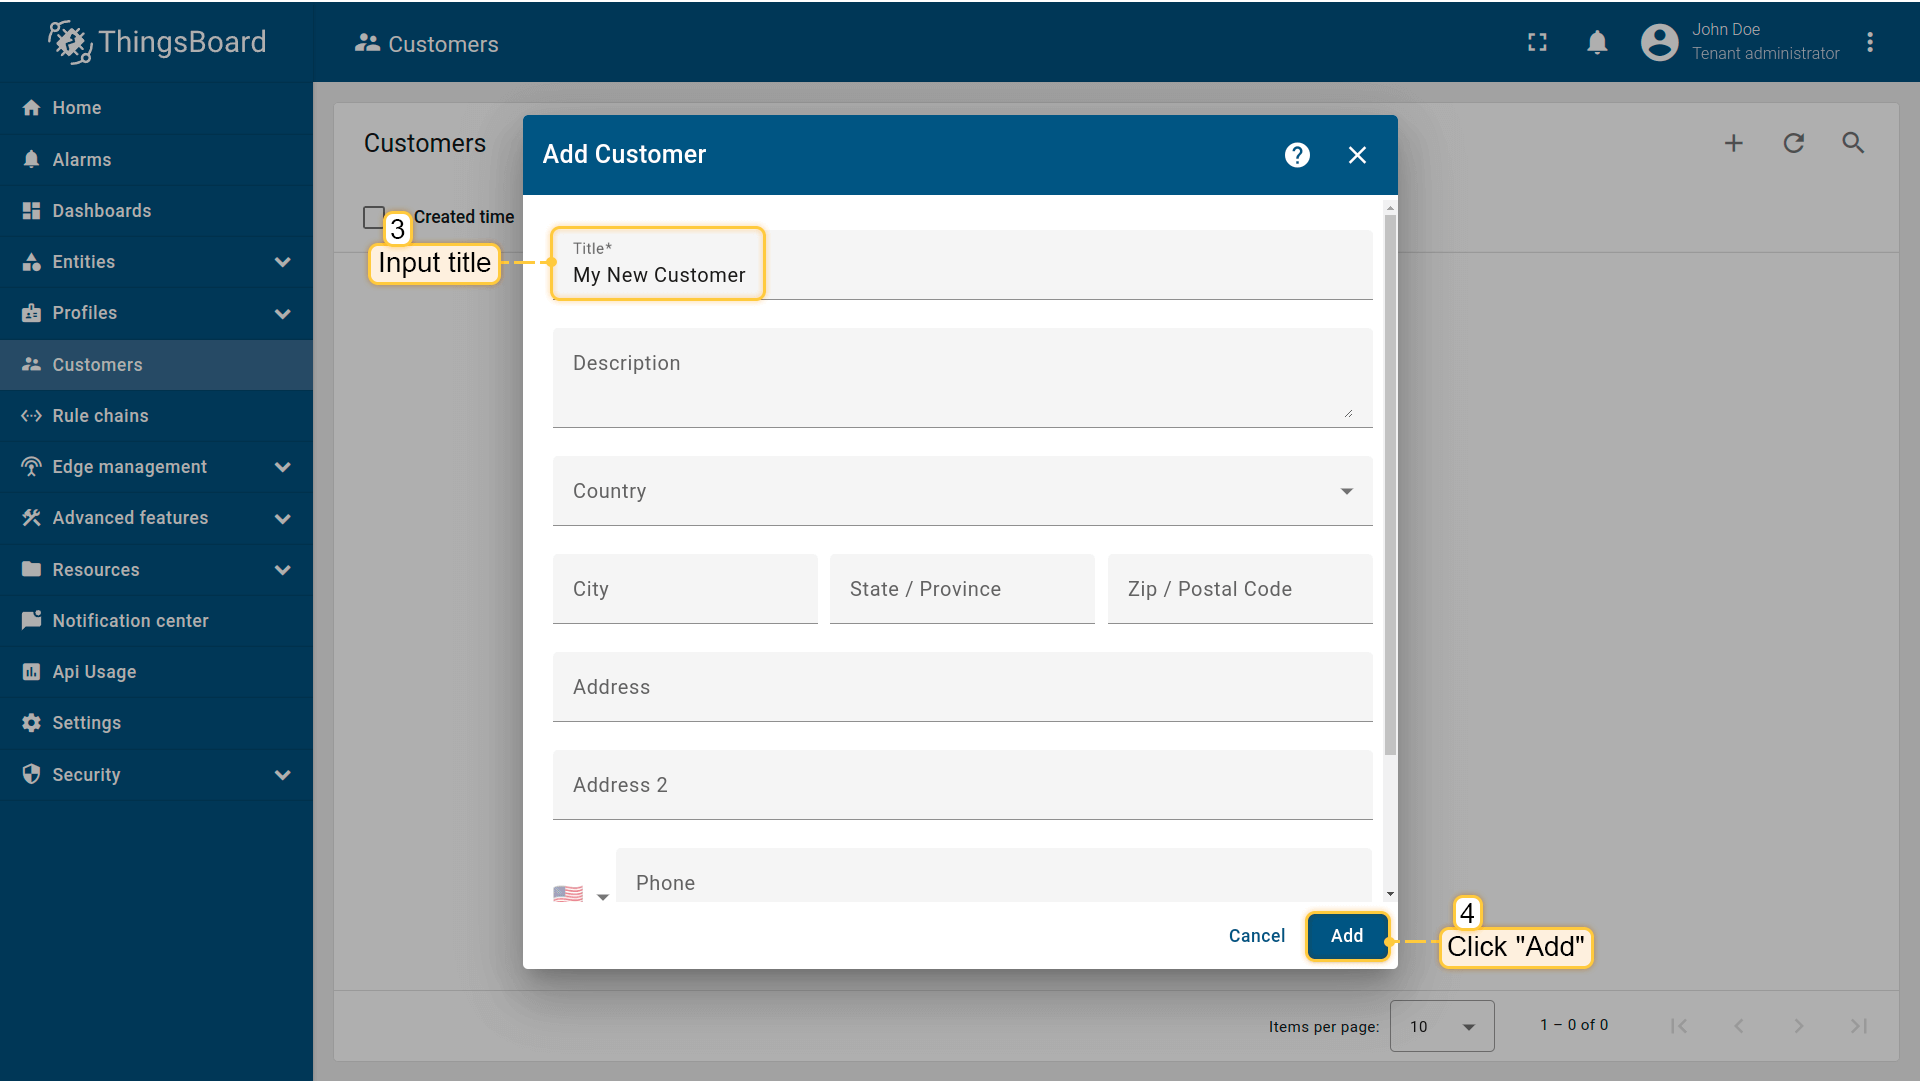
- 输入客户名称并点击「添加」。
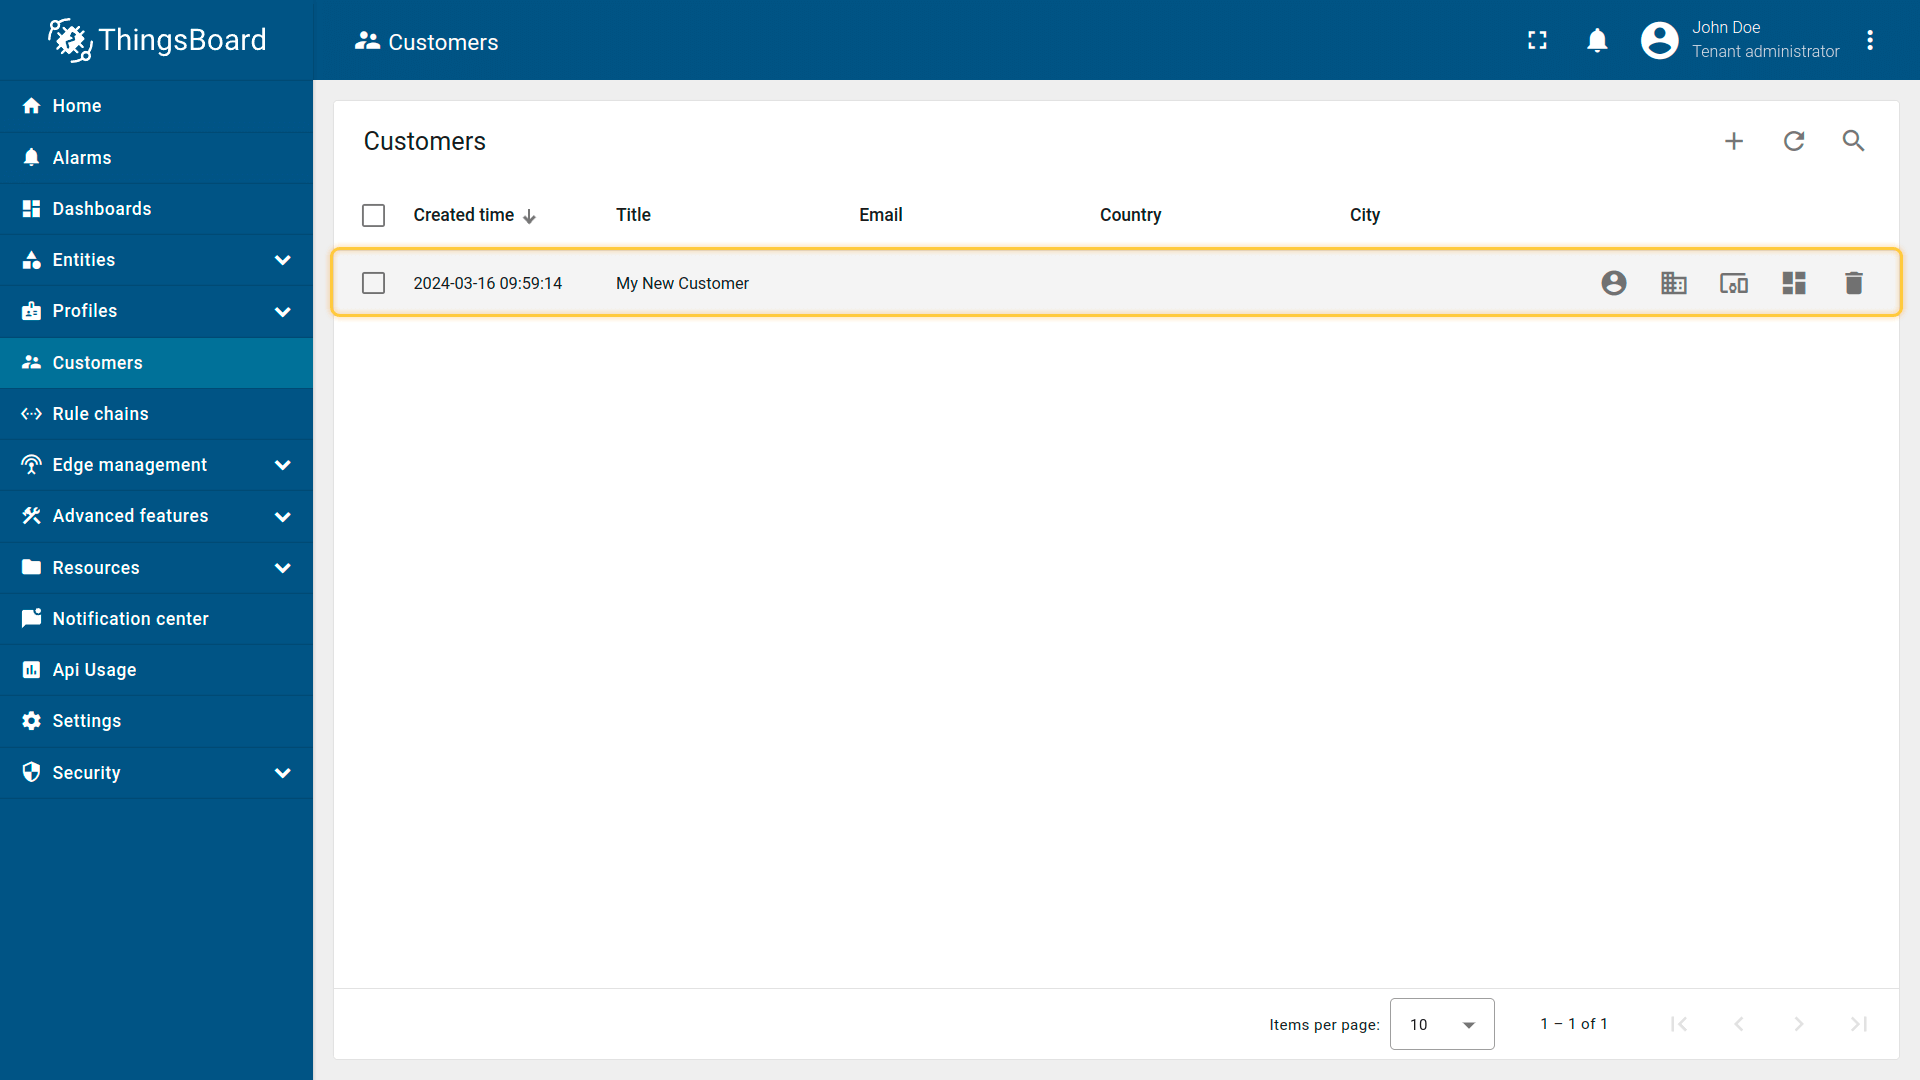
- 新客户已创建。
步骤 7.2 将设备分配至客户
将设备分配至客户。客户用户可读写遥测并向设备发送命令。
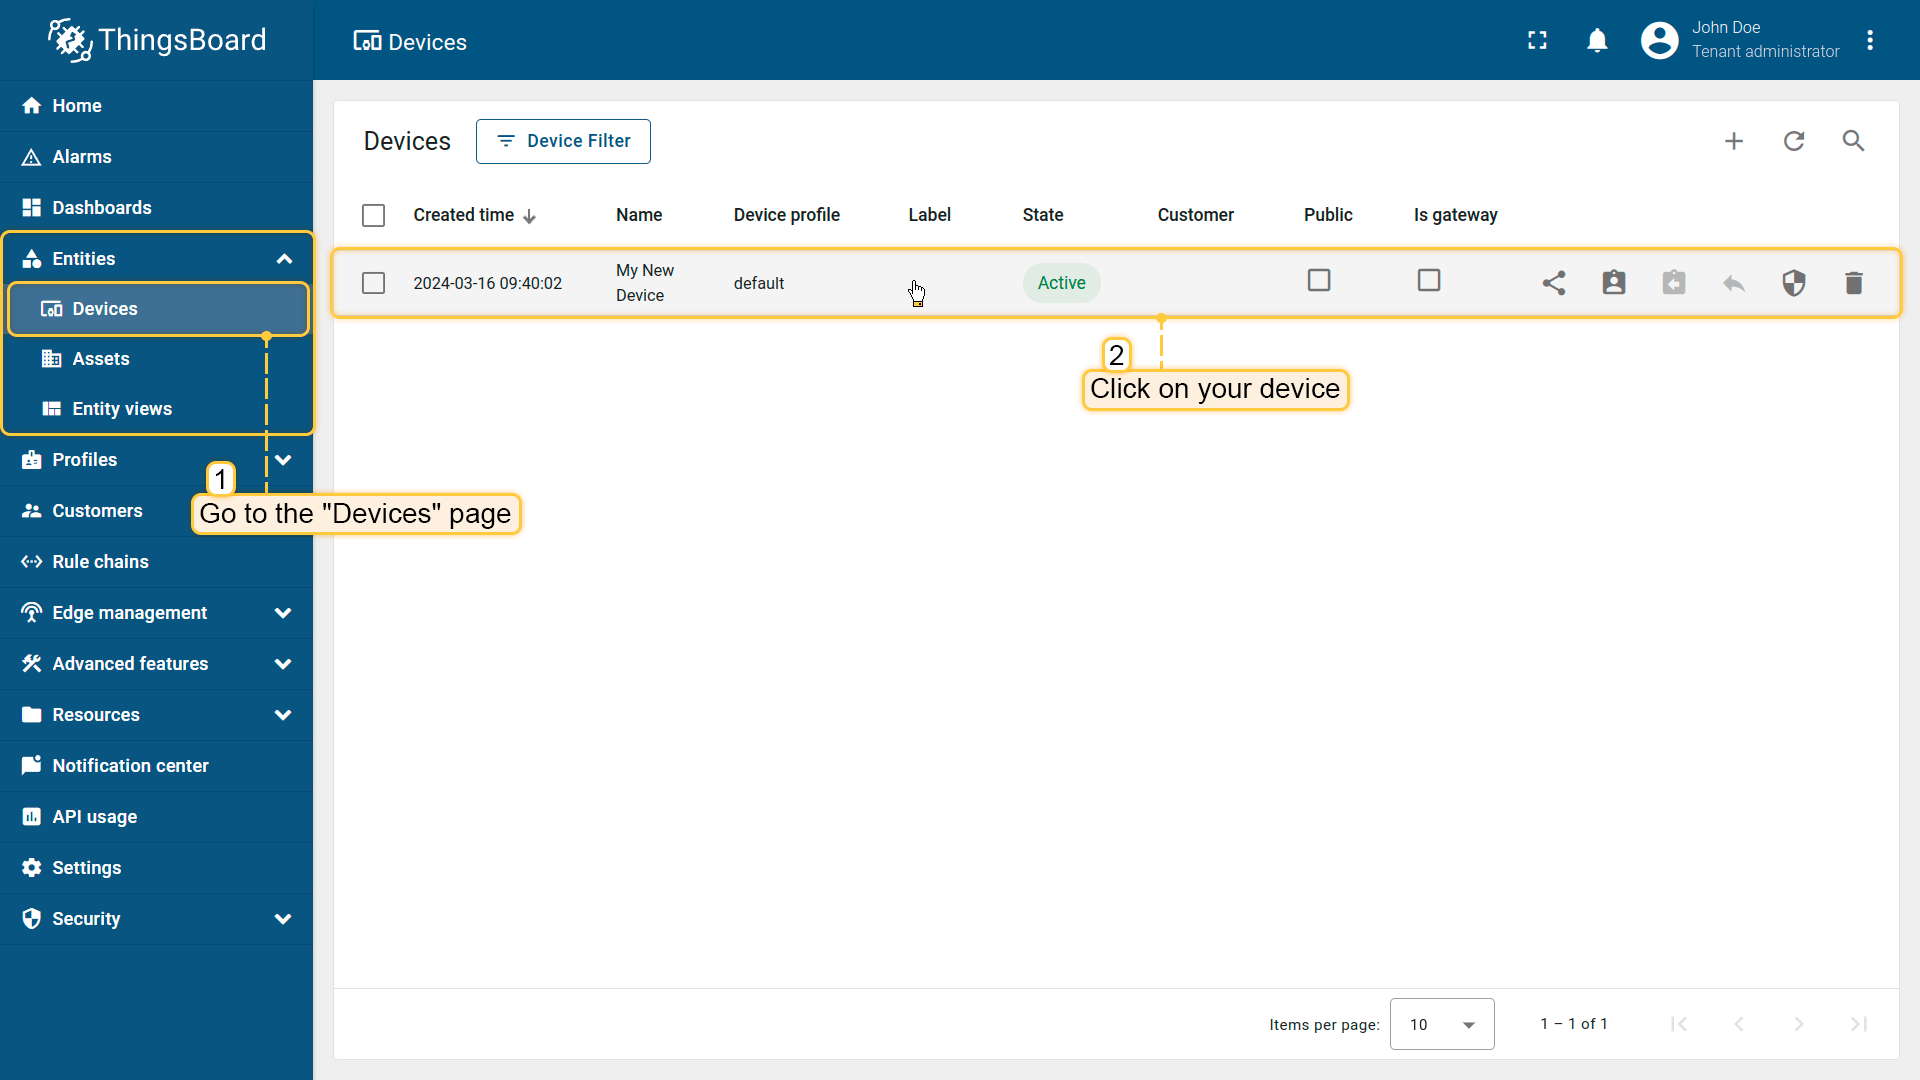
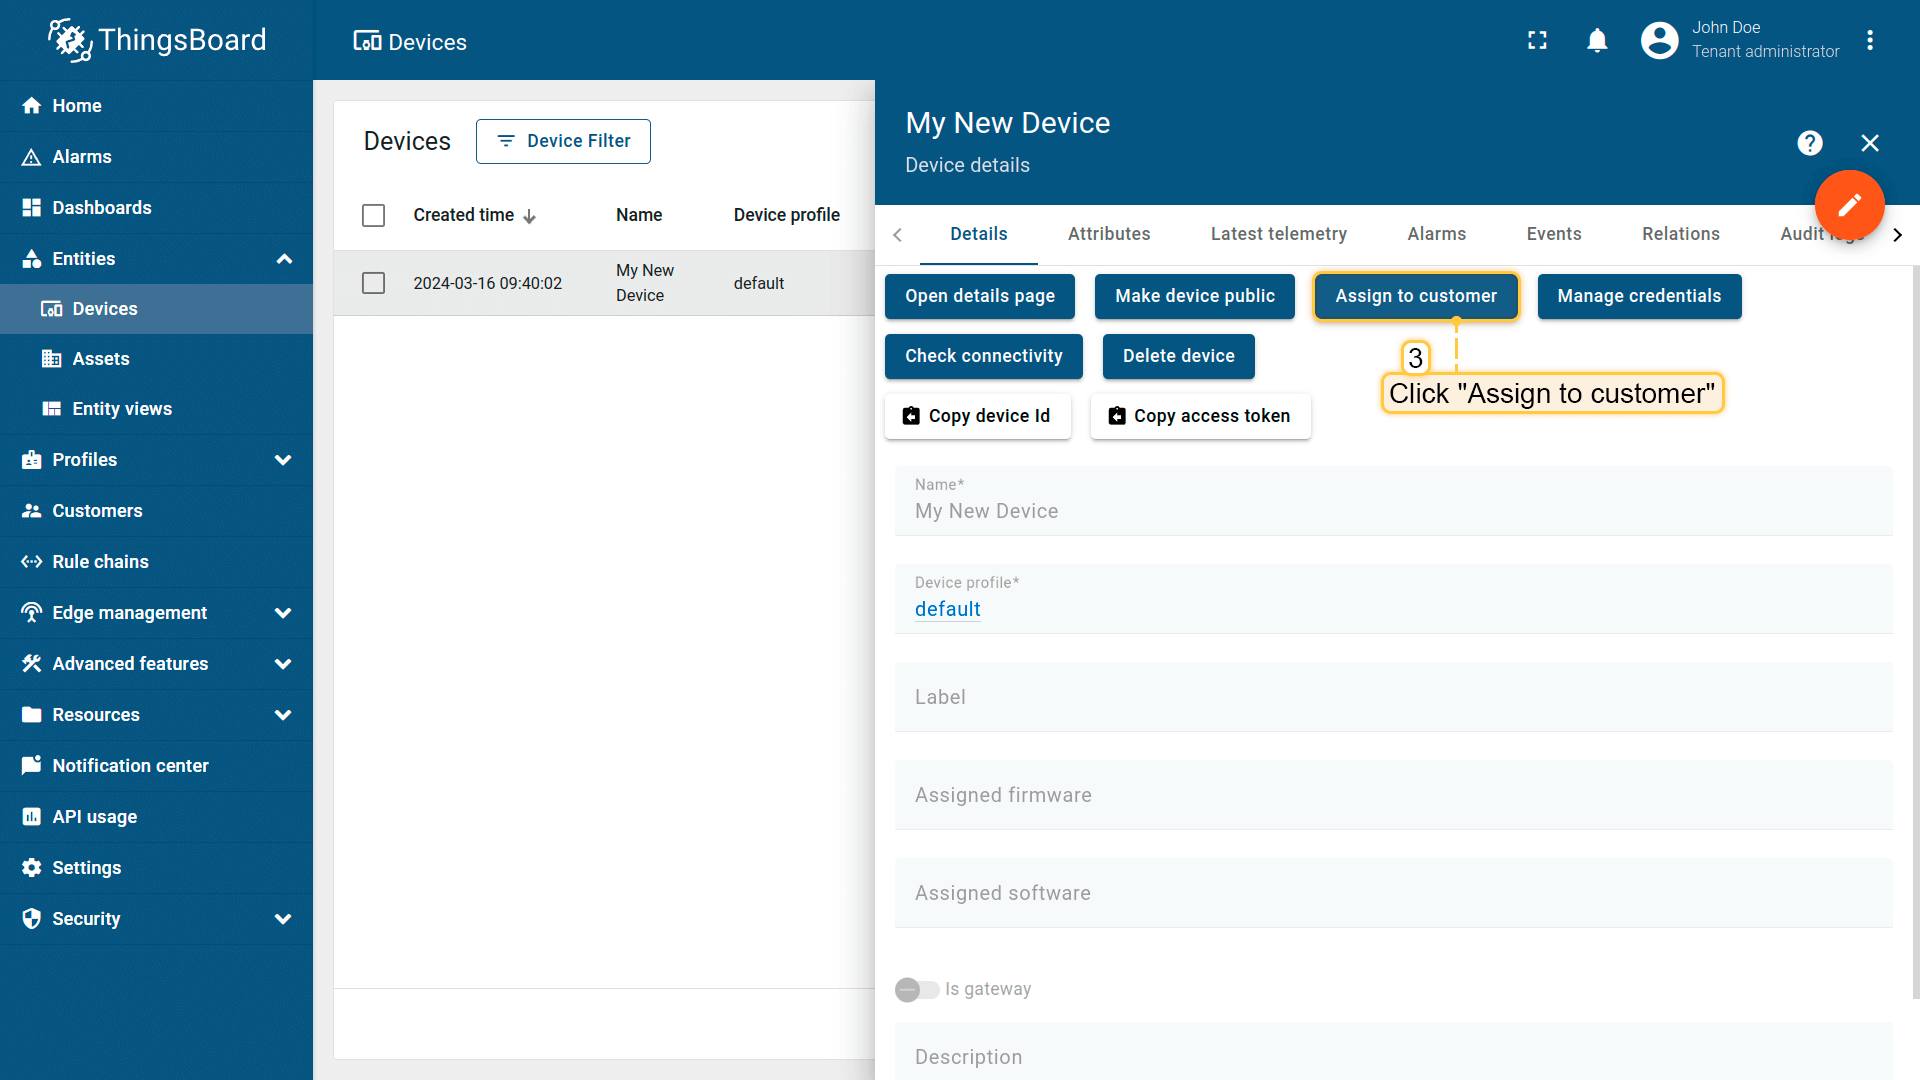
- 打开「设备」页面,选择设备打开详情;
- 点击「分配至客户」按钮;
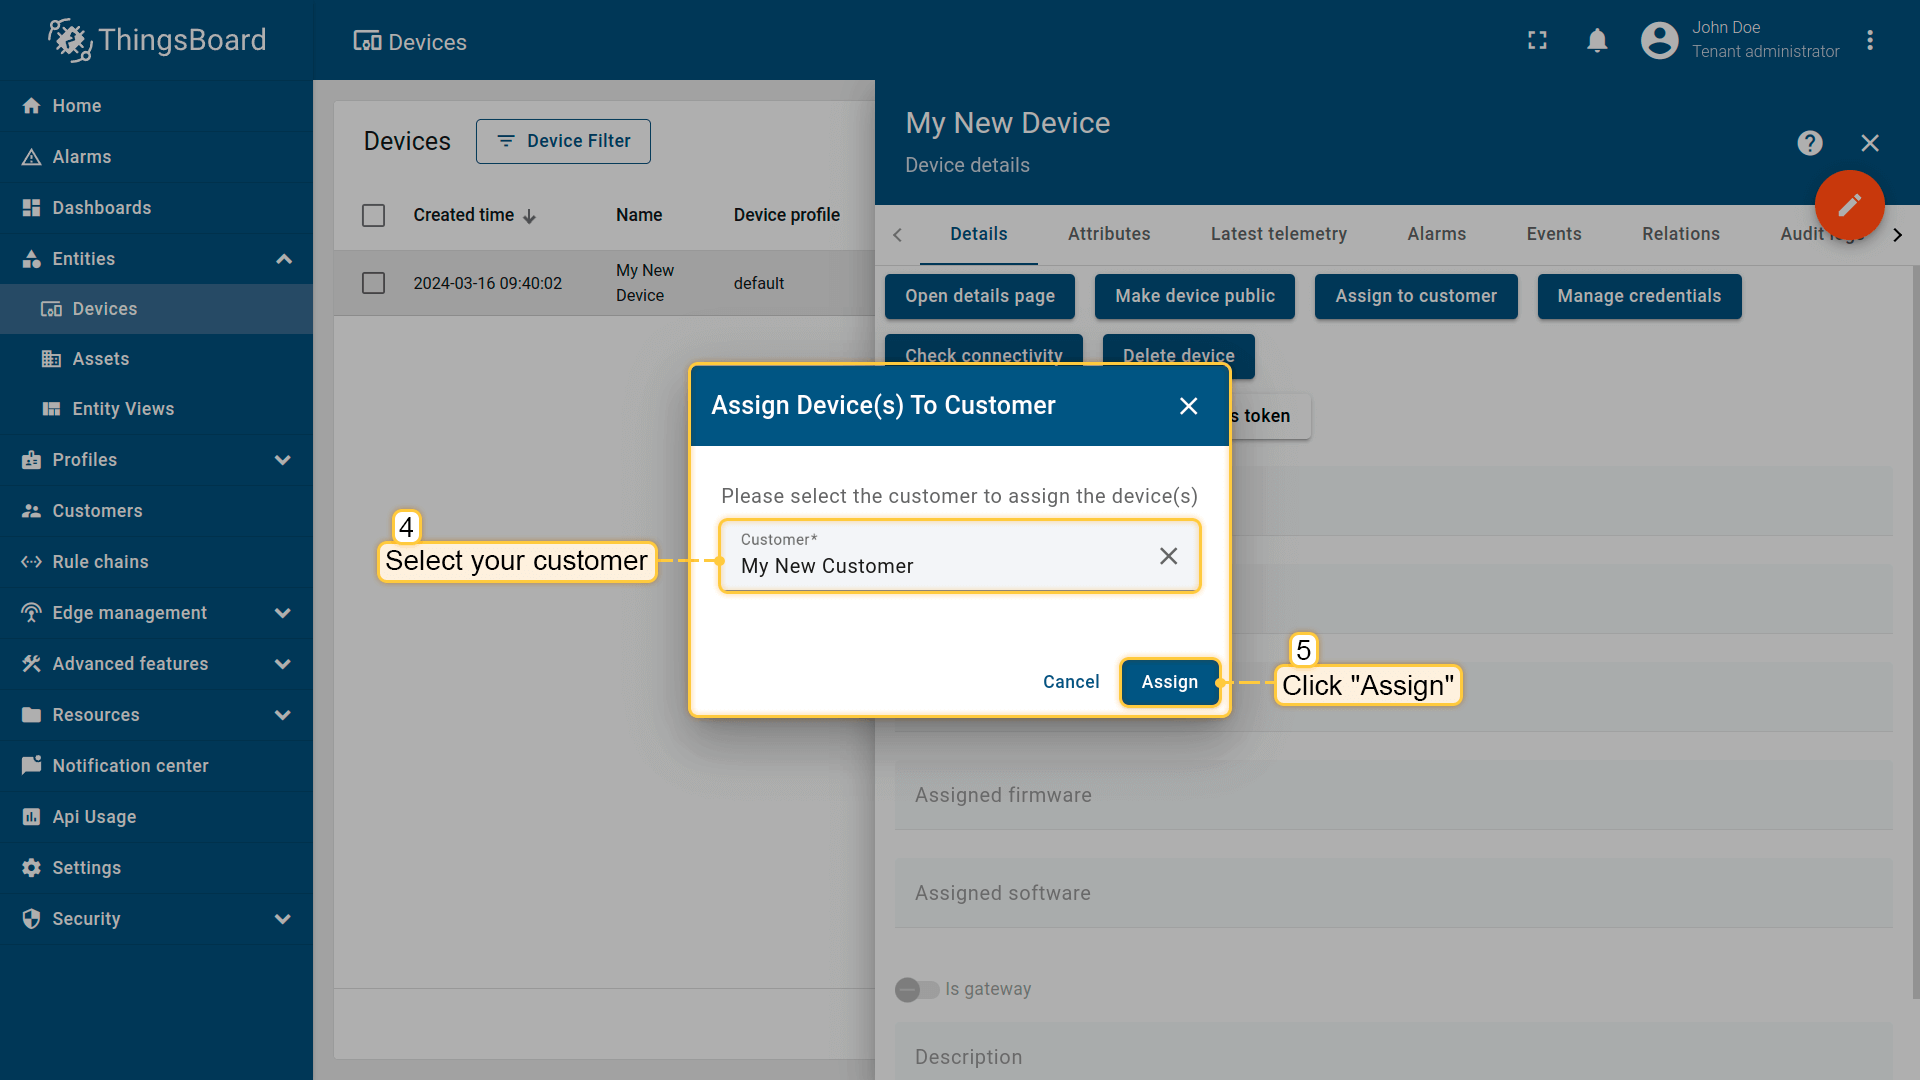
- 选择要分配设备的客户,点击「分配」;
- 设备归属已变更,在「客户」列可看到设备所有者;
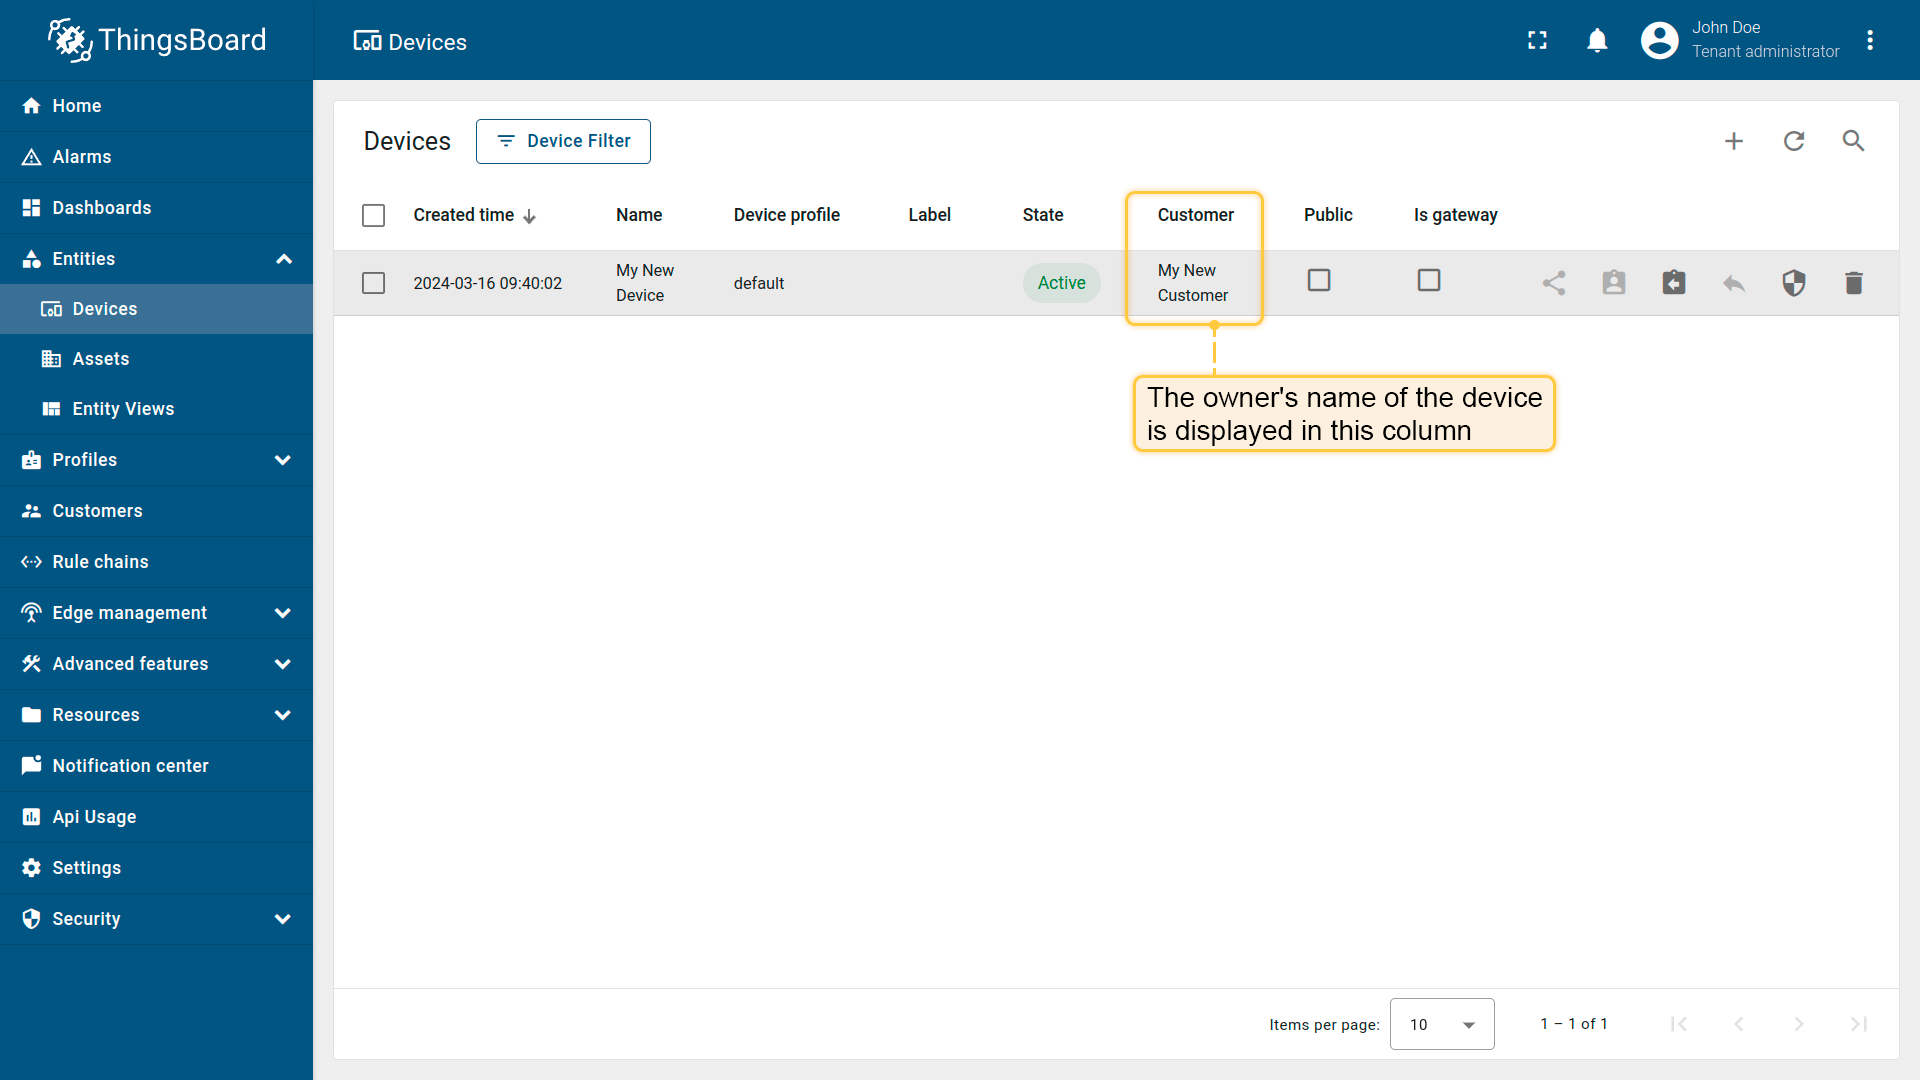
确认设备已分配至客户。
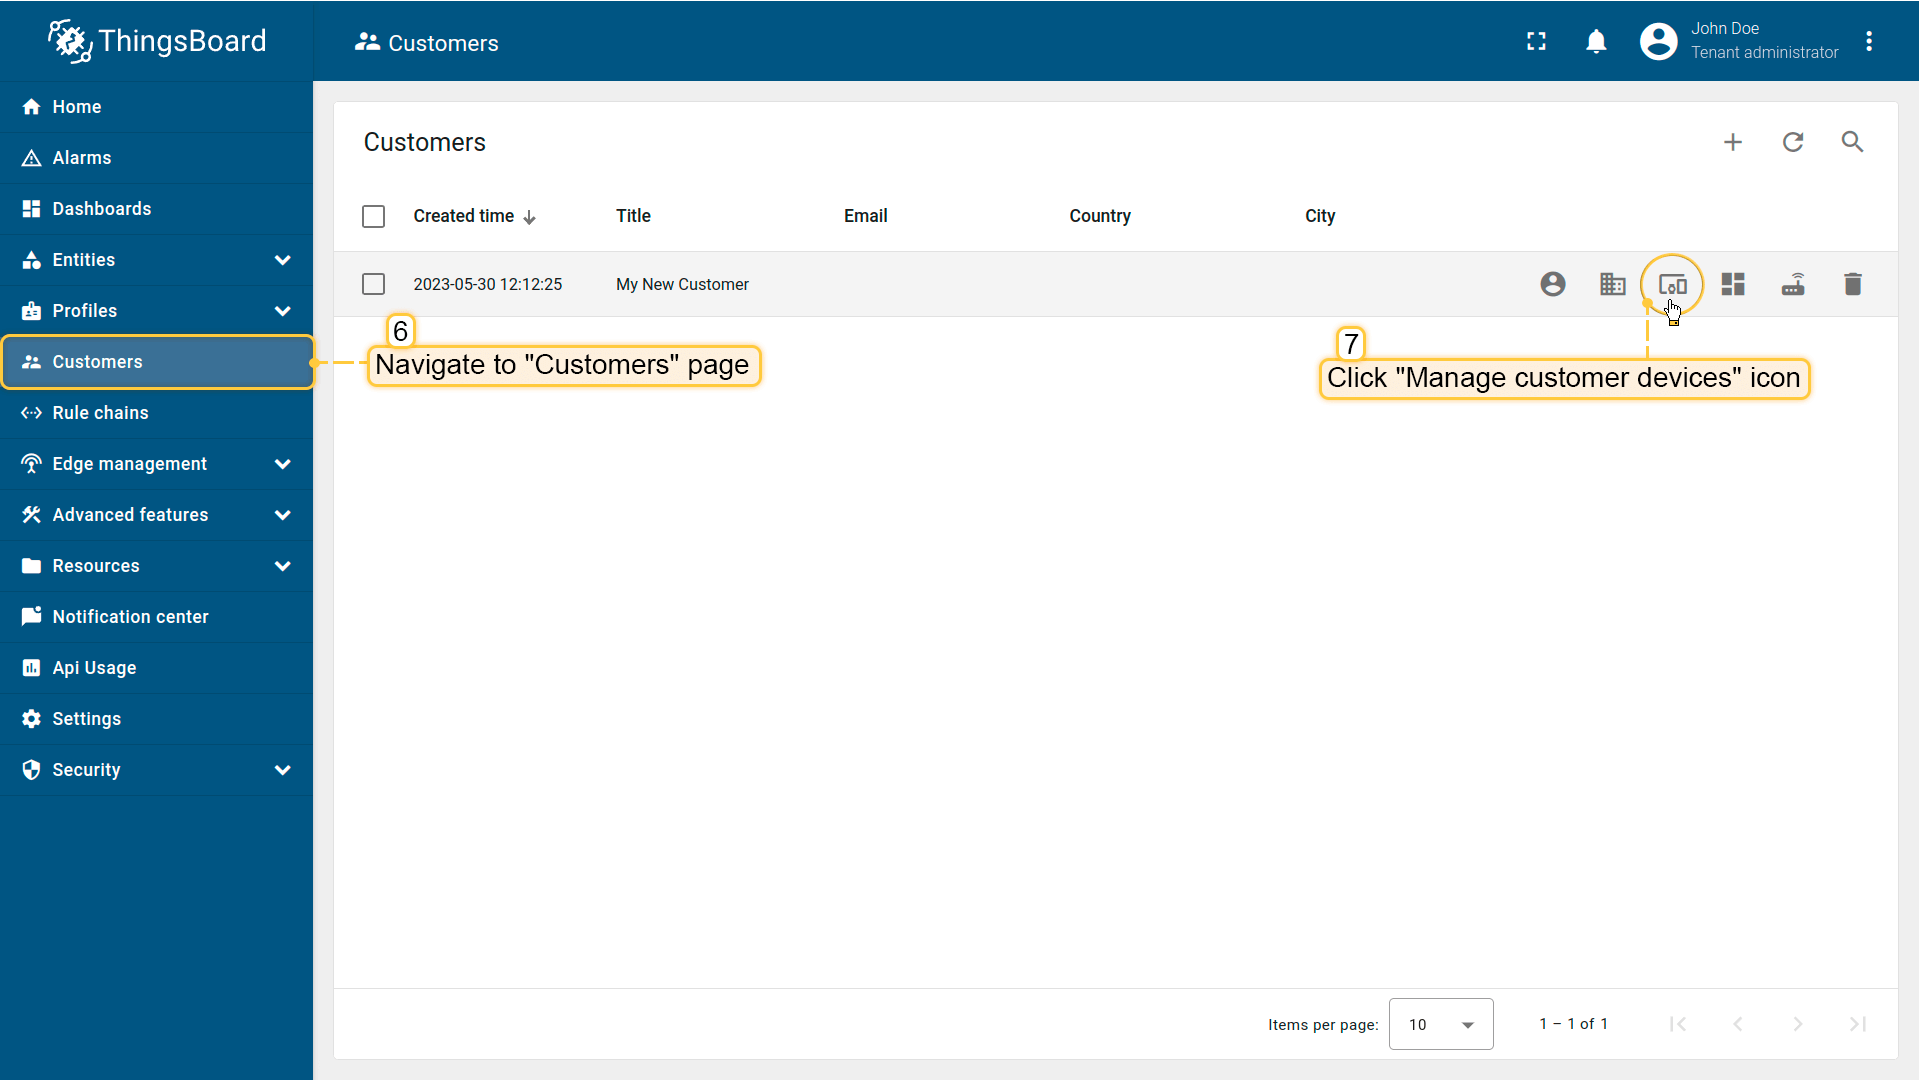
- 进入「客户」页面确认设备已分配。在客户列表中找到客户,点击「管理客户设备」图标;
- 设备已归属该客户。

可在创建设备时即指定客户为所有者,步骤如下:
- 点击表格右上角「+」图标,从下拉菜单选择「添加新设备」;
- 输入设备名称(如「Thermostat」),在「分配至客户」字段选择客户,点击「添加」;
- 关闭连接检查窗口;
- 设备已创建,并已归属所选客户。


步骤 7.3 将仪表盘分配至客户
将仪表盘分享给客户。客户用户对仪表盘仅具只读权限。
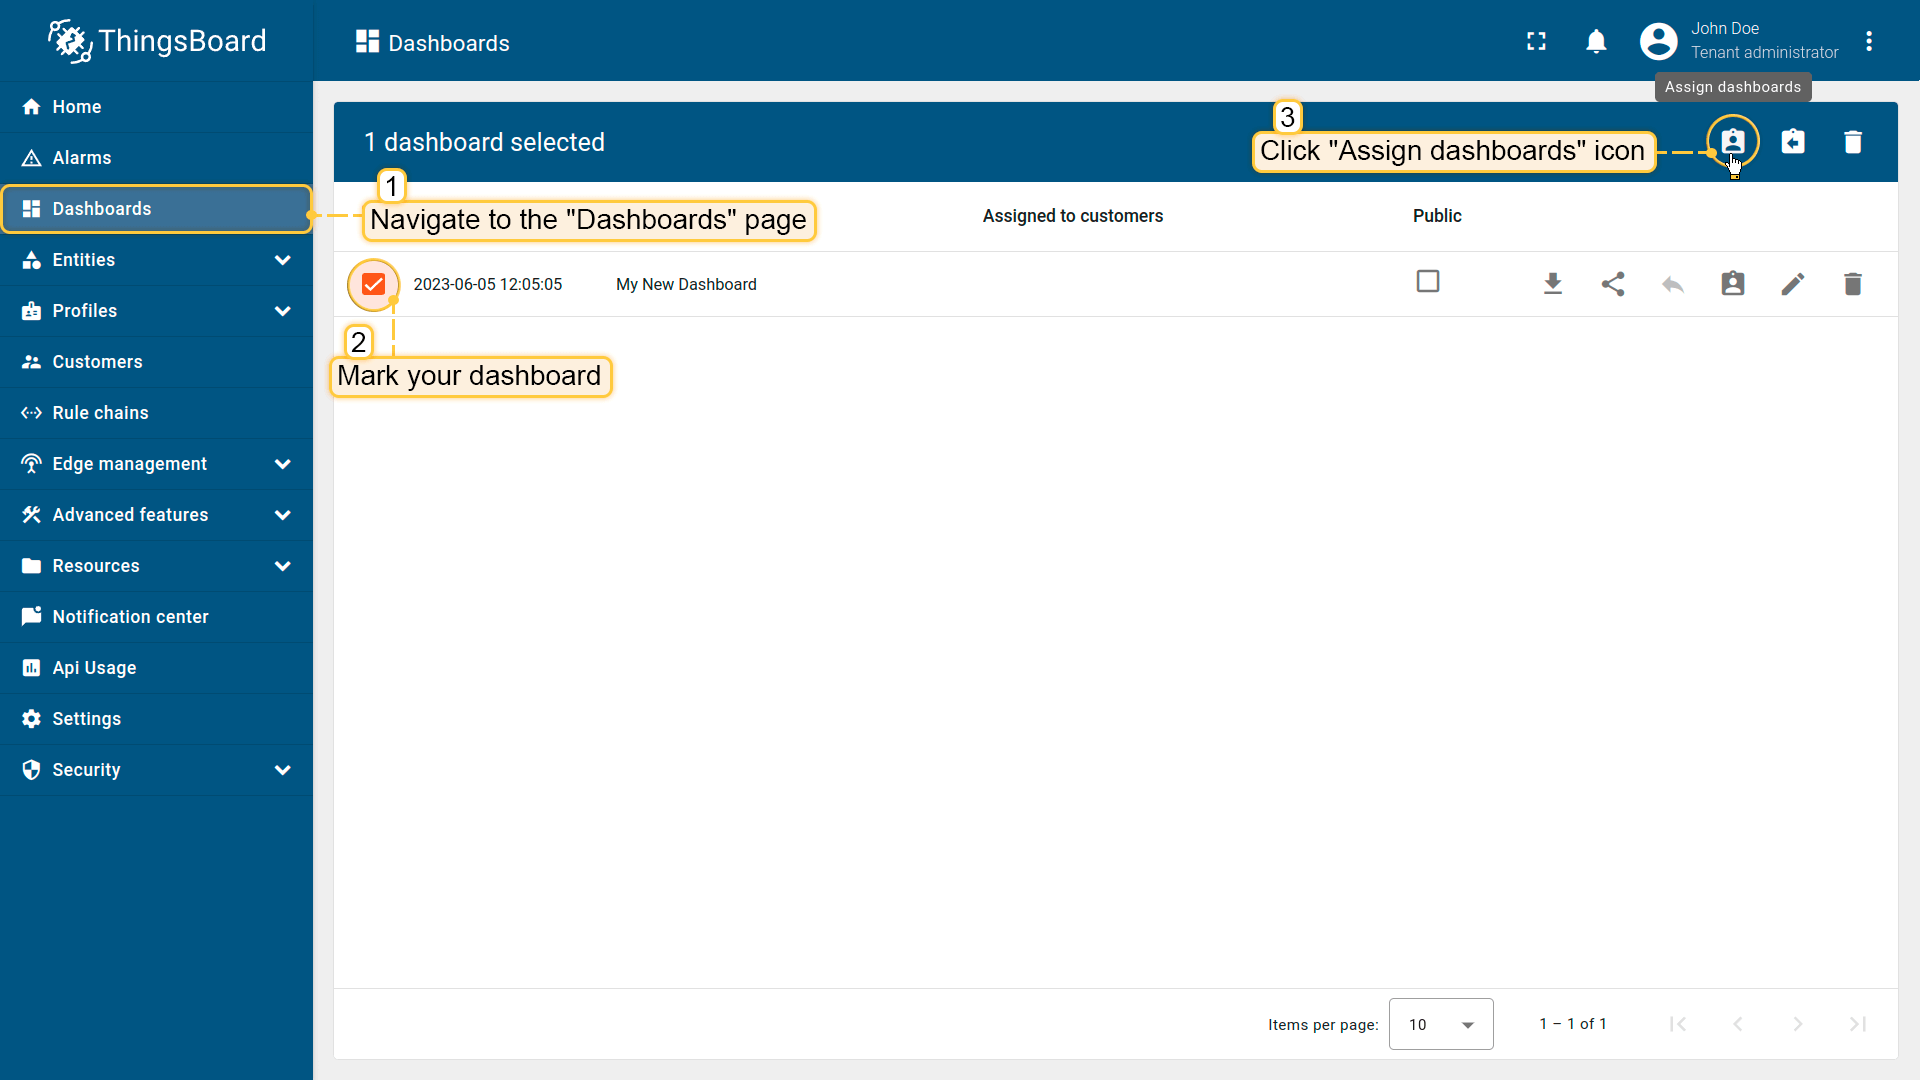
- 打开「仪表盘」页面,勾选仪表盘并点击「分配仪表盘」图标;
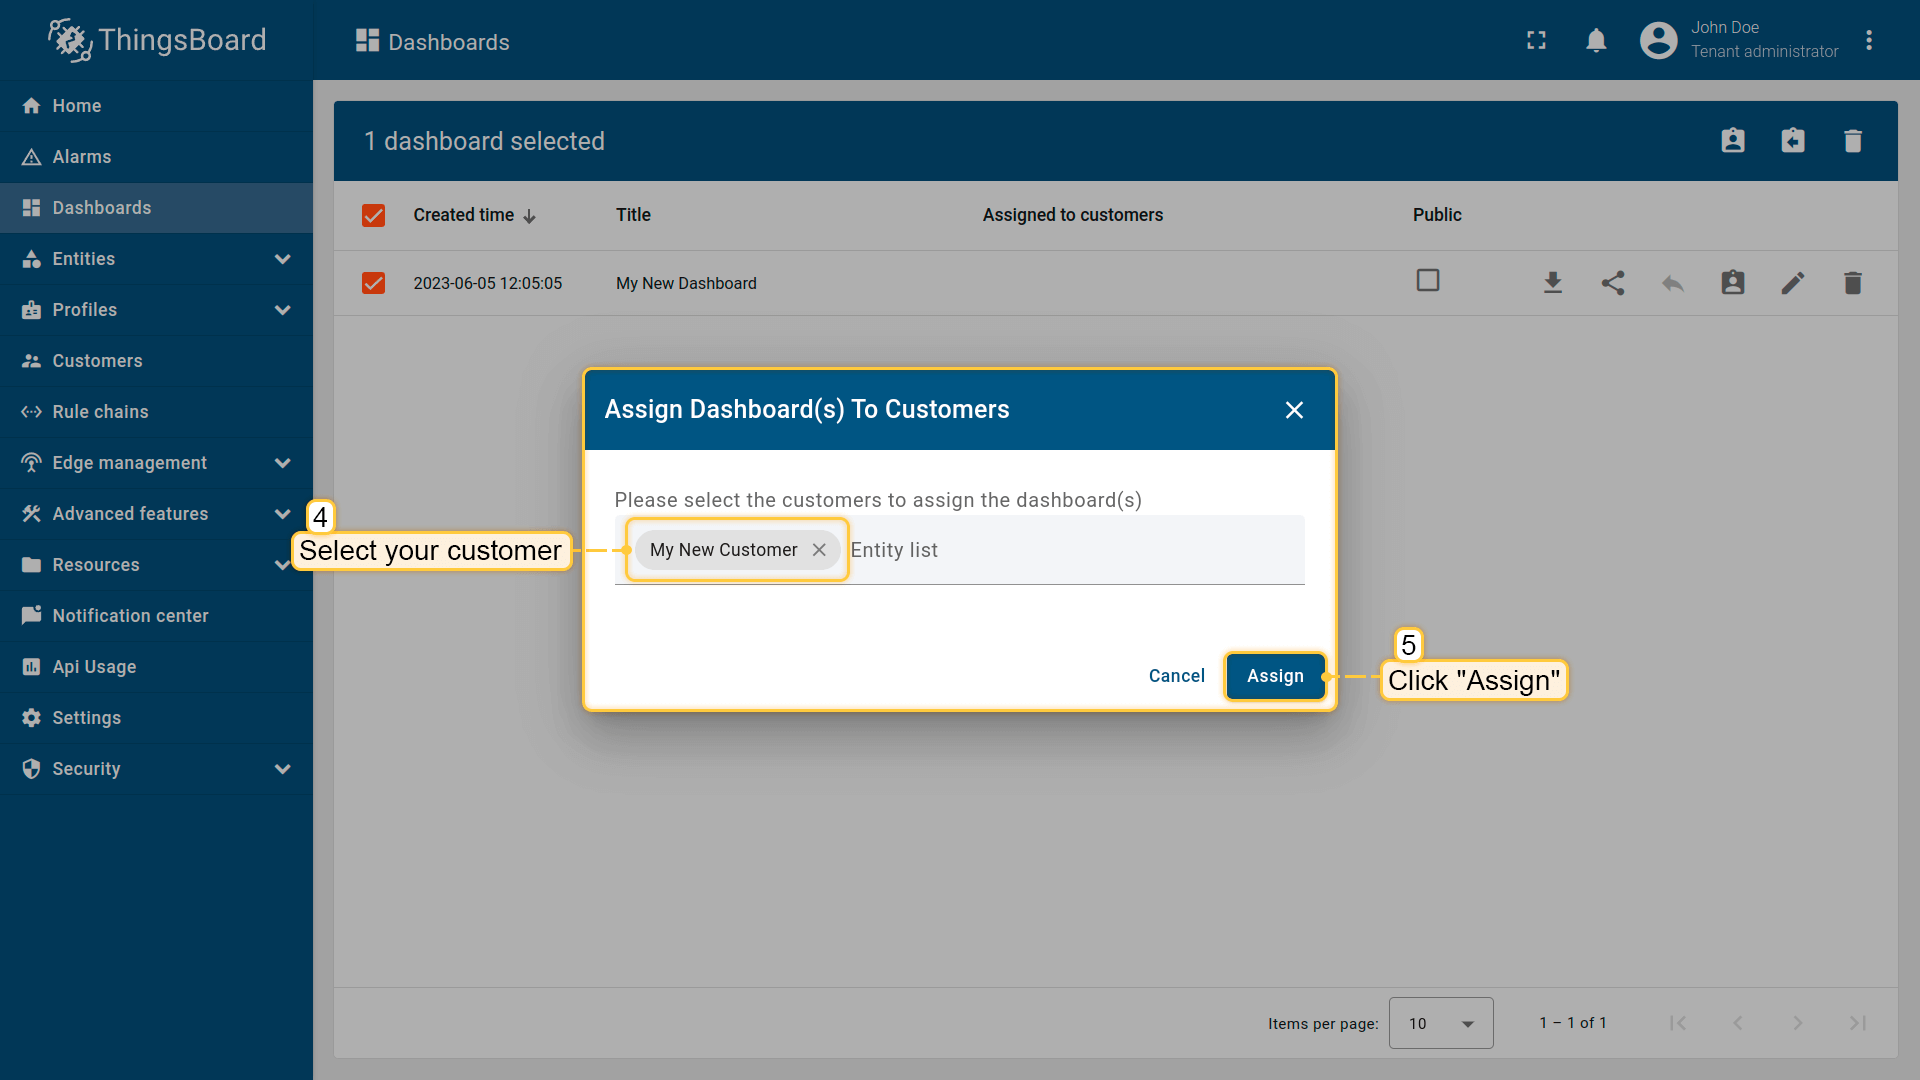
- 勾选「My New Customer」并点击「分配」;
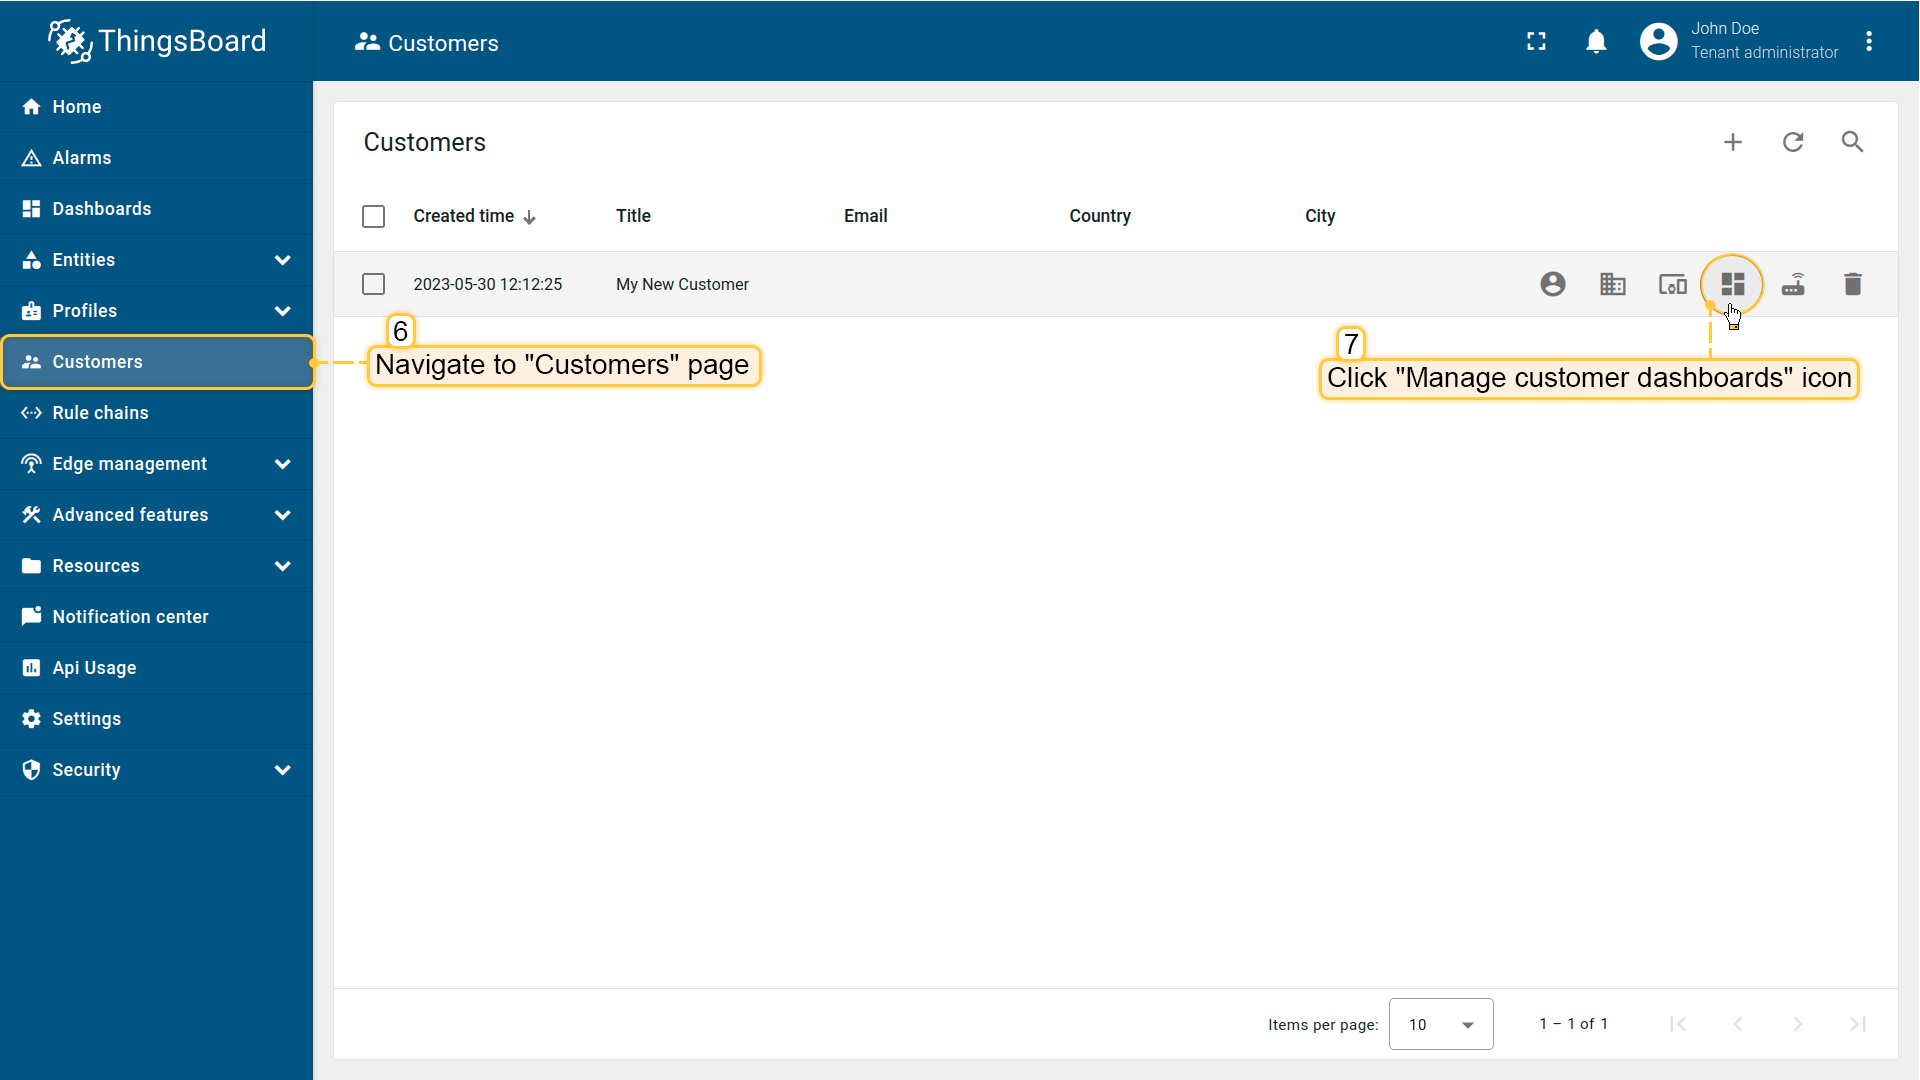
- 进入「客户」页面,点击「My New Customer」的「管理客户仪表盘」图标;
- 「My New Dashboard」已分配给您的客户。

步骤 7.4 创建客户用户
创建归属于该客户、对仪表盘和设备具有read-only权限的用户。
可选择配置用户登录平台 Web UI 后直接显示该仪表盘。
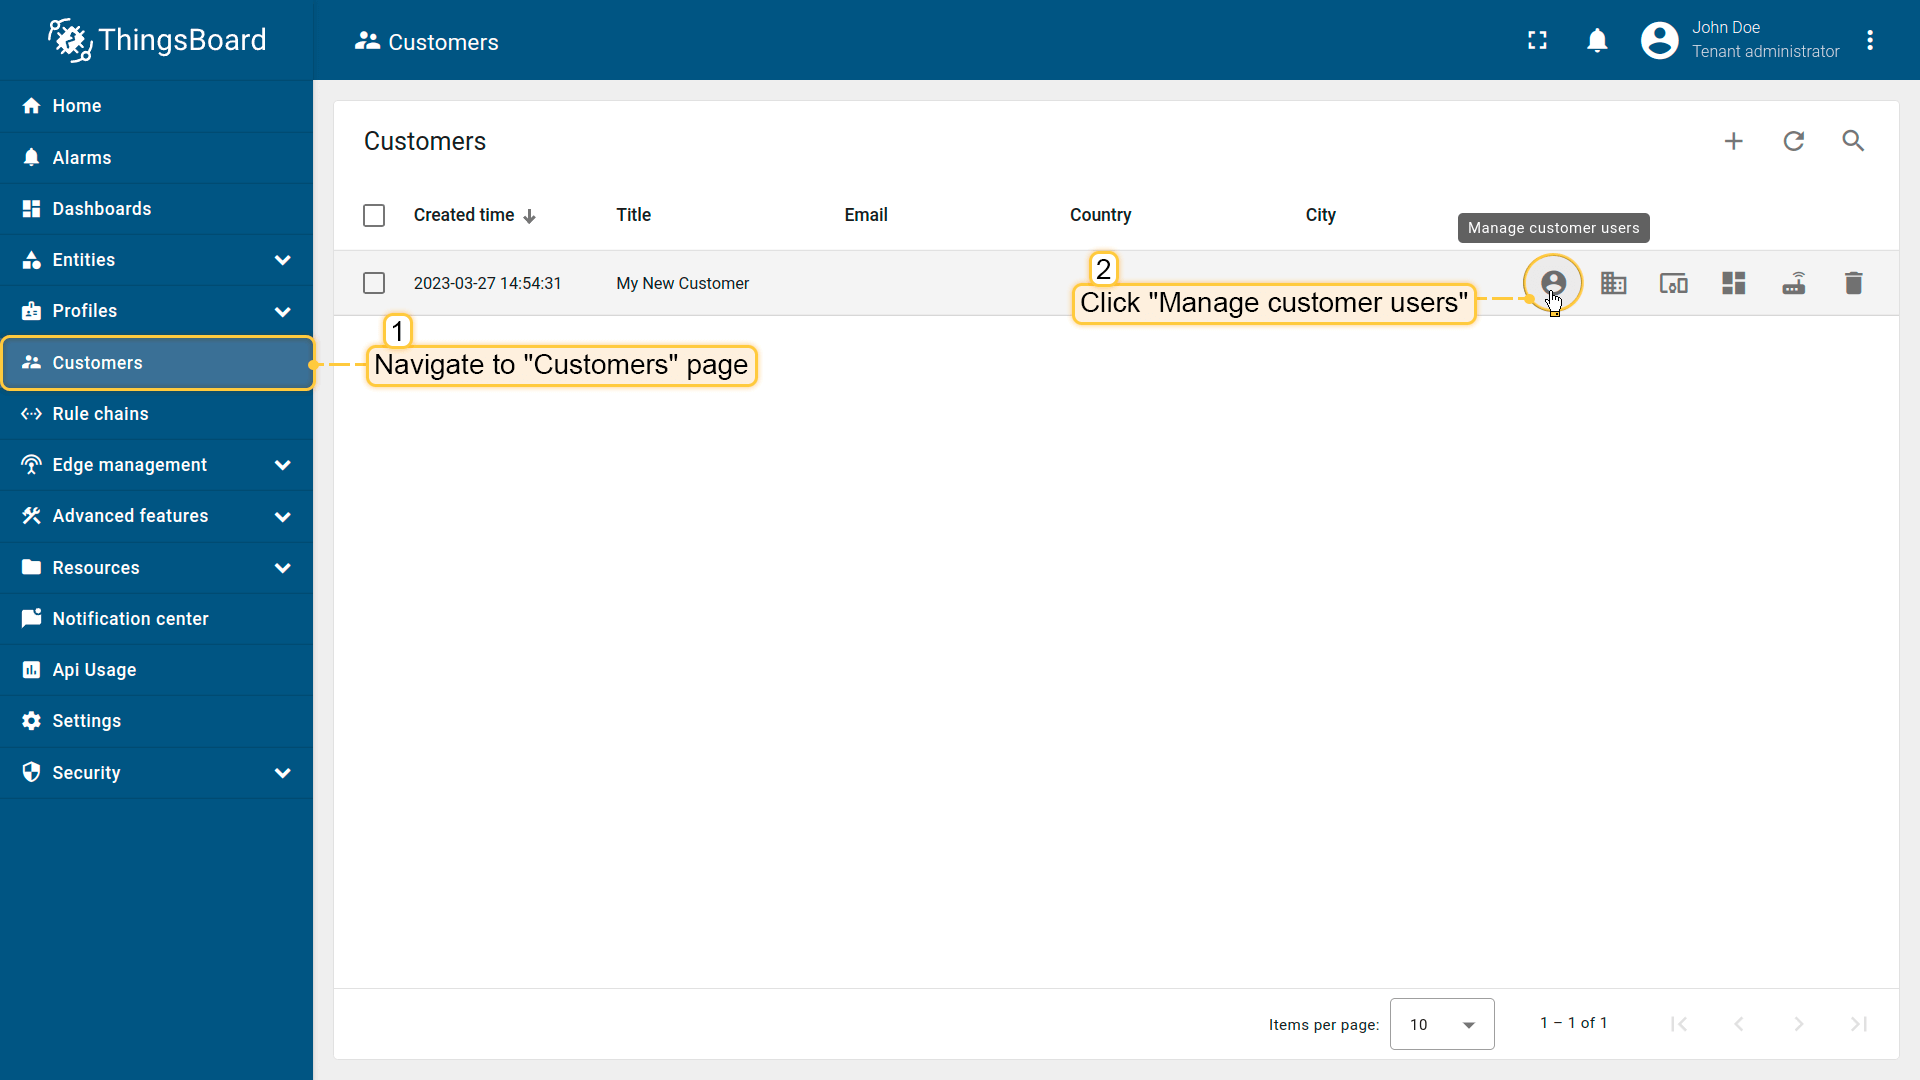
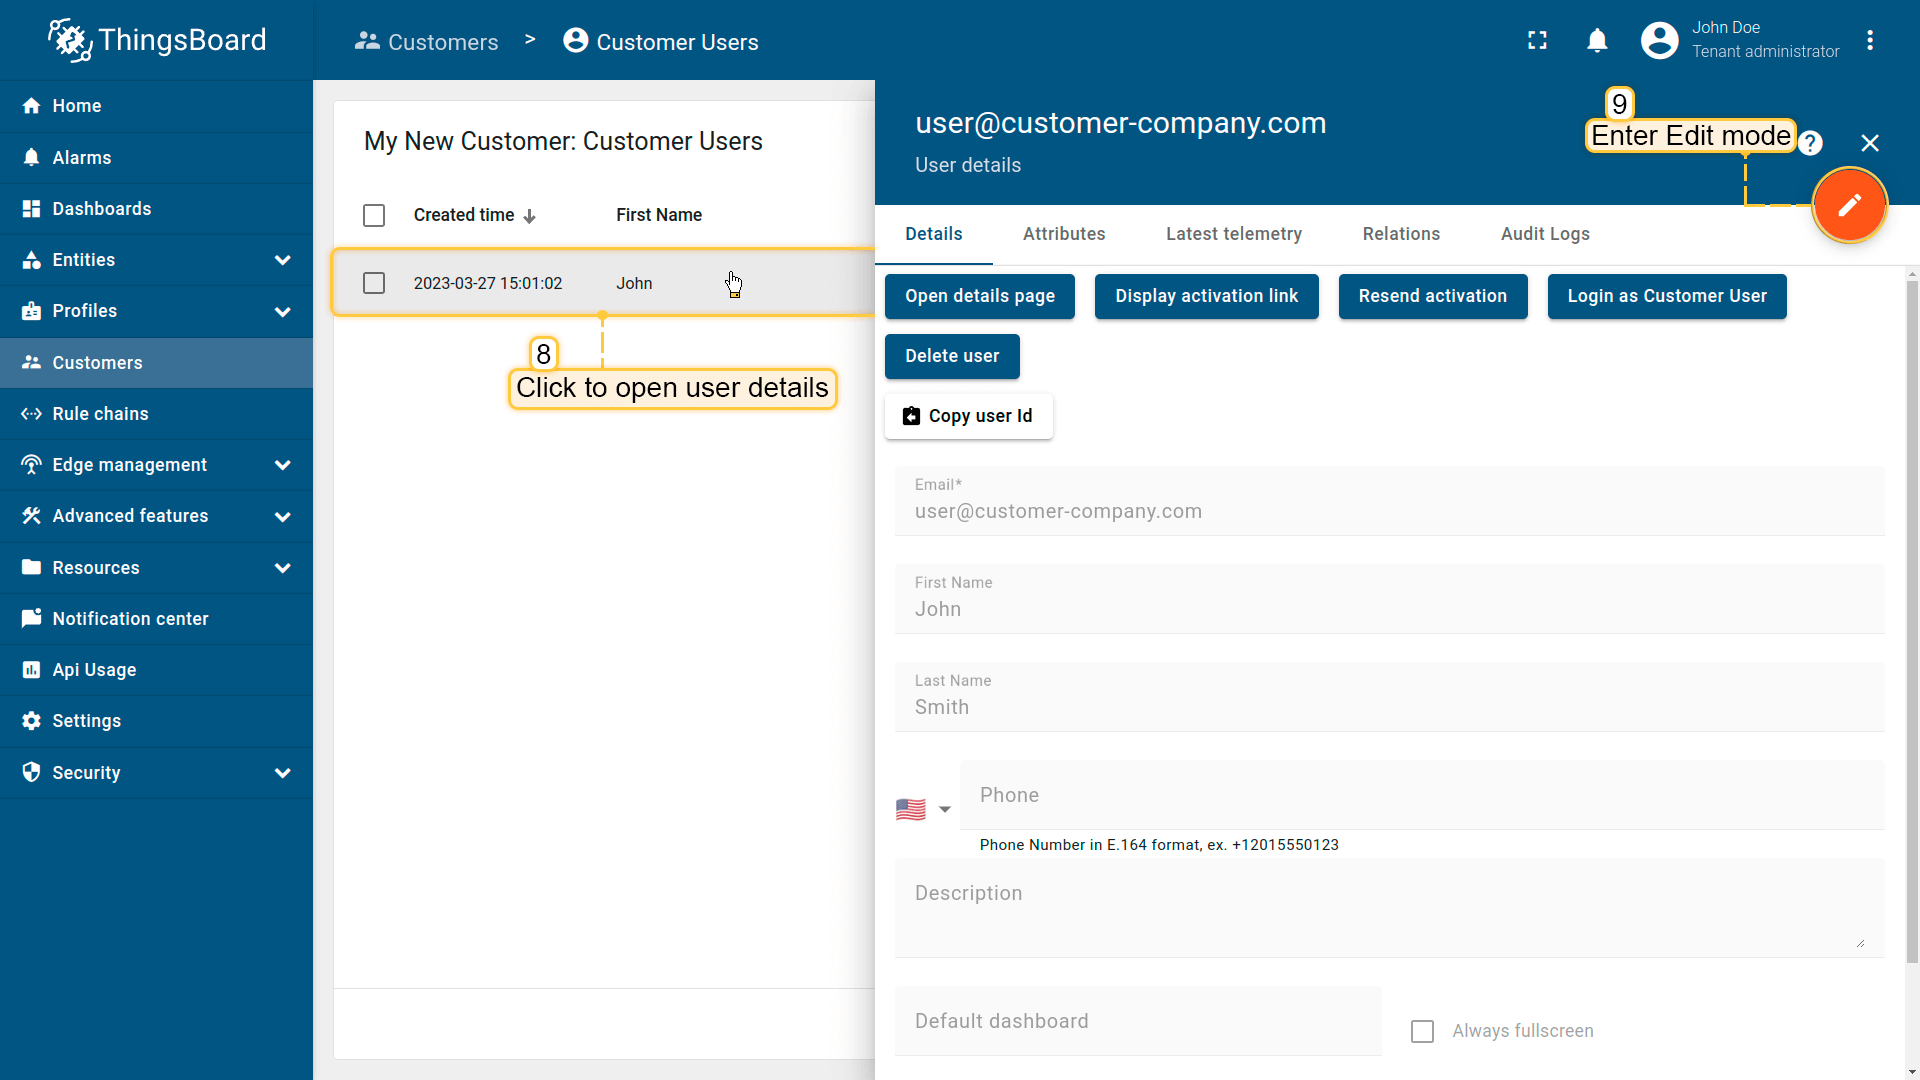
- 进入「客户」页面,在客户列表中找到客户,点击「管理客户用户」图标;
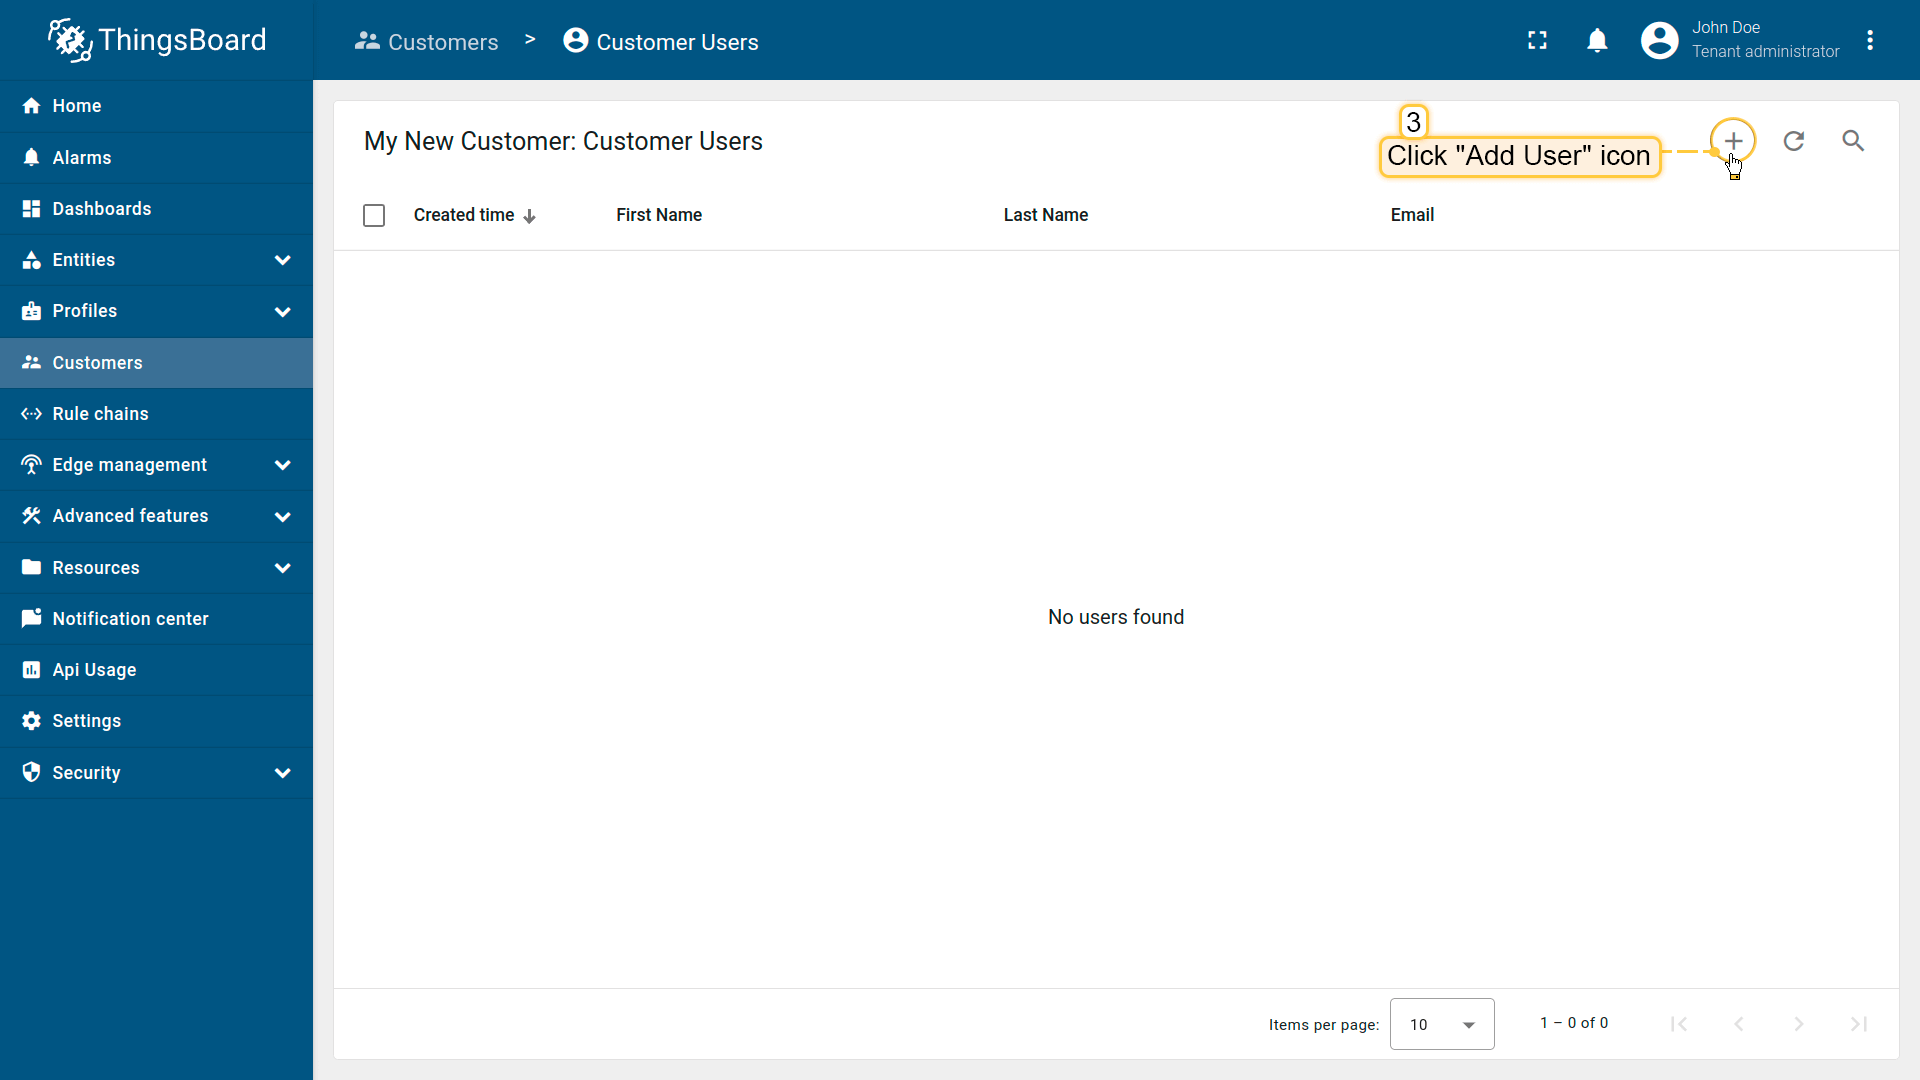
- 点击表格右上角「添加用户」图标;
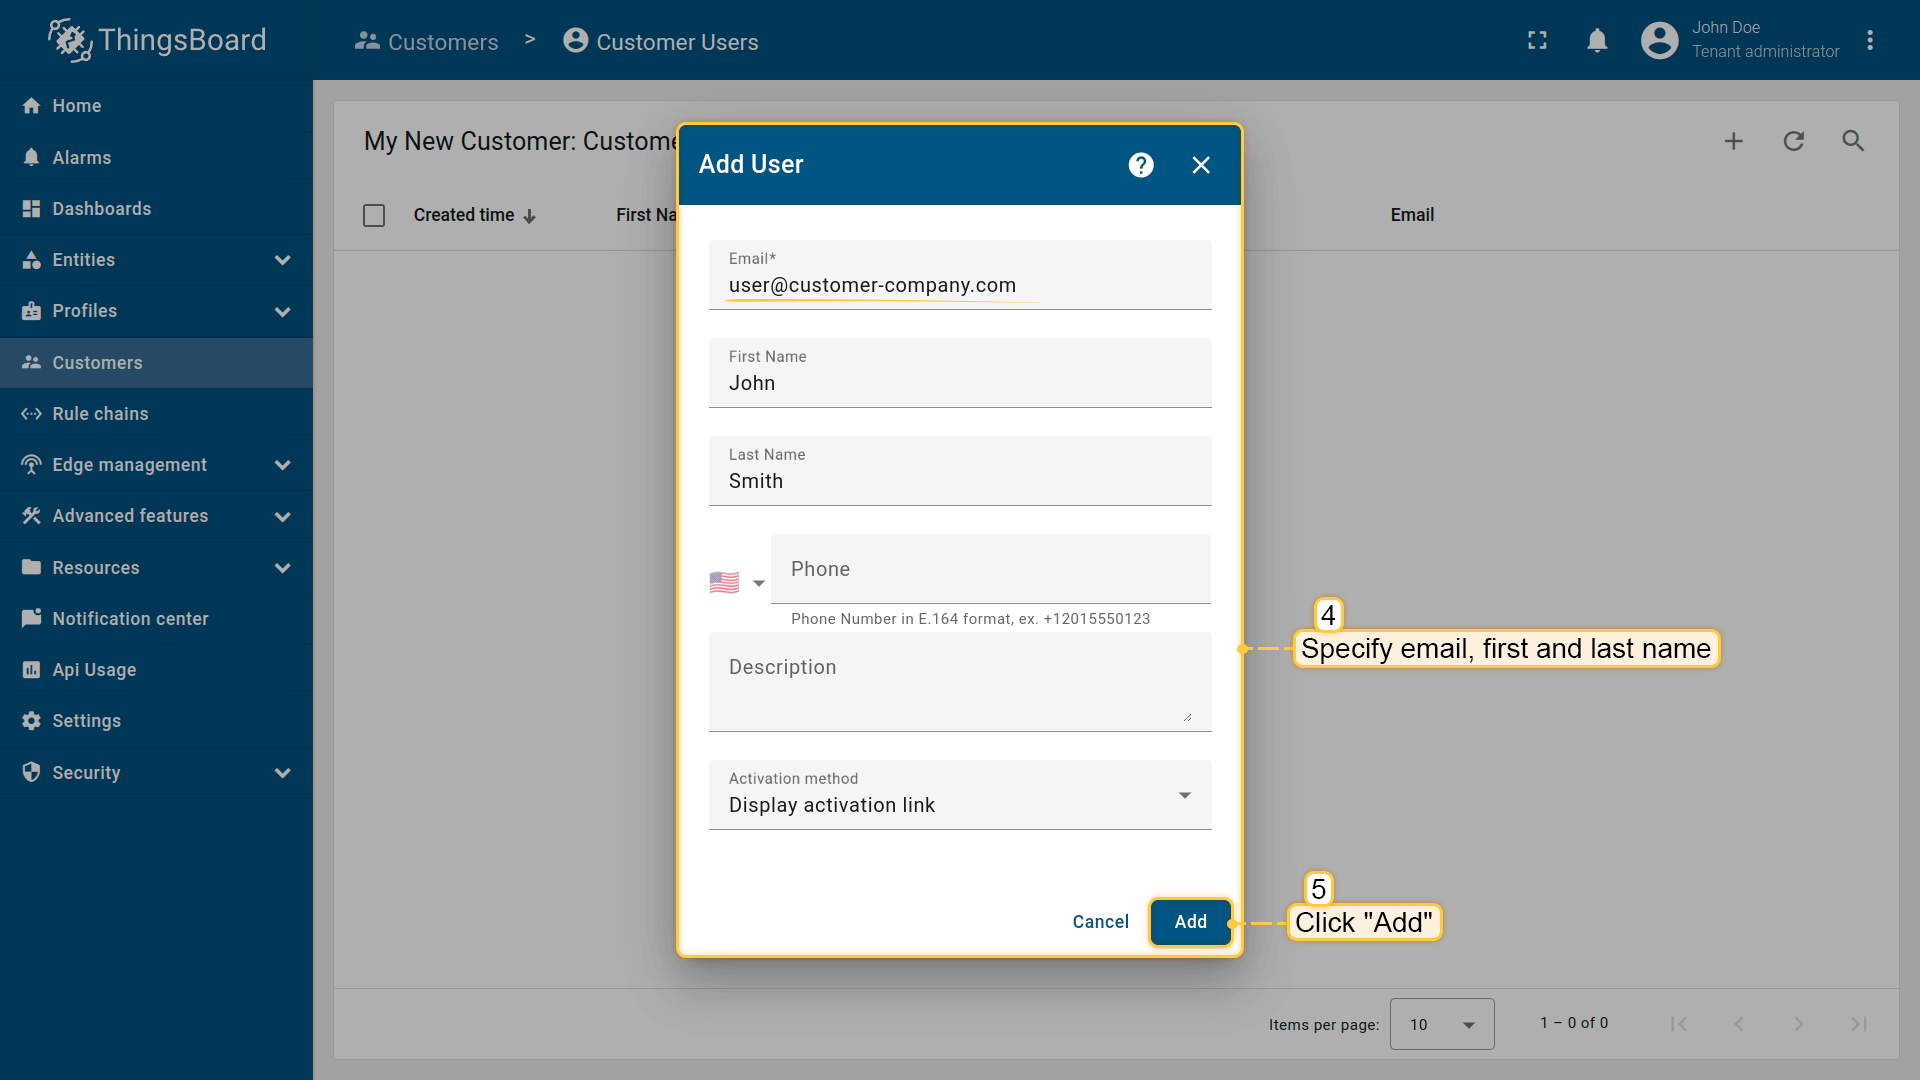
- 输入用于客户用户登录的邮箱,点击「添加」;
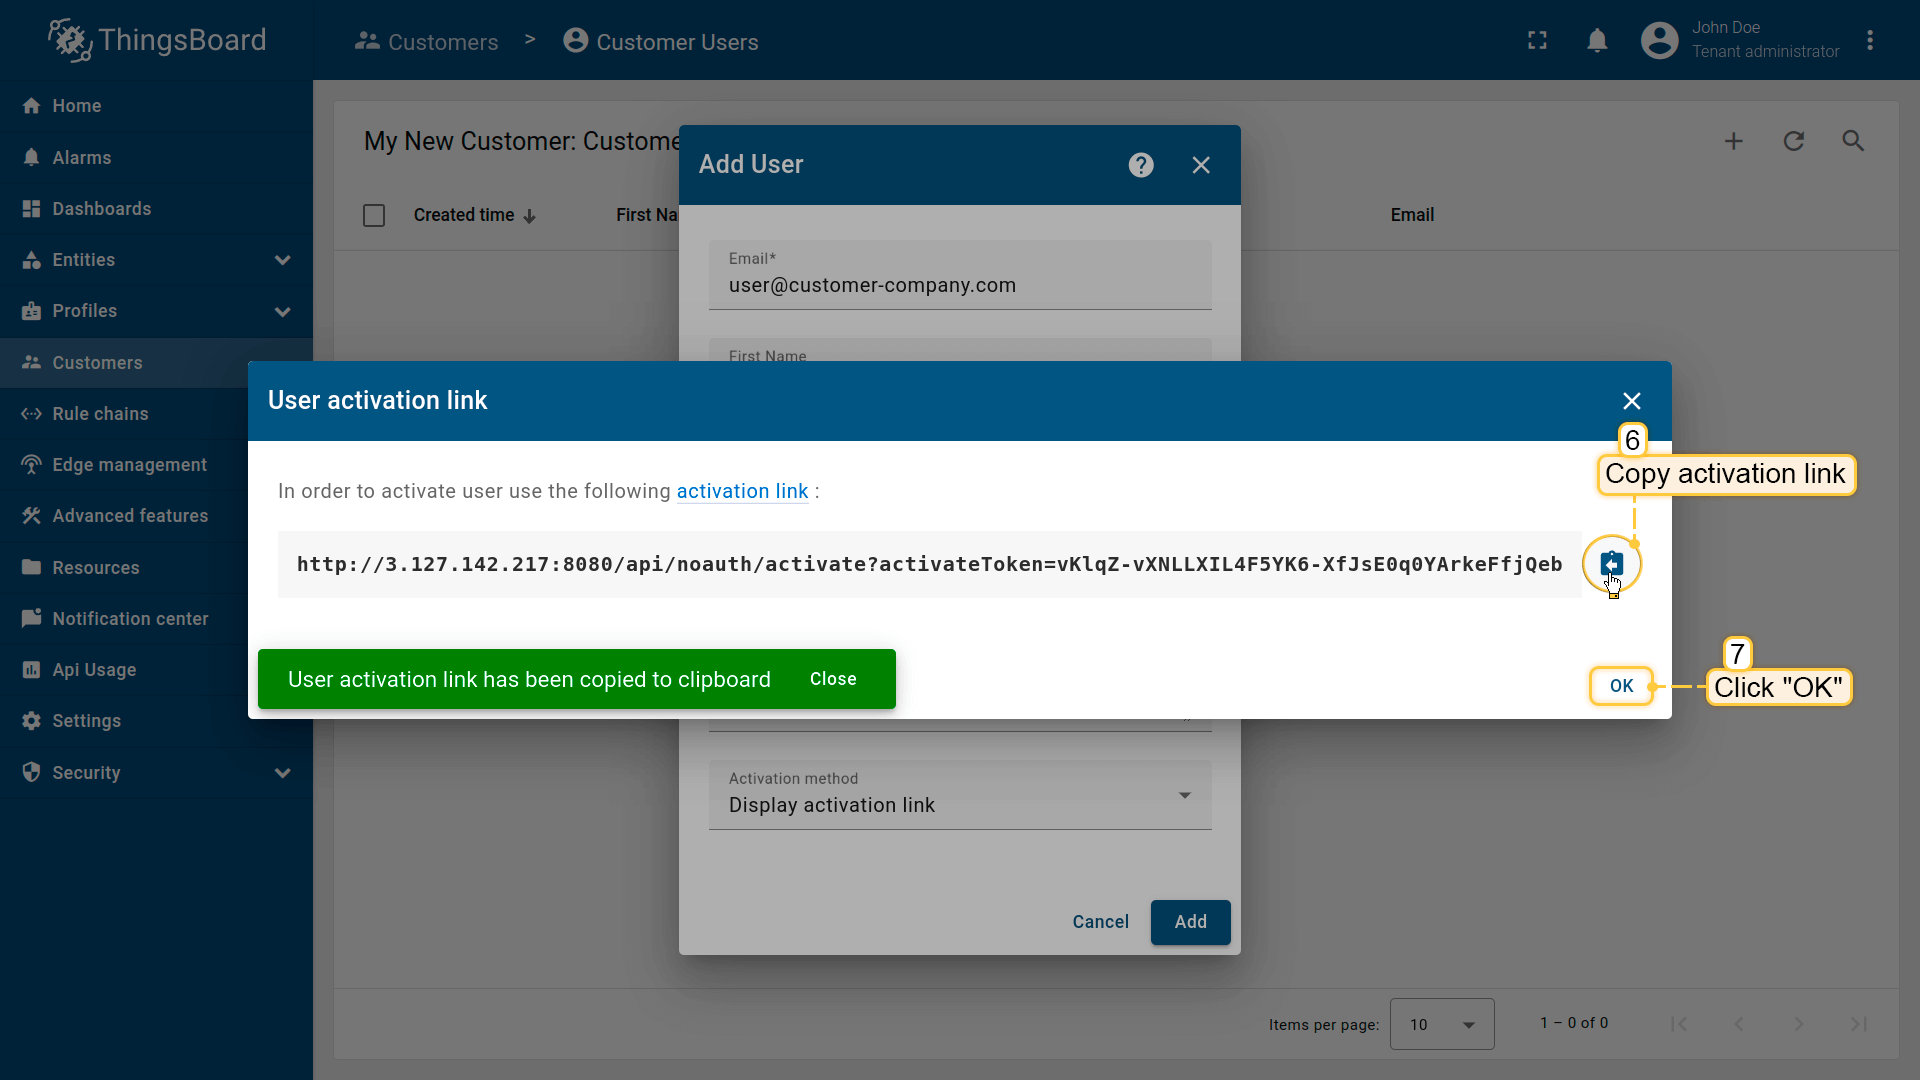
- 复制激活链接并妥善保存,稍后用于设置密码。点击「确定」;
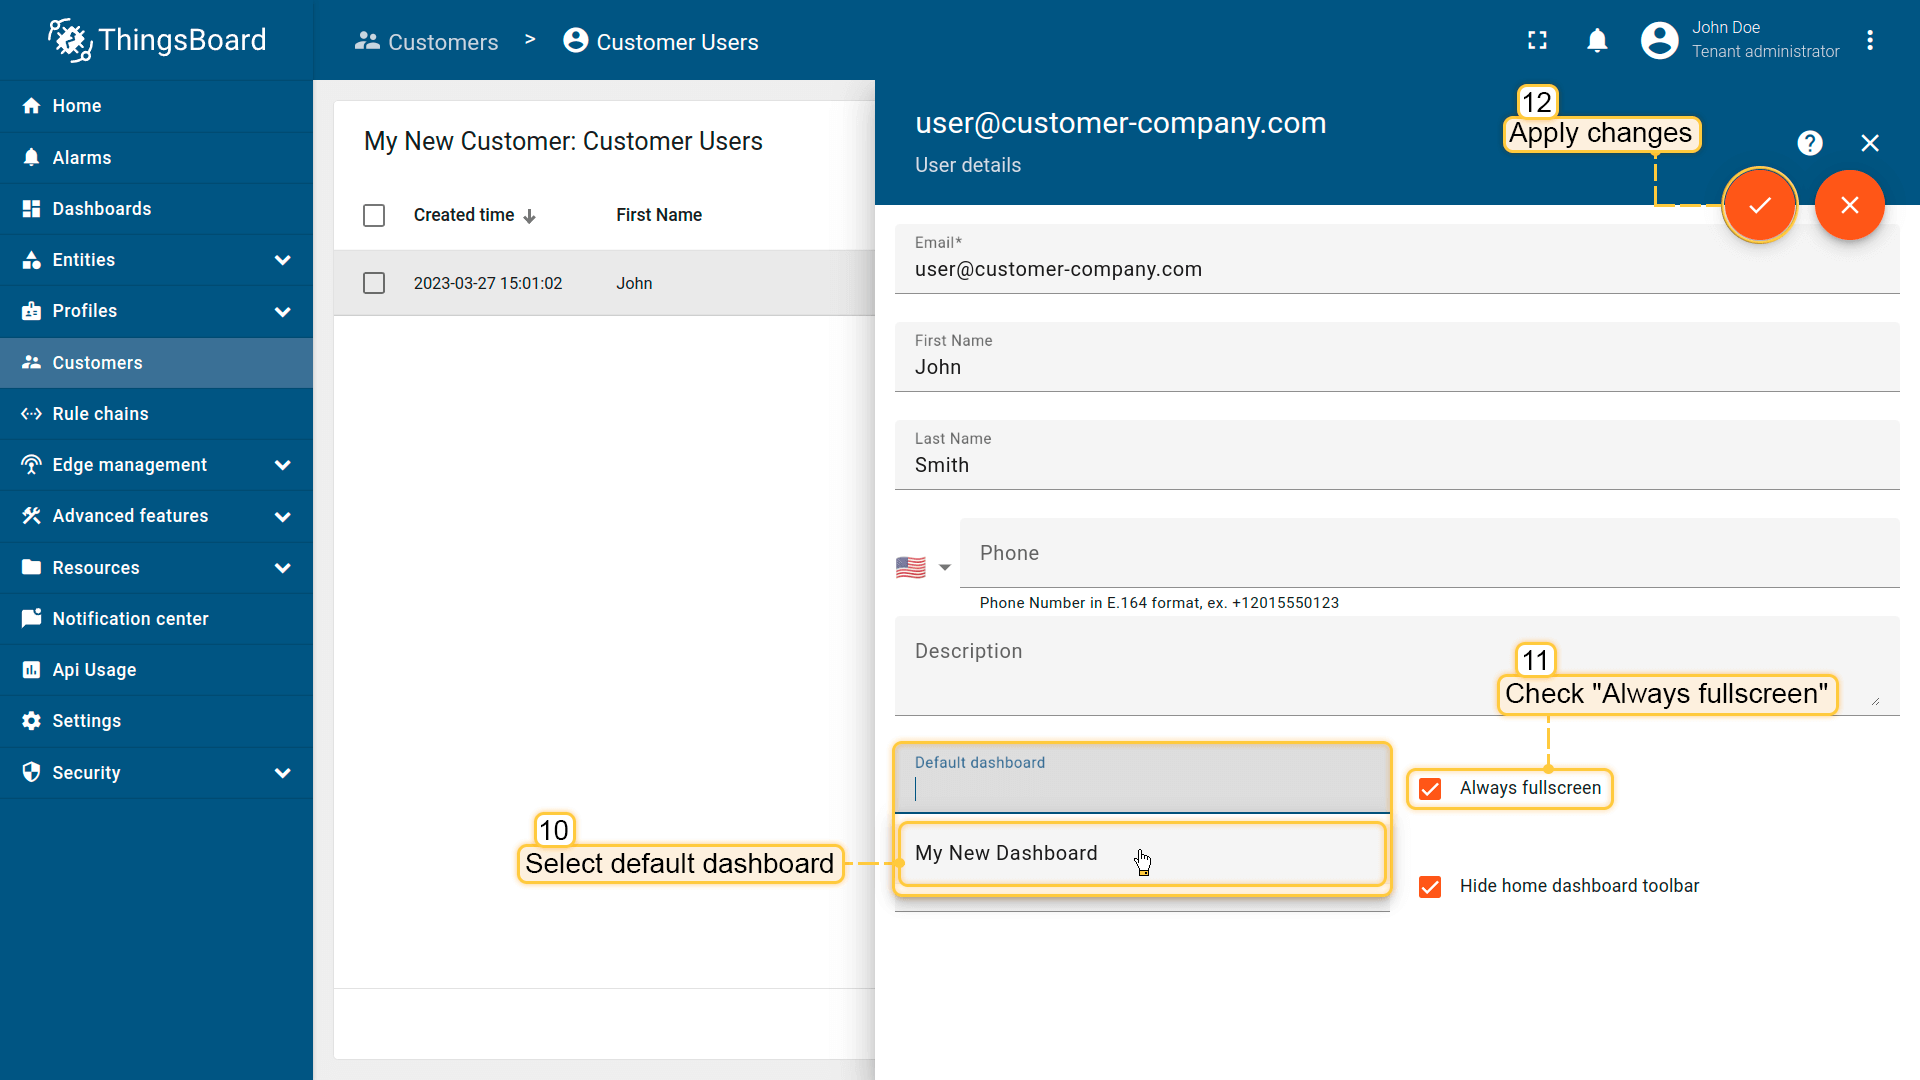
- 点击已创建用户打开详情,点击「铅笔」图标进入编辑模式;
- 将「My New Dashboard」设为默认仪表盘并勾选「始终全屏」。应用更改。
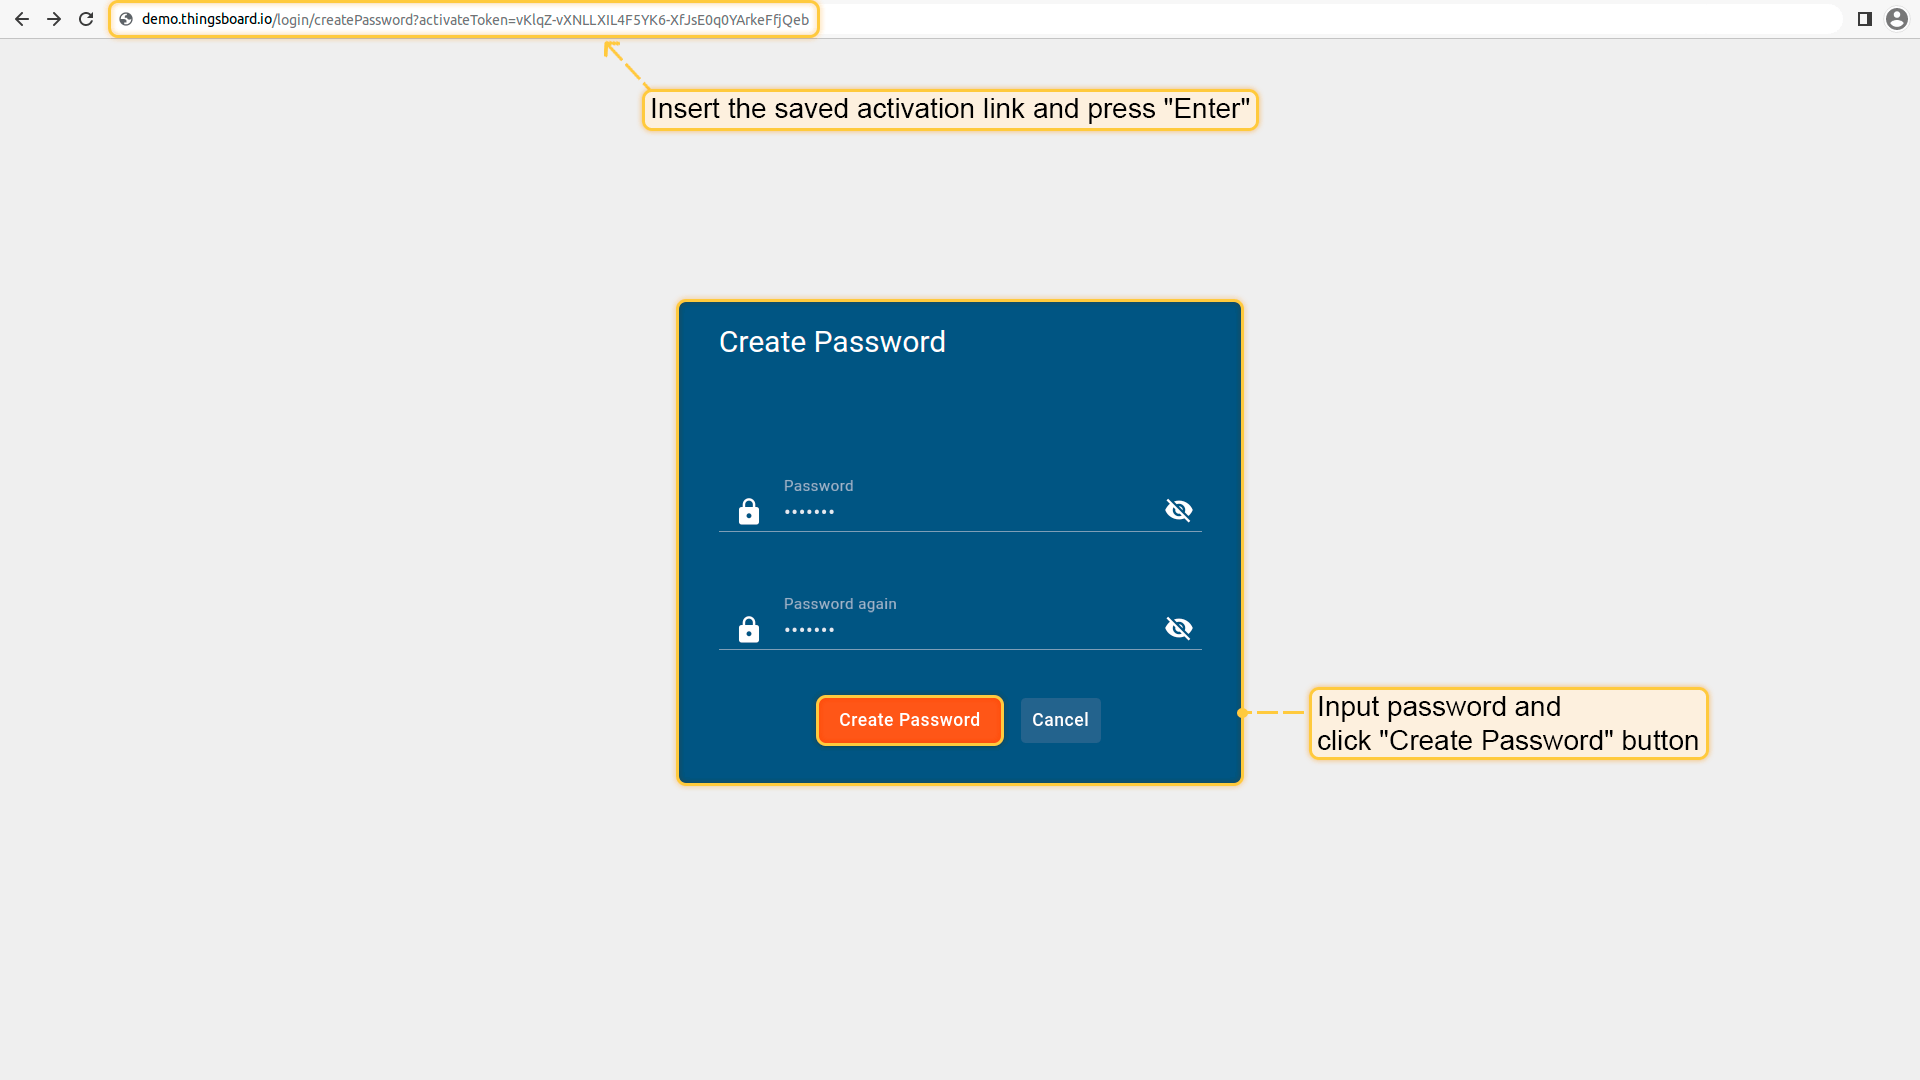
步骤 7.5 激活客户用户
最后以客户用户身份登录 ThingsBoard。
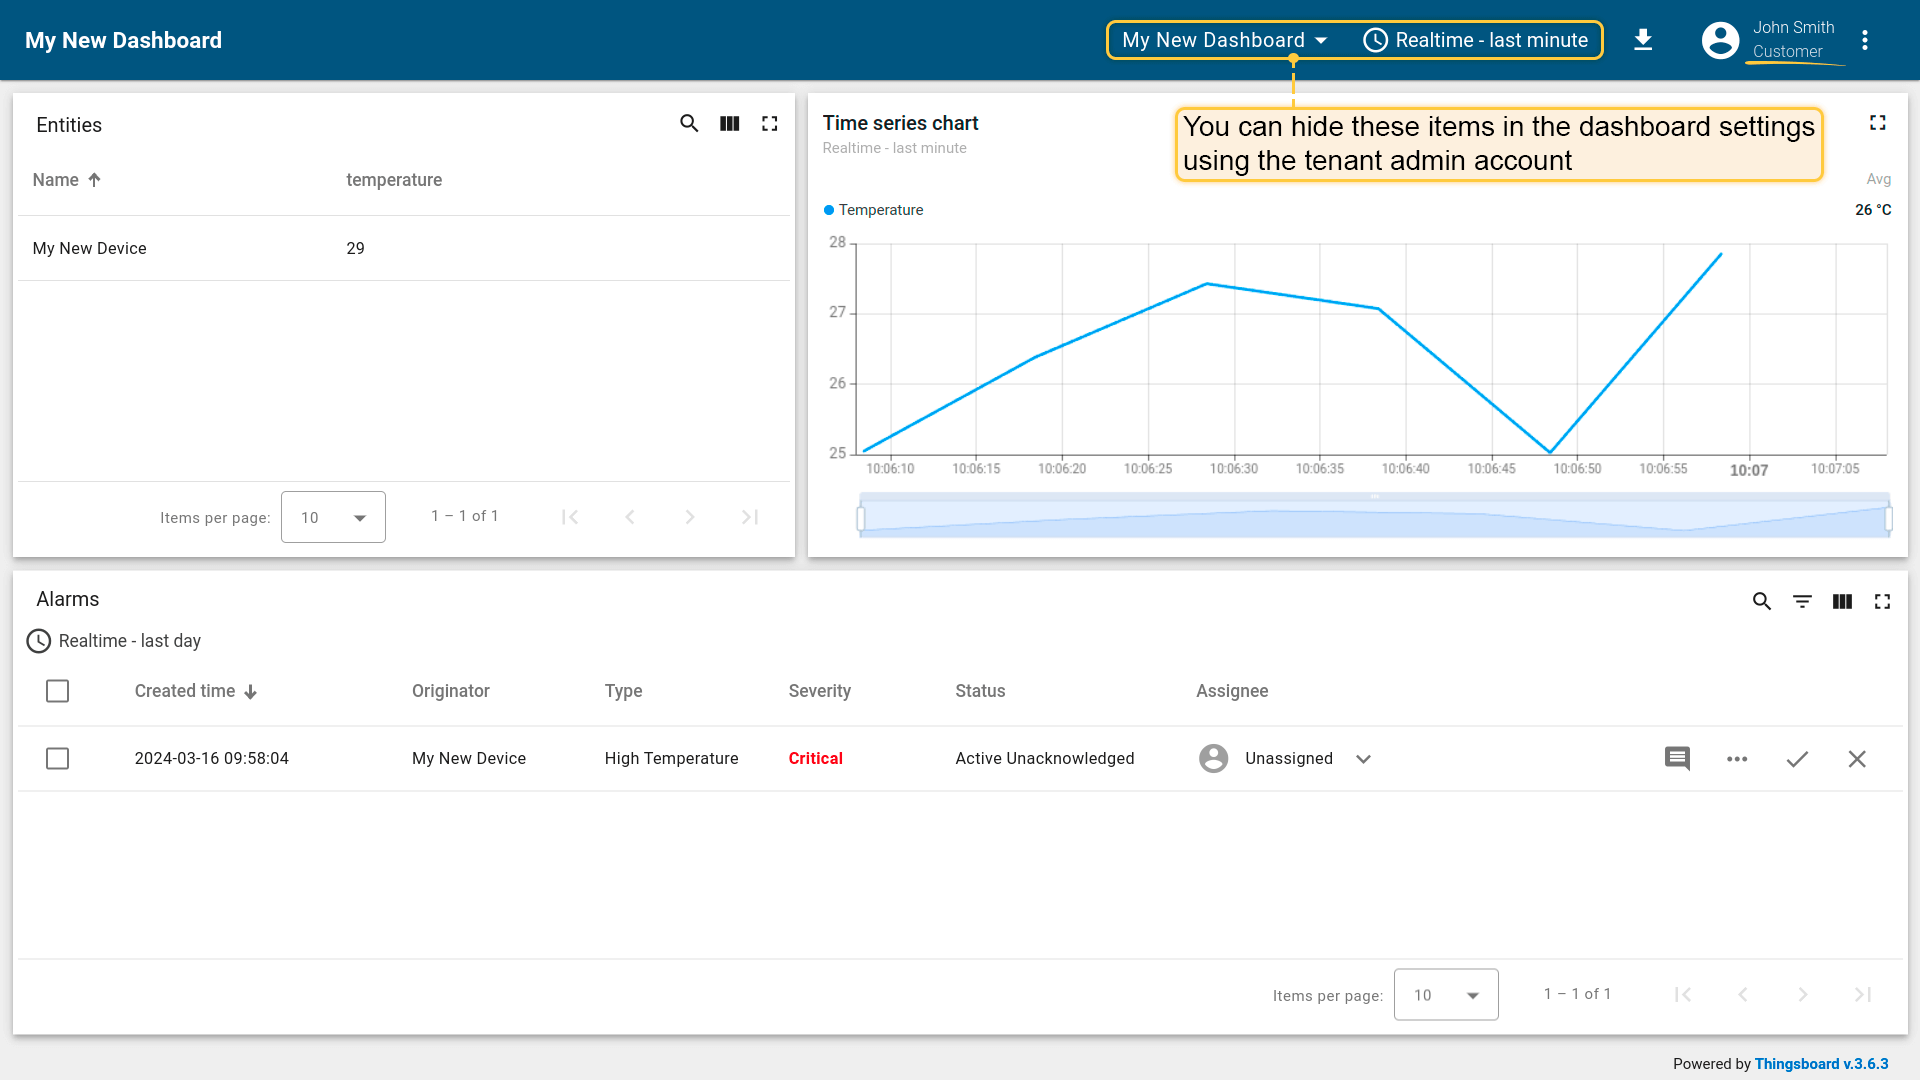
- 将之前复制的链接粘贴到新浏览器标签页,按 Enter。输入两次密码并点击「创建密码」。
- 您已以客户用户身份登录,可浏览数据并确认/清除告警。
下一步
-
连接设备 - 根据连接技术或方案学习如何连接设备。
-
数据可视化 - 配置ThingsBoard复杂仪表盘的说明。
-
数据处理与操作 - 学习使用ThingsBoard规则引擎。
-
IoT数据分析 - 学习使用规则引擎执行基本分析任务。
-
高级功能 - 了解ThingsBoard高级功能。
-
贡献与开发 - 了解ThingsBoard贡献与开发。