仅专业版支持Platform Integrations功能。
请使用ThingsBoard Cloud或自行安装平台实例。
概述
AWS IoT集成可从AWS IoT后端向ThingsBoard流式传输数据,并将设备负载转换为ThingsBoard格式。AWS IoT主要负责接收所有消息(作为broker——消息服务器)、过滤、判断订阅者,然后将消息发送给所有订阅者,本集成即为其订阅者之一。
AWS IOT
您需要提前准备好一个AWS账户,并在其上进行一些配置。为了在服务与ThingsBoard之间建立正确且安全的连接,您需要创建策略(Policies)、设备(Things)以及相应的证书(Certificates)。
创建策略(Create Policy)
策略是AWS中的一个对象,当它与实体或资源关联时,用于定义其权限。策略中的权限决定了请求是被允许还是被拒绝。大多数策略在AWS中以JSON文档的形式存储。
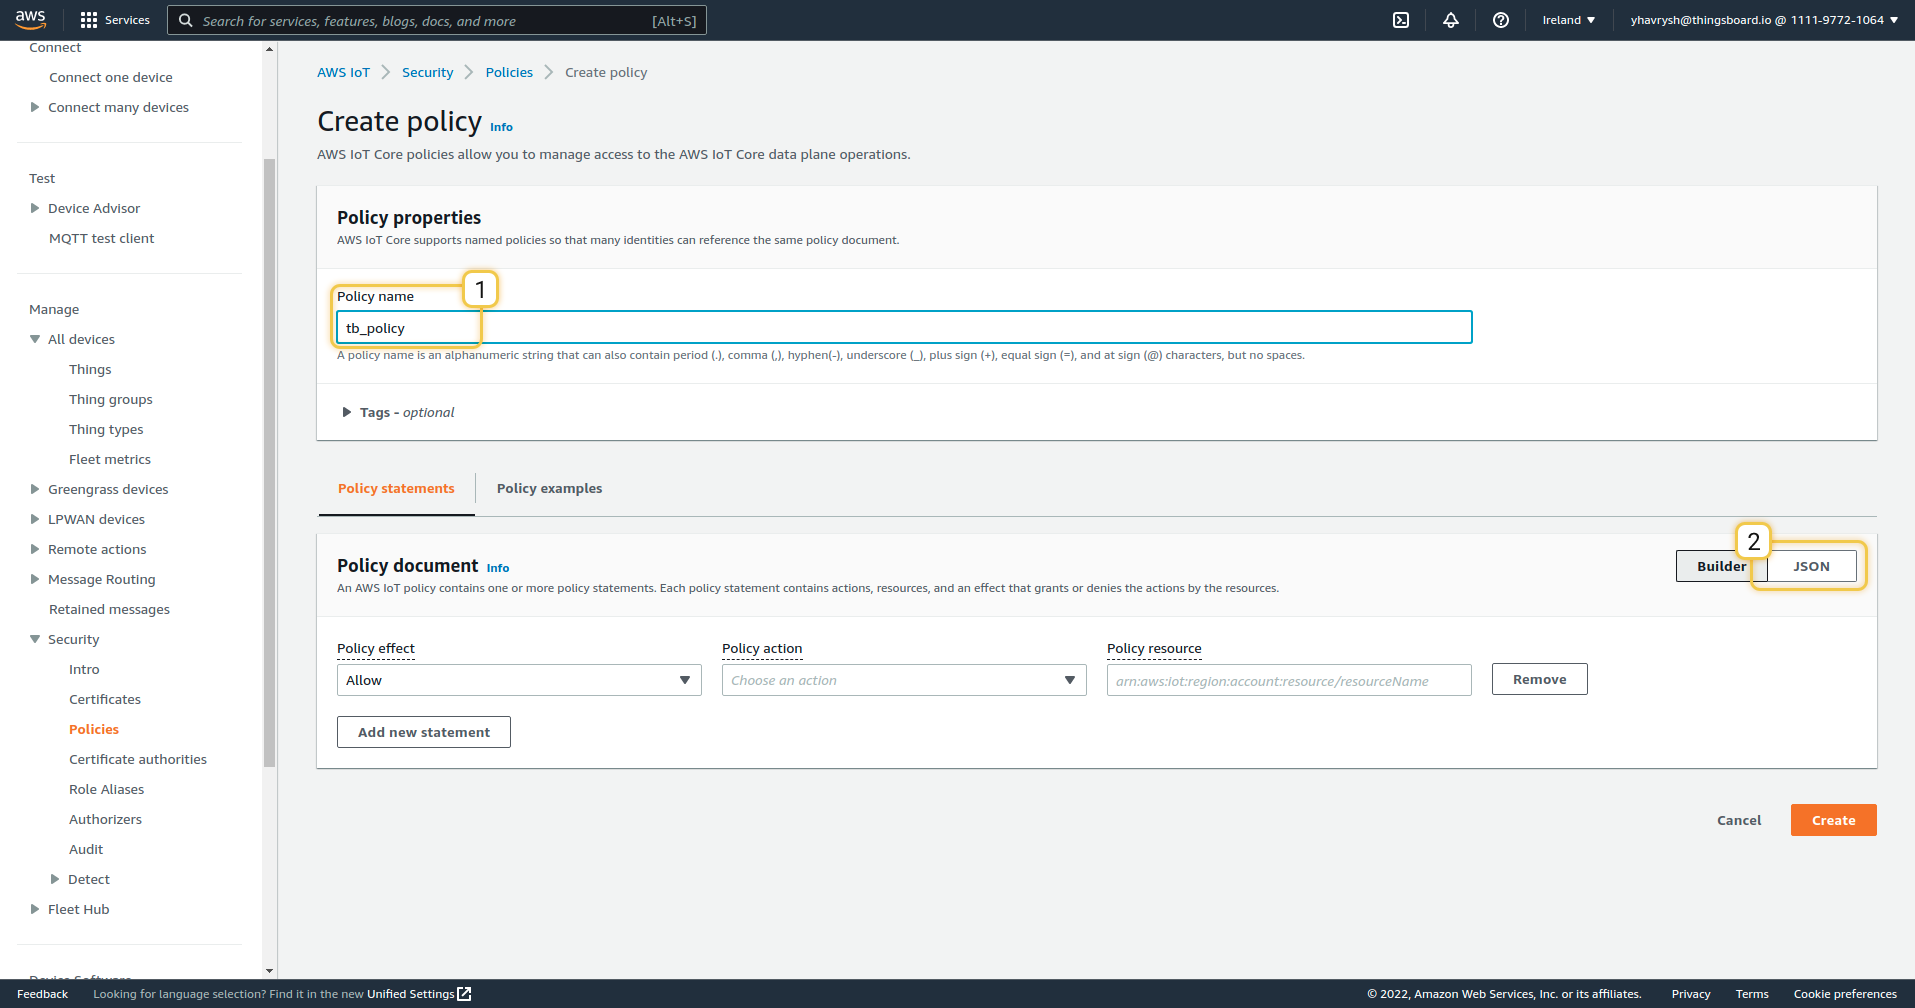
要添加新策略,请在主菜单中选择Security - Policies,然后点击Create Policy按钮。

您将被重定向到策略创建页面,在此需要指定Policy Name并切换到JSON类型。
在Policy document字段中,您需要粘贴以下代码,并替换为您自己的profile ID。
请务必将YOUR_REGION和YOUR_AWS_ID替换为您的区域和账户ID,
(例如区域和ID”
策略文档示例:
1
2
3
4
5
6
7
8
9
10
11
12
13
14
15
16
17
18
19
20
21
22
23
24
25
26
27
28
29
30
31
32
33
{
  "Version": "2012-10-17",
  "Statement": [
    {
      "Effect": "Allow",
      "Action": [
        "iot:Publish",
        "iot:Receive"
      ],
      "Resource": [
        "arn:aws:iot:YOUR_REGION:YOUR_AWS_ID:topic/*"
      ]
    },
    {
      "Effect": "Allow",
      "Action": [
        "iot:Subscribe"
      ],
      "Resource": [
        "arn:aws:iot:YOUR_REGION:YOUR_AWS_ID:topicfilter/*"
      ]
    },
    {
      "Effect": "Allow",
      "Action": [
        "iot:Connect"
      ],
      "Resource": [
        "arn:aws:iot:YOUR_REGION:YOUR_AWS_ID:client/*"
      ]
    }
  ]
}
当您登录AWS IoT账户时,您的区域会显示在URL中。
例如:https://
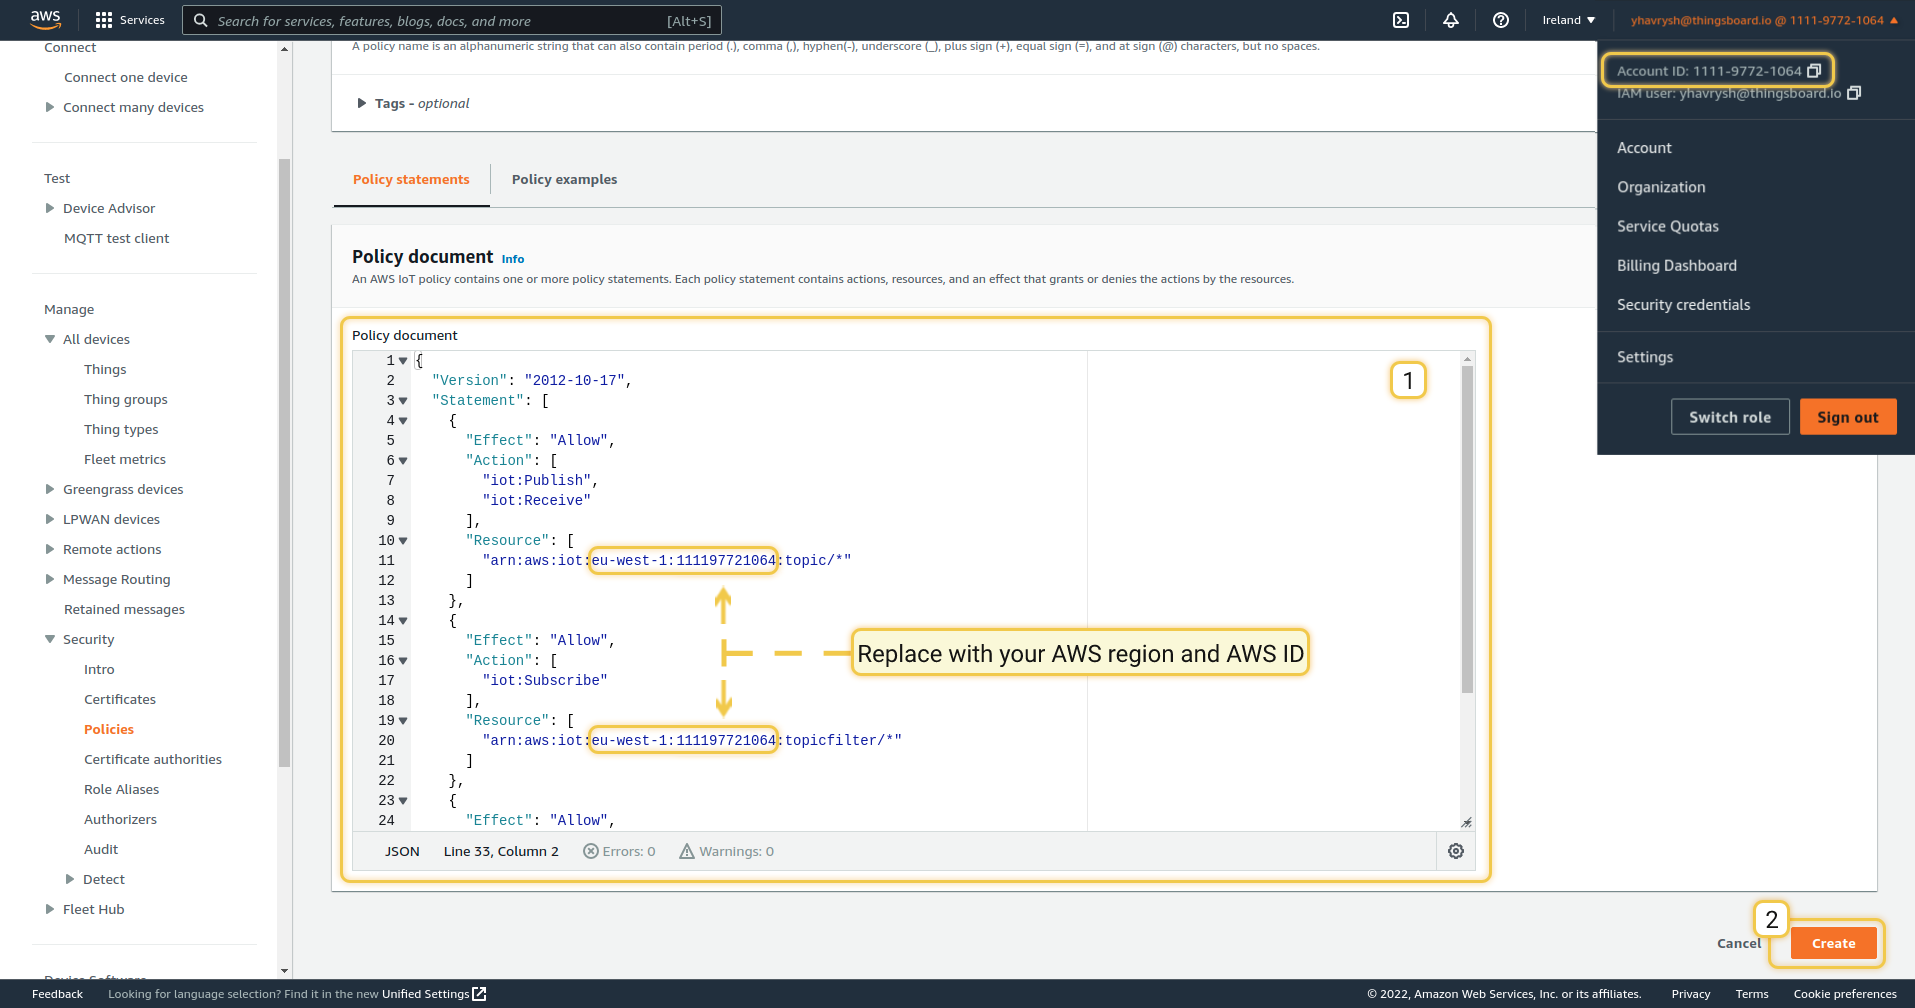
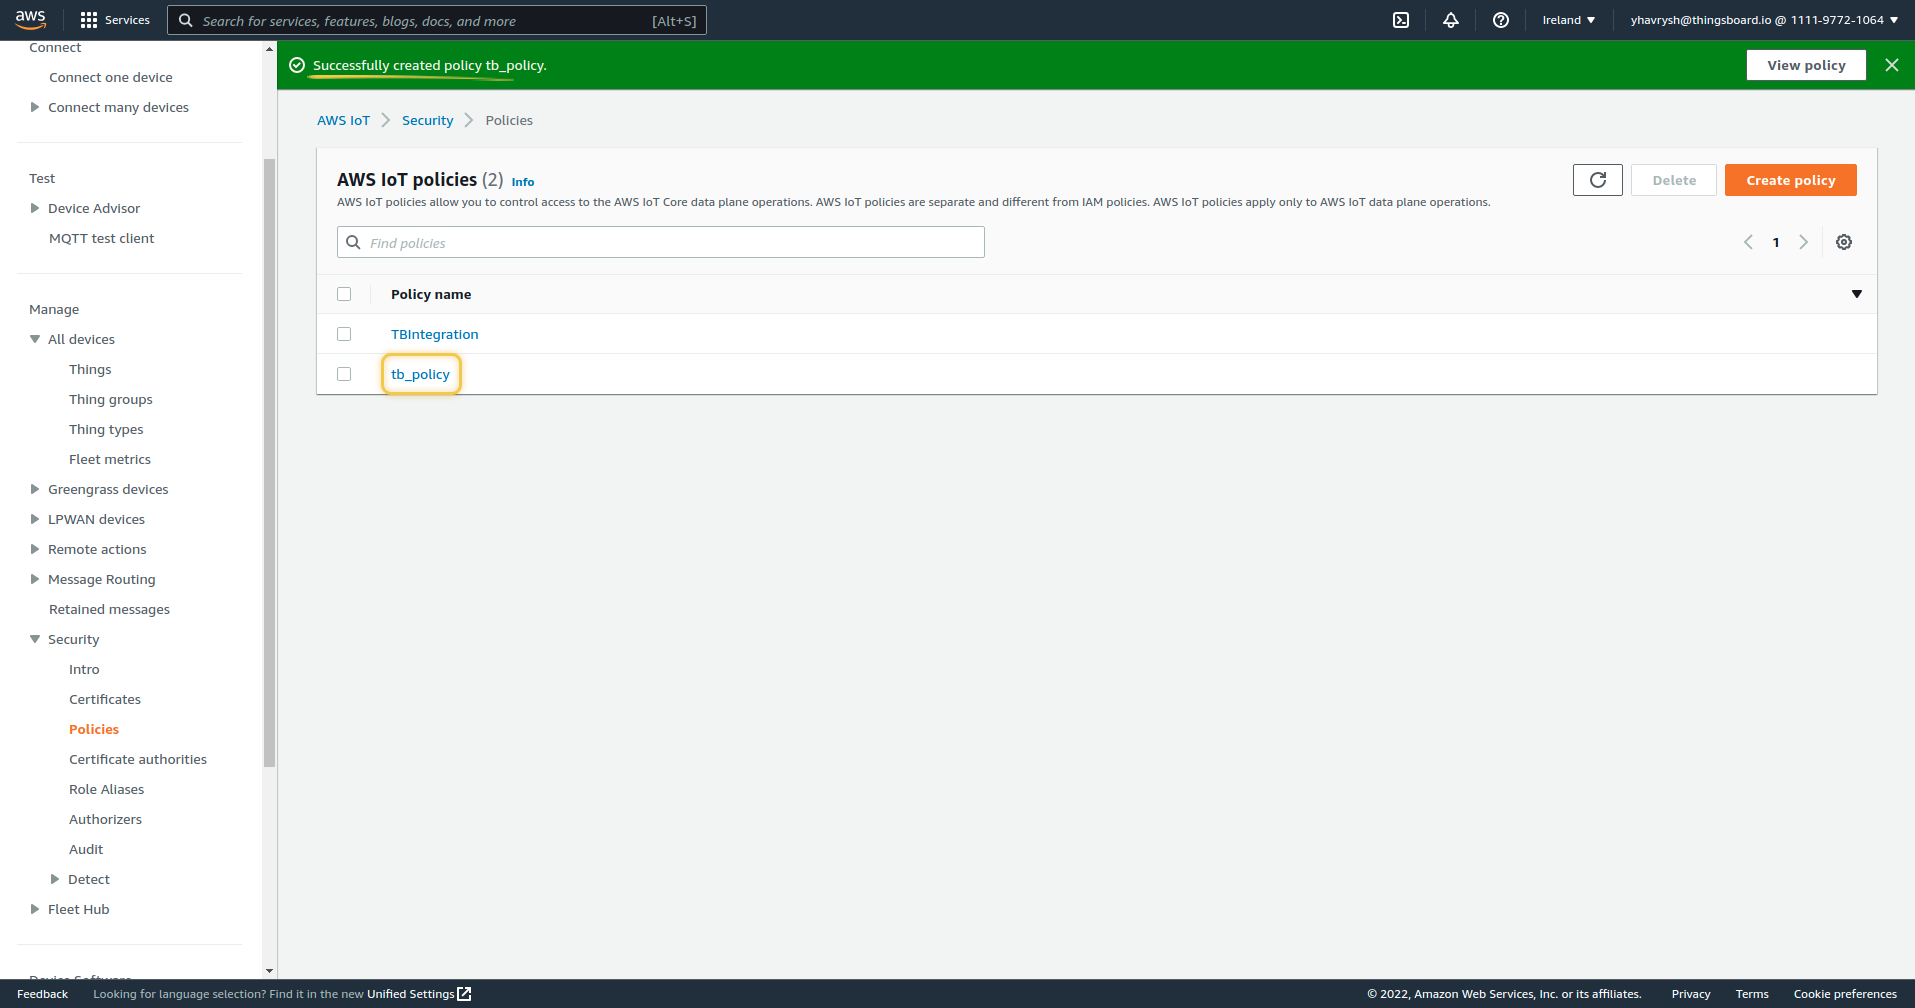
然后点击Create按钮。策略将被添加到列表中,您会看到Successfully created policy tb_policy的提示消息。
创建设备和证书(Create Things and Certificates)
Thing是AWS IoT中物理设备或逻辑实体的数字表示。
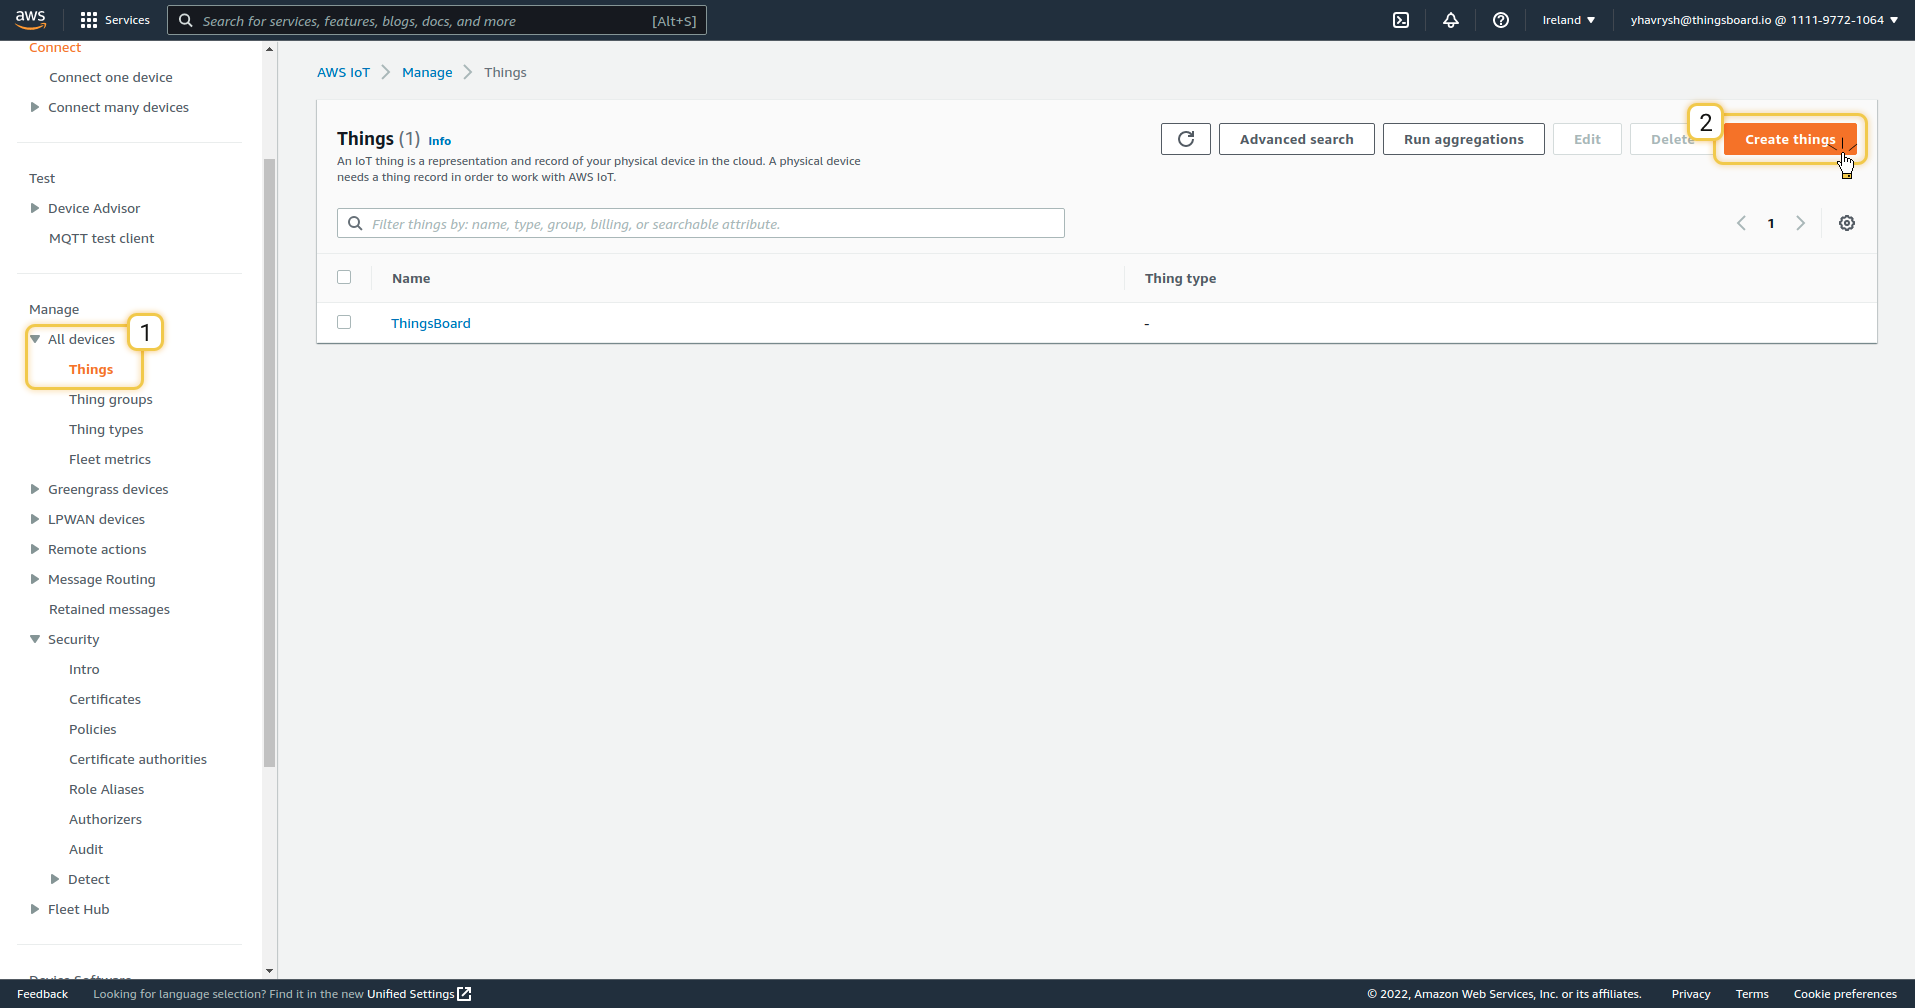
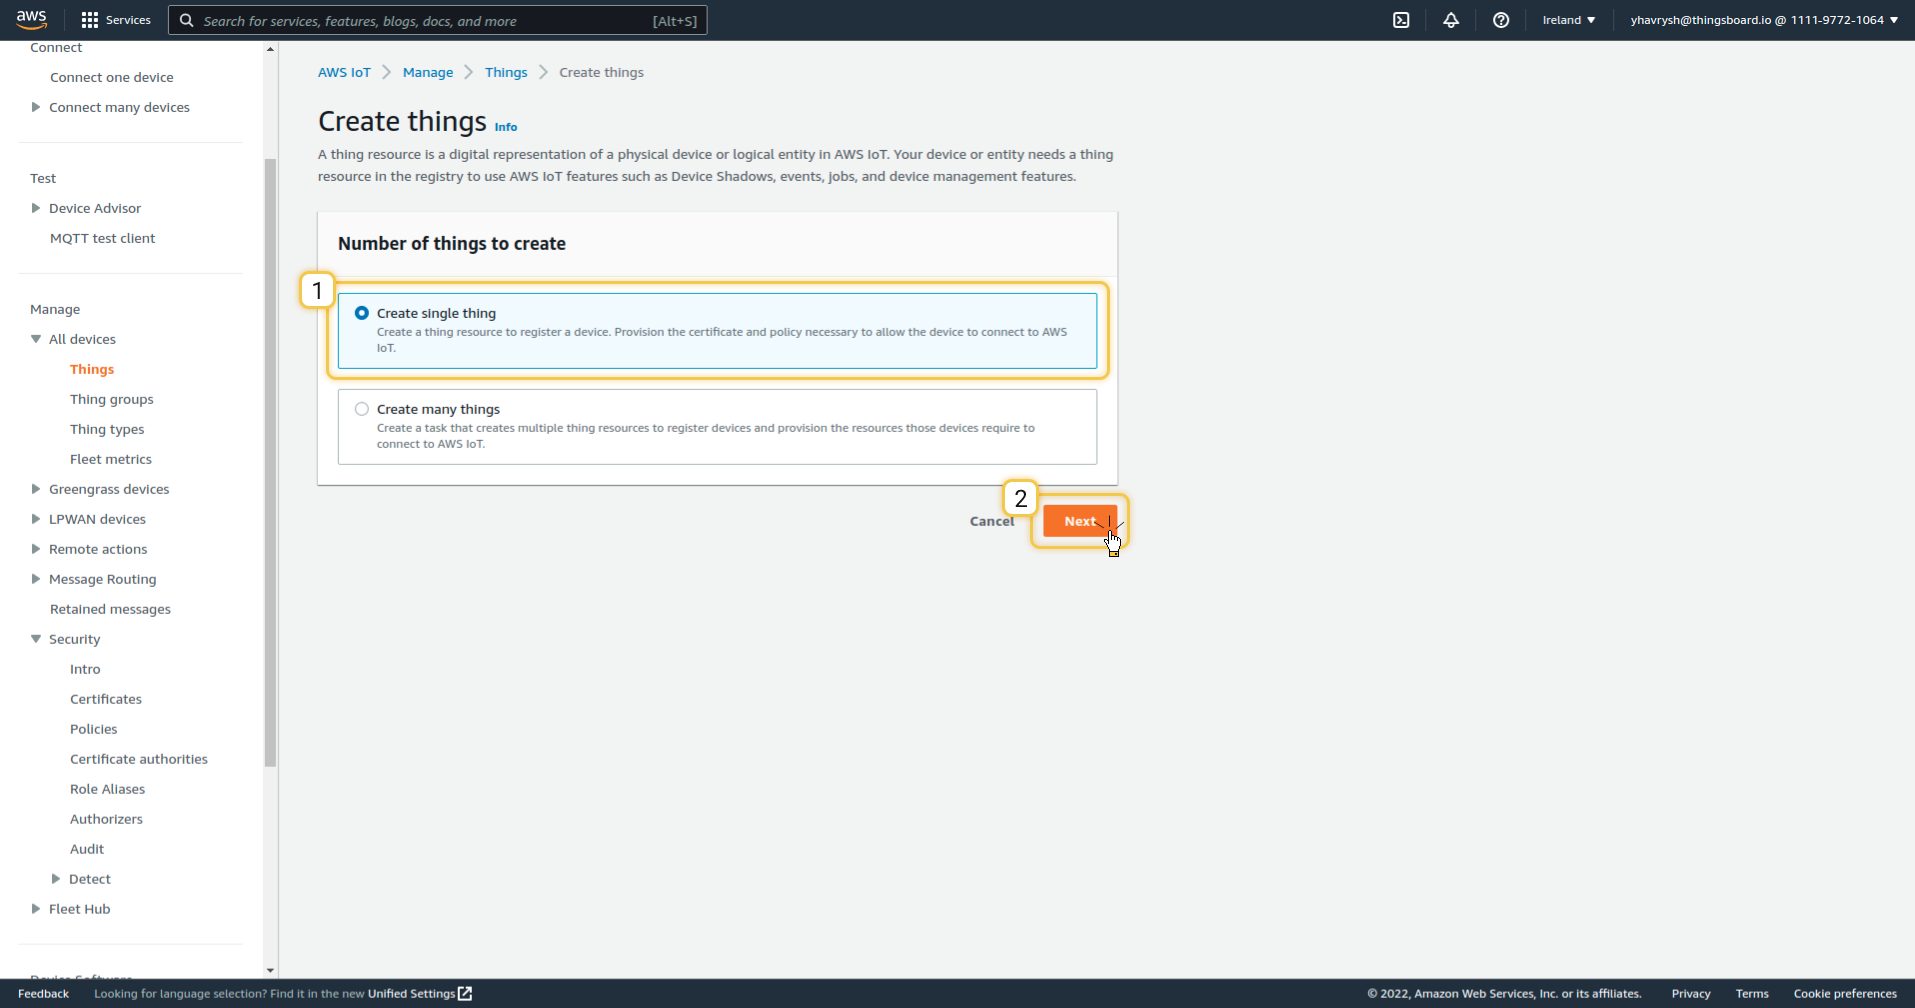
您可以通过几个步骤创建设备,但首先需要进入相应的页面。在左侧菜单中选择All devices类别,然后选择Things项。如果您尚未添加设备,此页面将显示所有已有设备。点击右上角的Create thing按钮开始添加设备。
以添加单个设备为例,选择Create single thing选项,然后点击Next按钮。
在第一步中,为设备设置Name,并根据需要设置其他附加参数。然后点击Next按钮进入下一步。

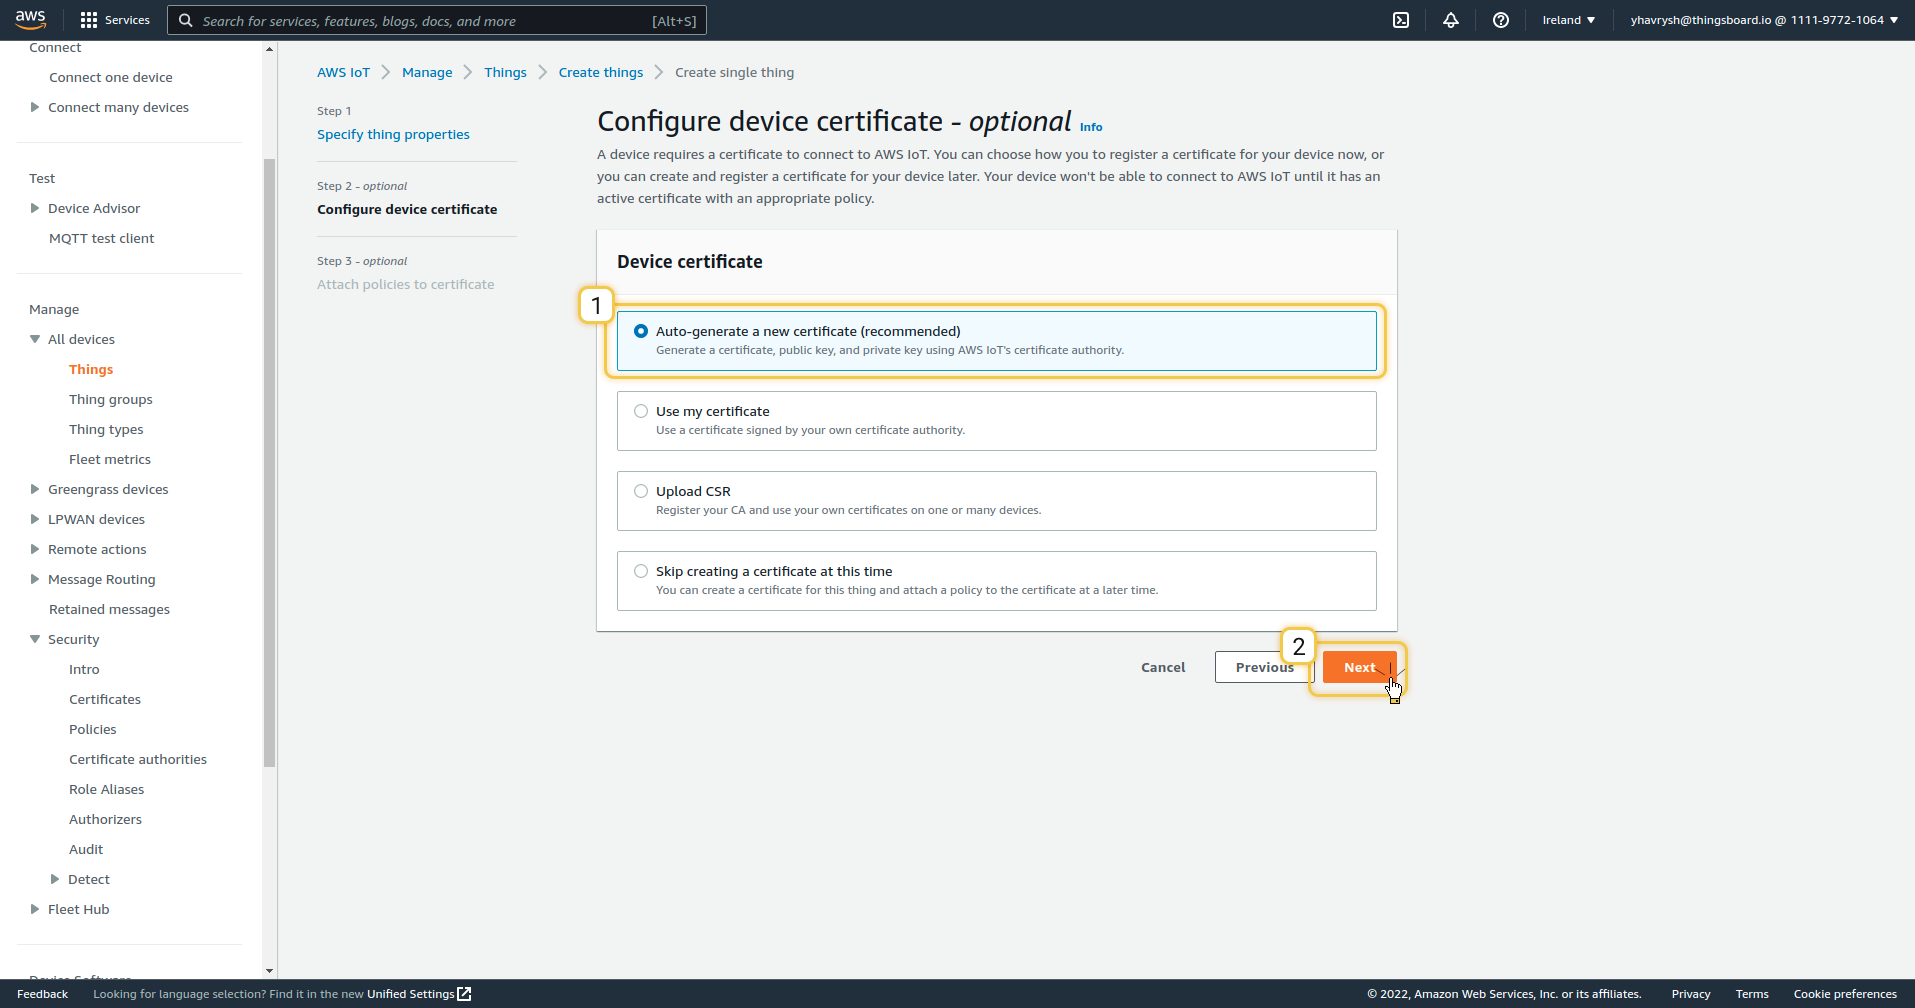
在此步骤中,选择Auto-generate a new certificate。证书和密钥将在确认添加设备后可供下载,因此直接点击下一步按钮即可。
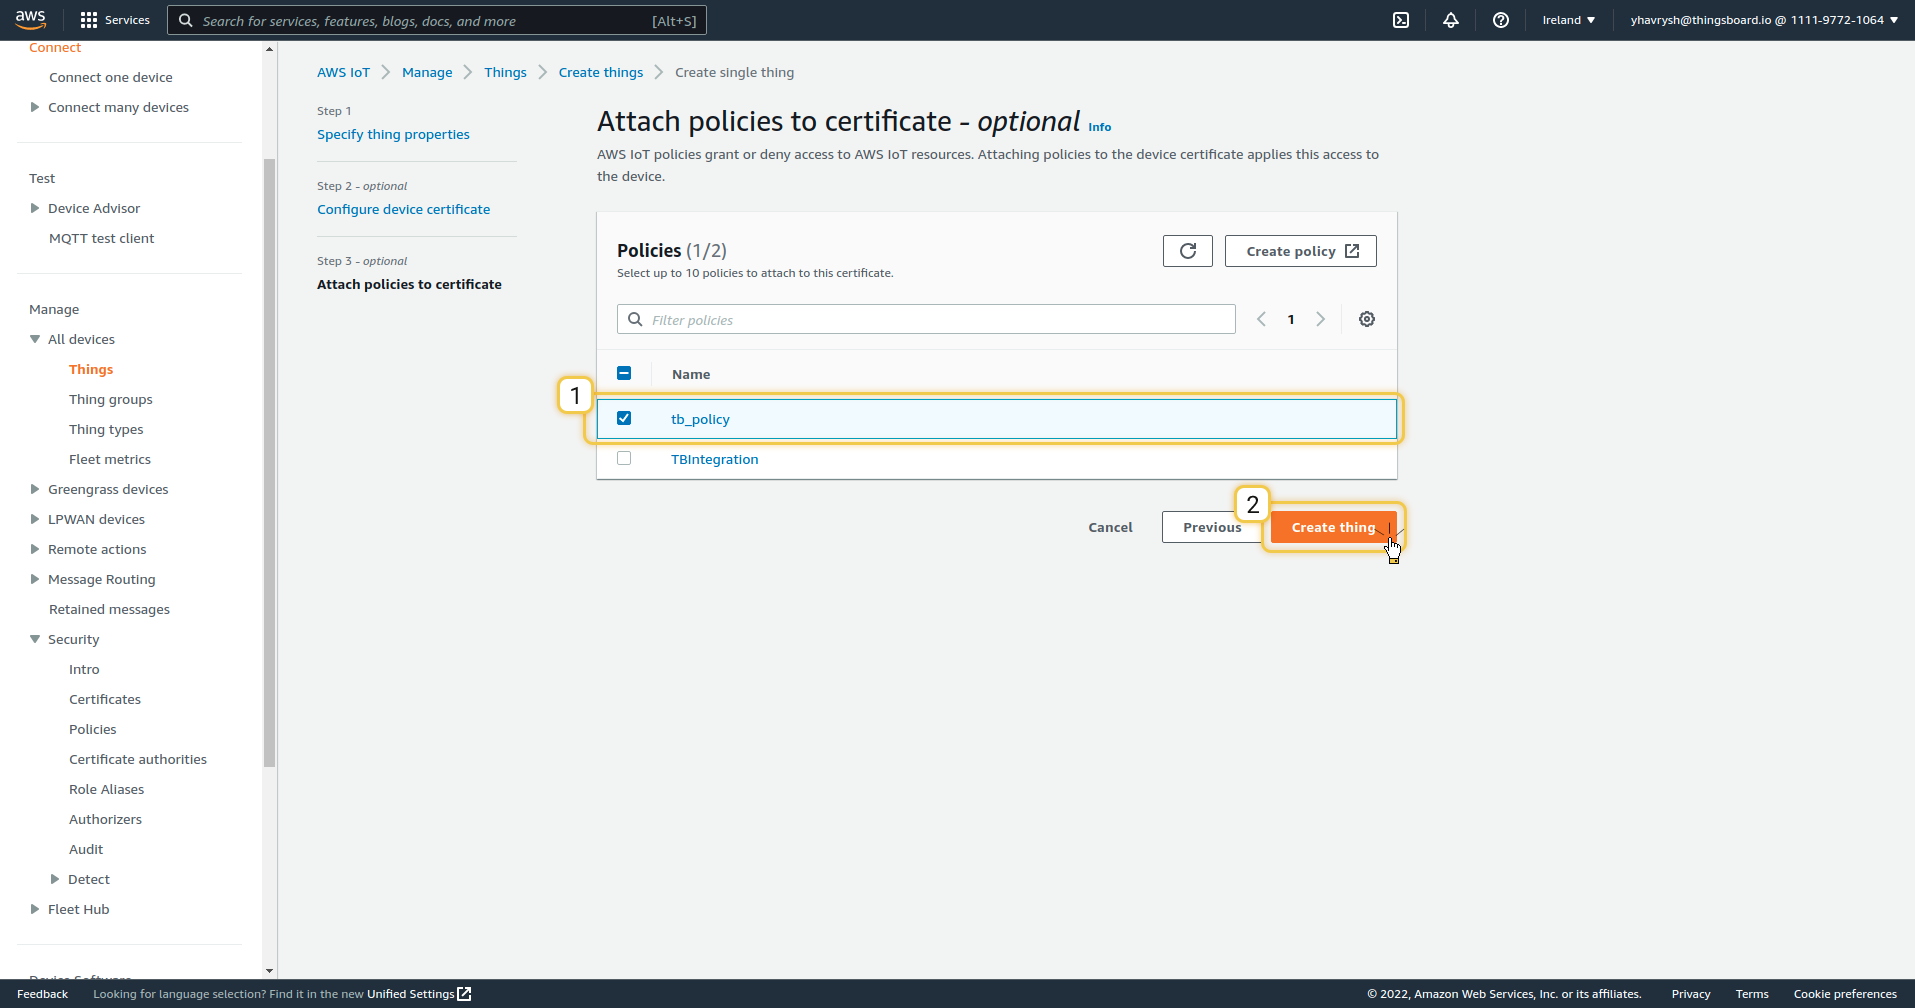
在最后一步中,选择您之前添加的策略,然后点击Create thing按钮确认创建设备。
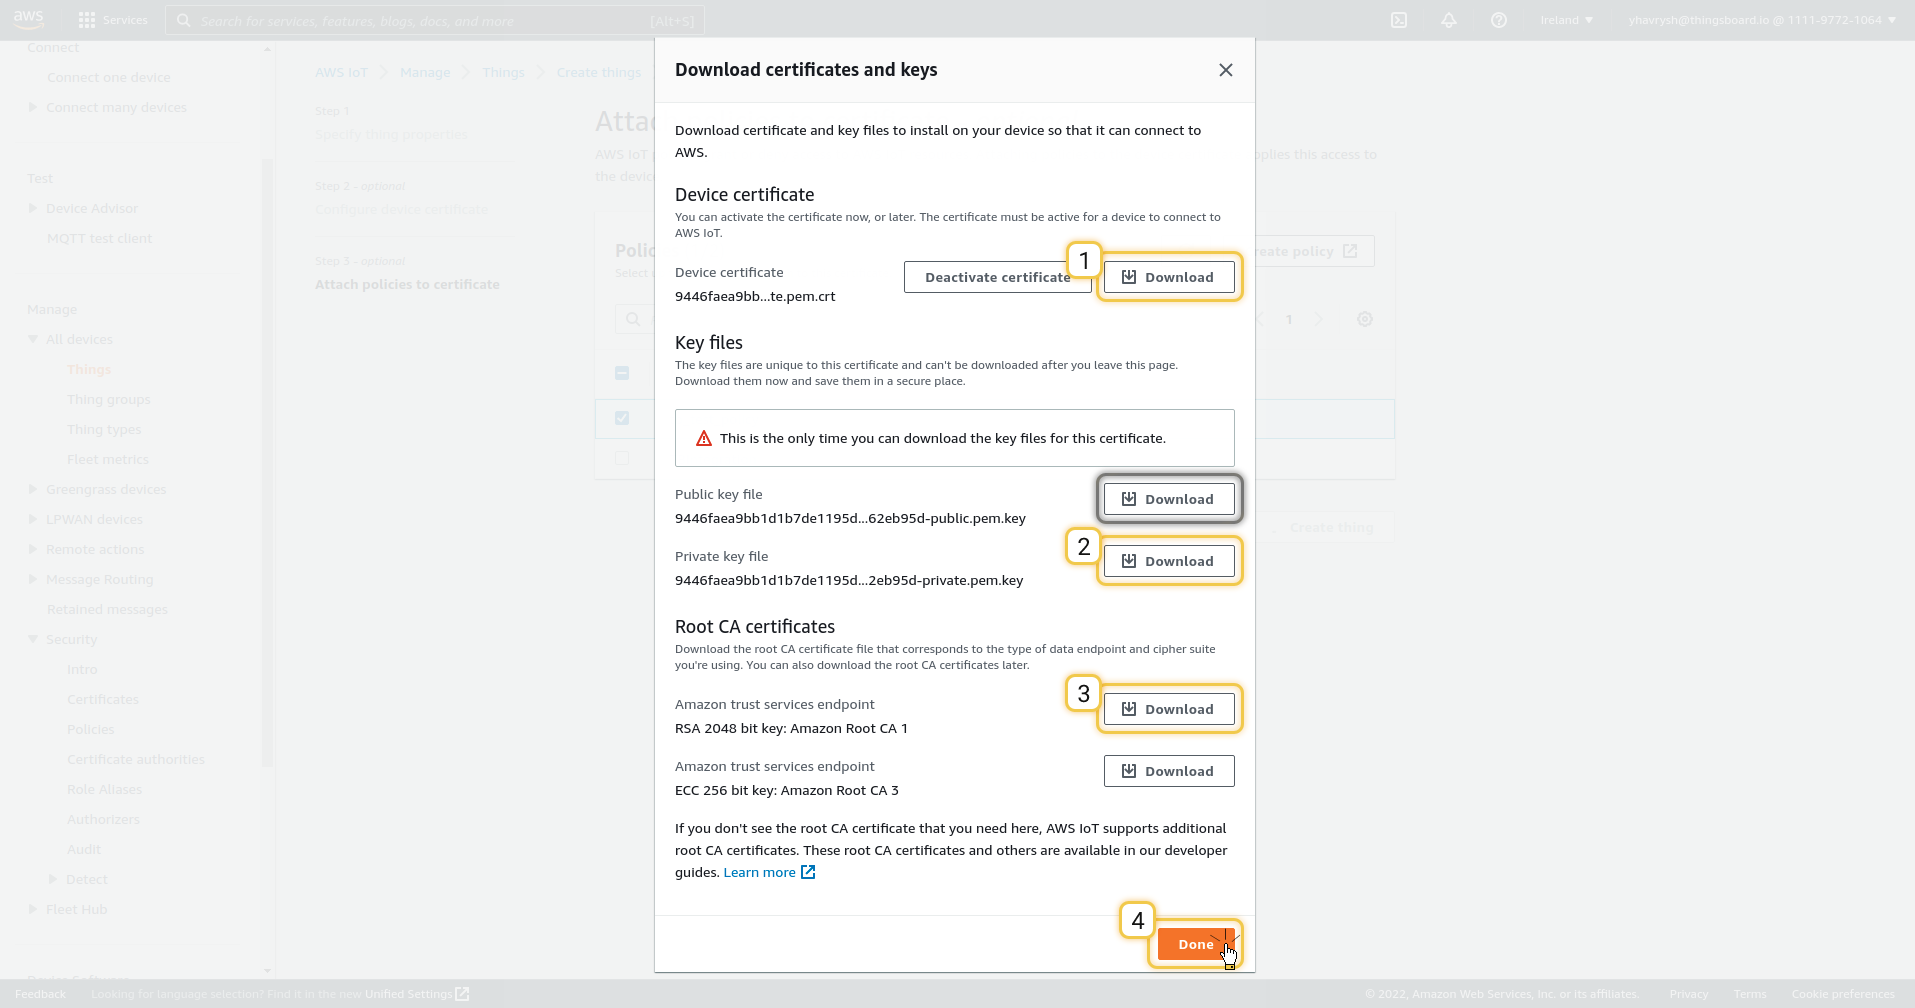
完成后,您将看到一个额外的窗口,可以下载证书和密钥。
配置集成所需的文件列表:
- 设备证书(*.pem.crt)
- 私钥(*-private.pem.key)
- 根CA证书(*.pem)
AWS还要求您保存Public key file,请一并下载。
保存所需文件后,点击Done。
ThingsBoard配置
创建上行数据转换器(Create Uplink Converter)
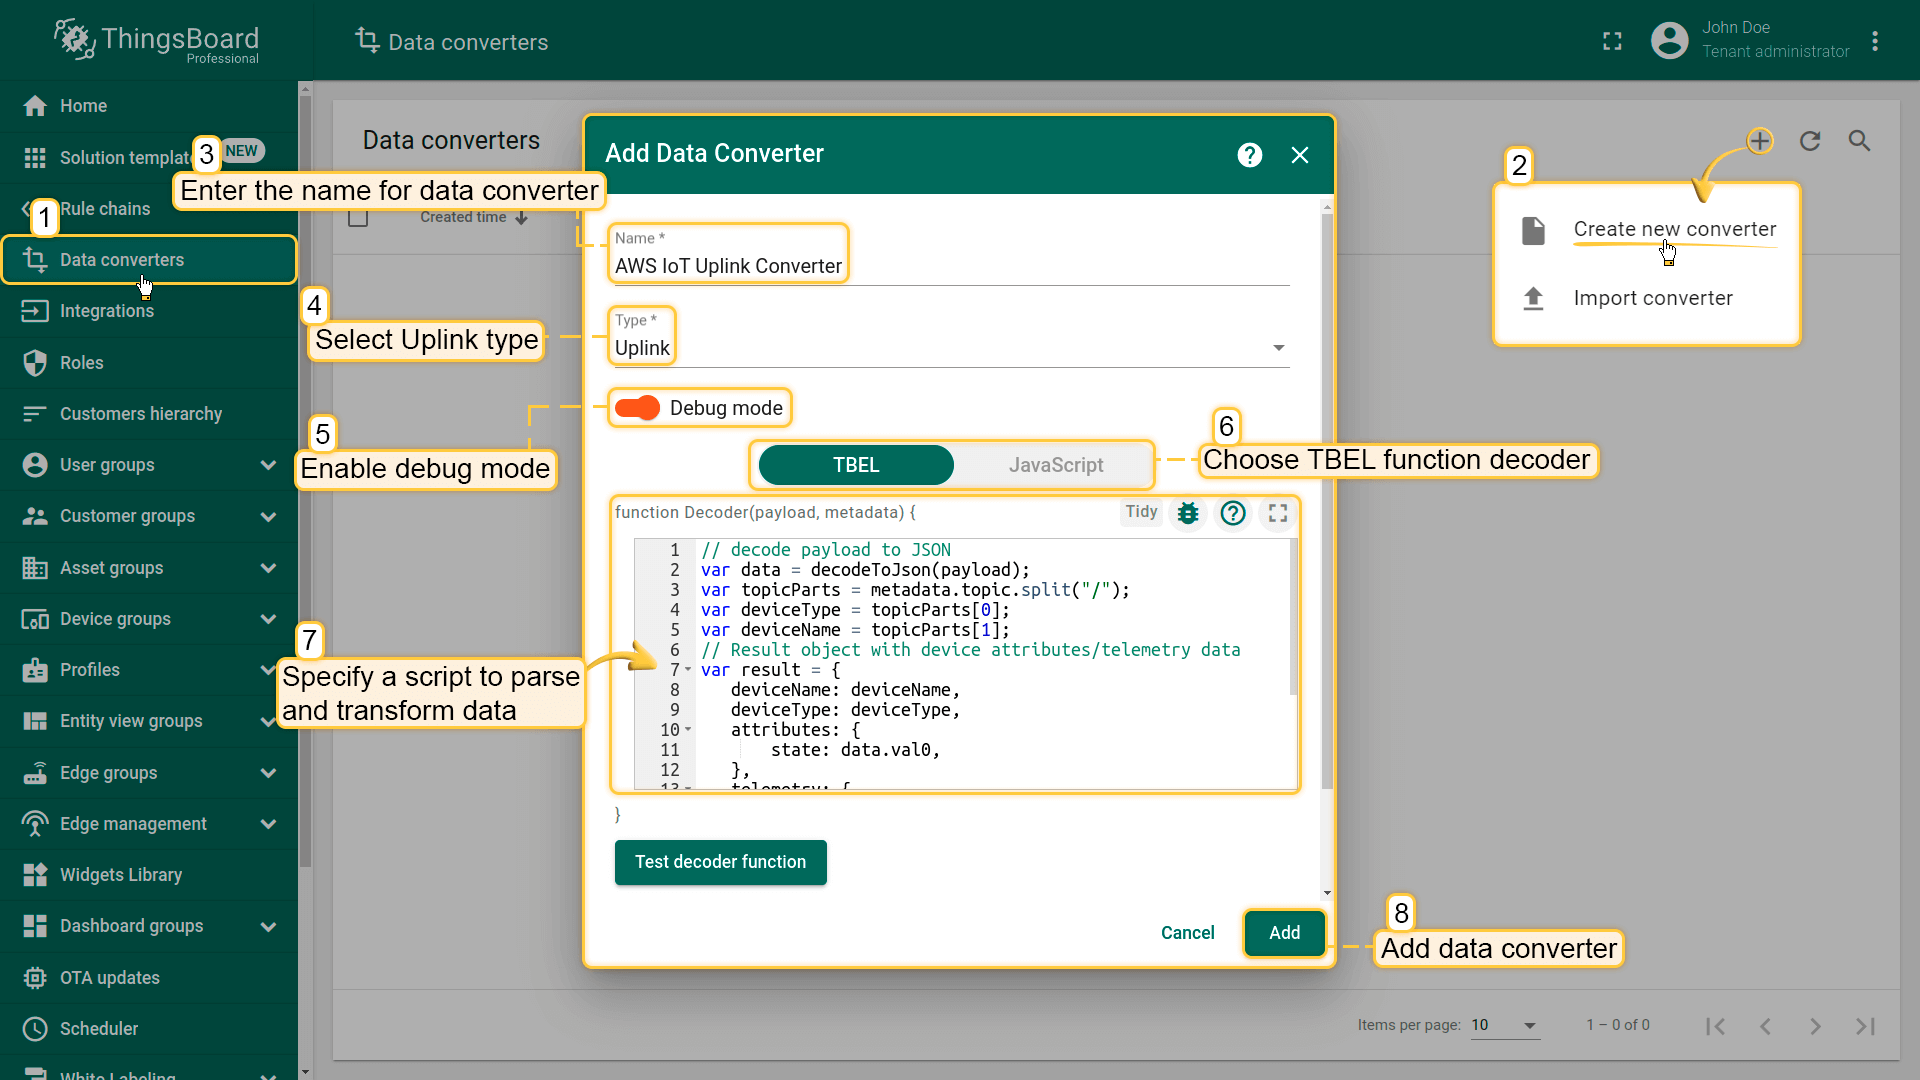
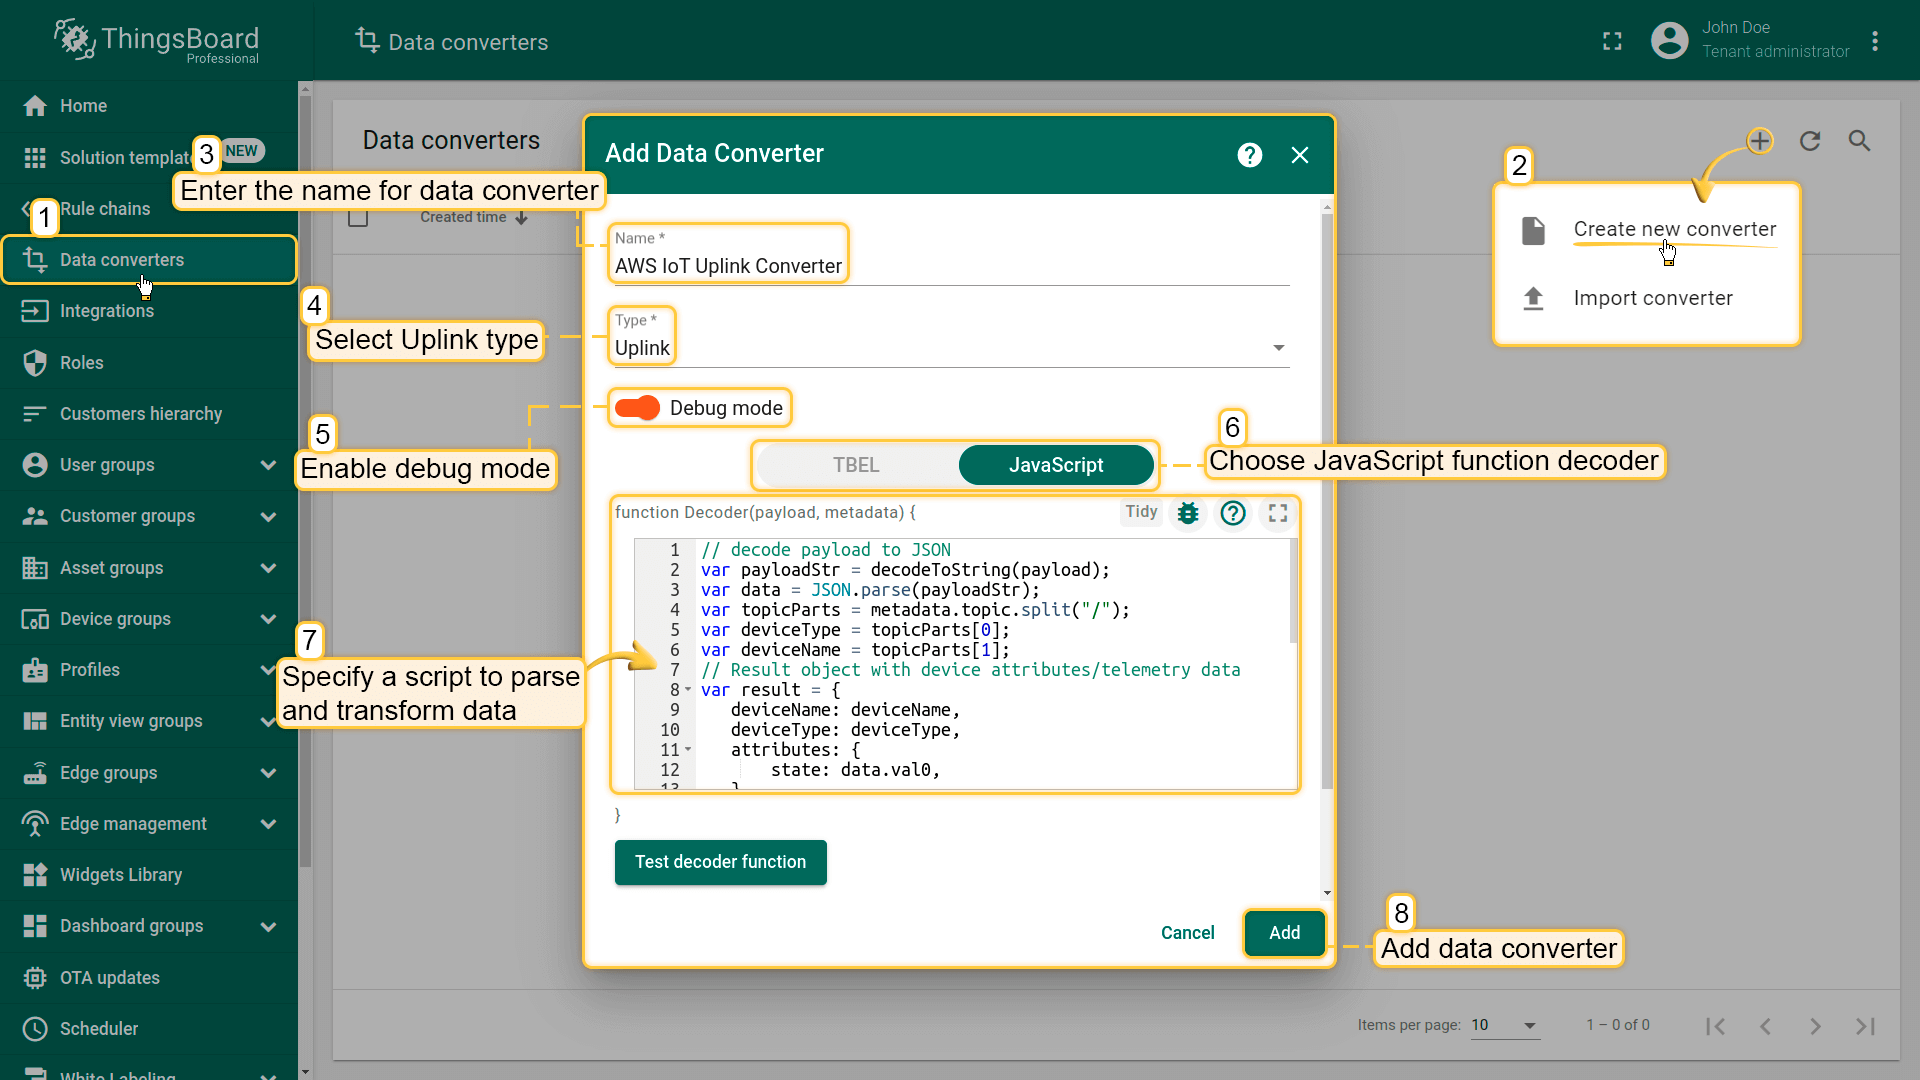
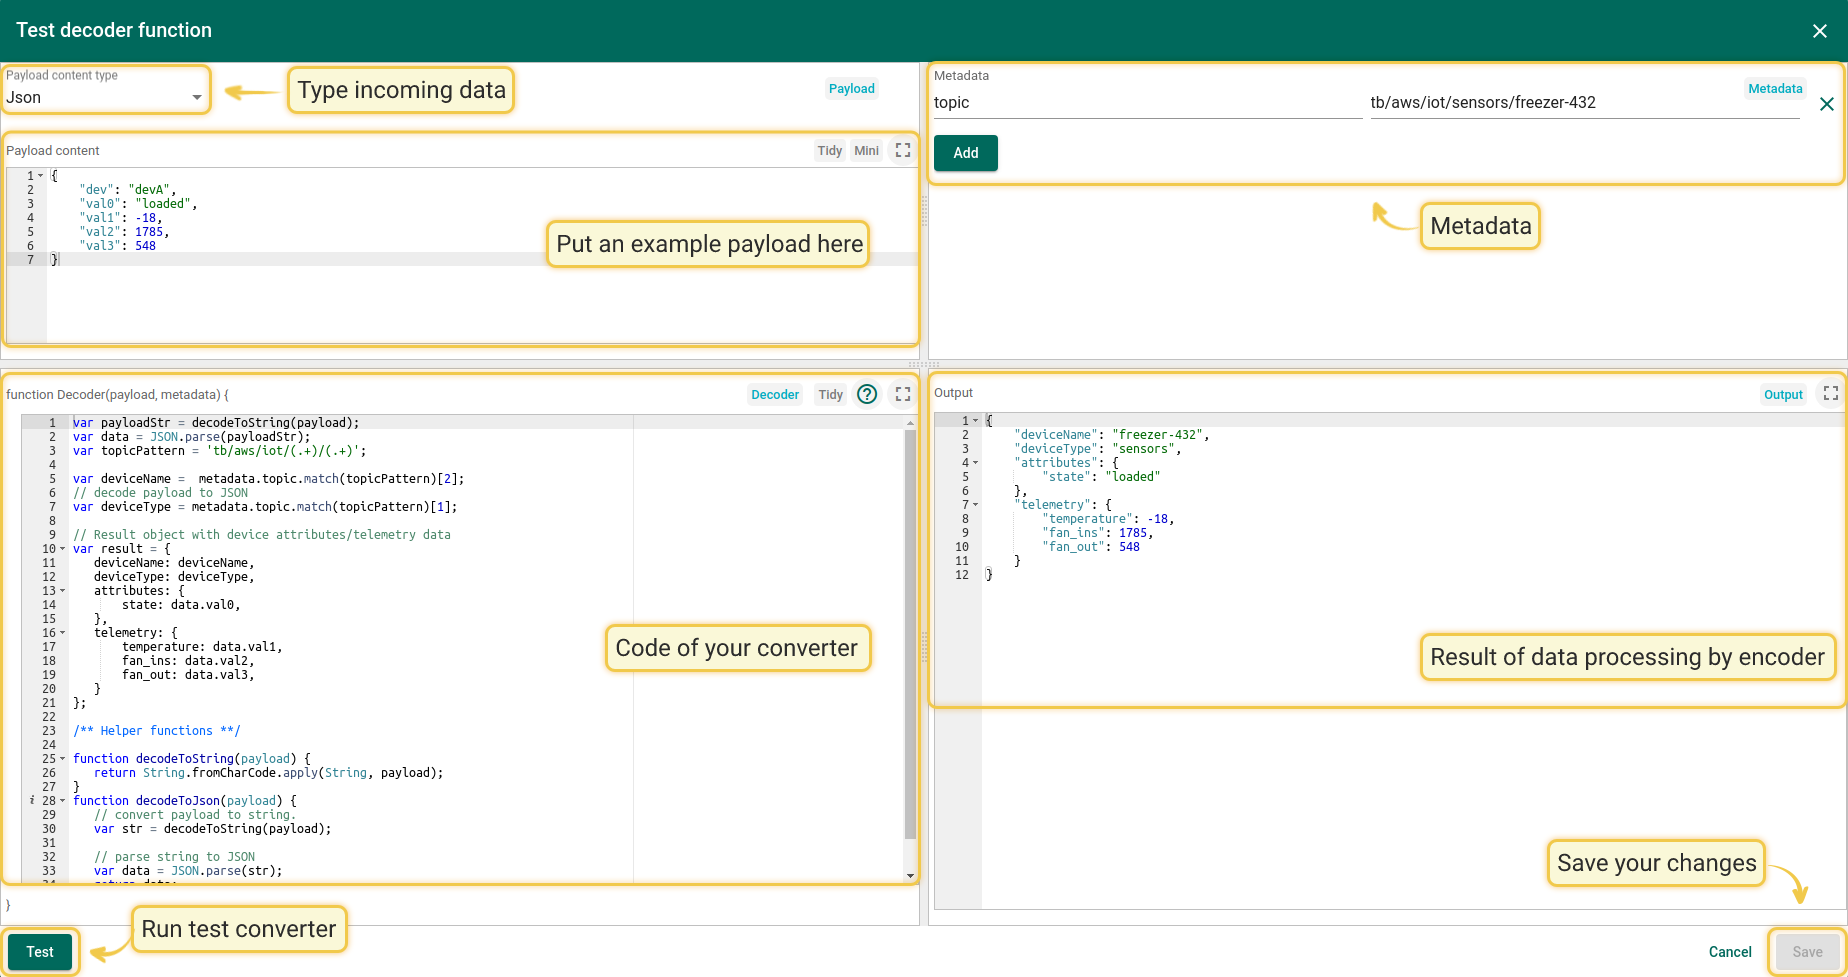
在创建集成之前,您需要在Data converters中创建一个上行数据转换器(Uplink converter)。上行数据转换器用于将设备传入的数据转换为ThingsBoard所需的显示格式。点击”加号”按钮,然后点击”Create new converter”。要查看事件,请启用Debug模式。在函数解码器字段中指定脚本,可以复制上行转换器示例,或使用自定义配置来解析和转换数据。
调试模式
启用调试模式可追踪与integrations执行相关的事件、状态及潜在错误,便于开发和排障。
注意:调试模式可能迅速增加磁盘占用,因为所有调试事件都会存入数据库。 自ThingsBoard 3.9起,平台仅在integrations创建后的前15分钟内存储完整调试事件,之后仅保留错误事件。
调试模式设置可组合使用或完全关闭。
可使用 TBEL(TBEL)或 JavaScript 开发用户自定义函数。 建议使用 TBEL,其在ThingsBoard 中的执行效率远高于 JS。
Uplink converter 示例:
|
Uplink converter 示例:
|
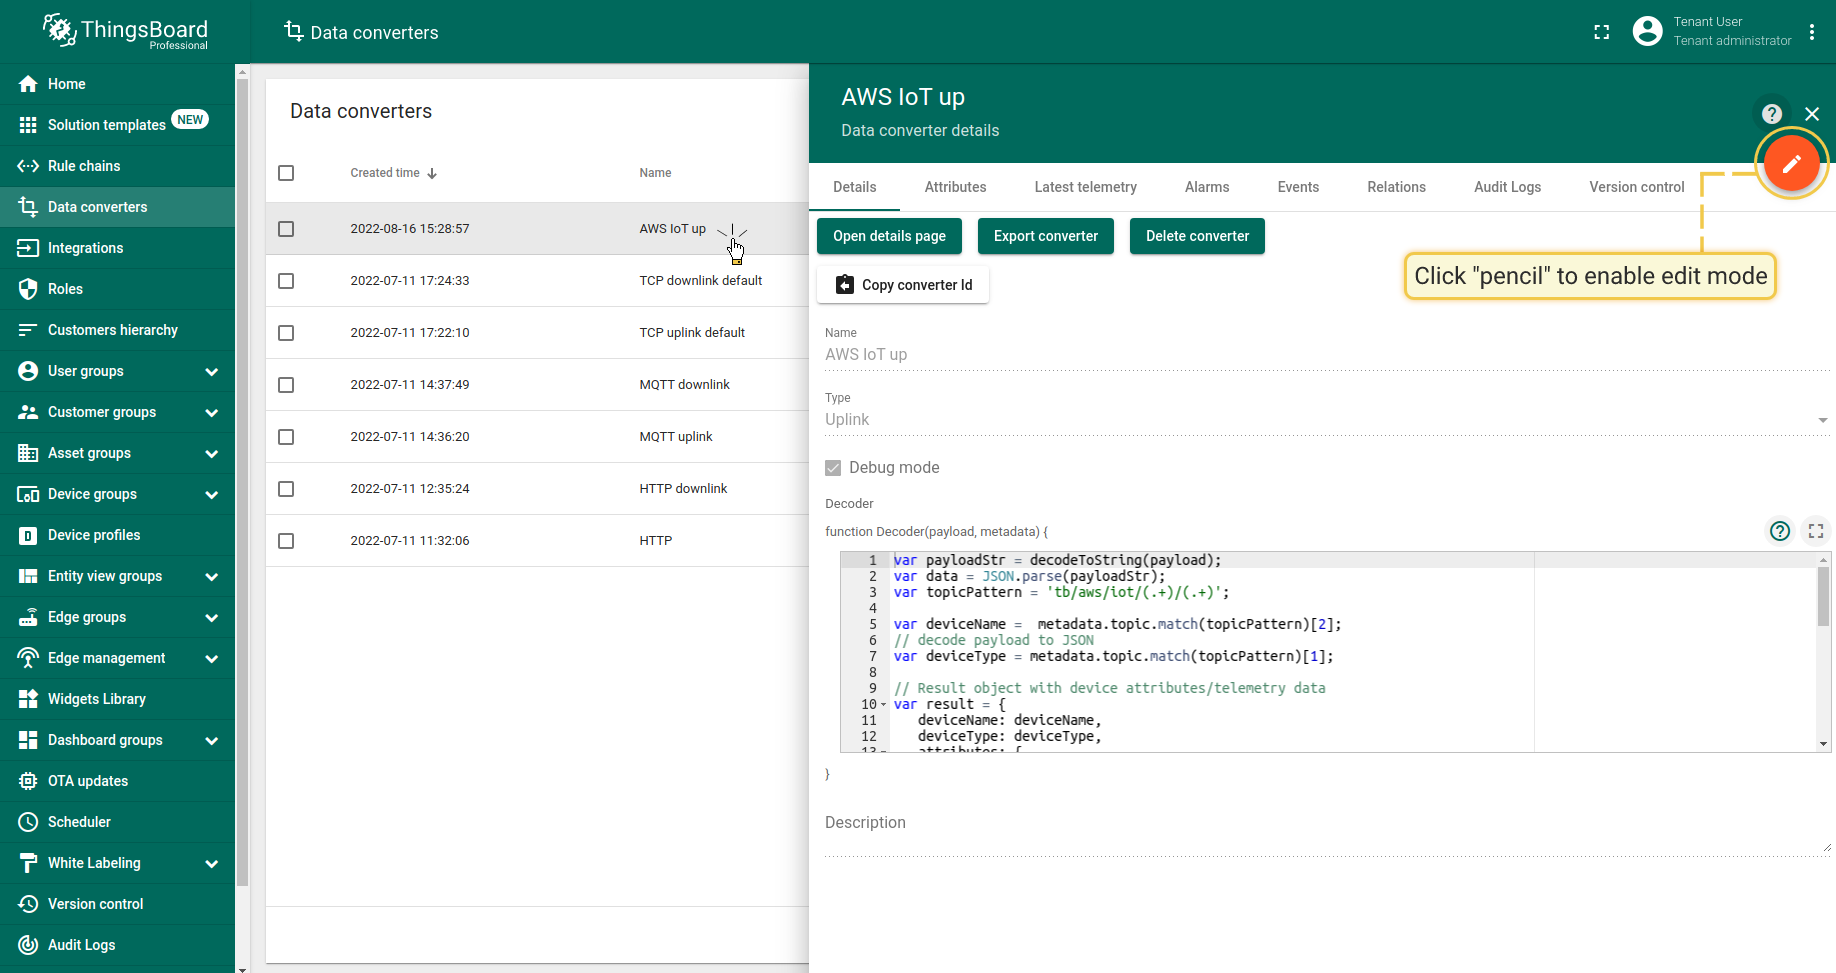
您可以在创建转换器时或创建后更改解码器函数。如果转换器已经创建,请点击”铅笔”图标进行编辑。
创建集成(Create Integration)
- 进入Integrations页面,点击Add new integration按钮。将其命名为“AWS IoT Integration”,选择类型为AWS IoT。
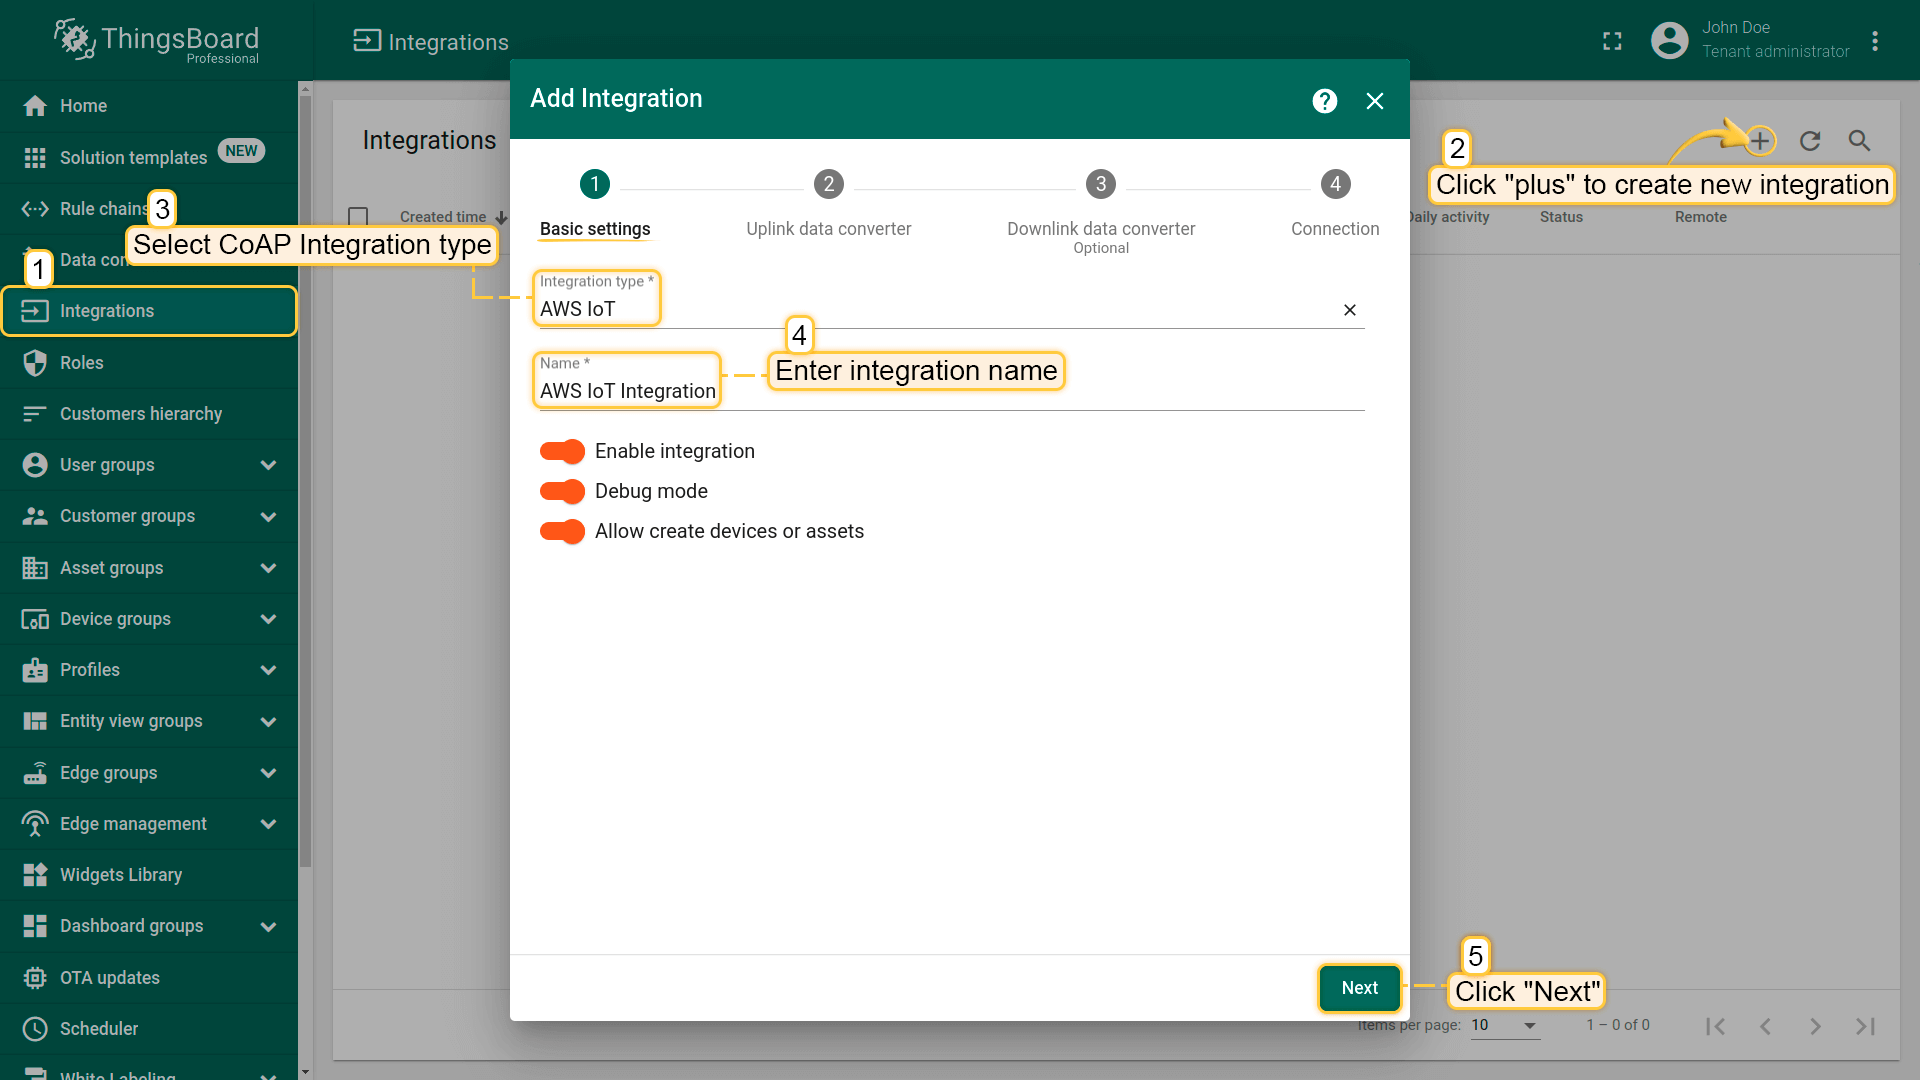
请注意,如果未勾选”Allow create devices or assets”复选框,当向ThingsBoard发送包含设备(或资产)参数的消息时,如果该设备(资产)不存在,则不会自动创建该设备(资产)。
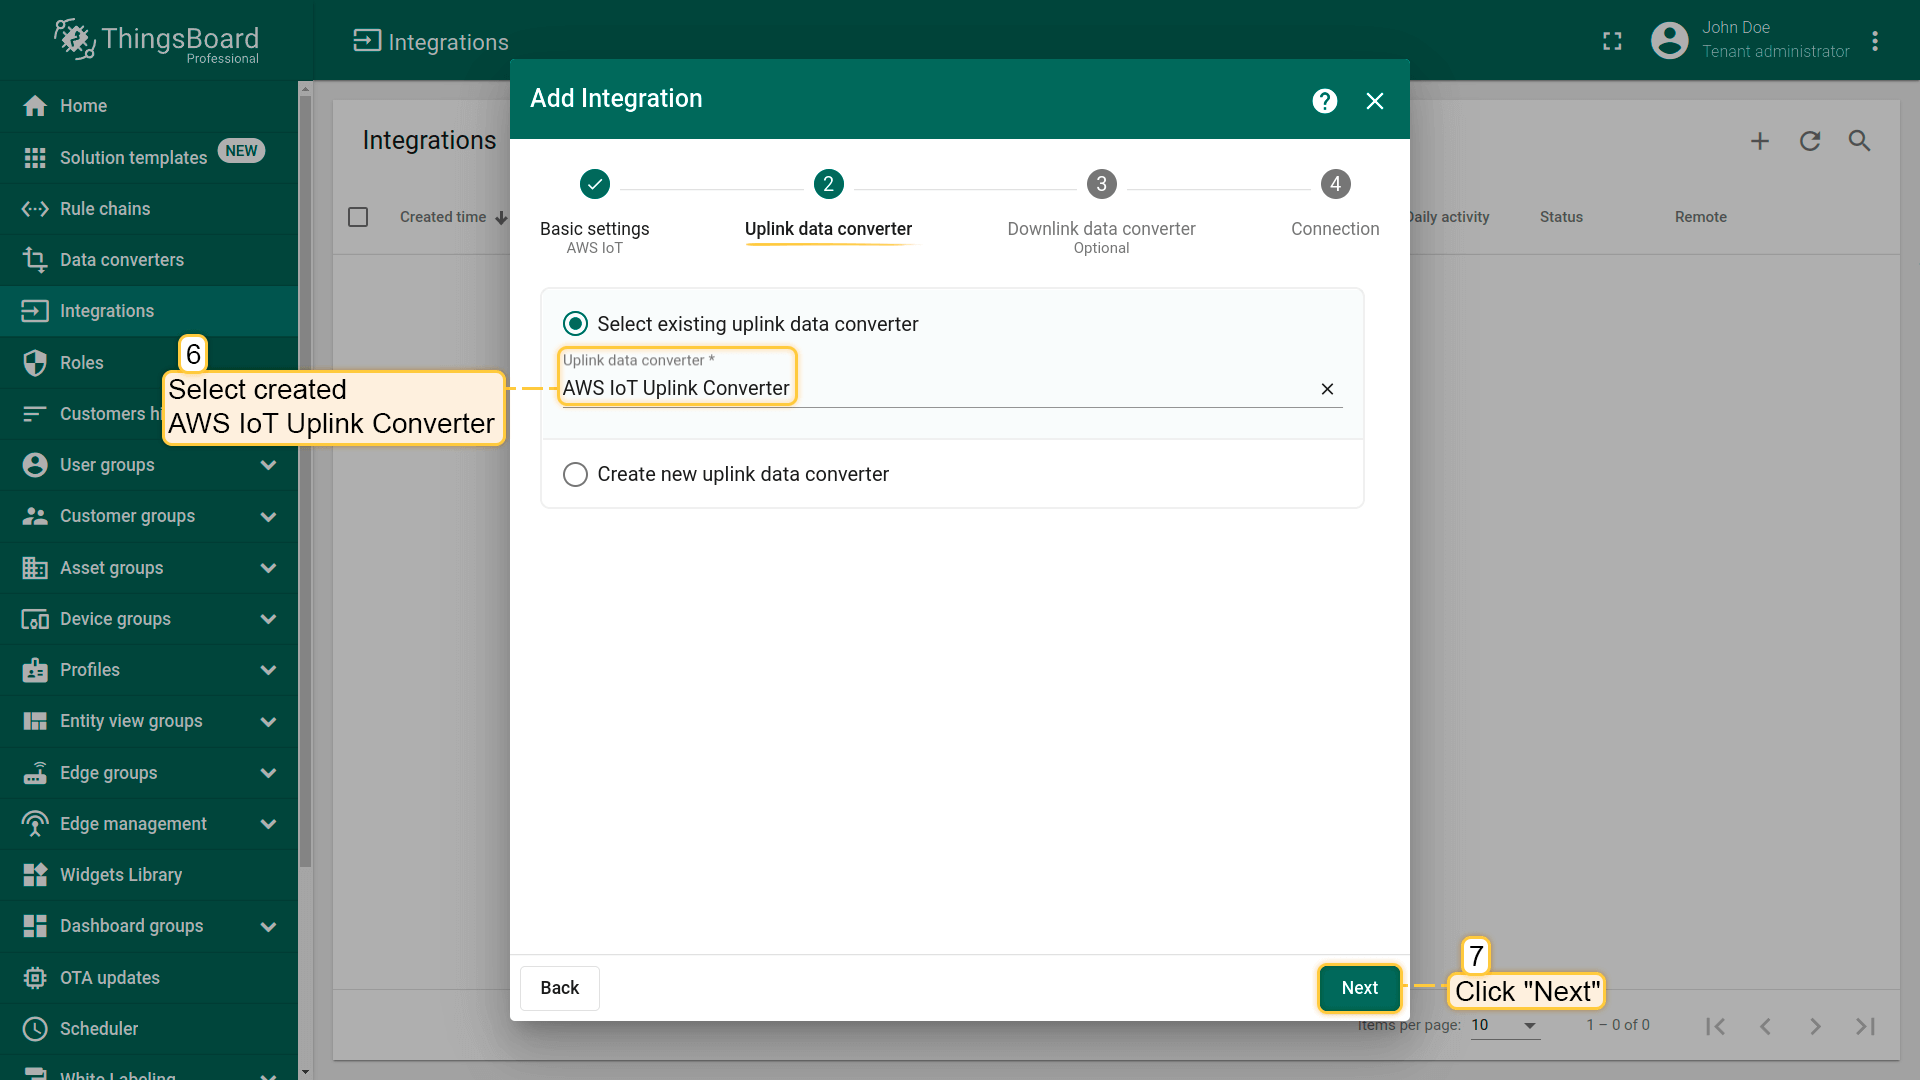
- 下一步是添加刚刚创建的Uplink转换器。
- 目前先将”Downlink data converter”字段留空。

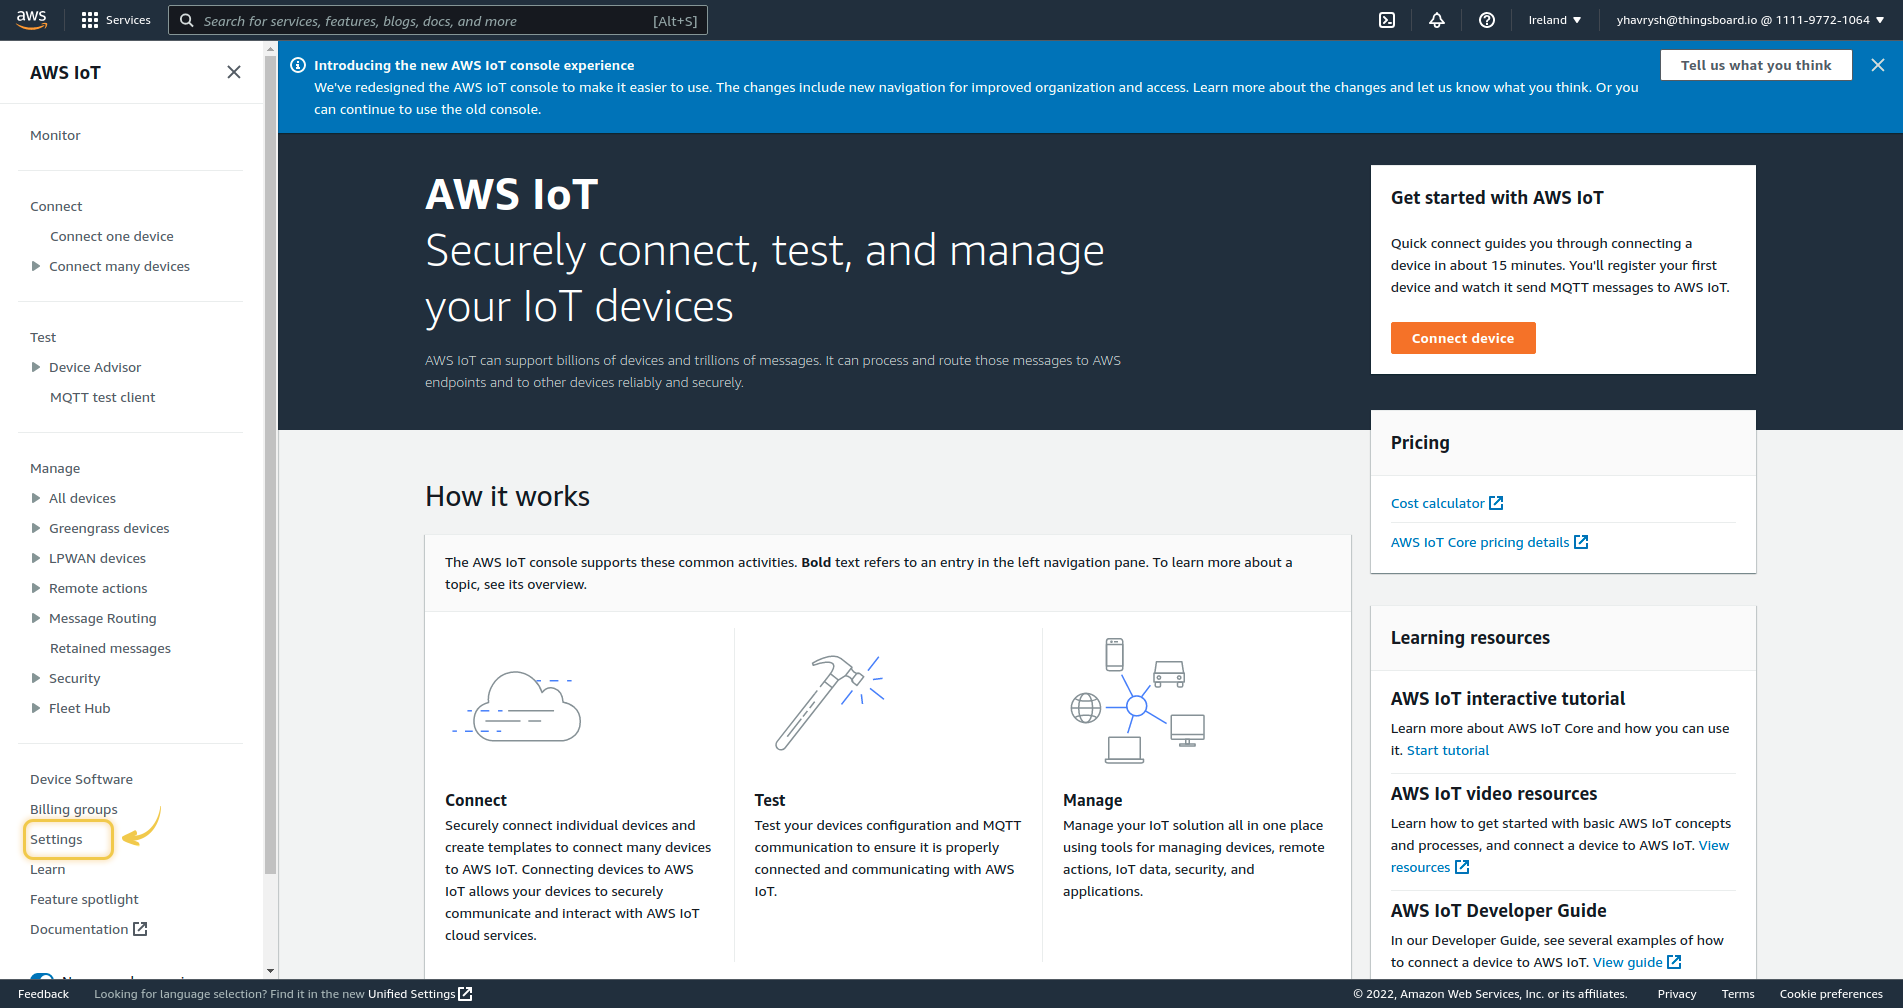
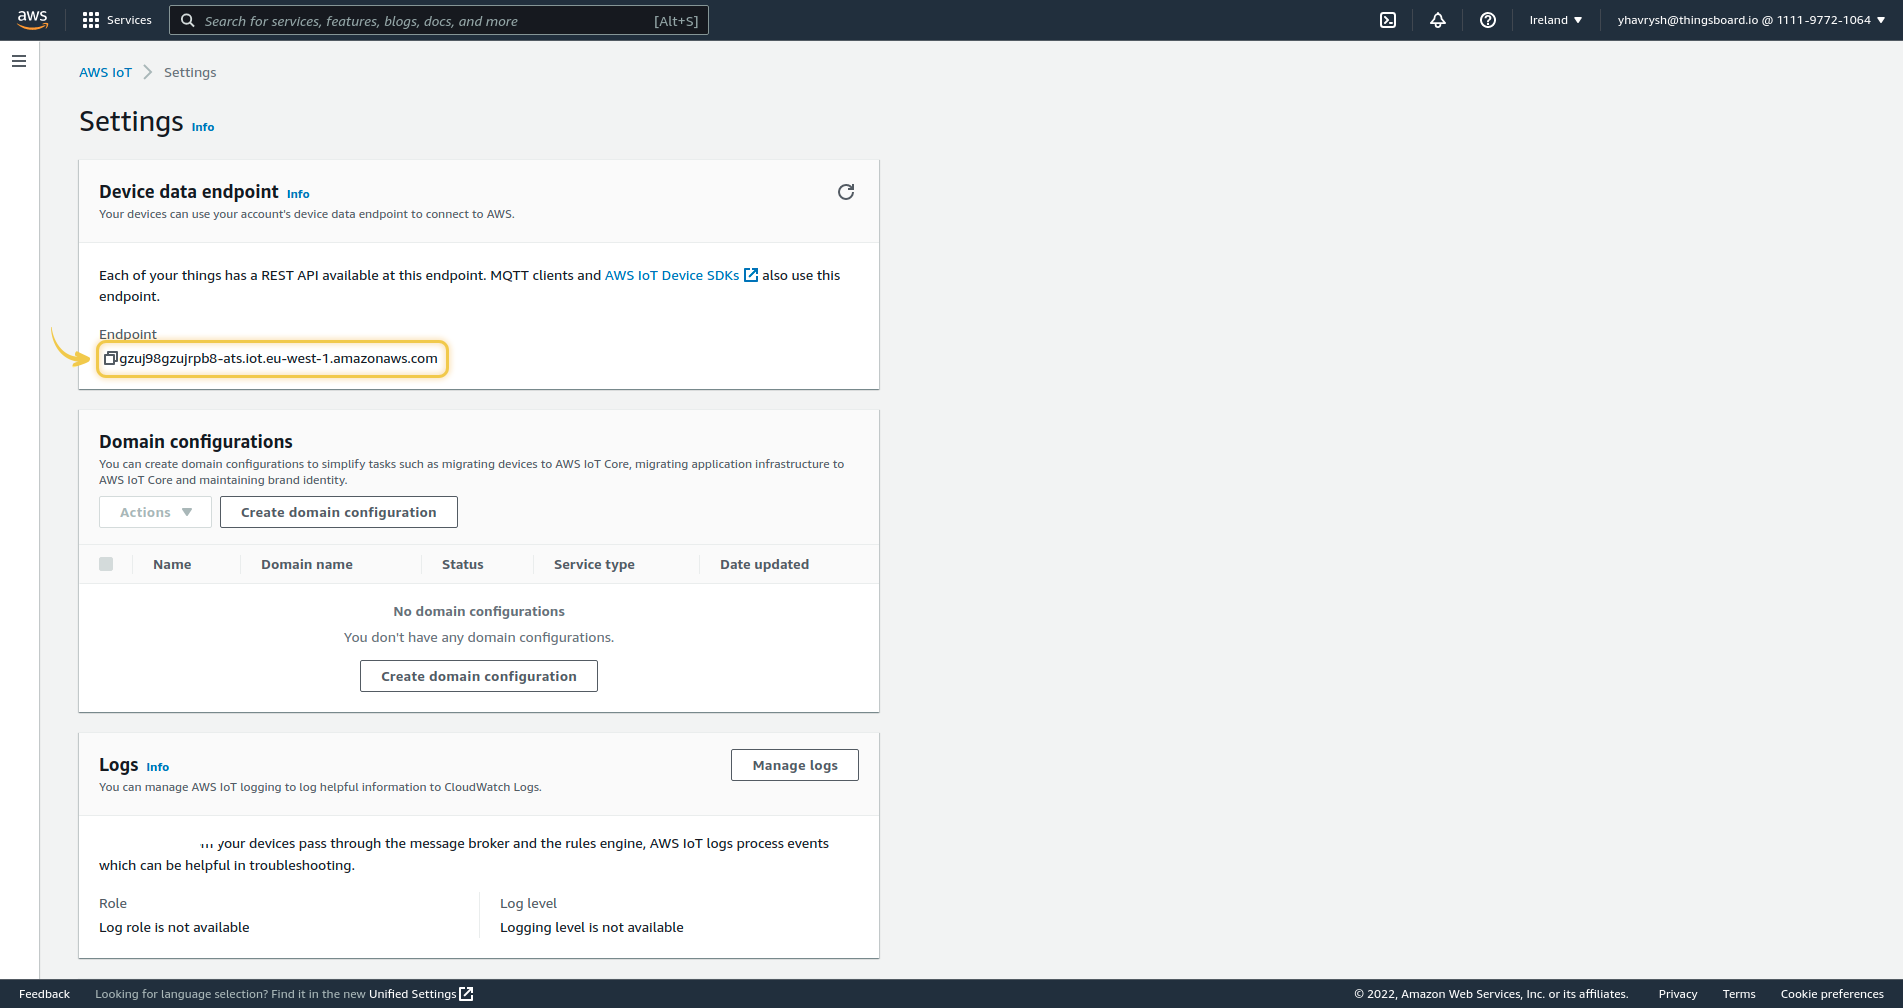
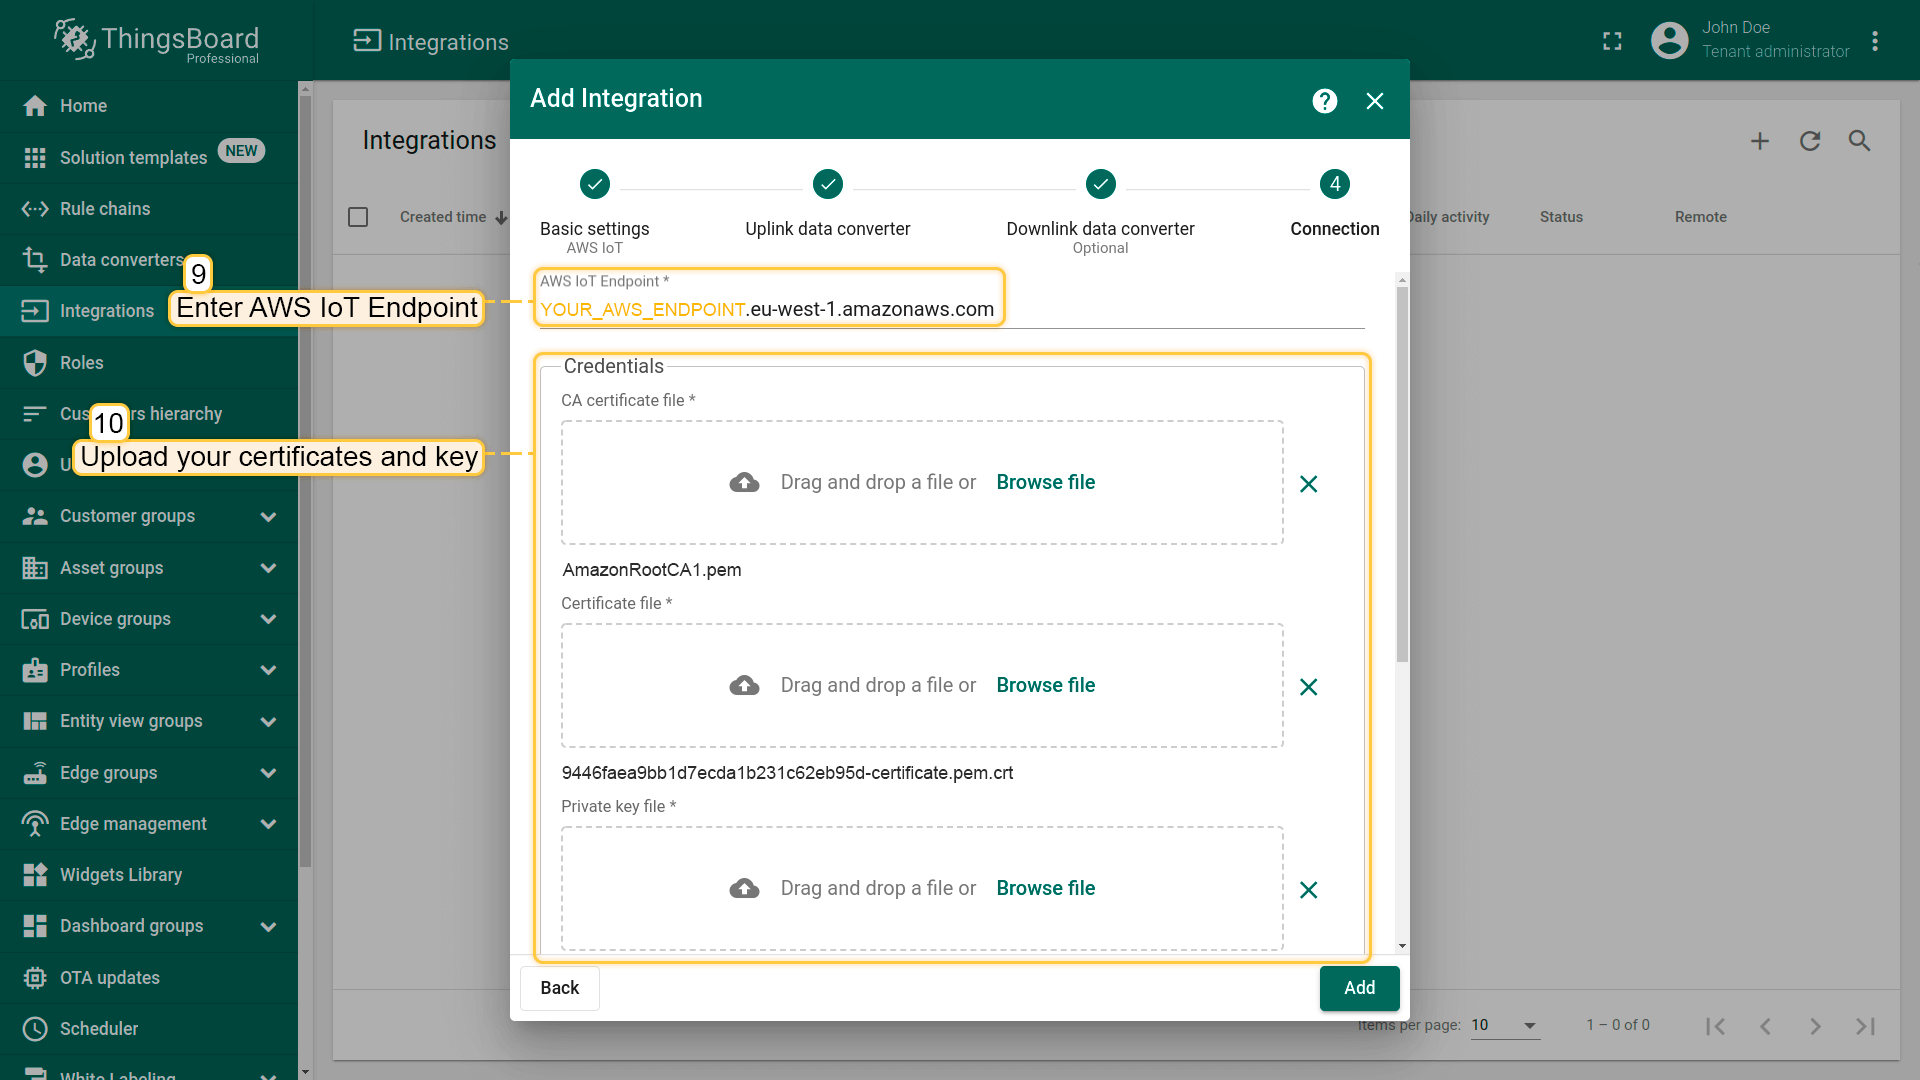
- 输入AWS IoT Endpoint。您可以在AWS账户中,进入Settings - Device data endpoint找到该地址。
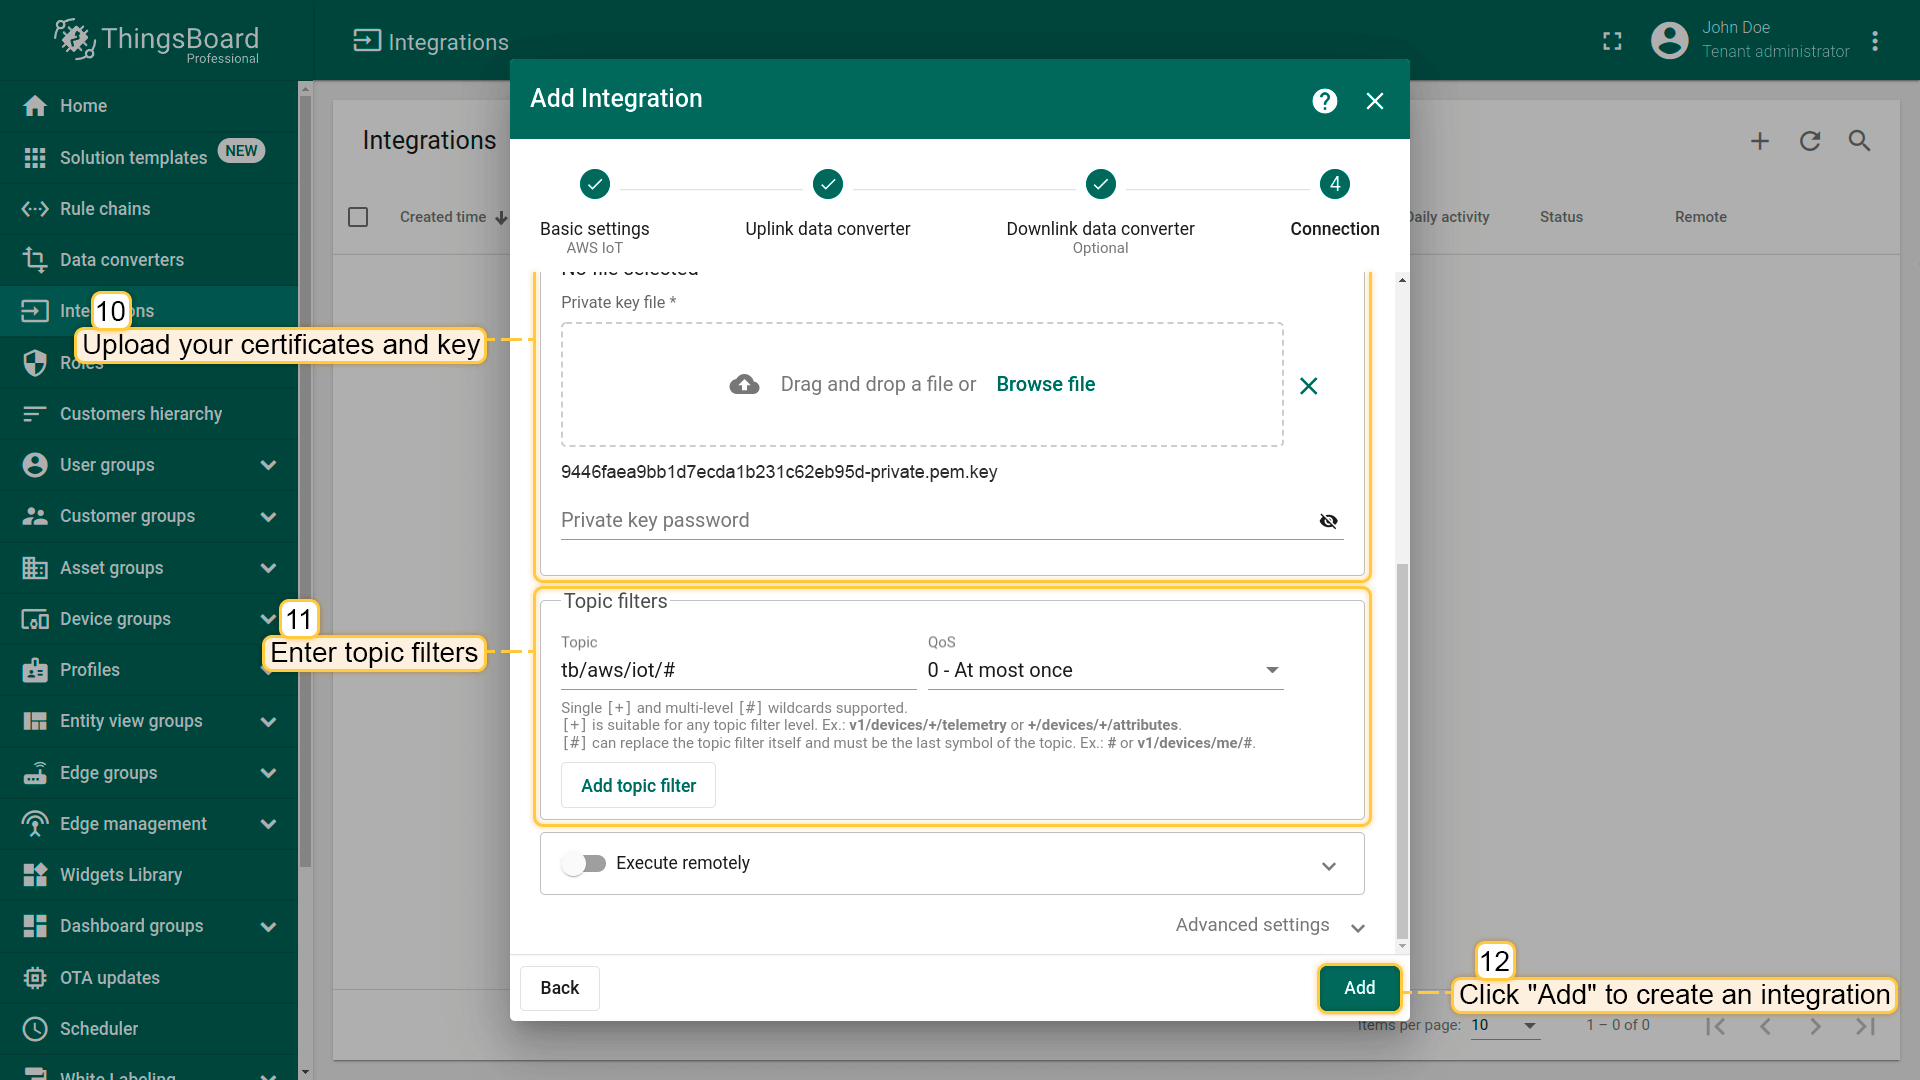
- 下载之前生成的证书和密钥。
-
添加Topic Filter tb/aws/iot/#。您还可以选择QoS级别,默认使用QoS level 0(最多一次)。
-
点击Add创建集成。
发送上行消息(Send Uplink message)
要发送测试消息,请使用AWS IoT的MQTT test client功能。在主菜单中进入MQTT test client,然后选择Publish to a topic选项卡。
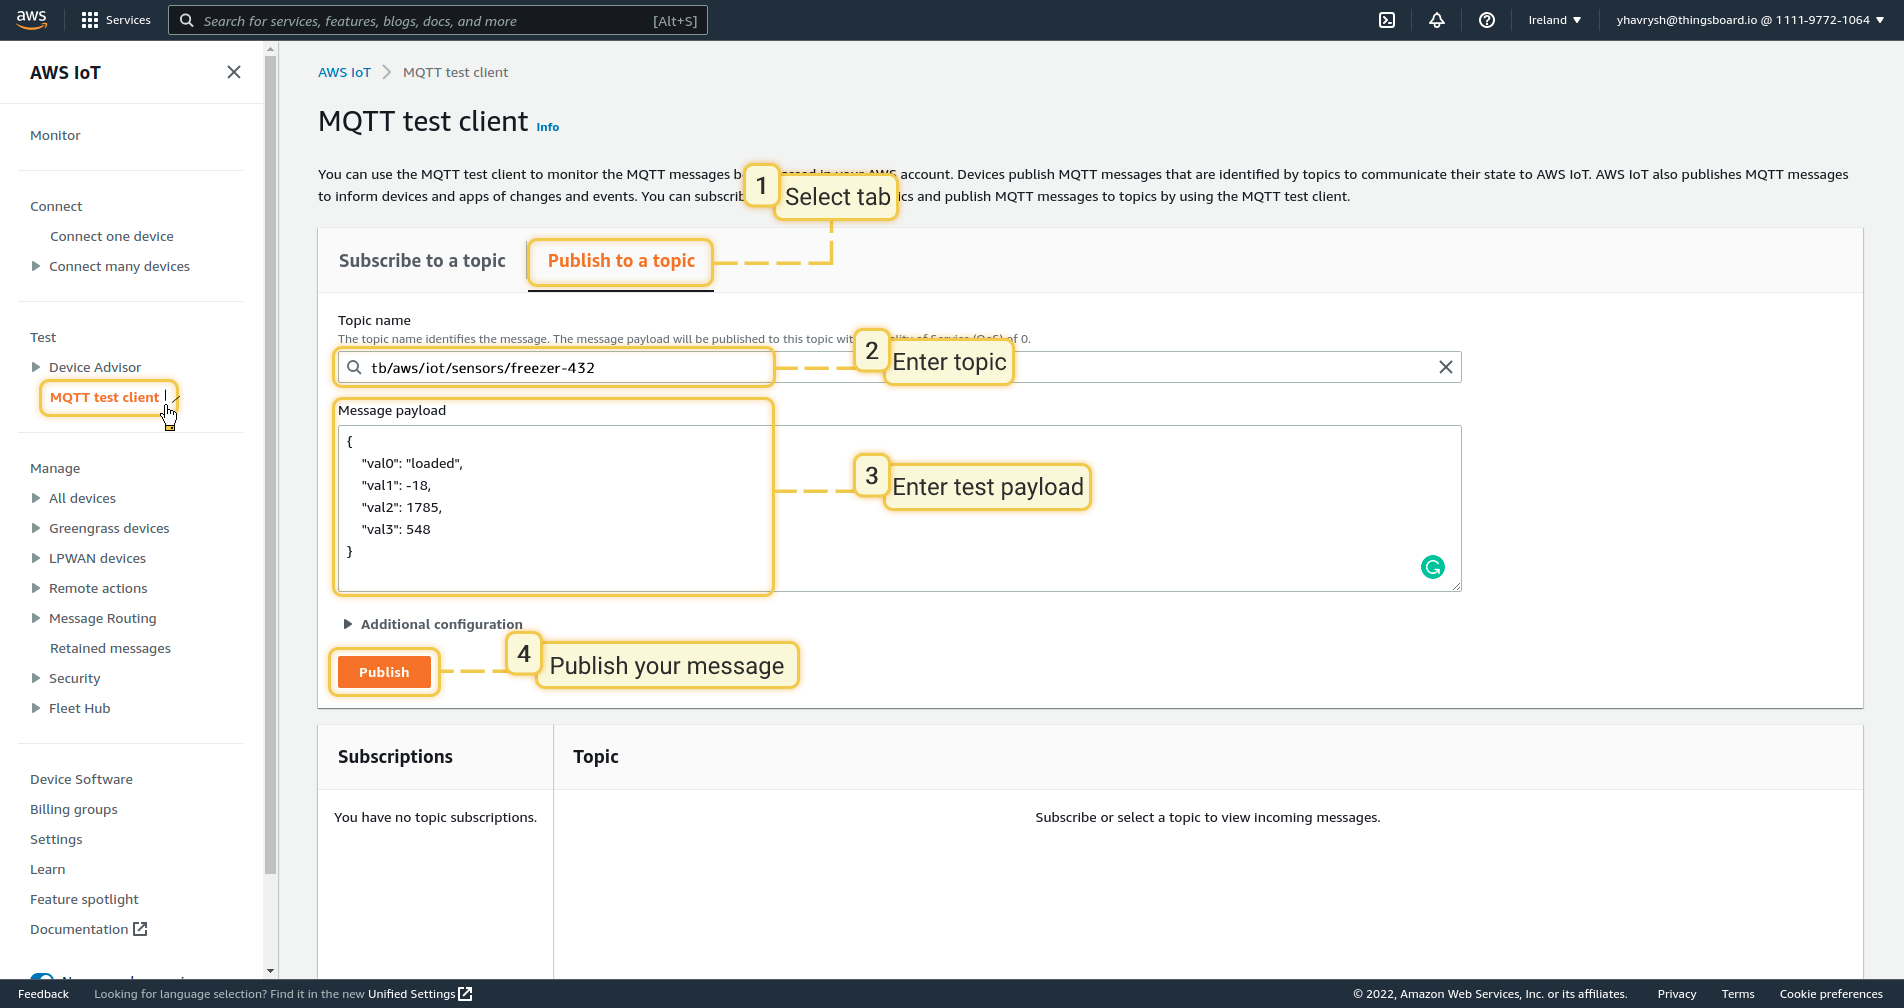
主题示例:
1
tb/aws/iot/sensors/freezer-432
消息负载示例:
1
2
3
4
5
6
{
    "val0": "loaded",
    "val1": -18,
    "val2": 1785,
    "val3": 548
}
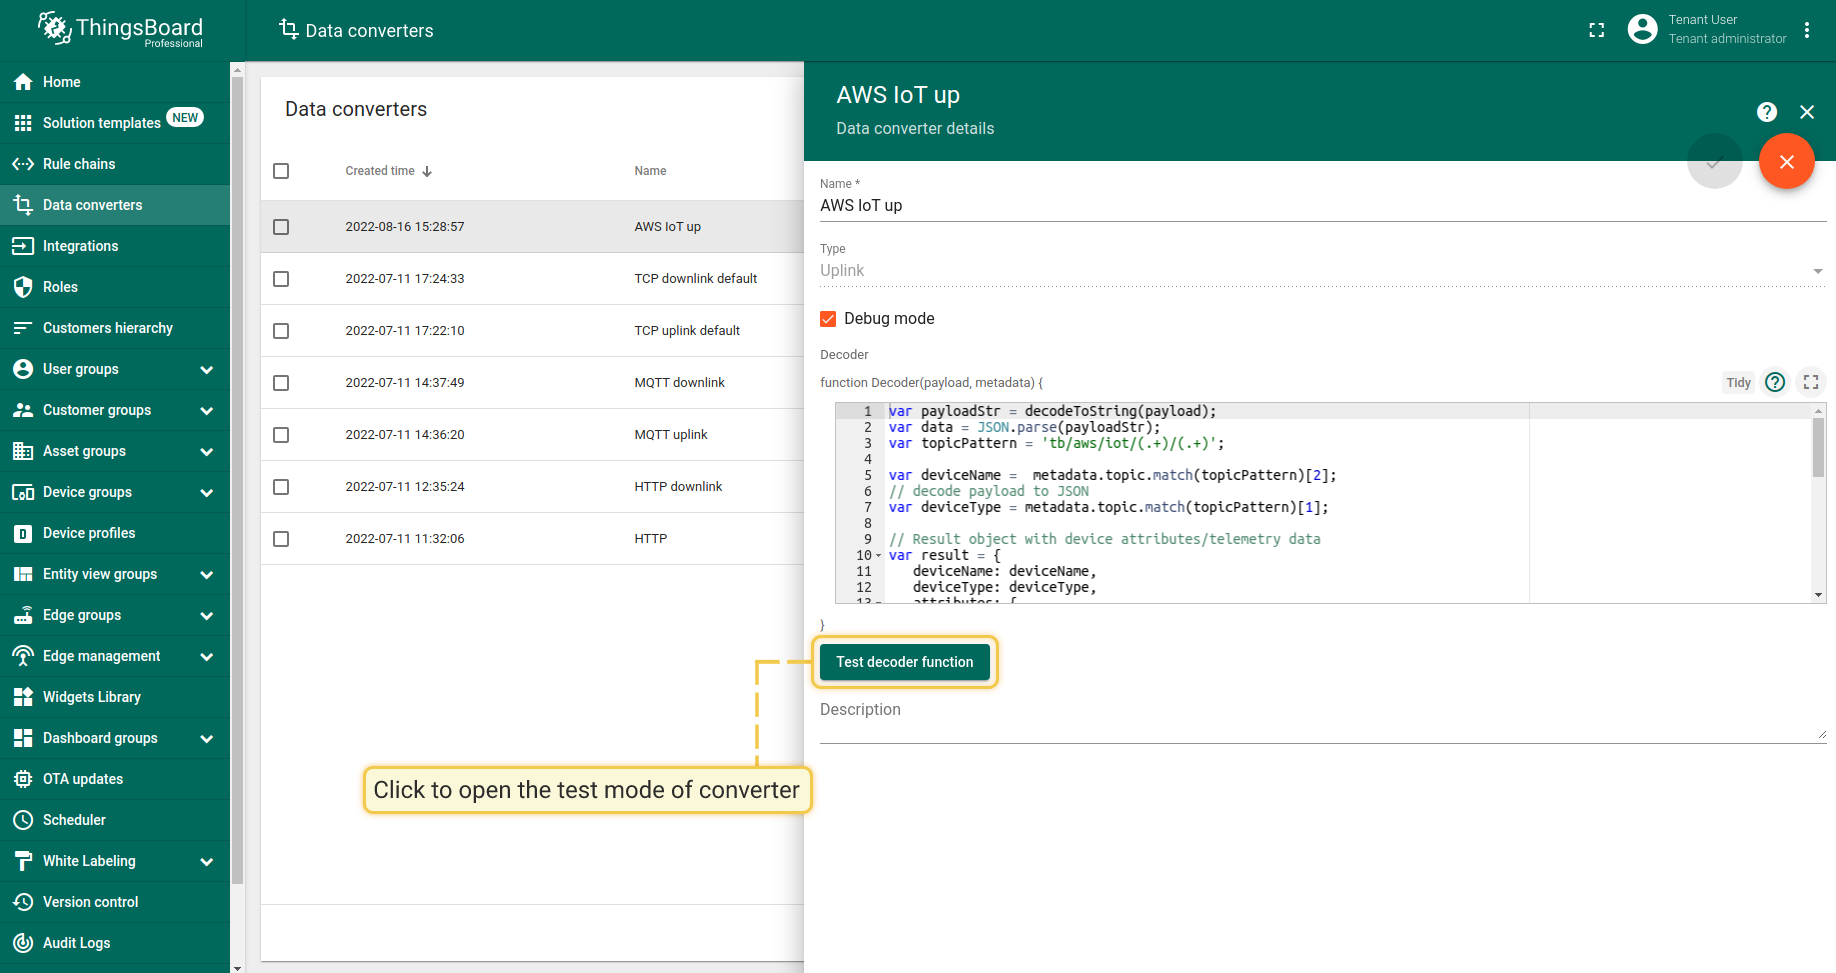
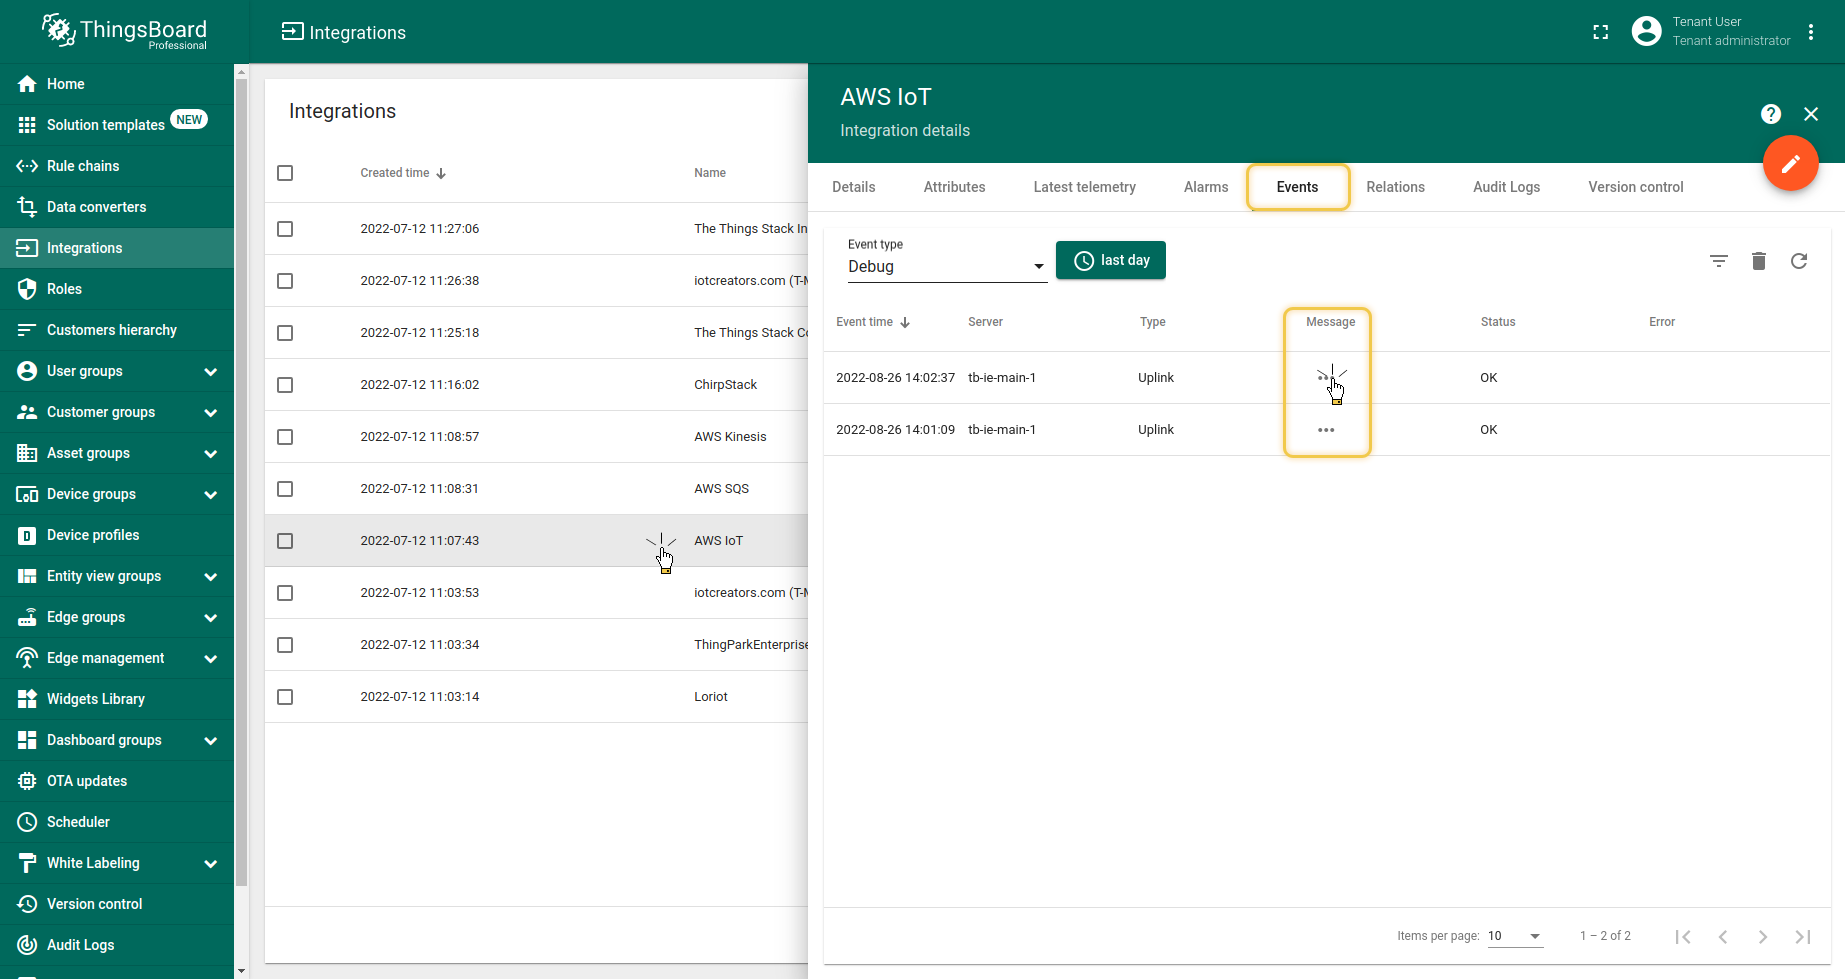
要检查消息是否已到达AWS IoT集成,请打开集成的事件(Events)选项卡。

高级用法:创建下行数据转换器(Create Downlink Converter)
下面通过一个简单示例来测试连接并发送消息。首先需要创建一个下行数据转换器(Downlink Data converter),然后在AWS IoT集成中设置该转换器和主题。
可使用 TBEL(TBEL)或 JavaScript 开发用户自定义函数。 建议使用 TBEL,其在ThingsBoard 中的执行效率远高于 JS。
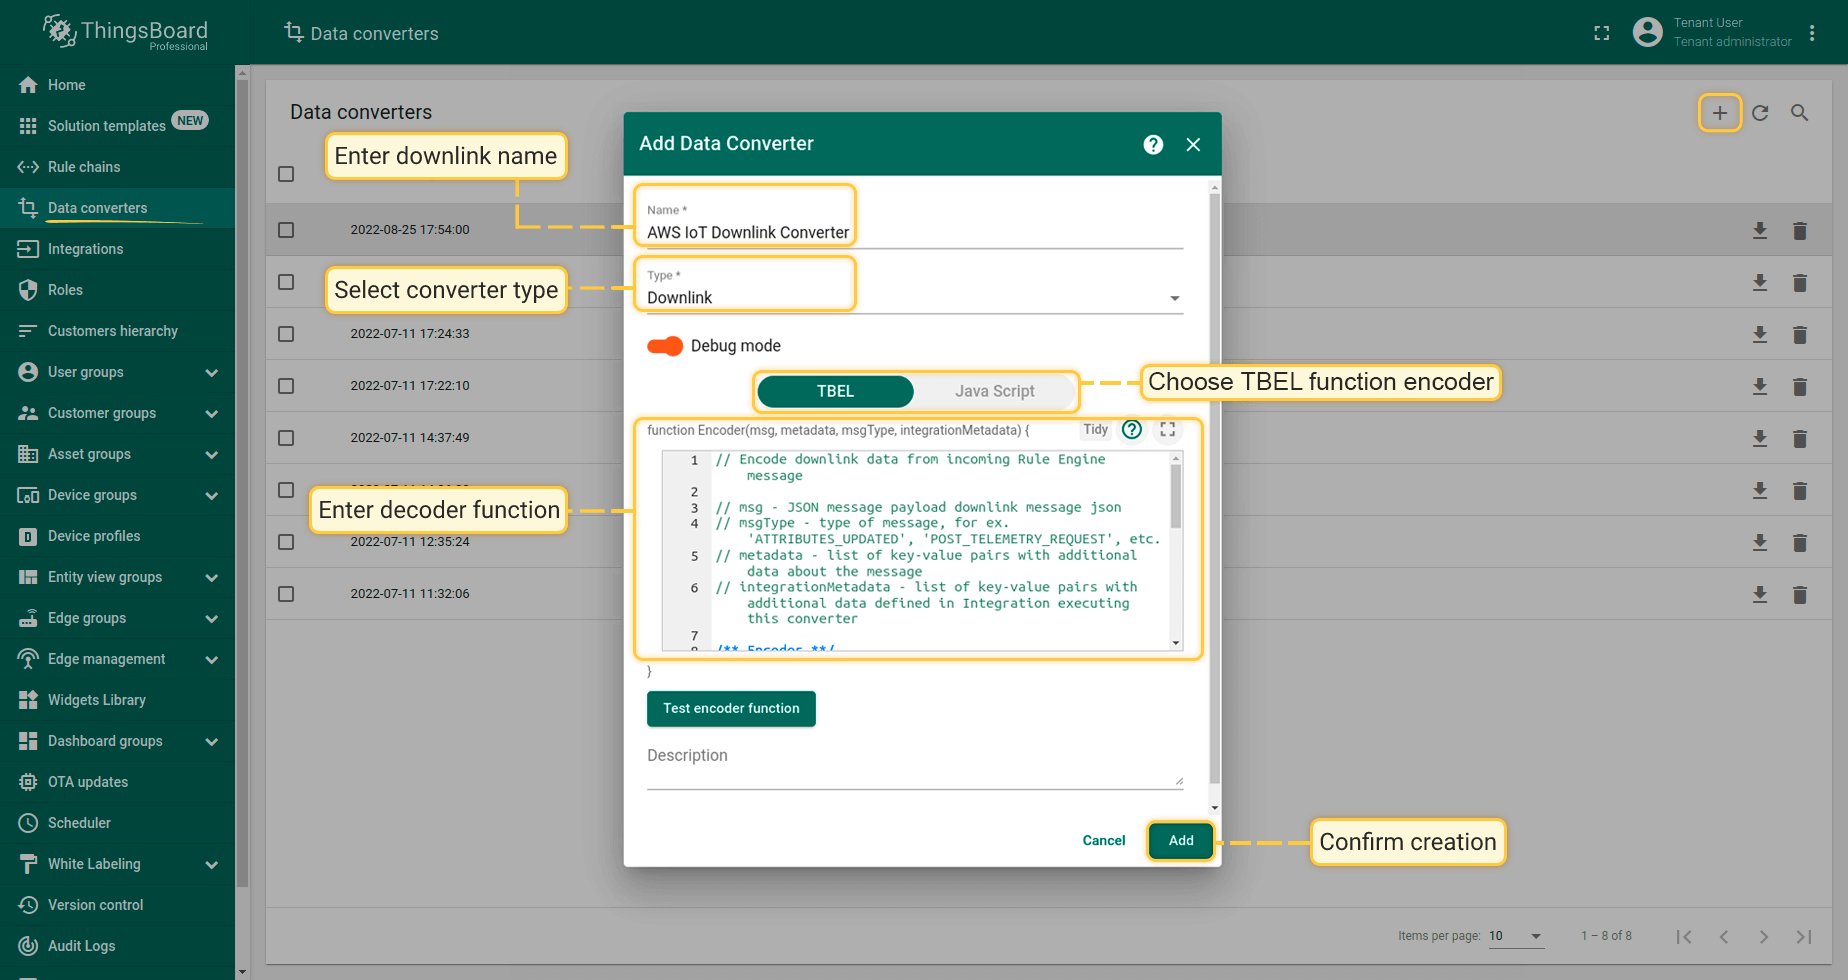  .png) 下行转换器示例: |
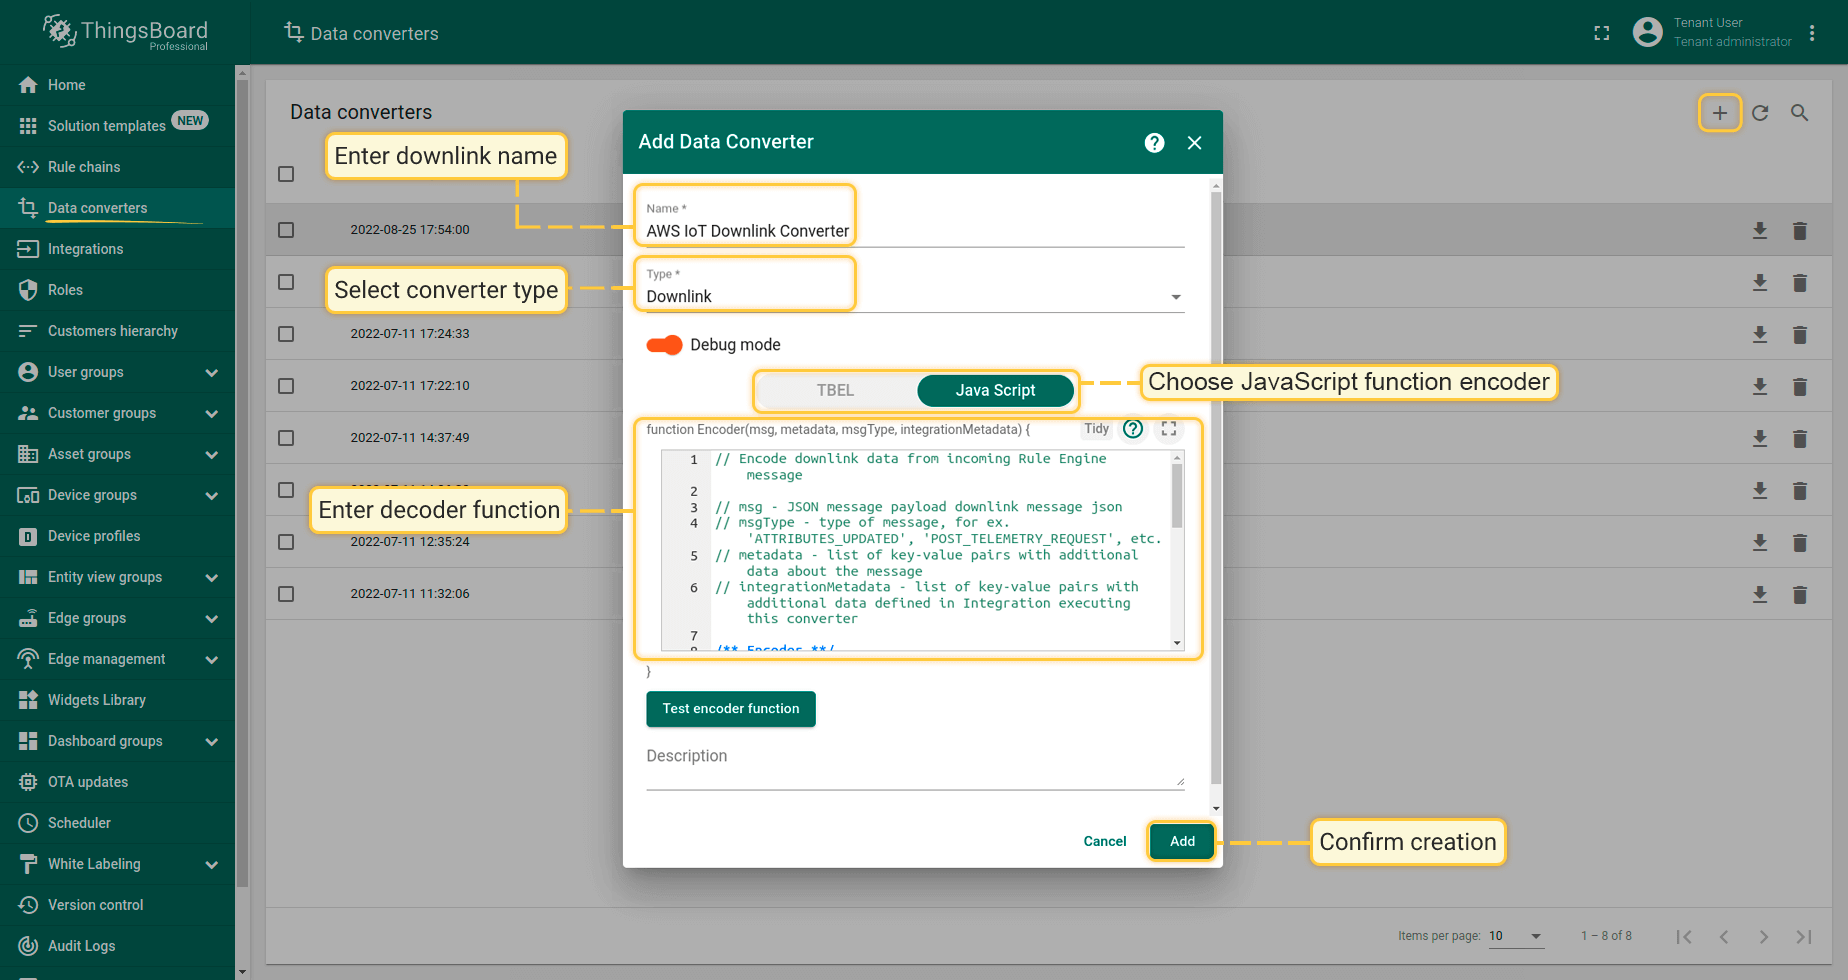 下行转换器示例: |
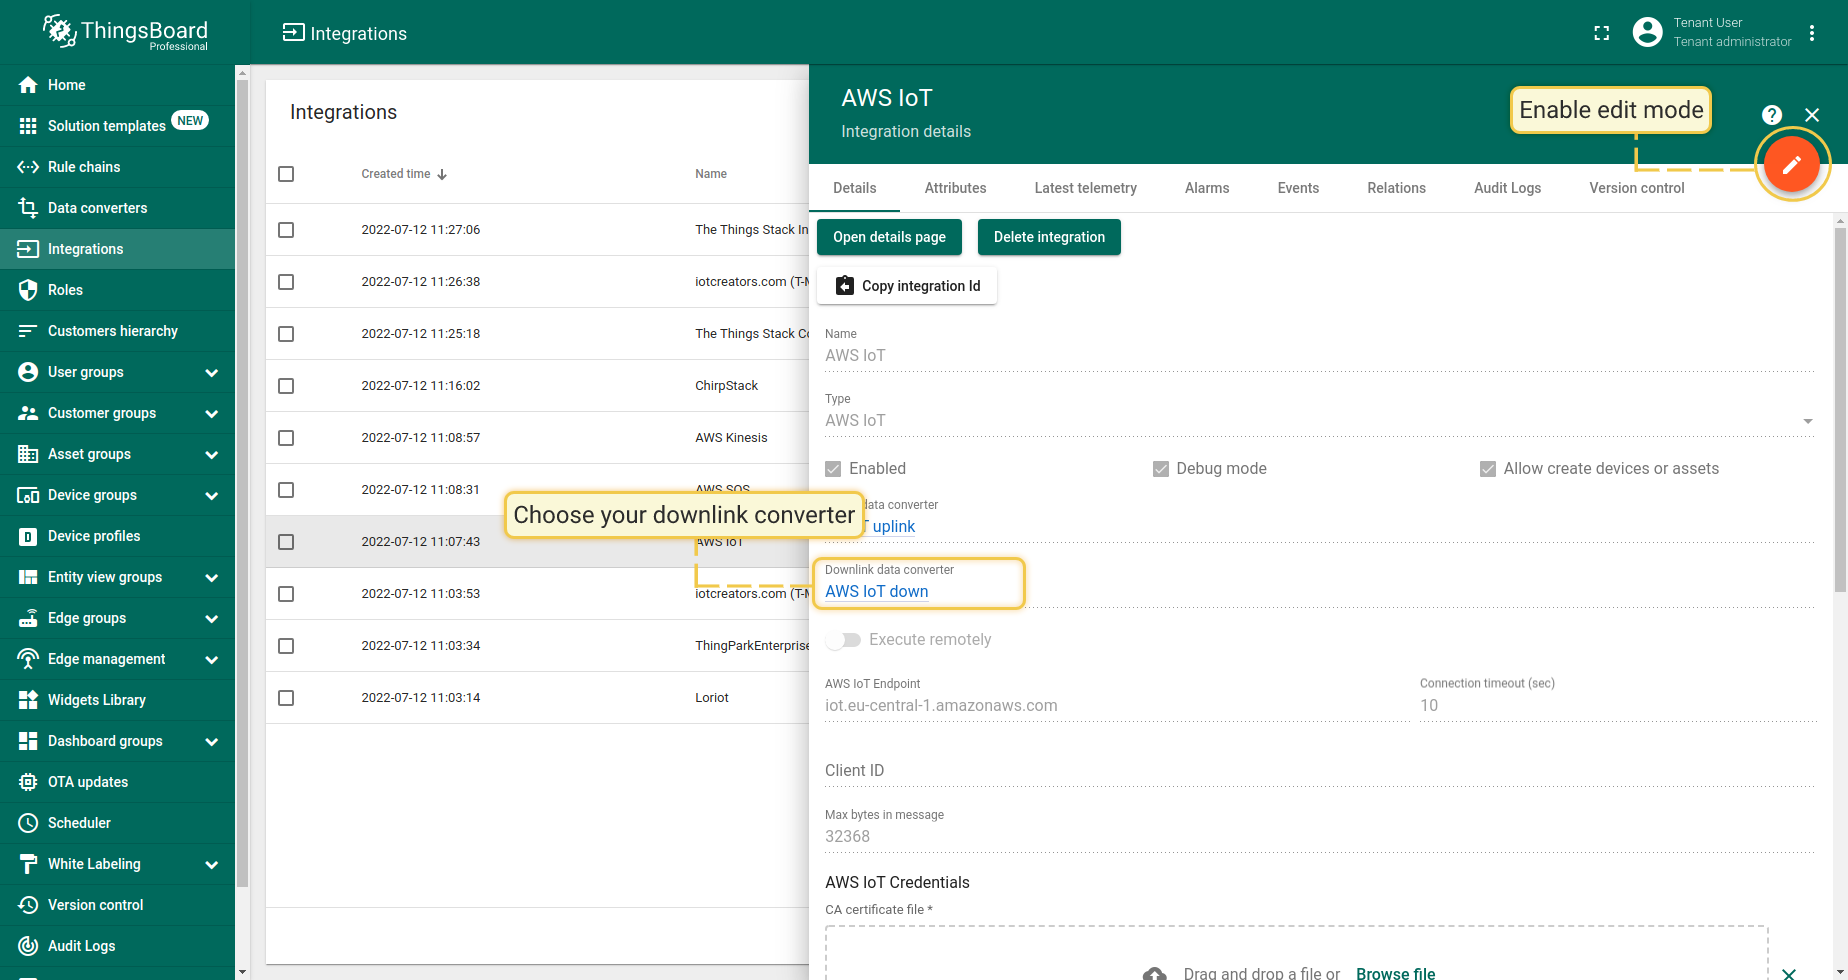
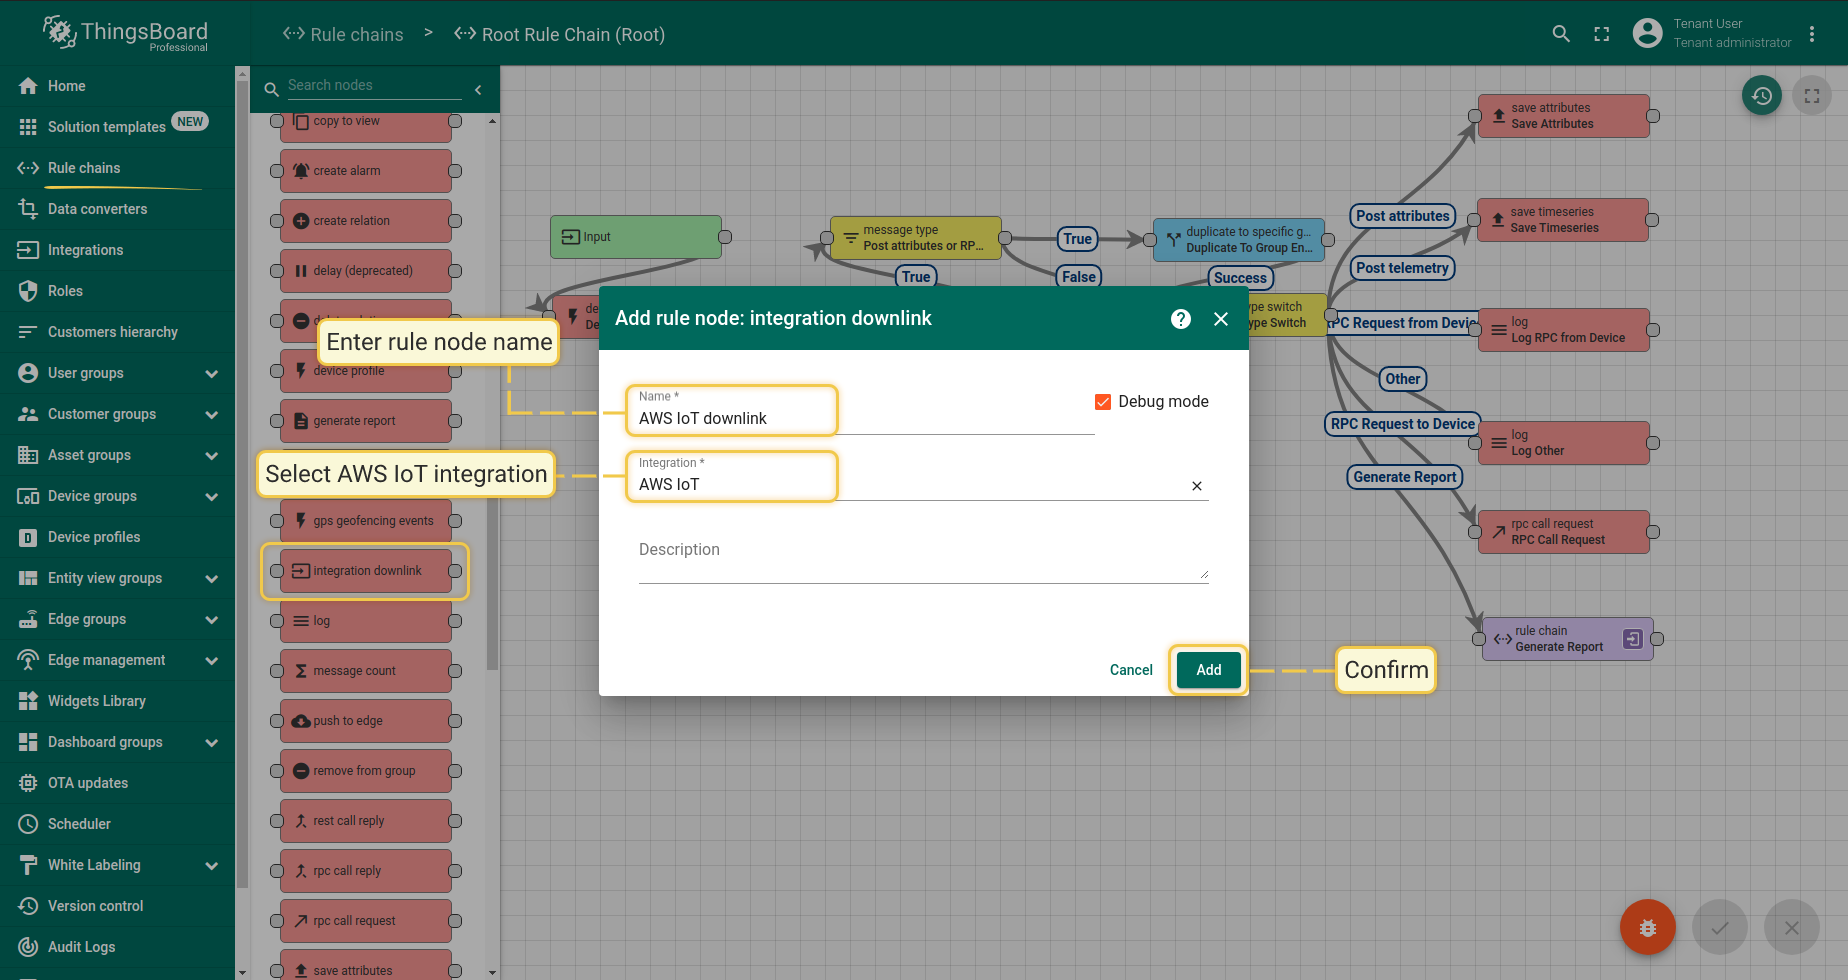
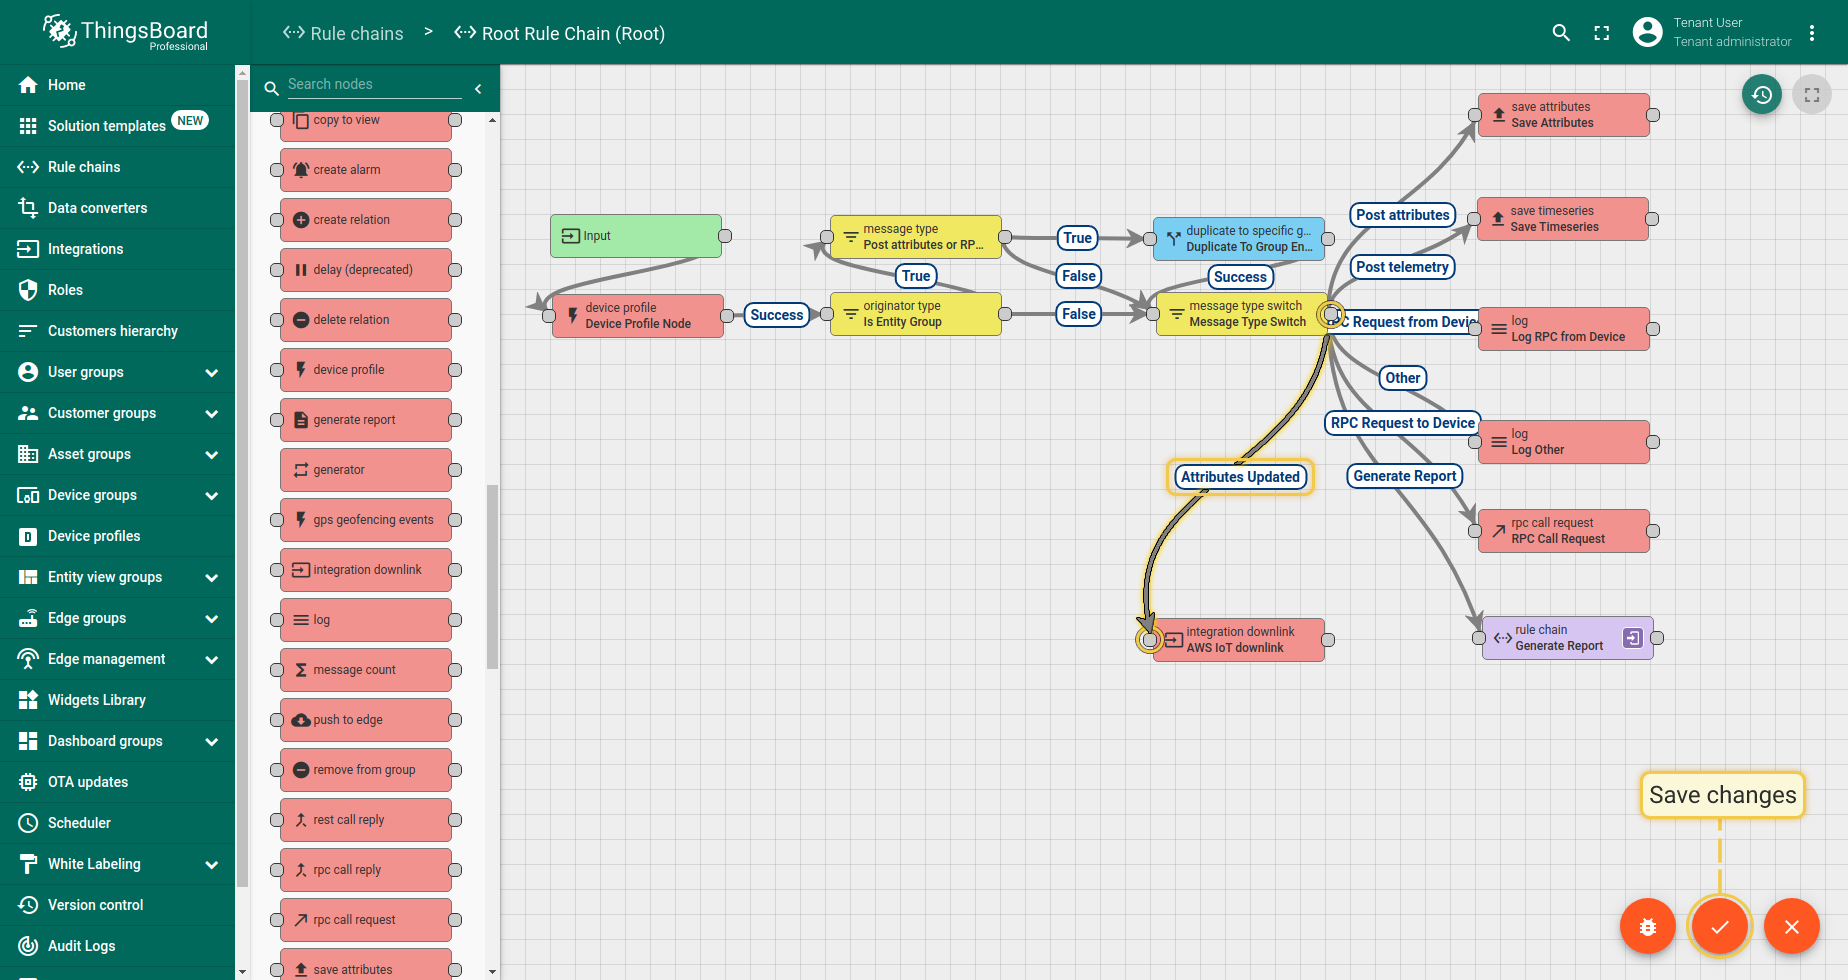
接下来,配置通过AWS IoT下行集成发送消息的条件。为此,您需要打开设备使用的规则链(在本例中为默认的Root Rule Chain),然后添加一个integration downlink node,并将链接条件设置为Attributes Updated。
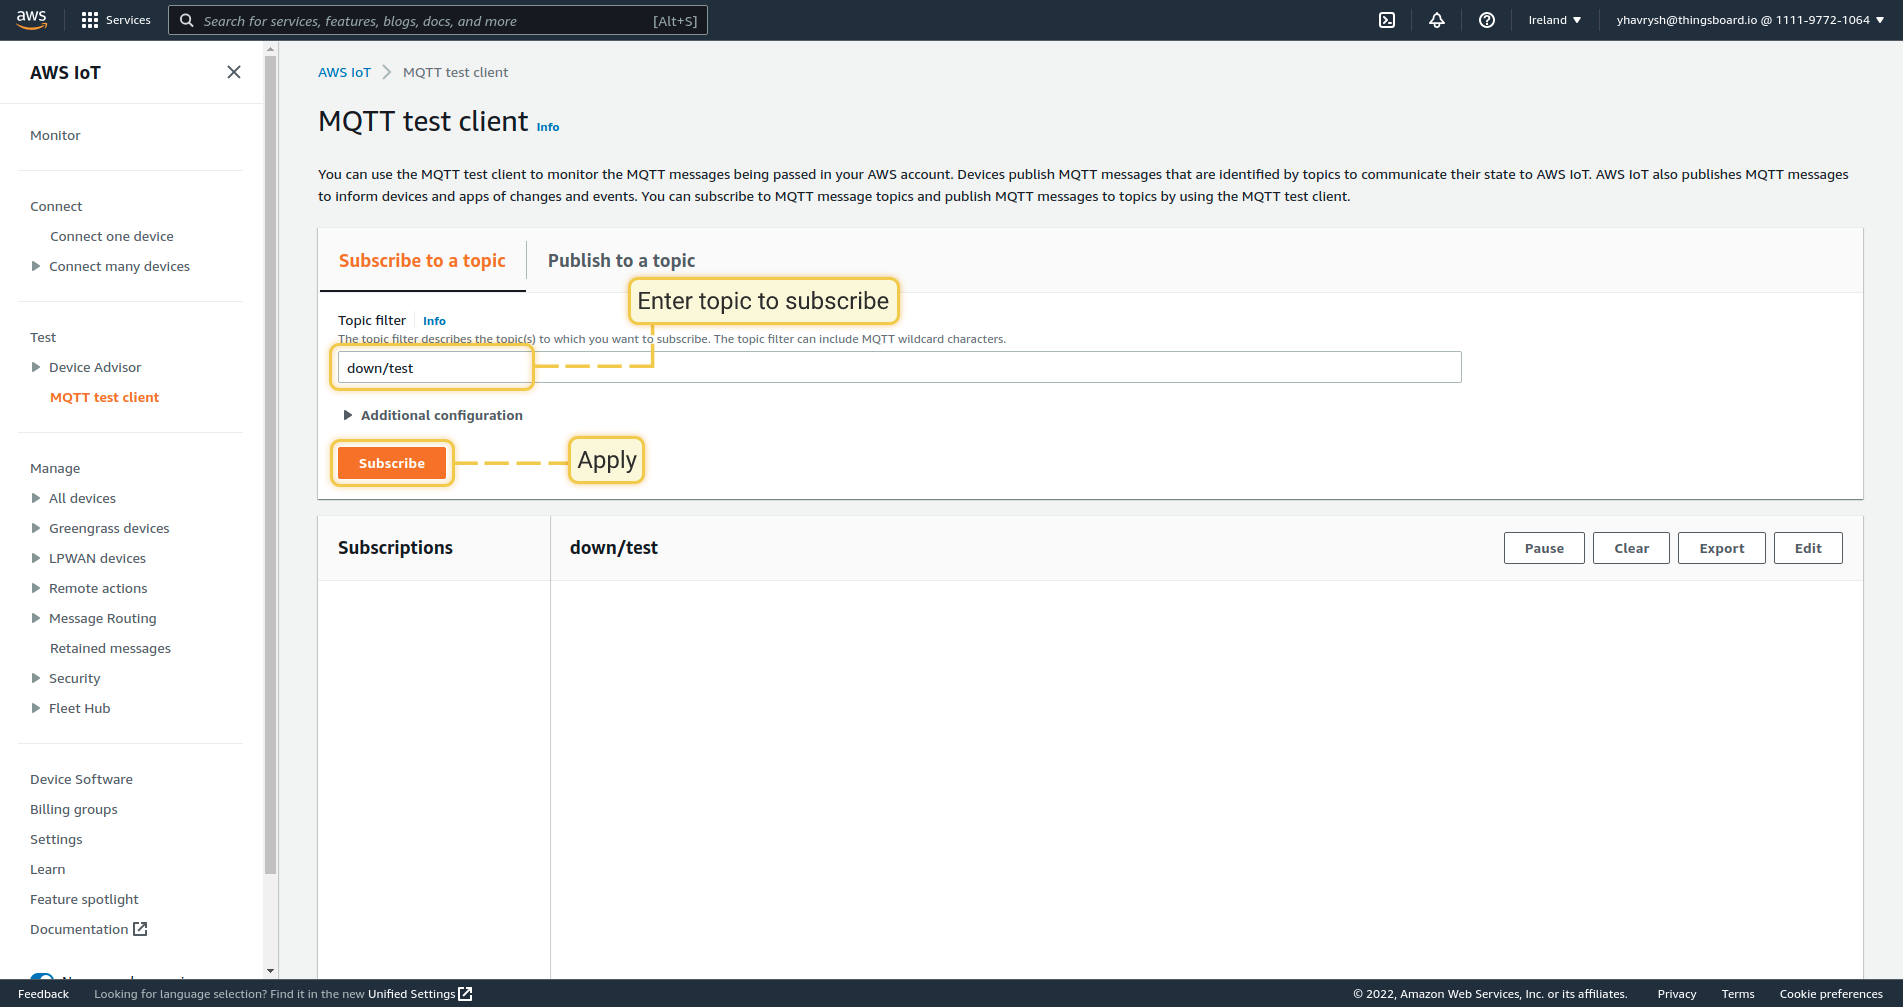
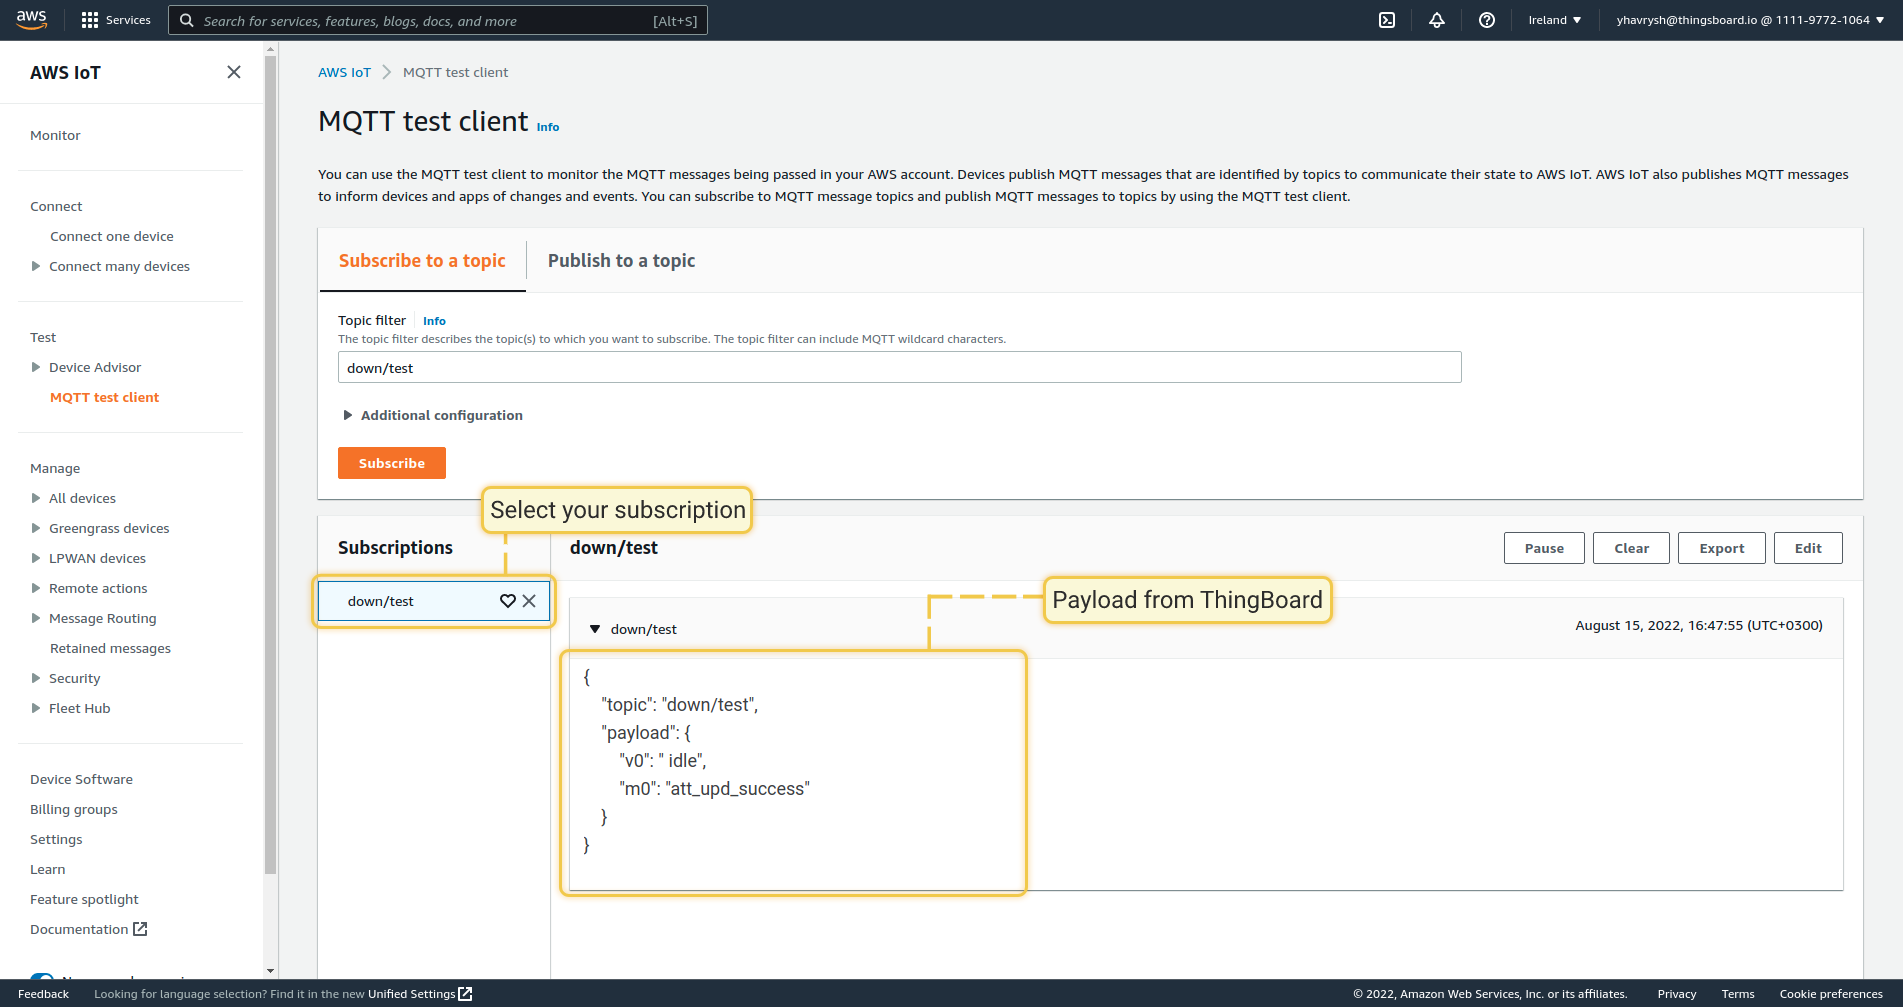
要订阅主题以接收来自ThingsBoard的消息,请使用AWS MQTT test client。
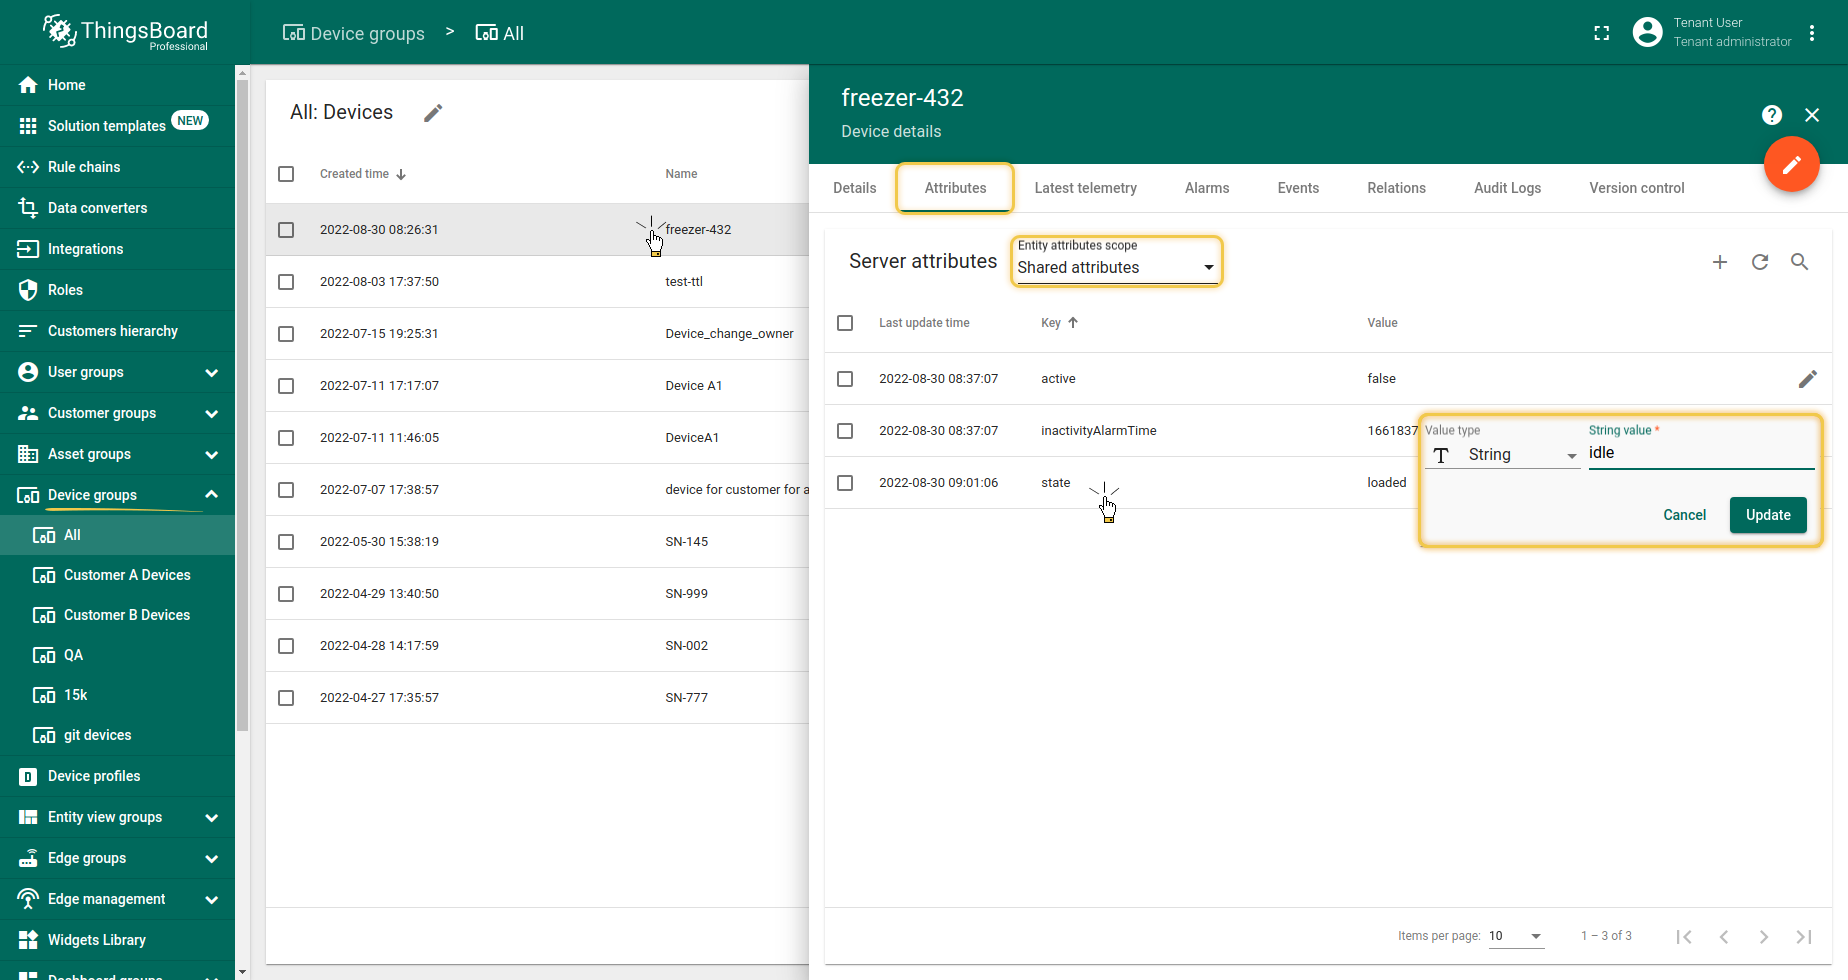
现在您可以更新设备属性。打开Device,进入Attributes选项卡,选择Shared Attributes,然后选择任意属性或添加新属性进行更新。
您可以在AWS中订阅主题的页面上查看结果:
视频教程
请观看下方视频教程,了解如何逐步设置AWS IoT集成(界面已过时,仅供参考)。