Overview
AWS Kinesis provides easily collect, process, and analyze video and data streams in real time, so you can get timely insights and react quickly to new information. After integrating AWS Kinesis with the Thingsboard, you can process and visualize data from AWS Kinesis streams in the Thingsboard IoT platform.
Please make sure that you know AWS Kinesis basics and what are the AWS Kinesis streams in general before continue with this topic.
AWS Kinesis setup
Install and configure AWS CLI
The first step is to obtain AWS Access Keys for your AWS account. Access key to your AWS account must be able to create AWS Kinesis stream, put data to the stream and get data from the stream. Please go to Managing Access Keys for Your AWS Account Root User to create your AWS access key.
Additionally, please make sure that access key for your account has access to AWS Kinesis, AWS DynamoDB and AWS CloudWatch services.
Once the Access Key is created, please note down AWS Access Key ID, AWS Secret Access Key:
- AWS Access Key ID: XXXXXXXXXXXXXXX
- AWS Secret Access Key: YYYYYYYYYYYYYYY
Additionally, please make sure that you know your default AWS region name:
- AWS region name: ZZZZZZZ
We we’ll refer to them later as AWS_ACCESS_KEY_ID, AWS_SECRET_ACCESS_KEY and AWS_REGION accordingly during the configuration of AWS Kinesis Thingsboard integration.
The second step is to install and configure AWS CLI to be able to create streams, put records into the streams and get records from the streams from the command line. Go to AWS CLI install and configuration and install AWS CLI onto your machine.
Once completed, please make sure that you are able to see help for command line:
1
aws kinesis help
and receive the following output:
1
2
3
4
5
6
7
8
9
10
11
12
13
14
15
16
17
18
19
20
21
KINESIS()                                                            KINESIS()

NAME
       kinesis -

DESCRIPTION
       Amazon  Kinesis  Data  Streams is a managed service that scales elasti-
       cally for real-time processing of streaming big data.

AVAILABLE COMMANDS
       o add-tags-to-stream
       o create-stream
       o decrease-stream-retention-period
       o delete-stream
       o deregister-stream-consumer
       o describe-limits
       o describe-stream
       o describe-stream-consumer
       o describe-stream-summary
       o disable-enhanced-monitoring
....
Please click q to close help.
Kinesis stream data format
Kinesis uses Base64 format for data inside streams. In mean time Thingsboard AWS Kinesis integration will automatically convert Base64 encoding into character payload.
If your application sends data as CSV, you will receive the same CSV payload on the Thingsboard converter. If your application sends data as JSON string, Thingsboard converter will receive JSON string in the text payload.
In this tutorial, we will use JSON string to put records into Kinesis data stream. As well we will send data back to Kinesis streams from the Thingsboard in the JSON string. In real life scenario, it is up to you what data format to use to decode/encode data.
AWS Kinesis demo streams
In this demo we will use two AWS Kinesis streams:
- uplink stream - for the incoming data into the Thingsboard.
- downlink stream - for the outgoing data from the Thingsboard.
Let’s create uplink stream with the help of AWS CLI:
1
aws kinesis create-stream --stream-name tb-test-uplink --shard-count 1
Please verify that stream was created successfully:
1
aws kinesis describe-stream --stream-name tb-test-uplink
The output should be similar to this:
1
2
3
4
5
6
7
8
9
10
11
12
13
14
15
16
17
18
19
20
21
22
23
24
25
26
27
28
{
    "StreamDescription": {
        "KeyId": null,
        "EncryptionType": "NONE",
        "StreamStatus": "ACTIVE",
        "StreamName": "tb-test-uplink",
        "Shards": [
            {
                "ShardId": "shardId-000000000000",
                "HashKeyRange": {
                    "EndingHashKey": "340282366920938463463374607431768211455",
                    "StartingHashKey": "0"
                },
                "SequenceNumberRange": {
                    "StartingSequenceNumber": "49599874927422395224927130964668873176443726009932447746"
                }
            }
        ],
        "StreamARN": "arn:aws:kinesis:eu-west-1:XXXXXXXXXX:stream/tb-test-uplink",
        "EnhancedMonitoring": [
            {
                "ShardLevelMetrics": []
            }
        ],
        "StreamCreationTimestamp": 1569503664.0,
        "RetentionPeriodHours": 24
    }
}
Next step is to create downlink stream:
1
aws kinesis create-stream --stream-name tb-test-downlink --shard-count 1
Please verify that stream was created successfully:
1
aws kinesis describe-stream --stream-name tb-test-downlink
The output should be similar to this:
1
2
3
4
5
6
7
8
9
10
11
12
13
14
15
16
17
18
19
20
21
22
23
24
25
26
27
28
{
    "StreamDescription": {
        "KeyId": null,
        "EncryptionType": "NONE",
        "StreamStatus": "ACTIVE",
        "StreamName": "tb-test-downlink",
        "Shards": [
            {
                "ShardId": "shardId-000000000000",
                "HashKeyRange": {
                    "EndingHashKey": "340282366920938463463374607431768211455",
                    "StartingHashKey": "0"
                },
                "SequenceNumberRange": {
                    "StartingSequenceNumber": "49599874927422395224927130964668873176443726009932447746"
                }
            }
        ],
        "StreamARN": "arn:aws:kinesis:eu-west-1:XXXXXXXXXX:stream/tb-test-downlink",
        "EnhancedMonitoring": [
            {
                "ShardLevelMetrics": []
            }
        ],
        "StreamCreationTimestamp": 1569503664.0,
        "RetentionPeriodHours": 24
    }
}
Integration with the Thingsboard
We have done all necessary steps on the AWS Kinesis side. Now we can start configuring the Thingsboard.
Thingsboard Uplink Data Converter
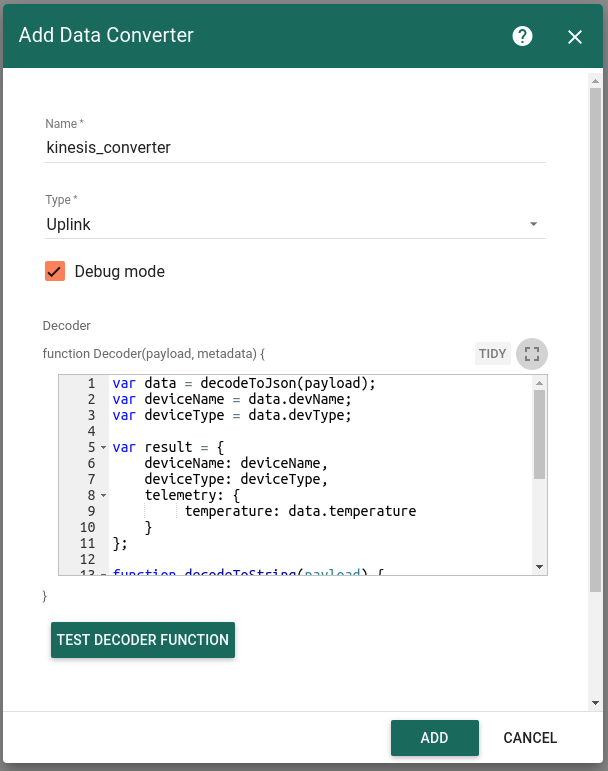
First, we need to create Uplink Data converter that will be used for converting messages received from the AWS Kinesis. The converter should transform incoming payload into the required message format. Message must contains deviceName and deviceType. Those fields are used for submitting data to the correct device. If a device was not found then new device will be created. Here is how demo payload from the AWS Kinesis will look like:
1
2
3
4
5
{
    "devName": "kitchen_thermostat",
    "devType": "thermostat",
    "temperature": 22
}
We will take devName and map it to the deviceName and devType map to the deviceType. But you can use another mapping in your specific use cases. Also, we will take the value of the temperature field and use it as a device telemetry.
Go to Data Converters and create new uplink Converter with this function:
1
2
3
4
5
6
7
8
9
10
11
12
13
14
15
16
17
18
19
20
21
22
23
var data = decodeToJson(payload);
var deviceName = data.devName;
var deviceType = data.devType;

var result = {
    deviceName: deviceName,
    deviceType: deviceType,
    telemetry: {
         temperature: data.temperature
    }
};

function decodeToString(payload) {
    return String.fromCharCode.apply(String, payload);
}

function decodeToJson(payload) {
    var str = decodeToString(payload);
    var data = JSON.parse(str);
    return data;
}

return result;
Thingsboard Downlink Data Converter
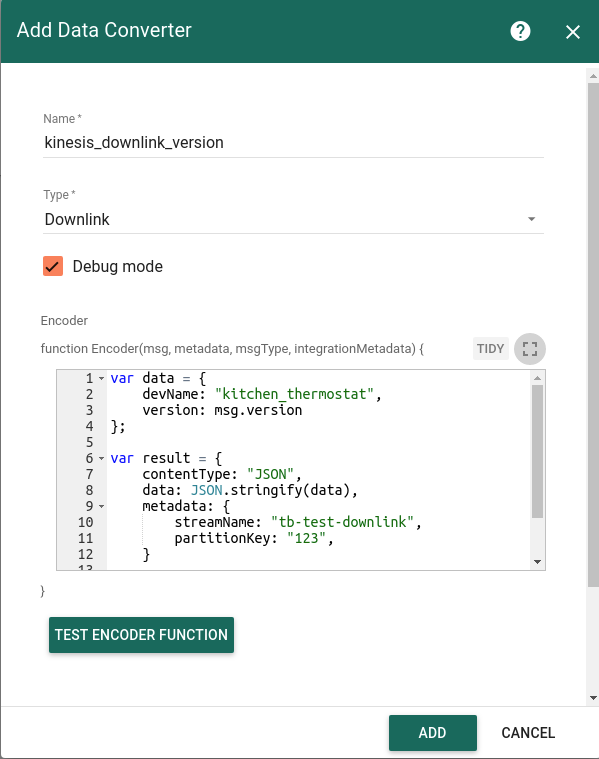
For sending Downlink messages from the Thingsboard to the Kinesis stream, we need to define downlink Converter. In general, output from Downlink converter should have the following structure:
1
2
3
4
5
6
7
8
{
    "contentType": "JSON",
    "data": "{\"devName\":\"kitchen_thermostat\",\"version\":\"0.11\"}",
    "metadata": {
        "streamName": "tb-test-downlink",
        "partitionKey": "1234"
    }
}
- contentType - defines how data will be encoded {TEXT | JSON | BINARY}
- data - actual data that will be sent to the AWS Kinesis stream.
- metadata - in this object you must place correct streamName value and partitionKey that will be used to identify correct stream in AWS Kinesis and partition key
Go to Data Converters and create new downlink Converter with this function:
1
2
3
4
5
6
7
8
9
10
11
12
13
14
15
16
var data = {
    devName: "kitchen_thermostat",
    version: msg.version
};

var result = {
    contentType: "JSON",
    data: JSON.stringify(data),
    metadata: {
        streamName: "tb-test-downlink",
        partitionKey: "123",
    }

};

return result;
This converter will take version field from the incoming message and add it as a payload field in the outbound message. Additionally, we will put device name in the outbound message. In this way next applications in our business flow, that will consume messages from the donwlink stream, will be able to identify, that this payload belongs to kitchen_thermostat device.
AWS Kinesis Integration
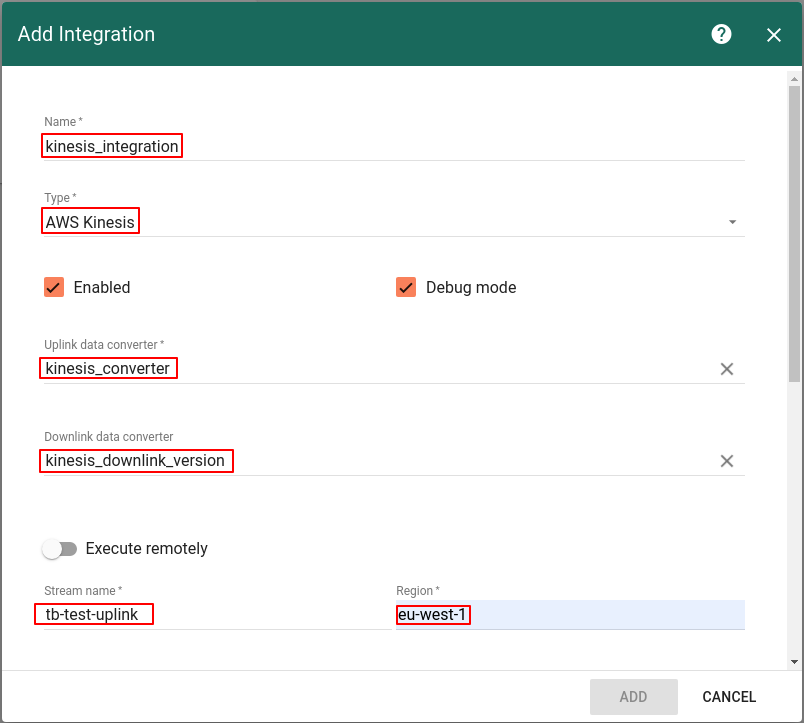
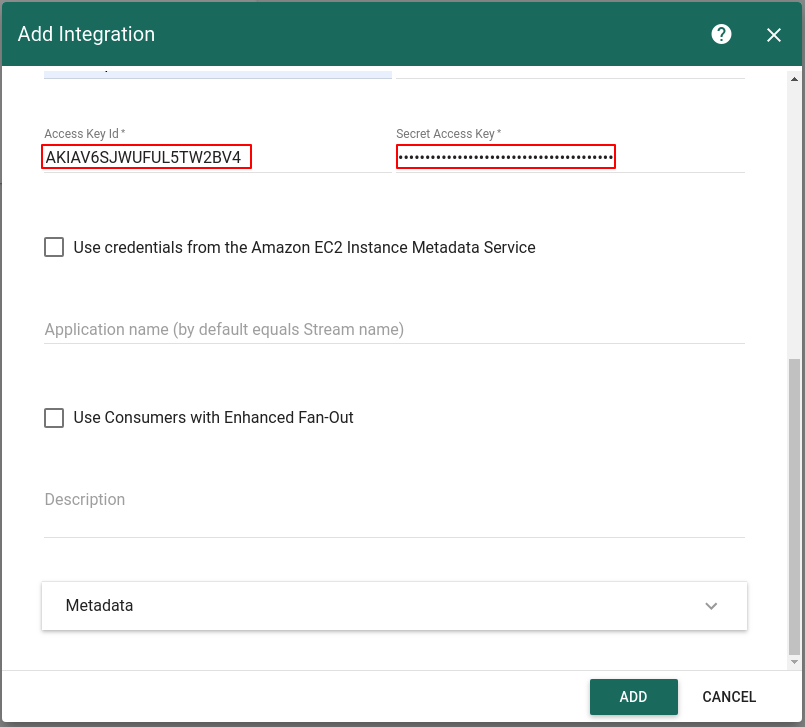
Next we will create Integration with AWS Kinesis inside the Thingsboard. Open Integrations section and add new Integration with type AWS Kinesis
- Name: kinesis_integration
- Type: AWS Kinesis
- Uplink data converter: kinesis_converter
- Downlink data converter: kinesis_downlink_version
- Stream name: tb-test-uplink
- Region: AWS_REGION
- Access Key Id: AWS_ACCESS_KEY_ID
- Access Key: SECRET_ACCESS_KEY
- Use credentials from the Amazon EC2 Instance Metadata Service: false (please refer to IAM Roles for Amazon EC2 for more details)
- Use Consumers with Enhanced Fan-Out: false (please refer to Using Consumers with Enhanced Fan-Out for more details)
Validation
Validate Uplink Messages
Lets verify our integration. First, lets put message into uplink stream, so Thingsboard will fetch this message. Type in the console:
1
aws kinesis put-record --stream-name tb-test-uplink --partition-key 123 --data '{"devName": "kitchen_thermostat", "devType": "thermostat", "temperature": 22}'
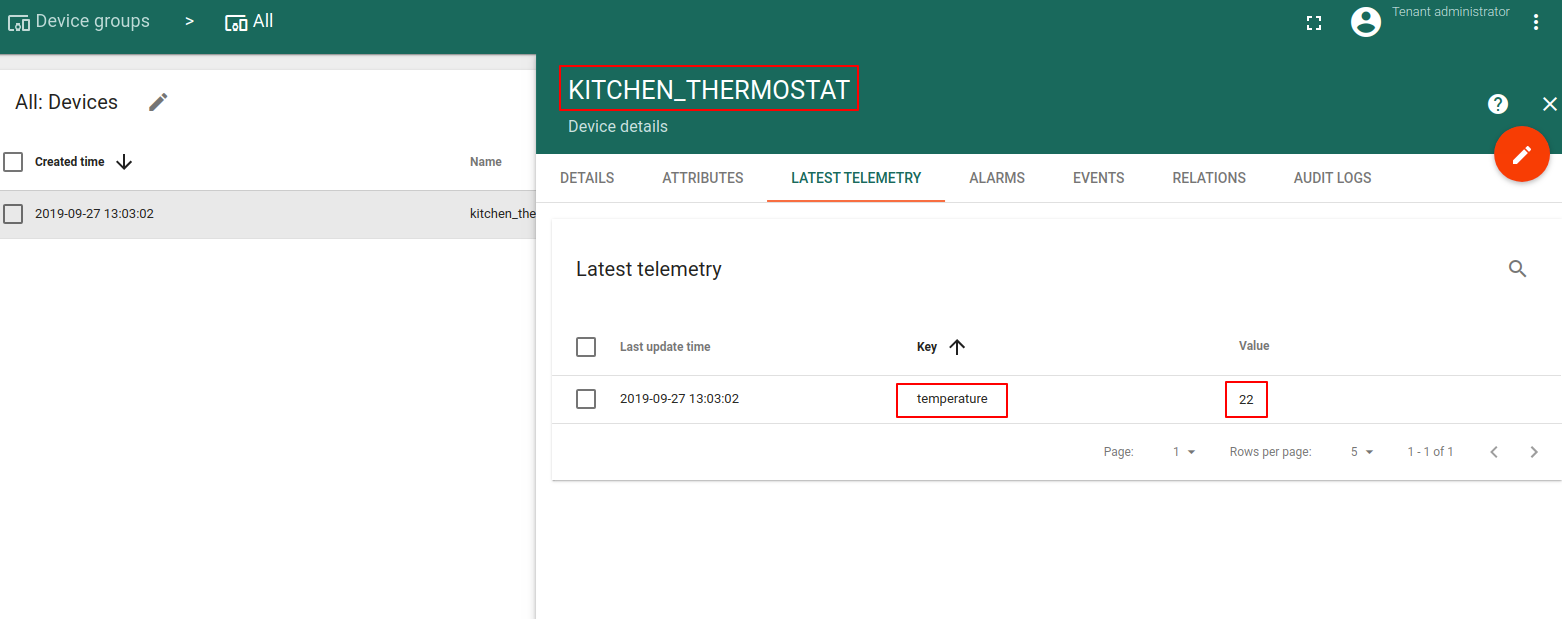
Go to Device Group -> All -> kitchen_thermostat - you can see that
- new device was registered in the thingsboard
- In the Latest Telemetry section you will see that last submitted temperature = 22.
Validate Downlink Messages
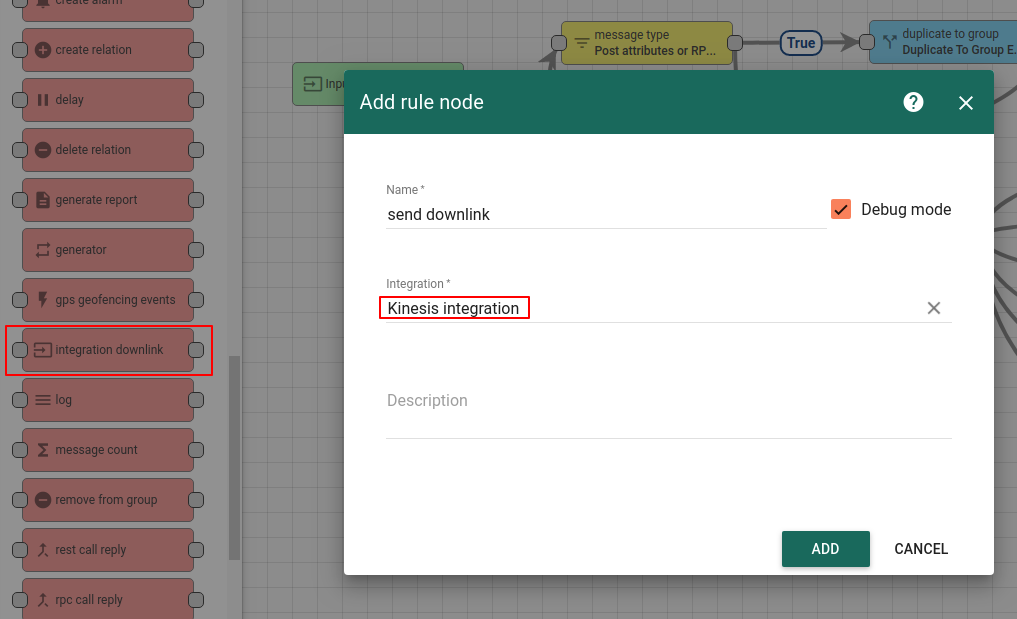
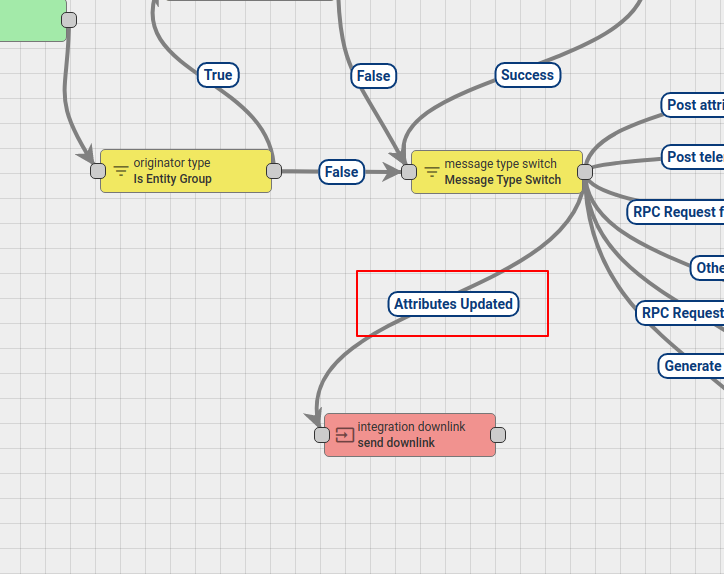
For testing Downlink Messages, we will update our Root Rule Chain to send downlink message when device attribute is changed. Open and edit Root Rule Chain. Add Integration Downlink Action node and connect it with the Message Type Switch Node using relation Attributes Updated
Save Changes.
Go to Device Group -> All -> kitchen_thermostat -> attributes section. We will add Shared attribute with name version and value v.0.11
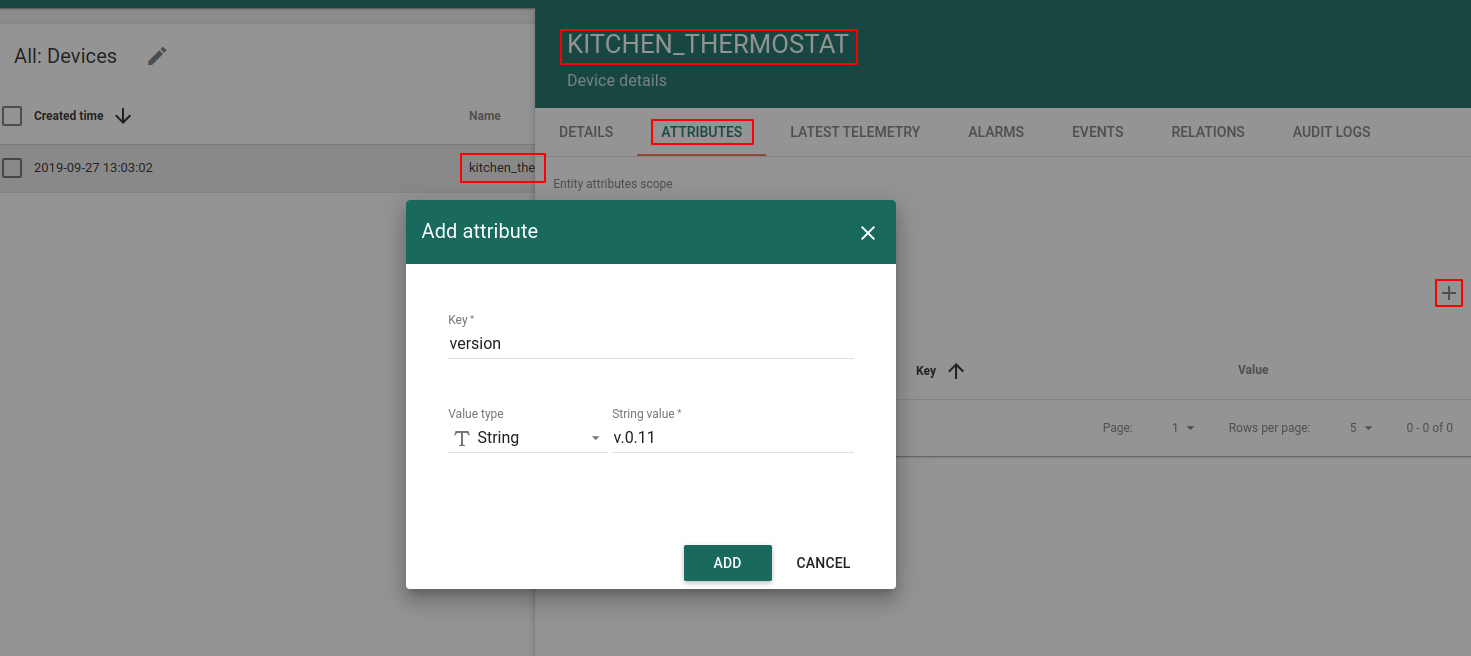
By making this step, we triggered downlink message to the downlink stream tb-test-downlink and this message should contains device name and version field value. Let’s use command line AWS CLI tool to validate, that we have received the massage in the downlink stream. First, we need to get shard iterator for the downlink stream, to get records from the stream:
1
aws kinesis get-shard-iterator --shard-id shardId-000000000000 --shard-iterator-type TRIM_HORIZON --stream-name tb-test-downlink
In the output you will receive ID of the iterator:
1
2
3
{
    "ShardIterator": "AAAAAAAAAAHHpat8cWmSZ1LSNg2oOra2yaRN/75ZhdwXFNZjnznXU1BQVjo9B+IVi3Pk6ltKN3V8Vhihi74MtXvG9rKcL9VRP1xRebo/NVjaMWd5FmAcp1rvs/DOahY+0FVm6UC1fKFwUXmgnsCzxkU9V8G9cFyGU/4Vvpf2PcrGsHG/JtNouCYT4wwdoXZ6FIFTuWdW7/Qs48PAZCkSjluwA7K1pld4"
}
Now, let’s use the ShardIterator from the above JSON in the get-records command:
1
aws kinesis get-records --shard-iterator **ShardIterator**
In our example:
1
aws kinesis get-records --shard-iterator AAAAAAAAAAFQtL3oAo74irn+ccC3vghADqqmh2MH+HKI9qYTi1NP957vDe8KyV6VdQ+I4shIP0HIRRVYyTZs0W9v6jaai9LevlJayMw6TgdPkVIGmV5SYZF8sGWgtd0wJuRqB+6QwCAUHQ52dgT4m+lypNSzJJw4Mo6h+9Wdk5fpwQxu/GlM8J+Uqblnq4EEr17FkWLahikaSZXktfLq5dh23+LEIc22
In the output you should receive records from the donwlink stream in the JSON format:
1
2
3
4
5
6
7
8
9
10
11
12
{
    "Records": [
        {
            "Data": "eyJkZXZOYW1lIjoia2l0Y2hlbl90aGVybW9zdGF0IiwidmVyc2lvbiI6InYuMC4xMSJ9",
            "PartitionKey": "1234",
            "ApproximateArrivalTimestamp": 1569609612.27,
            "SequenceNumber": "49599912710236940383450082324919185009278025474345271298"
        }
    ],
    "NextShardIterator": "AAAAAAAAAAFQlgSyxBdpKxlRrocJCYT9YDrCi/vxl0sstJgg4CM+pttVsK4AjjQwJ/QJsags5vdpQdopaqk9aKefAUOWobgwHVaZvhI4tdkmHBr45uO0Hq9AxUlKDxfiYbM0qgN33+5SvGxU8gJBUihYFY4ydPWOWdVTf2lOxp0a9X6DFrjsUqwMXR9skLw8/lQkBmHVFBlFURPy+z/AMuYHga5mDch/",
    "MillisBehindLatest": 0
}
As Kinesis uses Base64 for data presentation, we need to use some online Base64 converter tool to encode from the Base64 to JSON representative. As a result we will get next JSON payload:
1
2
3
4
{
    "devName":"kitchen_thermostat",
    "version":"v.0.11"
}
Now other application is able to listen to this downlink stream and react accordingly to your business logic.
See also
With this integration you can also configure Downlink converters and trigger required actions using Rule Engine nodes.
Next steps
-
入门指南 - 快速学习ThingsBoard相关功能。
-
安装指南 - 学习如何在各种操作系统上安装ThingsBoard。
-
可 视 化 - 学习如何配置复杂的ThingsBoard仪表板说明。
-
数据处理 - 学习如何使用ThingsBoard规则引擎。
-
数据分析 - 学习如何使用规则引擎执行基本的分析任务。
-
硬件样品 - 学习如何将各种硬件平台连接到ThingsBoard。
-
高级功能 - 学习高级ThingsBoard功能。
