仅专业版支持Platform Integrations功能。
请使用ThingsBoard Cloud或自行安装平台实例。
Kafka集成
Apache Kafka是Apache基金会下的开源分布式软件消息broker,使用Java和Scala编写。
设计为分布式、可水平扩展的系统,在源端数量和负载及订阅系统数量增加时均可扩展能力。订阅者可组成消费组。支持临时存储数据供后续批处理。
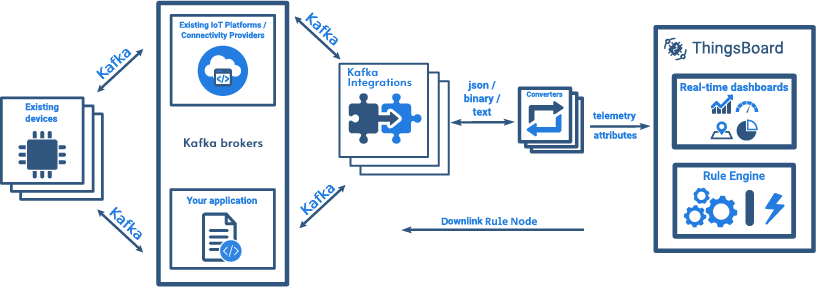
在某些场景下,当设备与实例之间无稳定连接时,Kafka可替代消息队列使用。
所需环境
在开始配置集成之前,您需要已经准备好一个Kafka Broker服务器。可以是本地安装,也可以是云解决方案。如果您尚未安装Kafka Broker,可以参考我们网站上关于在本地安装Kafka Broker的基本示例。如果您需要使用云解决方案,可以考虑Kafka Confluent,本指南中的示例也将基于该平台构建。
创建上行转换器
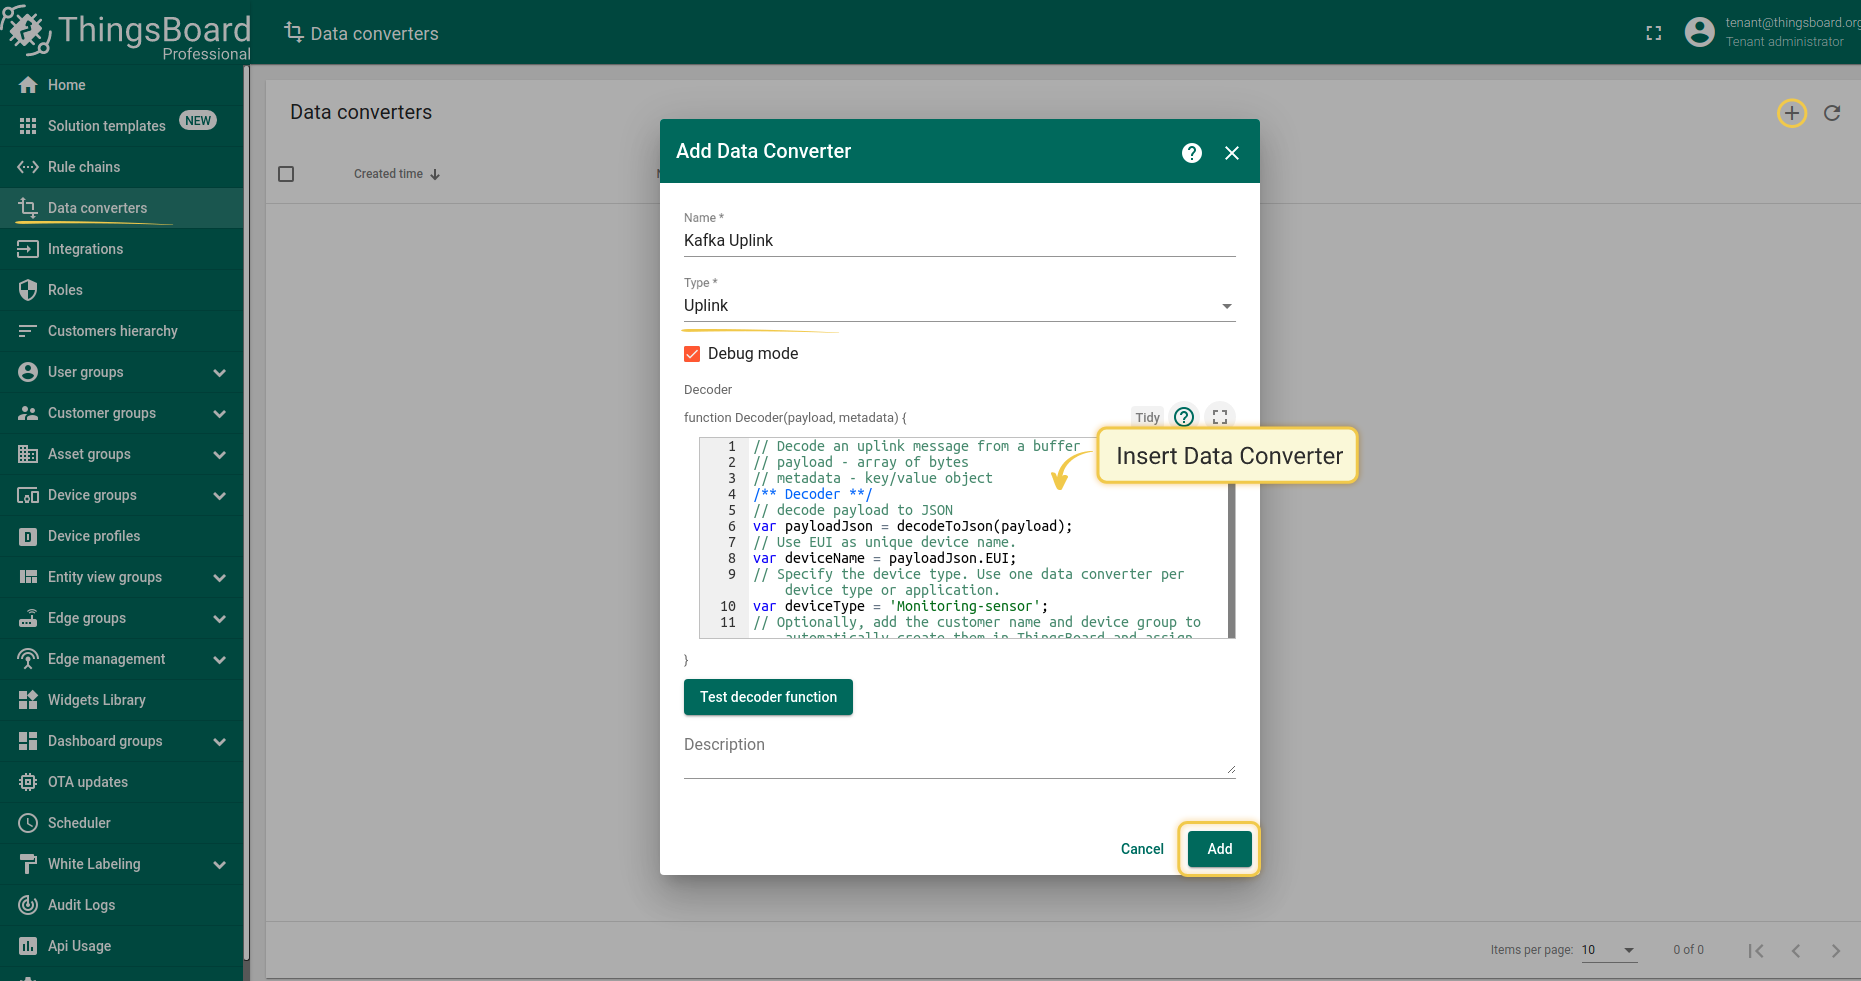
在创建集成之前,您需要在数据转换器中创建一个上行转换器。上行转换器用于将设备传入的数据转换为ThingsBoard所需的显示格式。点击“加号”按钮,然后点击“Create new converter”。要查看事件,请启用Debug模式。在解码器函数字段中,指定用于解析和转换数据的脚本。
调试模式
启用调试模式可追踪与integrations执行相关的事件、状态及潜在错误,便于开发和排障。
注意:调试模式可能迅速增加磁盘占用,因为所有调试事件都会存入数据库。 自ThingsBoard 3.9起,平台仅在integrations创建后的前15分钟内存储完整调试事件,之后仅保留错误事件。
调试模式设置可组合使用或完全关闭。
让我们查看来自Kafka的上行消息示例:
1
2
3
4
5
6
7
8
9
{
  "EUI"  : "43T1YH-REE",
  "ts"   : 1638876127000,
  "data"  : "3d1f0059",
  "port" : 10,
  "freq" : 24300,
  "rssi" : -130,
  "serial"  : "230165HRT"
}
EUI对应设备名称。“data”是遥测数据的双字符拼接,其中第一个值“3d”为温度,“1f”为湿度,“00”为风扇转速,“59”为压力。
您可以使用以下代码,将其复制到解码器函数部分:
1
2
3
4
5
6
7
8
9
10
11
12
13
14
15
16
17
18
19
20
21
22
23
24
25
26
27
28
29
30
31
32
33
34
35
36
37
38
39
40
41
42
43
44
45
46
47
48
49
50
51
52
// Decode an uplink message from a buffer
// payload - array of bytes
// metadata - key/value object
/** Decoder **/
// decode payload to JSON
var payloadJson = decodeToJson(payload);
// Use EUI as unique device name.
var deviceName = payloadJson.EUI;
// Specify the device type. Use one data converter per device type or application.
var deviceType = 'Monitoring-sensor';
// Optionally, add the customer name and device group to automatically create them in ThingsBoard and assign new device to it.
// var customerName = 'customer';
// var groupName = 'thermostat devices';
// Result object with device/asset attributes/telemetry data
var result = {
   deviceName: deviceName,
   deviceType: deviceType,
//   customerName: customerName,
//   groupName: groupName,
   attributes: {},
   telemetry: {
        ts: payloadJson.ts,
        values: {
            Temperature:hexToInt(payloadJson.data.substring(0,2)),
            Humidity:   hexToInt(payloadJson.data.substring(2,4)),
            Fan:        hexToInt(payloadJson.data.substring(4,6)),
            Port:       payloadJson.port,
            Freq:       payloadJson.freq,
            Pressure:   hexToInt(payloadJson.data.substring(6,8)),
            rssi:       payloadJson.rssi,
            serial:     payloadJson.serial
       }
   }
};
/** Helper functions **/
function decodeToString(payload) {
   return String.fromCharCode.apply(String, payload);
}

function decodeToJson(payload) {
   // covert payload to string.
   var str = decodeToString(payload);
   // parse string to JSON
   var data = JSON.parse(str);
   return data;
}

function hexToInt(value) {
    return parseInt('0x' + value.match(/../g).reverse().join(''));
}

return result;
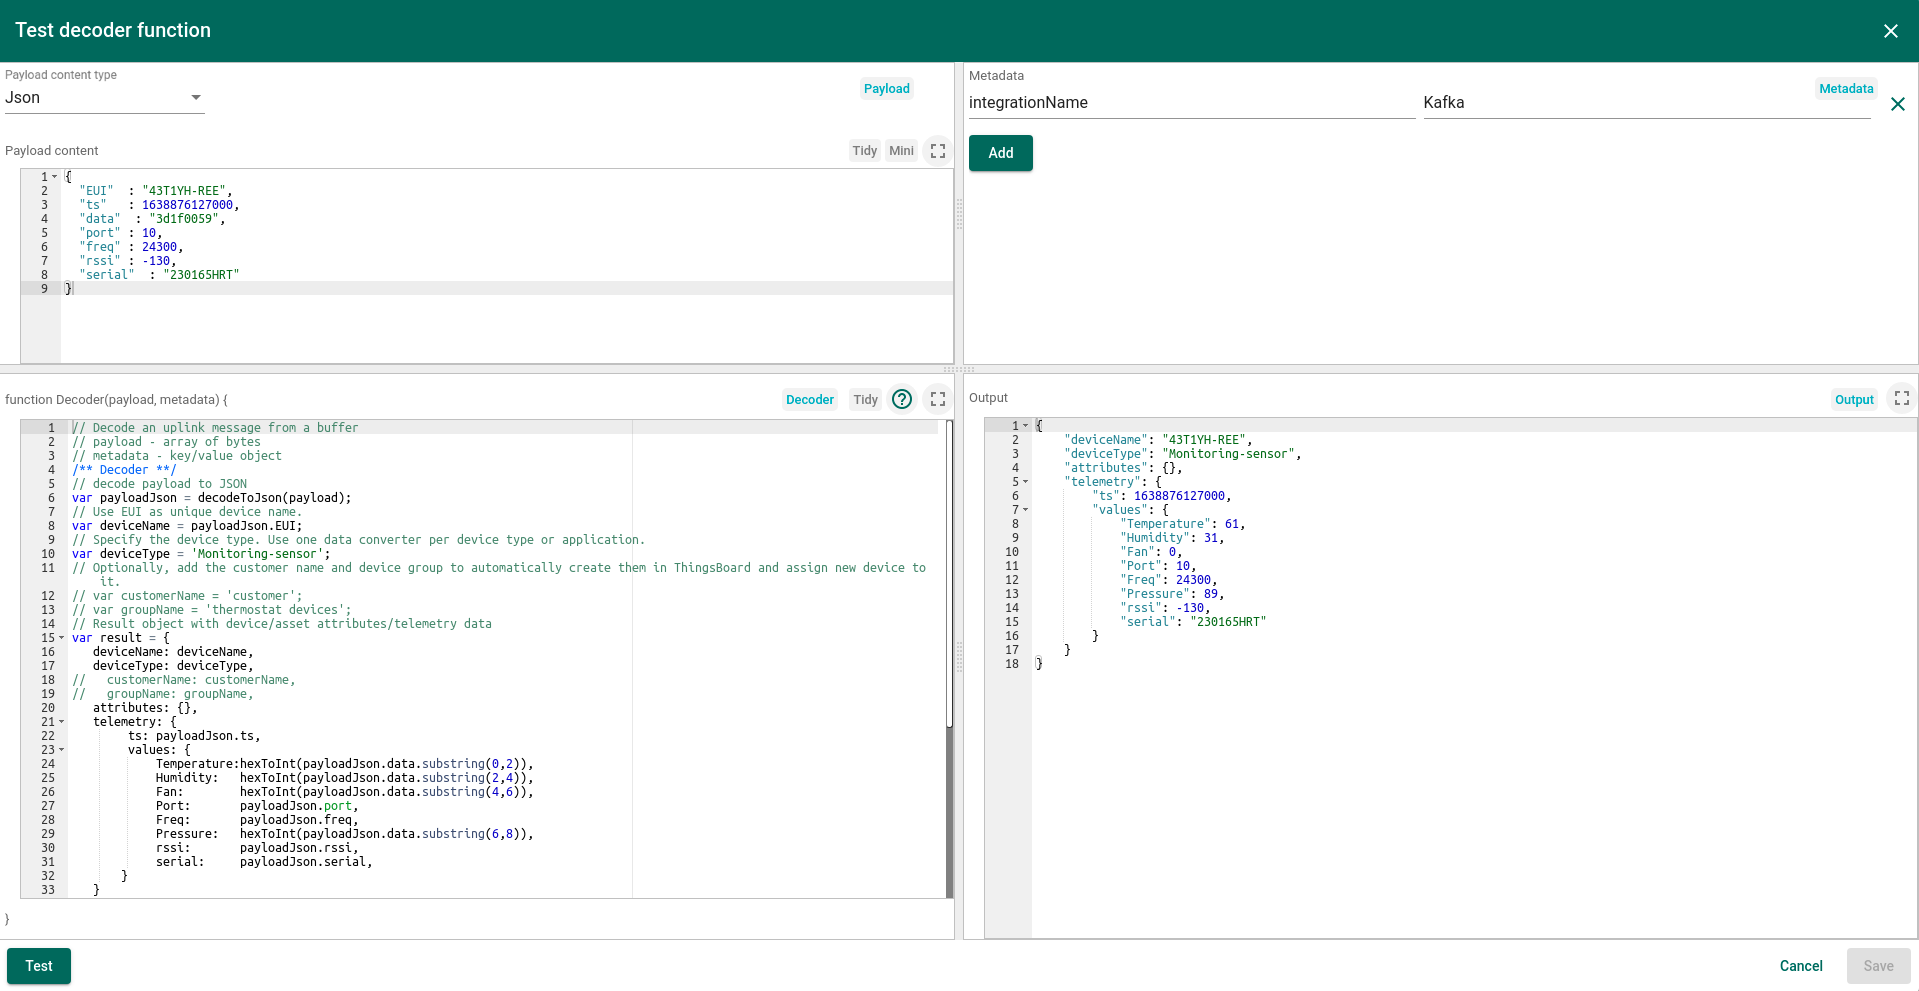
您可以在创建或编辑转换器时更改参数和解码器代码。如果转换器已经创建,点击铅笔图标进行编辑。复制示例转换器配置(或使用您自己的配置),并将其粘贴到解码器函数中。然后点击对勾图标保存更改。
创建集成
创建上行转换器后,即可创建集成。 在此阶段,您需要设置参数以建立ThingsBoard与Kafka Broker之间的连接。连接建立后,集成将把所有接收到的数据传输到上行转换器进行处理,并根据设备中指定的设备配置文件转发到规则链。
| 字段 | 描述 |
|---|---|
| Name | 集成的名称。 |
| Type | 选择Kafka类型。 |
| ‘Enable’ Checkbox | 启用/禁用集成。 |
| ‘Debug Mode’ Checkbox | 在集成调试期间启用。 |
| Allow create devices or assets | 如果ThingsBoard中不存在该设备,将自动创建设备。 |
| Uplink data converter | 选择之前创建的转换器。 |
| Downlink data converter | 此选项不支持通过集成实现,有关下行的更多详细信息,请参阅本指南下方内容。 |
| ‘Execute remotely’ Checkbox | 如果您希望从ThingsBoard主实例远程执行集成,请激活此选项。有关远程集成的更多信息,请参阅链接(远程集成)。 |
| Group ID | 指定Kafka消费者所属的消费组名称。 |
| Client ID | 消费组中Kafka消费者的标识符。 |
| Topics | ThingsBoard连接到Kafka Broker后将订阅的主题。 |
| Bootstrap servers | Kafka Broker的主机和端口地址,Kafka客户端首次连接时用于引导启动。 |
| Poll interval | 当没有新消息到达时,轮询消息的间隔时间(毫秒)。 |
| Auto create topics | 如果需要自动创建主题,请设置为Enable。 |
| Other properties | 可以提供用于连接Kafka Broker的其他附加属性。 |
| Metadata | Metadata是一个键值对映射,包含一些集成特定的字段。例如,您可以设置设备类型。 |
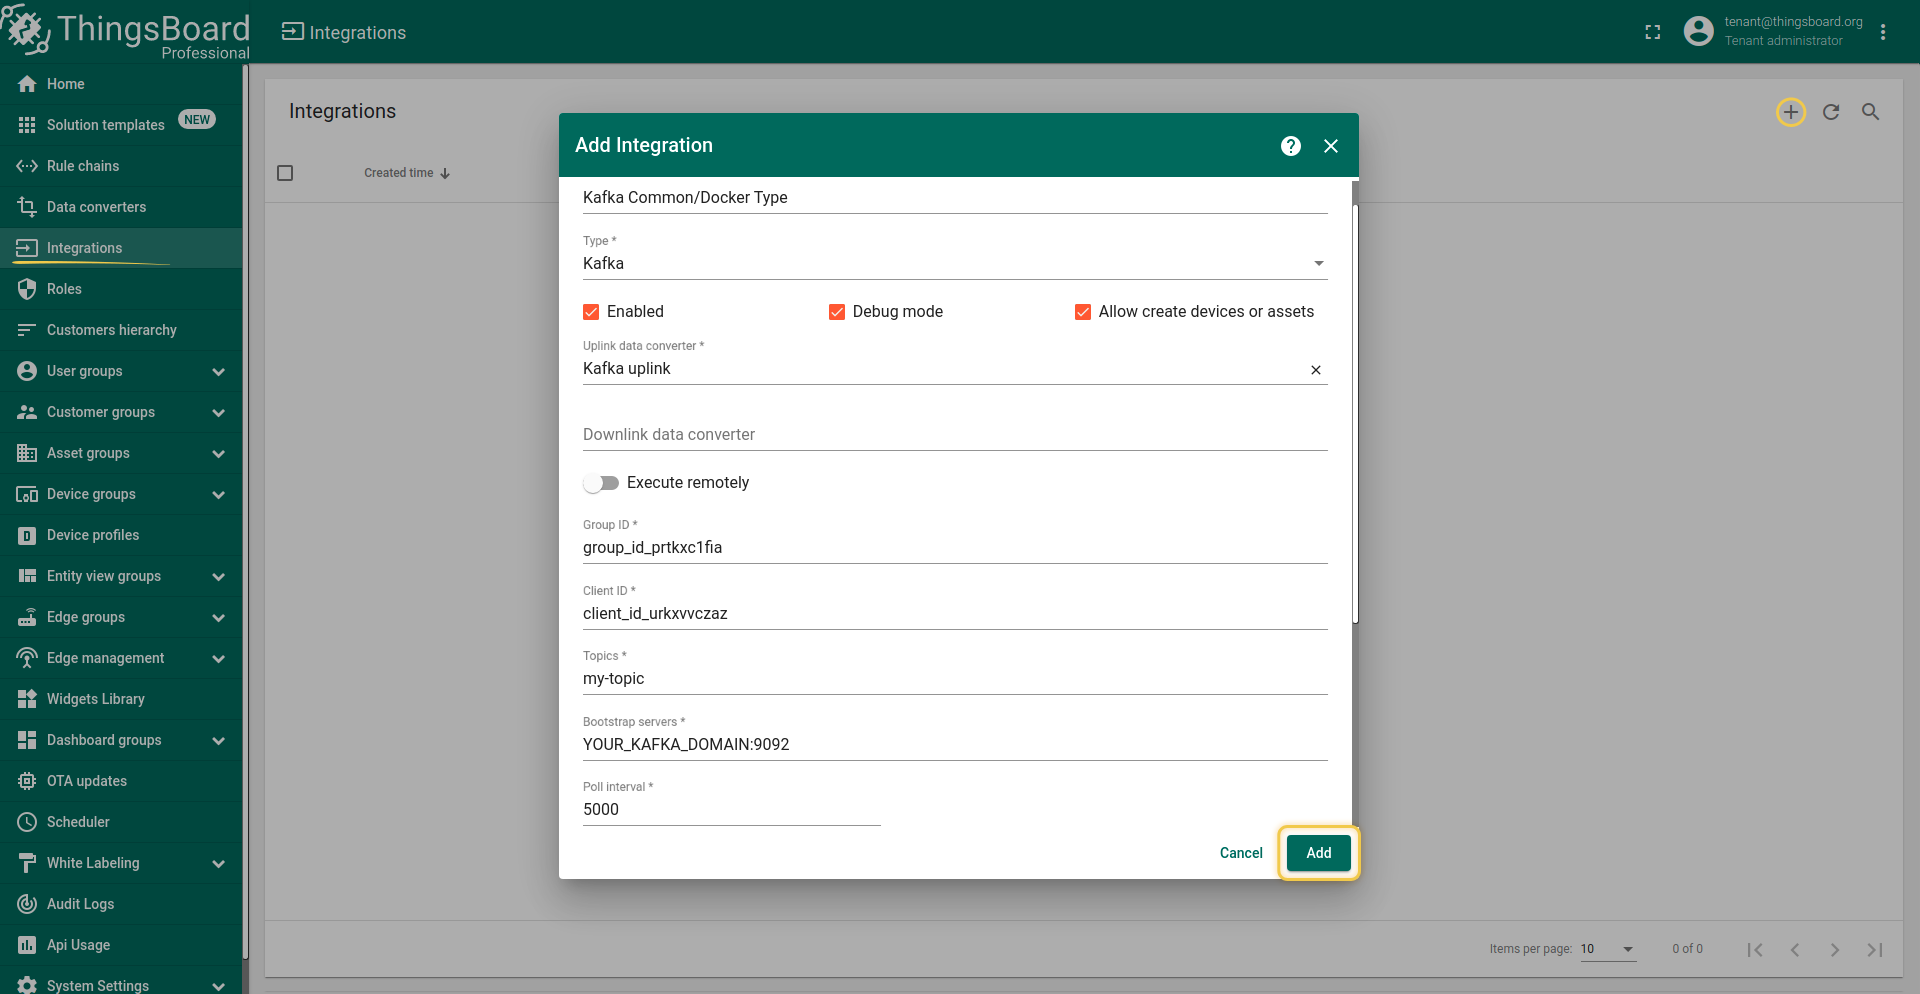 截图展示了 ThingsBoard 与 Kafka Broker 建立连接的基本配置。在此配置下,integration 将每 5 秒向 Kafka broker 请求更新;若设置的主题在 broker 中不存在,将自动创建。 注意:启用 debug 模式后,可通过打开 Events 选项卡查看错误、连接状态及其他事件。 |
|
配置 Kafka integration 在 ThingsBoard 实例中打开 Integration 菜单,选择 Add integration 或 Edit action - Details 选项卡。 设置 Name、Choose type,从下拉菜单选择 Uplink data converter,并填写 Topics、Bootstrap server、properties 等必填项。 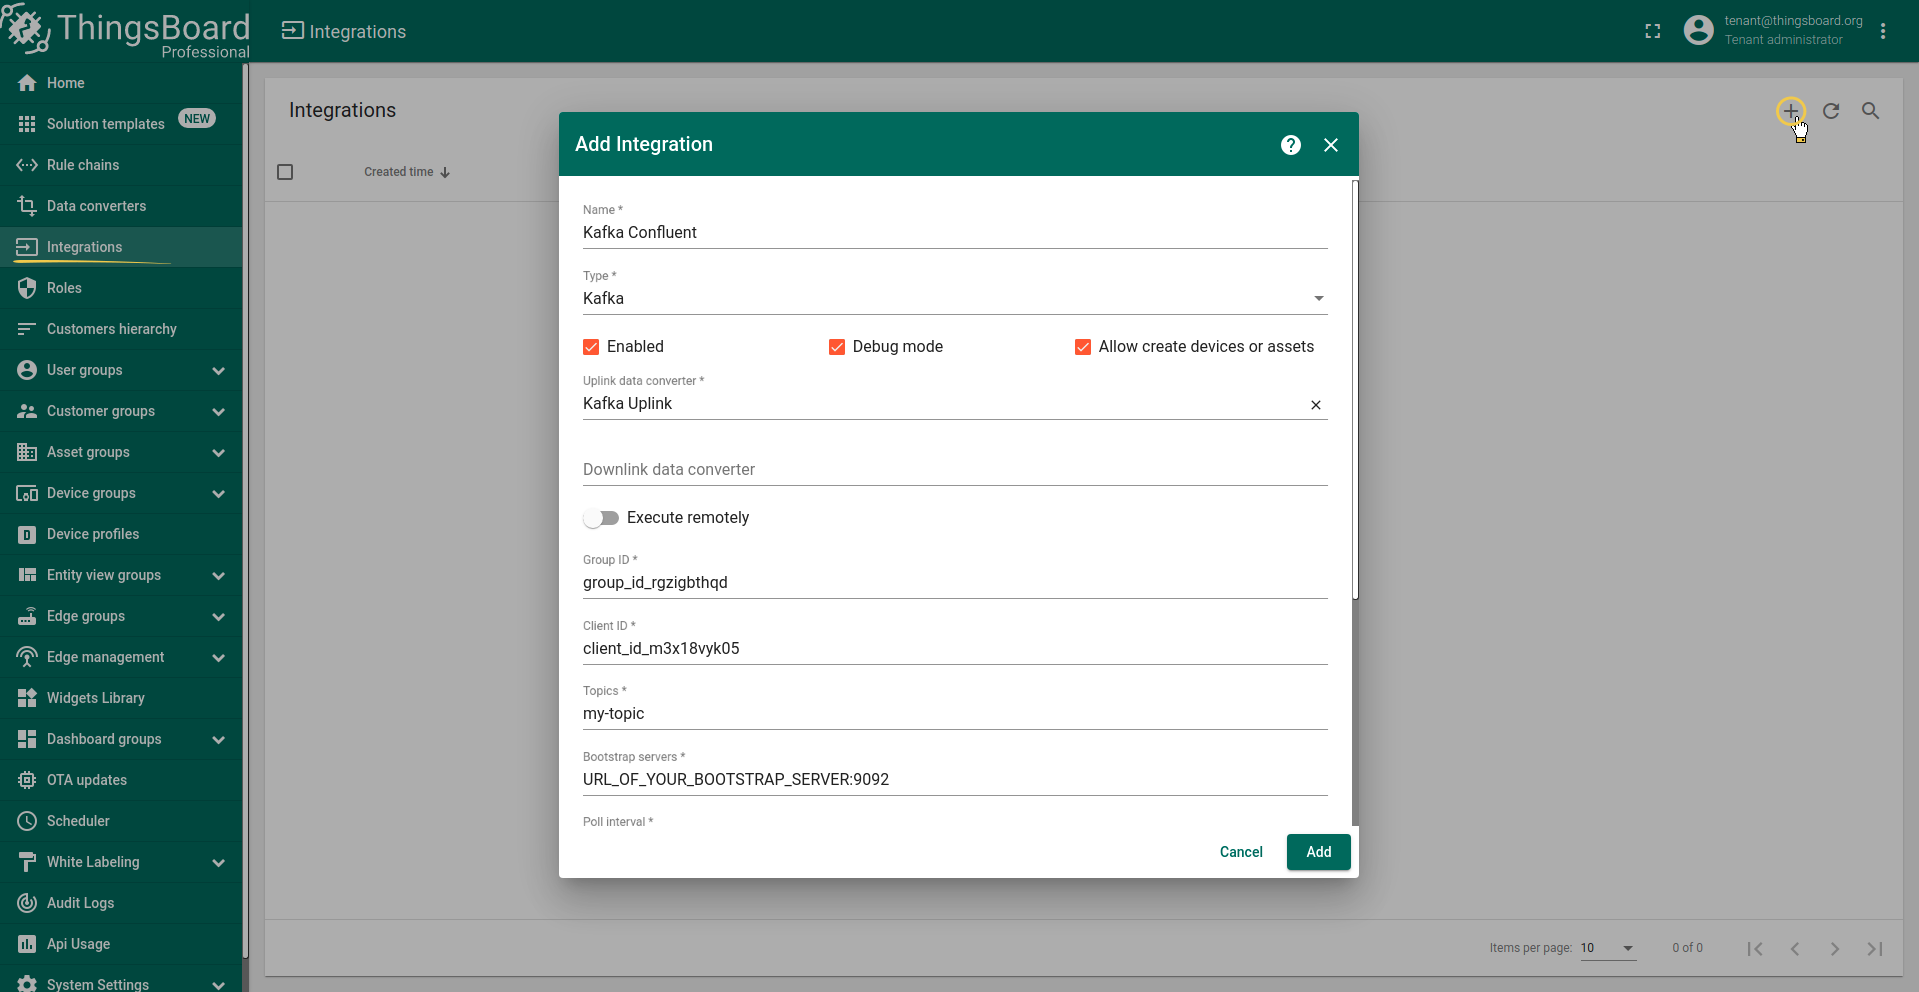 在 Confluent 中选中已创建的环境,打开 Cluster、Cluster settings。 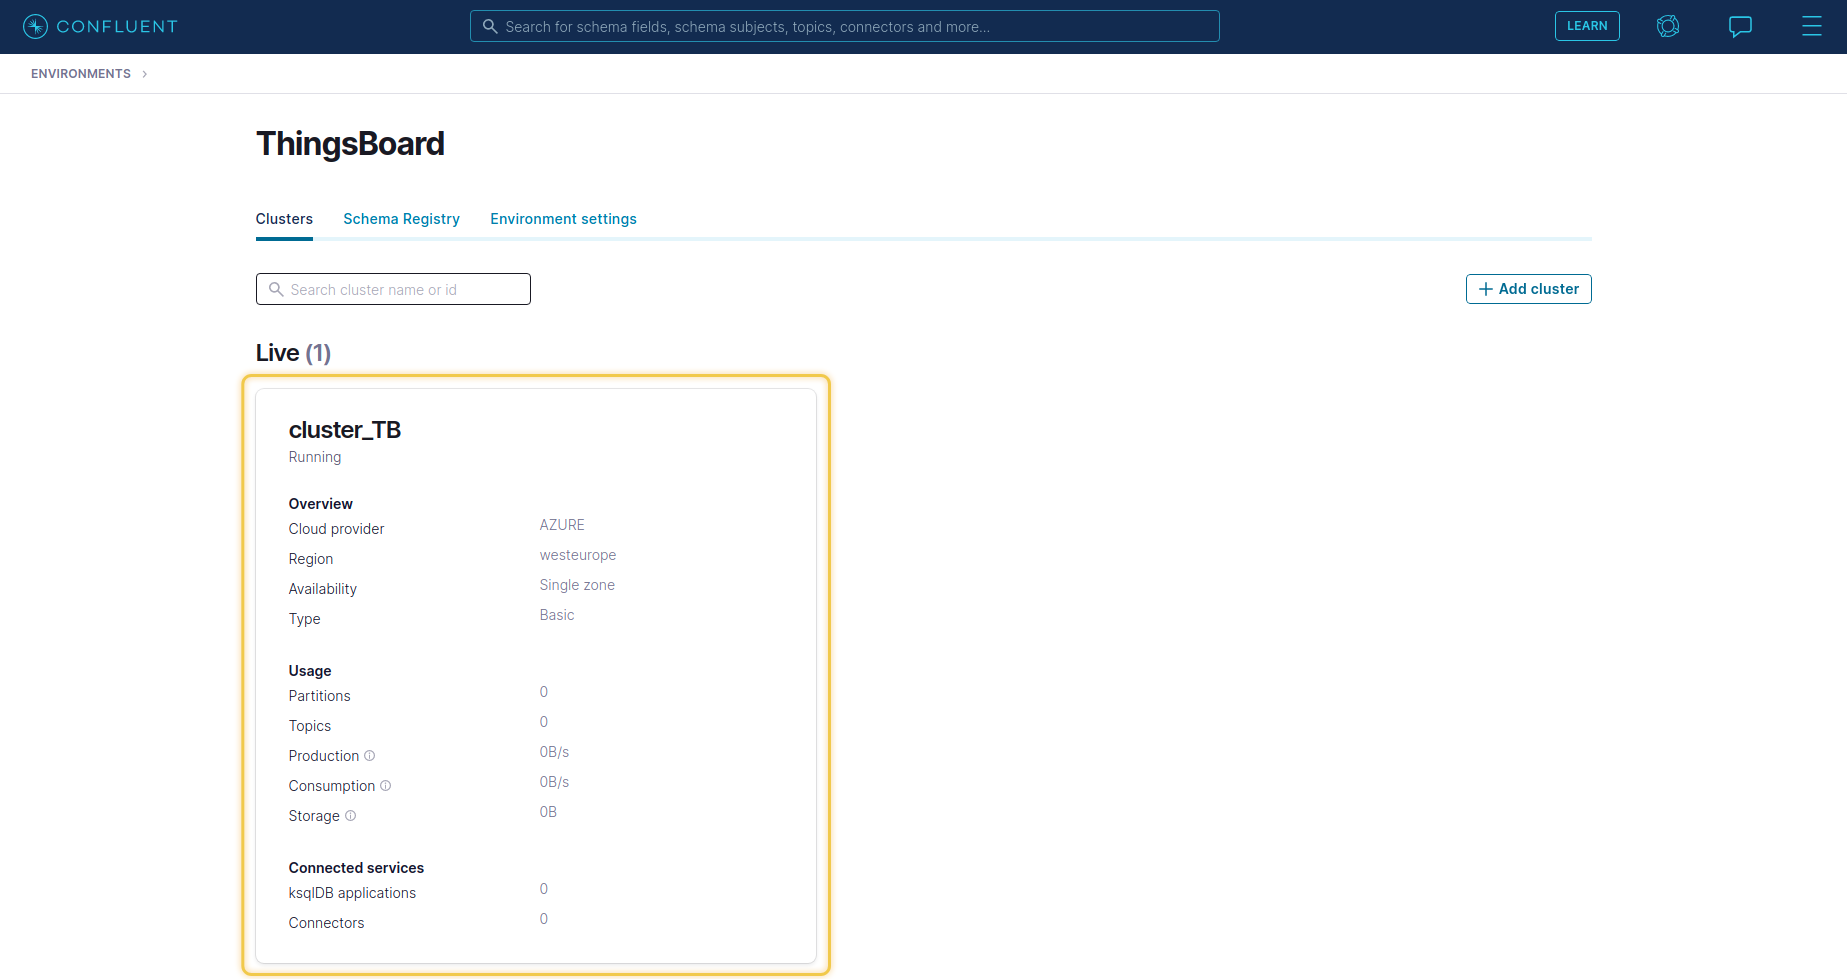 随后找到 Bootstrap server URL,格式类似 URL_OF_YOUR_BOOTSTRAP_SERVER:9092 请将其复制到 integration 中:  还需添加以下 other properties:
要生成所需的 API key 和 secret,请在 cluster 中进入 Data Integration 菜单,选择 API Keys 子菜单,选择 Create key 并选择 API Key 的 Scope。此处将显示 key 和 secret,需填入 integration 属性中。 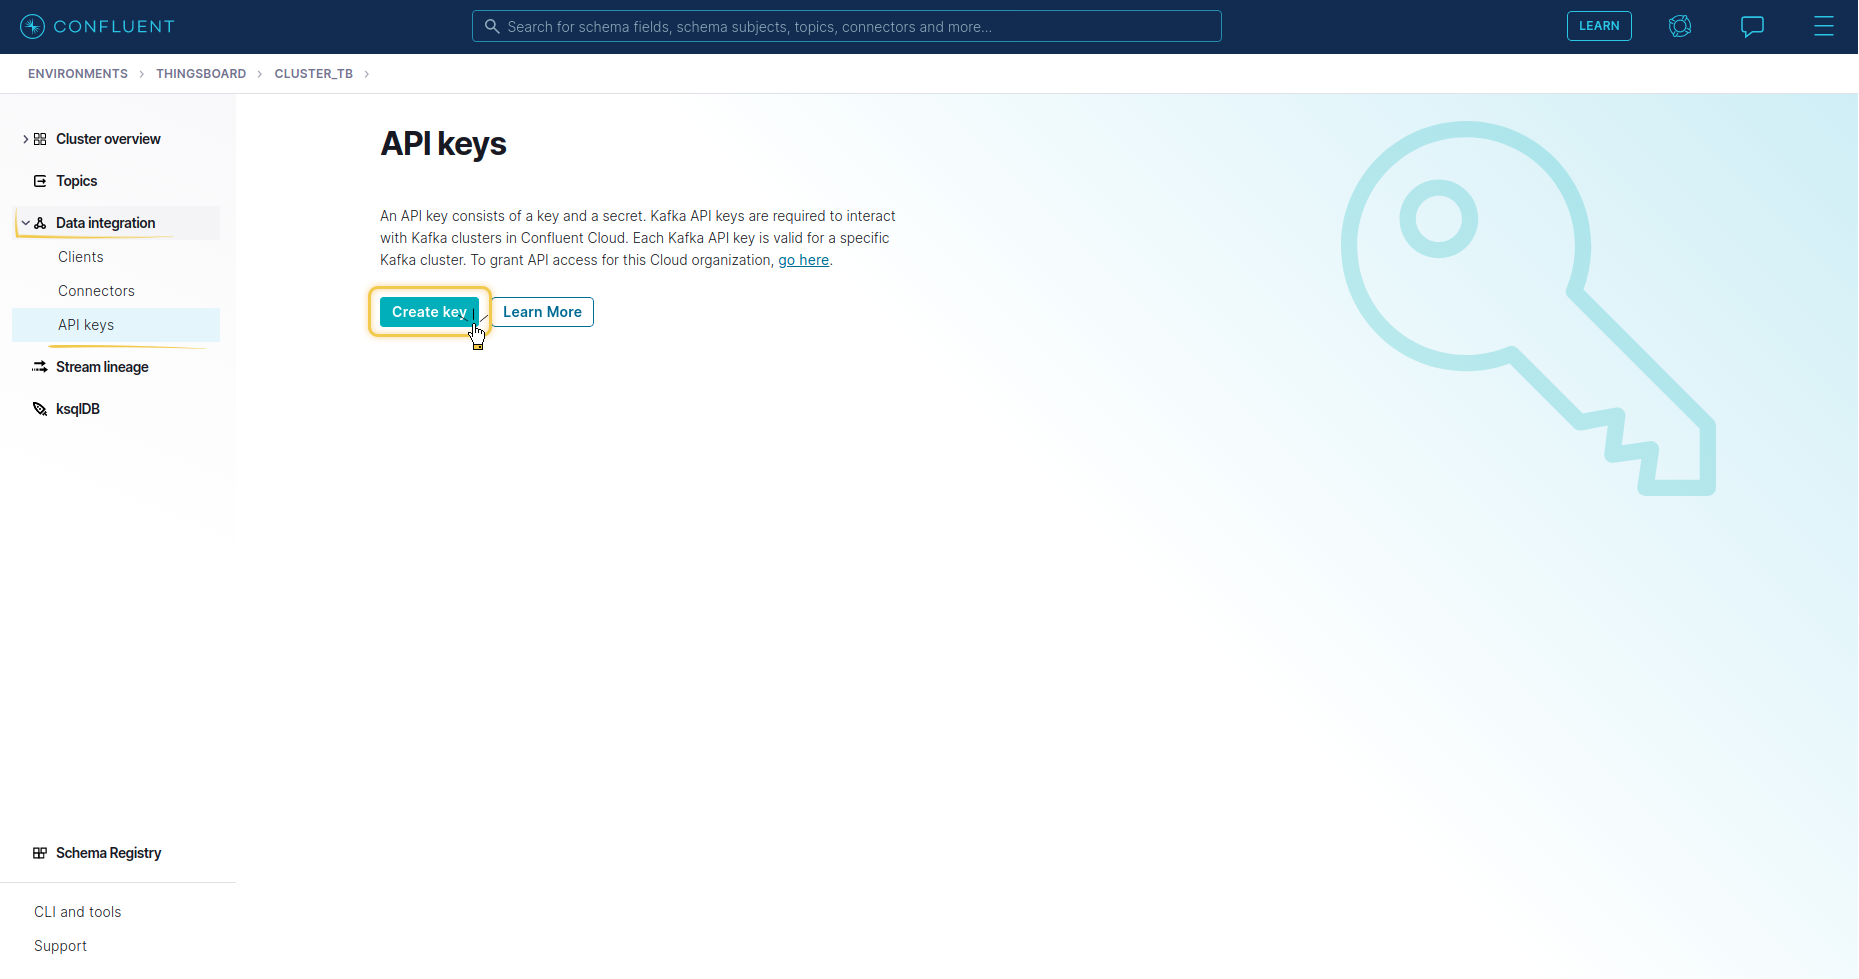 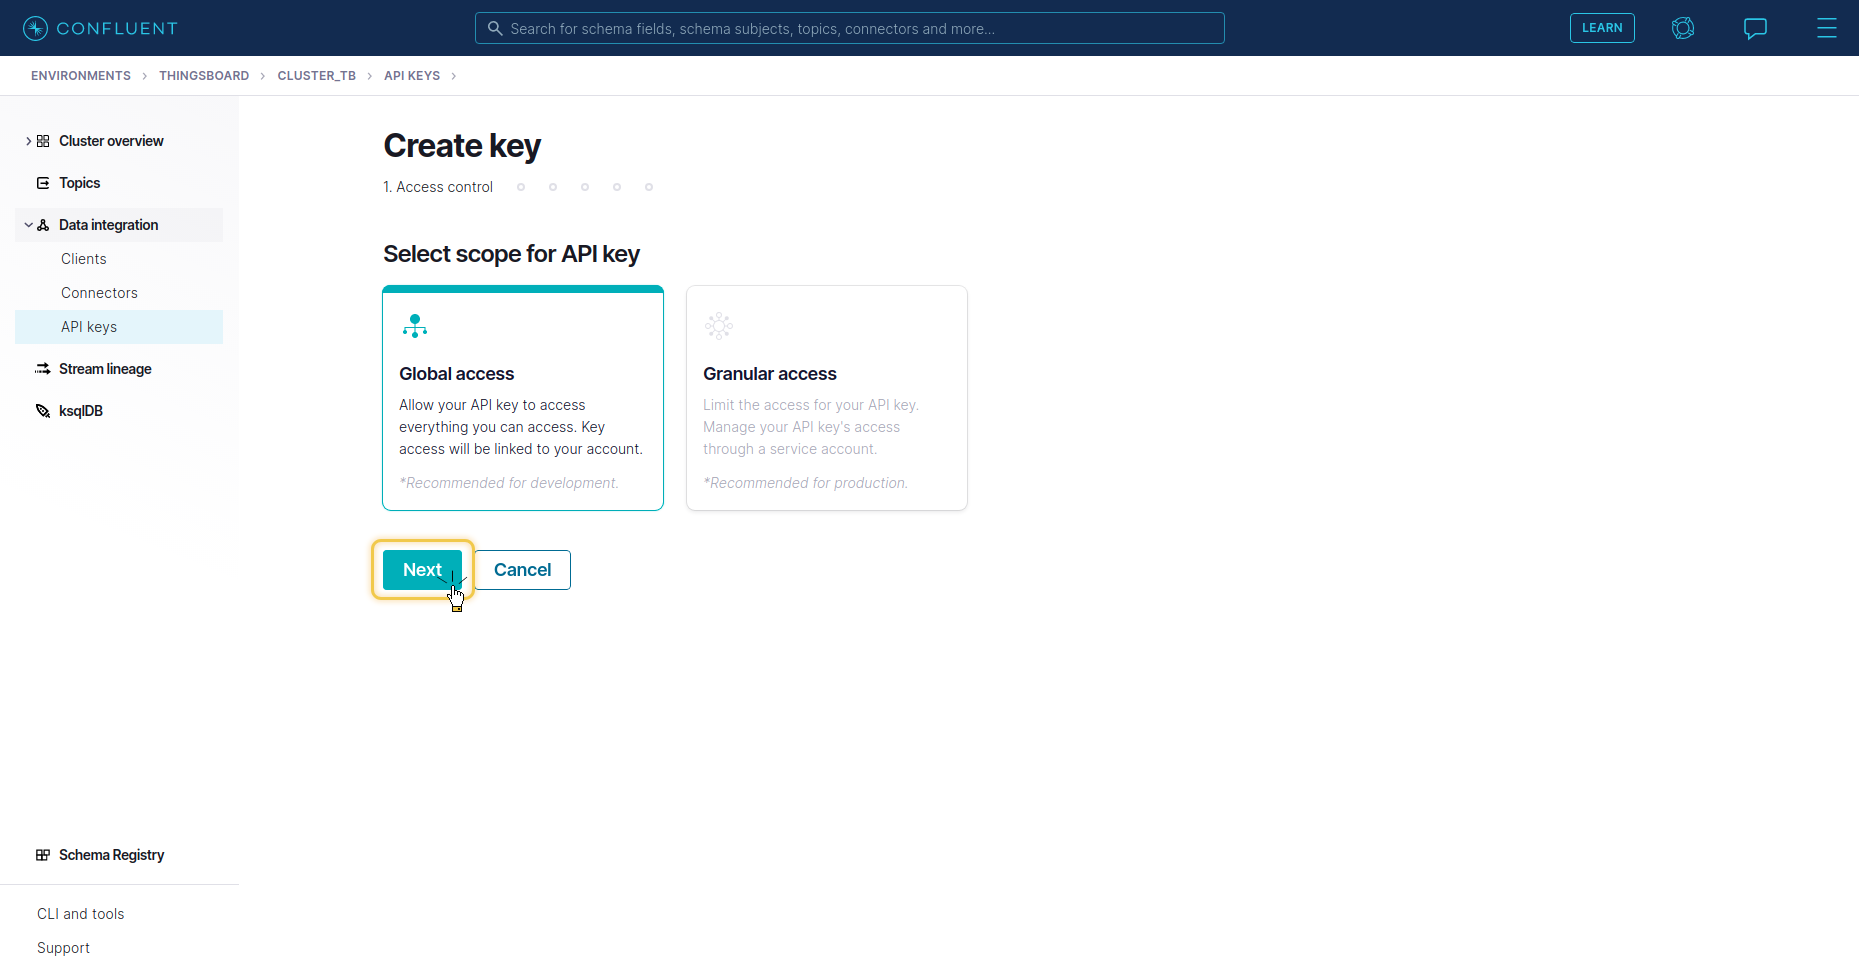 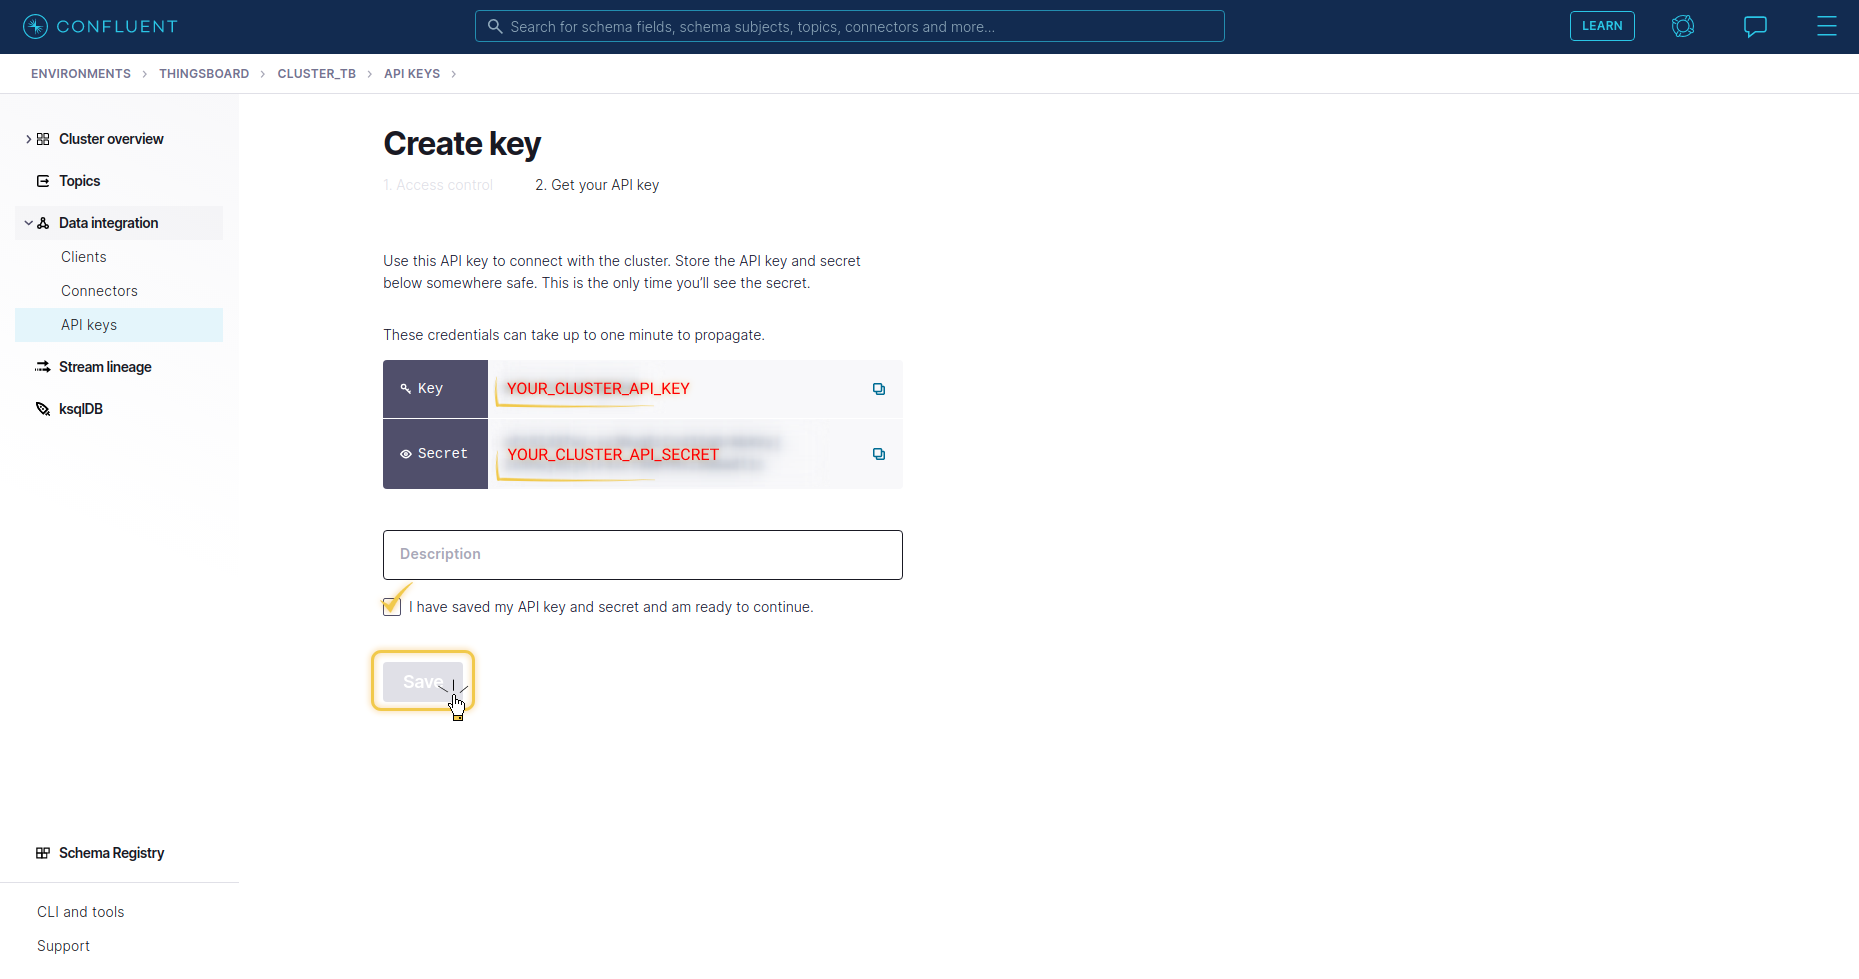  最后在 Confluent 中创建 topic:选择 「Topics」 菜单,选择 「Create Topics」,将名称设为 my-topic(需与 integration 中指定的一致)。下一步可按需修改 Storage 和 Message size 参数,然后点击 Create with defaults 确认创建。 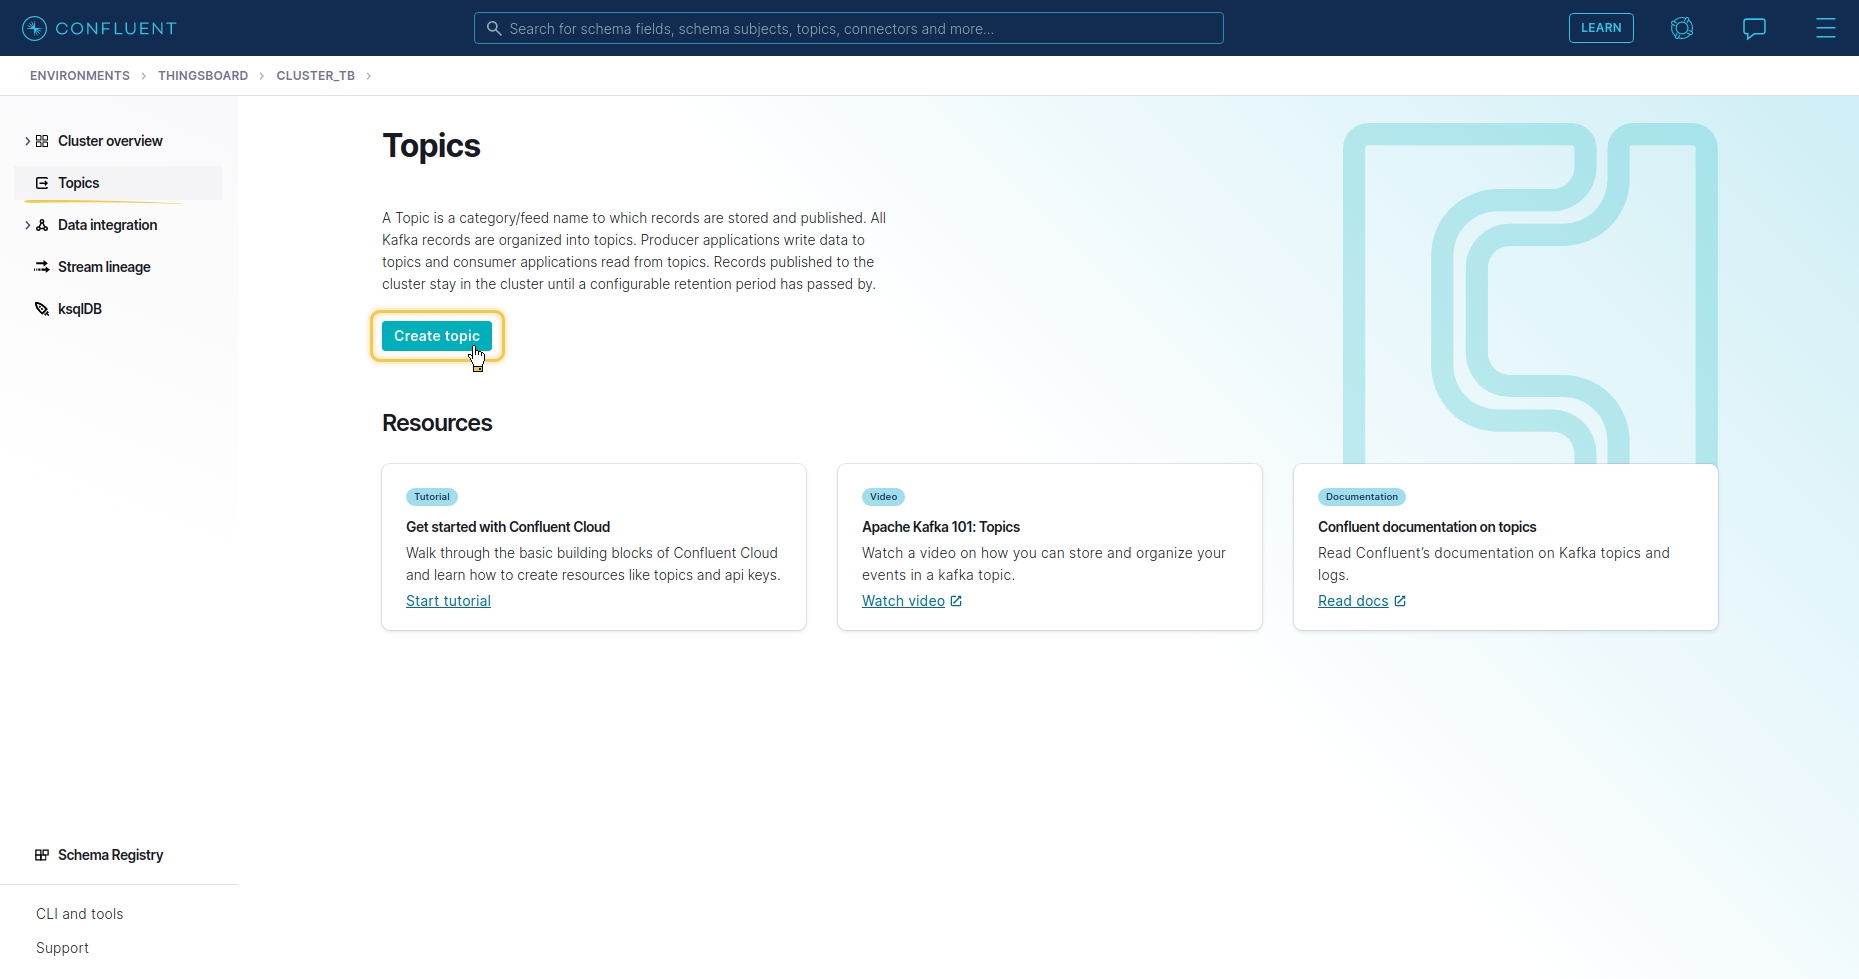 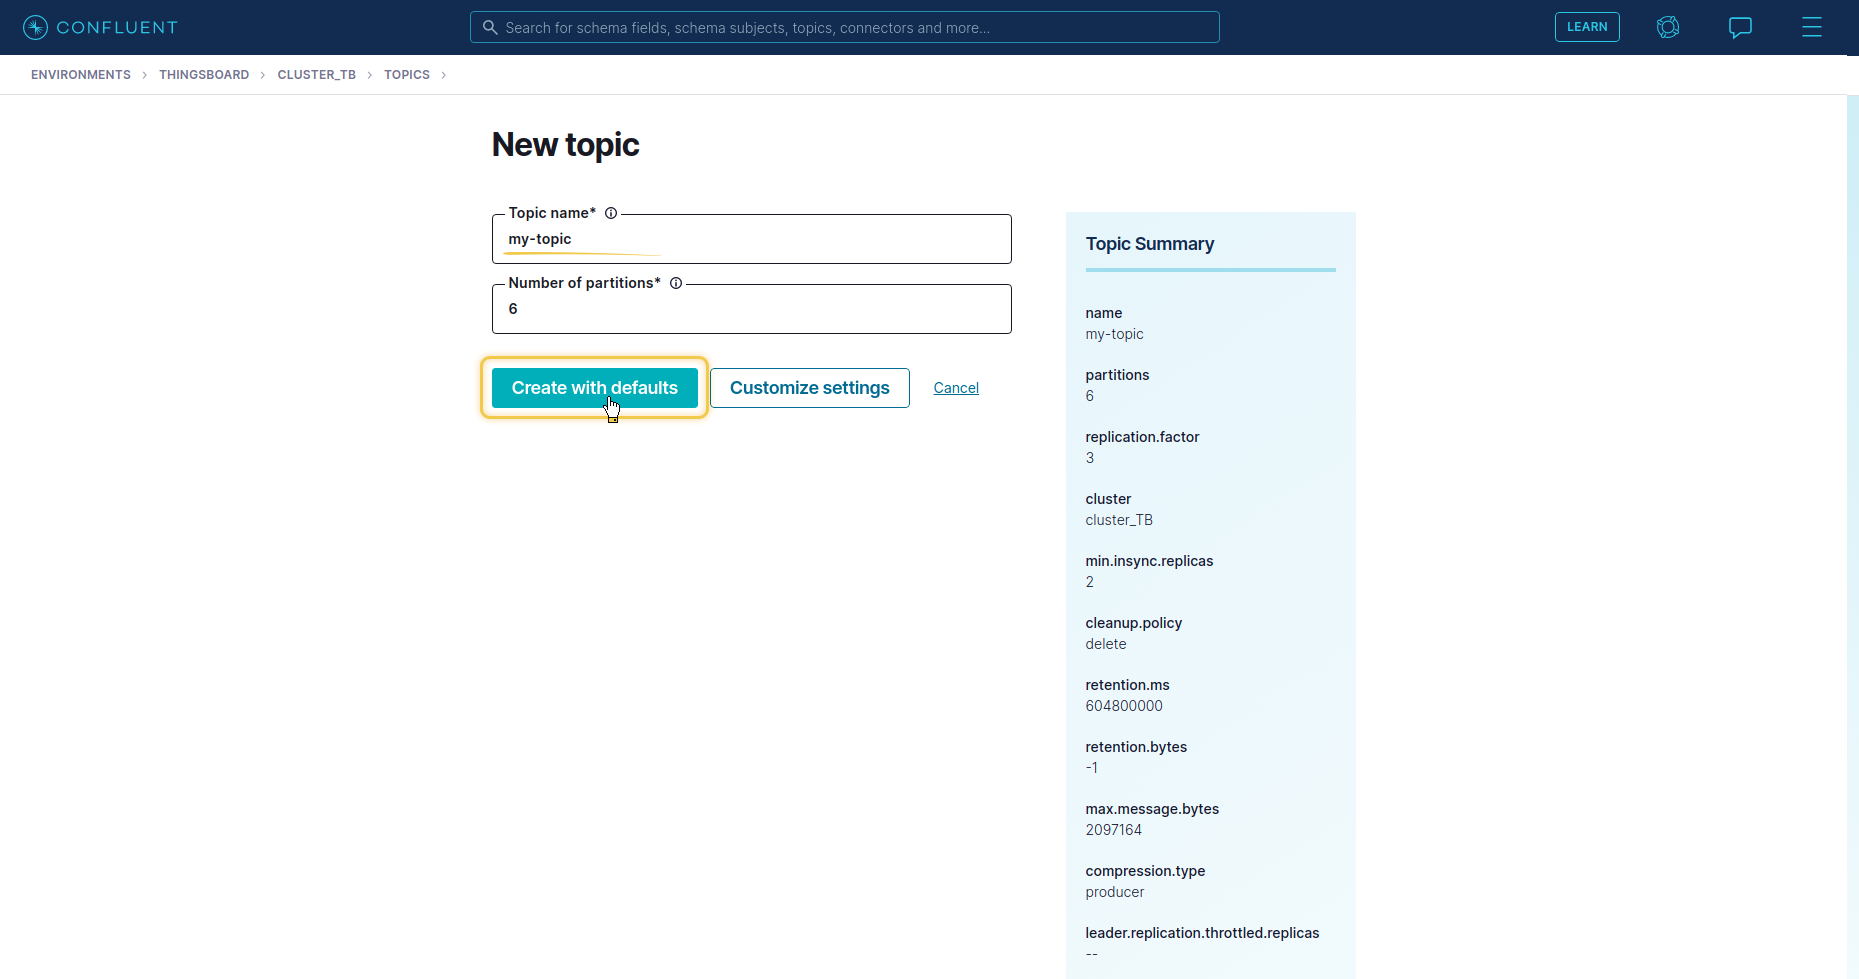 在此配置下,integration 将每 5 秒向 Kafka broker 请求更新。 |
发送上行消息
可使用终端模拟设备或服务器发送的消息。发送 uplink 消息需要 integration 中的 Kafka endpoint URL。 Result: 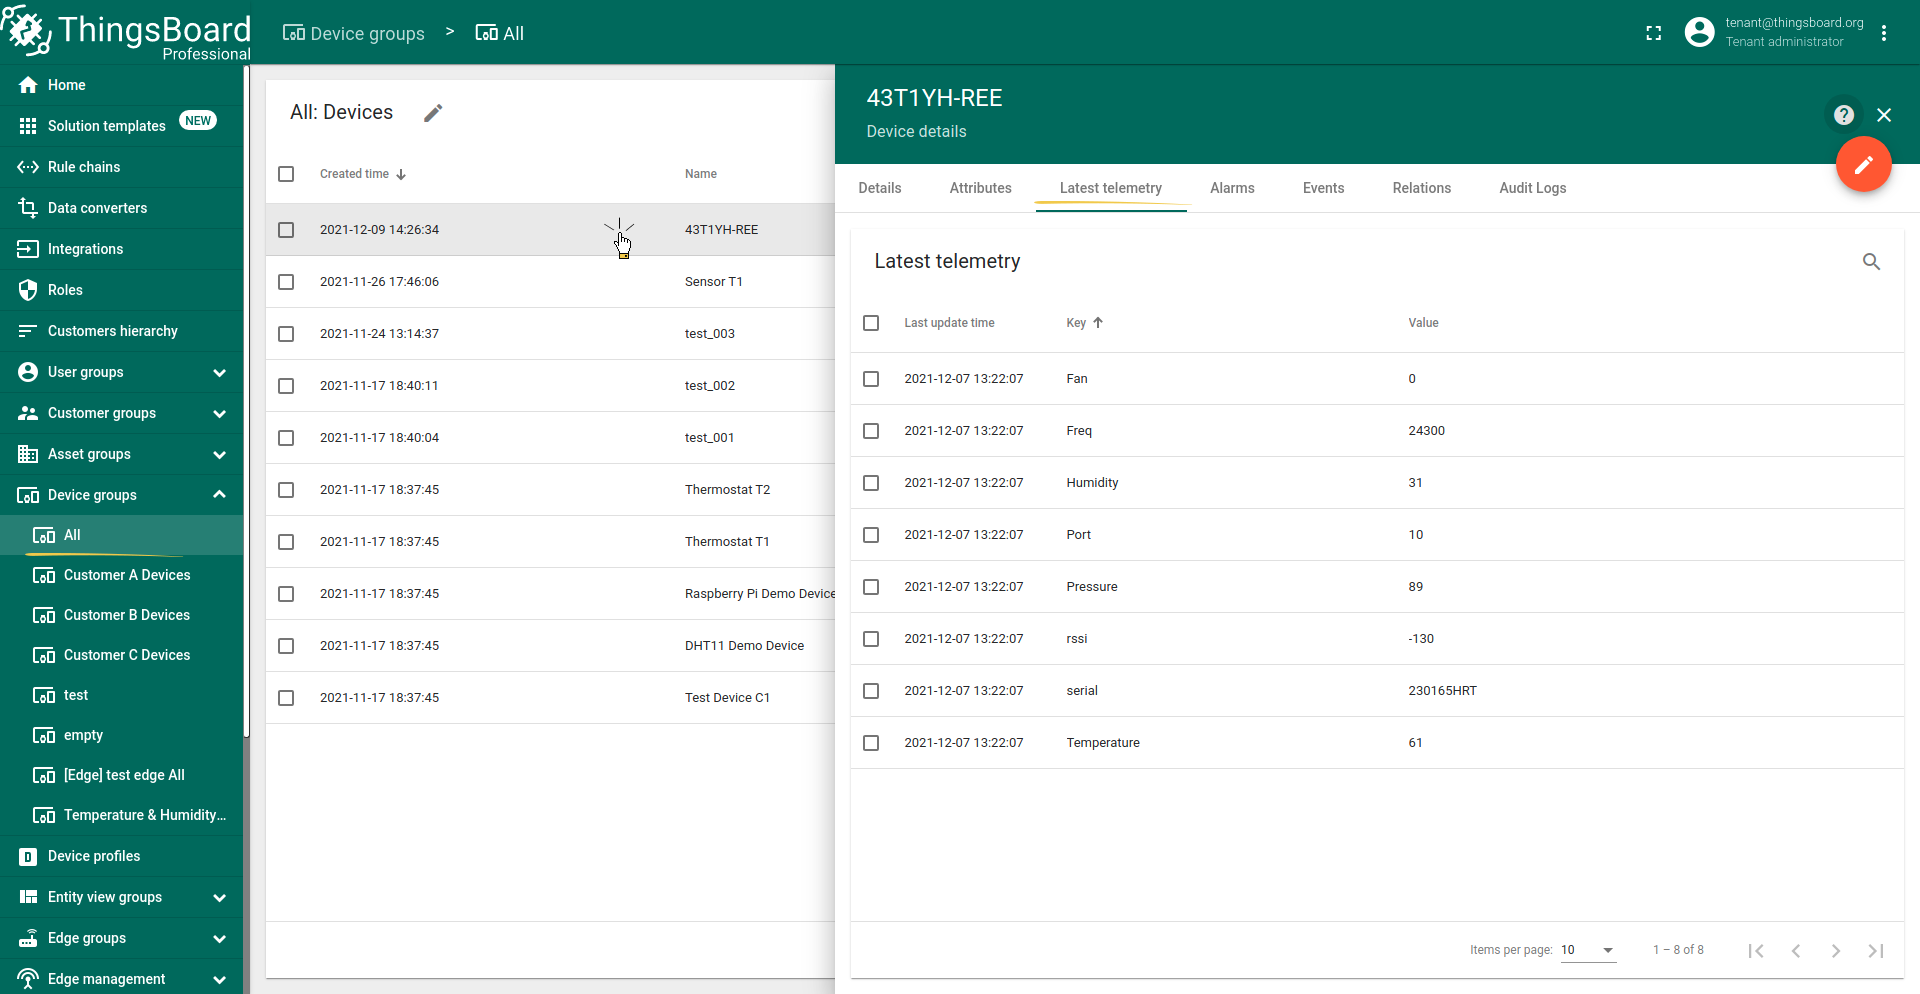 Also, you can check through the terminal what data came to Kafka. |
可使用 Confluent 提供的功能模拟从 Confluent cloud 向 ThingsBoard 发送消息。 在 cluster 中进入 topics 的 Messages 选项卡,选择 Produce a new message to this topic。 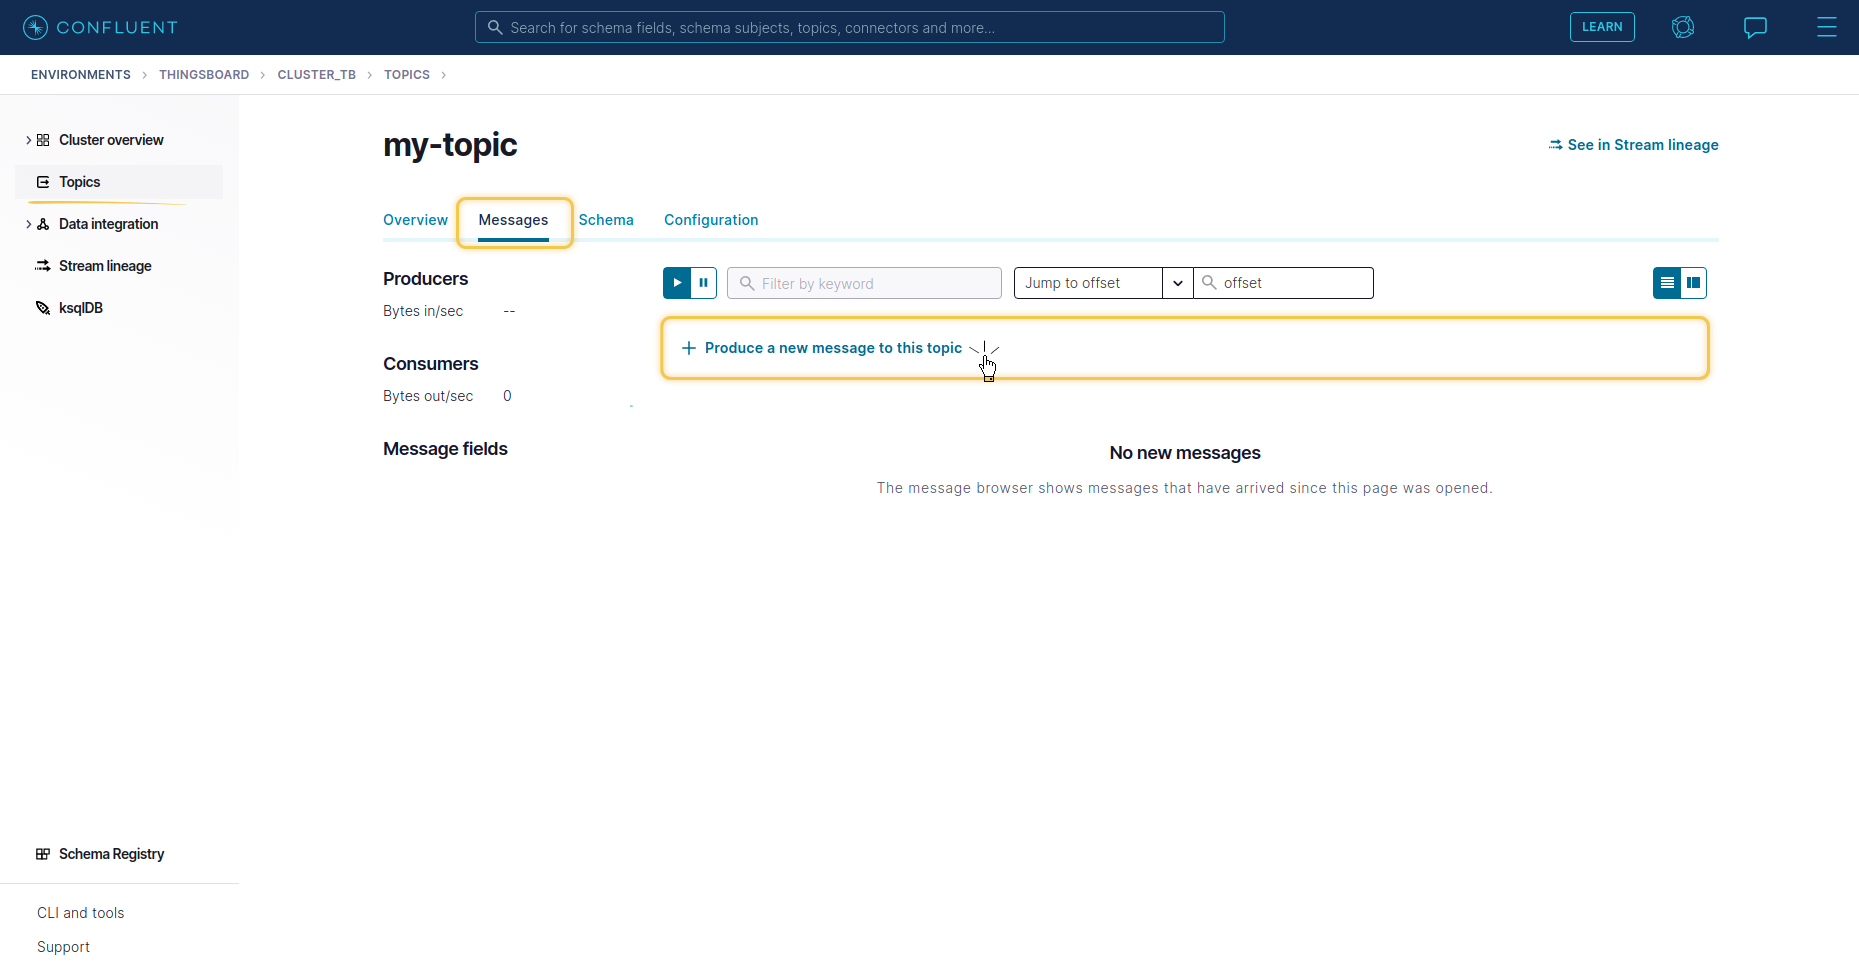 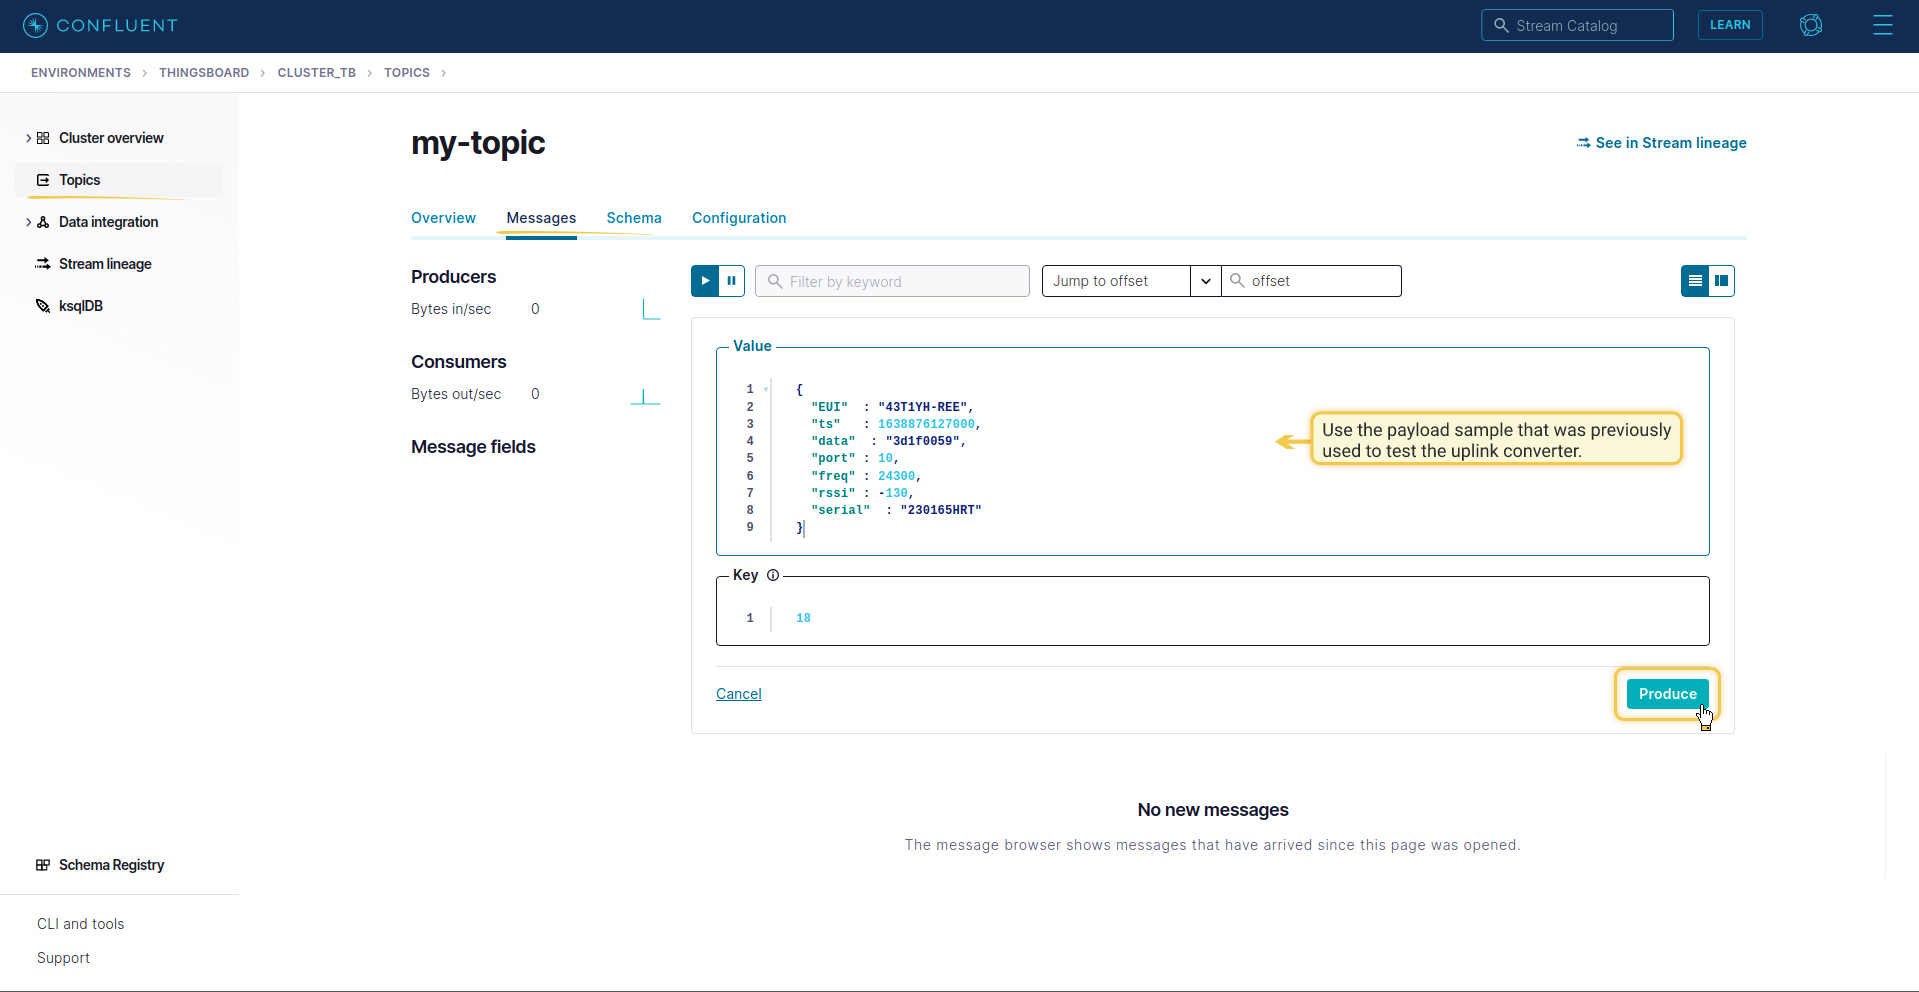  结果匹配所有 key、时间戳和值: |
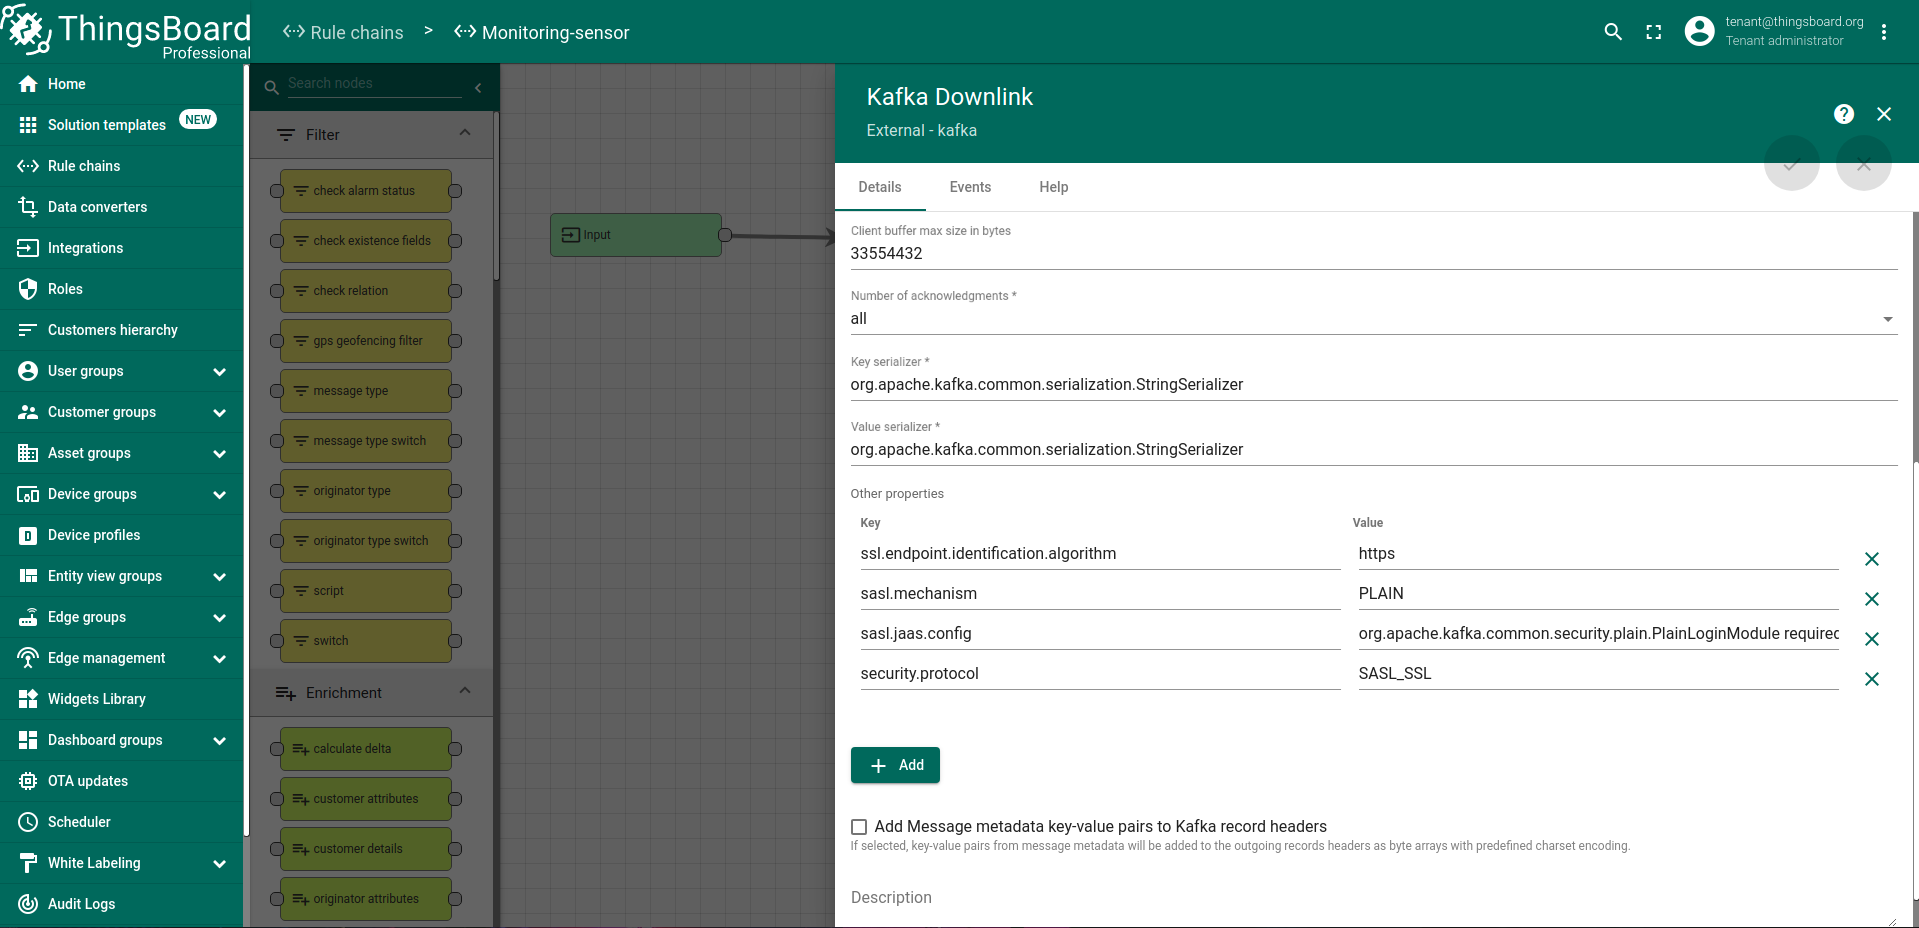
高级用法:Kafka Producer(下行)
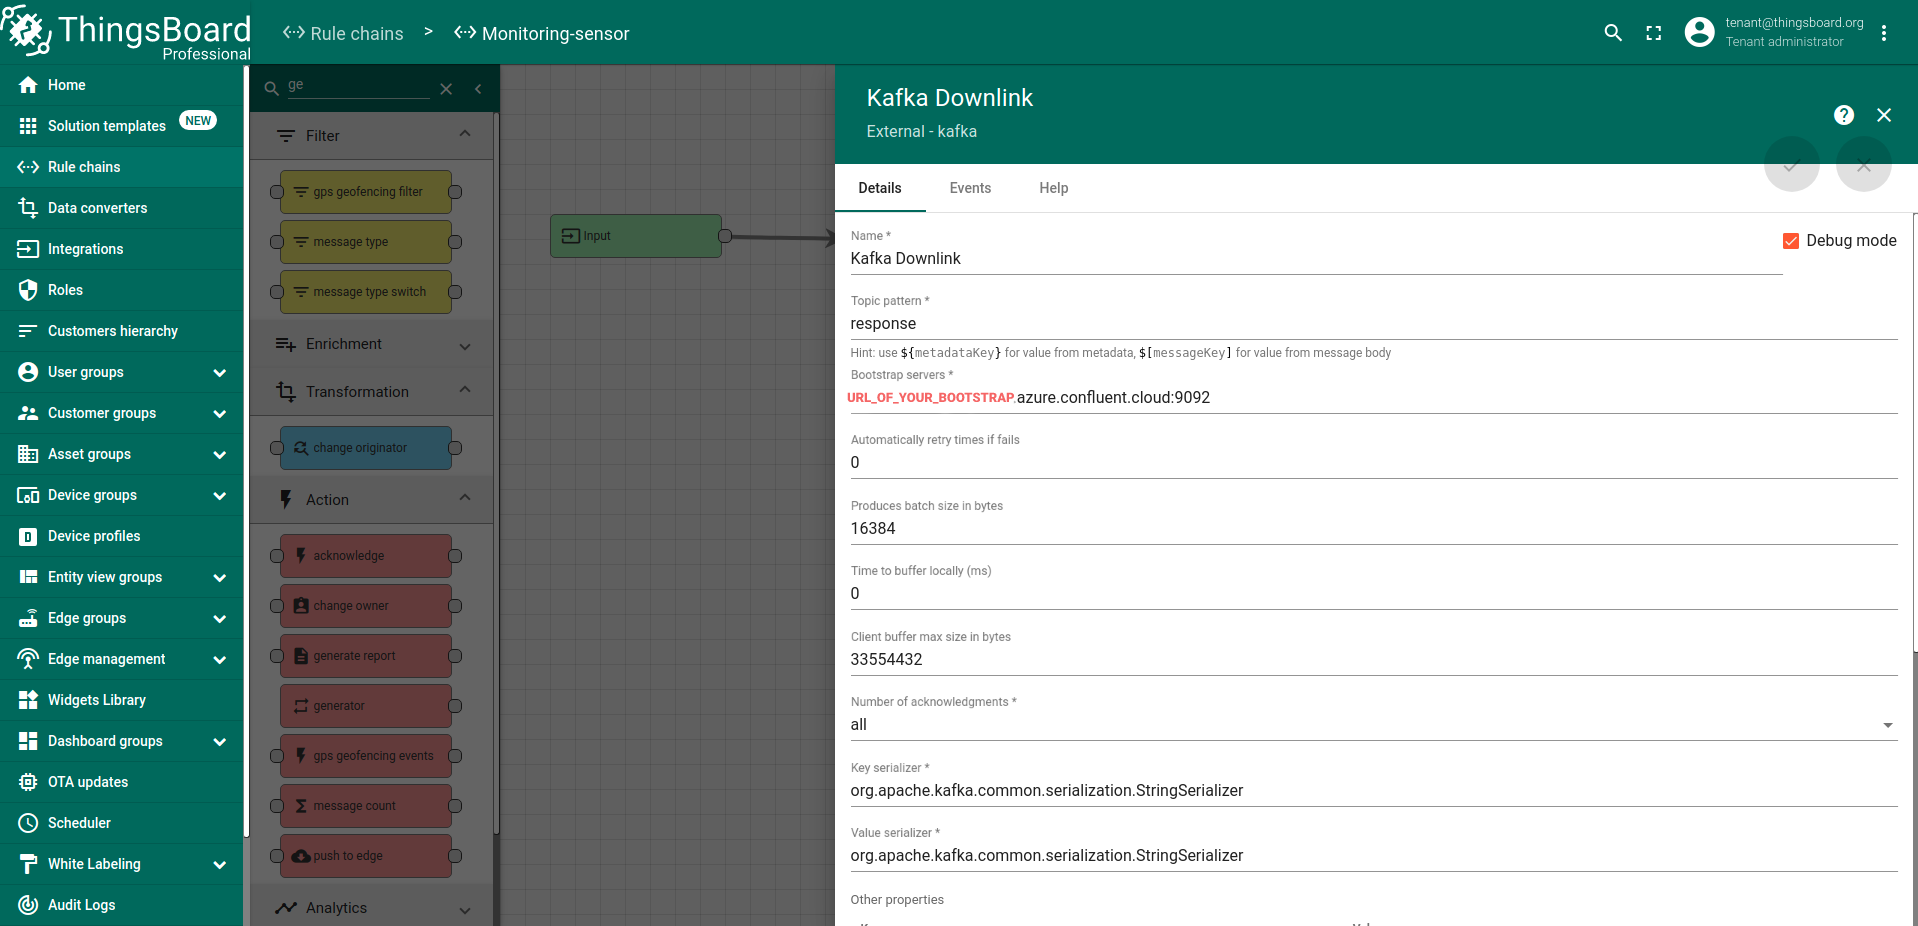
要实现Kafka Producer功能,您需要使用Kafka规则节点,在其中可以指定Bootstrap servers、Topic和其他参数来连接Kafka Broker,更多详细信息请参阅相应的指南。
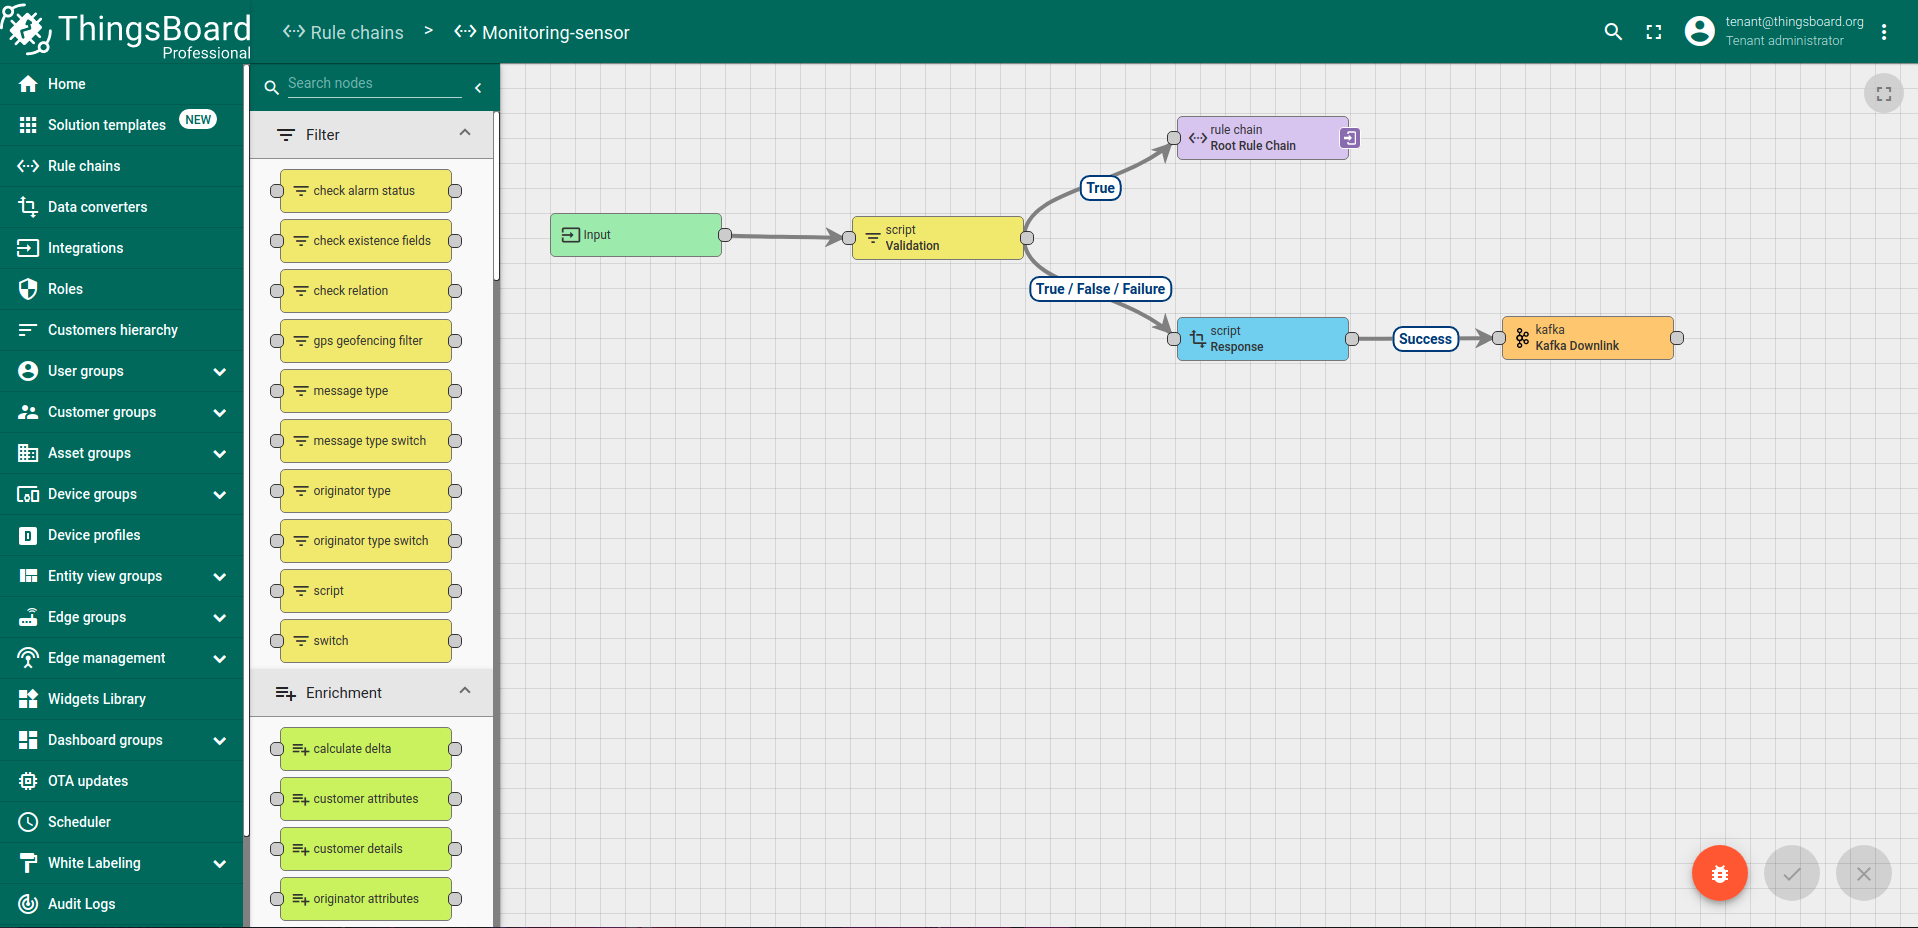
如果无法从ThingsBoard直接向设备发送管理命令,而只能通过Broker进行,那么在这种情况下可以使用Kafka下行规则节点。让我们来看一个简单的示例:假设数据从Broker传入并经过转换器处理,根据设备配置文件中的配置被转发到自定义规则链(”Monitoring-sensor”),在所有处理完成后,我们将把成功或失败的响应发送回Broker(您可以将响应更改为控制设备的命令等)。
要检查消息是否已成功传输,您可以在启用Debug Mode的Kafka规则节点的Events选项卡中查看:
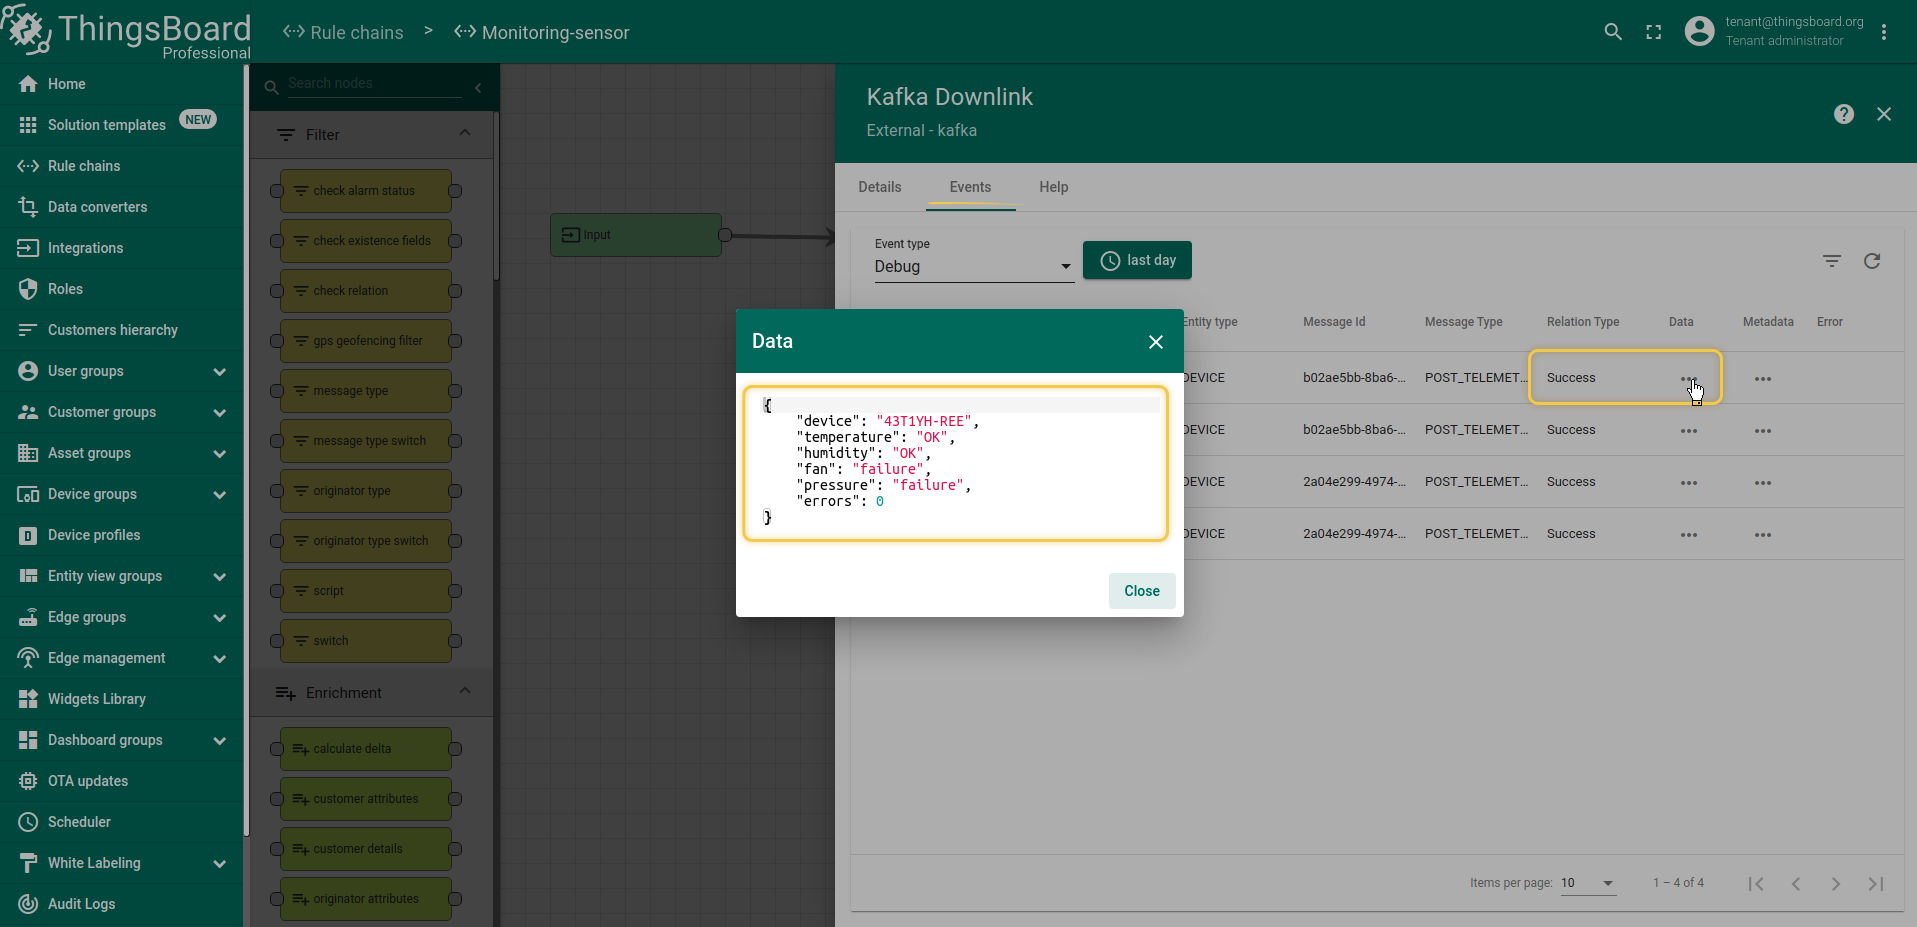

注意:对上行和下行连接使用相同的Broker主题可能会导致数据循环。