仅专业版支持Platform Integrations功能。
请使用ThingsBoard Cloud或自行安装平台实例。
Loriot是用于通过LoRaWAN栈连接设备的LoRaWAN网络。将LORIOT与ThingsBoard集成后,可在ThingsBoard IoT平台中连接、通信、处理和可视化设备数据。
在Loriot注册账户
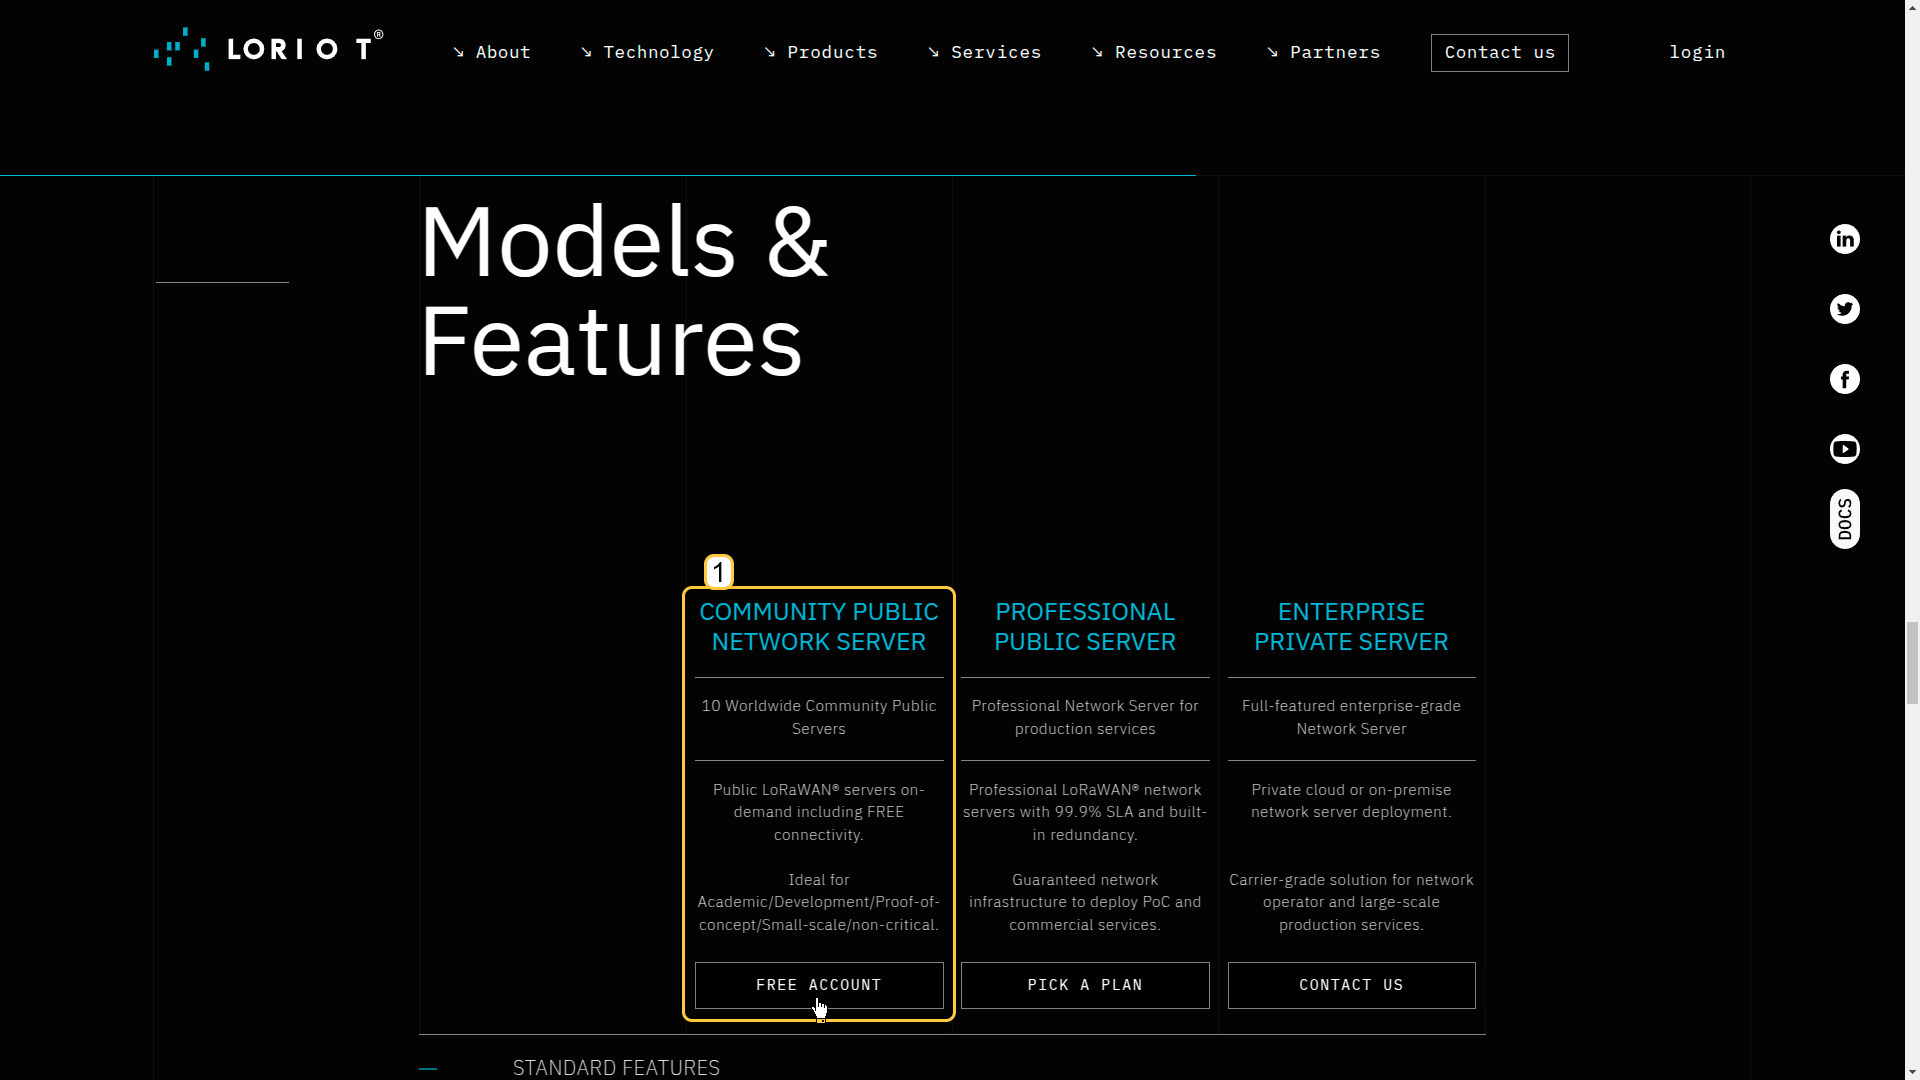
以下为Loriot入门步骤:
- 访问Loriot网站。
- 选择服务套餐——例如选择Community Public Network Server。
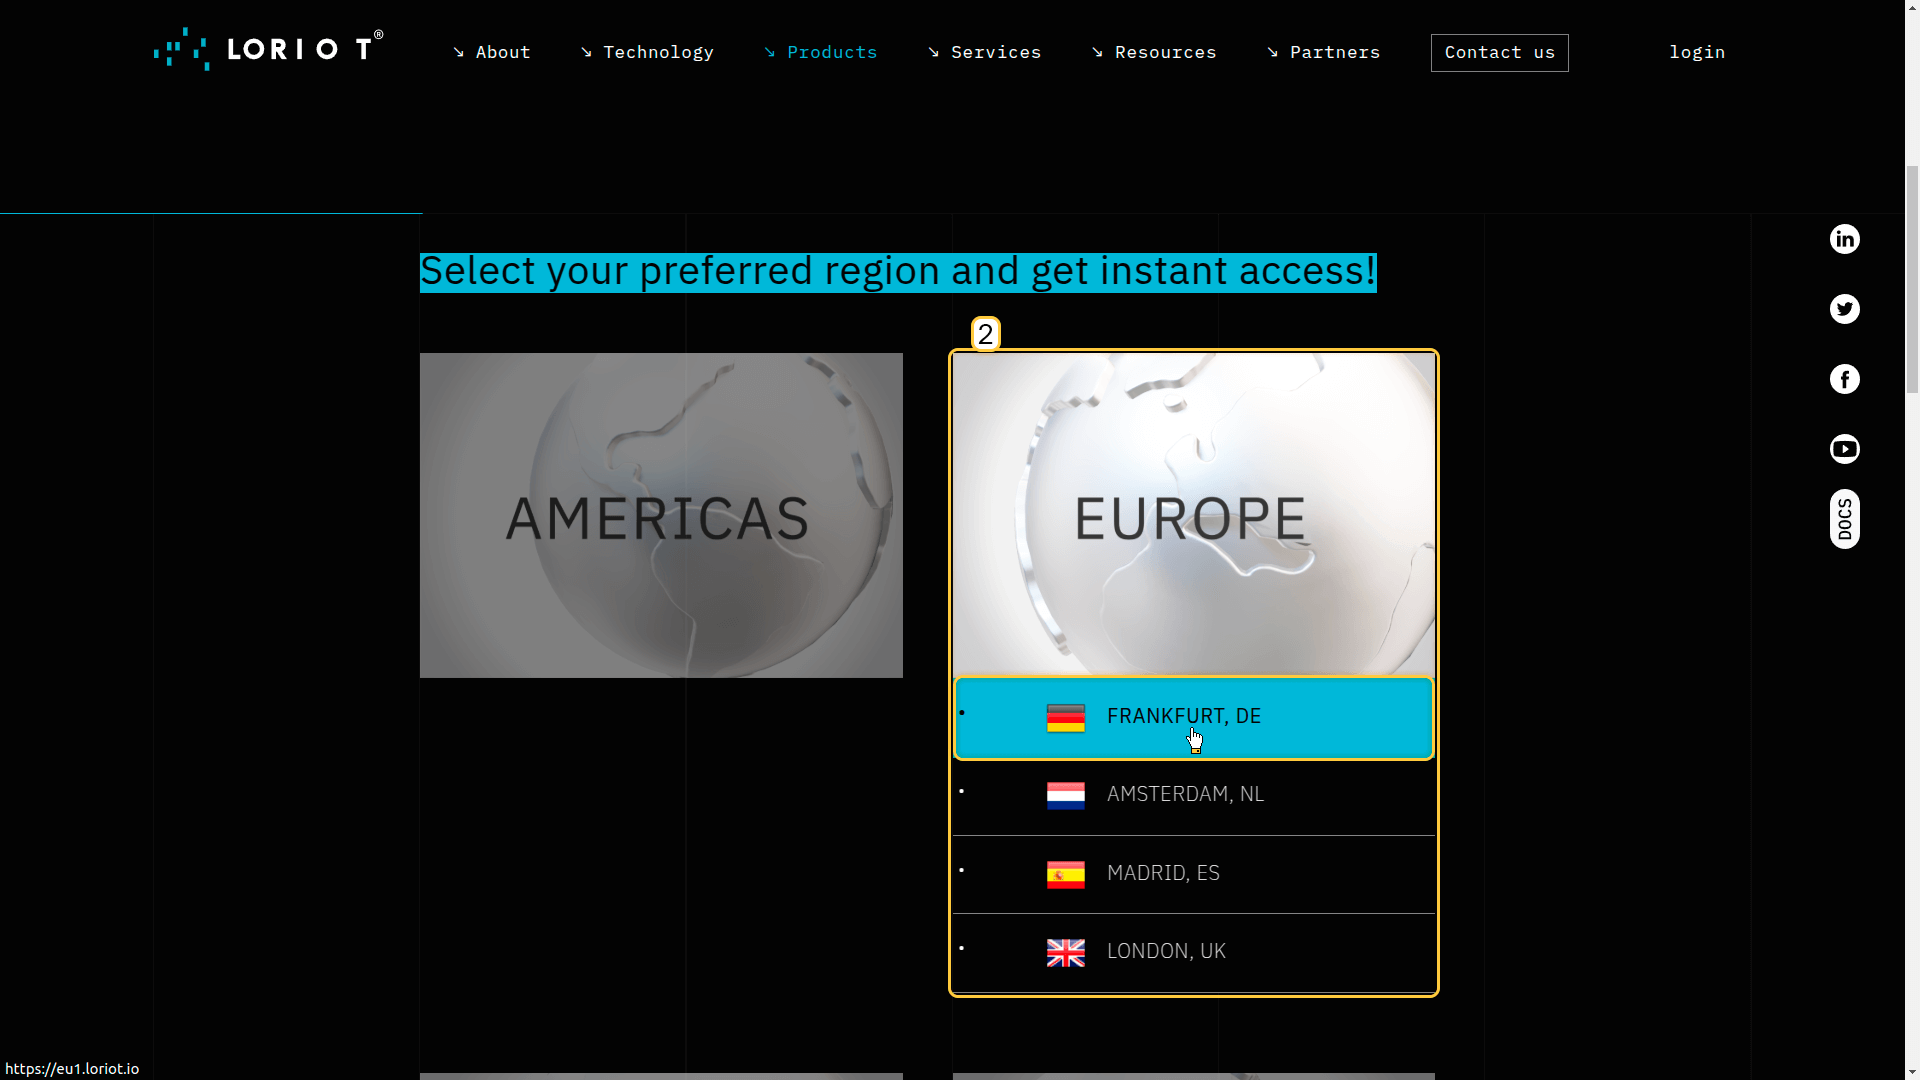
- 选择您偏好的区域和国家。
- 完成注册并登录Loriot账户。
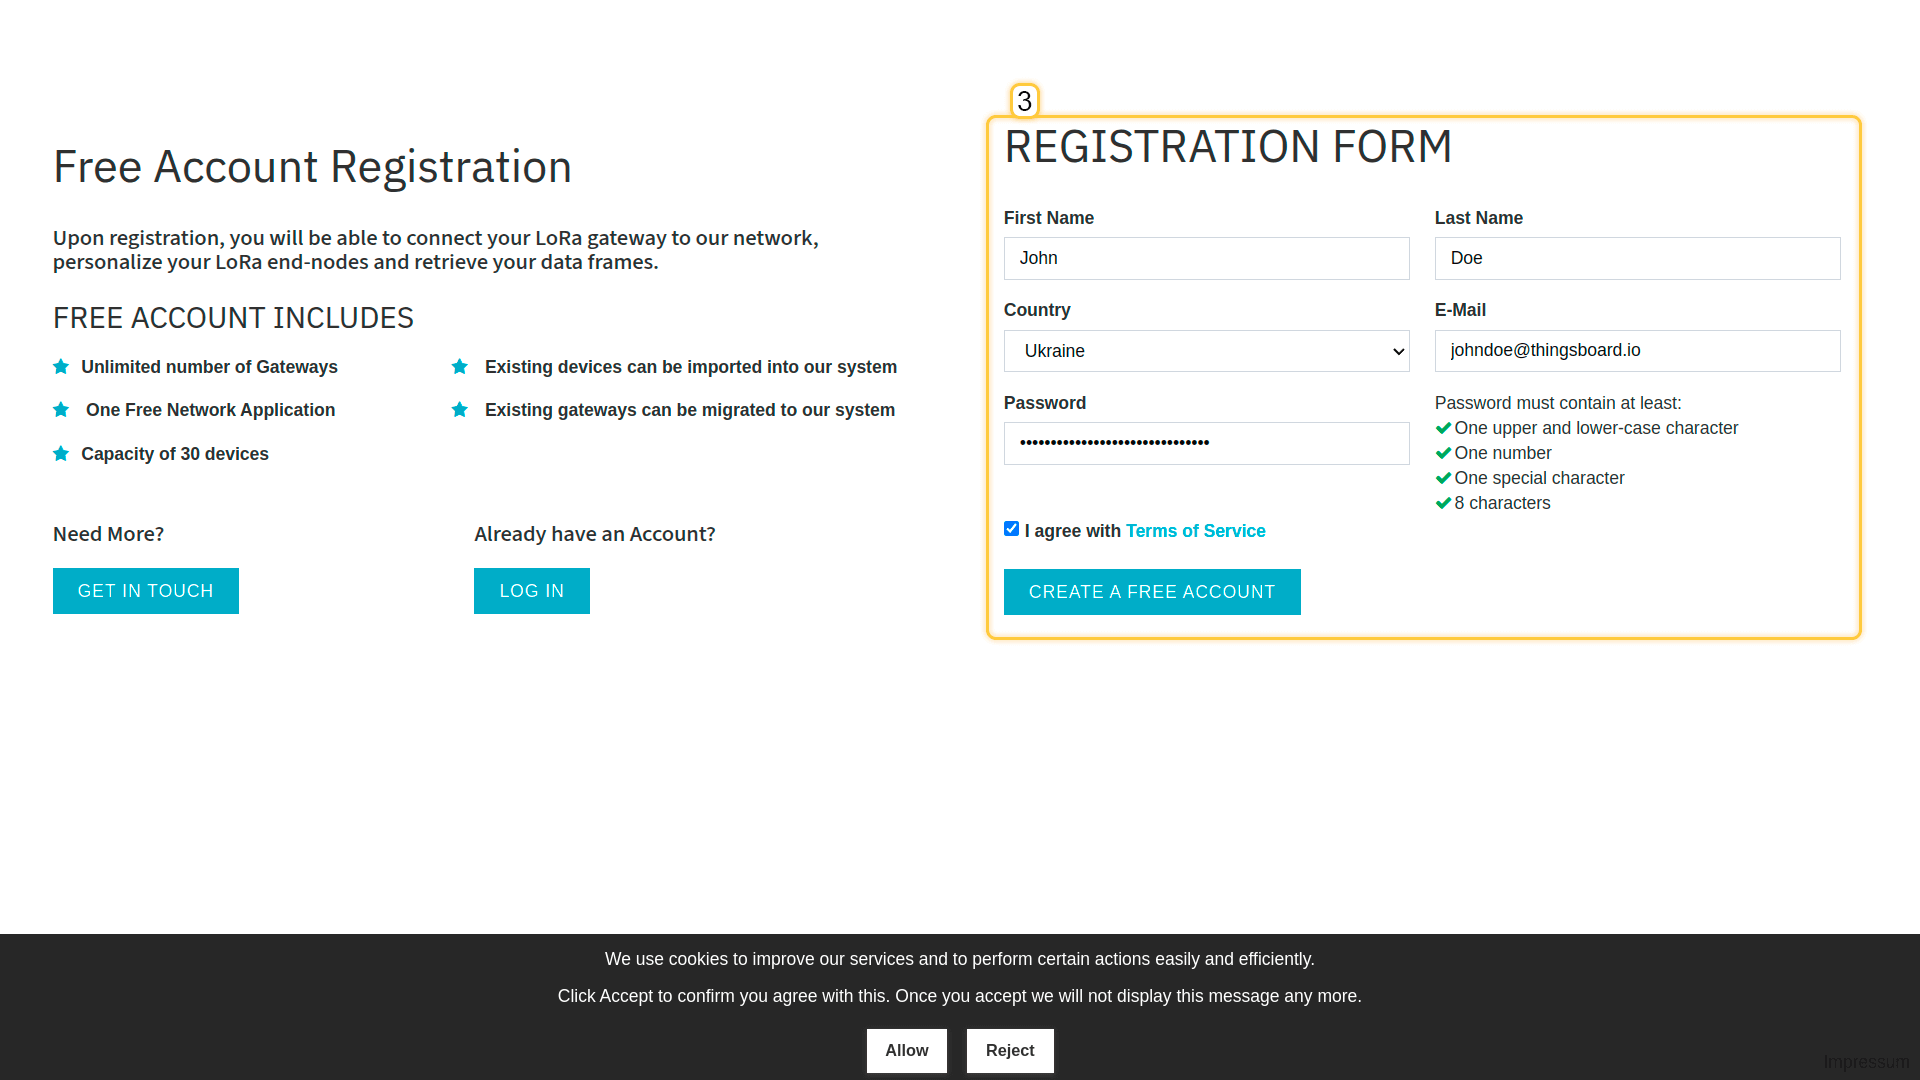
* Loriot界面将来可能会有所变化。
创建Loriot集成
您需要拥有ThingsBoard专业版的访问权限。最简单的方式是使用ThingsBoard Cloud服务器。 另一种方式是参照安装指南安装ThingsBoard。
接下来,我们开始配置ThingsBoard平台与Loriot之间的集成。
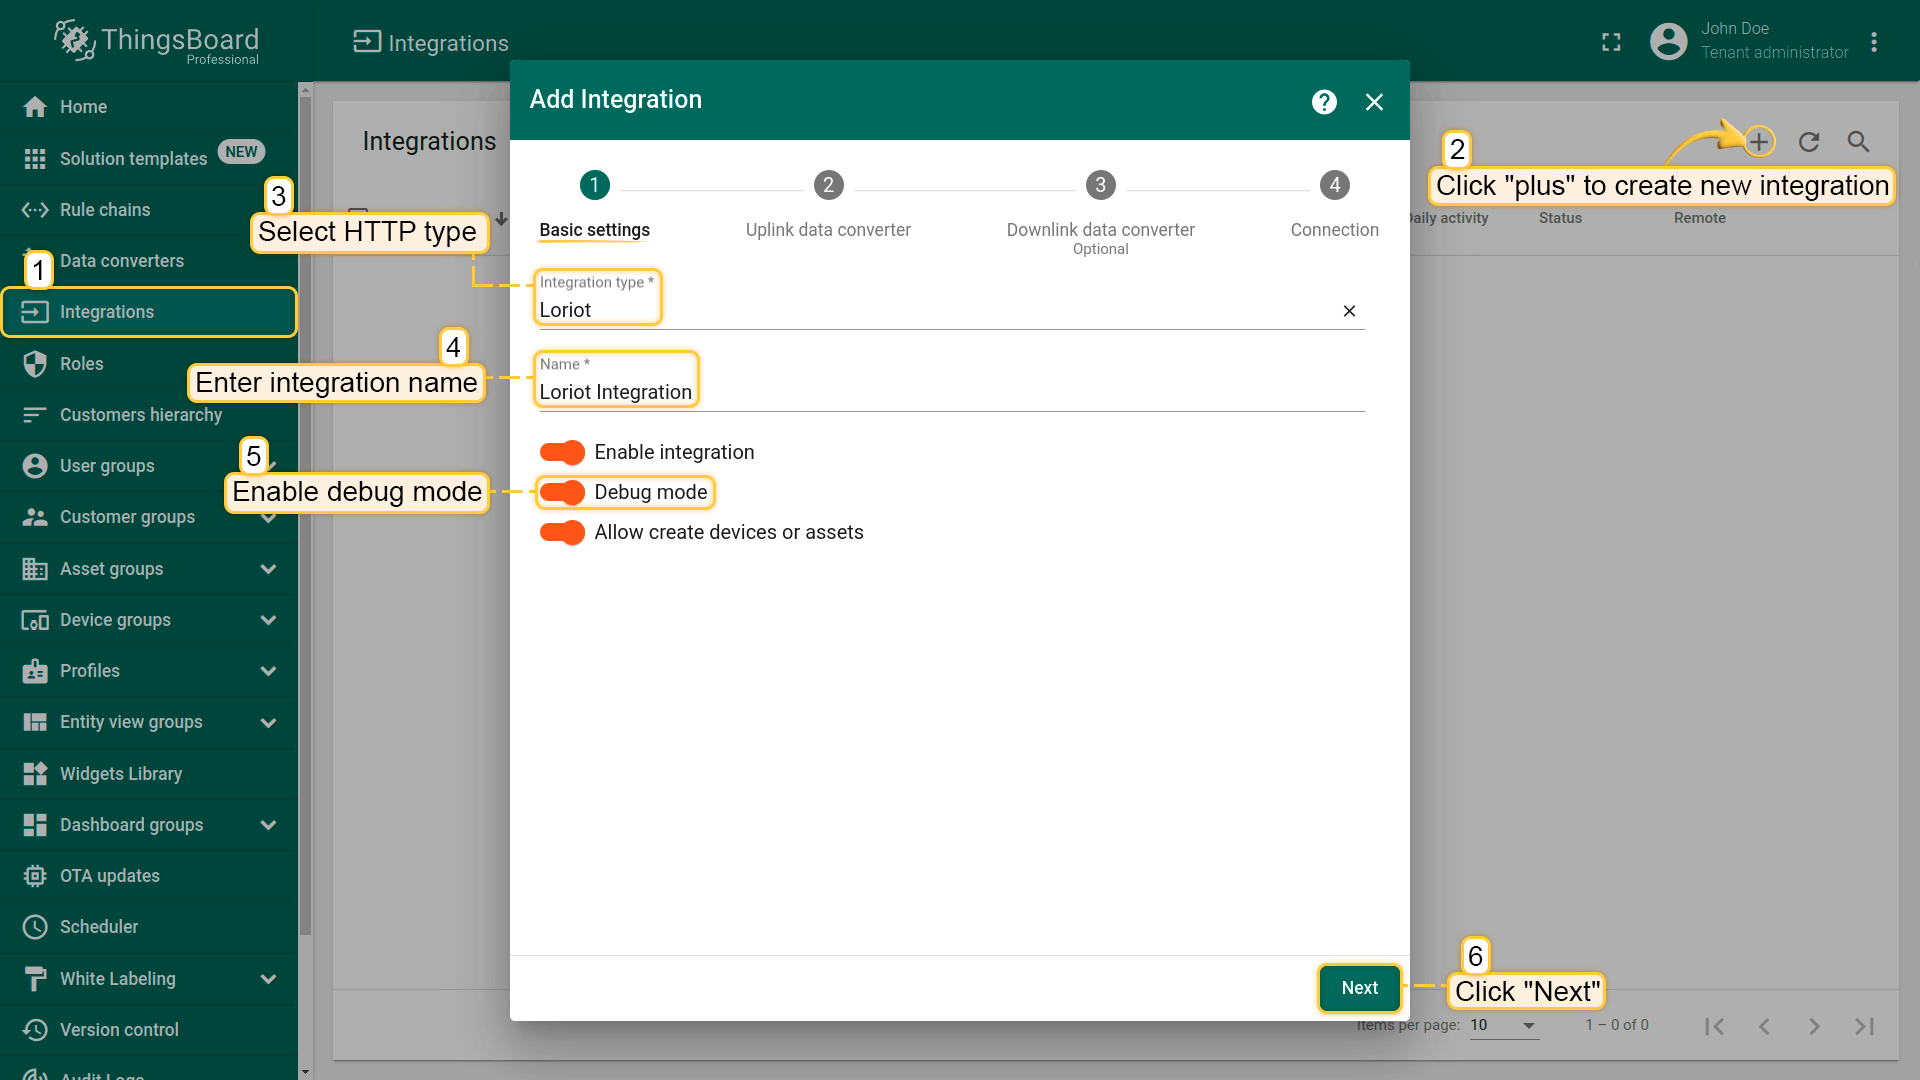
1. 基本设置。
- 登录您的ThingsBoard账户。
- 导航到”Integrations center“部分下的”Integrations“页面。点击”plus“按钮添加新的集成。
- 从列表中选择集成类型”Loriot“。
- 如果您想监控事件并进行故障排查,请启用调试模式。
调试模式
启用调试模式可追踪与integrations执行相关的事件、状态及潜在错误,便于开发和排障。
注意:调试模式可能迅速增加磁盘占用,因为所有调试事件都会存入数据库。 自ThingsBoard 3.9起,平台仅在integrations创建后的前15分钟内存储完整调试事件,之后仅保留错误事件。
调试模式设置可组合使用或完全关闭。
- 点击”Next“。
2. 上行数据转换器。
上行转换器用于将设备传入的数据转换为在ThingsBoard中显示所需的格式。
从ThingsBoard 4.0开始,我们简化了为Loriot集成编写转换器的流程。您现在可以轻松选择集成消息中的字段应存储到属性还是遥测中,无需在解码函数中手动定义。
注意:在ThingsBoard 4.0发布之前创建的转换器仍然可用,并将继续正常运行。
让我们查看来自Loriot的上行消息示例:
1
2
3
4
5
6
7
8
9
10
11
12
13
{
     "cmd"  : "rx",
     "EUI"  : "BE7A000000000552",
     "ts"   : 1470850675433,
     "ack"  : false,
     "fcnt" : 1,
     "port" : 1,
     "data" : "2A3F",
     "freq" : 868500000,
     "dr"   : "SF12 BW125 4/5",
     "rssi" : -130,
     "snr"  : 1.2
 }
如您所见,设备的唯一标识符位于”EUI“字段中。我们将其作为ThingsBoard中的设备名称。
设备数据编码在”data“字段中。此处的编码数据为:
1
"data": "2A3F"
让我们将它们转换为温度和湿度值。
2A是温度的值。解码后为42
3F是湿度的值。解码后为63
让我们回到集成的配置:
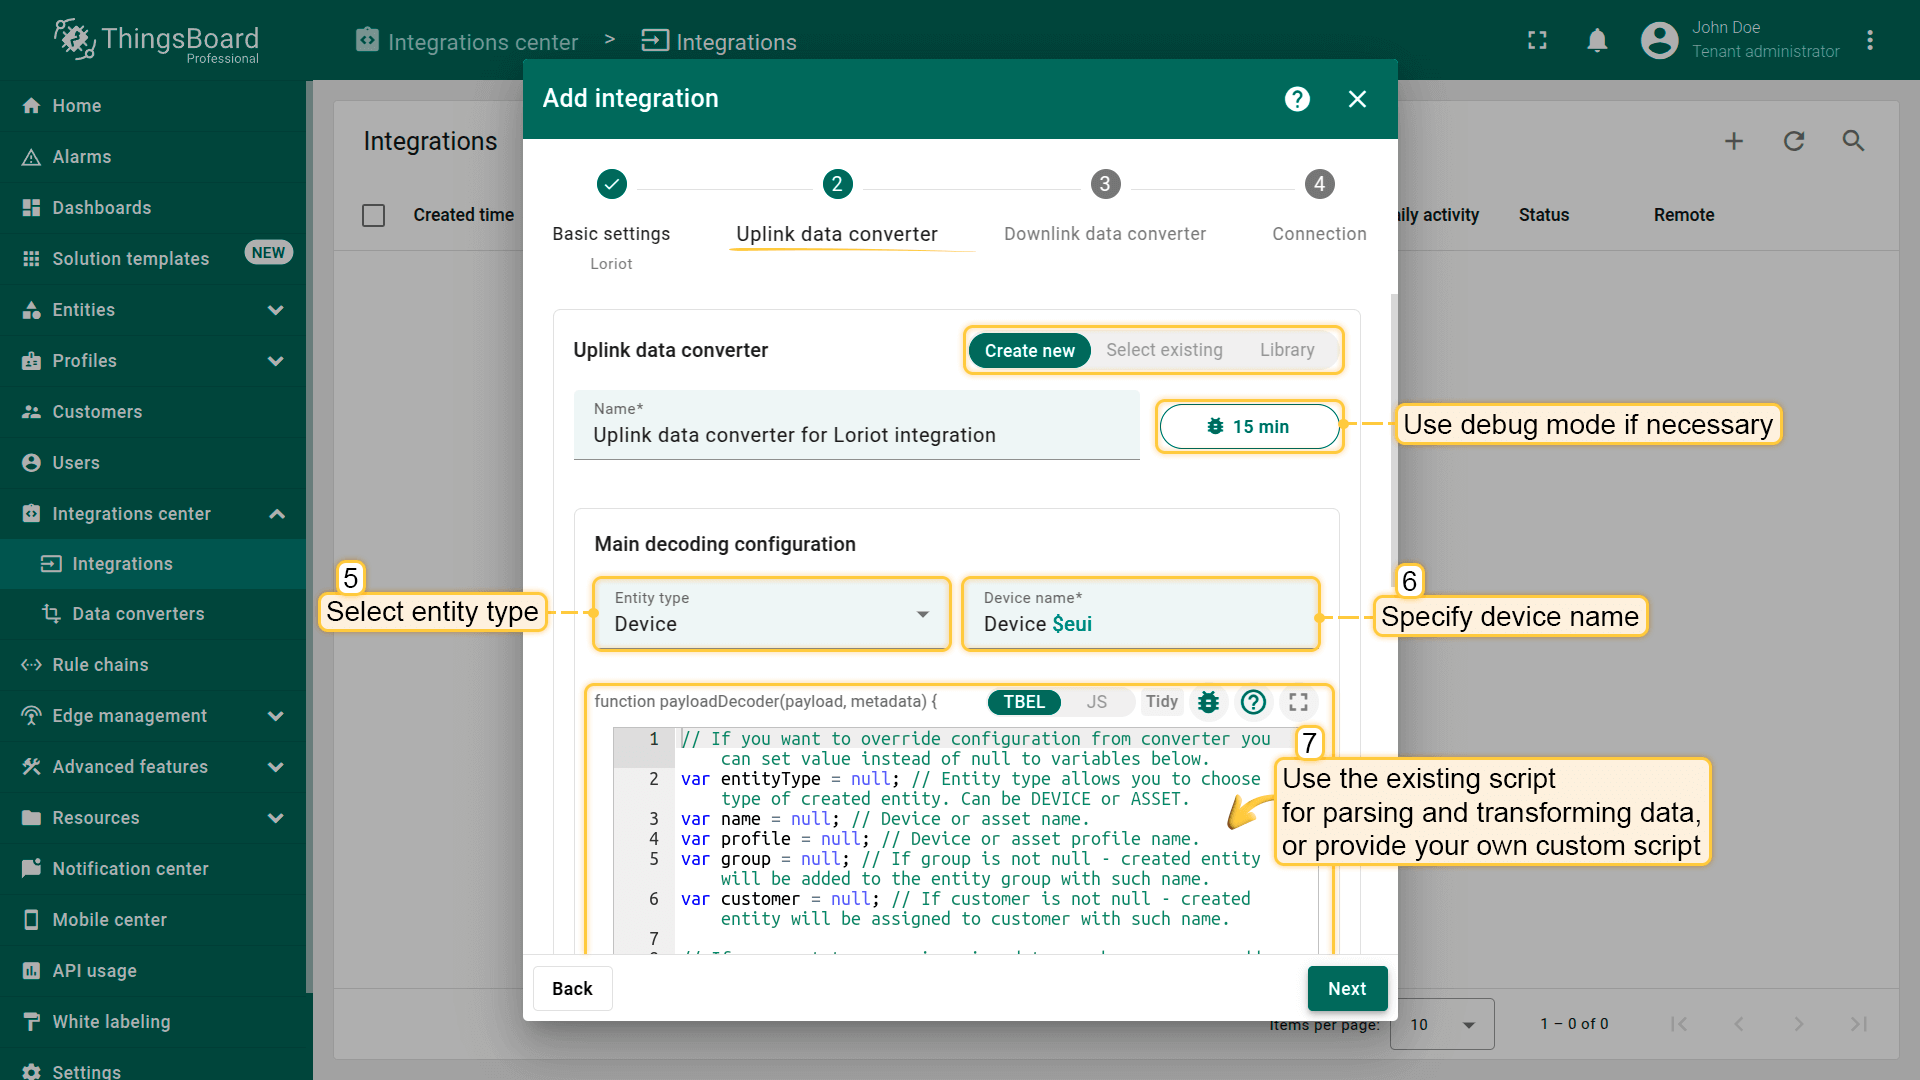
- 输入转换器的名称,名称必须唯一。
- 要查看事件,请启用调试模式。
- 在”Main decoding configuration“部分
- 选择集成后将创建的实体类型(Device或Asset),并指定实体名称。$eui模式将从Loriot消息中动态获取设备的唯一标识符。
示例:如果实体名称设置为Device $eui,且传入消息包含:“EUI”: “BE7A000000000552”,转换器将用”BE7A000000000552”替换$eui。最终的设备名称将为:”Device BE7A000000000552”。
- 使用现有的脚本来解析和转换数据,或提供您自定义的脚本。
- 选择集成后将创建的实体类型(Device或Asset),并指定实体名称。$eui模式将从Loriot消息中动态获取设备的唯一标识符。
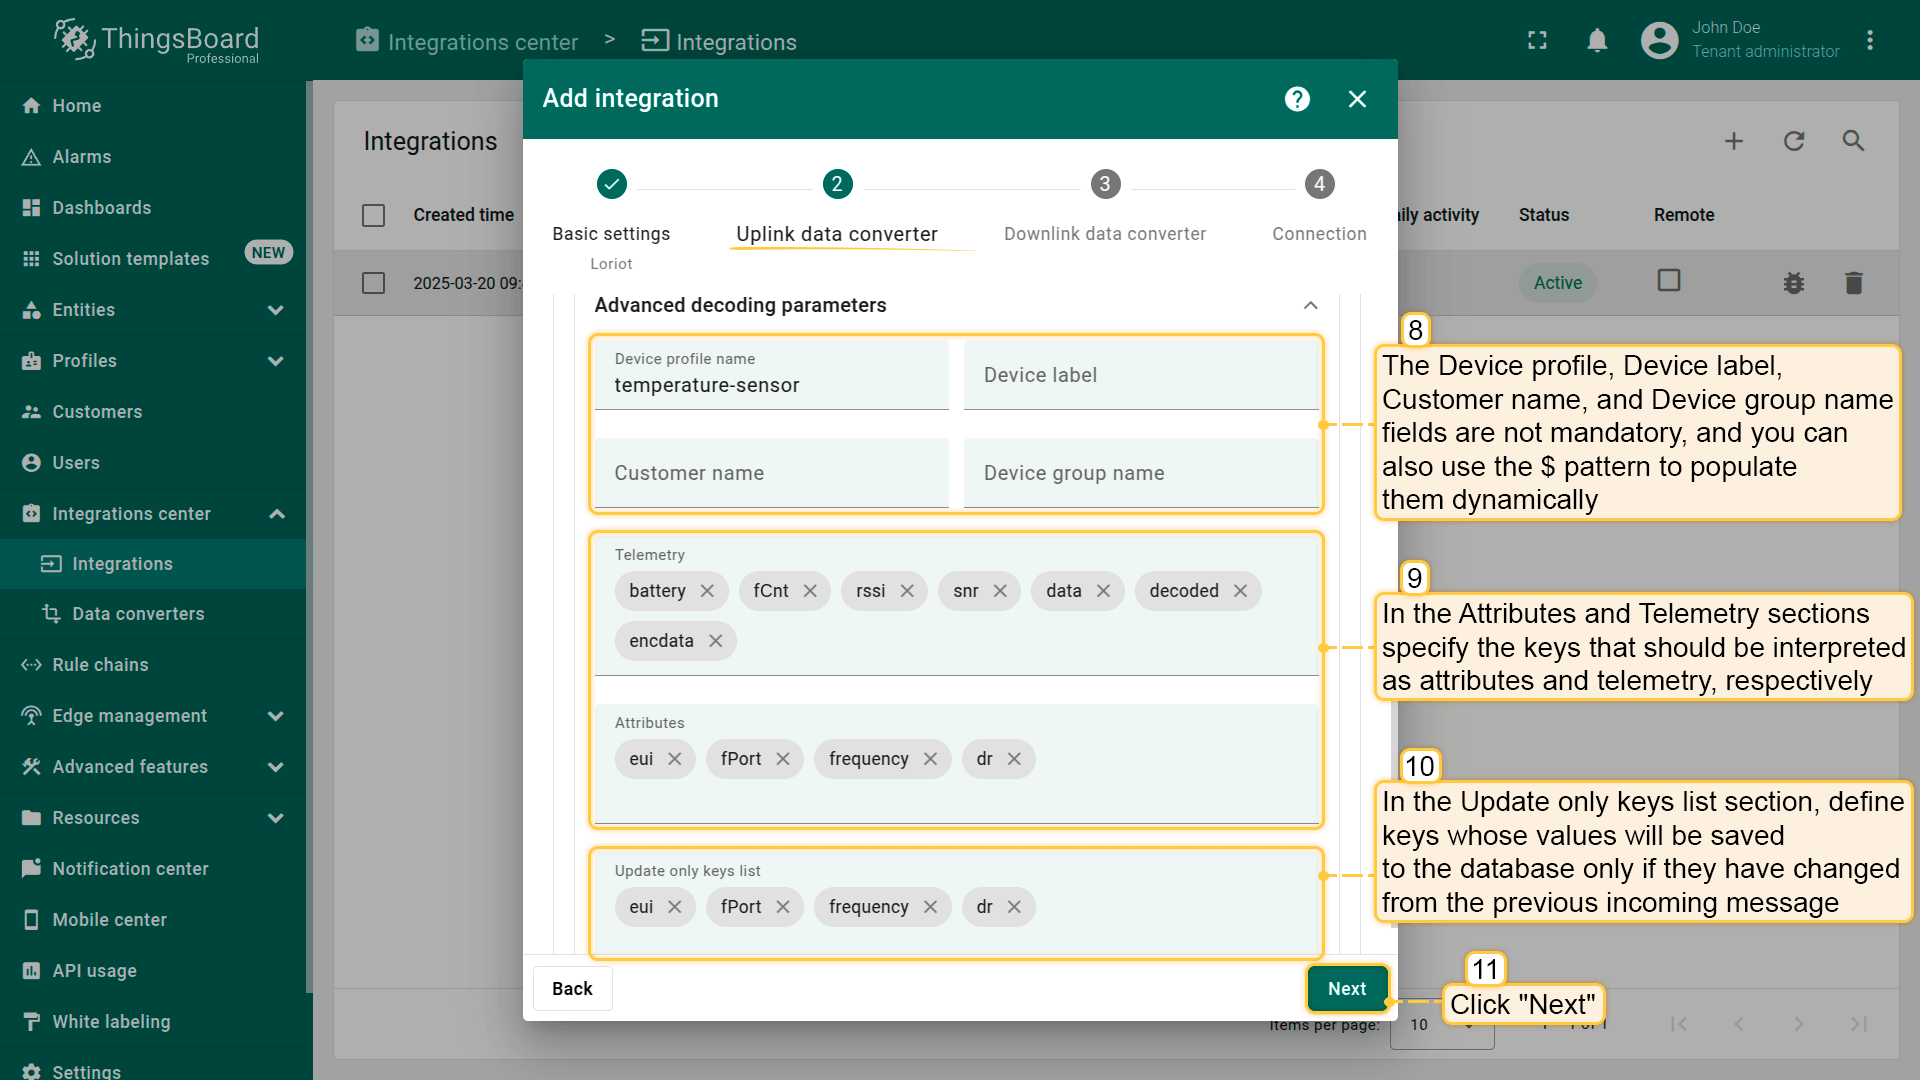
- “Advanced decoding parameters“部分:
- Device profile、Device label、Customer name和Device group name字段不是必填项,您也可以使用$模式来动态填充它们。
- 在Attributes和Telemetry部分中,分别指定应被解释为属性和遥测的键。
- 在Update only keys list部分中,定义仅在值与上一条传入消息相比发生变化时才保存到数据库的键。此设置同时适用于属性和遥测,有助于优化数据存储。
- 上行转换器设置完成后,点击”Next“。
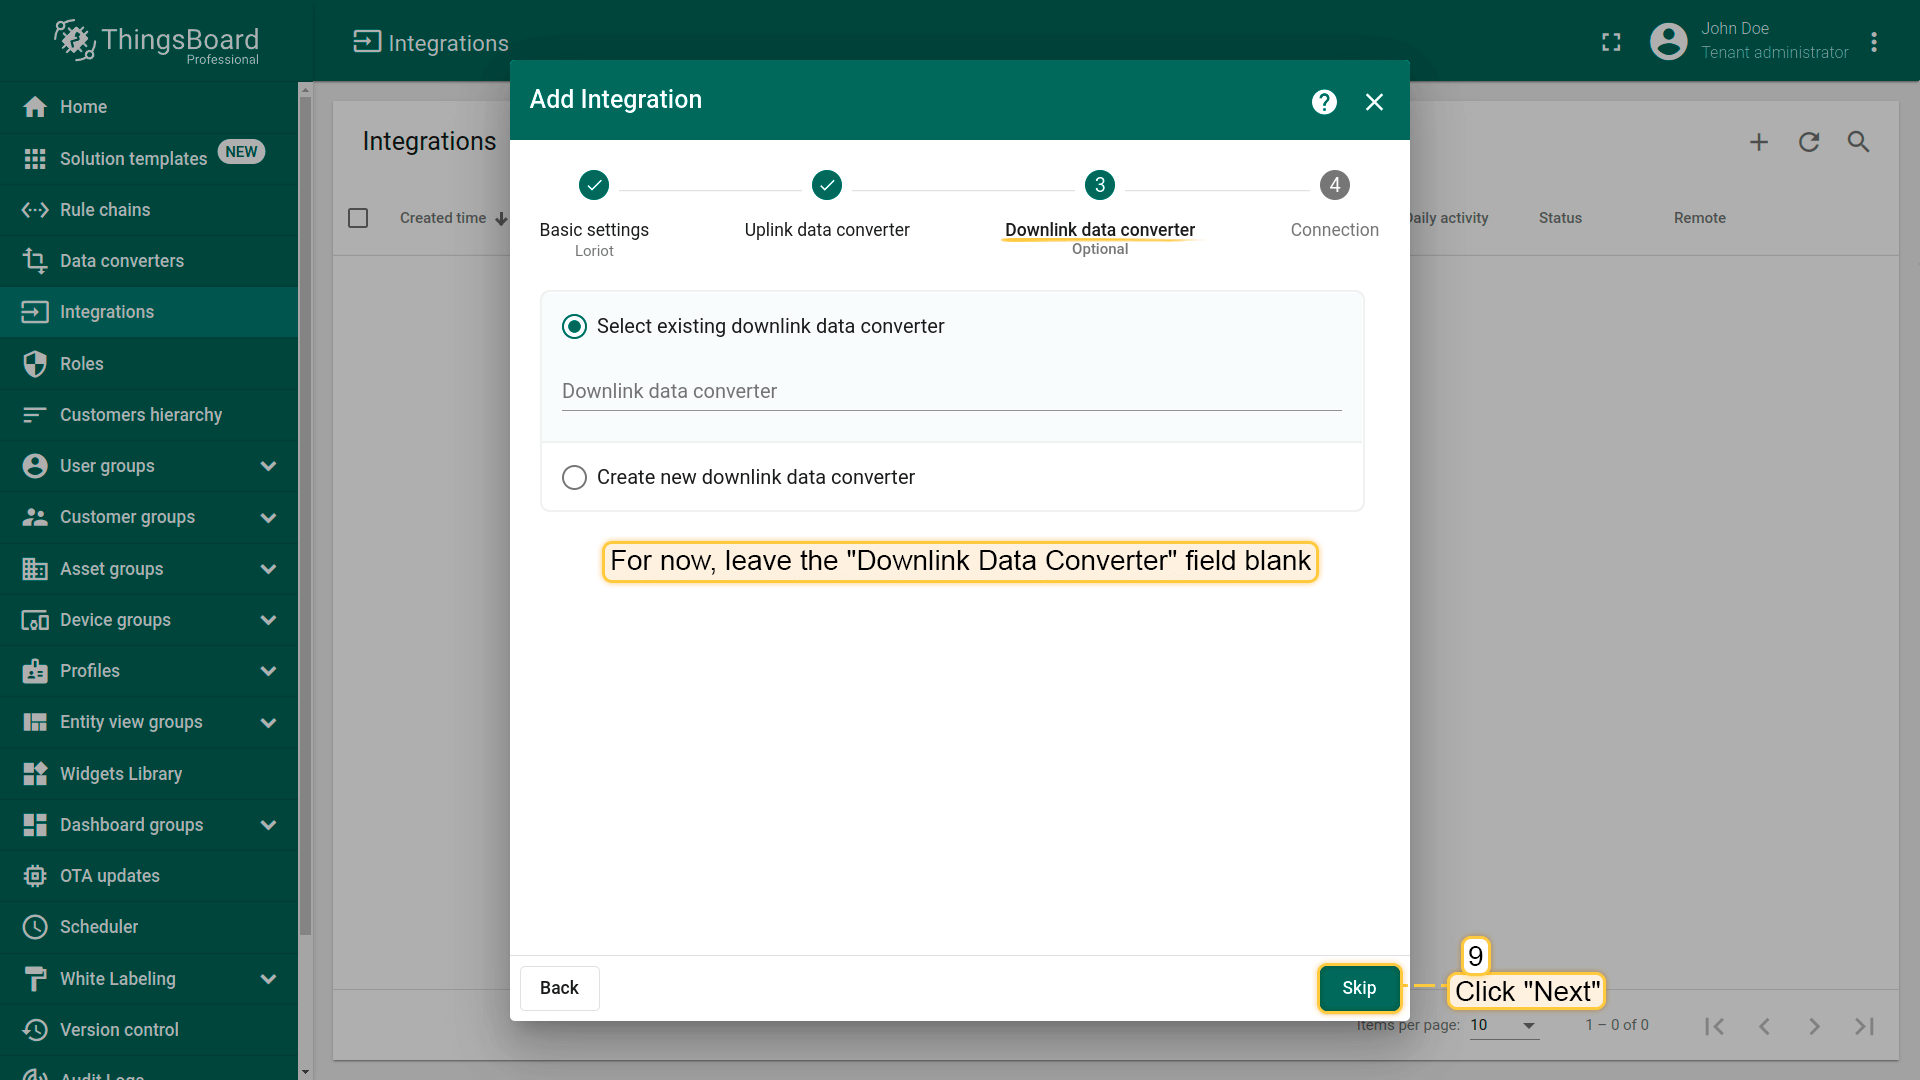
3. 下行数据转换器。
在添加下行转换器的步骤中,您可以选择之前创建的转换器或创建新的下行转换器。但目前,将”Downlink data converter“字段留空。点击”Skip“。
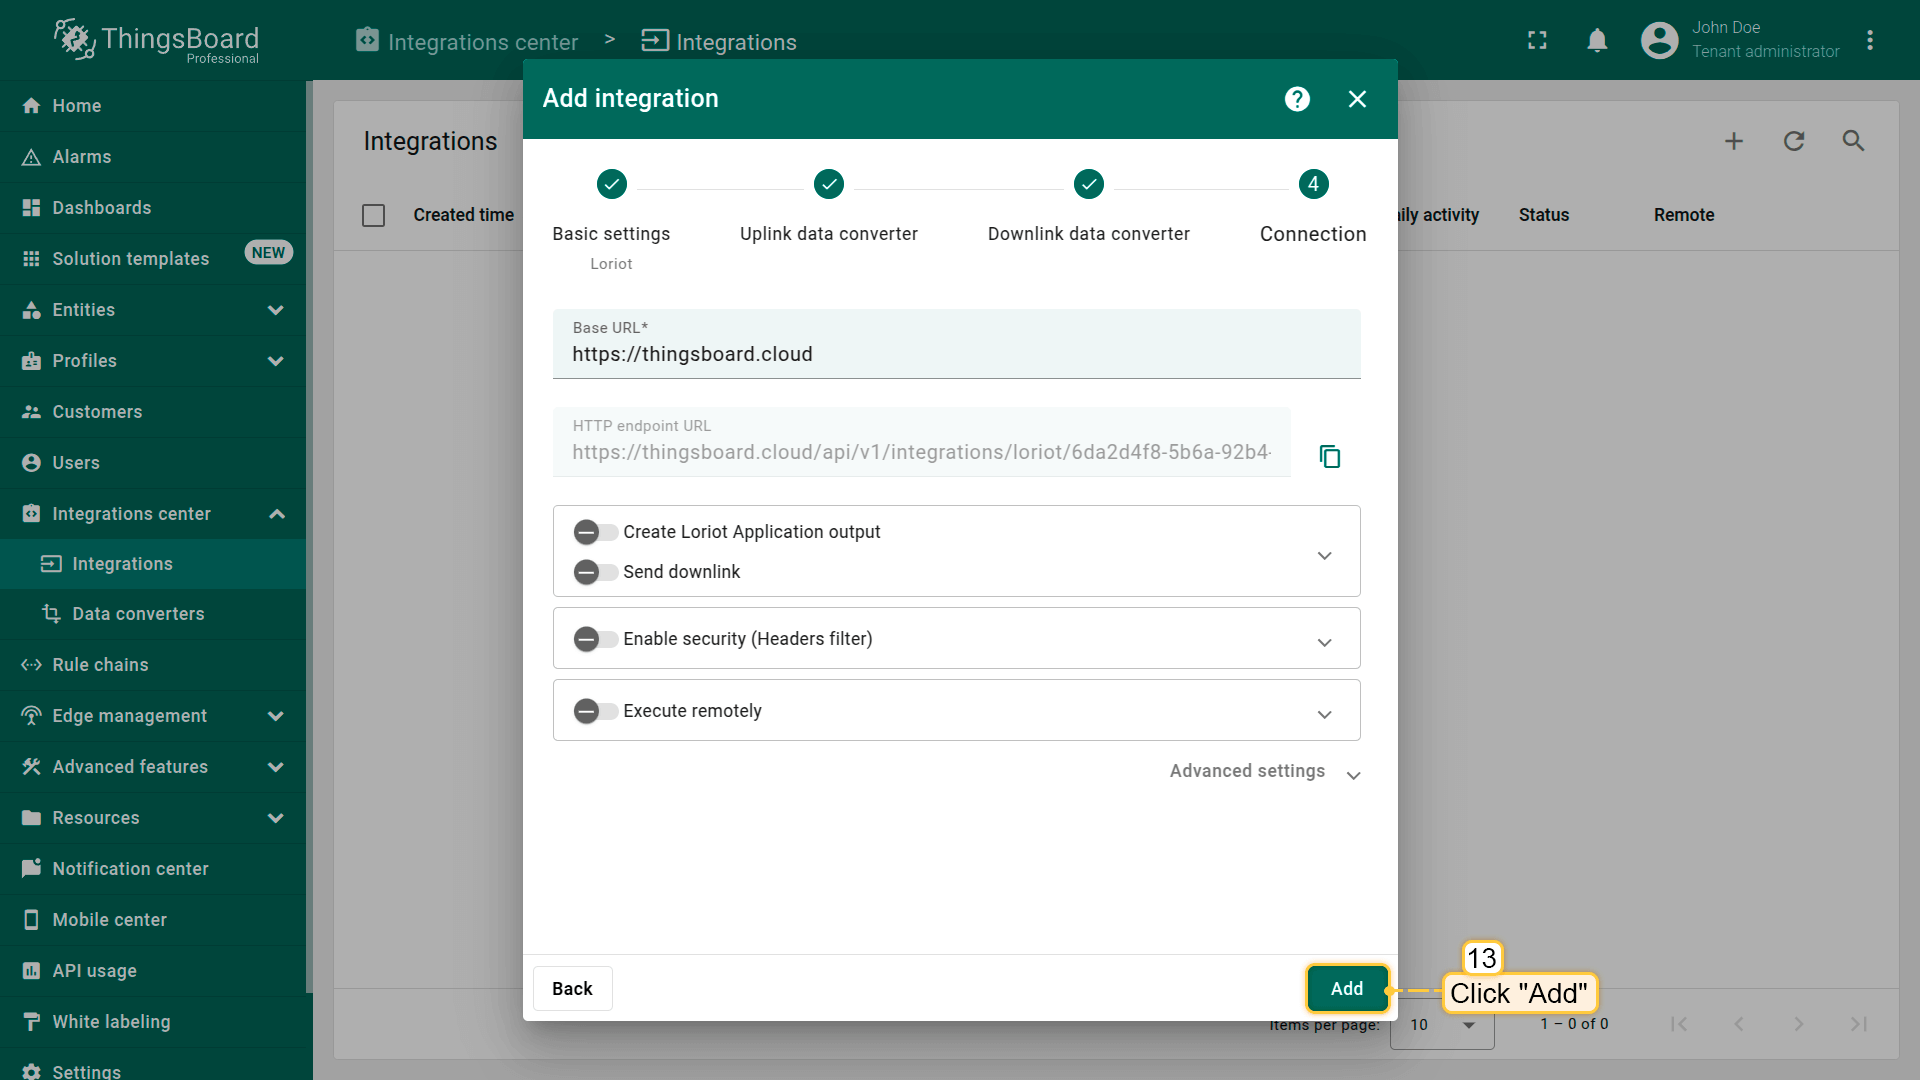
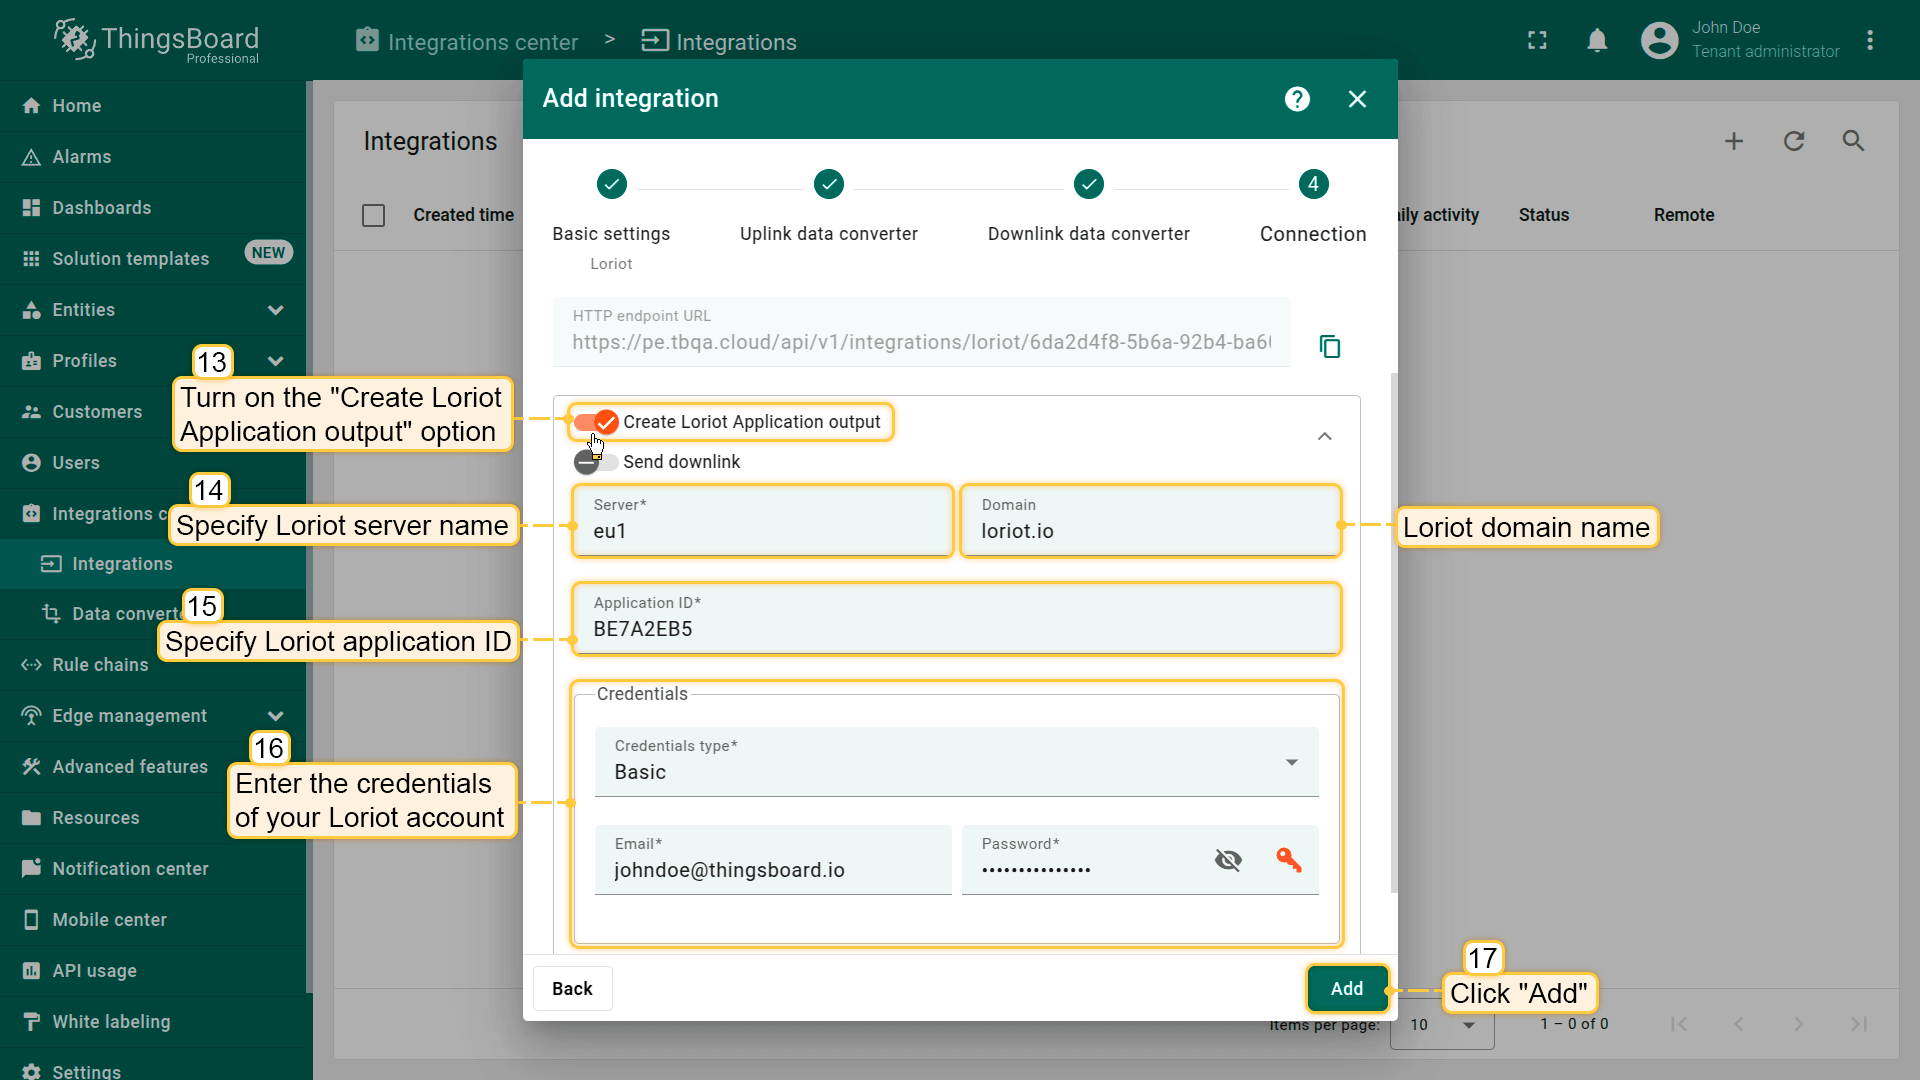
4. 连接。
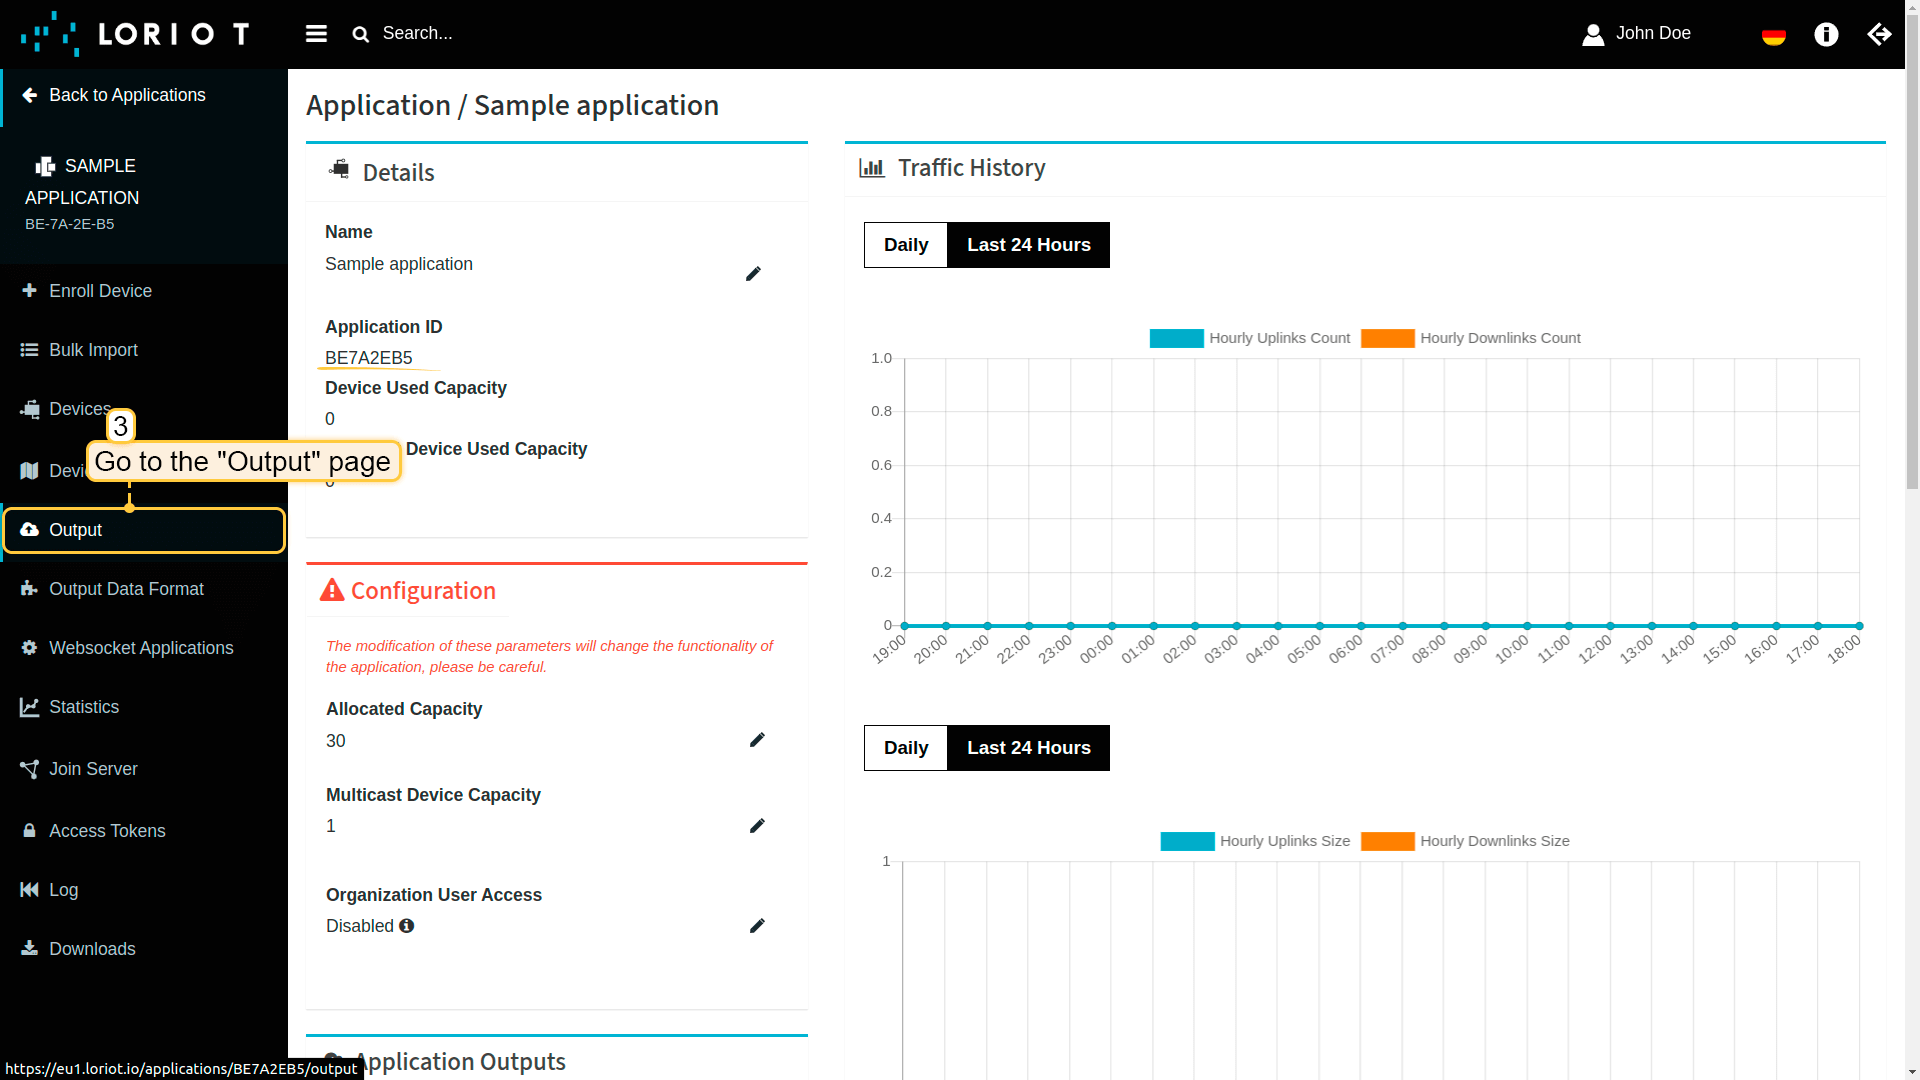
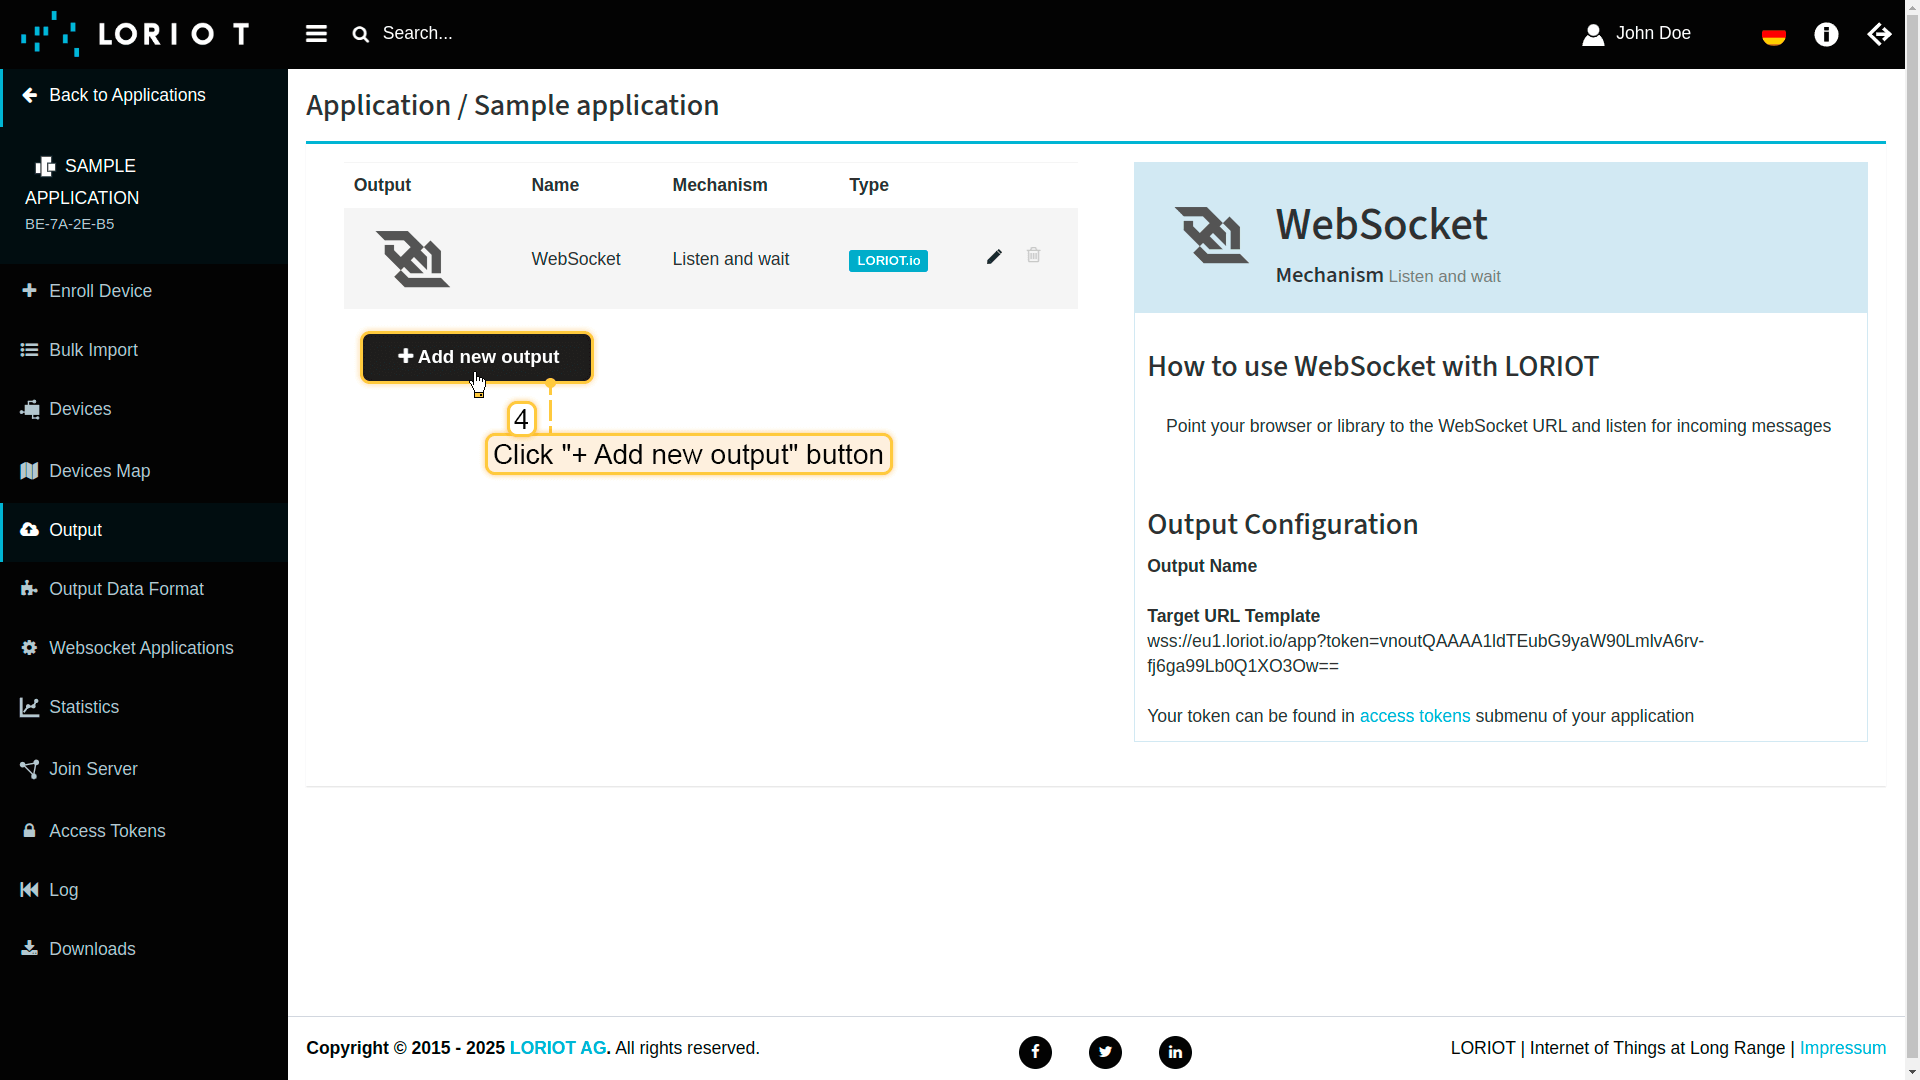
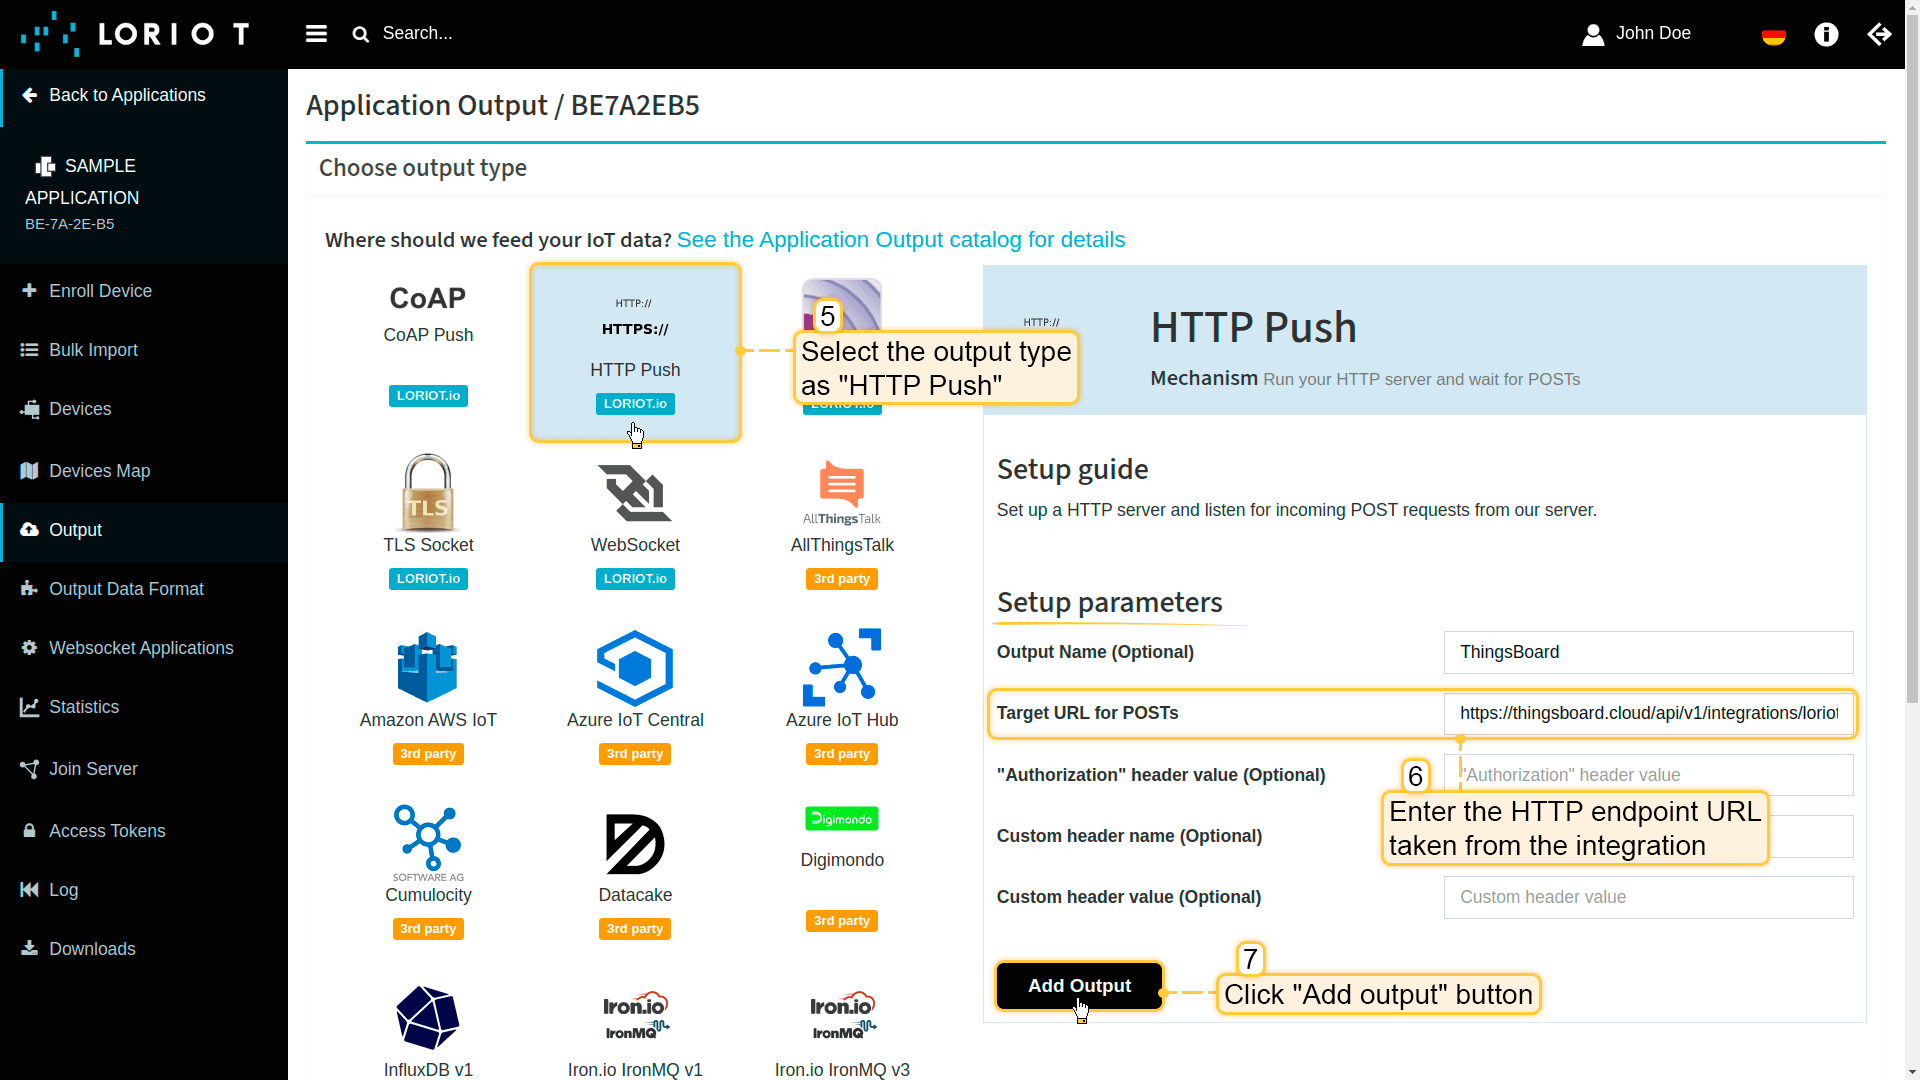
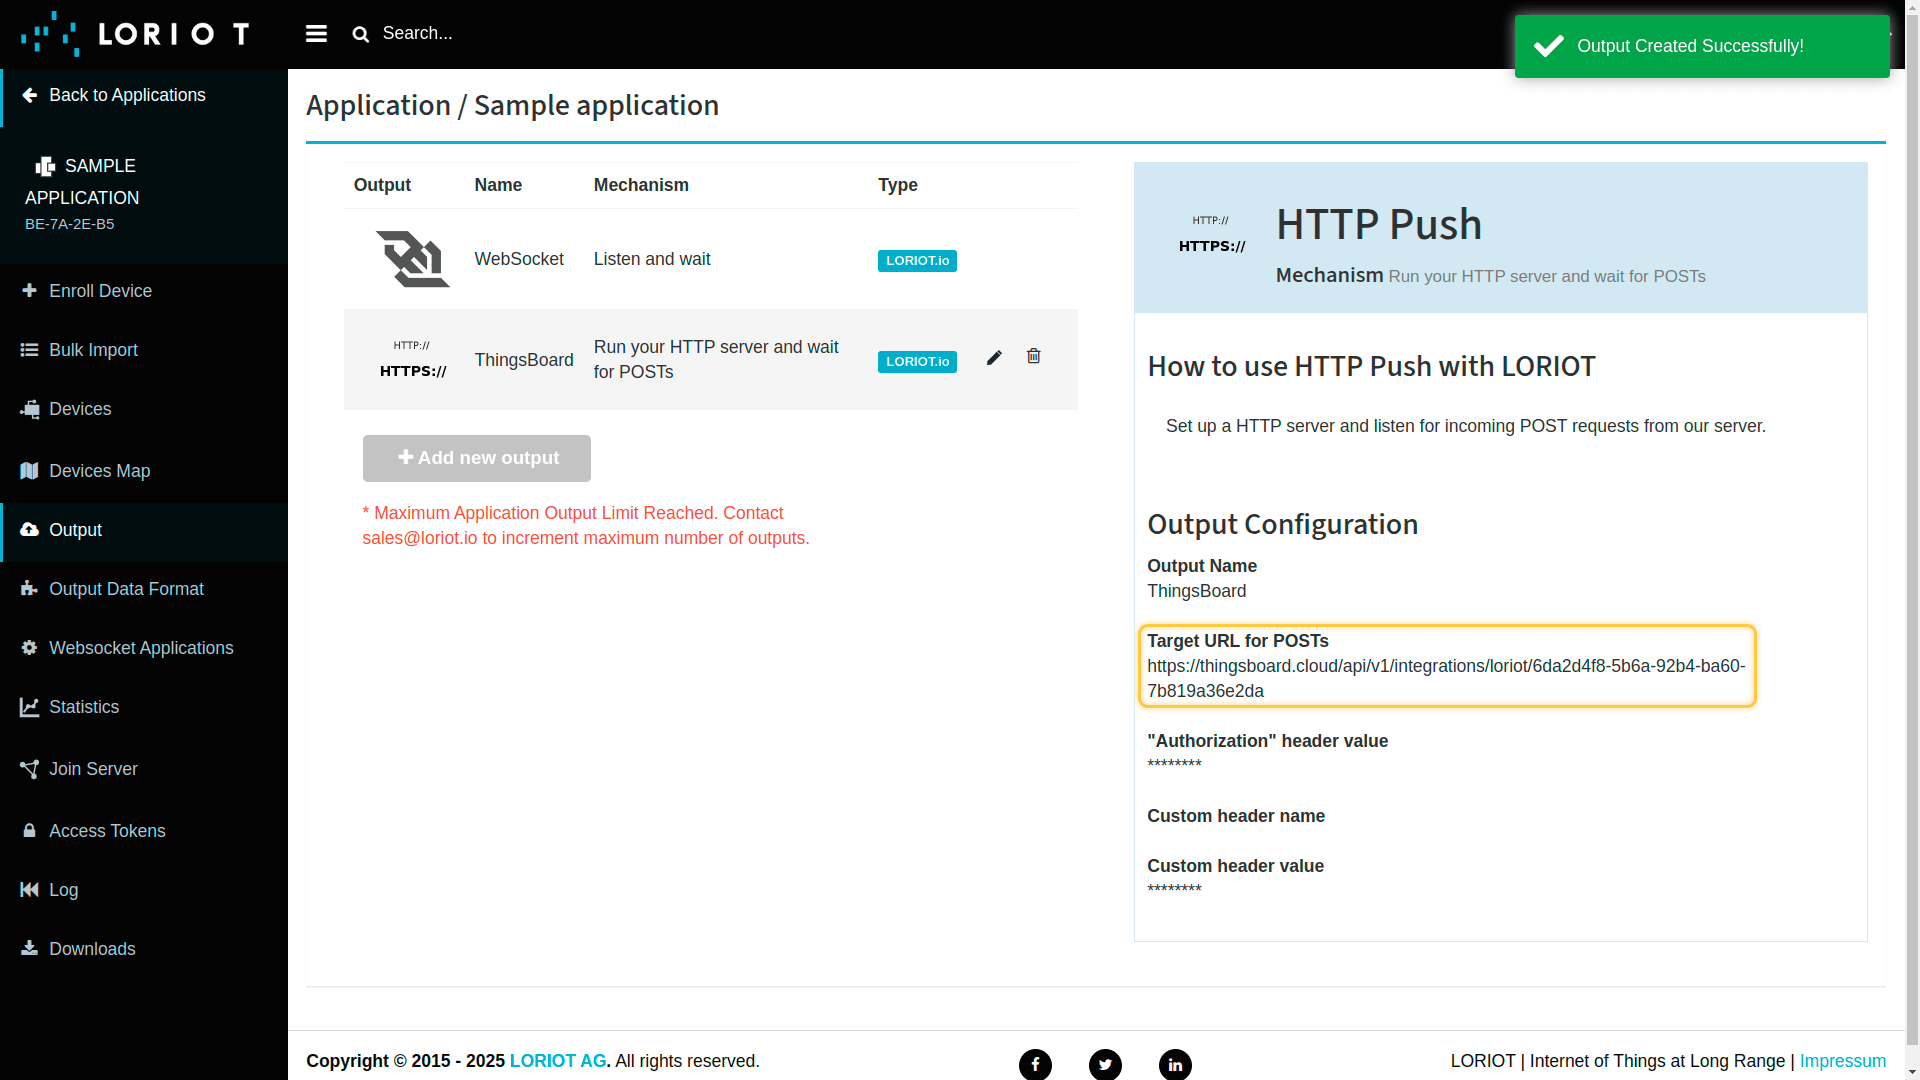
为了将数据从Loriot传输到ThingsBoard,您需要为Loriot应用程序配置一个Output。您可以手动完成此操作(推荐),也可以让ThingsBoard集成自动完成(您需要提供Loriot账户的登录名和密码,以便我们能够自动配置输出)。
我们可以通过两种方式创建Output:一种是直接在Loriot账户中指定集成的”HTTP endpoint URL“;另一种是在ThingsBoard中启用”Create Loriot Application output“选项并提供您的Loriot凭据。
|
In Loriot UI:
|
Server:
 Application ID:
 |
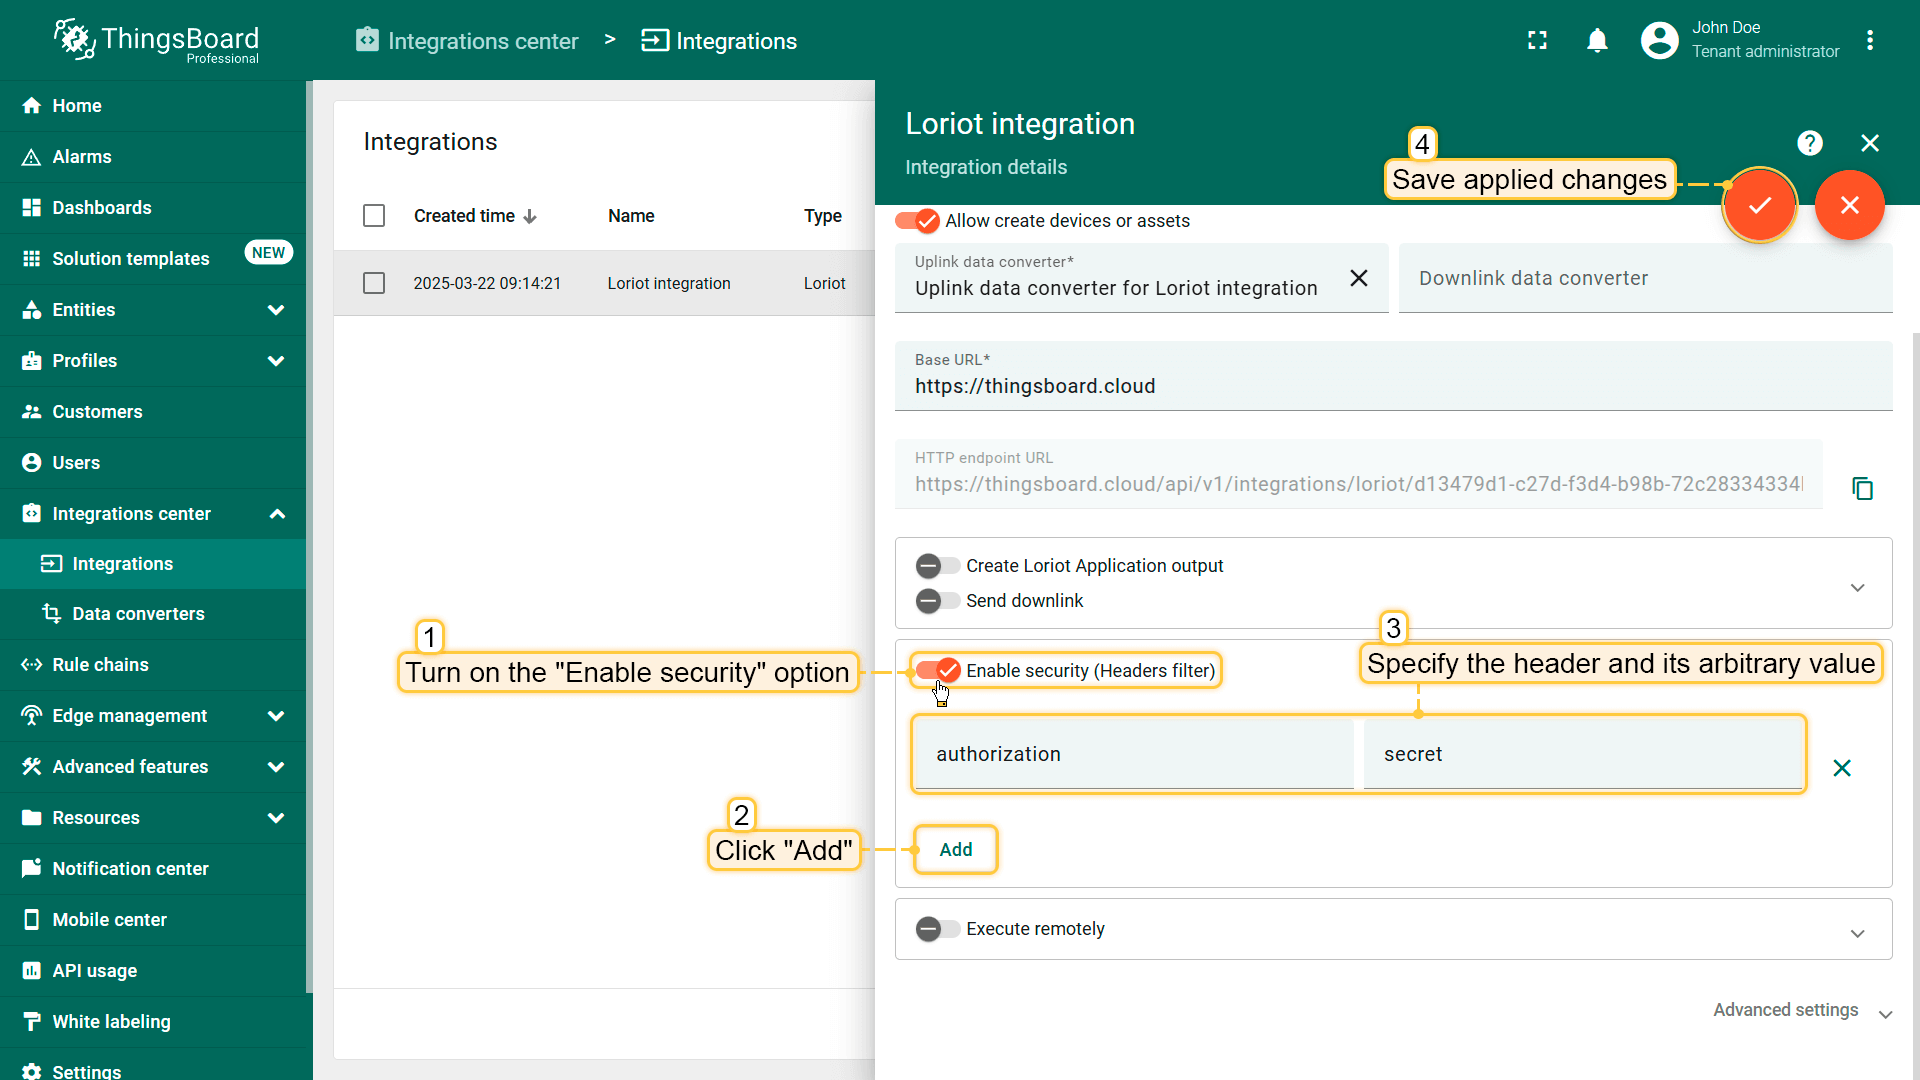
启用安全选项
如有需要,您可以指定附加参数,缺少这些参数数据将不会被纳入集成。
为此,请开启”Enable security“选项。点击”Add“并为”Header“和”Value“字段输入任意值。然后保存更改。
同时需要在Loriot UI中指定这些凭据。
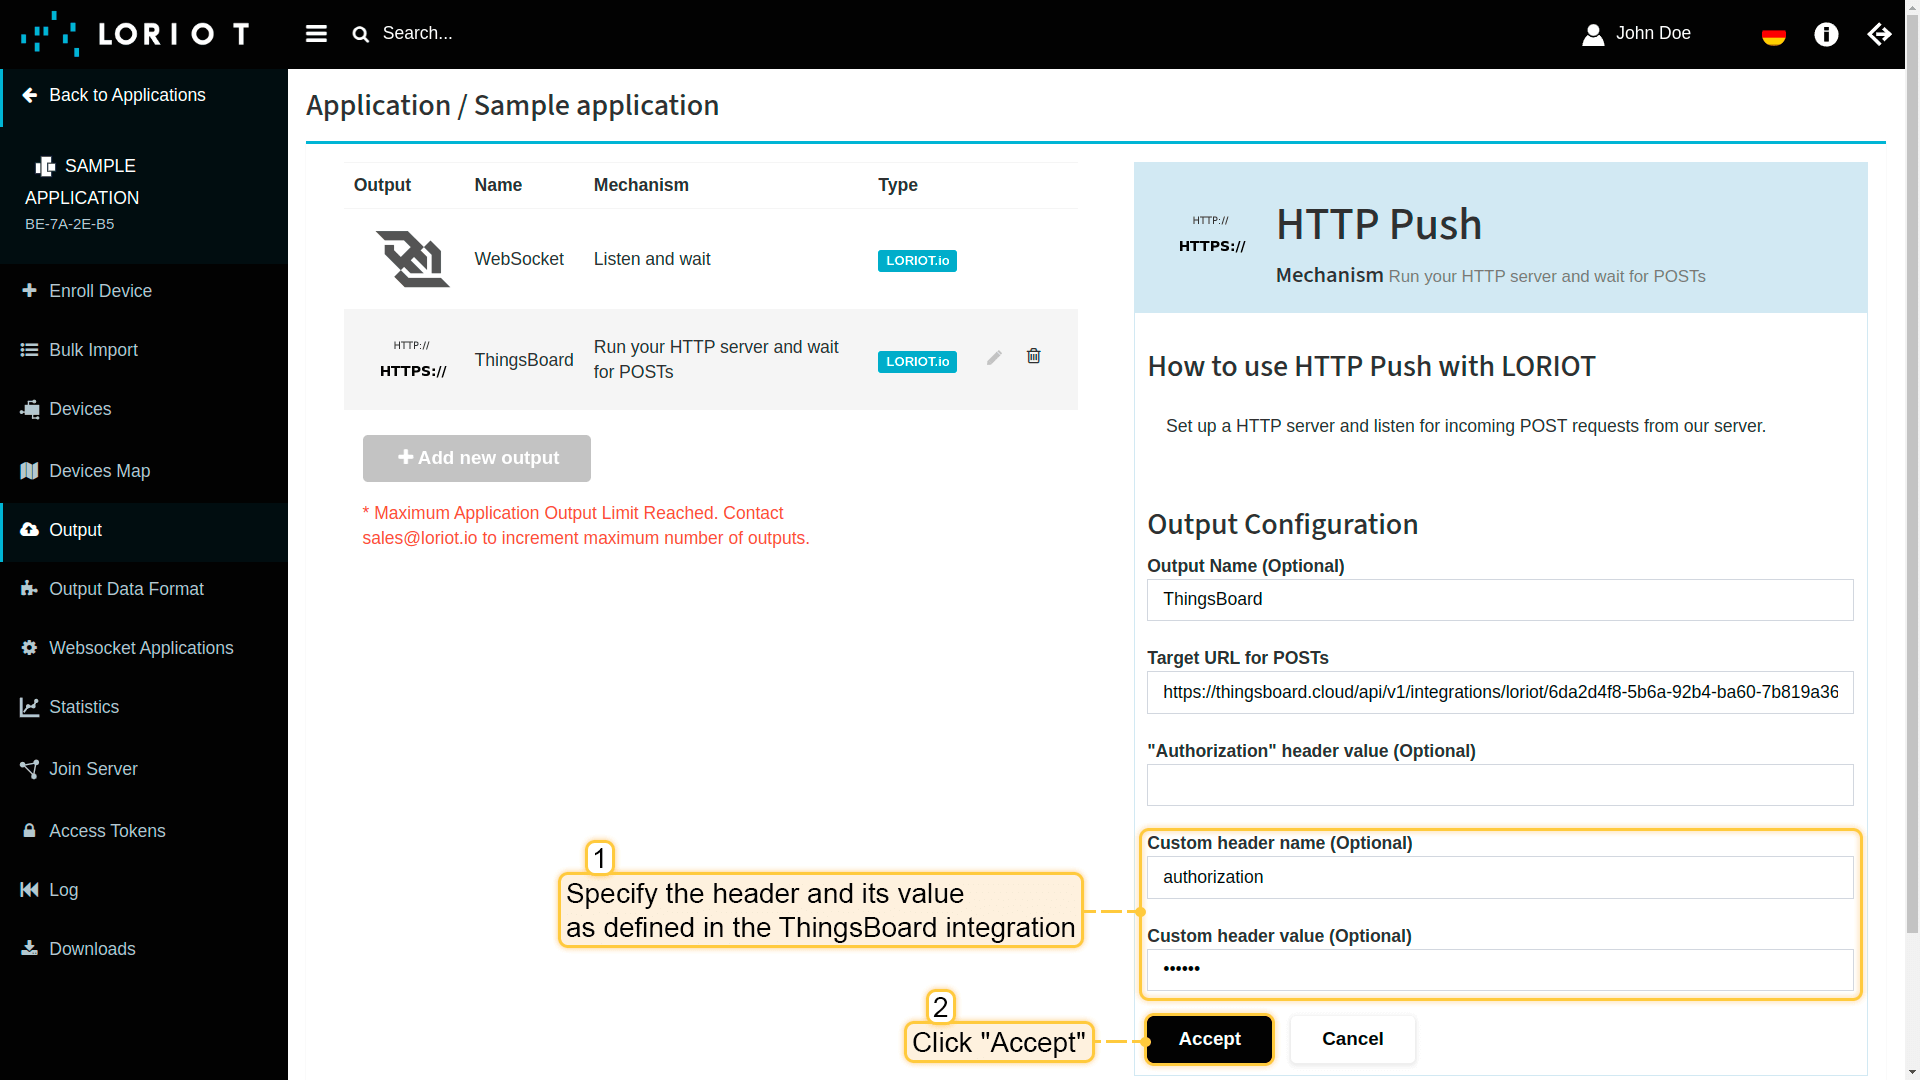
配置Headers过滤器后,还需要在上行消息中按以下格式指定:
1
-H "$HEADER:$VALUE"
示例:
1
-H "authorization:secret"
发送上行消息
使用控制台而非Loriot服务器来”模拟”设备消息可能会很有用。要发送上行消息,您需要集成中的HTTP endpoint URL。
使用以下命令发送消息。请将$HTTP_ENDPOINT_URL替换为相应的值。
1
curl -v -X POST -d "{\"EUI\":\"BE7A000000000552\",\"data\":\"2A3F\",\"port\":1,\"cmd\":\"rx\",\"dr\":\"SF12 BW125 4/5\",\"snr\":1.2,\"ack\":\"false\",\"freq\":868500000,\"fcnt\":1,\"rssi\":-130,\"ts\":1613745998000}" $HTTP_ENDPOINT_URL -H "Content-Type:application/json"
启用enable security选项时:请将$HTTP_ENDPOINT_URL和$HEADER:$VALUE替换为相应的值。
1
curl -v -X POST -d "{\"EUI\":\"BE7A000000000552\",\"data\":\"2A3F\",\"port\":1,\"cmd\":\"rx\",\"dr\":\"SF12 BW125 4/5\",\"snr\":1.2,\"ack\":\"false\",\"freq\":868500000,\"fcnt\":1,\"rssi\":-130,\"ts\":1613745998000}" $HTTP_ENDPOINT_URL "Content-Type:application/json" -H "$HEADER:$VALUE"
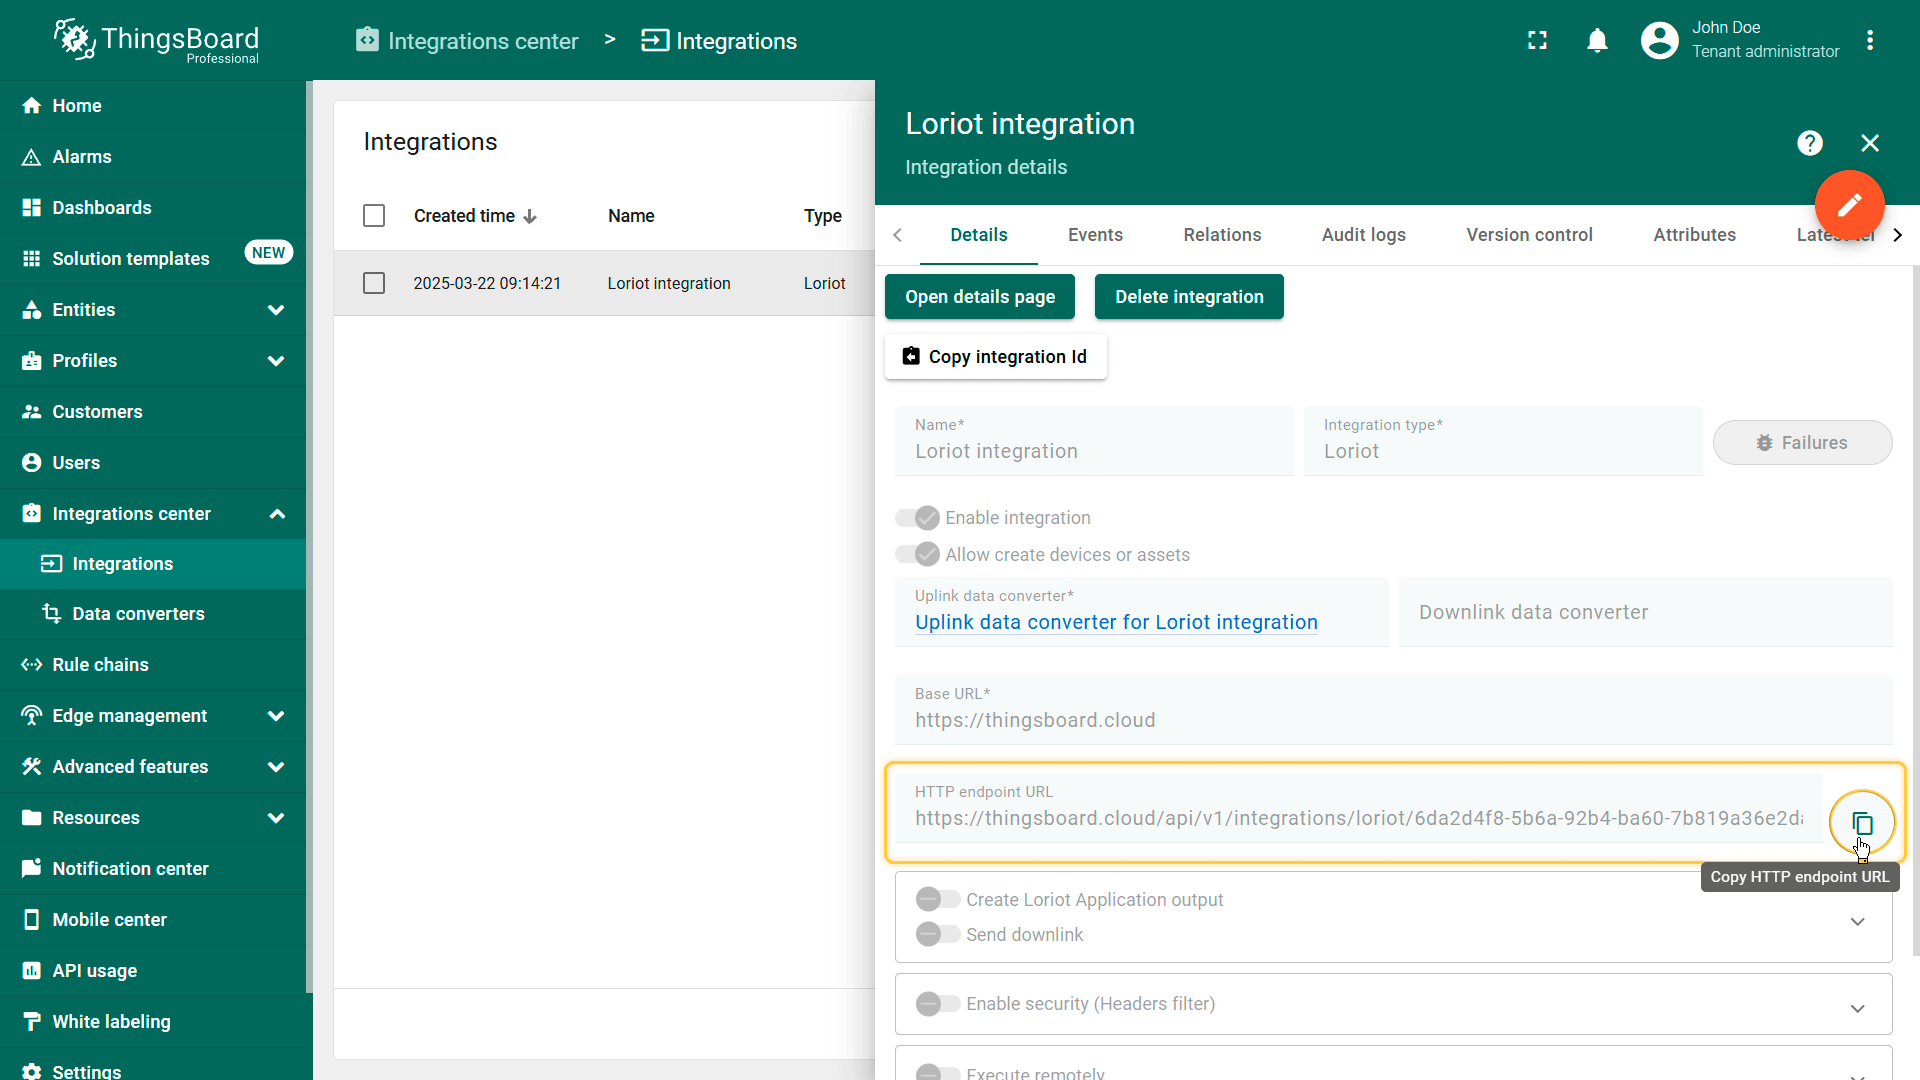
要找到”HTTP endpoint URL“,请前往ThingsBoard中的”Integrations”页面,点击Loriot集成以打开其详情。在那里,您将找到”HTTP endpoint URL“。
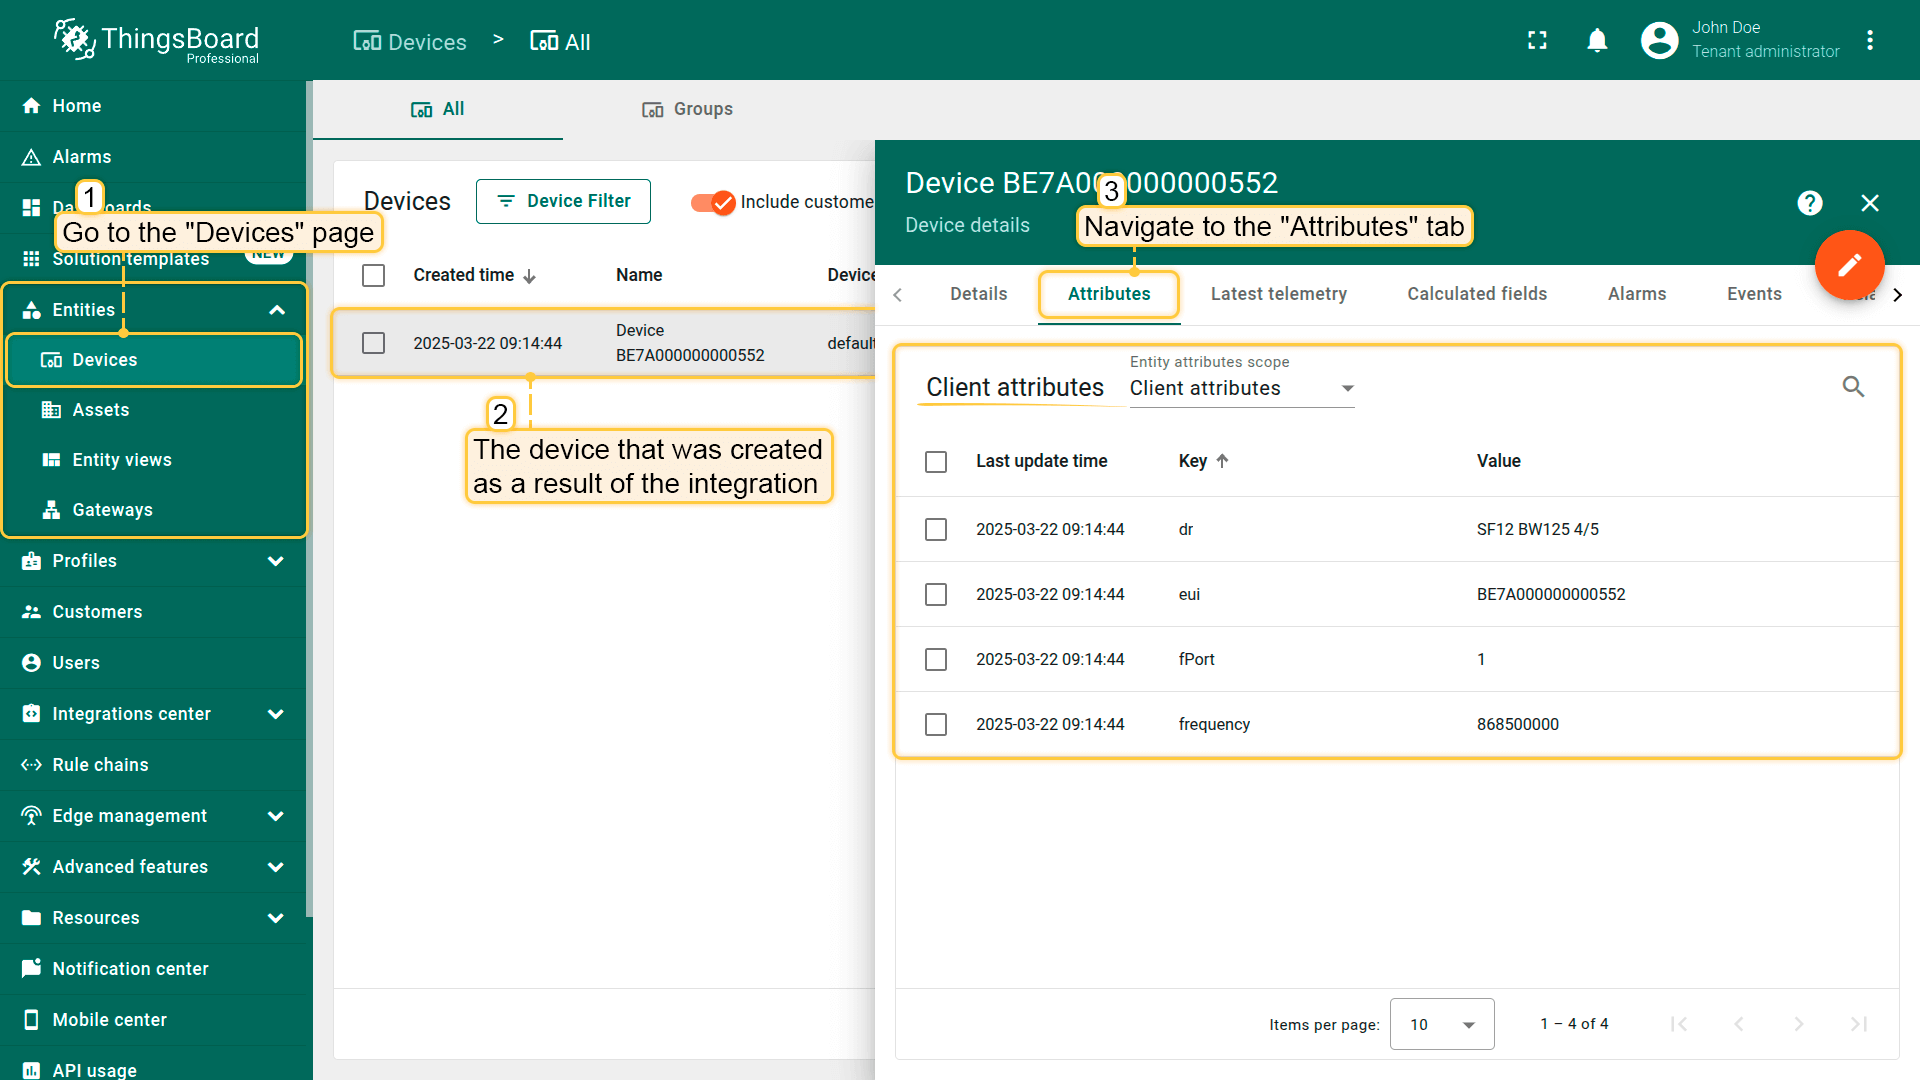
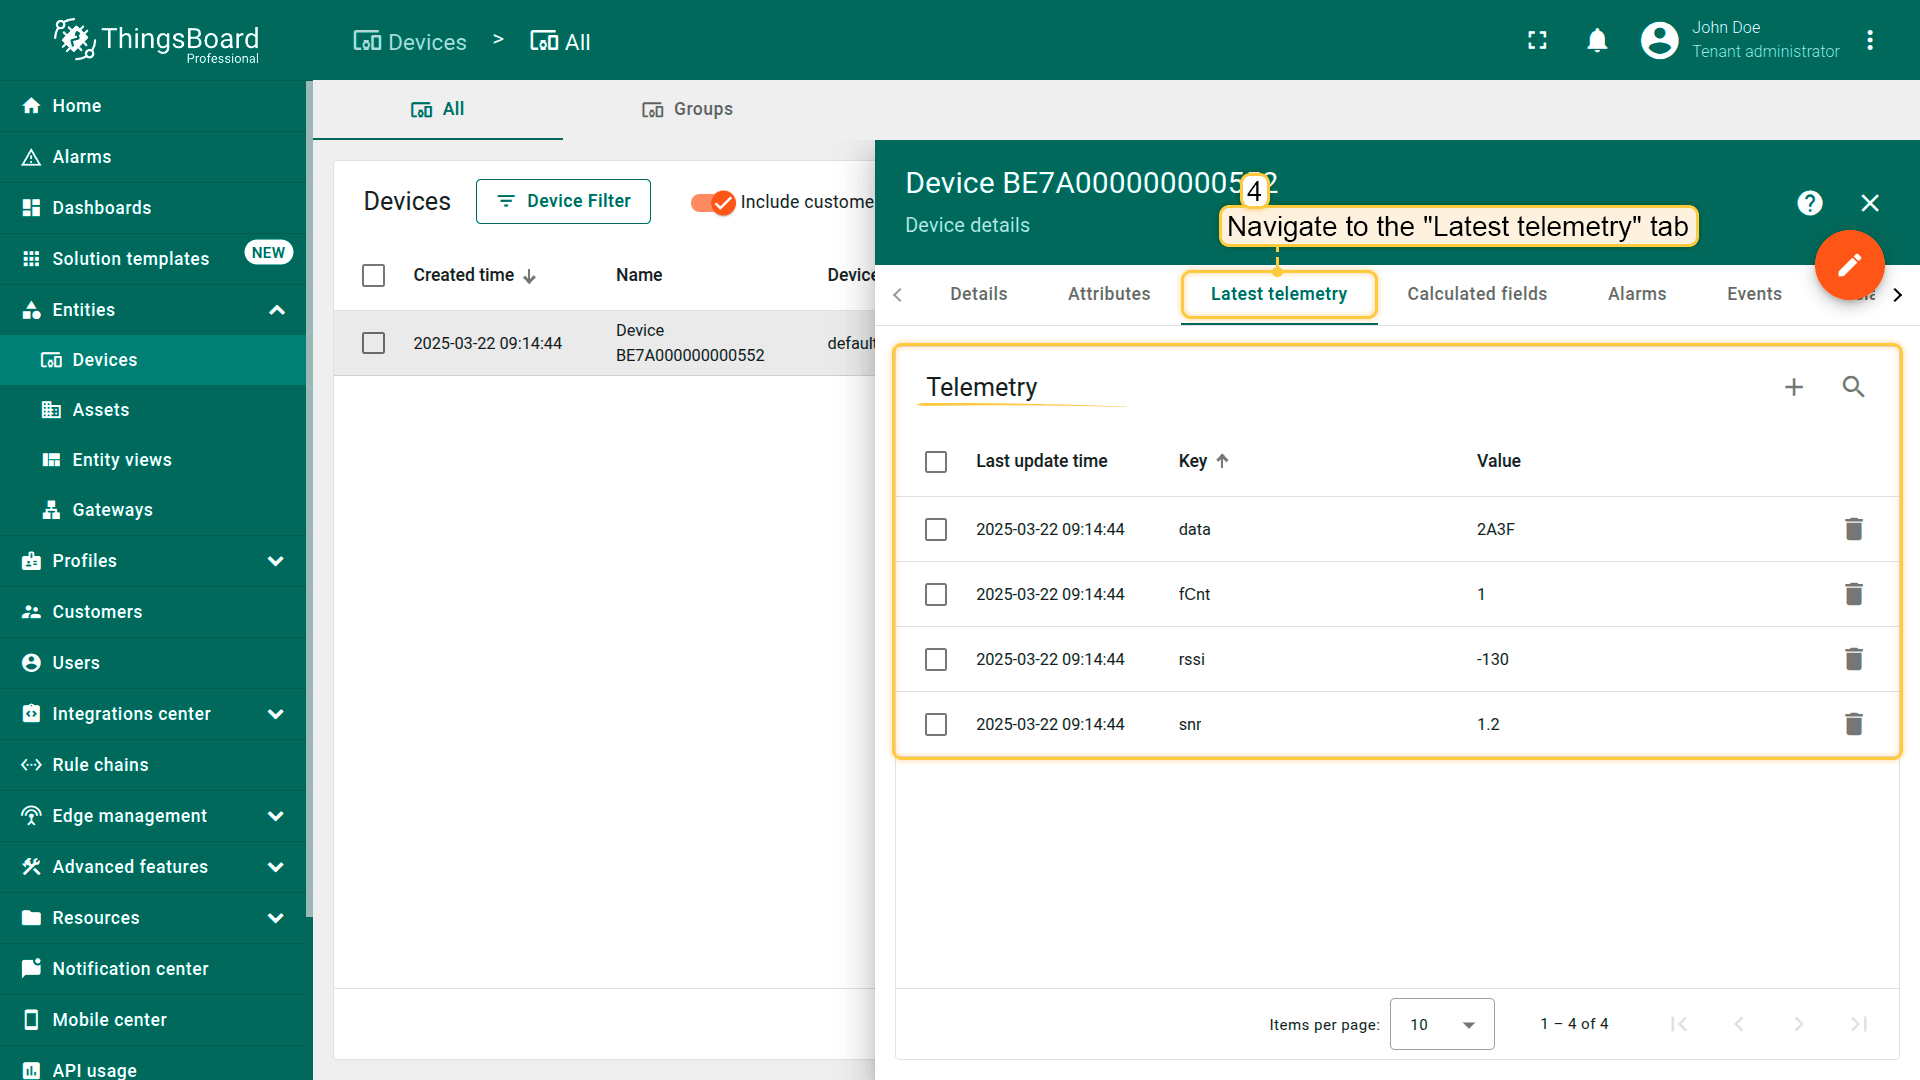
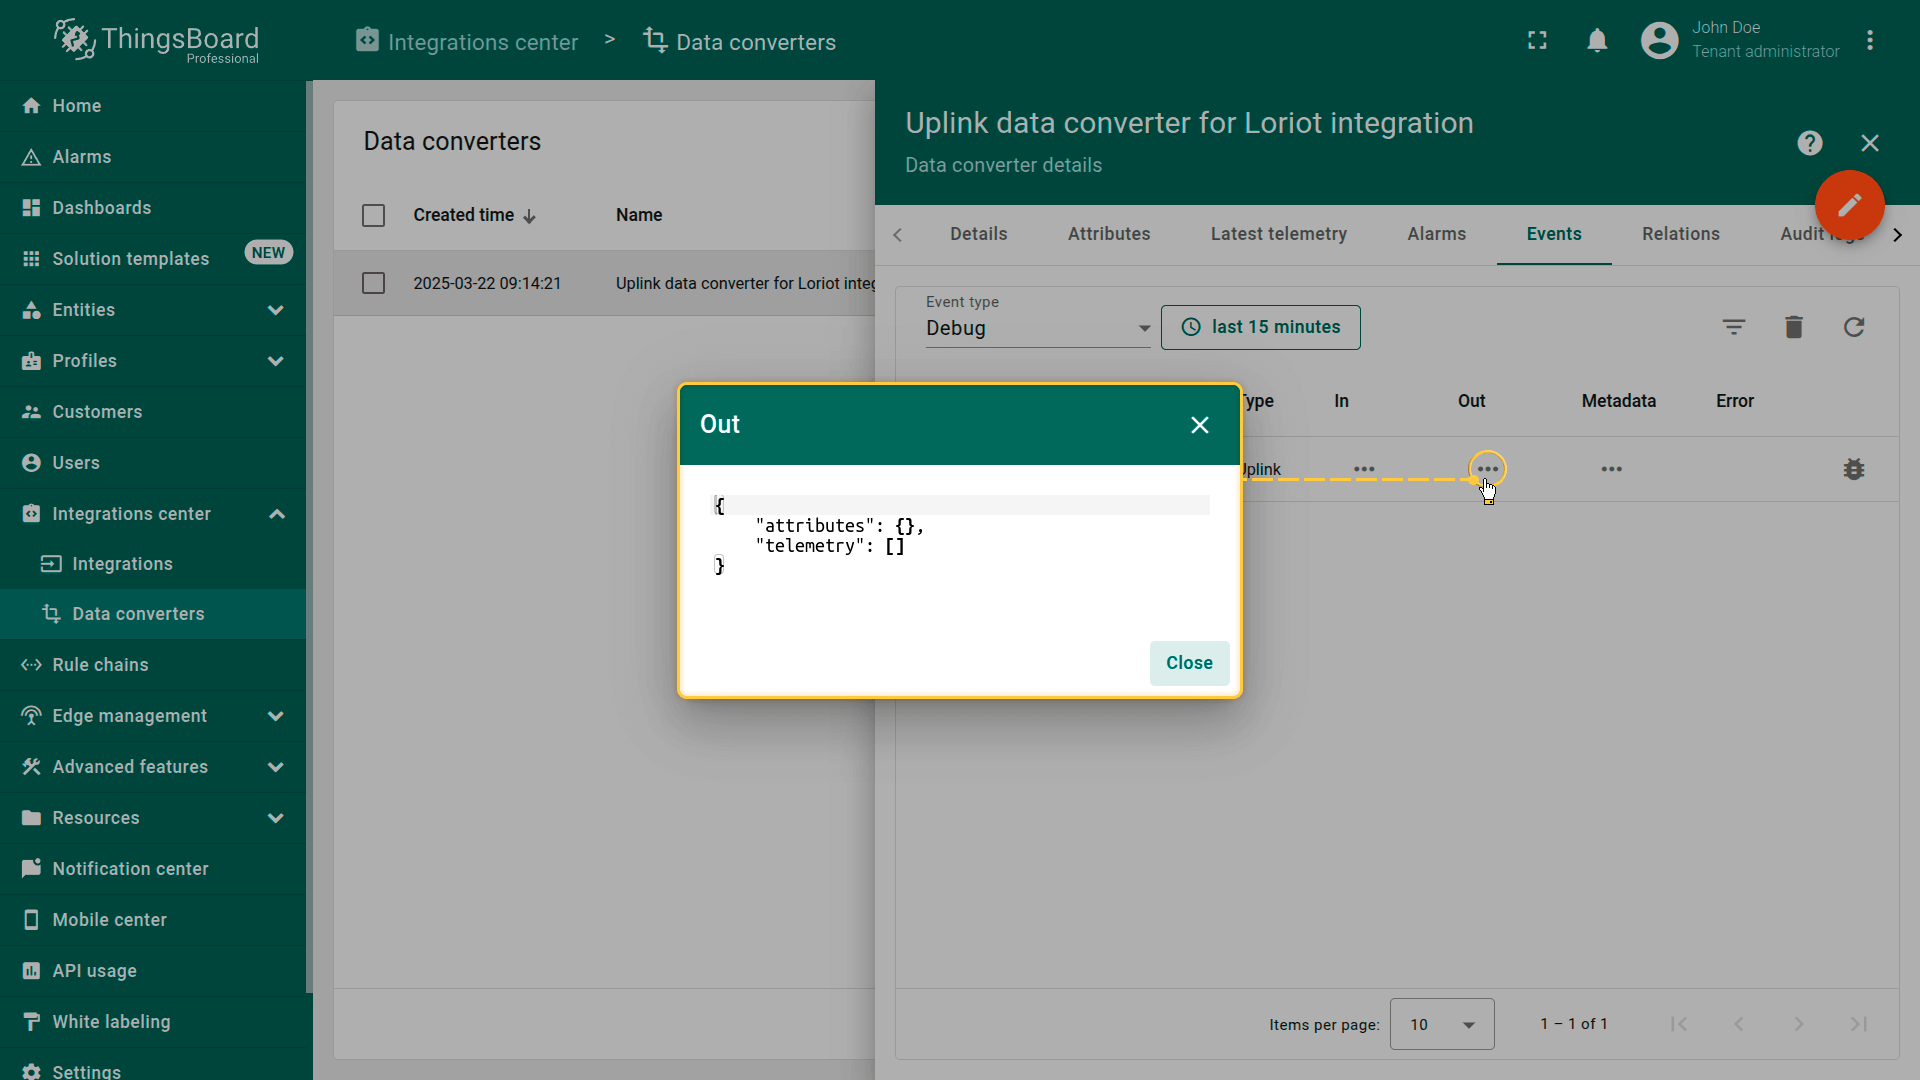
创建的设备及其数据可在”Entities“部分的”Devices“页面中查看。
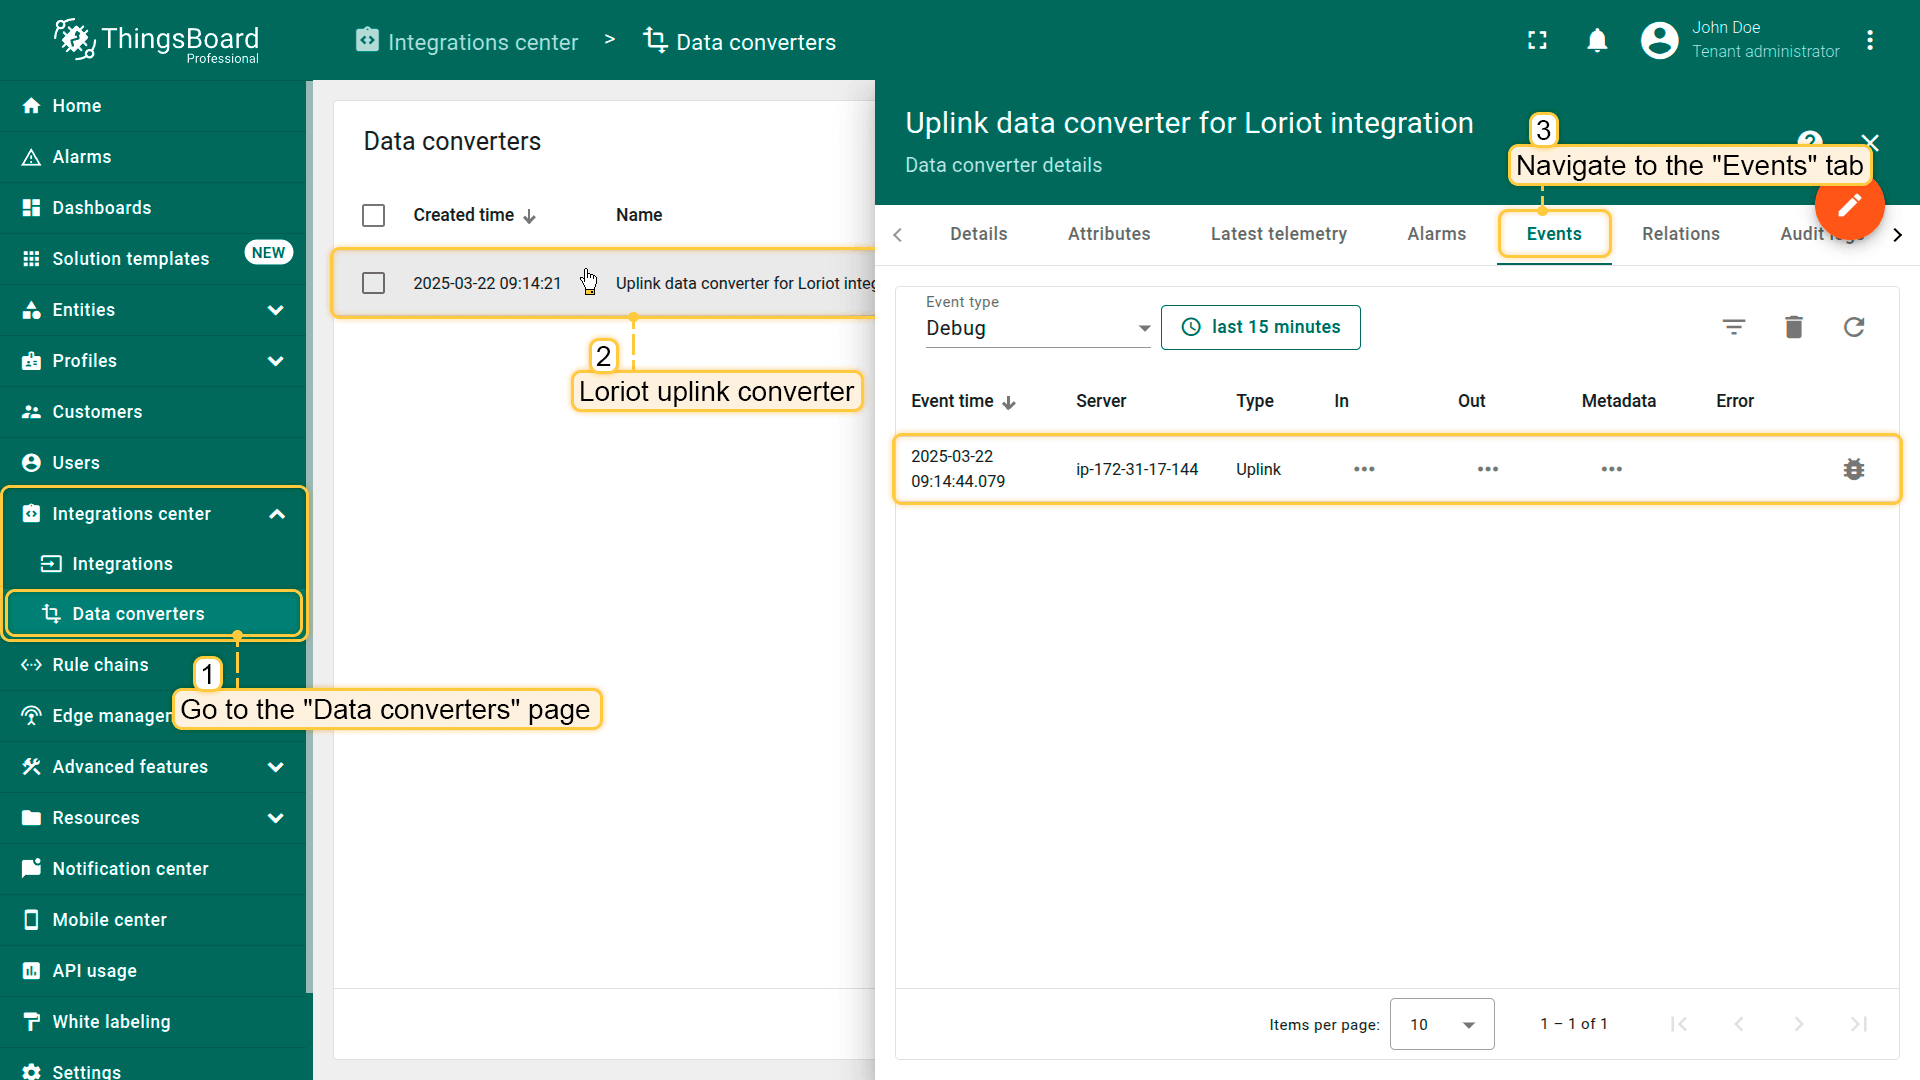
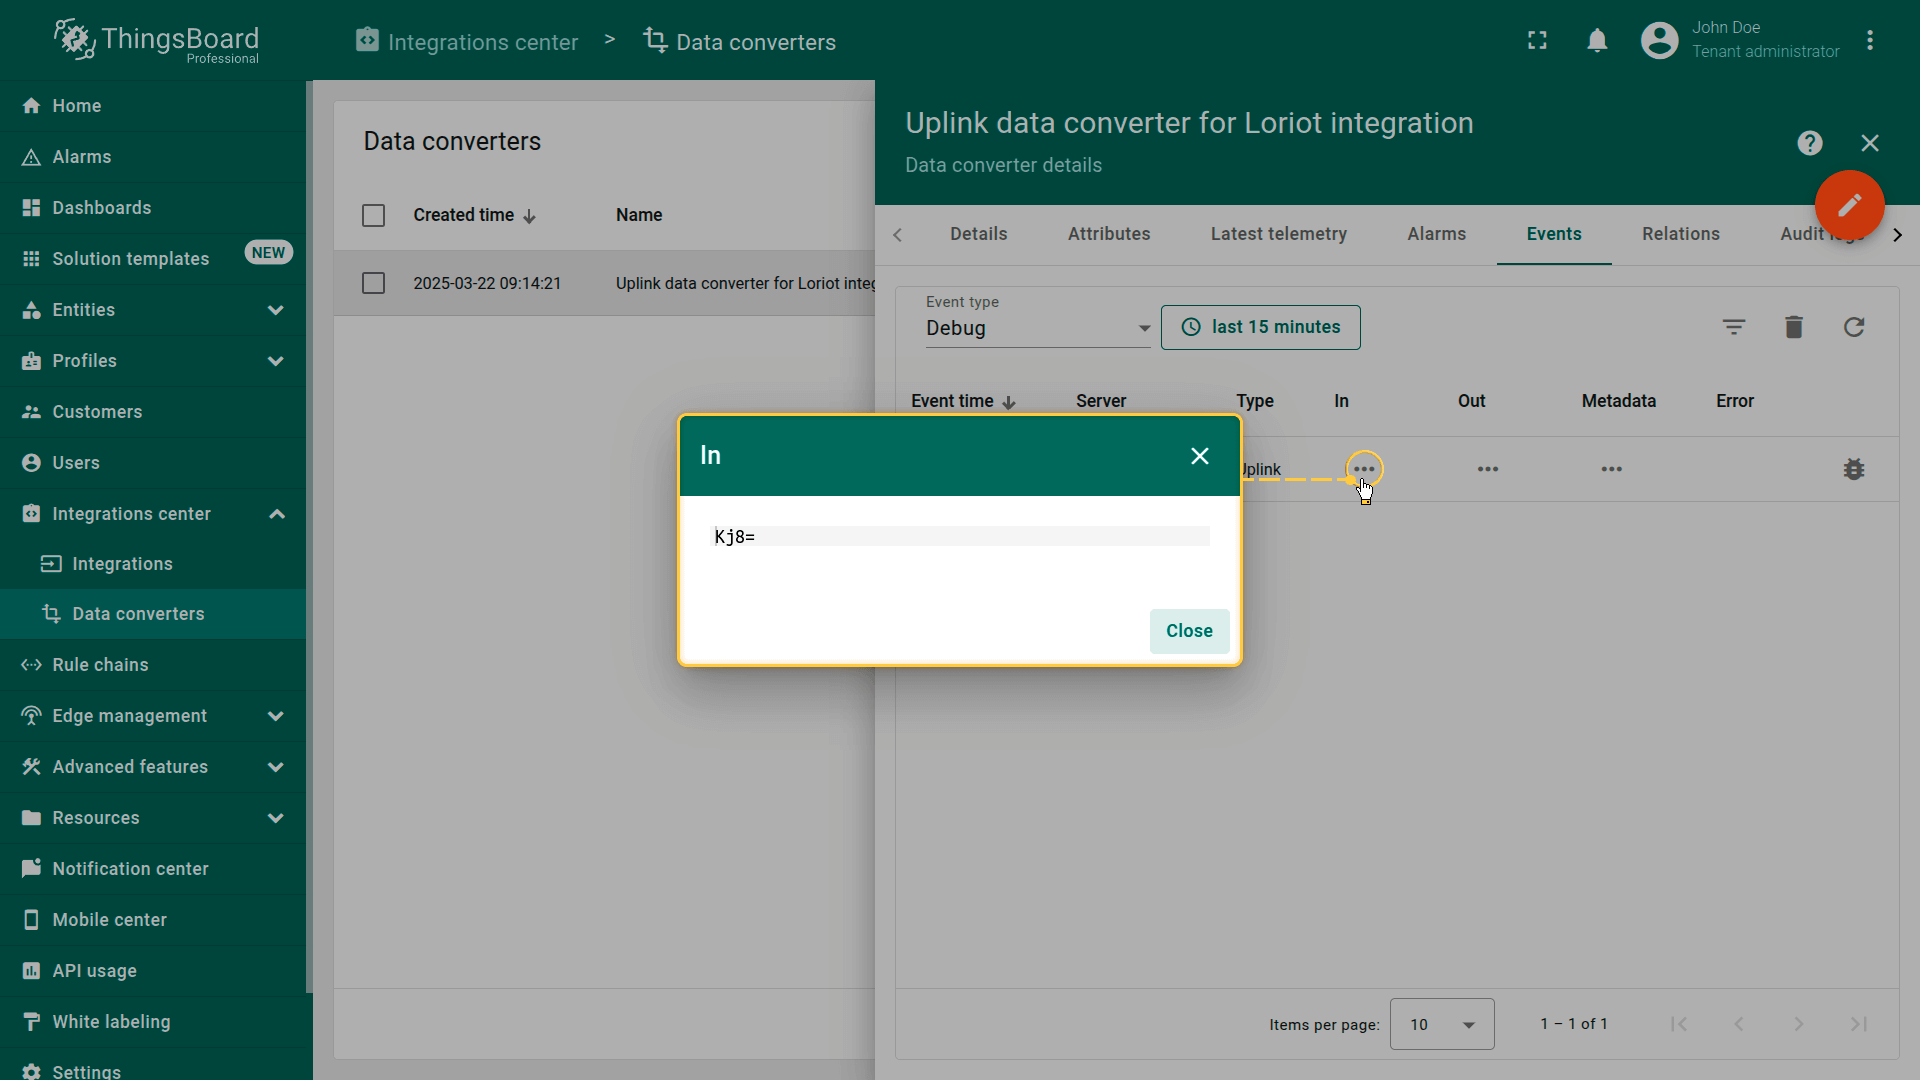
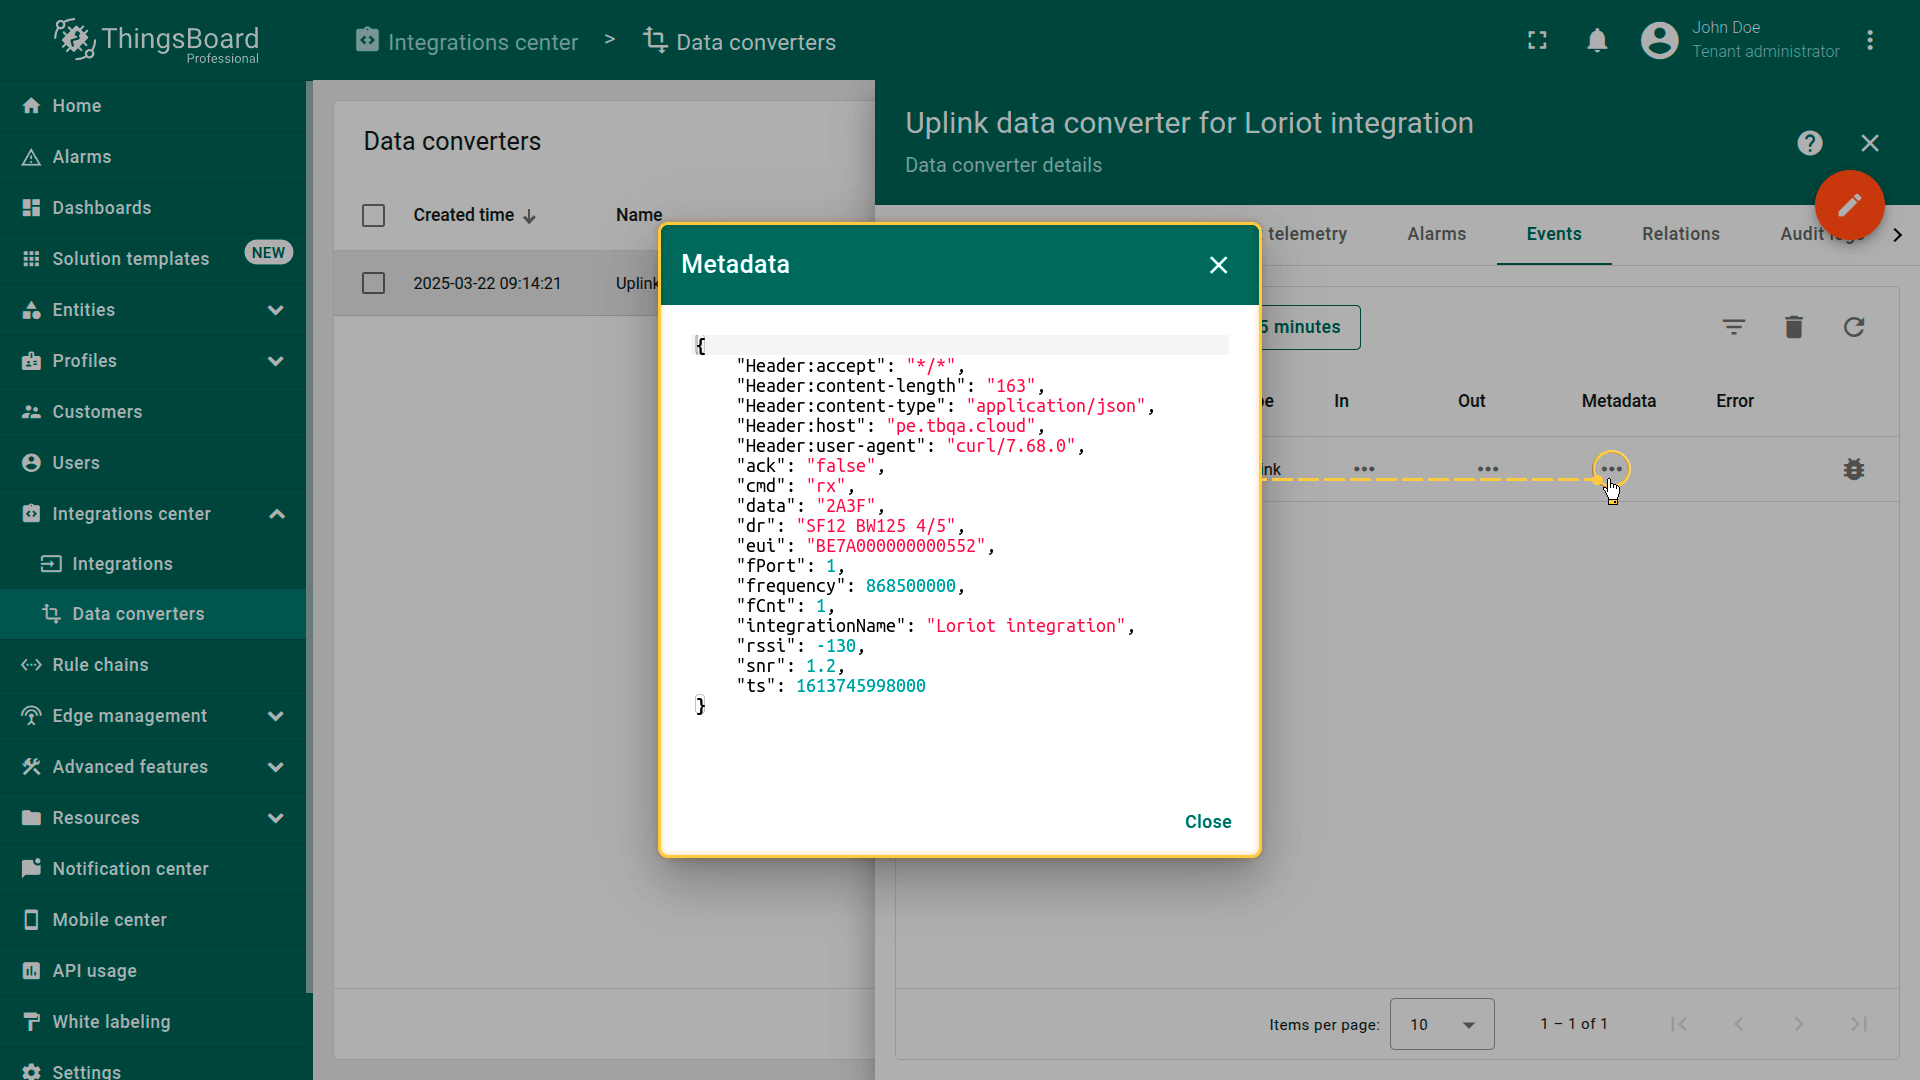
数据可在上行转换器中查看。在”Events“选项卡的”In“、”Out“和”Metadata“区块中:
高级用法:创建下行转换器
在Data converters中创建下行转换器。要查看事件,请启用调试模式。
可使用 TBEL(TBEL)或 JavaScript 开发用户自定义函数。 建议使用 TBEL,其在ThingsBoard 中的执行效率远高于 JS。
可根据您的配置自定义 downlink。以下示例为发送 attribute 更新消息。需在 downlink encoder function 中的
并在 metadata 中指明所需参数: *EUI 为设备 EUI,来自 LORIOT 中的设备。 *port 取值范围为 1 到 223。 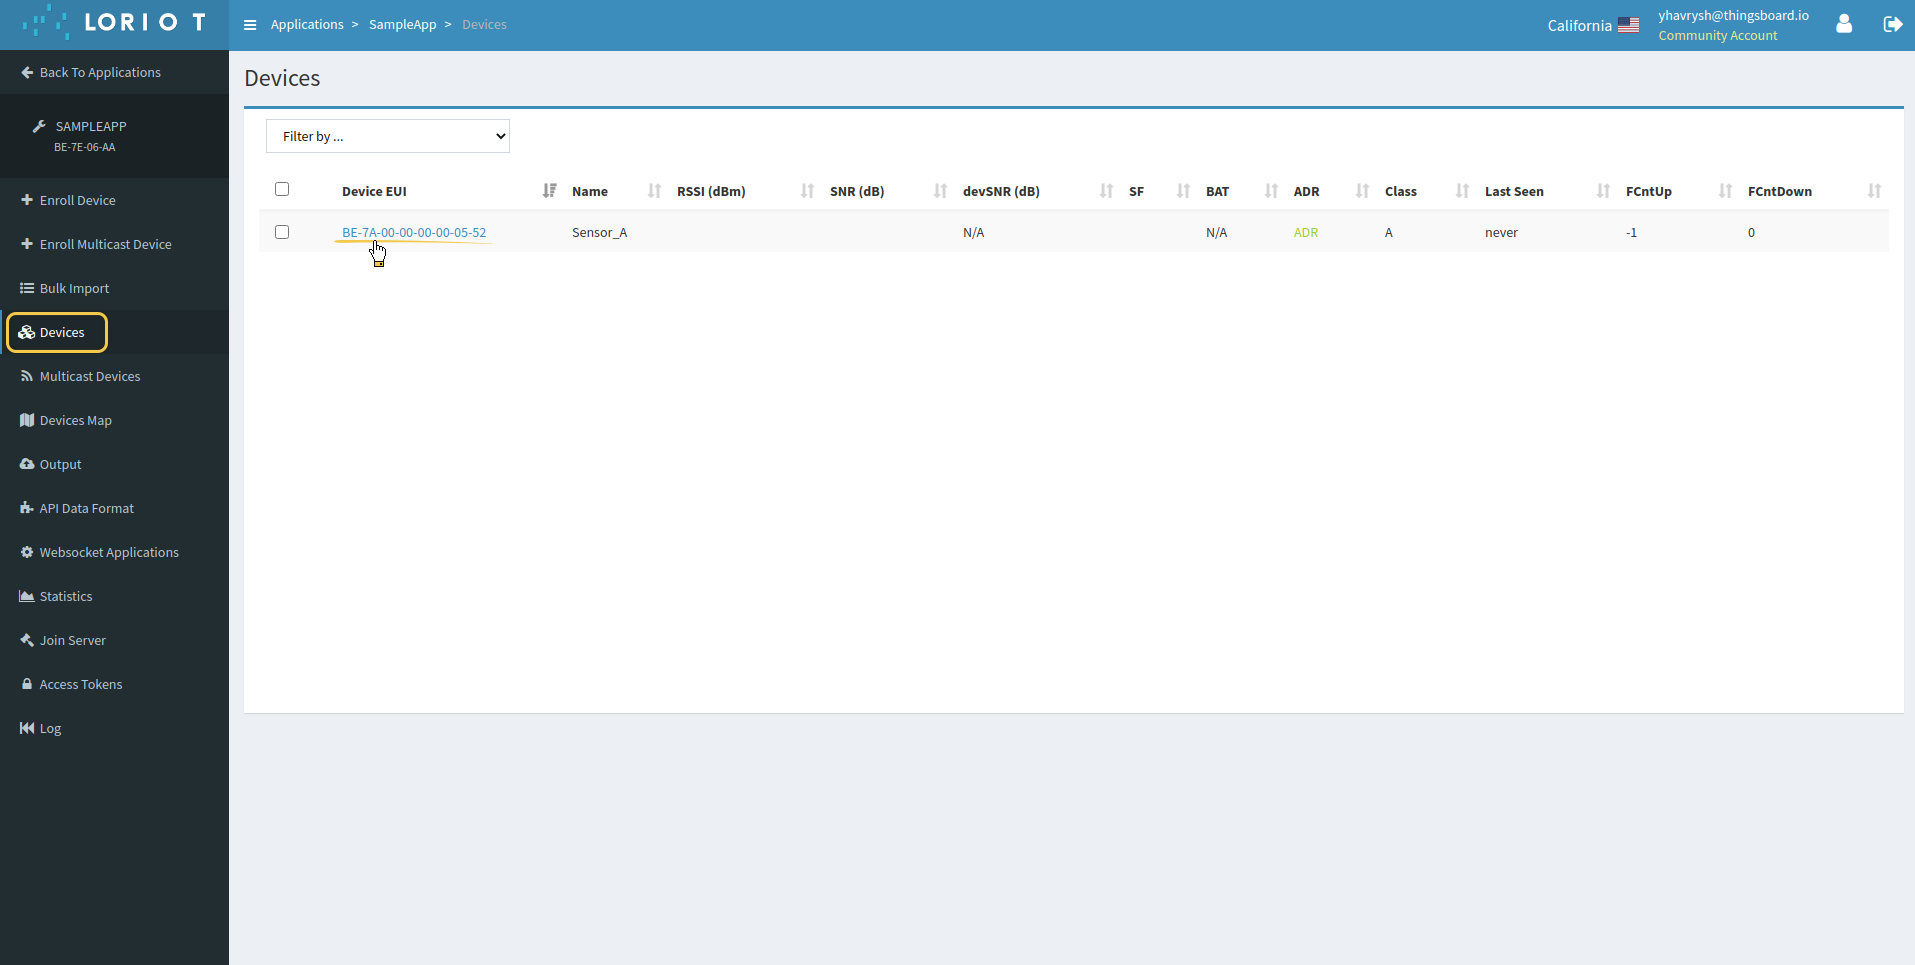 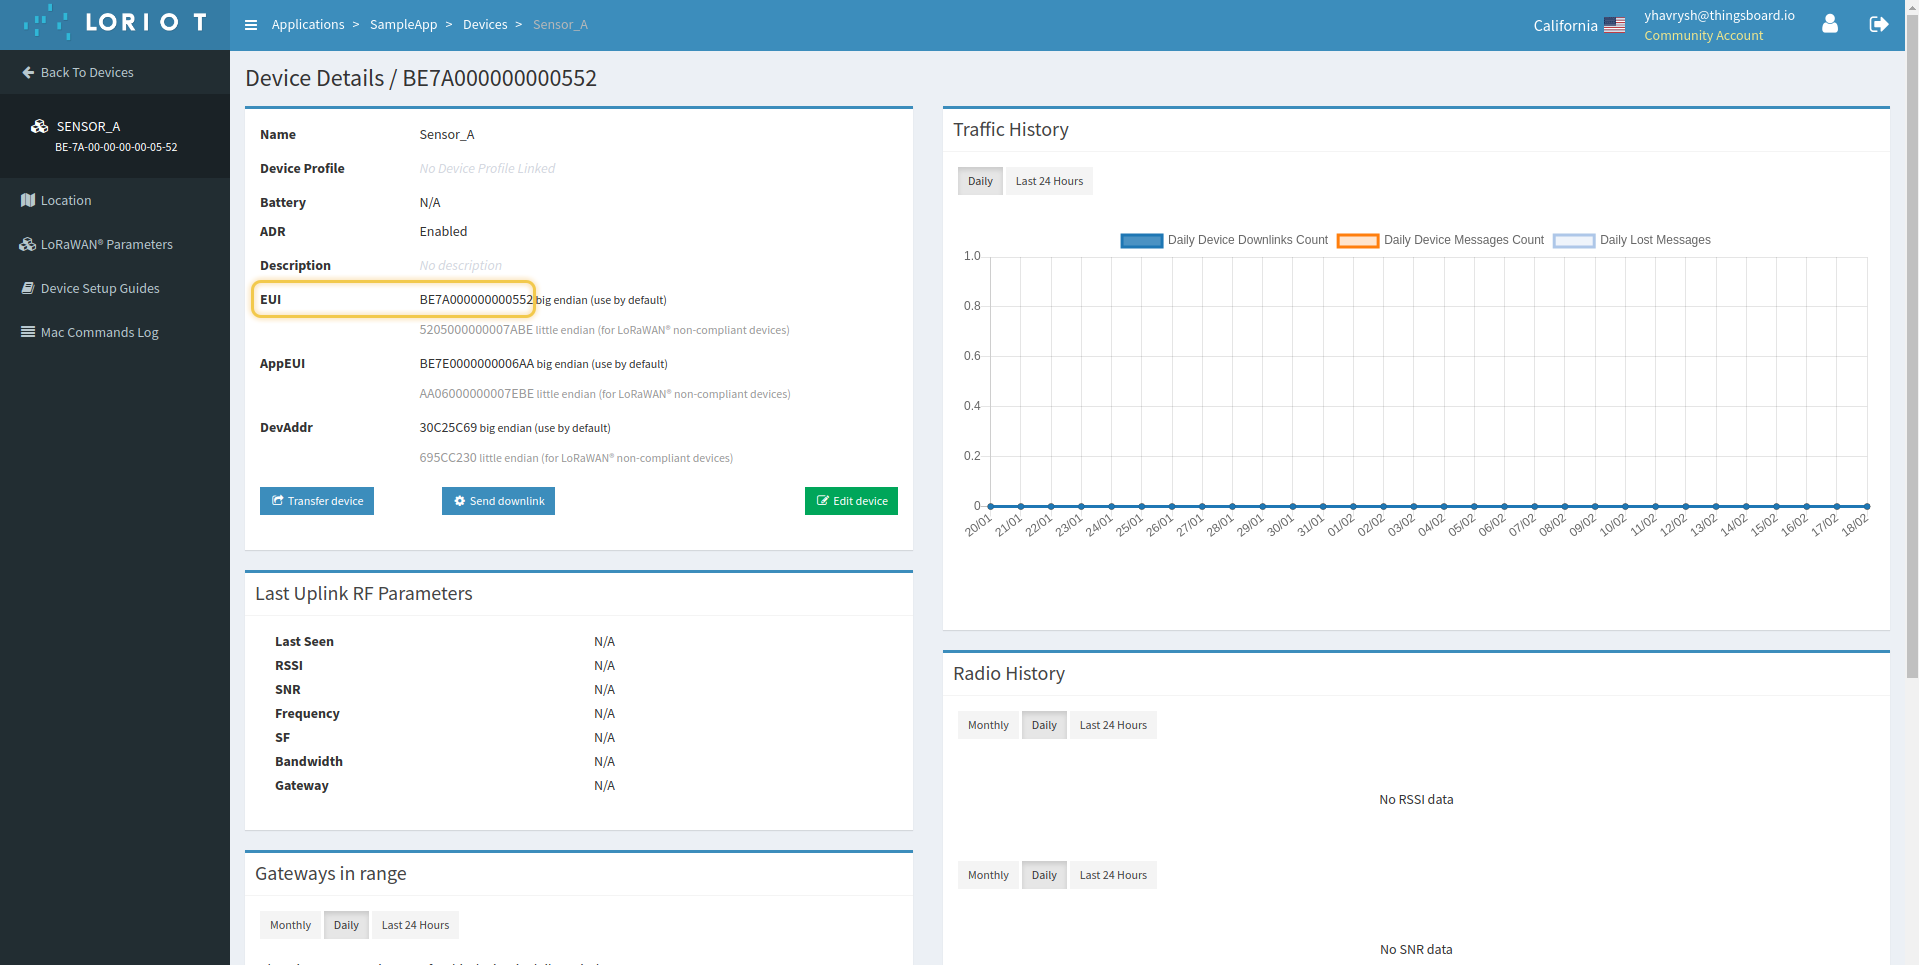 Downlink converter 示例:
启用该属性后,downlink 消息将以非双重十六进制编码形式发送至 Loriot。 无双重十六进制编码的 downlink converter 示例: 向 integration 添加 converter。可在创建 integration 或编辑时完成。  |
可根据您的配置自定义 downlink。以下示例为发送 attribute 更新消息。需在 downlink encoder function 中的
并在 metadata 中指明所需参数: *EUI 为设备 EUI,来自 LORIOT 中的设备。 *port 取值范围为 1 到 223。 Downlink converter 示例:
启用该属性后,downlink 消息将以非双重十六进制编码形式发送至 Loriot。 无双重十六进制编码的 downlink converter 示例: 向 integration 添加 converter。可在创建 integration 或编辑时完成。 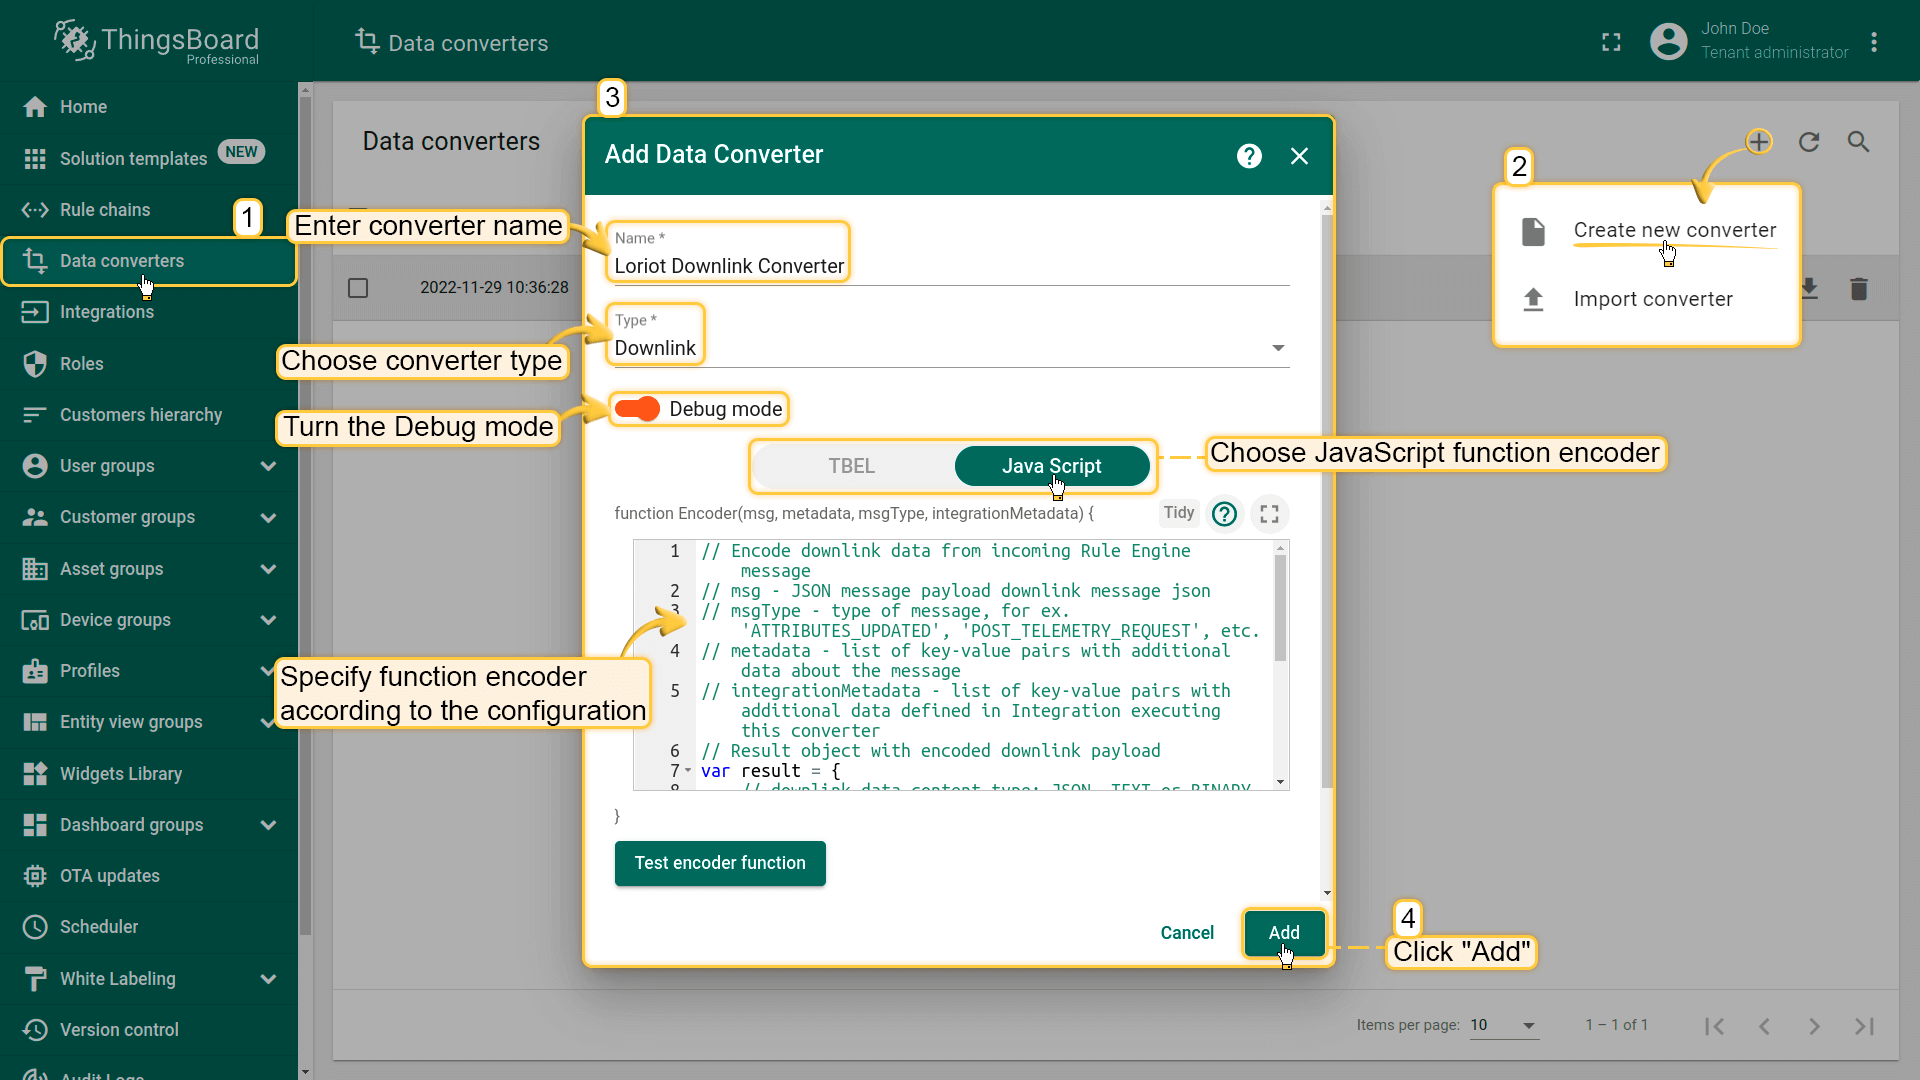 |
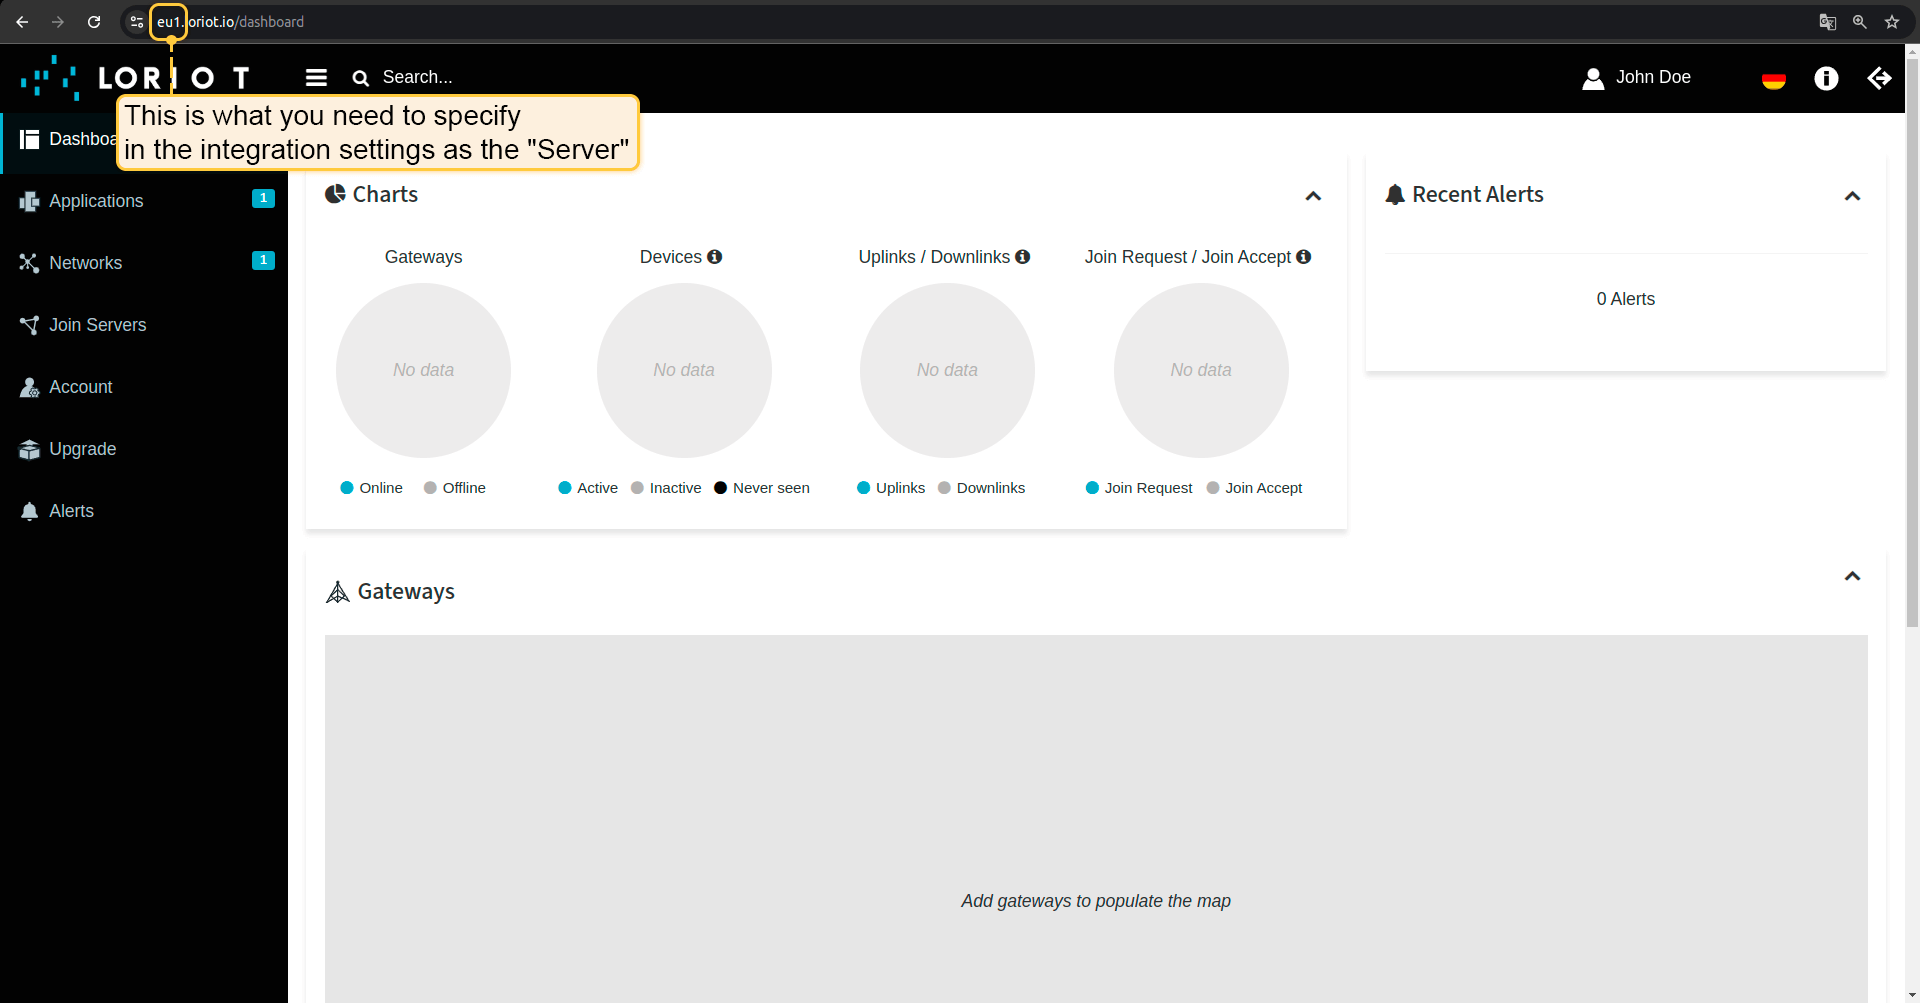
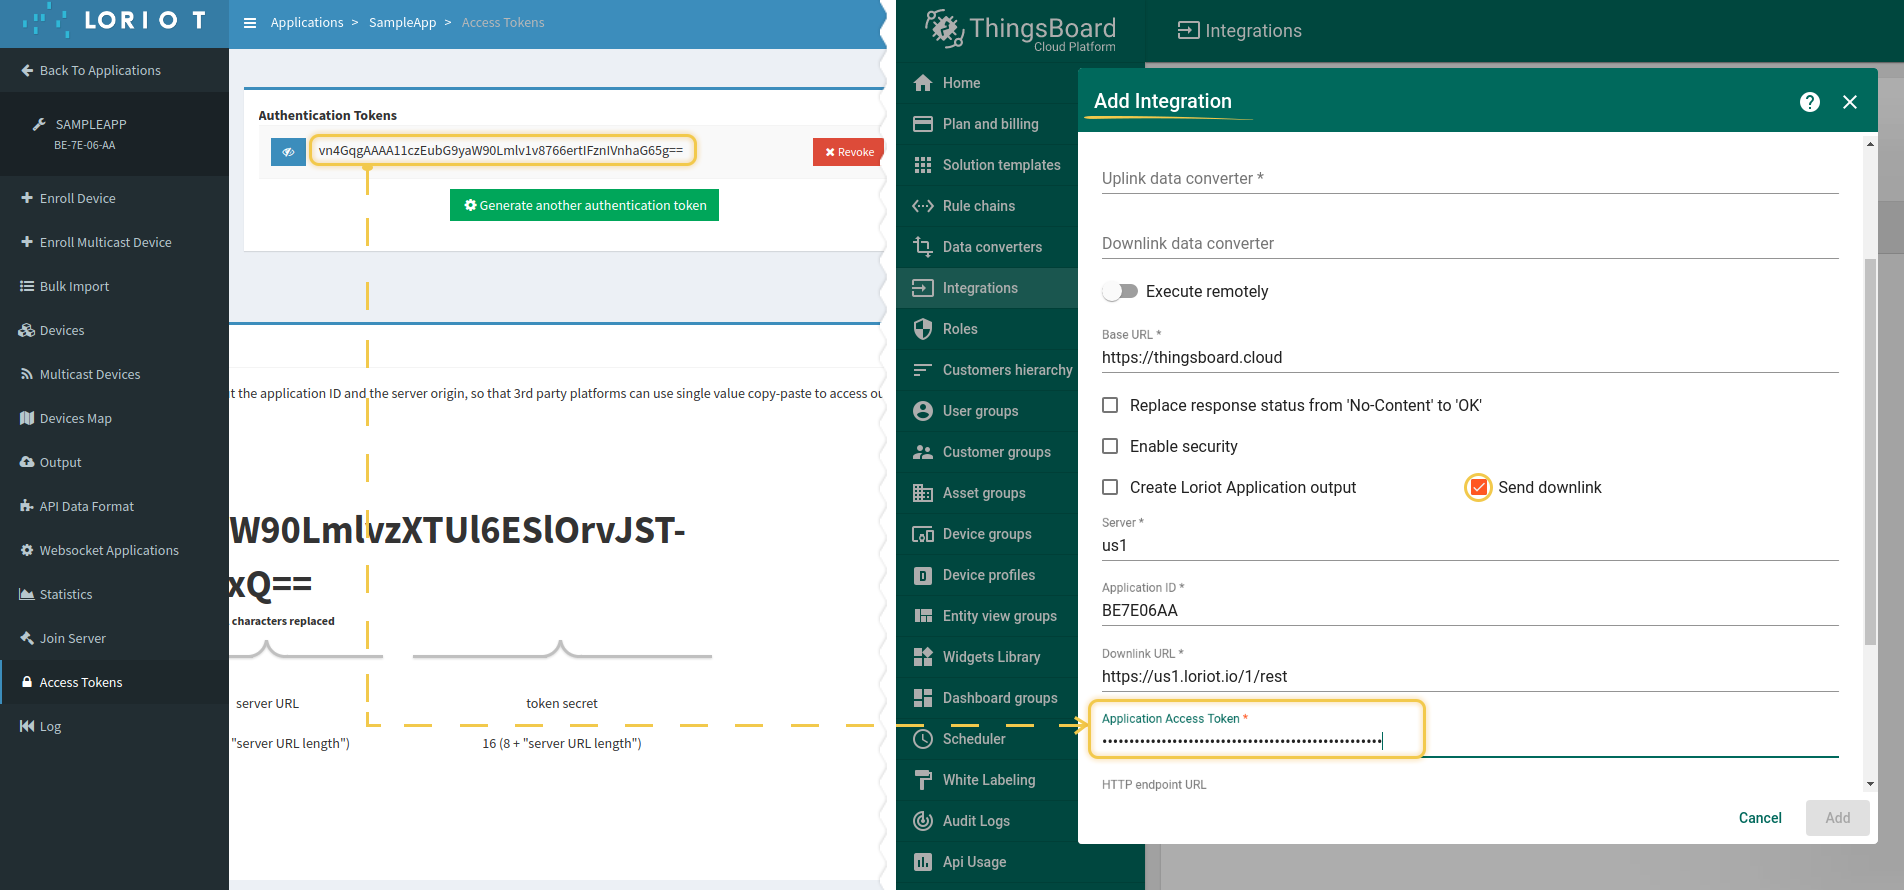
要发送下行消息,请在集成中启用Send downlink选项。 启用”Send downlink”选项后,在相应字段中指定Server、Application ID和Application Access Token:
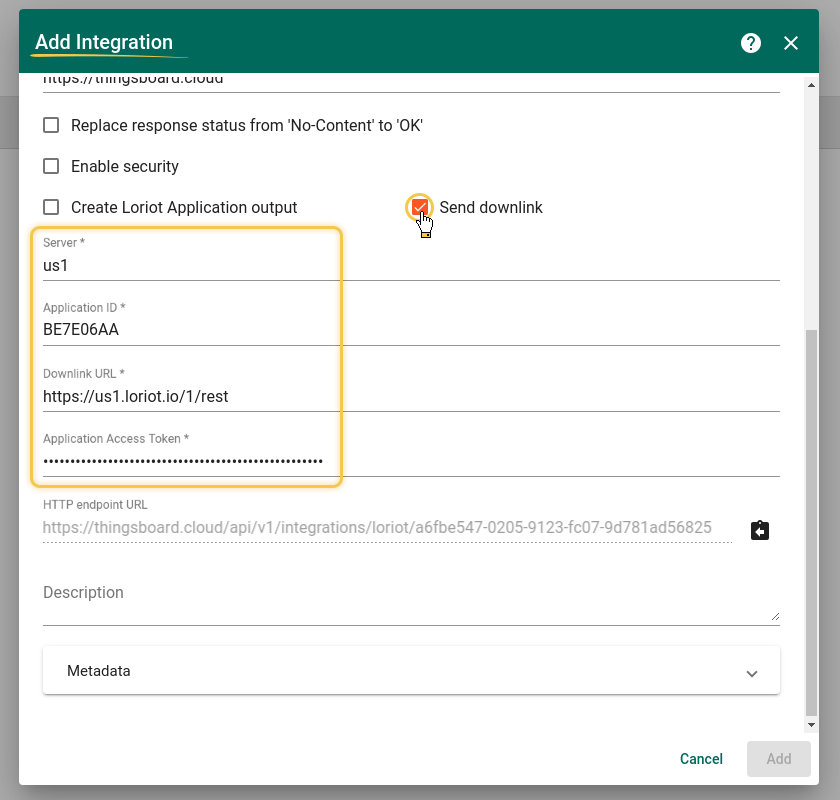
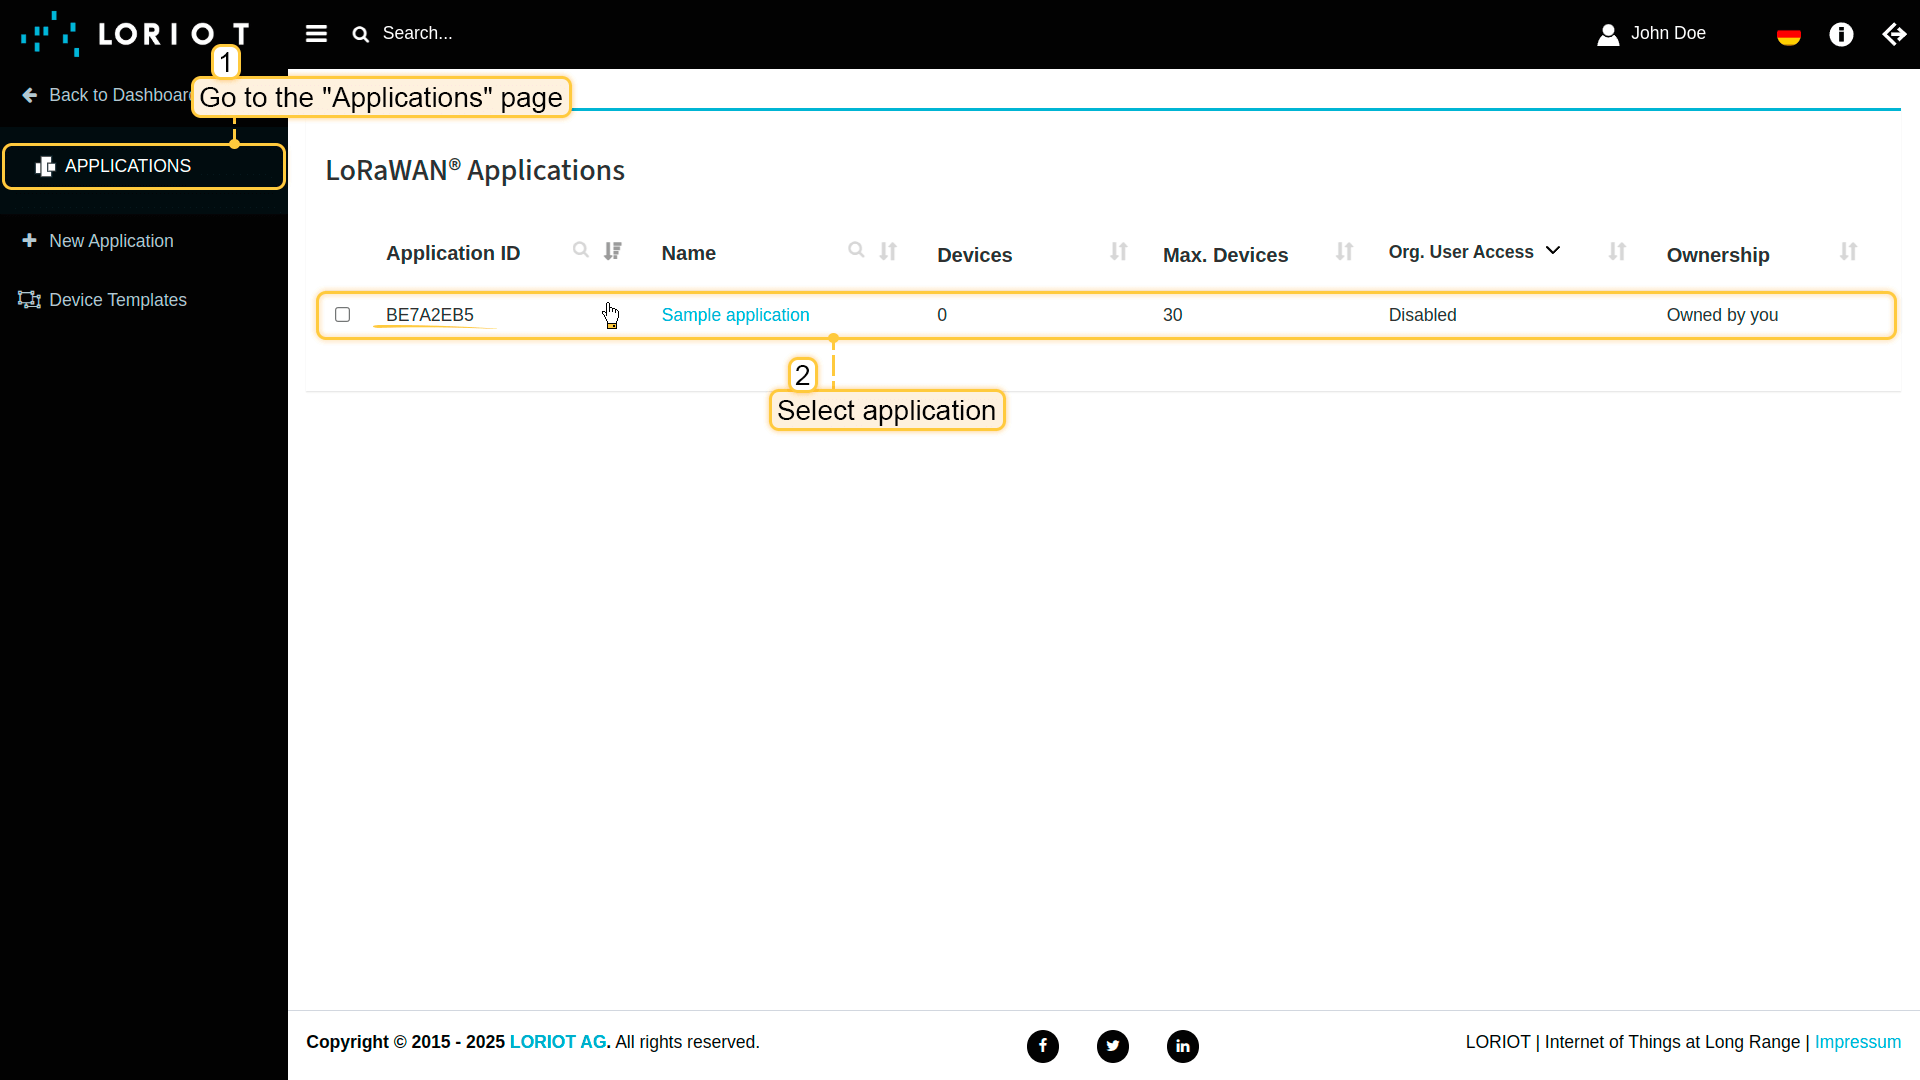
要获取这些数据,请登录您的LORIOT账户。
用于填写Server字段的数据:
用于填写Application ID字段的数据:
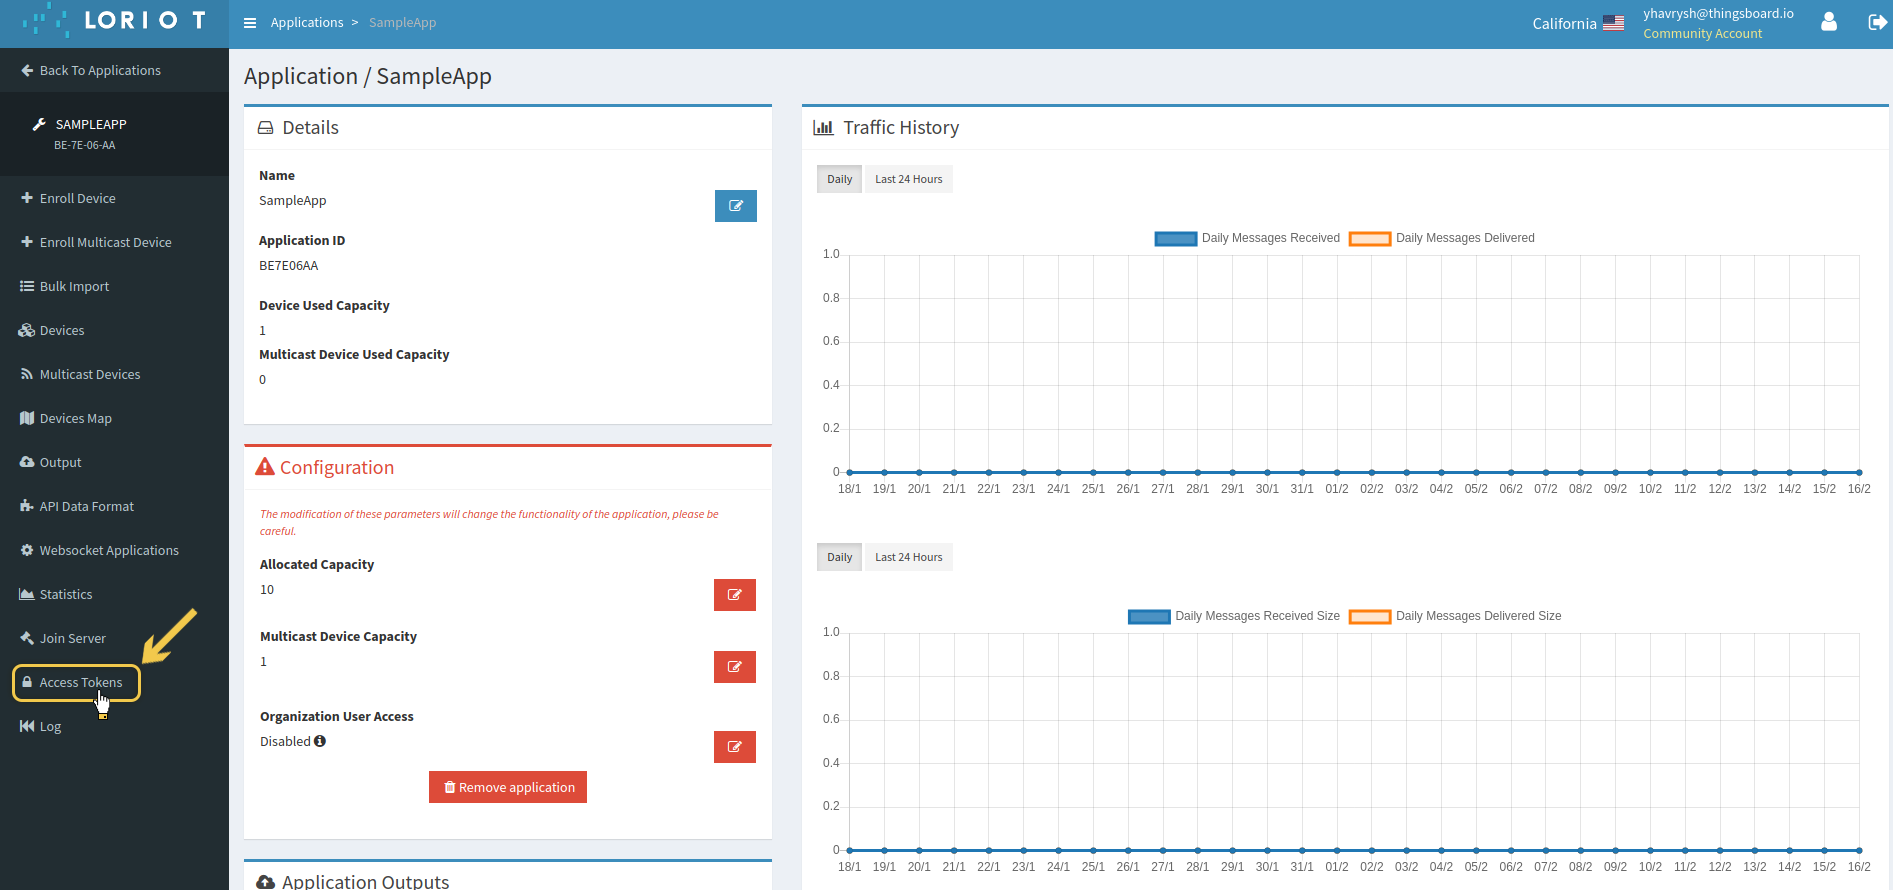
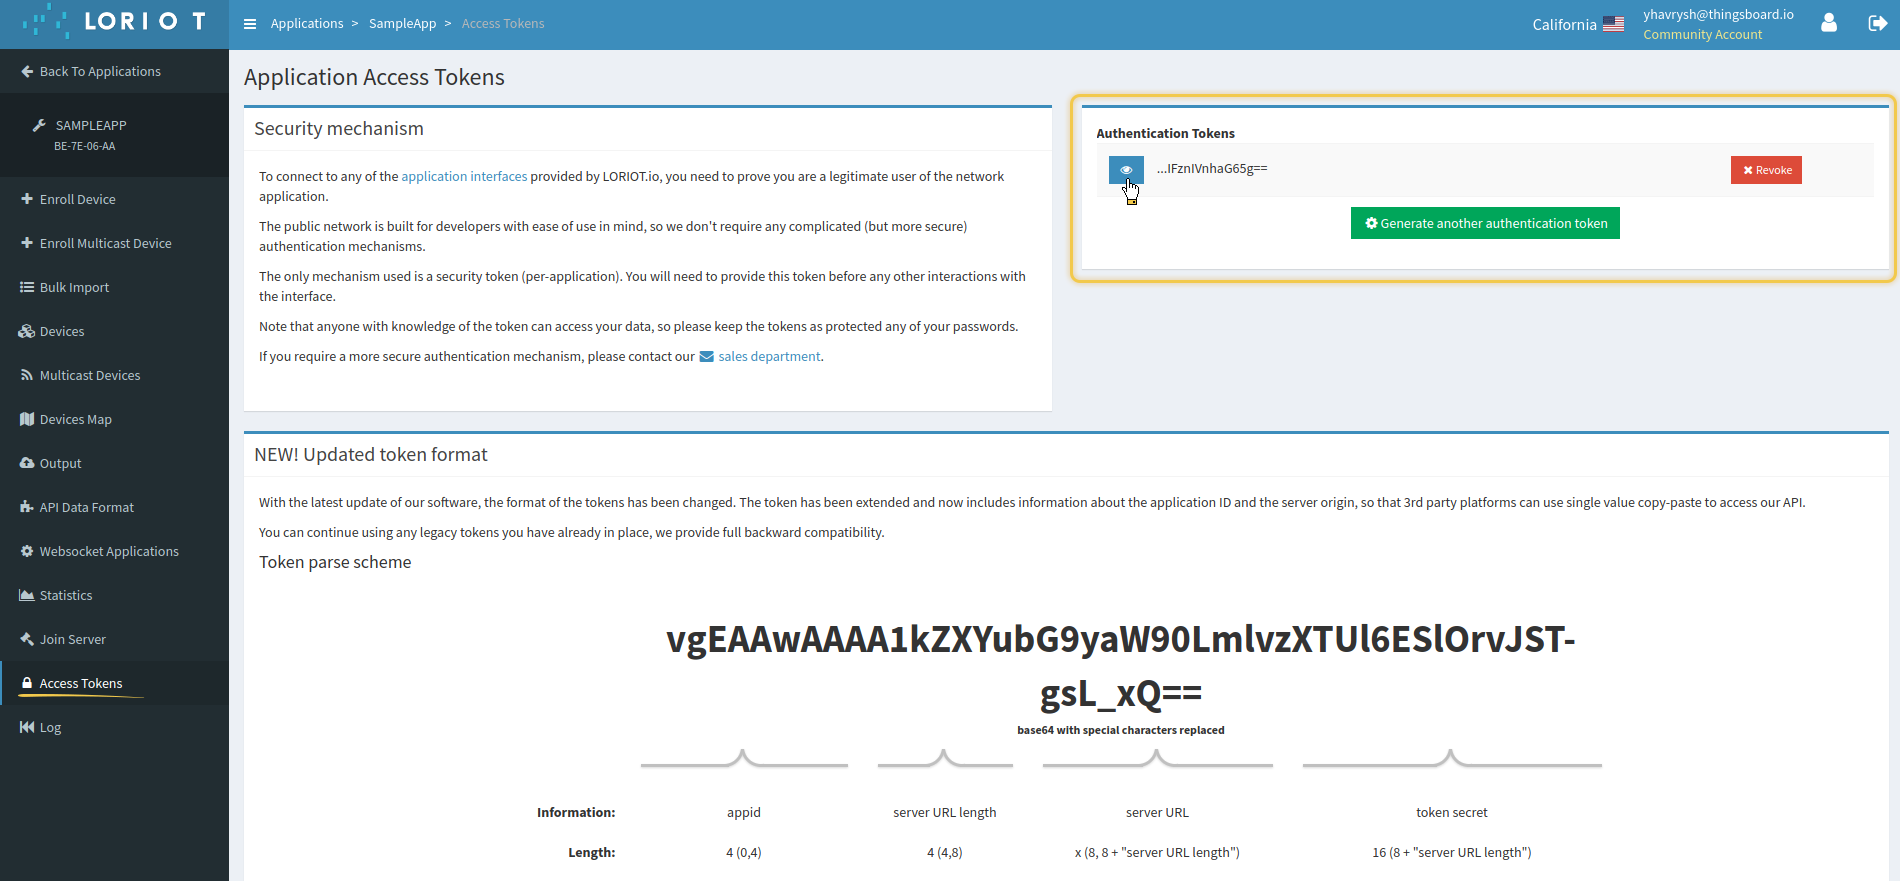
之后,进入Application并转到Access Tokens部分。找到将在集成中指定的令牌。
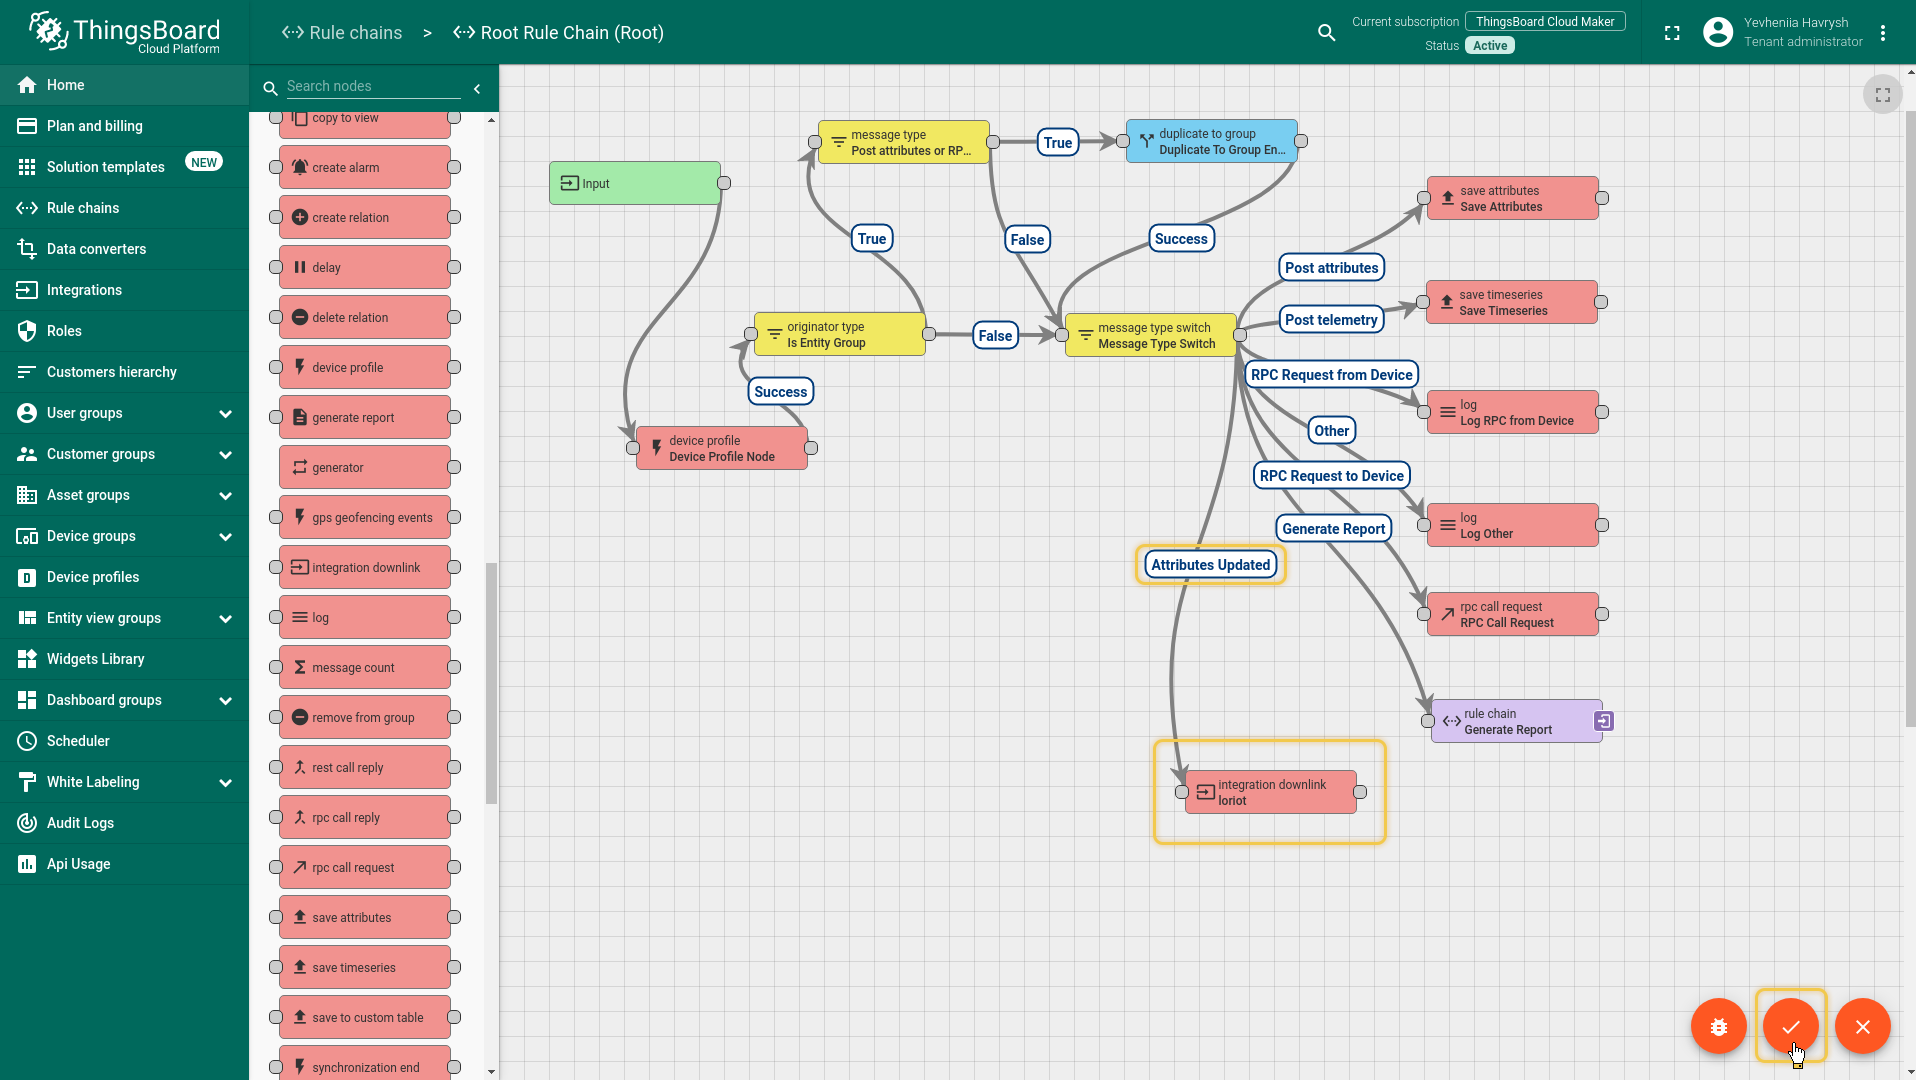
我们可以通过规则链中的规则节点向设备发送消息。在本示例中,我们创建integration downlink节点并将“Attributes updated”链接设置到该节点。当属性发生更改时,下行消息将发送到集成。
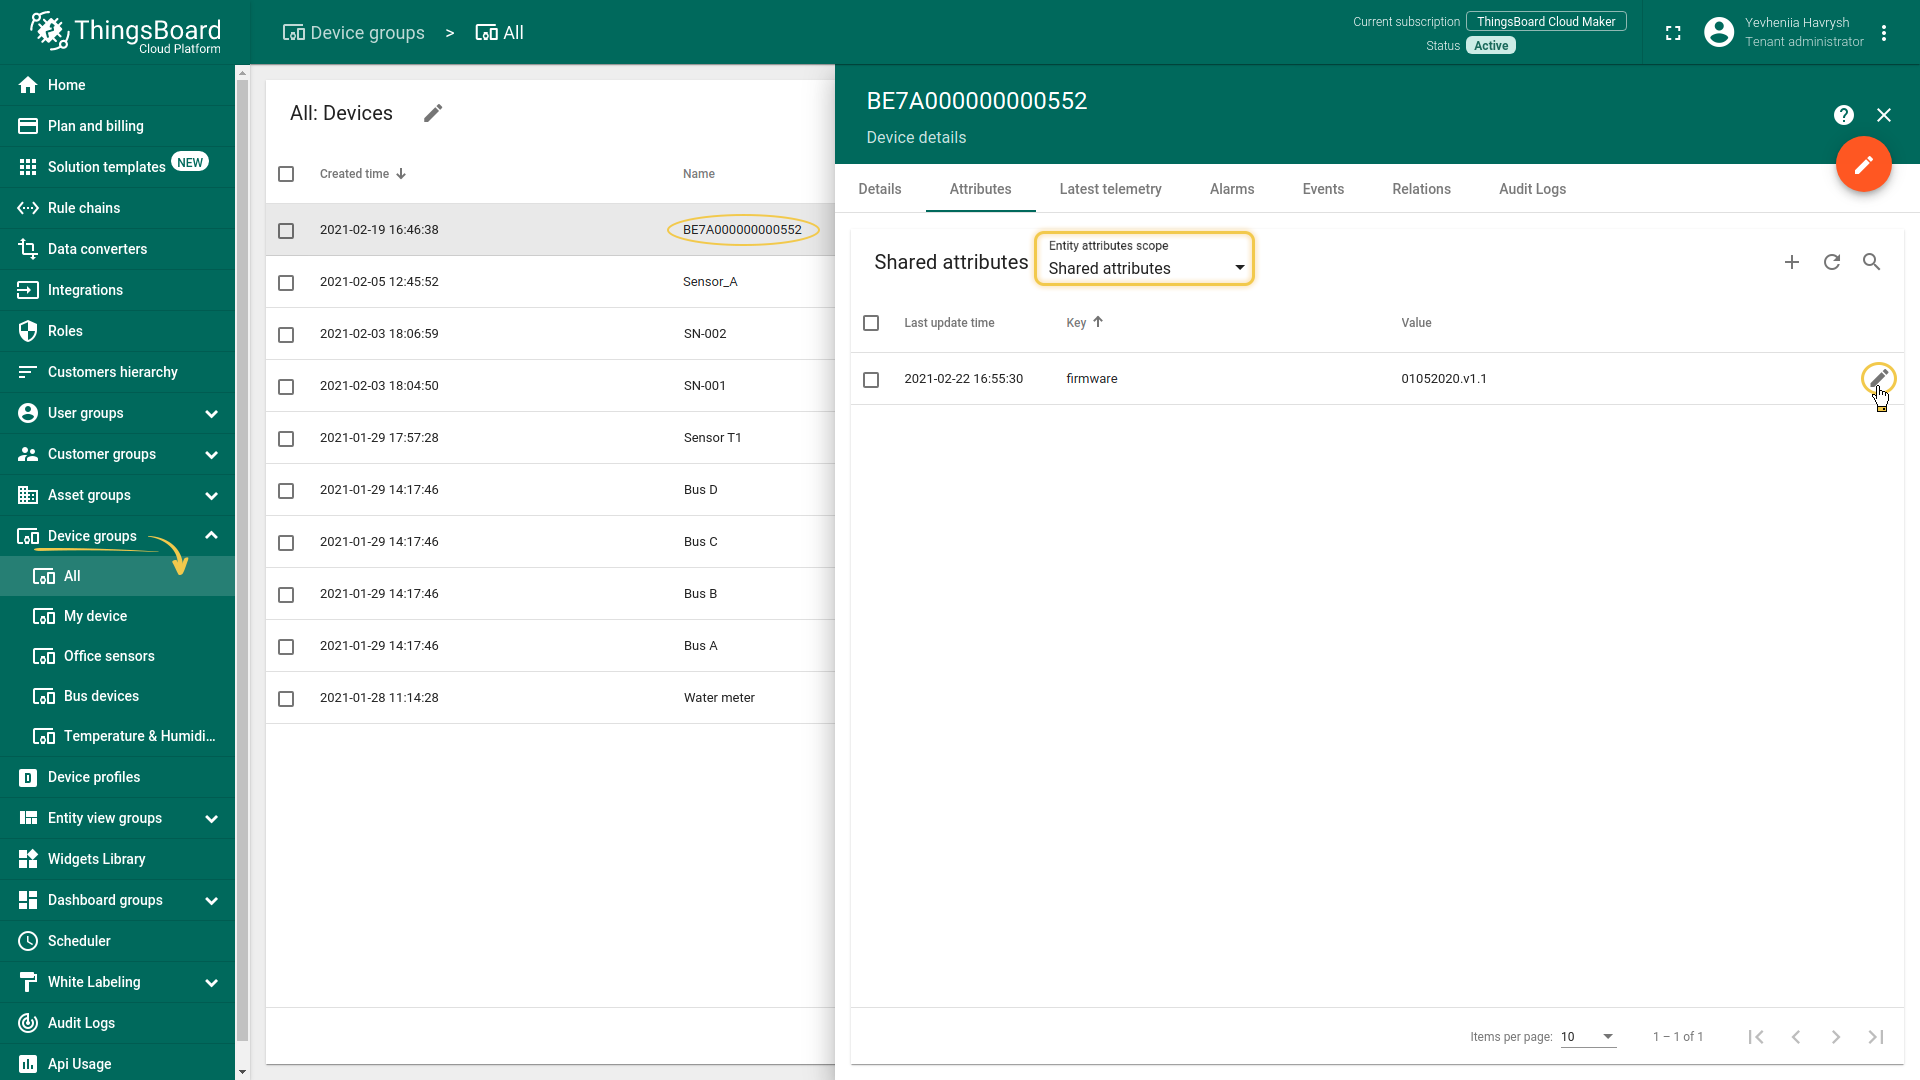
我们进入All文件夹下的Device group部分,通过示例来演示。我们已在Shared attributes中标注了设备的固件。现在点击”铅笔”图标进行编辑。然后修改属性(将固件从01052020.v1.1更改为01052020.v1.2)并保存数据。

接收到的数据和已发送的数据可以在下行转换器中查看。在Events选项卡的“In”区块中,我们可以看到输入的数据:
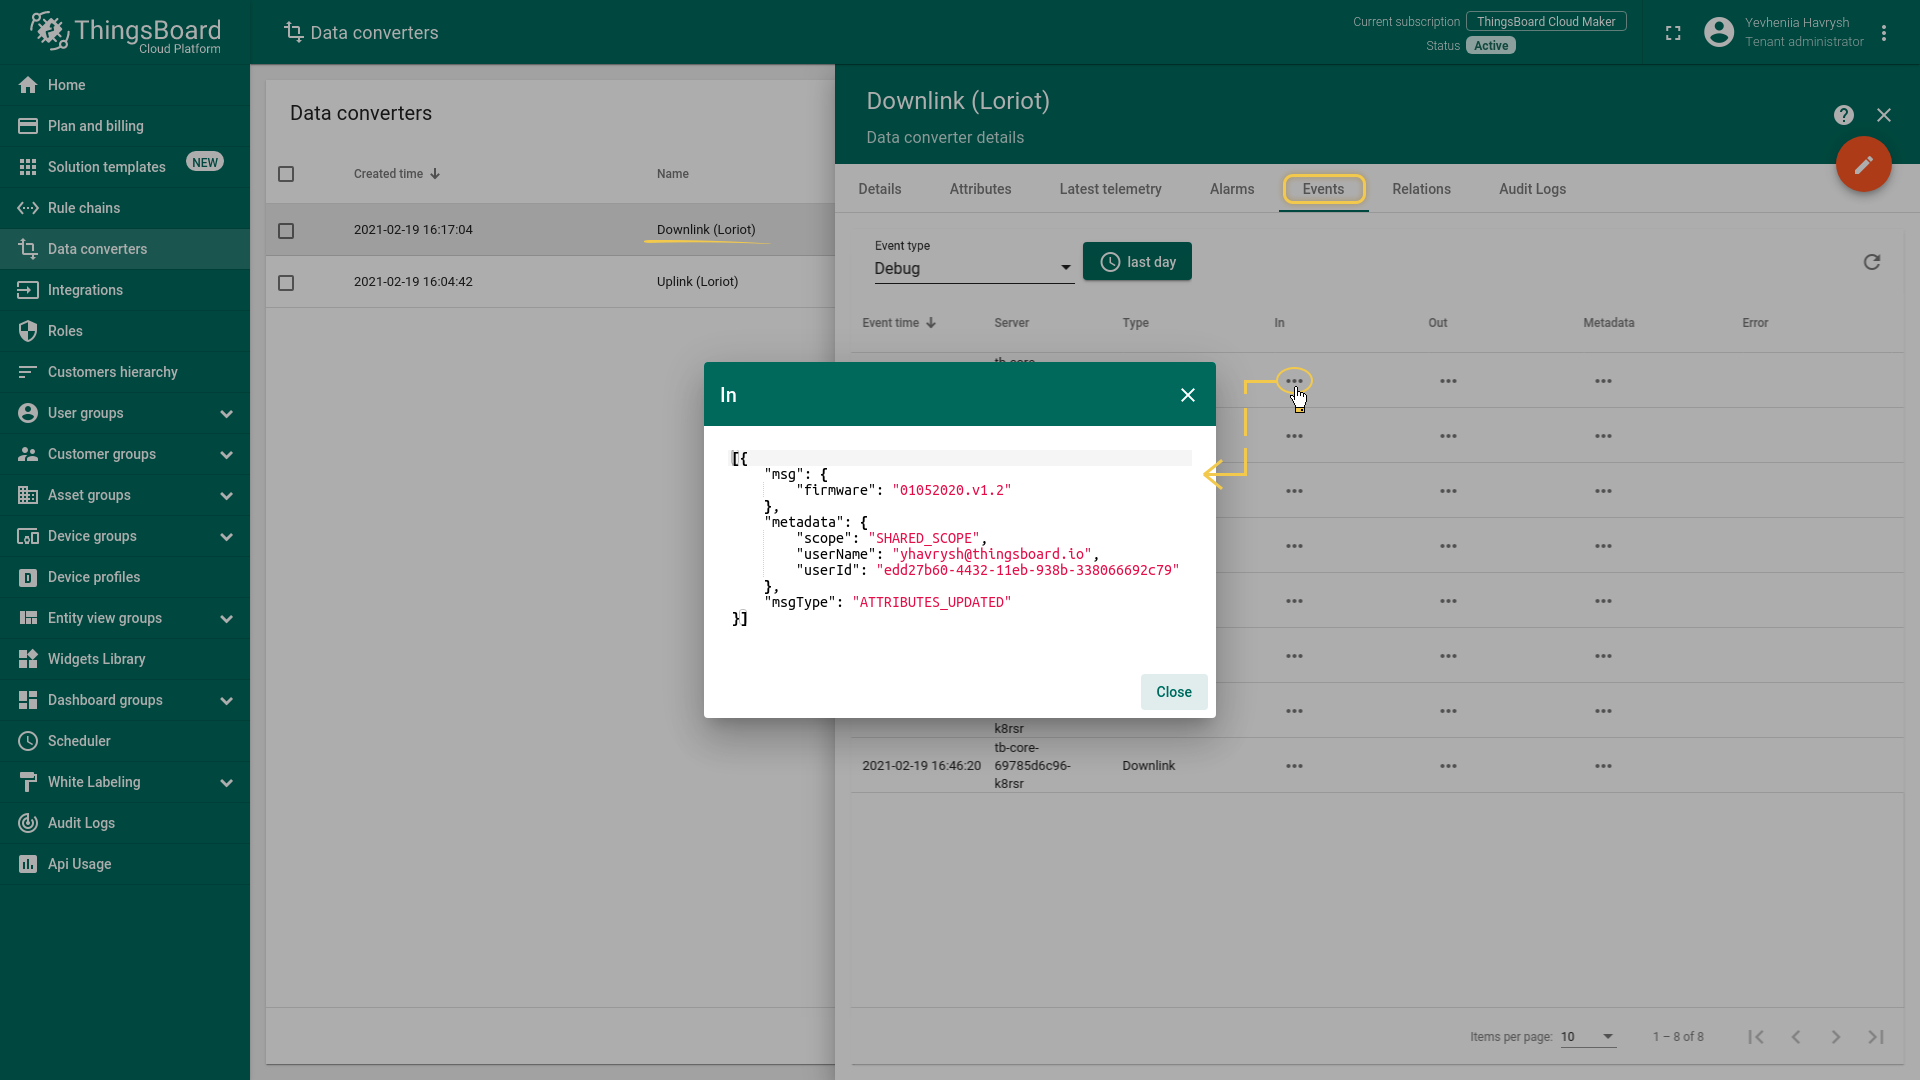
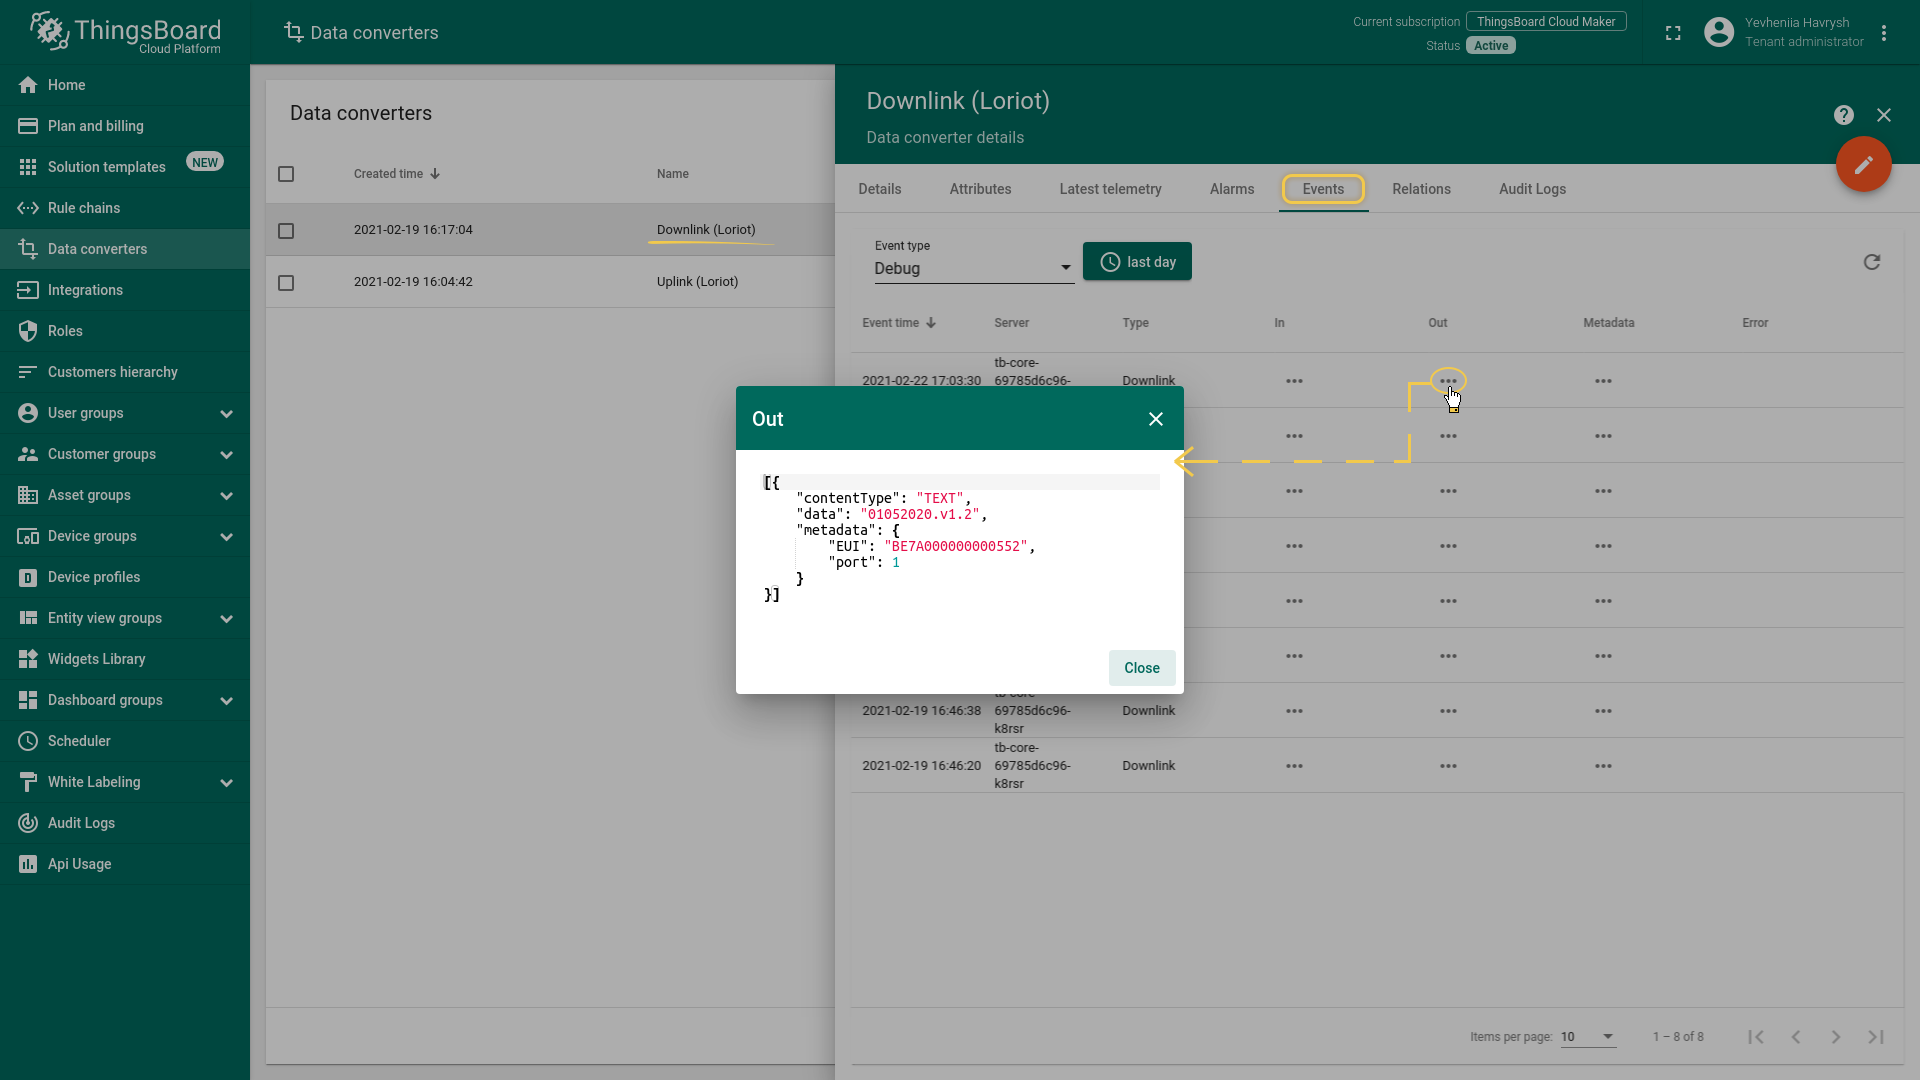
“Out”字段显示发送到设备的消息:
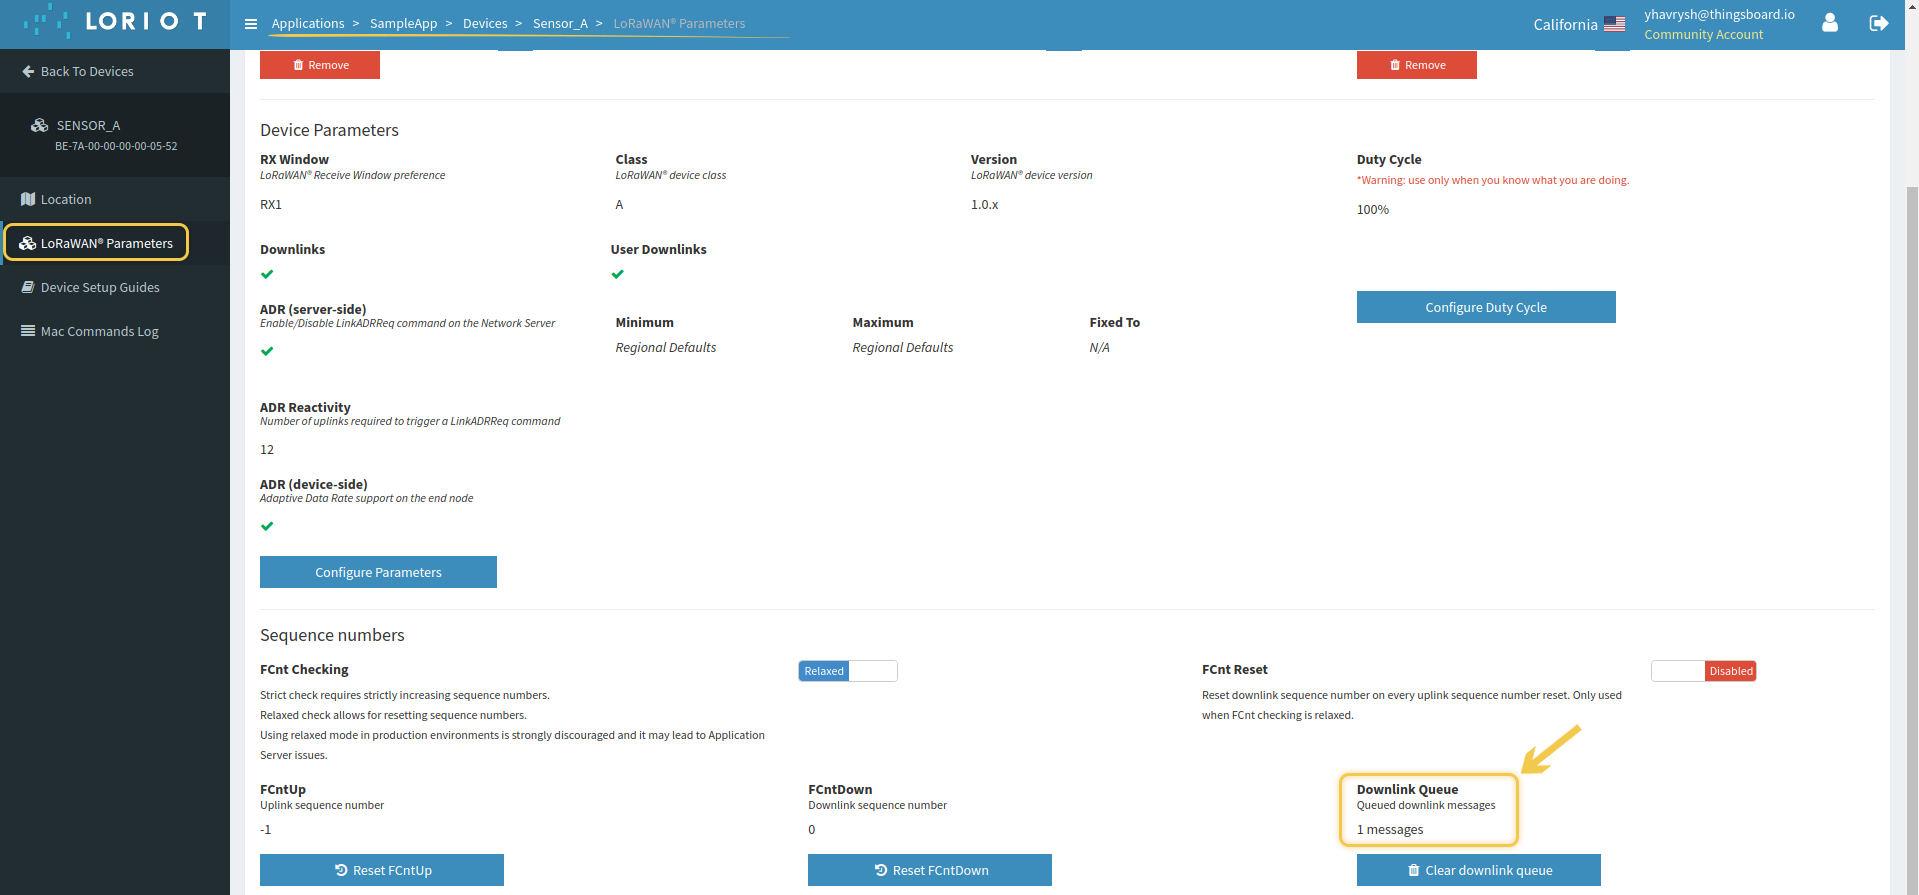
可以在Devices -> LoRaWAN Parameters页面底部的Downlink Queue字段中检查消息是否已到达LORIOT。