概述
身份访问与管理(IAM)是当今企业安全策略的重要组成部分。许多IAM系统采用基于角色的访问控制(RBAC)方法,以指定谁可以在既定IT资源范围内执行何种操作。
基于角色的访问控制(RBAC)允许通过分配一组权限来创建和授予进阶访问能力。RBAC角色决定了用户可拥有的访问层级,资源访问可限制为特定操作,如查看、创建、写入或删除数据,也可以限制对敏感信息的访问,从而提升企业安全性。
功能对比
社区版
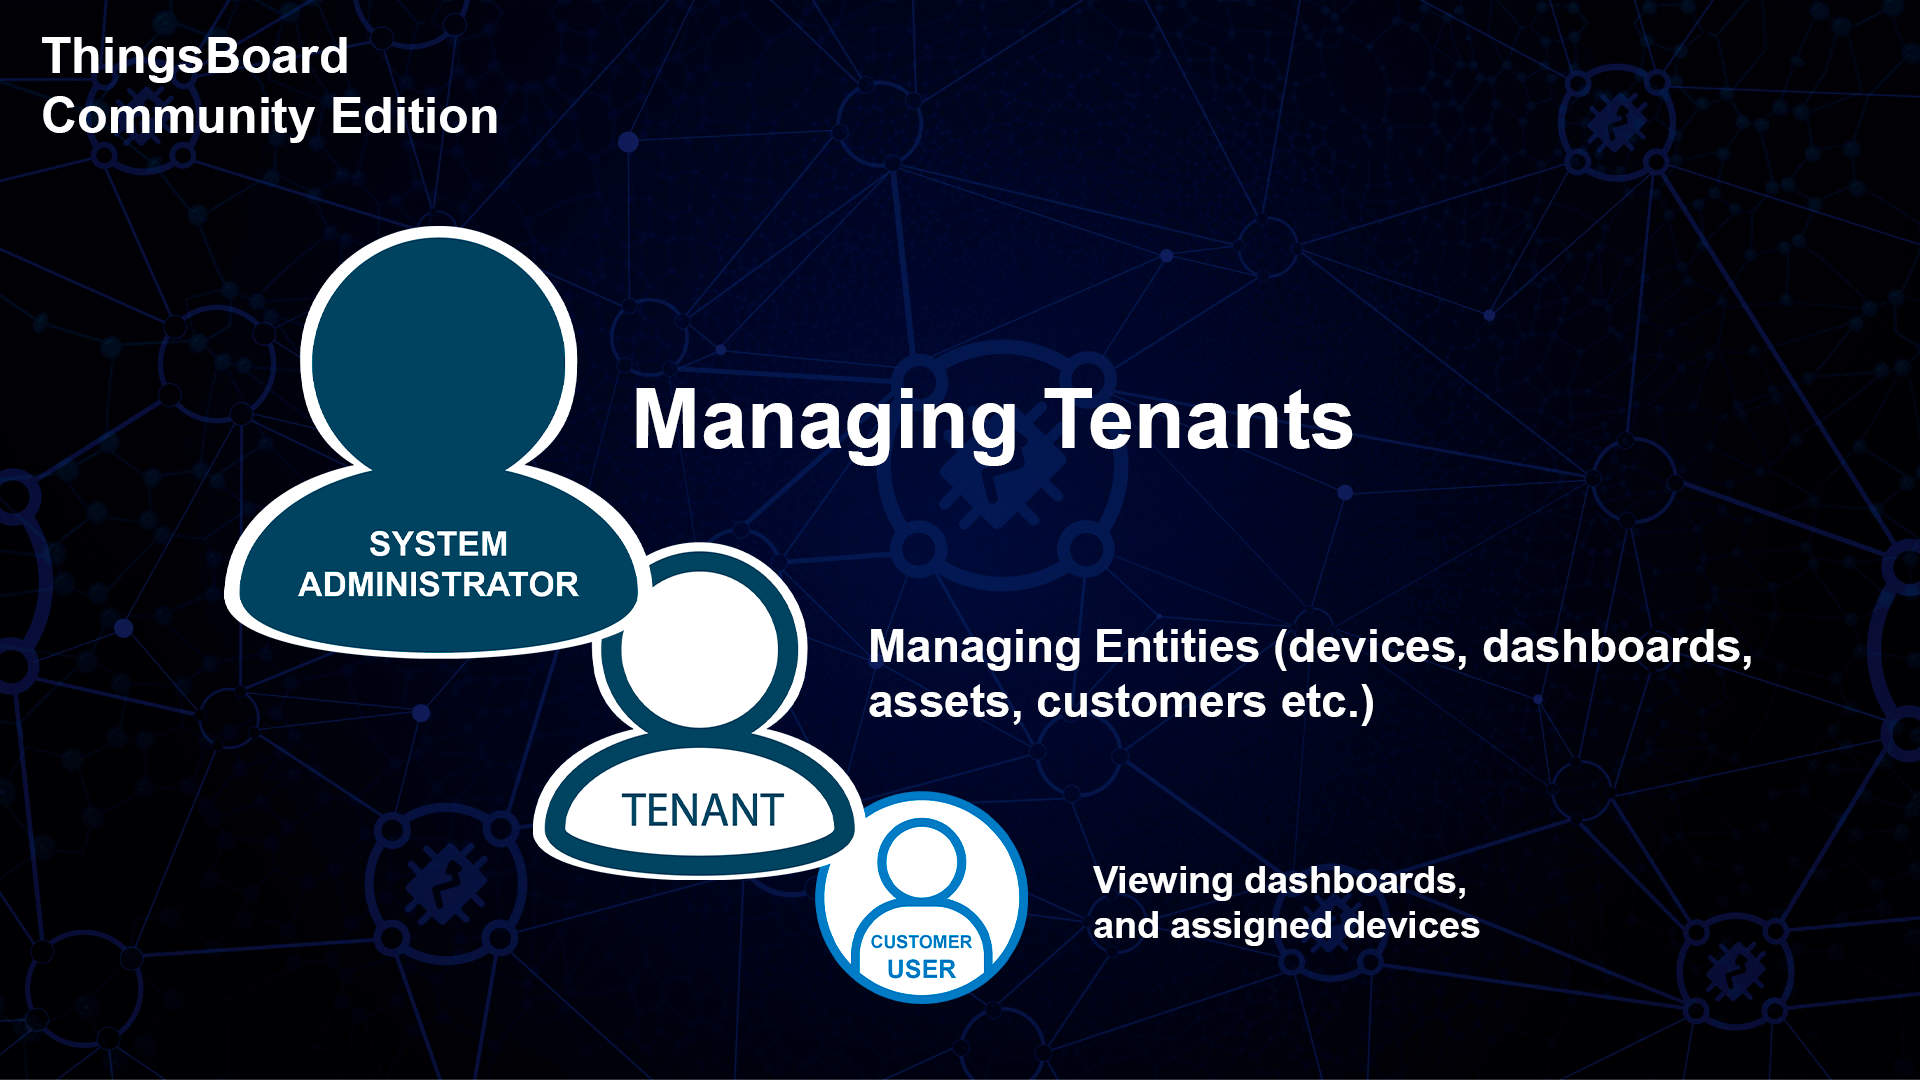
ThingsBoard社区版采用简洁的安全模型,包含三种主要角色:系统管理员、租户管理员和客户用户。系统管理员可管理租户,租户管理员可管理设备、仪表板、客户及该租户下的其他实体。客户用户可以查看仪表板并控制分配给特定客户的设备。对于许多简单场景而言,ThingsBoard社区版功能已足够使用,尤其适合构建实时最终用户仪表板。
专业版
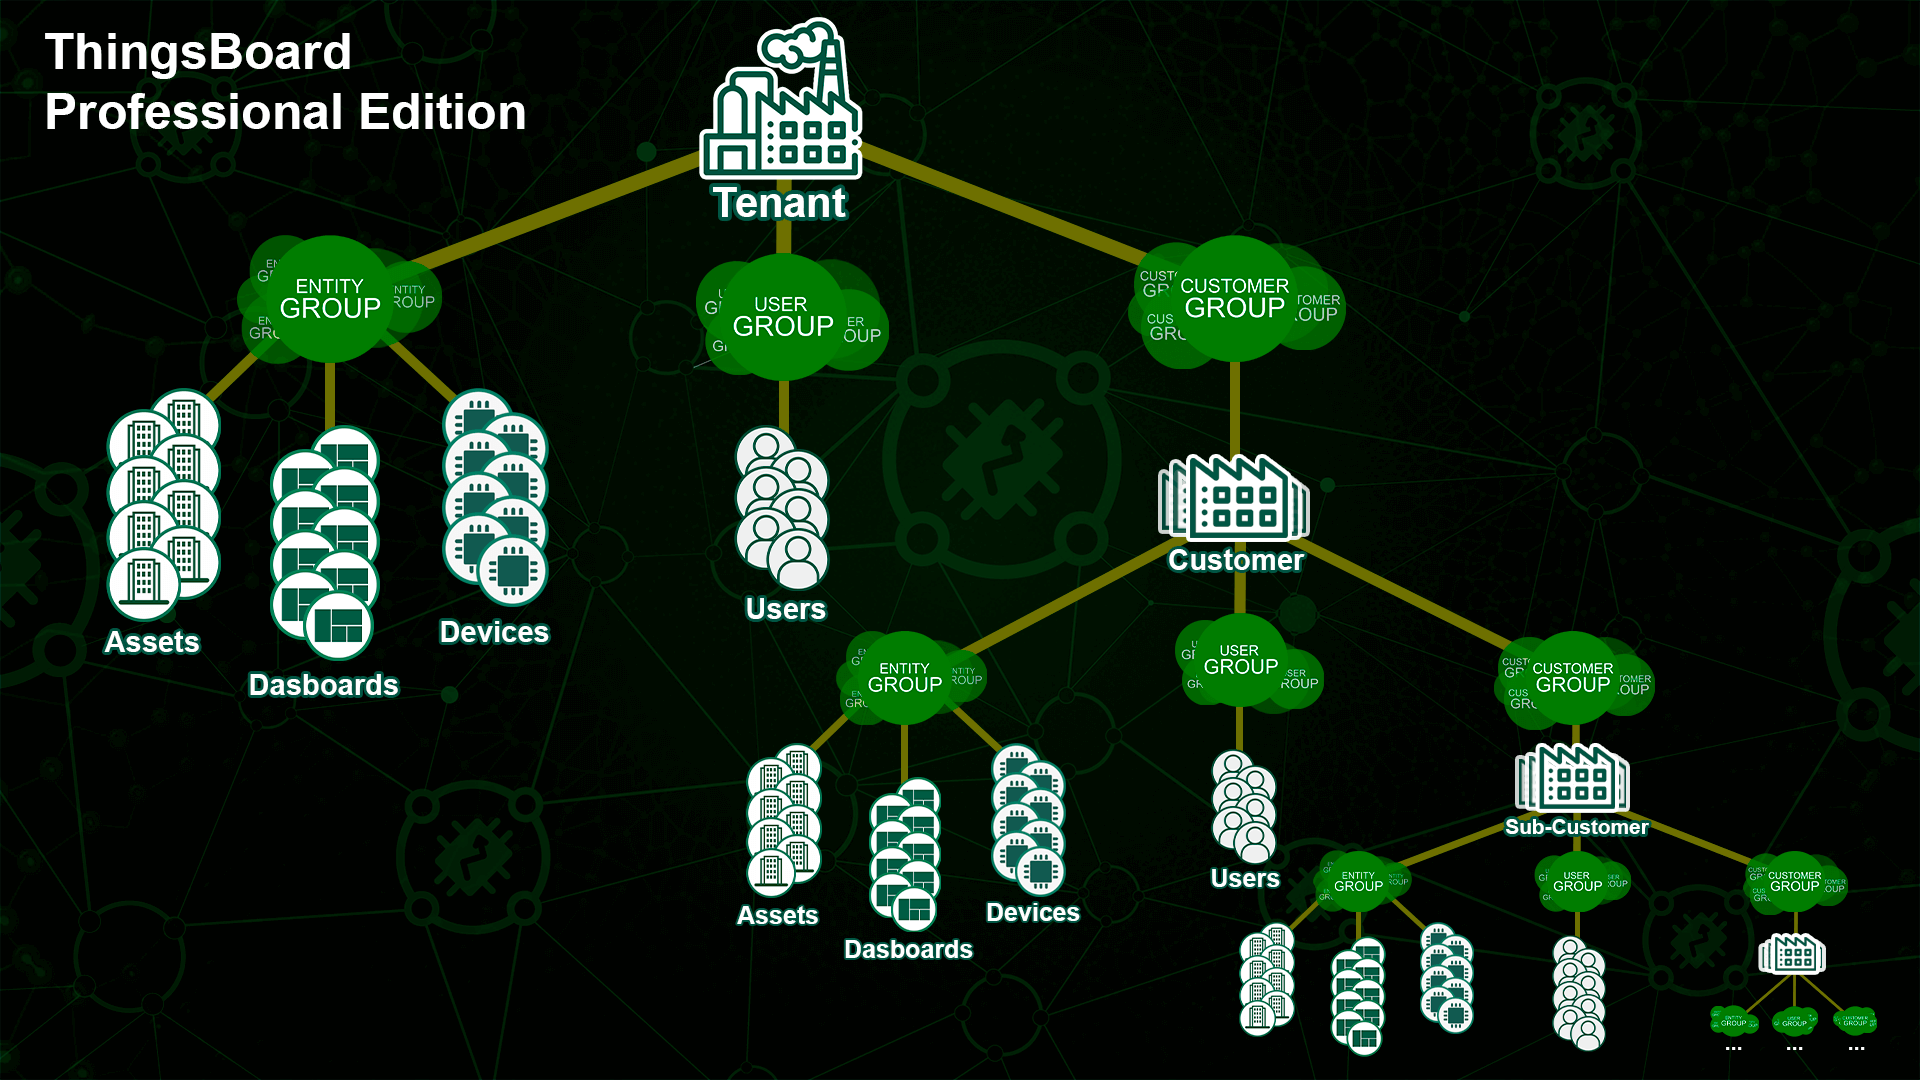
ThingsBoard专业版在用户、客户与角色管理方面提供了更高的灵活性。其面向多用户组的企业场景设计,不同权限的用户组可交互访问同一批设备和资产。
ThingsBoard支持“递归”客户层级,可容纳数万级子客户。根级所有者是租户,每个所有者可拥有多个实体组、用户组和客户组。
由于客户组可包含多个客户,每个客户也可拥有自己的实体组、用户组和客户组(即子客户组)。
注意:每个实体仅有一个所有者,但实体可归属于同一所有者下的多个实体组。
ThingsBoard专业版安全模型为物联网应用提供高级RBAC,并包含以下安全能力:
- 支持多级子客户、独立用户与设备的客户层级结构;
- 支持创建具有灵活权限集的角色;
- 支持将角色精确分配给指定用户组;
- 支持为特定用户组授予对精确设备组的细粒度权限。
本文档涵盖ThingsBoard专业版专属功能,将从术语表开始,并以分步示例说明常见场景的配置方法。
术语表
租户(Tenant)
租户代表独立的业务实体:拥有或生产设备与资产的个人或组织。一个租户可有多个租户管理员用户及数百万客户。
客户(Customer)
客户可以是独立的业务实体:购买或使用租户设备和/或资产的个人或组织,也可以是租户组织内部的部门。客户可拥有多个用户、内部客户以及数百万设备和/或资产。
客户组(Customer Group)
客户组也是一种实体组,具有与普通实体组相同的功能。单独使用“客户组”这一术语,便于区分客户组与其他类型的实体组。
用户(User)
用户可以登录ThingsBoard Web界面、执行REST API调用,并在授权范围内访问设备和资产。用户本身也是ThingsBoard中的实体。
用户组(User Group)
用户组同样是一种实体组,具有与普通实体组相同的功能。单独使用“用户组”这一术语,便于区分用户组与其他类型的实体组。
实体(Entity)
实体可以是设备、资产、用户、仪表板、实体视图等,由ThingsBoard统一管理。详见实体与关系指南。
实体组(Entity Group)
实体组是同一类型实体的集合,例如设备组或资产组。单个实体可同时属于多个实体组。例如,一个温控器设备可同时属于”温控器”组(包含所有设备)以及更具体的组(如”固件v1.2.3温控器”)。
所有者(Owner)
每个实体组属于一个所有者,可以是租户或客户。每个客户也仅有一个所有者。若客户的所有者是租户,则该客户为顶级客户;若所有者为另一客户,则该客户为子客户。ThingsBoard支持多级客户结构。
资源(Resource)
任何具有安全API或代表ThingsBoard实体的对象均为资源。实体的示例见上文“实体”定义。实体组也是资源,例如设备组、资产组、仪表板组。此外,白标、审计日志和管理设置也属于资源。
操作(Operation)
操作表示对资源执行的动作。通用操作包括“创建”“读取”“写入”“删除”“添加到组”“从组移除”等,也有特定操作如“读取/写入凭证”。
角色(Role)
角色包含资源列表及针对每类资源的允许操作列表。角色分为两种类型:通用角色和组角色。特殊资源“全部”是所有可用资源类型的快捷方式,特殊操作“全部”是所有可能操作的快捷方式。本文后续将说明两者区别。
组权限实体(GPE)
组权限实体本质上是用户组、角色与可选实体组之间的映射。详见通用角色与组角色。
角色
角色是一组权利与权限的集合,用于定义用户或用户组在系统中的可执行操作。通过角色,管理员可为整个组或单个用户分配和调整权限,简化权限管理。
角色将每种资源类型映射到允许操作列表。可在资源参考中查看完整资源类型列表。
下面的示意图展示了角色的工作机制。
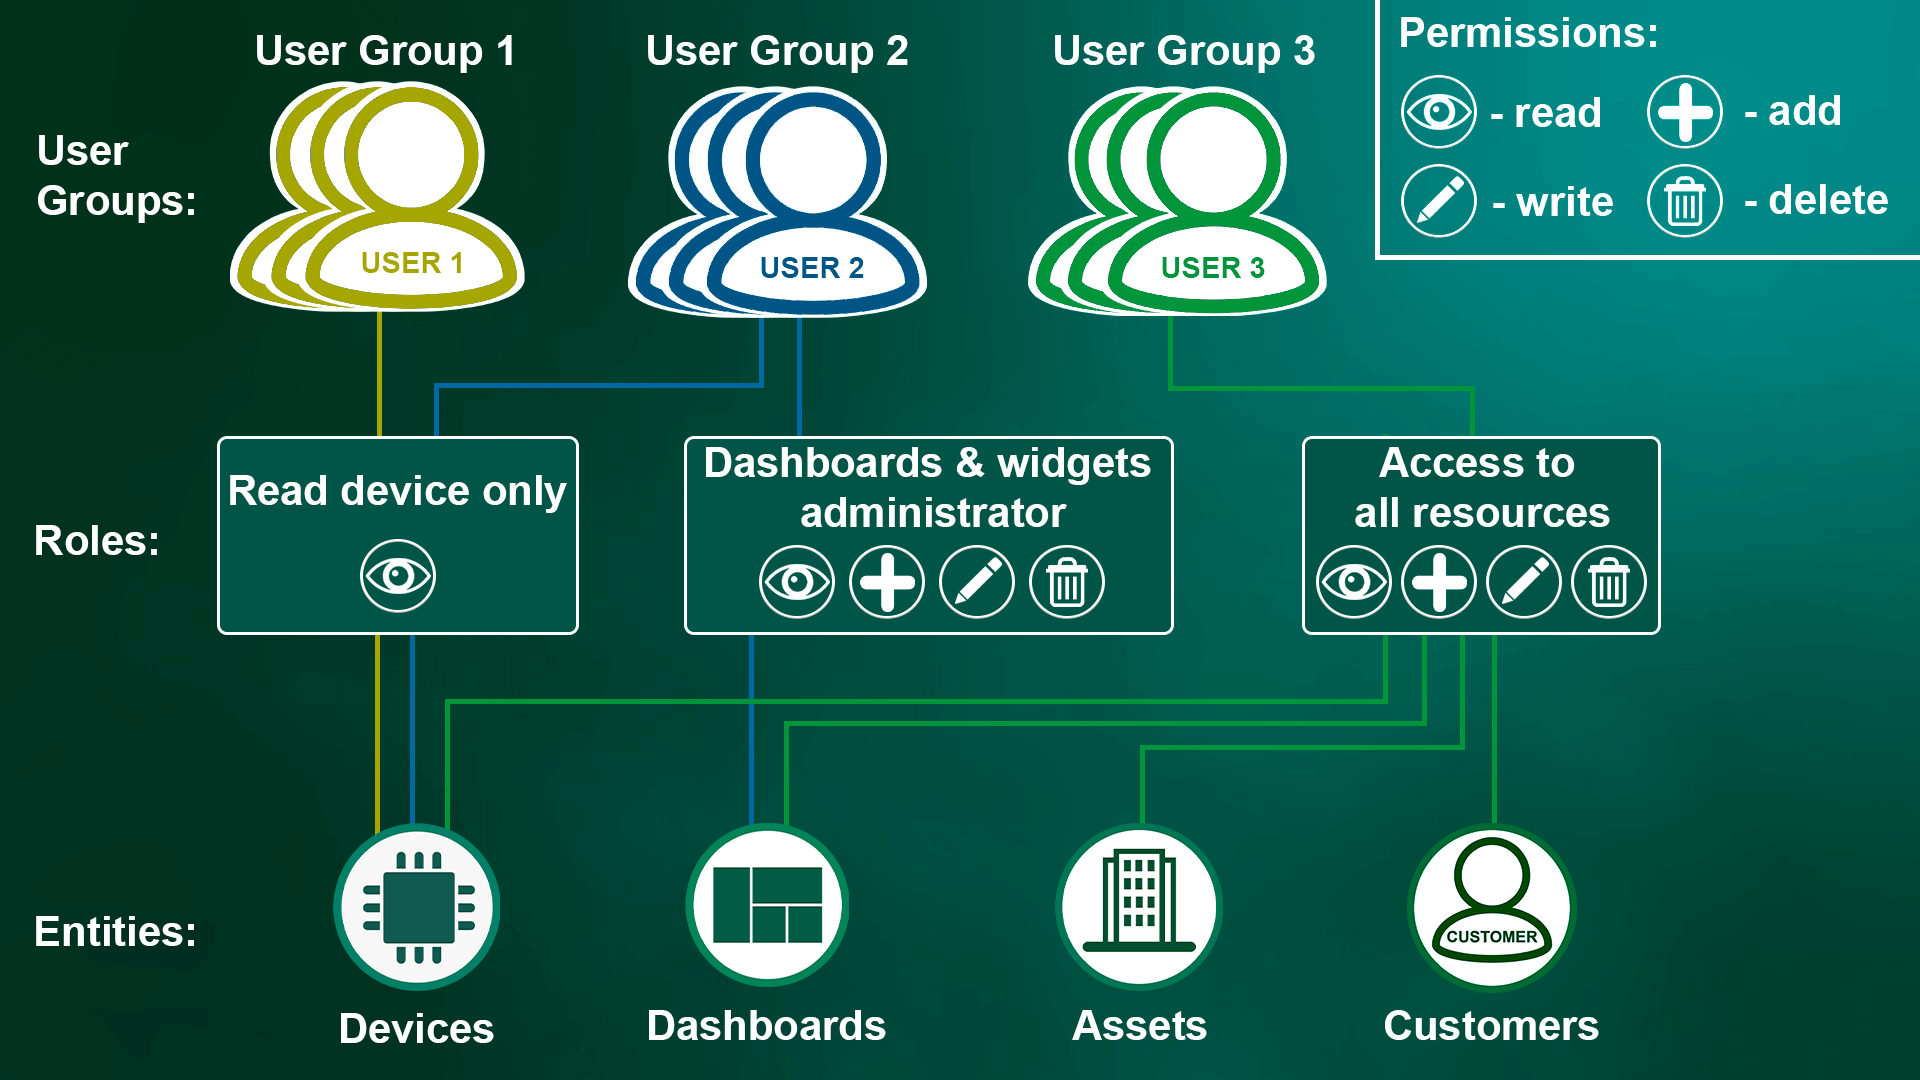
- 用户组1拥有仅读取设备角色时,仅能访问设备。可查看设备,但不能删除、编辑或添加设备,且无法访问其他对象类型。
- 用户组2拥有两个角色:仅读取设备和仪表板与组件管理员。仪表板与组件管理员角色允许用户创建、删除和编辑组件与仪表板。结合仅读取设备,用户可查看其有权访问的设备数据,并在仪表板上可视化这些数据。
- 用户组3拥有访问全部资源角色,可创建、编辑和删除所有对象类型,如设备、仪表板、资产和客户。
ThingsBoard专业版提供两种角色类型:通用角色和组角色,各自采用不同的权限模型。
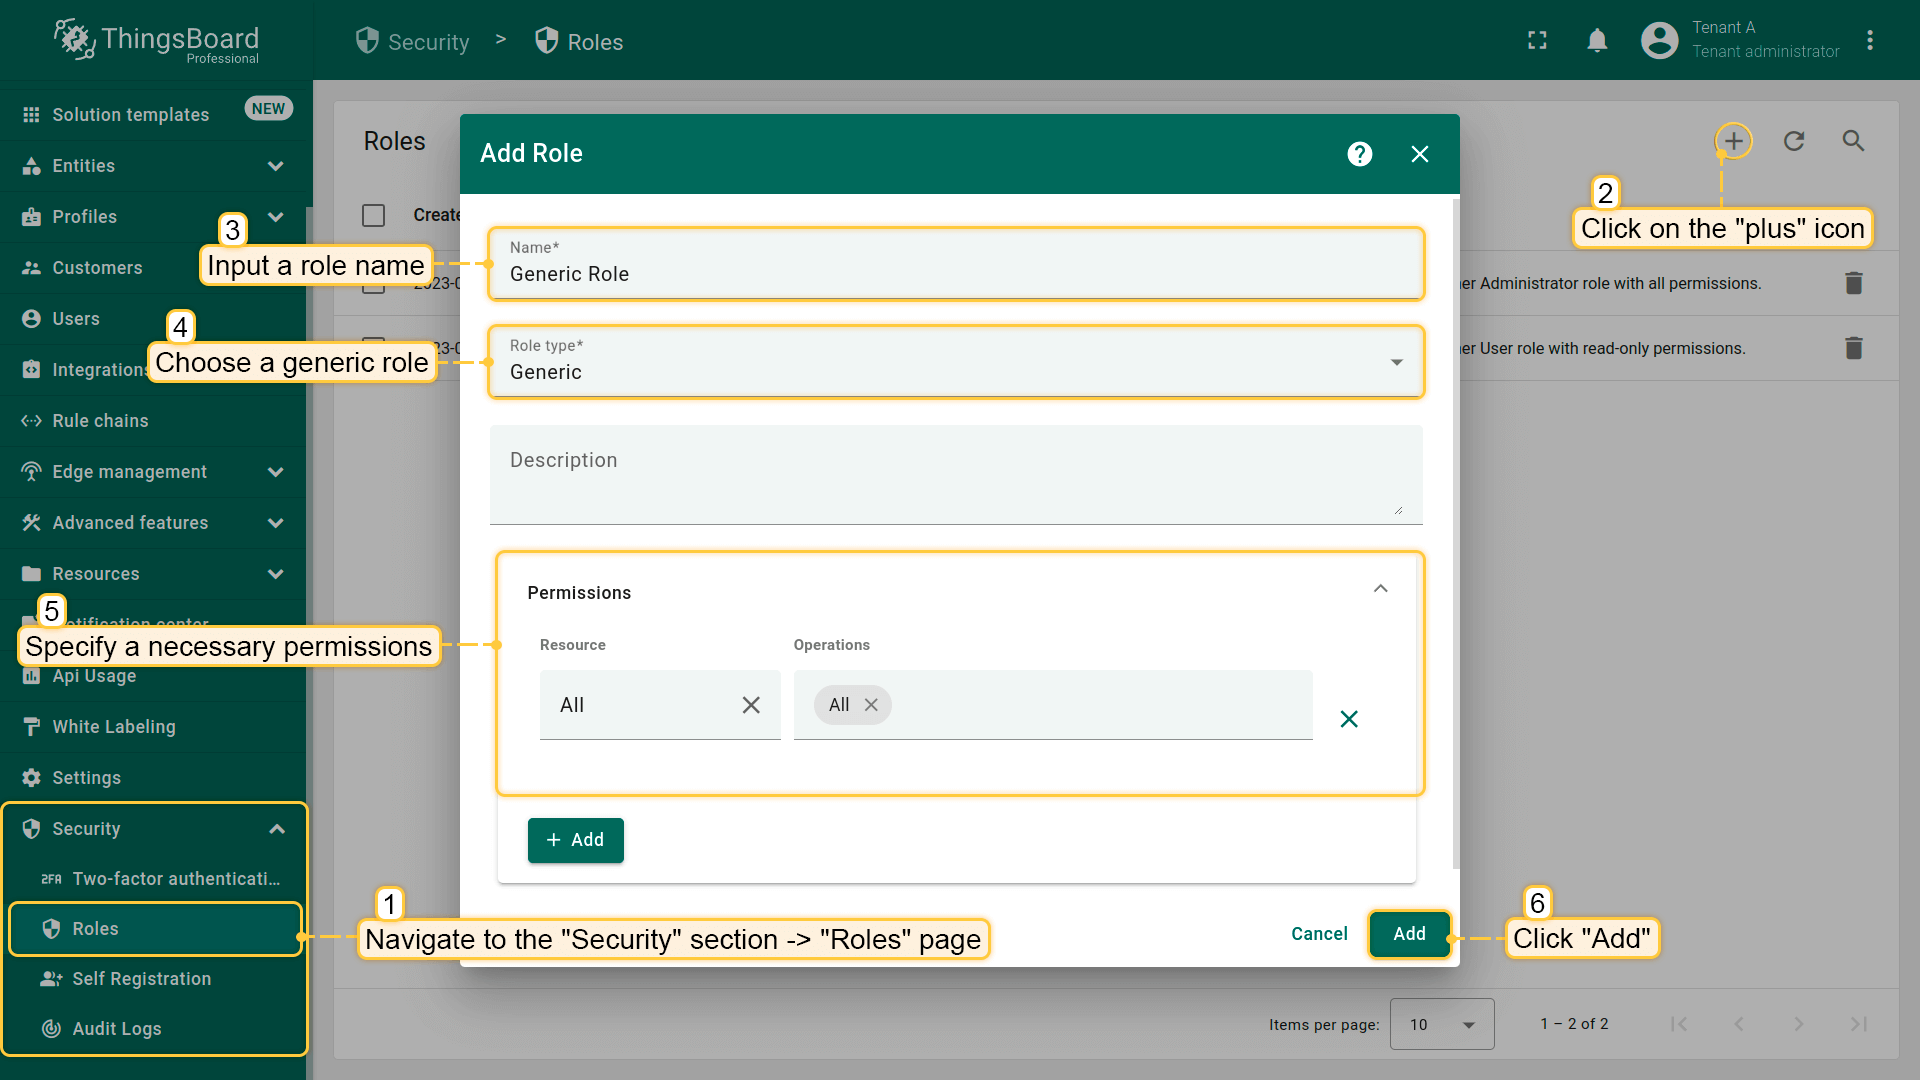
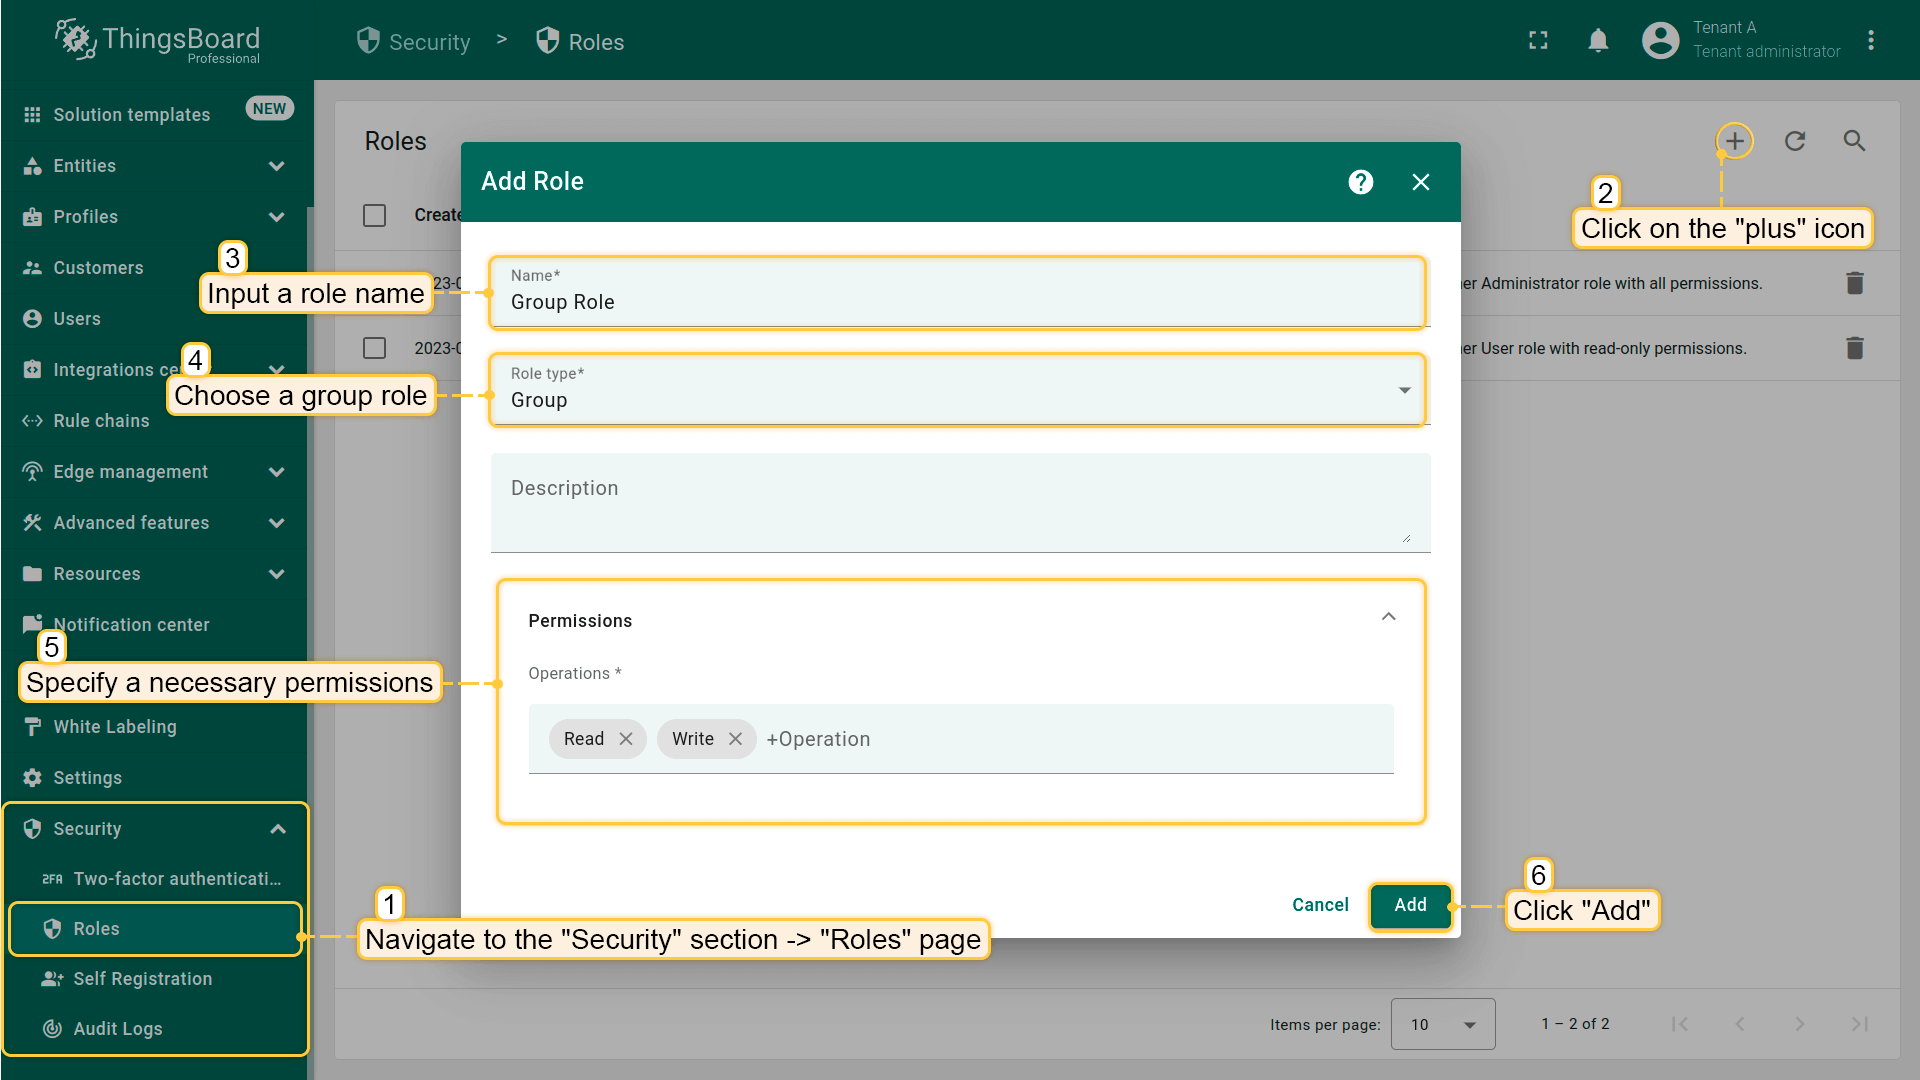
创建新角色
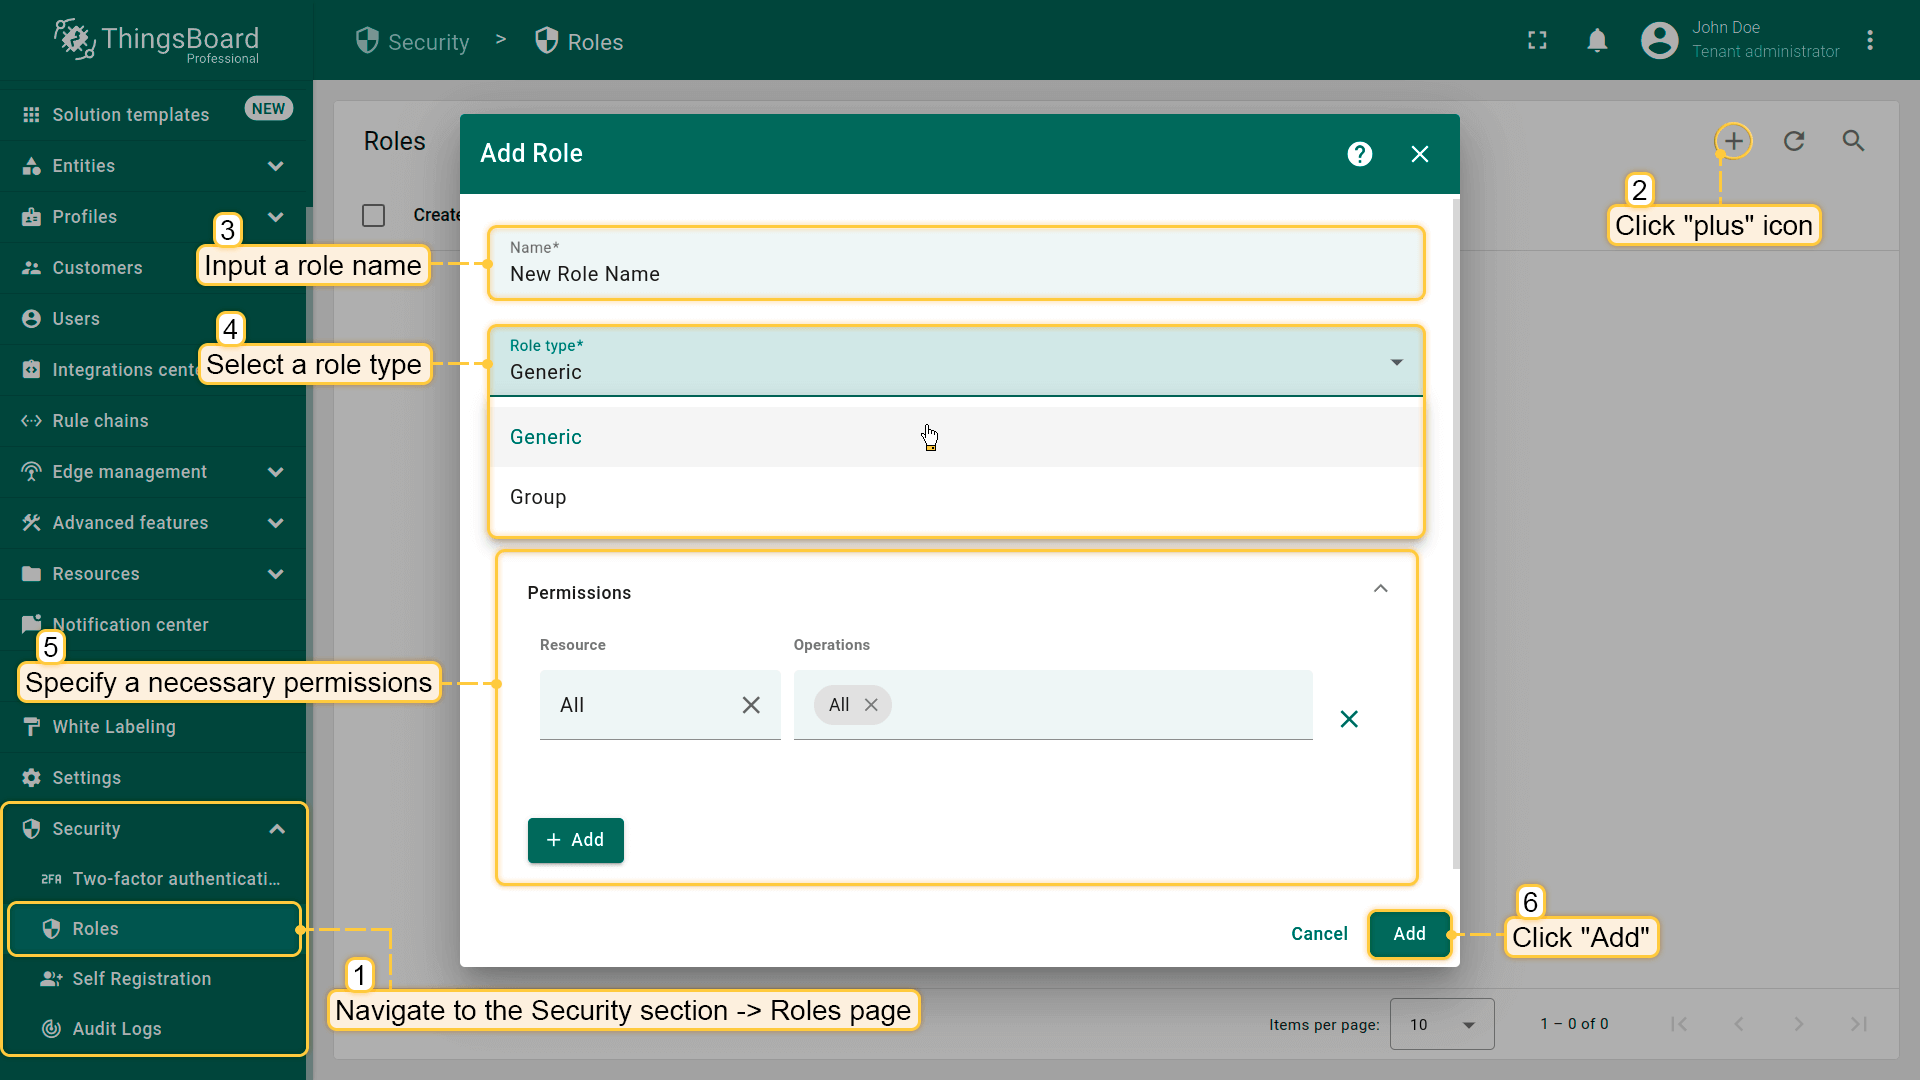
在安全区域的角色页面执行以下操作。
- 点击右上角“+”按钮。
- 输入角色名称。
- 选择角色类型:
- 通用:可在分配范围内(租户/客户/子客户)递归应用的可复用权限集。
- 组:需与特定实体组和特定用户组绑定的权限集。
- 选择权限(资源及允许的操作),然后点击“保存”。
下面分别介绍这两种角色类型。
通用角色
什么是通用角色?
通用角色是一组权限,可递归应用于所选范围内(租户、客户或子客户,包括所有后代)的全部实体。
ThingsBoard通过名为组权限实体(GPE)的关联对象,将通用角色分配给用户组。GPE将“谁”(用户组)、“范围”(作用域)与“权限”(角色权限)绑定在一起。
示例
下面通过示例说明通用角色在不同分配位置下的行为。

示例场景:
- 设备:
- Device A1 —— 位于租户A层级
- Device B1 —— 位于客户B层级
- 用户:
- Bob —— 租户A下的设备管理员组
- Alice —— 客户B下的设备管理员组
示例目标:
- 授予Bob(租户A范围)对客户A及其下所有实体的全部操作权限,包括客户B及其子客户下的实体。
- 授予Alice(客户B范围)仅对客户B及其子客户下实体的全部操作权限。
步骤1 — 创建通用角色
- 创建通用角色,设置资源:全部和操作:全部。

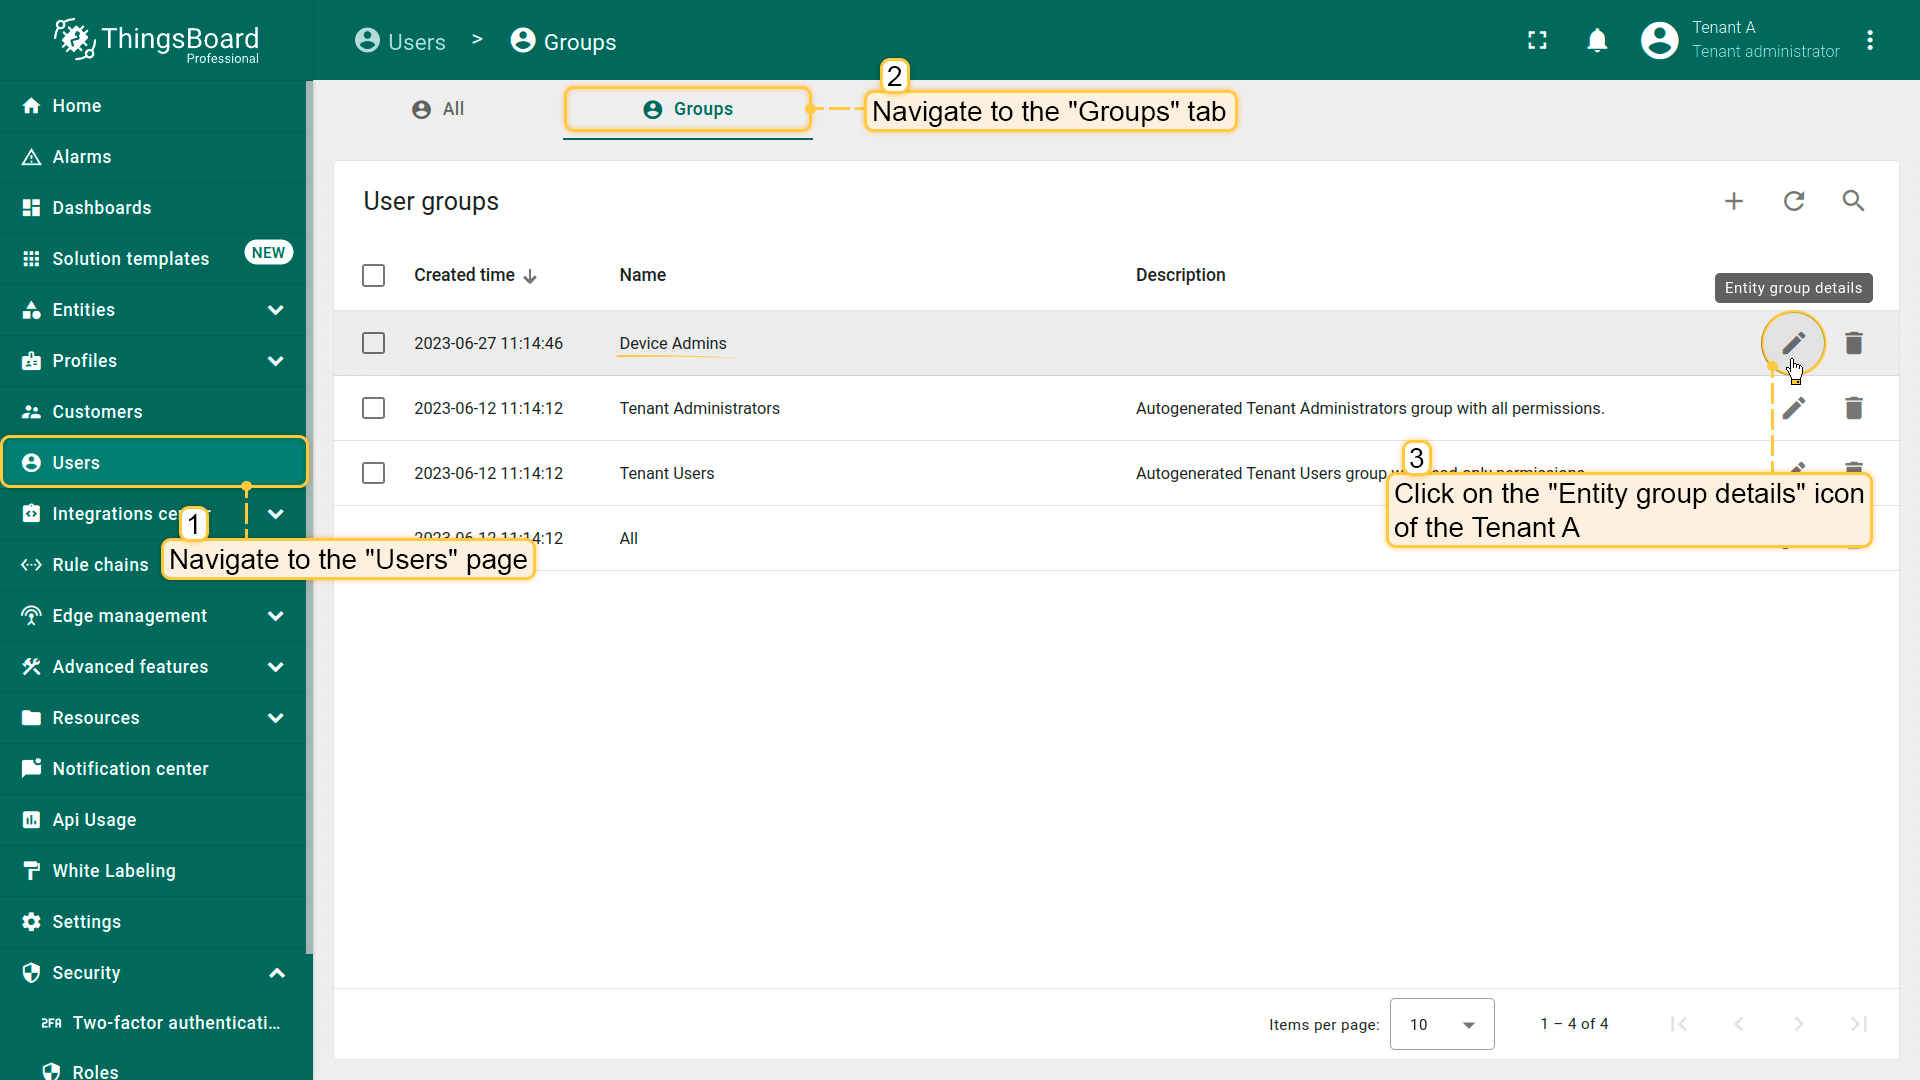
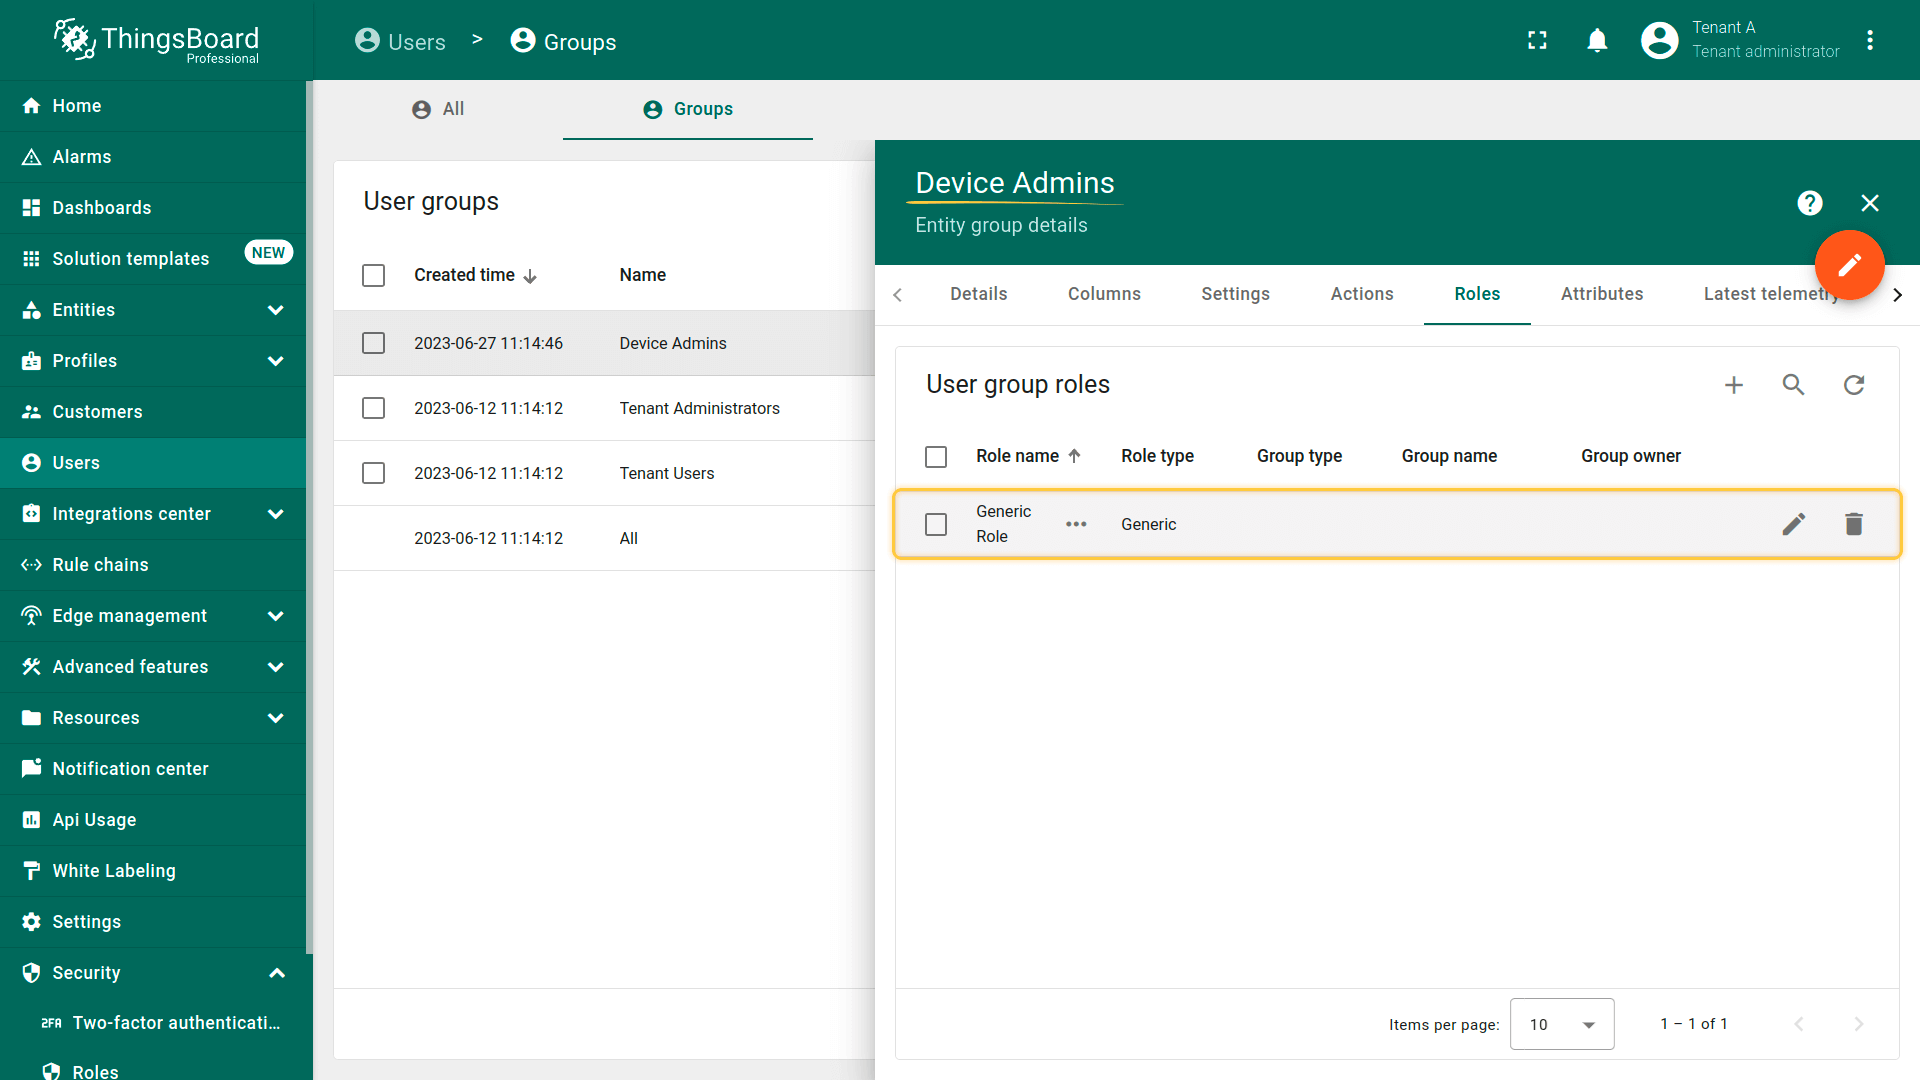
步骤2 — 将通用角色分配给租户用户组(Bob)
- 进入“用户”页面,打开“组”标签。
- 打开租户A下“Device Admins”组的实体组详情。
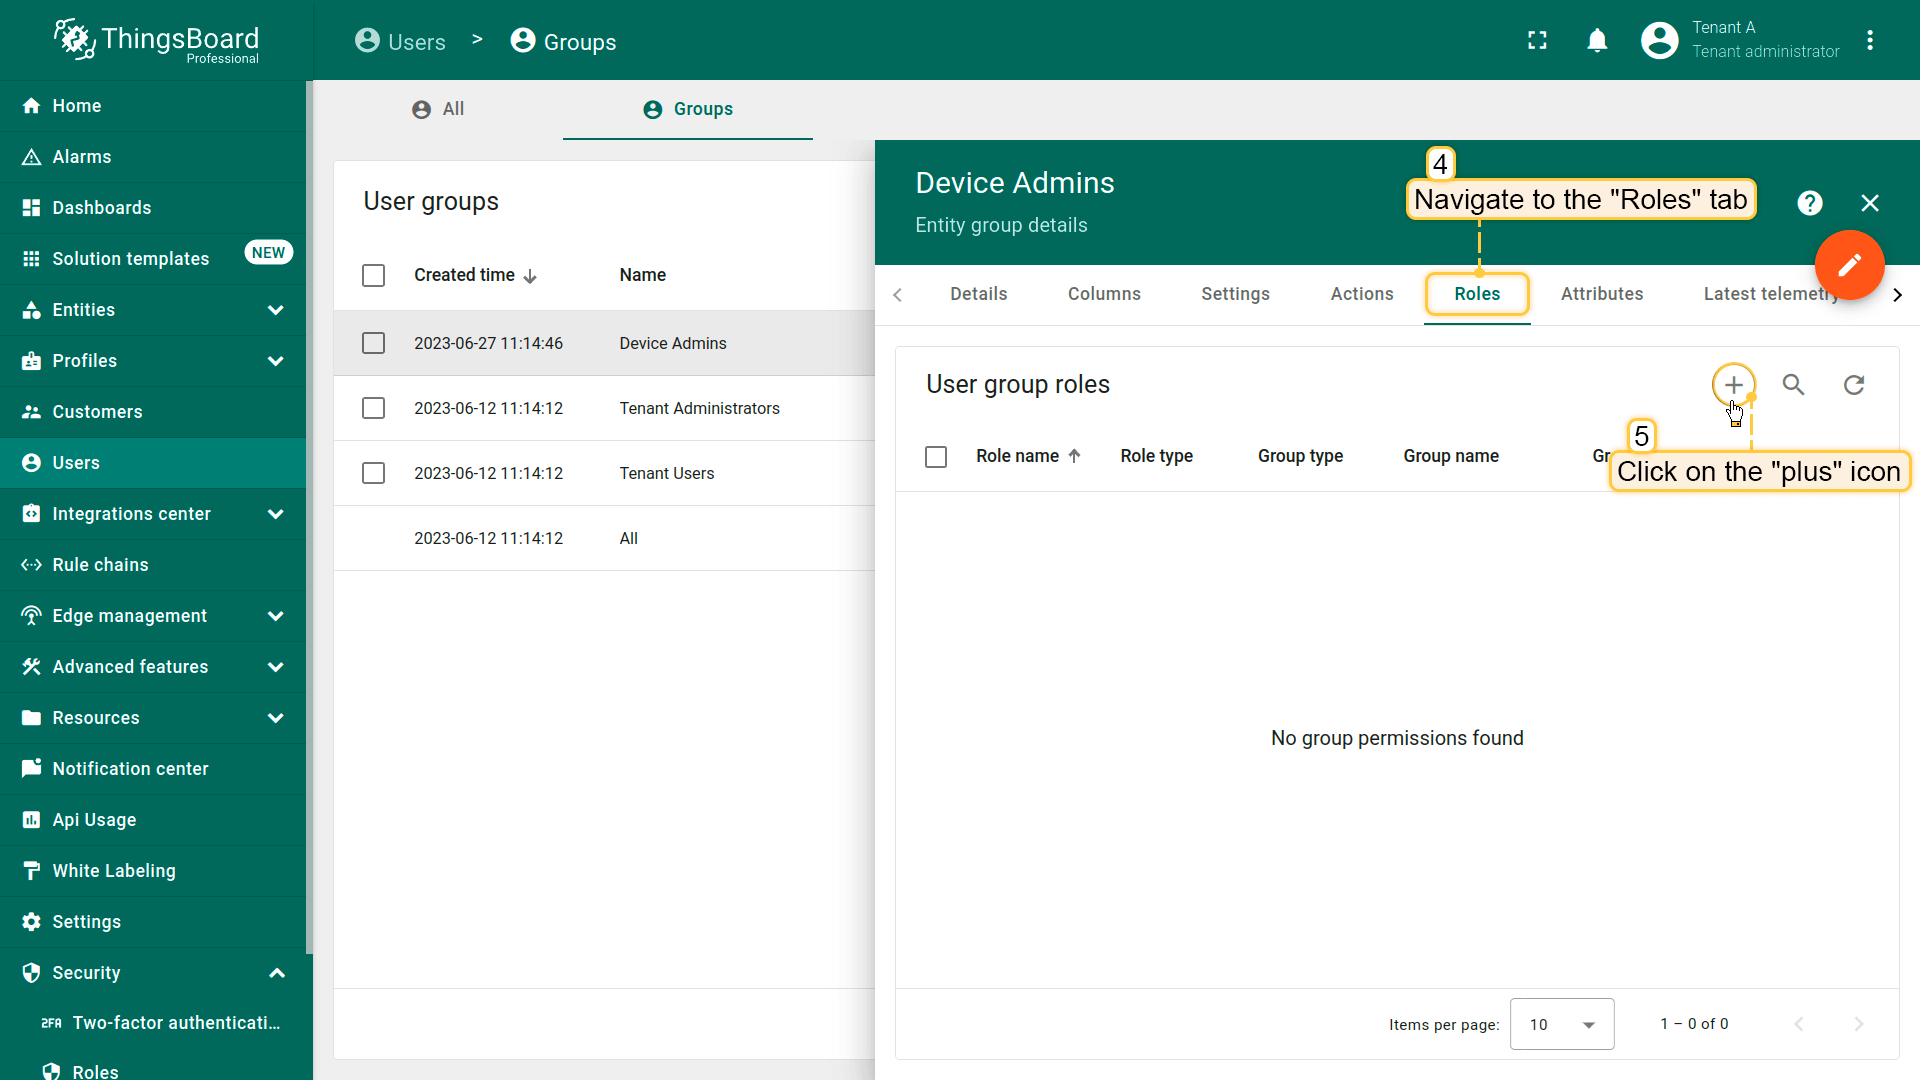
- 进入“角色”标签,点击“+”。
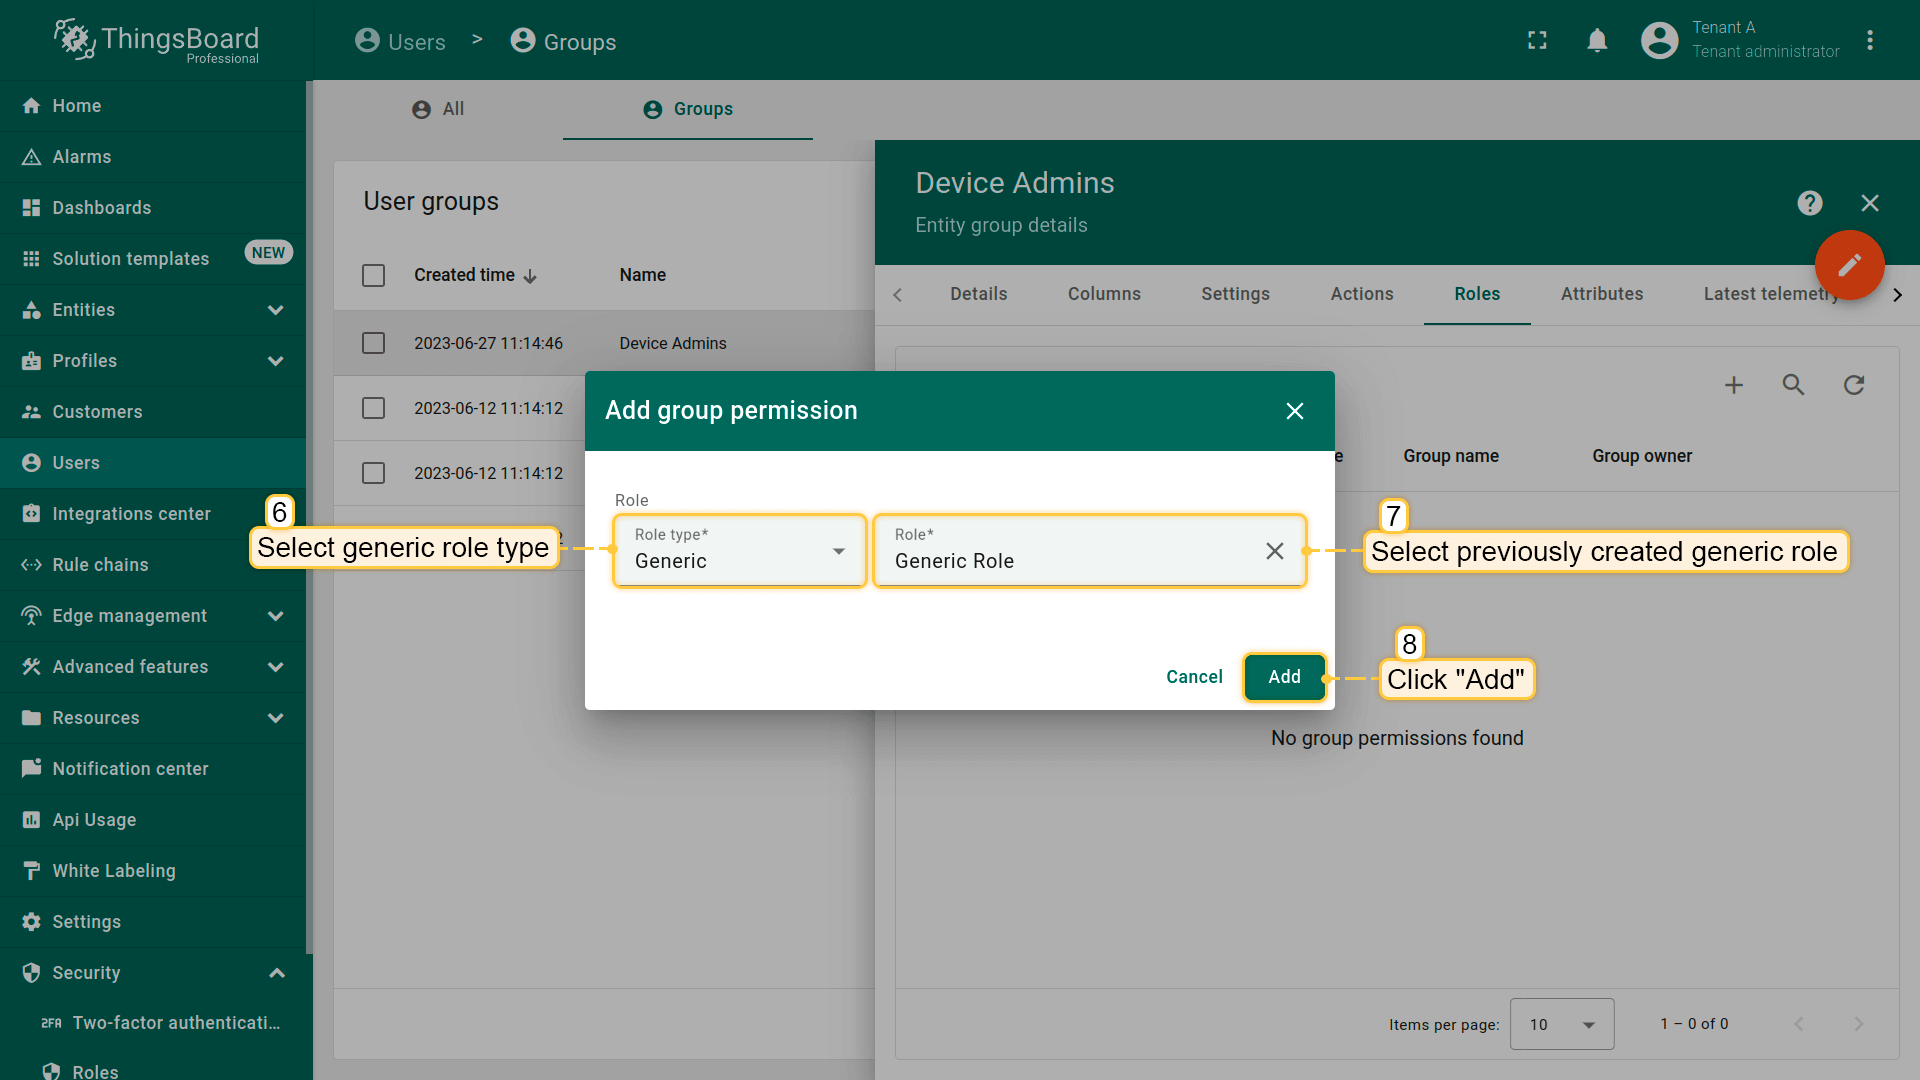
- 选择角色类型:通用,选中刚创建的角色,点击“添加”。
Bob(该租户级组的成员)可对属于租户A的全部实体执行任意操作,包括客户A、客户B及其子客户下的实体。
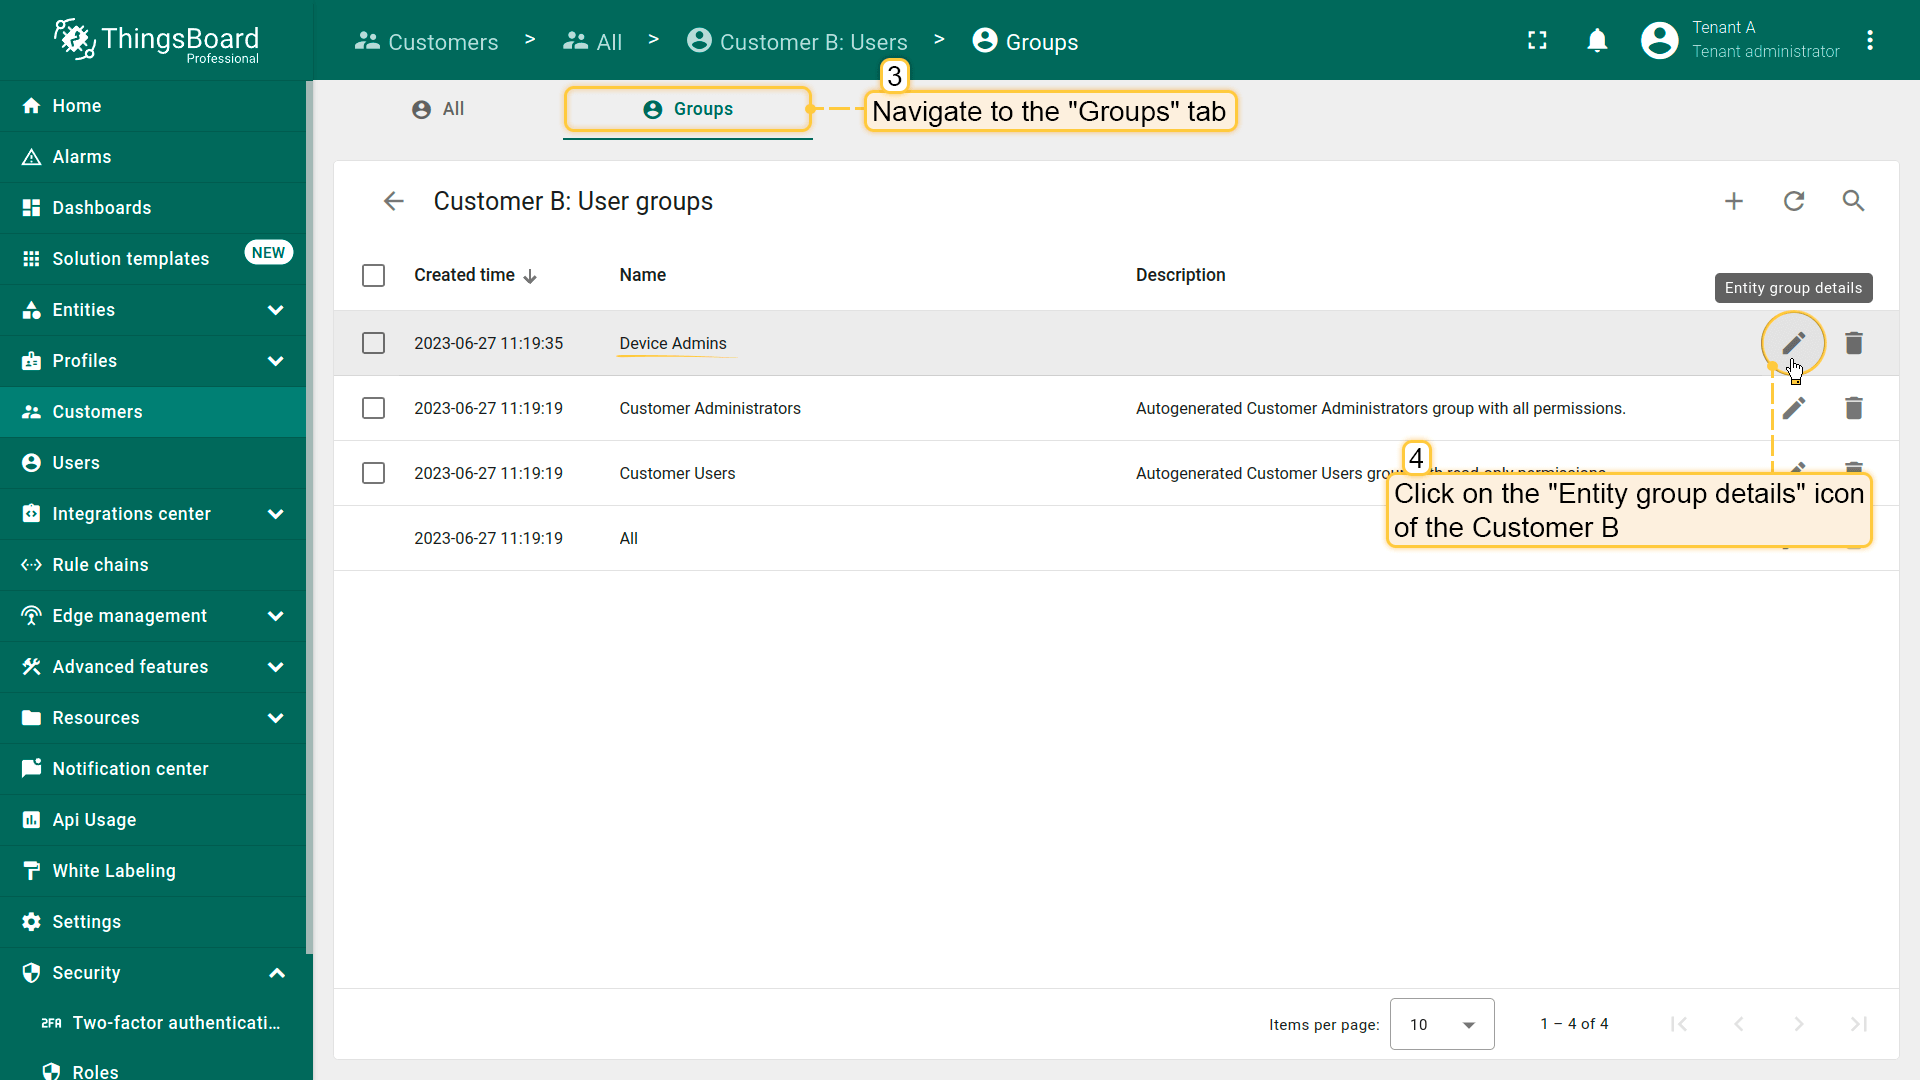
步骤3 — 将通用角色分配给客户用户组(Alice)
- 进入“客户”页面,在客户B旁点击管理客户用户。
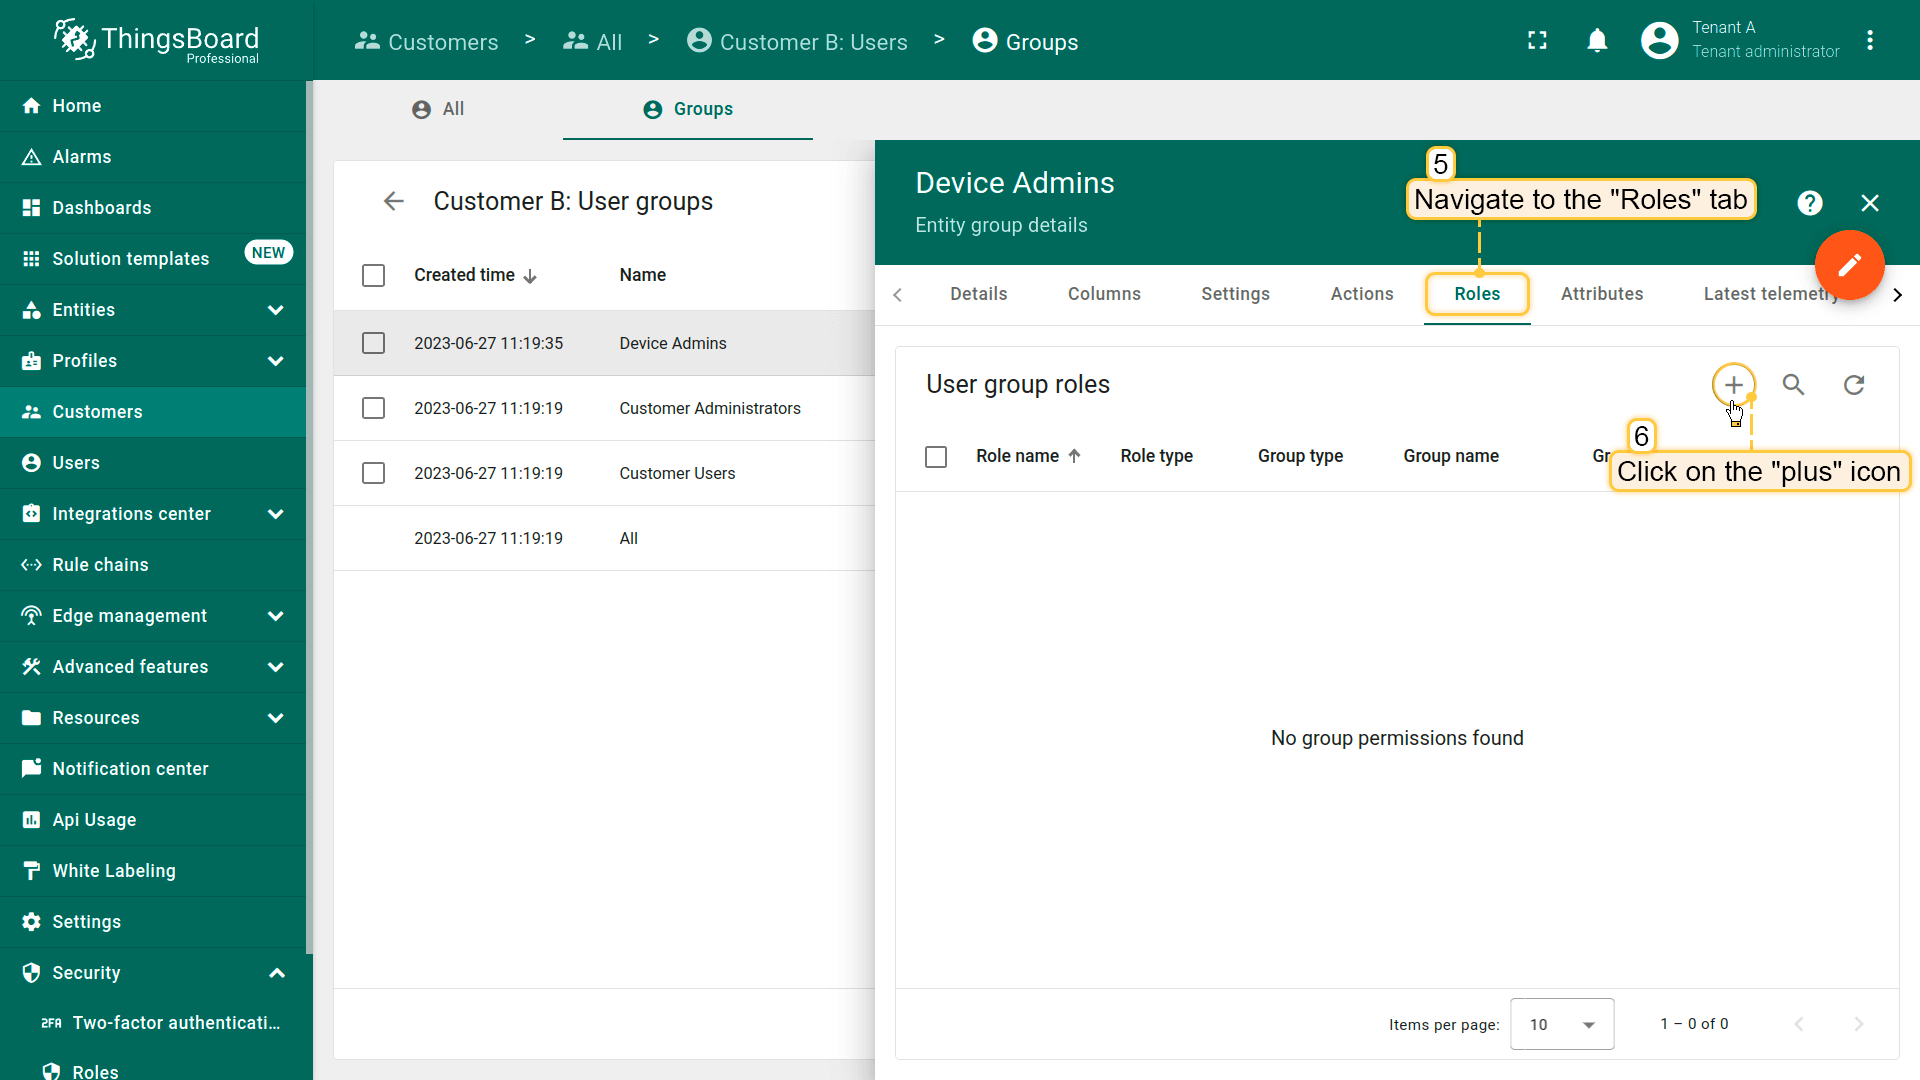
- 打开“组”标签,再打开Device Admins组的实体组详情。
- 进入“角色”标签,点击“+”。
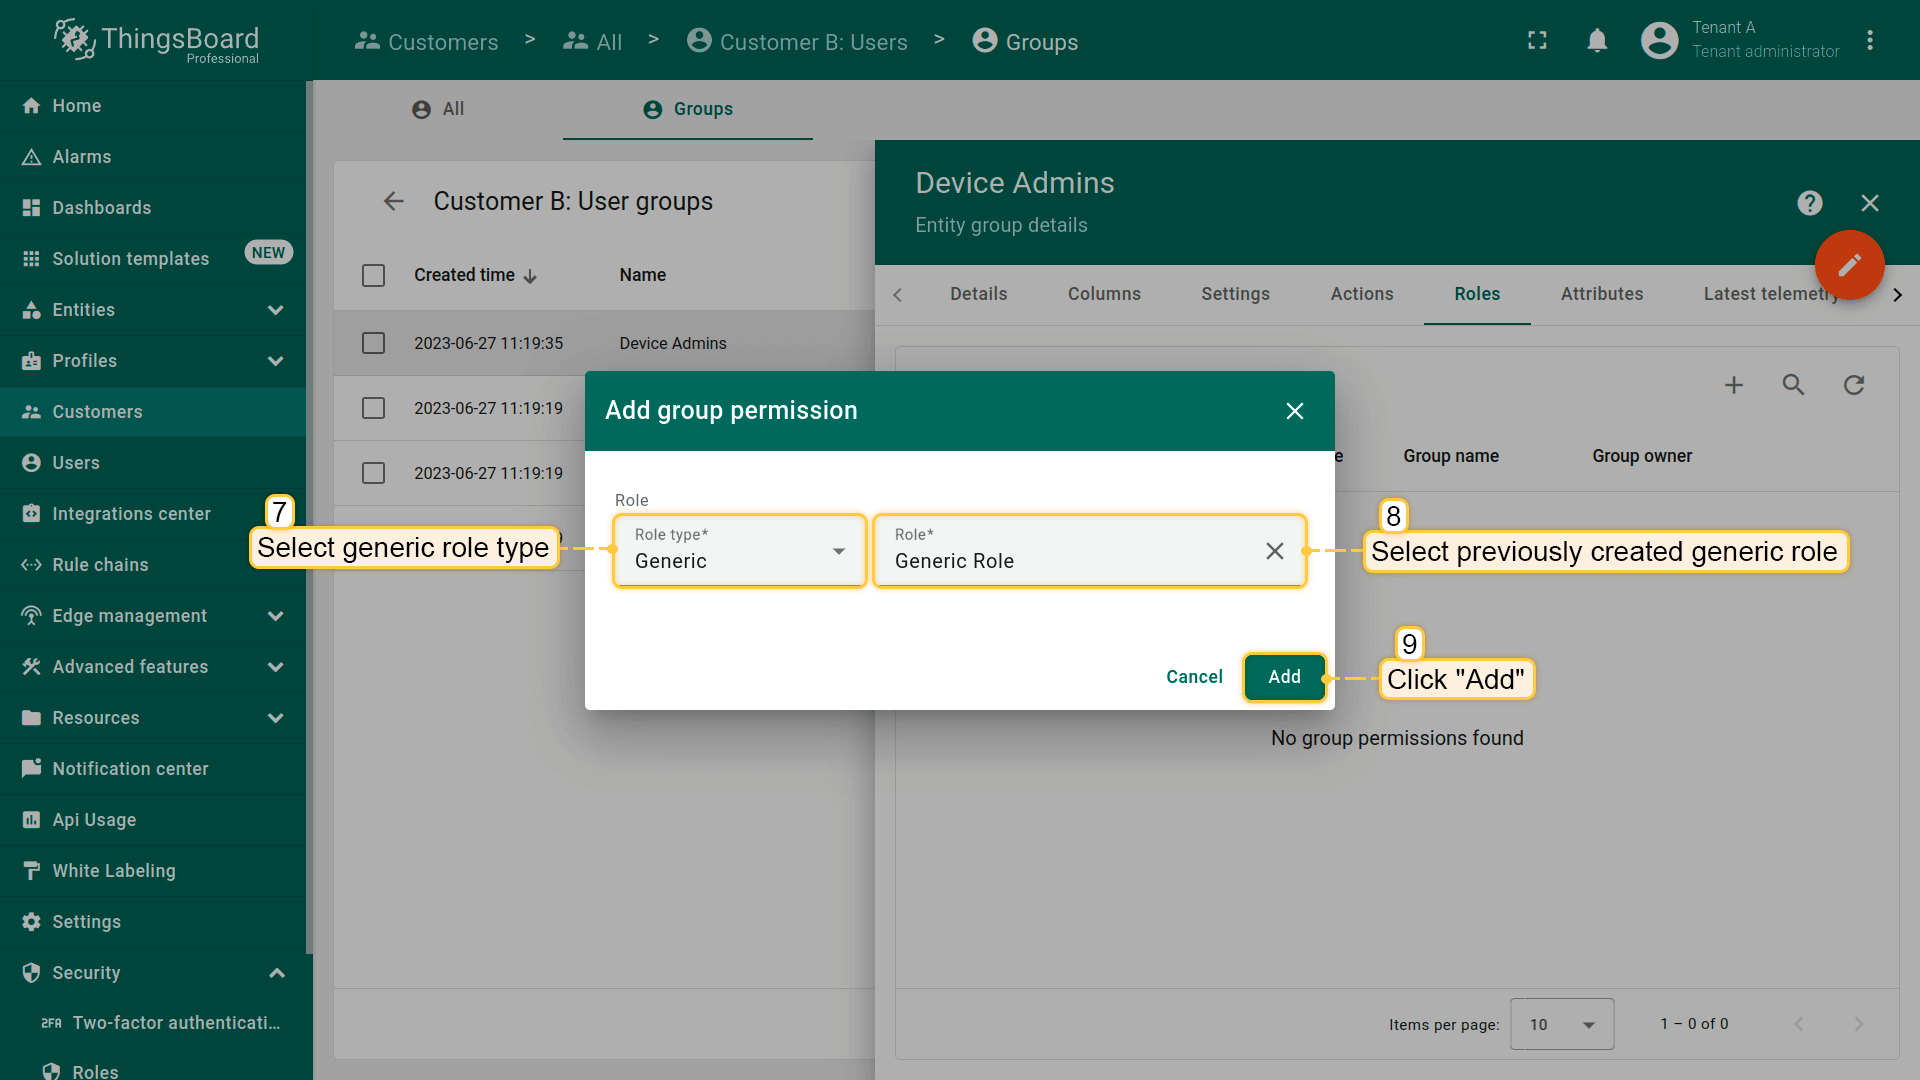
- 选择角色类型:通用,选中同一角色,点击“添加”。
Alice(客户B下该组的成员)可对仅属于客户B及其子客户的实体执行任意操作。


验证访问
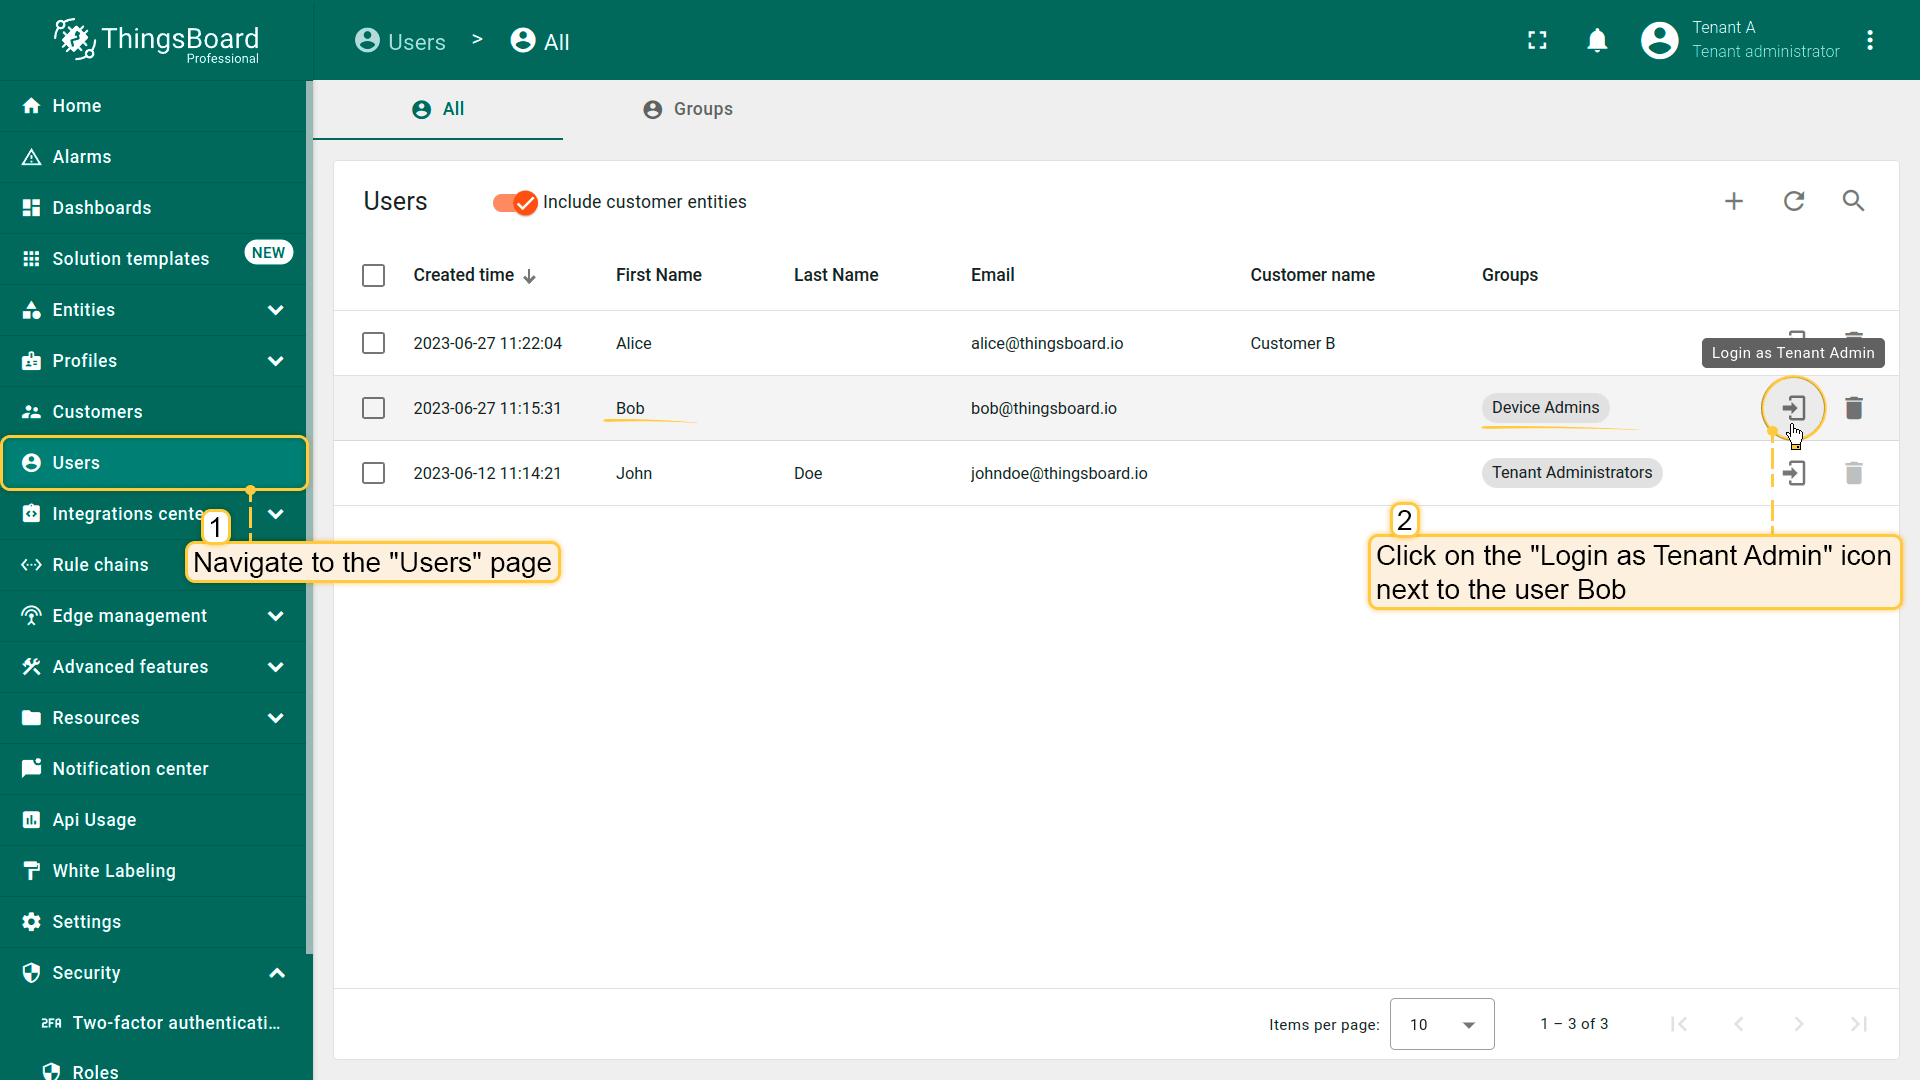
以Bob身份登录:
- 转到"用户"页面。单击租户A"设备管理员"组中Bob账户旁边的"以租户管理员身份登录"图标。
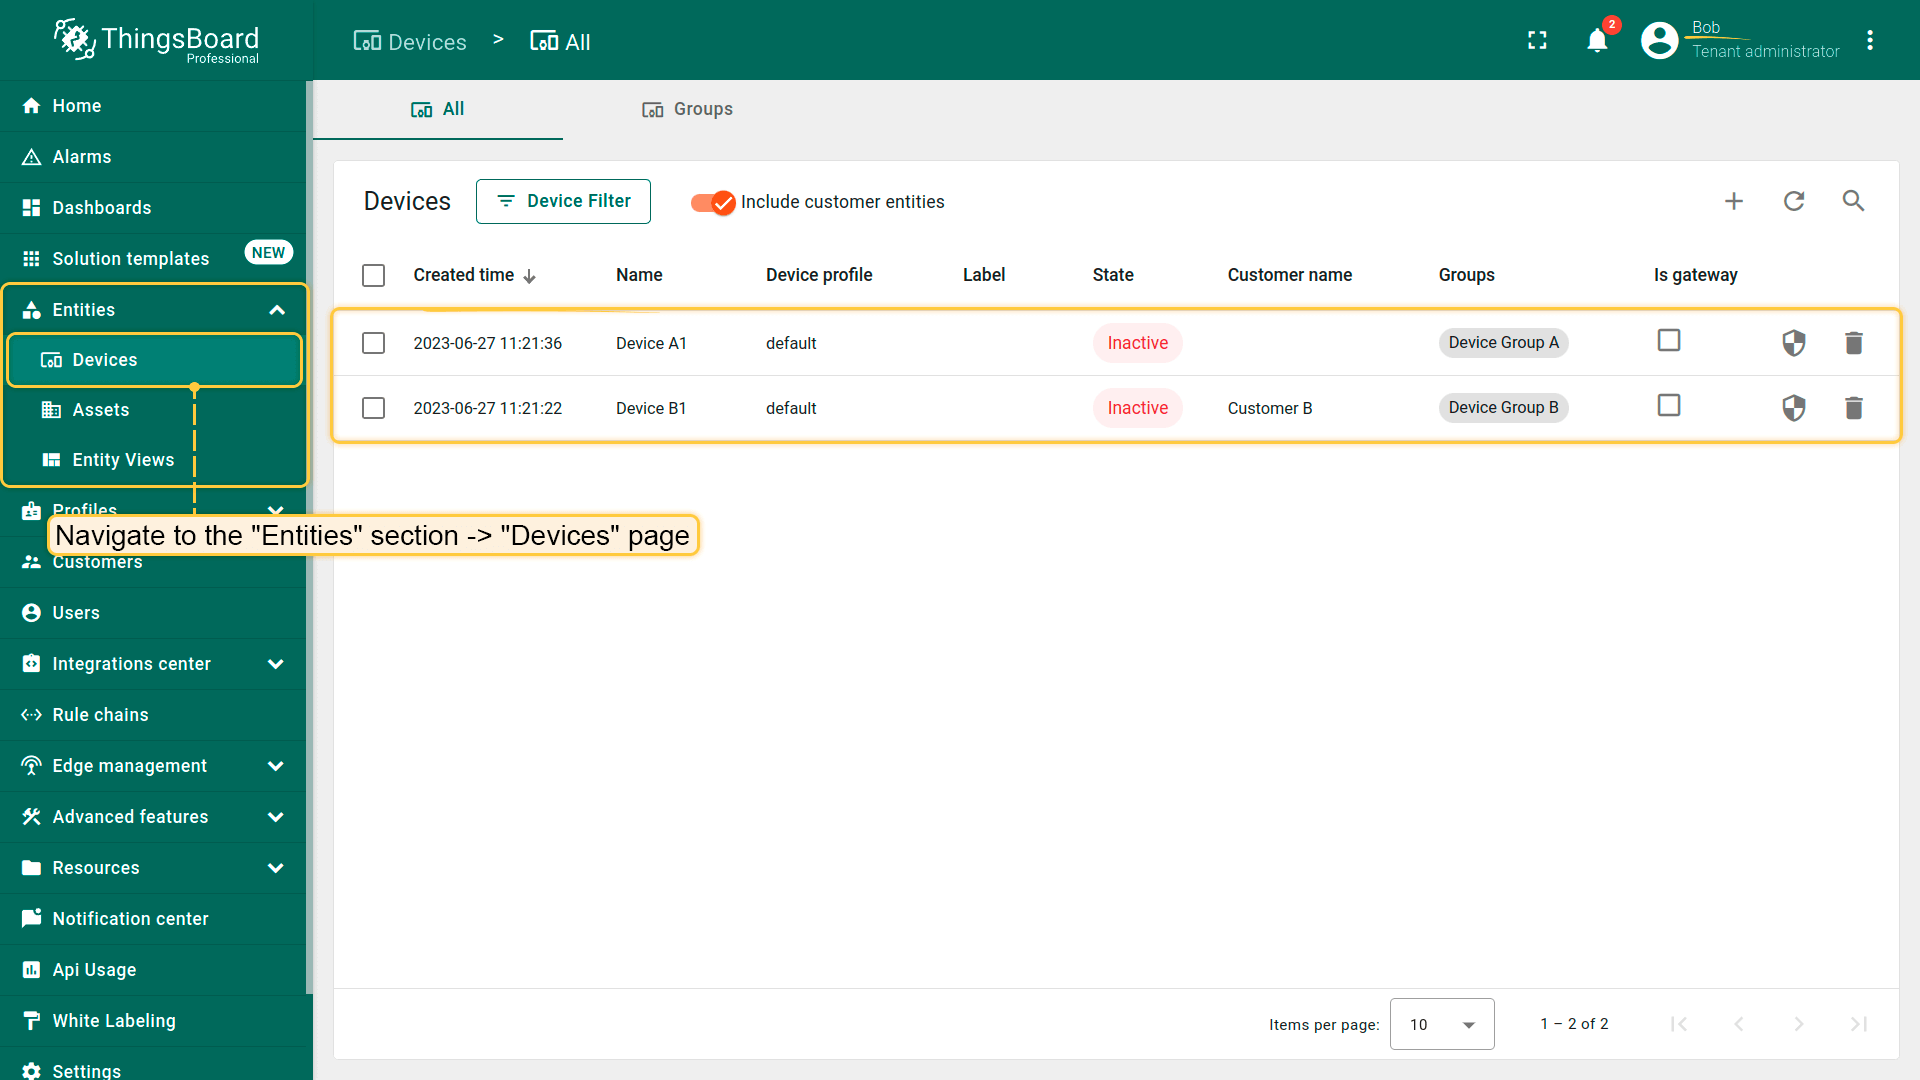
- 导航到"实体"部分->"设备"页面。您应该看到Bob可用的两个设备:设备A1和设备B1。
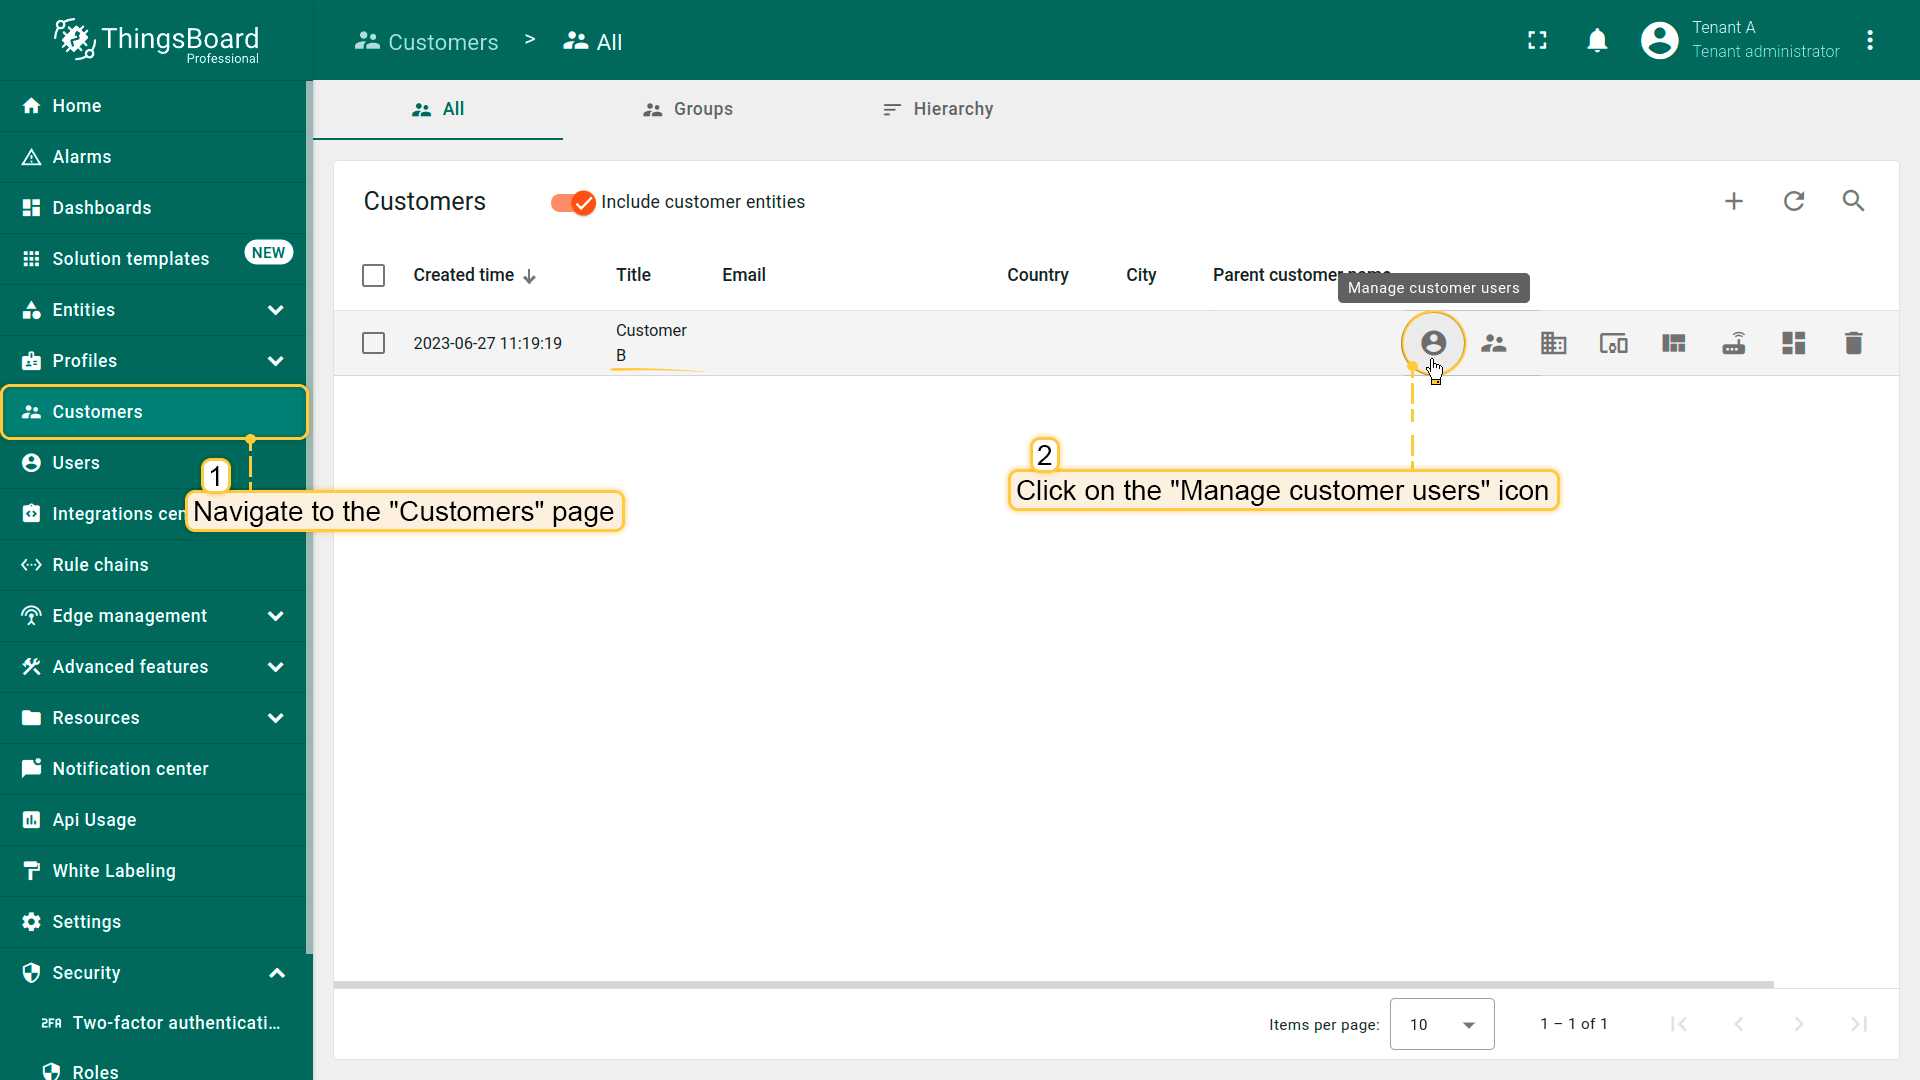
以Alice身份登录:
- 转到租户A的"客户"页面。然后转到客户B的"管理客户用户"页面。
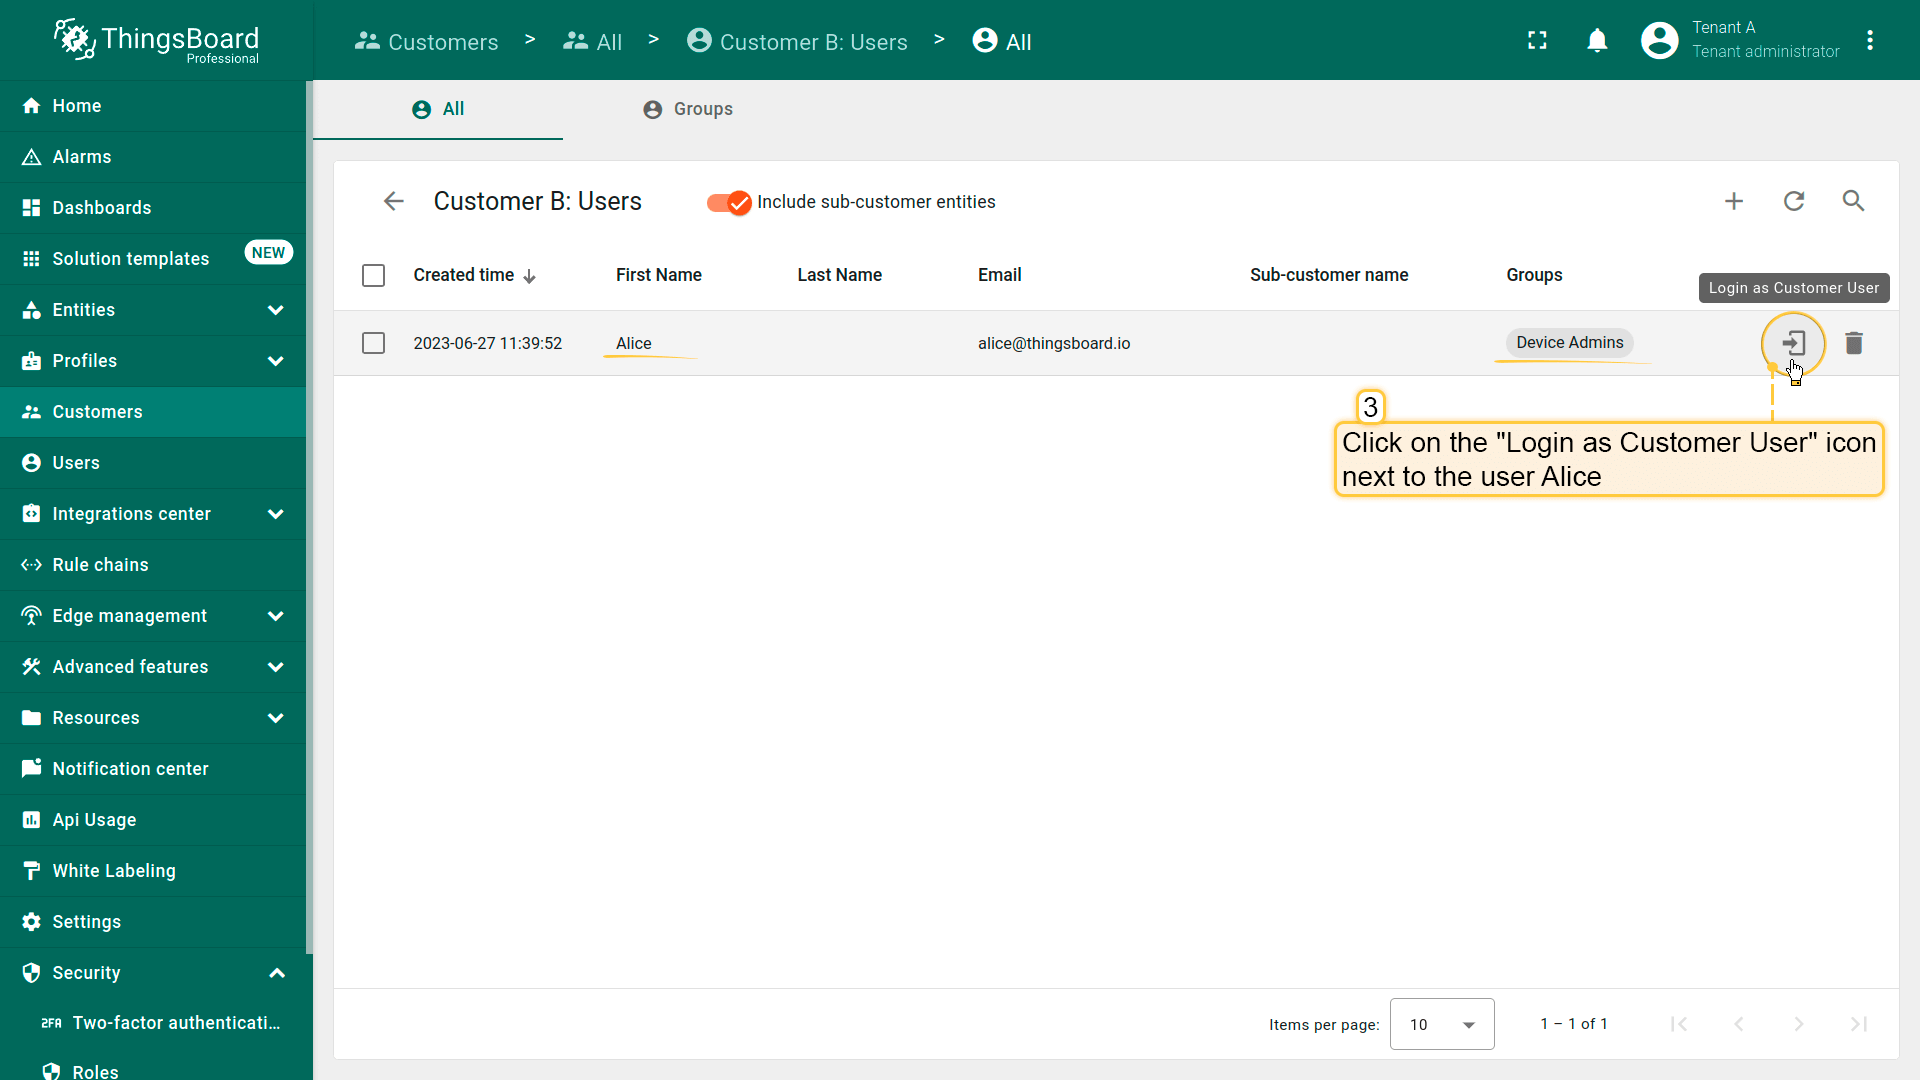
- 单击Alice账户旁边的"以客户用户身份登录"图标。
- 导航到"实体"部分->"设备"页面。用户Alice只能访问一个设备"设备B1"。
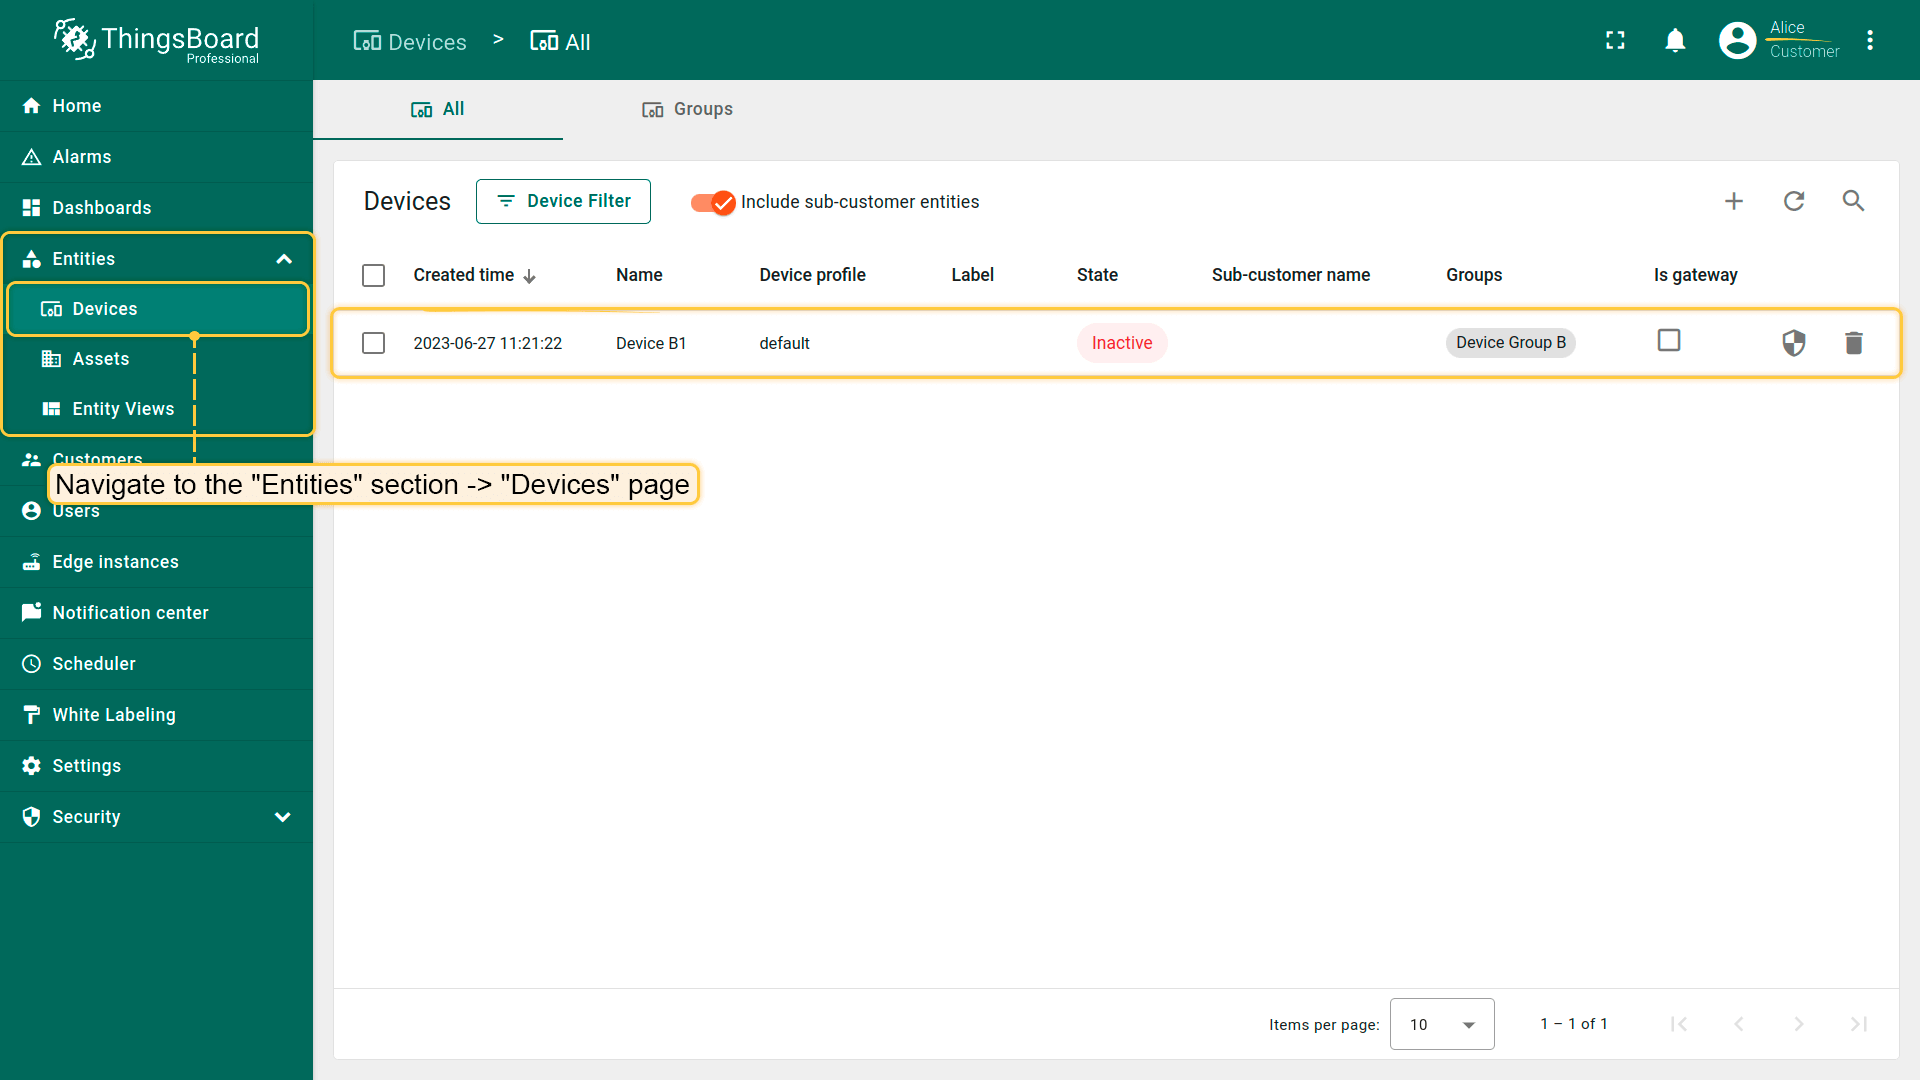
结果
- Alice和Bob均可访问Device B1。
- 仅Bob可访问Device A1(因其角色在租户级别分配)。
权限
下表列出了资源类型及对应的操作。
| 资源 | 操作 | 描述 |
|---|---|---|
| 全部 | “All”, “Add to Group”, “Assign to Tenant”, “Change Owner”, “Claim Device”, “Create”, “Delete”, “Impersonate”, “RPC Call”, “Read”, “Read Attributes”, “Read Credentials”, “Read Telemetry”, “Remove from Group”, “Share Group”, “Write”, “Write Attributes”, “Write Credentials”, “Write Telemetry” | 选择“全部”资源时,可对同一所有者下的所有实体执行所选操作。 |
| API使用状态 | “All”, “Read”, “Read Telemetry” | API使用布局位于ThingsBoard平台主菜单中,可查看平台完整统计信息。详见此处。 |
| 告警 | “All”, “Create”, “Read”, “Write” | 告警是当告警规则未被遵守时出现的特定严重级别的平台消息。可授予查看和管理告警的权限。详见告警。 |
| 资产 | “All”, “Change Owner”, “Create”, “Delete”, “Read”, “Read Attributes”, “Read Telemetry”, “Write”, “Write Attributes”, “Write Telemetry” | 资产是可与其它设备和资产关联的抽象物联网实体,例如工厂、现场、车辆等。详见资产。 |
| 资产组 | “All”, “Add to Group”, “Create”, “Delete”, “Read”, “Read Attributes”, “Read Telemetry”, “Remove from Group”, “Share Group”, “Write”, “Write Attributes”, “Write Telemetry” | 可将多个资产组合为资产组。详见实体组。 |
| 资产配置 | “All”, “Change Owner”, “Create”, “Delete”, “Read”, “Read Attributes”, “Read Telemetry”, “Write”, “Write Attributes”, “Write Telemetry” | 资产配置包含多个资产的通用设置。详见资产配置。 |
| 审计日志 | “All”和”Read” | 审计日志用于跟踪用户操作,可记录与主要实体(资产、设备、仪表板、规则等)相关的用户操作。详见审计日志。 |
| 计费 | “All”, “Read”和”Write” | 计费信息标签用于管理当前支付方式(信用卡或借记卡详情)及开票使用的公司名称、账单地址等计费信息。 |
| Blob实体 | “All”, “Change Owner”, “Create”, “Delete”, “Read”, “Read Attributes”, “Read Telemetry”, “Write”, “Write Attributes”, “Write Telemetry” | 二进制大对象实体用于报表功能,存储不同内容类型的仪表板状态快照。Blob实体信息包含名称、类型、内容类型等基本属性。对Blob实体的访问可用于以.pdf、png、jpeg等格式从仪表板生成报表。 |
| 转换器 | “All”, “Change Owner”, “Create”, “Delete”, “Read”, “Read Attributes”, “Read Telemetry”, “Write”, “Write Attributes”, “Write Telemetry” | 数据转换器是平台集成功能的一部分,包括上行和下行数据转换器。角色创建时会同时包含这两类转换器的权限。详见数据转换器。 |
| 客户 | “All”, “Change Owner”, “Create”, “Delete”, “Read”, “Read Attributes”, “Read Telemetry”, “Write”, “Write Attributes”, “Write Telemetry” | 客户是购买或使用租户设备和资产的独立业务实体、个人或组织。详见客户。 |
| 客户组 | “All”, “Add to Group”, “Create”, “Delete”, “Read”, “Read Attributes”, “Read Telemetry”, “Remove from group”, “Share group”, “Write”, “Write Attributes”, “Write Telemetry” | 租户管理员可创建客户组并分配具有特定权限的角色。对客户或客户组的访问权限使用户可查看上层级别的数据,适用于数据聚合等场景。详见实体组。 |
| 仪表板 | “All”, “Change Owner”, “Create”, “Delete”, “Read”, “Read Attributes”, “Read Telemetry”, “Write”, “Write Attributes”, “Write Telemetry” | 仪表板是特定数据的可视化展示,可从设备、资产等多种实体展示数据,并可分配给客户。详见仪表板。 |
| 仪表板组 | “All”, “Add to Group”, “Create”, “Delete”, “Read”, “Read Attributes”, “Read Telemetry”, “Remove from Group”, “Share Group”, “Write”, “Write Attributes”, “Write Telemetry” | 可将多个仪表板组合为仪表板组,并为每个实体创建带权限的角色。详见实体组。 |
| 设备 | “All”, “Assign to Tenant”, “Change Owner”, “Claim Devices”, “Create”, “Delete”, “RPC Call”, “Read”, “Read Attributes”, “Read Credentials”, “Read Telemetry”, “Write”, “Write Attributes”, “Write Credentials”, “Write Telemetry” | 设备是基本的物联网实体,可产生遥测数据并处理RPC命令,例如传感器、执行器、开关及其他仪表。详见设备。 |
| 设备组 | “All”, “Add to Group”, “Create”, “Delete”, “Read”, “Read Attributes”, “Read Telemetry”, “Remove from Group”, “Share Group”, “Write”, “Write Attributes”, “Write Telemetry” | 可将多个设备组合为设备组。详见实体组。 |
| 设备配置 | “All”, “Change Owner”, “Create”, “Delete”, “Read”, “Read Attributes”, “Read Telemetry”, “Write”, “Write Attributes”, “Write Telemetry” | 设备配置包含多个设备的通用设置。详见设备配置。 |
| Edge | “All”, “Change Owner”, “Create”, “Delete”, “Read”, “Read Attributes”, “Read Telemetry”, “Write”, “Write Attributes”, “Write Telemetry” | ThingsBoard Edge是ThingsBoard平台的扩展,用于分布式物联网环境中的本地数据处理与设备管理,支持无云连接时的离线运行。详见Edge。 |
| Edge组 | “All”, “Add to Group”, “Create”, “Delete”, “Read”, “Read Attributes”, “Read Telemetry”, “Remove from Group”, “Share Group”, “Write”, “Write Attributes”, “Write Telemetry” | 可将多个Edge实例组合为Edge组。详见实体组。 |
| 实体视图 | “All”, “Change Owner”, “Create”, “Delete”, “Read”, “Read Attributes”, “Read Telemetry”, “Write”, “Write Attributes”, “Write Telemetry” | 实体视图是ThingsBoard的功能,用于限制向客户暴露的设备或资产遥测与属性的程度。详见实体视图。 |
| 实体视图组 | “All”, “Add to Group”, “Create”, “Delete”, “Read”, “Read Attributes”, “Read Telemetry”, “Remove from Group”, “Share Group”, “Write”, “Write Attributes”, “Write Telemetry” | 可将多个实体视图组合为实体视图组。详见实体组。 |
| 组权限 | “All”, “Create”, “Delete”, “Read”, “Write” | 组权限是用户组、实体组(可选)与组角色之间的映射,即用户对实体组享有的权限。例如:用户组A对设备组B具有READ权限。 |
| 集成 | “All”, “Change Owner”, “Create”, “Delete”, “Read”, “Read Attributes”, “Read Telemetry”, “Write”, “Write Attributes”, “Write Telemetry” | 集成是将ThingsBoard与其他系统或设备连接并交互以交换和管理数据的过程。详见集成。 |
| 通知 | “All”, “Create”, “Delete”, “Read”, “Write” | 通知是向用户传达特定事件或更新的消息,可通过Web、短信、邮件或Slack等多种方式发送。详见通知。 |
| OTA包 | “All”, “Change Owner”, “Create”, “Delete”, “Read”, “Read Attributes”, “Read Telemetry”, “Write”, “Write Attributes”, “Write Telemetry” | OTA包是包含OTA包主要信息和数据的重量级对象,用于上传和分发空中升级(OTA)到设备。租户管理员可上传固件或软件包至OTA仓库。详见OTA包。 |
| 个人资料 | “All”, “Read”, “Write”, “Create”, “Delete” | 拥有这些权限后,用户可编辑其个人资料信息并修改ThingsBoard实例的登录密码。 |
| 队列 | “All”, “Change Owner”, “Create”, “Delete”, “Read”, “Read Attributes”, “Read Telemetry”, “Write”, “Write Attributes”, “Write Telemetry” | 拥有这些权限后,用户可编辑队列或创建新队列,并从列表中选择现有队列。详见队列。 |
| 资源 | “All”, “Change Owner”, “Create”, “Delete”, “Read”, “Read Attributes”, “Read Telemetry”, “Write”, “Write Attributes”, “Write Telemetry” | 资源库用于存储和组织文件,便于高效管理并提高复用性。 |
| 角色 | “All”, “Change Owner”, “Create”, “Delete”, “Read”, “Read Attributes”, “Read Telemetry”, “Write”, “Write Attributes”, “Write Telemetry” | ThingsBoard中的角色定义一组权限和访问权利,用于限制或授予用户基于角色执行特定操作、访问功能与数据的能力。 |
| 规则链 | “All”, “Change Owner”, “Create”, “Delete”, “Read”, “Read Attributes”, “Read Telemetry”, “Write”, “Write Attributes”, “Write Telemetry” | ThingsBoard中的规则链是应用于来自设备或其他源的数据的规则与操作序列,可自动化数据处理、基于条件做出决策,并执行通知、设备状态变更等操作。规则链可配置为处理各类数据的路由,简化物联网逻辑的开发与部署。详见规则链。 |
| 调度器事件 | “All”, “Change Owner”, “Create”, “Delete”, “Read”, “Read Attributes”, “Read Telemetry”, “Write”, “Write Attributes”, “Write Telemetry” | 调度器支持以灵活的计划配置安排各类事件,调度器事件页面显示当前已配置的调度器事件。详见调度器事件。 |
| 租户 | “All”, “Change Owner”, “Create”, “Delete”, “Read”, “Read Attributes”, “Read Telemetry”, “Write”, “Write Attributes”, “Write Telemetry” | ThingsBoard租户是在平台内拥有独立空间以管理其设备和数据的个人或组织。详见用户。 |
| 用户 | “All”, “Change Owner”, “Create”, “Delete”, “Read”, “Read Attributes”, “Read Telemetry”, “Write”, “Write Attributes”, “Write Telemetry” | 用户是可以登录ThingsBoard Web界面、执行REST API调用并在具备权限时访问设备、资产及其他实体的实体。详见用户。 |
| 用户组 | “All”, “Add to Group”, “Create”, “Delete”, “Read”, “Read Attributes”, “Read Telemetry”, “Remove from Group”, “Share Group”, “Write”, “Write Attributes”, “Write Telemetry” | 用户组是拥有相同权限、同一层级的用户集合。单个用户可同时属于多个用户组。详见实体组。 |
| 版本控制 | “All”, “Delete”, “Read”, “Write” | ThingsBoard版本控制服务支持使用Git导出和恢复ThingsBoard实体。详见版本控制。 |
| 白标 | “All”, “Read”, “Write” | 白标权限允许在短时间内配置公司或产品Logo及配色方案。详见白标。 |
| 组件类型与组件包 | “All”, “Create”, “Delete”, “Read”, “Write” | ThingsBoard中有多种组件类型,每种组件定义代表一种特定类型的组件。组件按用途分组为组件包。详见组件。 |
组角色
什么是组角色?
组角色定义特定用户组对特定实体组的权限集合。
“谁 → 对什么 → 拥有何权限”的关联通过GPE(组权限条目)建立,即用户组、实体组与组角色之间的桥接对象。
示例
下面通过示例理解组角色的工作方式。

示例场景:
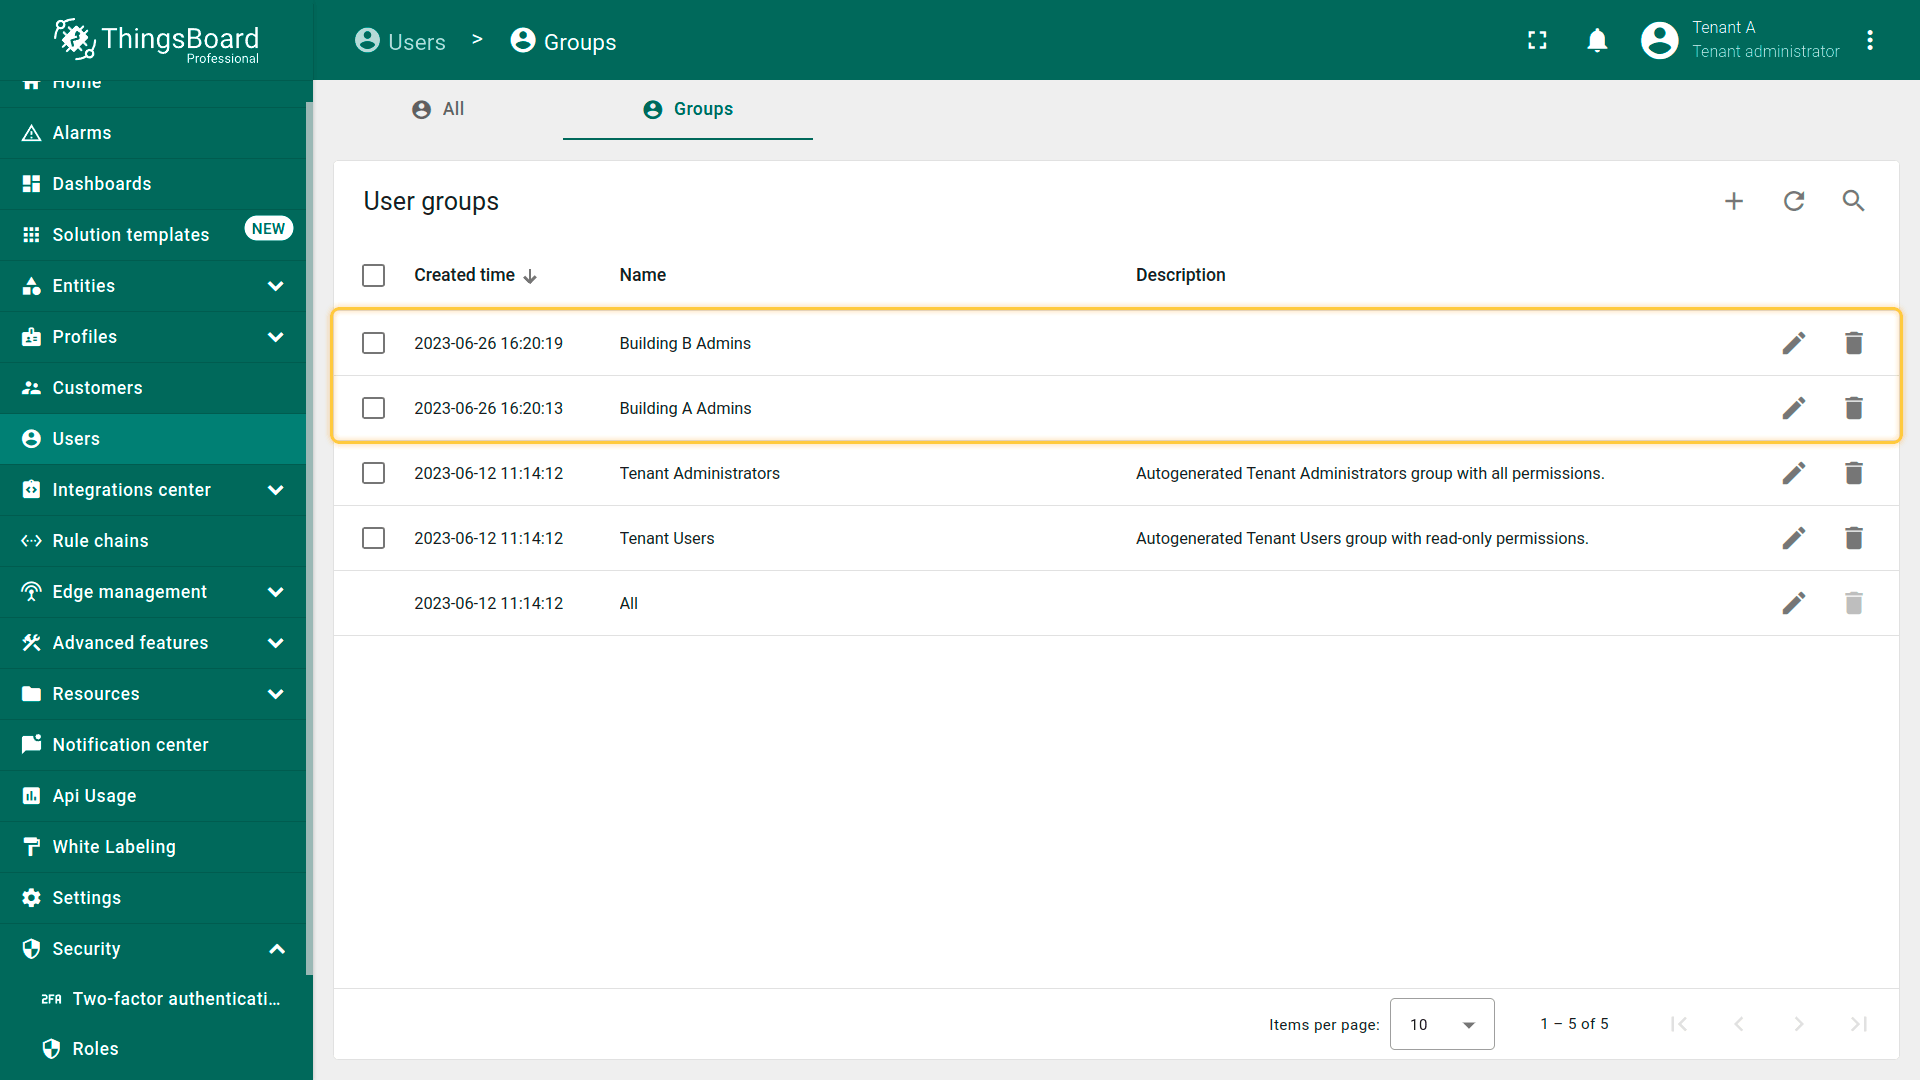
- 用户组:
- “Building A Admins”(包含Alice)
- “Building B Admins”(包含Bob)
- 设备组:
- “Building A”(含Device A1)
- “Building B”(含Device B1)

示例目标:
- 授予Bob(Building B Admins)对“Building B”组内设备的读写权限,且无法访问“Building A”组内的设备。
- 授予Alice(Building A Admins)对“Building A”组内设备的读写权限,且无法访问“Building B”组内的设备。
步骤1 — 创建组角色
- 创建具有读写操作(针对设备/设备组)的组角色。

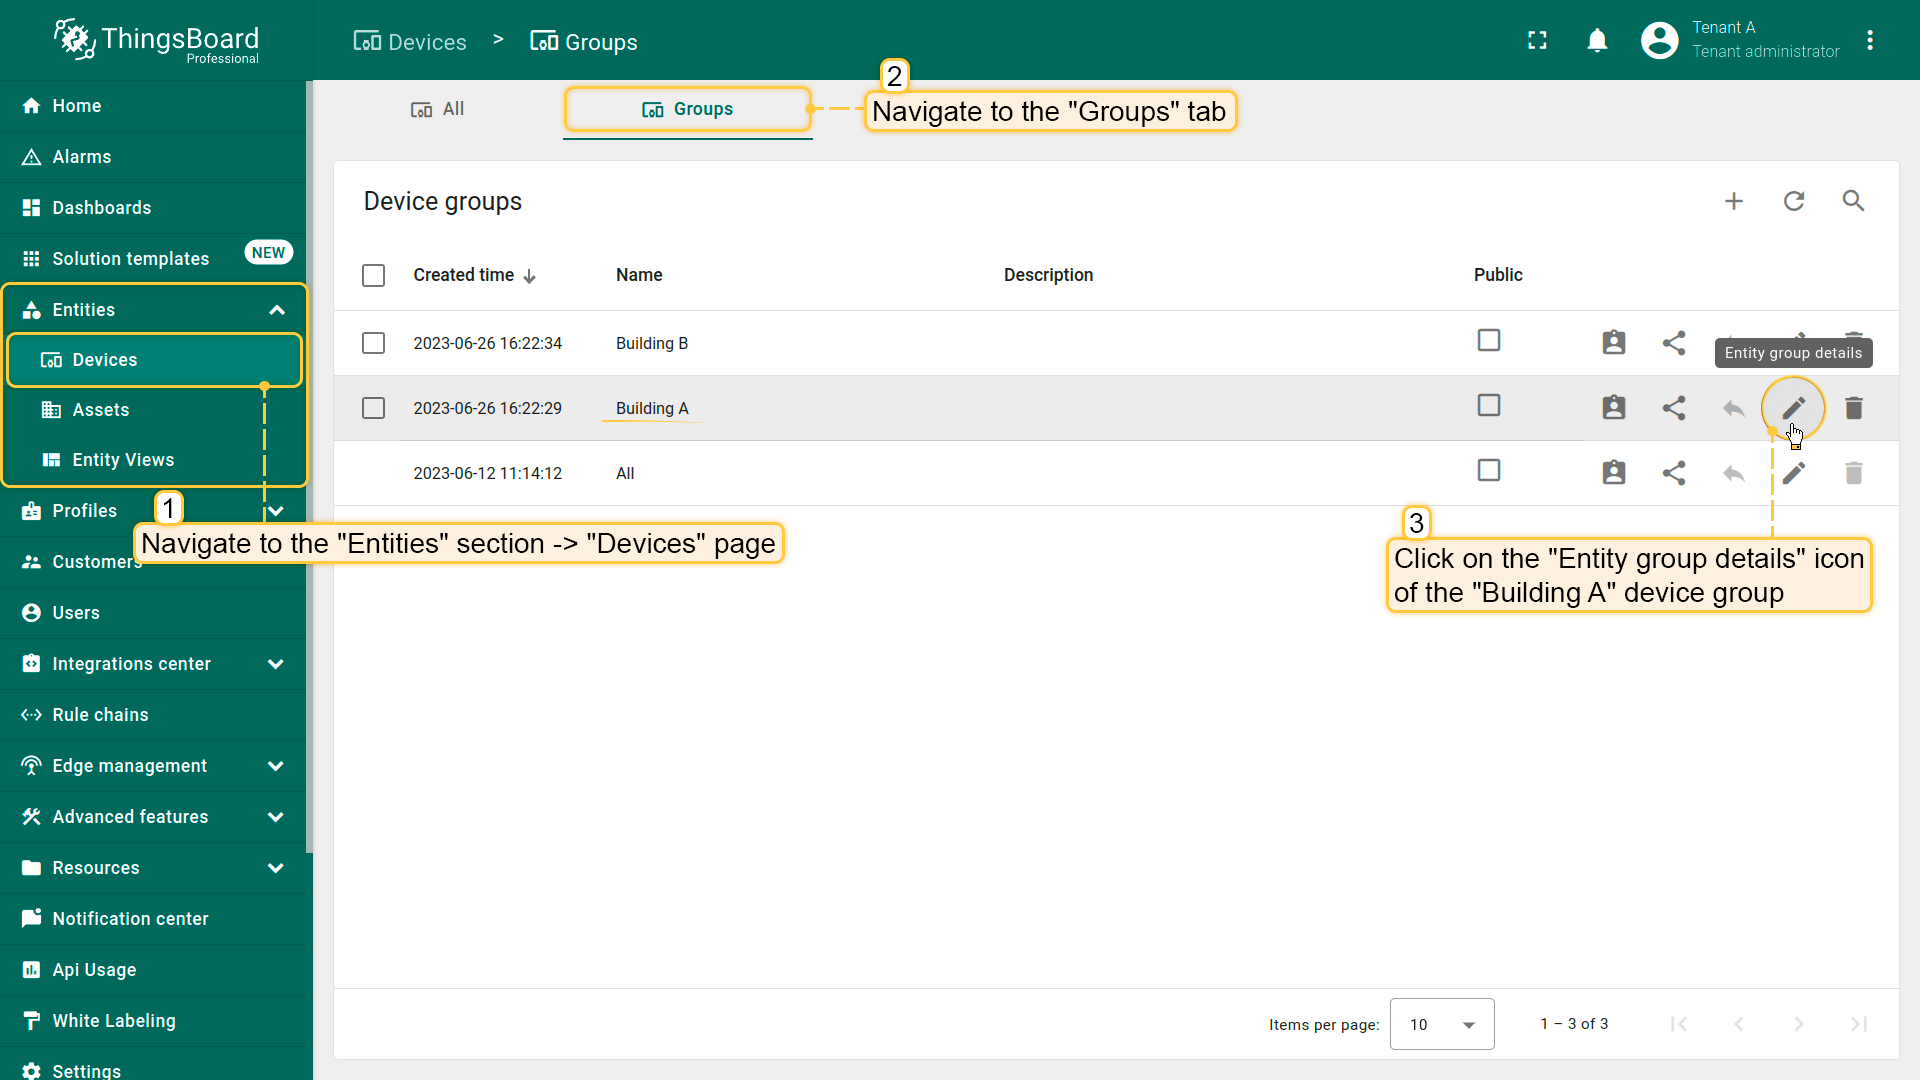
步骤2 — 将组角色分配给“Building A”设备组
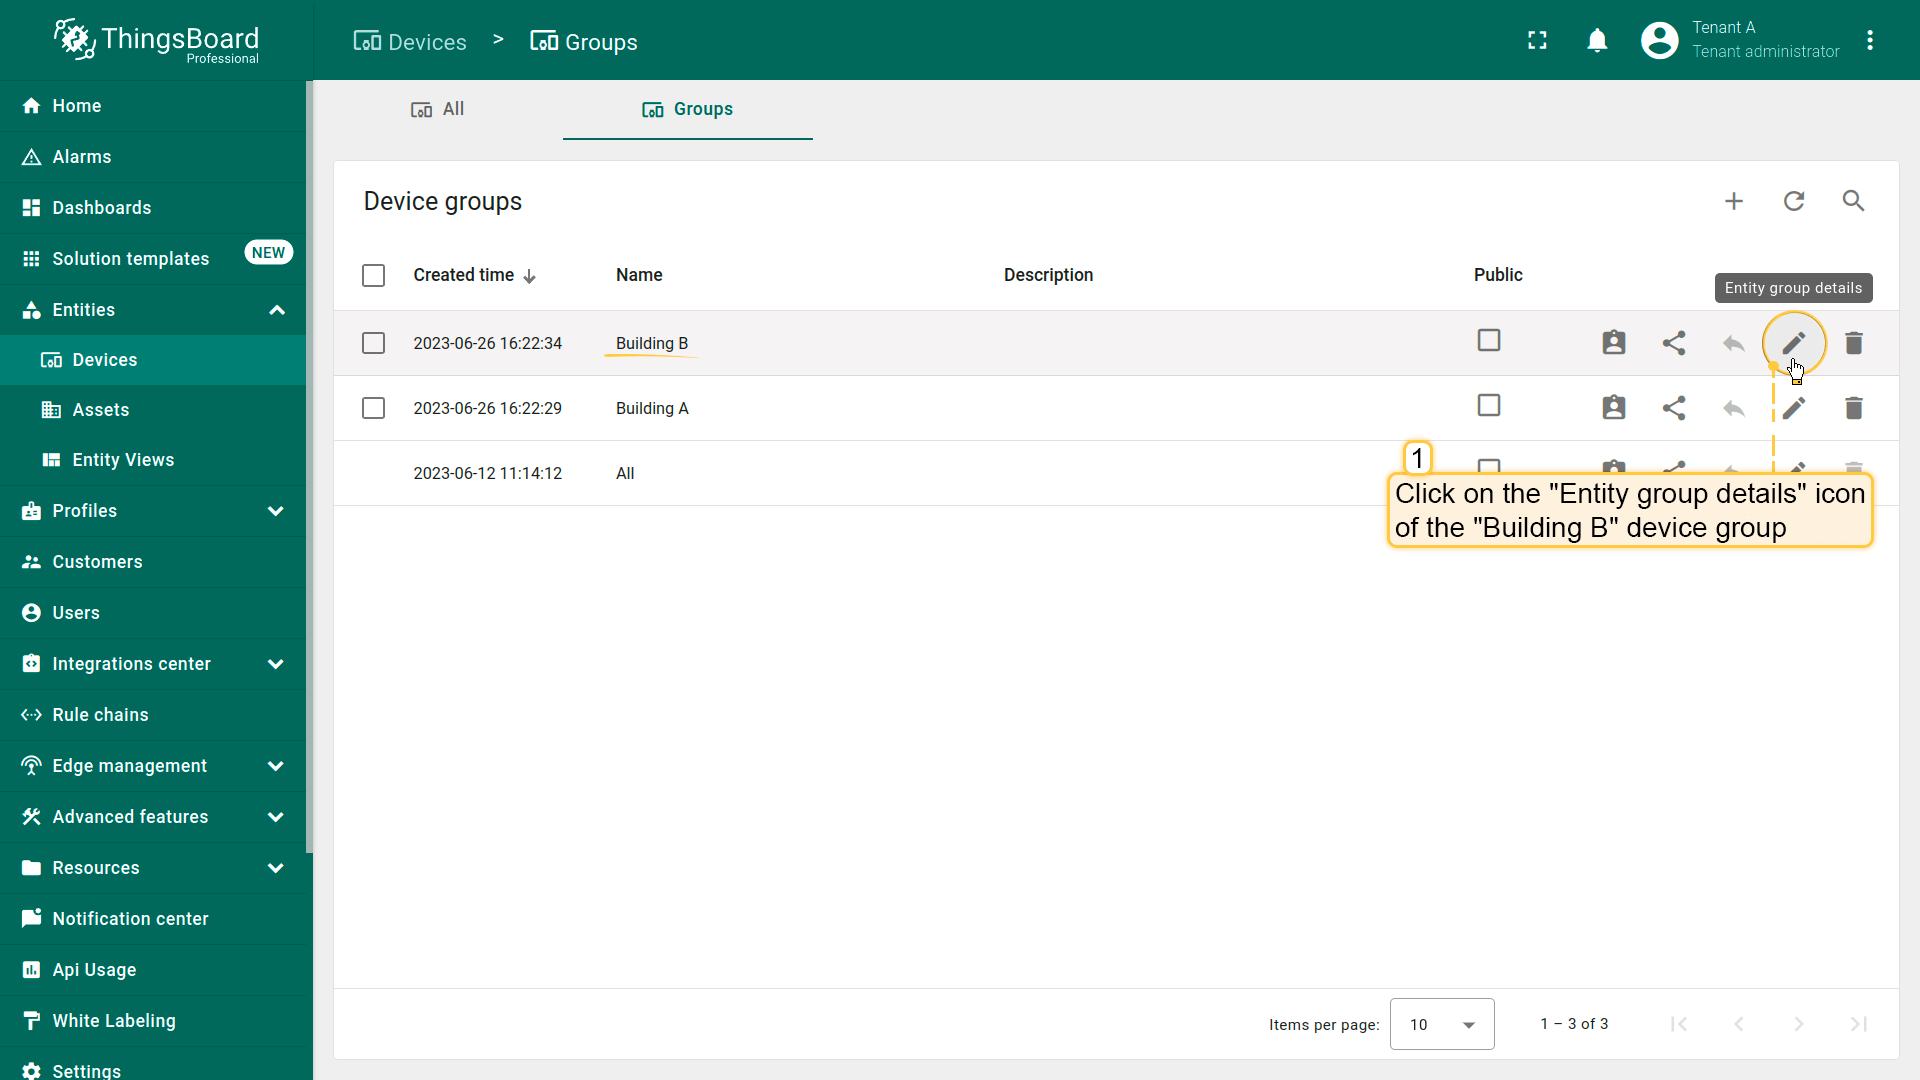
- 进入“设备” → “组”标签。
- 打开“Building A”的实体组详情。
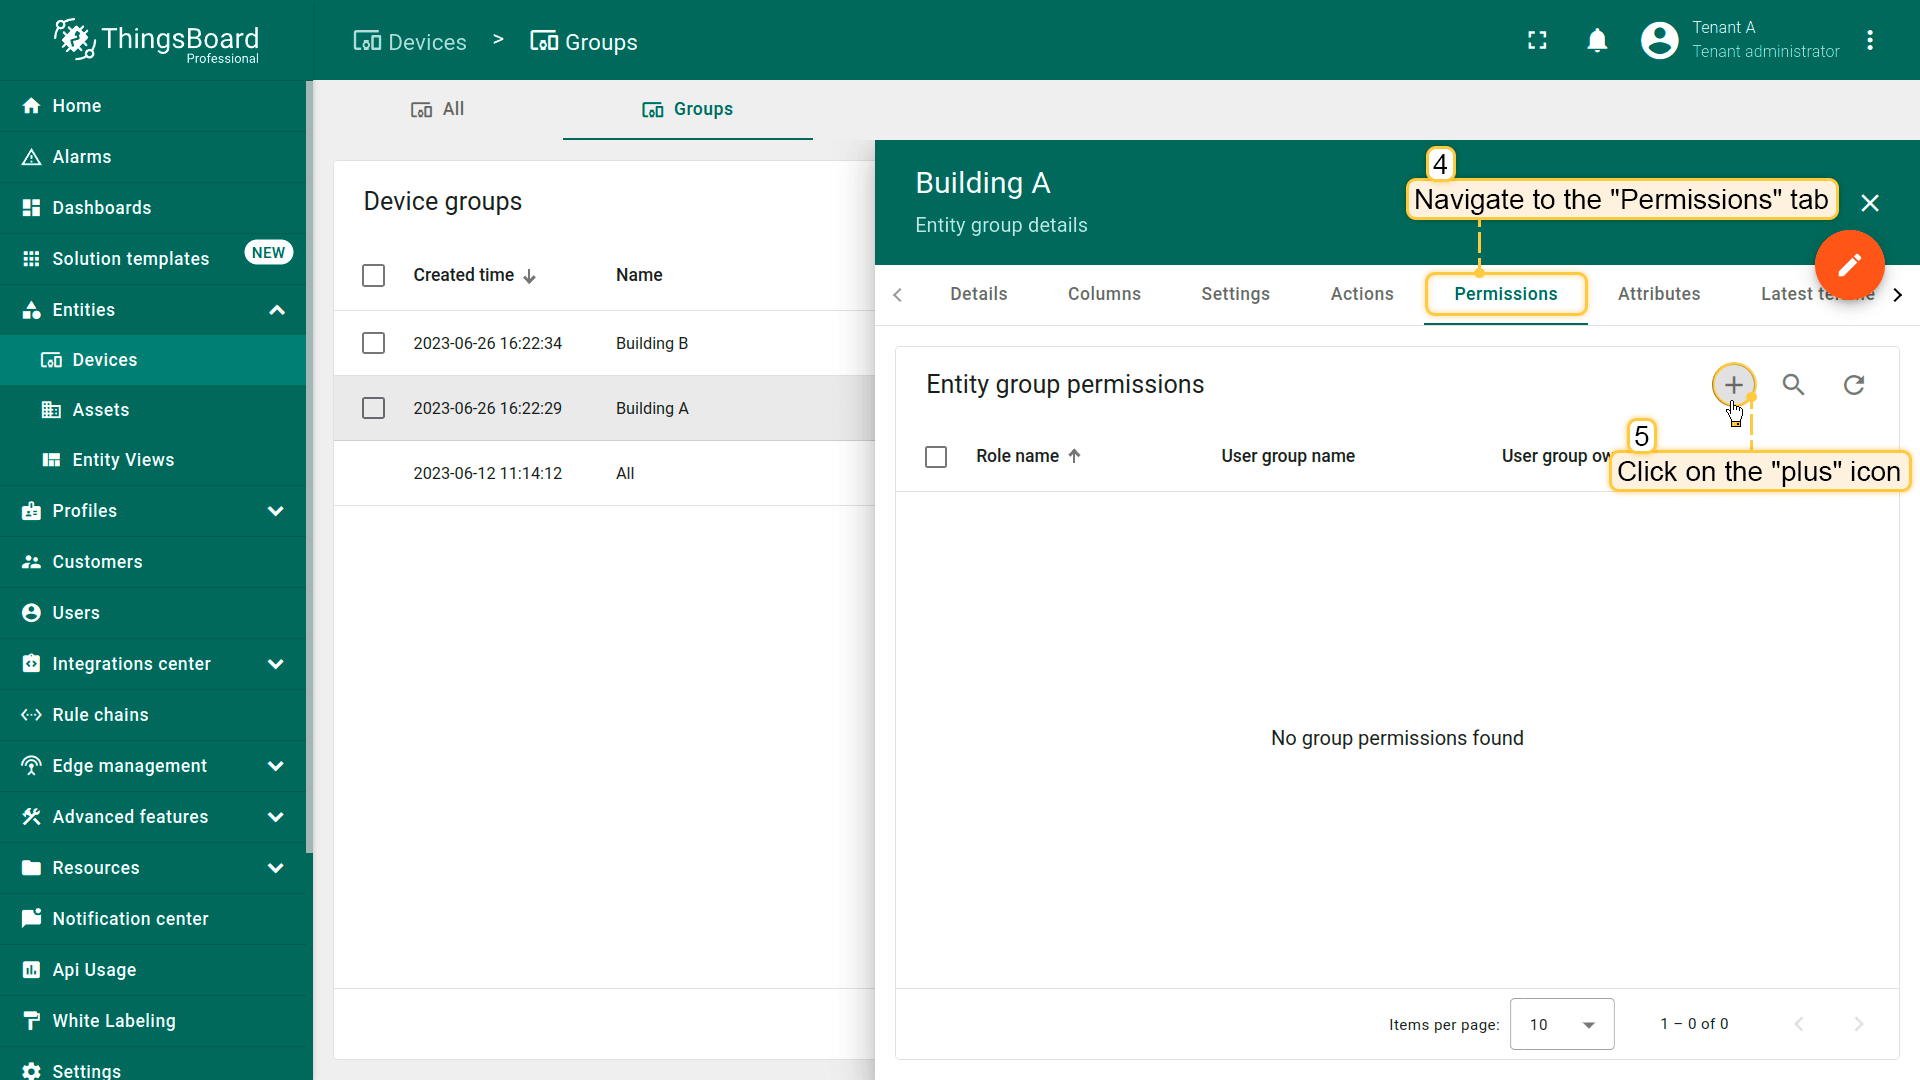
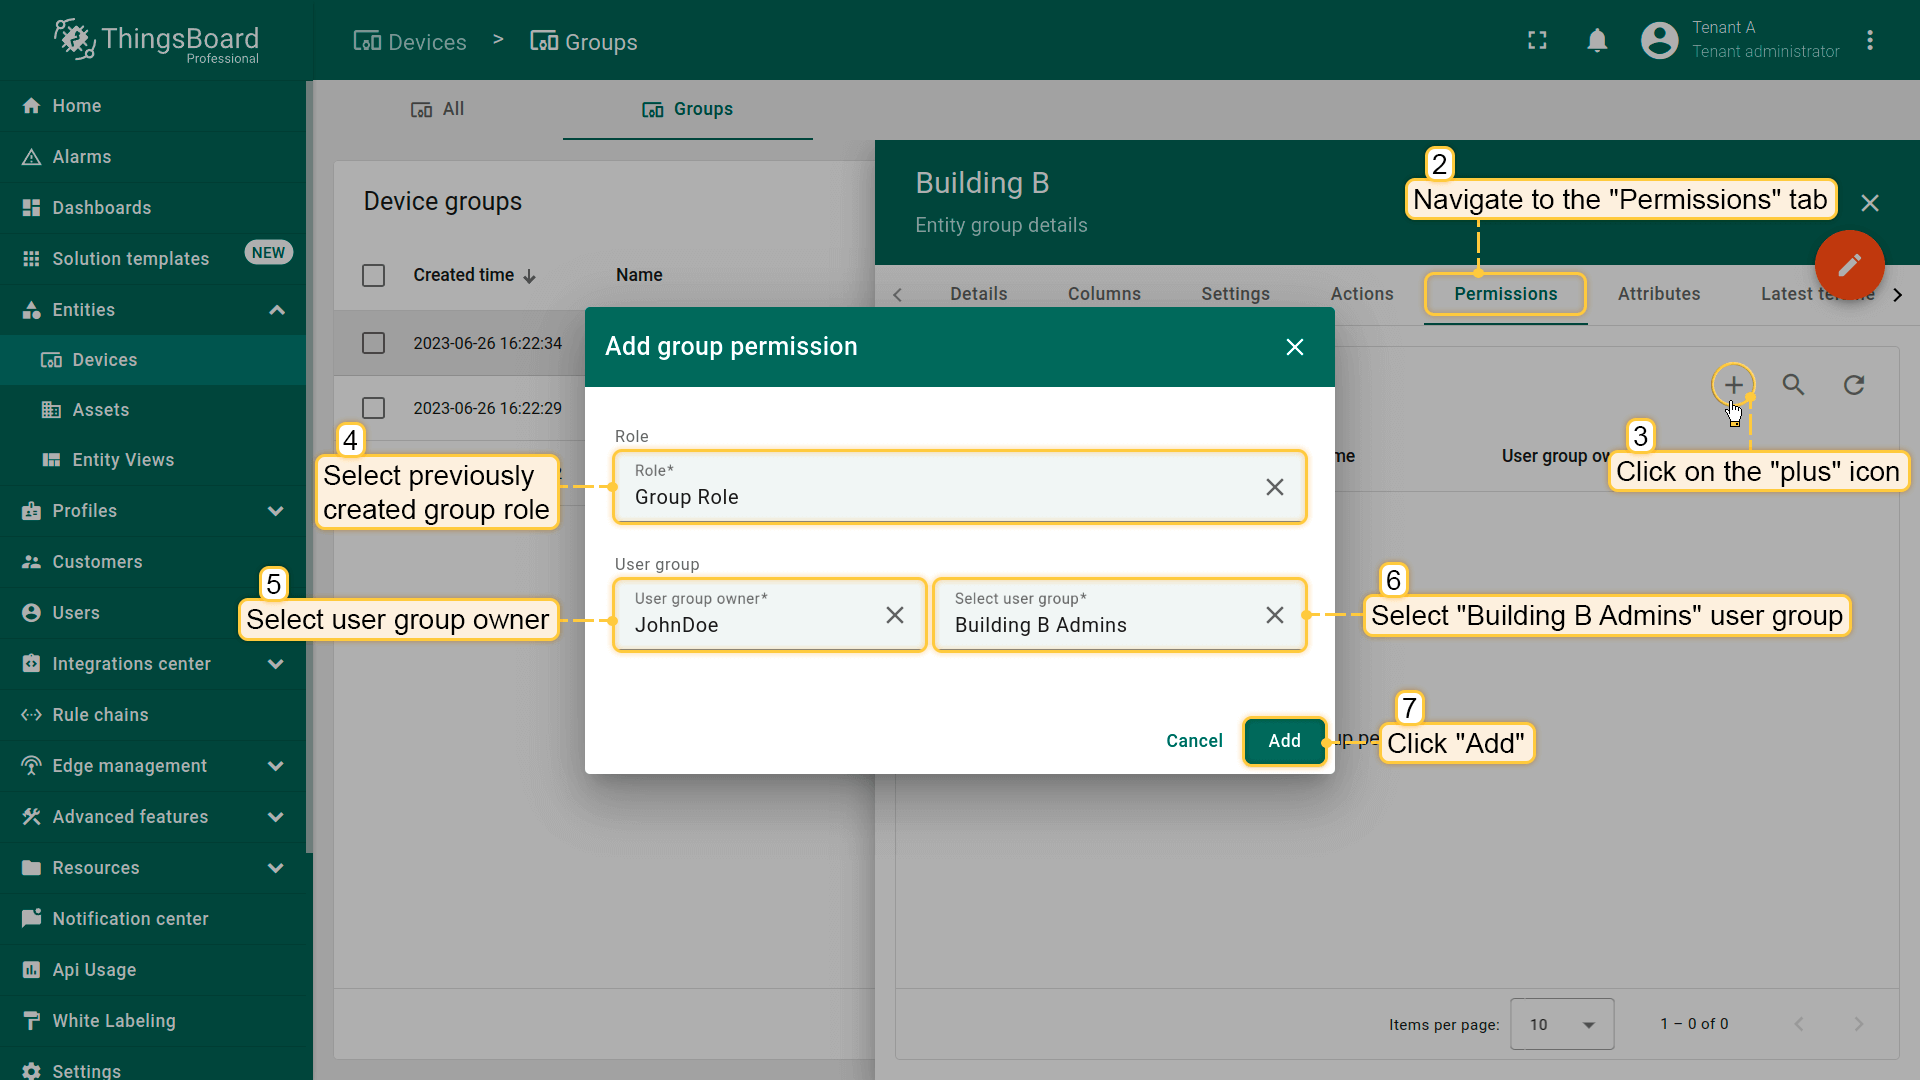
- 在“权限”标签中点击“+”。
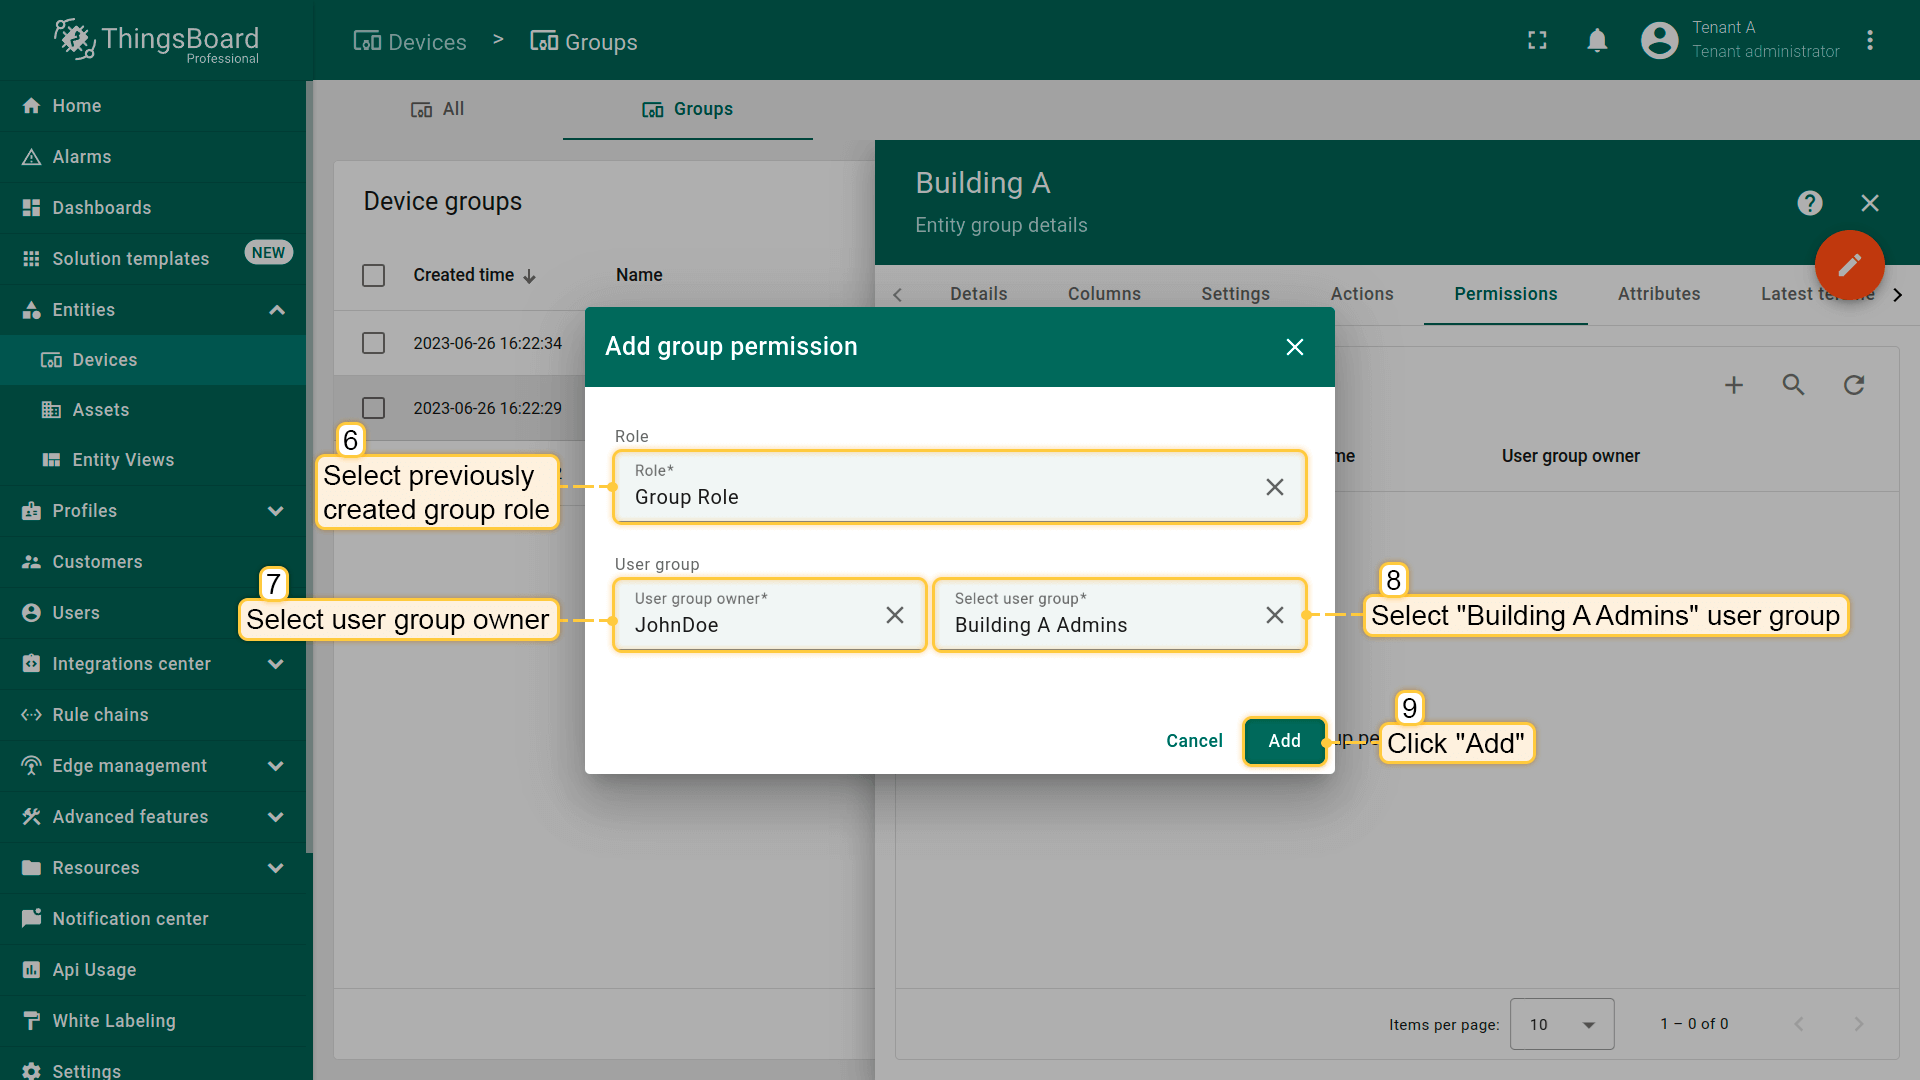
- 选择已创建的角色,设置所有者,选择用户组“Building A Admins”,点击“添加”。
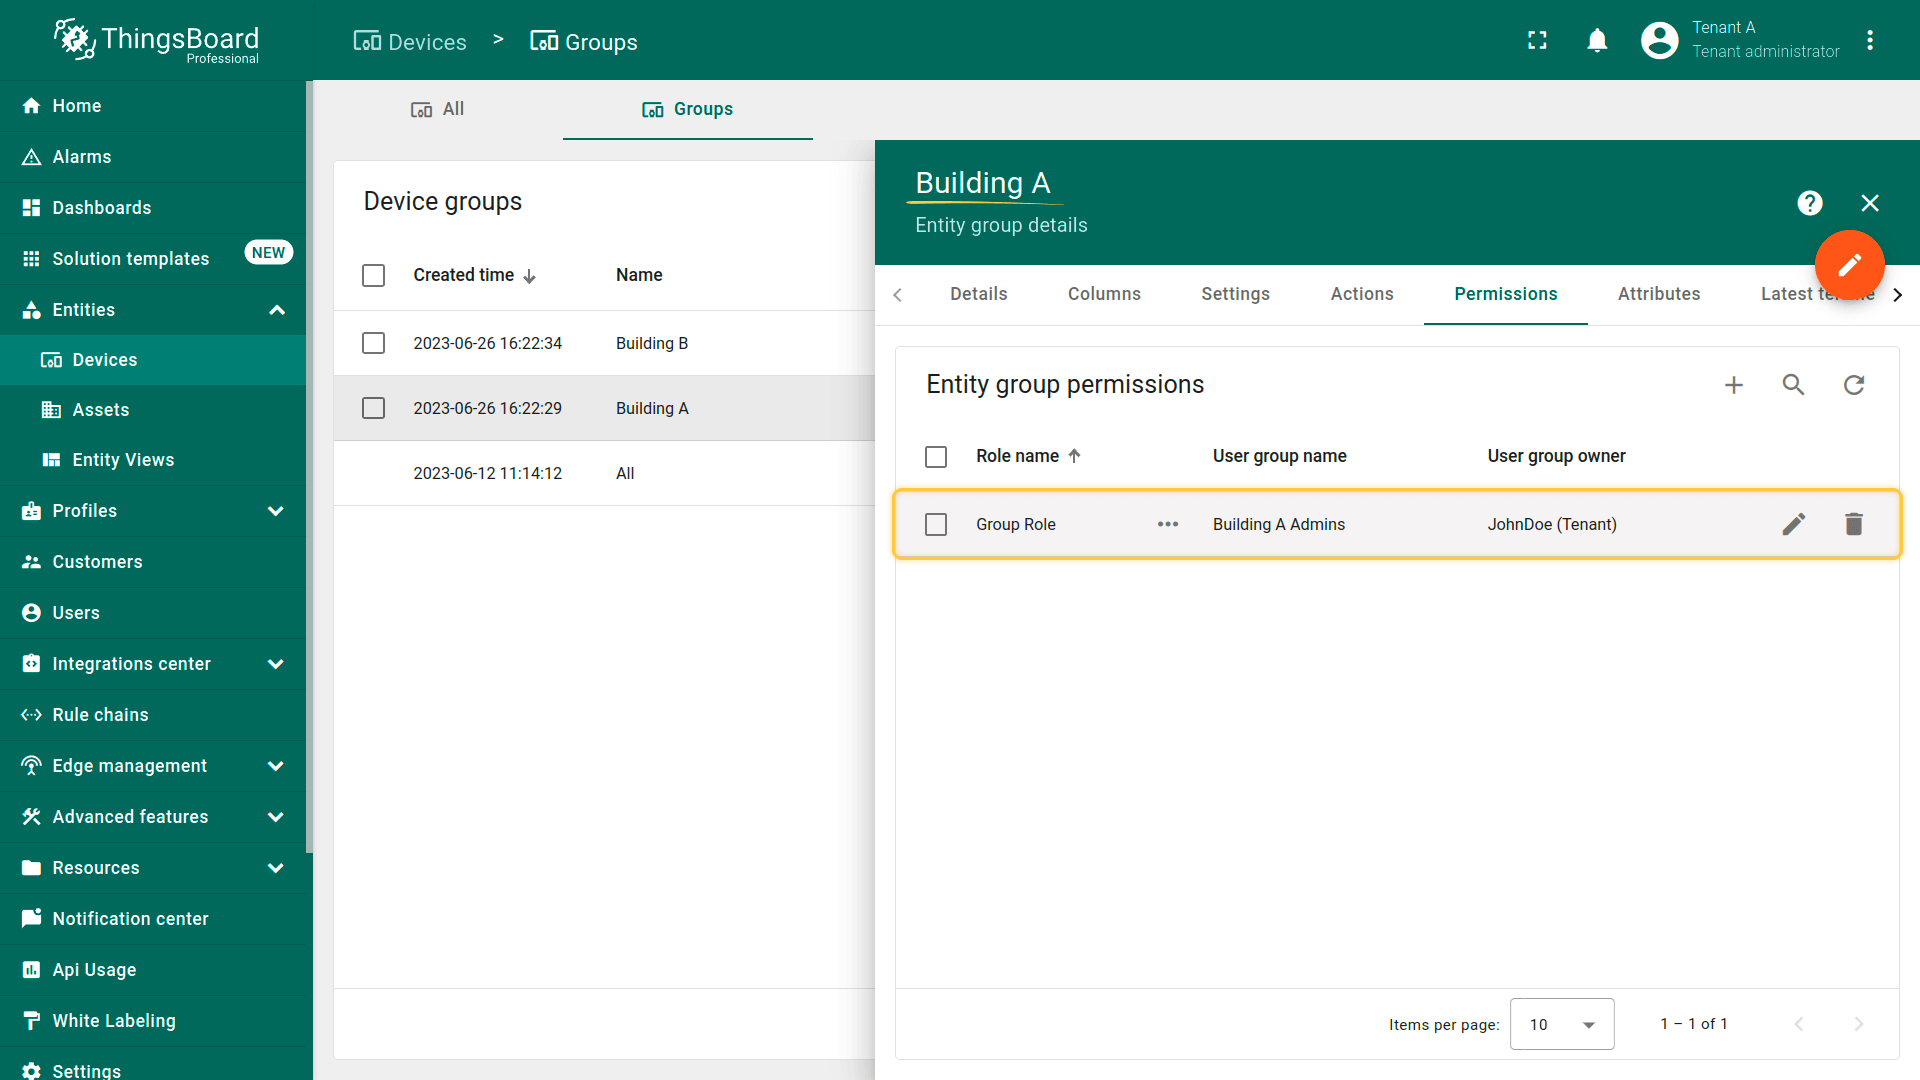
权限已分配。
步骤3 — 将组角色分配给“Building B”设备组
对“Building B”设备组重复相同操作:
- 在“Building B”设备组详情 → “权限”标签 → 点击“+”。
- 选择同一角色,设置所有者,选择用户组“Building B Admins”,点击“添加”。
权限已分配。

验证访问
因此,用户Alice及“Building A Admins”组内所有用户仅能访问Device A1。以Alice身份登录以验证:
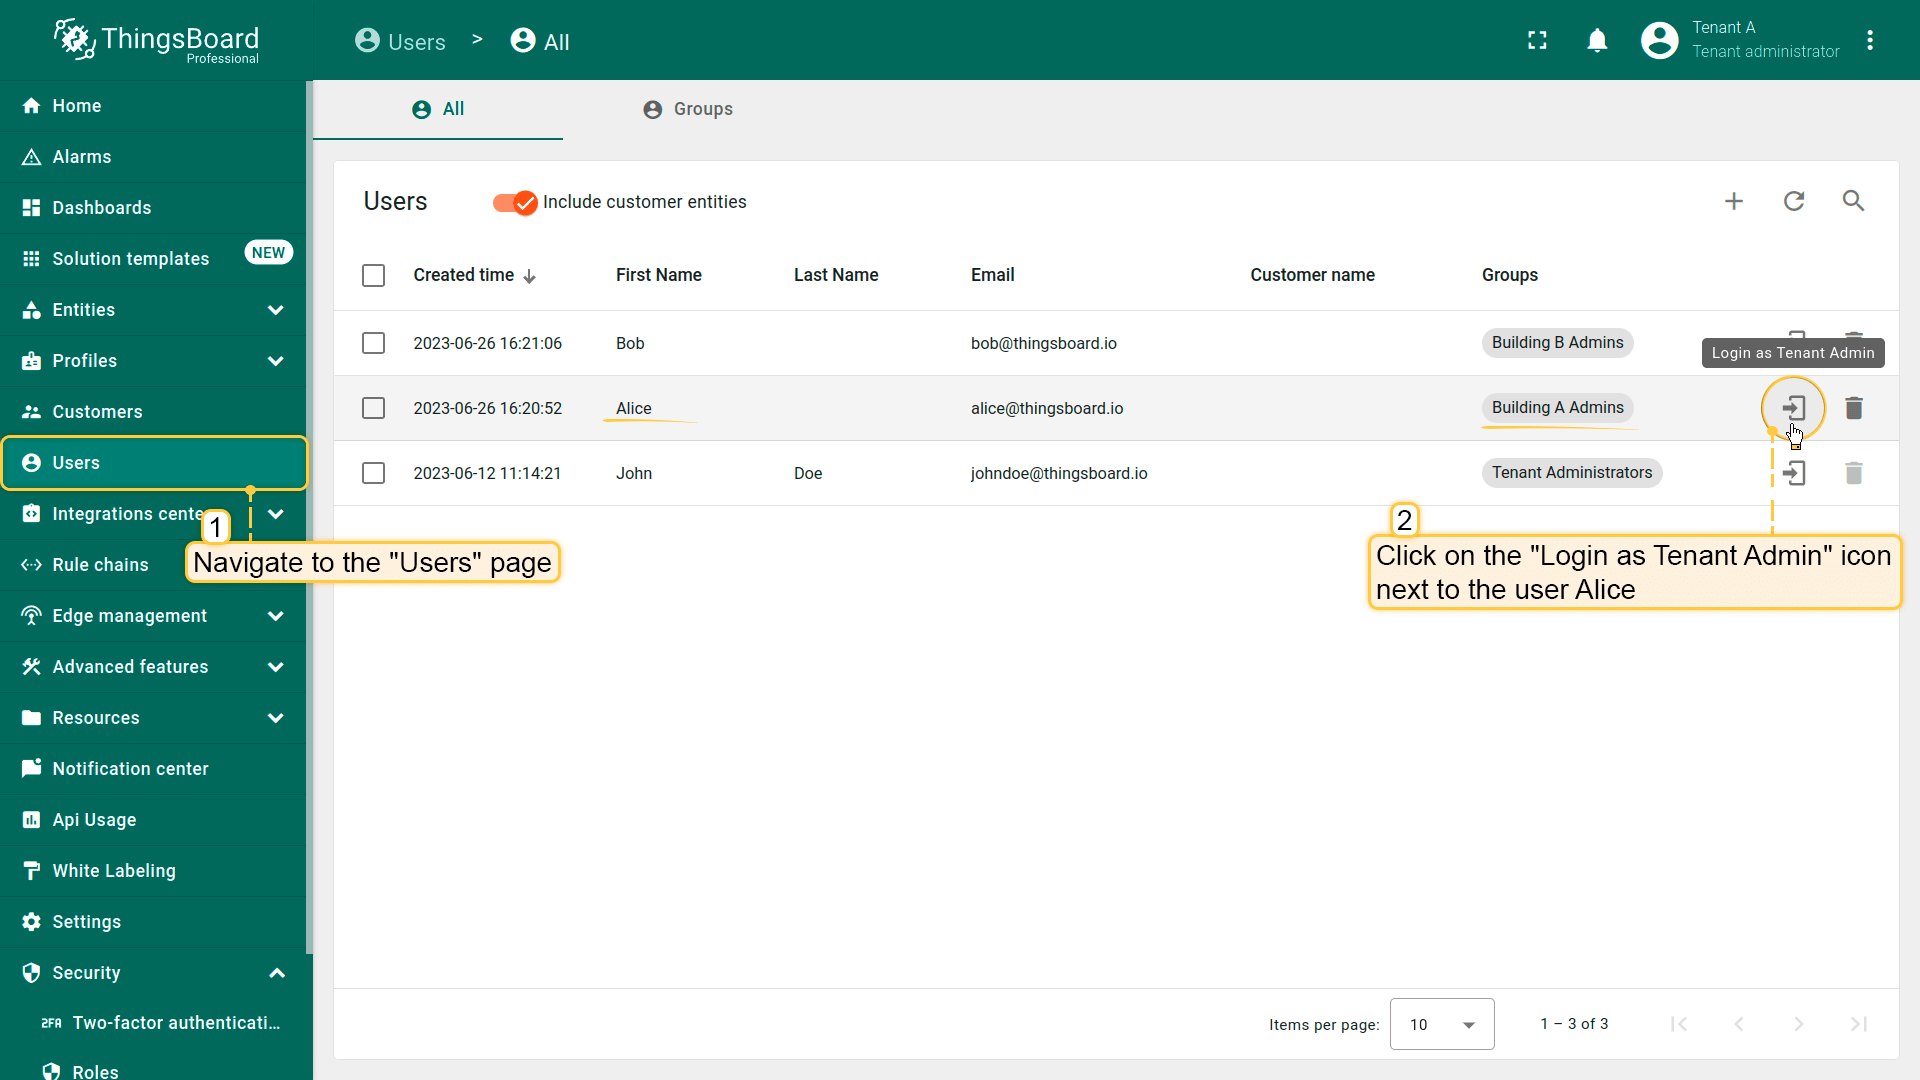
- 进入租户A的“用户”页面。
- 在Alice账号旁点击“以租户管理员身份登录”图标。
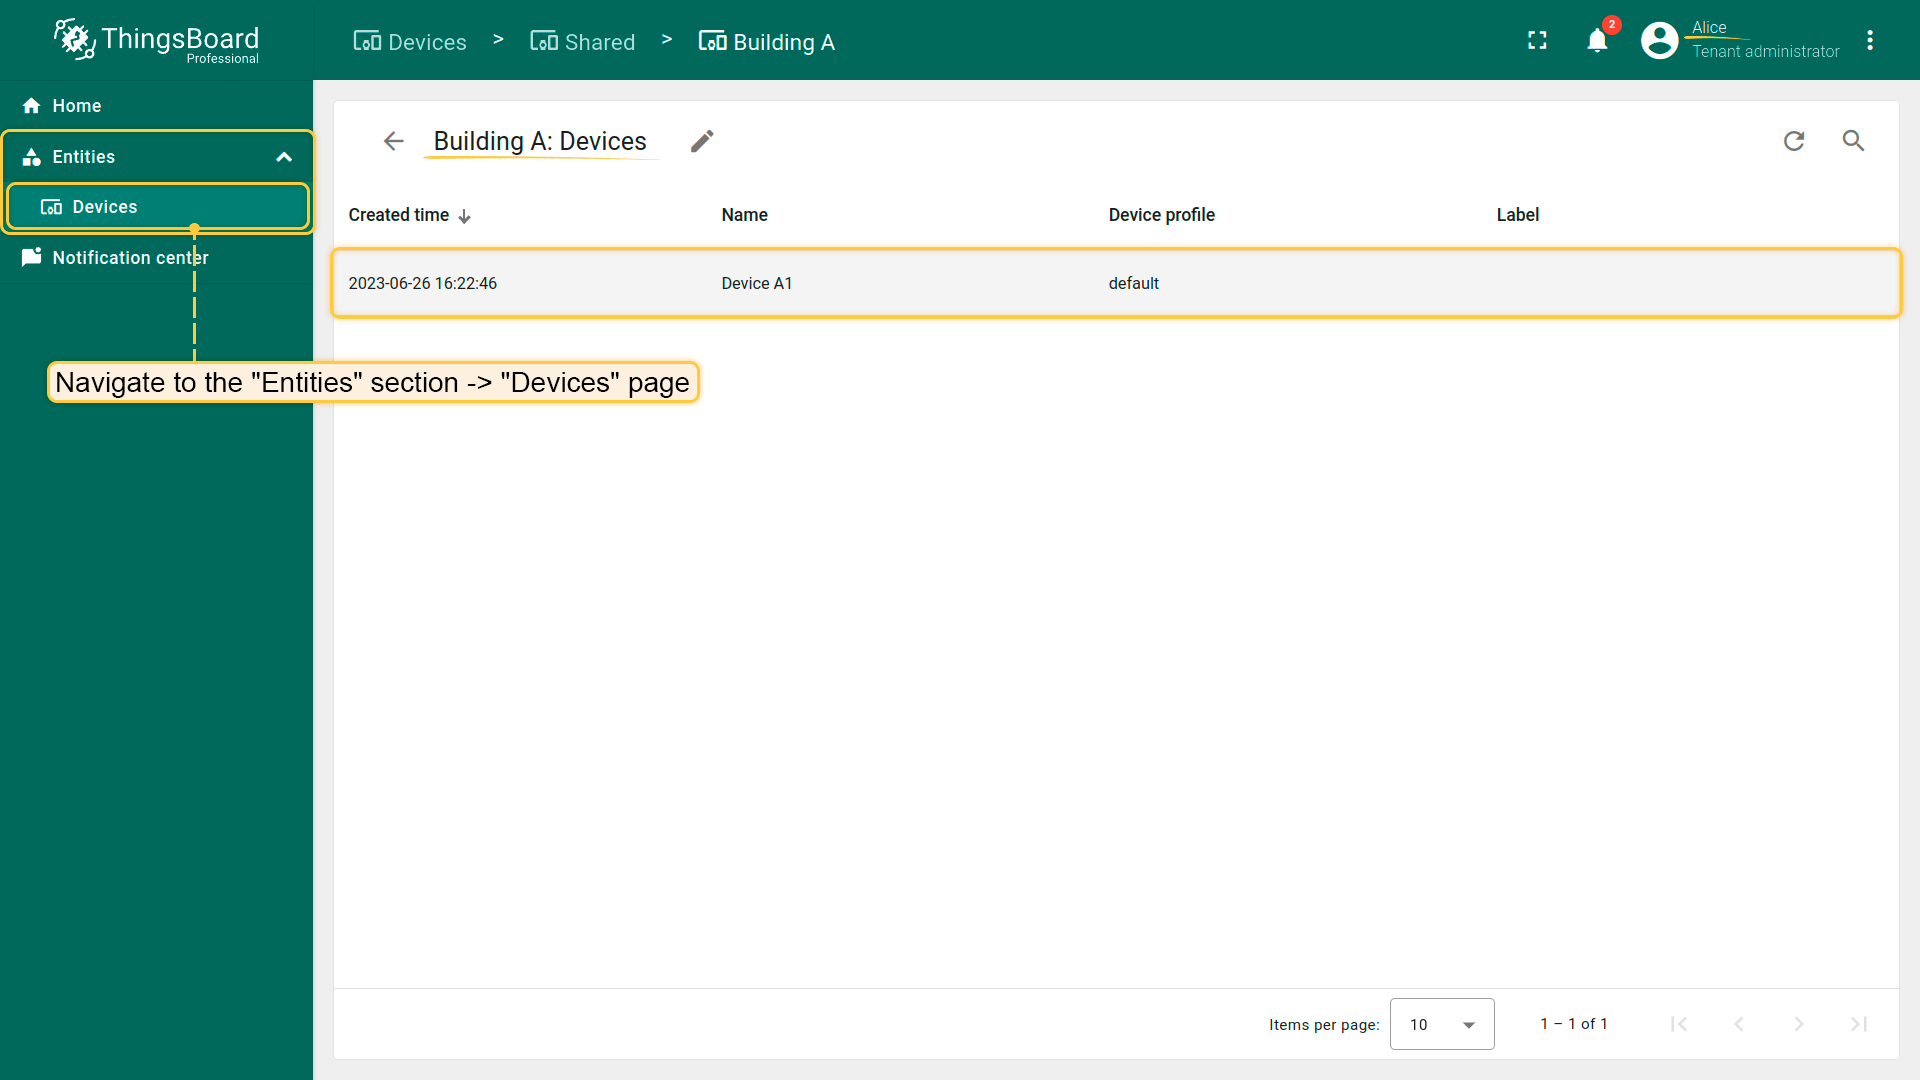
- 打开“设备”页面,仅能看到“Building A”组及其中的Device A1。
用户Bob同理。用户Bob及“Building B Admins”组内所有用户仅能访问Device B1。
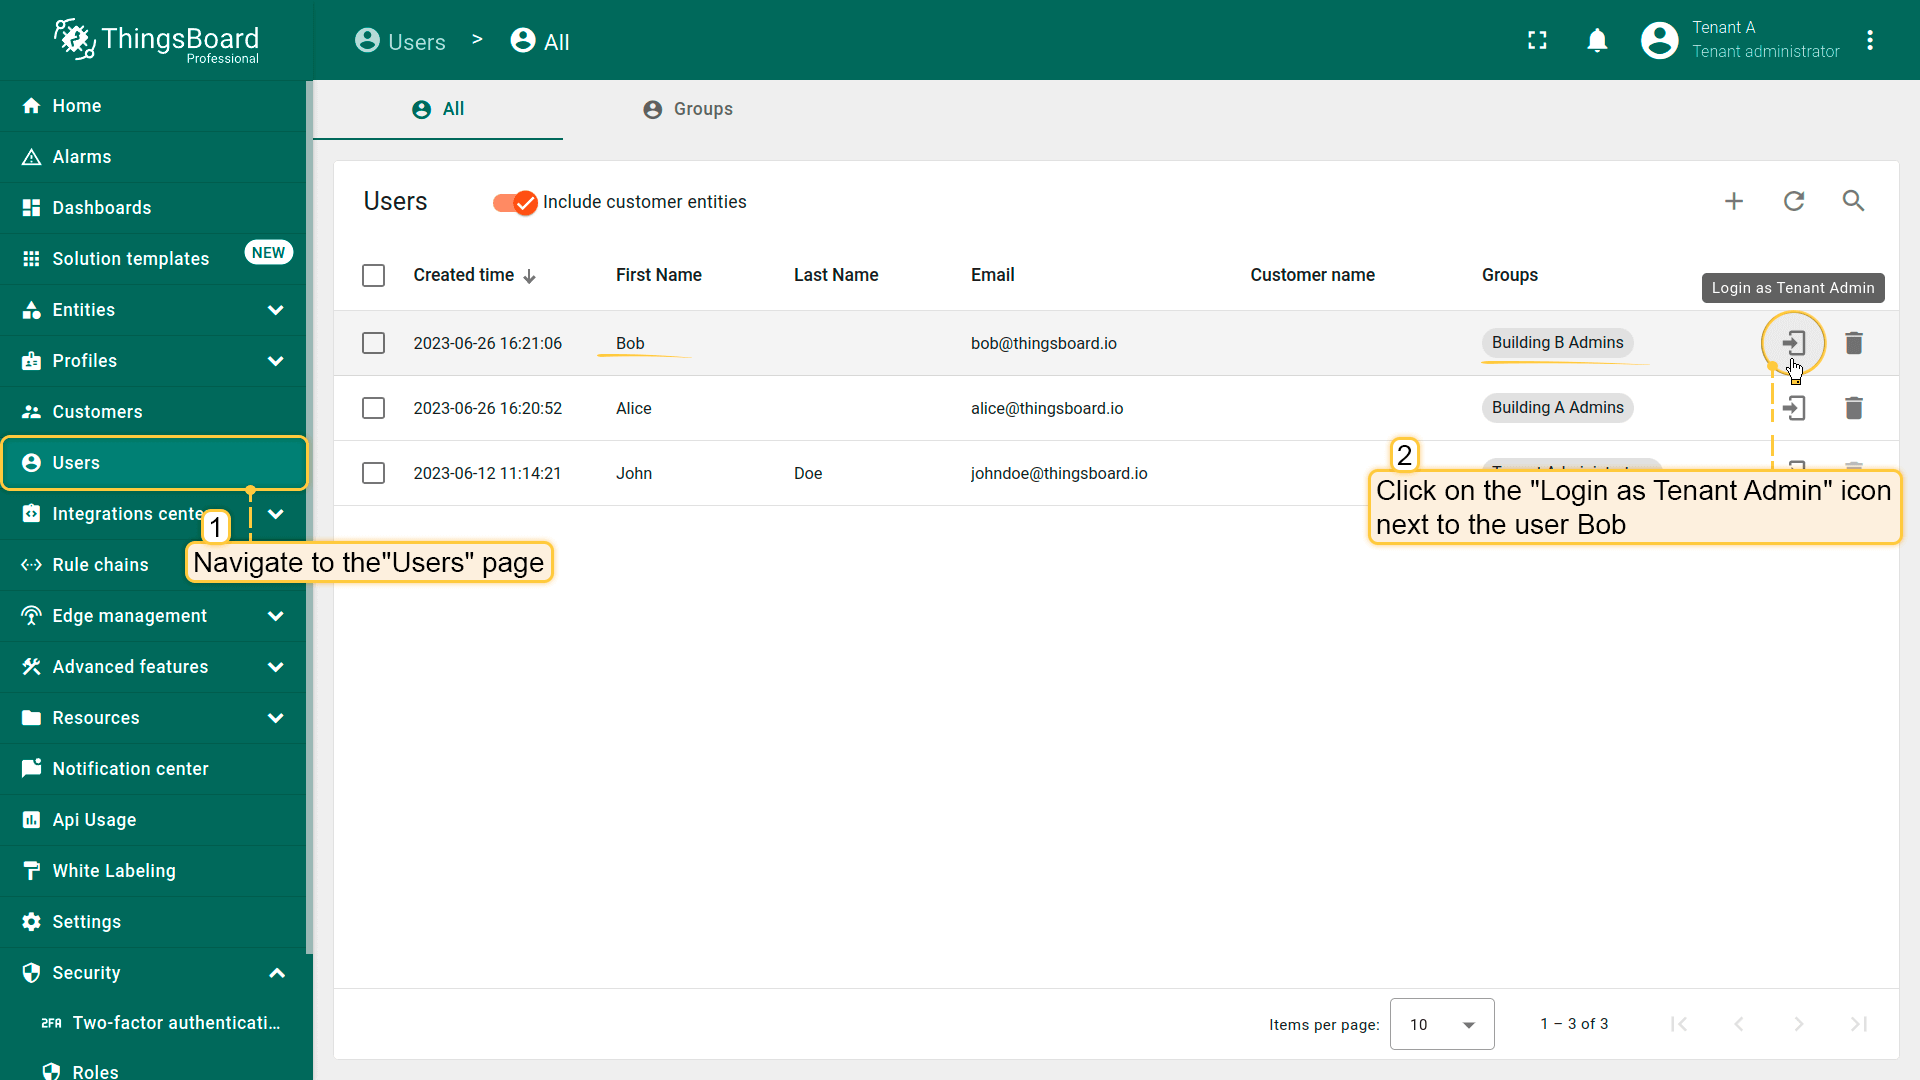
- 进入租户A的“用户”页面。
- 在Bob账号旁点击“以租户管理员身份登录”图标。
- 打开“设备”页面,仅能看到“Building B”组及其中的Device B1。

通过组角色,可在组级别灵活管理资源访问,而无需针对单个用户或单个设备逐一配置。
注意:由于实体组仅有一个所有者,只能将组角色分配给属于同一所有者或其任意上级所有者的用户组。
智能楼宇示例:
假设您的解决方案用于管理商业楼宇。主要客户是楼宇管理员,需要监控楼宇内的暖通空调系统、电力消耗及其他智能设备。楼宇管理员可能希望设计仪表板并与最终用户(办公人员)共享。此外,负责维护的工程师需要监控设备状态,例如在电池电量低于某阈值时接收告警。
将这些需求用ThingsBoard术语归纳,需实现以下角色:
- 督导员:对所有楼宇内所有设备的遥测数据具有只读访问权限,并可创建自定义仪表板,但无法访问其他用户组的仪表板。
- 设施管理员:可为每个设施预配新设备、设置阈值、管理用户并配置仪表板。
- 最终用户:对其所属设施的状态仅具有只读访问权限。
下面配置ThingsBoard以支持此场景。以下步骤假设您已以租户管理员身份登录。
督导员
我们将创建名为“Supervisors”的用户组、名为“Supervisor Dashboards”的仪表板组及一个仪表板。目标是为督导员在“Supervisor Dashboards”组中管理仪表板,而对系统内其他实体仅赋予只读权限。
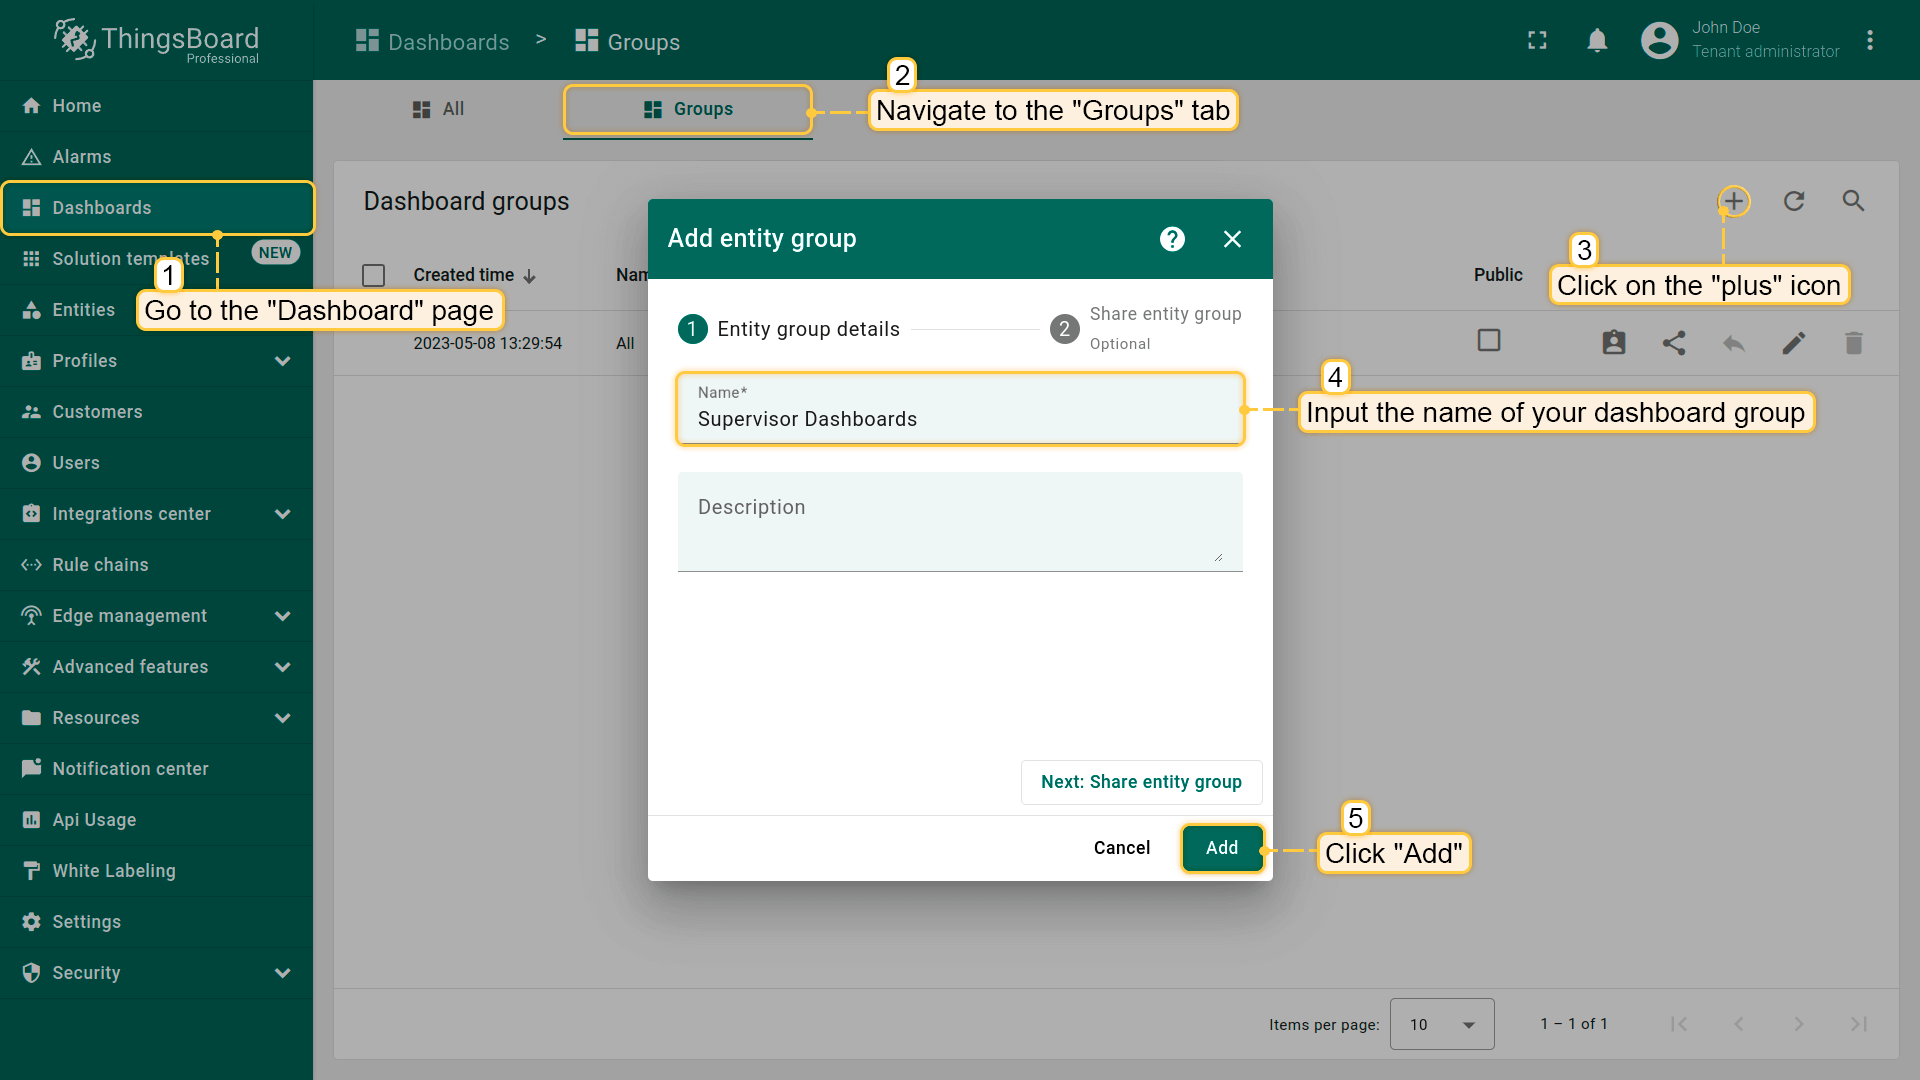
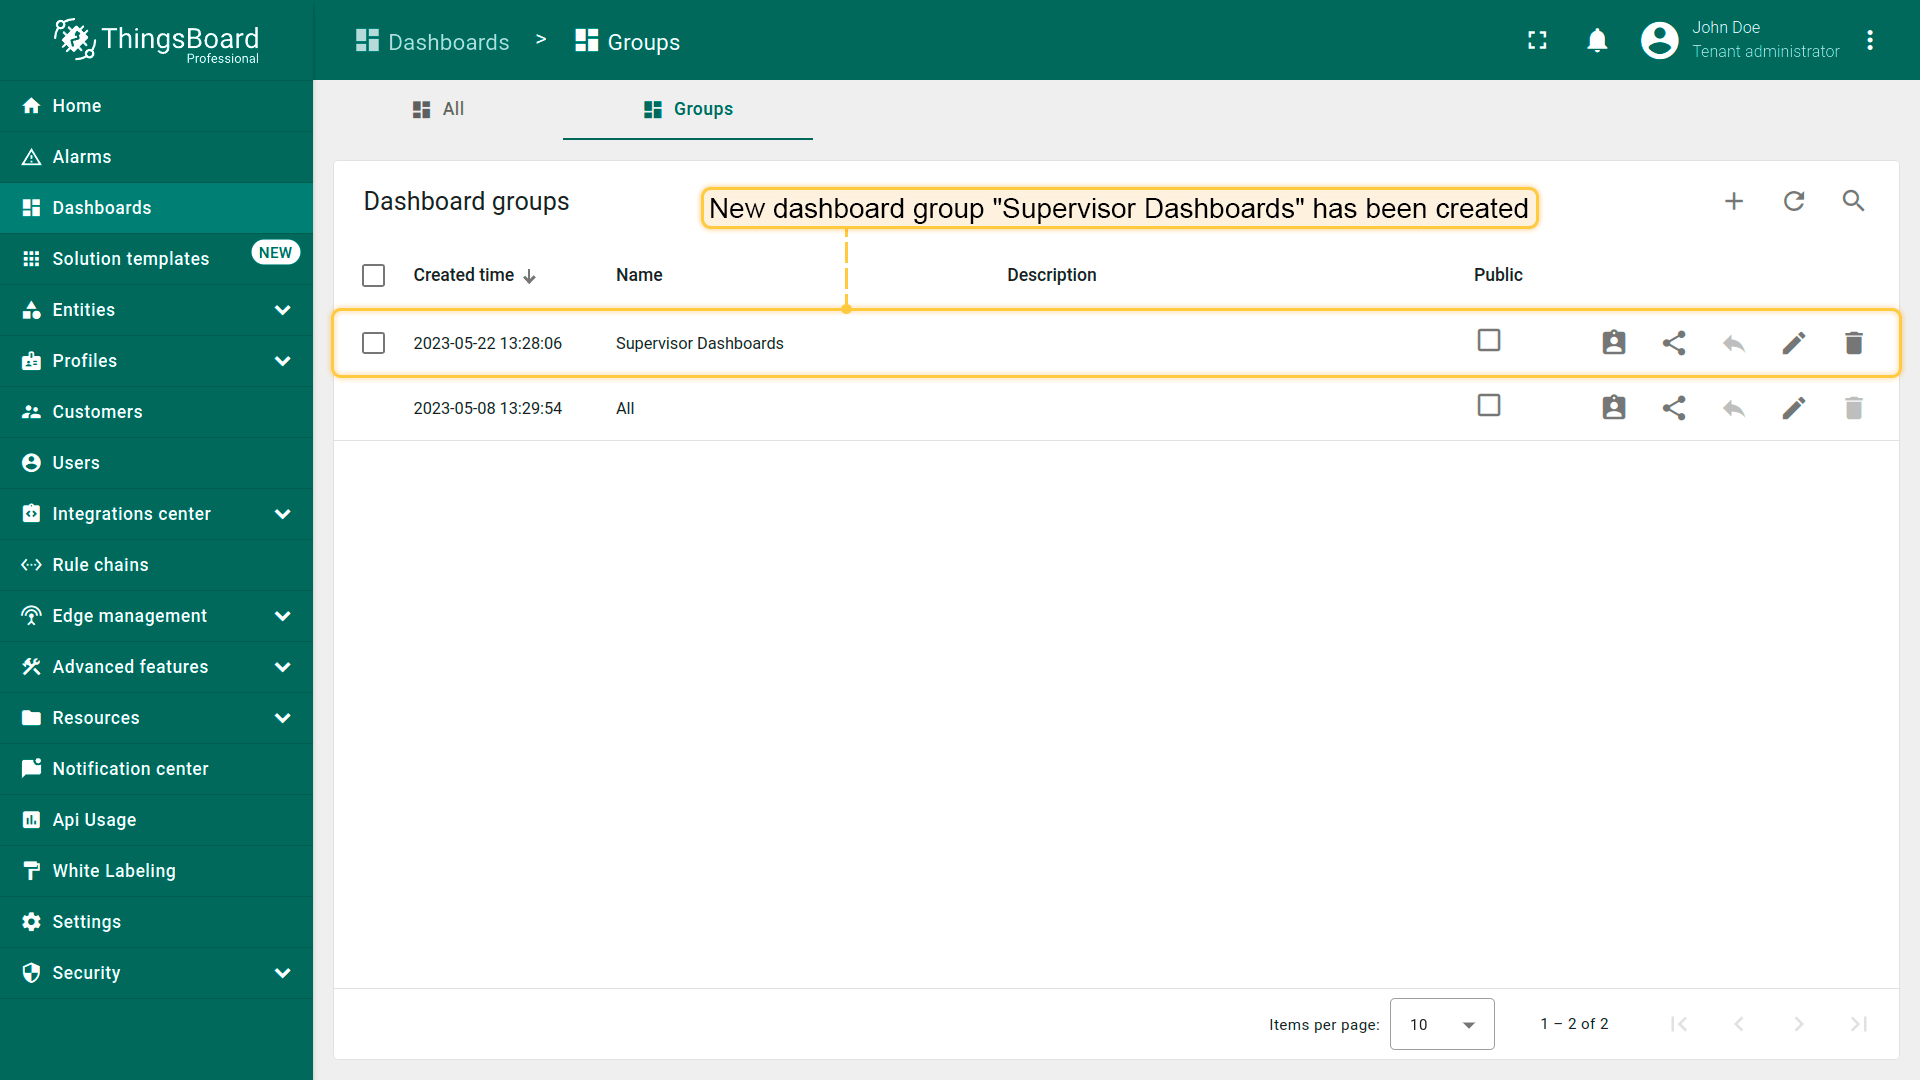
首先创建“Supervisor Dashboards”组: 1.在“仪表板”页面的“组”标签中点击“+”按钮创建新实体组; 2.输入仪表板组名称,此处为“Supervisor Dashboards”,点击“添加”; 3.仪表板组“Supervisor Dashboards”已创建。
接下来创建两个角色以实现此场景:
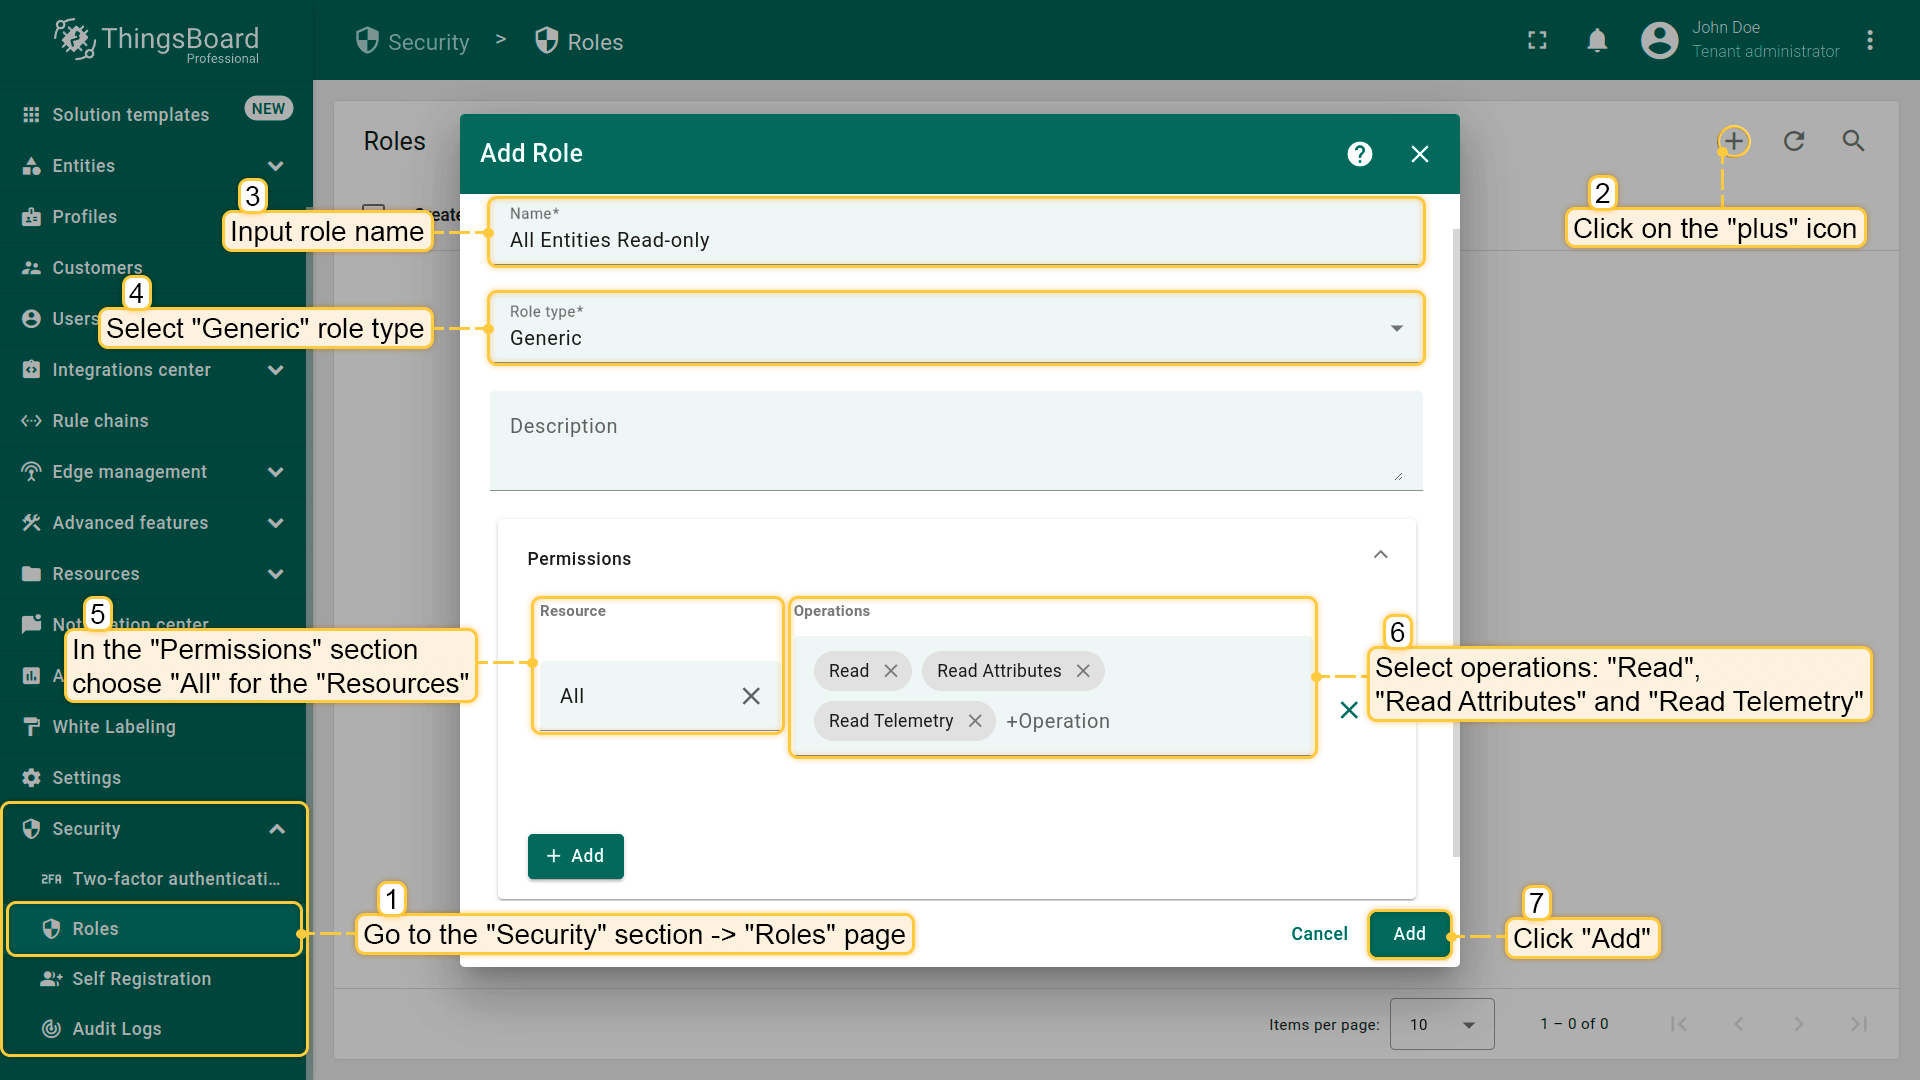
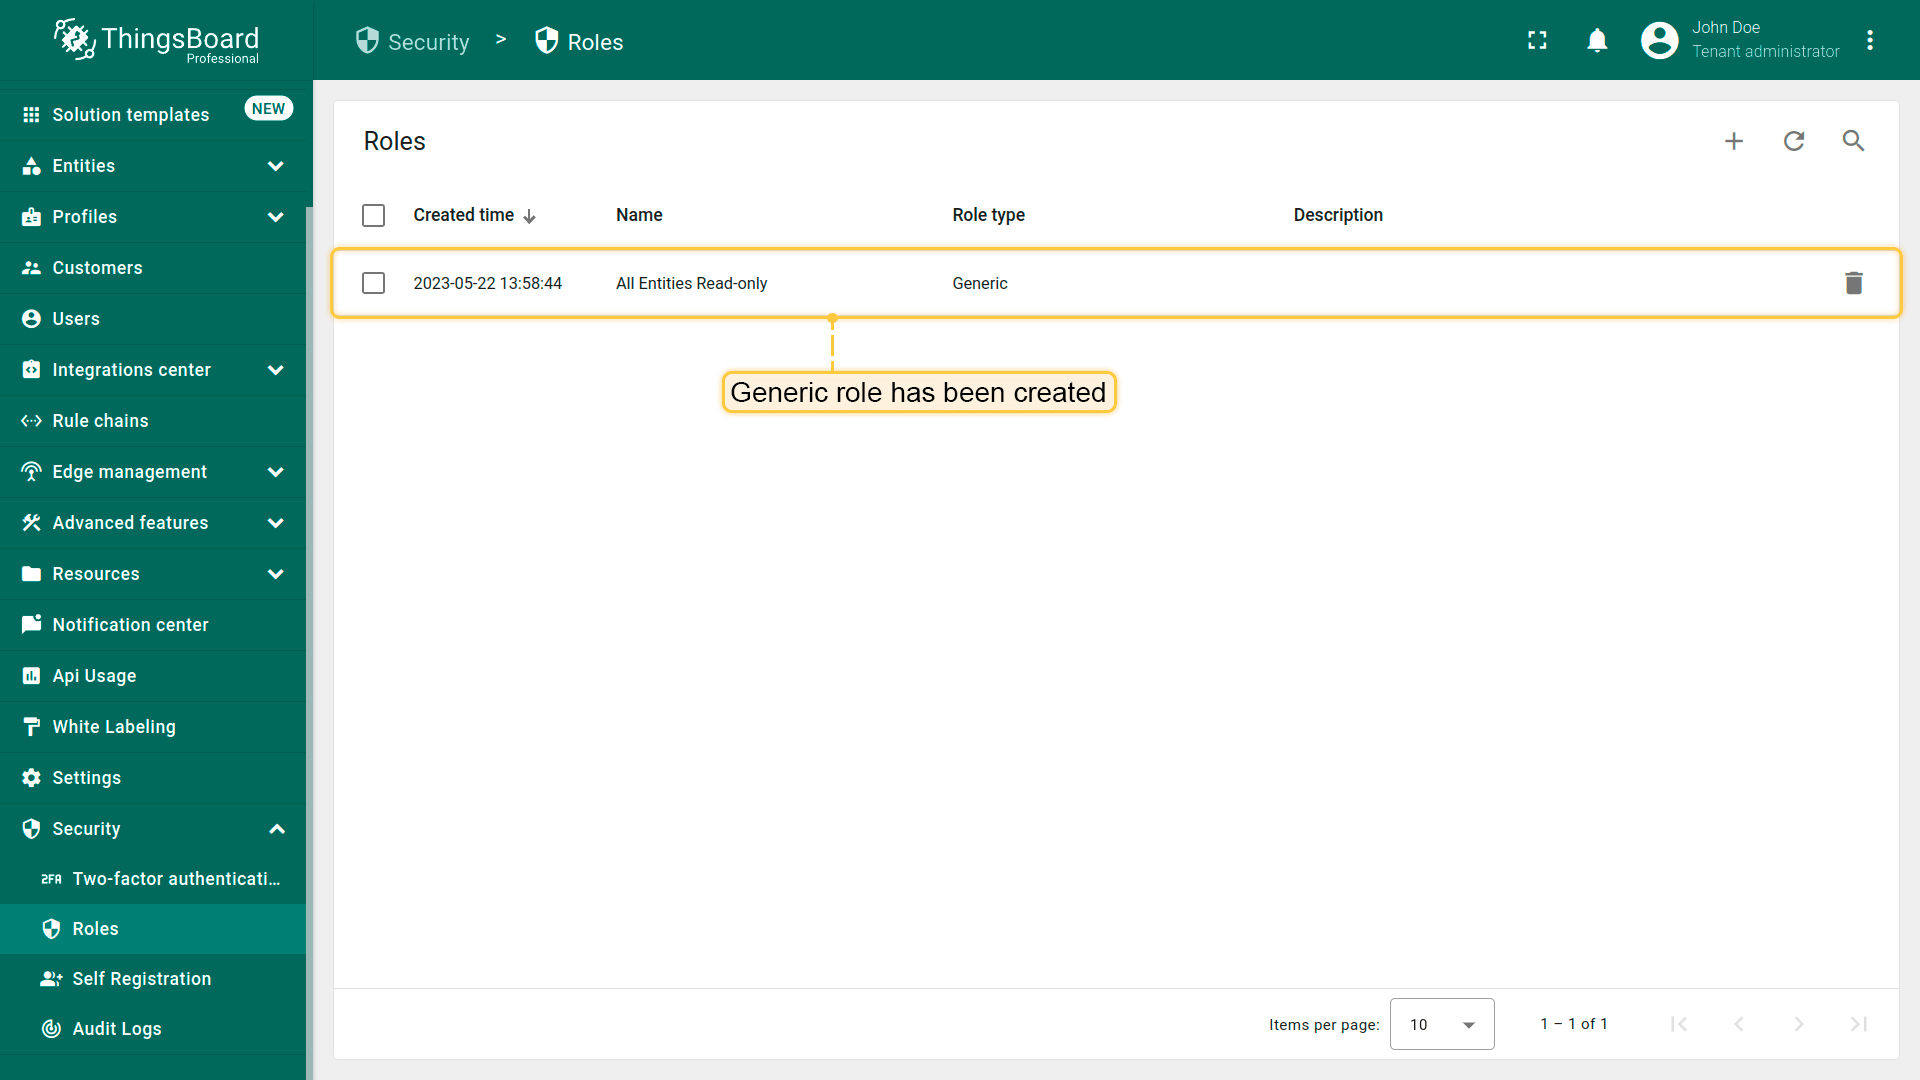
- “All Entities Read-only”——允许访问除设备凭证外全部实体数据的通用角色。 1.进入“安全” → “角色”页面,点击屏幕右上角的“+”; 2.输入角色名称“All Entities Read-only”; 3.选择角色类型“通用”; 4.在“权限”部分为“资源”选择“All”; 5.选择操作:“Read”“Read Attributes”和“Read Telemetry”; 6.点击底部“Add”按钮(不带“+”的按钮)。
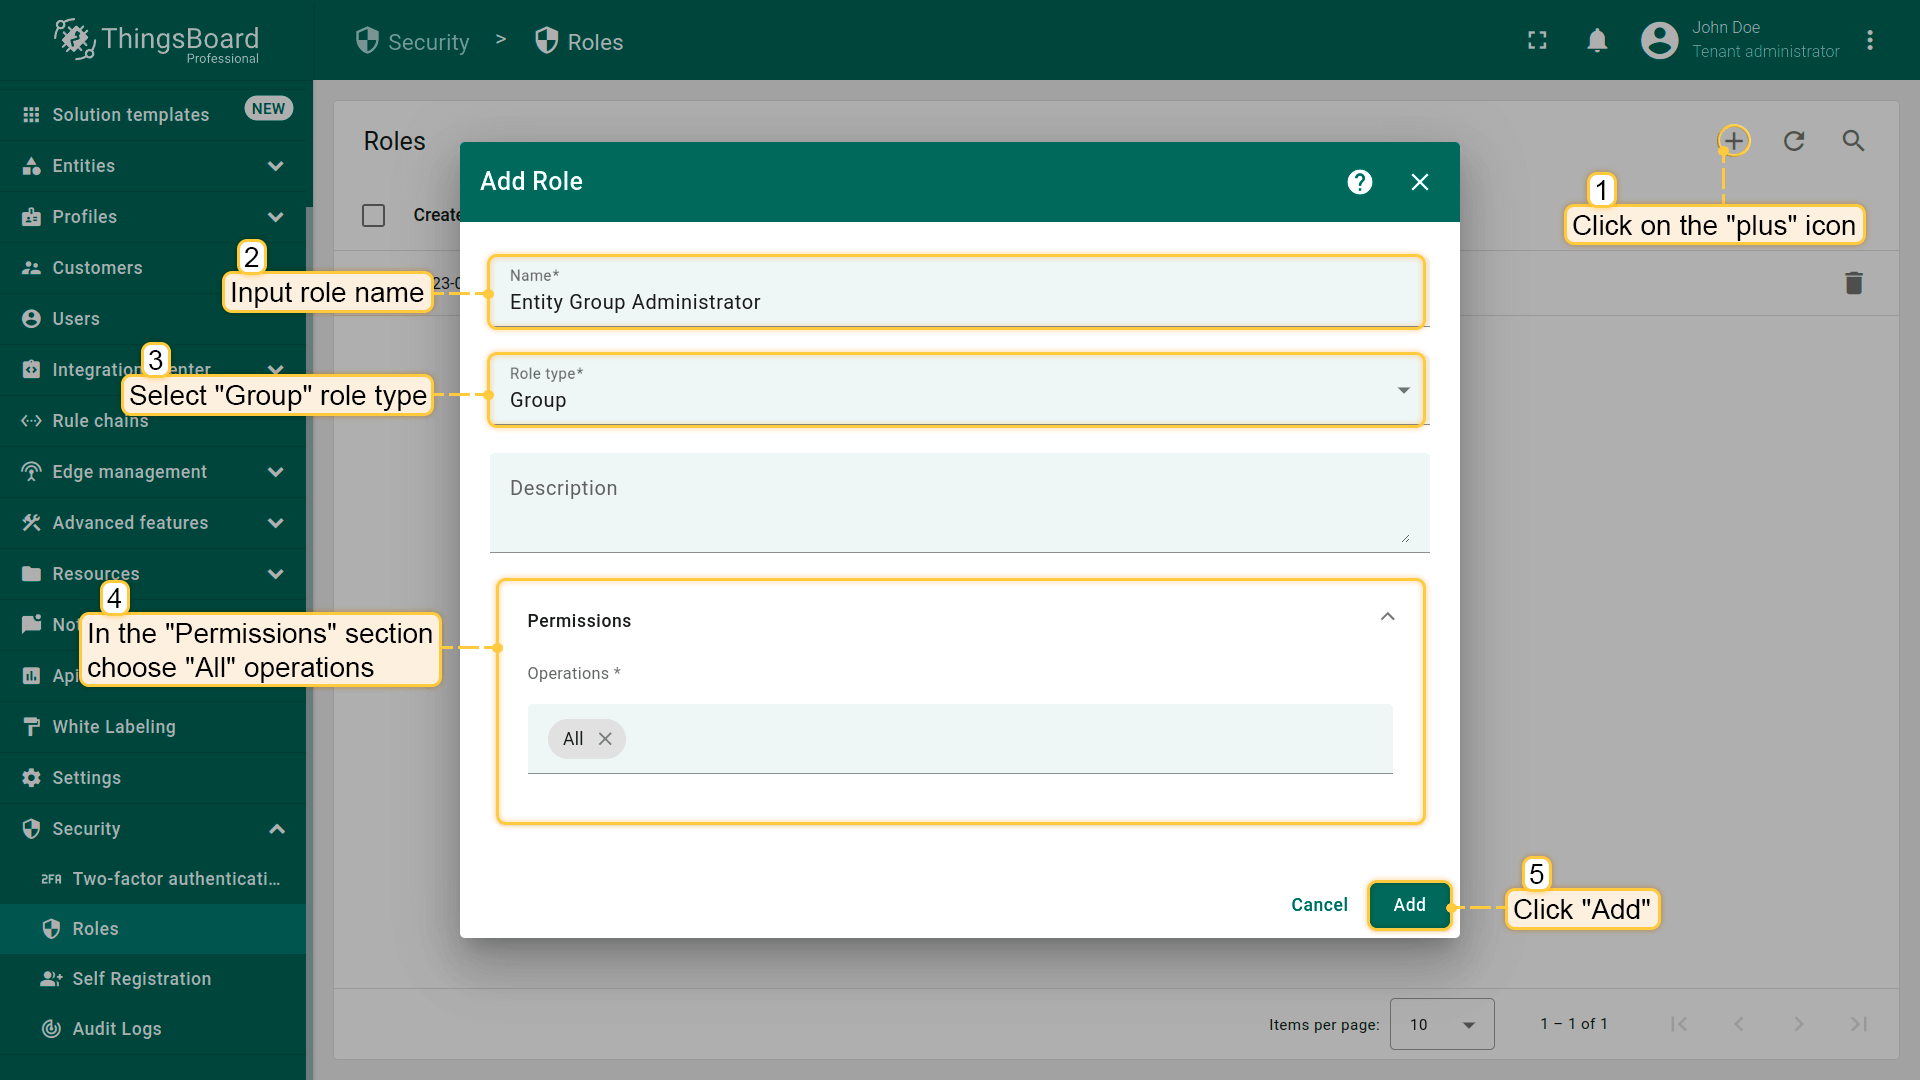
- “Entity Group Administrator”——允许对组执行全部操作的组角色。 1.再次点击“角色”页面右上角的“+”; 2.输入角色名称“Entity Group Administrator”; 3.选择角色类型“组”; 4.在“权限”部分选择“All”操作; 5.点击“添加”按钮。

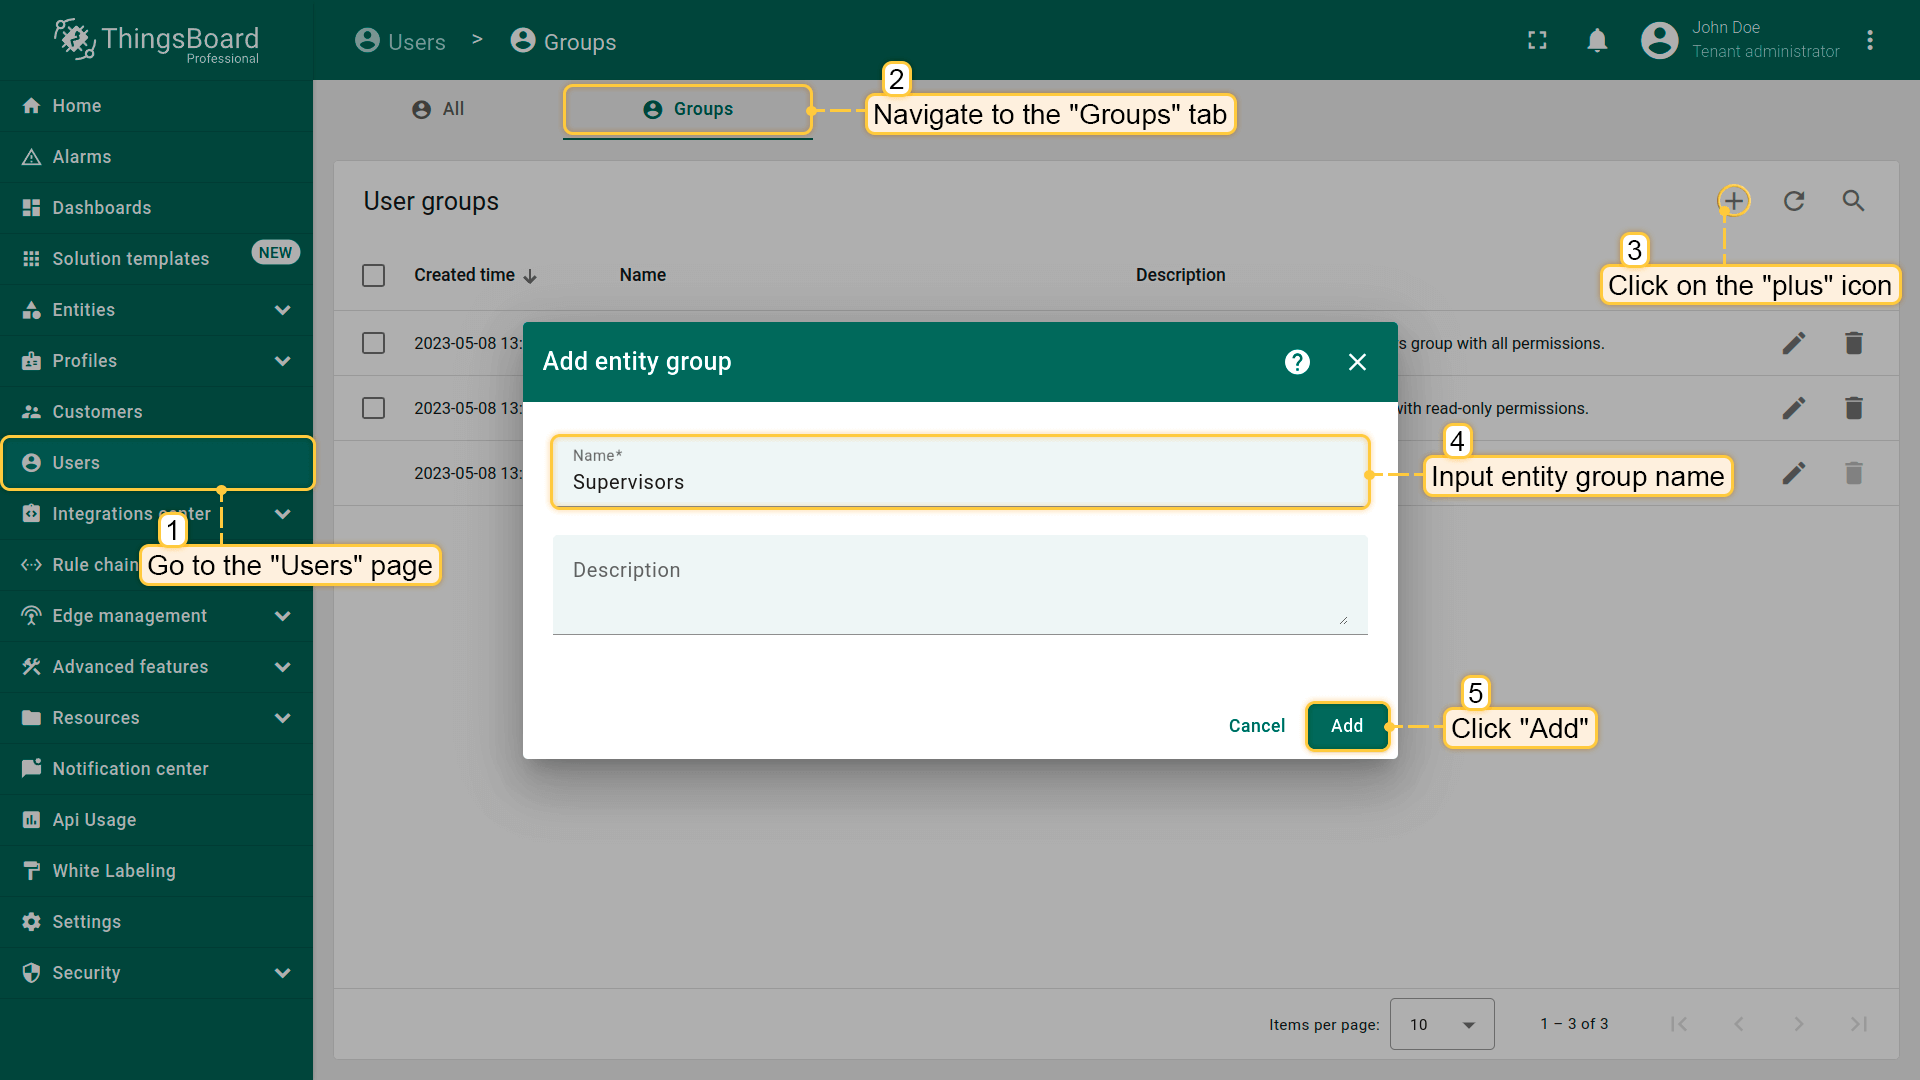
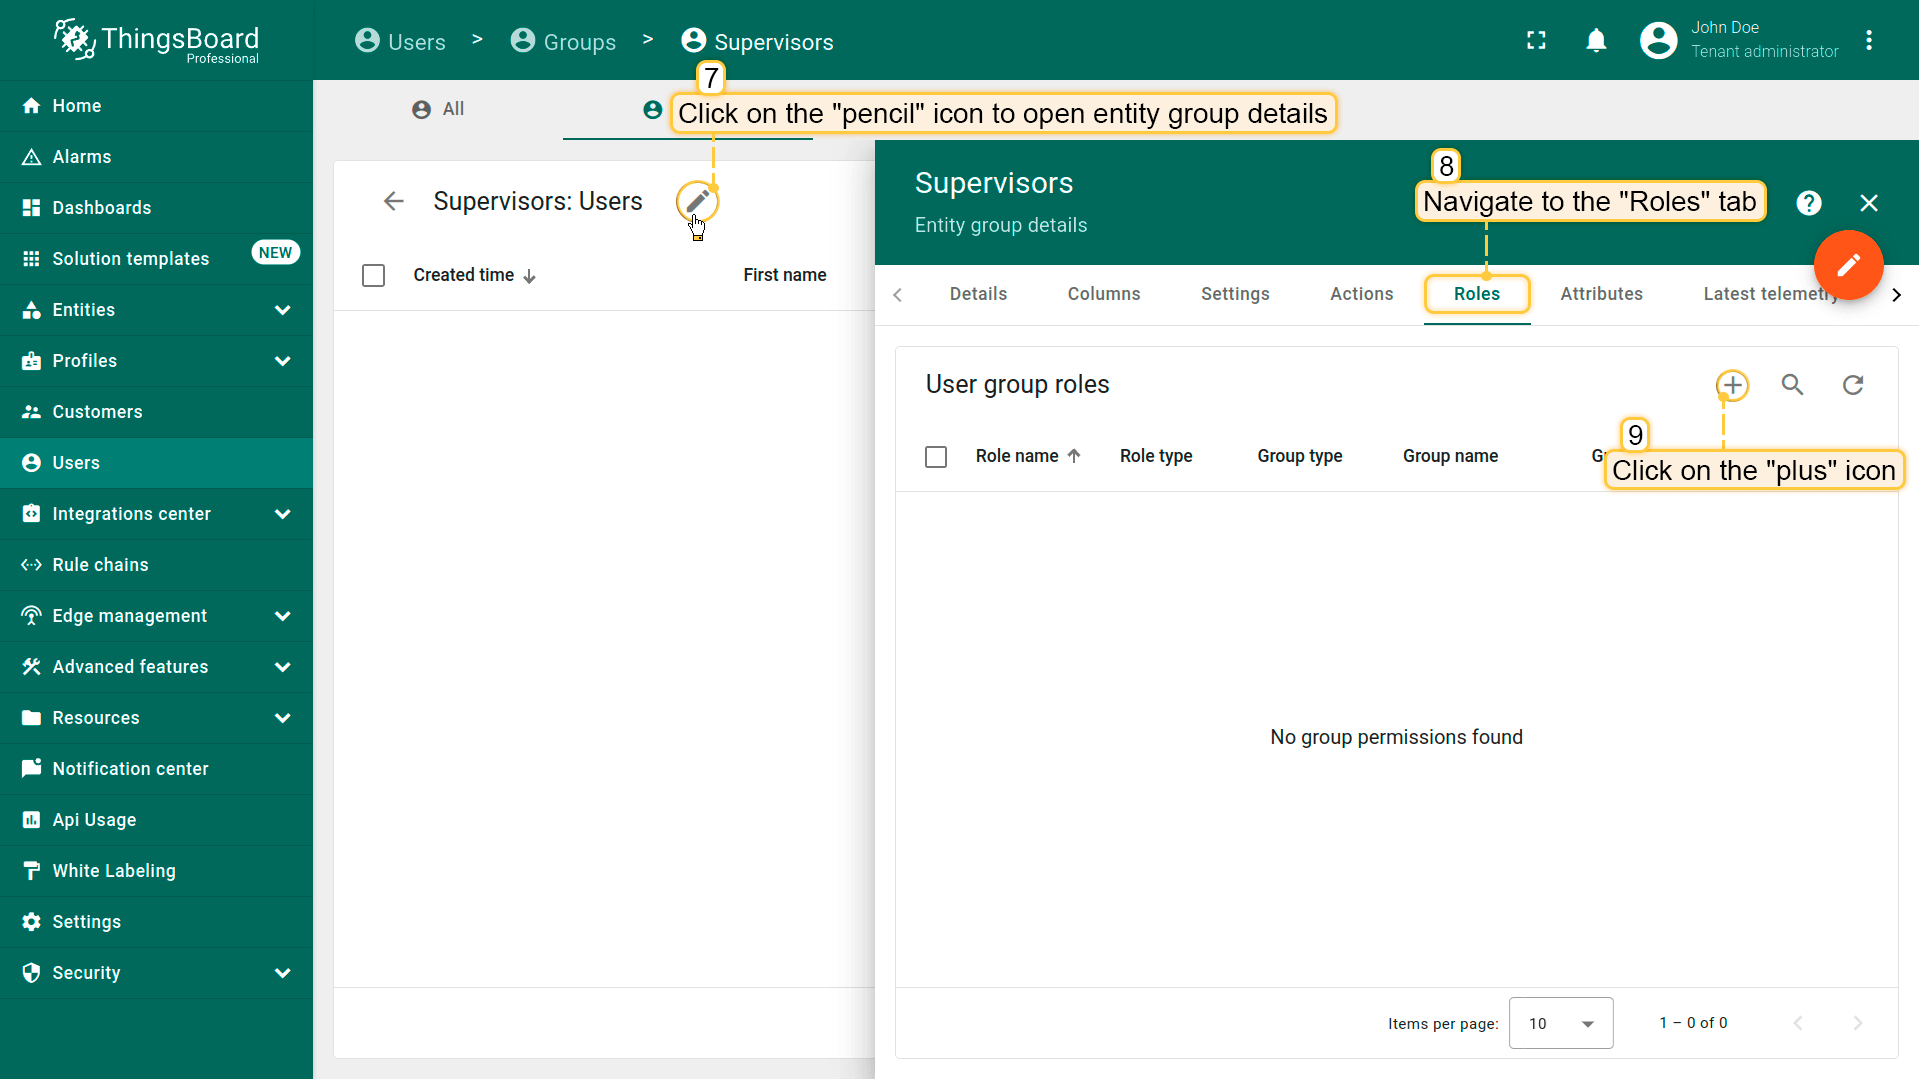
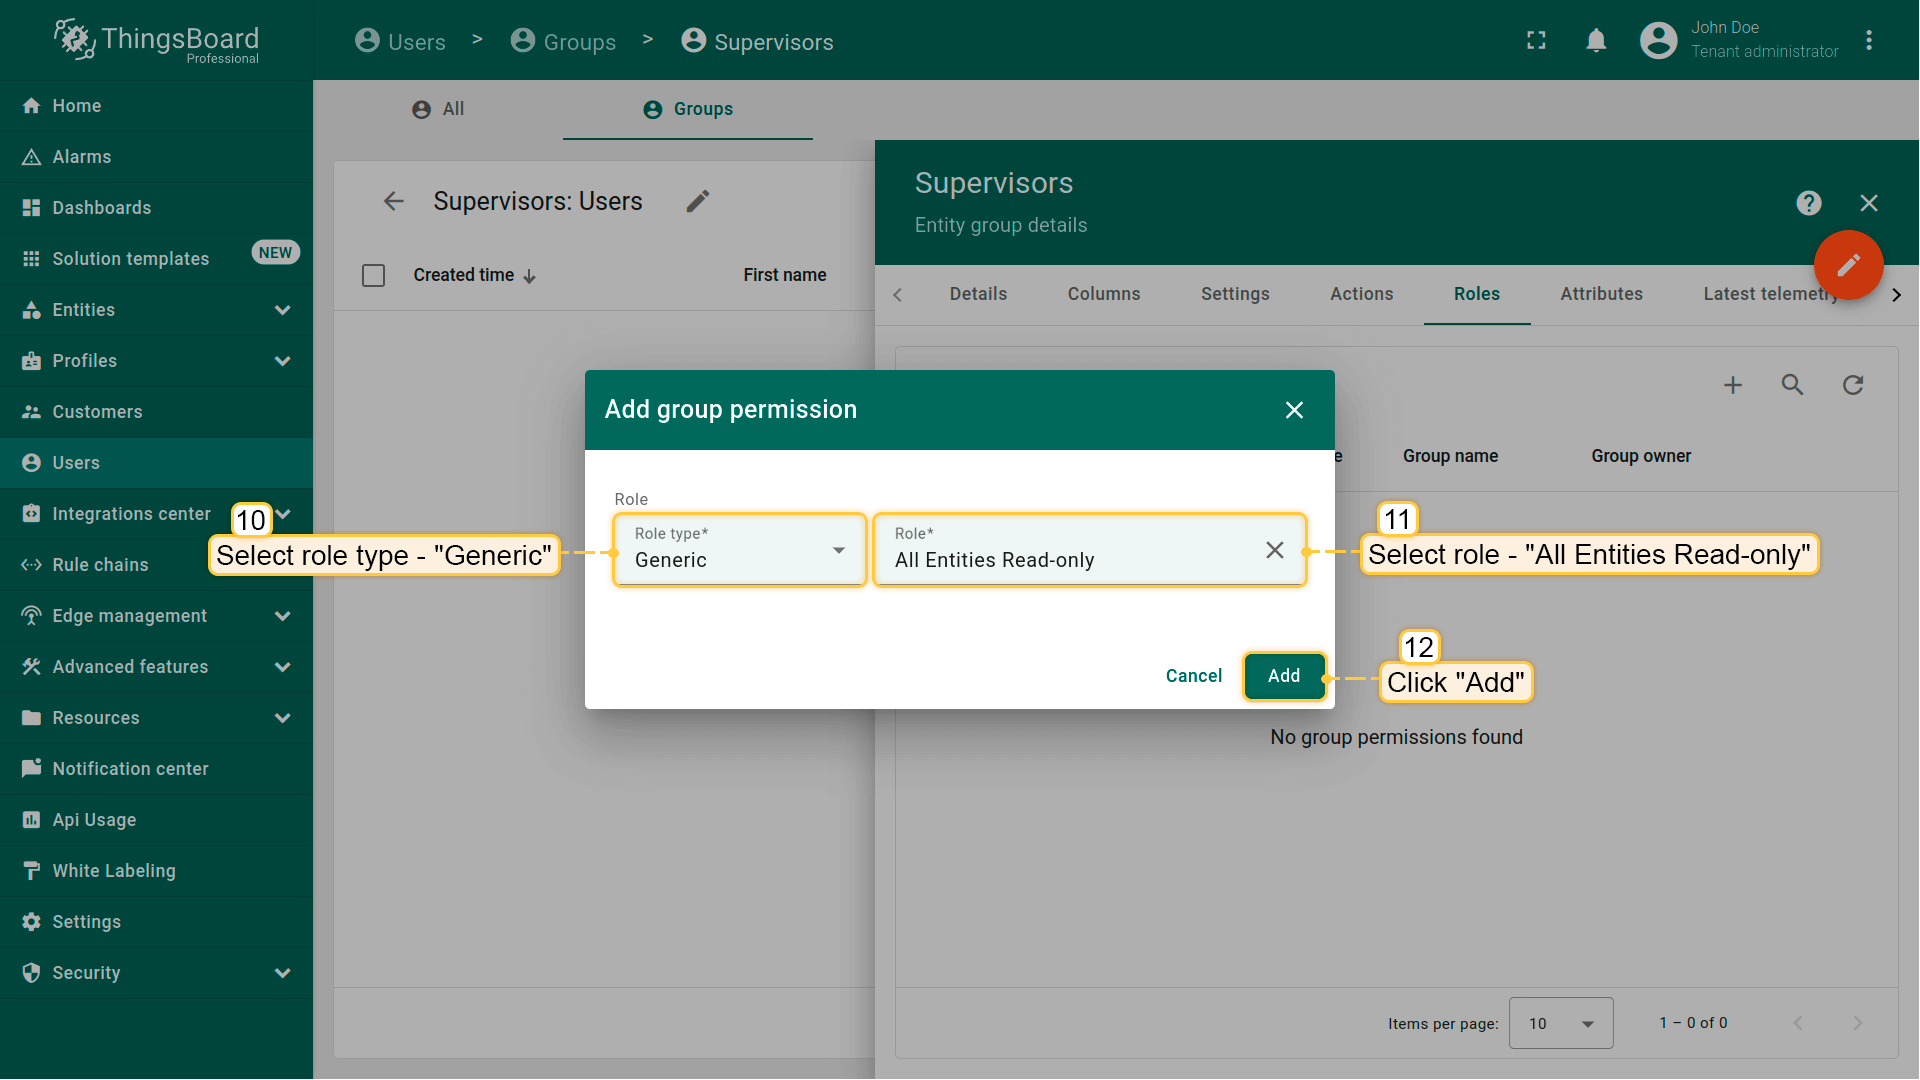
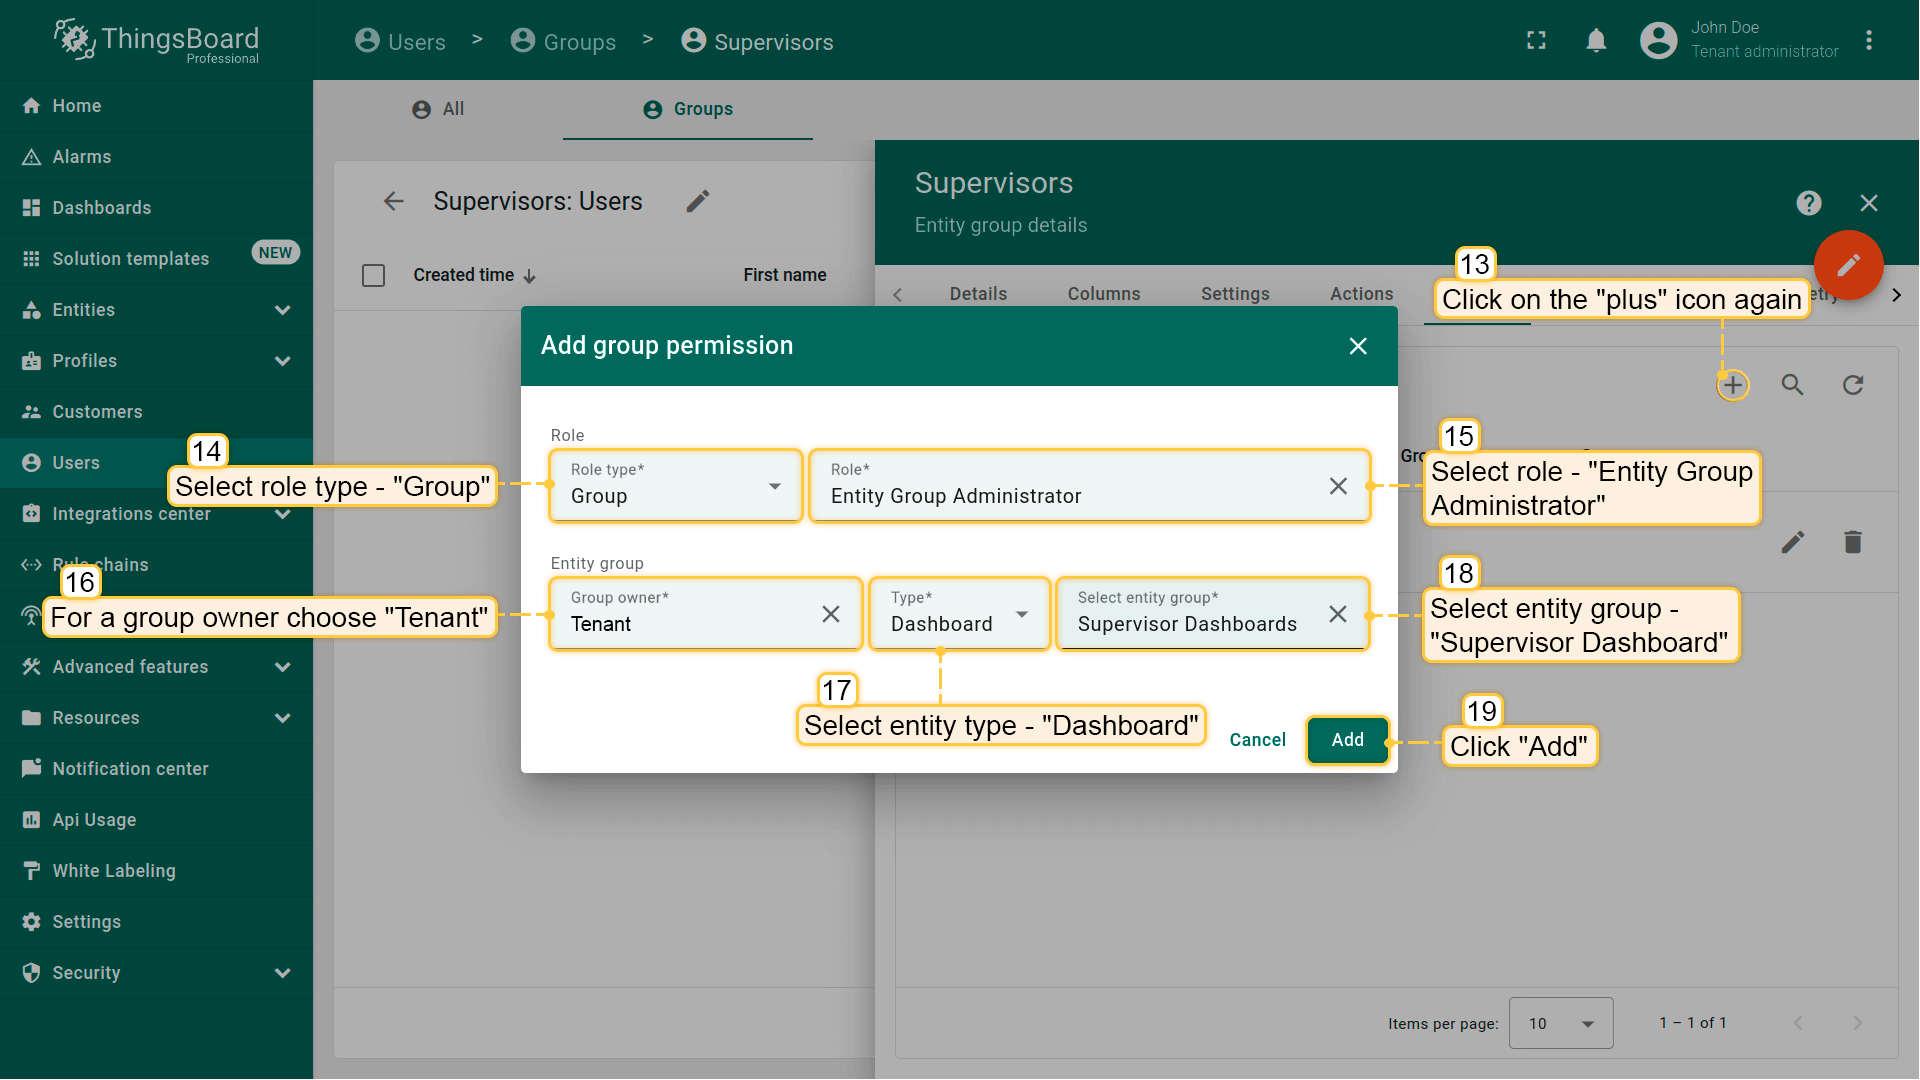
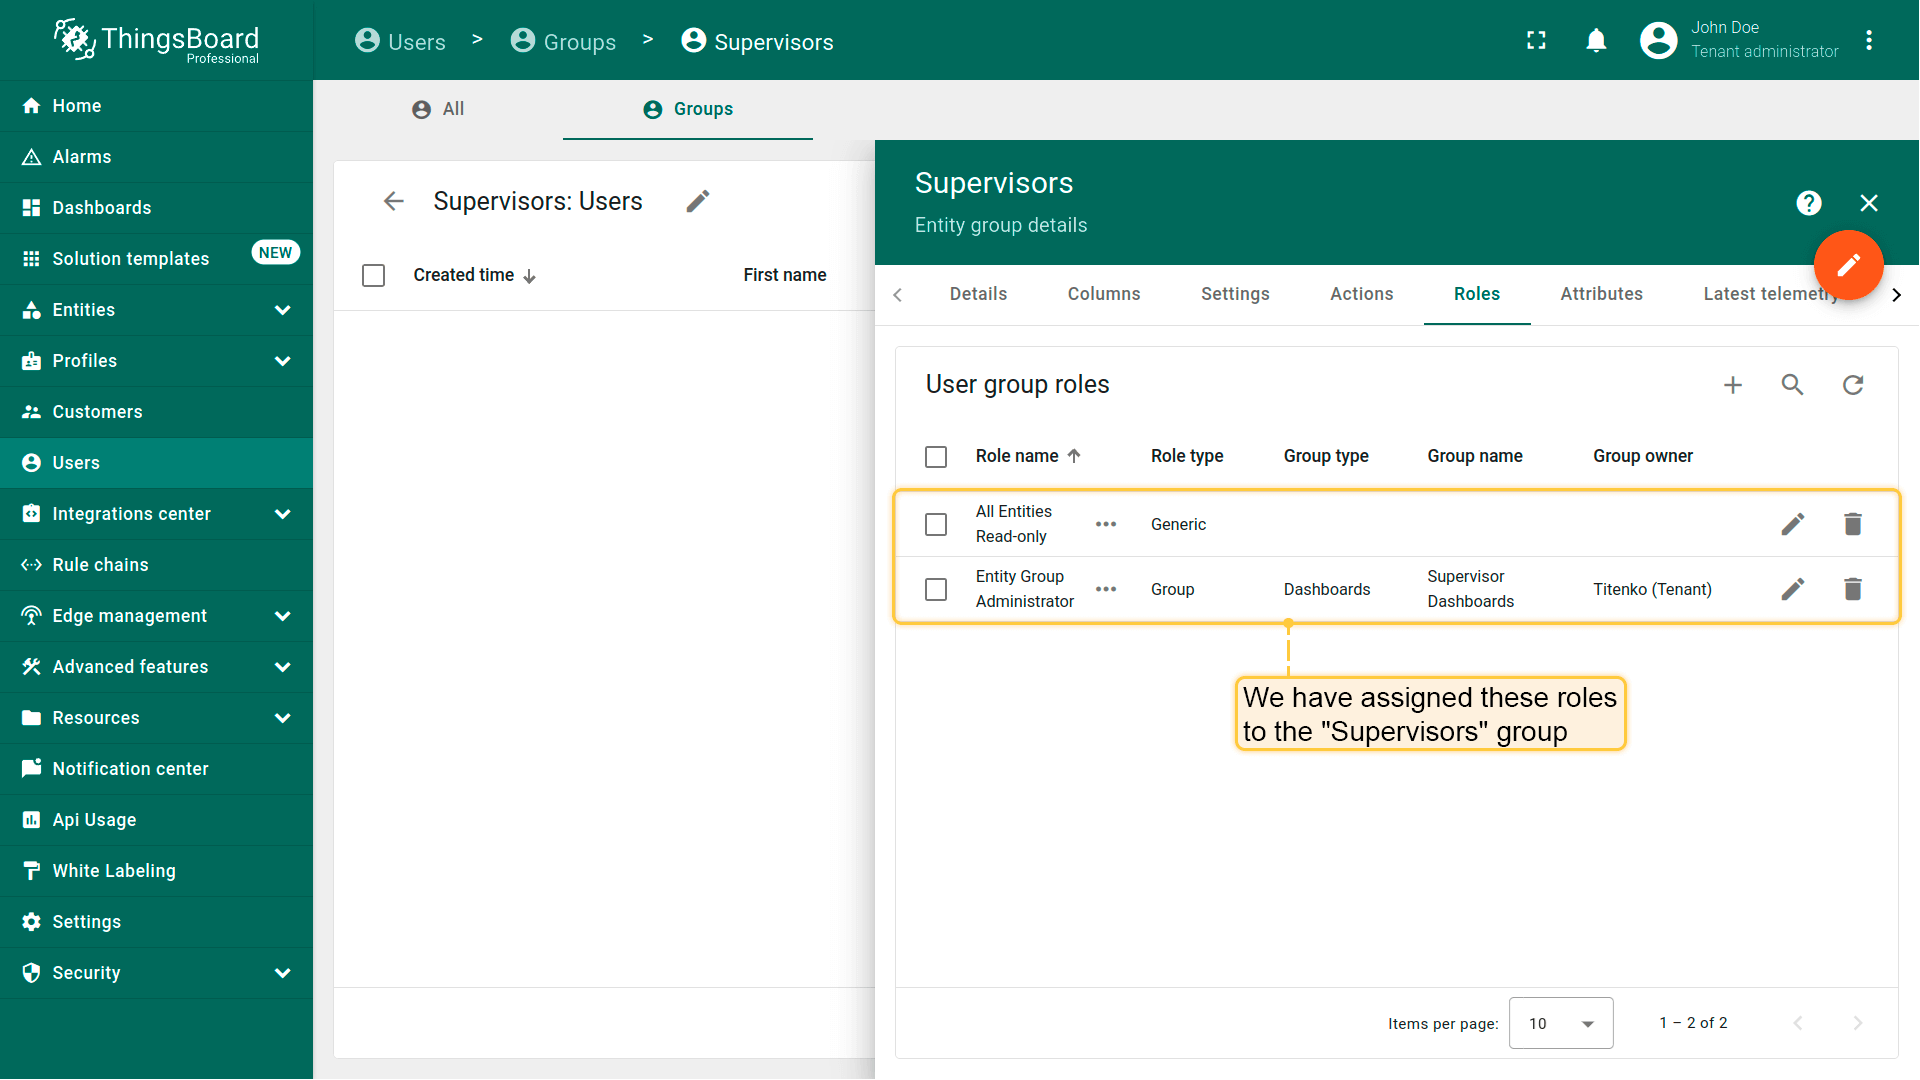
现在将上述角色分配给“Supervisors”组。 1.进入“用户”页面 → “组”标签,点击右上角“+”(添加实体组); 2.输入名称“Supervisors”,点击“添加”。用户组“Supervisors”已创建,点击进入; 3.点击“铅笔”图标打开实体组详情; 4.进入“角色”标签,点击打开菜单右上角的“+”; 5.选择角色类型“通用”及之前创建的角色“All Entities Read-only”,点击“添加”; 6.再次点击“+”。此次选择角色类型“组”及角色“Entity Group Administrator”,为组所有者选择“租户”,为实体类型选择“仪表板”,选择实体组“Supervisor Dashboard”,点击“添加”。角色已分配给Supervisors组。

设施管理员
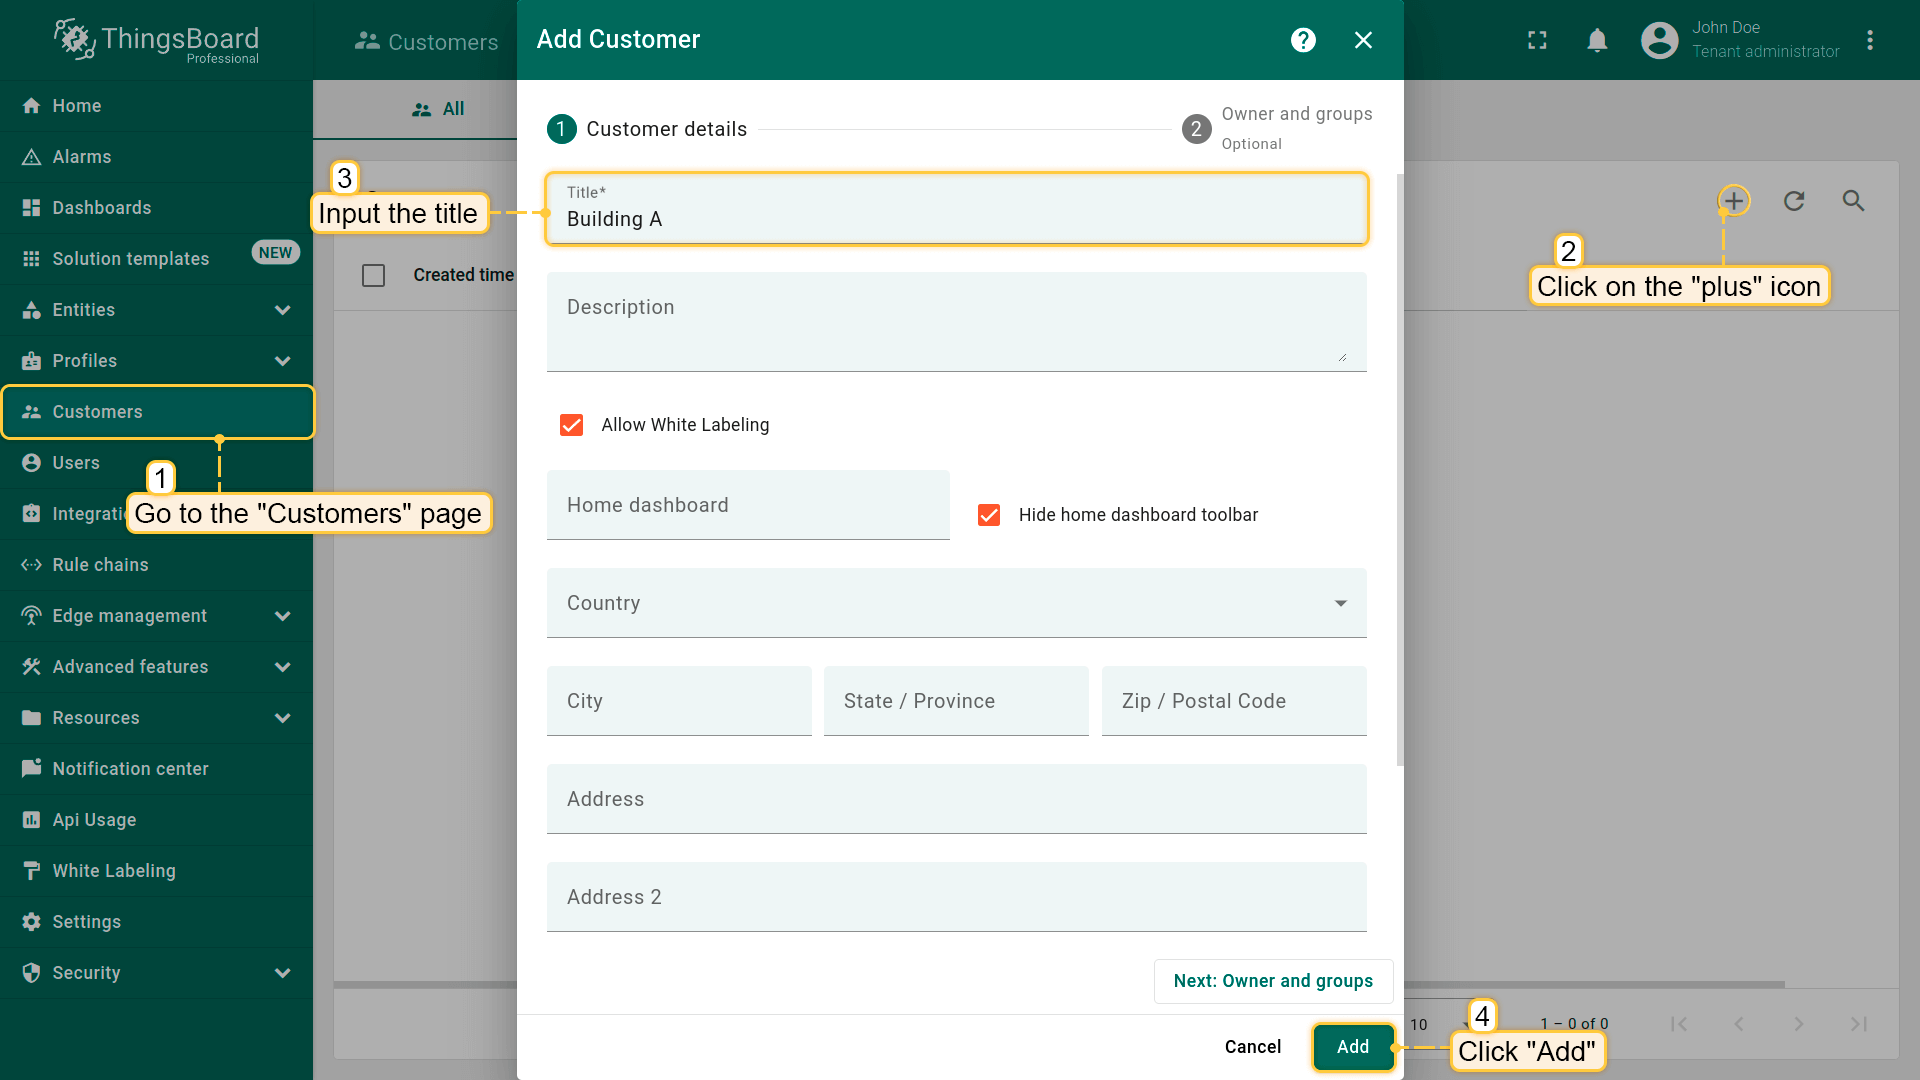
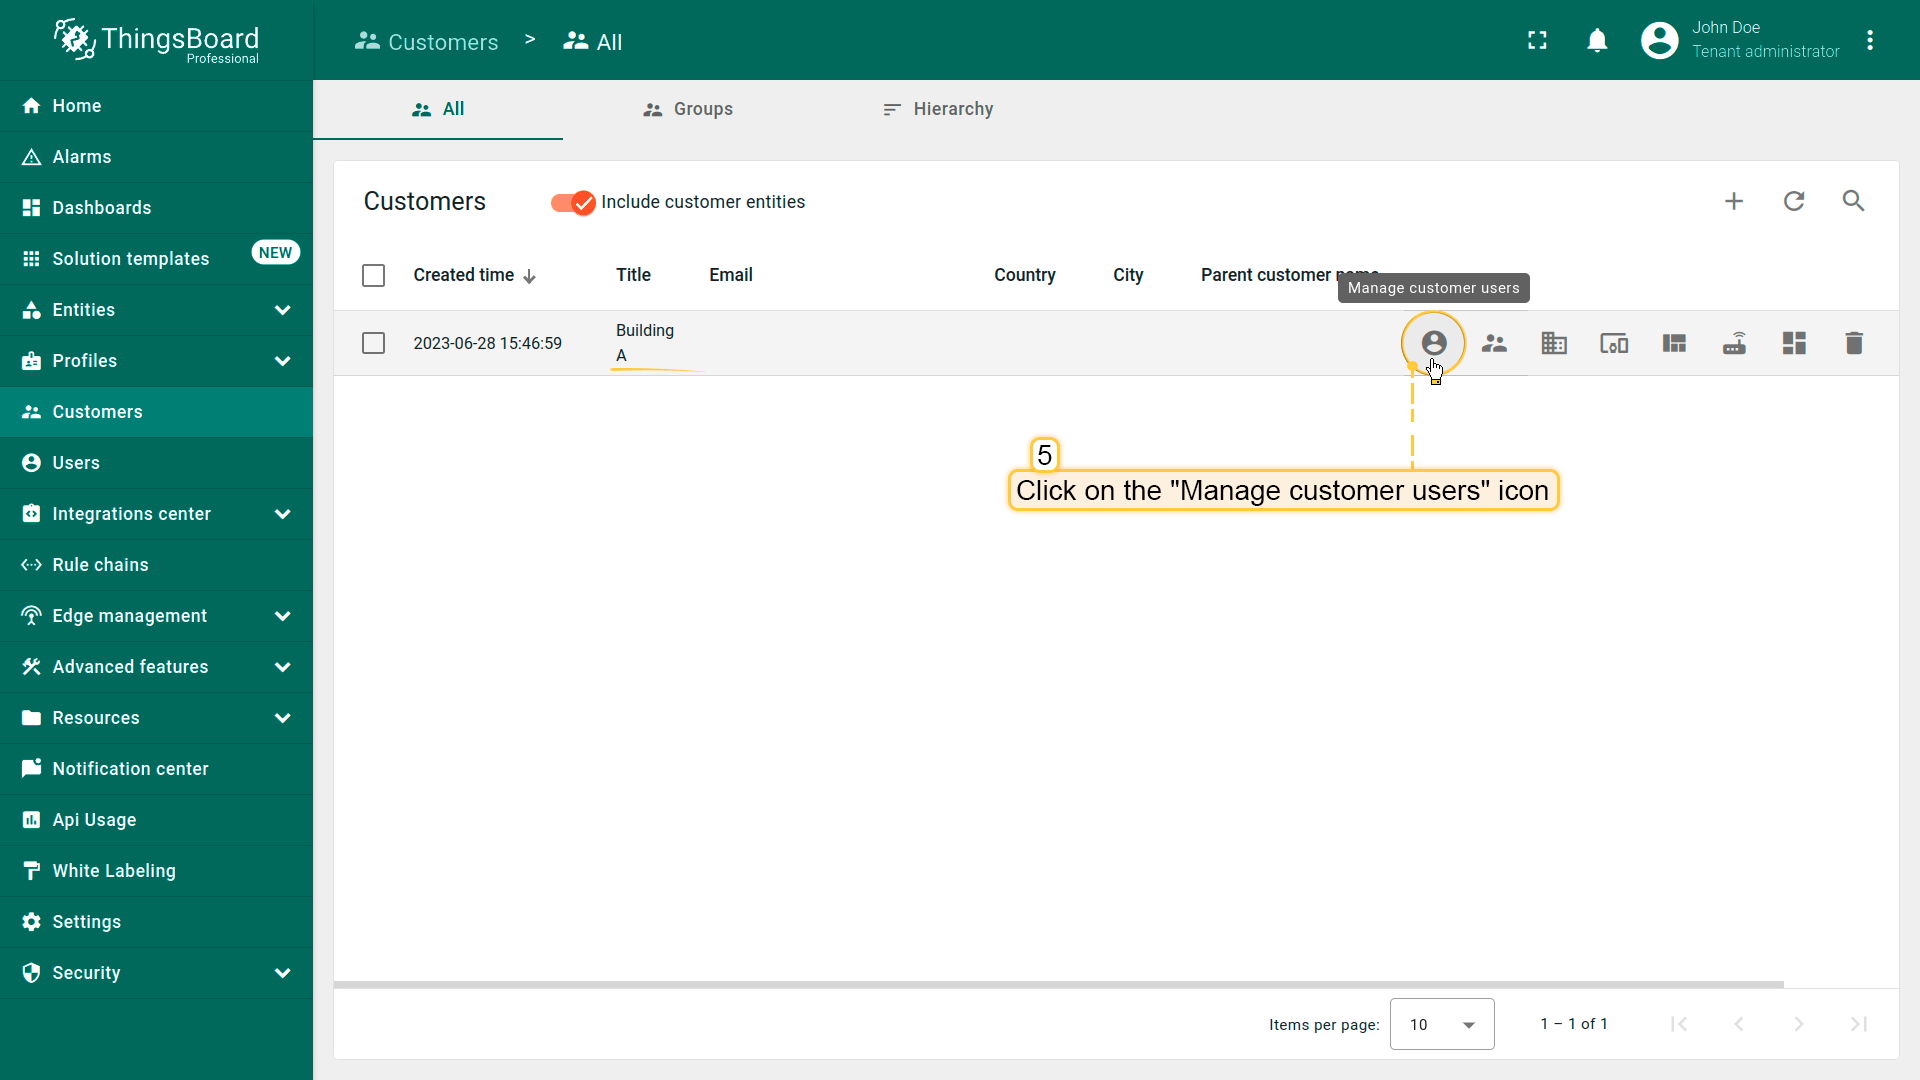
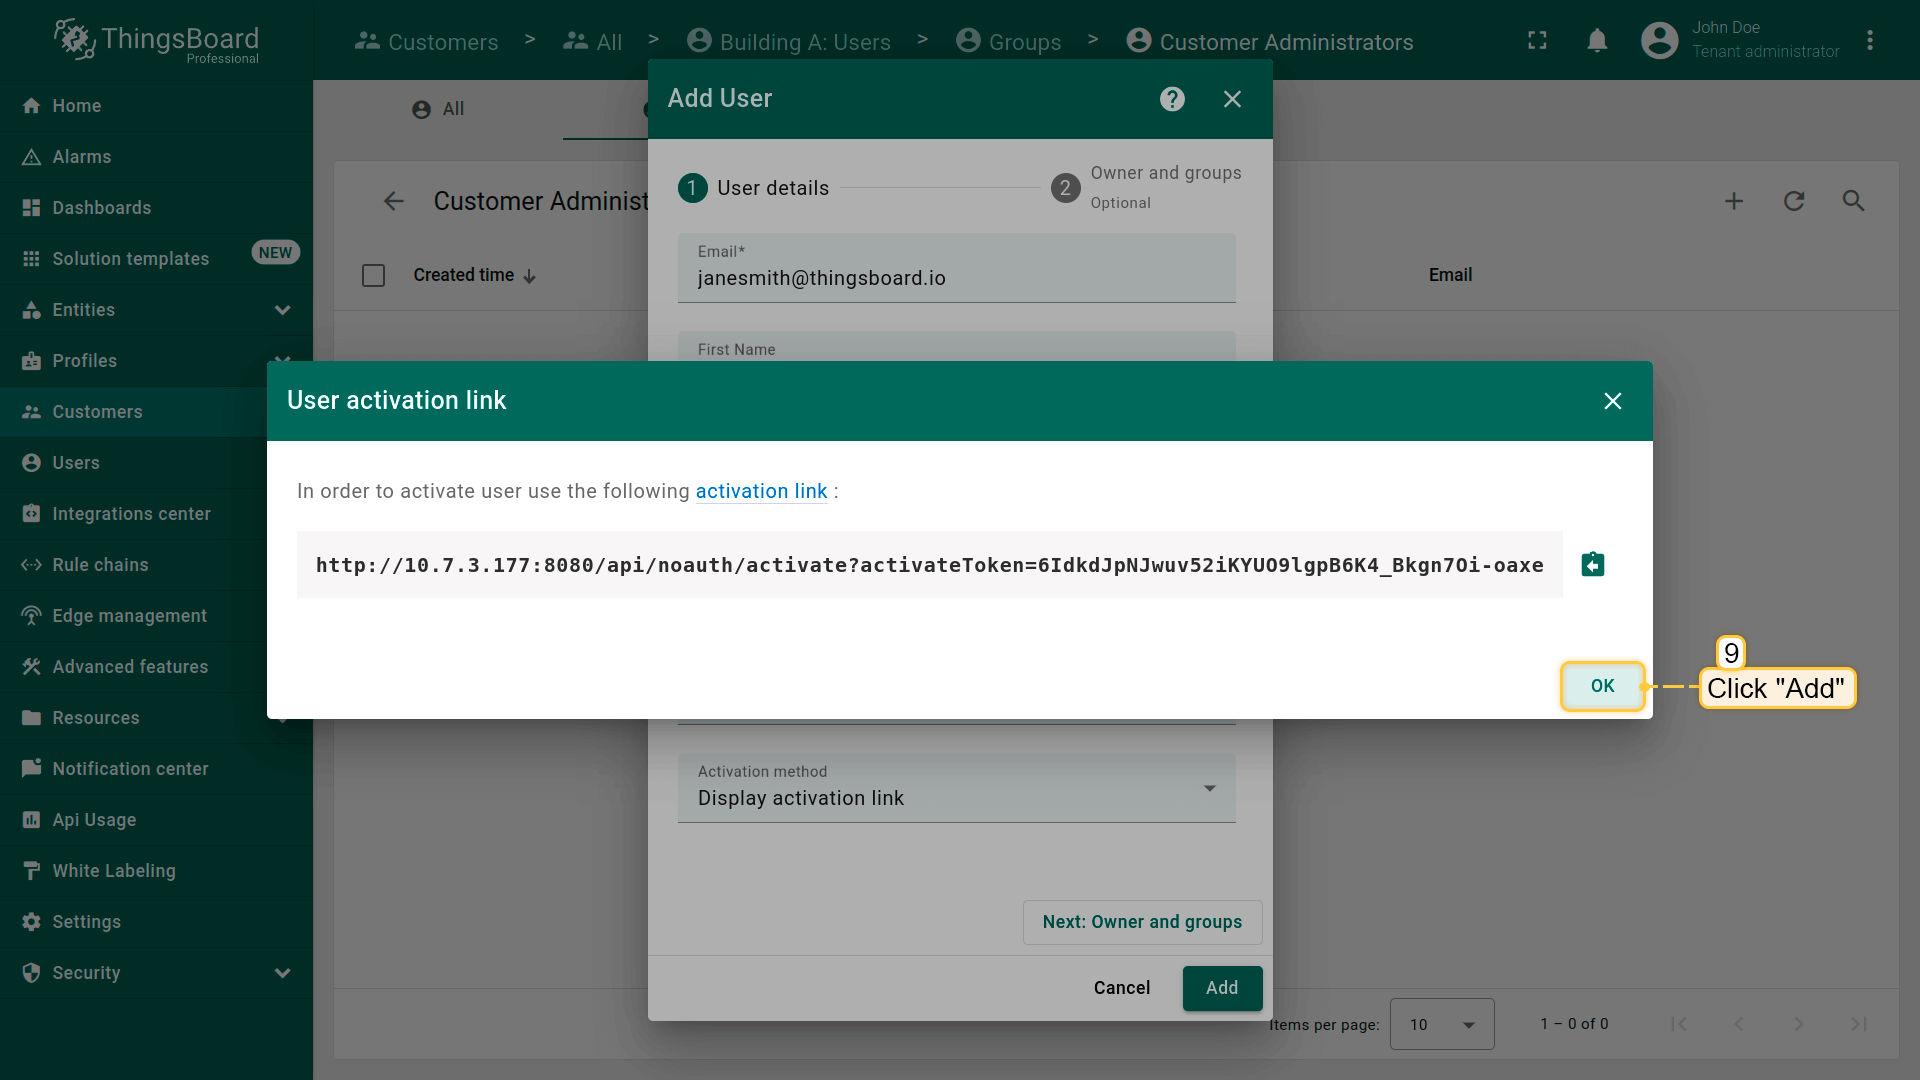
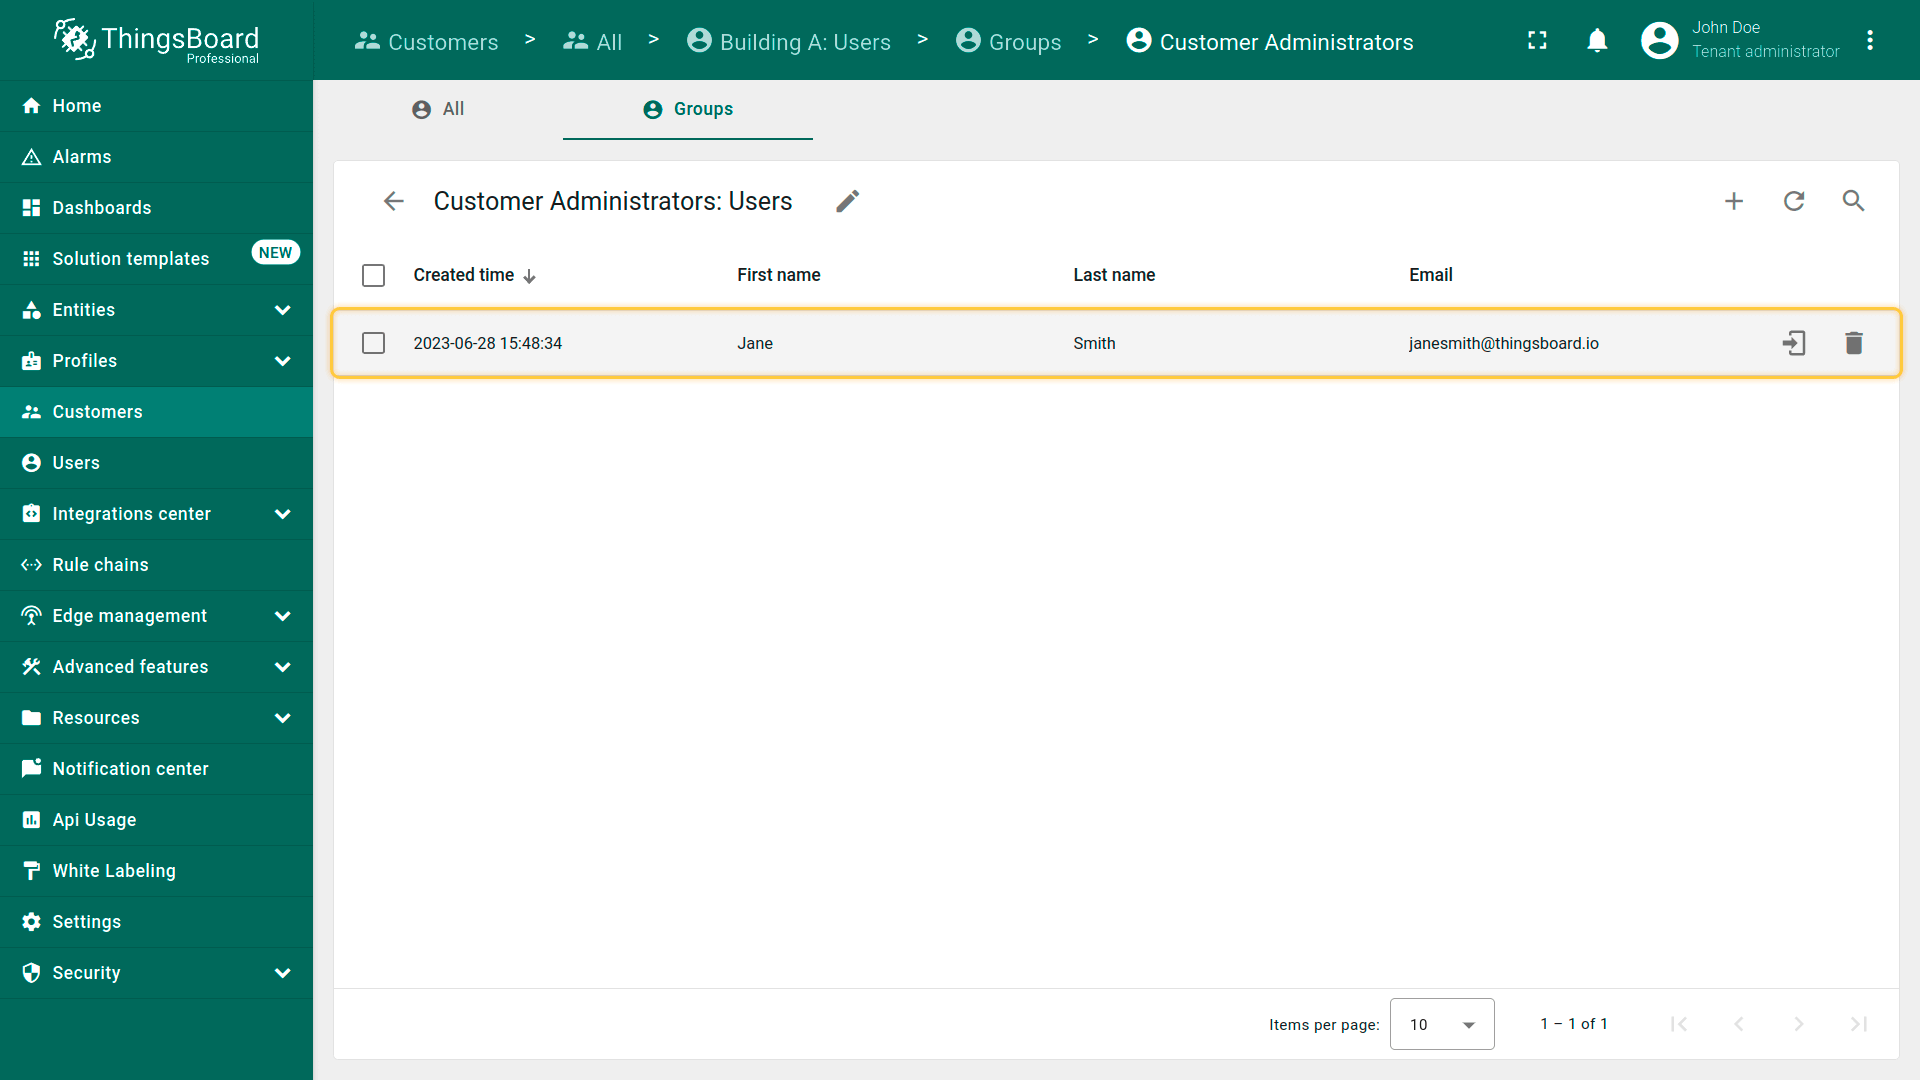
我们为每栋楼或楼群创建一个独立的客户实体,并将设施管理员用户账号加入每个客户自动创建的默认“Customer Administrators”用户组。以设施管理员身份登录后,即可设计仪表板、预配设备和管理最终用户。 1.进入“客户”页面,点击右上角“+”(添加客户); 2.输入名称“Building A”,点击“添加”; 3.在“Building A”客户旁点击“管理客户用户”; 4.进入“组”标签,点击“Customer Administrators”用户组; 5.点击右上角“+”,输入邮箱(例如_janesmith@thingsboard.io_),点击“添加”; 6.在弹出窗口中可看到用户激活链接,点击“确定”; 7.客户用户Jane已创建。

最终用户
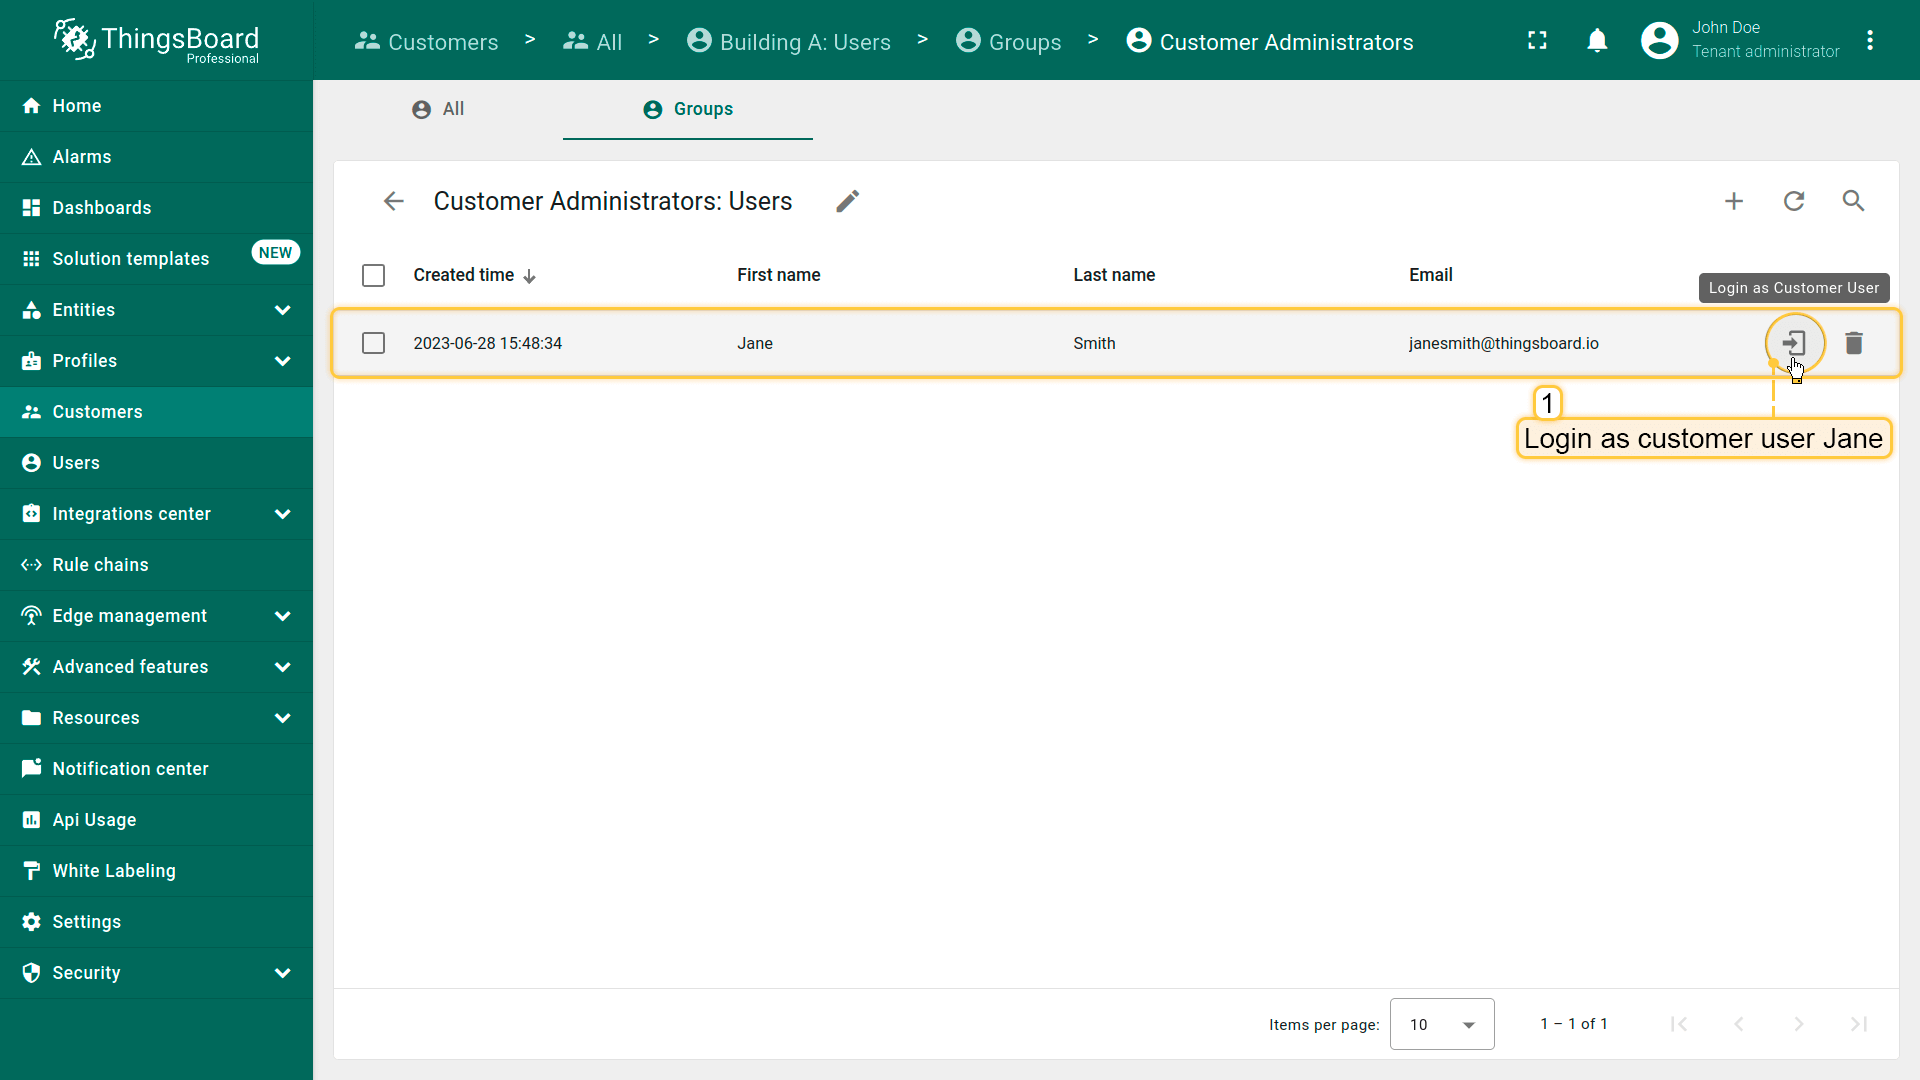
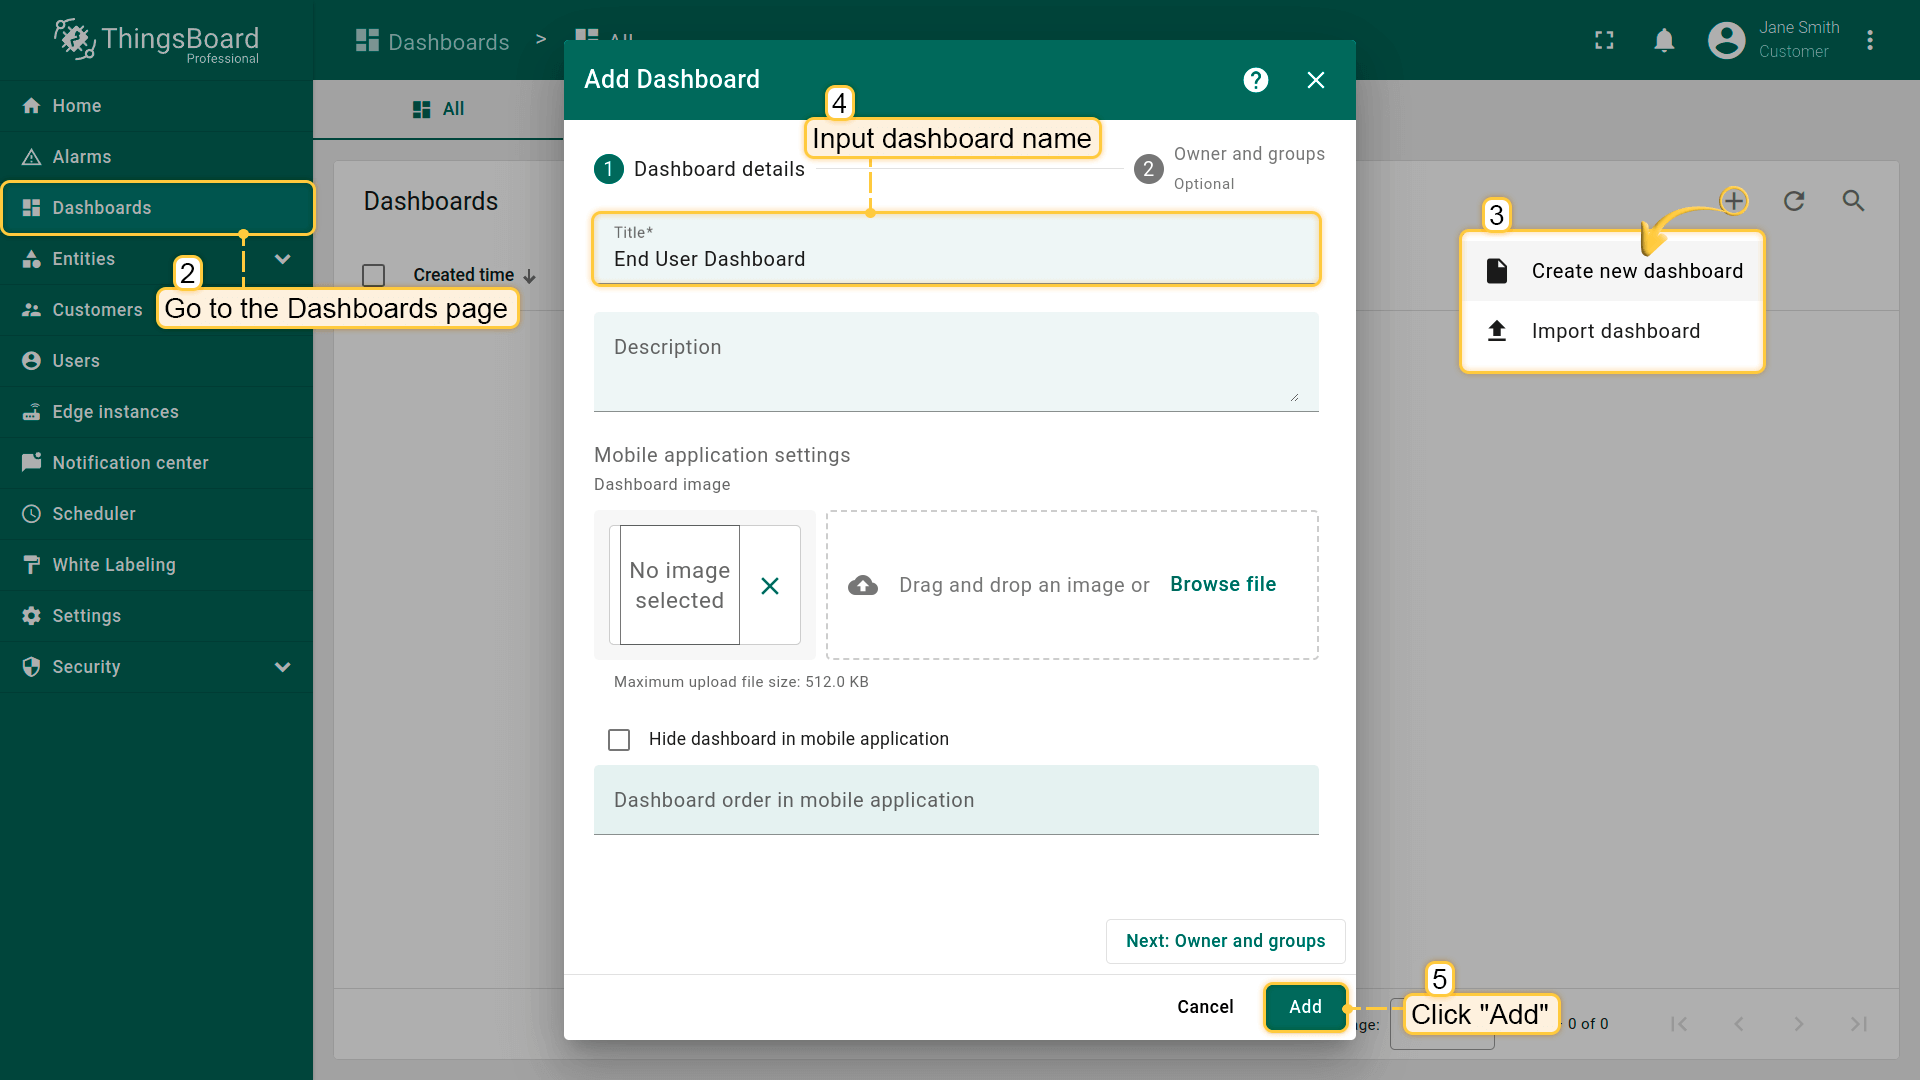
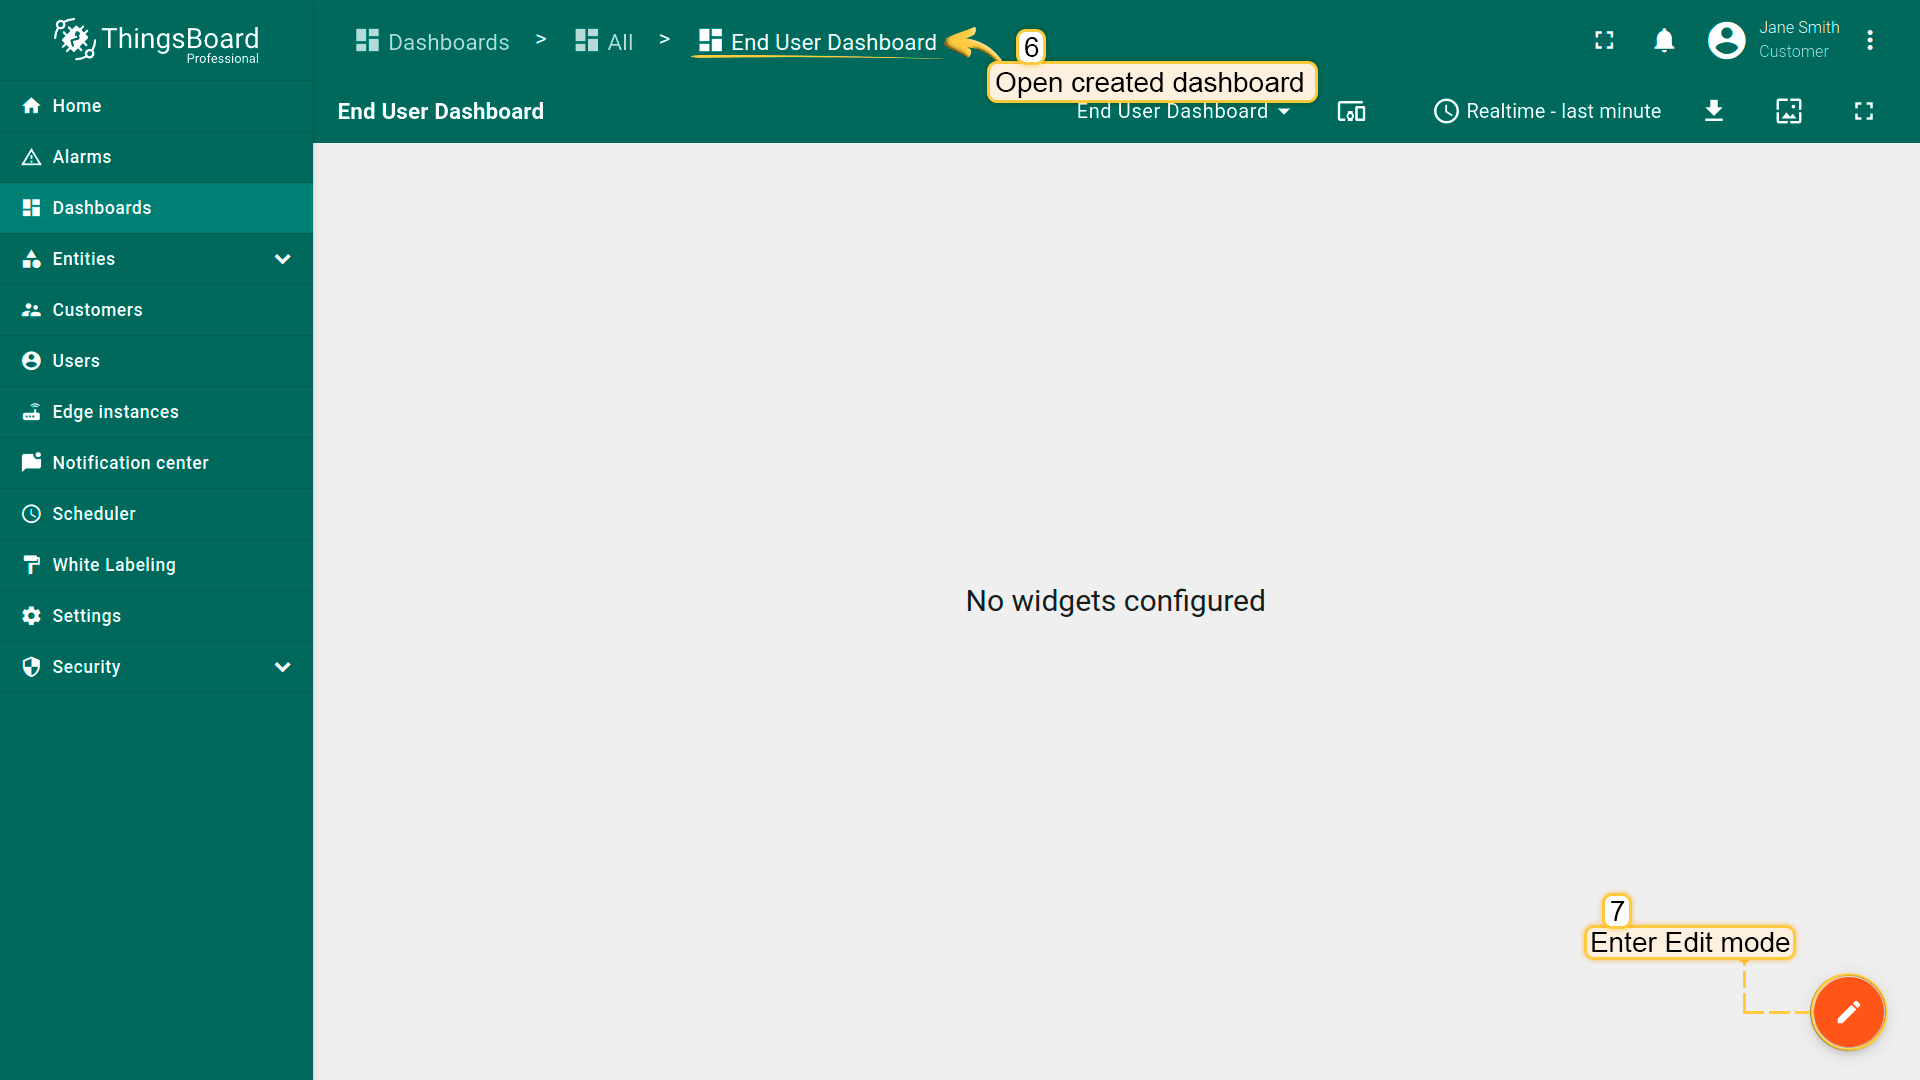
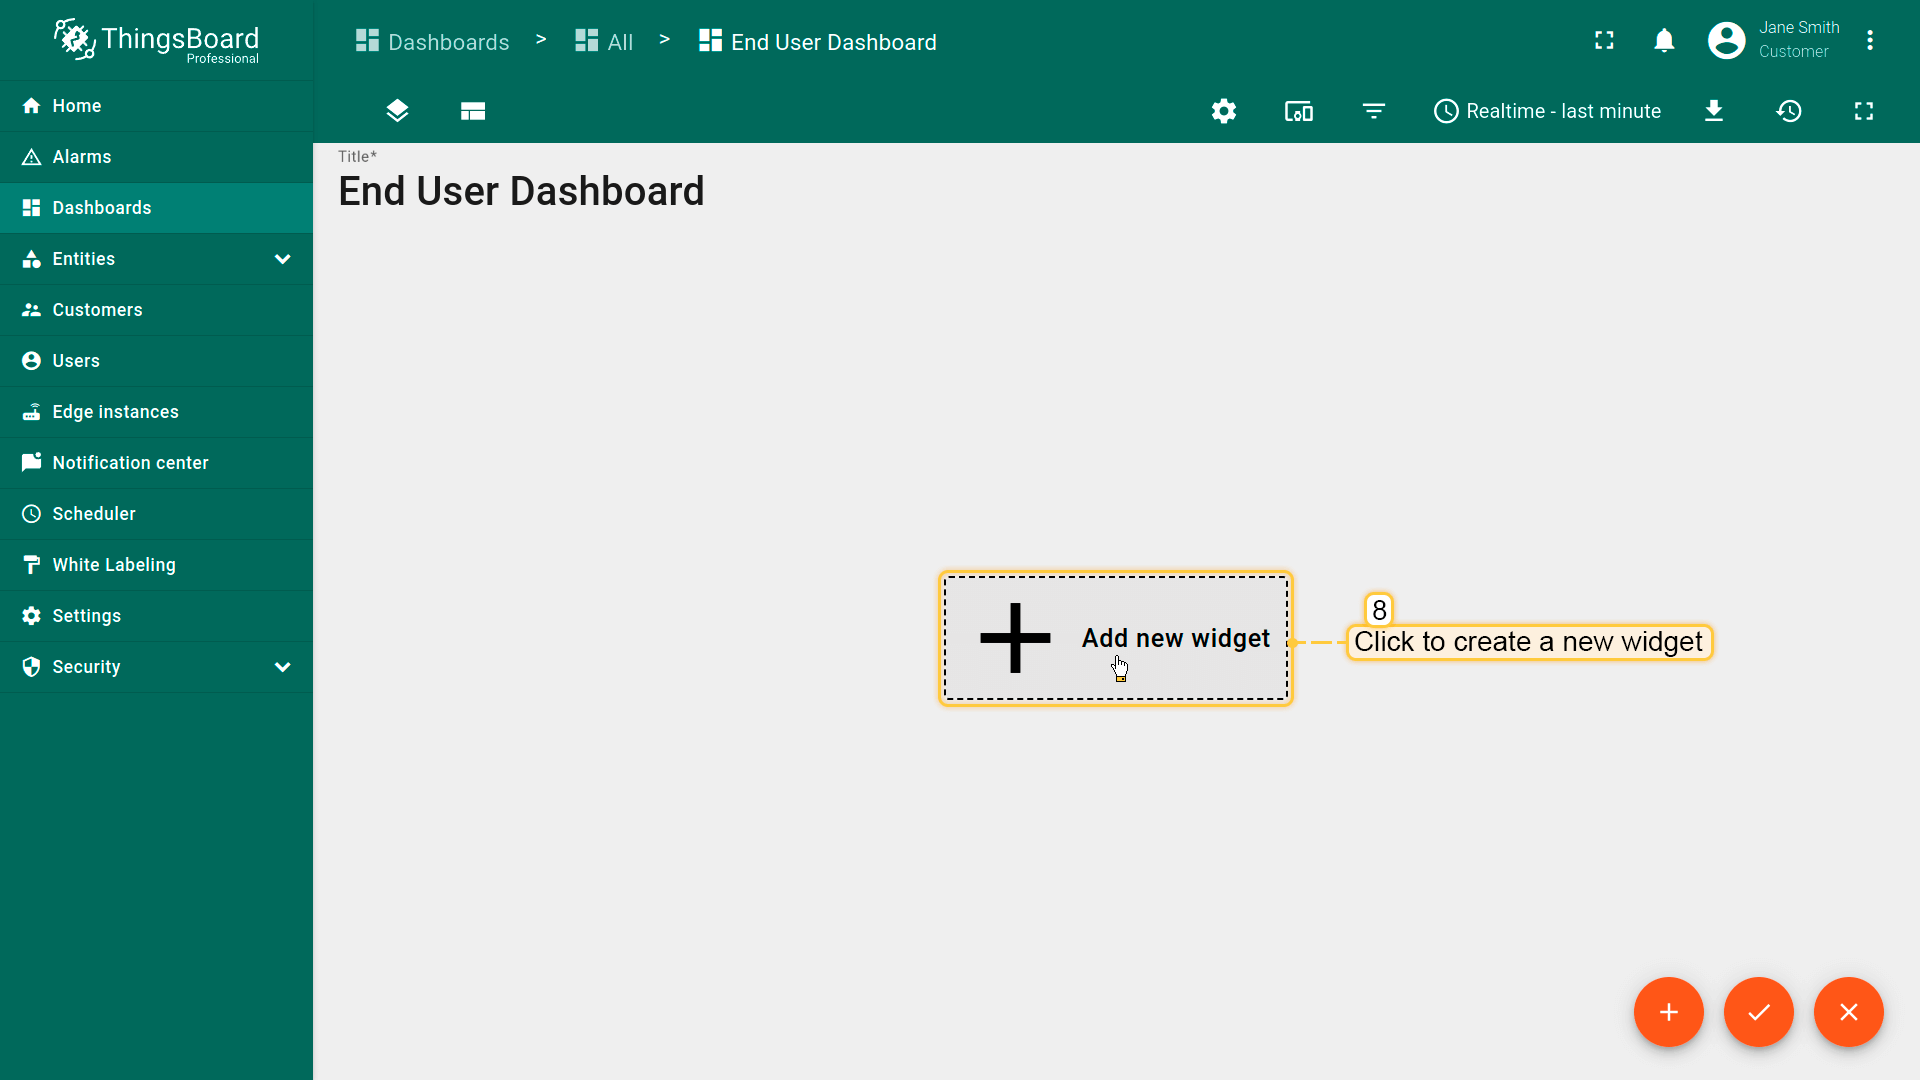
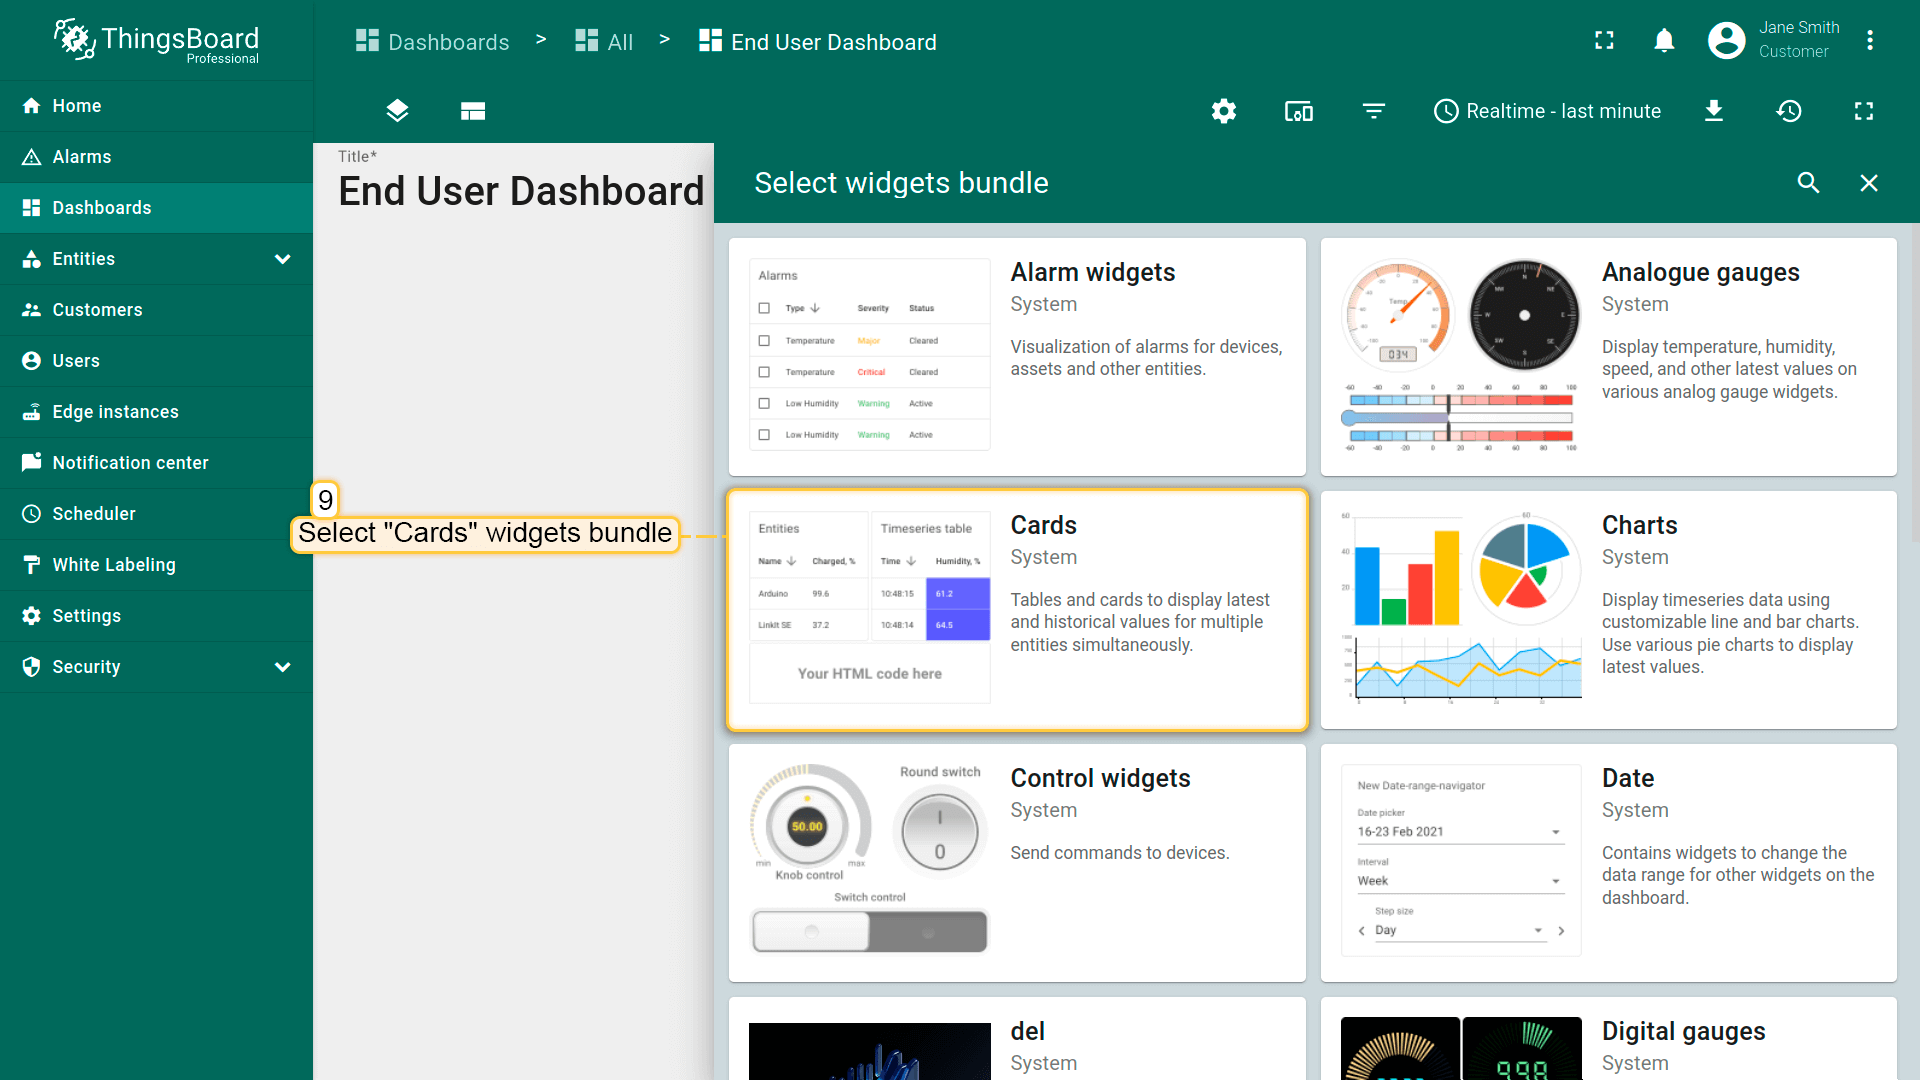
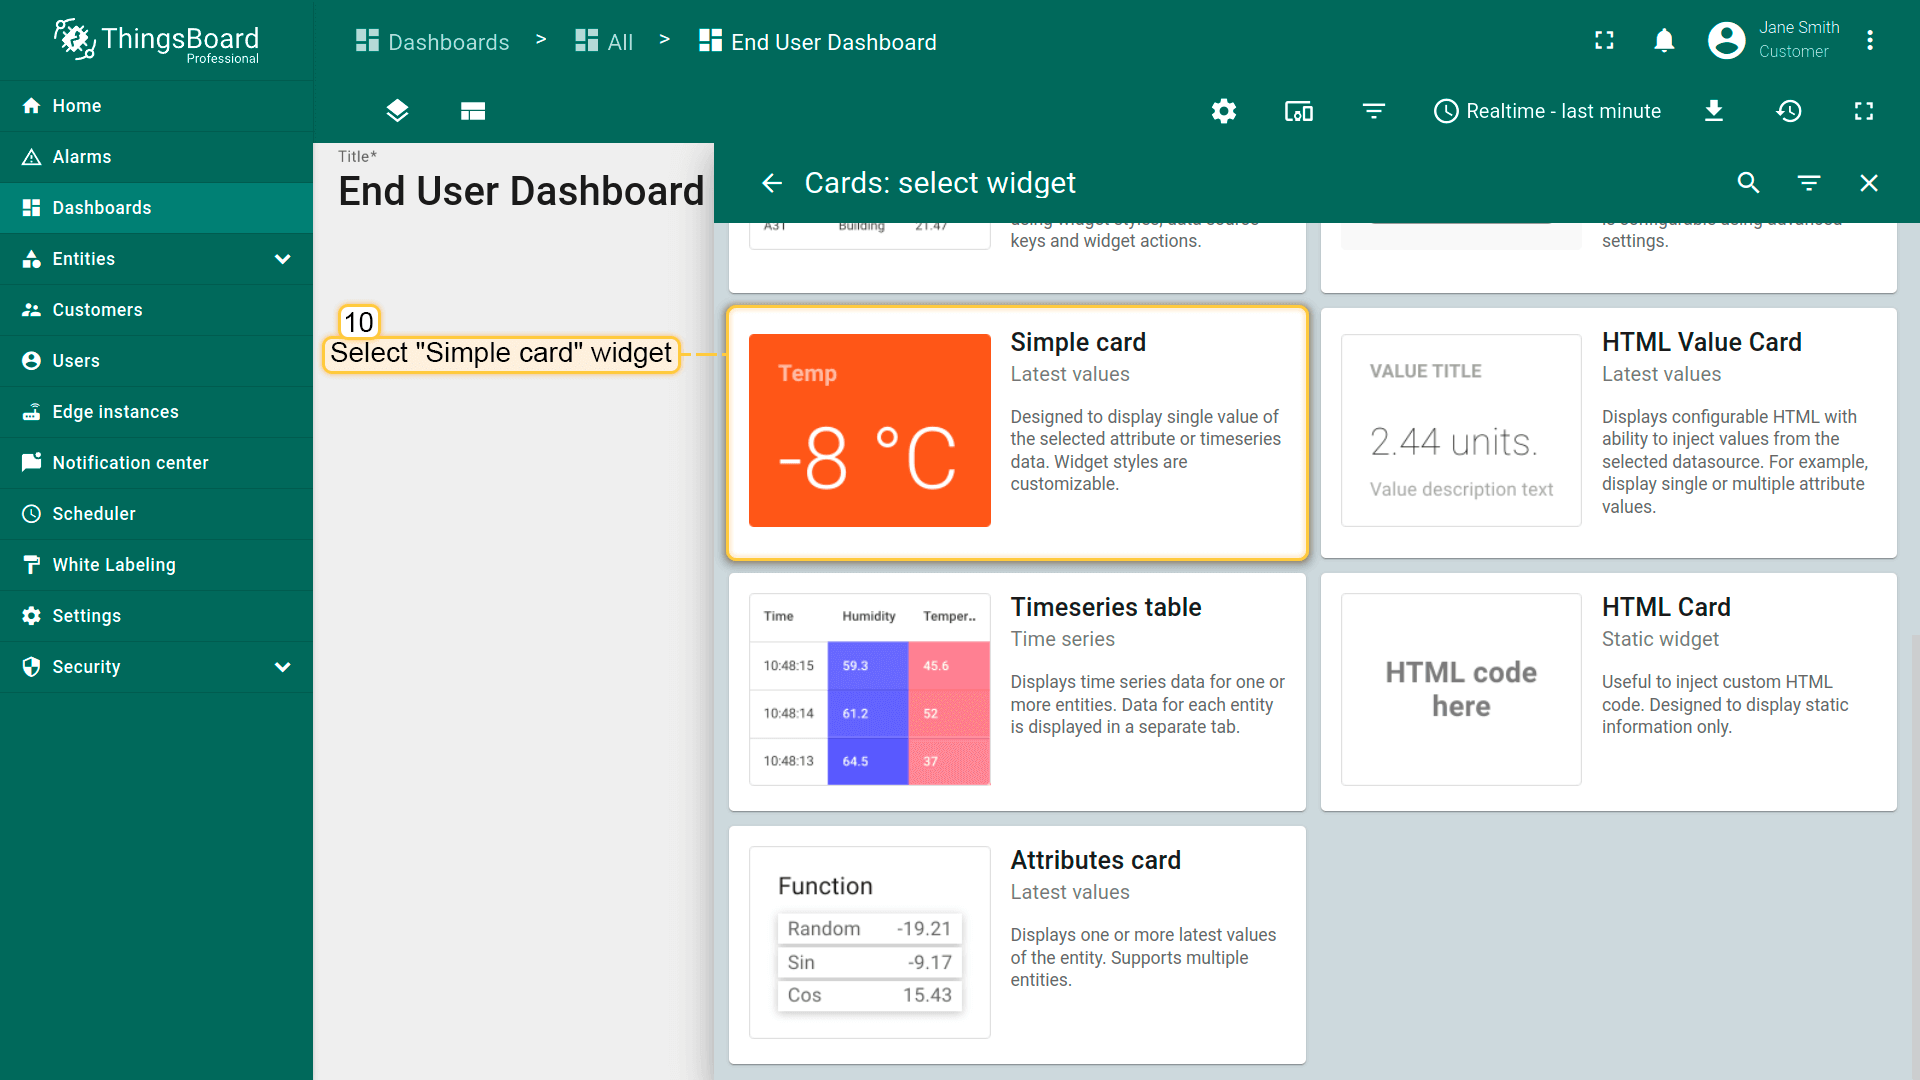
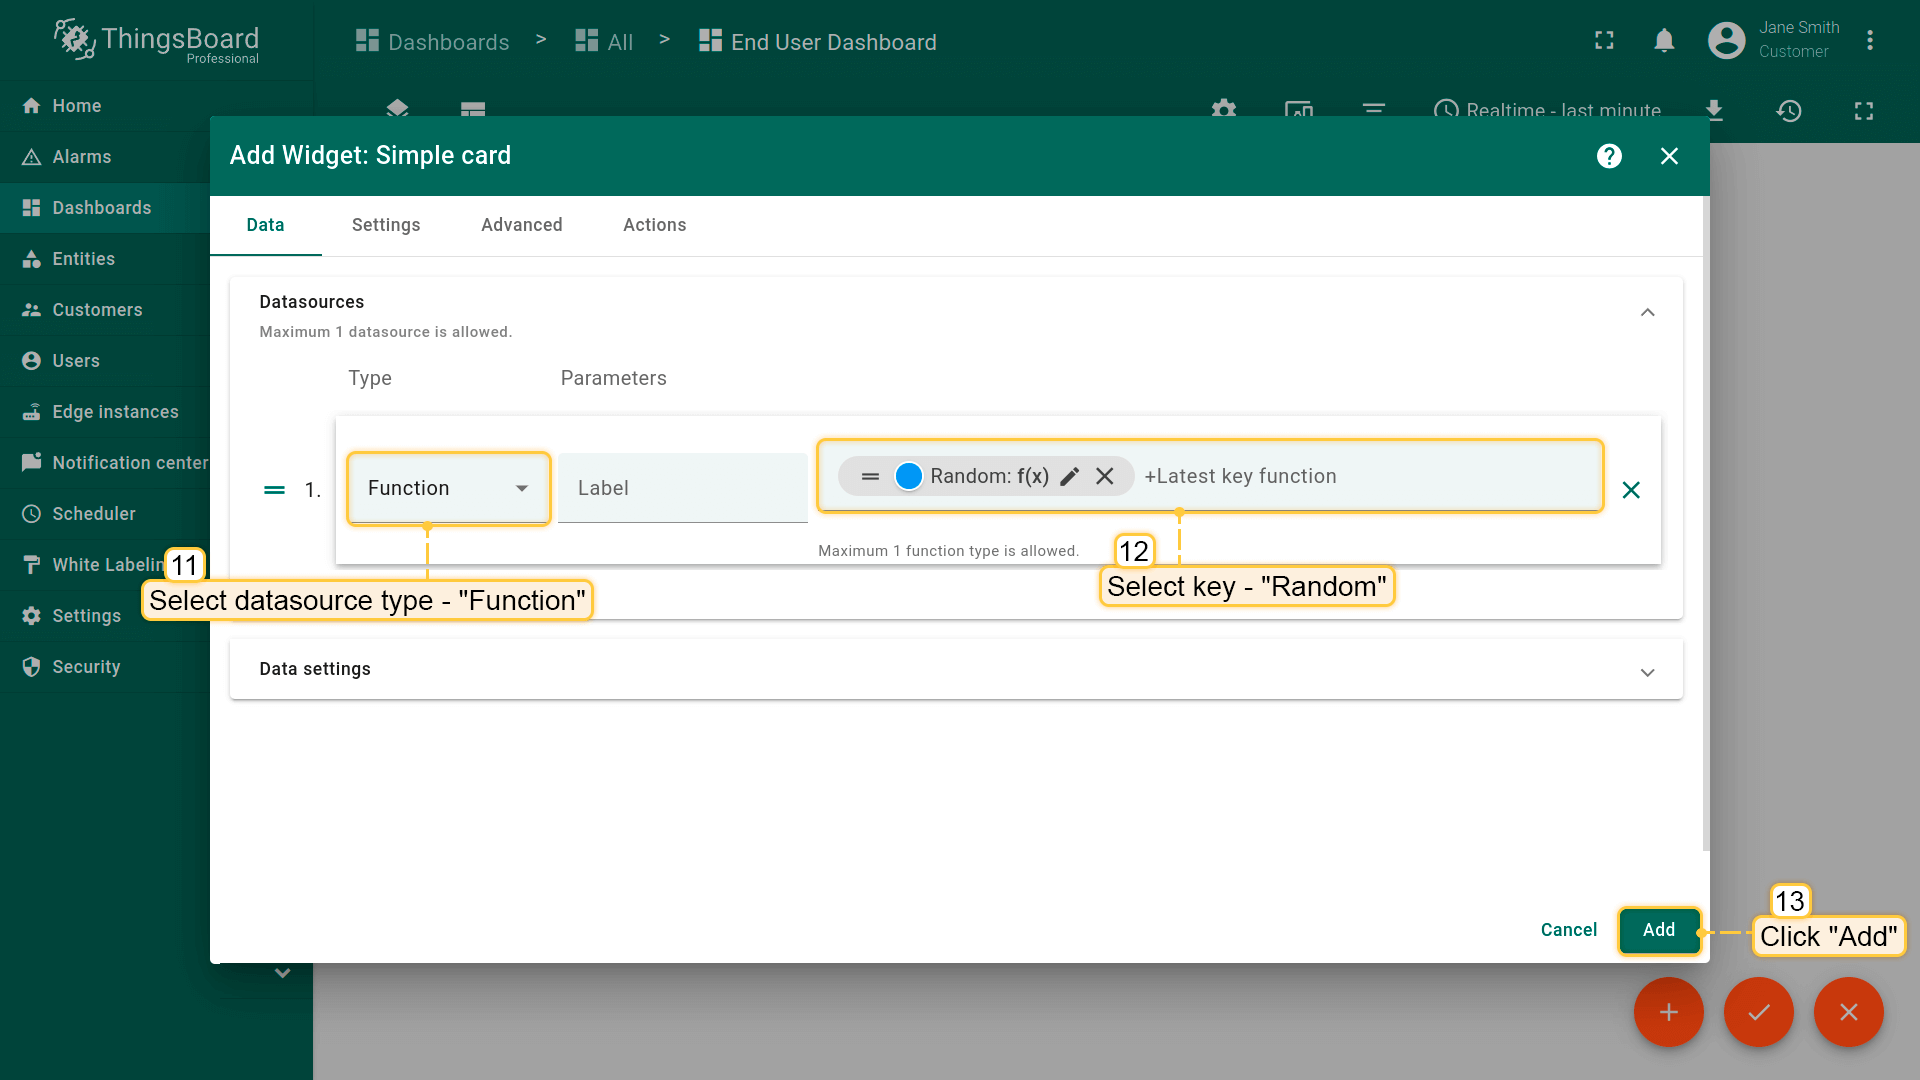
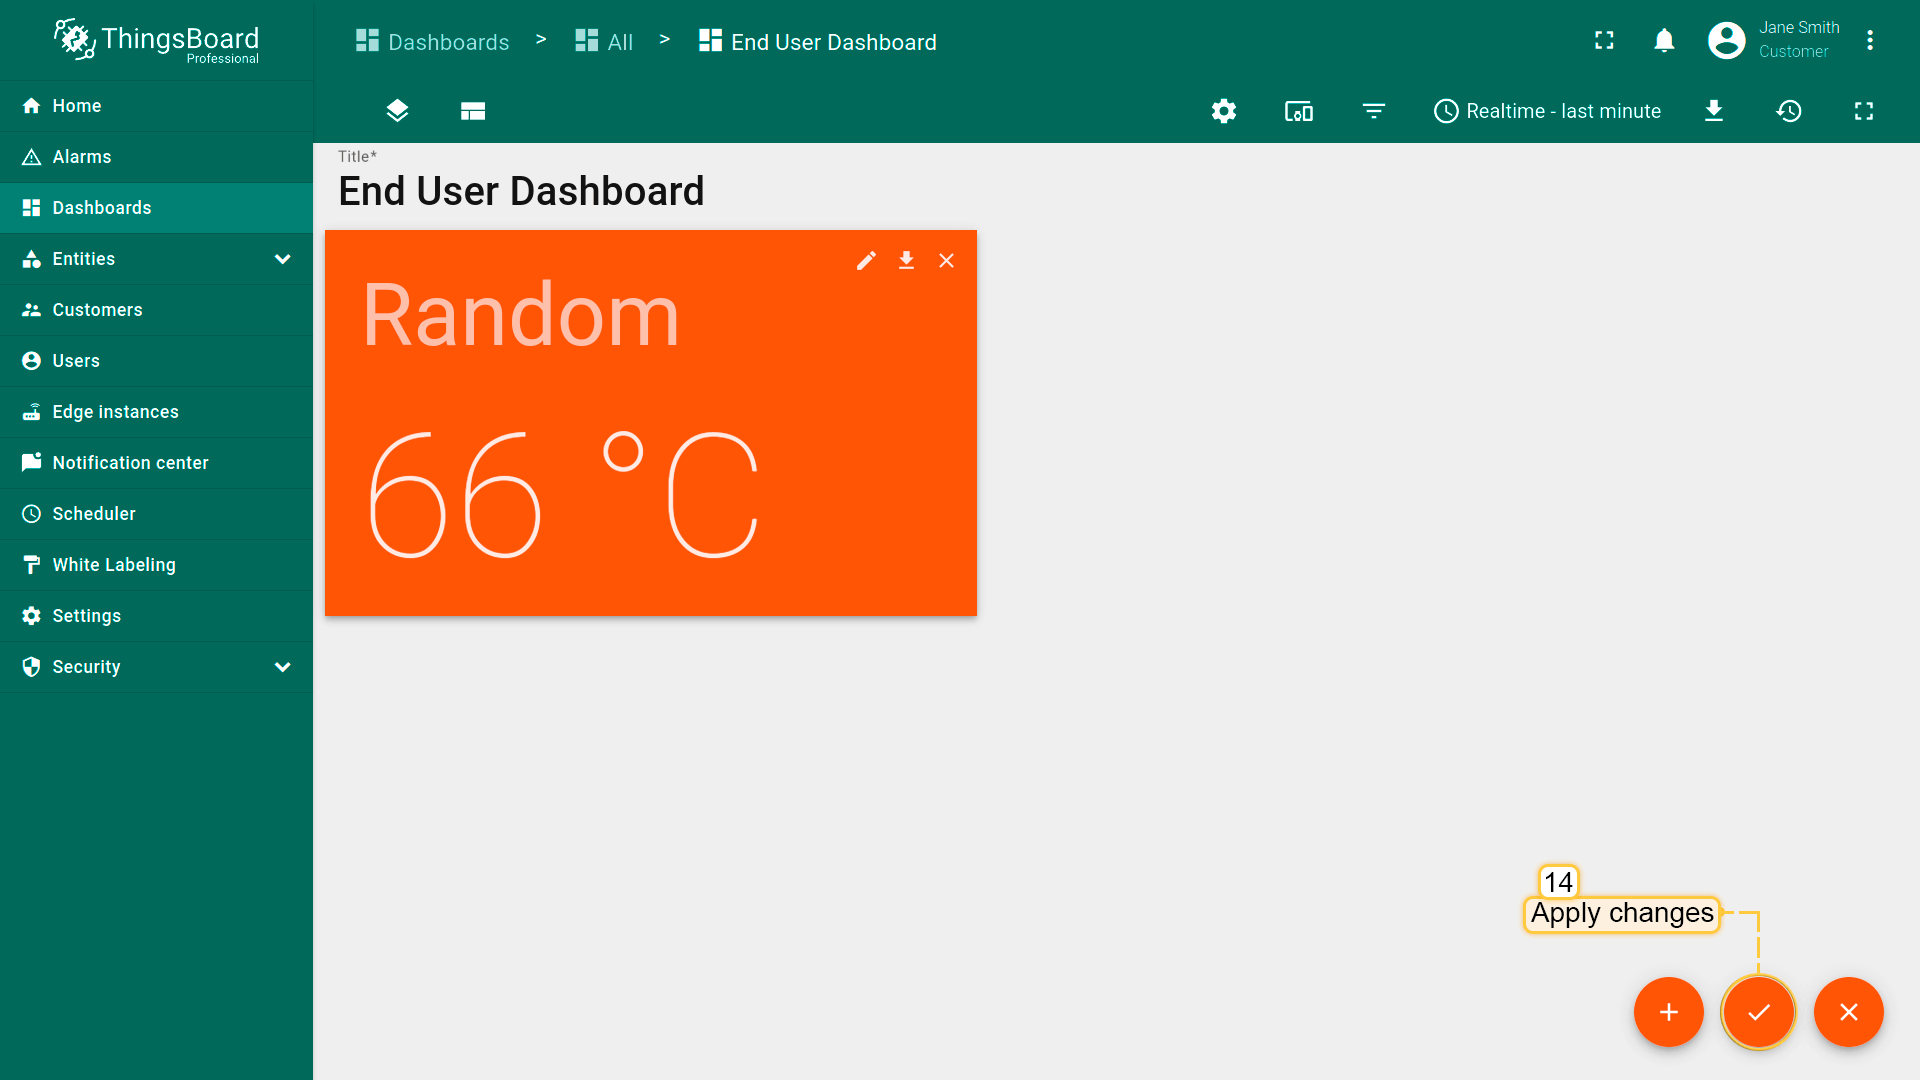
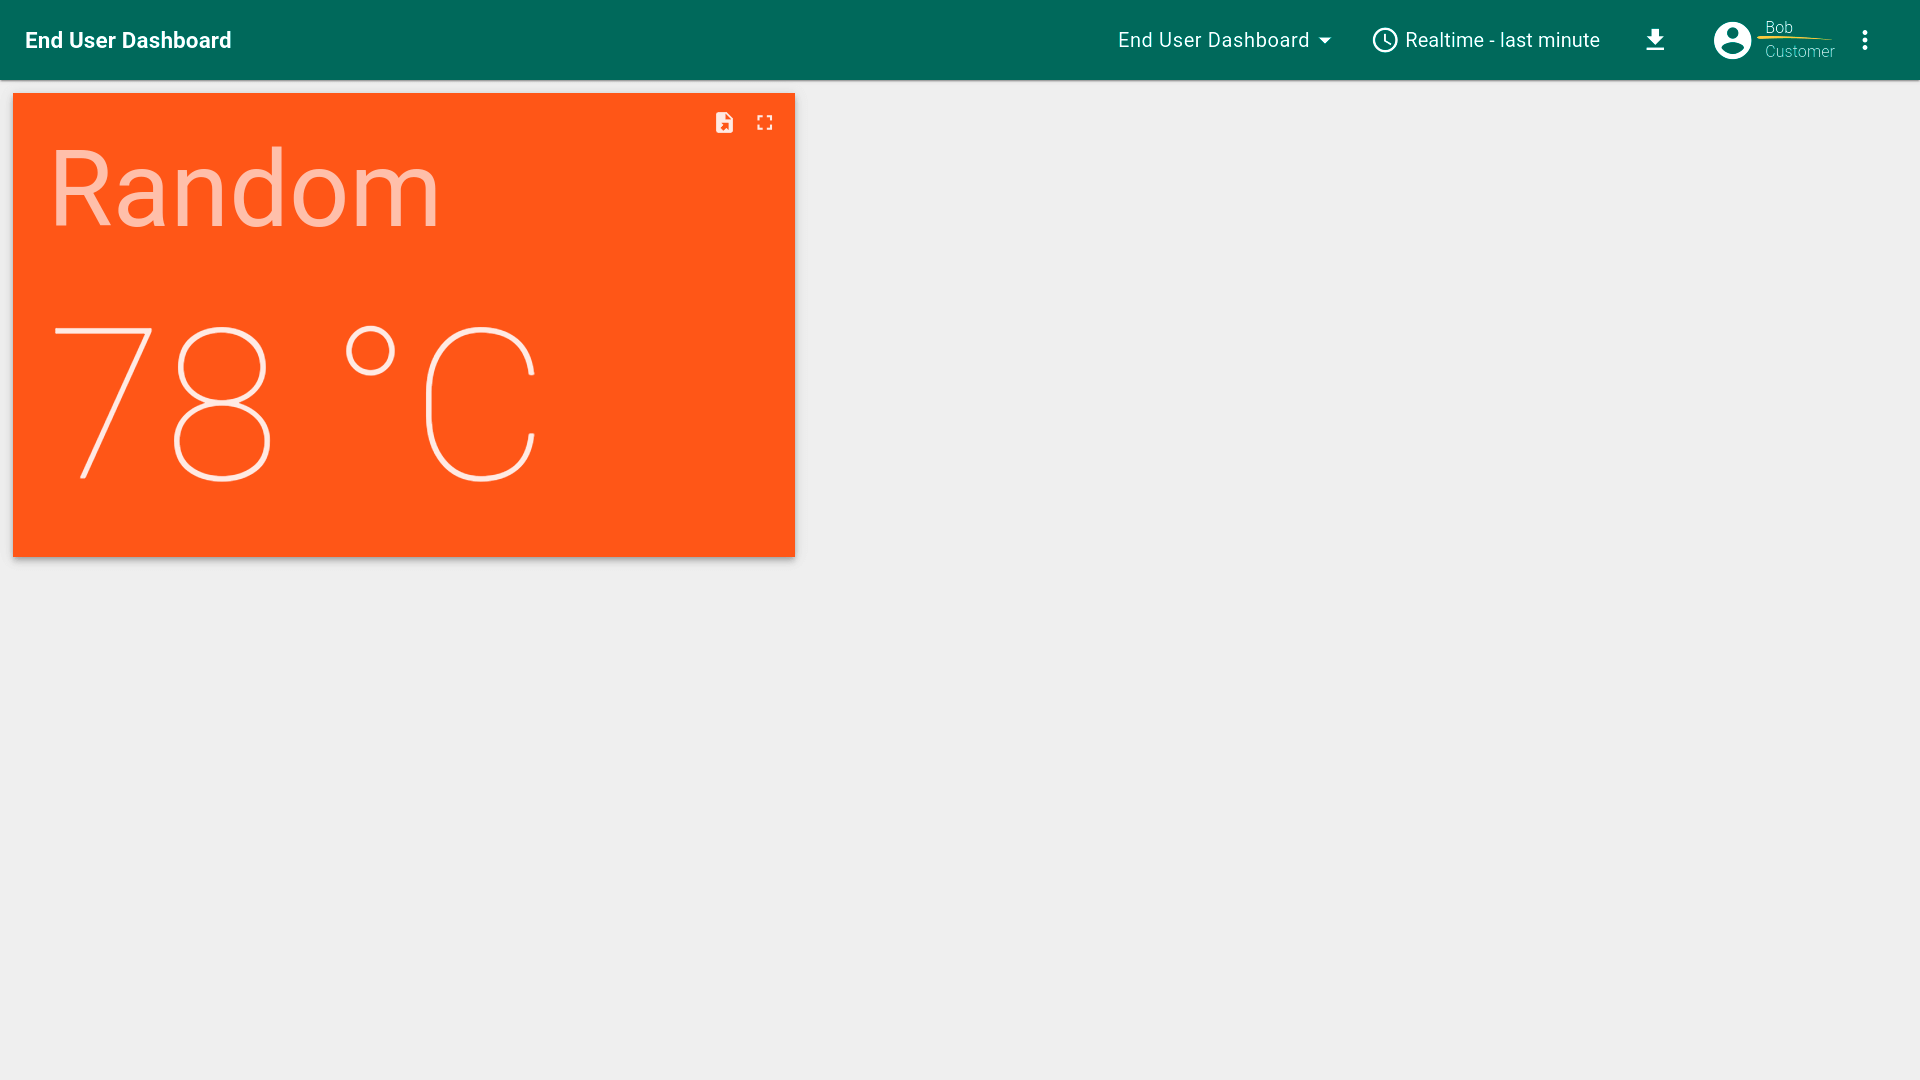
以客户用户Jane Smith(前文创建的Building A管理员)身份登录并创建仪表板。 1.以客户用户Jane Smith身份登录; 2.进入“仪表板”页面,点击右上角“+”,选择“创建新仪表板”; 3.输入仪表板名称,例如“End User Dashboard”,点击“添加”; 4.打开已创建的仪表板并进入编辑模式; 5.点击“添加新组件”,在“Cards”组件包中选择“Simple card”组件; 6.本示例将在组件中生成随机温度值。在“数据源”部分将类型设为“Function”,键设为“Random”,点击“添加”; 7.组件已创建,保存仪表板。
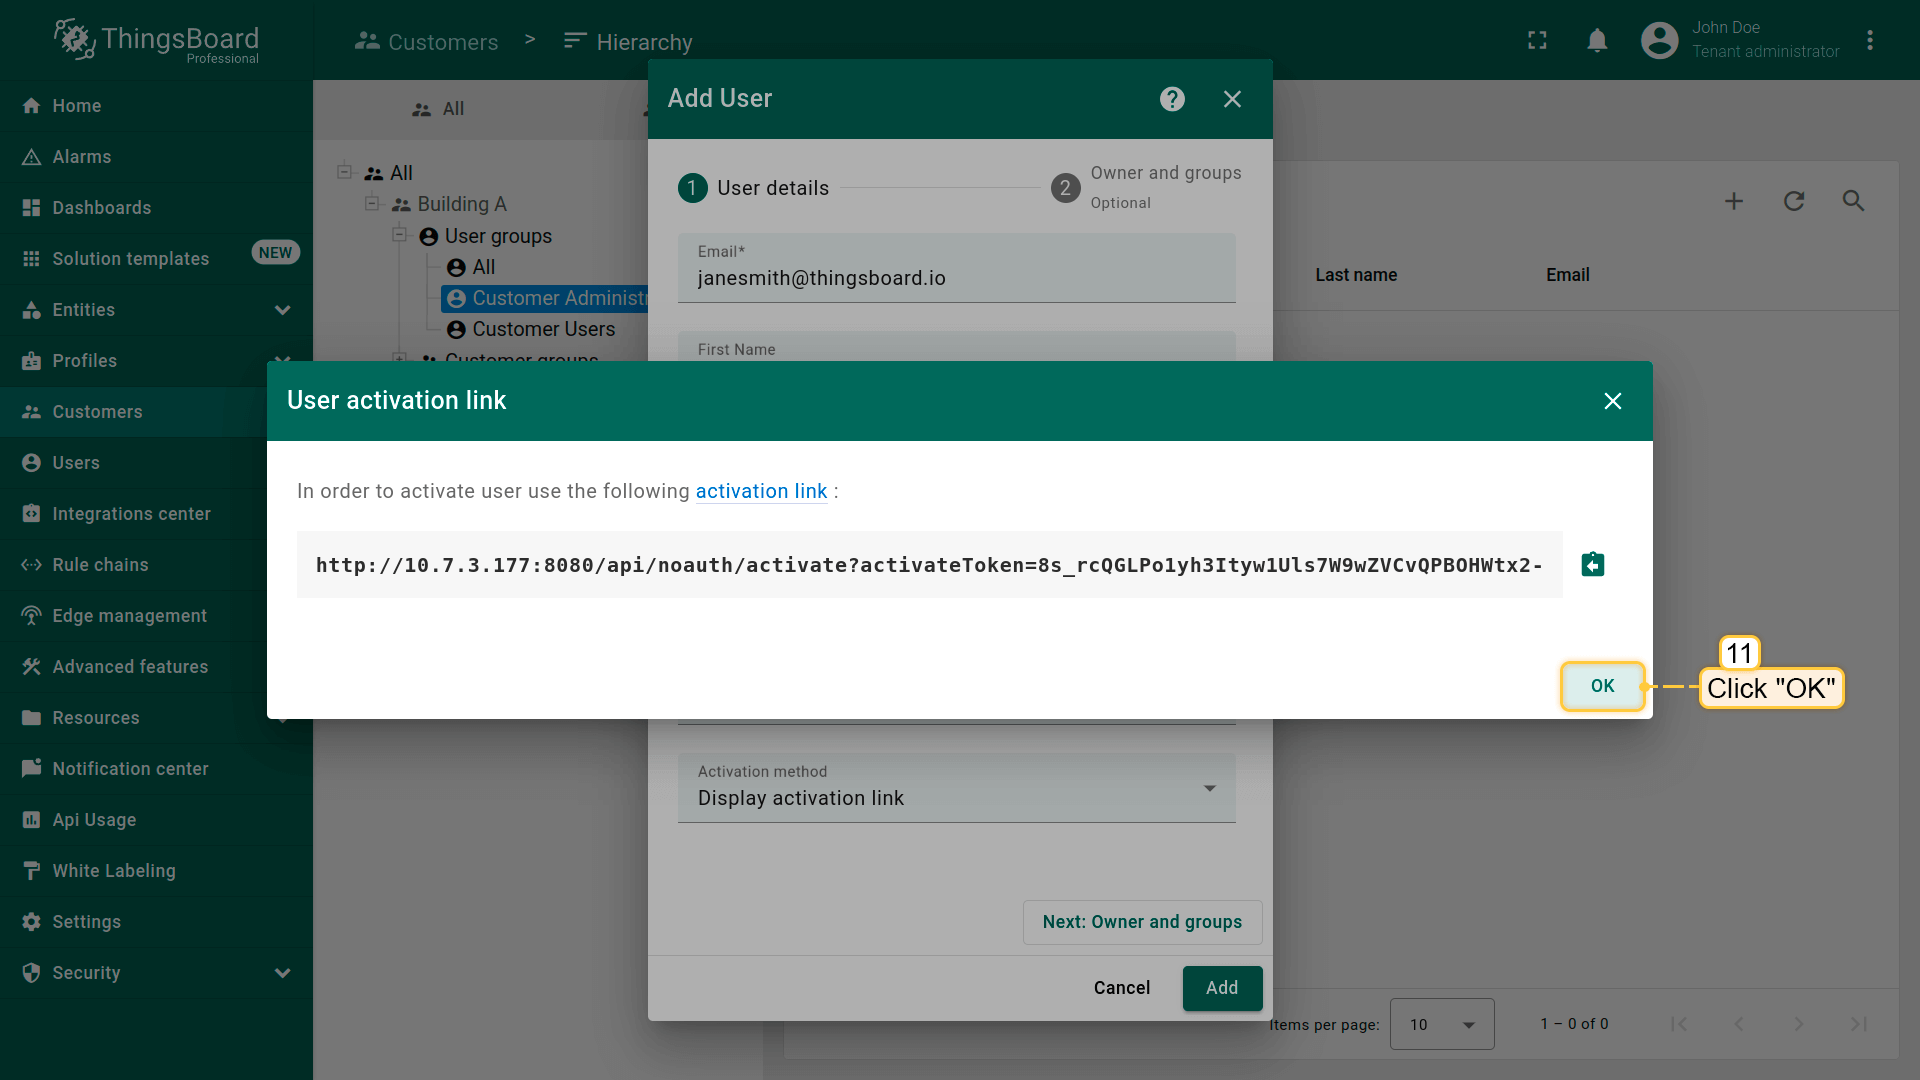
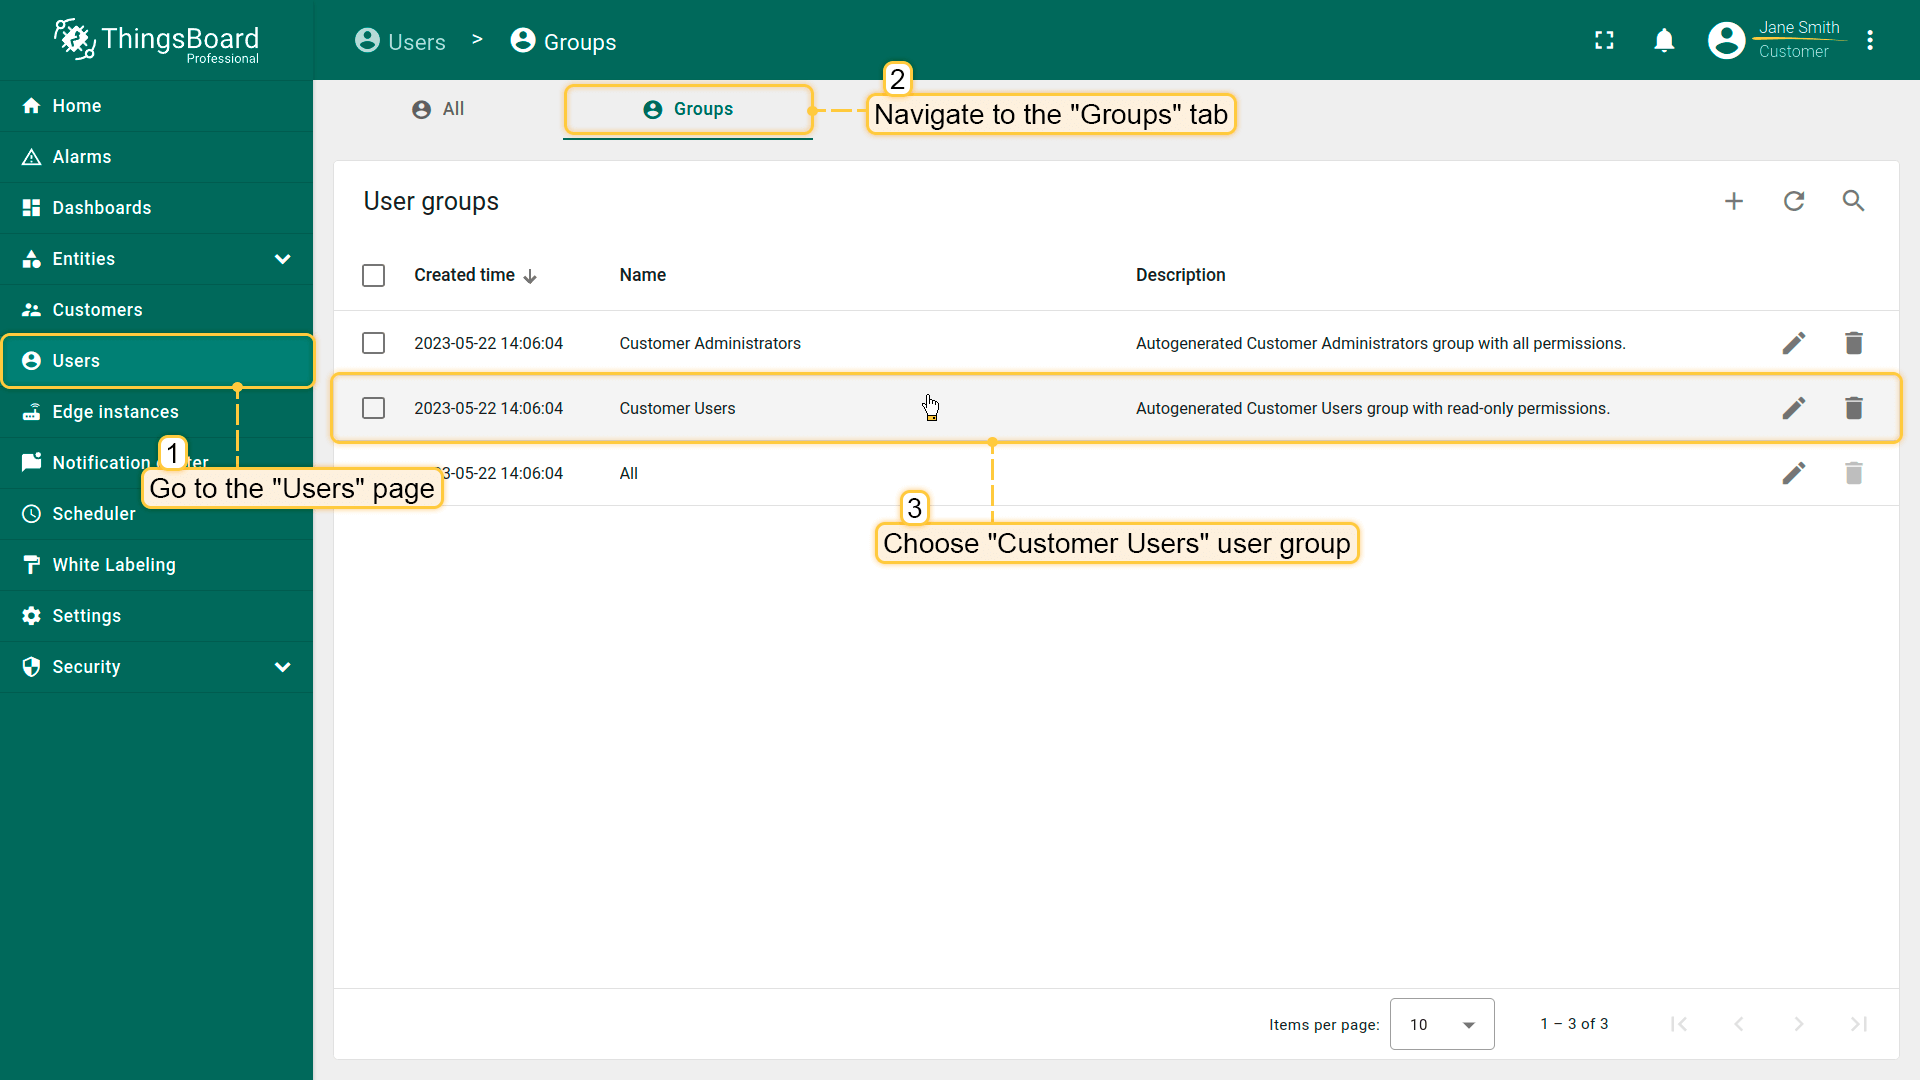
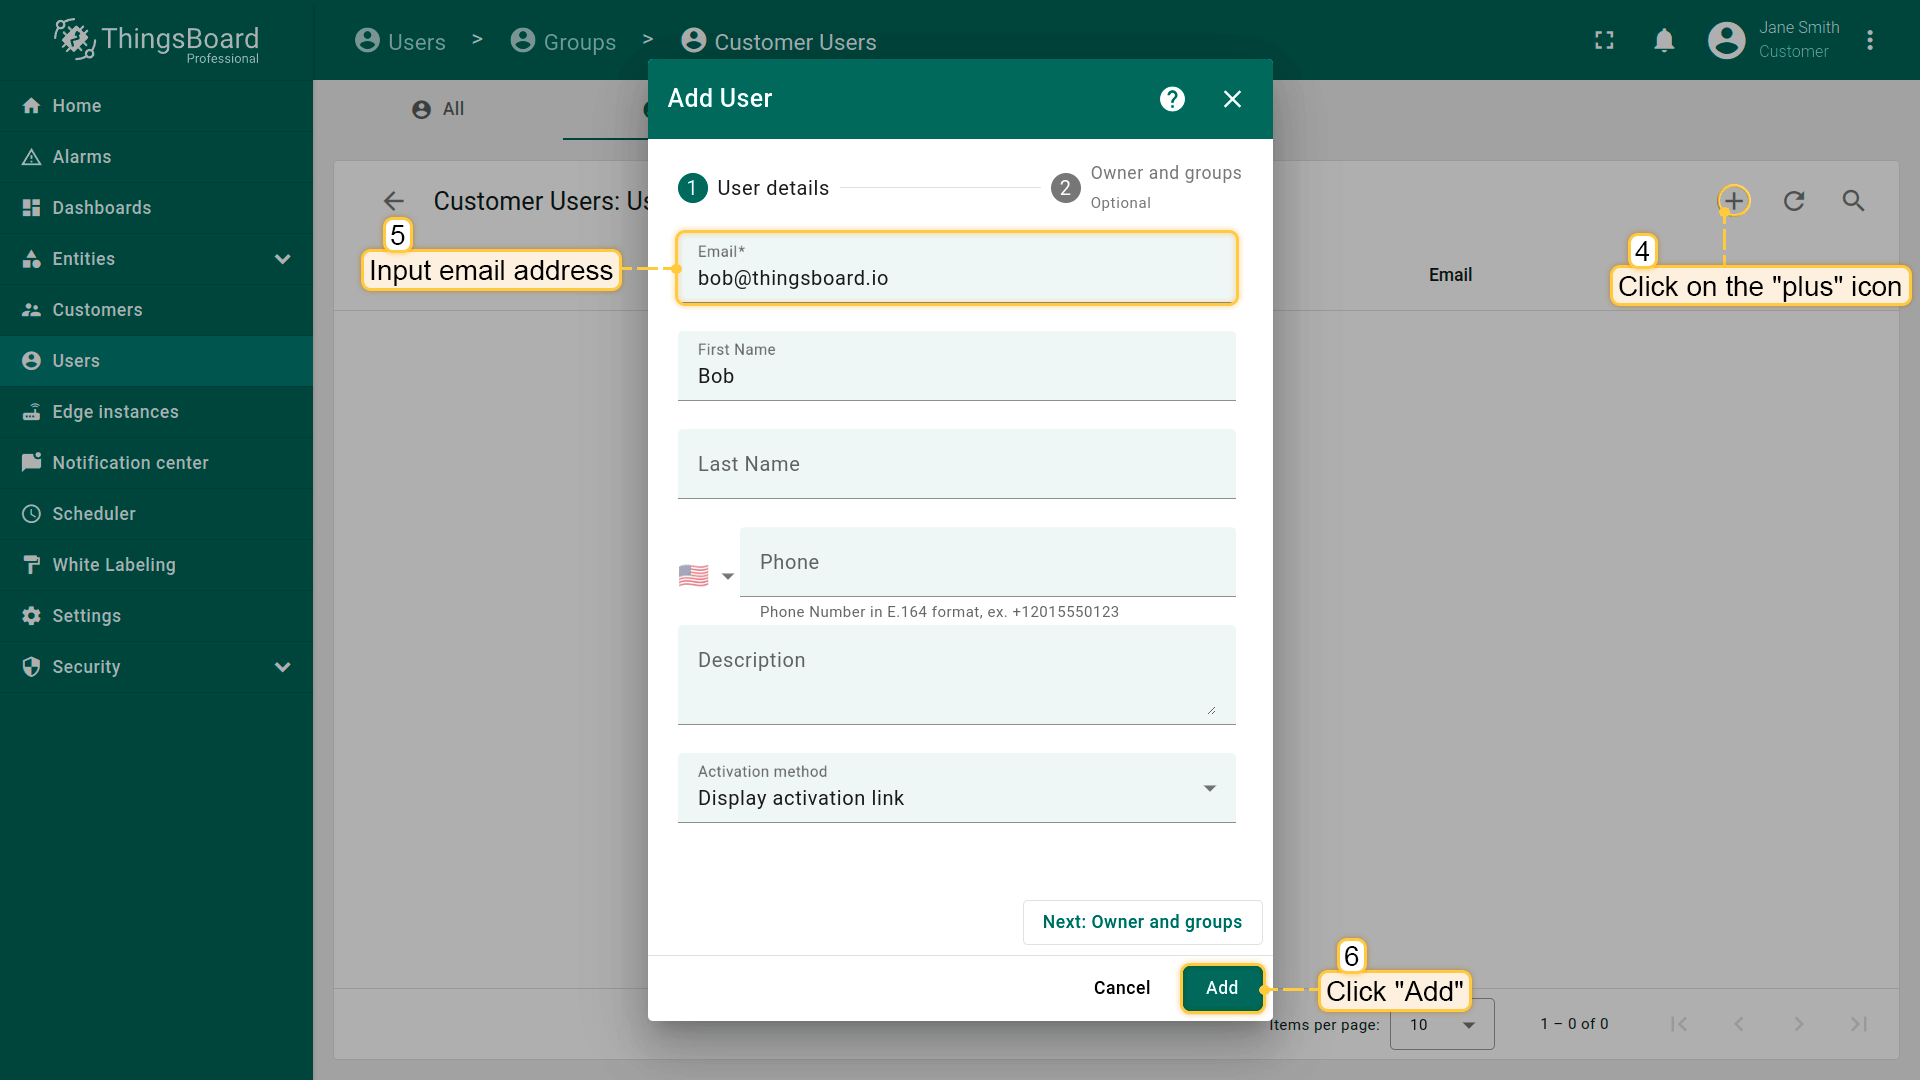
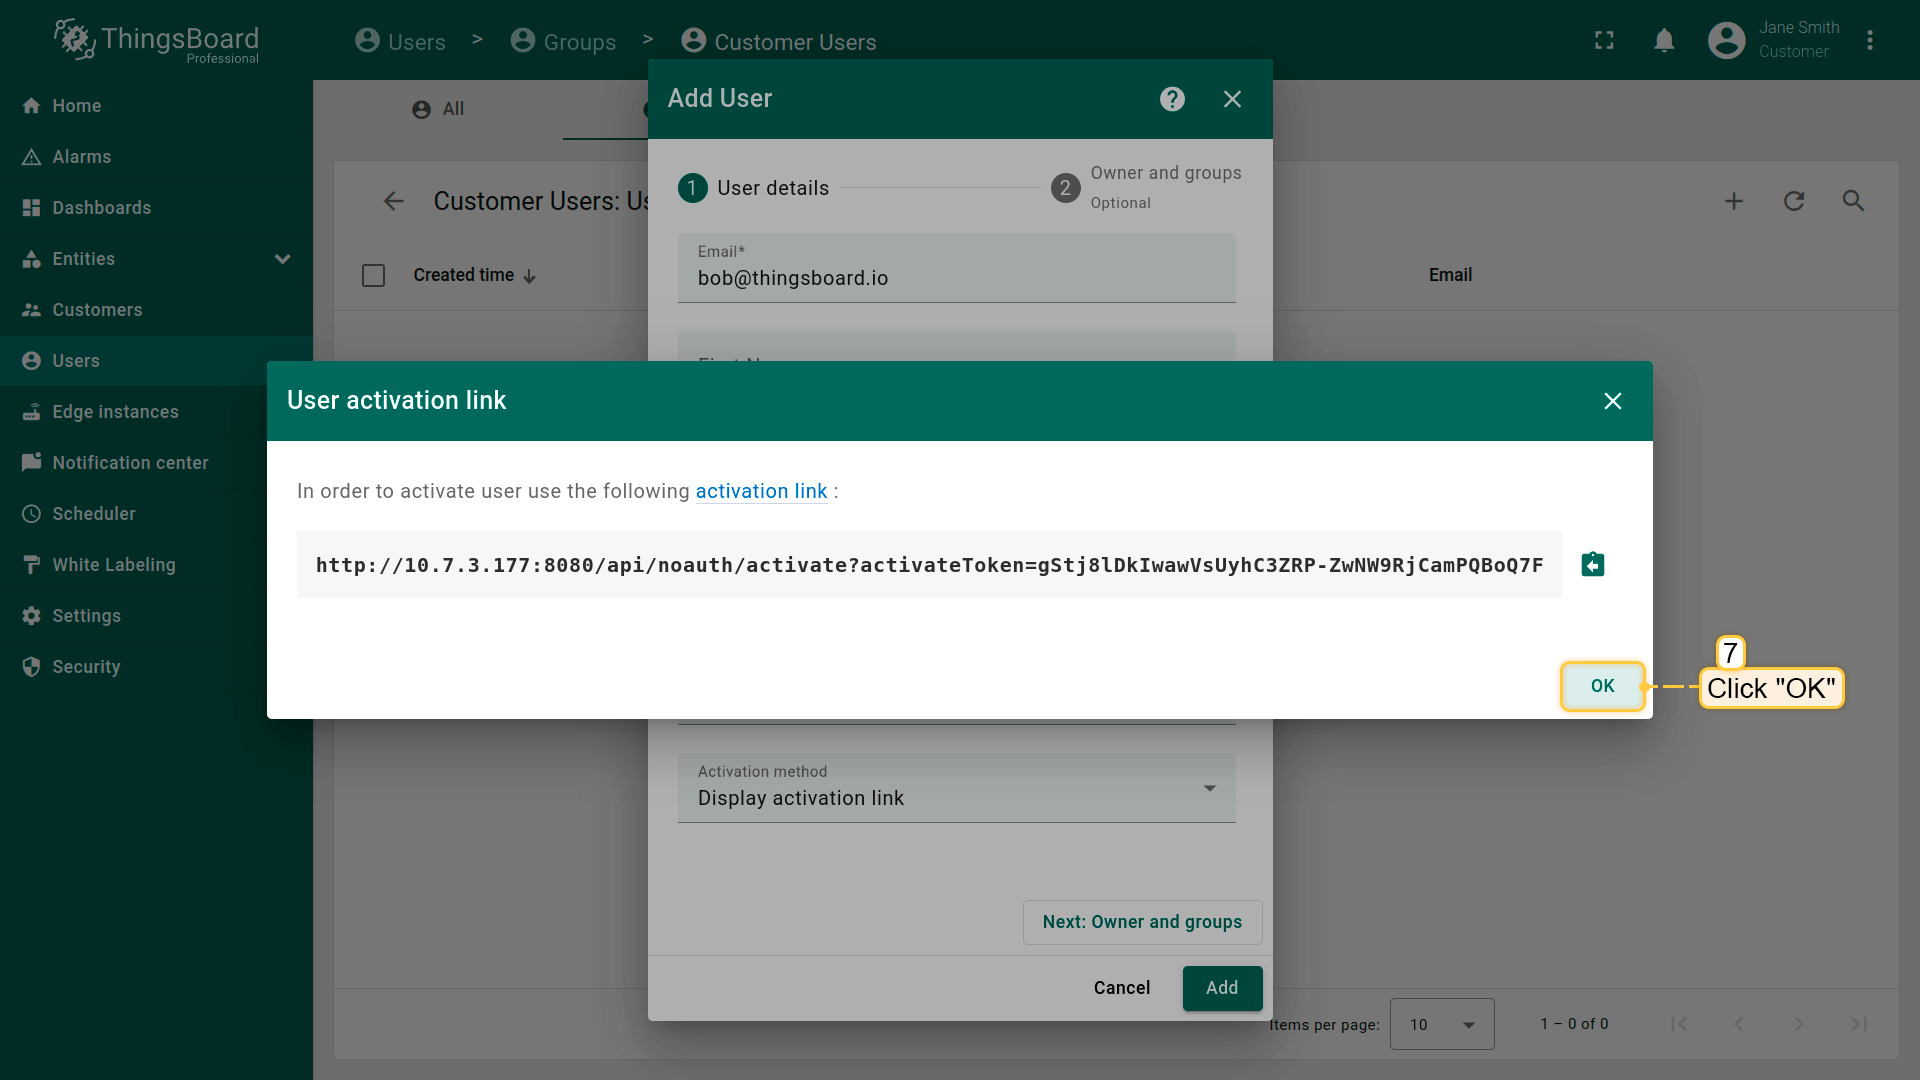
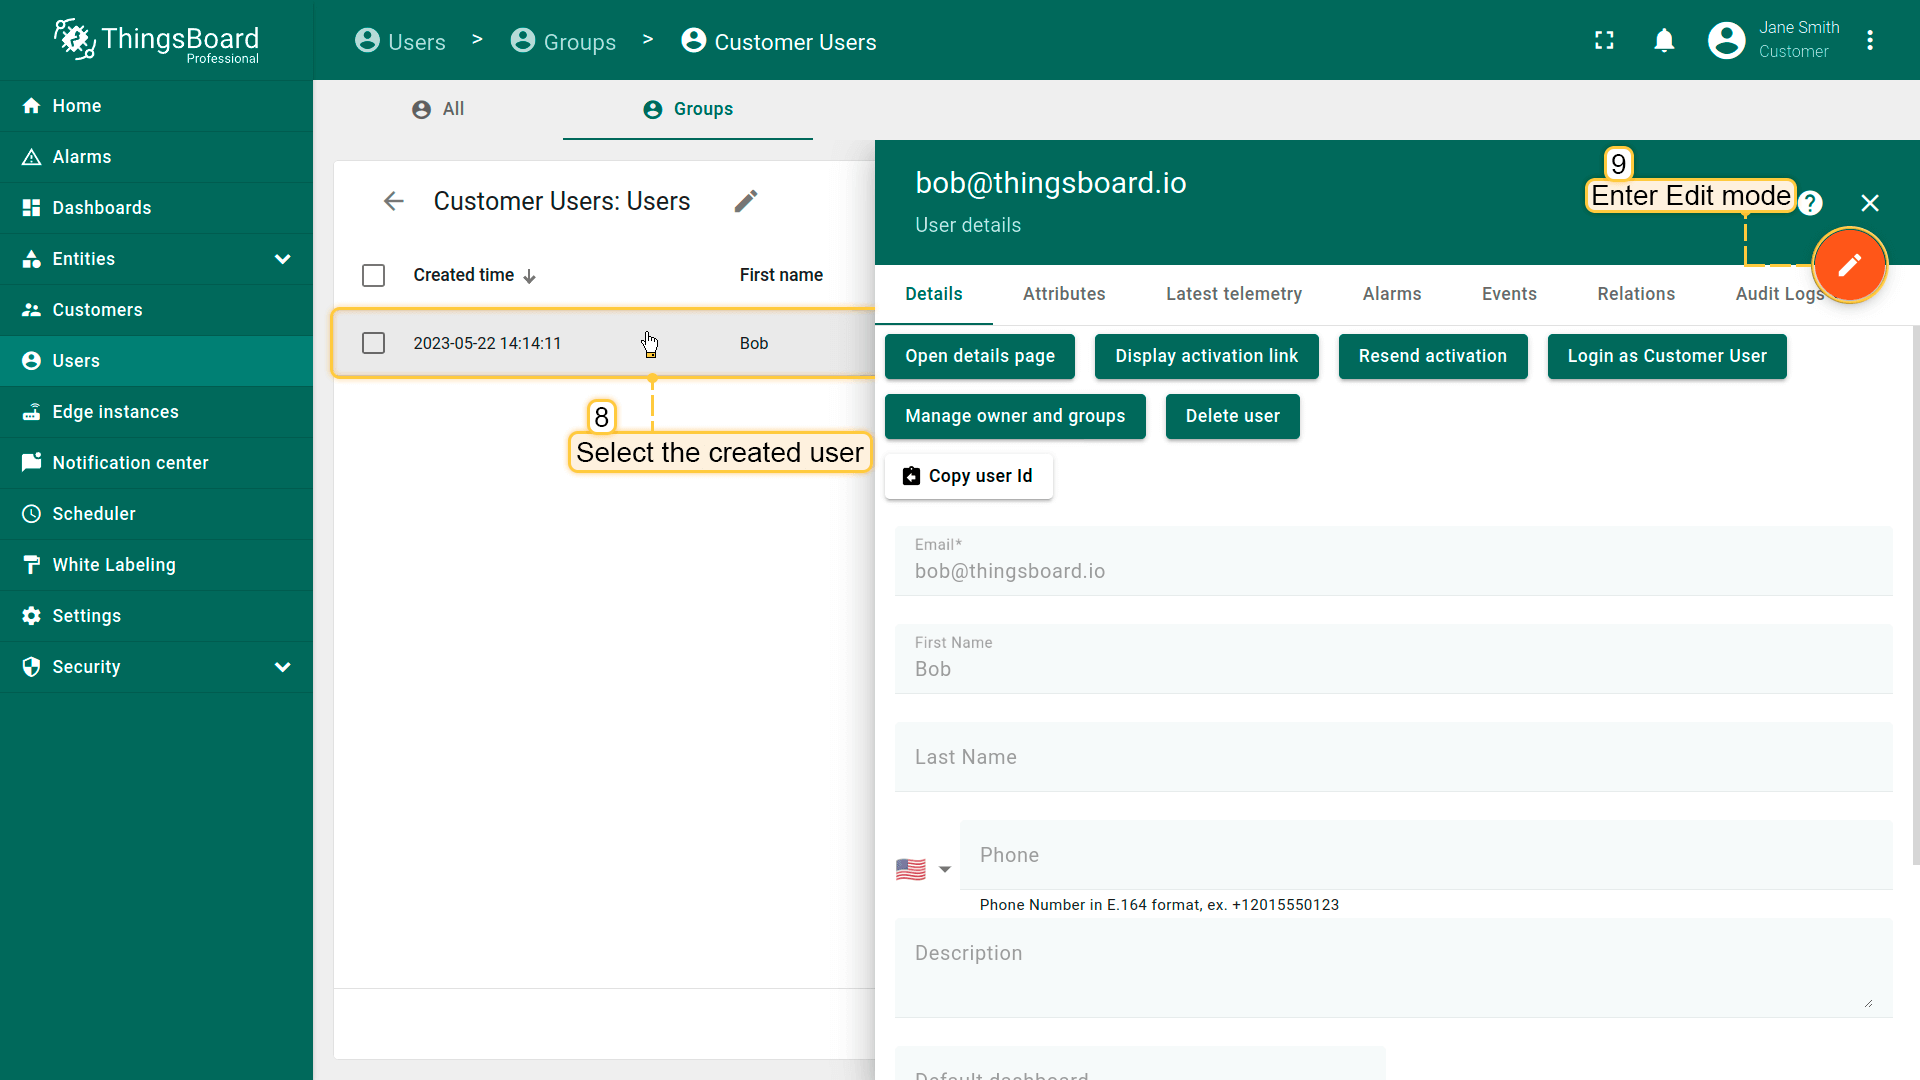
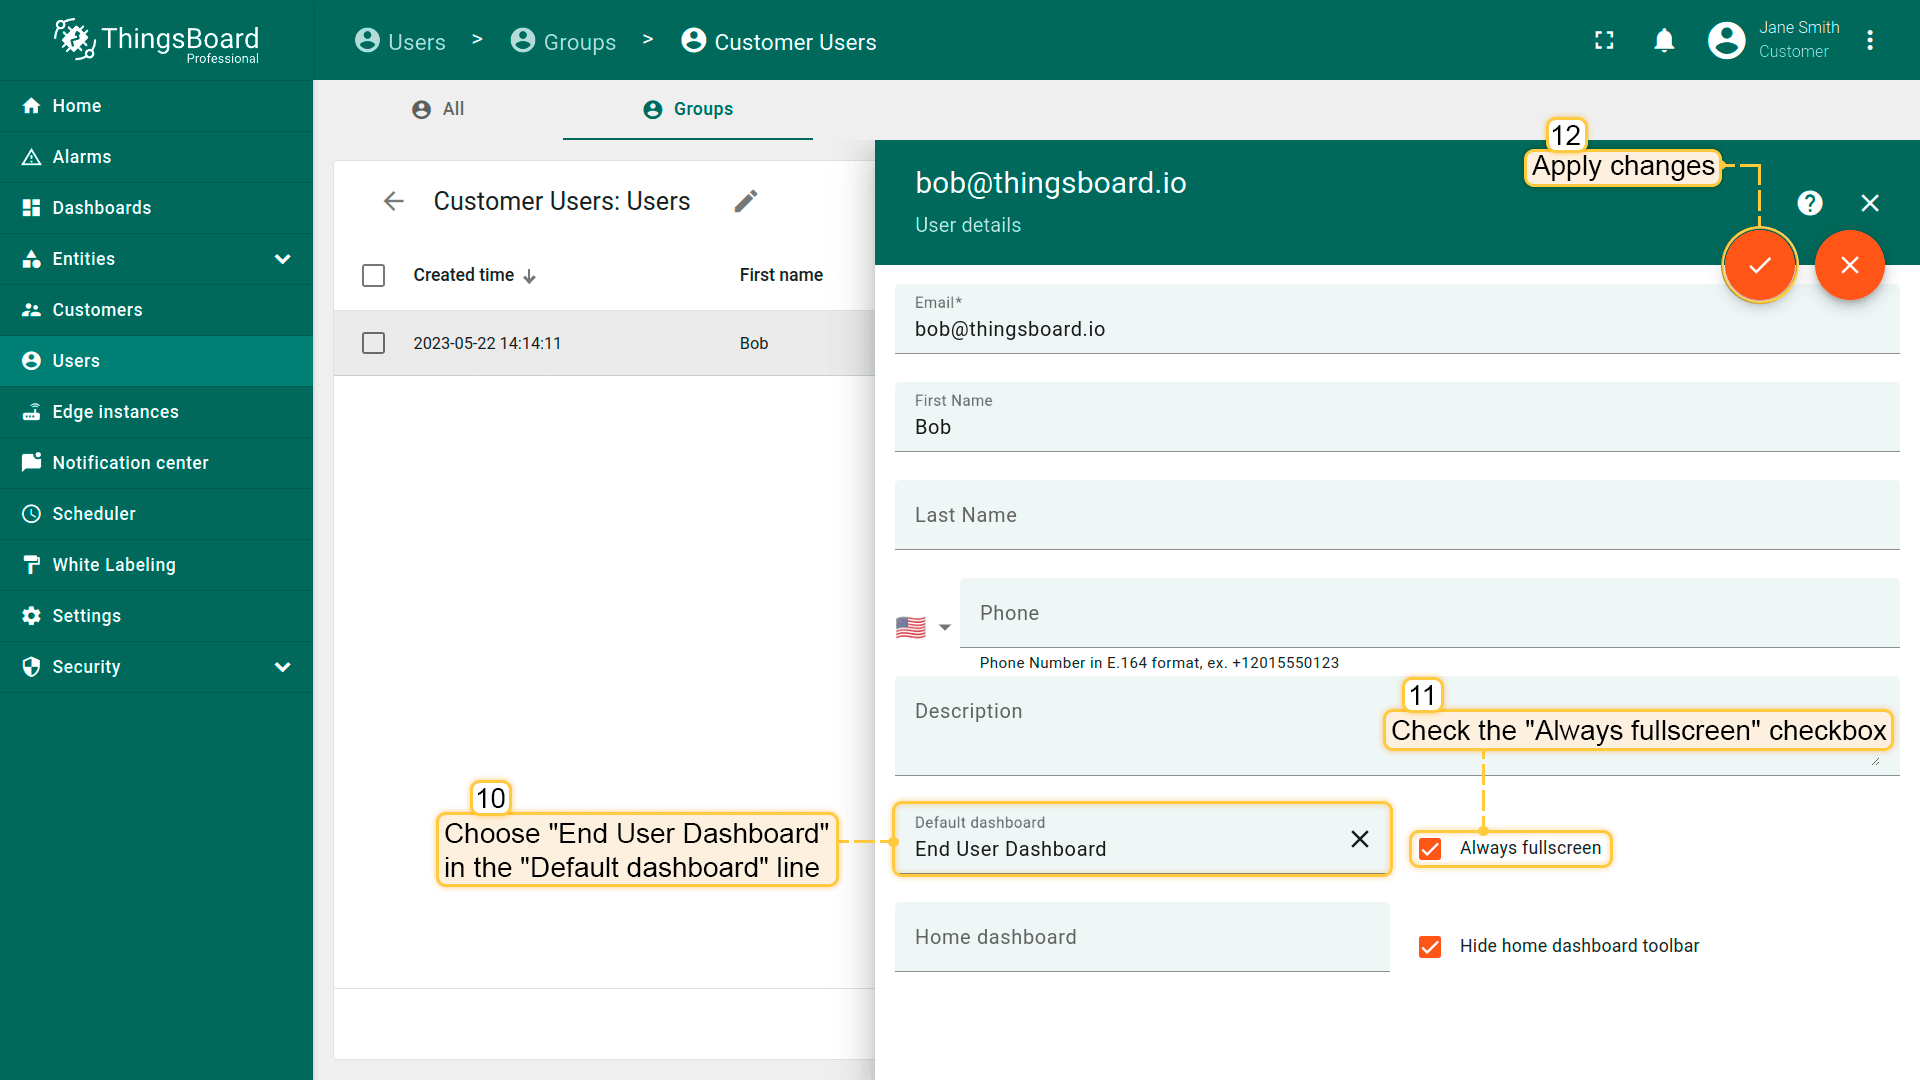
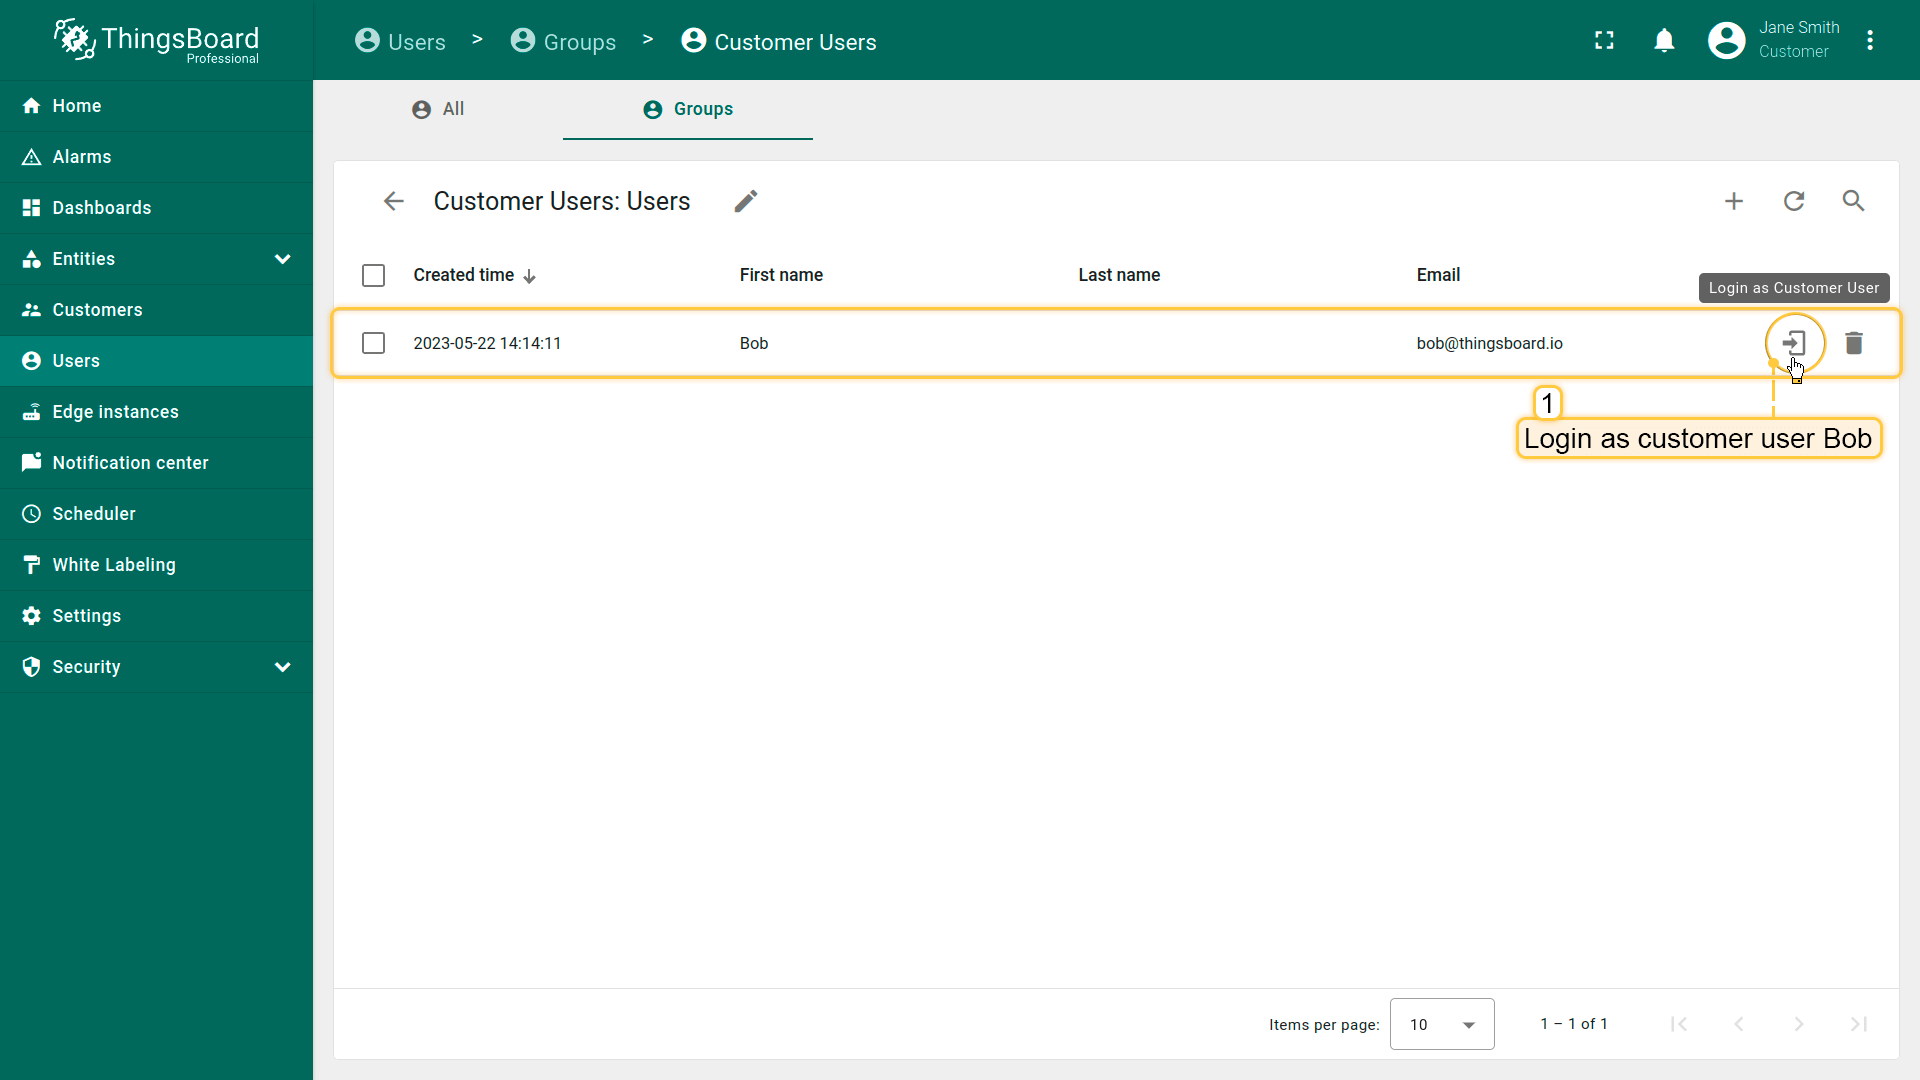
下面创建只读用户。假设将“End User Dashboard”分配给他,并确保该仪表板在用户登录后全屏打开。因此,该只读用户将无法访问左侧管理面板,因其仅能浏览只读数据,而不能执行任何服务端API调用。 1.在“用户”页面的“组”标签中选择“Customer Users”; 2.点击右上角“+”添加新用户; 3.输入邮箱(例如_bob@thingsboard.io_),点击“添加”; 4.在弹出窗口中可看到用户激活链接,点击“确定”; 5.点击已创建的用户; 6.在屏幕右上角点击“铅笔”图标进入编辑模式; 7.勾选“始终全屏”并在“默认仪表板”中选择“End User Dashboard”,保存; 8.以客户用户Bob身份登录,仪表板将全屏打开。用户Bob无法访问左侧管理面板,仅能浏览数据,不能执行任何服务端API调用。
视频教程
您可观看视频教程,获取基于角色的访问控制的分步指导。