n8n是一款工作流自动化平台,可让您将ThingsBoard与数百种其他服务连接起来。
ThingsBoard n8n Node使您能够从n8n工作流中直接访问IoT实体、遥测和告警。
- 直接从n8n工作流中管理IoT设备、资产和客户
- 通过属性和时序操作实时访问和纠正遥测数据
- 监控告警并根据告警严重程度和类型创建自动化响应
- 浏览实体关系以了解IoT基础设施拓扑
- 使用n8n AI代理的自然语言命令构建AI驱动的IoT自动化
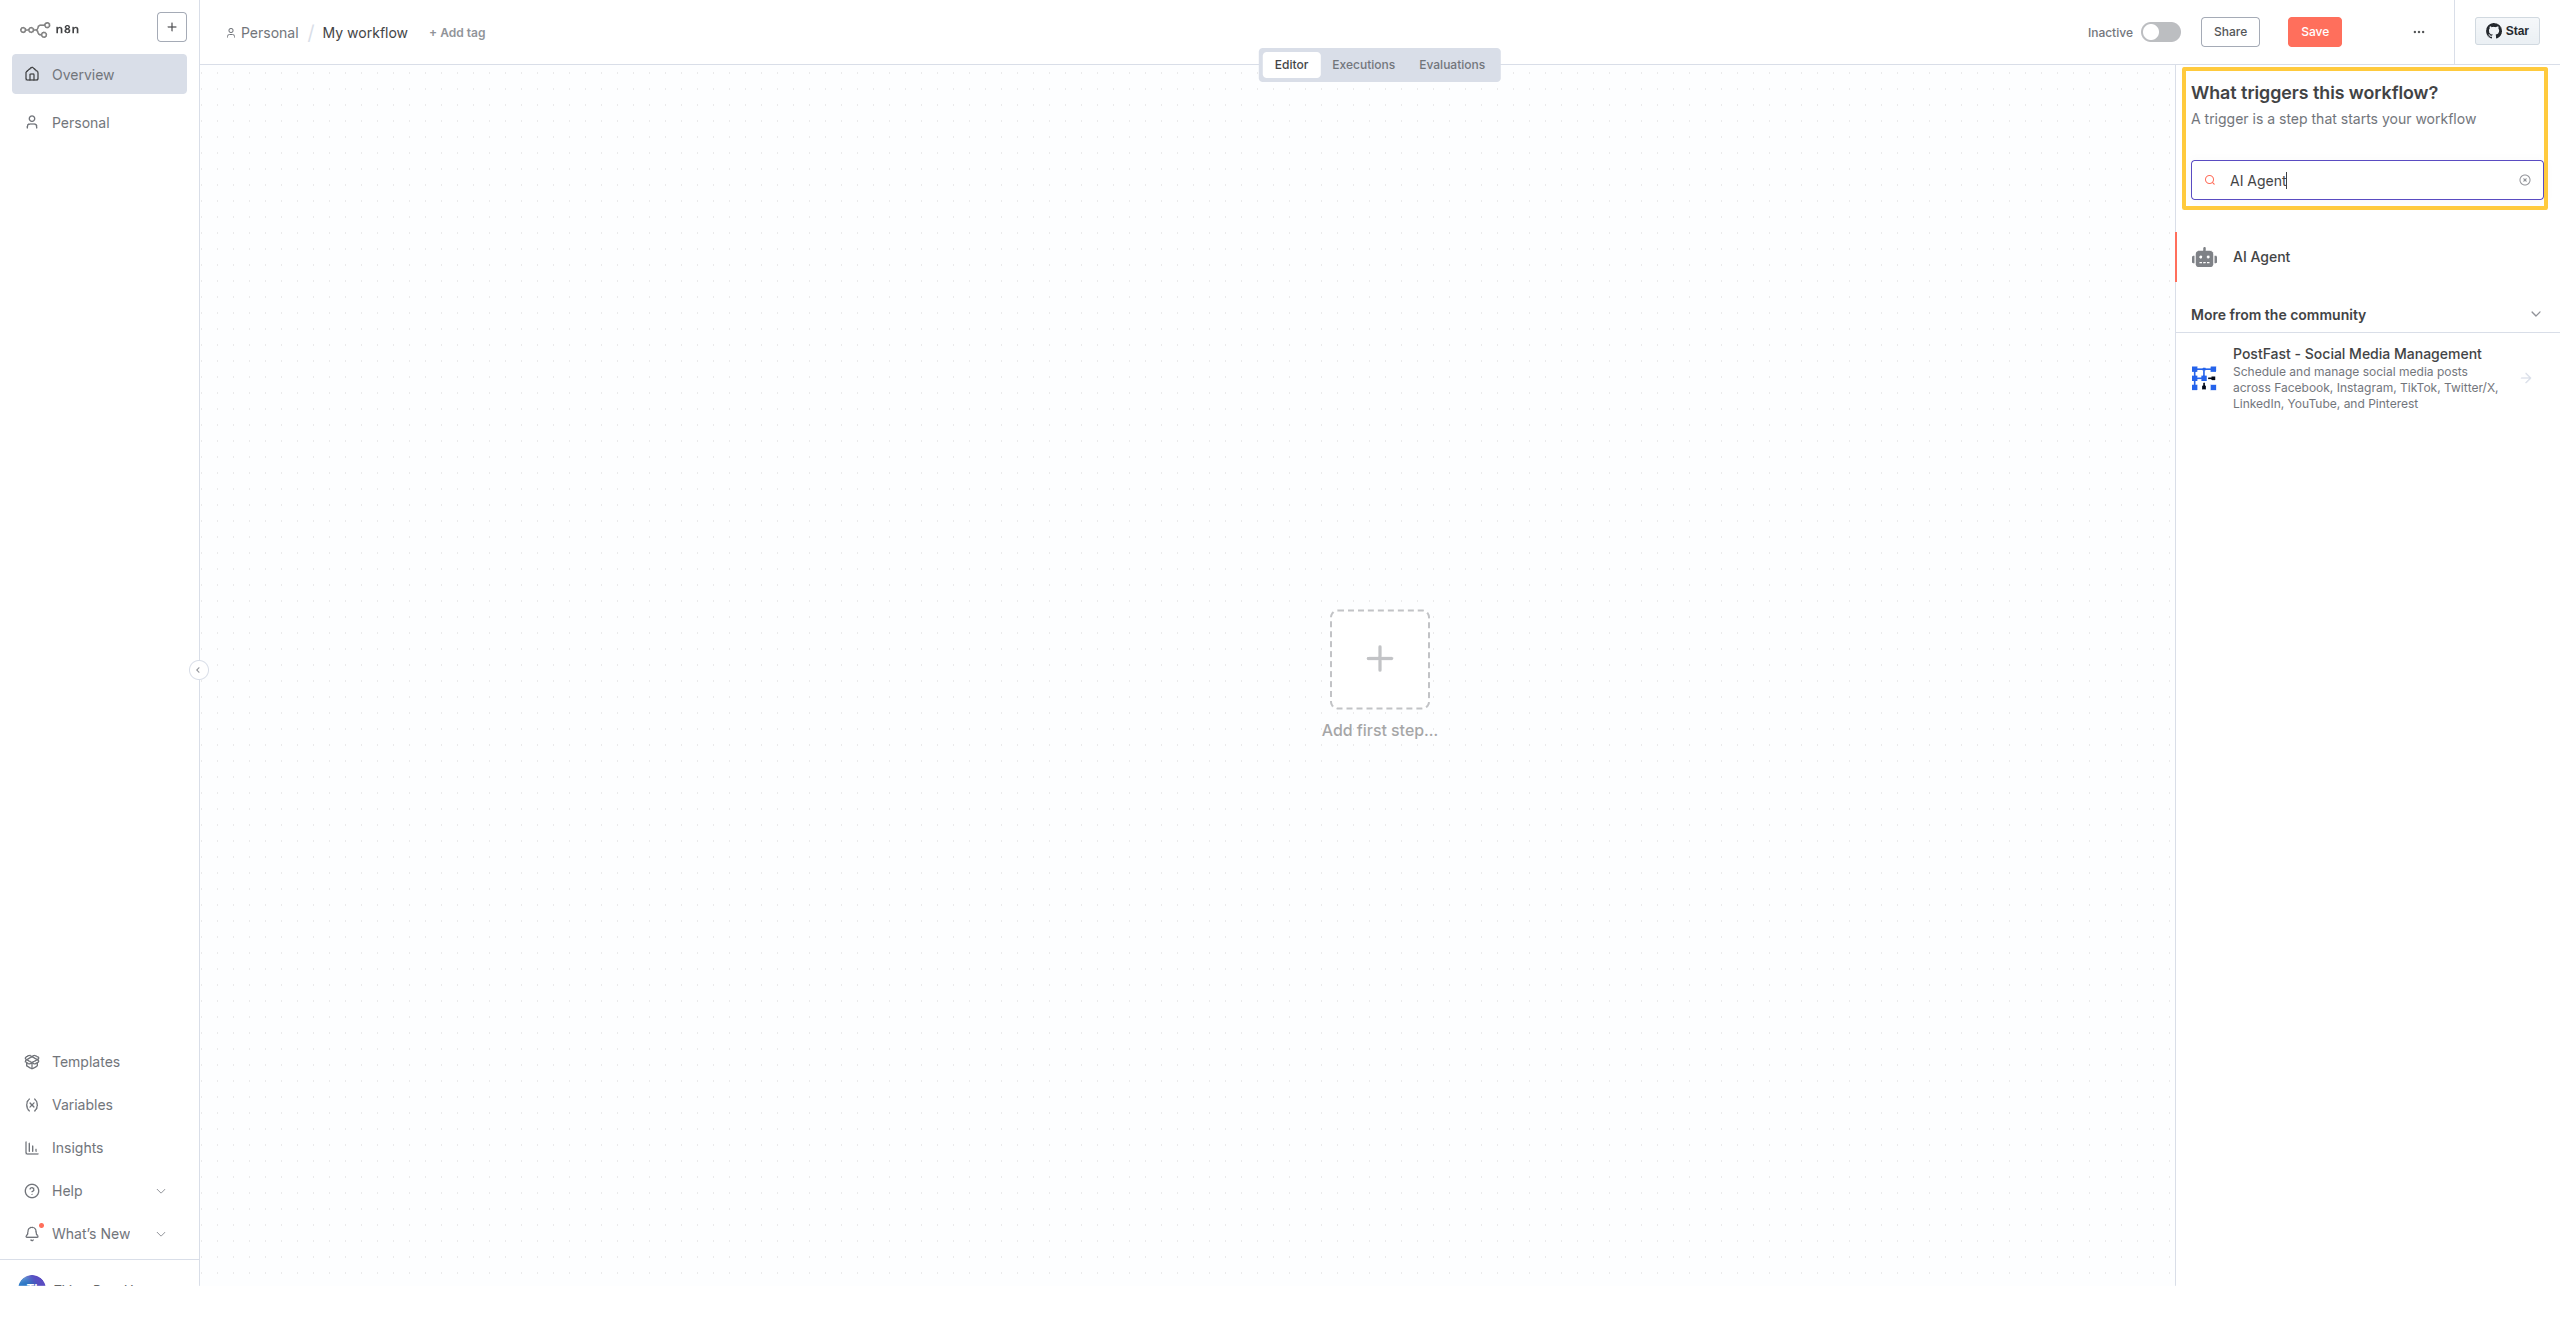
快速入门:您的第一个工作流
以下为5分钟内即可搭建的内容——将IoT遥测导出到云存储的实战数据管道。
场景:每天午夜自动将过去24小时的设备遥测导出为JSON文件到AWS S3,用于数据仓库、分析或合规归档。
工作流:
1
2
3
4
5
6
7
8
9
10
11
Schedule (Daily at 00:00 UTC)
    ↓
Code node (calculate last 24h time range in MS)
    ↓
ThingsBoard: Get device by a name
    ↓
ThingsBoard: Get timeseries data for device
    ↓
Convert to File (JSON format)
    ↓
Upload to AWS S3
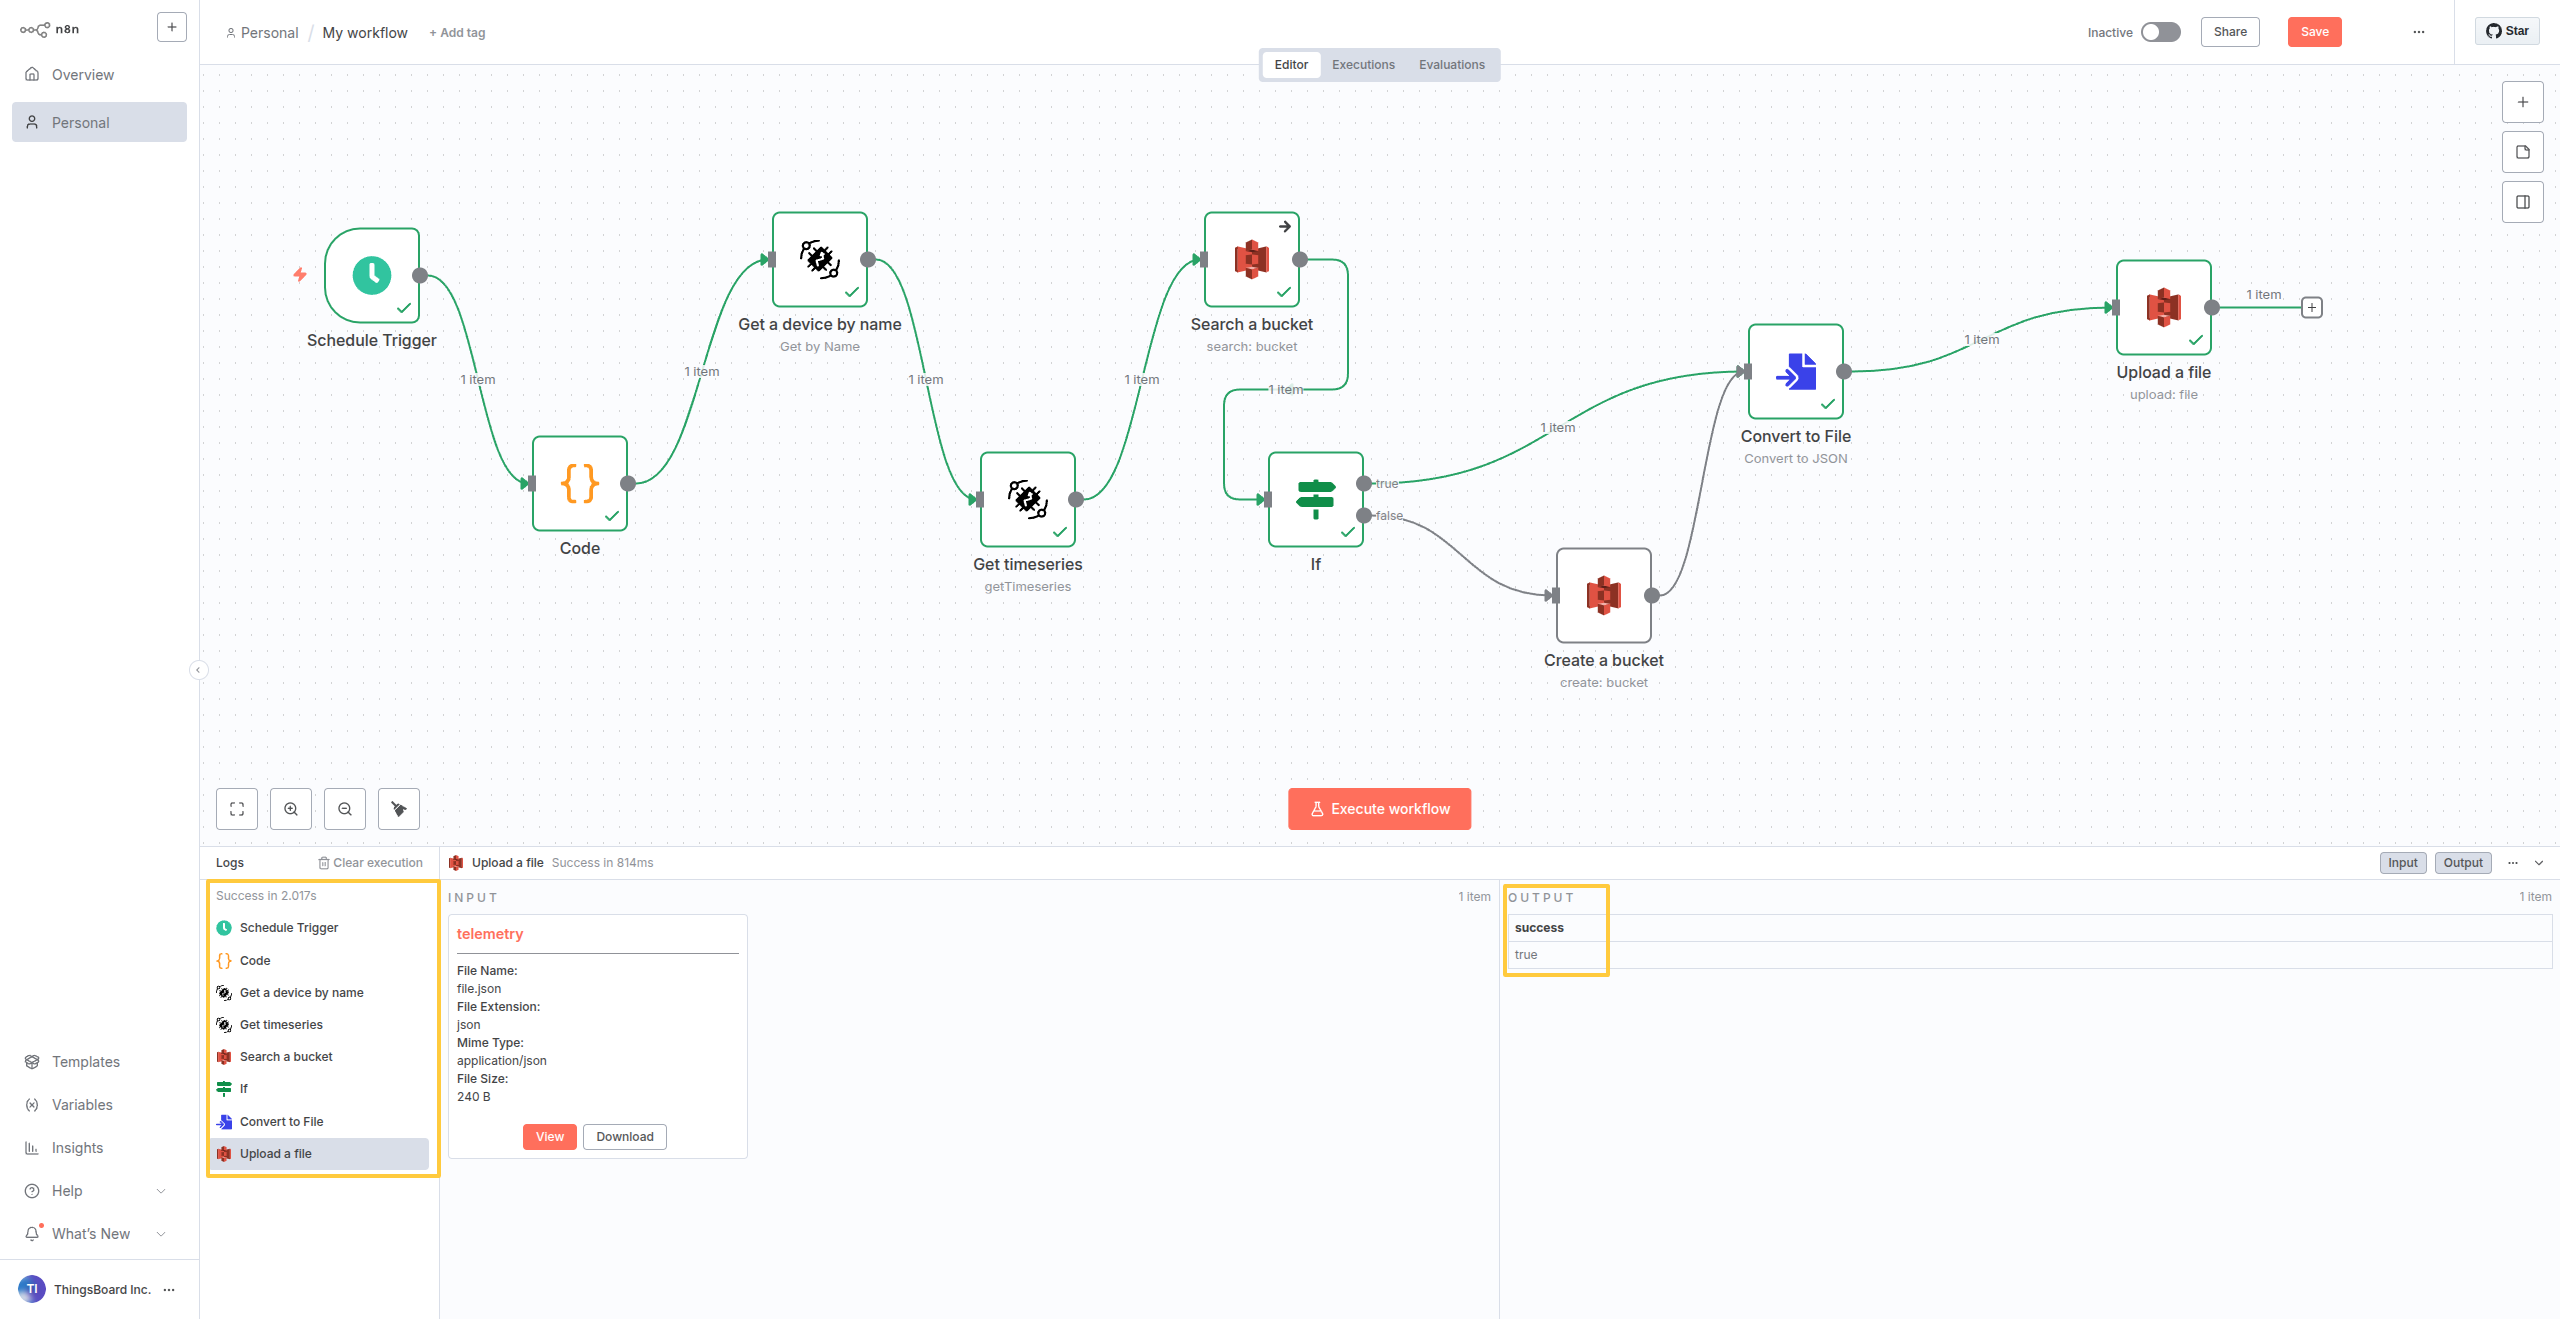
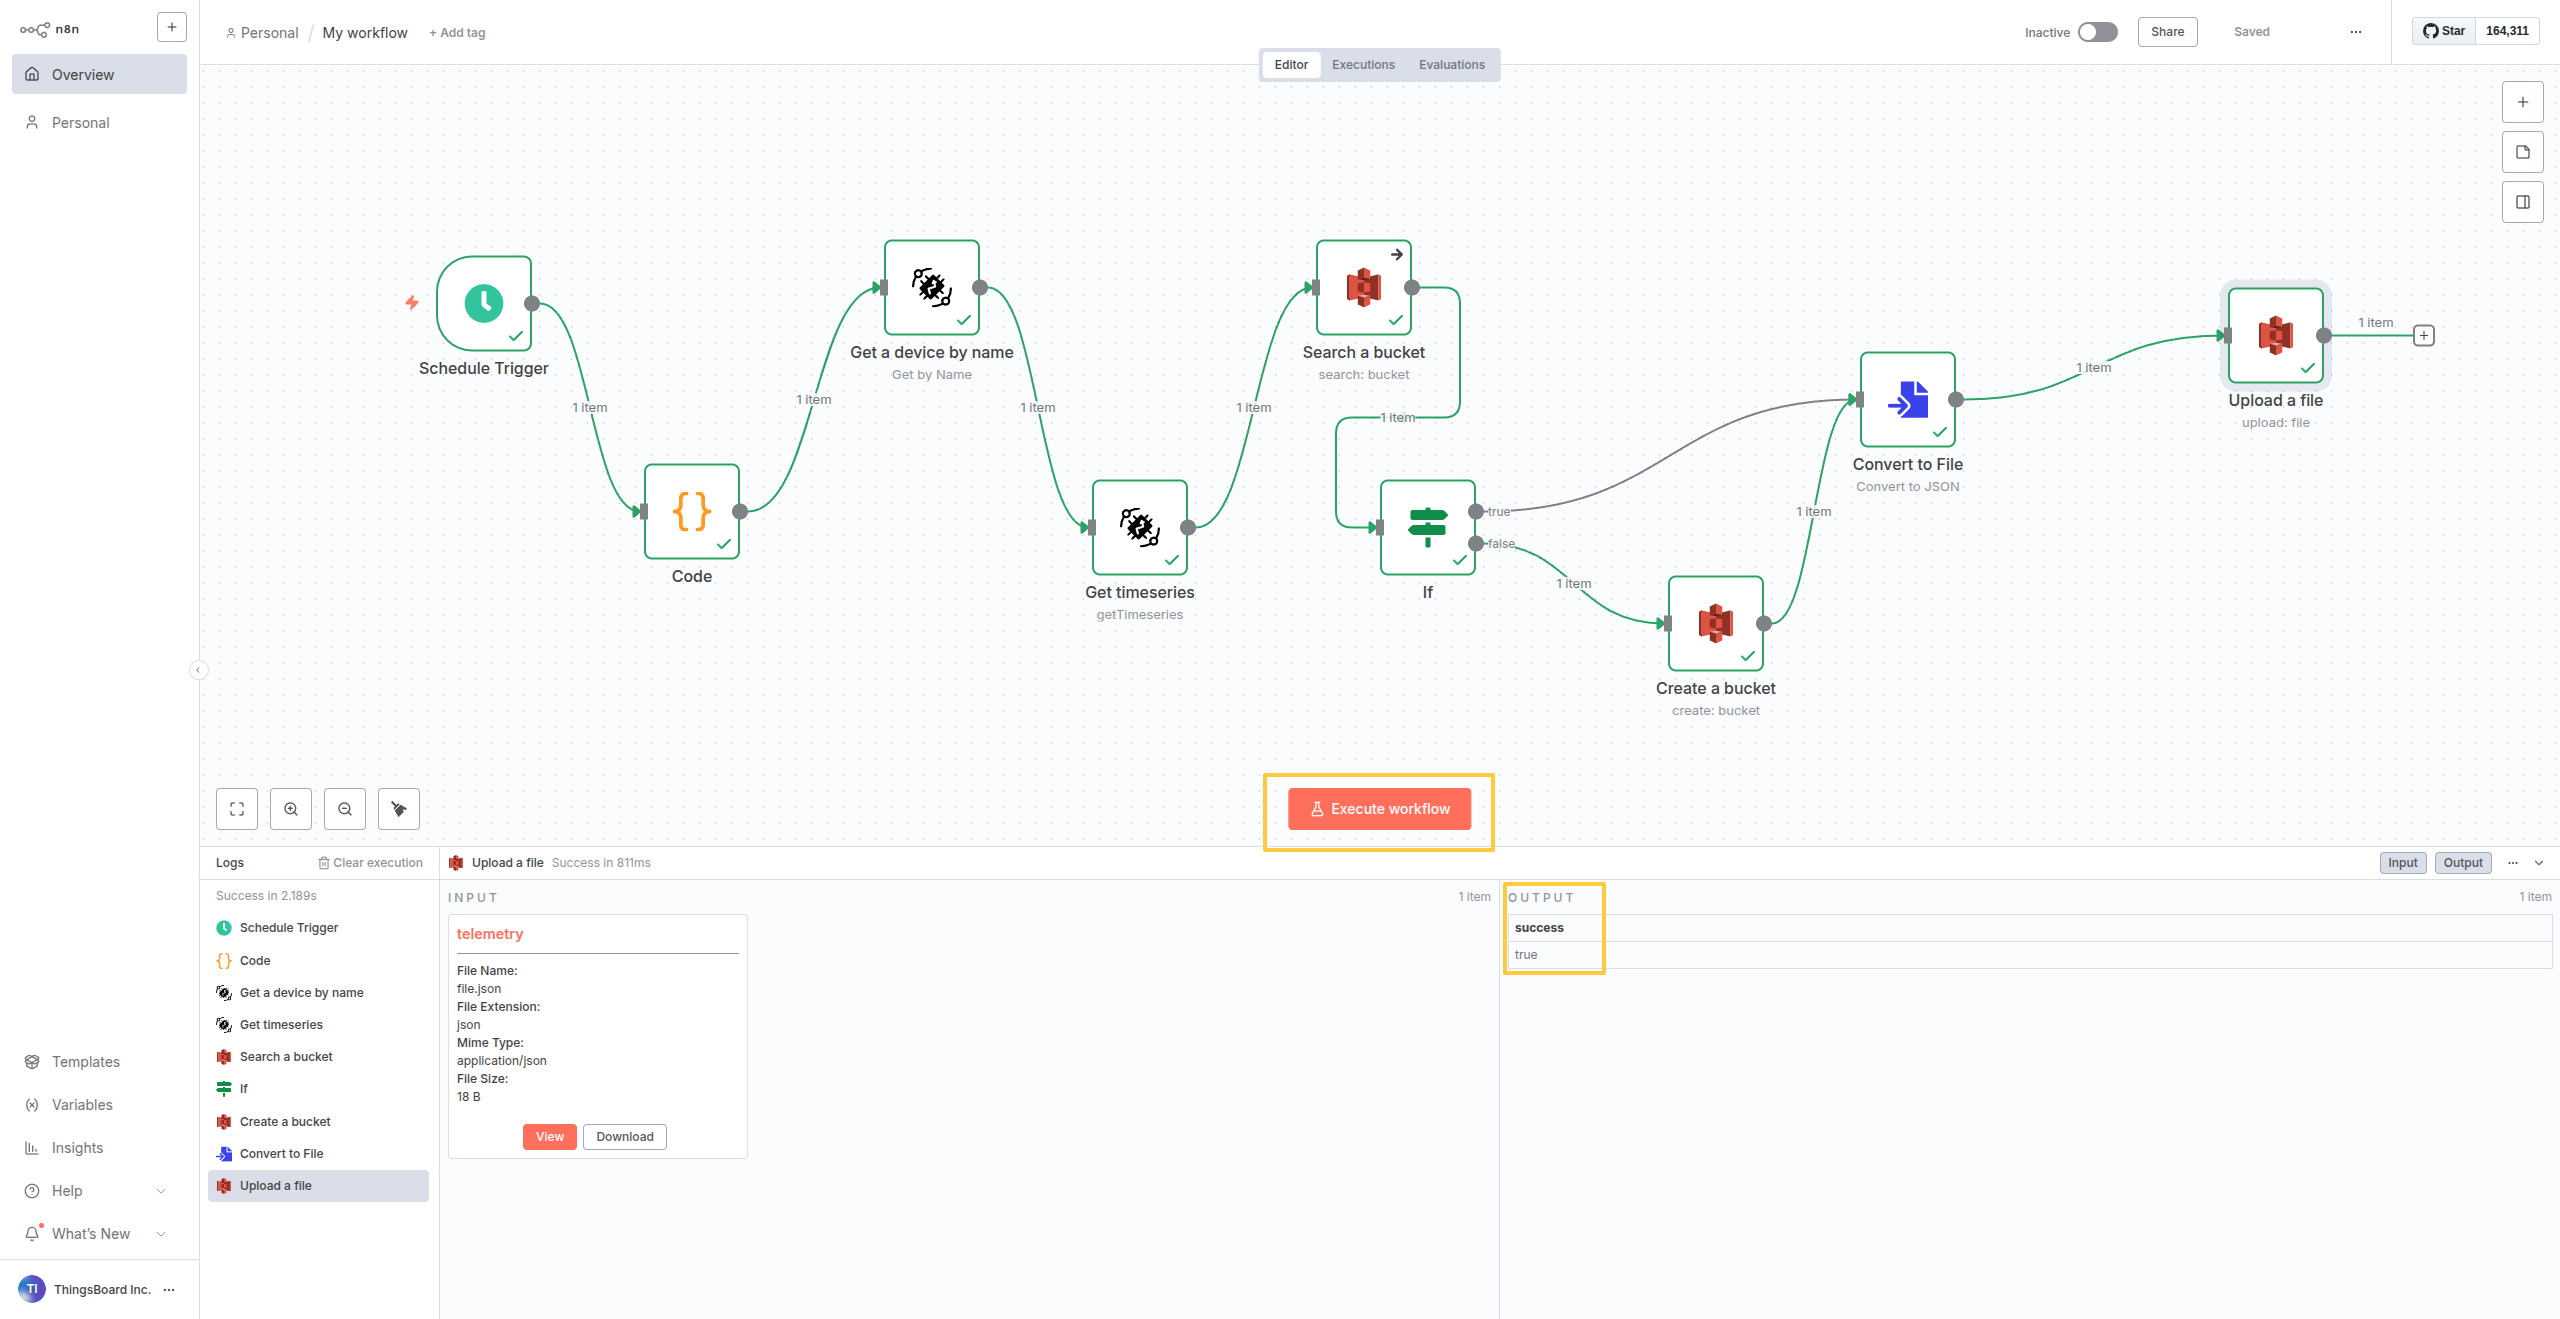
The complete workflow showing all nodes: Schedule trigger → Code (time calc) → Get device → Get timeseries → Convert to file → AWS S3 upload.
Successful execution result showing the telemetry data exported to S3 as a JSON file.
这是用于IoT数据归档、分析管道和合规日志的生产级模式。
想查看完整的分步演练和代码细节?安装后跳转到示例2:每日遥测导出到AWS S3。
何时将n8n与ThingsBoard配合使用
ThingsBoard的规则引擎非常适合IoT专项自动化。但当您需要连接到ThingsBoard未原生集成的外部系统时,n8n可以填补这一空白。
在以下情况使用n8n:
- 将遥测归档到AWS S3、Google Cloud Storage或Azure Blob用于数据仓库
- 将数据导出到数据库(PostgreSQL、Snowflake、ClickHouse)用于分析
- 在Jira、ServiceNow或其他工单系统中创建工单
- 将设备数据与CRM(Salesforce、HubSpot)或ERP同步
- 让非技术人员通过AI聊天编写查询
前置条件
开始前,请确保满足以下条件:
-
ThingsBoard Cloud:完全托管的云服务,可在thingsboard.cloud获取
- 认证凭据:ThingsBoard实例上具有适当权限的有效用户名和密码
- n8n实例:
- 本地n8n安装:在您的基础设施上自托管的n8n,或
- 基于Docker的n8n部署:在Docker容器中运行的n8n
- n8n Cloud:ThingsBoard节点需通过官方验证才能列入n8n Cloud目录
安装
开始前,请确保n8n已运行。如需安装,请参阅官方n8n文档。
安装ThingsBoard节点
注意: 社区节点要求在n8n环境中设置N8N_COMMUNITY_PACKAGES_ENABLED=true。大多数n8n安装默认已启用。若在设置中看不到Community Nodes区域,需在启动n8n前设置该变量。
推荐:使用n8n GUI(用于自托管实例):
- 在浏览器中打开n8n
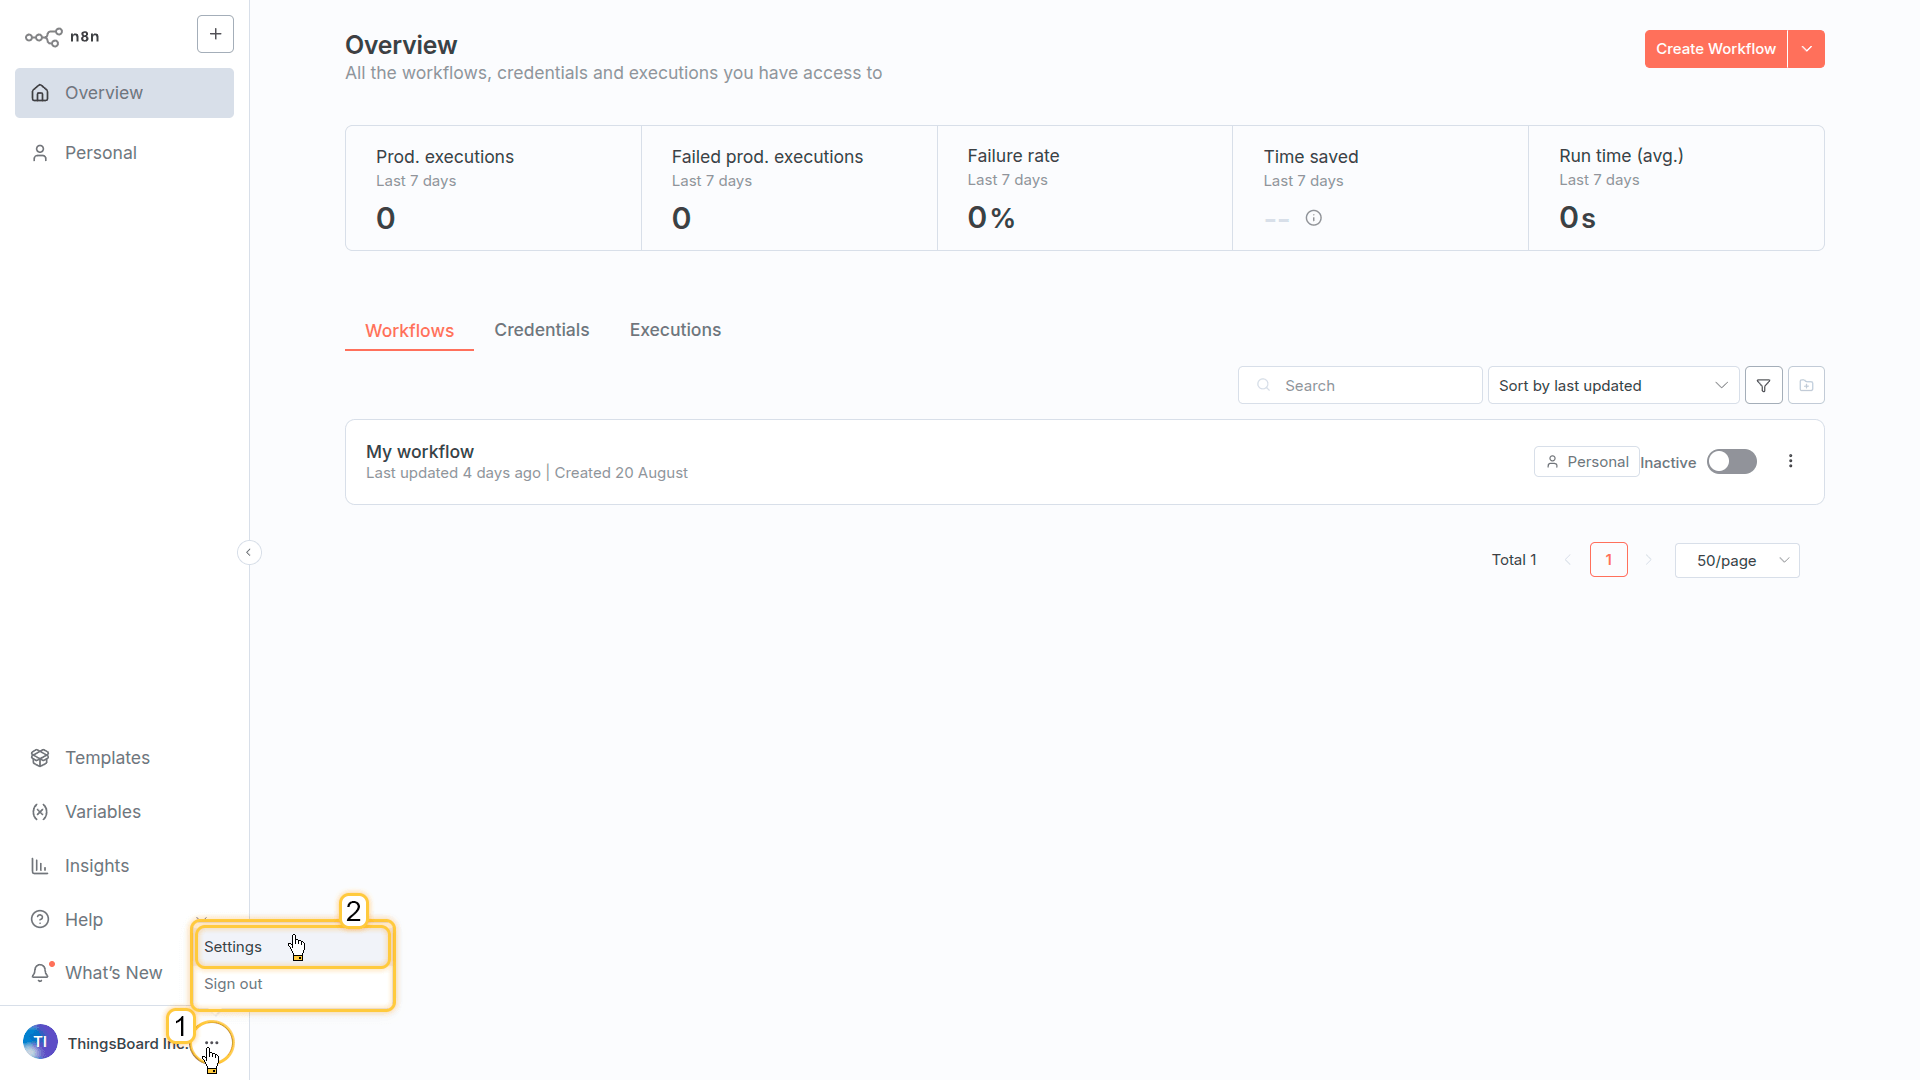
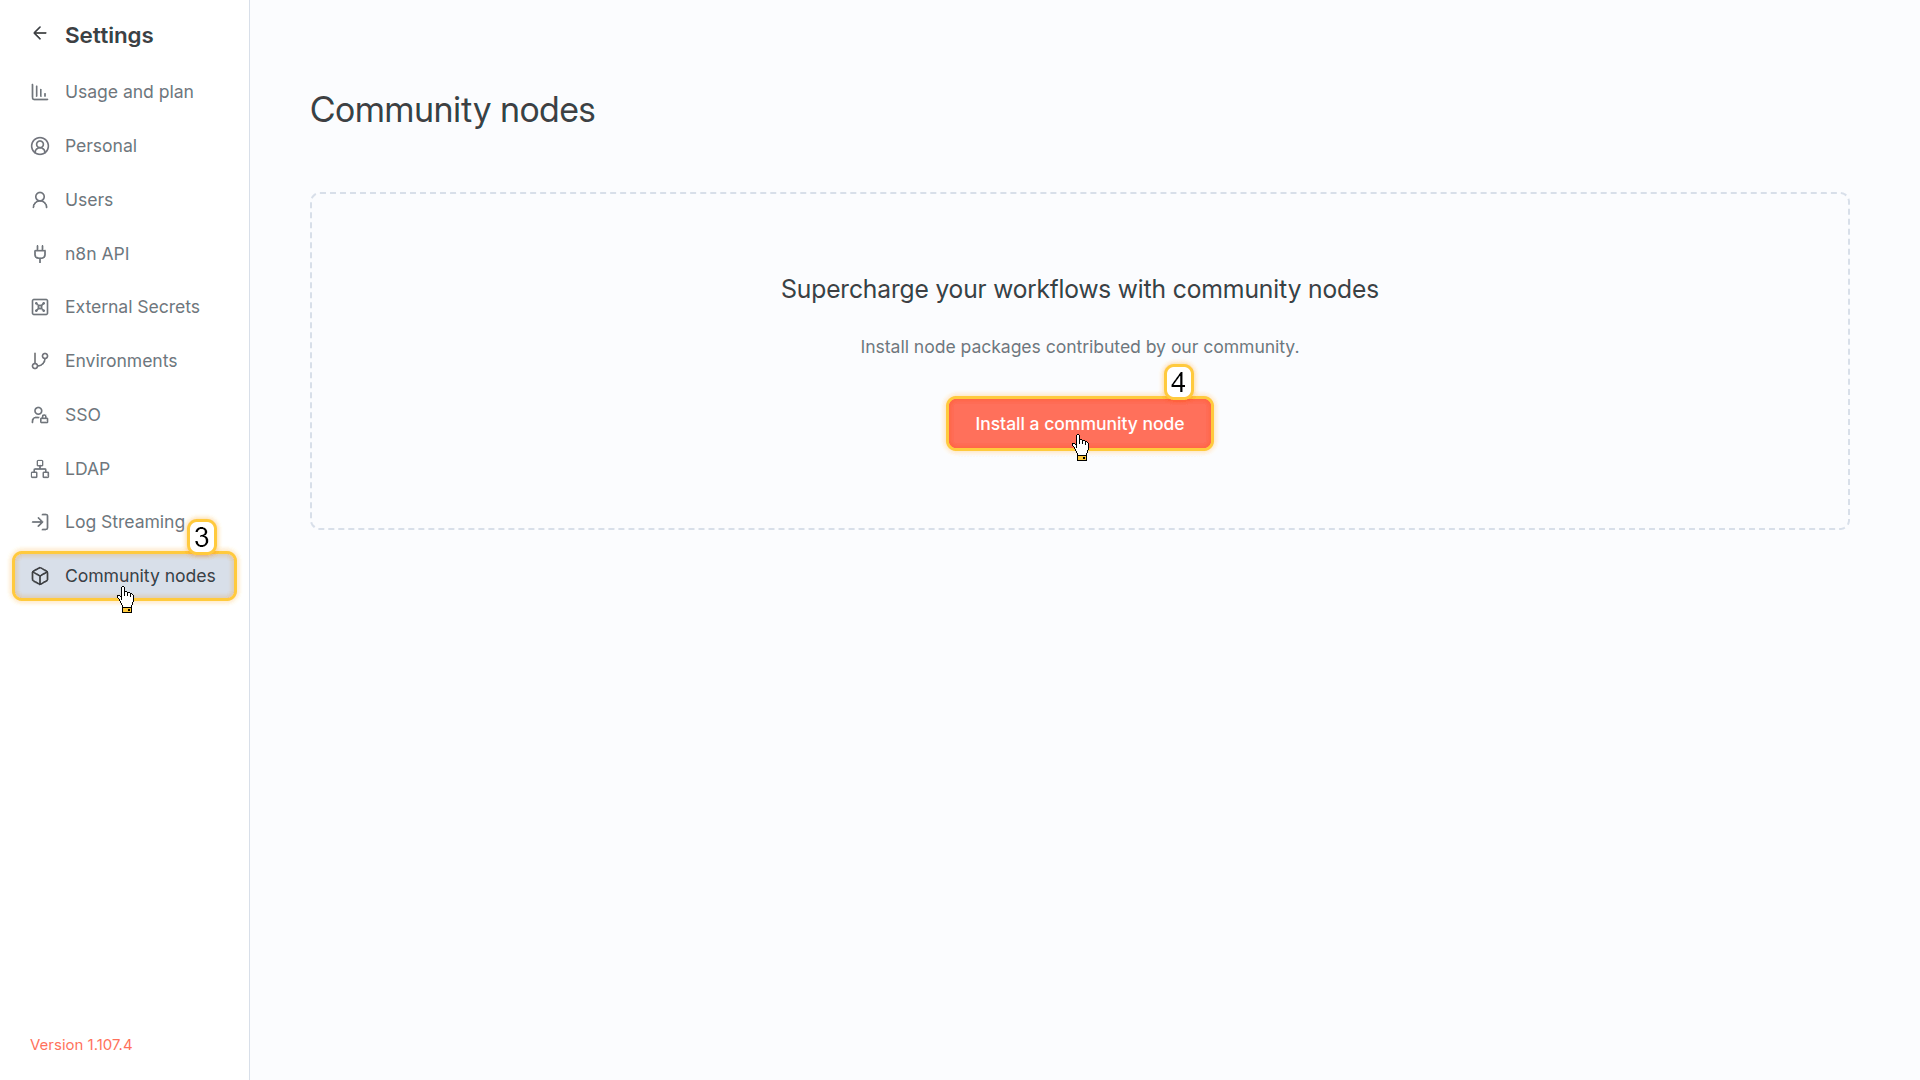
- 点击左下角三个点 → Settings → Community Nodes
- 点击Install a community node
- 输入:
@thingsboard/n8n-nodes-thingsboard并点击Install - 刷新浏览器
Open n8n in your browser. In the bottom-left corner, click the three dots button and select Settings from the dropdown menu.
Go to the Community Nodes tab and click Install a community node.
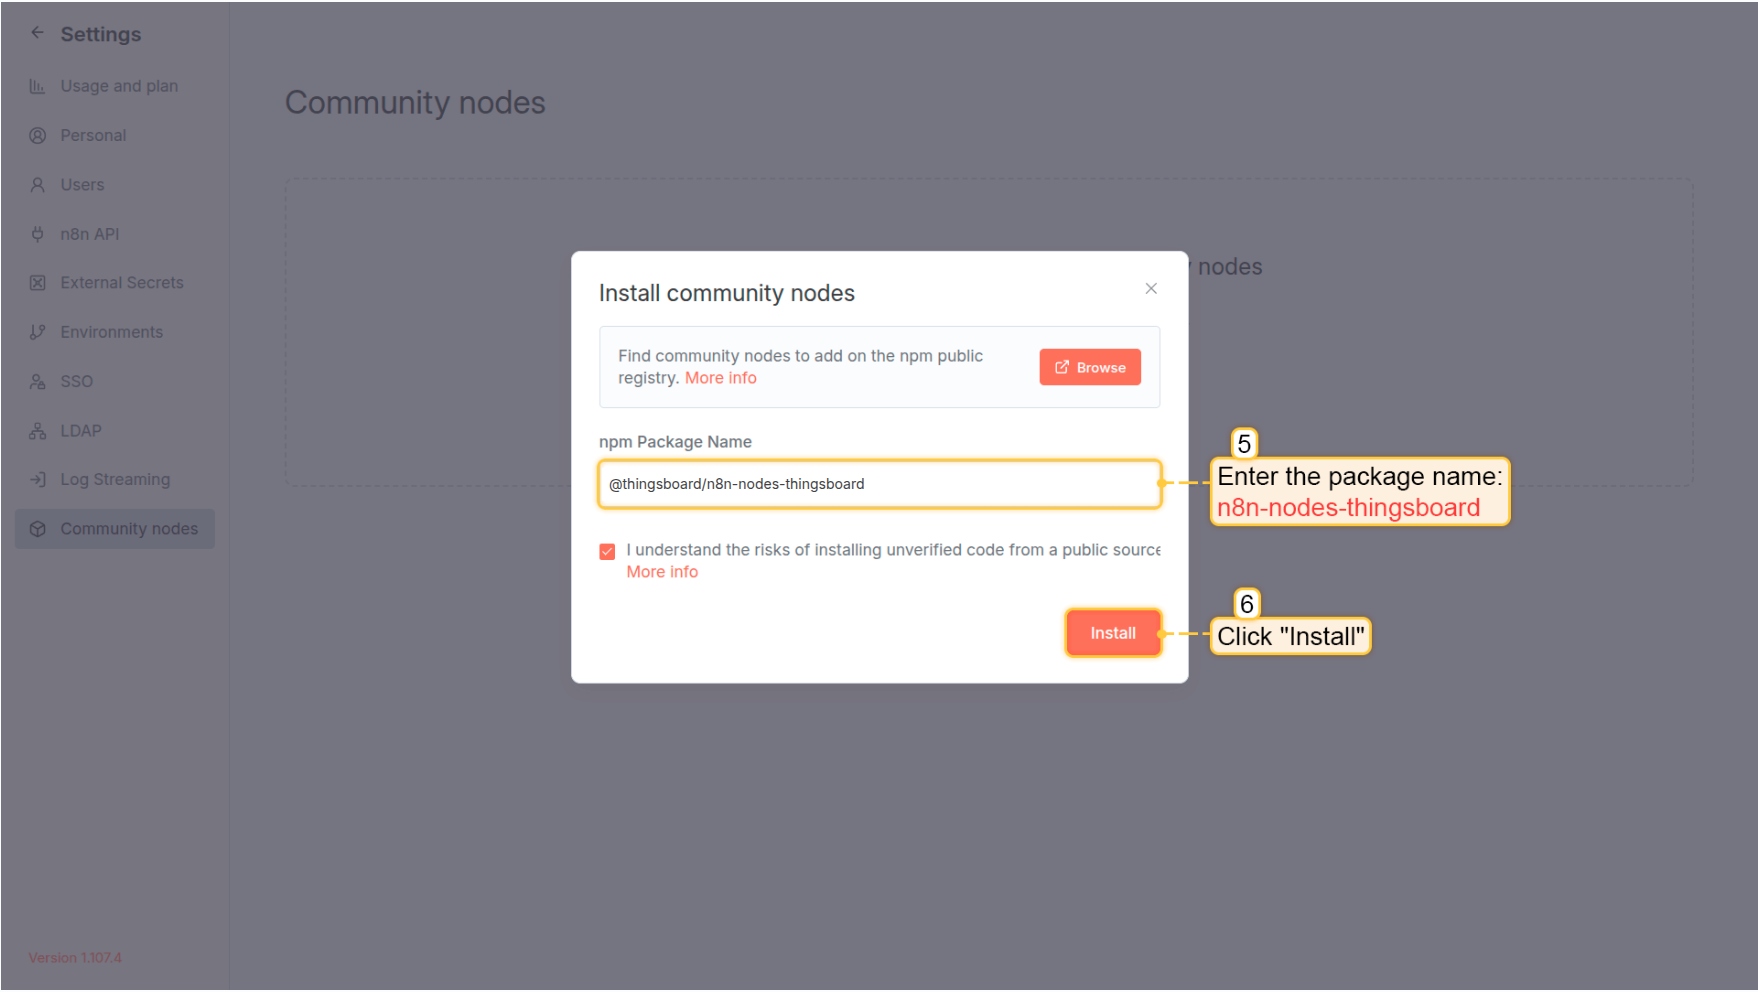
Enter the package name: @thingsboard/n8n-nodes-thingsboard and click Install.
Wait for the installation to complete. Then, refresh the browser page.
配置AI Agent支持(可选)
若仅在常规工作流中使用该节点(不与AI agents配合),可跳过此步骤。
若要让AI agents将ThingsBoard用作工具,在启动n8n前添加以下额外环境变量:
1
N8N_COMMUNITY_PACKAGES_ALLOW_TOOL_USAGE=true
如何设置:
- Docker:添加到
docker-compose.yml的environment部分(与N8N_COMMUNITY_PACKAGES_ENABLED=true一并) - npm/本地:在shell中导出:
N8N_COMMUNITY_PACKAGES_ALLOW_TOOL_USAGE=true n8n start
配置凭据
将n8n连接到ThingsBoard实例:
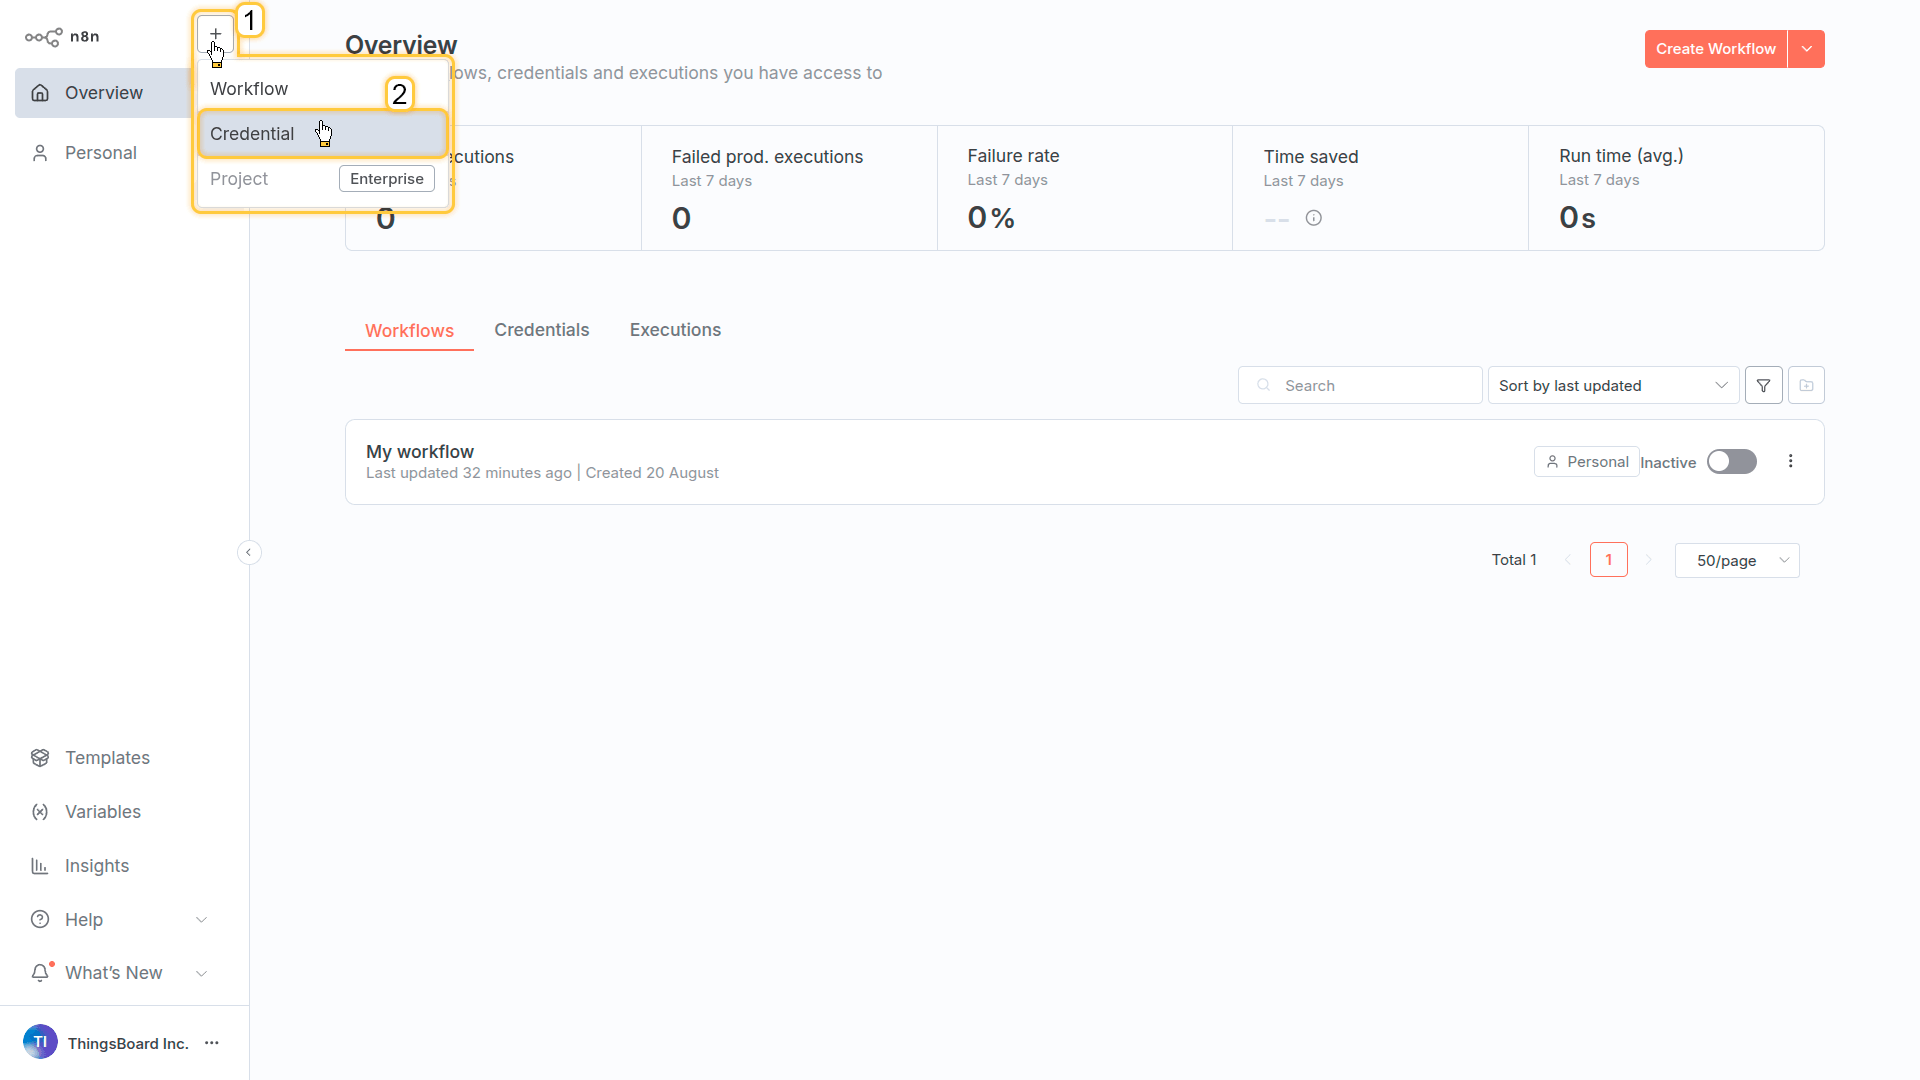
- 点击左上角+ → Credentials
- 搜索ThingsBoard API → Continue
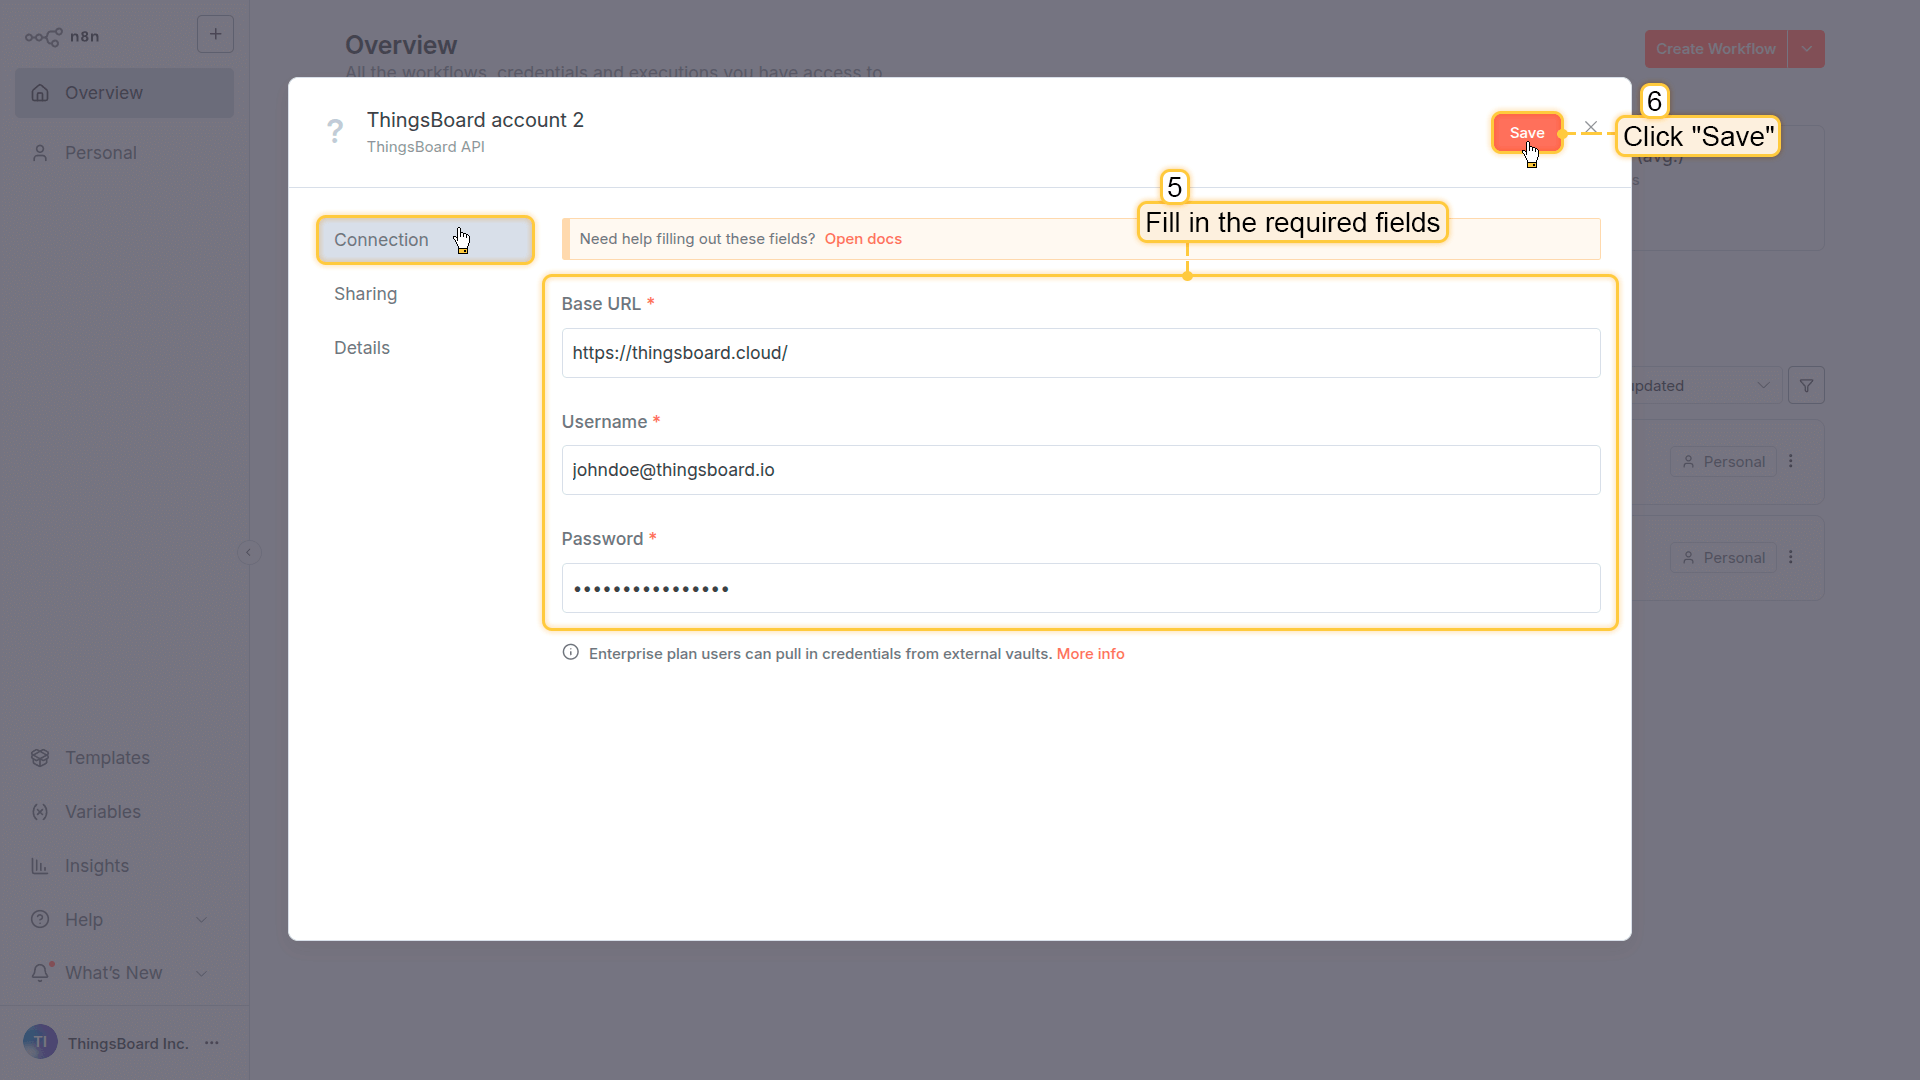
- 填写ThingsBoard信息:
- Base URL:您的实例URL(例如
https://thingsboard.cloud) - Username:您的邮箱
- Password:您的密码
- Base URL:您的实例URL(例如
- 点击Save
这些凭据可在工作流中所有ThingsBoard节点间共用。
In the top-left corner, click + and select Credentials from the dropdown menu.
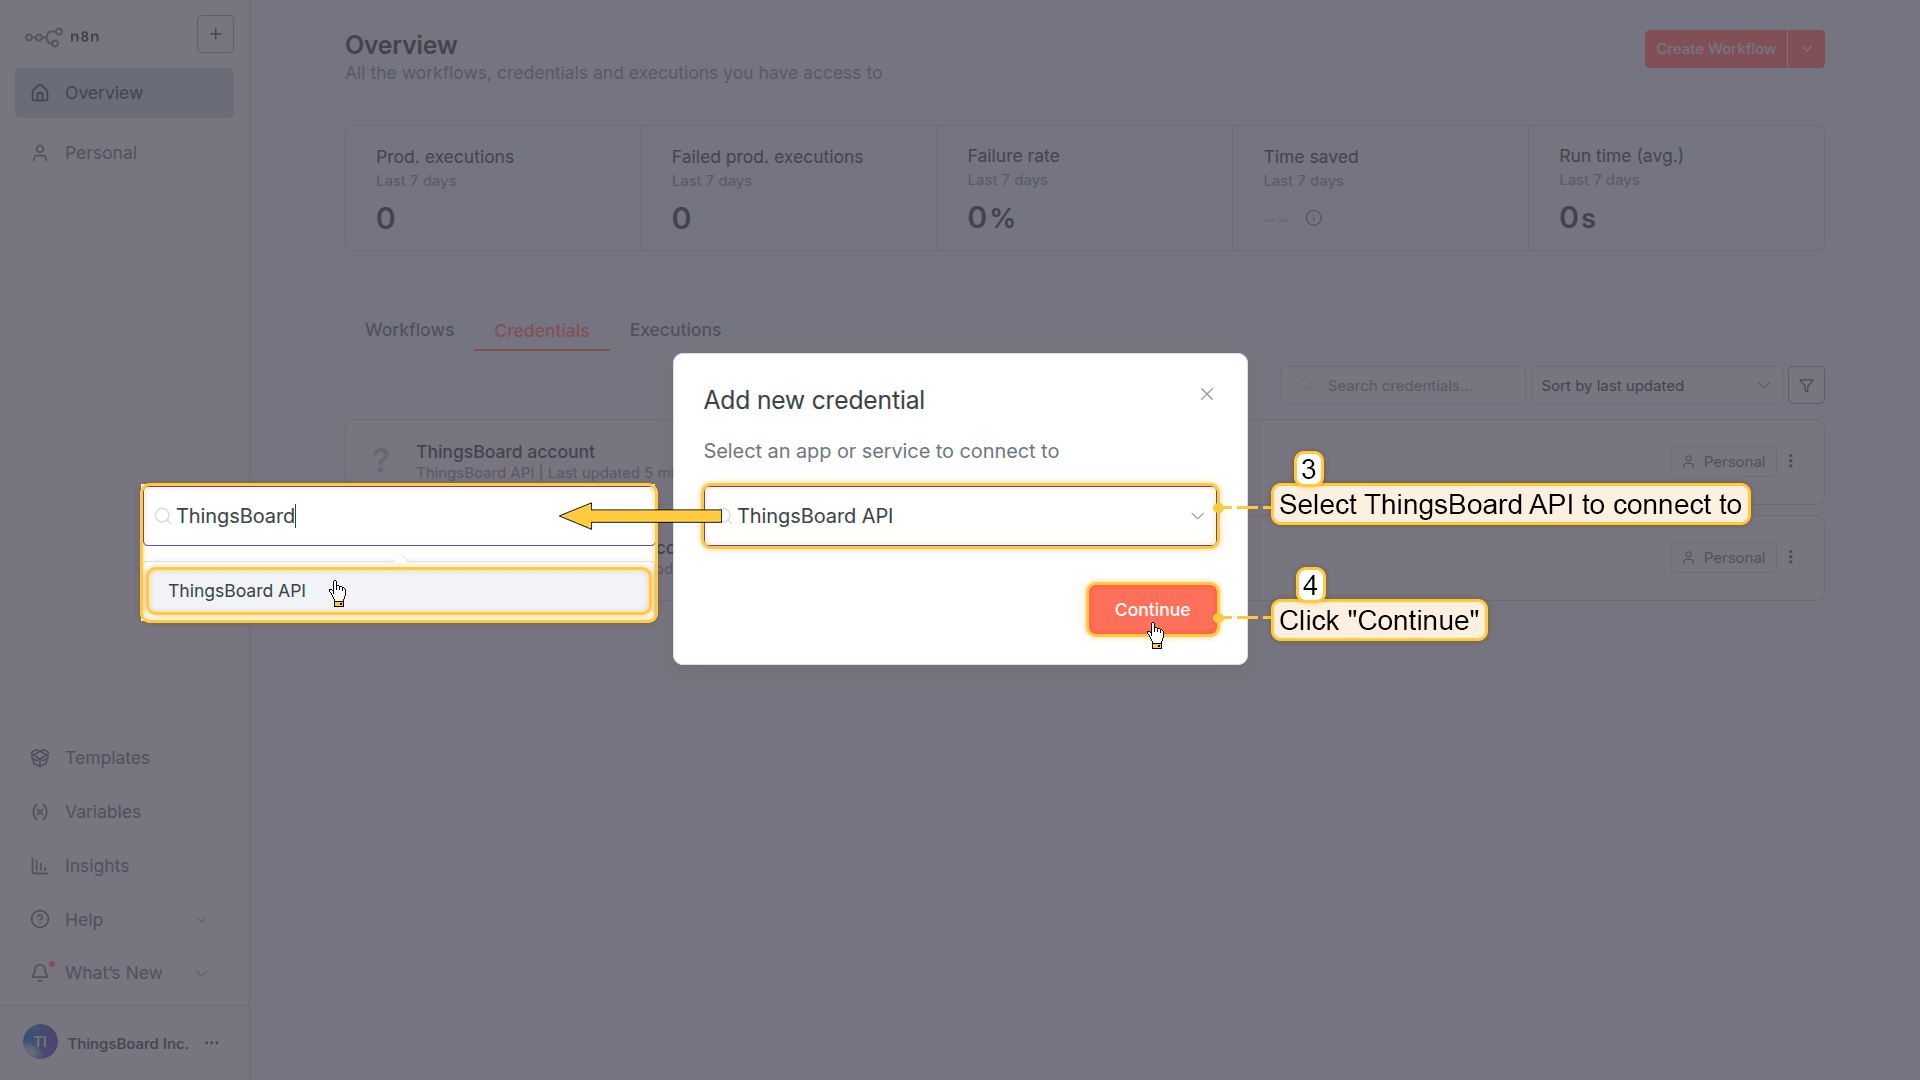
Search and select ThingsBoard API to connect to and click Continue.
Fill in the required fields:
- Base URL — your ThingsBoard instance URL (without a trailing slash)
- Username — your ThingsBoard account username
- Password — your ThingsBoard account password.
Click Save to store the credentials.
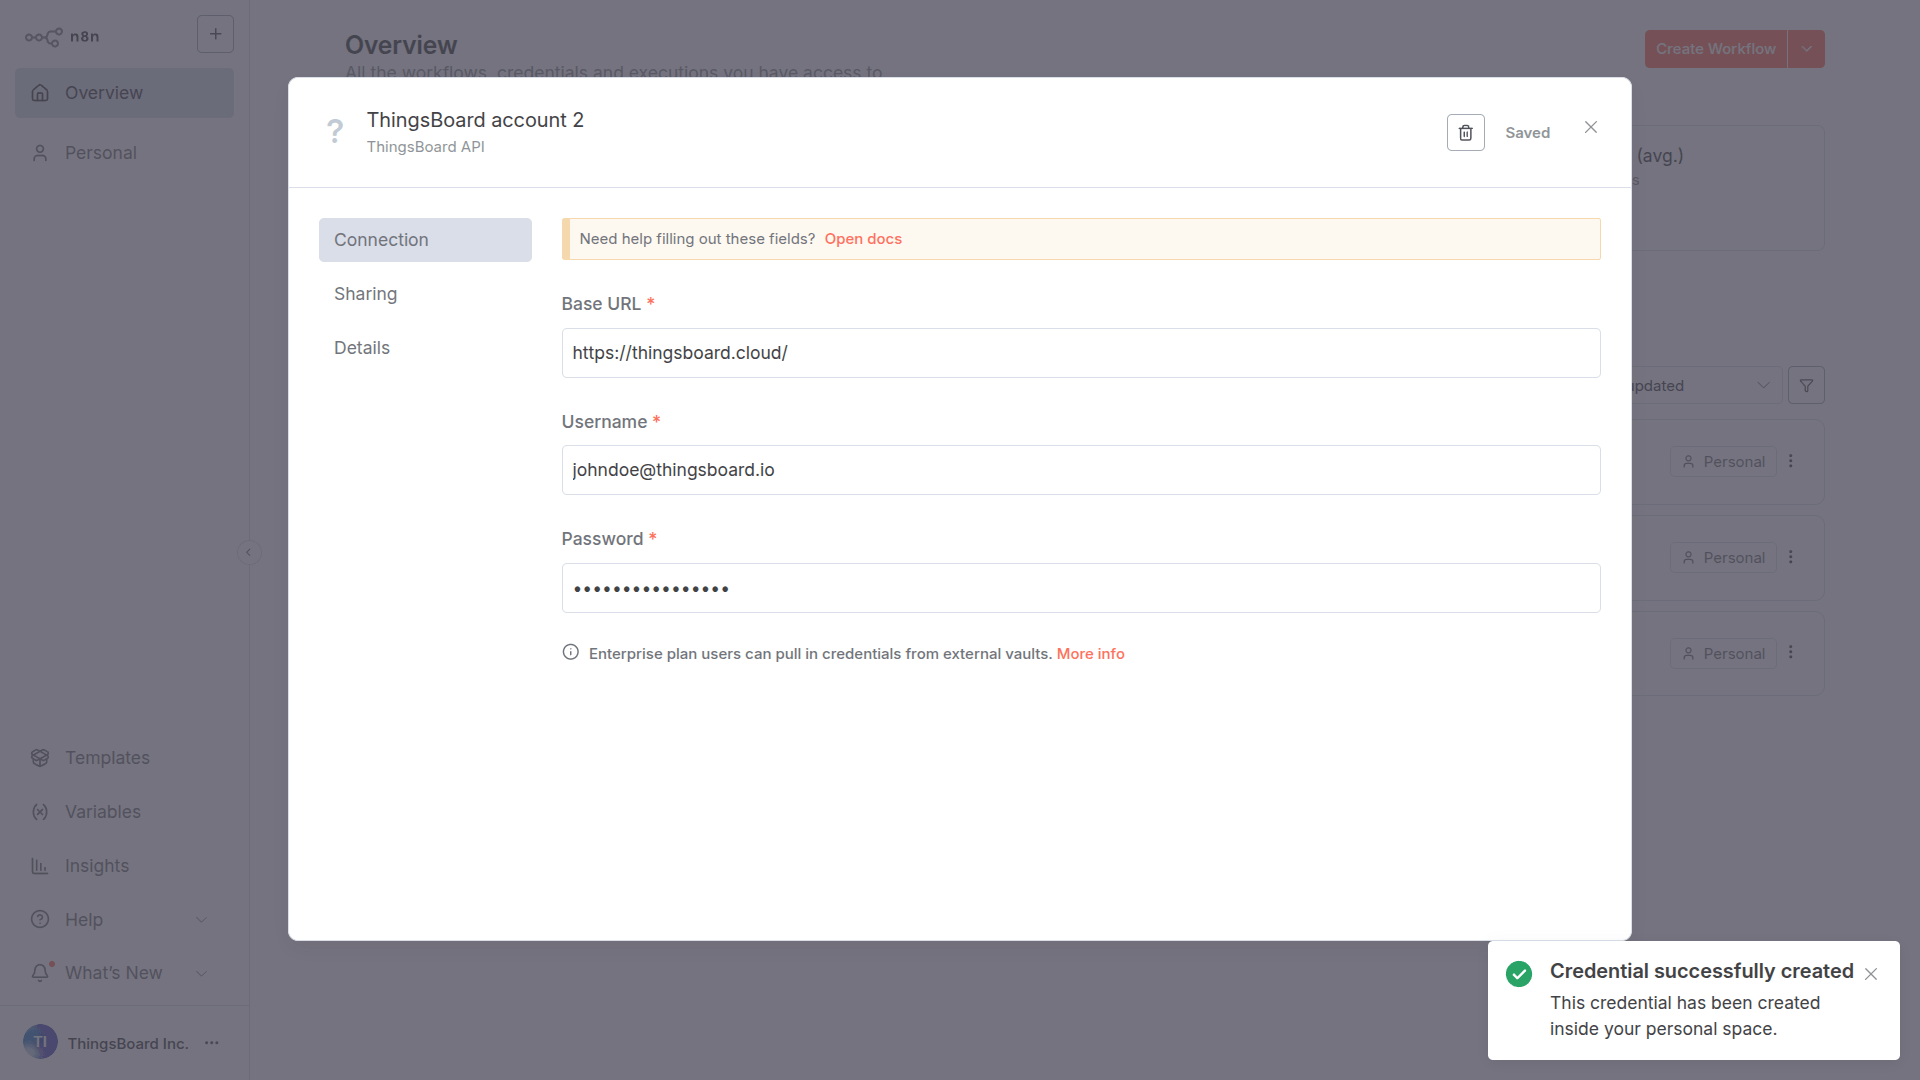
The credentials are encrypted and stored securely by n8n. You can reuse the same credentials across multiple ThingsBoard nodes in different workflows.
验证安装
安装节点并重启n8n后,验证ThingsBoard节点是否可用:
- 在浏览器中打开n8n(通常是 http://localhost:5678)
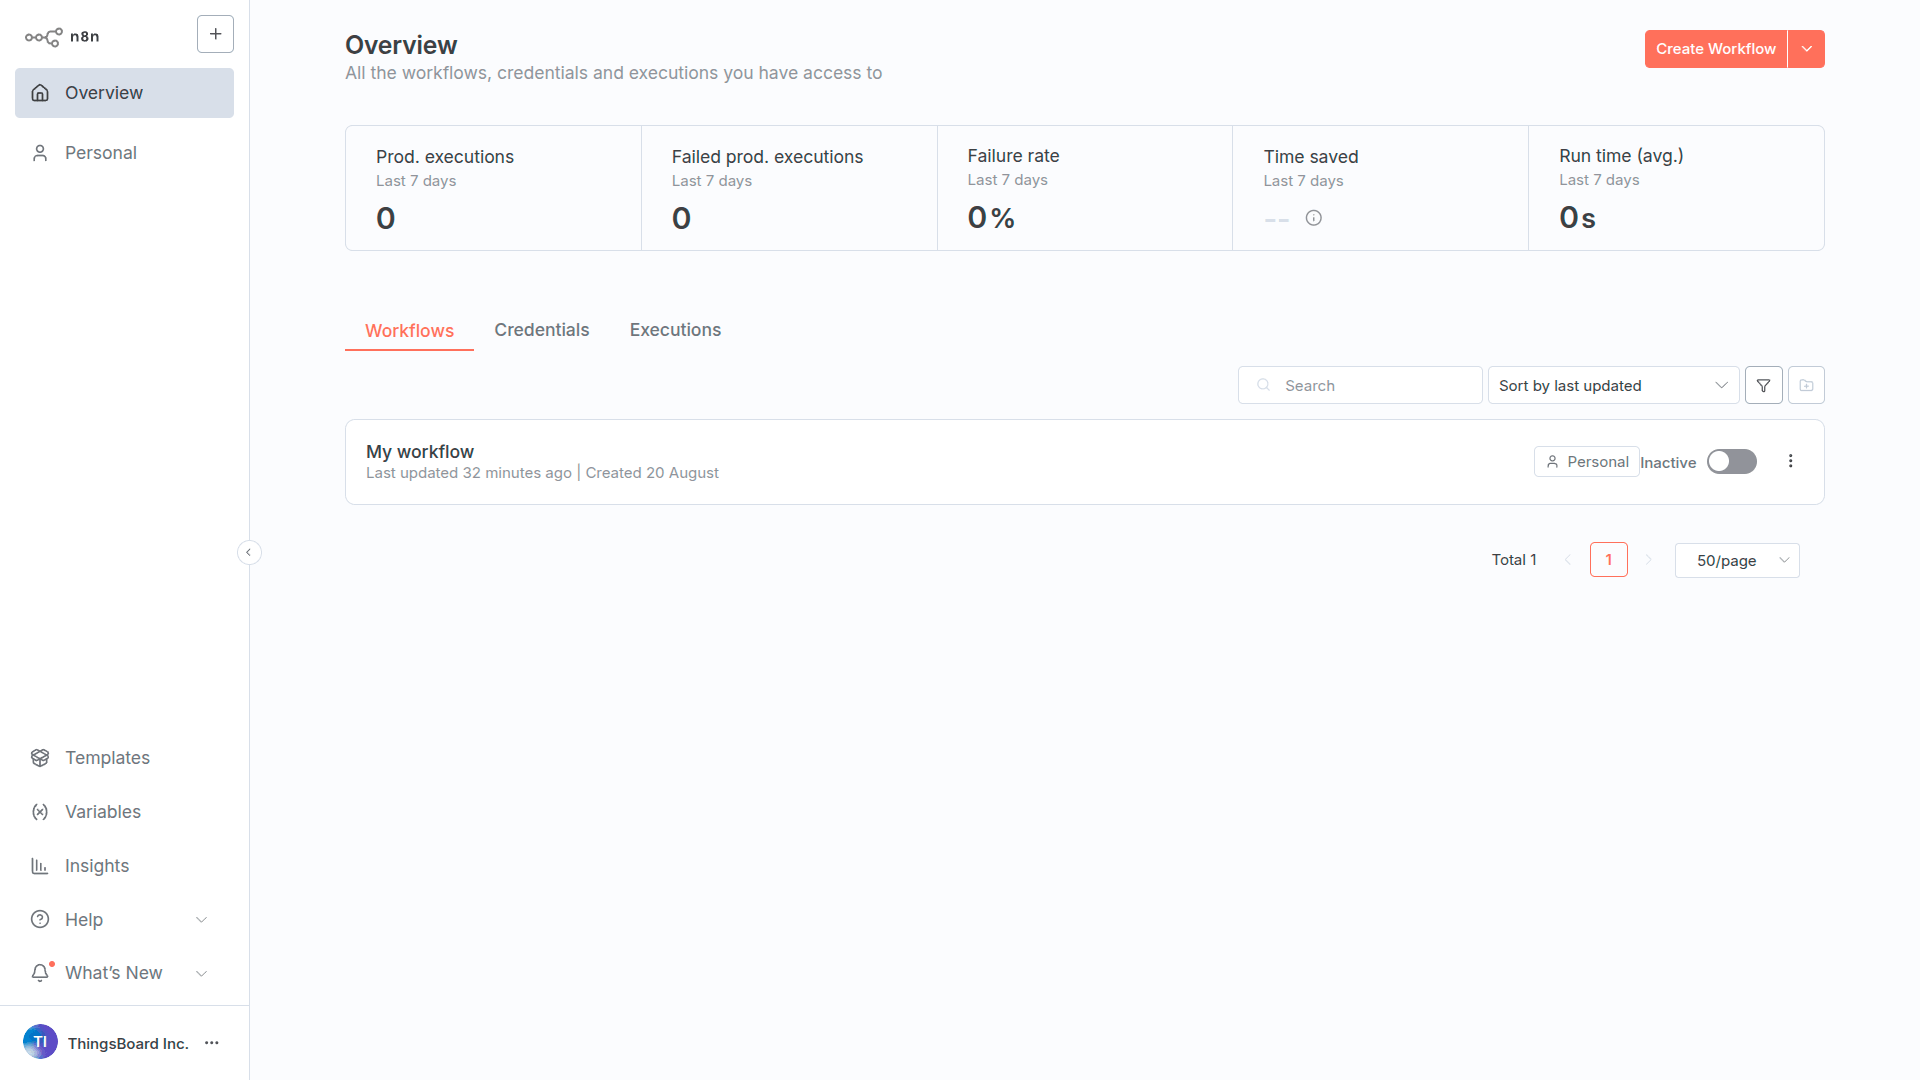
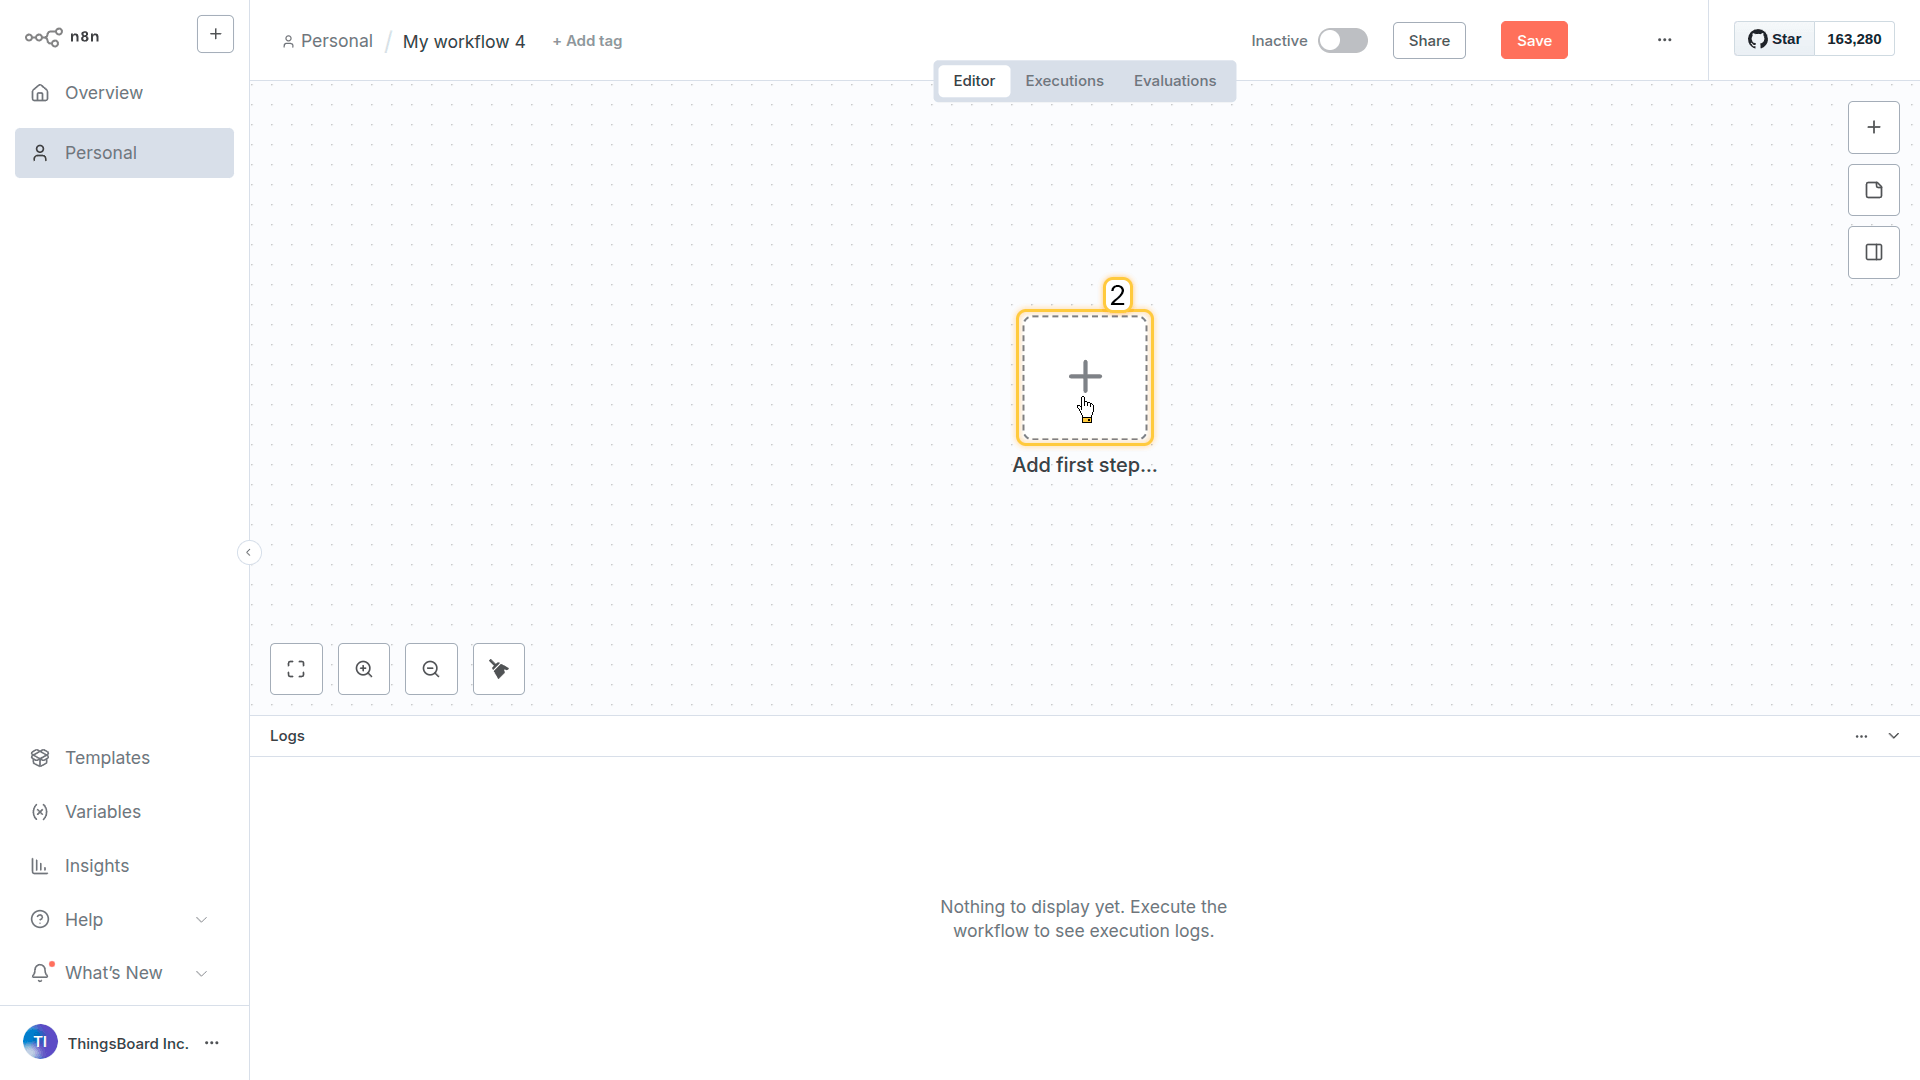
- 创建新工作流 - 点击右上角 Create Workflow
- 添加节点 - 点击工作流画布上的 + 按钮
- 搜索ThingsBoard - 在搜索框输入”ThingsBoard”
- 验证节点出现 - 应看到ThingsBoard节点及其可用操作

In the top-right corner of the interface, click Create Workflow.
On the workflow canvas, click the + button to open the list of available nodes.

In the node search field, type ThingsBoard. The ThingsBoard node should appear in the search results. Click on it.
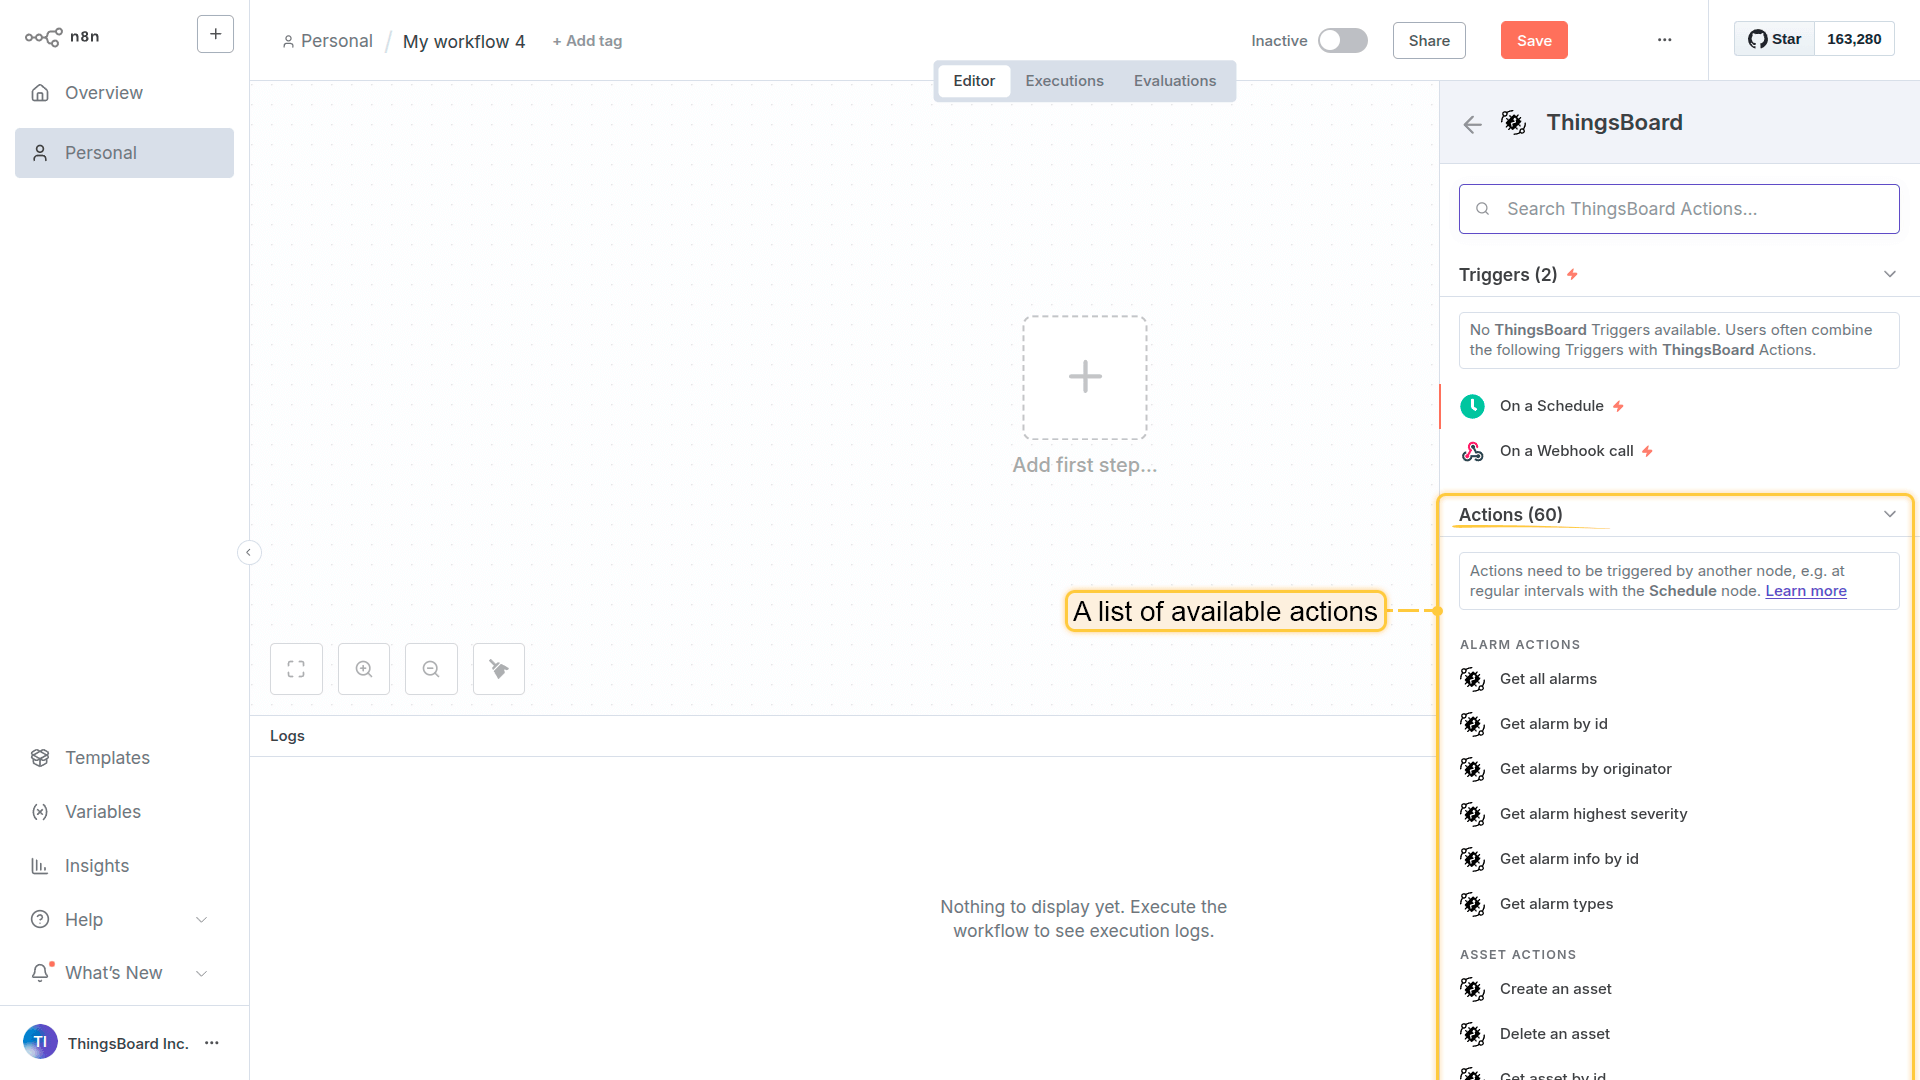
A list of available actions will be displayed.
注意:社区版和专业版的操作数量可能不同。
若看不到节点:
- 确认已设置
N8N_COMMUNITY_PACKAGES_ENABLED=true - 检查npm安装是否无错误完成
- 安装后重启n8n
- 在n8n日志中查看加载错误
如何使用节点
使用ThingsBoard节点有两种方式:
1. 常规工作流节点
将ThingsBoard节点拖到画布上,配置要执行的操作(获取设备、保存遥测、创建告警等)。
适用于:
- 定时任务(每日报告、健康检查)
- Webhook(传入传感器数据、外部触发)
- 多步骤工作流(获取设备 → 拉取遥测 → 发送到Slack)
2. AI Agent工具
为AI agent提供ThingsBoard操作访问权限。用户随后可用自然语言提问,而无需构建工作流。
适用于:
- 非技术人员查询实体、数据等
- 支持团队排查问题
配置要求:参见上方 AI Agent 配置。
查看下方 示例 了解两种方式的实战用法。
常见工作流模式
将遥测归档到云存储:Schedule(每日)→ Code(计算时间范围)→ Get timeseries → Convert to file → S3/GCS上传
根据告警创建工单:Webhook(告警)→ 检查严重程度 → 创建Jira/ServiceNow工单
客户入职自动化:CRM webhook(新客户)→ 创建设备和仪表板 → 分配给客户
AI驱动的查询:Chat → AI Agent → ThingsBoard操作 → 自然语言响应
使用示例
本节提供演示ThingsBoard n8n节点三种使用模式的实用示例。
示例1:AI Agent
实战场景:用纯文本提问,检查实体、状态、查询数据、更新配置等。
意义:
- 只需提出需求(”哪些设备离线?”、”显示今日温度”),节点会处理技术细节。
- 减少IoT运营中的瓶颈
配置:将ThingsBoard节点用作 AI Agents的工具,实现对话式IoT控制
Create a new workflow with AI Agent node. Choose your AI Model (Gemini, Anthropic, ChatGPT, etc.) and configure memory settings.
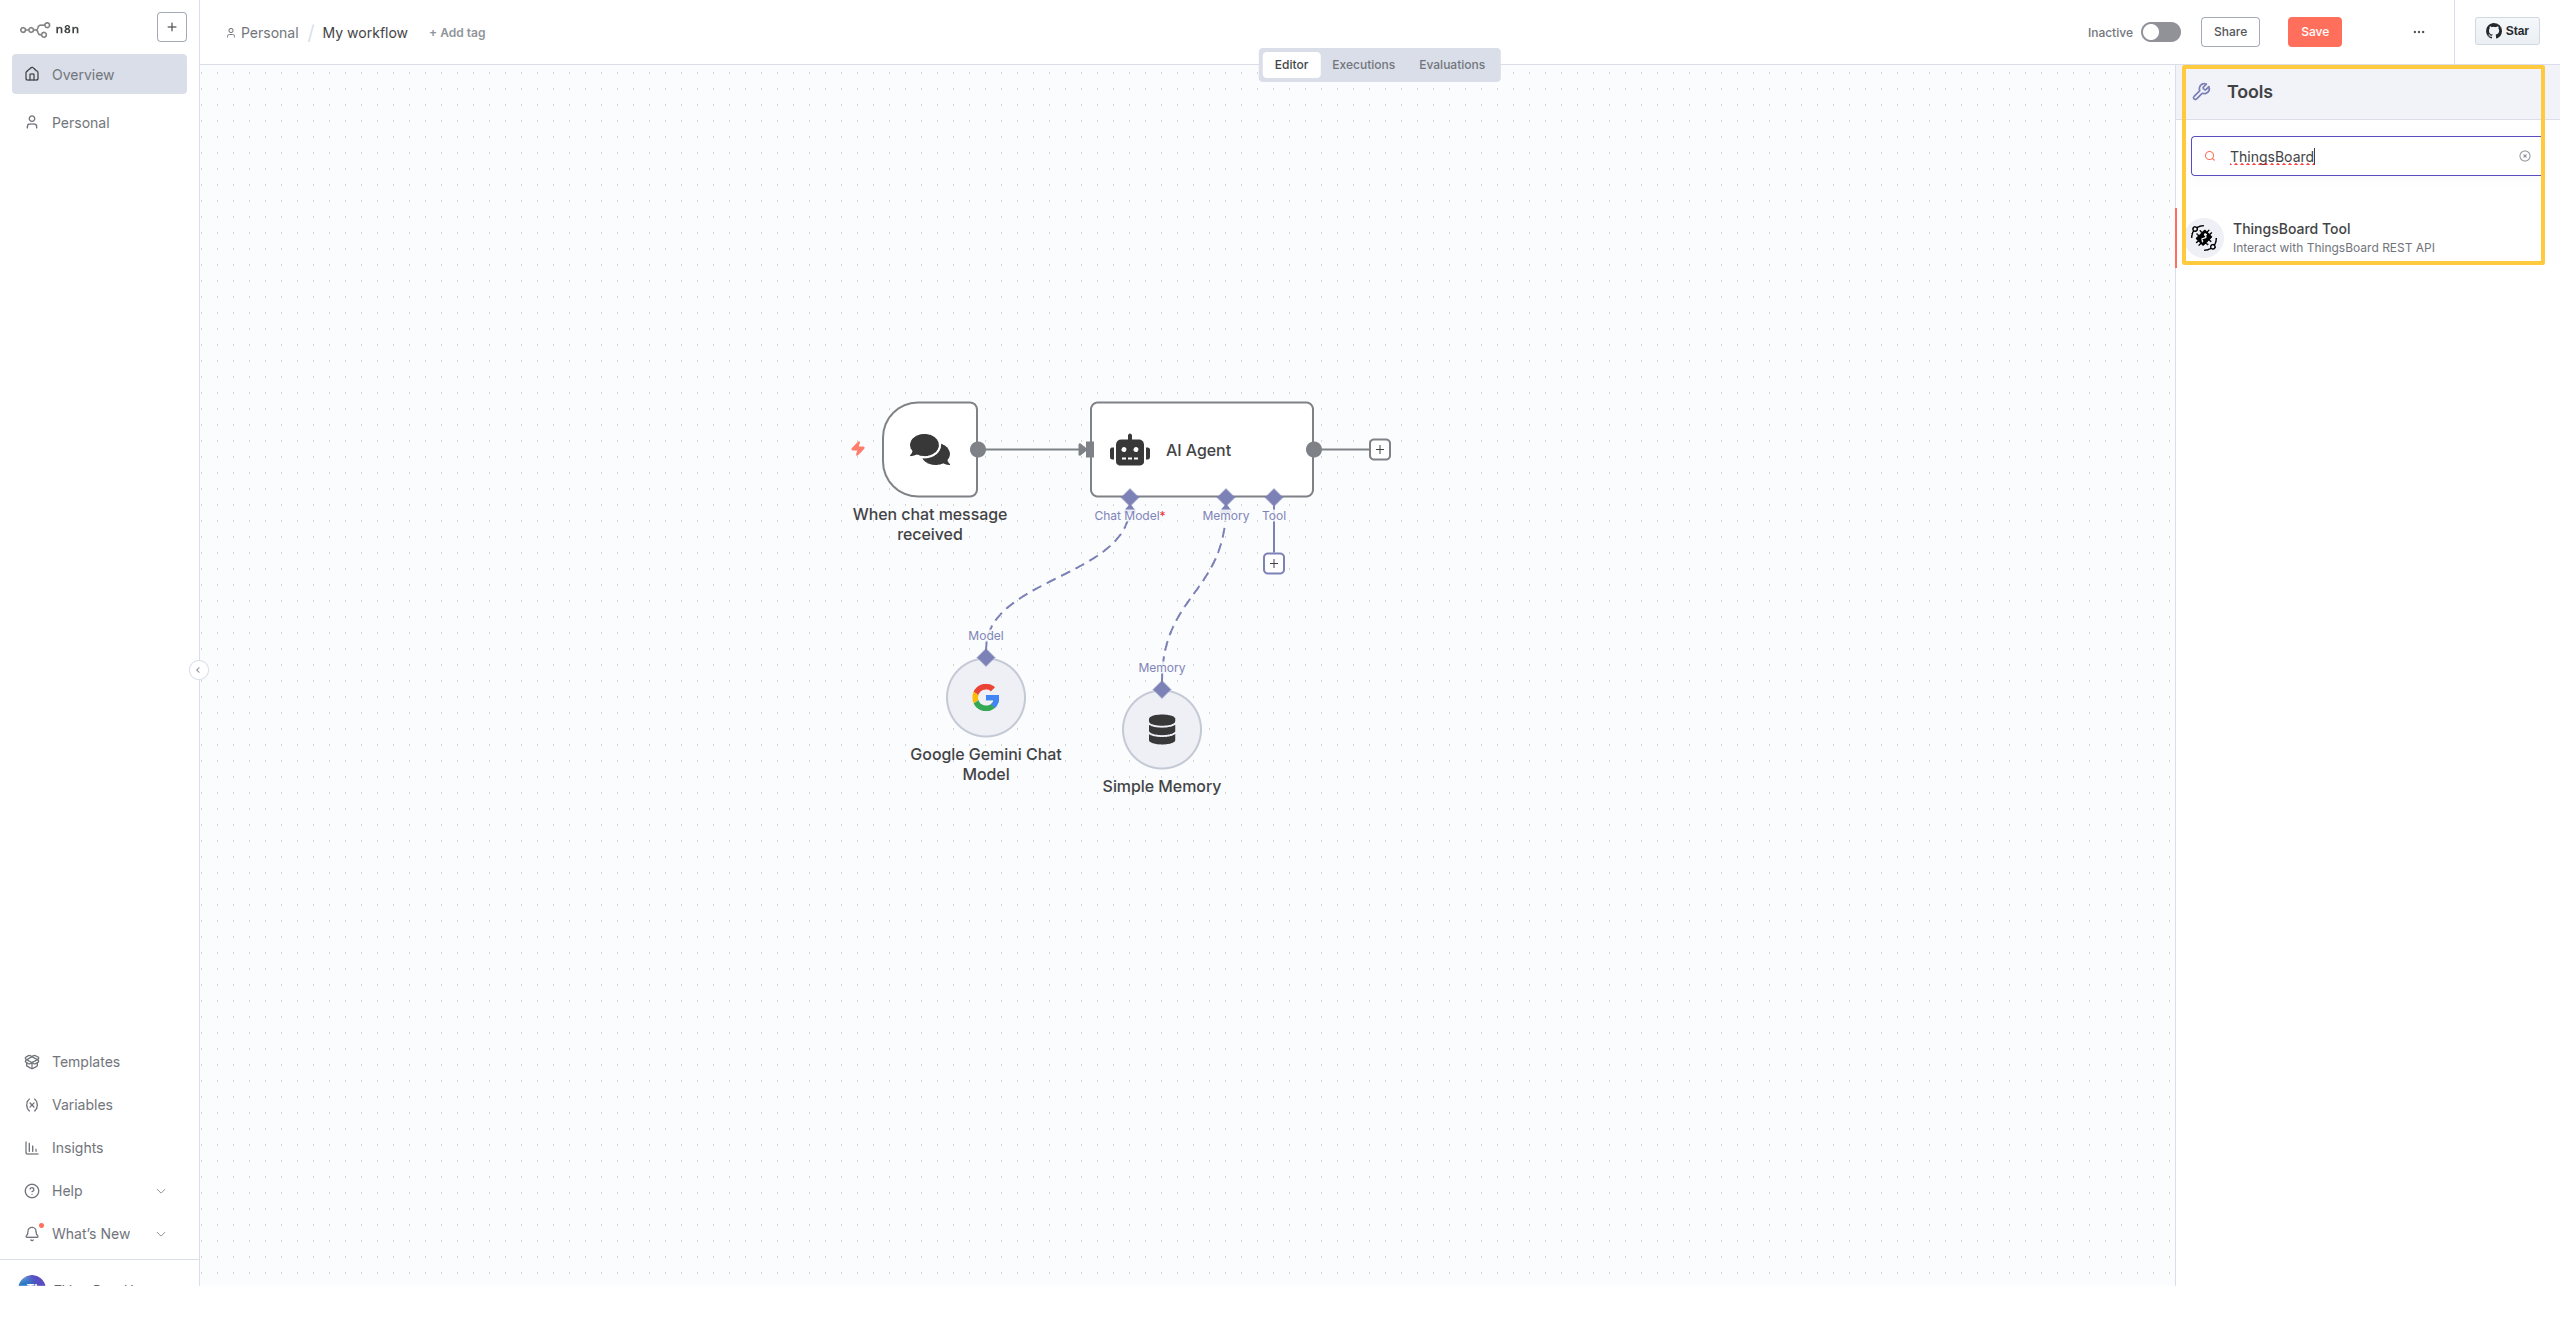
Select ThingsBoard from the Tools list. Add Get devices and Get timeseries operations.
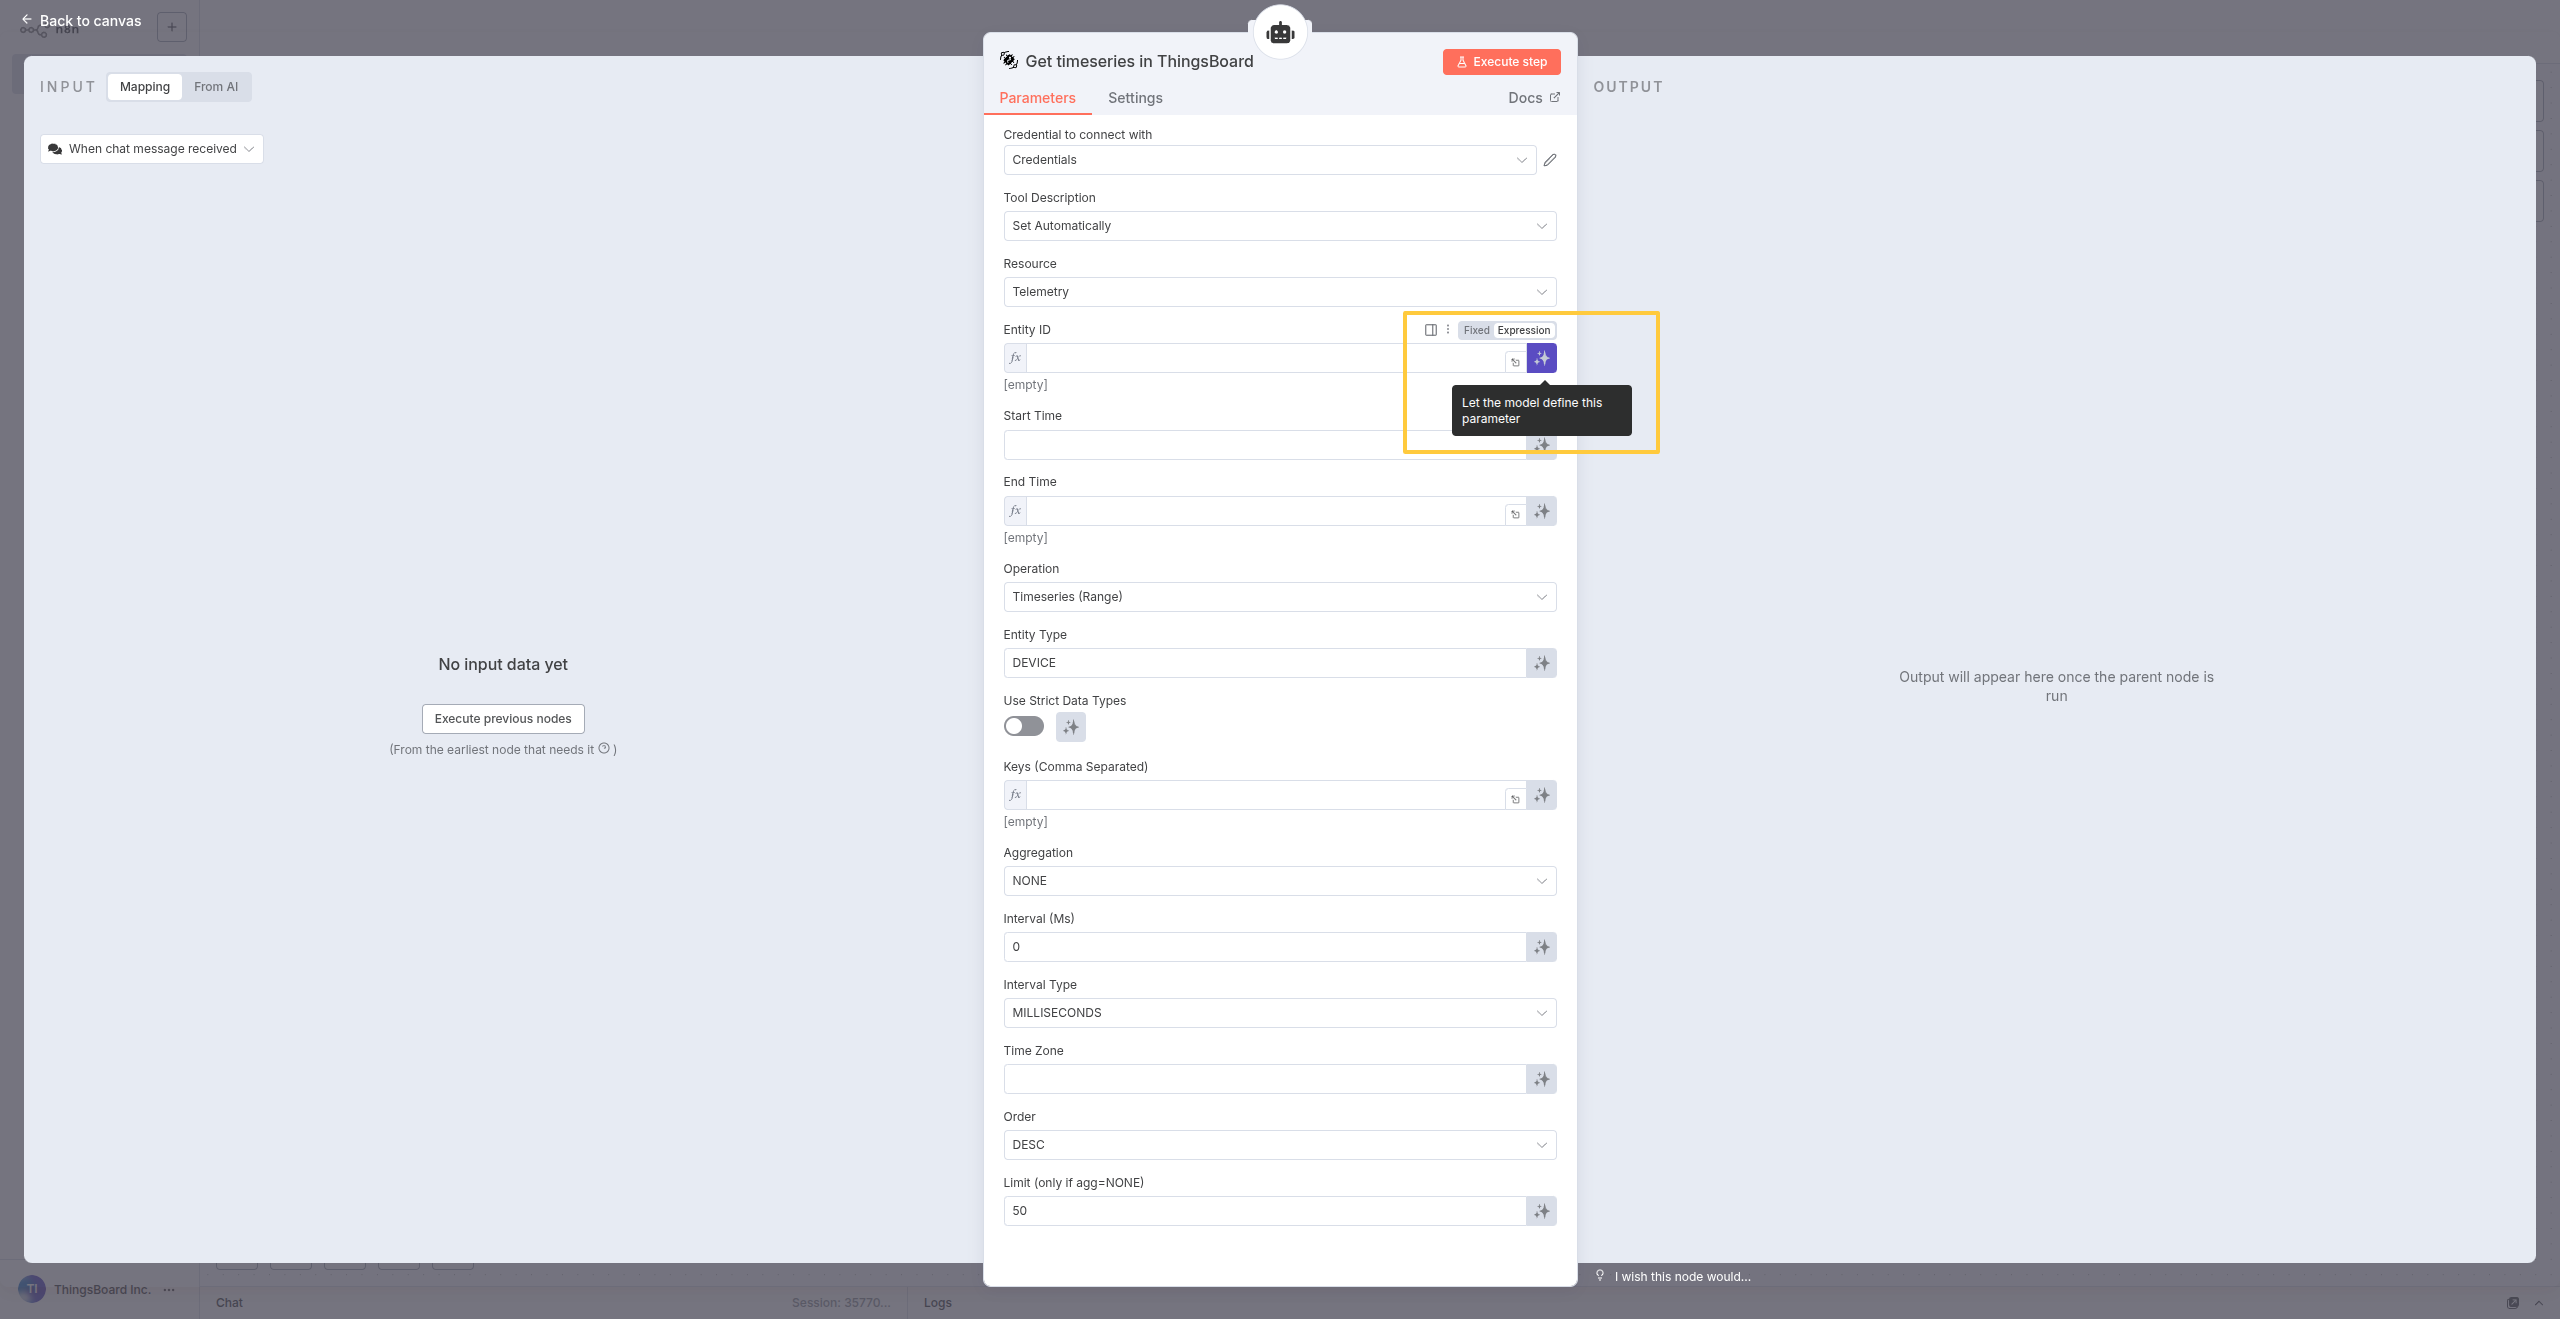
For tools with required or optional fields, the AI model intelligently determines parameter values based on conversation context. The model decides which values to pass automatically.
Open the chat interface and write your natural language query.
工作流程:
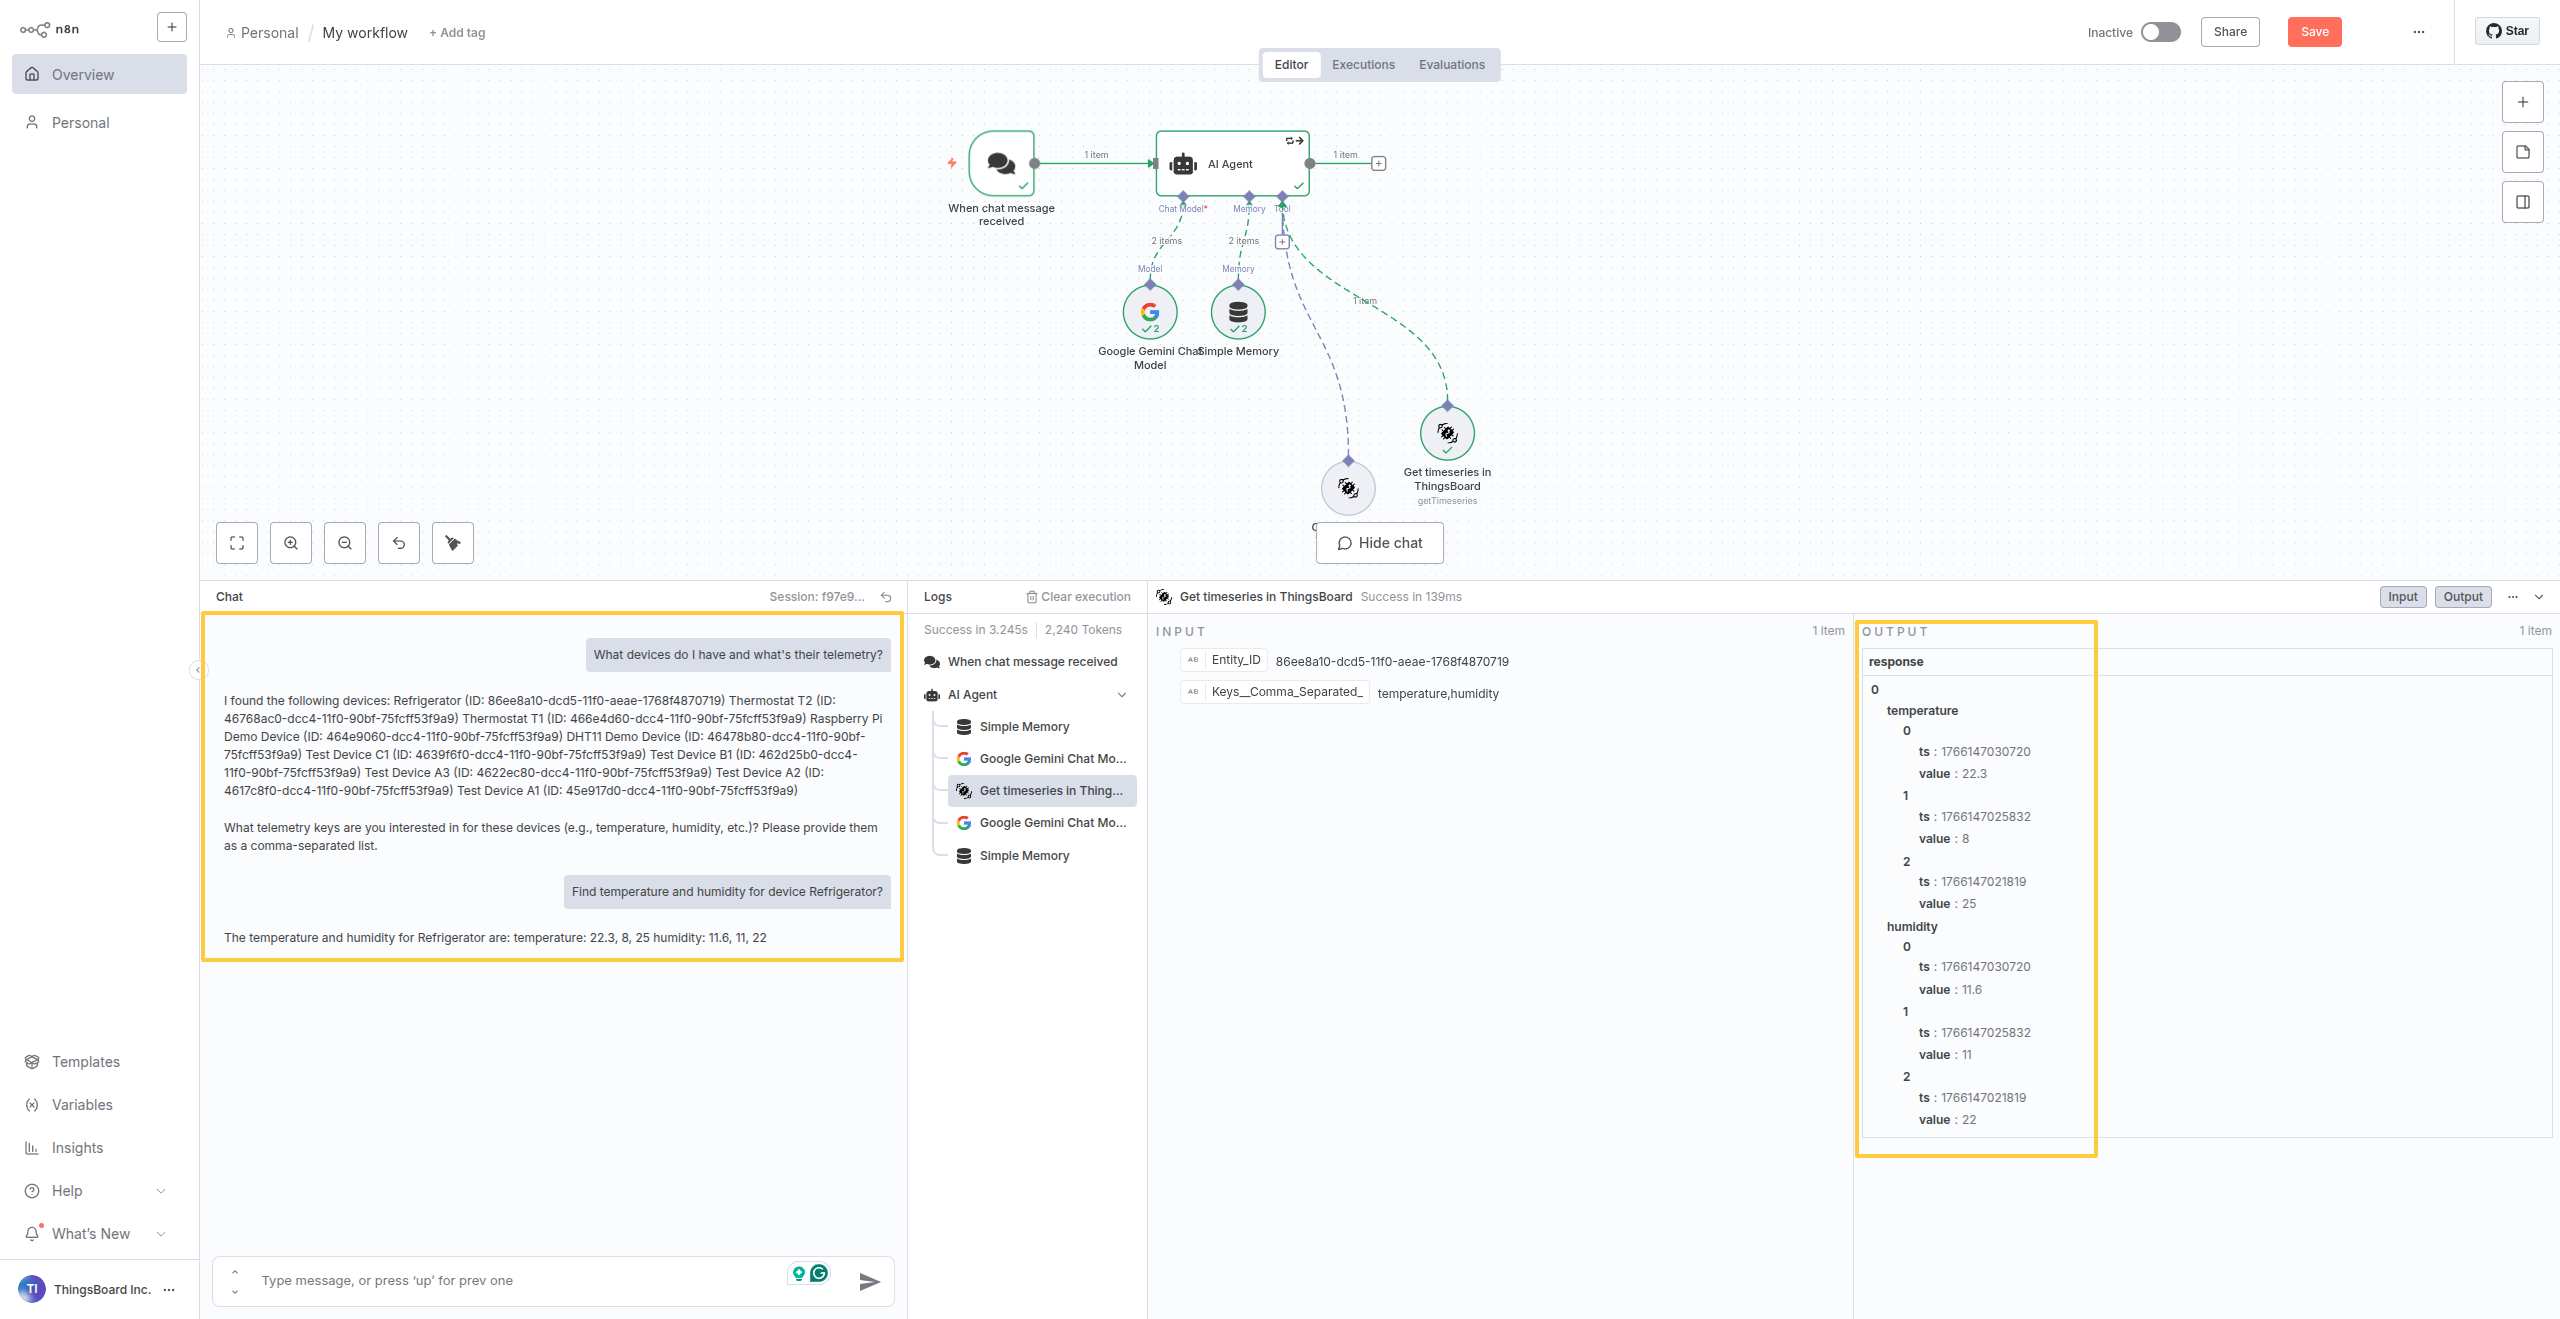
- 用户提问:“仓库中哪些冰柜温度高于 -10°C?”
- AI Agent(基于Google Gemini、Anthropic或OpenAI)自动:
- 调用
Get devices查找所有冰柜设备 - 调用
Get timeseries获取温度读数 - 过滤结果并以自然语言回复
- 调用
- 无需代码或API知识
团队可问的实际查询:
- “显示过去24小时内未发送数据的设备”
- “冰柜3当前温度是多少?”
- “Building A中有哪些传感器?”
- “获取所有仓库传感器过去一周的湿度数据”
这将使IoT访问民主化——任何人都可在不了解ThingsBoard API的情况下查询基础设施。
示例2:每日遥测导出到AWS S3
实战场景:每晚将设备遥测导出到S3,同时用CRM中的设备元数据丰富数据,转换为Parquet格式供Athena使用,并触发Lambda函数更新数据仓库。一个工作流,多种输出。
为何用n8n而非ThingsBoard原生导出:
- 多目的地 - 在同一工作流中将相同数据发送到S3 + Snowflake + 邮件报告
- 数据转换 - 用业务上下文丰富遥测(客户名称、CRM中的位置)
- 自定义格式 - 转换为Parquet、Avro或CSV,并为分析工具提供特定schema
- 条件逻辑 - 仅导出特定设备、按客户层级过滤或存储前聚合
- 集成链 - S3上传后 → 触发AWS Lambda → 更新追踪数据库 → 发送Slack通知
构建工作流
步骤1:创建新工作流并添加Schedule Trigger
创建新工作流并添加Schedule Trigger,在UTC午夜每日执行导出。
配置:
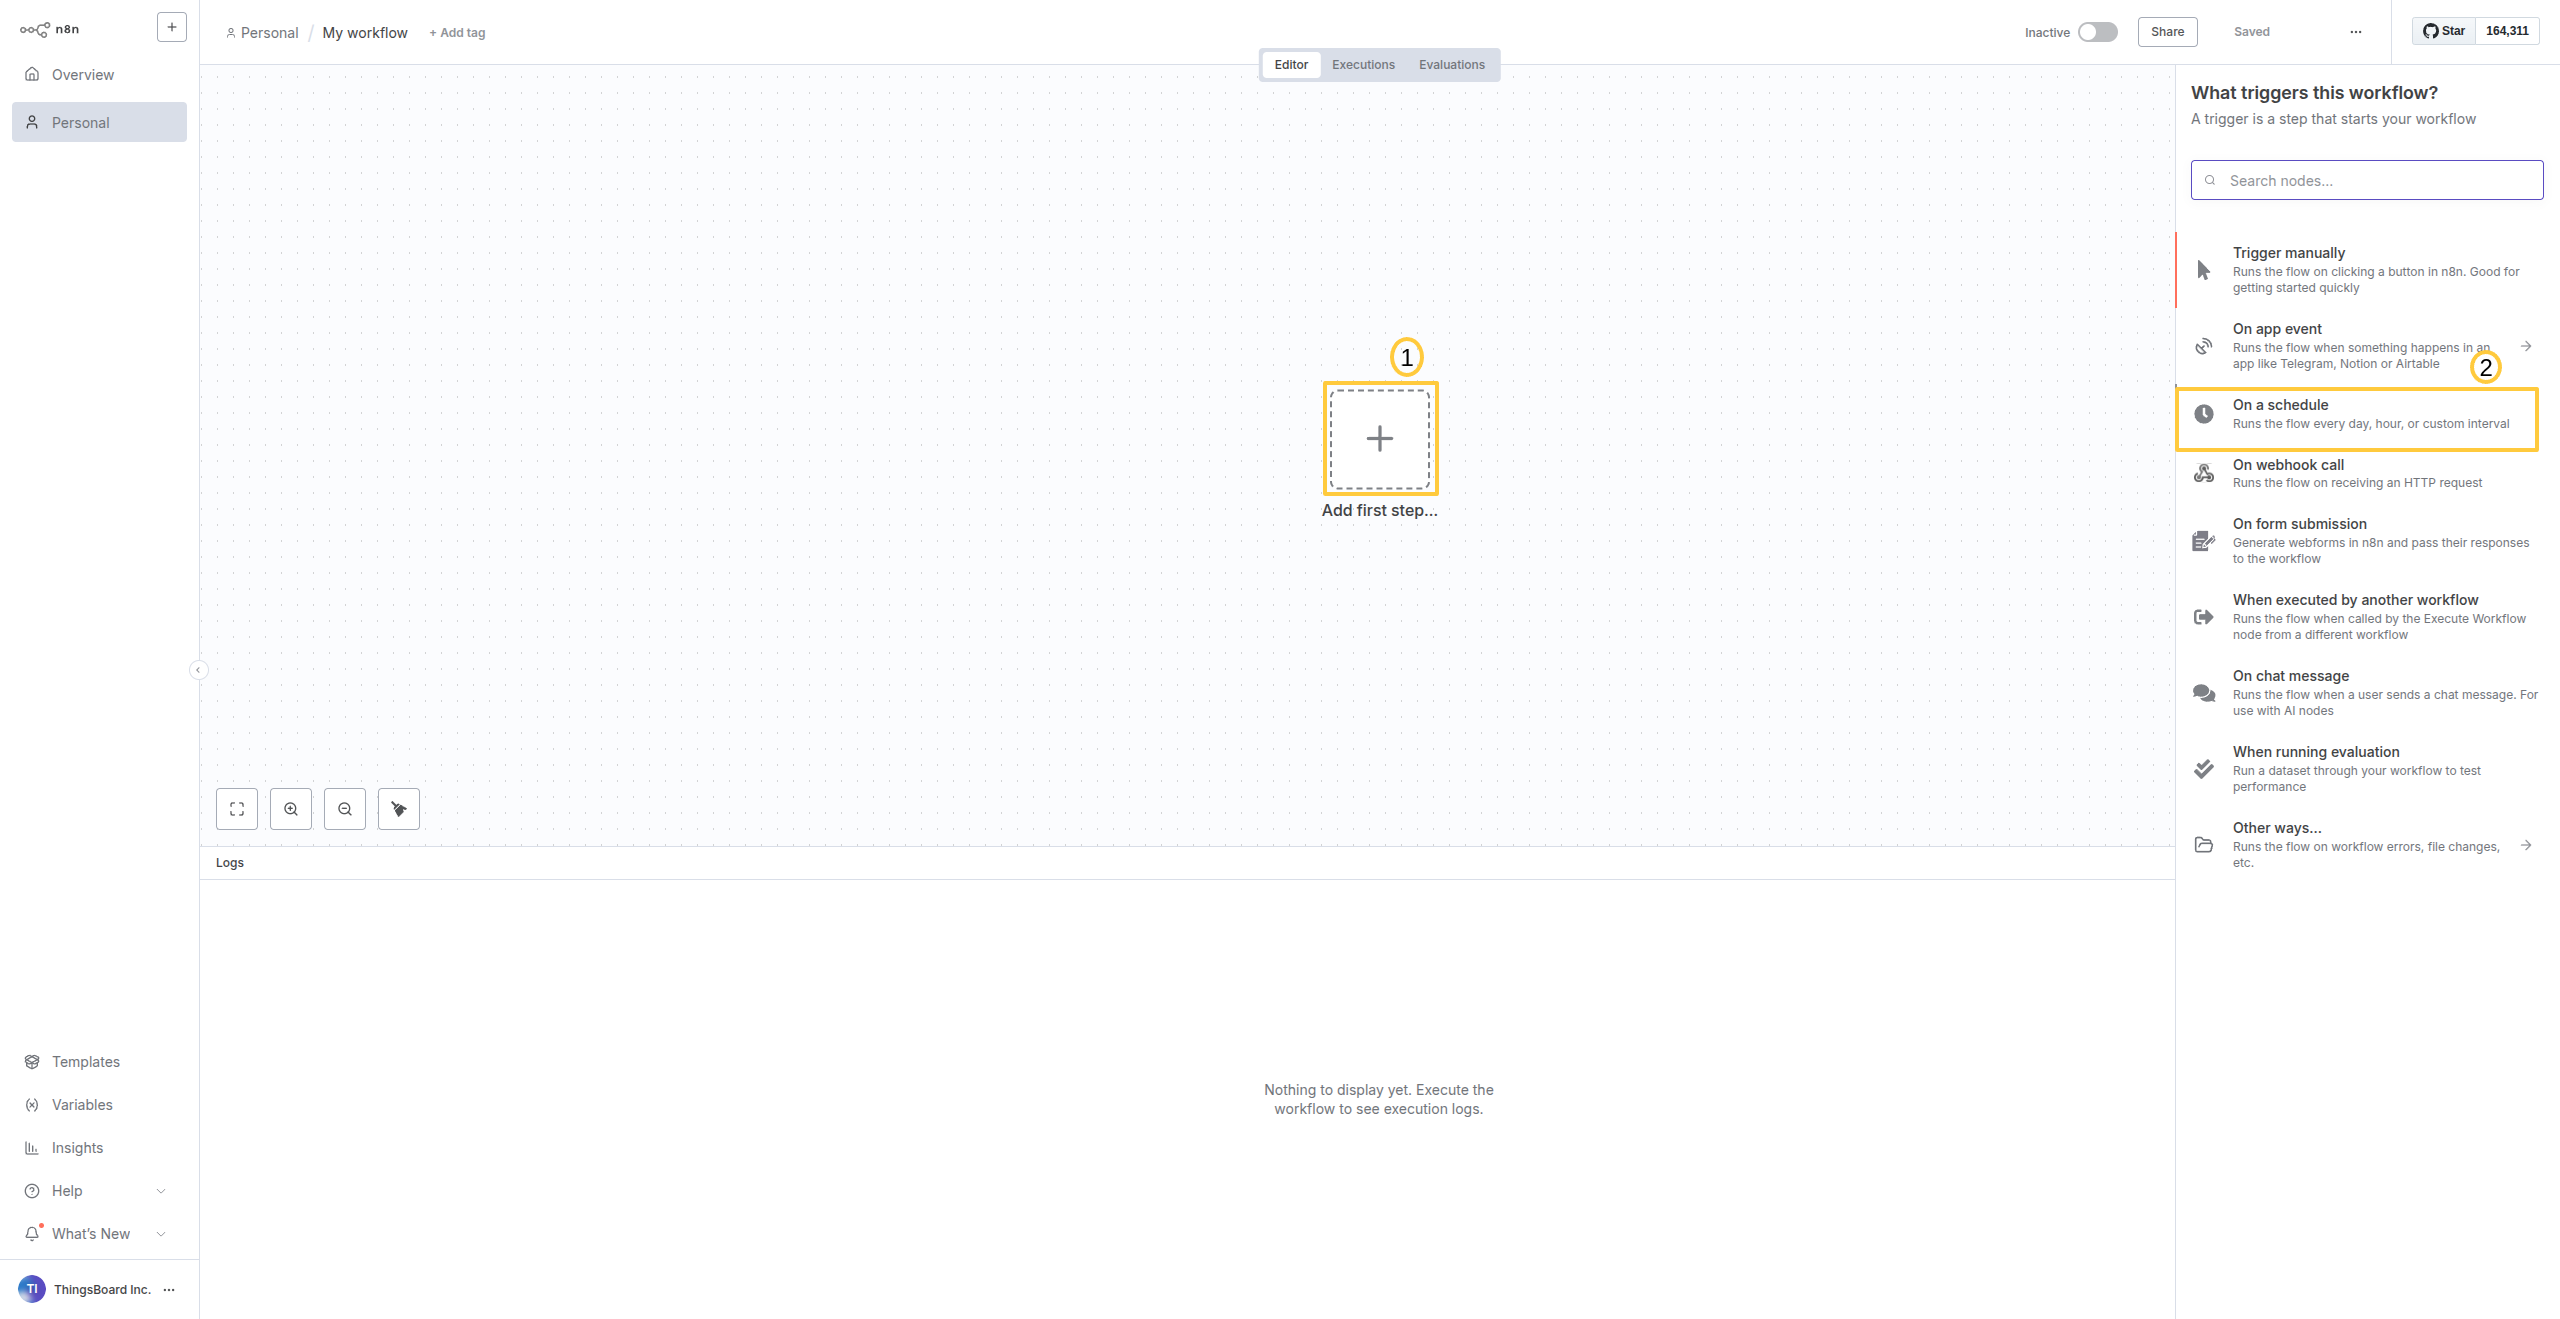
- 点击 Add first step… → 选择 Schedule Trigger
- 设置 Trigger Interval:每天00:00(午夜)
- 确保导出每24小时自动运行
Create a new workflow and select Schedule Trigger to run the export daily.
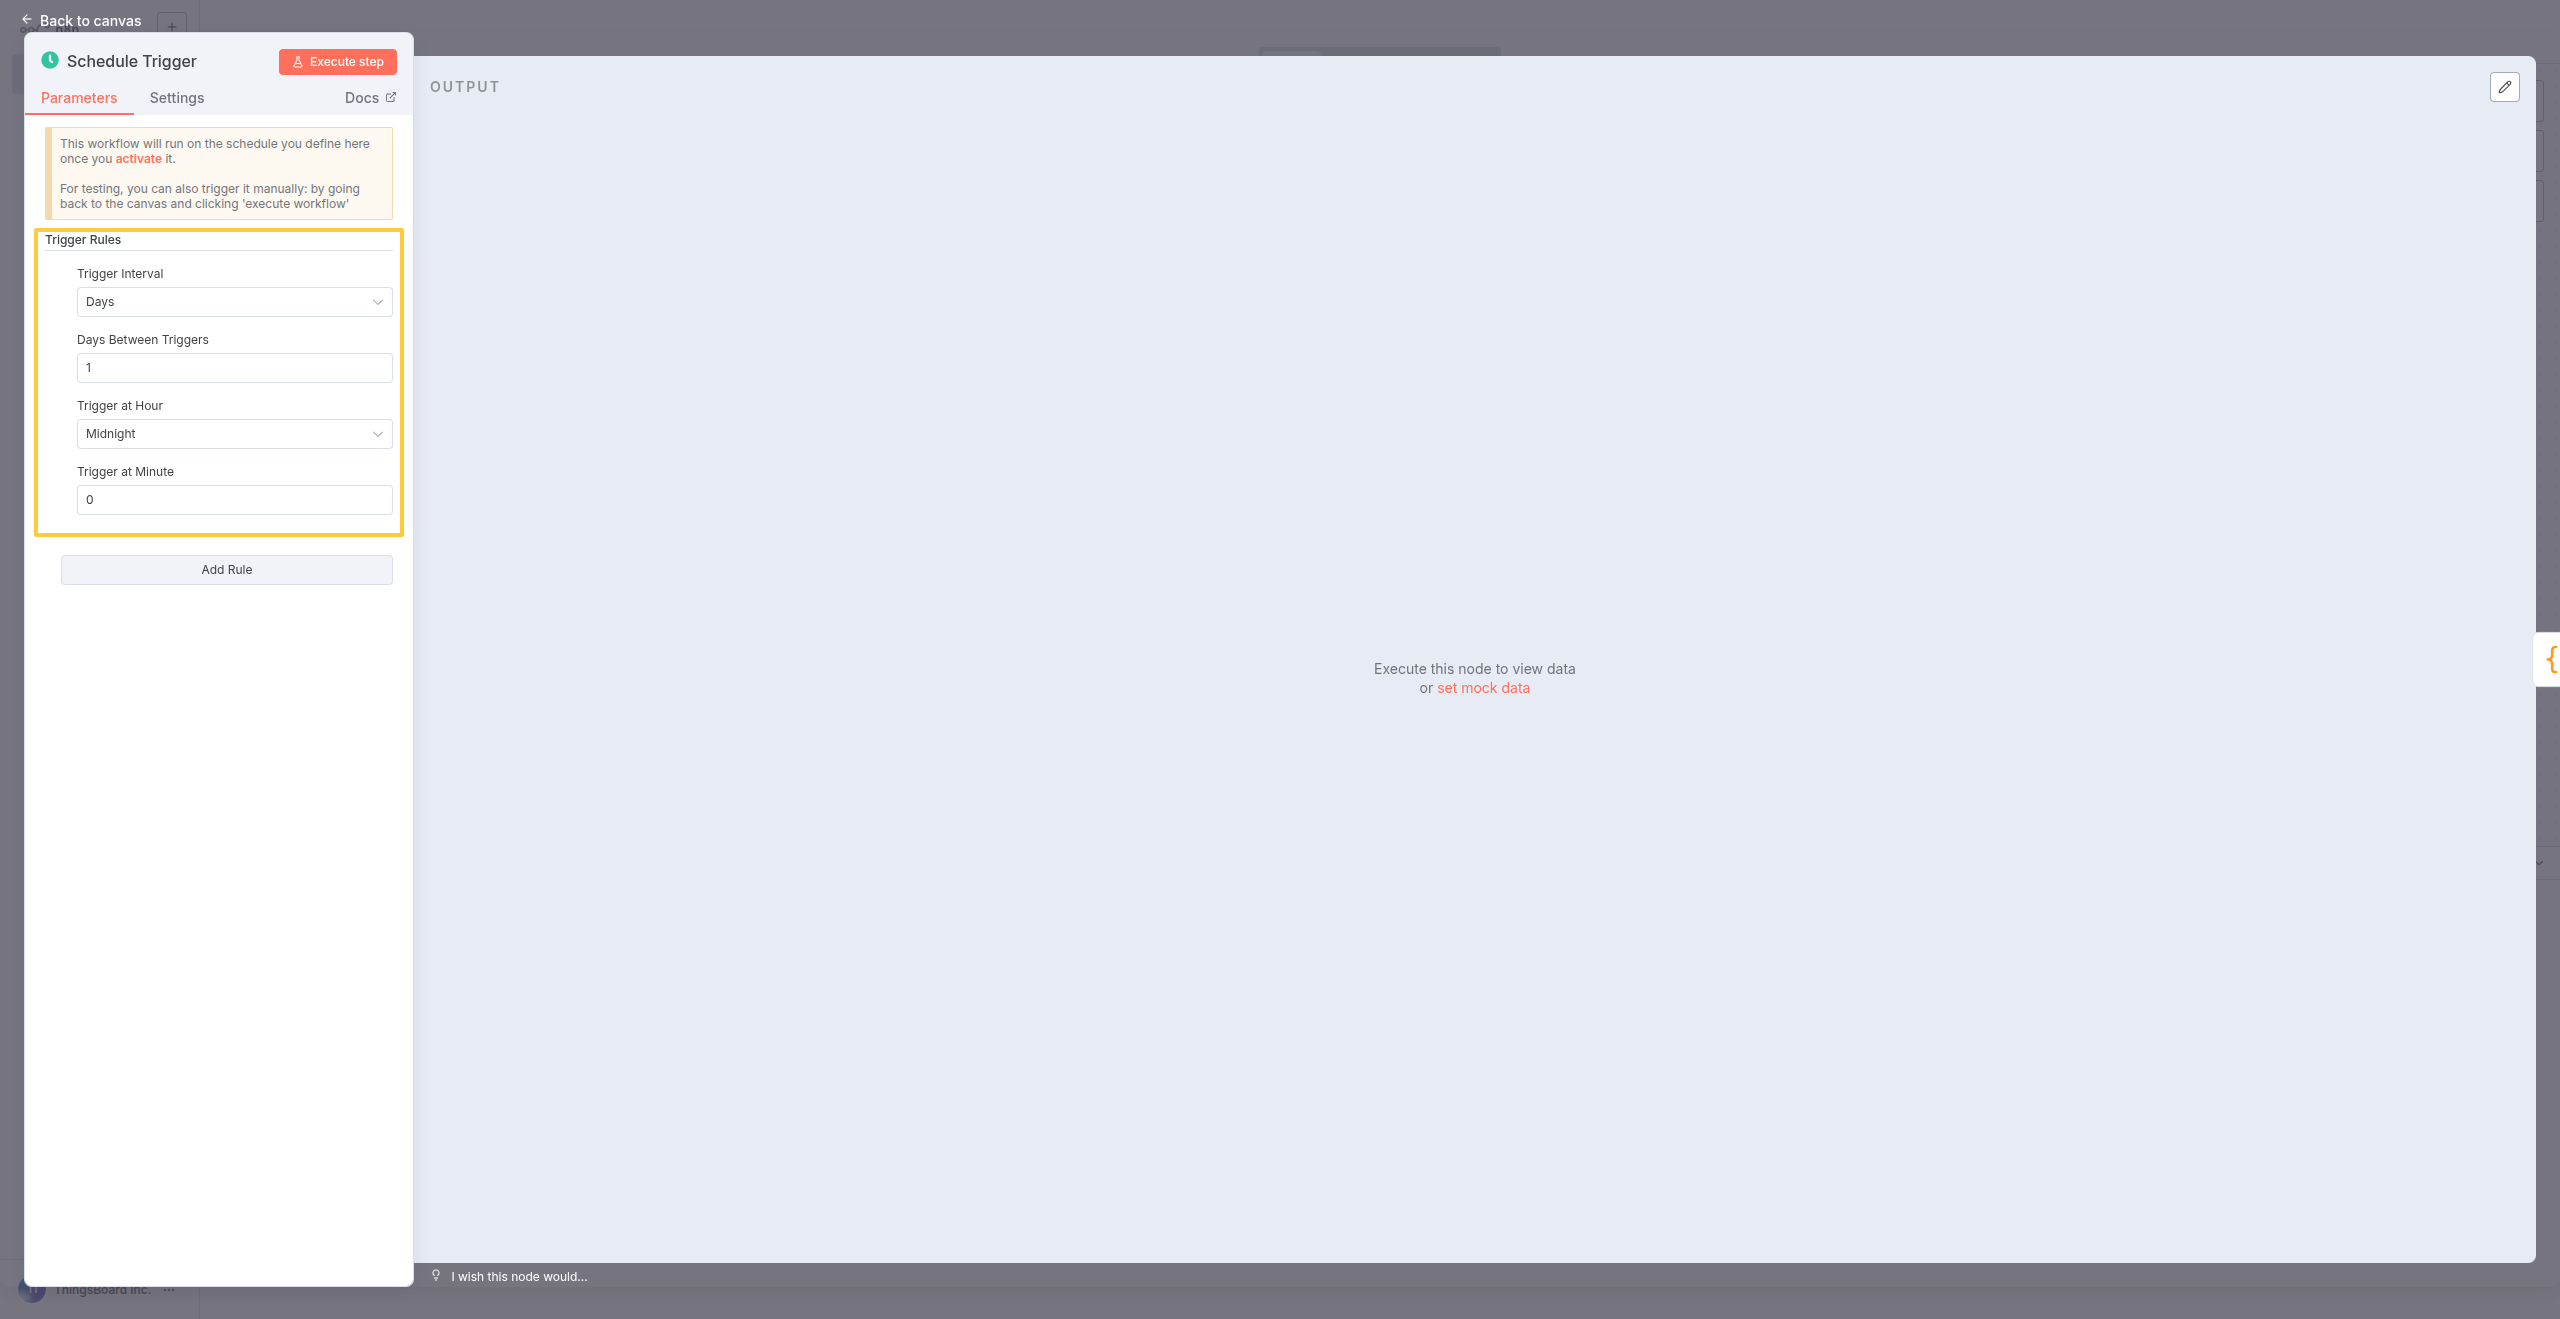
Configure the trigger to run every day at 00:00 UTC (midnight).
您已完成:设置UTC午夜每日自动执行。
步骤2:添加Code节点计算时间范围
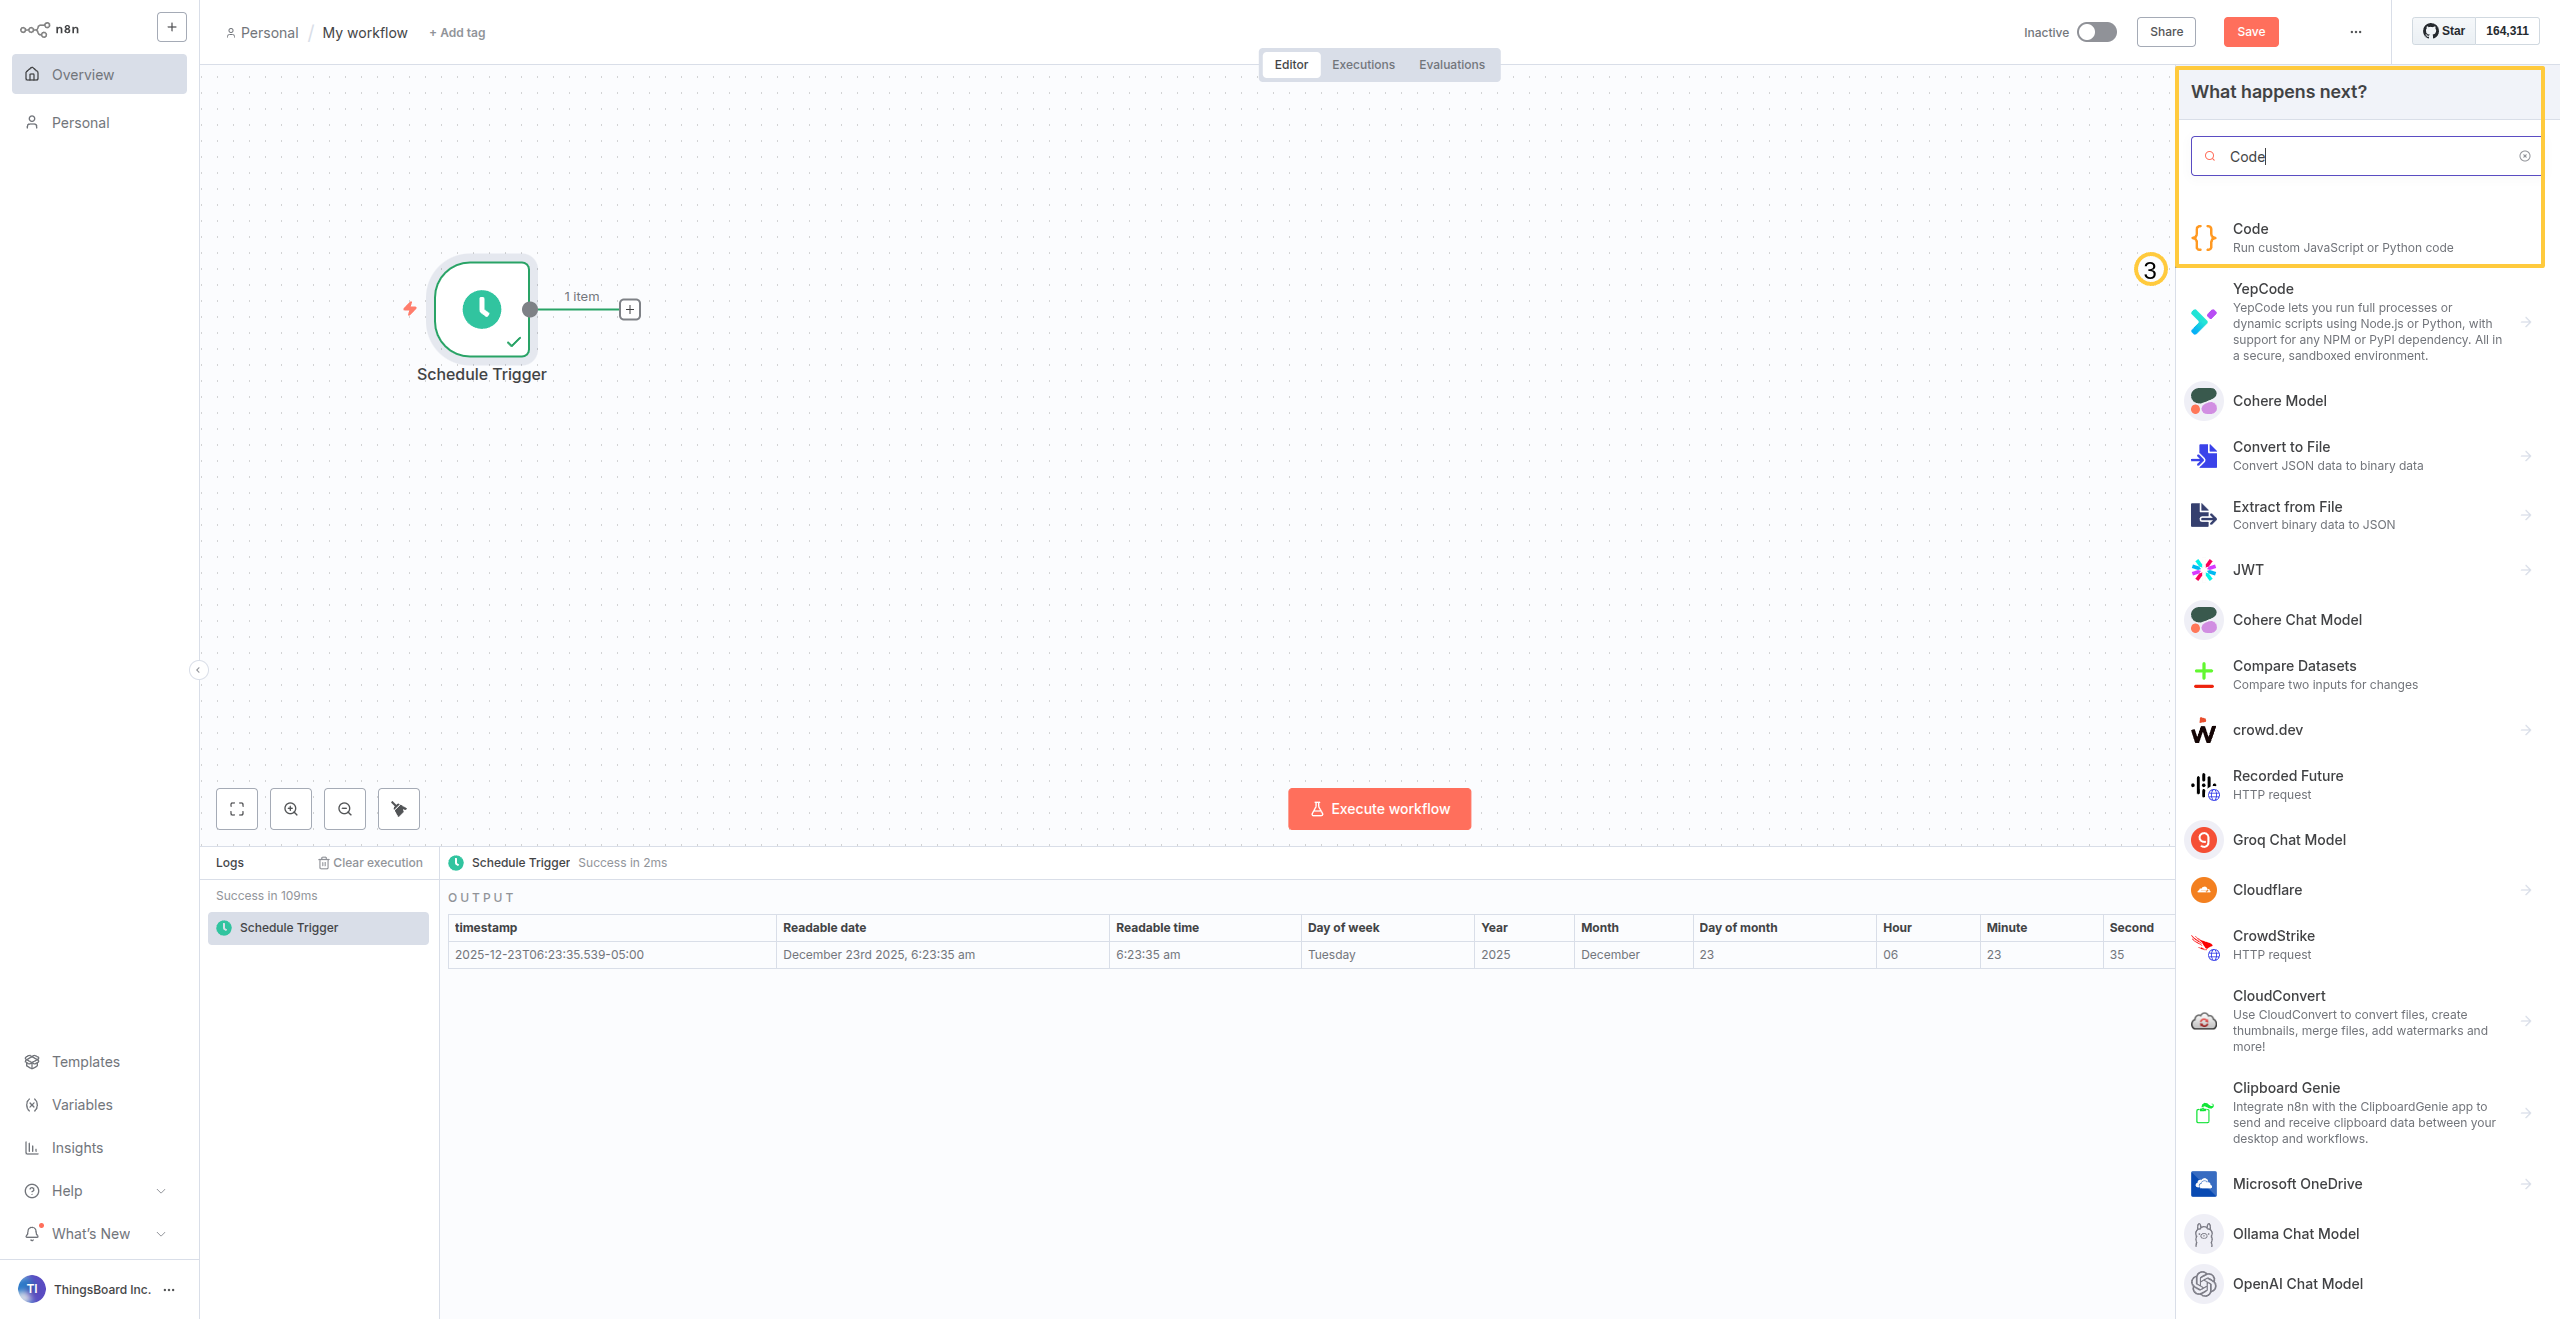
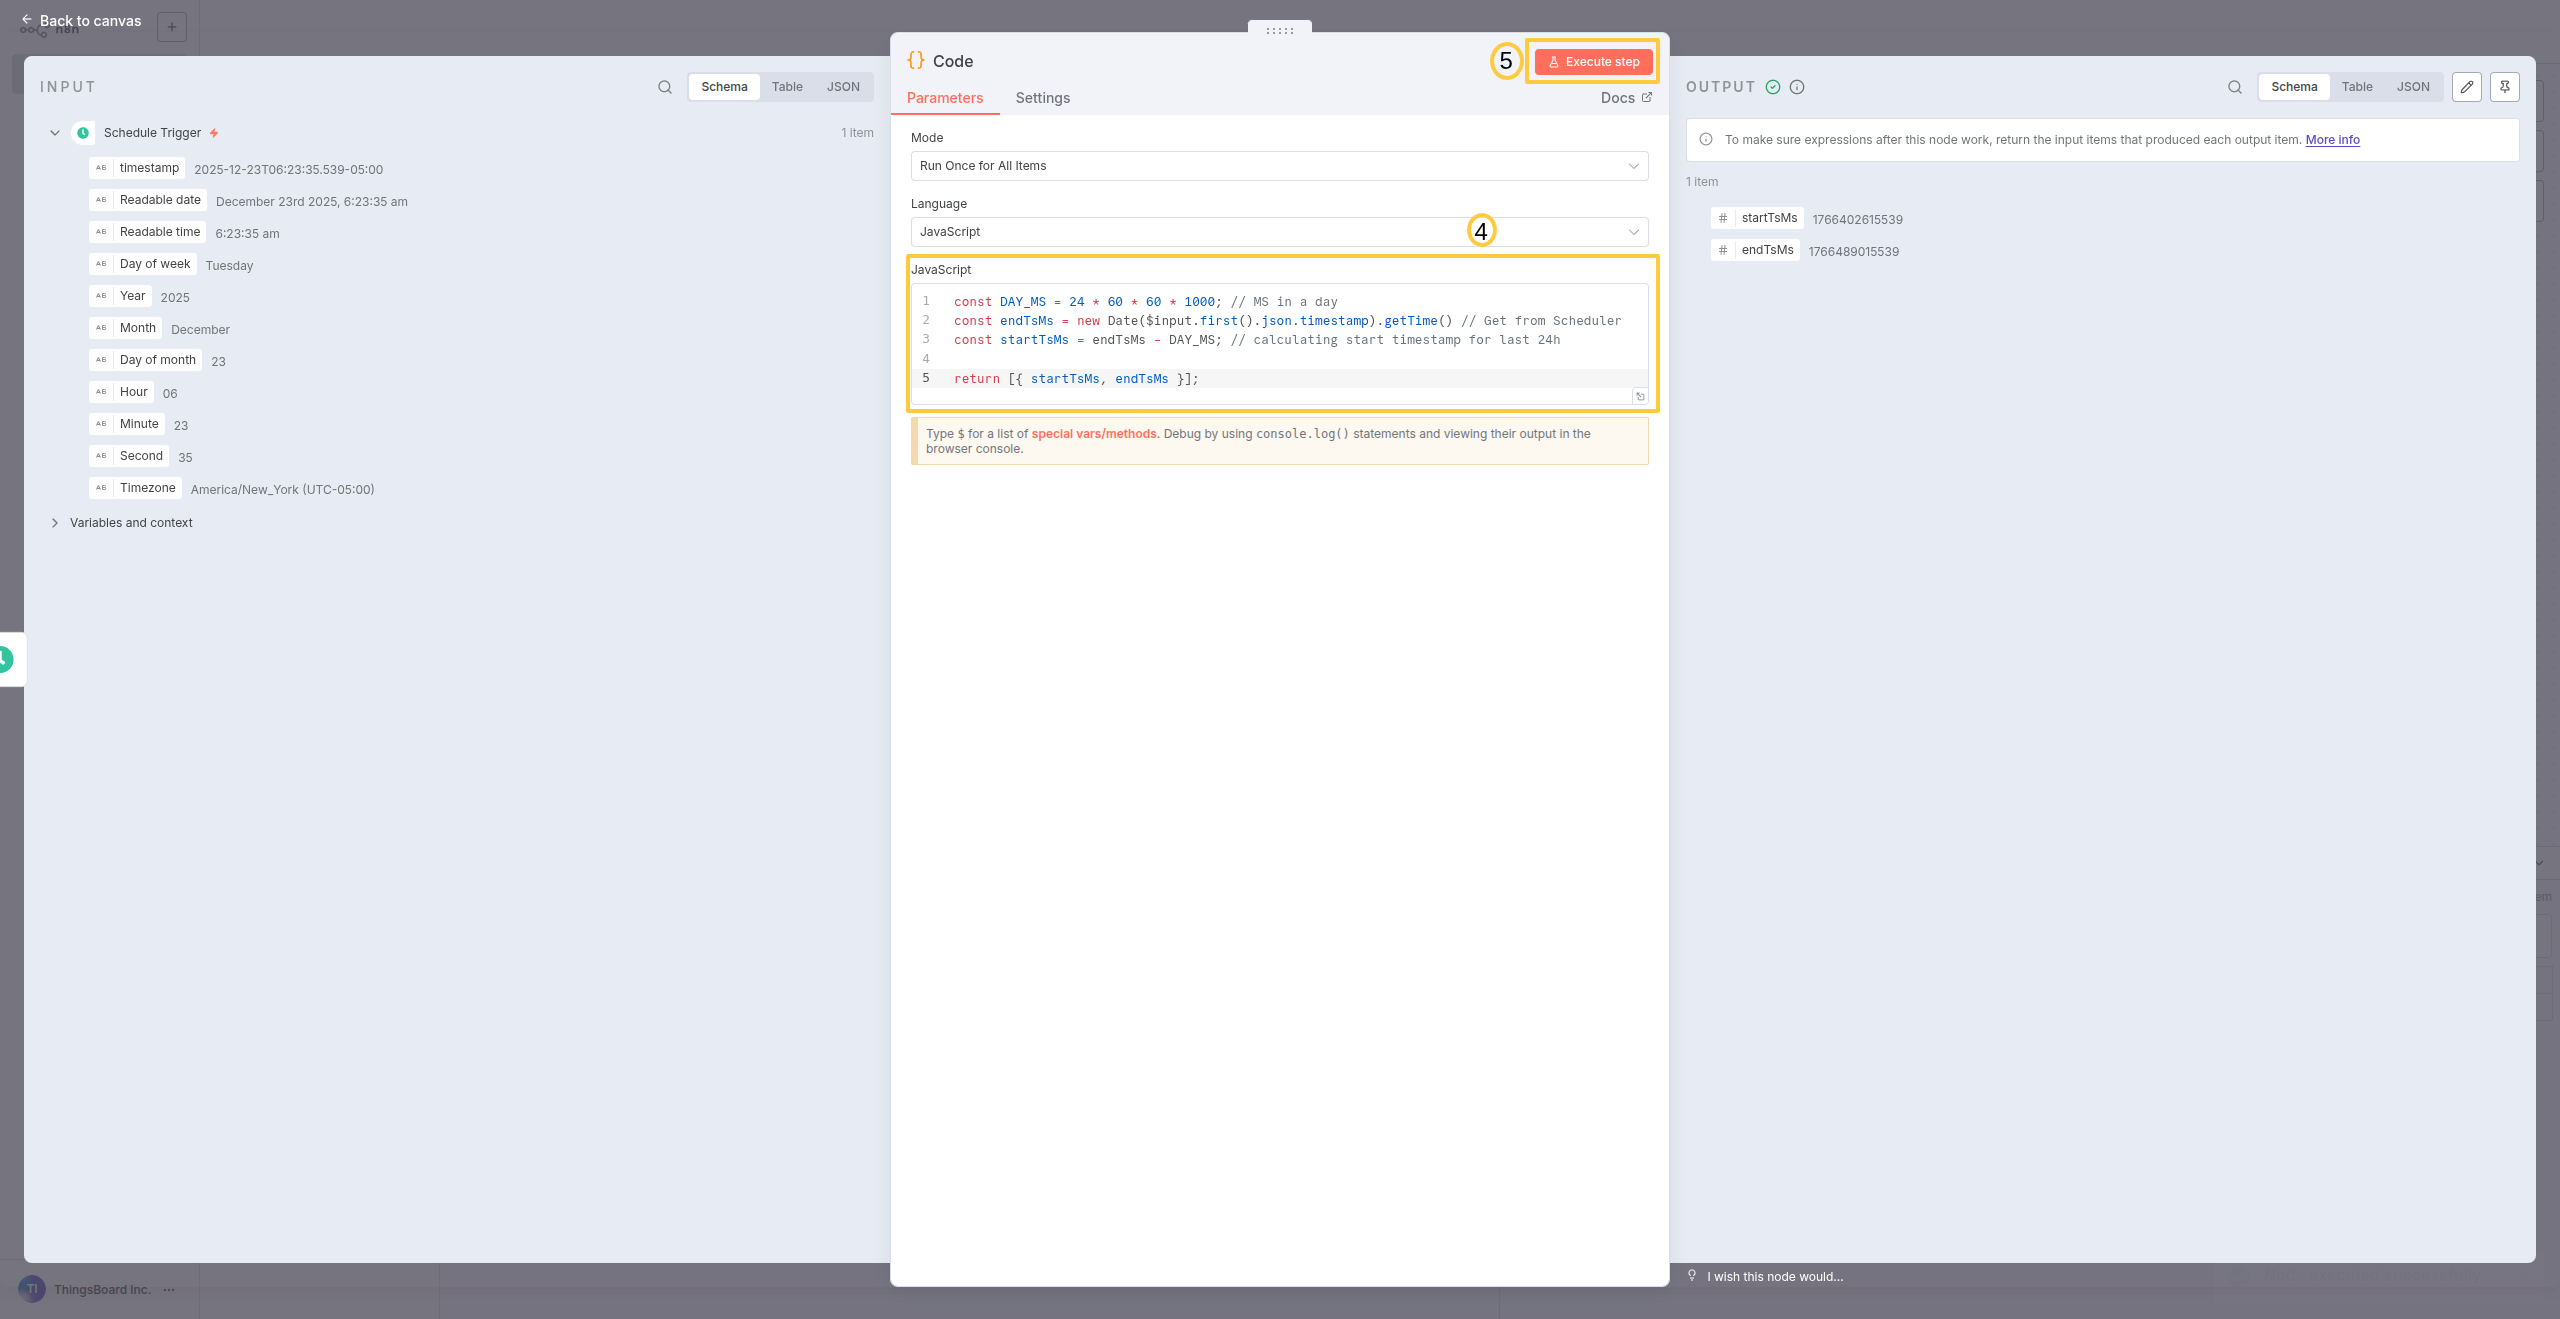
ThingsBoard API需要毫秒时间戳。添加Code节点计算精确的24小时时间范围。
配置:
- 在Schedule节点后点击 + → 选择 Code
- 粘贴以下代码:
1
2
3
4
5
const DAY_MS = 24 * 60 * 60 * 1000;  // 24 hours in milliseconds
const endTsMs = new Date($input.first().json.timestamp).getTime()  // Current time in MS
const startTsMs = endTsMs - DAY_MS;  // 24 hours ago in MS

return [{ startTsMs, endTsMs }];  // Pass to next node
- 点击 Execute node 进行测试
Add a Code node after the Schedule Trigger.
Paste the time calculation code and click Execute node to test it.
您将得到:表示精确24小时数据的两个时间戳(startTsMs和endTsMs)。
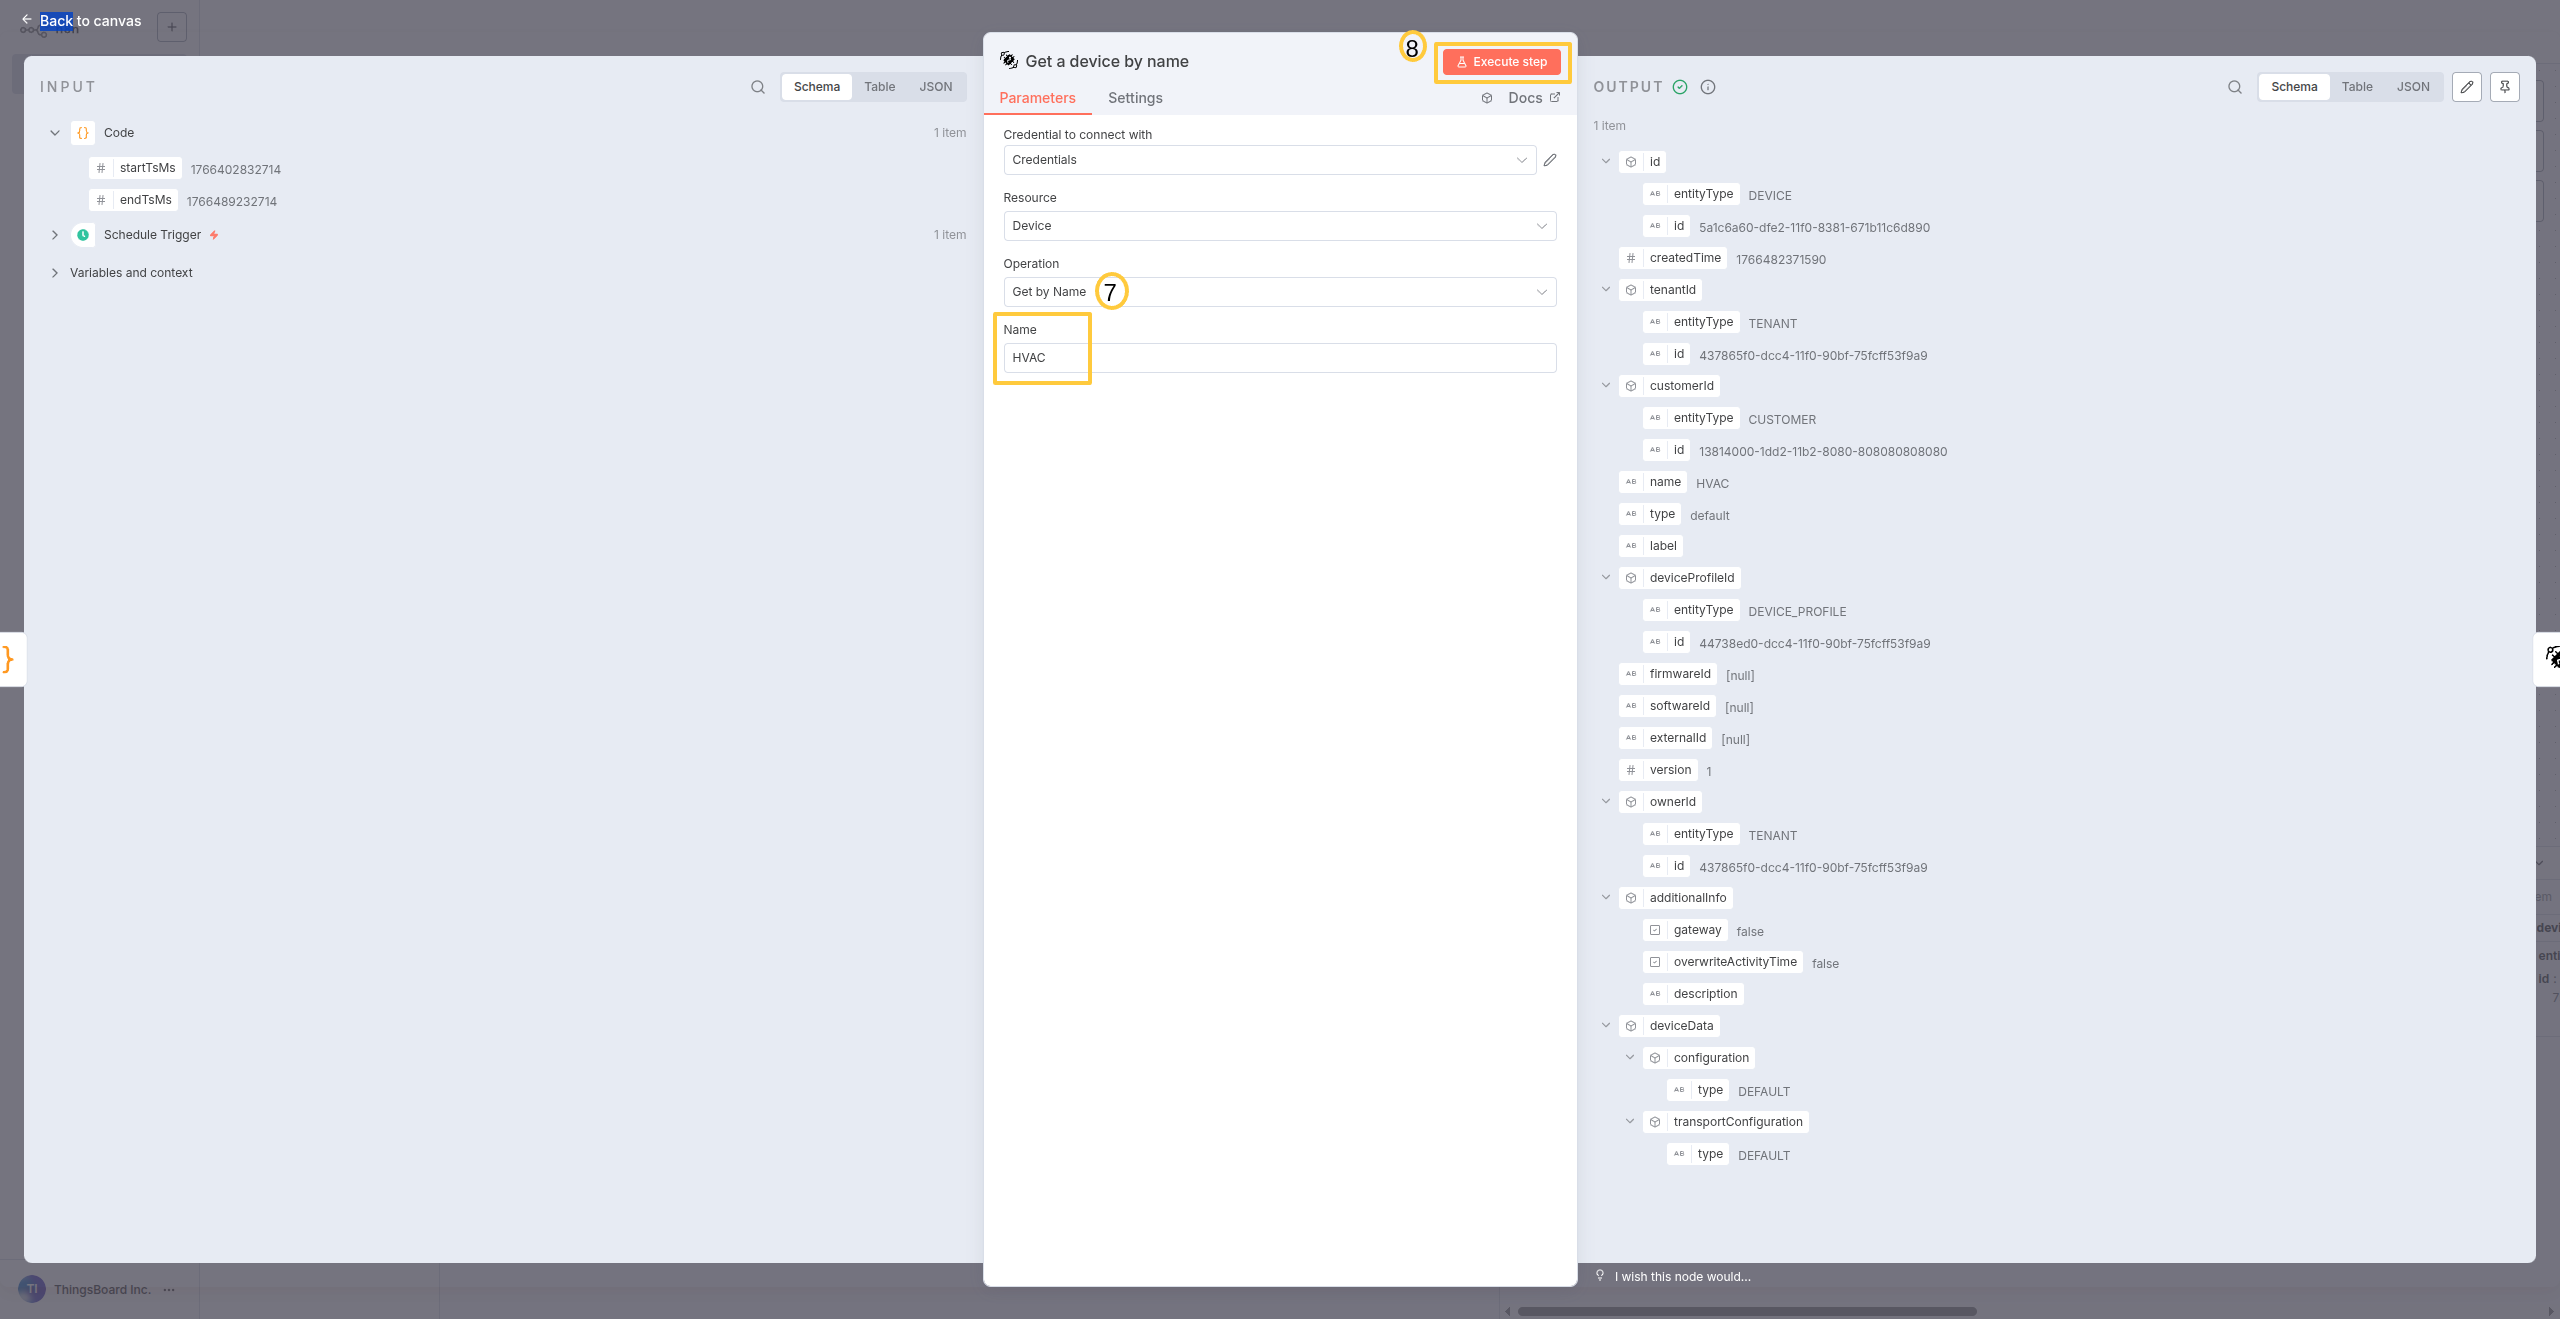
步骤3:从ThingsBoard按名称获取设备
现在获取要导出遥测的目标设备。
配置:
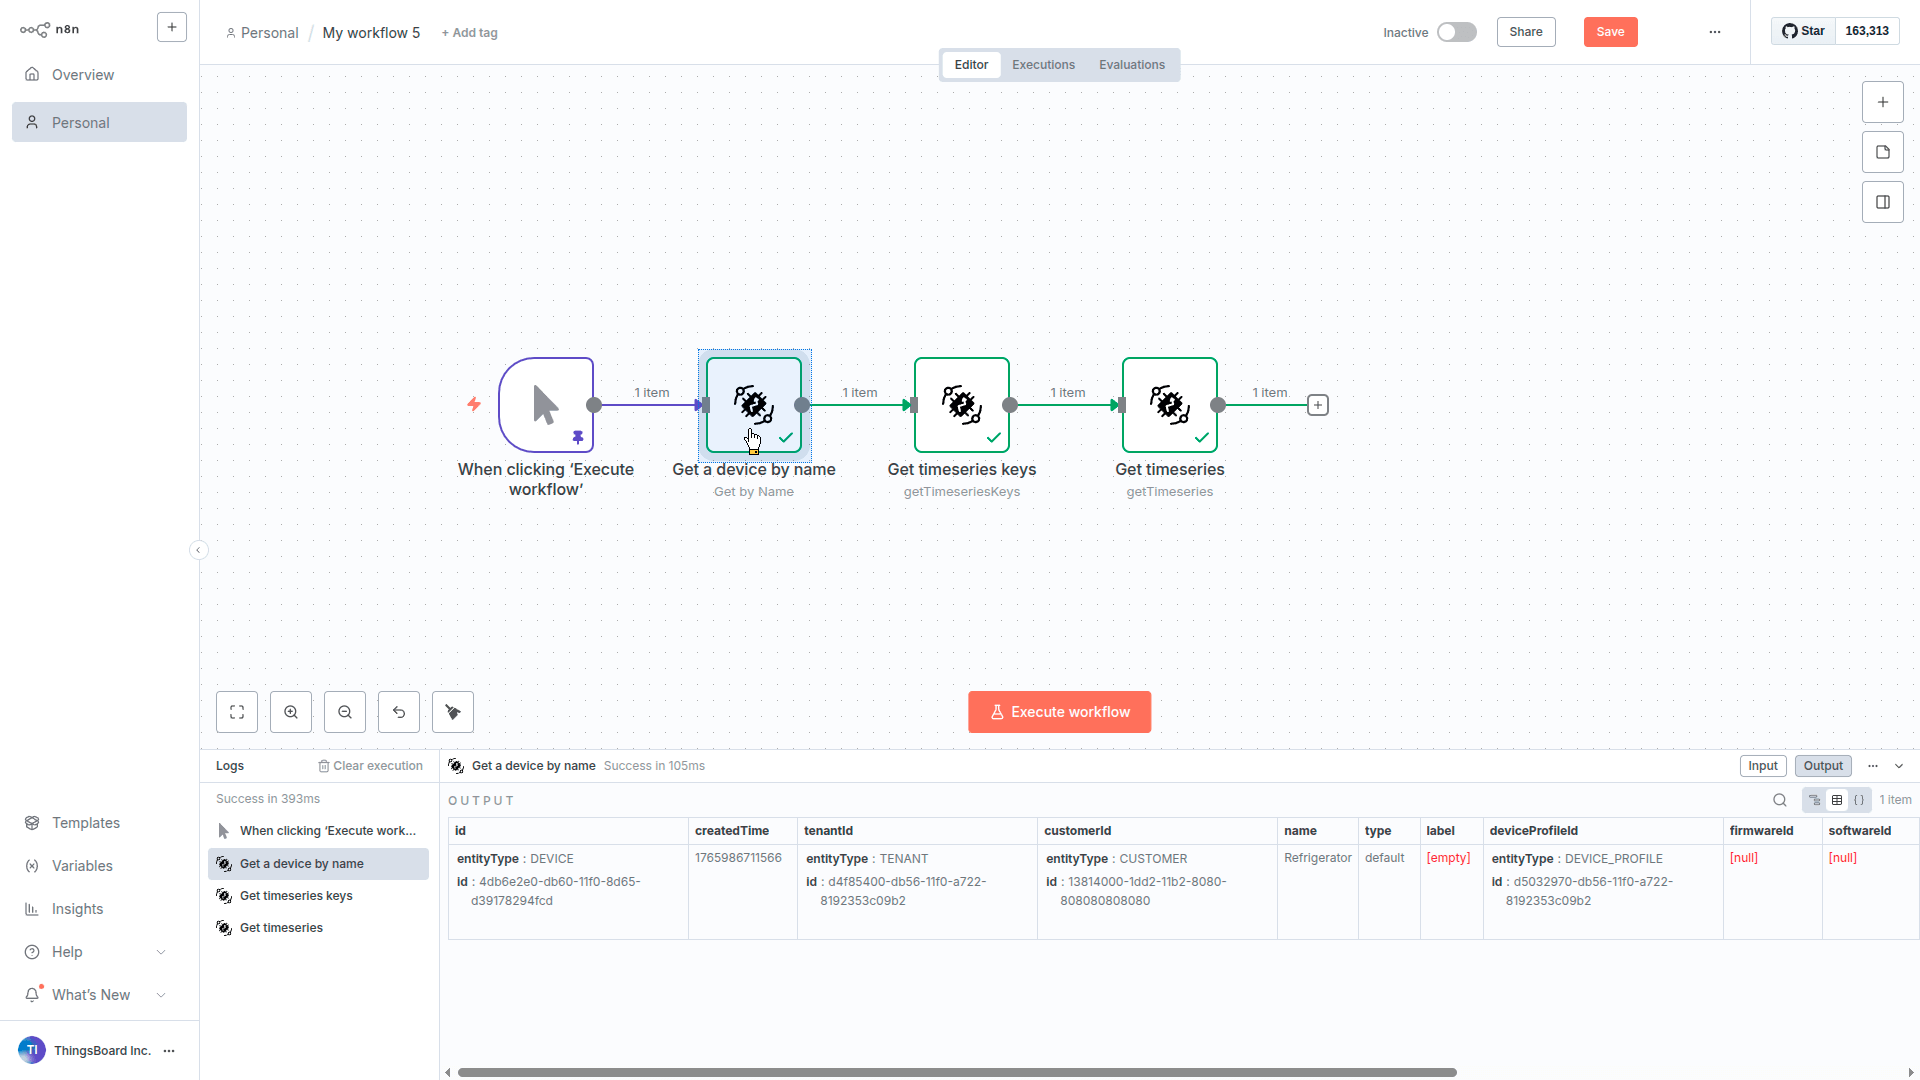
- 点击 + → ThingsBoard → Get a device by name
- Device Name:输入设备名称(如 “Temperature Sensor 1”)
- 点击 Execute node
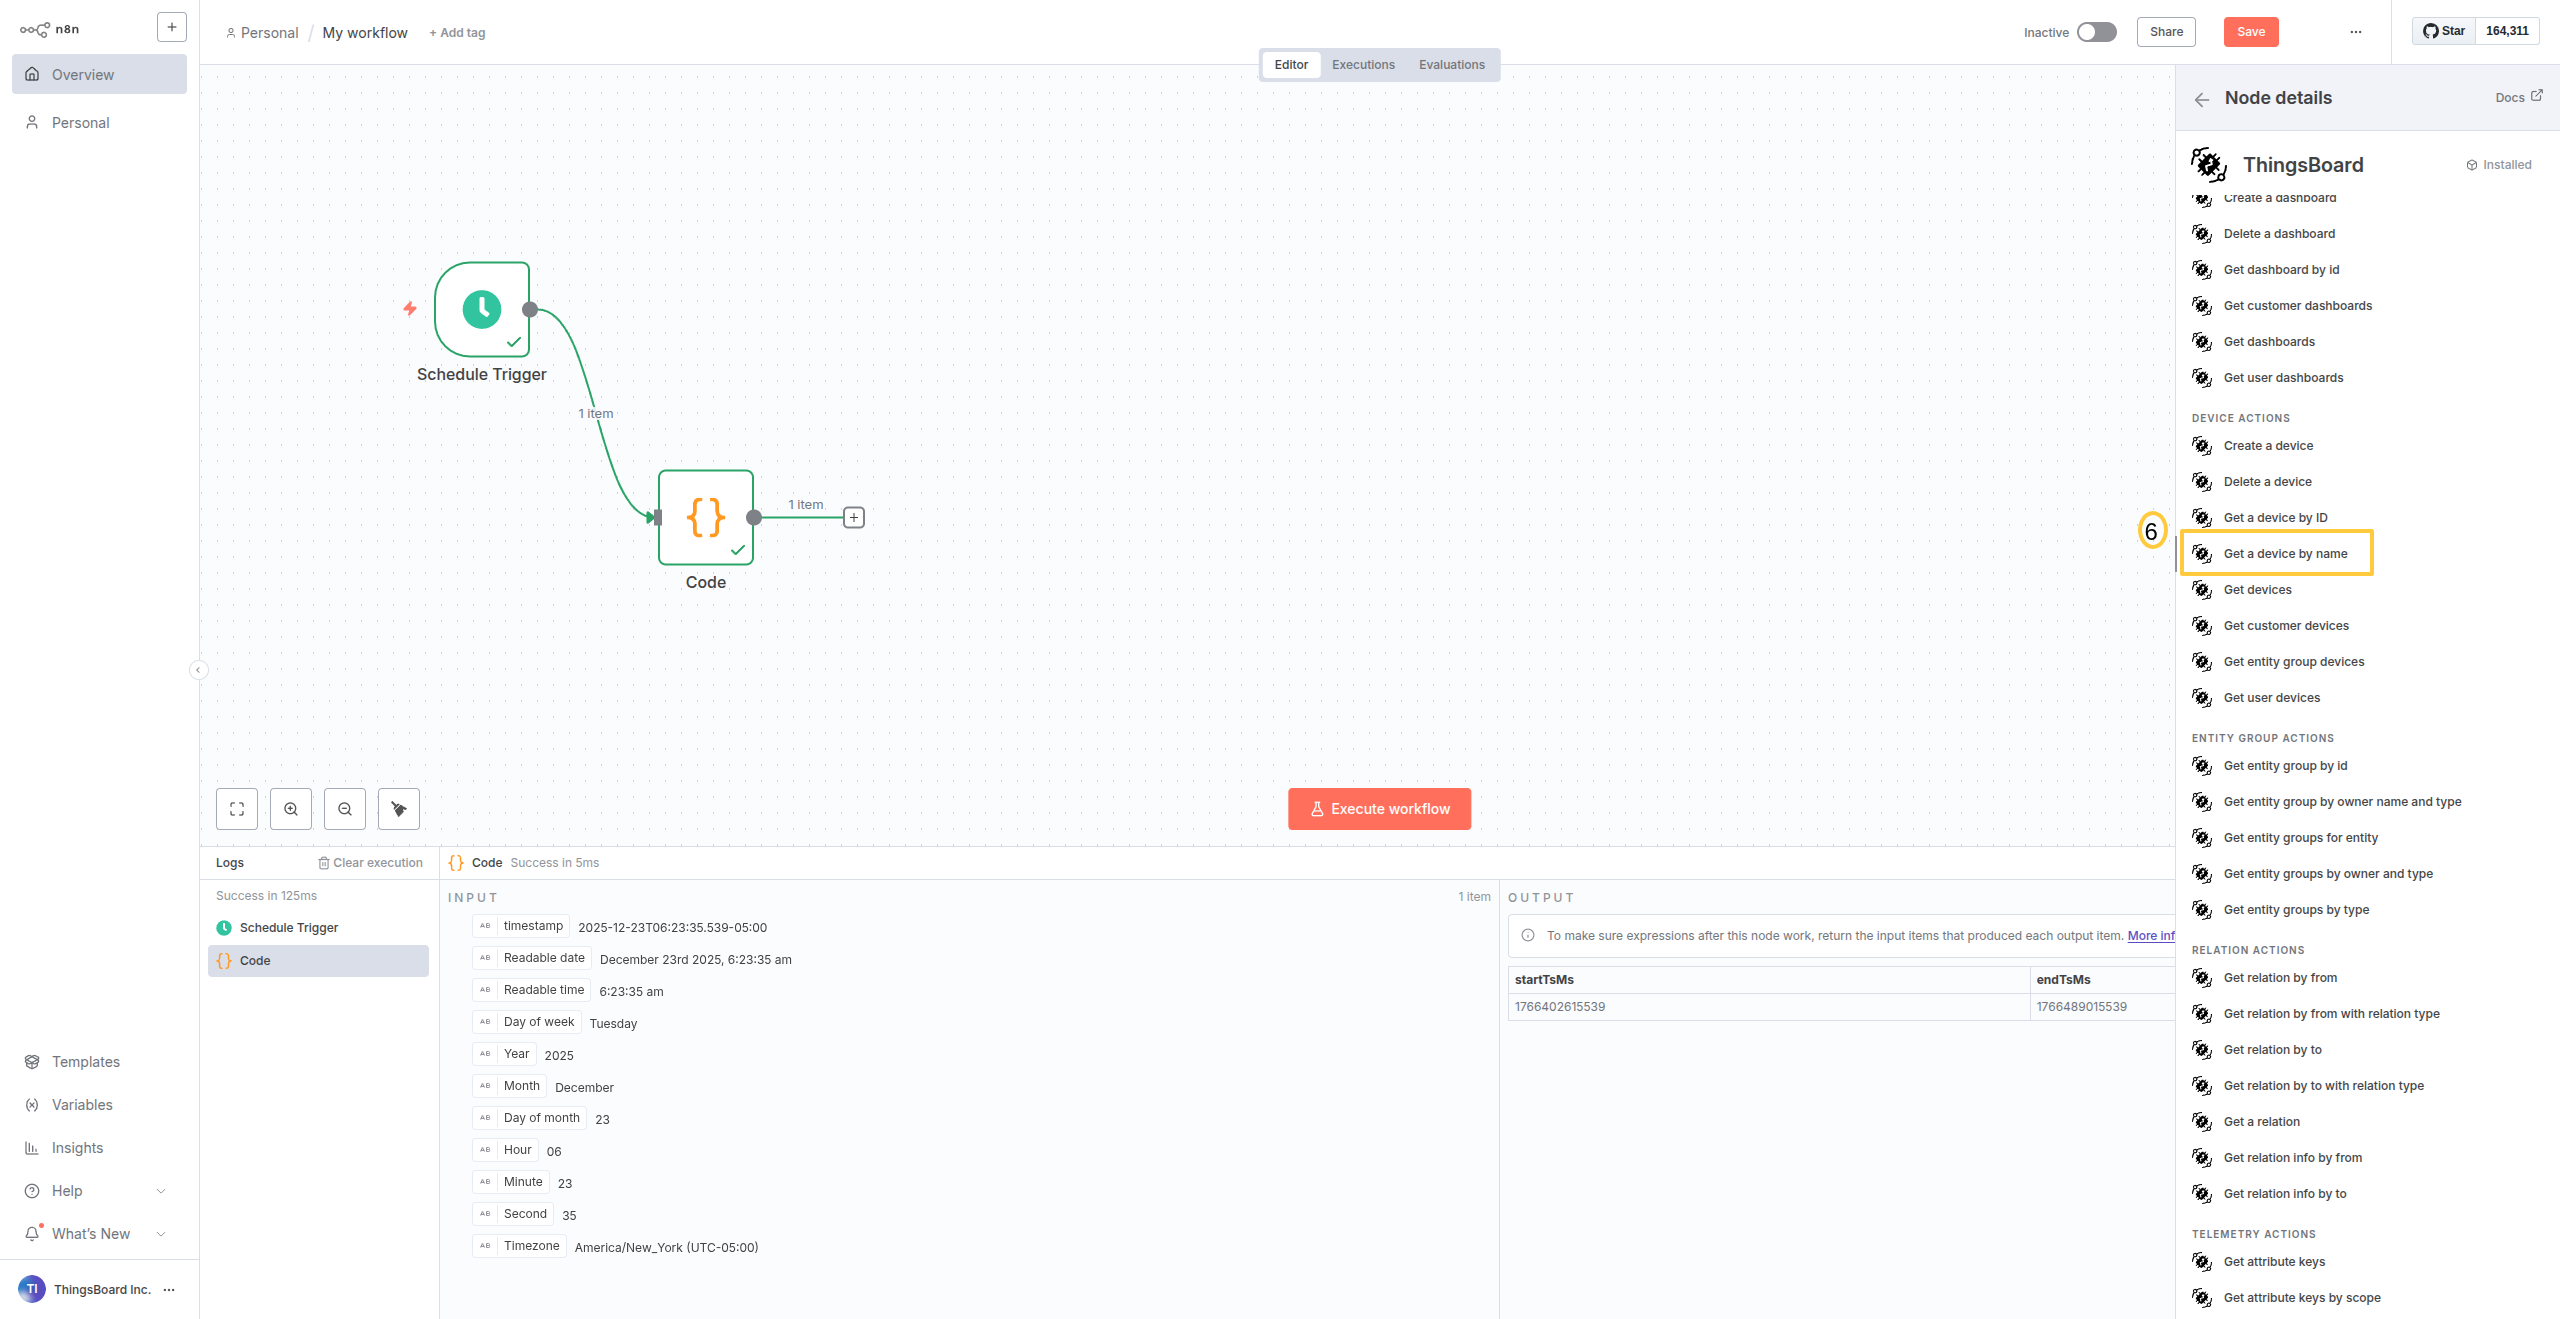
Add ThingsBoard node and select Get a device by name.
Enter the device name and execute to retrieve the device object.
您将得到:完整设备对象,包括下一步所需的ID、类型和元数据。
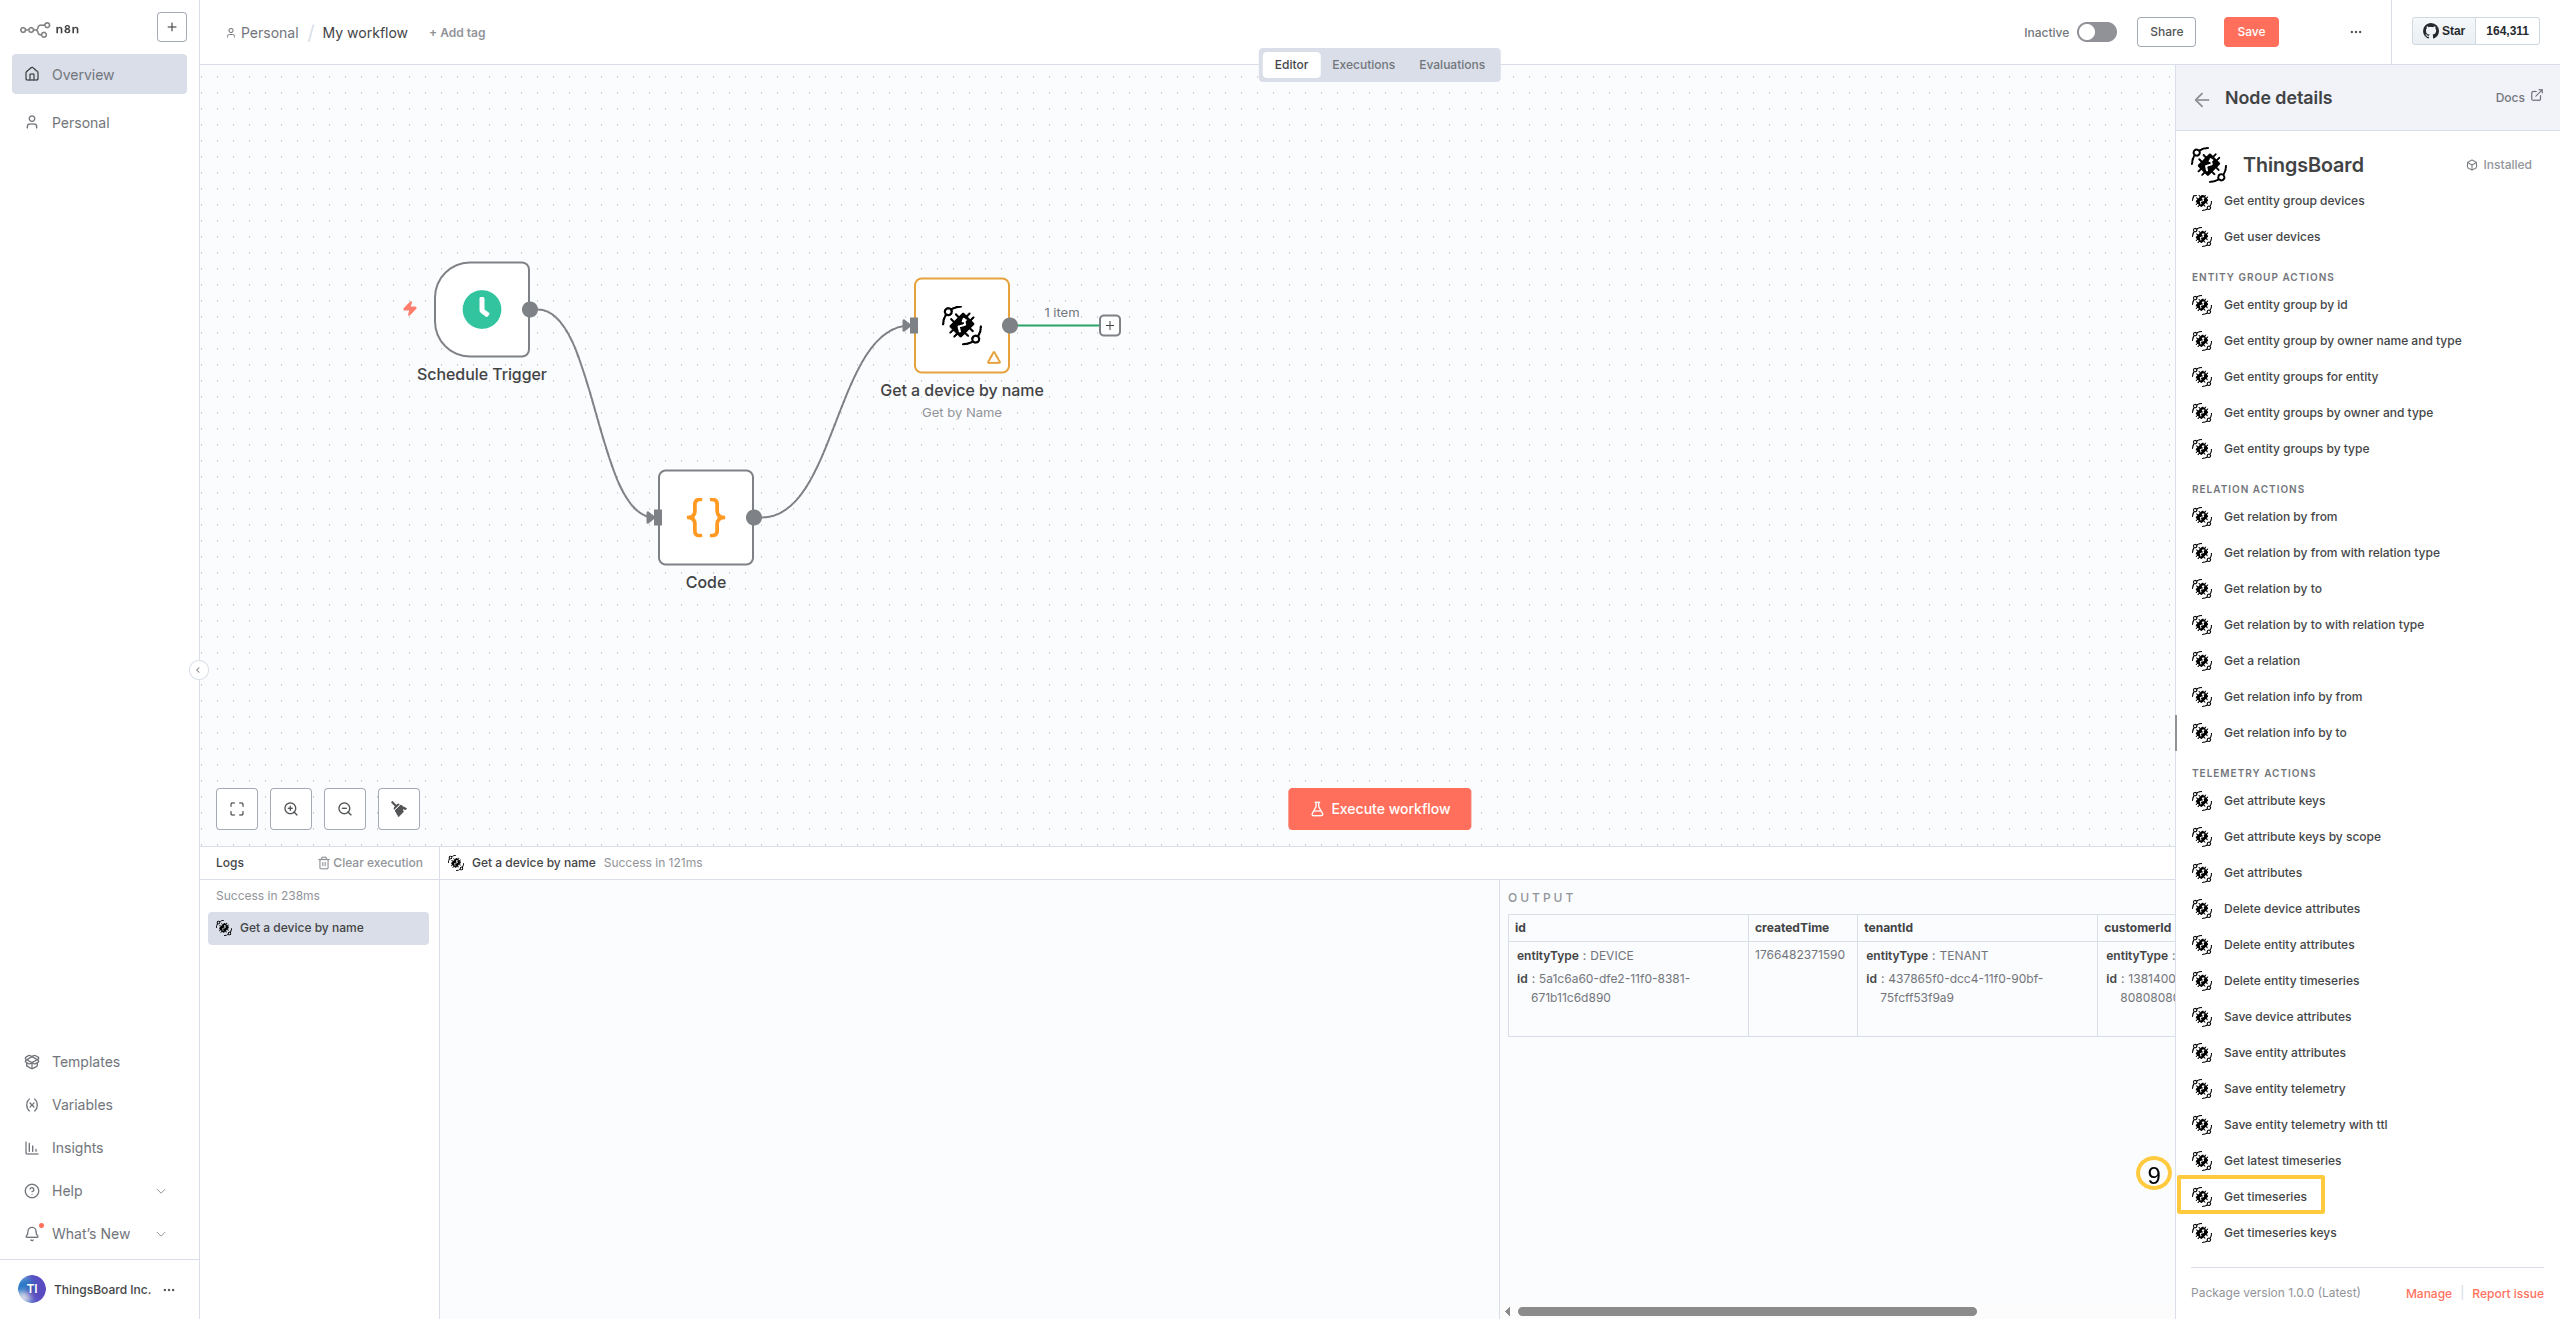
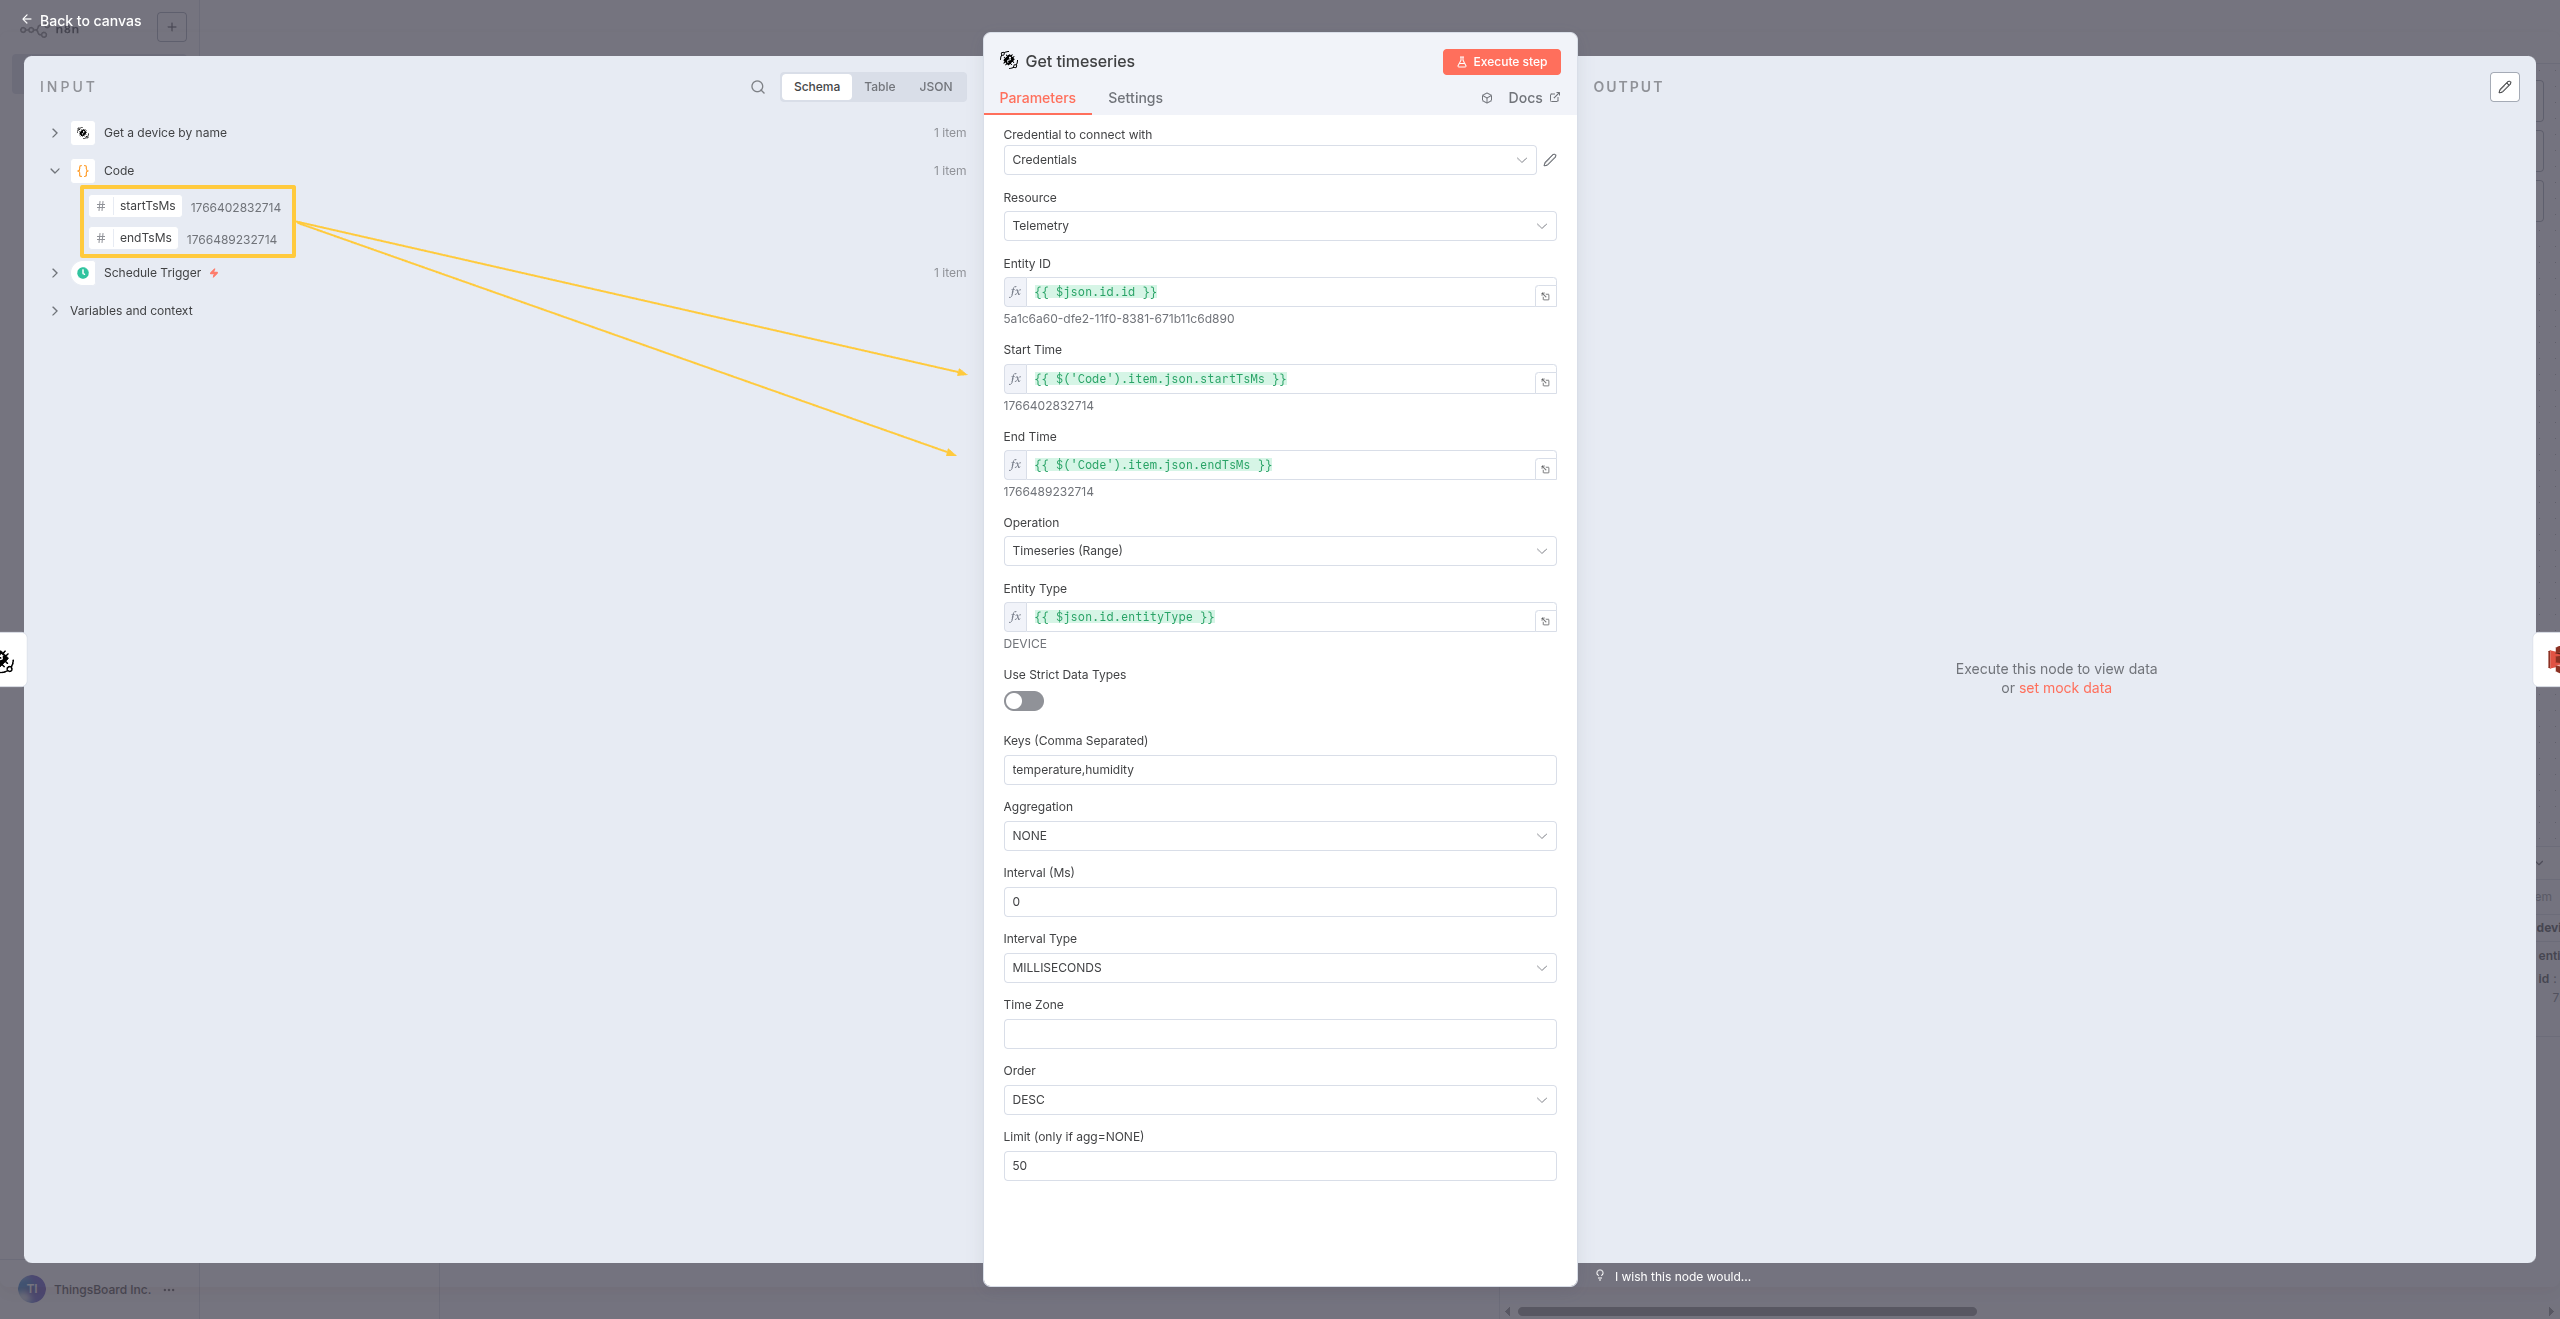
步骤4:获取设备的时序数据
使用Code节点计算的时间范围拉取遥测数据。
配置:
- 点击 + → ThingsBoard → Get timeseries
- 从 INPUT面板(左侧)拖入值:
- Entity ID:来自 “Get a device by name” → id → id
- Entity Type:来自 “Get a device by name” → id → entityType
- Start timestamp:来自Code节点 → startTsMs
- End timestamp:来自Code节点 → endTsMs
- Keys:输入需要的遥测键(如 “temperature,humidity”)
- 点击 Execute node
Add ThingsBoard Get timeseries node.
Configure with device ID, entity type, and time range from previous nodes. Execute to fetch telemetry data.
您将得到:设备过去24小时遥测数据的JSON格式。
步骤5:构建逻辑并上传到AWS S3
最后,将文件上传到S3存储桶。
配置:
- 点击 + → AWS S3
- Operation:Upload
- Bucket Name:您的S3存储桶名称
- File Name:使用表达式生成带日期的文件名(如
telemetry-.json) - 配置AWS凭据
- 点击 Execute node
Add AWS S3 node and configure upload settings with your bucket name and credentials.
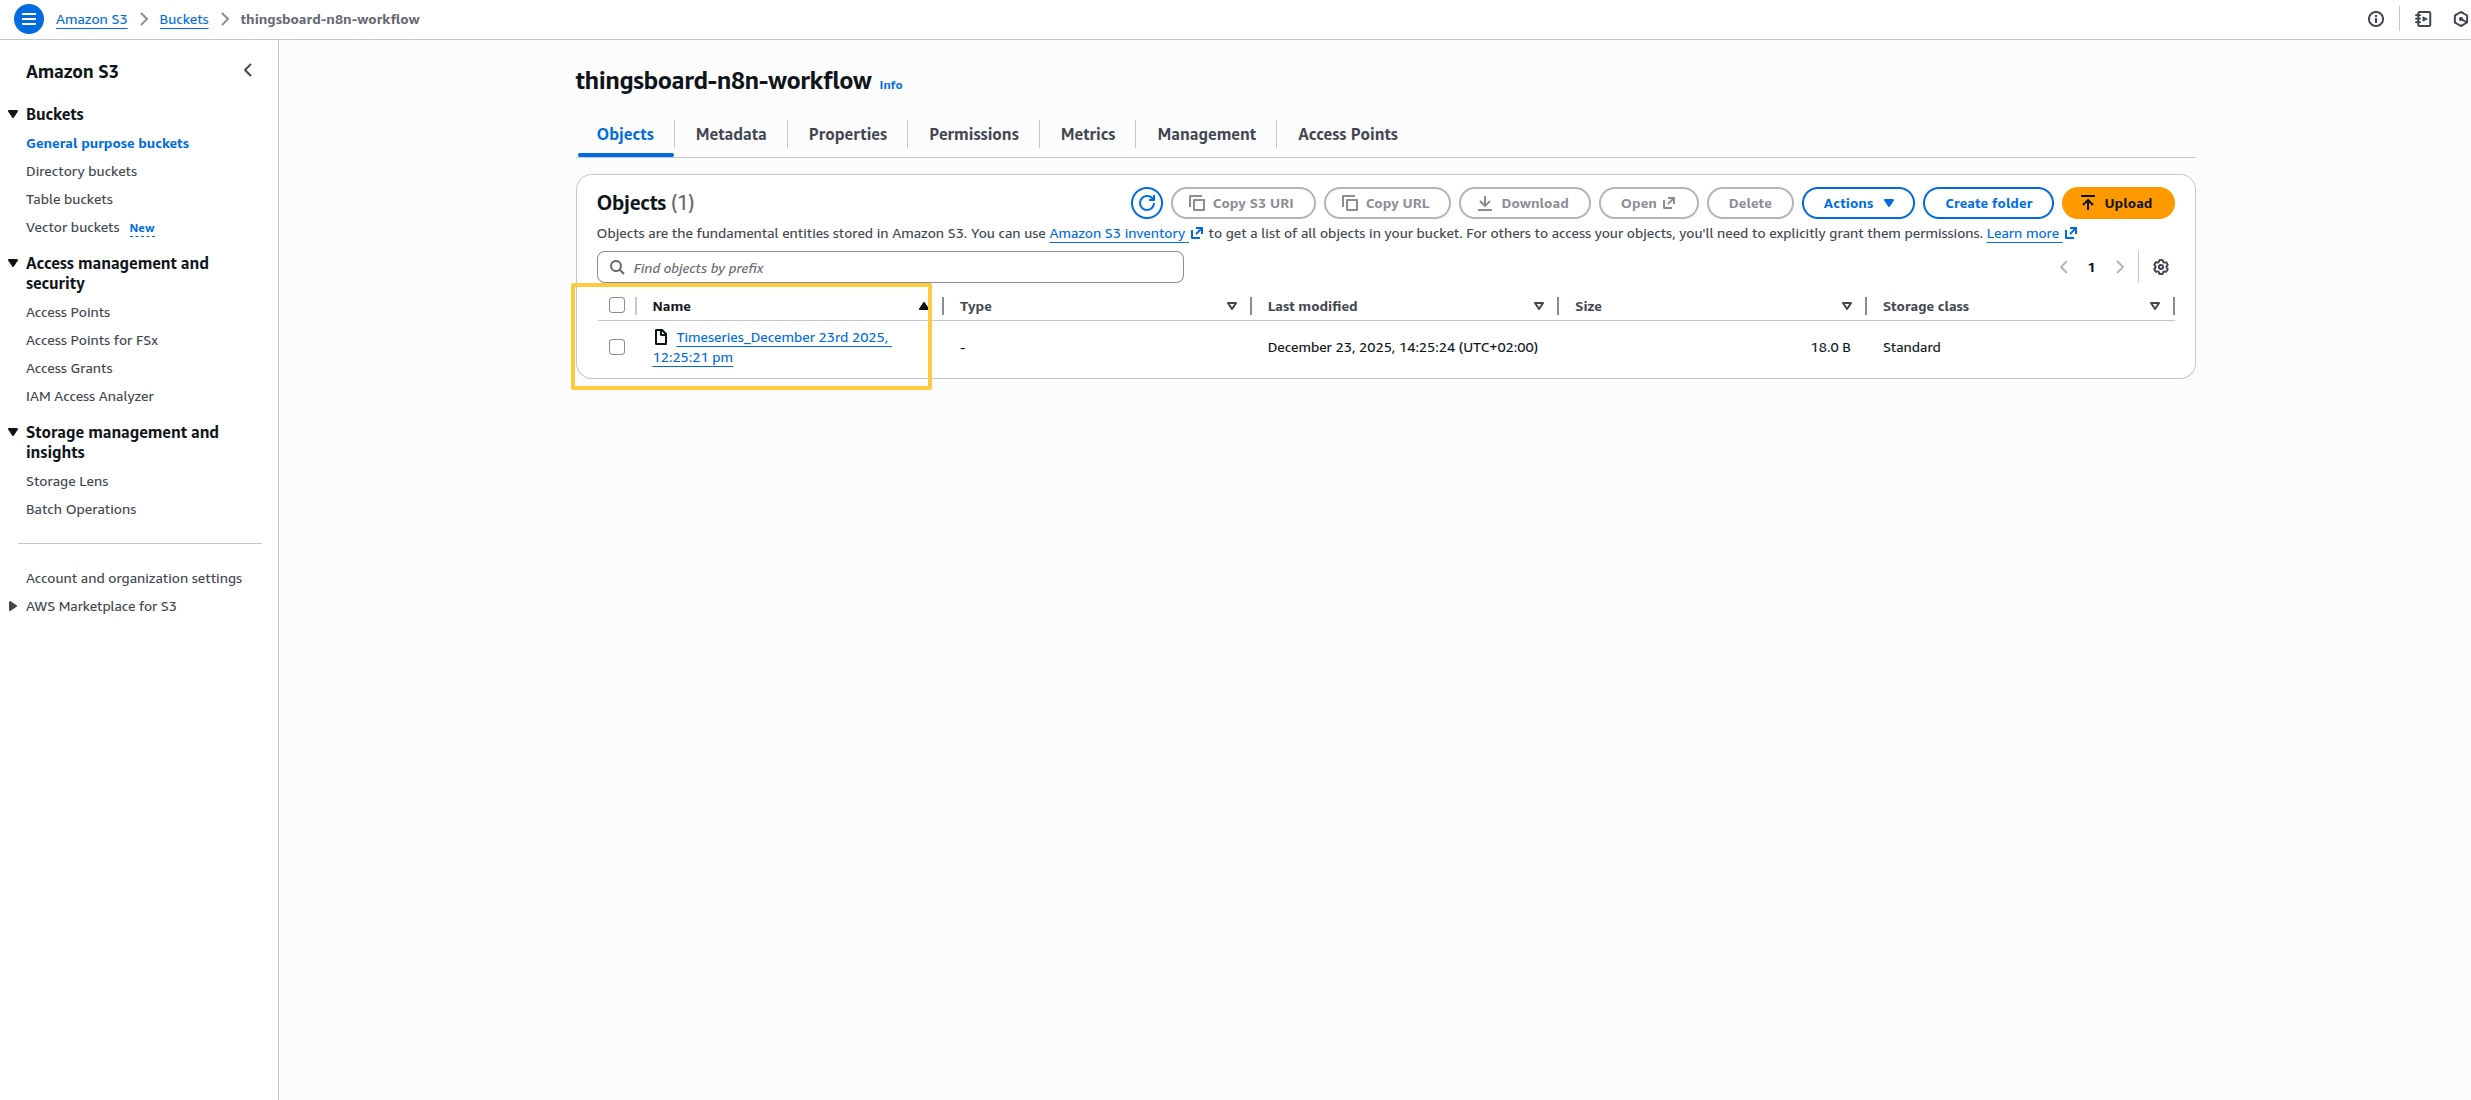
Execute the workflow to see the file successfully uploaded to S3.
您将得到:遥测数据已成功上传到S3,文件名带有日期戳。
最终结果
您已构建完整的自动化数据管道:
- 每夜UTC午夜运行
- 计算精确的24小时时间窗口
- 从ThingsBoard拉取设备遥测
- 转换为文件格式
- 以可预测命名上传到AWS S3
您将获得:
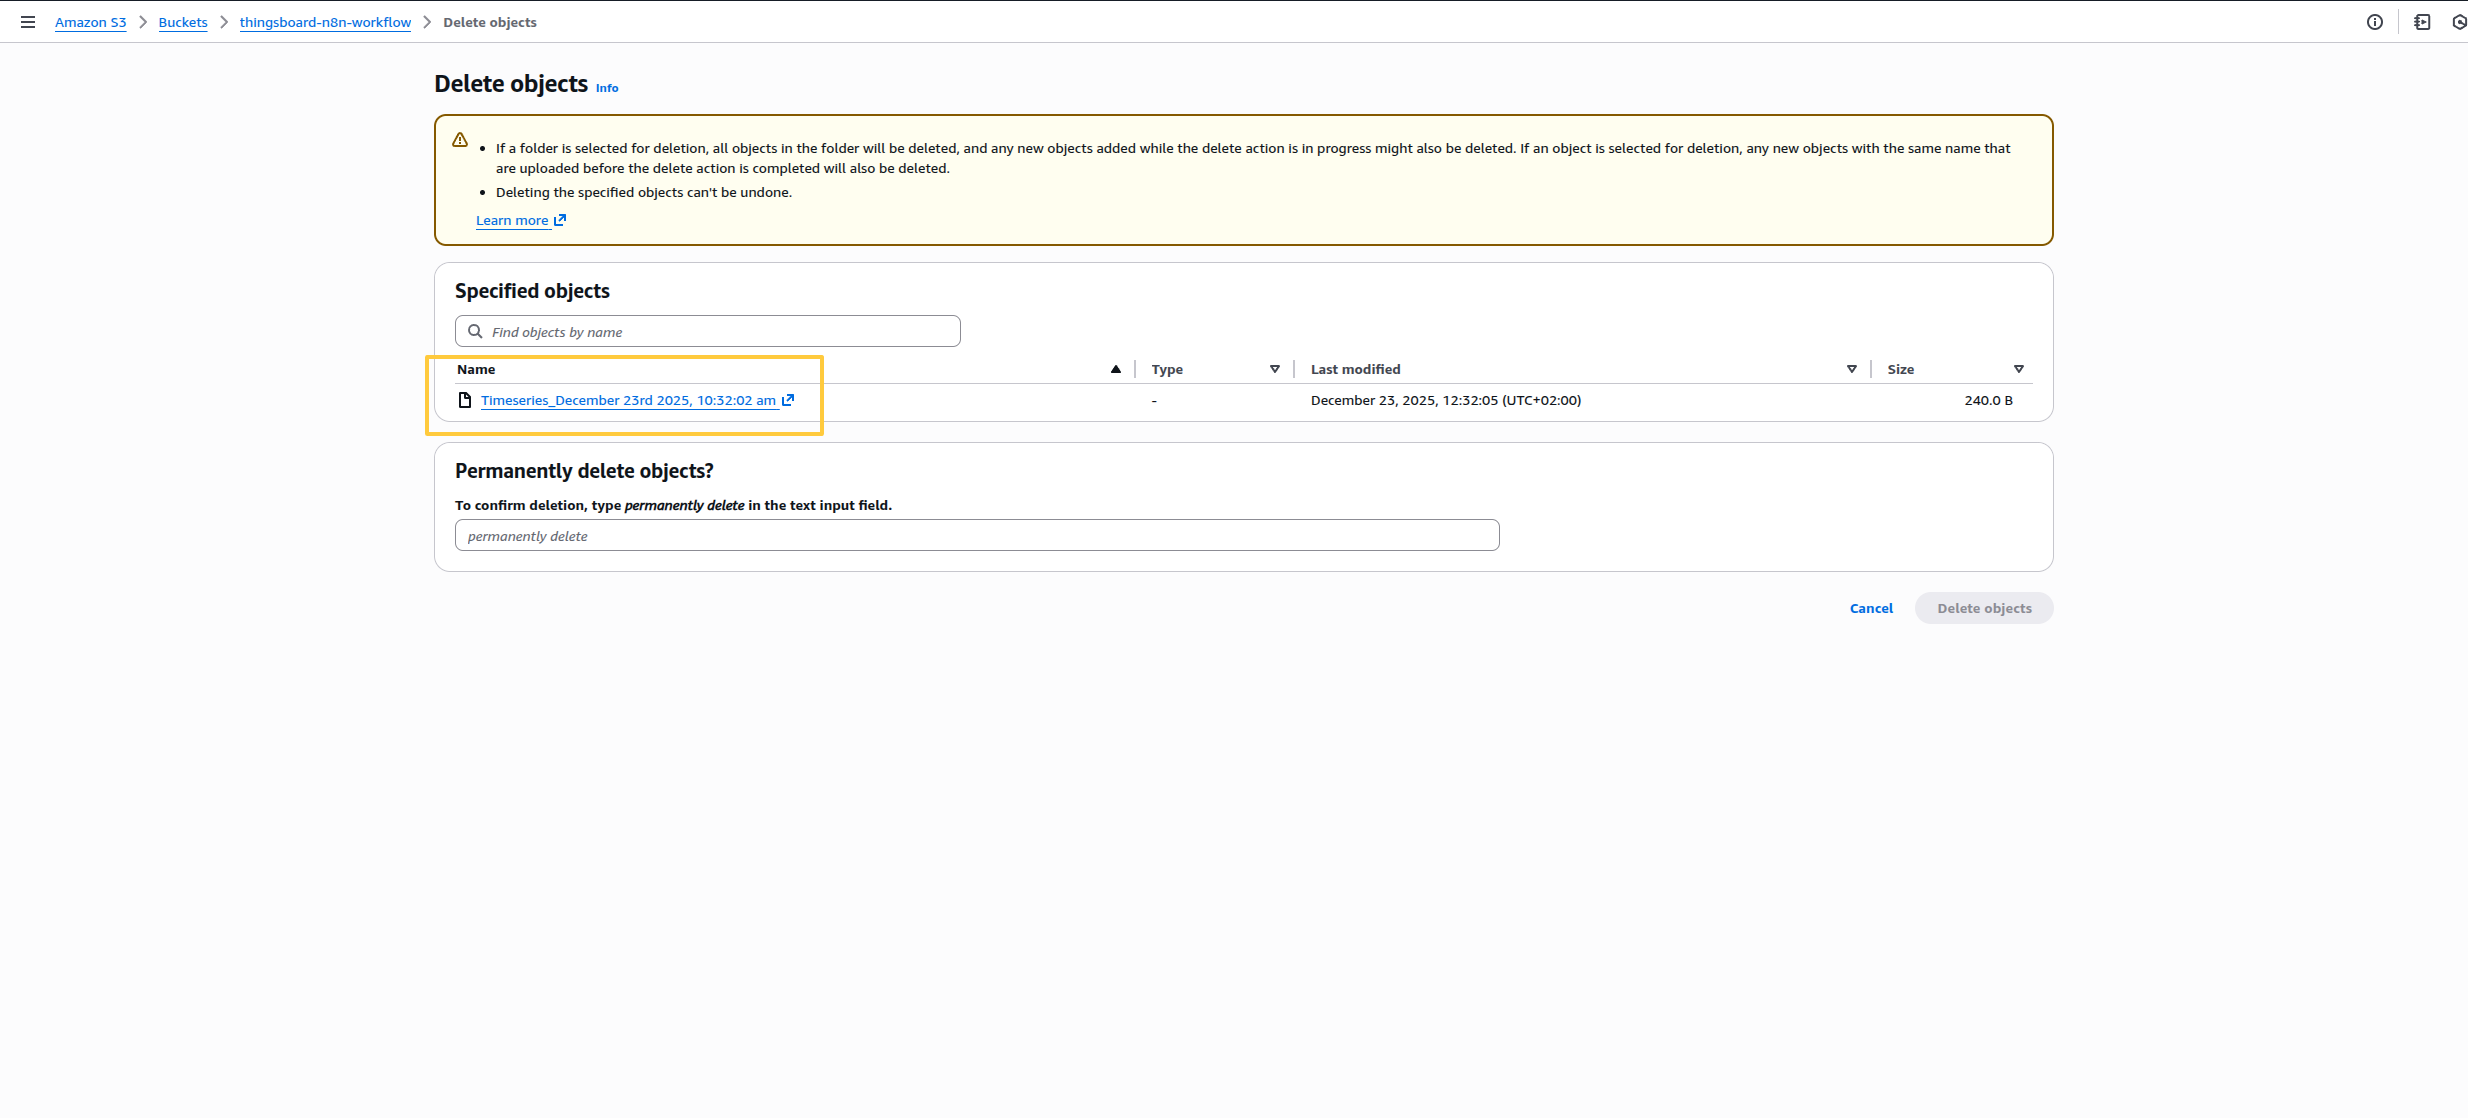
- S3中的每日JSON文件:
s3://my-bucket/telemetry-2024-12-23.json - 无需人工干预的自动备份
- 可直接用于AWS Athena查询或数据管道摄入的数据
- 每日导出的完整审计追踪
强大之处: n8n作为ThingsBoard与数据生态系统之间的编排层。您不仅是在导出数据——而是在构建包含转换、丰富和多系统集成的完整数据管道,这些是ThingsBoard单独无法完成的。
下一步 - 扩展此工作流:
- 添加多目的地:在 “Convert to File” 后分流,同时发送到Snowflake、Google Sheets或邮件
- 丰富数据:在S3上传前与CRM数据合并或添加业务上下文
- 条件路由:将高价值客户路由到高级存储,其他到标准存储
- 触发下游操作:S3上传后 → 触发AWS Lambda → 更新库存系统 → 通知团队
示例3:Webhook触发的设备查询
实战场景:客户门户有”获取设备状态”按钮。点击后需要获取客户所拥有设备的实时遥测——您事先不知道具体设备。
为何需要该模式? 大多数实战工作流是动态的:
- 按名称(而非硬编码ID)查询设备的移动应用
- 响应”检查Room 405温度”的聊天机器人
- 为特定资产触发报告的外部系统
- 按用户过滤的客户仪表板
您将学到:如何将ThingsBoard操作串联,在节点间传递数据(设备名称 → 设备ID → 遥测键 → 实际数据)。
构建工作流
步骤1:设置触发器(模拟webhook)
我们将使用手动触发器模拟通常来自客户门户的webhook。
配置:
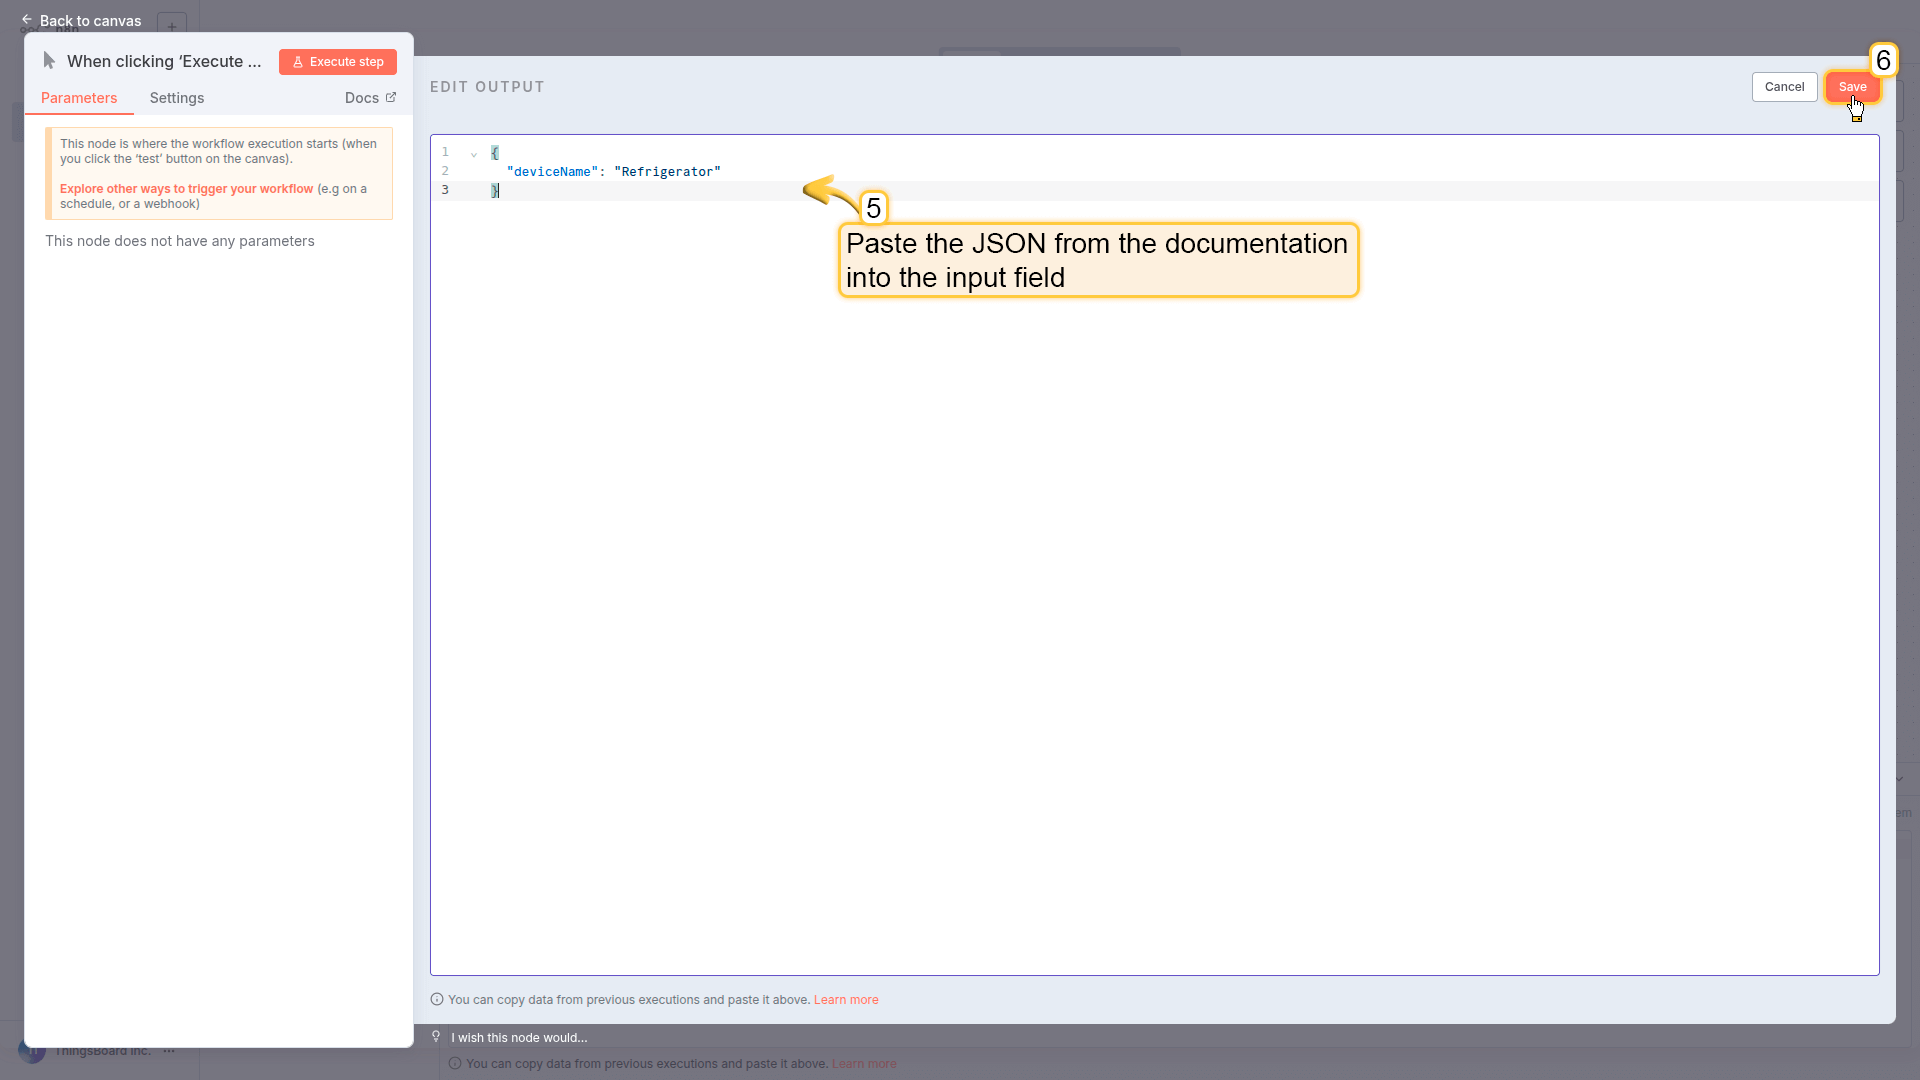
- 点击 Add first step… → Trigger manually
- 点击触发器节点 → 点击右上角铅笔图标
- 粘贴以下JSON(模拟传入webhook数据):
1
2
3
{
  "deviceName": "Refrigerator"
}
- 保存更改
- 返回画布
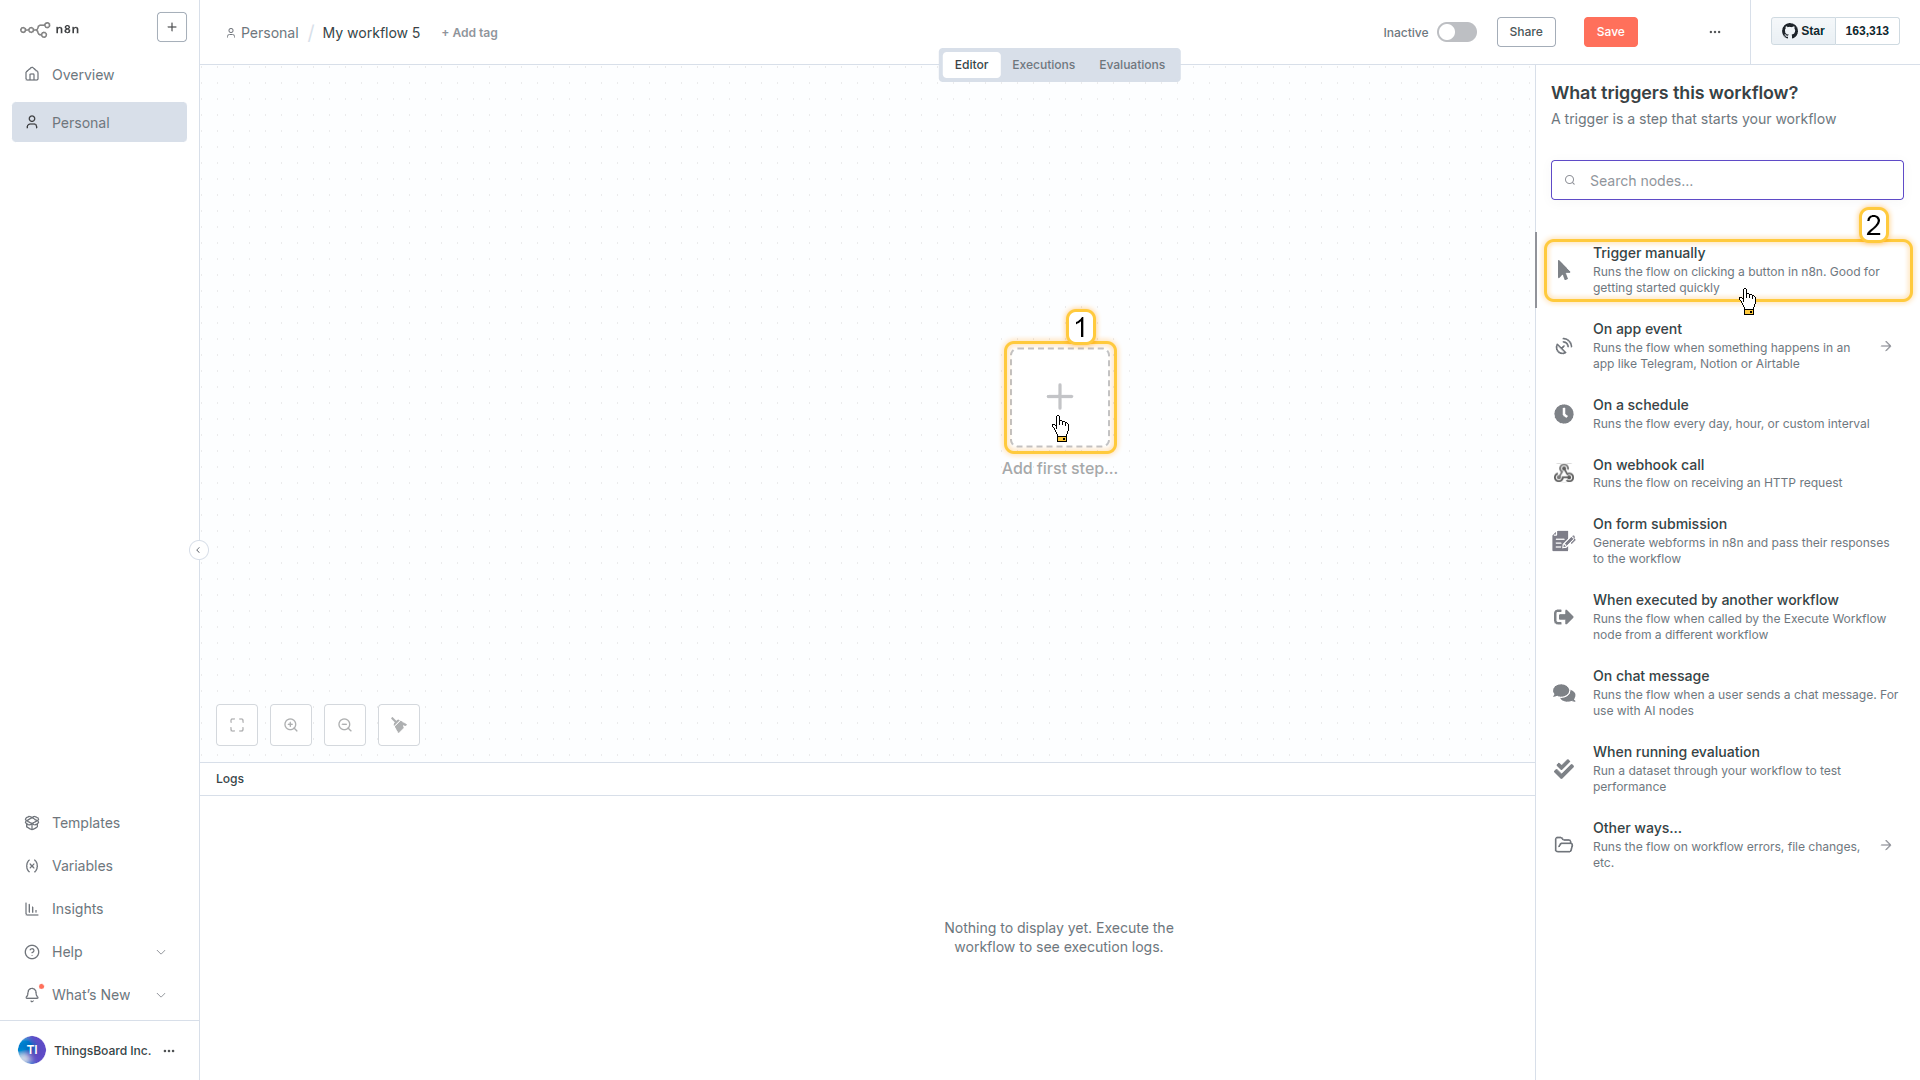
Click Add first step… and select Trigger manually.
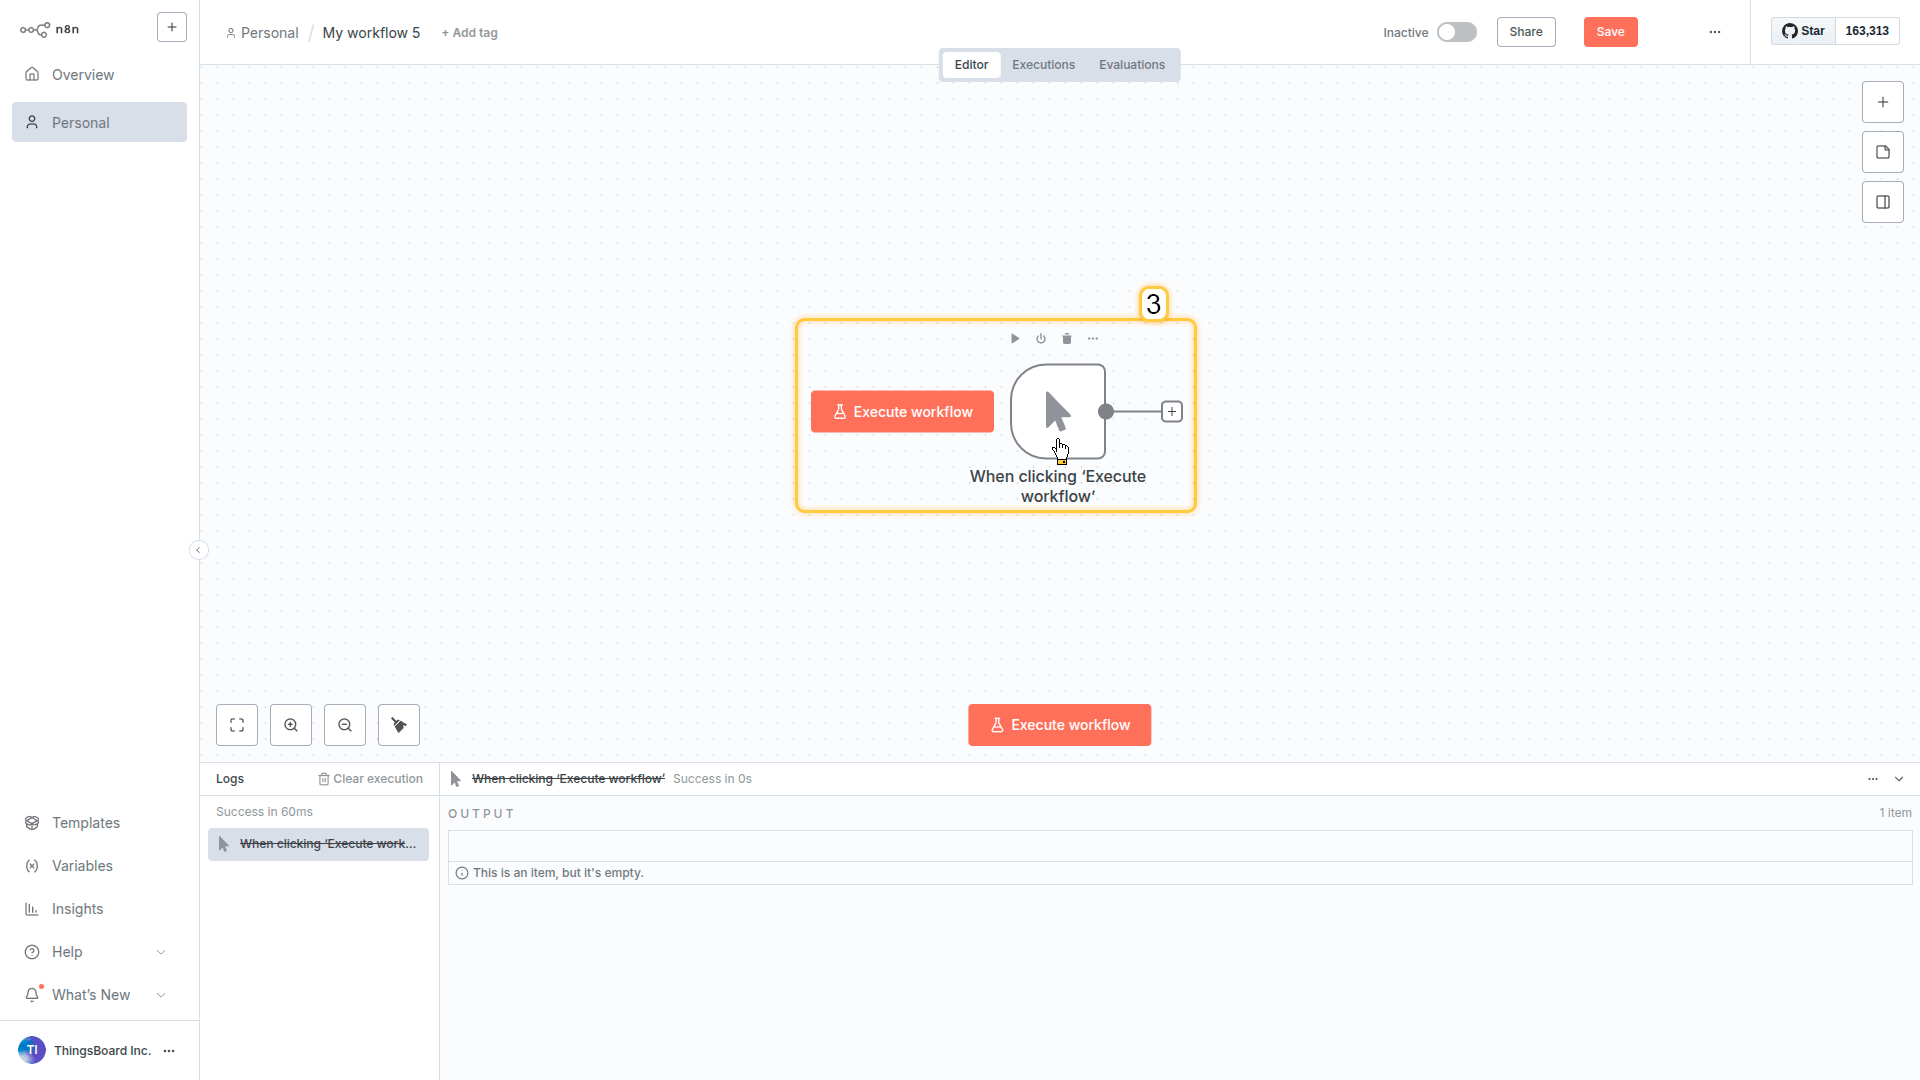
Click on the trigger node to open its configuration.
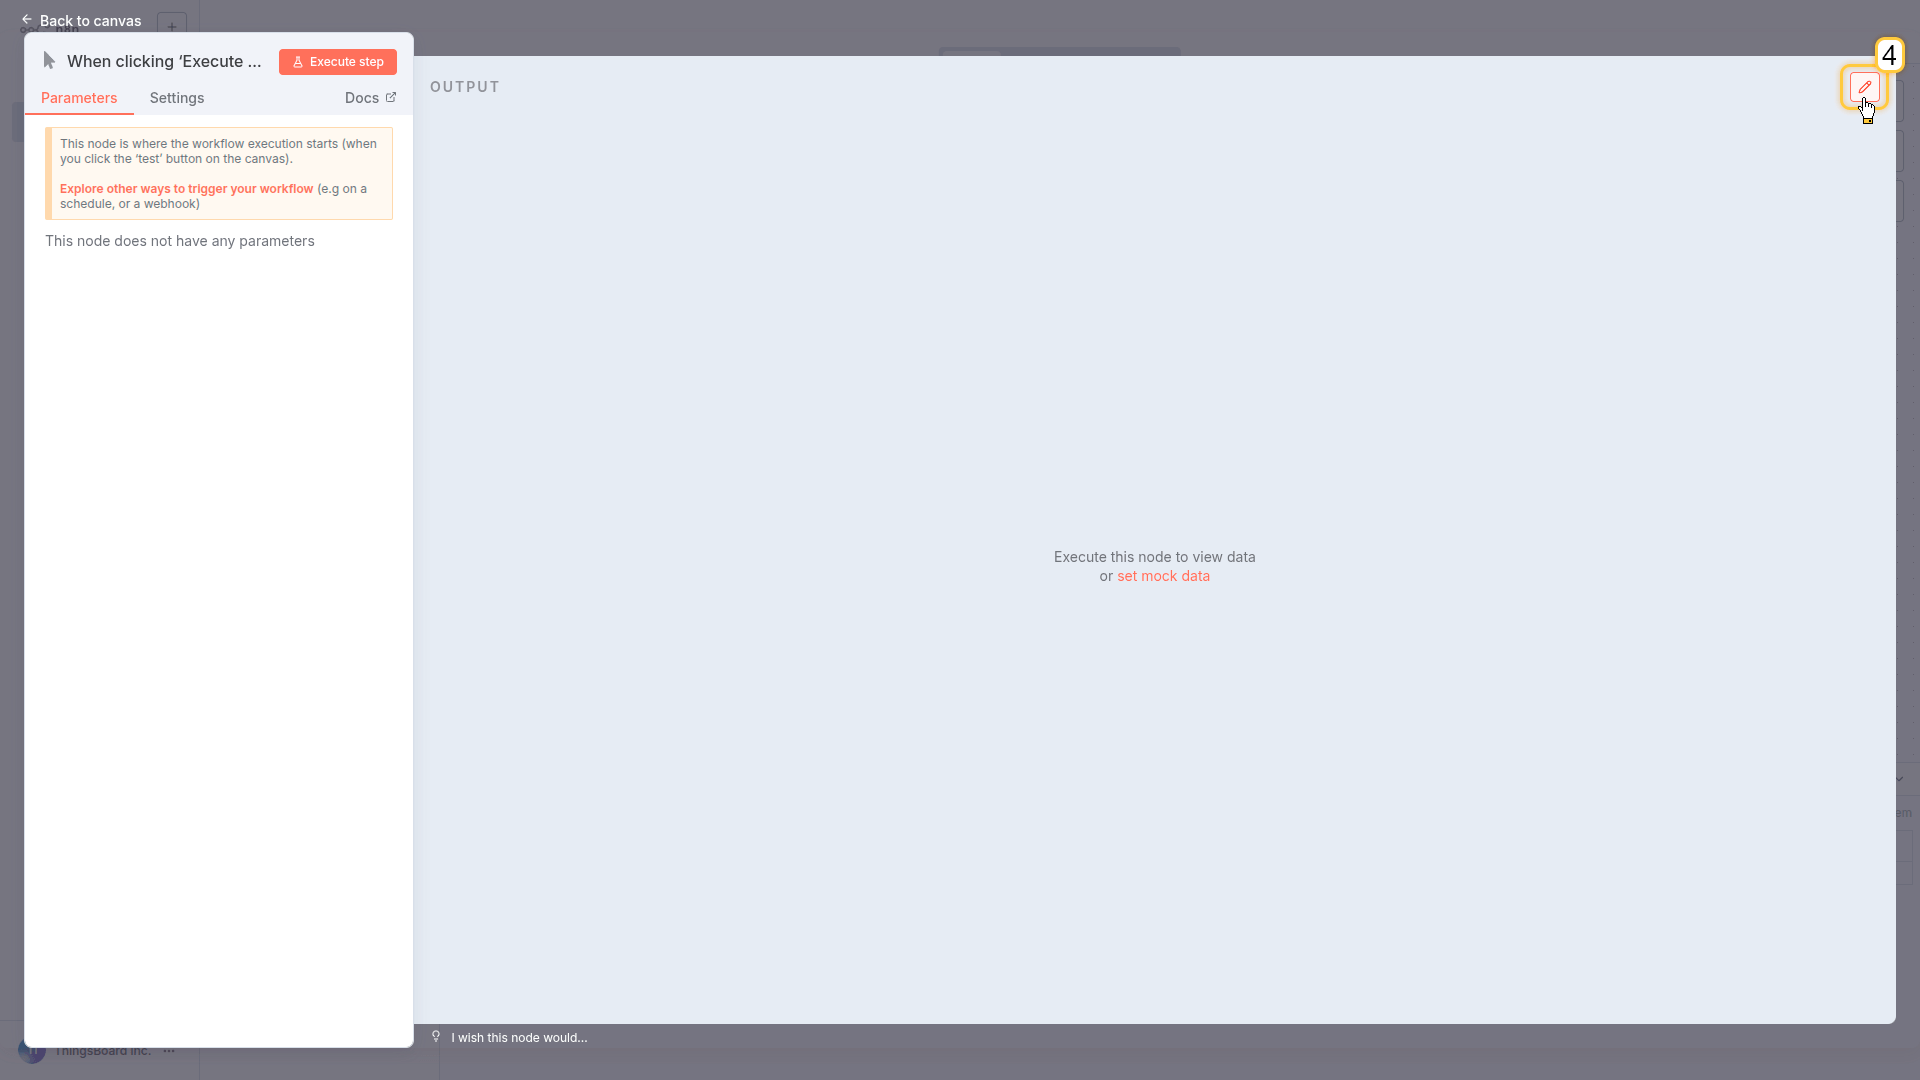
In the top-right corner, click the pencil icon.
Paste the following JSON into the input field. Save the changes and back to canvas.
您已完成:创建工作流输入,接受设备名称。在生产环境中,这将来自webhook、API调用或聊天消息。
步骤2:在ThingsBoard中查找设备
现在需要按名称查找设备以获取其ID(因为大多数ThingsBoard操作需要设备ID,而非名称)。
配置:
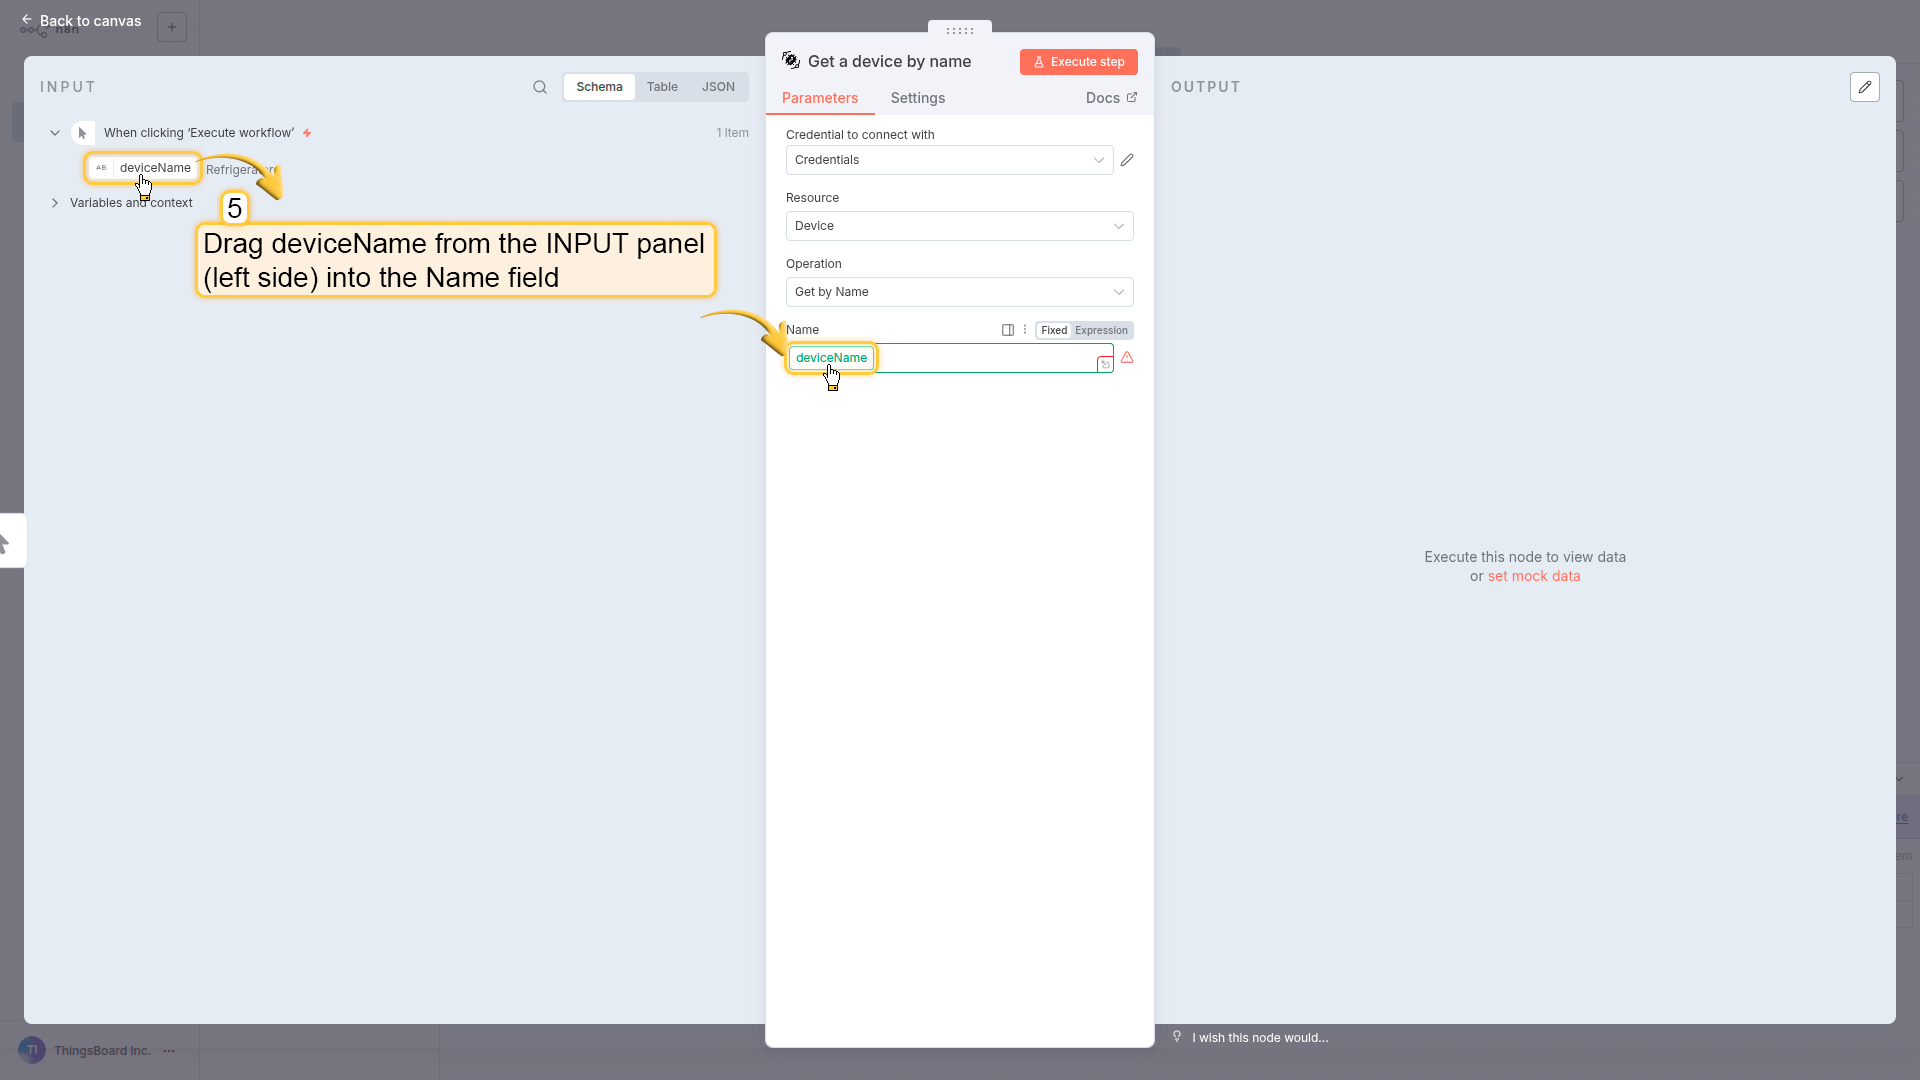
- 在触发器节点旁点击 + → ThingsBoard → Get device by name
-
从 INPUT面板(左侧)将
deviceName拖入 Name 字段这将创建动态链接——节点将使用触发器中出现的设备名称
- 点击 Execute step 进行测试
- 返回画布
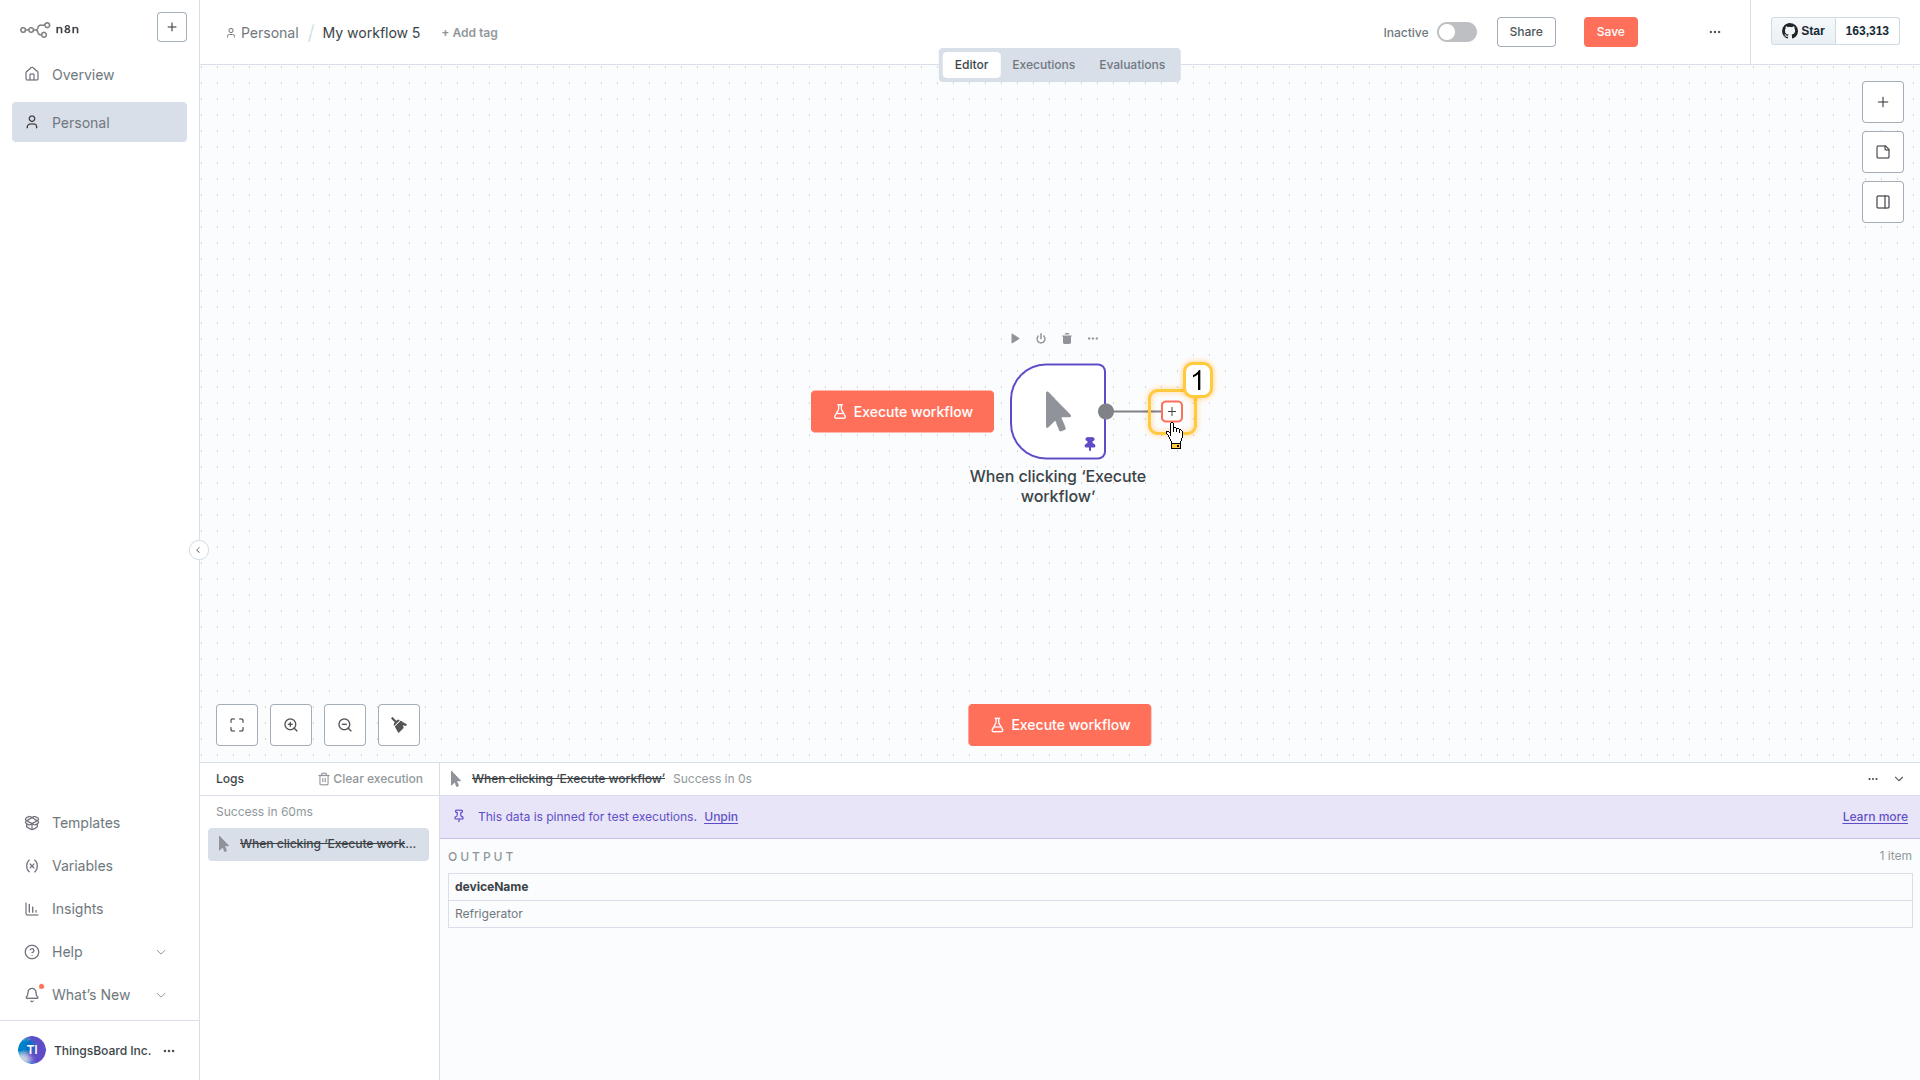
Click the + button to the right of the trigger node.
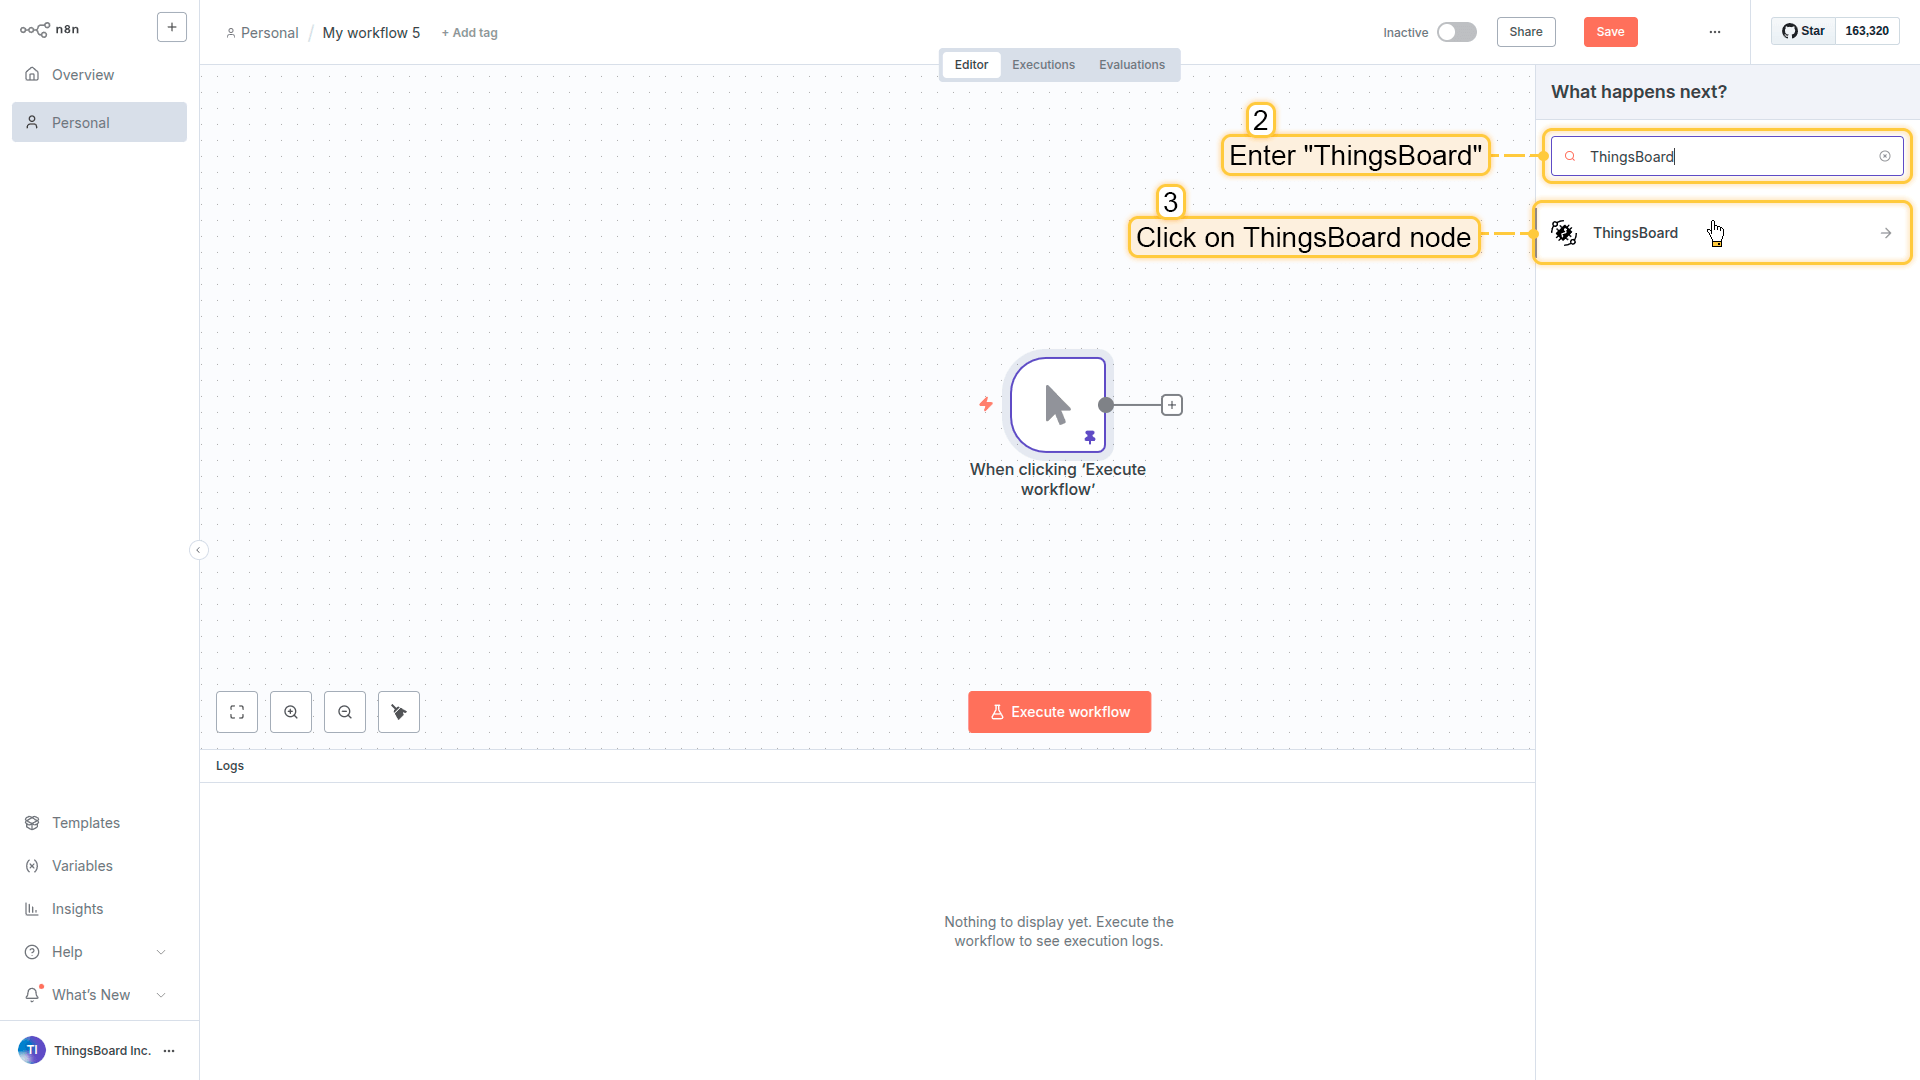
Find and select ThingsBoard
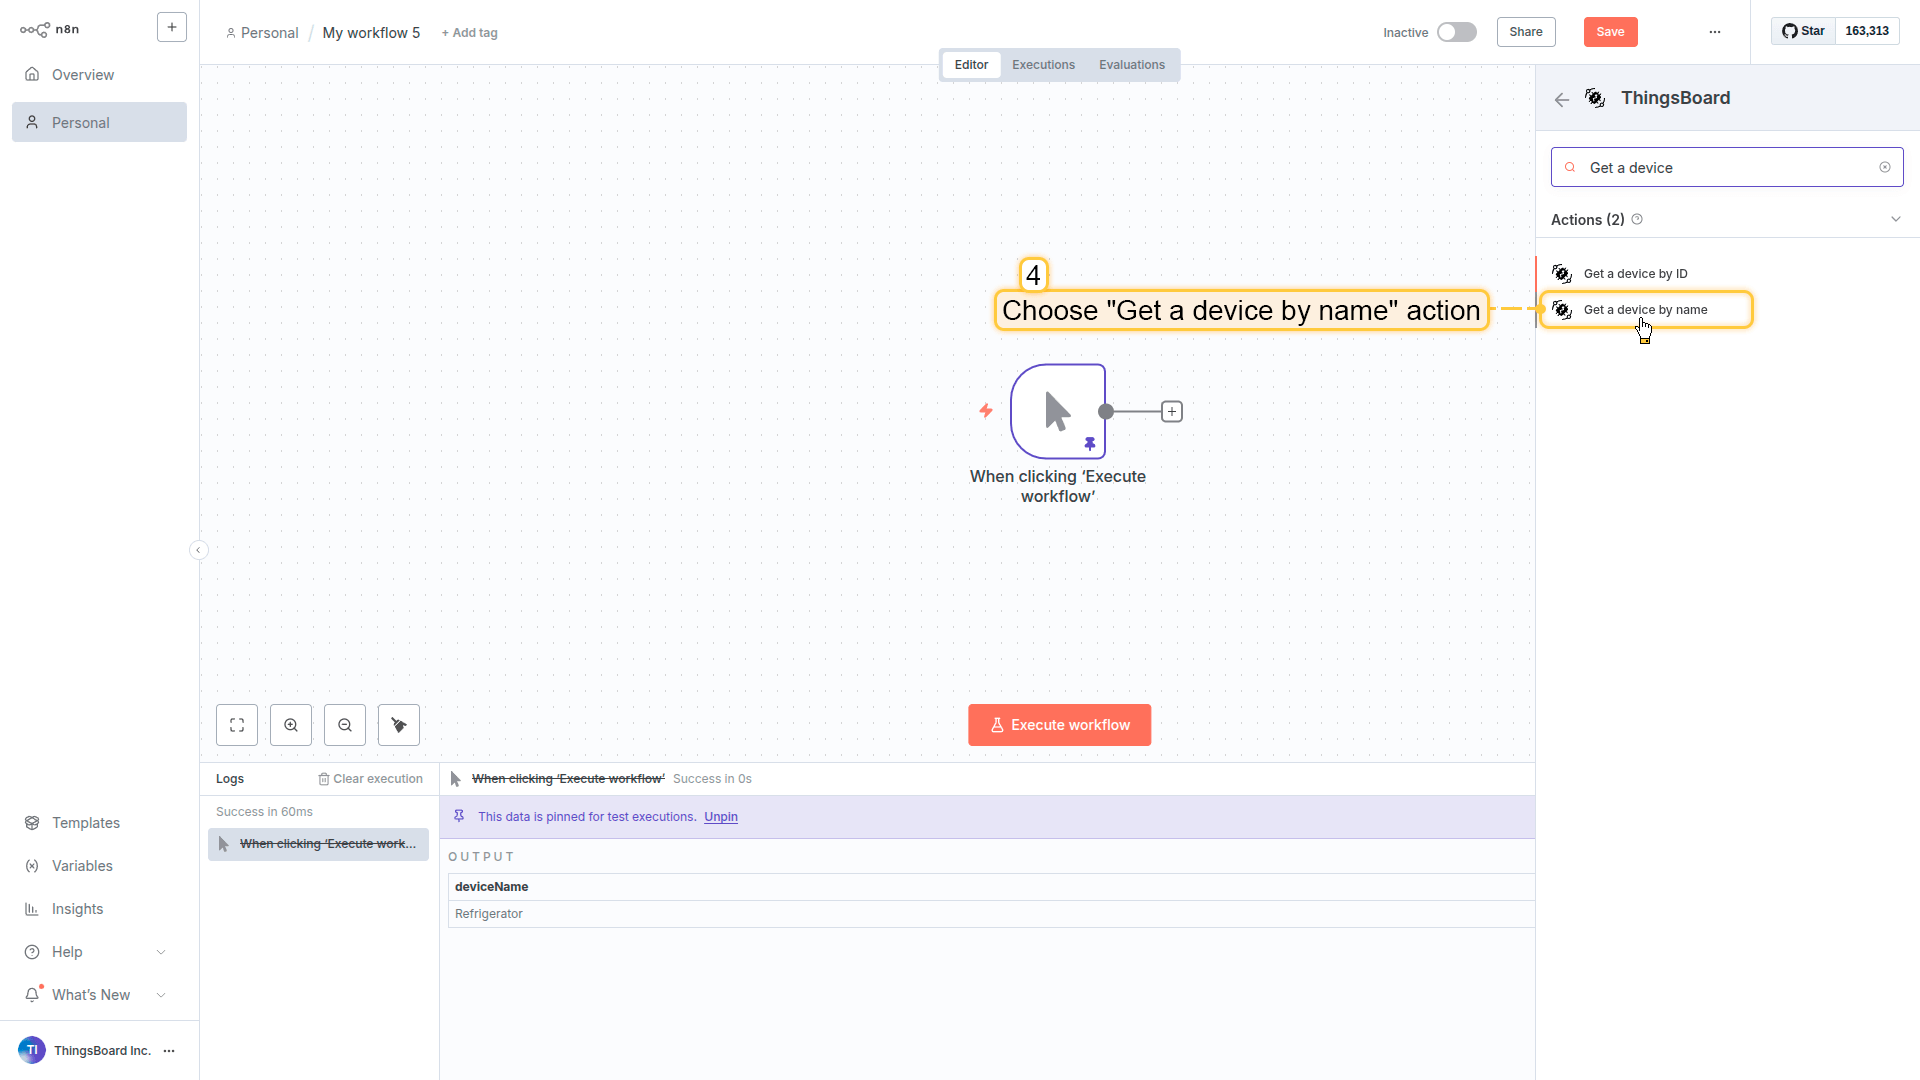
Choose Get a device by name action.
Drag deviceName from the INPUT panel (left side) into the Name field. This creates a dynamic reference to the trigger input.
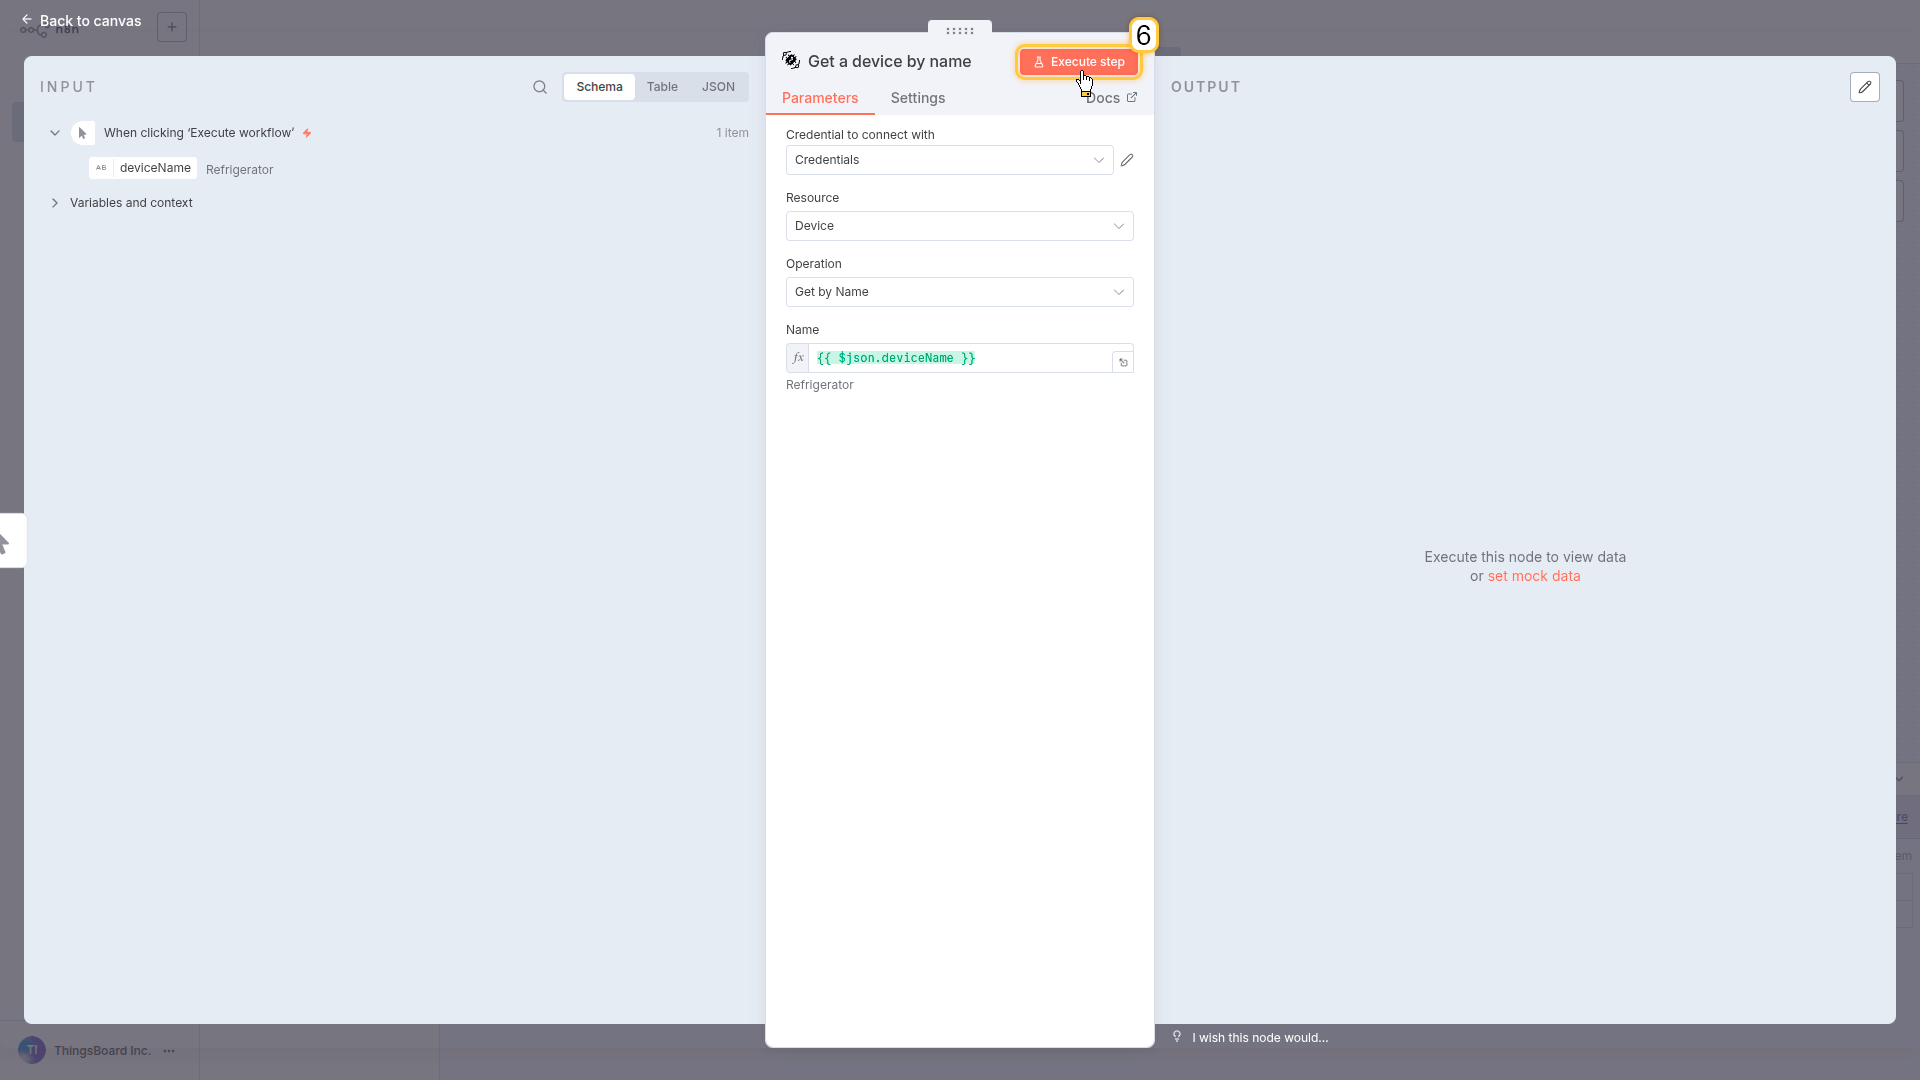
Click Execute step
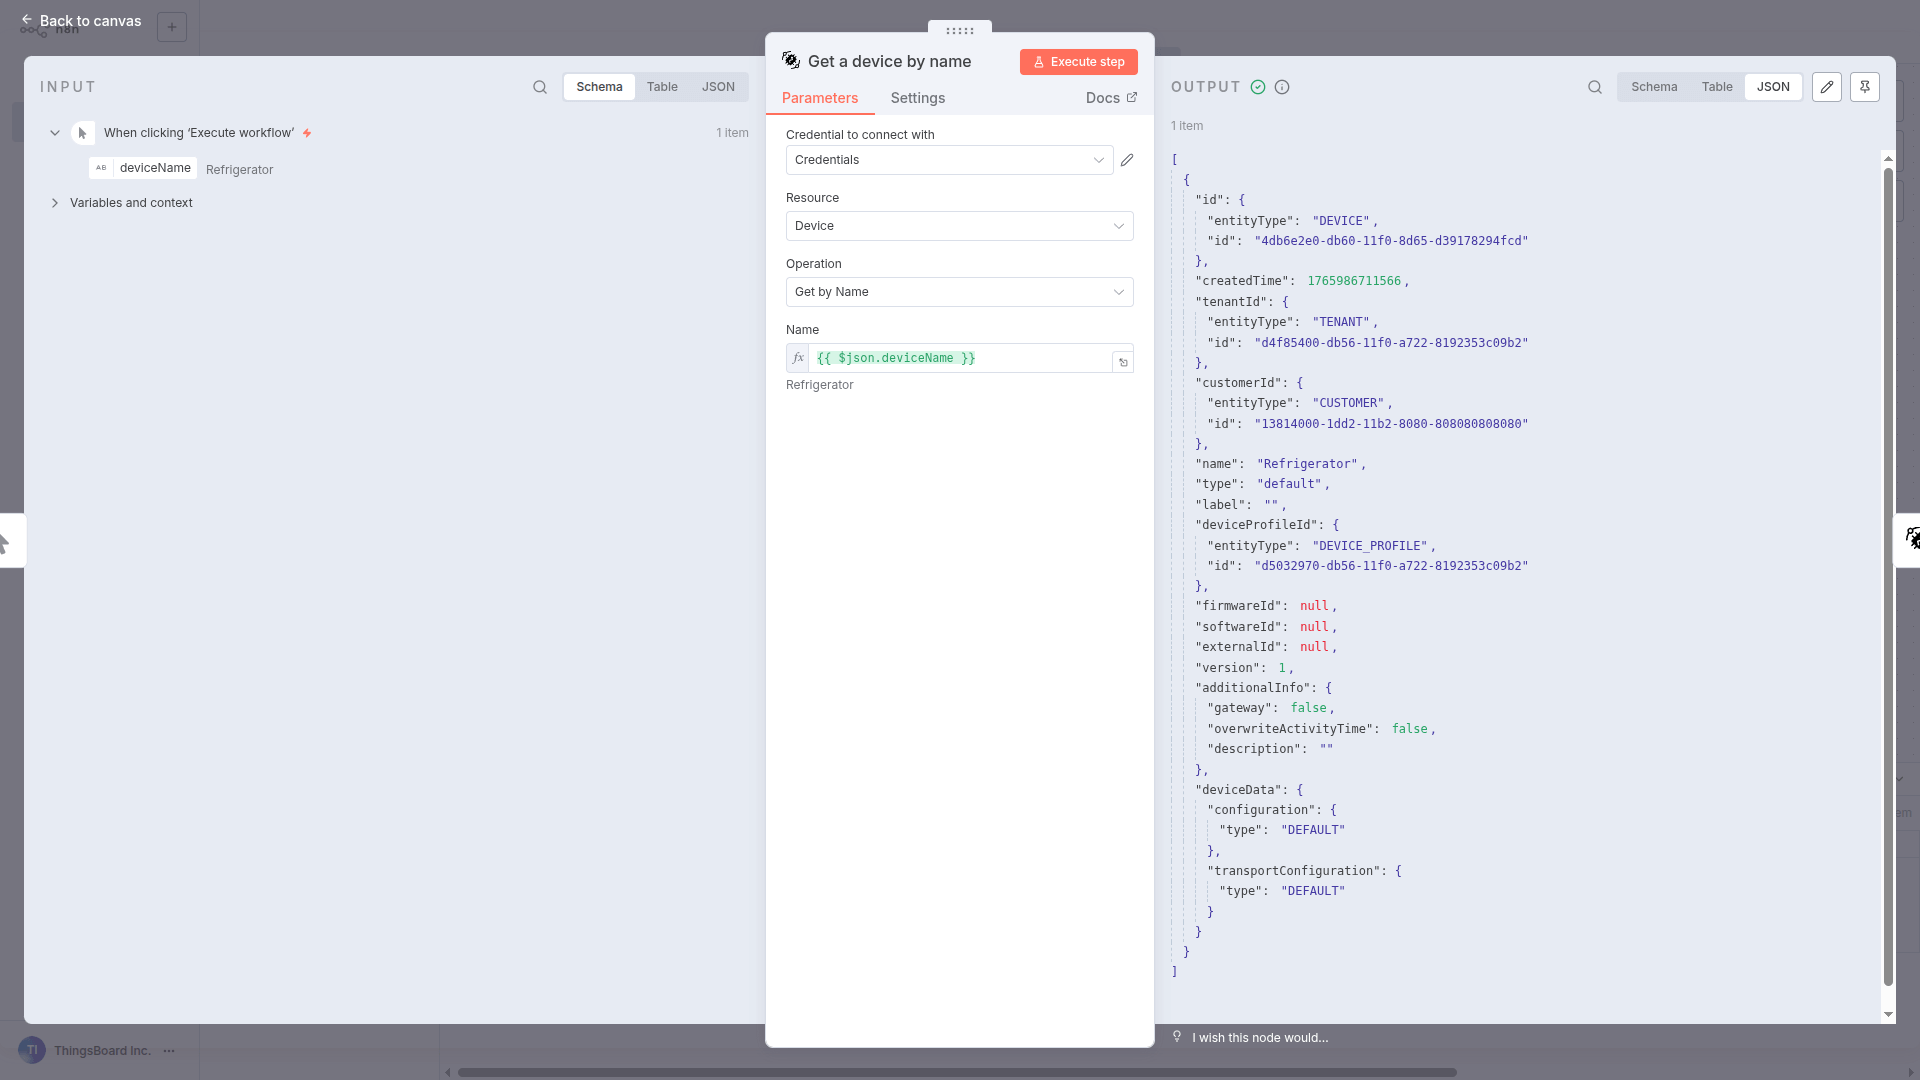
The node returns the full device object, including:
- device ID
- type
- additional metadata
Back to canvas.
您将得到:完整设备对象——包括下一步所需的ID。
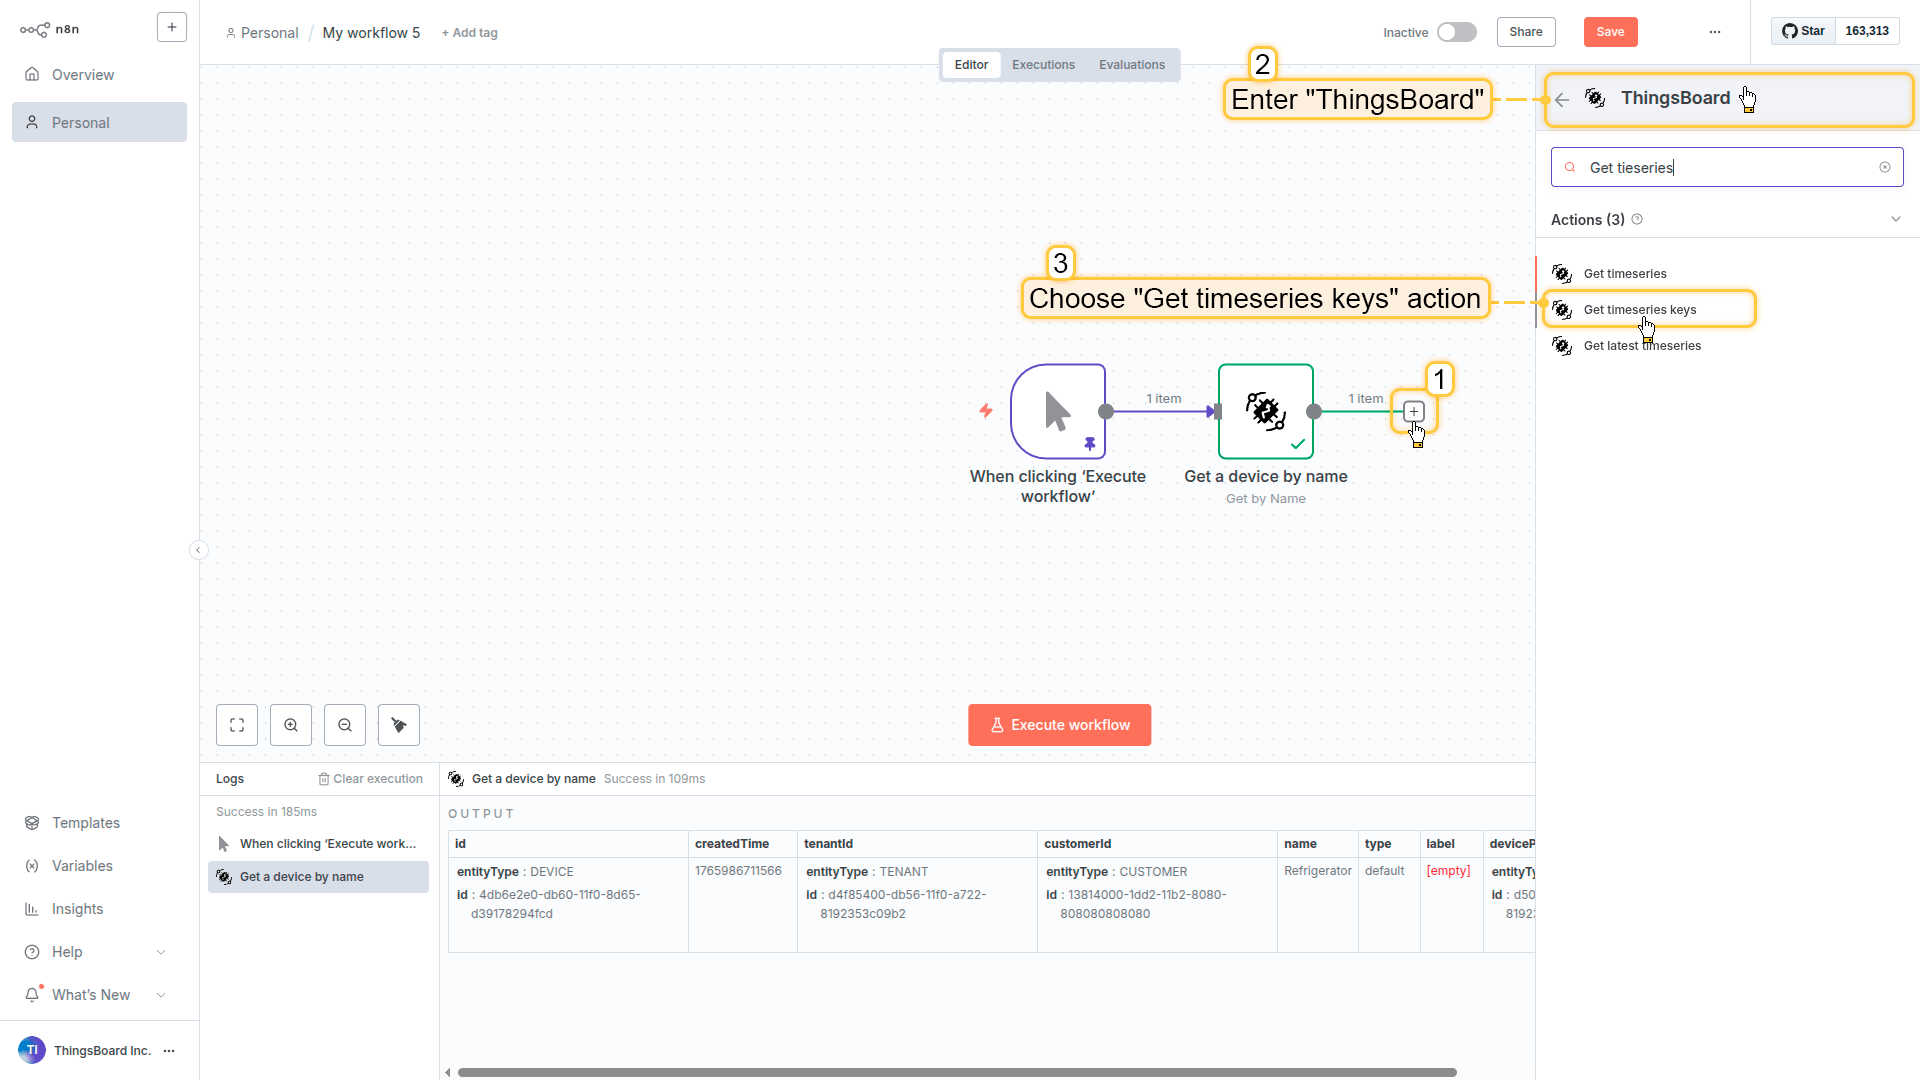
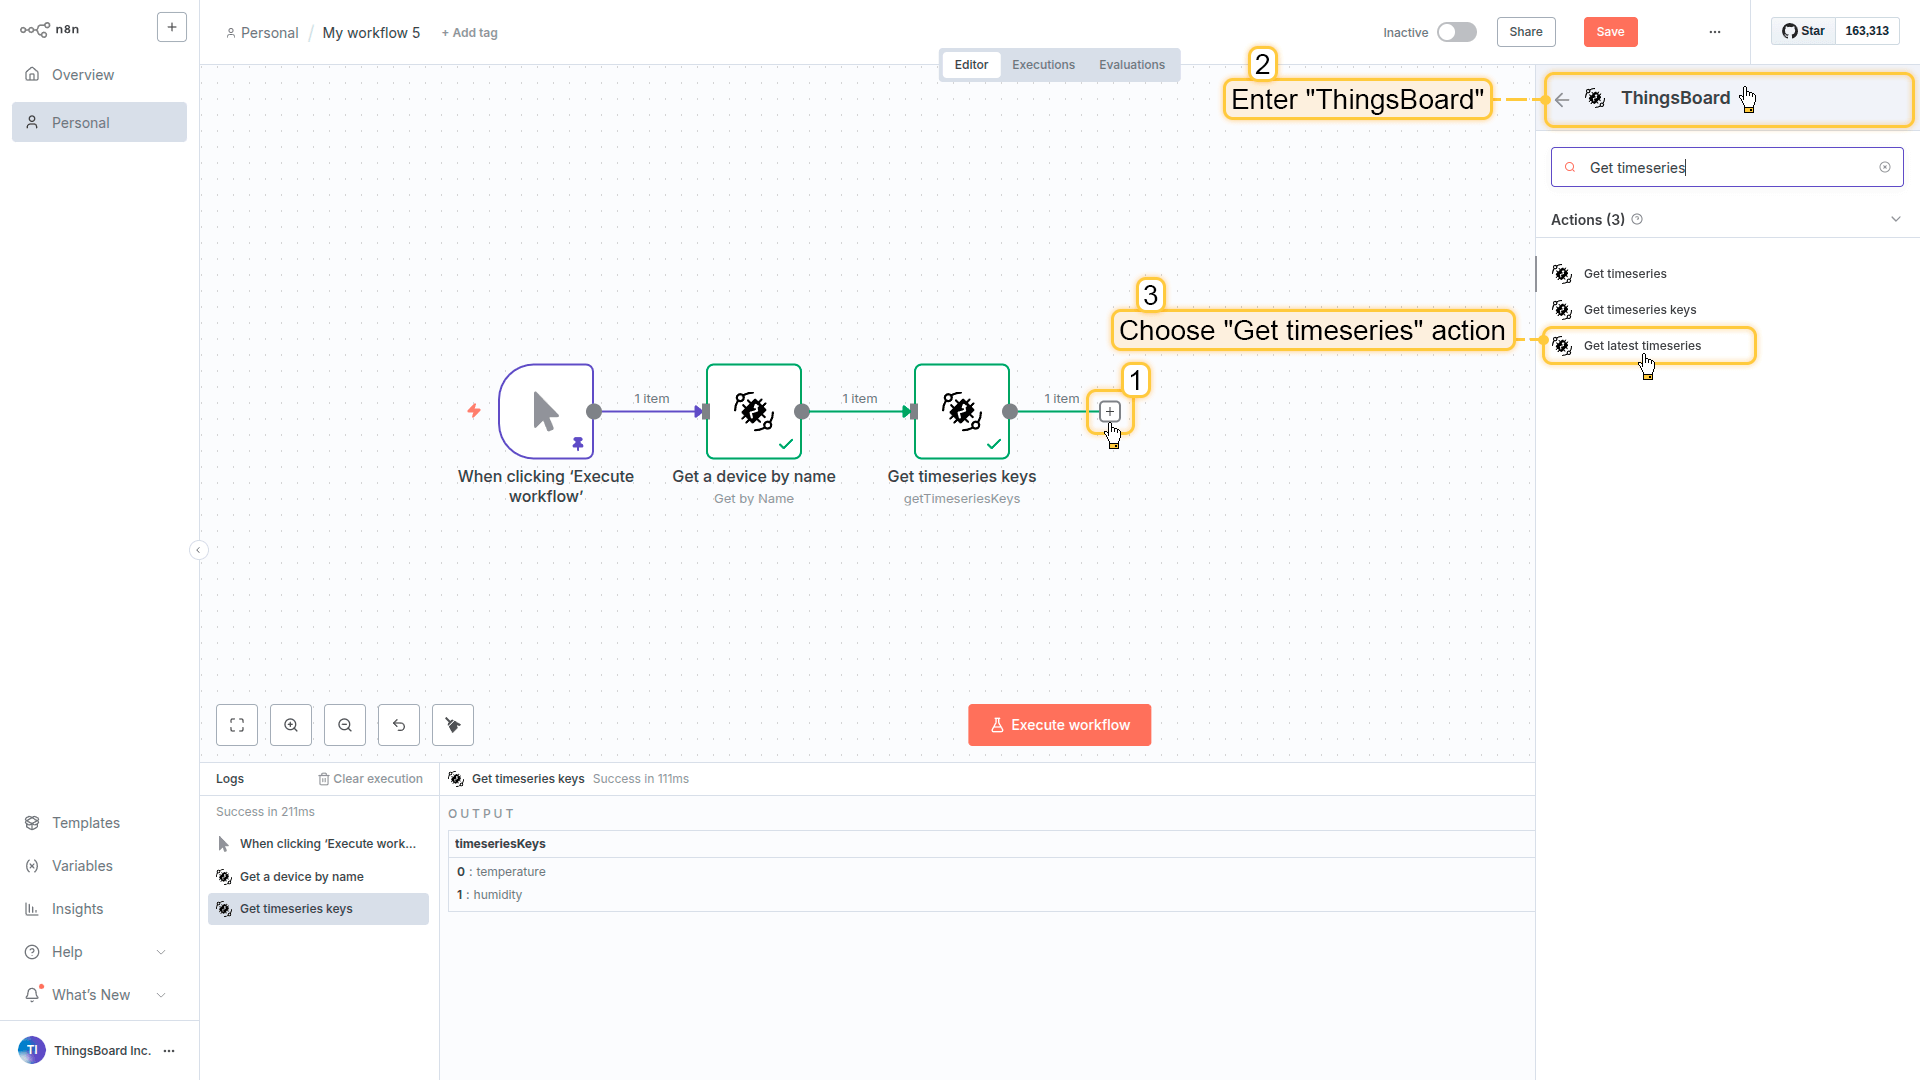
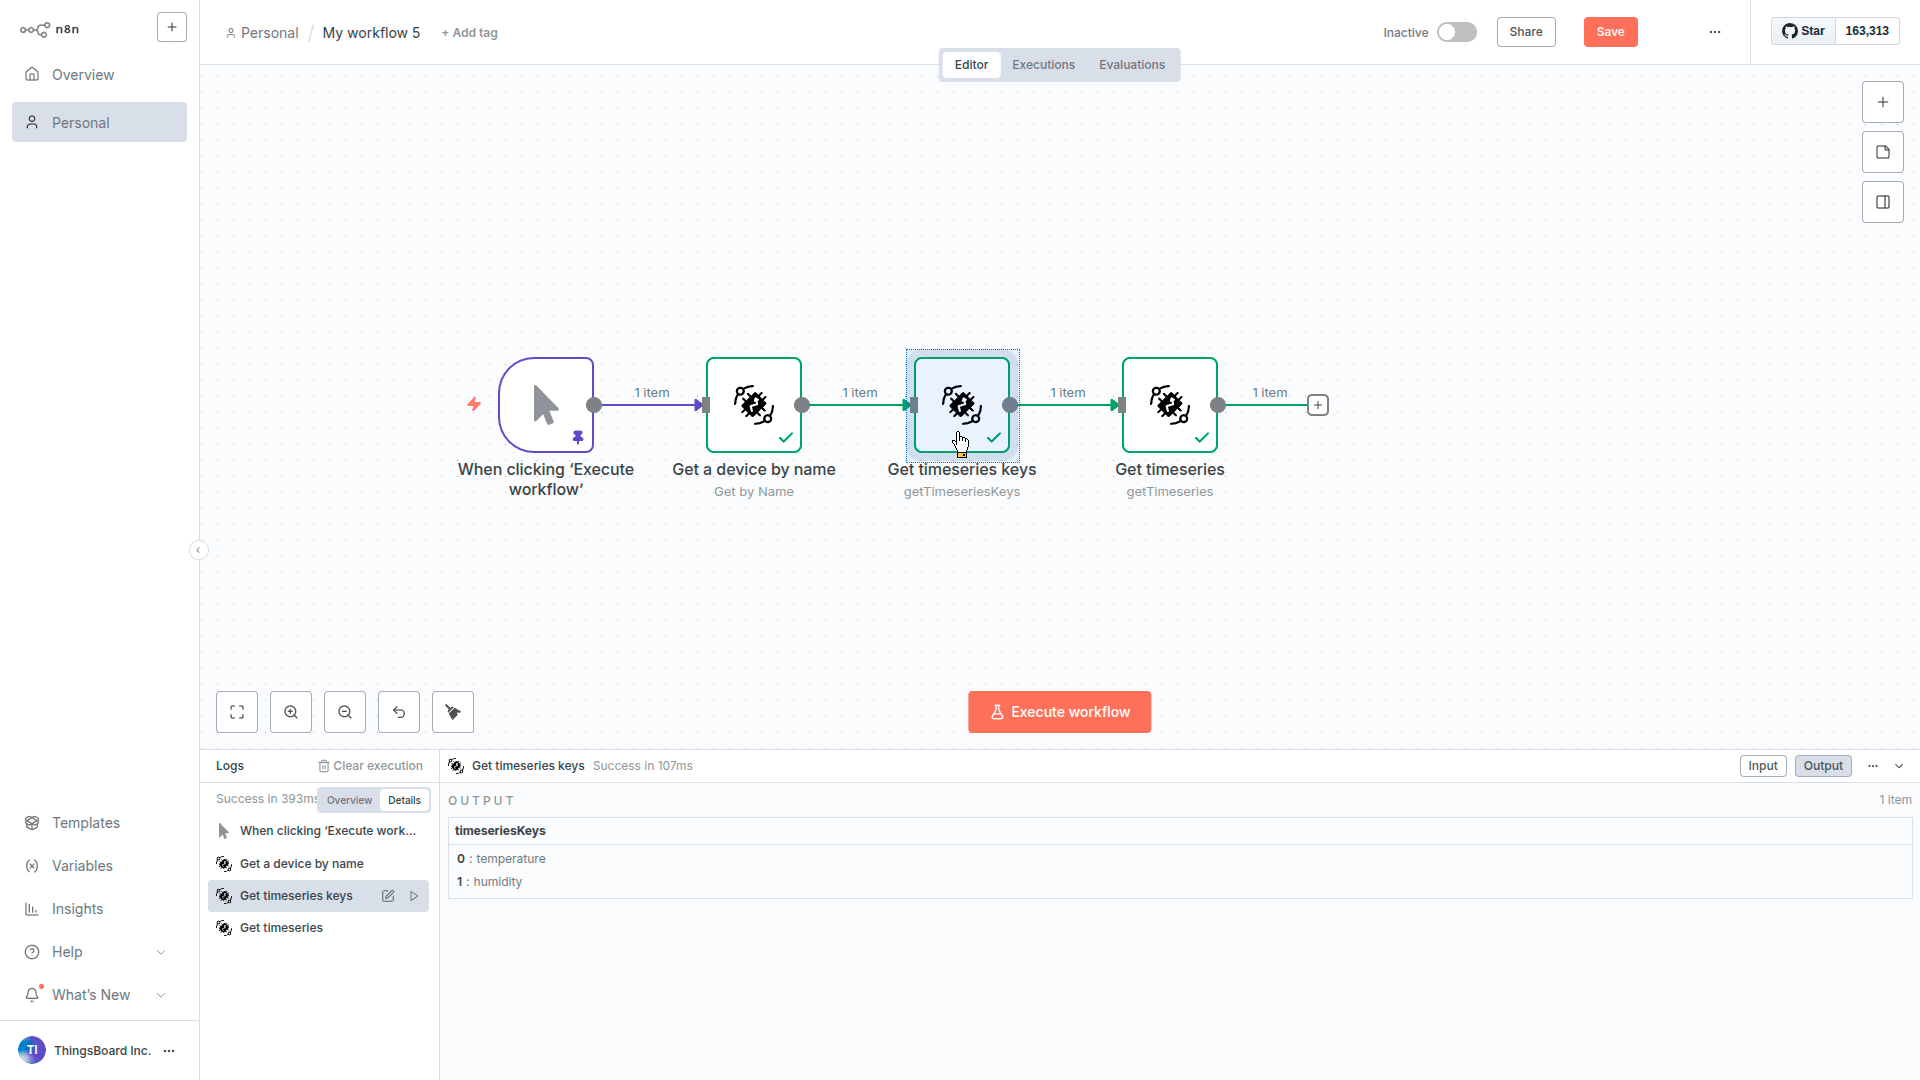
步骤3:发现该设备的遥测键
在拉取遥测前,需要了解有哪些可用键(温度?湿度?电量?)。此步骤将查明这一点。
配置:
- 点击 + → ThingsBoard → Get timeseries keys
-
从 INPUT面板(左侧)拖入 Entity ID 和 Entity Type
我们自动使用步骤2中的设备信息
- 点击 Execute step
- 返回画布
- Click the + button to the right of the Get a device by name node.
- Select ThingsBoard
- Choose Get timeseries keys action.
- Set parameters dynamically:
- Entity ID
- Entity Type
You can drag these values directly from the INPUT panel (left side).
- Click Execute step
- Back to canvas
您将得到:可用遥测键列表(如 temperature、humidity 等)
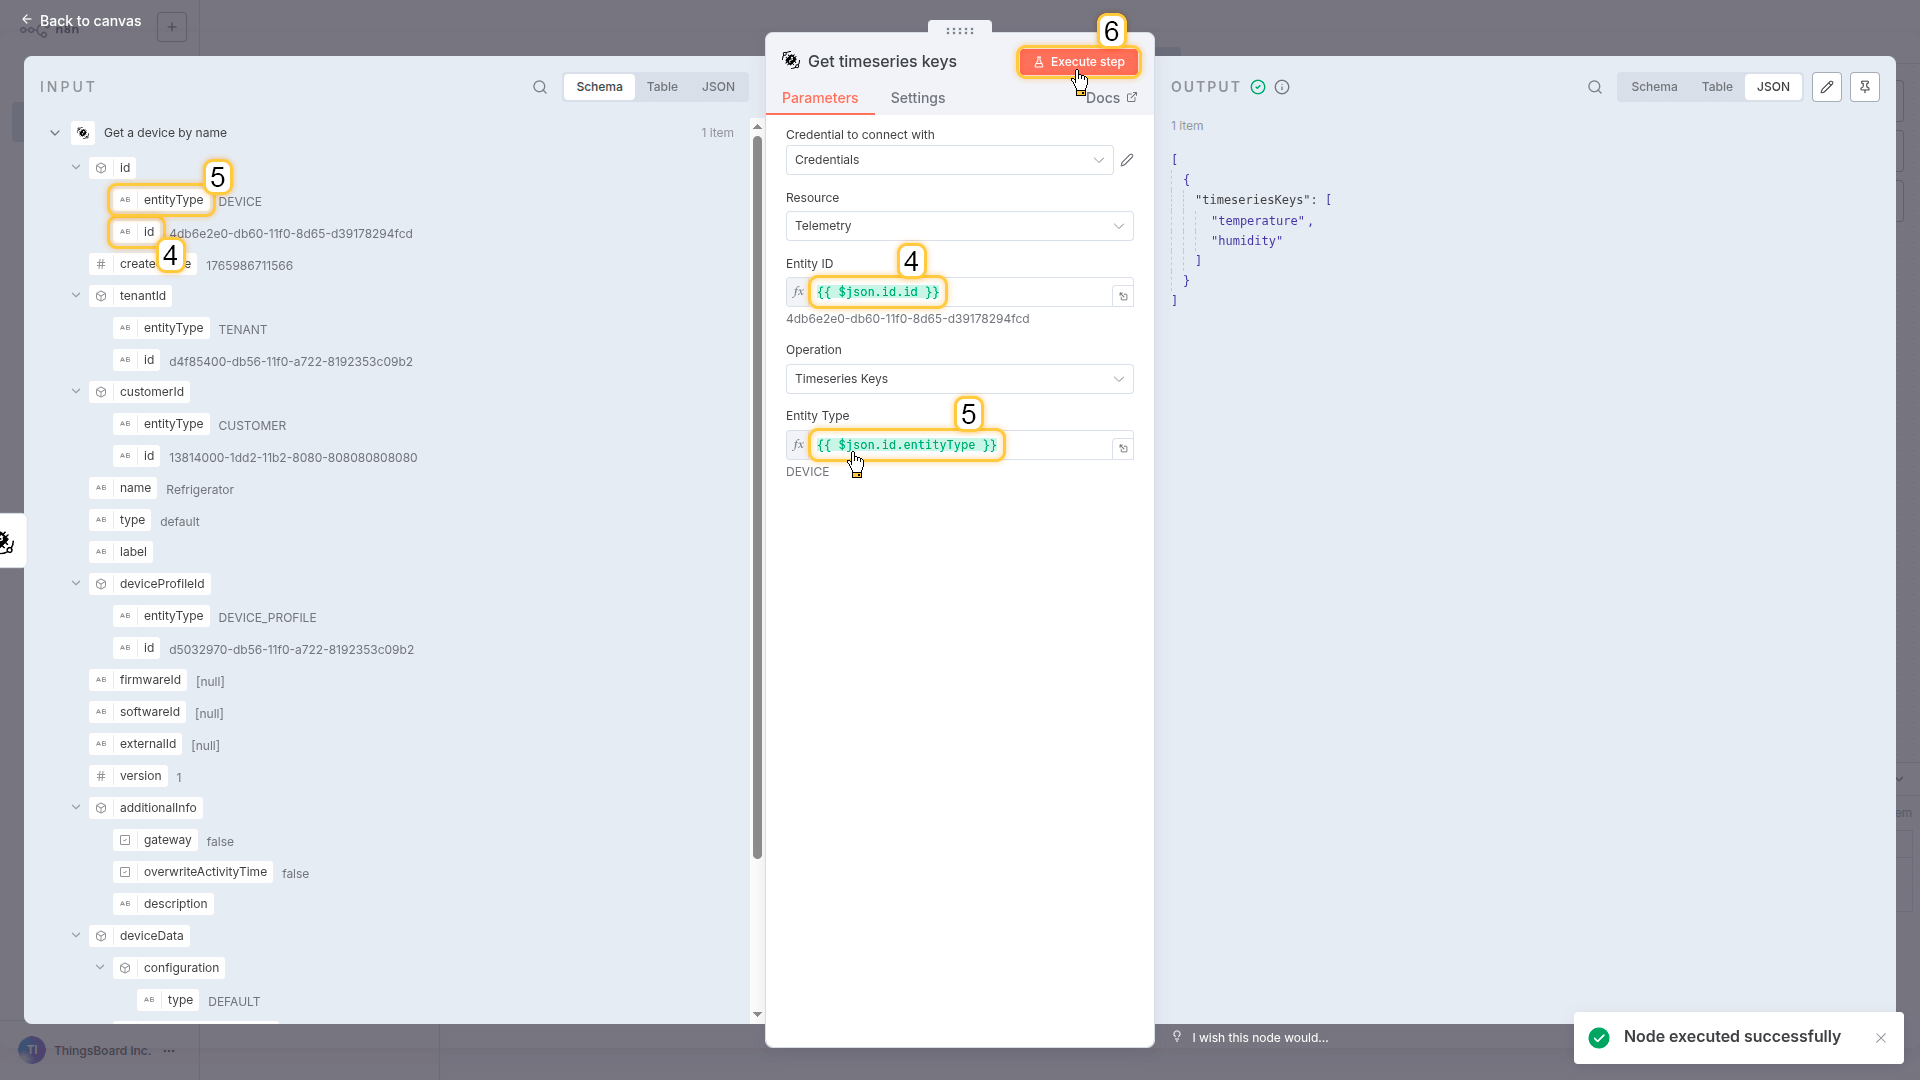
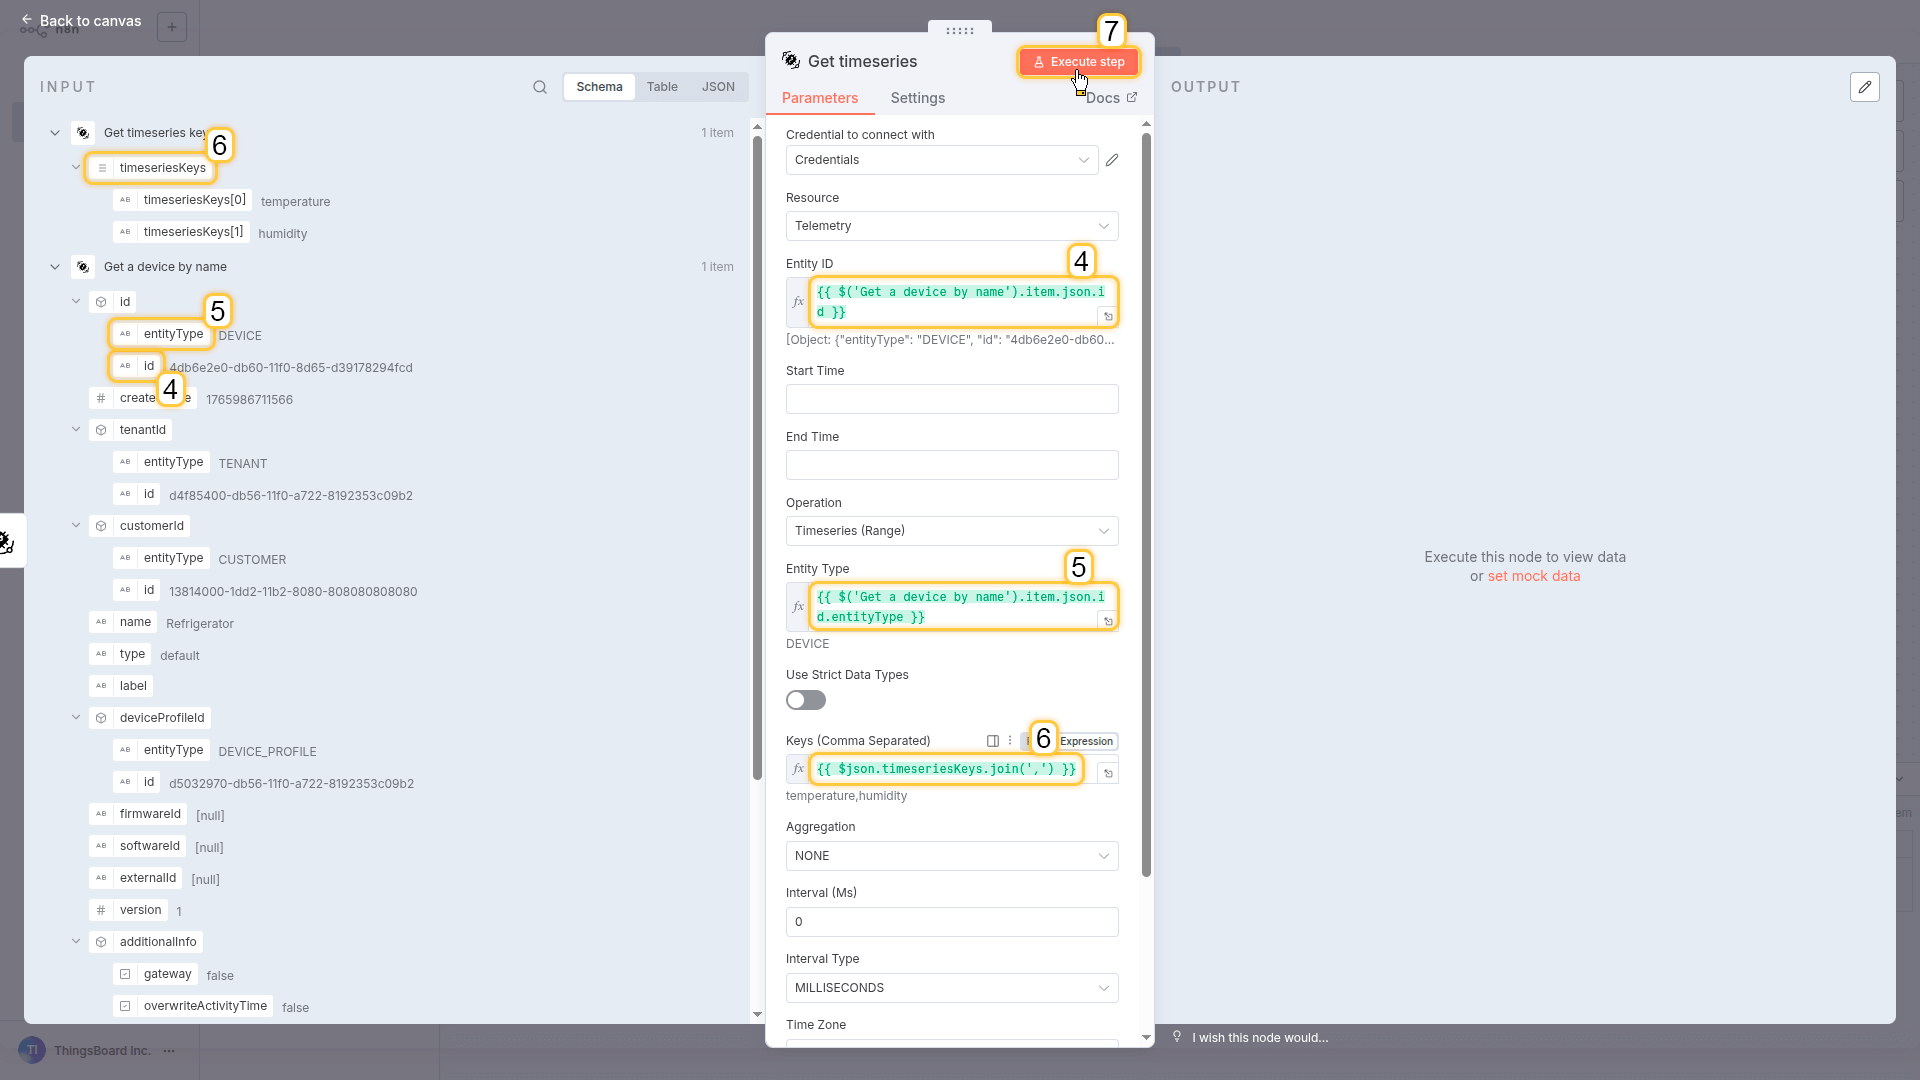
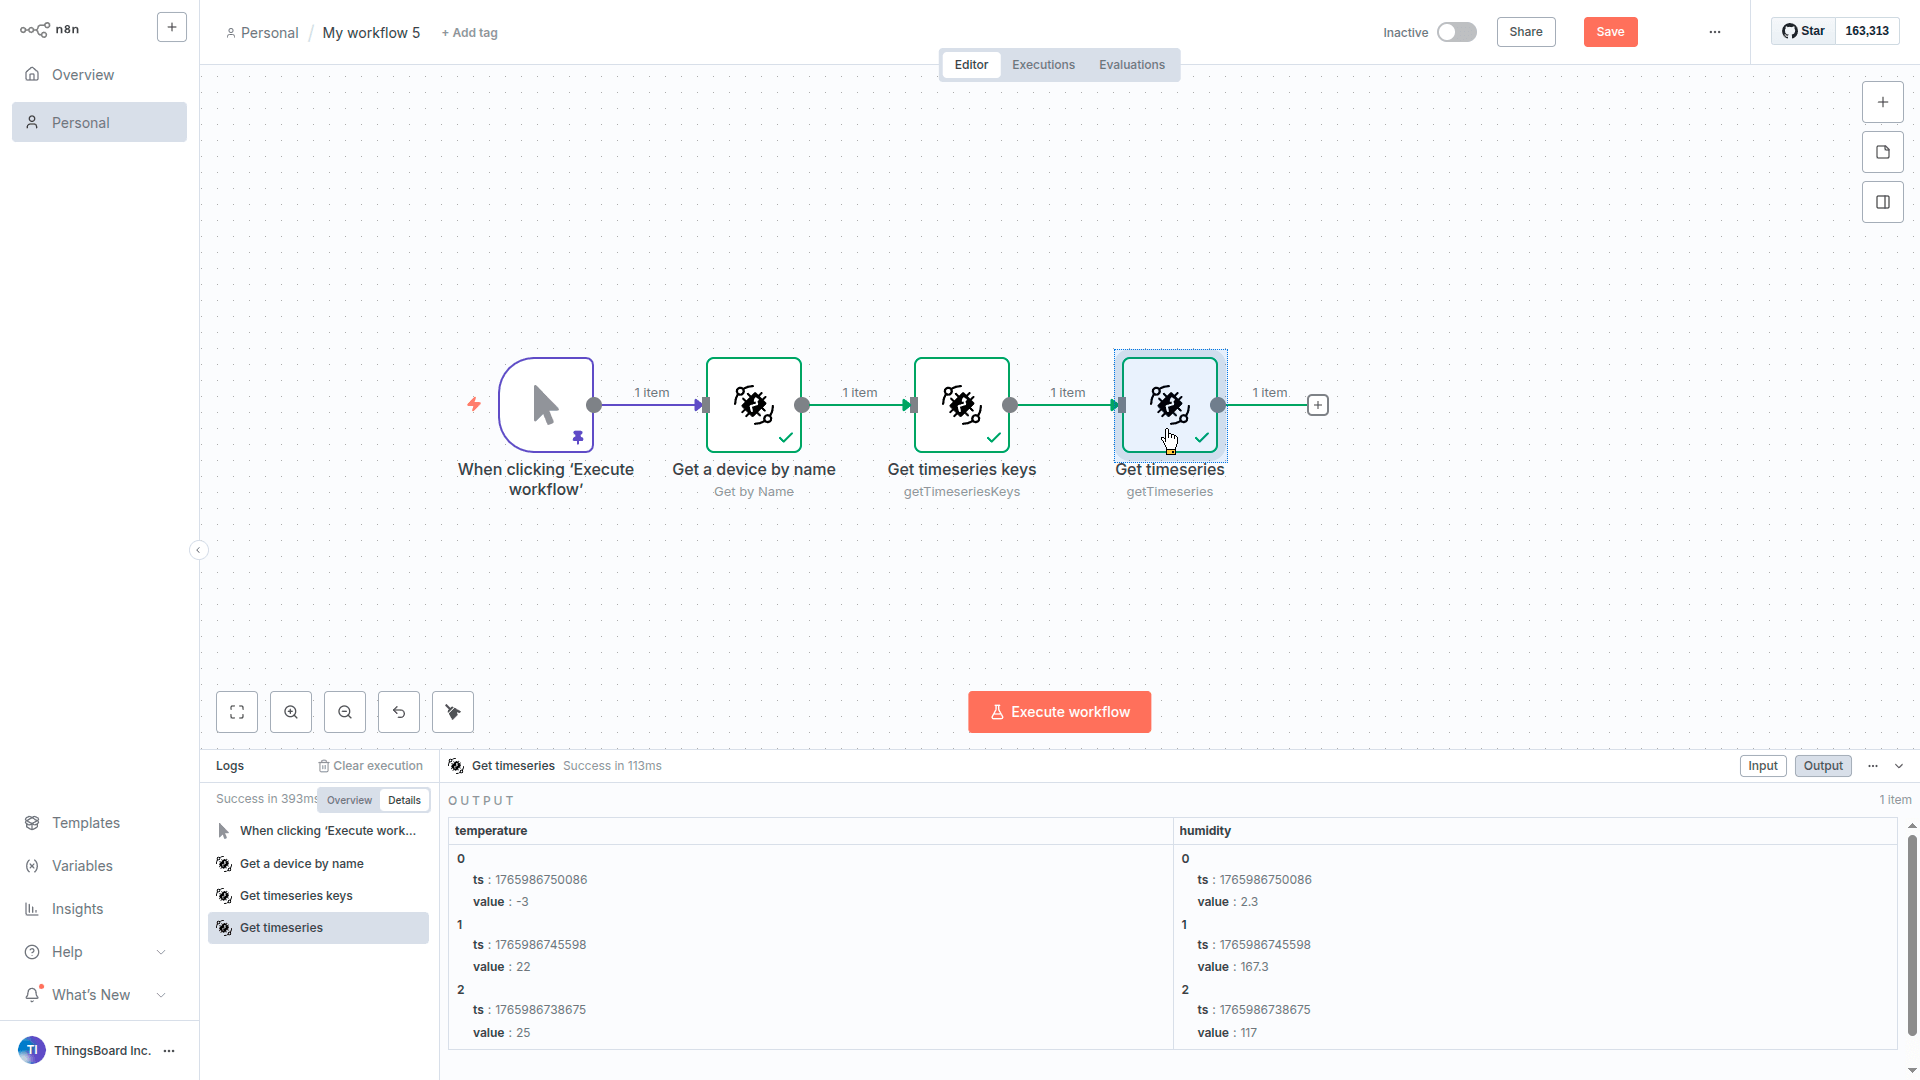
步骤4:拉取实际遥测数据
最后,使用刚发现的键获取实际传感器读数。
配置:
- 在Get timeseries keys节点右侧点击 + 按钮。
- 选择 ThingsBoard
- 选择 Get timeseries 操作
- 配置参数:
- Get a device by name -> id -> id 到 Entity ID
- Get a device by name -> id -> entityType 到 Entity Type
- Get timeseries keys -> timeseriesKeys 到 Keys (Comma Separated)
注意:Keys字段需要逗号分隔的值。由于步骤3返回数组,需要拼接:``
- 点击 Execute step
- 返回画布
Click the + button to the right of the trigger node.
Select ThingsBoard.
Choose Get timeseries action.
Configure parameters:
- Entity ID
- Entity Type
- Keys (Comma Separated)
You can drag these values directly from the INPUT panel (left side).
- Click Execute step.
- Back to canvas.
您将得到:真实遥测数据!温度、湿度或该设备拥有的任意传感器数据。
意义
您已构建完全可复用的工作流。将输入从 “Refrigerator” 改为 “Freezer 3” 即可自动生效。无需硬编码ID,也无需任何修改。
该模式支持:
- 客户门户 - 每位用户看到自己的设备
- 聊天机器人 -“检查Room 405的空调”即可工作
- 移动应用 - 按名称查询任意设备
- 多租户系统 - 相同工作流,不同数据
Accepts a device name as input. Finds the corresponding device in ThingsBoard.
Discovers available telemetry keys.
Retrieves telemetry values for the specified time window.
下一步
- 用 Webhook 替换手动触发器,连接客户门户
- 在末尾添加 Slack 或 Email 节点发送遥测数据
- 使用 Schedule 触发器每小时运行以进行监控
- 连接到 AI Agent,让用户可在聊天中询问”检查设备X”
API参考
ThingsBoard n8n节点基于ThingsBoard REST API构建。有关API端点、请求/响应格式和附加参数的详细信息,请参阅 ThingsBoard REST API文档。
链接
- npm包:@thingsboard/n8n-nodes-thingsboard
- GitHub仓库:thingsboard/thingsboard-n8n-node
- n8n文档:docs.n8n.io
- n8n社区:community.n8n.io
- ThingsBoard REST API:REST API 参考
支持
若遇到问题或对ThingsBoard n8n节点有疑问:
许可证
MIT许可证 - 详见 LICENSE文件。