仅专业版支持Custom translations功能。
请使用ThingsBoard Cloud或自行安装平台实例。
ThingsBoard通过内置i18n系统支持多语言界面。可选择最适合的语言使用界面。
针对更细粒度需求,提供自定义翻译功能,支持:
更改平台语言
更改账户语言的步骤:
- 点击屏幕右上角的三点图标,选择“Account”。
- 在个人资料设置中,从下拉列表选择所需语言。
- 应用更改。
之后,ThingsBoard界面将切换为所选语言。
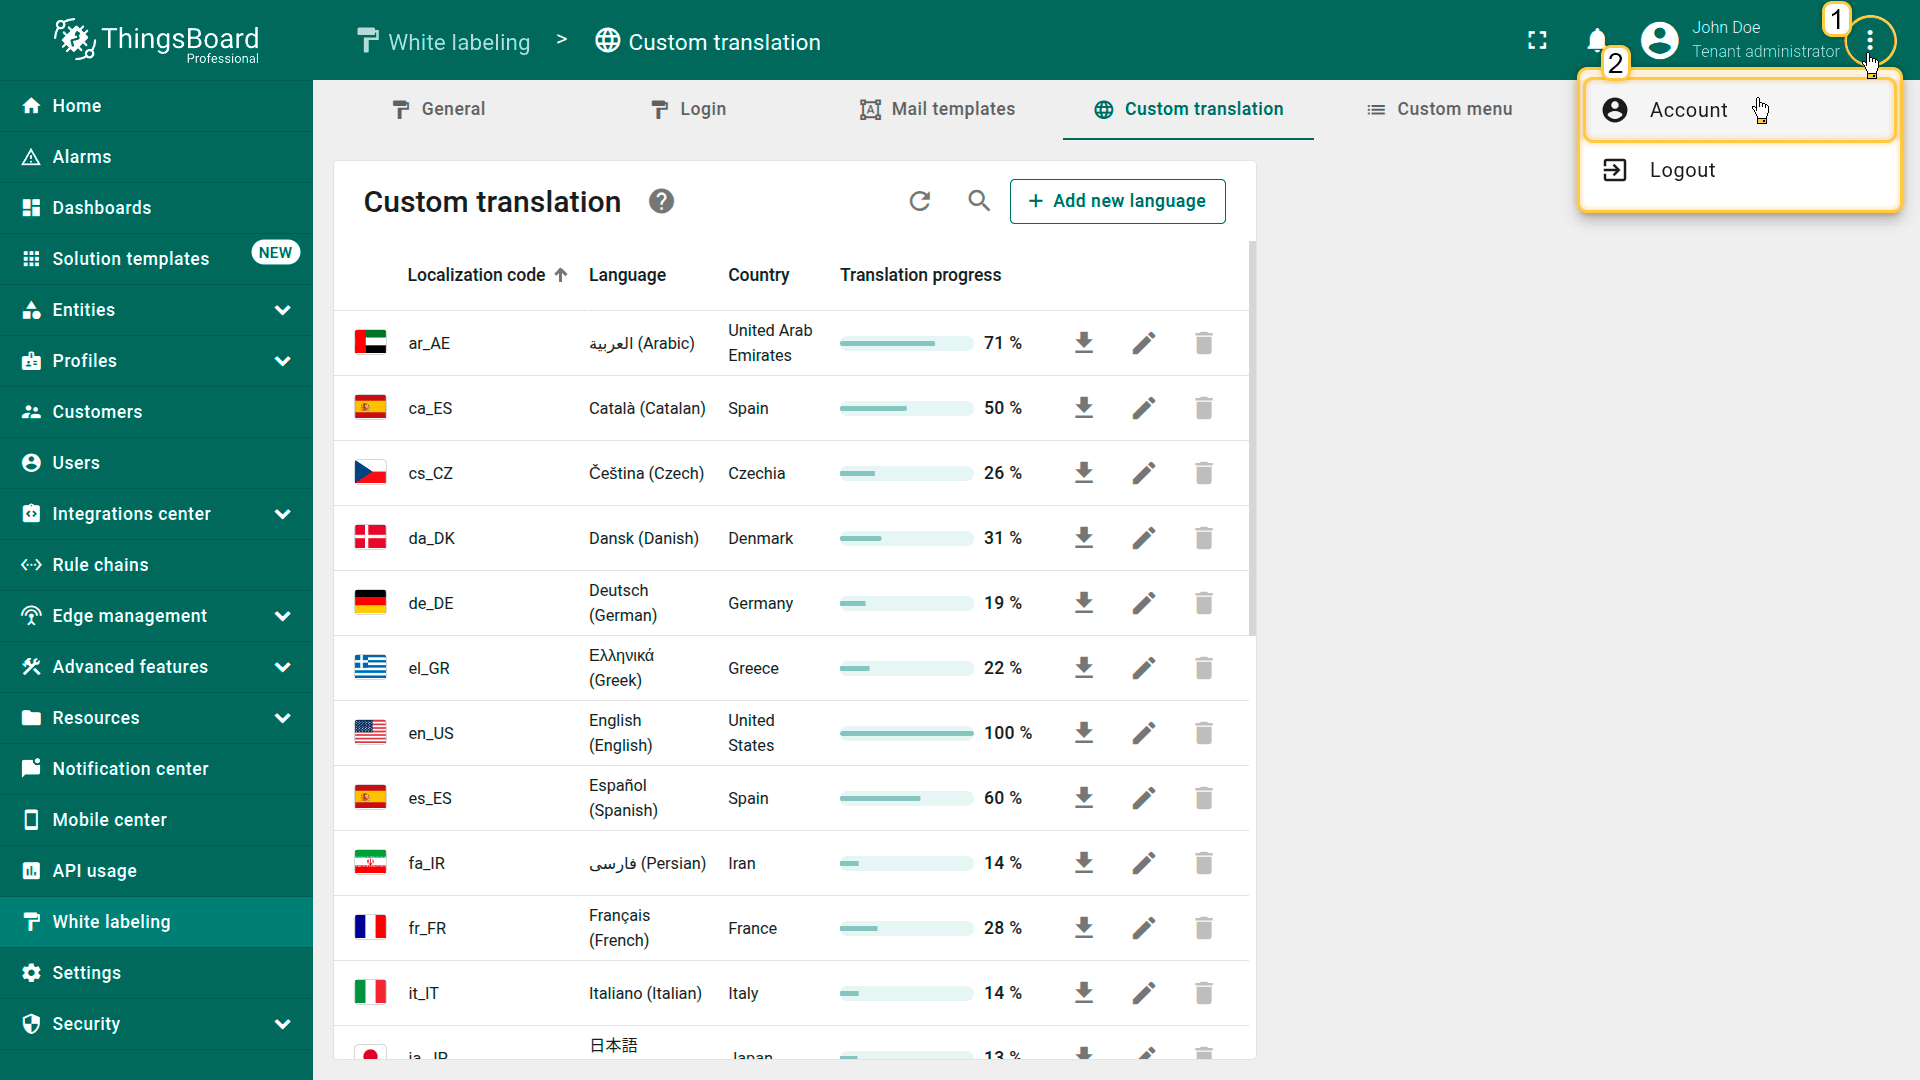
Navigate to your profile by clicking on the three dots in the top right corner of the screen and select “Account”.
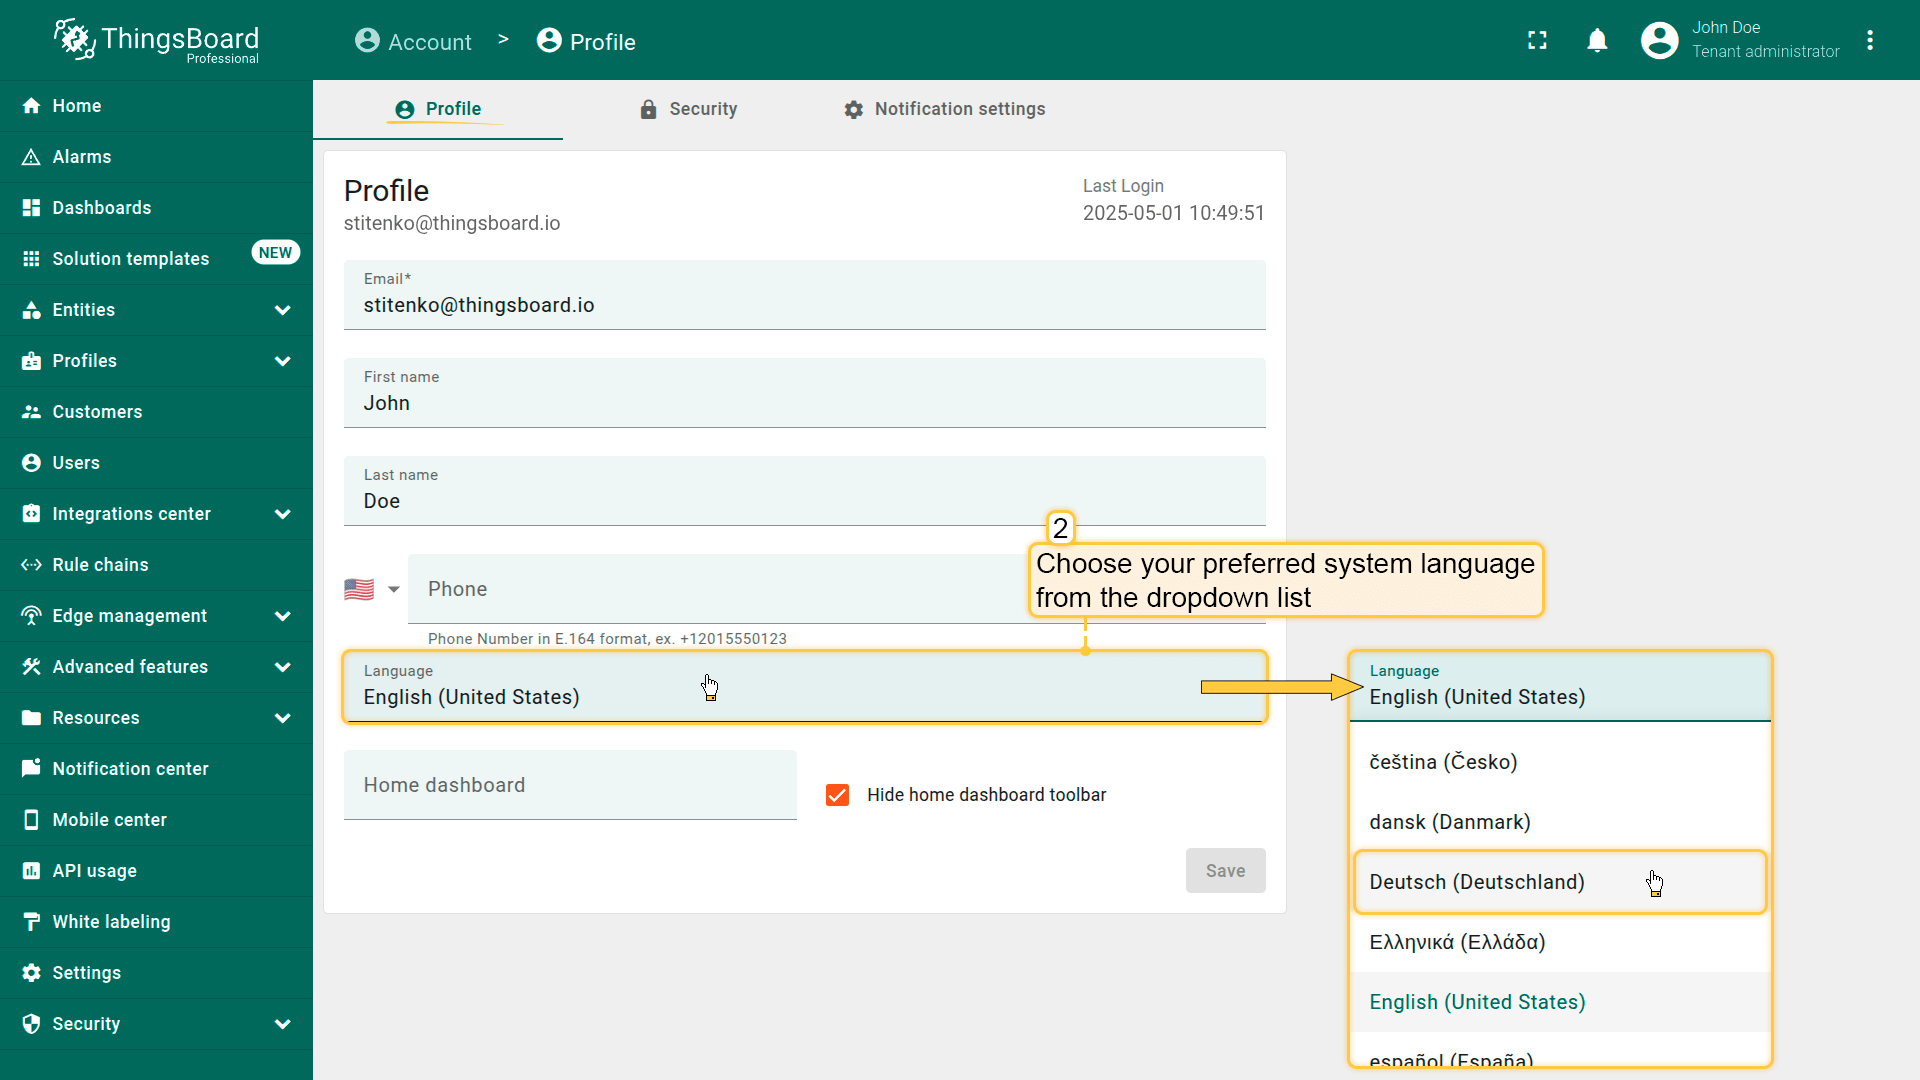
Click on the “Language” field and choose desired system language from the drop-down list.
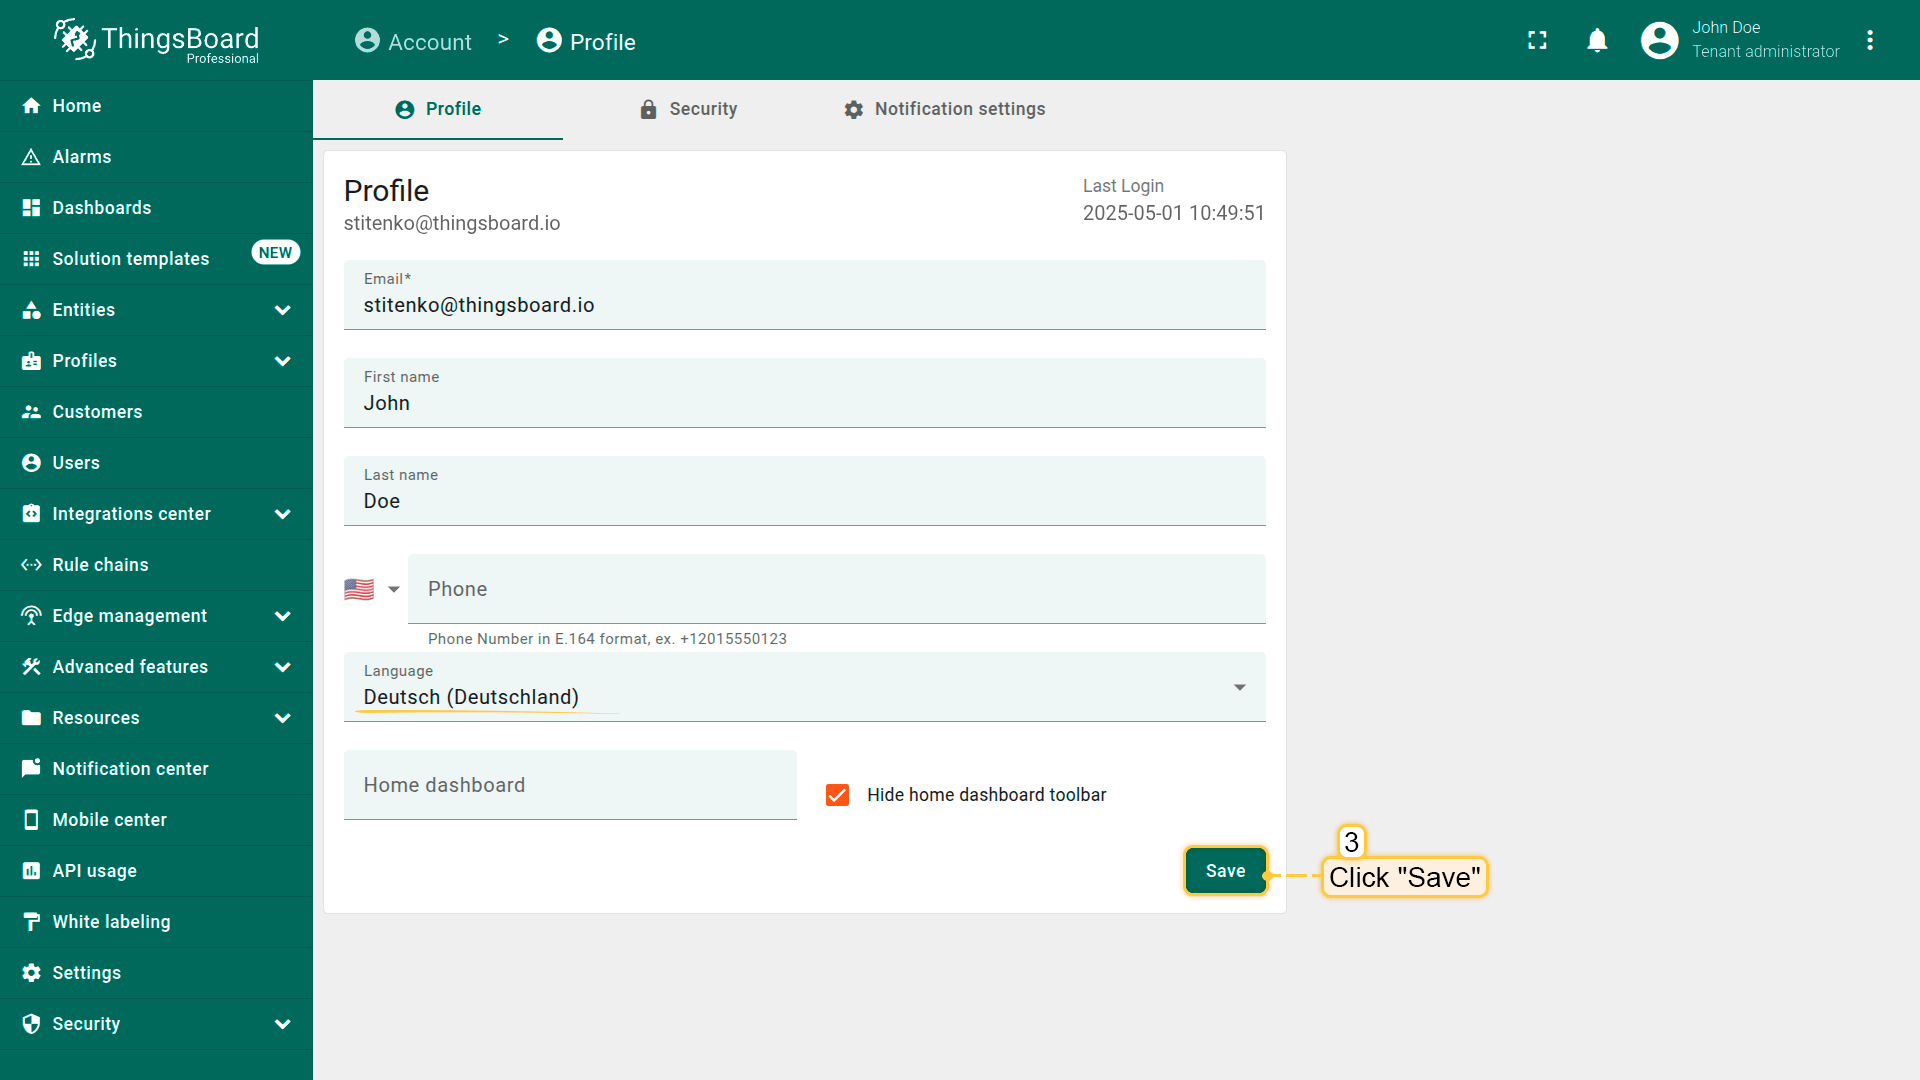
Click the “Save” button to apply the changes;

After that, the ThingsBoard interface will switch to the selected language.
添加新语言
若所需语言不在列表中,可添加新语言。操作步骤:
- 前往“白标”页面的“自定义翻译”选项卡,点击右上角“Add new language”按钮。
- 在打开的窗口中选择所需语言。
- 可立即上传包含翻译映射的 JSON文件 快速完成本地化,或留待后续逐步填写翻译。
- 点击“Add”。
新语言已成功添加。您和用户现可将其用作实例的界面语言。
由于提供的JSON文件仅包含有限的翻译键,当前翻译进度为5%。 随着继续添加更多翻译,进度条会自动增加。
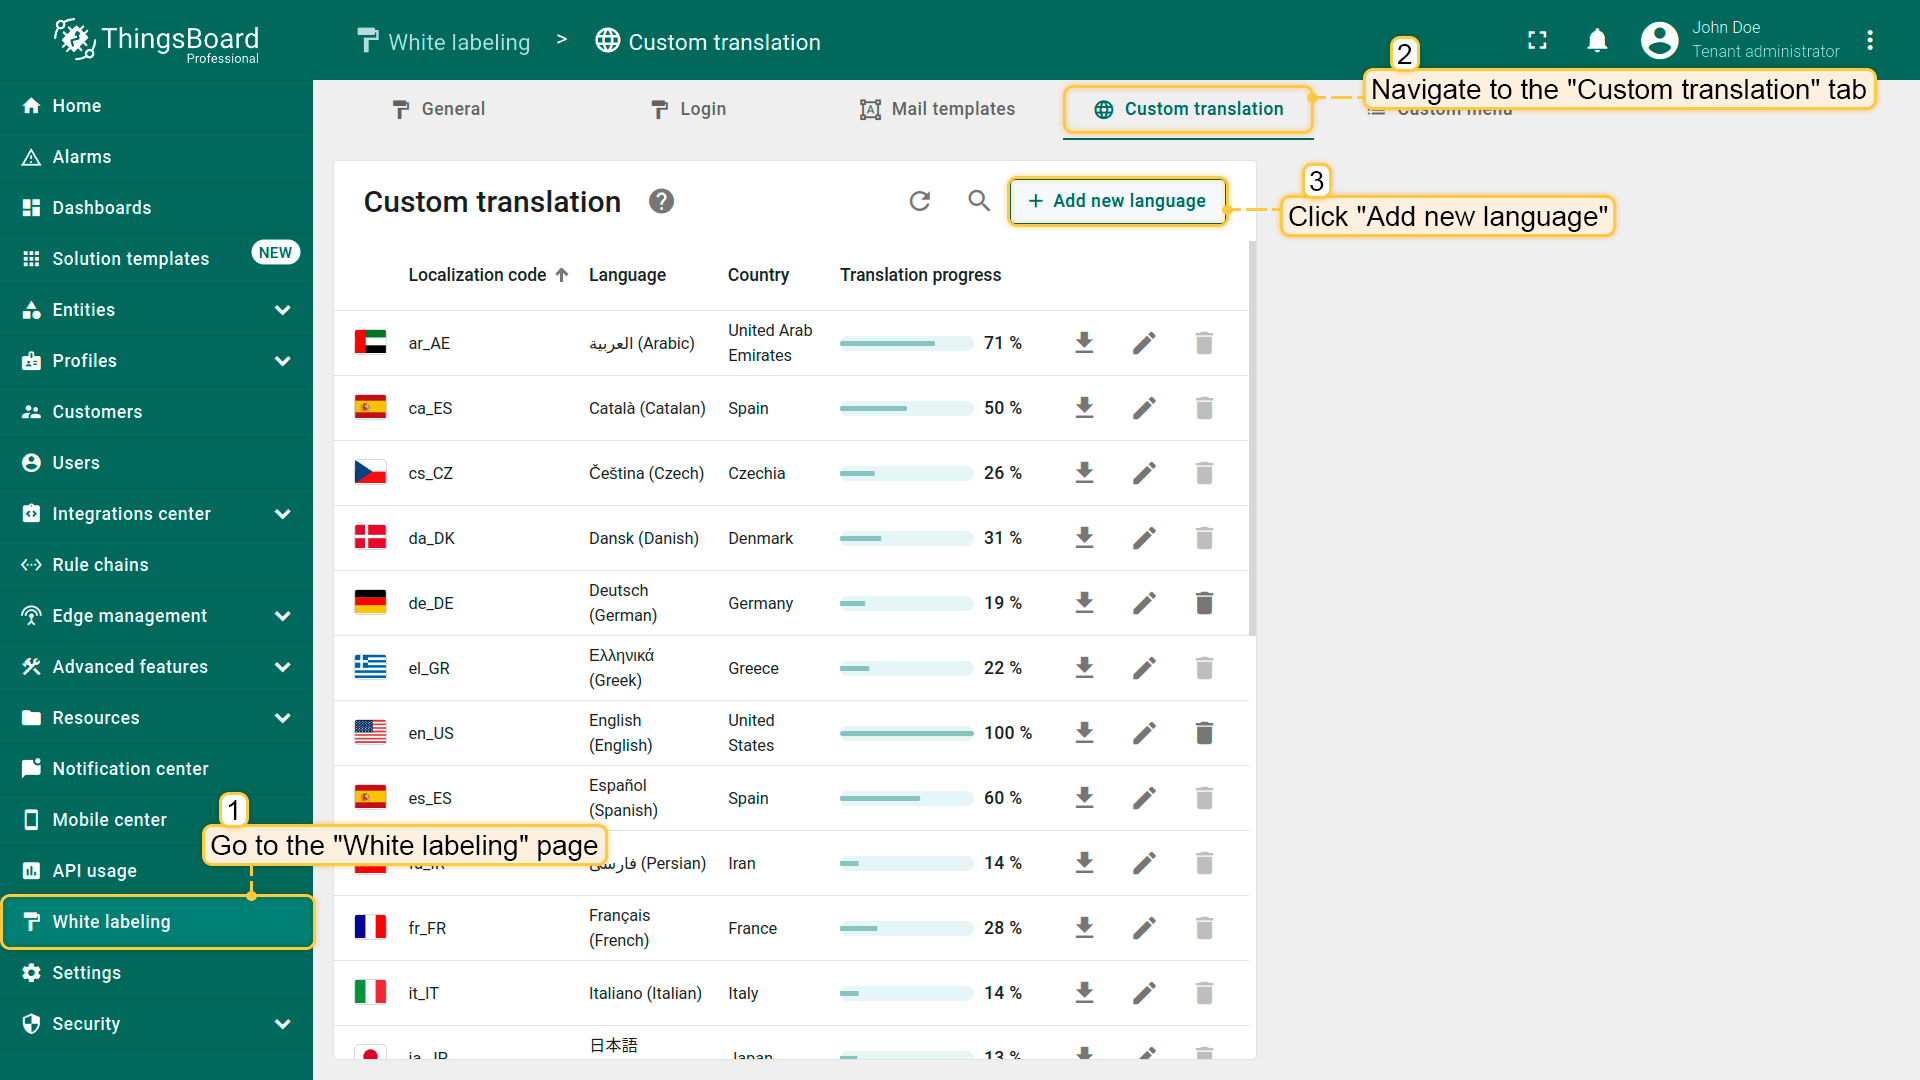
Go to the “Custom translation” tab of the “White labeling” page. Click the “Add new language” button in the upper-right corner.
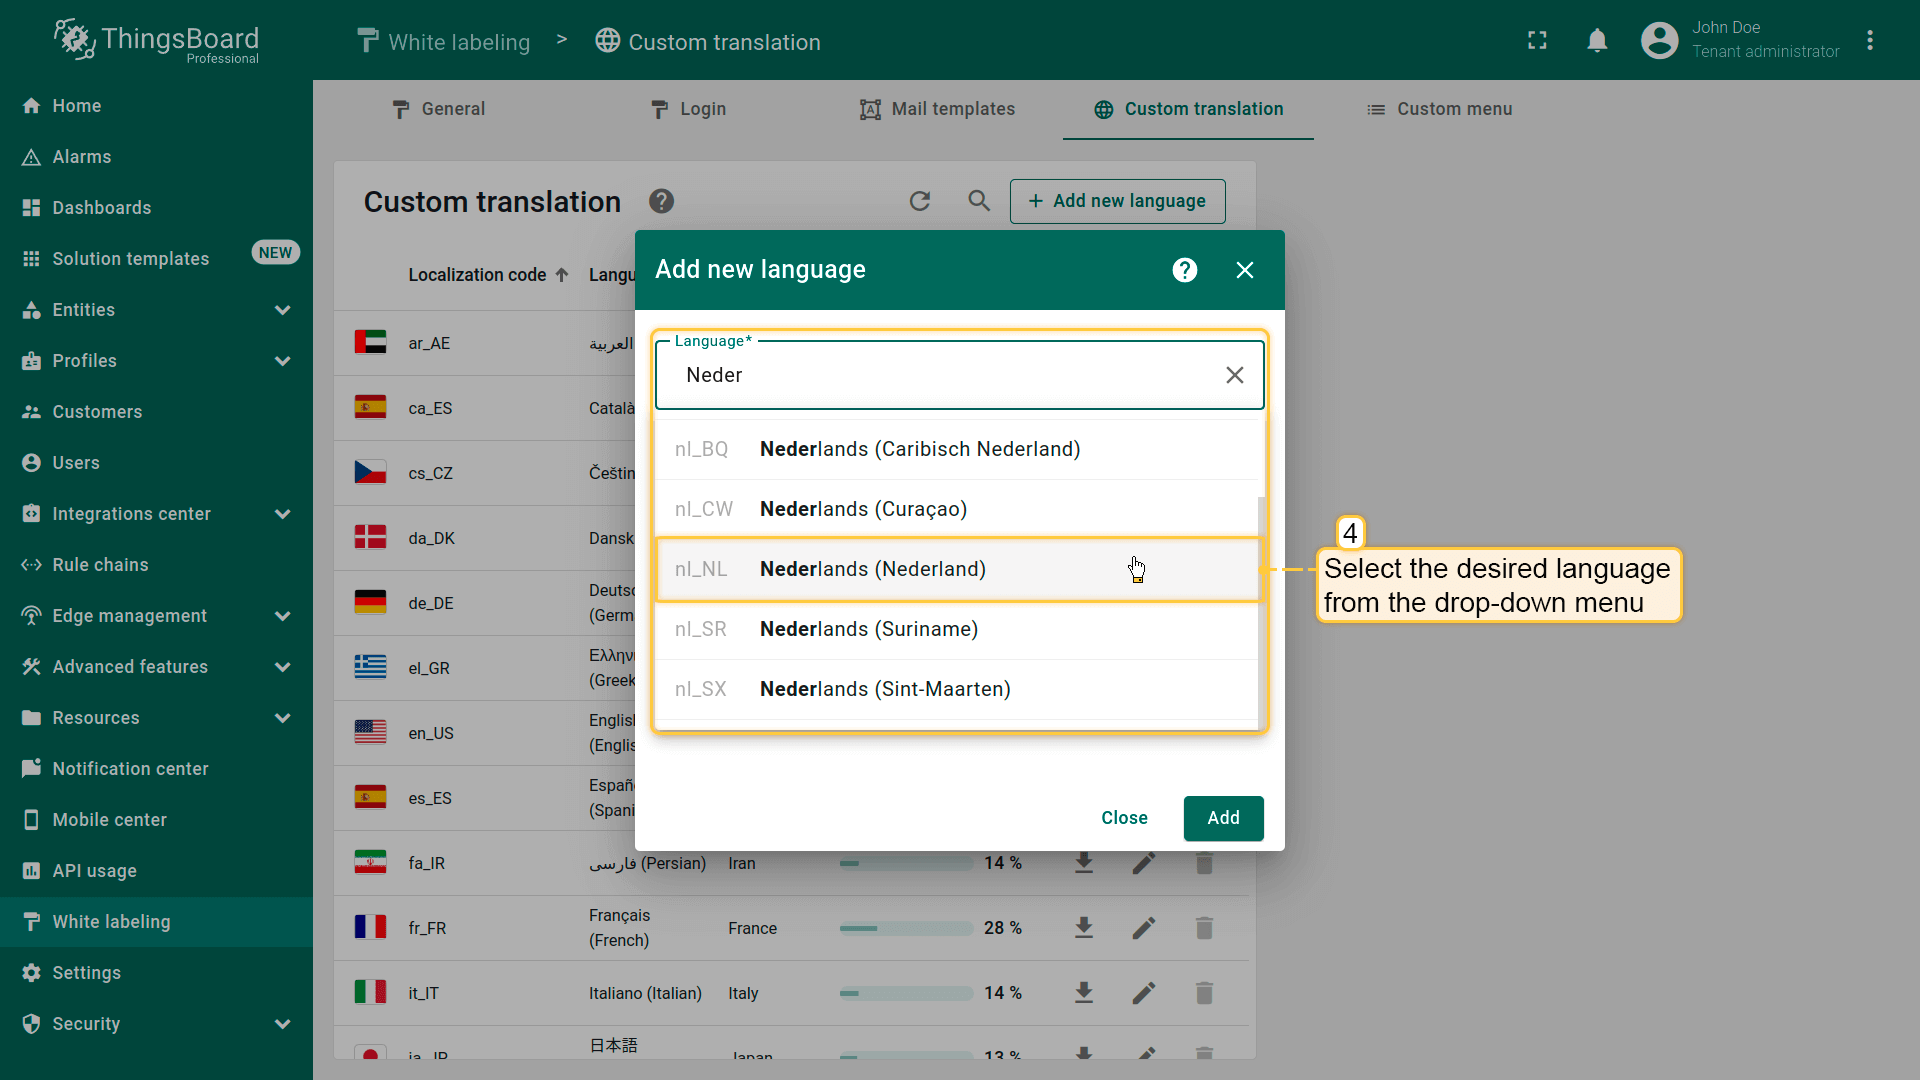
Select the desired language from the list.
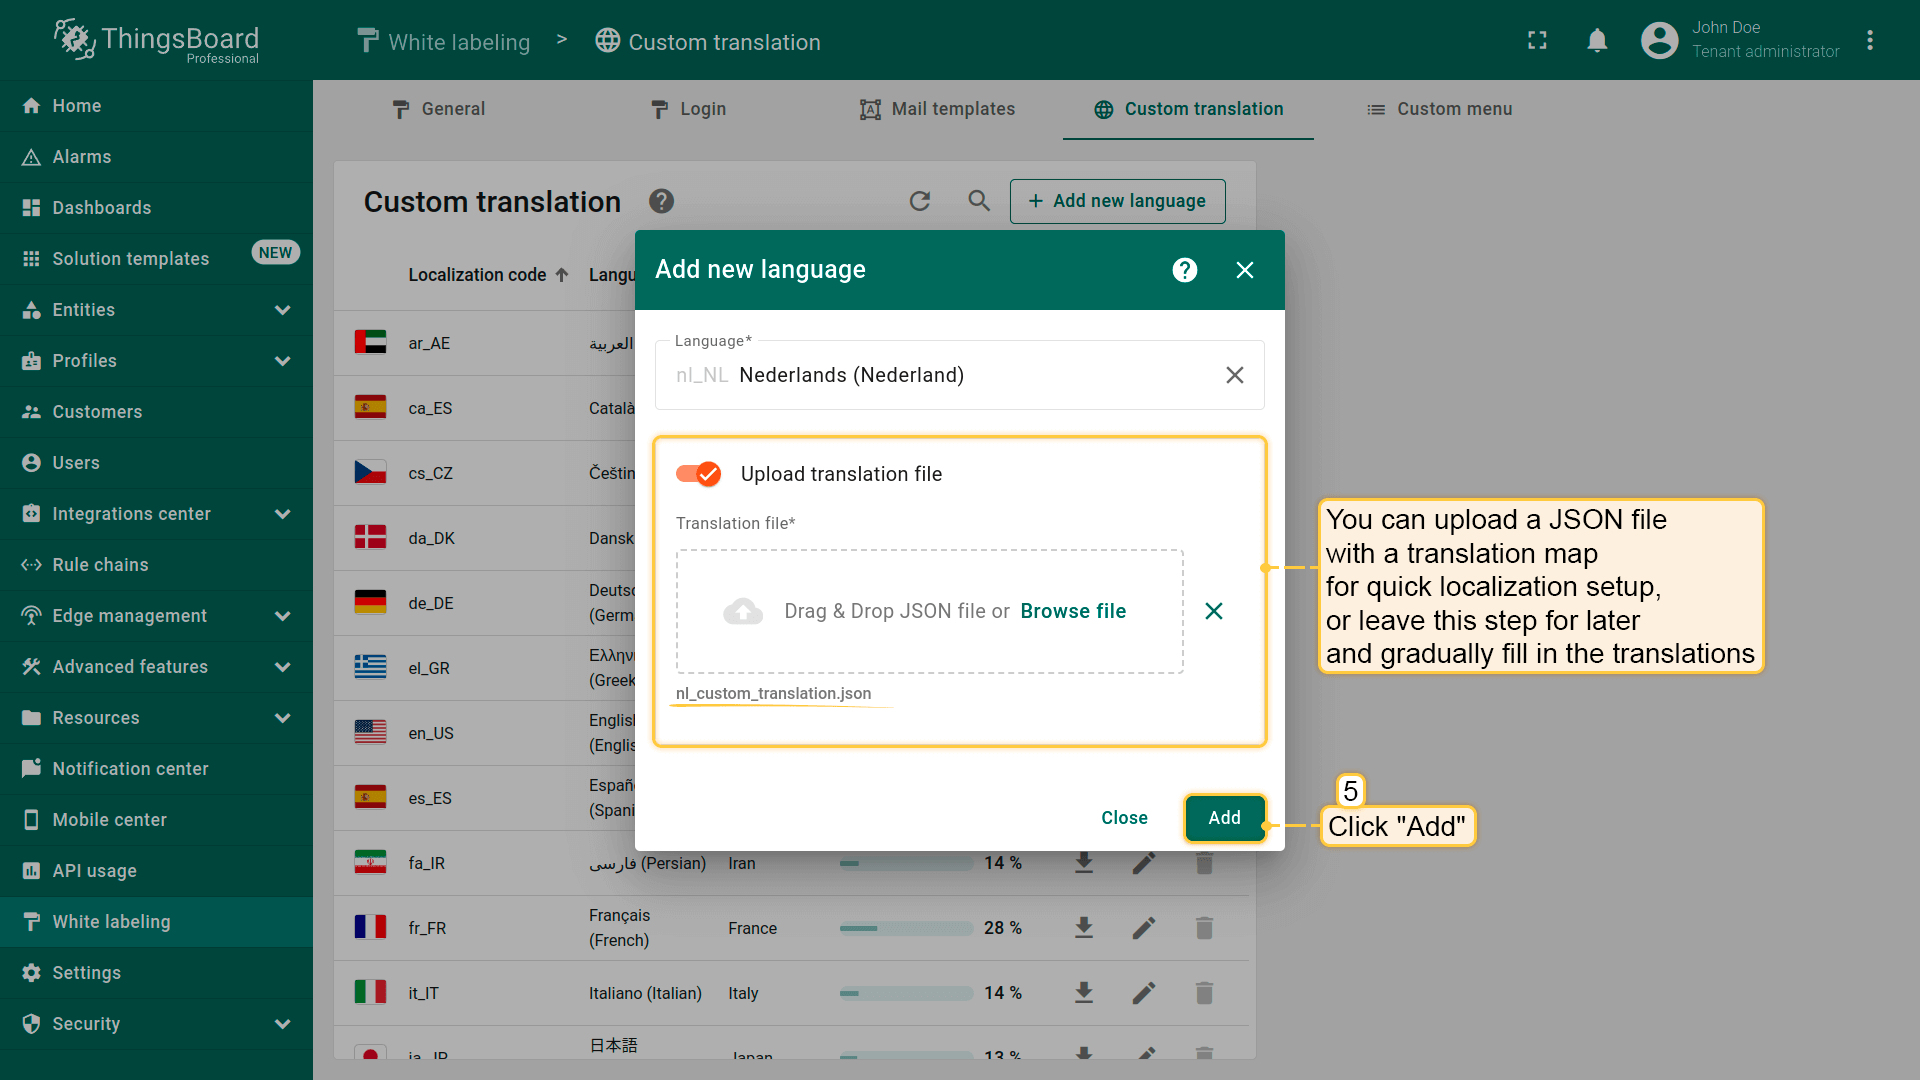
You can immediately upload a JSON file with a translation map for quick localization setup, or leave this step for later and gradually fill in the translations. Then, click “Add”.
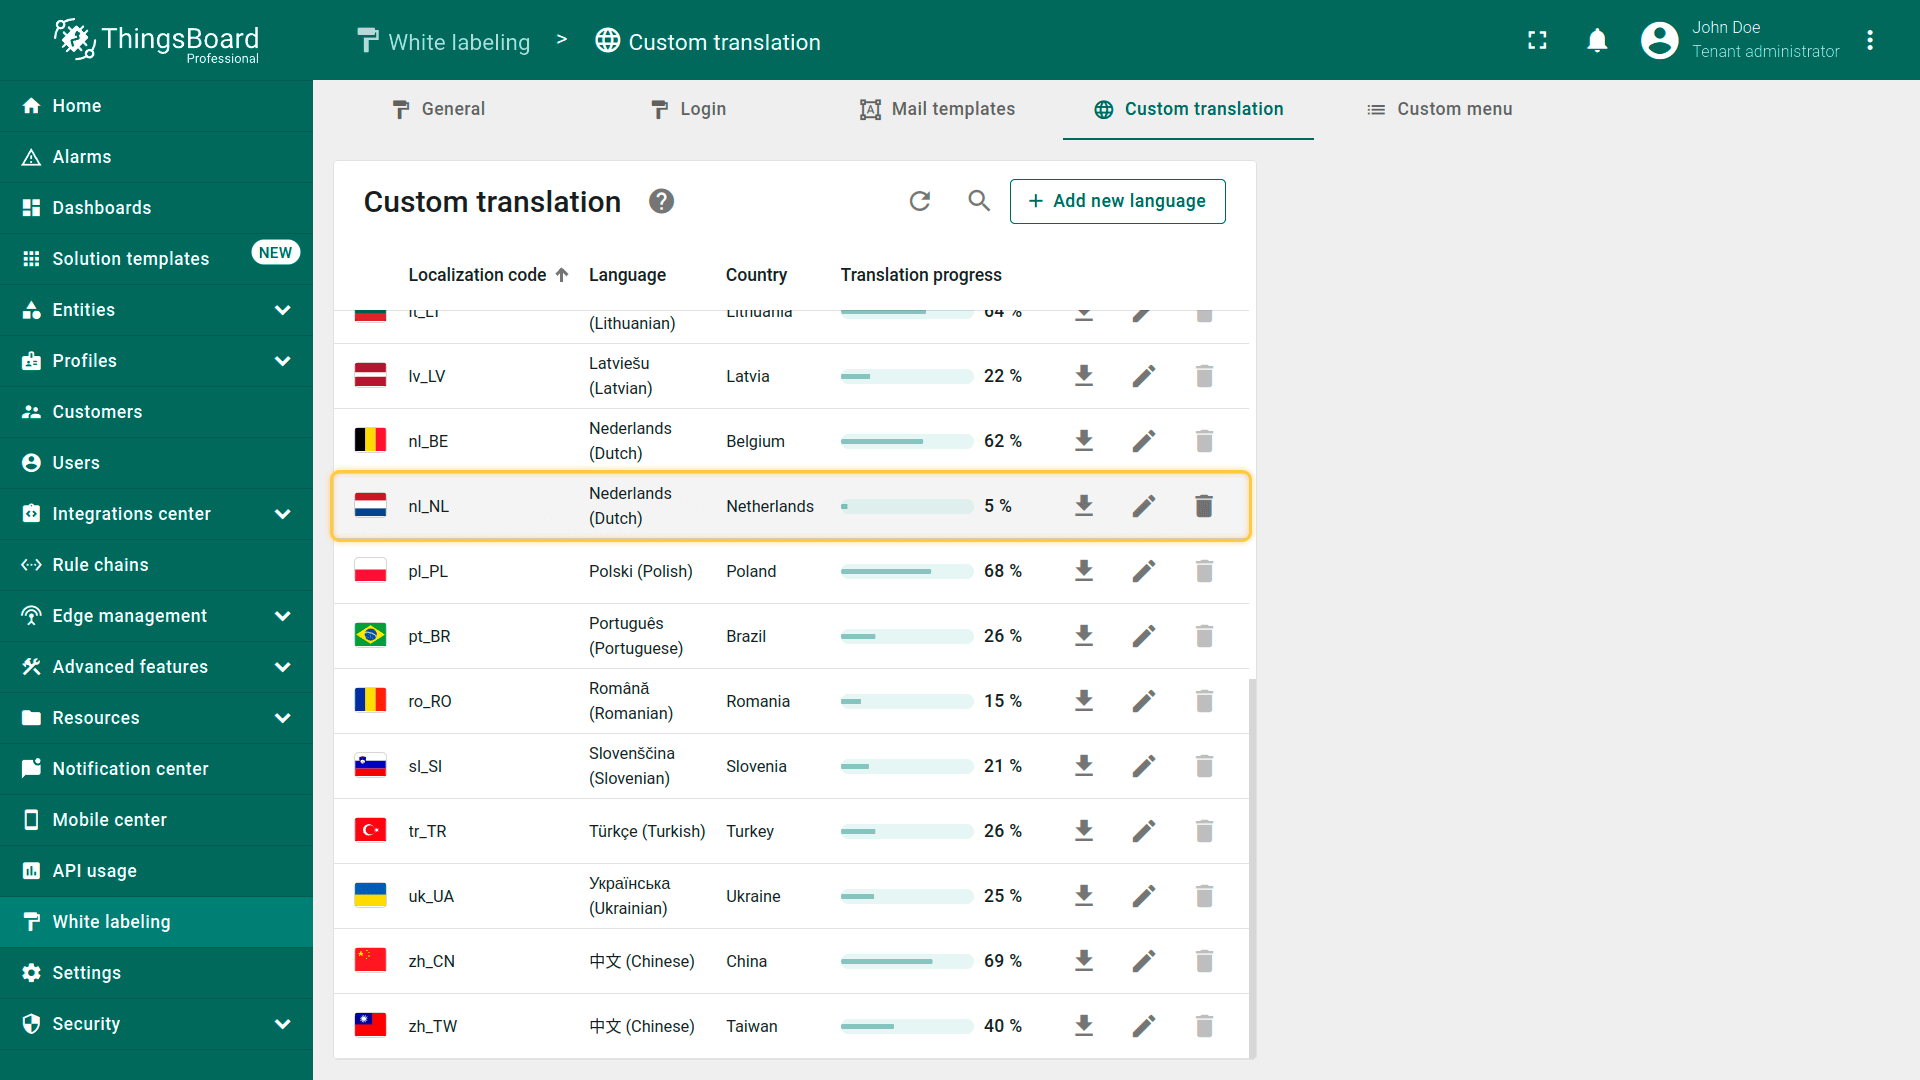
The new language has been successfully added. You and your users can now use it as the interface language for your instance. Since the JSON file I provided includes only a limited set of translation keys, the translation progress is currently at 5%. As you continue adding more translations, the progress indicator will automatically increase.
翻译编辑器
前往“白标”页面并打开“自定义翻译”选项卡。此处可见可用语言列表及以百分比显示的翻译进度。
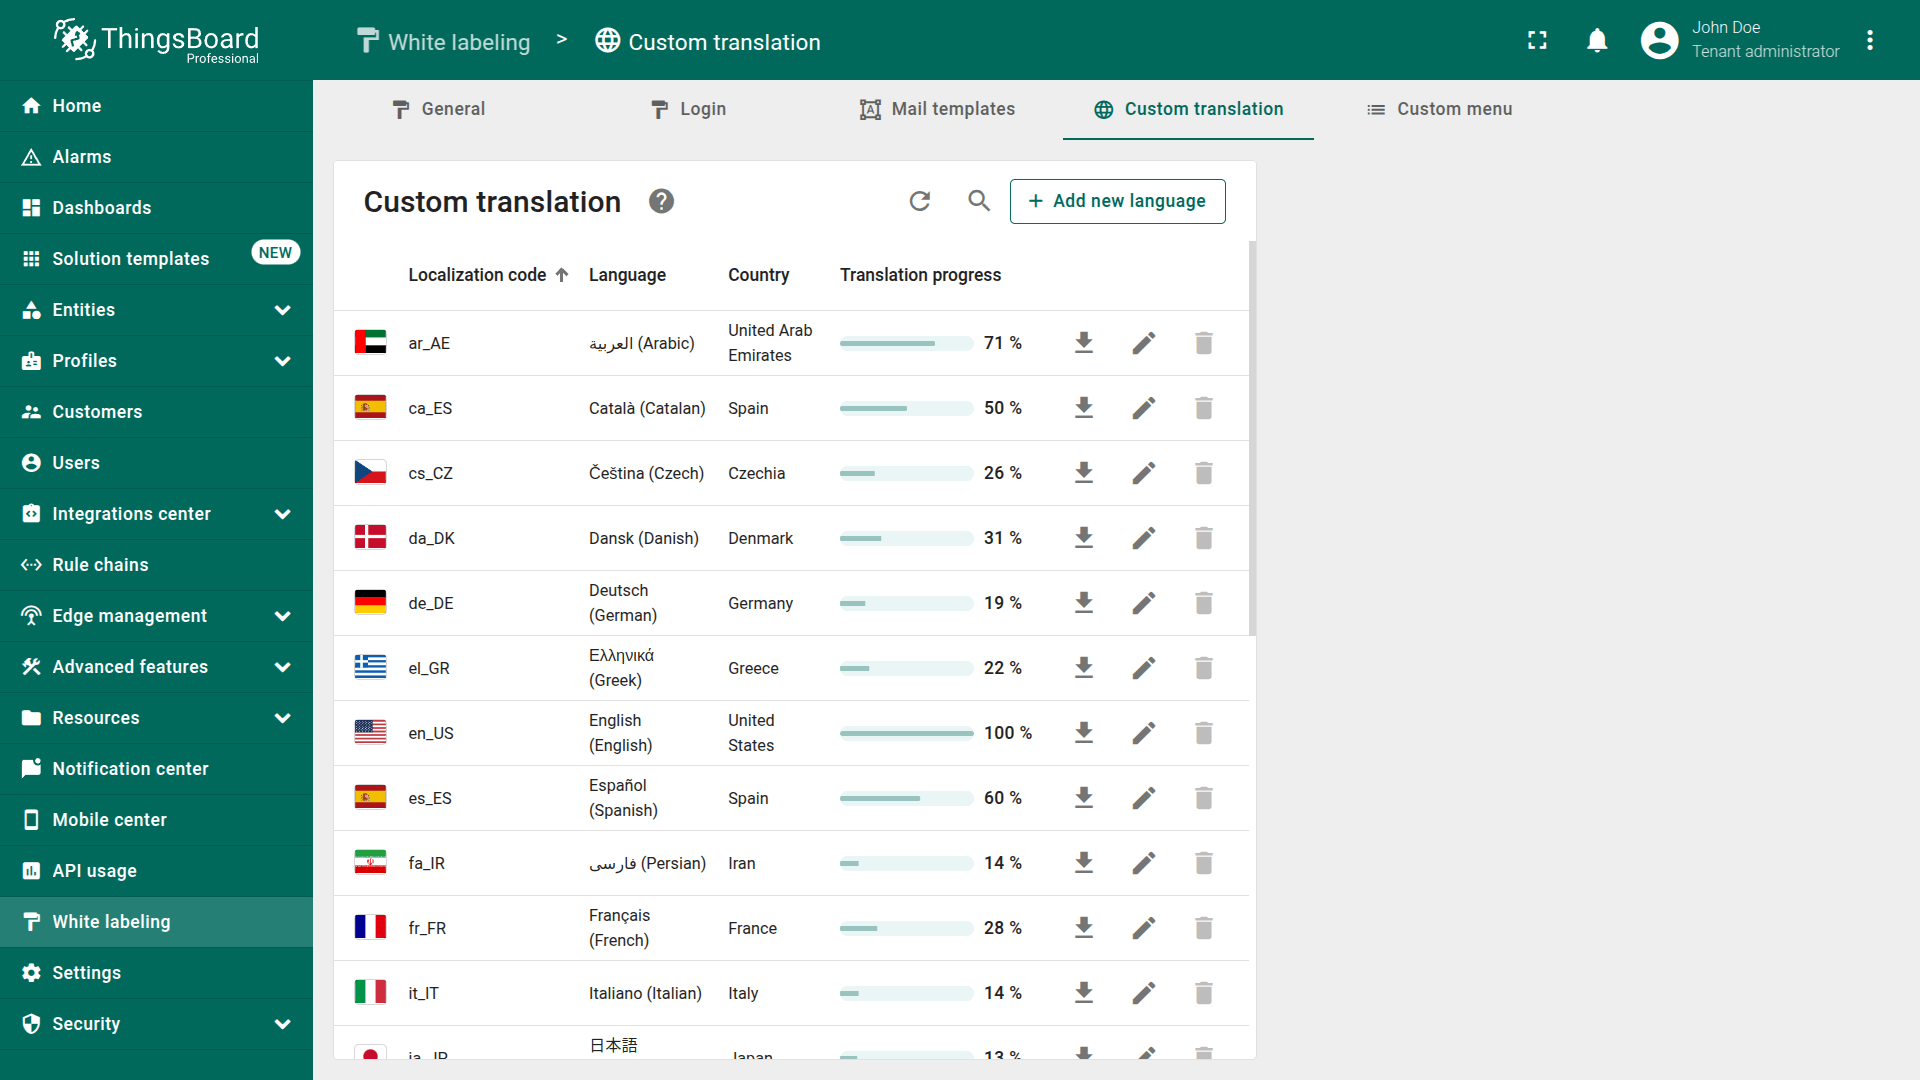
请注意:自定义翻译初始列表由系统管理员创建。租户不能删除系统的自定义翻译,但可修改并添加新翻译。
可修改或扩展任一语言的翻译。点击要编辑的语言旁的”pencil”图标即可进入编辑。
右上角有一个开关,用于在基本设置和高级设置之间切换:
- 在”Basic”选项卡中,可编辑现有翻译键或添加新键。
- 在”Advanced”选项卡中,可上传包含翻译映射的JSON文件及其对应翻译。
下方是一个包含三列的表格:
- 术语键——用于将用户界面元素与其翻译关联。
- 英文键值输入字段——该值将作为所有未配置特定翻译的语言的回退值。
- 所选语言键值输入字段。
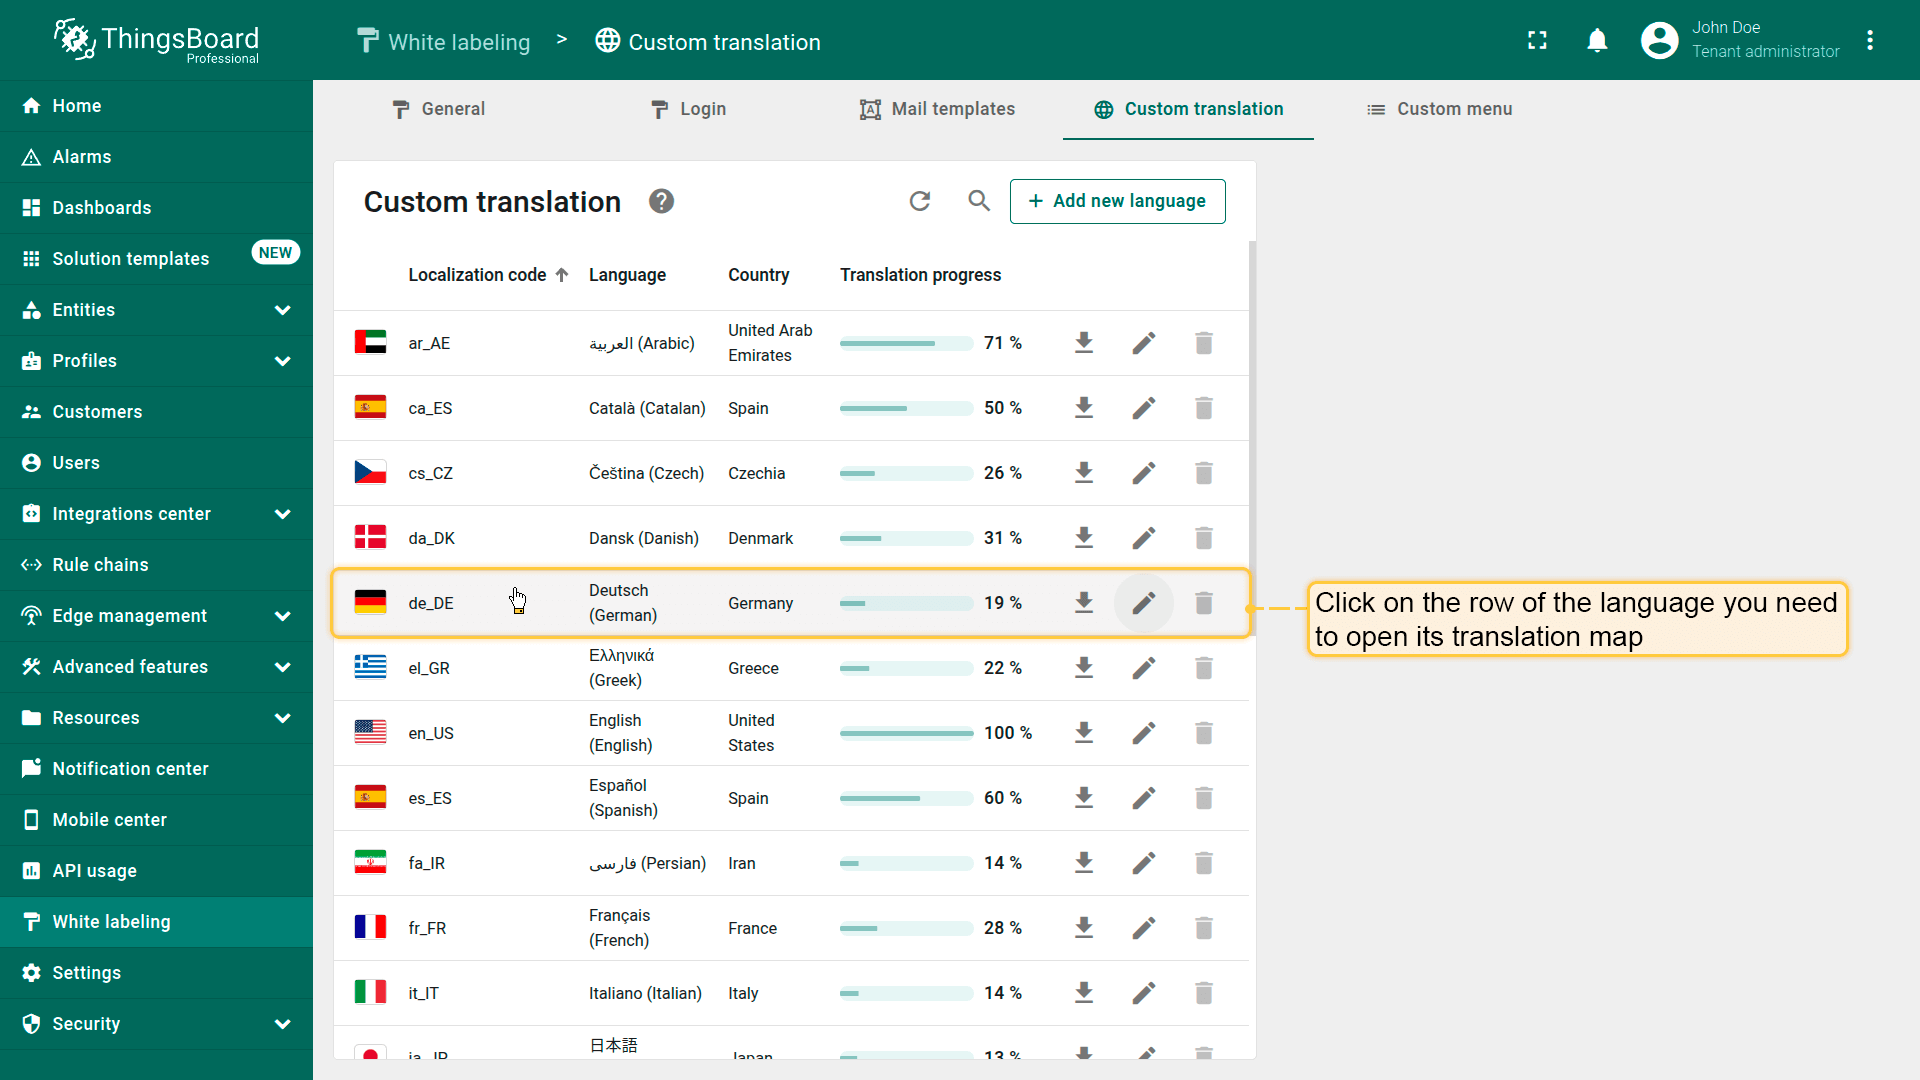
Click the “pencil” icon button next to the language you want to open the editor menu.
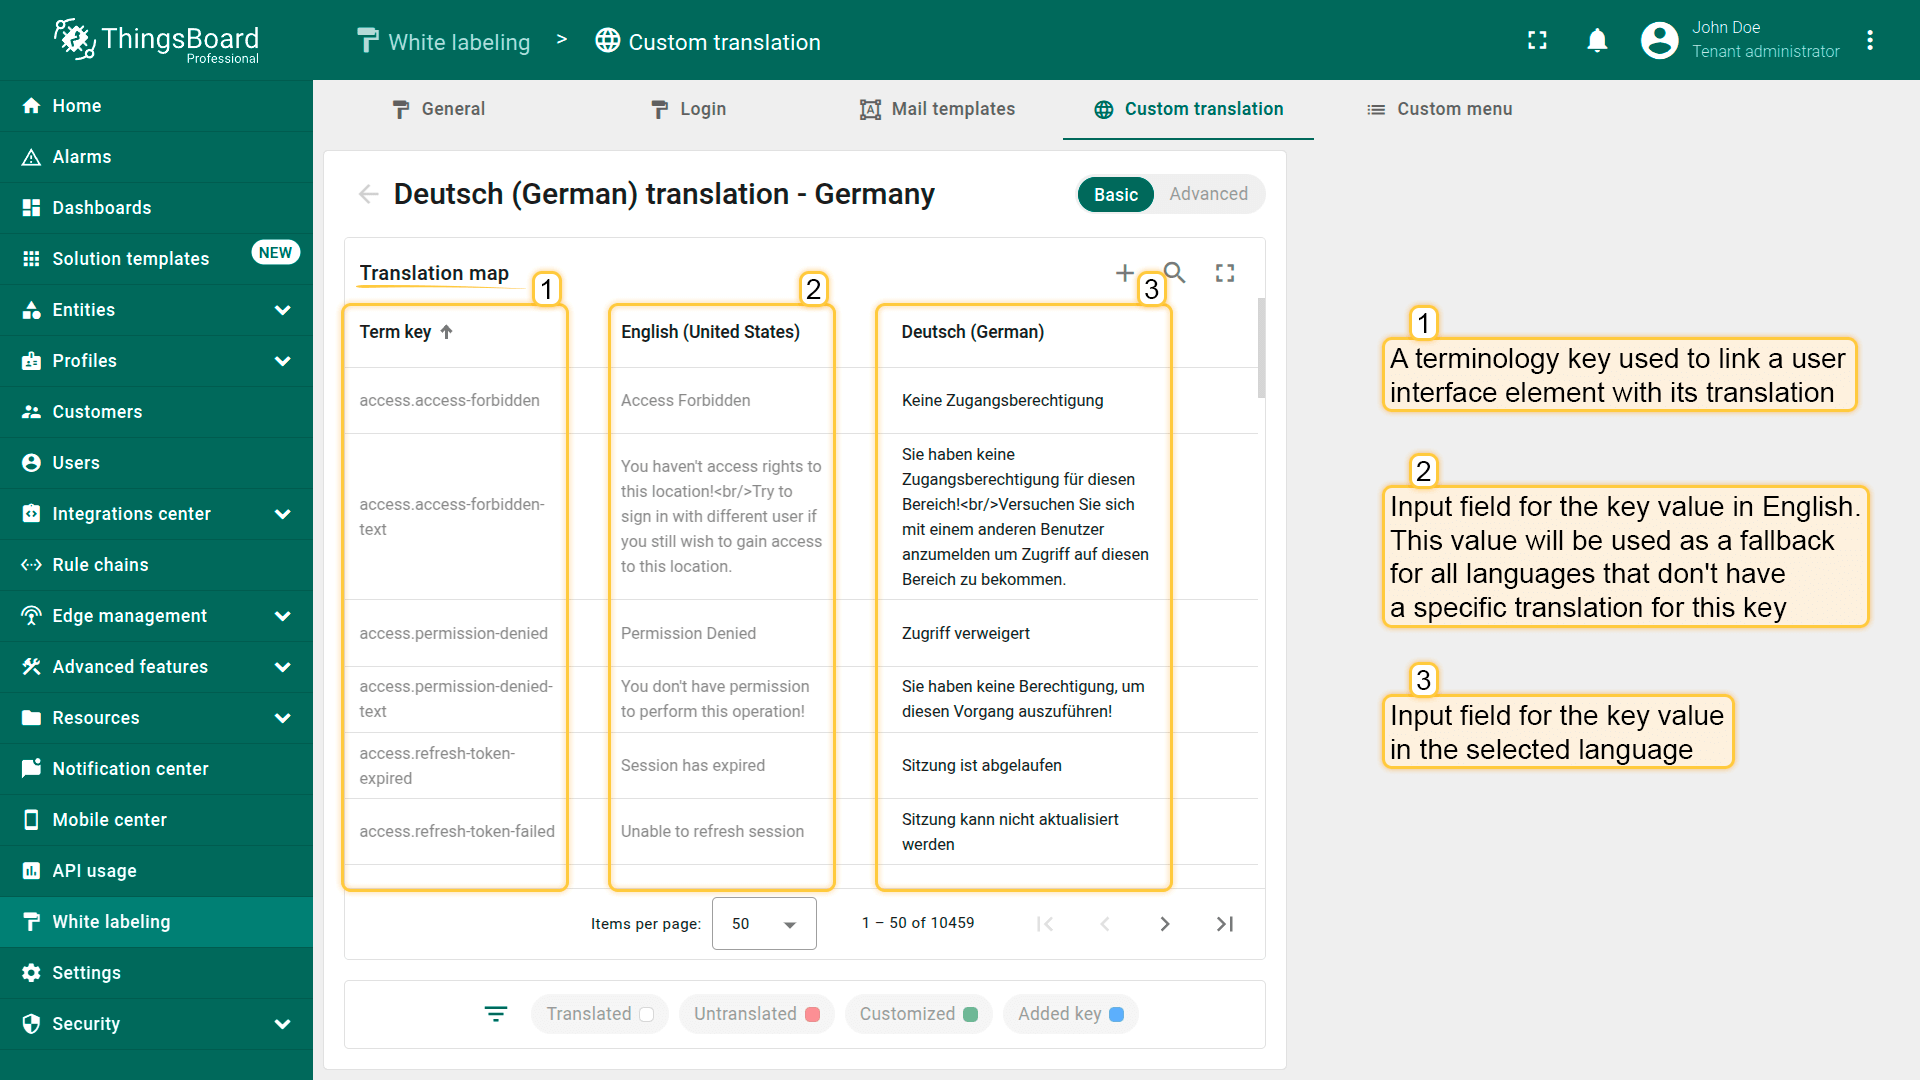
You'll see a table with three columns: The term key, which links an interface element to a translation; Input field for the key value in English. This value will be used as a fallback for all languages that don't have a specific translation for this key; Input field for the key value in the selected language.
筛选器
翻译映射表下方提供了便捷的筛选器,帮助定位特定键:
- “Translated“筛选器显示已有所选语言翻译的键。
- “Untranslated“显示仍缺少翻译的键。
- “Customized“筛选器仅高亮显示用户手动修改过翻译的键。
- “Added key“显示手动添加到本地化文件中的键。
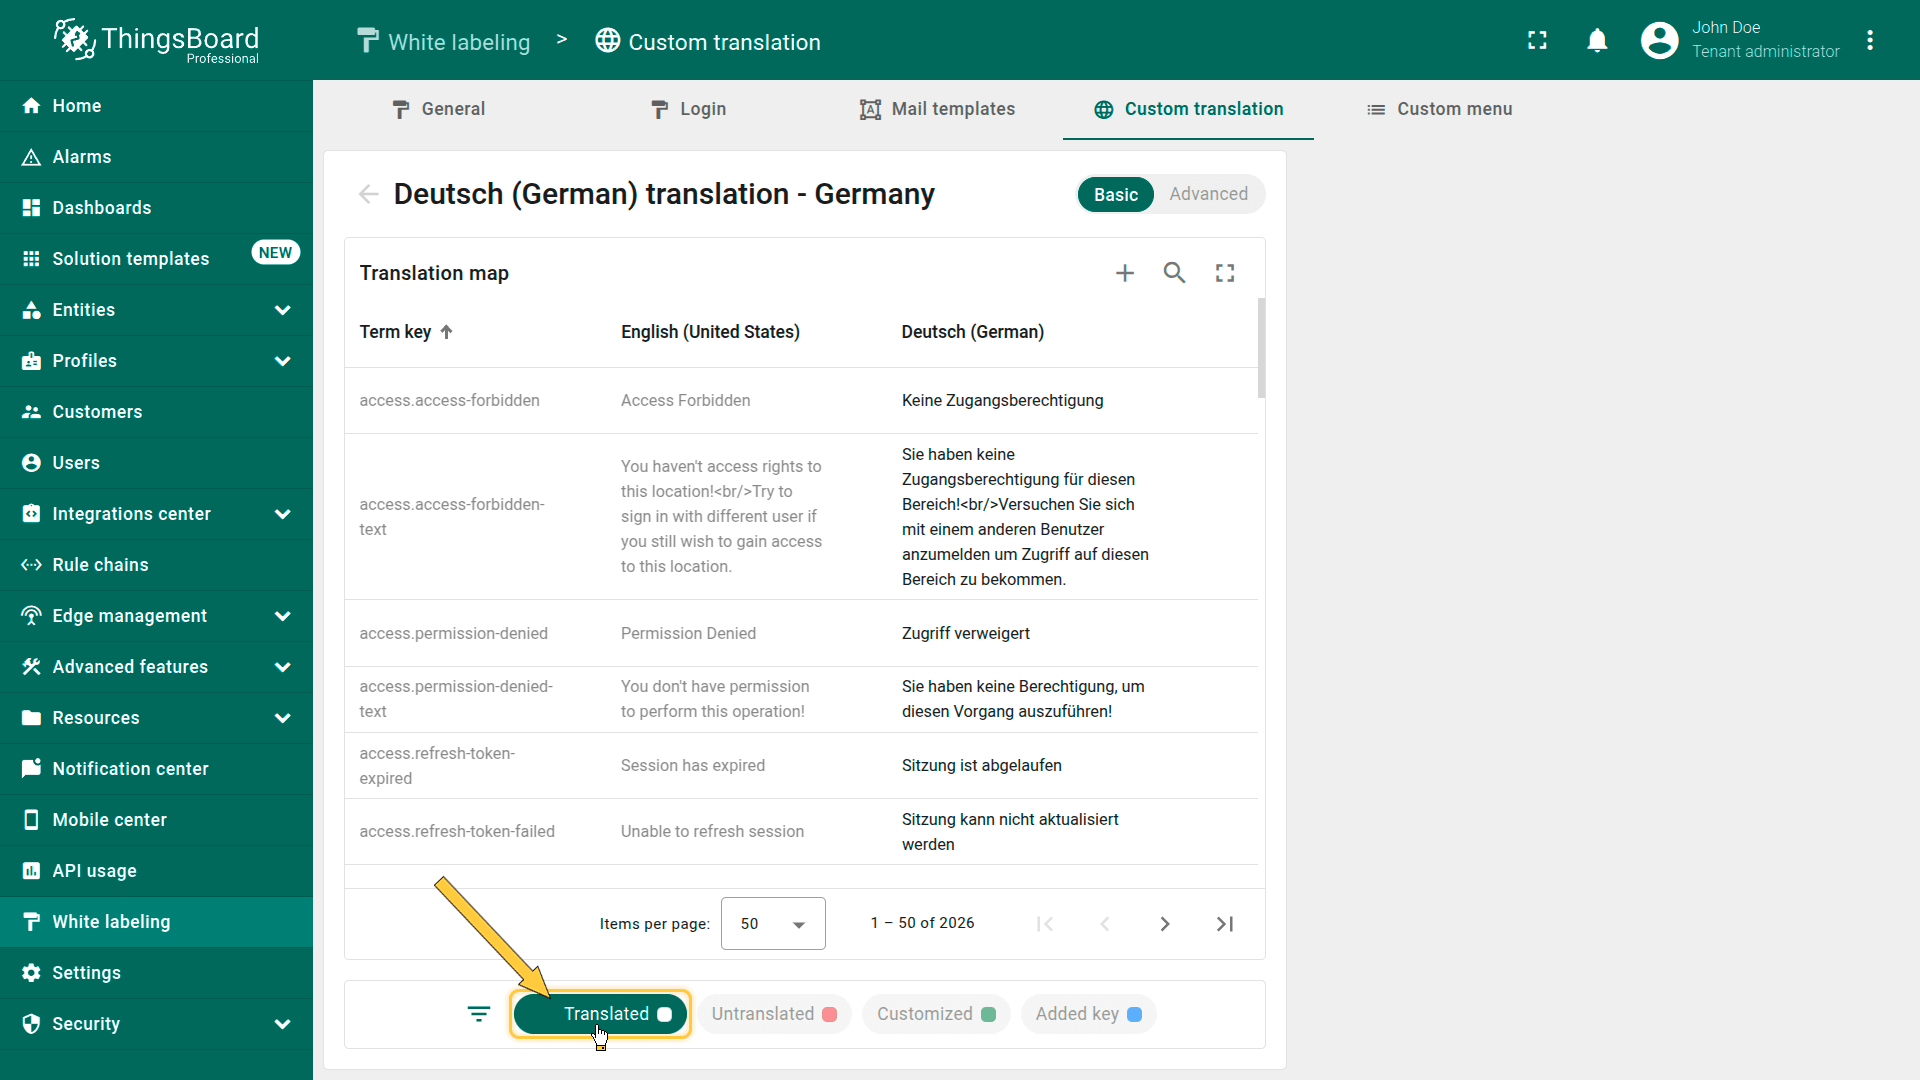
The “Translated” filter displays keys that already have a translation for the selected localization.
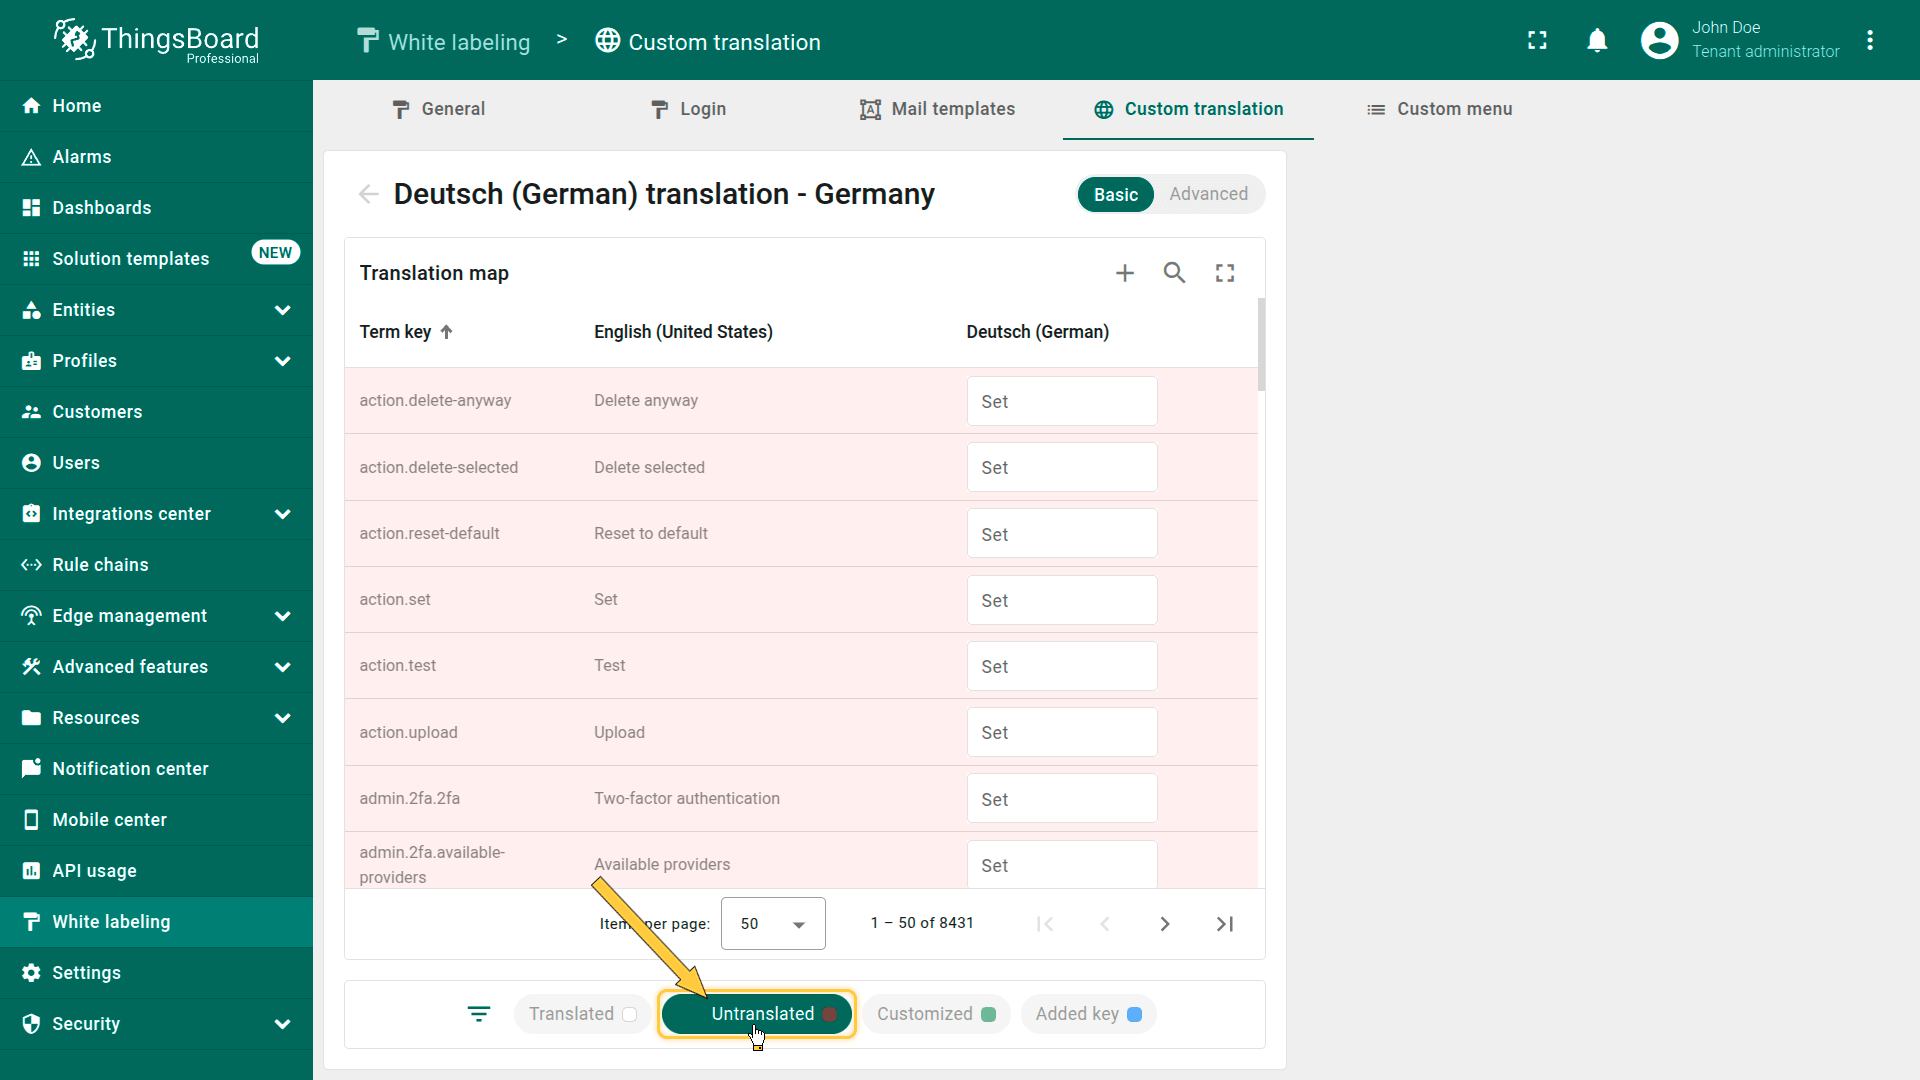
The “Untranslated” shows keys that are still missing translations.
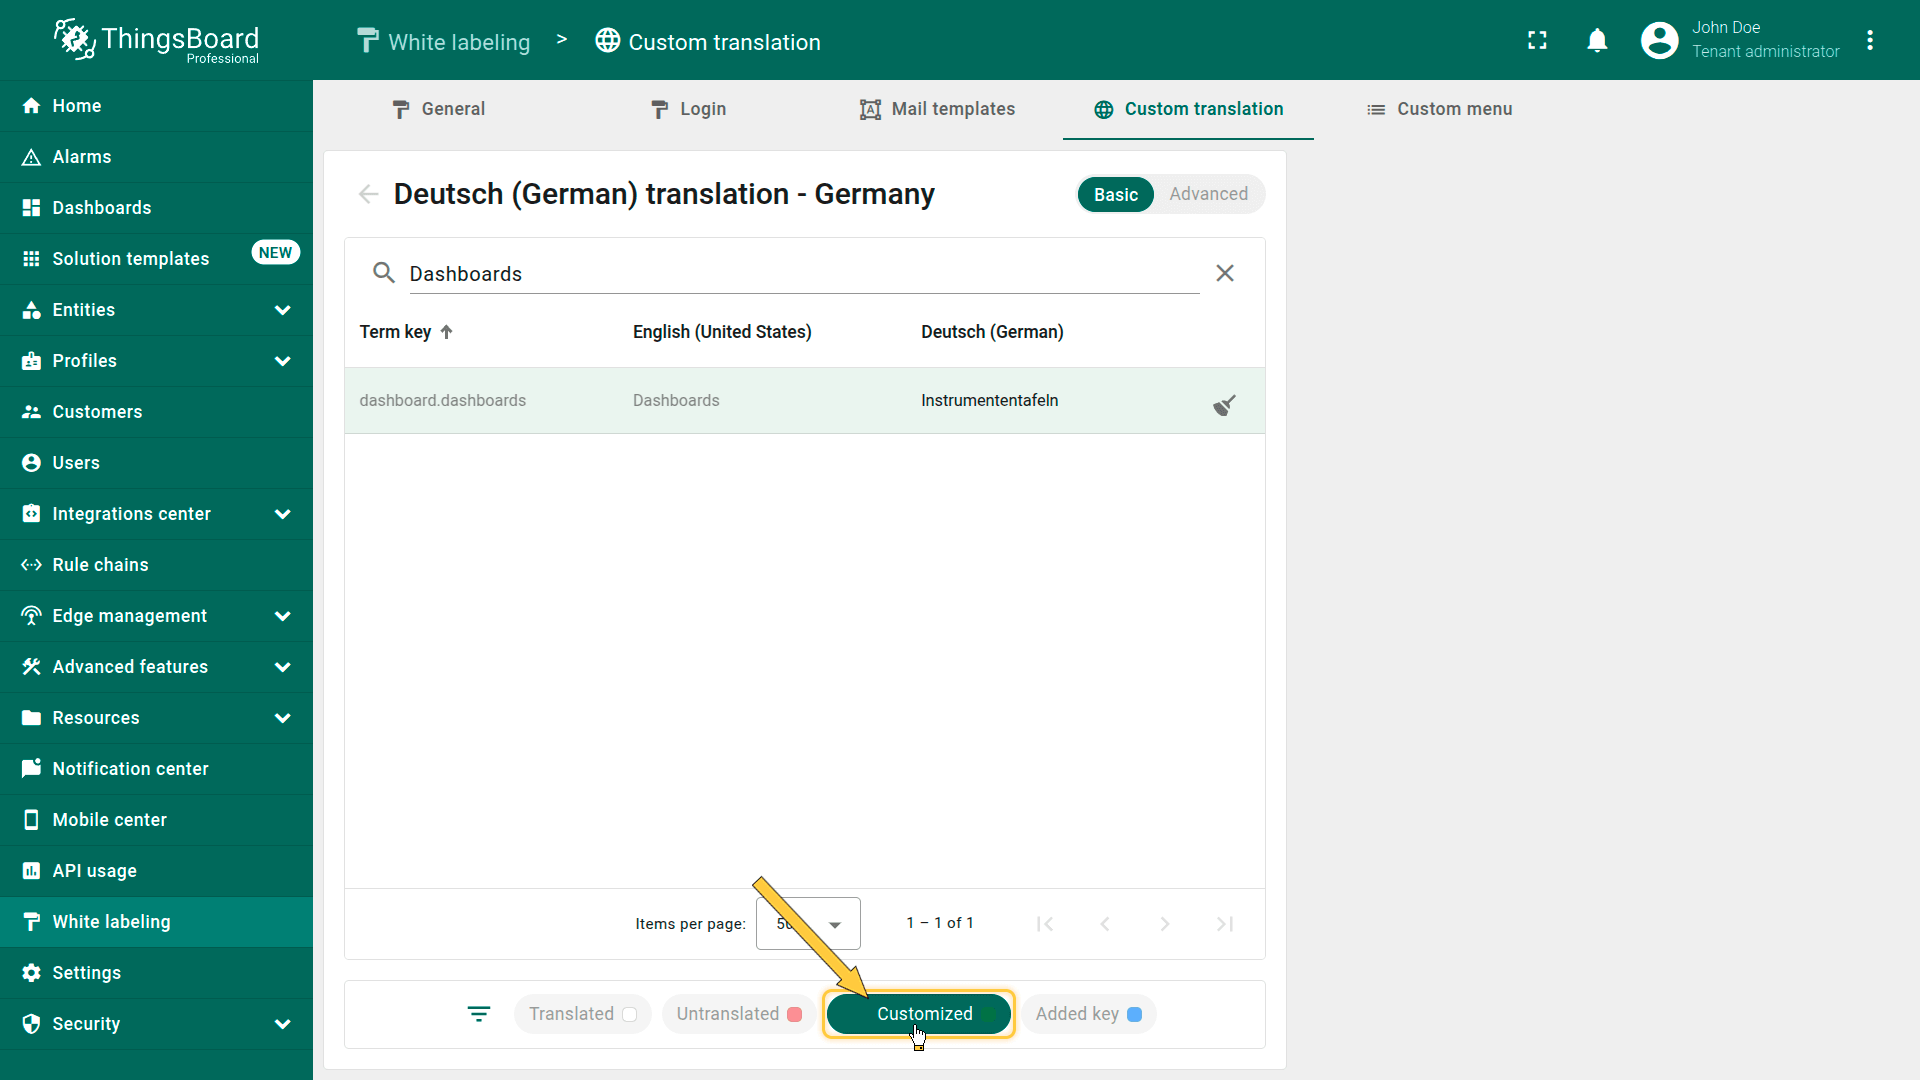
The “Customized” filter highlights only the keys whose translations have been manually modified by the user.
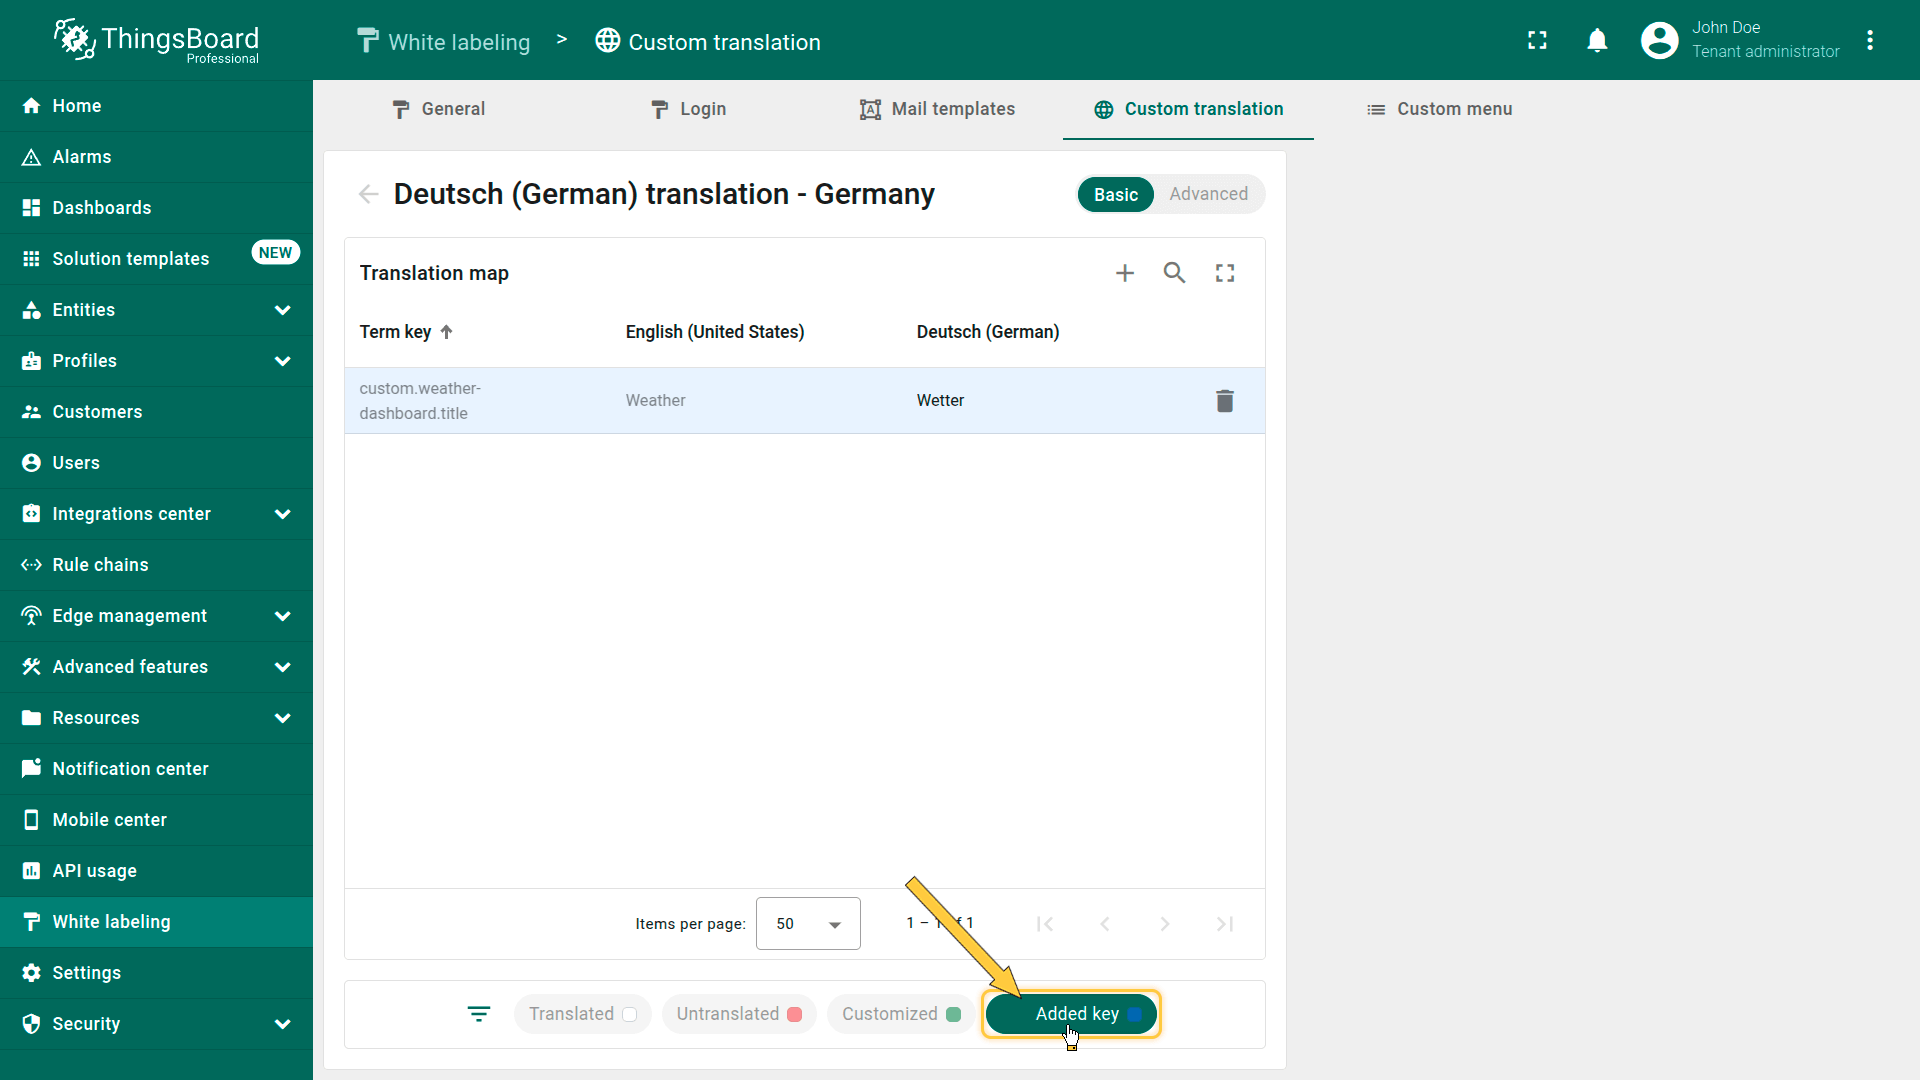
The “Added key” shows the keys that were manually added to the localization file.
添加新翻译键
要添加新翻译键,请进入所需语言的翻译映射表并按以下步骤操作:
- 点击右上角的加号图标。
- 表格下方将出现新行。在字段中填入相应值——输入键名、英文值及所选语言的值。
- 然后点击输入字段外的任意位置以应用更改。
新创建的键将添加到语言列表中的每种语言。除非您提供自定义翻译,否则所有语言将使用英文值作为默认键值。
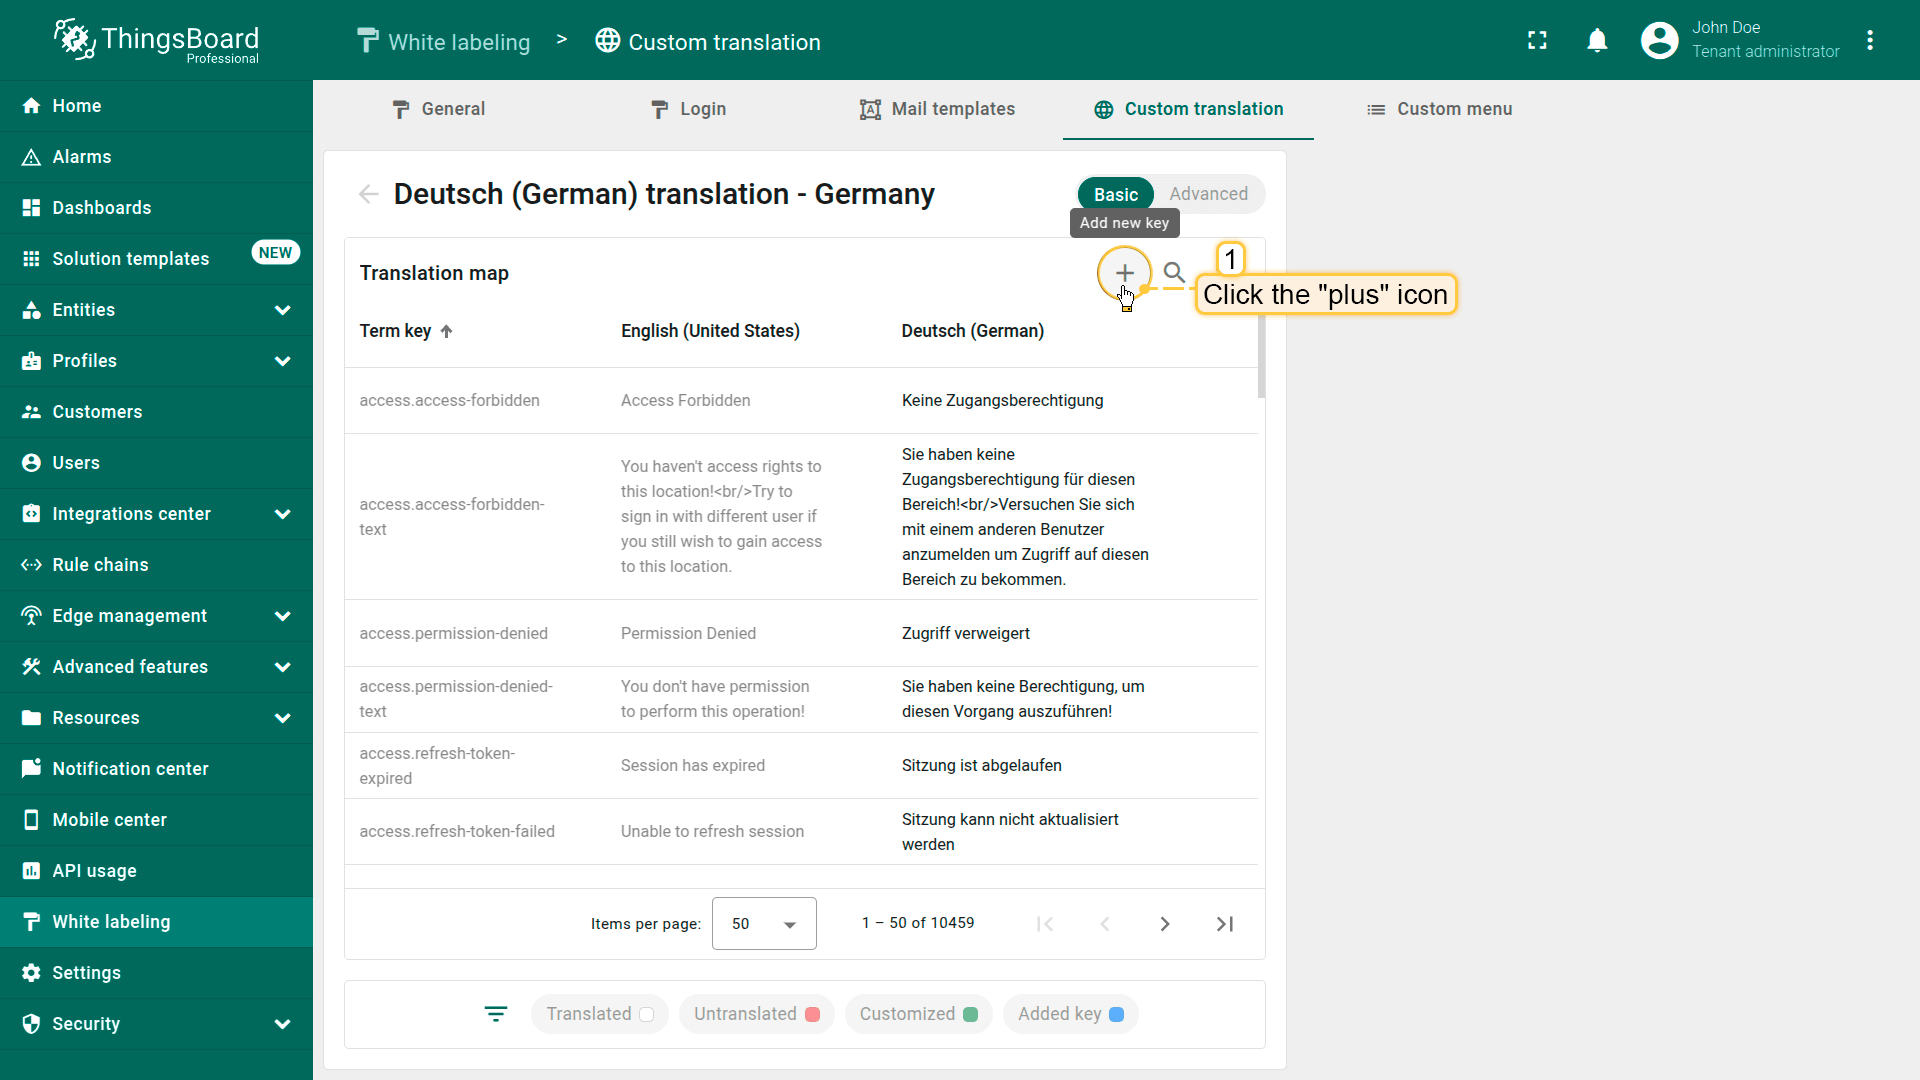
Go to the translation map of the desired language and click the “plus” icon in the top-right corner.
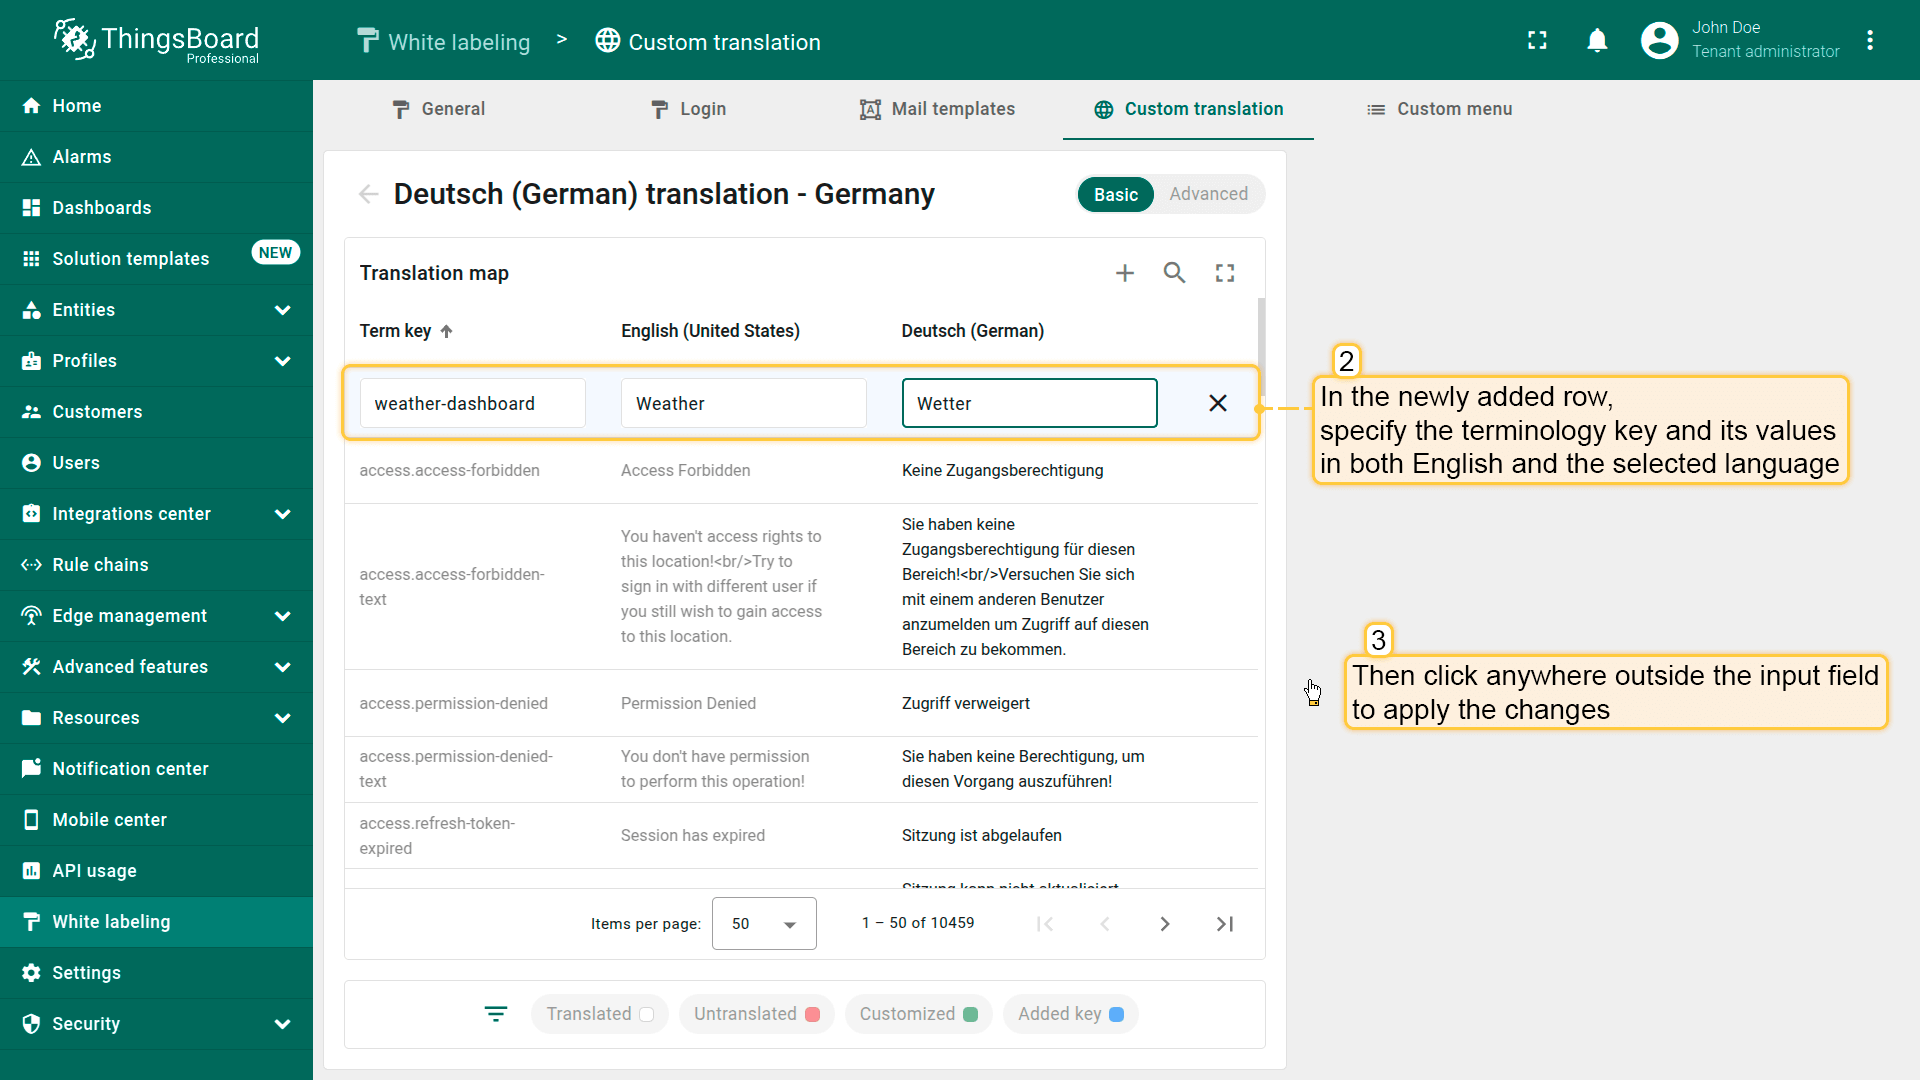
A new row will appear in the table below. Fill in the fields with the appropriate values — enter the key, its English value, and the value for the selected language. Then click anywhere outside the input field to apply the changes.
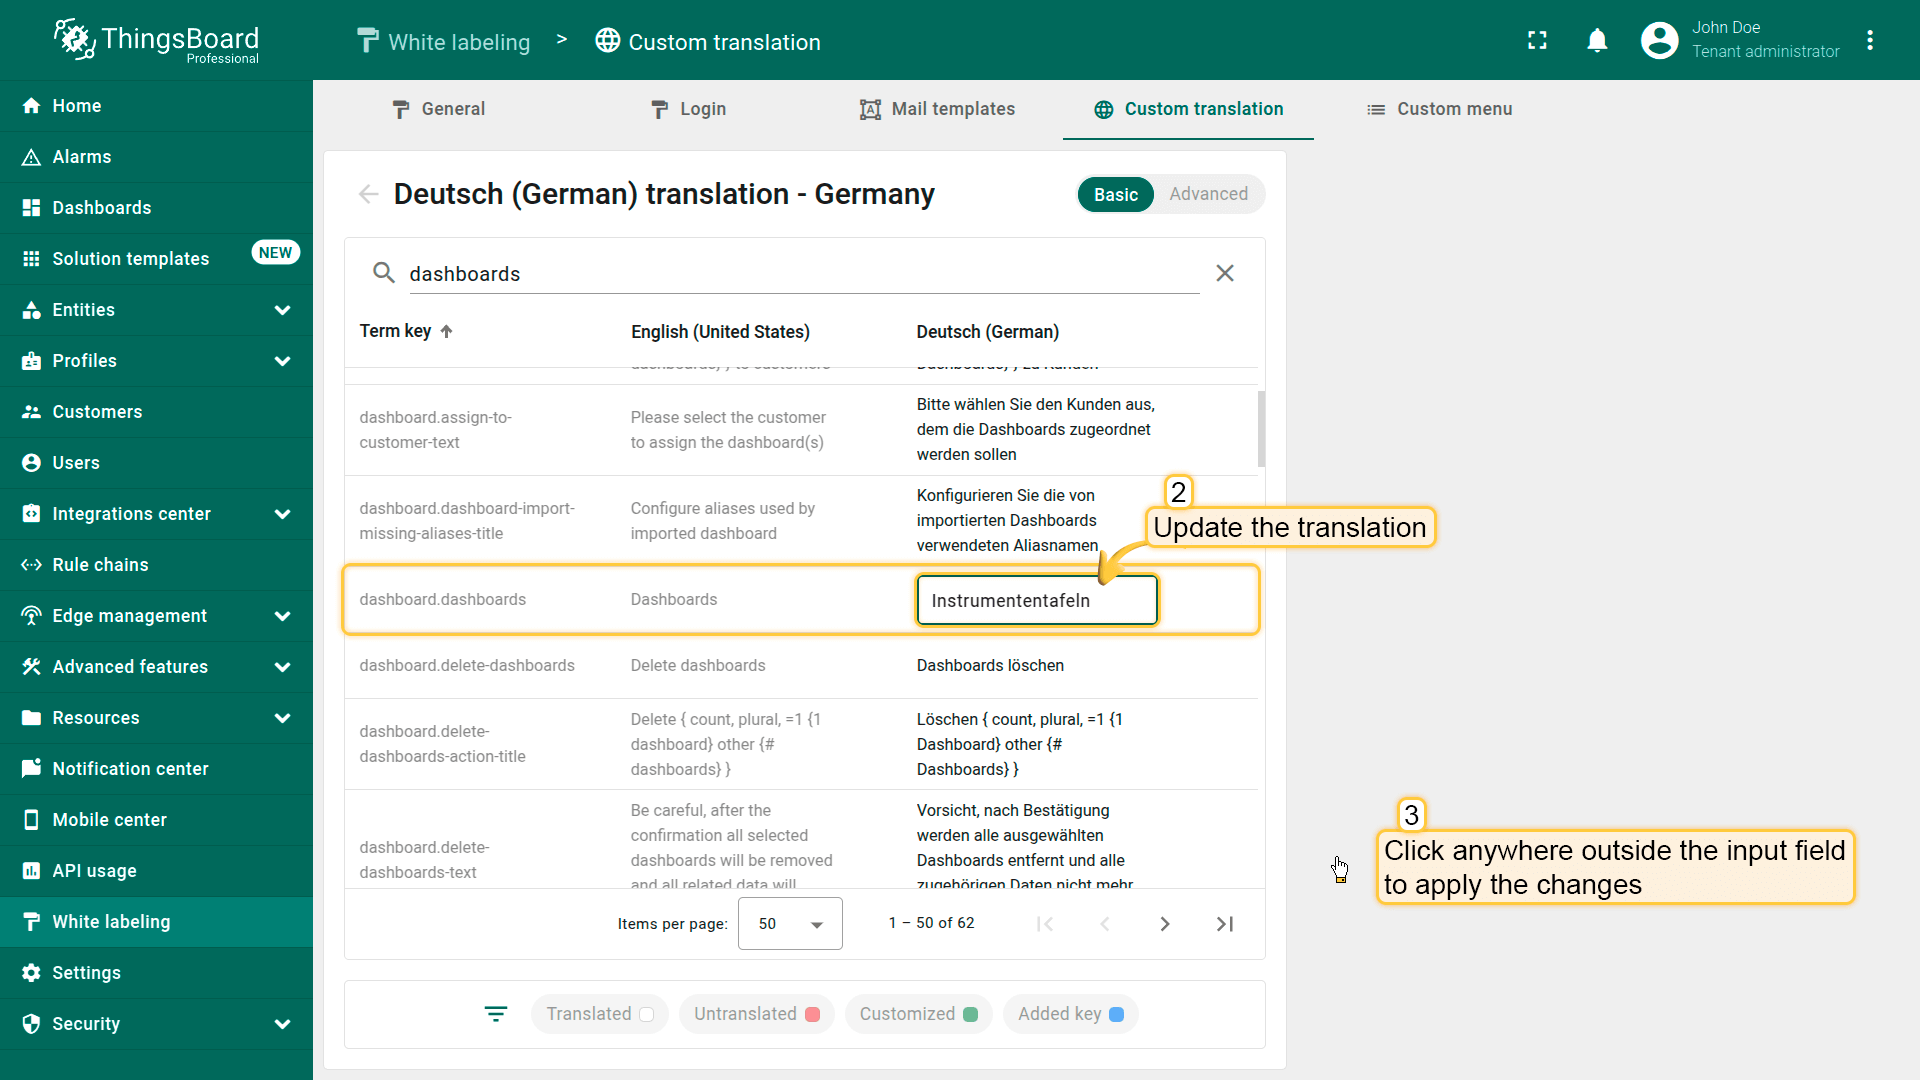
修改现有翻译
下面介绍如何编辑术语键的现有翻译:
-
Go to the language editing menu and use the search to find the key you want to edit.
-
Update the translation for that key.
-
Then click anywhere outside the input field to apply the changes.

Go to the language editing menu and use the search to find the key you want to edit.
Update the translation for that key.

Then click anywhere outside the input field to apply the changes.
要将键的翻译值重置为系统管理员定义的值,请点击该键所在行的”broom”图标。
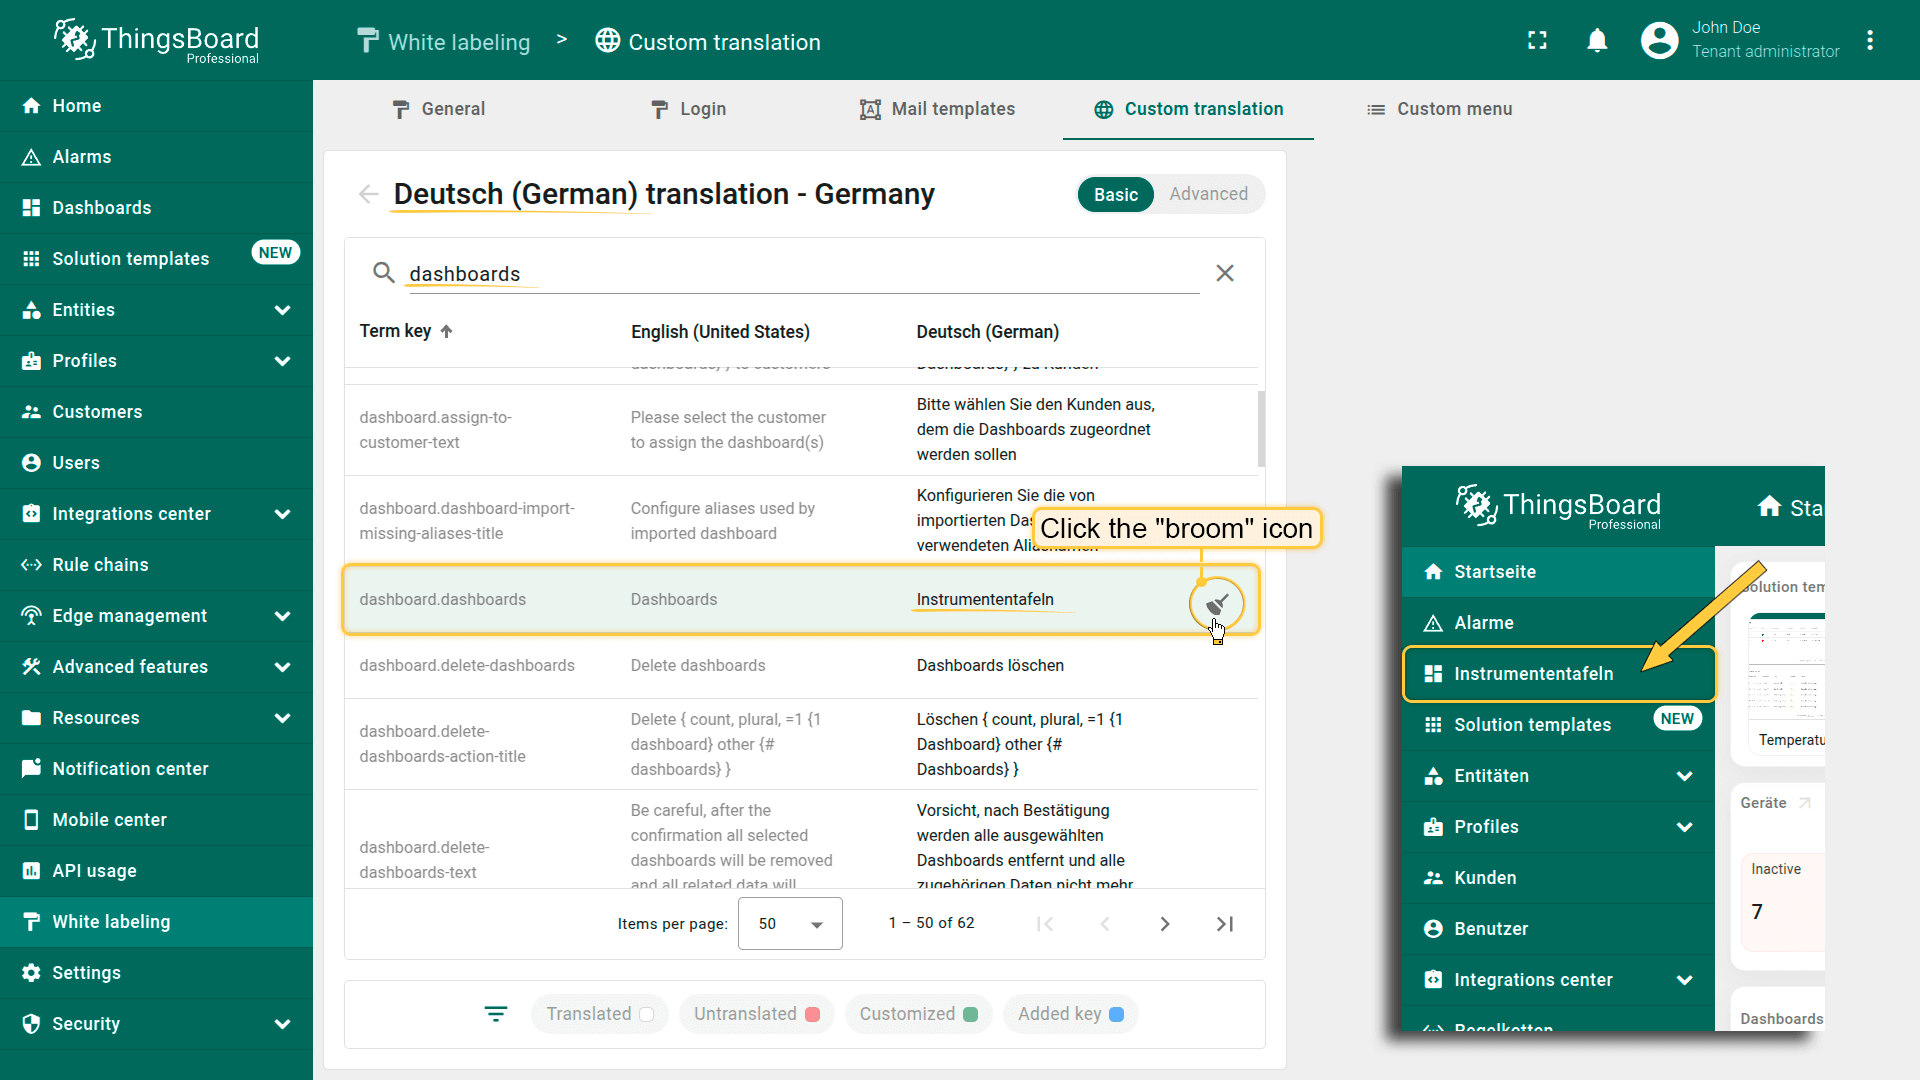
To reset the translation value of a key to the one defined by the system administrator, click the “broom” icon in that key's row.

The translation has been reset to the default value.
从JSON文件上传翻译映射
可上传包含翻译映射的JSON文件,其中包含键及其对应翻译。 当翻译键数量较多,通过基本界面手动创建过于耗时时,此选项非常实用。
- 进入语言编辑菜单。
- 切换到”Advanced”选项卡。
- 以JSON格式插入包含键及其对应翻译的翻译映射。
- 点击”Save”。
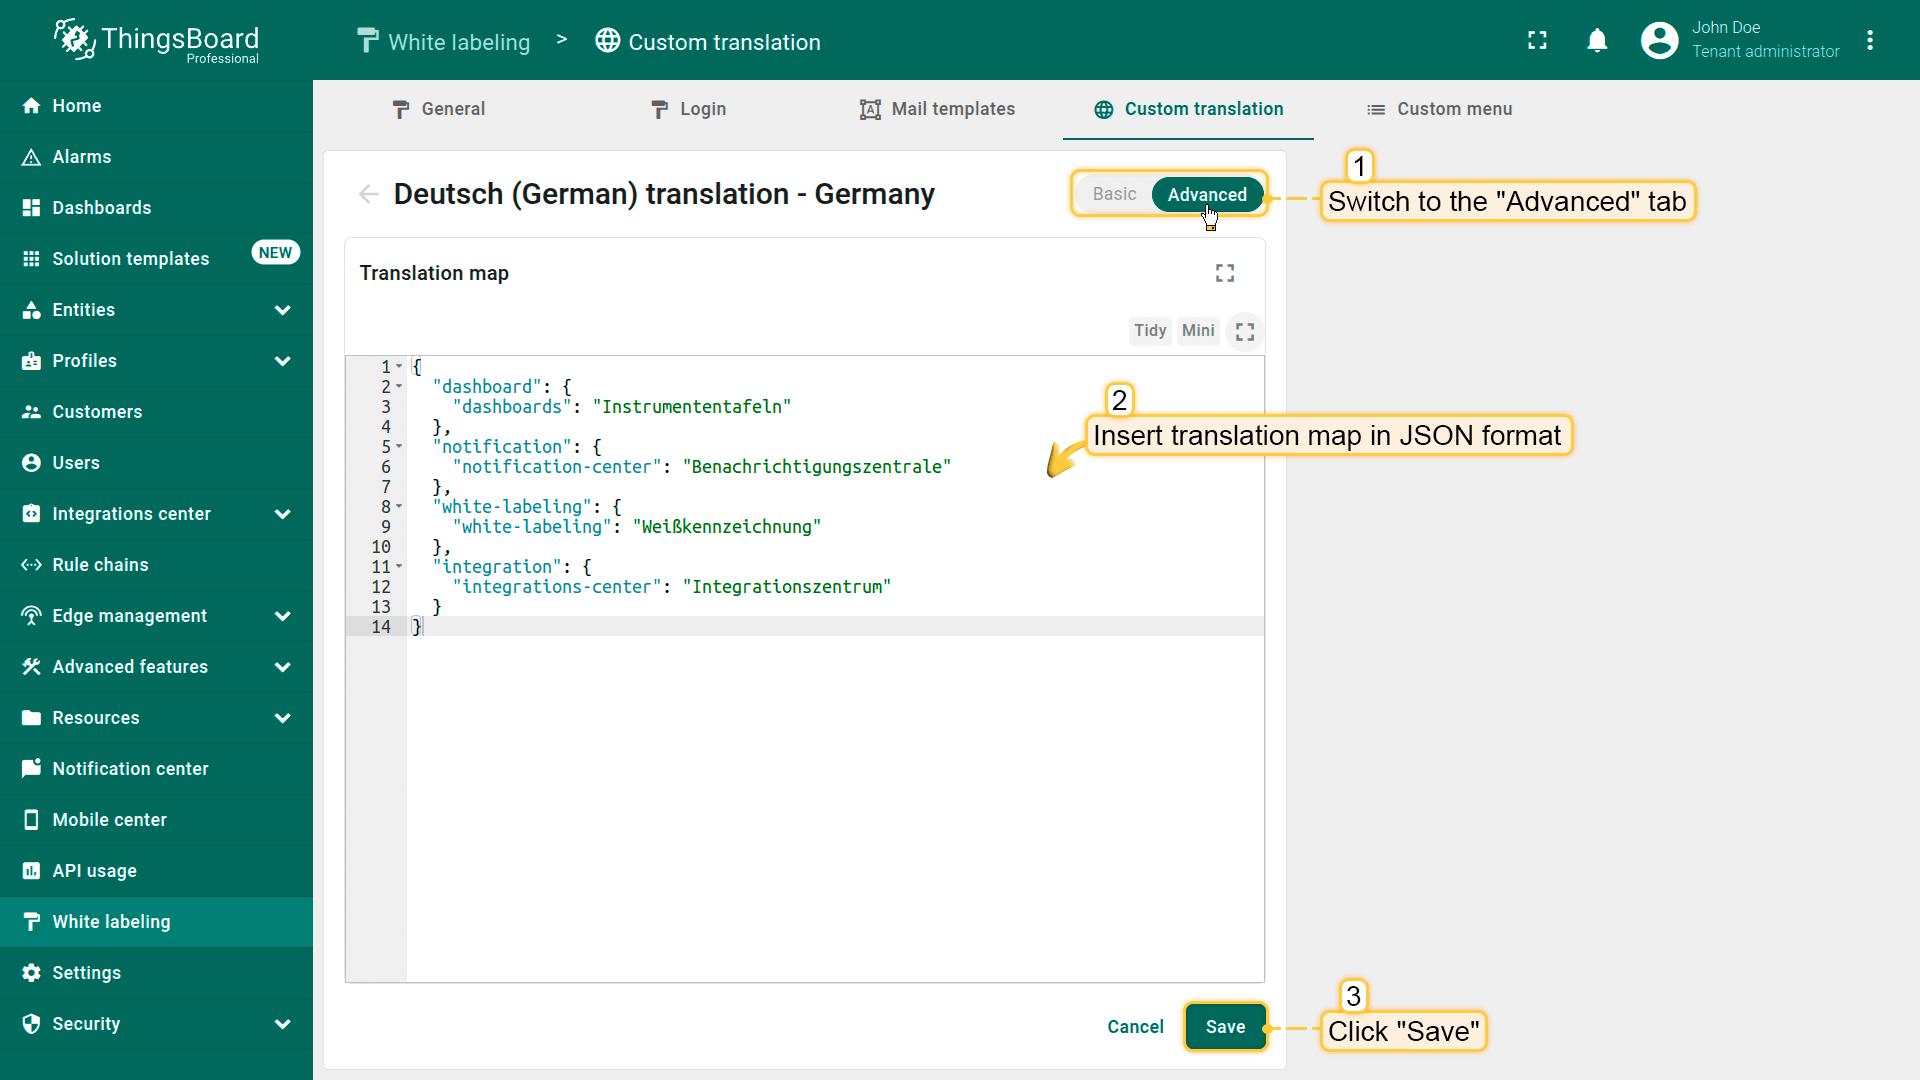
Go to the language editing menu and switch to the “Advanced” tab. Insert translation map with keys and their corresponding translations in JSON format. Then, click “Save”.
翻译映射示例:
1
2
3
4
5
6
7
8
9
10
11
12
13
14
{
  "dashboard": {
    "dashboards": "Instrumententafeln"
  },
  "notification": {
    "notification-center": "Benachrichtigungszentrale"
  },
  "white-labeling": {
    "white-labeling": "Weißkennzeichnung"
  },
  "integration": {
    "integrations-center": "Integrationszentrum"
  }
}
自定义翻译
可使用i18n格式的翻译键,为新自定义菜单项或单个UI元素(如仪表板标题、部件名称、设备名称、数据键等)提供自定义翻译。
添加自定义翻译的步骤:
1.在界面元素的标题字段中,用带有i18n:前缀的键替换纯文本,并用花括号包裹:
1
{i18n:custom.translation.key}
*其中:
ㅤㅤ‐ i18n: - 必需前缀。
ㅤㅤ‐ custom.translation.key - 已添加到翻译映射中的国际化键。
2.然后,在所选语言的翻译映射中添加该键的对应值。
| Term key | English (United States) | Selected language |
|---|---|---|
| your.custom.key | Value in English | Value in the selected language |
注意:如果i18n结构被用作UI元素的标题,但翻译映射中不包含对应键,则i18n字符串会原样显示。
提示:
- 始终为所有所需语言添加翻译。
- 避免重复键,使用结构化层级(例如custom.section.subsection)。
- 切换UI语言后测试键的显示效果。
在仪表板中使用自定义翻译
假设您是一位英语用户,管理着一个被不同国家客户访问的仪表板。 为确保每位用户都能轻松理解界面,所有组件的名称——包括仪表板标题、部件标题、设备名称、数据键及其他元素——都应以用户首选语言显示。
作为示例,我将对”Weather”仪表板的上述元素应用德语自定义翻译。 当然,您可根据实际需求使用任何其他语言。
首先,将”Weather”仪表板添加到您的实例:
- 下载仪表板配置的JSON文件。
- 导入到您的ThingsBoard实例中。
本仪表板使用Generator节点模拟遥测数据,函数如下:
1
2
3
4
5
6
var temperature = toFixed(Math.random()*10 + 18, 2);
var humidity = toFixed(Math.random()*15 + 40, 2);
var msg = { temperature: temperature, humidity: humidity, };
var metadata = { data: 40 };
var msgType = "POST_TELEMETRY_REQUEST";
return { msg: msg, metadata: metadata, msgType: msgType };
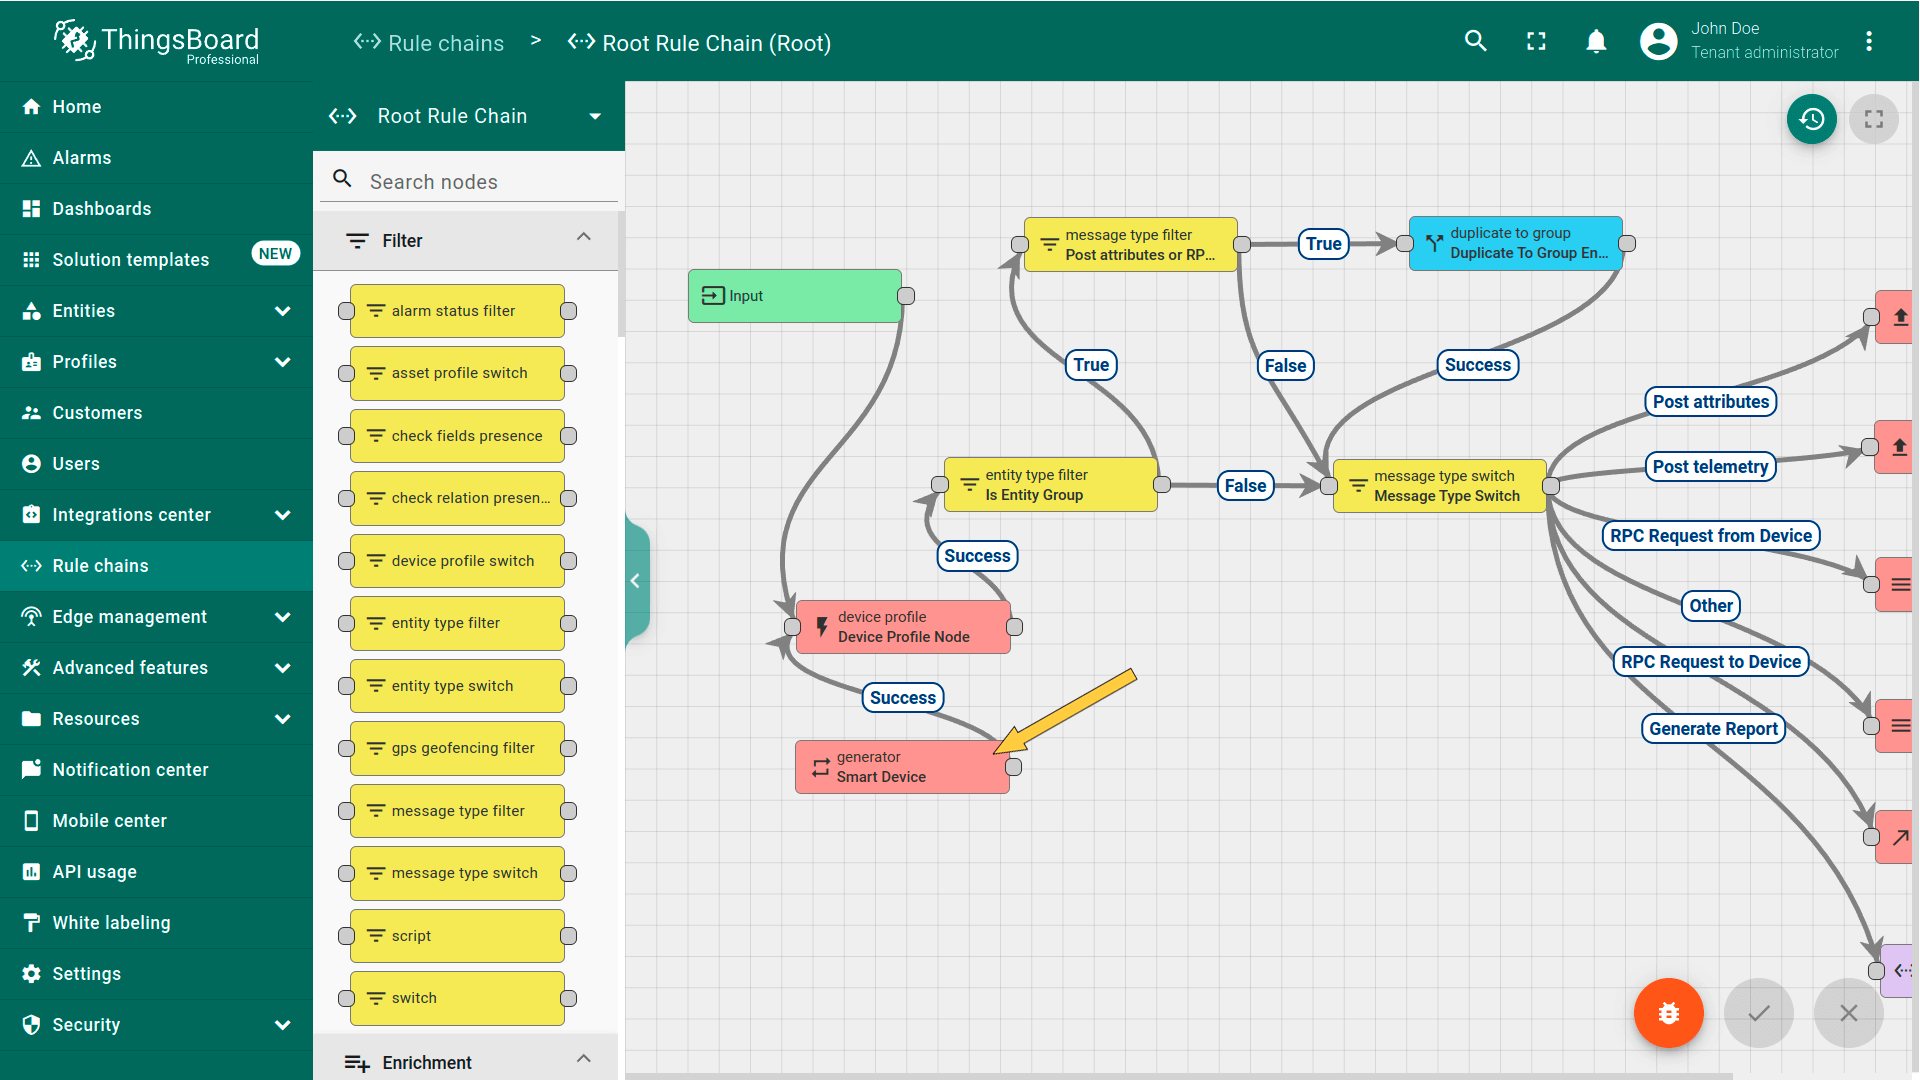
For this dashboard, I'm emulating telemetry data using a Generator node.

The generator node emulates telemetry using the specified function.
同时,别忘了更新仪表板的数据源。
Also, don't forget to update the data source for your dashboard.
自定义仪表板标题翻译
要为仪表板标题设置自定义翻译,请按以下步骤操作:
- 进入”Custom translations”选项卡,打开德语的翻译映射。
- 点击右上角的”plus”图标。
- 输入仪表板标题的翻译键:
1
custom.weather-dashboard.title
- 在相应字段中输入该键的英文和德文翻译。所需值见下方表格。
| Term key | Value in English | Value in German | Key description |
|---|---|---|---|
| custom.weather-dashboard.title | Weather | Wetter | Dashboard title |
- 点击输入字段外的任意位置以保存键。
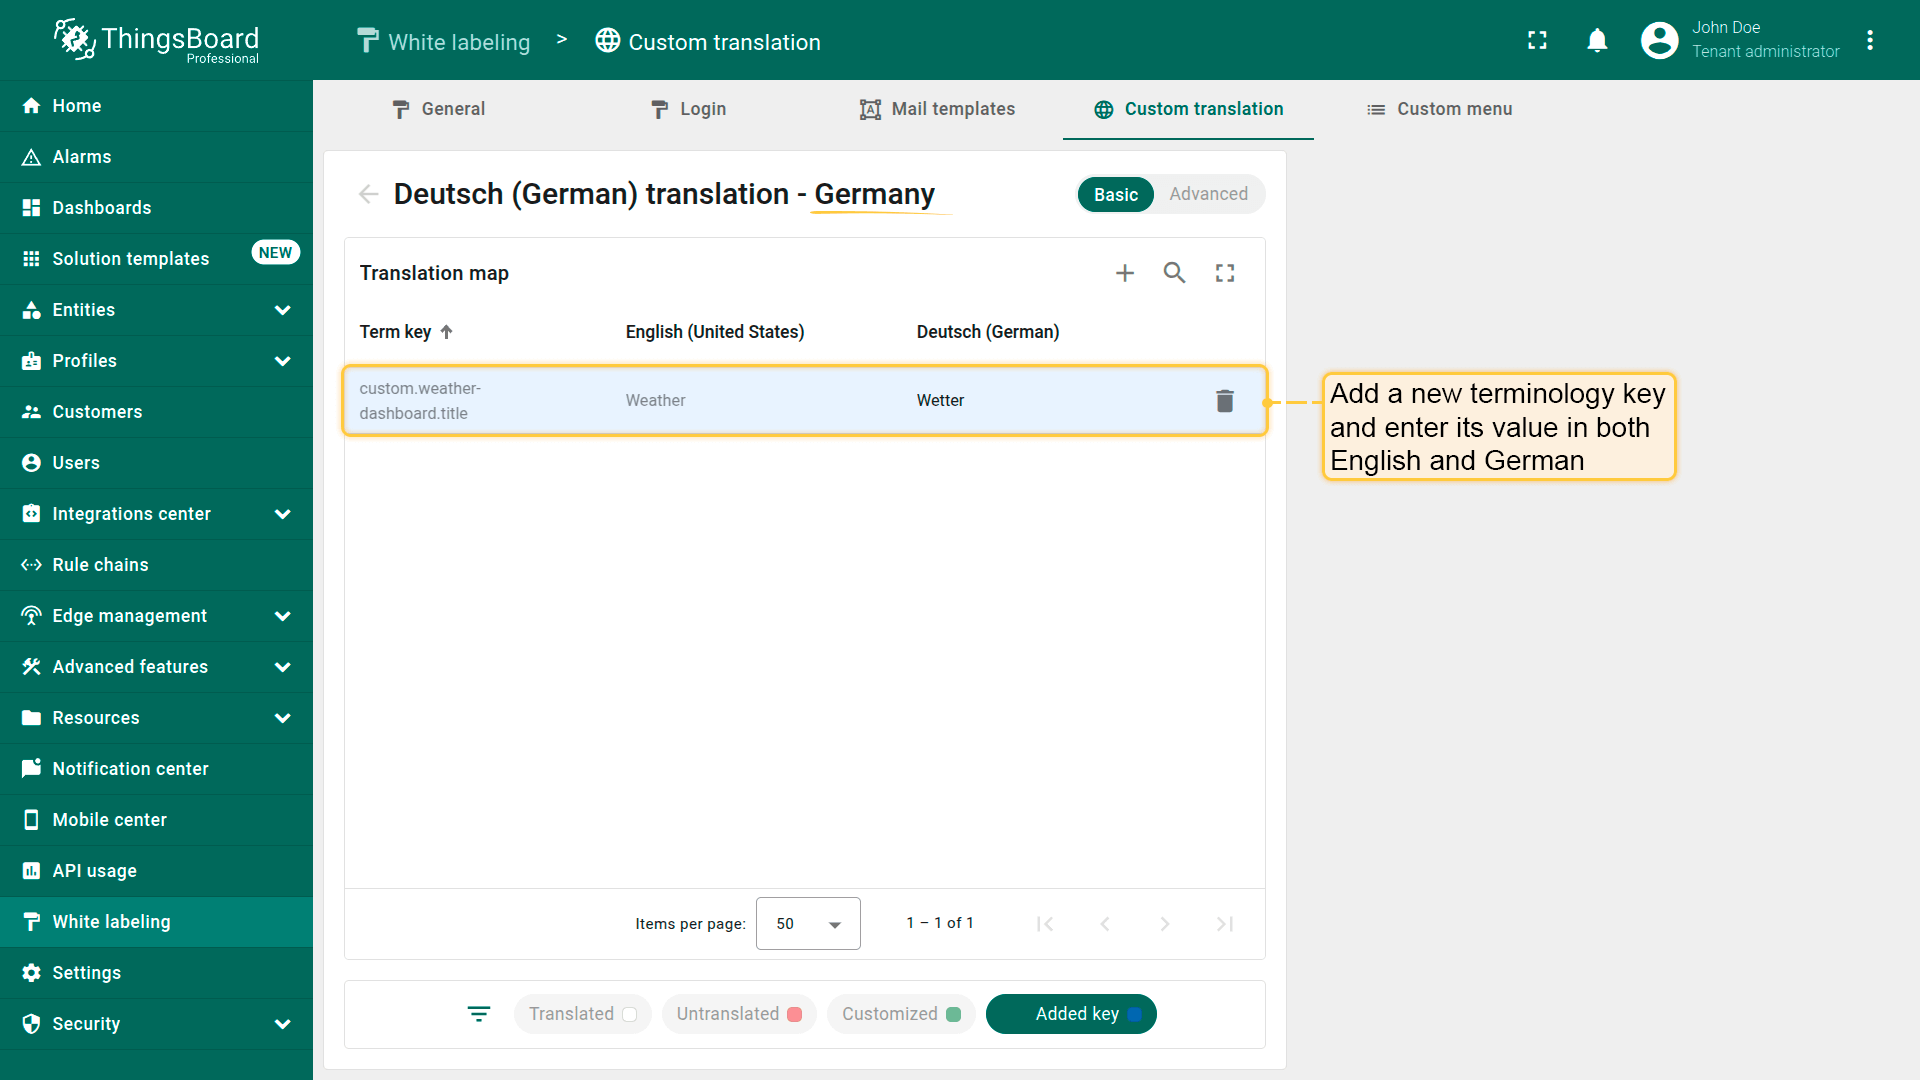
Go to the “Custom translations” tab. Add a new key and enter its value in English and German.
键及其翻译已添加。现在将该键设为仪表板标题:
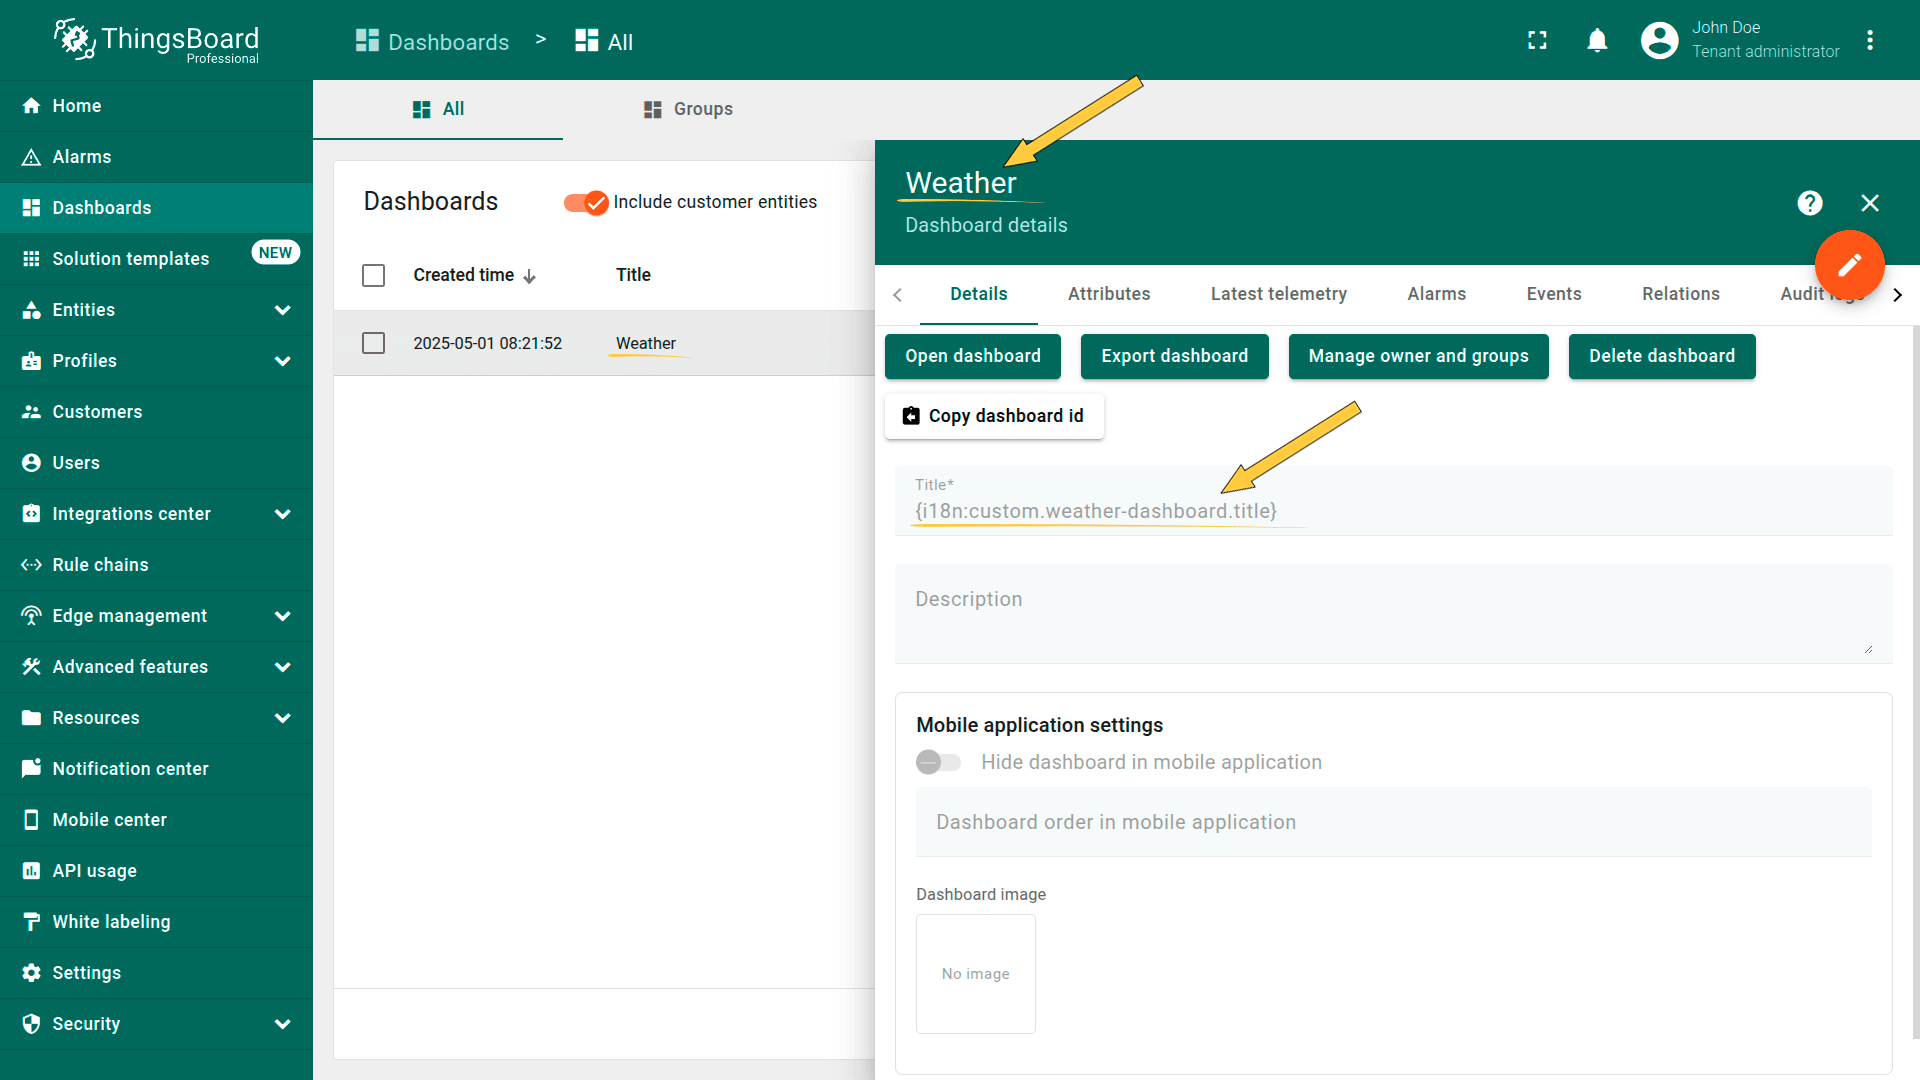
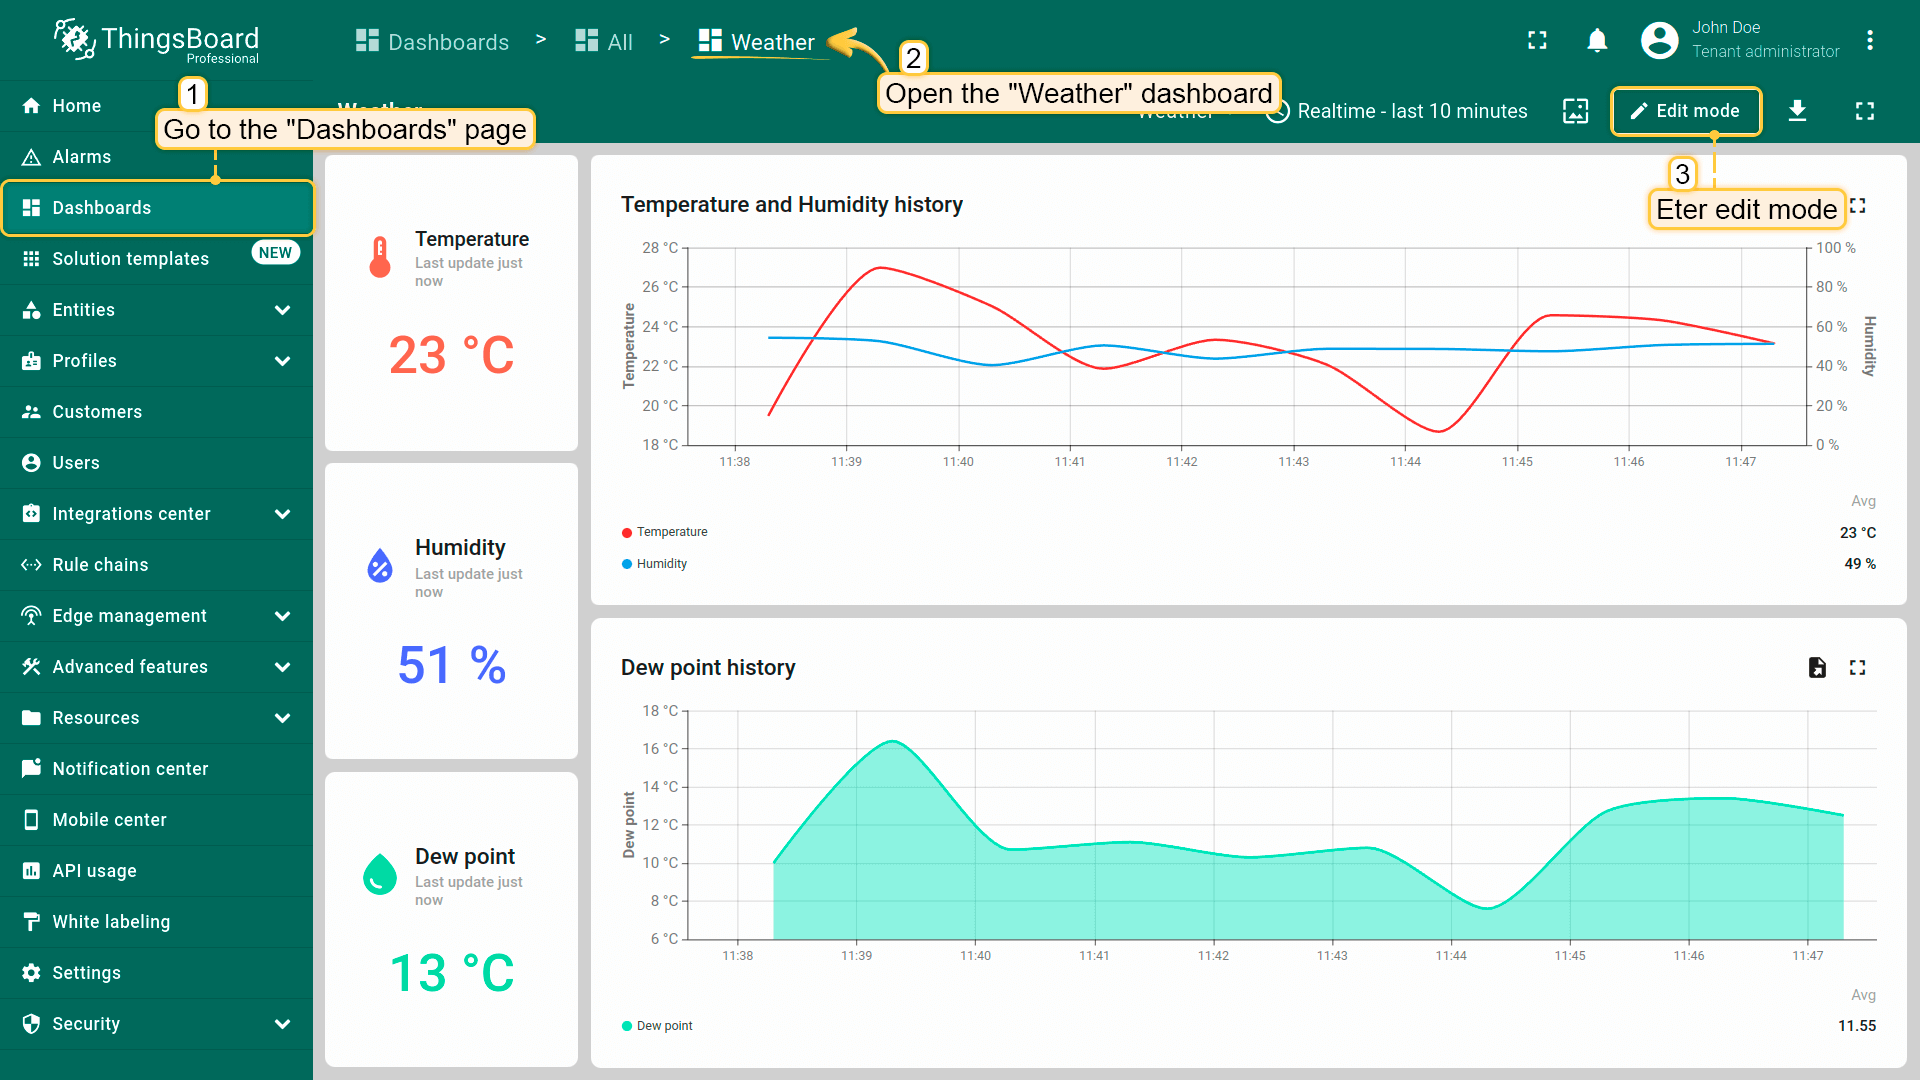
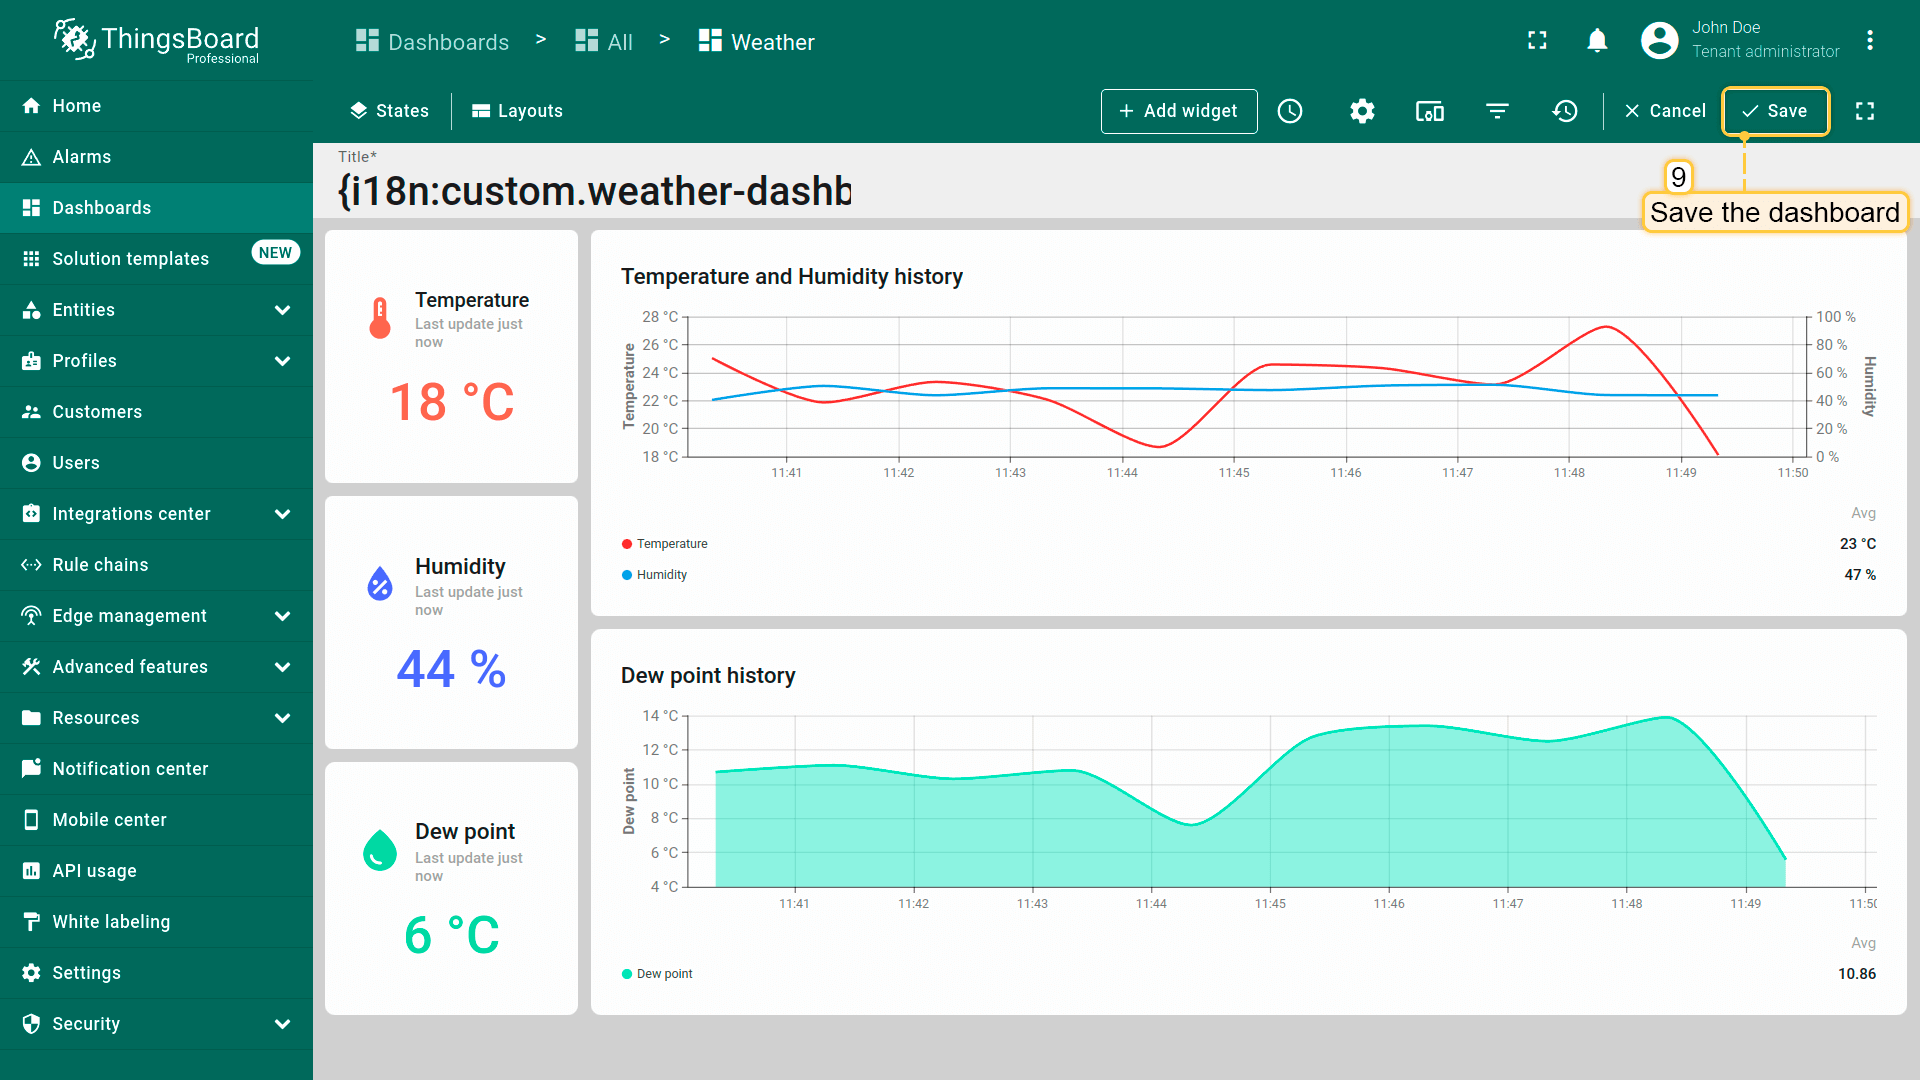
- 进入”Dashboards”页面并打开”Weather”仪表板详情。
- 进入编辑模式,将标题字段的文本替换为使用i18n结构的键:i18n前缀加翻译键,用花括号包裹——如下:
1
{i18n:custom.weather-dashboard.title}
- 保存更改。
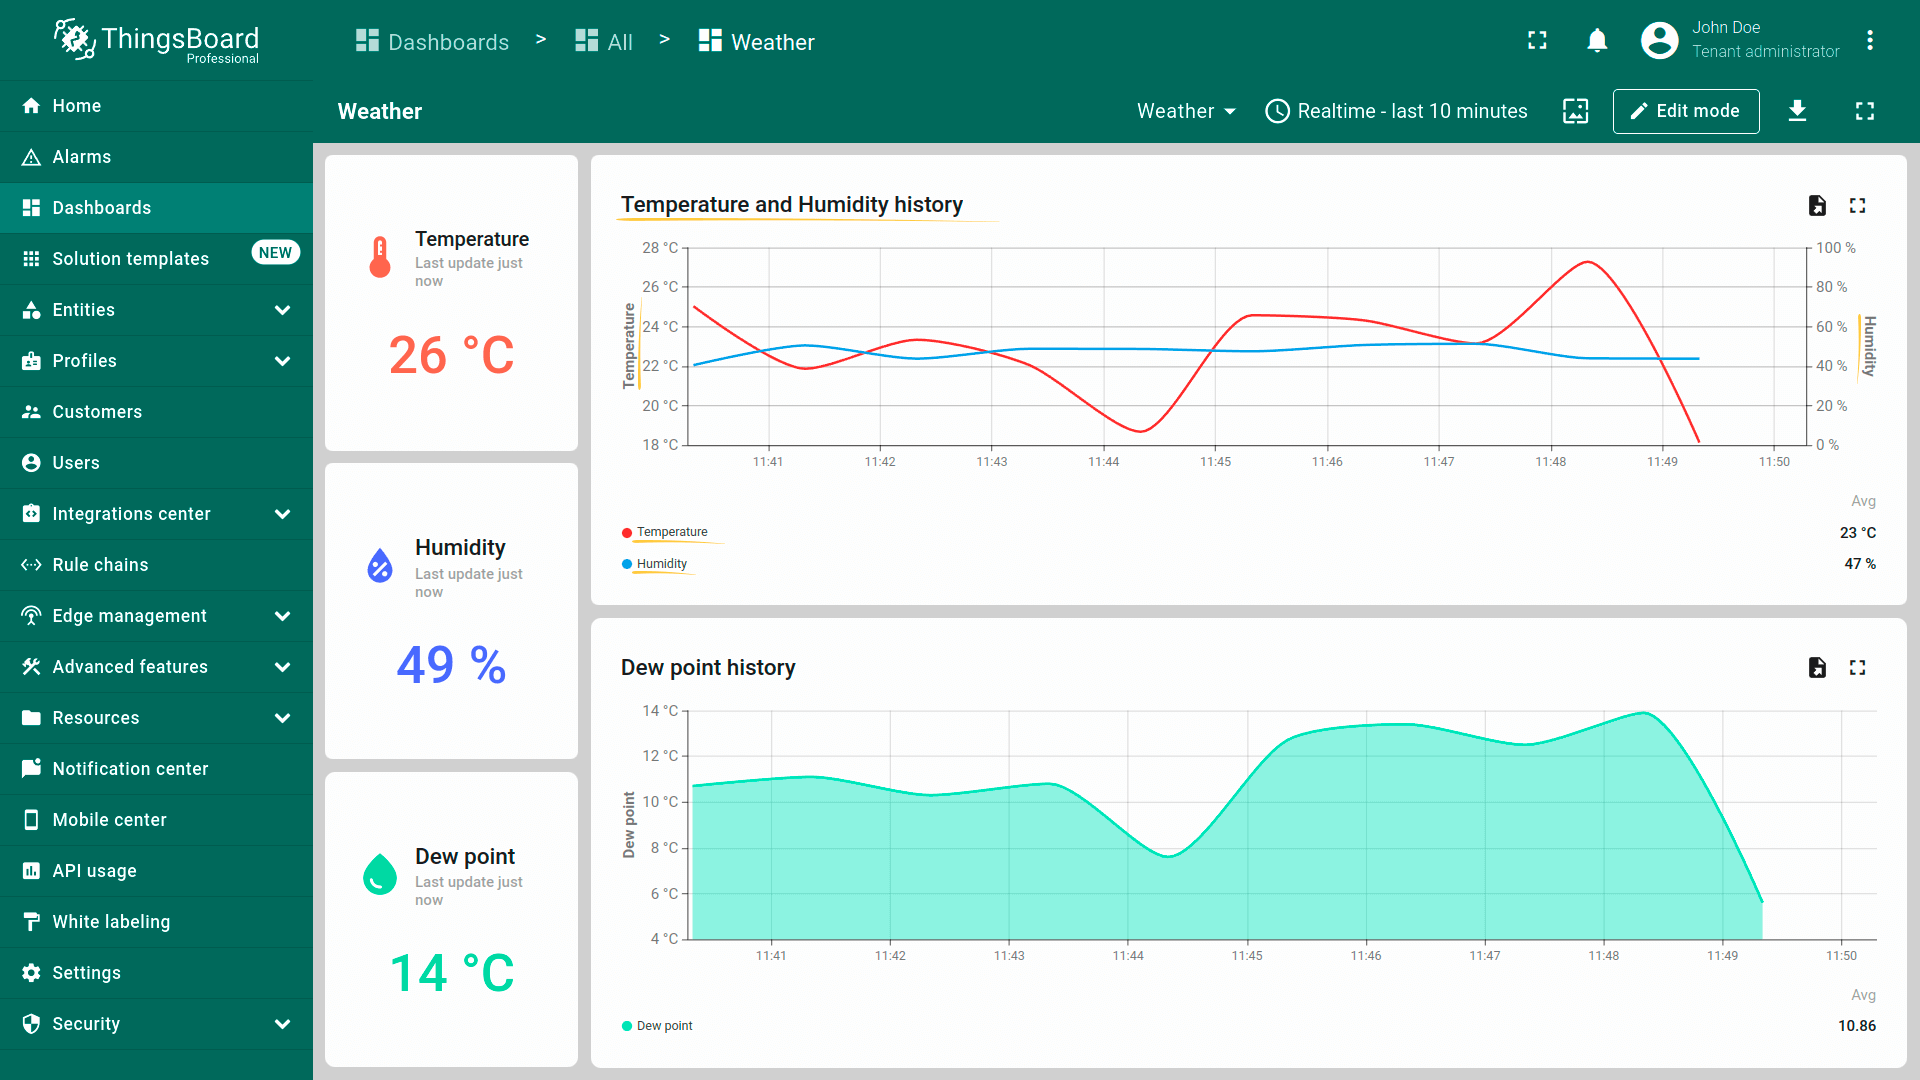
由于我使用英语作为界面语言,仪表板标题显示为英文。
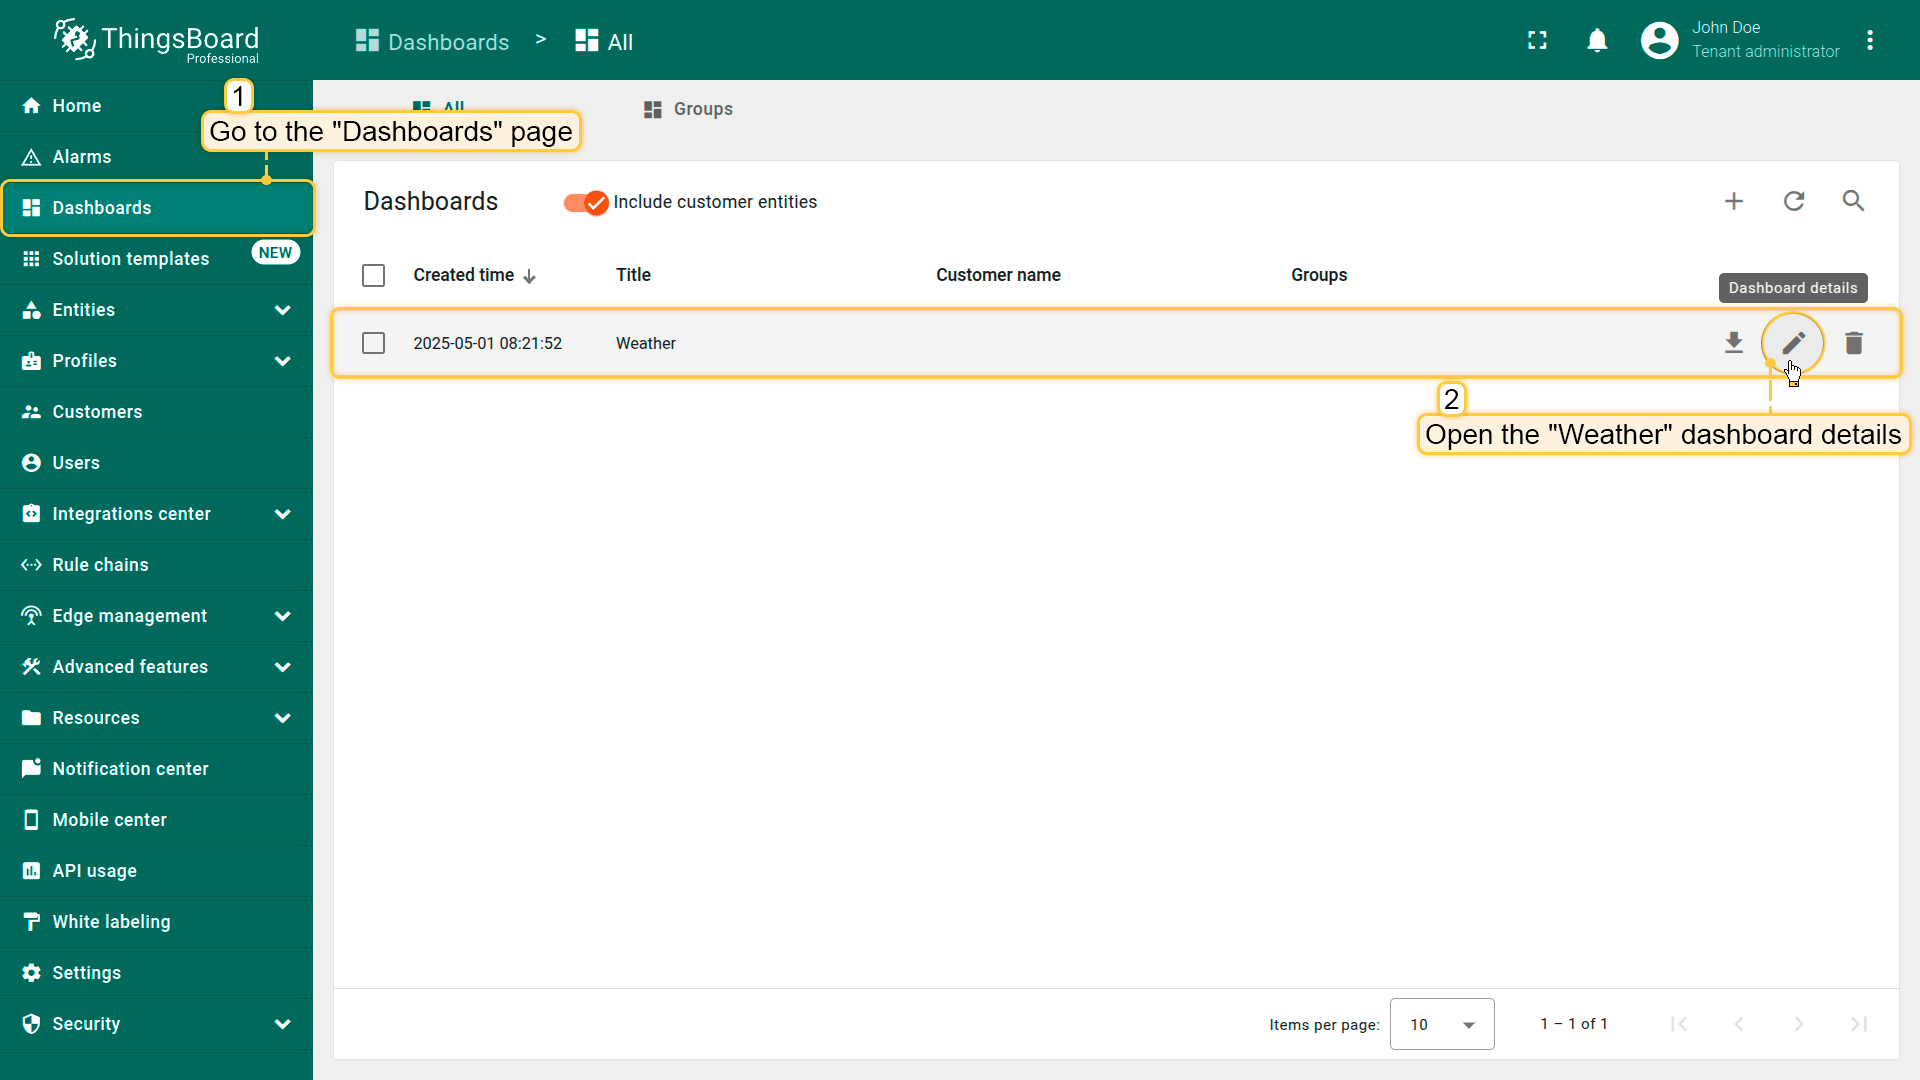
Navigate to the “Dashboards” page. and open the dashboard details.
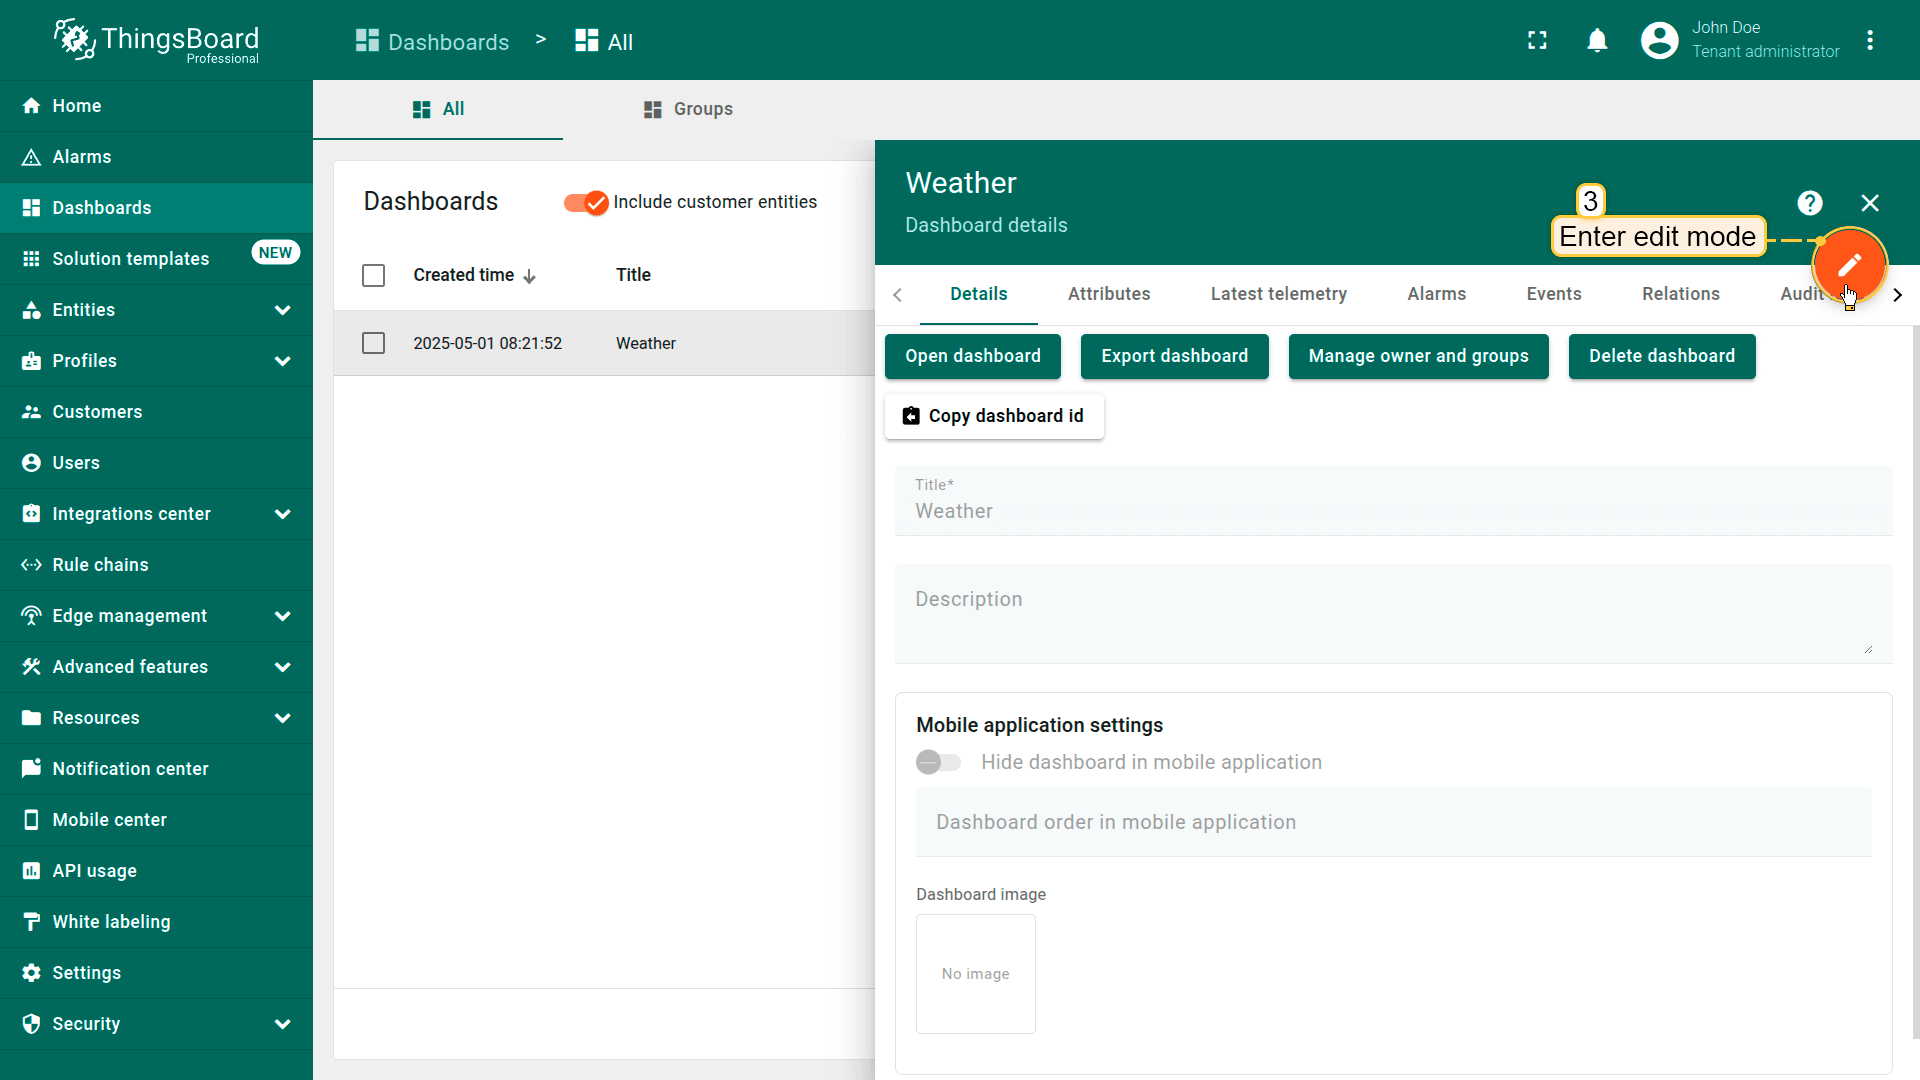
Enter edit mode.
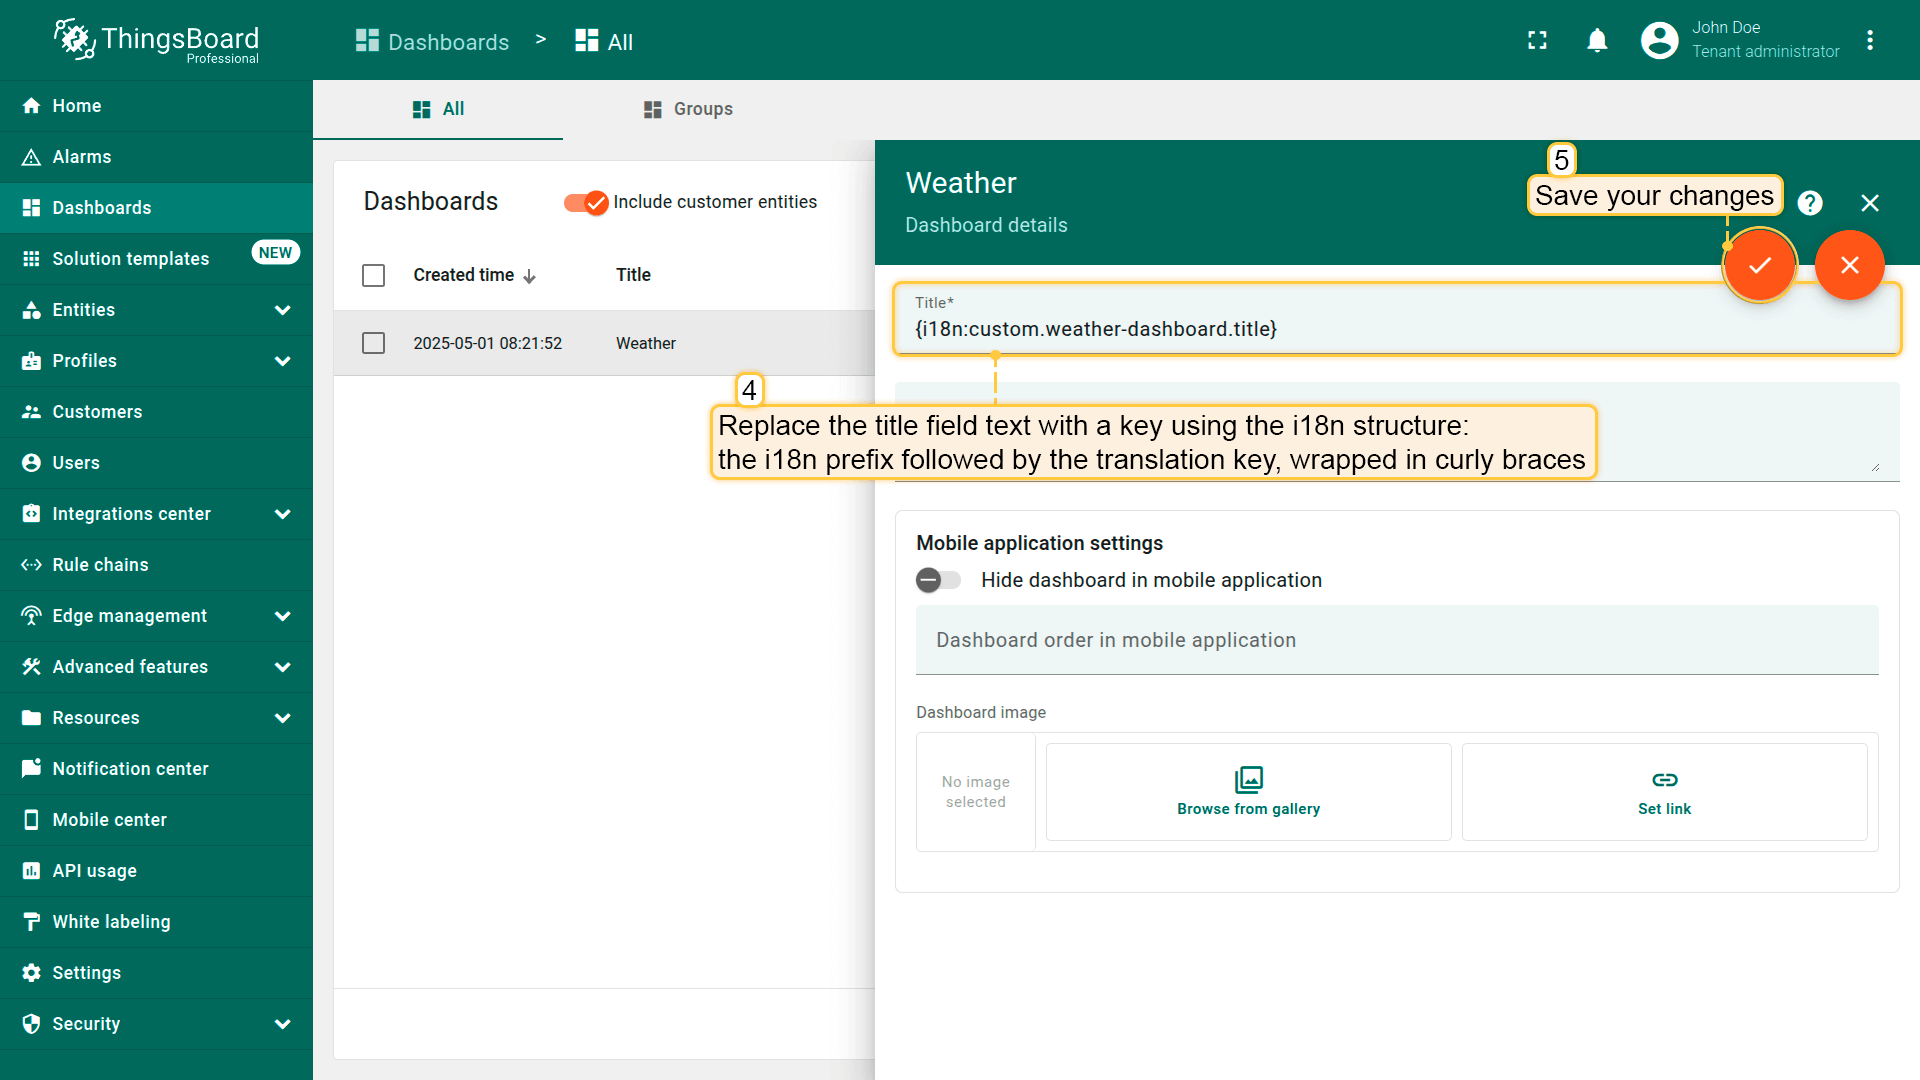
Replace the title field text with a key using the i18n structure: the i18n prefix followed by the translation key, wrapped in curly braces. Then, save your changes.
I'm using English as my interface language, so the dashboard title is displayed in English.
现在,切换到界面语言设为德语的用户账户,或直接将您的界面语言更改为德语。
您应能看到仪表板标题按翻译映射显示为德文——这表明一切正常运行。
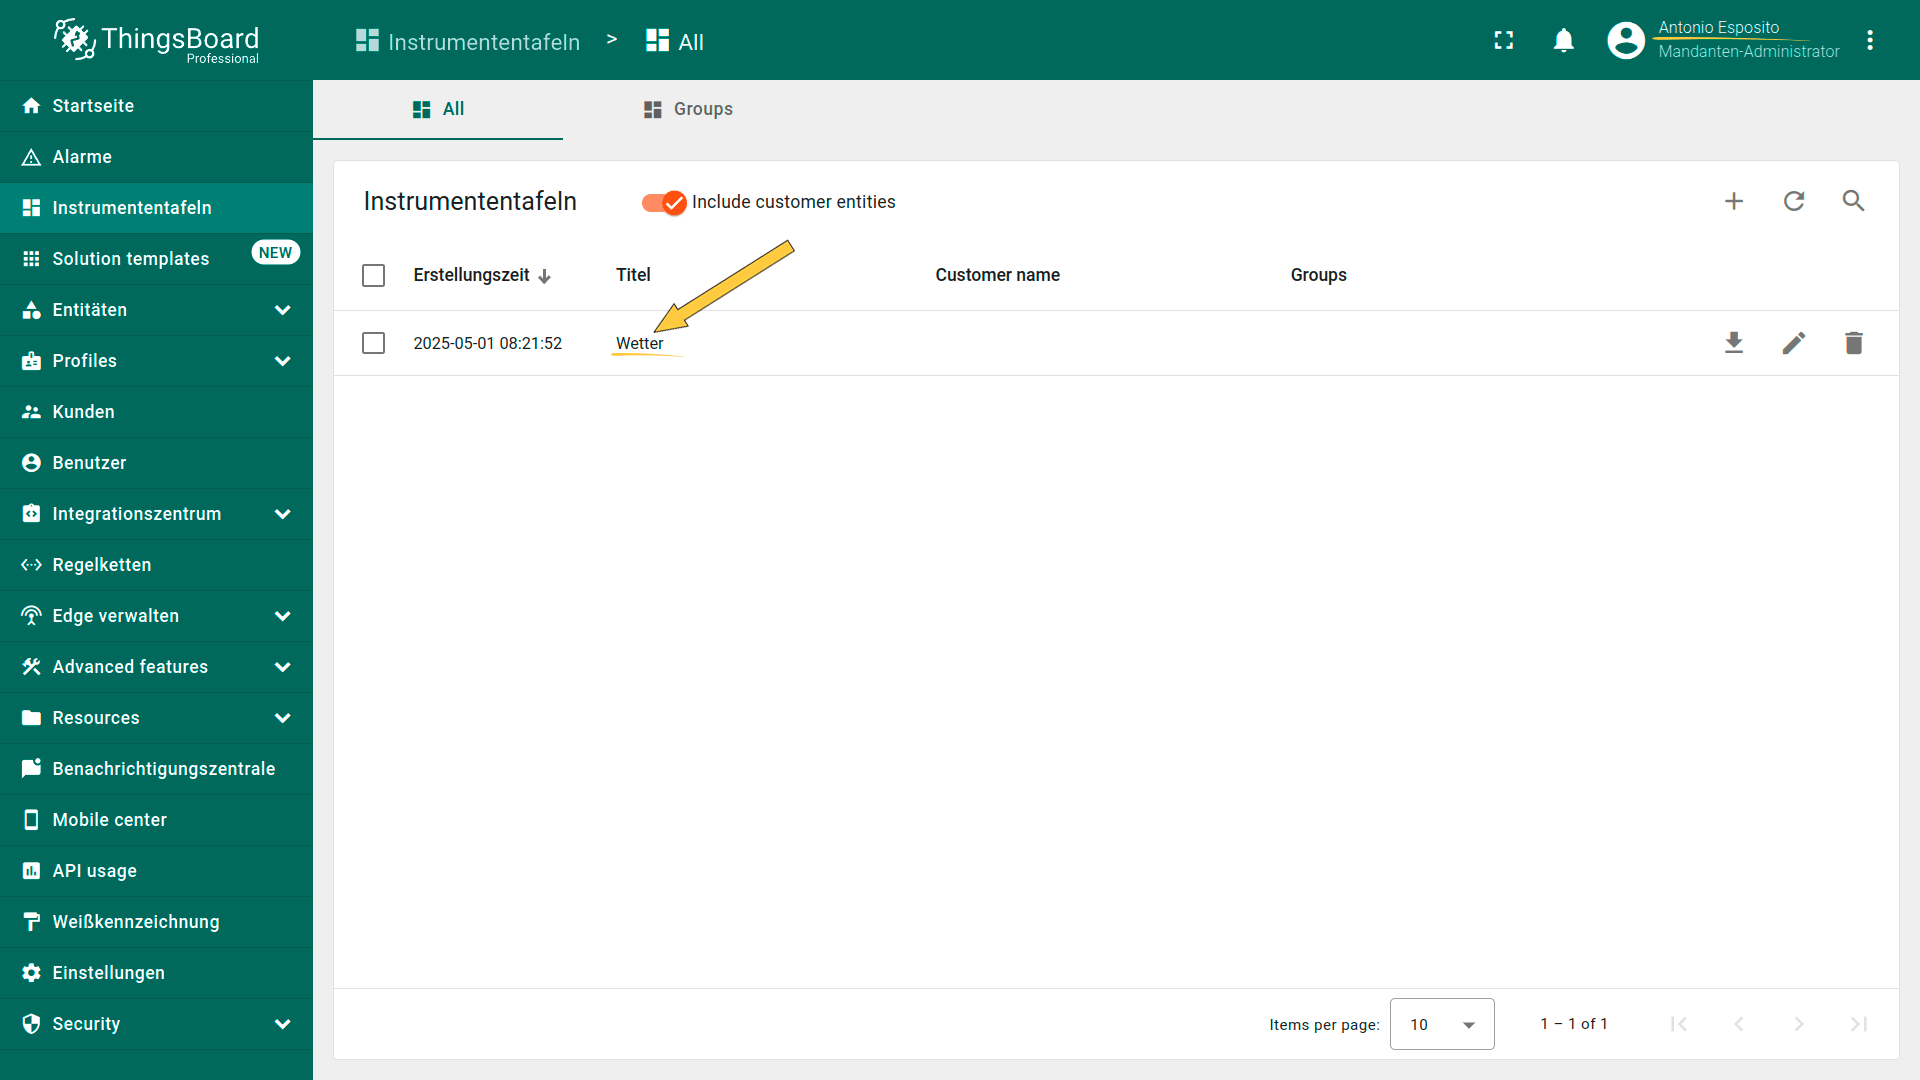
Now, either switch to your user's account where the interface language is set to German, or simply change your own interface language to German. You should see the dashboard title displayed in German according to the translation map — which means everything is working as expected.
自定义部件元素翻译
与仪表板标题类似,现在对”Temperature and Humidity history”部件的标题、遥测键和坐标轴标签应用国际化。 同样,为演示效果,我将使用界面语言设为德语的用户实例。
首先,添加键及其英文和所选语言(本例为德语)的对应值。请使用下方表格中的值。
| Term key | Value in English | Value in German | Key description |
|---|---|---|---|
| custom.weather-dashboard.temperature-and-humidity-widget.title | Temperature and Humidity history | Temperatur- und Luftfeuchtigkeitsverlauf | Temperature and Humidity history widget title |
| custom.weather-dashboard.temperature.telemetry-key | Temperature | Temperatur | Temperature telemetry key name |
| custom.weather-dashboard.humidity.telemetry-key | Humidity | Feuchtigkeit | Humidity telemetry key name |
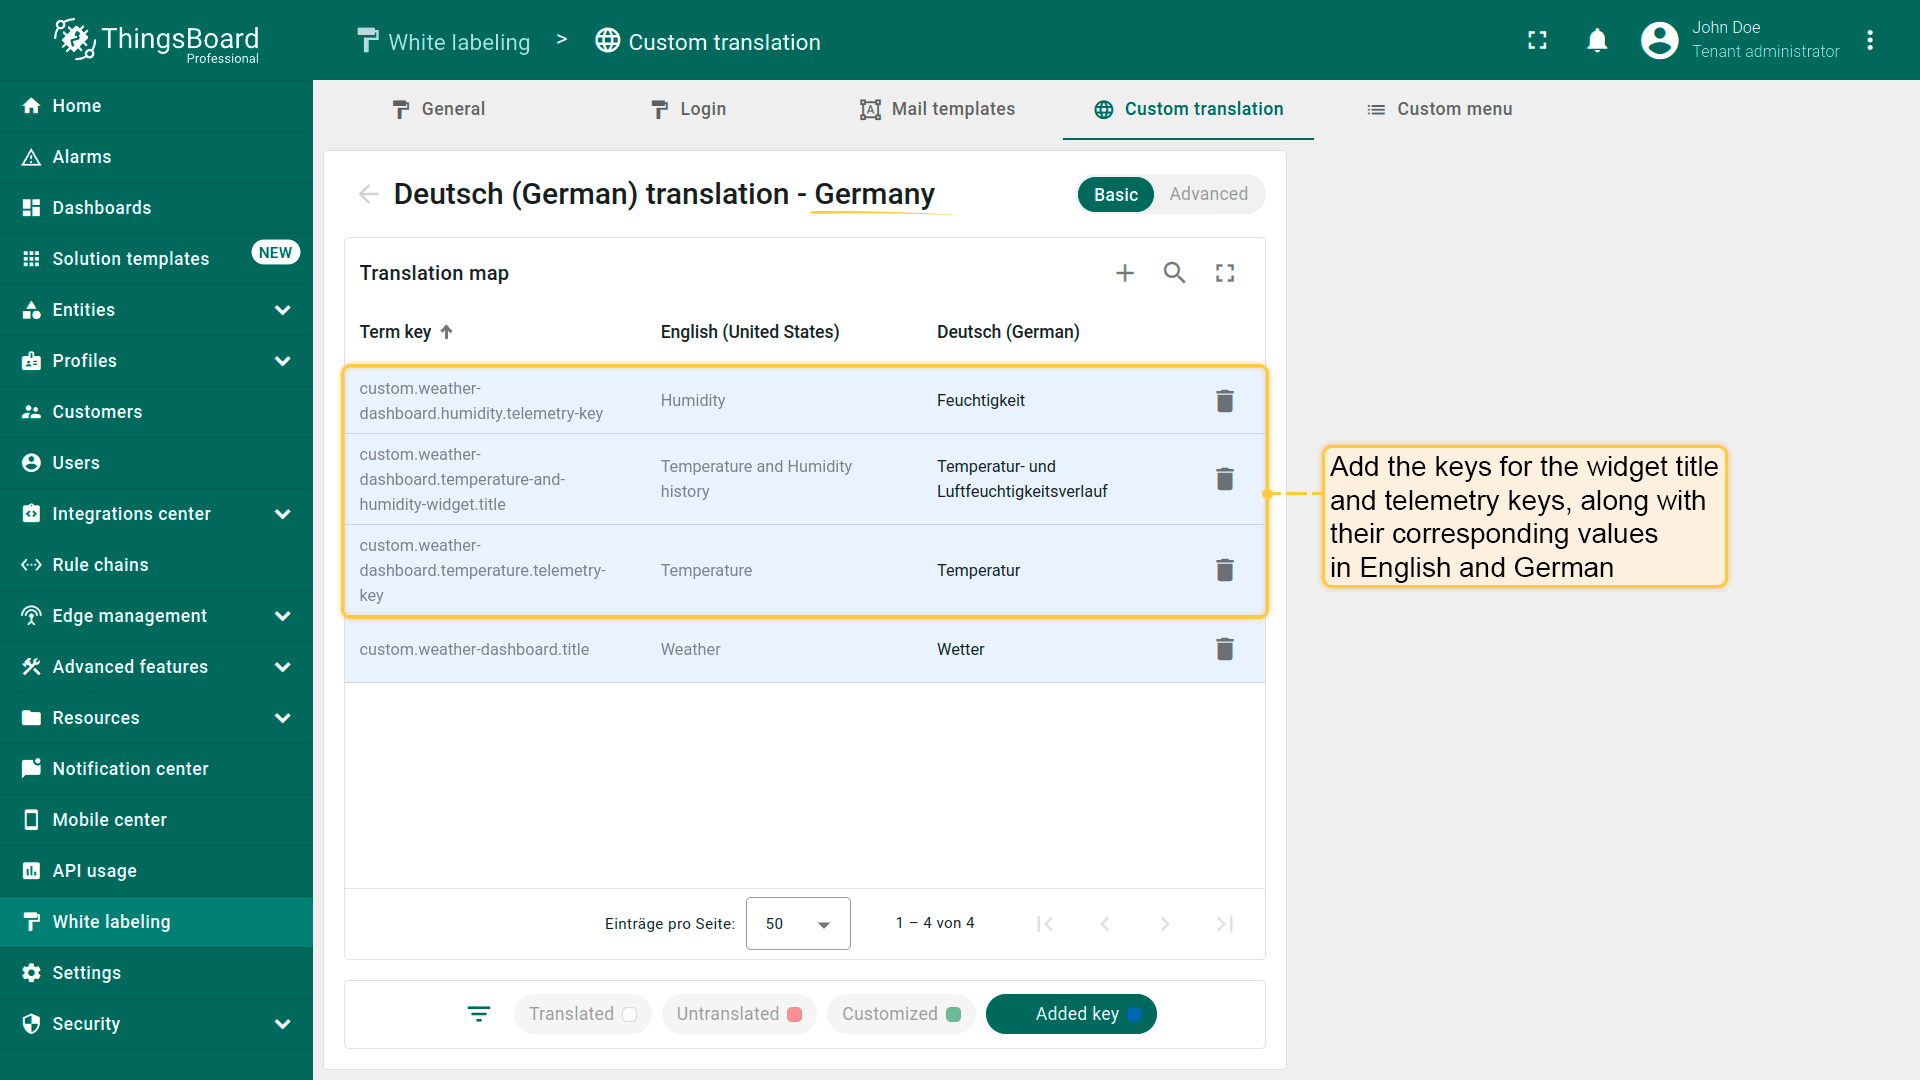
Add the keys along with their corresponding values in English and the selected language (in our case German).
现在进入”Weather”仪表板,打开”Temperature and Humidity history”部件的编辑模式。
将添加的i18n结构键分配给以下字段:
- 温度和湿度键的标签:
- temperature: {i18n:custom.weather-dashboard.temperature.telemetry-key}
- humidity: {i18n:custom.weather-dashboard.humidity.telemetry-key}
- Y轴标签:
- default(温度): {i18n:custom.weather-dashboard.temperature.telemetry-key}
- axis1(湿度): {i18n:custom.weather-dashboard.humidity.telemetry-key}
- 部件标题: {i18n:custom.weather-dashboard.temperature-and-humidity-widget.title}
完成后保存更改。
Now navigate to the “Weather” dashboard and enter its edit mode.
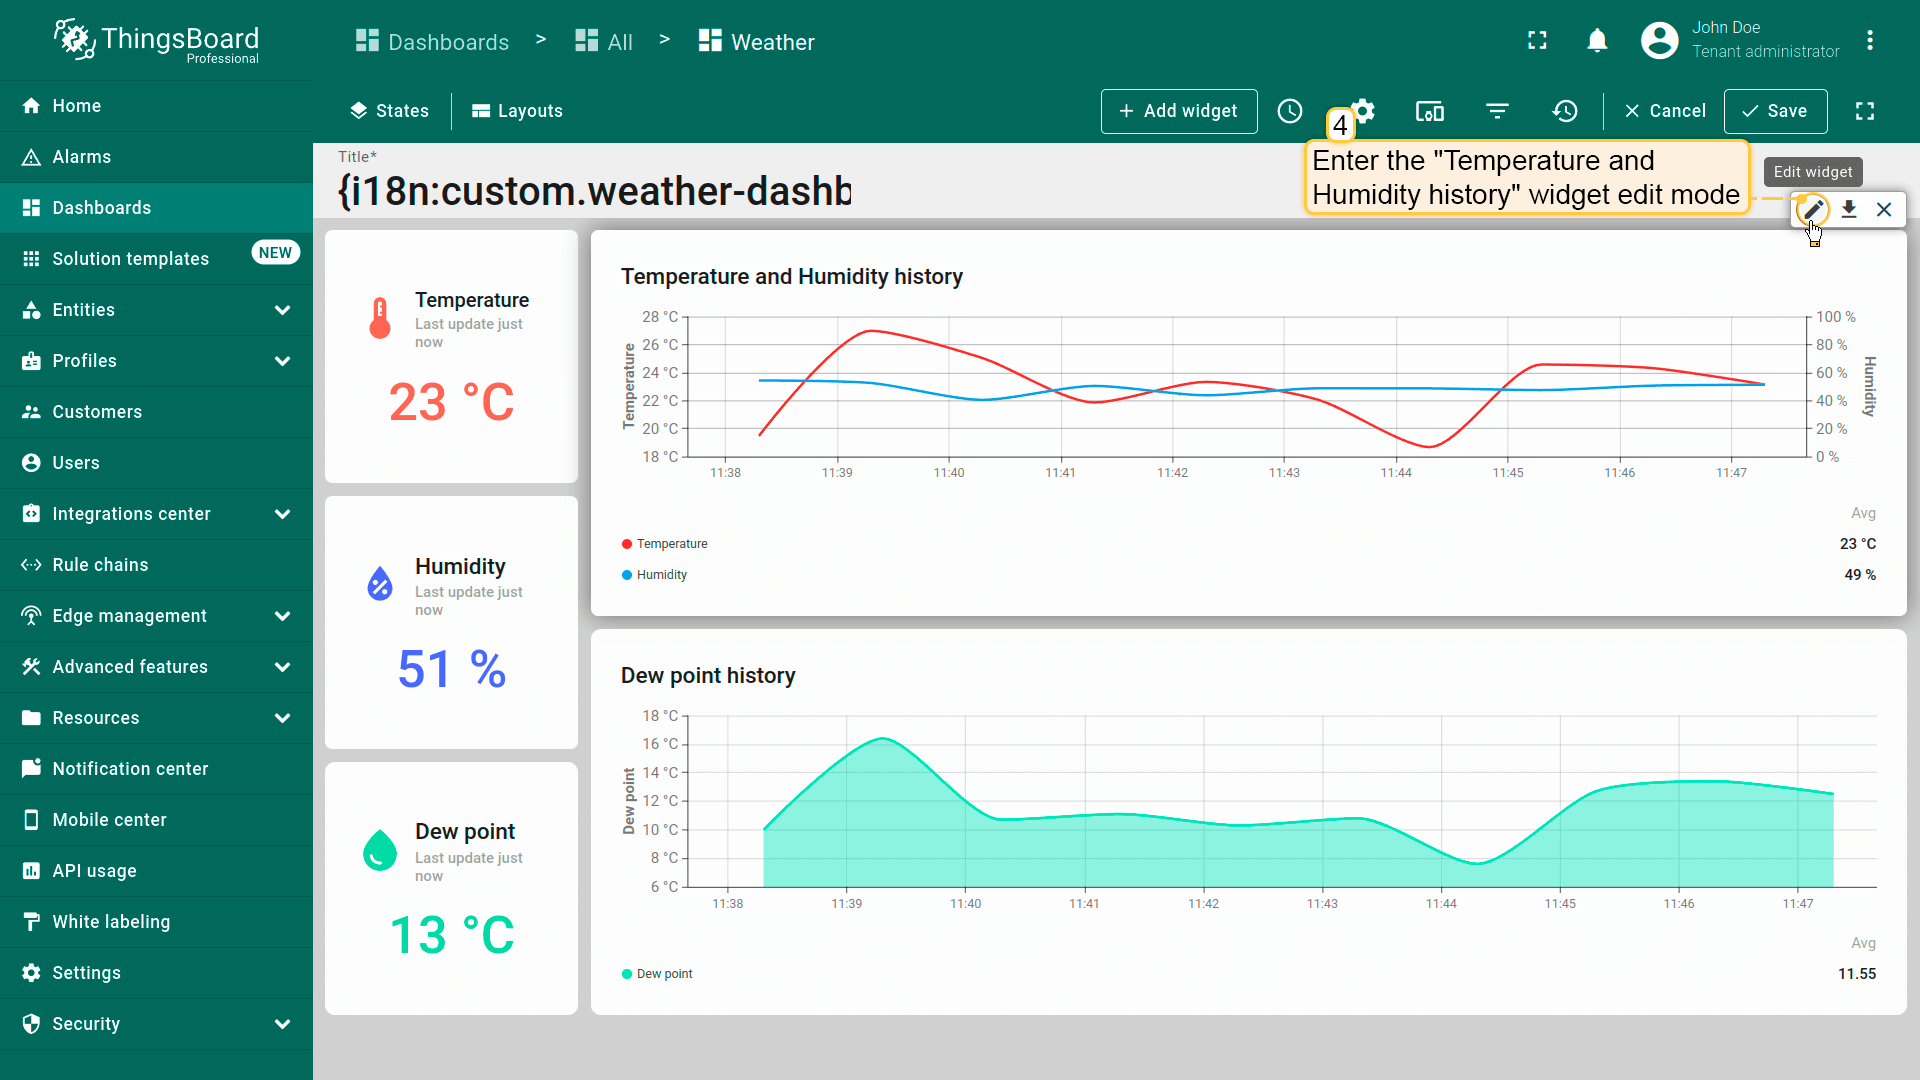
Enter the “Temperature and Humidity history” widget edit mode.
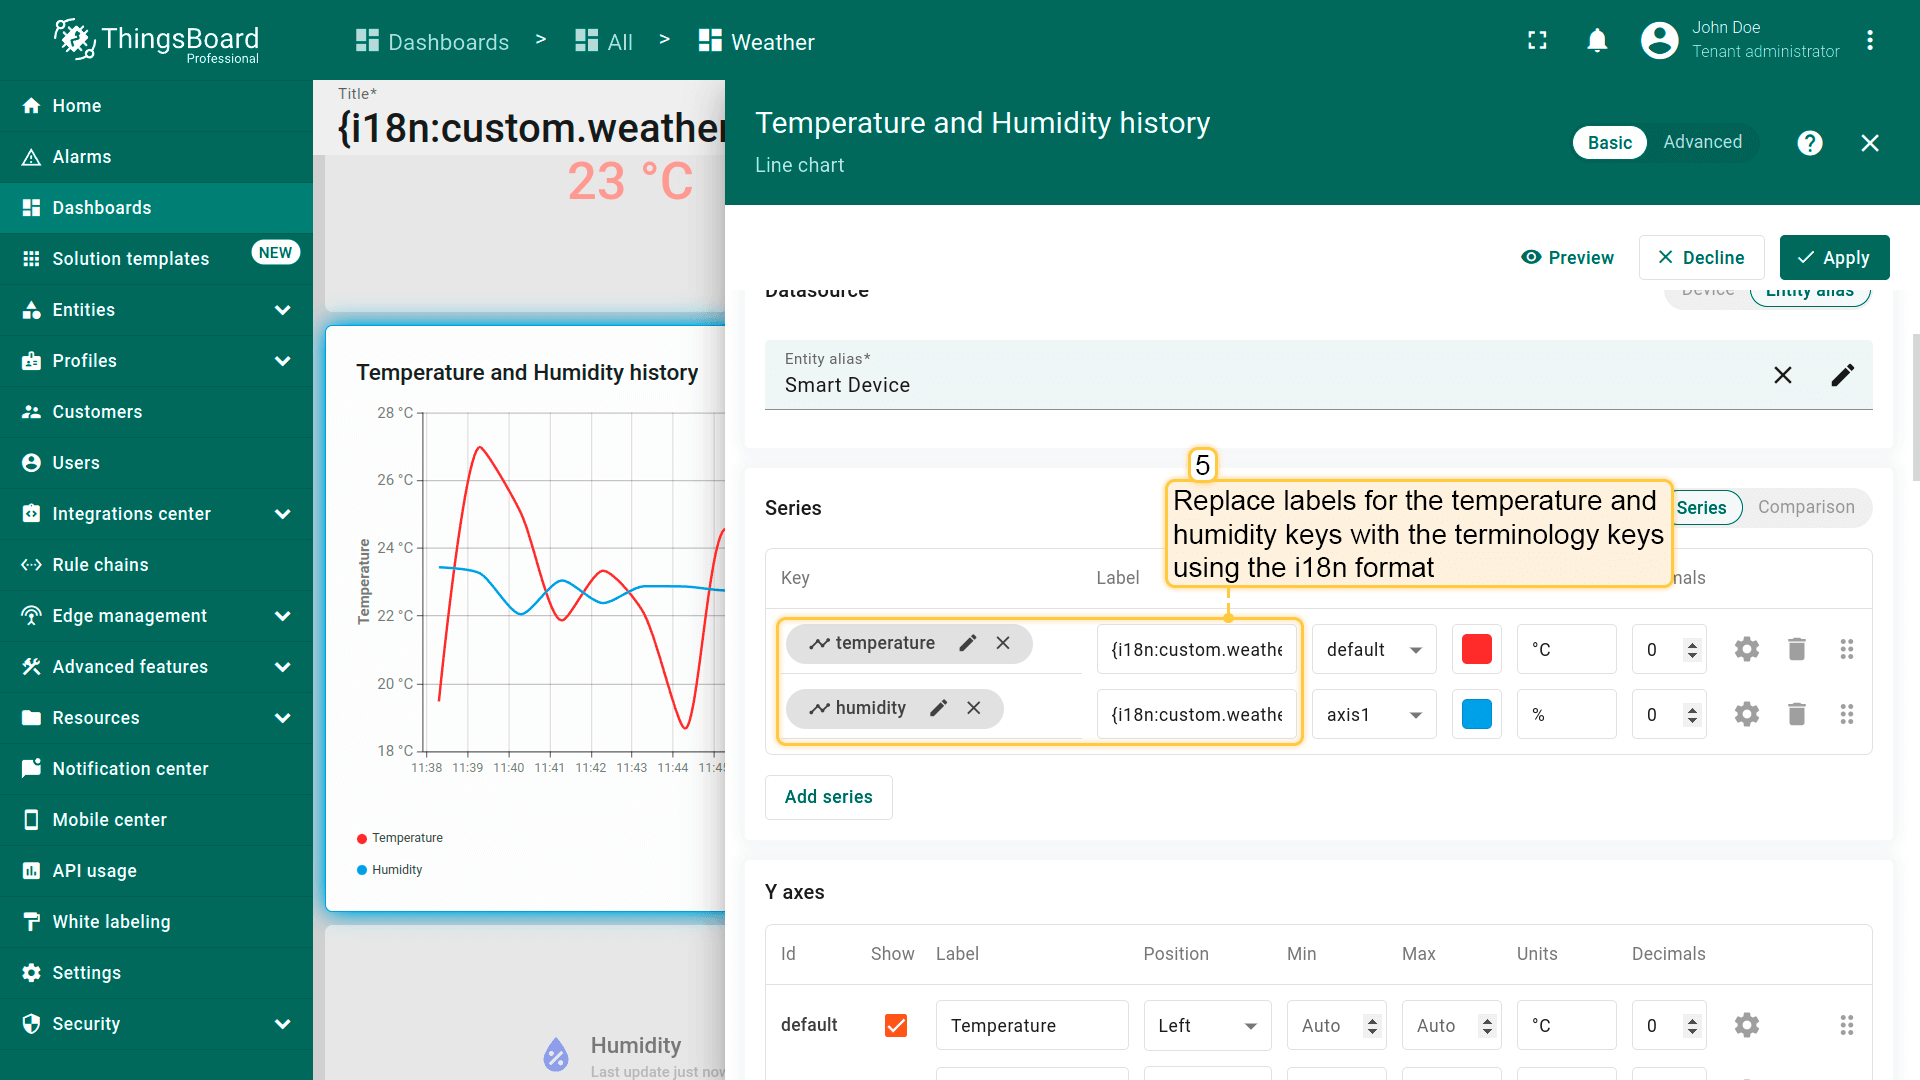
Assign the added internationalization keys as labels for the temperature and humidity telemetry keys.
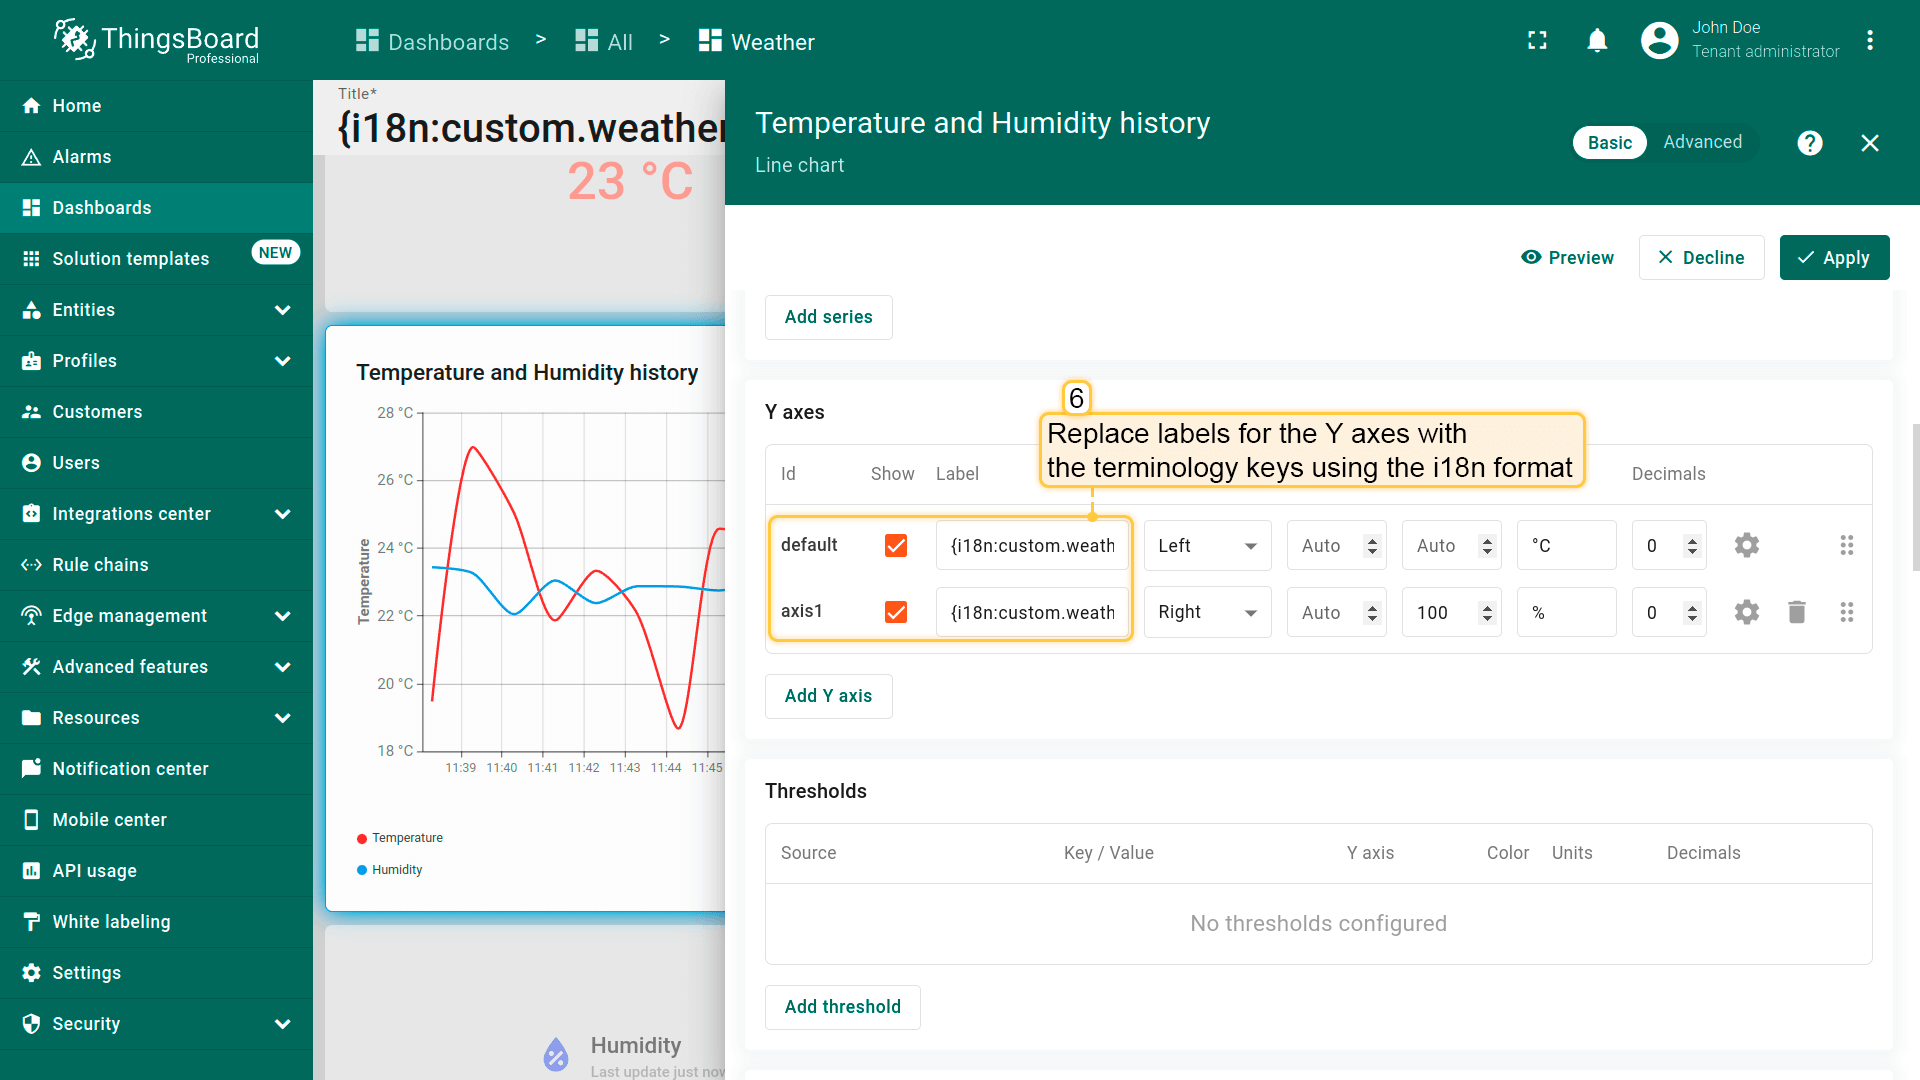
Use the same values as labels for the Y axes of the temperature and humidity keys.
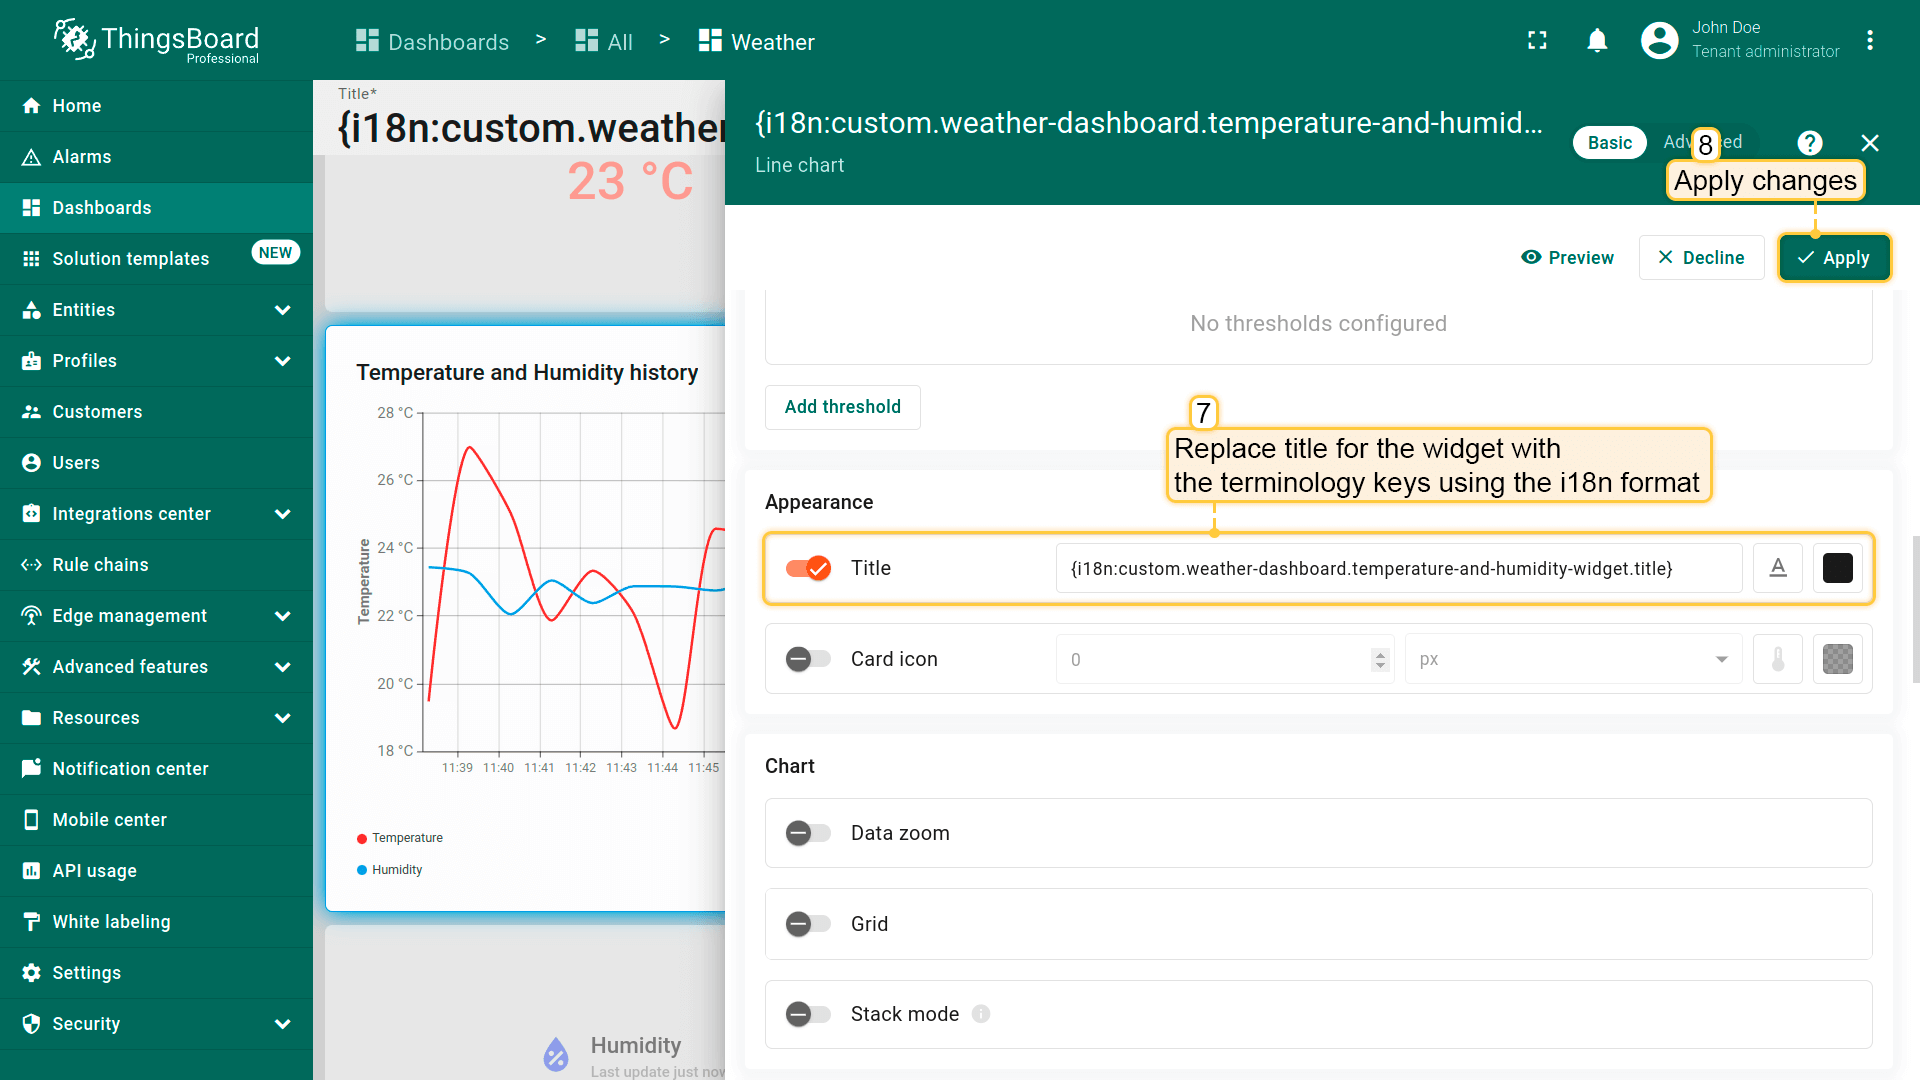
Now set the translation key for the widget
After that, save your changes.
.
现在切换到界面语言设为德语的用户。 可以看到,”Temperature and Humidity history”部件的所有元素现已显示为德文。
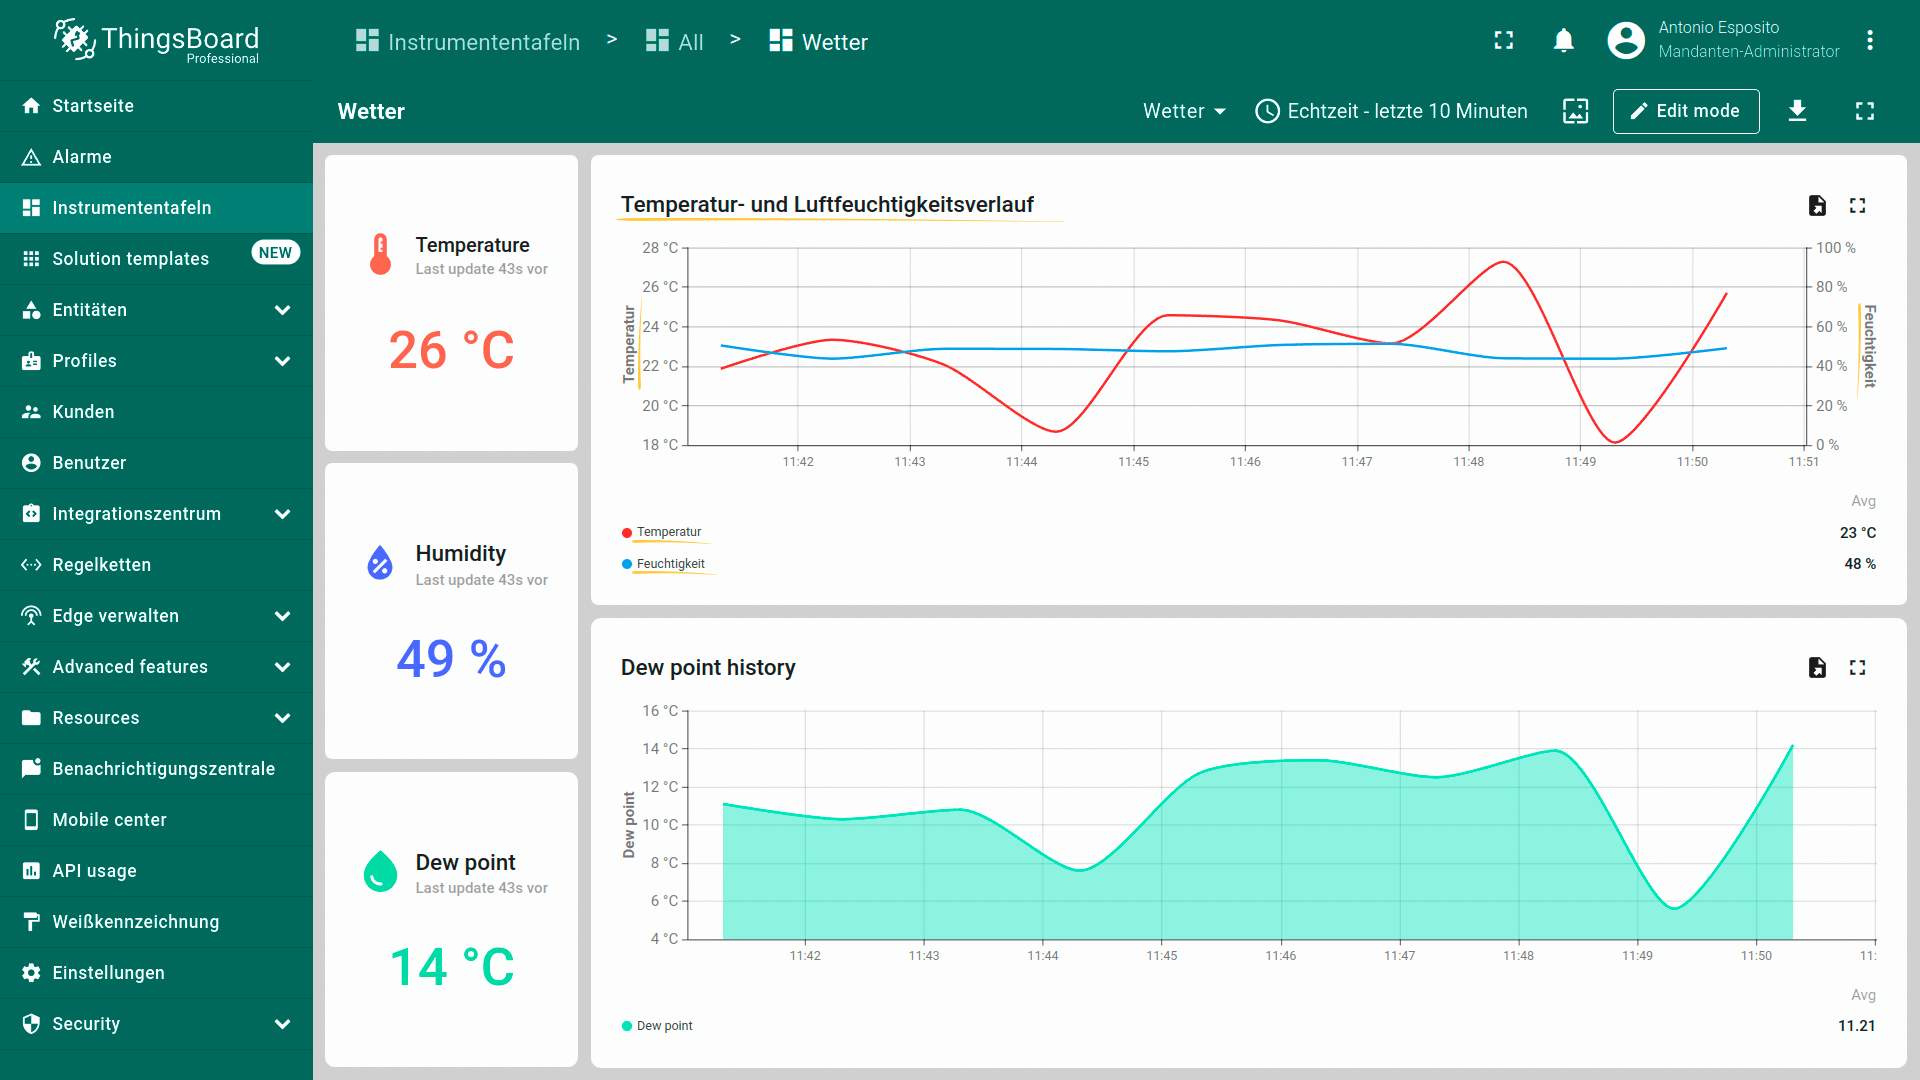
Switch to the user who has German set as their interface language. As you can see, all elements of the “Temperature and Humidity history” widget are now displayed in German.
以相同方式将自定义翻译应用到其他部件。
首先,将所需的自定义翻译键添加到翻译映射中,然后使用i18n结构将这些键分配给相应的部件字段。
| Term key | Value in English | Value in German | Key description |
|---|---|---|---|
| custom.weather-dashboard.dew-point.widget-title | Dew point history | Taupunktverlauf | Dew point history widget title |
| custom.weather-dashboard.dew-point.telemetry-key | Dew point | Taupunkt | Dew point telemetry key name |
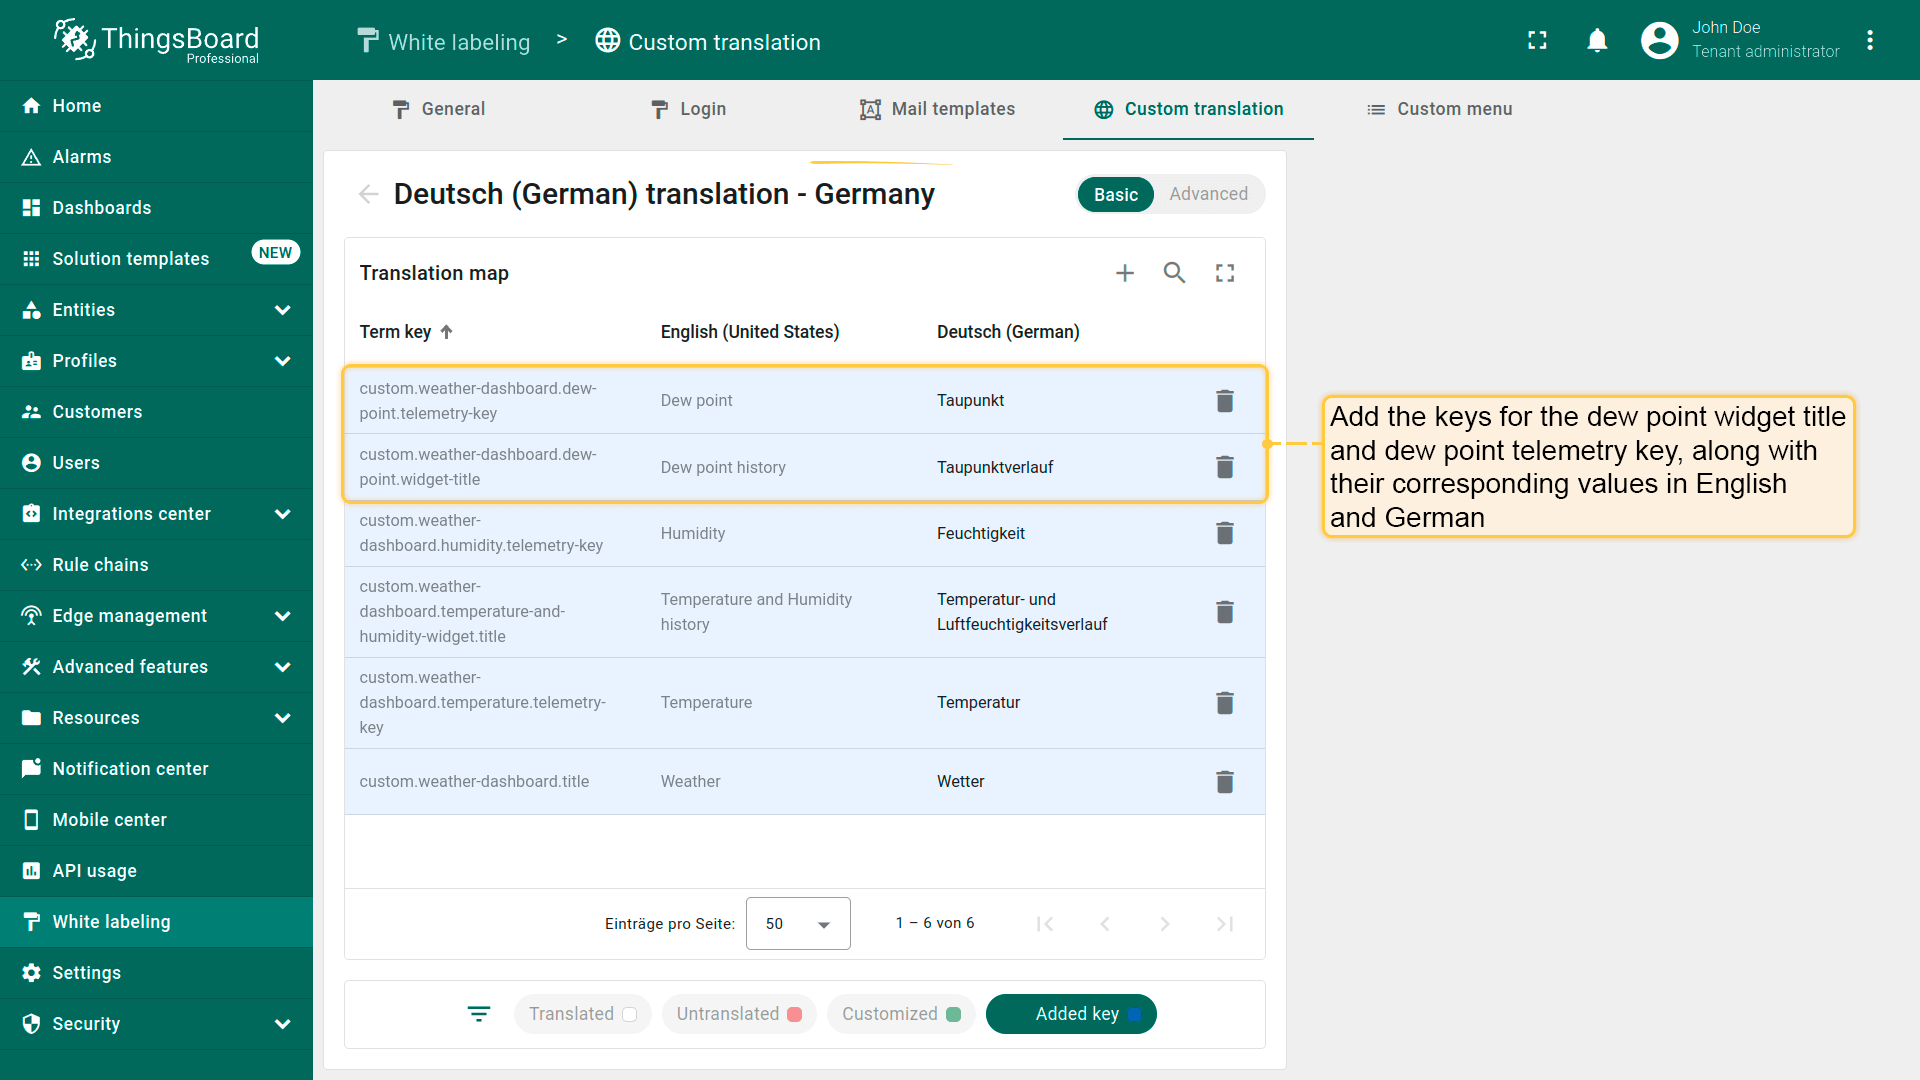
Add the required custom translation keys to the translation map
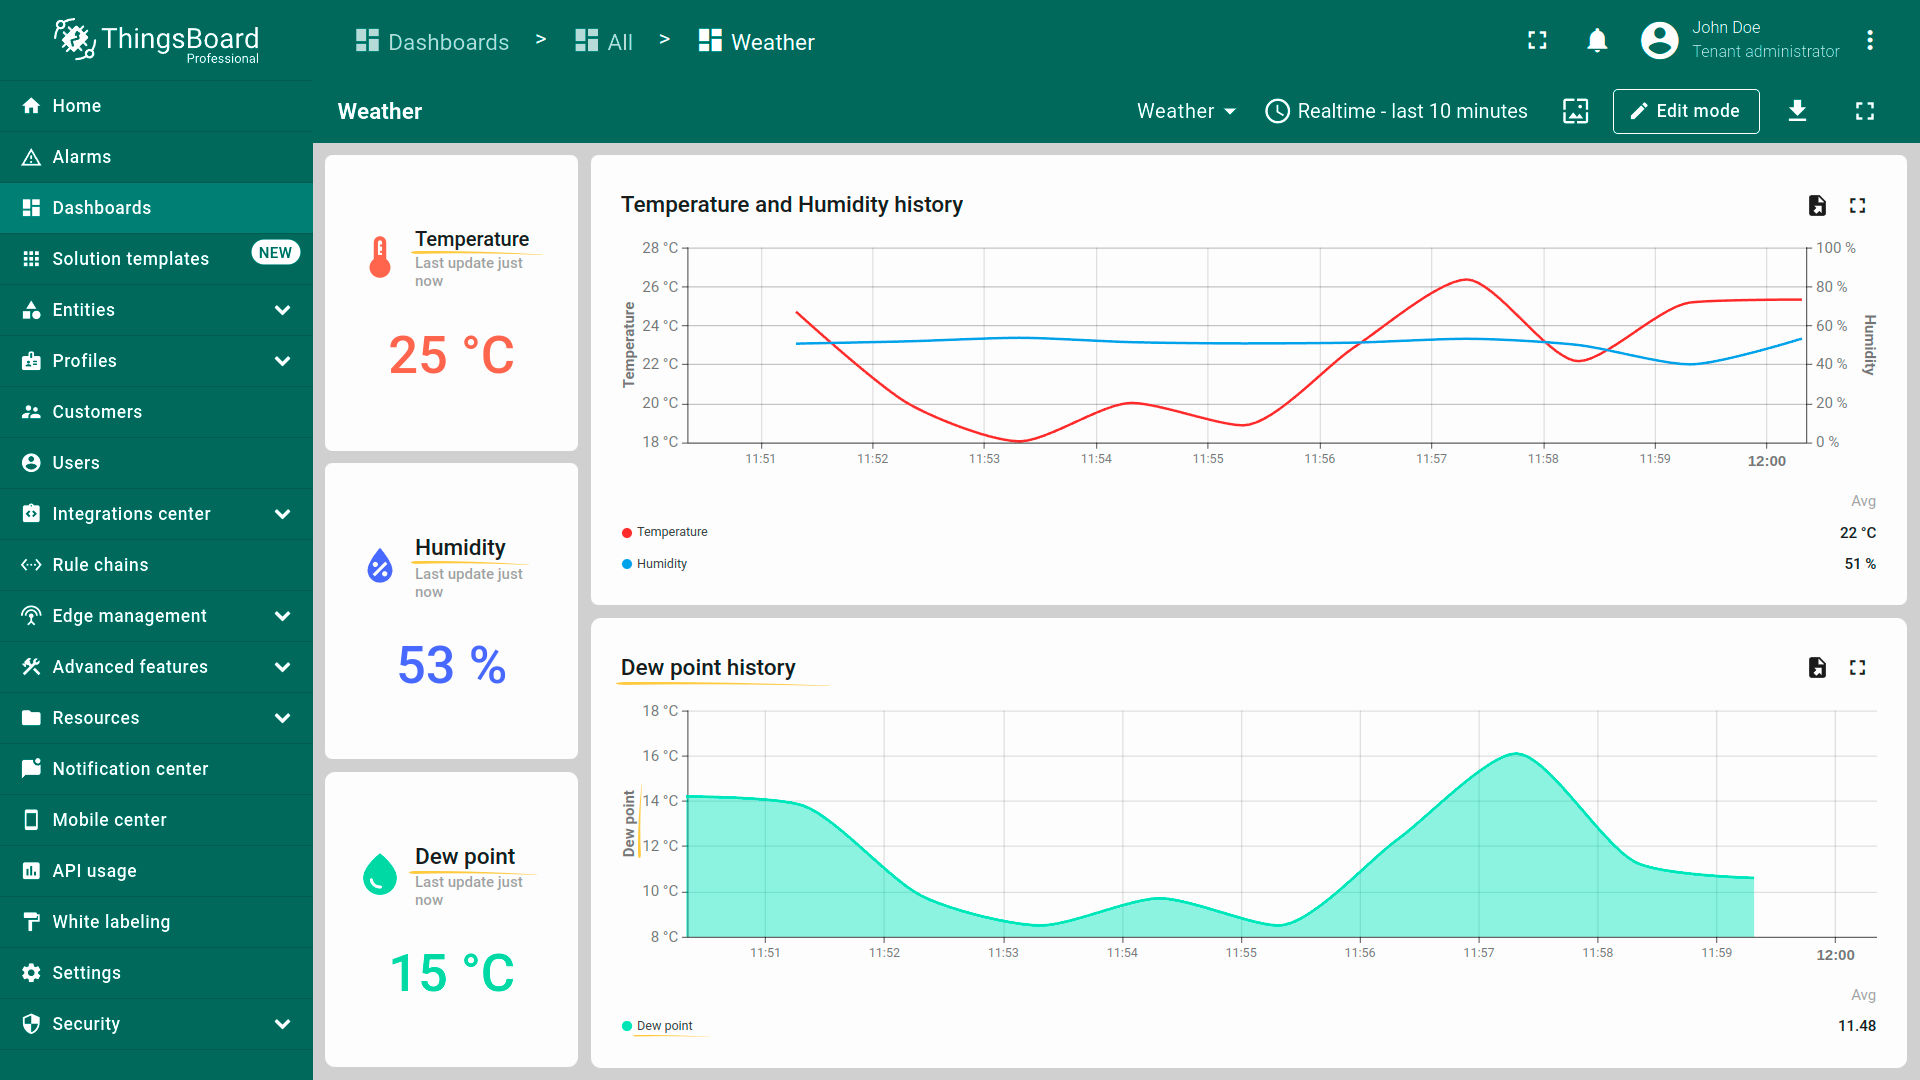
User interface in English
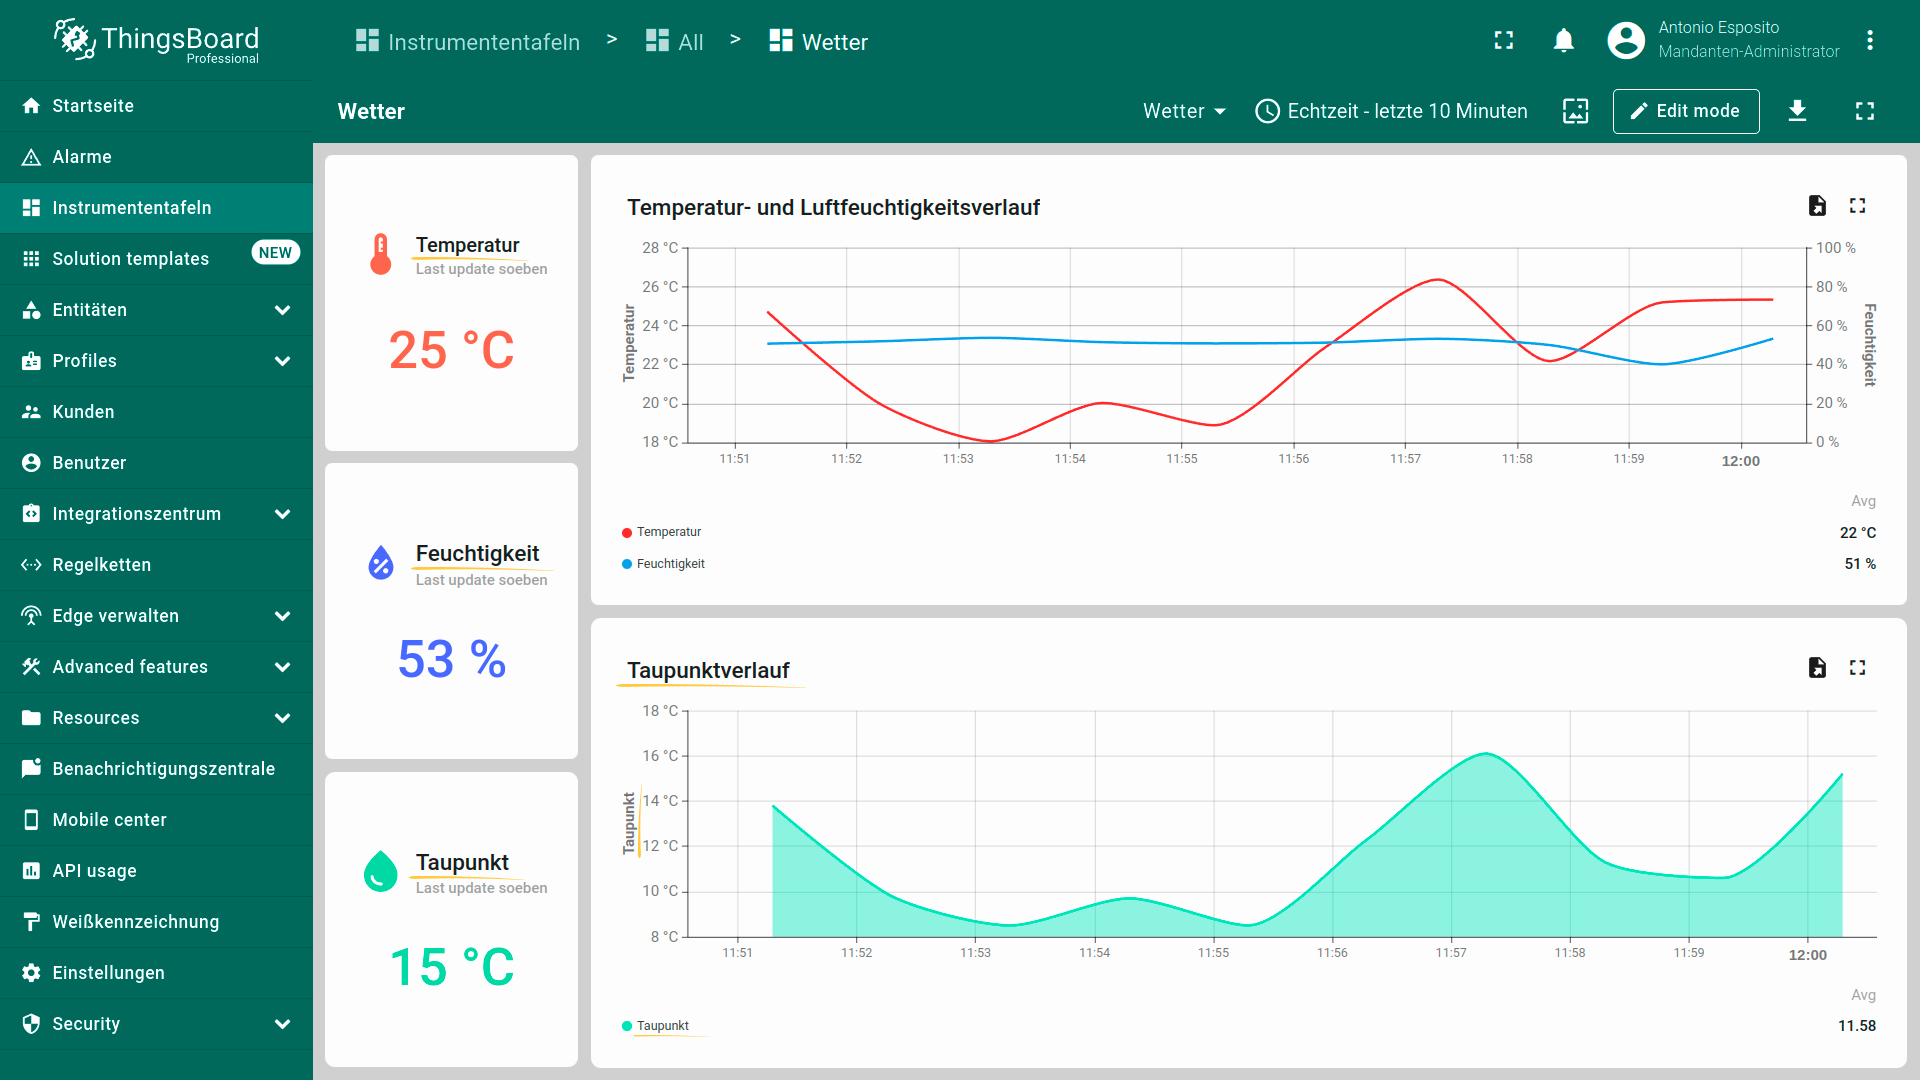
User interface in German.
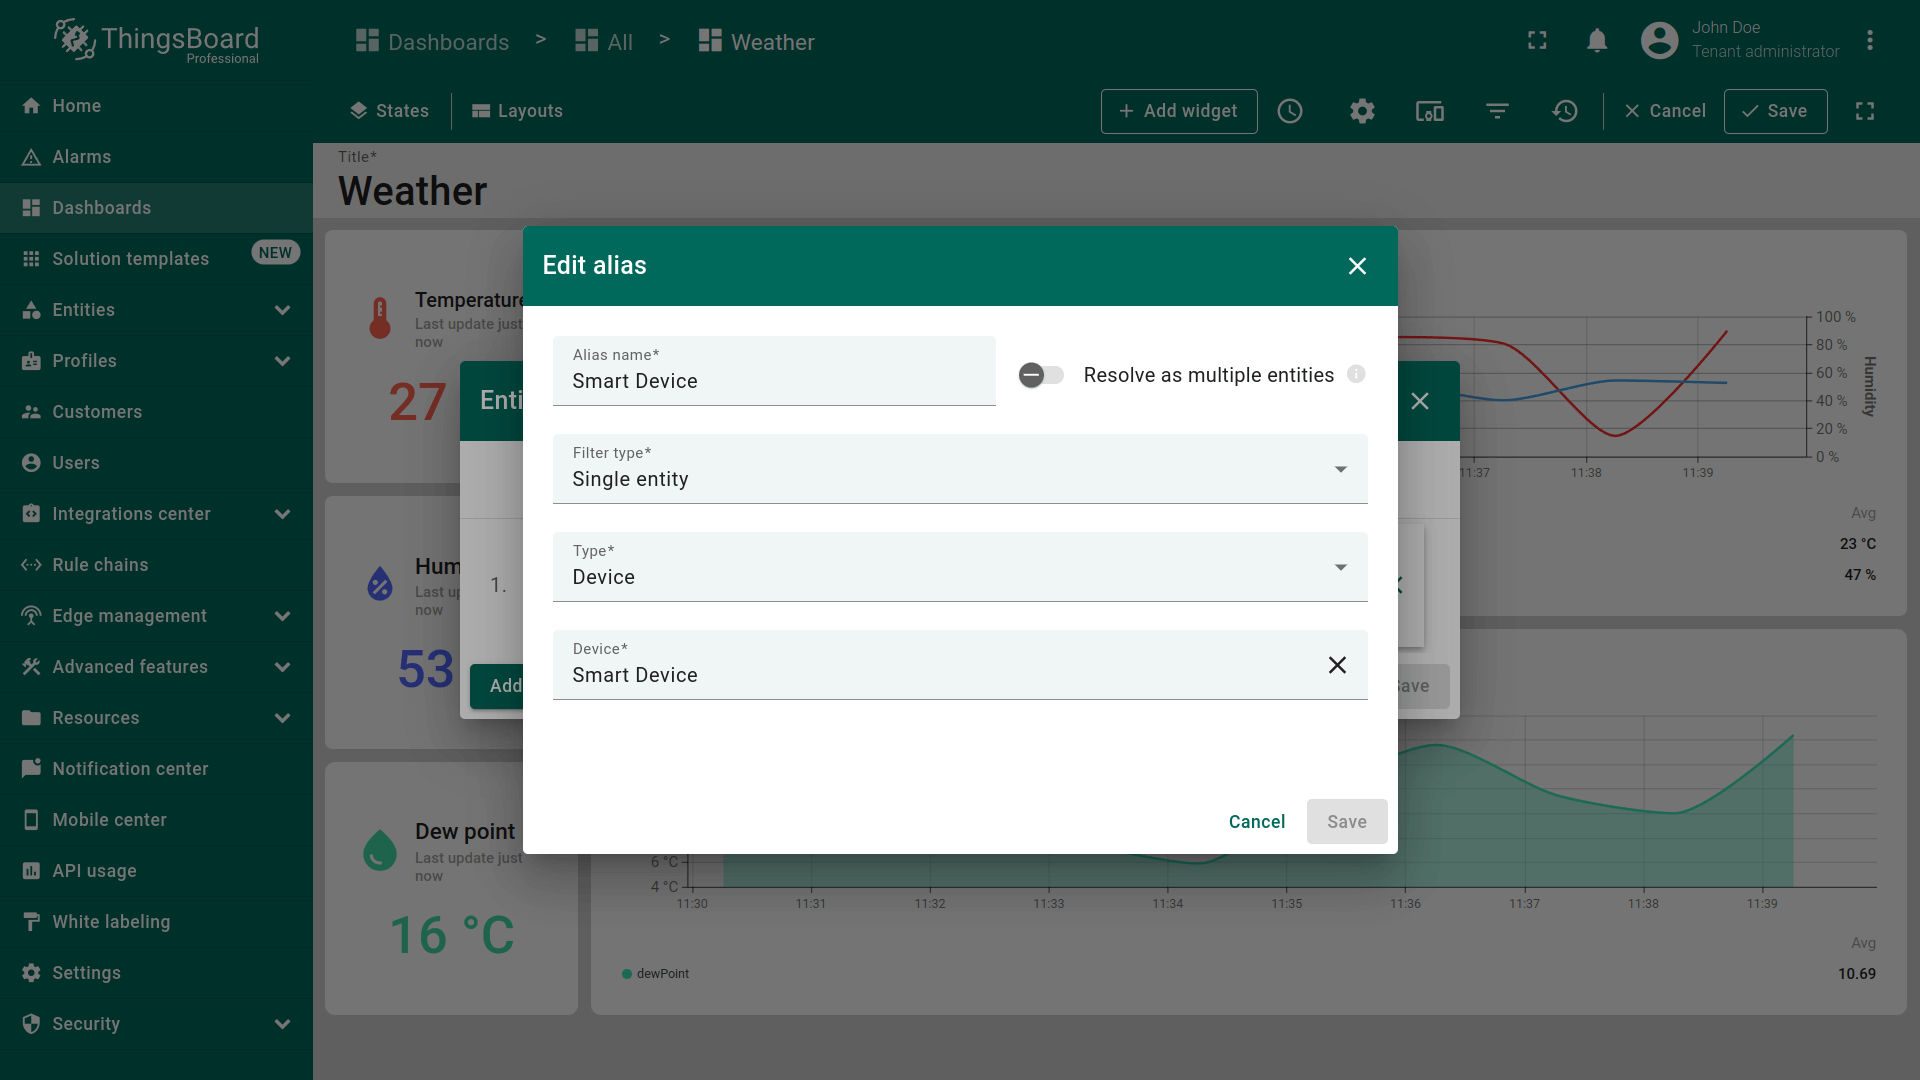
在HTML Value Card部件中使用自定义翻译
自定义翻译可用于部件函数中——例如”HTML Value Card”部件。下面来看一个示例。
1.将翻译键添加到所选语言(本例为德语)的翻译映射中。
| Term key | Value in English | Value in German | Key description |
|---|---|---|---|
| custom.devices.smart-device.name | Smart Device | Intelligentes Gerät | Device name |
| custom.my-dashboard.title | My Dashboard | Mein Dashboard | Dashboard title |
| custom.my-widget.telemetry-key.temperature | Temperature | Temperatur | Temperature telemetry key name |
| custom.my-widget.telemetry-value.low-temperature | Low temperature | Niedrigtemperatur | Low temperature value |
| custom.my-widget.telemetry-value.high-temperature | High temperature | Hochtemperatur | High temperature value |
| custom.my-widget.telemetry-value.normal-temperature | Normal temperature | Normaltemperatur | Normal temperature value |
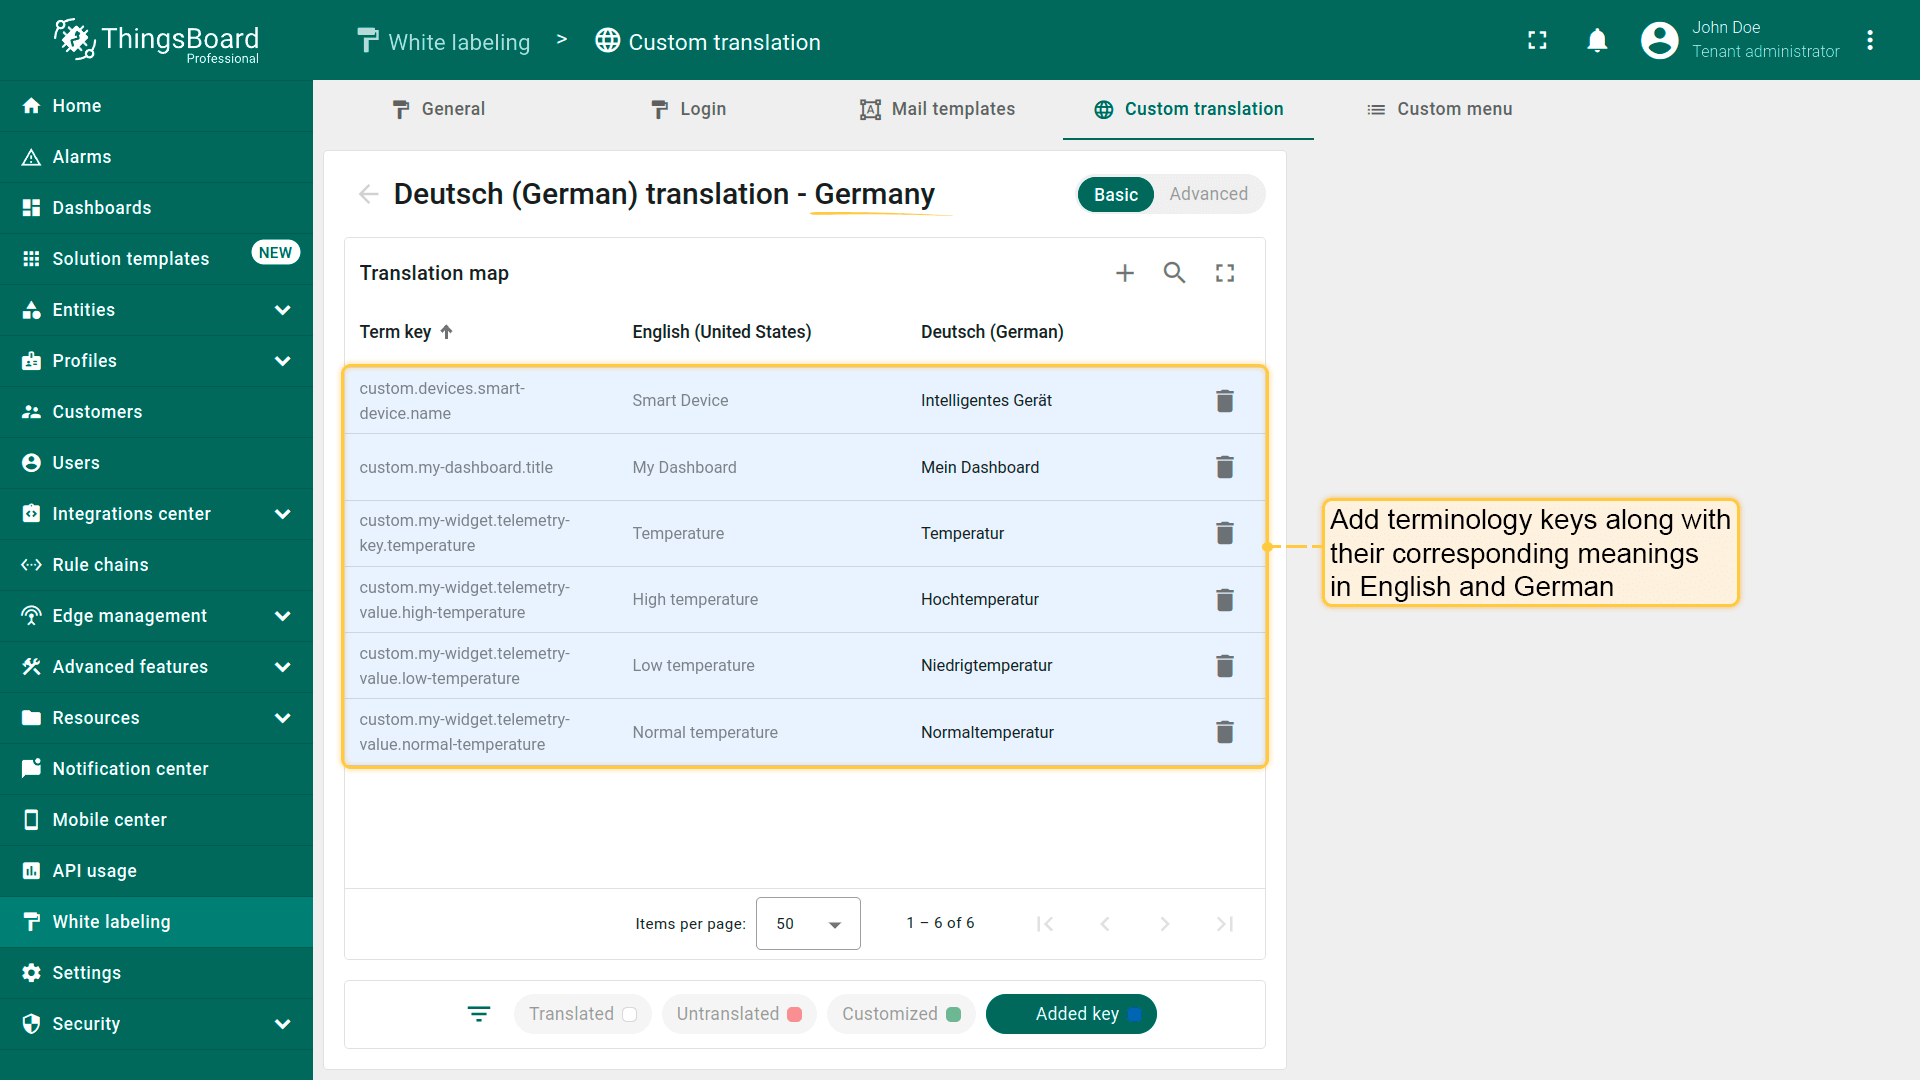
Add the required custom translation keys to the translation map of the selected language.
2.添加”HTML Value Card”部件:
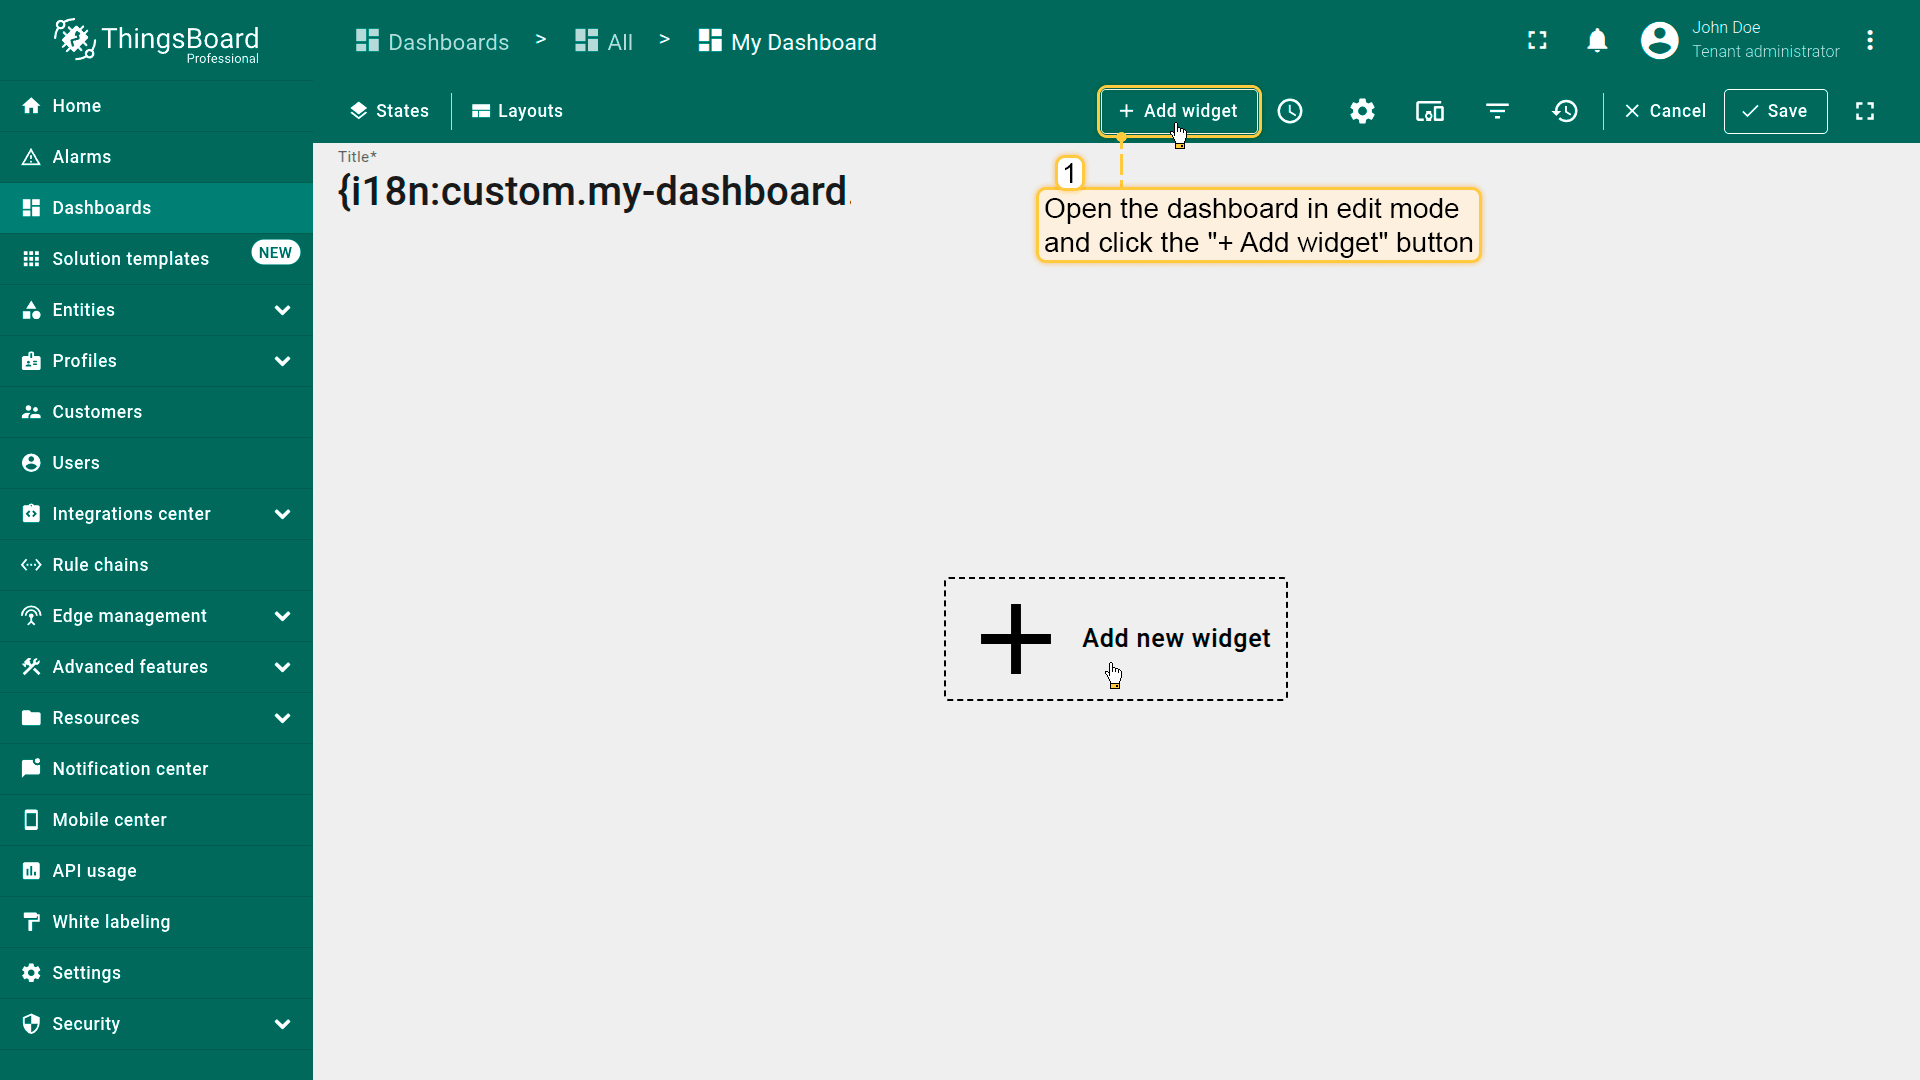
- 在编辑模式下打开仪表板,点击”Add widget”按钮。
- 从”Cards”部件包中选择”HTML Value Card”部件。
- 指定发送温度读数的设备作为数据源,以及对应的遥测键。
- 进入”Appearance”选项卡,使用自己的代码或复制下方提供的代码粘贴到”HTML”字段中。
代码语法要求将i18n键放在引号中。
在”HTML Value Card”部件中使用自定义翻译的示例:
- 点击”Add”。
- 保存仪表板。
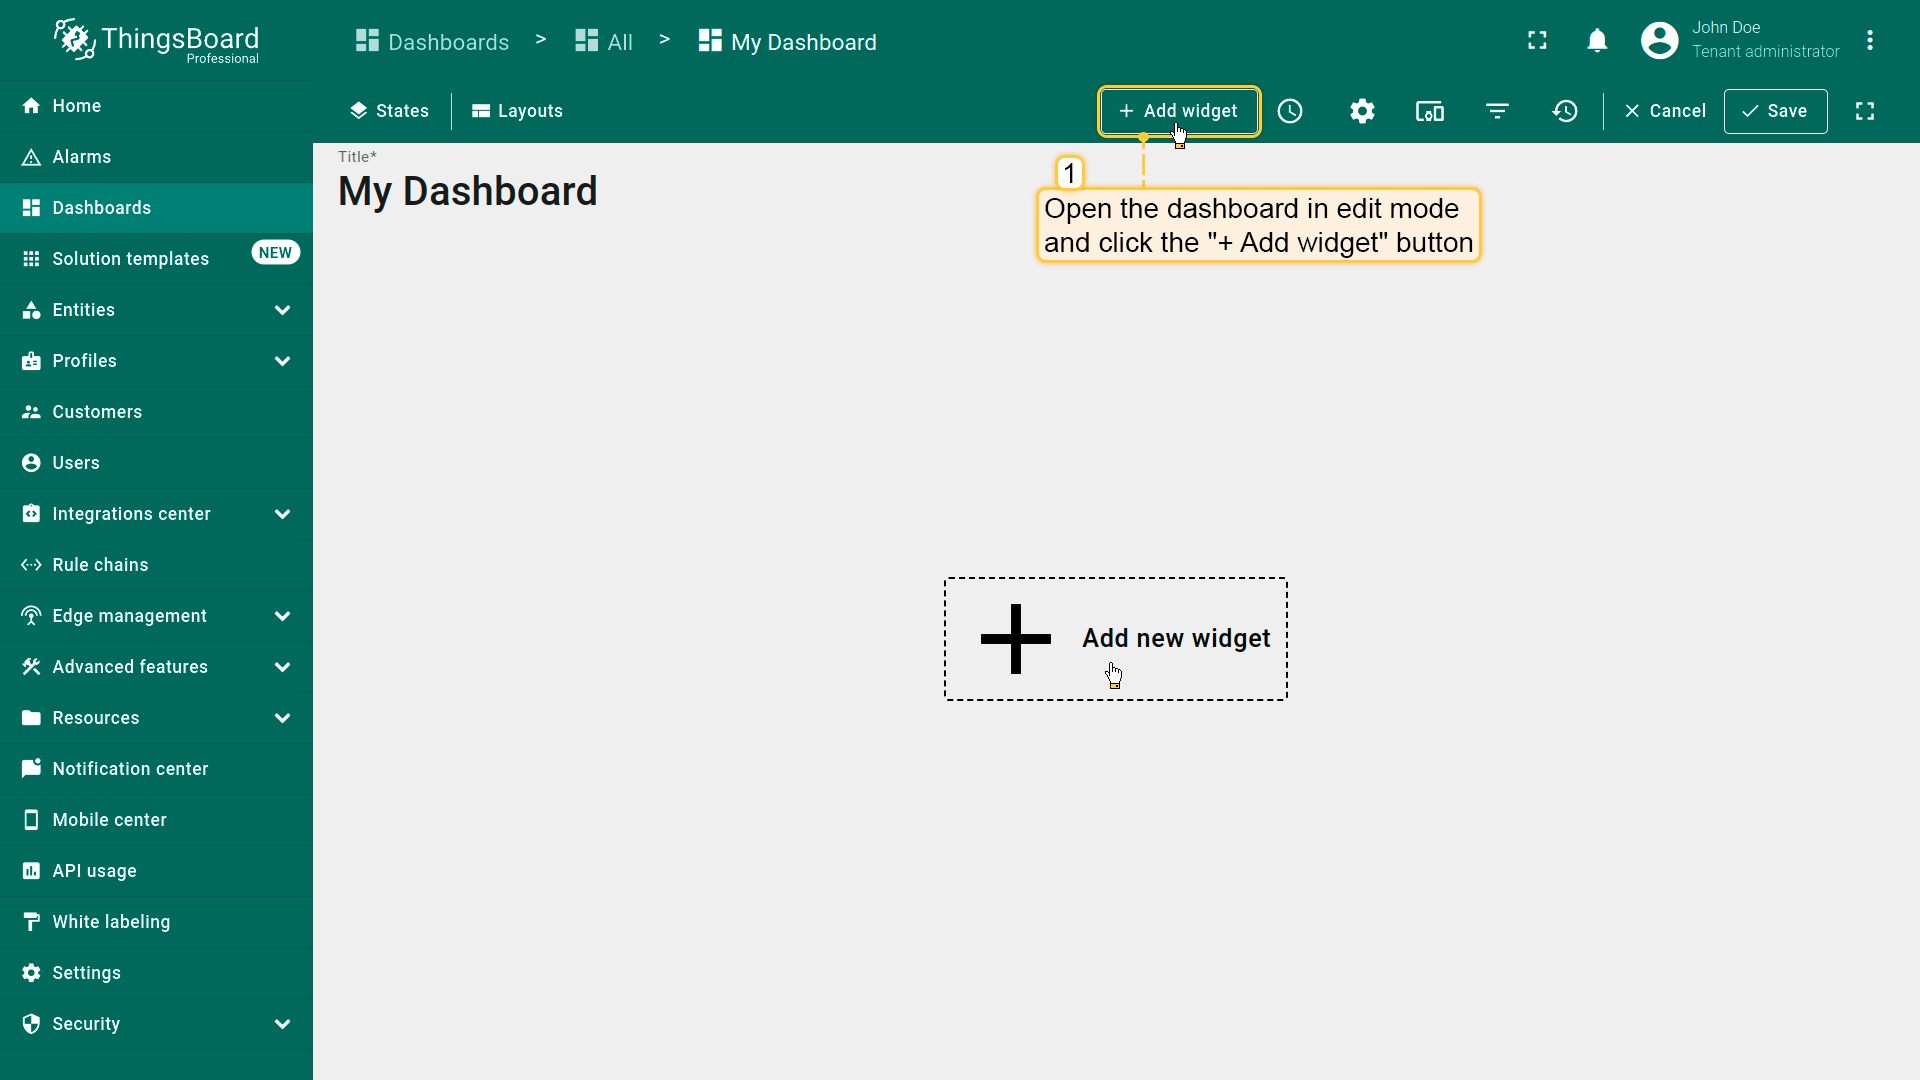
Open the dashboard in edit mode and click the “Add widget” button.
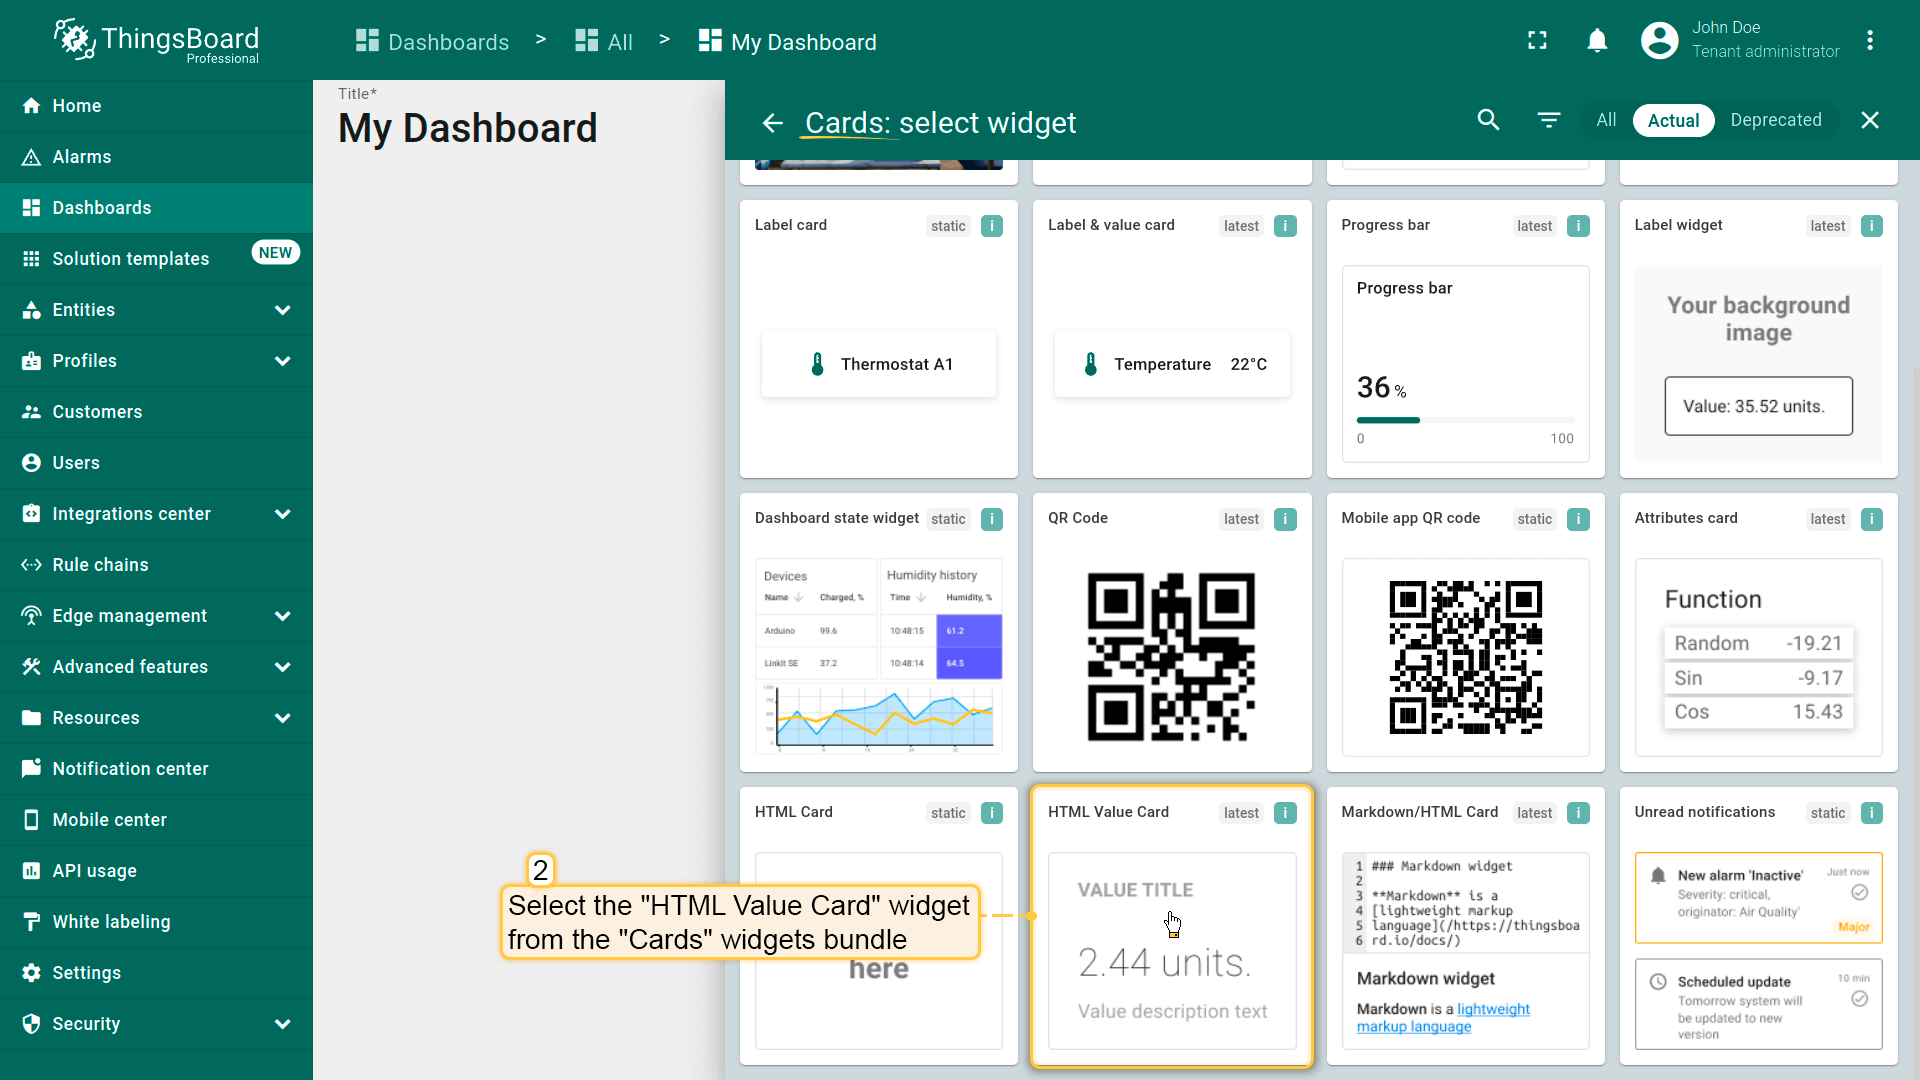
Select the “HTML Value Card” widget from the “Cards” widgets bundle.
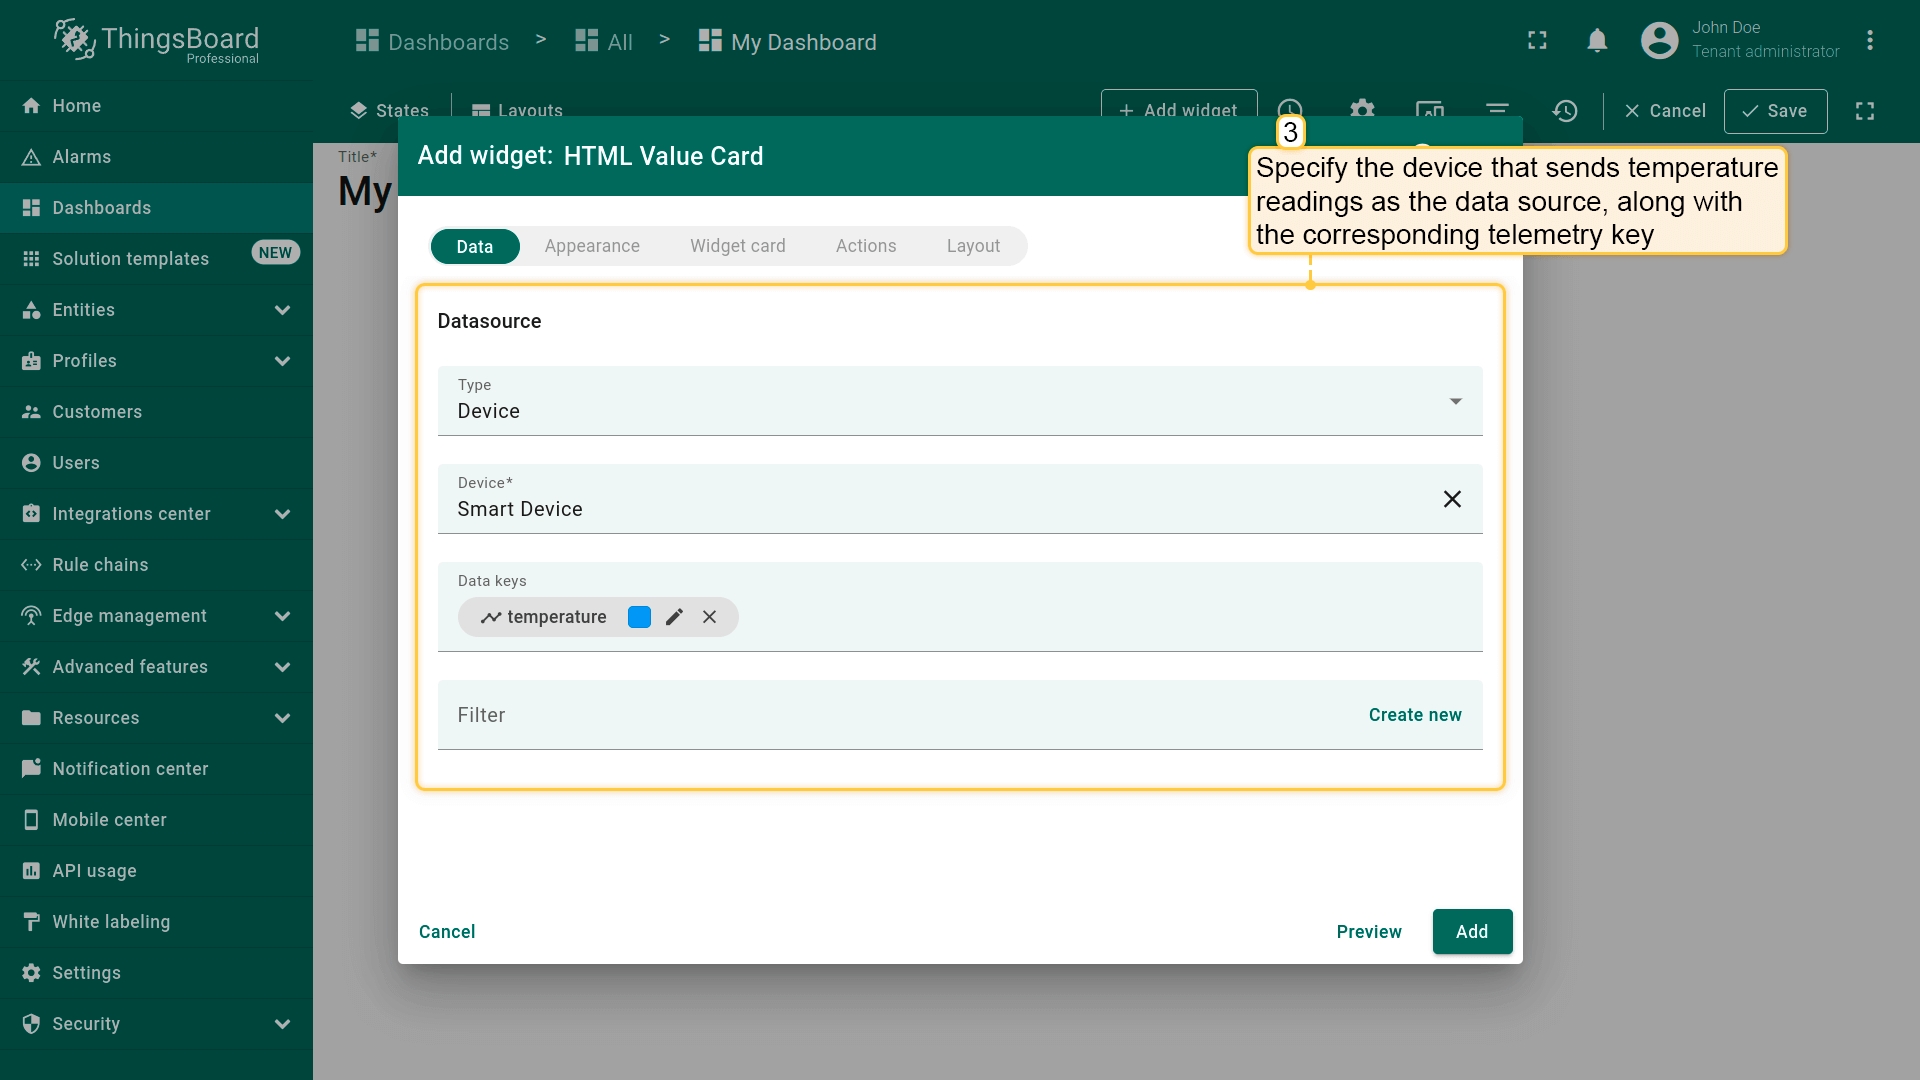
Specify the device that sends temperature readings as the data source, along with the corresponding telemetry key.
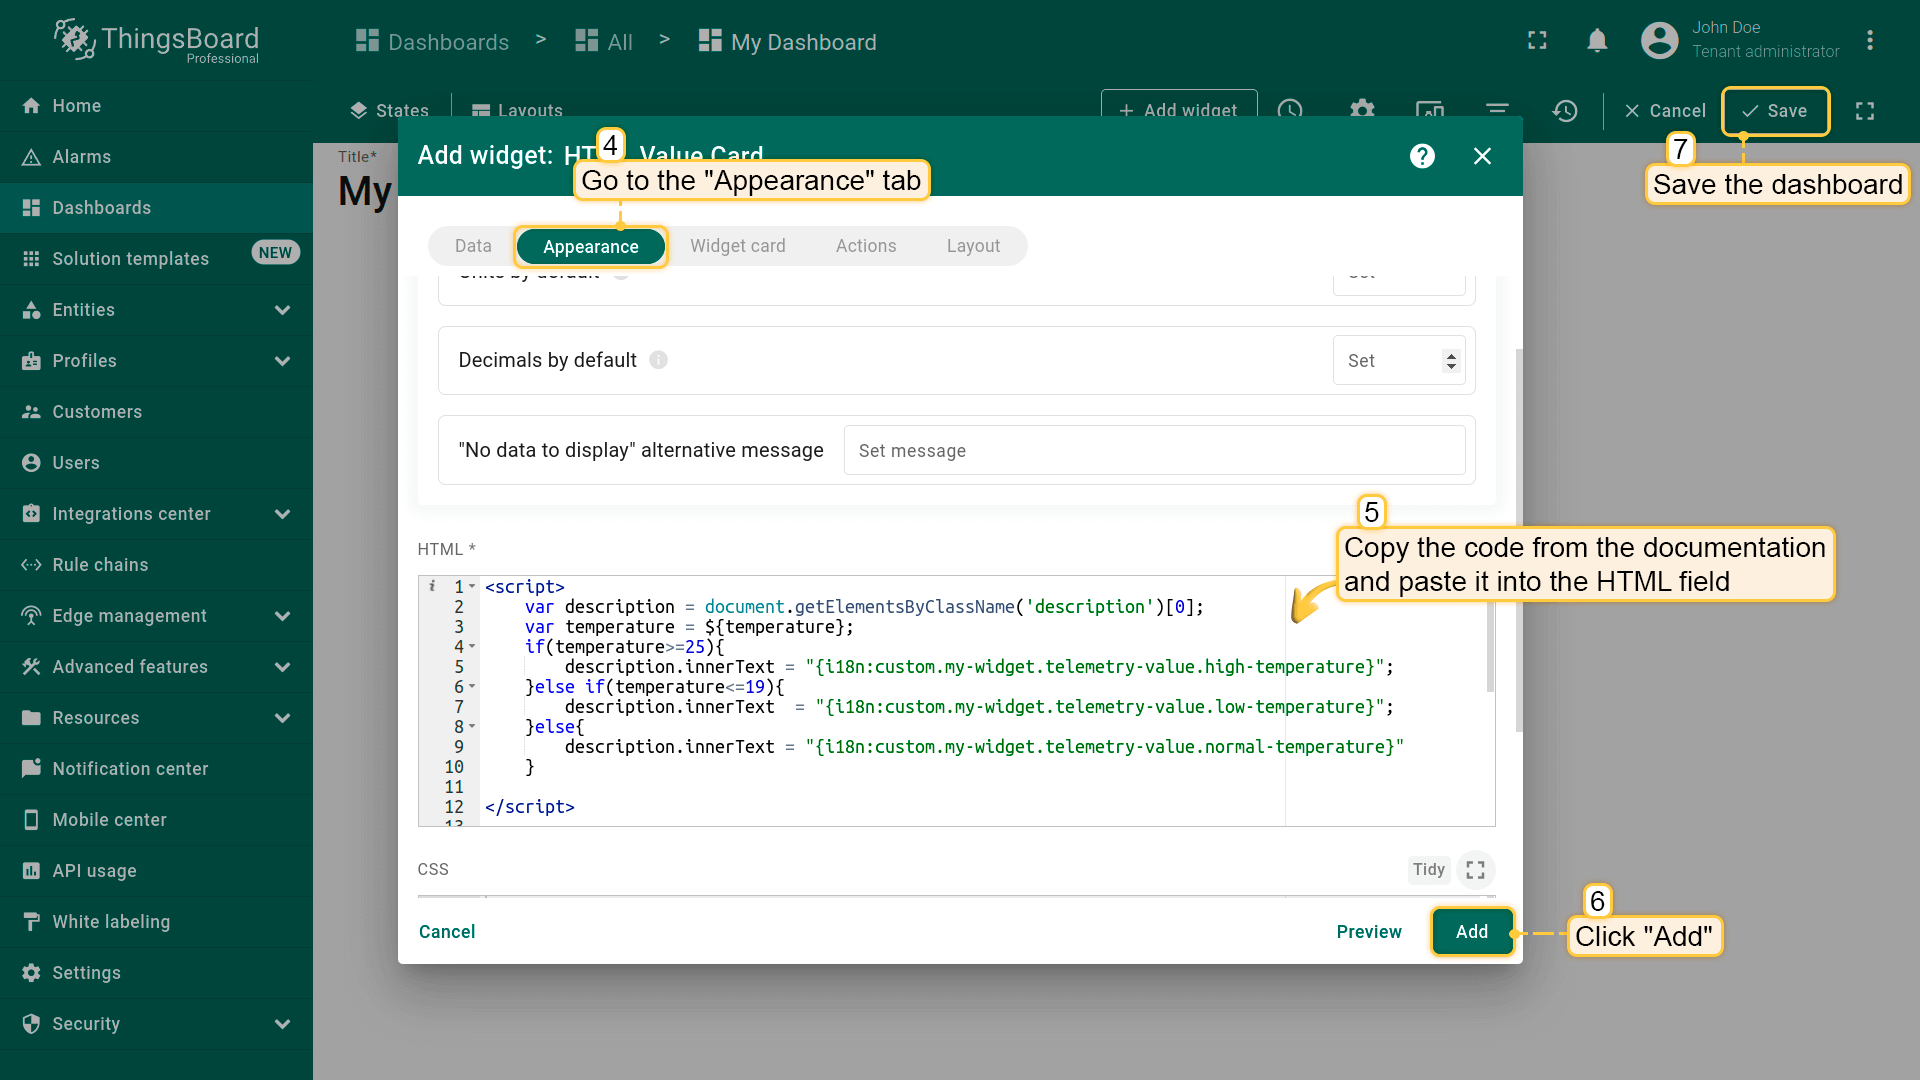
Go to the “Appearance” tab. Use your own code or copy the one provided below and paste it into the “HTML” field and click “Add”. Then, save the dashboard.
Now check the result. The value displayed in the HTML card will dynamically update based on the incoming telemetry data.
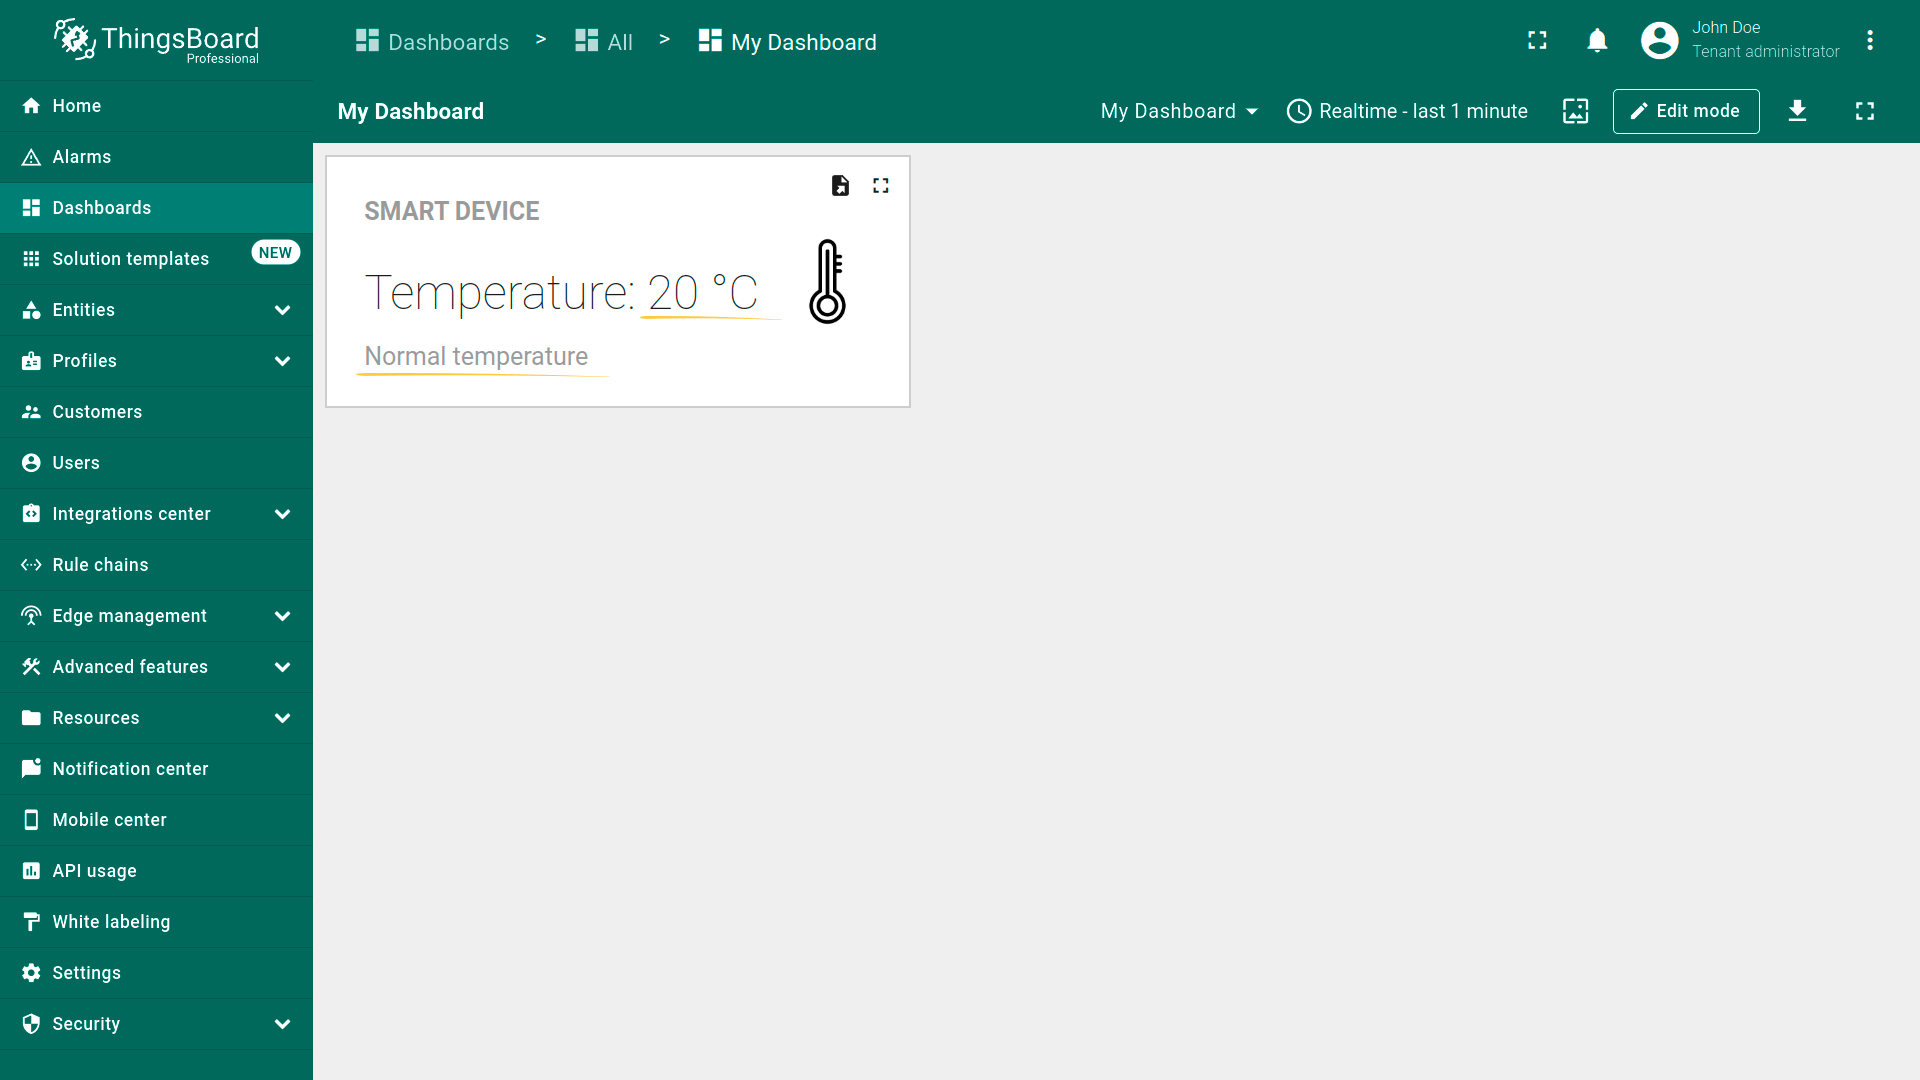
Now check the result. The value displayed in the HTML card will dynamically update based on the incoming telemetry data.
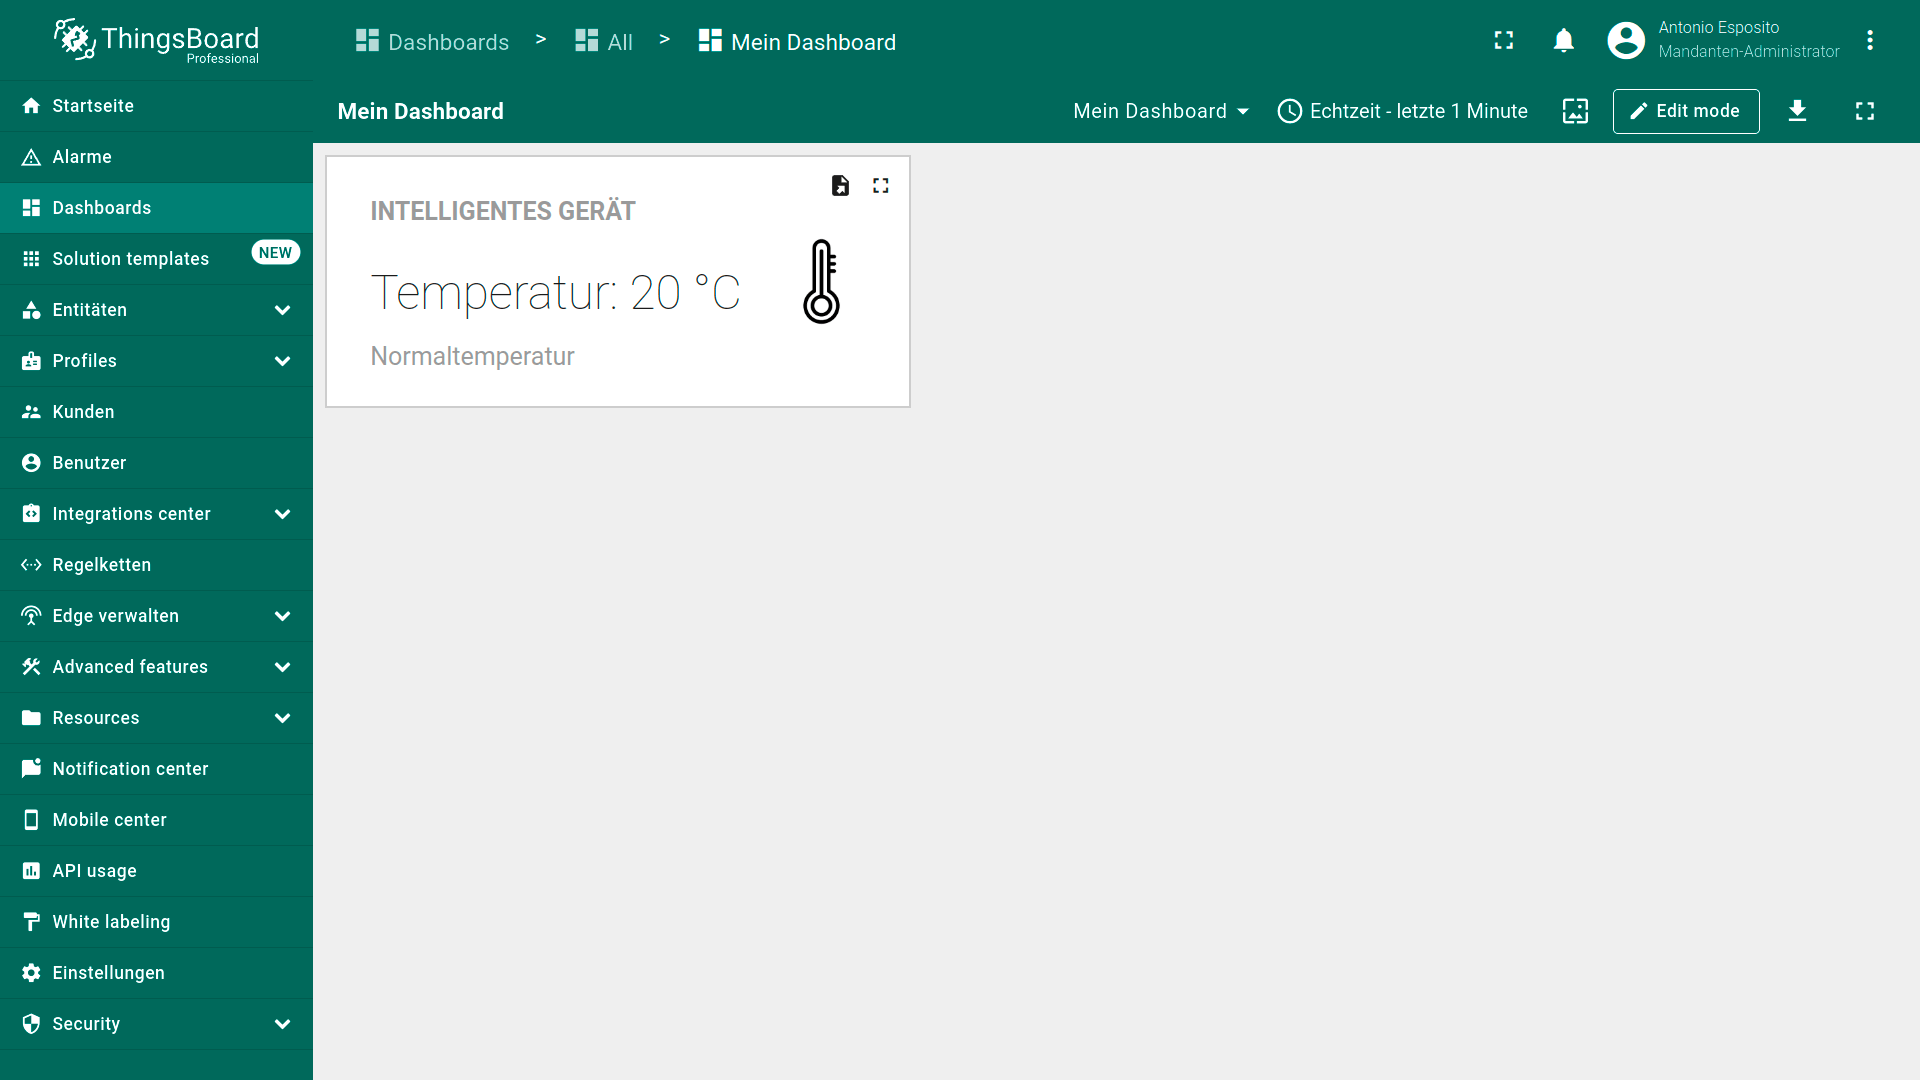
对于界面语言设置为德语的用户,部件也将以德语显示。
Click the “Add widget” button.
在数据后处理函数中使用自定义翻译
自定义翻译可用于数据后处理函数。 下面来看一个示例。
1.将翻译键添加到所选语言(本例为德语)的翻译映射中。
| Term key | Value in English | Value in German | Key description |
|---|---|---|---|
| custom.my-dashboard.title | My Dashboard | Mein Dashboard | Dashboard title |
| custom.my-widget.telemetry-key.temperature | Temperature | Temperatur | Temperature telemetry key name |
| custom.my-widget.telemetry-value.range | Value range | Wertebereich | Temperature range |
| custom.my-widget.telemetry-value.low-temperature | Low temperature | Niedrigtemperatur | Low temperature value |
| custom.my-widget.telemetry-value.high-temperature | High temperature | Hochtemperatur | High temperature value |
| custom.my-widget.telemetry-value.normal-temperature | Normal temperature | Normaltemperatur | Normal temperature value |

Add the required custom translation keys to the translation map of the selected language.
2.添加”HTML Value Card”部件:
- 在编辑模式下打开仪表板,点击”Add widget”按钮。
- 从”Tables”部件包中选择”Entities table”部件。
- 指定发送温度读数的设备作为数据源。
- 在”Columns”部分,显示设备名称的name列已默认添加。现在再添加两列:
- 第一列添加遥测键”temperature”,用于显示摄氏温度值。
- 第二列同样使用遥测键”temperature”,但将此列配置为显示温度范围而非原始值。
为两个列标签应用相应的i18n翻译键,用花括号包裹:
- 第一列:{i18n:custom.my-widget.telemetry-key.temperature}
- 第二列:{i18n:custom.my-widget.telemetry-value.range}
- 第一列:{i18n:custom.my-widget.telemetry-key.temperature}
Open the dashboard in edit mode and click the “Add widget” button.
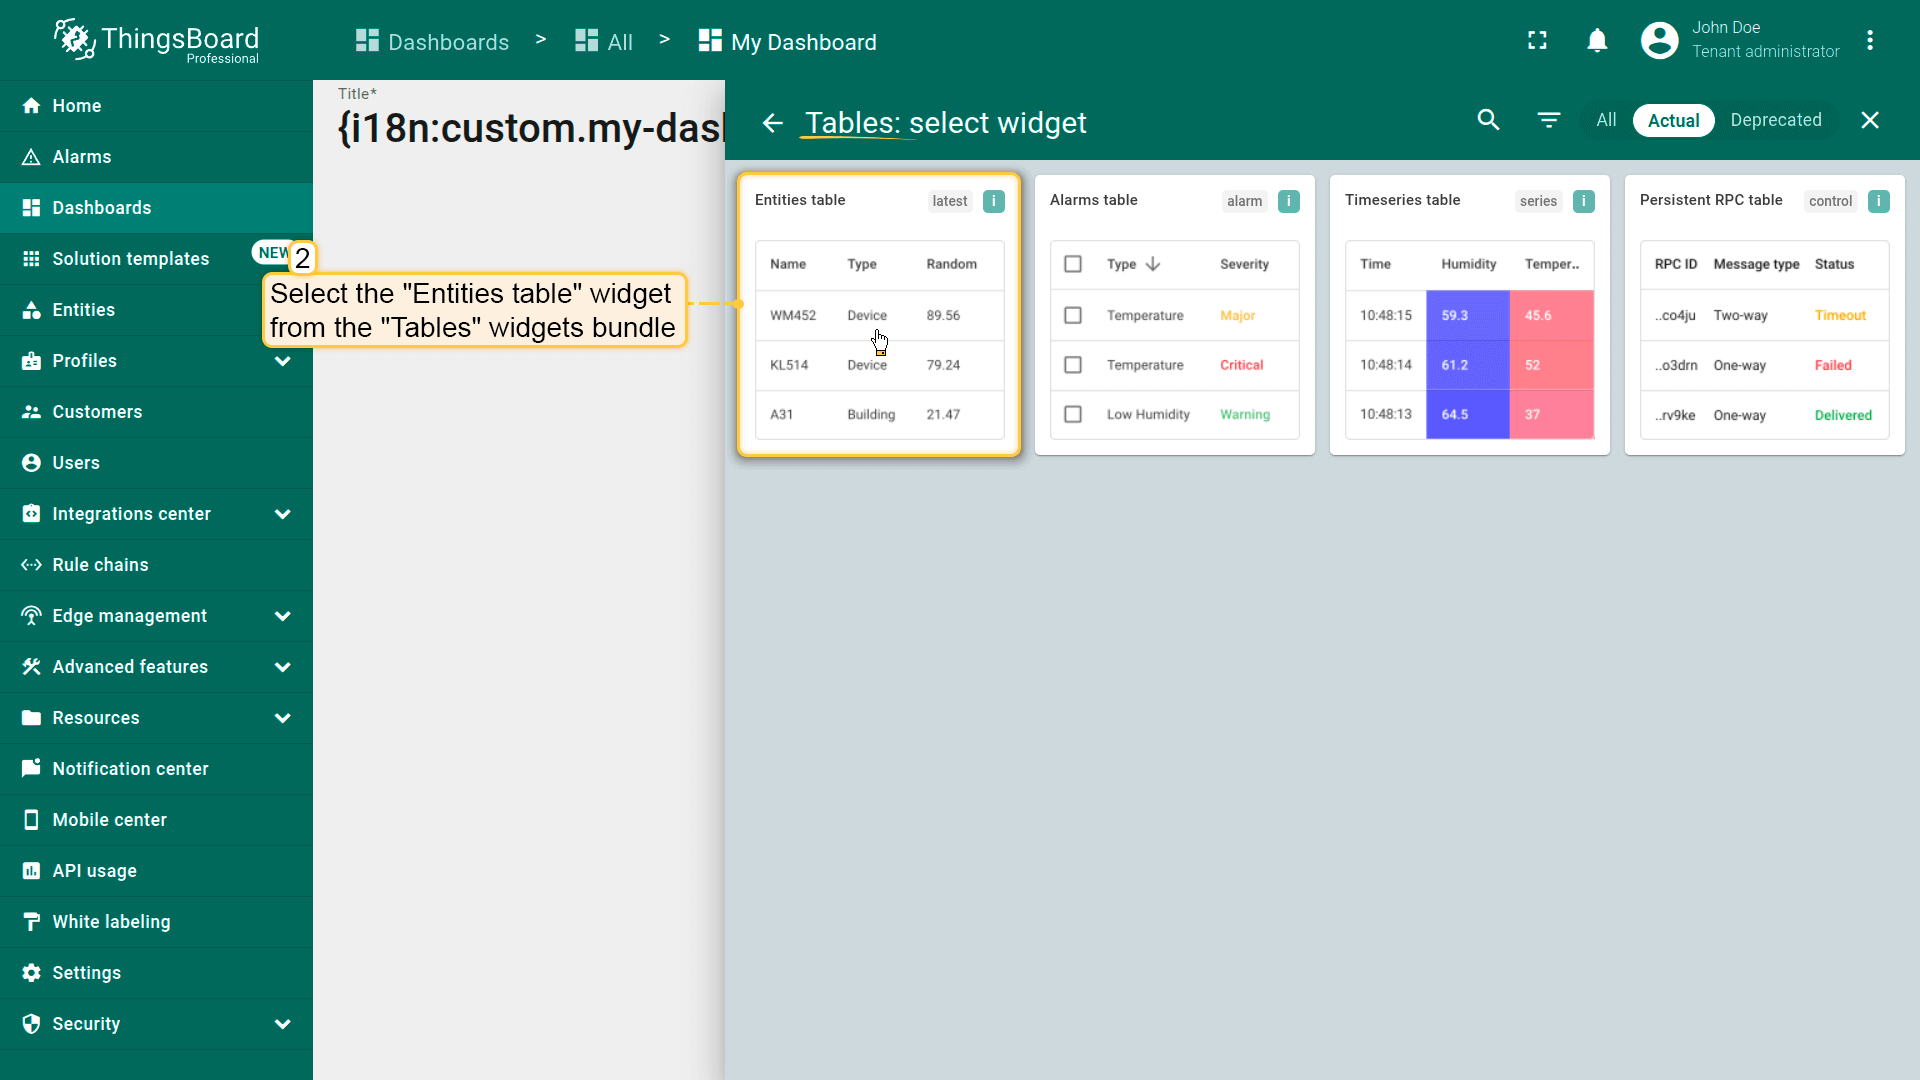
Select the “Entities table” widget from the “Tables” widgets bundle.
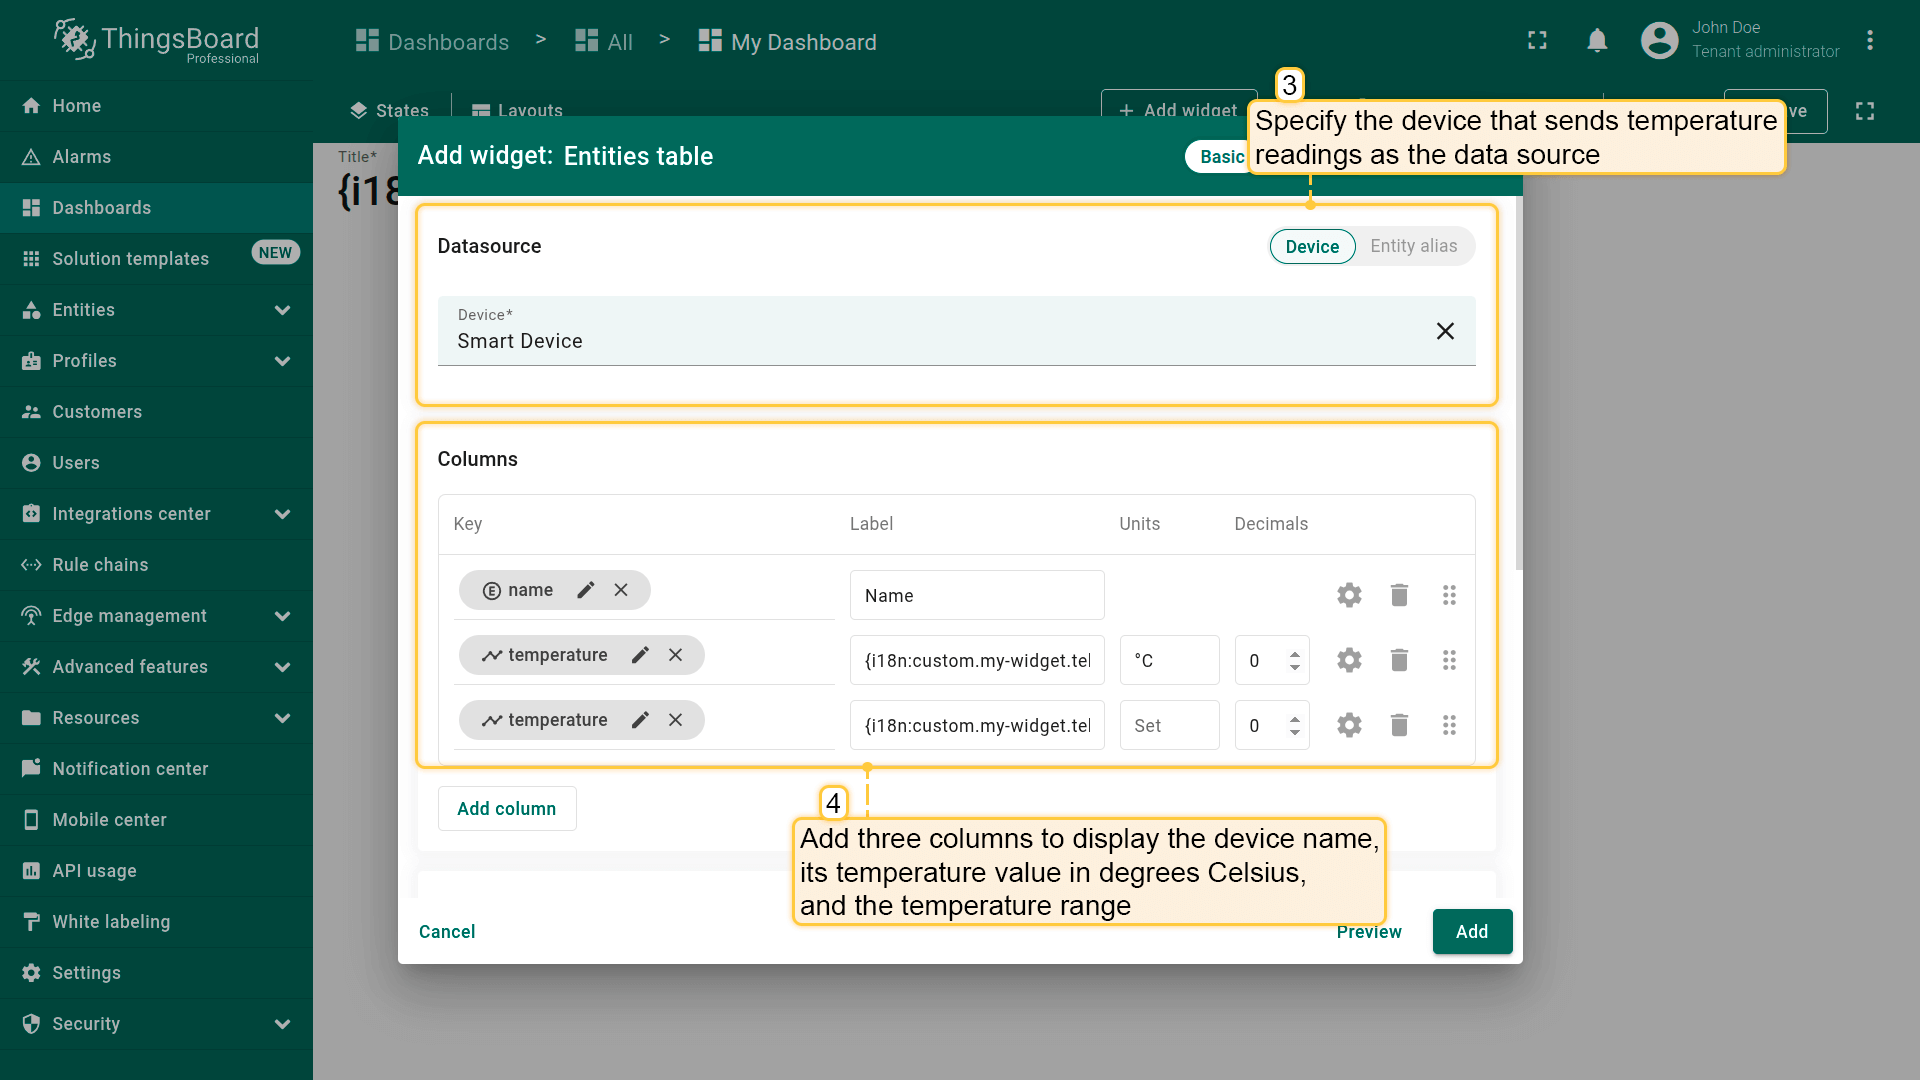
Specify the device that sends temperature readings as the data source. Then, add three columns to display the device name, its temperature value in degrees Celsius, and the temperature range.
- 打开最后一列的键配置。
- 使用下方提供的数据后处理函数,显示从自定义翻译键获取的温度范围值。然后点击Save。
代码语法要求将i18n键放在引号中。
在数据后处理函数中使用自定义翻译的示例:
1
2
3
4
5
6
7
if(value>=25){
    return "{i18n:custom.my-widget.telemetry-value.high-temperature}";
}else if(value<=19){
    return "{i18n:custom.my-widget.telemetry-value.low-temperature}";
}else{
    return "{i18n:custom.my-widget.telemetry-value.normal-temperature}";
}
- 点击”Add”将部件添加到仪表板。然后保存仪表板。
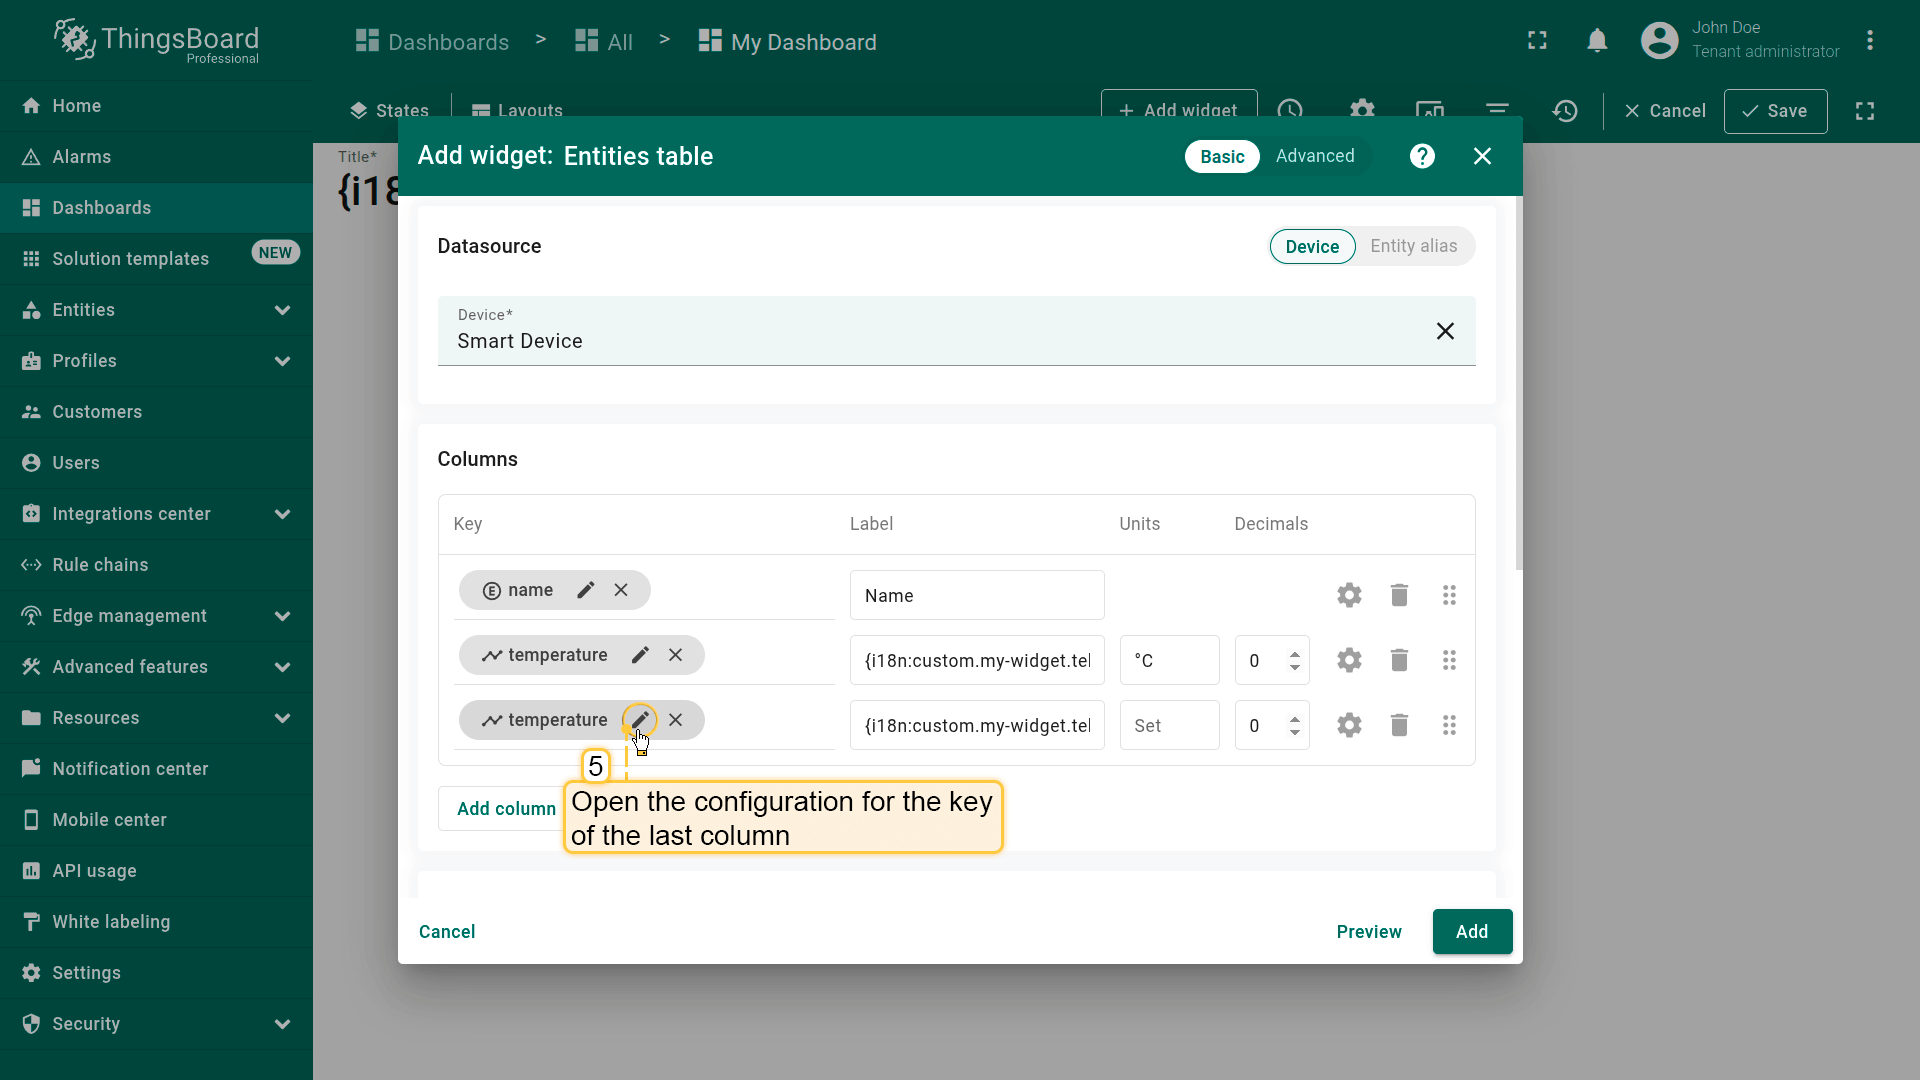
Open the configuration for the key of the last column.
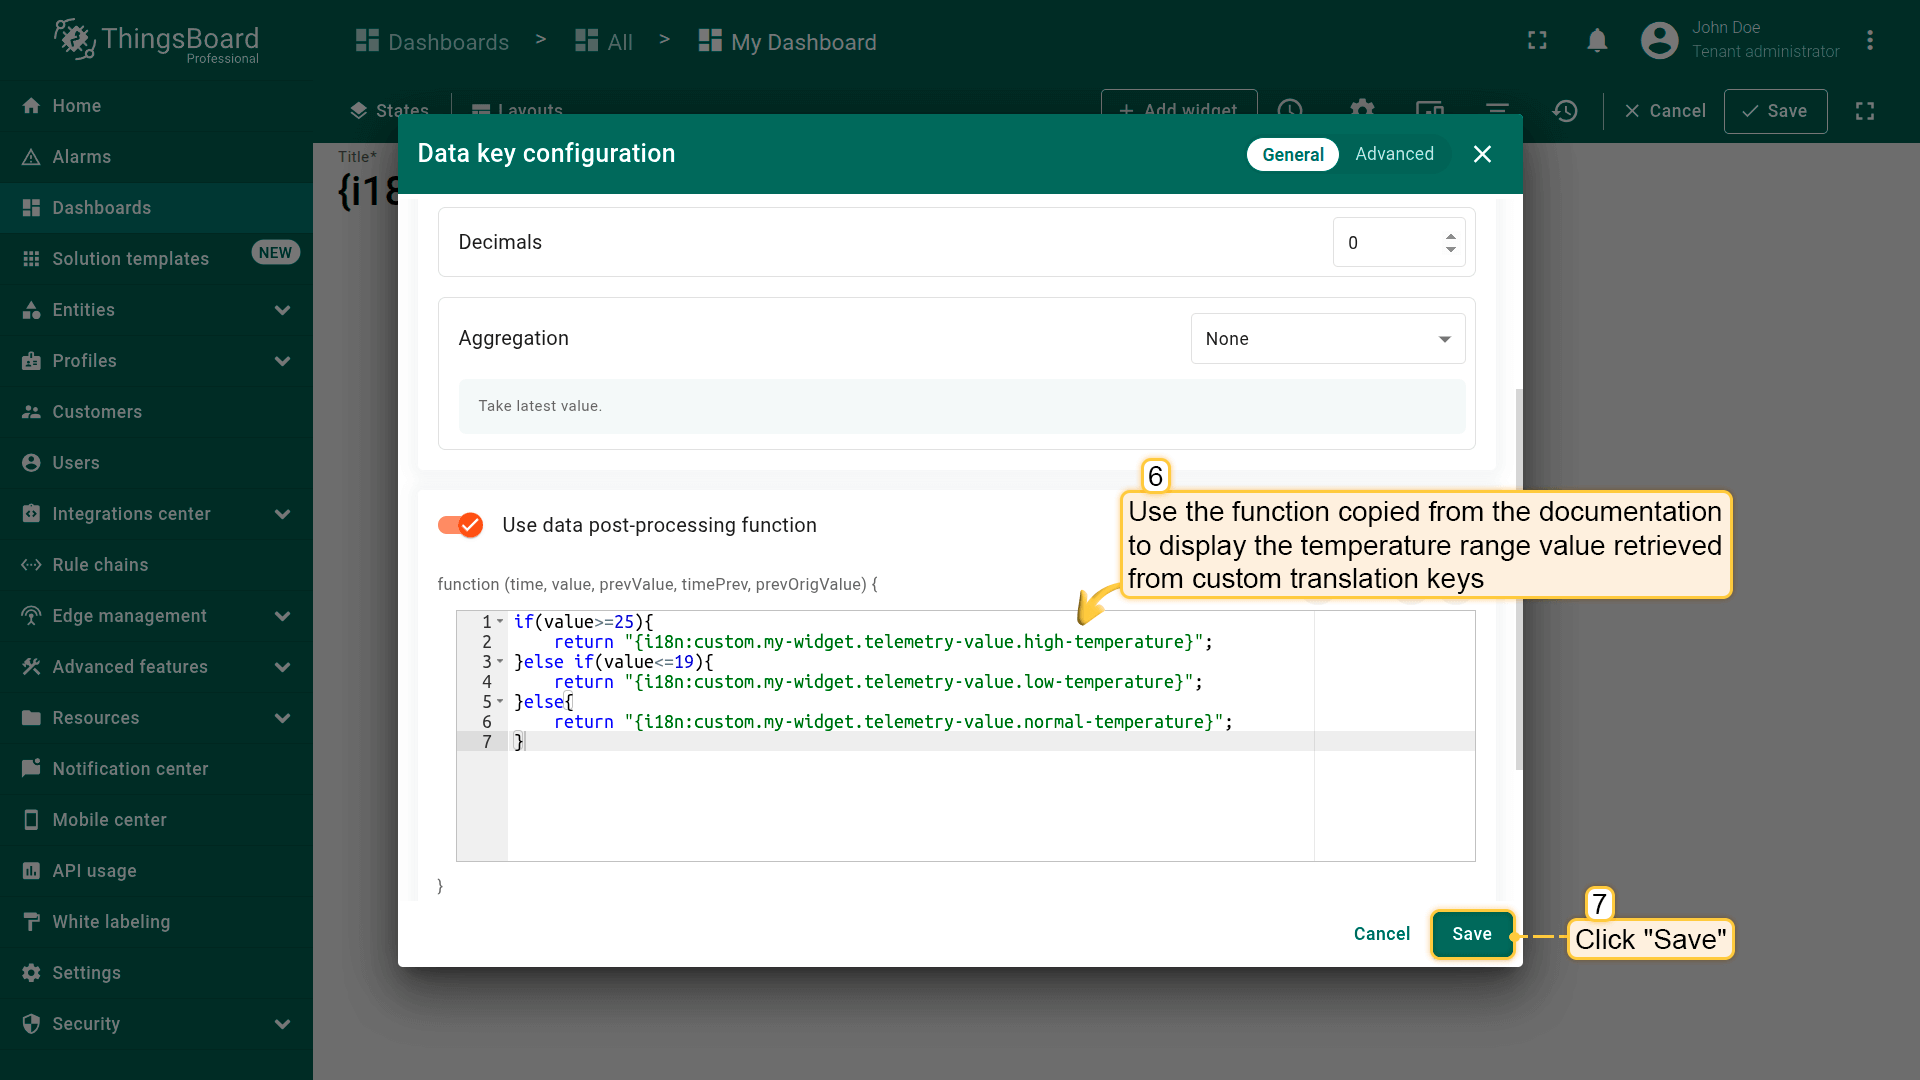
Use the data post-processing function provided below to display the temperature range value retrieved from a custom translation key. Then, click “Save”.
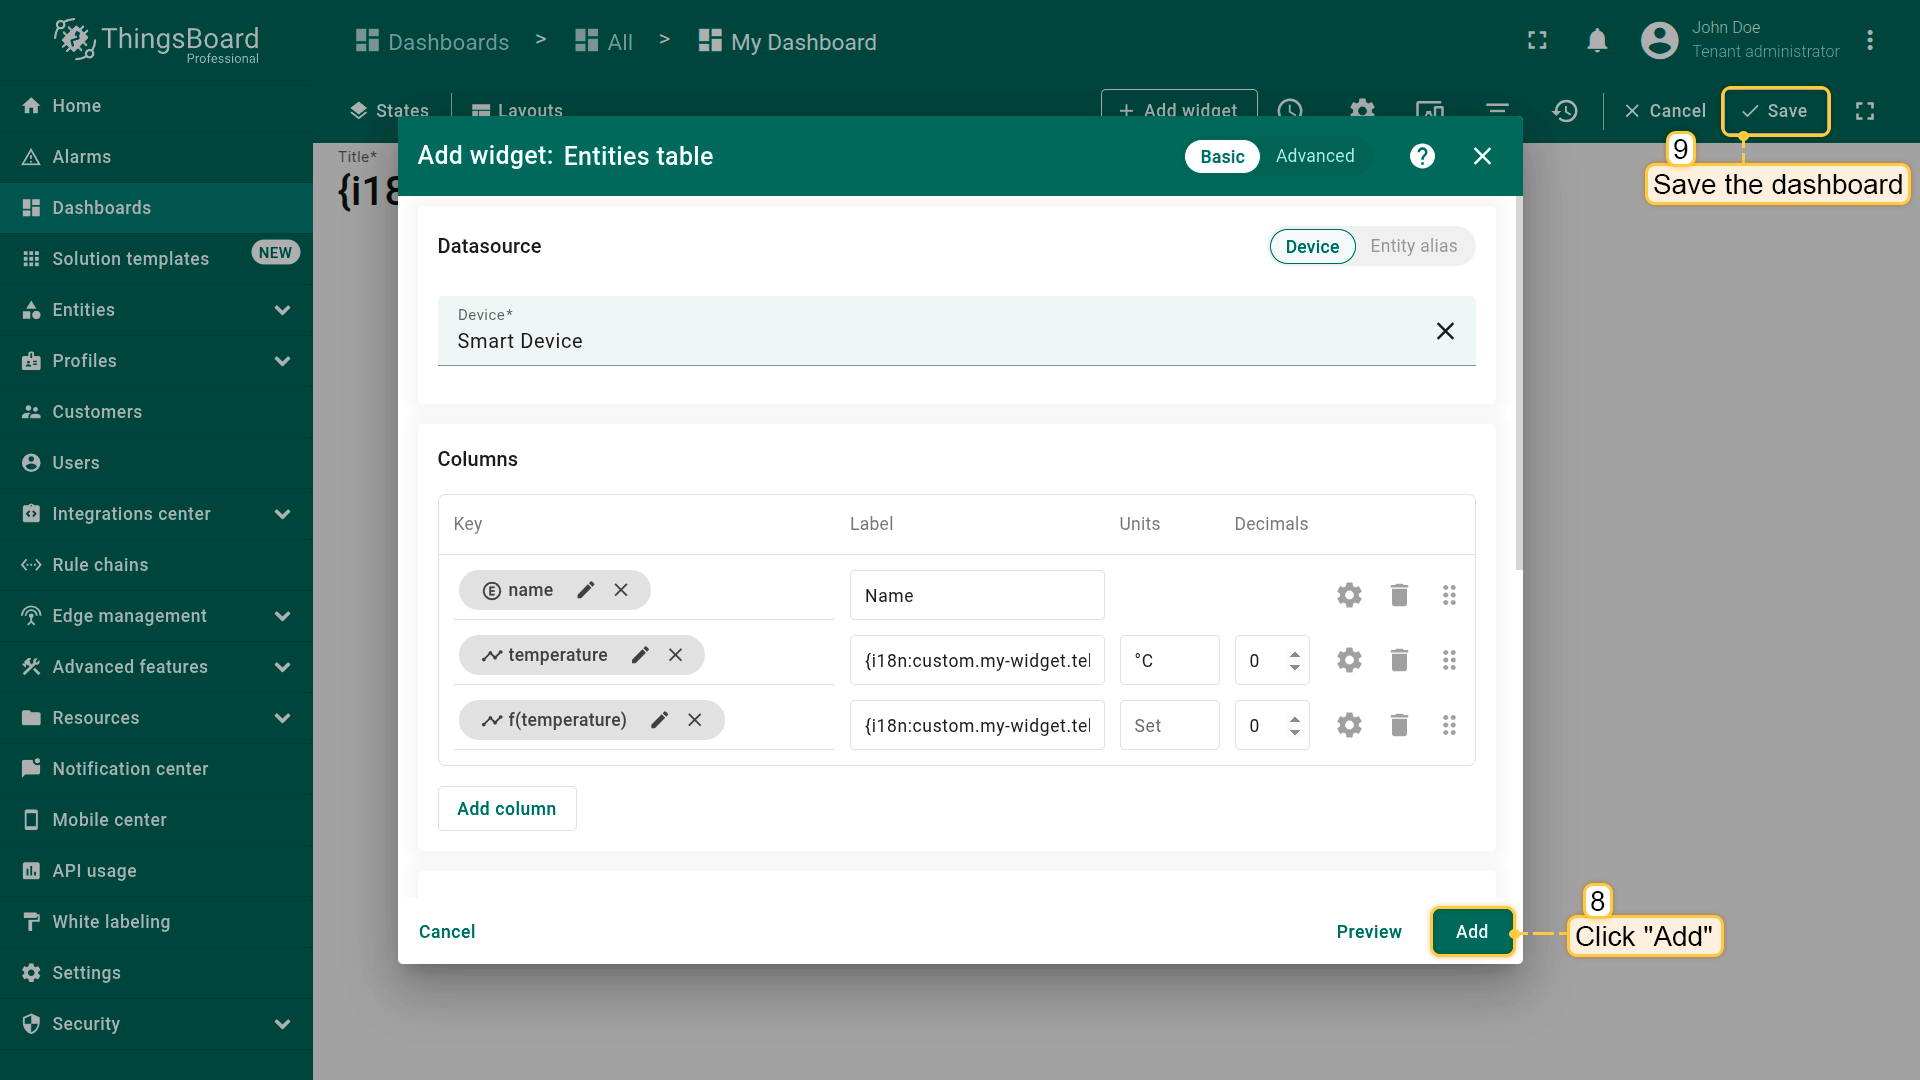
Click “Add” to add widget on the dashboard. Then, save dashboard.
查看结果。负责温度读数的列中的值将根据传入的遥测值变化。
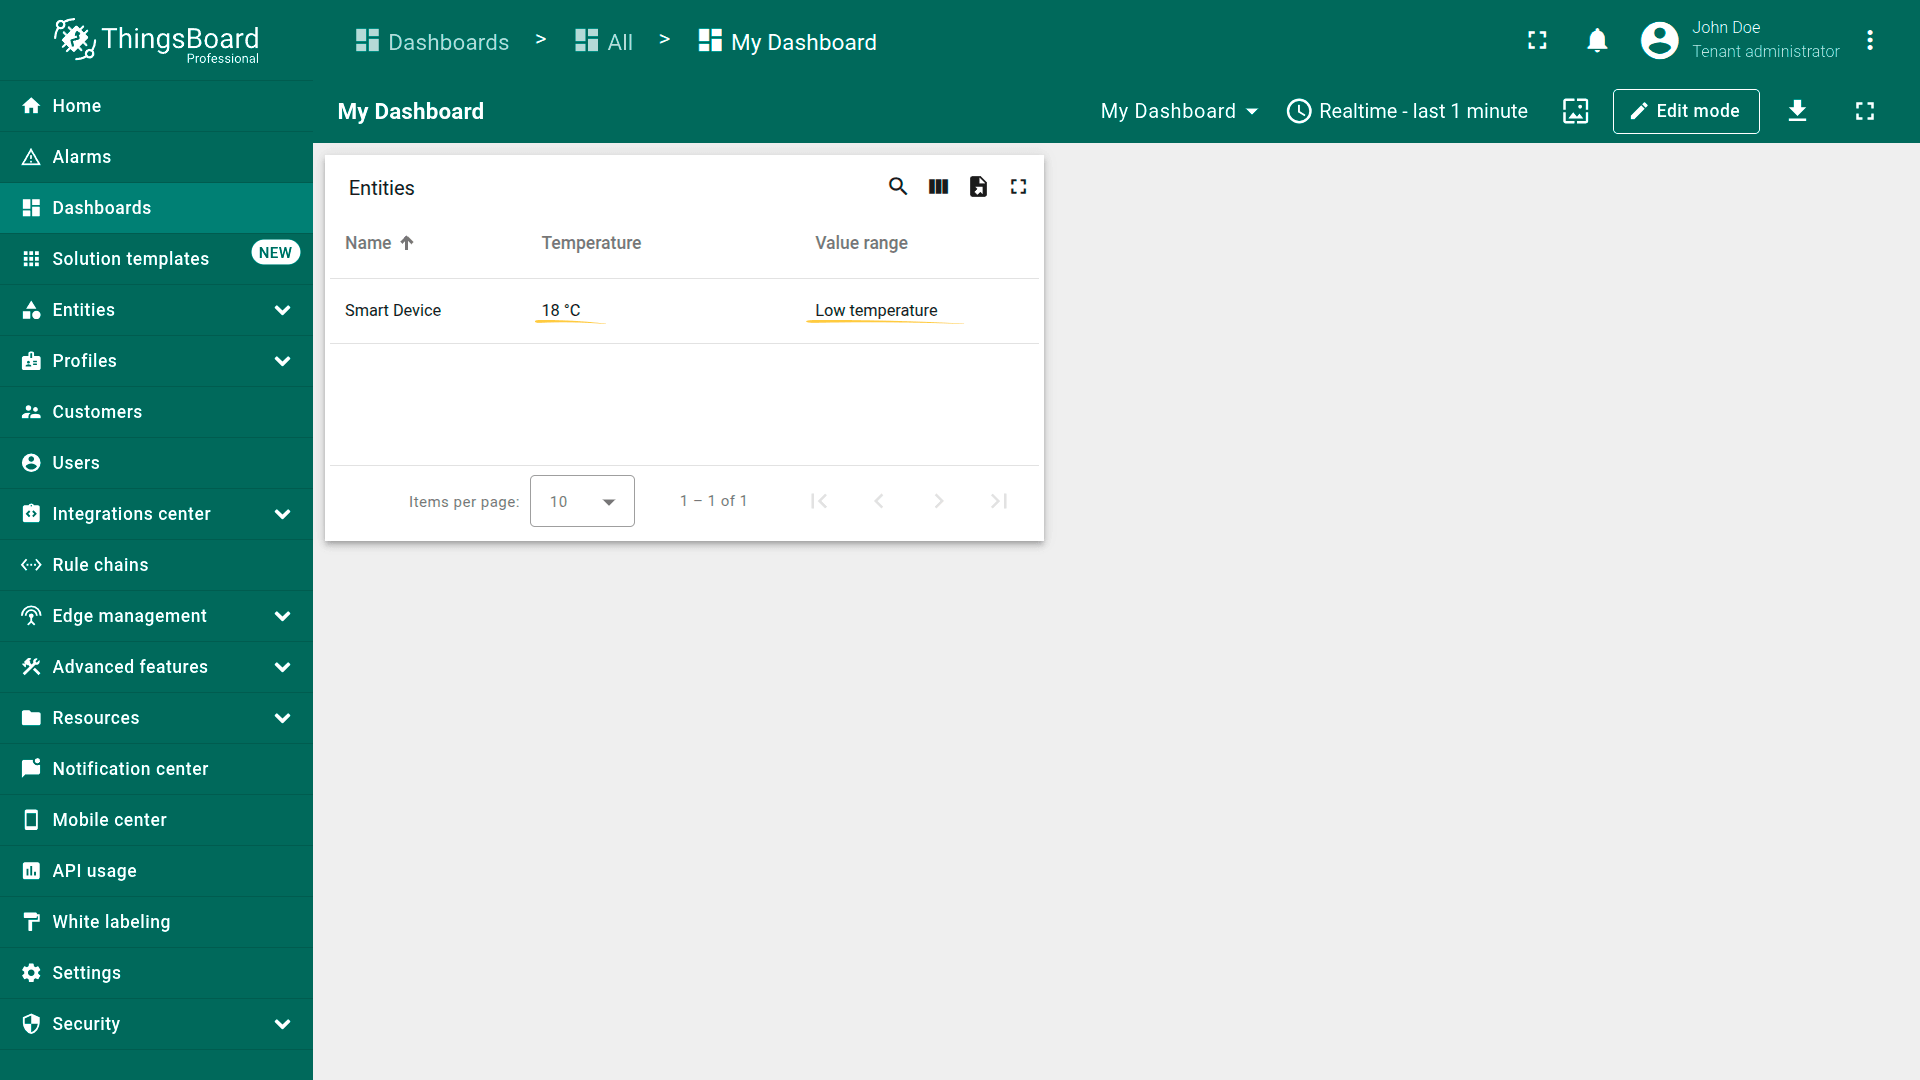
Check the result. If the temperature value is less than or equal to 19 degrees, the “Temperature range” column will display “Low temperature”.

If the temperature value is between 19 and 25 degrees, the “Temperature range” column will display “Normal temperature”.
删除语言
如果需要删除某种语言或将其翻译重置为默认版本,只需点击对应语言旁的垃圾桶图标,并在弹出的对话框中确认删除。
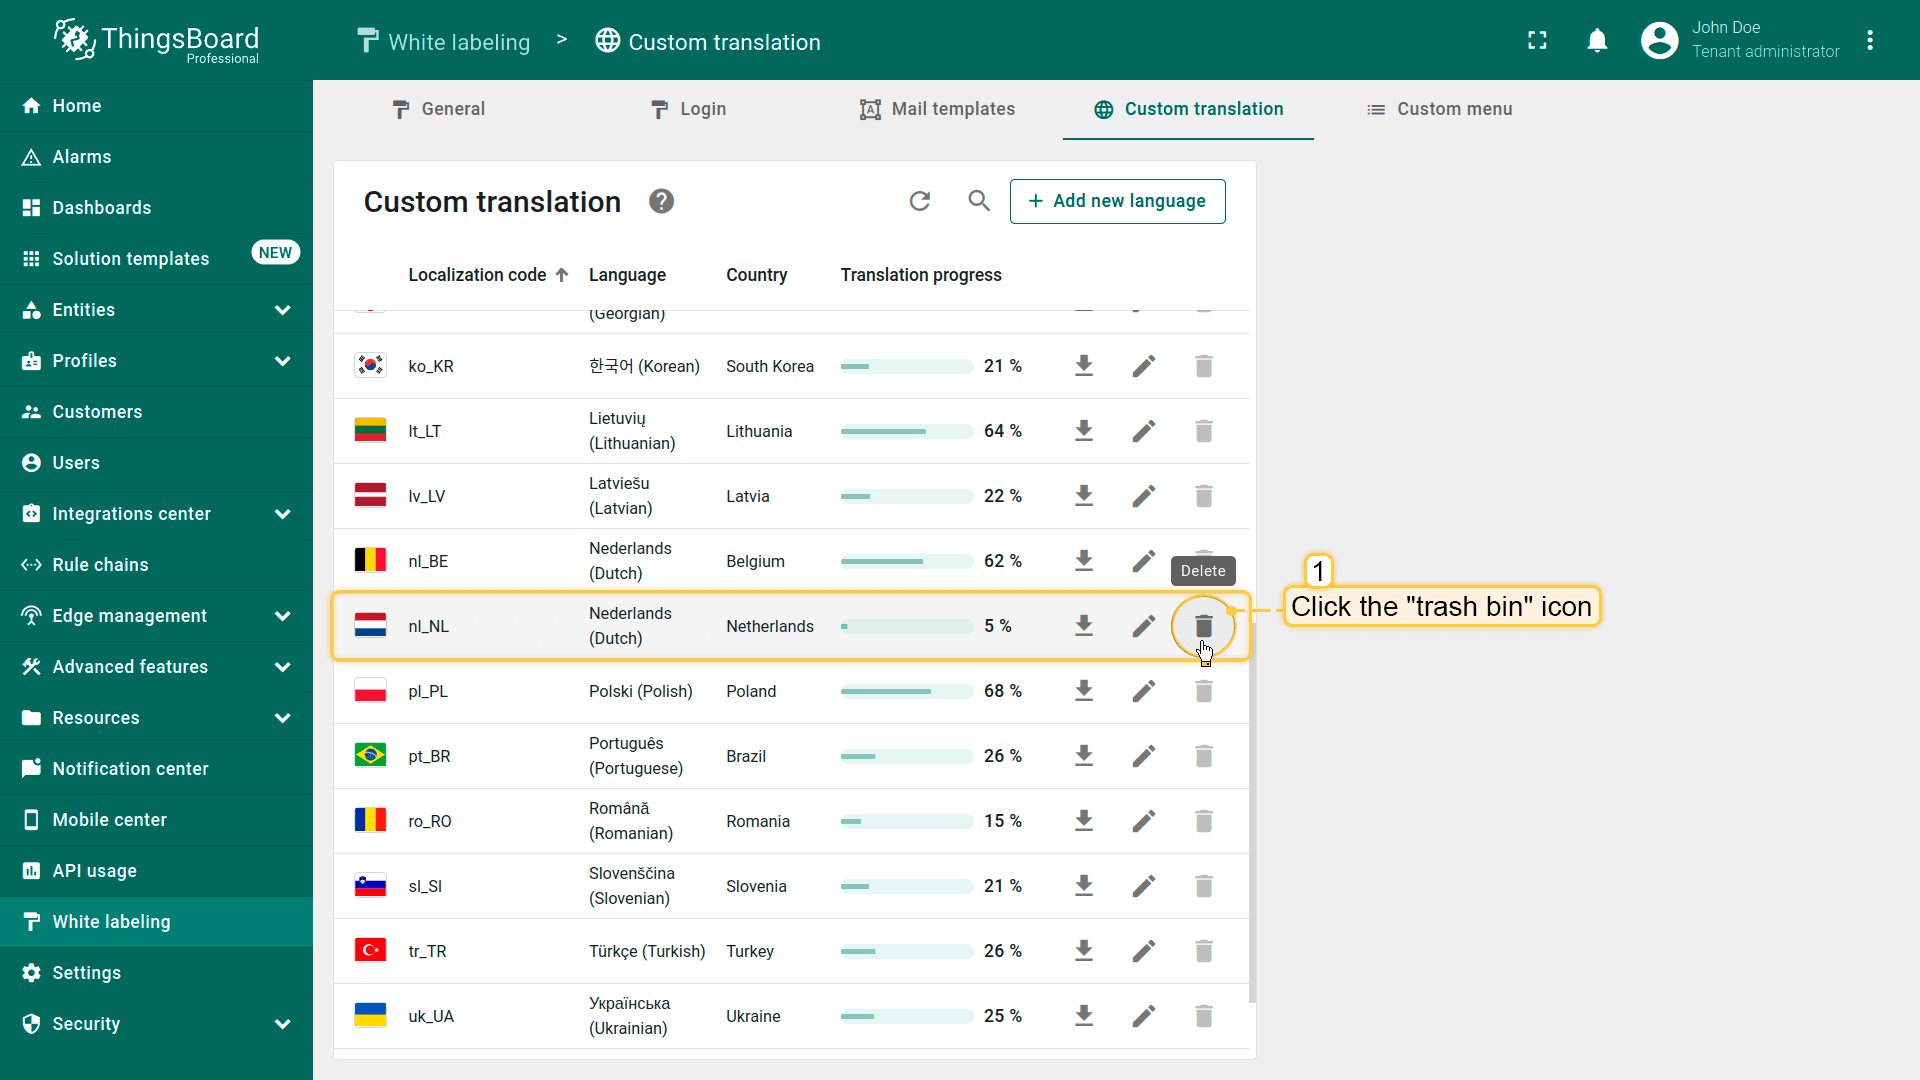
Tto delete a language or reset its translations to the default version, simply click the trash bin icon next to the corresponding language.
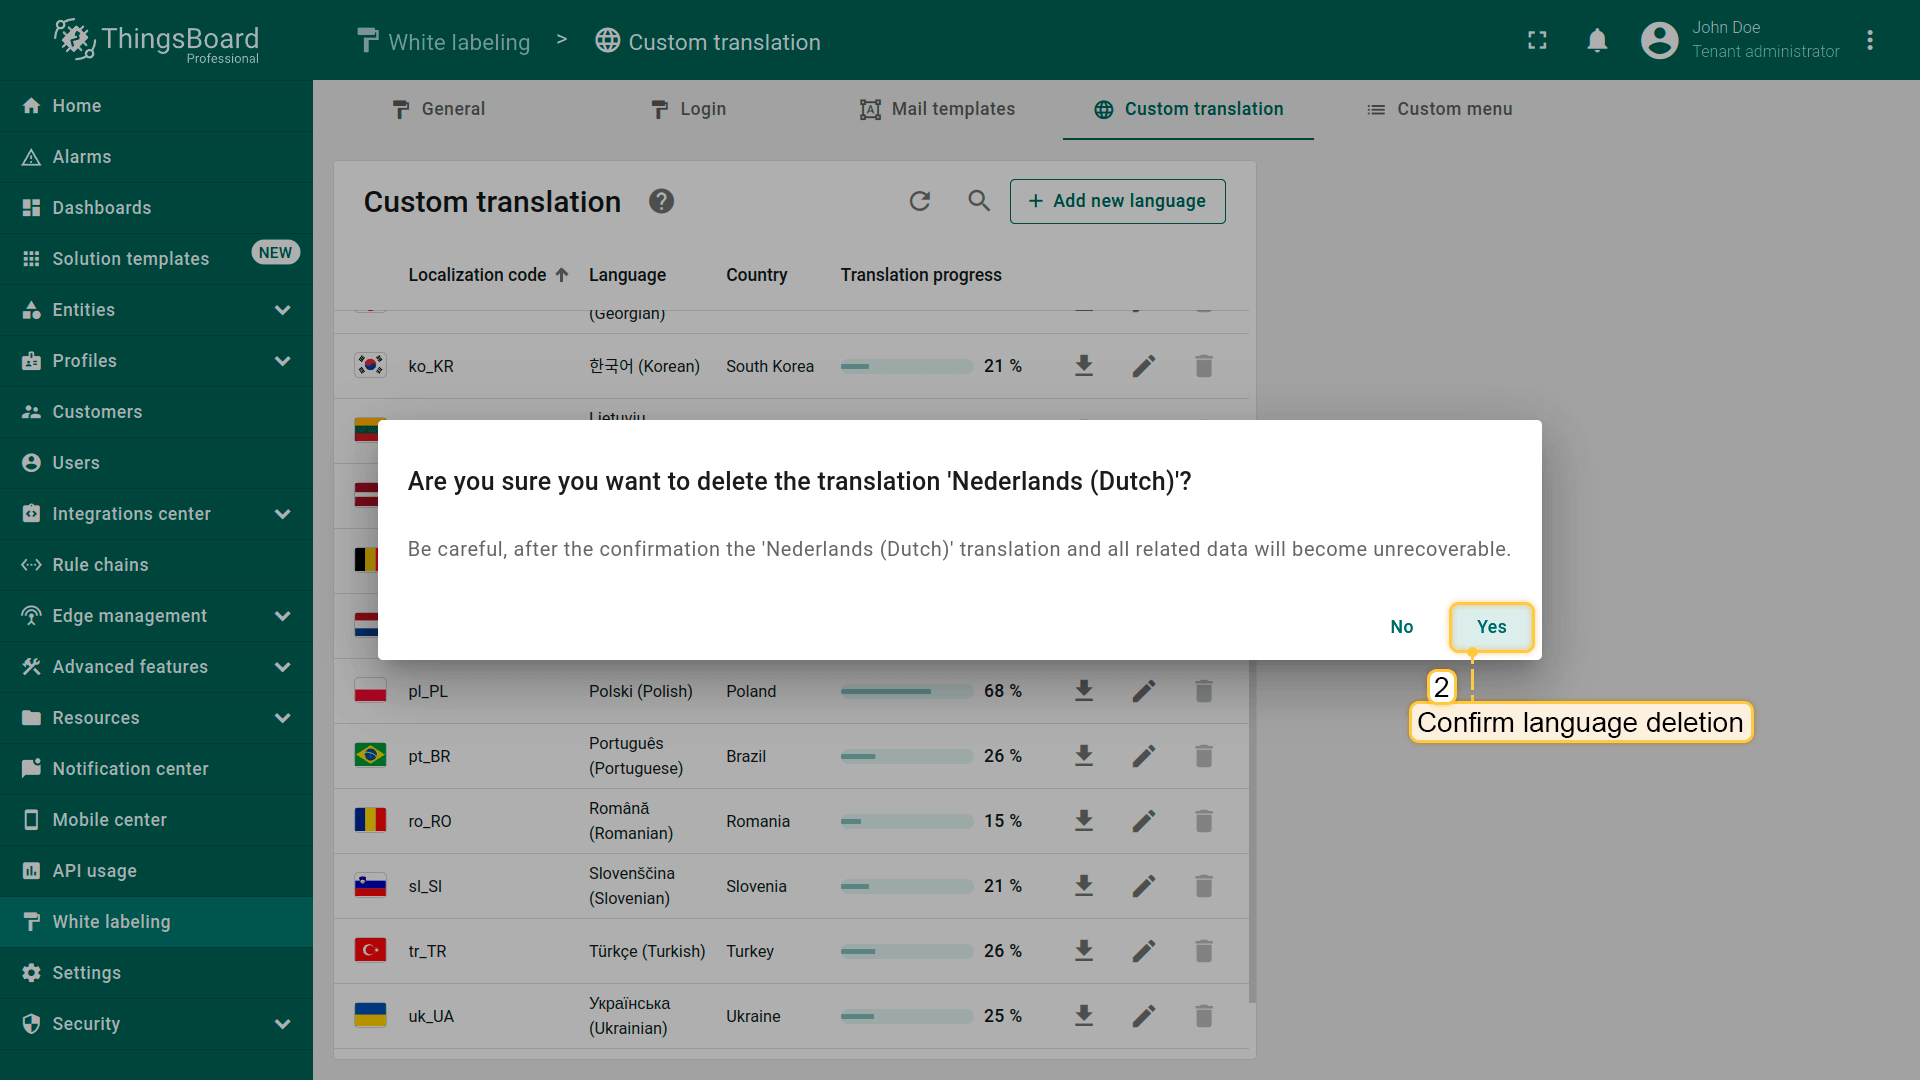
Confirm the deletion in the dialog window.