Overview
OPC UA Integration allows you to stream data from the OPC UA server to ThingsBoard and converts the device payloads to the ThingsBoard format.
OPC-UA Integration Tutorial
In this tutorial, we will configure the integration between ThingsBoard and OPC-UA to get the Airconditioners data from the OPC UA C++ Demo Server and allow the user to switch on/off any Airconditioner using the Integration downlink feature.
Prerequisites
- Download and install the OPC UA C++ Demo Server
- After installation, launch the UA Admin Dialog
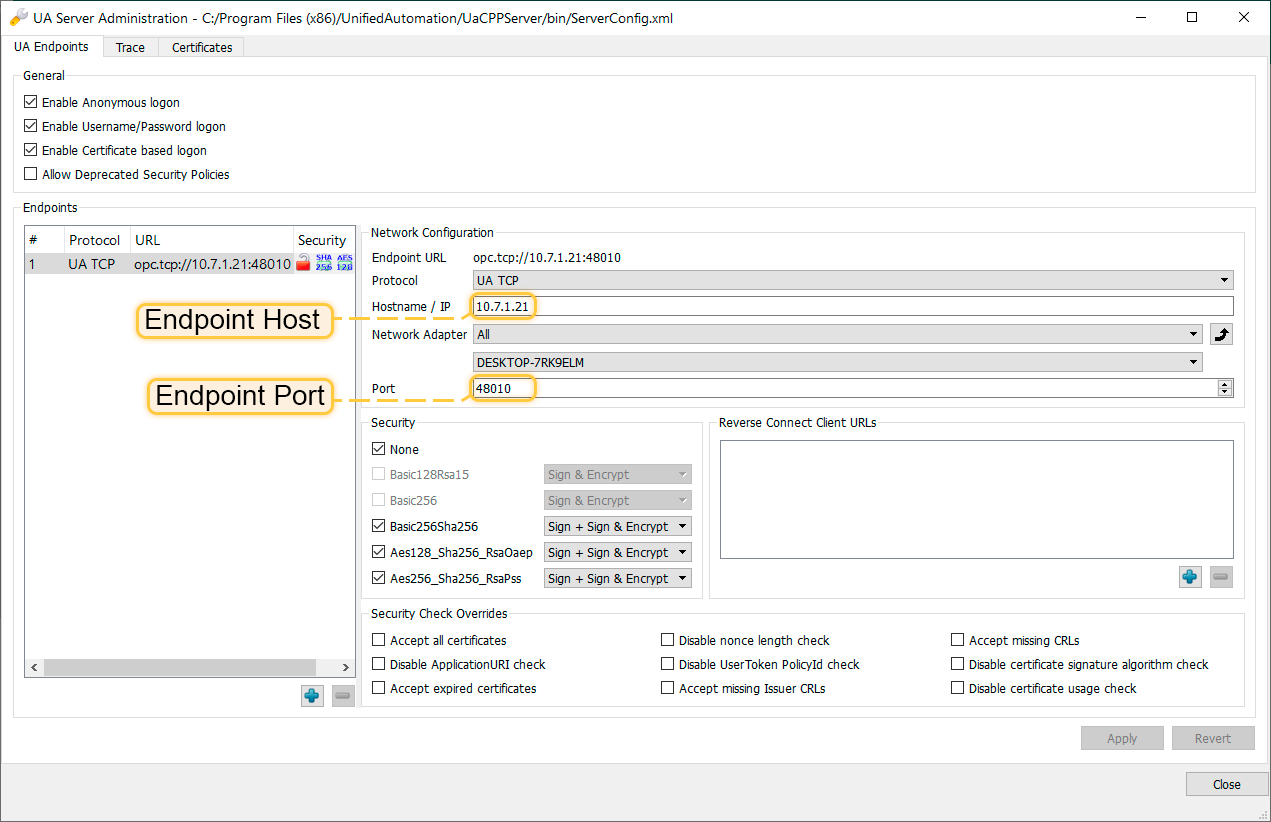
- Verify that the Endpoint URL is set correctly and remember the values of Endpoint Host and Endpoint Port. These values will be needed during the OPC-UA Integration setup
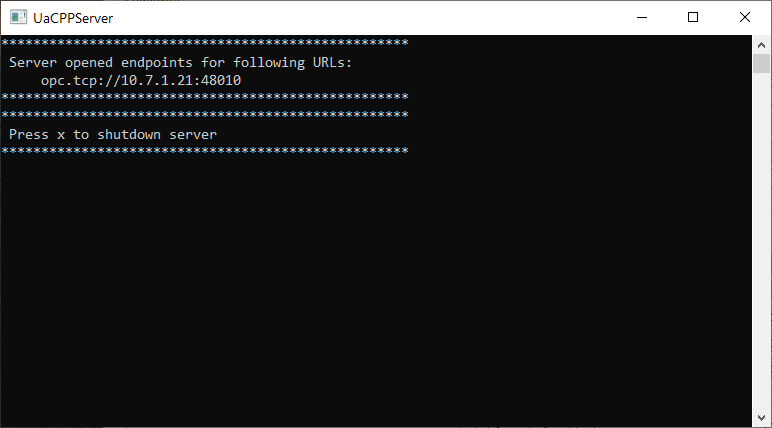
- Launch the UaCPPServer. The console dialog will open showing the server endpoints URLs
ThingsBoard setup
Uplink Data Converter
First, we need to create the Uplink Data converter that will be used for receiving the messages from the OPC UA server. The converter should transform the incoming payload into the required message format. The message must contain the deviceName and deviceType. These fields are used to submit the data to the correct device. If a device cannot not be found, a new device will be created. Here is how the payload from the OPC UA integration will look like:
Payload:
1
2
3
{
    "temperature": "72.15819999999641"
}
Metadata:
1
2
3
4
5
6
7
{
    "opcUaNode_namespaceIndex": "3",
    "opcUaNode_name": "AirConditioner_1",
    "integrationName": "OPC-UA Airconditioners",
    "opcUaNode_identifier": "AirConditioner_1",
    "opcUaNode_fqn": "Objects.BuildingAutomation.AirConditioner_1"
}
We will take the opcUaNode_name metadata value and map it to the deviceName and set the deviceType as airconditioner.
However, you can use another mapping in your specific use cases.
Also, we will retrieve the values of the temperature, humidity and powerConsumption fields and use them as device telemetries.
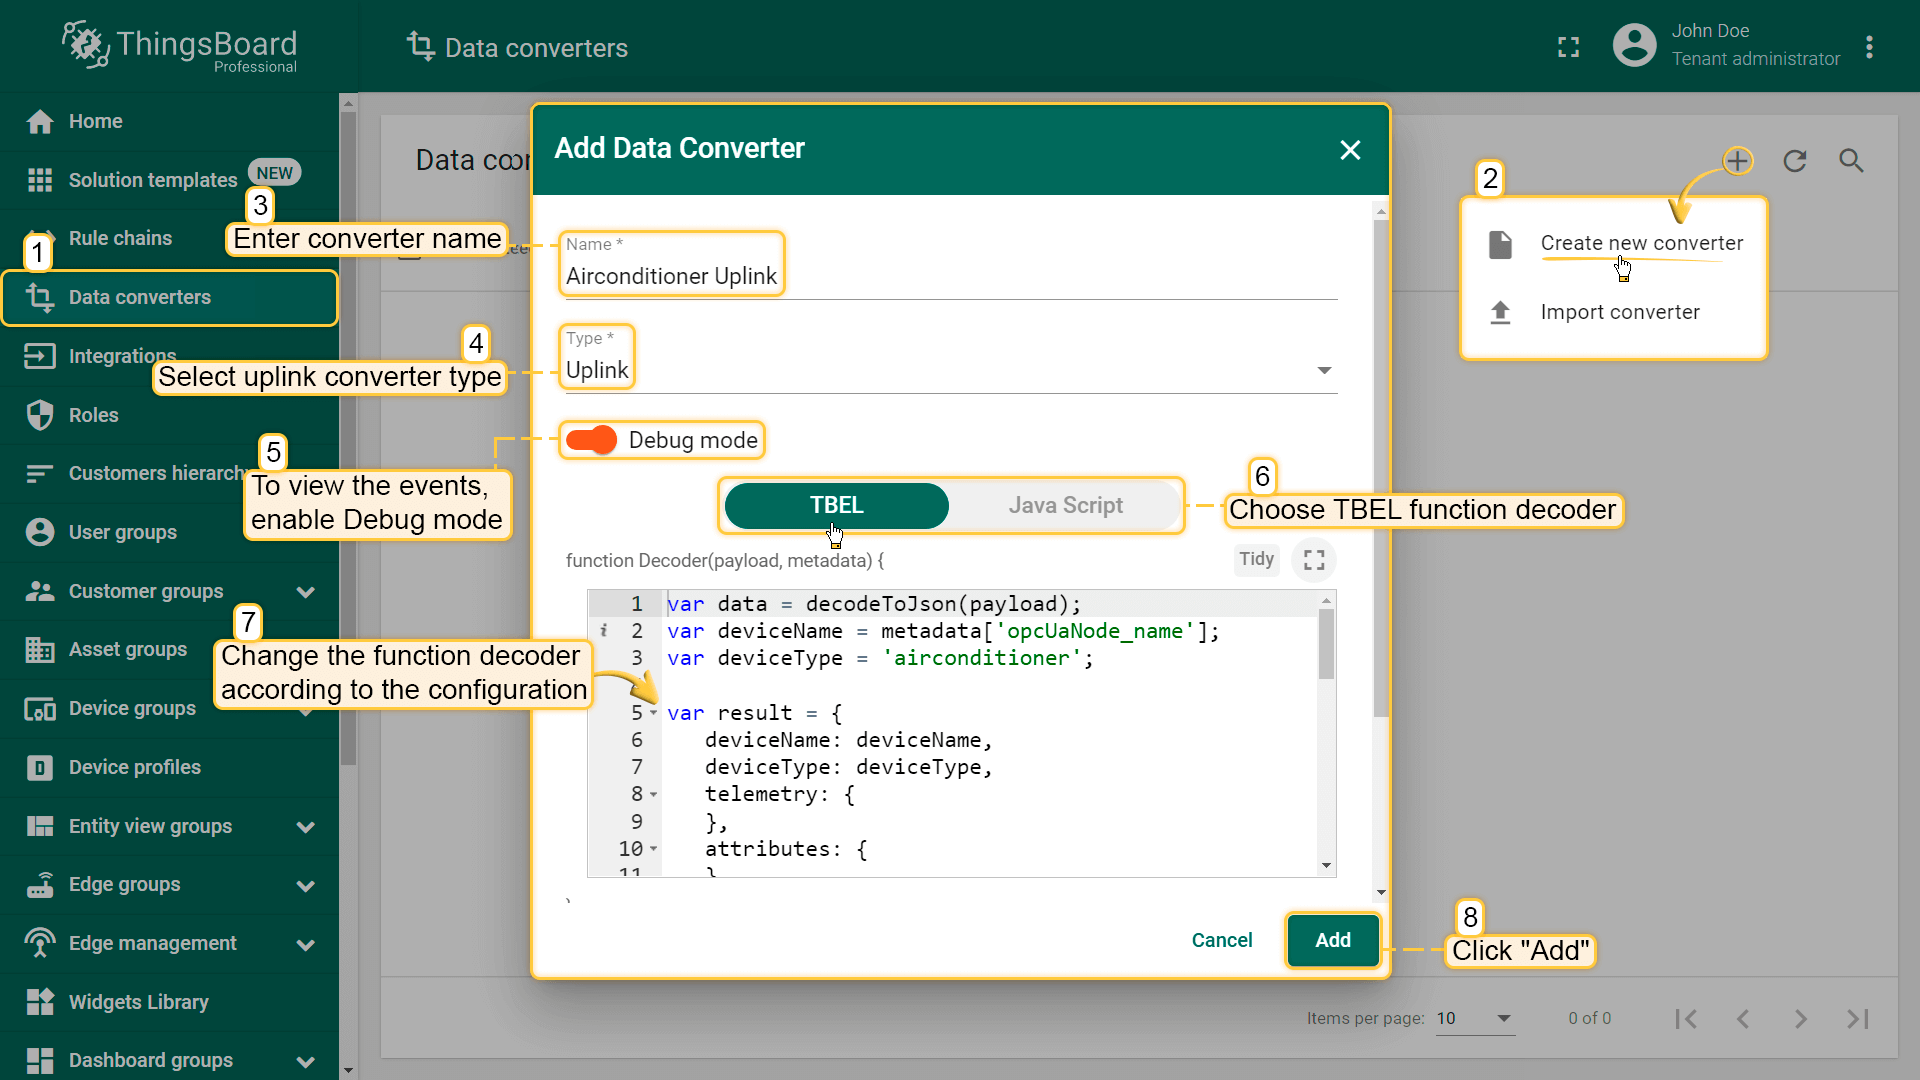
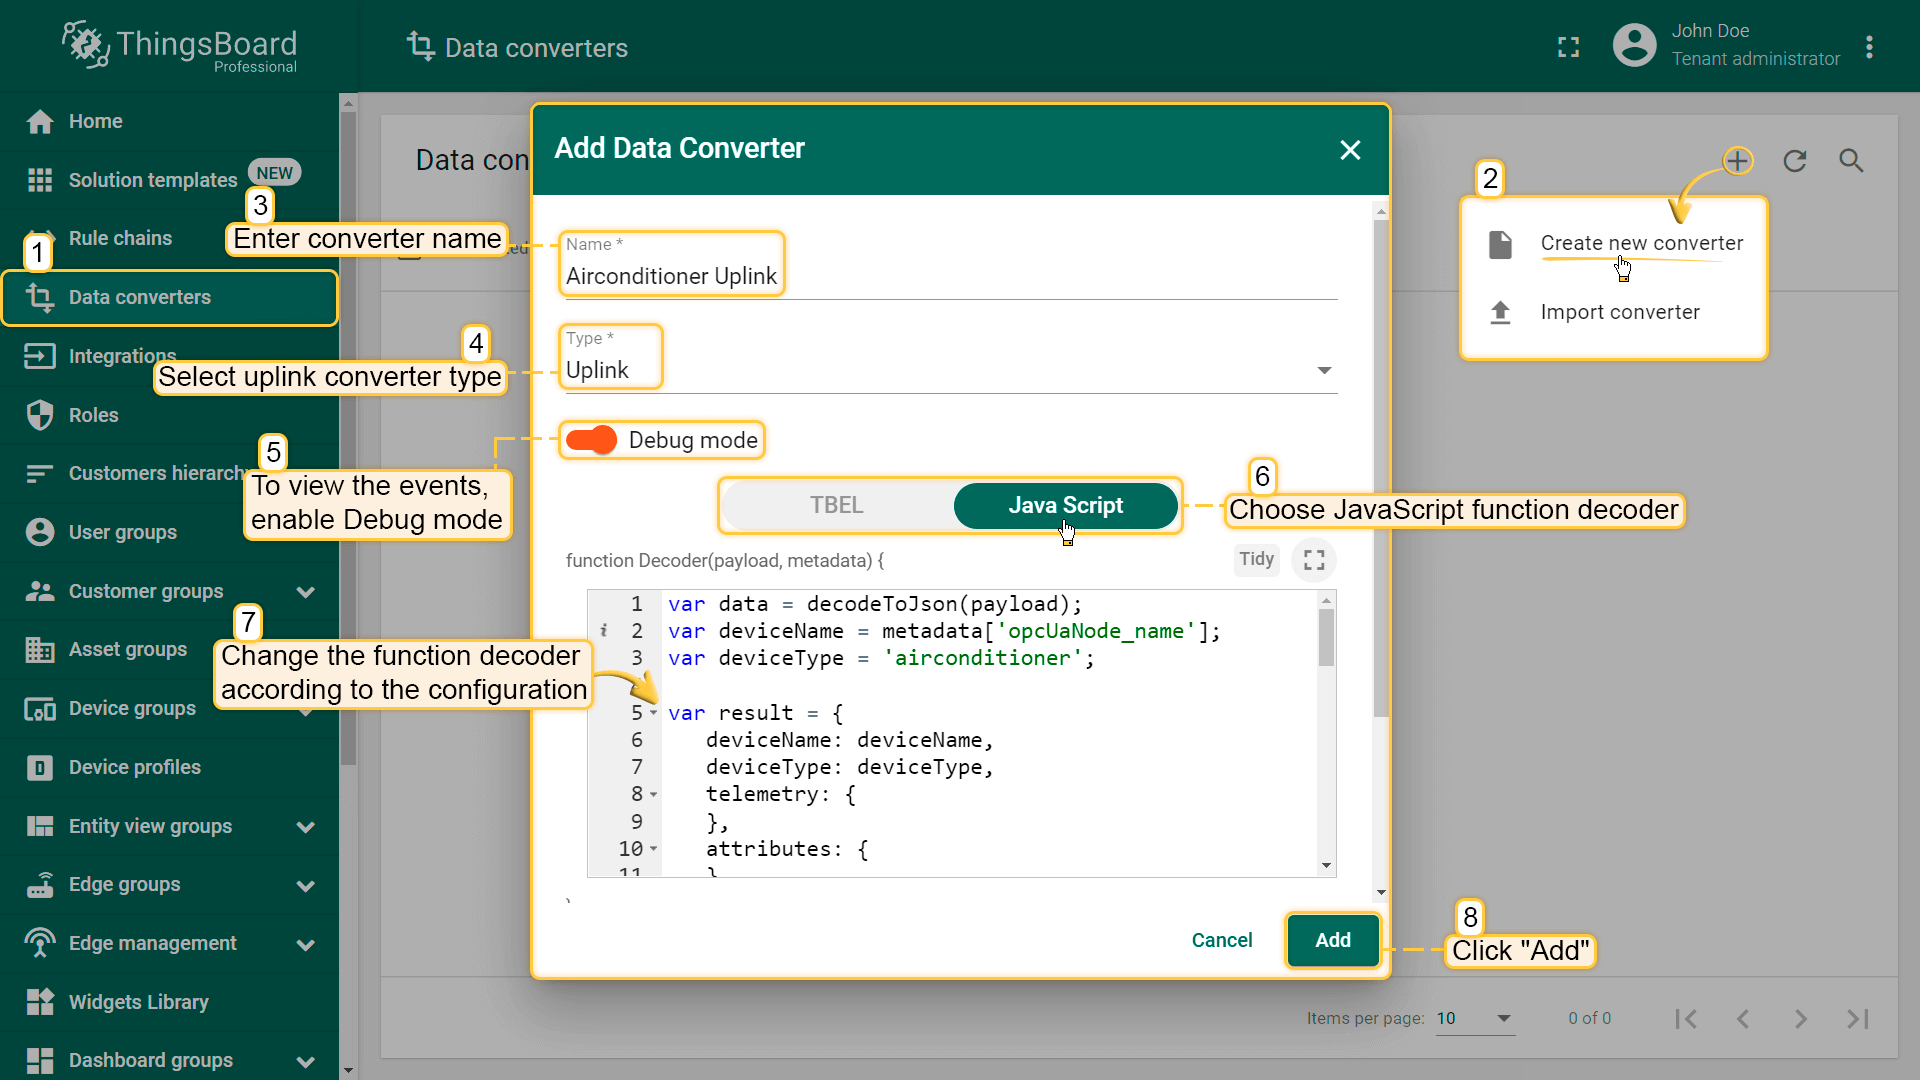
Go to the Data Converters and create a new uplink Converter
One can use either TBEL (ThingsBoard expression language) or JavaScript to develop user defined functions. We recommend utilizing TBEL as it’s execution in ThingsBoard is much more efficient compared to JS.
|
Use this function:
|
|
Use this function:
|
Downlink Data Converter
For sending Downlink messages from the Thingsboard to the OPC UA node, we need to define a downlink Converter.
In general, the output from a Downlink converter should have the following structure:
1
2
3
4
5
[{
    "contentType": "JSON",
    "data": "{\"writeValues\":[],\"callMethods\":[{\"objectId\":\"ns=3;s=AirConditioner_1\",\"methodId\":\"ns=3;s=AirConditioner_1.Stop\",\"args\":[]}]}",
    "metadata": {}
}]
- contentType - defines how data will be encoded {TEXT | JSON | BINARY}. In case of OPC UA Integration, JSON is used by default.
- data - the actual data that will be processed by OPC UA Integration and sent to the target OPC UA nodes:
- writeValues - array of write values methods:
- nodeId - target node in OPC UA NodeId format (
ns=<namespaceIndex>;<identifiertype>=<identifier>) - value - value to write
- nodeId - target node in OPC UA NodeId format (
- callMethods - array of call methods:
- objectId - target object in OPC UA NodeId format
- methodId - target method in OPC UA NodeId format
- args - array of method input values
- writeValues - array of write values methods:
- metadata - not used in case of OPC UA Integration and can be empty.
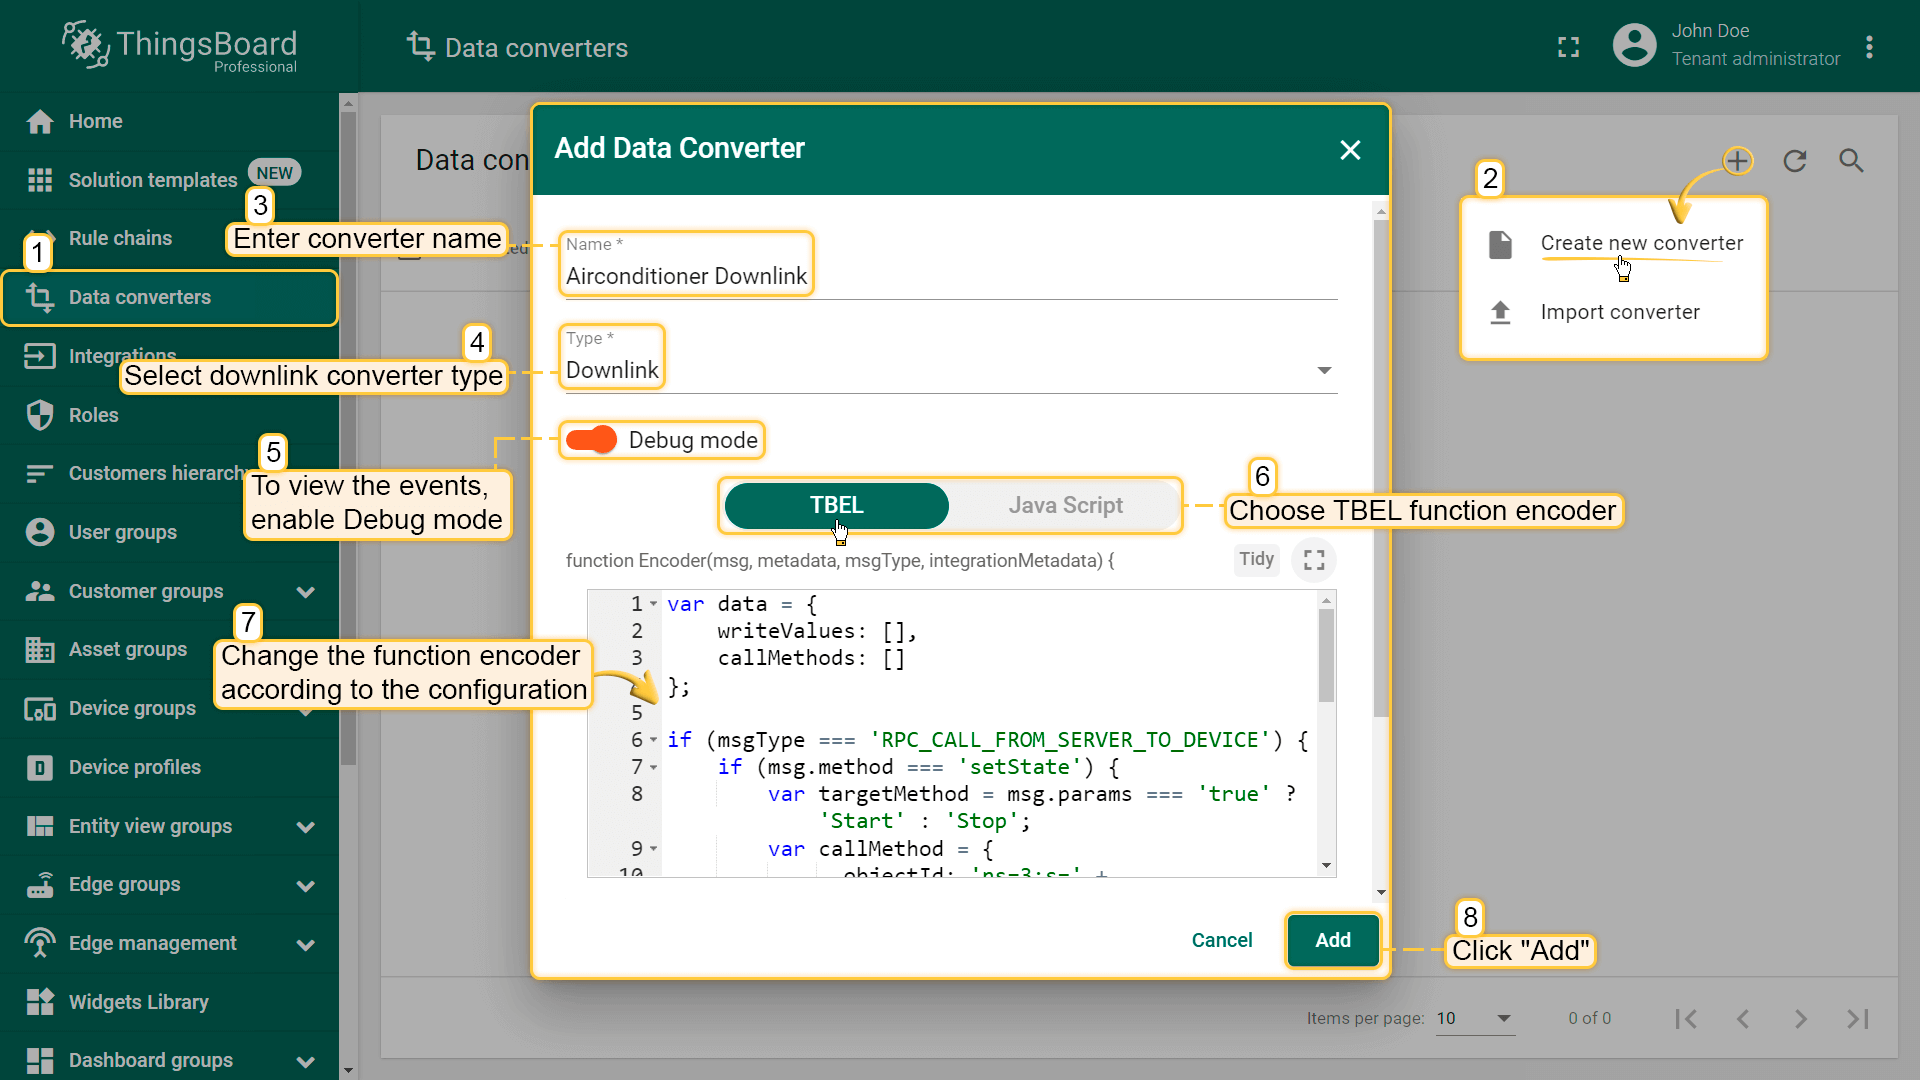
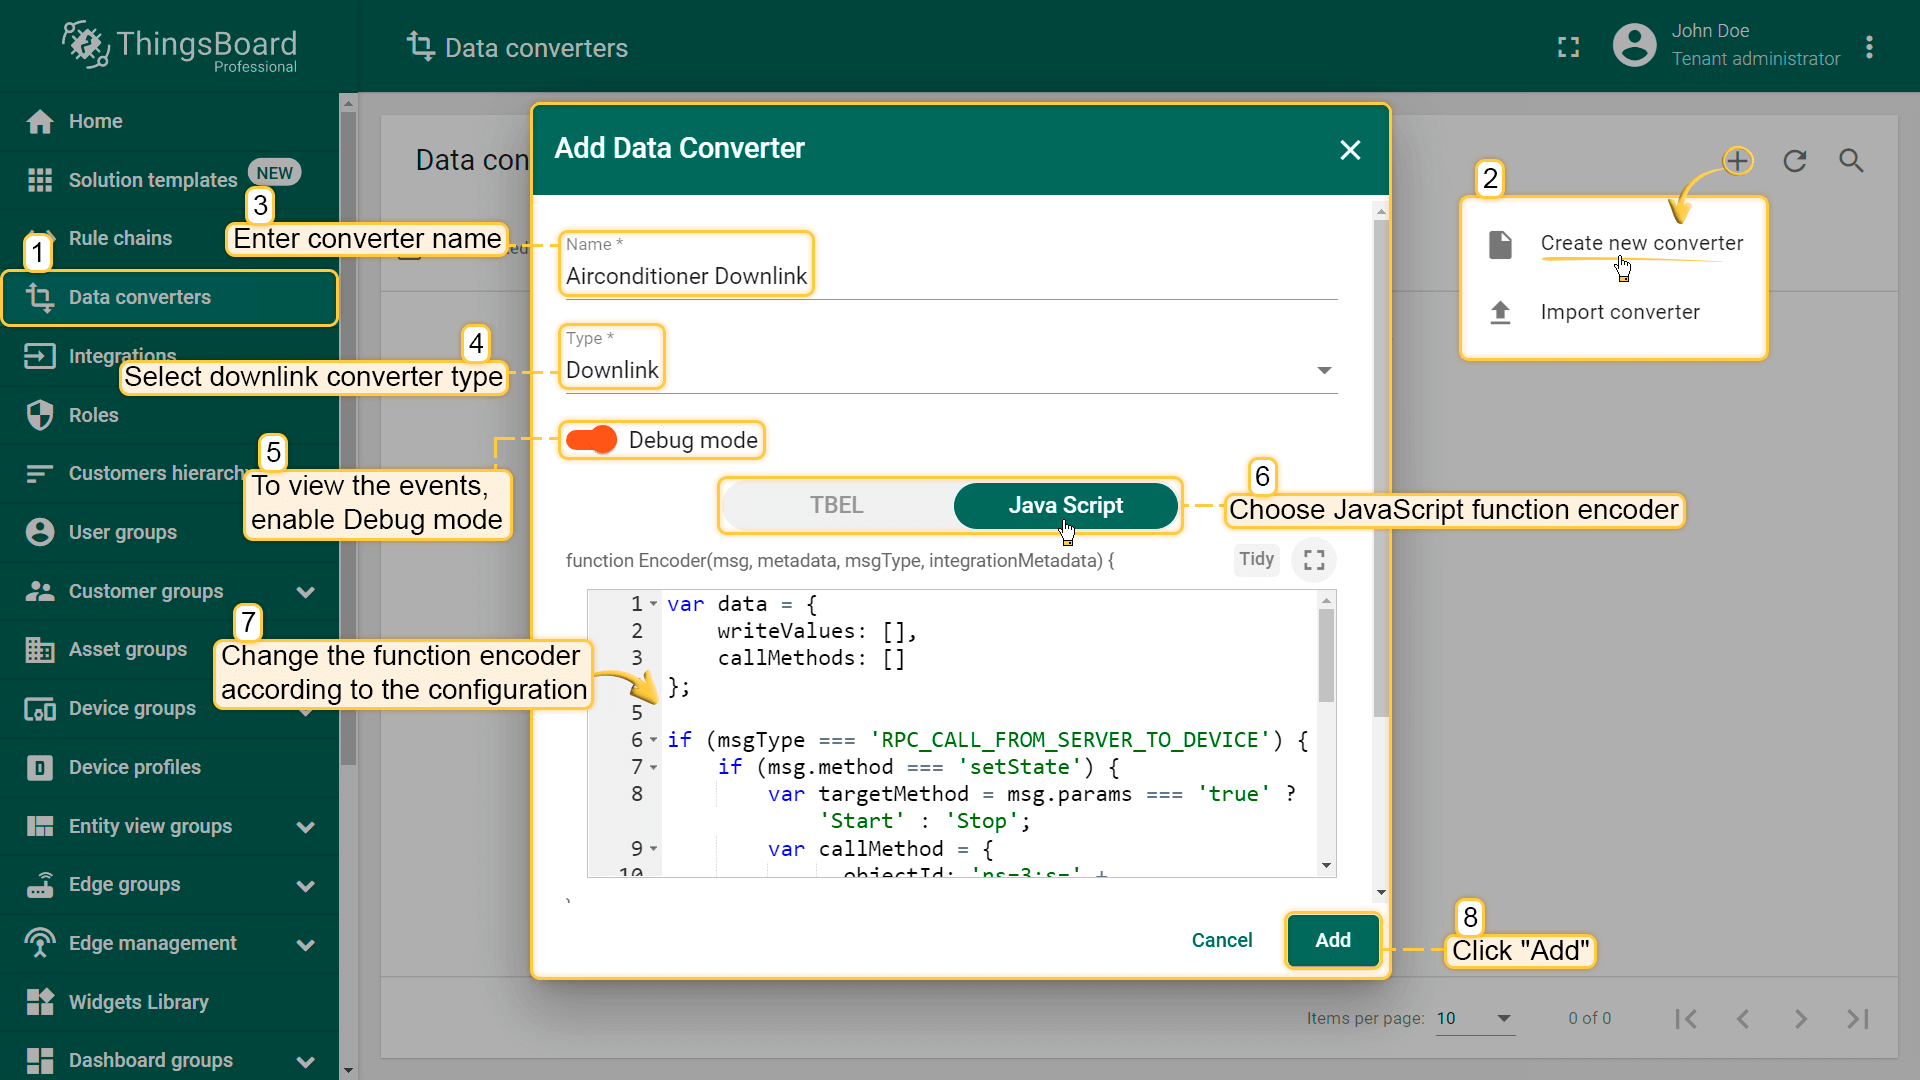
Go to Data Converters and create a new downlink Converter.
One can use either TBEL (ThingsBoard expression language) or JavaScript to develop user defined functions. We recommend utilizing TBEL as it’s execution in ThingsBoard is much more efficient compared to JS.
|
Use this function:
|
|
Use this function:
|
This converter will process the RPC command to the device using the method setState and a boolean params value to call the ‘Start’ or ‘Stop’ method of the Airconditioner.
Destination node is detected using the deviceName field of the incoming message metadata.
OPC-UA Integration
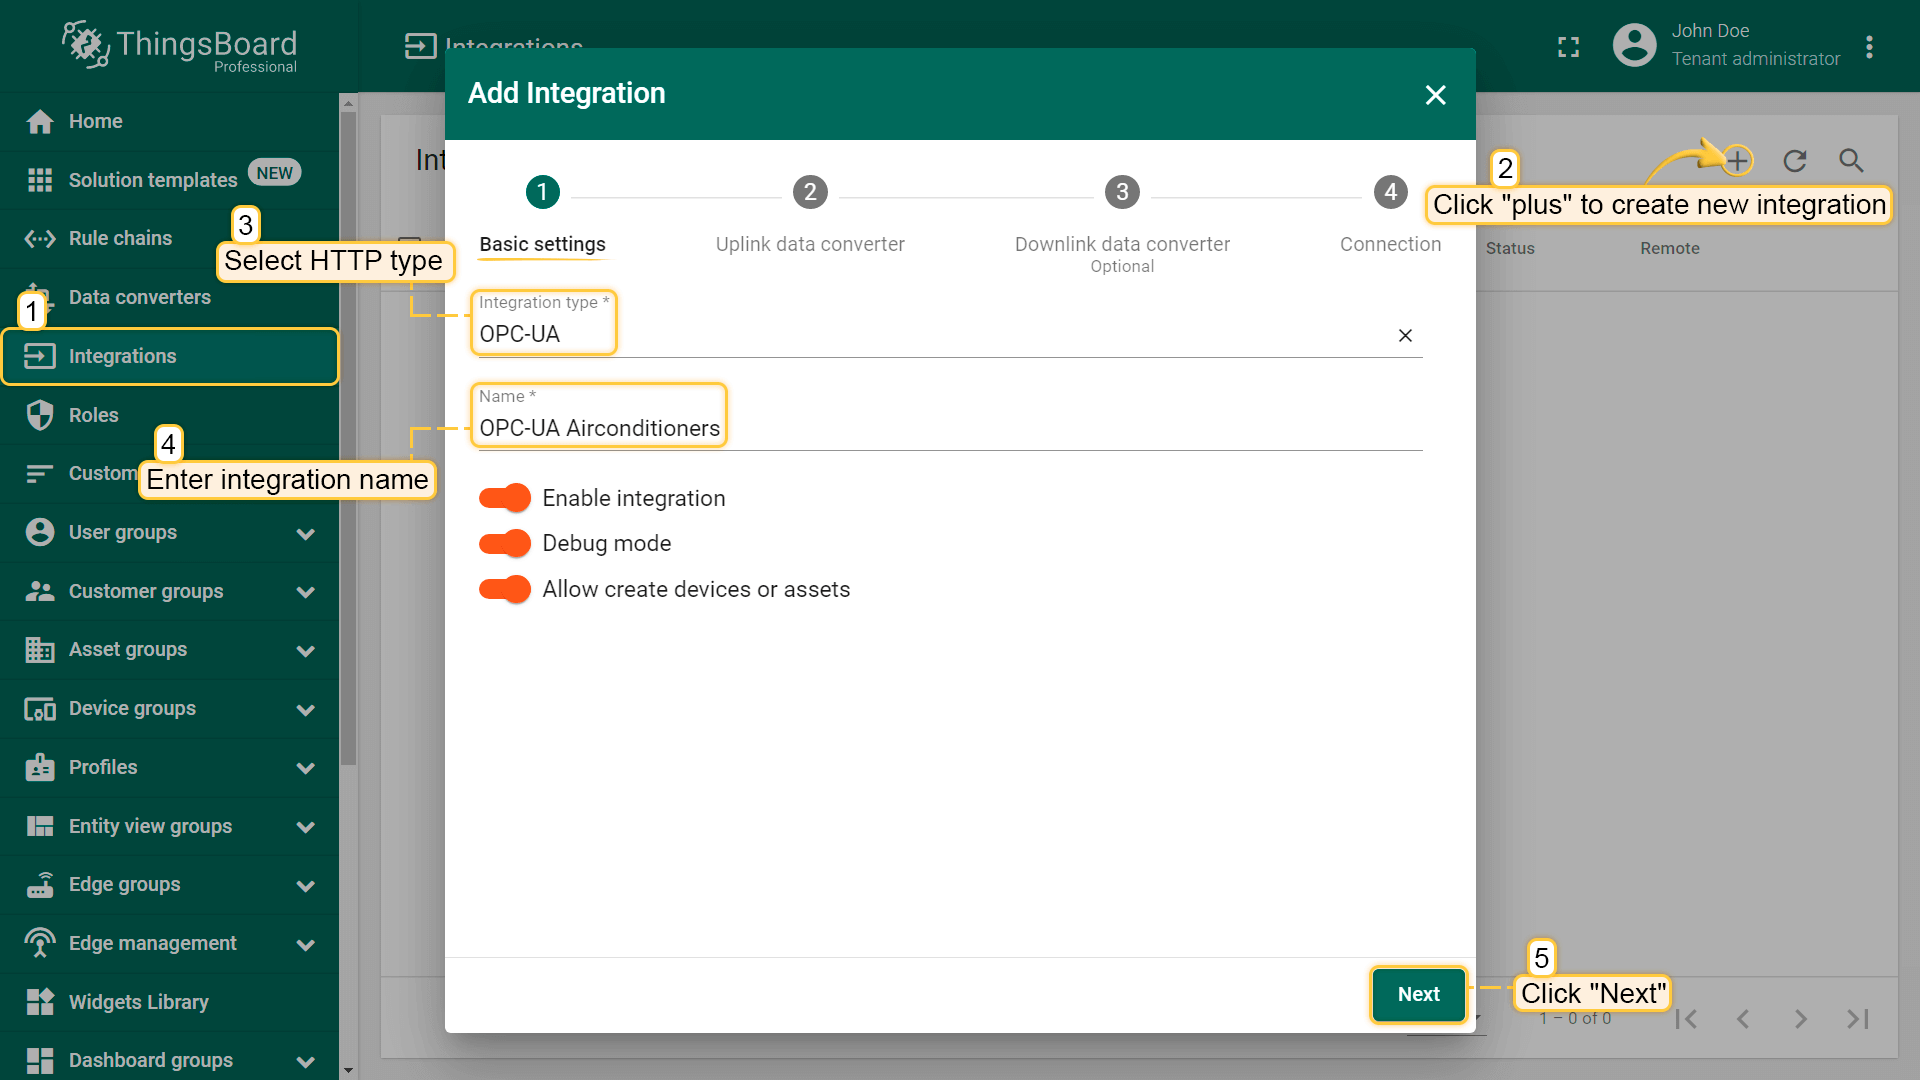
Next, we will create Integration with OPC UA server inside the ThingsBoard. Open the Integrations section and add a new Integration with a type OPC-UA
Specify such parameters:
- Name: OPC-UA Airconditioners
- Type: OPC-UA
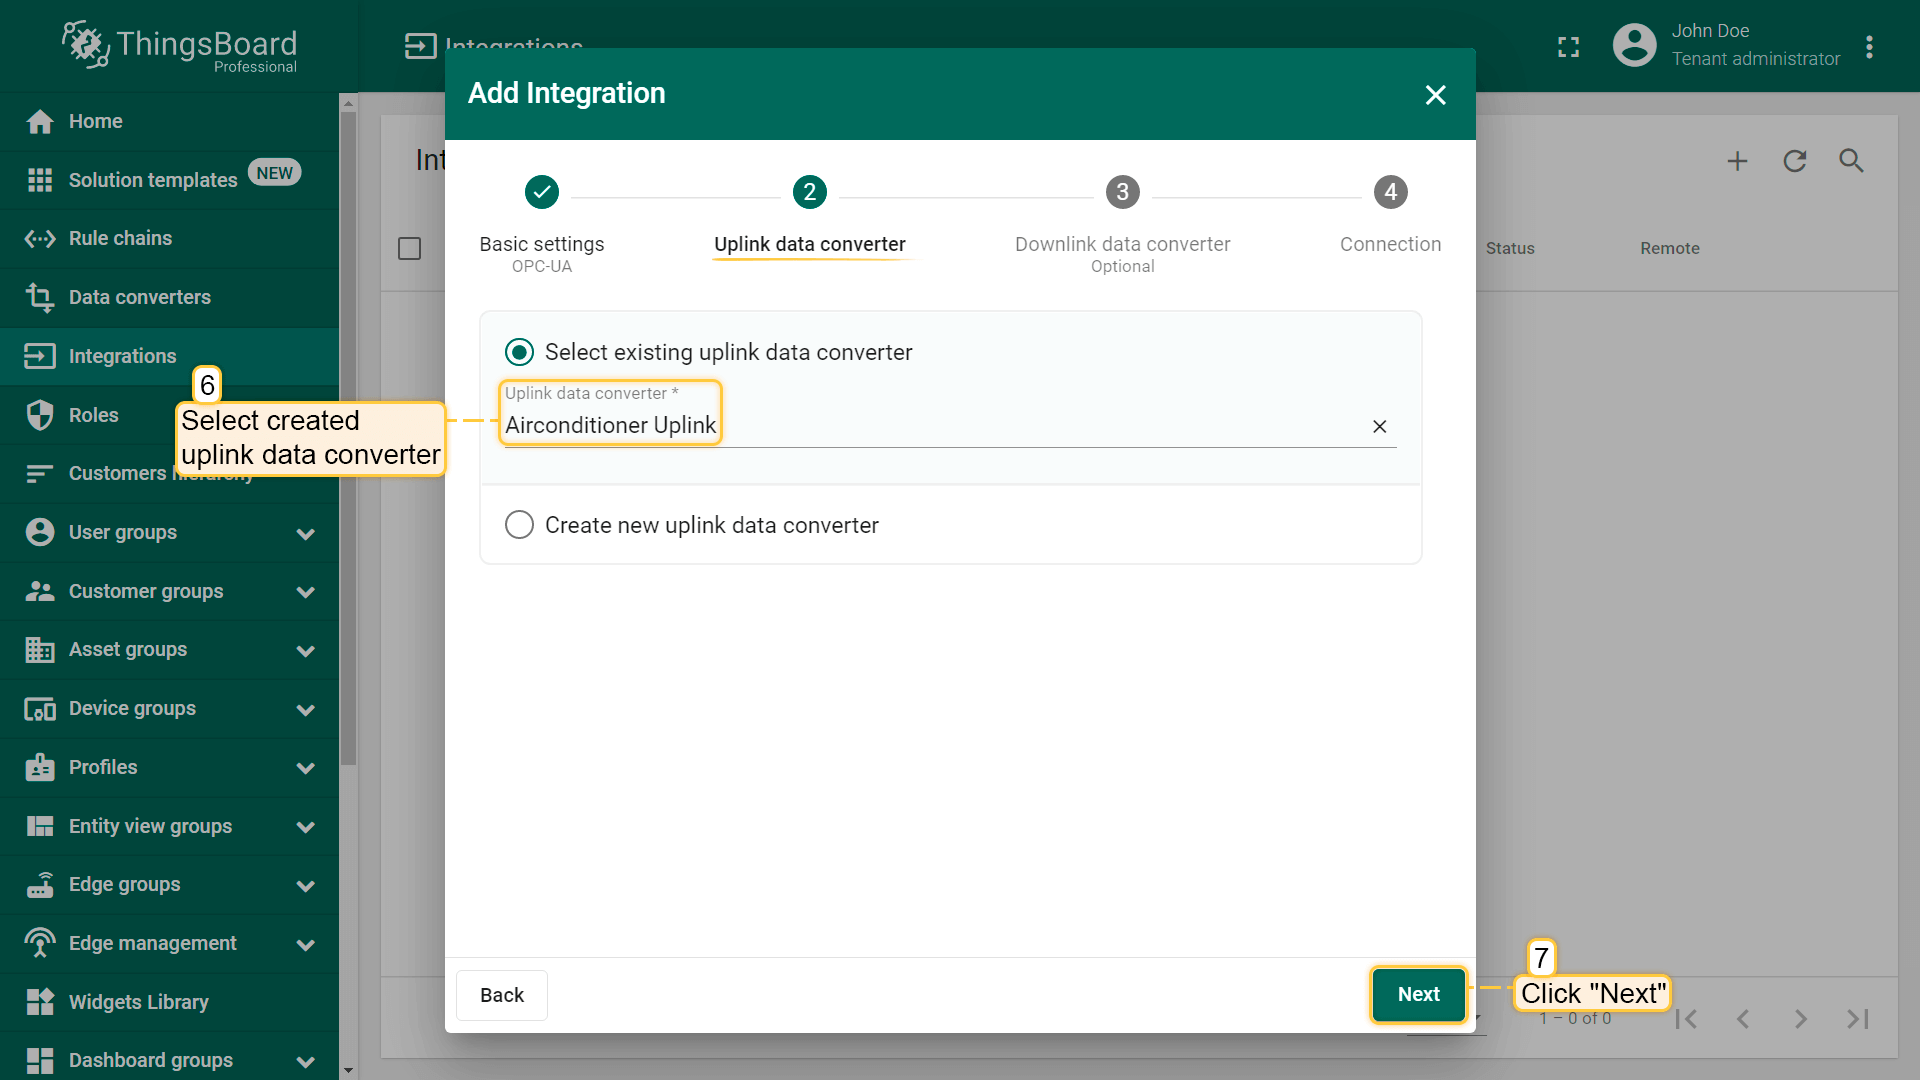
- Uplink data converter: Airconditioner Uplink
- Downlink data converter: Airconditioner Downlink
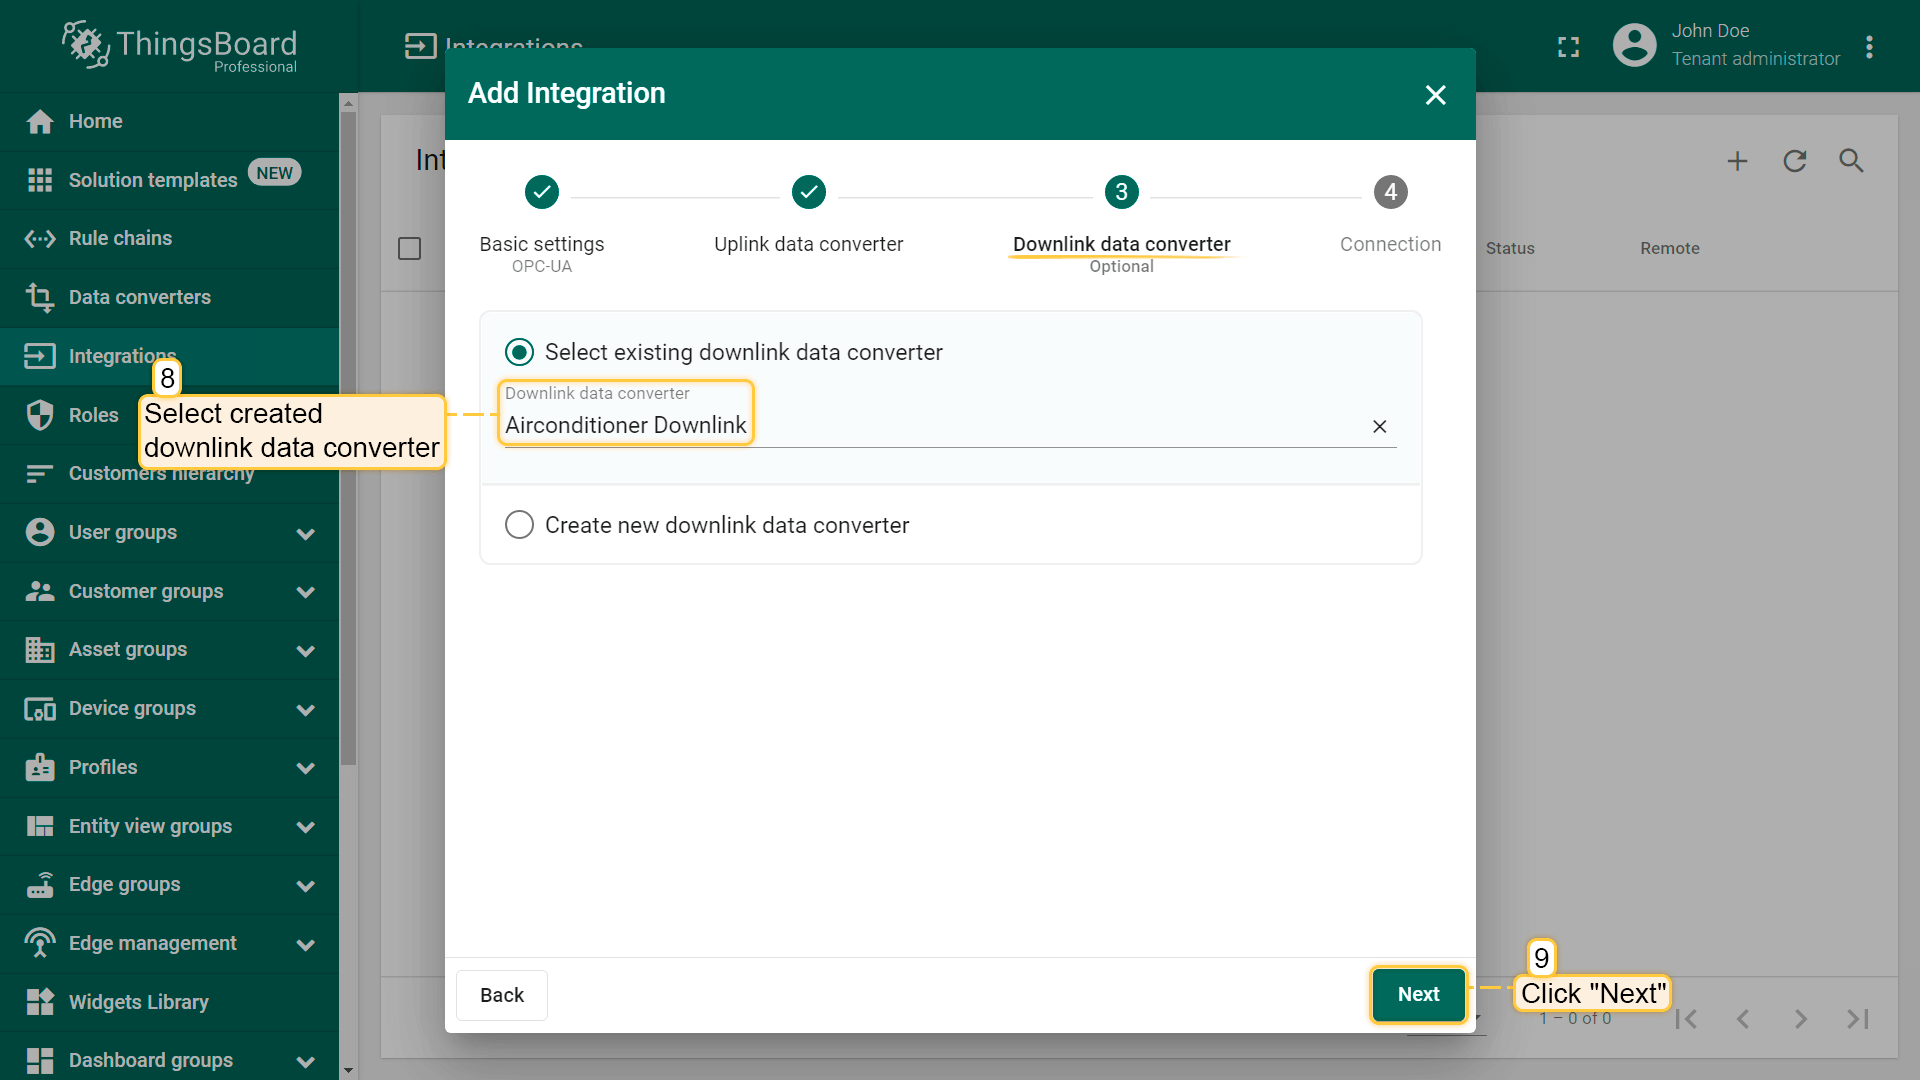
- Host: Endpoint Host (see Prerequisites)
- Port: Endpoint Port (see Prerequisites)
- Security: None (can be Basic128Rsa15 / Basic256 / Basic256Sha256 / None)
- Identity: Anonymous (can be Anonymous / Username)
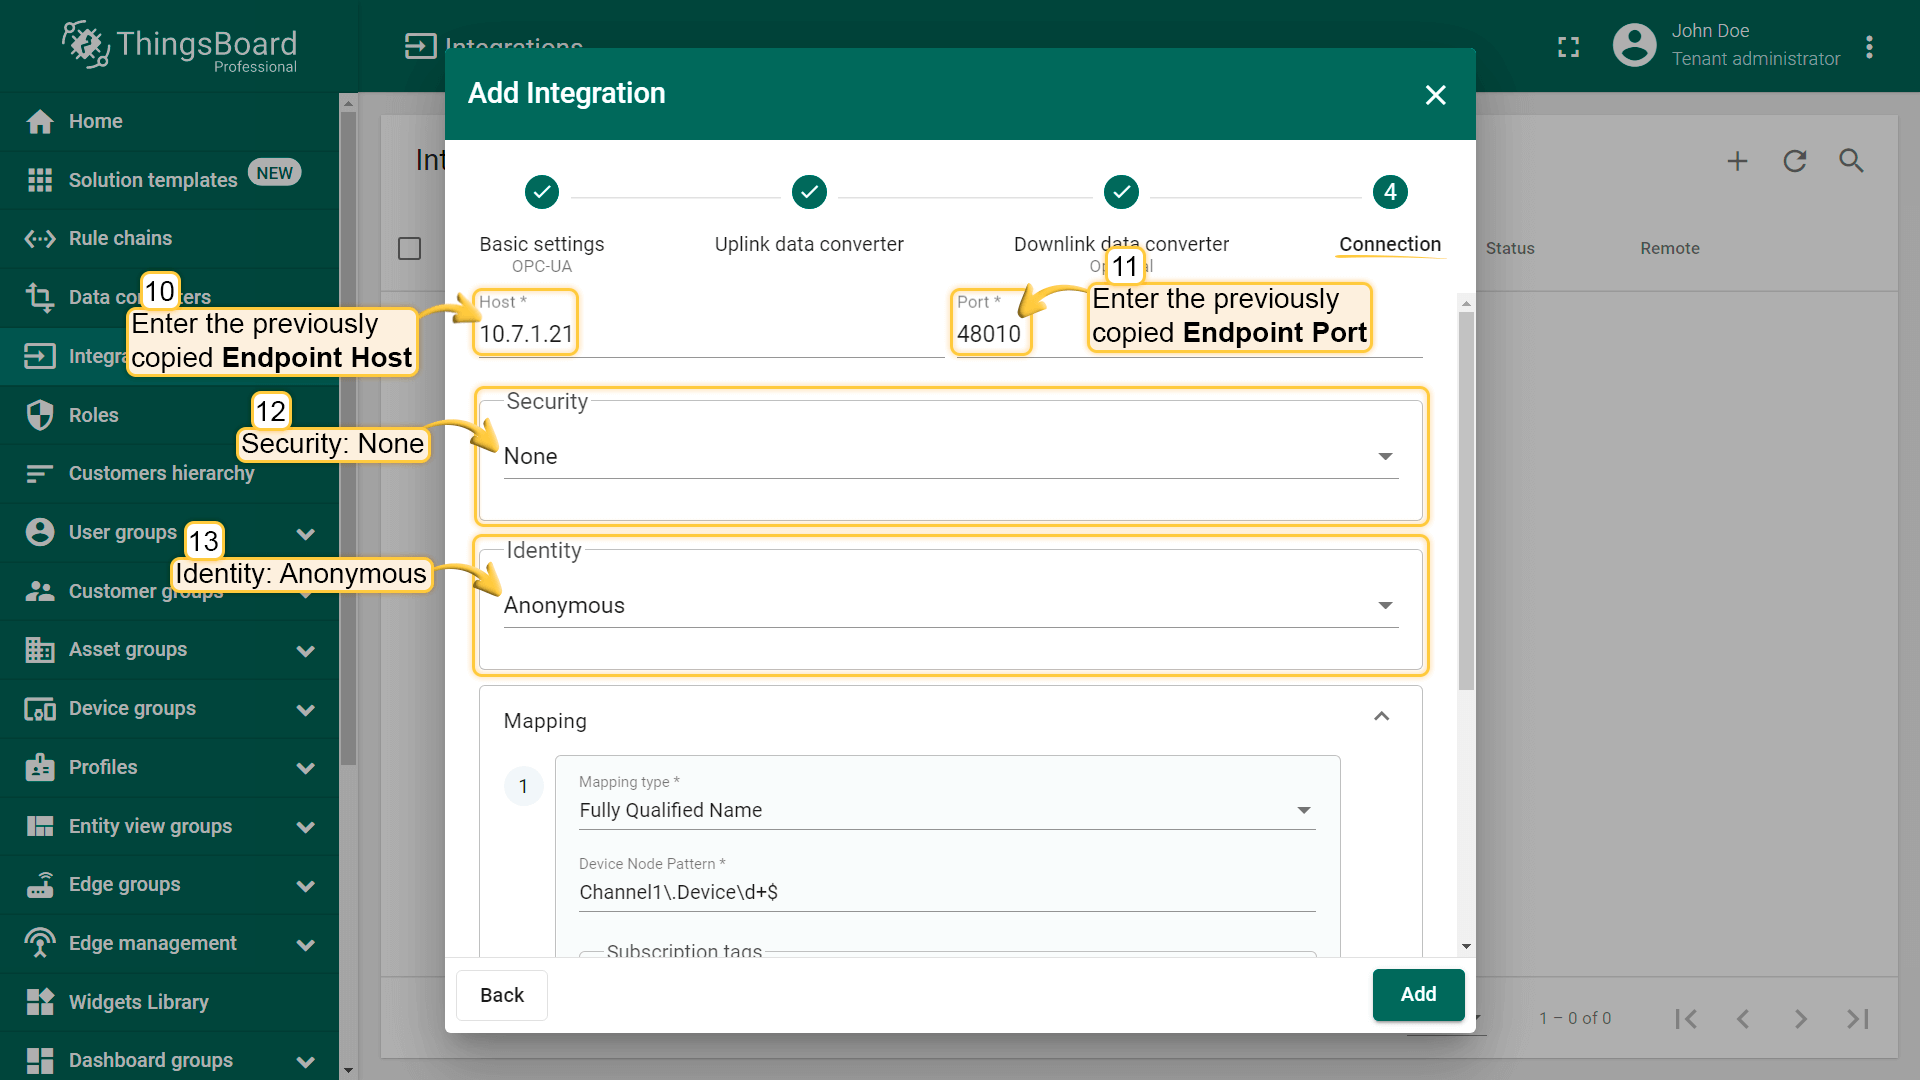
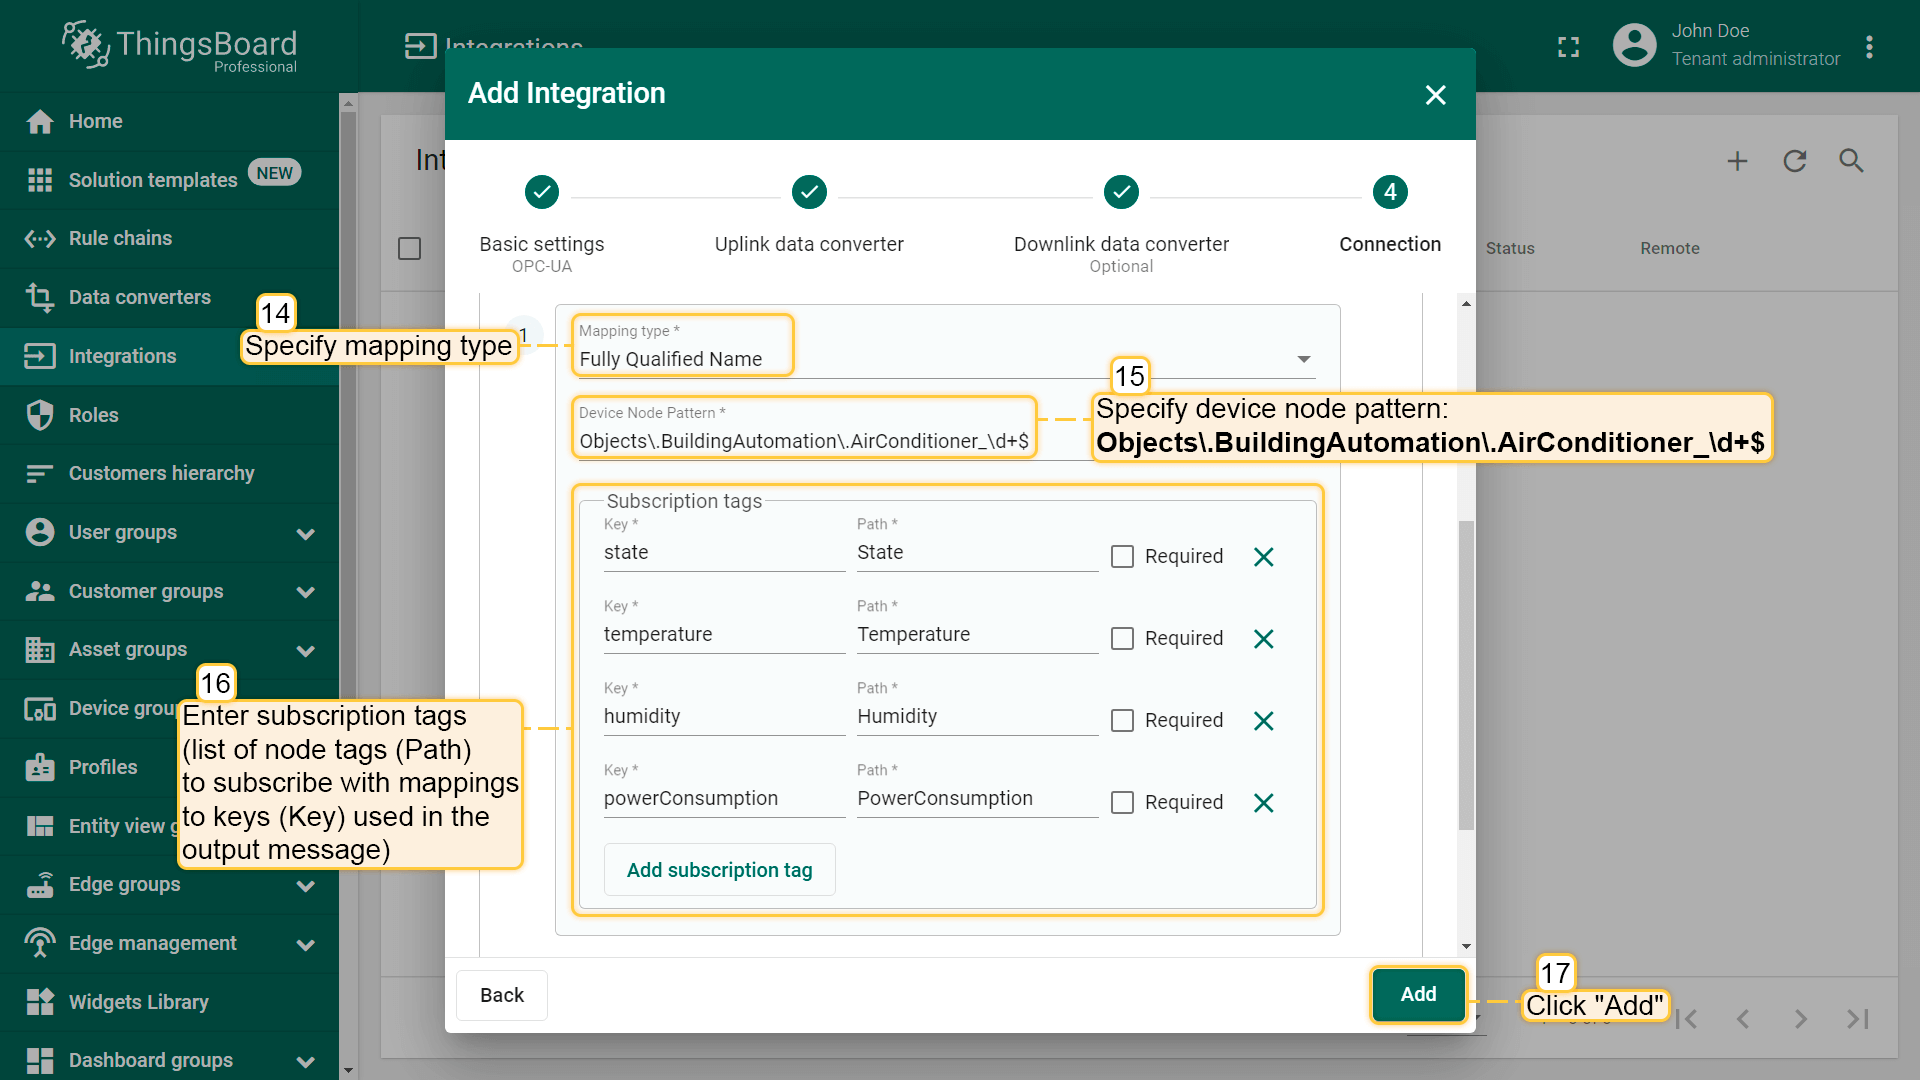
- Mapping:
- MappingType: Fully Qualified Name (can be Fully Qualified Name / ID)
- Device Node Pattern:
Objects\.BuildingAutomation\.AirConditioner_\d+$(regular expression used to match scanned OPC UA Node FQNs/IDs to device name. In this sample, path on OPC UA Explorer isObjects/BuildingAutomation/AirConditioner_X, where X is a number from 1 to N. That’s why we useObjects\.BuildingAutomation\.AirConditioner_\d+$as regular expression, because\d+means any number from 1 to N, and$means the end of the string) - Subscription tags (list of node tags (Path) to subscribe with mappings to keys (Key) used in the output message):
- state - State
- temperature - Temperature
- humidity - Humidity
- powerConsumption - PowerConsumption
Airconditioners Rule Chain
To demonstrate OPC-UA Integration and Rule Engine capabilities, we will create a separate Rule Chain to process the uplink and downlink messages related to the OPC-UA Integration.
Let´s create the Airconditioners Rule Chain.
- Download the airconditioners.json file
- Go to the Rule Chain tab
- To import this JSON file, click the
+button at the bottom right corner of the Rule Chains page and select the Import rule chain - double-click on the Airconditioners integration downlink node and select OPC-UA Airconditioners in the Integrations field
- Apply and save all changes
- Open and edit the Root Rule Chain
- Add the rule chain node
- Select the Airconditioners Rule Chain and connect it to the Message Type Switch Node using the following link labels: Attributes Updated / Post telemetry / RPC Request to Device
Devices
To verify our integration:
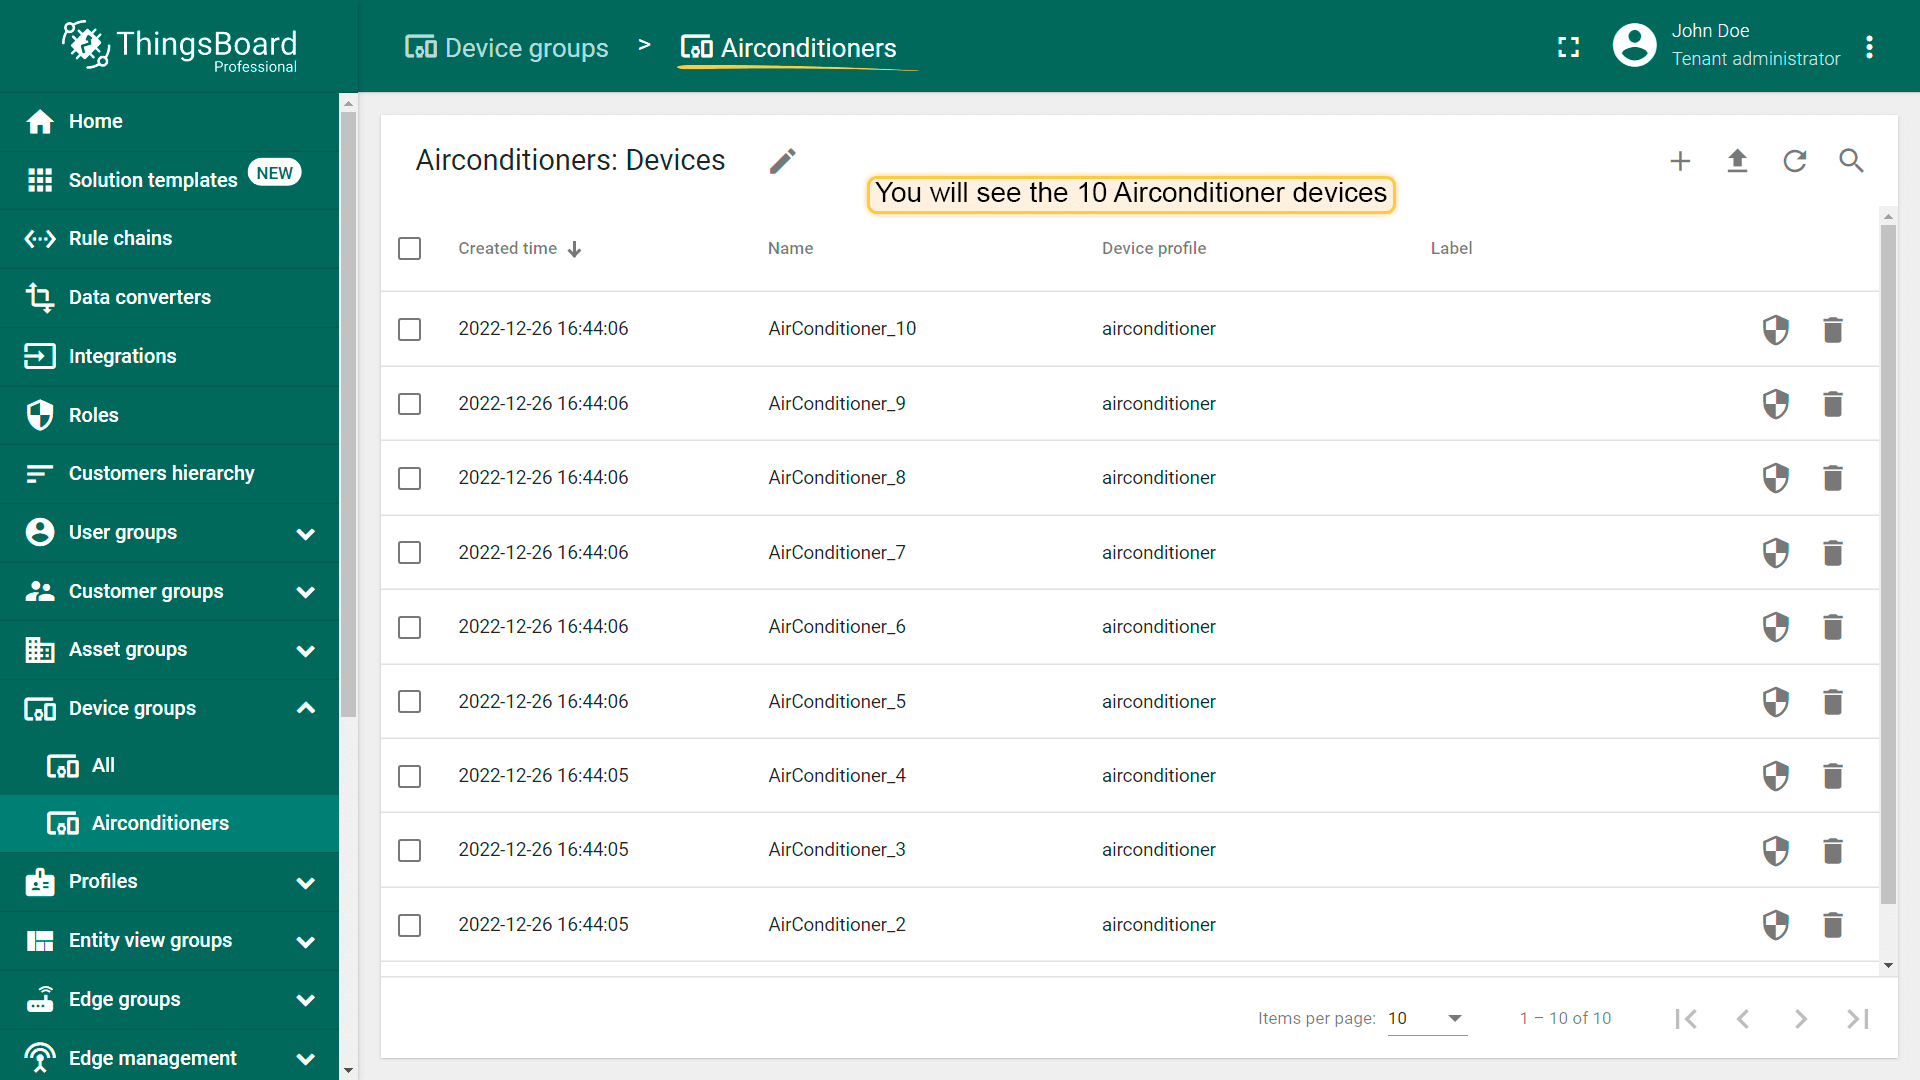
- Go to the Device groups page. You will see the Airconditioners group. Open this group
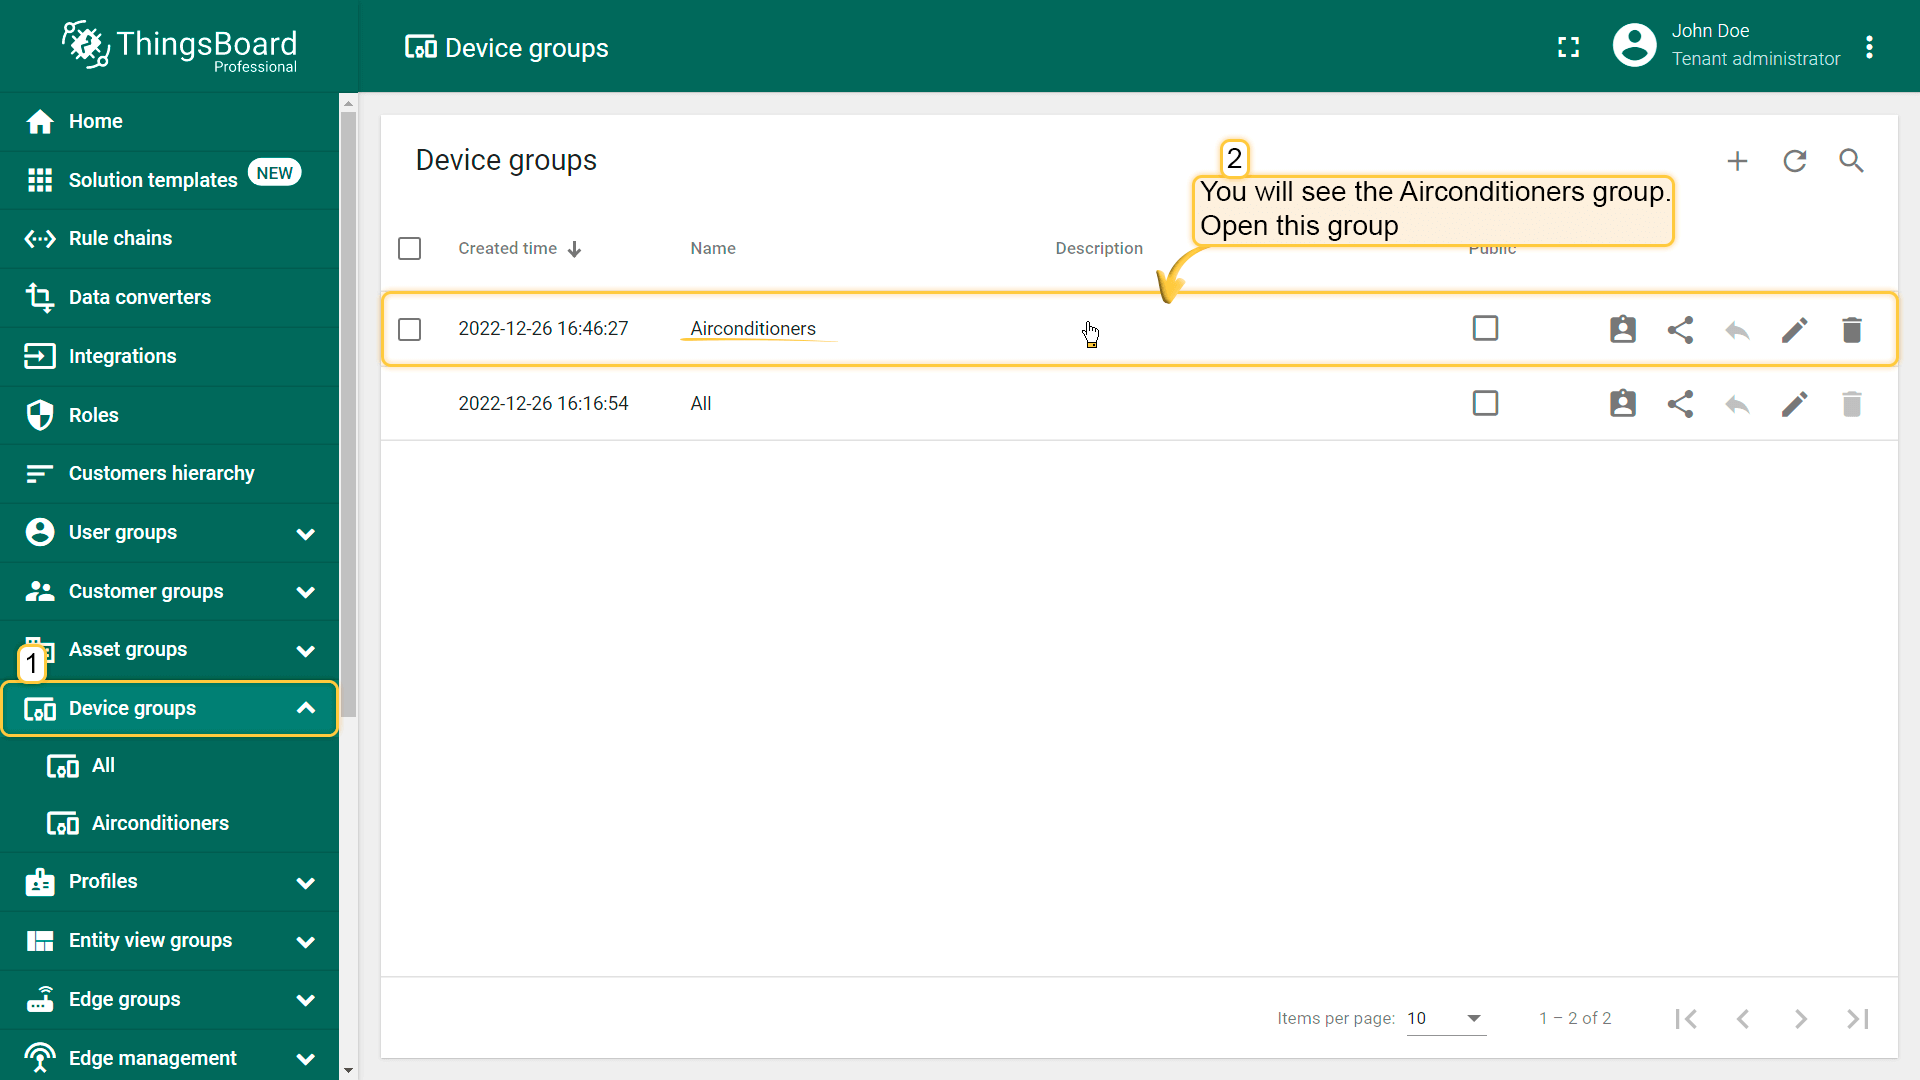
- When you open this group, you will see the 10 Airconditioner devices
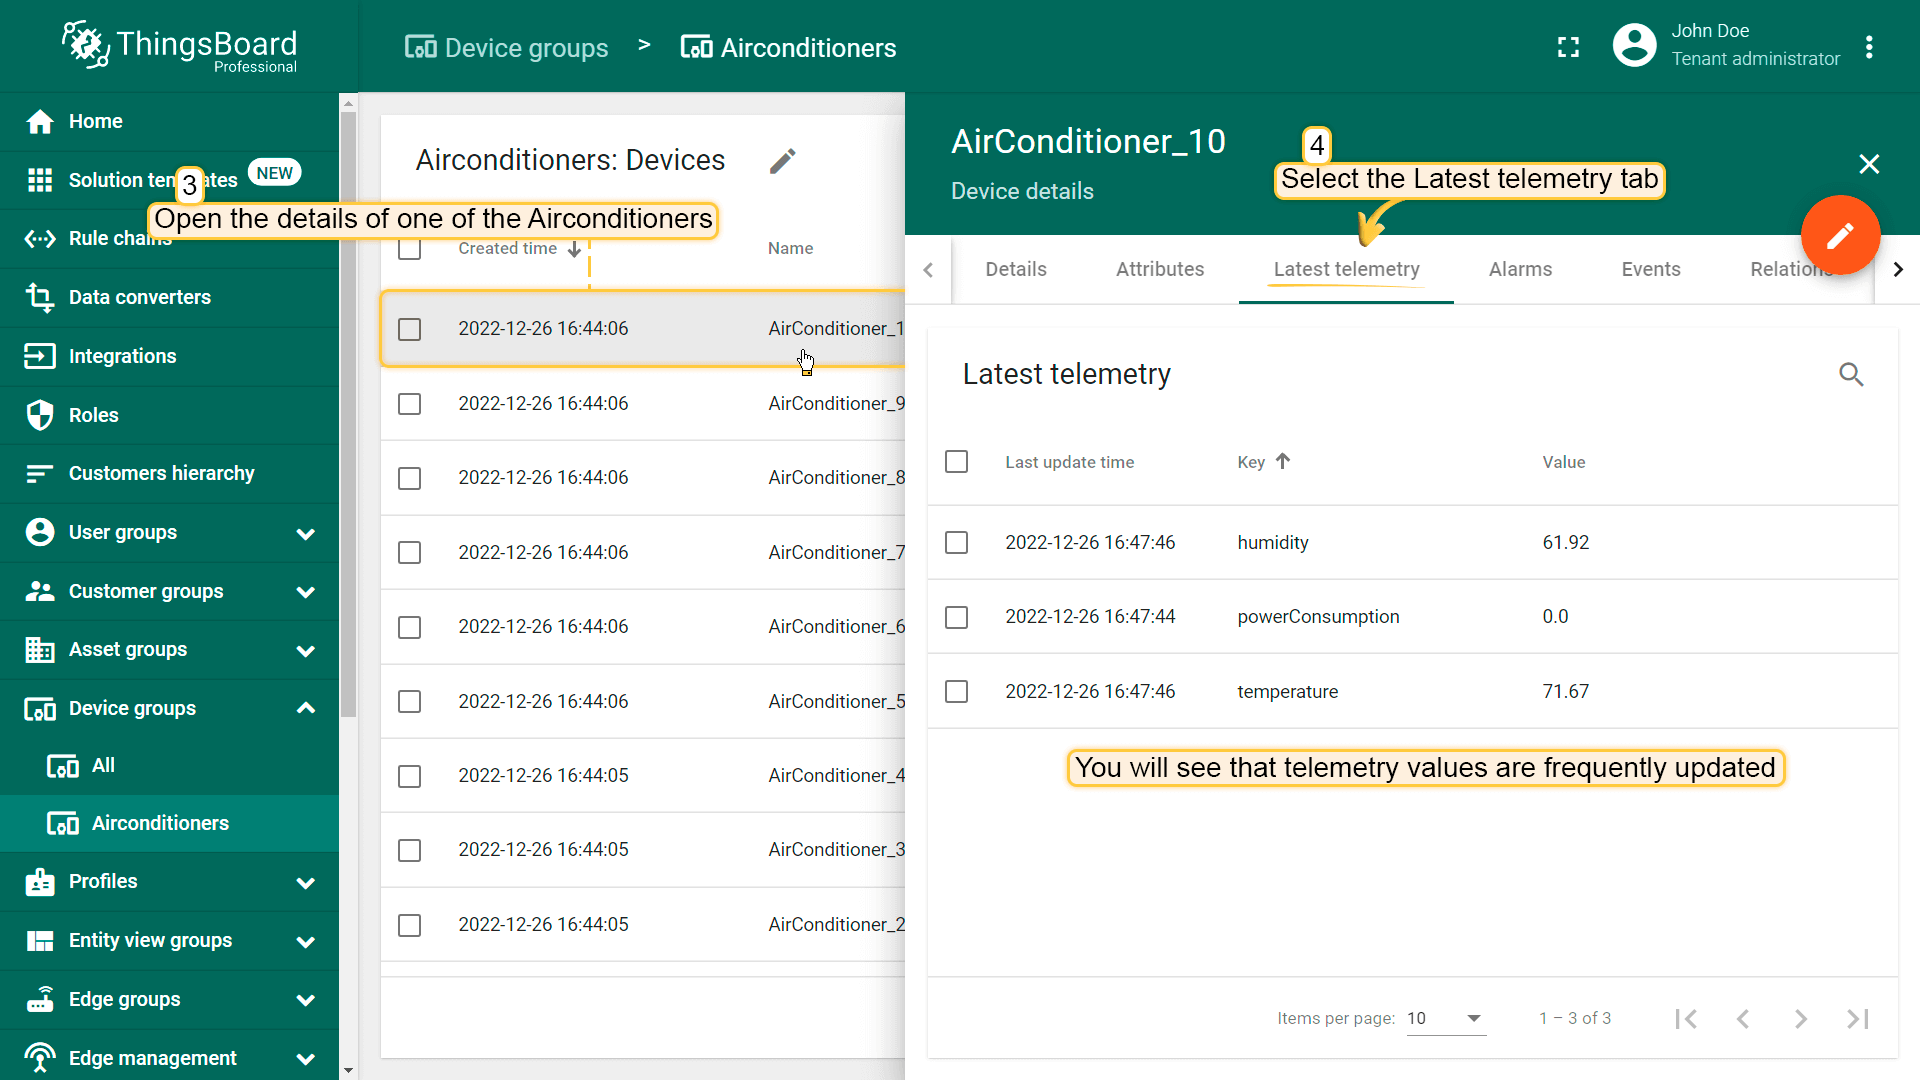
- Open the details of one of the Airconditioners and select the Latest Telemetry tab
- You will see that telemetry values are frequently updated
Airconditioners Dashboard
To visualize the Airconditioners data and test RPC commands, we will create the Airconditioners dashboard.
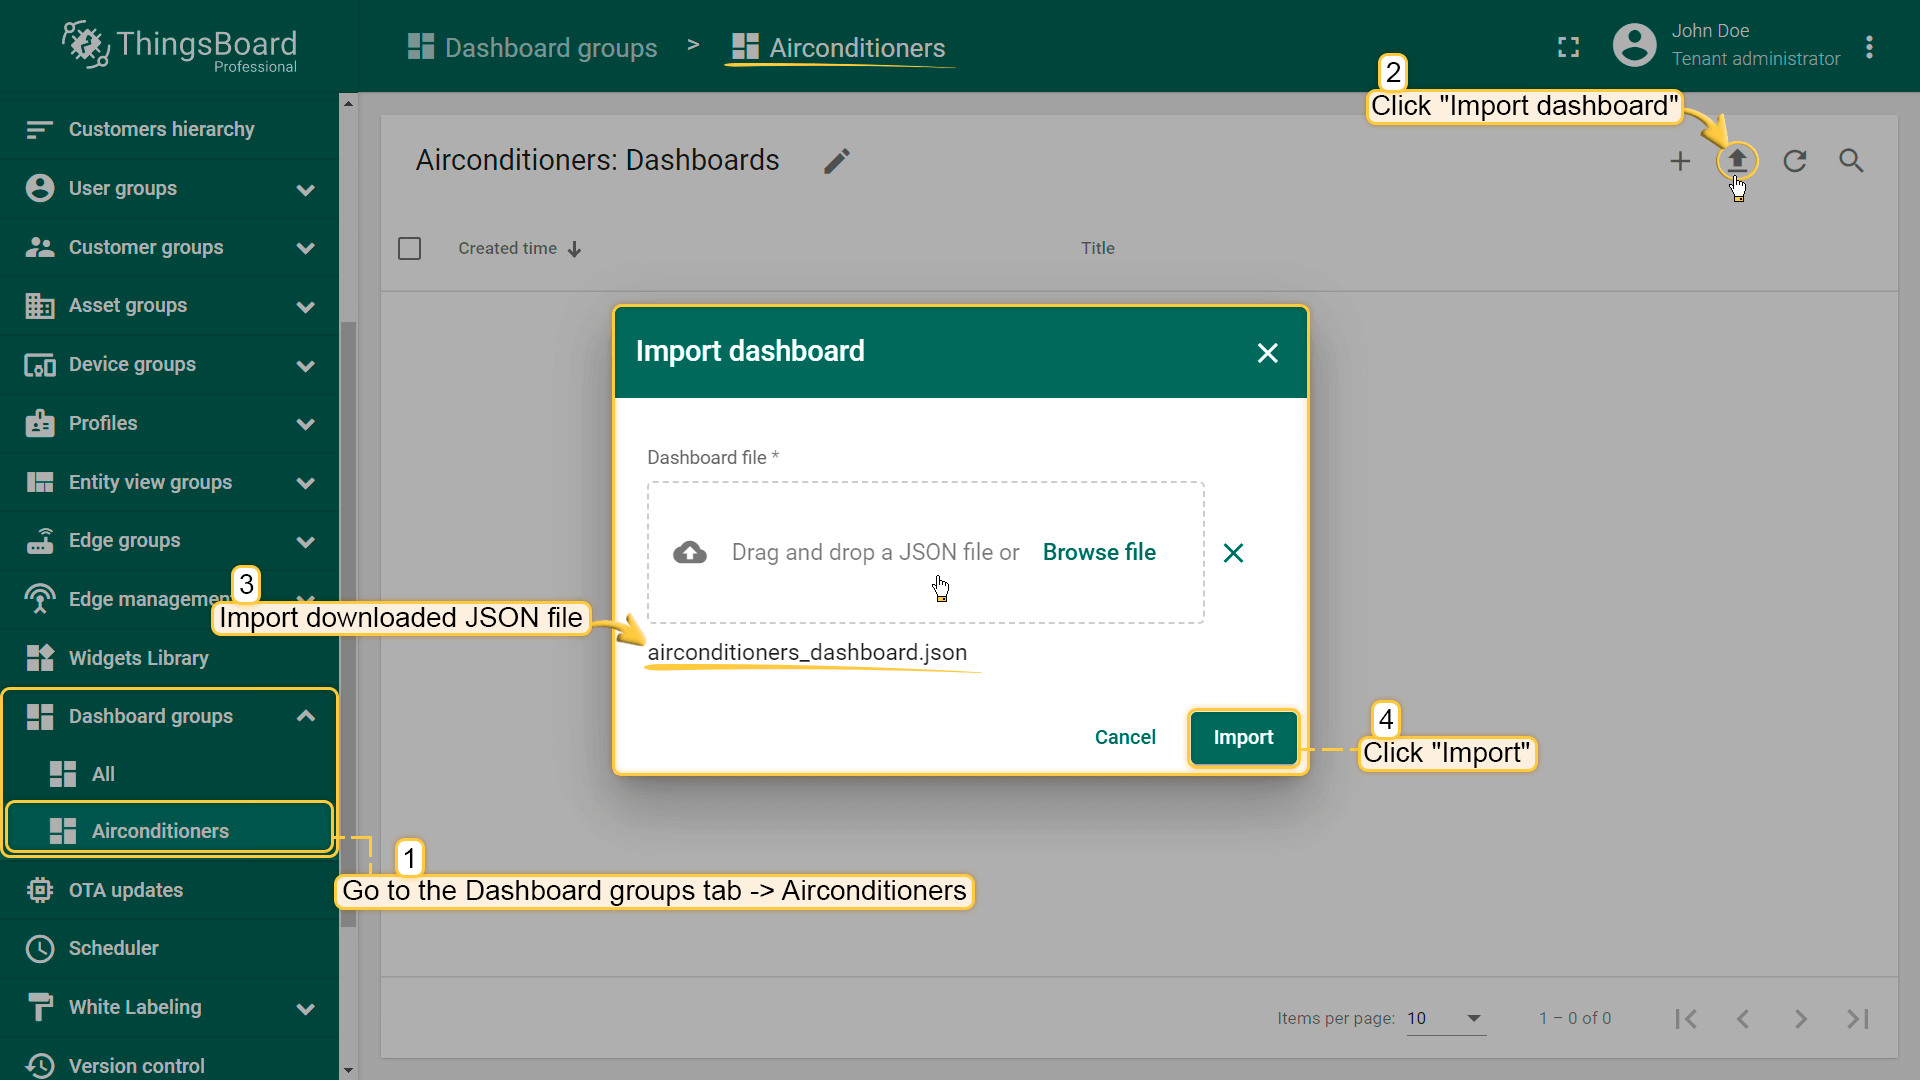
- Download the airconditioners_dashboard.json file
- Go to the Dashboard groups tab
- To import this JSON file, click the
+button at the bottom right corner of the Dashboards page and select Import dashboard
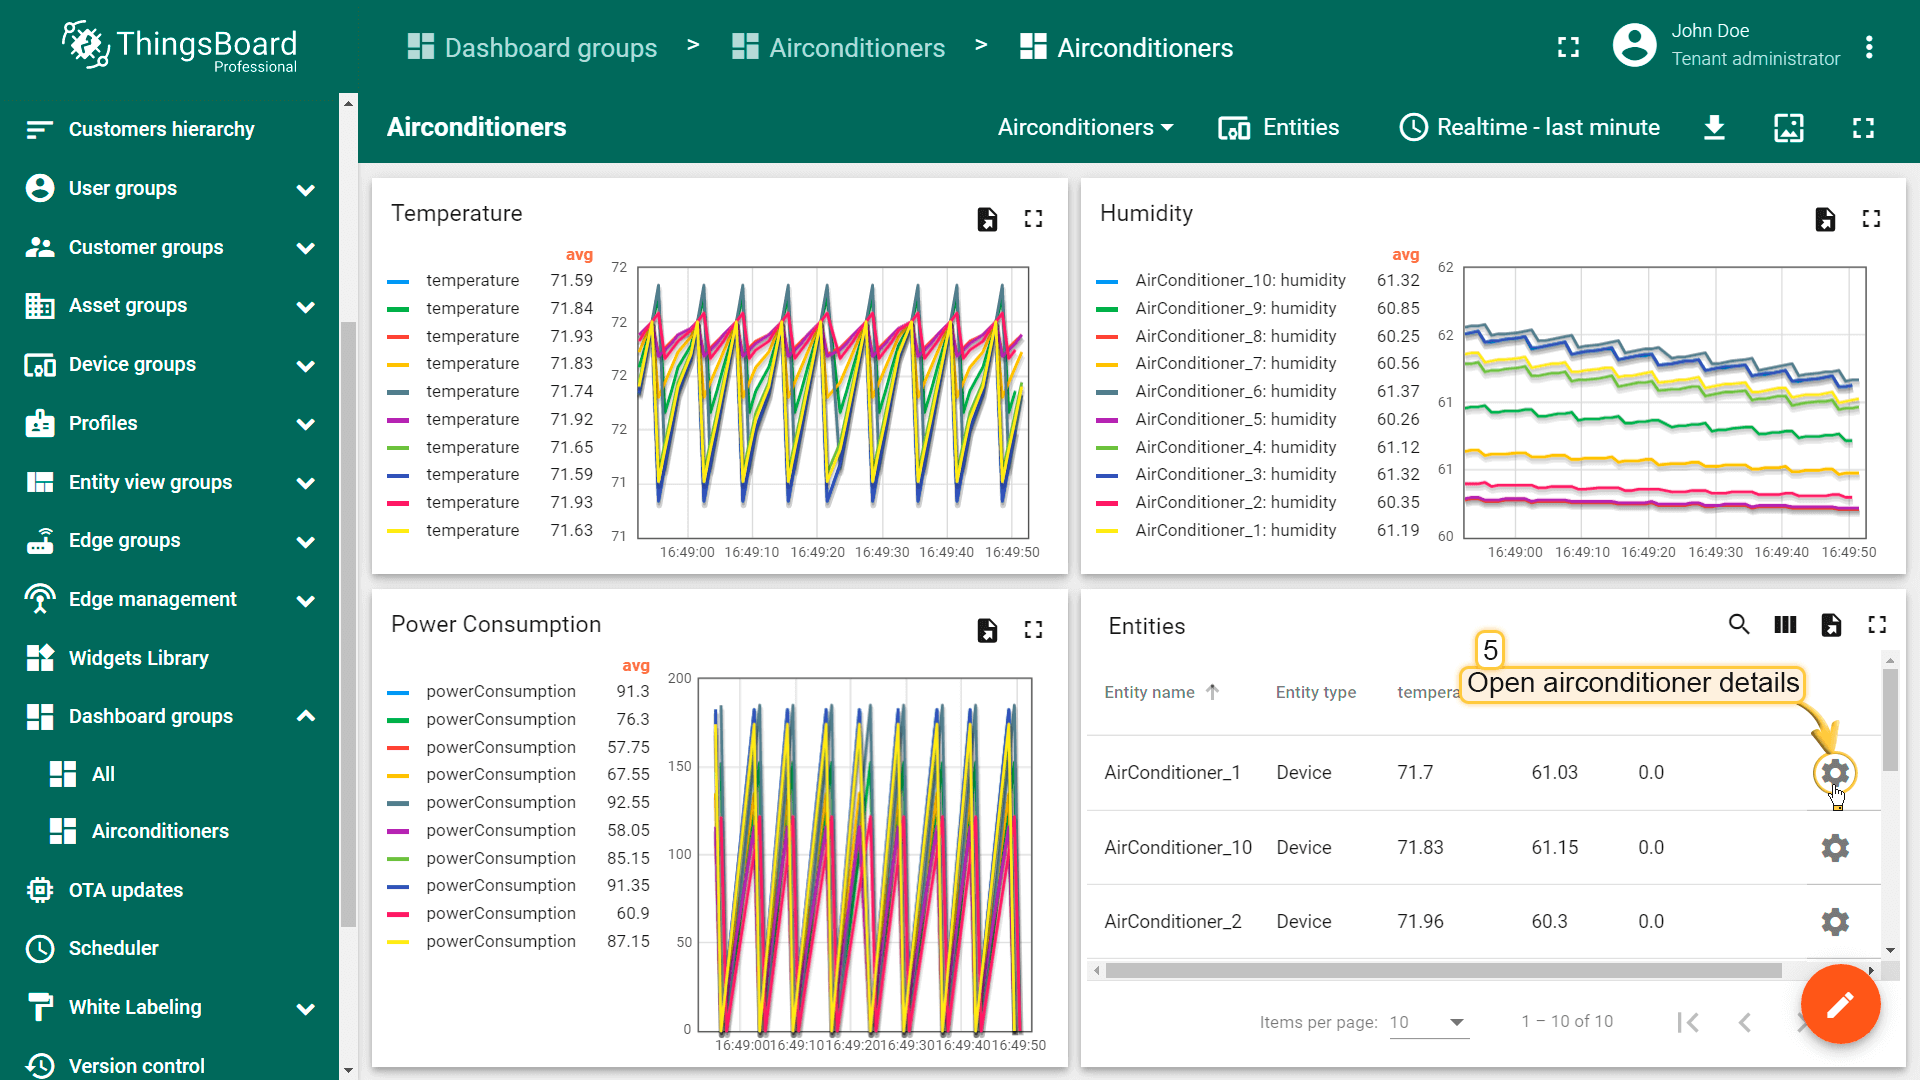
- Open the Airconditioners dashboard
- You will see the telemetry till the last minute from all the 10 airconditioners
- Open the Airconditioner details page by clicking on the details button in the Entities widget
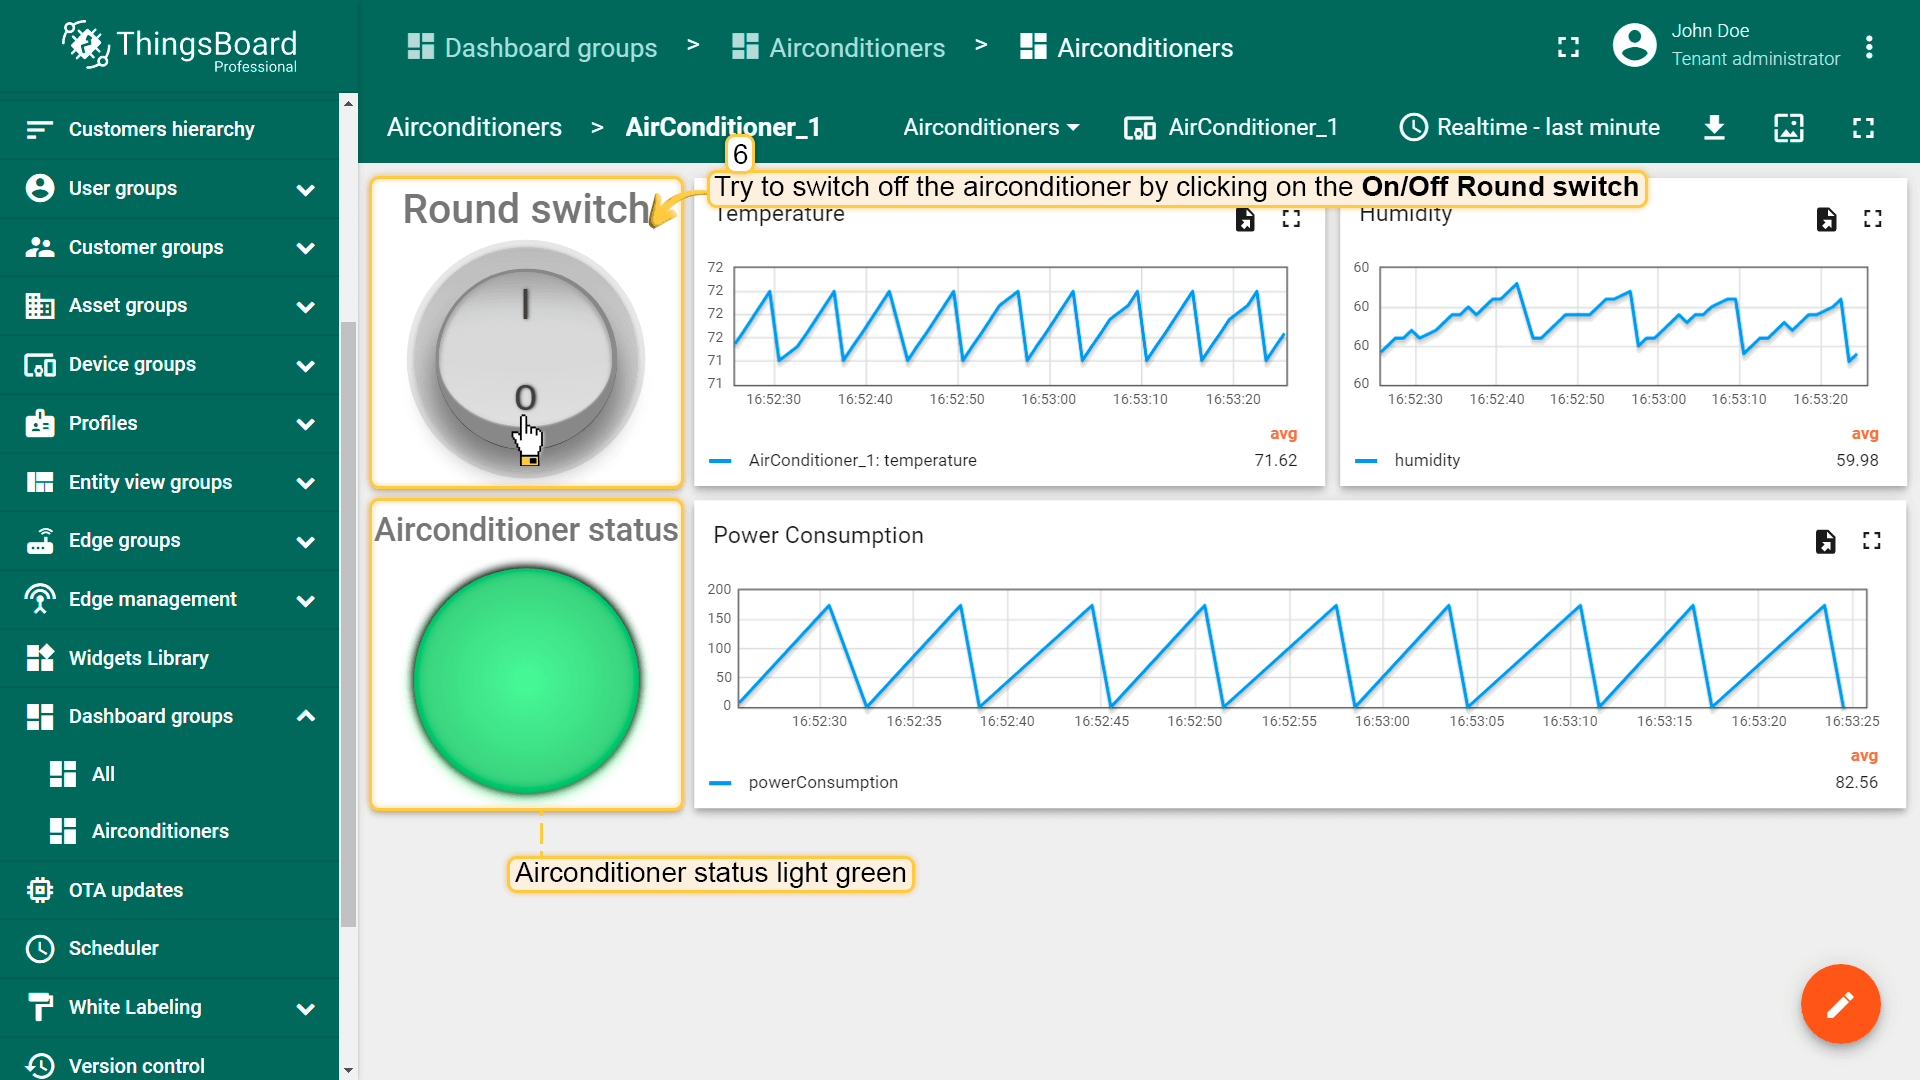
- You will find the Airconditioner status light green. Try to switch off the airconditioner by clicking on the On/Off Round switch
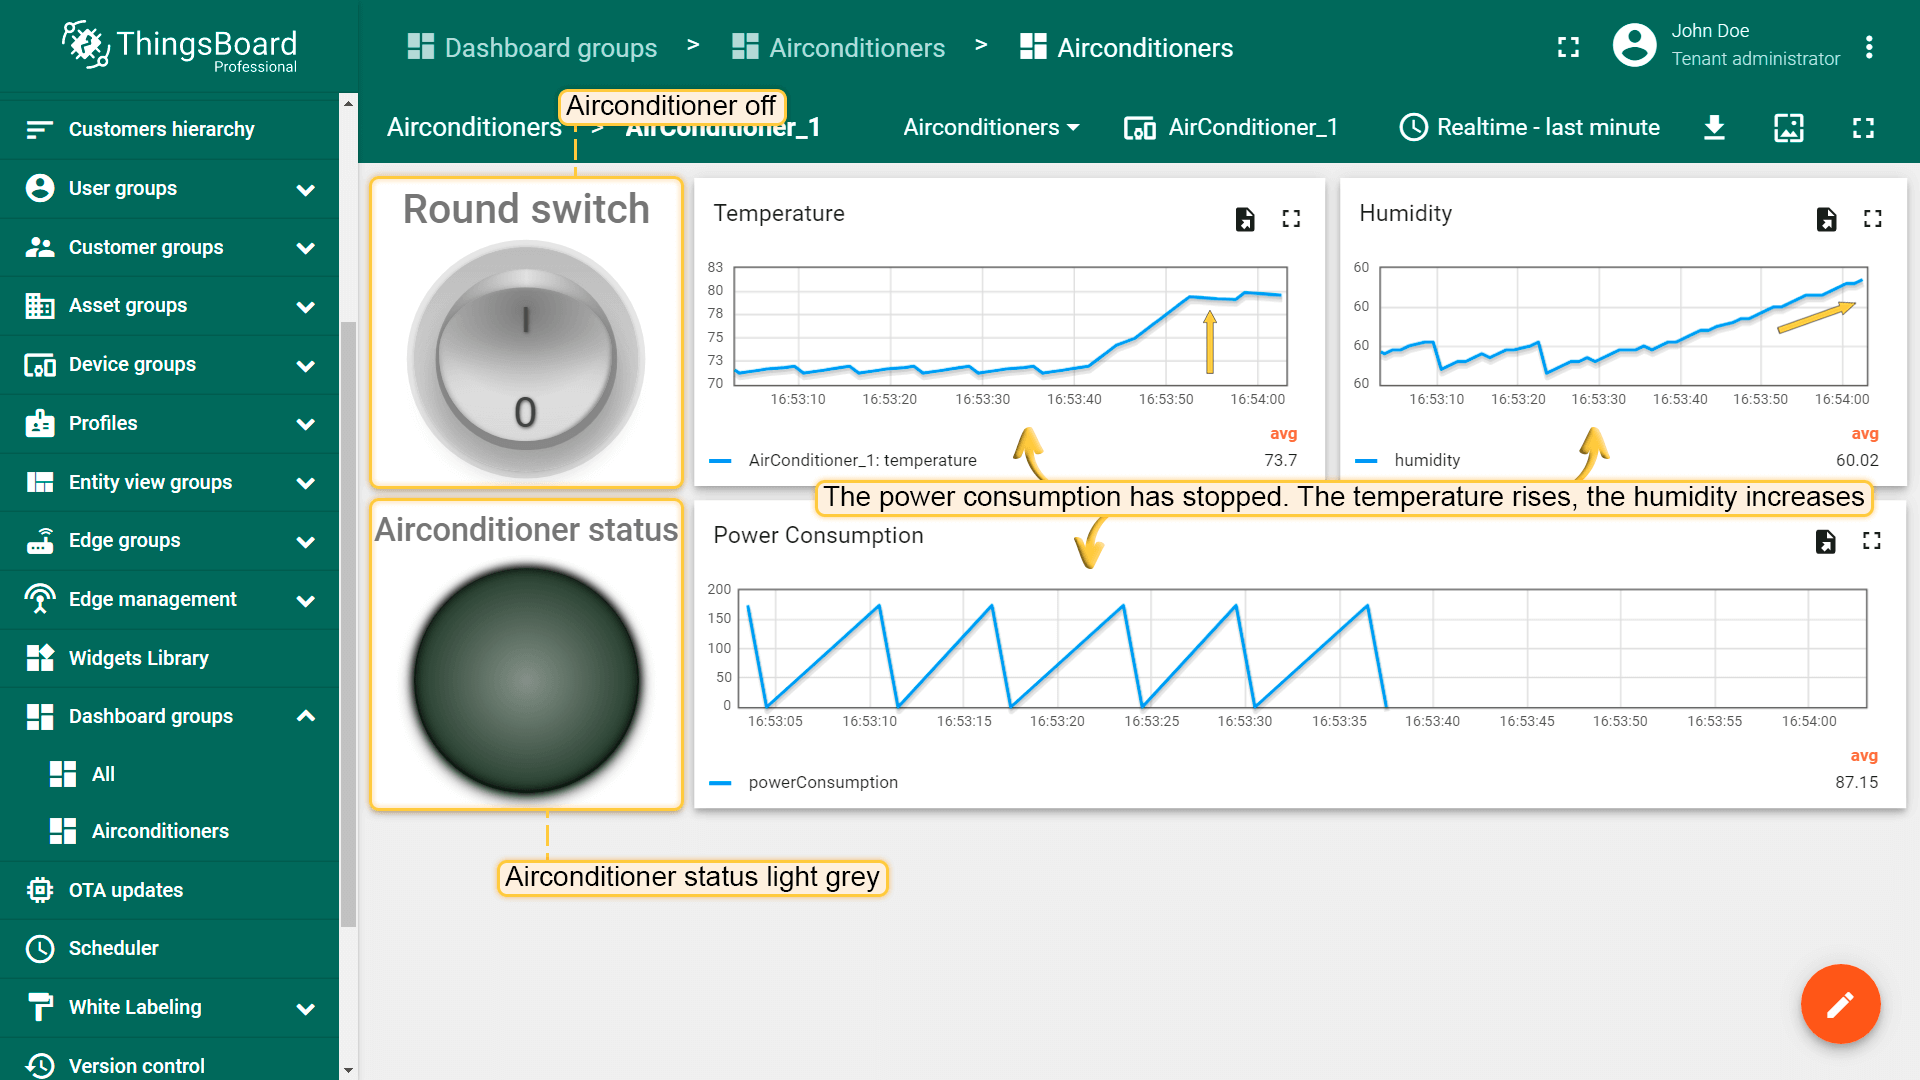
- The Airconditioner status light will turn into grey, the temperature will start rising, the humidity will start increasing and the power consumption will stop
Video tutorial
See video tutorial below for step-by-step instruction how to setup OPC-UA Integration.
See also
Next steps
-
入门指南 - 快速学习ThingsBoard相关功能。
-
可 视 化 - 学习如何配置复杂的ThingsBoard仪表板说明。
-
数据处理 - 学习如何使用ThingsBoard规则引擎。
-
数据分析 - 学习如何使用规则引擎执行基本的分析任务。
-
硬件样品 - 学习如何将各种硬件平台连接到ThingsBoard。
-
高级功能 - 学习高级ThingsBoard功能。
