ThingsBoard IoT Gateway是开源方案,作为接入传统与第三方系统的IoT设备与ThingsBoard之间的桥梁。
本指南覆盖IoT Gateway的初始安装与配置,将完成: -创建新的网关设备; -使用Docker命令启动网关; -配置多种connector(MQTT、OPC-UA、Modbus),连接本地演示服务器并读取数据; -在ThingsBoard中查看收到的设备数据。
前置条件
-开始配置网关前,确保ThingsBoard服务器已启动运行。最简便的方式是使用ThingsBoard Cloud。也可按安装指南手动安装ThingsBoard。 -确保已安装并正确配置Docker。若未安装,可从Docker官网下载,并按对应操作系统的安装指南进行安装。
步骤1.在ThingsBoard上创建新的网关设备
首先,按下列步骤在你的ThingsBoard实例中添加网关设备:

,选择设备配置,点击「**创建**」。)
若此前已配置过网关,请先备份,新的远程配置会覆盖现有设置文件。
若曾使用 3.4 之前的网关版本,网关将自动生成新的 JSON 格式配置文件。
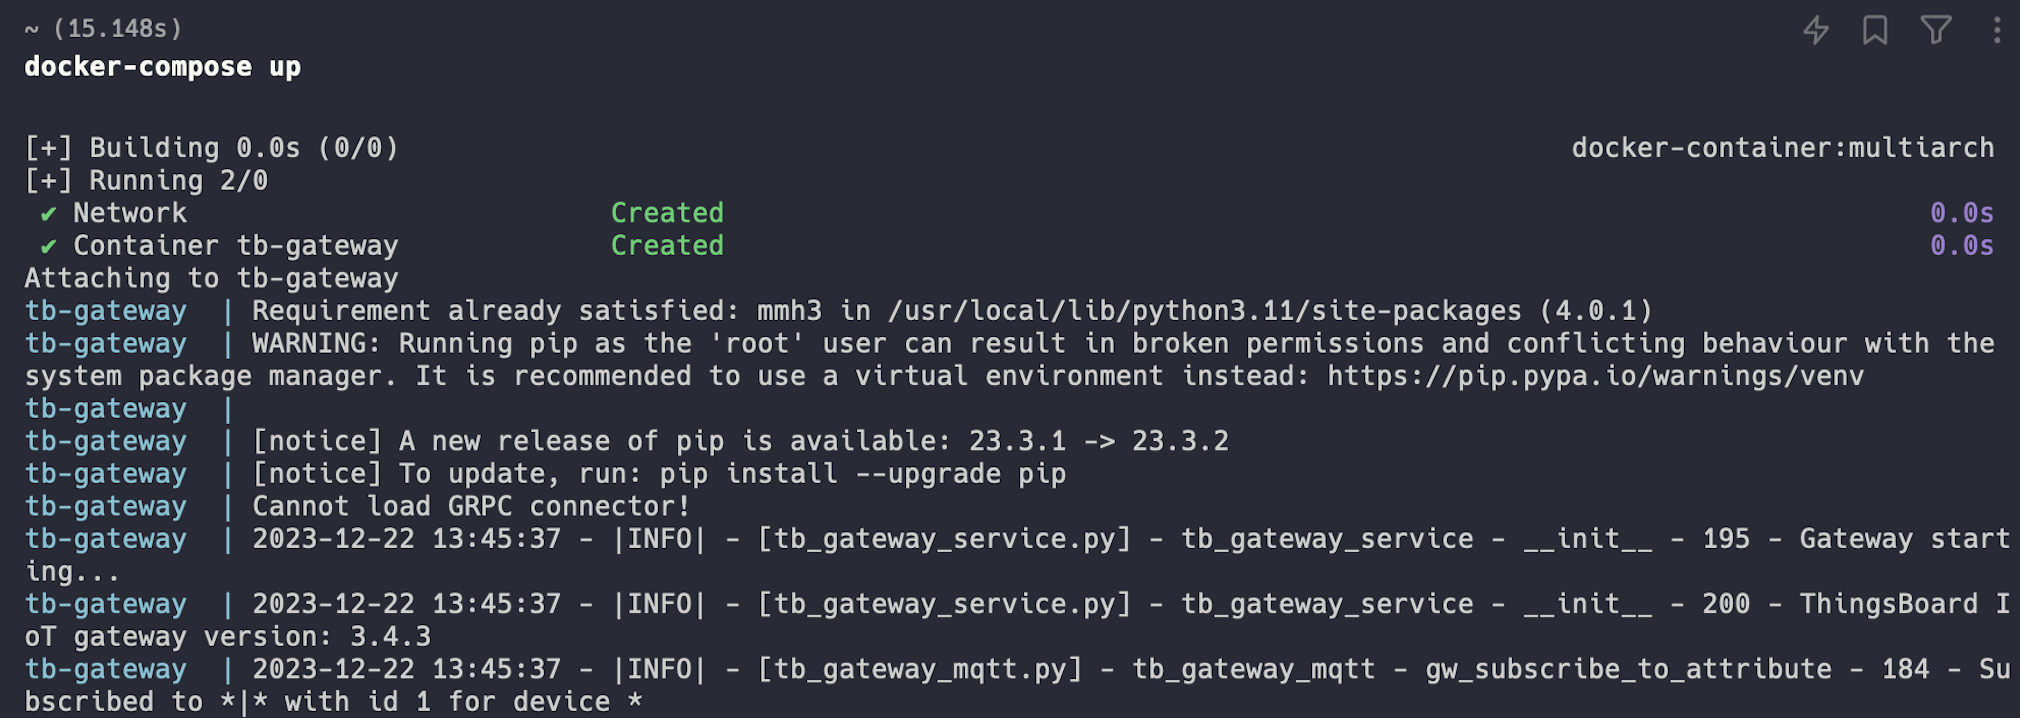
启动网关的步骤如下:


运行网关Docker镜像后,终端中可看到如下日志:
步骤2:启用远程日志
要在平台侧查看网关与connector的日志,需启用远程日志。操作步骤如下:


步骤3:添加新connector
选择connector类型即确定网关与其他系统或设备交互所使用的具体连接方式。
了解connector工作方式,可从以下connector中选择一个:
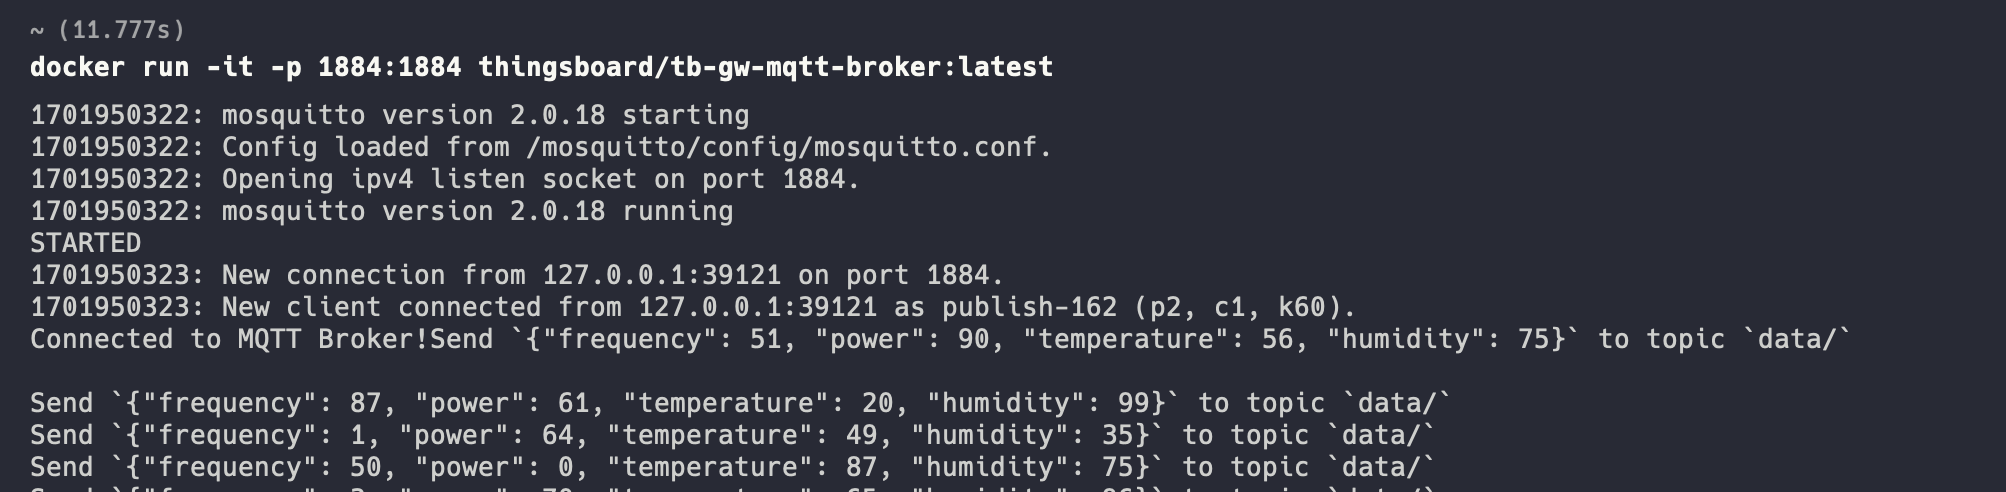
下面我们添加 MQTT connector,它将使用带内置数据生成器的演示 broker 订阅若干数据 topic,并将数据发送到网关。 配置演示 MQTT broker我们将使用 docker 镜像作为演示 MQTT broker,可通过以下命令安装并运行: 运行 docker 镜像后,终端会显示以下日志:
配置 connectorMQTT connector 将使用 anonymous 安全类型,在端口 1884 连接到 “host.docker.internal” 上名为 “Demo Broker” 的 broker。 它将包含 “data/” topic 的数据 mapping,指定 JSON converter,并为设备数据定义 attribute 和 time series mapping。 此外,它将处理传感器的 connect 和 disconnect 请求,通过表达式从 topic filter 中提取设备名称。 创建 connector 请按以下步骤操作:
 在右侧面板点击”Connectors configuration(Connector 配置)“按钮; 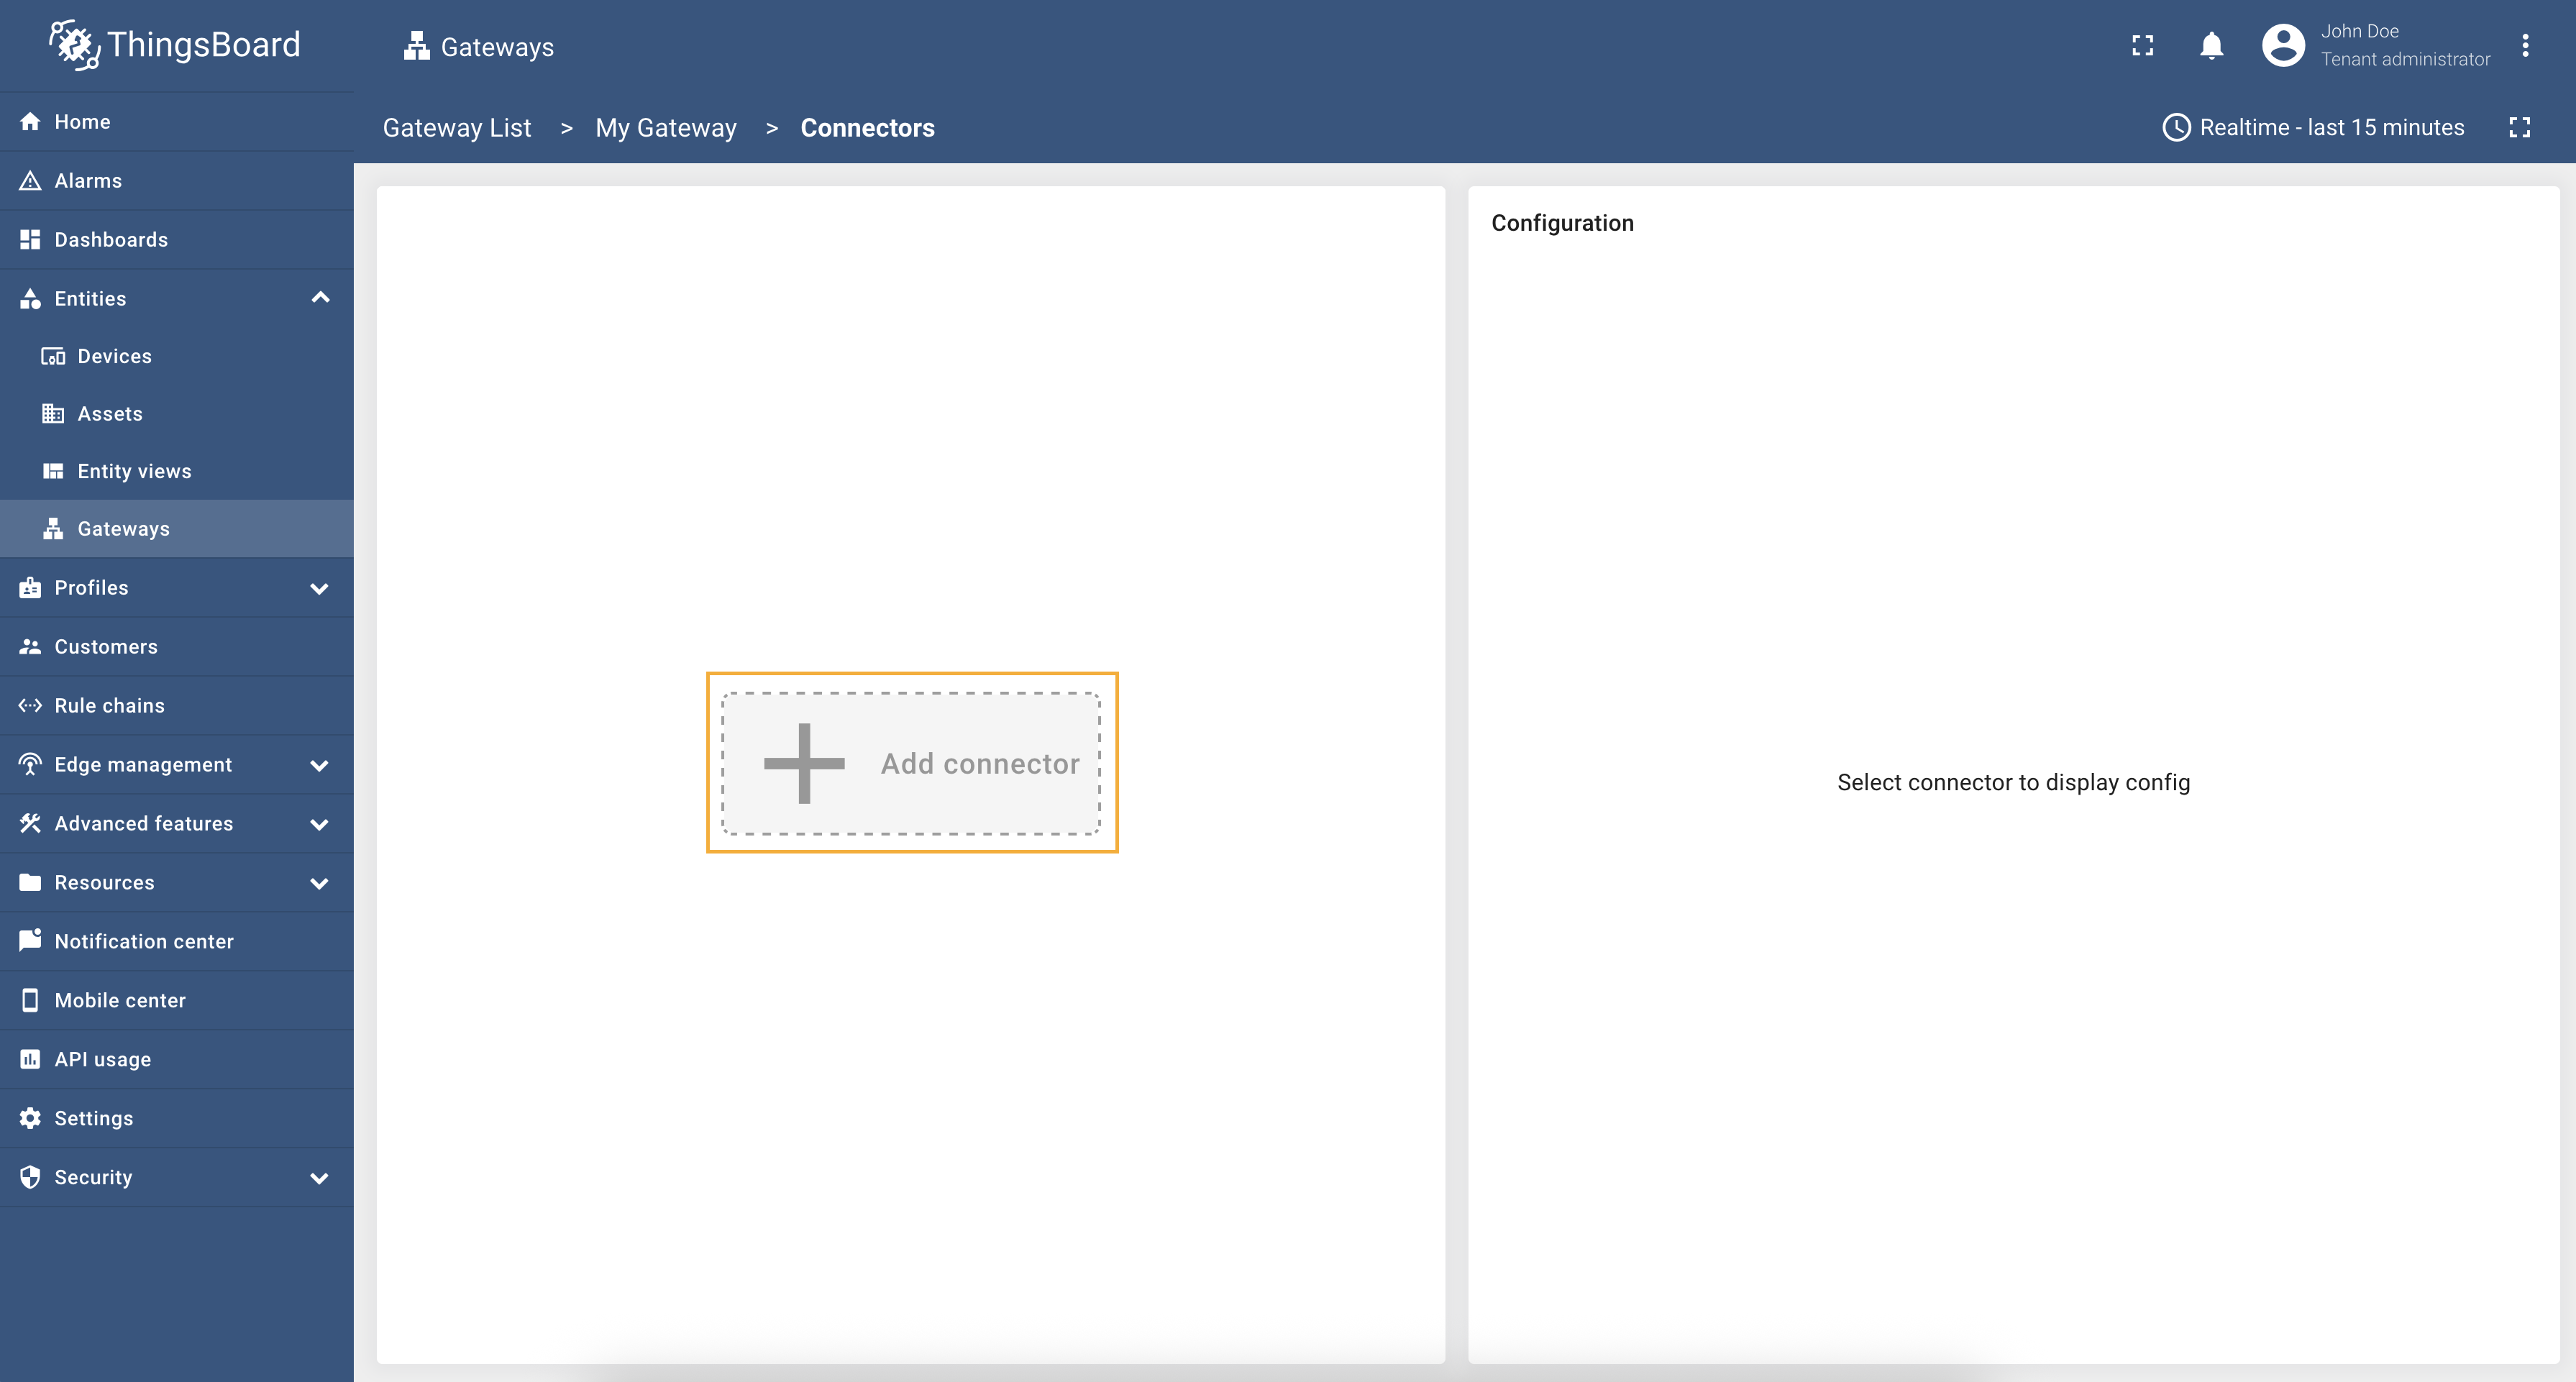 点击”+ Add connector(添加 Connector)“按钮;  在下拉中选择”MQTT“connector 类型,填写”Name“字段,将”Logging level“设为 INFO,禁用”Fill configuration with default values“并点击”Add“按钮; 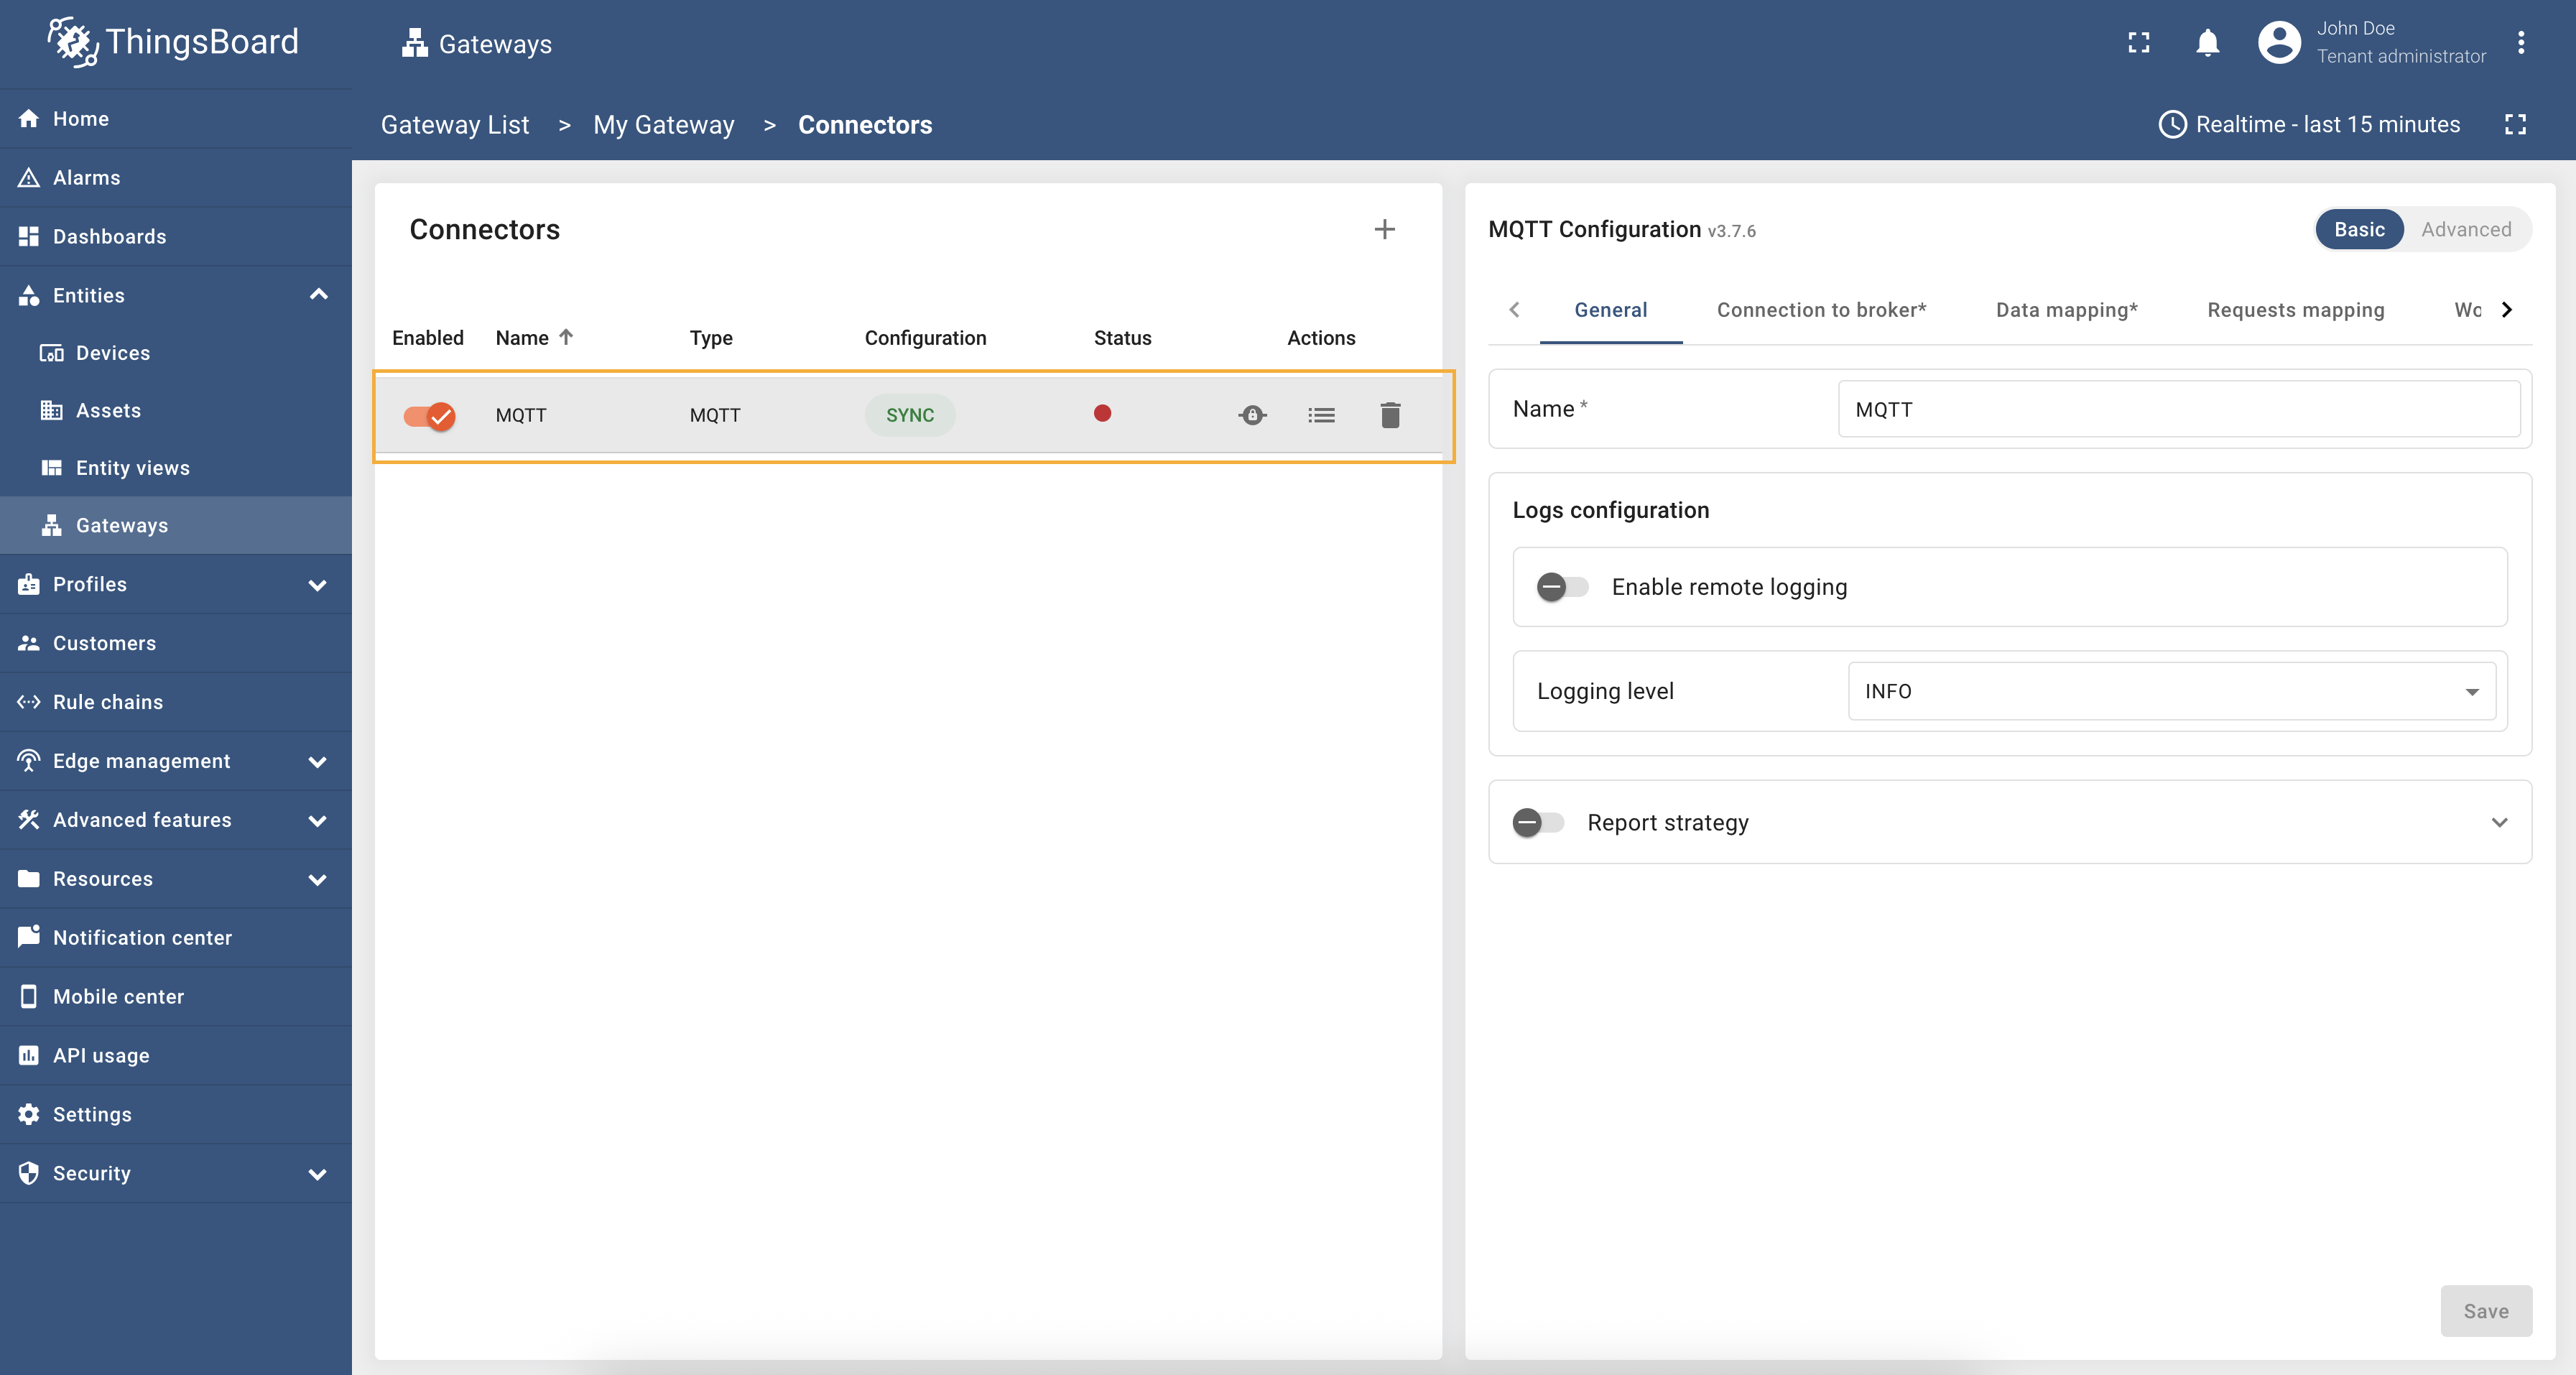 Connector 已创建。 首先配置到演示 broker 的连接。从”Connection to broker(连接 Broker)“部分开始。 该部分提供详细连接配置选项,包含 host、port、MQTT version、client ID、security 等重要字段。 host 字段指定 broker 地址,port 字段指定通信端口,MQTT version 字段确保与所用协议版本兼容,client ID 唯一标识客户端,security 配置 client 在 MQTT Broker 的授权。 填写以下字段值:
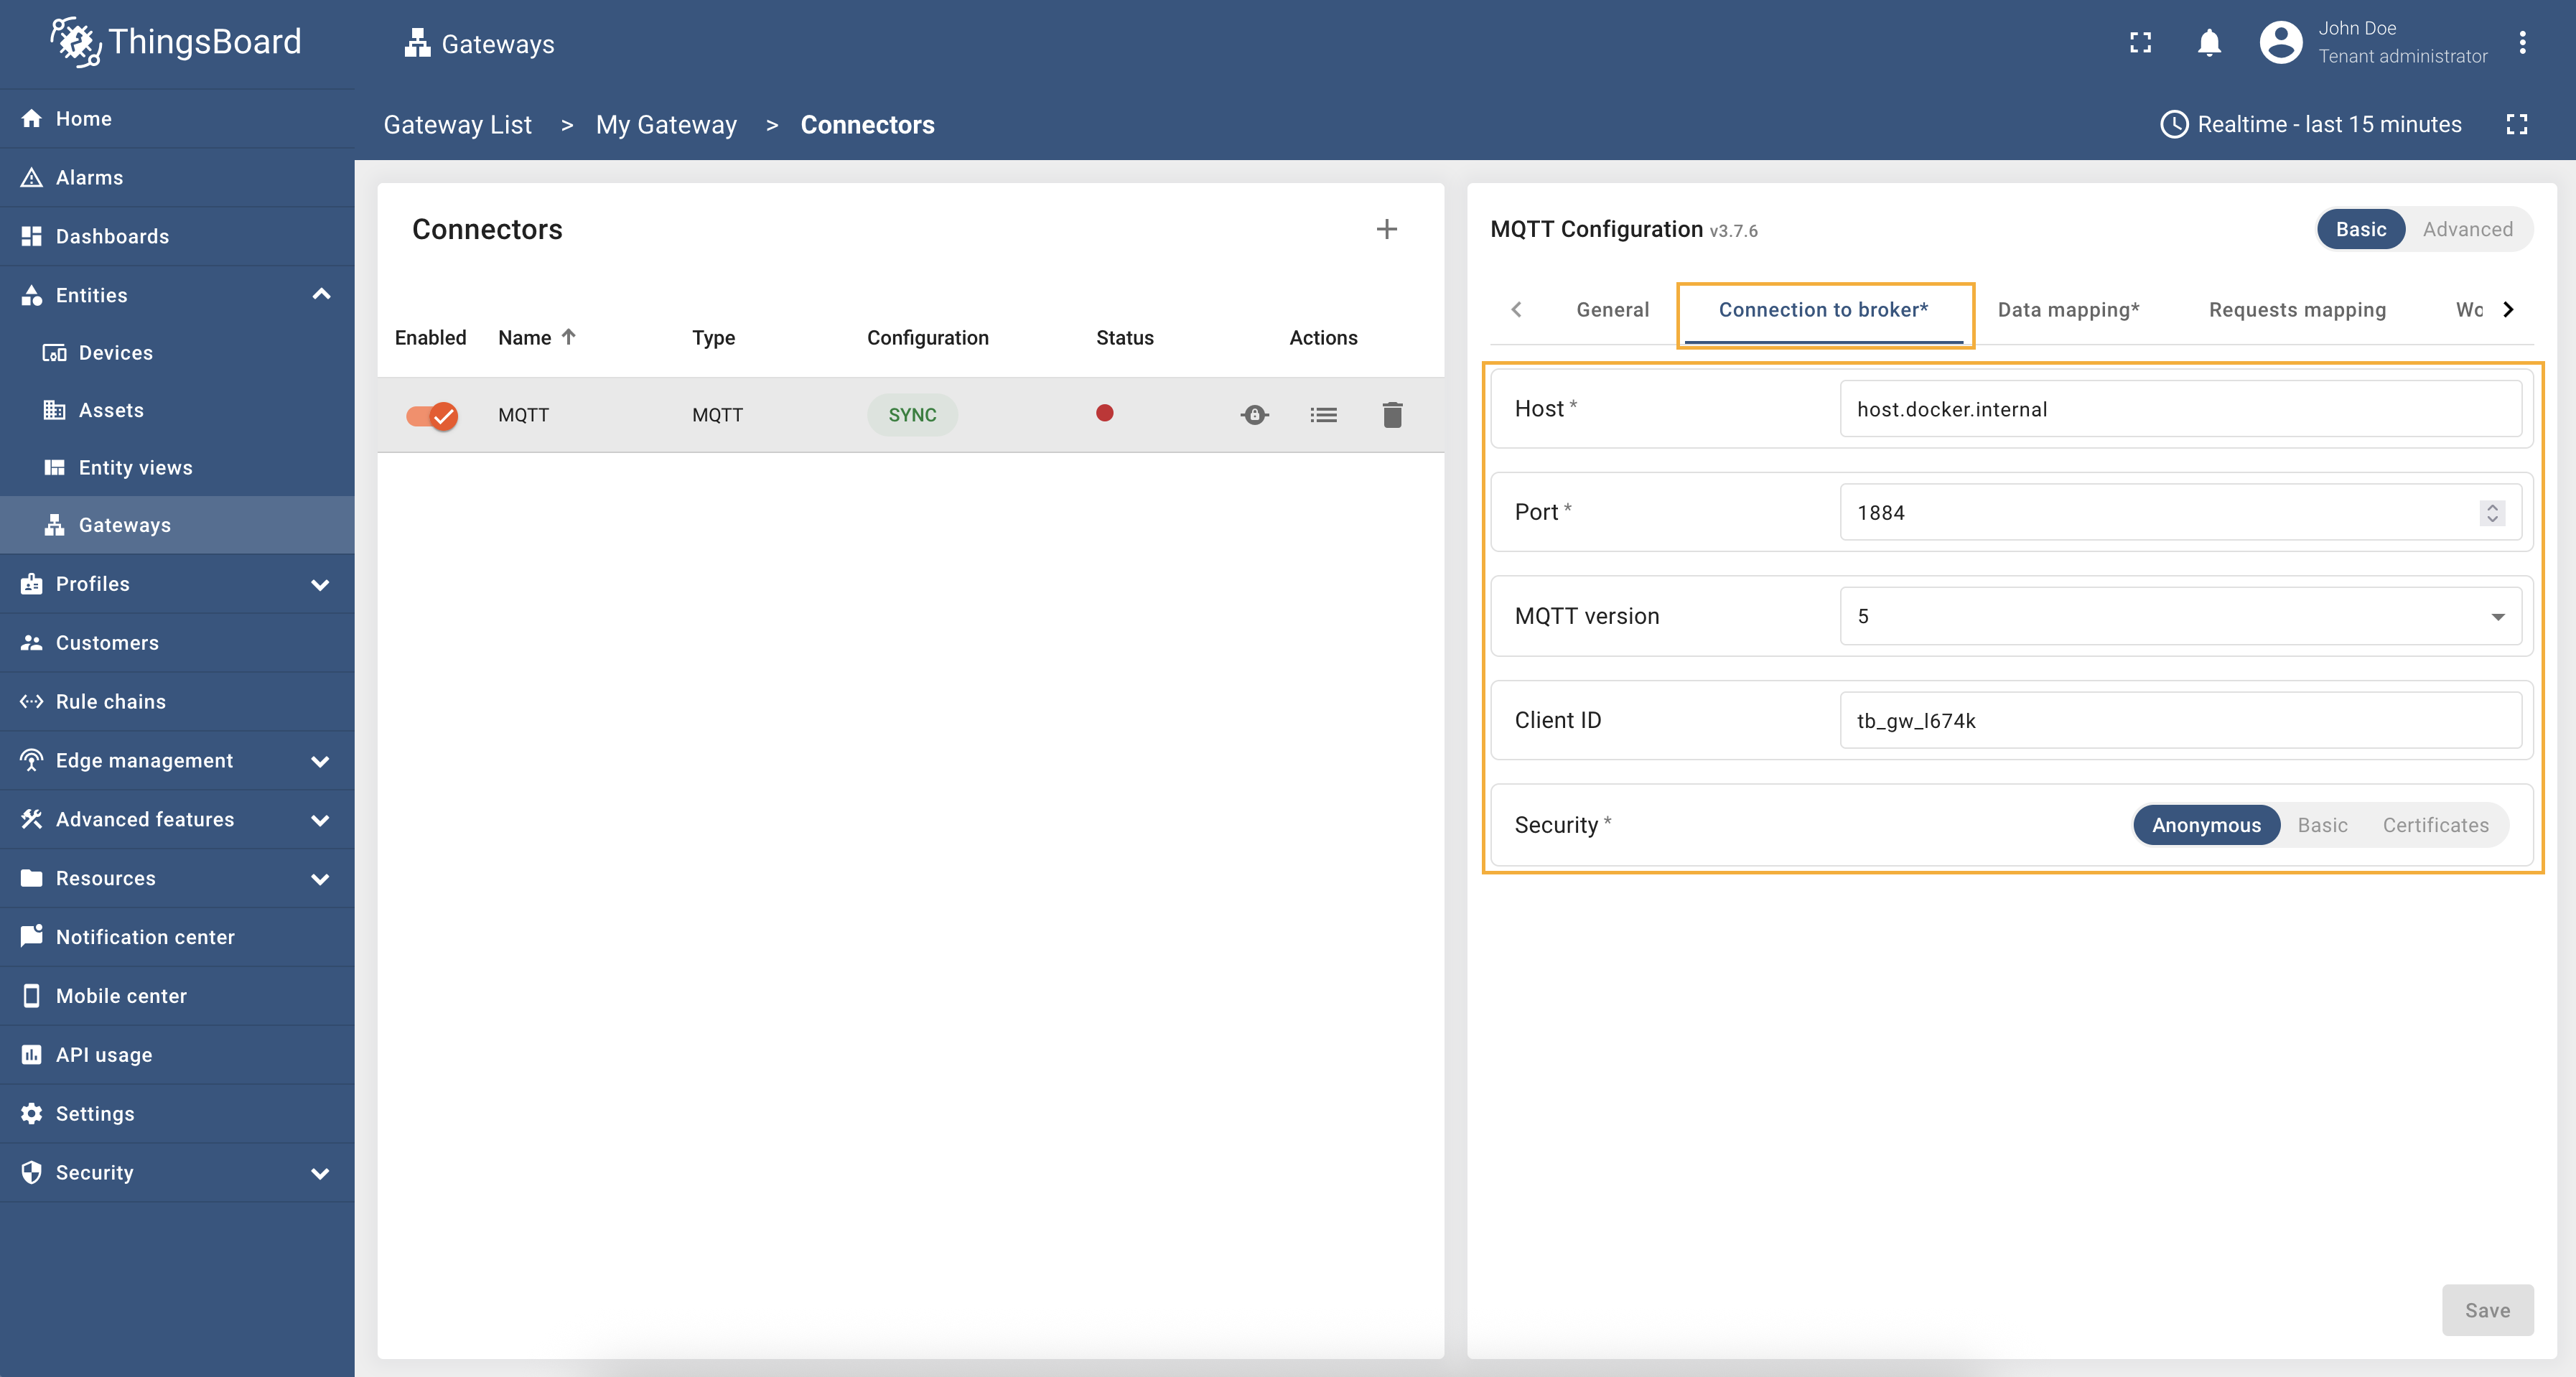 首先配置到演示 broker 的连接。从”Connection to broker“部分开始。该部分提供 host、port、MQTT version、client ID、security 等详细连接配置选项。
按以下步骤配置数据映射:
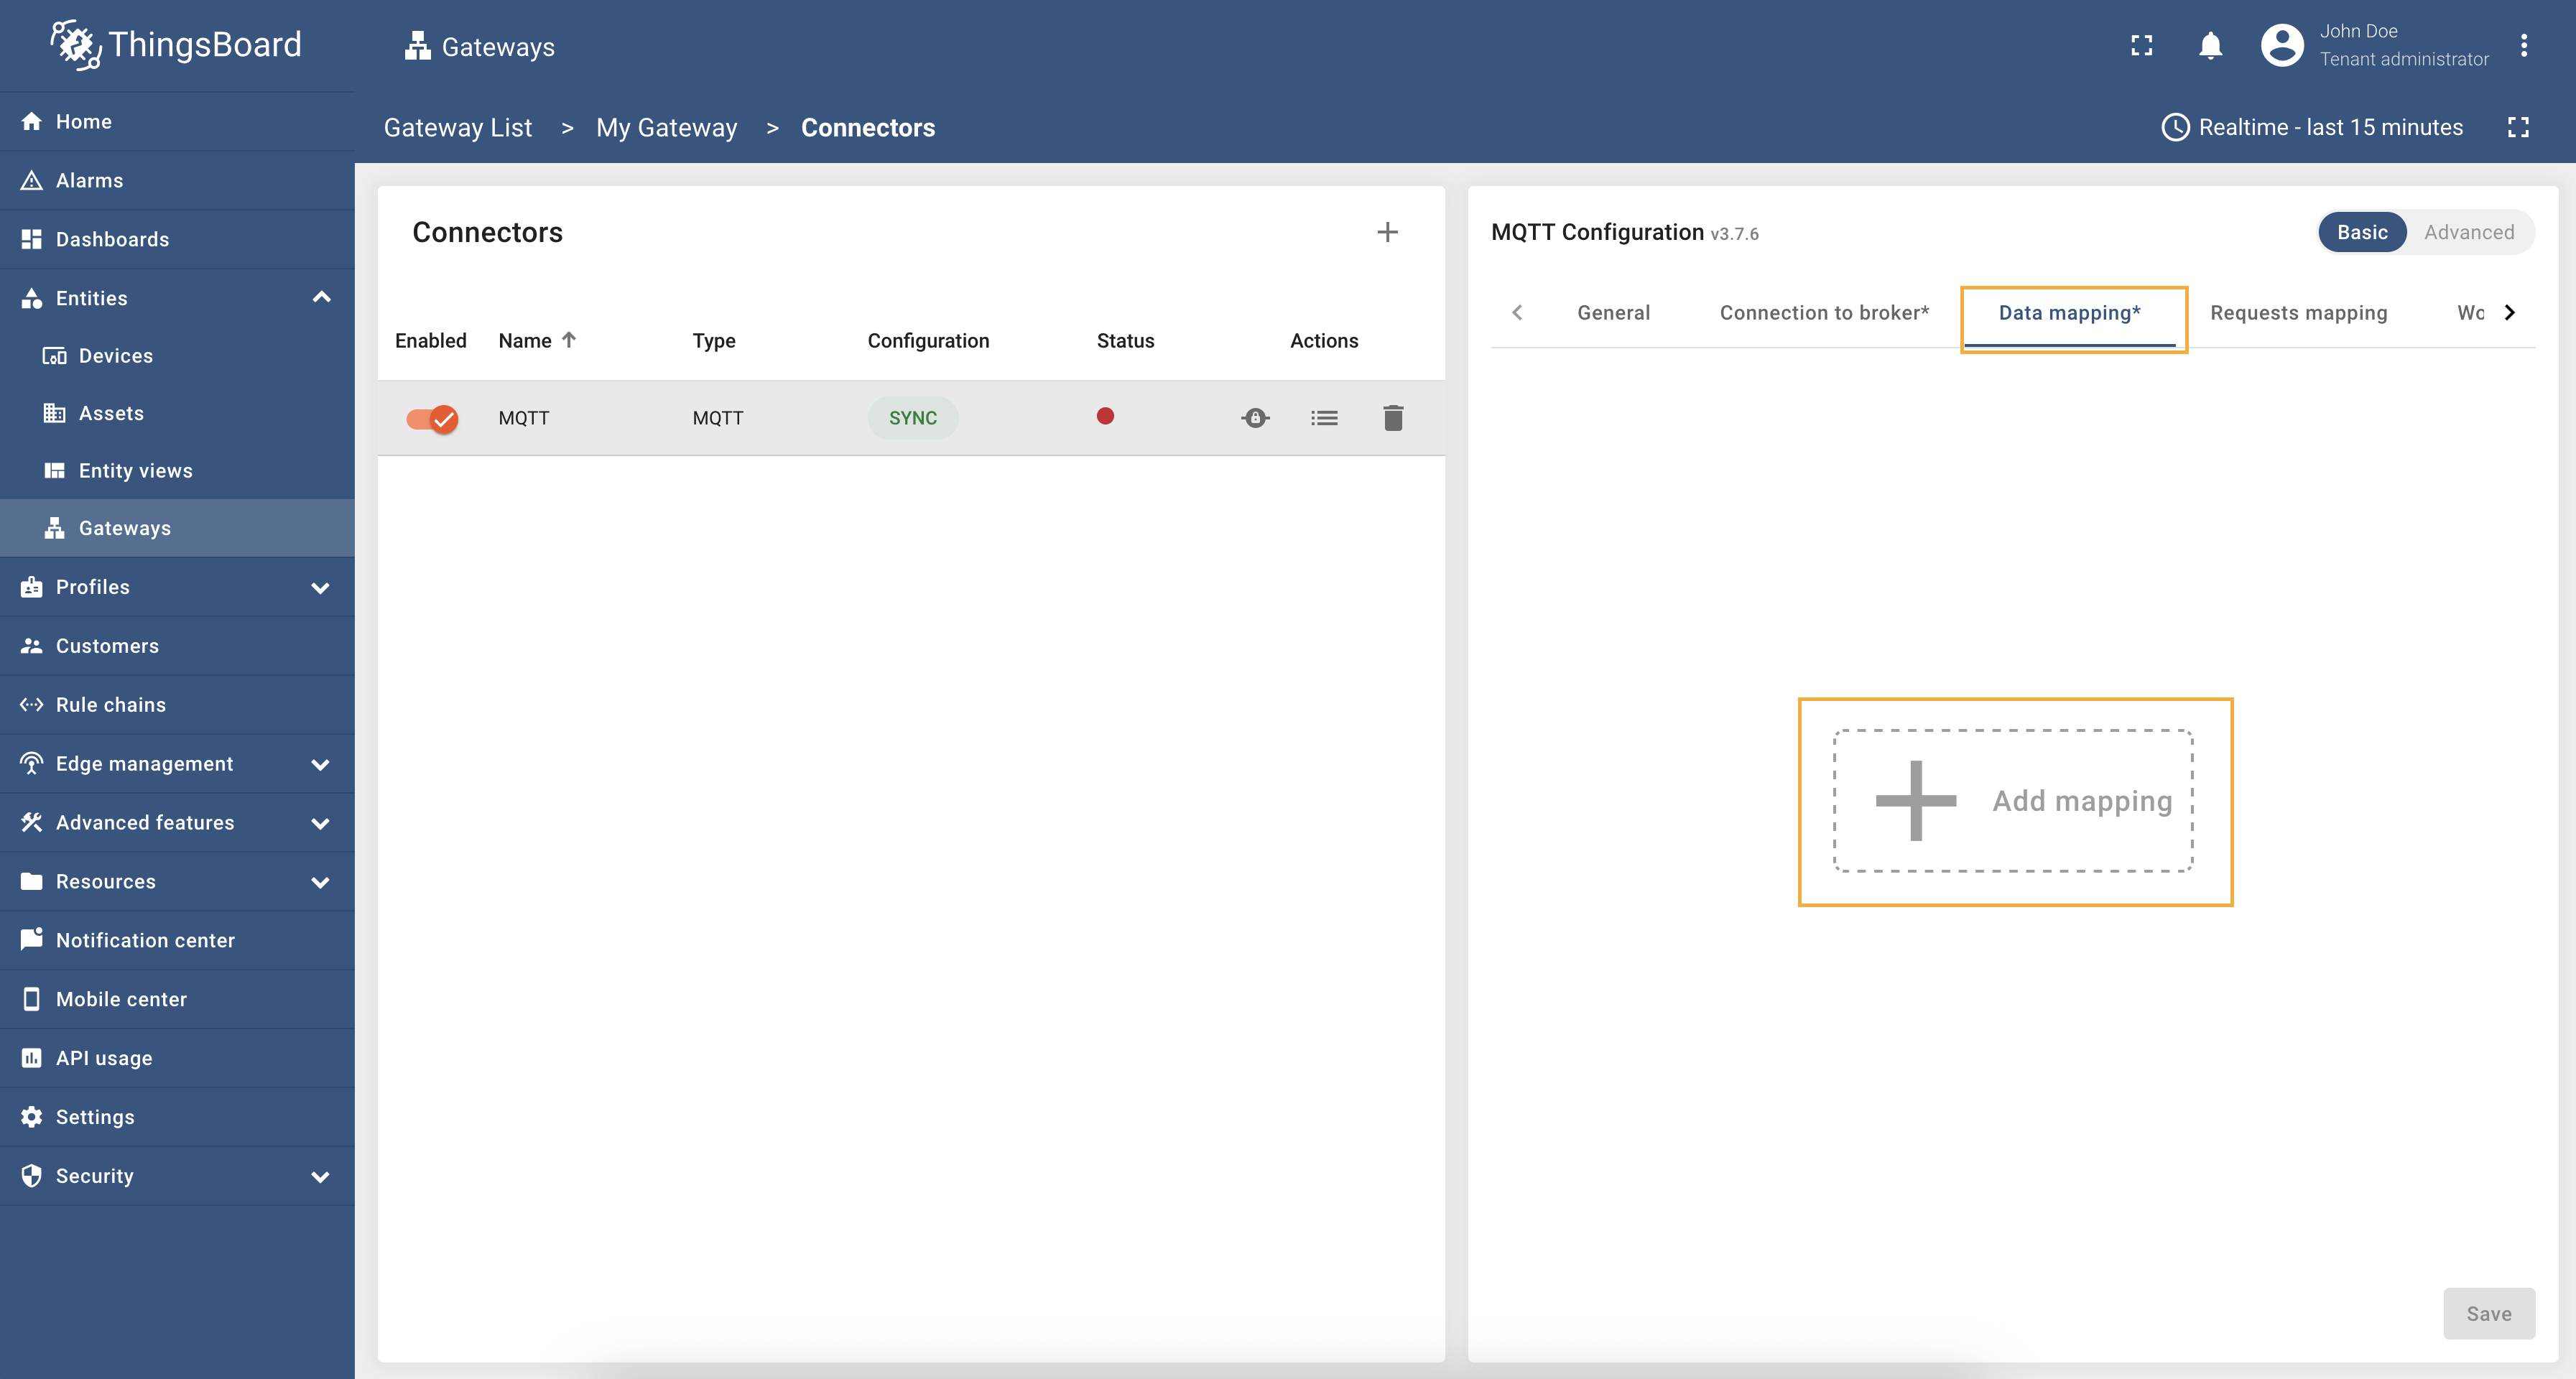 点击右侧面板的”Connectors configuration“按钮。 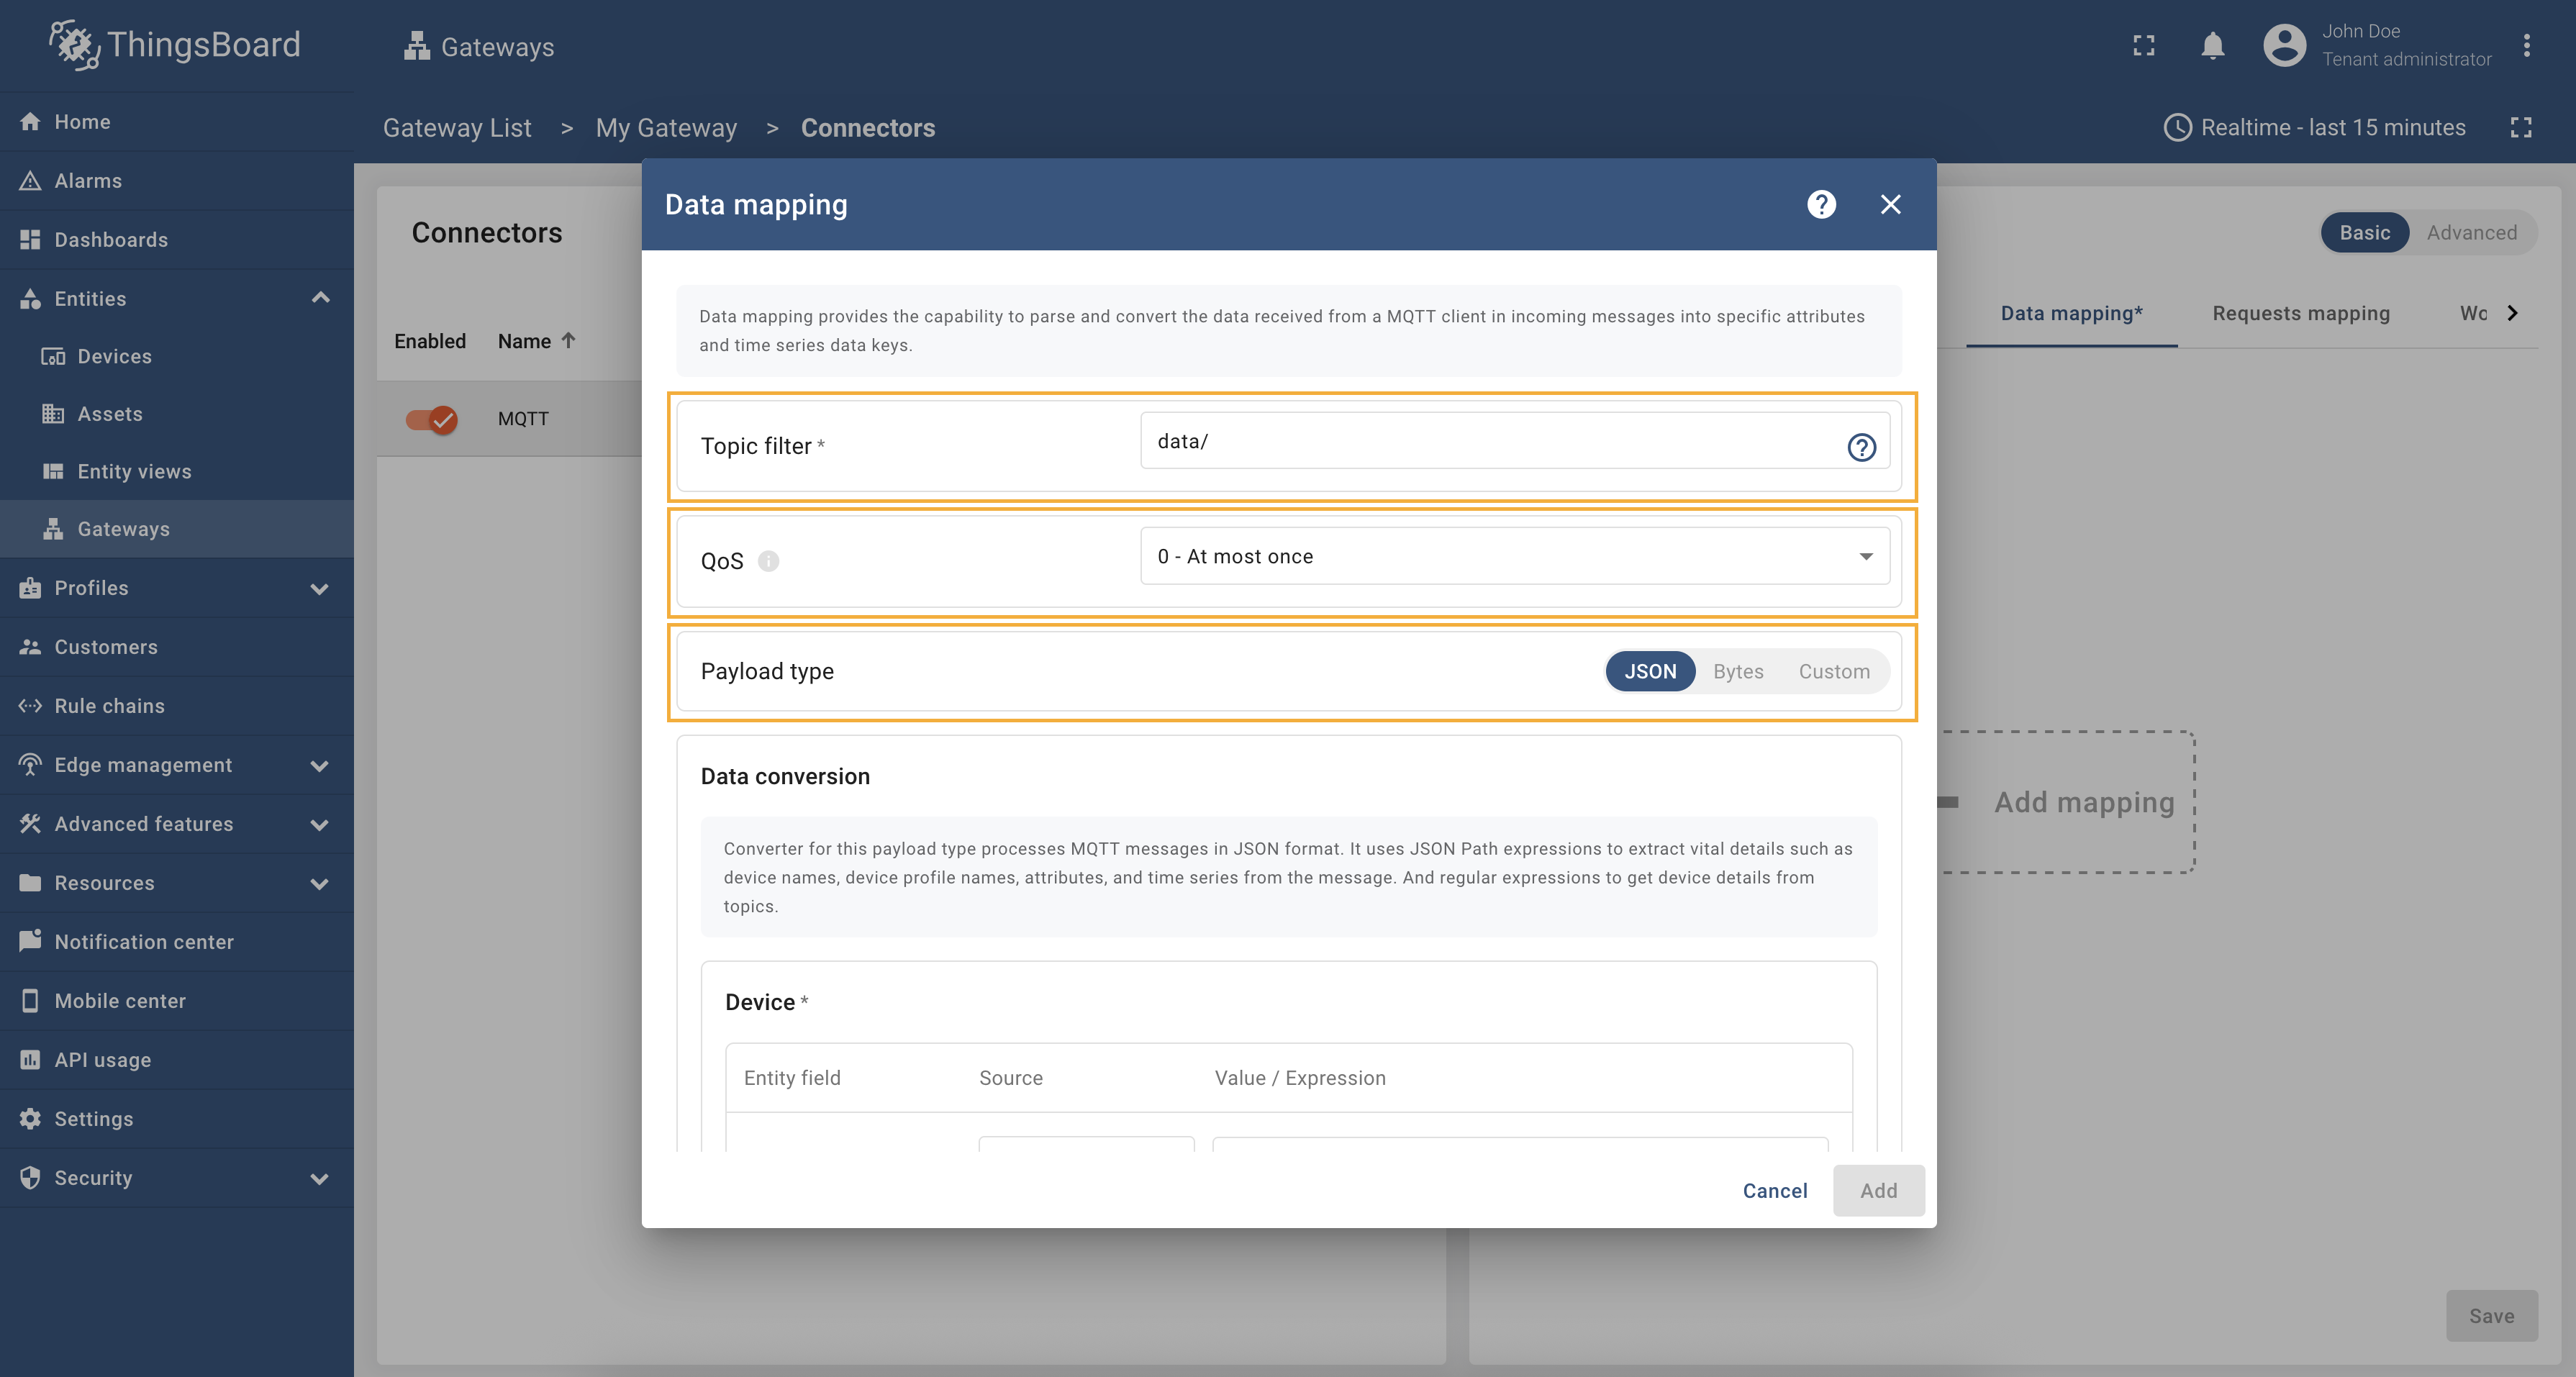 在打开窗口中,将”Topic filter“填为”data/“,将”QoS“选为”0 - At most once“,将”Payload type“选为 JSON。
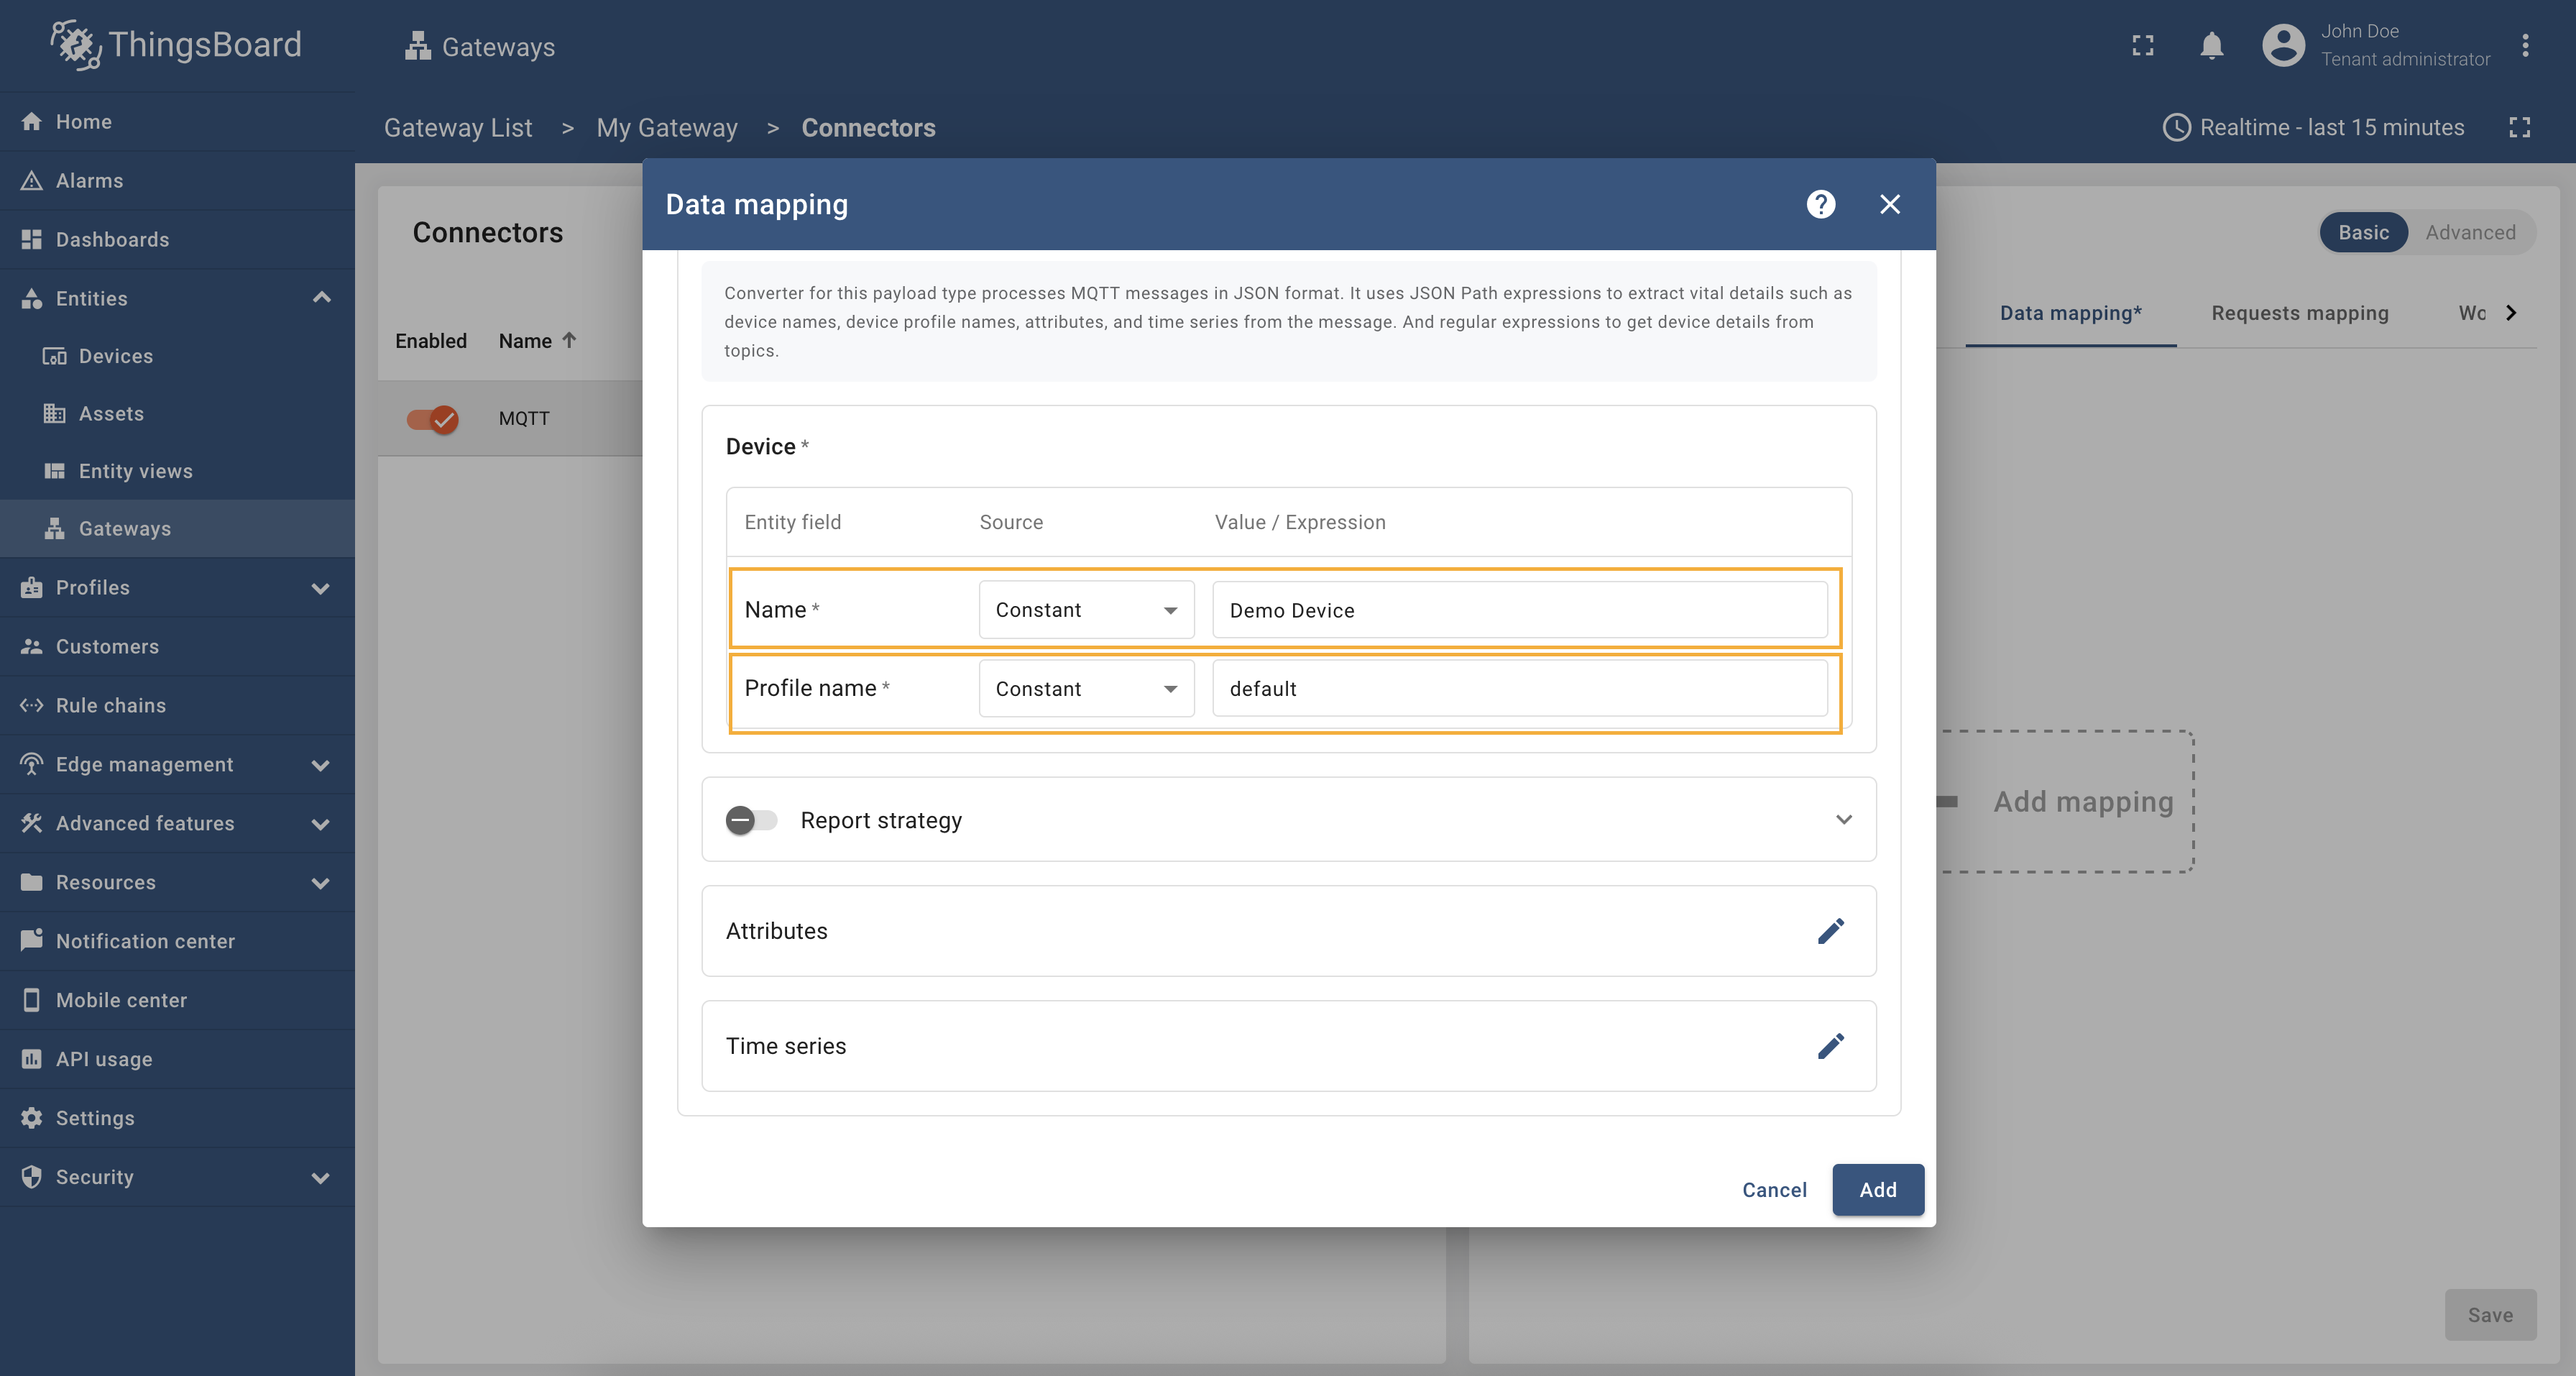 滚动到”Data conversion“部分。对于”Device“子节:在 Name 行选择”Constant“并填写”Device Demo“;在”Profile name“行选择”Constant“并填写”default“。
 点击”Attributes“子节旁的铅笔图标; 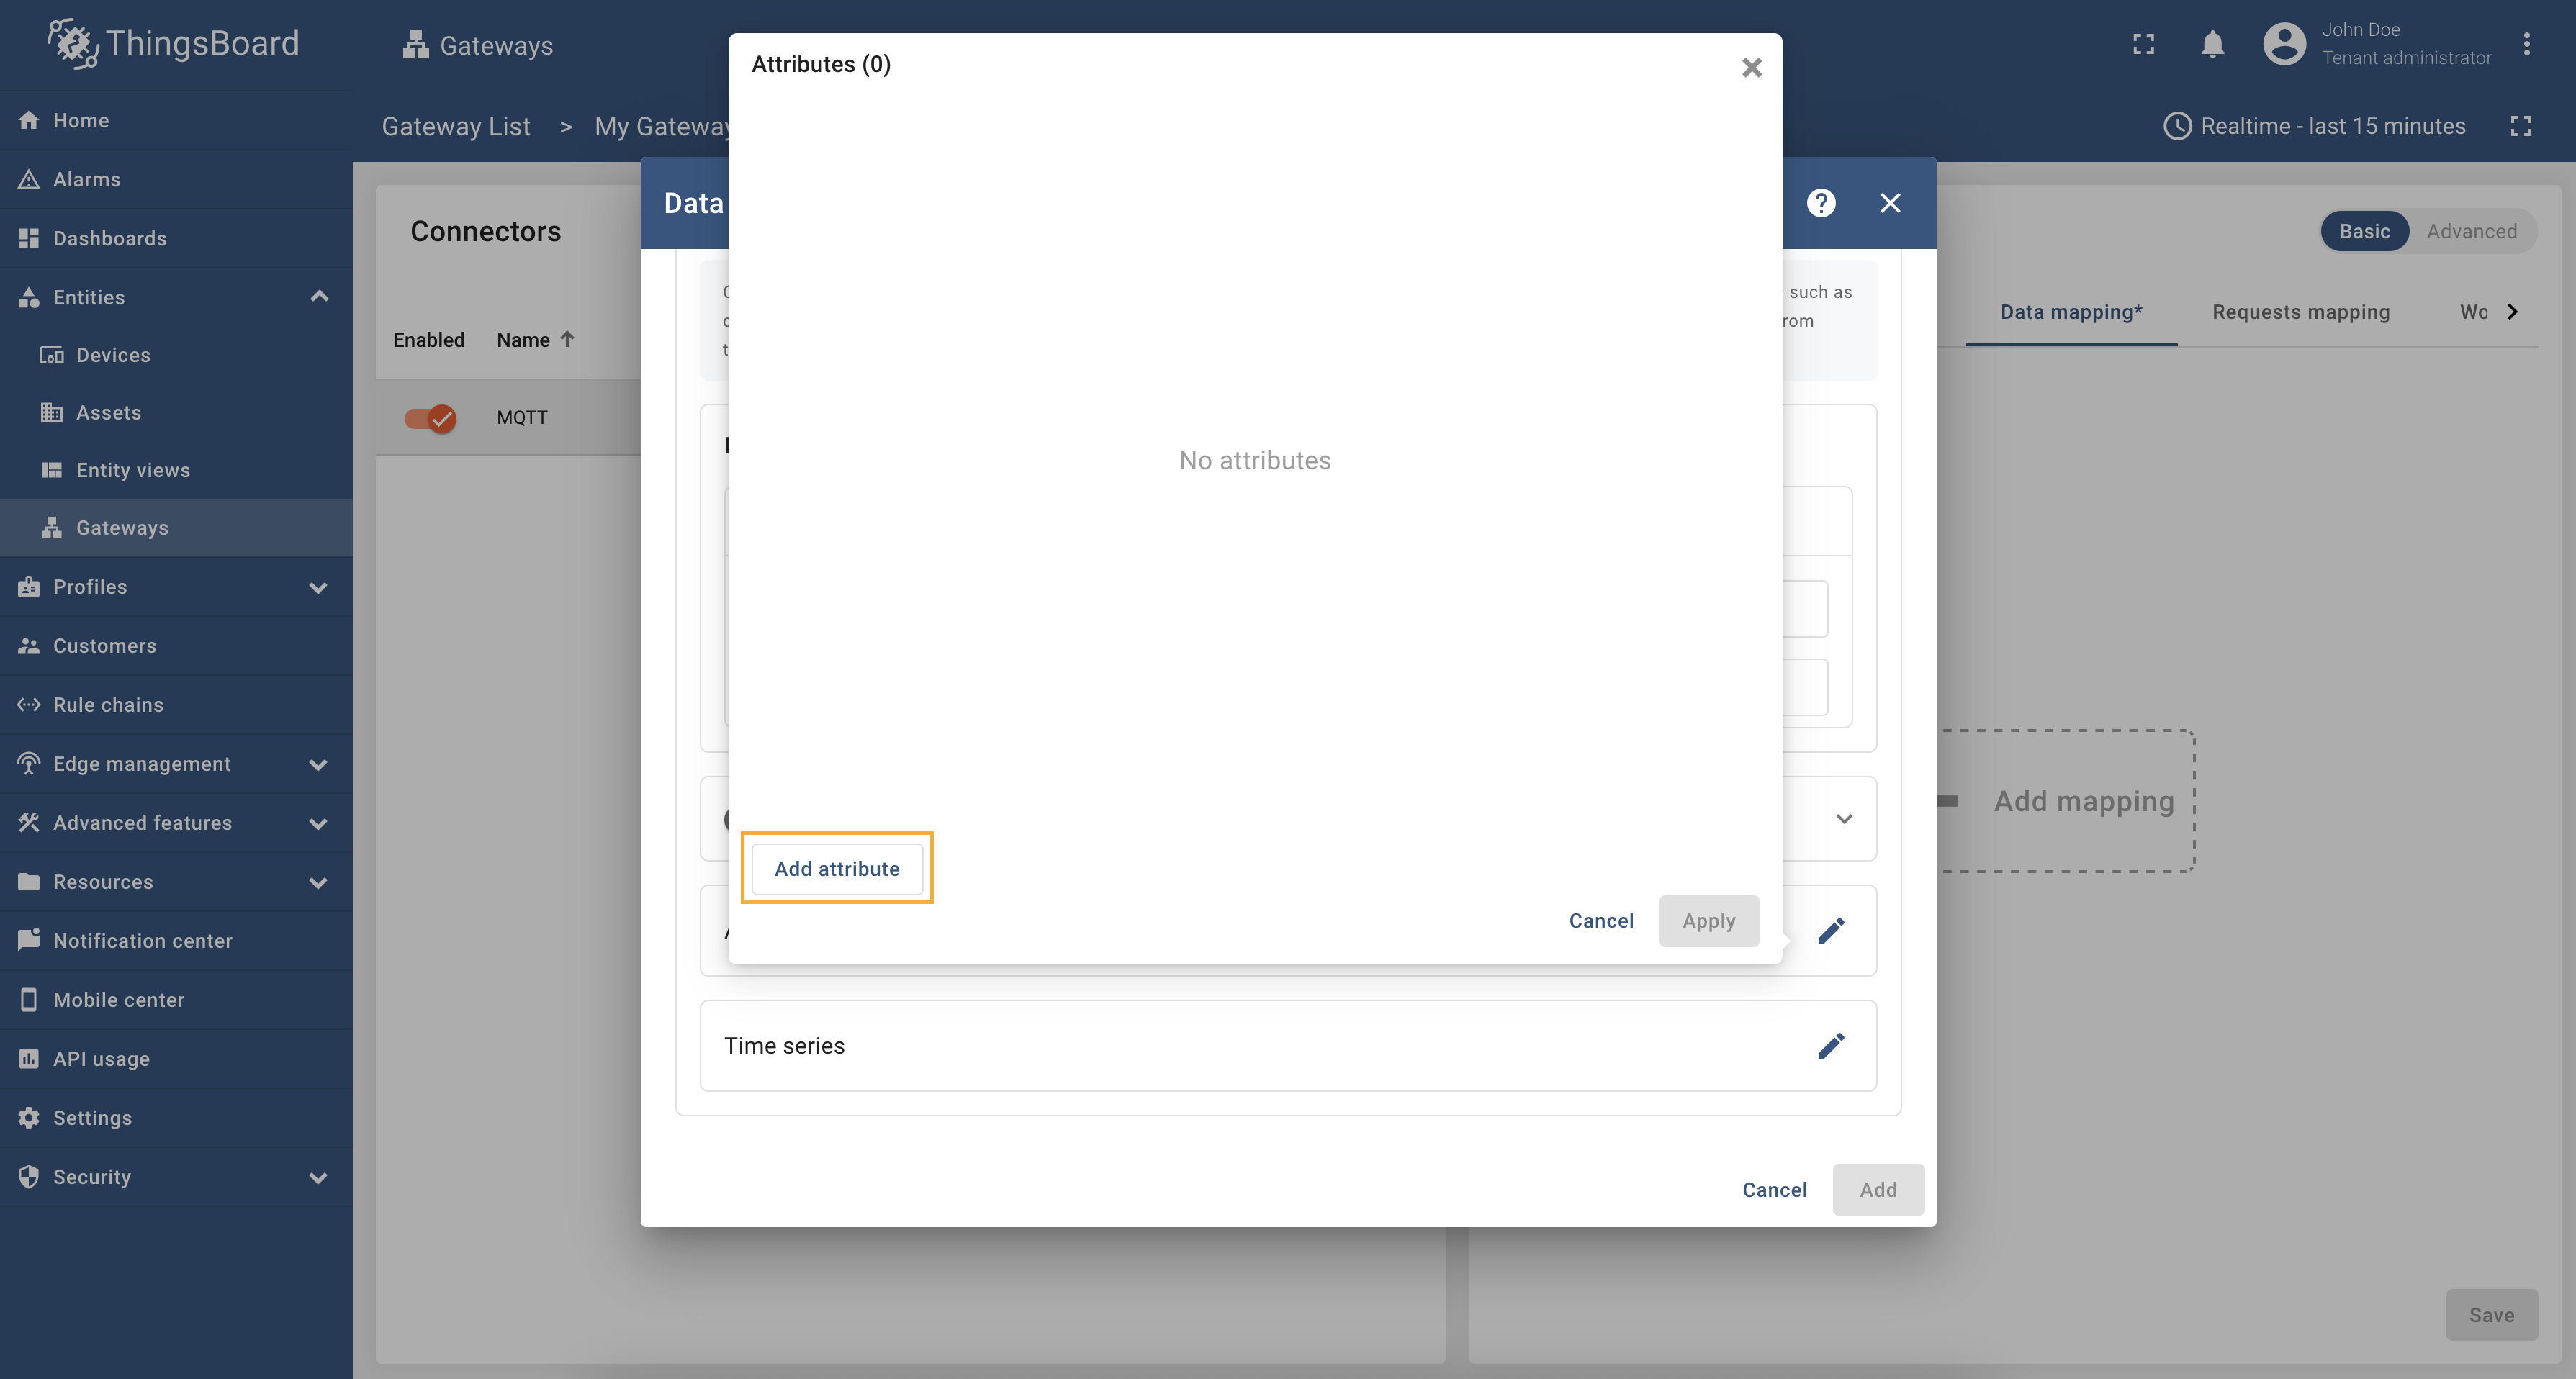 点击”Add attribute“; 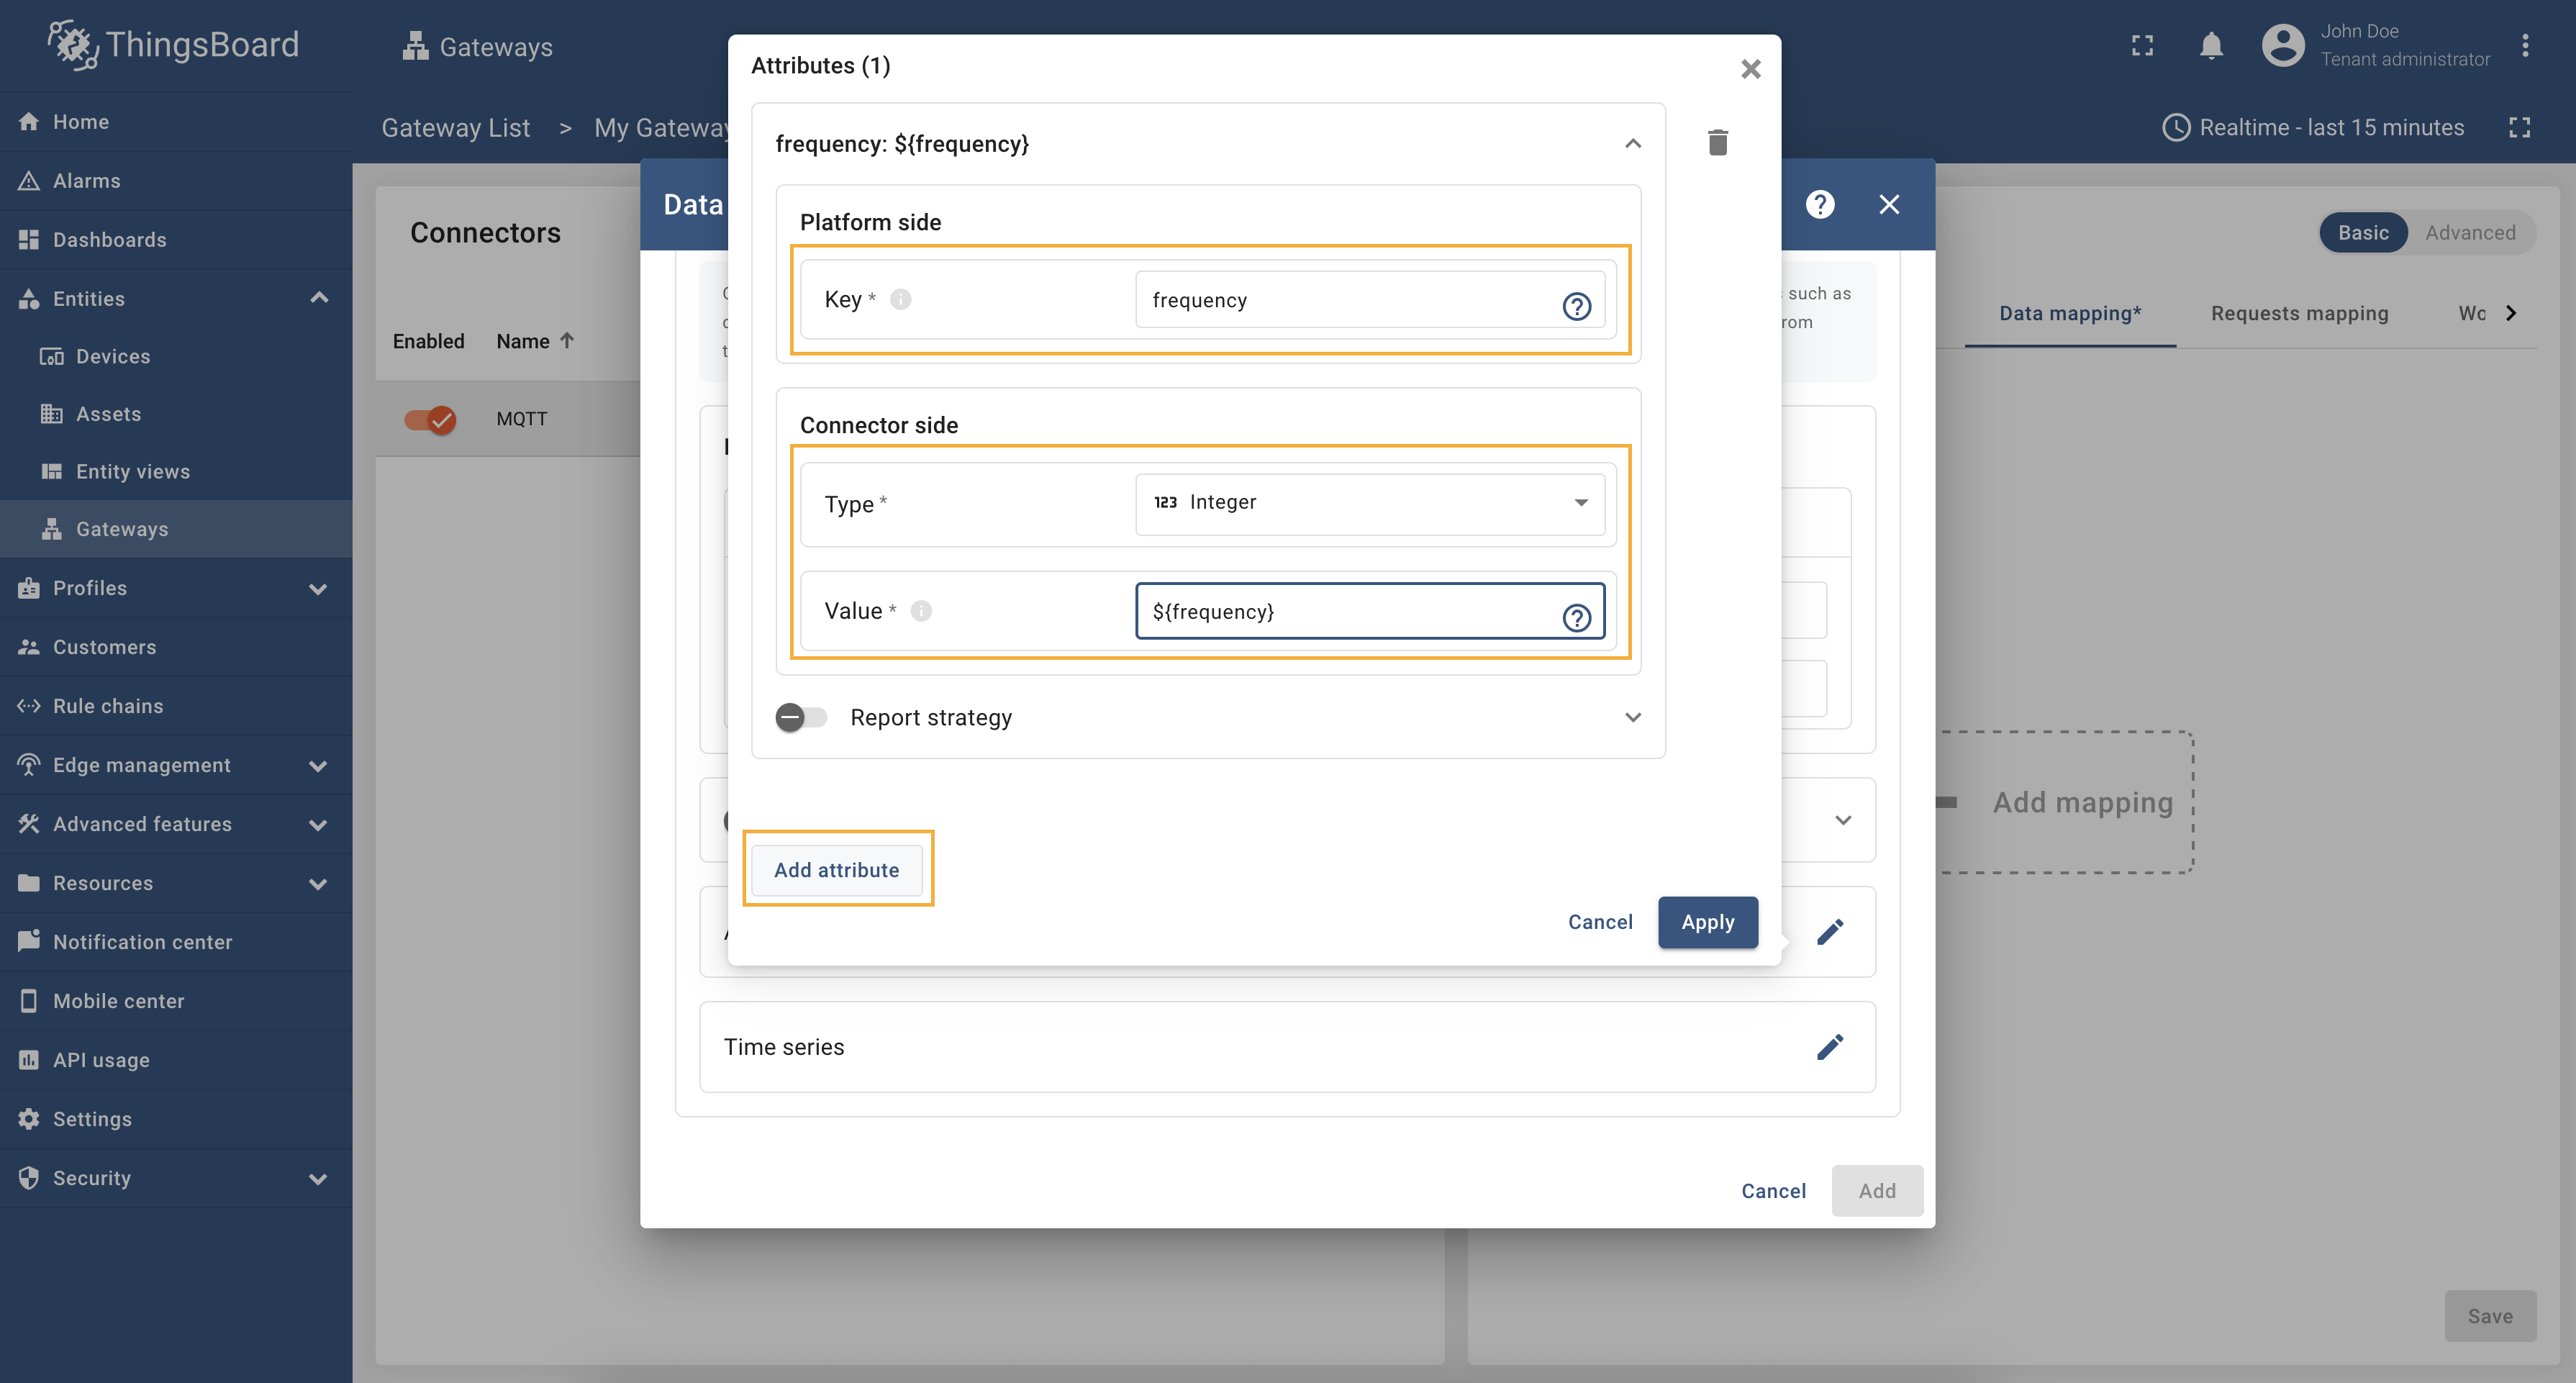 在”Key“中填写”frequency“,在”Type“中选择”Integer“,在”Value“中填写”${frequency}“。再次点击”Add attribute“; 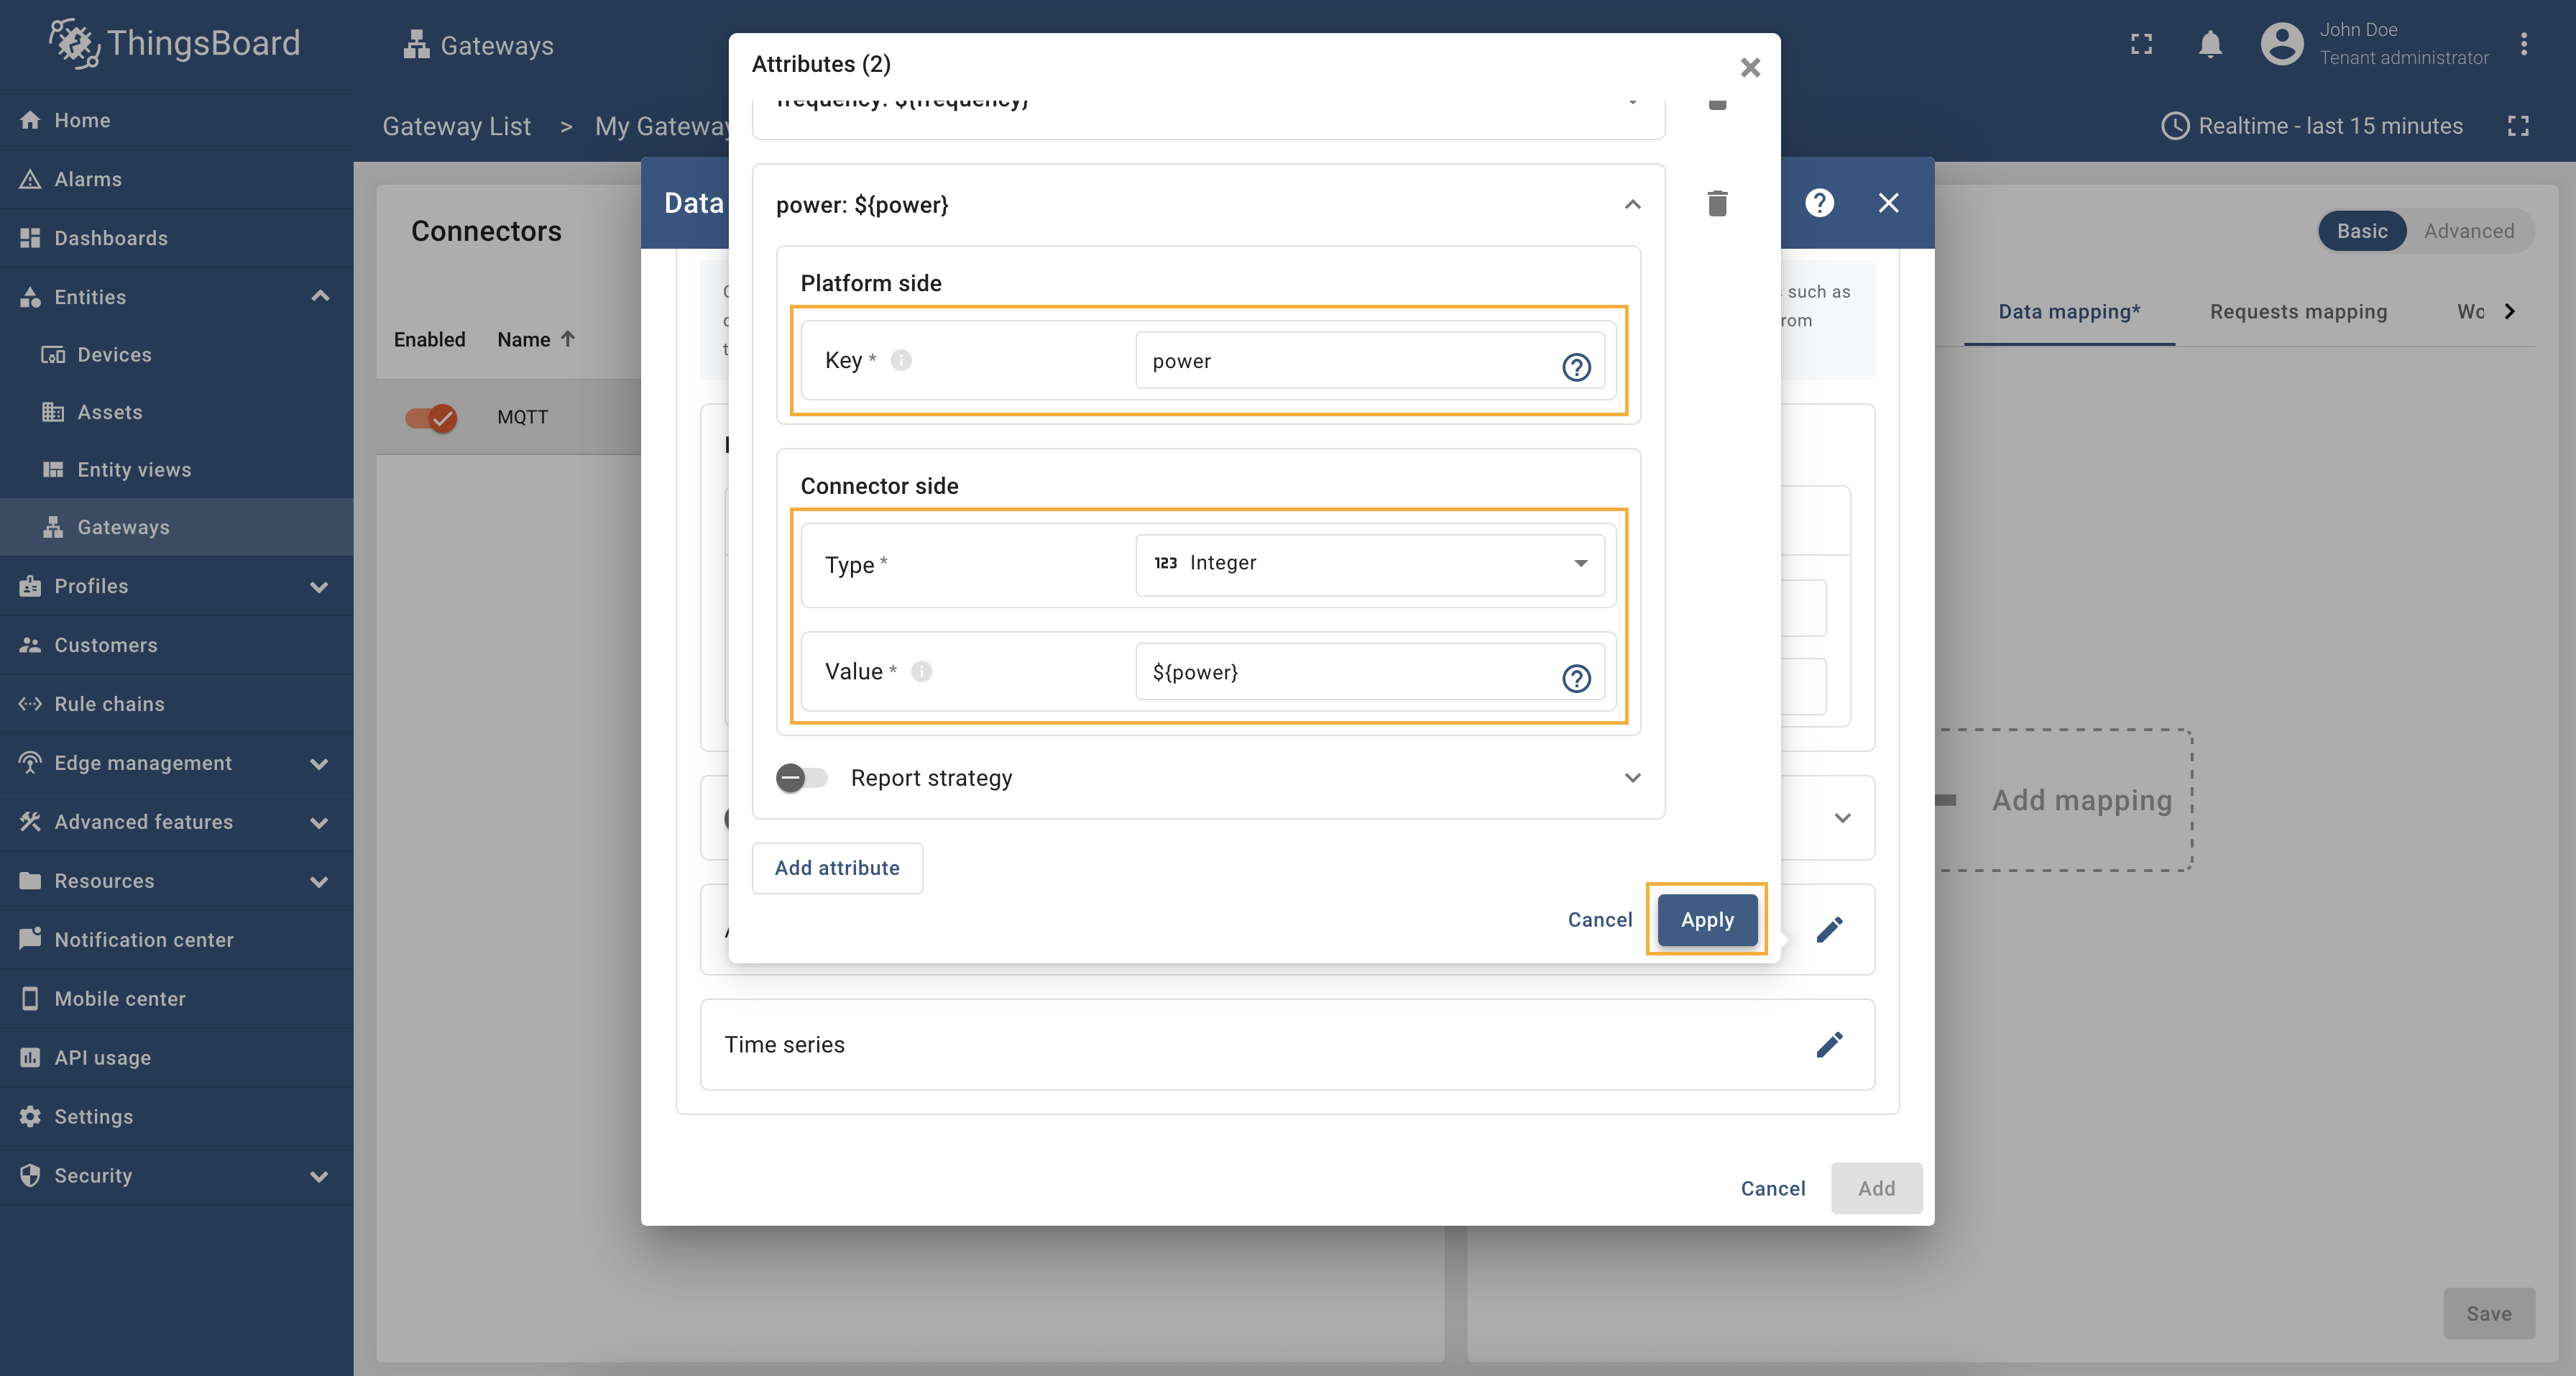 在”Key“中填写”power“,在”Type“中选择”Integer“,在”Value“中填写”${power}“。点击”Apply“。
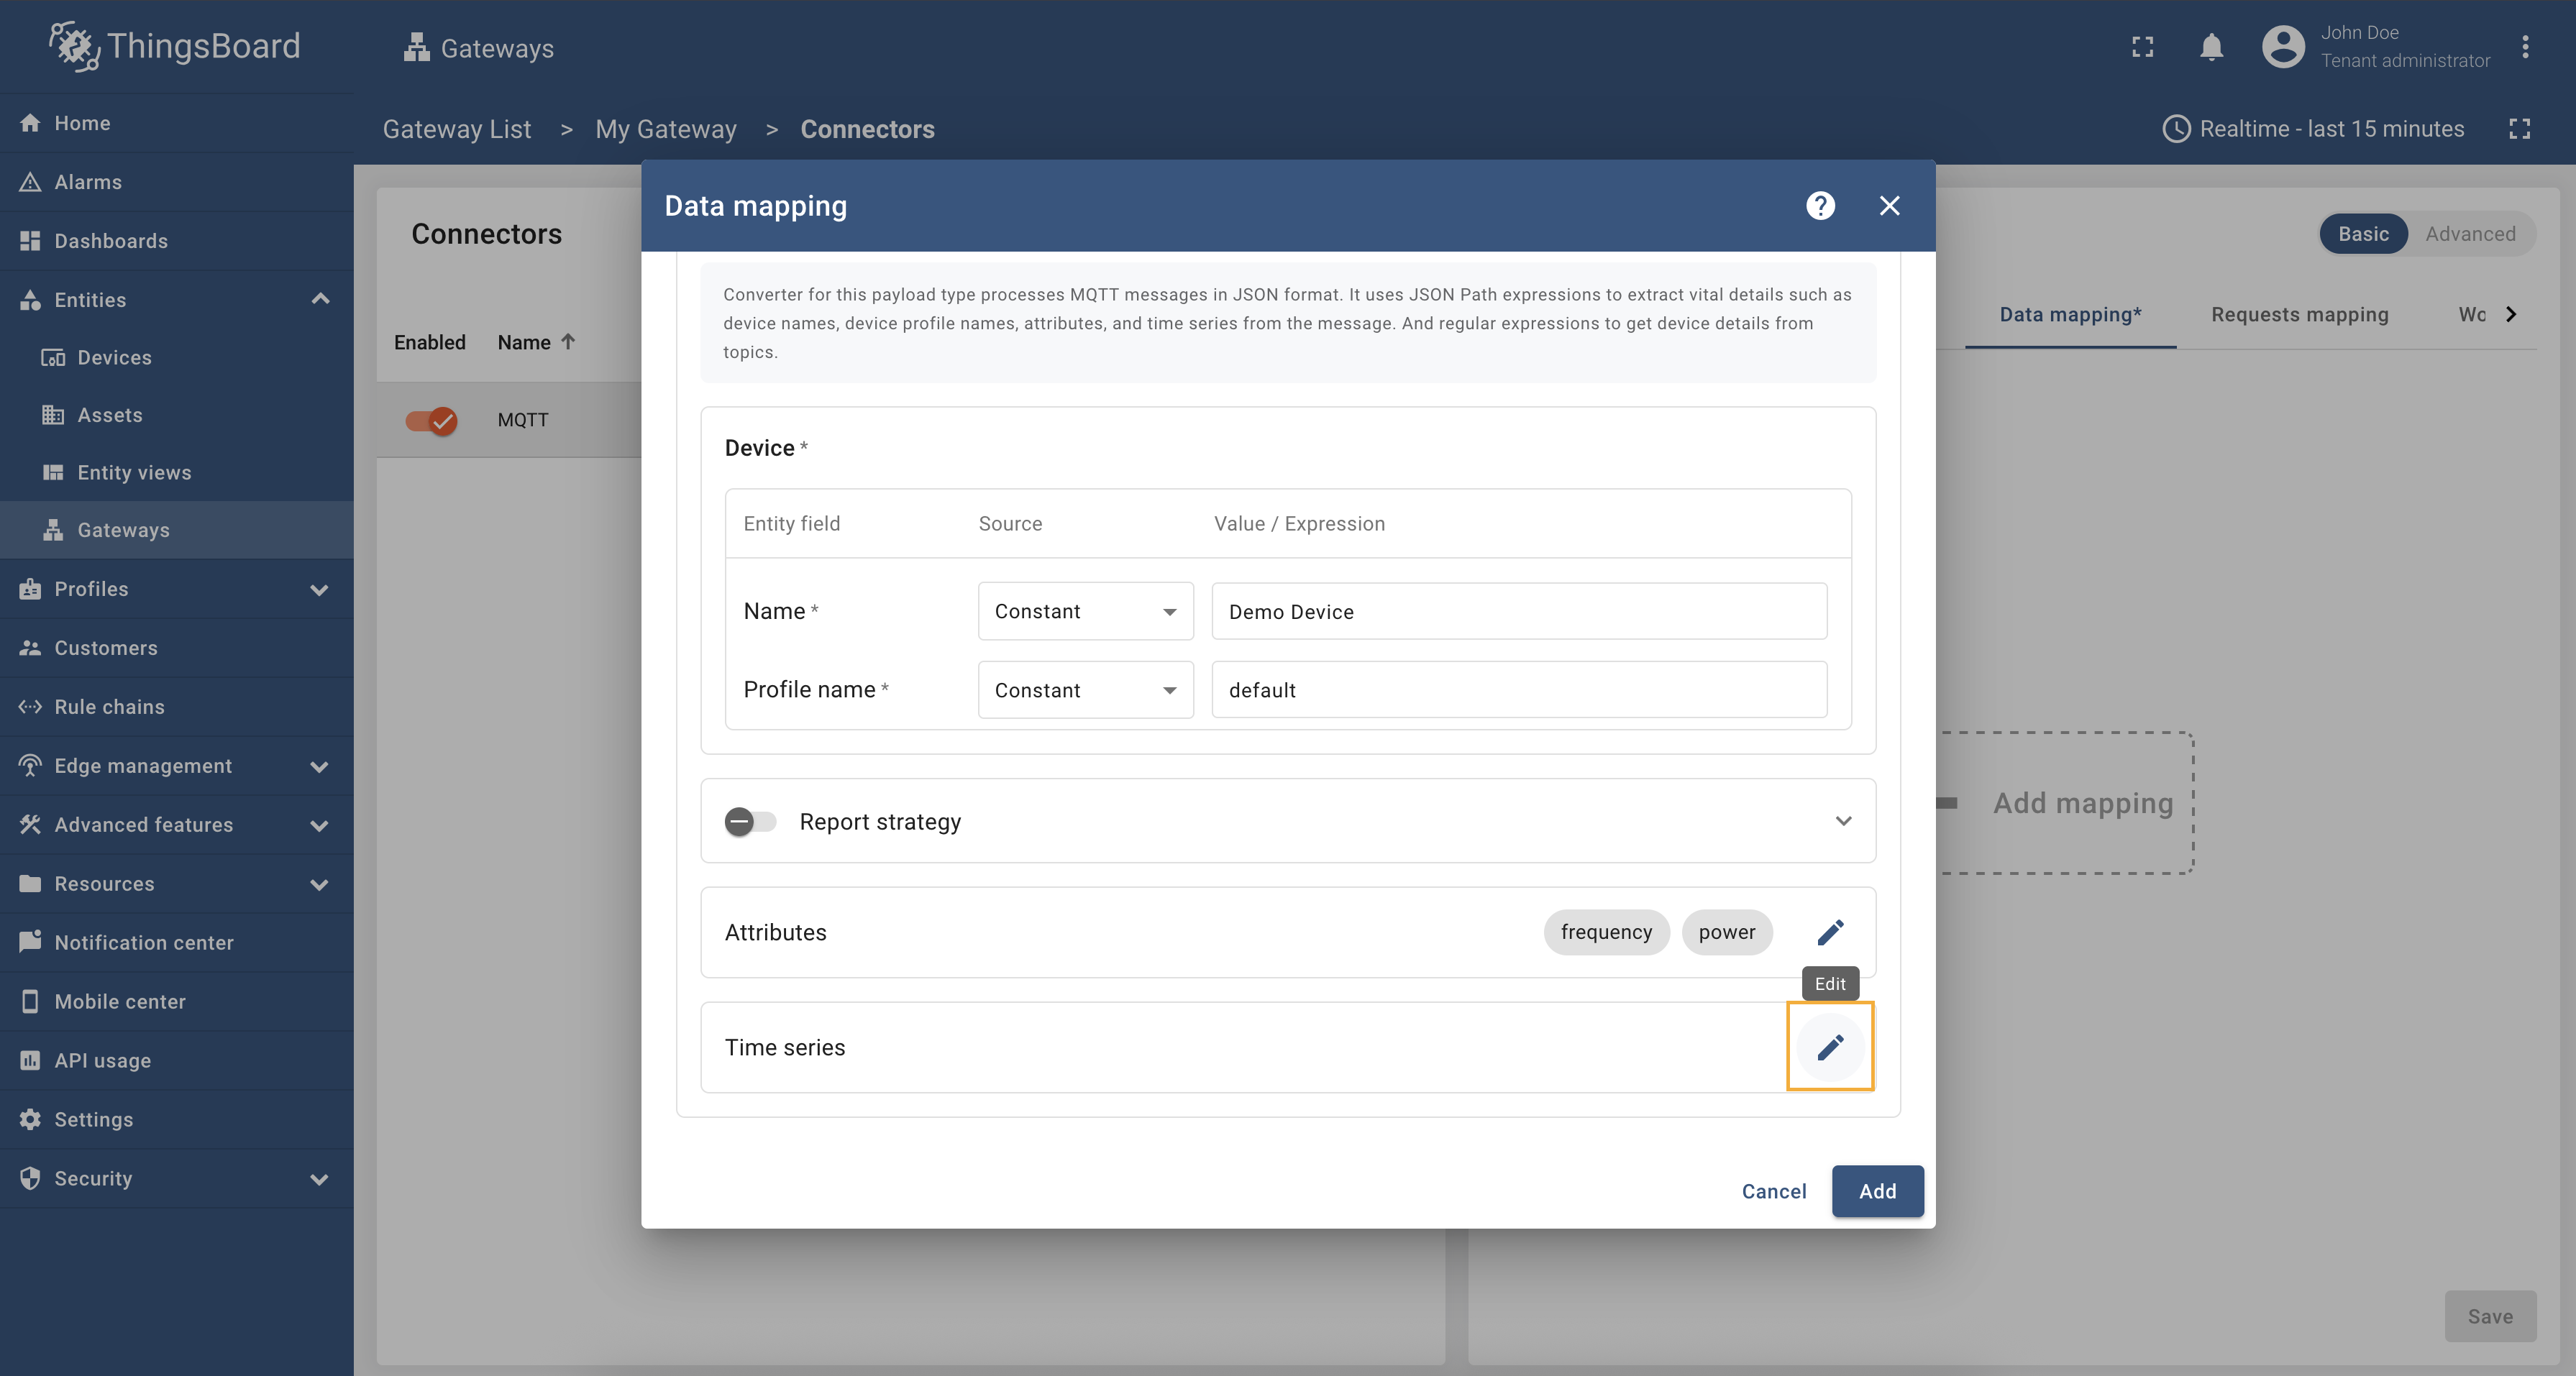 点击”Time series“子节旁的铅笔图标; 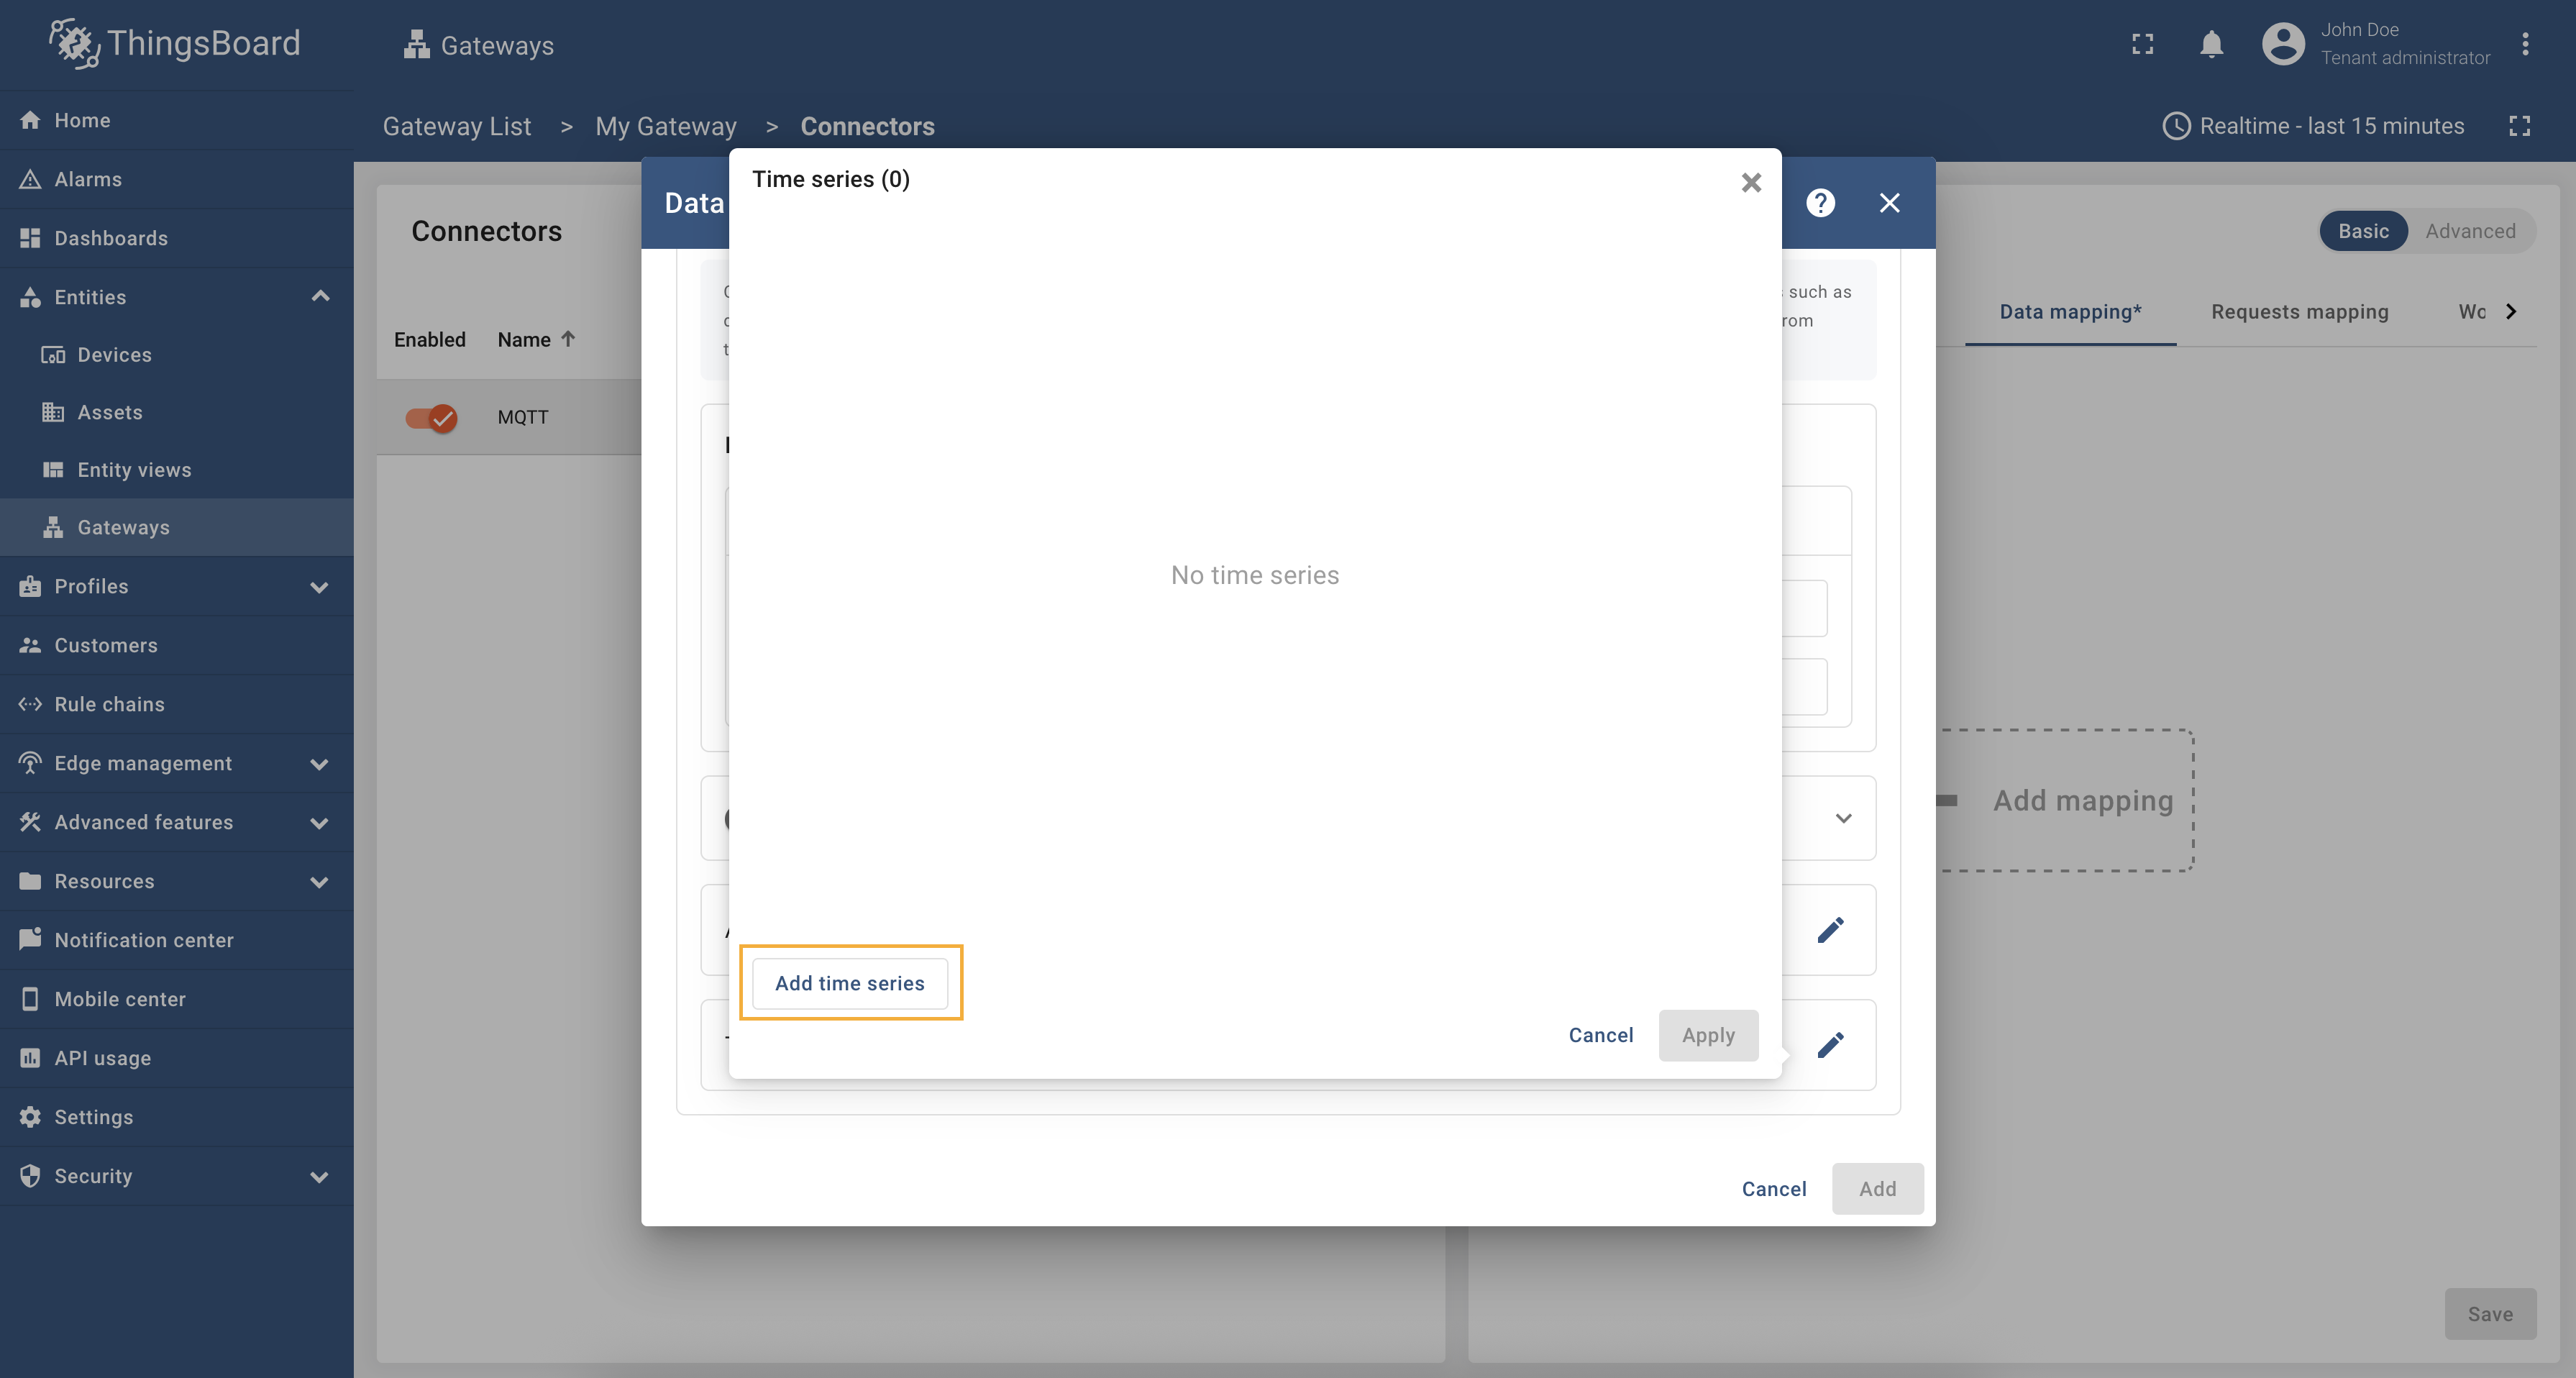 点击”Add time series“; 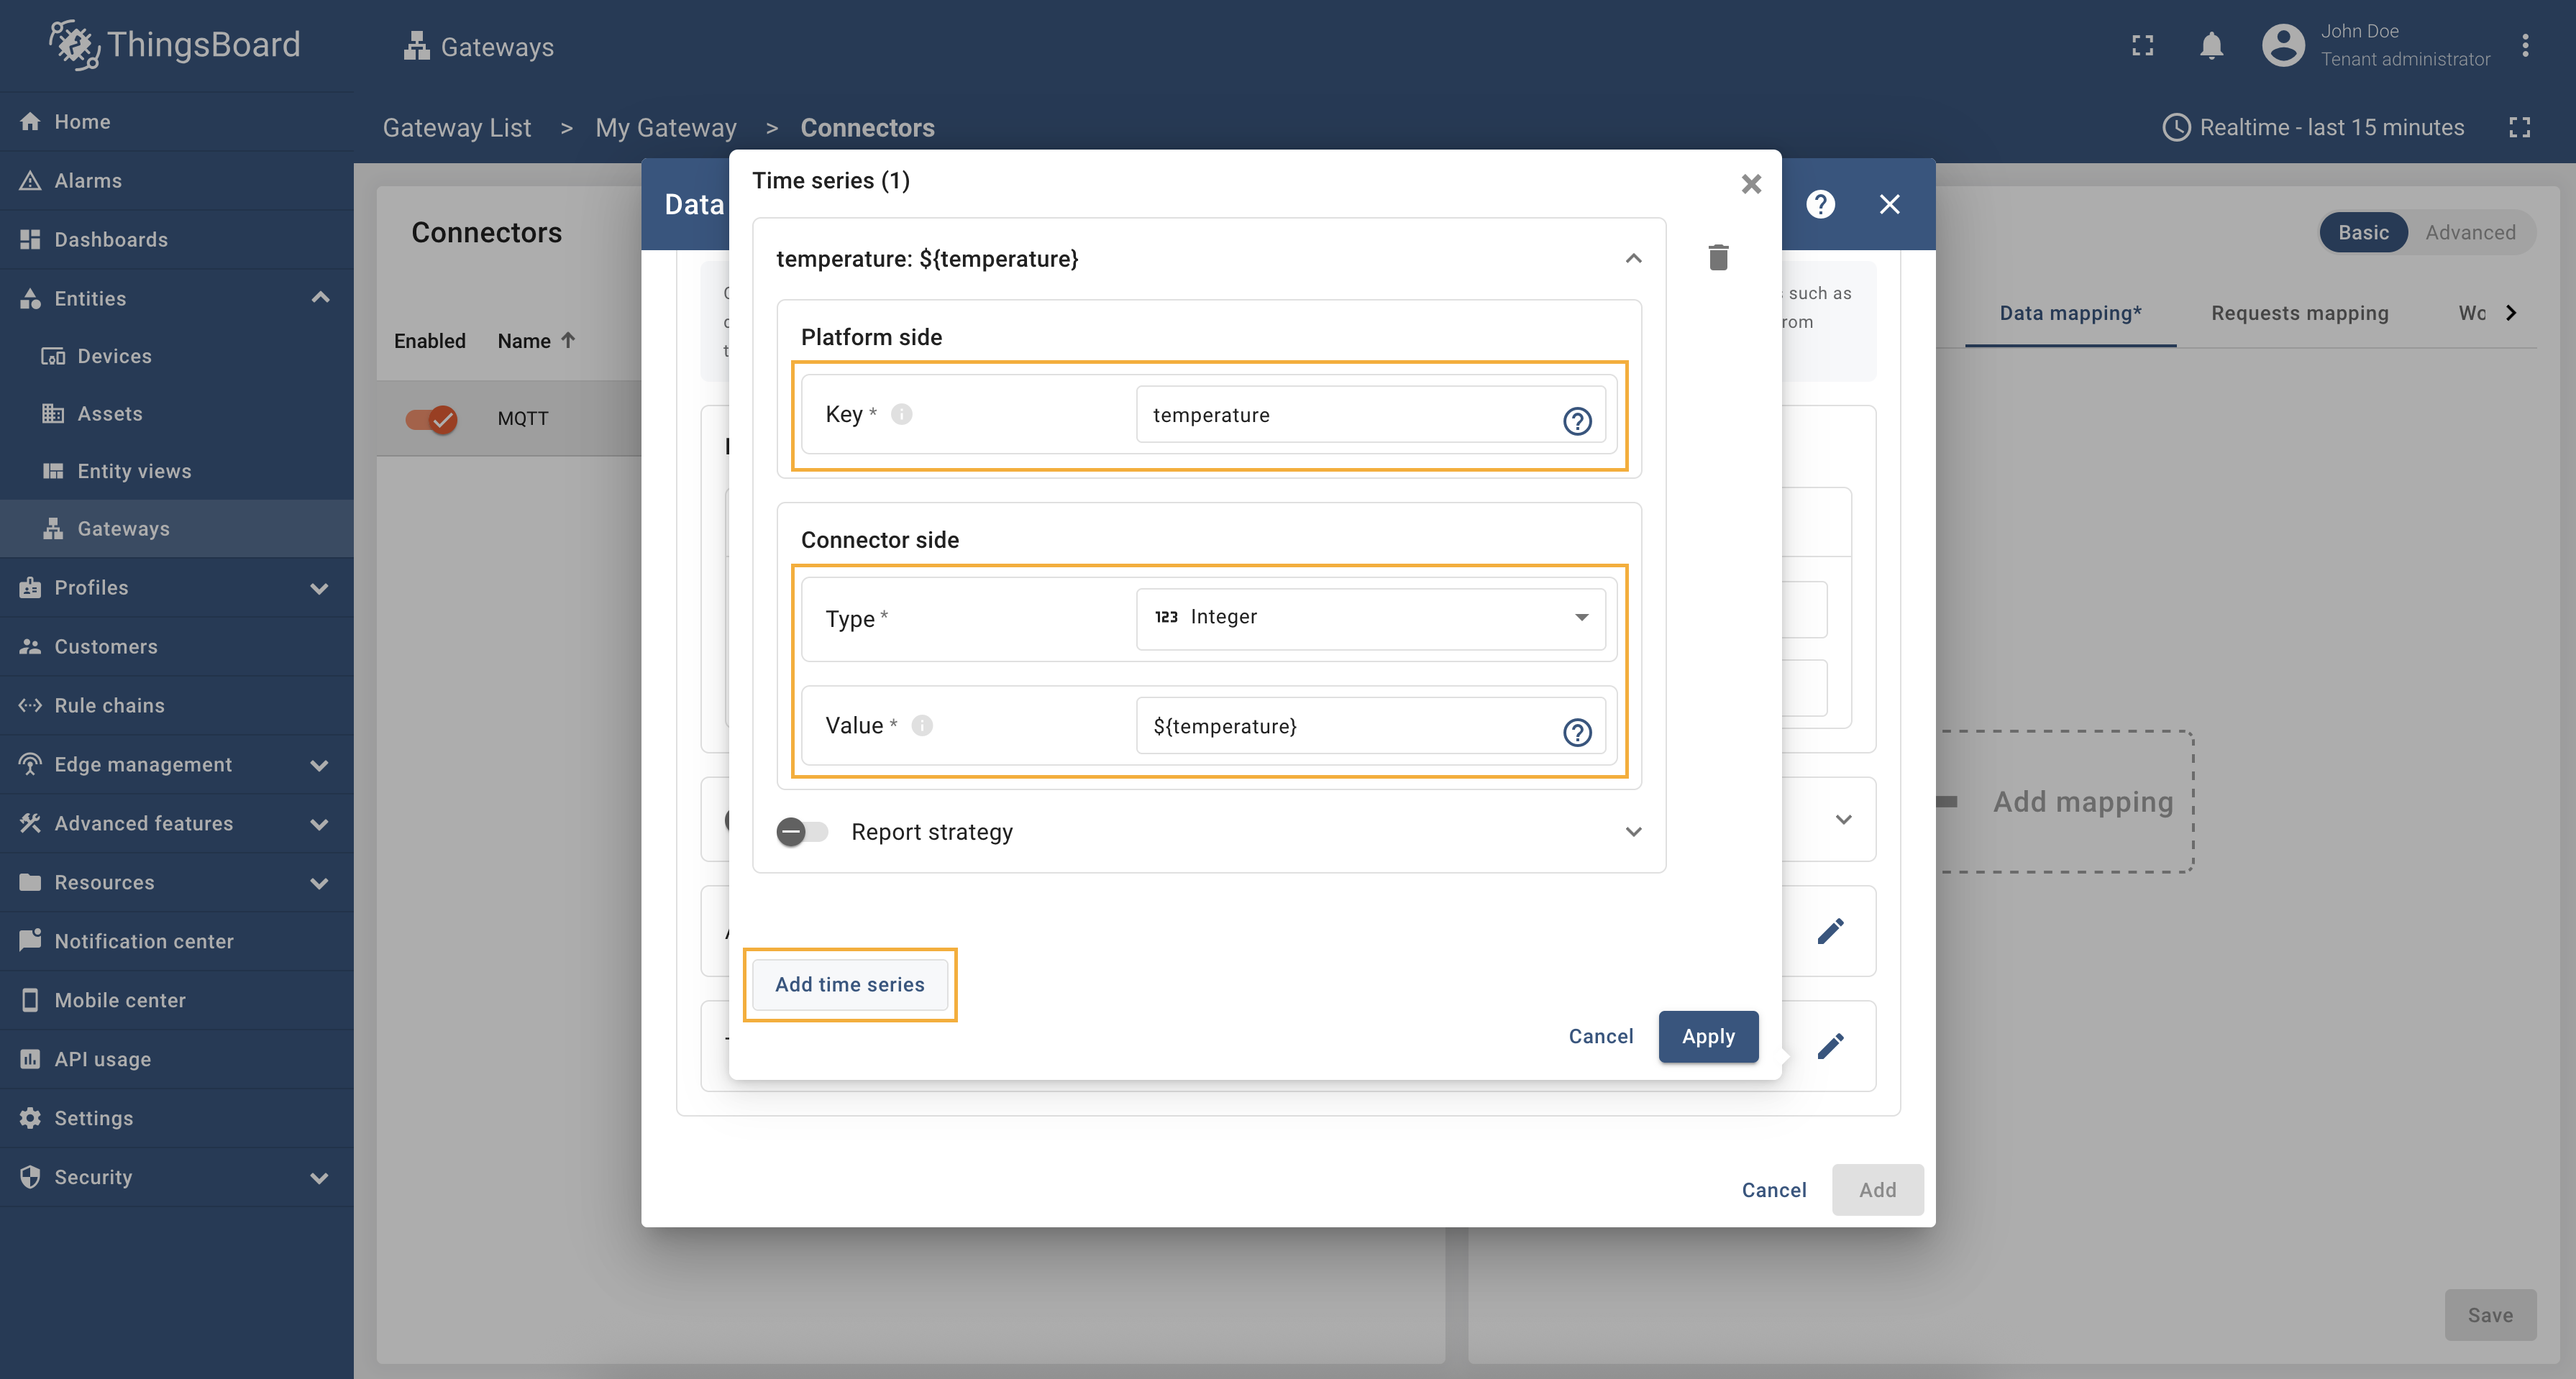 在”Key“中填写”temperature“,在”Type“中选择”Integer“,在”Value“中填写”${temperature}“。再次点击”Add time series“; 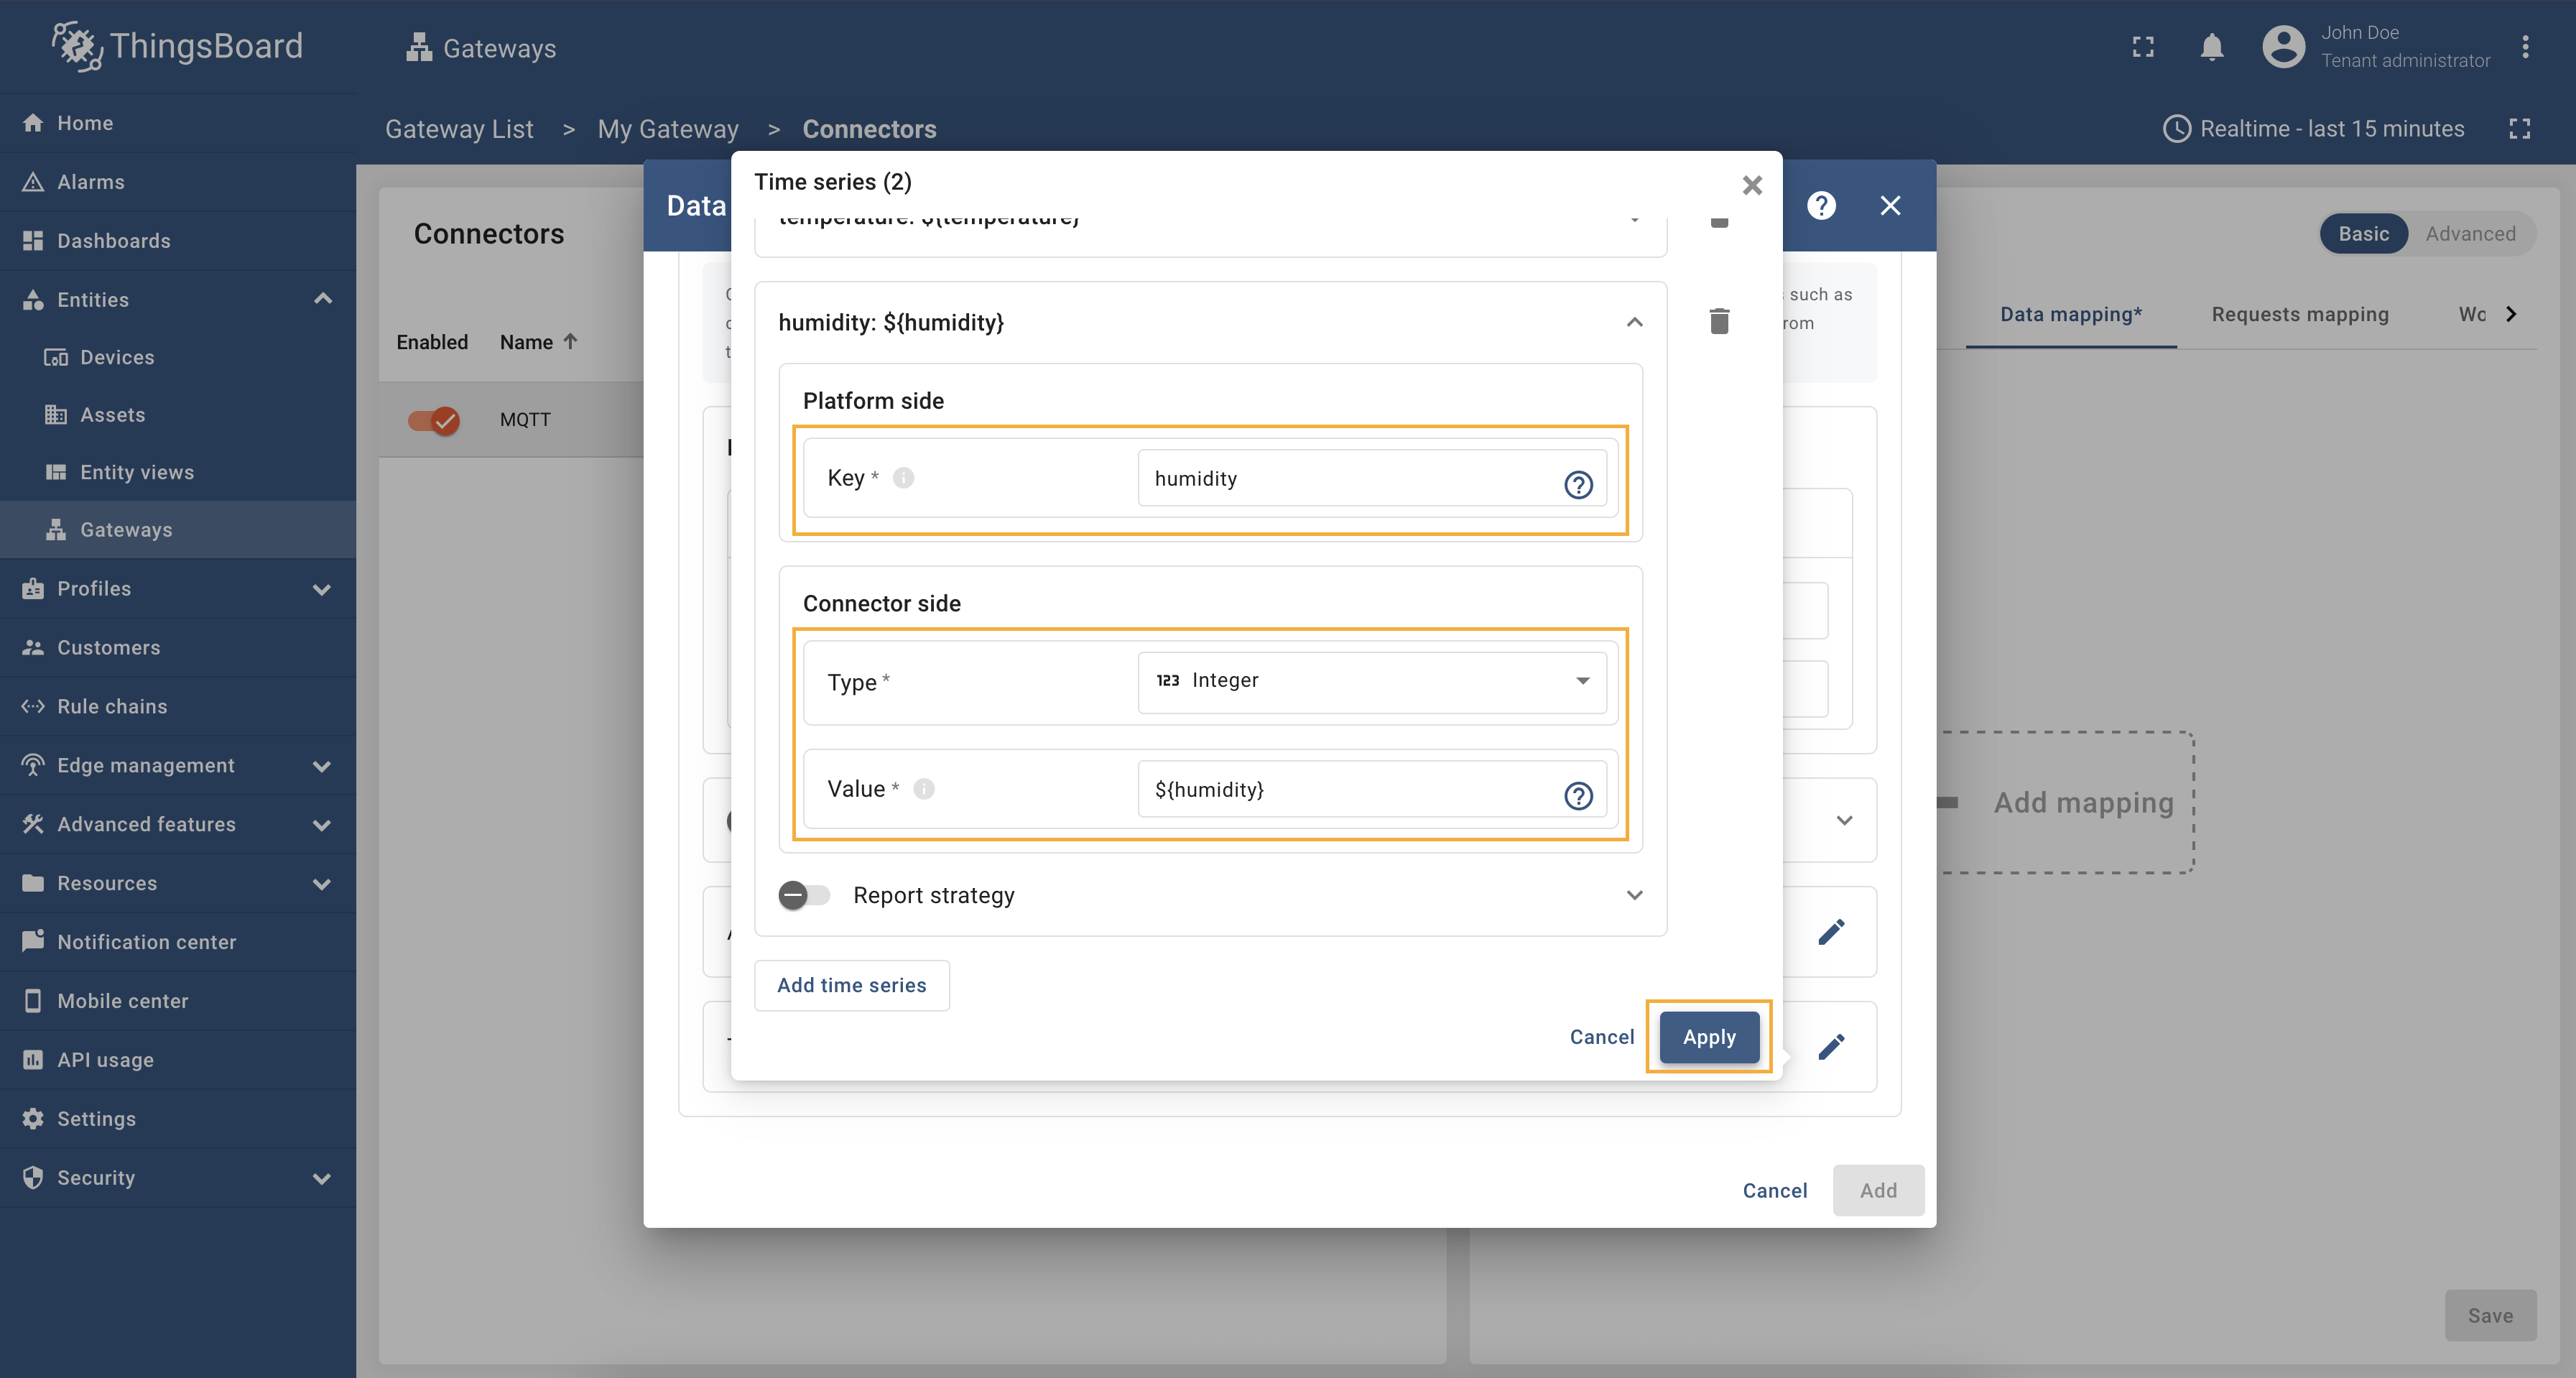 在”Key“中填写”humidity“,在”Type“中选择”Integer“,在”Value“中填写”${humidity}“。点击”Apply“;  点击”Add“; 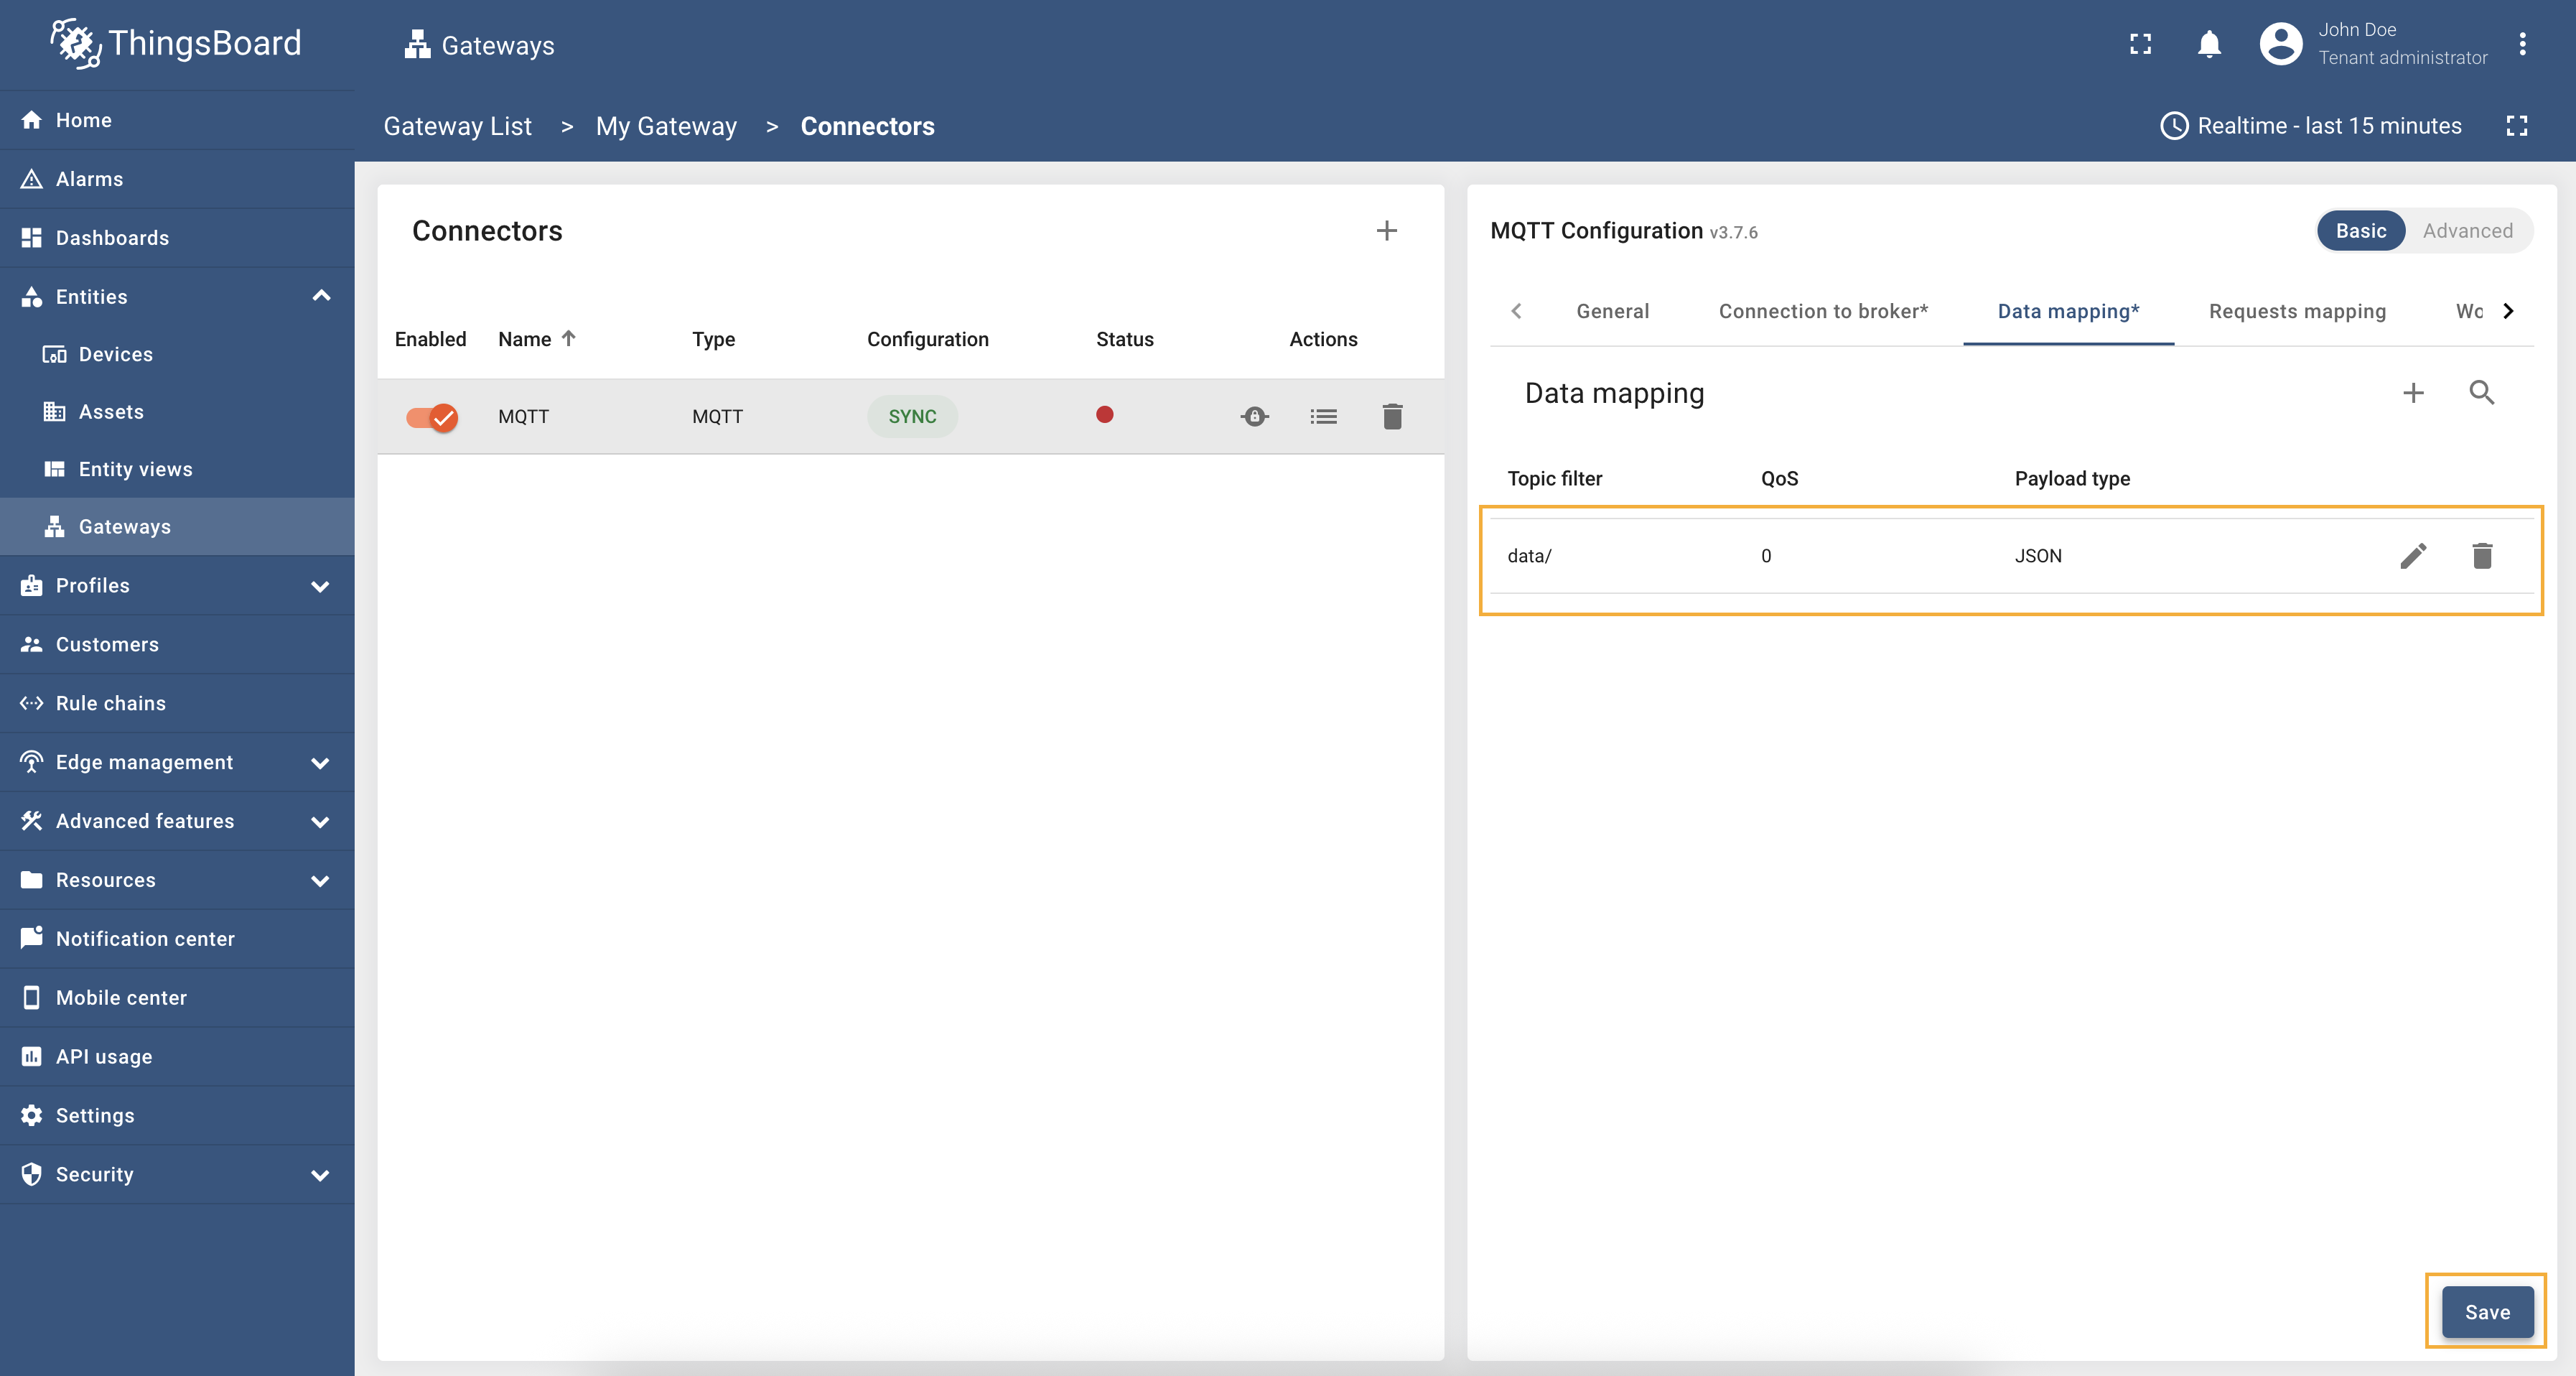 数据映射已添加。点击”Save“。 完成上述步骤后,网关将接收并应用新配置,并与远程服务器同步状态。可在”Configuration“列查看 connector 配置的同步状态,确认网关是否与远程设置一致。 此外,可查看 connector 日志以确认 connector 工作正常,操作如下:
 在 connector 的”General“标签页中,开启”Enable remote logging“开关启用远程日志。在”Log level“下拉中选择”DEBUG“。点击”Save“应用更改;  点击日志图标打开 connector 日志页面; 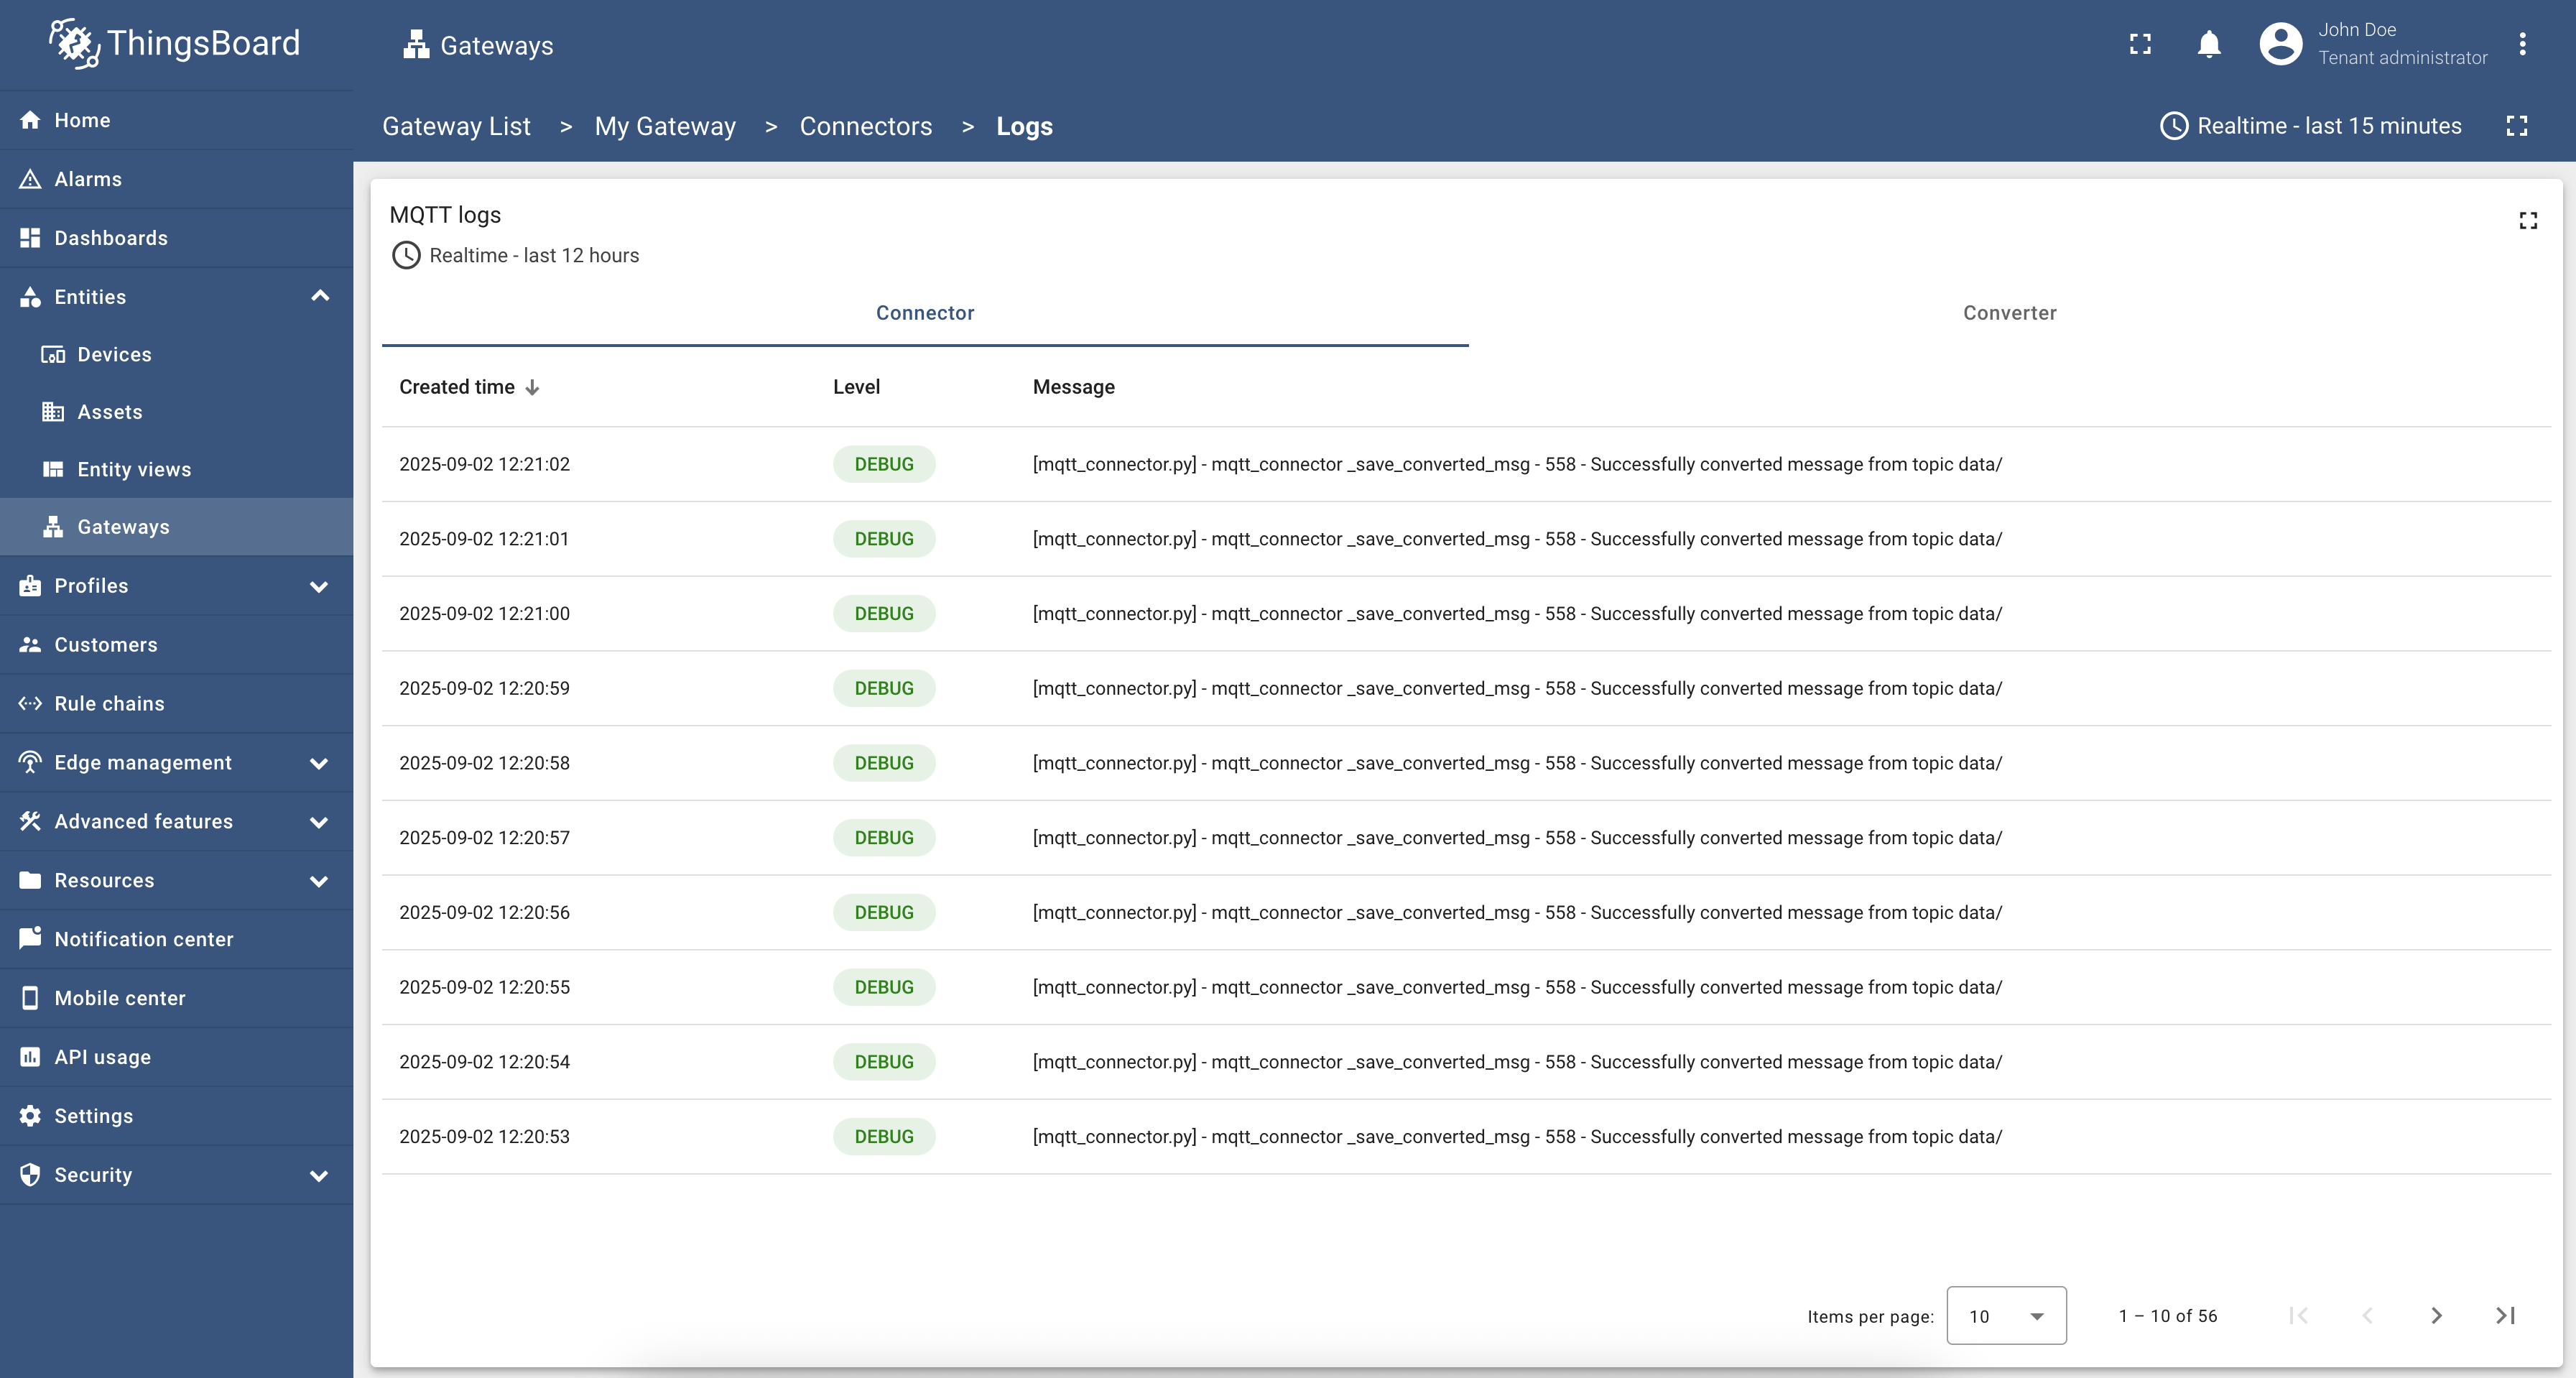 可看到由”Created time“、”Status“和”Message“列组成的”Logs“表格。 至此,网关已可通过新建并配置的 MQTT connector 处理数据。 下面向上述配置中的 MQTT Broker 发布数据。可使用 mosquitto_pub 或您所用编程语言的 MQTT 客户端库。本例使用 mosquitto_pub 命令行工具。
其中:
请根据需要调整 payload 值。 |
下面我们添加 Modbus connector,它将从演示 slave 读取部分数据到已创建的网关。 配置演示服务器我们将使用 docker 镜像作为演示仿真 slave,可通过以下命令安装并运行: 运行 docker 镜像后,终端会显示以下日志:
配置 connector此 Modbus connector 配置通过 TCP 与端口 5021 上 “host.docker.internal” 的 slave 设备通信。 配置包括字节序、字序、timeout、轮询周期等数据获取规格。 名为 “Demo Device” 的 slave 设备配置为处理 Modbus function code 4 请求。 为 frequency、power、humidity、temperature 等参数定义了 attribute 和 time series mapping。此外还提供连接尝试、重试及失败后等待时间的配置。 创建 connector 请按以下步骤操作:
在右侧面板点击”Connectors configuration“按钮; 点击”+ Add connector“按钮;  在下拉中选择”MODBUS“connector 类型,填写”Name“,将”Logging level“设为”INFO“,关闭”Fill configuration with default values“并点击”Add“;  Connector 已创建。 首先添加新 slave 并配置到其的连接。从”Master Connections“标签页开始。 该部分提供 slave 添加及连接类型、host、port、unit ID、method 等详细连接配置。
 进入”Master Connections“标签页,点击”Add Slave“; 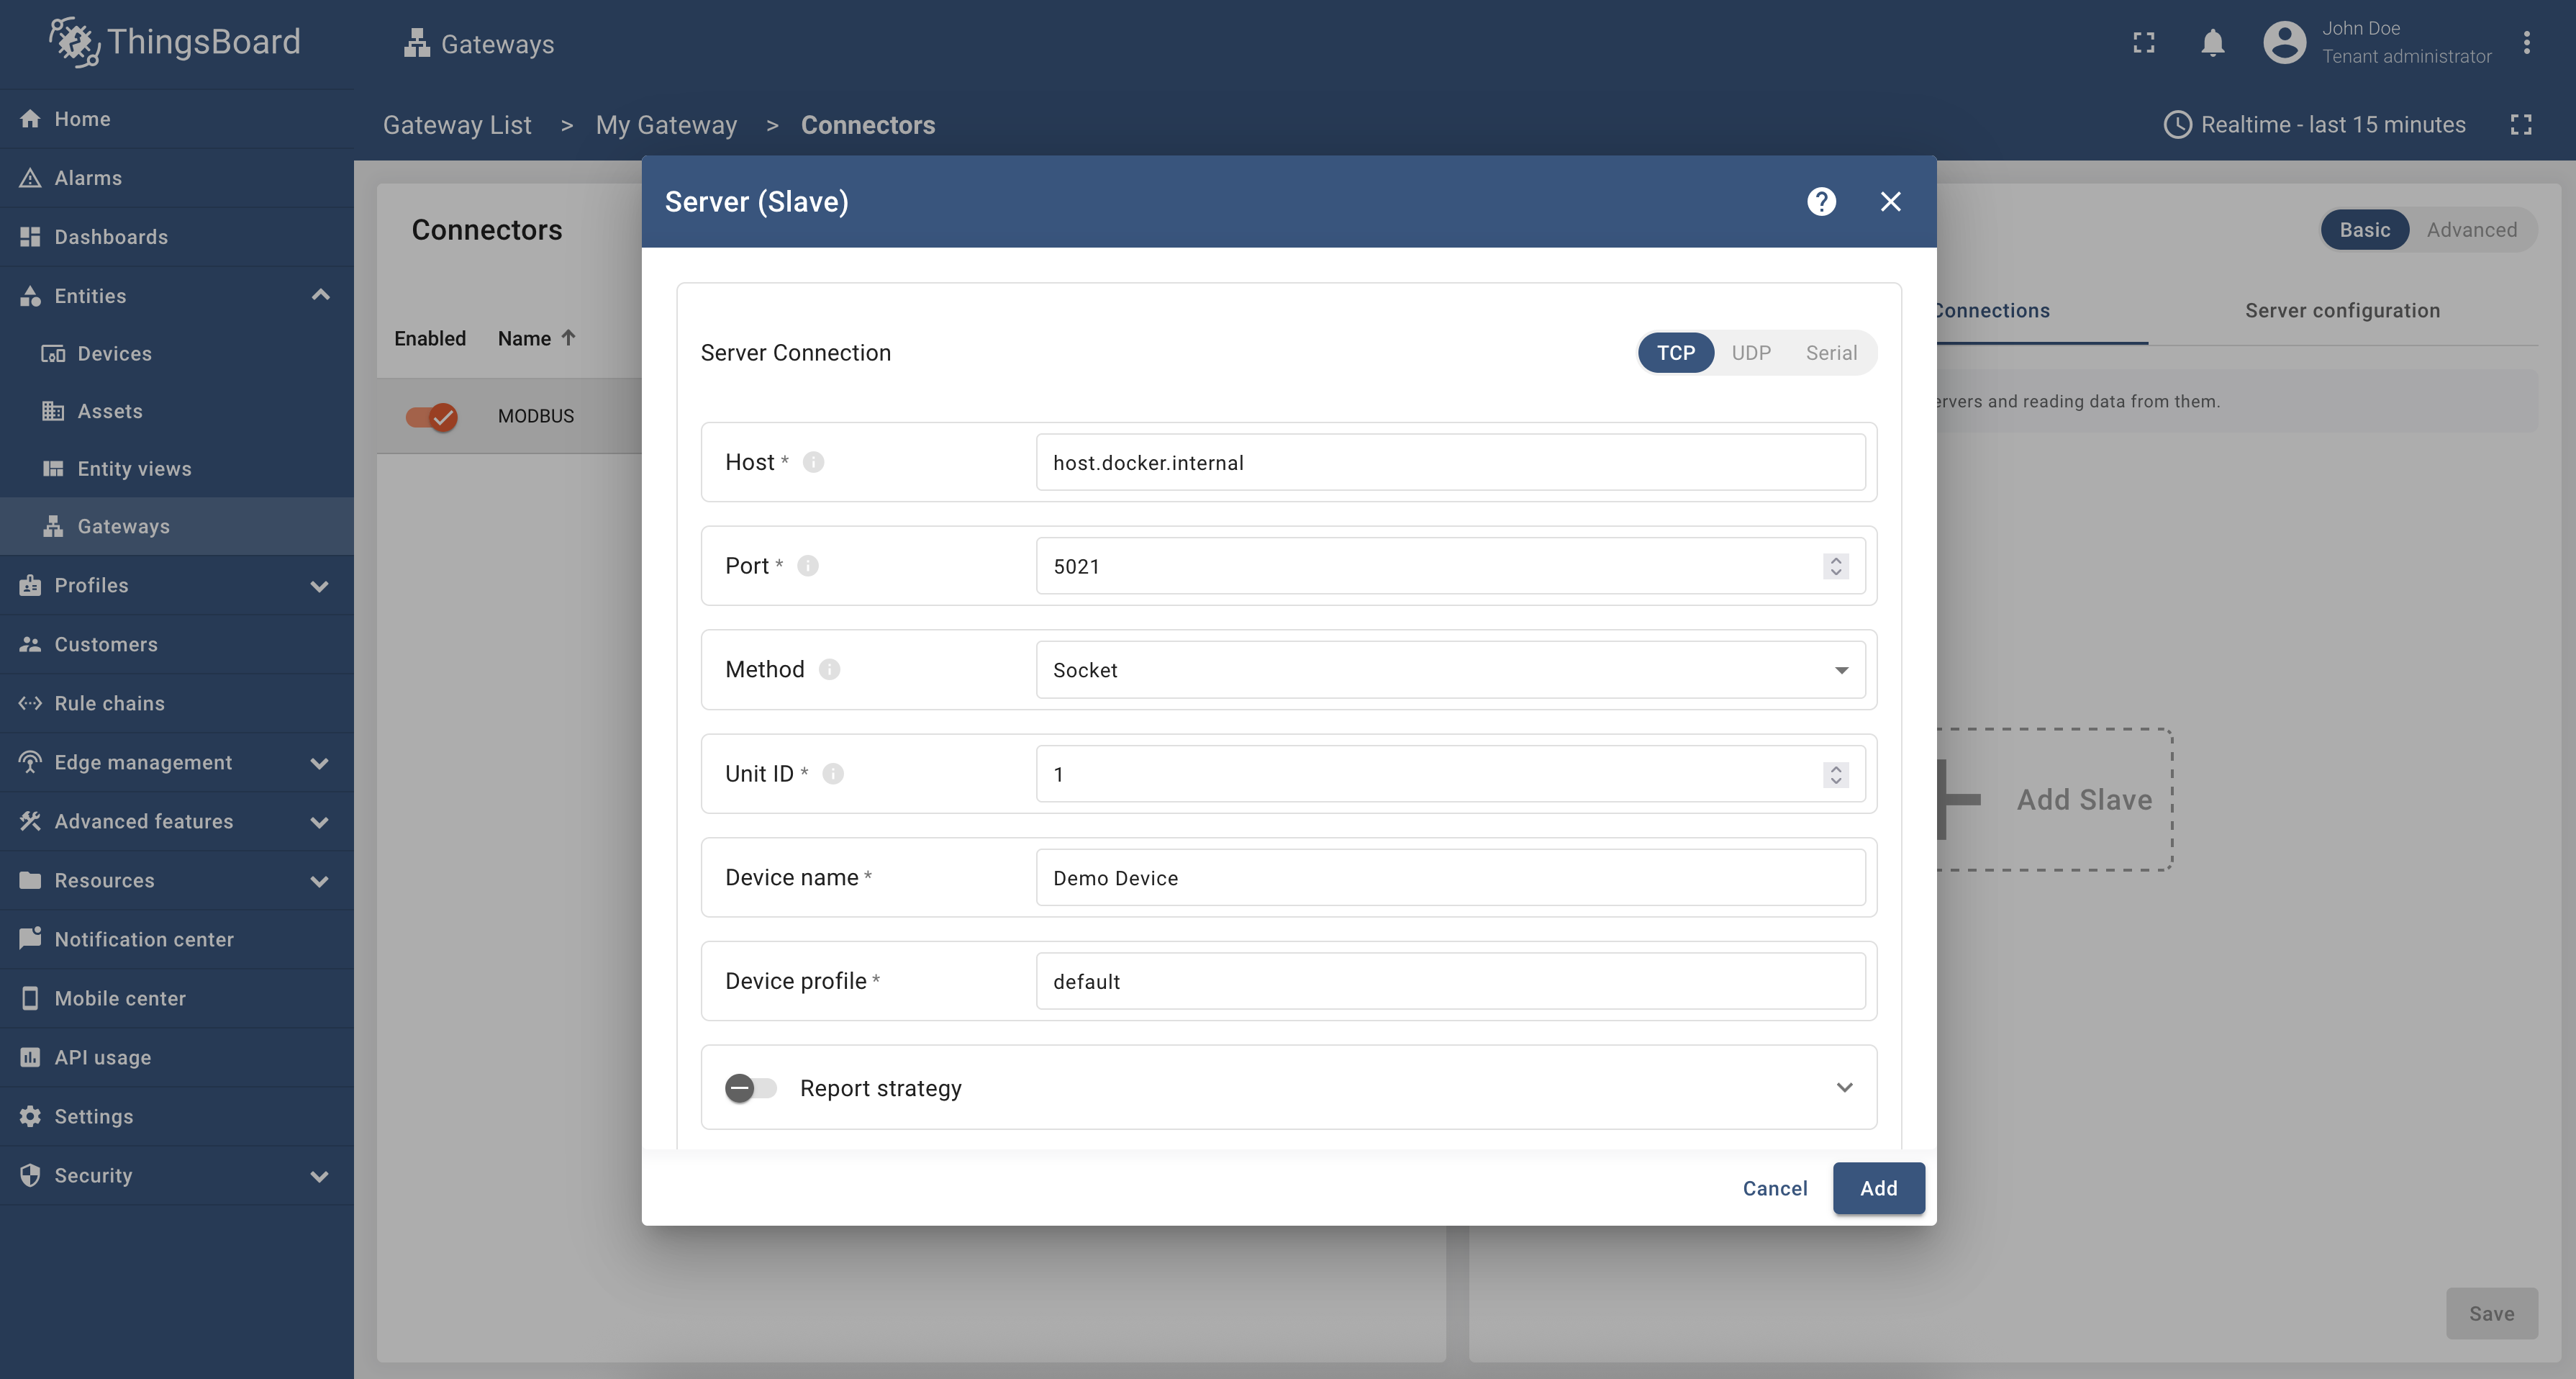 按文档填写字段值。 接下来进入”Attributes“部分。本部分配置用于处理 Modbus 服务器数据,在ThingsBoard 中将被解释为设备 attribute。 按以下步骤配置 attribute 部分:
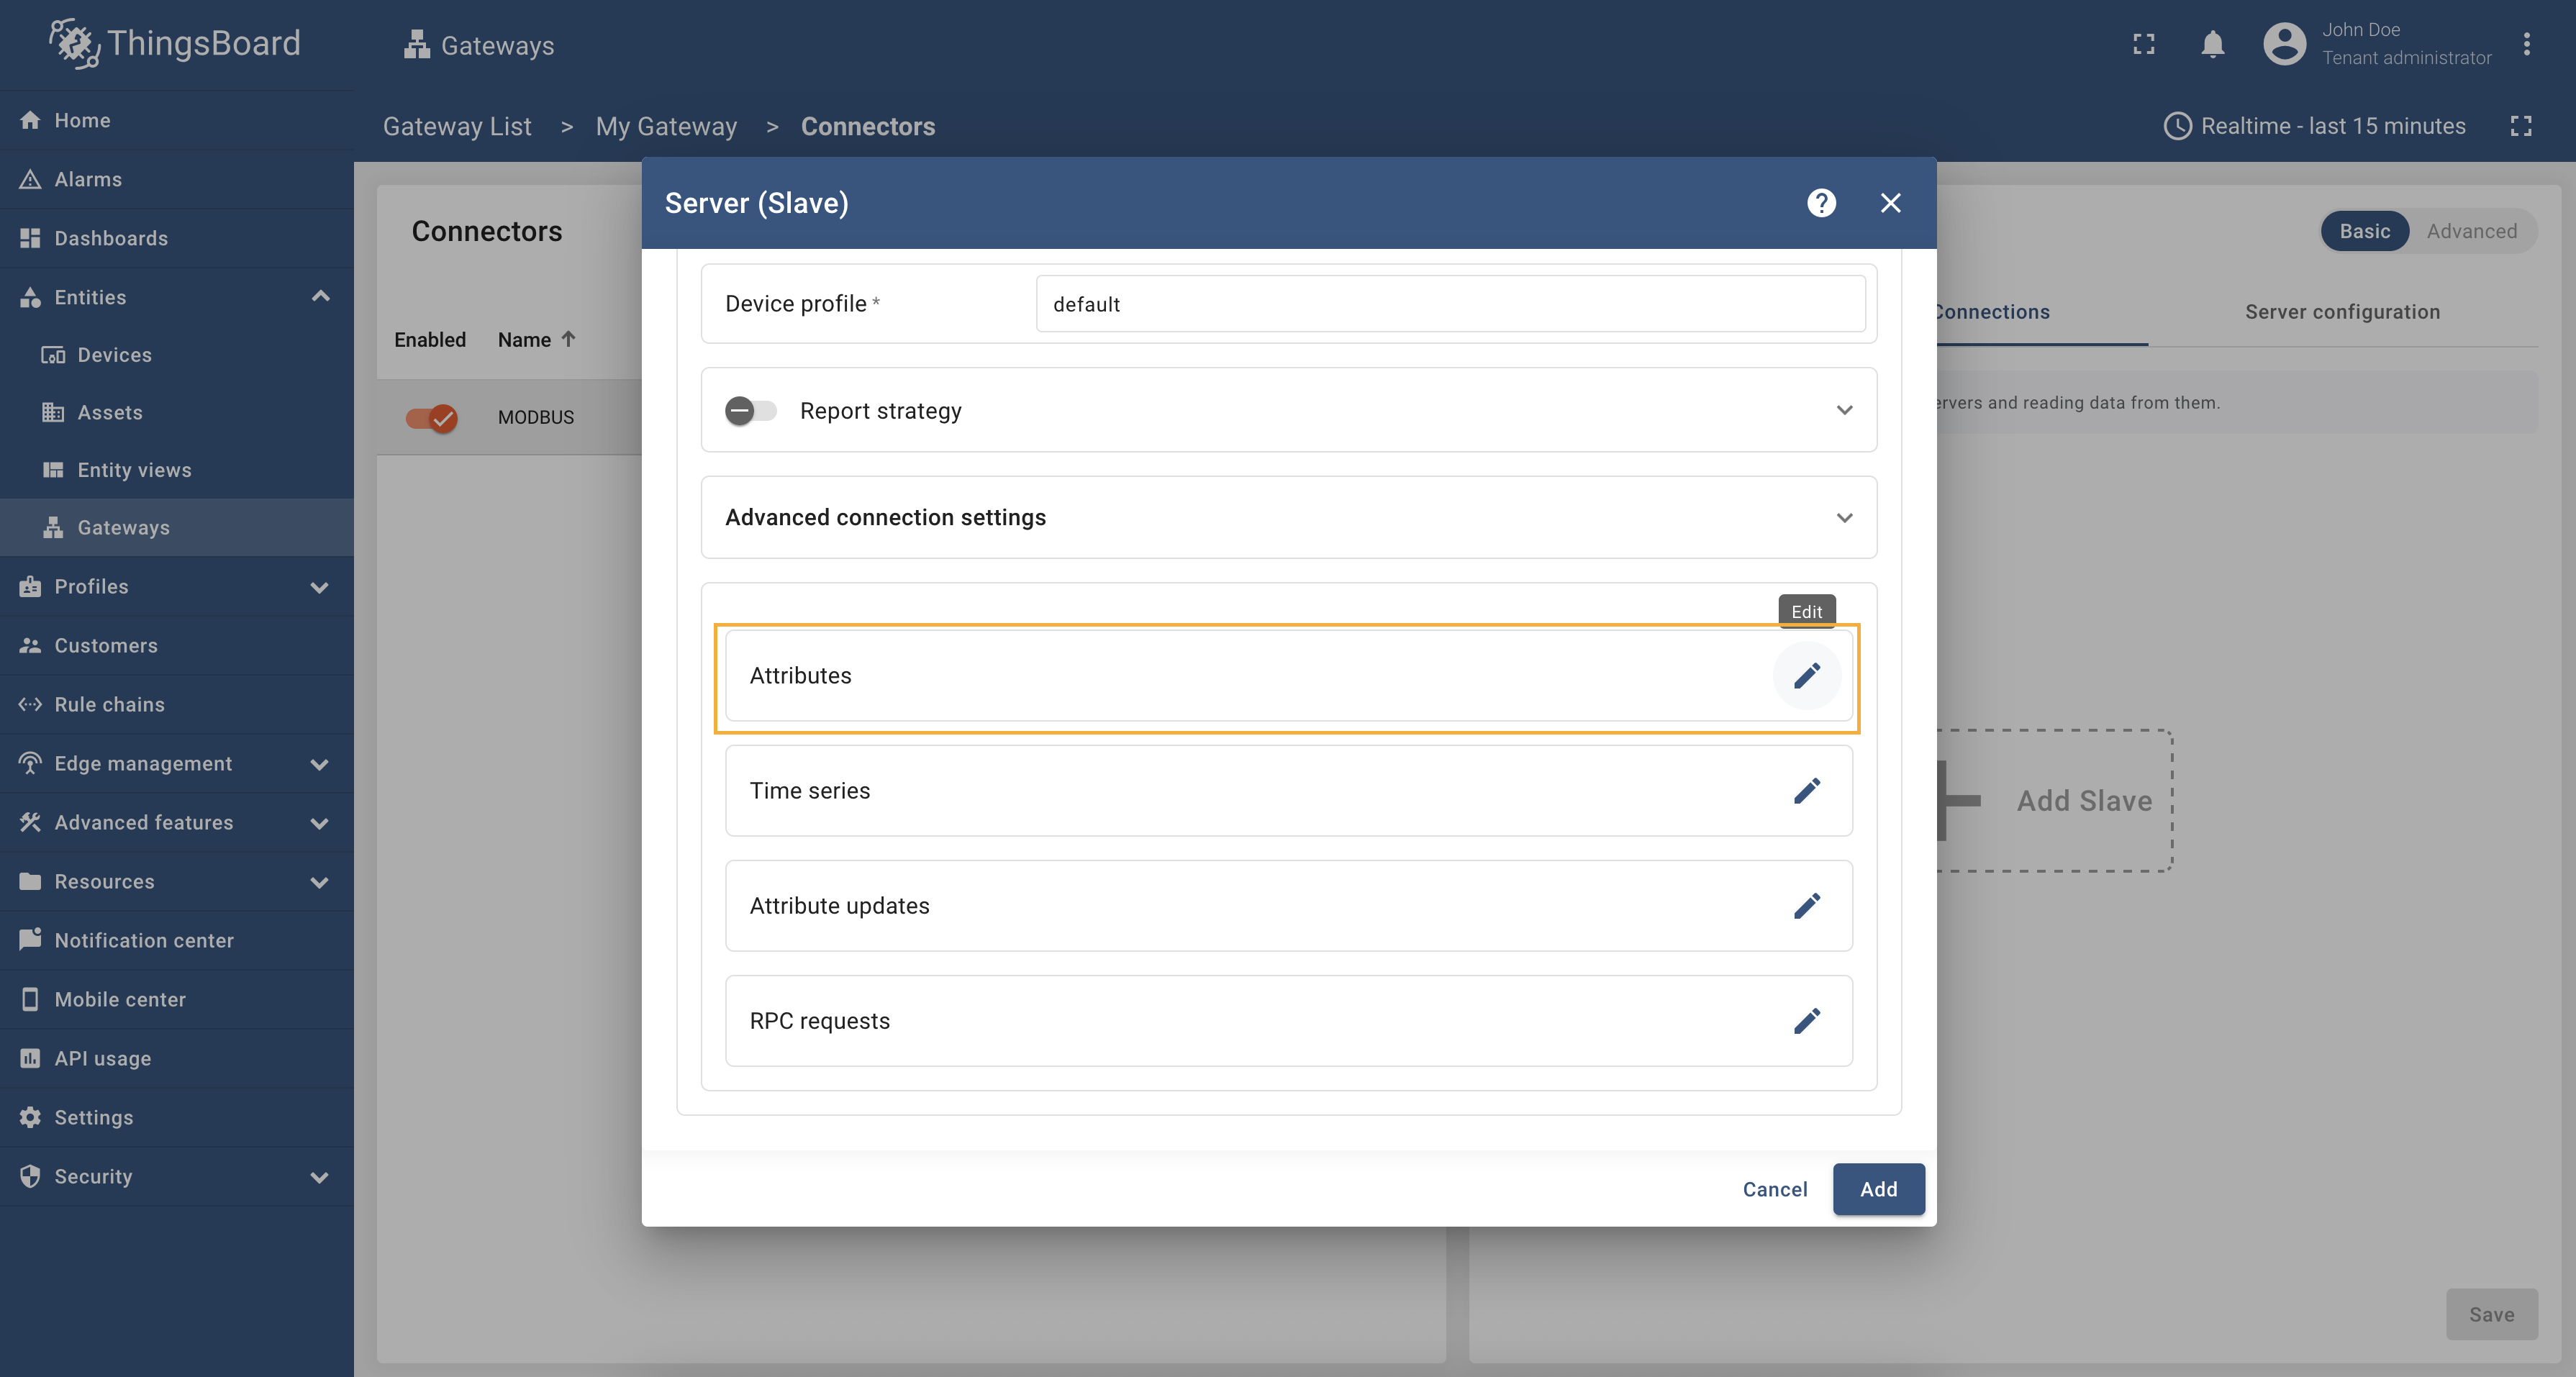 点击”Attributes“部分的”铅笔“图标; 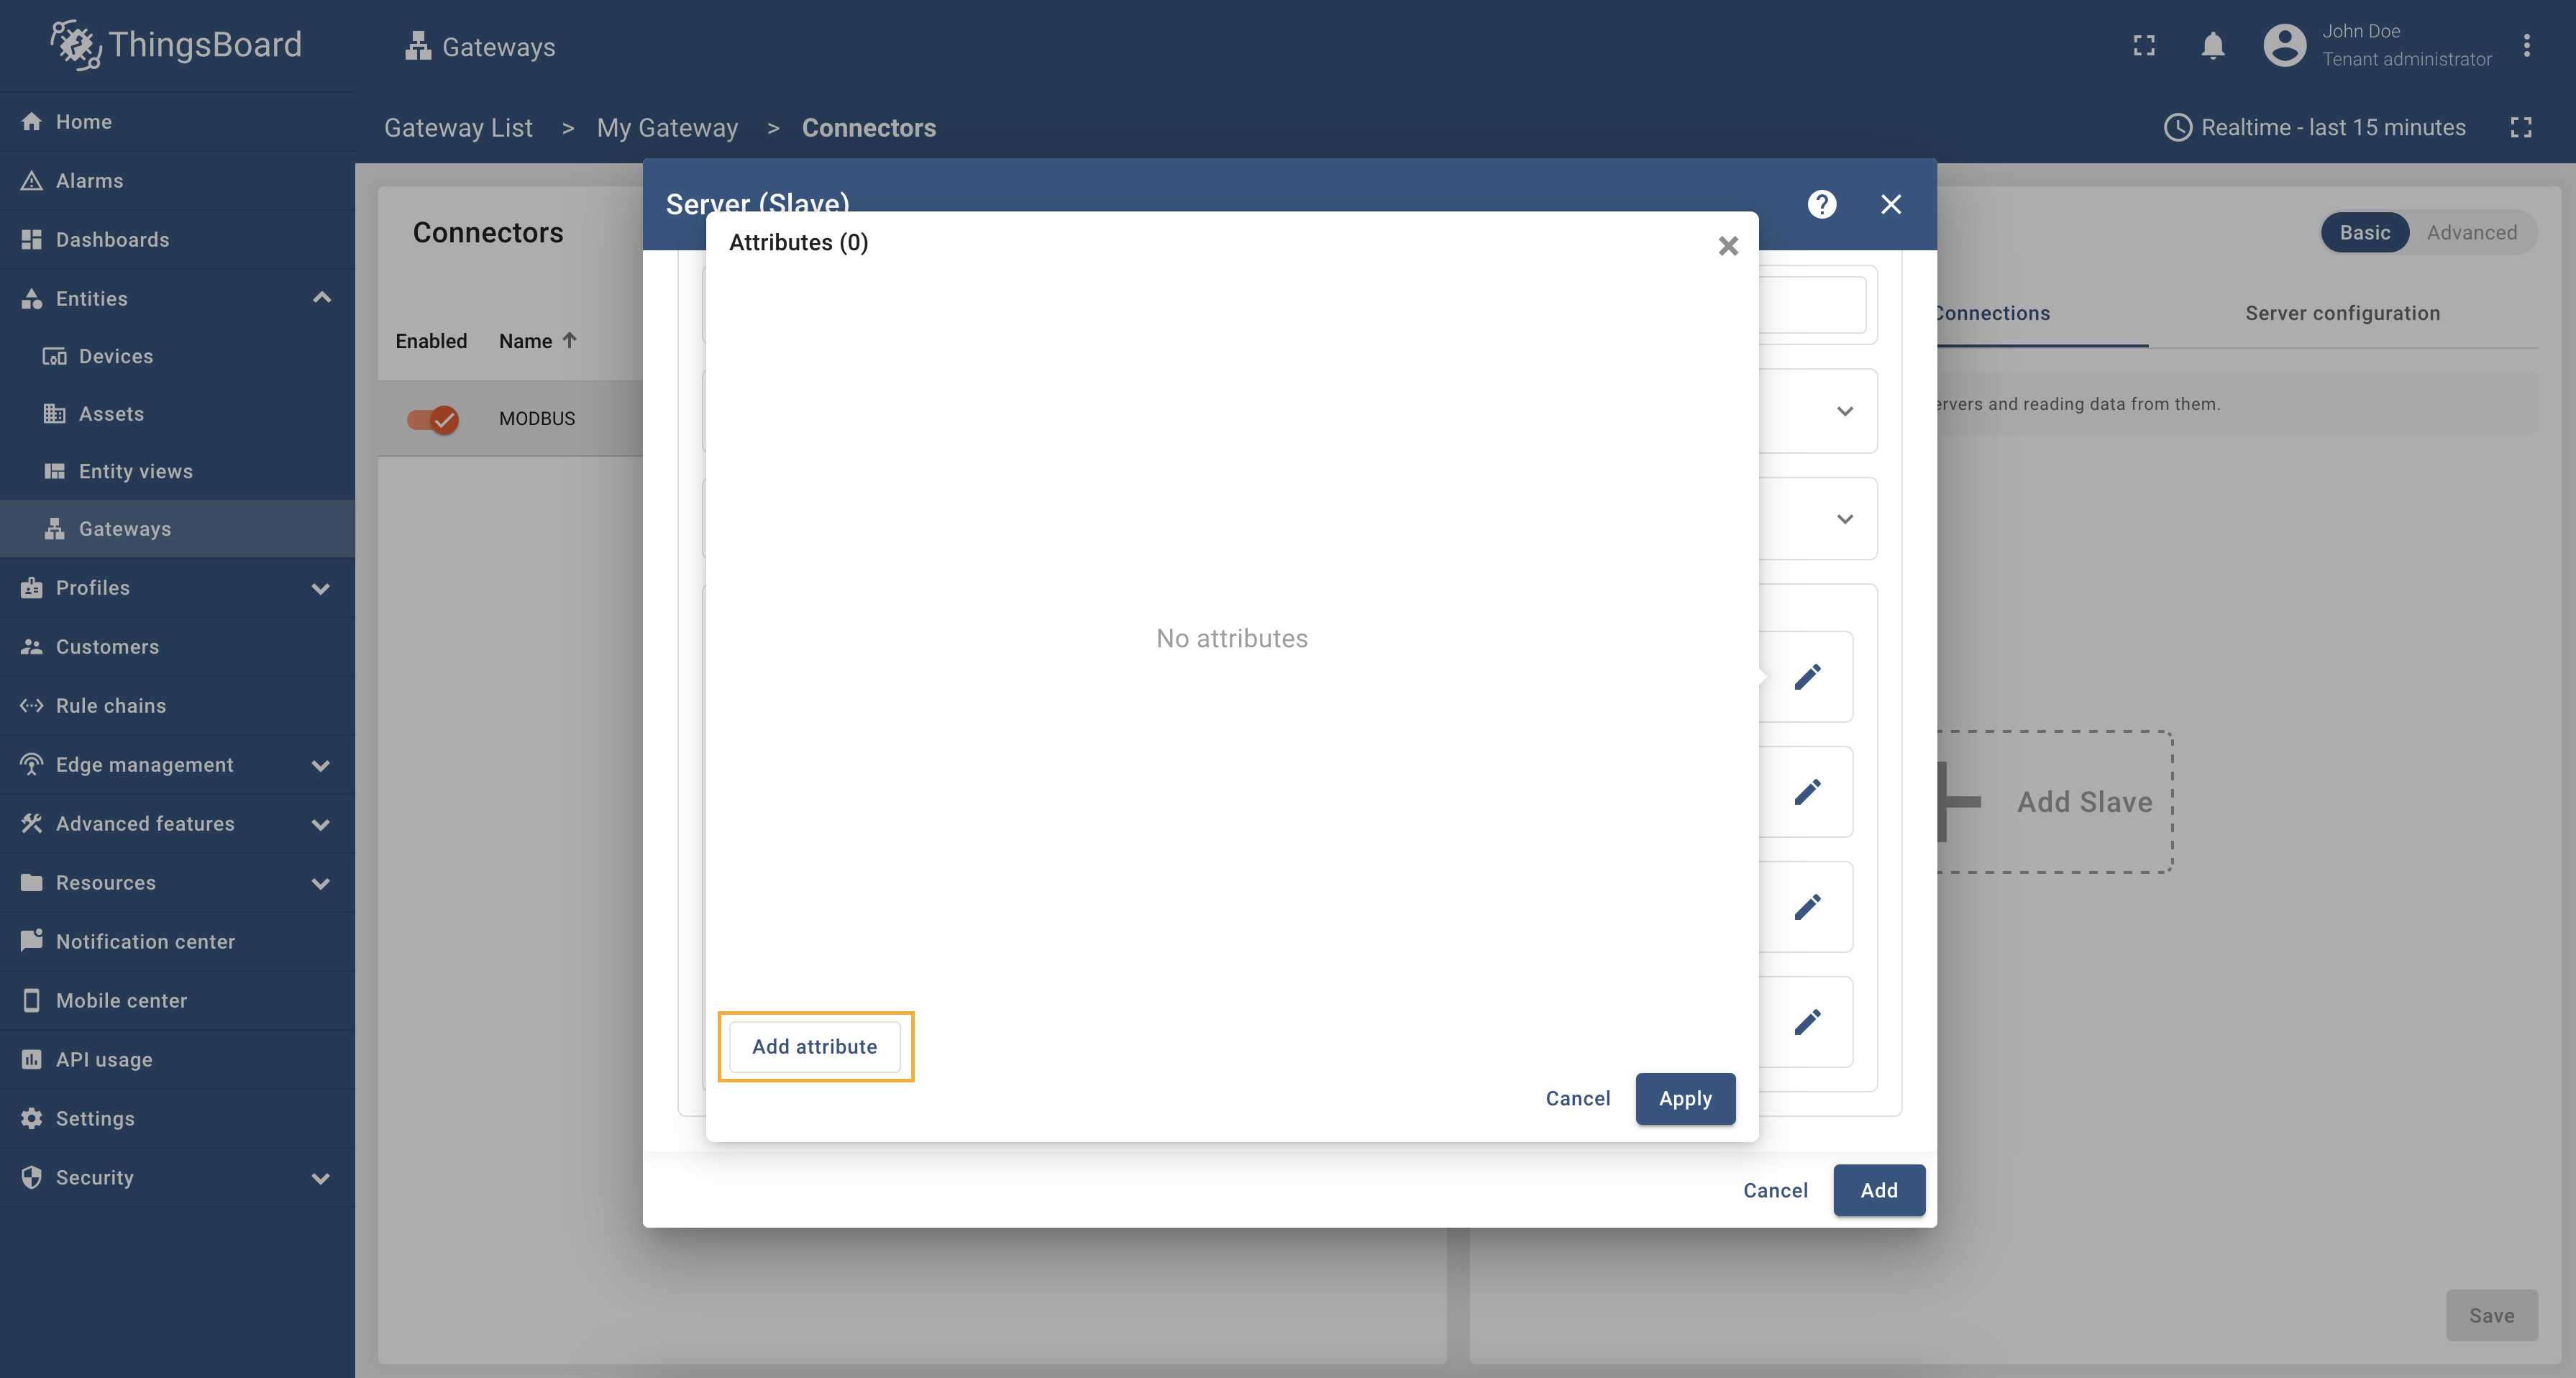 在打开窗口中点击”Add attribute“; 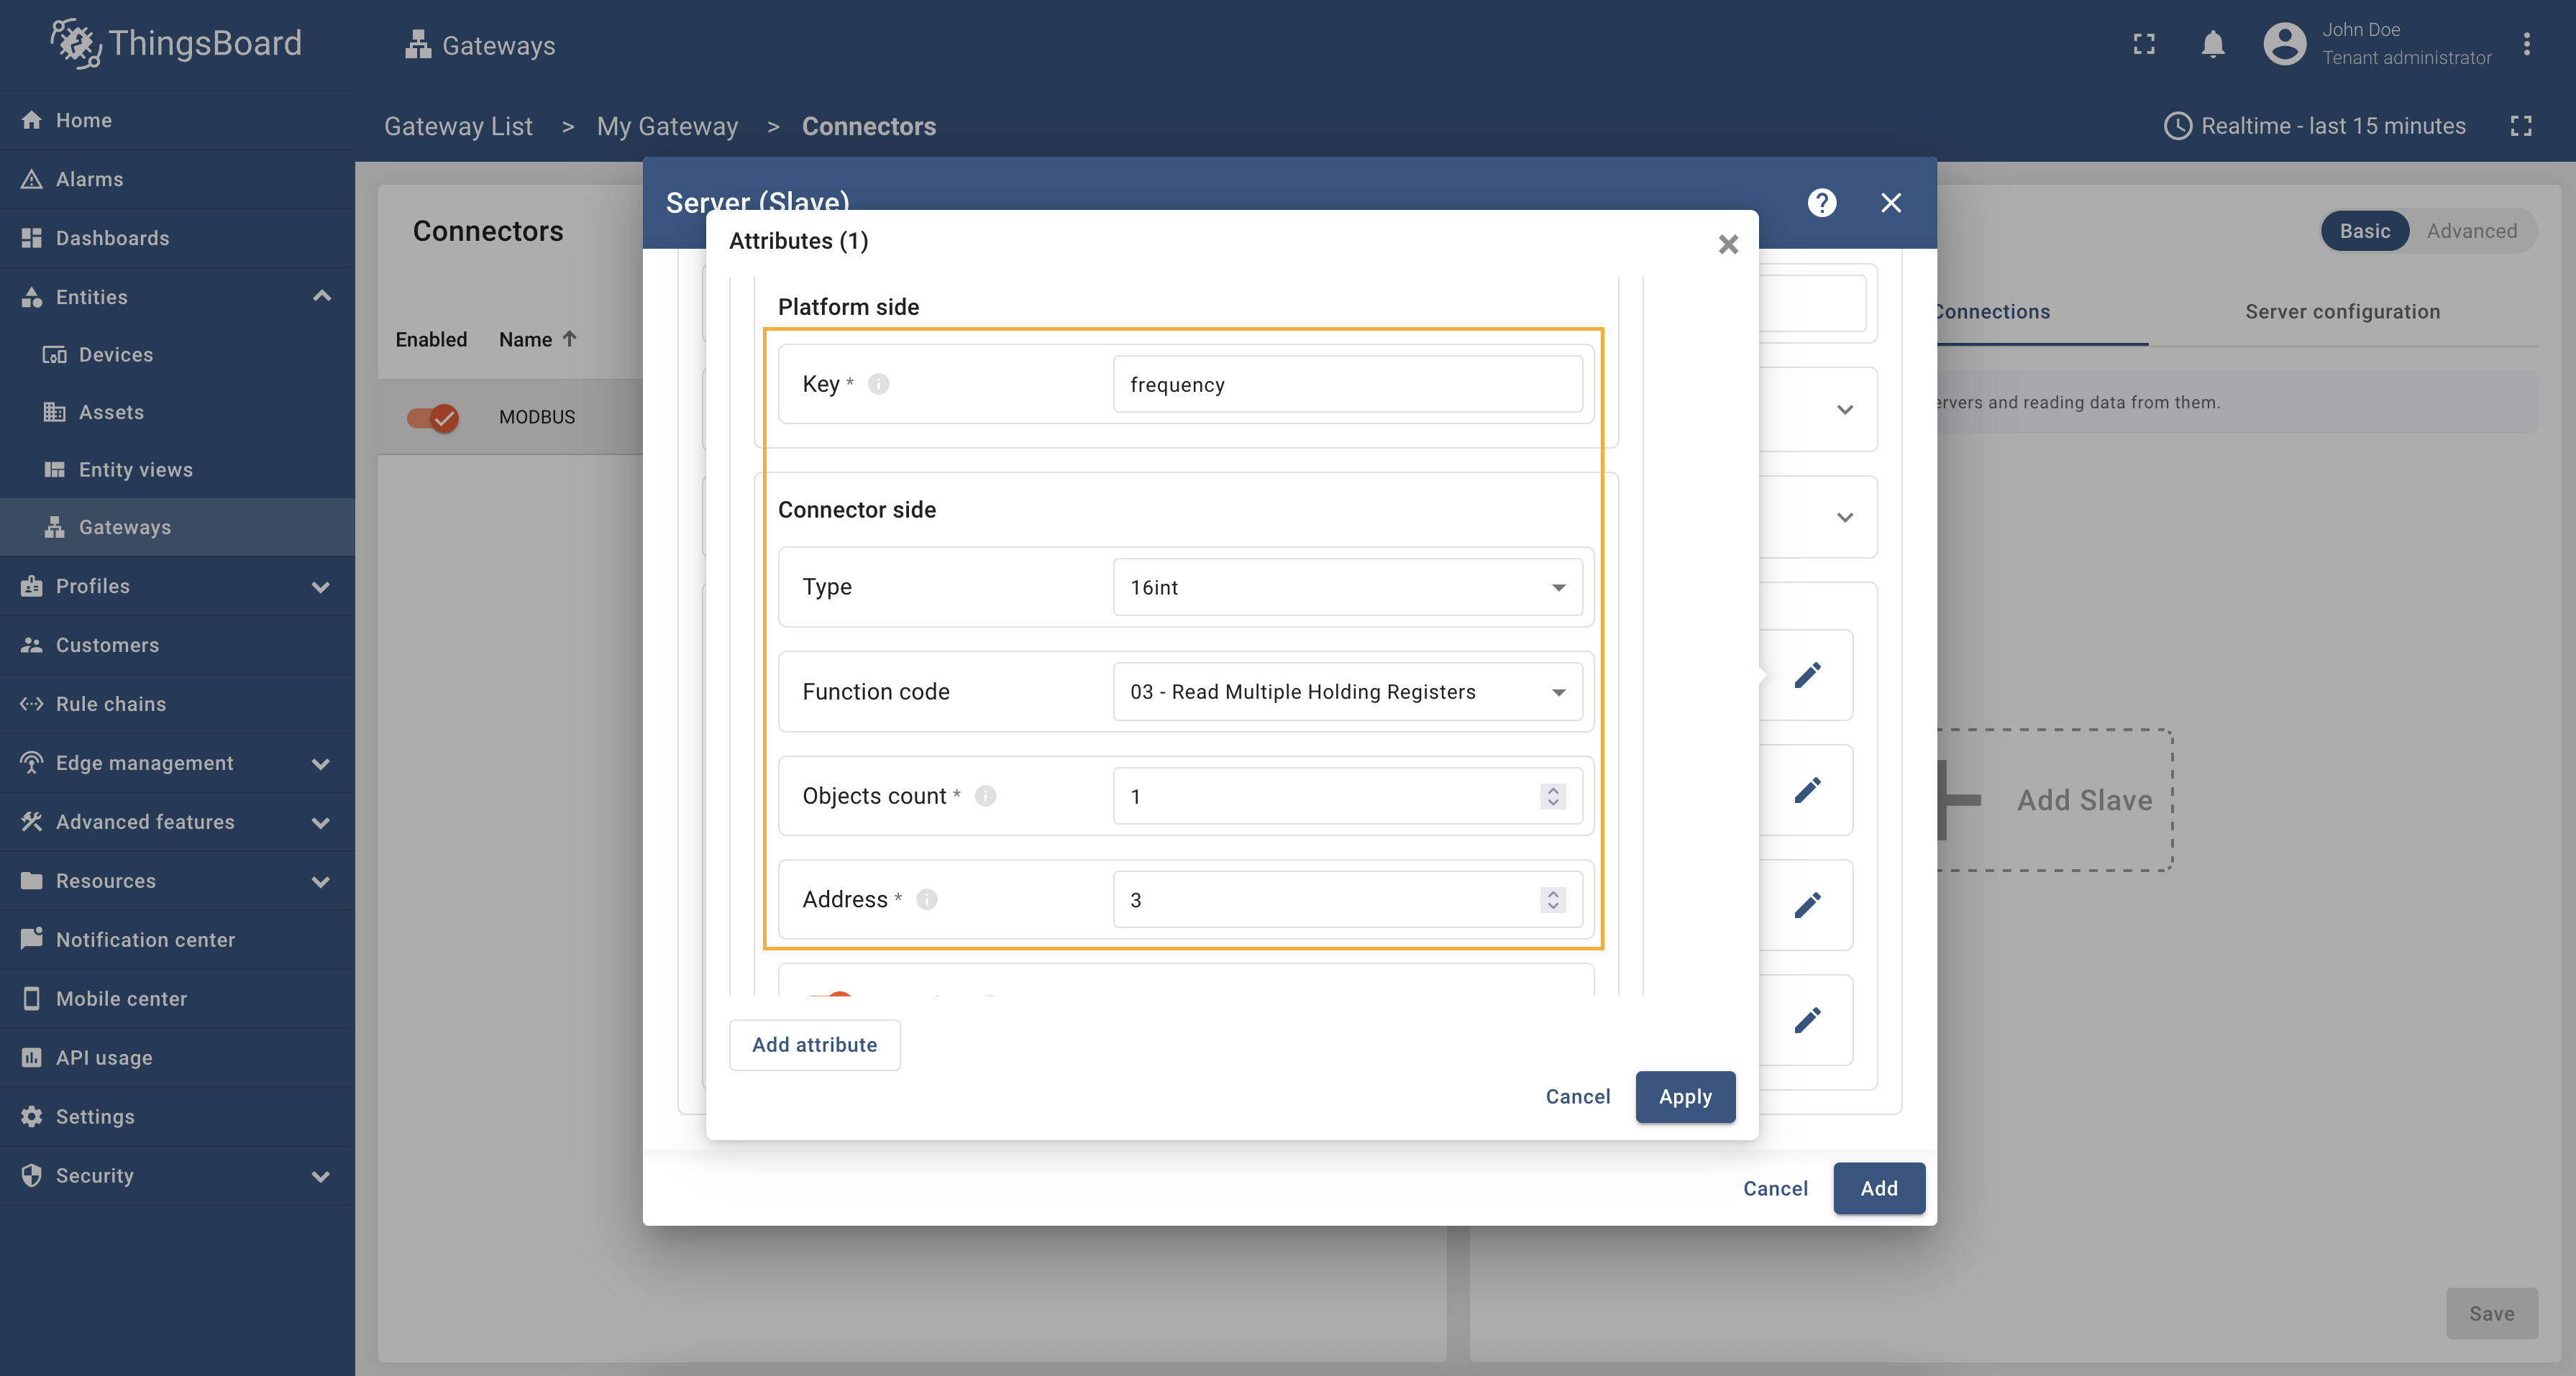 按文档填写字段值。 添加另一 attribute:折叠刚添加的 “frequency” attribute,点击”Add attribute“,按相同步骤填写以下值:
完成”Attributes“配置后点击”Apply“。 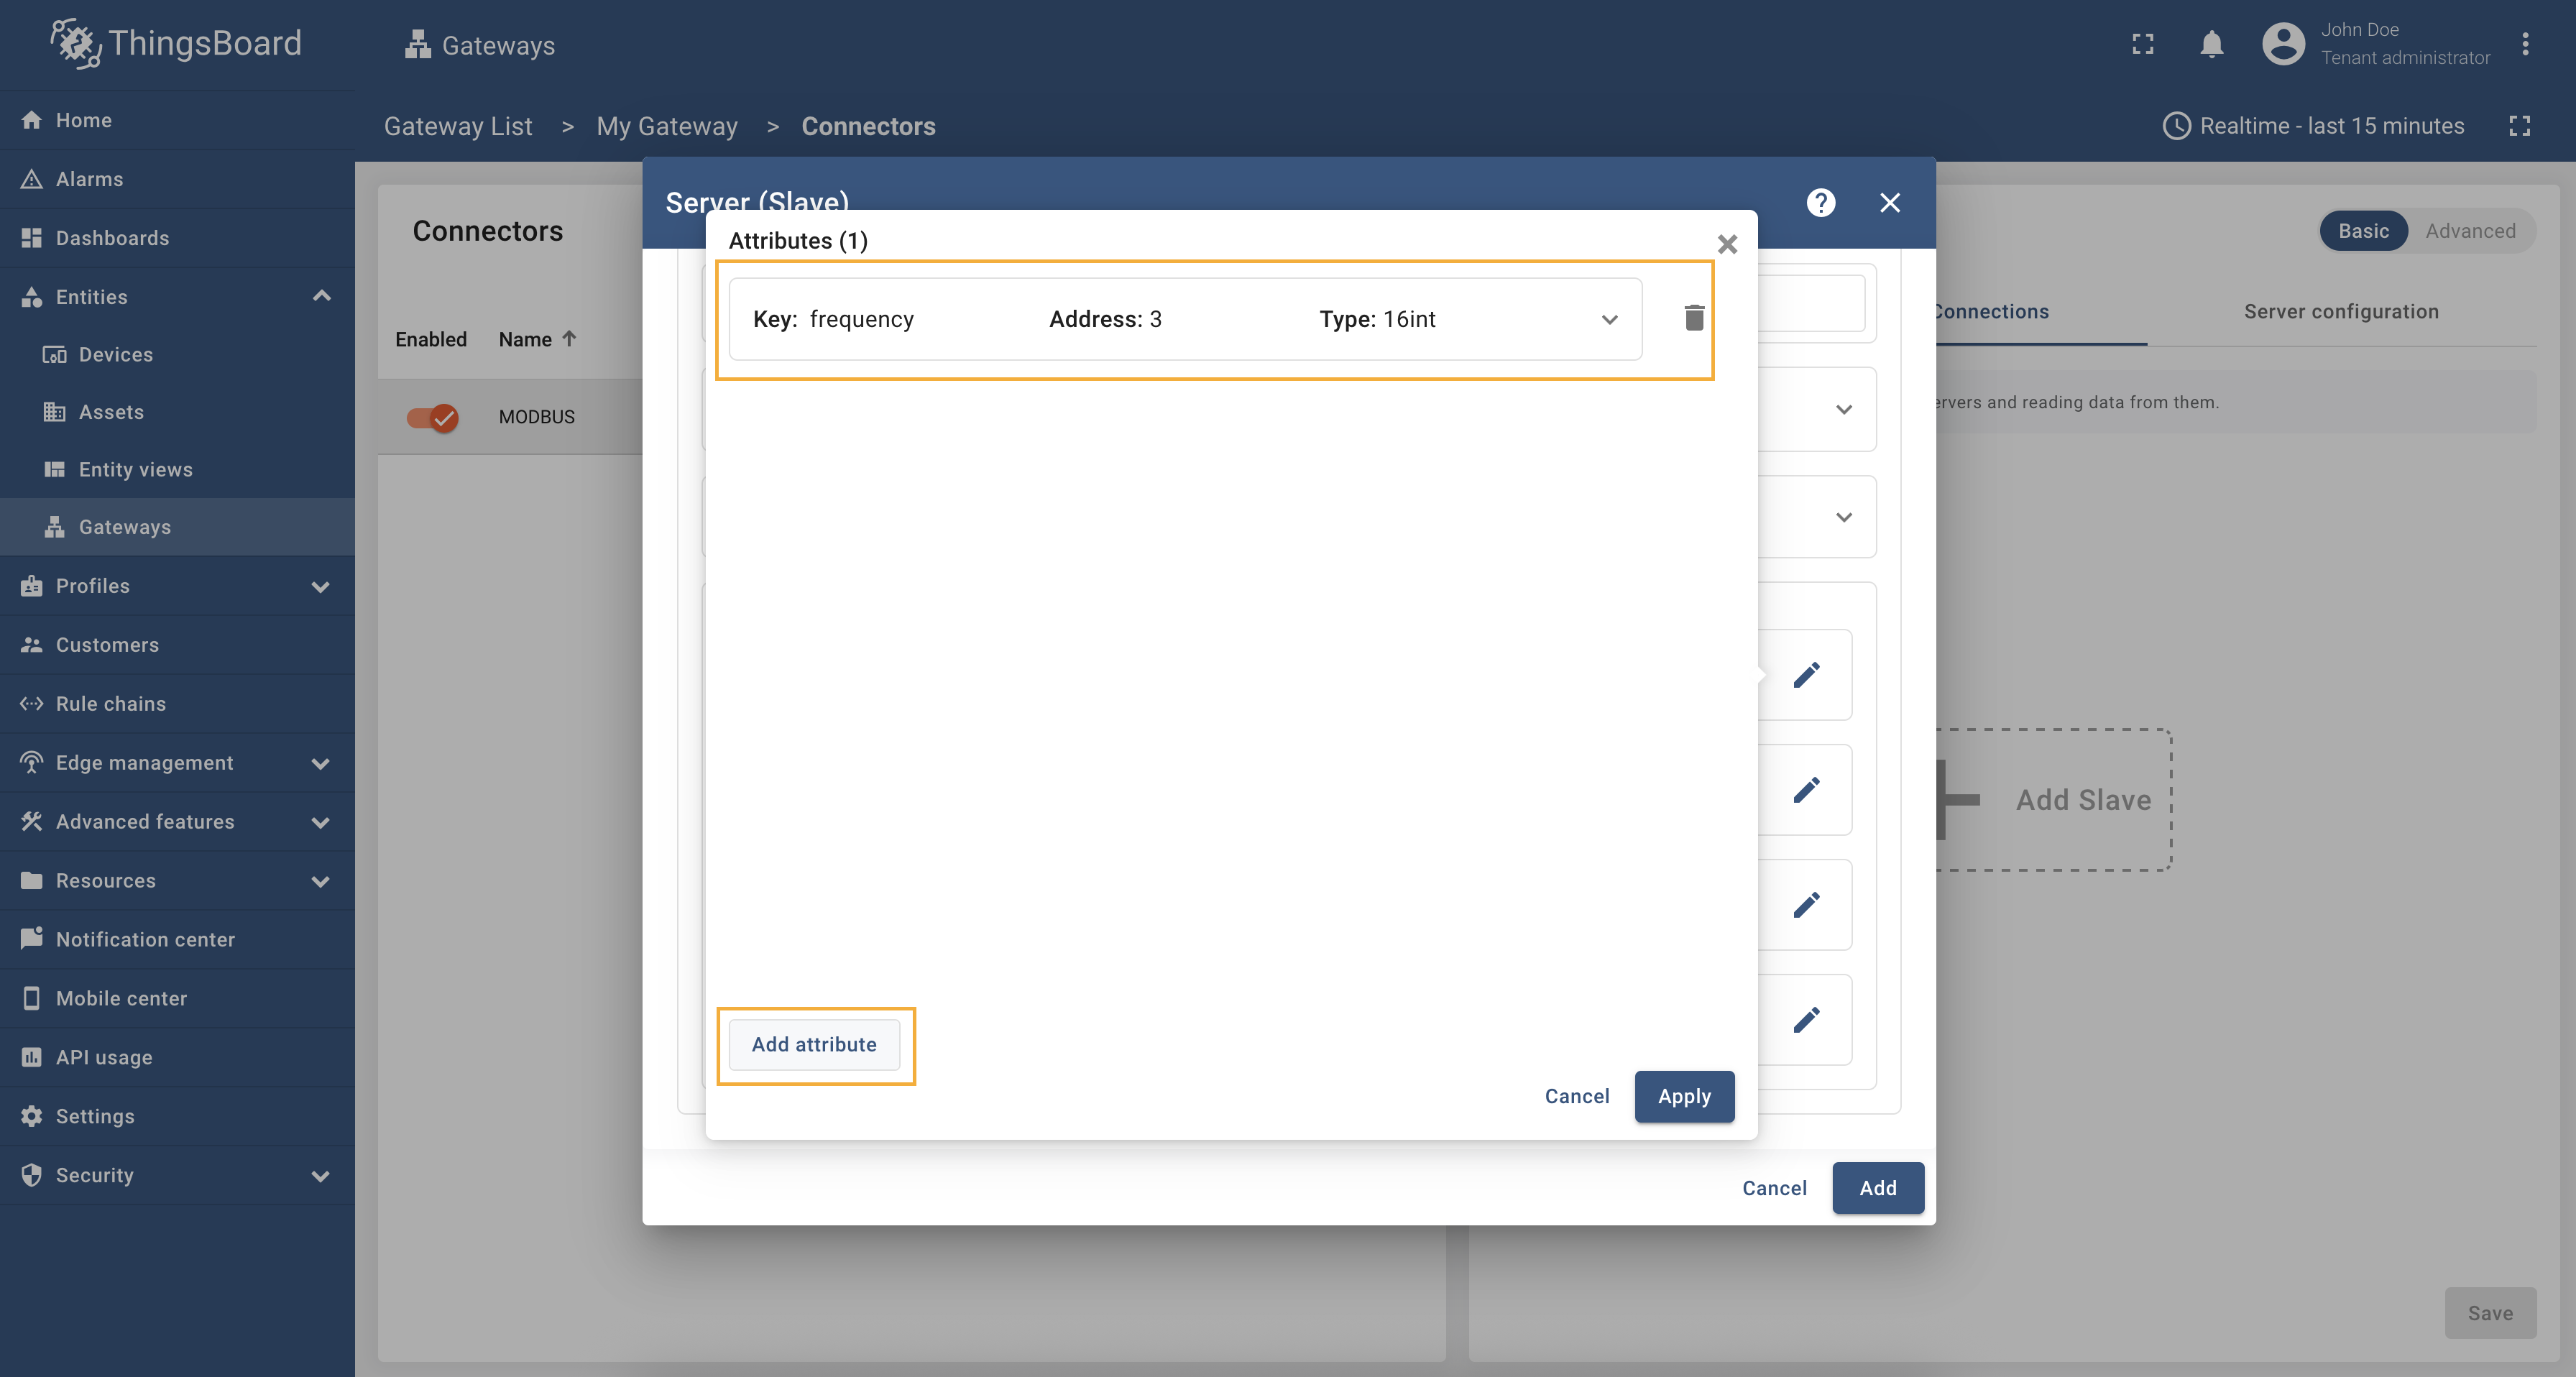 折叠刚添加的”frequency“attribute,点击”Add attribute“添加另一 attribute;  按文档填写字段值。然后点击”Apply“。 完成”Attributes“部分后,进入”Time series“部分。本部分配置用于处理 Modbus 服务器数据,在ThingsBoard 中将被解释为设备 time series。 按以下步骤配置 time series 部分:
 点击”Time series“部分的”铅笔“图标; 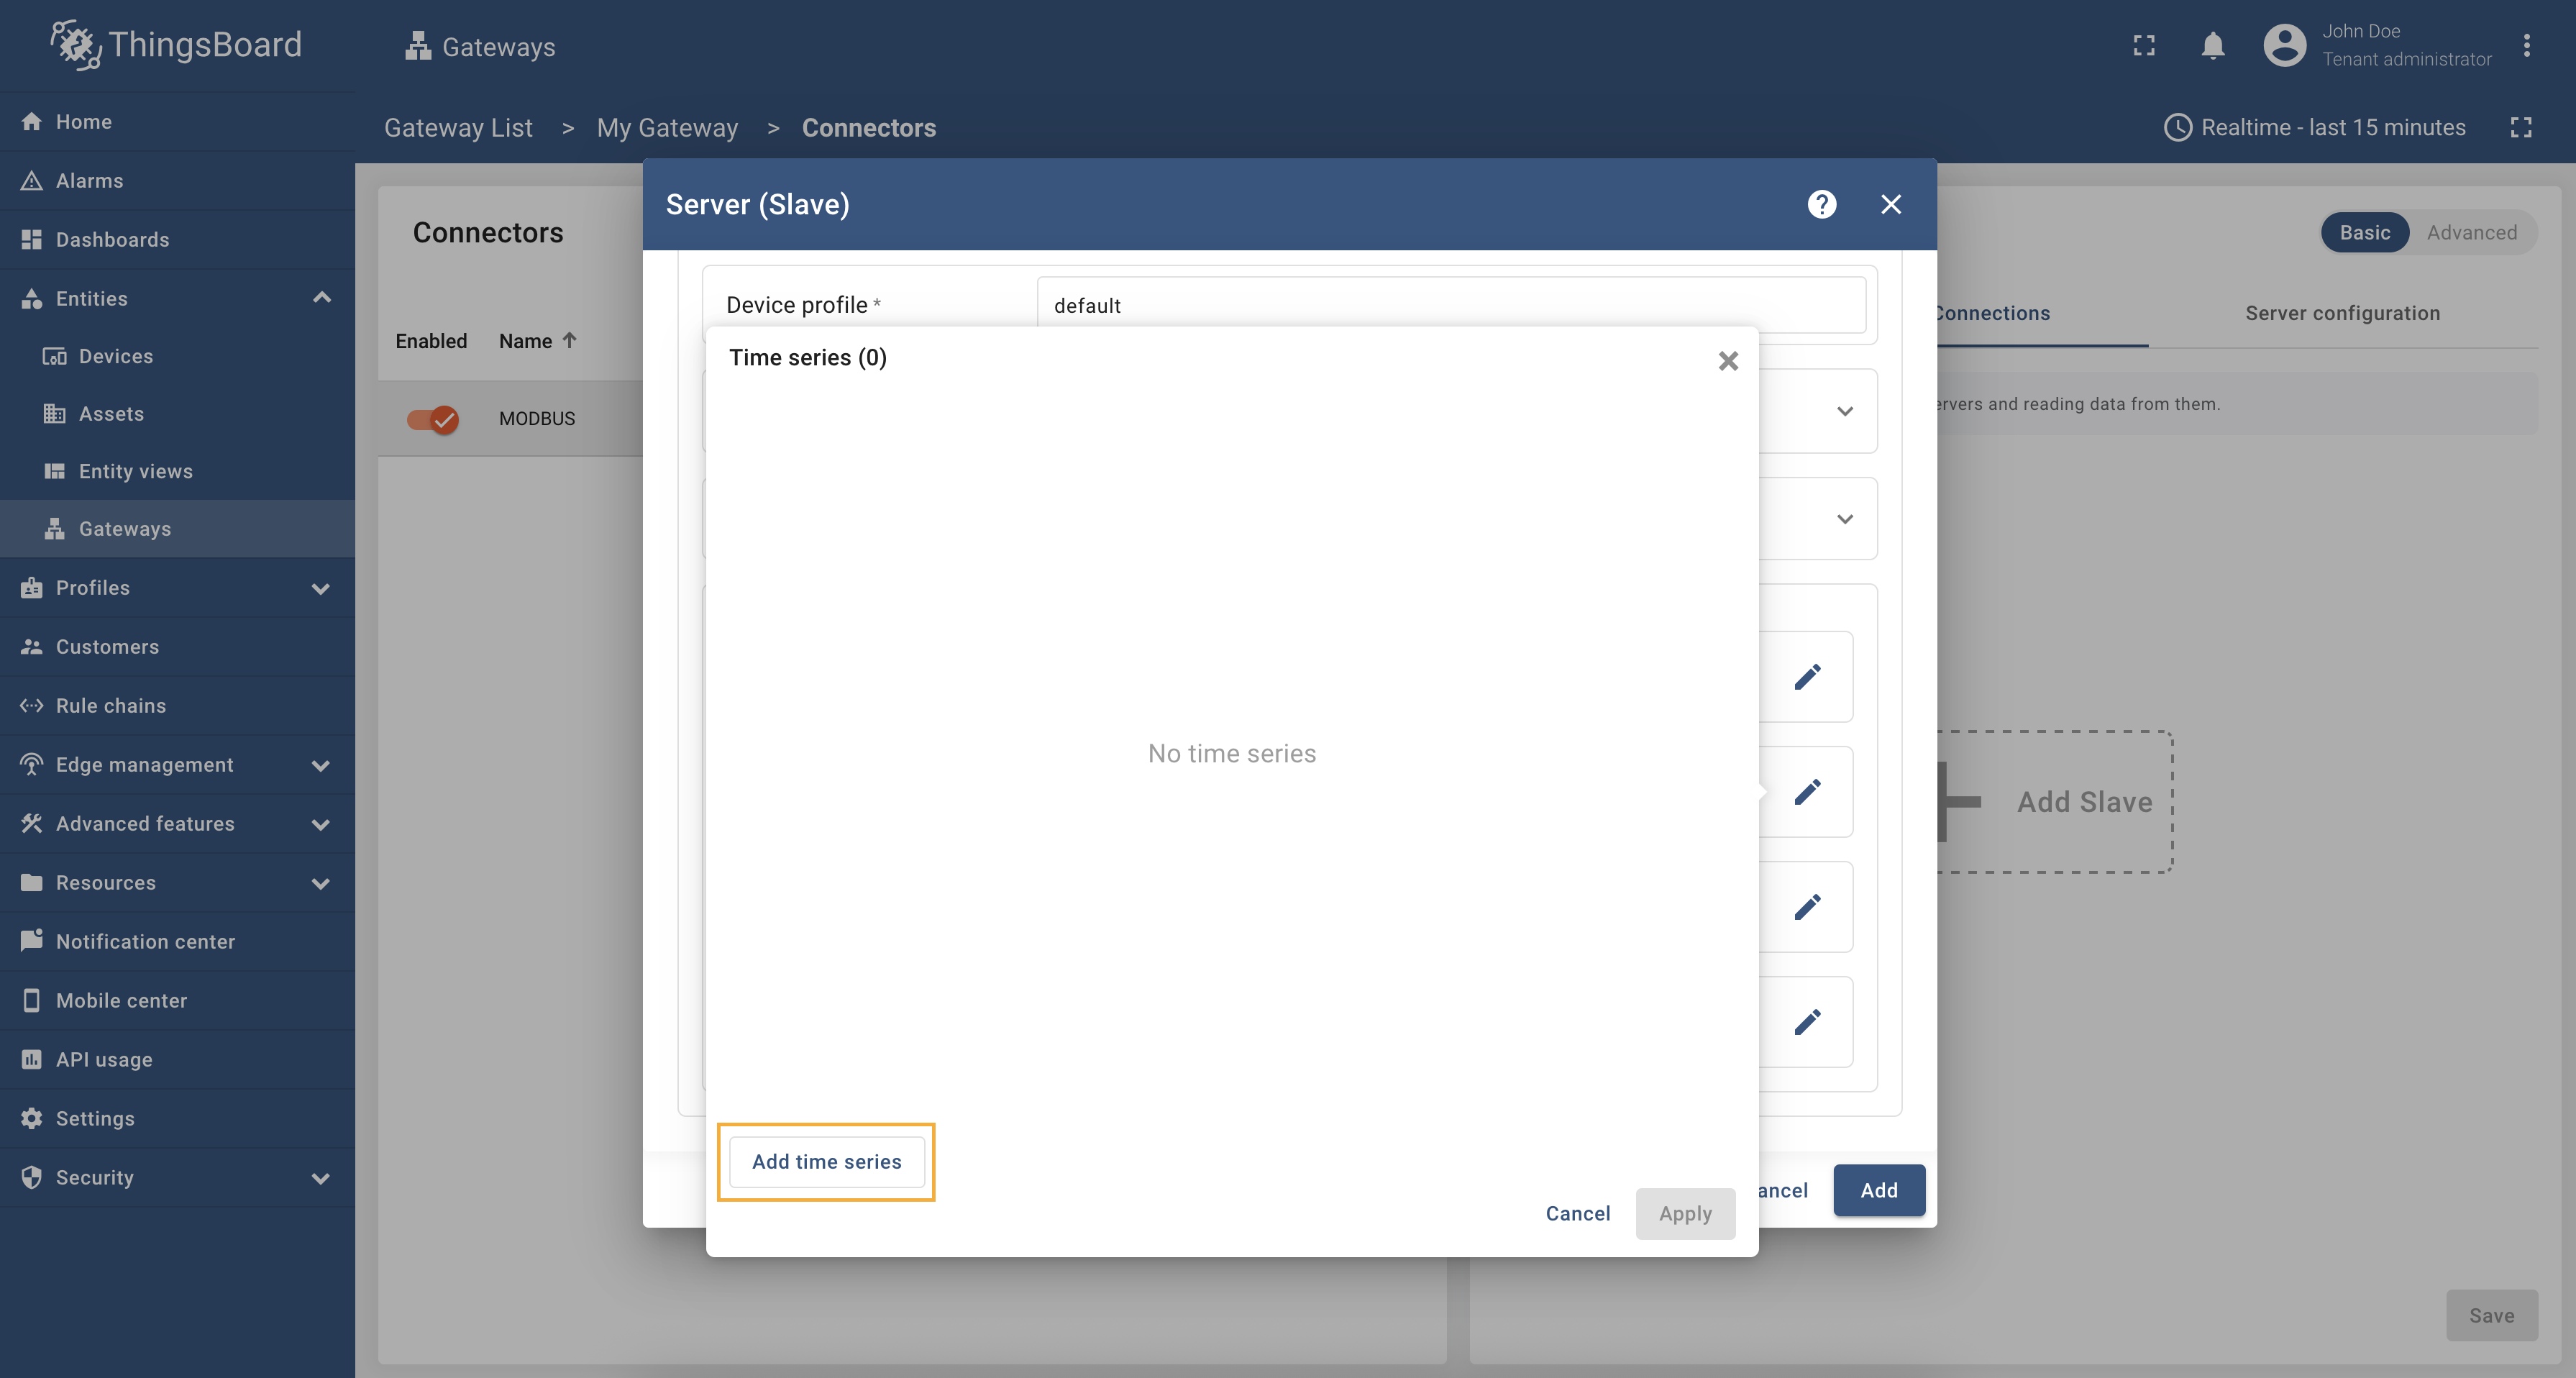 在打开窗口中点击”Add time series“;  按文档填写字段值。 添加另一 time series:折叠刚添加的”humidity“time series,点击”Add time series“,按相同步骤填写以下值:
 折叠刚添加的”humidity“time series,点击”Add time series“添加另一 time series; 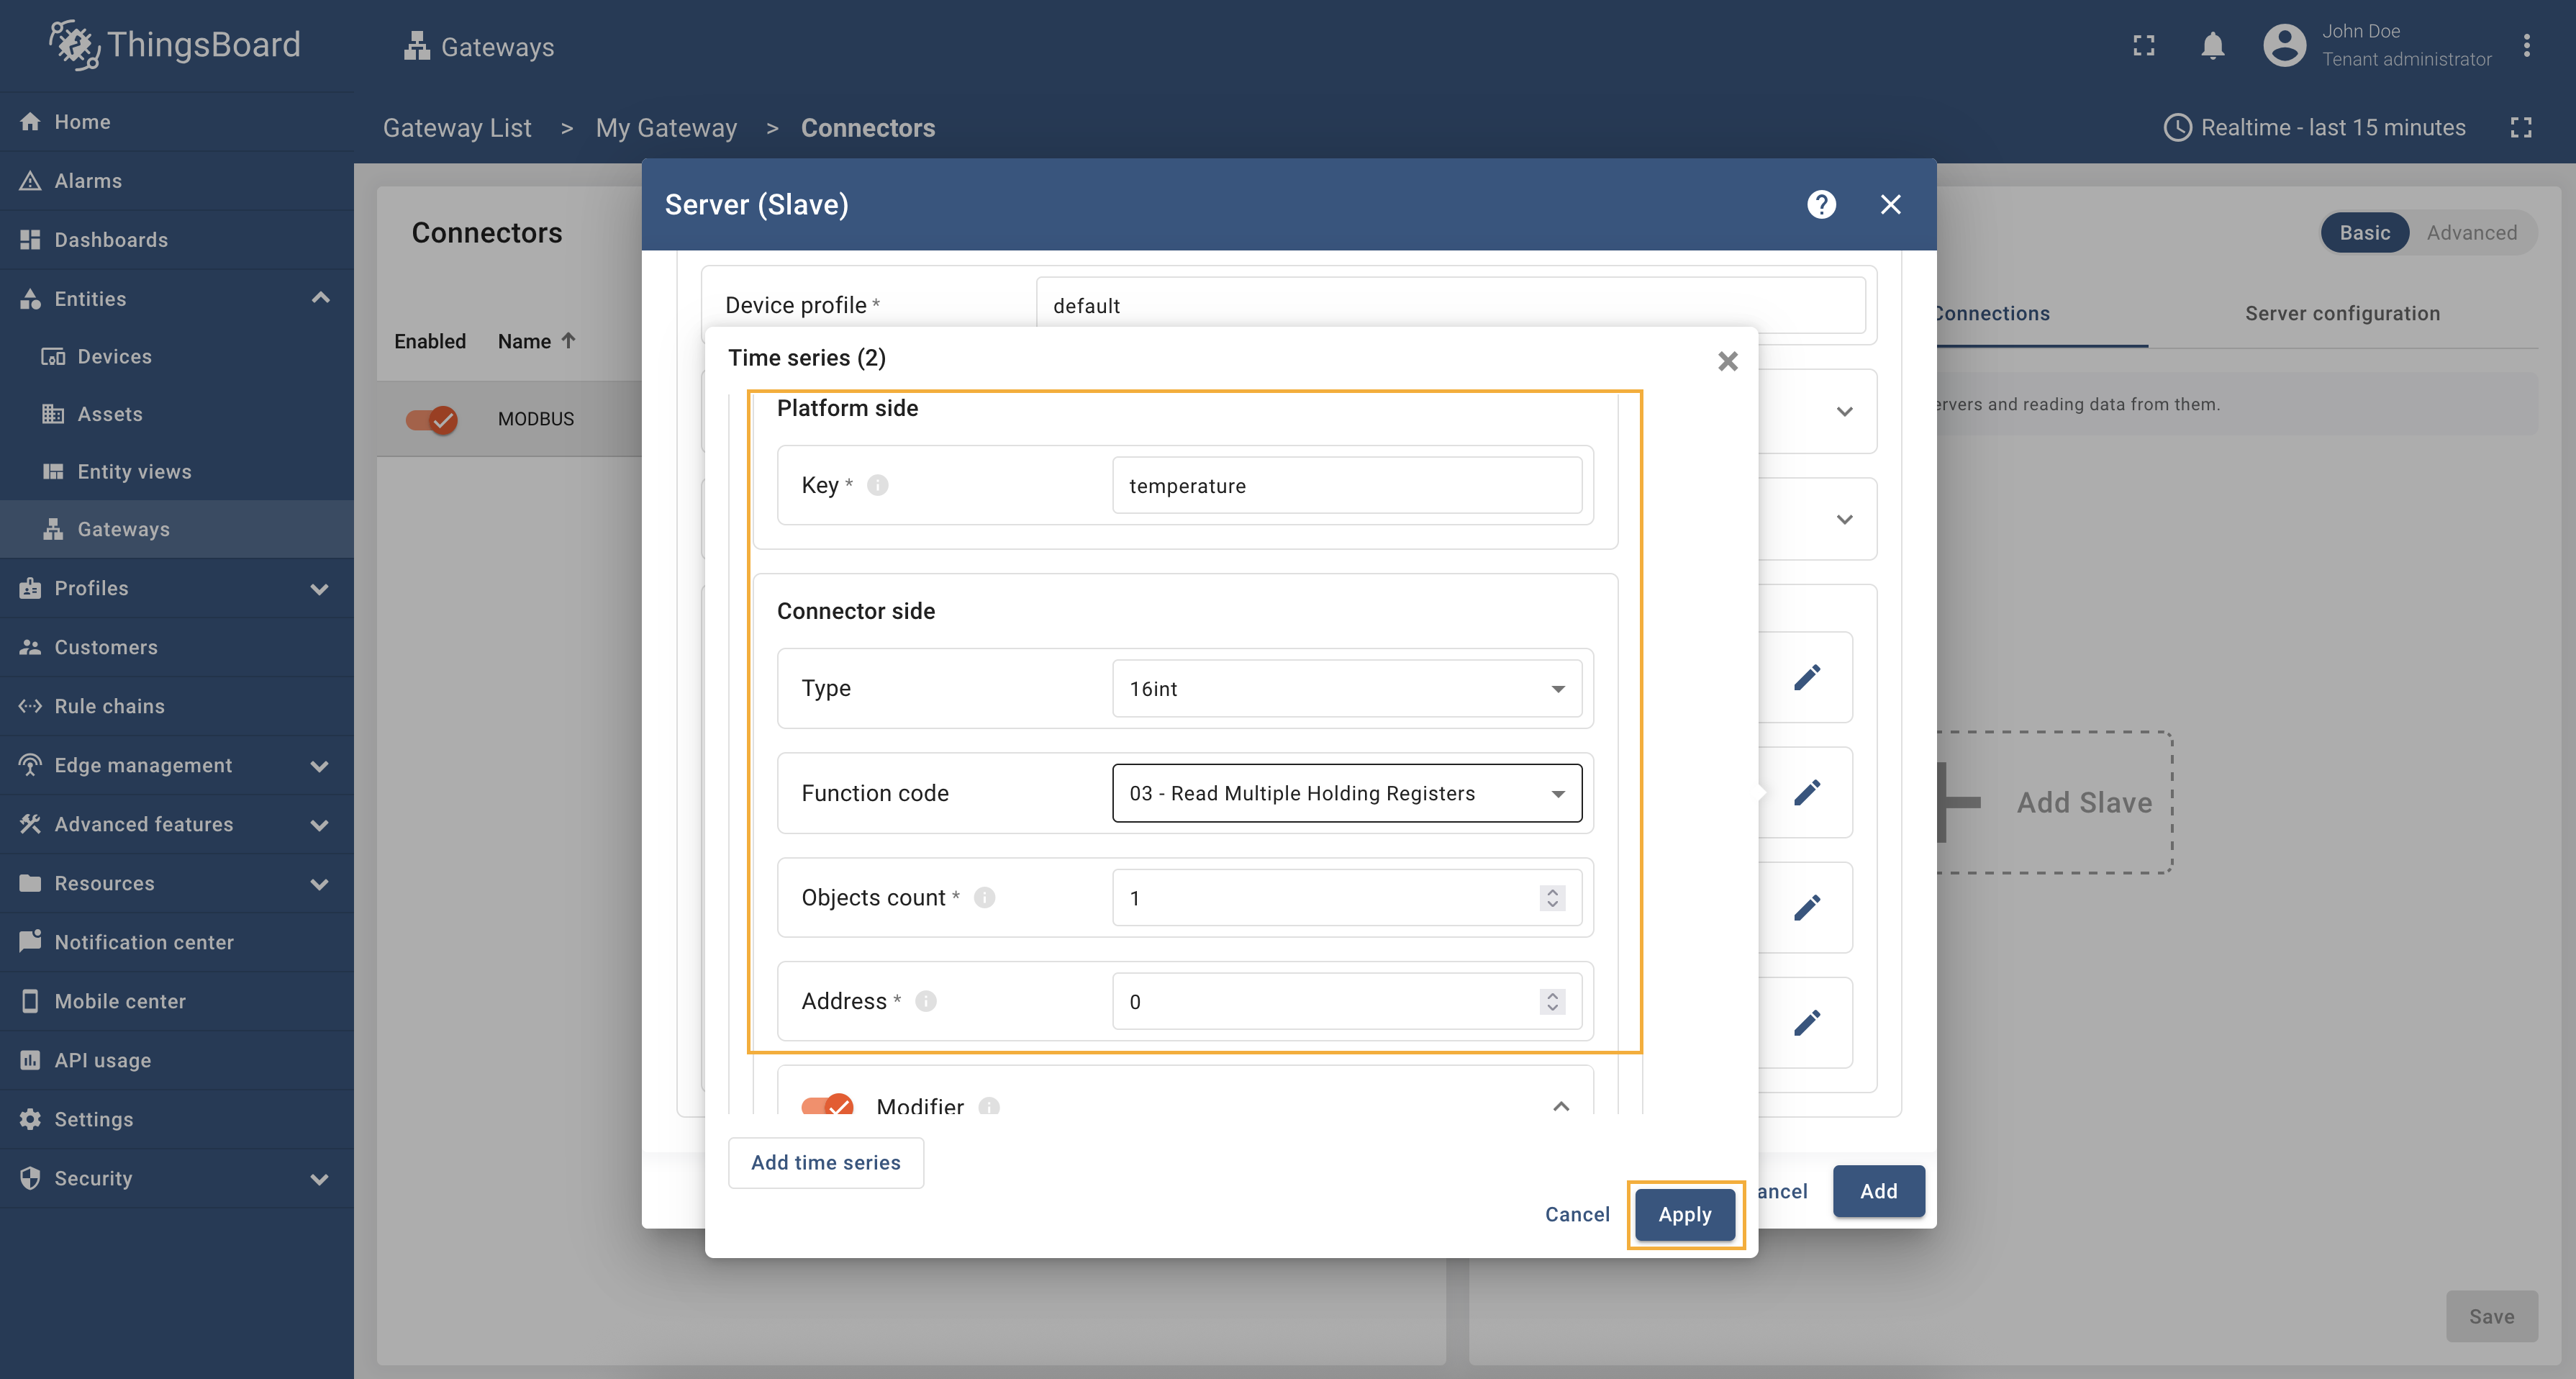 按文档填写字段值。然后点击”Apply“。 配置完成后,connector 的最终效果如下。完成后点击”Add“。 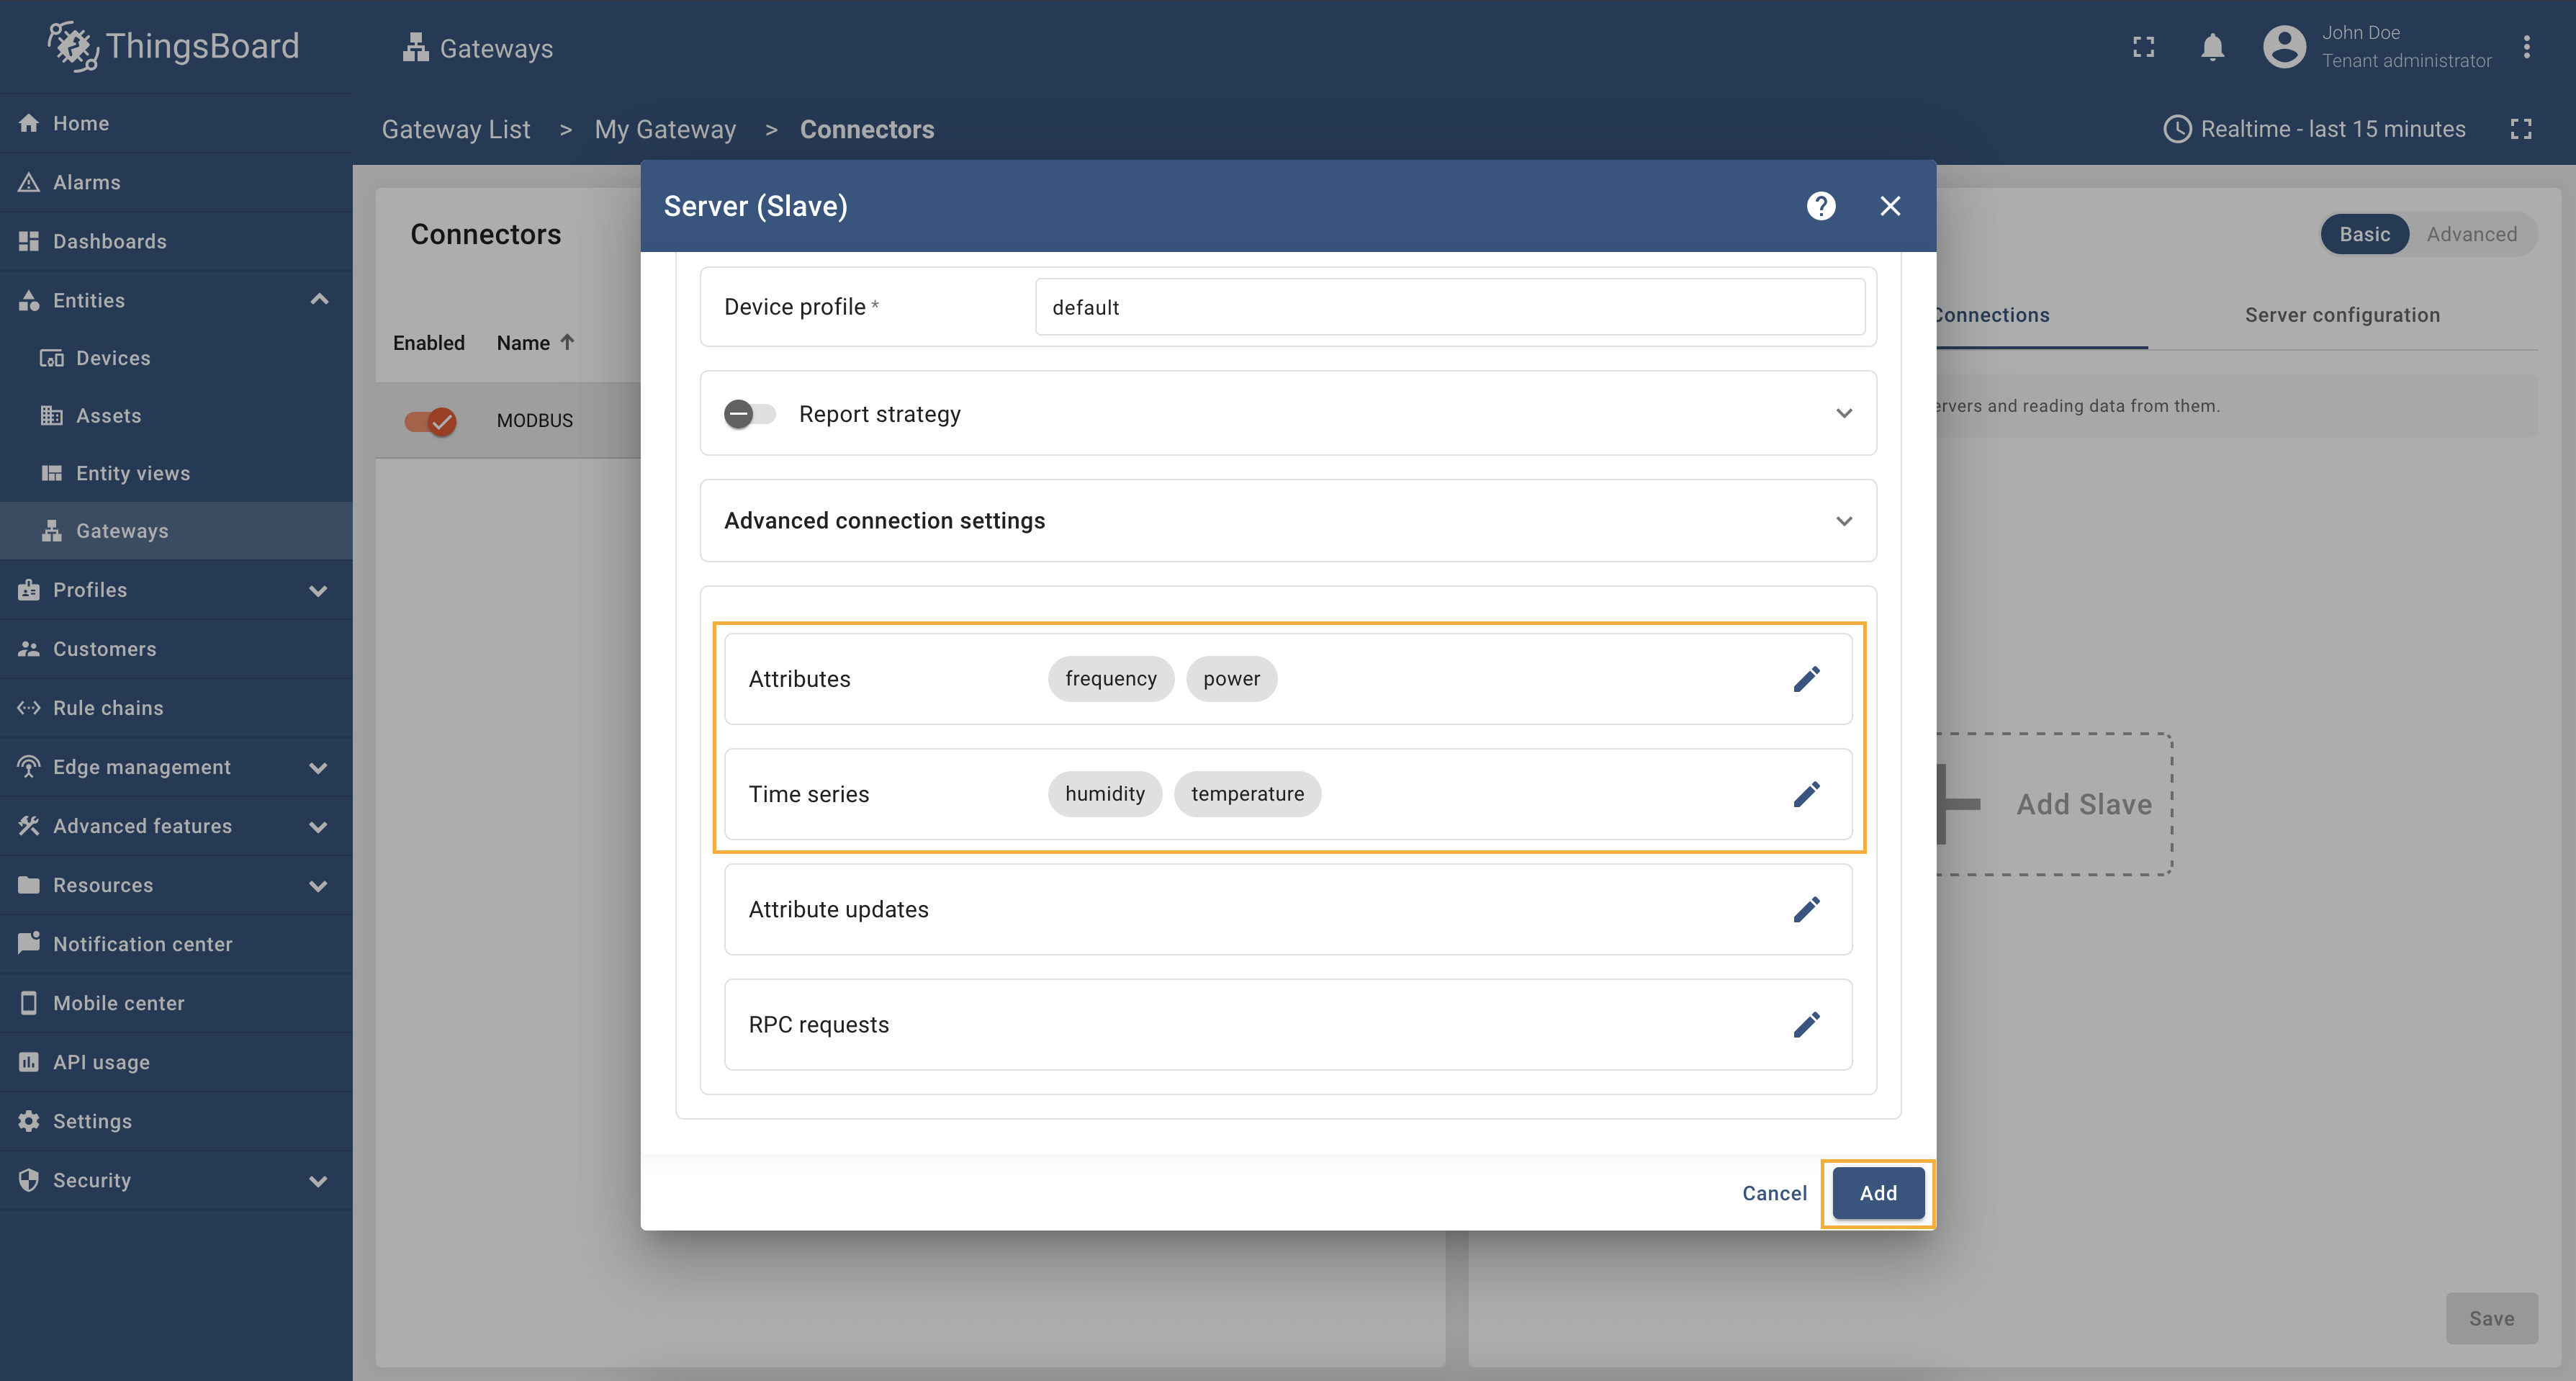 配置完成后的 connector 最终效果。完成后点击”Add“。 最后,点击”Save“保存 Modbus 配置。  最后,点击”Save“保存 Modbus 配置。 完成上述步骤后,网关将接收并应用新配置,并与远程服务器同步状态。 可在”Configuration“列查看 connector 配置的同步状态,确认网关是否与远程设置一致。 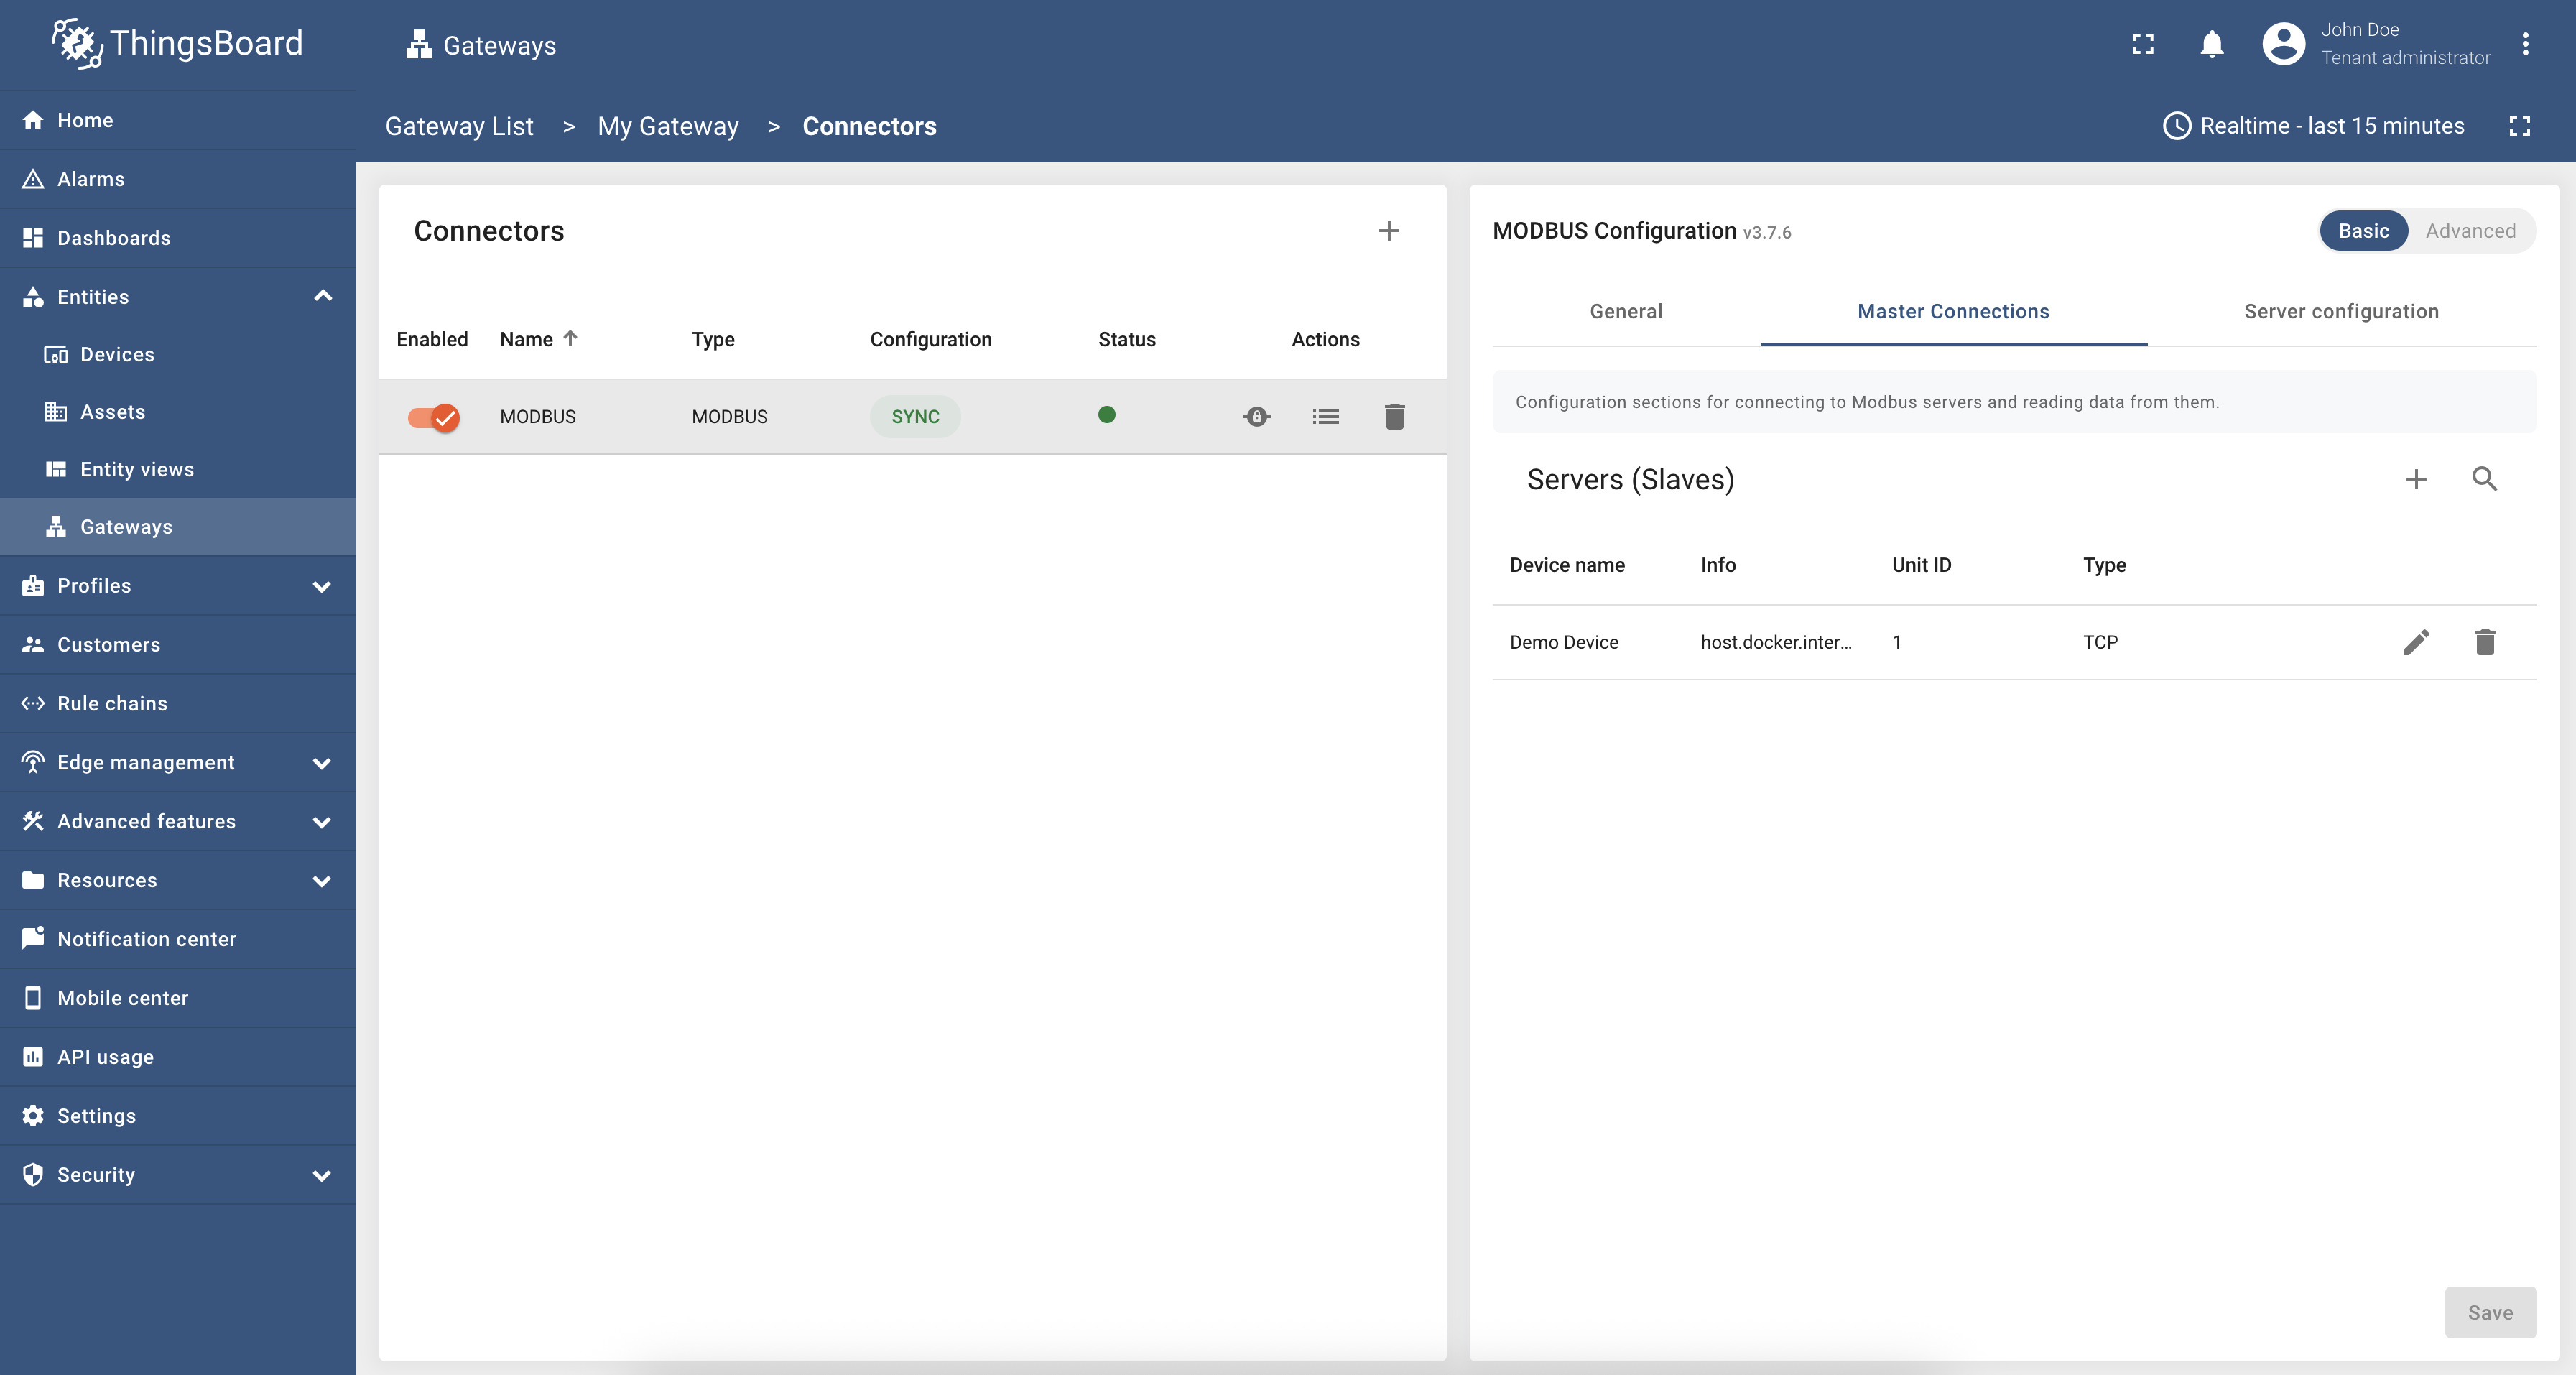 可在”Configuration“列查看 connector 配置的同步状态。 此外,可查看 connector 日志以确认 connector 工作正常:
 在 connector 的”General“标签页中,开启”Enable remote logging“启用远程日志。在”Log level“下拉中选择”DEBUG“。点击”Save“应用更改;  点击”logs“图标打开 connector 日志页面; 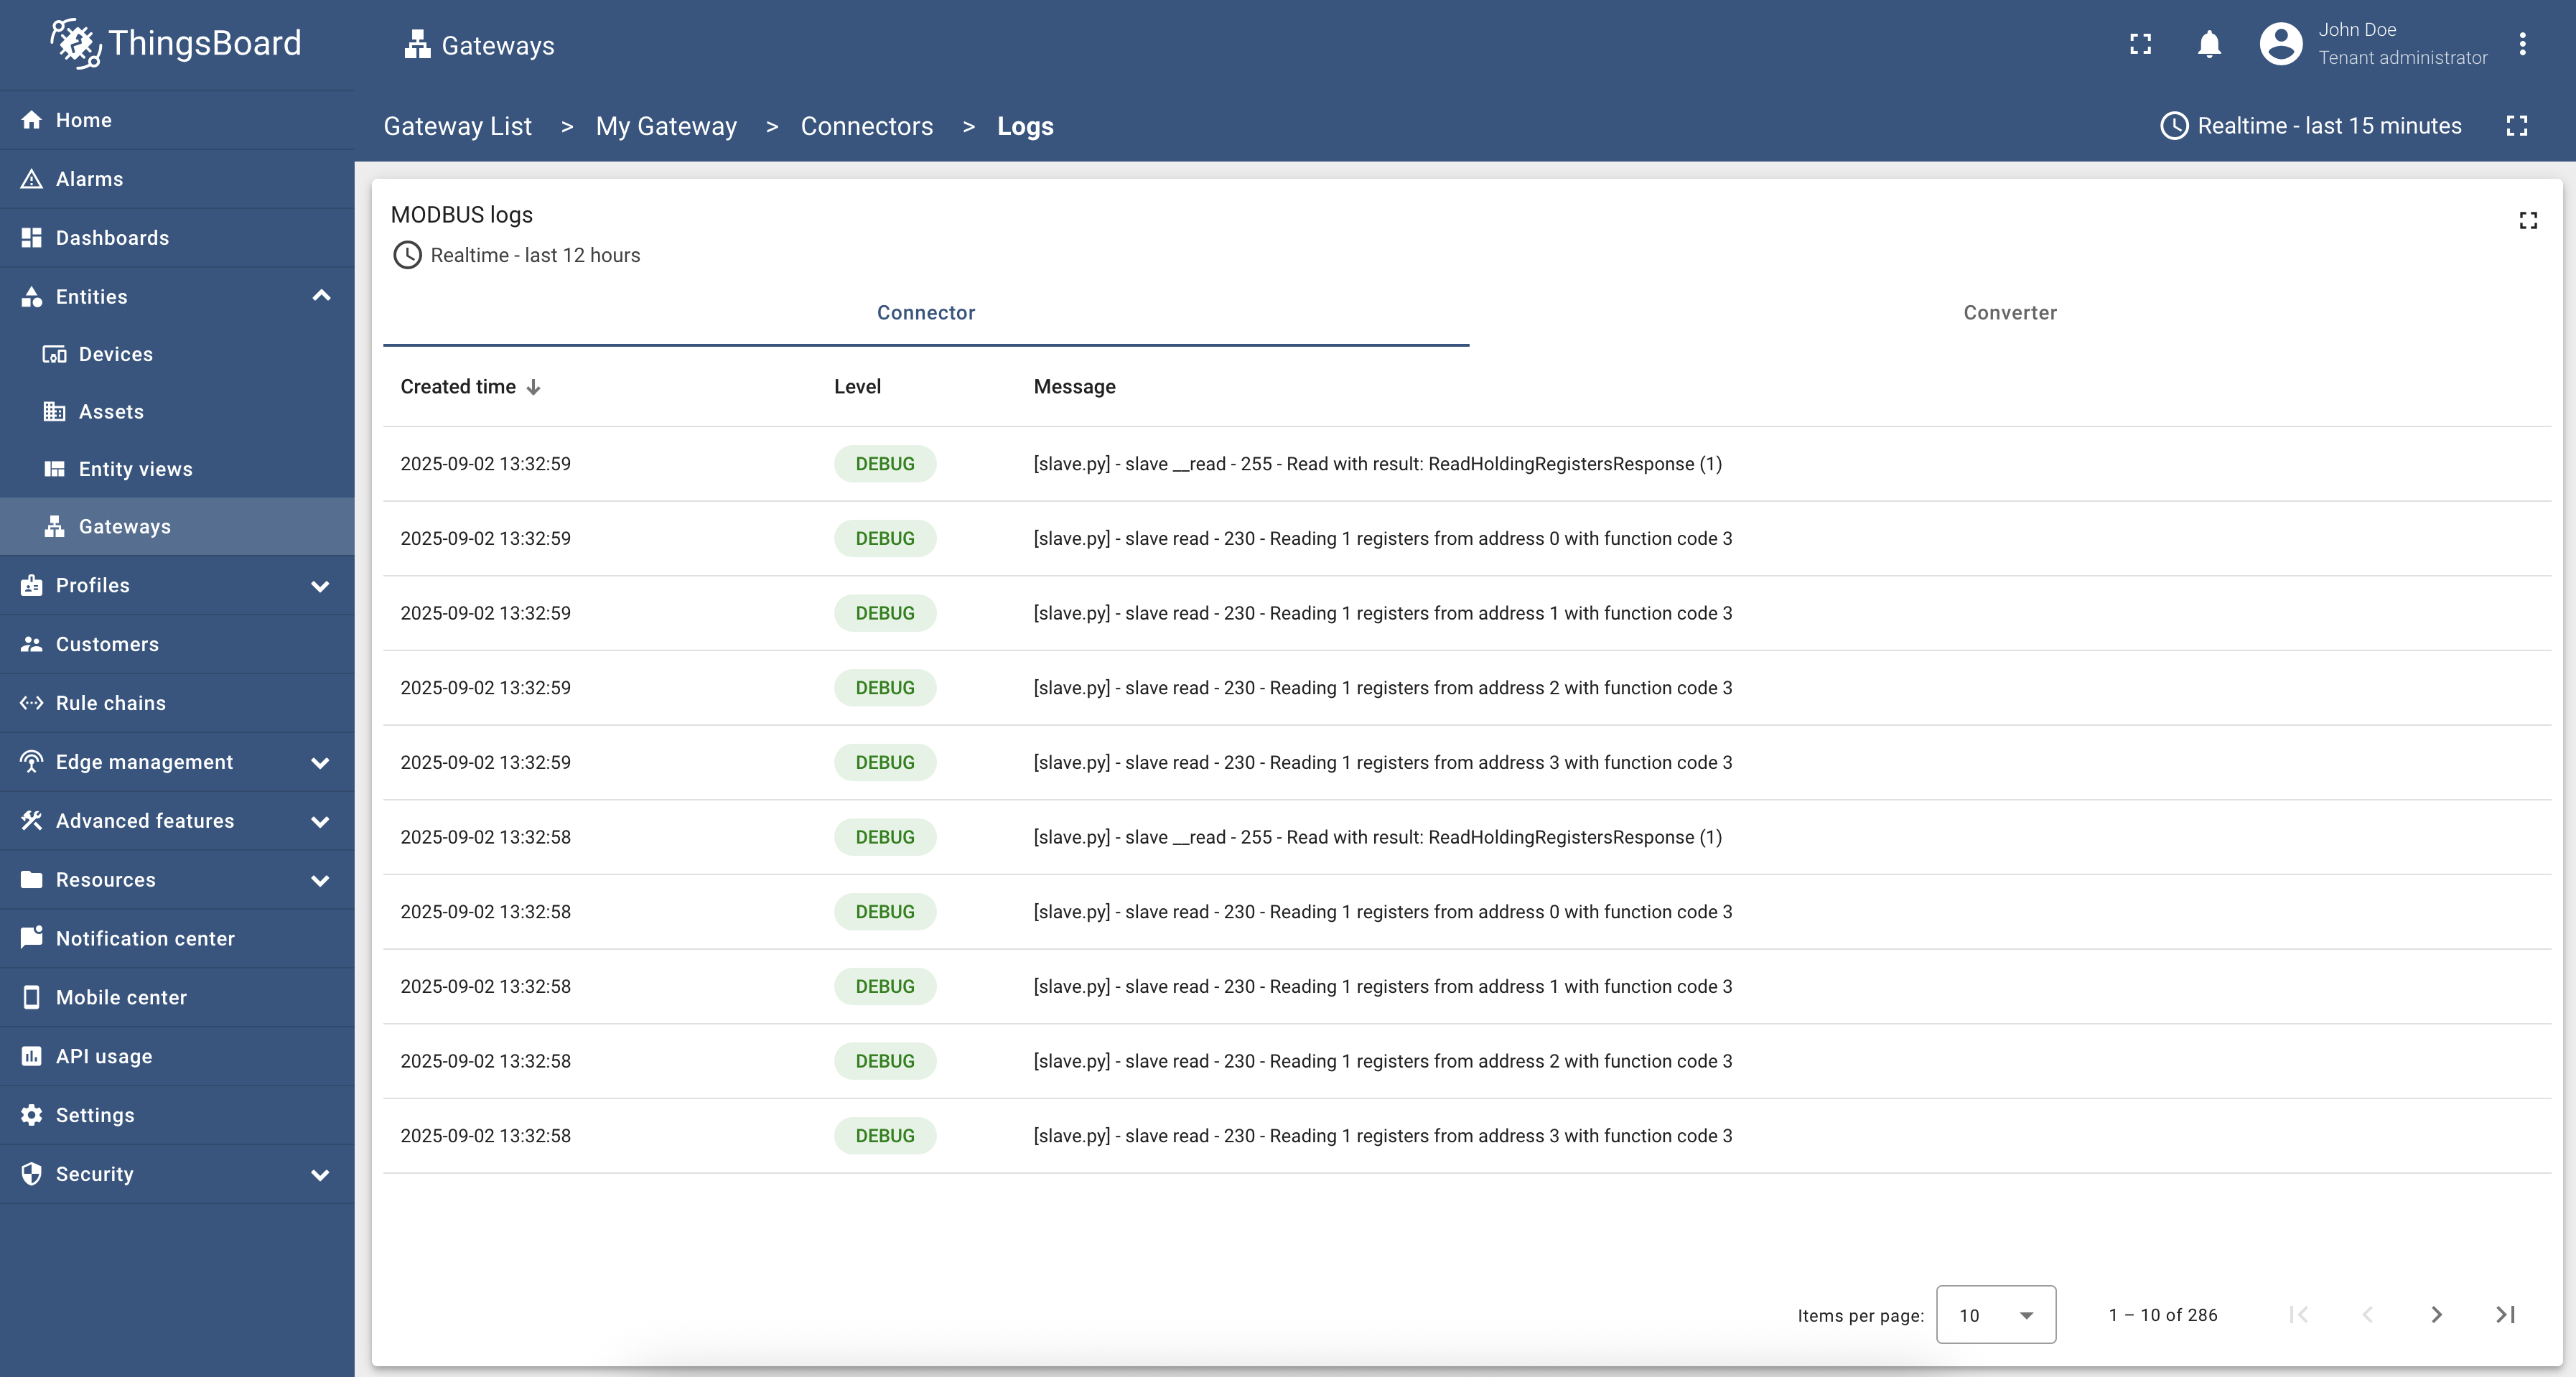 可看到由”Created time“、”Status“和”Message“列组成的”Logs“表格。 至此,网关已可通过新建并配置的 Modbus connector 处理数据。 |

下面我们添加 OPC-UA connector,它将从演示服务器读取部分数据到已创建的网关。 配置演示服务器我们将使用 docker 镜像作为演示仿真服务器,可通过以下命令安装并运行: 运行 docker 镜像后,终端会显示以下日志:
配置 connector此 OPC-UA connector 配置在 “opc.tcp://host.docker.internal:4840/freeopcua/server/” 连接到名为 “OPC-UA Demo Server” 的服务器。 配置指定了 timeout、scan period、security 机制(如 anonymous 身份的 “Basic128Rsa15”)等。 mapping 部分定义 OPC-UA 节点如何映射到设备及其 attribute 和 time series。本例中将名为 “Demo Device”、类型为 “default” 的设备映射到 “ 创建 connector 请按以下步骤操作:
在右侧面板点击”Connectors configuration“按钮; 点击”+ Add connector“按钮; 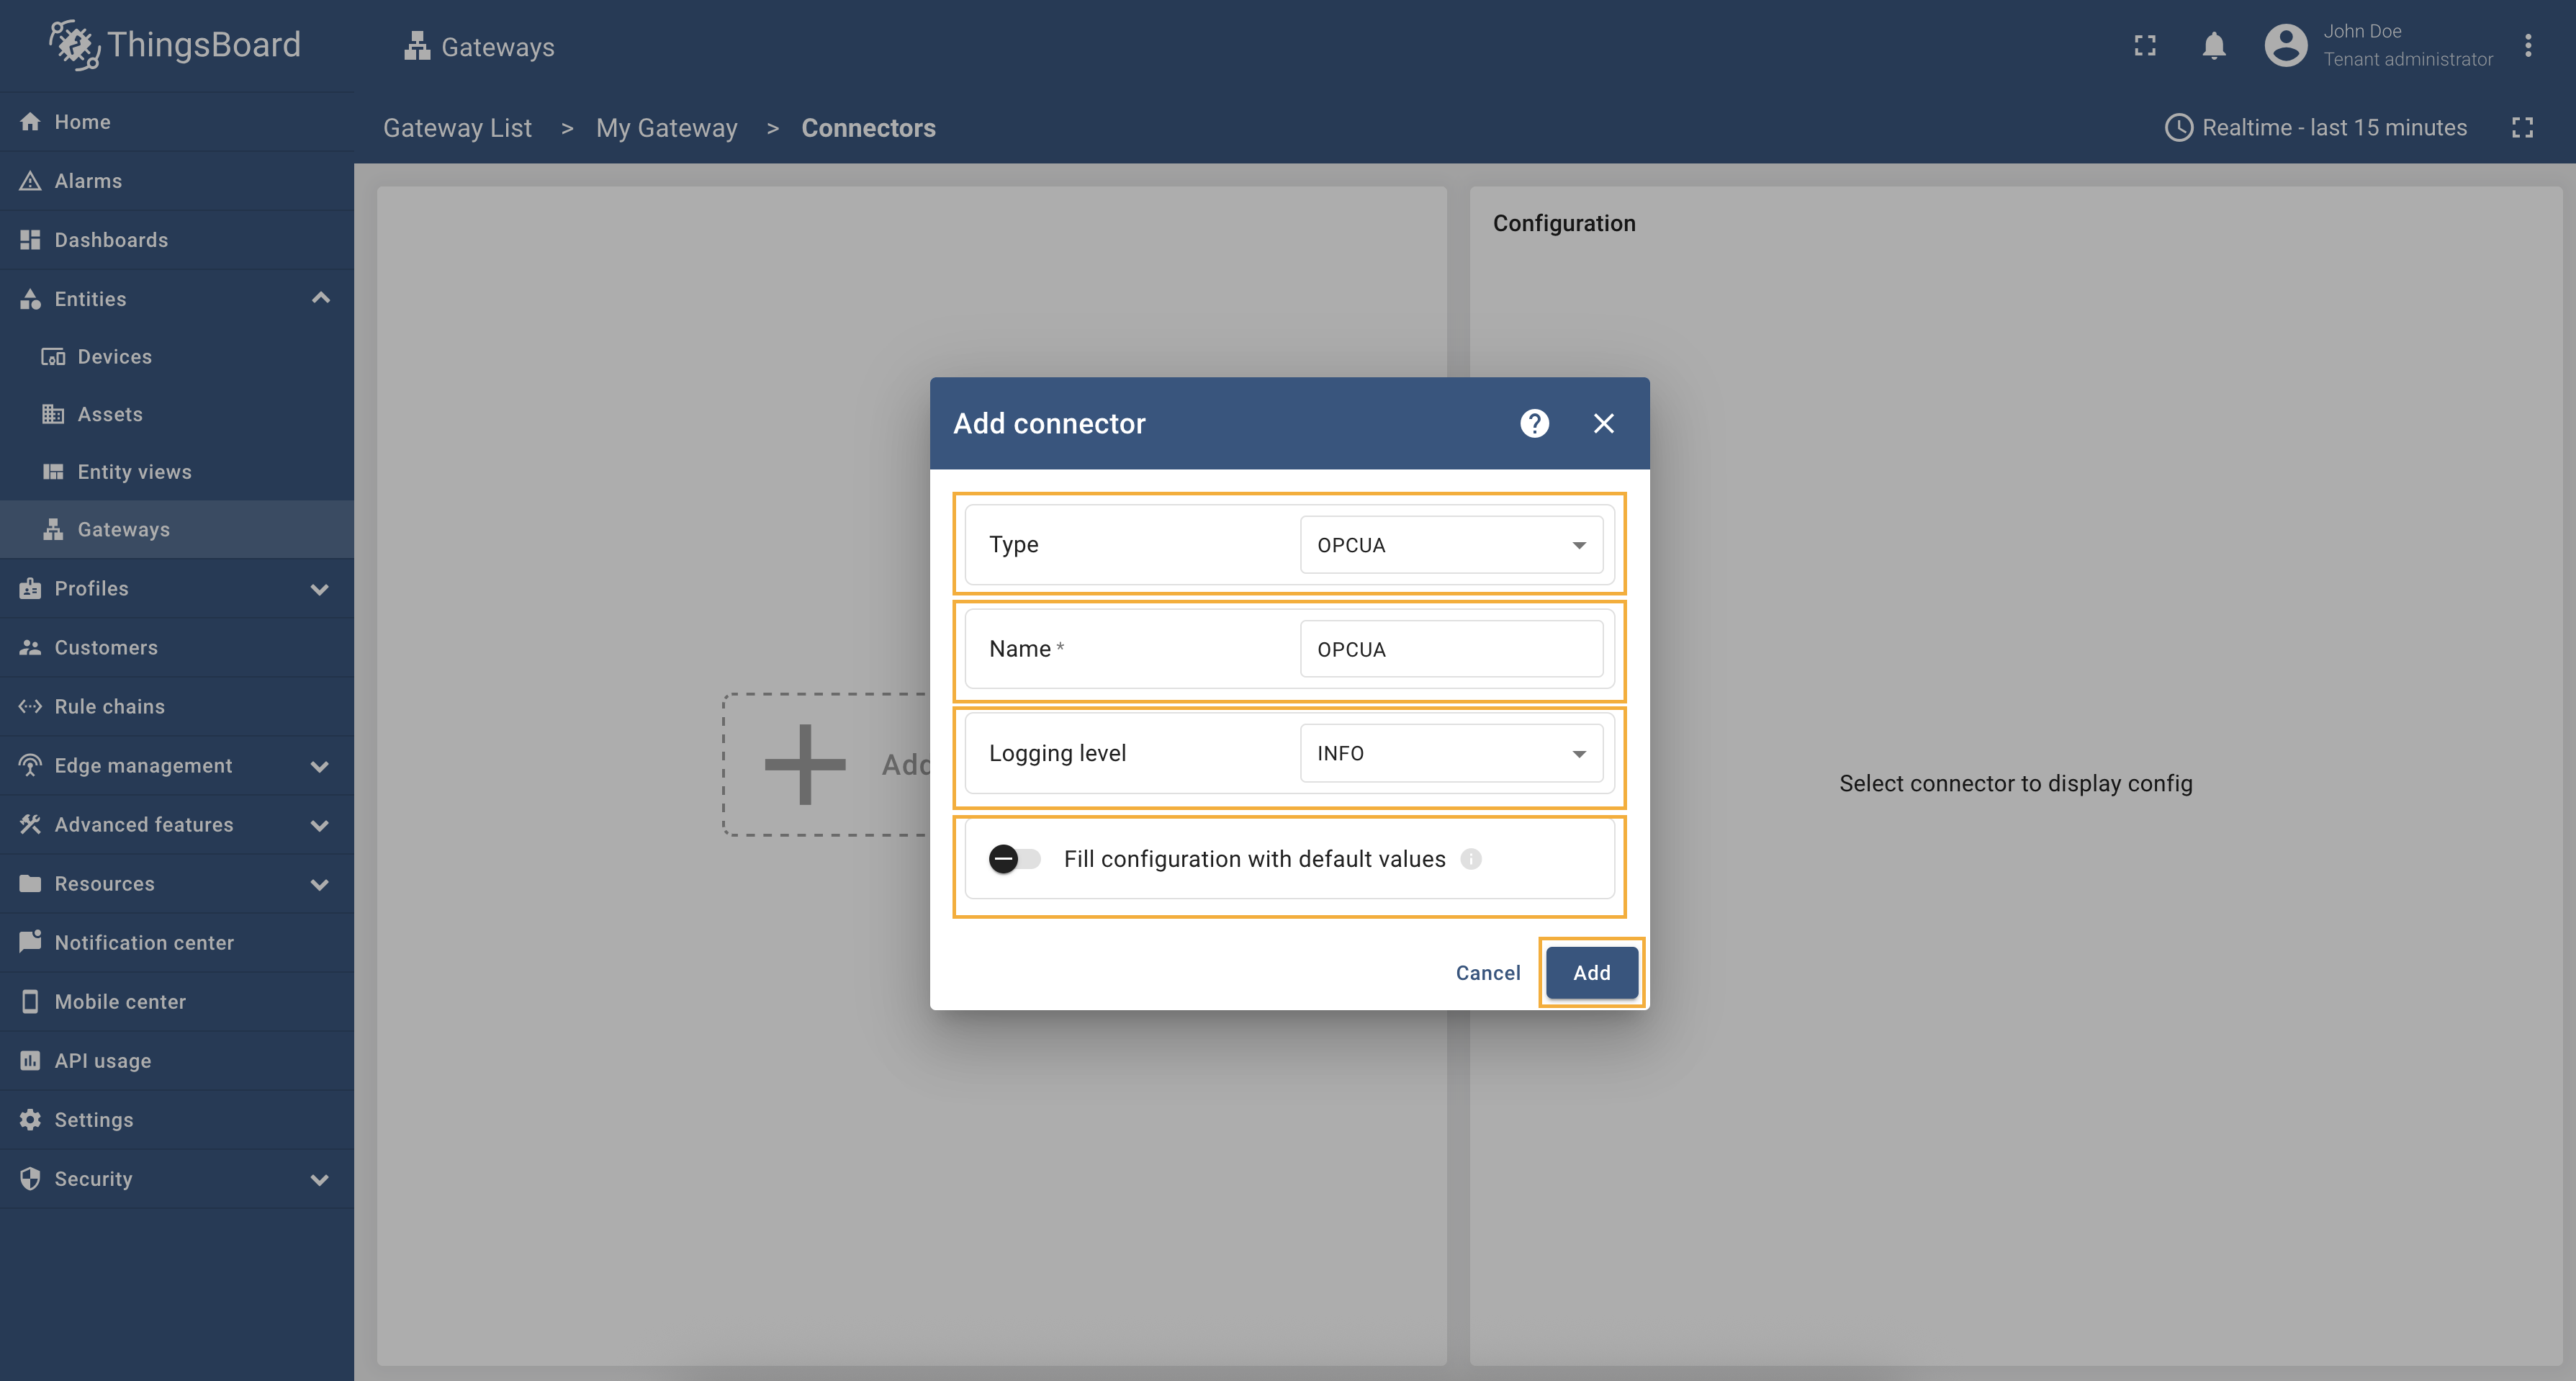 在下拉中选择”OPCUA“connector 类型,填写”Name“,将”Logging level“设为”INFO“,关闭”Fill configuration with default values“并点击”Add“;  Connector 已创建。 首先配置到演示 OPC-UA 服务器的连接。从”Server“标签页开始。 该部分提供 server endpoint url、security、scan period、poll period、subscriptions 等详细连接配置选项。
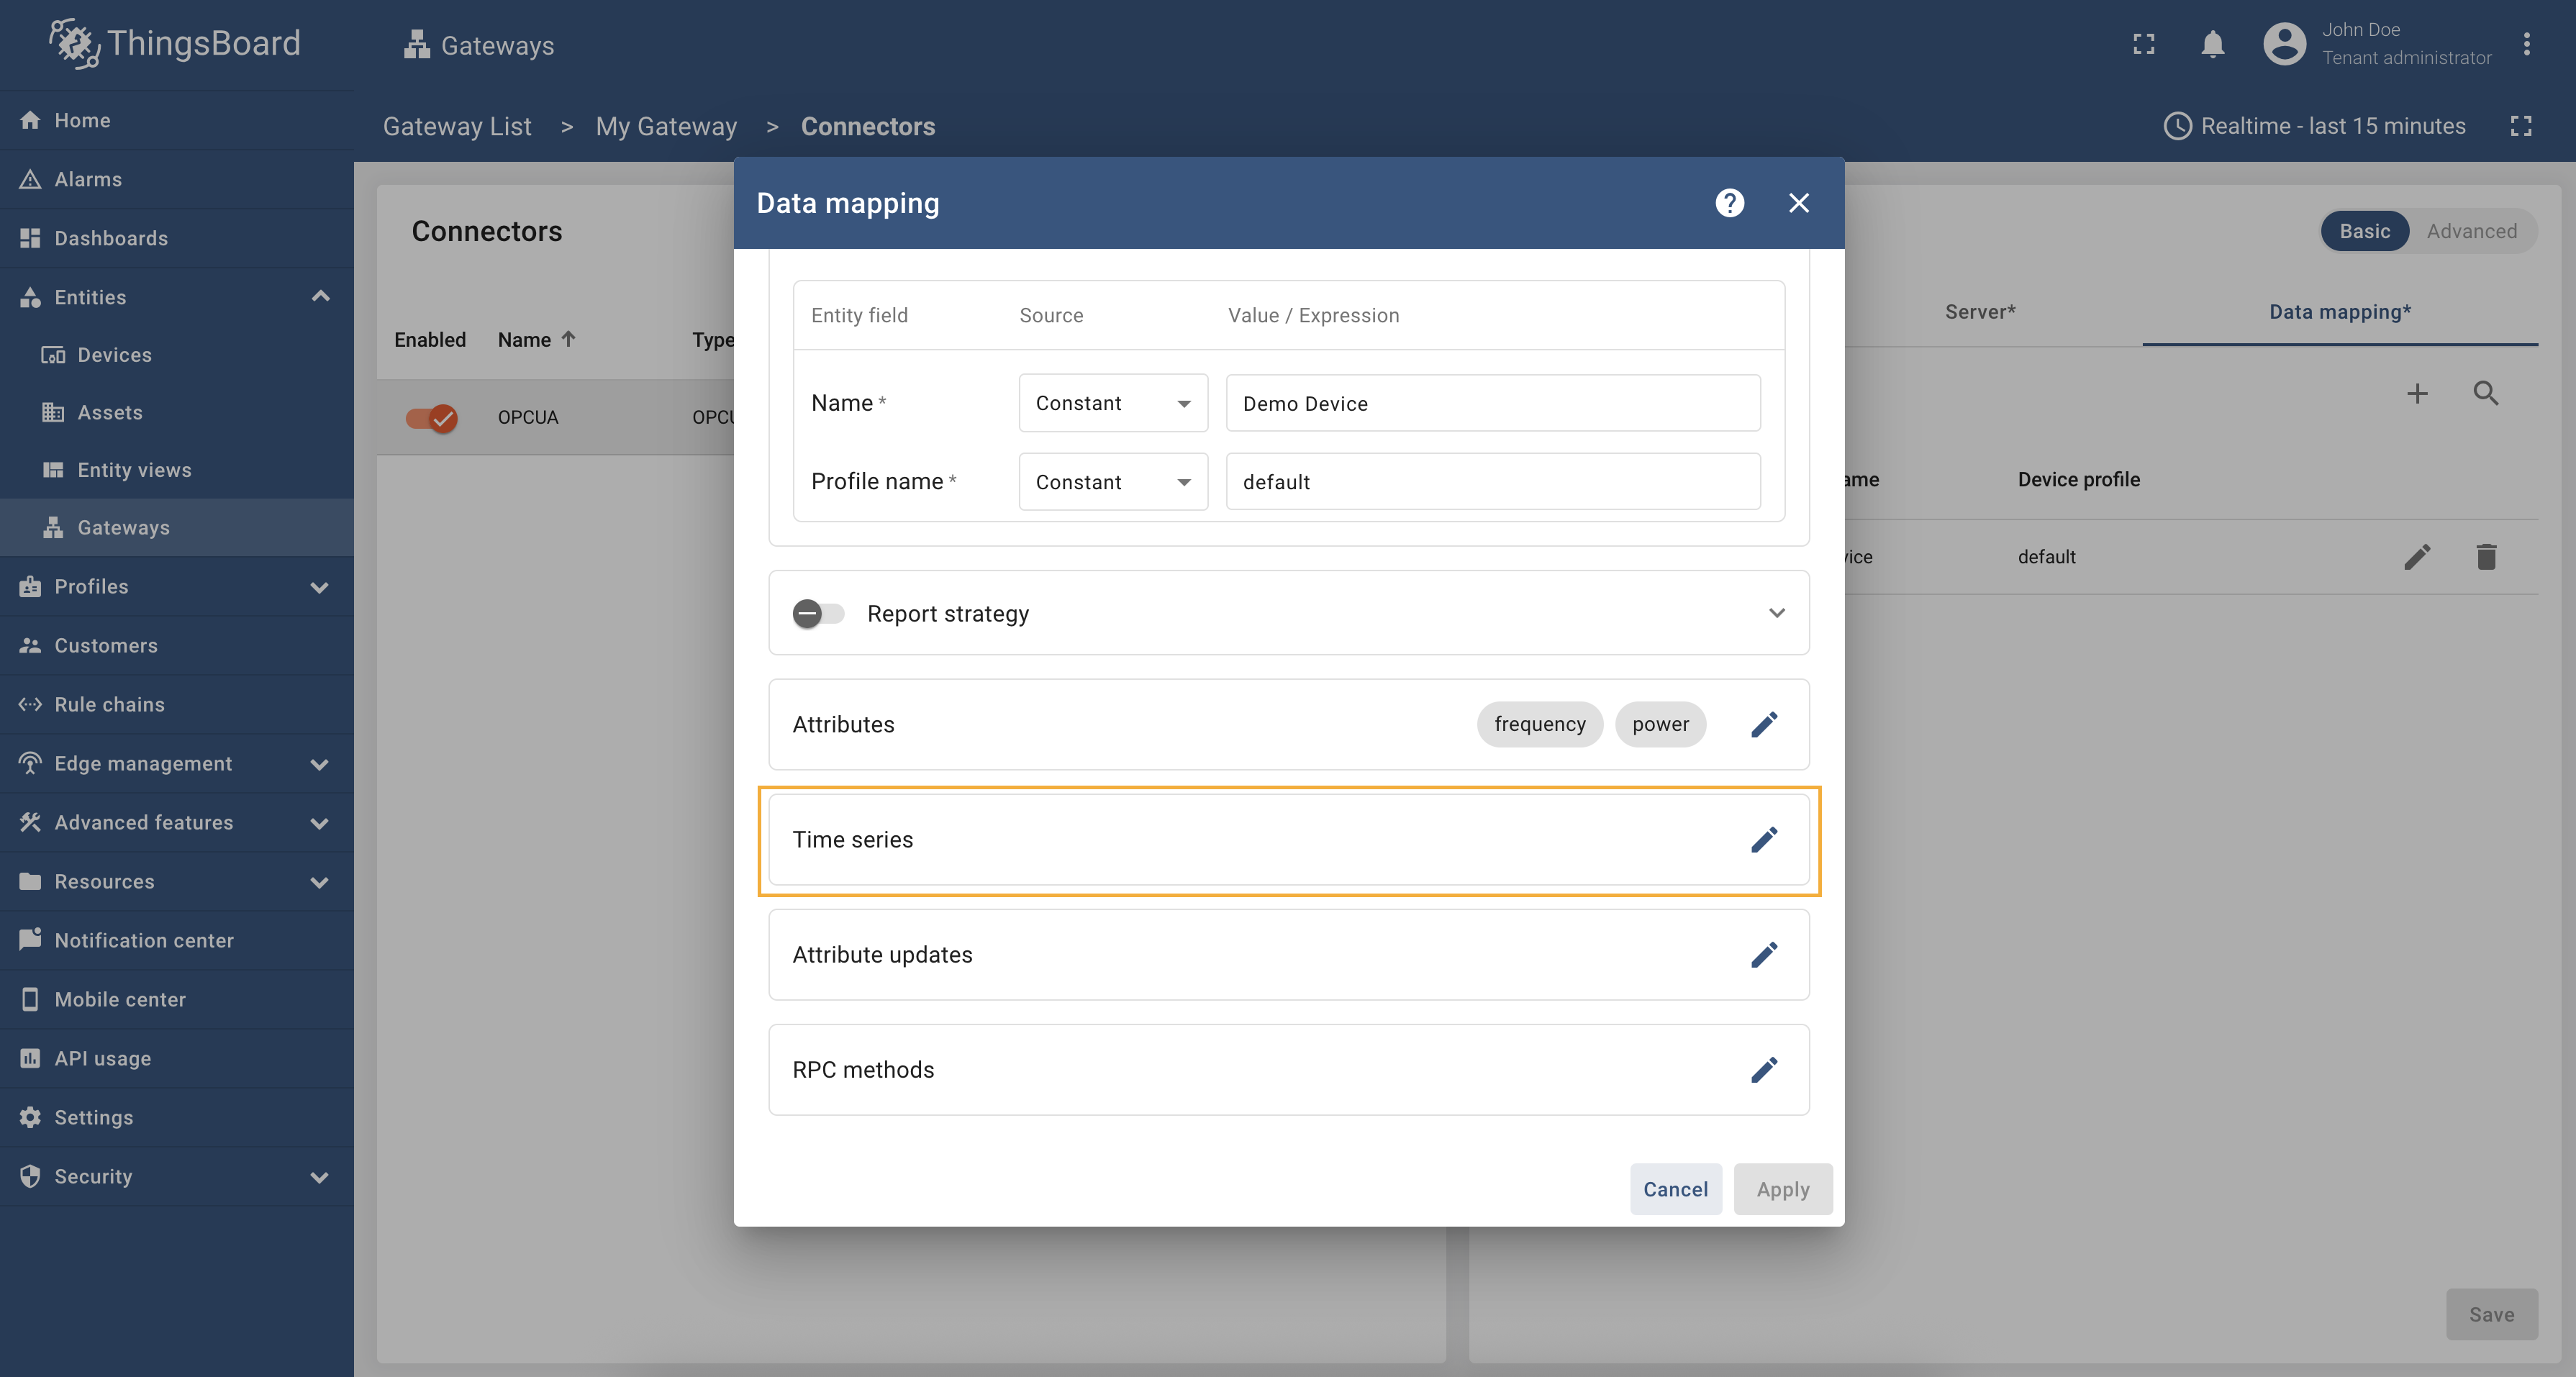
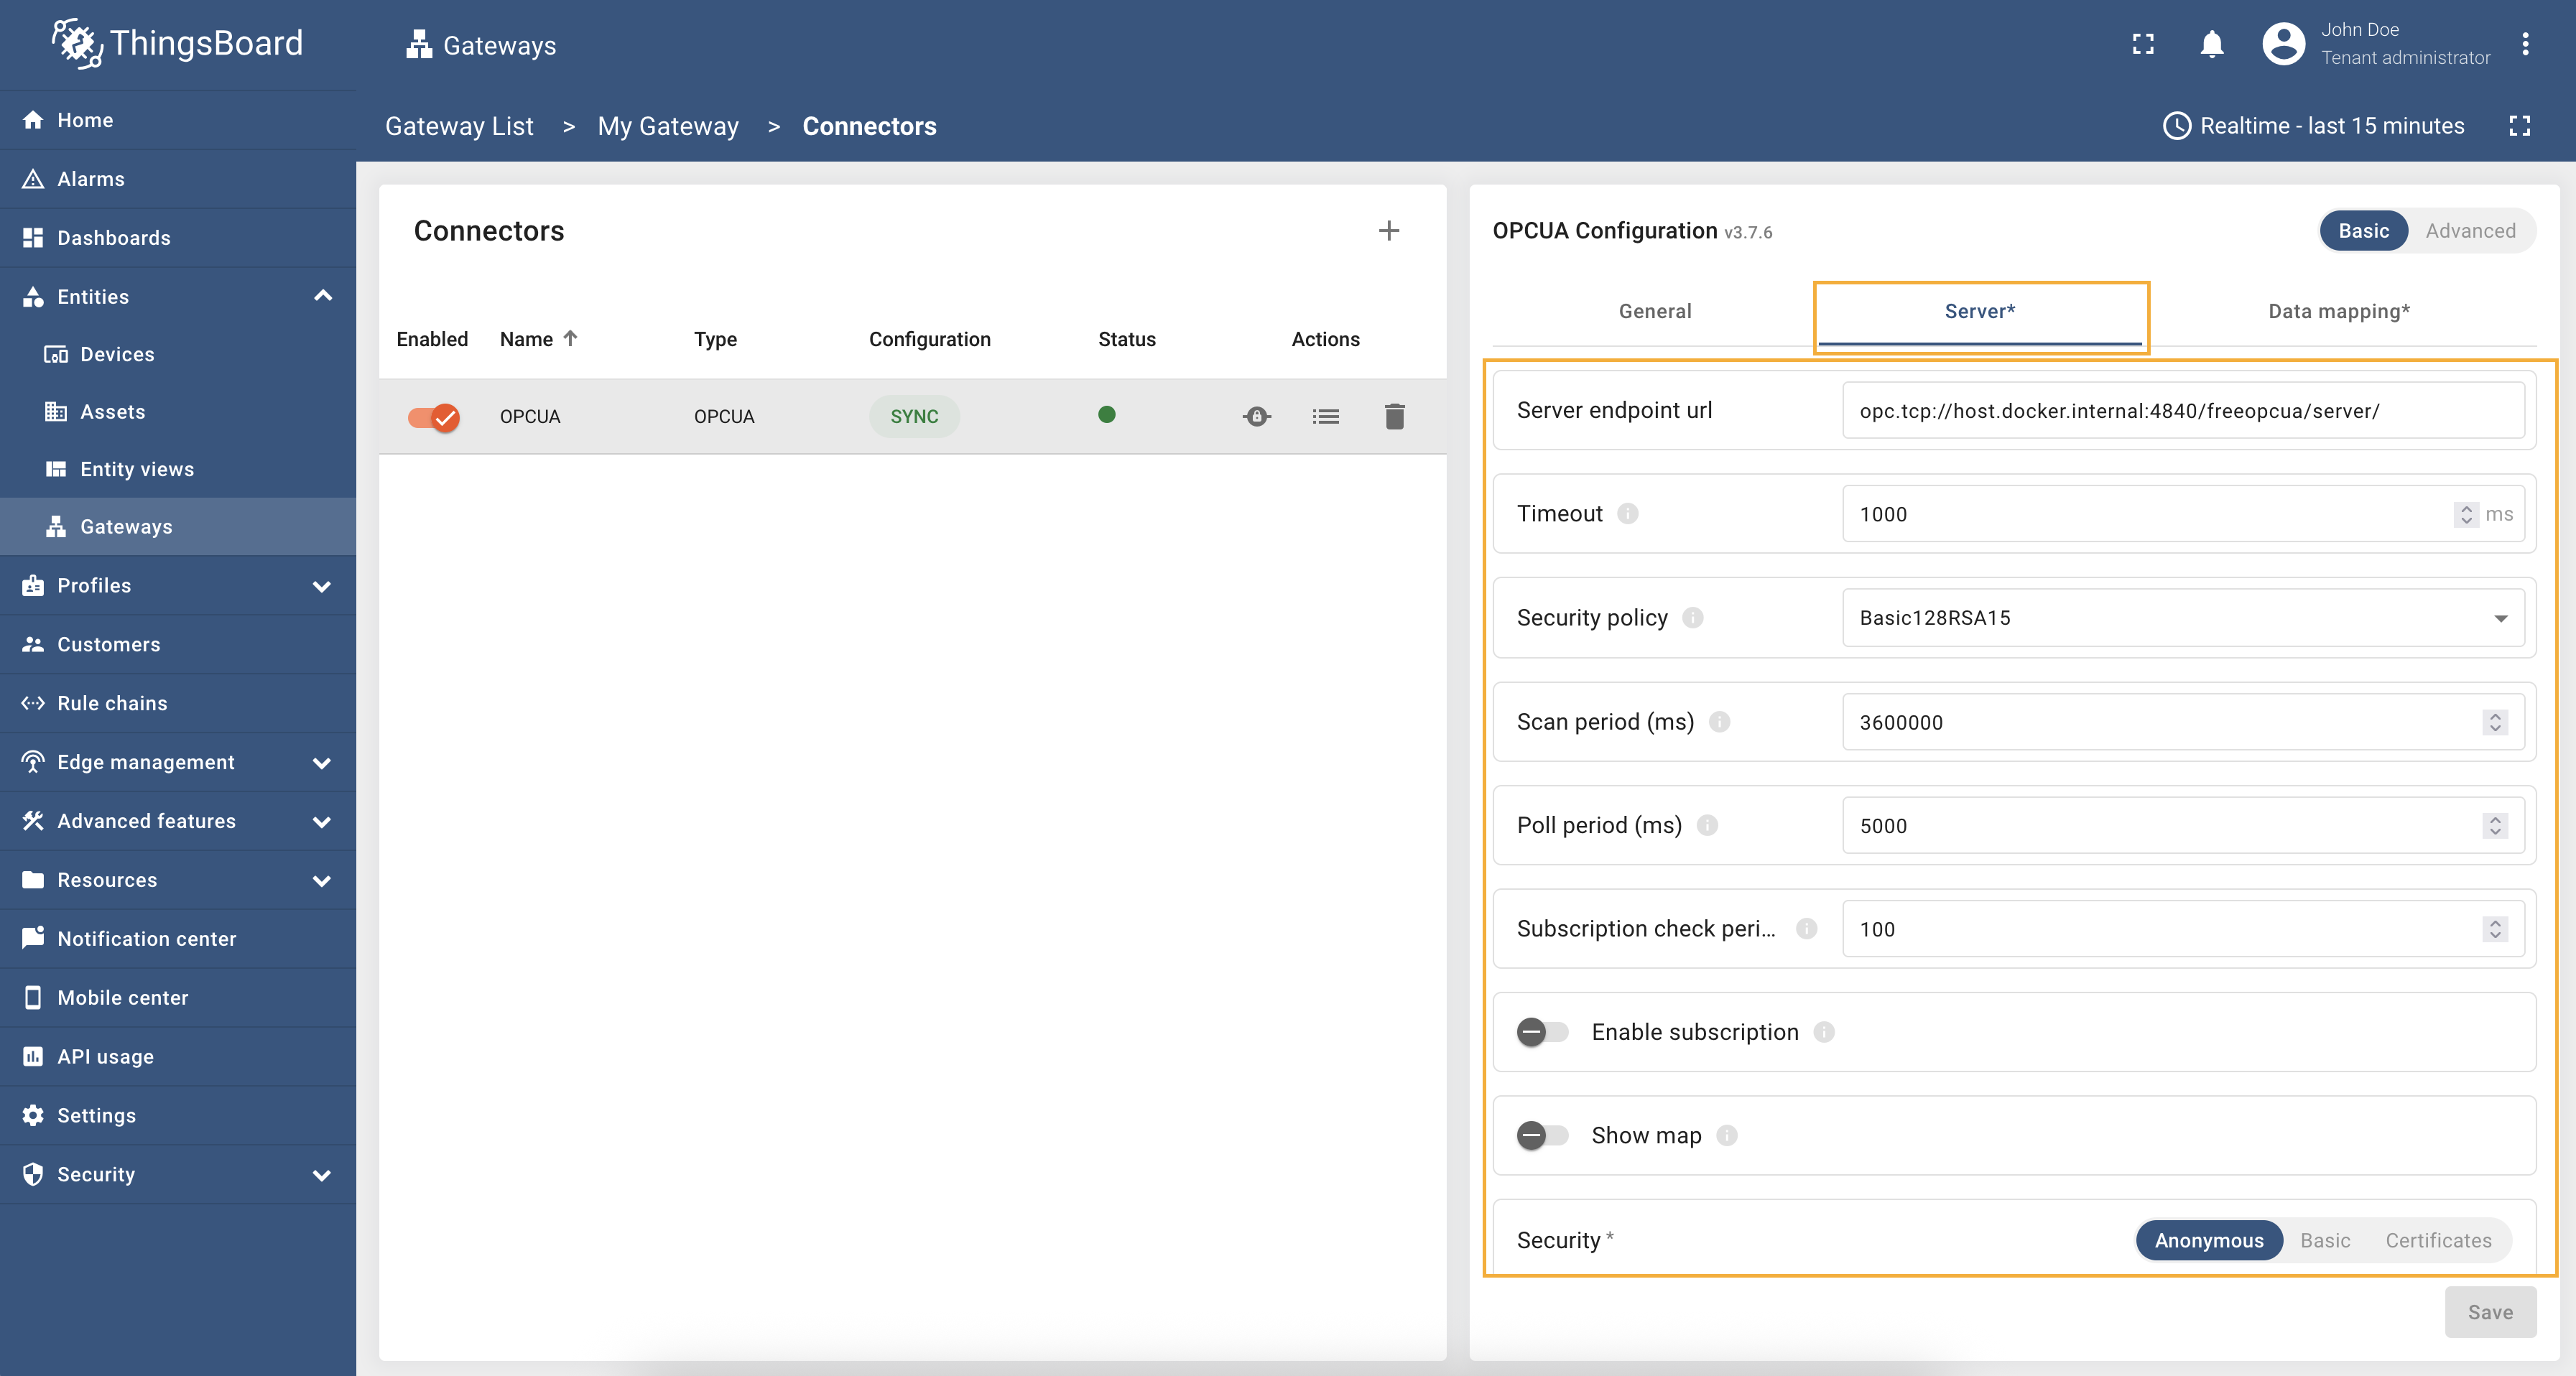 进入”Server“标签页,按文档填写字段值。 接下来进入”Data mapping“部分。该部分包含网关连接 OPC-UA 服务器后将订阅的节点列表,以及处理这些节点数据的配置。 按以下步骤添加新节点:
 进入”Data mapping“标签页,点击”Add mapping“; 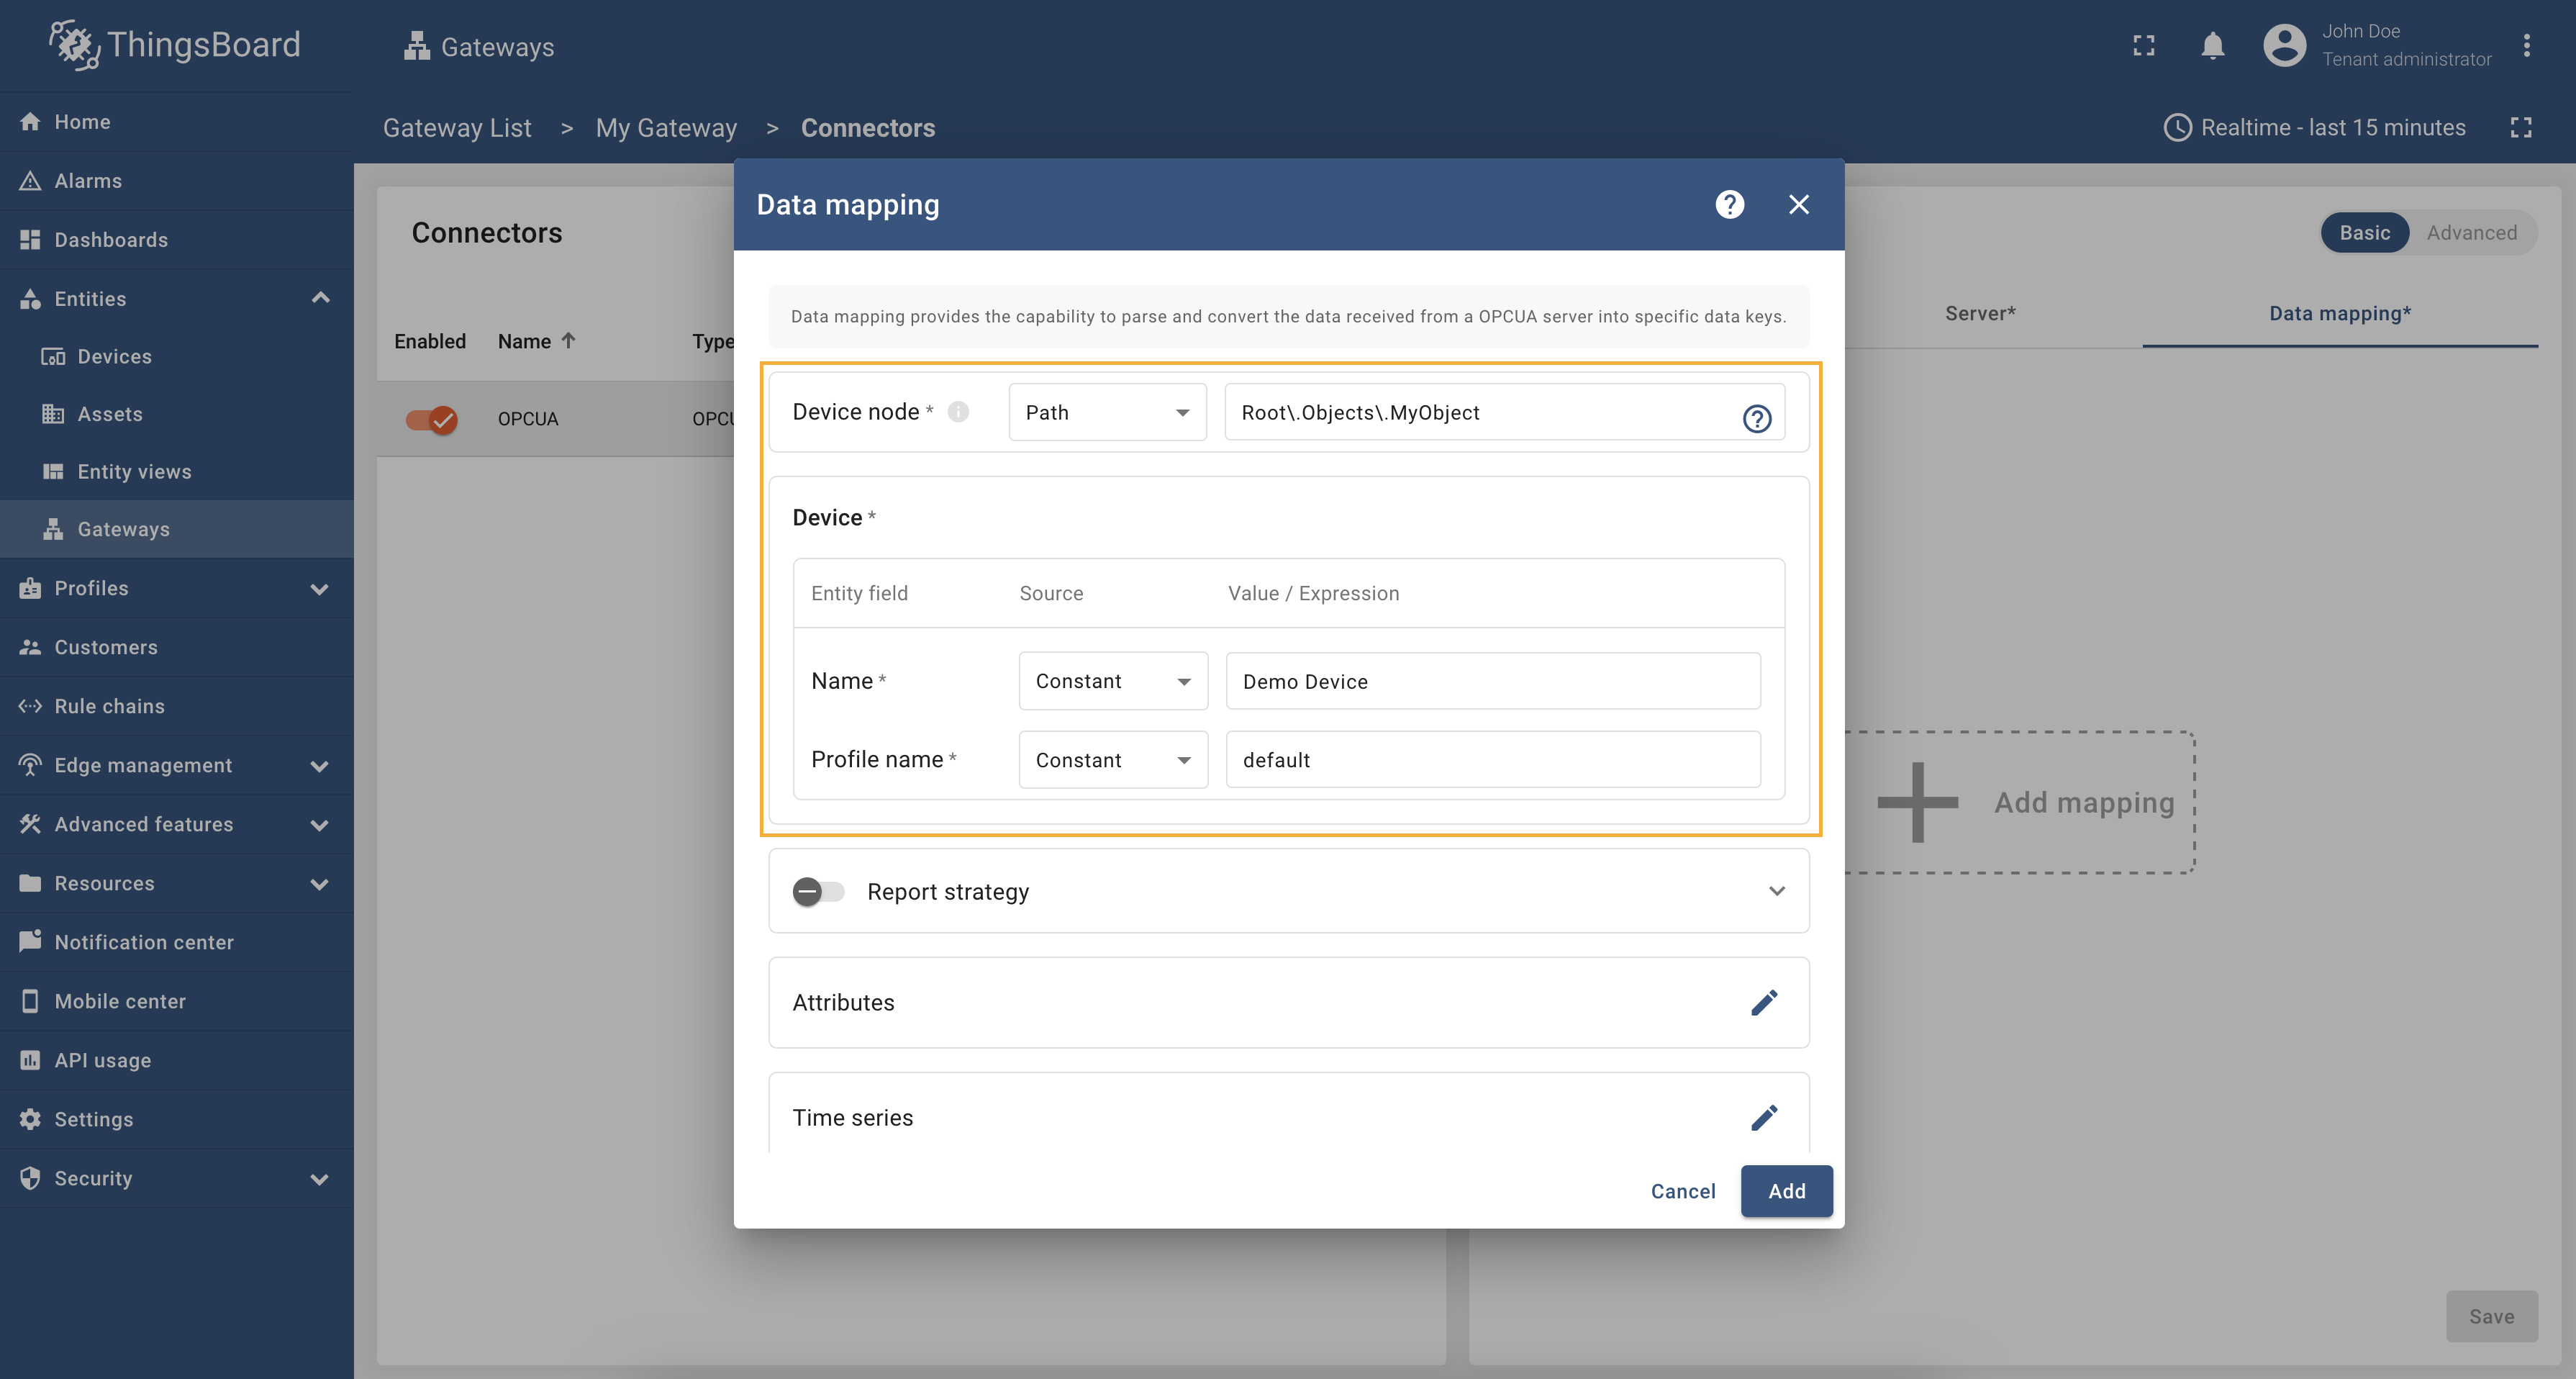 按文档填写字段值。 进入”Attributes“部分添加 “frequency” 和 “power” attribute。本部分配置用于处理 OPC-UA 服务器数据,在ThingsBoard 中将被解释为设备 attribute。我们使用 path 查找对应节点。 Path 类型指 OPC-UA 服务器命名空间中的层级地址,用于定位服务器中的特定节点。attribute/time series 的 path 可为绝对或相对(本例为相对)。 按以下步骤配置 attribute 部分:
 点击”Attributes“部分的”铅笔“图标; 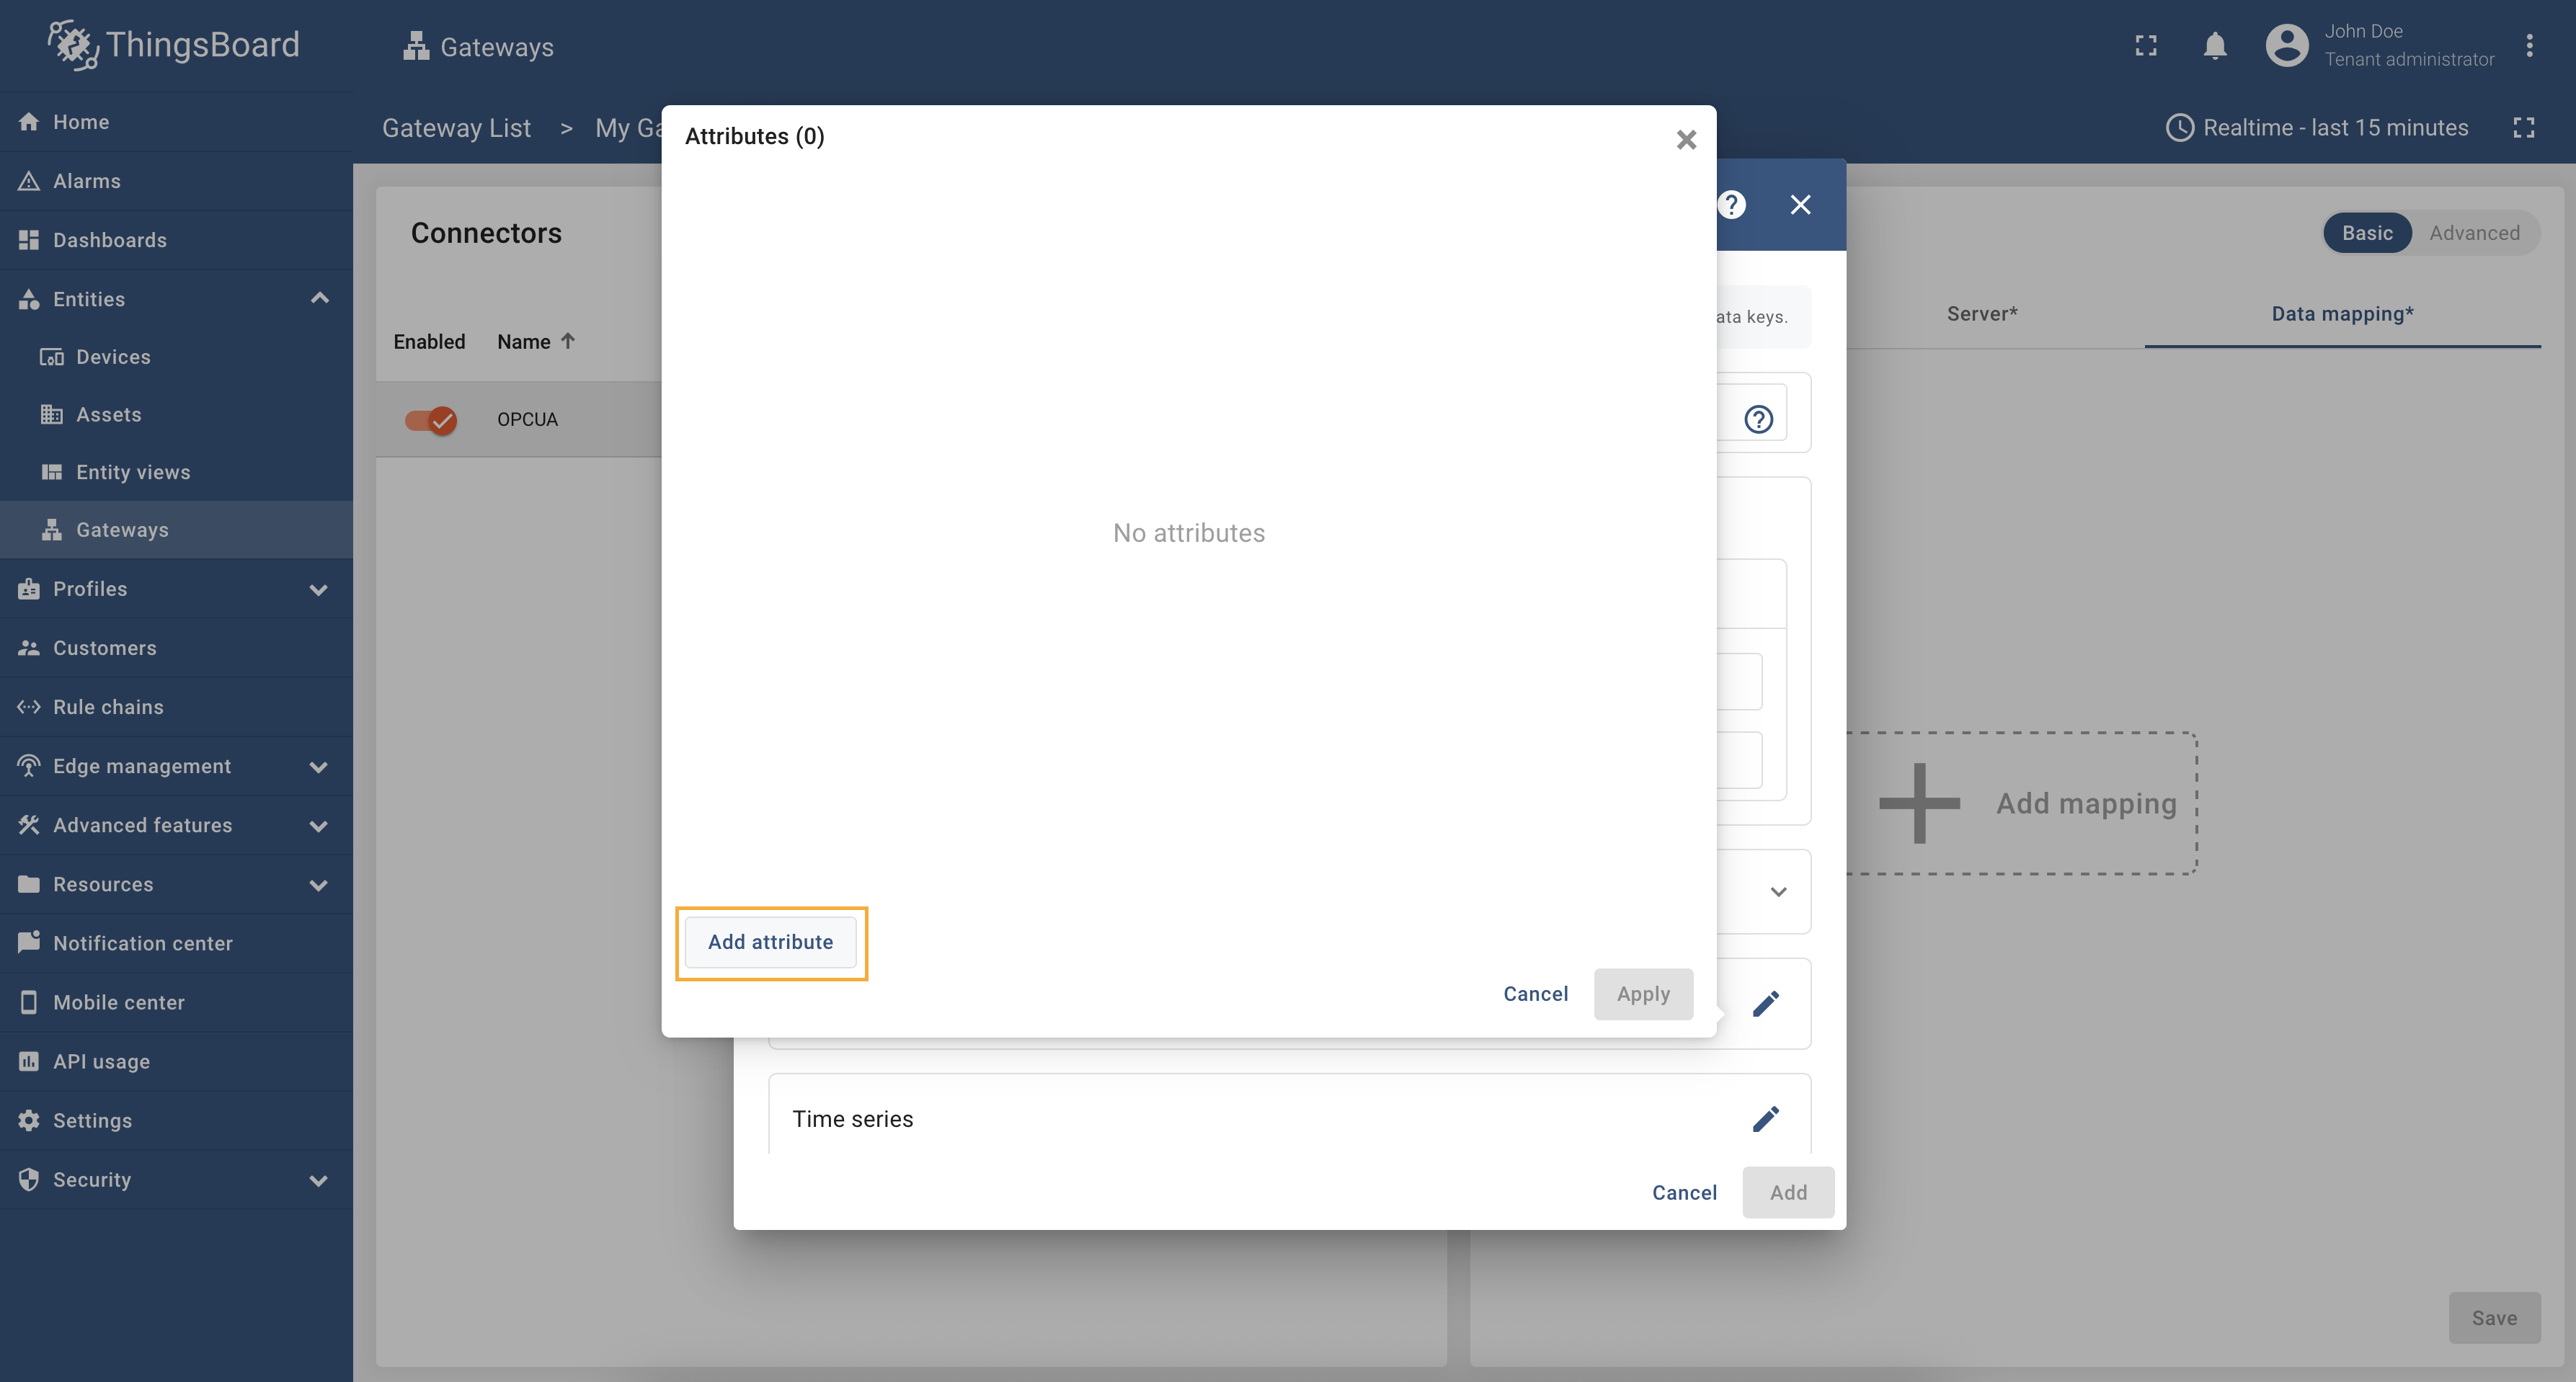 在打开窗口中点击”Add attribute“; 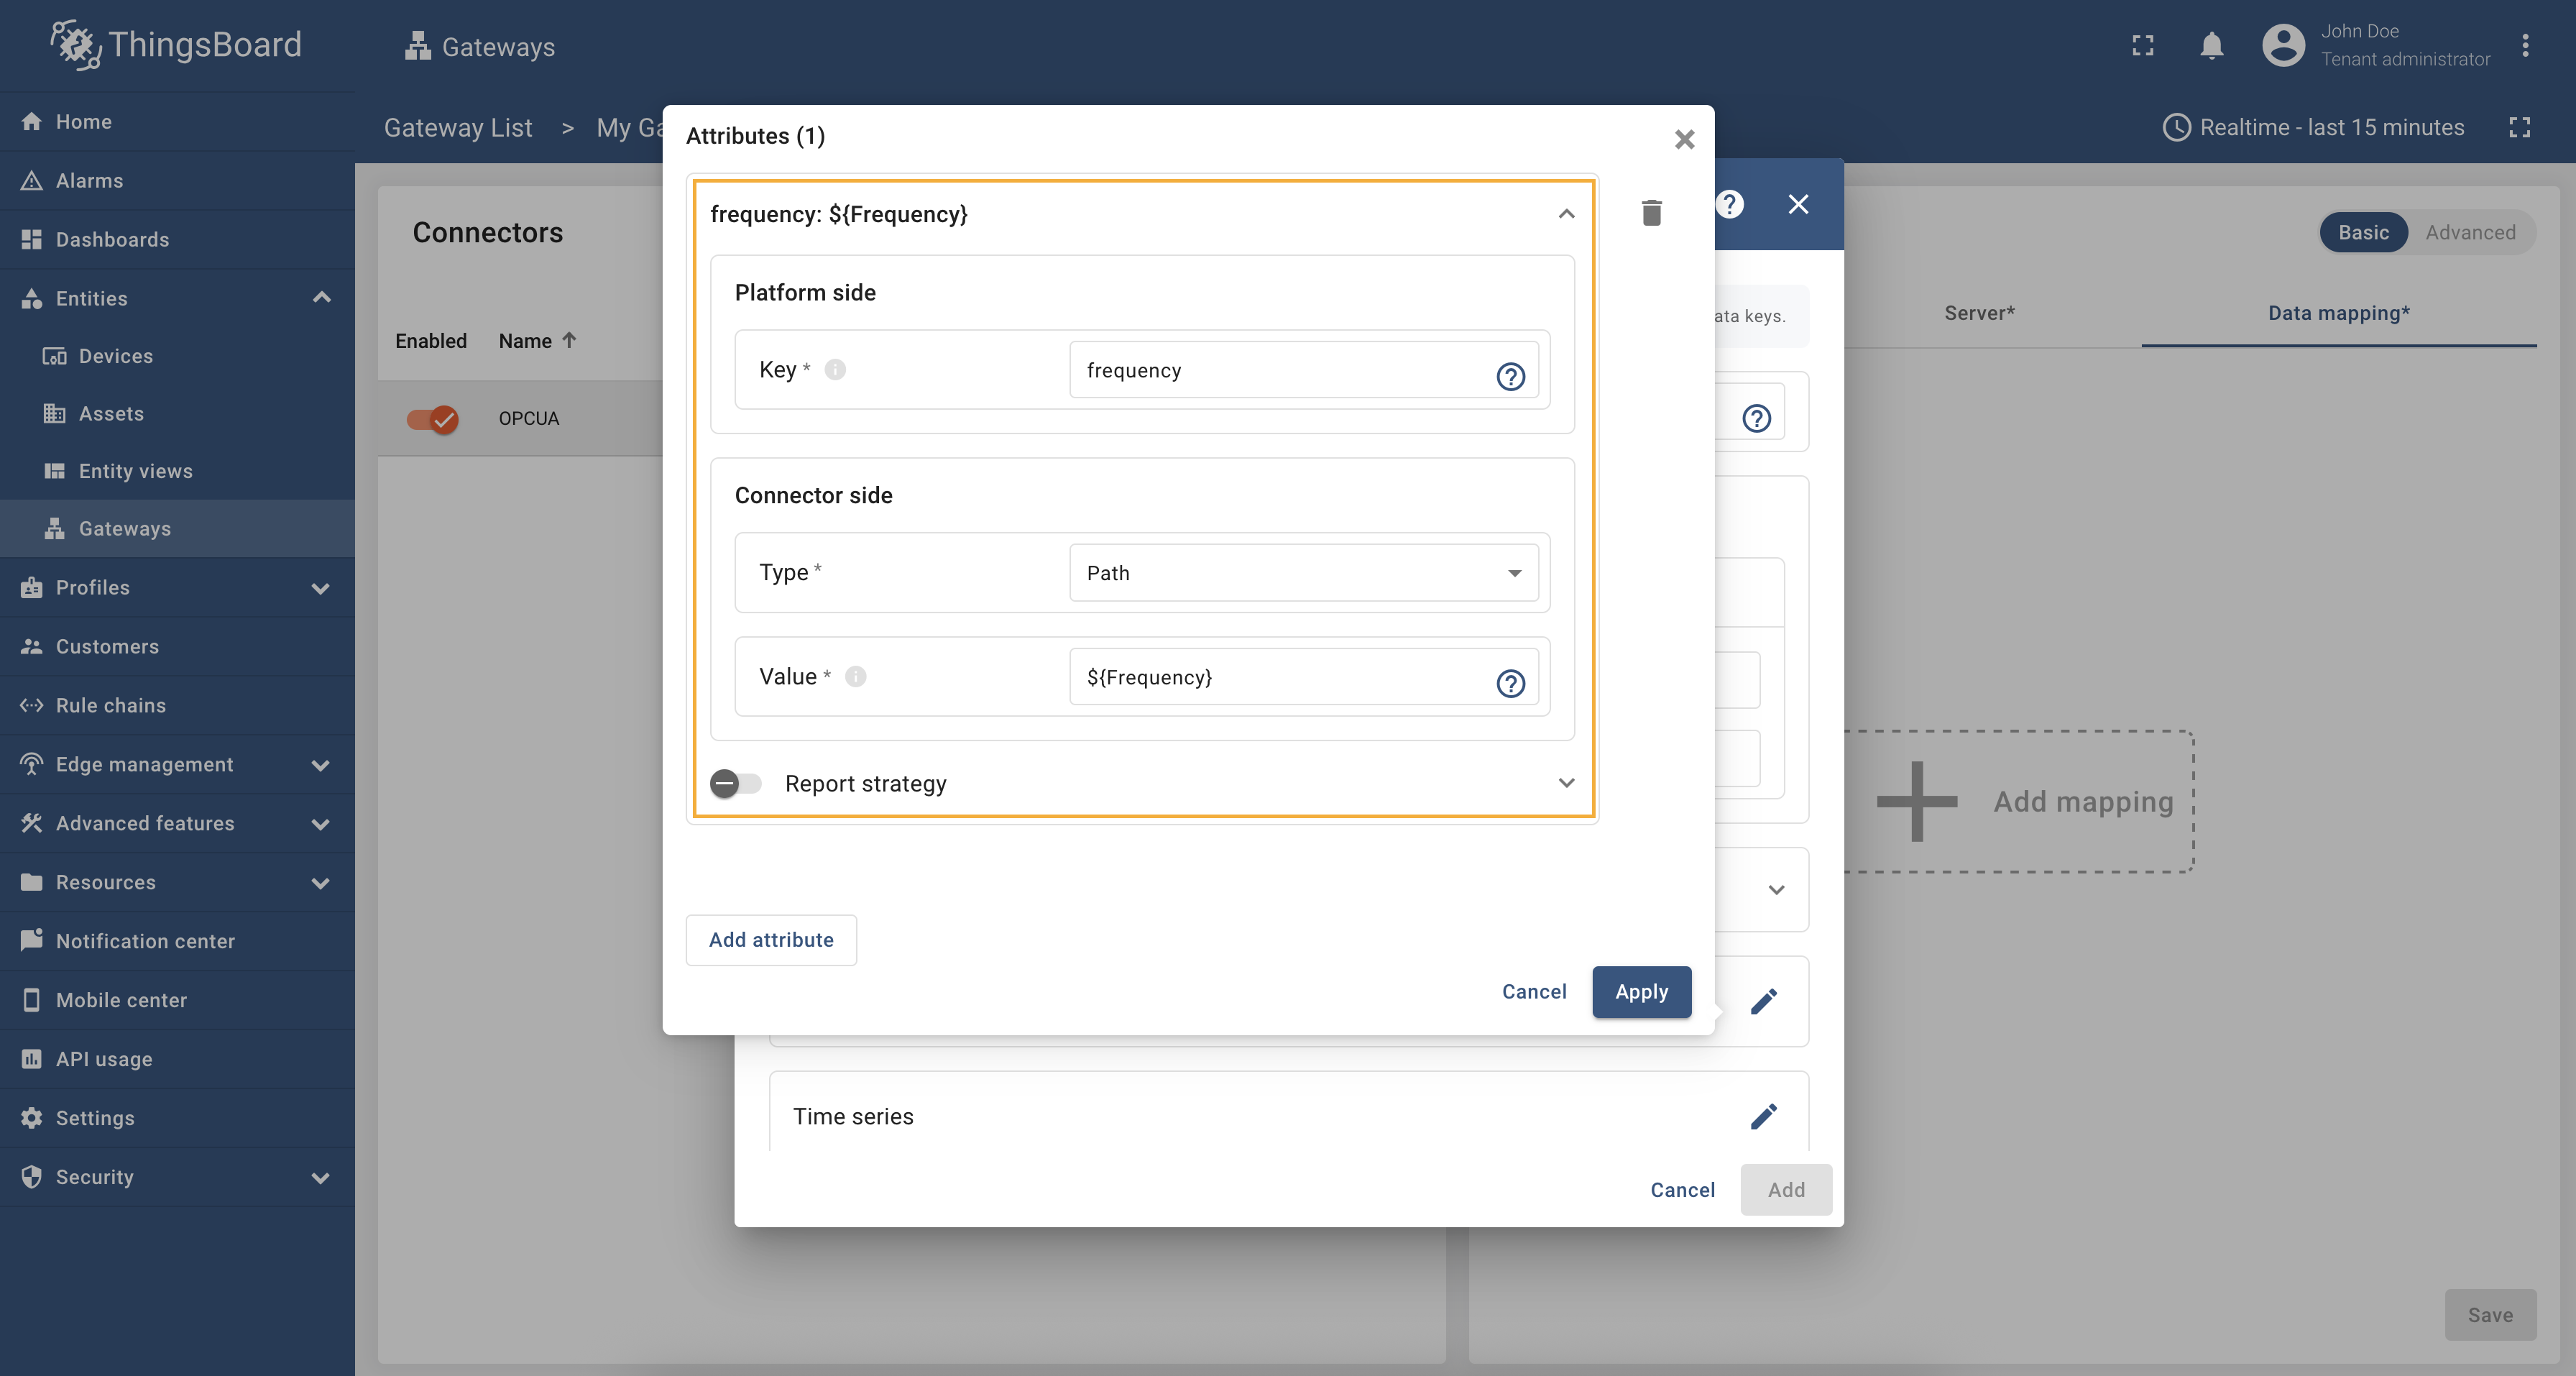 在”Key“中填写”frequency“,将”Type“选为”Path“,在”Value“中填写”${Frequency}“。 添加另一个 attribute:折叠刚添加的 “frequency” attribute,点击”Add attribute“,按相同步骤填写以下值:
完成配置后点击”Apply“。 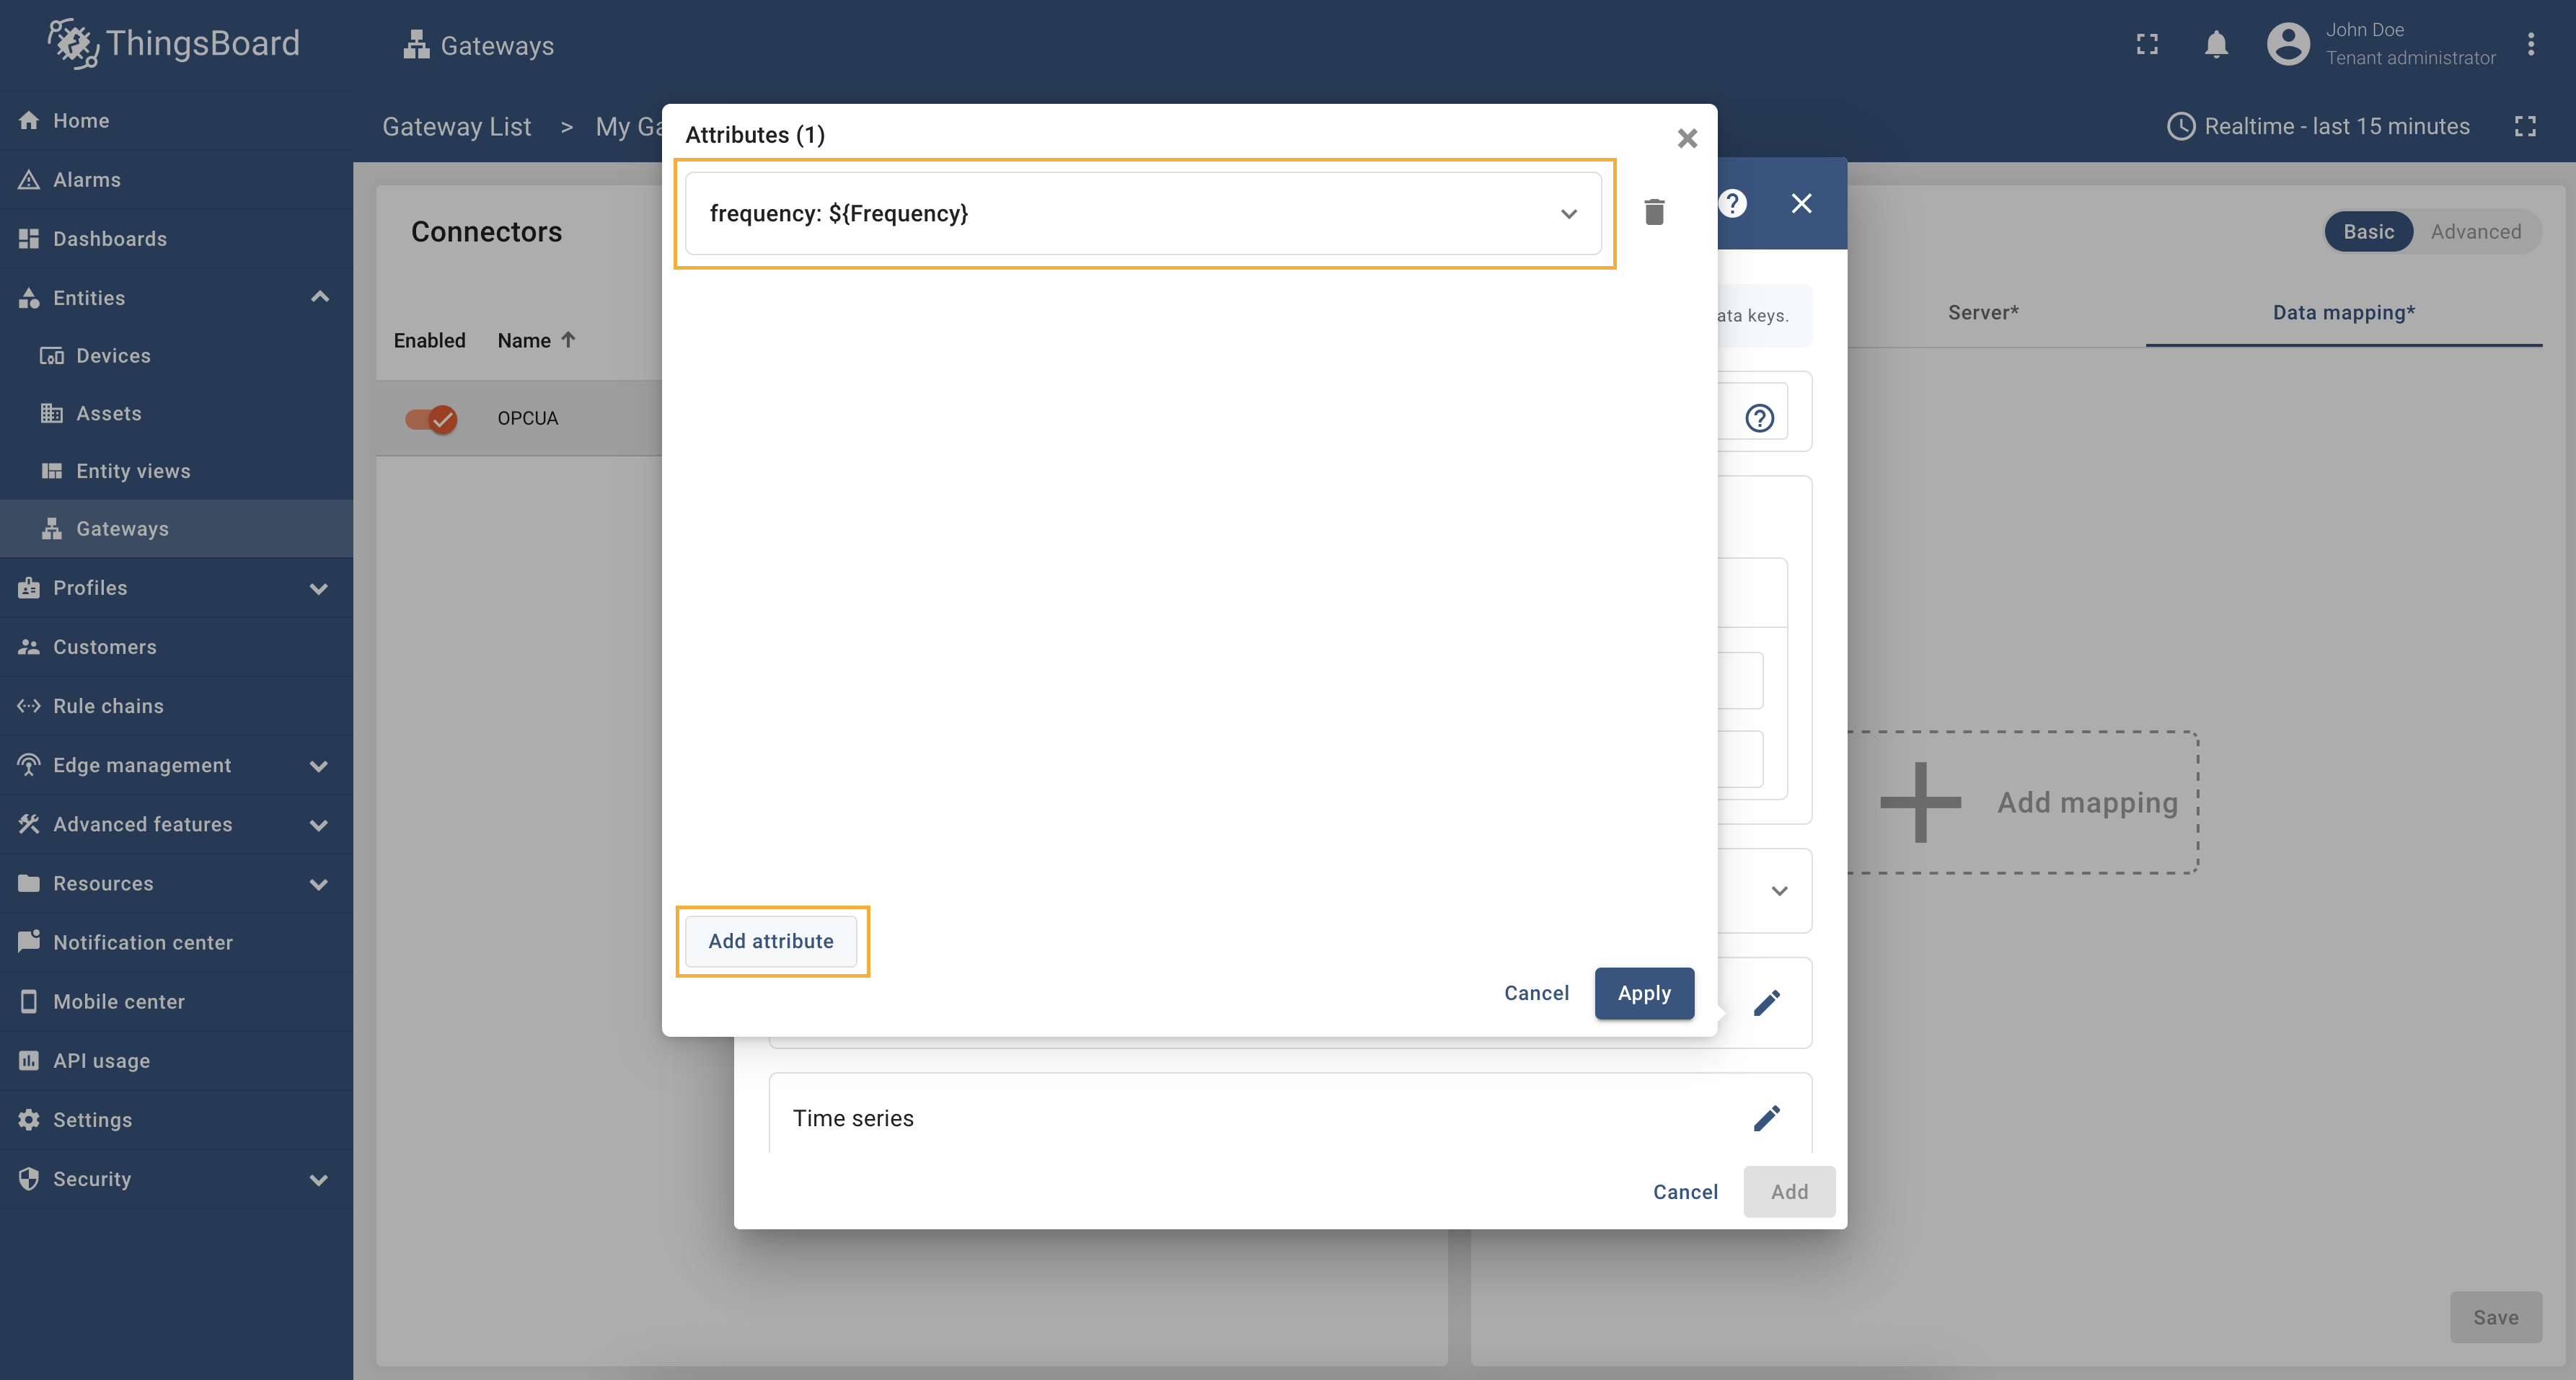 折叠刚添加的 “frequency” attribute,点击”Add attribute“添加另一 attribute;  按文档填写字段值。然后点击”Apply“。 完成”Attributes“部分后,进入”Time series“部分。本部分配置用于处理 OPC-UA 服务器数据,在ThingsBoard 中将被解释为设备 time series。 按以下步骤配置 time series 部分:
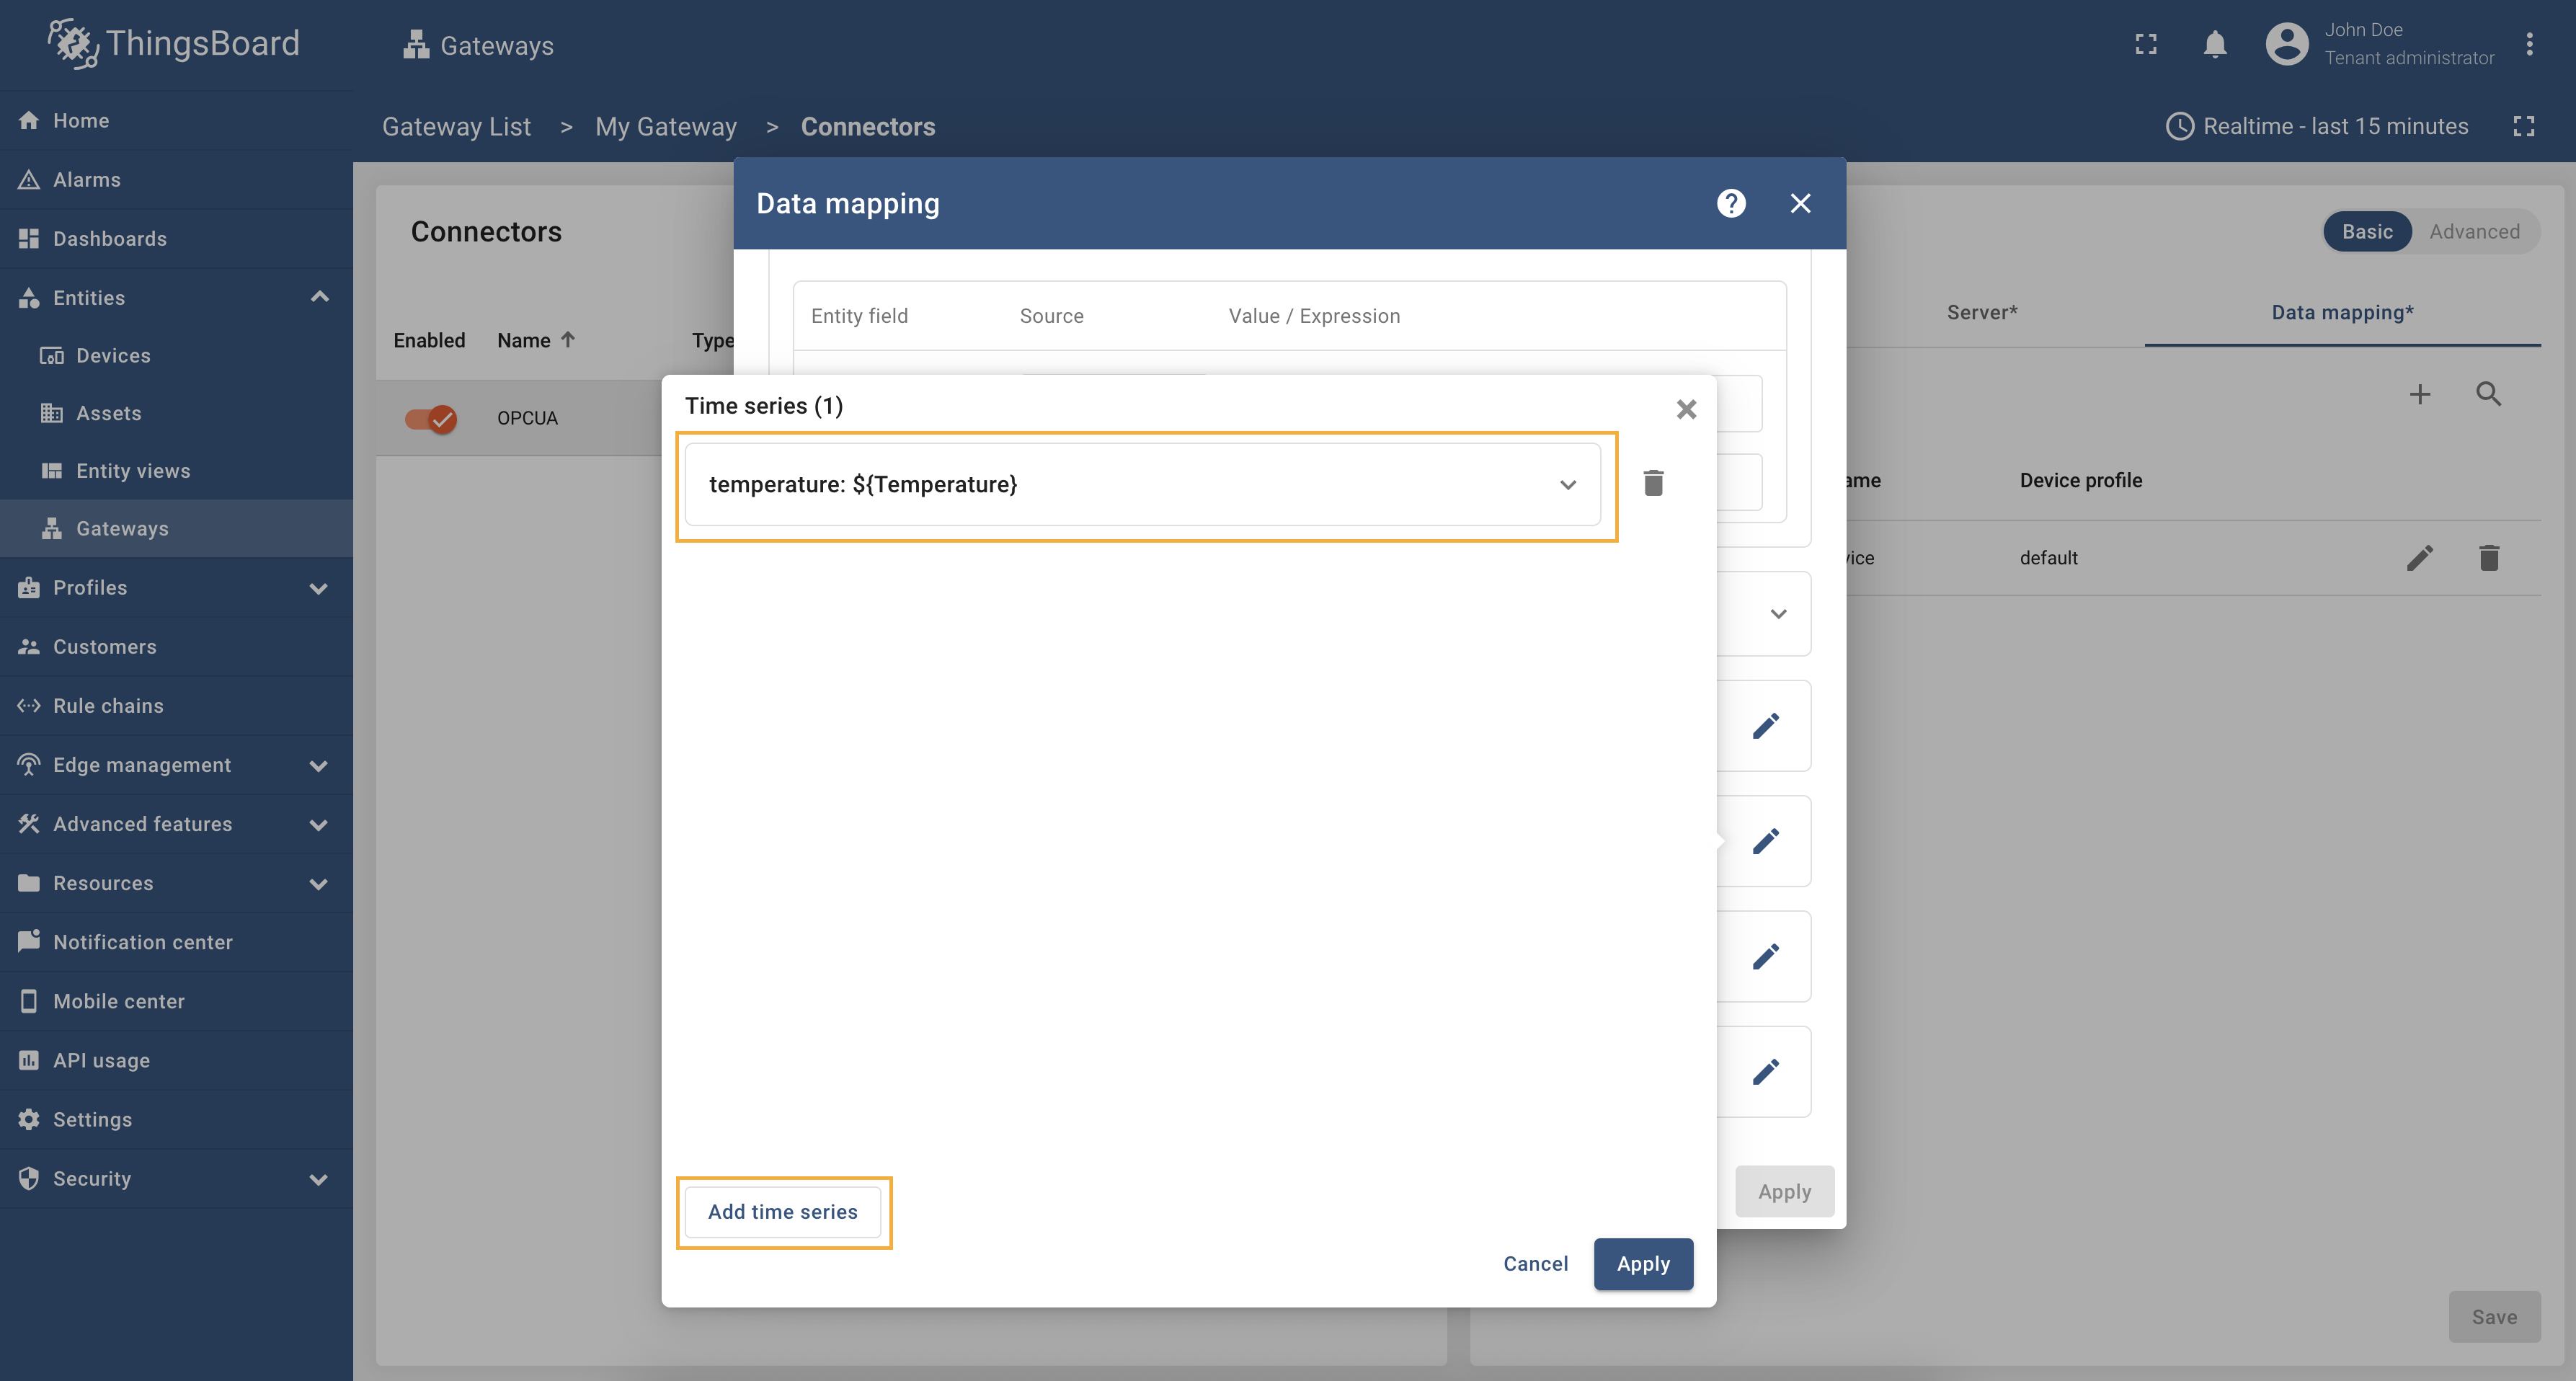
 点击”Time series“部分的”铅笔“图标; 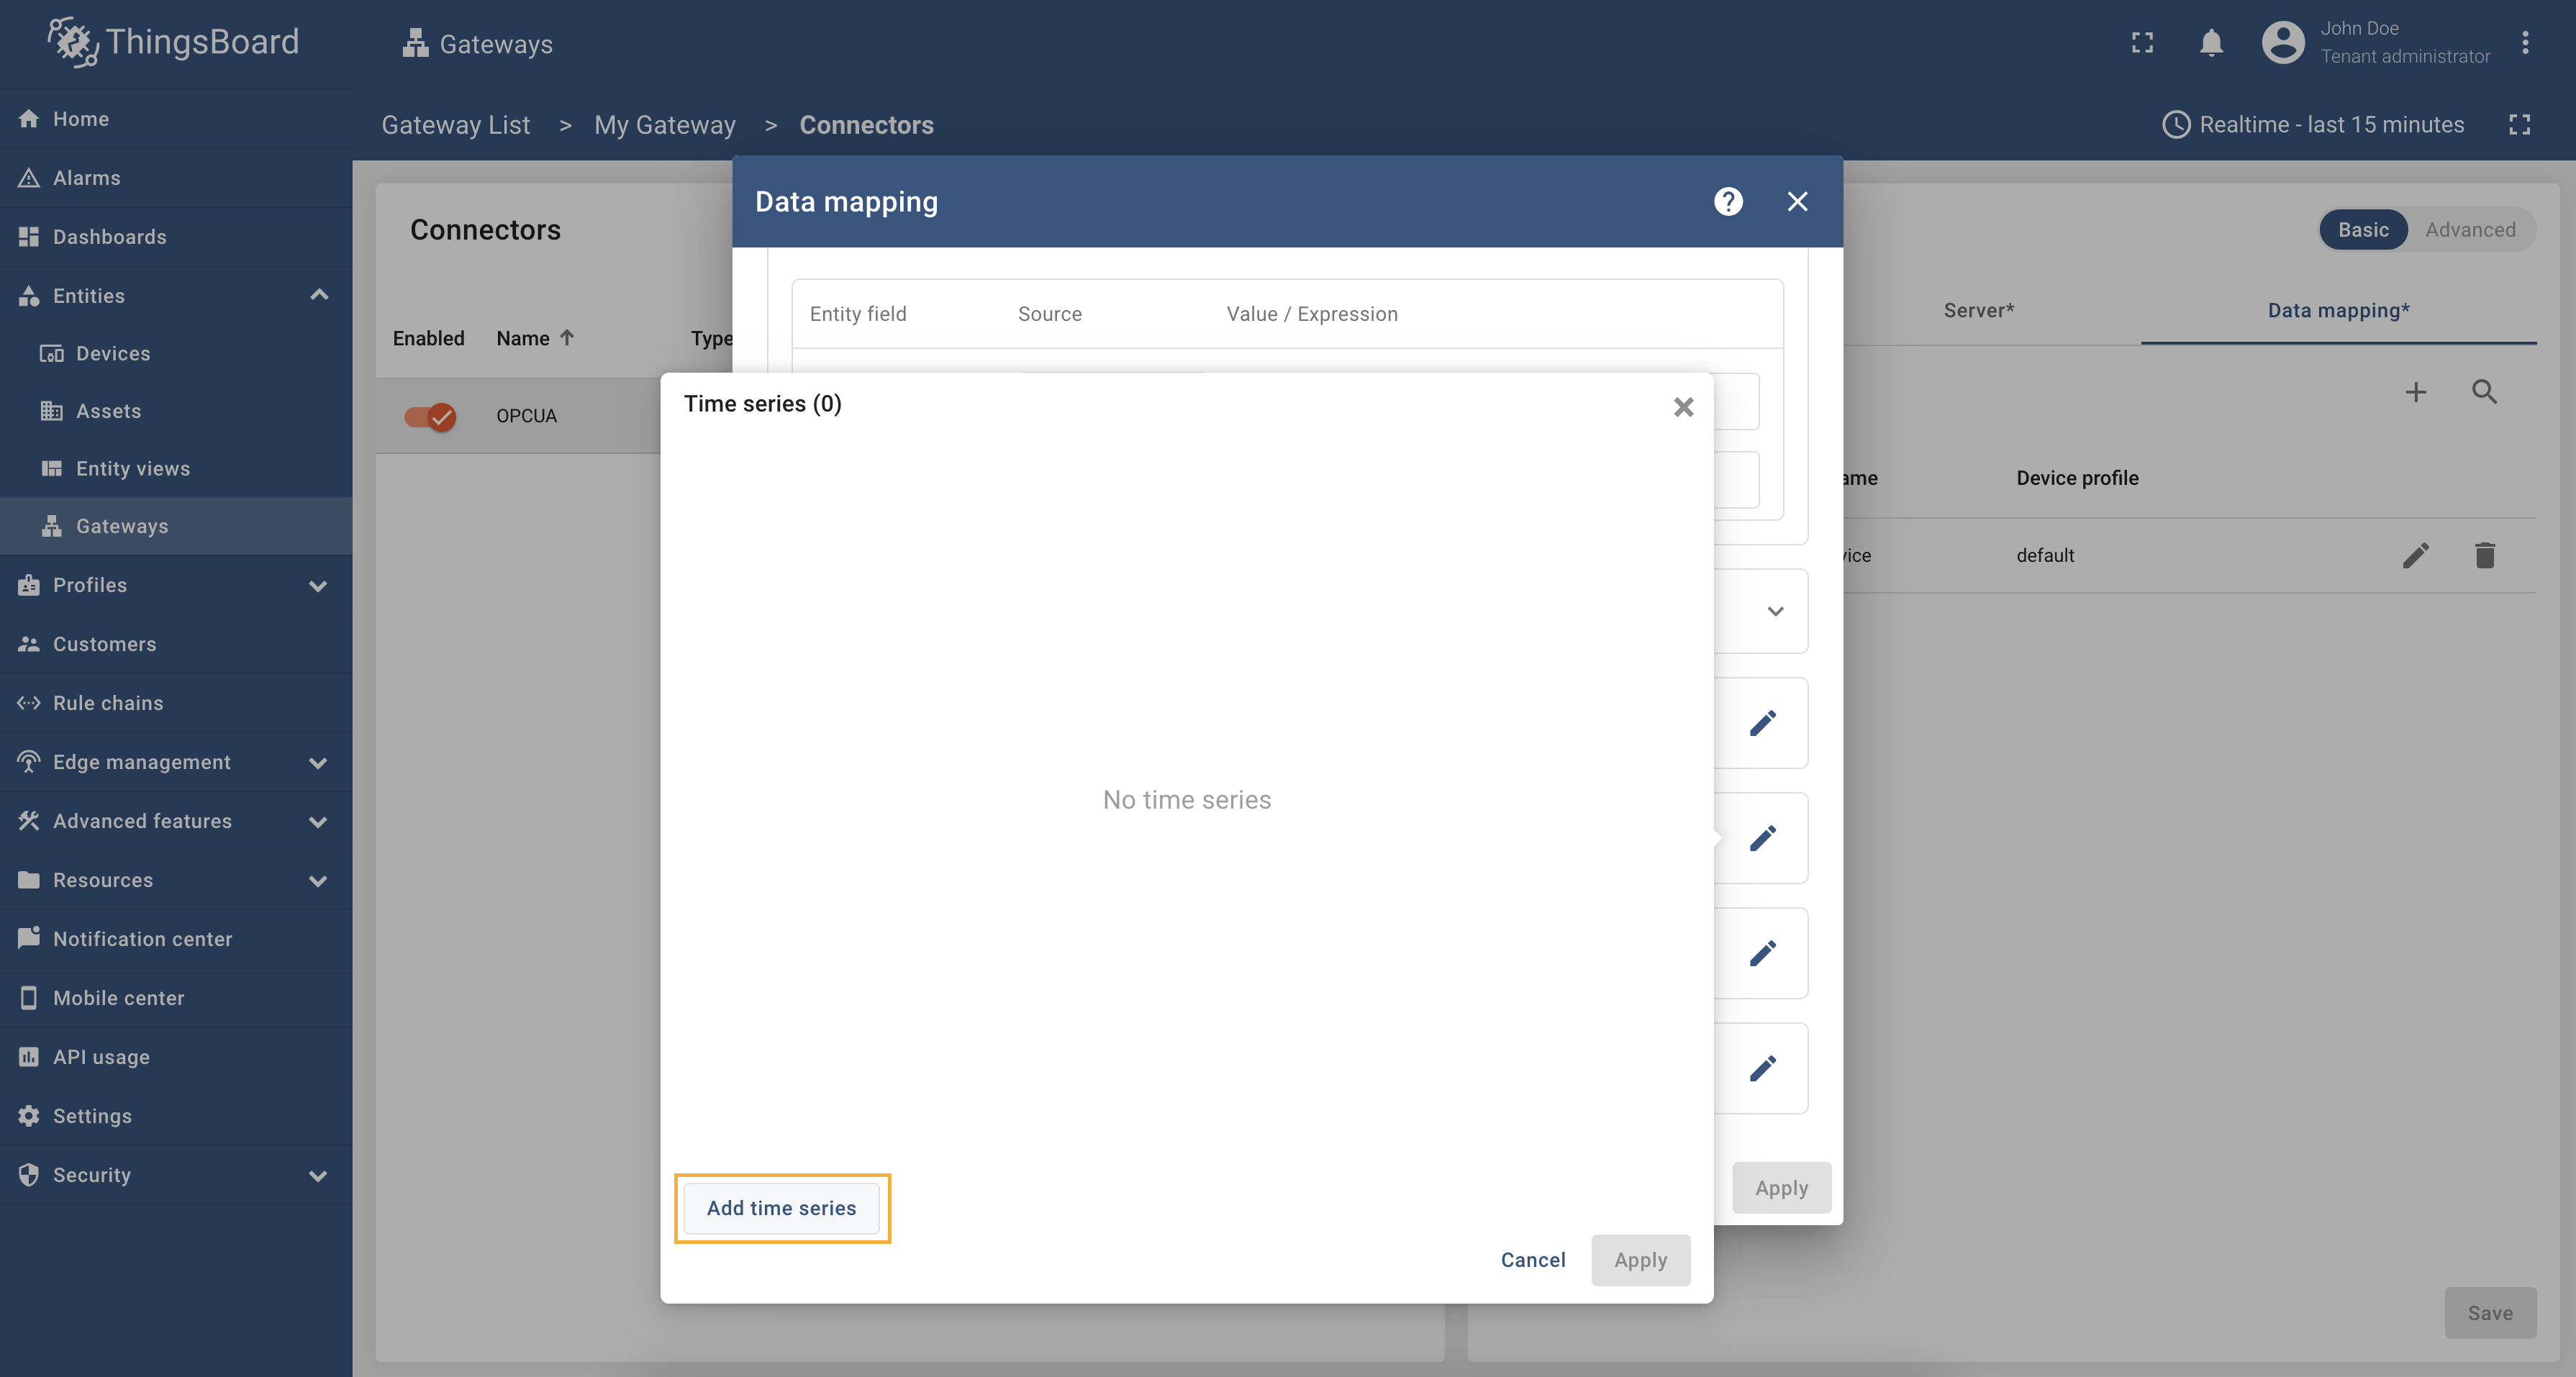 在打开窗口中点击”Add time series“; 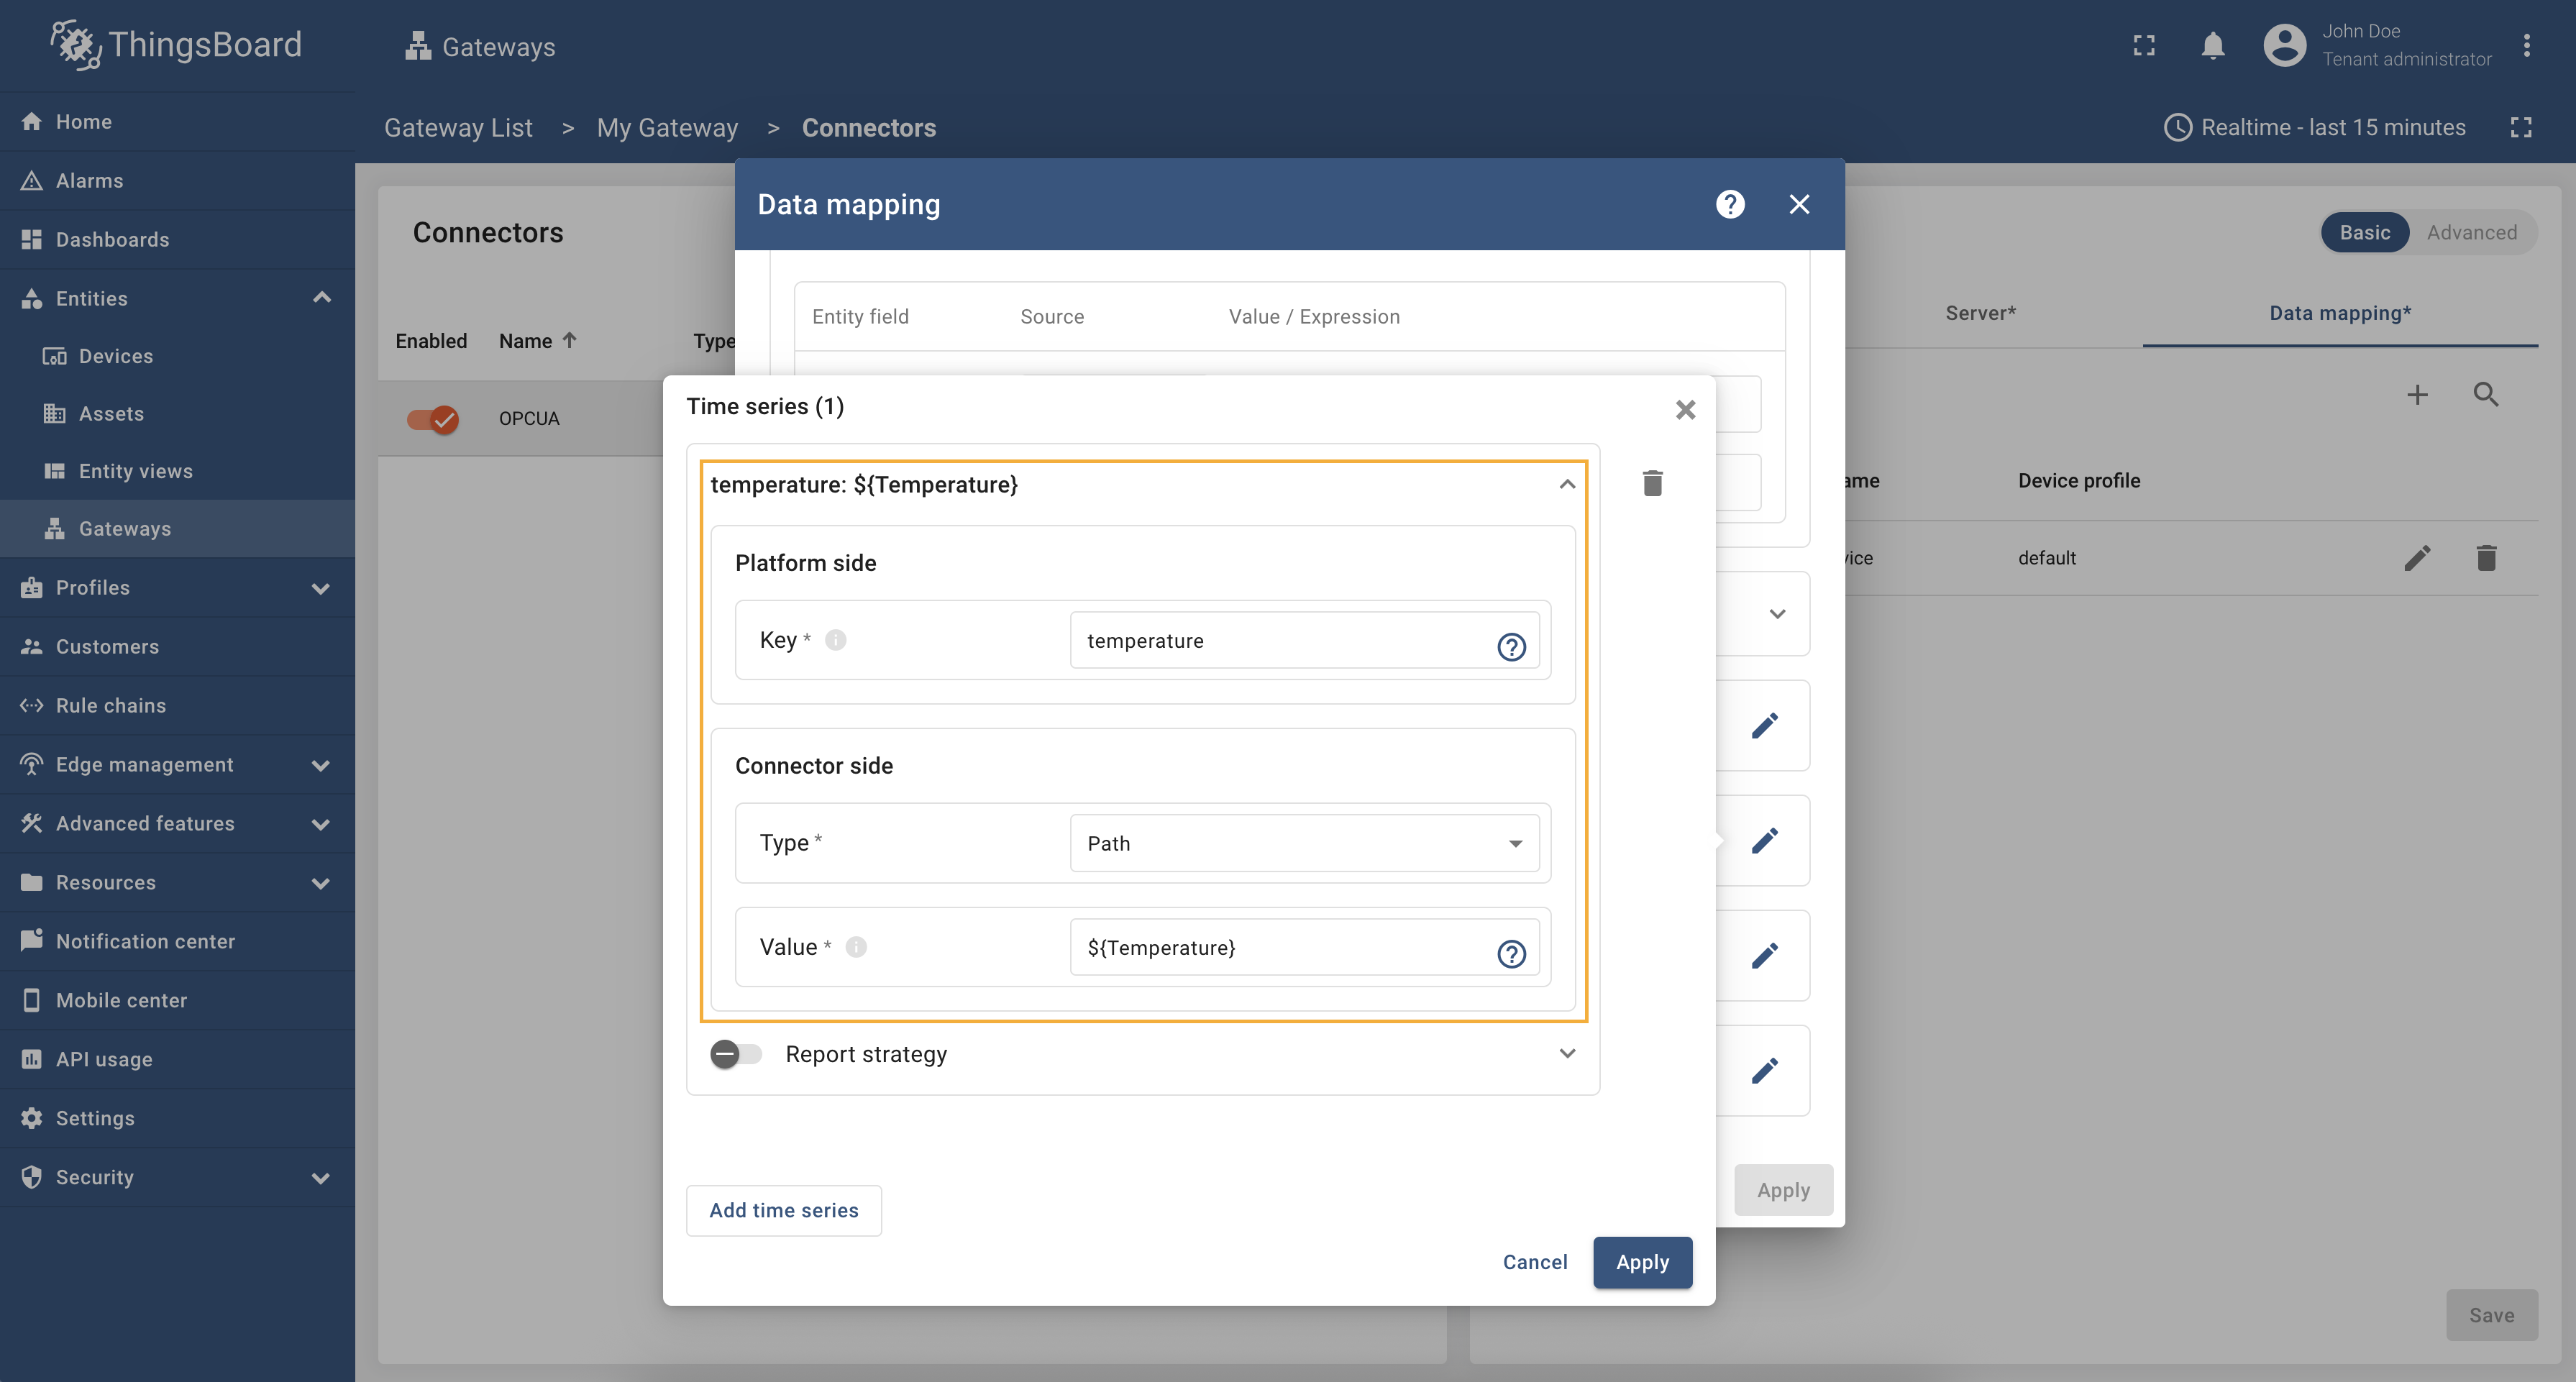 按文档填写字段值。 添加另一 time series:折叠刚添加的”temperature“time series,点击”Add time series“,按相同步骤填写以下值:
 折叠刚添加的”temperature“time series,点击”Add time series“添加另一 time series; 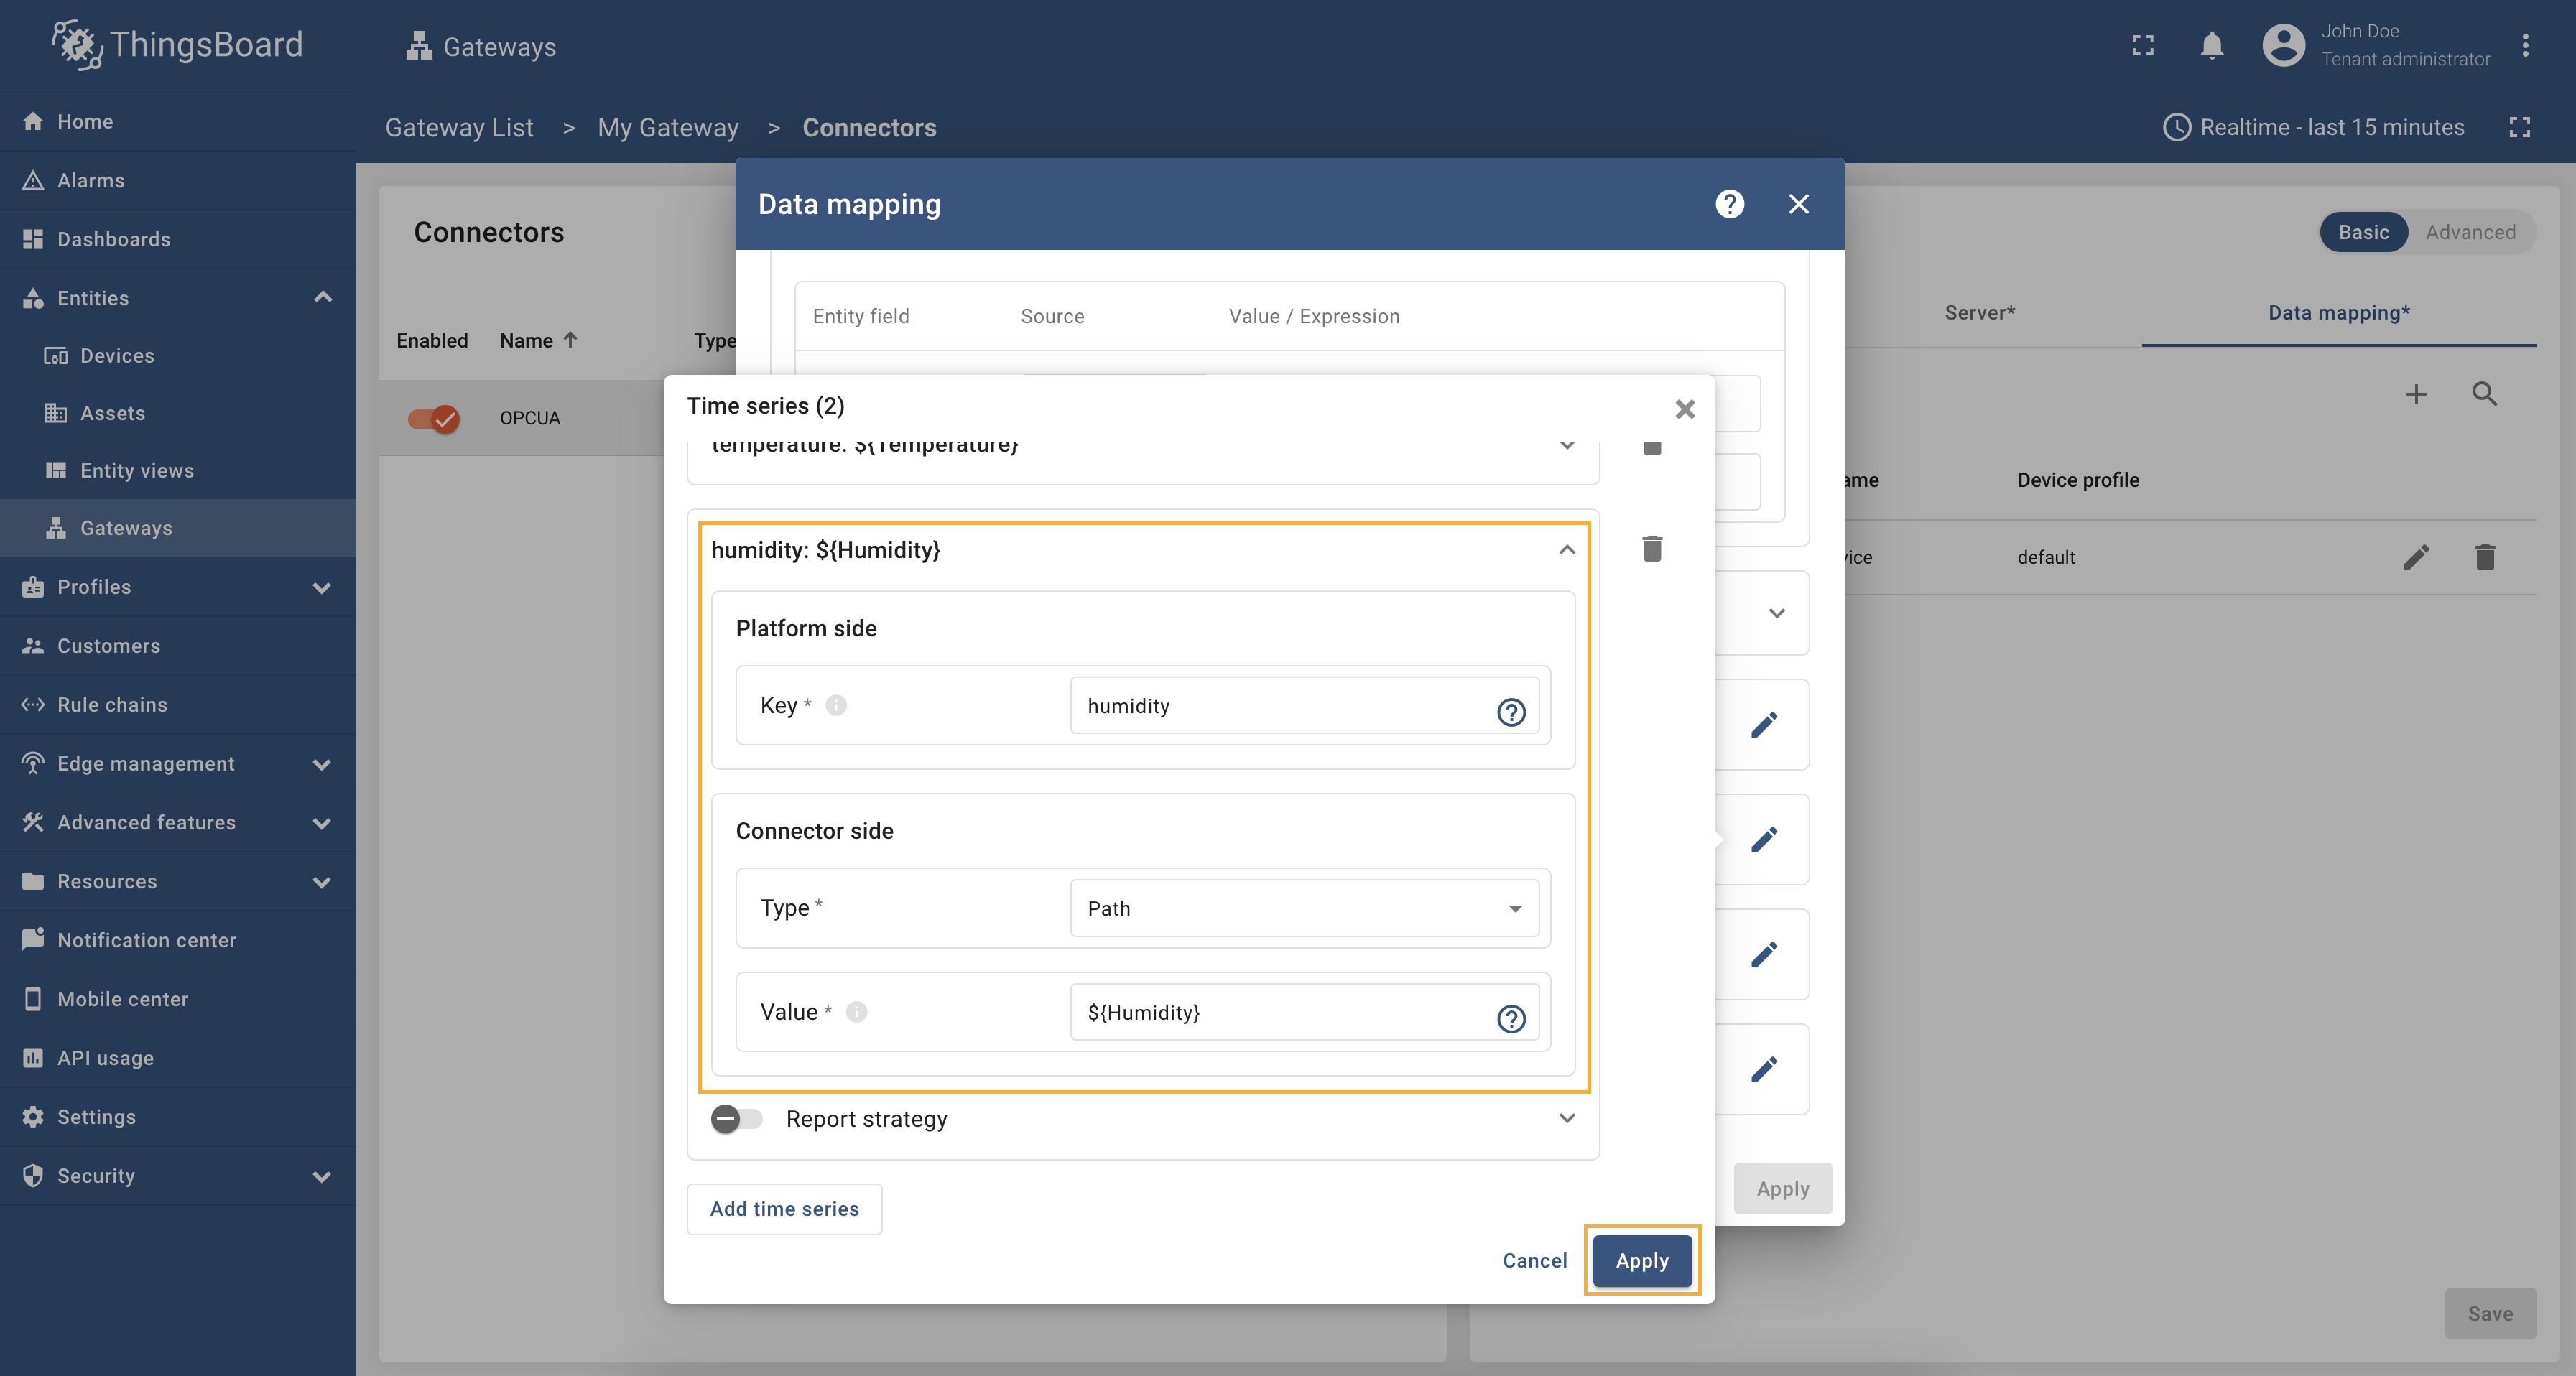 按文档填写字段值。然后点击”Apply“。 配置完成后,connector 的最终效果如下。完成后点击”Add“。 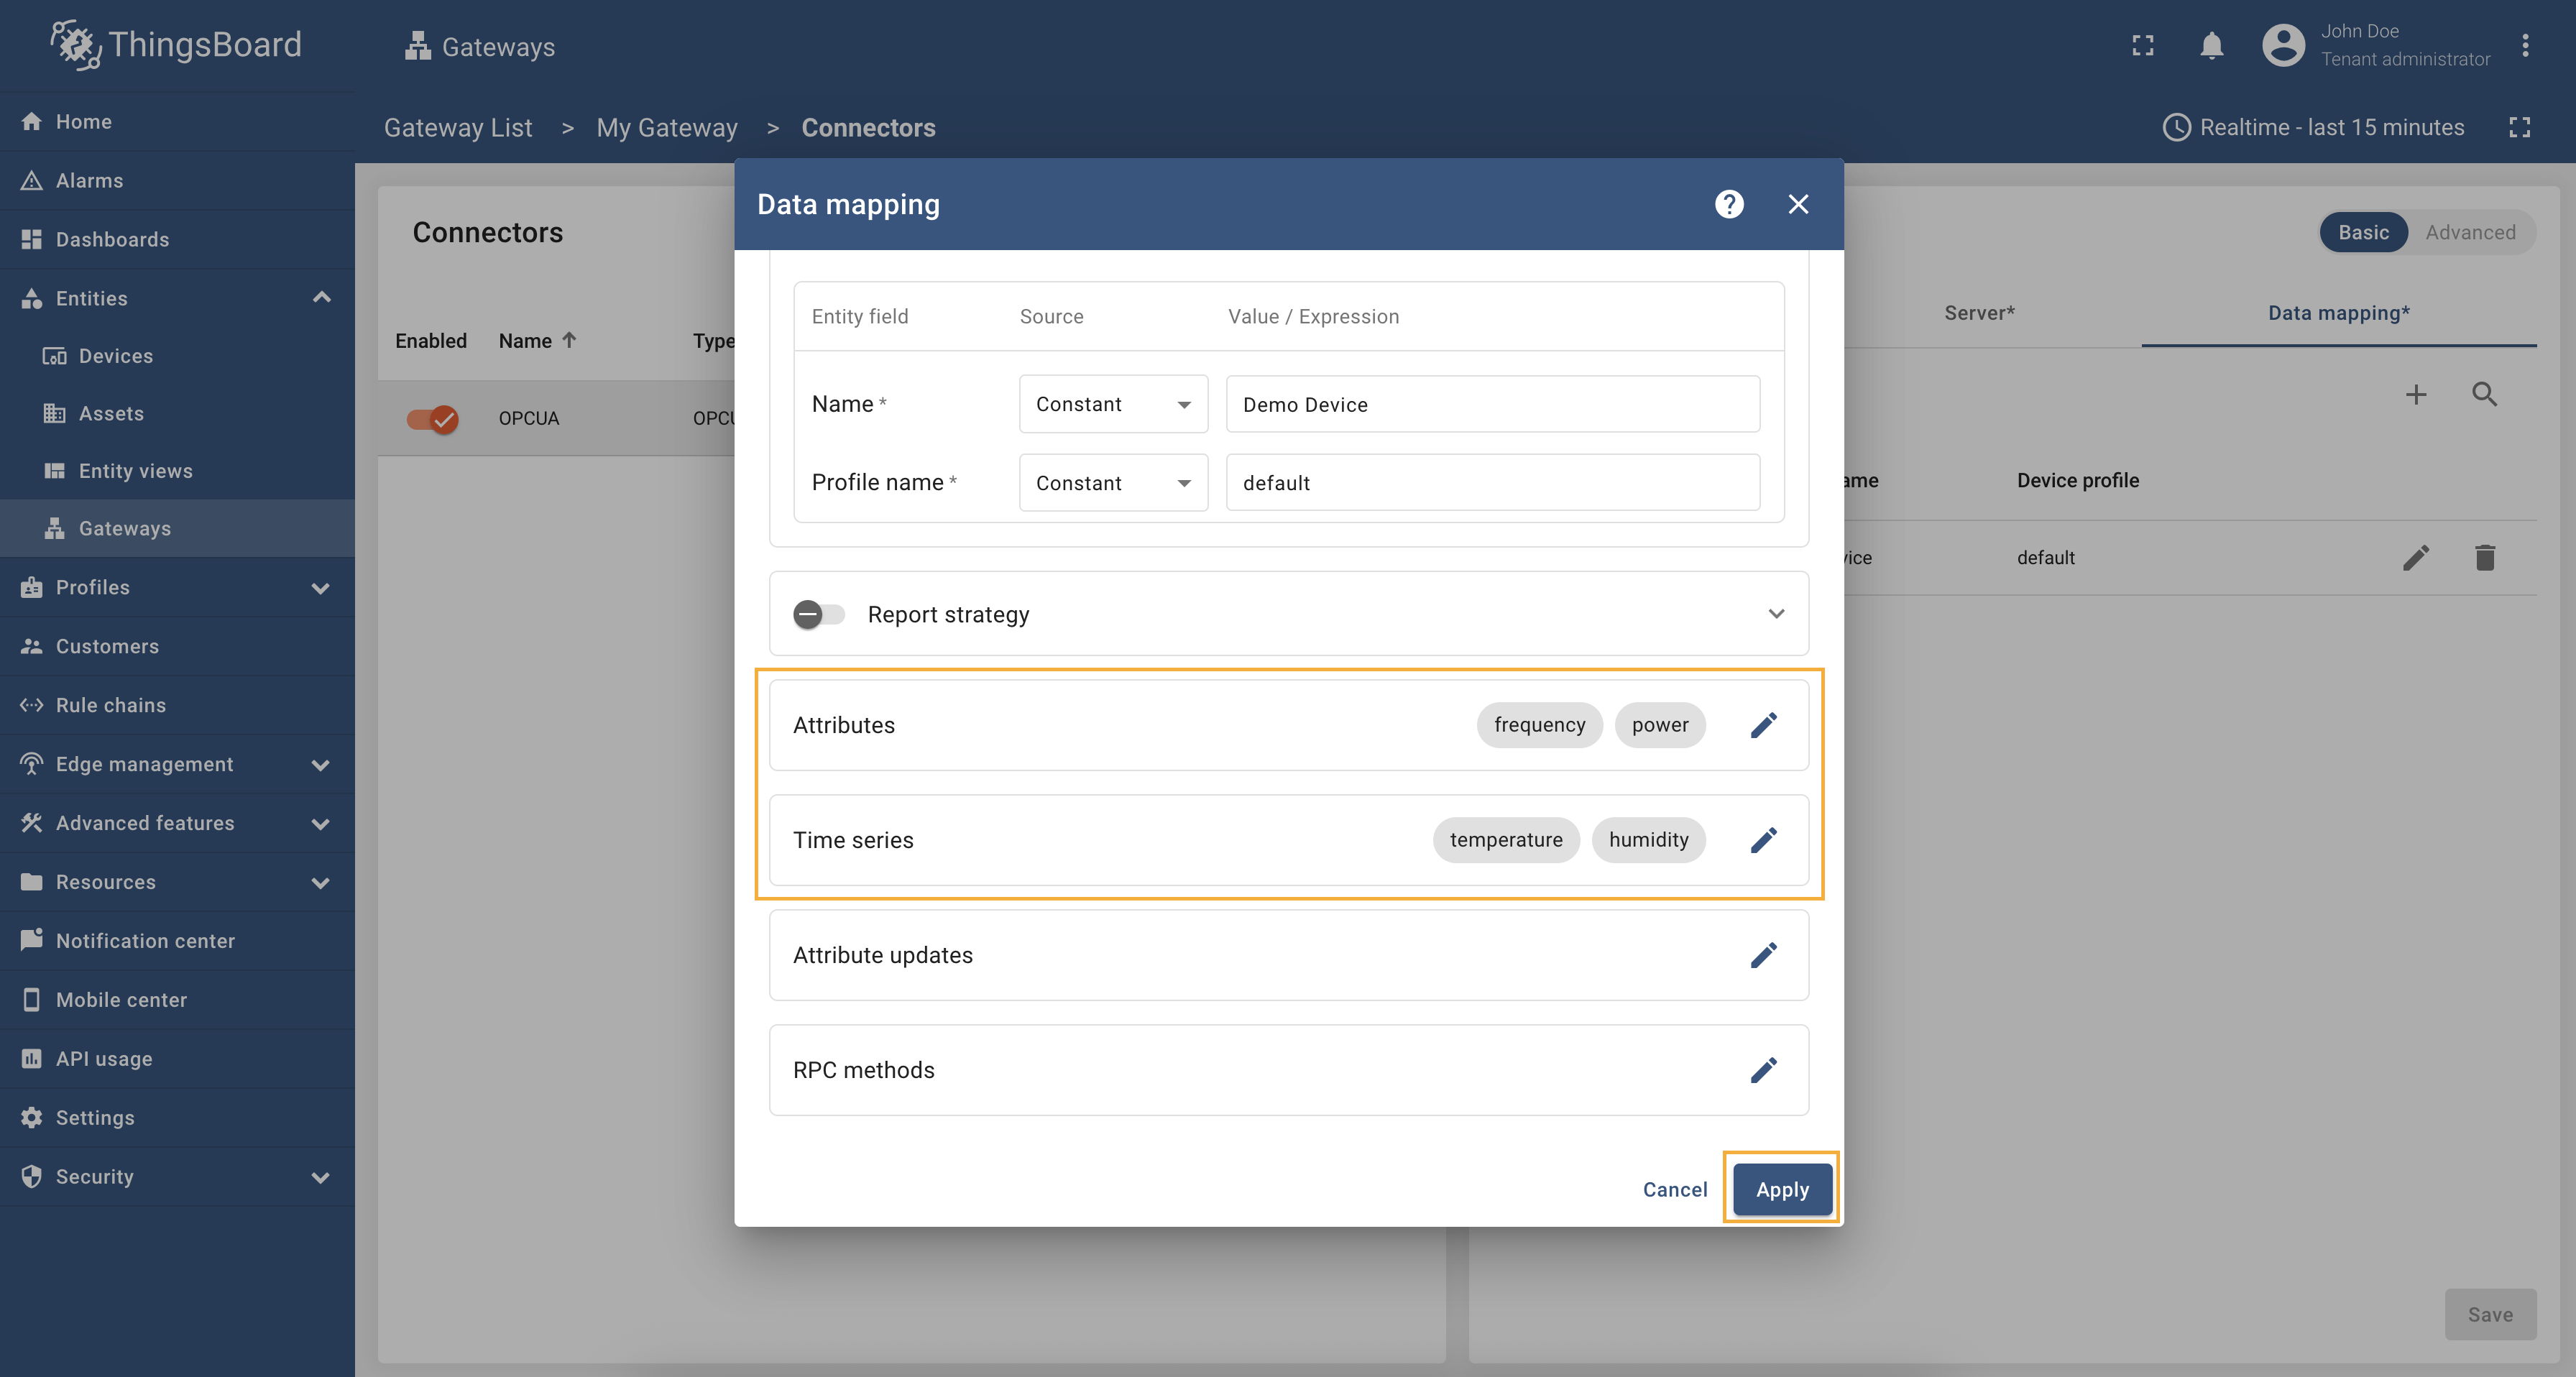 配置完成后的 connector 最终效果。完成后点击”Add“。 最后,点击”Save“保存 OPC-UA 配置。  最后,点击”Save“保存 OPC-UA 配置。 完成上述步骤后,网关将接收并应用新配置,并与远程服务器同步状态。 可在”Configuration“列查看 connector 配置的同步状态,确认网关是否与远程设置一致。 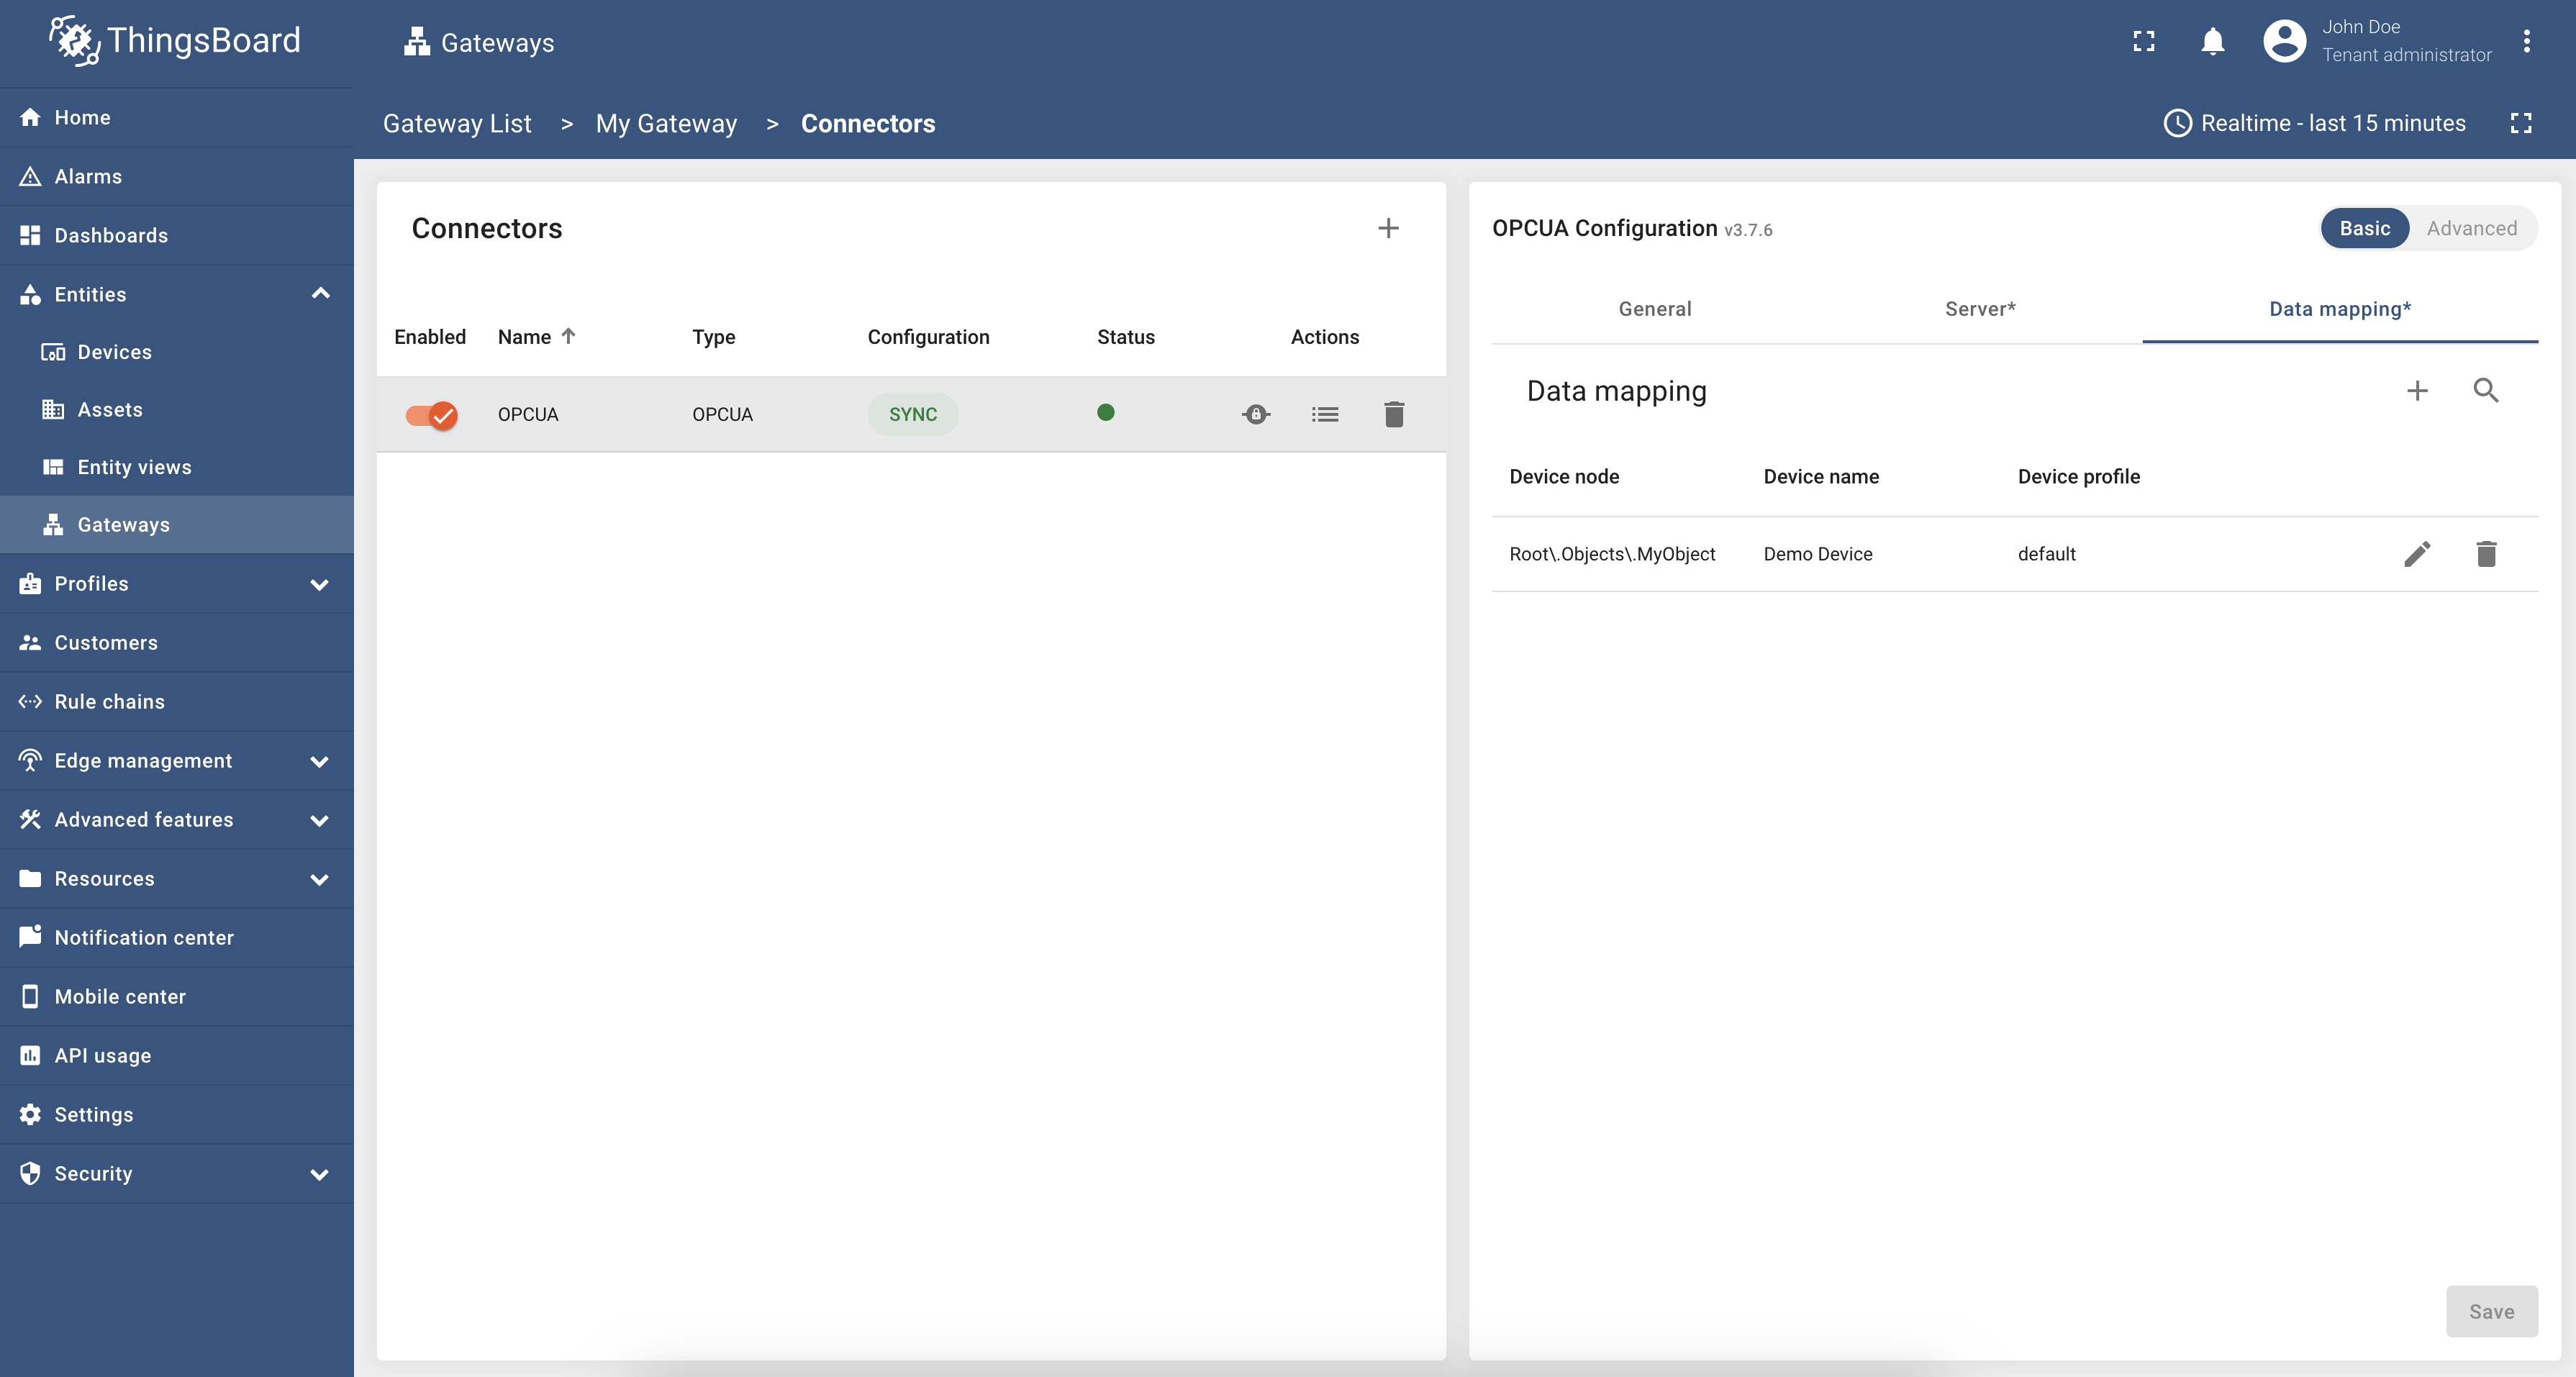 可在”Configuration“列查看 connector 配置的同步状态。 此外,可查看 connector 日志以确认 connector 工作正常:
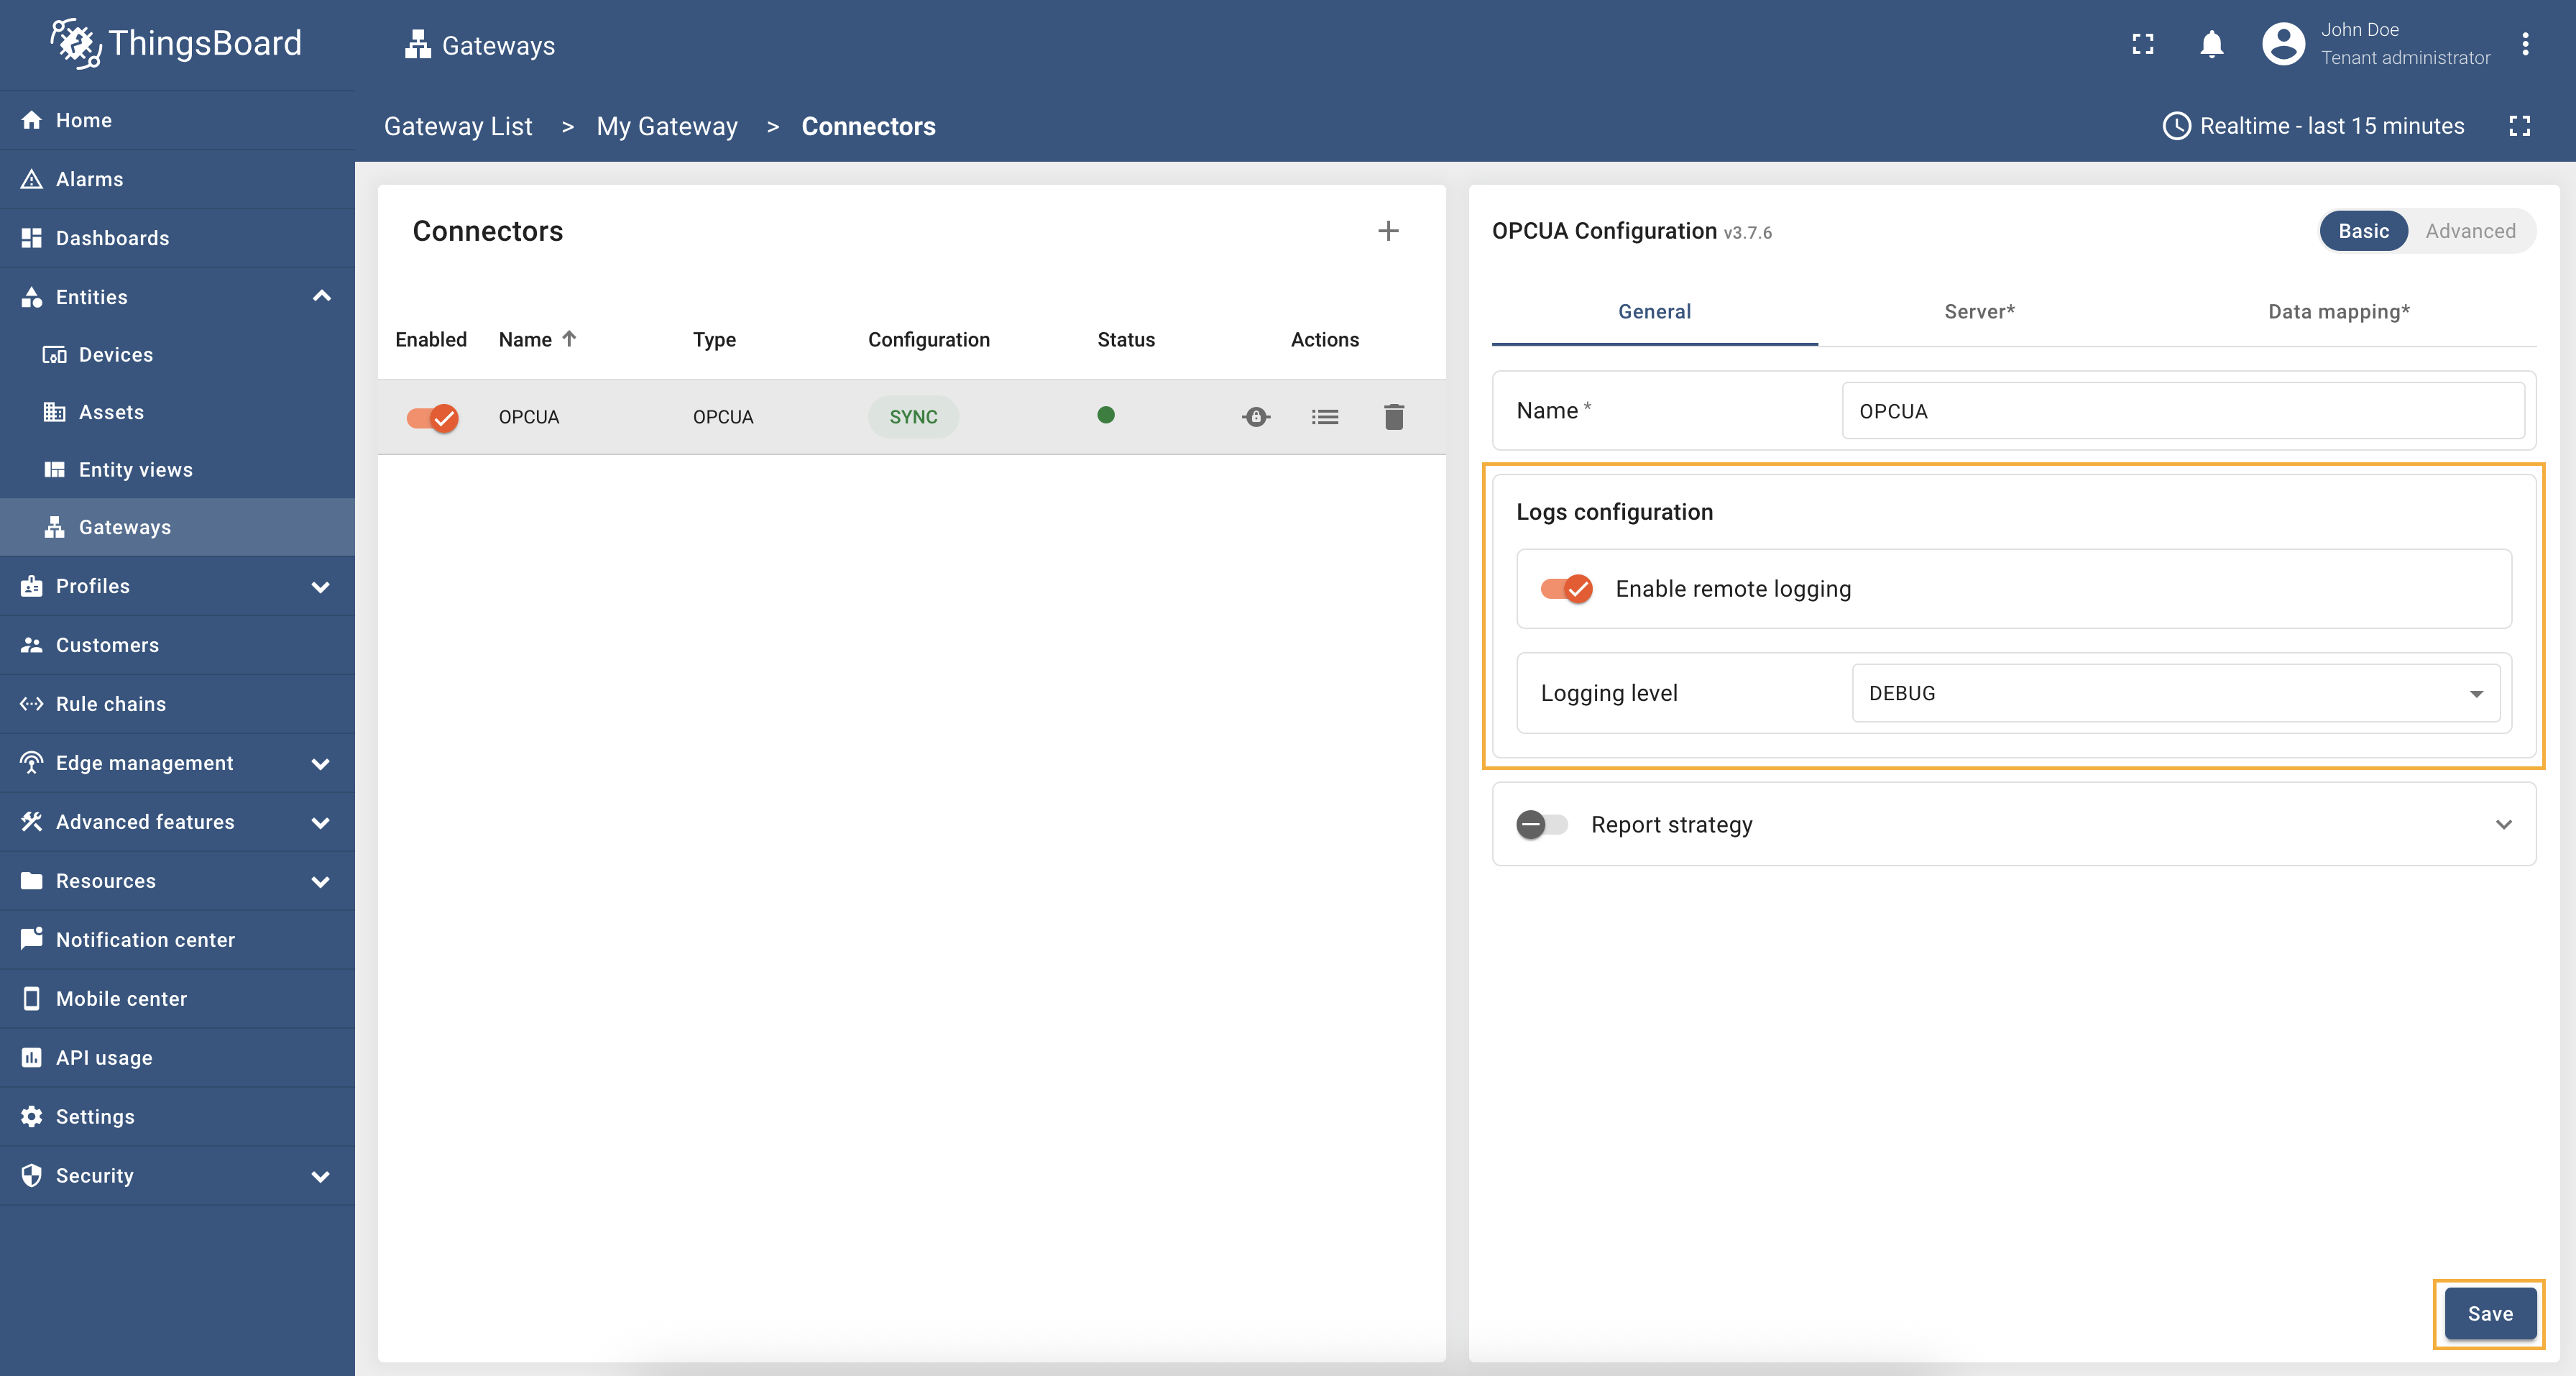 在 connector 的”General“标签页中,开启”Enable remote logging“启用远程日志。在”Log level“下拉中选择”DEBUG“。点击”Save“应用更改;  点击日志图标打开 connector 日志页面; 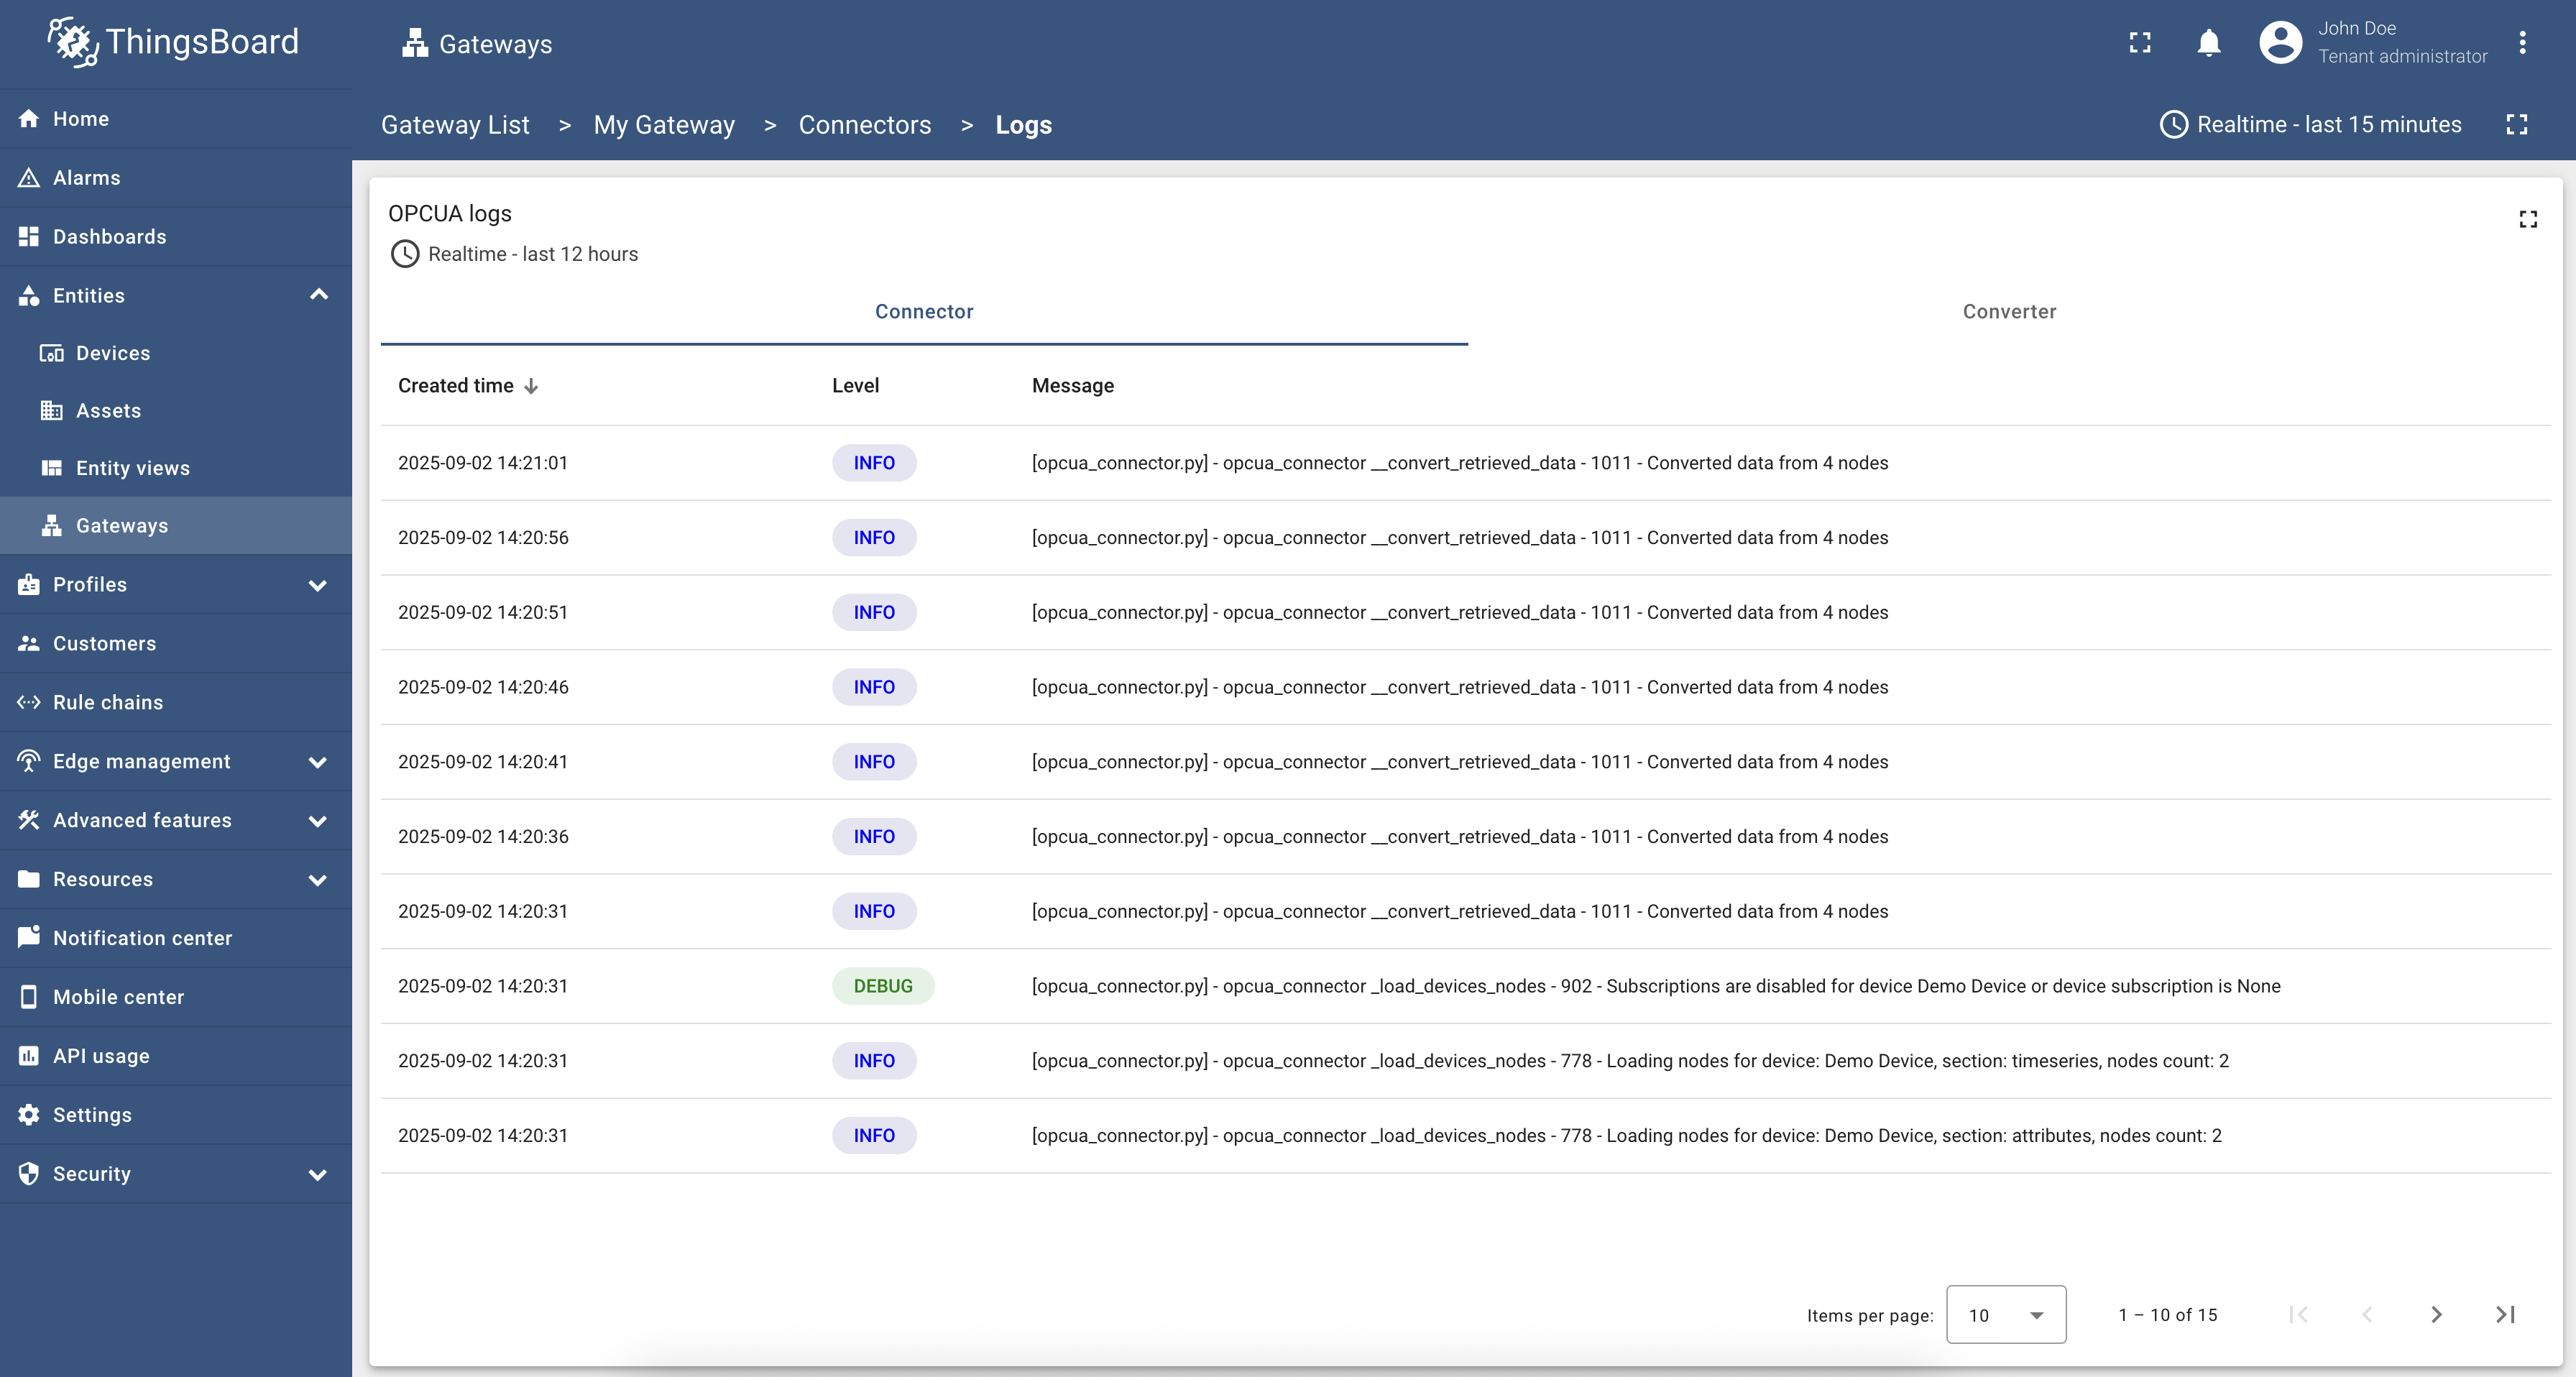 可看到由”Created time“、”Status“和”Message“列组成的”Logs“表格。 至此,网关已可通过新建并配置的 OPC-UA connector 处理数据。 |

步骤4:查看设备数据
要查看网关上报的数据,按下列步骤操作:


配置其他connector
在第一个connector安装并配置成功后,可继续配置其他connector连接不同设备。更多connector说明见以下文章:
- MQTT connector
- OPC-UA connector
- Modbus connector
- BLE connector
- Request connector
- REST connector
- CAN connector
- FTP connector
- Socket connector
- XMPP connector
- BACnet connector
- OCPP connector
- ODBC connector
- SNMP connector
- Custom connector
关于ThingsBoard IoT Gateway仪表板,可在此阅读。
下一步
查阅ThingsBoard主要功能的相关指南: