This guide explains how to install Trendz Analytics on RHEL/CentOS 8 or 9.
Important note before proceeding with RHEL/CentOS installation
Certain Trendz Analytics features like predictions, metric explorations, and Python calculation fields require a Python executor.
The python executor runs only via Docker. Even on RHEL/CentOS, Docker is essential to fully utilize all Trendz features. We recommend following the Docker (Linux or Mac OS) installation guide and using the Docker installation instead of RHEL/CentOS.
Proceed here only if you have a compelling reason to use a combined RHEL/CentOS + Docker setup.
Prerequisites
Hardware Requirements
取决于分析数据量与接入系统的设备数量。 单机运行 Trendz Analytics 至少需要 1GB 可用内存。
中小型部署中,Trendz 可与 ThingsBoard 安装在同一台服务器上。
Software Requirements
- 已安装 Docker CE。安装方法见此处
-
已安装 Docker Compose。安装方法见此处
- ThingsBoard 版本 4.3.0 或更高。若使用 4.2.1 或更早版本,请参阅此指南将 Trendz 连接到 ThingsBoard。
- 已激活的 Trendz Analytics 插件。激活方法请参阅此指南。
For CentOS 7:
1
2
3
4
5
# Install wget and nano
sudo yum install -y nano wget
# Add latest EPEL release for CentOS 7
sudo yum install -y https://dl.fedoraproject.org/pub/epel/epel-release-latest-7.noarch.rpm
For CentOS 8:
1
2
3
4
5
# Install wget and nano
sudo yum install -y nano wget
# Add latest EPEL release for CentOS 8
sudo yum install -y https://dl.fedoraproject.org/pub/epel/epel-release-latest-8.noarch.rpm
Installation Steps
Step 1. Install Java 17 (OpenJDK)
ThingsBoard 服务运行在 Java 17 上。请按以下说明安装 OpenJDK 17:
1
sudo dnf install java-17-openjdk-headless
请勿忘记将您的操作系统配置为默认使用 OpenJDK 17。您可以使用以下命令配置默认版本:
1
sudo update-alternatives --config java
您可以使用以下命令检查安装:
1
java -version
预期命令输出为:
1
2
3
openjdk version "17.x.xx"
OpenJDK Runtime Environment (...)
OpenJDK 64-Bit Server VM (build ...)
Step 2. Trendz Analytics service installation
Download installation package.
1
wget https://dist.thingsboard.io/trendz-1.15.0.4.rpm
Install Trendz Analytics as a service
1
sudo rpm -Uvh trendz-1.15.0.4.rpm
Step 3. Configure Trendz database
Trendz uses PostgreSQL as a database. You can install PostgreSQL on the same serverfor Trendz or use managed PostgreSQL service from your cloud vendor.
- PostgreSQL Installation
以下说明将帮助您安装 PostgreSQL。
1
2
# Update your system
sudo dnf update
安装软件源。
对于 CentOS/RHEL 8:
1
2
# Install the repository RPM:
sudo dnf -y install https://download.postgresql.org/pub/repos/yum/reporpms/EL-8-x86_64/pgdg-redhat-repo-latest.noarch.rpm
对于 CentOS/RHEL 9:
1
2
# Install the repository RPM:
sudo dnf -y install https://download.postgresql.org/pub/repos/yum/reporpms/EL-9-x86_64/pgdg-redhat-repo-latest.noarch.rpm
安装软件包。
1
2
3
4
5
6
7
8
# Install packages
sudo dnf -qy module disable postgresql
sudo dnf -y install postgresql16 postgresql16-server postgresql16-contrib
# Initialize your PostgreSQL DB
sudo /usr/pgsql-16/bin/postgresql-16-setup initdb
sudo systemctl start postgresql-16
# Optional: Configure PostgreSQL to start on boot
sudo systemctl enable --now postgresql-16
安装 PostgreSQL 后,建议为 PostgreSQL 主用户 设置密码。
以下命令将切换当前用户为 PostgreSQL 用户并在 PostgreSQL 中直接设置密码。
1
sudo -u postgres psql -c "\password"
然后输入并确认密码。
After configuring the password, edit the pg_hba.conf to use MD5 authentication with the postgres user.
Edit the pg_hba.conf file:
1
sudo nano /var/lib/pgsql/16/data/pg_hba.conf
Locate the following lines:
1
2
# IPv4 local connections:
host    all             all             127.0.0.1/32            ident
Replace ident with md5:
1
host    all             all             127.0.0.1/32            md5
Finally, you should restart the PostgreSQL service to initialize the new configuration:
1
sudo systemctl restart postgresql-16.service
- Create Database for Trendz
Connect to the database to create trendz DB:
1
psql -U postgres -d postgres -h 127.0.0.1 -W
Execute create database statement
1
CREATE DATABASE trendz;
Then, press “Ctrl+D” to return to main user console.
- Configure database connection for Trendz
Edit Trendz configuration file
1
sudo nano /etc/trendz/conf/trendz.conf
Add the following lines to the configuration file. Don’t forget to replace “PUT_YOUR_POSTGRESQL_PASSWORD_HERE” with your real postgres user password:
1
2
3
4
# DB Configuration
export SPRING_DATASOURCE_URL=jdbc:postgresql://localhost:5432/trendz
export SPRING_DATASOURCE_USERNAME=postgres
export SPRING_DATASOURCE_PASSWORD=PUT_YOUR_POSTGRESQL_PASSWORD_HERE
Step 4. Run installation script
Once Trendz service is installed and DB configuration is updated, you can execute the following script:
1
sudo /usr/share/trendz/bin/install/install.sh
Step 5. Start Trendz service
Execute the following command to start Trendz Analytics:
1
sudo service trendz start
Step 6. Sync ThingsBoard With Trendz
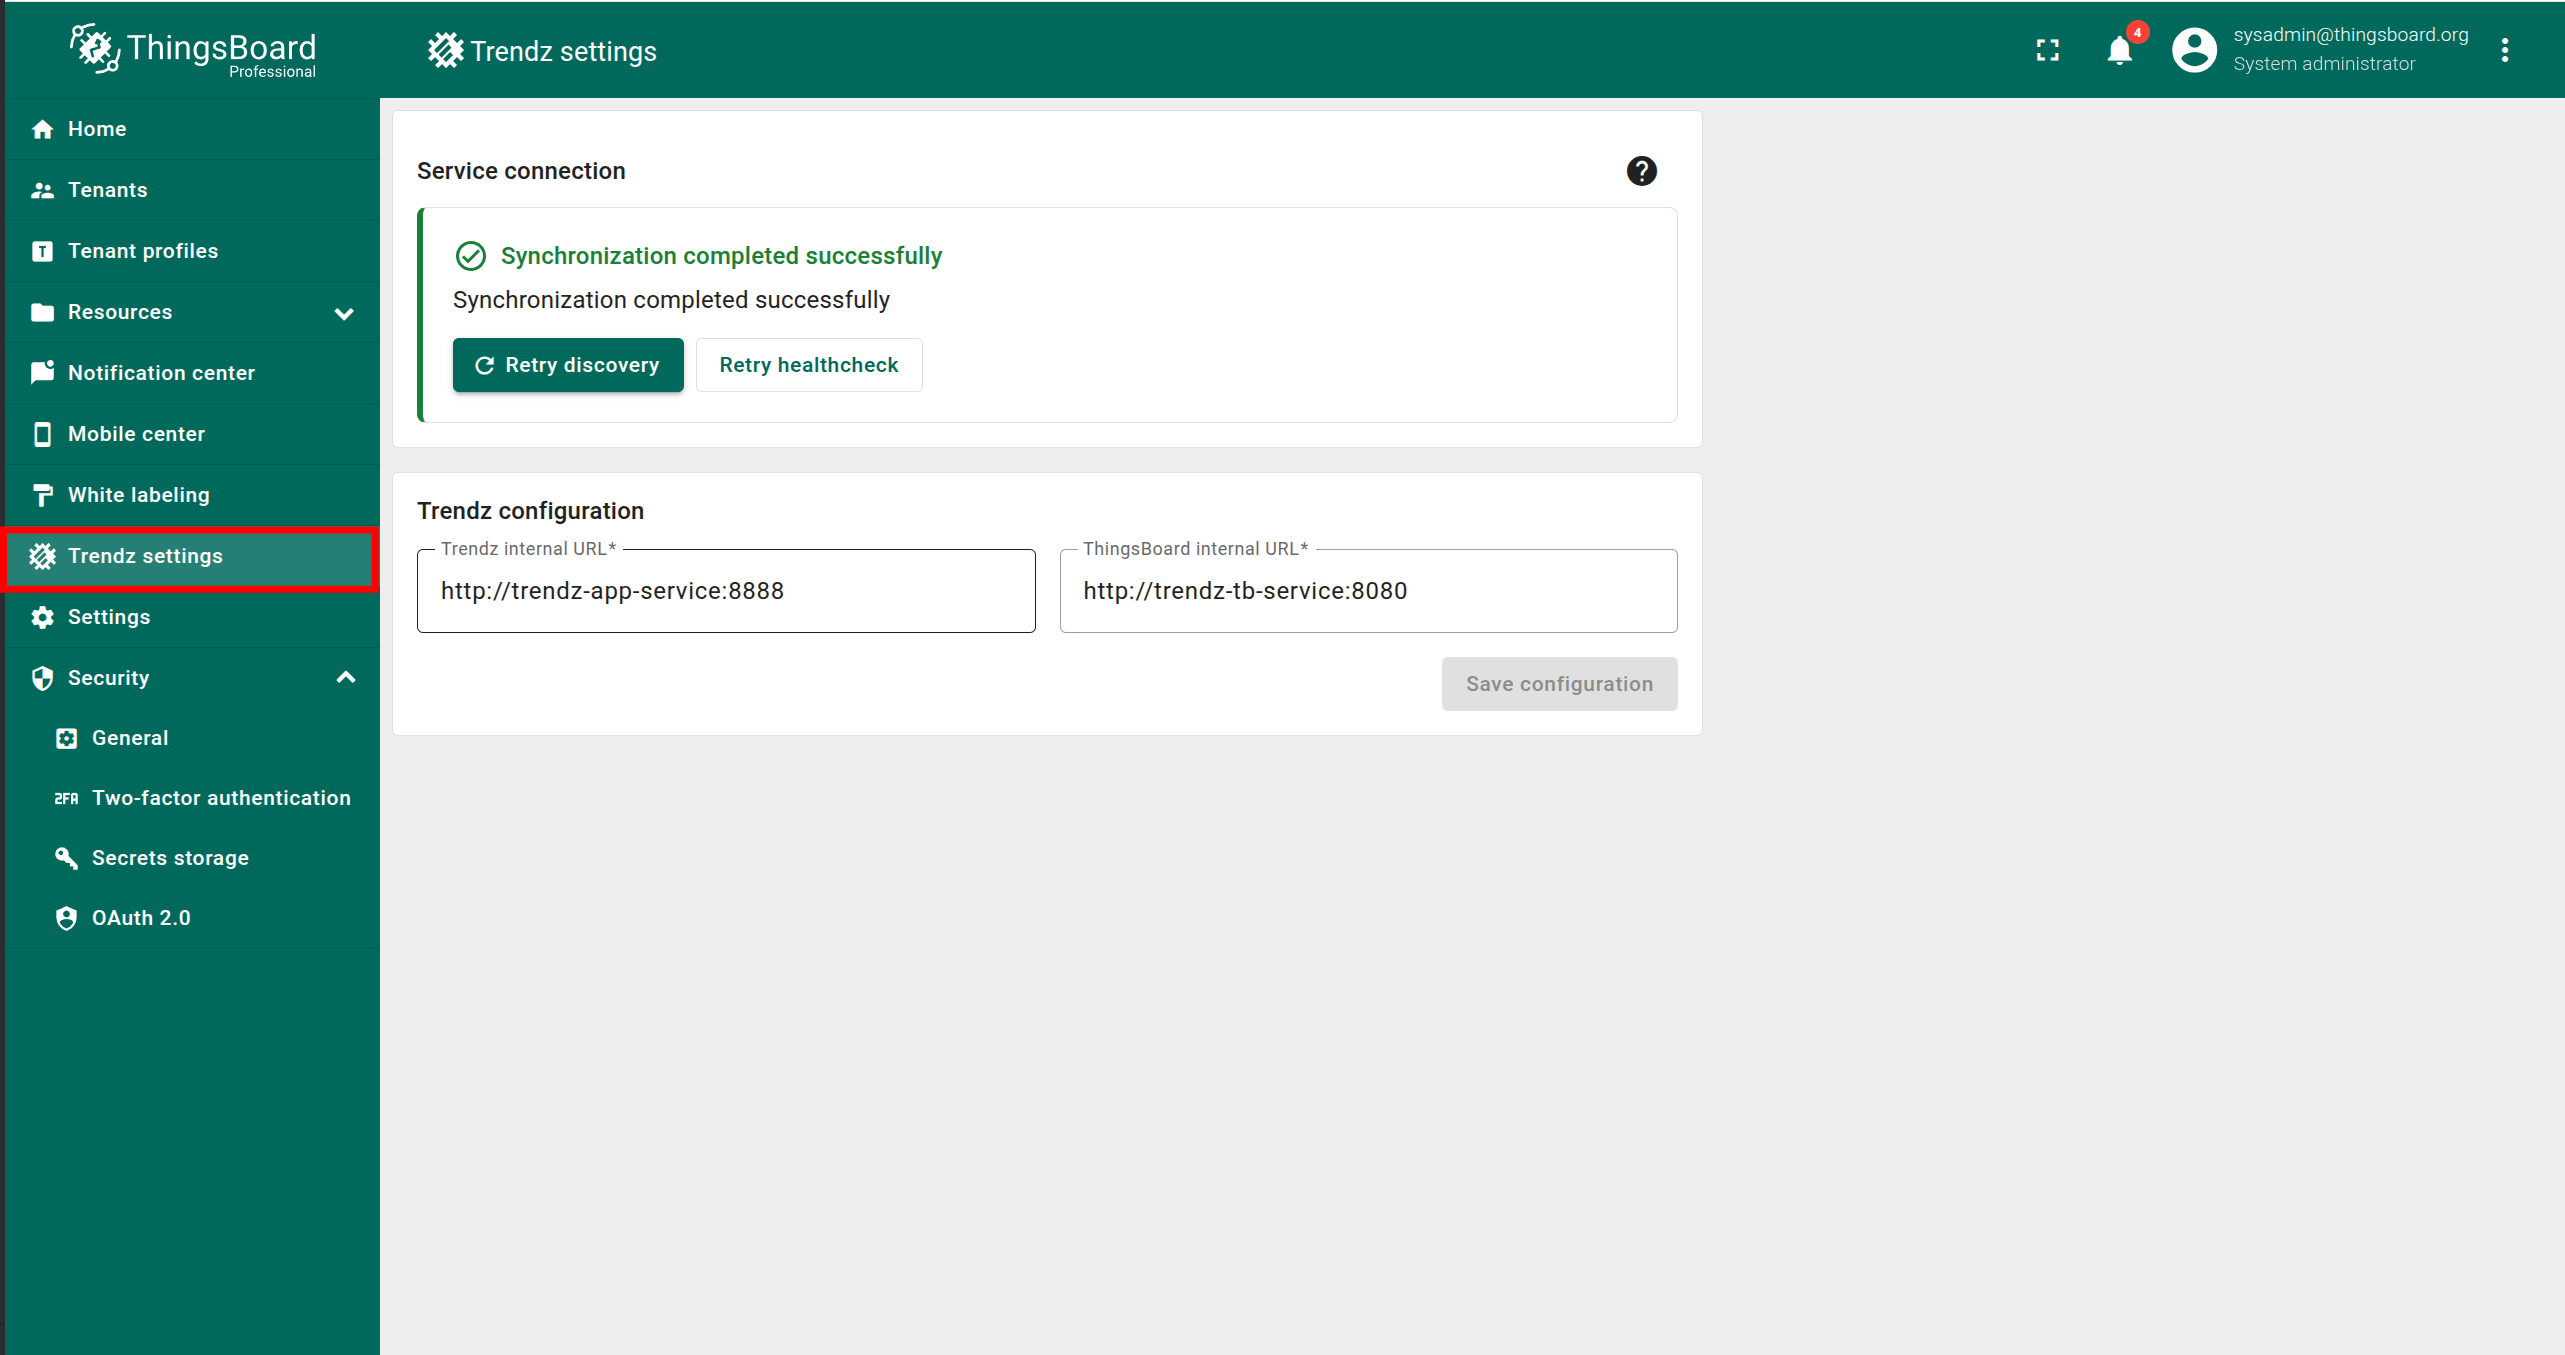
最后一步是确认 ThingsBoard 已与 Trendz 同步。操作如下:
- 以 Sysadmin 身份登录 ThingsBoard。
- 打开 Trendz Settings 页面。
若看到 “Synchronization completed successfully” 提示,说明同步已自动完成,无需进一步操作。

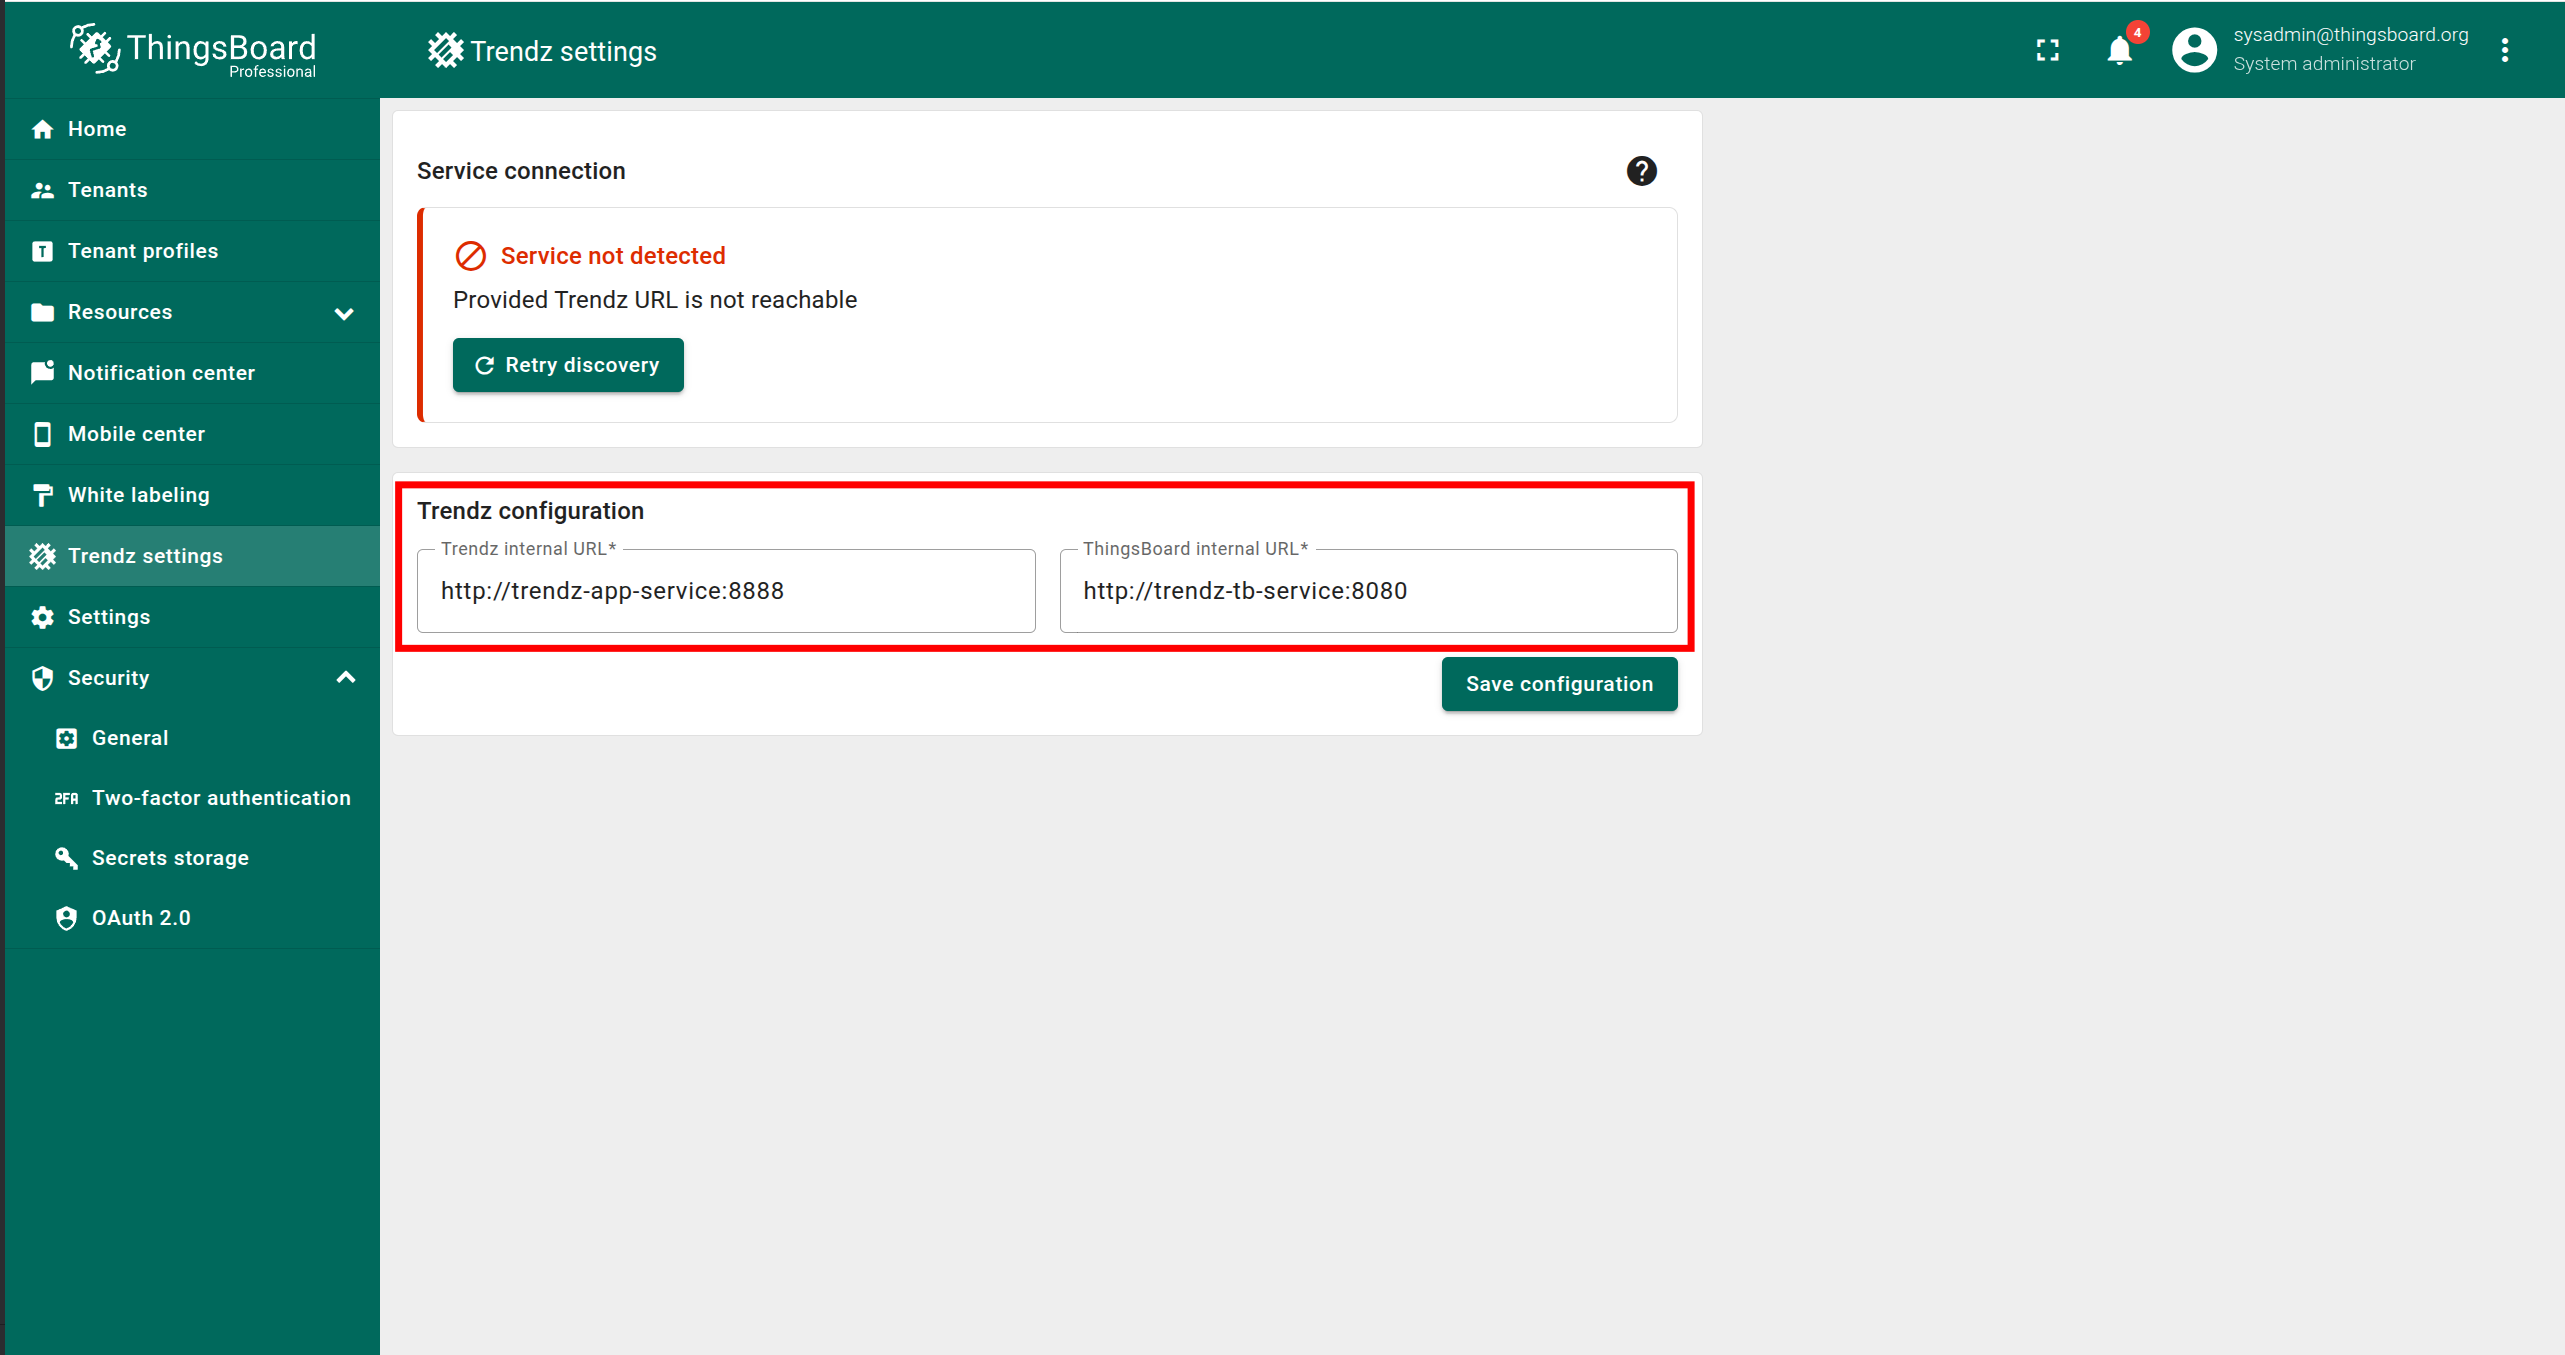
若出现错误提示,请按以下步骤排查:
- 确认 Trendz 正在运行。
- 填写正确的 Trendz internal URL,且 ThingsBoard 服务可访问。
- 填写正确的 ThingsBoard internal URL,且 Trendz 服务可访问。
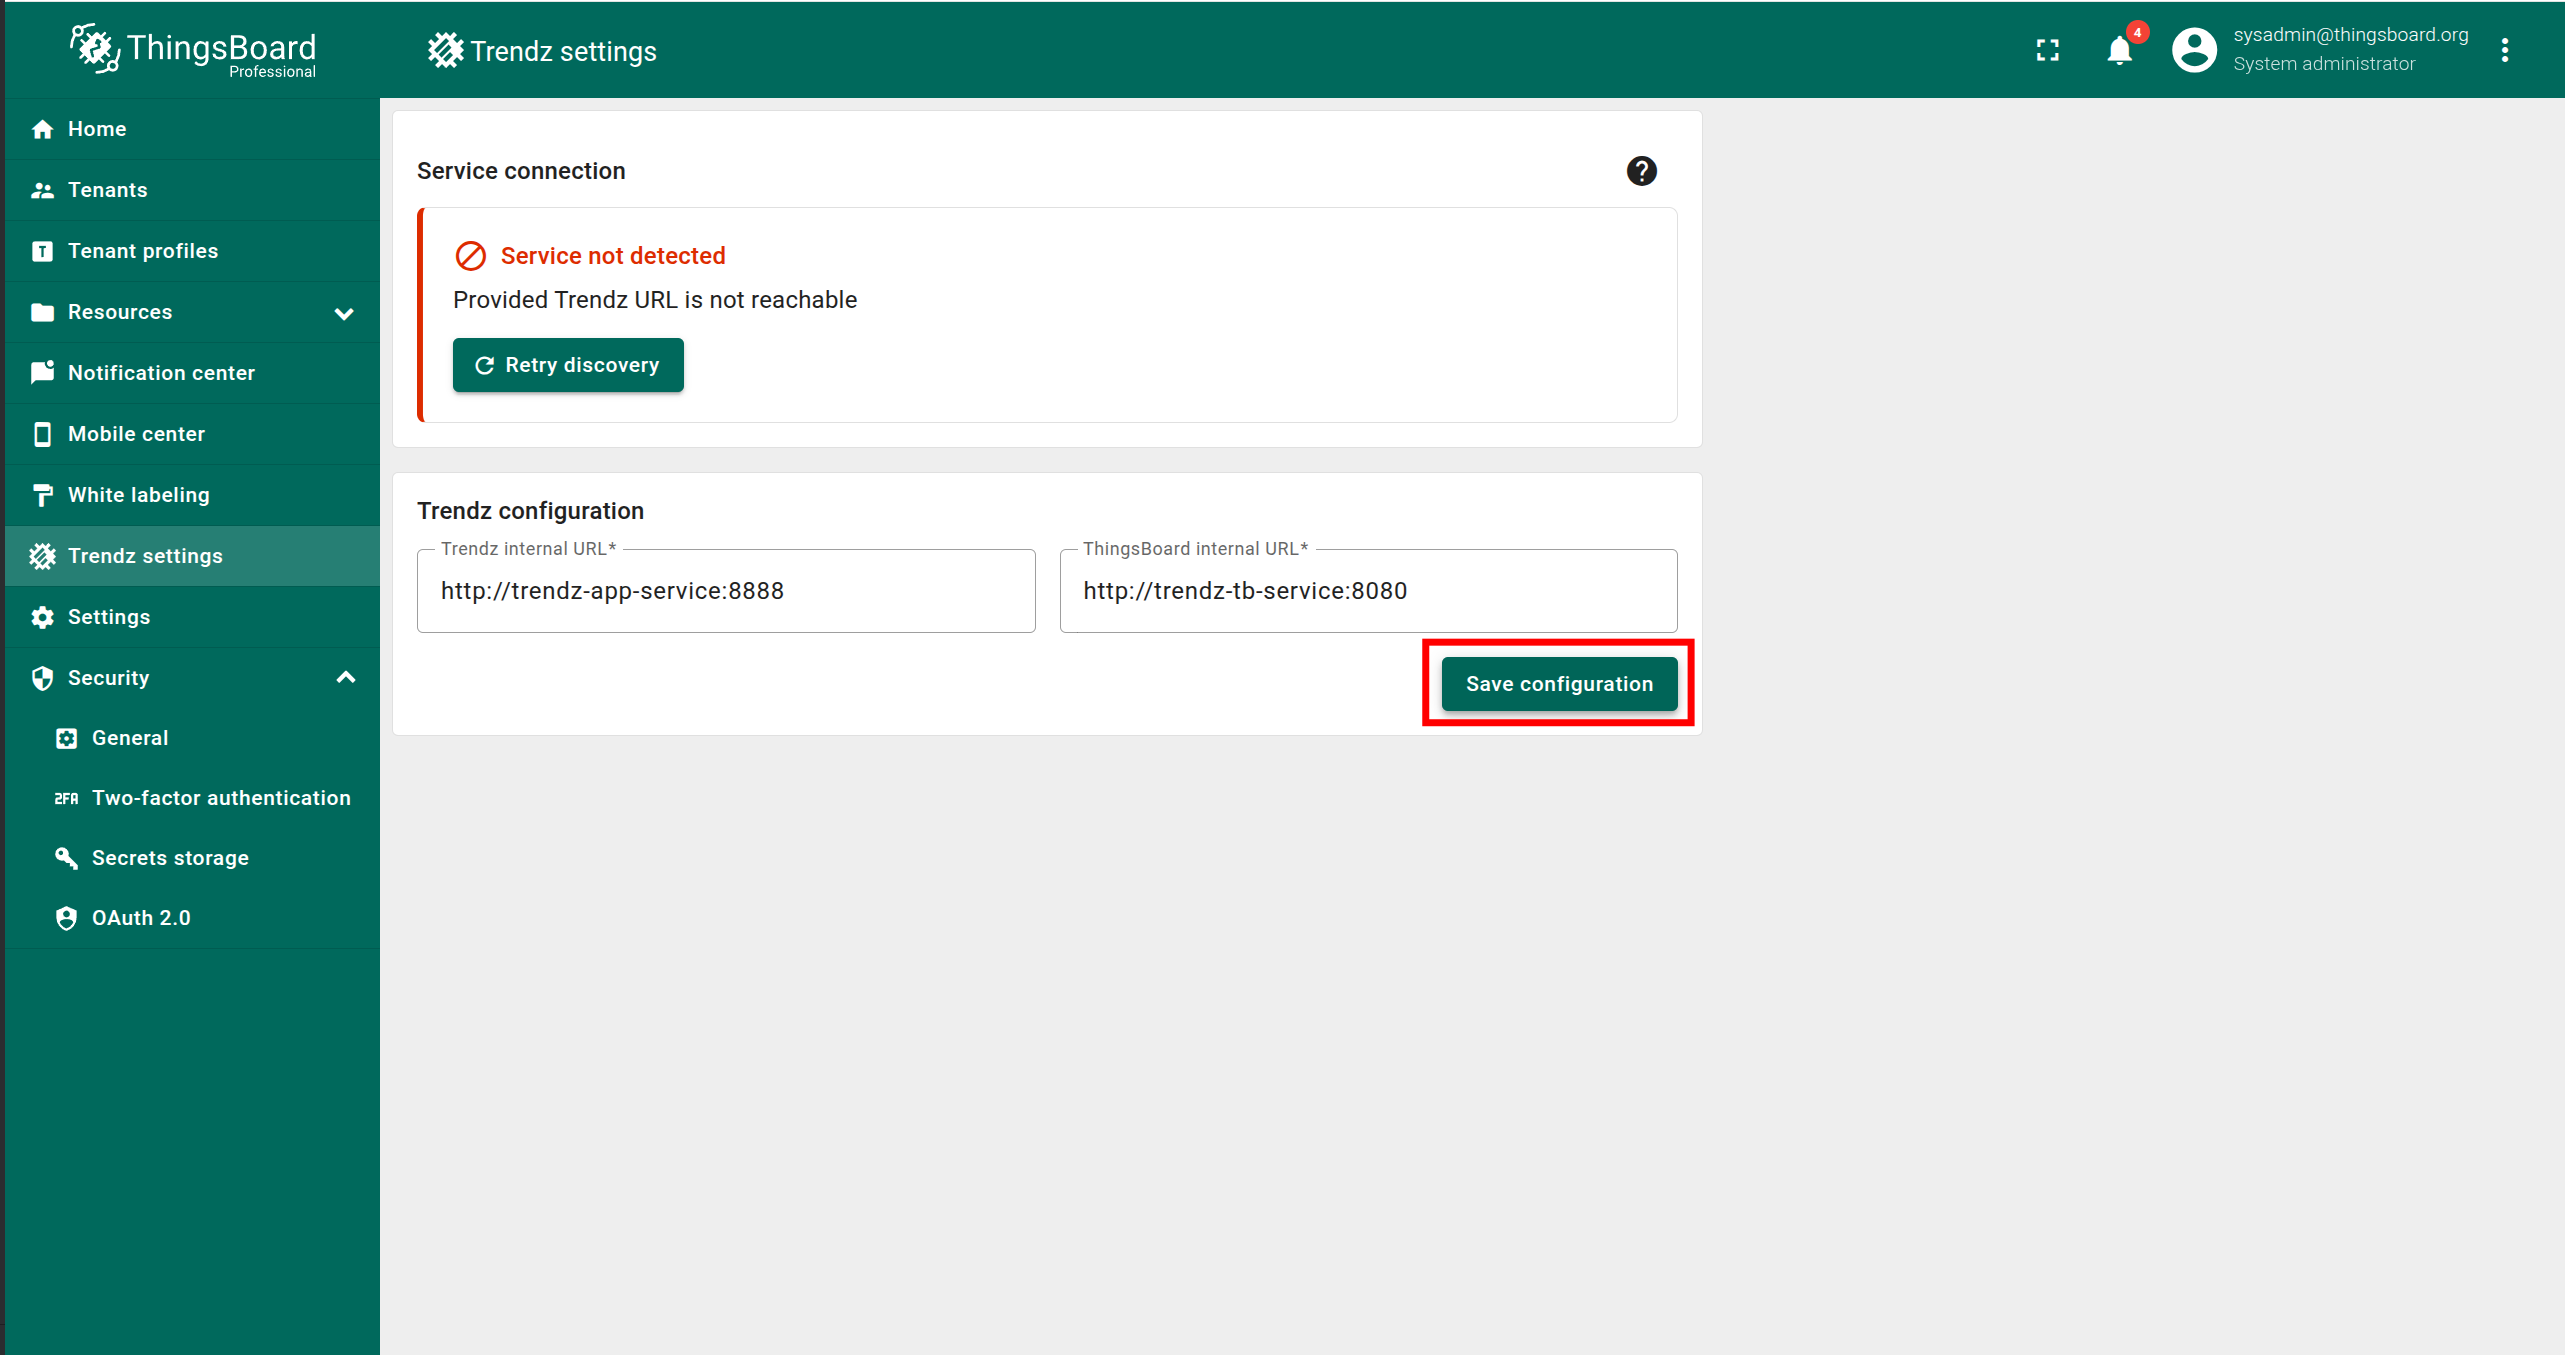
- 点击 Save configuration。
- 点击 Retry discovery。
当出现 “Synchronization completed successfully” 后,同步即完成。


Step 7. Install Trendz Python Executor
To utilize all Trendz capabilities, such as Trendz Python Calculation Fields or Prediction Models, it is essential to install an additional service: the Trendz Python Executor, which can securely run Python code.
You can learn more about how to install it here.
Authentication
默认可在 http://localhost:8888 访问 Trendz UI。
Trendz 使用 ThingsBoard 作为认证服务,首次认证需使用 ThingsBoard 中的 Tenant Administrator 凭证。
Topology Discovery
首次登录 Trendz 后,需发现拓扑以使 Trendz 识别资产、设备、其配置与关系:
- 点击 Discover Topology 按钮开始拓扑发现。
- 等待拓扑发现完成。
- 点击 Finish 按钮关闭拓扑发现页面并解锁 Trendz 主要功能。
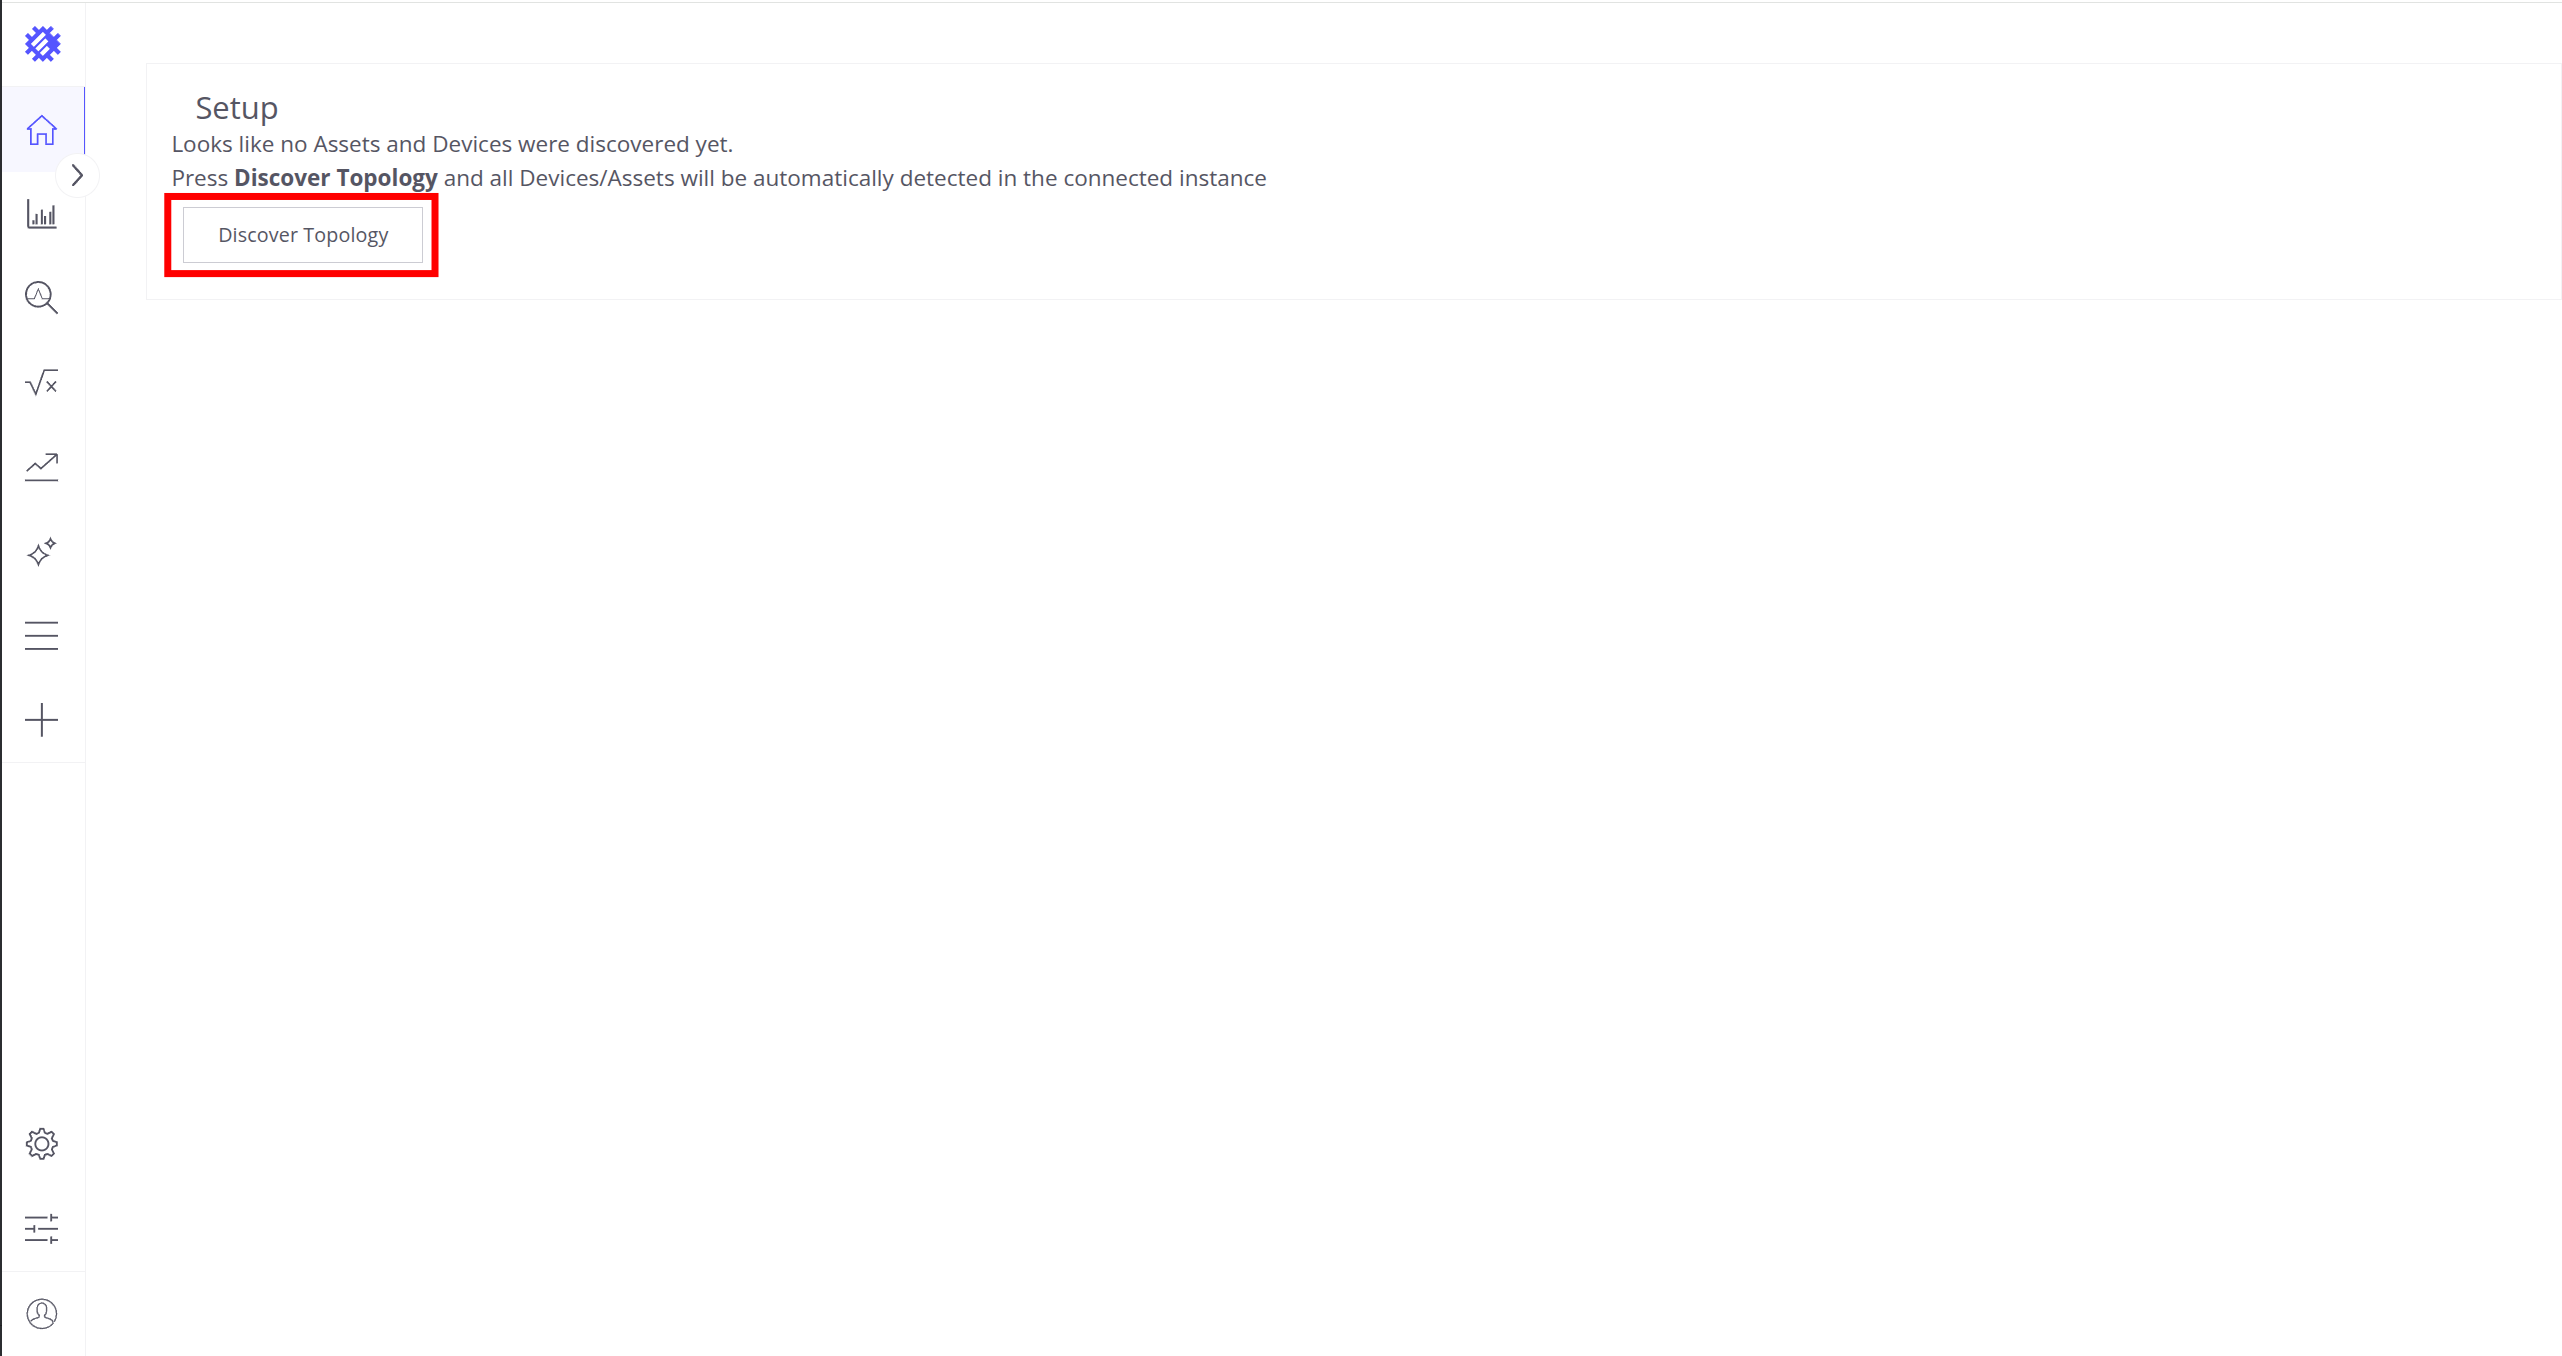
点击 Discover Topology 按钮开始拓扑发现。
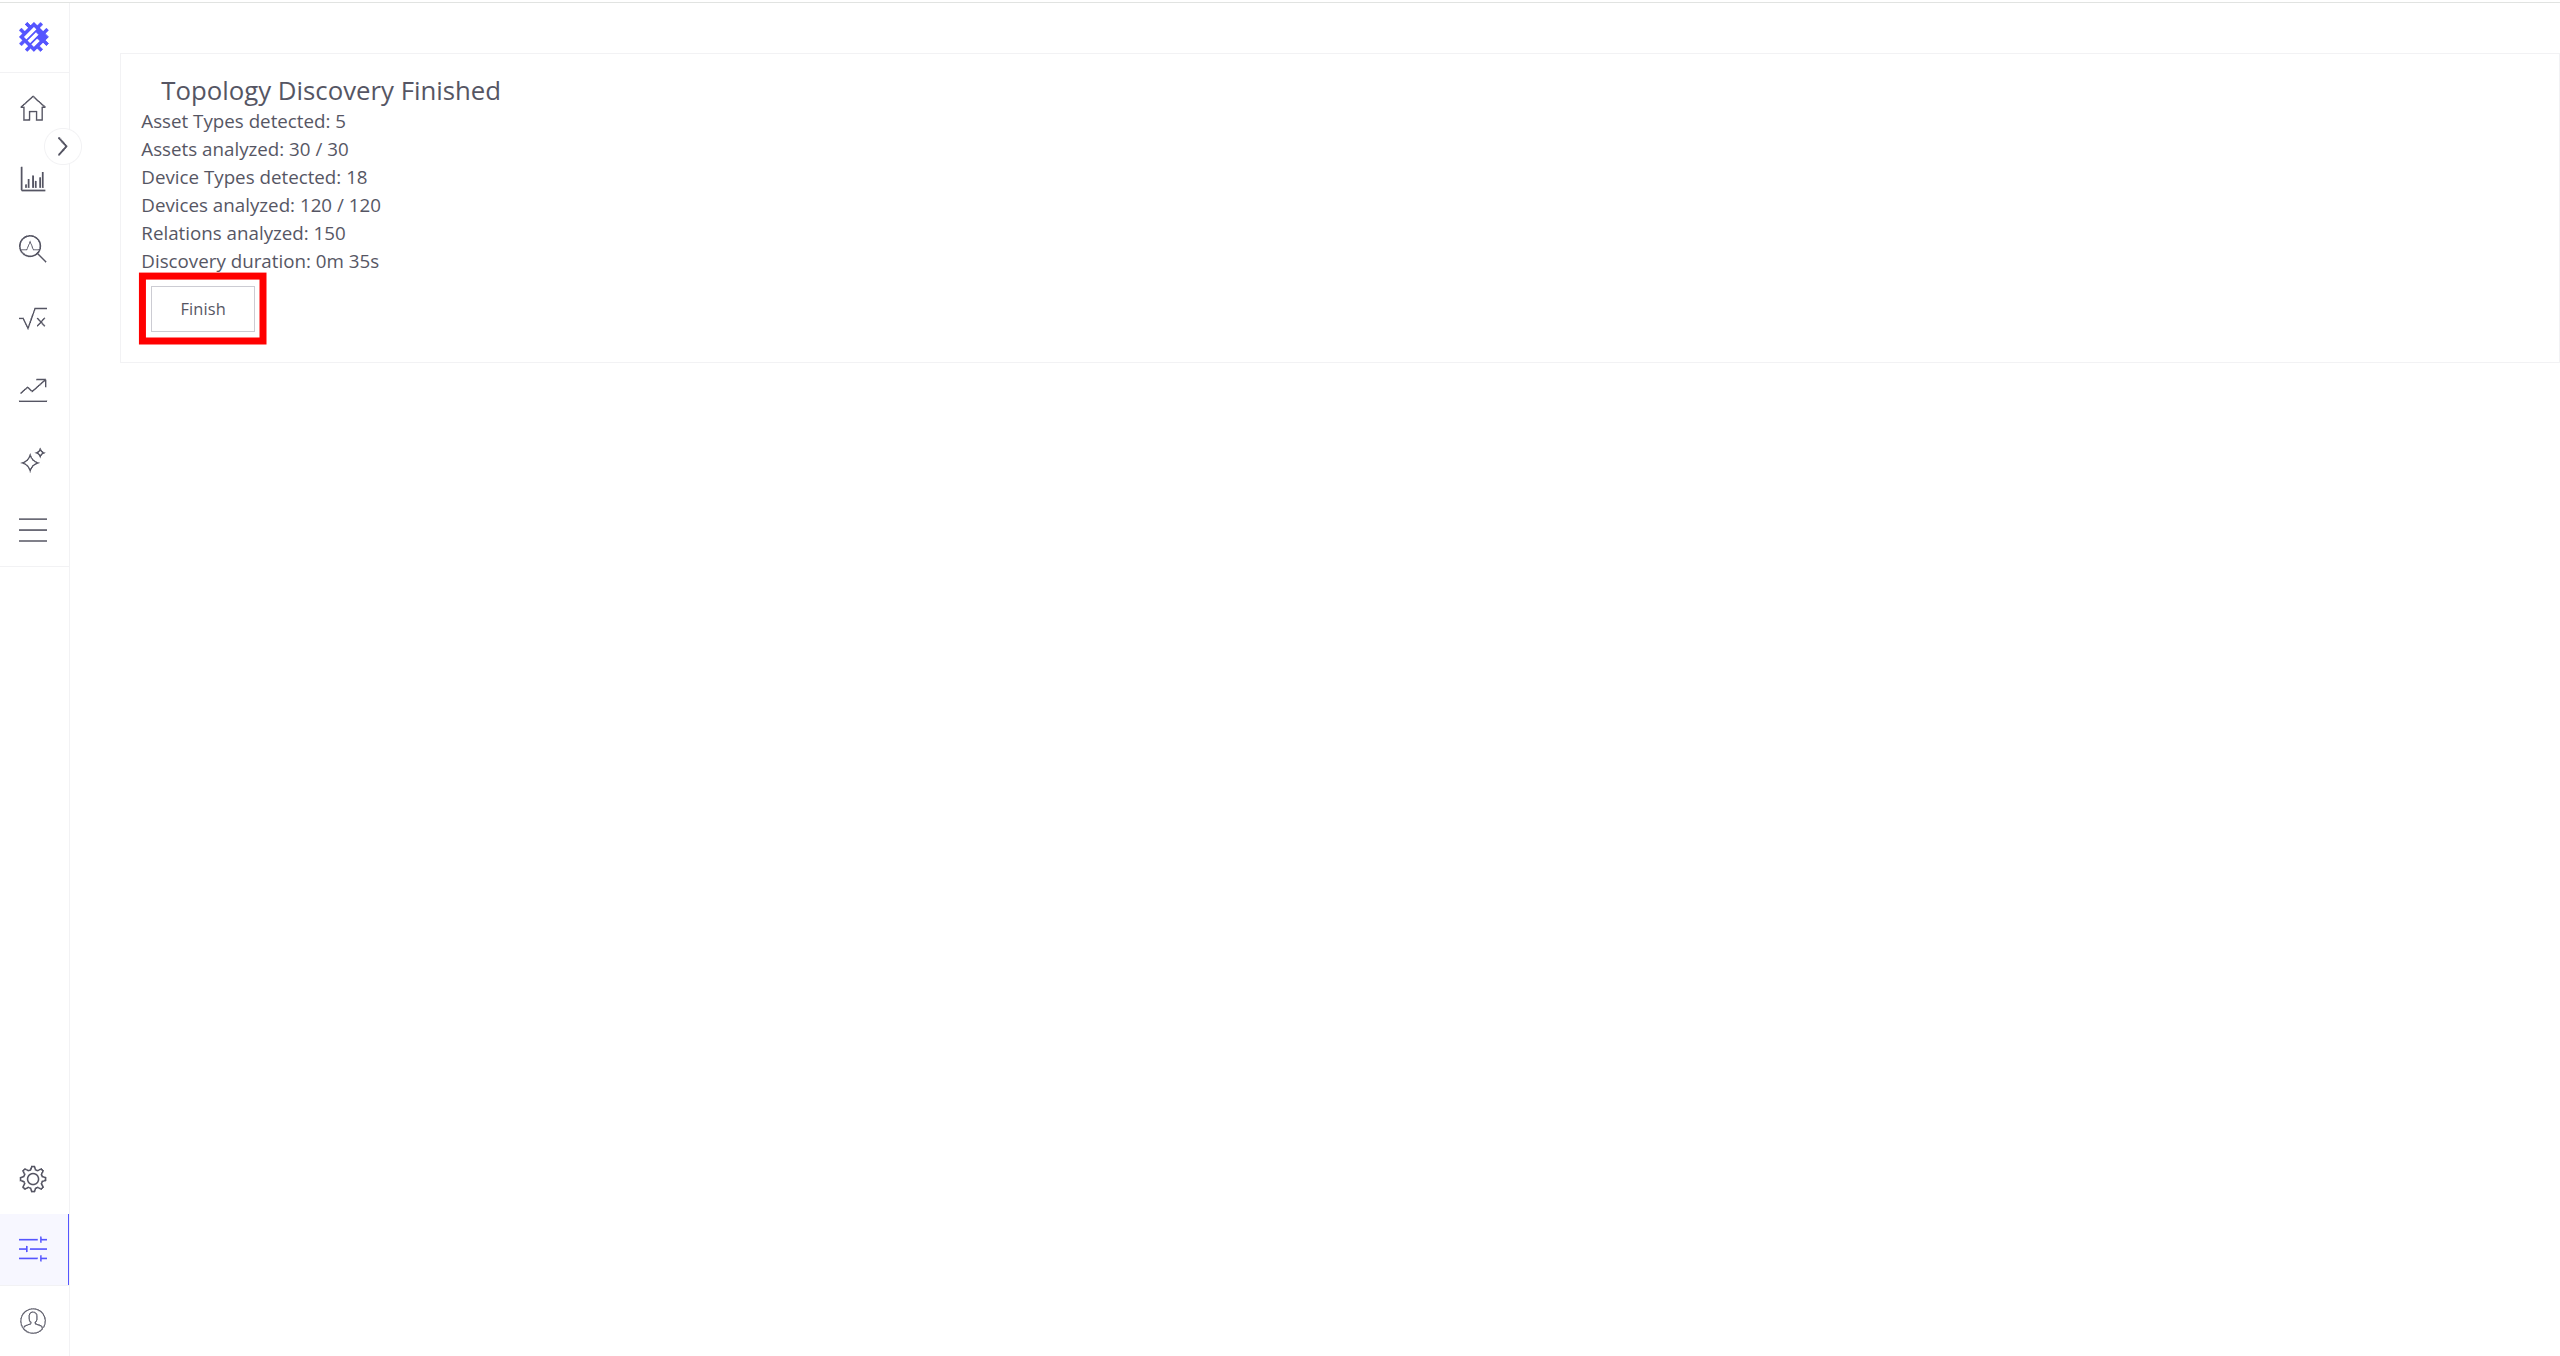
点击 Finish 按钮关闭拓扑发现页面并解锁 Trendz 主要功能。
更多关于 Trendz 如何使用拓扑的信息,请参阅此处。
Troubleshooting
Trendz logs are stored in the following directory:
1
/var/log/trendz
You can issue the following command in order to check if there are any errors on the backend side:
1
cat /var/log/trendz/trendz.log | grep ERROR
HTTPS configuration
可使用 HAProxy 配置 HTTPS 访问。 若 Trendz 托管在云端并为实例分配了有效 DNS 名称,即可实现。
Trendz 与 ThingsBoard 同机部署
若服务器已安装 HAProxy/Let’s Encrypt 且 ThingsBoard 已启用 HTTPS,请参考本节。
打开 HAProxy 配置文件
1
sudo nano /etc/haproxy/haproxy.cfg
找到 frontend https_in 段落,添加新的访问列表以按域名匹配流量并转发到 Trendz 后端:
1
2
acl trendz_http hdr(host) -i new-trendz-domain.com
use_backend tb-trendz if trendz_http
在同一文件中注册 Trendz 后端:
1
2
3
4
5
6
backend tb-trendz
  balance leastconn
  option tcp-check
  option log-health-checks
  server tbTrendz1 127.0.0.1:8888 check inter 5s
  http-request set-header X-Forwarded-Port %[dst_port]
为新域名生成 SSL 证书:
1
sudo certbot-certonly --domain new-trendz-domain.com --email some@email.io
刷新 HAProxy 配置:
1
sudo haproxy-refresh
至此 Trendz UI 的 HTTPS 已配置完成,可通过以下地址访问: https://new-trendz-domain.com
新服务器全新安装
请参阅此指南安装 HAProxy 并使用 Let’s Encrypt 生成有效 SSL 证书。
同一域名下托管 ThingsBoard 与 Trendz
ThingsBoard 与 Trendz 可共享同一域名。此时 ThingsBoard 页面通过以下链接加载:
1
https://{my-domain}/
Trendz 页面通过以下链接加载
1
https://{my-domain}/trendz/
启用该配置需更新 HAProxy,将特定请求路由到 Trendz 服务。 打开 HAProxy 配置文件
1
sudo nano /etc/haproxy/haproxy.cfg
找到 frontend https_in 段落,添加新的访问列表以按 URL 路径匹配流量并转发到 Trendz 后端:
1
2
3
4
...
acl trendz_acl path_beg /trendz/ path_beg /apiTrendz/
....
use_backend tb-trendz if trendz_acl
下一步
-
快速入门指南 - 快速了解 Trendz 主要功能。
-
指标探索器 - 学习使用 Trendz Metric Explorer 探索和创建指标。
-
异常检测 - 学习识别数据中的异常。
-
字段计算 - 了解字段计算及使用方法。
-
状态 - 学习基于原始遥测定义和分析资产状态。
-
预测 - 学习进行预测及遥测行为预测。
-
筛选器 - 学习在分析中筛选数据集。
-
可用可视化部件 - 了解 Trendz 中可用的可视化部件及配置方法。
-
分享与嵌入可视化 - 学习将 Trendz 可视化添加到 ThingsBoard 仪表盘或第三方网页。
-
AI 助手 - 学习使用 Trendz AI 功能。