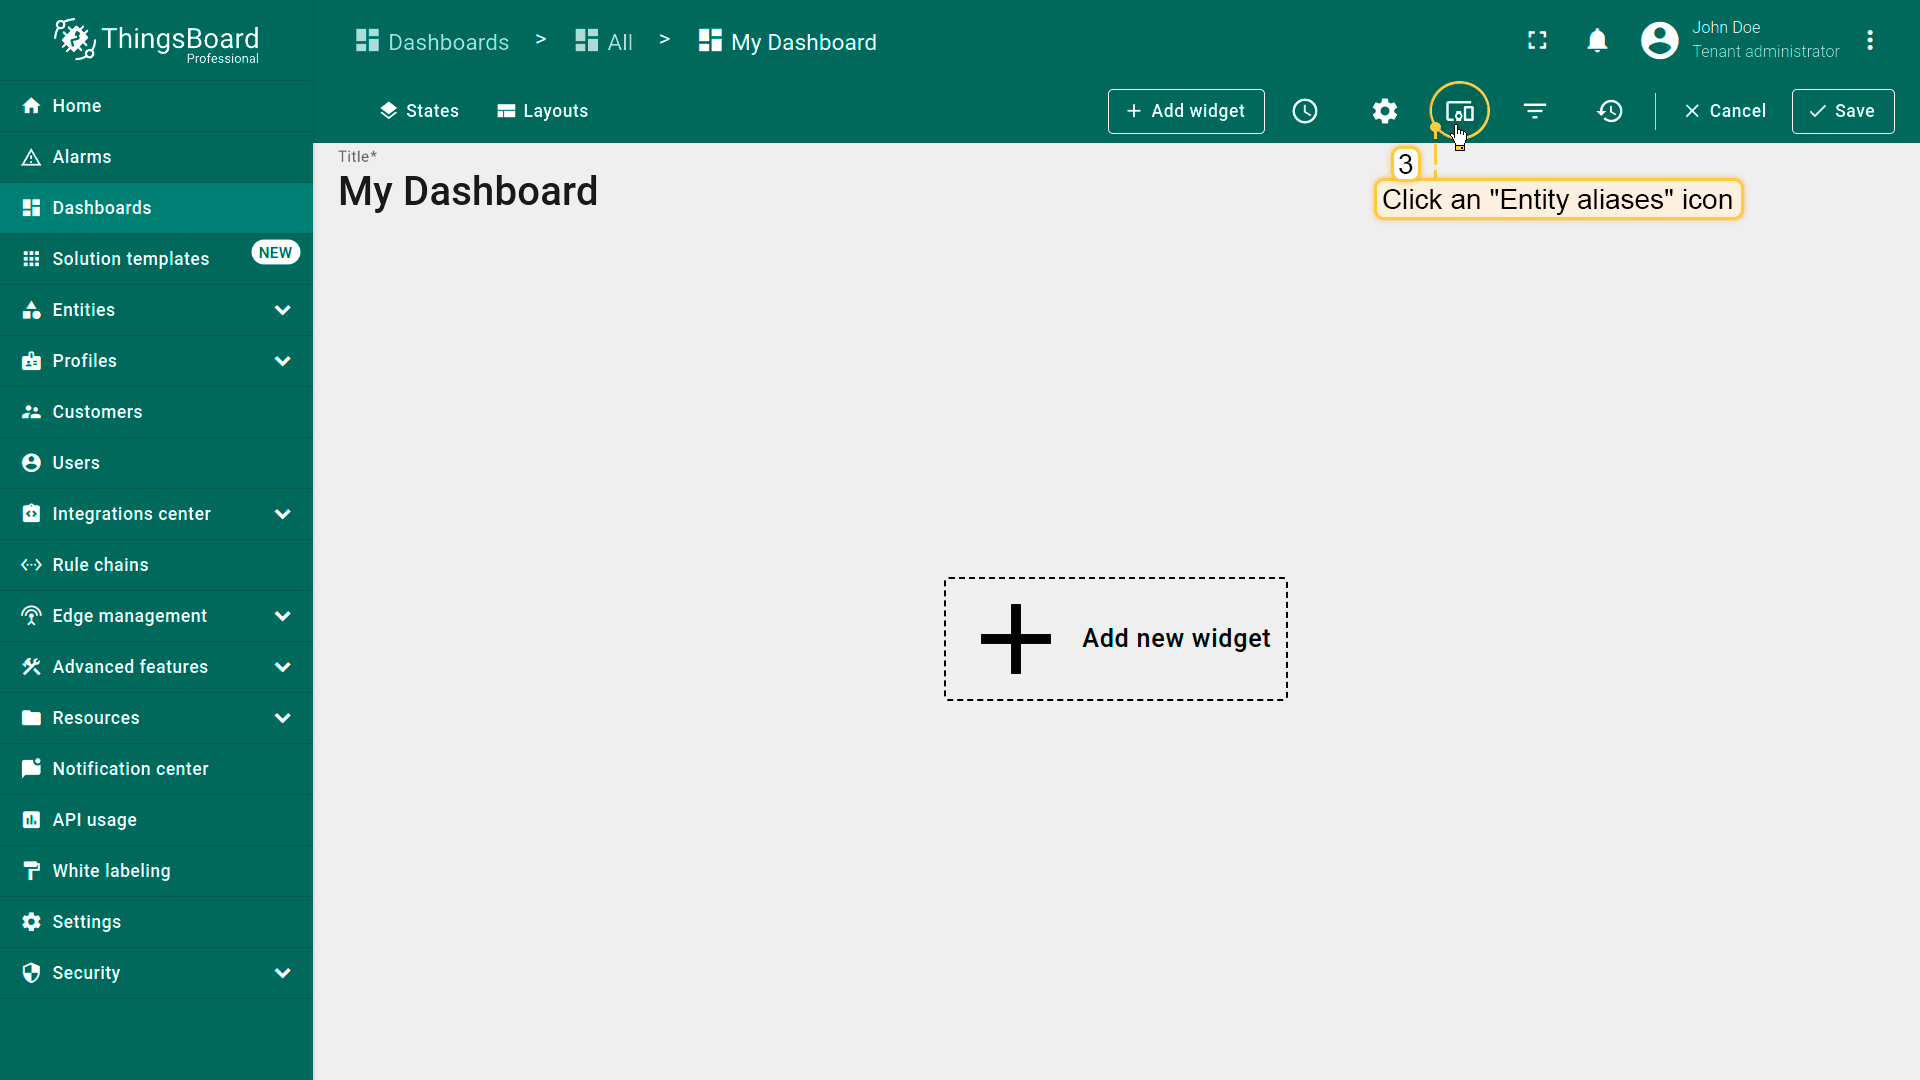
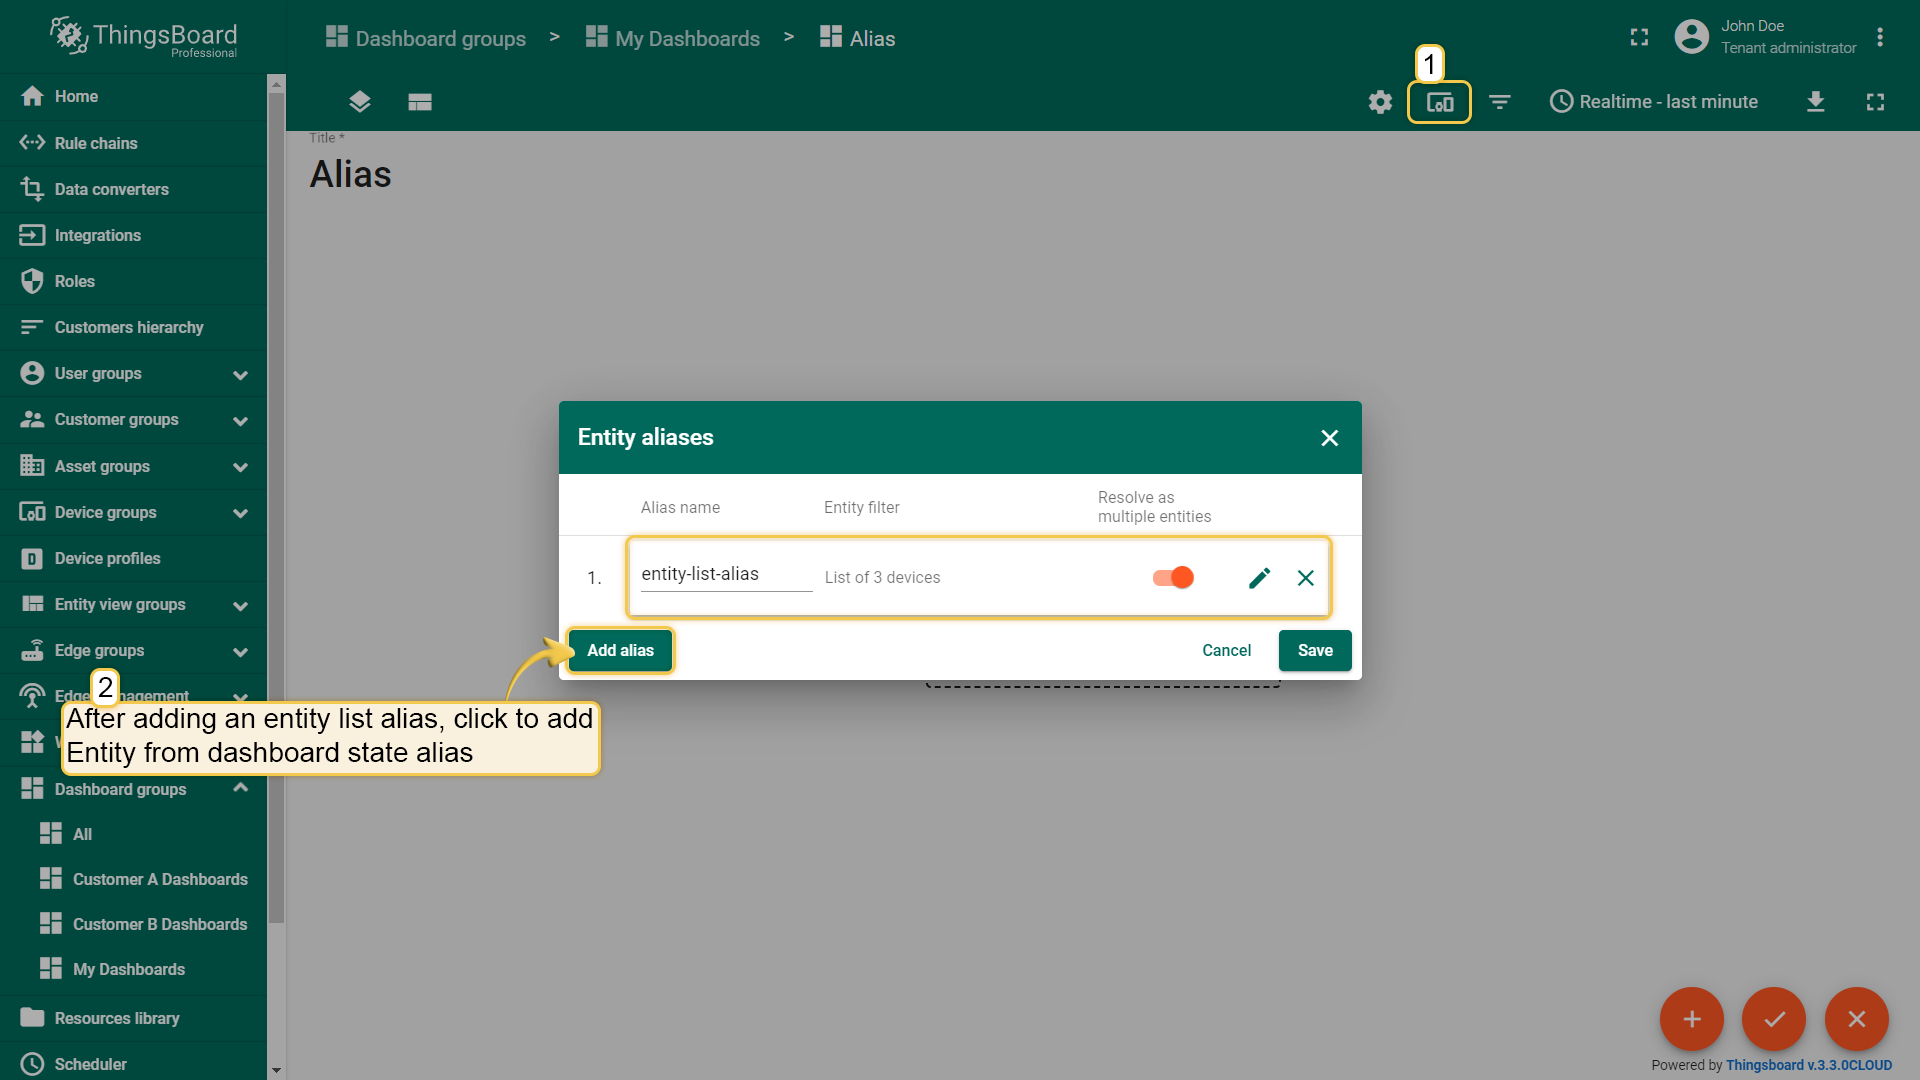
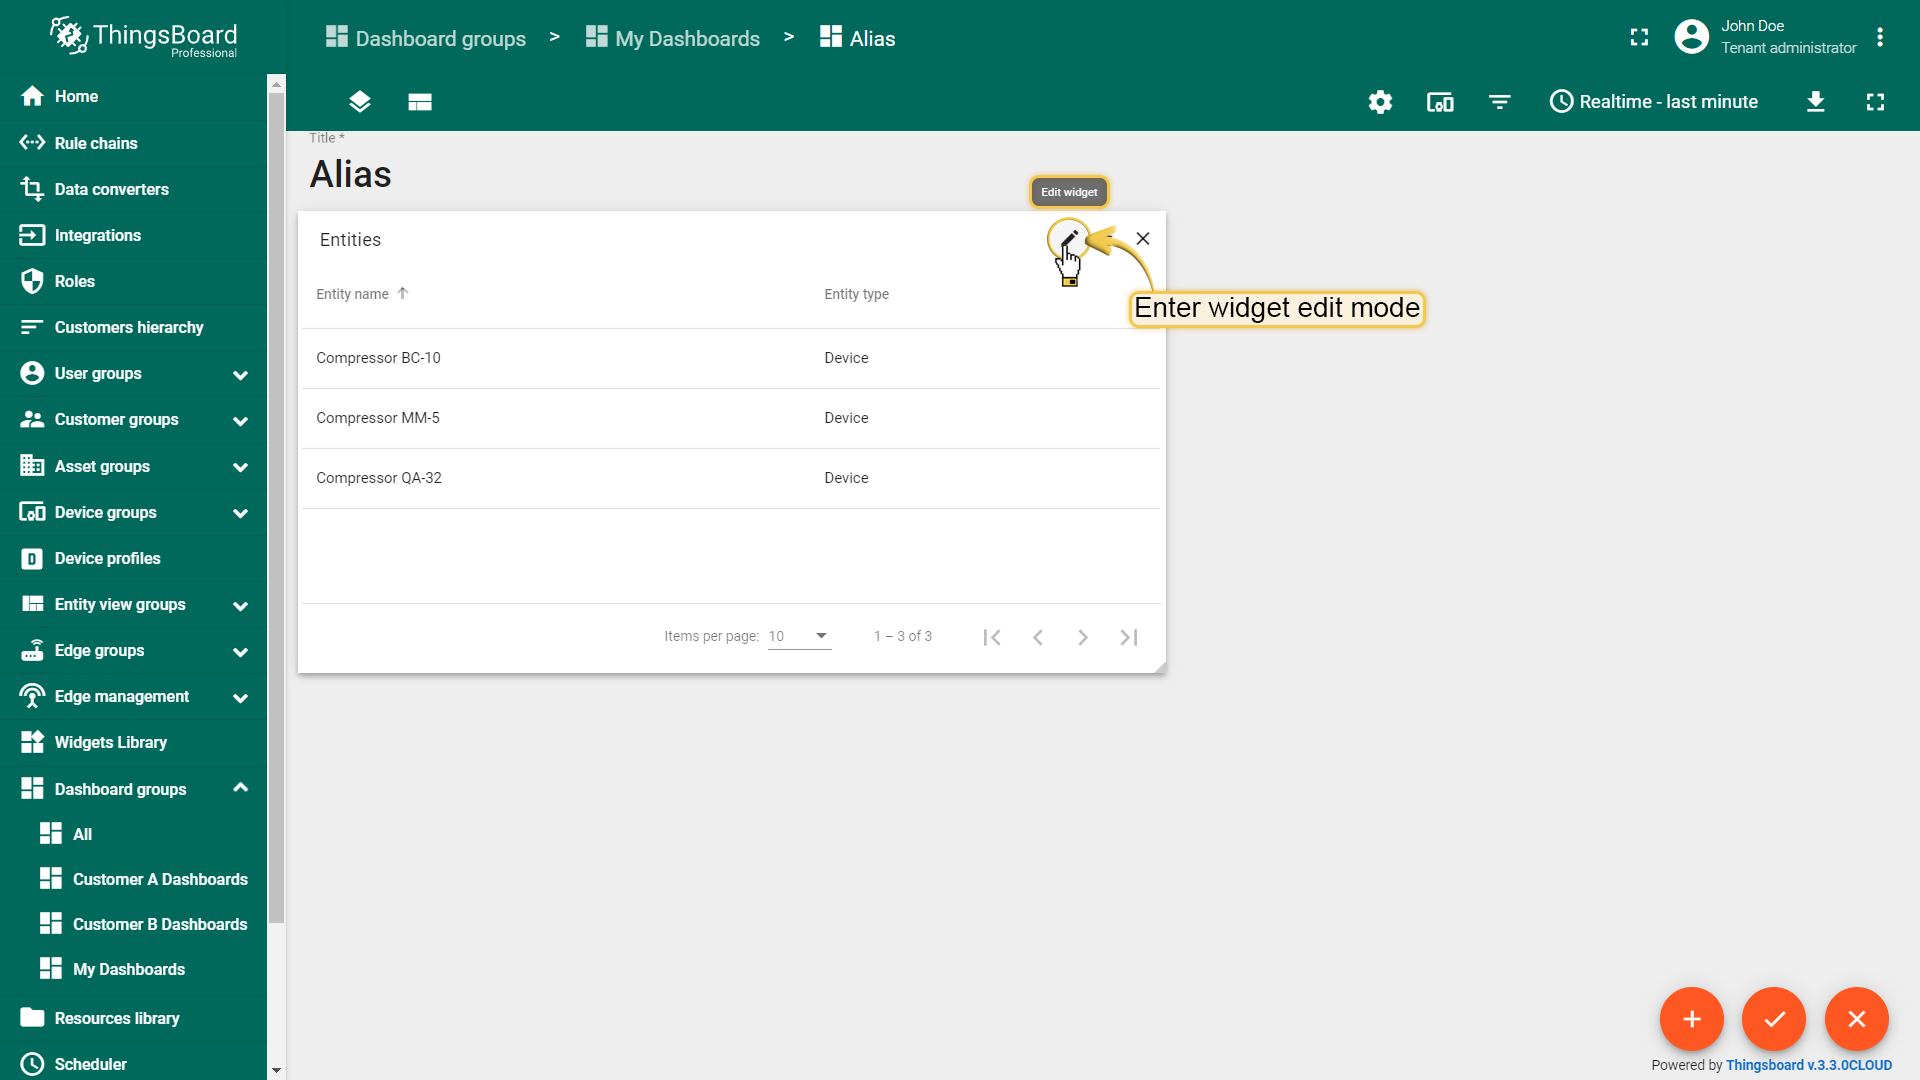
Click the "Entity aliases" icon in the upper right corner of the window;
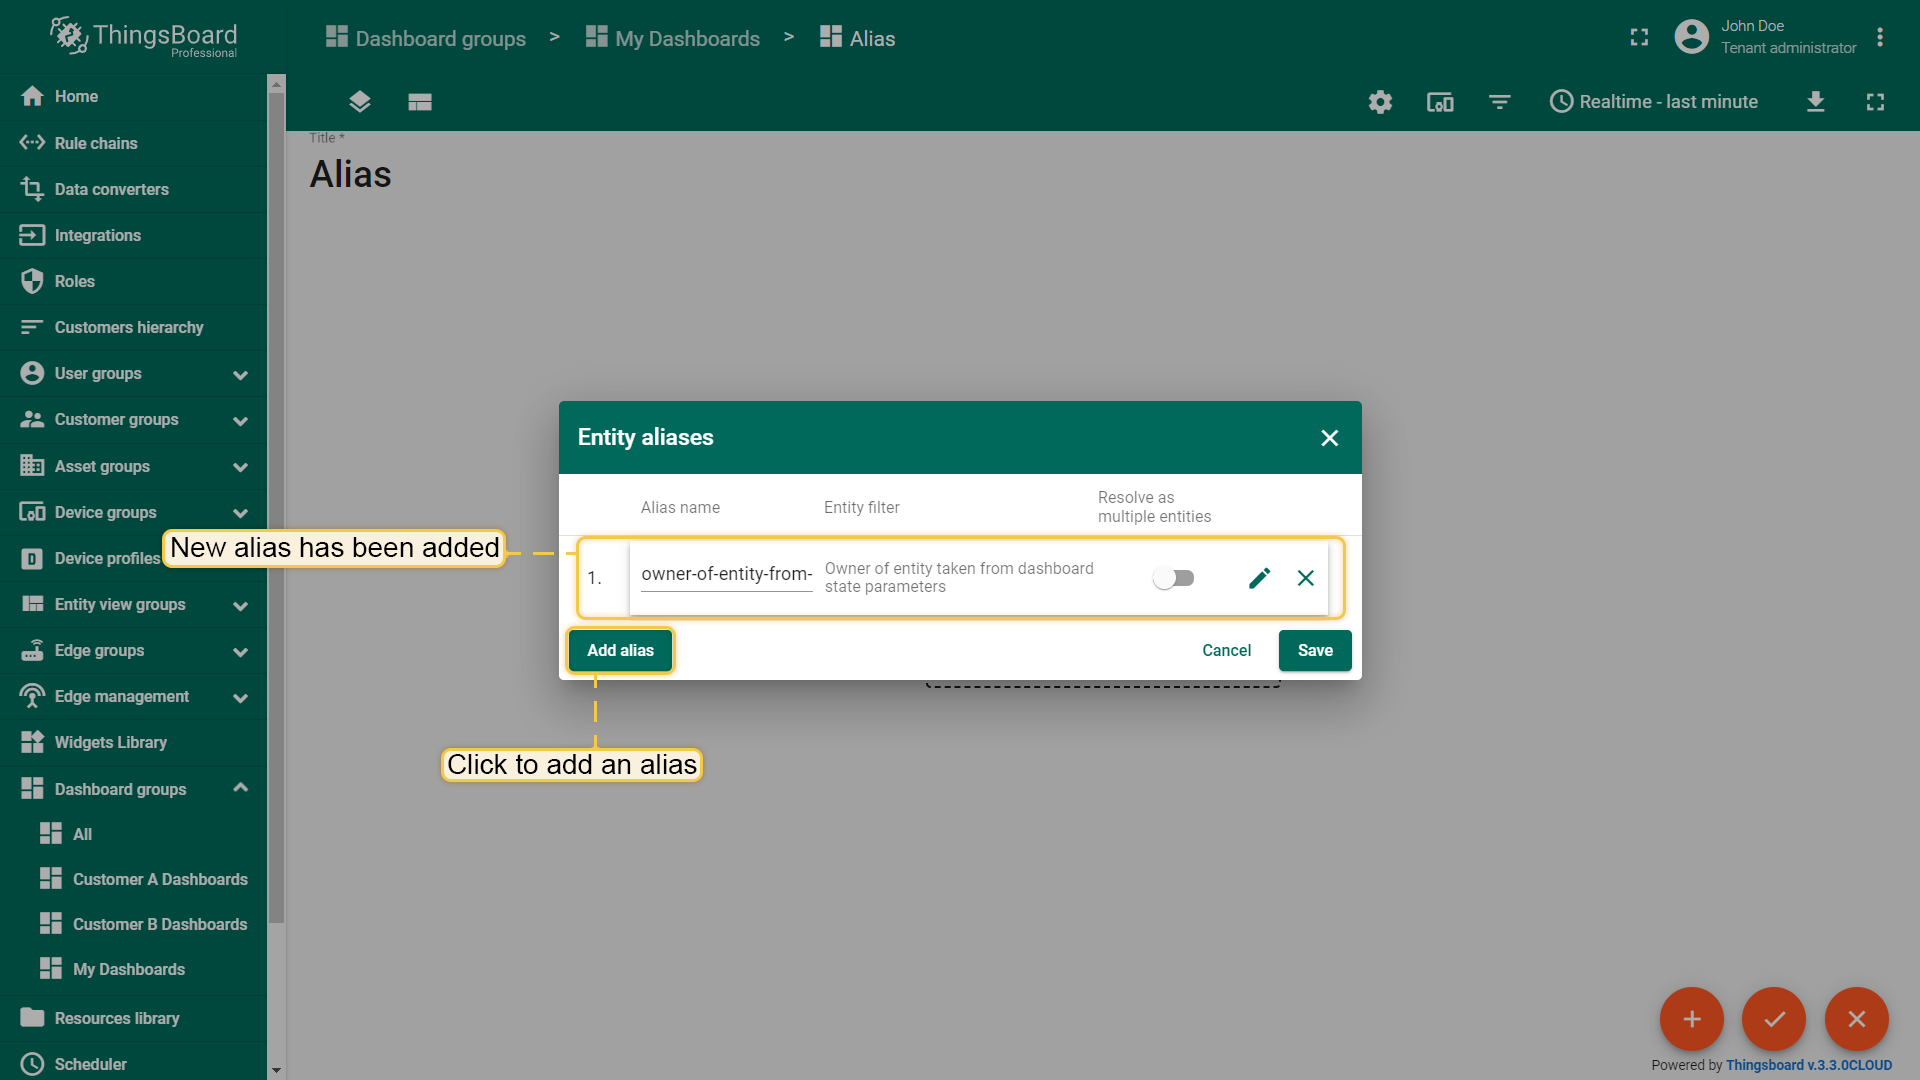
In the opened "Entity aliases" window click the “Add alias” button on the left side of the dialog box;
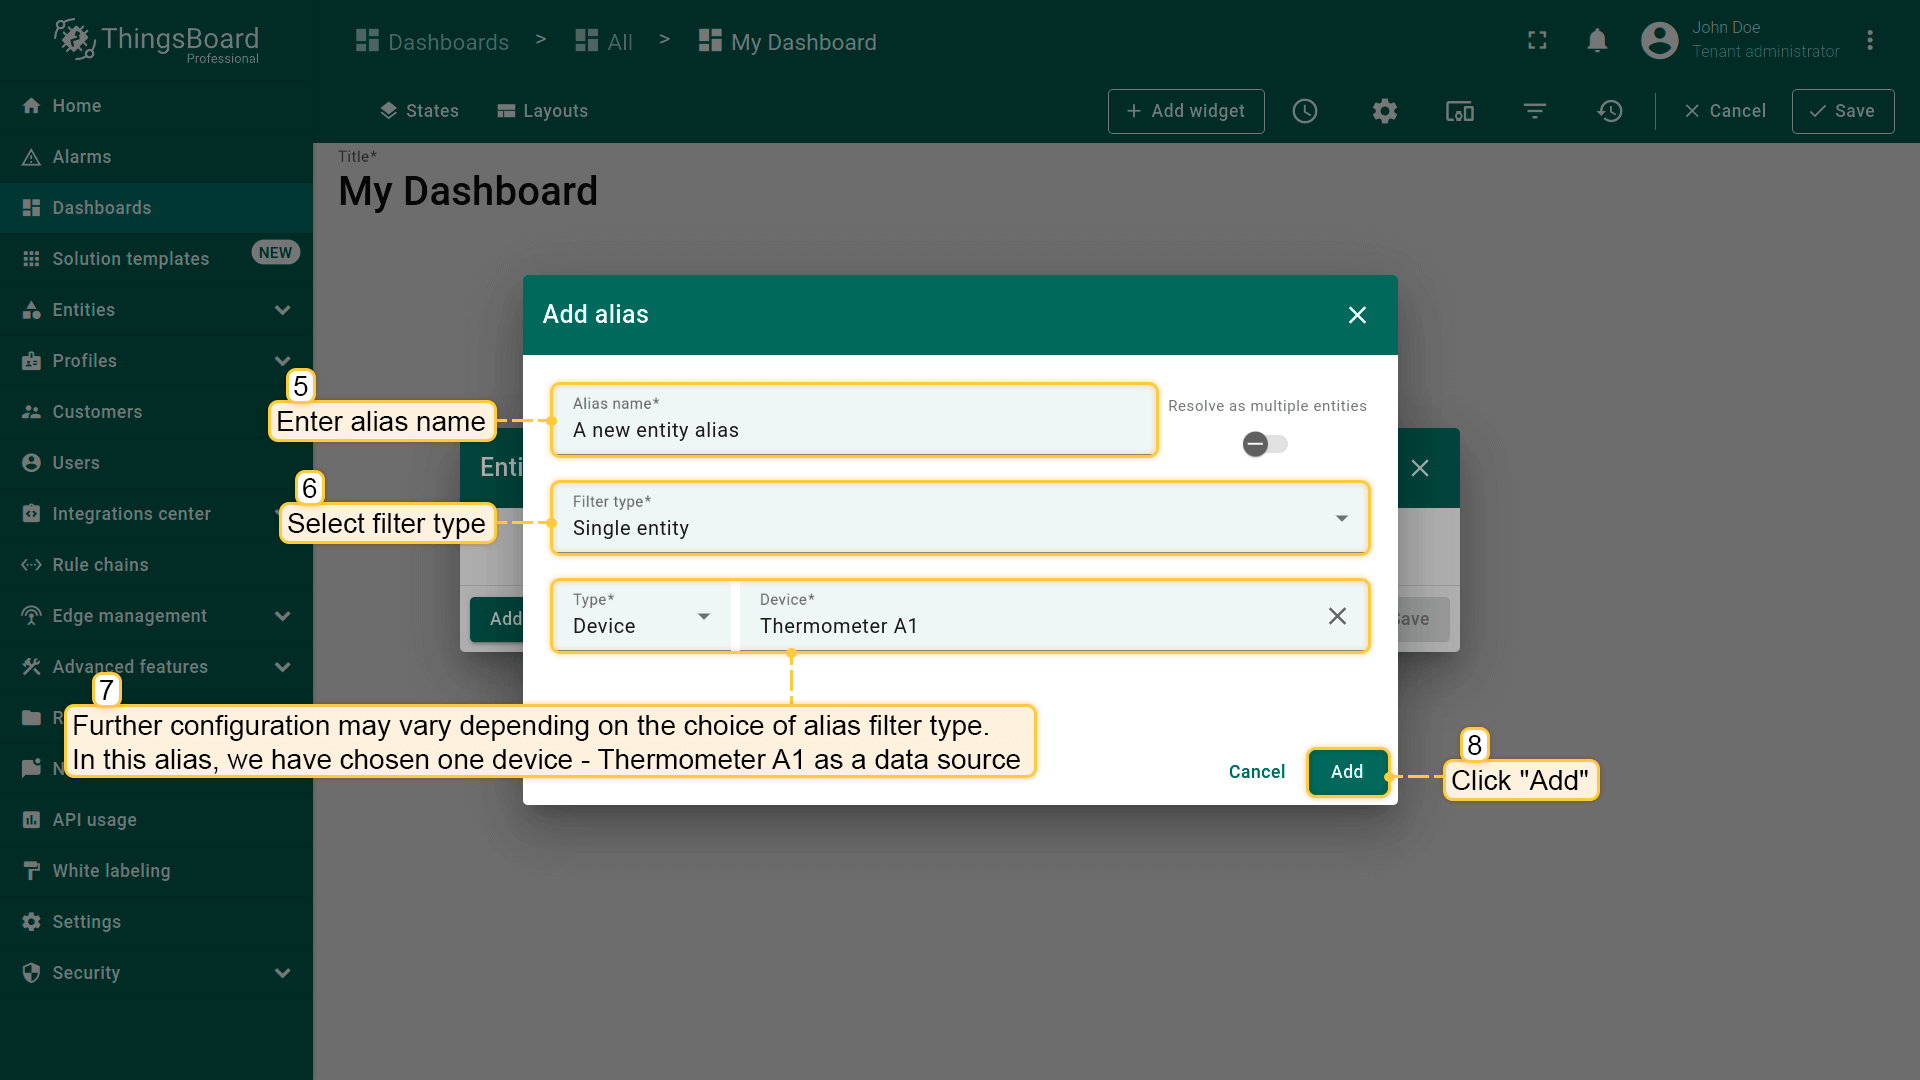
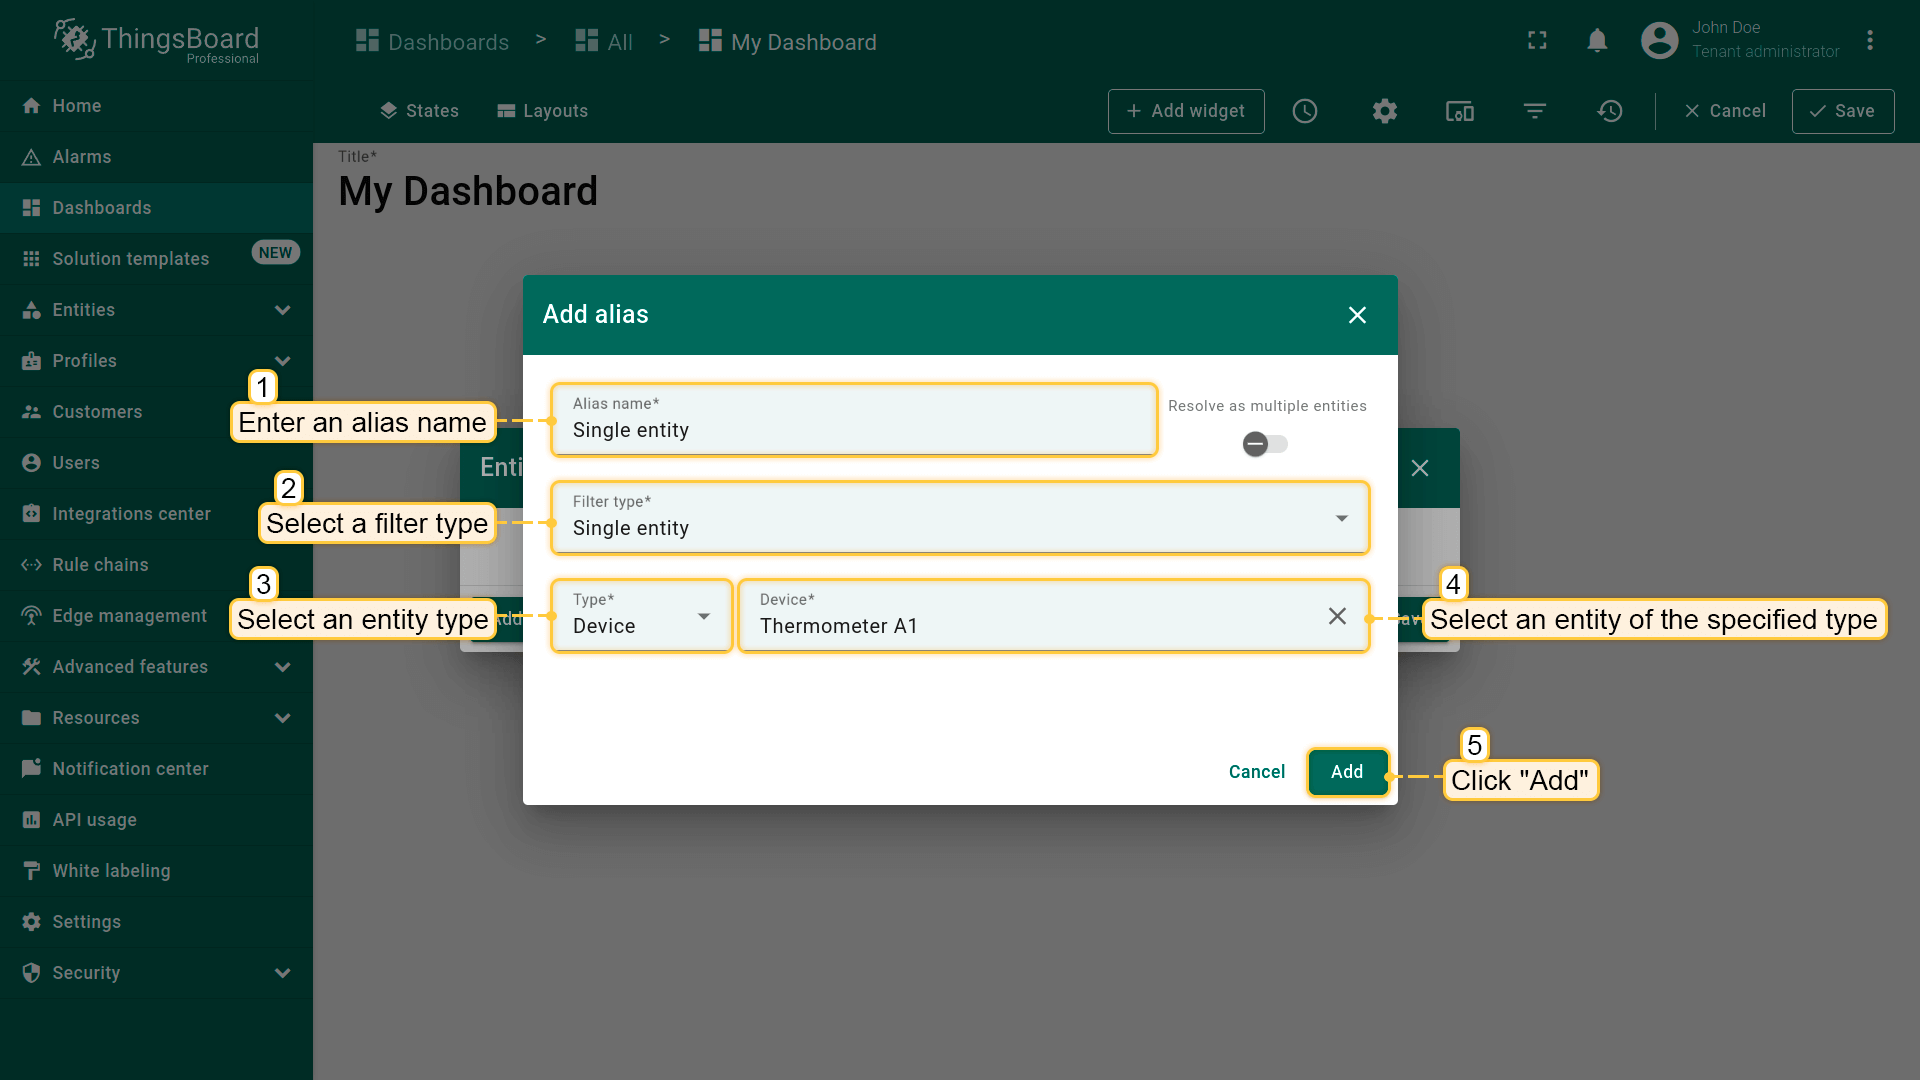
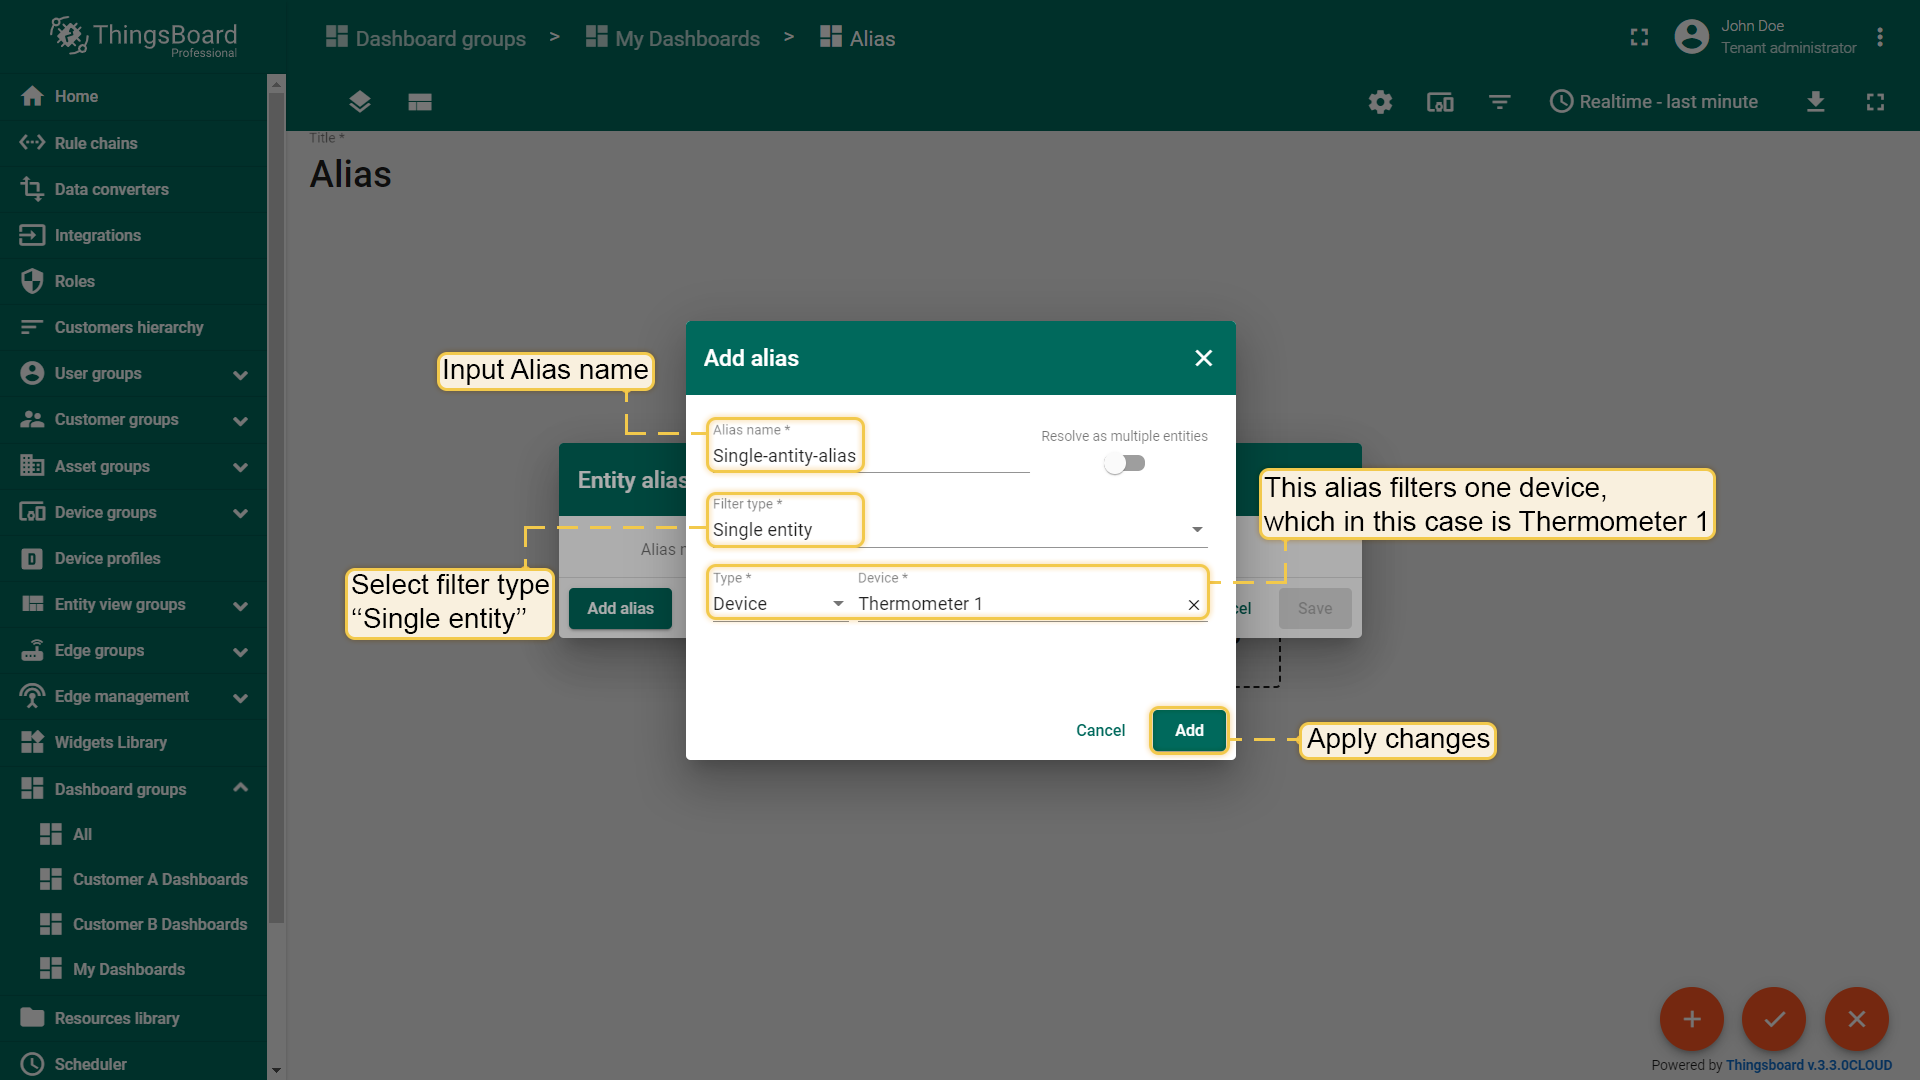
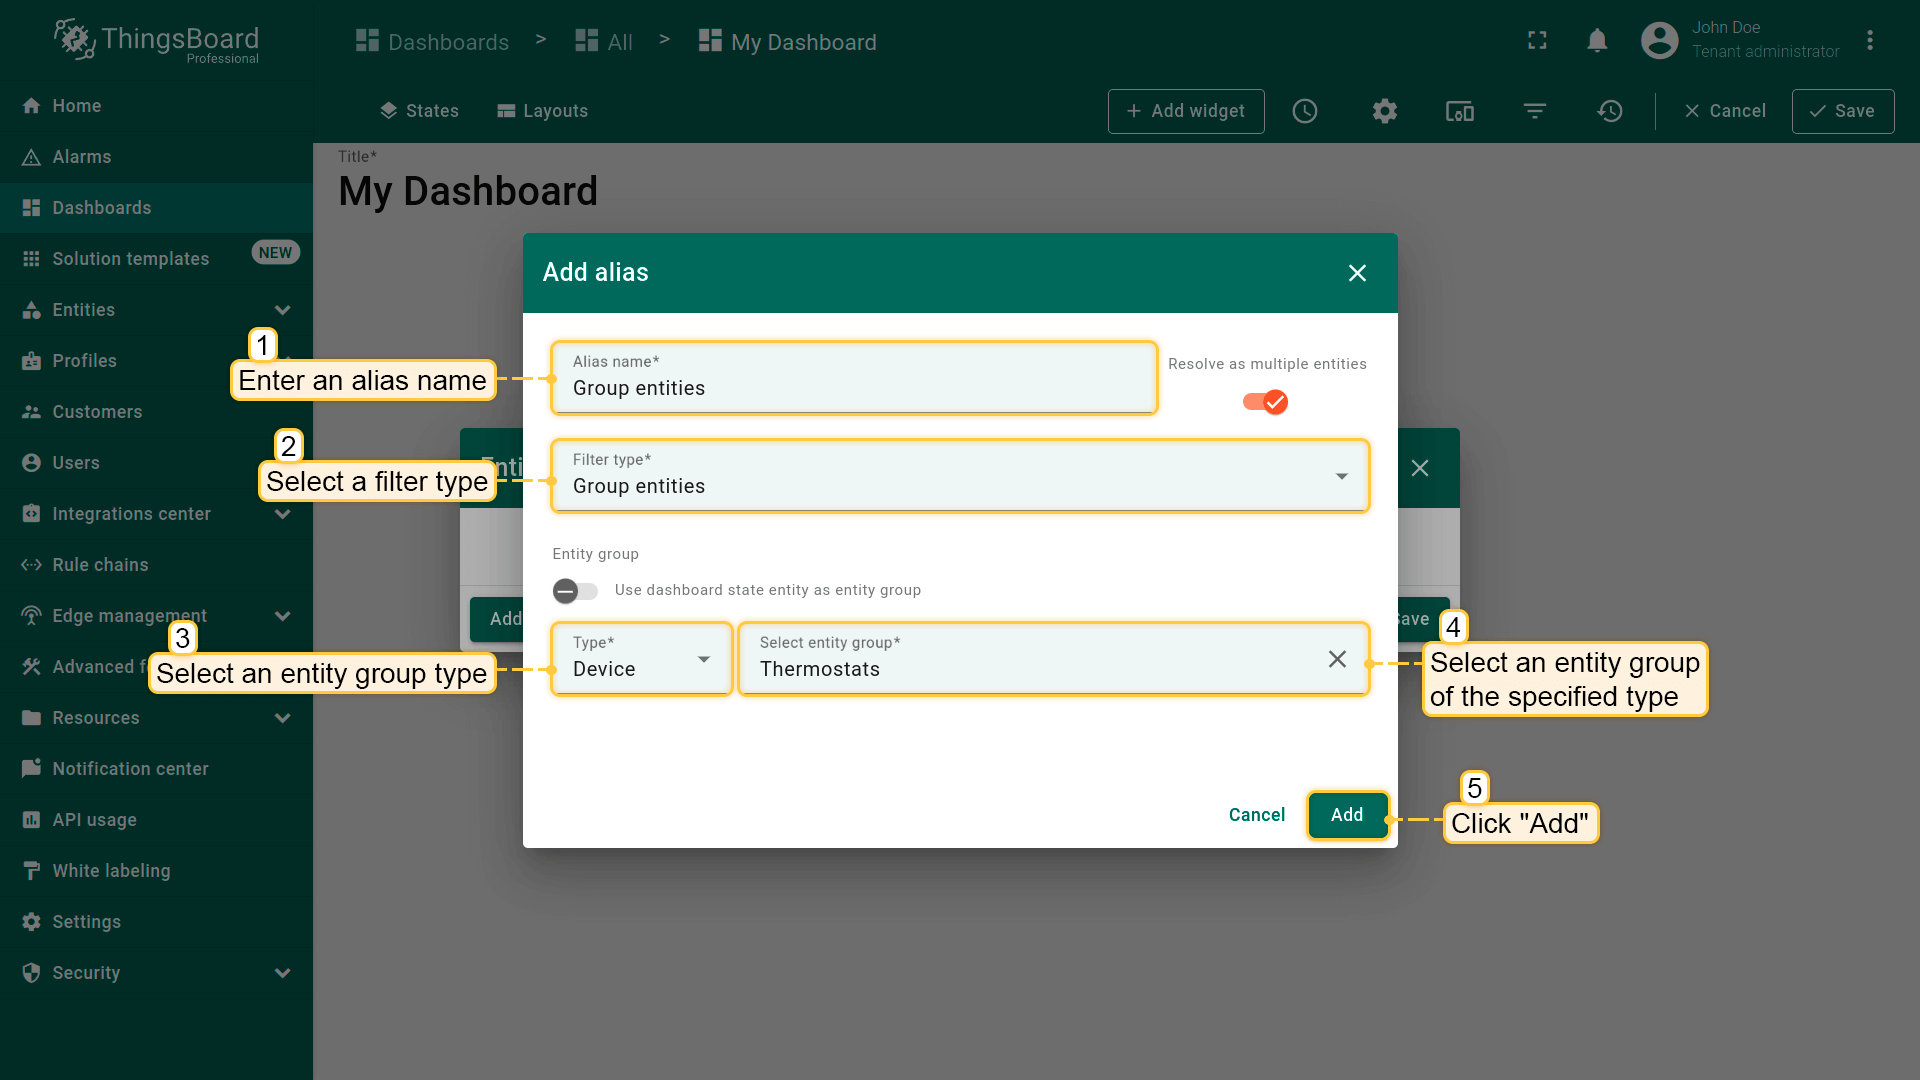
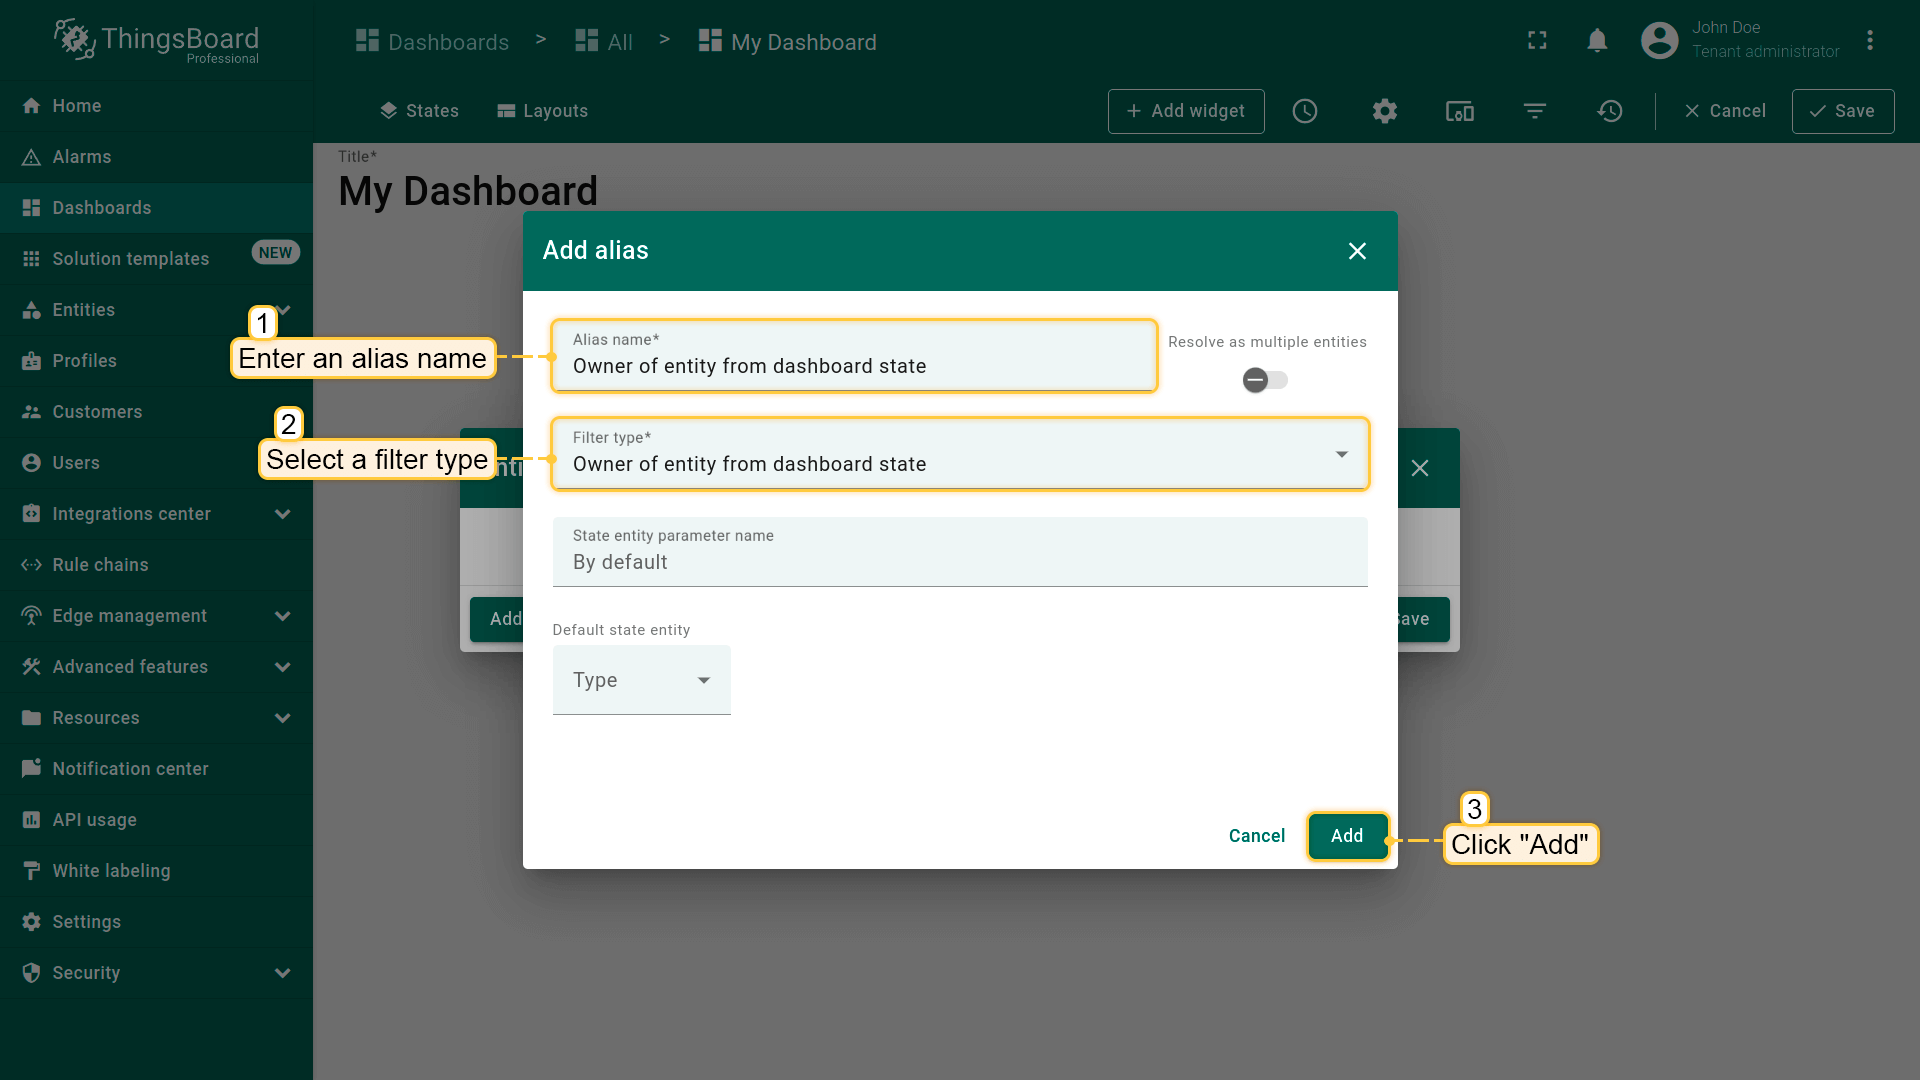
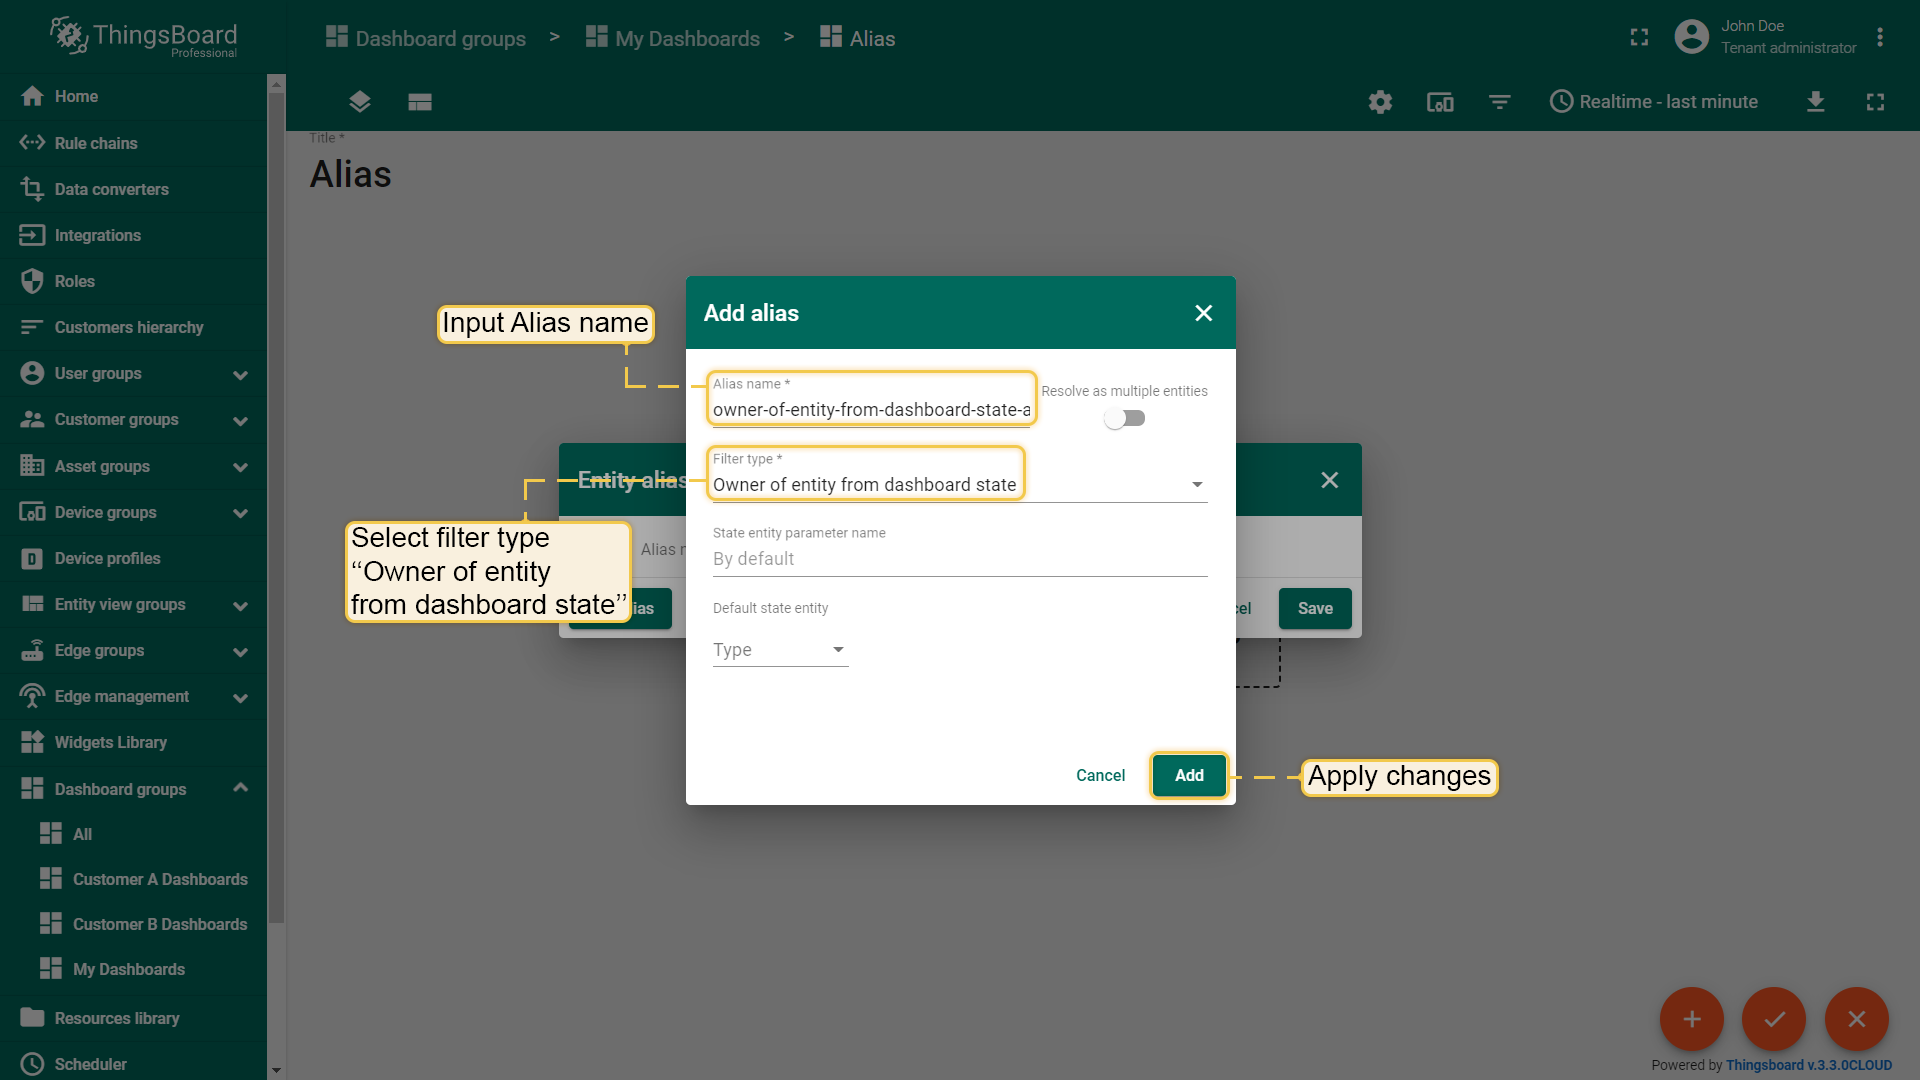
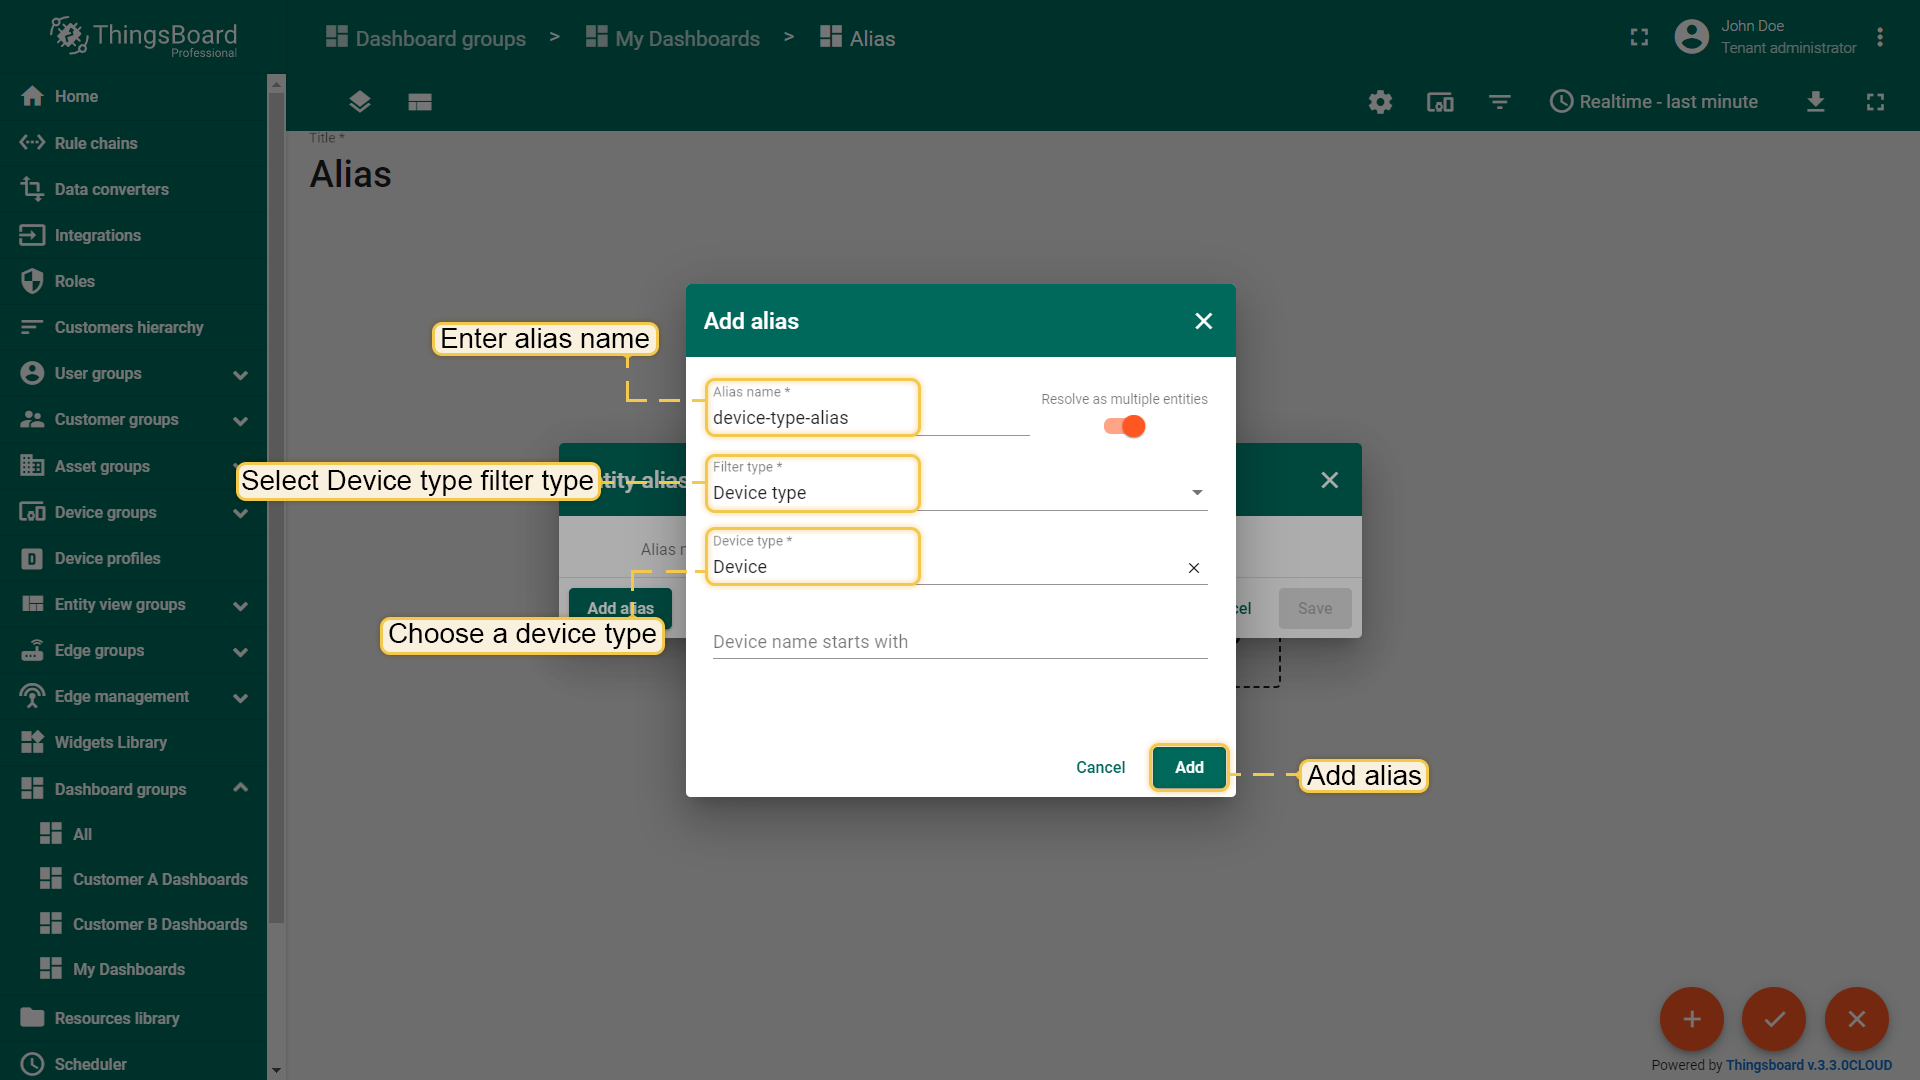
In the opened "Add alias" dialog, enter a name for the alias and select a filter type. Then, fill in all required fields and click the "Add" button in the lower right corner;
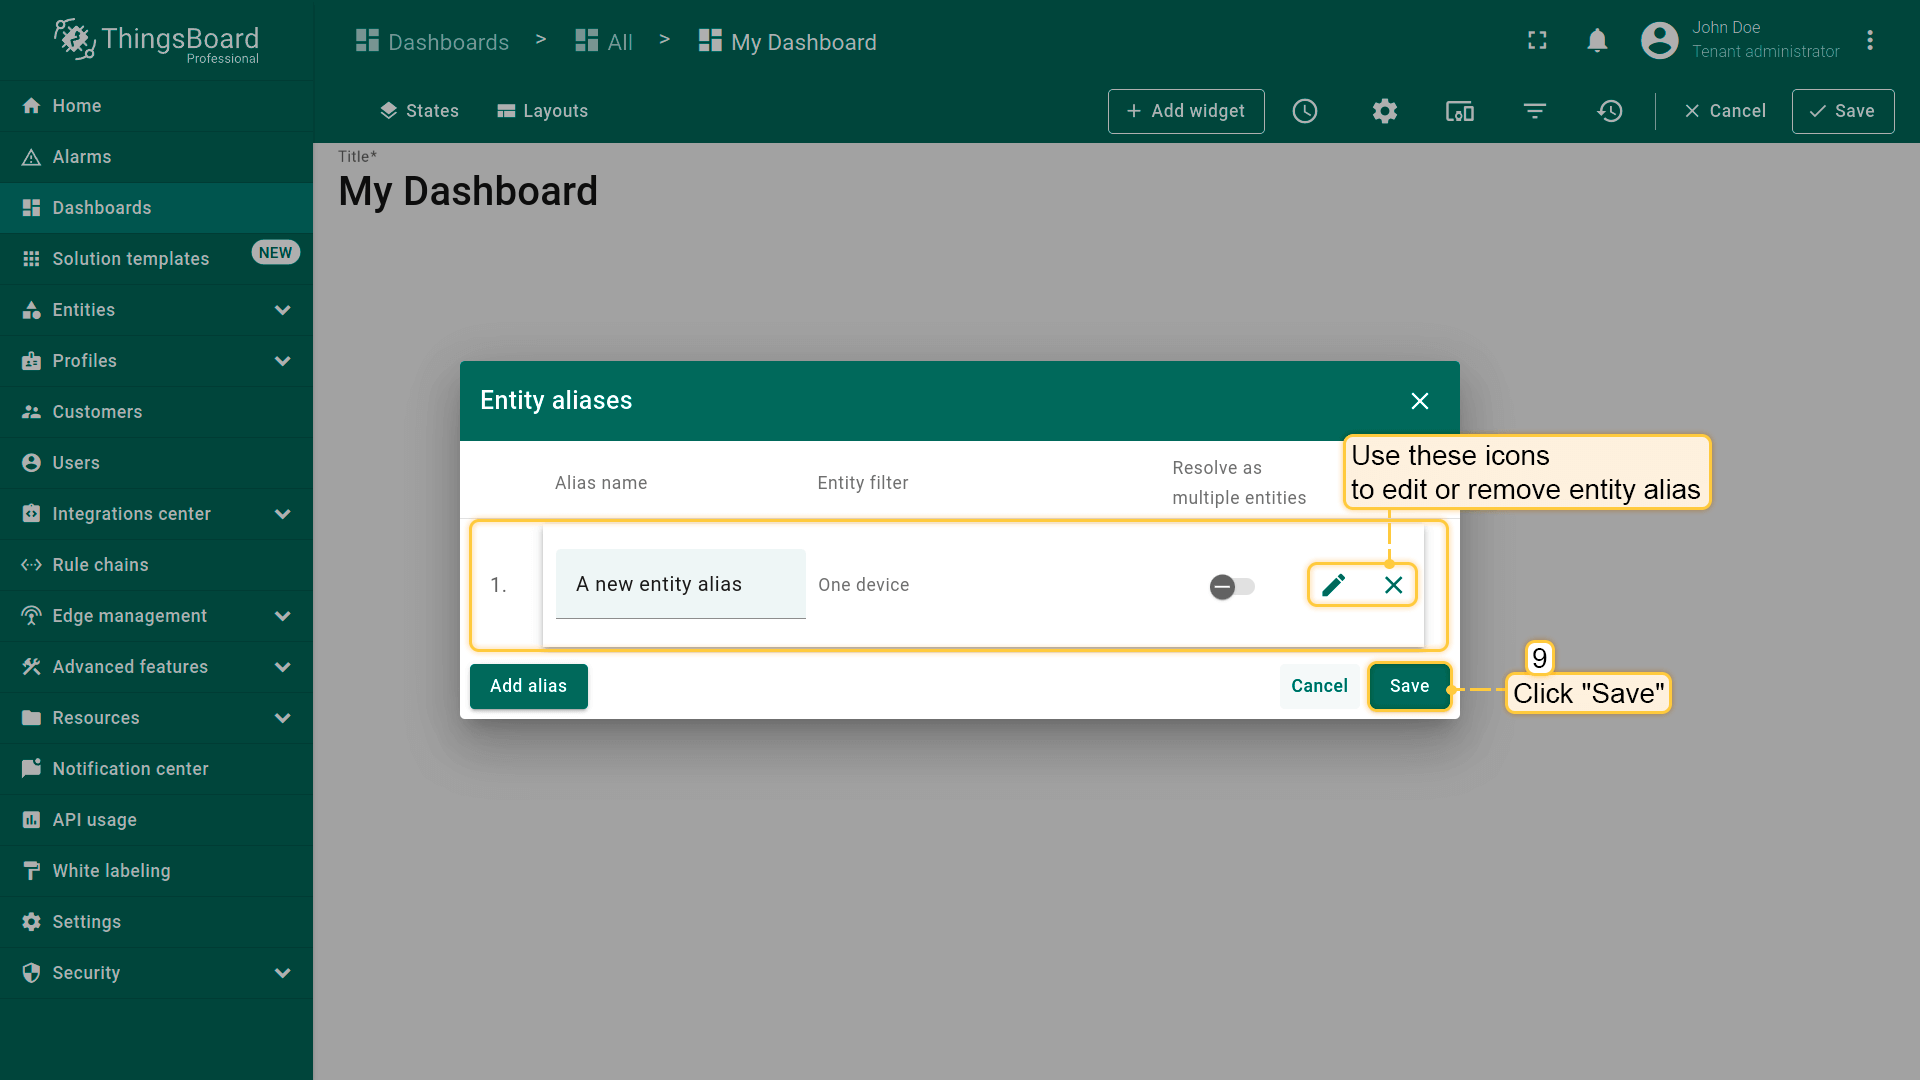
We can now see that a new alias has been added. In this window you can view, edit and delete your aliases. Click "Save" in the lower right corner of the dialog box.
Open your dashboard and switch to Edit mode;
Click the "Entity aliases" icon in the upper right corner of the window;
In the opened "Entity aliases" window click the “Add alias” button on the left side of the dialog box;
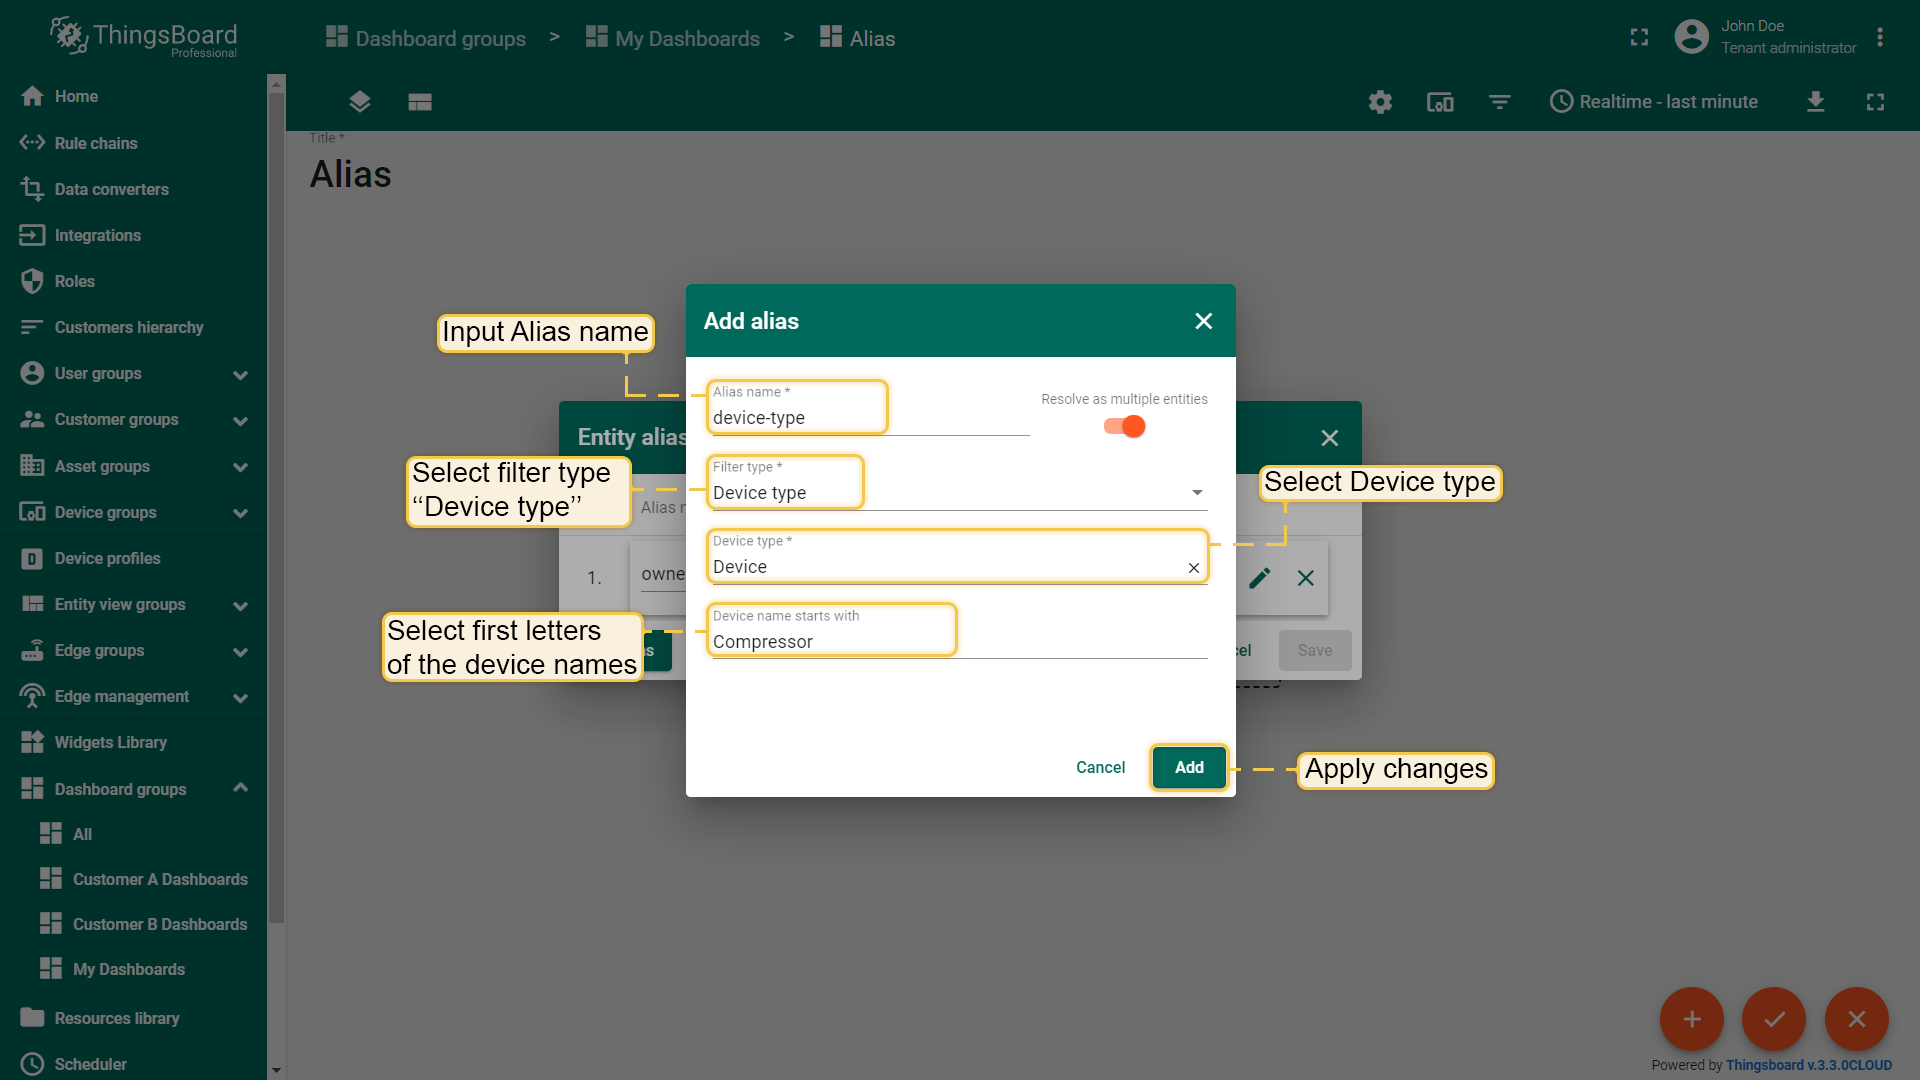
In the opened "Add alias" dialog, enter a name for the alias and select a filter type. Then, fill in all required fields and click the "Add" button in the lower right corner;
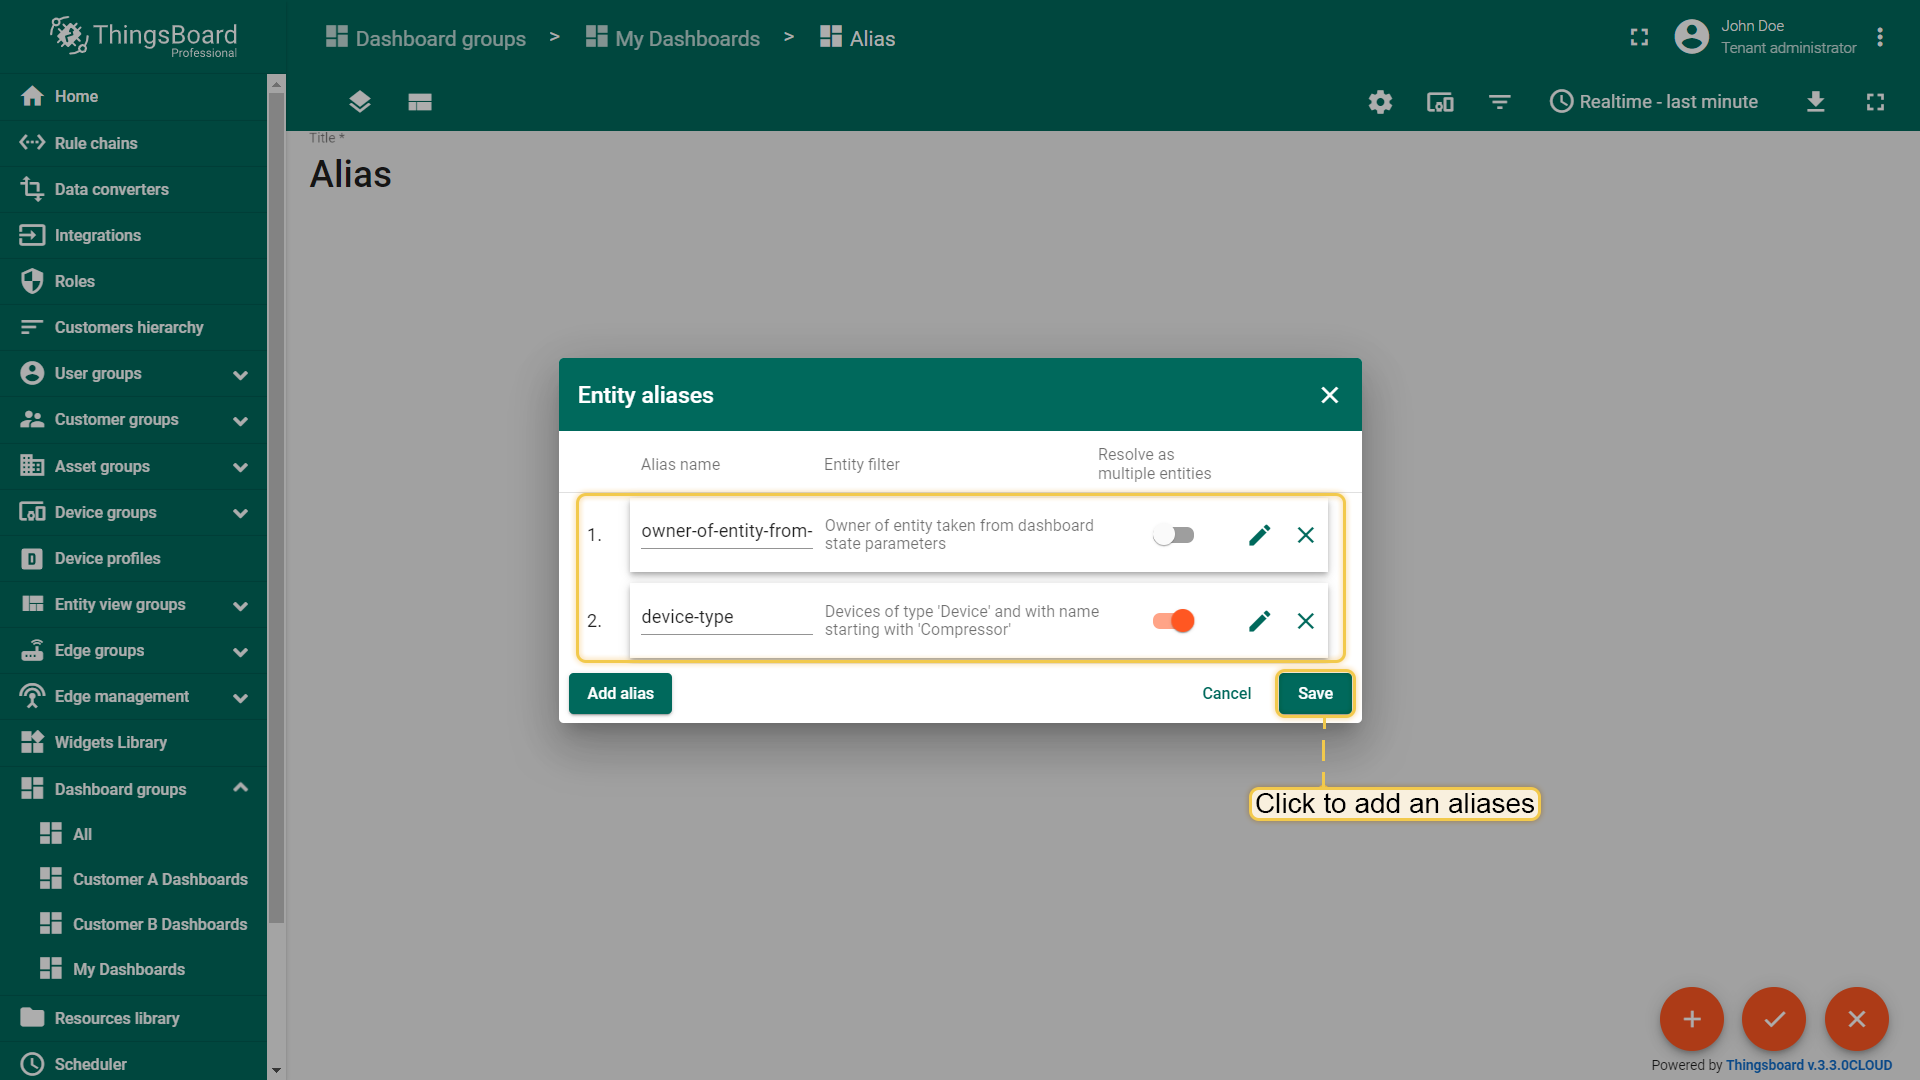
We can now see that a new alias has been added. In this window you can view, edit and delete your aliases. Click "Save" in the lower right corner of the dialog box.
现在,让我们在部件中使用已添加的别名:
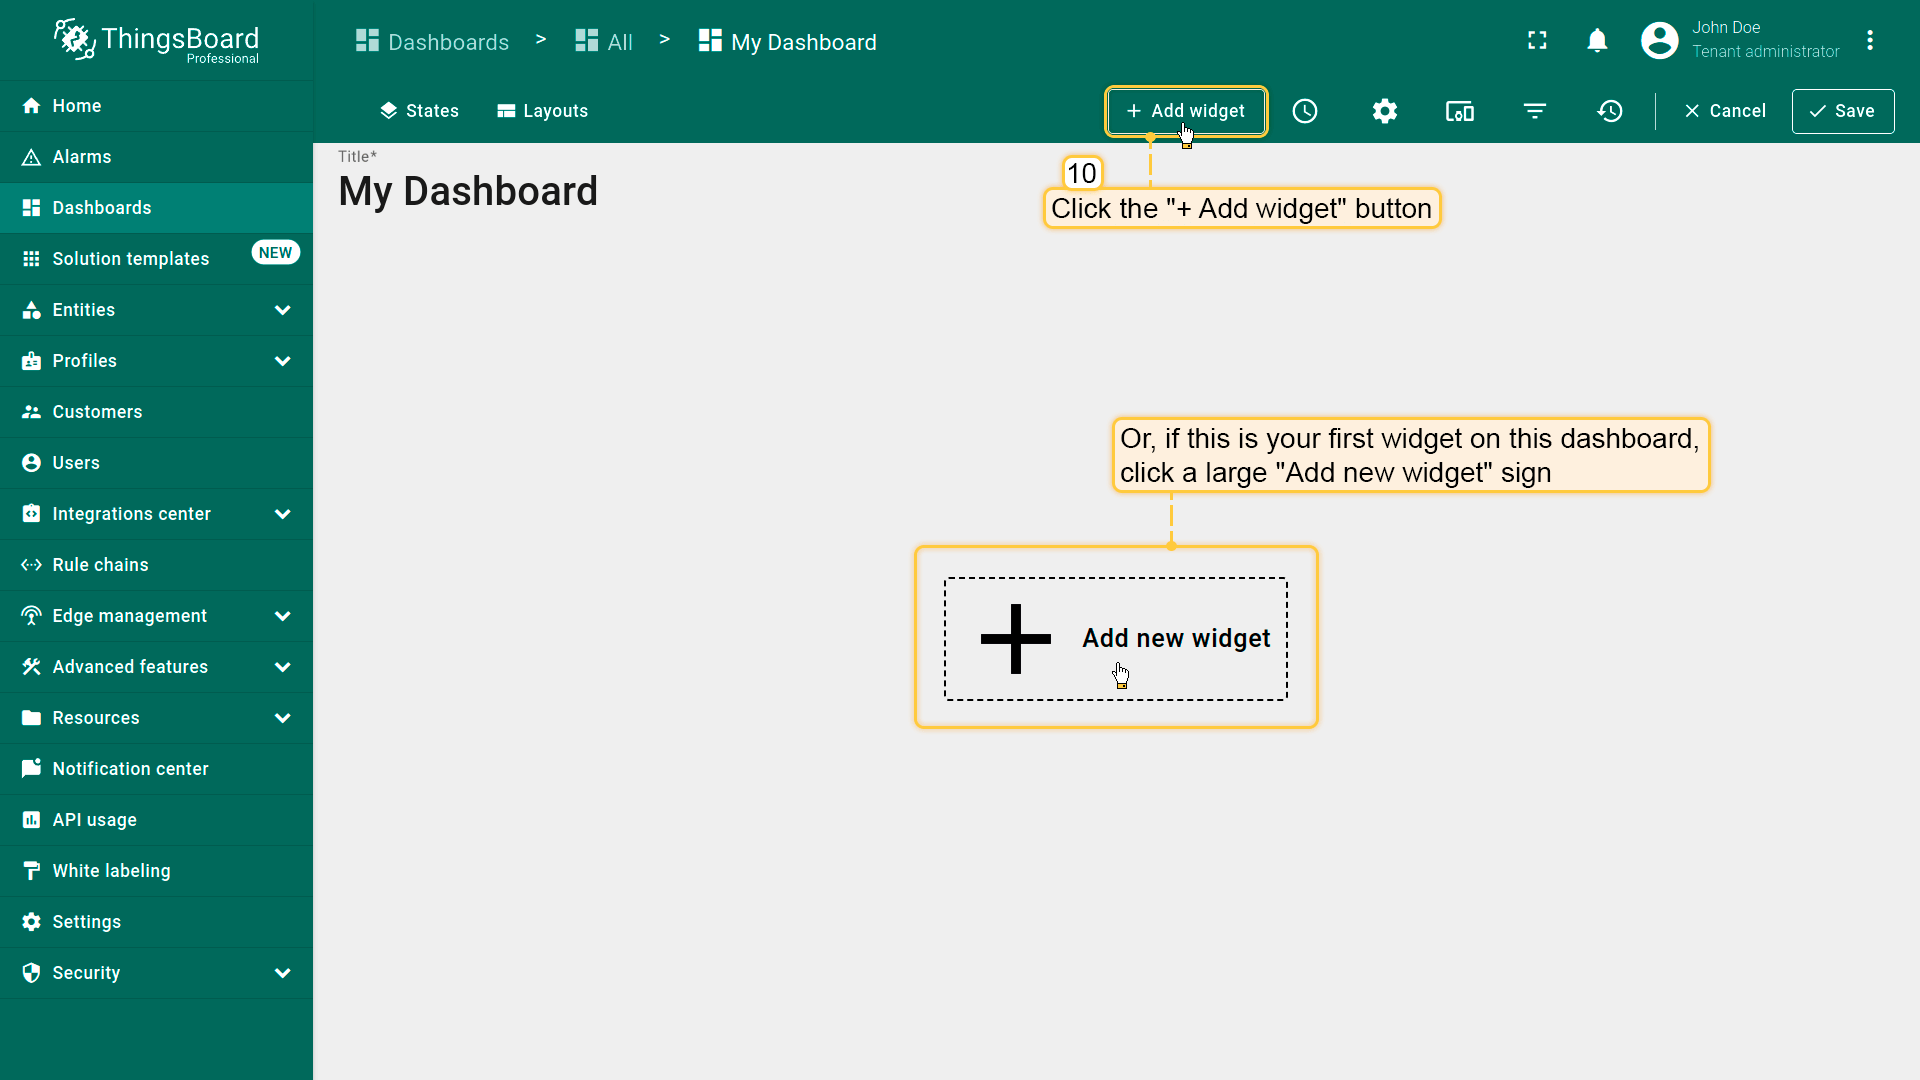
Click the "Add widget" button at the top of the screen or click the large "Add new widget" icon in the center of the screen (if this is your first widget on this dashboard);
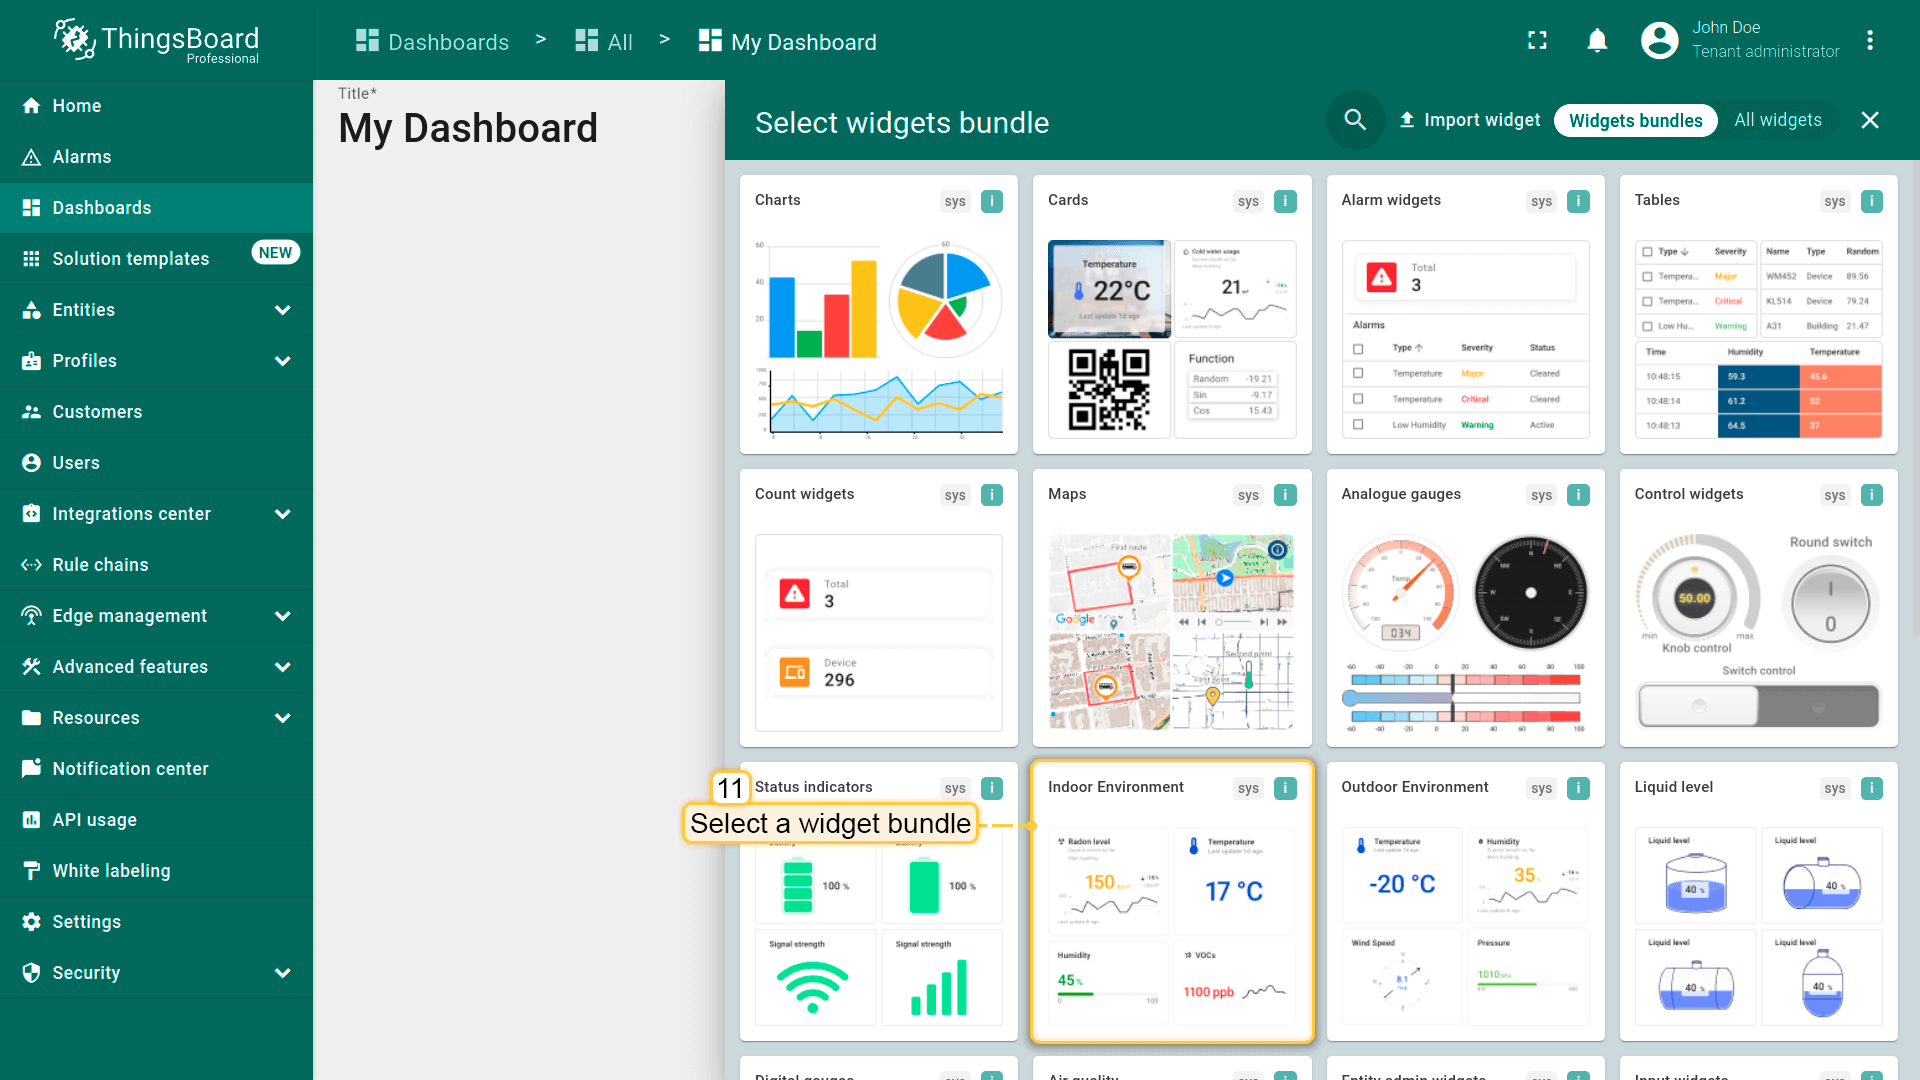
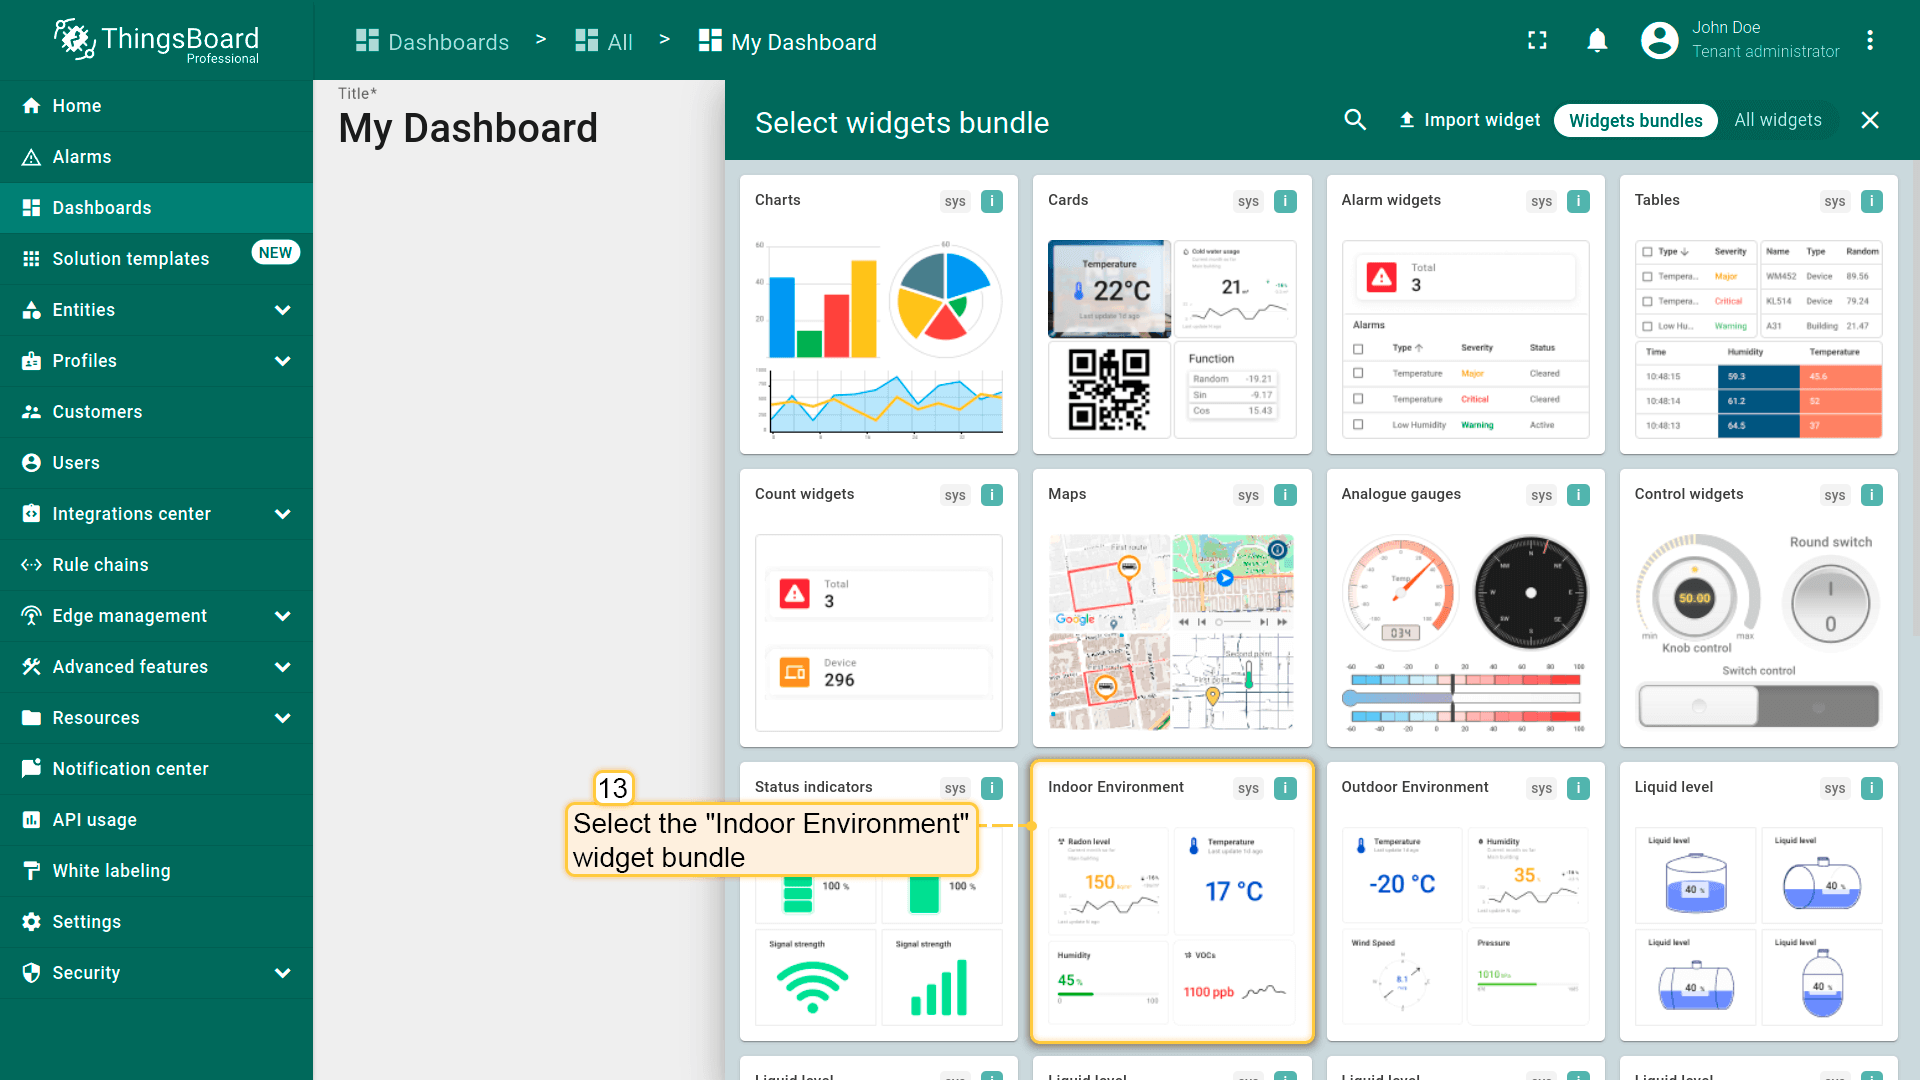
Select the widget bundle. For example, select "Indoor Environment" widgets bundle;
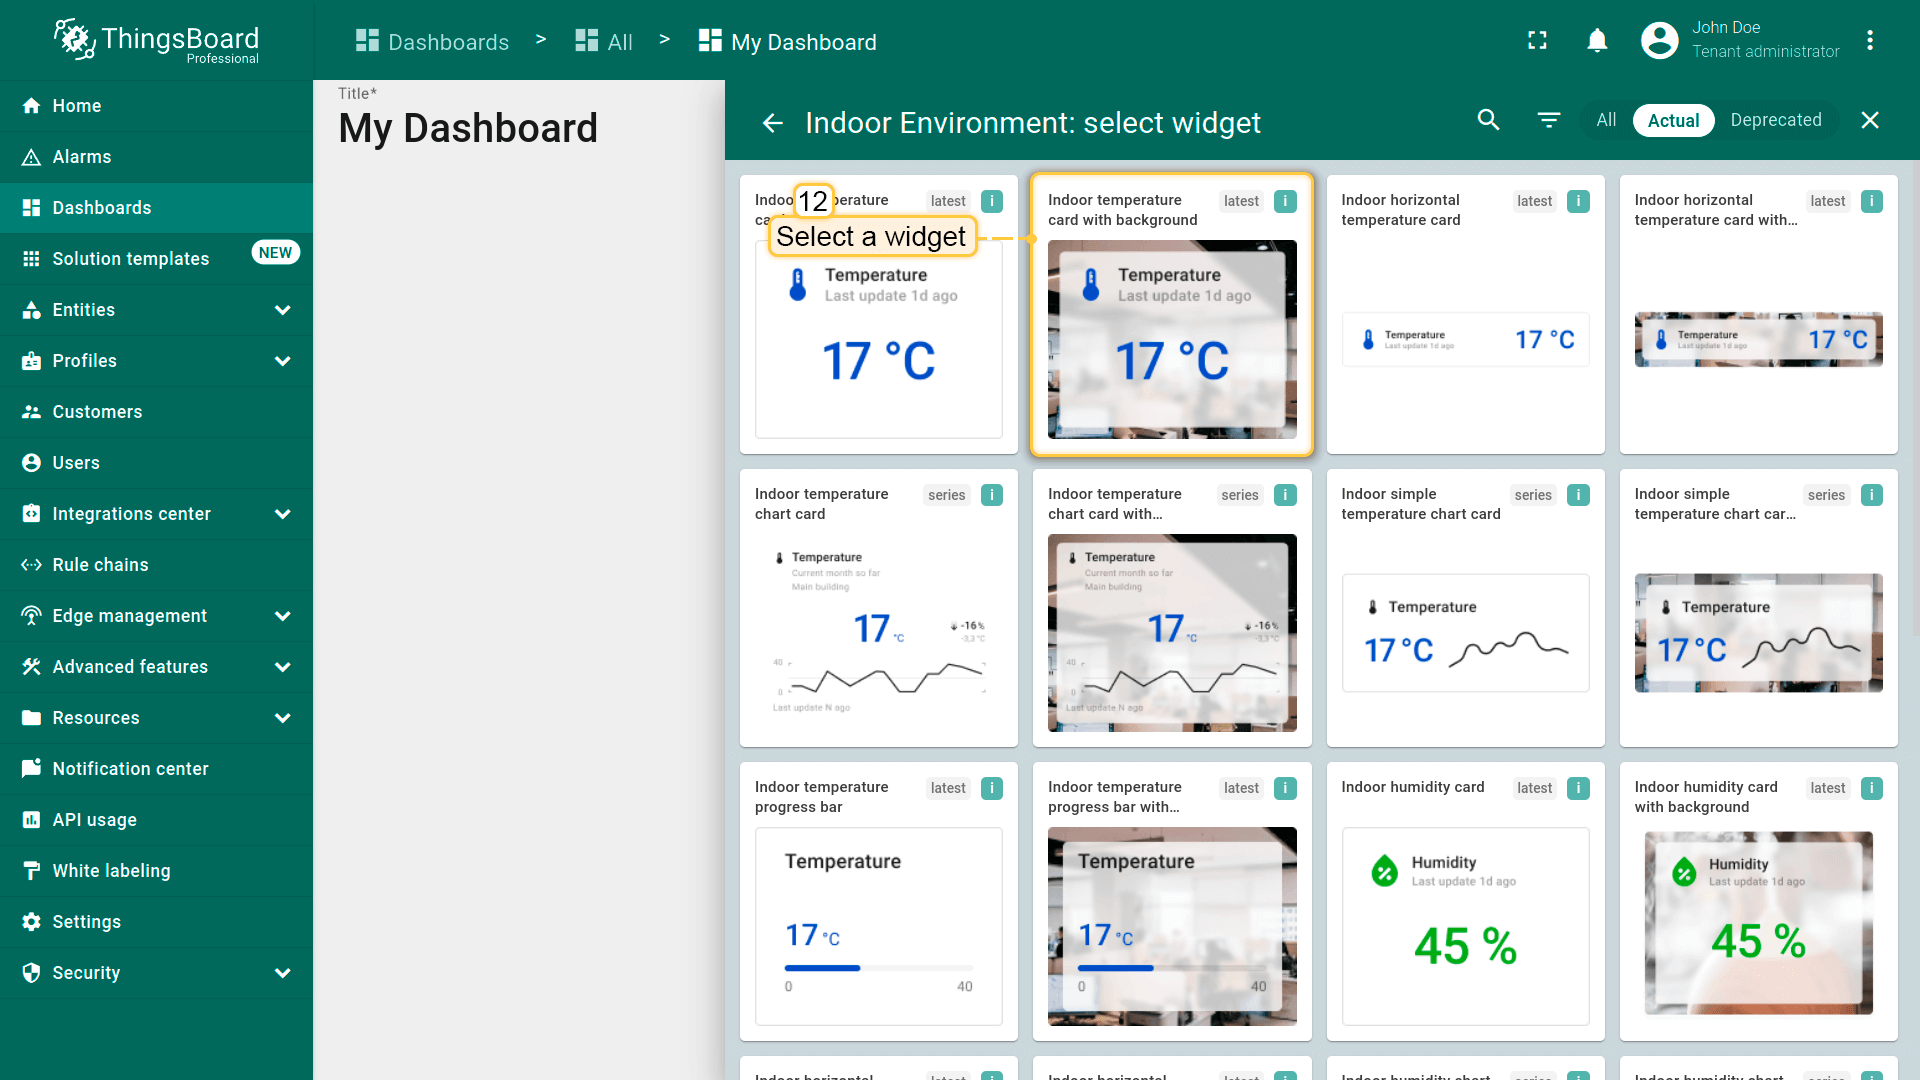
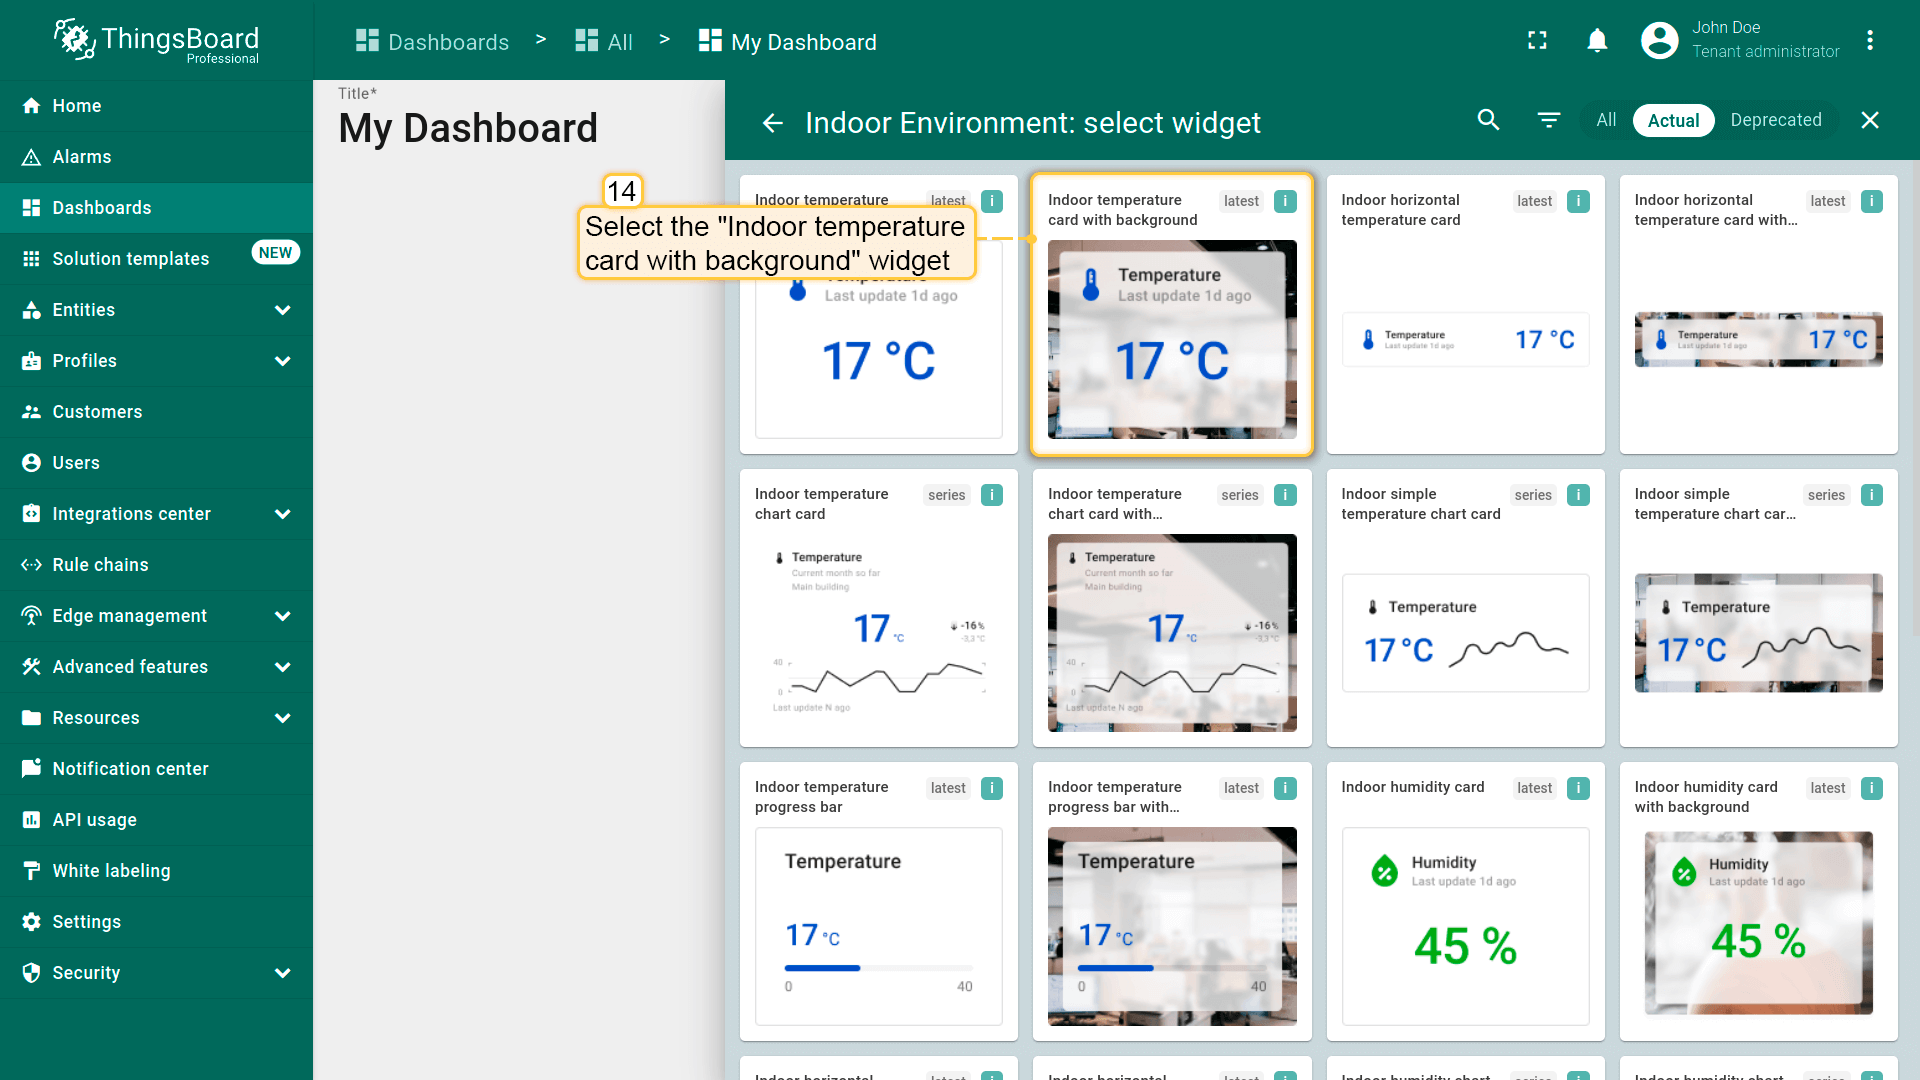
Now, select the "Indoor temperature card with background" widget;
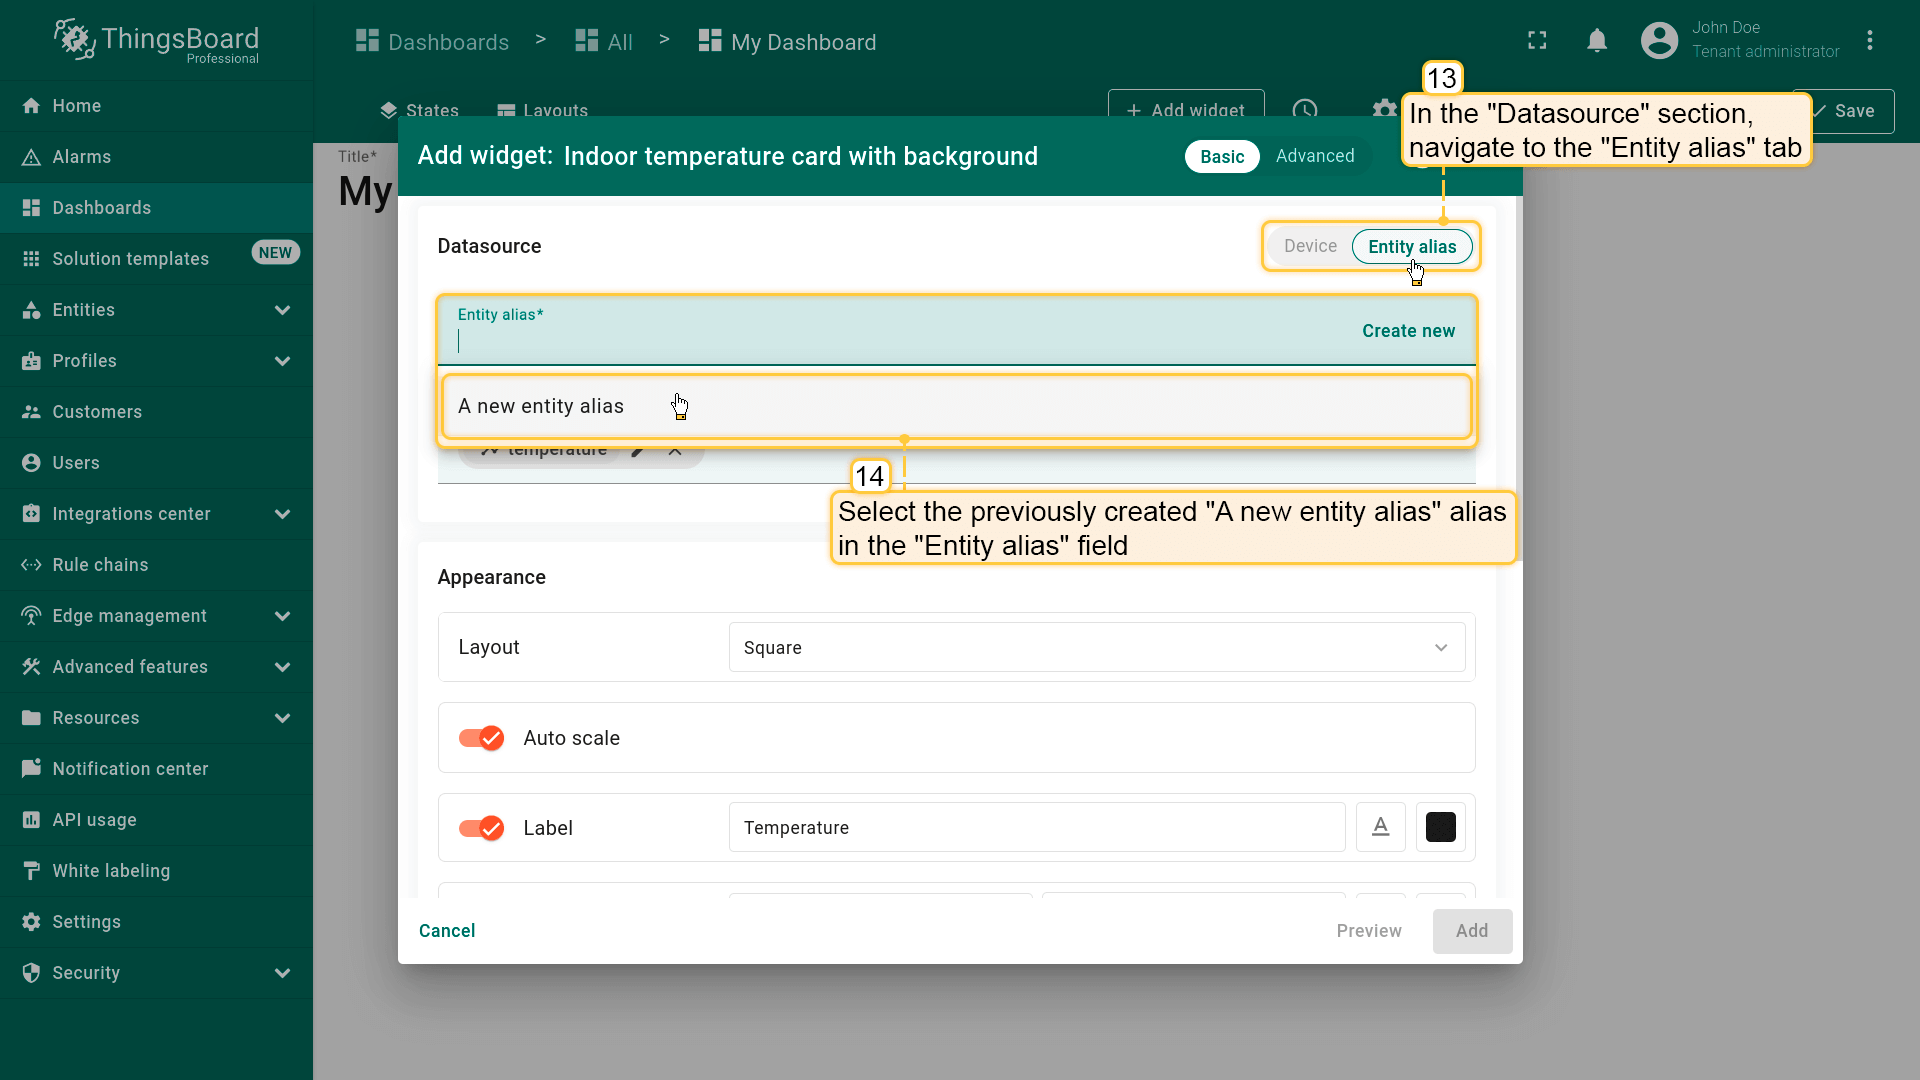
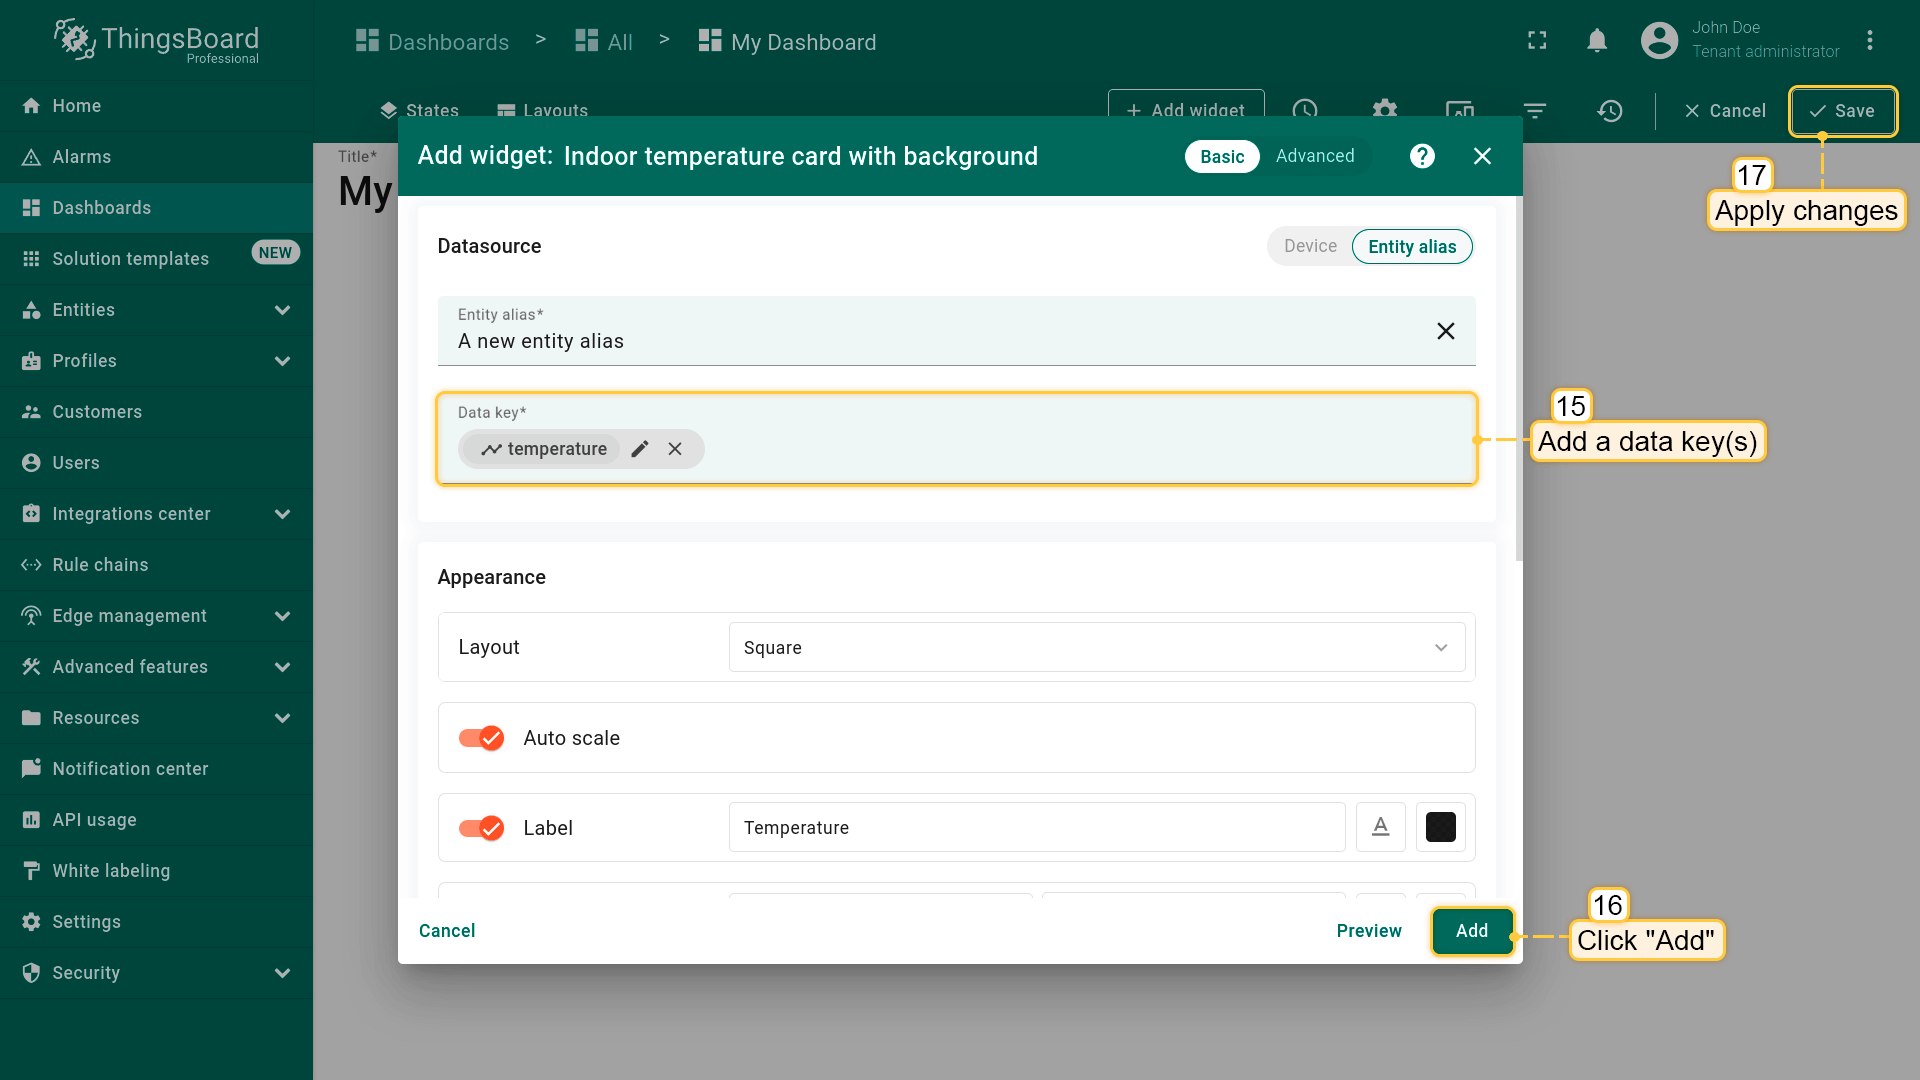
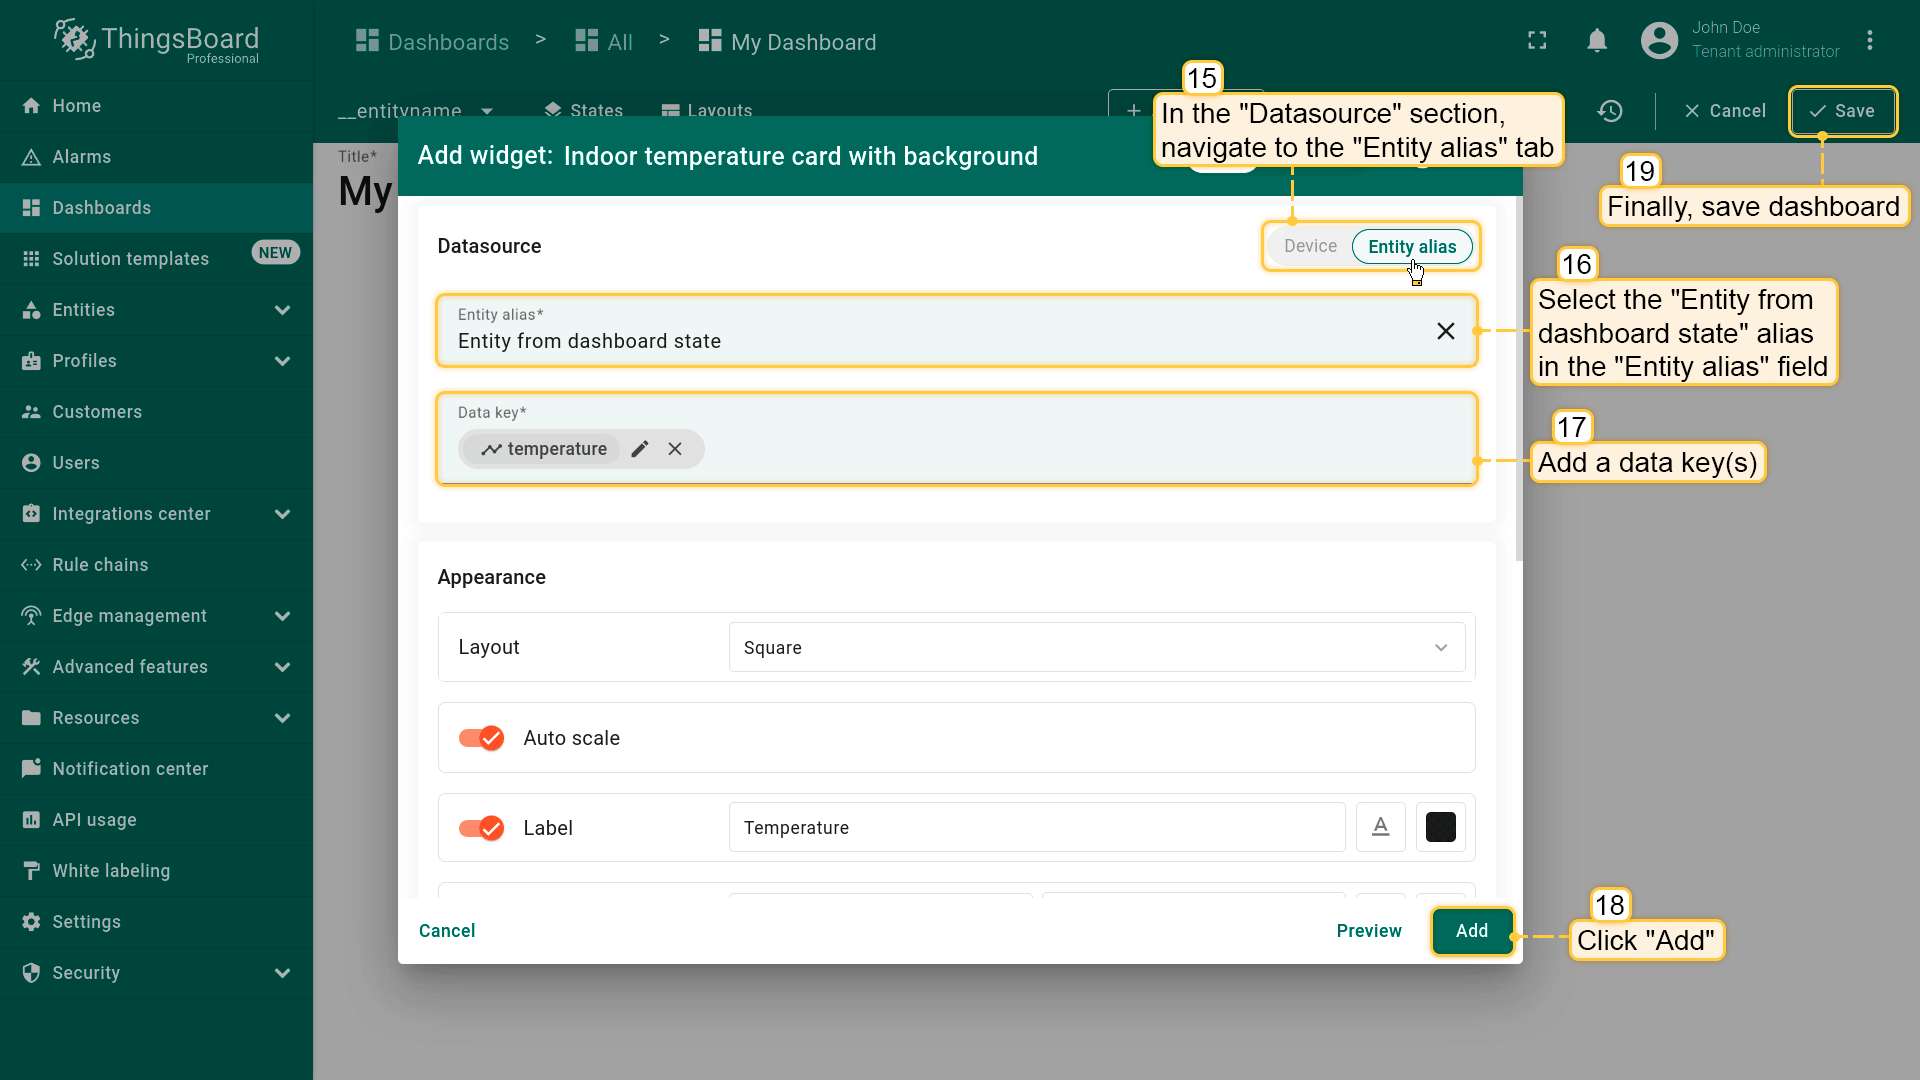
The "Add Widget" window will appear. Navigate to the "Entity alias" tab. Specify the previously created "A new entity alias" in the "Entity alias" field.
Specify the data key(s) in the "Data key" field. In our example, it's the "temperature" data key. Then, click "Add";
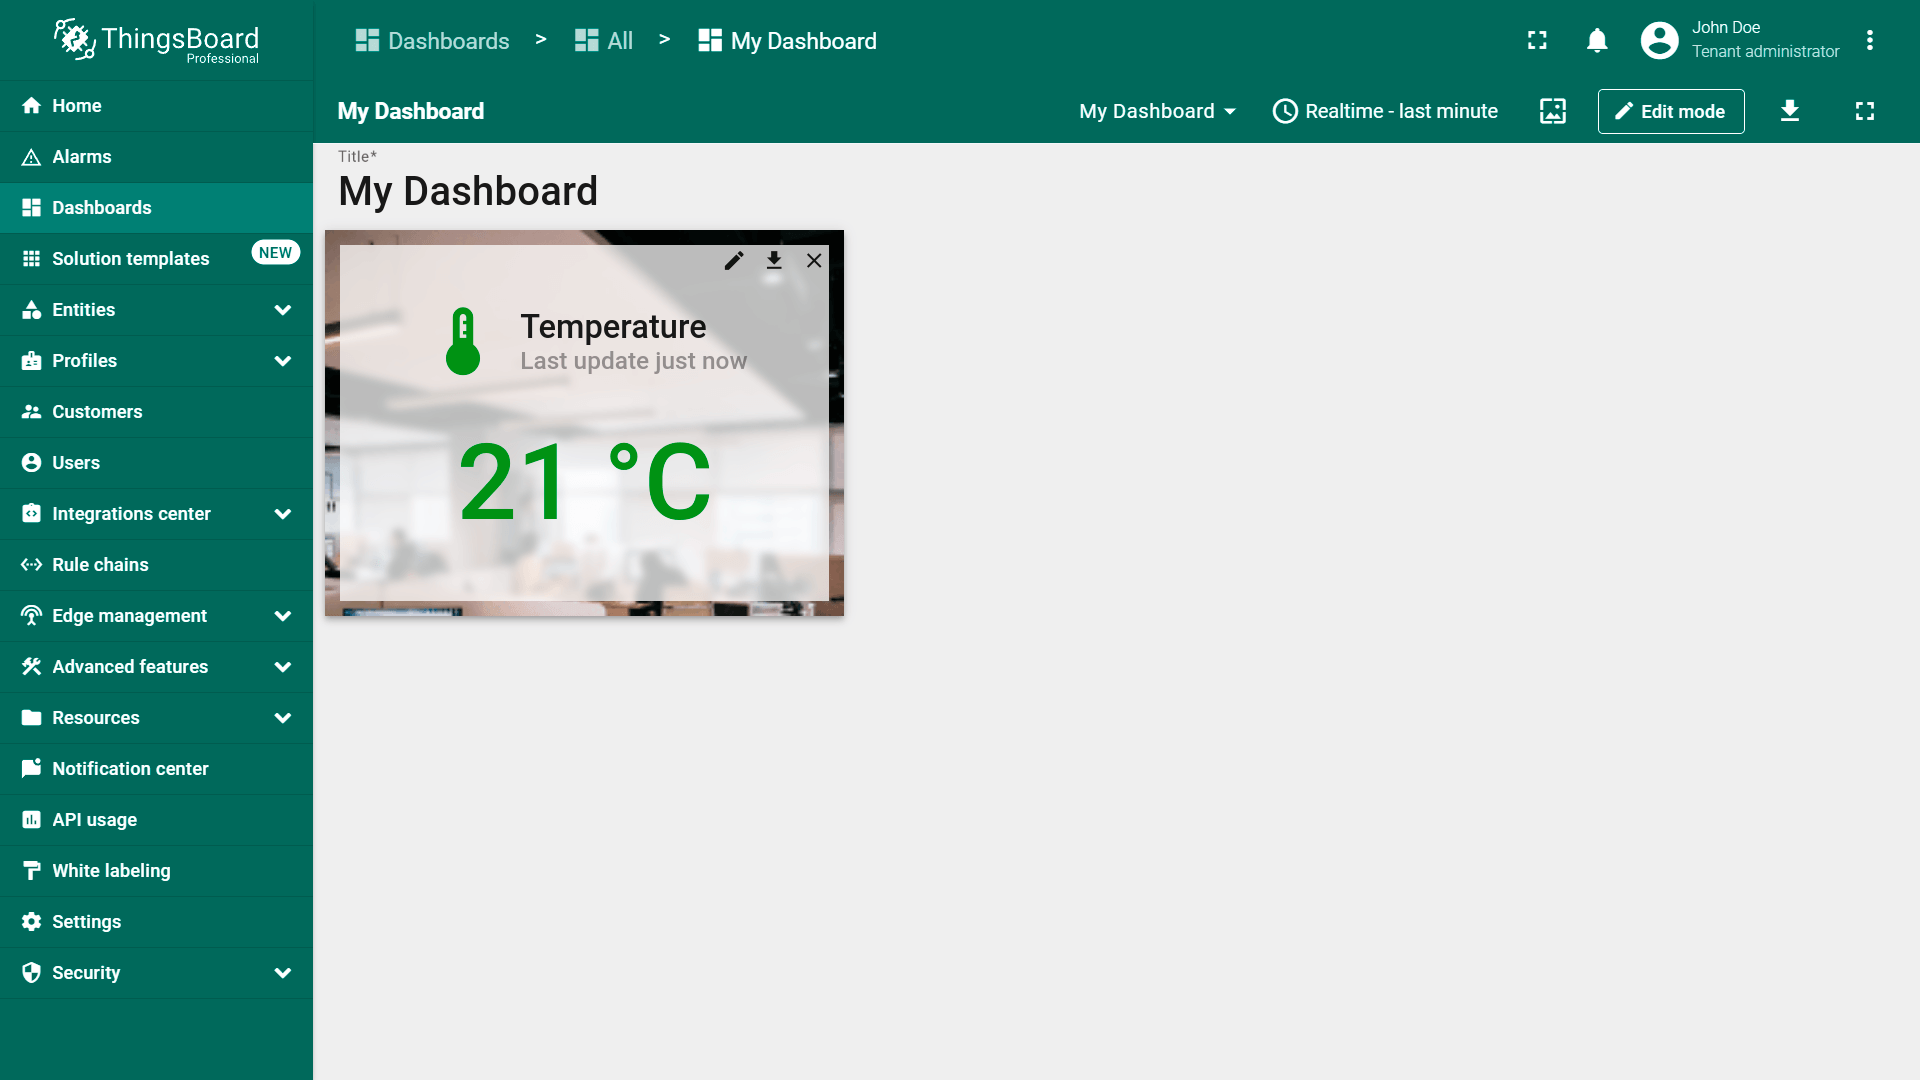
You have added a widget that uses the previously configured alias as a data source.
Click the "Add widget" button at the top of the screen or click the large "Add new widget" icon in the center of the screen (if this is your first widget on this dashboard);
Select the widget bundle. For example, select "Indoor Environment" widgets bundle;
Now, select the "Indoor temperature card with background" widget;
The "Add Widget" window will appear. Navigate to the "Entity alias" tab. Specify the previously created "A new entity alias" in the "Entity alias" field.
Specify the data key(s) in the "Data key" field. In our example, it's the "temperature" data key. Then, click "Add";
You have added a widget that uses the previously configured alias as a data source.
In the "Add Alias" dialog box, enter the alias name, and select the "Single Entity" filter type. Then choose the entity type and specify the final entity/entities.
In the "Tables" widgets bundle select the "Entities table" widget. Navigate to the "Entity alias" tab. Specify the "Single entity" alias in the "Entity alias" field and "temperature" data key in the "Columns" section. Click "Add";
The Entities table widget with the alias that filters one device - Thermometer A1 has been added.
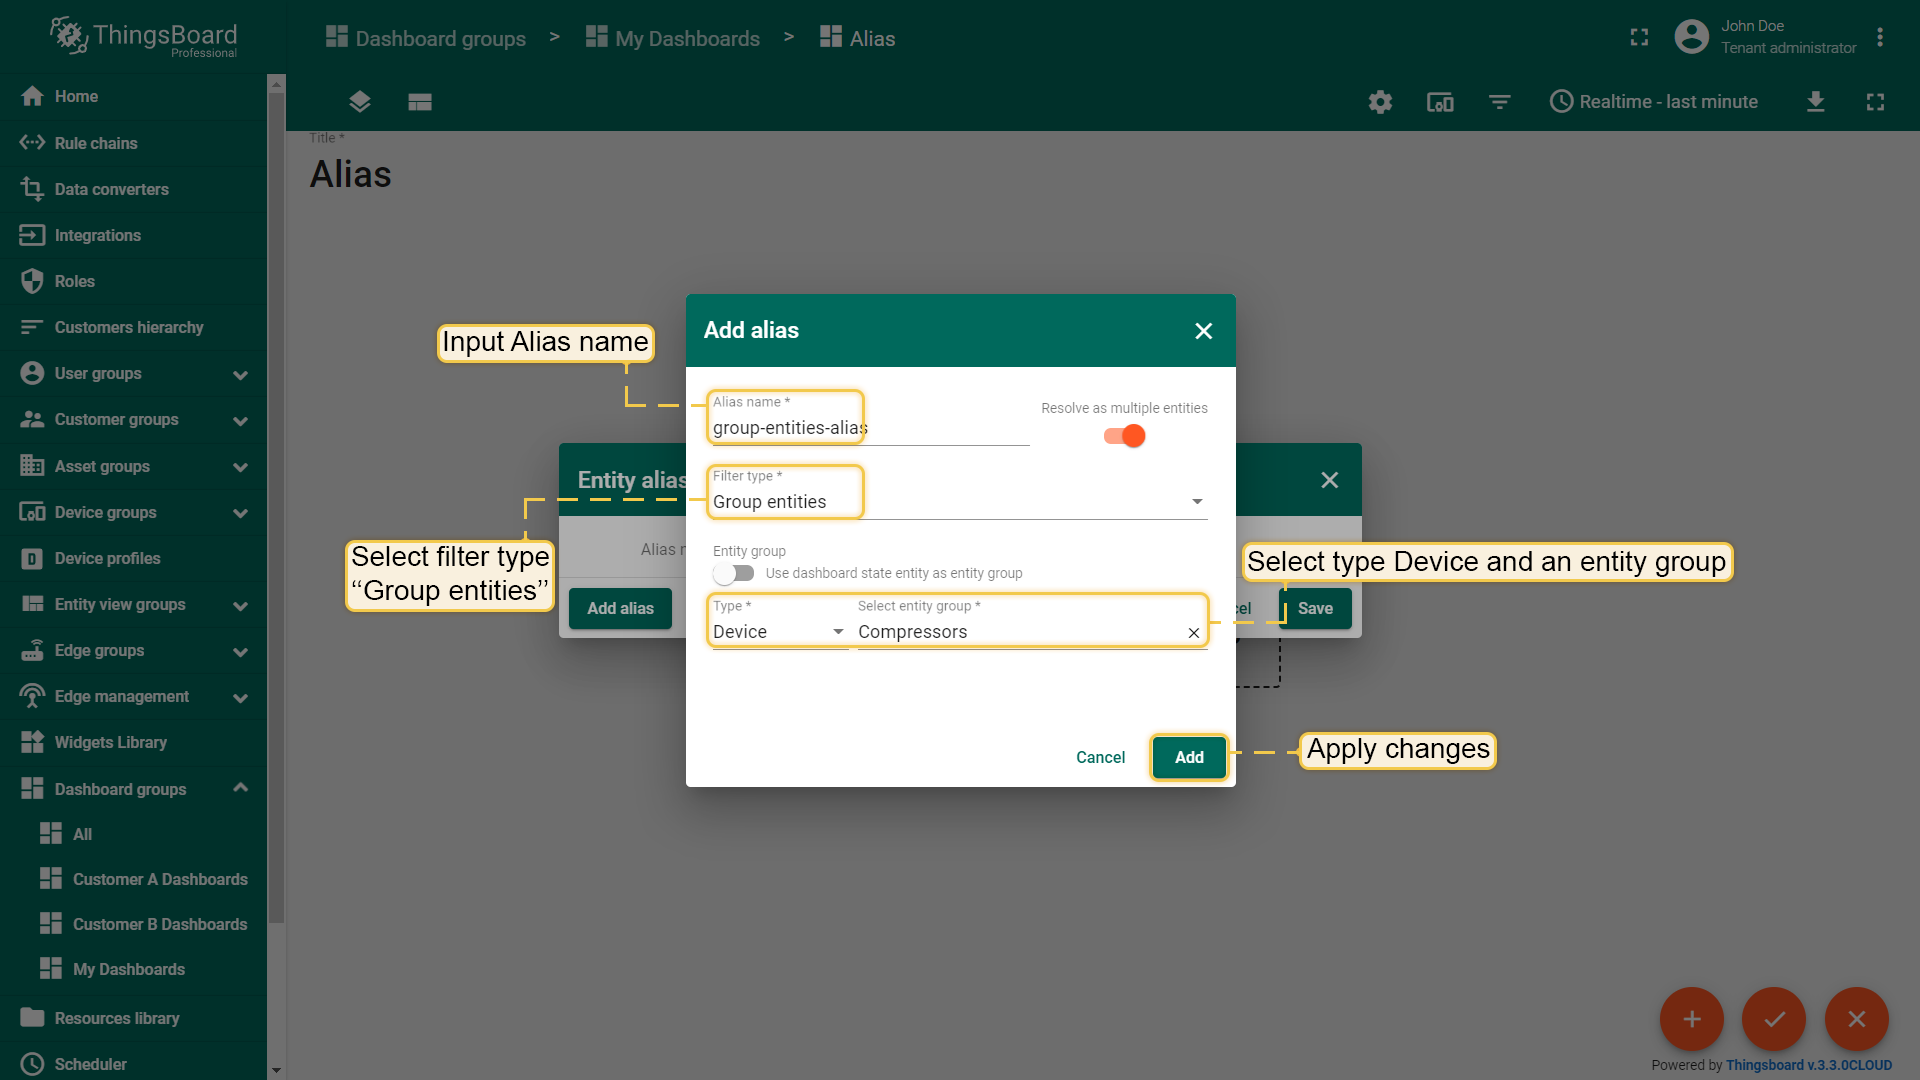
In the "Add alias" dialog box, enter the alias name, and select the "Group entities" filter type. Then choose the entities type and select the entity group.
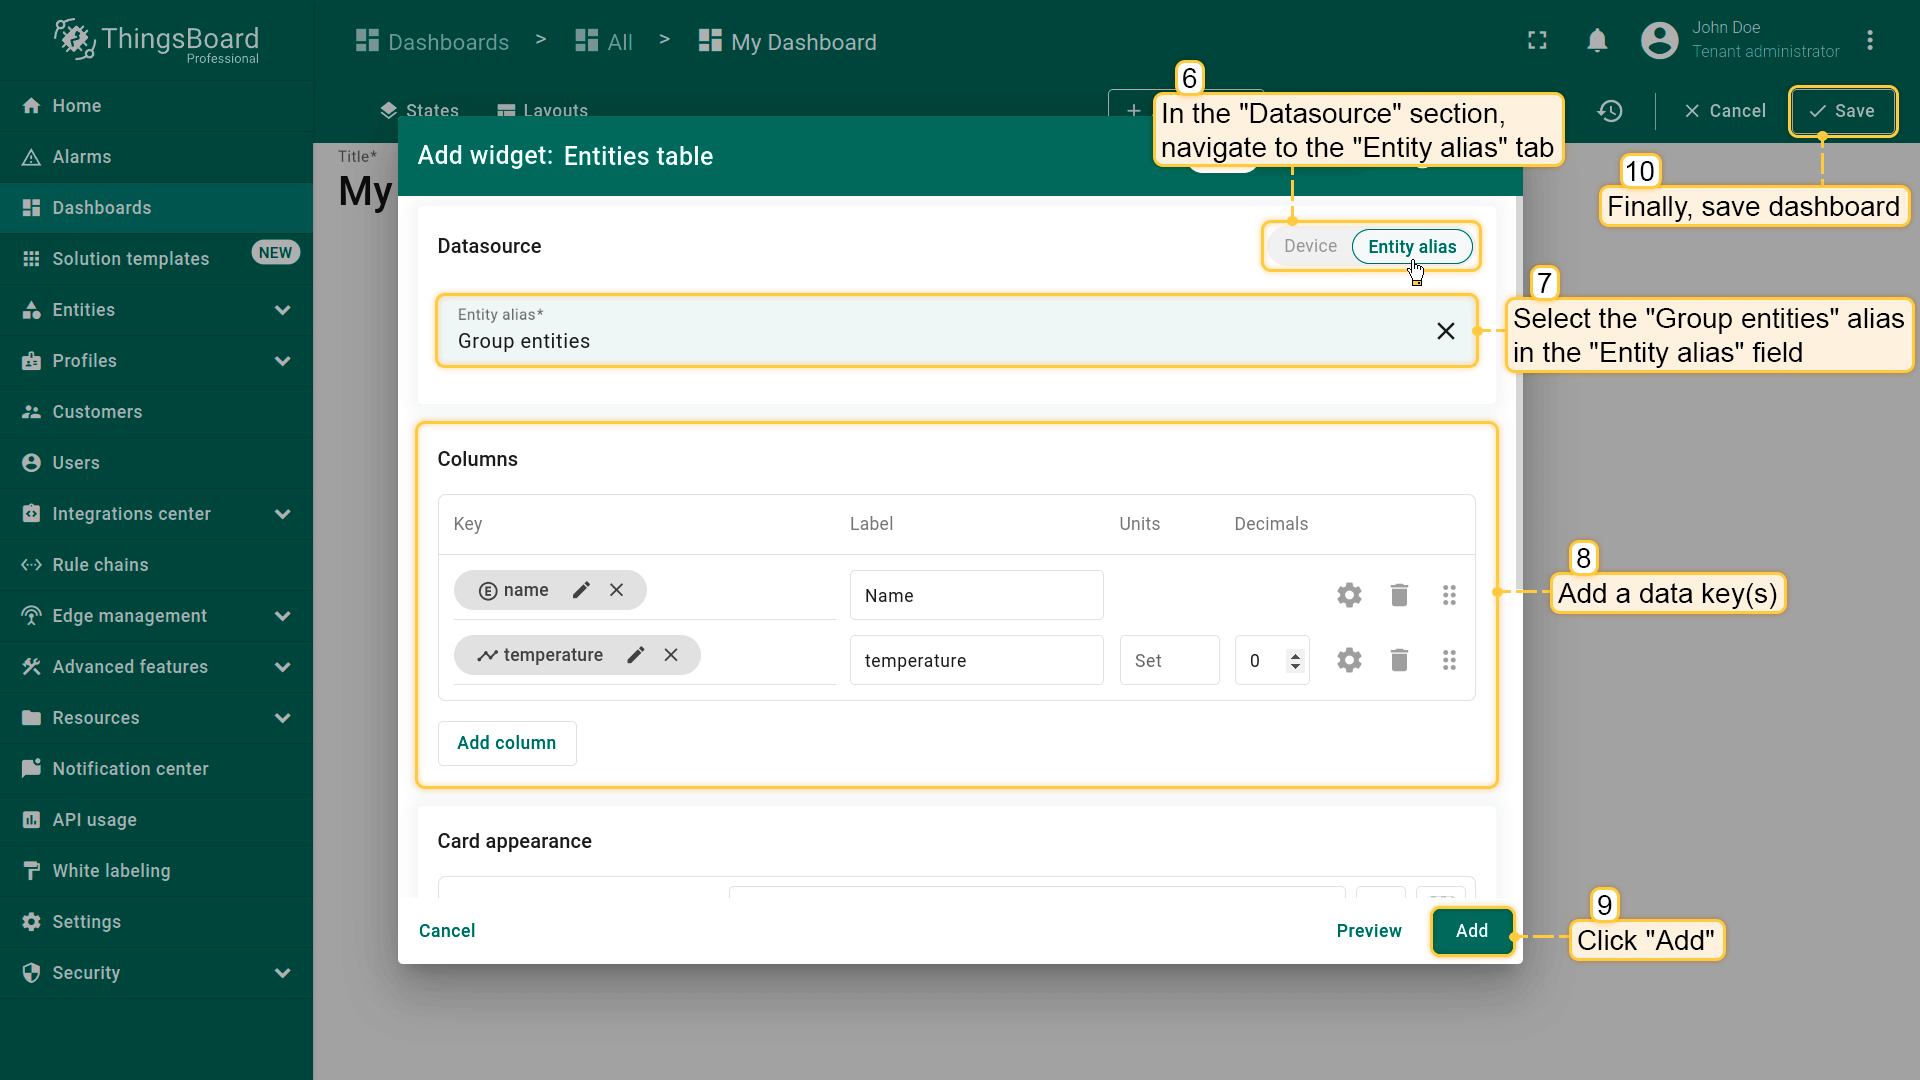
In the "Tables" widgets bundle select the "Entities table" widget. Navigate to the "Entity alias" tab. Specify the "Group entities" alias in the "Entity alias" field and "temperature" data key in the "Columns" section. Click "Add";
The Entities table widget with the alias that displays all devices that belong to the "Thermostats" device group has been added.
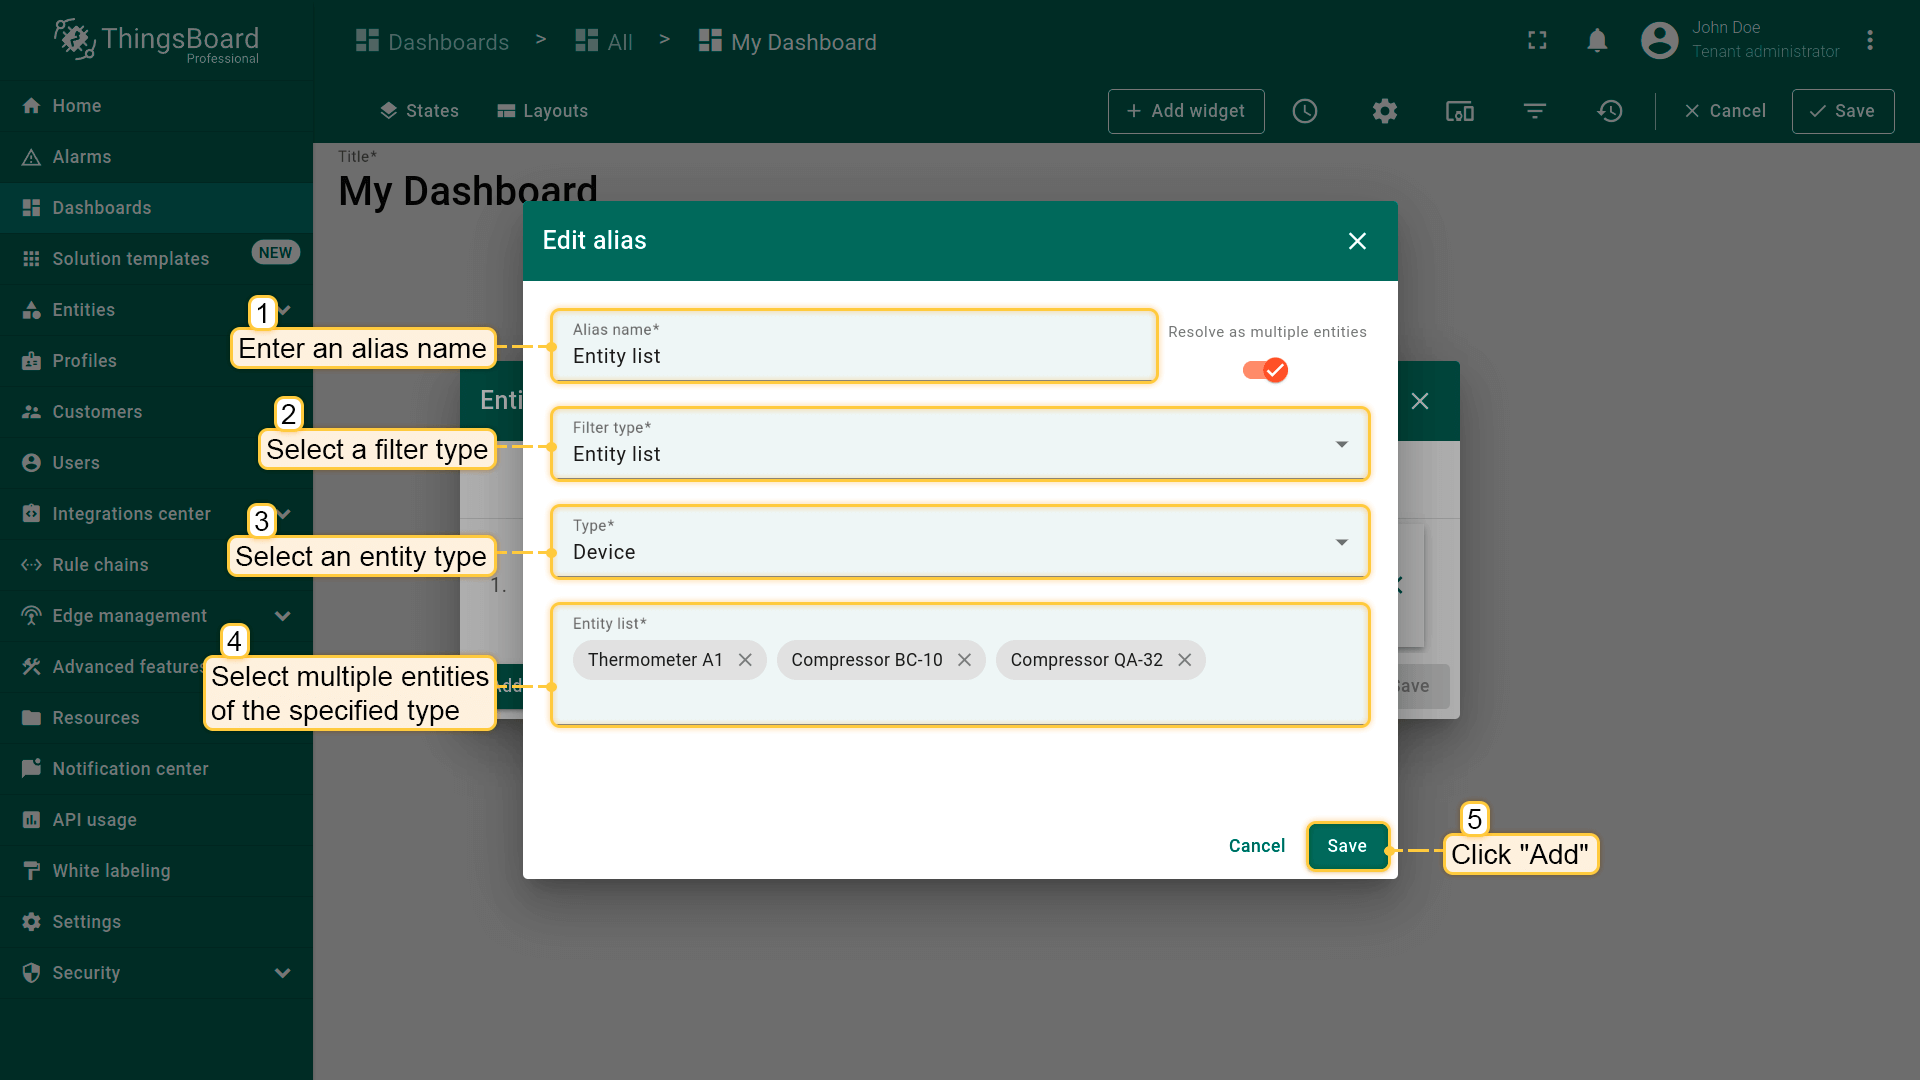
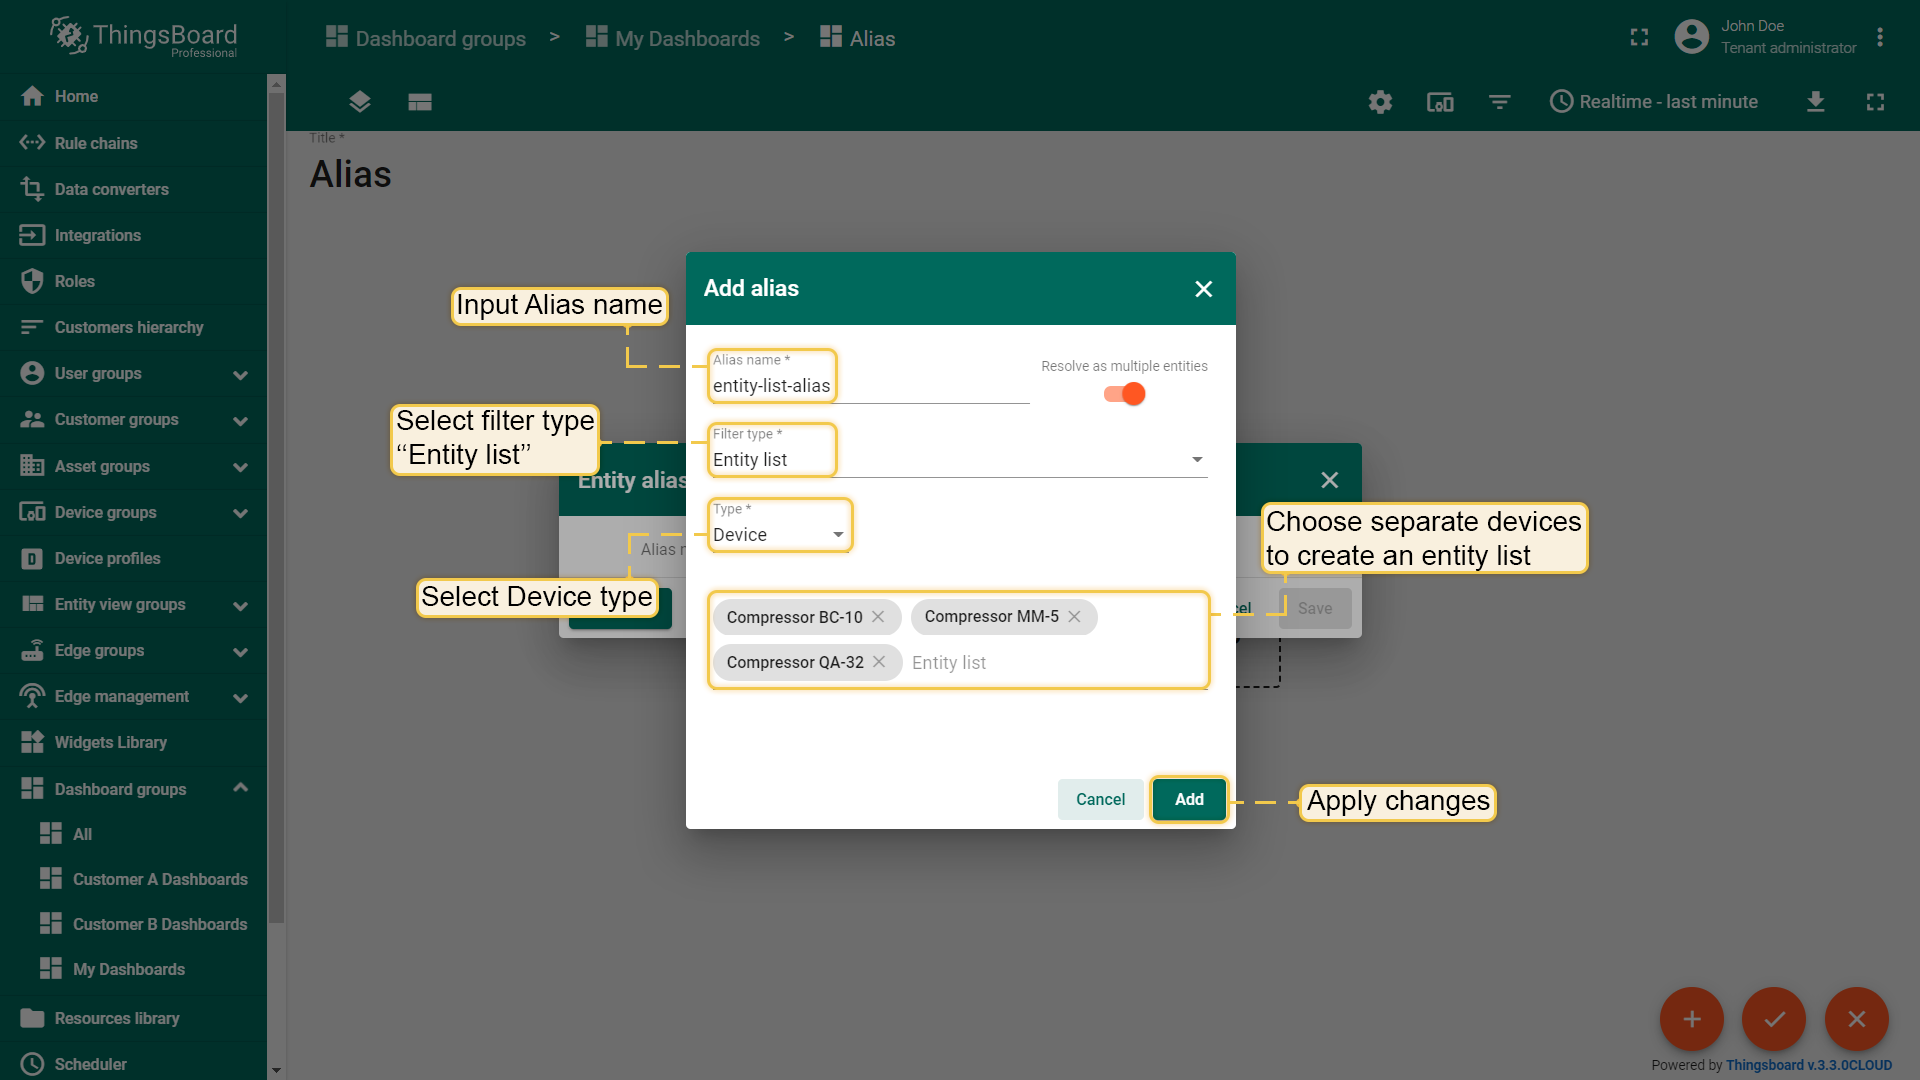
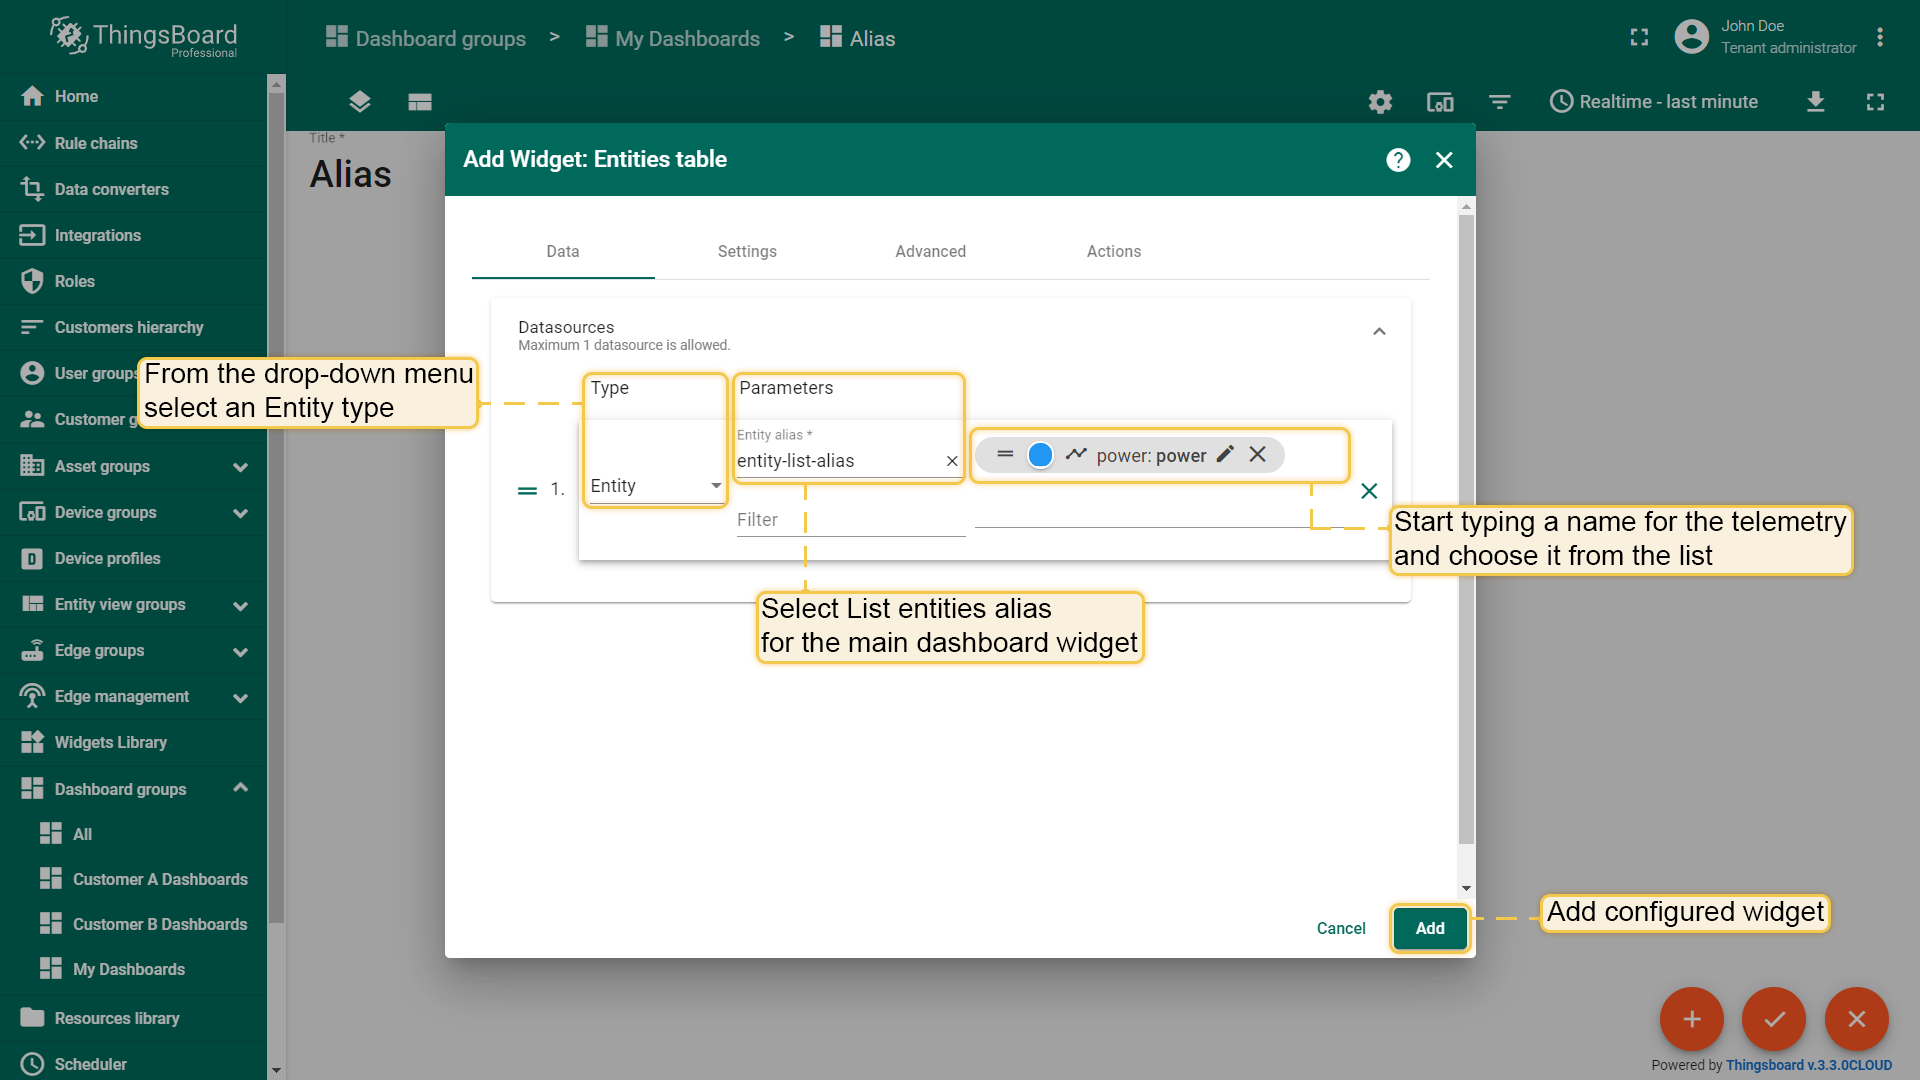
In the "Add alias" dialog, enter the alias name, and select the "Entity list" filter type. Then choose the entities type and specify entities whose data you want to display on the widget.
In the "Tables" widgets bundle select the "Entities table" widget. Navigate to the "Entity alias" tab. Specify the "Entity list" alias in the "Entity alias" field and "temperature" data key in the "Columns" section. Click "Add";
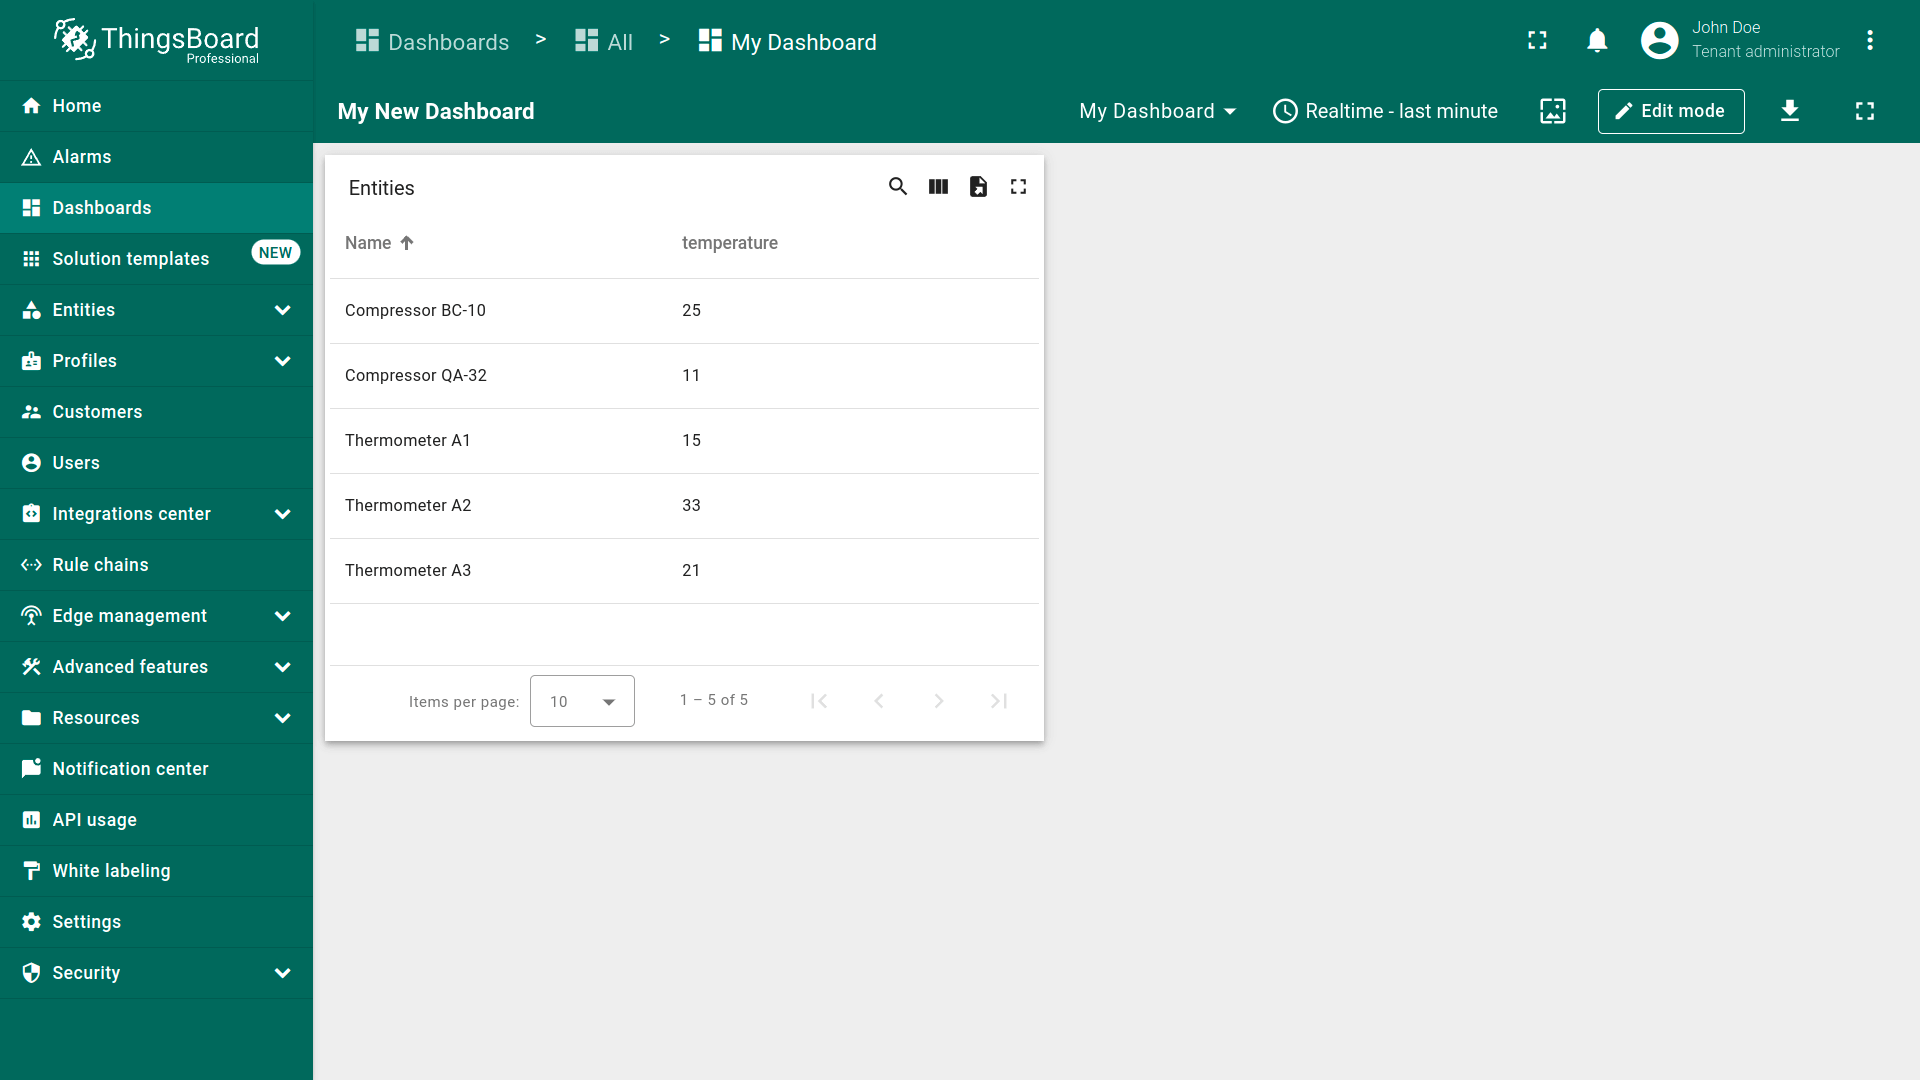
The Entities table widget with the alias that displays a list of several devices, which in this case are Compressor BC-10, Compressor QA-32, and Thermometer A1 has been added.
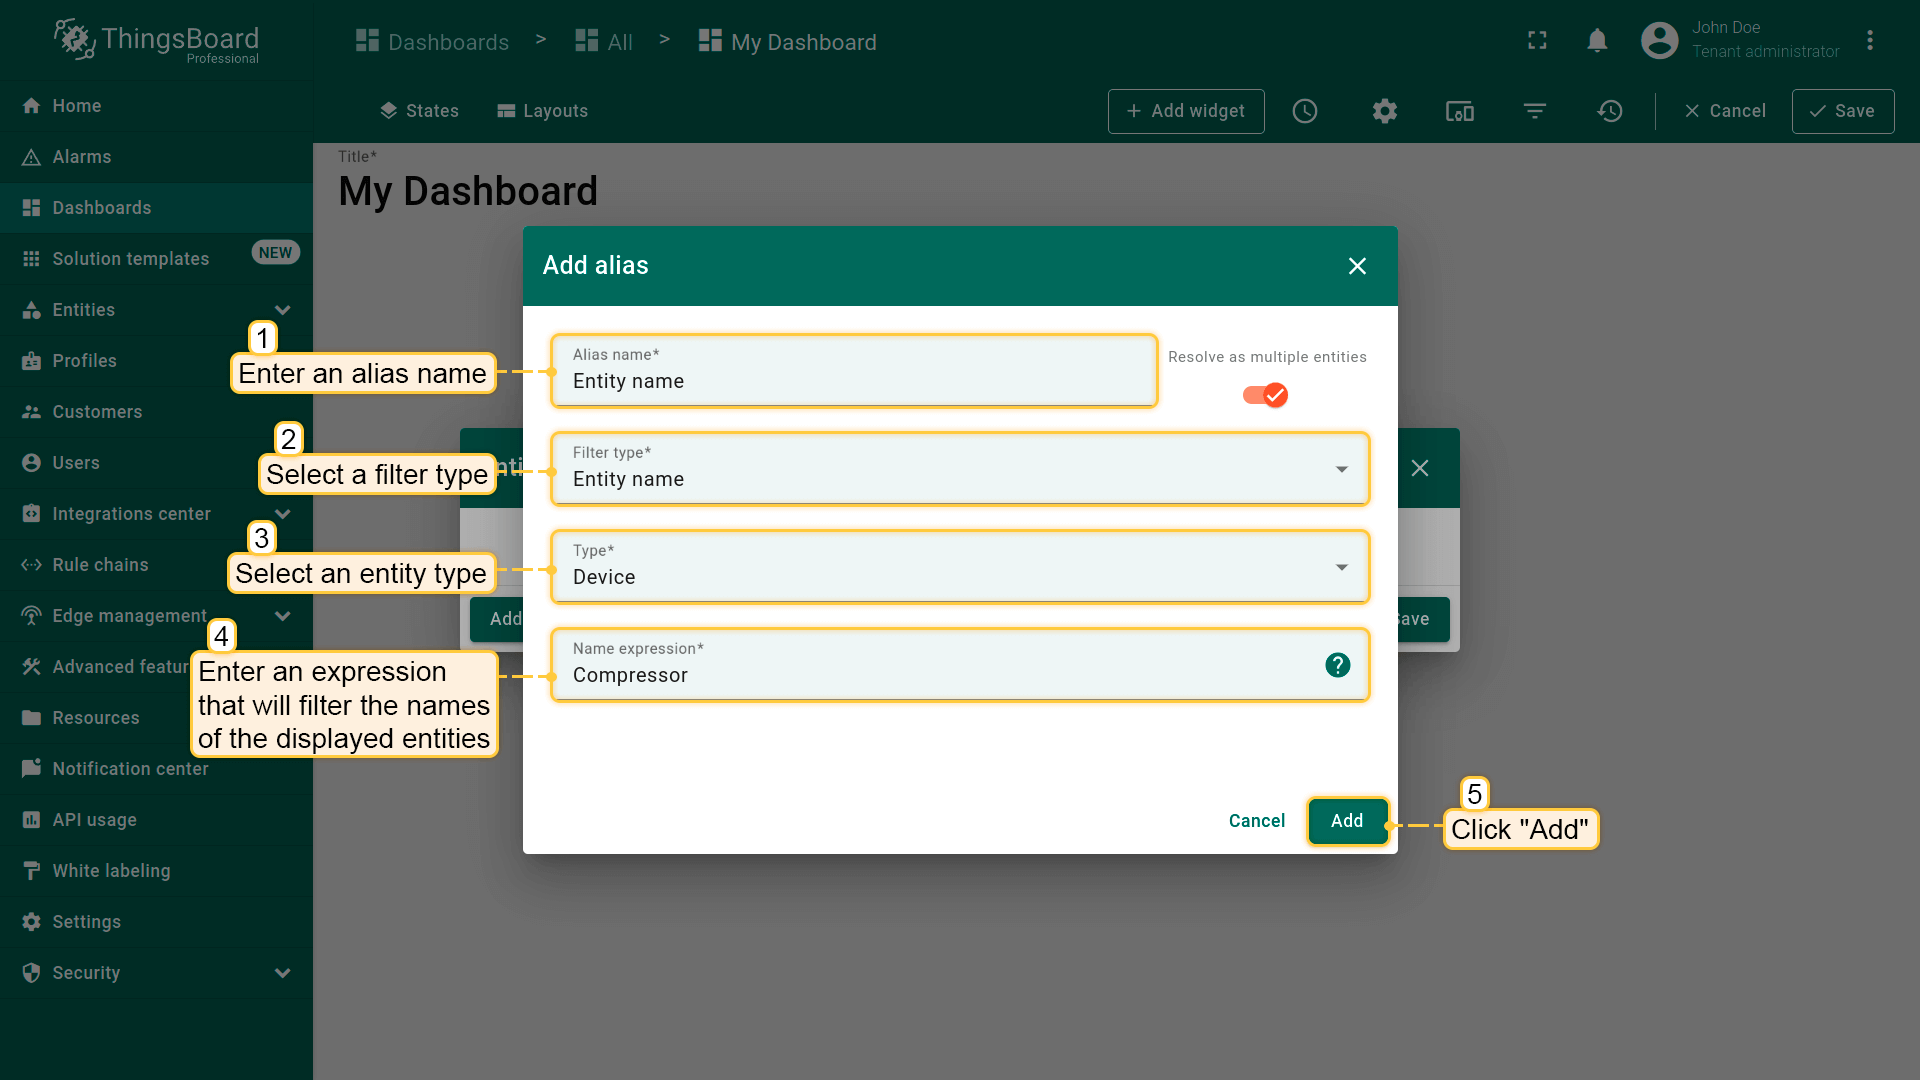
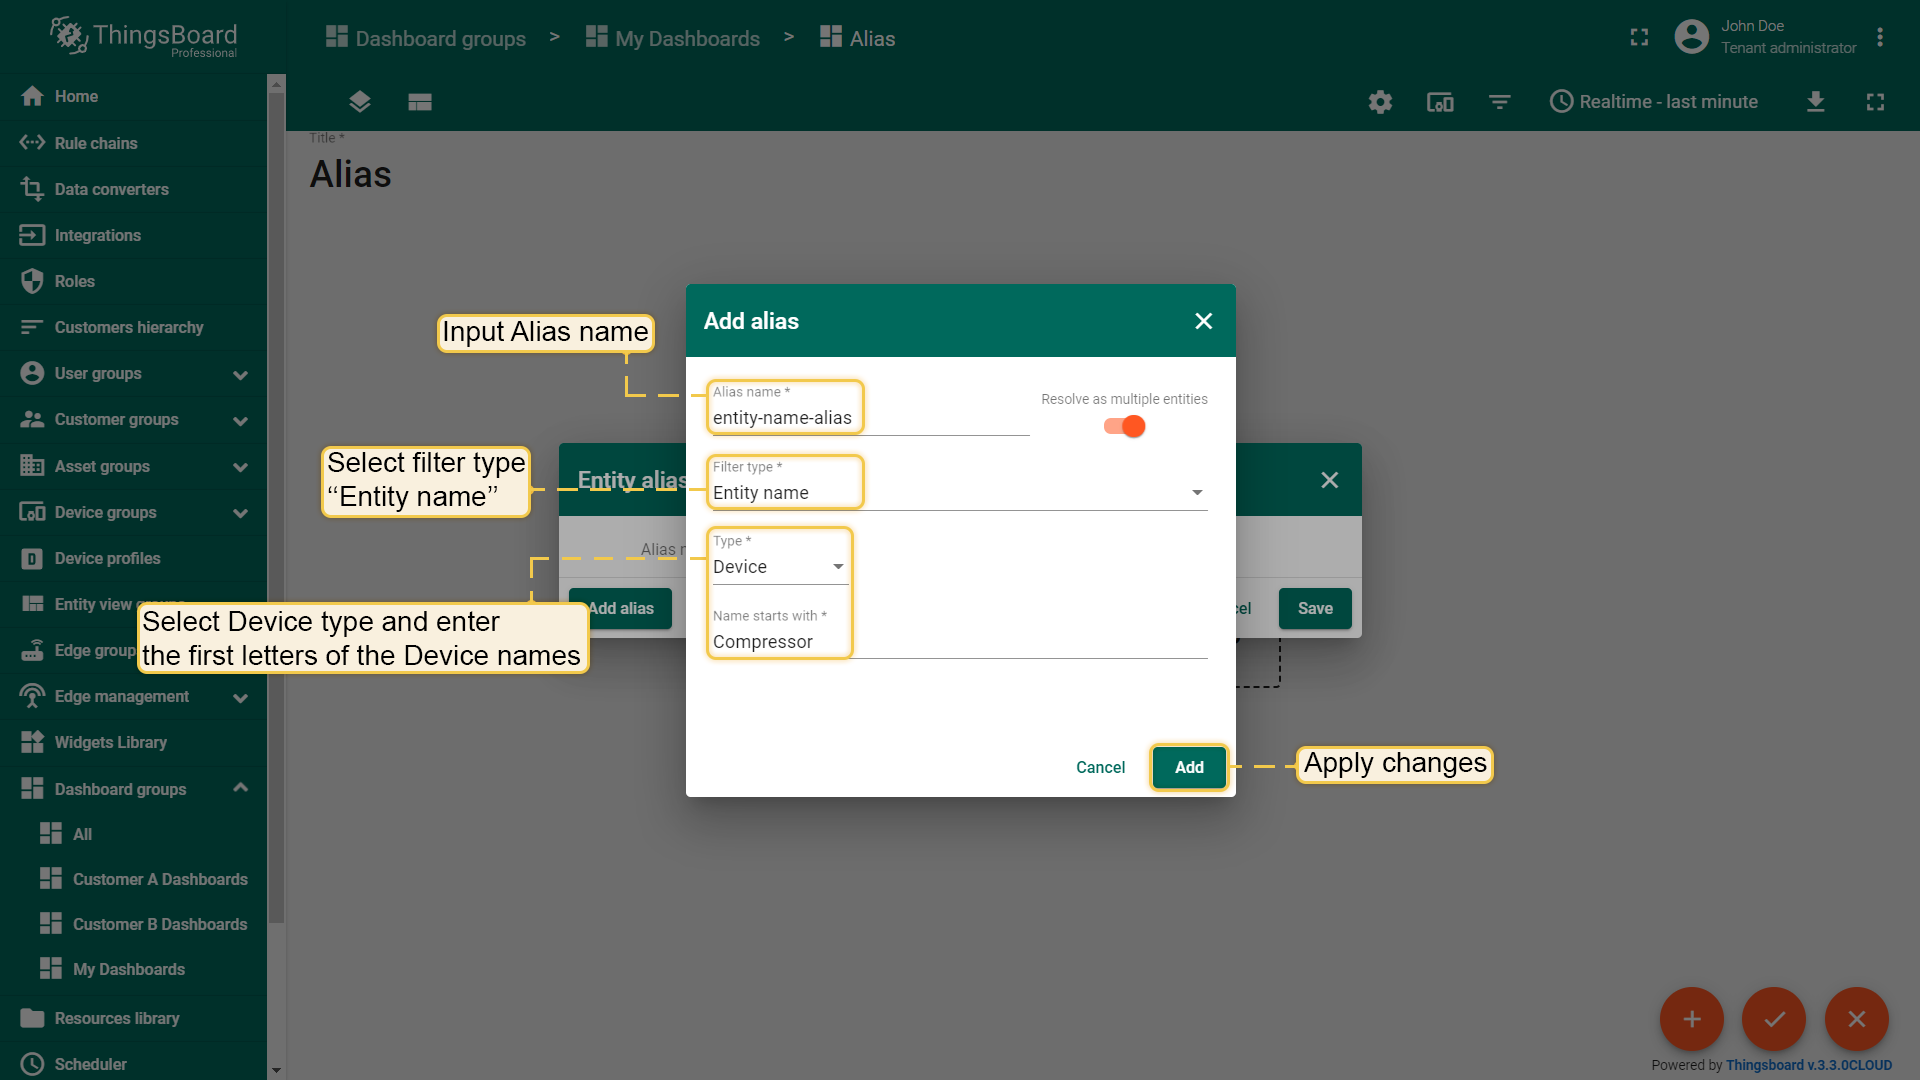
In the "Add alias" dialog box, enter the alias name, and select the "Entity name" filter type. Then choose the entities type and enter an expression that will filter the names of the displayed entities.
In the "Tables" widgets bundle select the "Entities table" widget. Navigate to the "Entity alias" tab. Specify the "Entity name" alias in the "Entity alias" field and "temperature" data key in the "Columns" section. Click "Add";
The Entities table widget with alias that filters devices, which names start with ‘Compressor’, has been added.
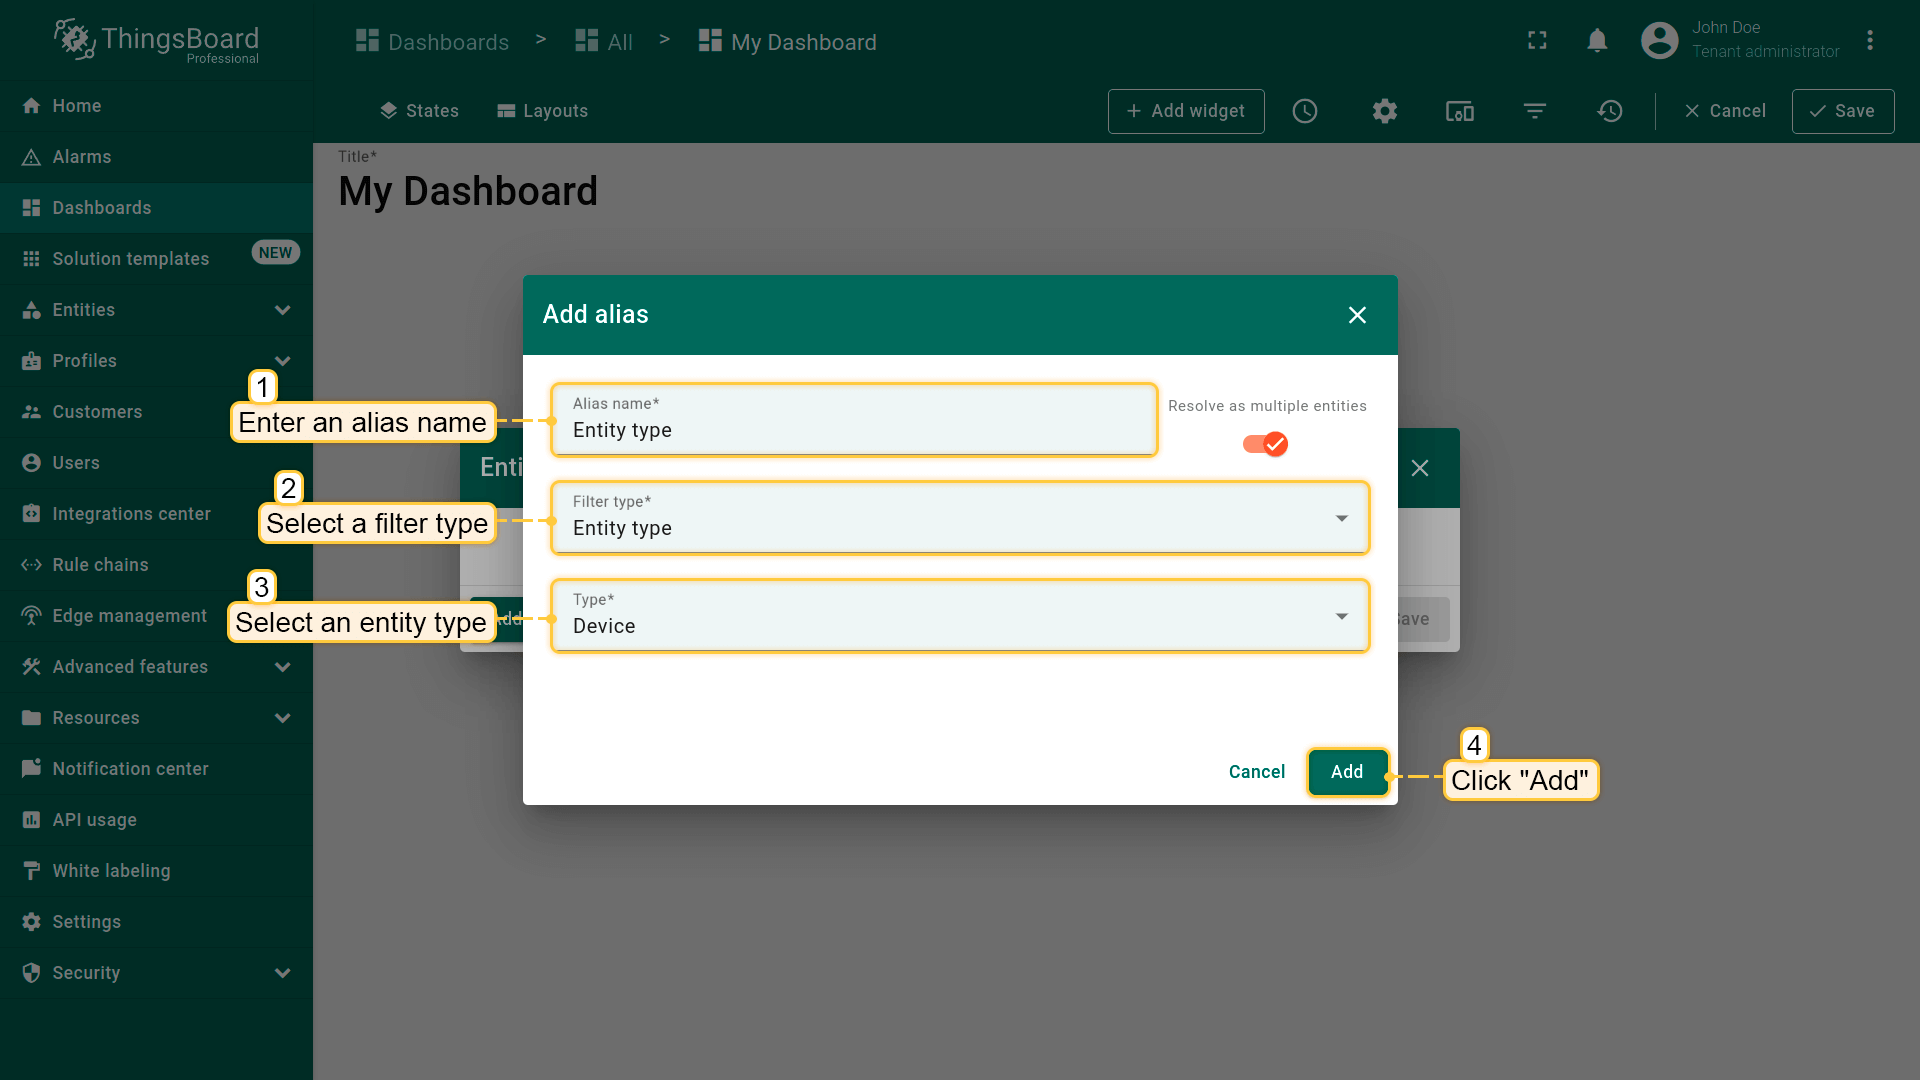
Add an Entity table widget that will display a list of entities. Use the "Entity type" alias as a data source;
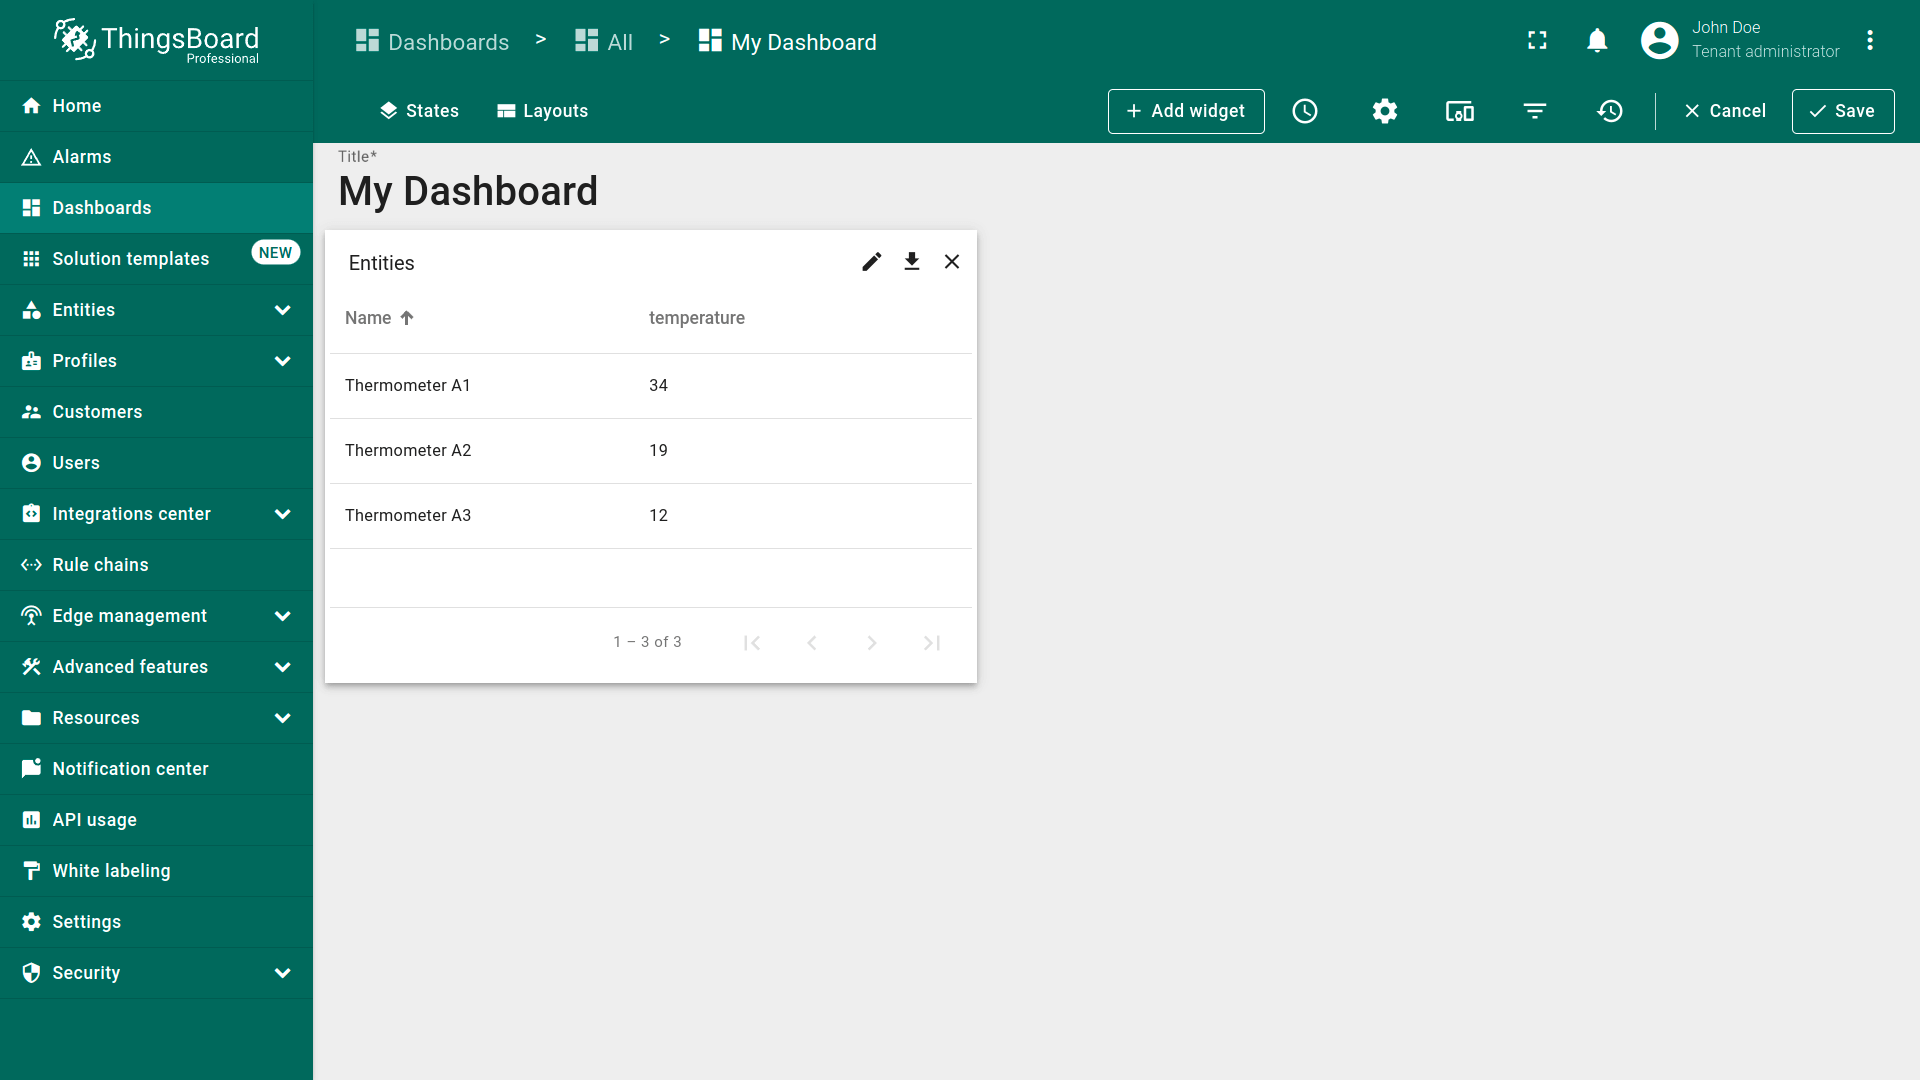
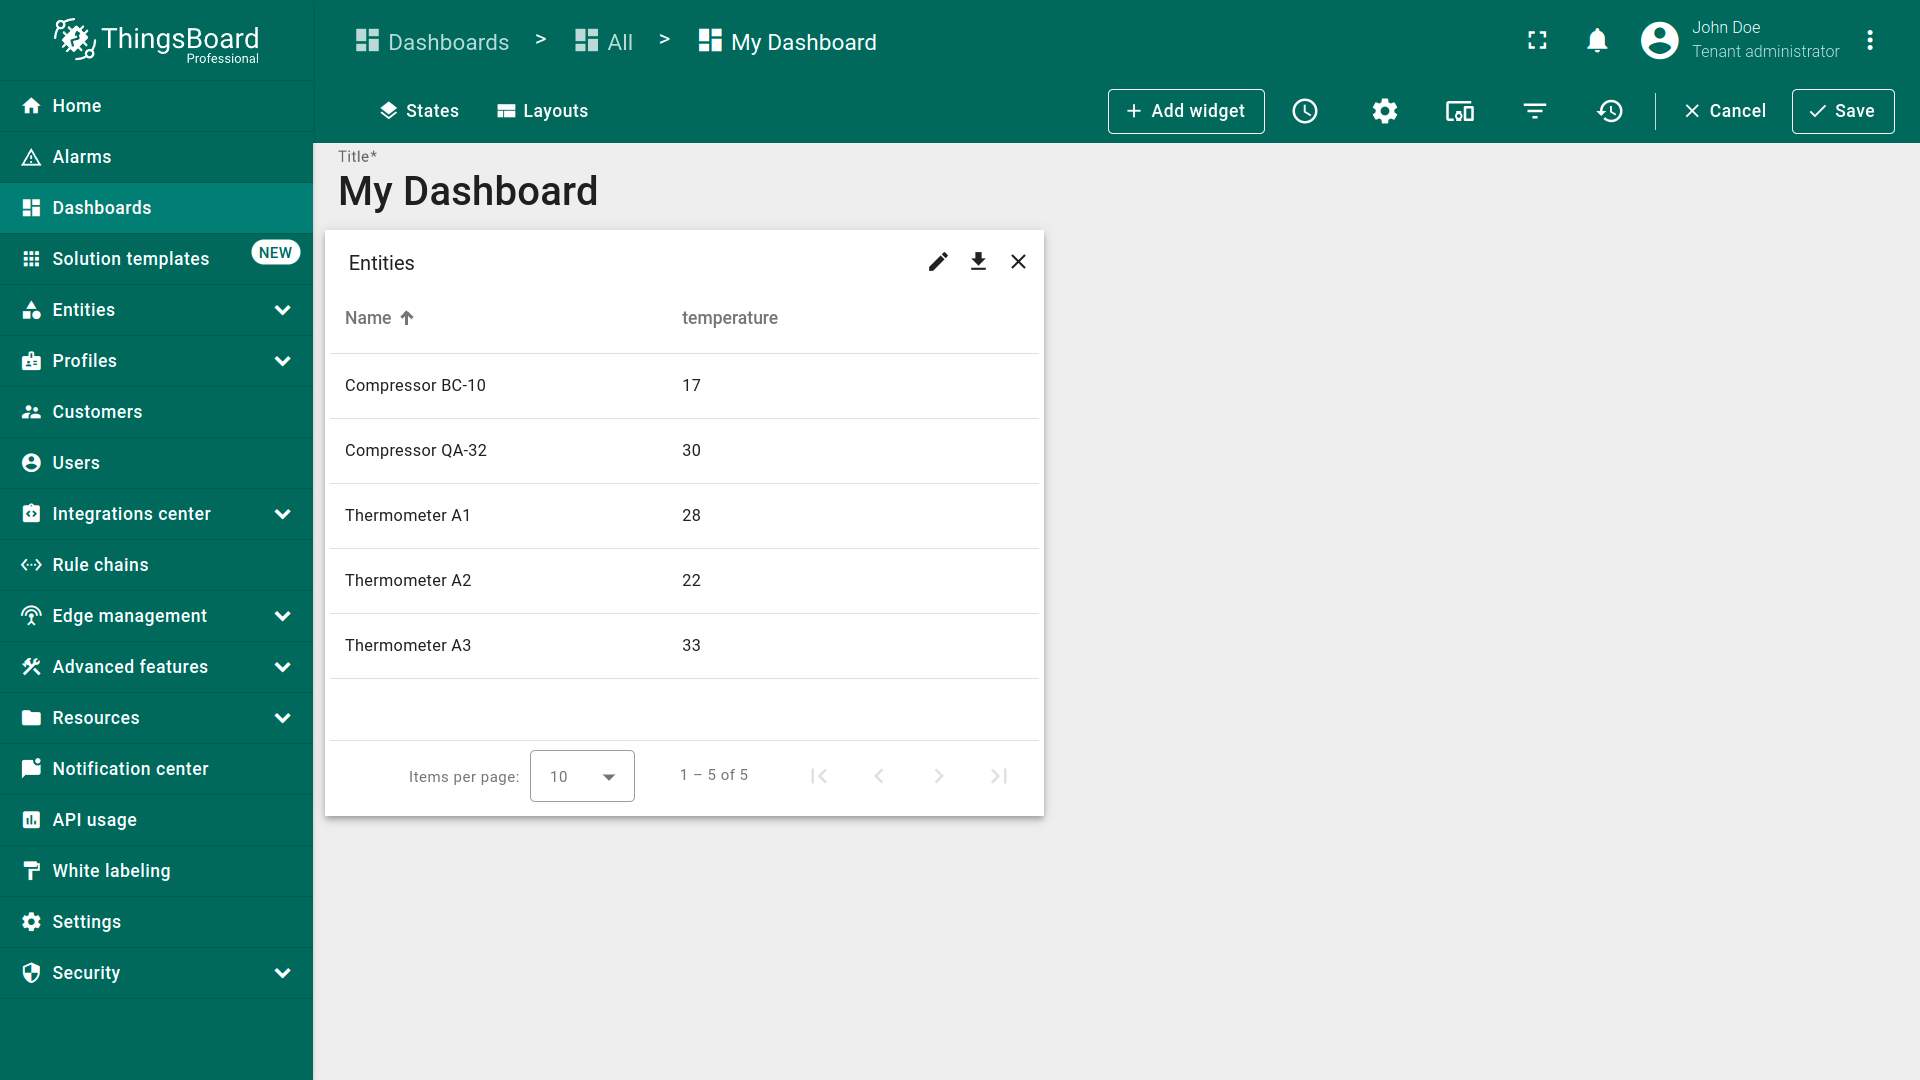
The Entity table widget that displays a list of devices has been added.
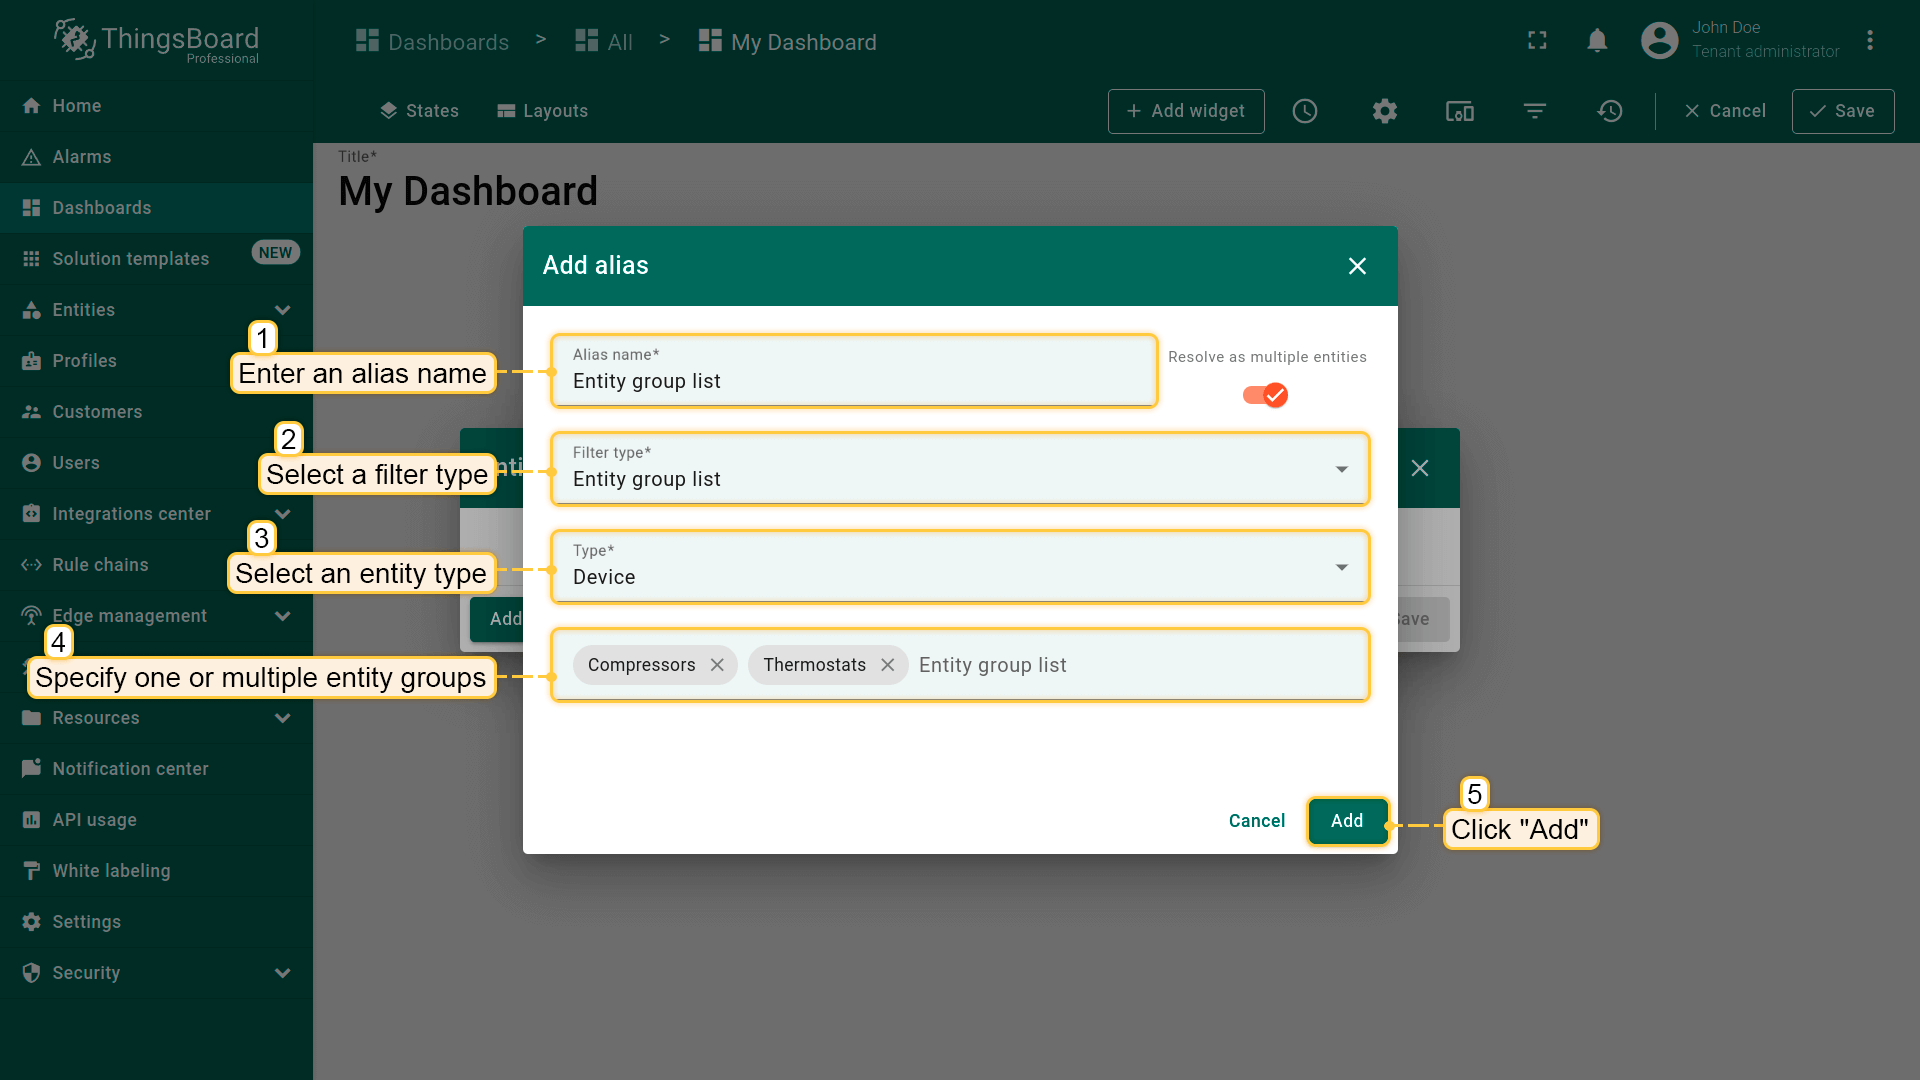
In the “Add alias” dialog, enter the alias name, and select the "Entity group list" filter. Then select the entity type and specify entity groups you want to display on the widget.
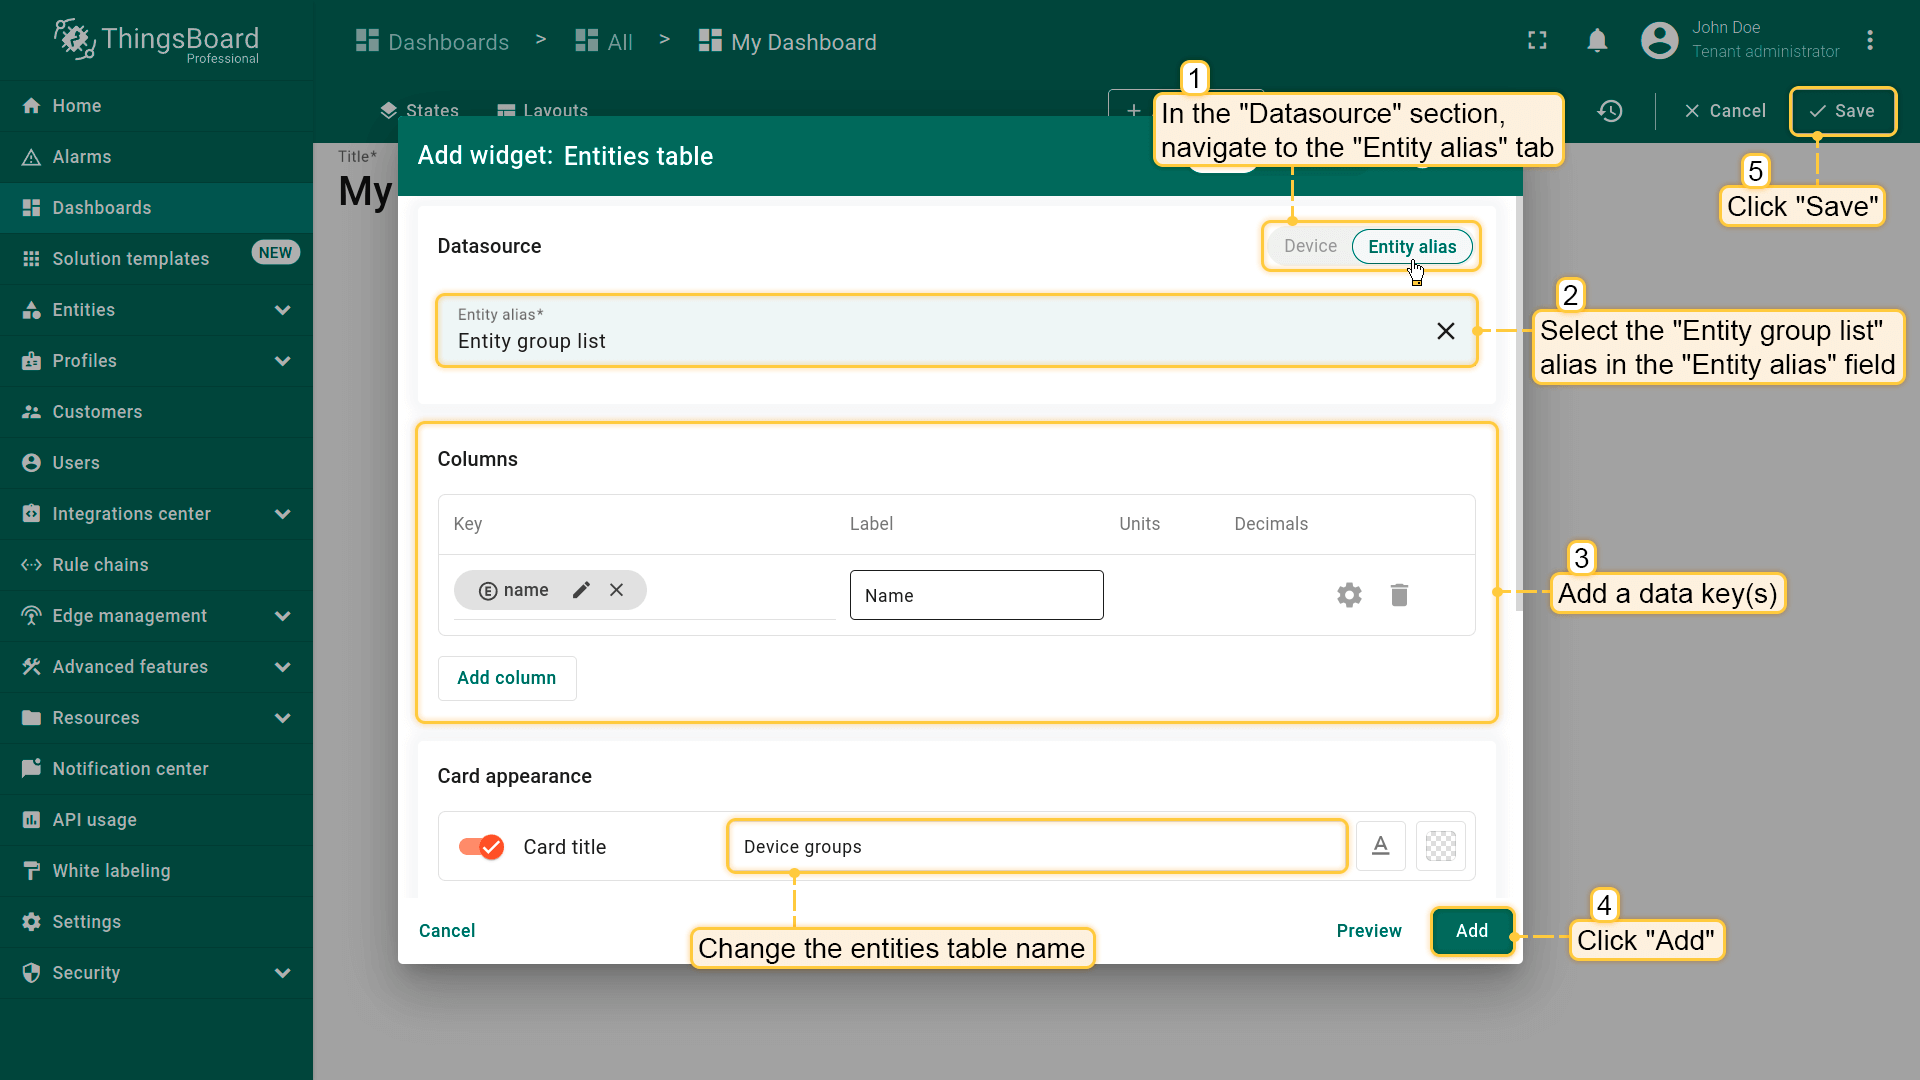
In the "Tables" widgets bundle select the "Entities table" widget. Navigate to the "Entity alias" tab. Specify the "Entity group list" alias in the "Entity alias" field. Click "Add";
The Entities table widget displaying a list of device groups has been added.
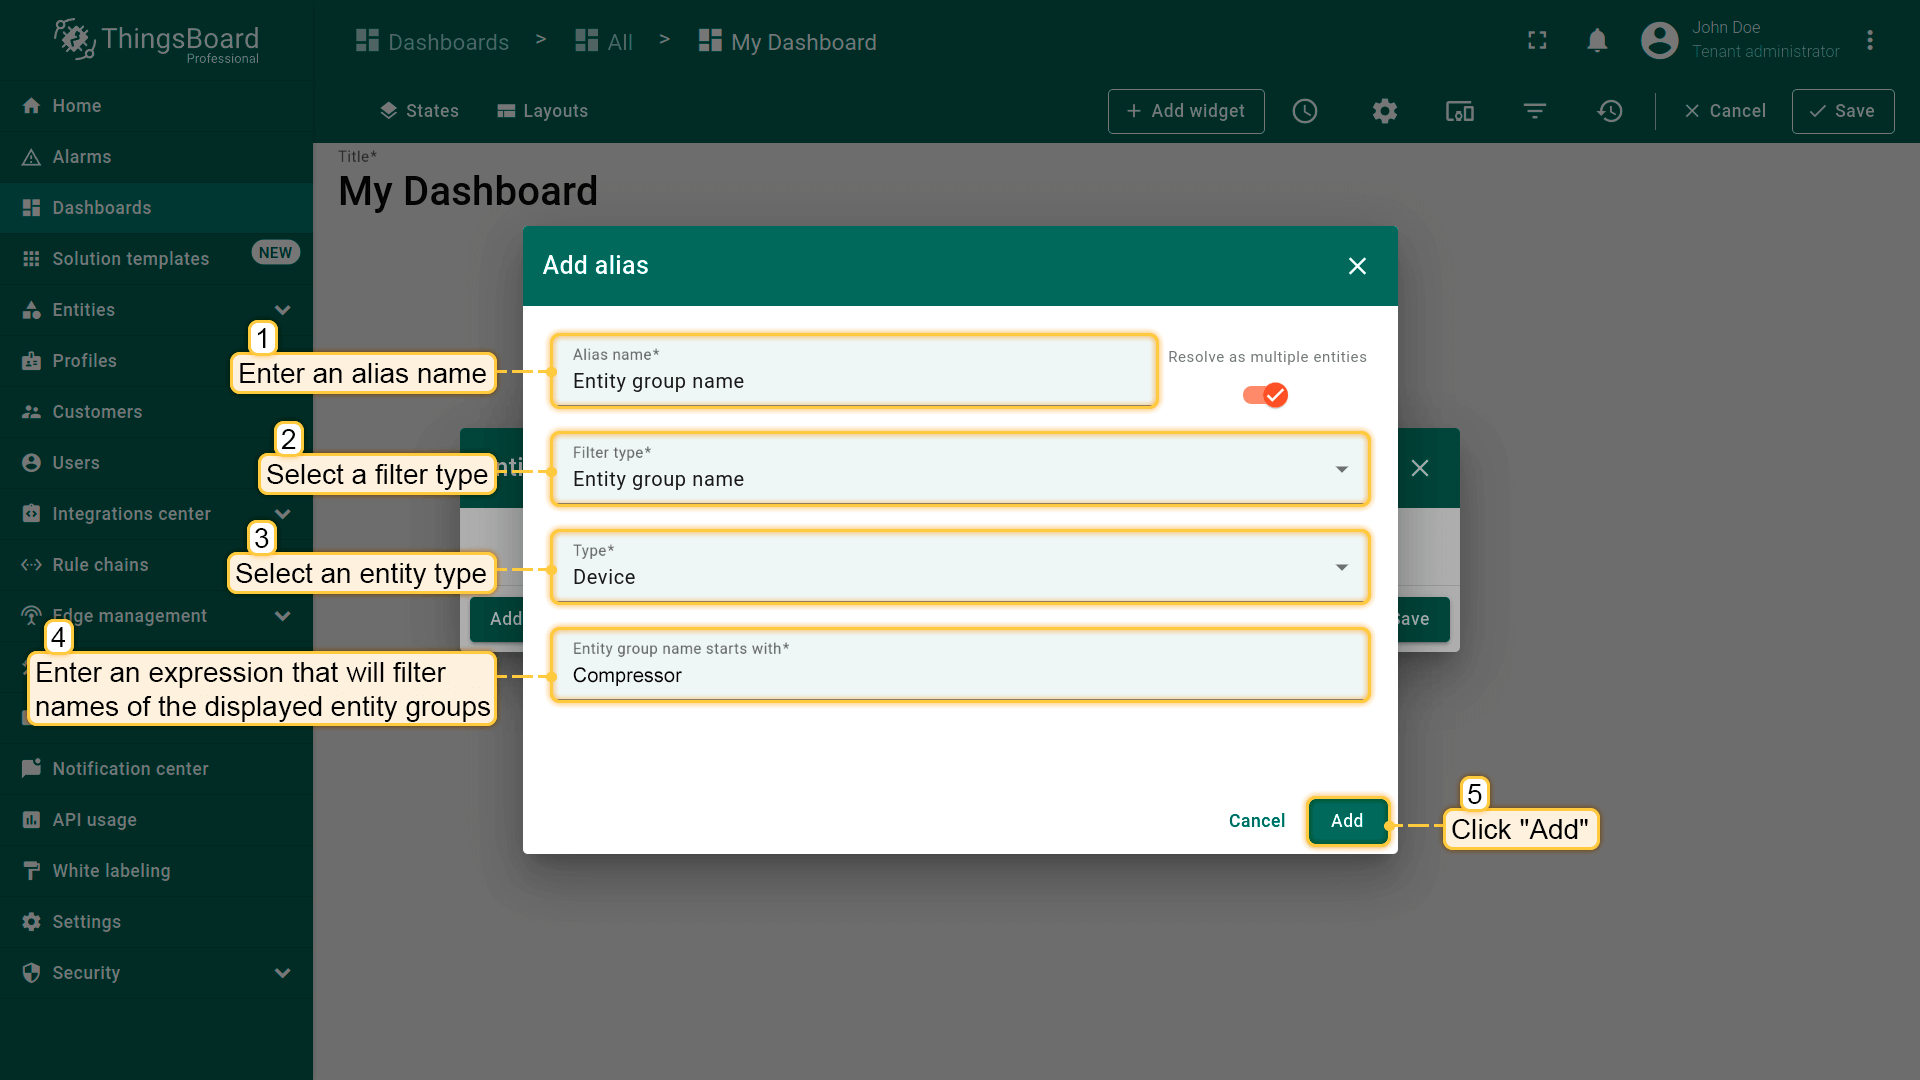
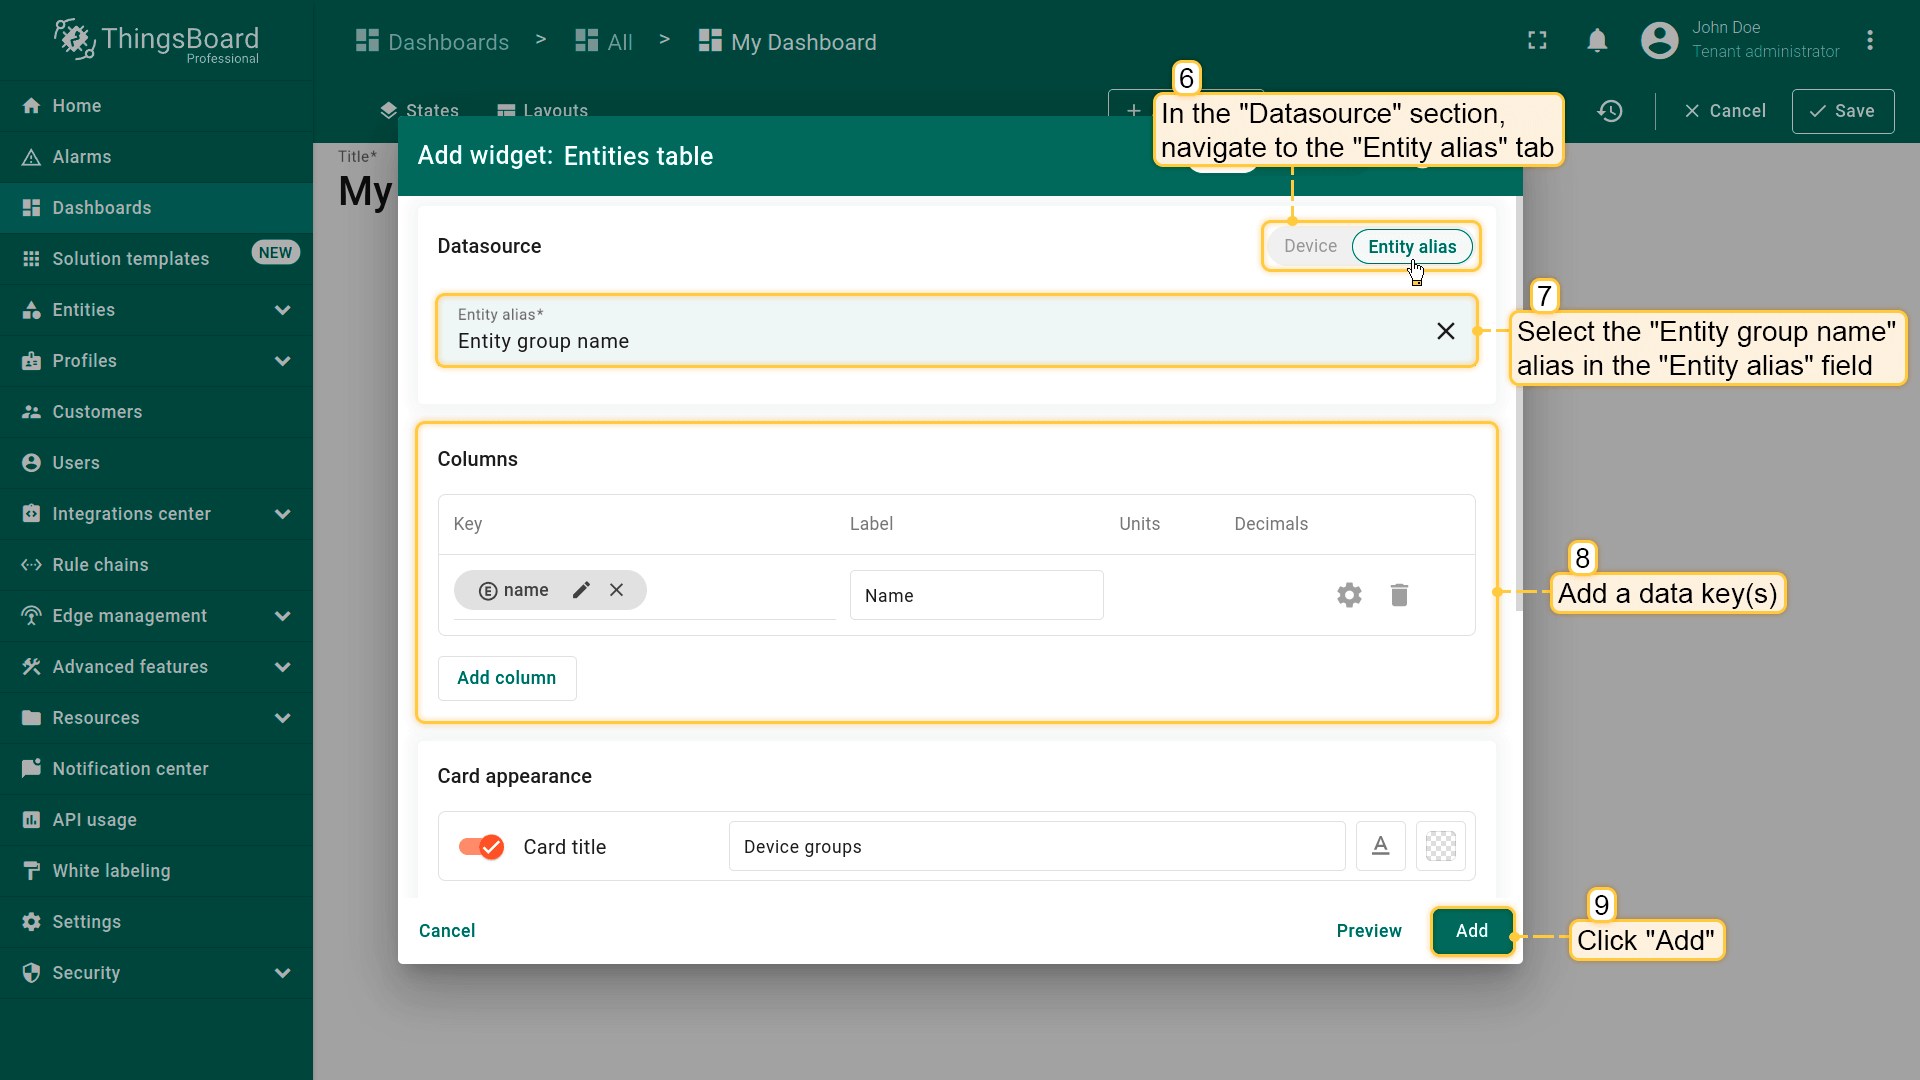
In the "Add alias" dialog, enter the alias name, and select the “Entity group name” filter type. Then choose the entity type and enter an expression that will filter the names of the displayed entity groups. Then, click "Add" button.
In the "Tables" widgets bundle select the "Entities table" widget. Navigate to the "Entity alias" tab. Specify the "Entity group name" alias in the “Entity alias” field. Click "Add" and apply changes;
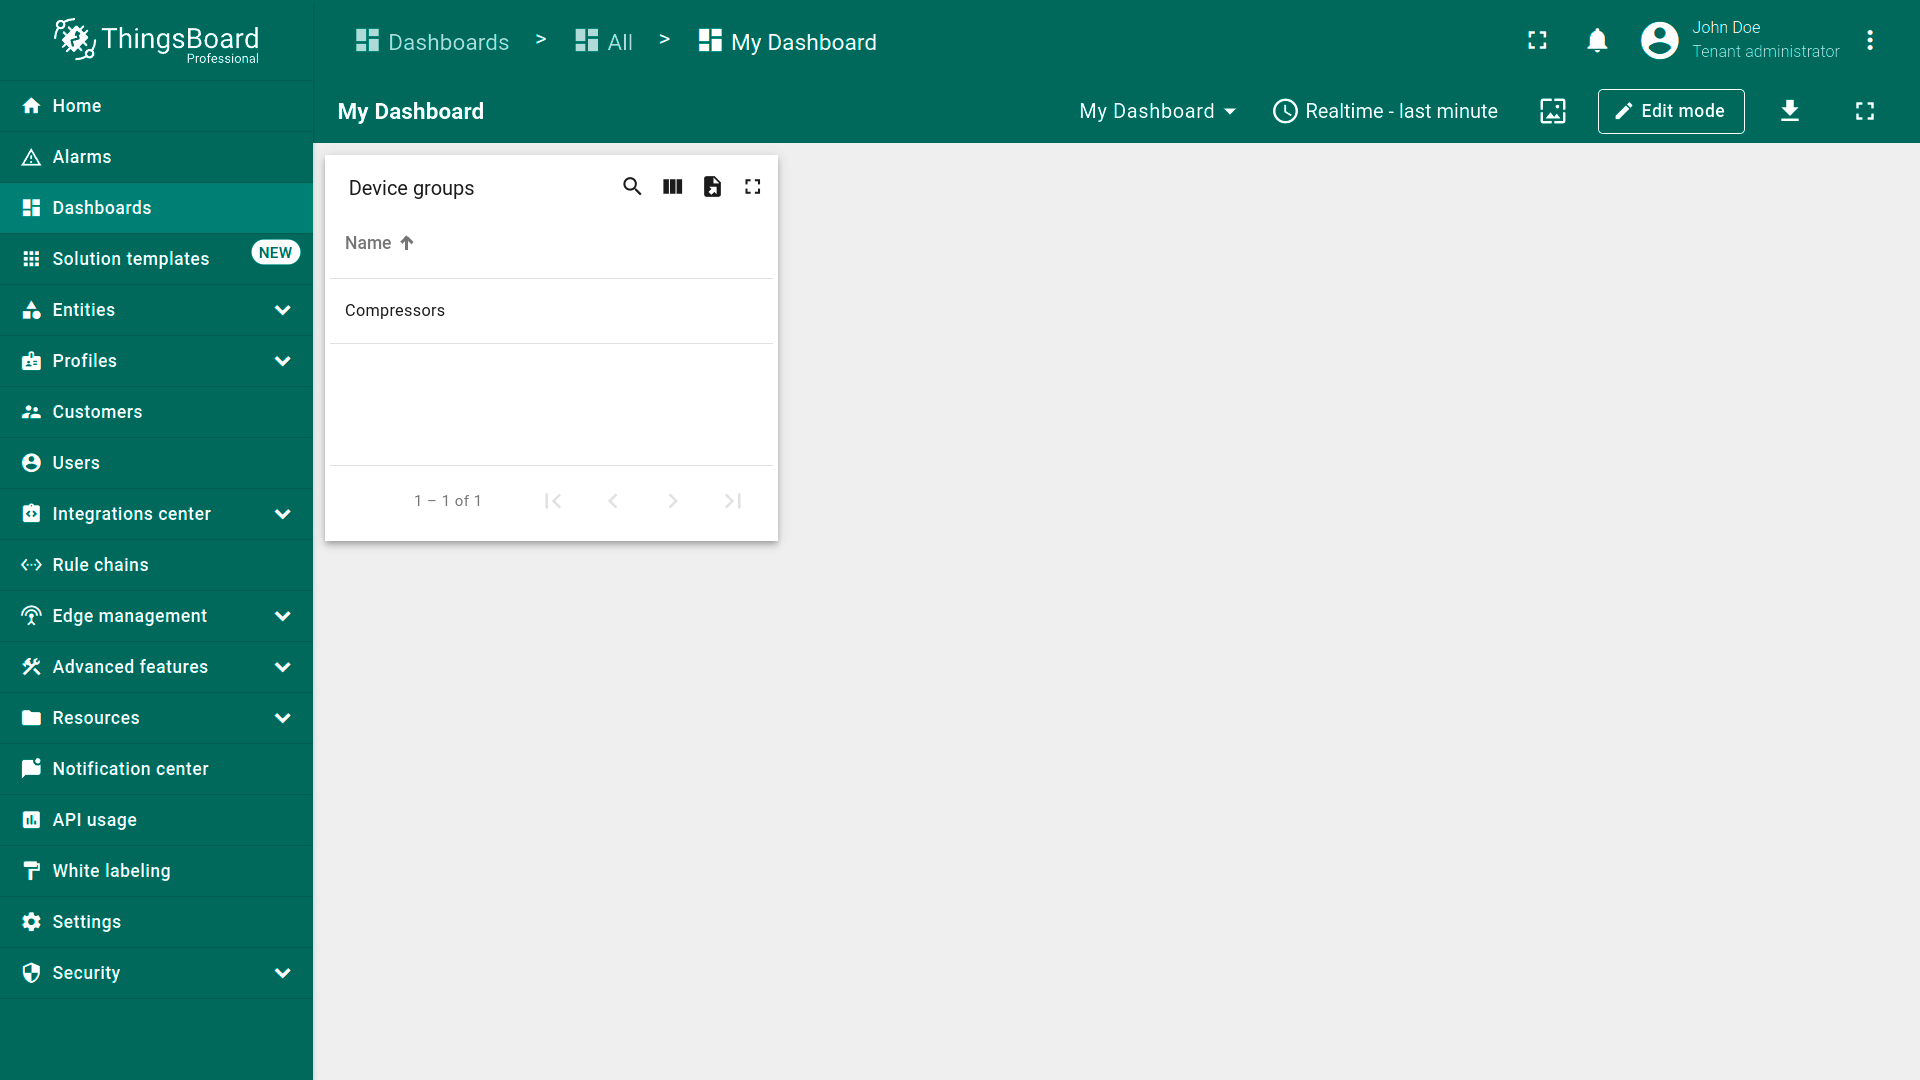
The Entities table widget, which displays device groups whose name begins with the entered query has been added.
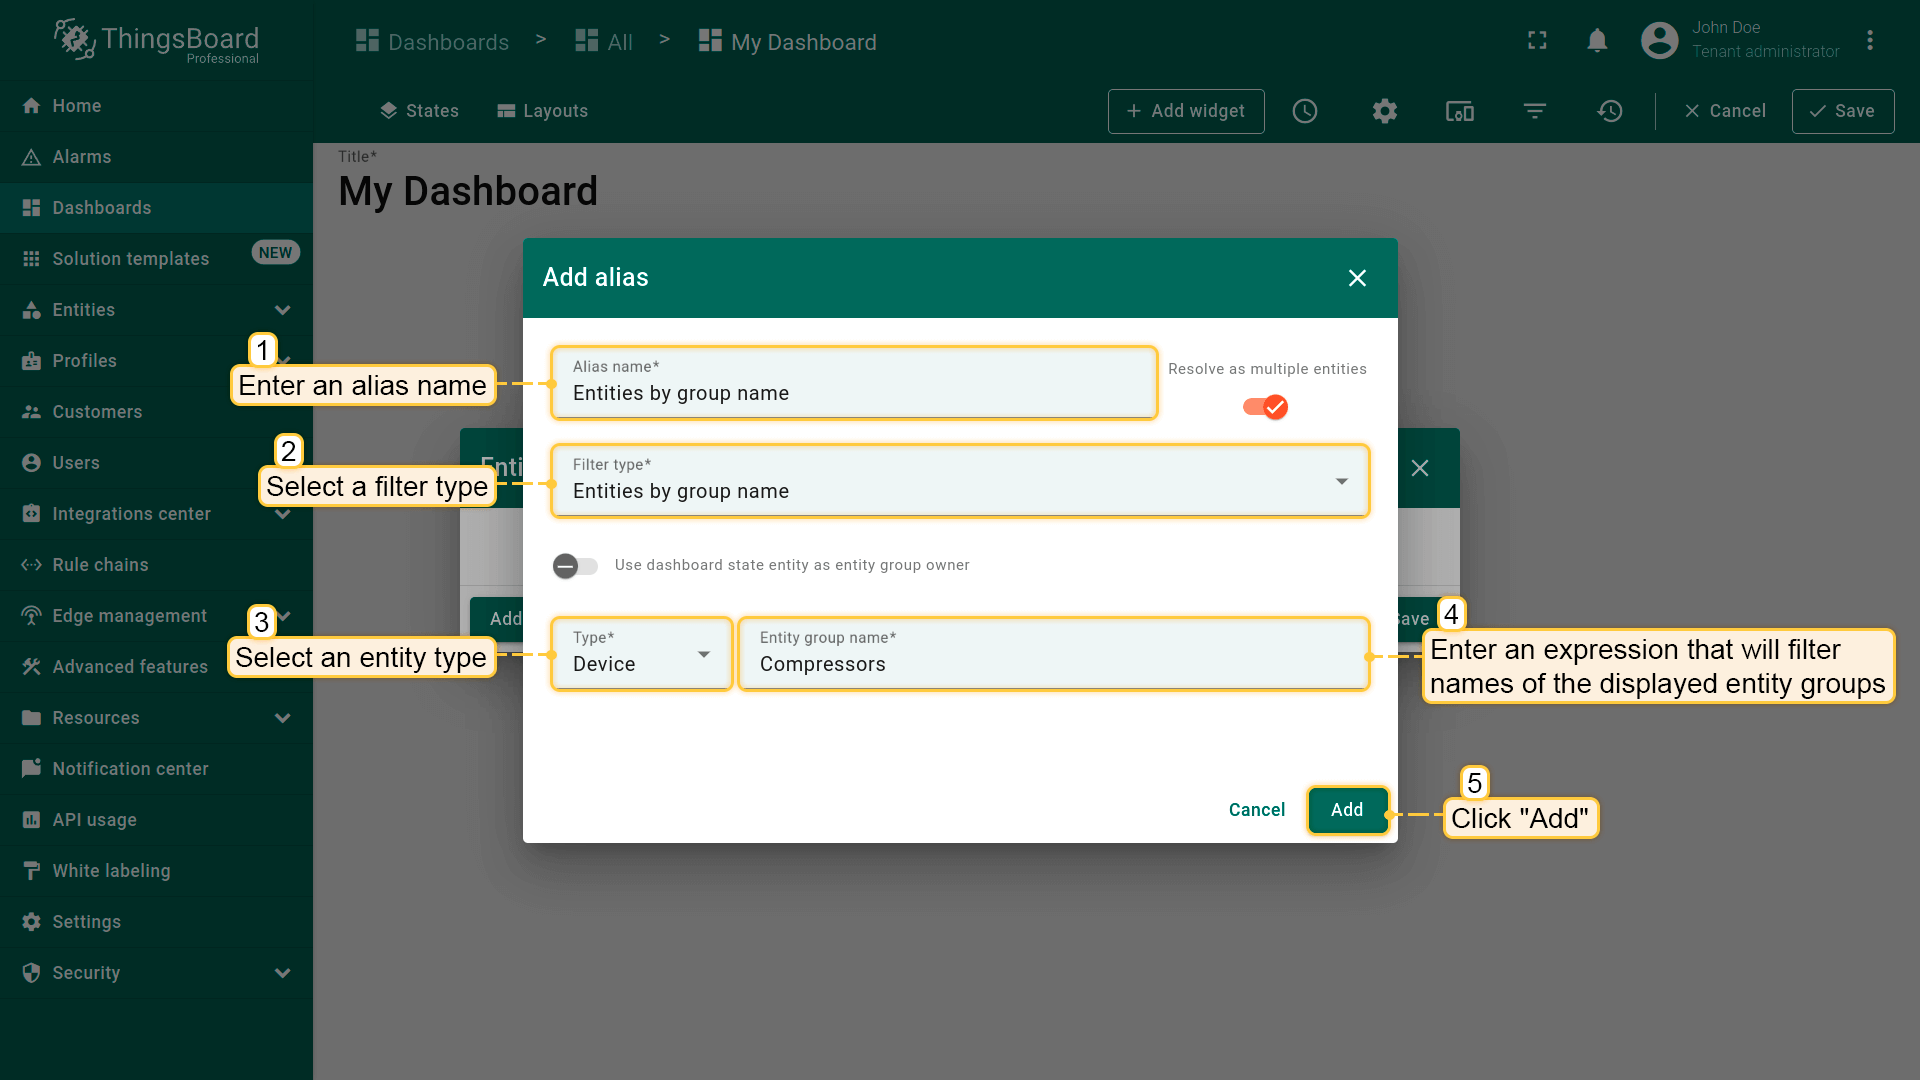
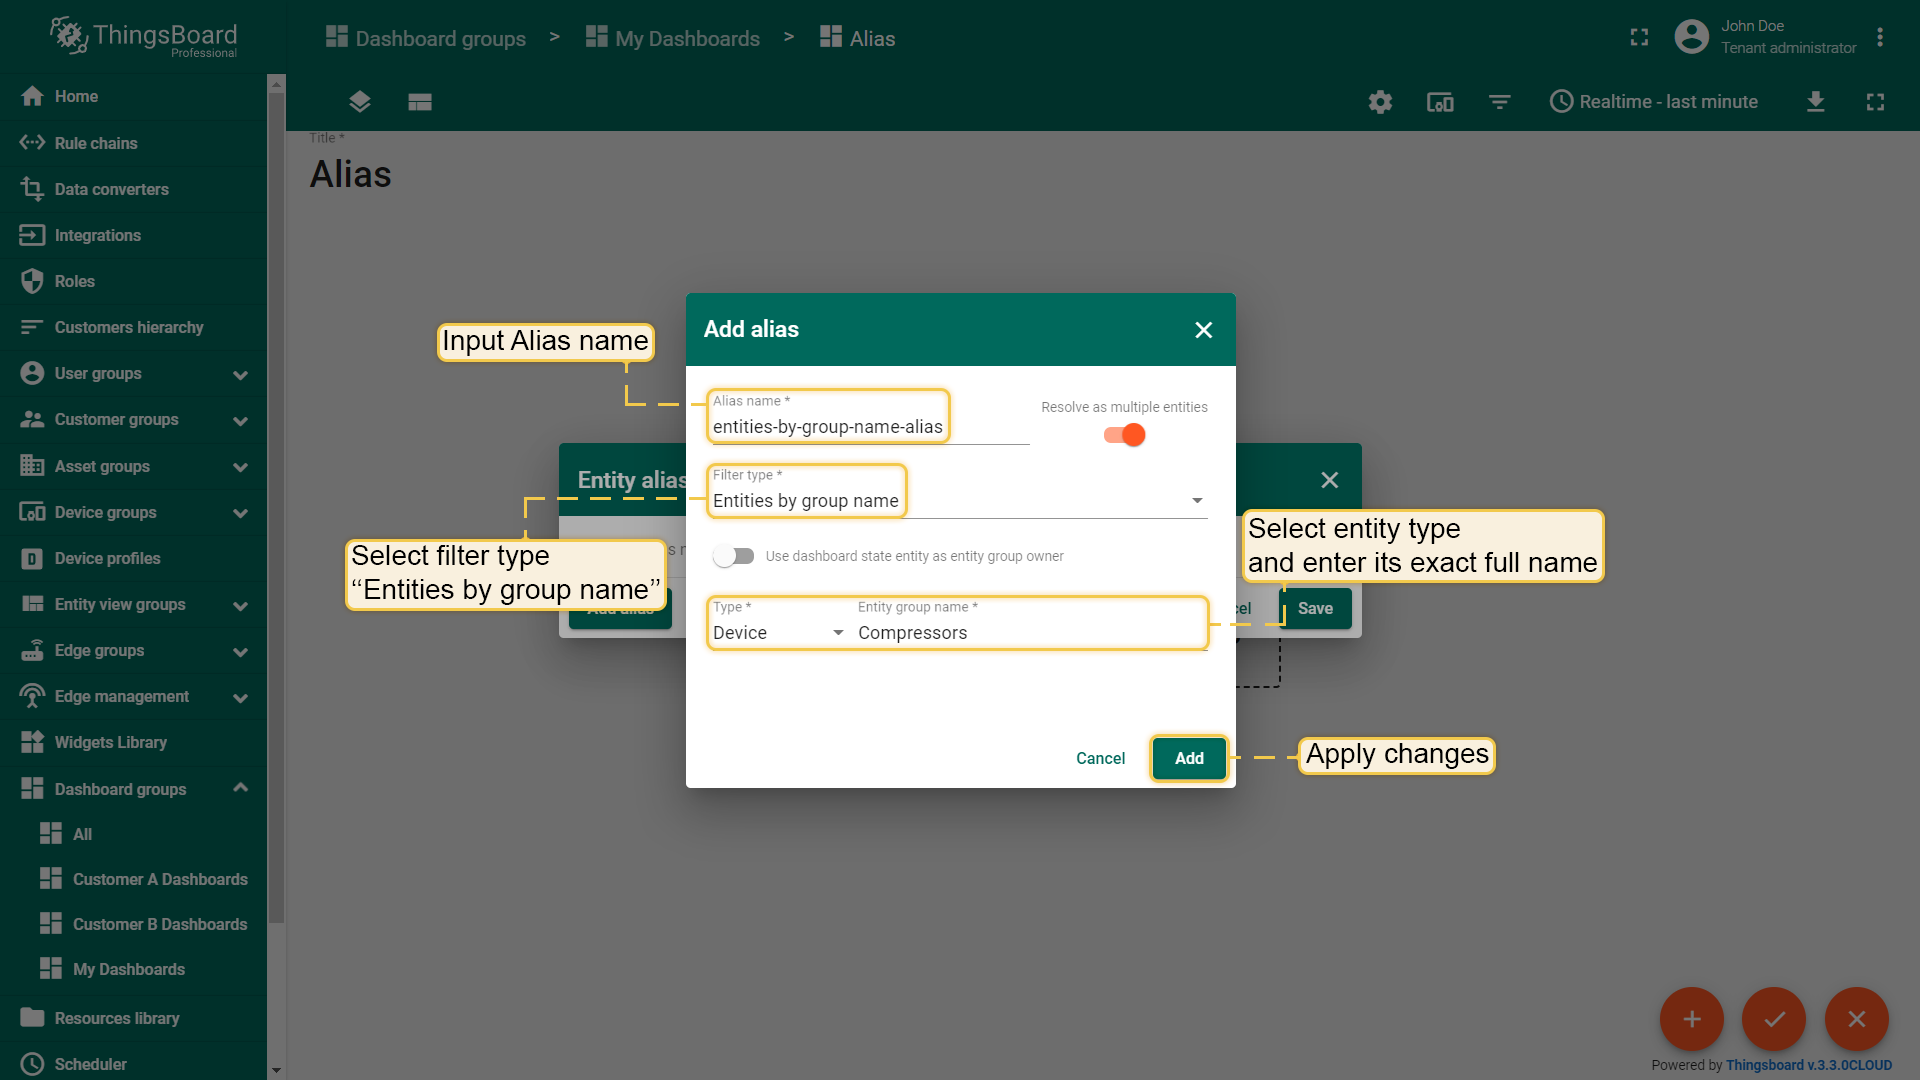
In the "Add alias" dialog, enter the alias name, and select the "Entities by group name" filter type. Then select an entity type and enter the exact full name of a group whose entities you want to display.
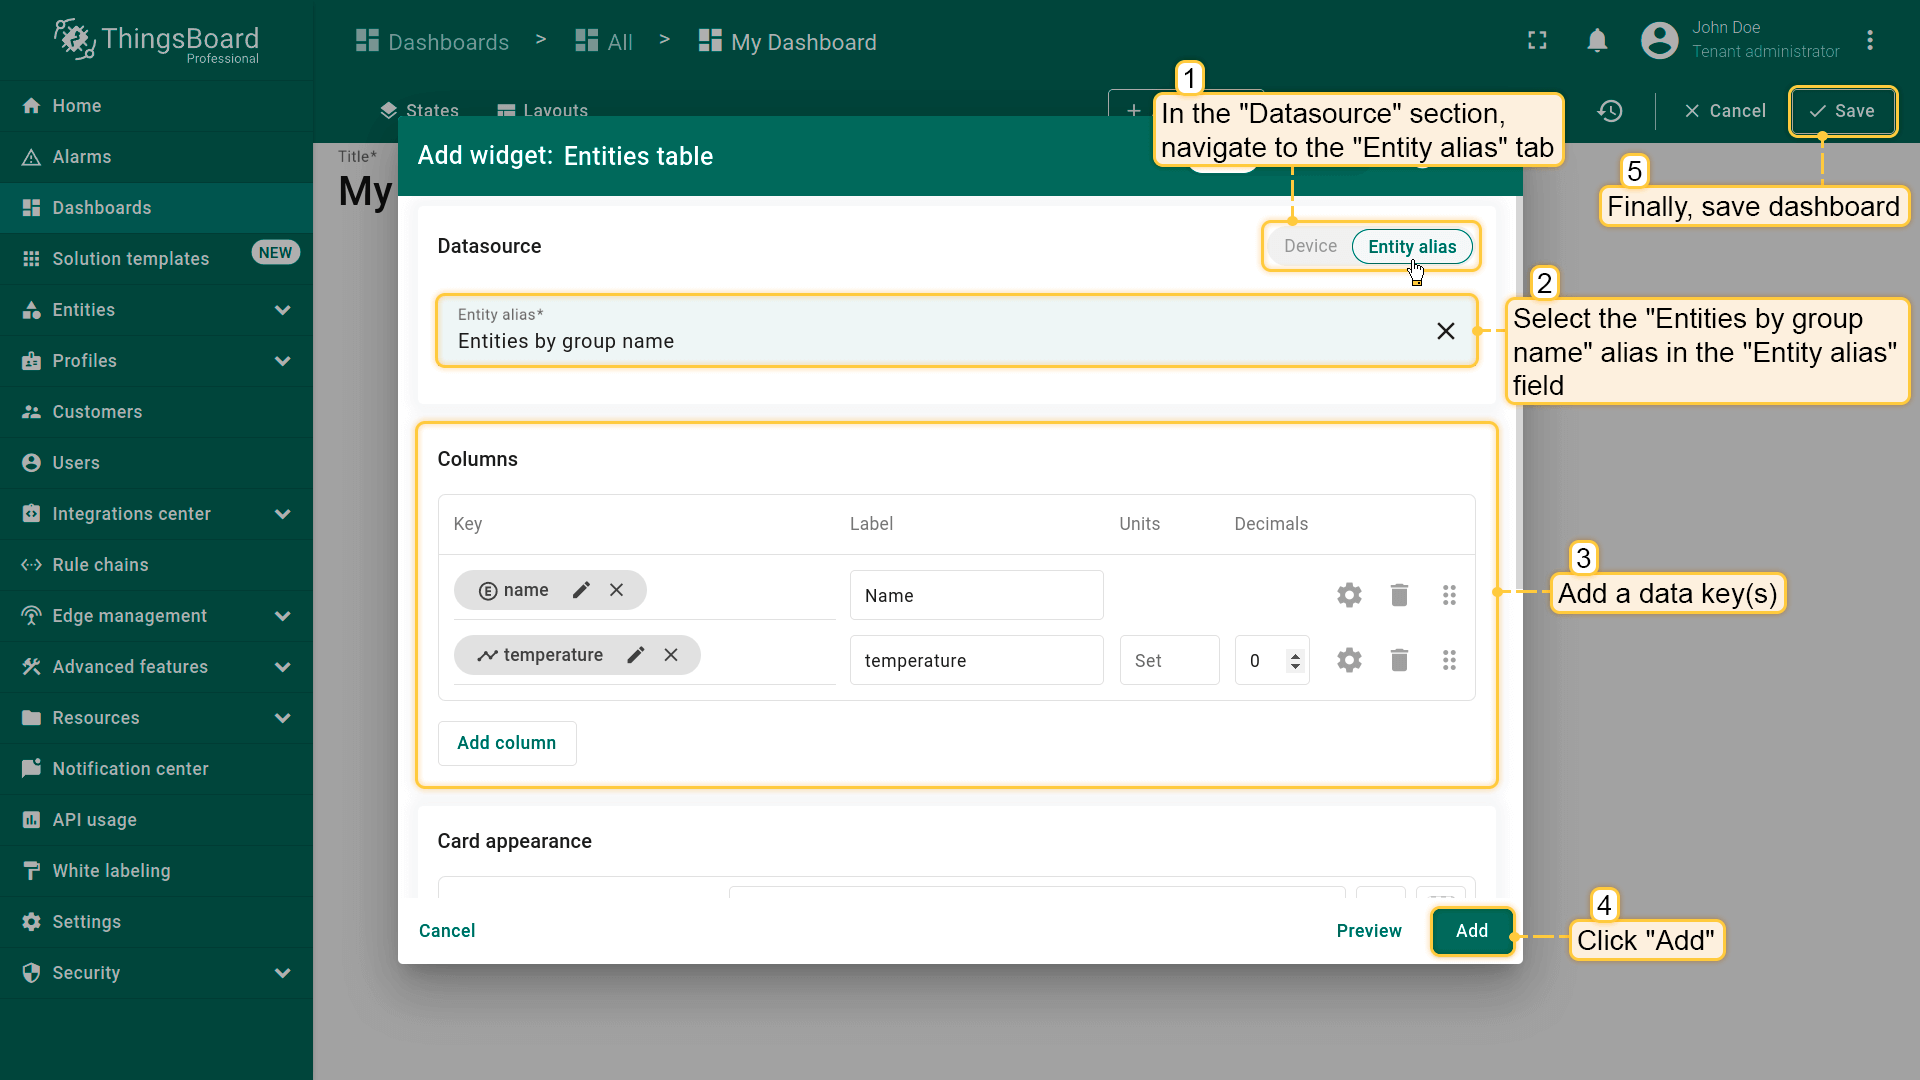
In the "Tables" widgets bundle select the "Entities table" widget. Navigate to the "Entity alias" tab. Specify the "Entities by group name" alias in the "Entity alias" field and "temperature" data key in the "Columns" section. Click "Add";
The Entities table widget that displays entities filtered by the exact full name of the entity group entered has been added.
In the "Add alias" dialog box, enter the alias name, and select the "Group entities" filter type. Then choose the entities type and select the entity group;
Add an Entity table widget that will display a list of entities. Use the "Group entities" alias as a data source;
The Entity table widget that will display a list of devices has been added.
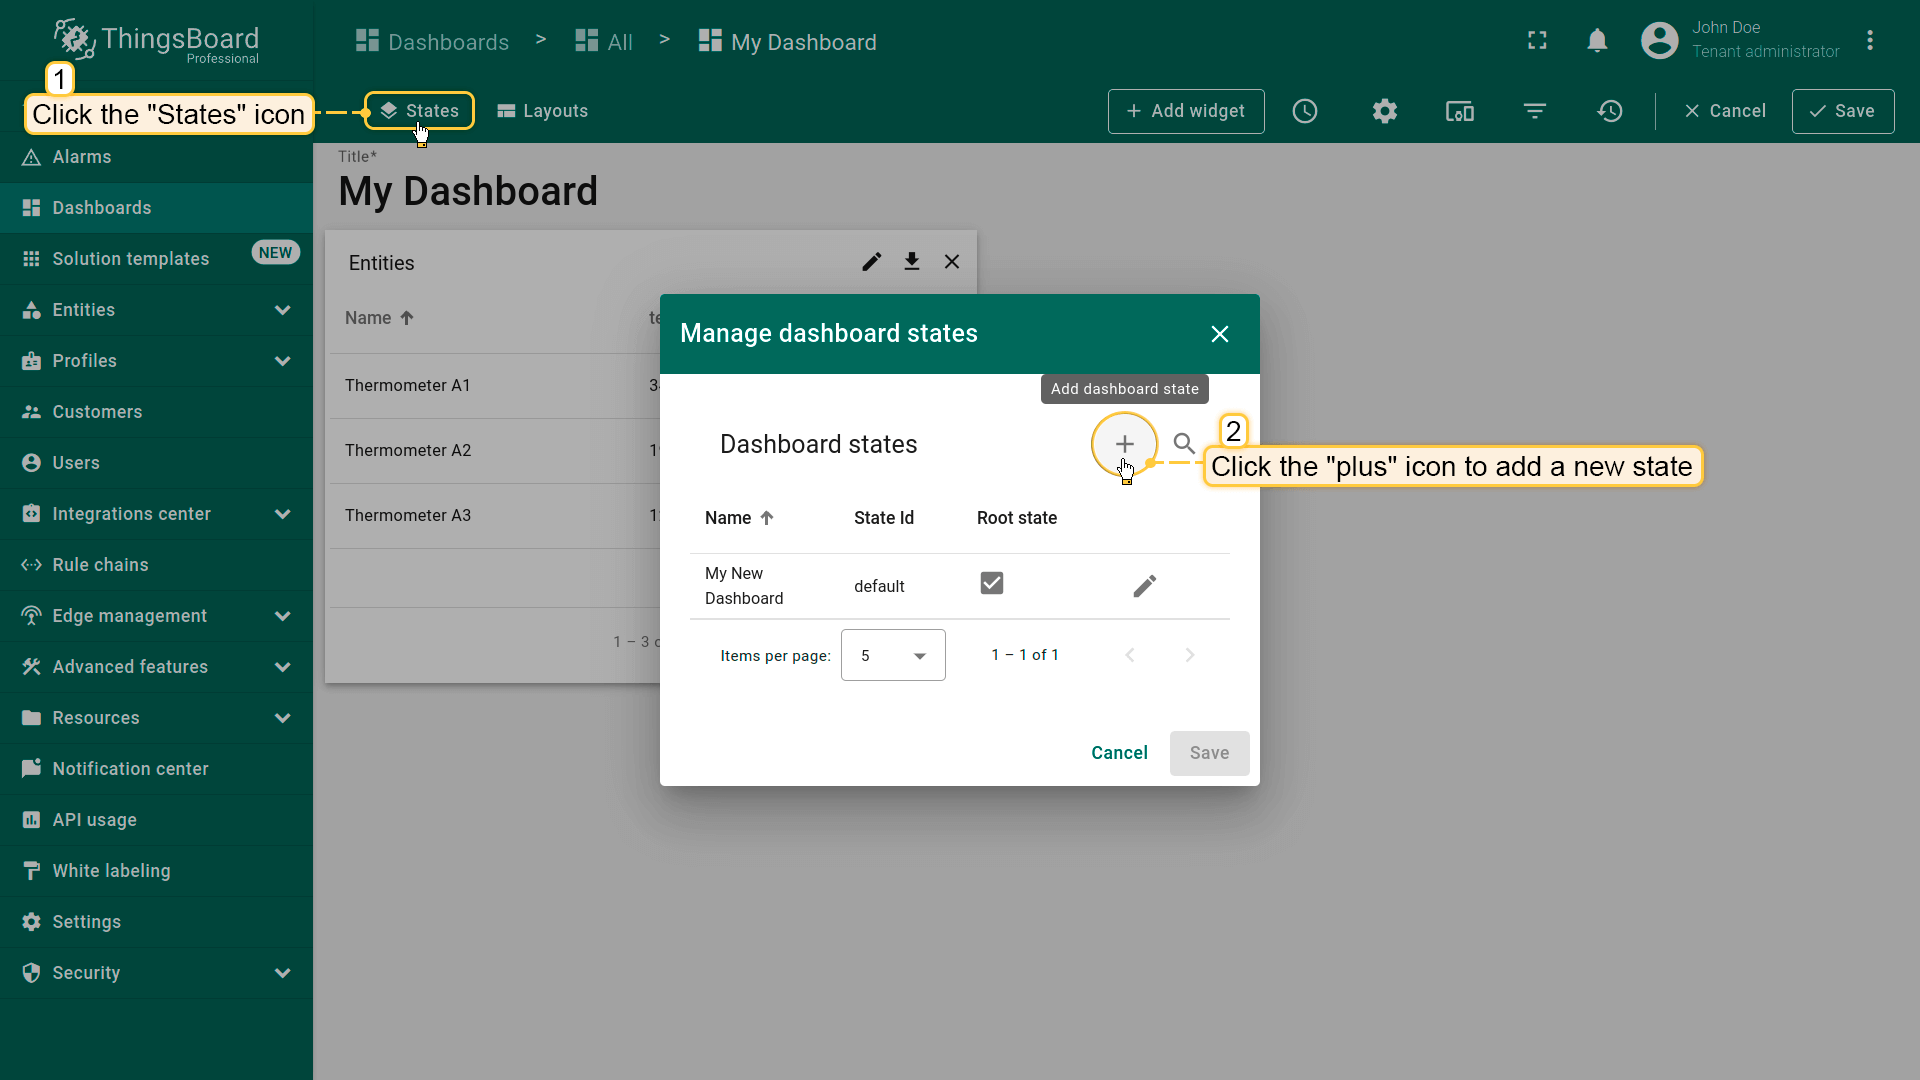
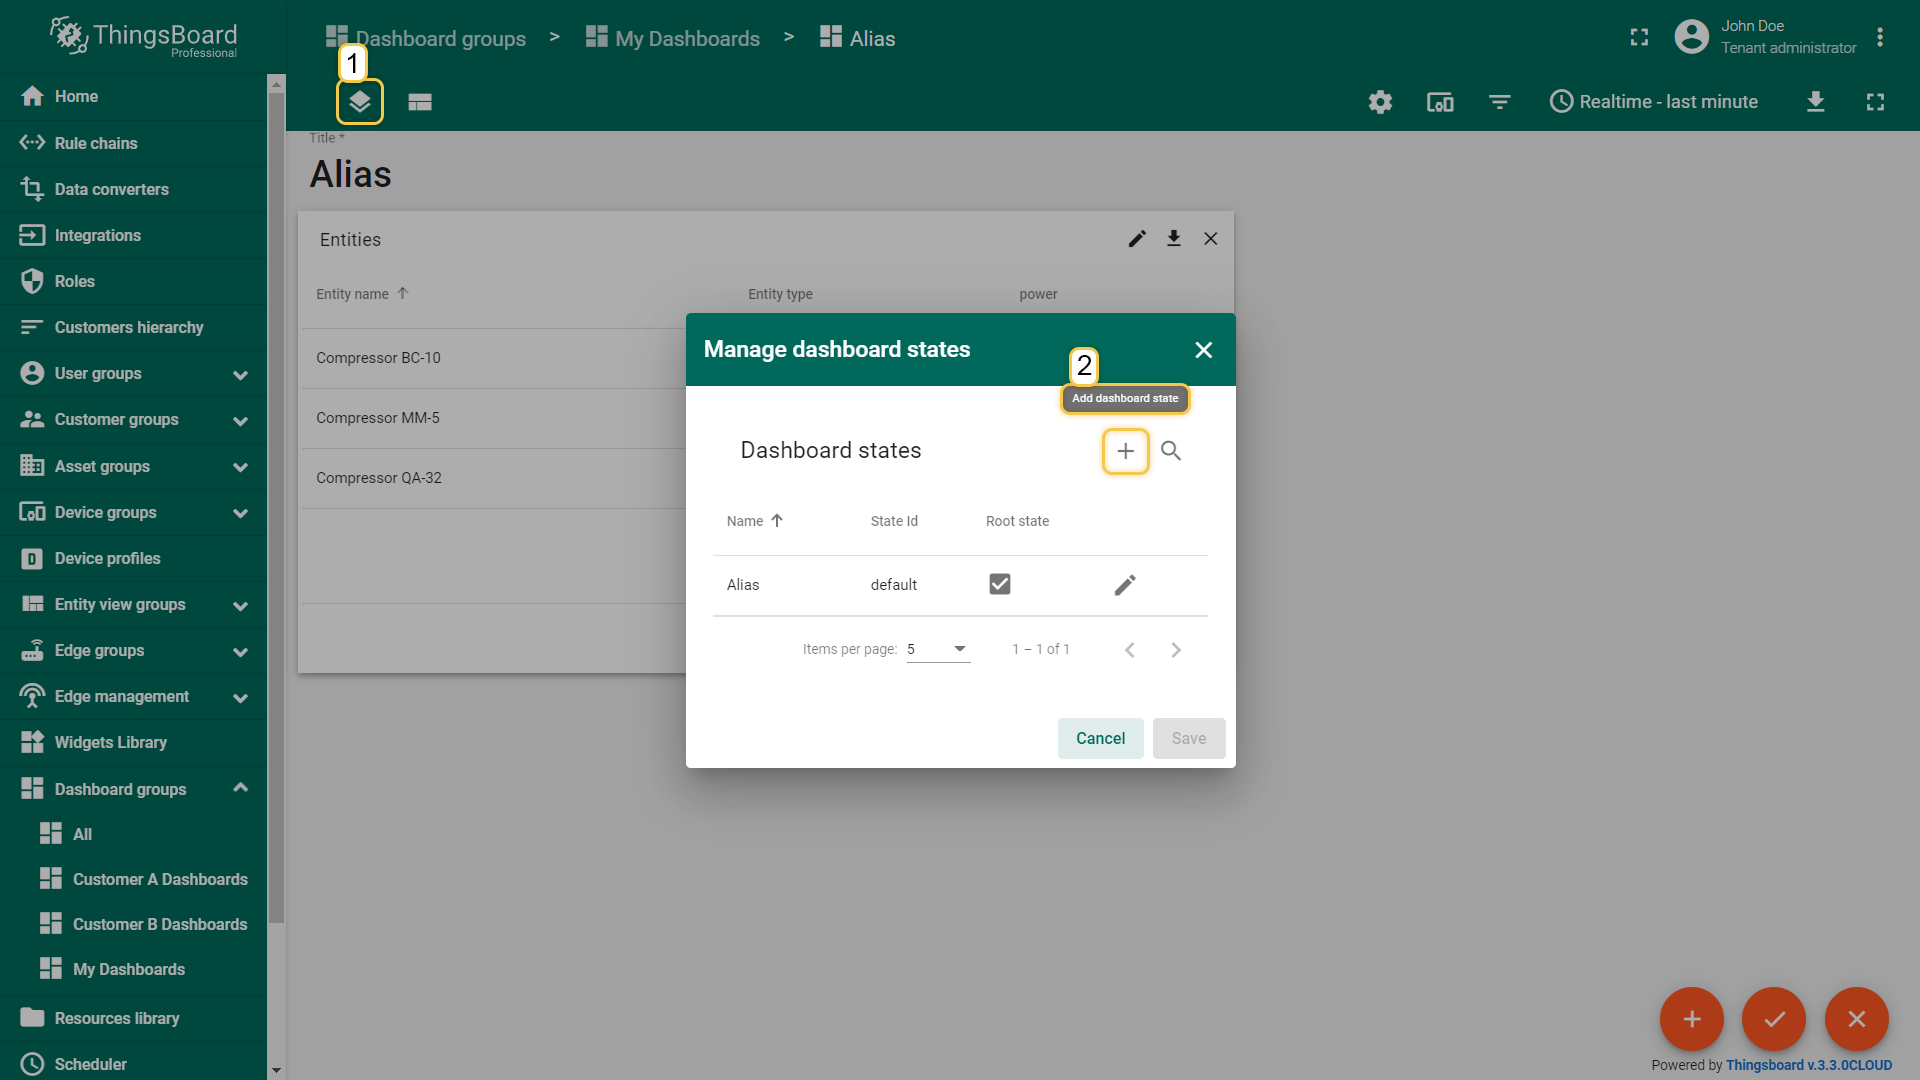
Click the layers icon in the top left corner of the dashboard to create a new state. In the opened dialog window, click a "+" icon to add a new state;
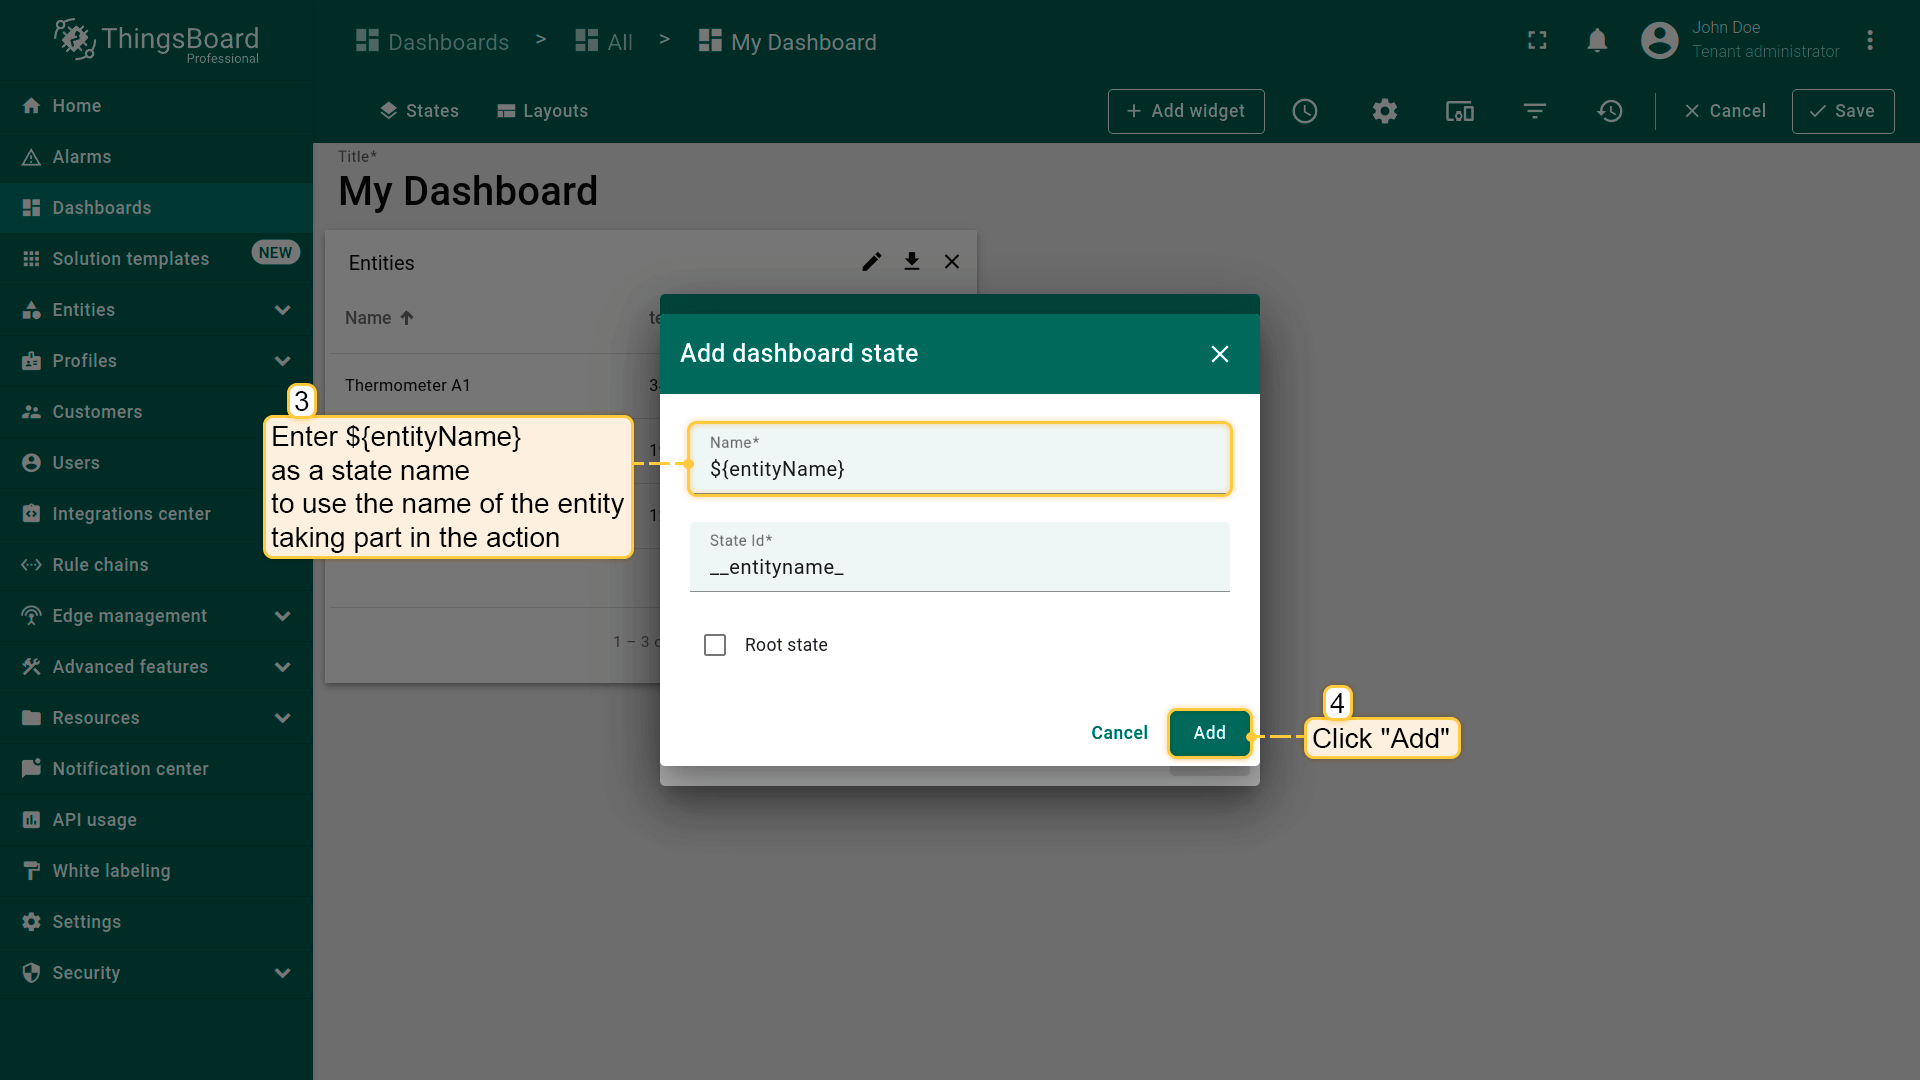
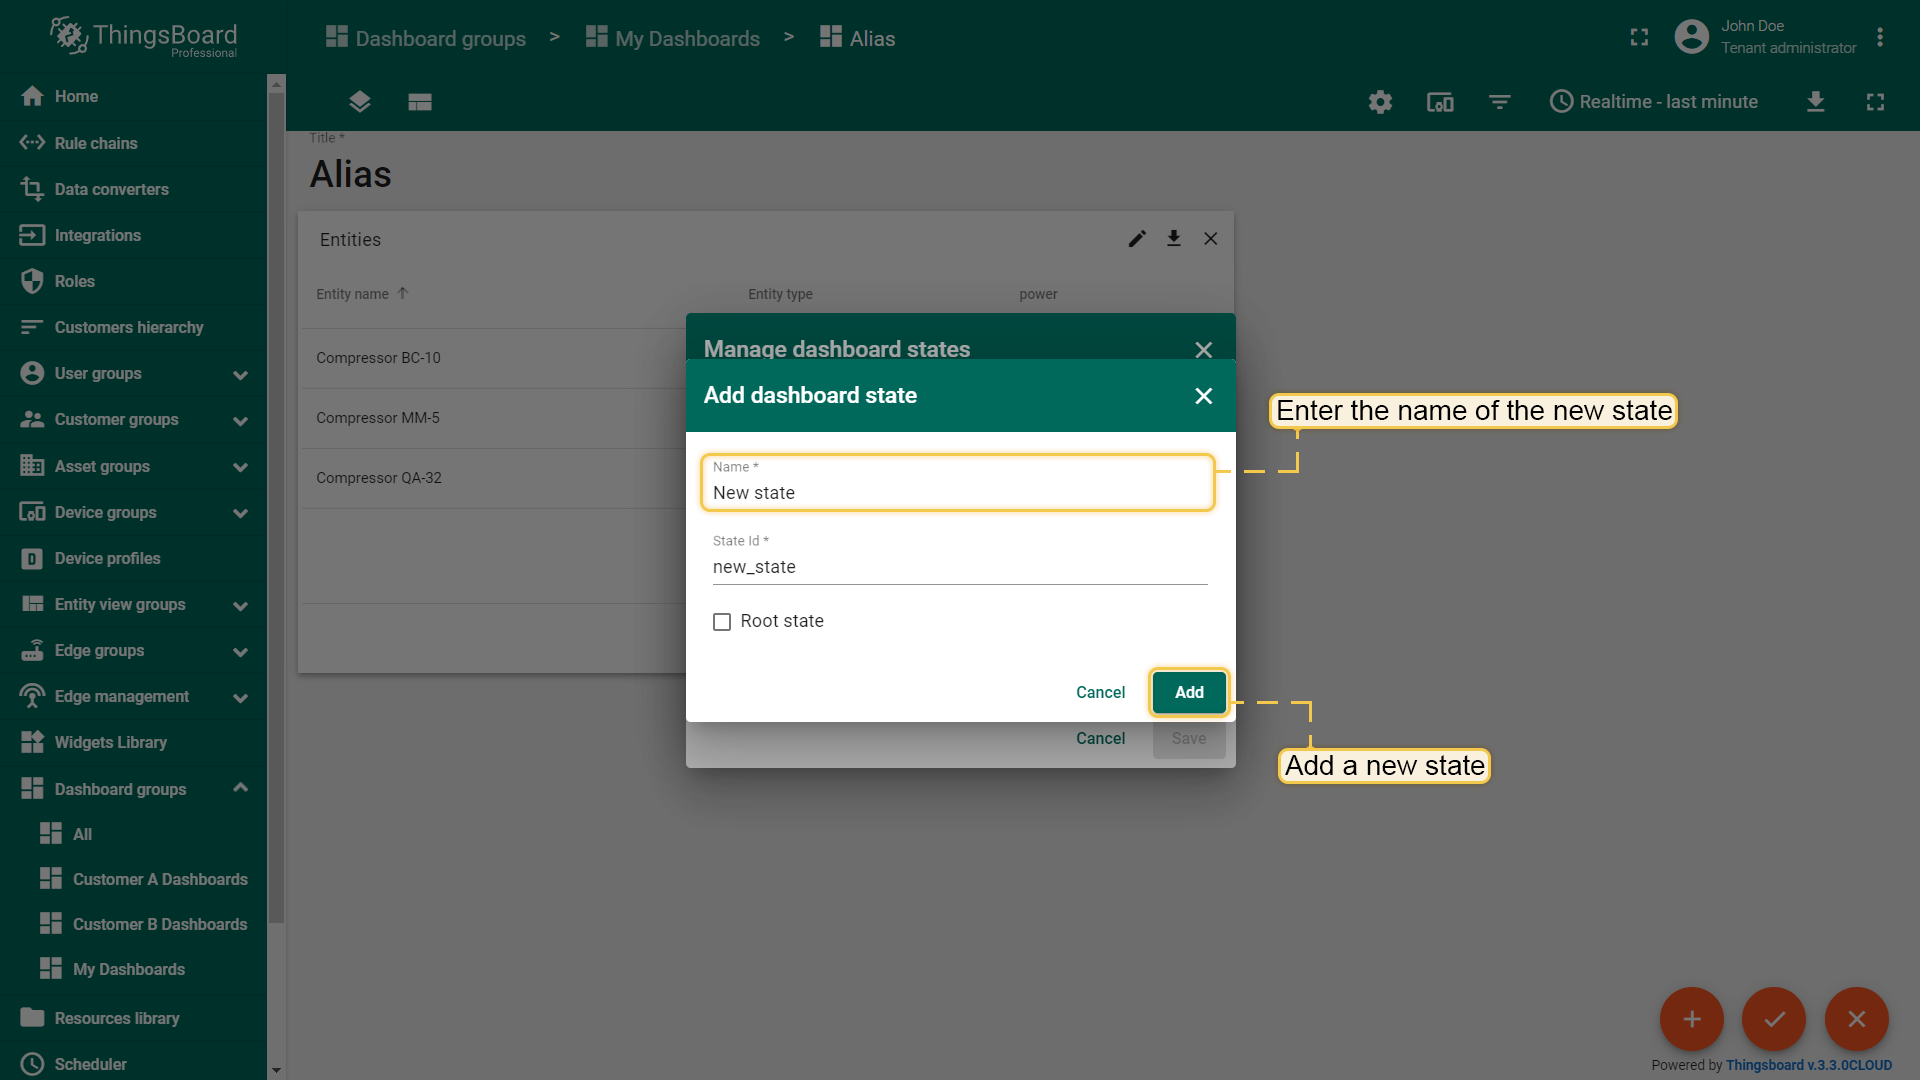
Enter state's name. For the state to be named after the entity, use ${entityName} as the name of the state. Thus, during the action, you will be transitioned to a state named after the entity that took part in the action. Click "Add";
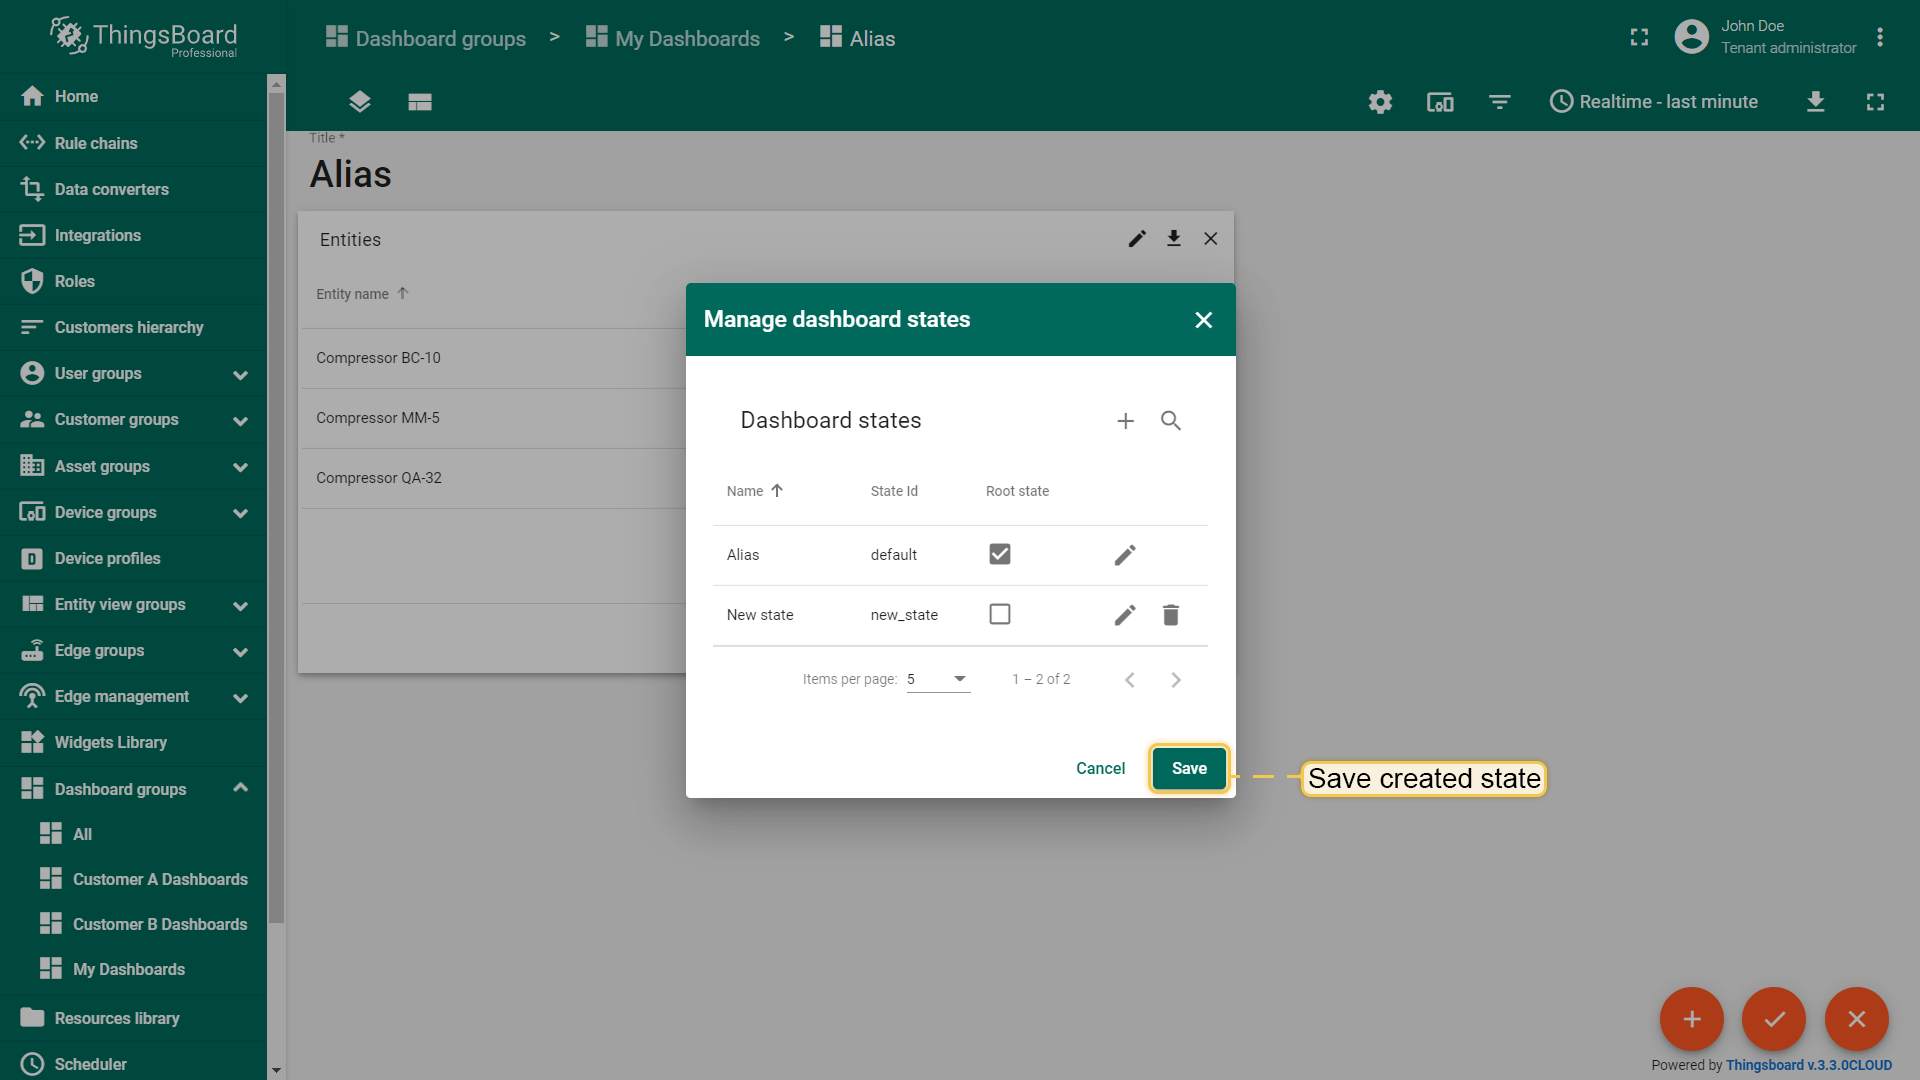
Now you see a list with two states: the root one, and the one that has just been created. Click "Save" in the lower right corner of the dialog.
Click the layers icon in the top left corner of the dashboard to create a new state. In the opened dialog window, click a "+" icon to add a new state;
Enter state's name. For the state to be named after the entity, use ${entityName} as the name of the state. Thus, during the action, you will be transitioned to a state named after the entity that took part in the action. Click "Add";
Now you see a list with two states: the root one, and the one that has just been created. Click "Save" in the lower right corner of the dialog.
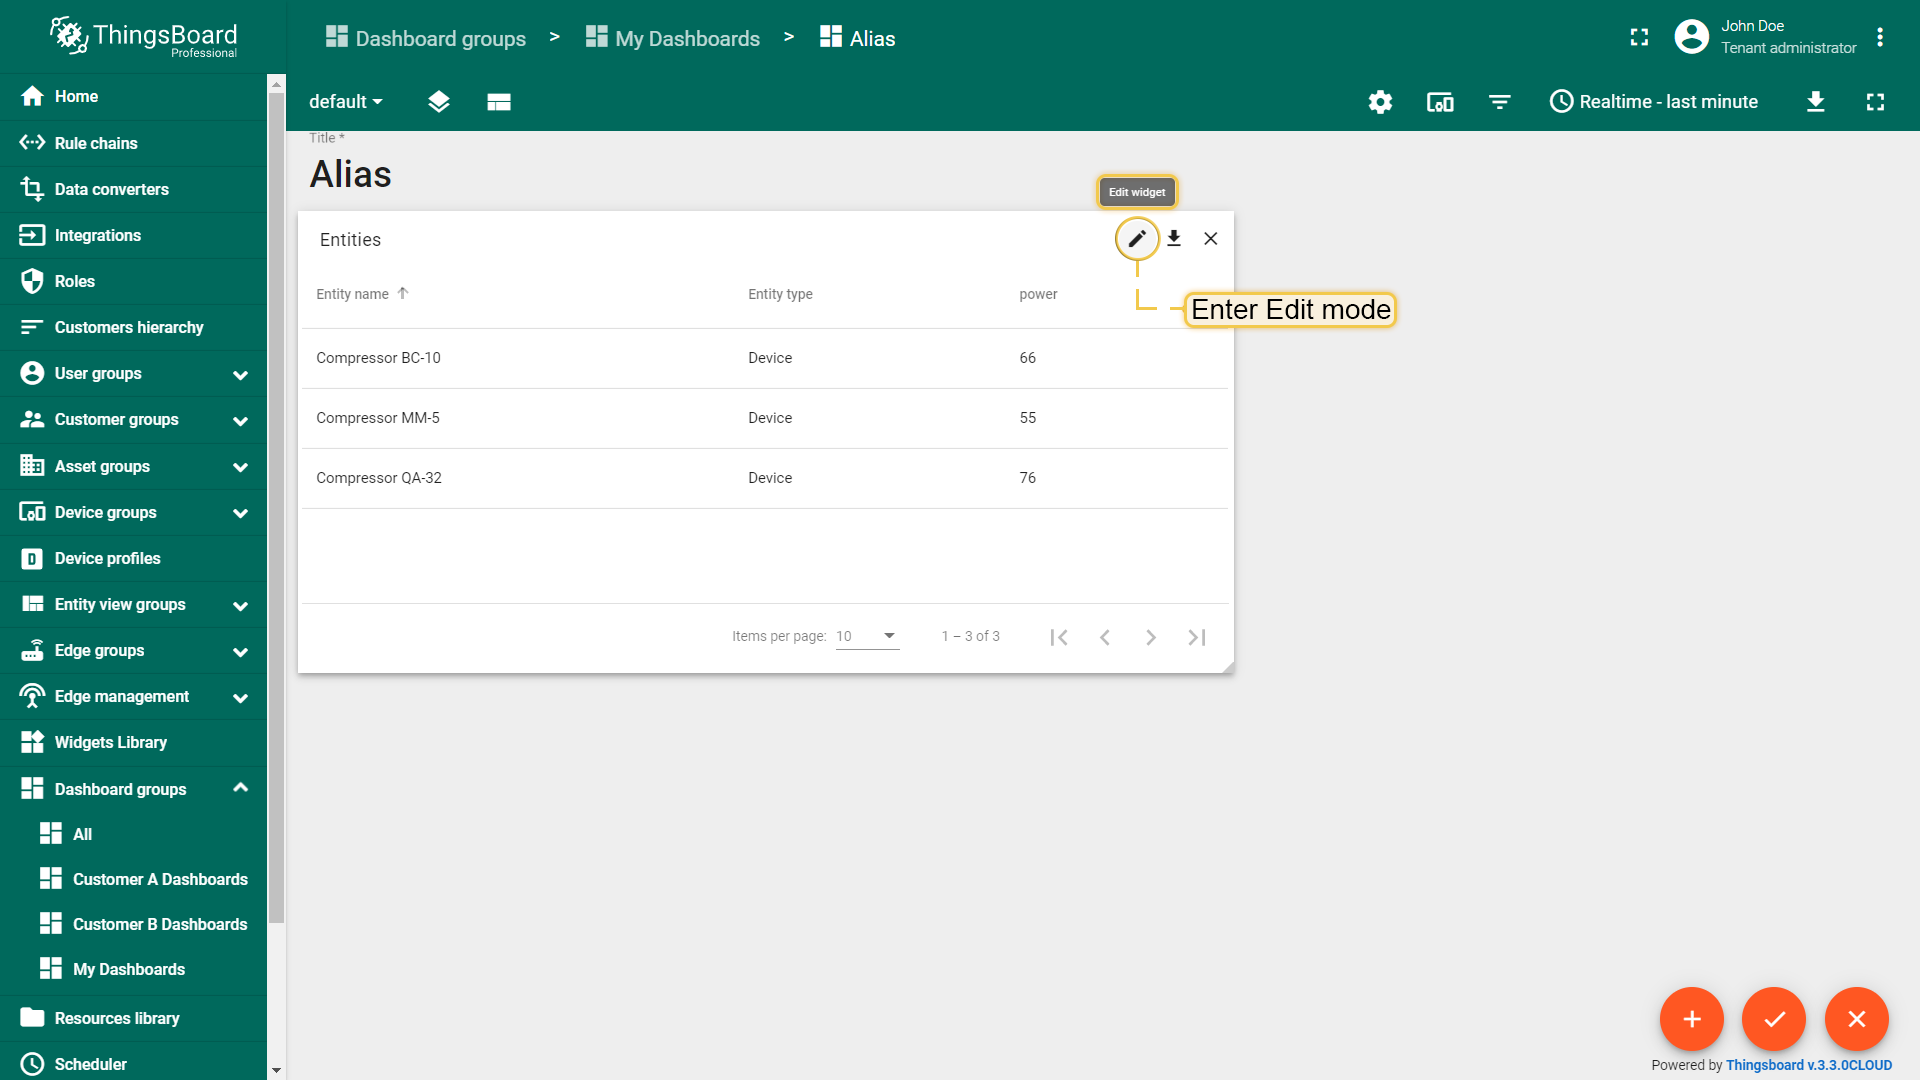
In the root dashboard state, enter widget Edit mode by clicking the “pencil” icon in the upper right corner;
Scroll down to find "Actions" section. Click "Add action" button;
The "Entities table: Actions" window will be opened. Click the "Add action" button in the top right corner;
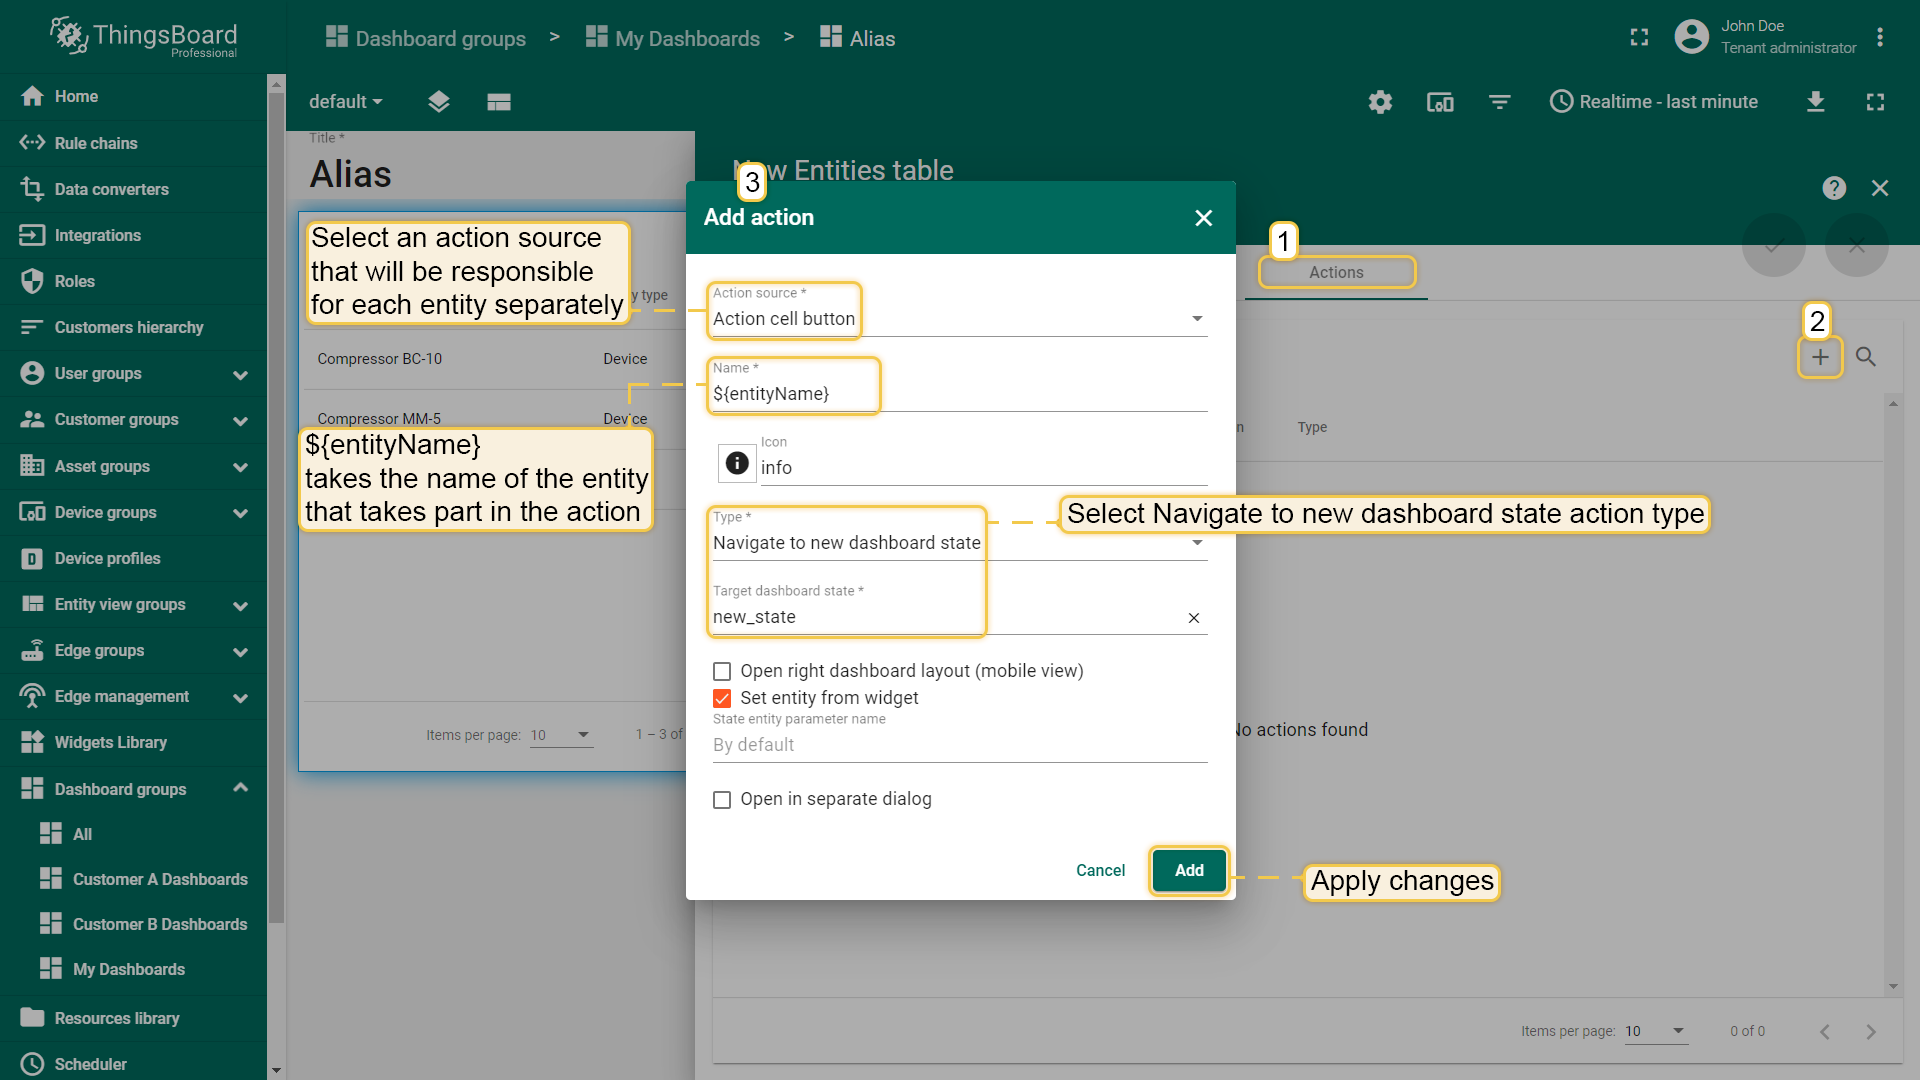
In the "Add action" dialog, enter the action name, and select an action source responsible for each entity separately (action cell button, on row click etc.). Then, choose the action type "Navigate to new dashboard state" and specify the new dashboard state to which the transition will be made. After, click "Add";
After successfully adding the action, click the "Save" button. Then, click the "Apply" button;
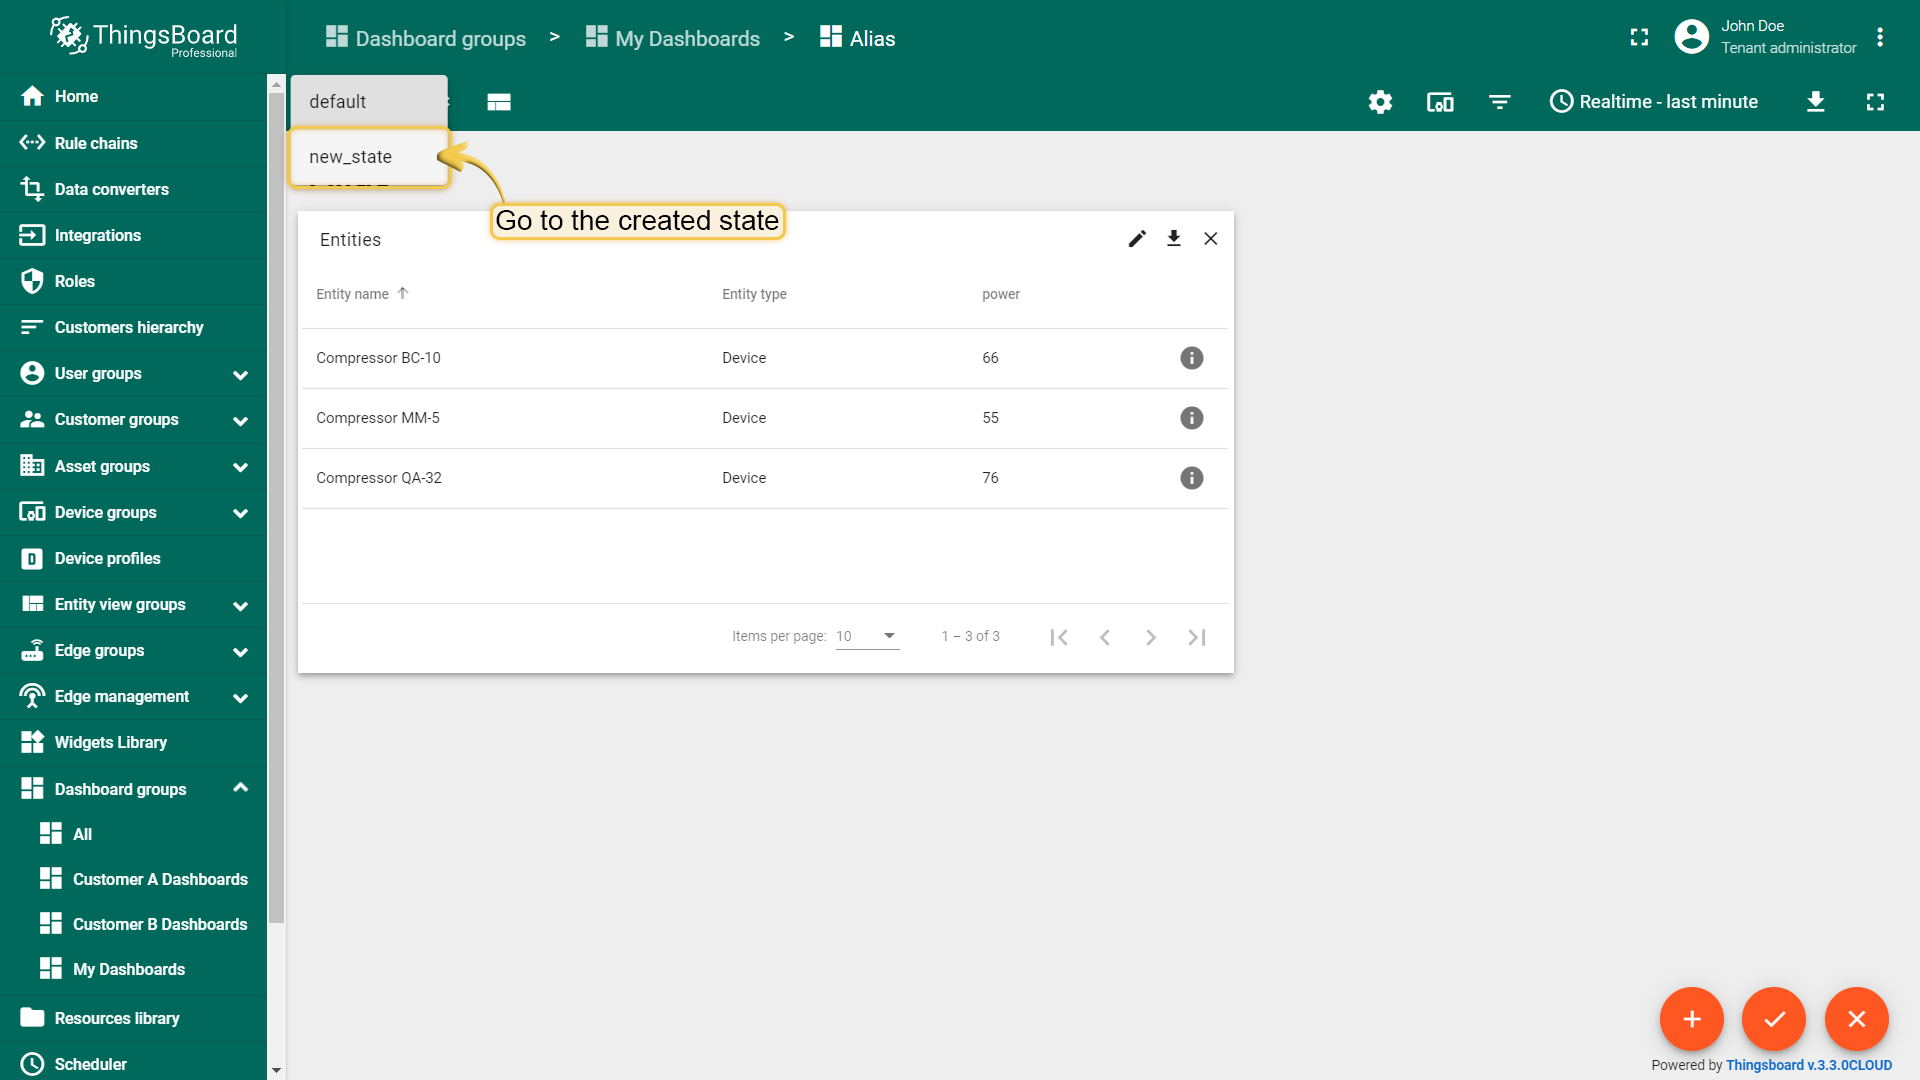
Now, go to the created state by selecting it from the drop-down menu accessed through the layers icon in the upper left corner;
Click the “Add new widget” icon in the center of the screen;
In the opened widget bundles selection, select "Indoor Environment";
Select the "Indoor temperature card with background" widget;
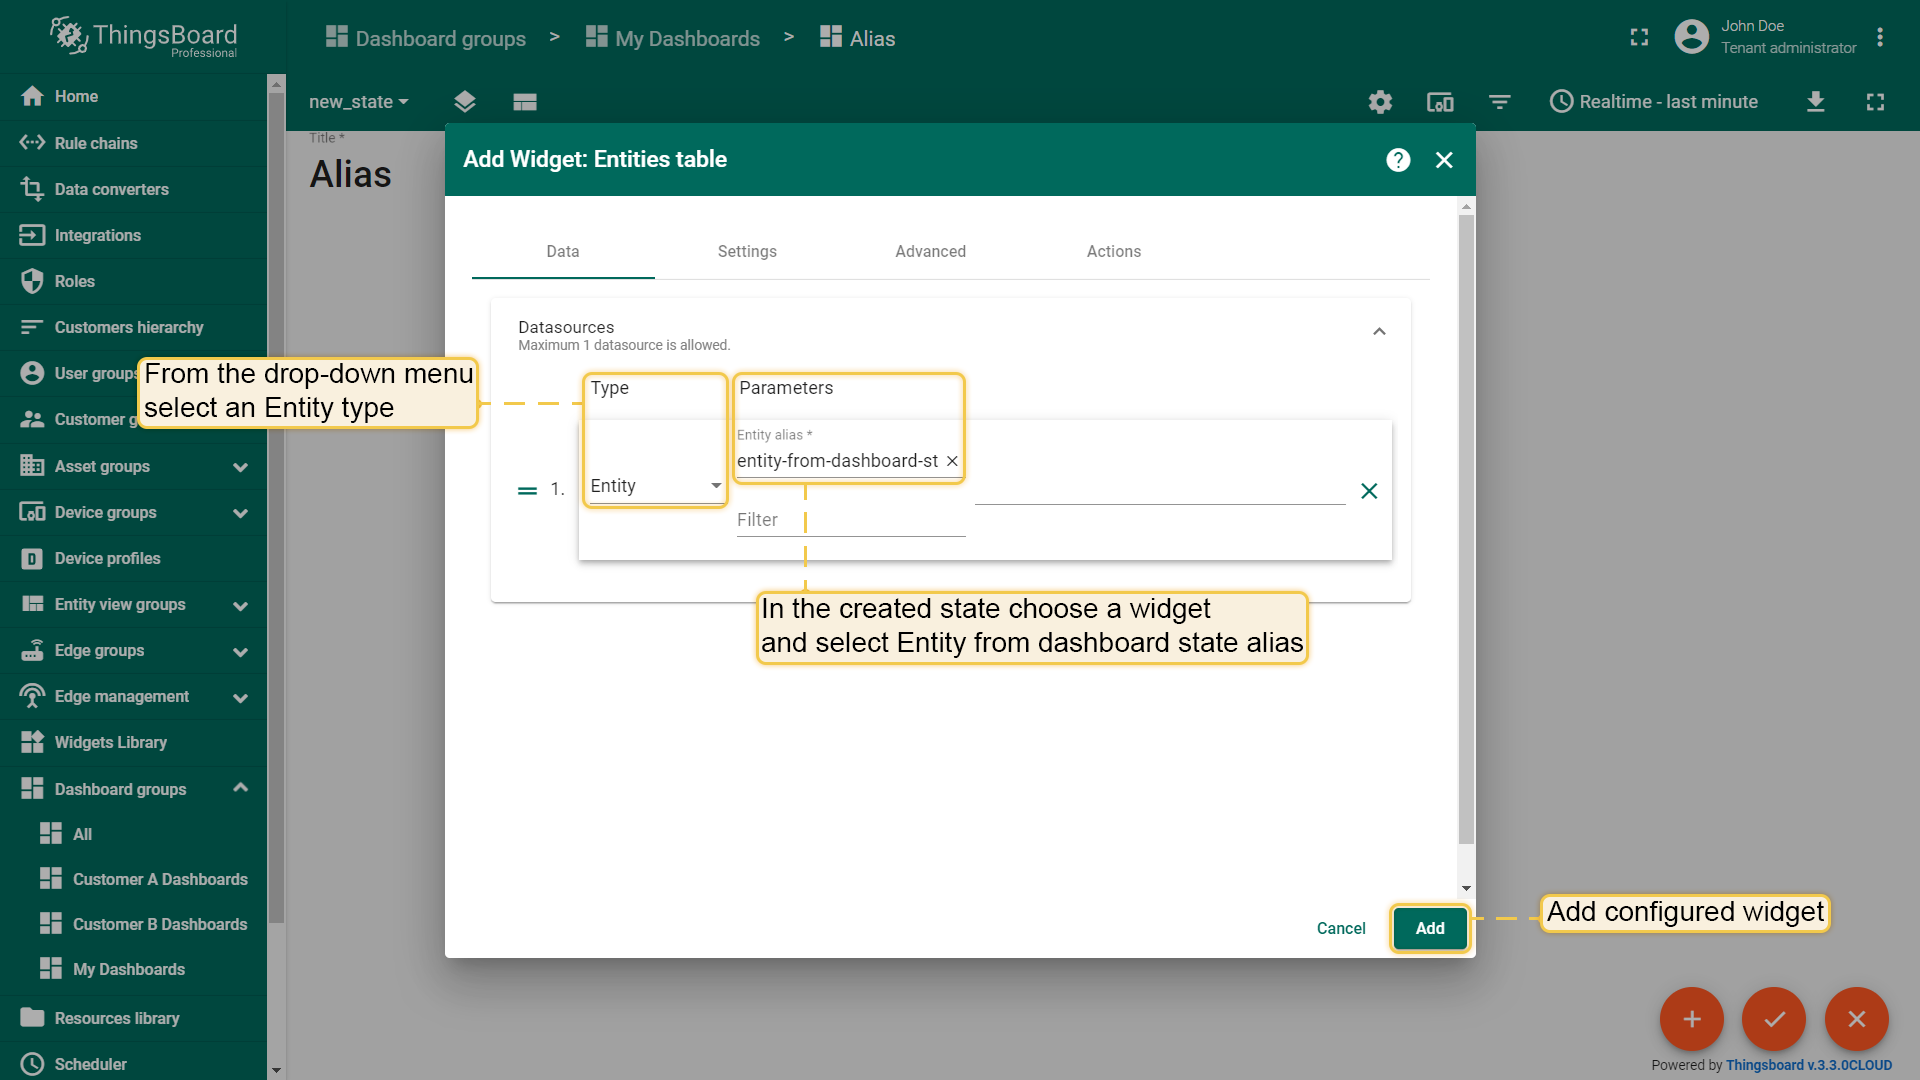
In the add widget window, navigate to the "Entity alias" tab. Specify the "Entity from dashboard state" alias in the "Entity alias" field and "temperature" data key in the “Columns” section. Click the "Add" button in the lower right corner;
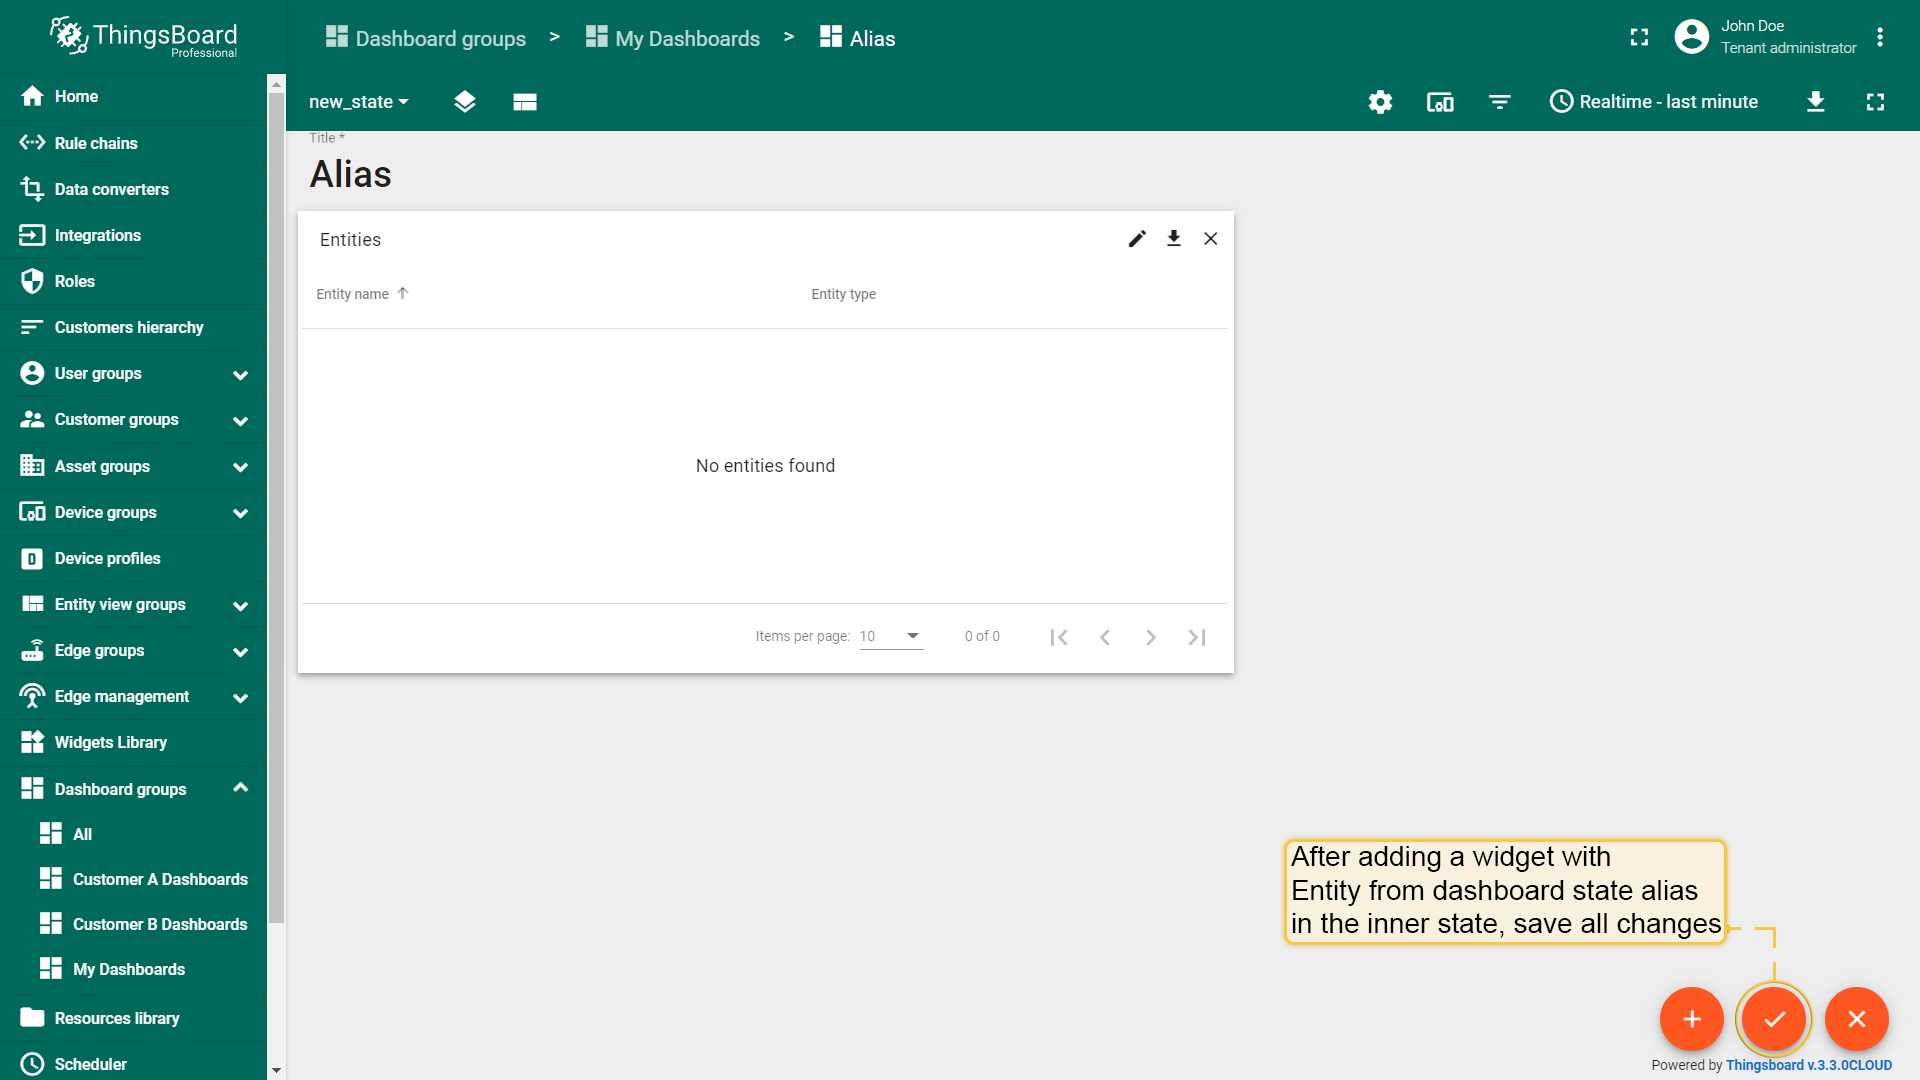
After adding the widget save all applied changes;
In the root dashboard state, enter widget Edit mode by clicking the “pencil” icon in the upper right corner;
Scroll down to find "Actions" section. Click "Add action" button;
The "Entities table: Actions" window will be opened. Click the "Add action" button in the top right corner;
In the "Add action" dialog, enter the action name, and select an action source responsible for each entity separately (action cell button, on row click etc.). Then, choose the action type "Navigate to new dashboard state" and specify the new dashboard state to which the transition will be made. After, click "Add";
After successfully adding the action, click the "Save" button. Then, click the "Apply" button;
Now, go to the created state by selecting it from the drop-down menu accessed through the layers icon in the upper left corner;
Click the “Add new widget” icon in the center of the screen;
In the opened widget bundles selection, select "Indoor Environment";
Select the "Indoor temperature card with background" widget;
In the add widget window, navigate to the "Entity alias" tab. Specify the "Entity from dashboard state" alias in the "Entity alias" field and "temperature" data key in the “Columns” section. Click the "Add" button in the lower right corner;
After adding the widget save all applied changes;
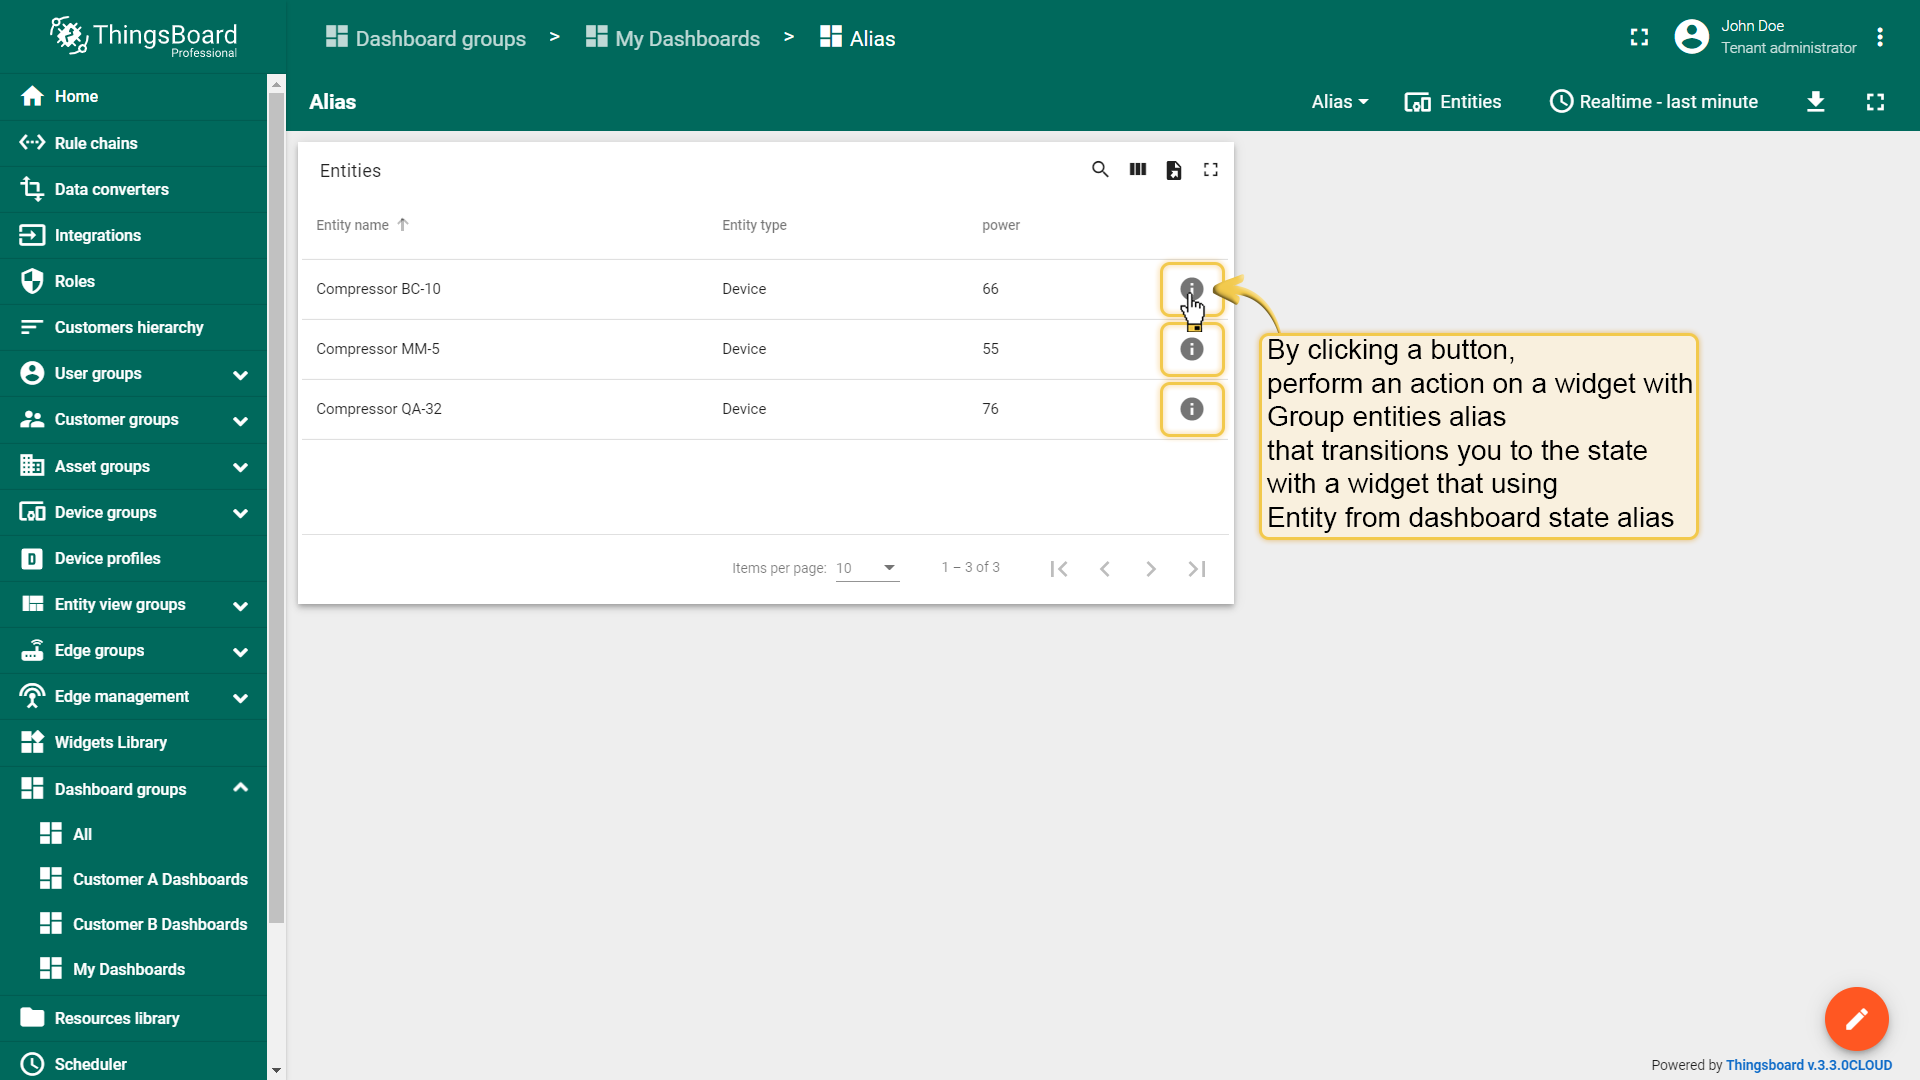
现在,点击任意实体旁的操作按钮。将跳转到内部状态,其中包含选中实体详情的部件。
Now, click an action button opposite any entity;
You will be transitioned to an inner state, which contains a widget with the details of the selected entity.
In the "Add alias" dialog box, enter the alias name, select the "Entity type " filter type, and choose the entity type - "Device". Then, click "Add";
Add an Entity table widget that will display a list of entities. Use the "Entity type" alias as a data source;
Added the Entity table widget that displays a list of all devices.
Add another Entities table widget that will display the owner of the selected device. Specify the "Owner of entity from dashboard state" alias in the "Entity alias" field. Change the title of the widget to "Owner of device". Click the "Add" button in the lower right corner;
Added the Entity Table widget, which will display the owner of the selected device.
In the root dashboard state, enter widget Edit mode by clicking the “pencil” icon in the upper right corner of it;
Scroll down to find "Actions" section. Click "Add action" button;
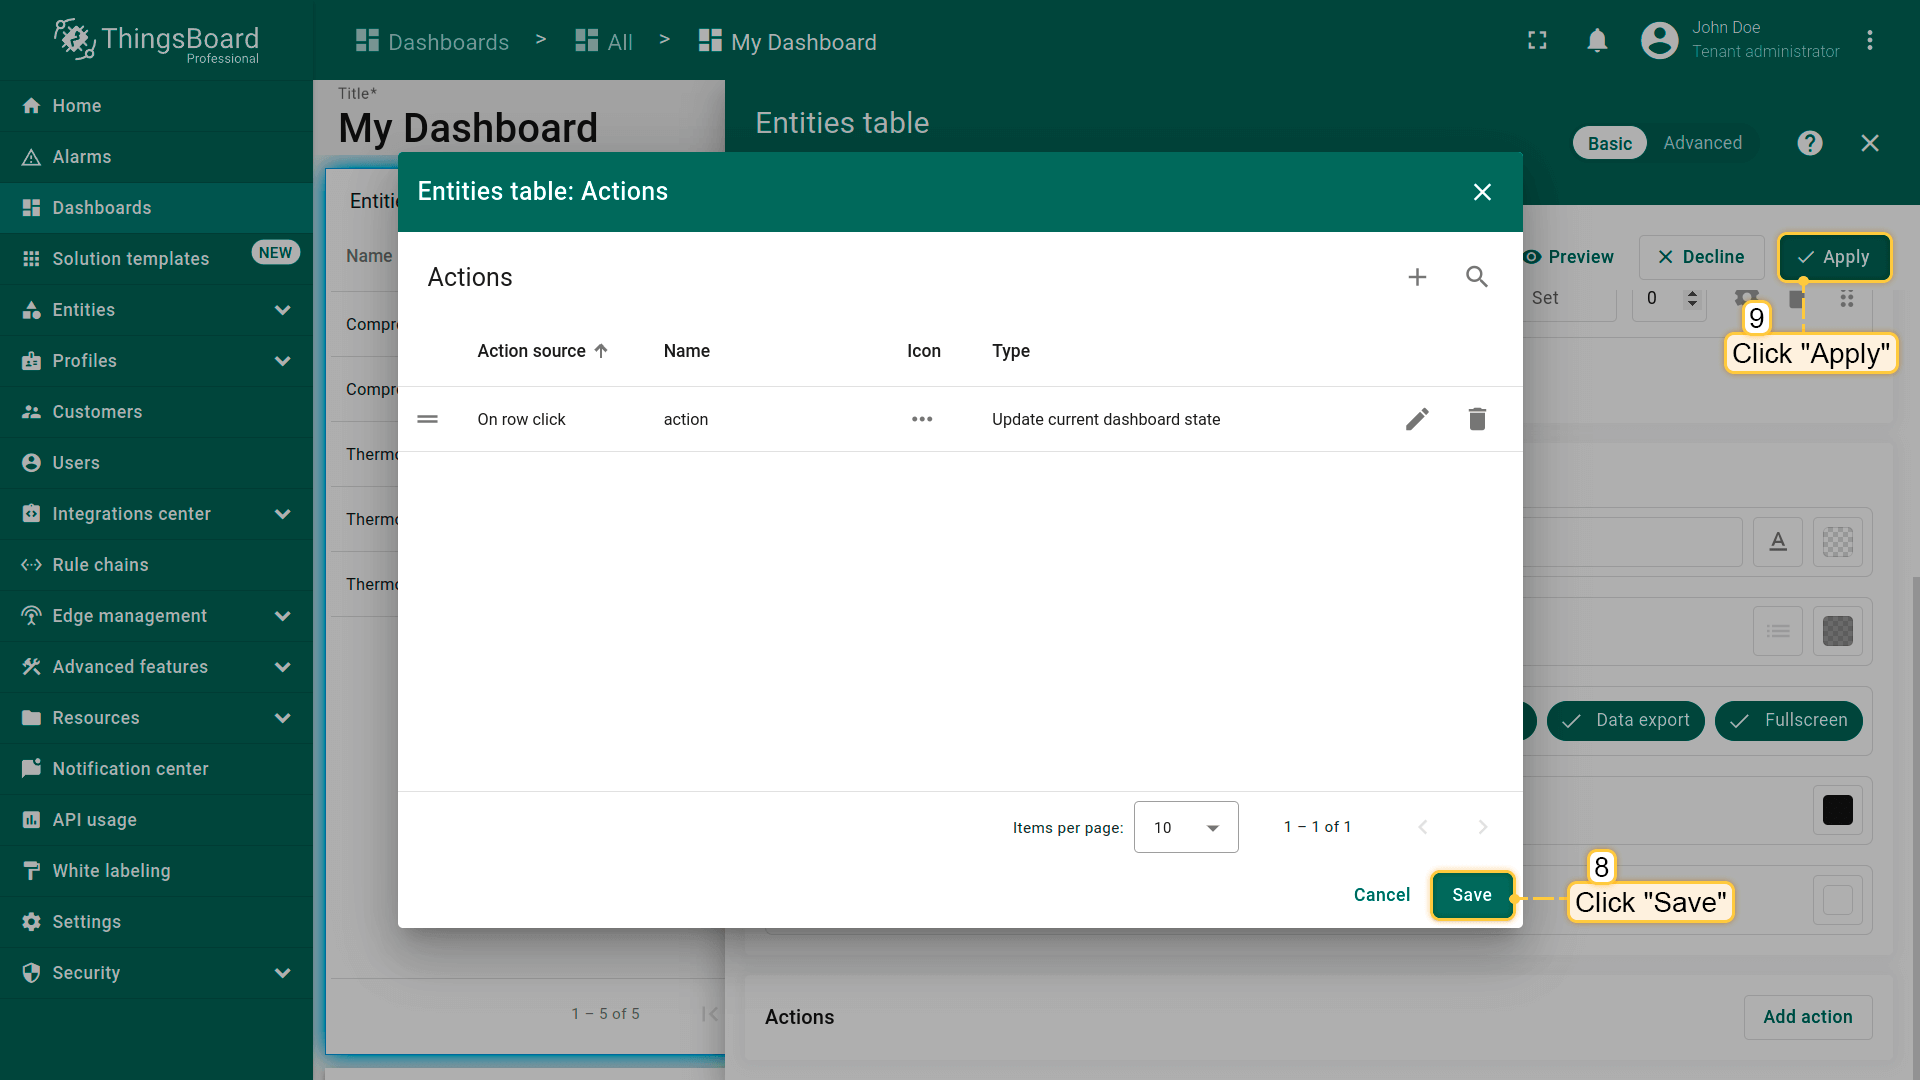
The "Entities table: Actions" window will be opened. Click the "Add action" button in the top right corner;
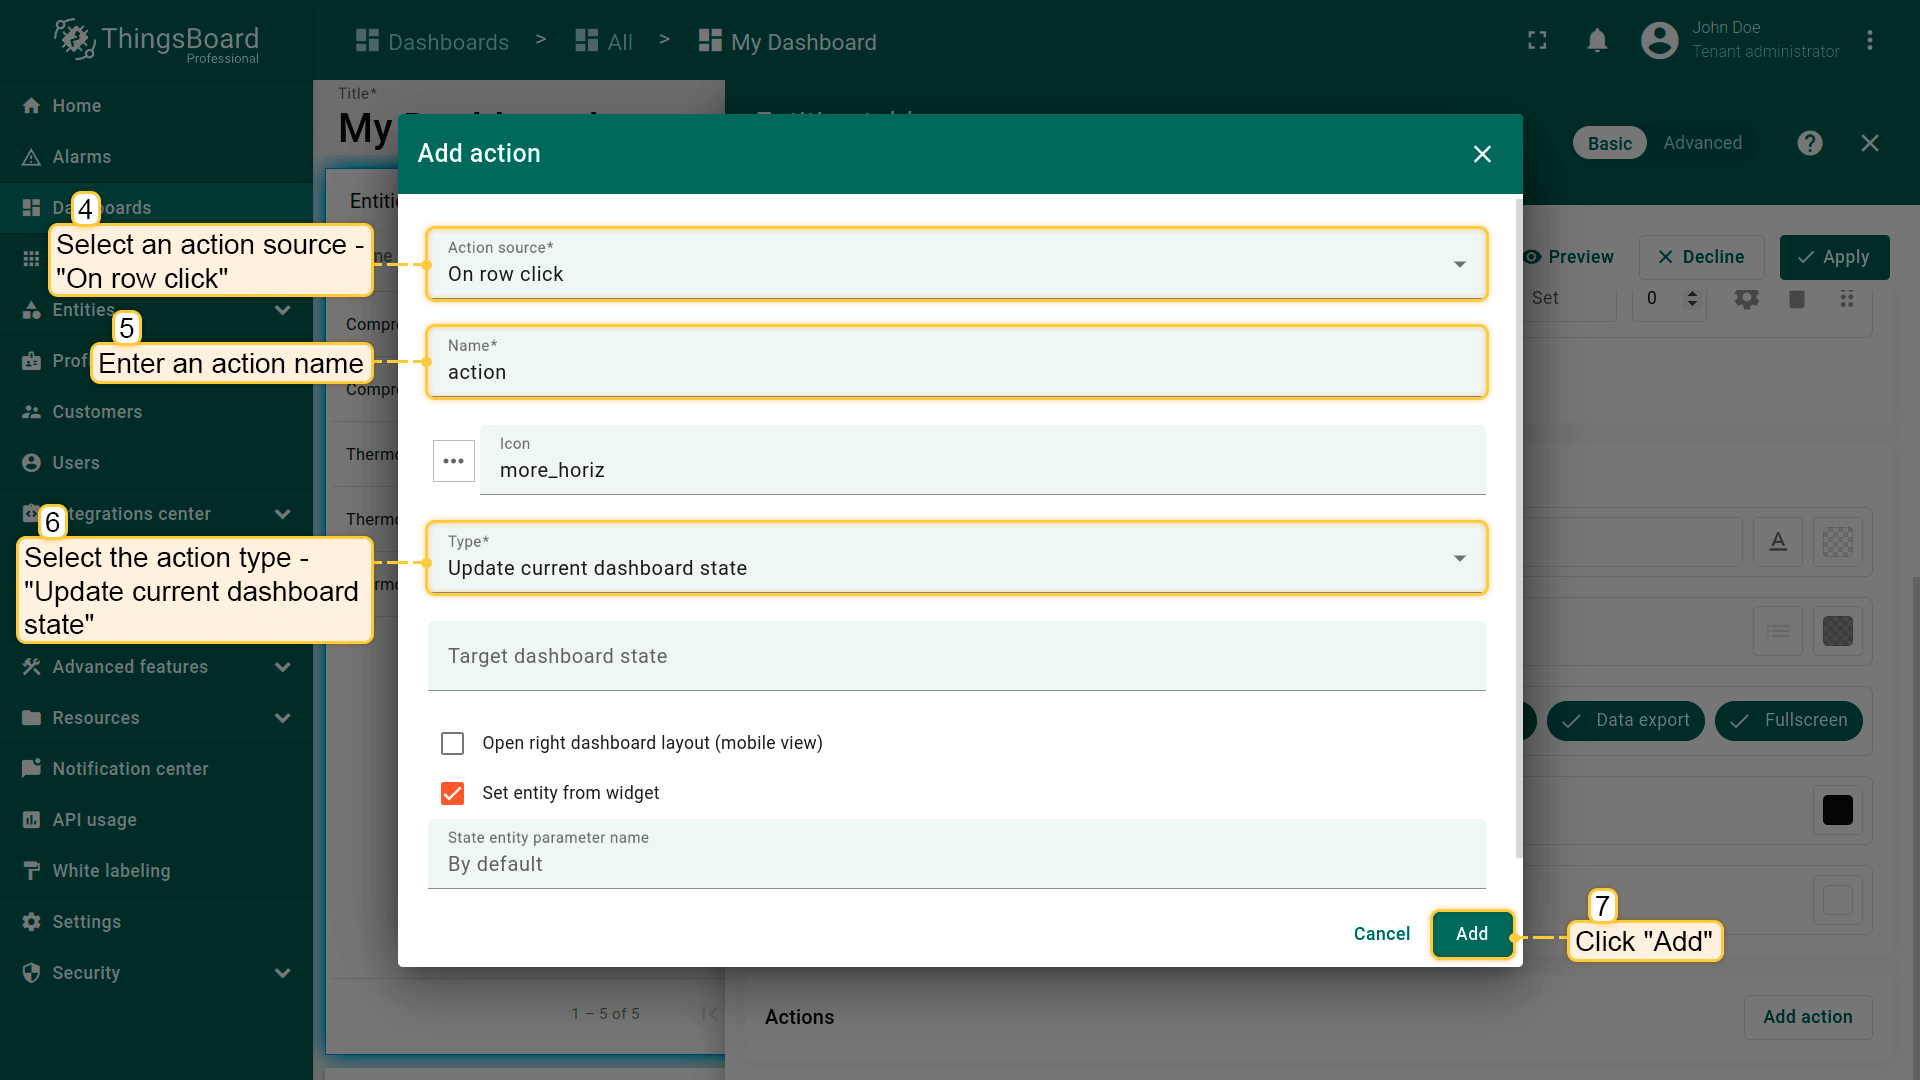
In the "Add action" dialog, enter the action name, select an action source - "on row click", and choose the action type "Update current dashboard state". After, click "Add";
After successfully adding the action, click the "Save" button. Then, click the "Apply" button;
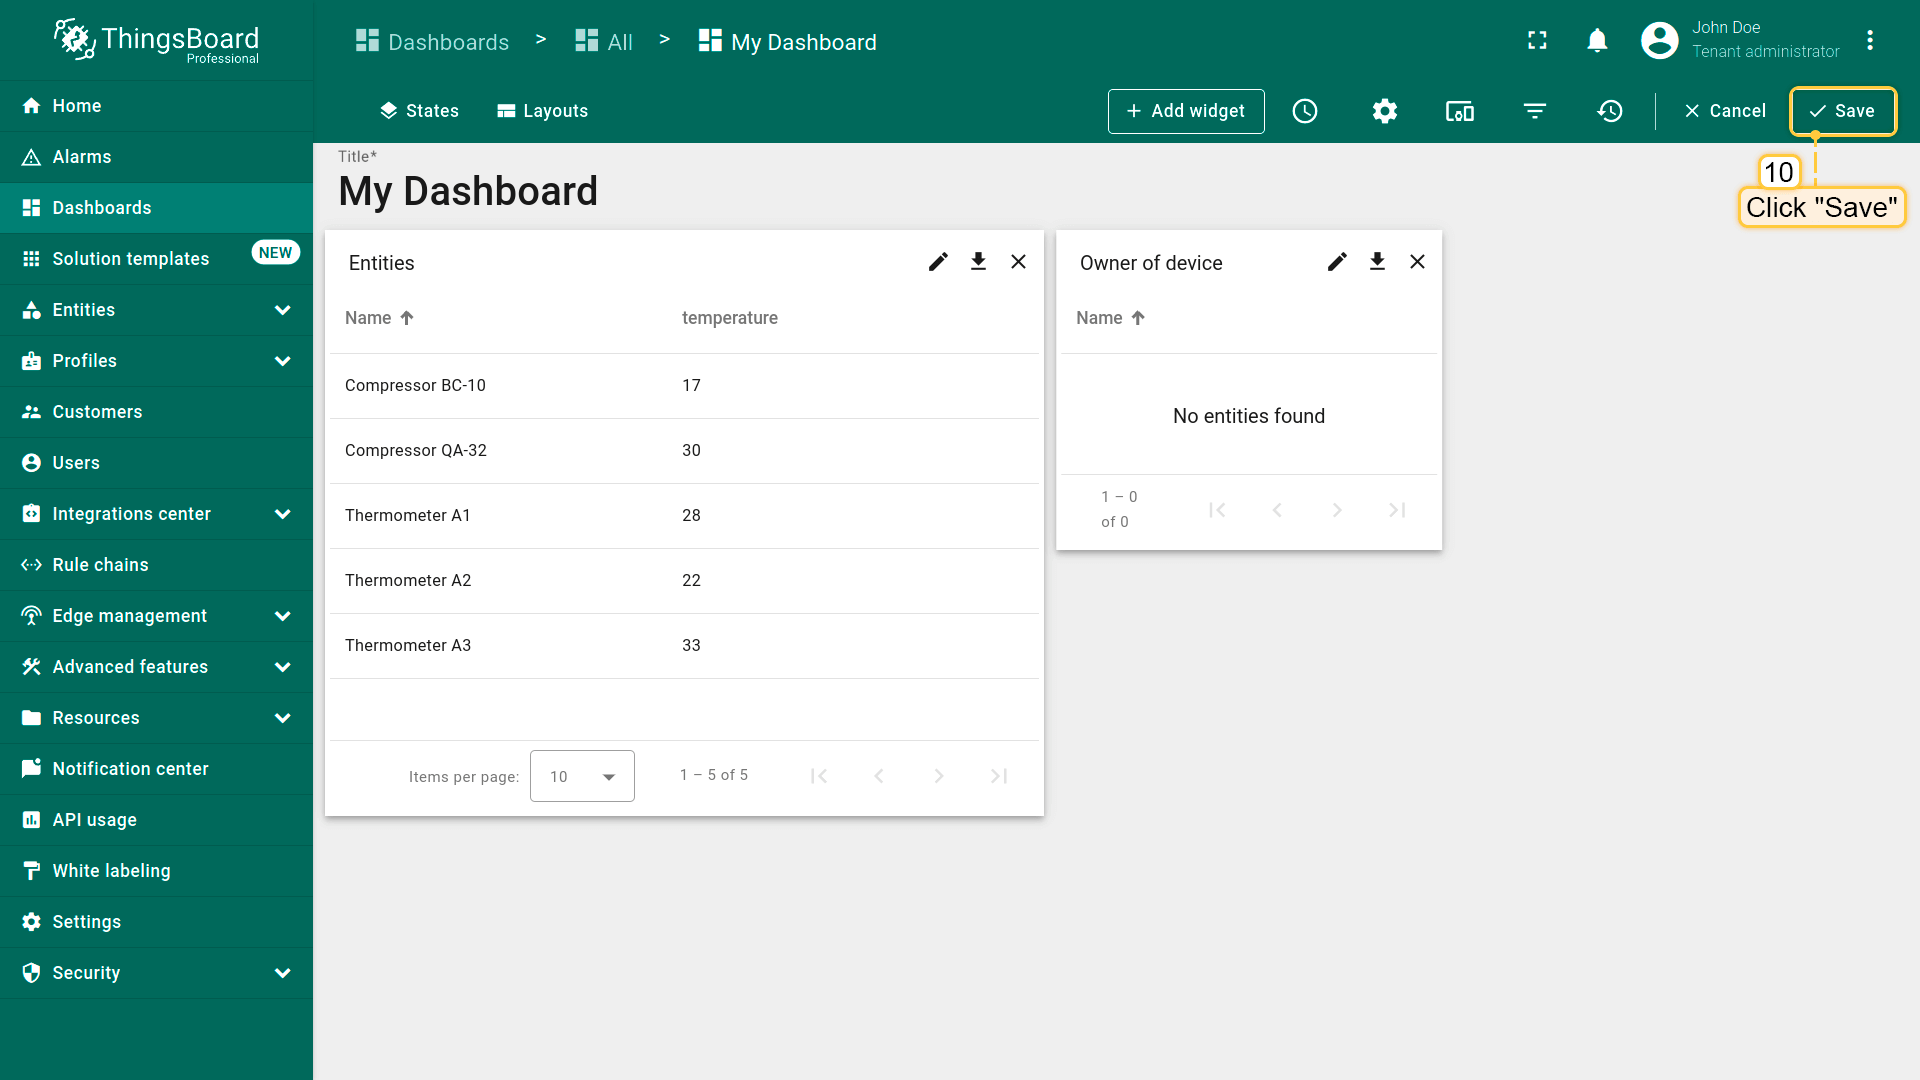
Save the dashboard;
In the root dashboard state, enter widget Edit mode by clicking the “pencil” icon in the upper right corner of it;
Scroll down to find "Actions" section. Click "Add action" button;
The "Entities table: Actions" window will be opened. Click the "Add action" button in the top right corner;
In the "Add action" dialog, enter the action name, select an action source - "on row click", and choose the action type "Update current dashboard state". After, click "Add";
After successfully adding the action, click the "Save" button. Then, click the "Apply" button;
Save the dashboard;
Click on the row with the device name in the "Entities" widget. The action will be executed, and the owner of the selected device will be displayed in the "Device Owner" widget;
Repeat this action with another device.
In the "Add alias" dialog, enter the alias name, and select the “Asset type” filter type. Next, specify the asset profile(s) and optionally enter an expression to filter the names of the displayed assets;
In the "Tables" widgets bundle select the "Entities table" widget. Navigate to the "Entity alias" tab. Specify the "Asset type" alias in the "Entity alias" field. Click "Add";
The Entities table widget that displays assets with the asset profile "buildings" and whose names begins with "Build" has been added
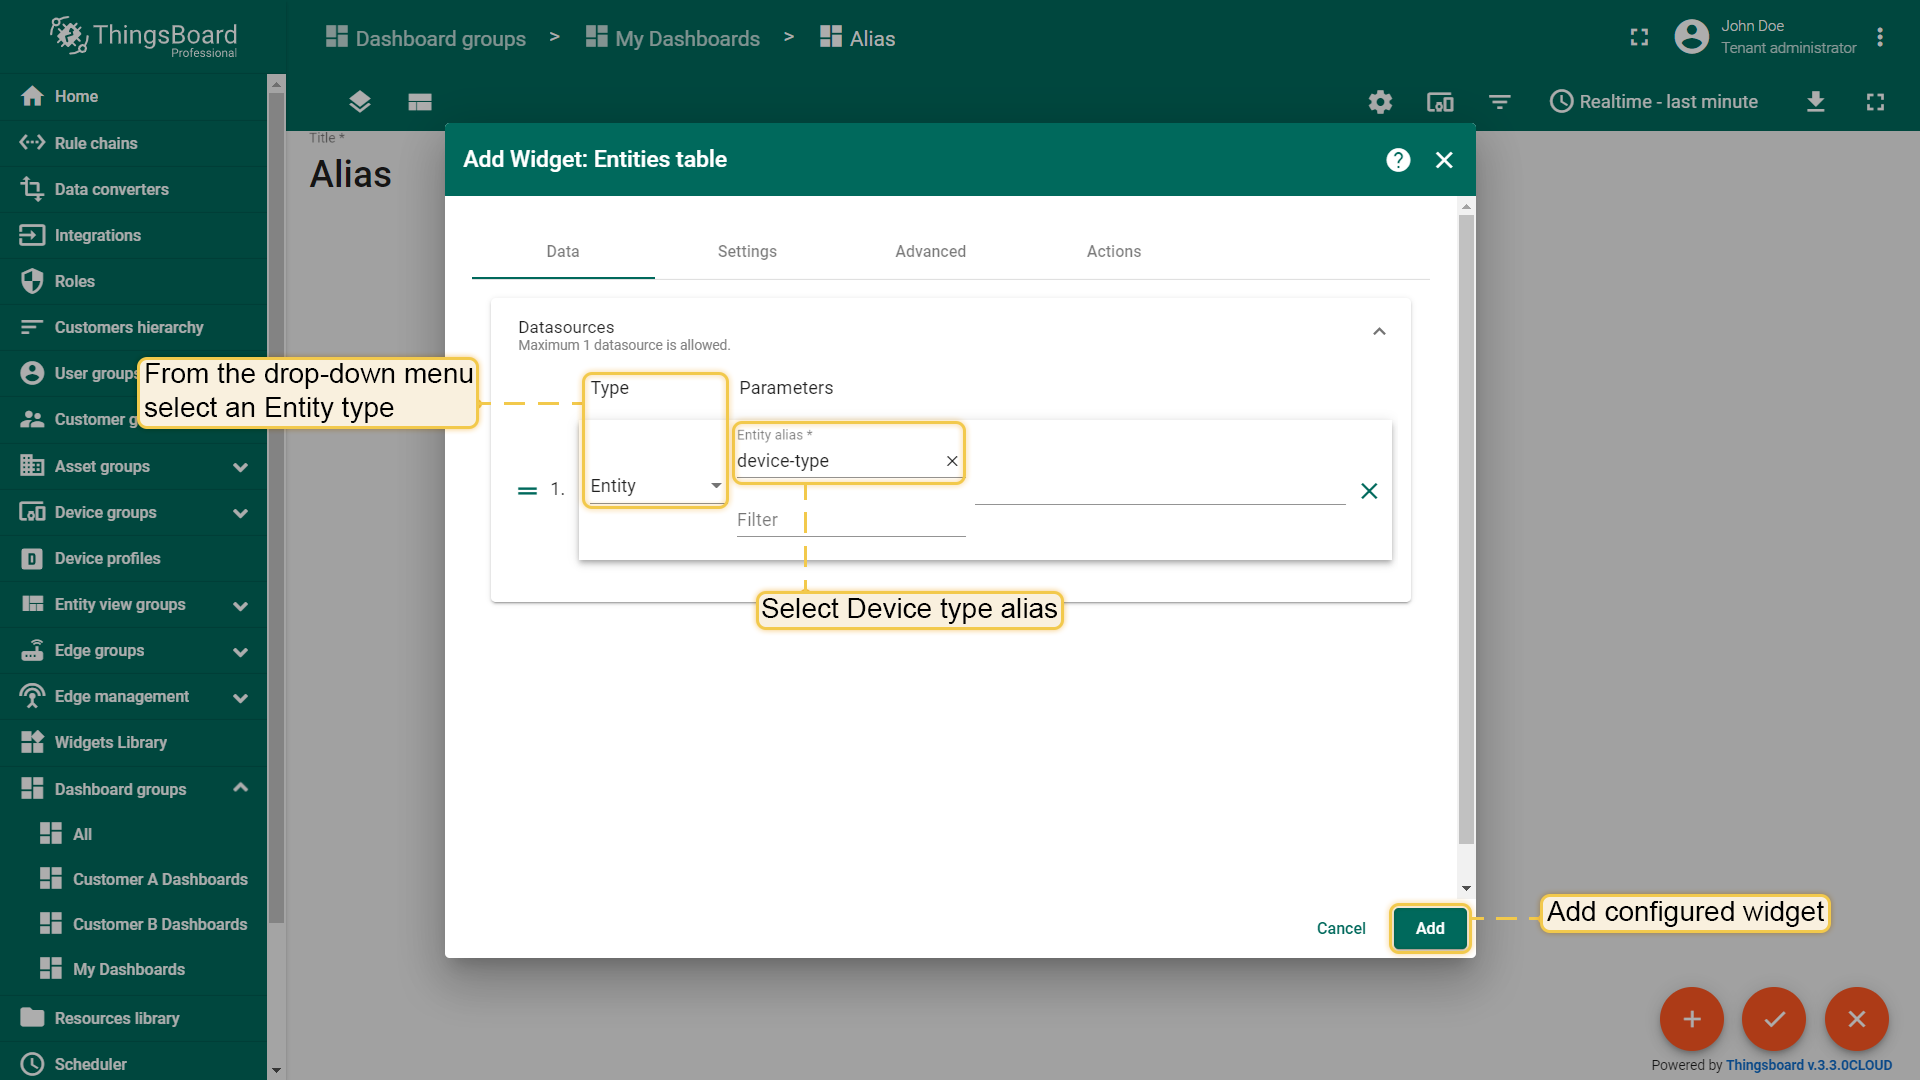
In the "Add alias" dialog, enter the alias name, and select the "Device type" filter type. Then specify the device profile(s) and optionally enter an expression to filter the names of the displayed devices;
In the "Tables" widgets bundle select the "Entities table" widget. Navigate to the "Entity alias" tab. Specify the "Device type" alias in the "Entity alias" field. Click "Add";
The Entities table widget that displays assets with the asset profile "thermometers" and whose names begins with "Therm" has been added
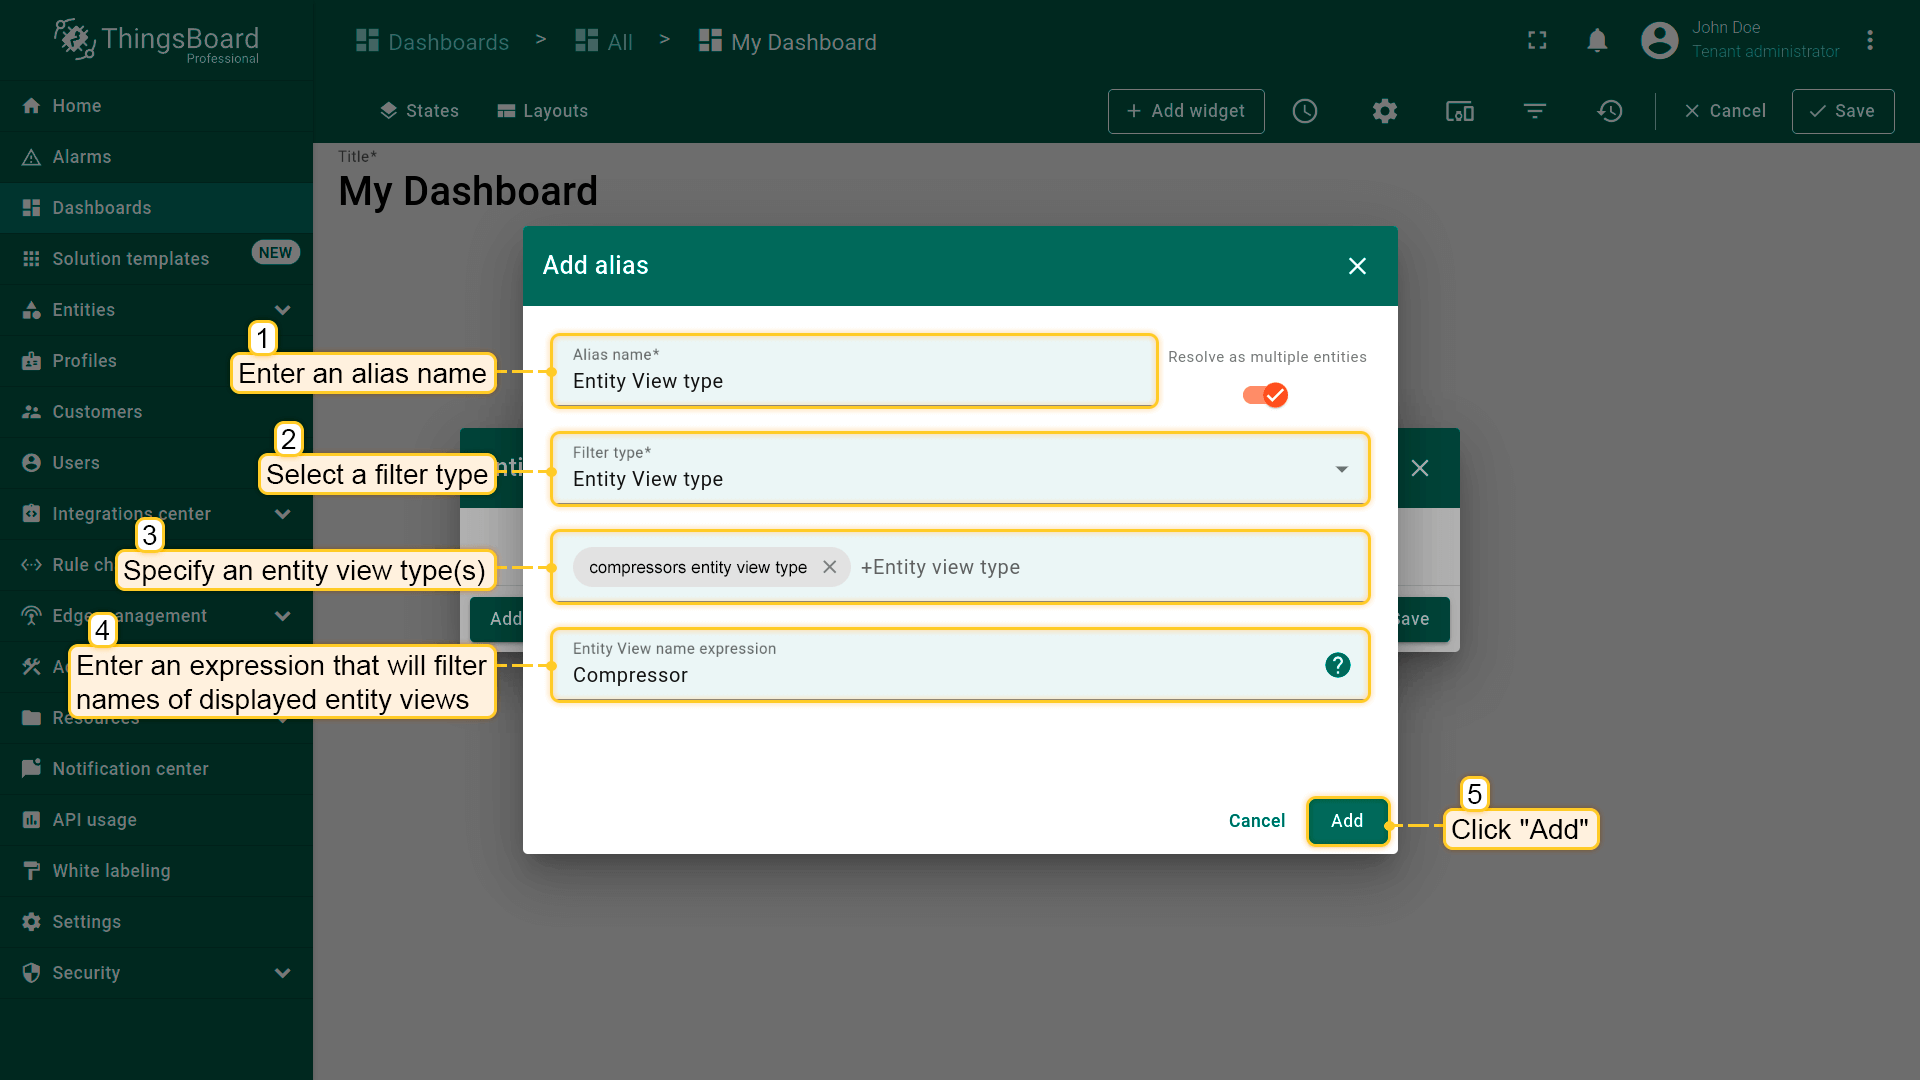
In the "Add alias" dialog, enter the alias name, and select the "Entity view type" filter type. Then specify the entity view type(s) and optionally enter an expression to filter the names of the displayed entity views;
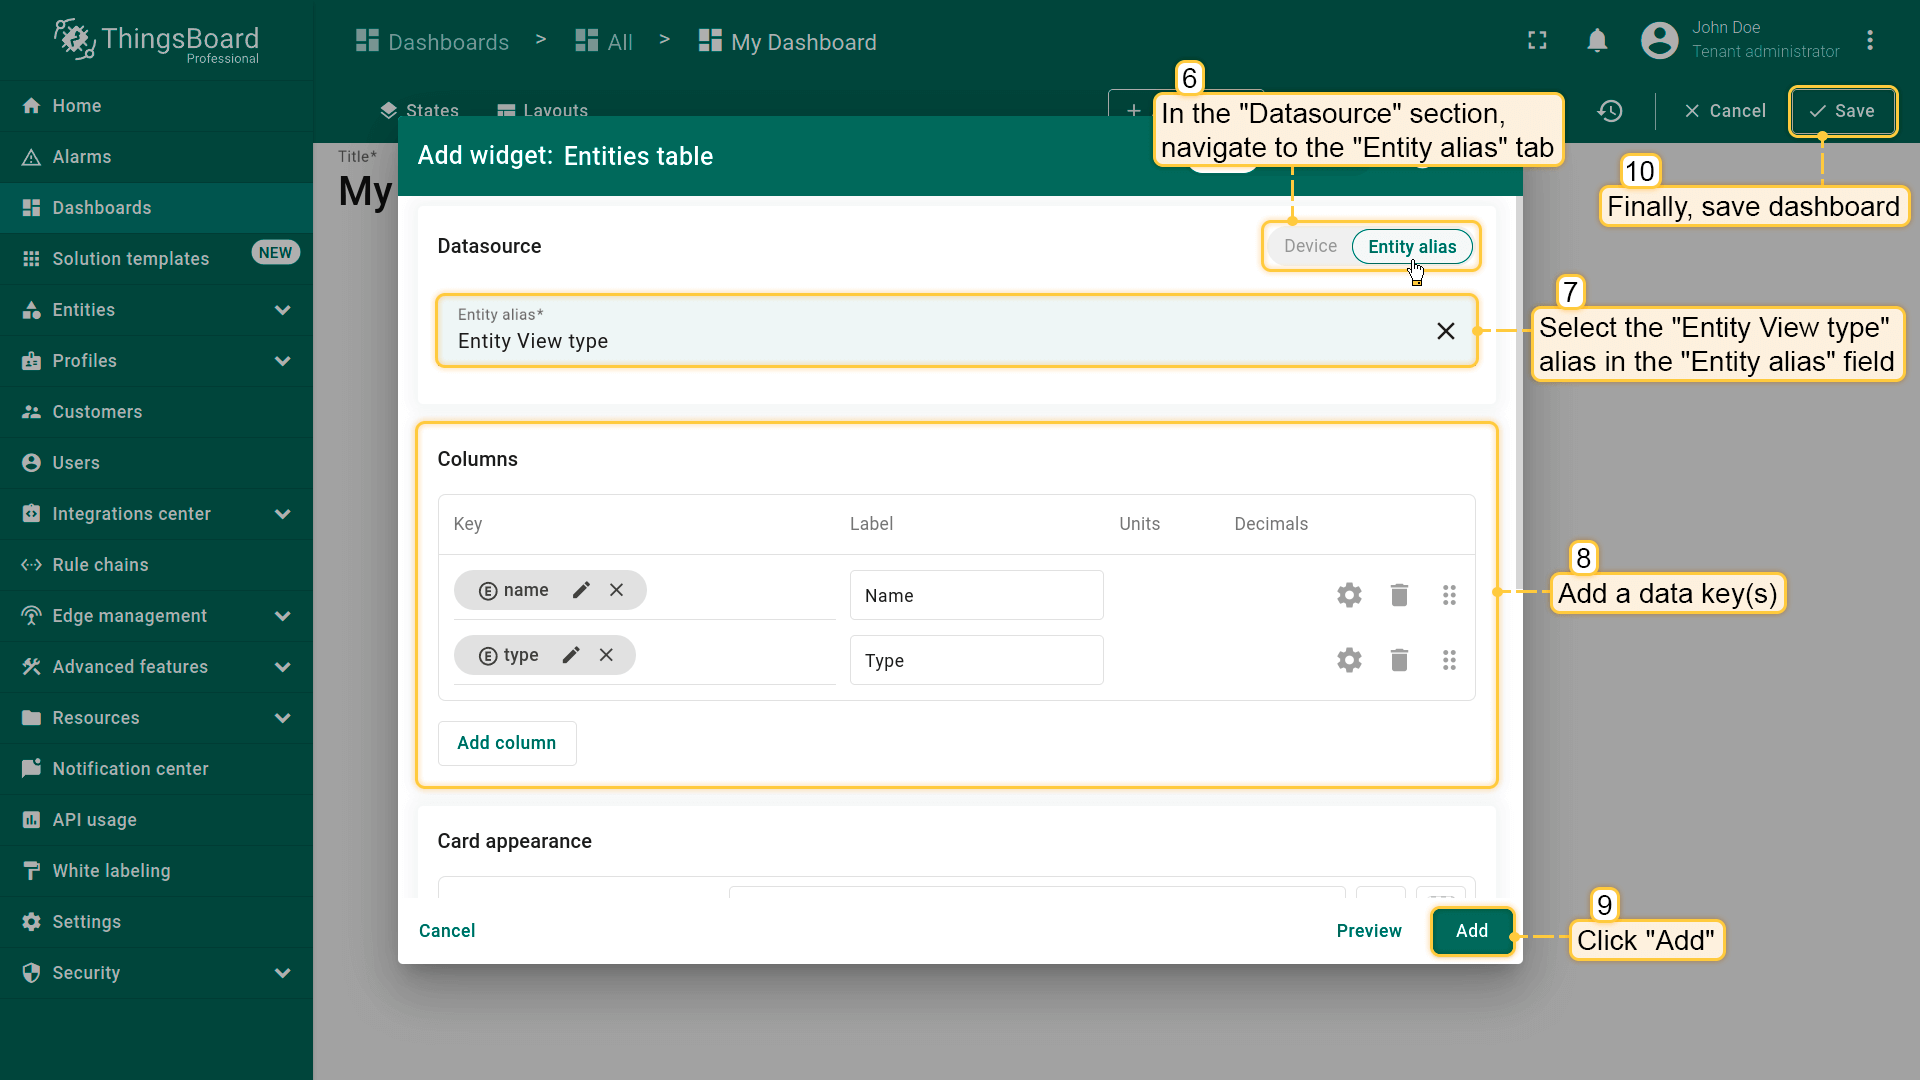
In the "Tables" widgets bundle select the "Entities table" widget. Navigate to the "Entity alias" tab. Specify the "Entity view type" alias in the "Entity alias" field. Click "Add";
The Entities table widget that displays entity views with the entity view type "Entity view type" and whose names begins with "Compressor" has been added
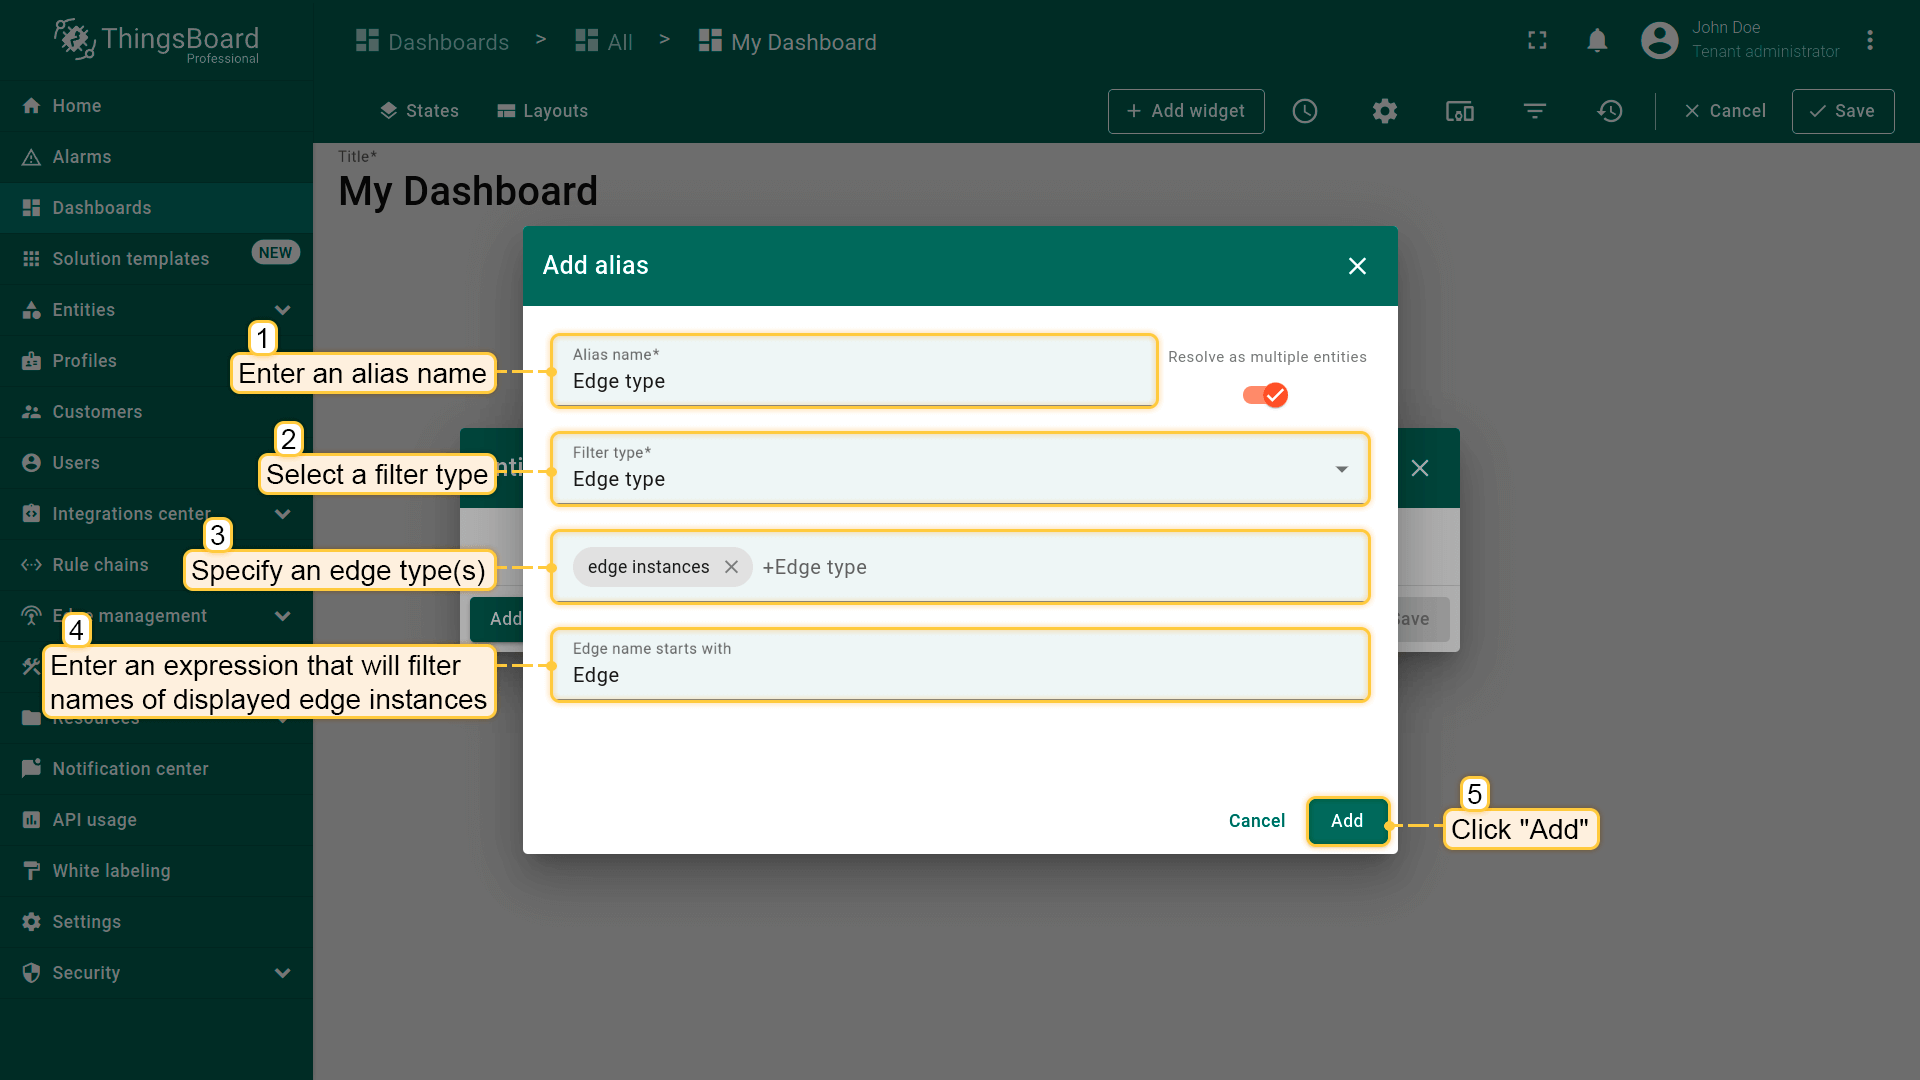
In the "Add alias" dialog, enter the alias name, and select the "Edge type" filter type. Then specify the edge type(s) and enter an expression that will filter the names of the displayed edges;
In the "Tables" widgets bundle select the "Entities table" widget. Navigate to the "Entity alias" tab. Specify the "Edge type" alias in the "Entity alias" field. Click "Add";
The Entities table widget that displays edges with the edge type "edge instance" and whose names begins with "Edge" has been added
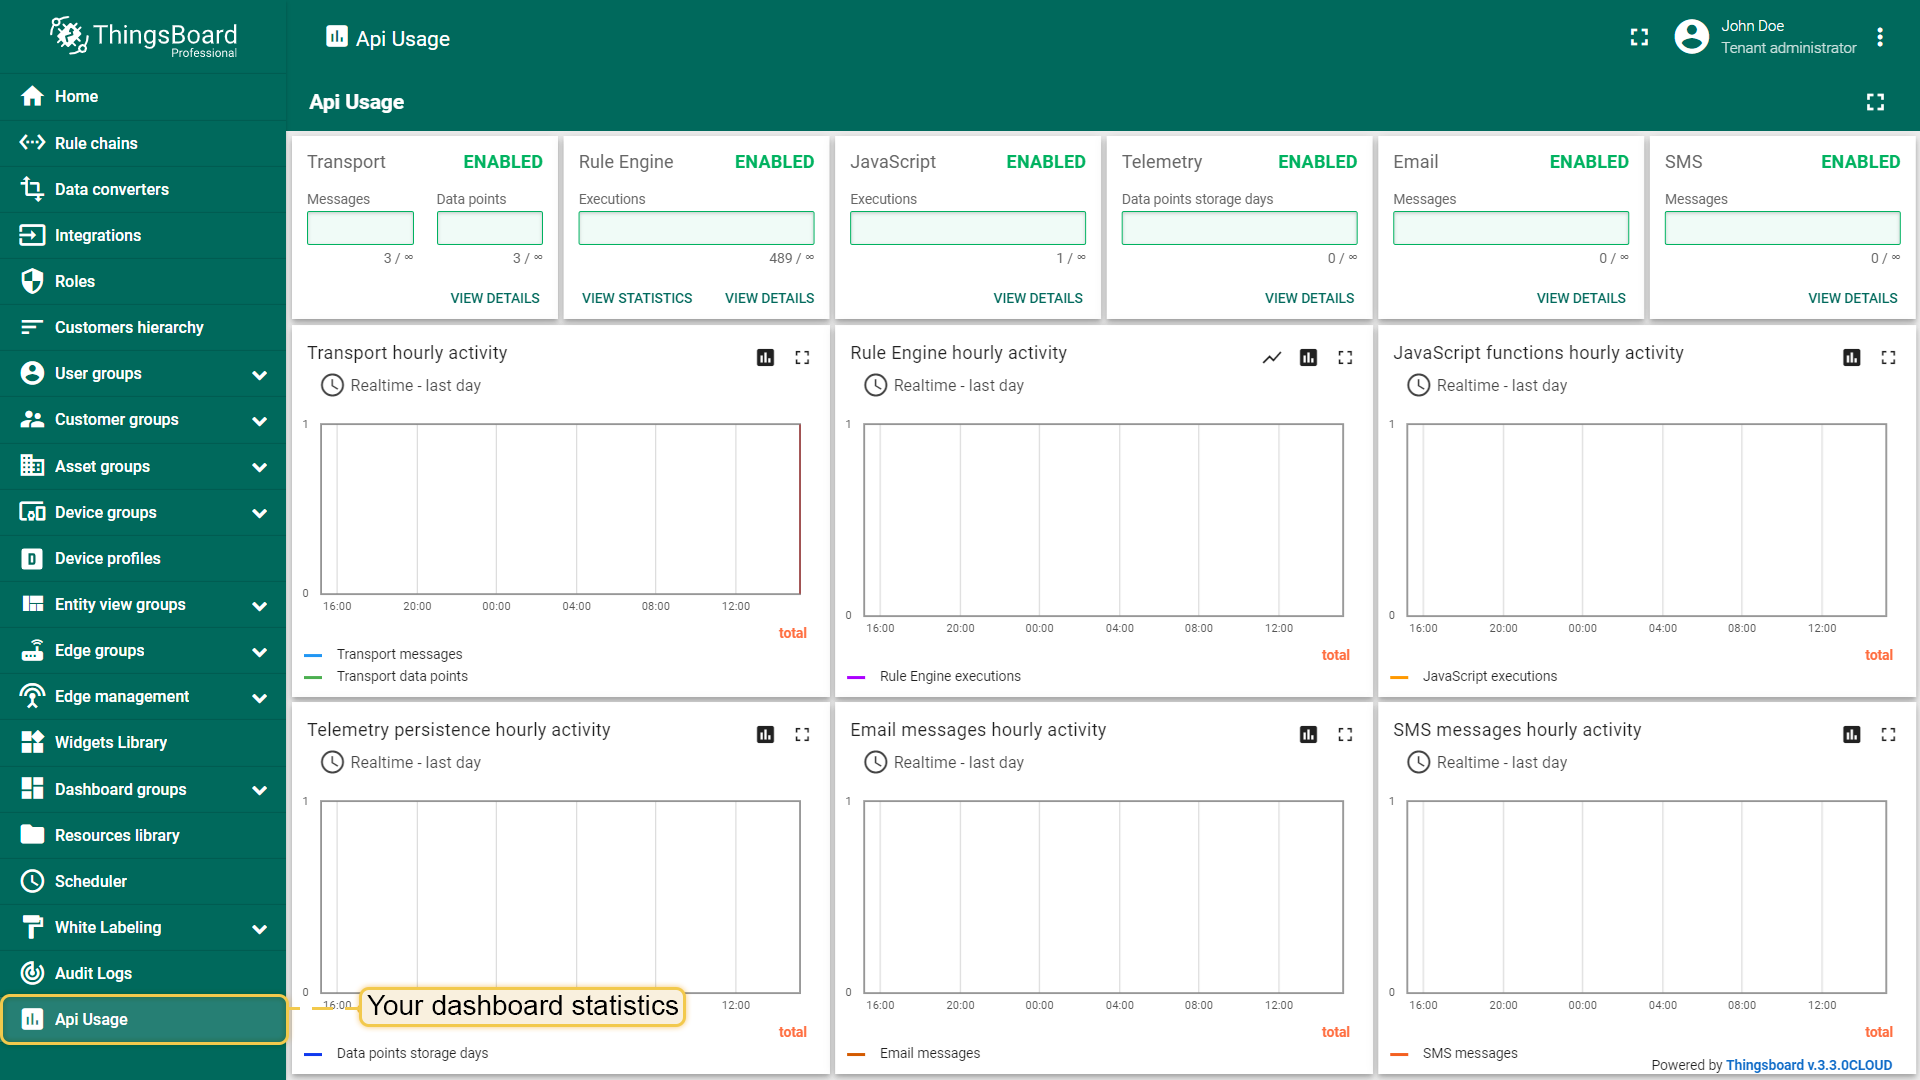
In the "Tables" widgets bundle select the "Entities table" widget. Navigate to the "Entity alias" tab. Specify the "Api Usage State" alias in the "Entity alias" field and add data key(s) in the "Columns" section that fetches statistics from an API usage. Click "Add";
The Entities table widget that displays API usage statistics has been added.
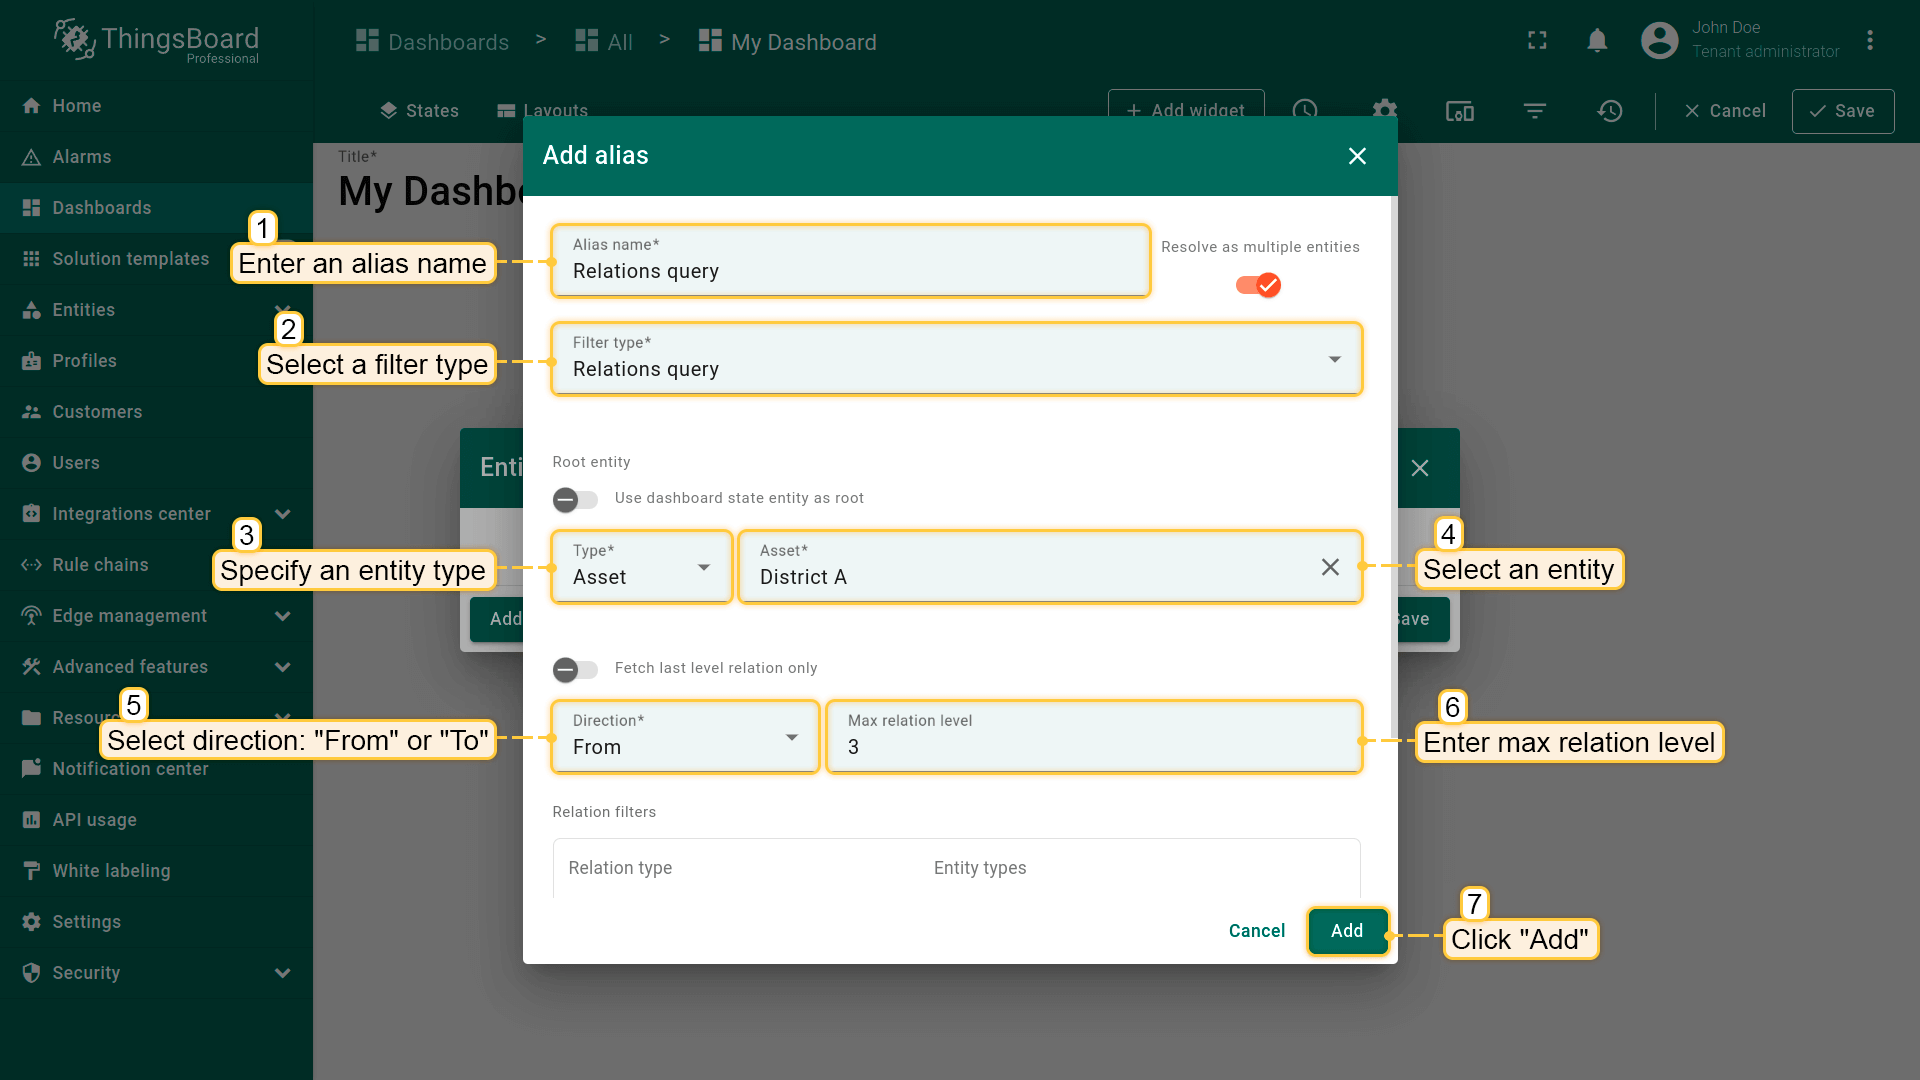
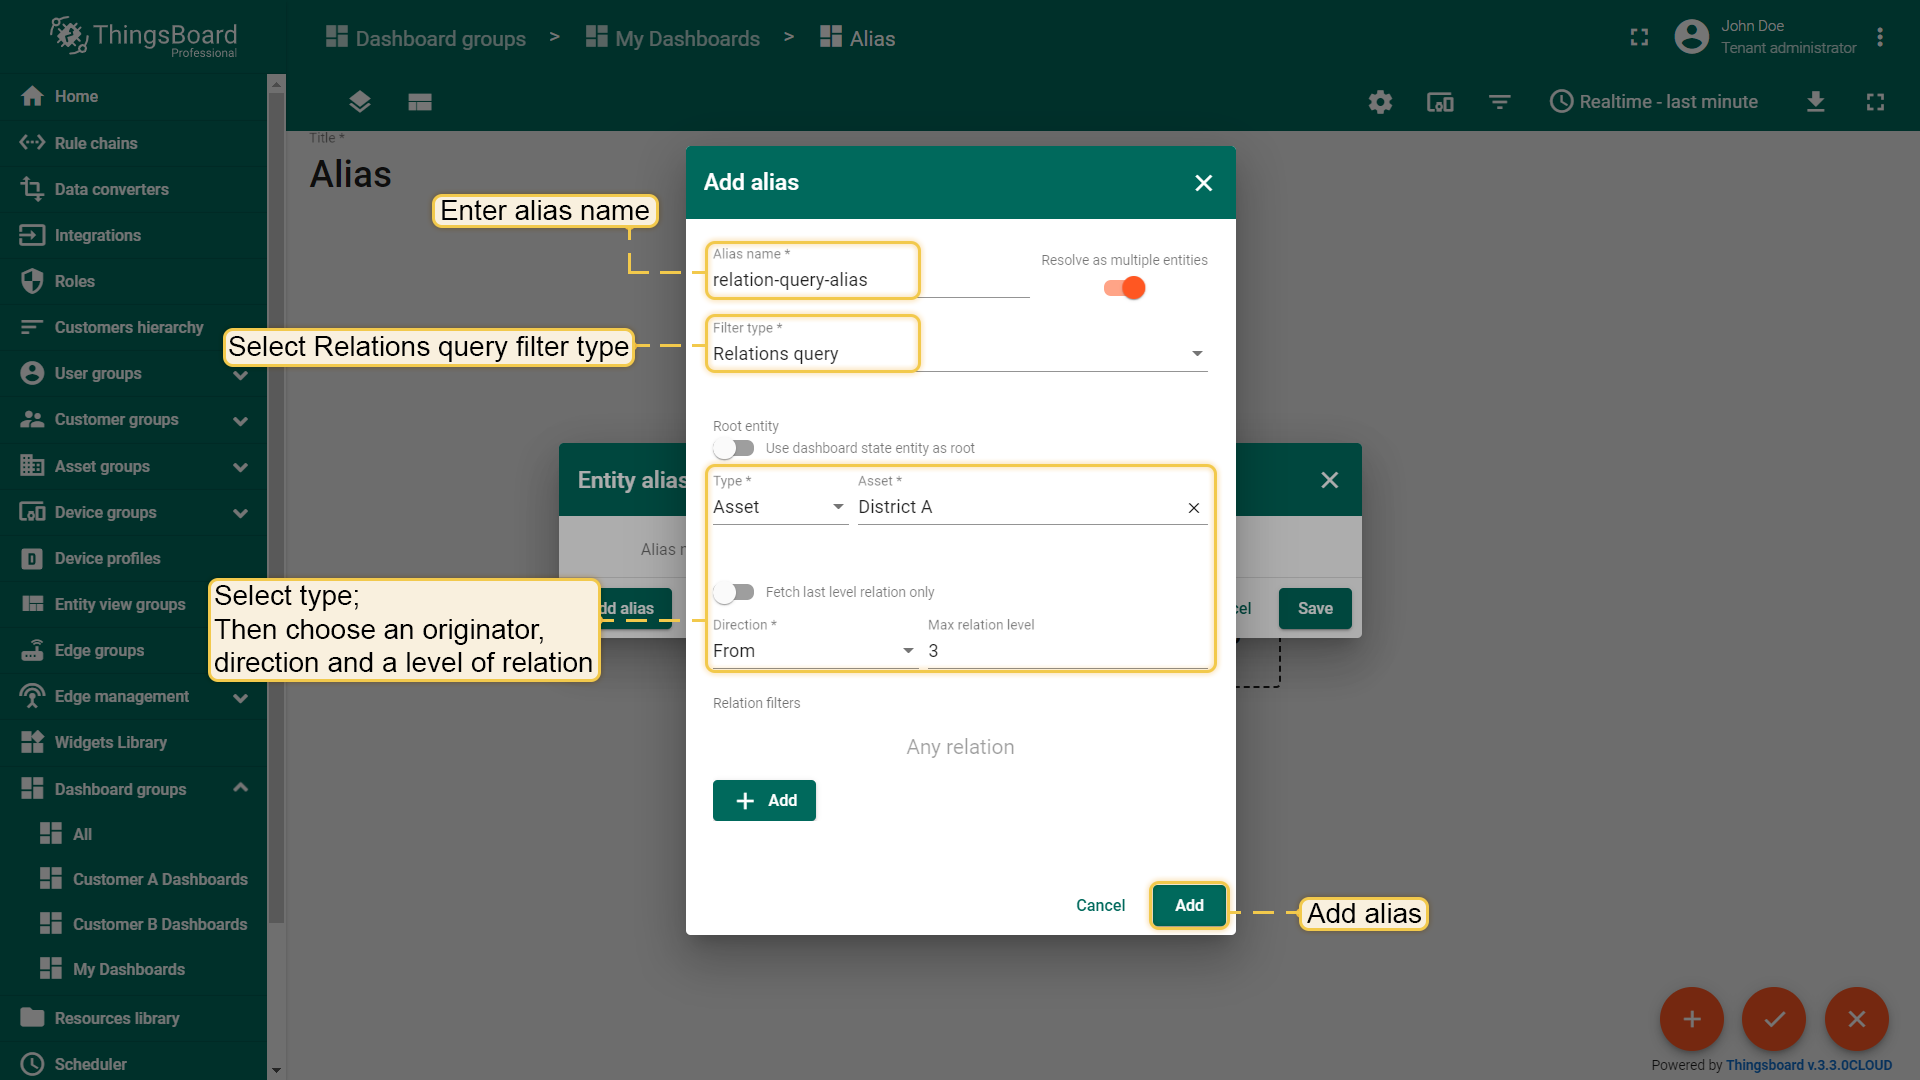
In the "Add alias" dialog, enter the alias name, specify the "Relations query" filter type. Then, select the type of entity and the entity itself, the relationship with which you want to display. Set direction to "From" or "To" and max relation level.
In the "Tables" widgets bundle select the "Entities table" widget. Navigate to the "Entity alias" tab. Specify the "Relations query" alias in the "Entity alias" field and add the "entityType" data key in the "Columns" section. Click "Add";
The Entities table widget displays entities and their type that have any relation to the asset "District A" up to relation level 3.
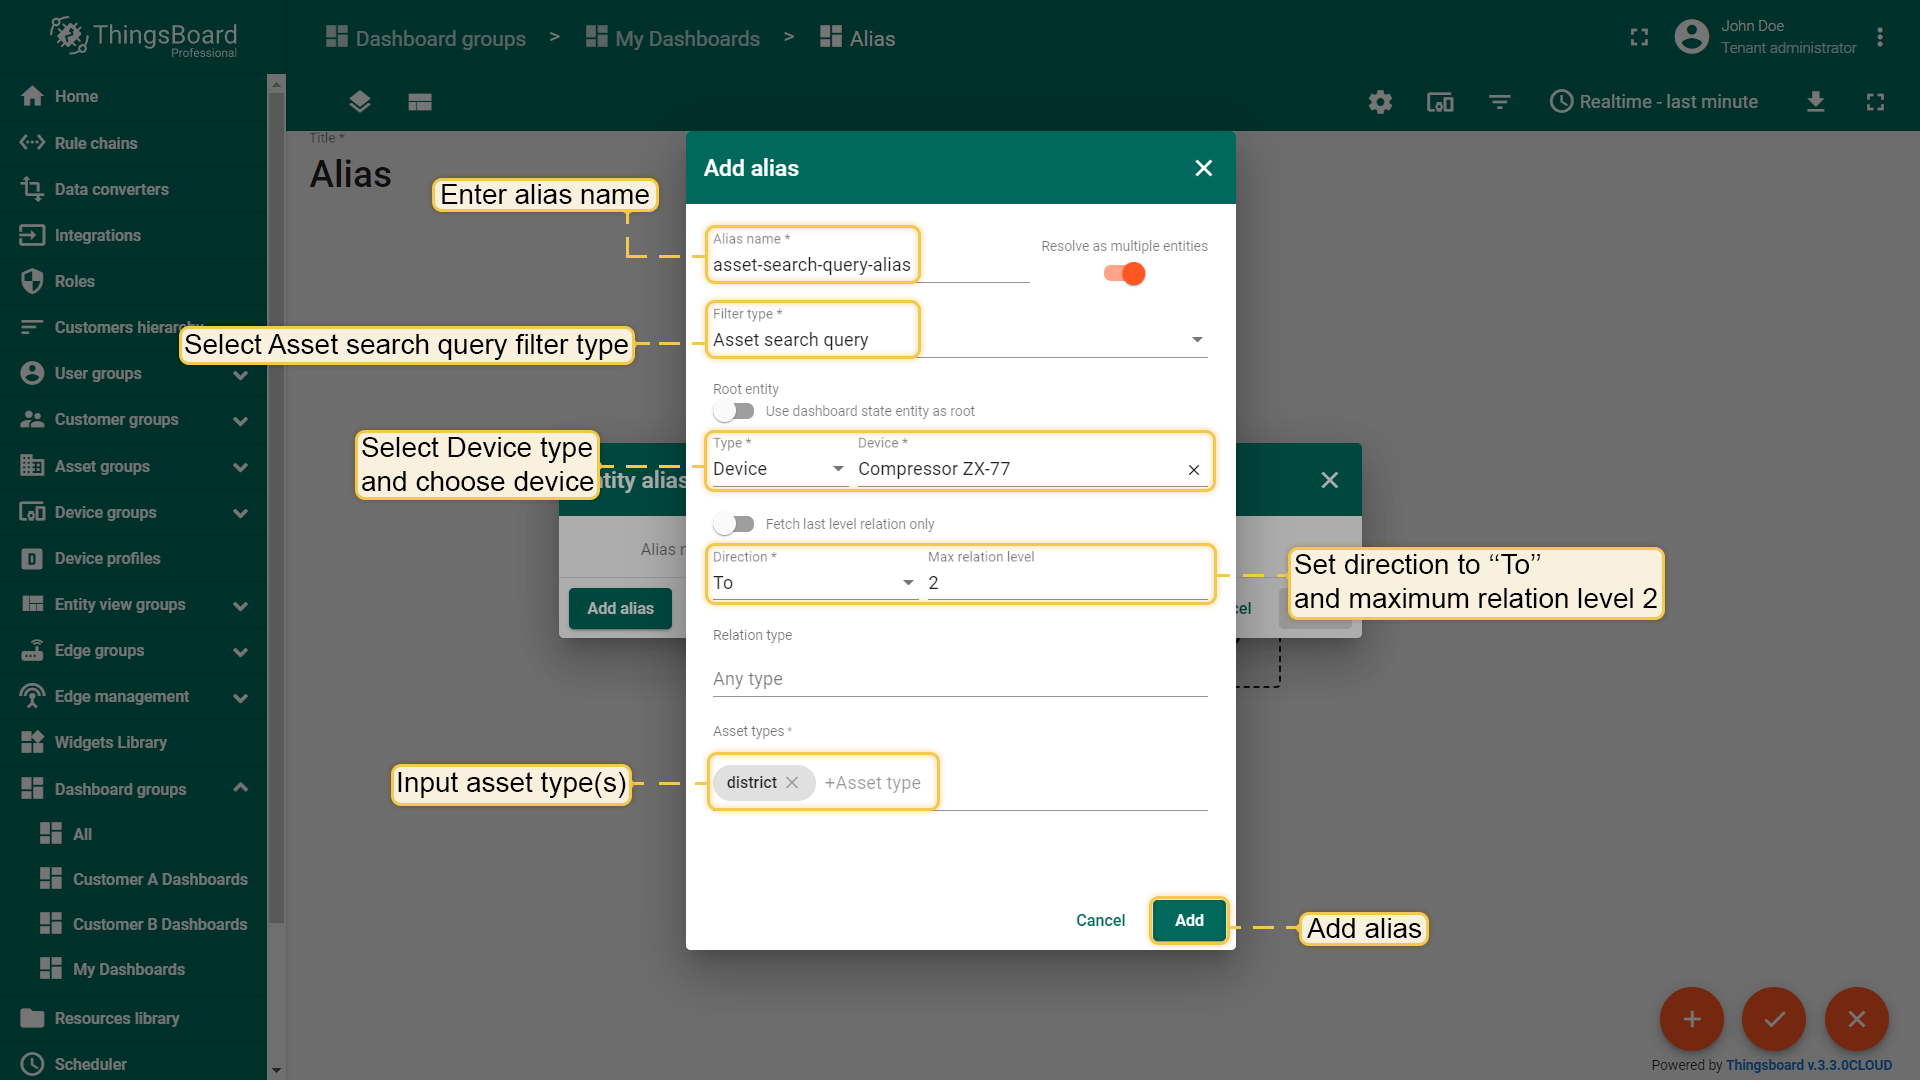
in the "Add alias" dialog, enter the alias name, select the "Asset search query" filter type, and select the entity type and an entity itself, the relationship with which you want to display. Set direction to "From" or "To" and max relation level and specify the asset profile(s) by which the assets will be filtered.
In the "Tables" widgets bundle select the "Entities table" widget. Navigate to the "Entity alias" tab. Specify the "Asset search query" alias in the "Entity alias" field and add "name" and "type" data keys in the "Columns" section. Click "Add";
The Entities table widget that displays assets that have any relation to the device "Compressor QA-32" with relation level 2 has been added.
In the "Add alias" dialog, enter the alias name, select the "Device search query" filter type, and select the entity type and choose an entity itself, the relationship with which you want to display. Set direction to "From" or "To" and max relation level and specify the device profile(s) by which the devices will be filtered.
In the "Tables" widgets bundle select the "Entities table" widget. Navigate to the "Entity alias" tab. Specify the "Device search query" alias in the "Entity alias" field and add "name", "type" and "temperature" data keys in the "Columns" section. Click "Add";
The Entities table widget that displays devices that have any relation to the asset “Building A” up to relation level 1 has been added.
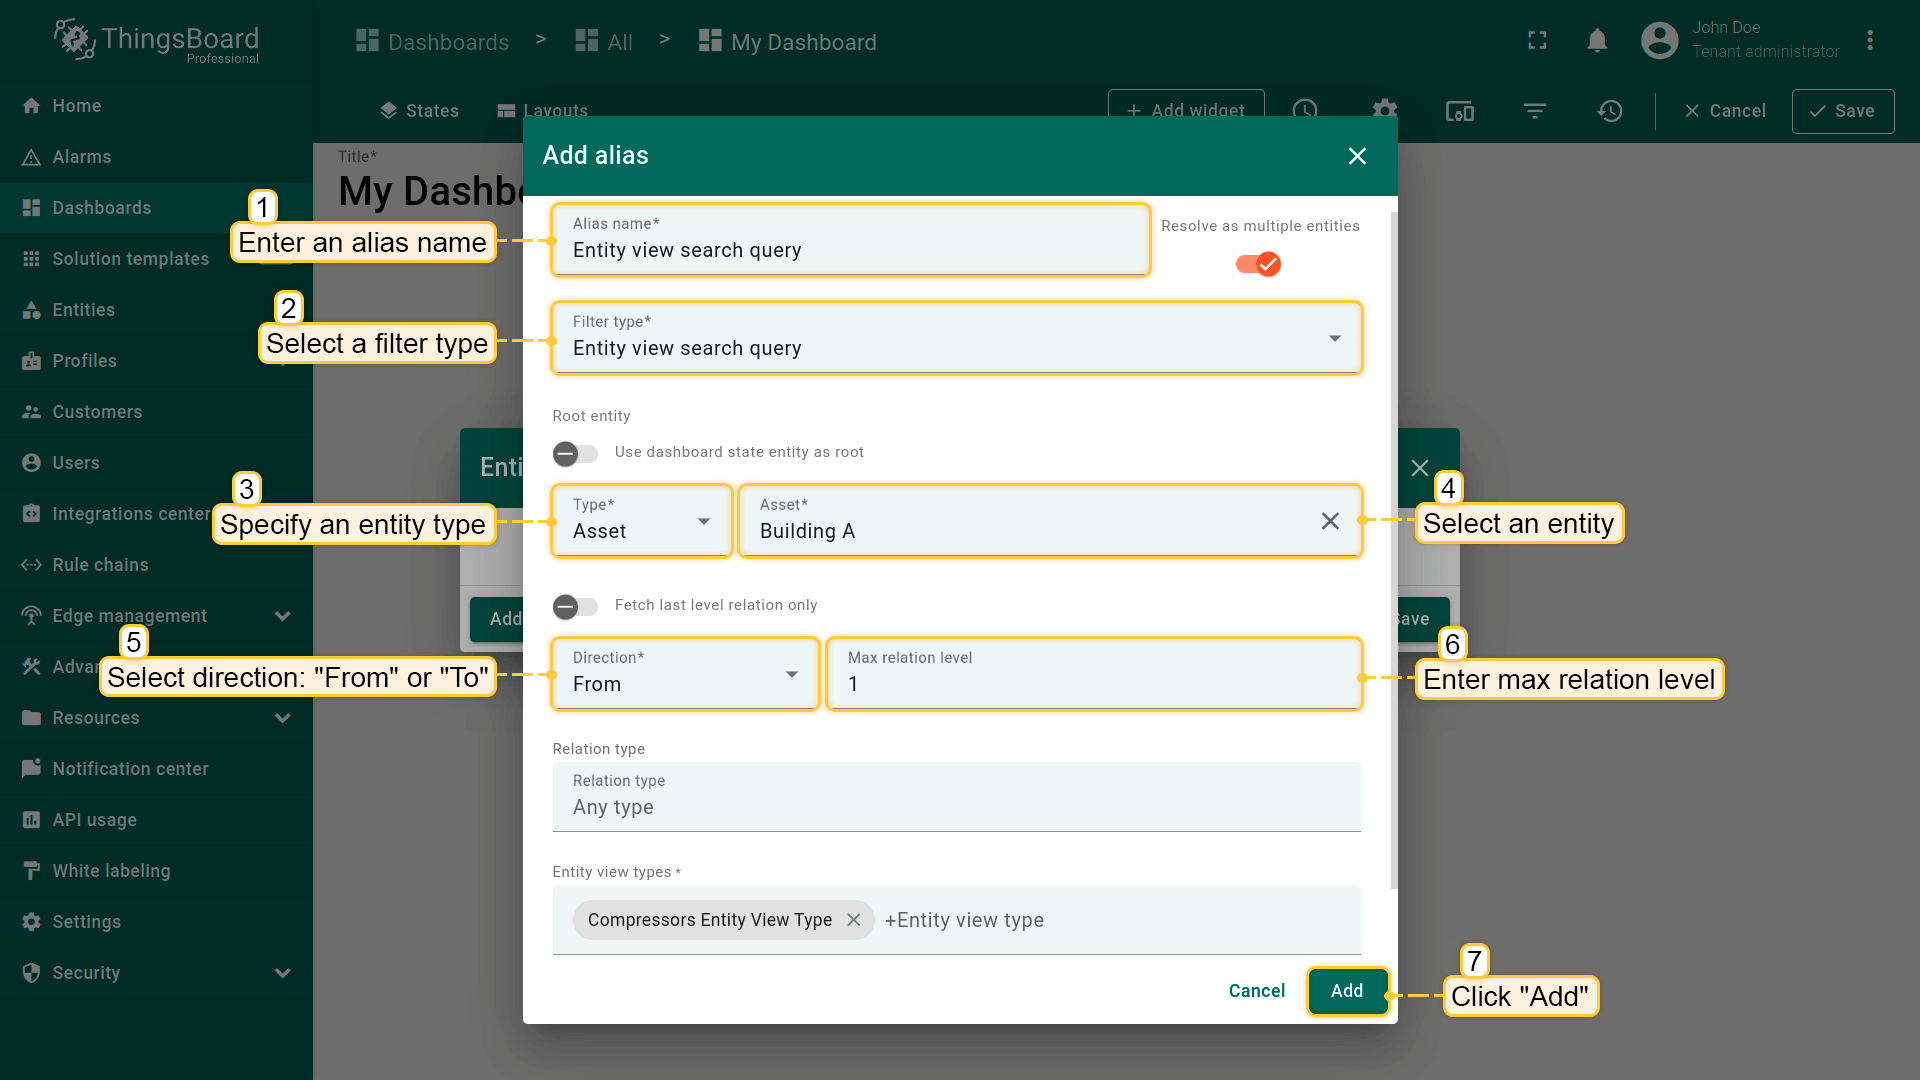
In the “Add alias” dialog, enter the alias name, select the "Entity view search query" filter type, and select the entity type and choose an entity itself, the relationship with which you want to display. Set direction to "From" or "To" and max relation level and specify the entity view type(s) by which entity views will be filtered
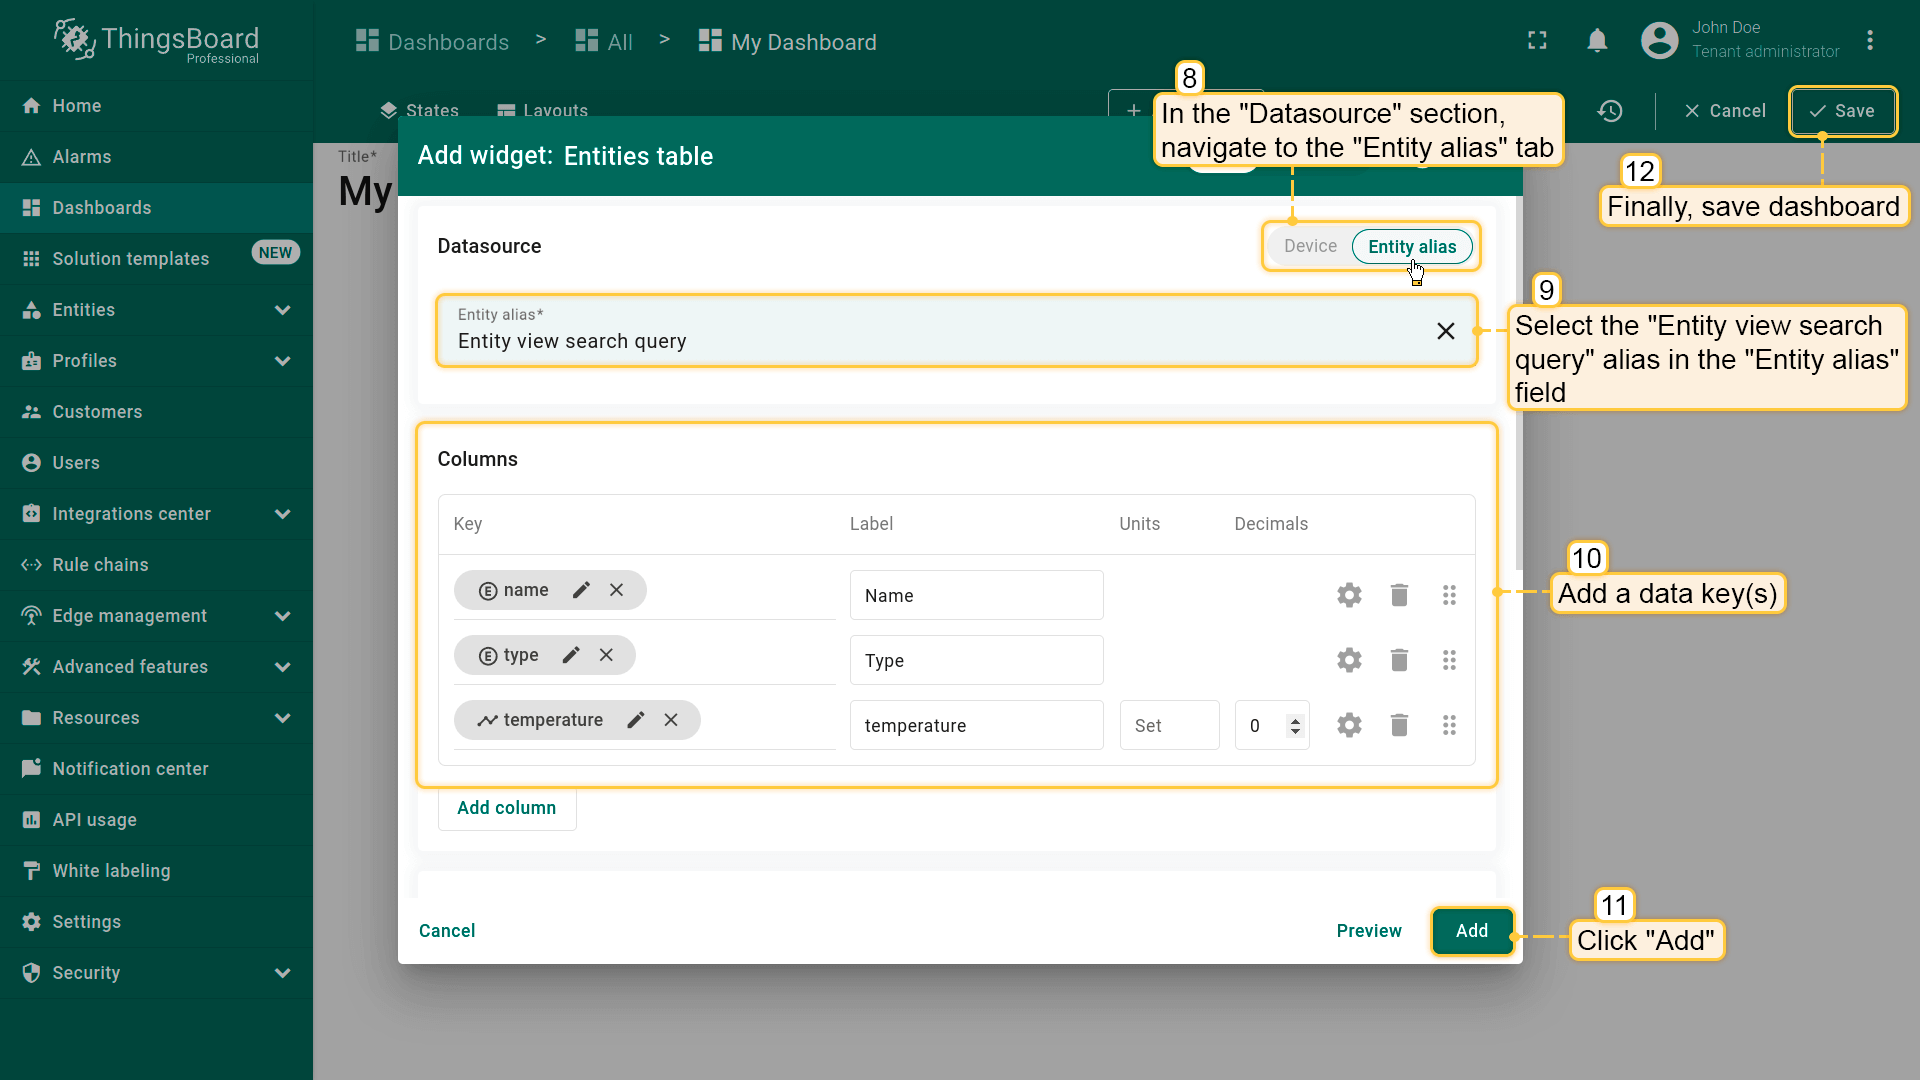
In the "Tables" widgets bundle select the "Entities table" widget. Navigate to the "Entity alias" tab. Specify the "Entity view search query" alias in the "Entity alias" field and add "name", "type" and "temperature" data keys in the "Columns" section. Click "Add";
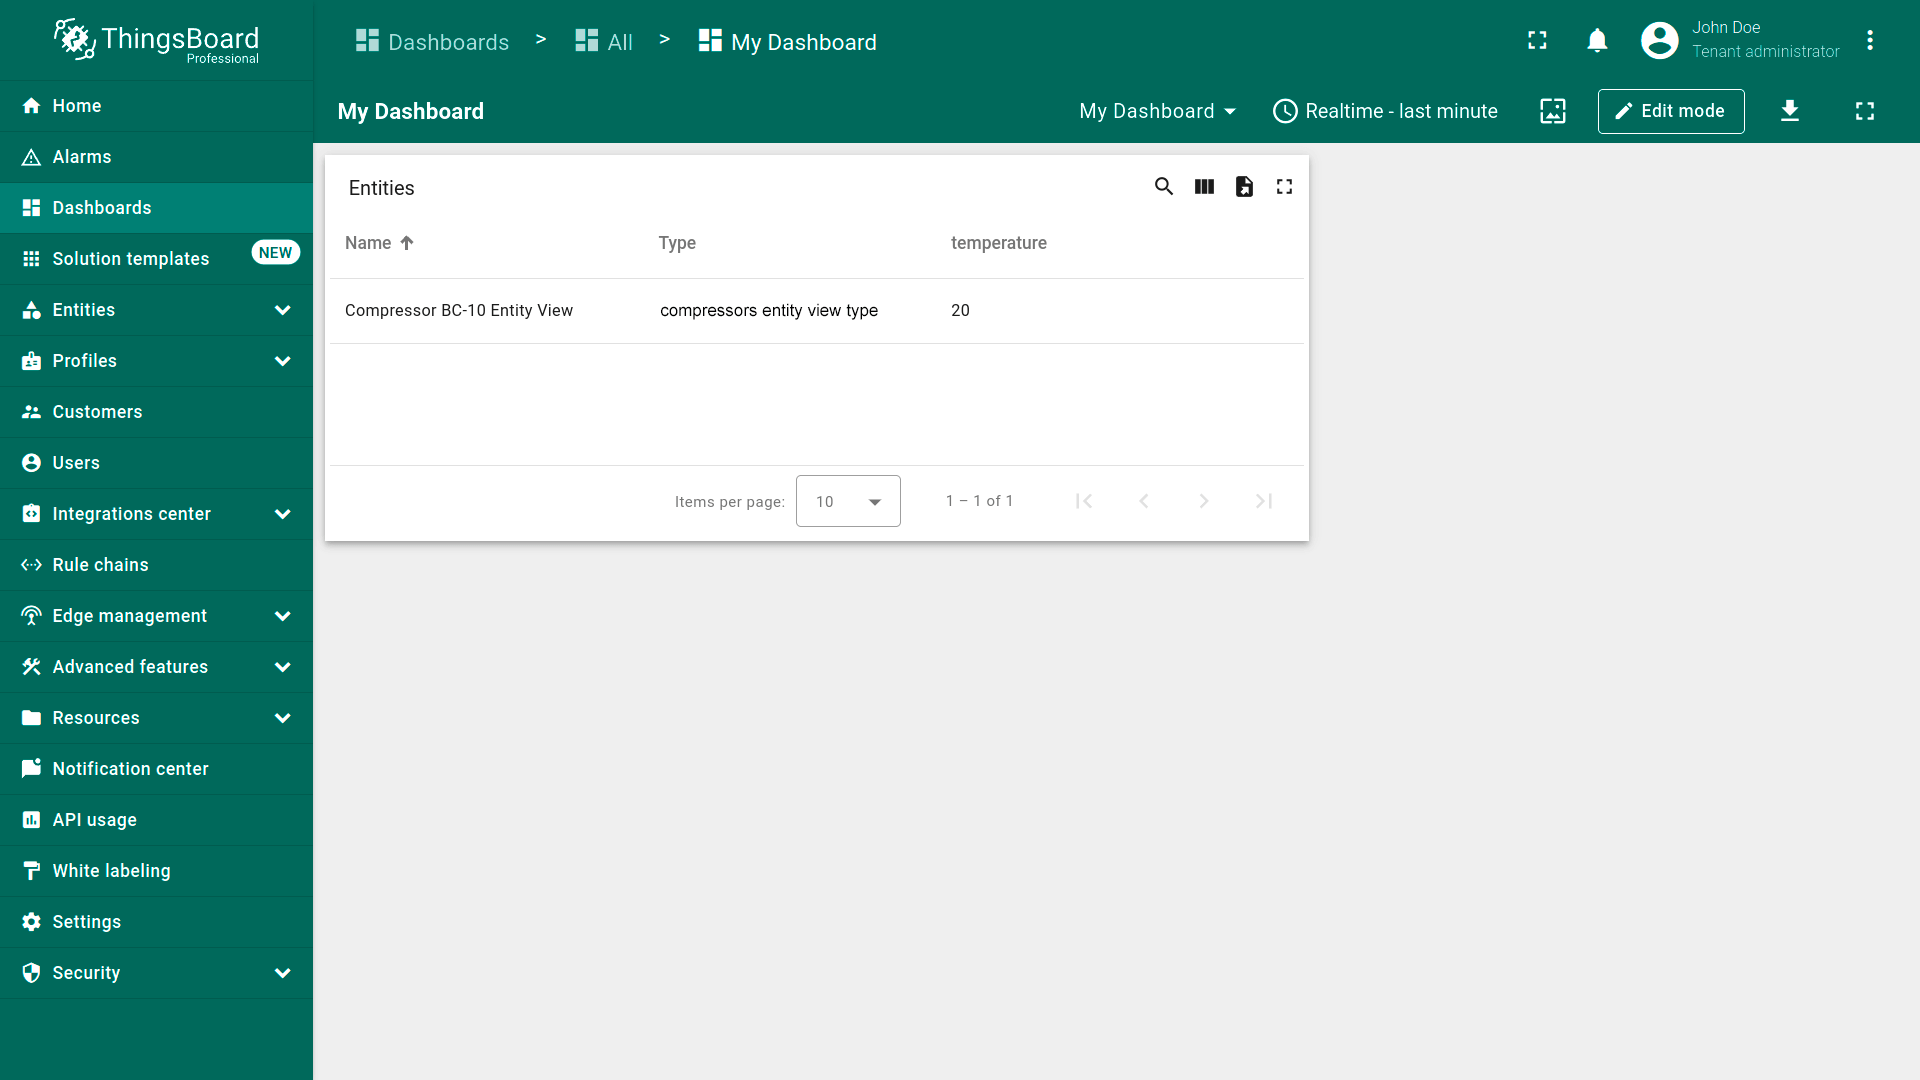
The Entities table widget that displays entity views that have any relation to the asset "Building A" up to relation level 1 has been added.
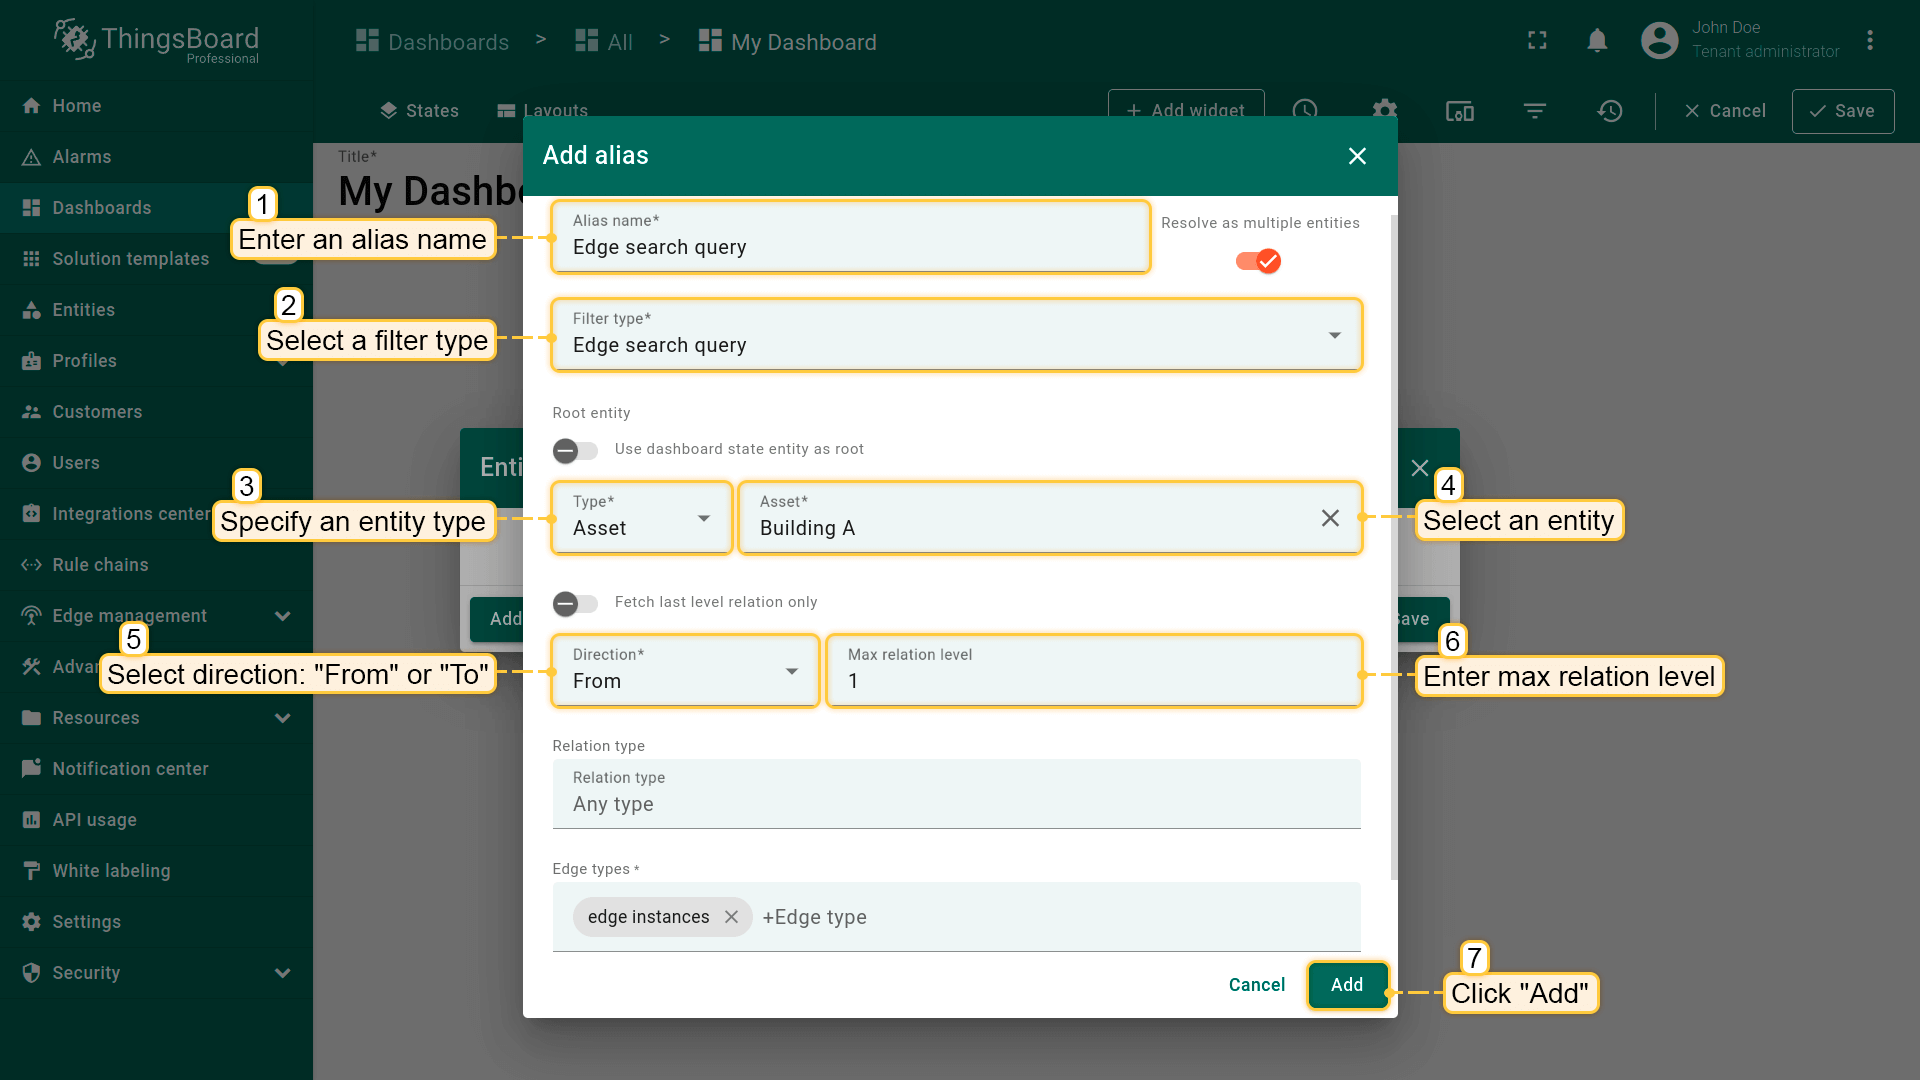
In the "Add alias" dialog, enter the alias name, select the "Edge search query" filter type, and select the entity type and an entity itself, the relationship with which you want to display. Set the direction to "From" or "To", max relation level and specify the edge type(s) by which the edges will be filtered.
In the "Tables" widgets bundle select the "Entities table" widget. Navigate to the "Entity alias" tab. Specify the "Edge search query" alias in the "Entity alias" field and add "name" and "type" data keys in the "Columns" section. Click "Add";
The Entities table widget that displays edges that have any relation to the asset "Building A" up to relation level 1 has been added.
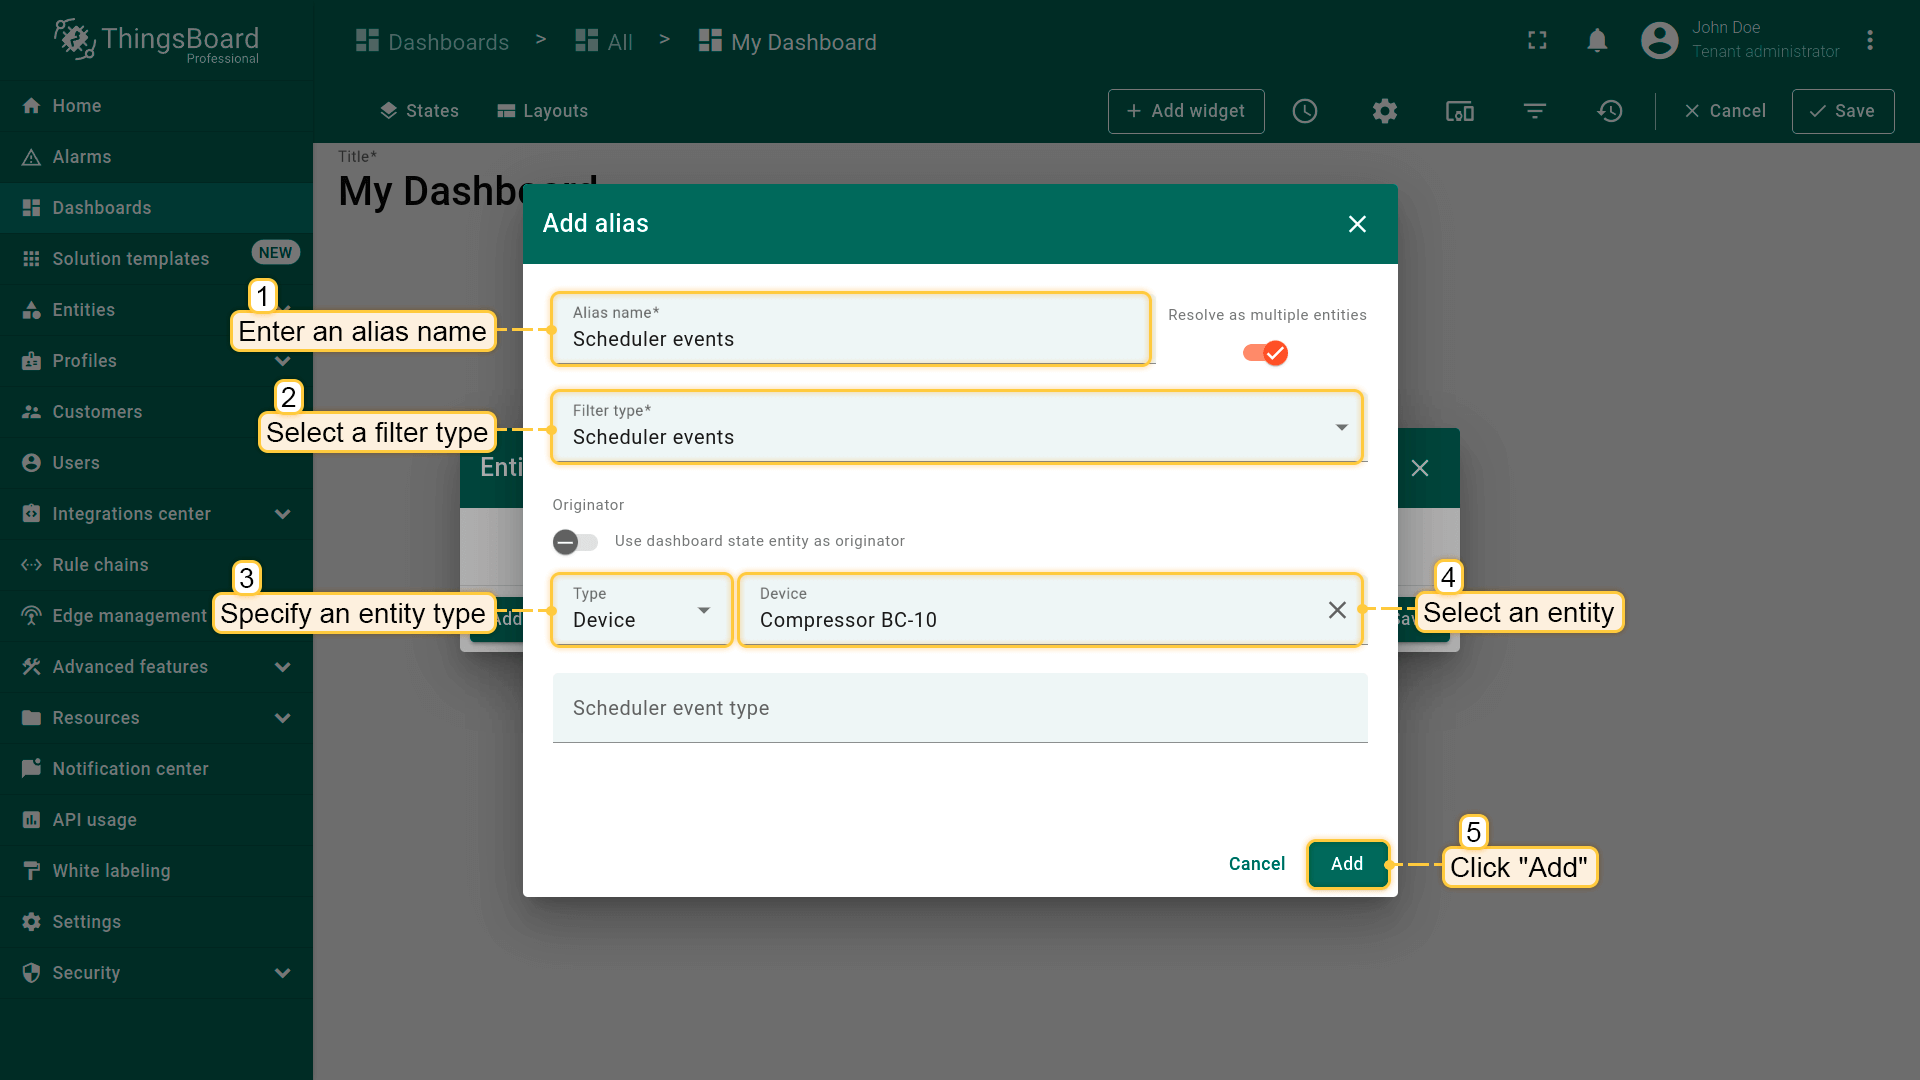
In the "Add alias" dialog, enter the alias name, select the "Scheduler events" filter type, and select the entity for which scheduler events will be displayed.
In the "Tables" widgets bundle select the "Entities table" widget. Navigate to the "Entity alias" tab. Specify the "Scheduler events" alias in the "Entity alias" field and add "name", "type" and "schedule" data keys in the "Columns" section. Click "Add";
The Entities table widget that displays scheduler events for the "Compressor BC-10" device has been added.