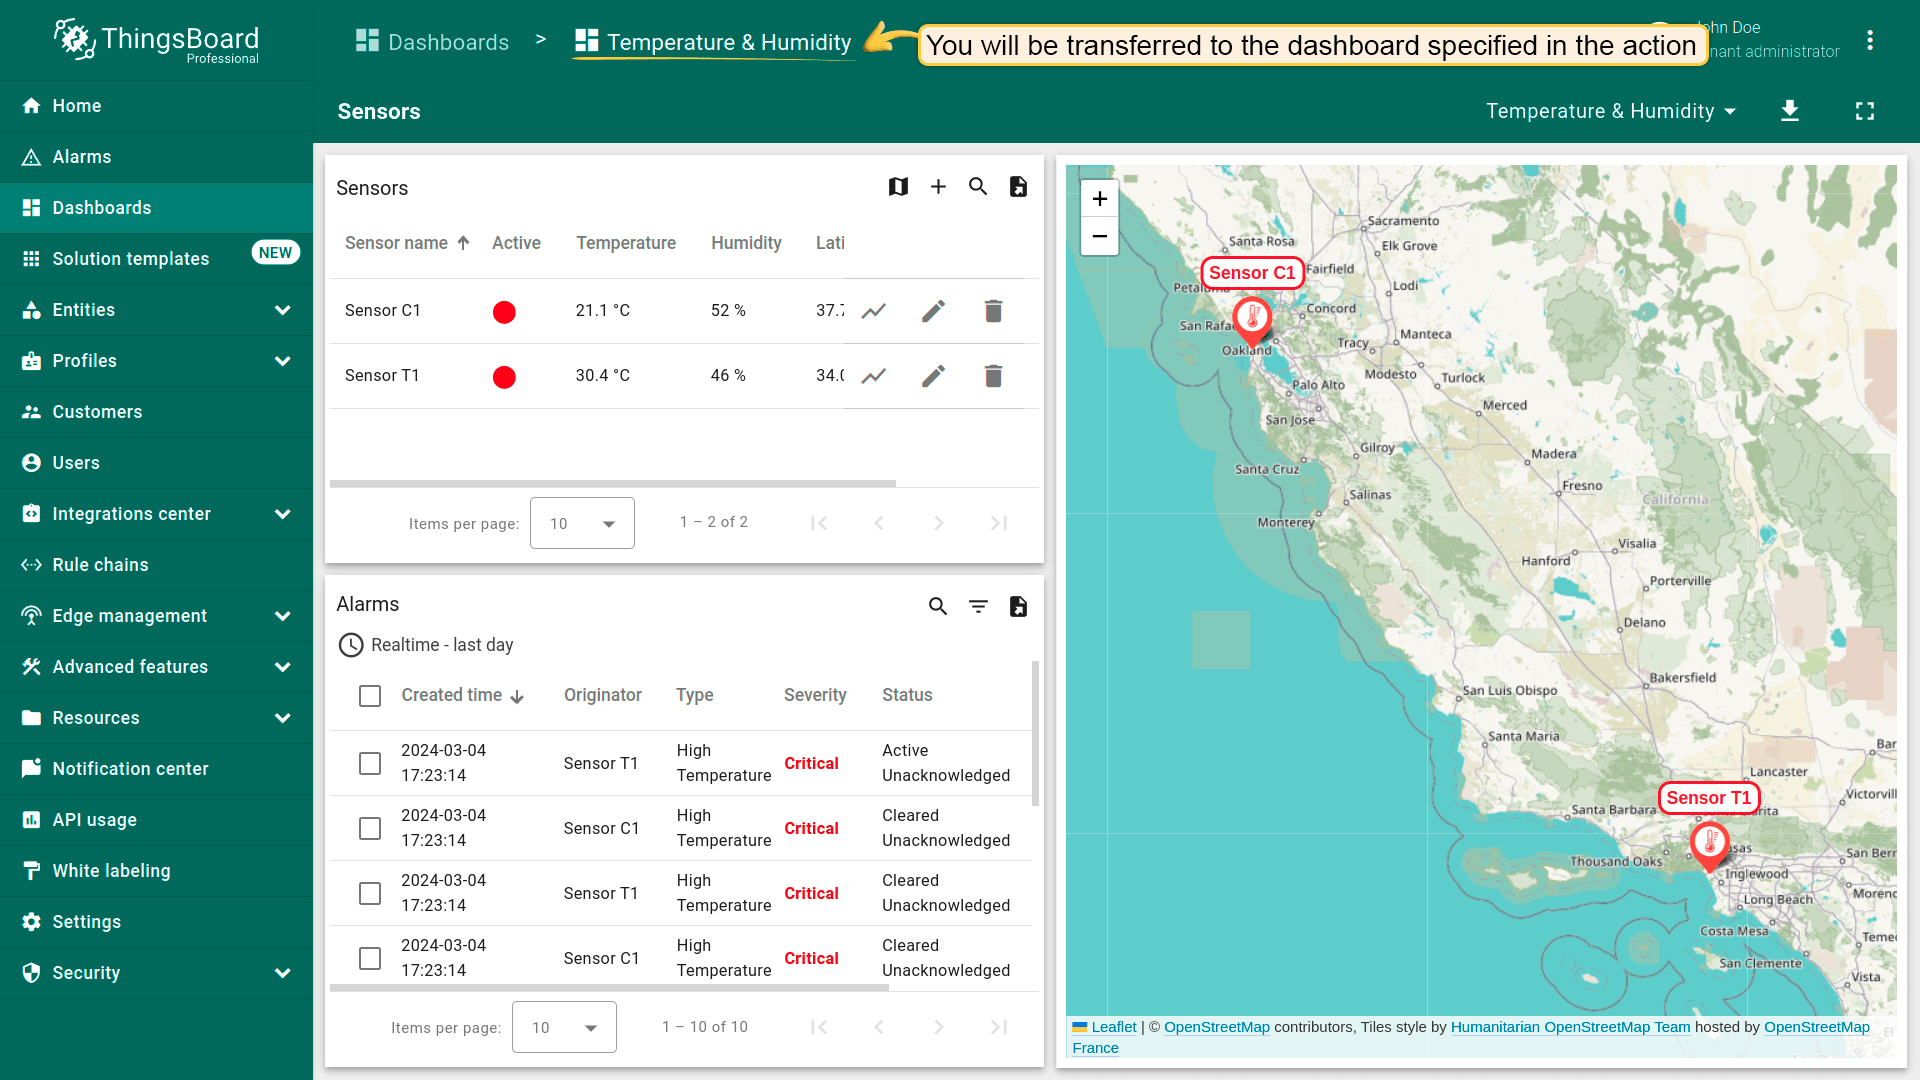
Actions功能可用于在 dashboard 的 states 之间或不同 dashboards 之间导航。 Actions可快速配置跳转到已创建state、切换到其它dashboard或更新当前dashboard。 不同部件的action来源各异,但所有部件可选的动作类型相同。 可在编辑或创建部件时配置Actions。
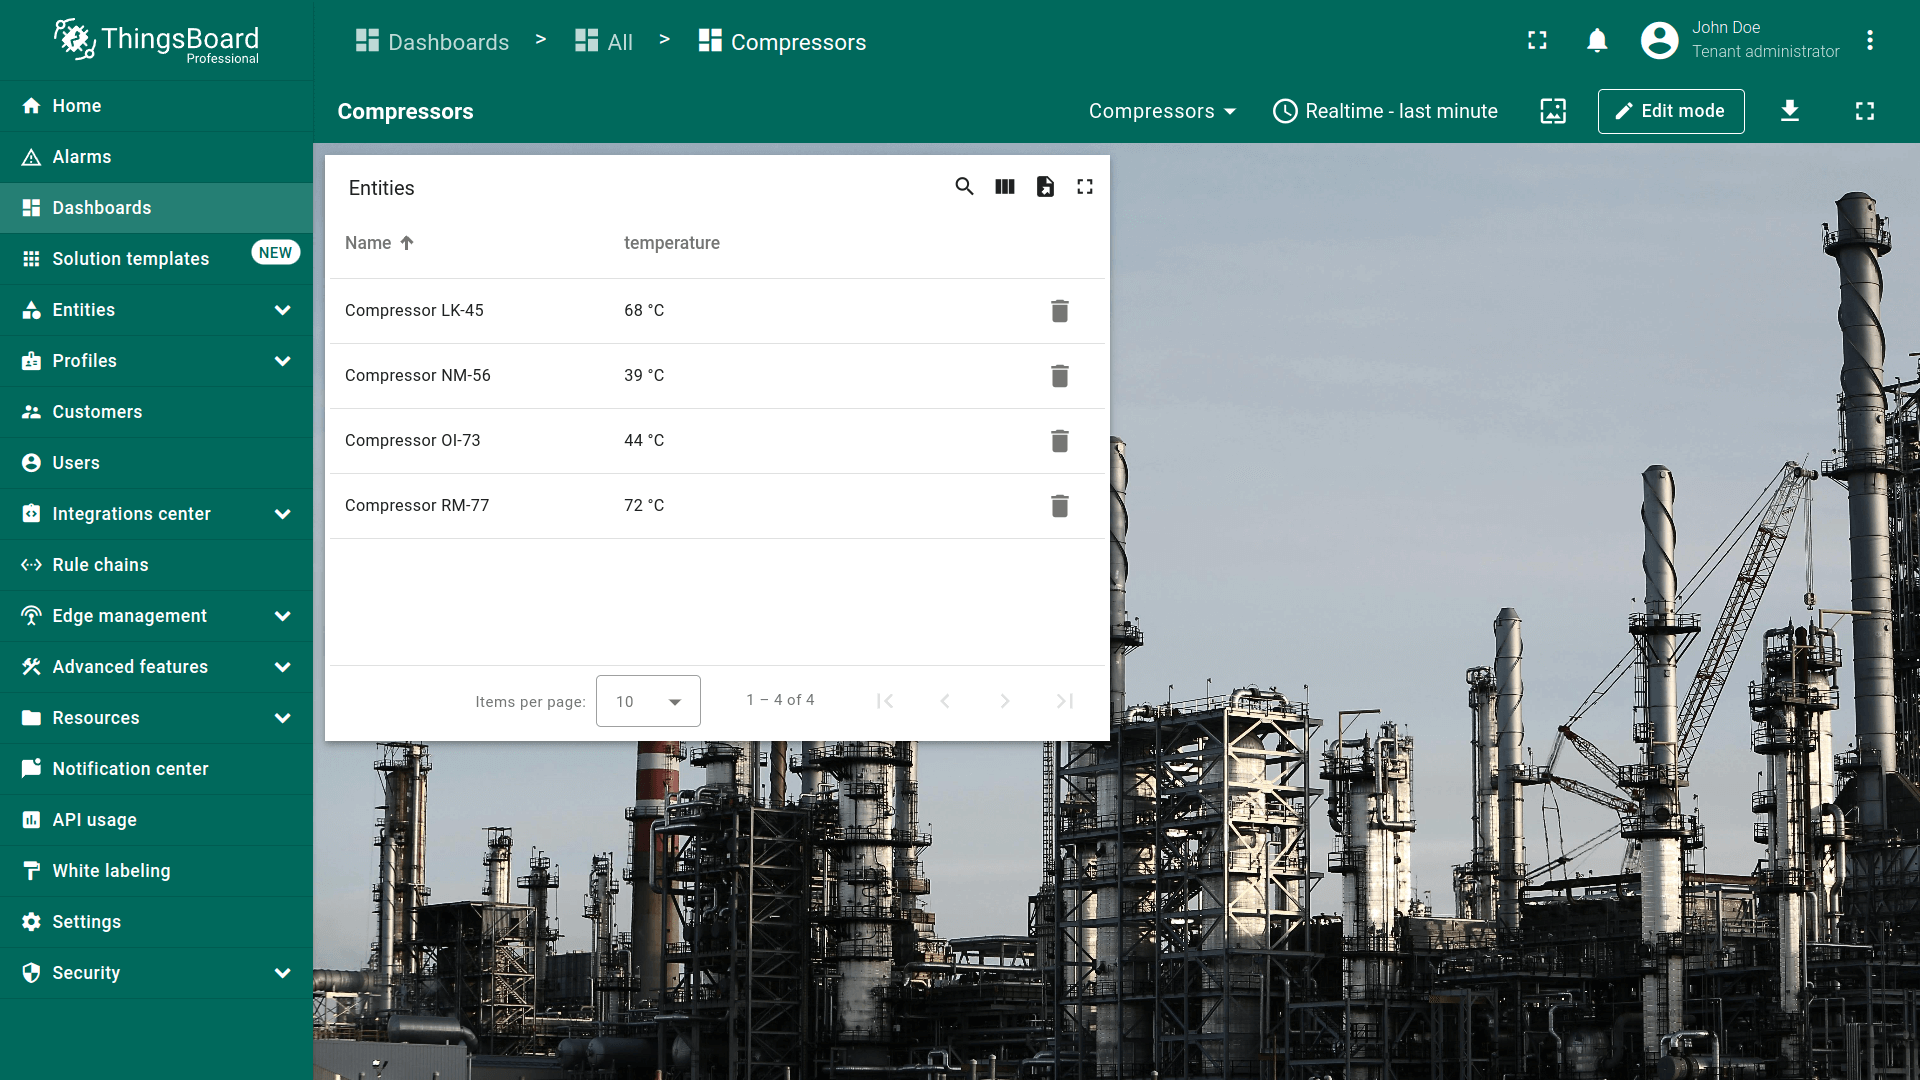
本指南以Entities table部件为例在编辑模式下配置actions。请在此了解如何将Entity table部件添加到dashboard。
要完整理解Actions用法,需先在dashboard上添加State。添加方法见此处。
添加操作
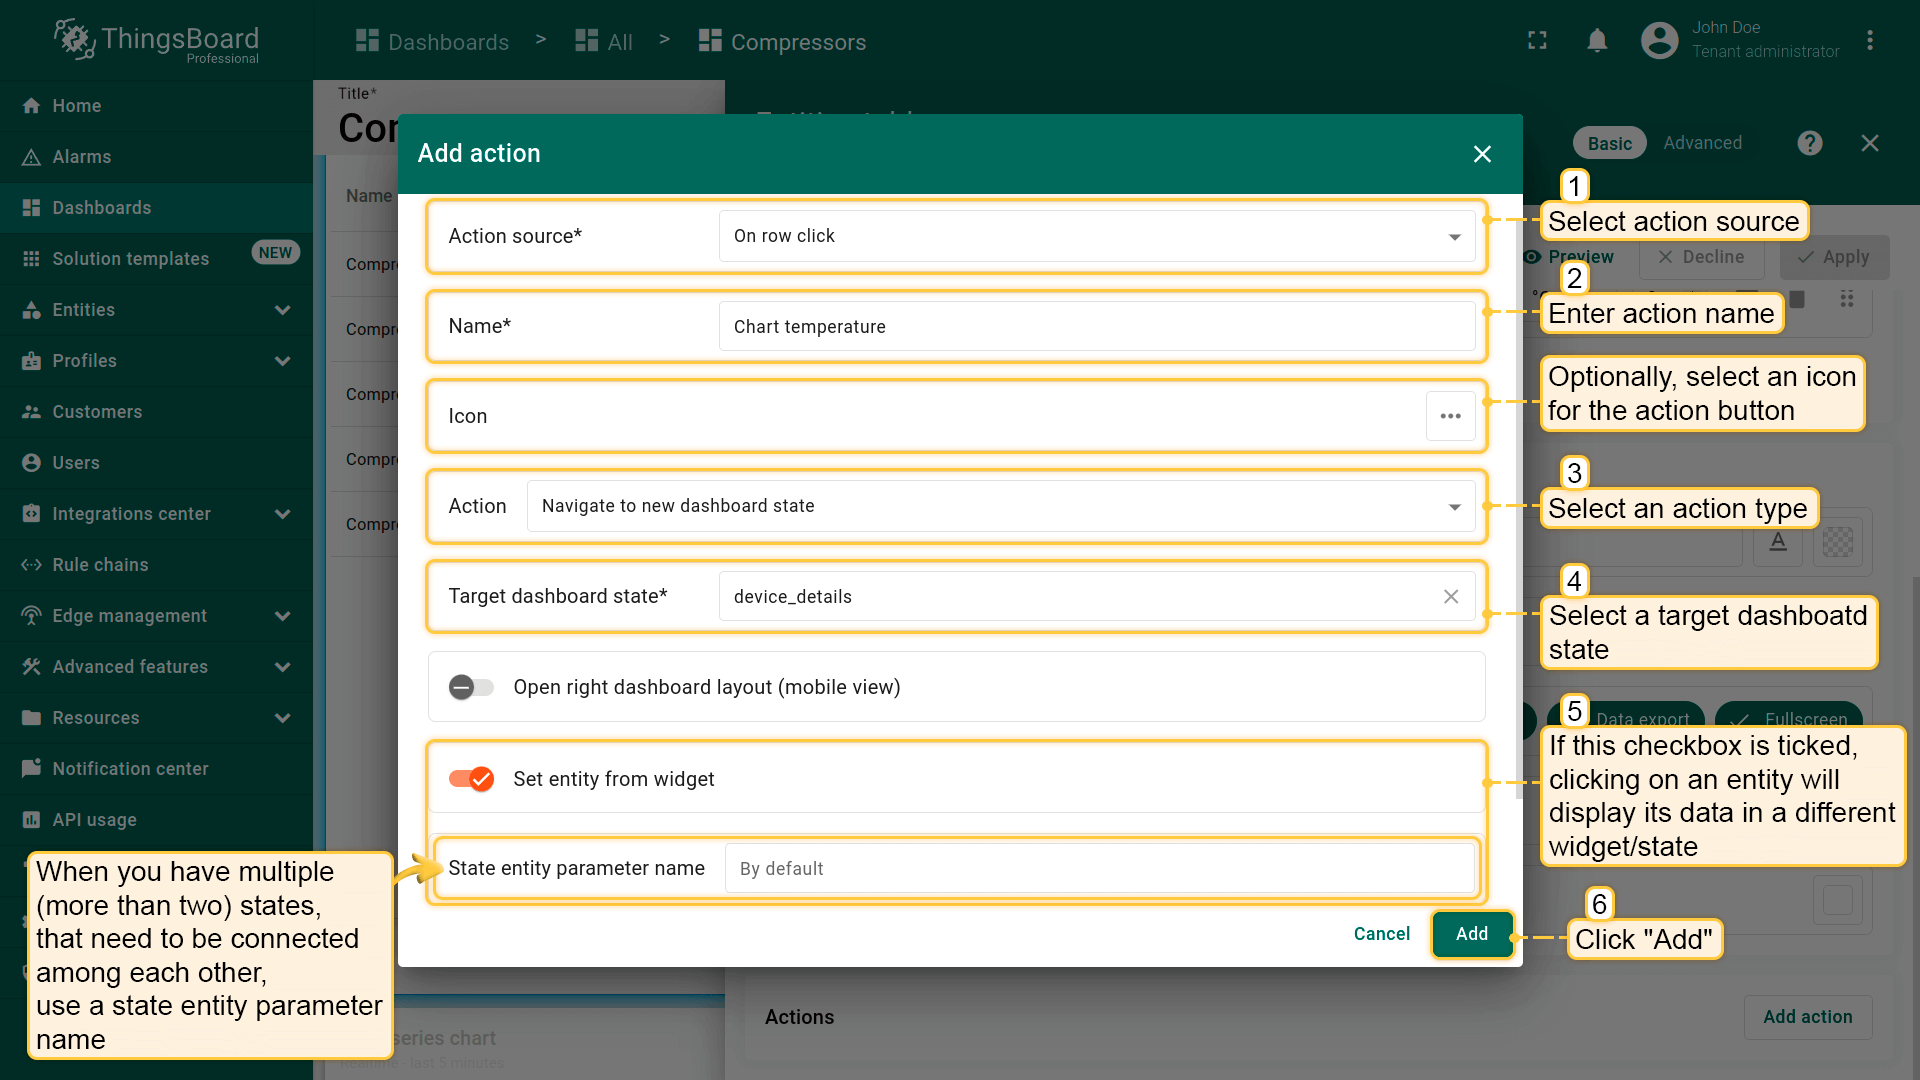
添加第一个操作。本节仅概述通用步骤,不展开每项设置的细节。操作类型和操作来源的使用示例将在后文说明。
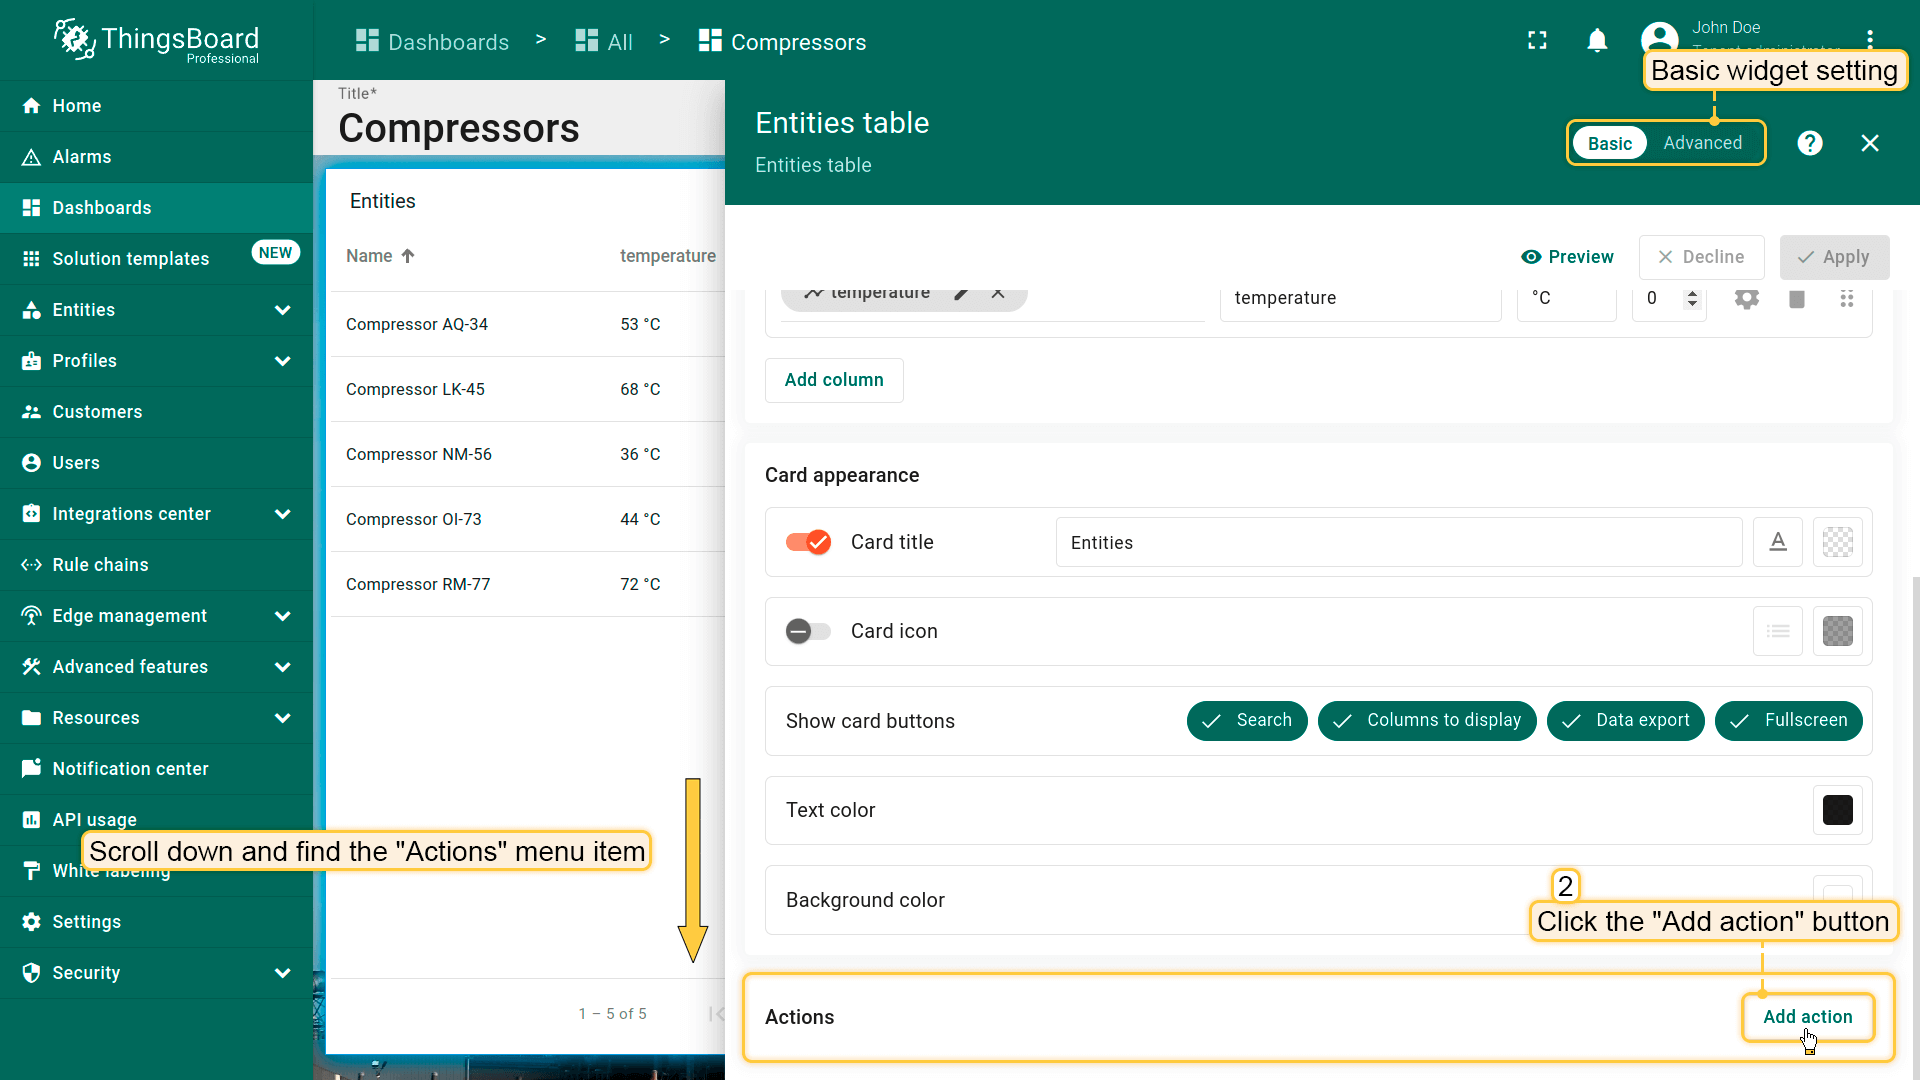
多数部件提供 basic 和 advanced 两种配置。添加action的流程在这两种模式下略有不同。分别说明:
若使用 basic 部件配置:
- 进入要添加action的部件编辑模式,向下滚动找到“Actions”菜单项;
- 点击“Add action”按钮(创建一个或多个action后,该按钮会变为
+图标)。 “Actions”窗口将打开。当前为空,之后会显示所有已创建actions; - 点击屏幕右上角“plus”图标打开新“Add action”窗口。在此需输入名称、指定action来源、选择action类型以配置新action。后续配置取决于所选action类型。然后点击“Add”继续;
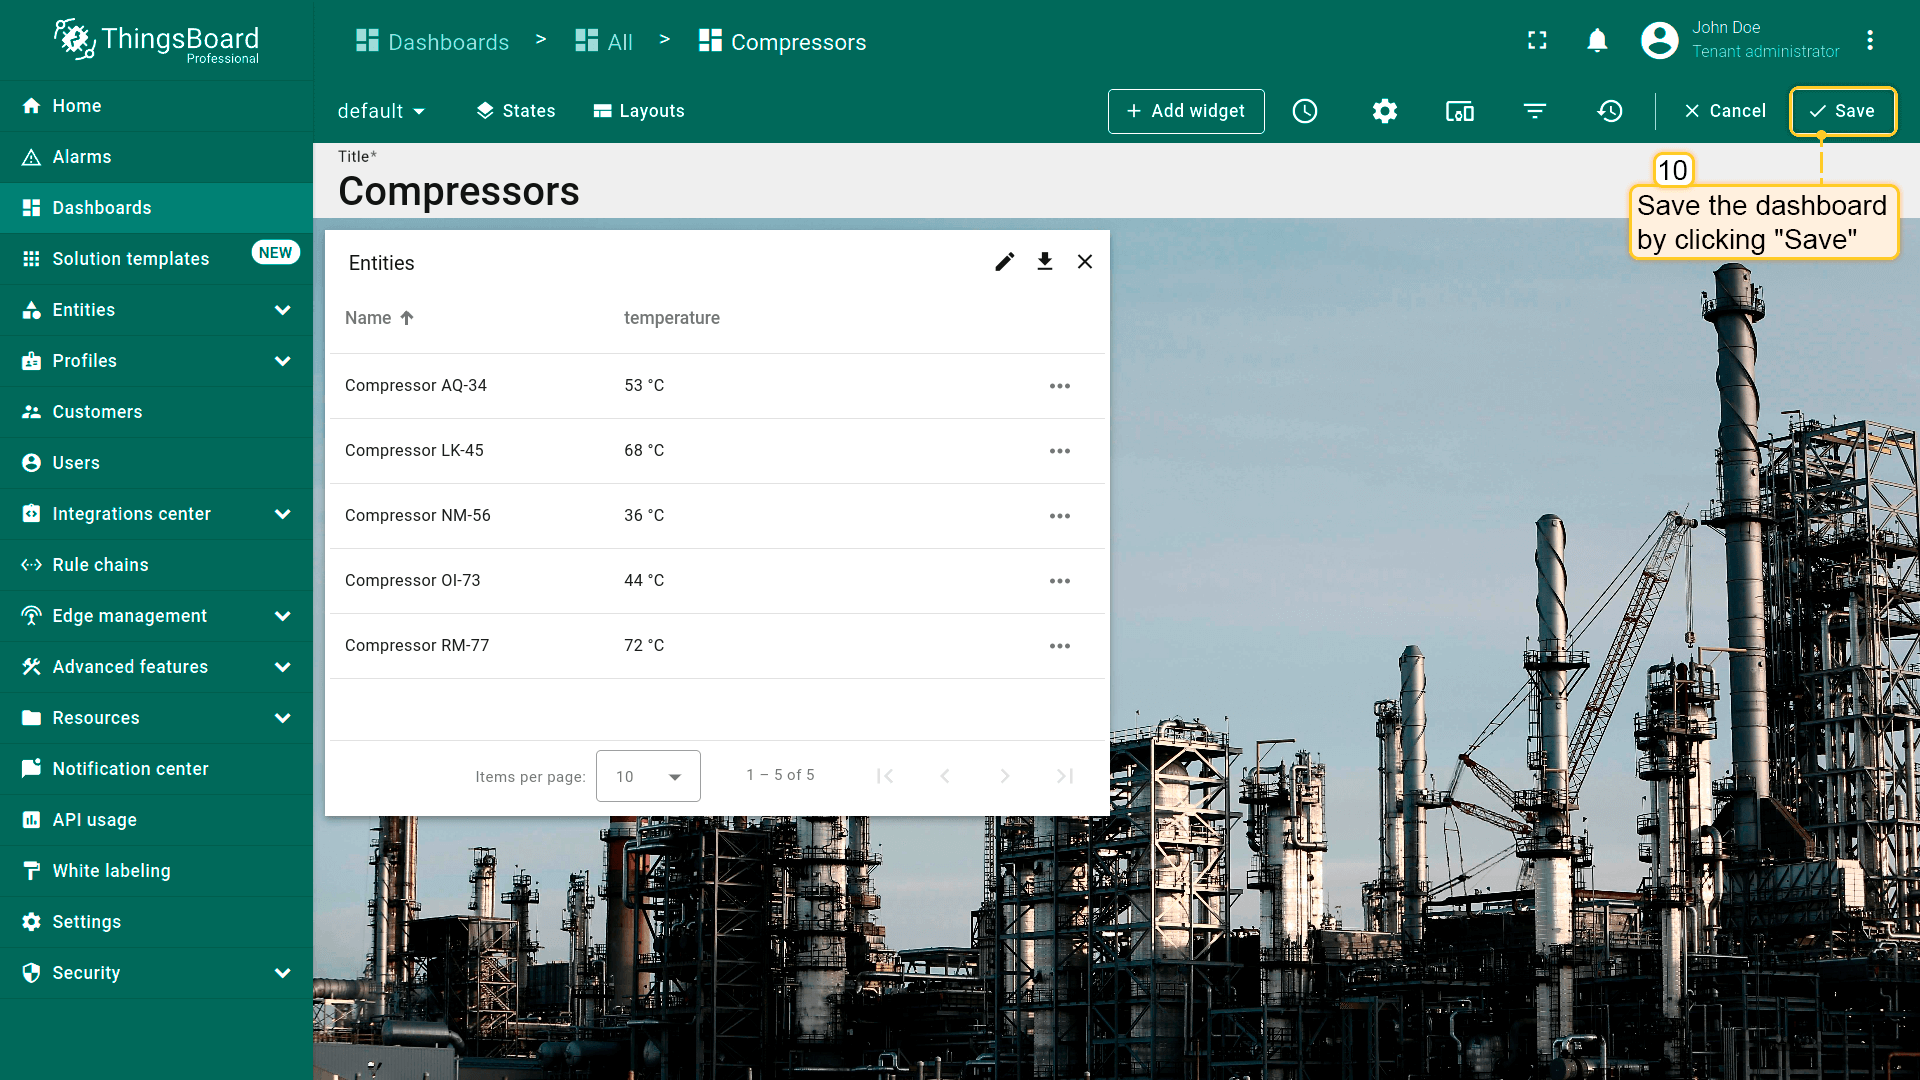
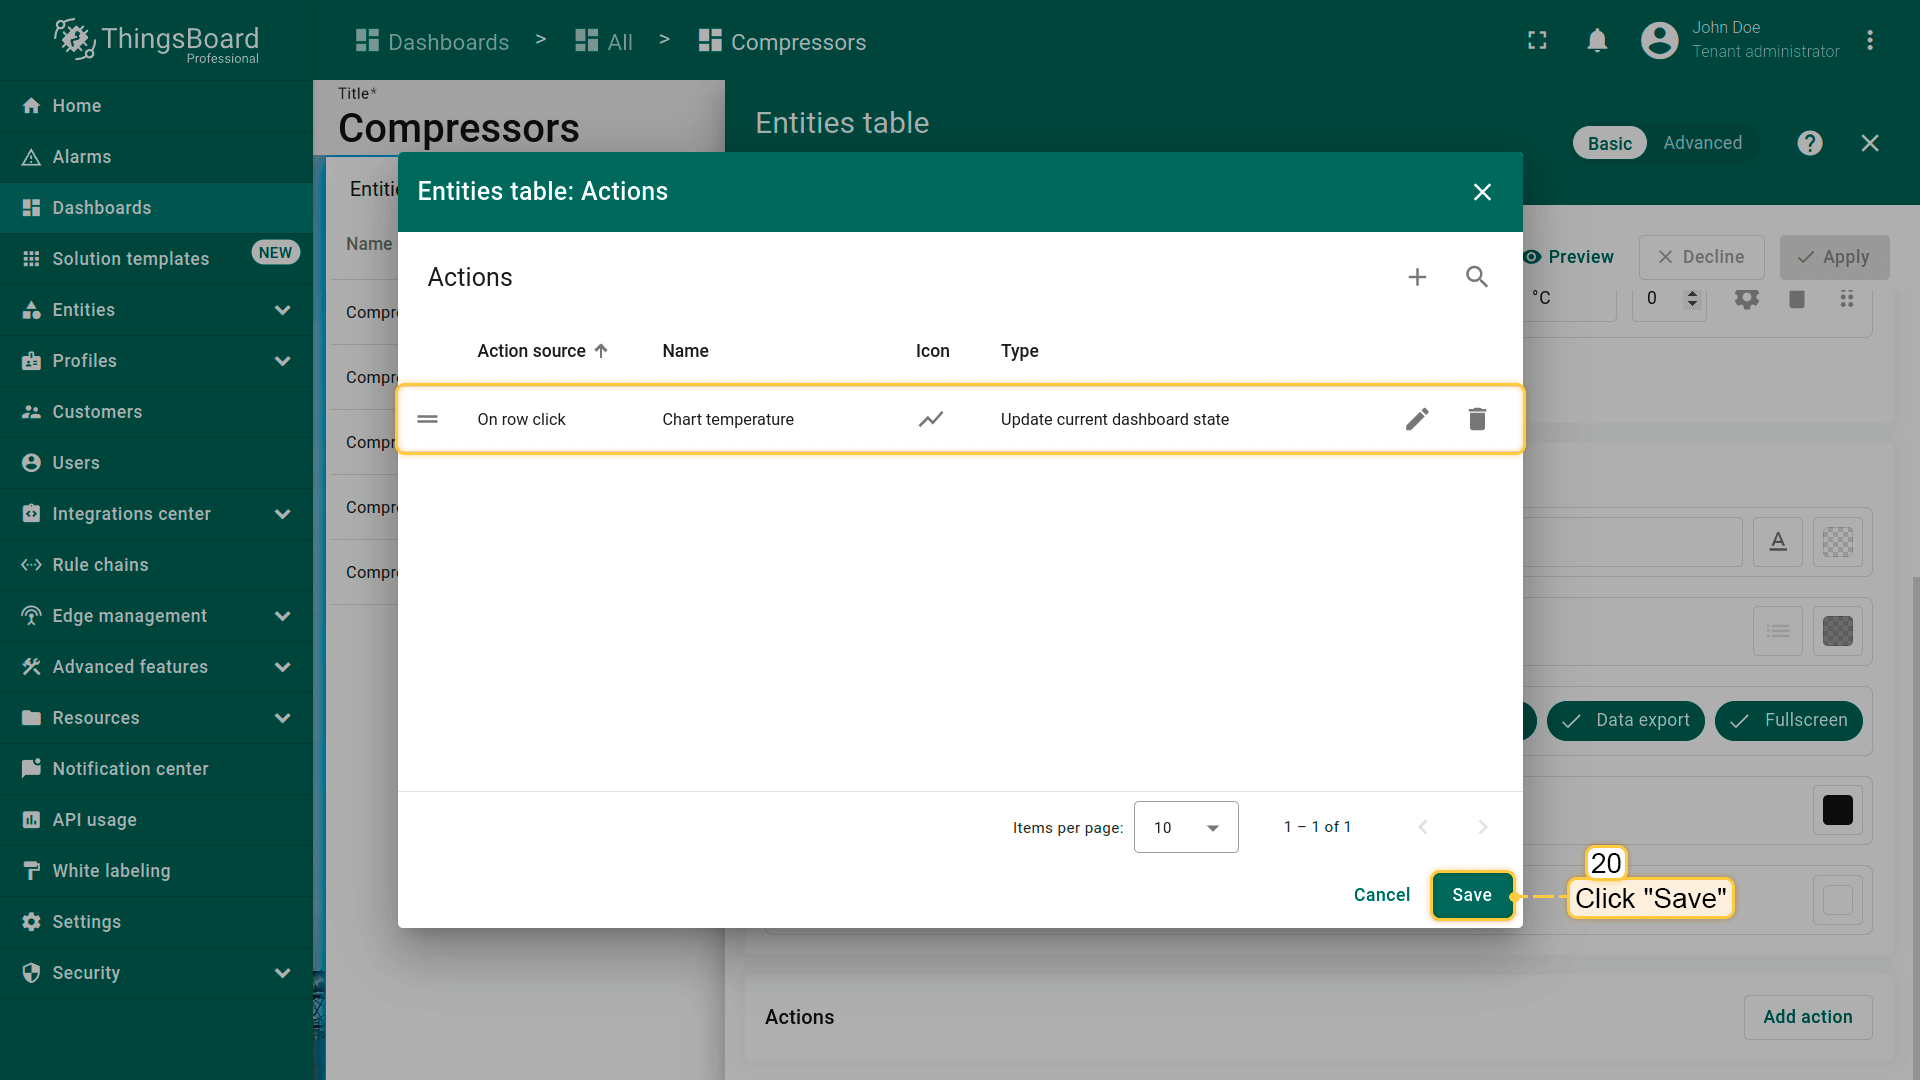
- 在“Actions”窗口中可查看已配置action,核对action来源、图标和类型。点击“Save”;
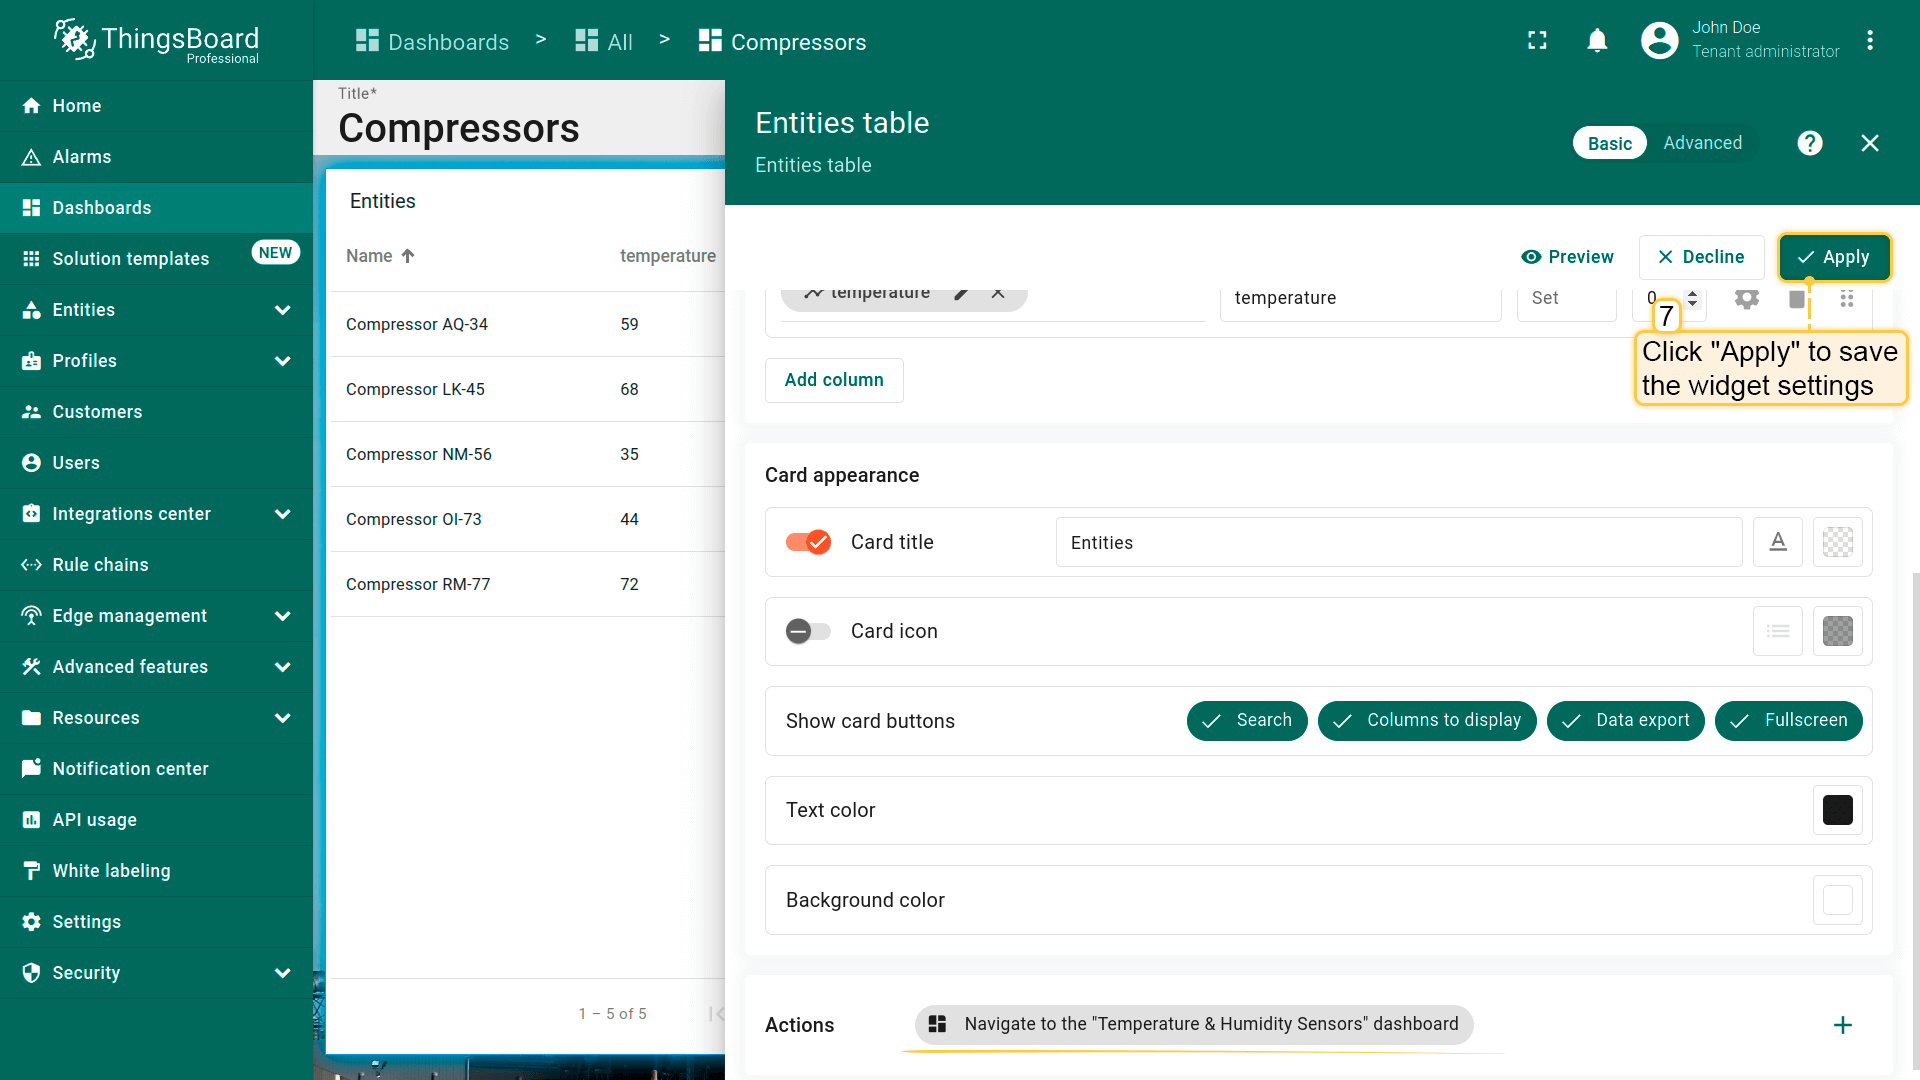
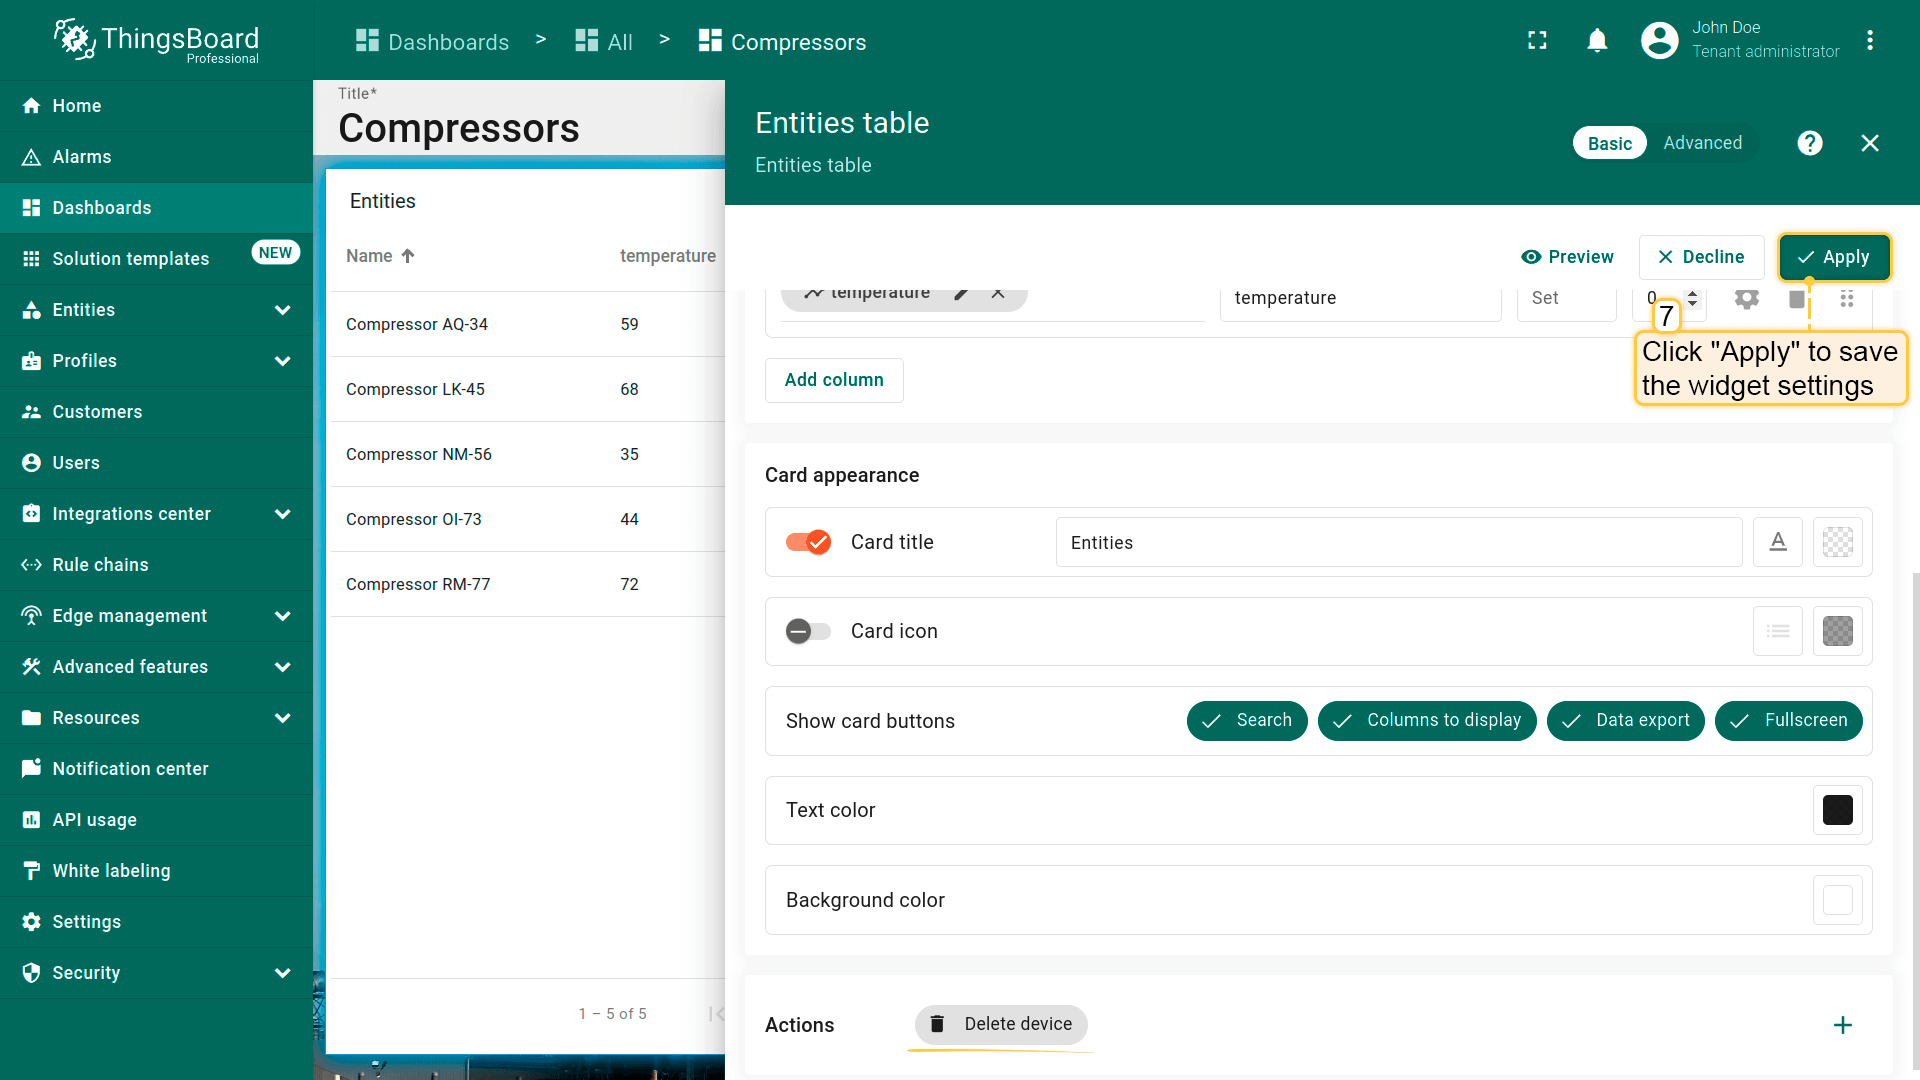
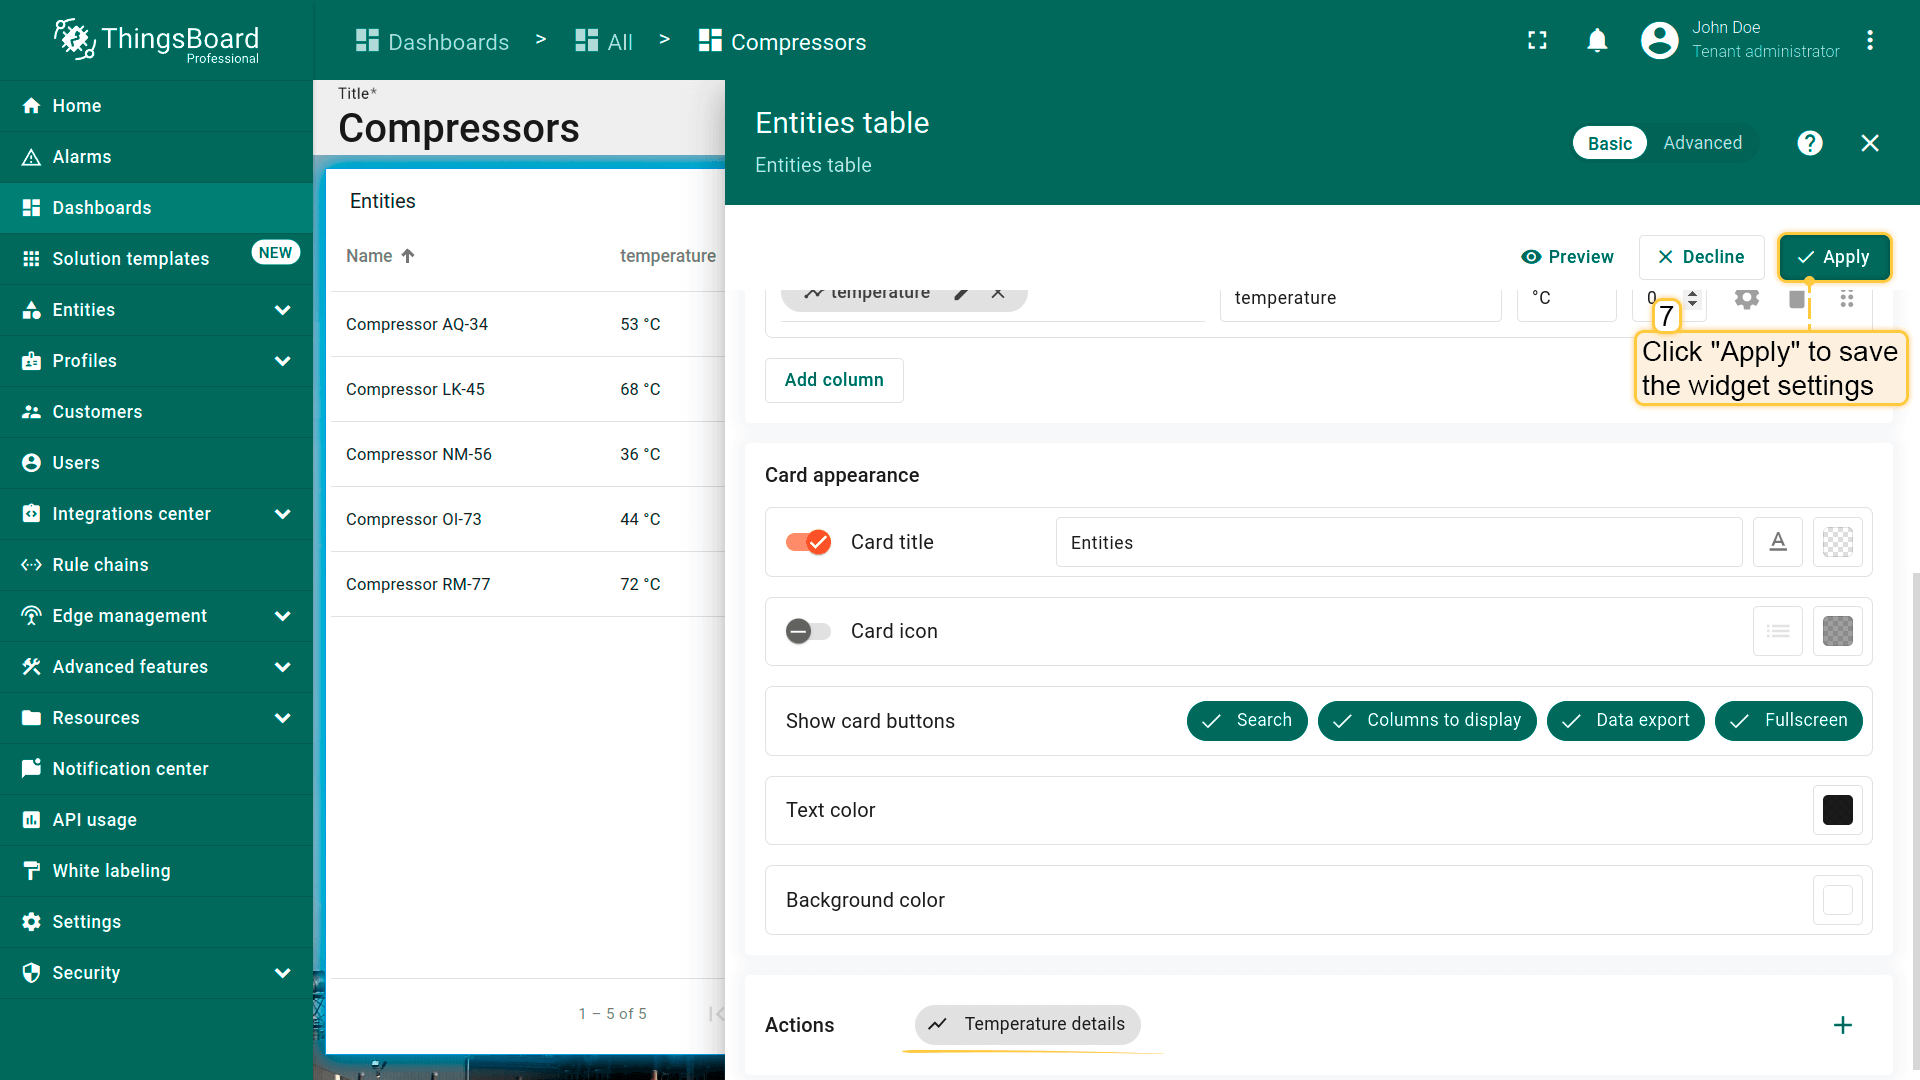
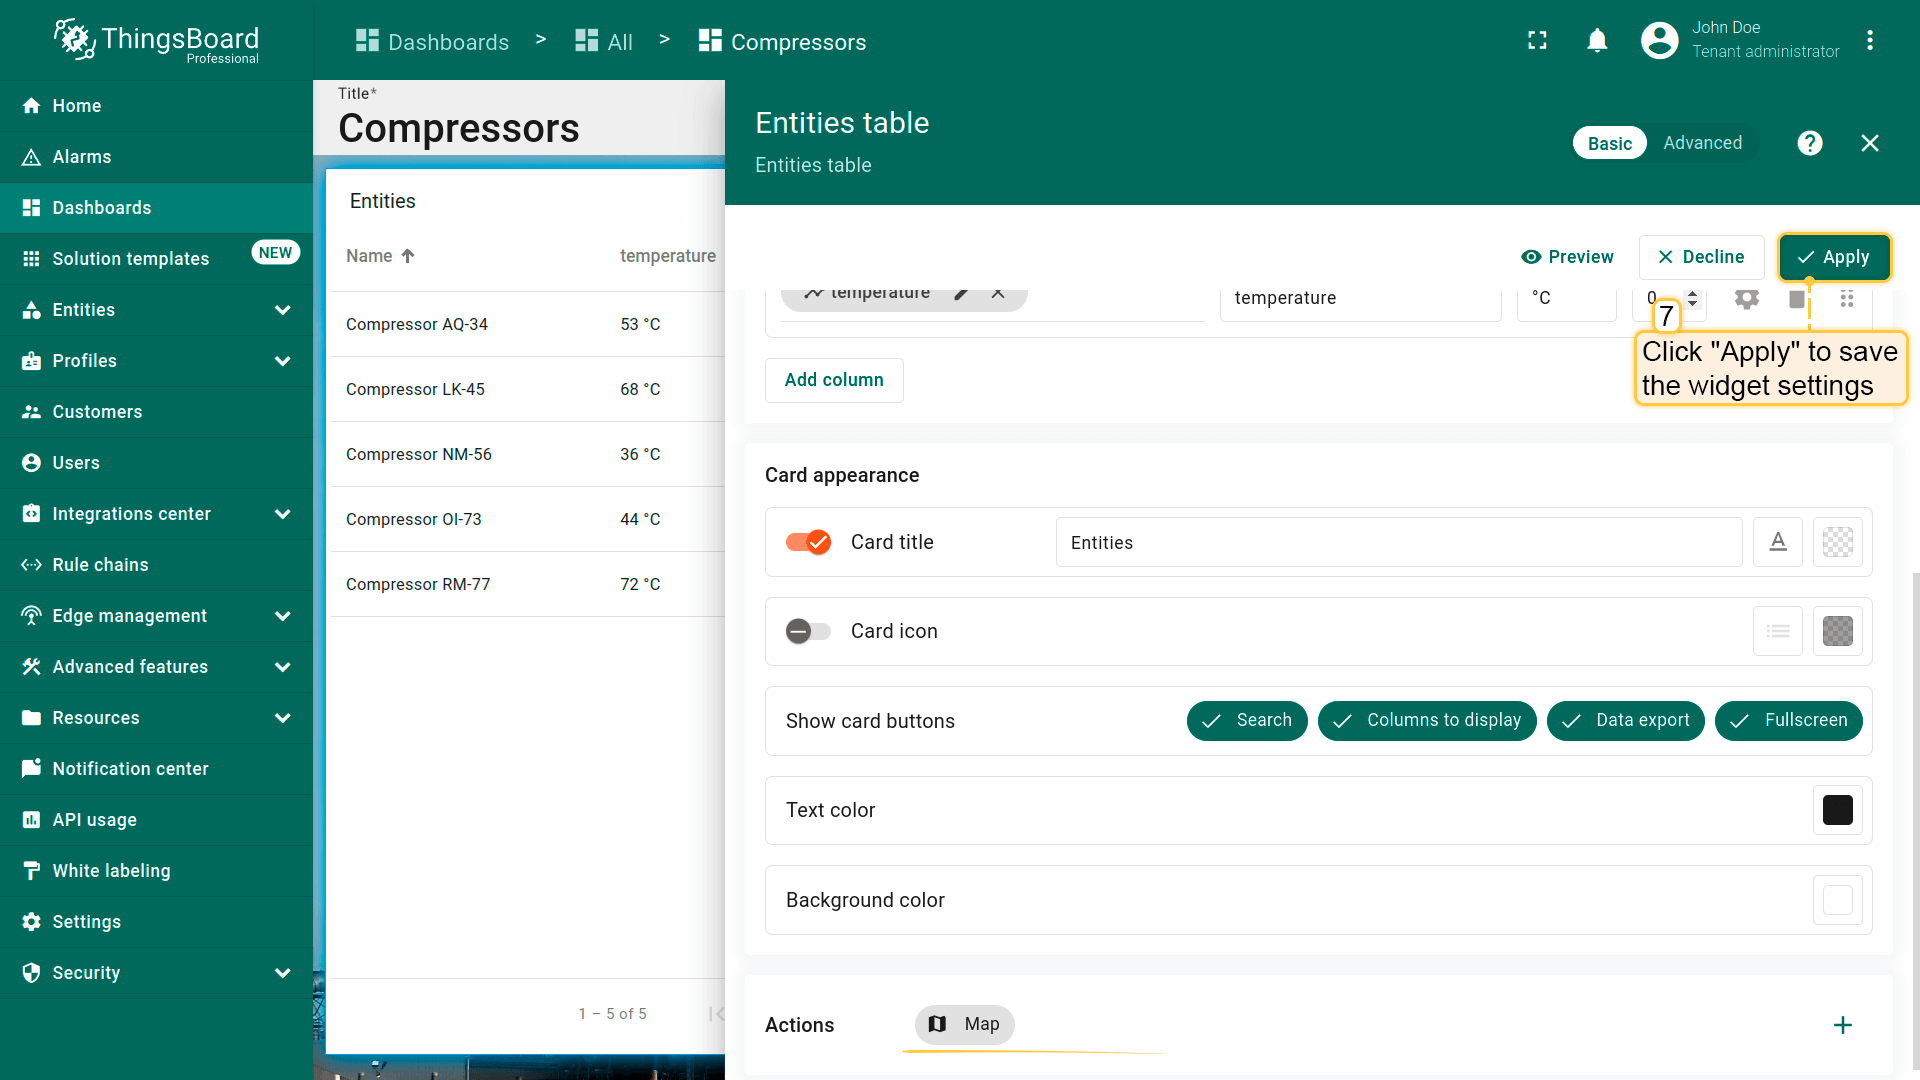
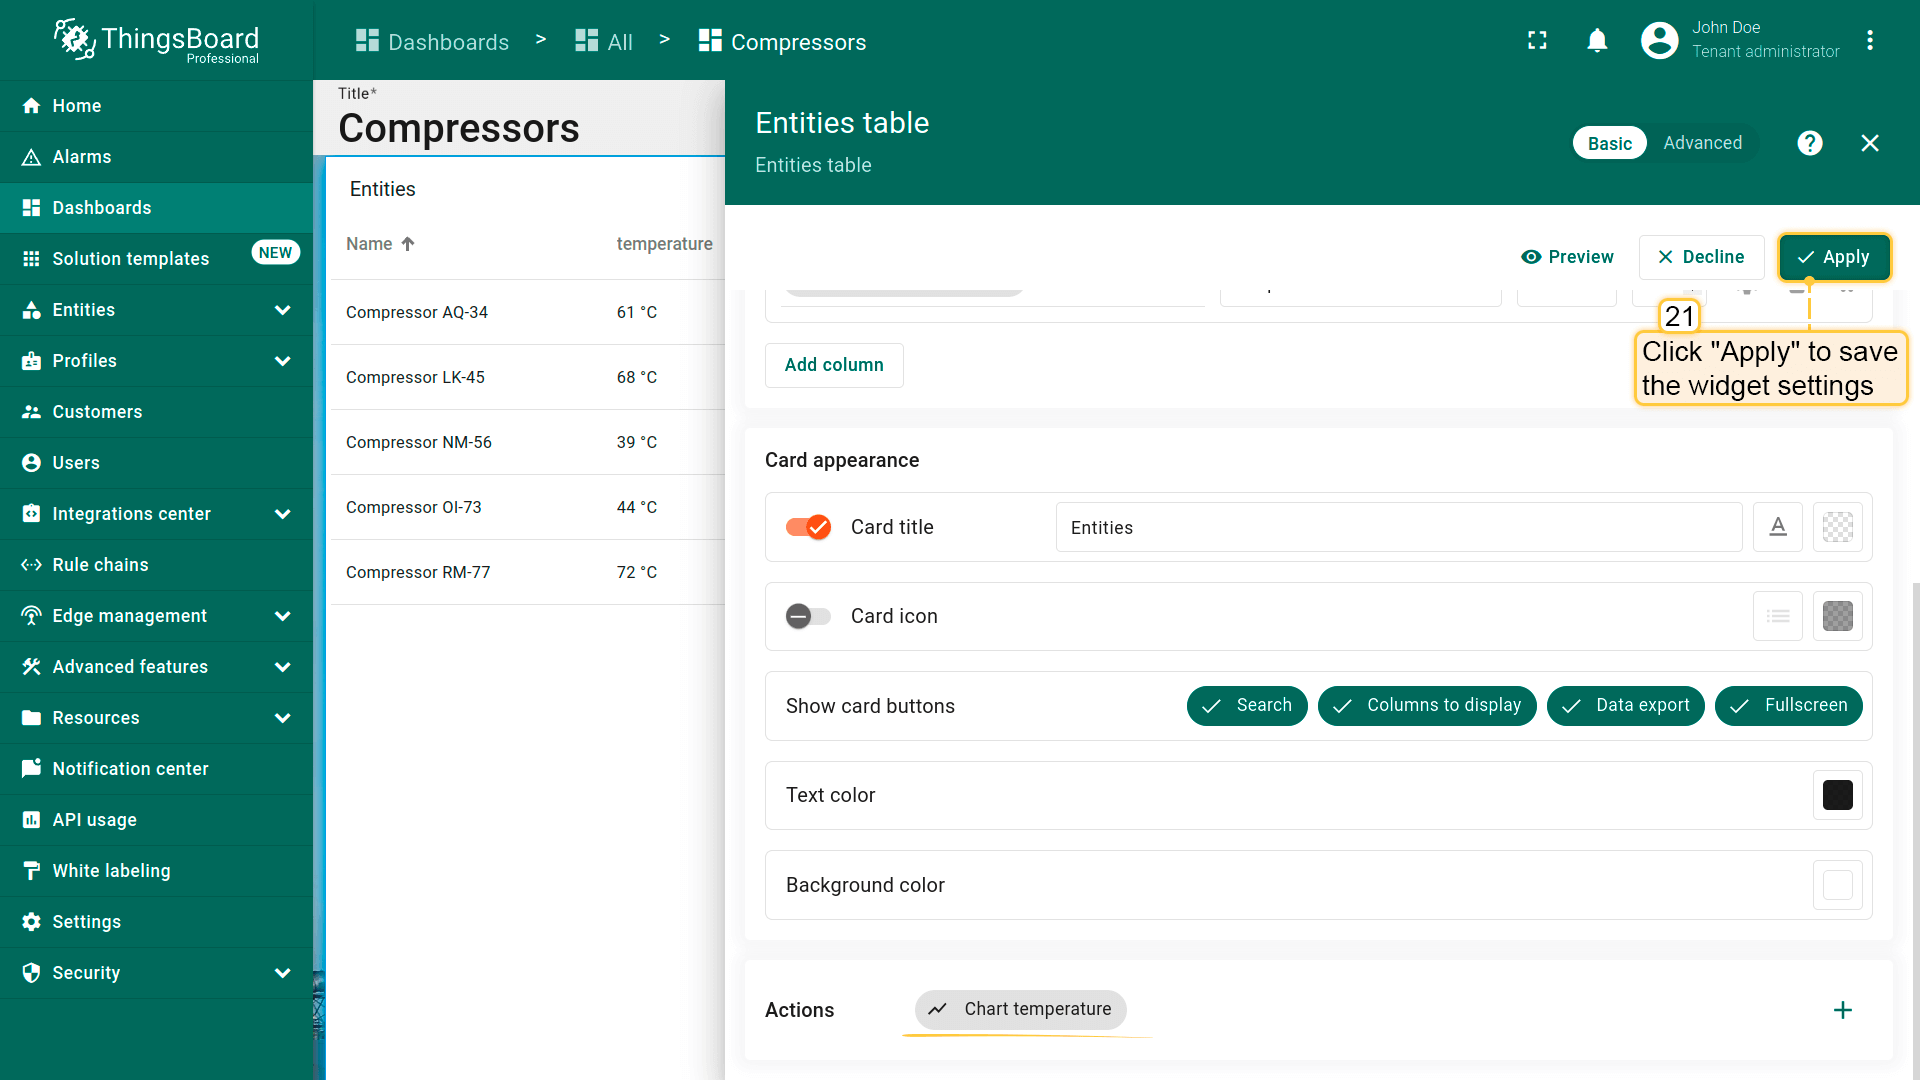
- 点击“Apply”保存部件设置;
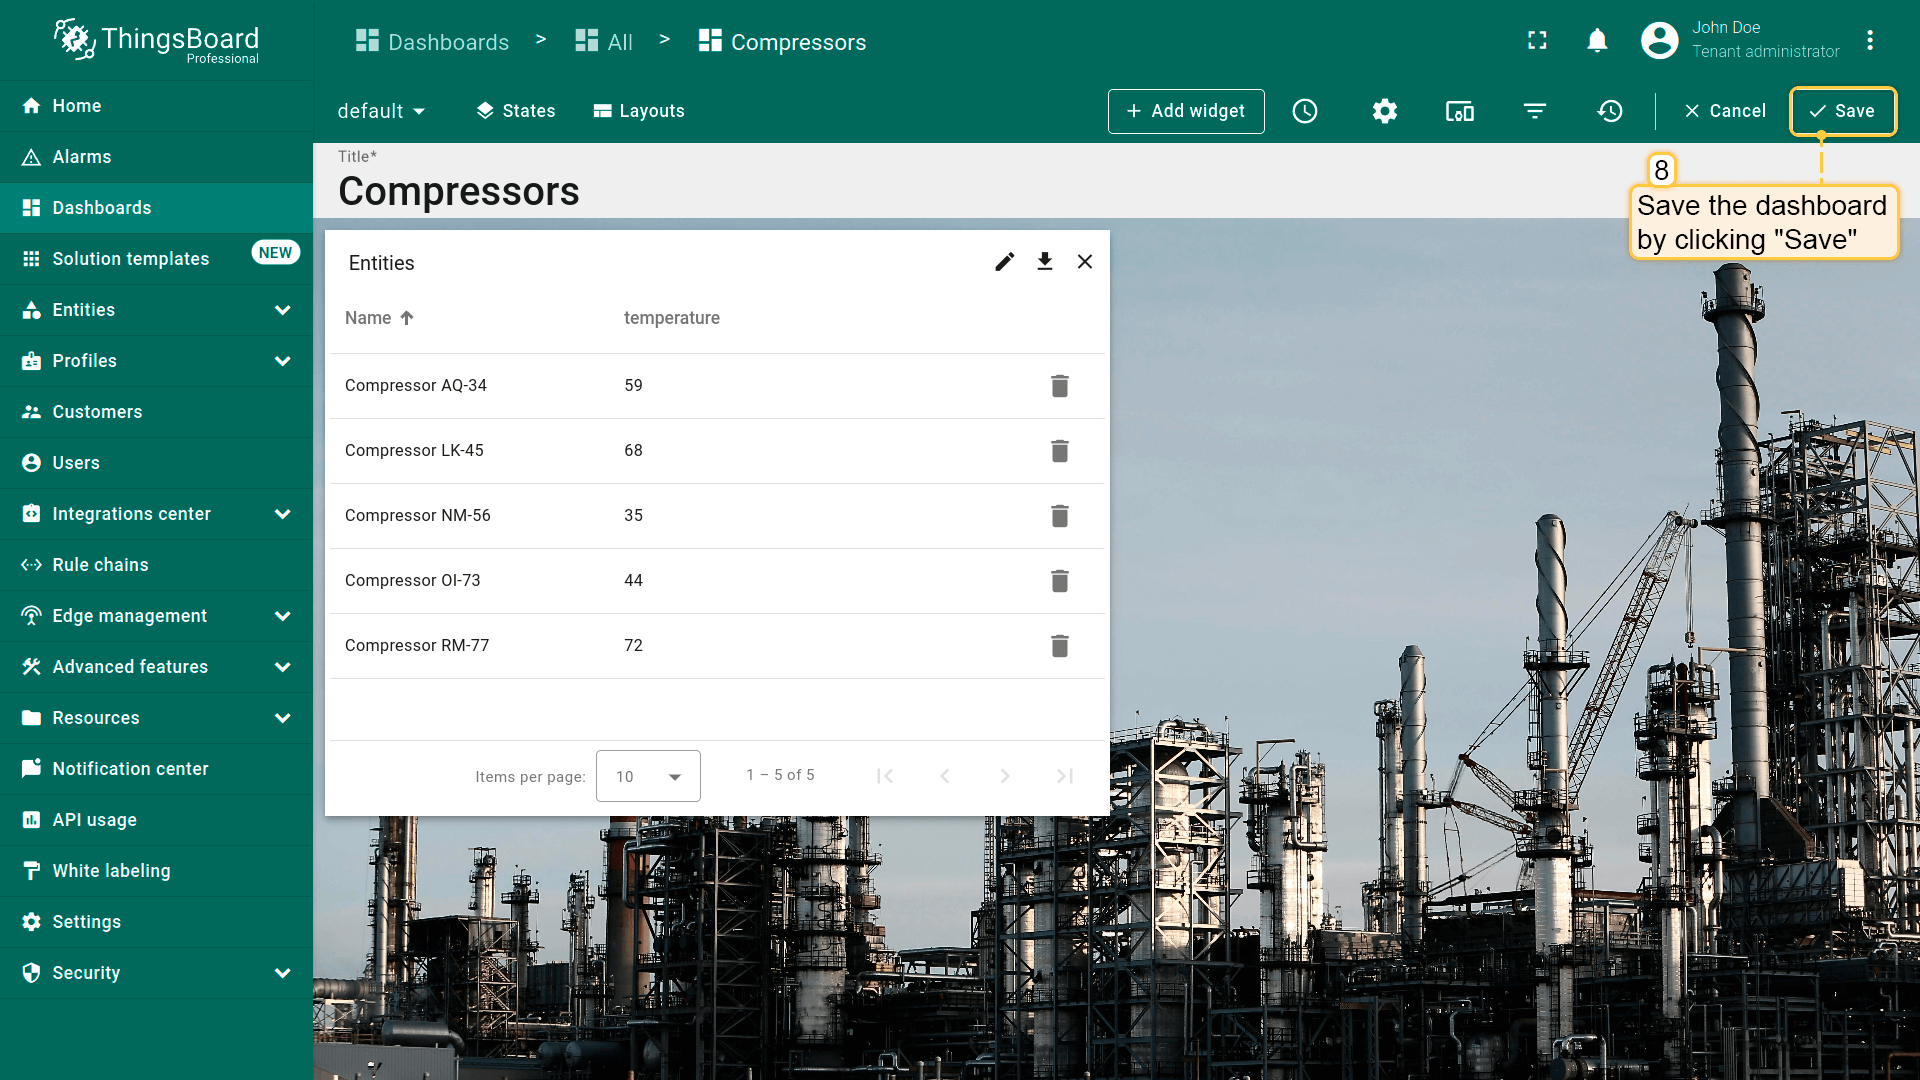
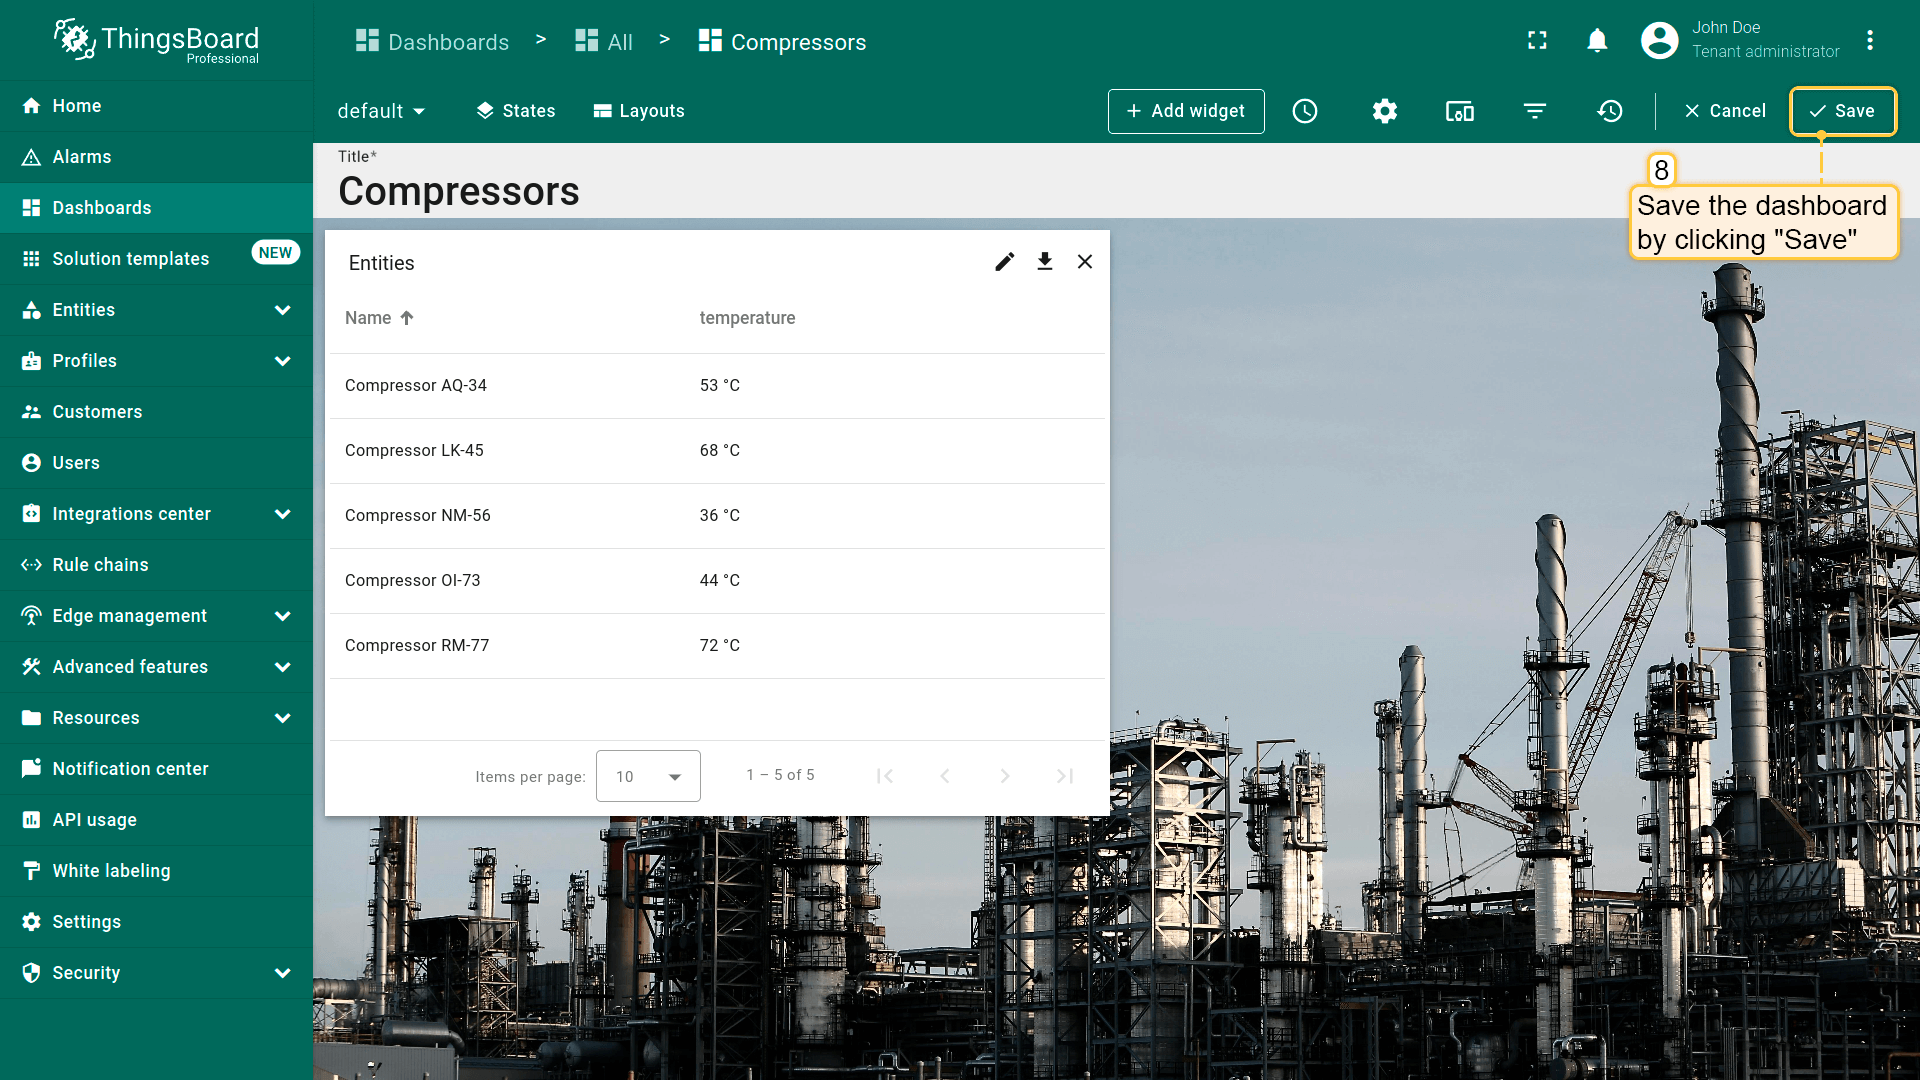
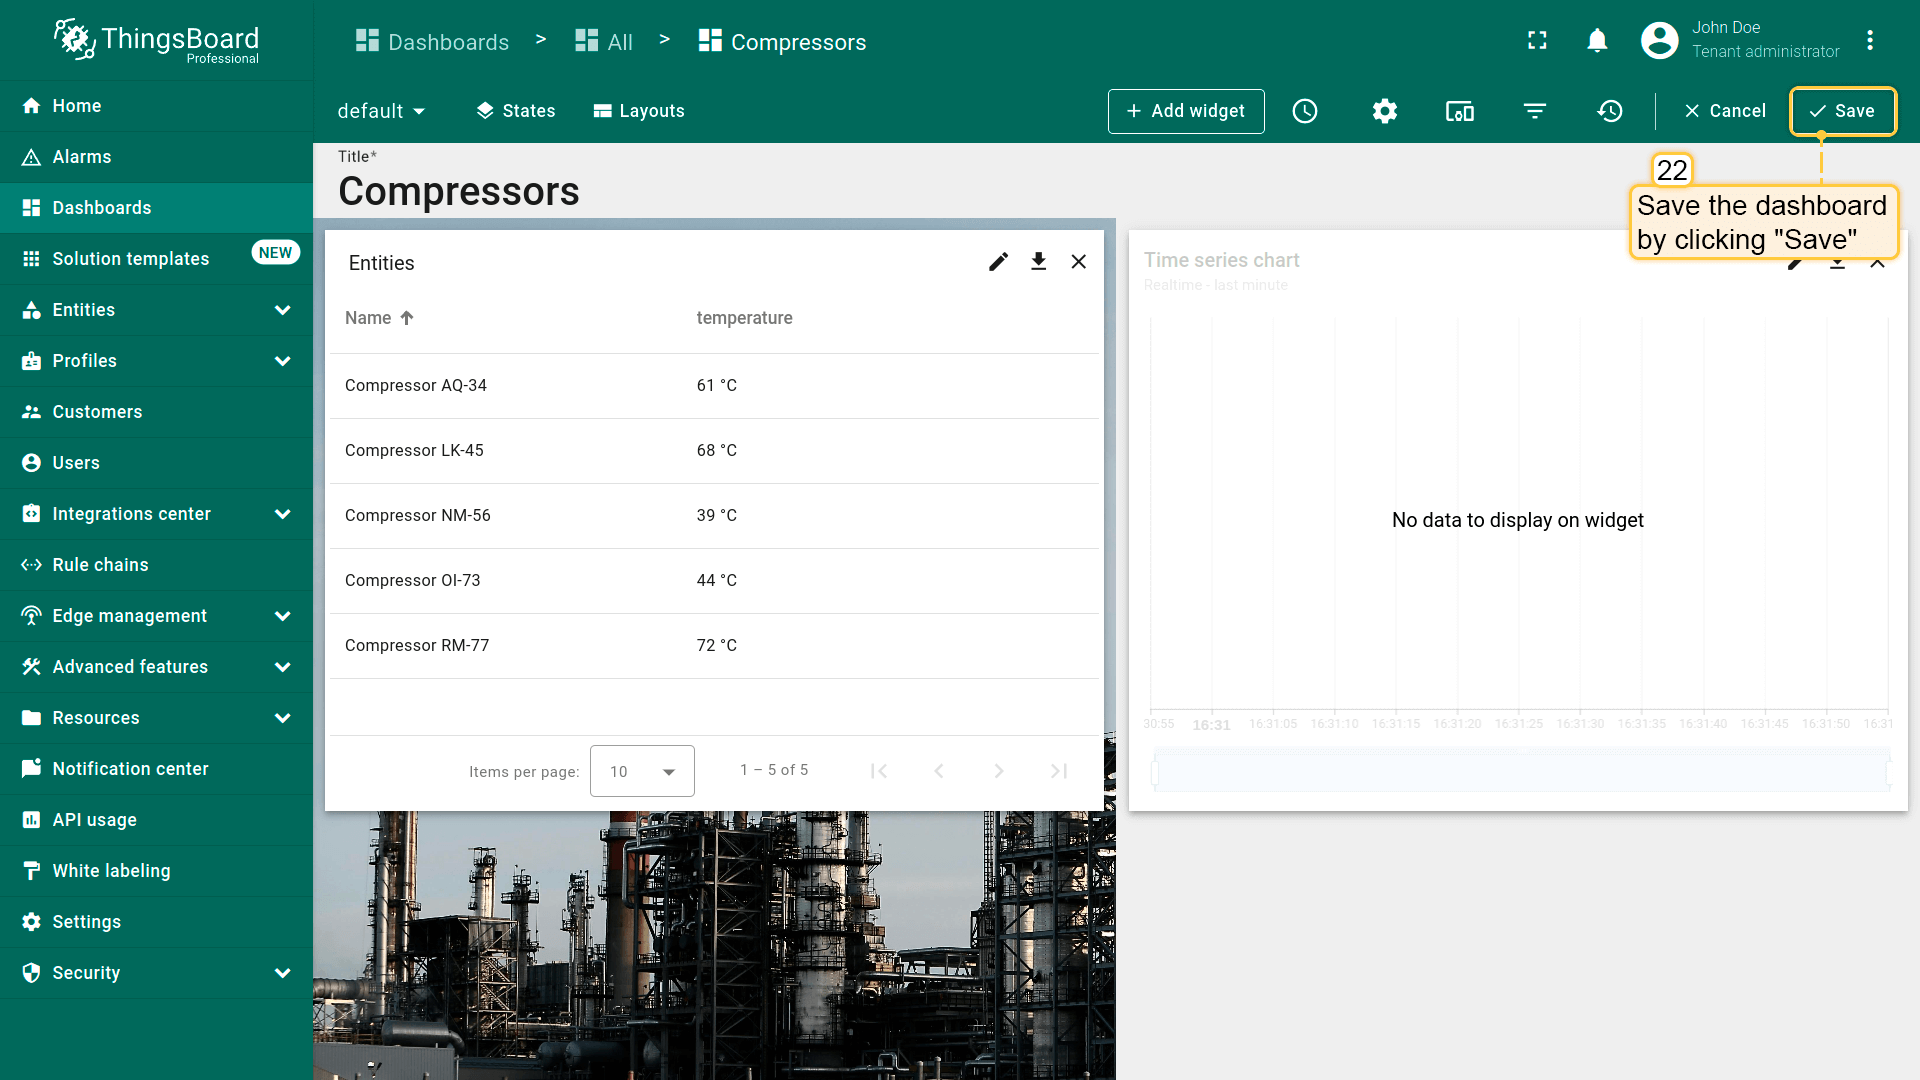
- 点击dashboard页面右上角“Save”保存dashboard。


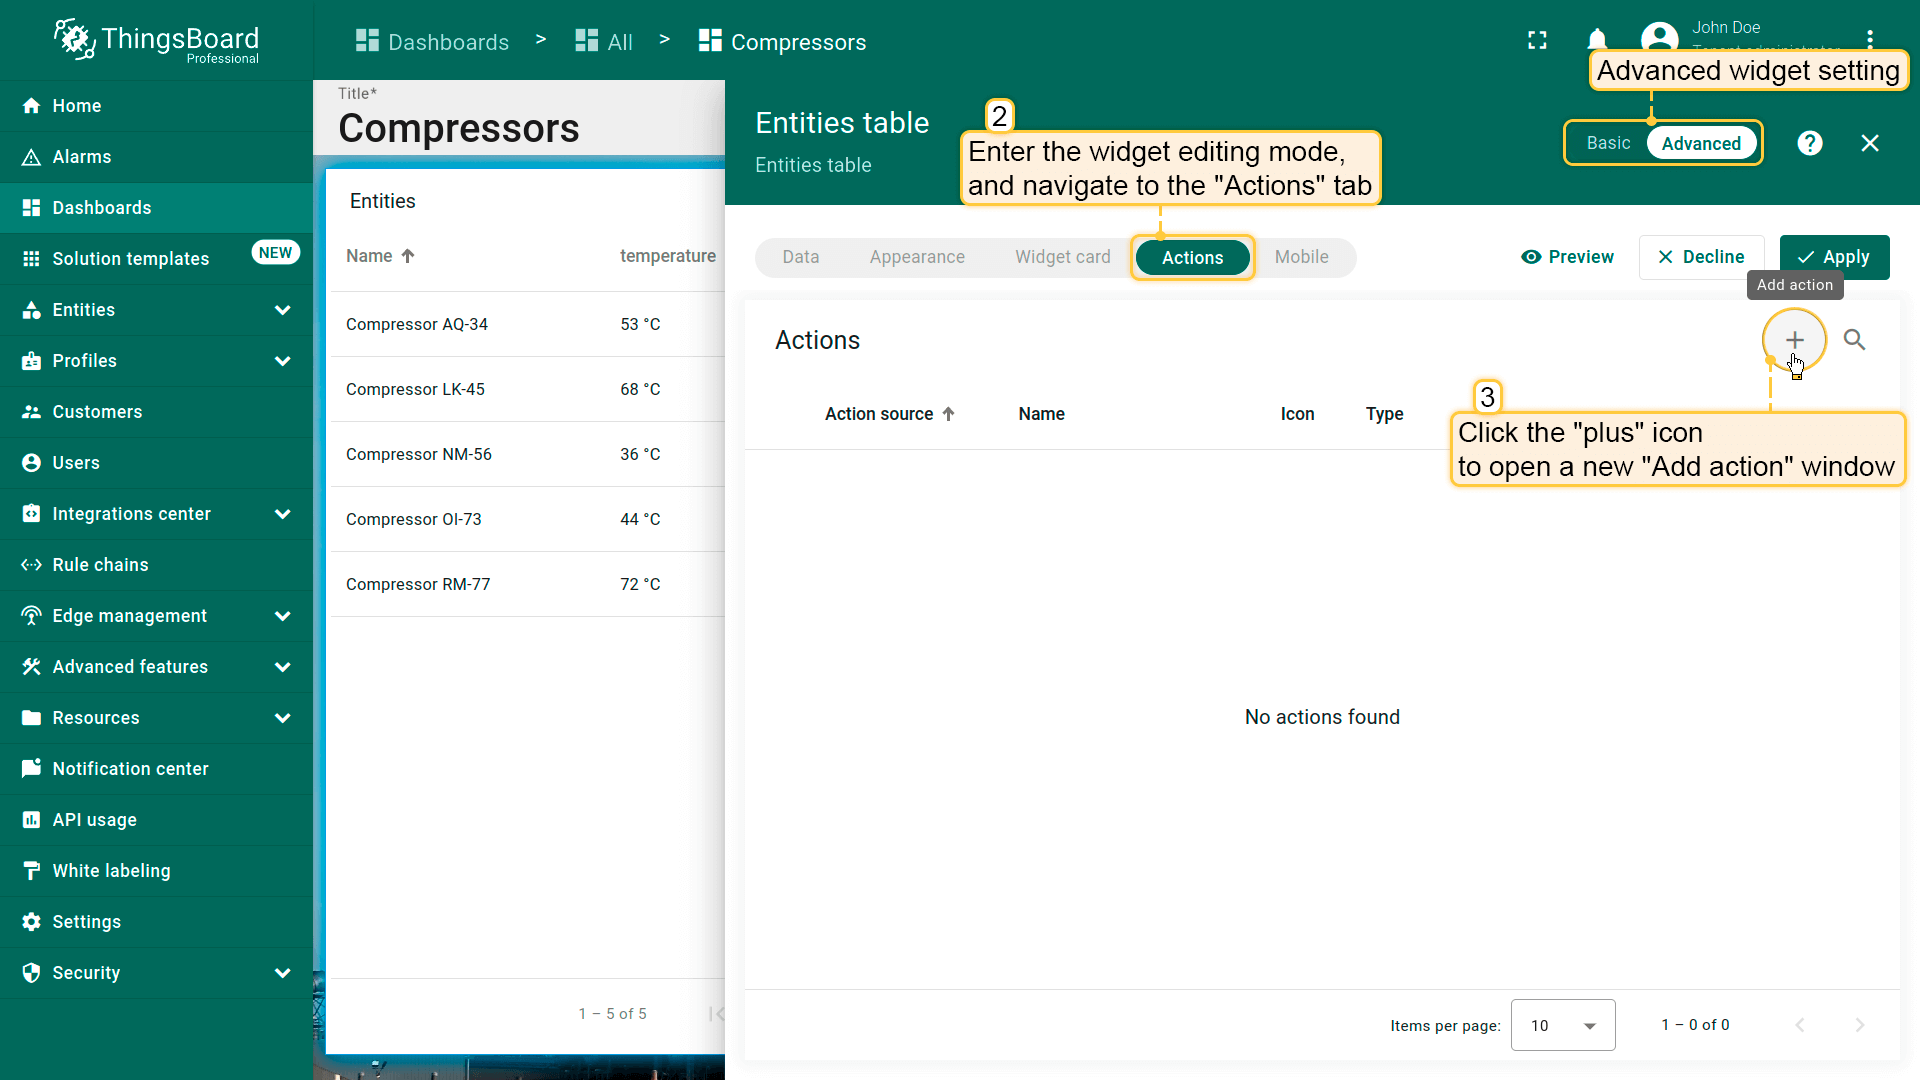
若使用 advanced 部件设置:
- 进入部件编辑模式,打开“Actions”选项卡。当前为空,之后所有已创建actions会显示在此;
- 点击屏幕右上角“plus”图标打开新“Add action”窗口。在此需输入名称、指定action来源、选择action类型以配置新action。后续配置取决于所选action类型。然后点击“Add”继续;
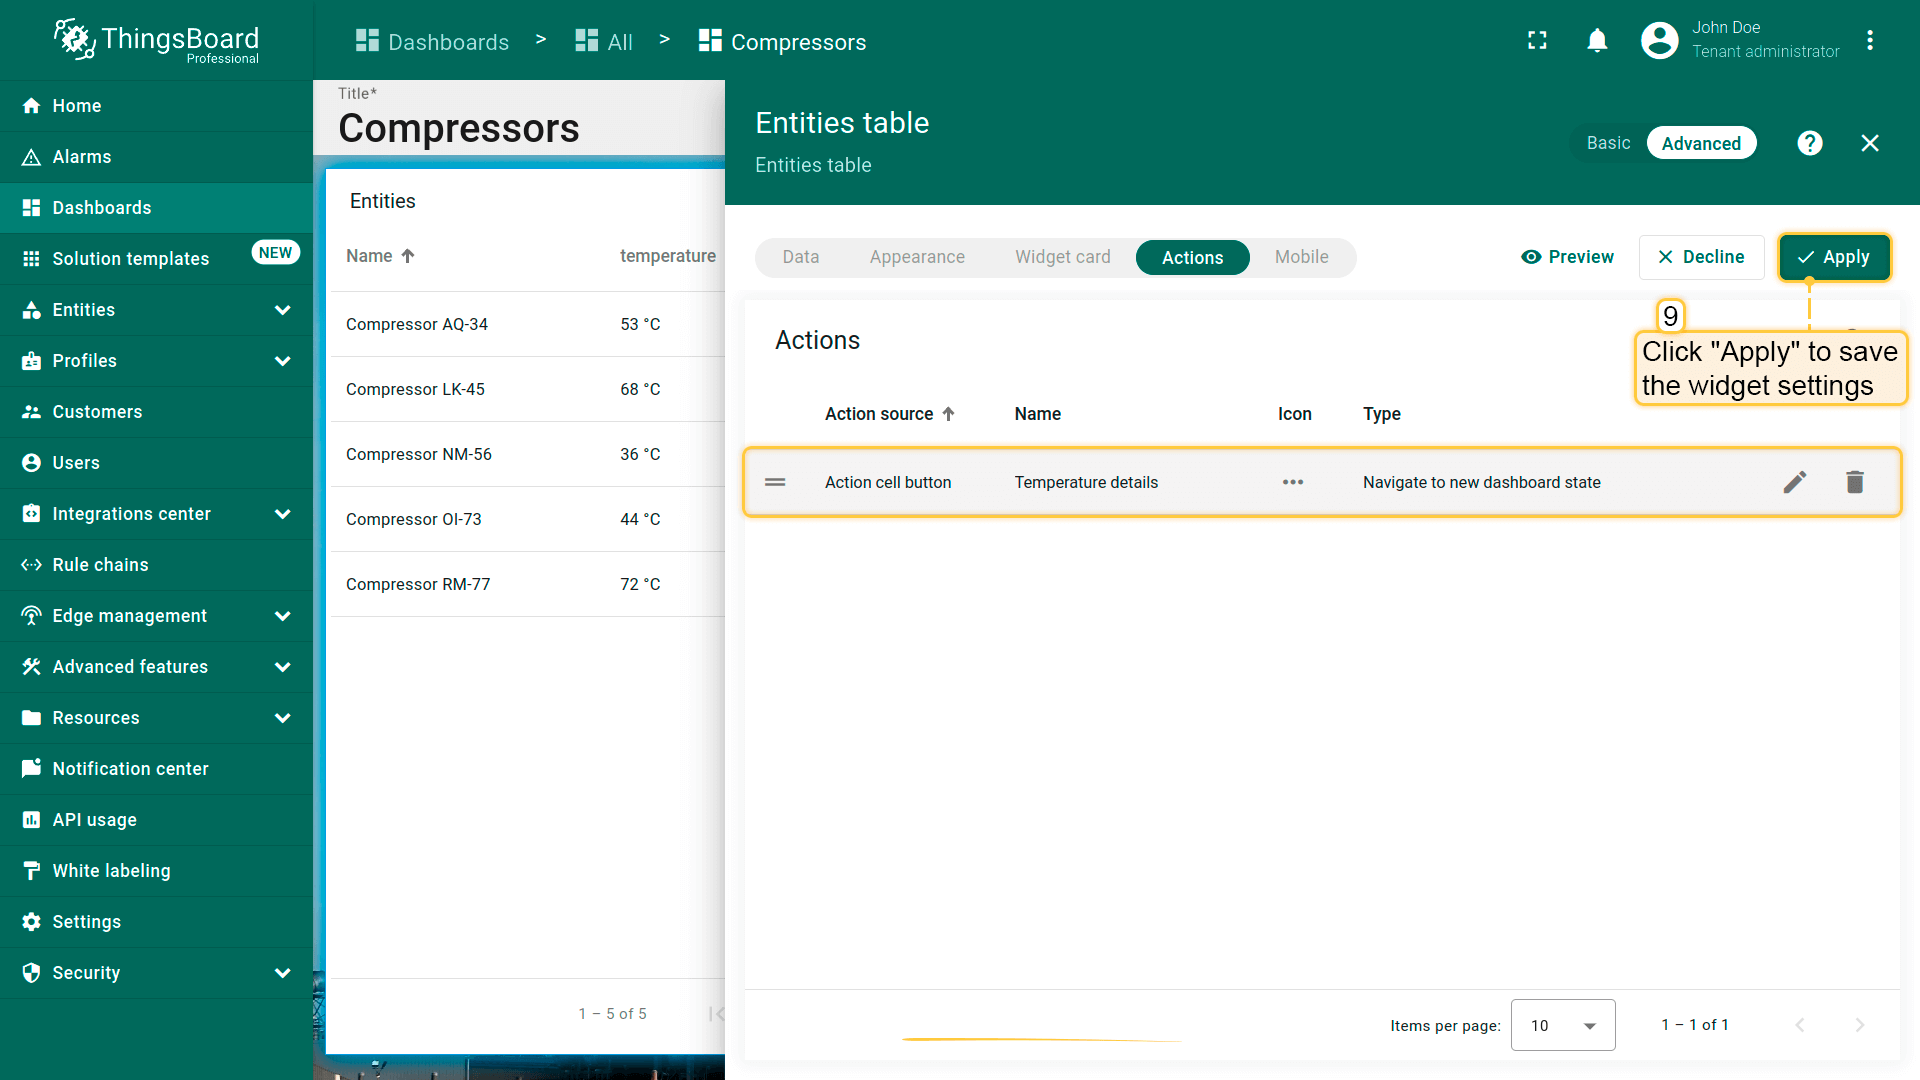
- 可查看已配置action,核对action来源、图标和类型。点击“Save”;
- 点击“Apply”保存部件设置;
- 点击dashboard页面右上角“Save”保存dashboard。

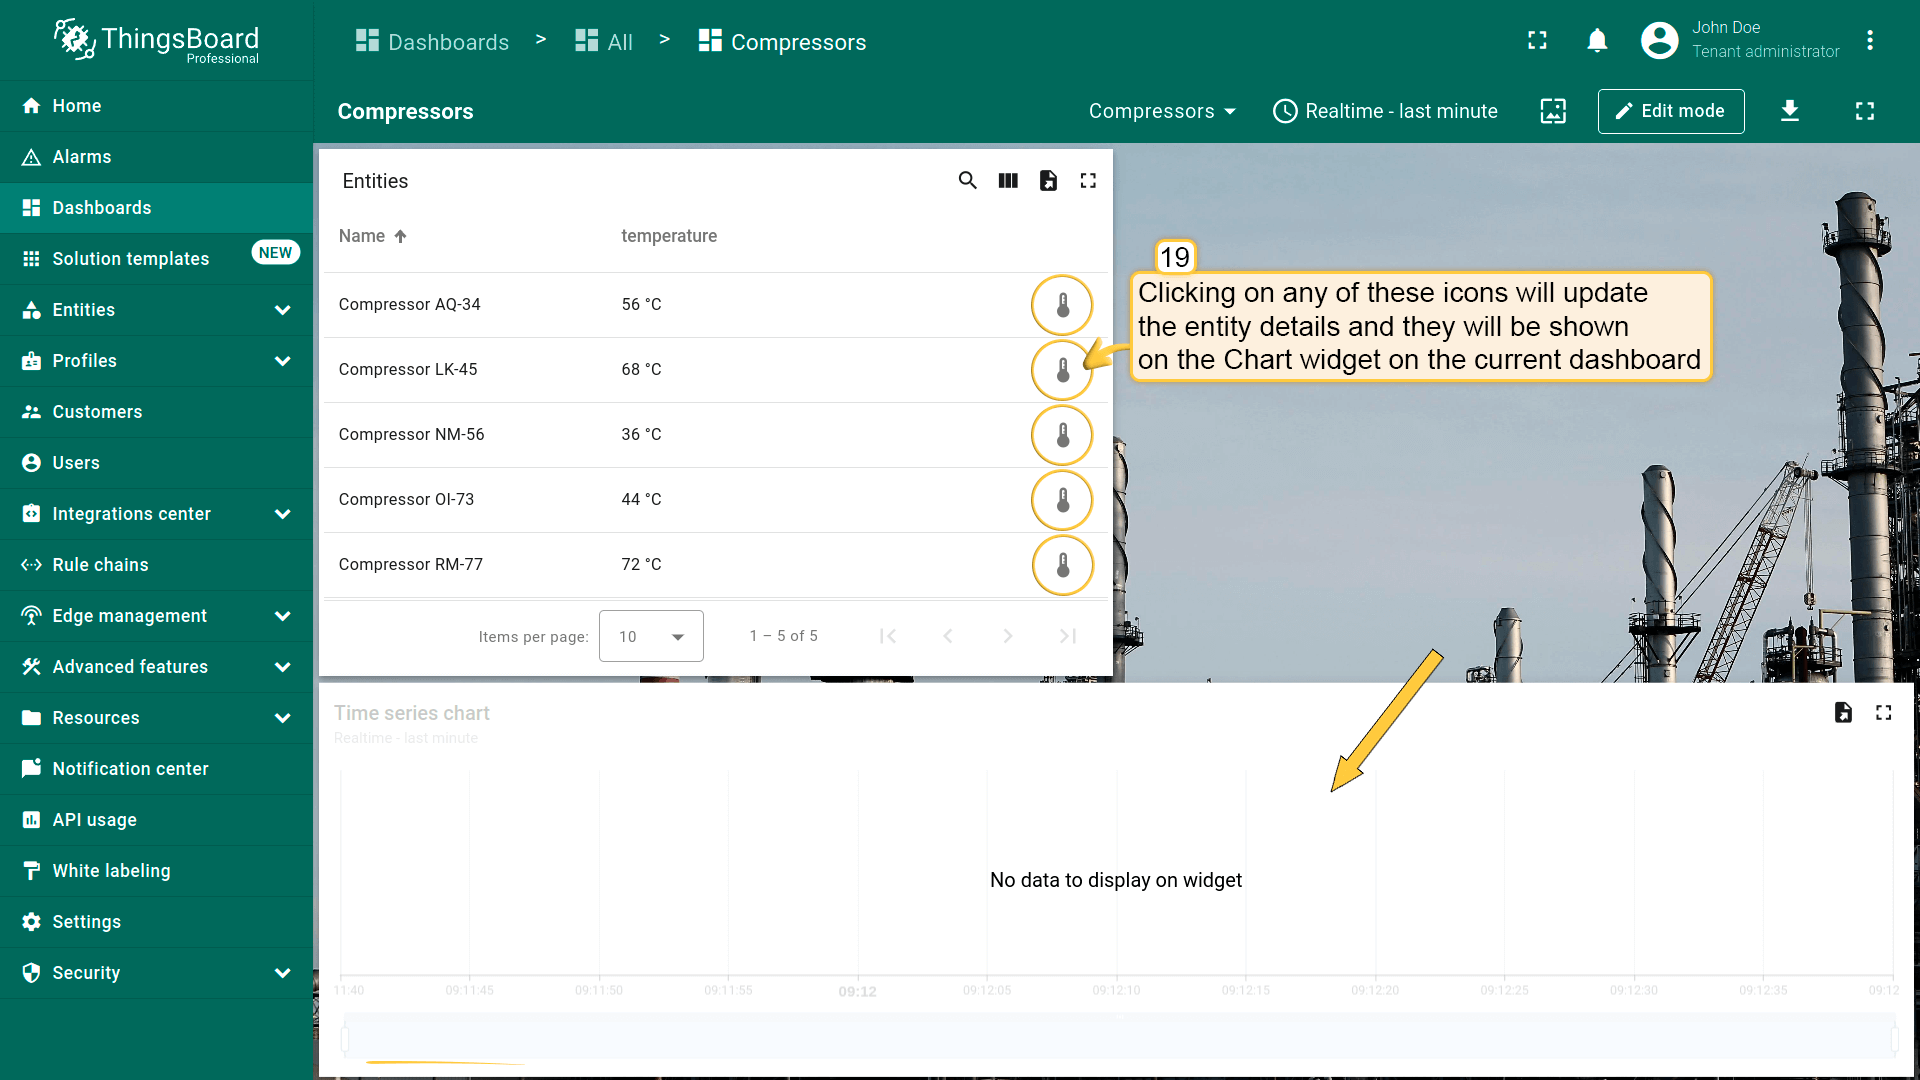
此时即可使用action。可通过点击独立按钮、部件标题、实体单行等触发。
操作类型
操作类型定义将执行的具体操作。 适用于所有部件的七种操作类型:
- 导航到新的仪表板状态 - 跳转到当前仪表板内的指定状态;
- 更新当前仪表板状态 - 更新当前所在仪表板;
- 导航到其他仪表板 - 跳转到指定仪表板;
- 自定义操作 - 允许为部件上的单个操作手动配置函数;
- 自定义操作(带HTML模板) - 允许在现有HTML模板中手动输入函数;
- 移动设备操作 - 支持拍照、扫描二维码、获取设备位置、拨打电话等移动设备功能;
- 打开URL - 跳转到URL所表示的任何资源。
地图部件另有专用操作类型:
- 在地图上放置项目 — 可直接在地图部件上创建并放置新实体,仅需几次点击。
下面分别说明各类型。
导航到新的仪表板状态
状态是用于在不同设备、资产和部件对象间导航以查看详细信息的层级。 选择_导航到新的仪表板状态_操作类型时,将跳转到此前创建的状态。
假设你已在dashboard上添加新 state并熟悉“Add action”步骤。下面直接进行action配置:
- 进入部件编辑模式,打开“Add action”窗口;
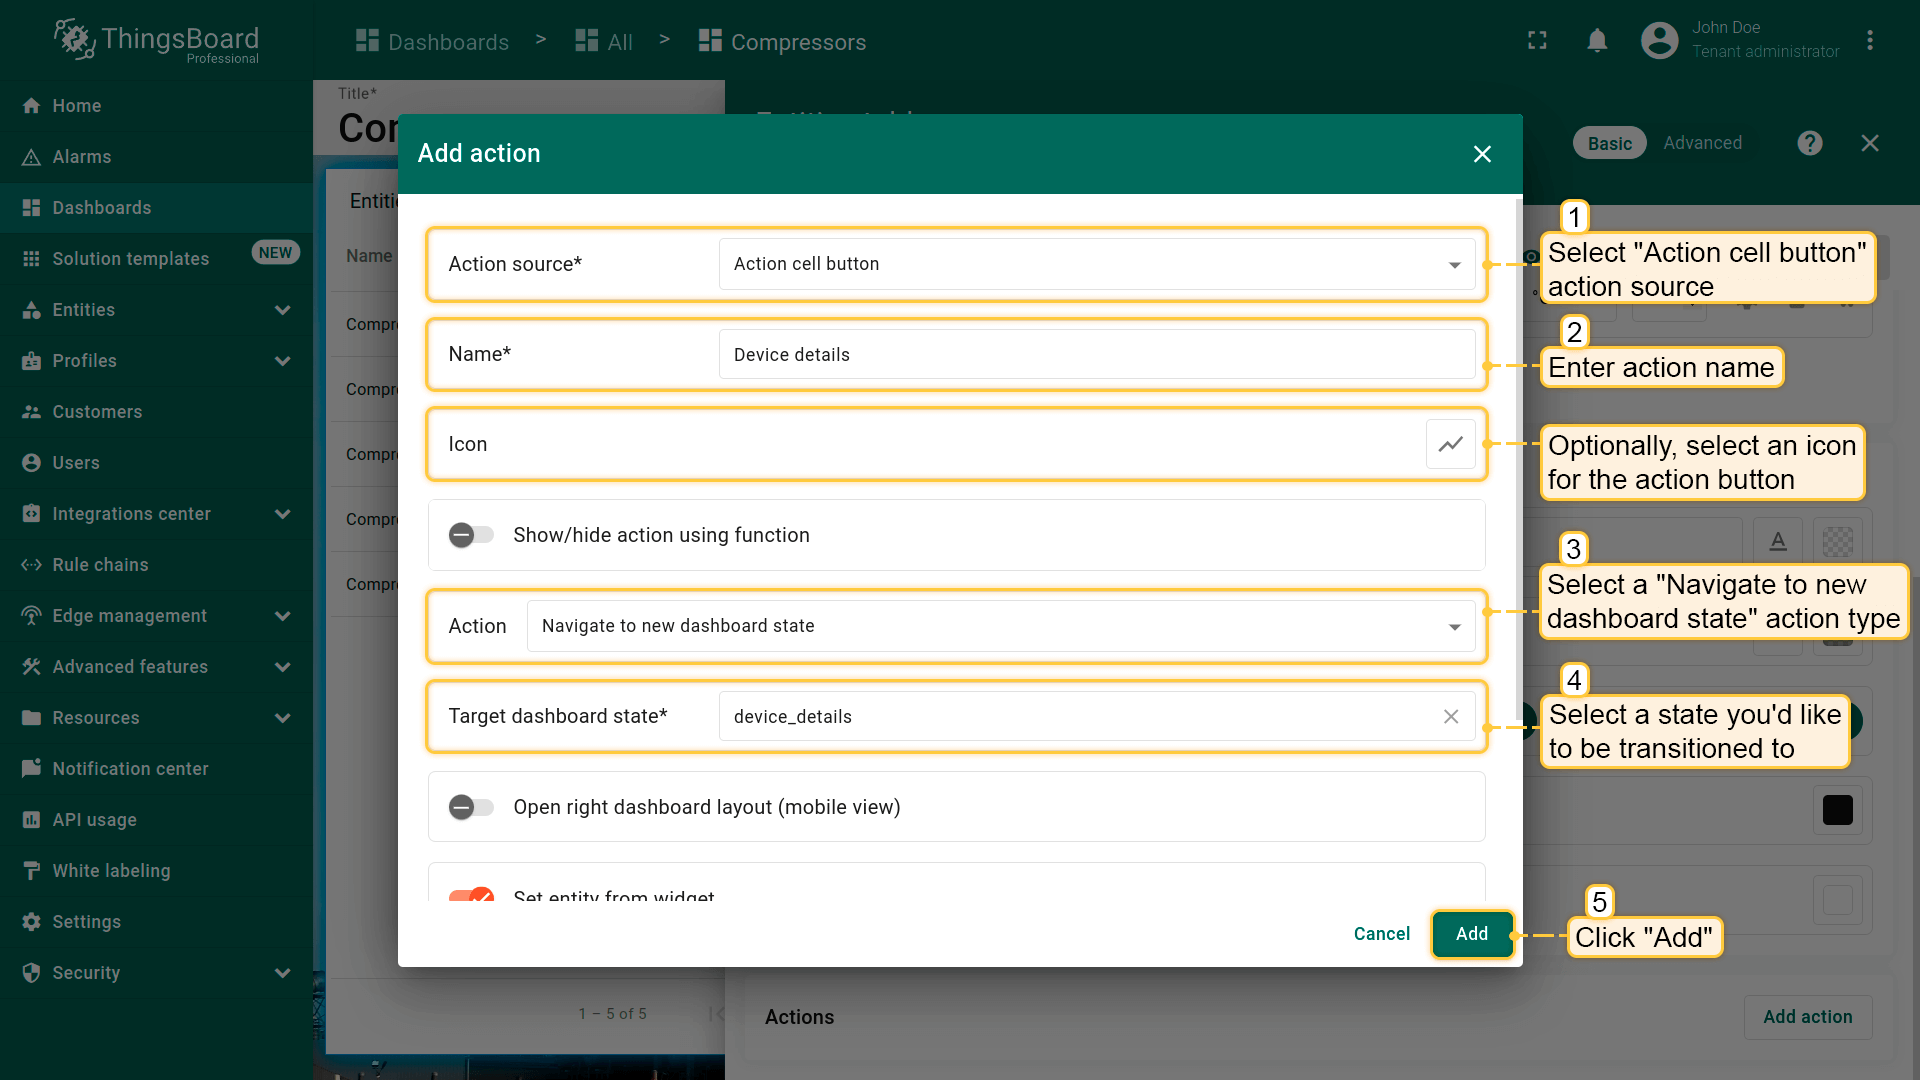
- 本指南以“Action cell button”为例,选择该action来源;
- 输入action名称并选择表示按钮的图标,该图标将用于执行action;
- 在“Action”下拉菜单中选择“Navigate to new dashboard state”类型;
- 选择类型后会出现“Target dashboard state”下拉菜单,选择要跳转的已创建 state;
- 选择state后,点击“Add action”窗口底部的“Add”按钮;
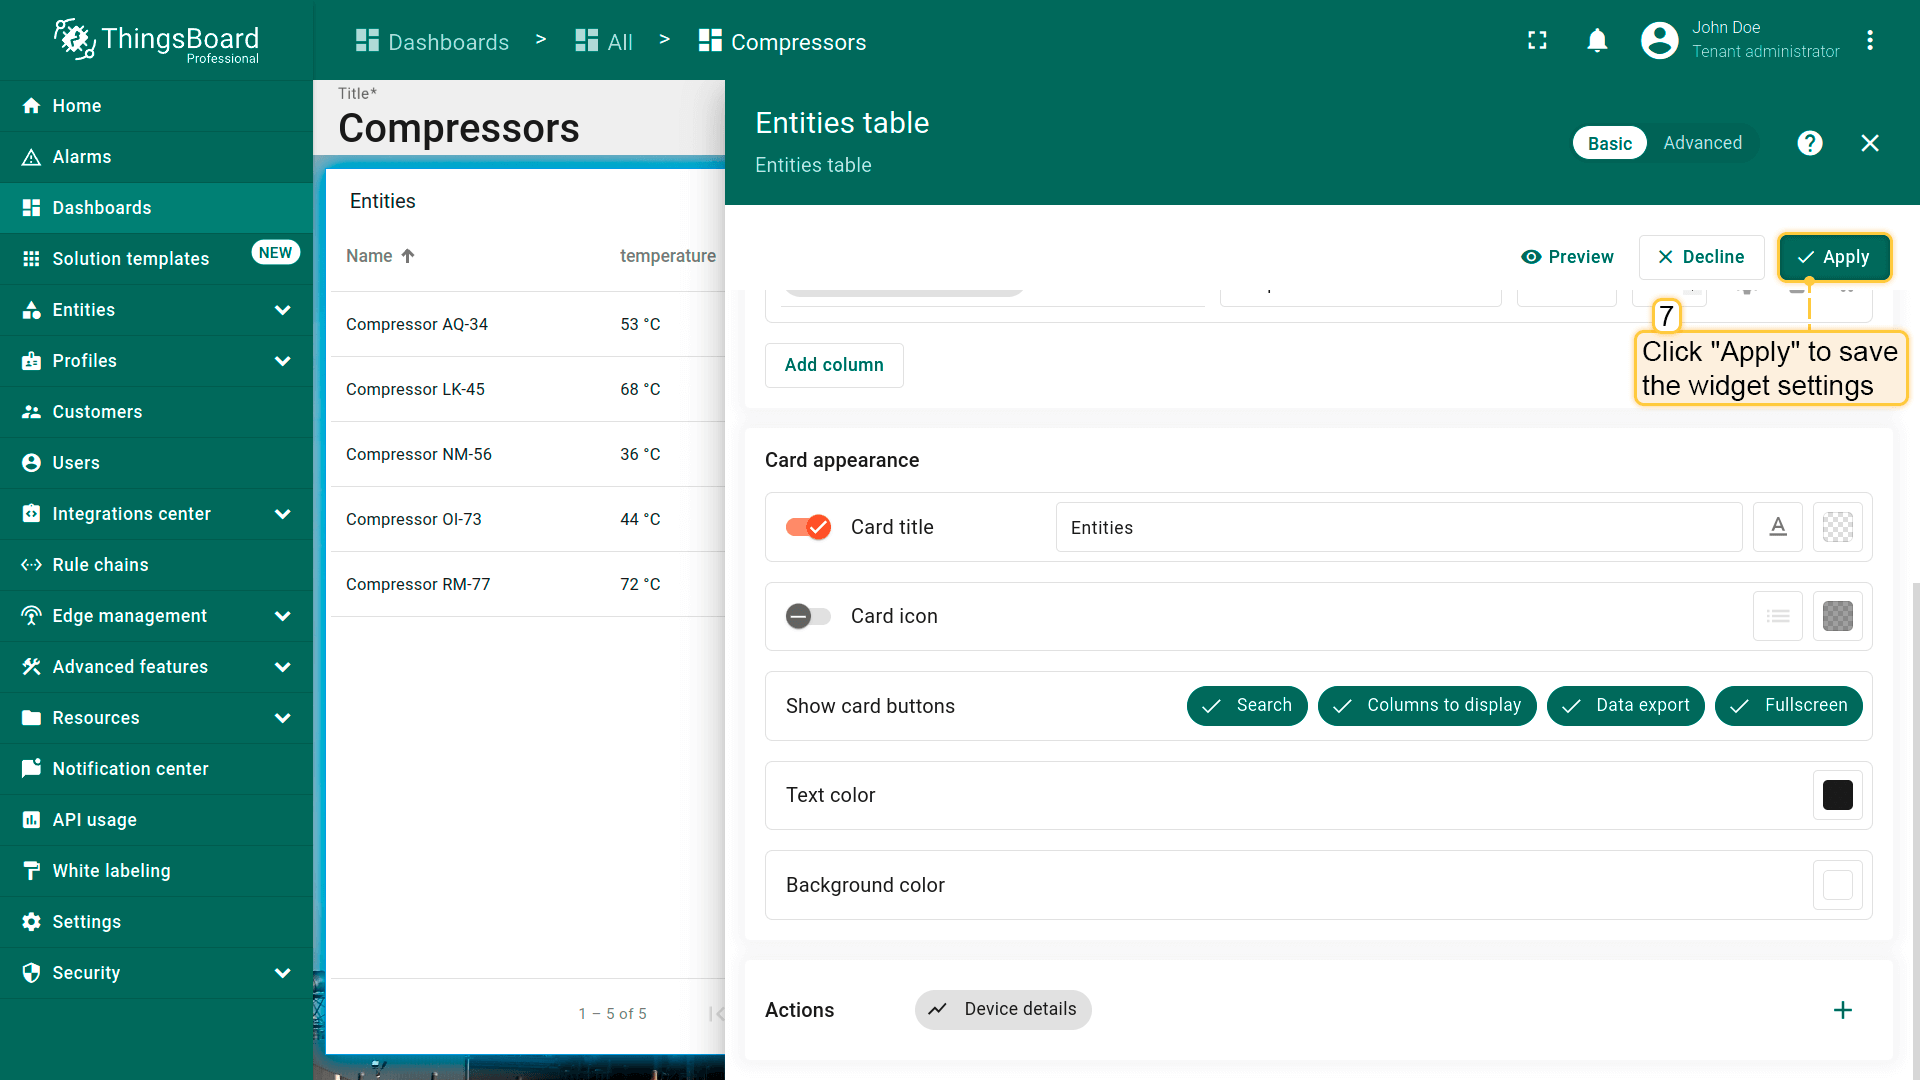
- 在“Actions”窗口中可查看已配置action,核对来源、图标和类型。点击“Save”,再点“Apply”保存部件设置;
- 点击dashboard页面右上角“Save”保存dashboard。


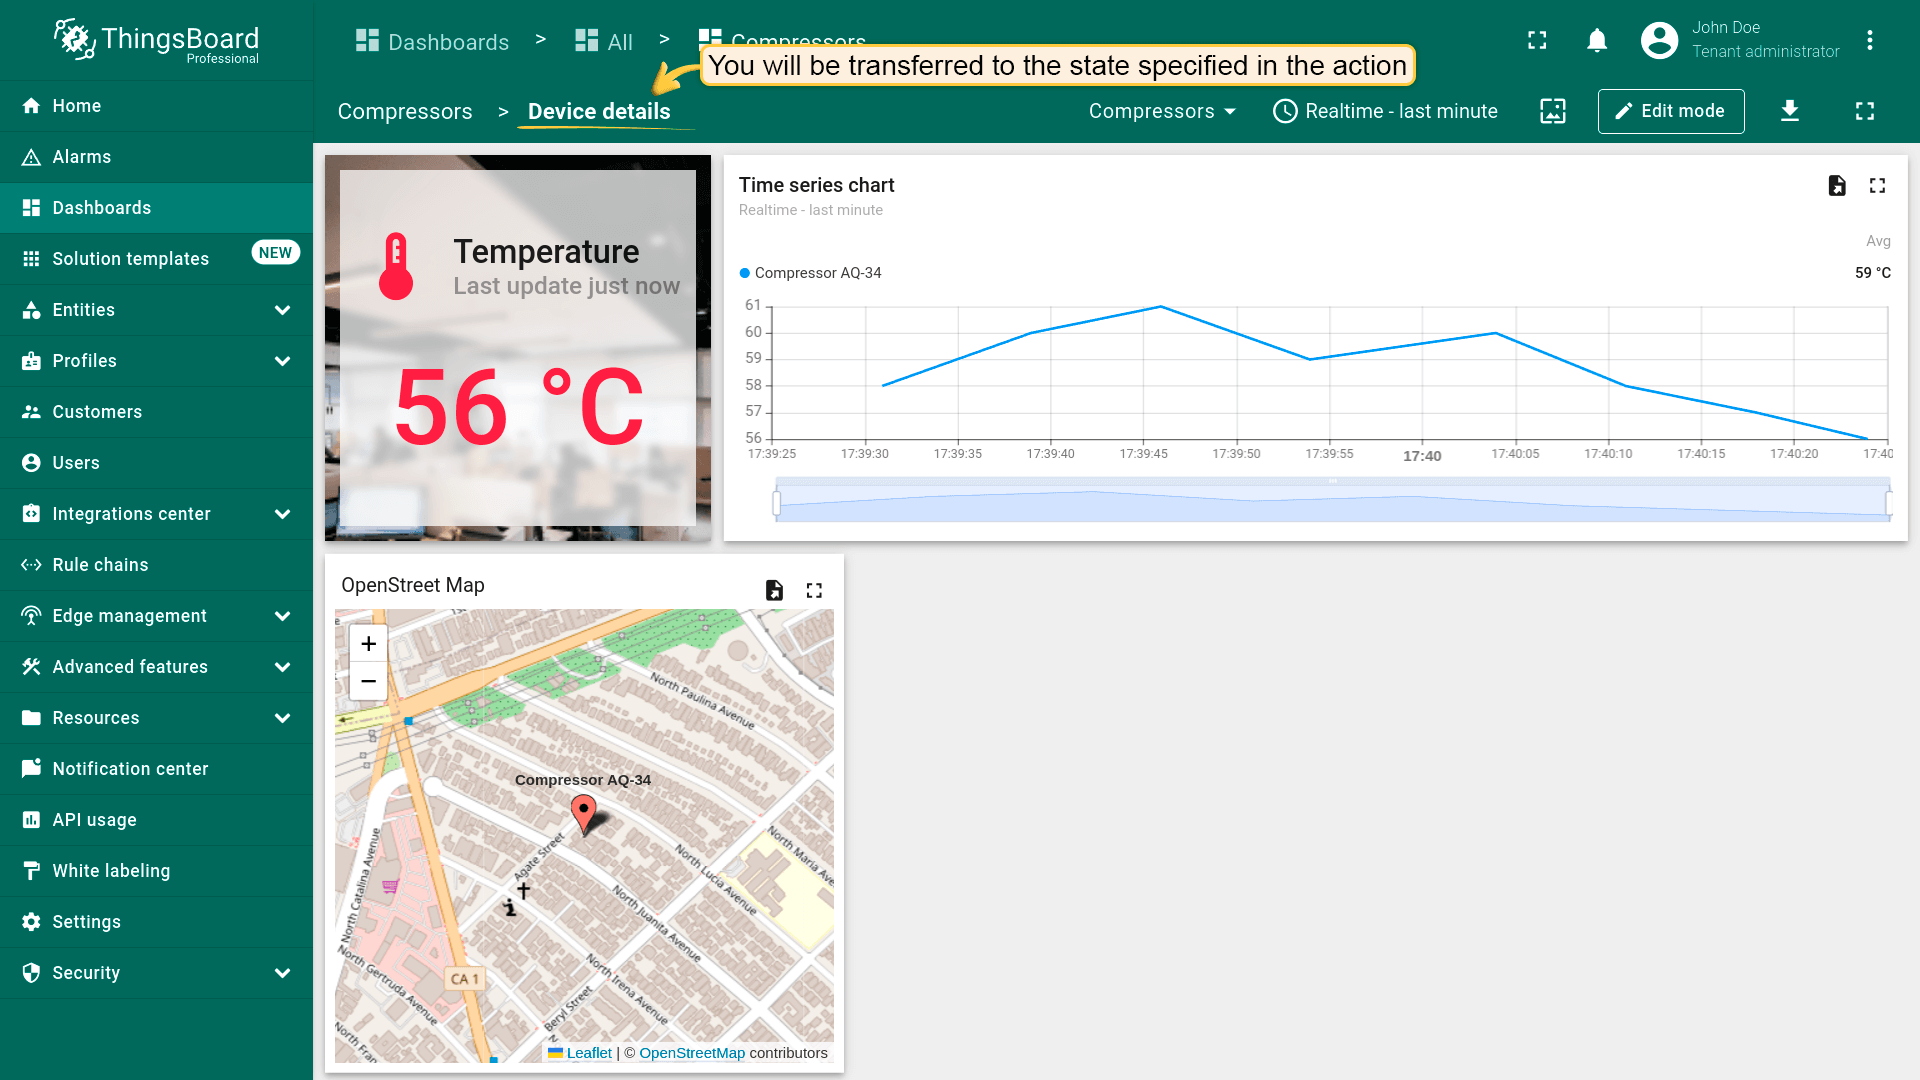
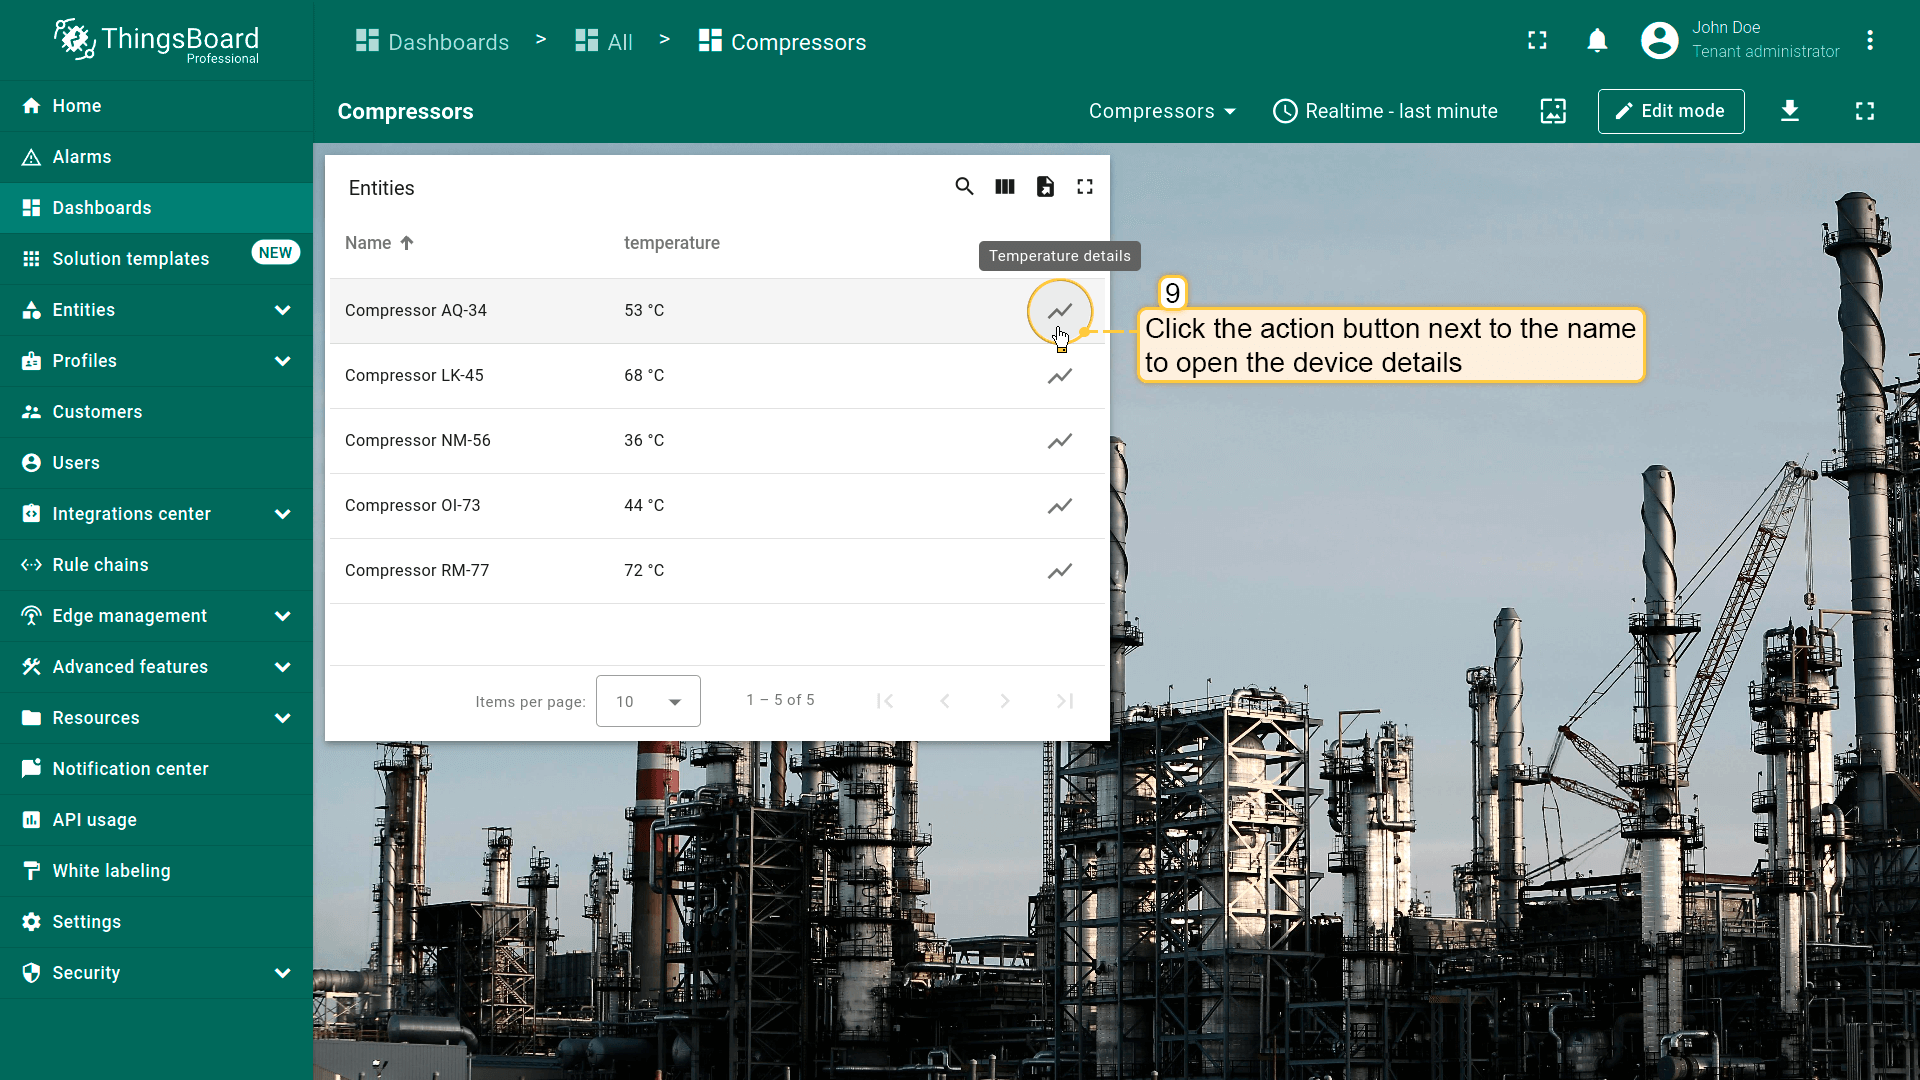
保存后,每个实体旁会显示action图标。点击任一图标即跳转到action指定的state。

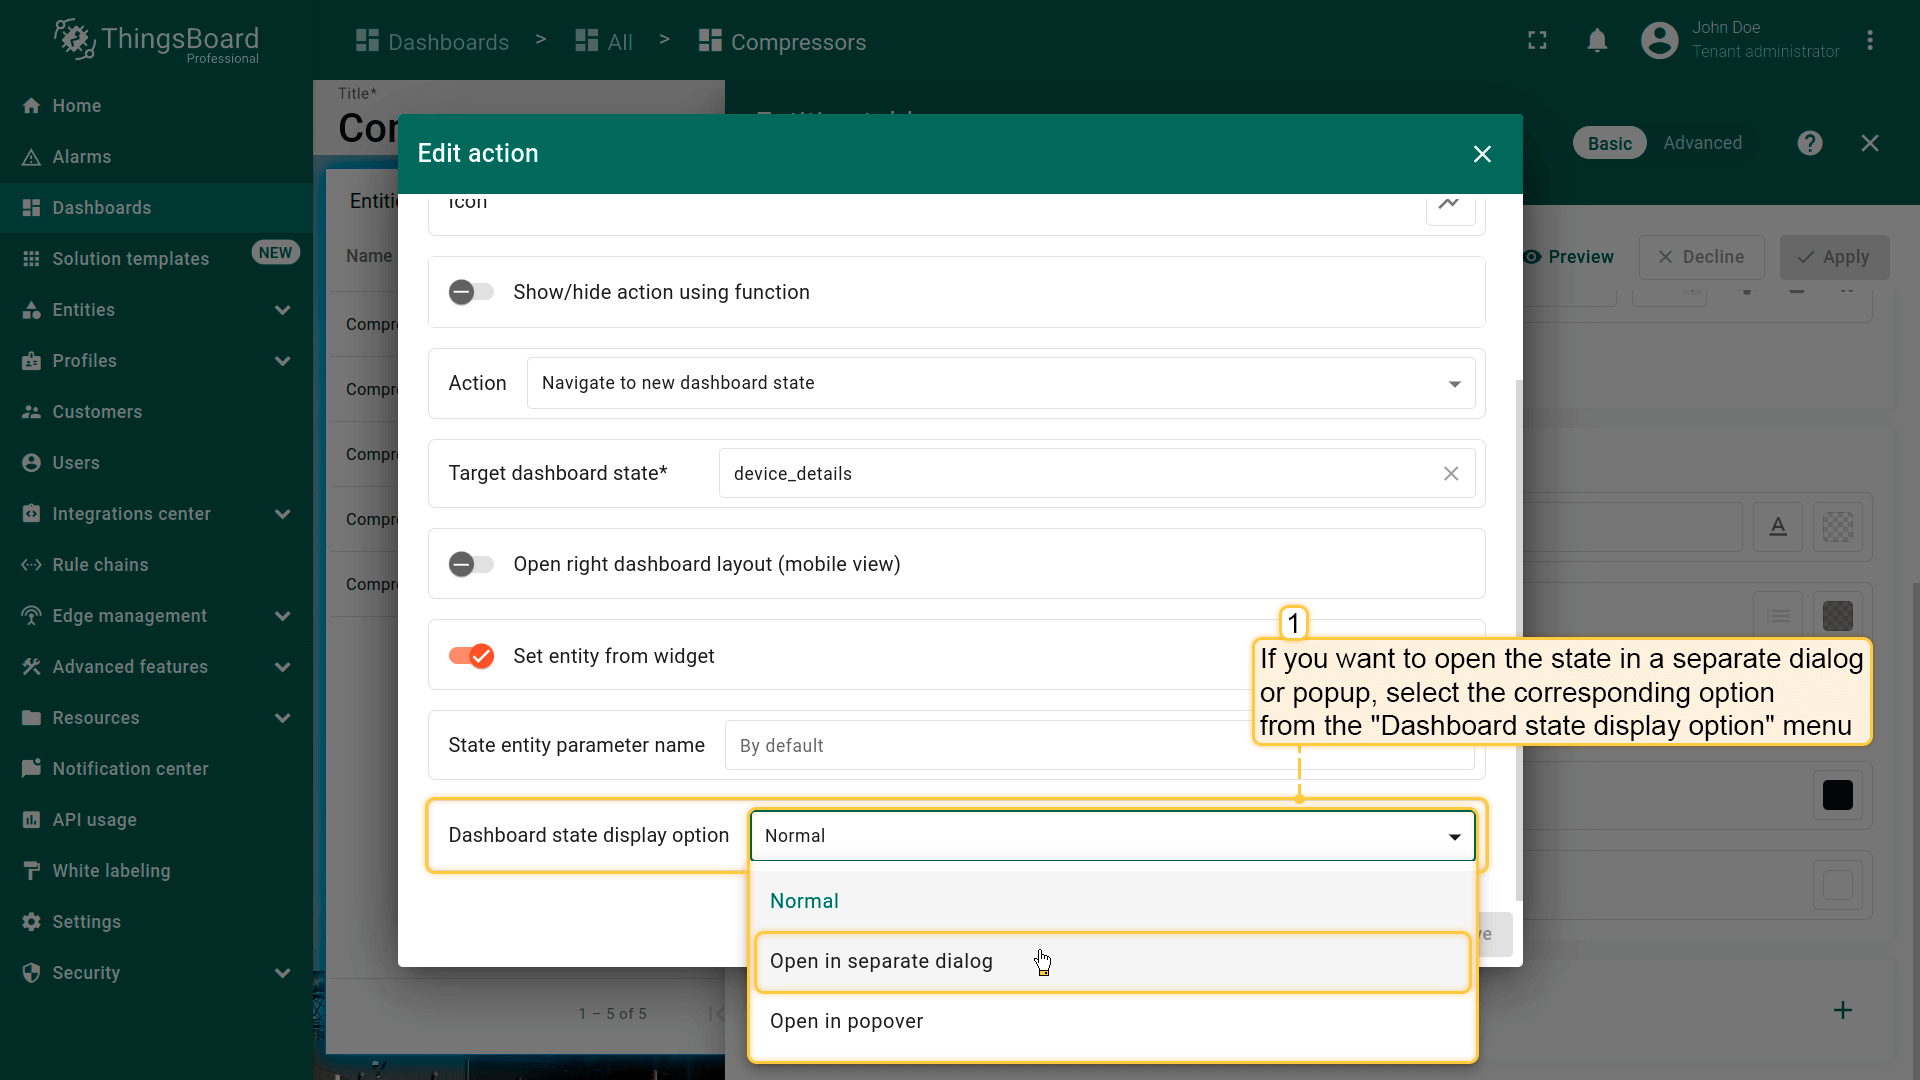
在独立对话框或弹出窗口中打开新仪表板状态
有时不需要跳转到单独的仪表板状态查看部件详情,而只需在同一仪表板页面上打开。 为此提供_仪表板状态显示选项_功能,可在同一页面上以独立对话框或弹出窗口打开另一状态。
在action设置中选择dashboard state的显示方式,并可配置窗口选项(如显示/隐藏dashboard工具栏、弹出窗口宽高)。
例如,在独立对话框中显示新dashboard state:
- 在“Dashboard state display option”字段中选择“Open in separate dialog”;
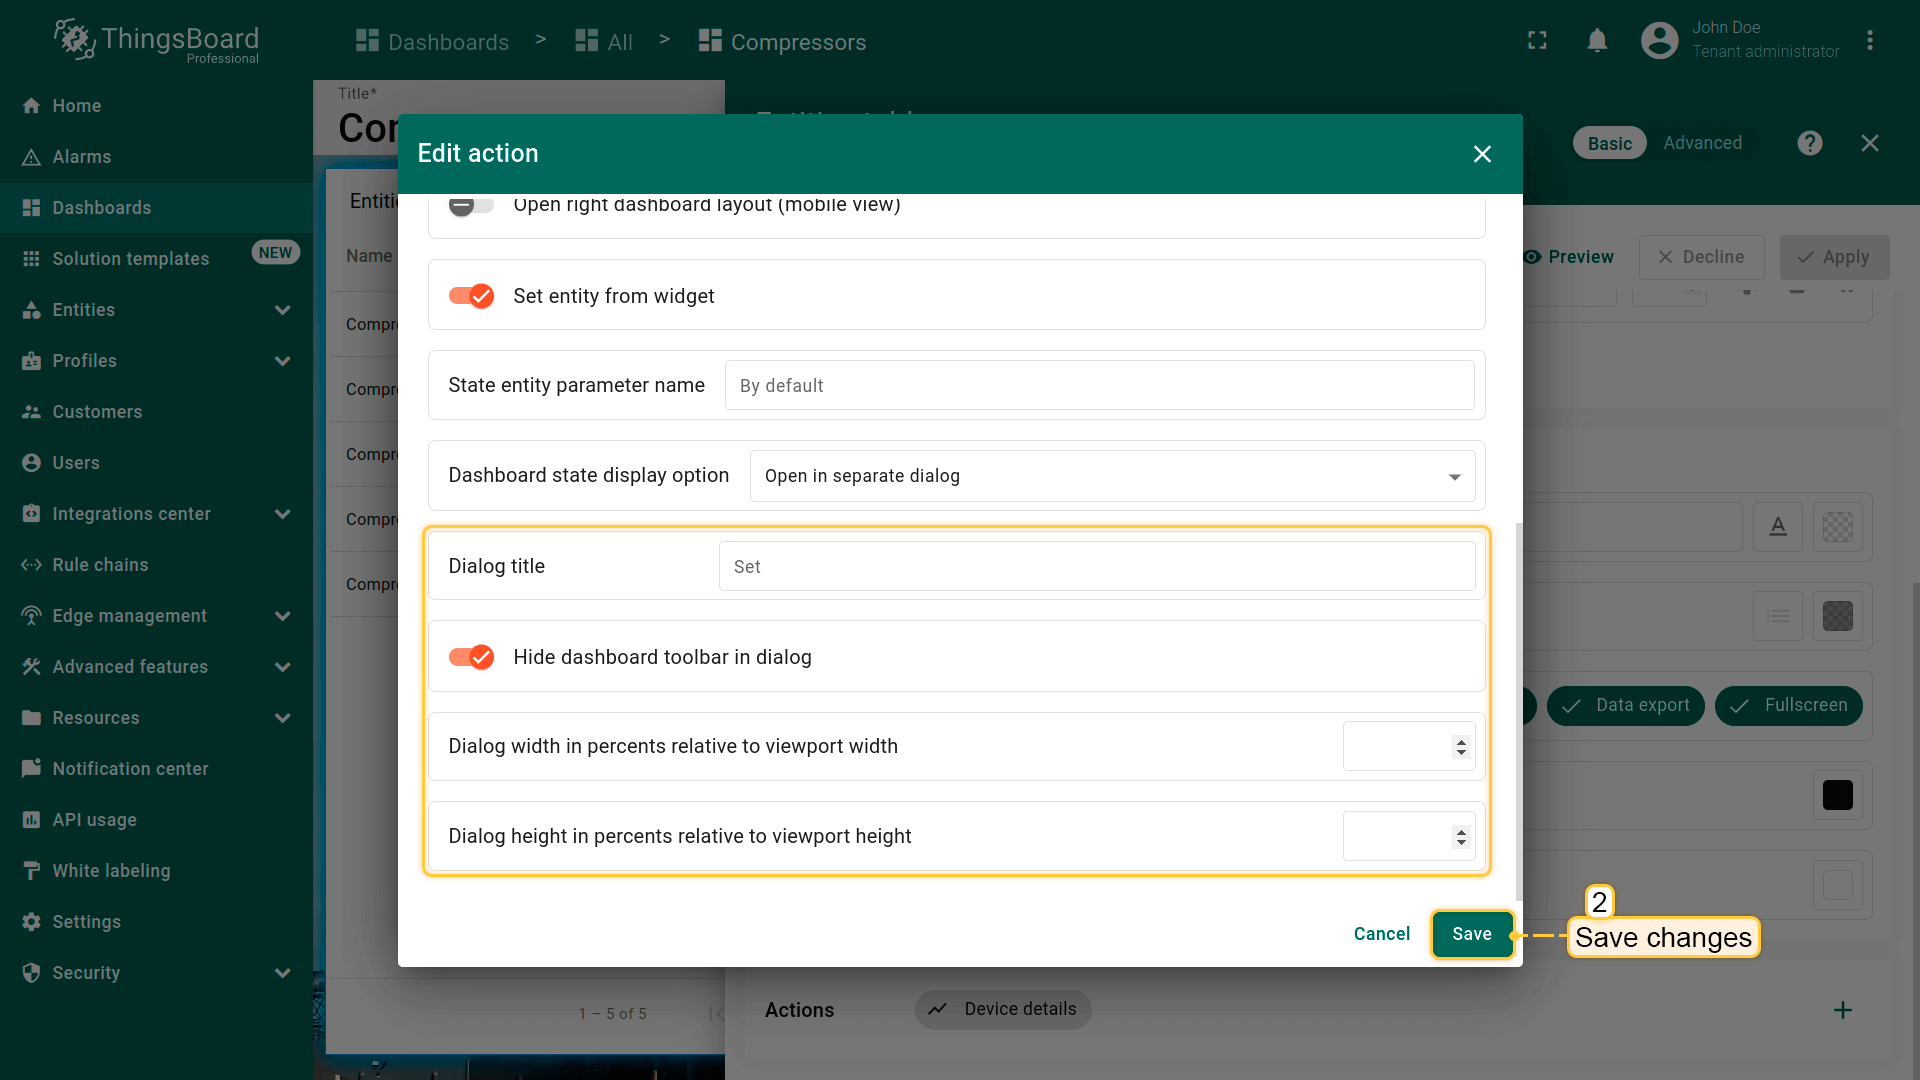
- 默认勾选“Hide dashboard toolbar in dialog”。若需在对话框中显示工具栏,则取消勾选。工具栏显示实体、时间窗口、dashboard导出按钮和全屏展开按钮;
- 可按百分比调整对话框宽高(宽度相对于视口高度,高度相对于宽度);
- 配置完成后保存所有更改。
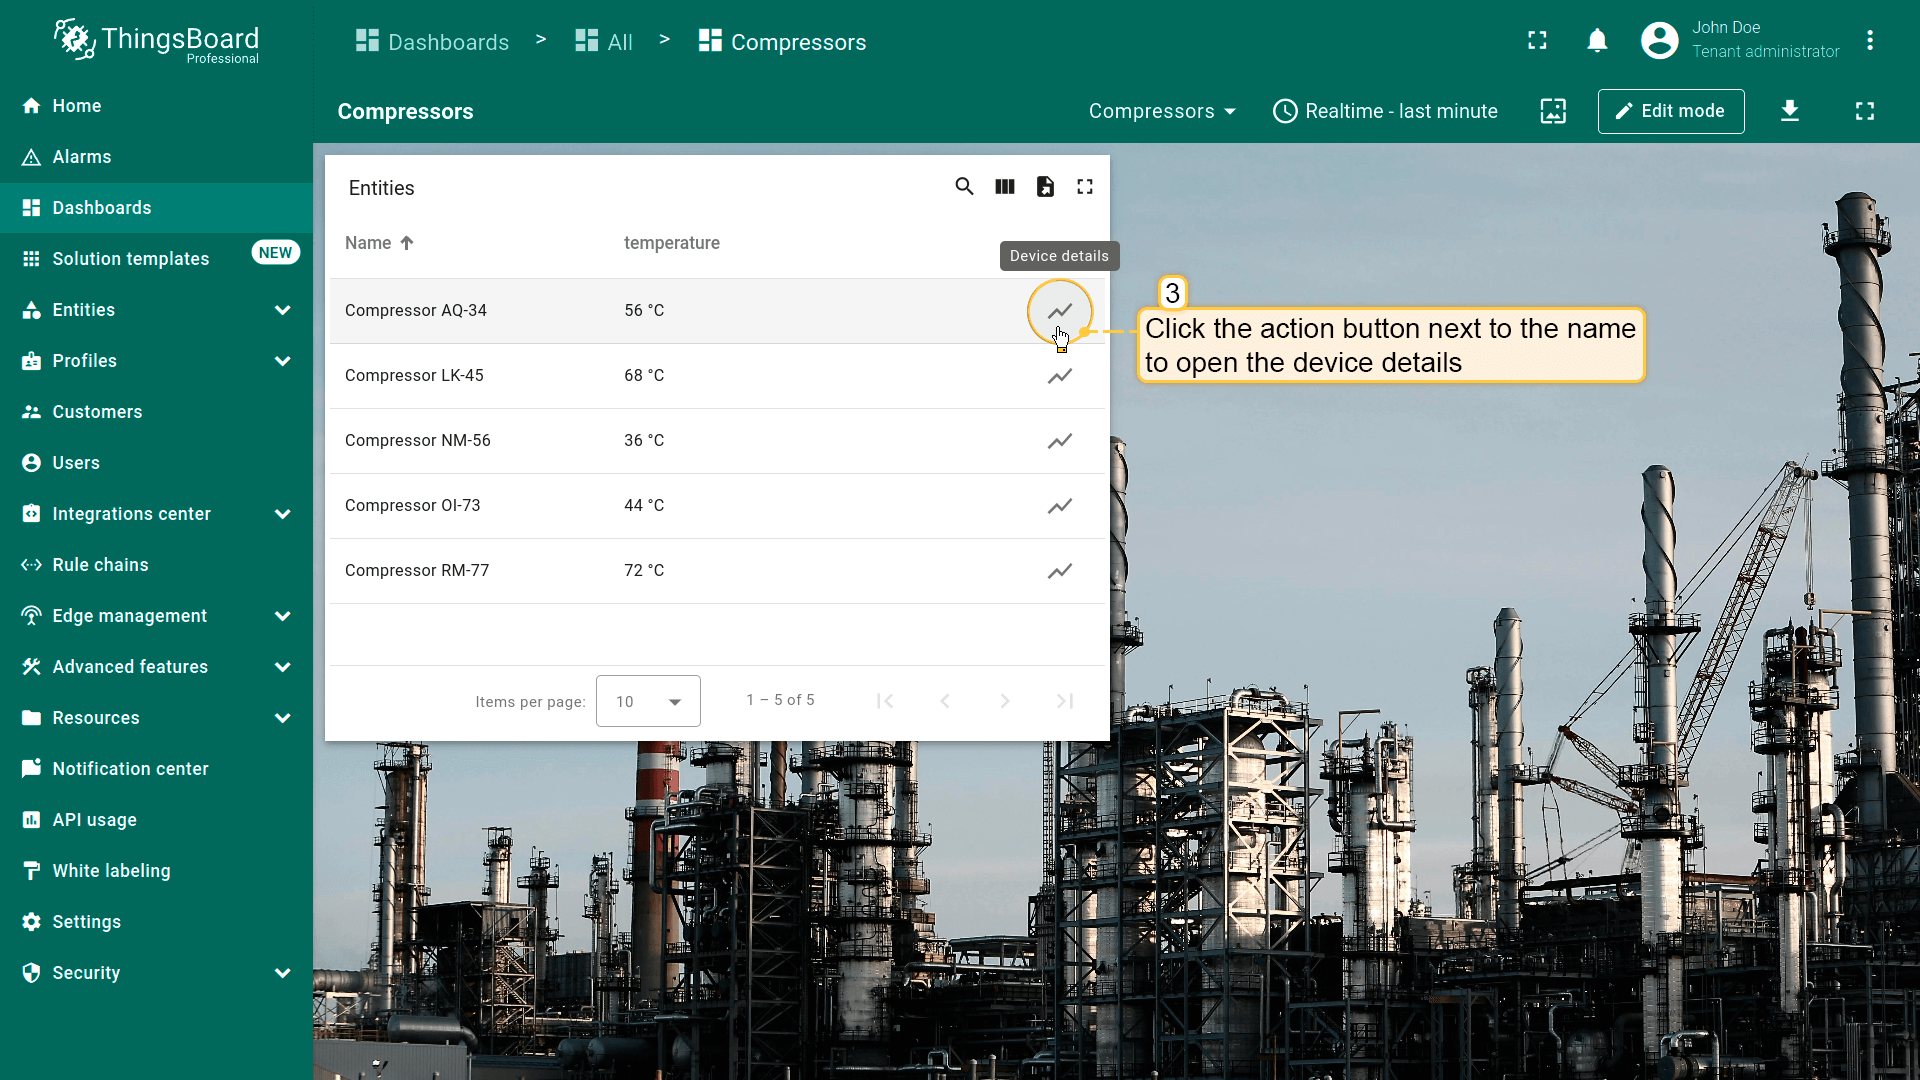
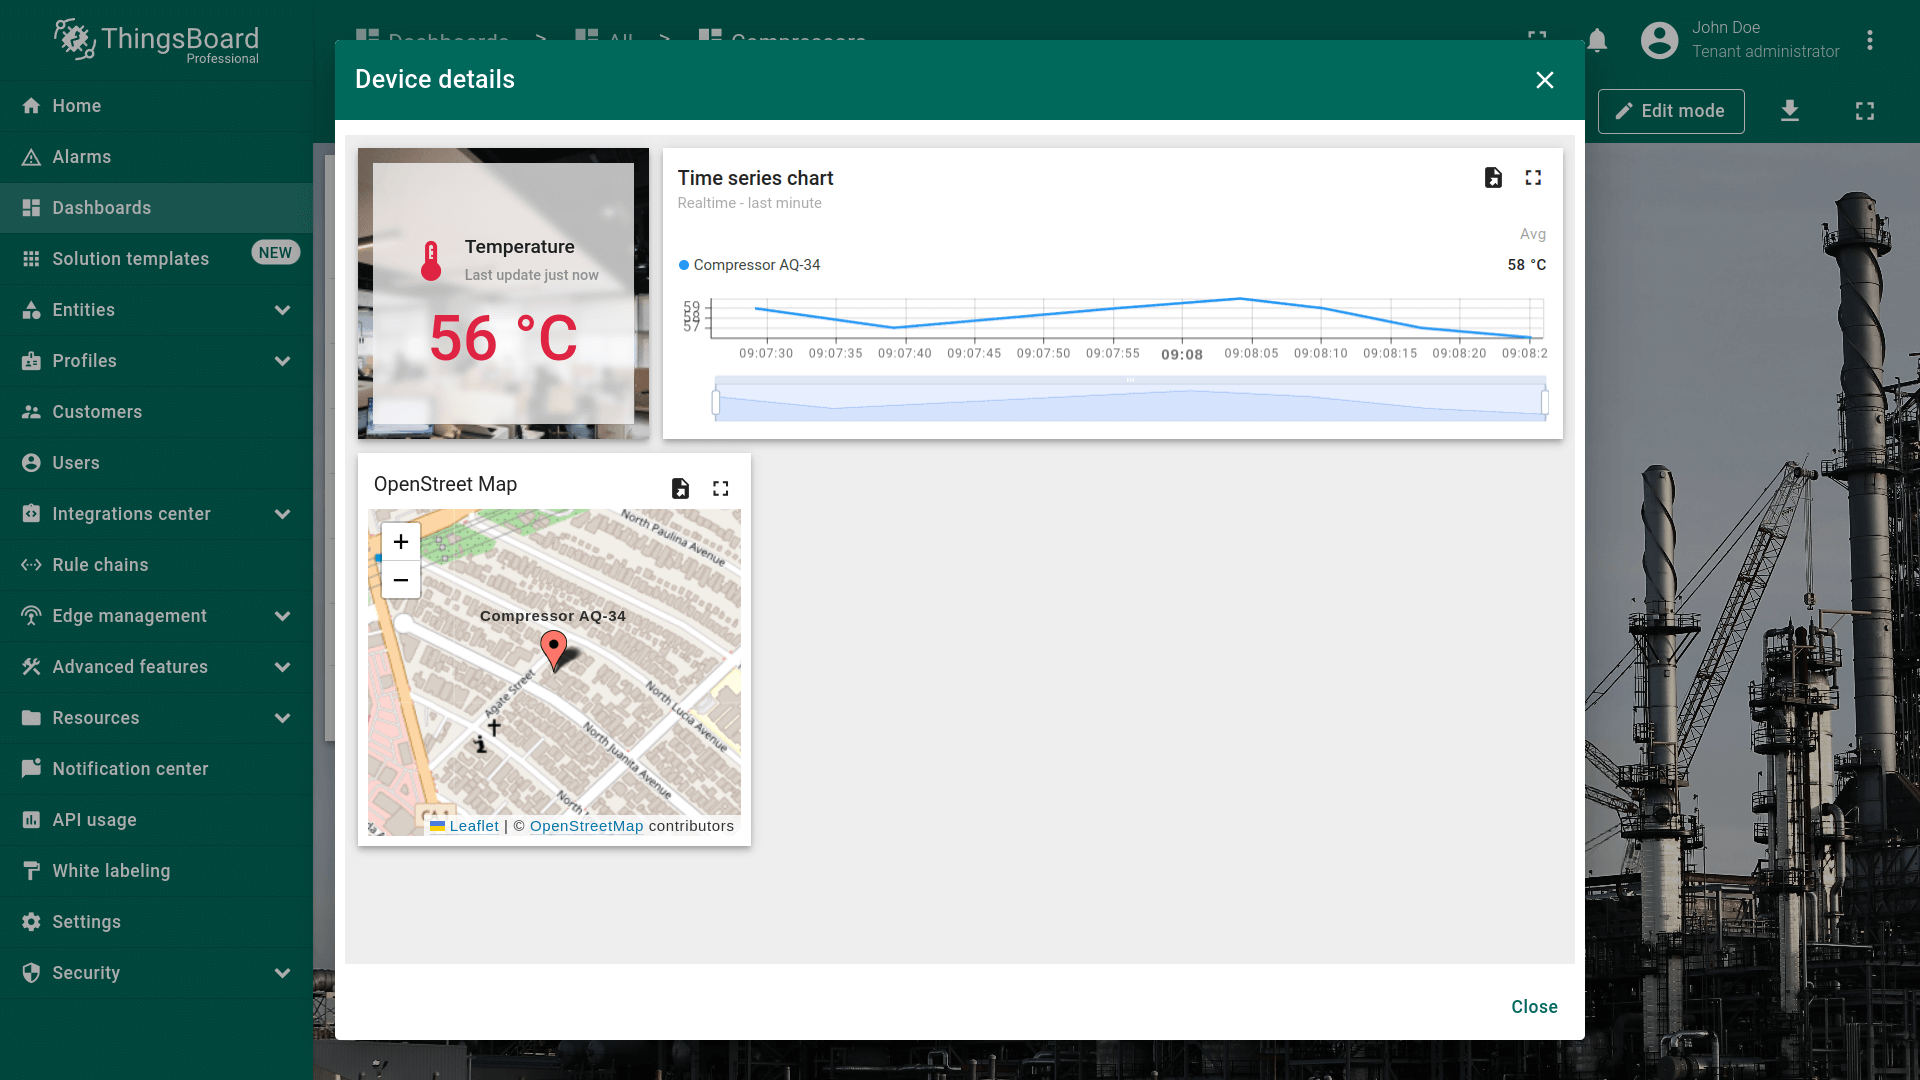
要执行action并以新state打开对话框,点击任意实体旁的action按钮。
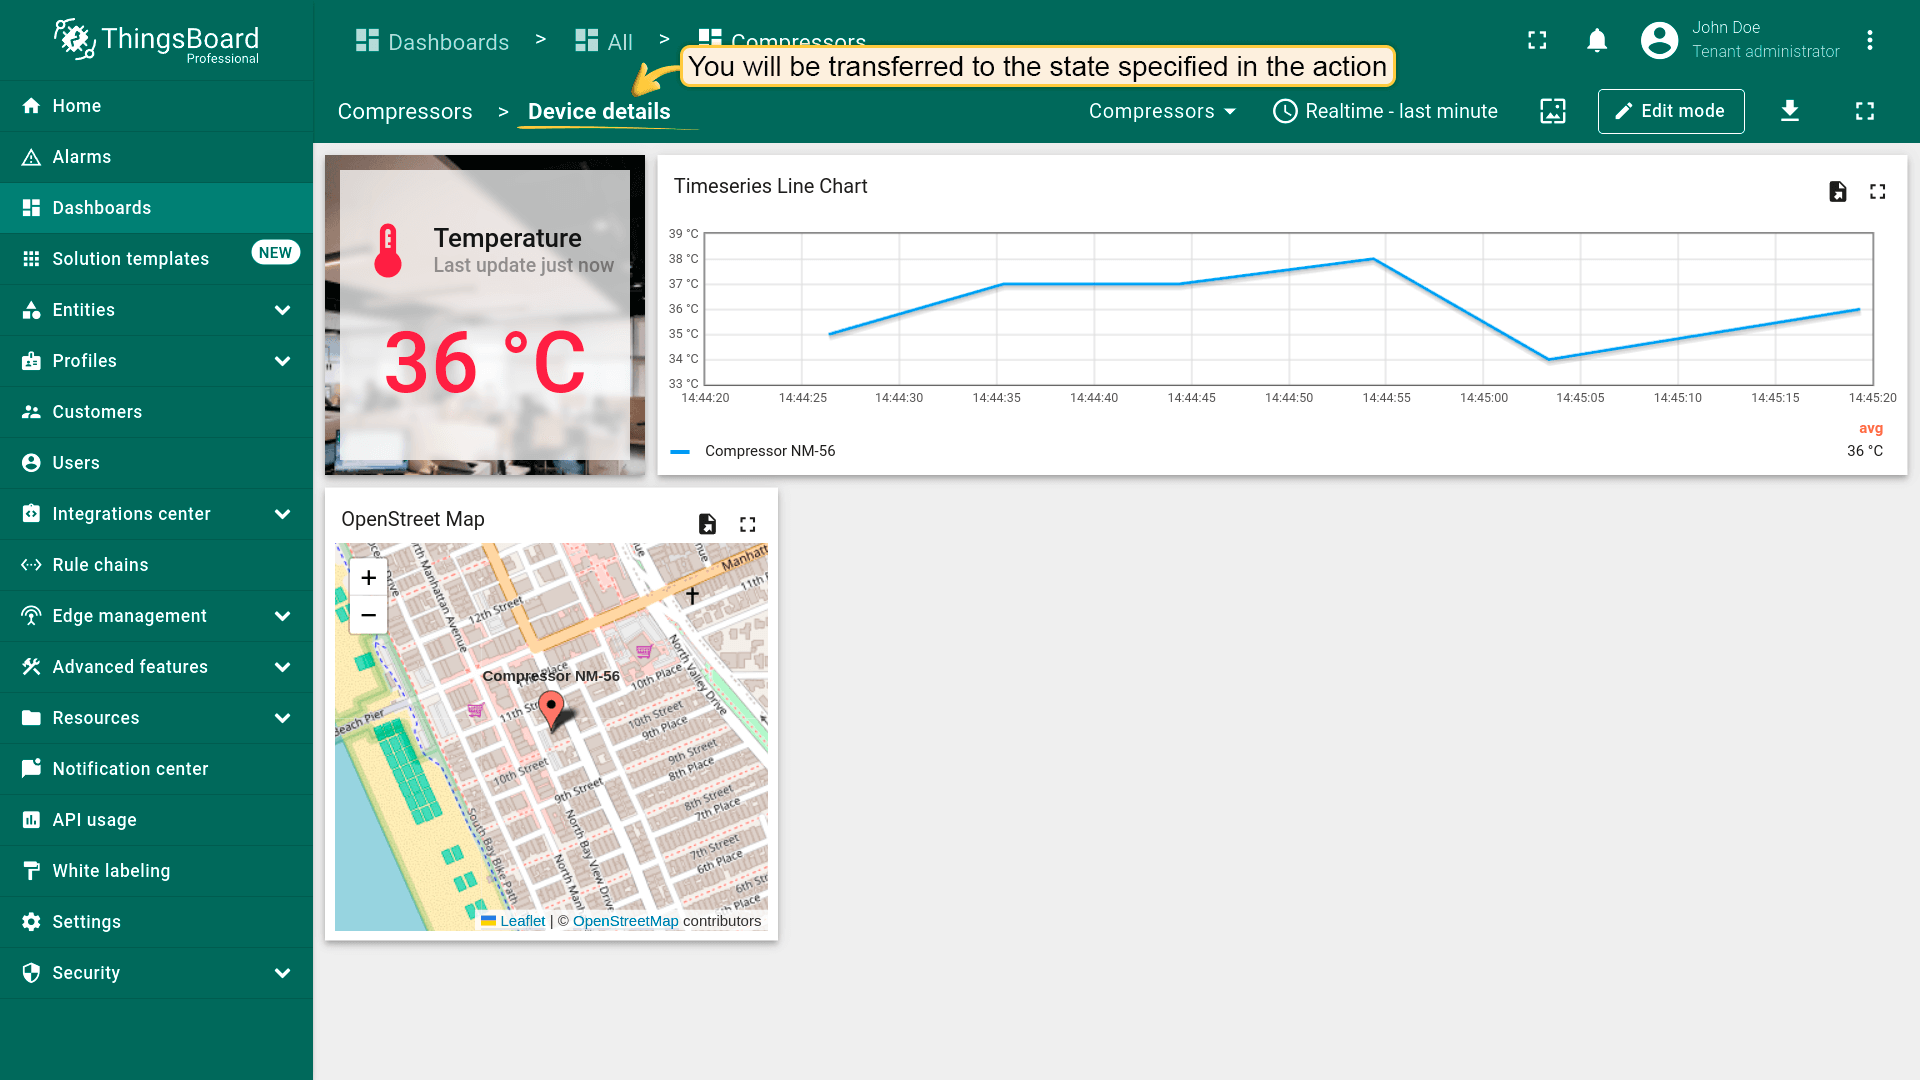
Update current dashboard state
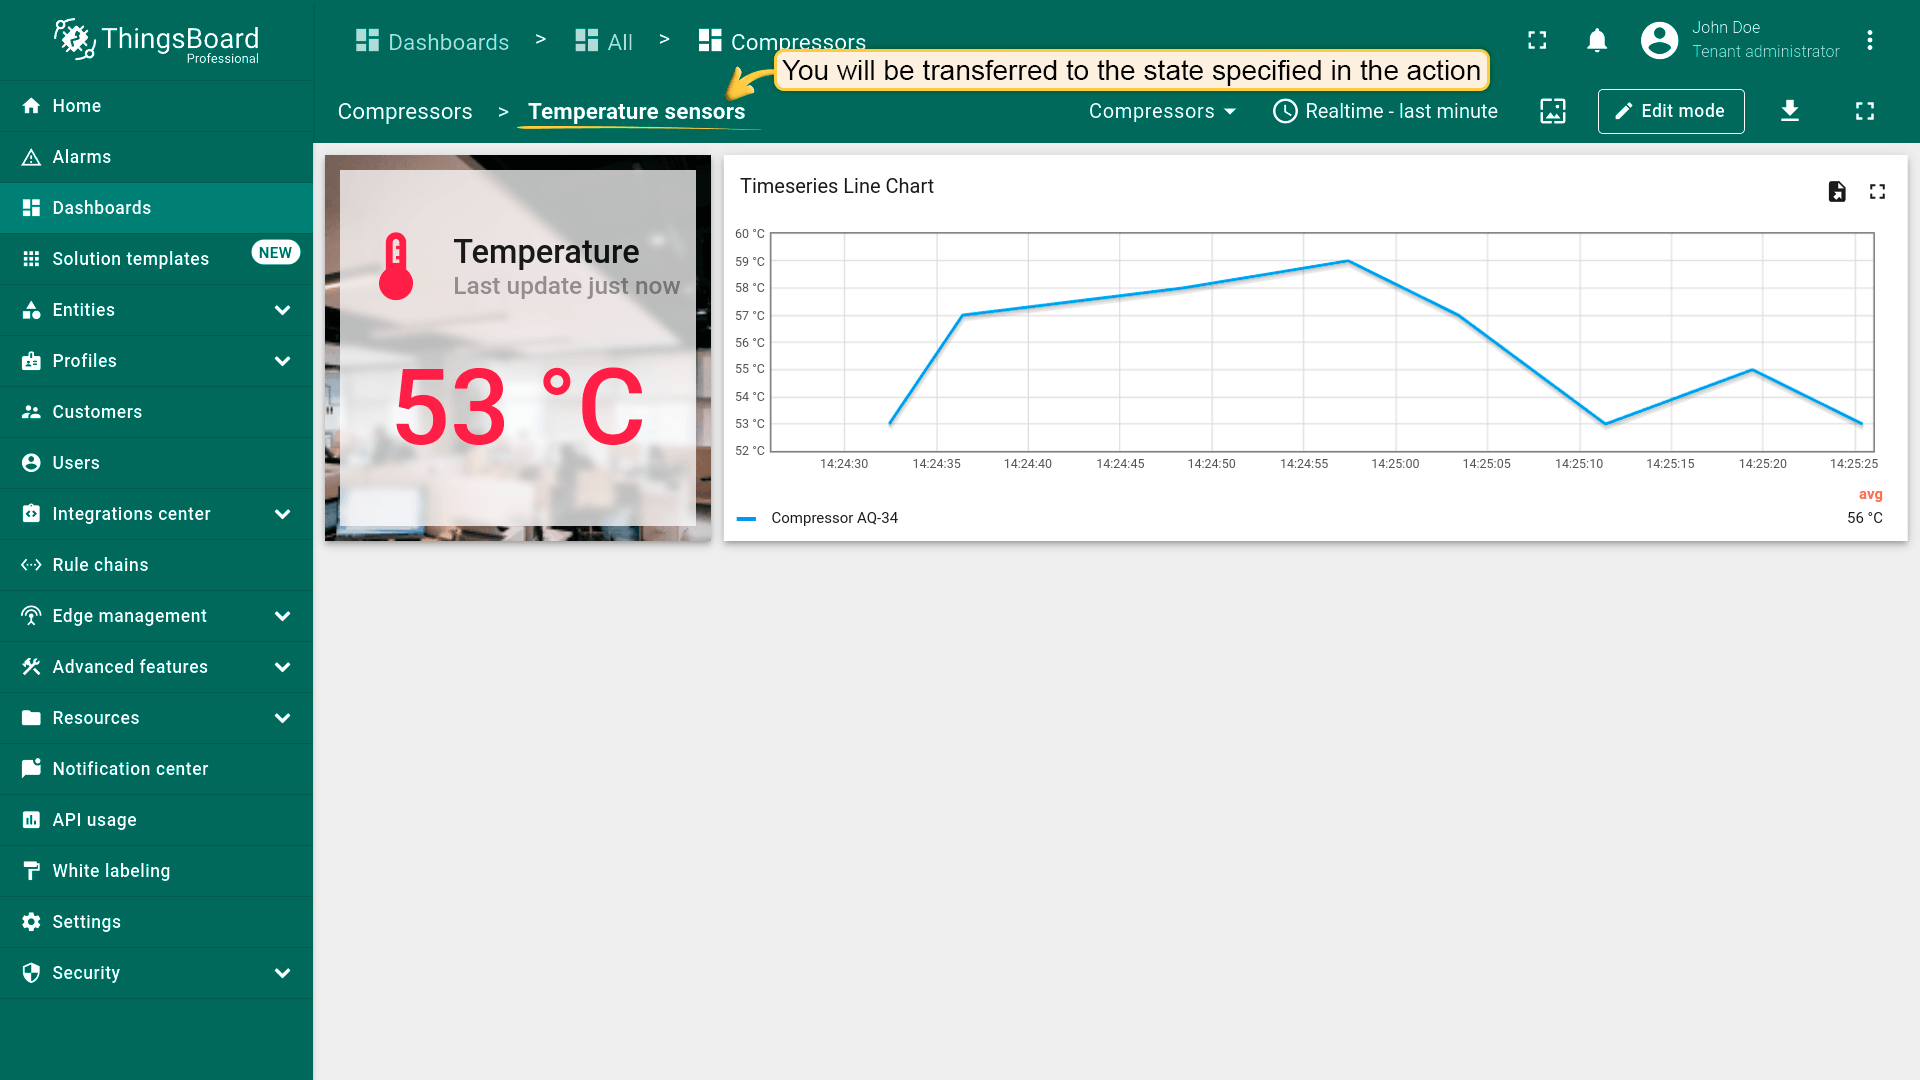
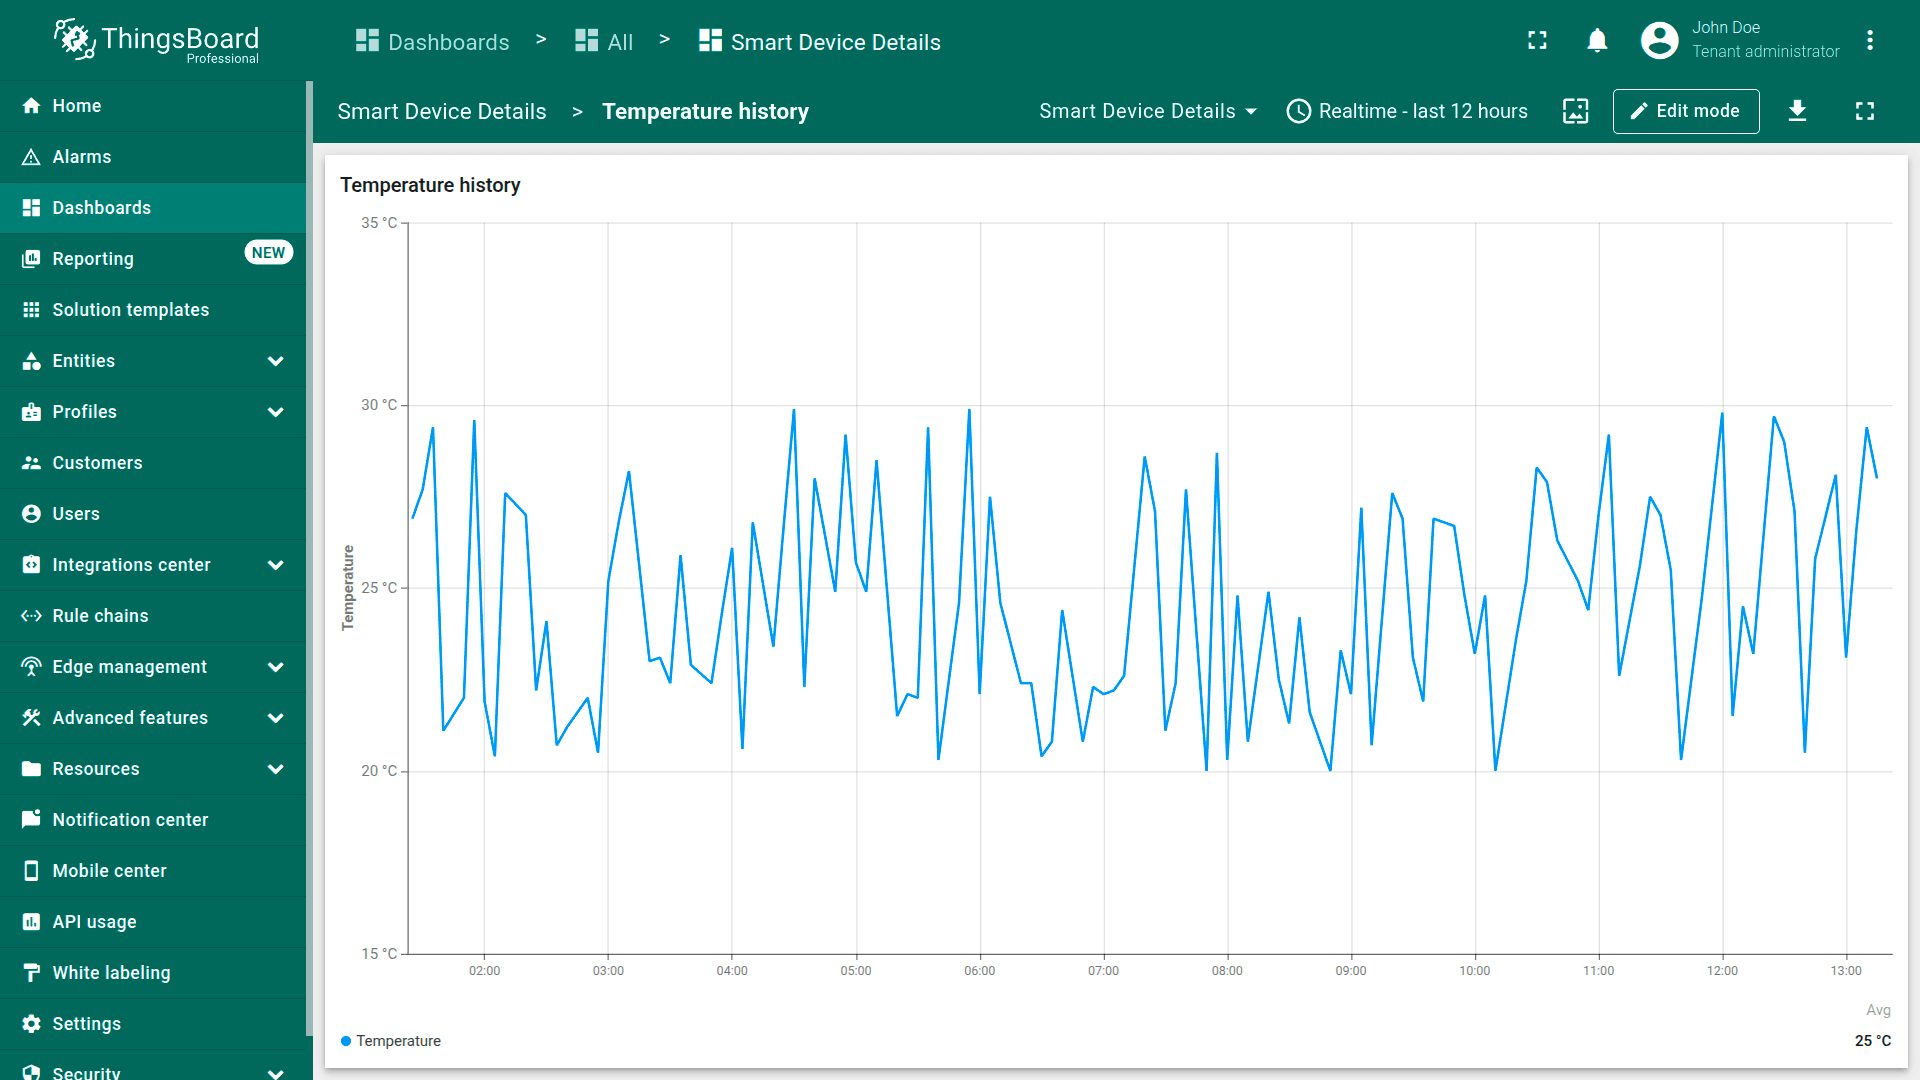
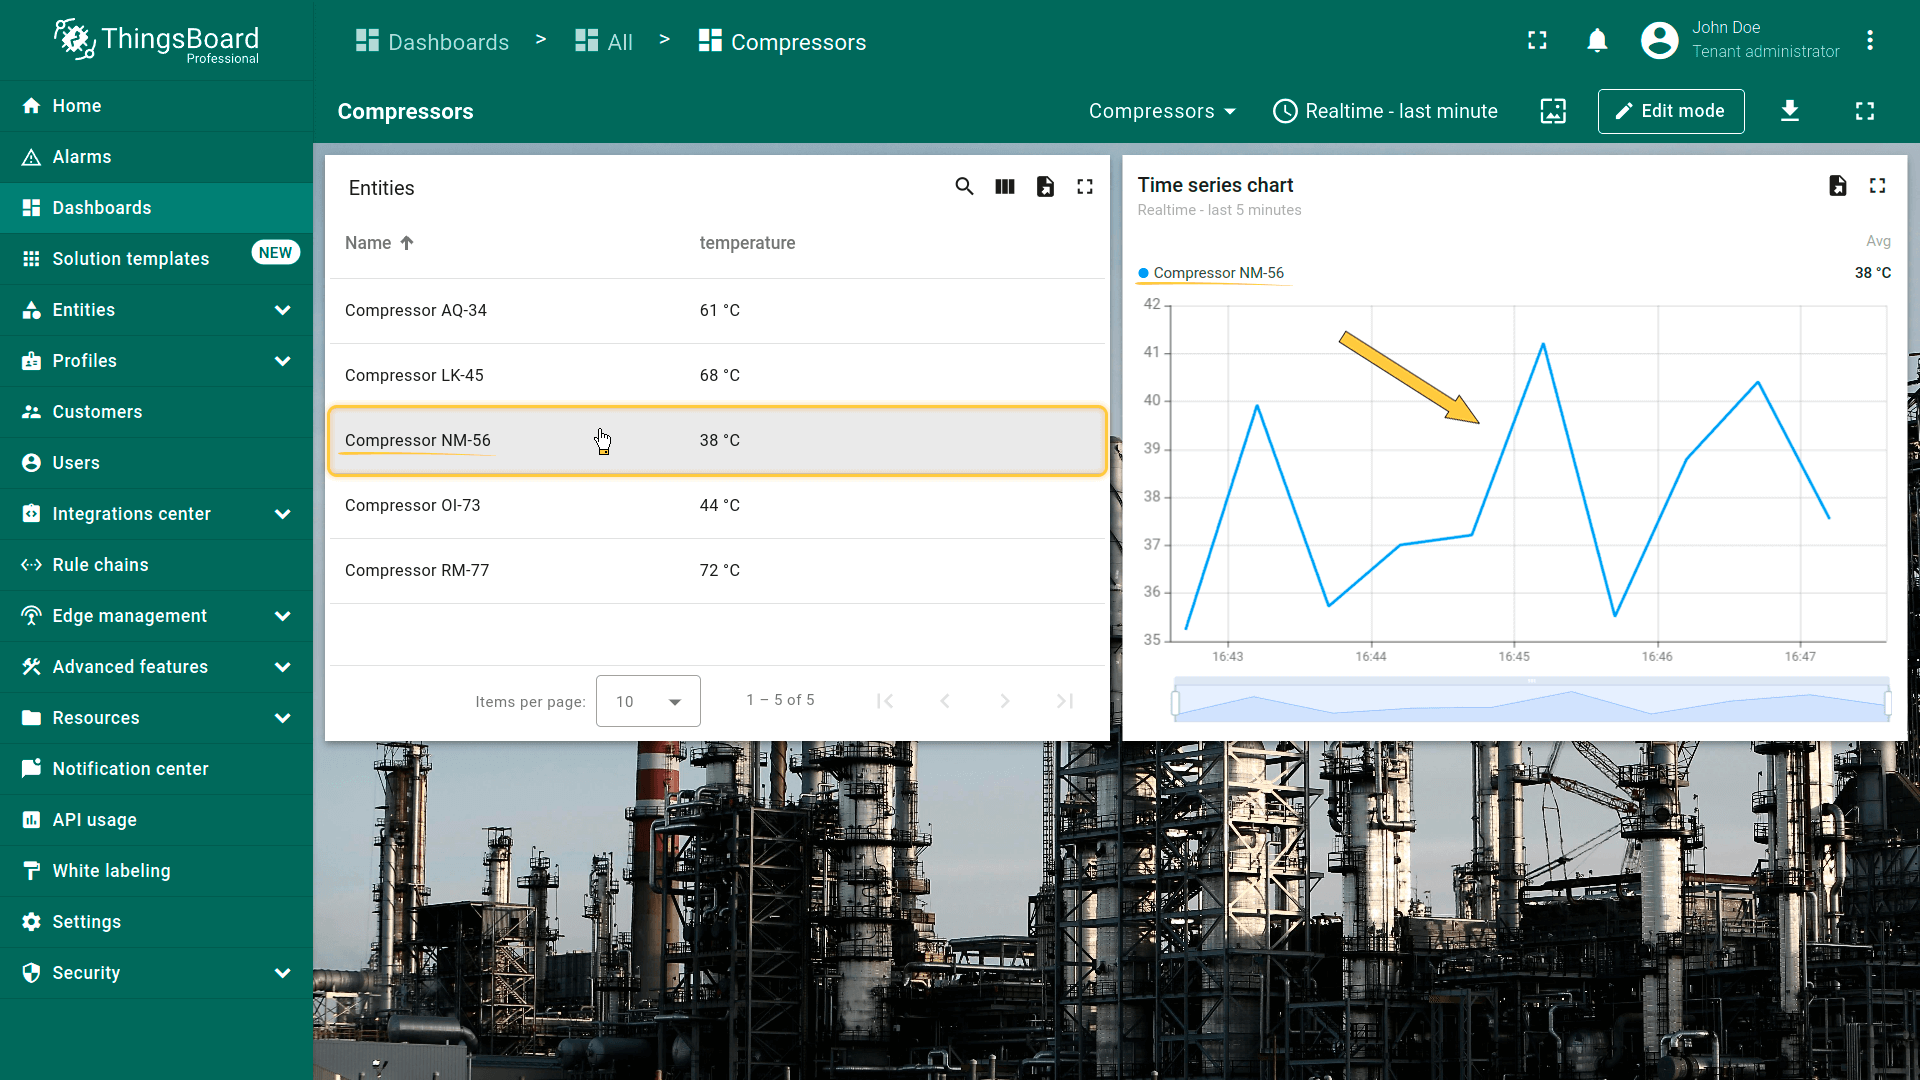
该action类型用于更新当前所在的dashboard。 在使用dashboard时可实时查看特定设备/资产的详细信息。 此类型最常用于Chart部件,便于更精确查看详情。
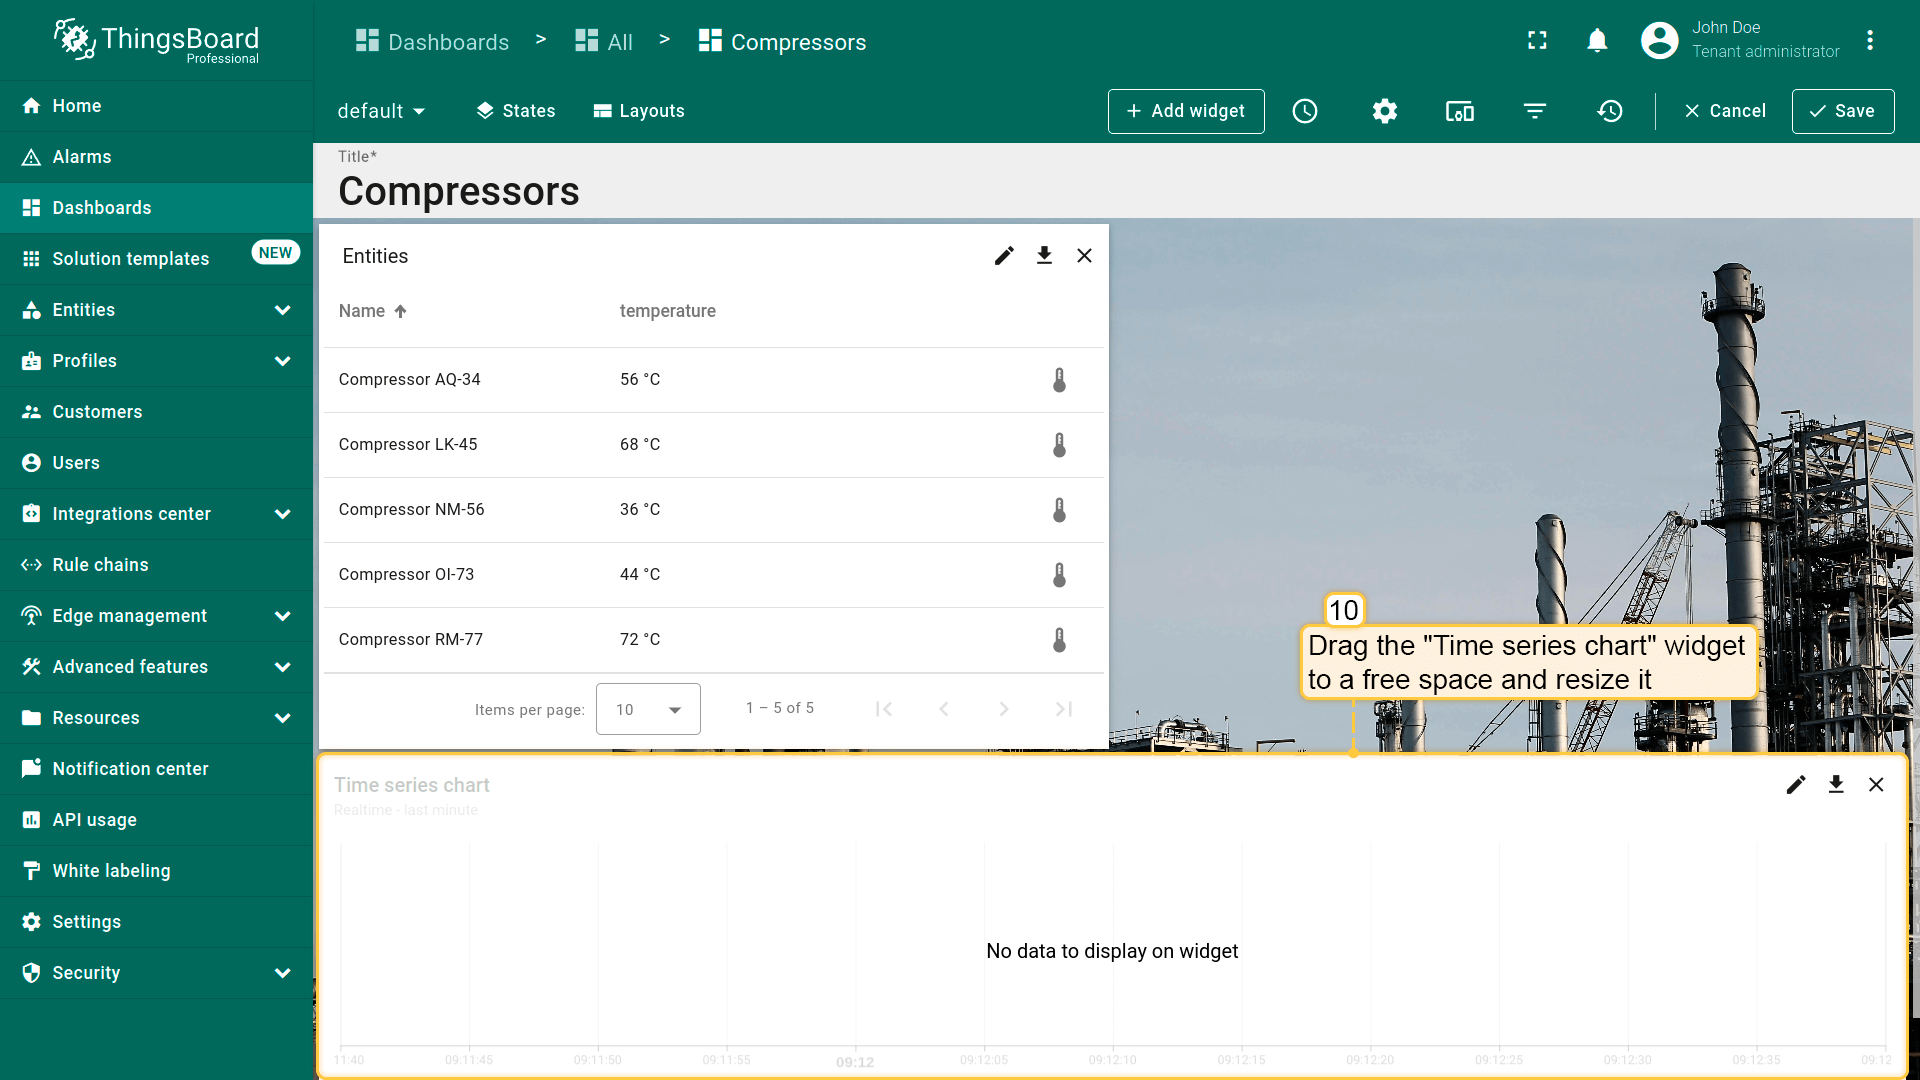
本例中,除“Entities table”部件外,还需在dashboard中添加“Timeseries Line Chart”部件。数据源请指定 asset 类型“Entity from dashboard state”:
- Enter edit mode of the dashboard and click the "Add new widget" button at the top of the screen;
- Find the "Charts" widget bundle and click on it;
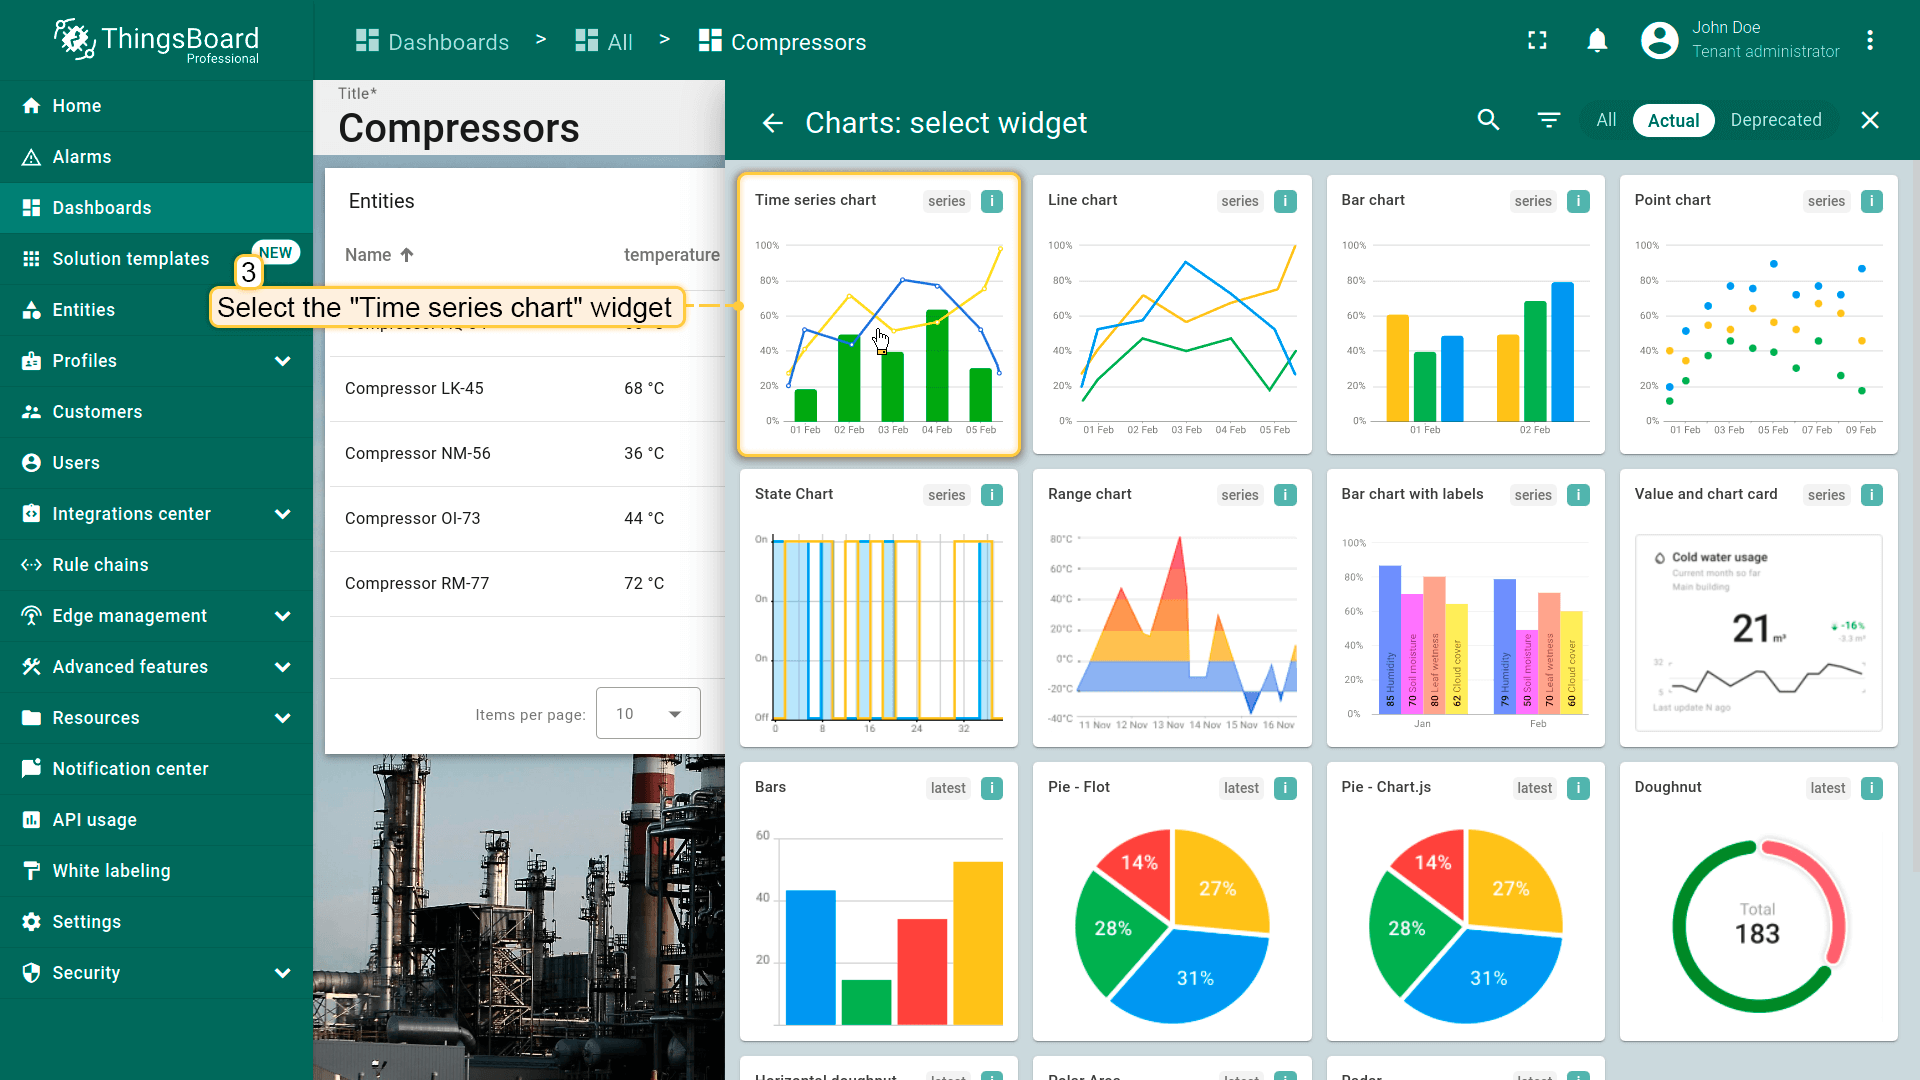
- Select the "Time series chart" widget;
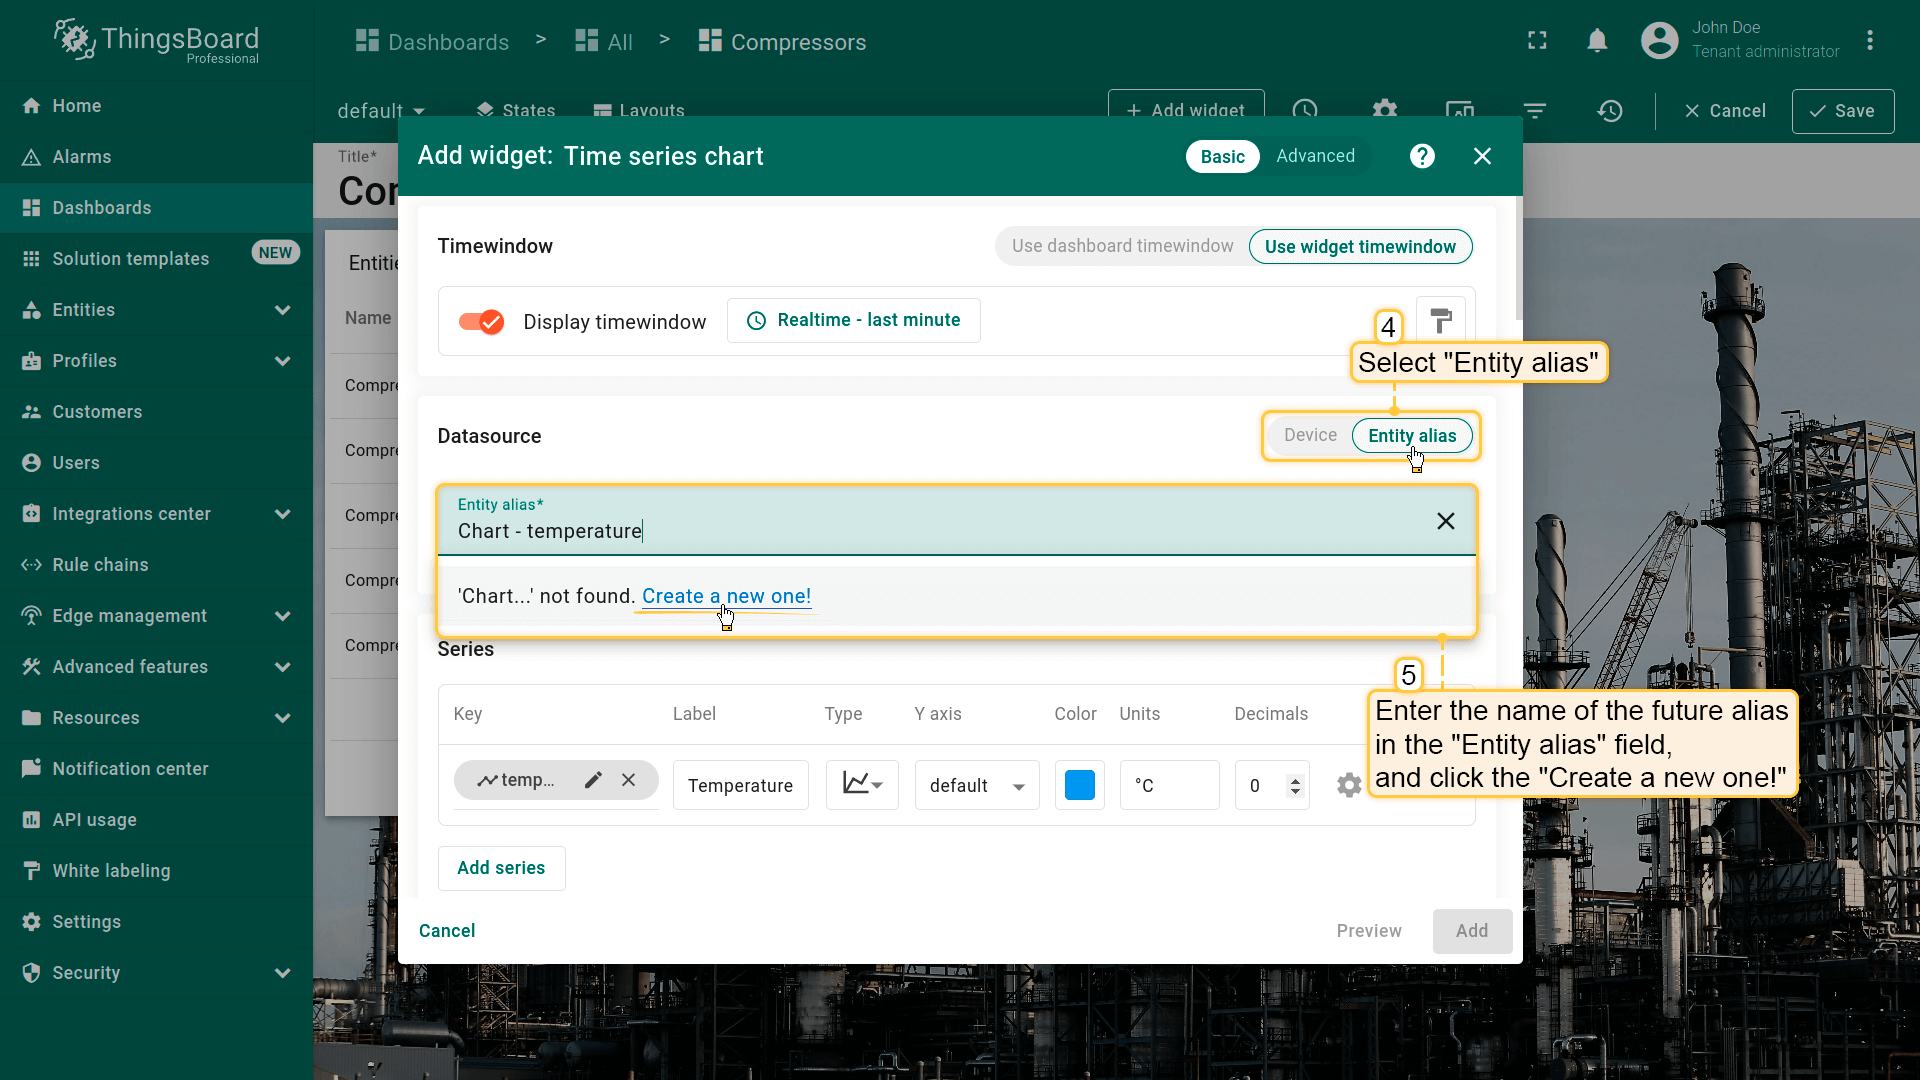
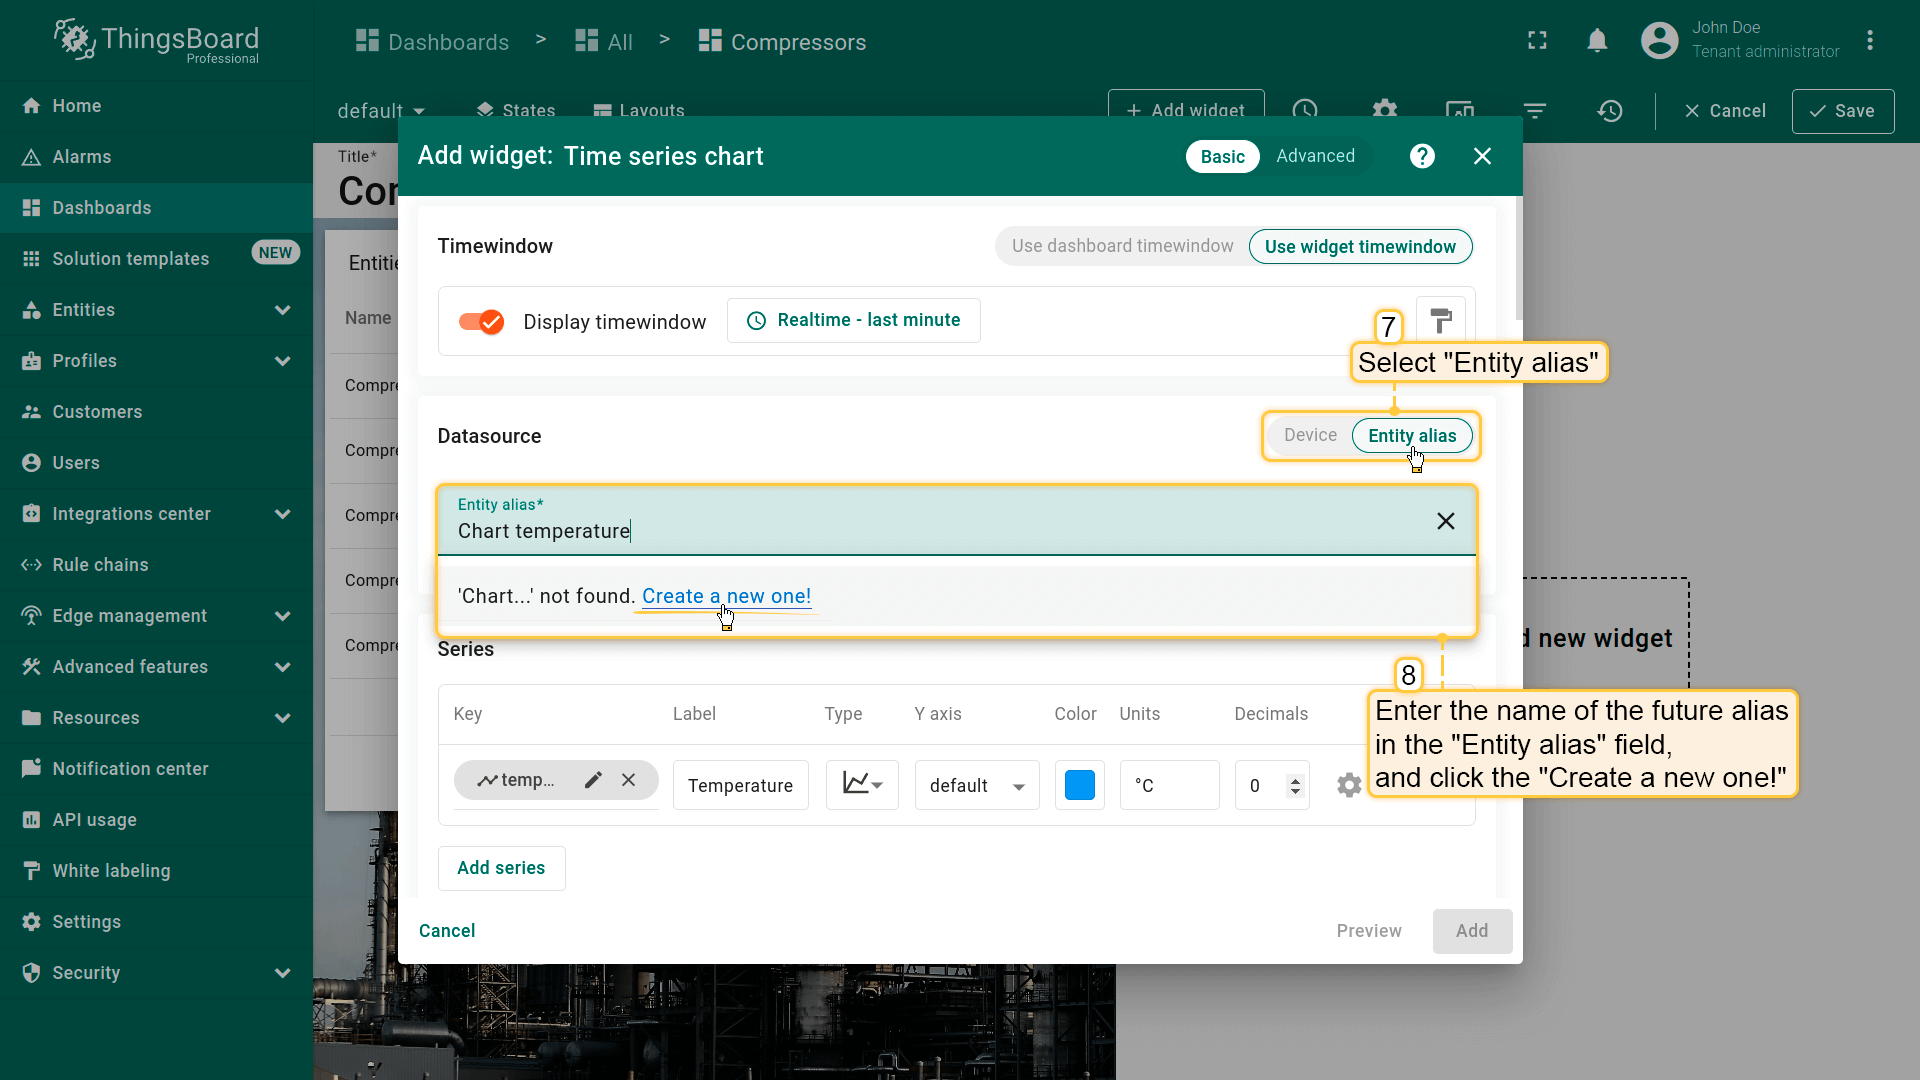
- Navigate to the "Entity alias" tab in the "Datasource" section. Enter the desirable alias name in the "Entity alias" field and click the "Create a new one!" button;
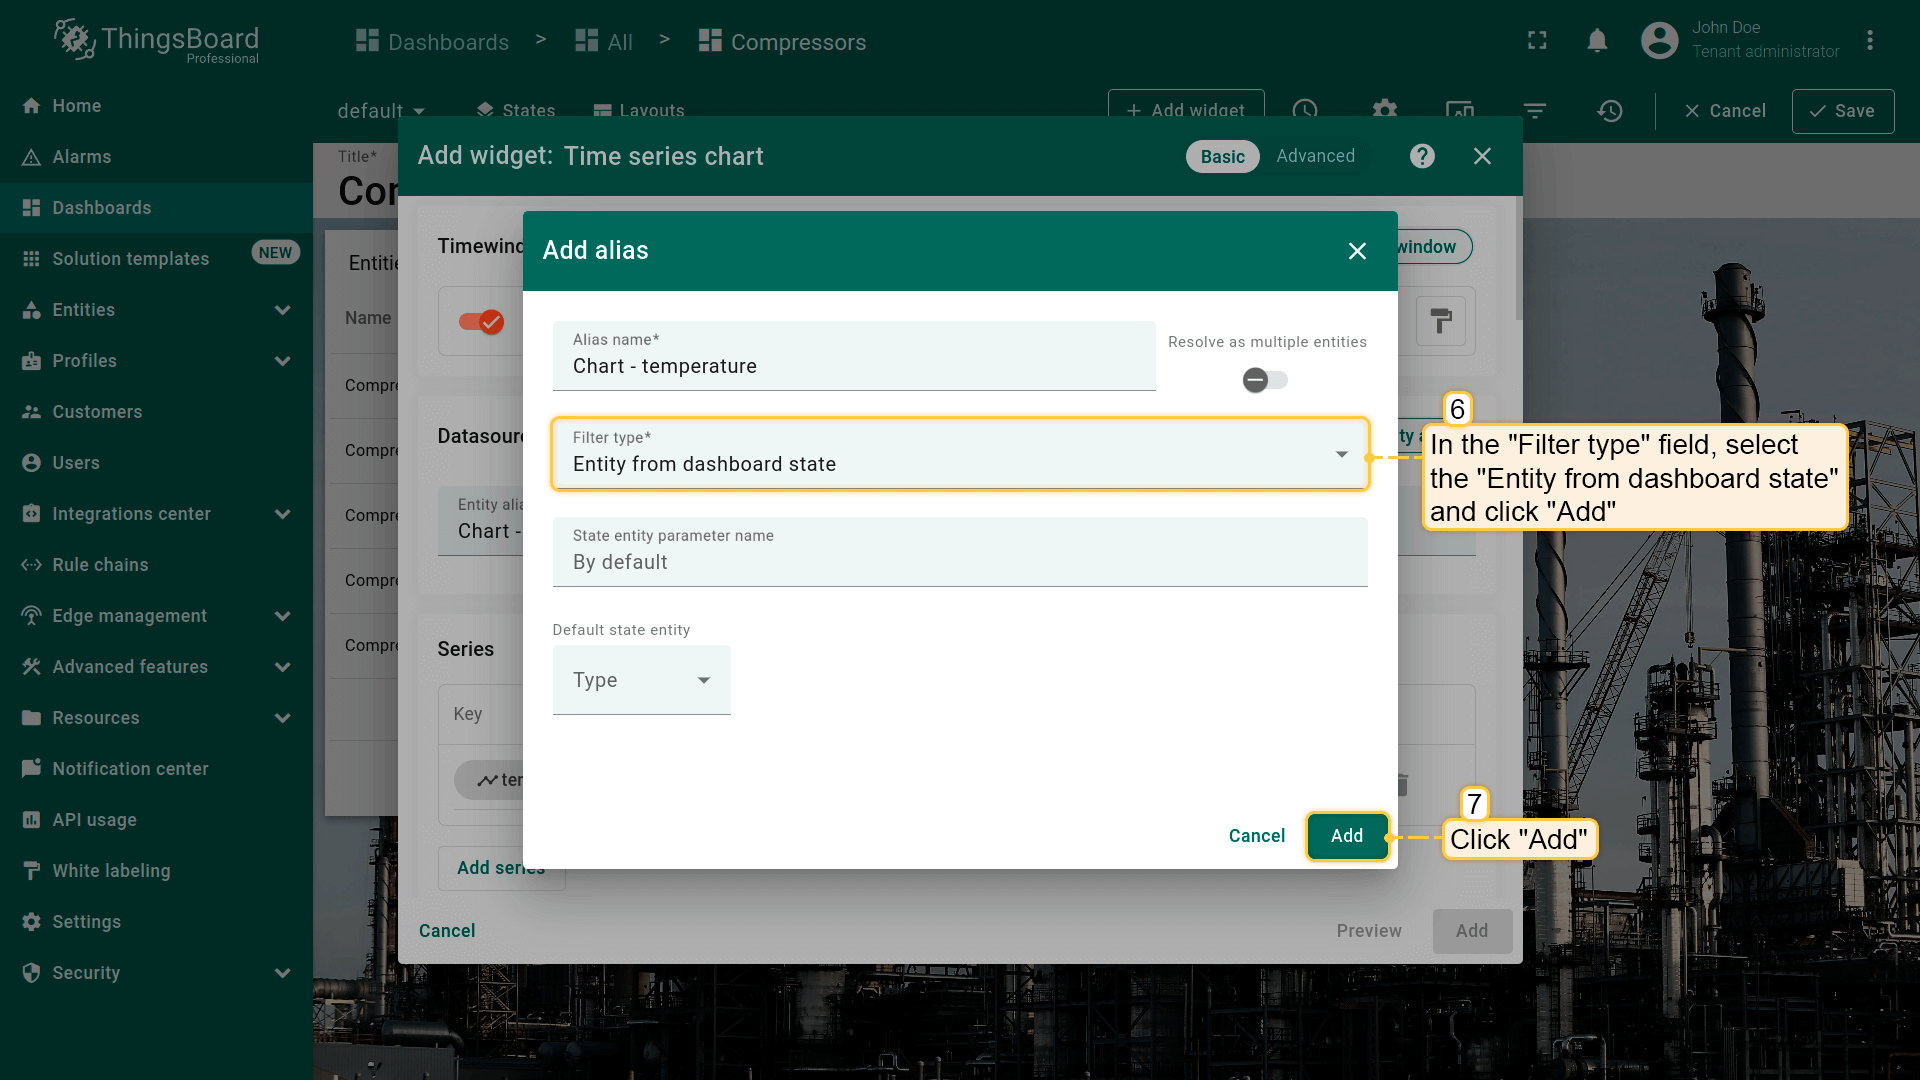
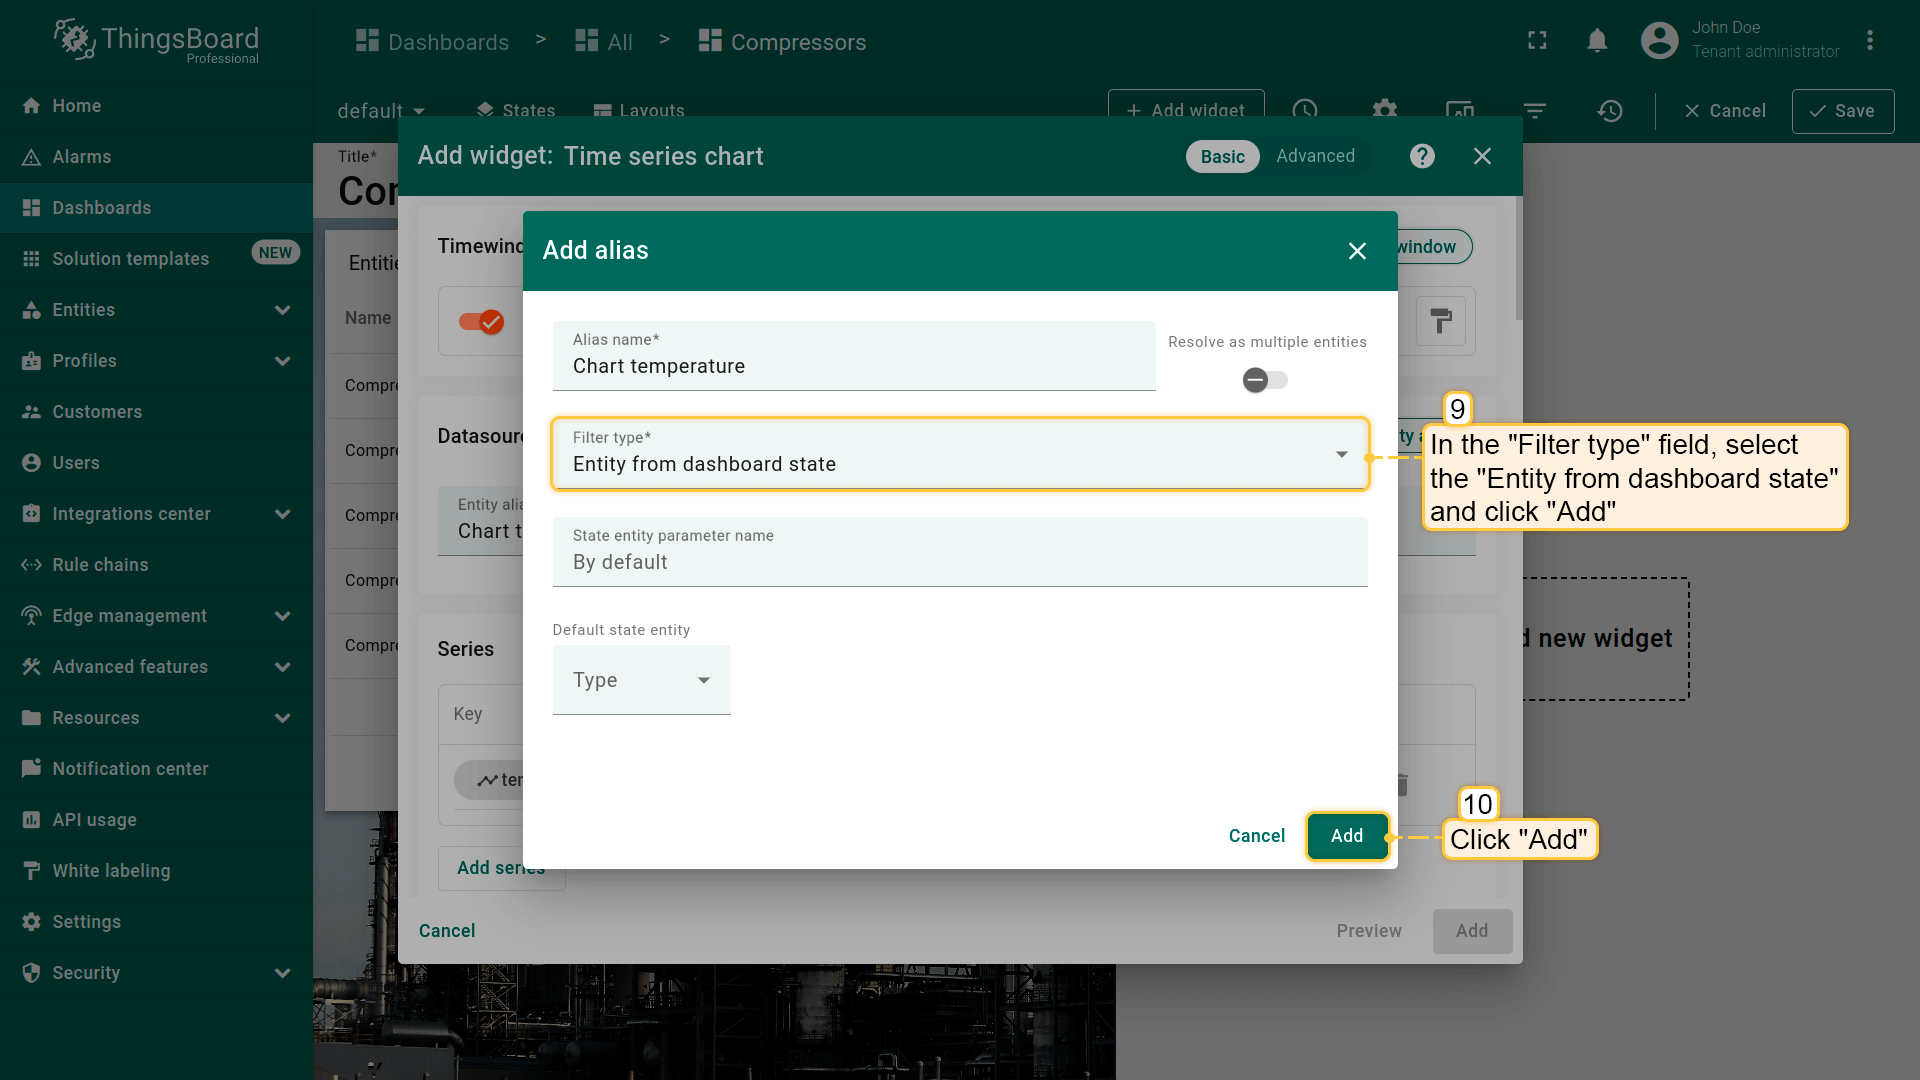
- Select the "Entity from dashboard state" from the "Filter type" field and click "Add";
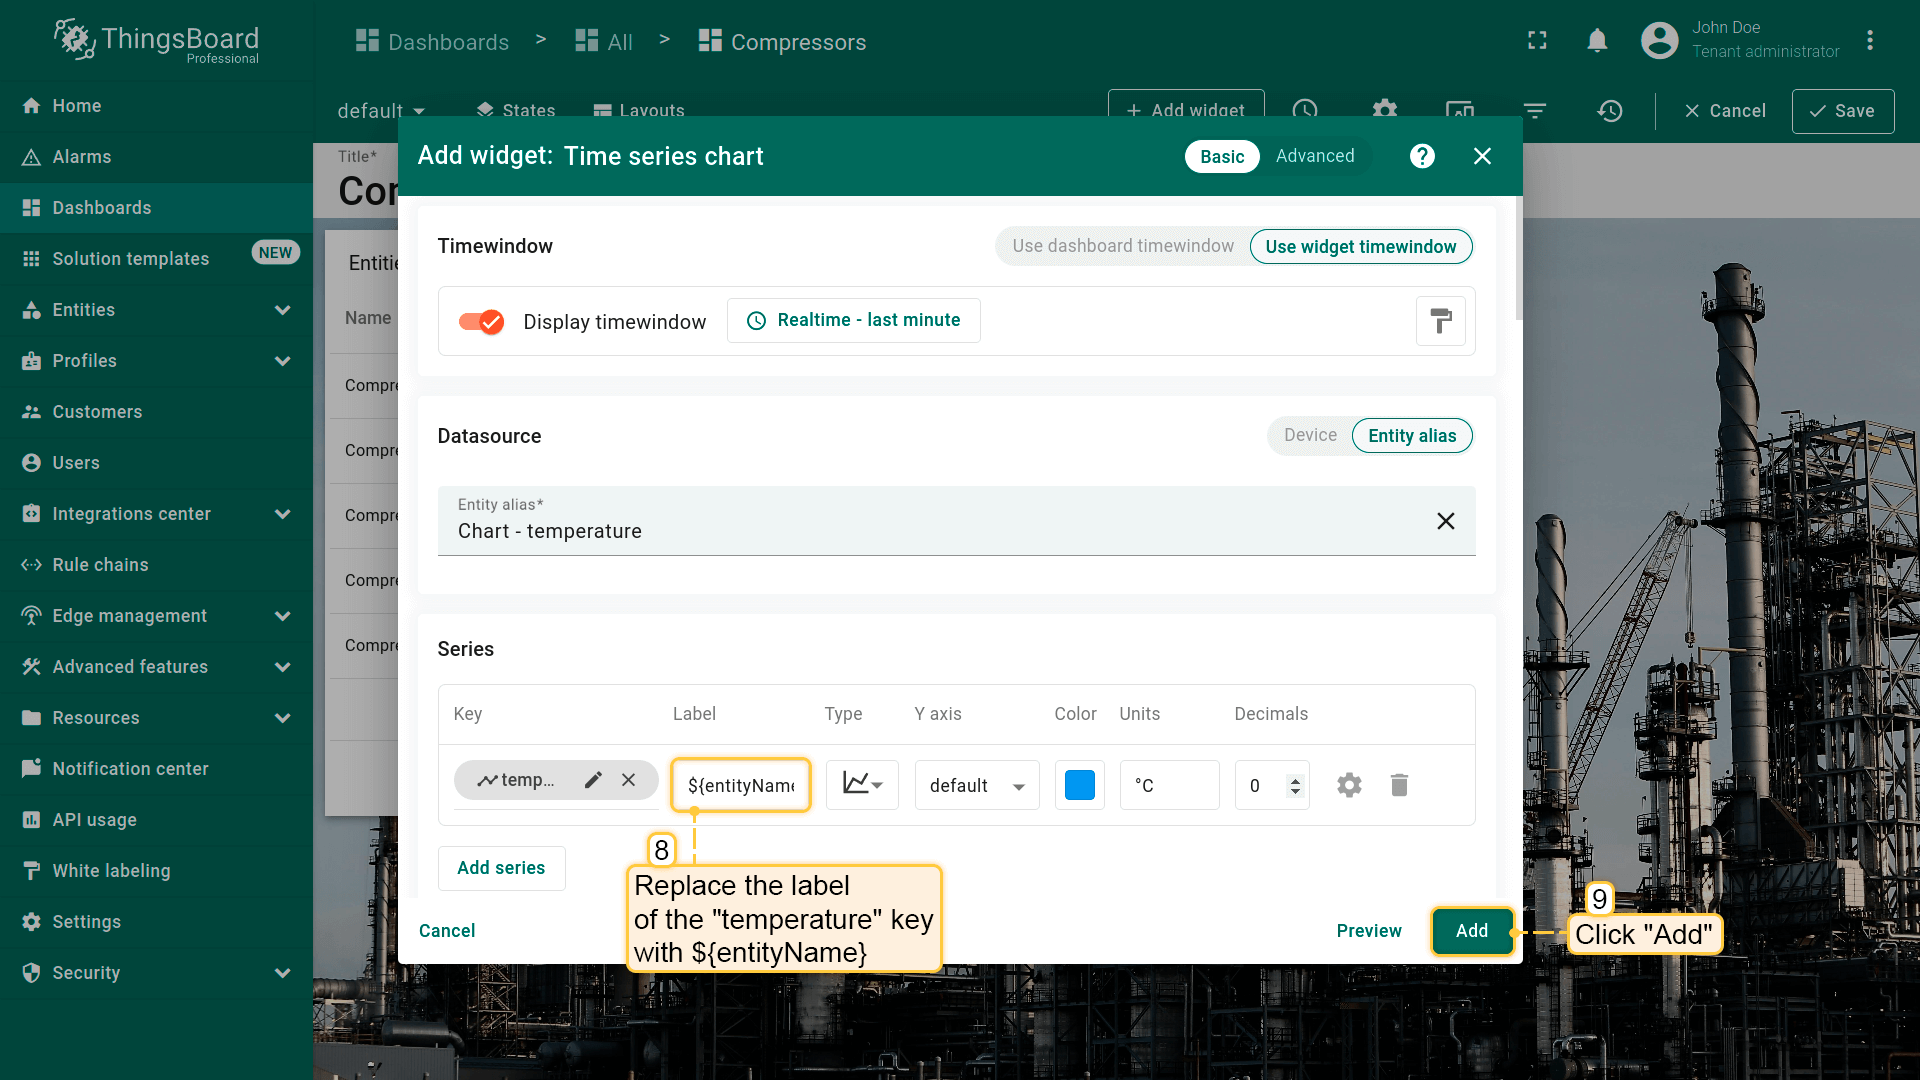
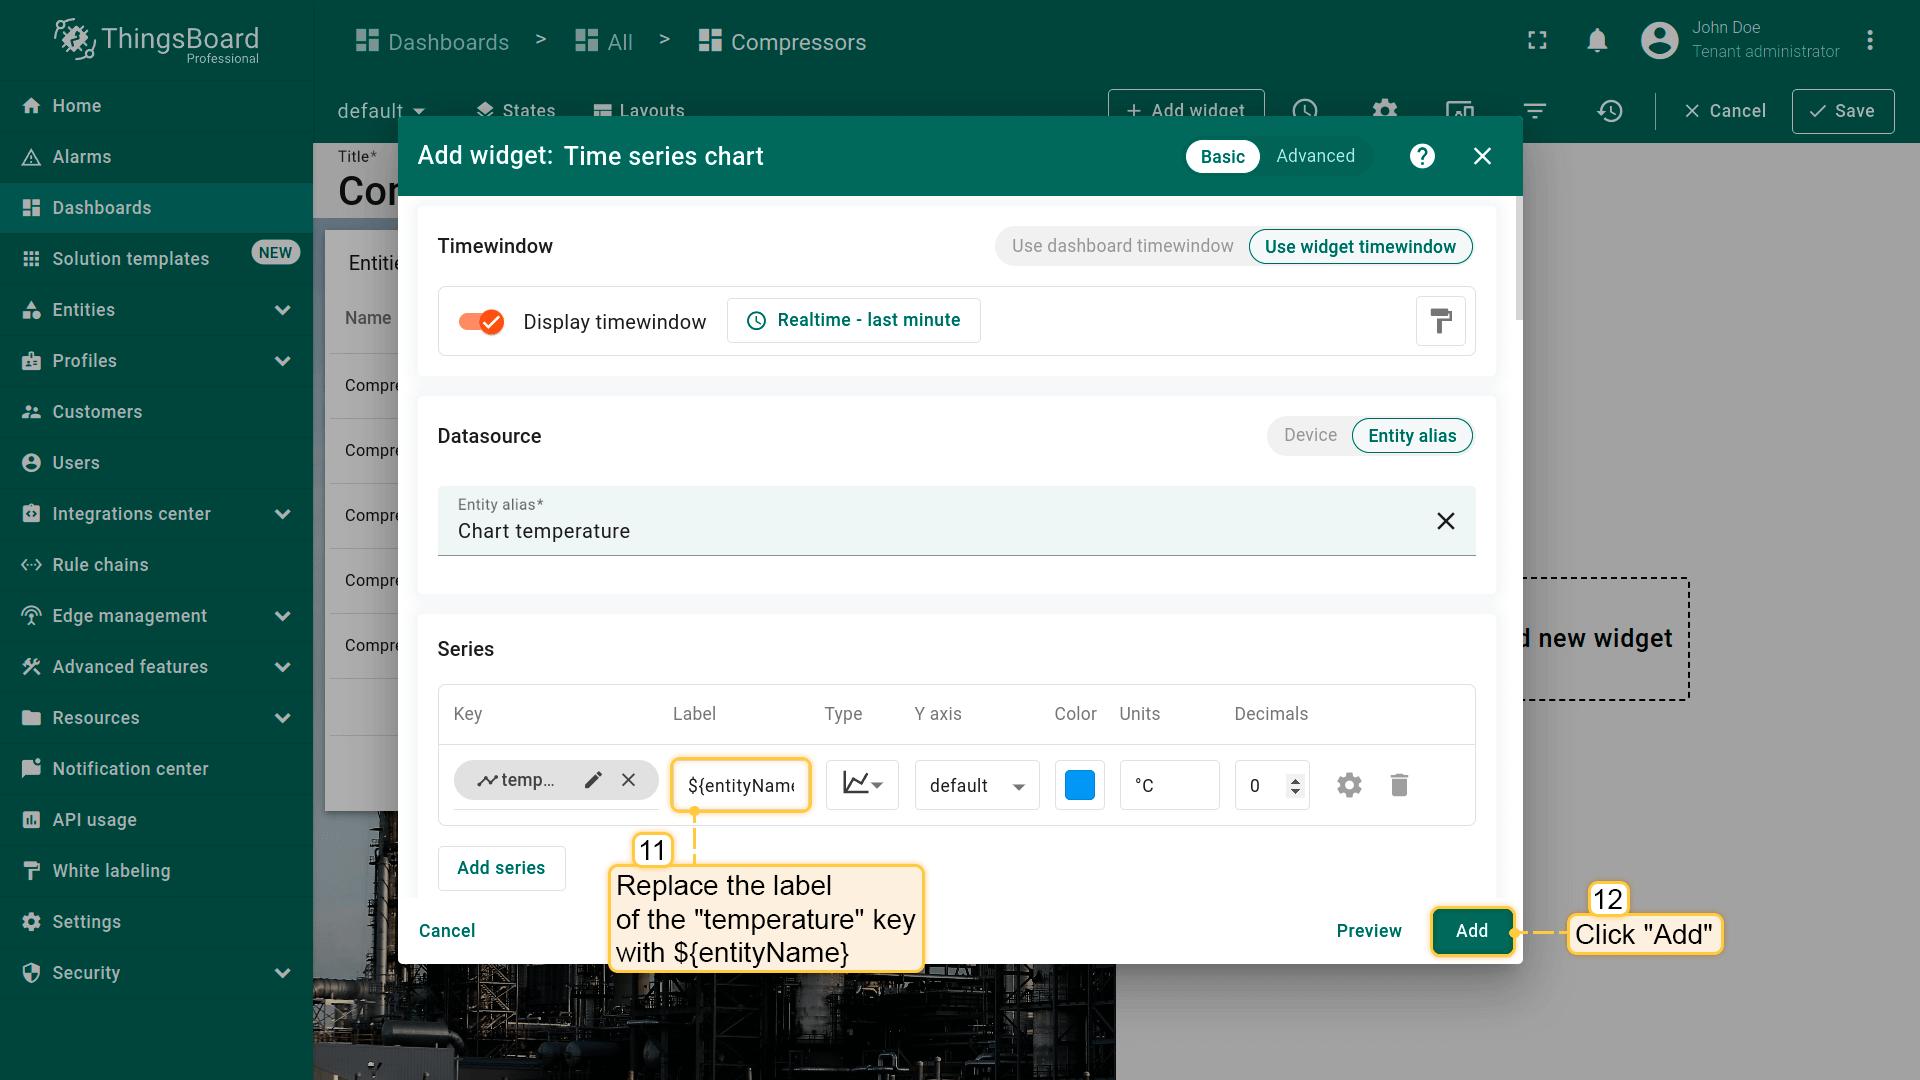
- Replace the label of the "temperature" key with ${entityName}. Then, click "Add" to add new widget on the dashboard;
- Drag the "Time series chart" widget to a free space and resize it.


下面为“Entities table”部件添加类型为“Update current dashboard state”的action。 假设已熟悉“Add action”步骤,直接进行action配置:
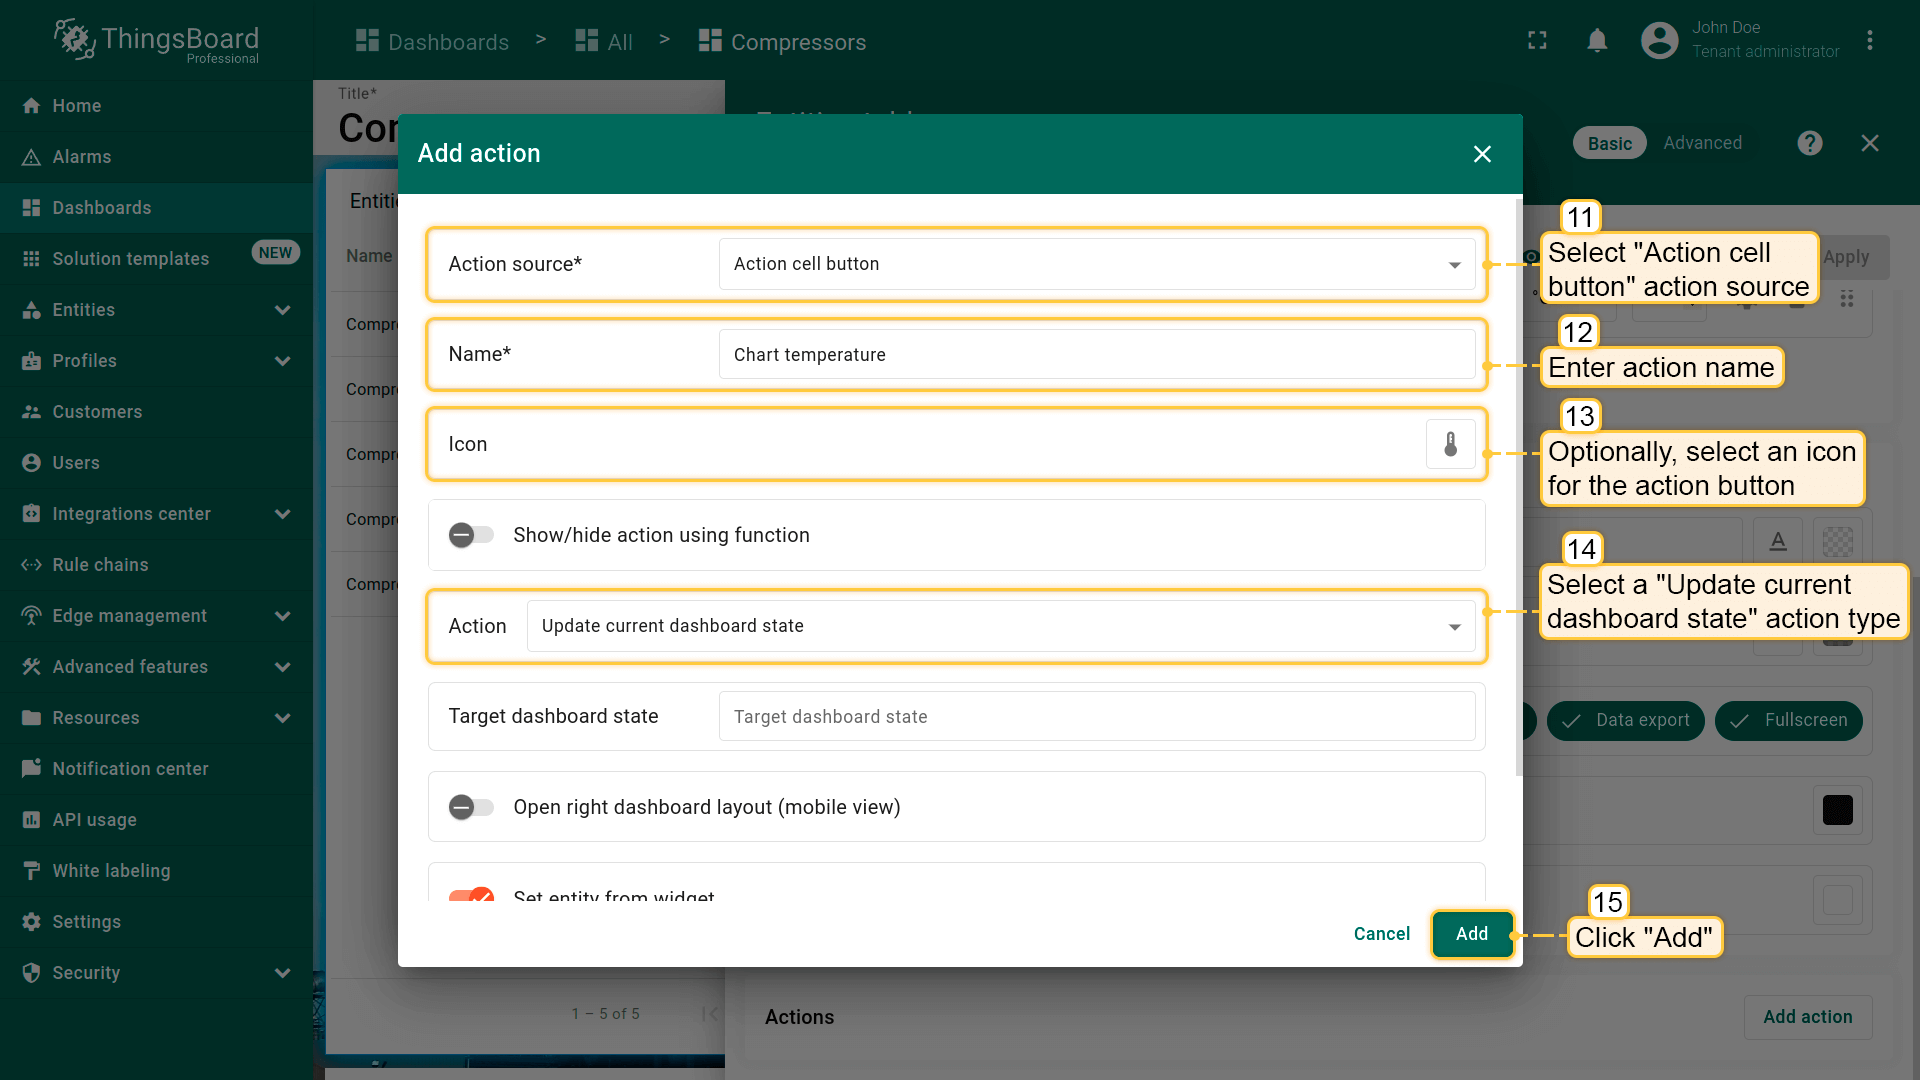
- 进入部件编辑模式,打开“Add action”窗口;
- 本指南以“Action cell button”为例,选择该action来源;
- 输入action名称并选择表示按钮的图标;
- 在“Action”下拉菜单中选择“Update current dashboard state”类型;
- 点击“Add action”窗口底部的“Add”按钮;
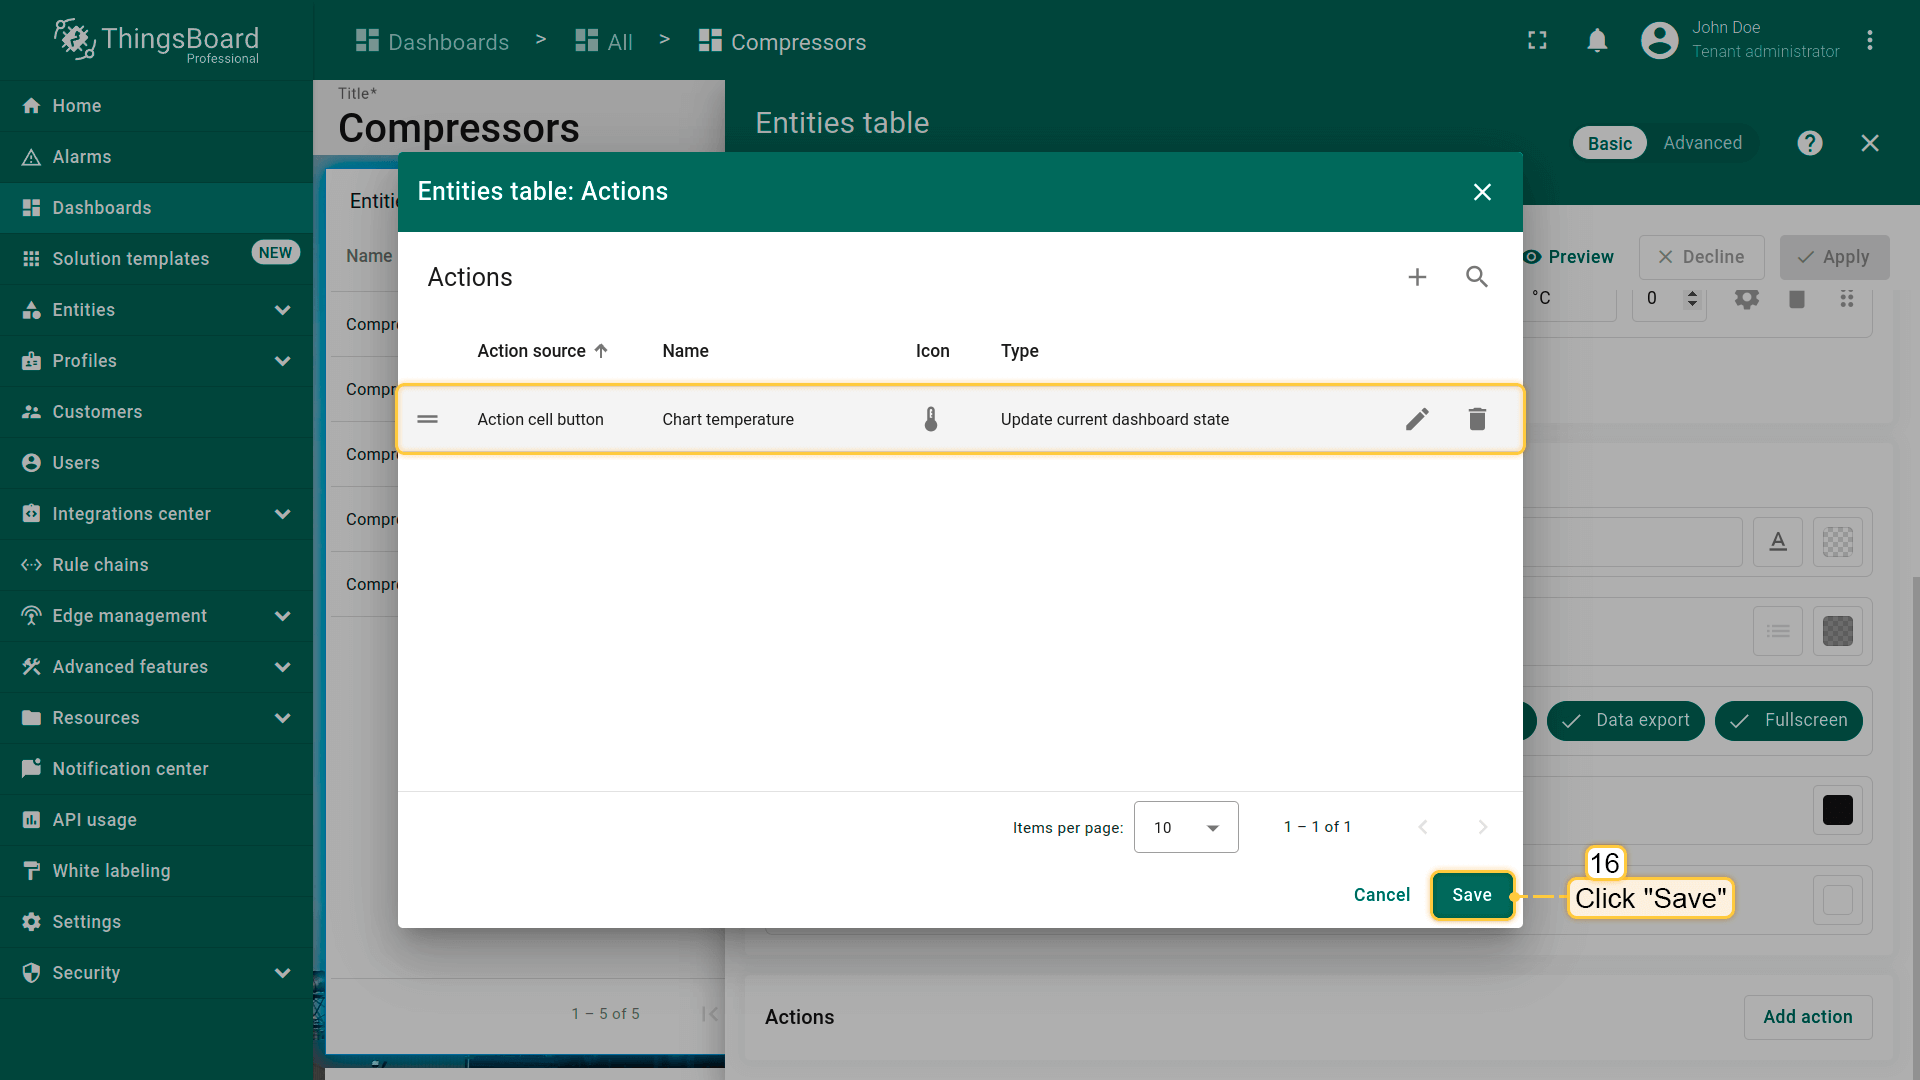
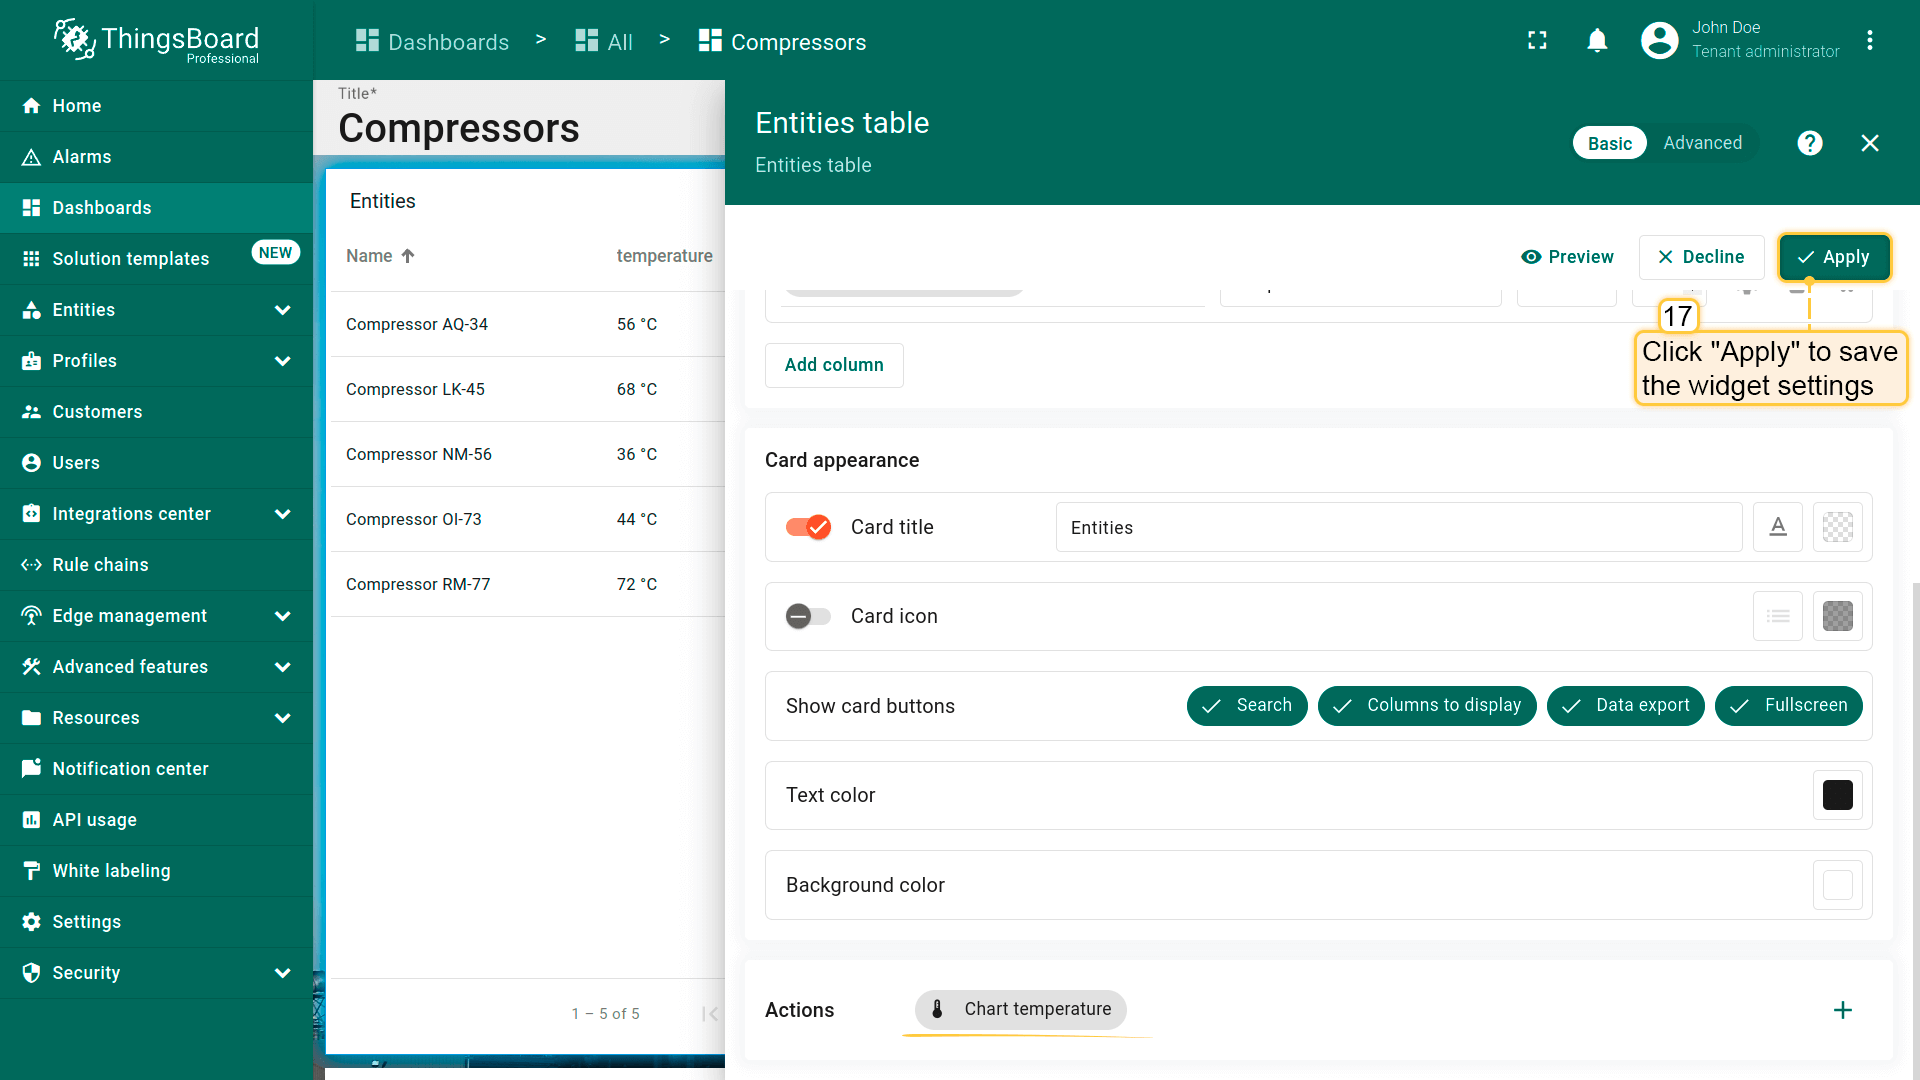
- 在“Actions”窗口中查看已配置action,核对来源、图标和类型。点击“Save”,再点“Apply”保存部件设置;
- 点击dashboard页面右上角“Save”保存dashboard。
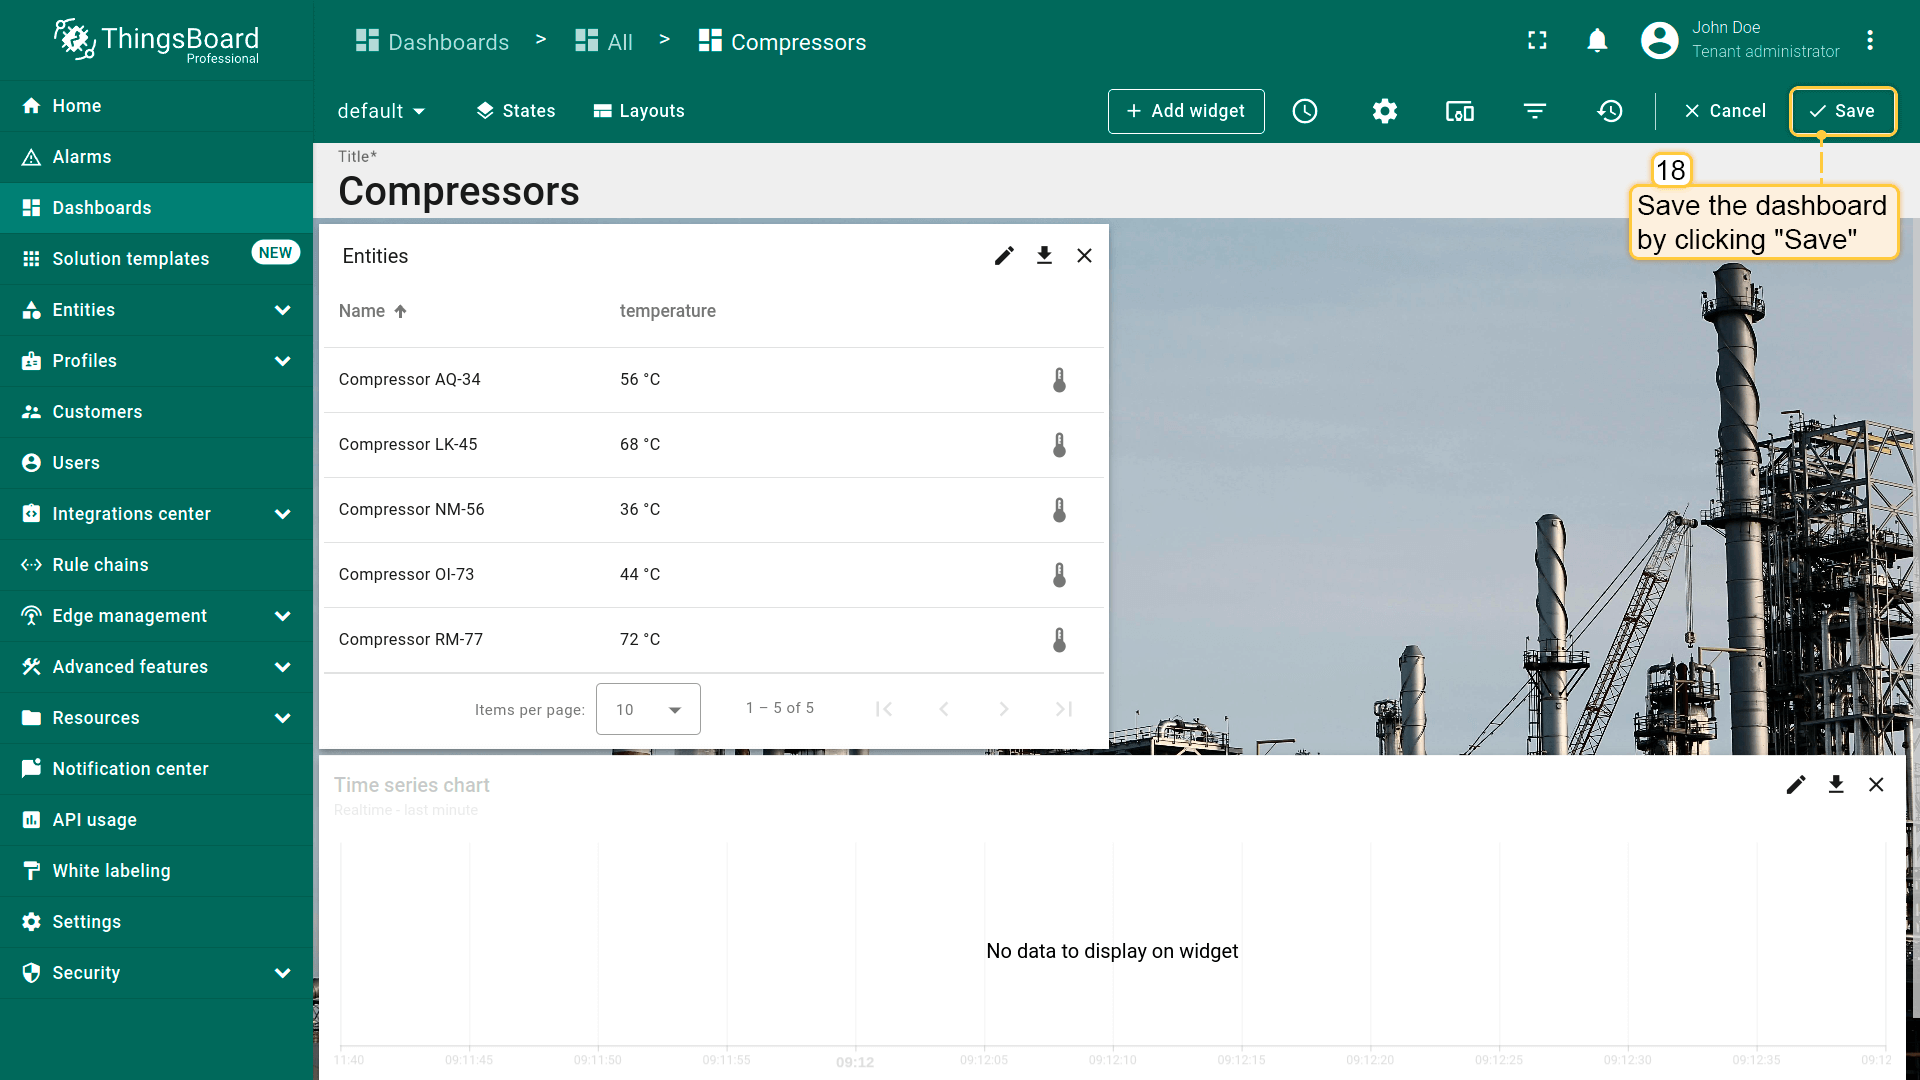
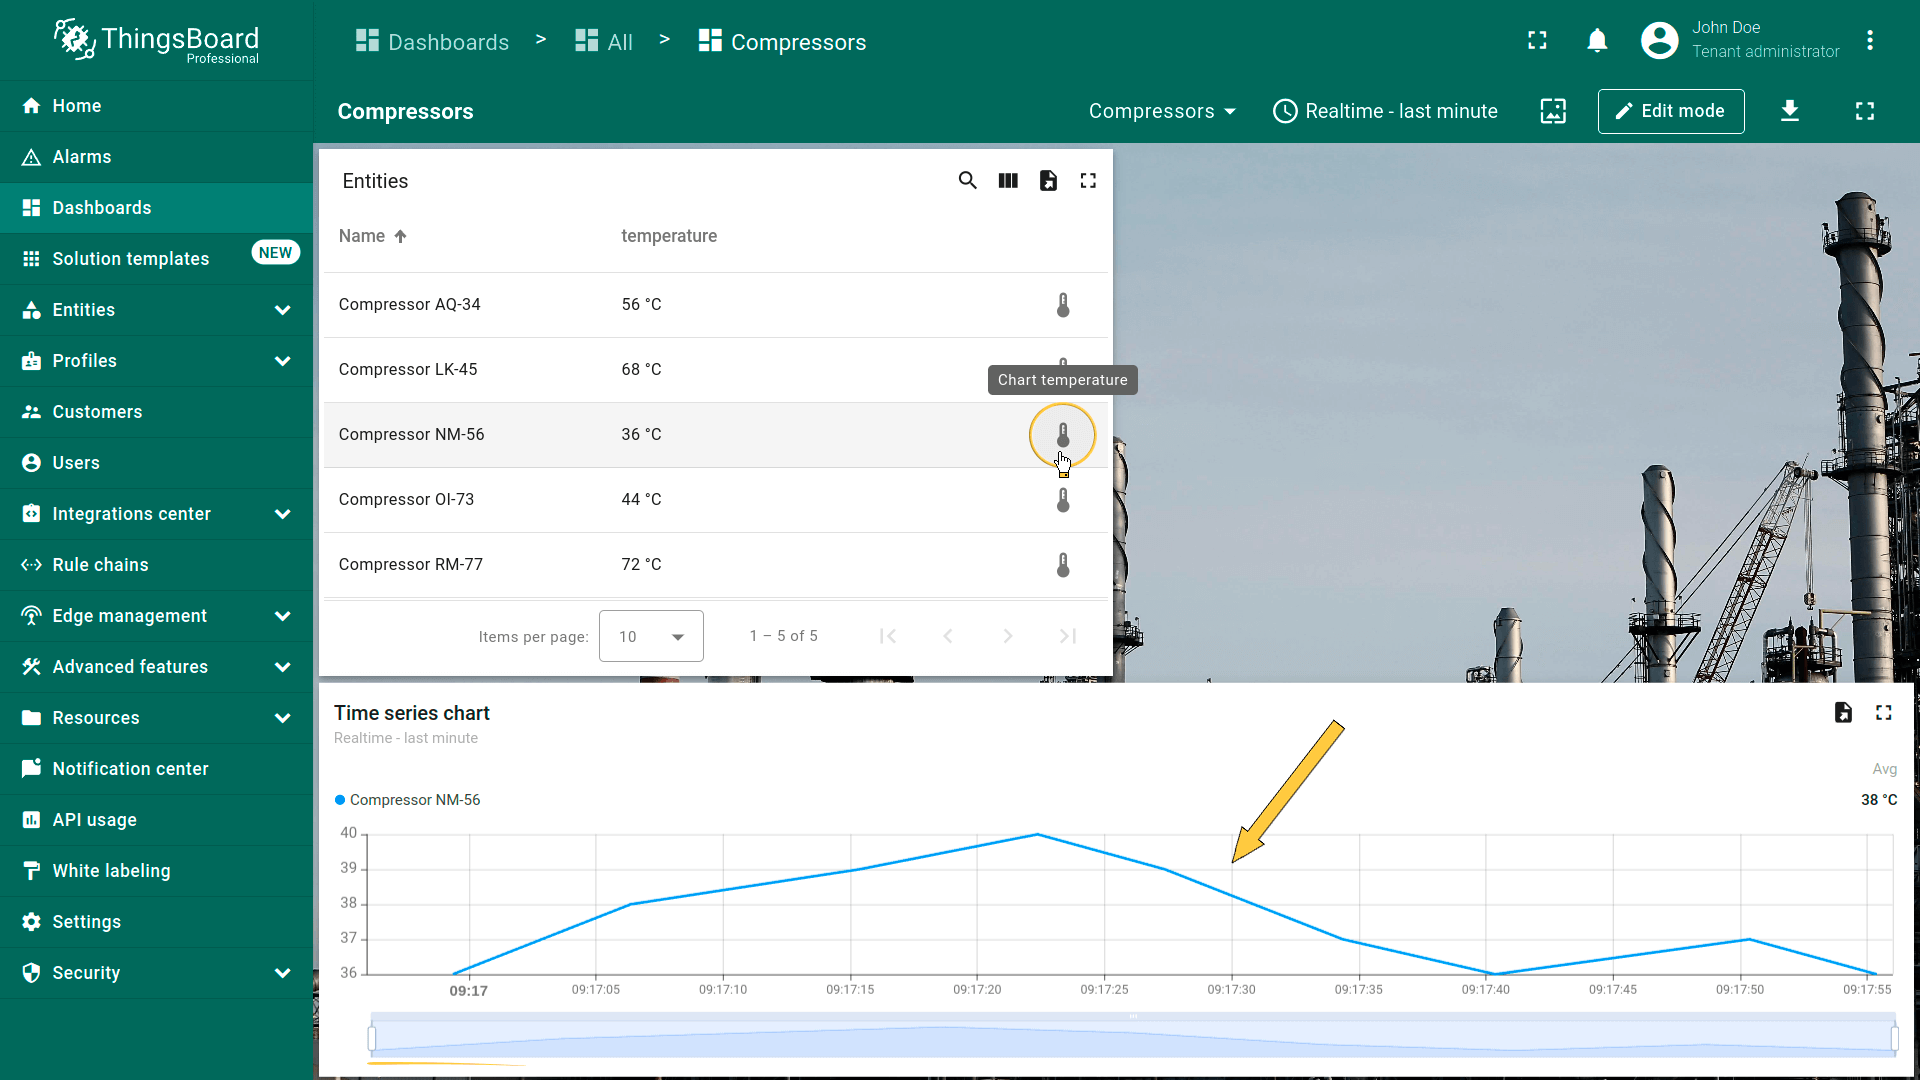
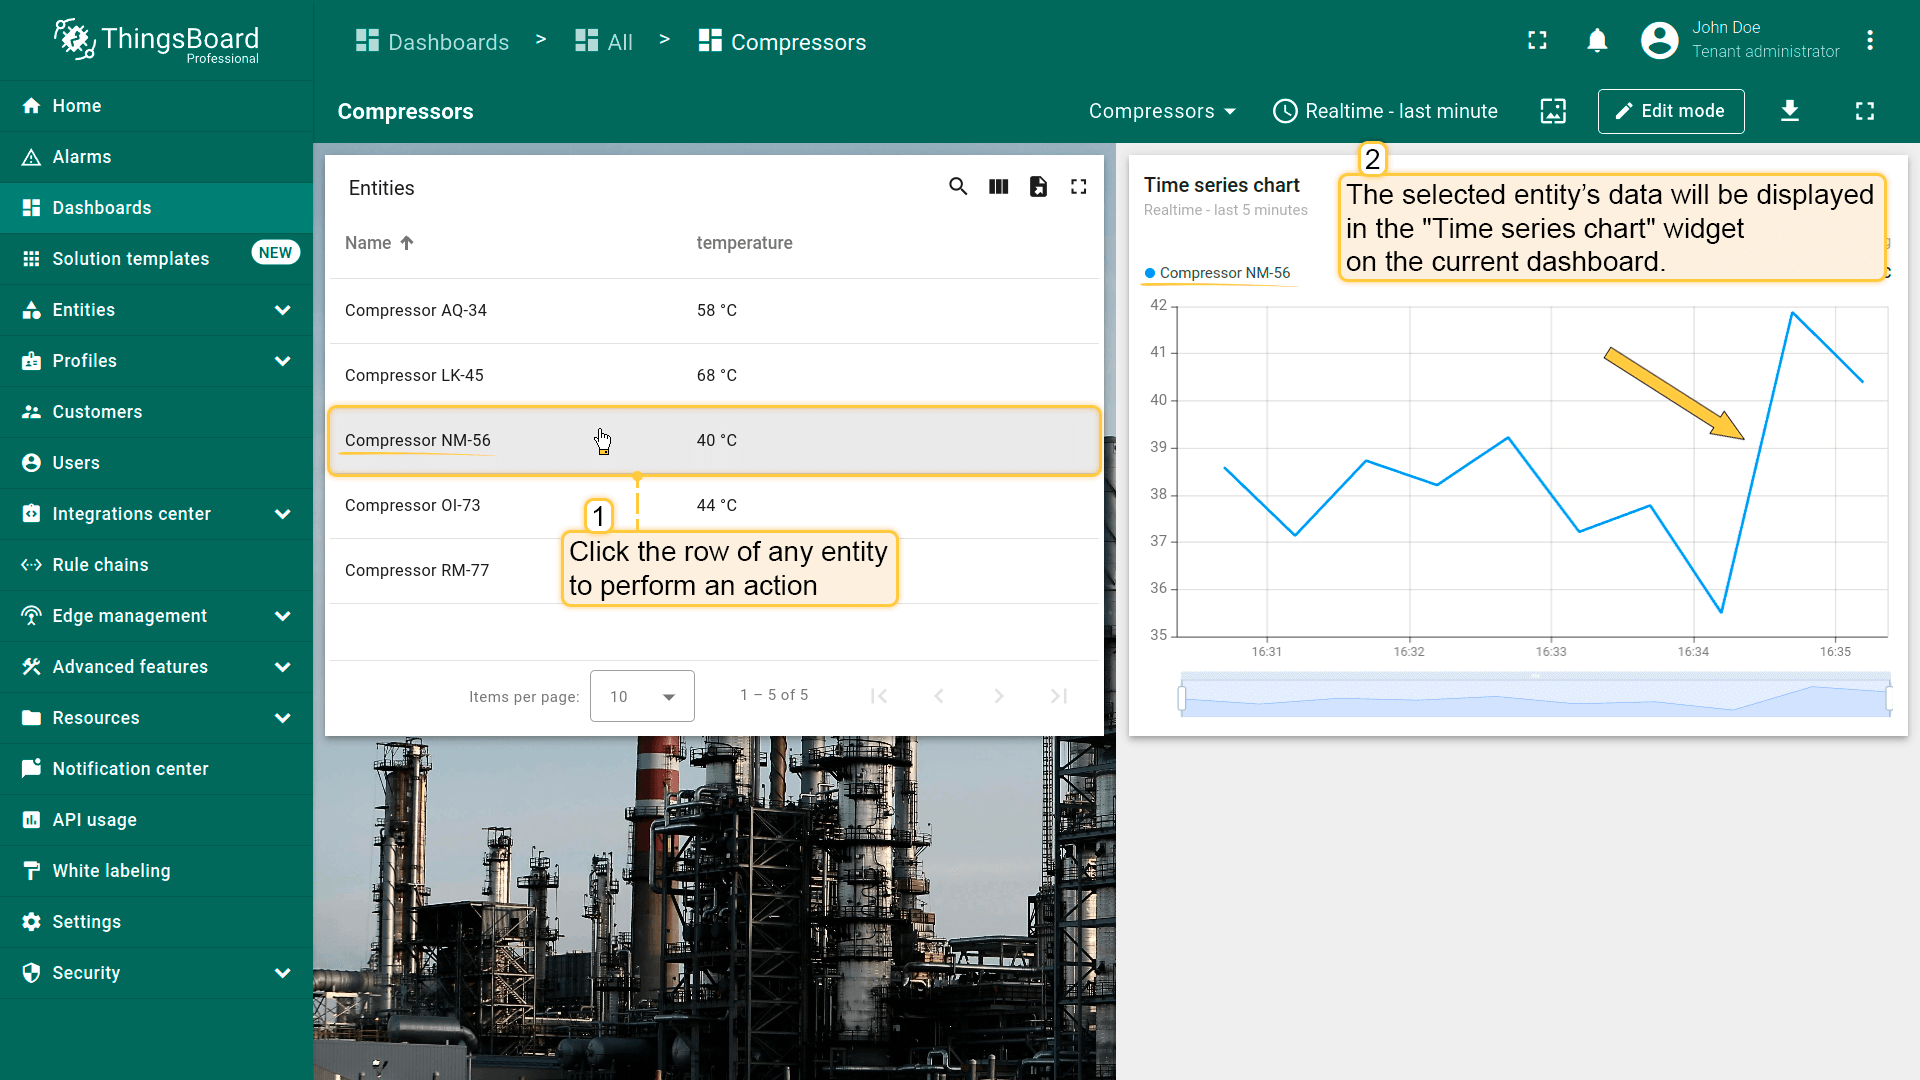
保存后,“Entities table”部件中实体名称旁会显示图标。点击任一图标将更新实体详情,并显示在当前dashboard的“Timeseries Line Chart”部件上。
导航到其他仪表板
该action类型可跳转到之前创建的dashboard。
假设已熟悉“Add action”步骤,直接进行action配置:
- 进入部件编辑模式,打开“Add action”窗口;
- 本指南以“Widget header button”为例,选择该action来源;
- 输入action名称并选择表示按钮的图标;
- 在“Action”下拉菜单中选择“Navigate to other dashboard”类型;
- 选择后会出现“Target dashboard state”下拉菜单,选择要跳转的dashboard。也可选择该dashboard的已有state;
- 选择dashboard后,点击“Add action”窗口底部的“Add”按钮;
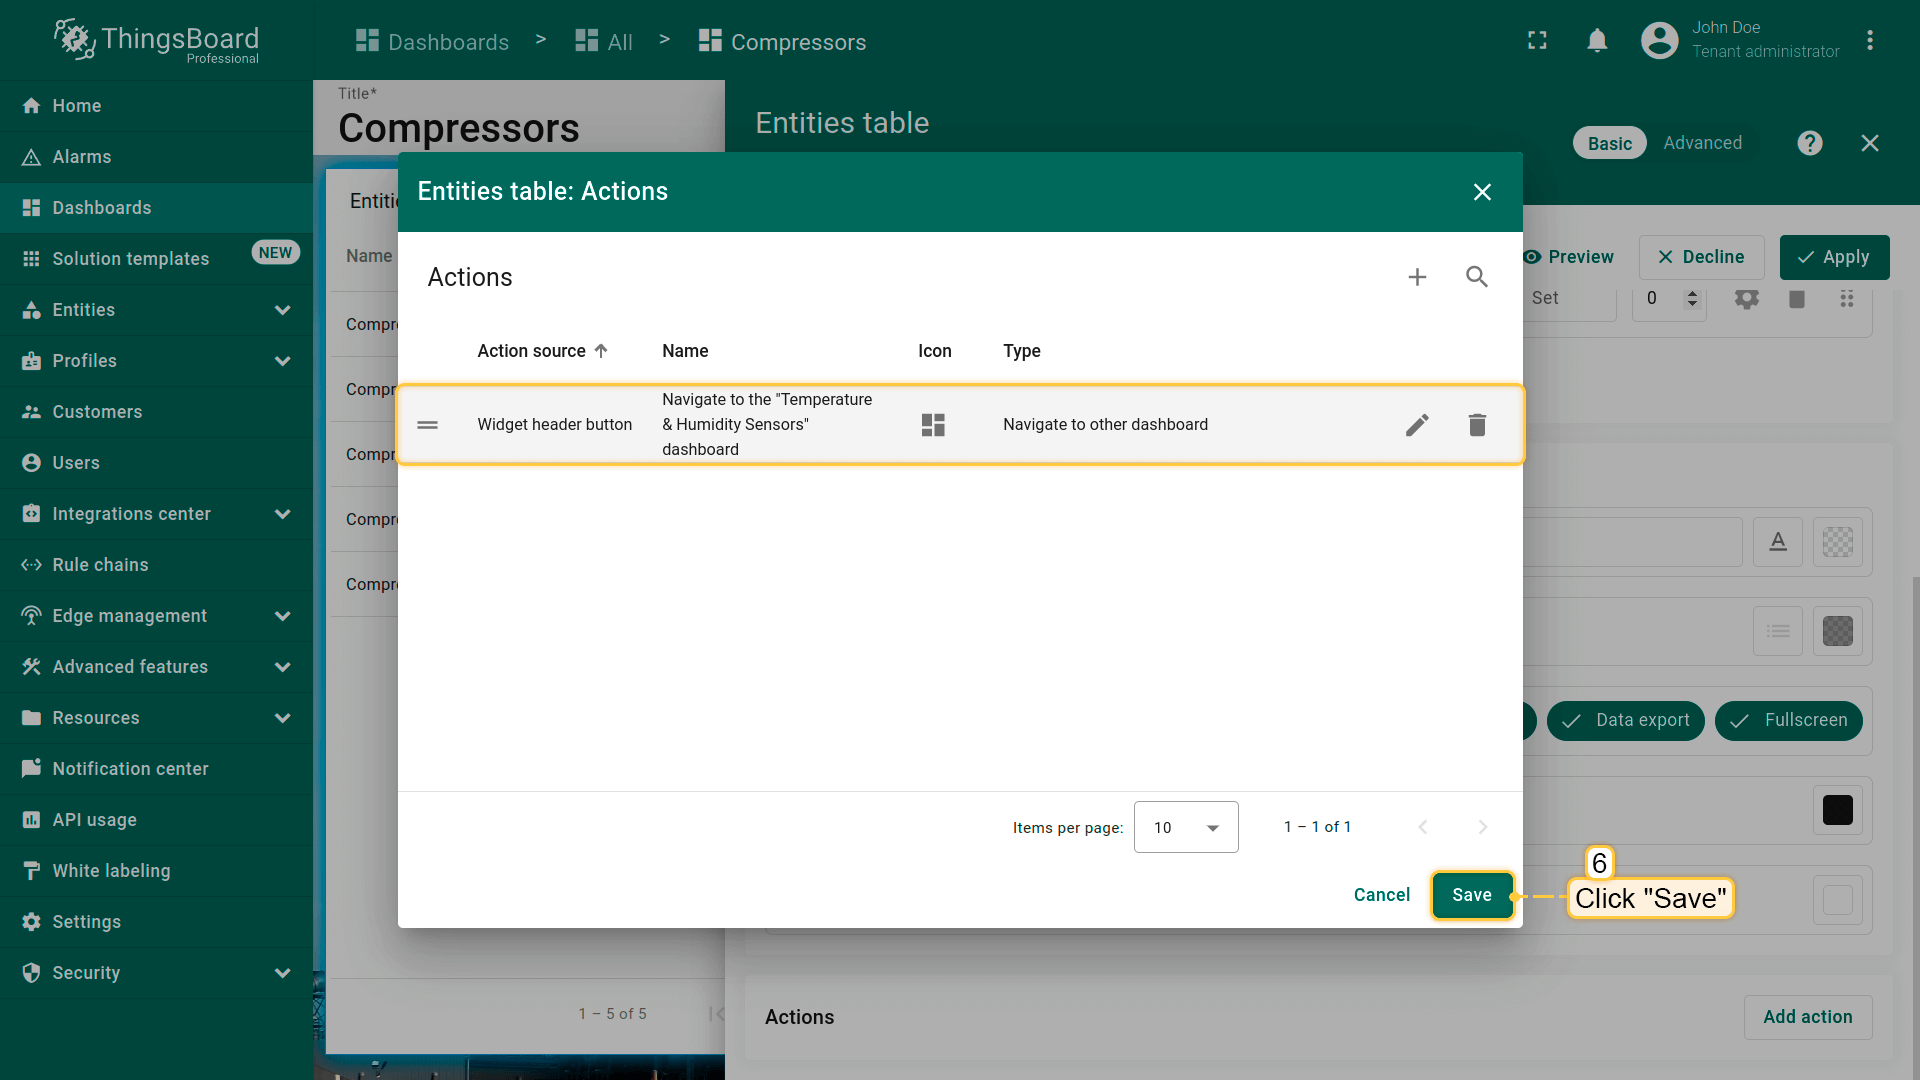
- 在“Actions”窗口中查看已配置action,核对来源、图标和类型。点击“Save”,再点“Apply”保存部件设置;
- 点击dashboard页面右上角“Save”保存dashboard。
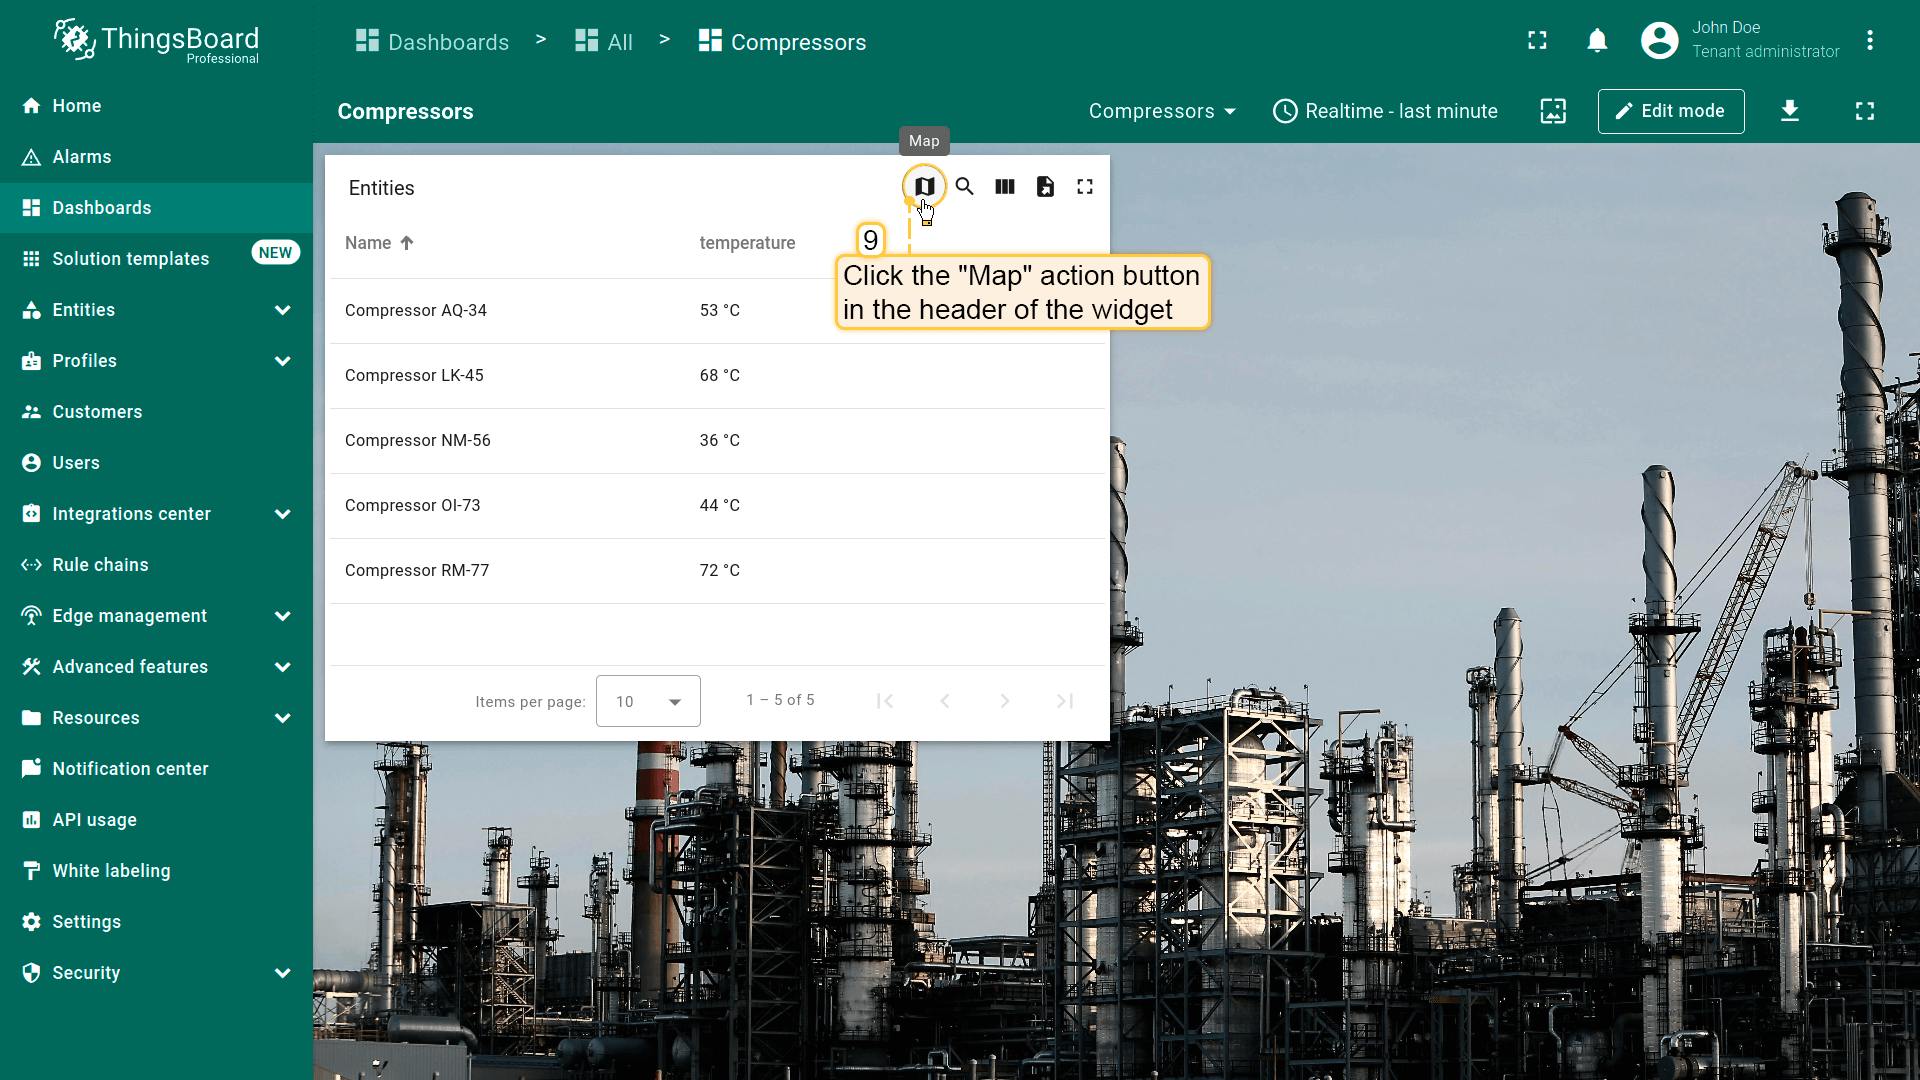
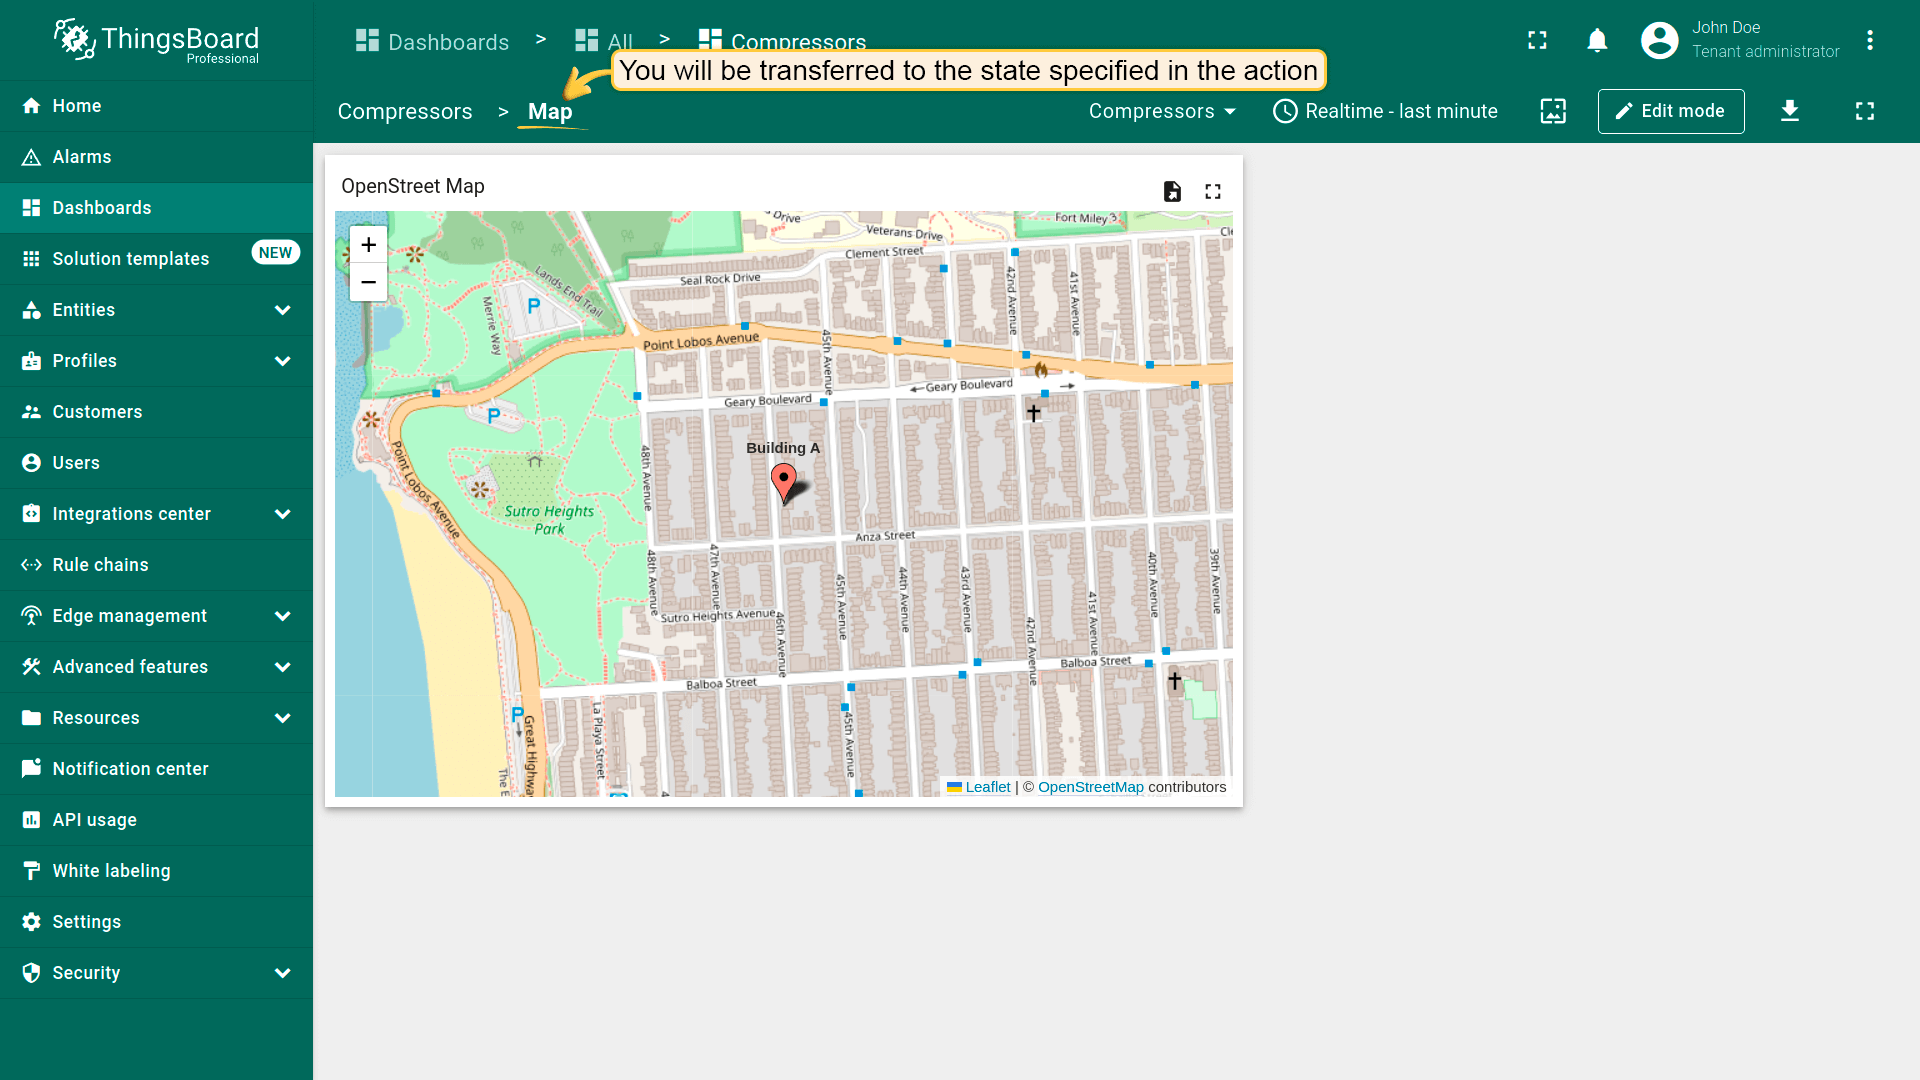
保存后,部件右上角会显示图标。点击该图标即跳转到所选dashboard(或该dashboard中的所选state)。


自定义操作
Custom action允许手动配置函数,为部件添加单个action(例如删除列出的设备/资产)。 下面以设备删除为例配置带函数的custom action:
假设已熟悉“Add action”步骤,直接进行action配置:
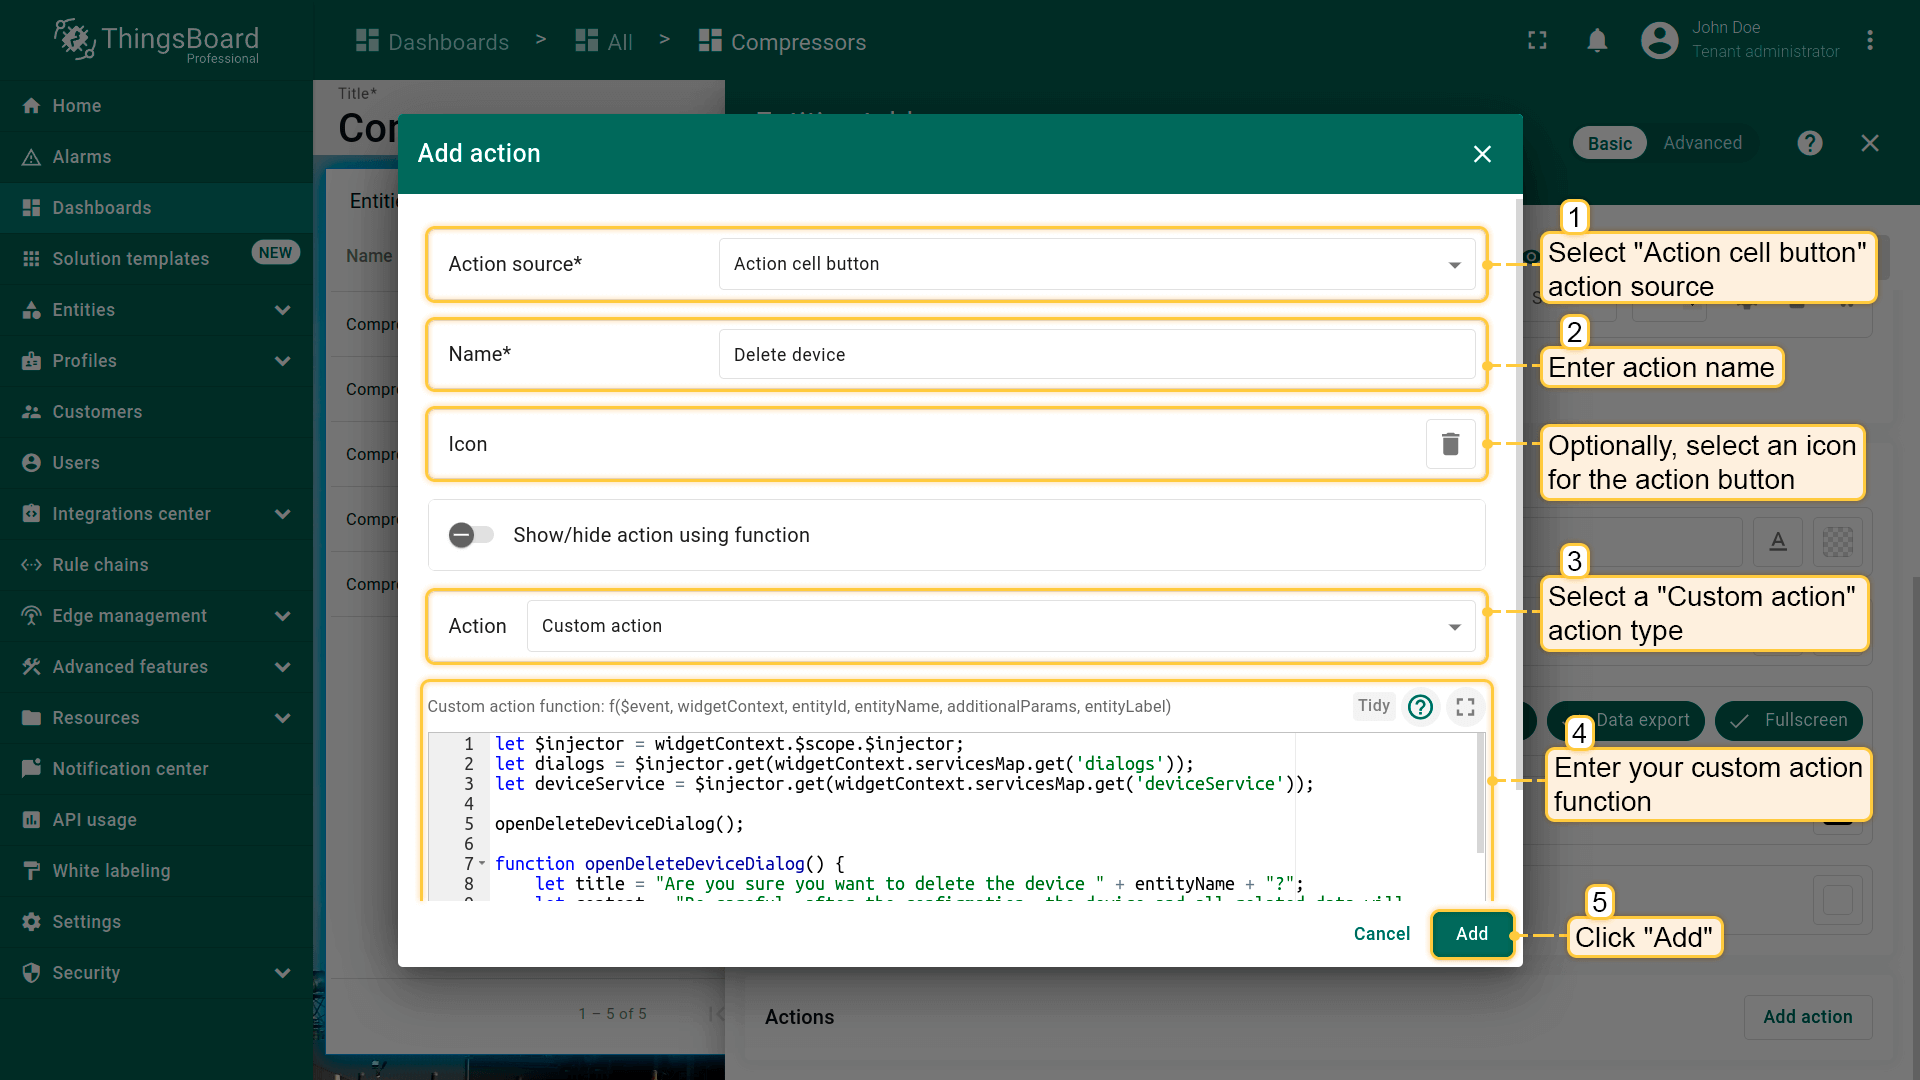
- 进入部件编辑模式,打开“Add action”窗口;
- 本指南以“Action cell button”为例,选择该action来源;
- 输入action名称并选择表示action按钮的图标;
- 在“Action”下拉菜单中选择“Custom action”类型;
- 选择Custom action后会出现函数输入框;
- 在其中输入自定义函数。本例为在表格中直接删除设备的action(下方提供示例函数);
设备删除函数示例(点击展开):
1
2
3
4
5
6
7
8
9
10
11
12
13
14
15
16
17
18
19
20
21
22
23
24
25
let $injector = widgetContext.$scope.$injector;
let dialogs = $injector.get(widgetContext.servicesMap.get('dialogs'));
let deviceService = $injector.get(widgetContext.servicesMap.get('deviceService'));
openDeleteDeviceDialog();
function openDeleteDeviceDialog() {
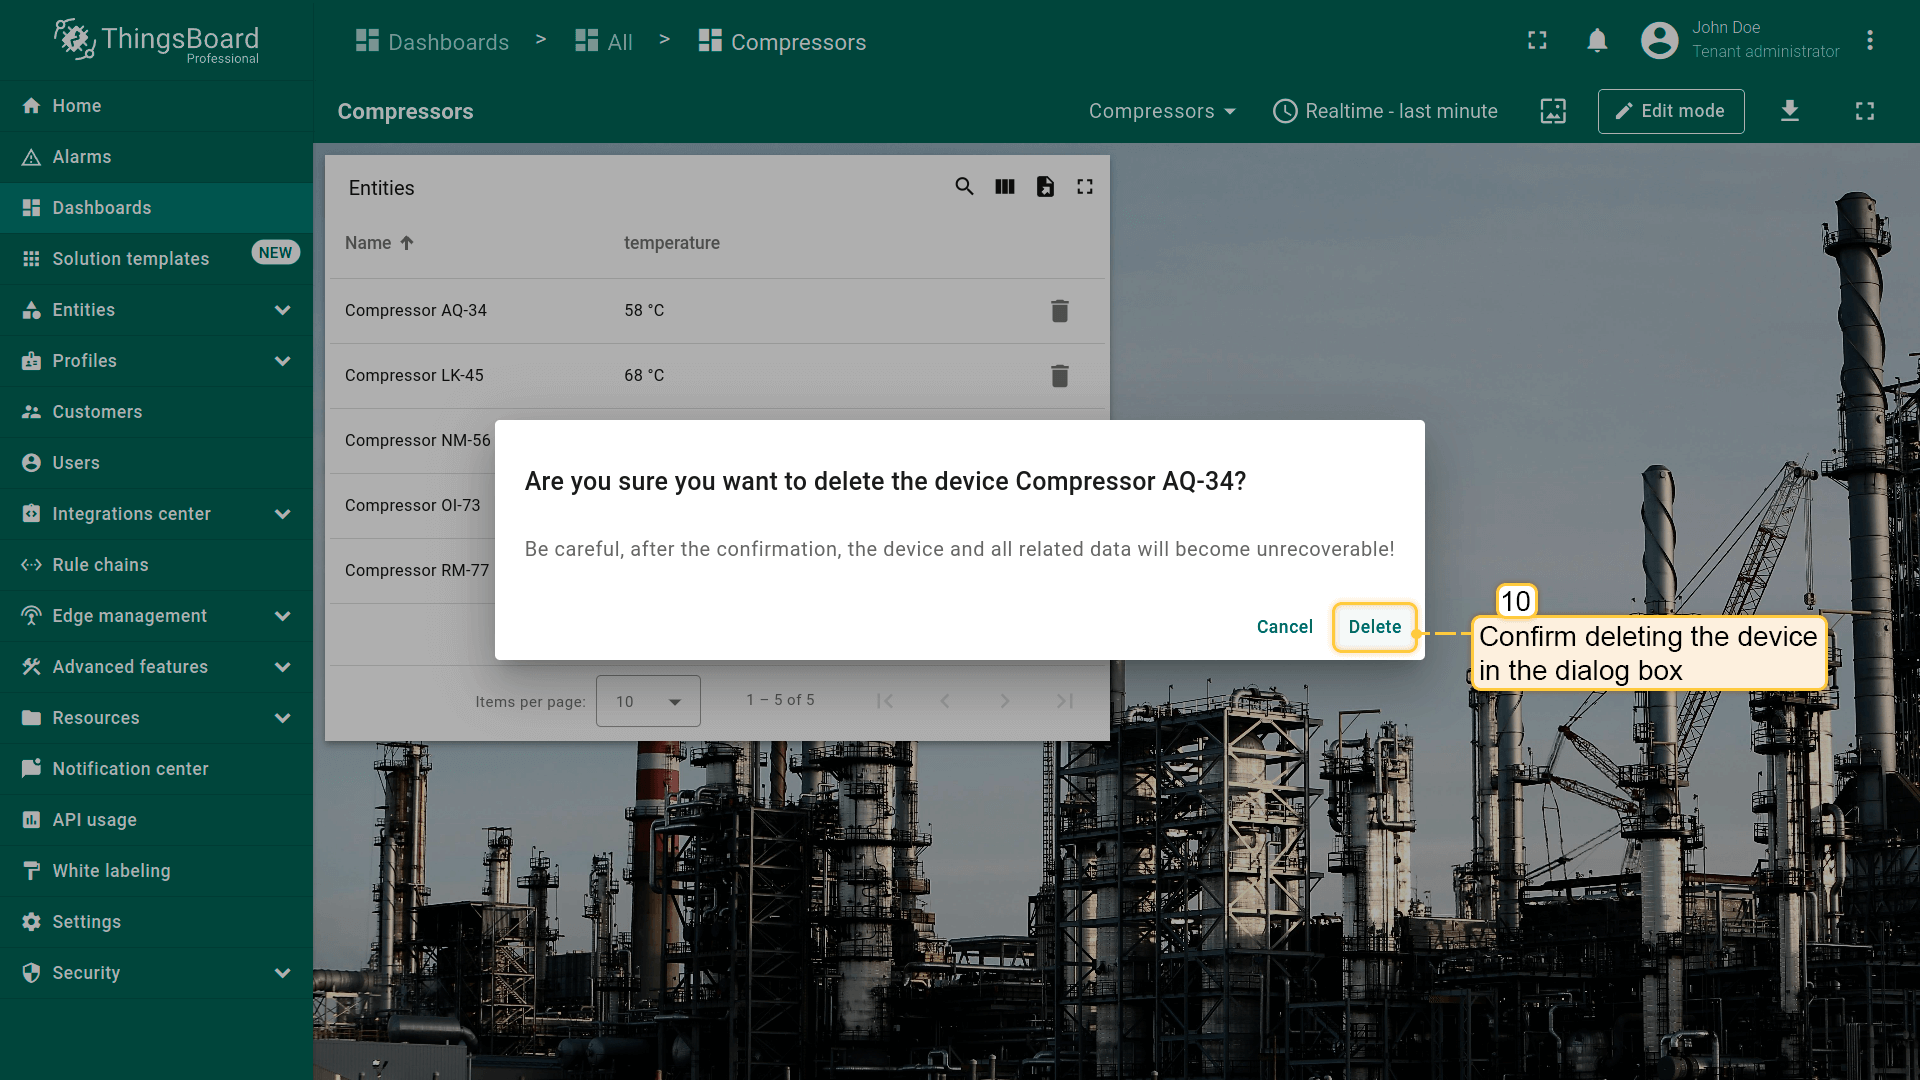
let title = "Are you sure you want to delete the device " + entityName + "?";
let content = "Be careful, after the confirmation, the device and all related data will become unrecoverable!";
dialogs.confirm(title, content, 'Cancel', 'Delete').subscribe(
function(result) {
if (result) {
deleteDevice();
}
}
);
}
function deleteDevice() {
deviceService.deleteDevice(entityId.id).subscribe(
function() {
widgetContext.updateAliases();
}
);
}
- 输入函数后,点击“Add action”窗口底部的“Add”按钮;
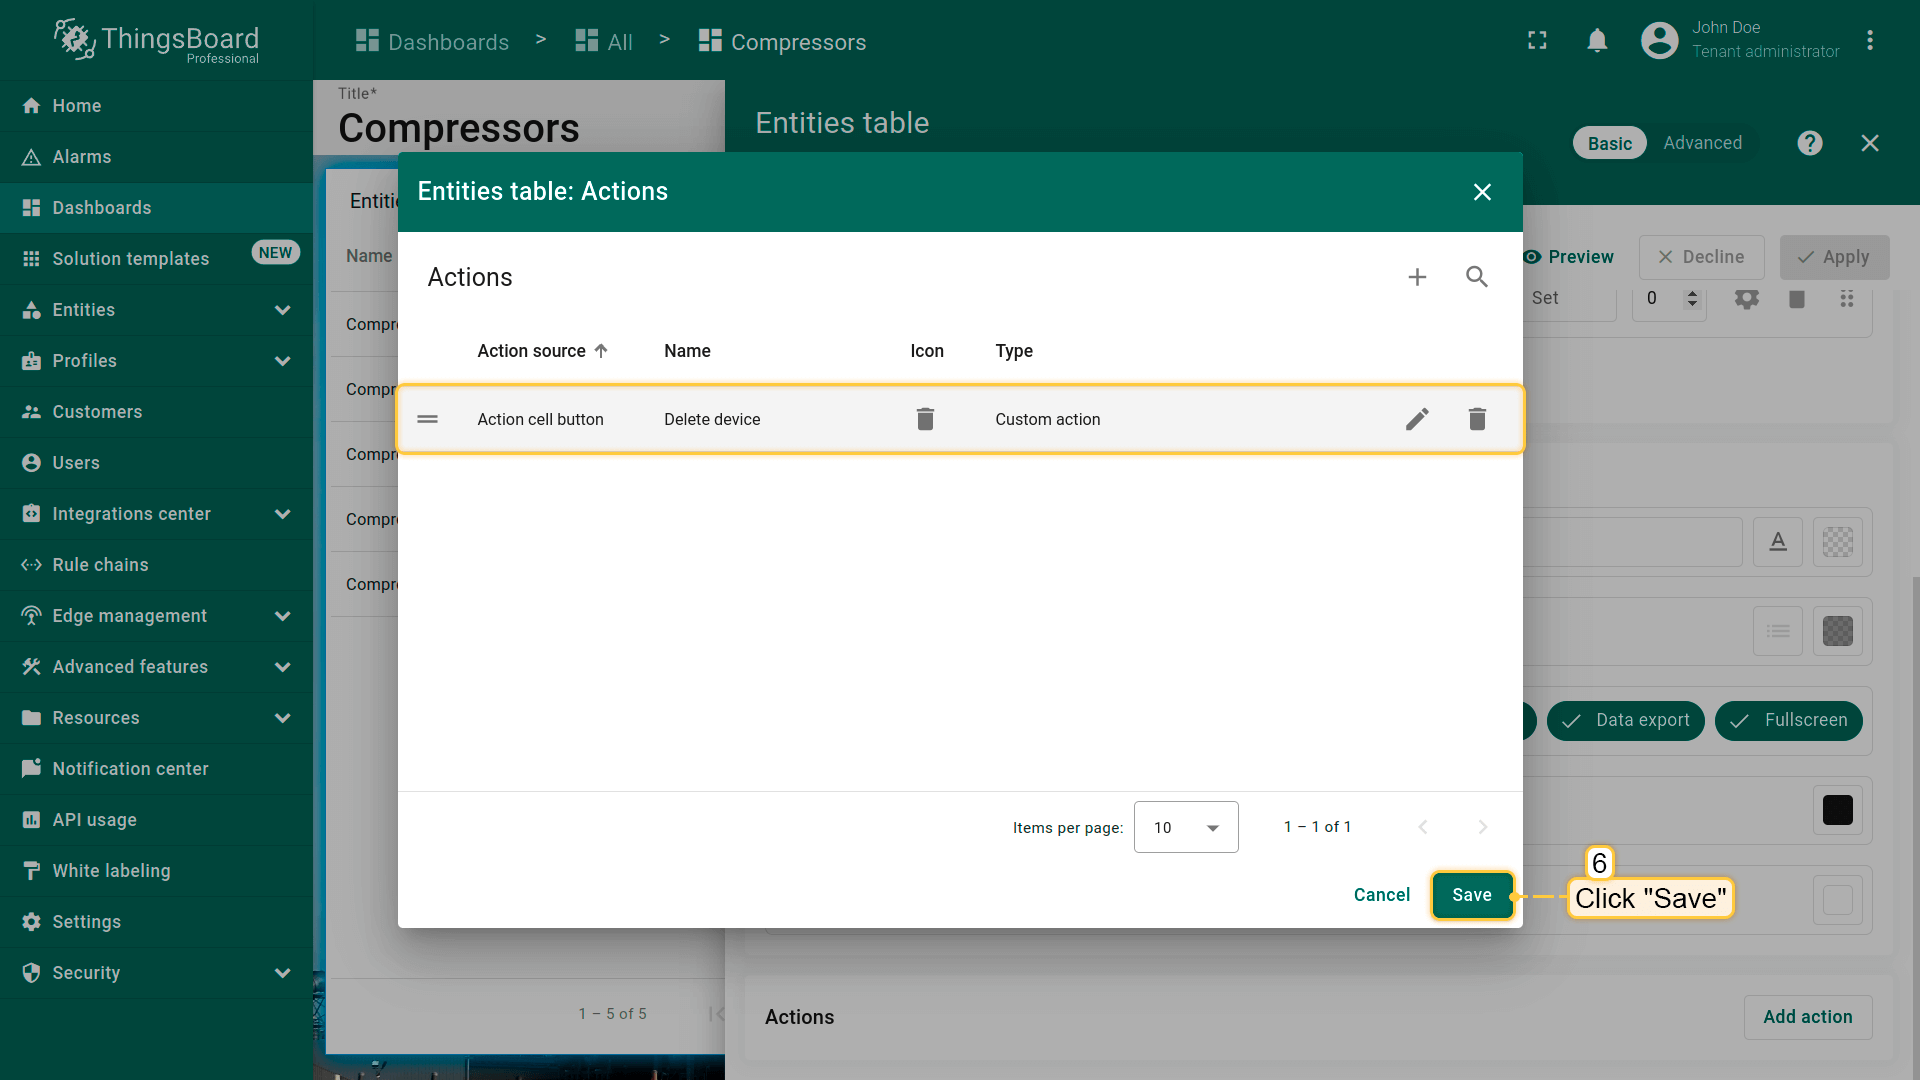
- 在“Actions”窗口中查看已配置action,核对来源、图标和类型。点击“Save”,再点“Apply”保存部件设置;
- 点击dashboard页面右上角“Save”保存dashboard。
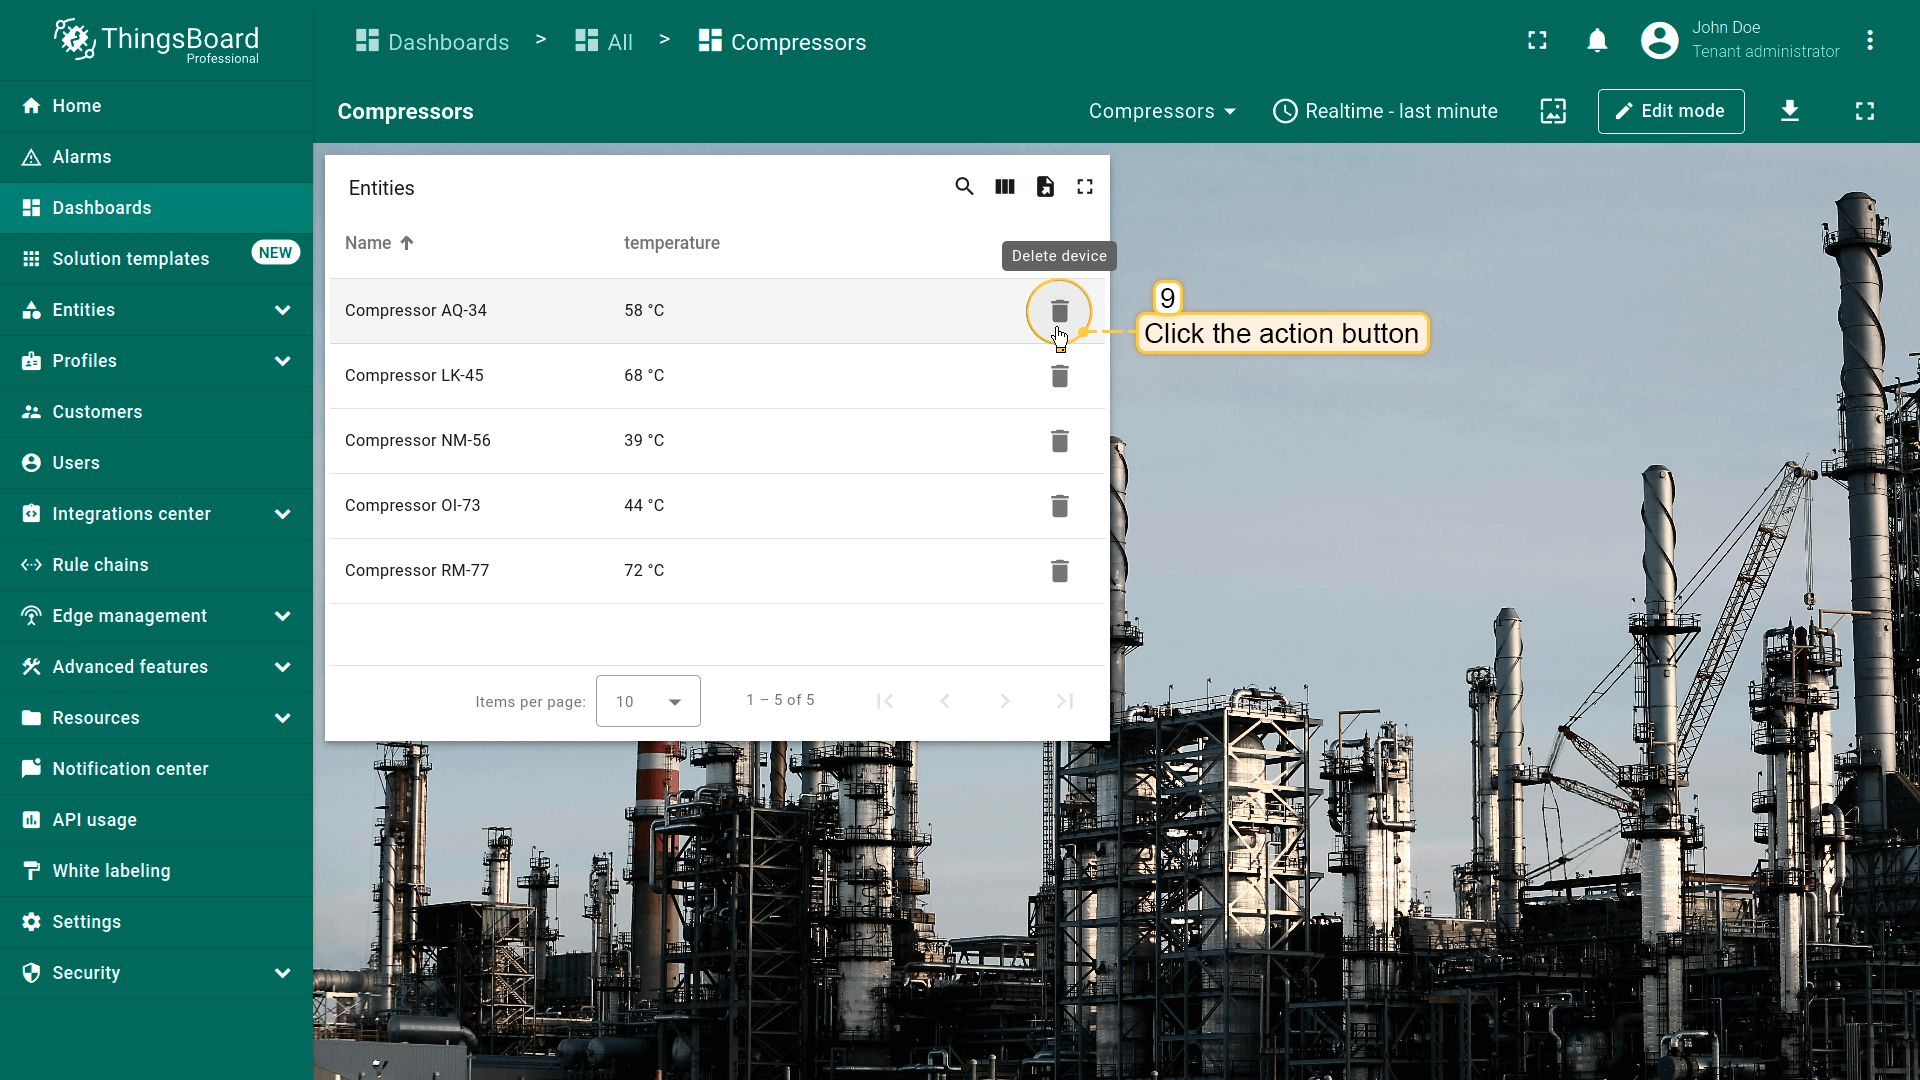
保存后,“Entities Table”部件中实体名称旁会显示action按钮。 点击任一按钮将执行删除对应对象的操作。
自定义操作(带HTML模板)
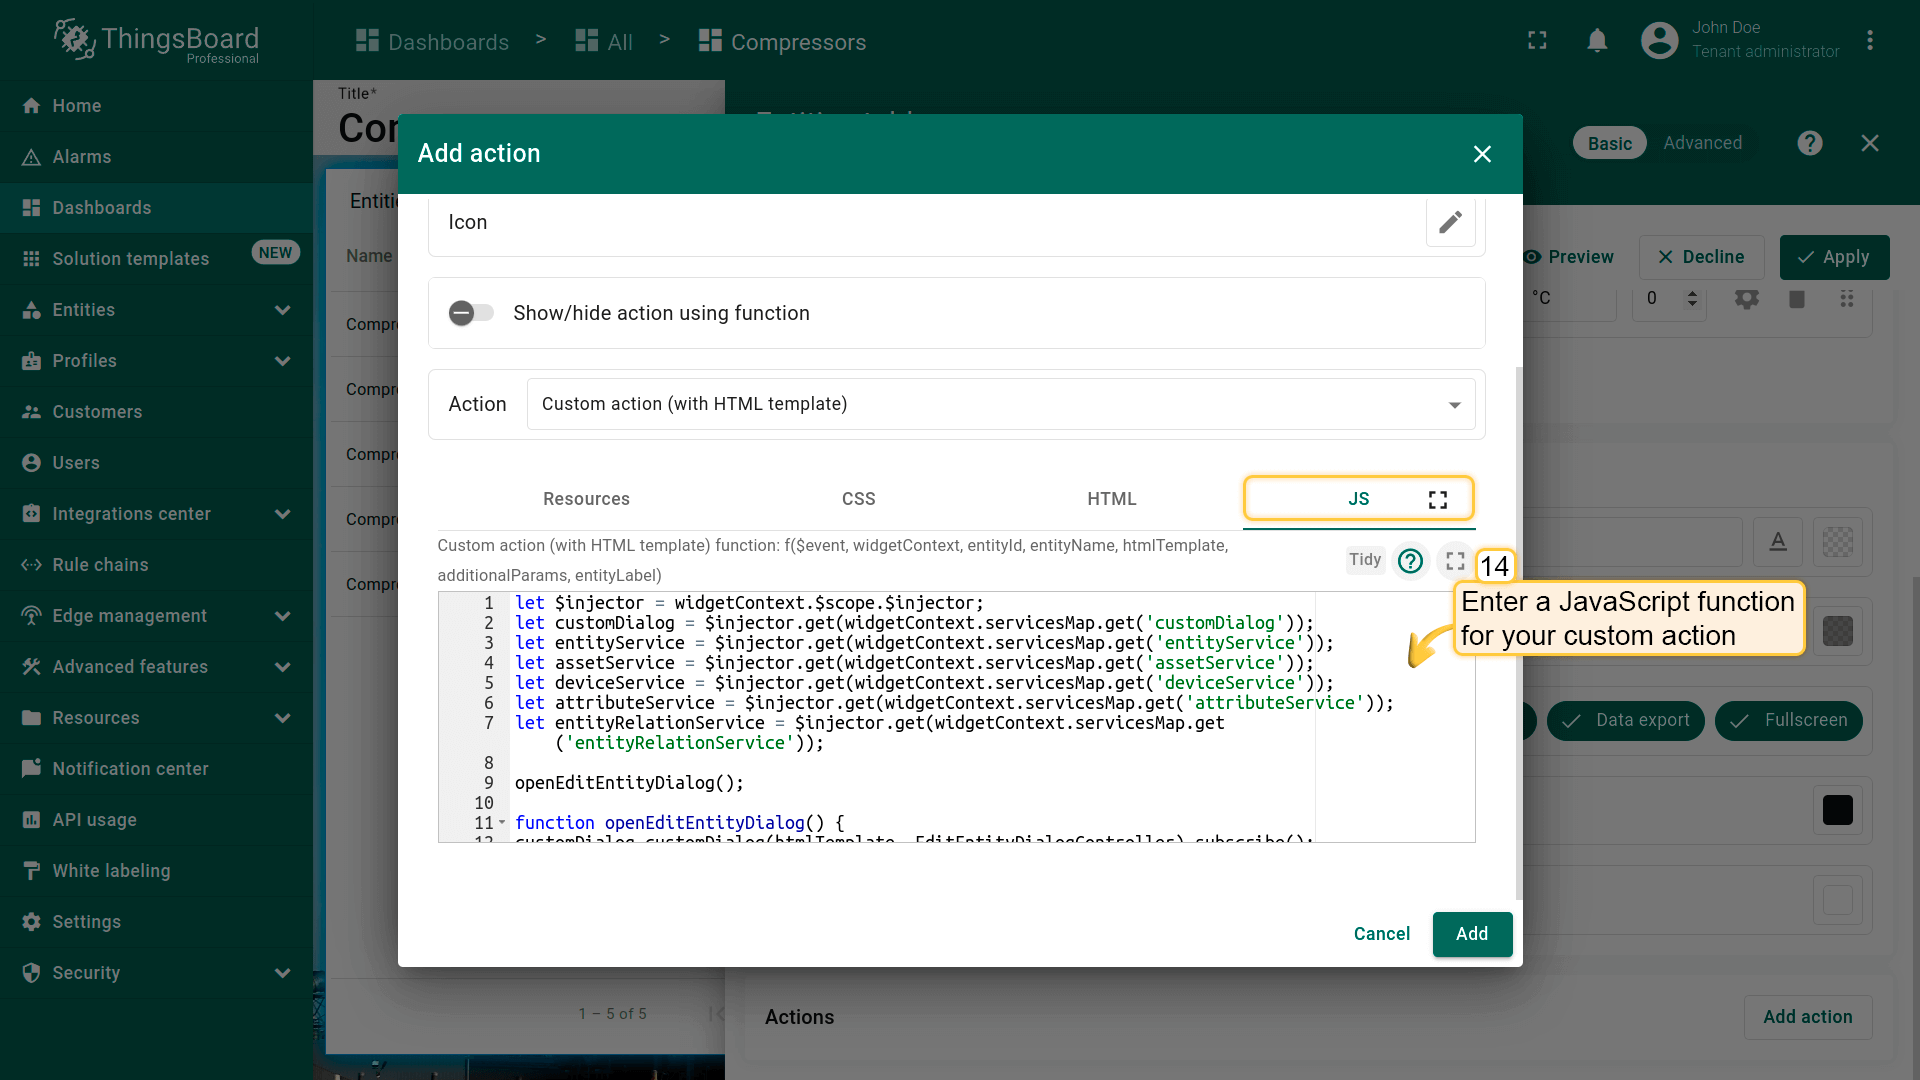
Custom action(带HTML模板)允许在现有HTML模板中手动输入函数(例如创建用于新增或编辑列出的设备/资产的对话框窗口)。 选择Custom action类型(with HTML template)后,会出现四个用于配置action的选项卡:
-
“Resources” 选项卡用于指定部件使用的外部JavaScript/CSS资源;
-
“CSS” 选项卡包含custom action专用的CSS样式定义;
-
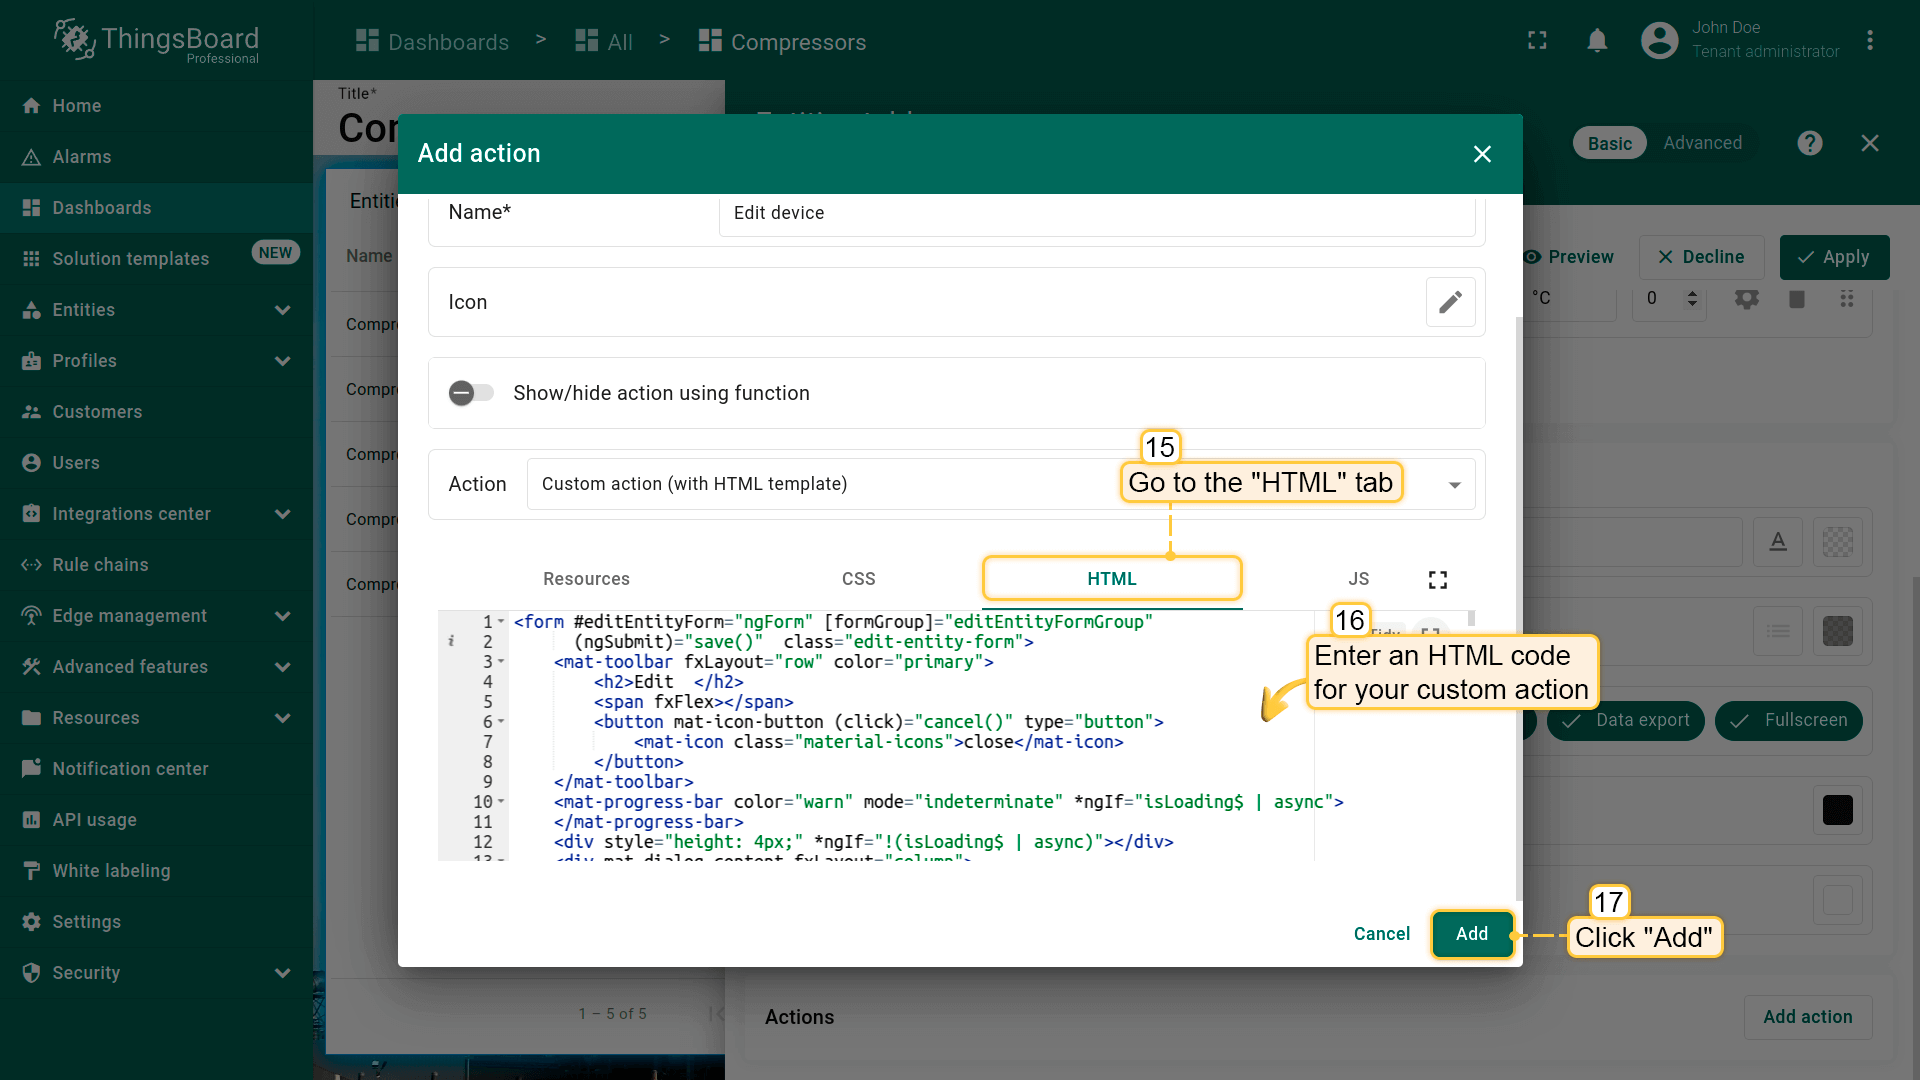
“HTML” 选项卡包含custom action的HTML代码;
-
“JavaScript” 选项卡包含custom action的JS代码。
本例将添加两个action按钮。部件右上角为添加新实体的action按钮,第二个action负责实体名称旁的编辑按钮。
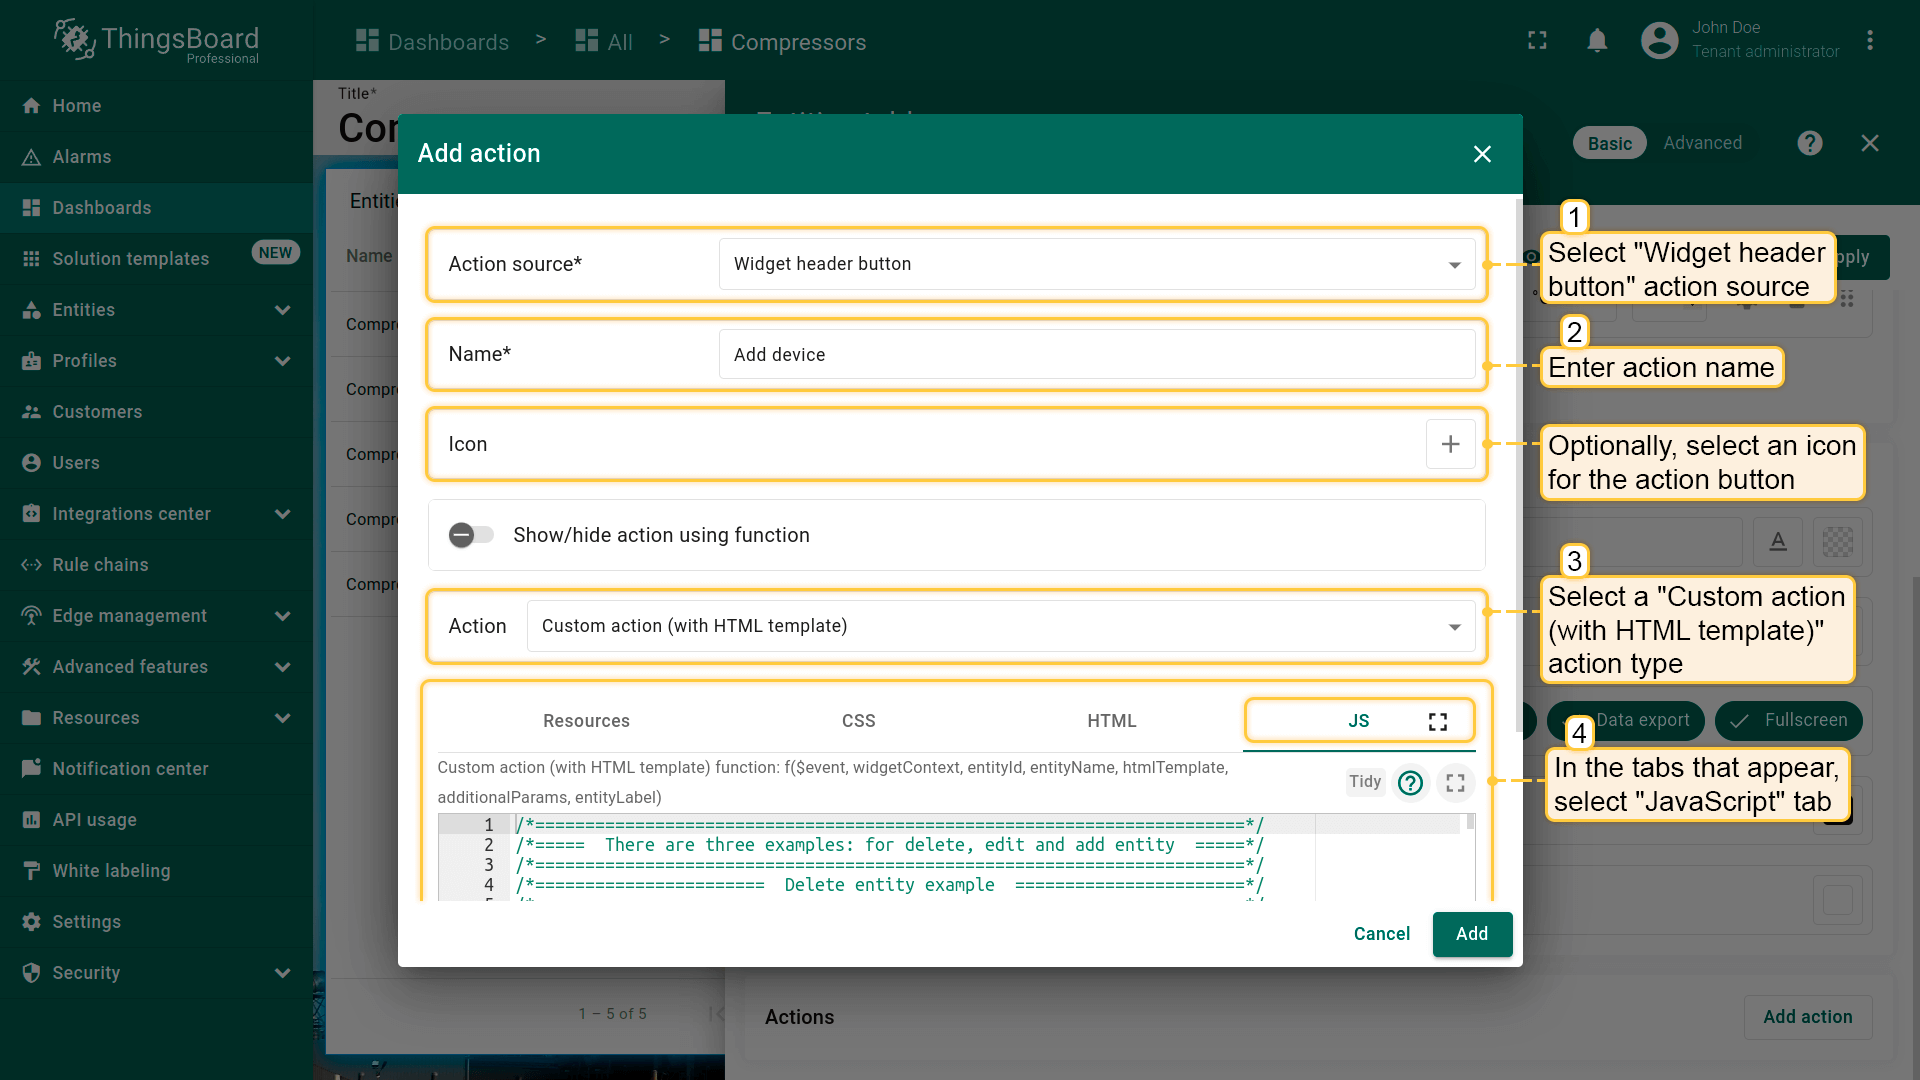
先添加新增实体的action按钮。假设已完成“Add action”步骤,直接进行action配置:
- 进入部件编辑模式,打开“Add action”窗口;
- 本指南以“Widget header button”为例,选择该action来源;
- 输入action名称并选择表示action按钮的图标;
- 在“Action”下拉菜单中选择“Custom action (with HTML template)”类型;
- 在出现的选项卡中选择“JavaScript”选项卡,输入custom action的JavaScript函数。本例使用可创建新实体的函数(下方有示例);
添加设备或资产的JavaScript函数示例(点击展开):
1
2
3
4
5
6
7
8
9
10
11
12
13
14
15
16
17
18
19
20
21
22
23
24
25
26
27
28
29
30
31
32
33
34
35
36
37
38
39
40
41
42
43
44
45
46
47
48
49
50
51
52
53
54
55
56
57
58
59
60
61
62
63
64
65
66
67
68
69
70
71
72
73
74
75
76
77
78
79
80
81
82
83
84
85
86
87
88
89
90
91
92
93
94
95
96
97
98
99
100
101
102
103
104
105
106
107
108
109
110
111
112
113
114
115
116
117
118
119
120
121
122
123
124
125
126
127
let $injector = widgetContext.$scope.$injector;
let customDialog = $injector.get(widgetContext.servicesMap.get('customDialog'));
let assetService = $injector.get(widgetContext.servicesMap.get('assetService'));
let deviceService = $injector.get(widgetContext.servicesMap.get('deviceService'));
let attributeService = $injector.get(widgetContext.servicesMap.get('attributeService'));
let entityRelationService = $injector.get(widgetContext.servicesMap.get('entityRelationService'));

openAddEntityDialog();

function openAddEntityDialog() {
customDialog.customDialog(htmlTemplate, AddEntityDialogController).subscribe();
}

function AddEntityDialogController(instance) {
let vm = instance;

    vm.allowedEntityTypes = ['ASSET', 'DEVICE'];
    vm.entitySearchDirection = {
        from: "FROM",
        to: "TO"
    }

    vm.addEntityFormGroup = vm.fb.group({
     entityName: ['', [vm.validators.required]],
     entityType: ['DEVICE'],
     entityLabel: [null],
     type: ['', [vm.validators.required]],
     attributes: vm.fb.group({
         latitude: [null],
         longitude: [null],
         address: [null],
         owner: [null],
         number: [null, [vm.validators.pattern(/^-?[0-9]+$/)]],
         booleanValue: [null]
     }),
     relations: vm.fb.array([])
    });

    vm.cancel = function() {
        vm.dialogRef.close(null);
    };

    vm.relations = function() {
        return vm.addEntityFormGroup.get('relations');
    };

    vm.addRelation = function() {
        vm.relations().push(vm.fb.group({
         relatedEntity: [null, [vm.validators.required]],
         relationType: [null, [vm.validators.required]],
         direction: [null, [vm.validators.required]]
        }));
    };

    vm.removeRelation = function(index) {
        vm.relations().removeAt(index);
        vm.relations().markAsDirty();
    };

    vm.save = function() {
        vm.addEntityFormGroup.markAsPristine();
        saveEntityObservable().subscribe(
            function (entity) {
                widgetContext.rxjs.forkJoin([
                    saveAttributes(entity.id),
                    saveRelations(entity.id)
                ]).subscribe(
                    function () {
                        widgetContext.updateAliases();
                        vm.dialogRef.close(null);
                    }
                );
            }
        );
    };

    function saveEntityObservable() {
        const formValues = vm.addEntityFormGroup.value;
        let entity = {
            name: formValues.entityName,
            type: formValues.type,
            label: formValues.entityLabel
        };
        if (formValues.entityType == 'ASSET') {
            return assetService.saveAsset(entity);
        } else if (formValues.entityType == 'DEVICE') {
            return deviceService.saveDevice(entity);
        }
    }

    function saveAttributes(entityId) {
        let attributes = vm.addEntityFormGroup.get('attributes').value;
        let attributesArray = [];
        for (let key in attributes) {
            if(attributes[key] !== null) {
                attributesArray.push({key: key, value: attributes[key]});
            }
        }
        if (attributesArray.length > 0) {
            return attributeService.saveEntityAttributes(entityId, "SERVER_SCOPE", attributesArray);
        }
        return widgetContext.rxjs.of([]);
    }

    function saveRelations(entityId) {
        let relations = vm.addEntityFormGroup.get('relations').value;
        let tasks = [];
        for(let i=0; i < relations.length; i++) {
            let relation = {
                type: relations[i].relationType,
                typeGroup: 'COMMON'
            };
            if (relations[i].direction == 'FROM') {
                relation.to = relations[i].relatedEntity;
                relation.from = entityId;
            } else {
                relation.to = entityId;
                relation.from = relations[i].relatedEntity;
            }
            tasks.push(entityRelationService.saveRelation(relation));
        }
        if (tasks.length > 0) {
            return widgetContext.rxjs.forkJoin(tasks);
        }
        return widgetContext.rxjs.of([]);
    }
}
- 在“HTML”选项卡中输入custom action的HTML代码(下方有示例);
添加设备或资产的HTML代码示例(点击展开):
1
2
3
4
5
6
7
8
9
10
11
12
13
14
15
16
17
18
19
20
21
22
23
24
25
26
27
28
29
30
31
32
33
34
35
36
37
38
39
40
41
42
43
44
45
46
47
48
49
50
51
52
53
54
55
56
57
58
59
60
61
62
63
64
65
66
67
68
69
70
71
72
73
74
75
76
77
78
79
80
81
82
83
84
85
86
87
88
89
90
91
92
93
94
95
96
97
98
99
100
101
102
103
104
105
106
107
108
109
110
111
112
113
114
115
116
117
118
119
120
121
122
123
124
125
126
127
128
129
130
131
132
133
134
135
136
137
138
139
140
141
142
143
144
145
146
147
148
149
150
151
152
153
154
155
<form #addEntityForm="ngForm" [formGroup]="addEntityFormGroup"
      (ngSubmit)="save()" class="add-entity-form">
    <mat-toolbar fxLayout="row" color="primary">
        <h2>Add entity</h2>
        <span fxFlex></span>
        <button mat-icon-button (click)="cancel()" type="button">
            <mat-icon class="material-icons">close</mat-icon>
        </button>
    </mat-toolbar>
    <mat-progress-bar color="warn" mode="indeterminate" *ngIf="isLoading$ | async">
    </mat-progress-bar>
    <div style="height: 4px;" *ngIf="!(isLoading$ | async)"></div>
    <div mat-dialog-content fxLayout="column">
        <div fxLayout="row" fxLayoutGap="8px" fxLayout.xs="column"  fxLayoutGap.xs="0">
            <mat-form-field fxFlex class="mat-block">
                <mat-label>Entity Name</mat-label>
                <input matInput formControlName="entityName" required>
                <mat-error *ngIf="addEntityFormGroup.get('entityName').hasError('required')">
                    Entity name is required.
                </mat-error>
            </mat-form-field>
            <mat-form-field fxFlex class="mat-block">
                <mat-label>Entity Label</mat-label>
                <input matInput formControlName="entityLabel" >
            </mat-form-field>
        </div>
        <div fxLayout="row" fxLayoutGap="8px" fxLayout.xs="column"  fxLayoutGap.xs="0">
            <tb-entity-type-select
                    class="mat-block"
                    formControlName="entityType"
                    [showLabel]="true"
                    [allowedEntityTypes]="allowedEntityTypes"
            ></tb-entity-type-select>
            <tb-entity-subtype-autocomplete
                    fxFlex *ngIf="addEntityFormGroup.get('entityType').value == 'ASSET'"
                    class="mat-block"
                    formControlName="type"
                    [required]="true"
                    [entityType]="'ASSET'"
            ></tb-entity-subtype-autocomplete>
            <tb-entity-subtype-autocomplete
                    fxFlex *ngIf="addEntityFormGroup.get('entityType').value != 'ASSET'"
                    class="mat-block"
                    formControlName="type"
                    [required]="true"
                    [entityType]="'DEVICE'"
            ></tb-entity-subtype-autocomplete>
        </div>
        <div formGroupName="attributes" fxLayout="column">
            <div fxLayout="row" fxLayoutGap="8px" fxLayout.xs="column"  fxLayoutGap.xs="0">
                <mat-form-field fxFlex class="mat-block">
                    <mat-label>Latitude</mat-label>
                    <input type="number" step="any" matInput formControlName="latitude">
                </mat-form-field>
                <mat-form-field fxFlex class="mat-block">
                    <mat-label>Longitude</mat-label>
                    <input type="number" step="any" matInput formControlName="longitude">
                </mat-form-field>
            </div>
            <div fxLayout="row" fxLayoutGap="8px" fxLayout.xs="column"  fxLayoutGap.xs="0">
                <mat-form-field fxFlex class="mat-block">
                    <mat-label>Address</mat-label>
                    <input matInput formControlName="address">
                </mat-form-field>
                <mat-form-field fxFlex class="mat-block">
                    <mat-label>Owner</mat-label>
                    <input matInput formControlName="owner">
                </mat-form-field>
            </div>
            <div fxLayout="row" fxLayoutGap="8px" fxLayout.xs="column"  fxLayoutGap.xs="0">
                <mat-form-field fxFlex class="mat-block">
                    <mat-label>Integer Value</mat-label>
                    <input type="number" step="1" matInput formControlName="number">
                    <mat-error *ngIf="addEntityFormGroup.get('attributes.number').hasError('pattern')">
                        Invalid integer value.
                    </mat-error>
                </mat-form-field>
                <div class="boolean-value-input" fxLayout="column" fxLayoutAlign="center start" fxFlex>
                    <label class="checkbox-label">Boolean Value</label>
                    <mat-checkbox formControlName="booleanValue" style="margin-bottom: 40px;">

                    </mat-checkbox>
                </div>
            </div>
        </div>
        <div class="relations-list">
            <div class="mat-body-1" style="padding-bottom: 10px; color: rgba(0,0,0,0.57);">Relations</div>
            <div class="body" [fxShow]="relations().length">
                <div class="row" fxLayout="row" fxLayoutAlign="start center" formArrayName="relations" *ngFor="let relation of relations().controls; let i = index;">
                    <div [formGroupName]="i" class="mat-elevation-z2" fxFlex fxLayout="row" style="padding: 5px 0 5px 5px;">
                        <div fxFlex fxLayout="column">
                            <div fxLayout="row" fxLayoutGap="8px" fxLayout.xs="column"  fxLayoutGap.xs="0">
                                <mat-form-field class="mat-block" style="min-width: 100px;">
                                    <mat-label>Direction</mat-label>
                                    <mat-select formControlName="direction" name="direction">
                                        <mat-option *ngFor="let direction of entitySearchDirection | keyvalue" [value]="direction.value">

                                        </mat-option>
                                    </mat-select>
                                    <mat-error *ngIf="relation.get('direction').hasError('required')">
                                        Relation direction is required.
                                    </mat-error>
                                </mat-form-field>
                                <tb-relation-type-autocomplete
                                        fxFlex class="mat-block"
                                        formControlName="relationType"
                                        [required]="true">
                                </tb-relation-type-autocomplete>
                            </div>
                            <div fxLayout="row" fxLayout.xs="column">
                                <tb-entity-select
                                        fxFlex class="mat-block"
                                        [required]="true"
                                        formControlName="relatedEntity">
                                </tb-entity-select>
                            </div>
                        </div>
                        <div fxLayout="column" fxLayoutAlign="center center">
                            <button mat-icon-button color="primary"
                                    aria-label="Remove"
                                    type="button"
                                    (click)="removeRelation(i)"
                                    matTooltip="Remove relation"
                                    matTooltipPosition="above">
                                <mat-icon>close</mat-icon>
                            </button>
                        </div>
                    </div>
                </div>
            </div>
            <div>
                <button mat-raised-button color="primary"
                        type="button"
                        (click)="addRelation()"
                        matTooltip="Add Relation"
                        matTooltipPosition="above">
                    Add
                </button>
            </div>
        </div>
    </div>
    <div mat-dialog-actions fxLayout="row" fxLayoutAlign="end center">
        <button mat-button color="primary"
                type="button"
                [disabled]="(isLoading$ | async)"
                (click)="cancel()" cdkFocusInitial>
            Cancel
        </button>
        <button mat-button mat-raised-button color="primary"
                type="submit"
                [disabled]="(isLoading$ | async) || addEntityForm.invalid || !addEntityForm.dirty">
            Create
        </button>
    </div>
</form>
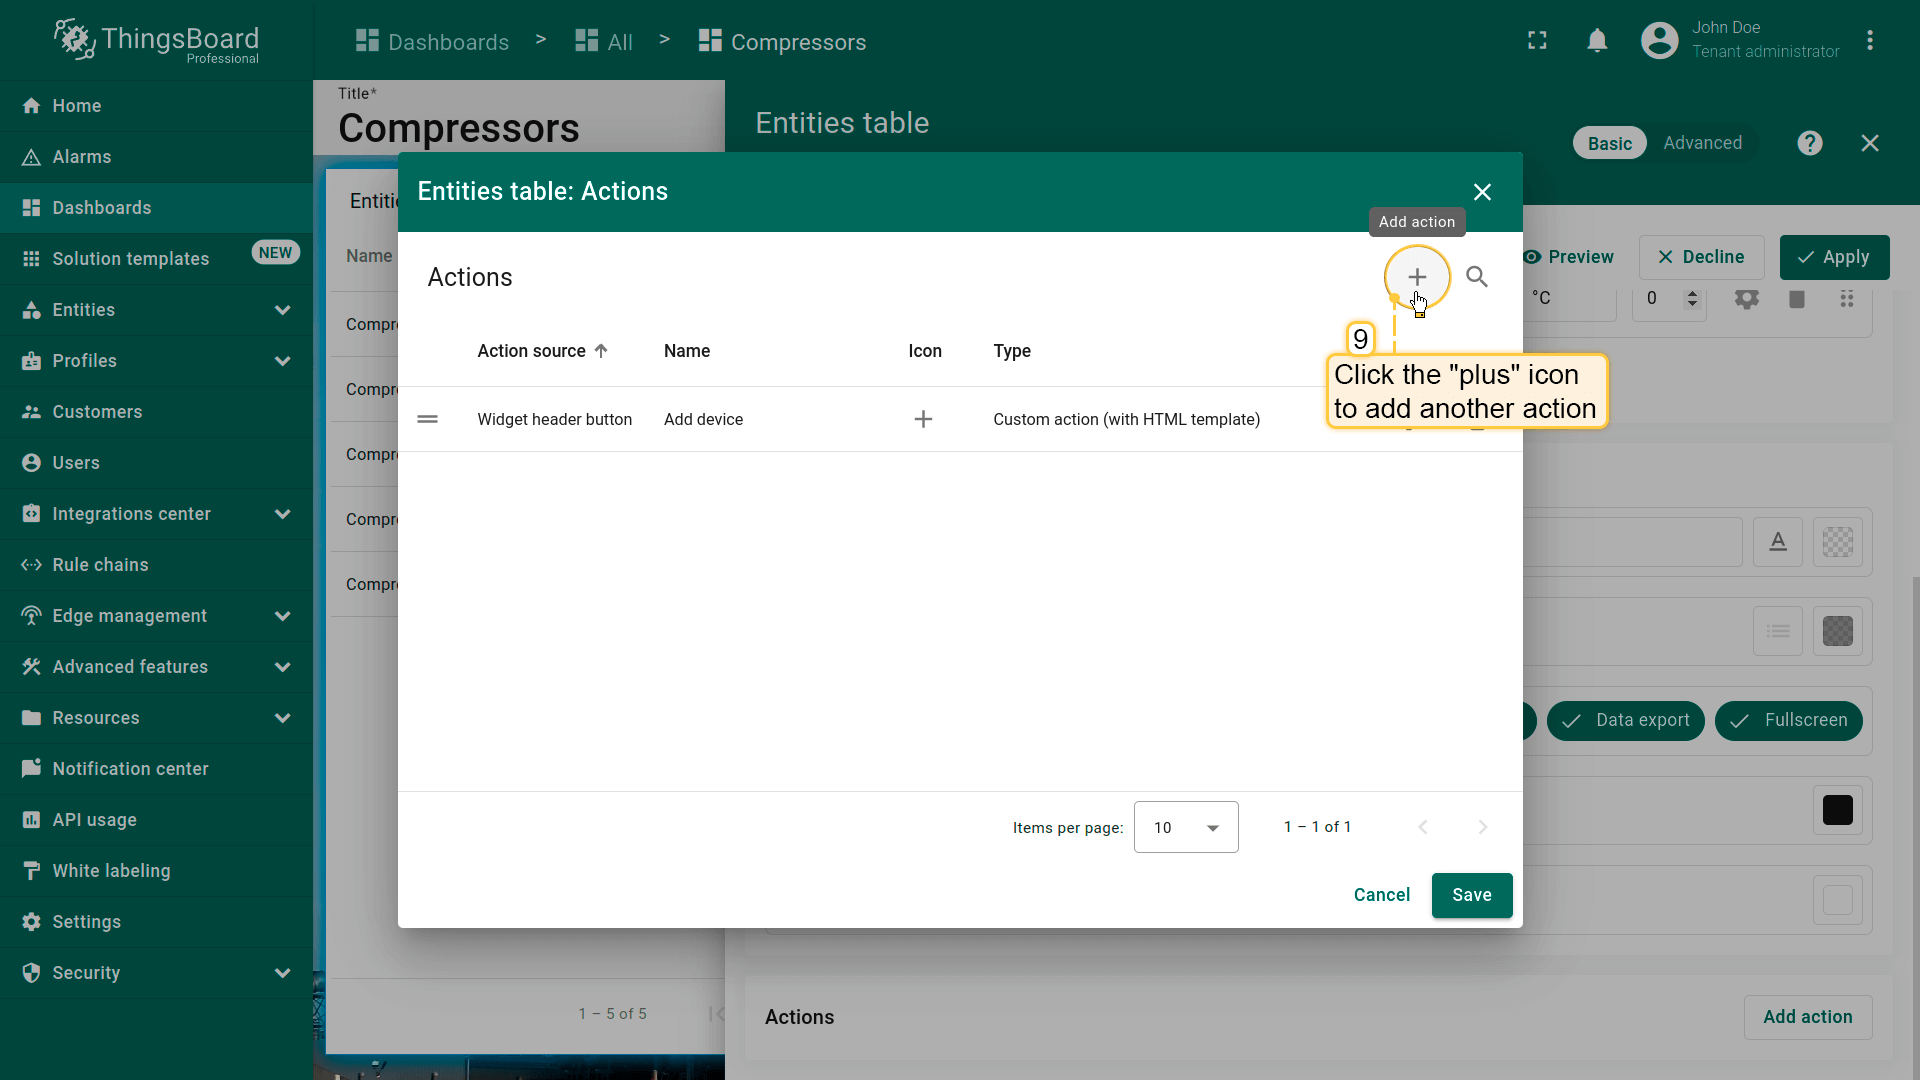
- 输入函数后,点击“Add action”窗口底部的“Add”按钮。


下面添加用于编辑实体的action按钮。
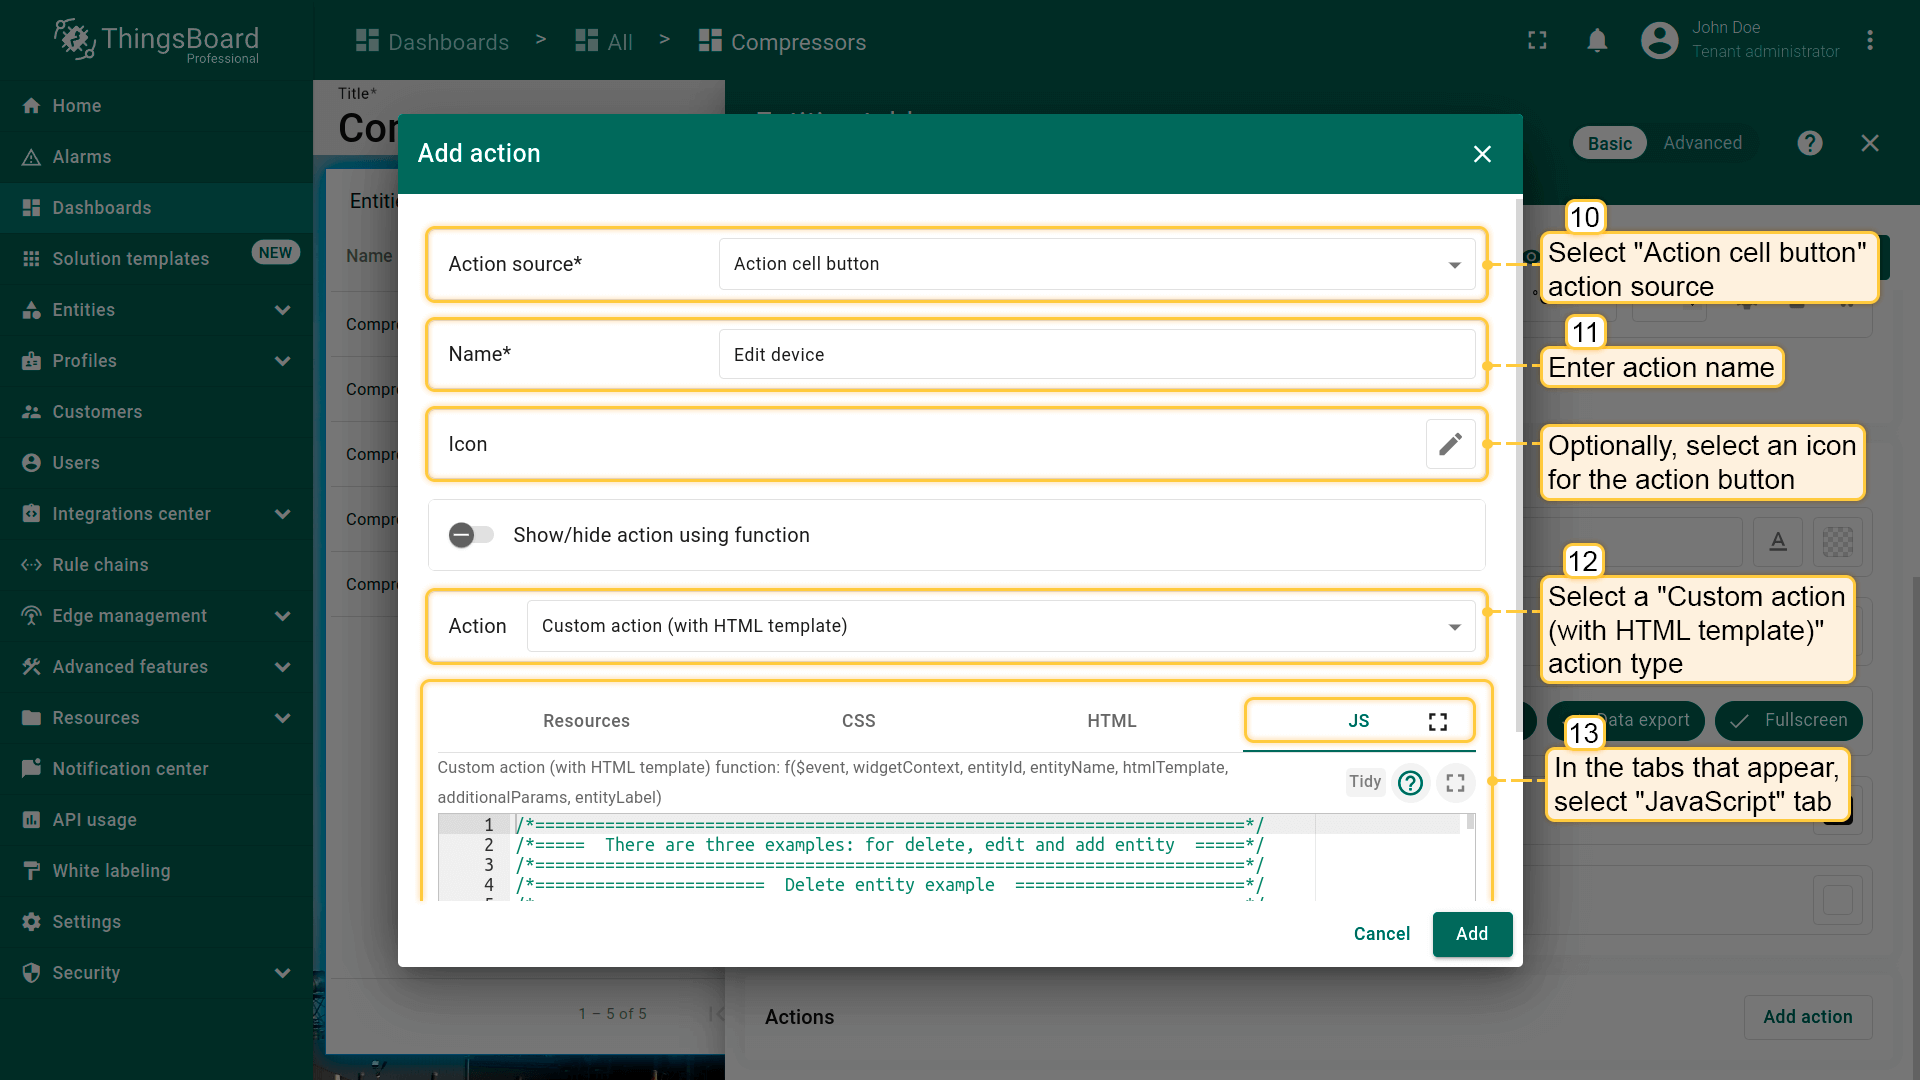
- 再次点击屏幕右上角“plus”图标打开新“Add action”窗口;
- 本指南以“Action cell button”为例,选择该action来源;
- 输入action名称并选择表示action按钮的图标;
- 在“Action”下拉菜单中选择“Custom action (with HTML template)”类型;
- 在出现的选项卡中选择“JavaScript”选项卡,输入custom action的JavaScript函数。本例使用可编辑实体的函数(下方有示例);
编辑设备或资产的JavaScript函数示例(点击展开):
1
2
3
4
5
6
7
8
9
10
11
12
13
14
15
16
17
18
19
20
21
22
23
24
25
26
27
28
29
30
31
32
33
34
35
36
37
38
39
40
41
42
43
44
45
46
47
48
49
50
51
52
53
54
55
56
57
58
59
60
61
62
63
64
65
66
67
68
69
70
71
72
73
74
75
76
77
78
79
80
81
82
83
84
85
86
87
88
89
90
91
92
93
94
95
96
97
98
99
100
101
102
103
104
105
106
107
108
109
110
111
112
113
114
115
116
117
118
119
120
121
122
123
124
125
126
127
128
129
130
131
132
133
134
135
136
137
138
139
140
141
142
143
144
145
146
147
148
149
150
151
152
153
154
155
156
157
158
159
160
161
162
163
164
165
166
167
168
169
170
171
172
173
174
175
176
177
178
179
180
181
182
183
184
185
186
187
188
189
190
191
192
193
194
195
196
197
198
199
200
201
202
203
204
205
206
207
208
209
210
211
212
213
214
215
let $injector = widgetContext.$scope.$injector;
let customDialog = $injector.get(widgetContext.servicesMap.get('customDialog'));
let entityService = $injector.get(widgetContext.servicesMap.get('entityService'));
let assetService = $injector.get(widgetContext.servicesMap.get('assetService'));
let deviceService = $injector.get(widgetContext.servicesMap.get('deviceService'));
let attributeService = $injector.get(widgetContext.servicesMap.get('attributeService'));
let entityRelationService = $injector.get(widgetContext.servicesMap.get('entityRelationService'));

openEditEntityDialog();

function openEditEntityDialog() {
customDialog.customDialog(htmlTemplate, EditEntityDialogController).subscribe();
}

function EditEntityDialogController(instance) {
let vm = instance;

    vm.entityName = entityName;
    vm.entityType = entityId.entityType;
    vm.entitySearchDirection = {
        from: "FROM",
        to: "TO"
    };
    vm.attributes = {};
    vm.oldRelationsData = [];
    vm.relationsToDelete = [];
    vm.entity = {};

    vm.editEntityFormGroup = vm.fb.group({
        entityName: ['', [vm.validators.required]],
        entityType: [null],
        entityLabel: [null],
        type: ['', [vm.validators.required]],
        attributes: vm.fb.group({
            latitude: [null],
            longitude: [null],
            address: [null],
            owner: [null],
            number: [null, [vm.validators.pattern(/^-?[0-9]+$/)]],
            booleanValue: [false]
        }),
        oldRelations: vm.fb.array([]),
        relations: vm.fb.array([])
    });

    getEntityInfo();

    vm.cancel = function() {
        vm.dialogRef.close(null);
    };

    vm.relations = function() {
        return vm.editEntityFormGroup.get('relations');
    };

    vm.oldRelations = function() {
        return vm.editEntityFormGroup.get('oldRelations');
    };

    vm.addRelation = function() {
        vm.relations().push(vm.fb.group({
            relatedEntity: [null, [vm.validators.required]],
            relationType: [null, [vm.validators.required]],
            direction: [null, [vm.validators.required]]
        }));
    };

    function addOldRelation() {
        vm.oldRelations().push(vm.fb.group({
            relatedEntity: [{value: null, disabled: true}, [vm.validators.required]],
            relationType: [{value: null, disabled: true}, [vm.validators.required]],
            direction: [{value: null, disabled: true}, [vm.validators.required]]
        }));
    }

    vm.removeRelation = function(index) {
        vm.relations().removeAt(index);
        vm.relations().markAsDirty();
    };

    vm.removeOldRelation = function(index) {
        vm.oldRelations().removeAt(index);
        vm.relationsToDelete.push(vm.oldRelationsData[index]);
        vm.oldRelations().markAsDirty();
    };

    vm.save = function() {
        vm.editEntityFormGroup.markAsPristine();
        widgetContext.rxjs.forkJoin([
            saveAttributes(entityId),
            saveRelations(entityId),
            saveEntity()
        ]).subscribe(
            function () {
                widgetContext.updateAliases();
                vm.dialogRef.close(null);
            }
        );
    };

    function getEntityAttributes(attributes) {
        for (var i = 0; i < attributes.length; i++) {
            vm.attributes[attributes[i].key] = attributes[i].value;
        }
    }

    function getEntityRelations(relations) {
        let relationsFrom = relations[0];
        let relationsTo = relations[1];
        for (let i=0; i < relationsFrom.length; i++) {
            let relation = {
                direction: 'FROM',
                relationType: relationsFrom[i].type,
                relatedEntity: relationsFrom[i].to
            };
            vm.oldRelationsData.push(relation);
            addOldRelation();
        }
        for (let i=0; i < relationsTo.length; i++) {
            let relation = {
                direction: 'TO',
                relationType: relationsTo[i].type,
                relatedEntity: relationsTo[i].from
            };
            vm.oldRelationsData.push(relation);
            addOldRelation();
        }
    }

    function getEntityInfo() {
        widgetContext.rxjs.forkJoin([
            entityRelationService.findInfoByFrom(entityId),
            entityRelationService.findInfoByTo(entityId),
            attributeService.getEntityAttributes(entityId, 'SERVER_SCOPE'),
            entityService.getEntity(entityId.entityType, entityId.id)
        ]).subscribe(
            function (data) {
                getEntityRelations(data.slice(0,2));
                getEntityAttributes(data[2]);
                vm.entity = data[3];
                vm.editEntityFormGroup.patchValue({
                    entityName: vm.entity.name,
                    entityType: vm.entityType,
                    entityLabel: vm.entity.label,
                    type: vm.entity.type,
                    attributes: vm.attributes,
                    oldRelations: vm.oldRelationsData
                }, {emitEvent: false});
            }
        );
    }

    function saveEntity() {
        const formValues = vm.editEntityFormGroup.value;
        if (vm.entity.label !== formValues.entityLabel){
            vm.entity.label = formValues.entityLabel;
            if (formValues.entityType == 'ASSET') {
                return assetService.saveAsset(vm.entity);
            } else if (formValues.entityType == 'DEVICE') {
                return deviceService.saveDevice(vm.entity);
            }
        }
        return widgetContext.rxjs.of([]);
    }

    function saveAttributes(entityId) {
        let attributes = vm.editEntityFormGroup.get('attributes').value;
        let attributesArray = [];
        for (let key in attributes) {
            if (attributes[key] !== vm.attributes[key]) {
                attributesArray.push({key: key, value: attributes[key]});
            }
        }
        if (attributesArray.length > 0) {
            return attributeService.saveEntityAttributes(entityId, "SERVER_SCOPE", attributesArray);
        }
        return widgetContext.rxjs.of([]);
    }

    function saveRelations(entityId) {
        let relations = vm.editEntityFormGroup.get('relations').value;
        let tasks = [];
        for(let i=0; i < relations.length; i++) {
            let relation = {
                type: relations[i].relationType,
                typeGroup: 'COMMON'
            };
            if (relations[i].direction == 'FROM') {
                relation.to = relations[i].relatedEntity;
                relation.from = entityId;
            } else {
                relation.to = entityId;
                relation.from = relations[i].relatedEntity;
            }
            tasks.push(entityRelationService.saveRelation(relation));
        }
        for (let i=0; i < vm.relationsToDelete.length; i++) {
            let relation = {
                type: vm.relationsToDelete[i].relationType
            };
            if (vm.relationsToDelete[i].direction == 'FROM') {
                relation.to = vm.relationsToDelete[i].relatedEntity;
                relation.from = entityId;
            } else {
                relation.to = entityId;
                relation.from = vm.relationsToDelete[i].relatedEntity;
            }
            tasks.push(entityRelationService.deleteRelation(relation.from, relation.type, relation.to));
        }
        if (tasks.length > 0) {
            return widgetContext.rxjs.forkJoin(tasks);
        }
        return widgetContext.rxjs.of([]);
    }
}
- 在“HTML”选项卡中输入custom action的HTML代码(下方有示例);
编辑设备或资产的HTML代码示例(点击展开):
1
2
3
4
5
6
7
8
9
10
11
12
13
14
15
16
17
18
19
20
21
22
23
24
25
26
27
28
29
30
31
32
33
34
35
36
37
38
39
40
41
42
43
44
45
46
47
48
49
50
51
52
53
54
55
56
57
58
59
60
61
62
63
64
65
66
67
68
69
70
71
72
73
74
75
76
77
78
79
80
81
82
83
84
85
86
87
88
89
90
91
92
93
94
95
96
97
98
99
100
101
102
103
104
105
106
107
108
109
110
111
112
113
114
115
116
117
118
119
120
121
122
123
124
125
126
127
128
129
130
131
132
133
134
135
136
137
138
139
140
141
142
143
144
145
146
147
148
149
150
151
152
153
154
155
156
157
158
159
160
161
162
163
164
165
166
167
168
169
170
171
172
173
174
175
176
177
178
179
180
181
182
183
184
185
186
187
<form #editEntityForm="ngForm" [formGroup]="editEntityFormGroup"
      (ngSubmit)="save()"  class="edit-entity-form">
    <mat-toolbar fxLayout="row" color="primary">
        <h2>Edit  </h2>
        <span fxFlex></span>
        <button mat-icon-button (click)="cancel()" type="button">
            <mat-icon class="material-icons">close</mat-icon>
        </button>
    </mat-toolbar>
    <mat-progress-bar color="warn" mode="indeterminate" *ngIf="isLoading$ | async">
    </mat-progress-bar>
    <div style="height: 4px;" *ngIf="!(isLoading$ | async)"></div>
    <div mat-dialog-content fxLayout="column">
        <div fxLayout="row" fxLayoutGap="8px" fxLayout.xs="column"  fxLayoutGap.xs="0">
            <mat-form-field fxFlex class="mat-block">
                <mat-label>Entity Name</mat-label>
                <input matInput formControlName="entityName" required readonly="">
            </mat-form-field>
            <mat-form-field fxFlex class="mat-block">
                <mat-label>Entity Label</mat-label>
                <input matInput formControlName="entityLabel">
            </mat-form-field>
        </div>
        <div fxLayout="row" fxLayoutGap="8px" fxLayout.xs="column"  fxLayoutGap.xs="0">
            <mat-form-field fxFlex class="mat-block">
                <mat-label>Entity Type</mat-label>
                <input matInput formControlName="entityType" readonly>
            </mat-form-field>
            <mat-form-field fxFlex class="mat-block">
                <mat-label>Type</mat-label>
                <input matInput formControlName="type" readonly>
            </mat-form-field>
        </div>
        <div formGroupName="attributes" fxLayout="column">
            <div fxLayout="row" fxLayoutGap="8px" fxLayout.xs="column"  fxLayoutGap.xs="0">
                <mat-form-field fxFlex class="mat-block">
                    <mat-label>Latitude</mat-label>
                    <input type="number" step="any" matInput formControlName="latitude">
                </mat-form-field>
                <mat-form-field fxFlex class="mat-block">
                    <mat-label>Longitude</mat-label>
                    <input type="number" step="any" matInput formControlName="longitude">
                </mat-form-field>
            </div>
            <div fxLayout="row" fxLayoutGap="8px" fxLayout.xs="column"  fxLayoutGap.xs="0">
                <mat-form-field fxFlex class="mat-block">
                    <mat-label>Address</mat-label>
                    <input matInput formControlName="address">
                </mat-form-field>
                <mat-form-field fxFlex class="mat-block">
                    <mat-label>Owner</mat-label>
                    <input matInput formControlName="owner">
                </mat-form-field>
            </div>
            <div fxLayout="row" fxLayoutGap="8px" fxLayout.xs="column"  fxLayoutGap.xs="0">
                <mat-form-field fxFlex class="mat-block">
                    <mat-label>Integer Value</mat-label>
                    <input type="number" step="1" matInput formControlName="number">
                    <mat-error *ngIf="editEntityFormGroup.get('attributes.number').hasError('pattern')">
                        Invalid integer value.
                    </mat-error>
                </mat-form-field>
                <div class="boolean-value-input" fxLayout="column" fxLayoutAlign="center start" fxFlex>
                    <label class="checkbox-label">Boolean Value</label>
                    <mat-checkbox formControlName="booleanValue" style="margin-bottom: 40px;">

                    </mat-checkbox>
                </div>
            </div>
        </div>
        <div class="relations-list old-relations">
            <div class="mat-body-1" style="padding-bottom: 10px; color: rgba(0,0,0,0.57);">Relations</div>
            <div class="body" [fxShow]="oldRelations().length">
                <div class="row" fxLayout="row" fxLayoutAlign="start center" formArrayName="oldRelations"
                     *ngFor="let relation of oldRelations().controls; let i = index;">
                    <div [formGroupName]="i" class="mat-elevation-z2" fxFlex fxLayout="row" style="padding: 5px 0 5px 5px;">
                        <div fxFlex fxLayout="column">
                            <div fxLayout="row" fxLayoutGap="8px" fxLayout.xs="column"  fxLayoutGap.xs="0">
                                <mat-form-field class="mat-block" style="min-width: 100px;">
                                    <mat-label>Direction</mat-label>
                                    <mat-select formControlName="direction" name="direction">
                                        <mat-option *ngFor="let direction of entitySearchDirection | keyvalue" [value]="direction.value">

                                        </mat-option>
                                    </mat-select>
                                    <mat-error *ngIf="relation.get('direction').hasError('required')">
                                        Relation direction is required.
                                    </mat-error>
                                </mat-form-field>
                                <tb-relation-type-autocomplete
                                        fxFlex class="mat-block"
                                        formControlName="relationType"
                                        required="true">
                                </tb-relation-type-autocomplete>
                            </div>
                            <div fxLayout="row" fxLayout.xs="column">
                                <tb-entity-select
                                        fxFlex class="mat-block"
                                        required="true"
                                        formControlName="relatedEntity">
                                </tb-entity-select>
                            </div>
                        </div>
                        <div fxLayout="column" fxLayoutAlign="center center">
                            <button mat-icon-button color="primary"
                                    aria-label="Remove"
                                    type="button"
                                    (click)="removeOldRelation(i)"
                                    matTooltip="Remove relation"
                                    matTooltipPosition="above">
                                <mat-icon>close</mat-icon>
                            </button>
                        </div>
                    </div>
                </div>
            </div>
        </div>
        <div class="relations-list">
            <div class="mat-body-1" style="padding-bottom: 10px; color: rgba(0,0,0,0.57);">New Relations</div>
            <div class="body" [fxShow]="relations().length">
                <div class="row" fxLayout="row" fxLayoutAlign="start center" formArrayName="relations" *ngFor="let relation of relations().controls; let i = index;">
                    <div [formGroupName]="i" class="mat-elevation-z2" fxFlex fxLayout="row" style="padding: 5px 0 5px 5px;">
                        <div fxFlex fxLayout="column">
                            <div fxLayout="row" fxLayoutGap="8px" fxLayout.xs="column"  fxLayoutGap.xs="0">
                                <mat-form-field class="mat-block" style="min-width: 100px;">
                                    <mat-label>Direction</mat-label>
                                    <mat-select formControlName="direction" name="direction">
                                        <mat-option *ngFor="let direction of entitySearchDirection | keyvalue" [value]="direction.value">

                                        </mat-option>
                                    </mat-select>
                                    <mat-error *ngIf="relation.get('direction').hasError('required')">
                                        Relation direction is required.
                                    </mat-error>
                                </mat-form-field>
                                <tb-relation-type-autocomplete
                                        fxFlex class="mat-block"
                                        formControlName="relationType"
                                        [required]="true">
                                </tb-relation-type-autocomplete>
                            </div>
                            <div fxLayout="row" fxLayout.xs="column">
                                <tb-entity-select
                                        fxFlex class="mat-block"
                                        [required]="true"
                                        formControlName="relatedEntity">
                                </tb-entity-select>
                            </div>
                        </div>
                        <div fxLayout="column" fxLayoutAlign="center center">
                            <button mat-icon-button color="primary"
                                    aria-label="Remove"
                                    type="button"
                                    (click)="removeRelation(i)"
                                    matTooltip="Remove relation"
                                    matTooltipPosition="above">
                                <mat-icon>close</mat-icon>
                            </button>
                        </div>
                    </div>
                </div>
            </div>
            <div>
                <button mat-raised-button color="primary"
                        type="button"
                        (click)="addRelation()"
                        matTooltip="Add Relation"
                        matTooltipPosition="above">
                    Add
                </button>
            </div>
        </div>
    </div>
    <div mat-dialog-actions fxLayout="row" fxLayoutAlign="end center">
        <button mat-button color="primary"
                type="button"
                [disabled]="(isLoading$ | async)"
                (click)="cancel()" cdkFocusInitial>
            Cancel
        </button>
        <button mat-button mat-raised-button color="primary"
                type="submit"
                [disabled]="(isLoading$ | async) || editEntityForm.invalid || !editEntityForm.dirty">
            Save
        </button>
    </div>
</form>
- 输入函数后,点击“Add action”窗口底部的“Add”按钮;
- 在“Actions”窗口中可查看已配置actions,核对来源、图标和类型。点击“Save”,再点“Apply”保存部件设置;
- 点击dashboard页面右上角“Save”保存dashboard。


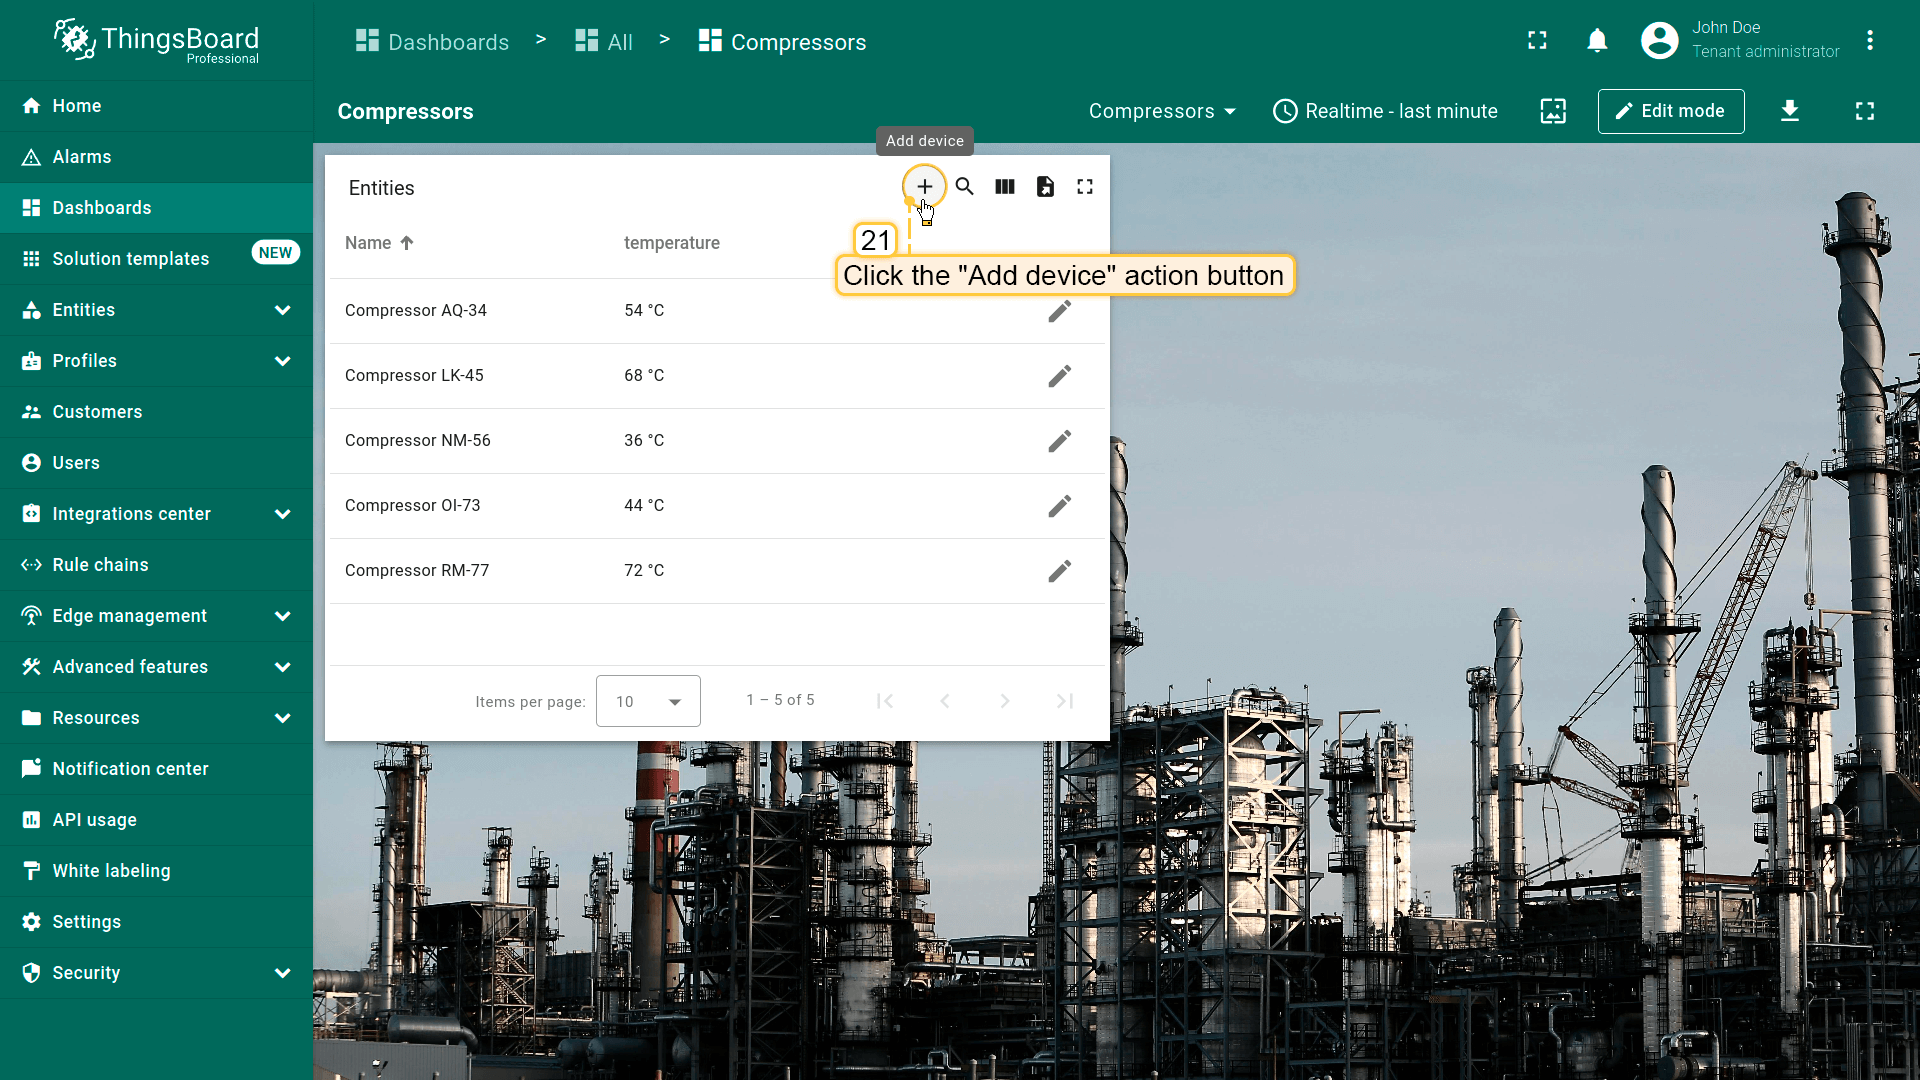
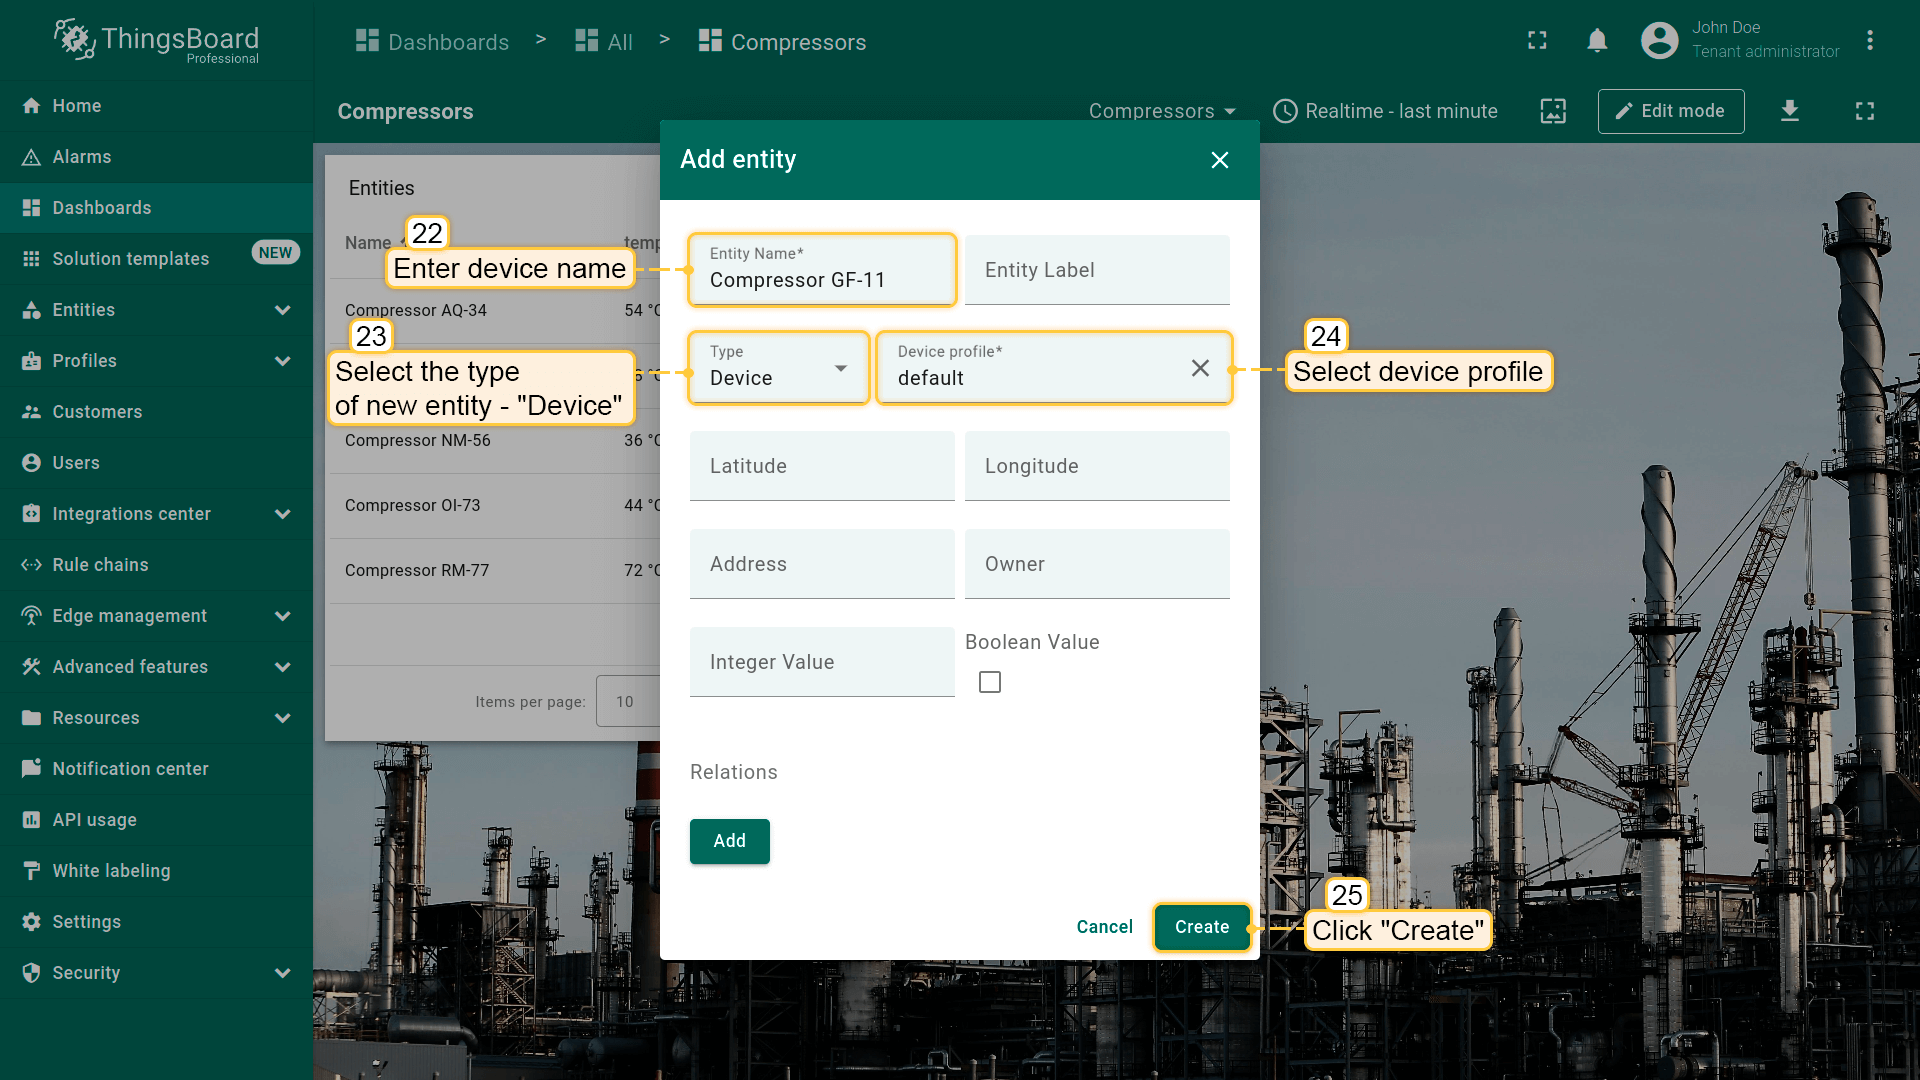
点击部件顶部的“Add device”action按钮添加新设备。 在打开的“Add entity”窗口中,选择新实体类型“Device”并输入名称。输入必要数据后点击“Create”。
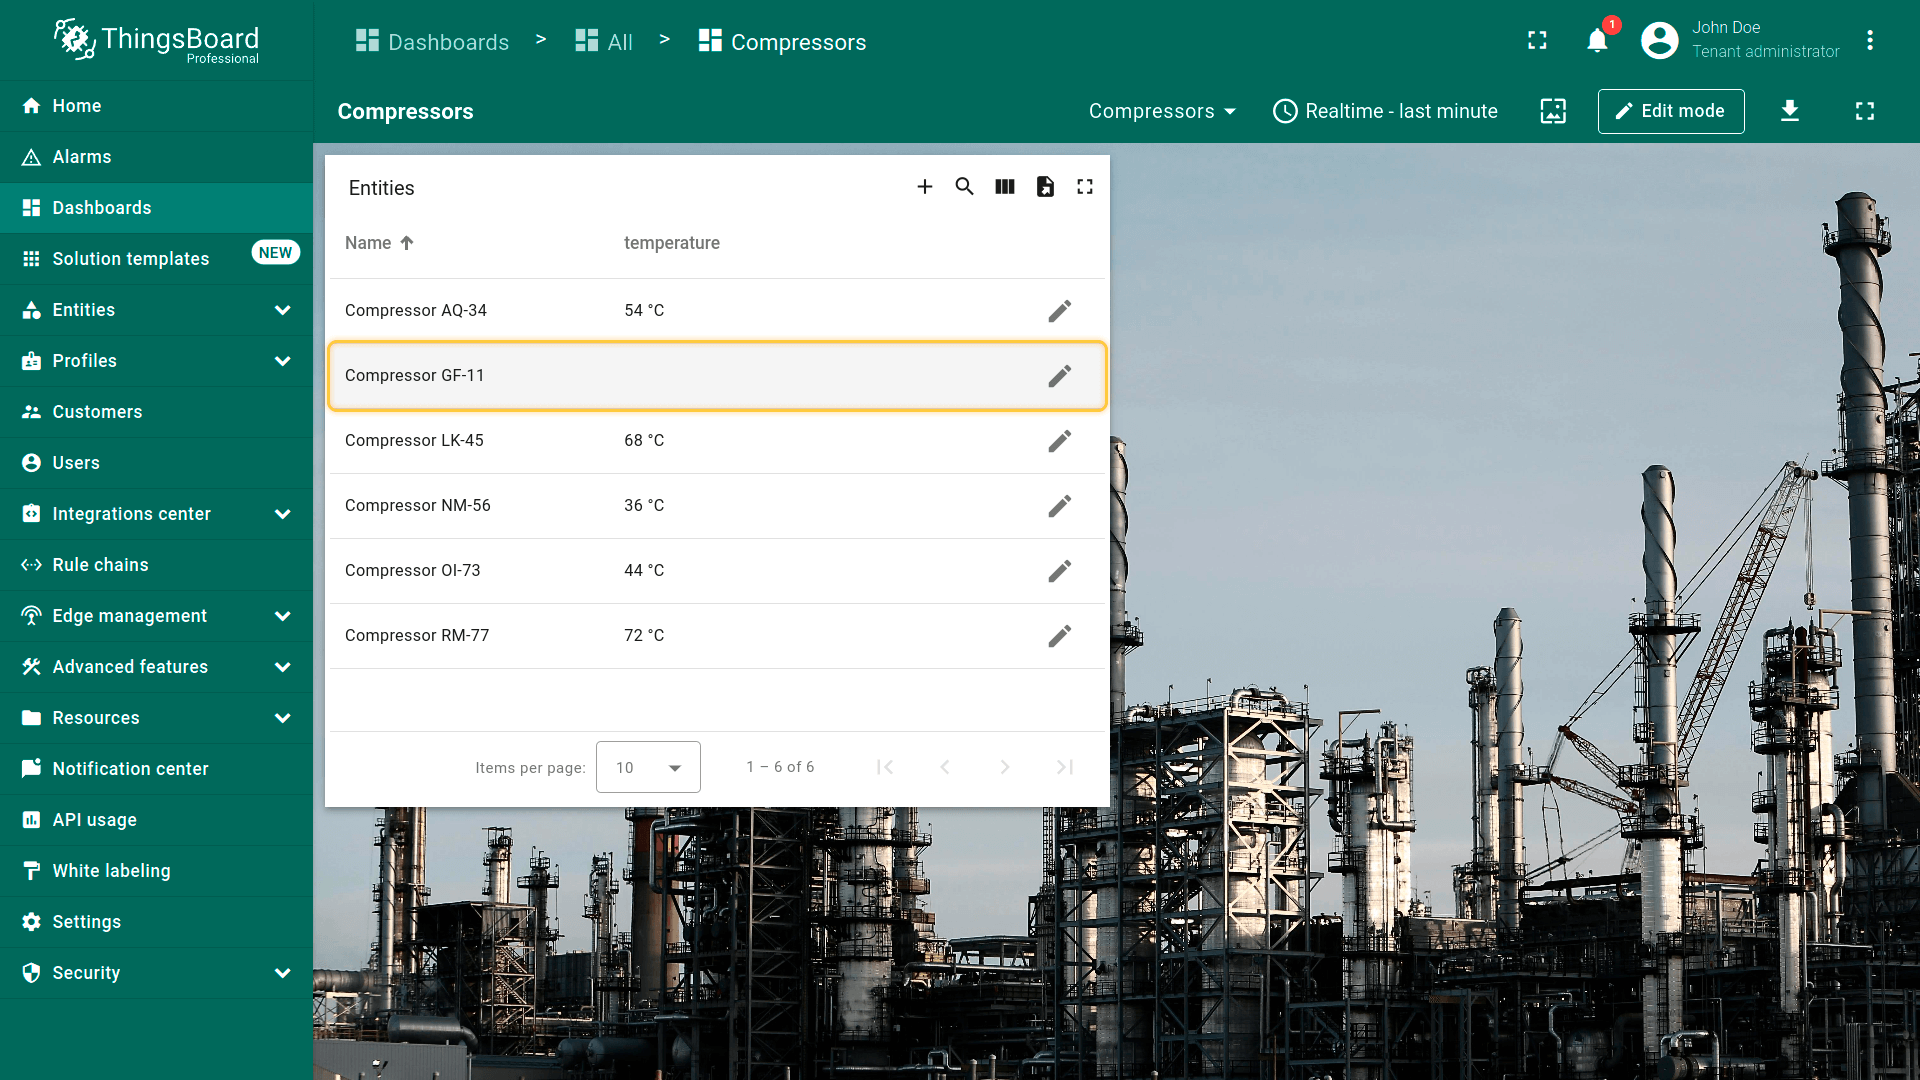
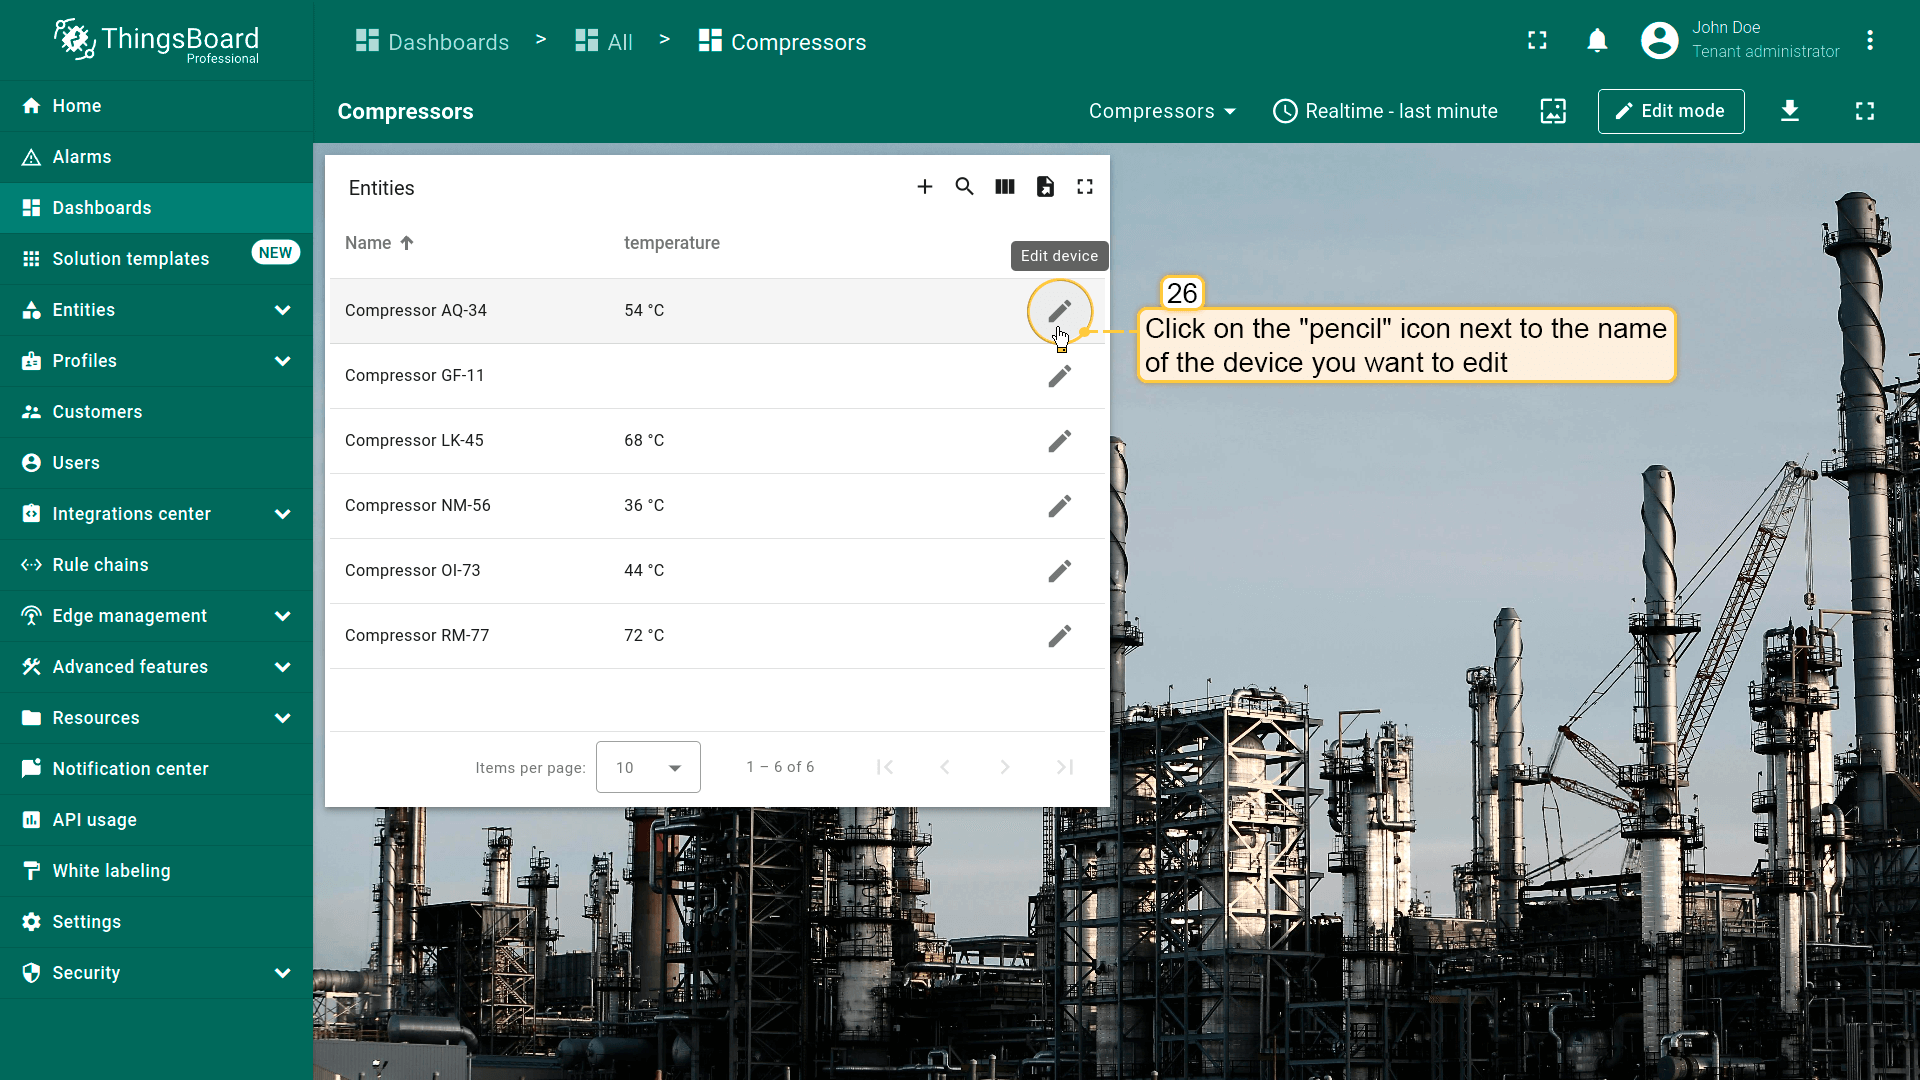
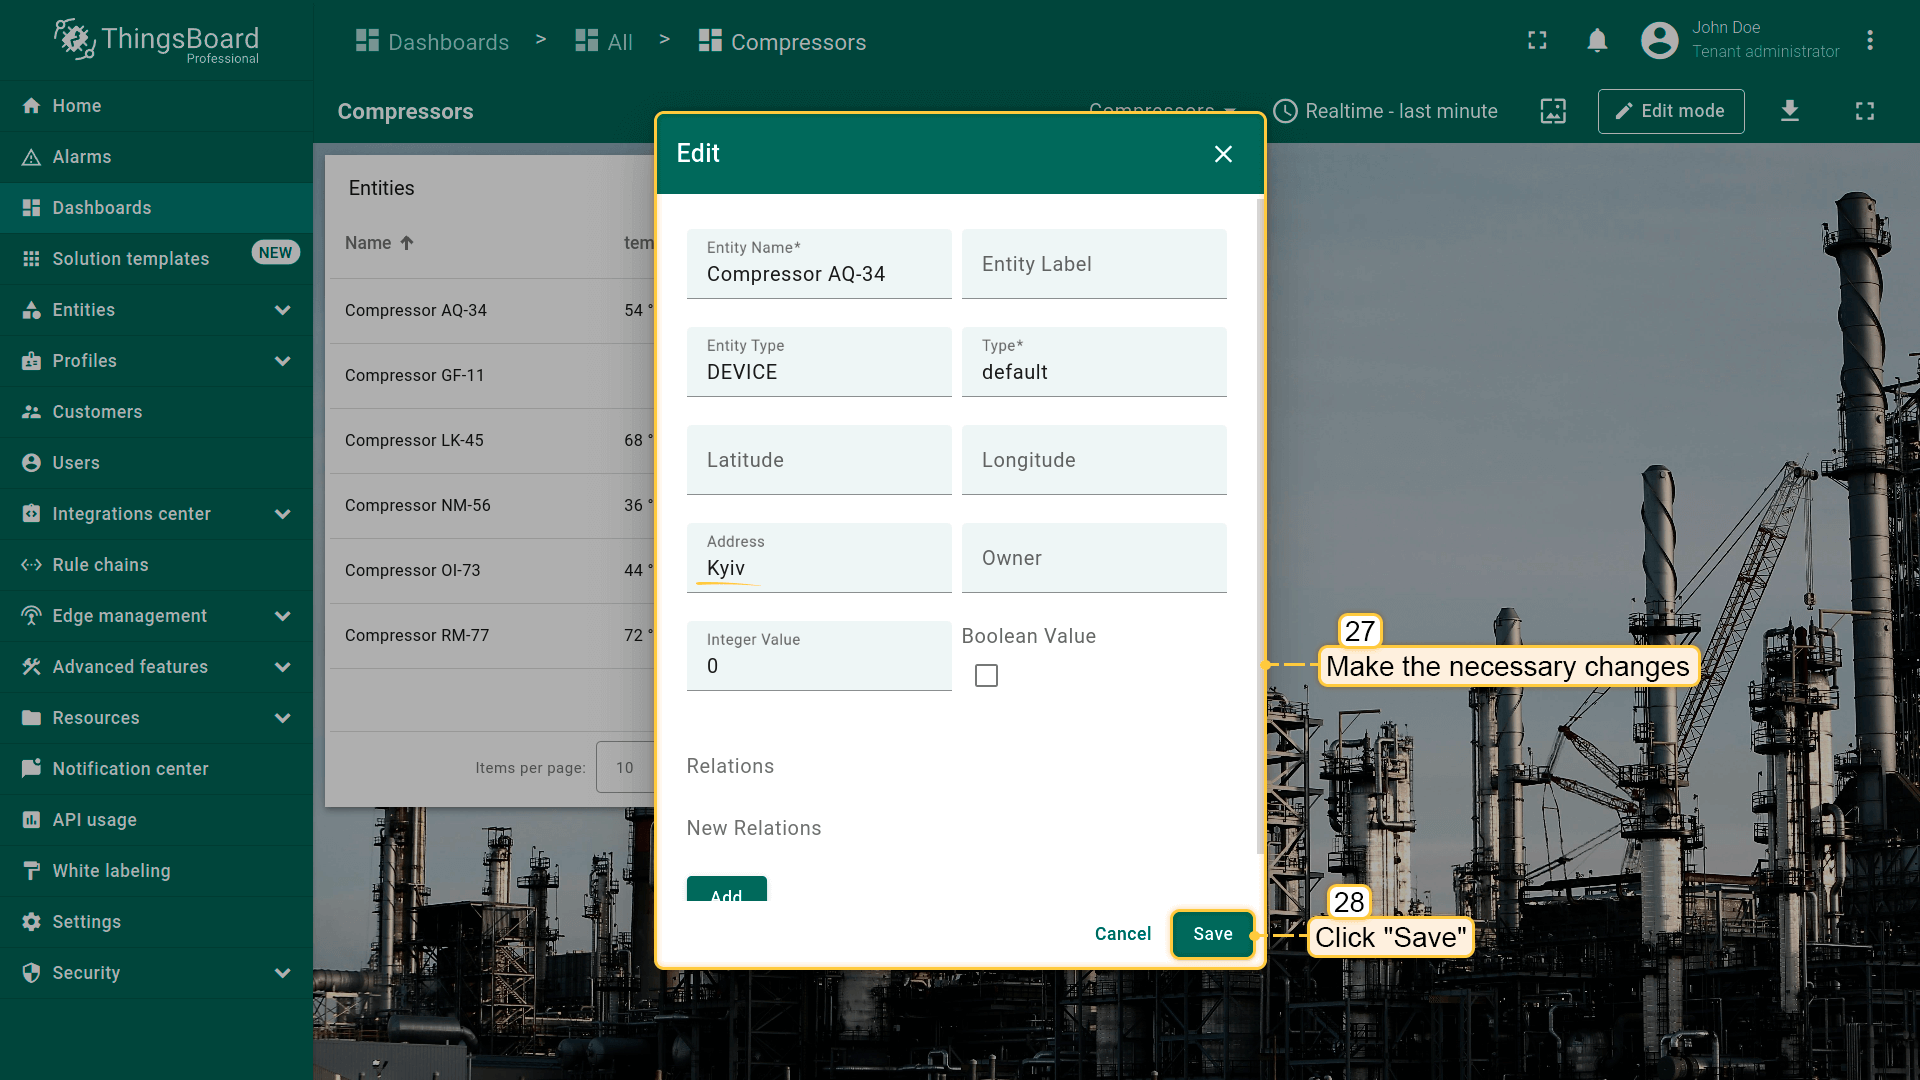
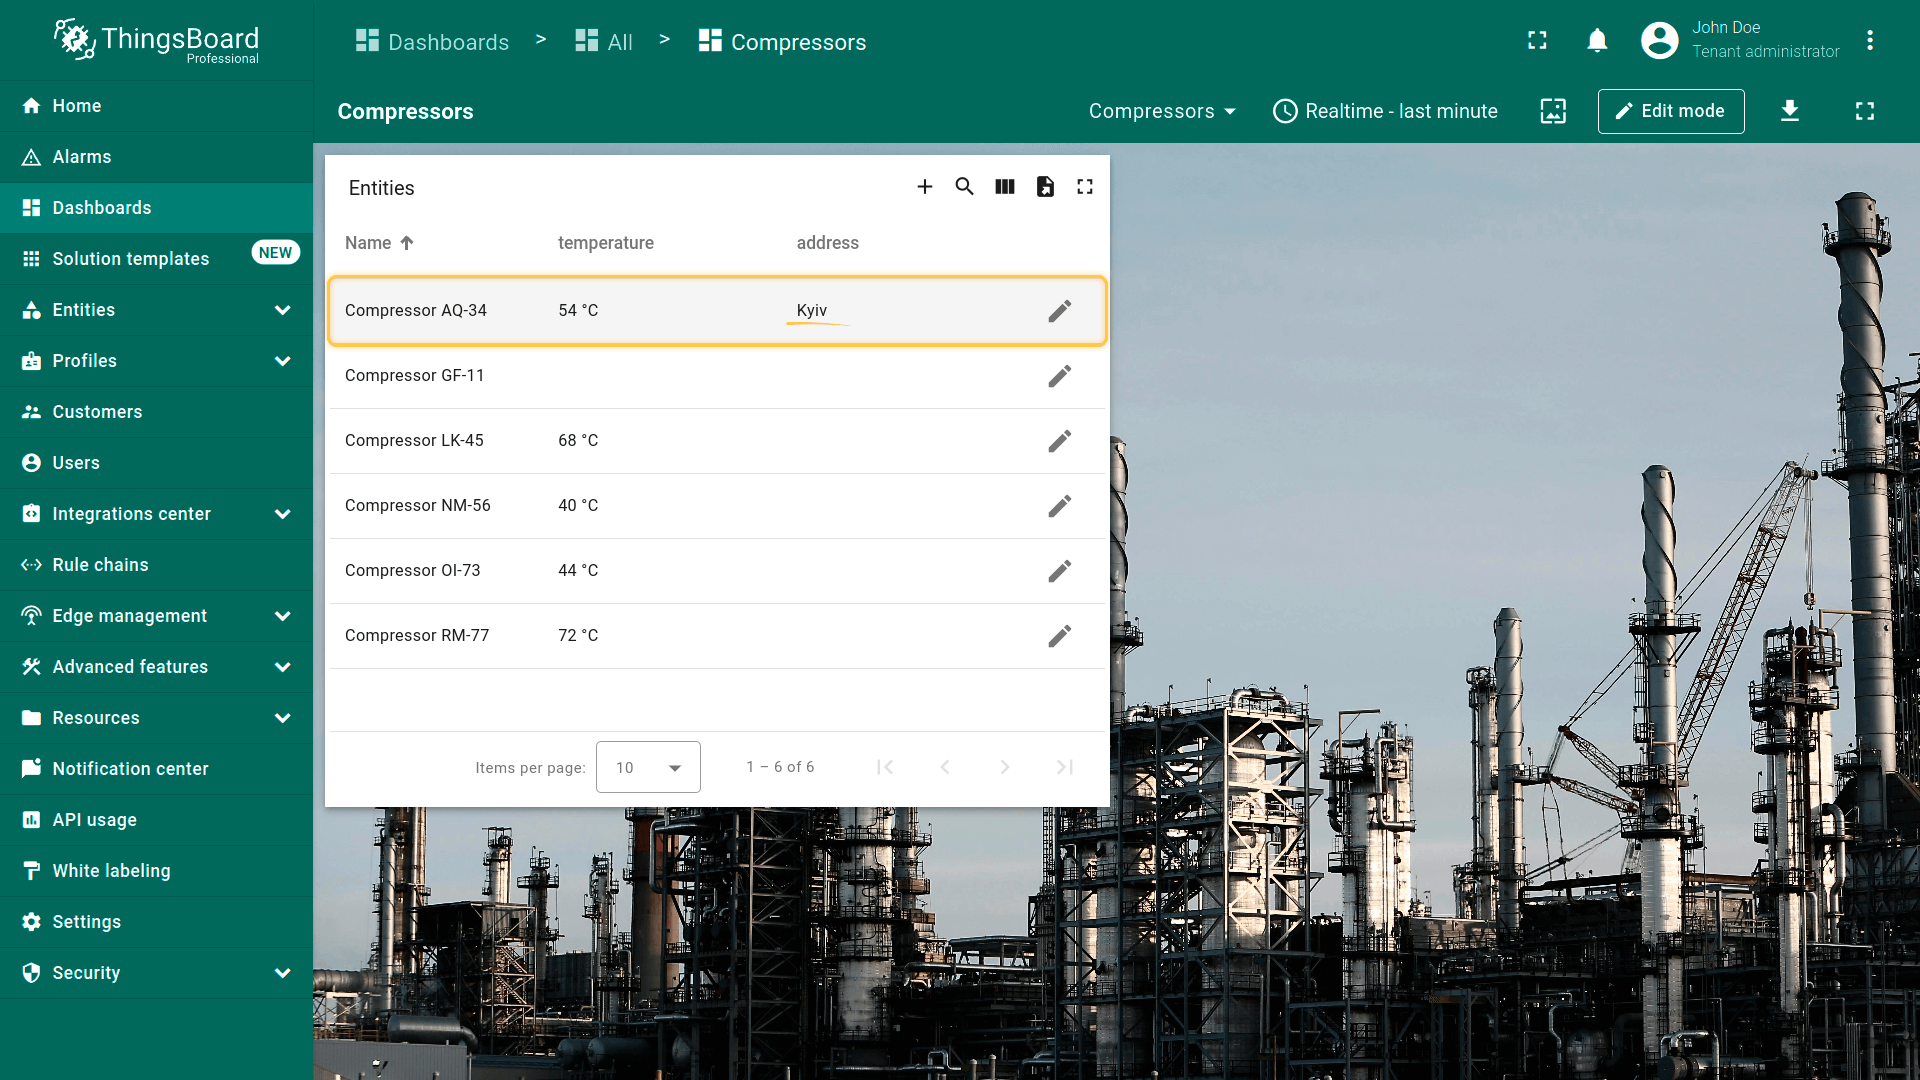
点击要编辑设备名称旁的action按钮。点击后即打开设备编辑窗口。完成修改后点击“Save”。
移动设备操作
Mobile action在移动应用配置中说明。详见 Mobile actions。
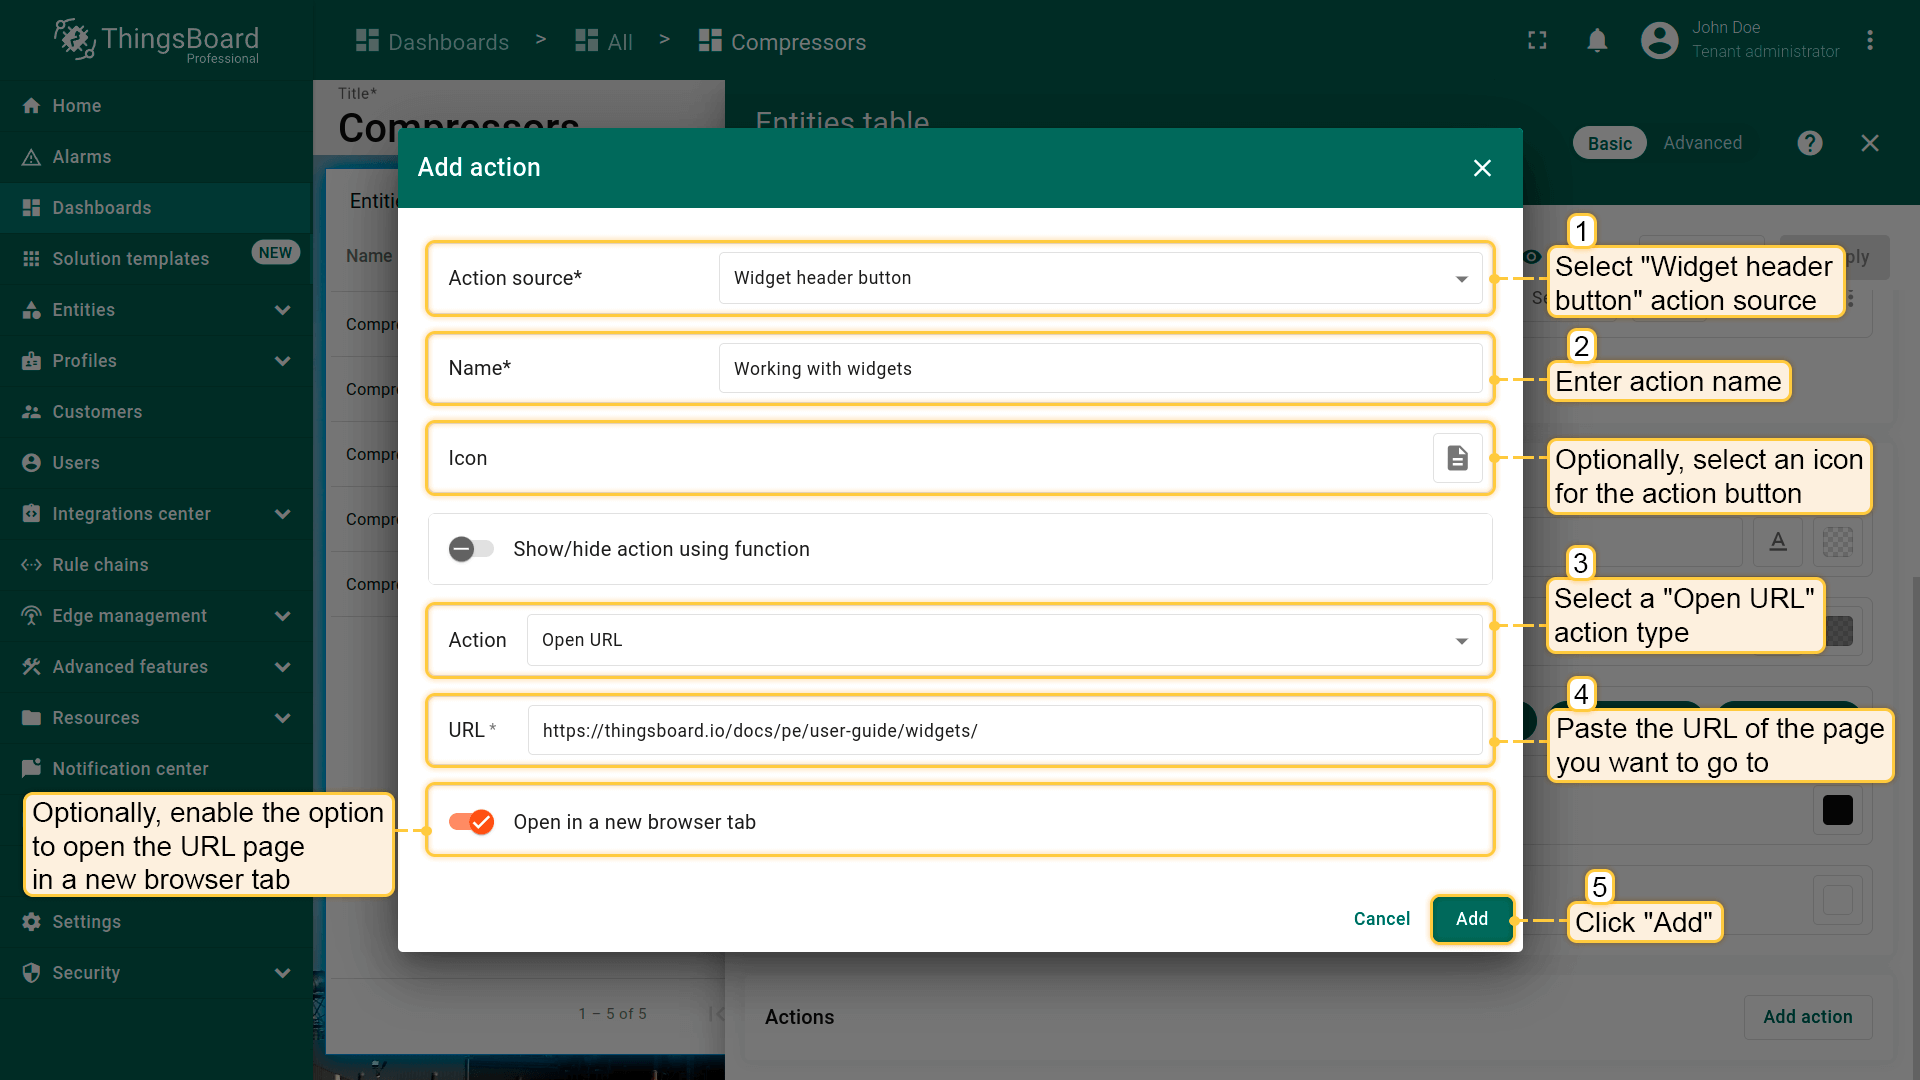
打开URL
该action类型将跳转到URL所表示的资源。资源可以是HTML页面、文档、图片、ThingsBoard内部页面(如Alarms)等。
假设已熟悉“Add action”步骤,直接进行action配置:
- 进入部件编辑模式,打开“Add action”窗口;
- 本指南以“Widget header button”为例,选择该action来源;
- 输入action名称并选择表示按钮的图标;
- 在“Action”下拉菜单中选择“Open URL”类型;
- 选择后会出现“URL”菜单。填入点击action按钮时要跳转的页面URL;
- 可选:启用在新浏览器标签页中打开URL页面;
- 点击“Add action”窗口底部的“Add”按钮;
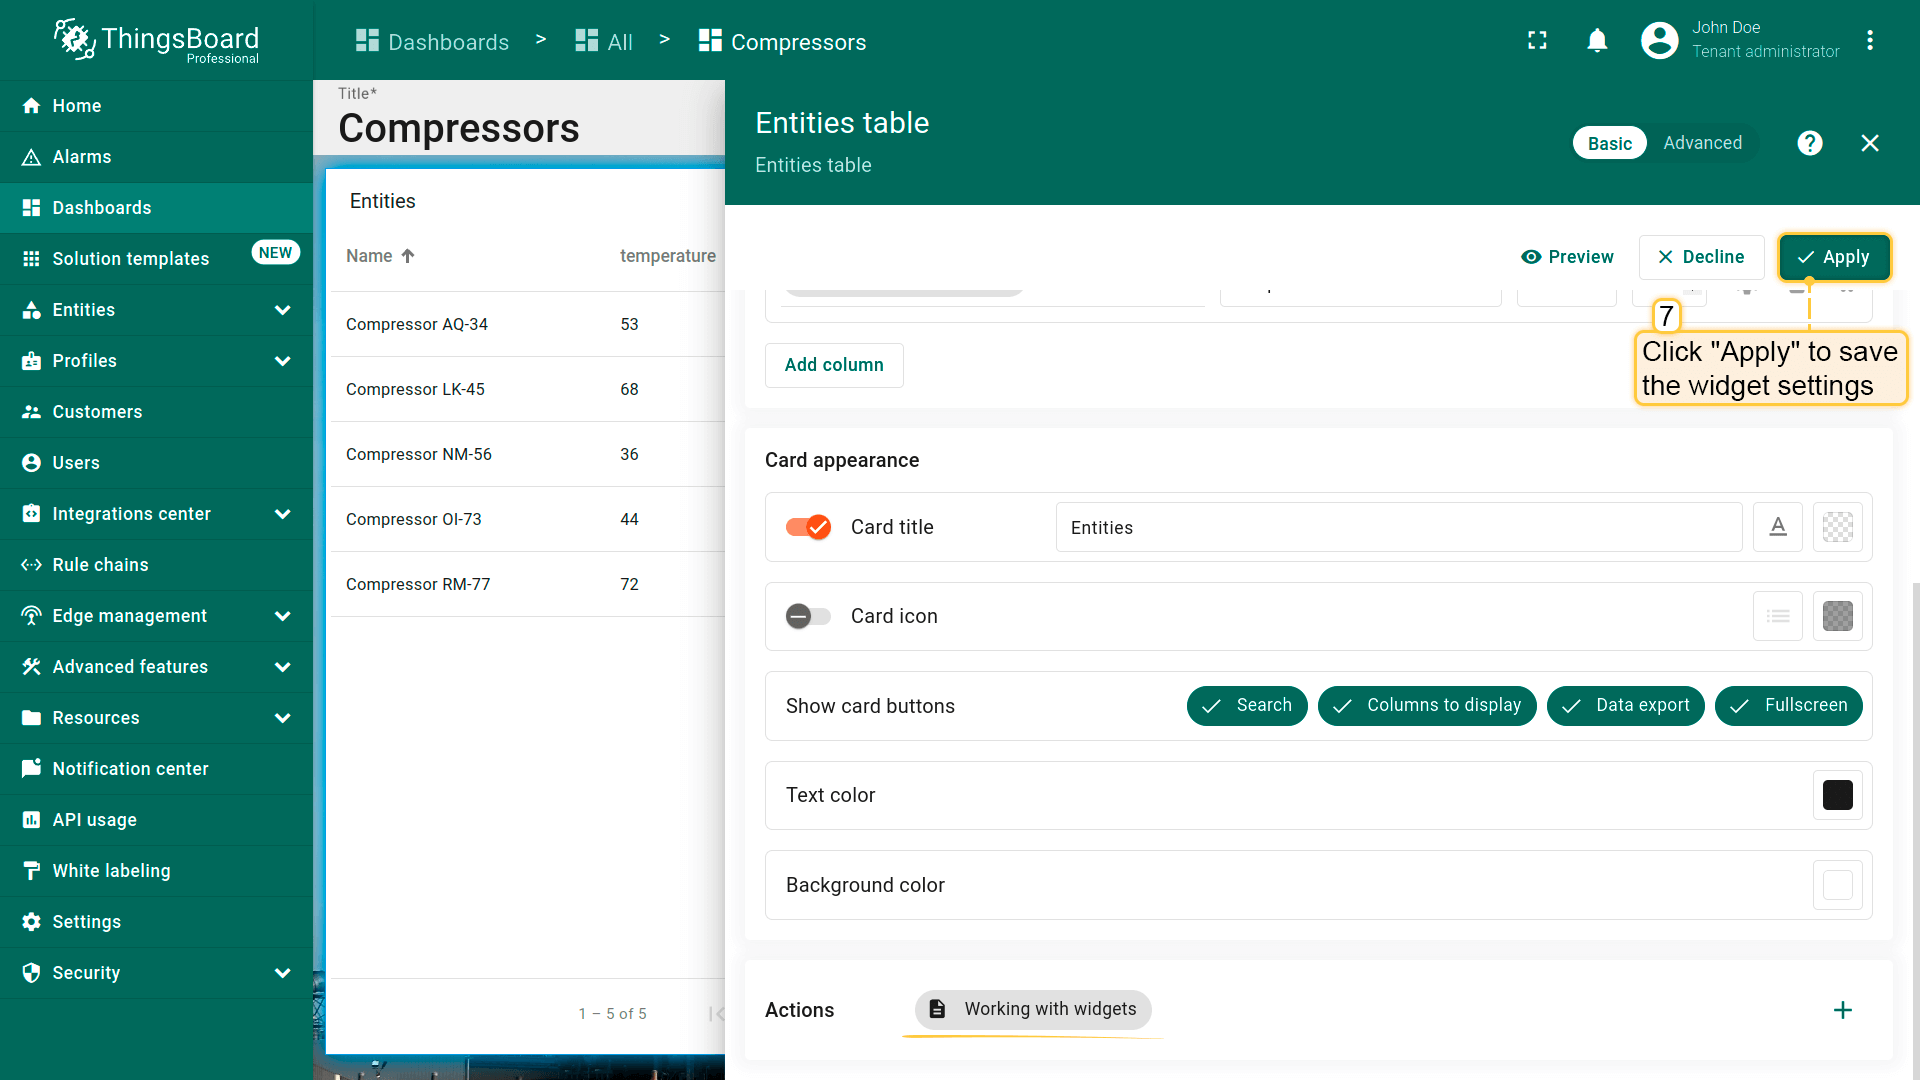
- 在“Actions”窗口中查看已配置action,核对来源、图标和类型。点击“Save”,再点“Apply”保存部件设置;
- 点击dashboard页面右上角“Save”保存dashboard。


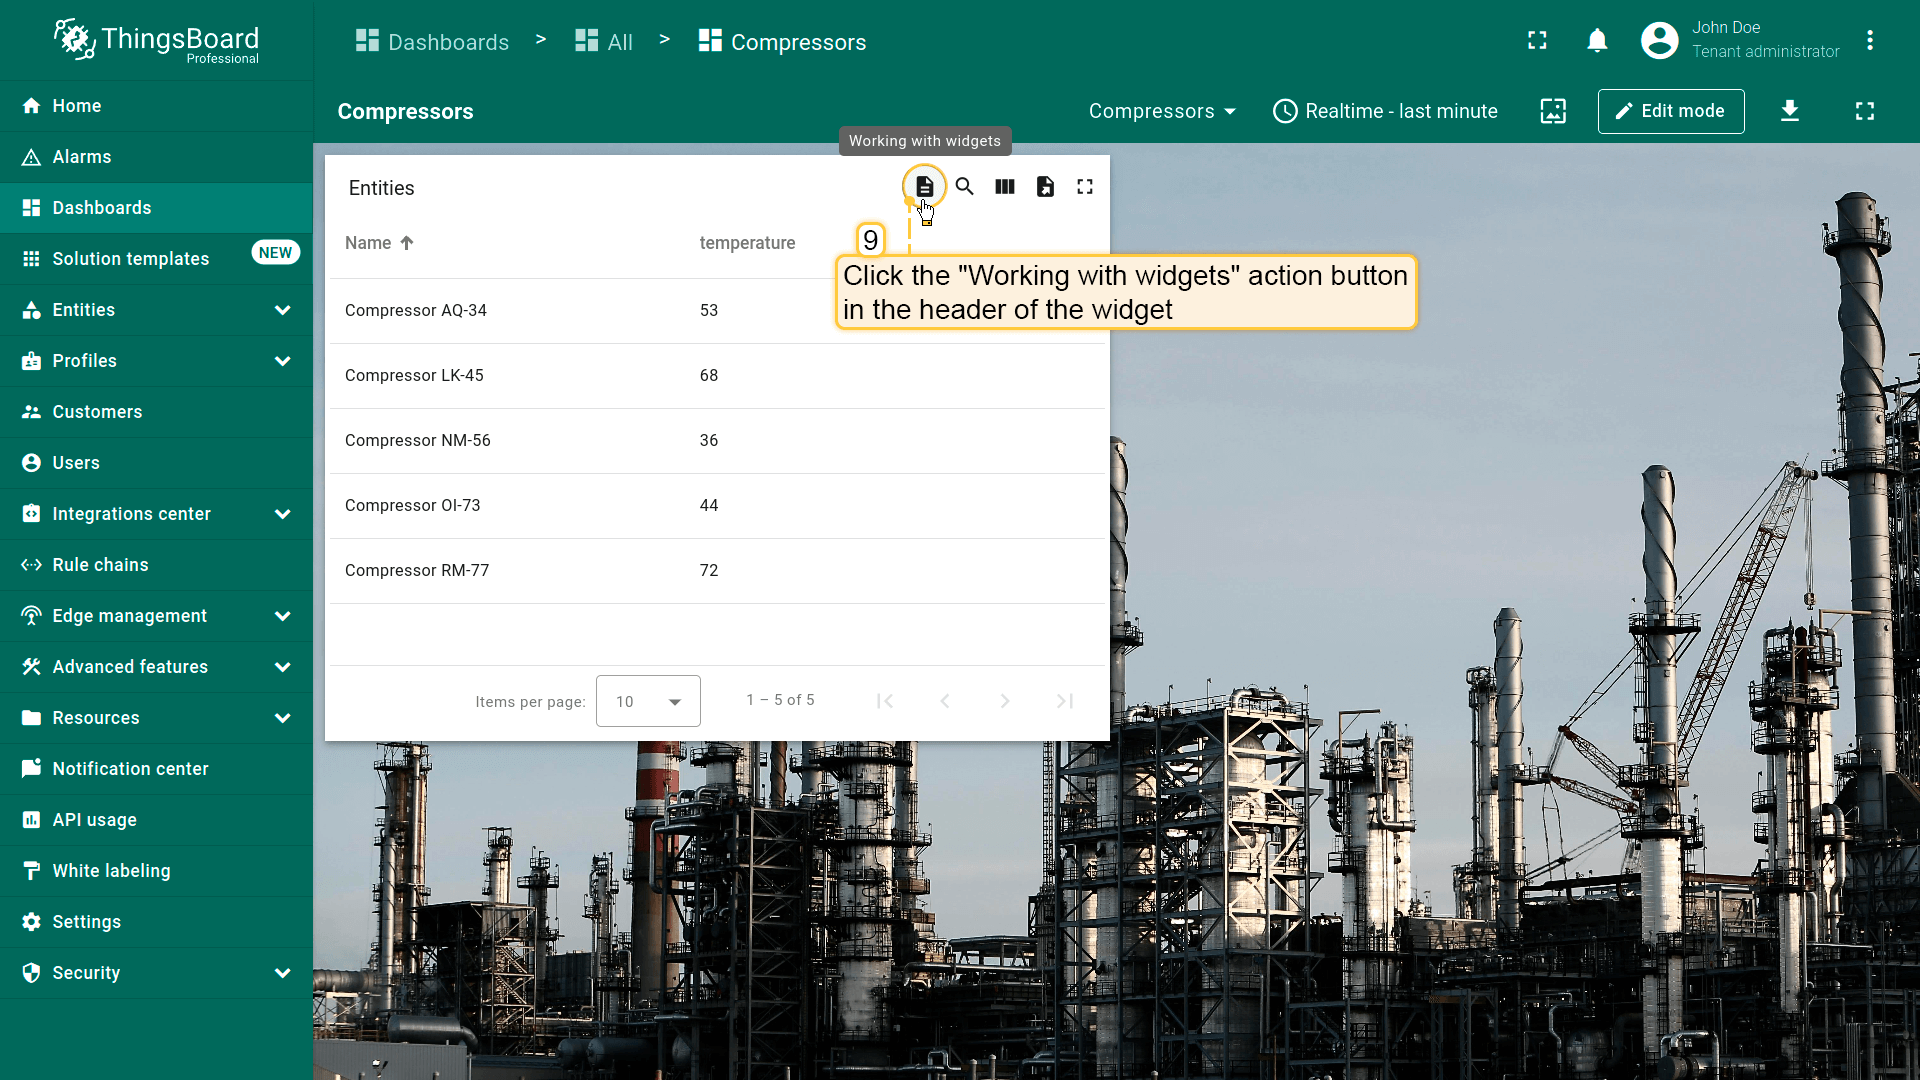
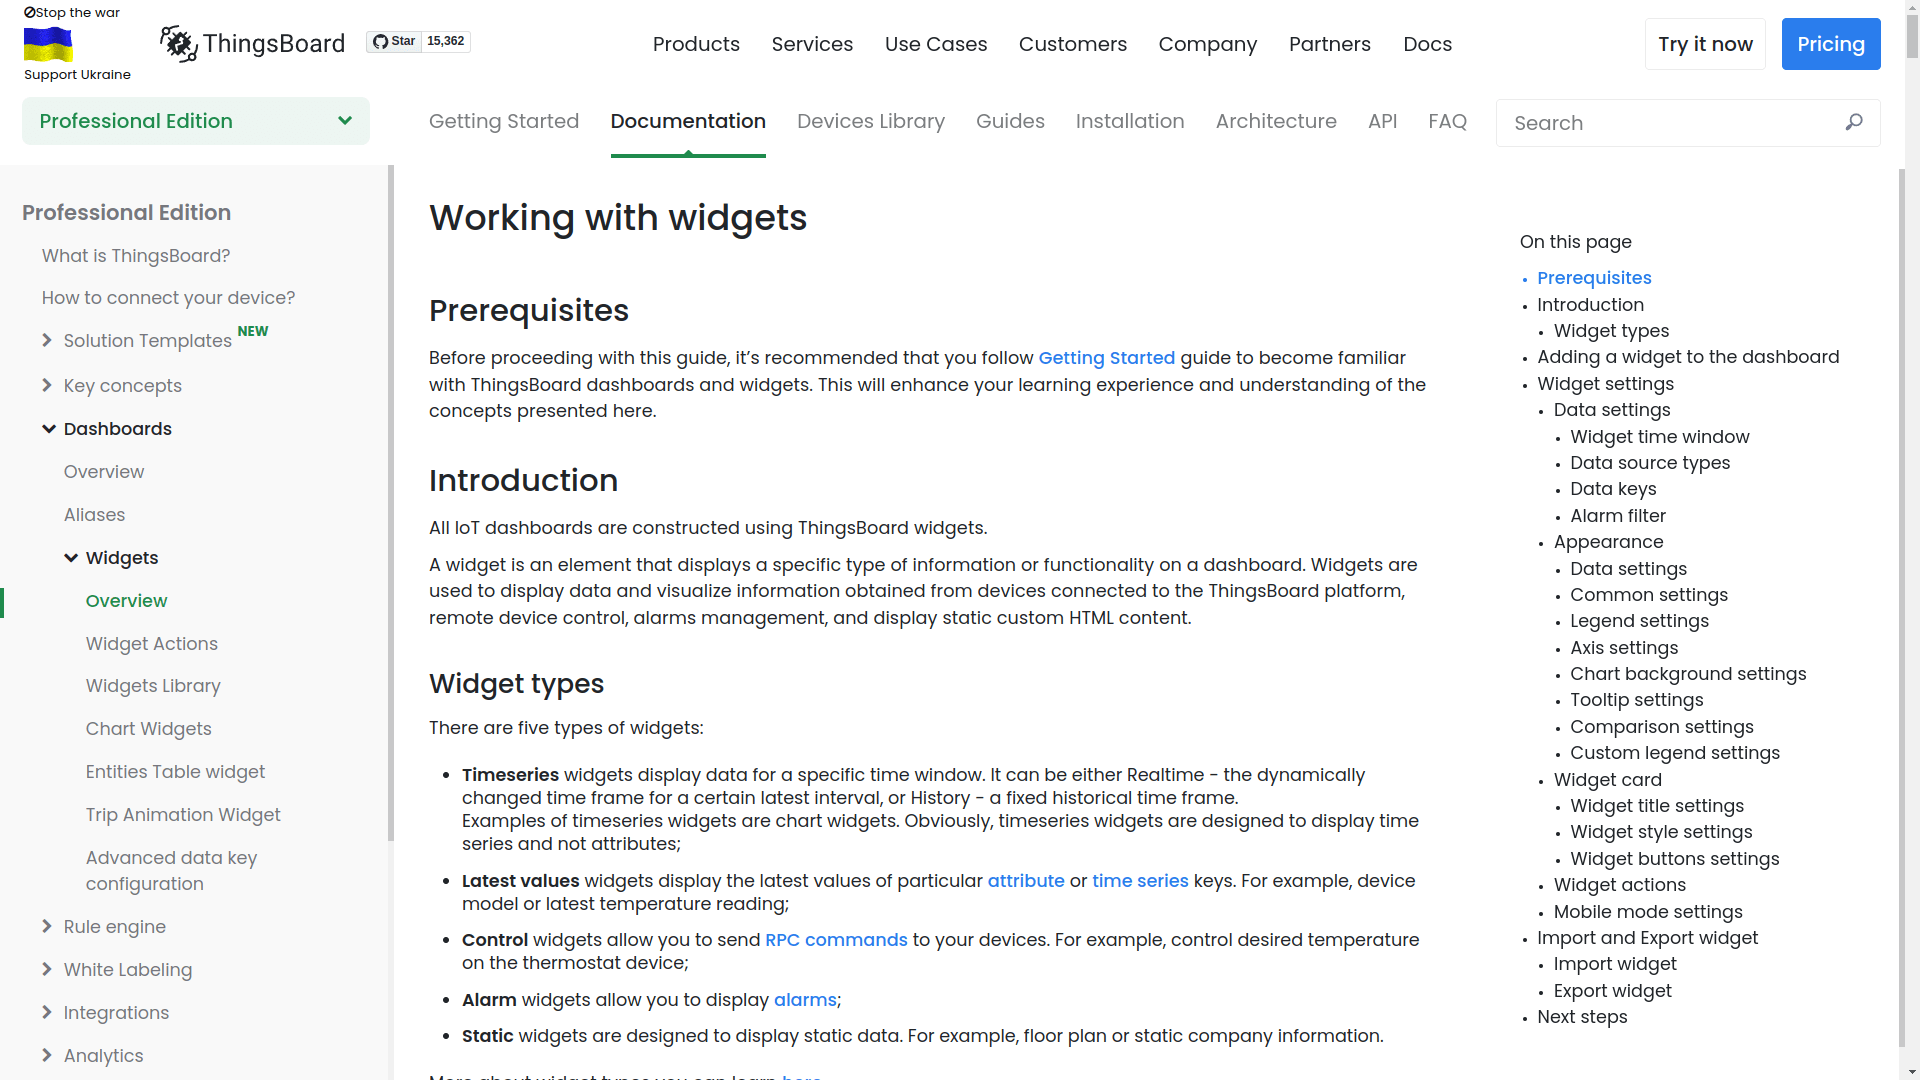
保存后,部件右上角会显示图标。点击该图标即跳转到action中指定的URL。本例为“Working with ThingsBoard widgets”文档页面。
在地图上放置项目
Place map item action类型允许用户创建新实体并立即在地图部件上放置。
例如,添加一个供用户在地图上放置充电站的按钮:
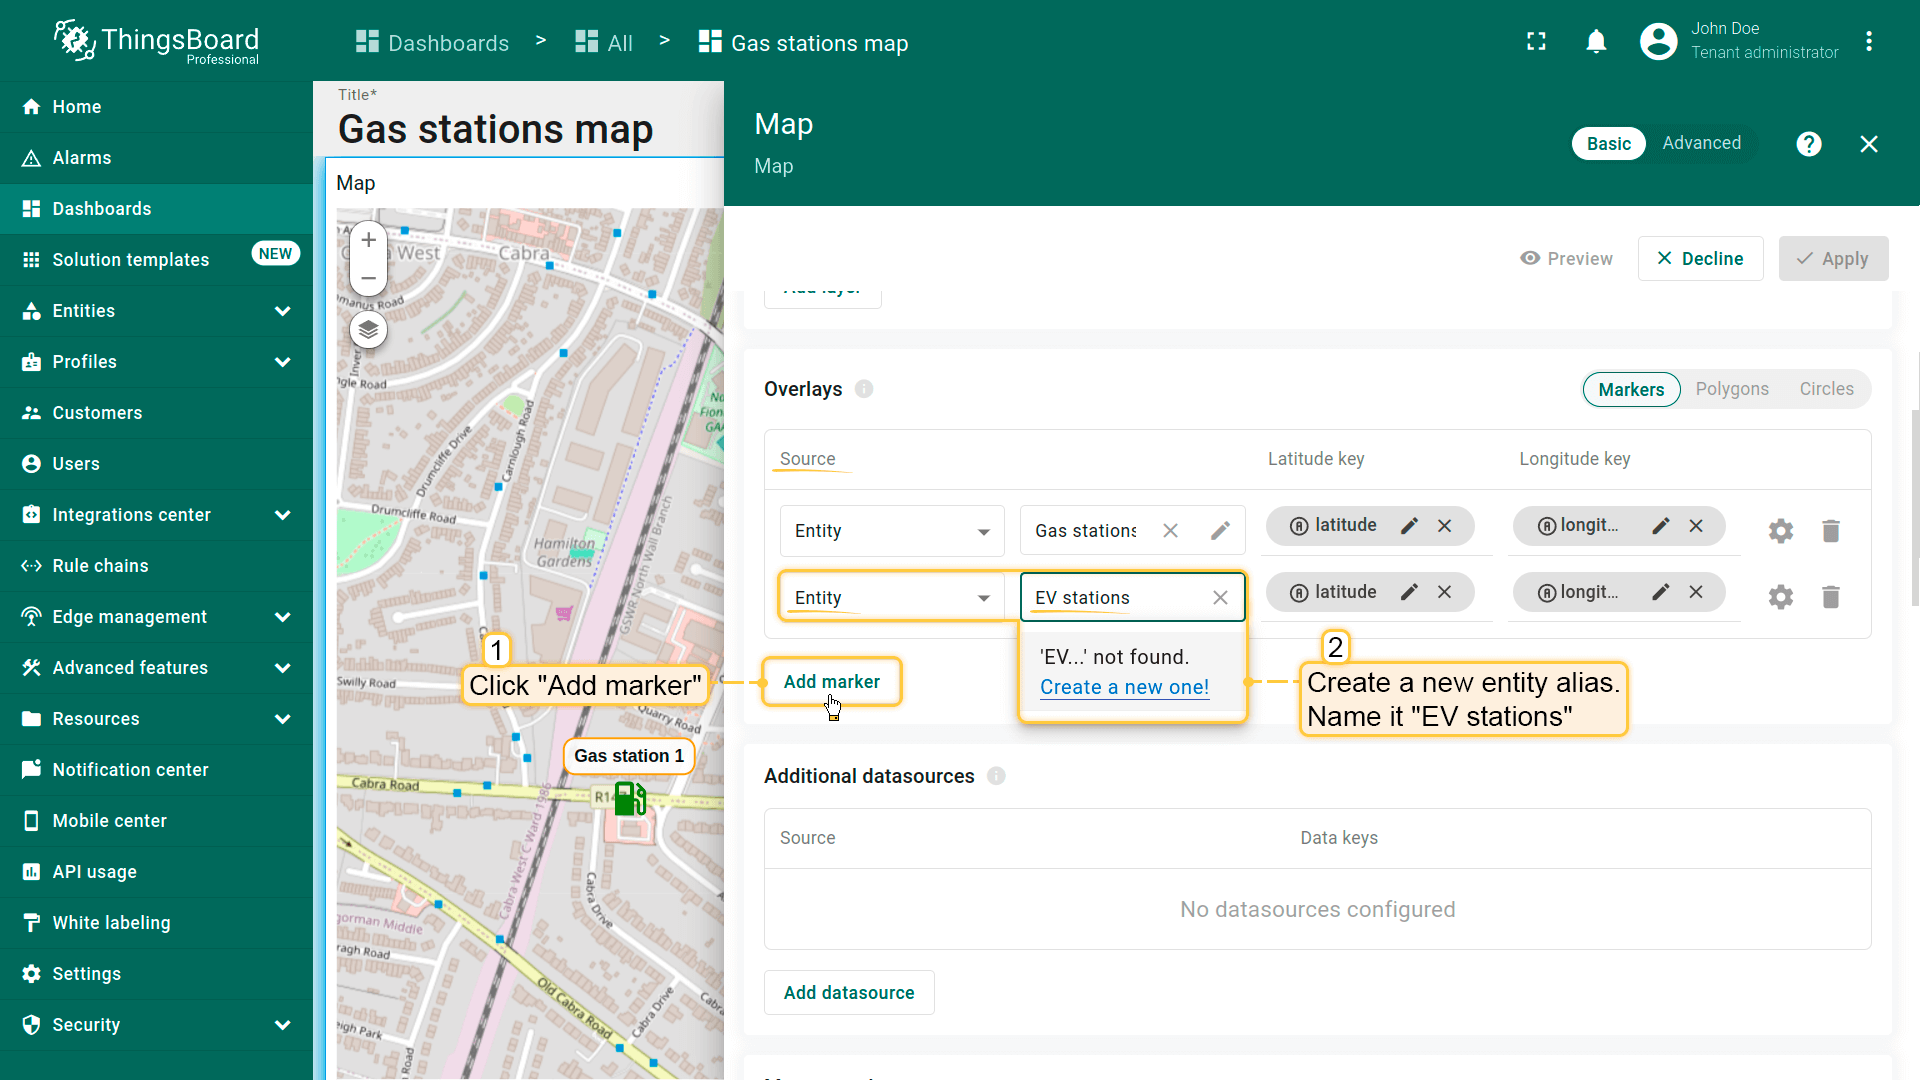
首先,为确保新建实体立即显示在地图上,需配置数据源。
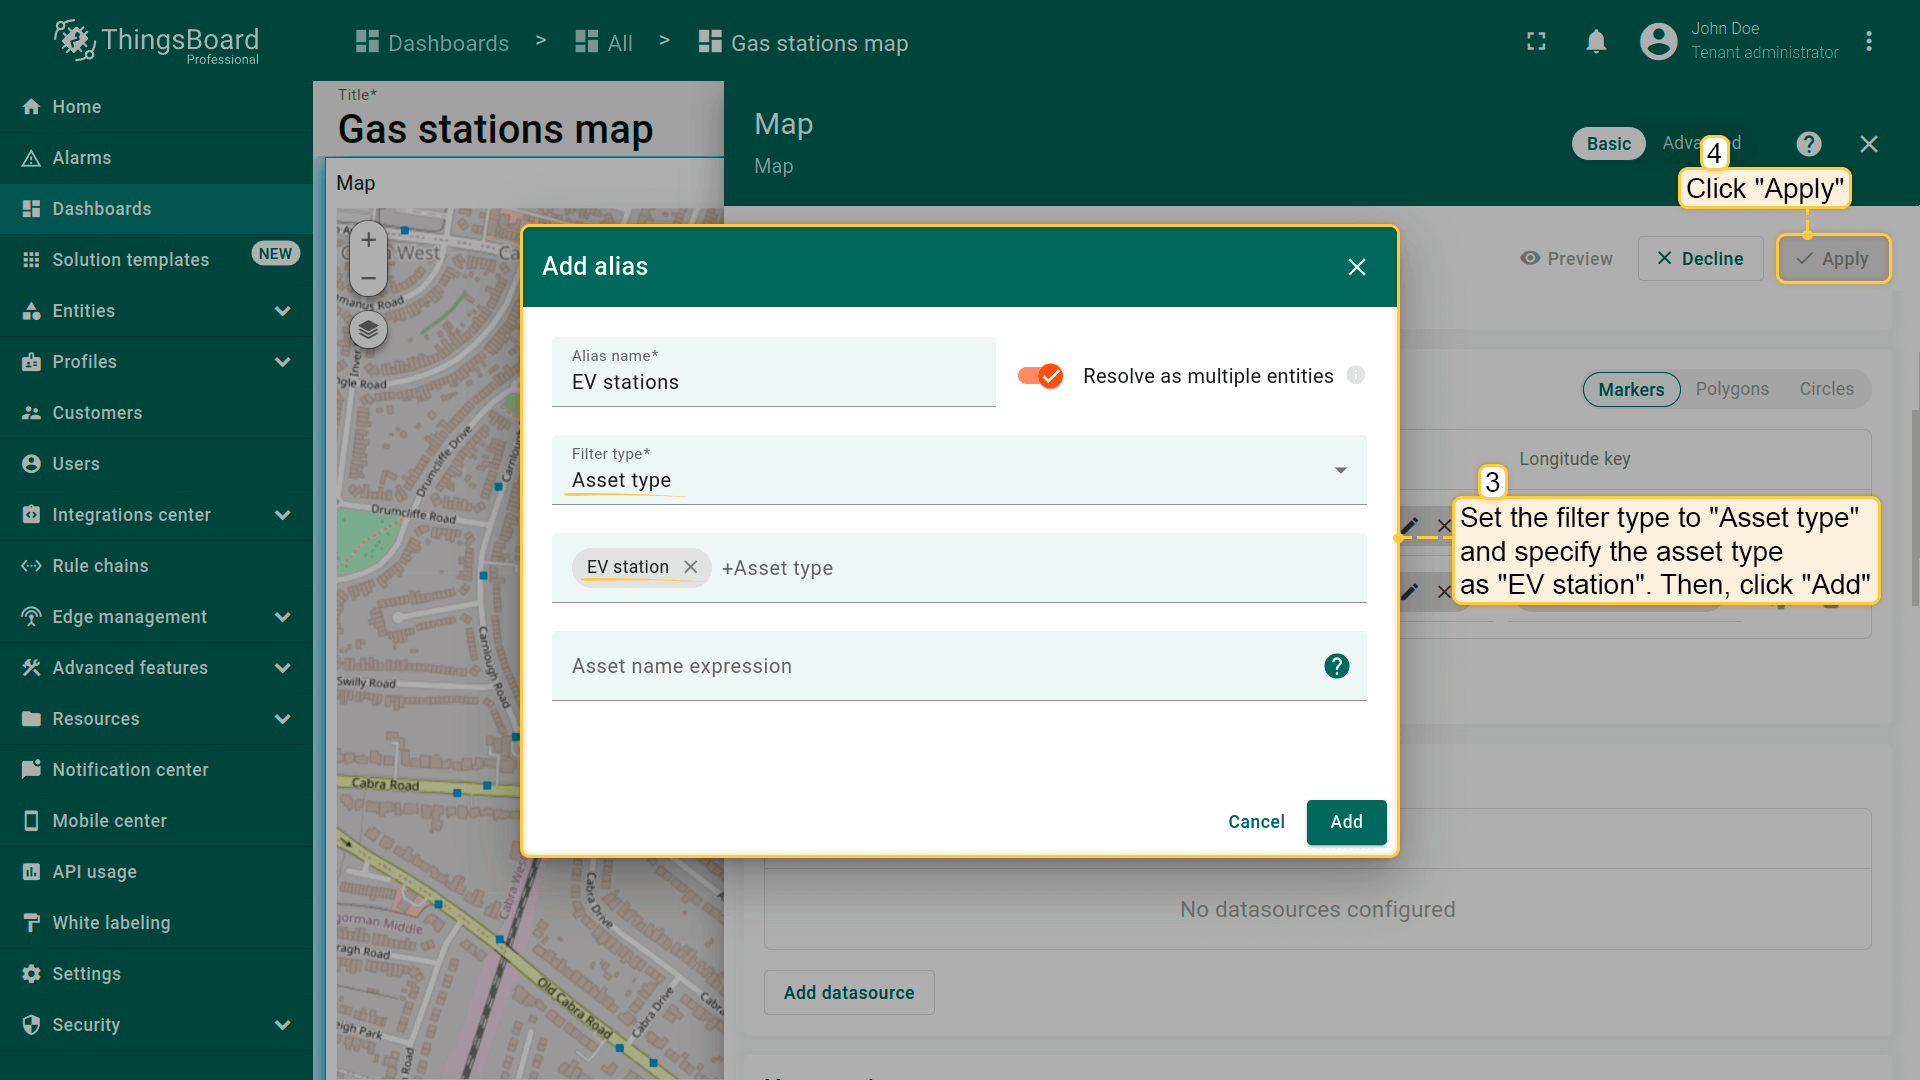
- 在“Overlays”部分的“Marker”选项卡下,新建实体别名作为数据源,命名为“EV stations”。
- 因将创建类型为“EV station”的实体,将filter类型设为“Asset type”,类型指定为“EV station”。
- 应用更改。
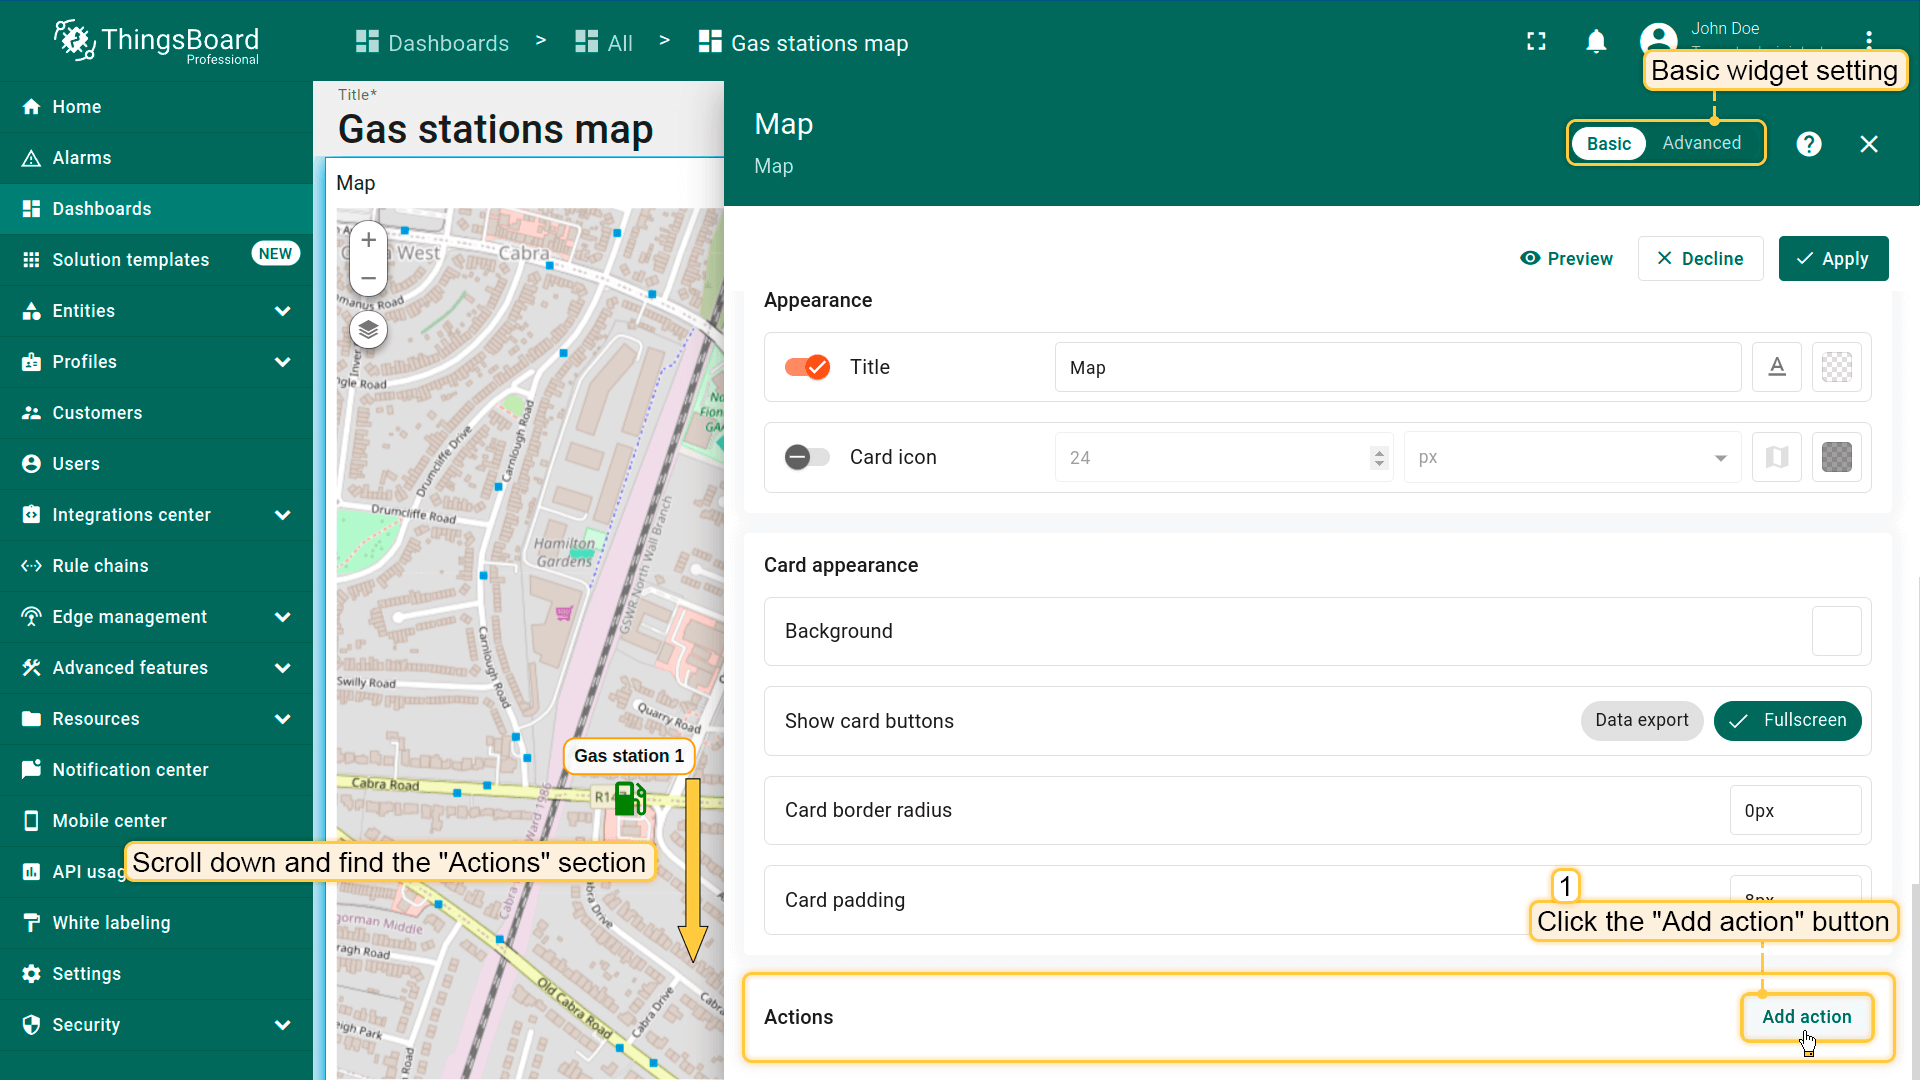
下面配置action:
- 向下滚动到“Actions”部分,点击“Add action”按钮。
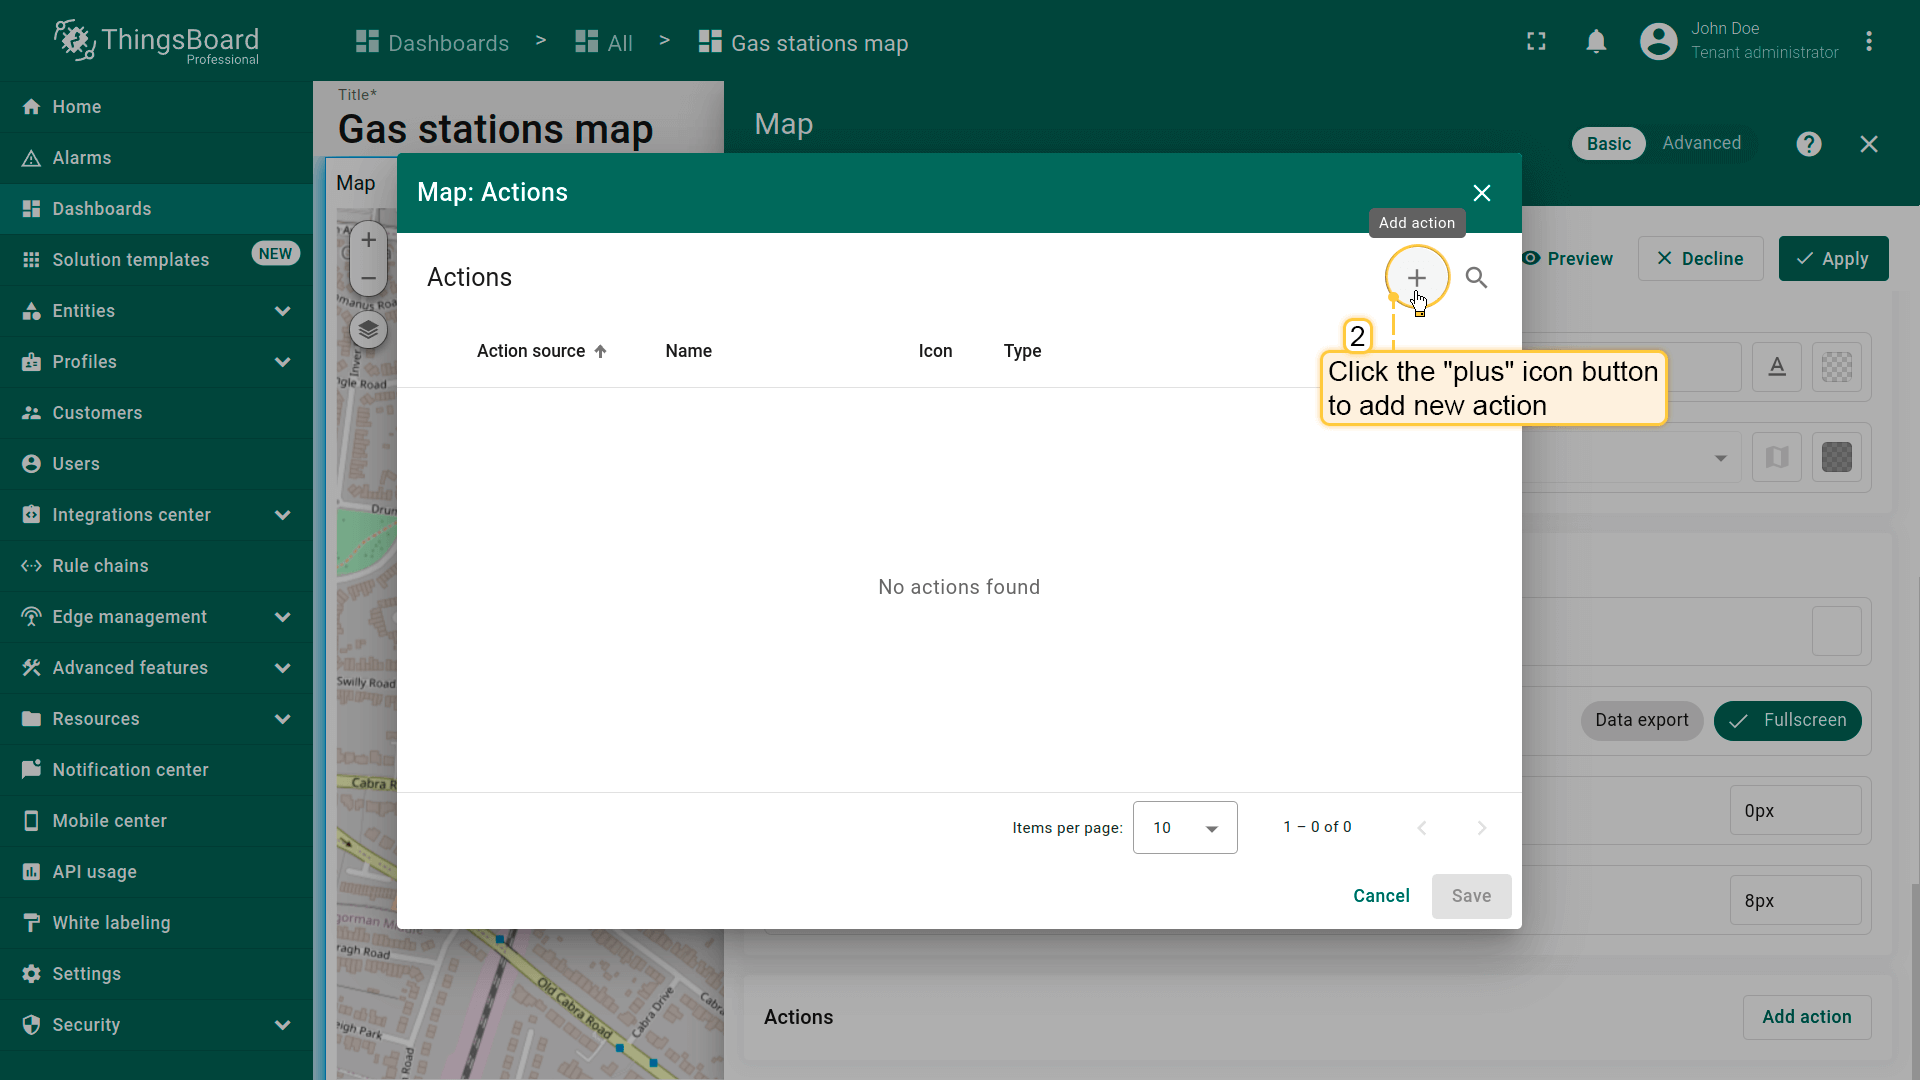
- 新窗口将打开并显示所有已创建actions。点击右上角“plus”图标添加一个。
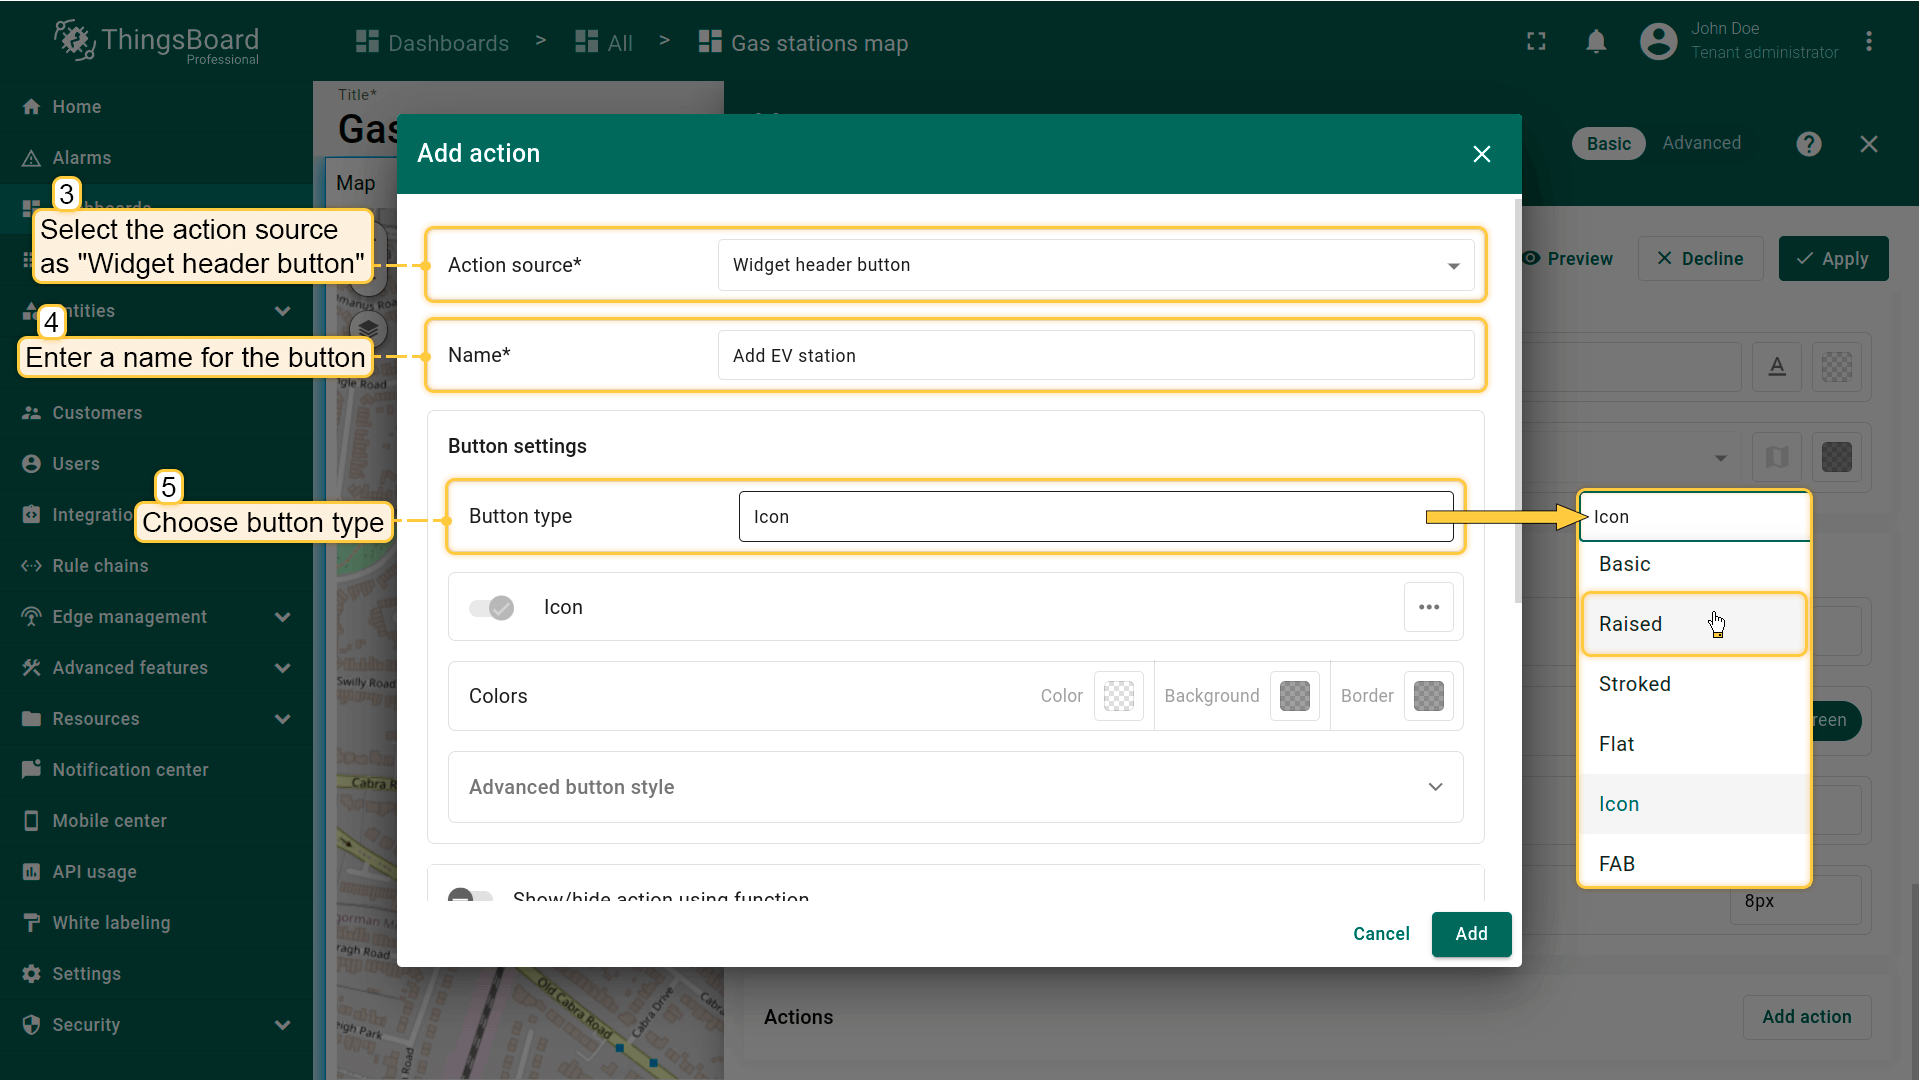
- 选择action来源为“Widget header button”,输入按钮名称并选择类型。
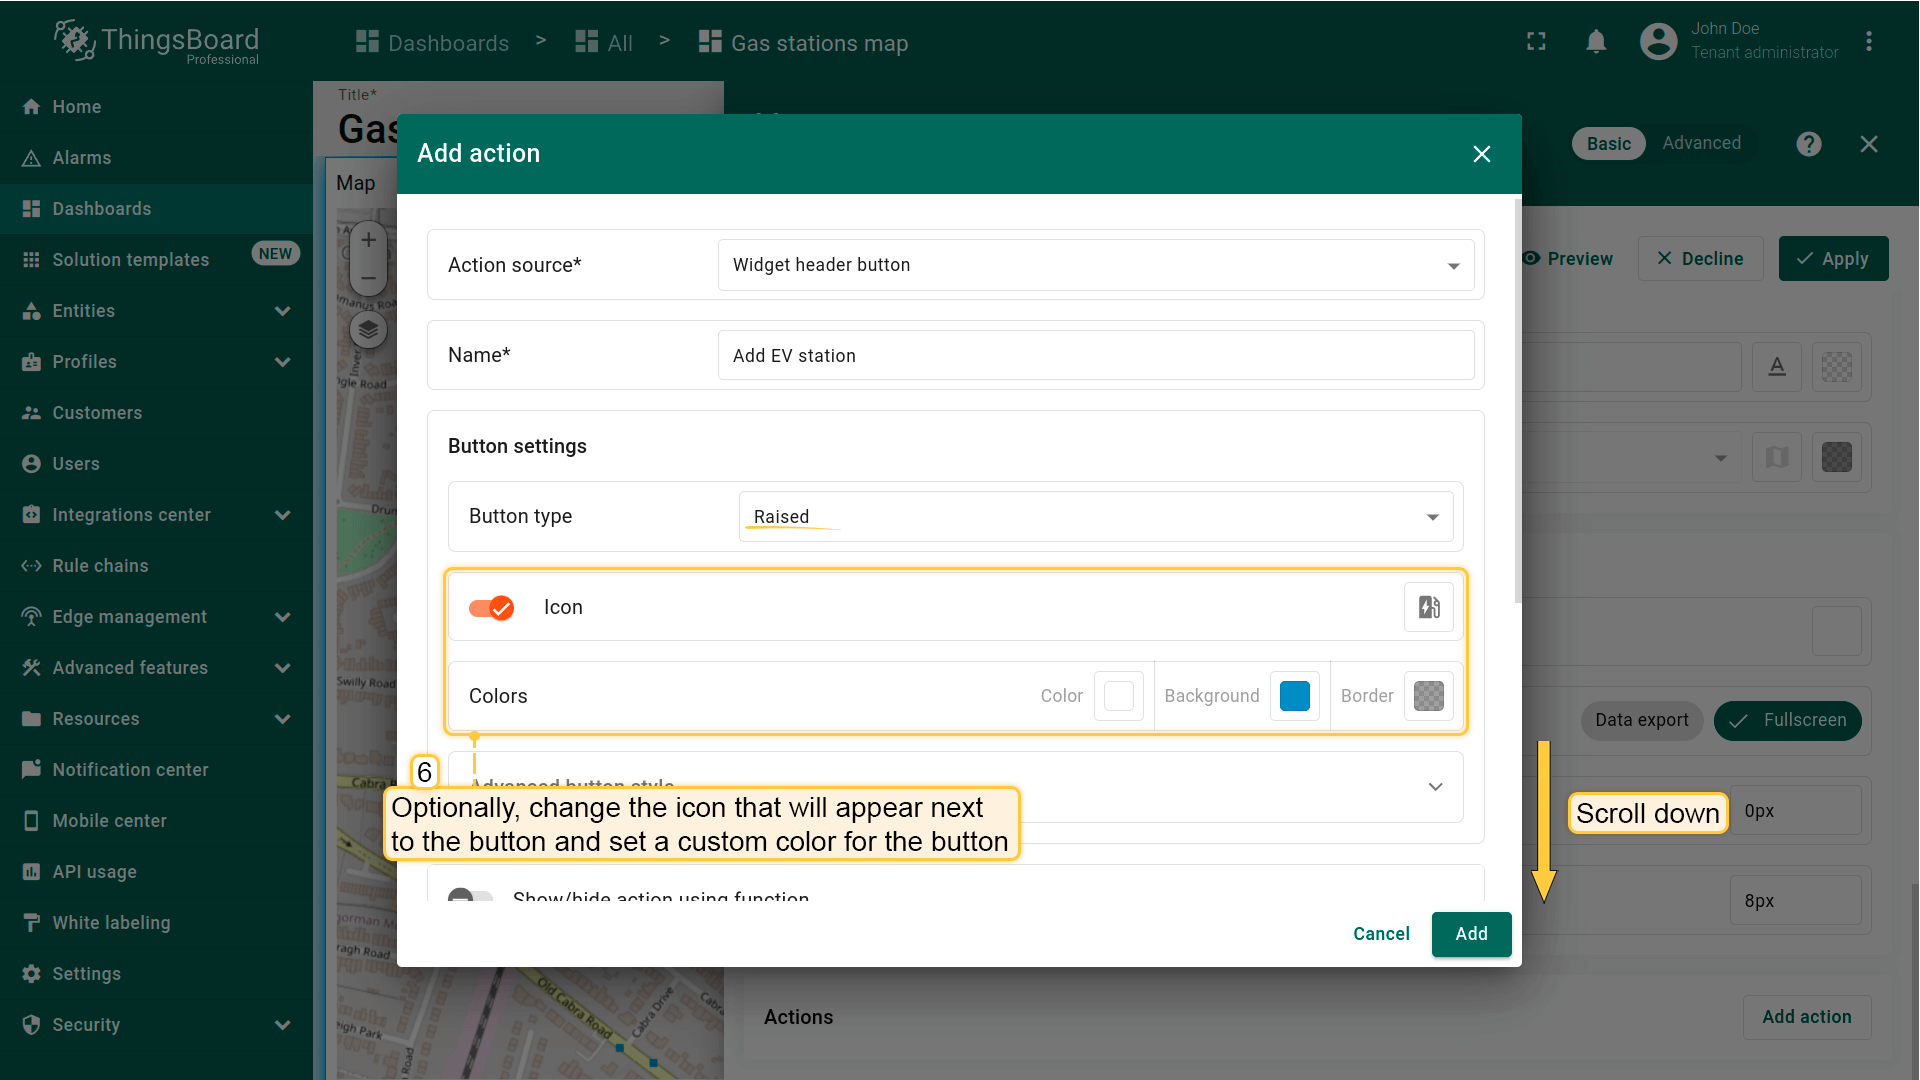
- 可选:更换按钮旁图标或完全隐藏,也可为按钮设置自定义颜色。
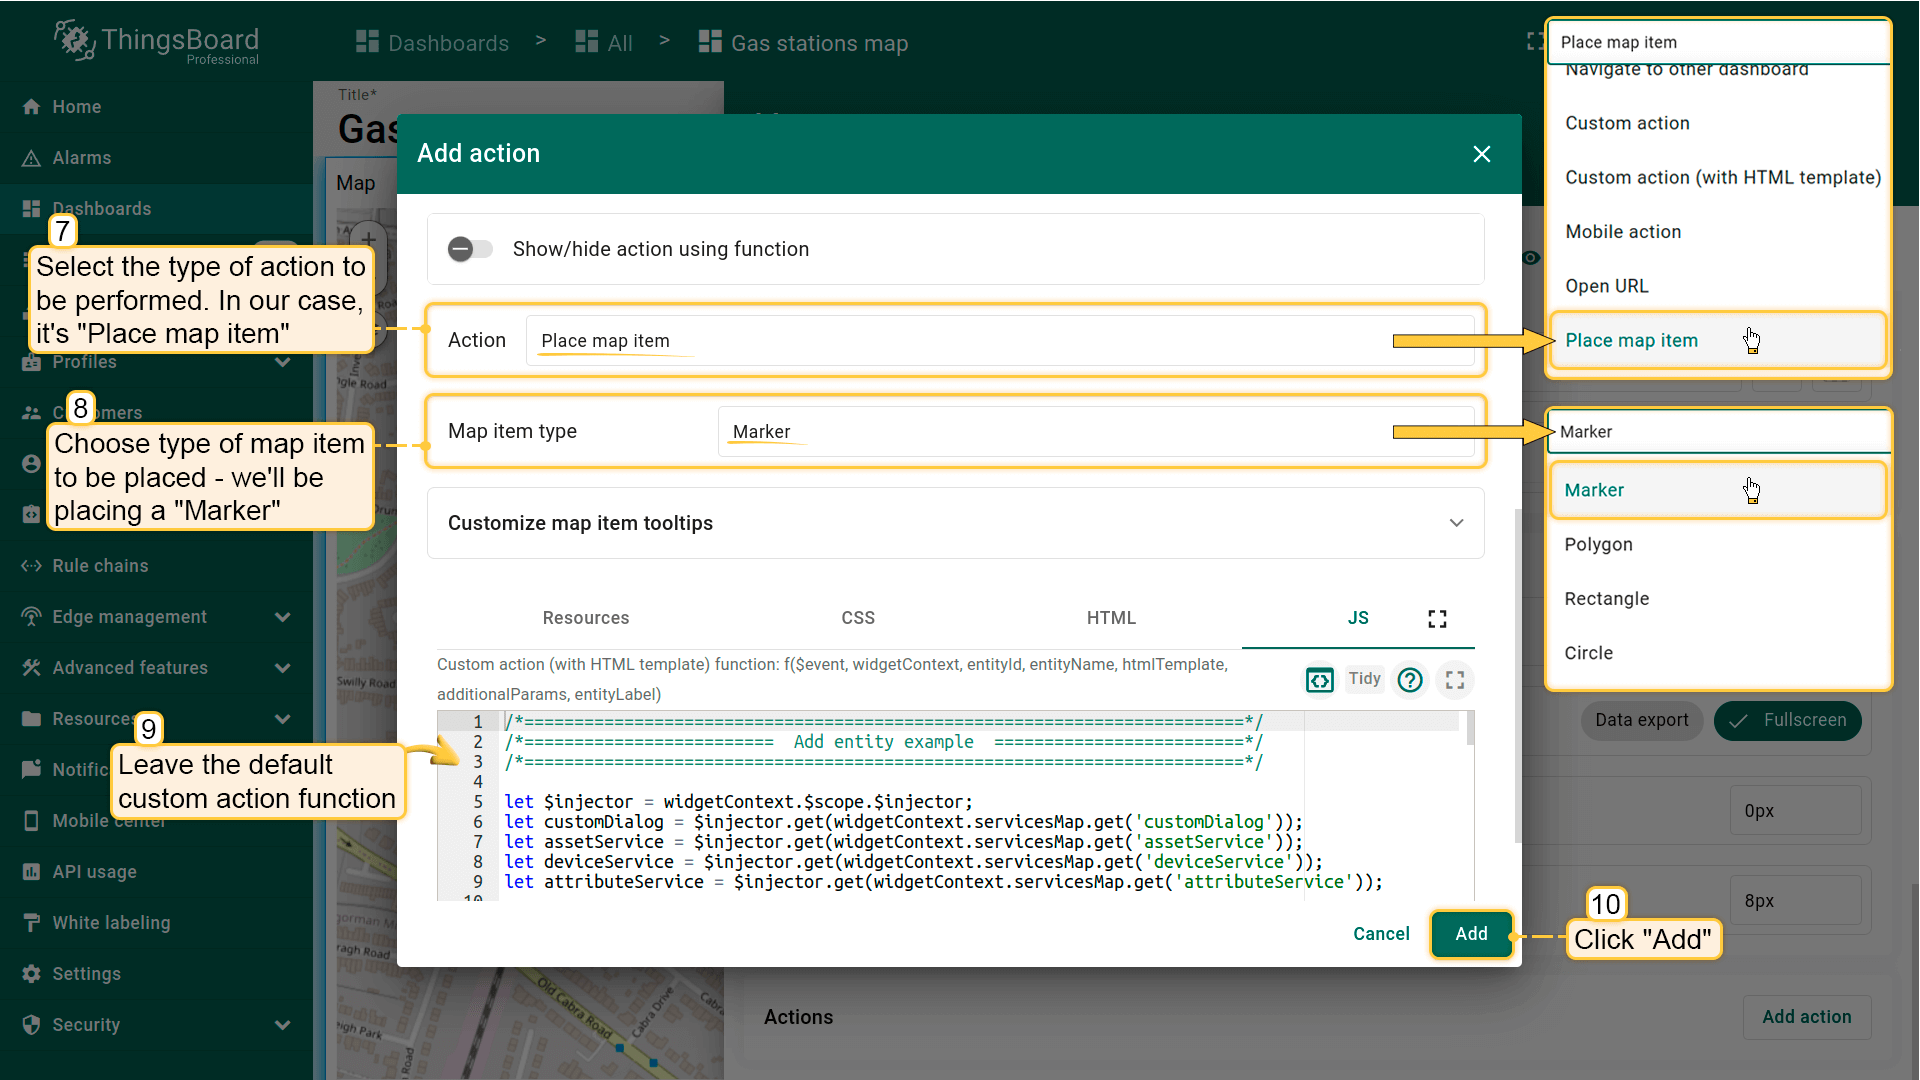
- 在下拉菜单中选择要执行的action类型。本例为“Place map item”。
- 选择要放置的 map item类型 — 本例为“Marker”。
- custom action function 字段已包含用于打开创建设备或资产对话框的默认函数,可直接使用。
- 在“Action”部分从下拉菜单选择“Place map item”。选择要放置的map item类型 — 本例为“Marker”。Custom action function字段包含打开创建设备或资产对话框的默认函数。
- 点击“Add”。
- 应用所有更改并保存dashboard。
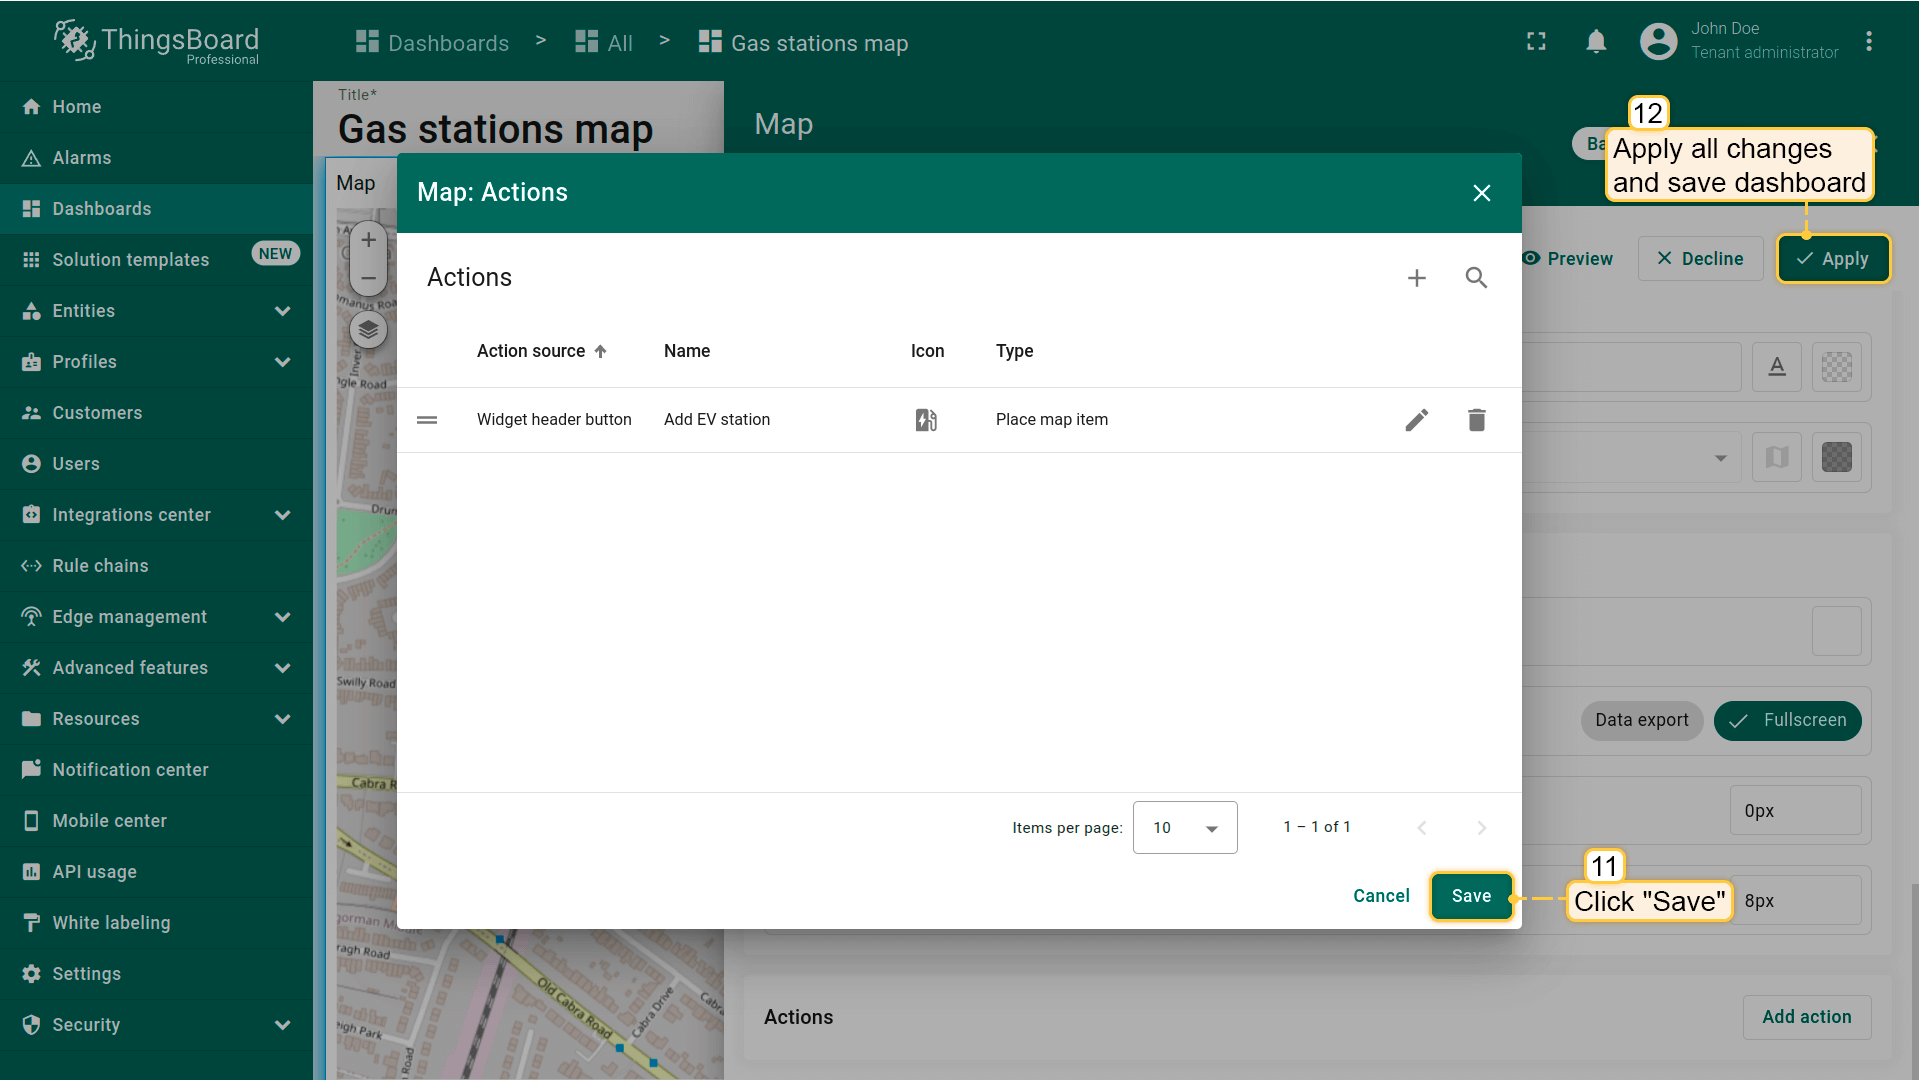
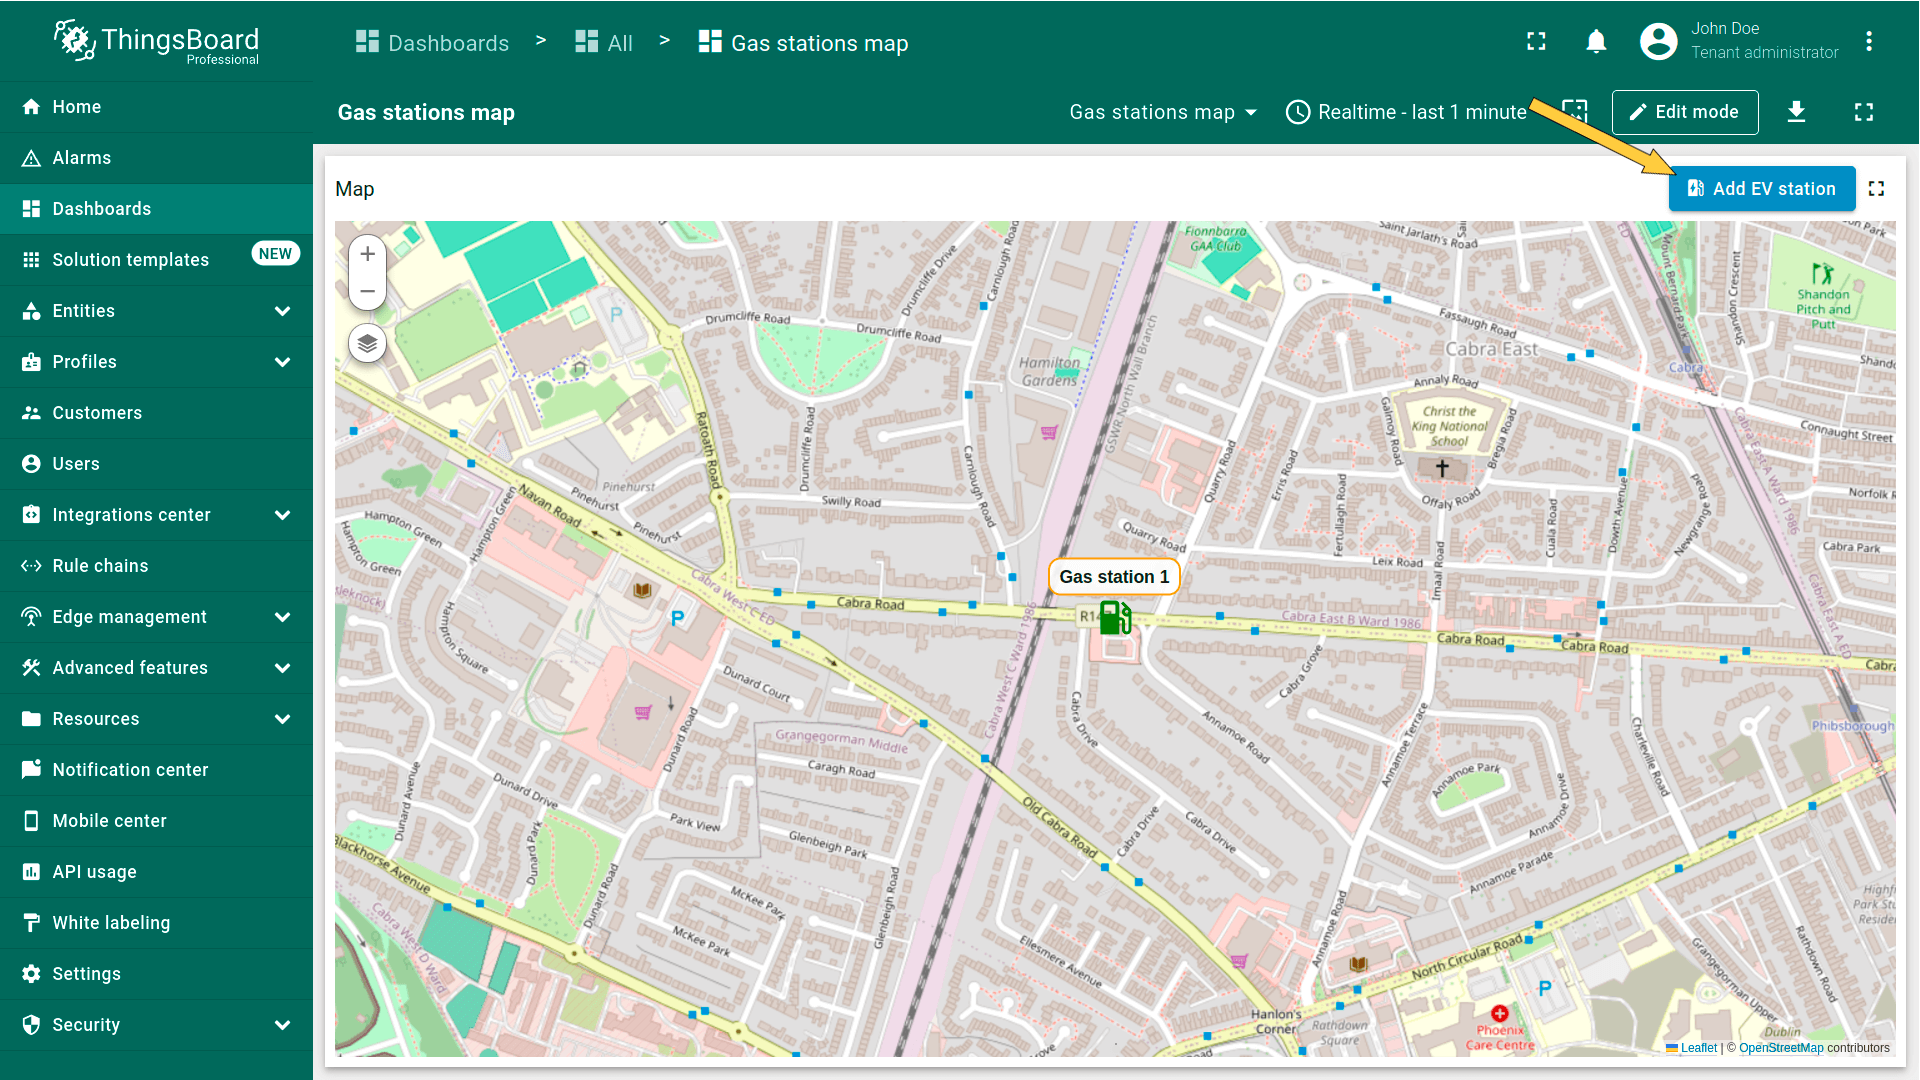
地图顶部会出现标签为“Add EV station”的新action按钮。使用该按钮即可。
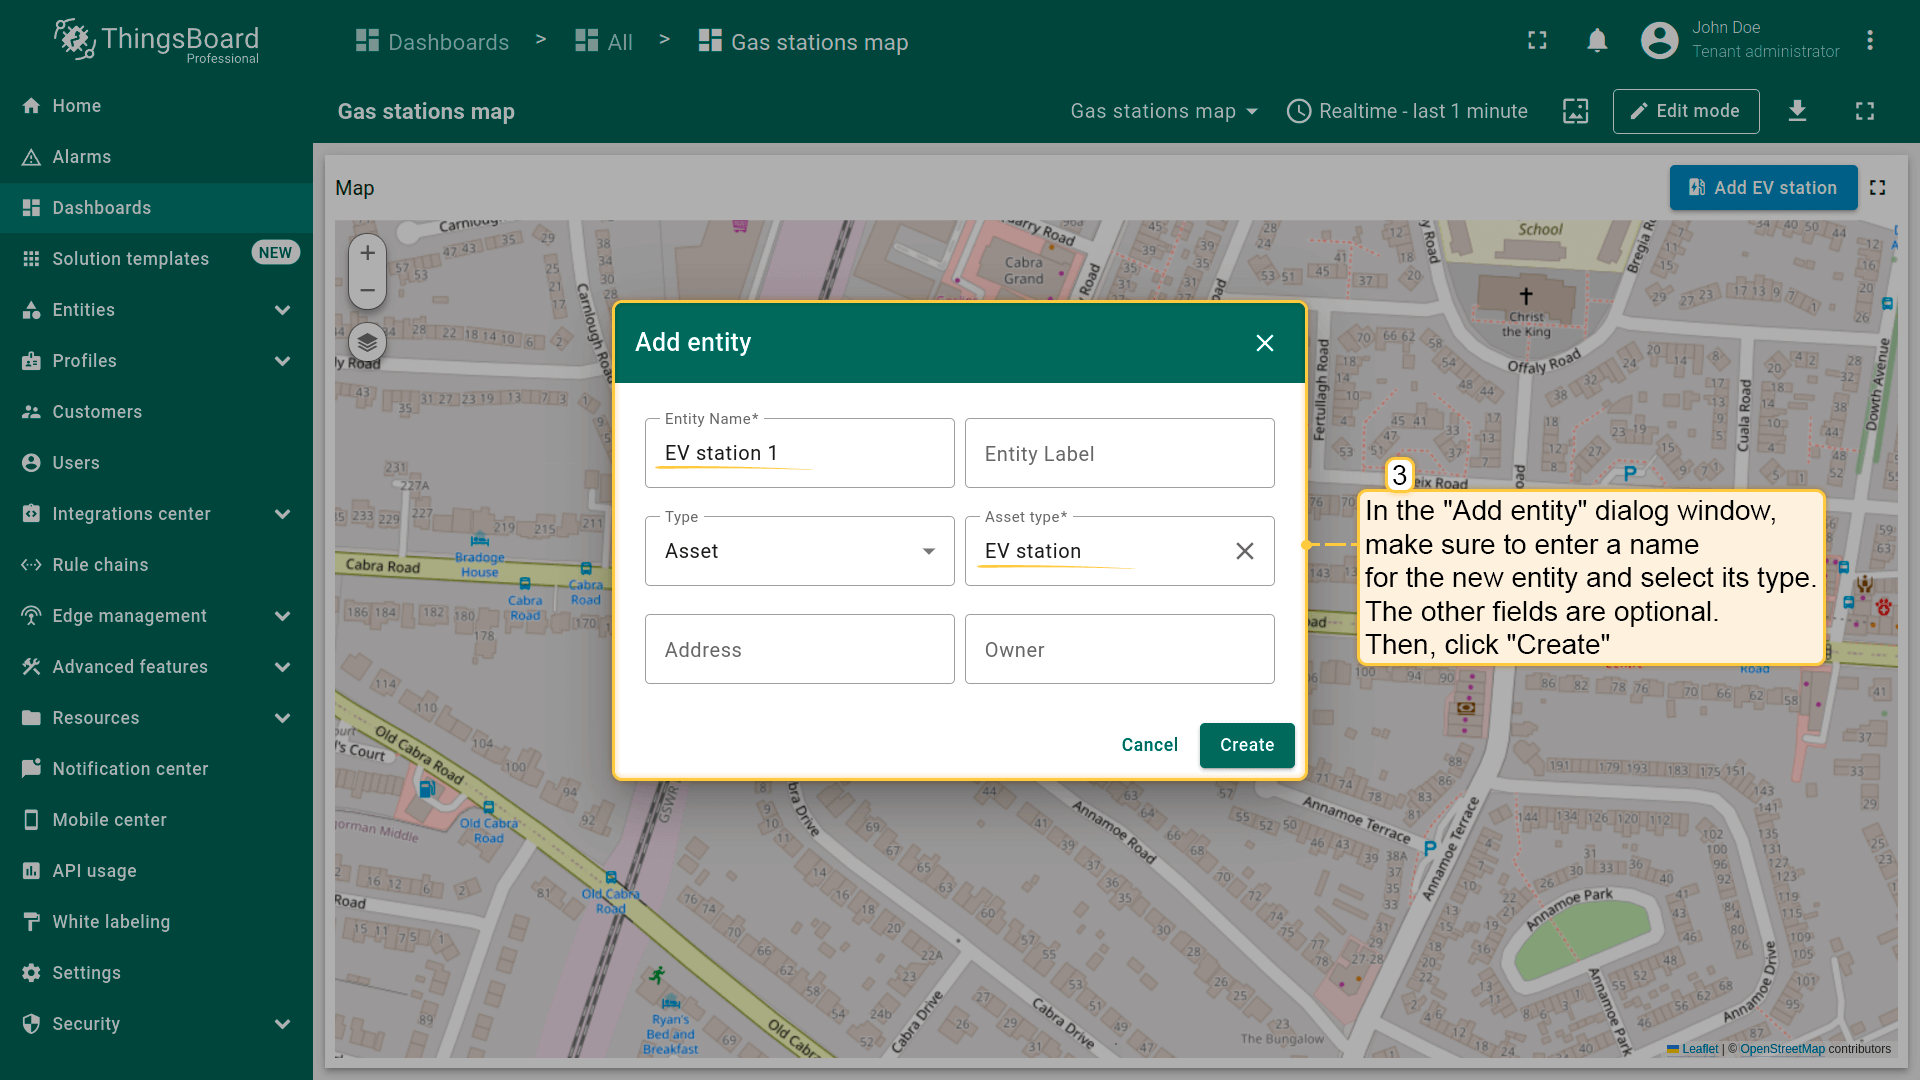
- Click the newly created "Add EV station" button. Then, find the location on the map where you want to place the EV station and click on it.
- In the "Add entity" dialog that appears, make sure to enter a name for the new entity and select its type — Asset. The other fields are optional. Then click "Create".
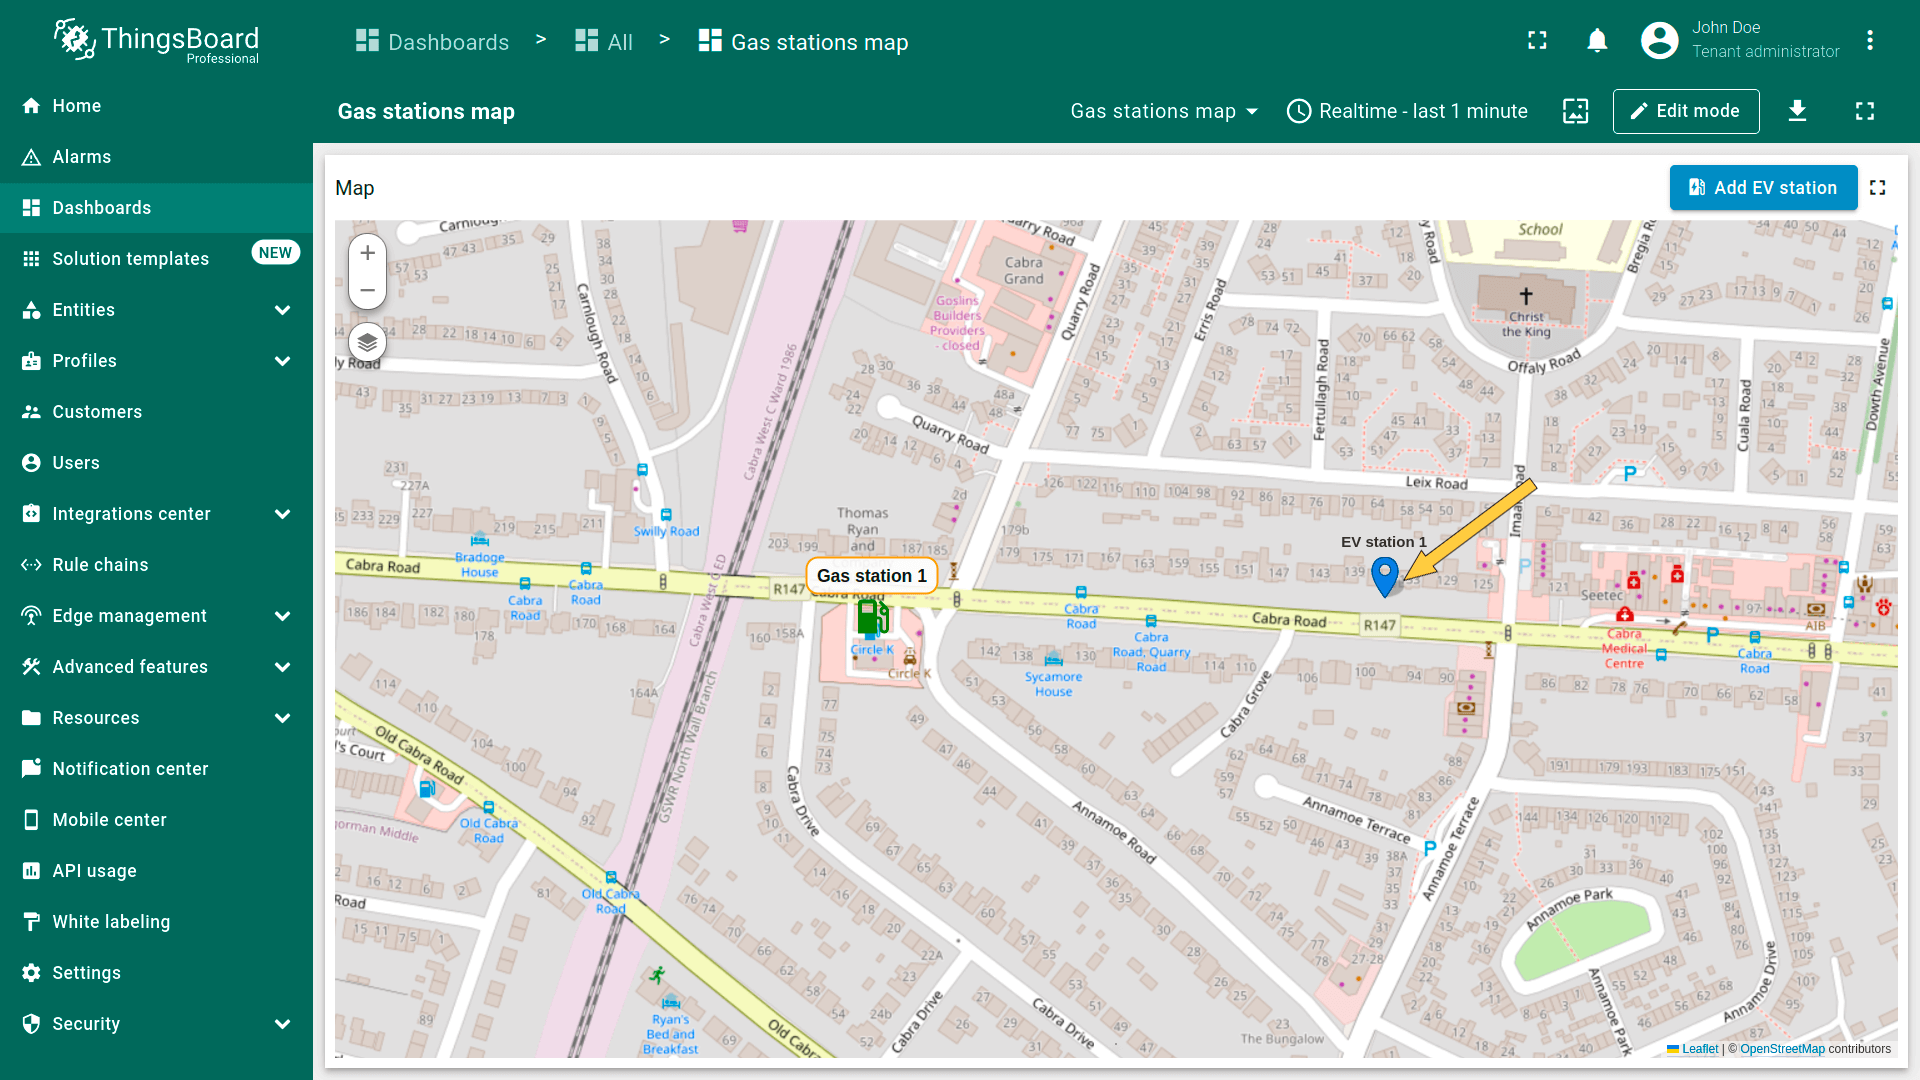
- The new "EV station" marker is now added to the map.

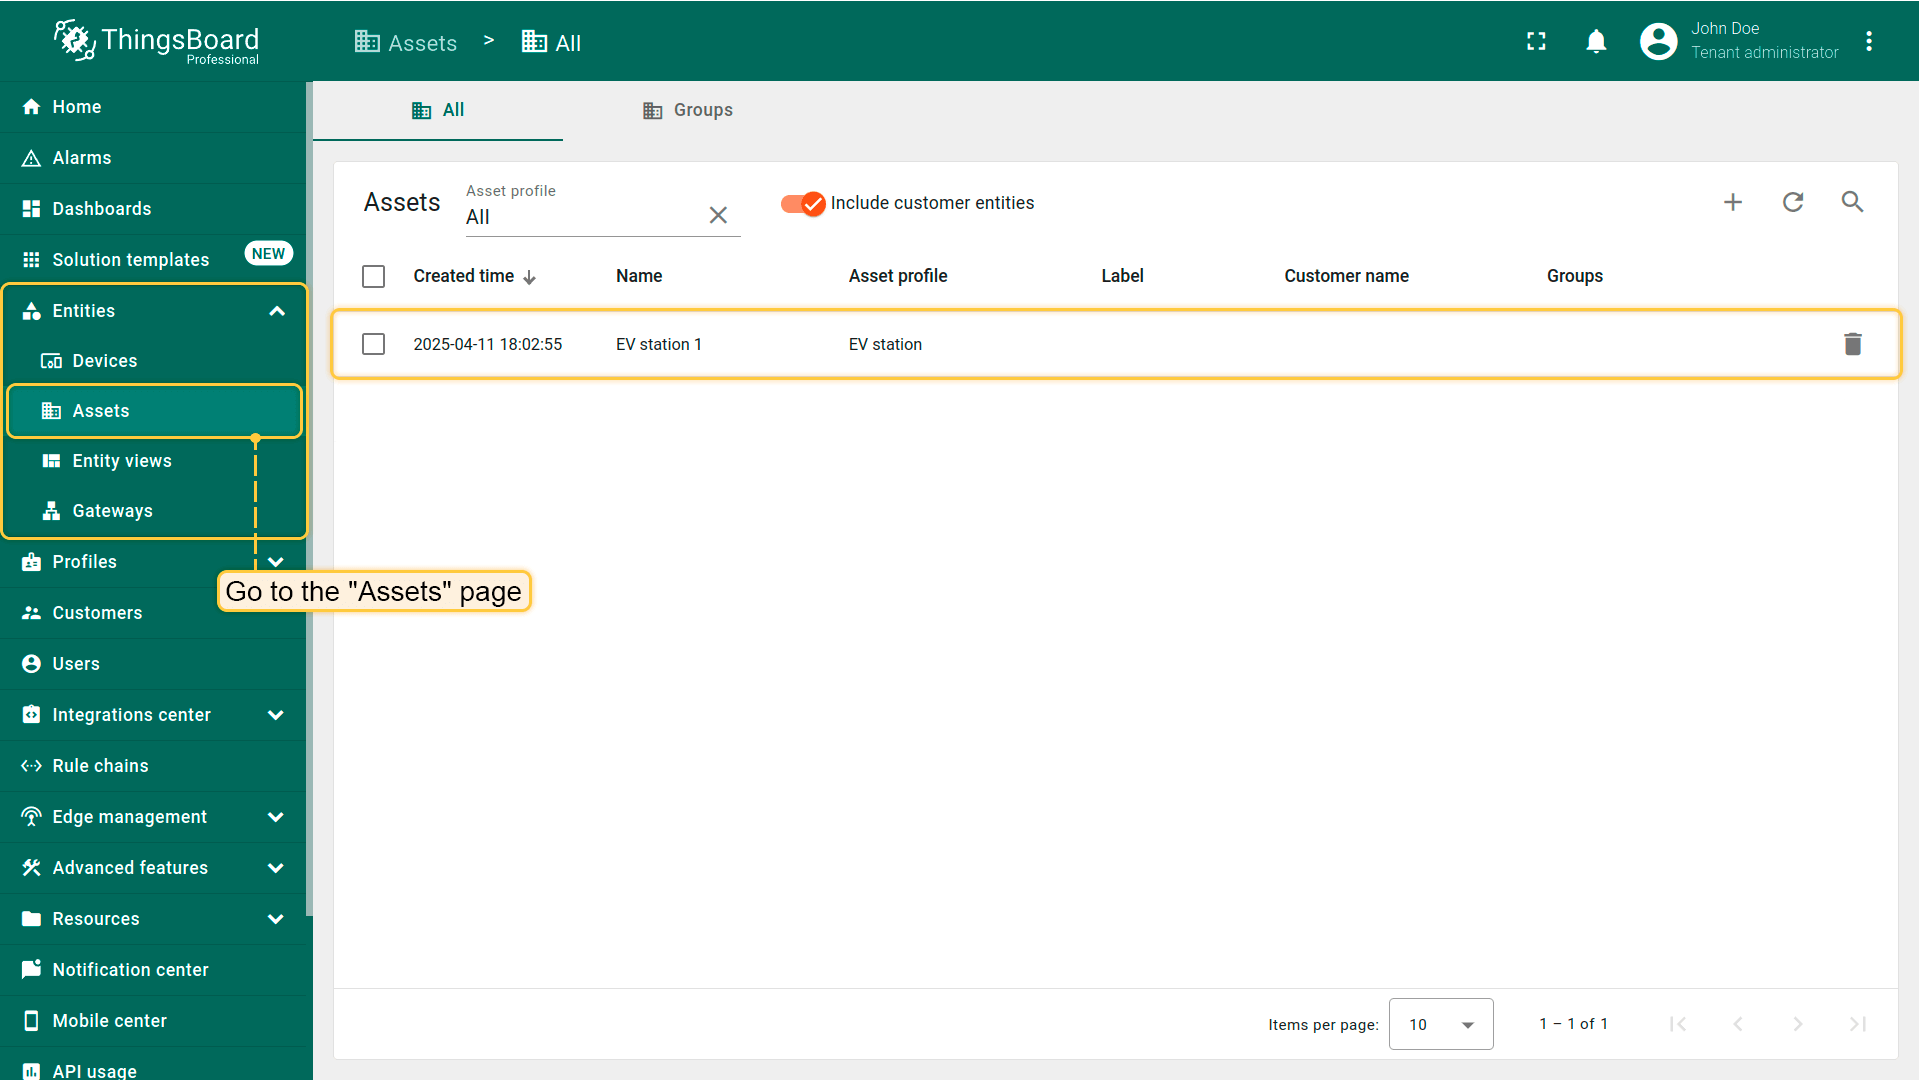
前往“Assets”页面 — 可找到新建资产“EV station 1”。
Action sources
Action sources是达成目标所需执行的具体操作(如点击部件标题按钮、双击行或地图marker)。不同部件提供的action来源不同。 下面以最常用的“Navigate to new dashboard state”为例,分别说明各类部件的action来源。
下面以“Entities table”部件为例演示各action来源的用法。 若不清楚如何添加Entity table部件,可在此了解。
Action cell button
“Action cell button”为部件中每个实体添加action按钮,如删除设备/资产或编辑。 该action按钮常用于“Entity table”部件。下面以该部件为例说明“Action cell button”用法。 点击所选实体的action图标将跳转到显示该实体详细信息的另一state。
假设已在dashboard上添加新 state并熟悉“Add action”步骤,直接进行action配置:
- 进入部件编辑模式,打开“Add action”窗口;
- 选择“Action cell button”作为action来源;
- 输入action名称并选择表示按钮的图标;
- 在“Action”下拉菜单中选择“Navigate to new dashboard state”类型;
- 选择后会出现“Target dashboard state”下拉菜单,选择要跳转的已创建 state;
- 选择state后,点击“Add action”窗口底部的“Add”按钮;
- 在“Actions”窗口中查看已配置action,核对来源、图标和类型。点击“Save”,再点“Apply”保存部件设置;
- 点击dashboard页面右上角“Save”保存dashboard。


可见每个实体名称旁都有action cell按钮。点击该按钮将执行对应action,即跳转到所选state。
单元格点击事件
* 仅适用于Entities table、Alarms table、Device admin table和Asset admin table部件。
“On cell click”为指定表格列中每个单元格添加点击功能。
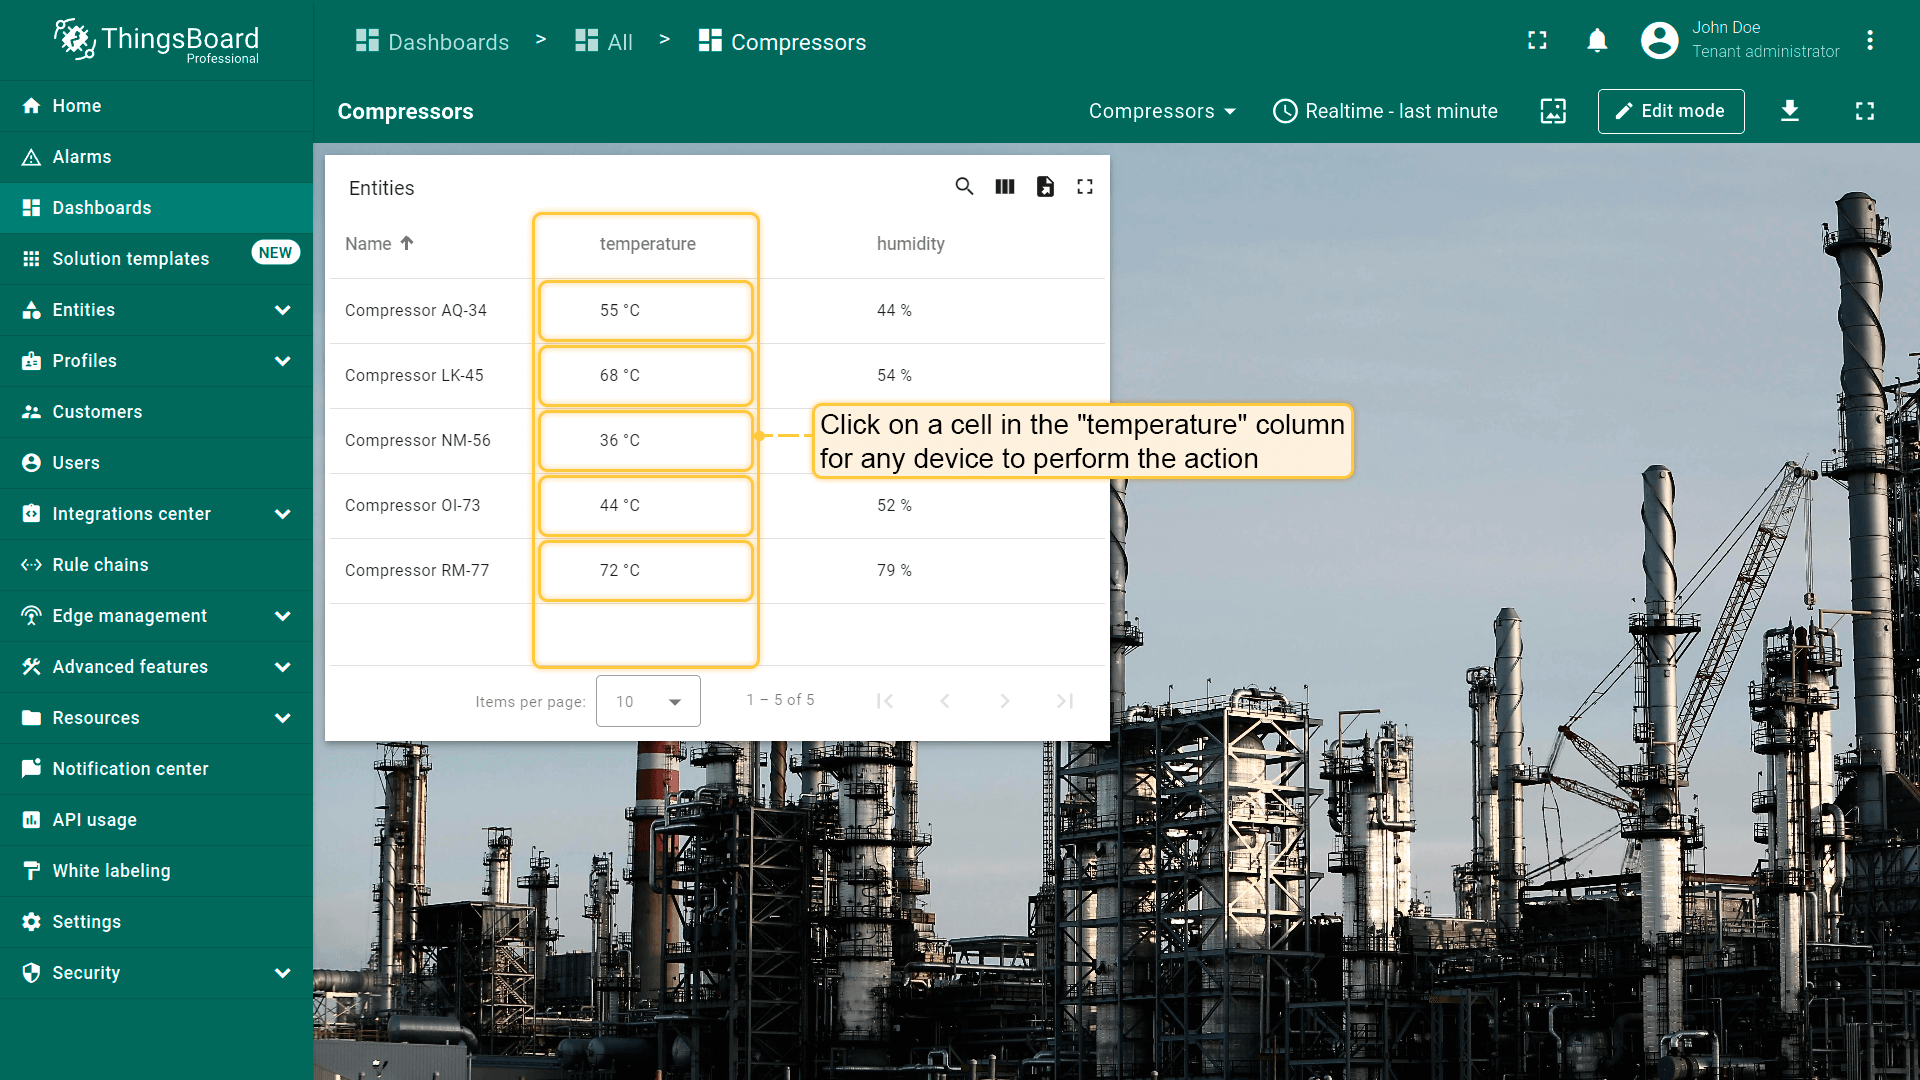
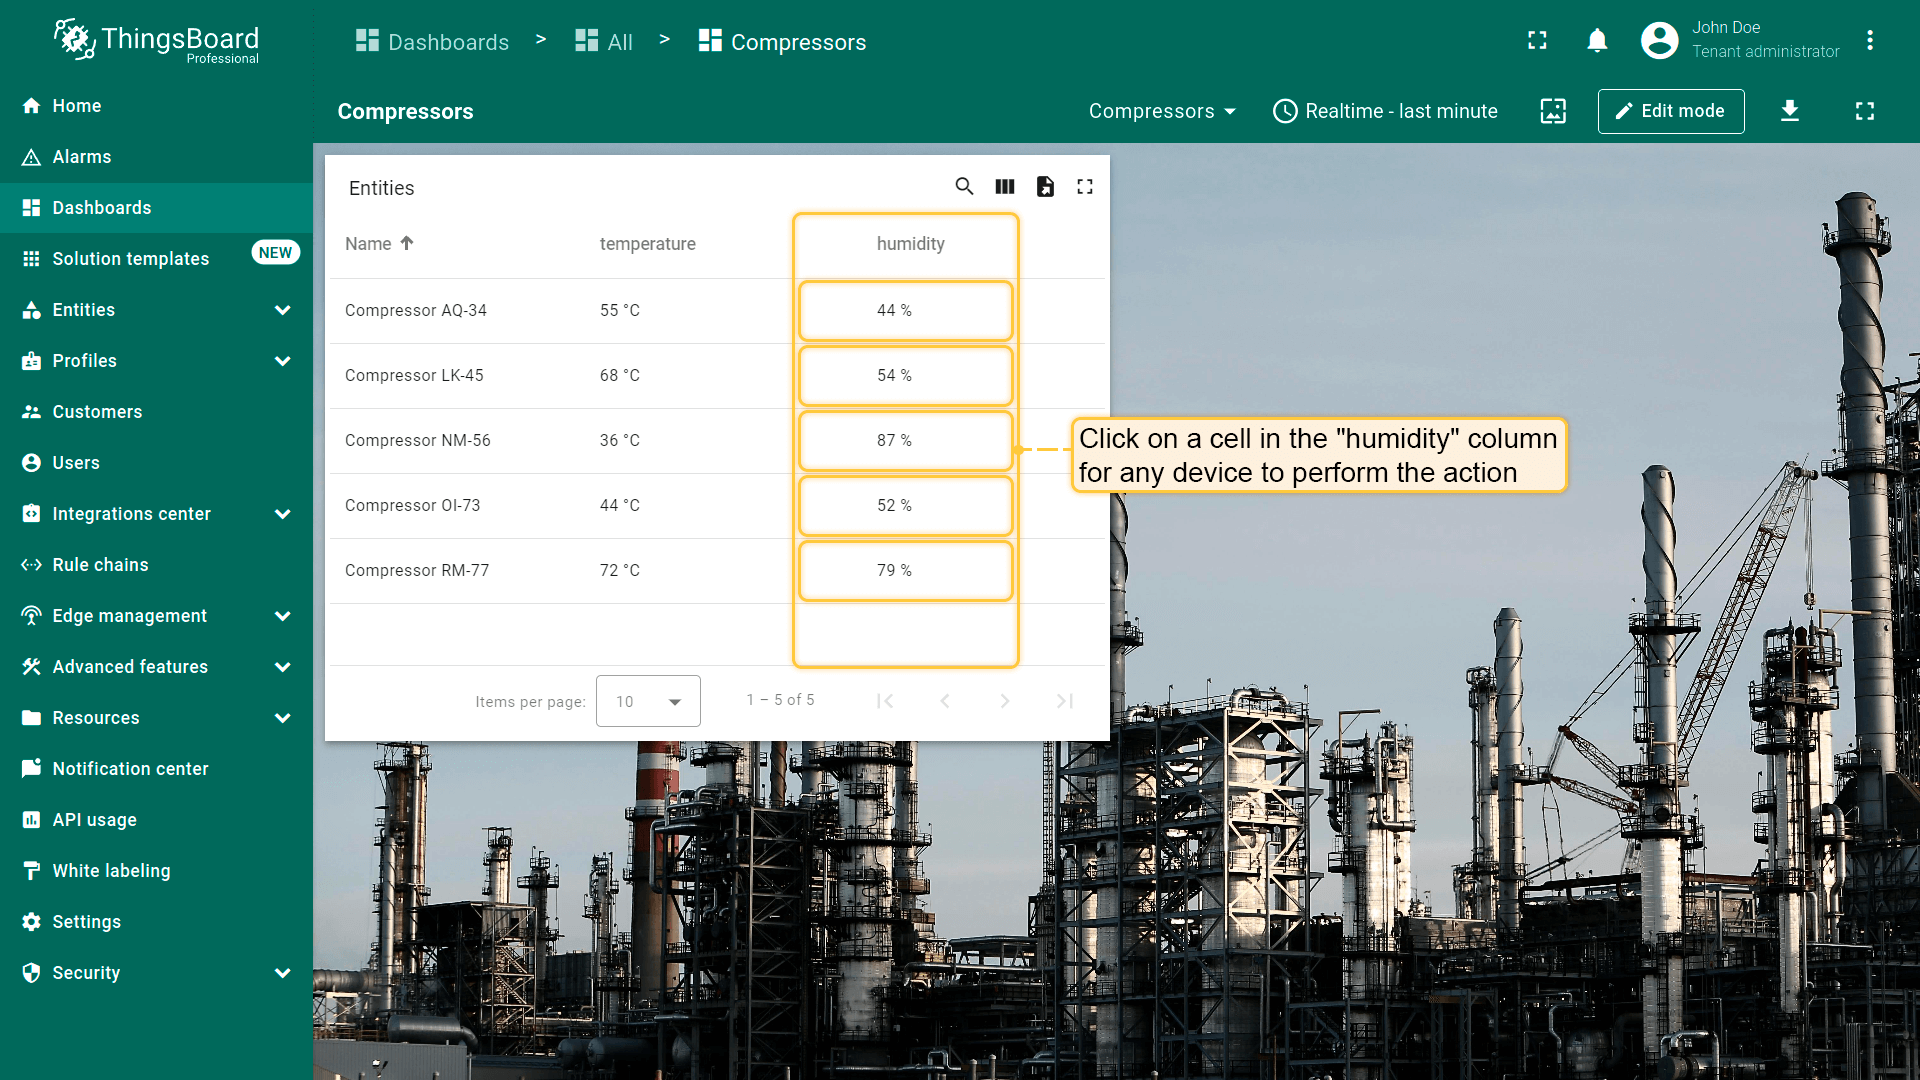
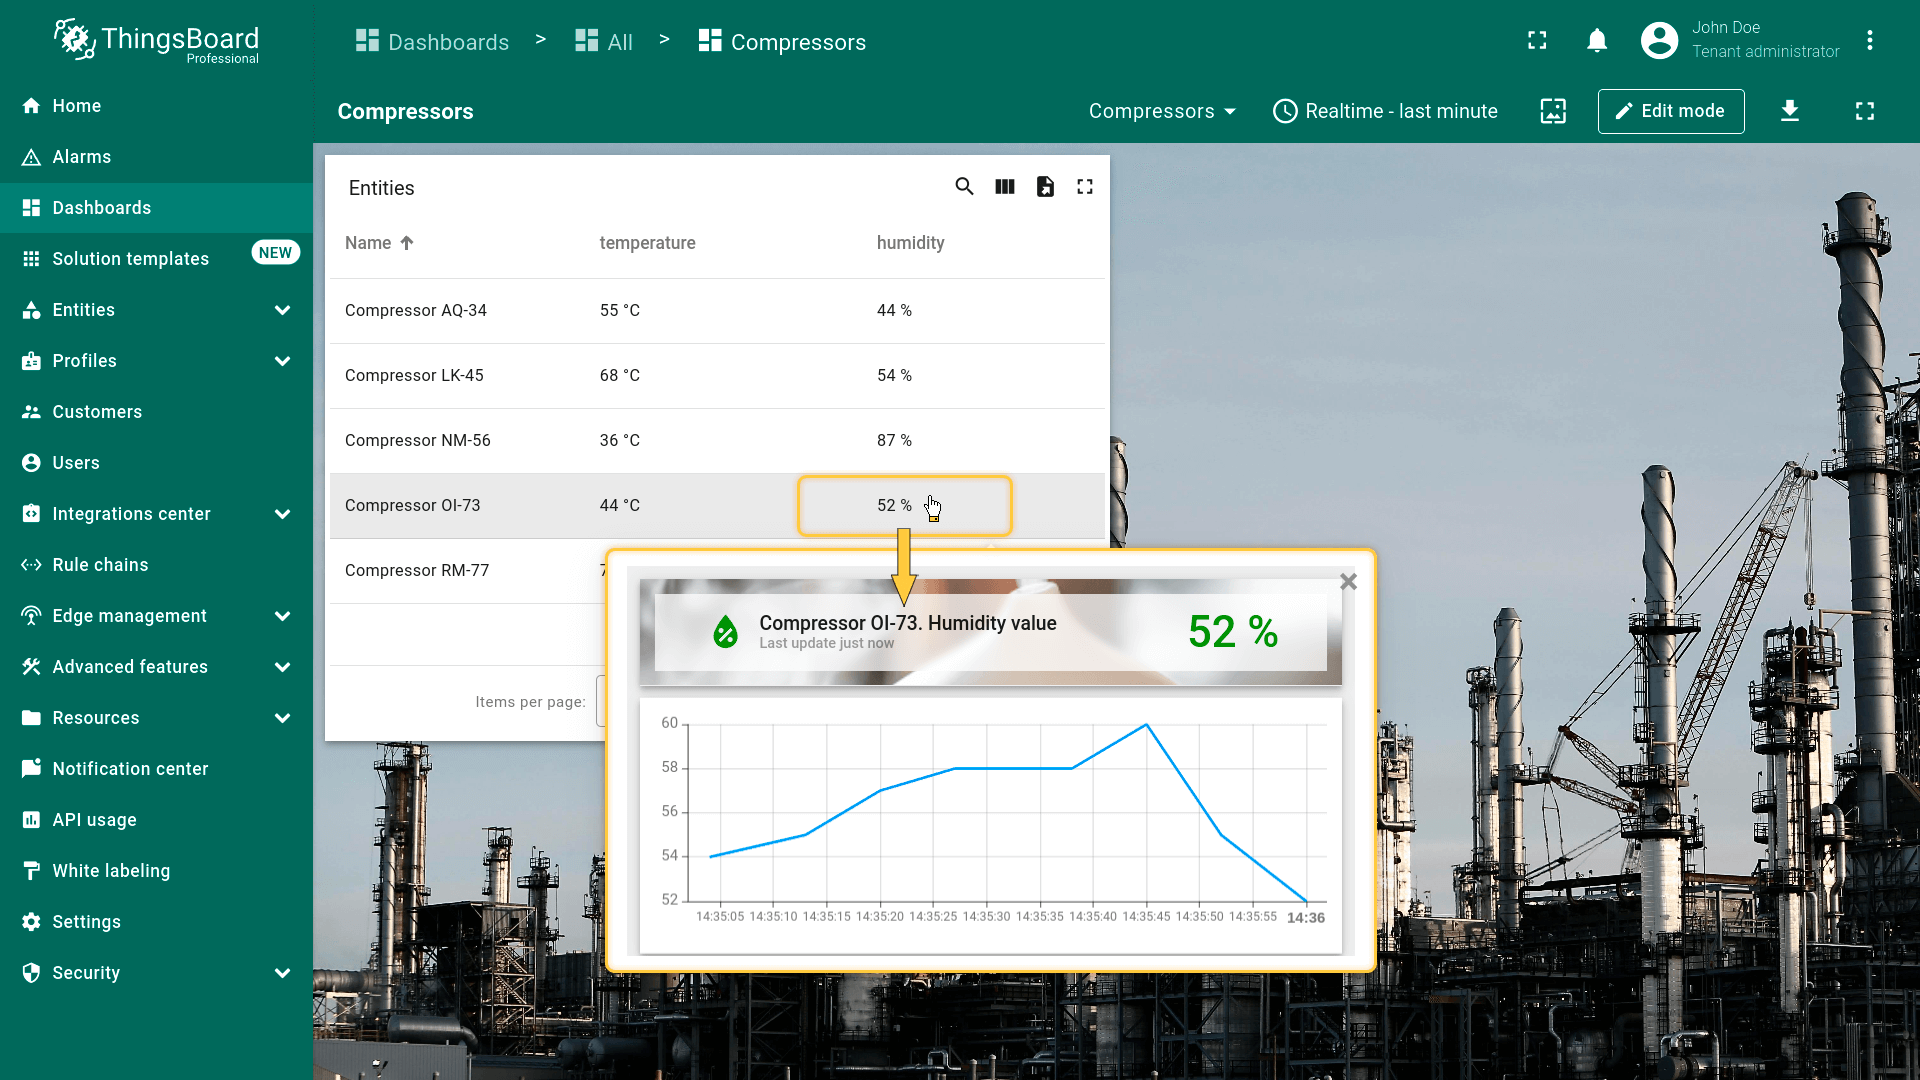
以“Entities table”部件为例,该部件显示设备列表及其最新温度和湿度读数。 将配置为:点击某列单元格时打开包含所选设备详细telemetry信息的弹出窗口。
为此需为表格每列添加action。
假设已在dashboard上添加两个新 states并熟悉“Add action”步骤,直接进行action配置。
先为“temperature”列添加action:
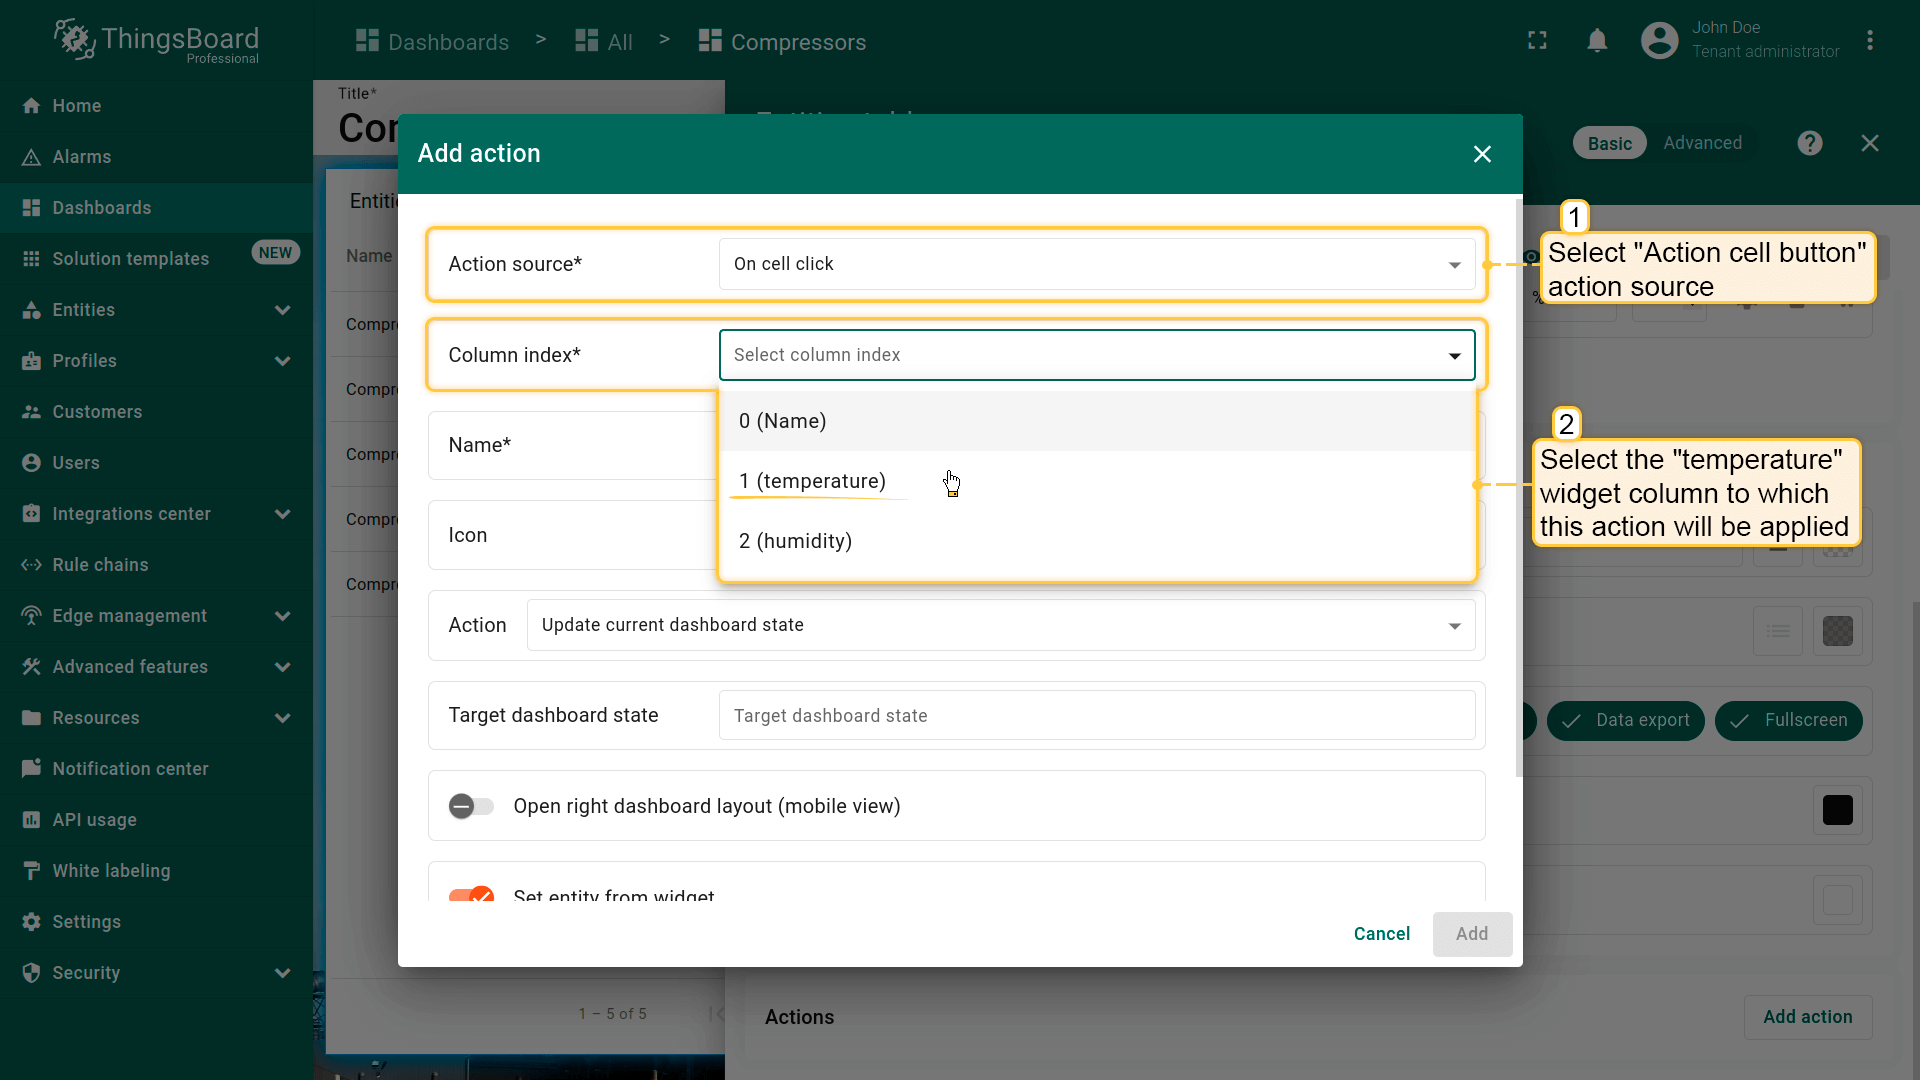
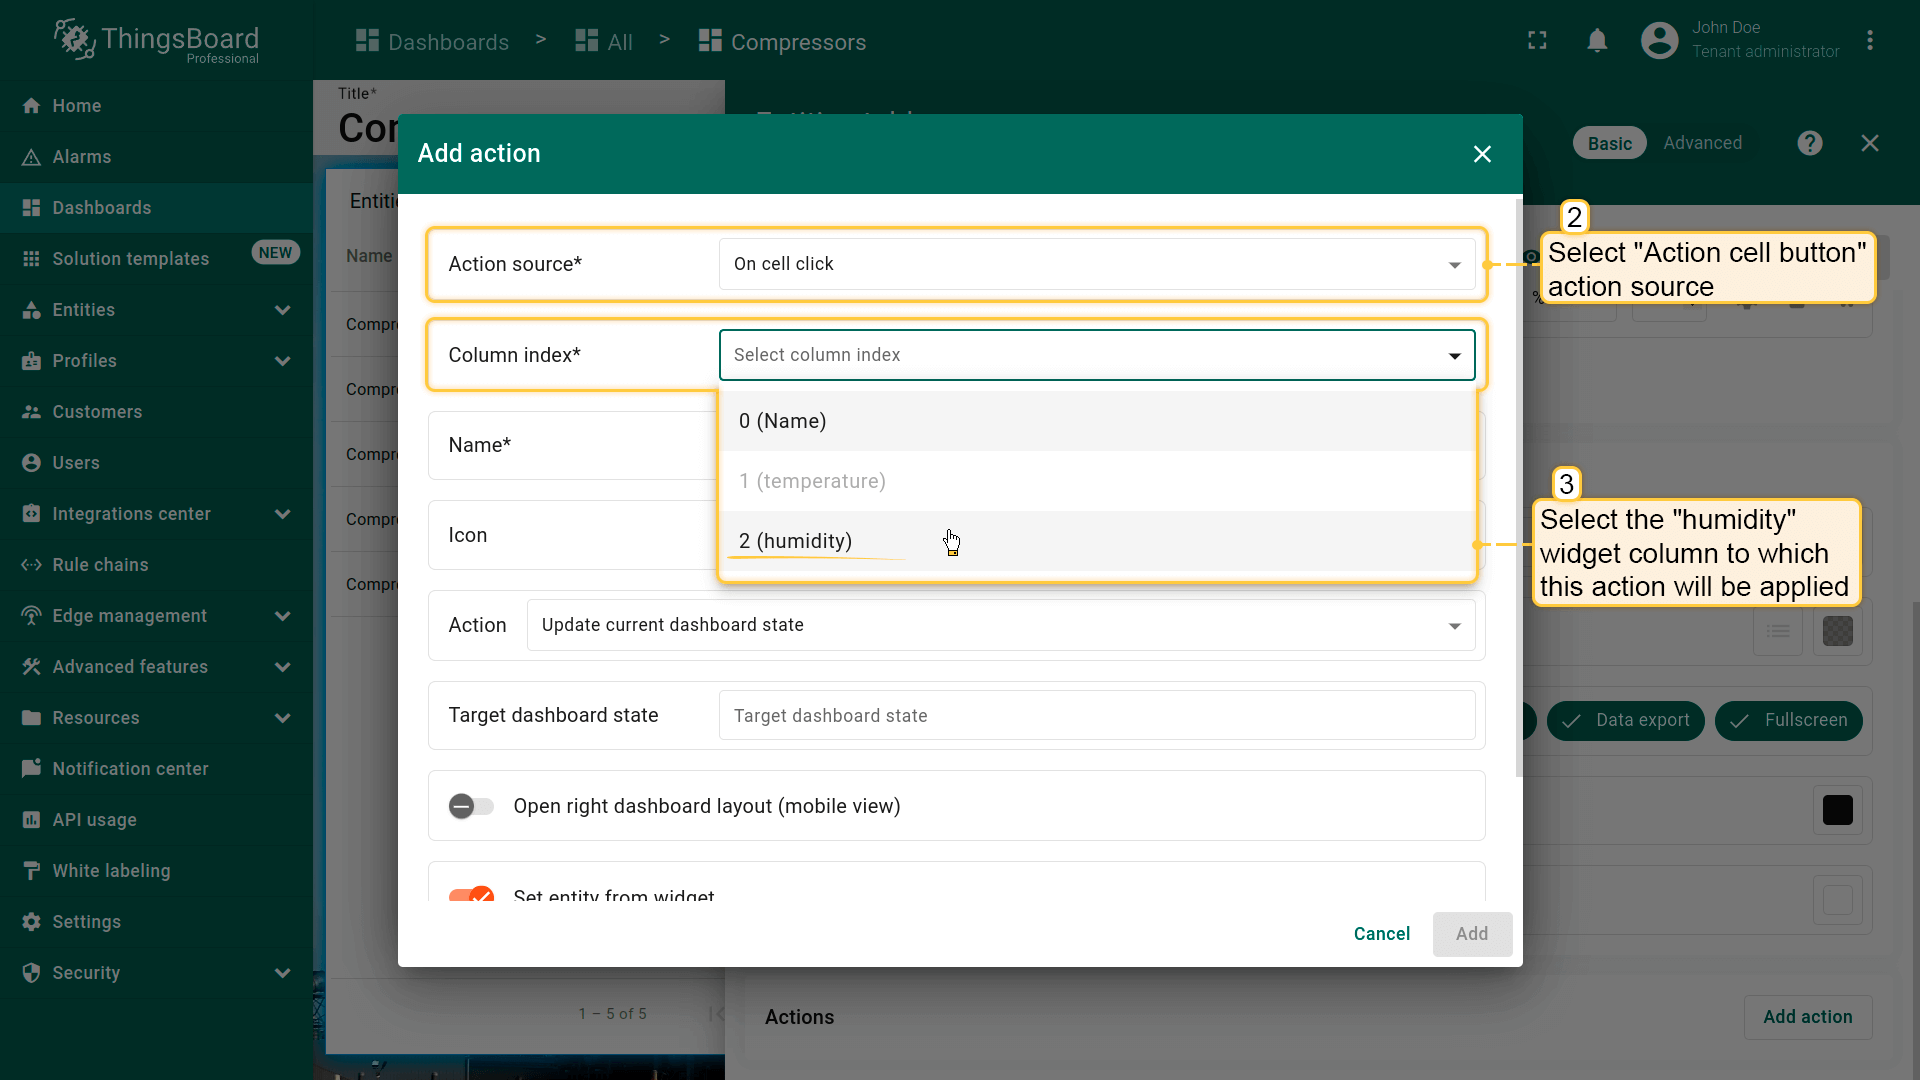
- 选择“On cell click”作为action来源;
- 在“Column index”下拉菜单中选择“temperature”列;
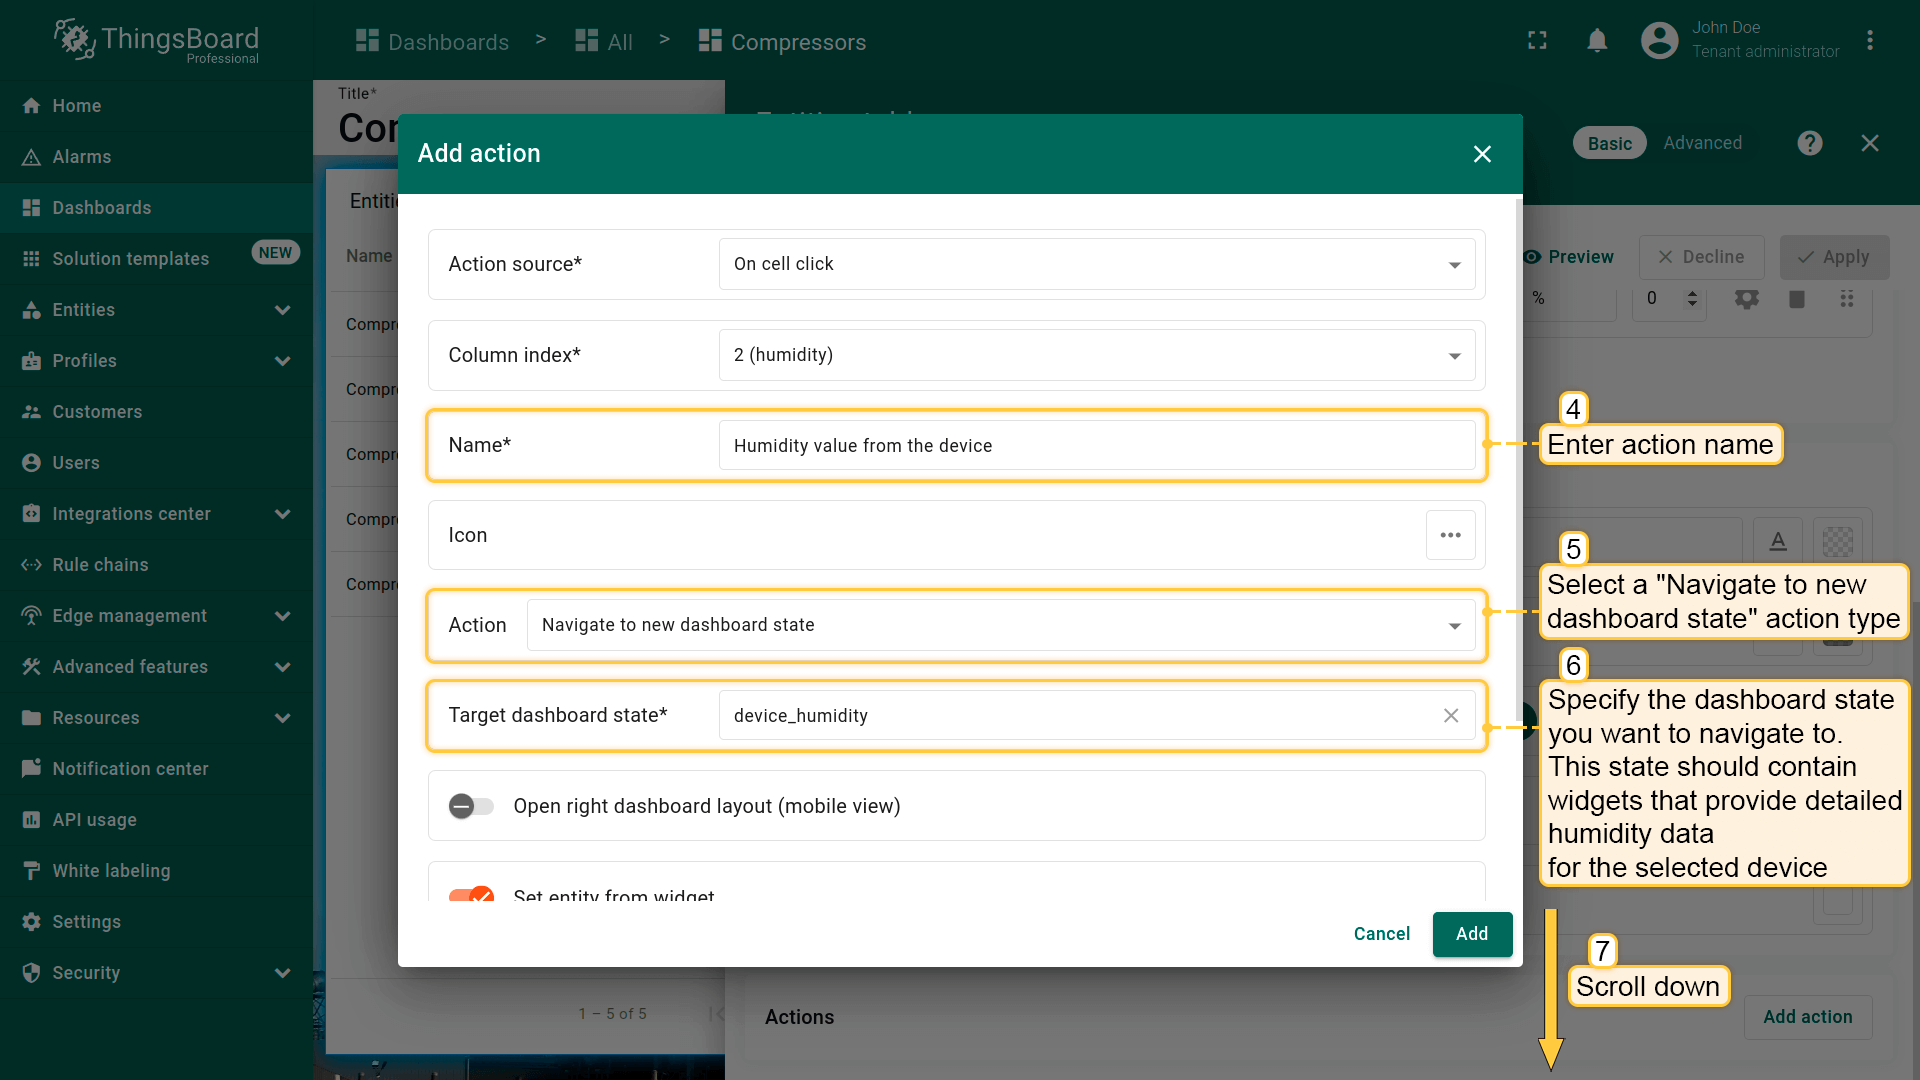
- 输入action名称,可选选择图标;
- action类型选择“Navigate to new dashboard state”;
- 指定“Target dashboard state”,用于显示所选设备的详细温度数据;
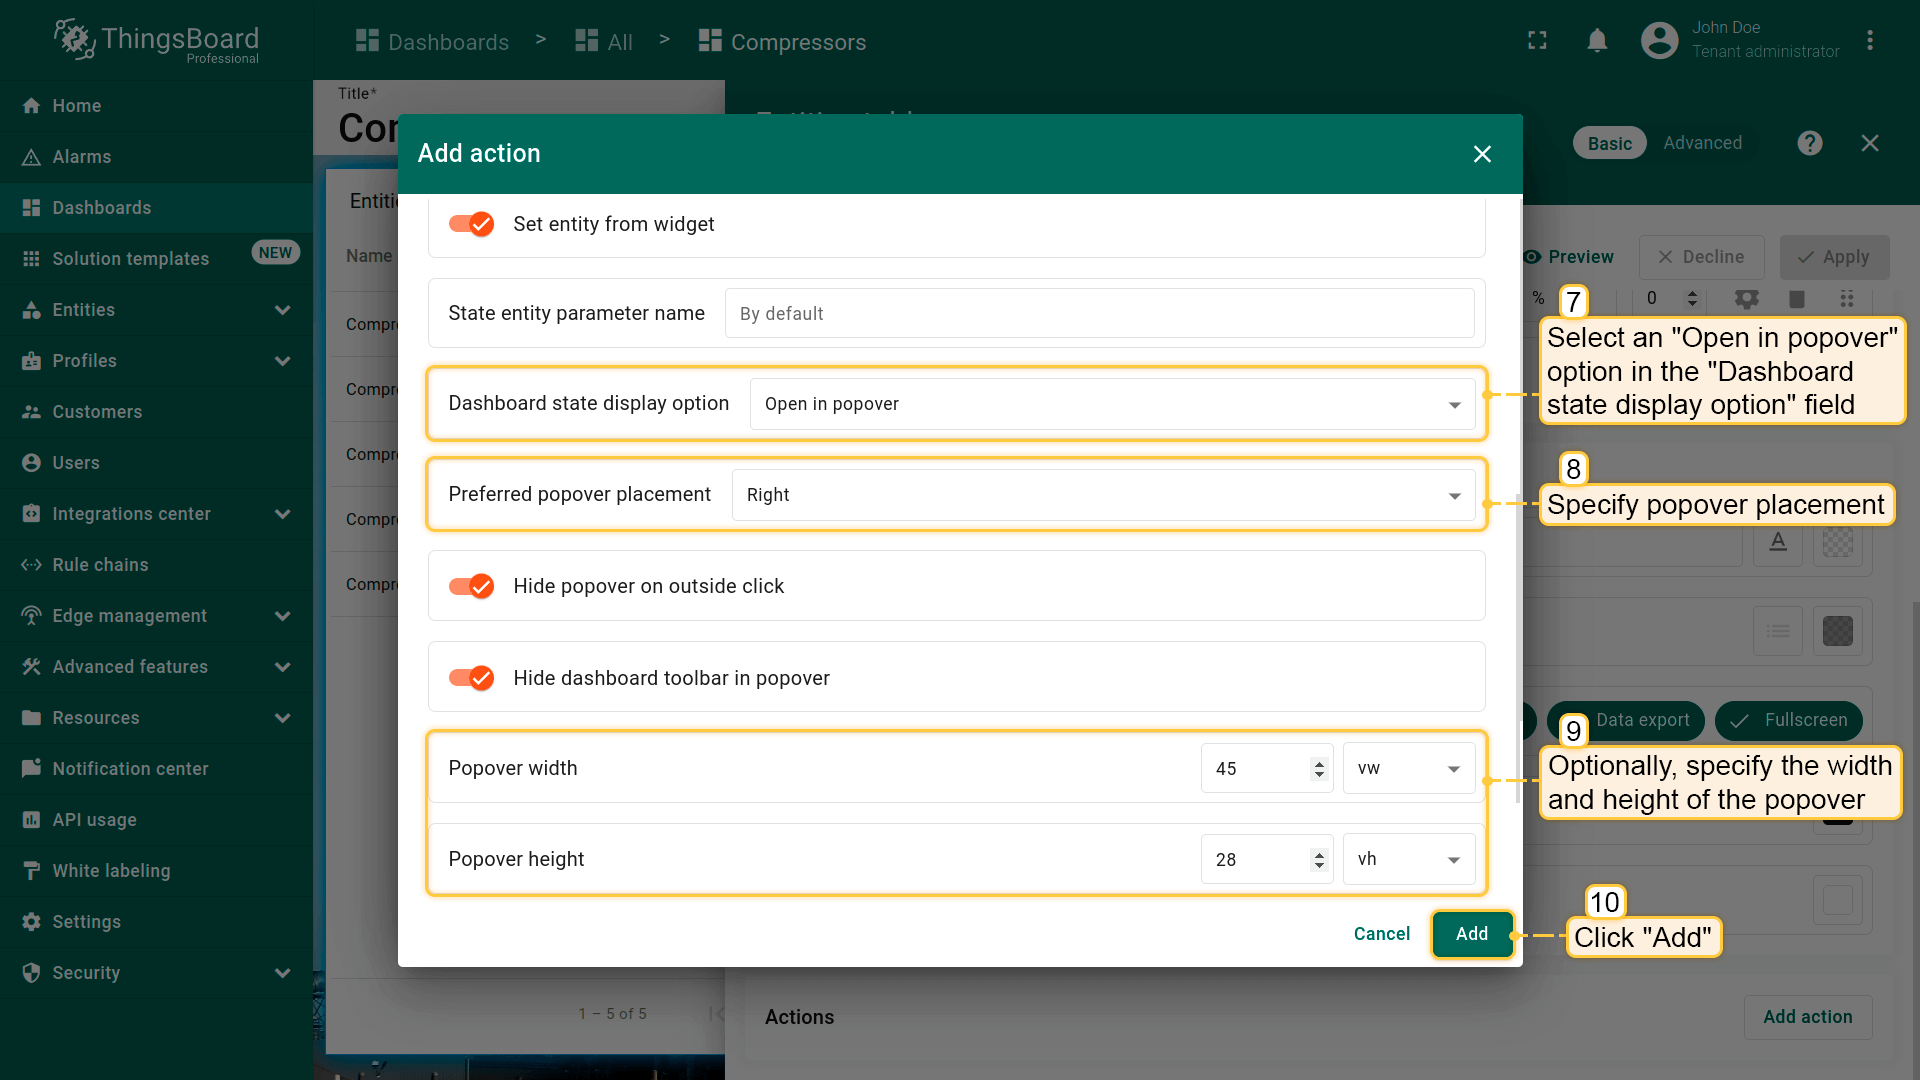
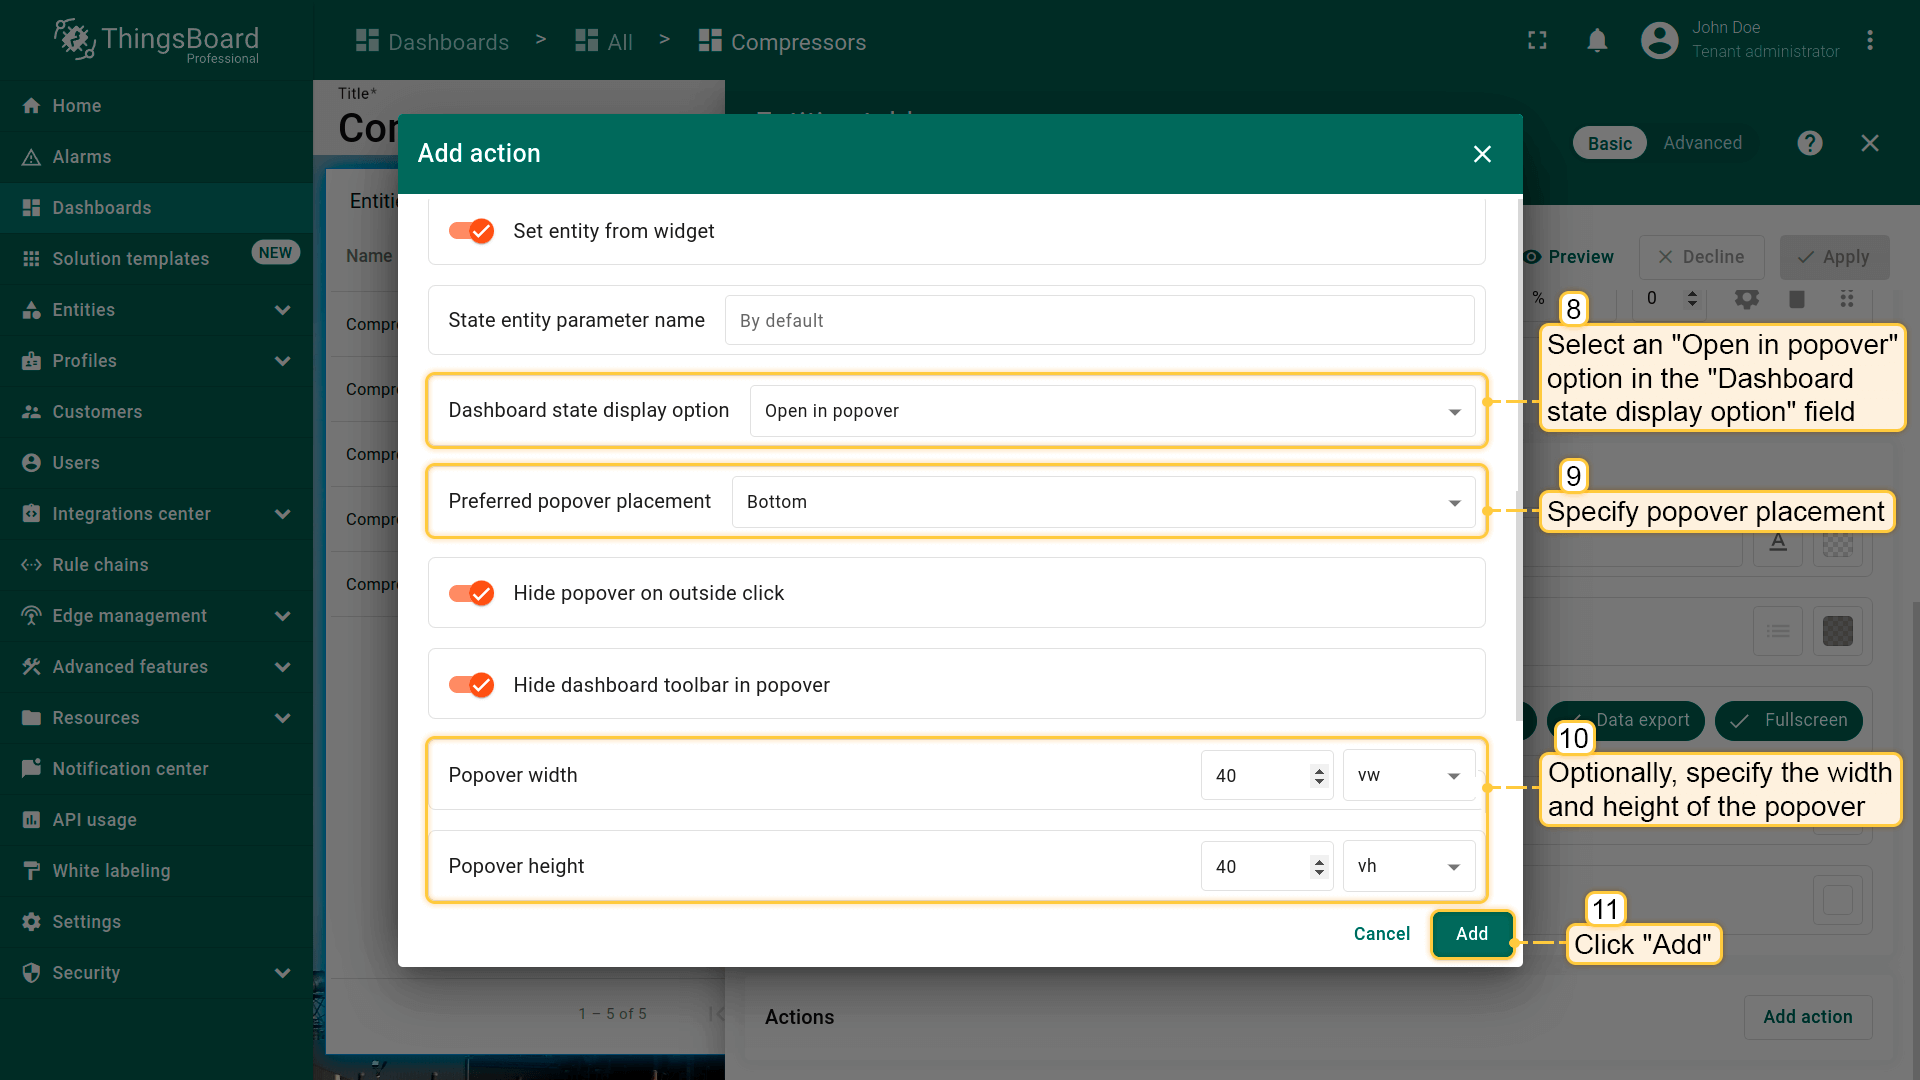
- 在“Dashboard state display options”字段选择“Open in popover”;
- 指定popover位置;
- 可选:指定popover宽高;
- 点击“Add”添加action。
“temperature”列的action已配置完成。


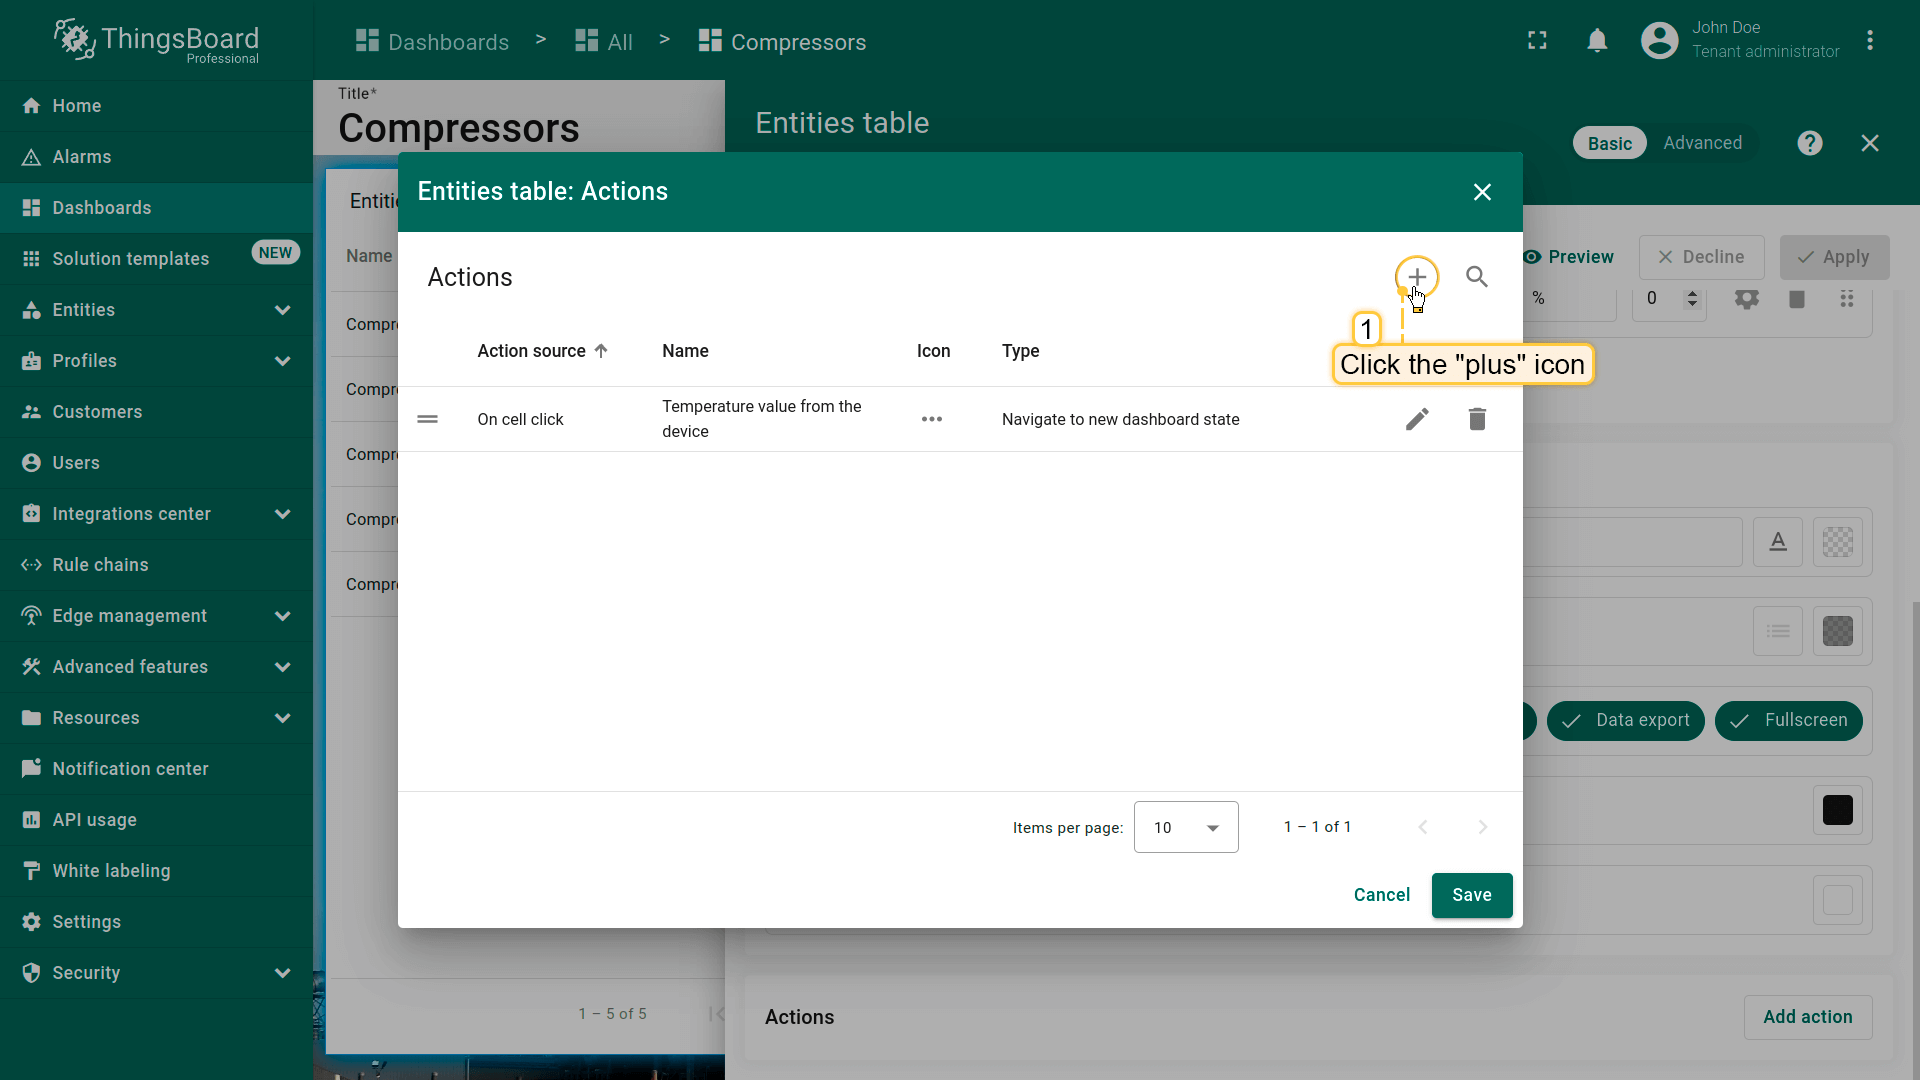
接下来为“humidity”列添加action:
- 点击“Actions”窗口右上角“plus”图标添加新action;
- 重复上述步骤,此次在“Column index”下拉菜单中选择“humidity”列;
- 指定“Target dashboard state”,用于显示所选设备的详细湿度数据;
- 在“Dashboard state display options”字段选择“Open in popover”;
- 指定popover位置;
- 可选:指定popover宽高;
- 点击“Add”添加action;
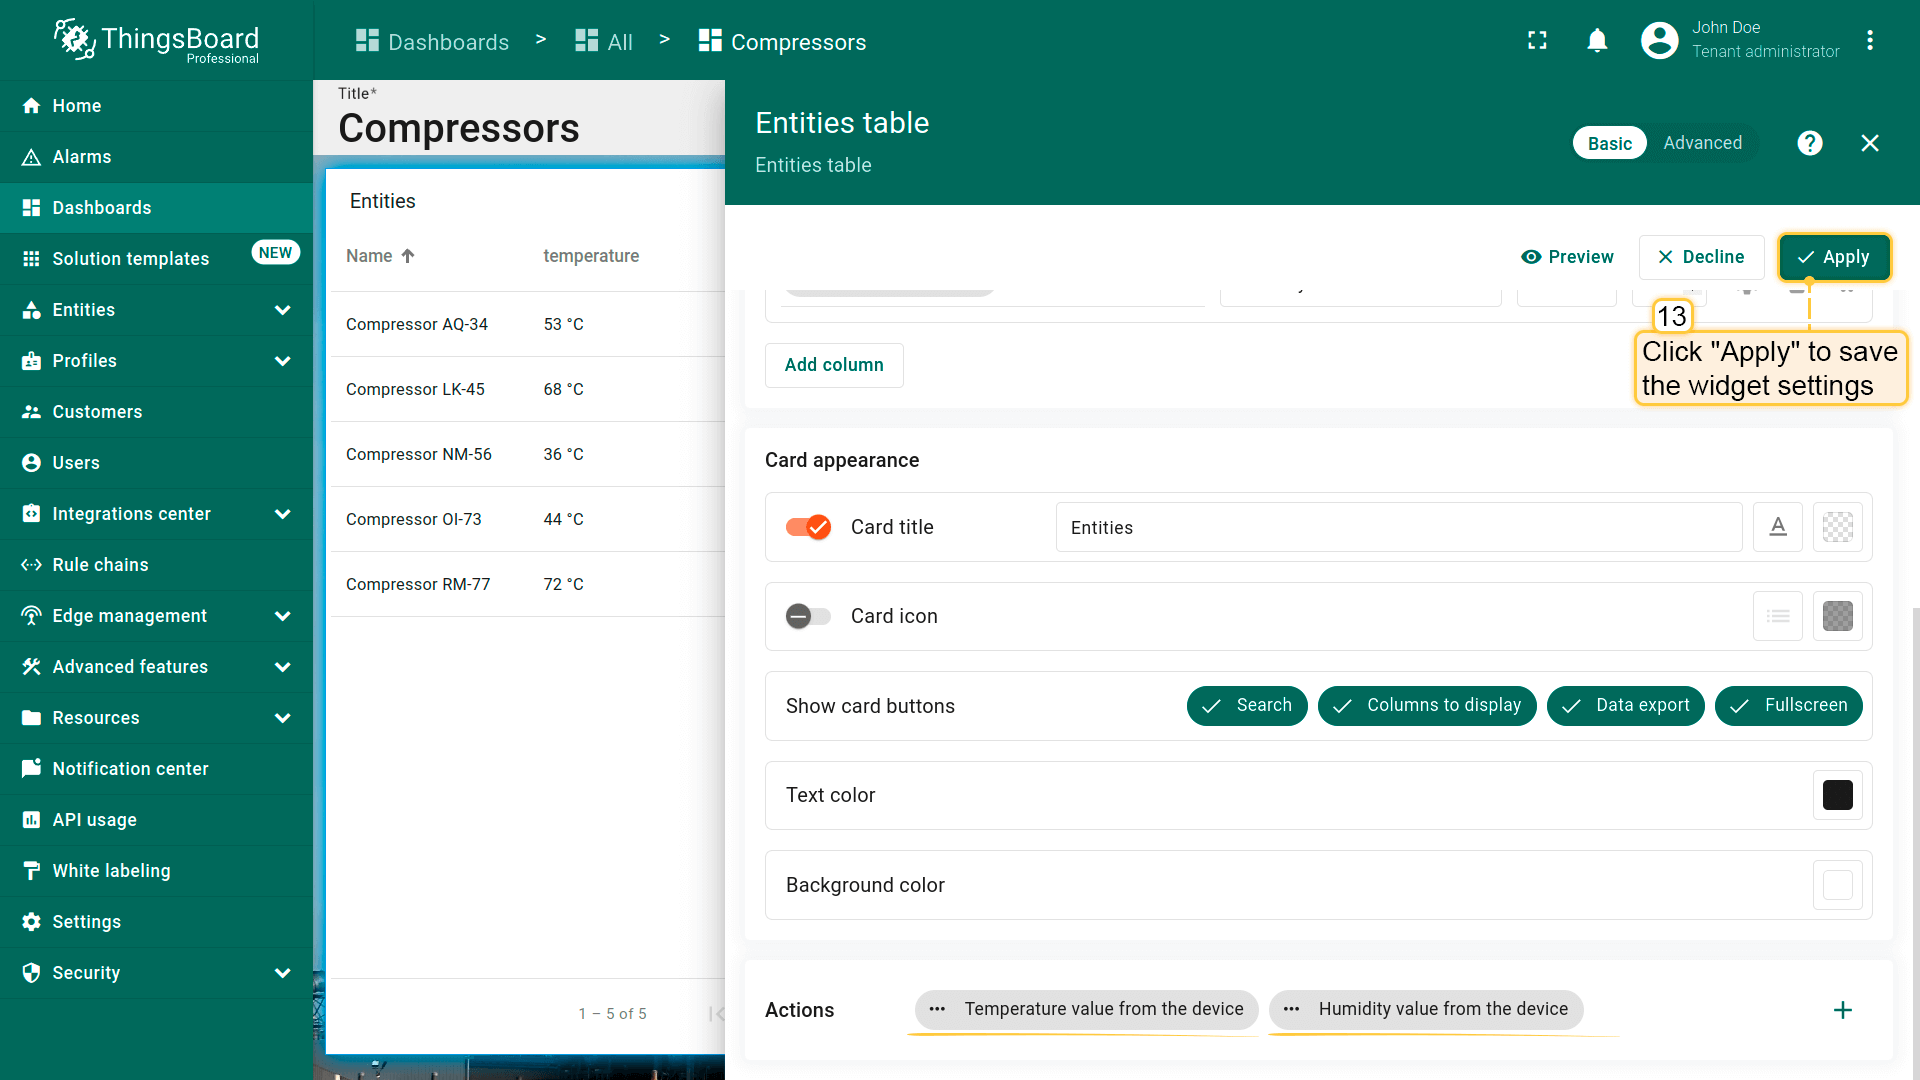
- 配置完成后,点击“Save”再点“Apply”保存部件设置;
- 点击dashboard页面右上角“Save”保存整体dashboard配置。


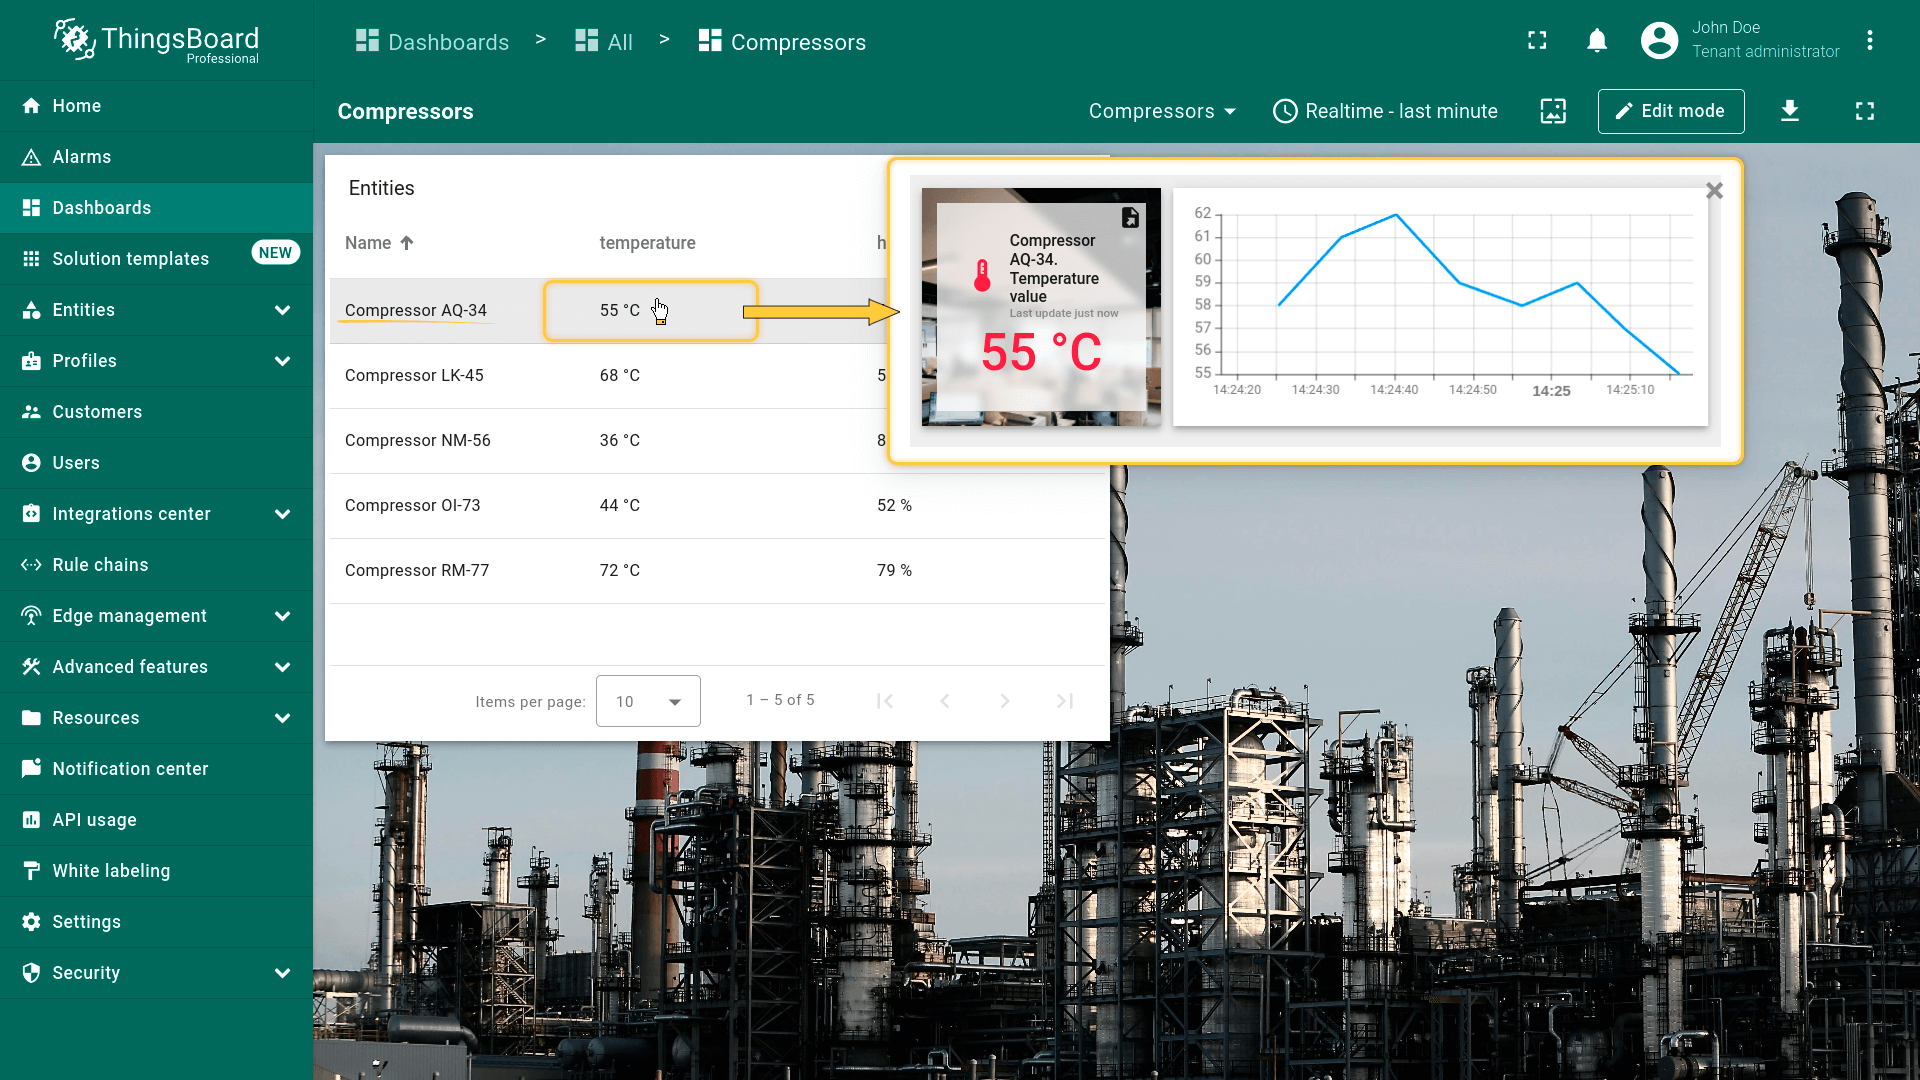
此后,点击任意设备“temperature”列单元格时,将执行action:弹出窗口显示所选设备的详细温度信息。
同样,点击“humidity”列单元格将弹出该设备详细湿度信息。
Widget header button
“Widget header button”在部件标题栏添加action按钮。点击该按钮执行action。该按钮作用于整个部件,而非单个实体。 Widget header button是最常用的action来源,所有部件均支持。配置 Widget header button action来源步骤如下:
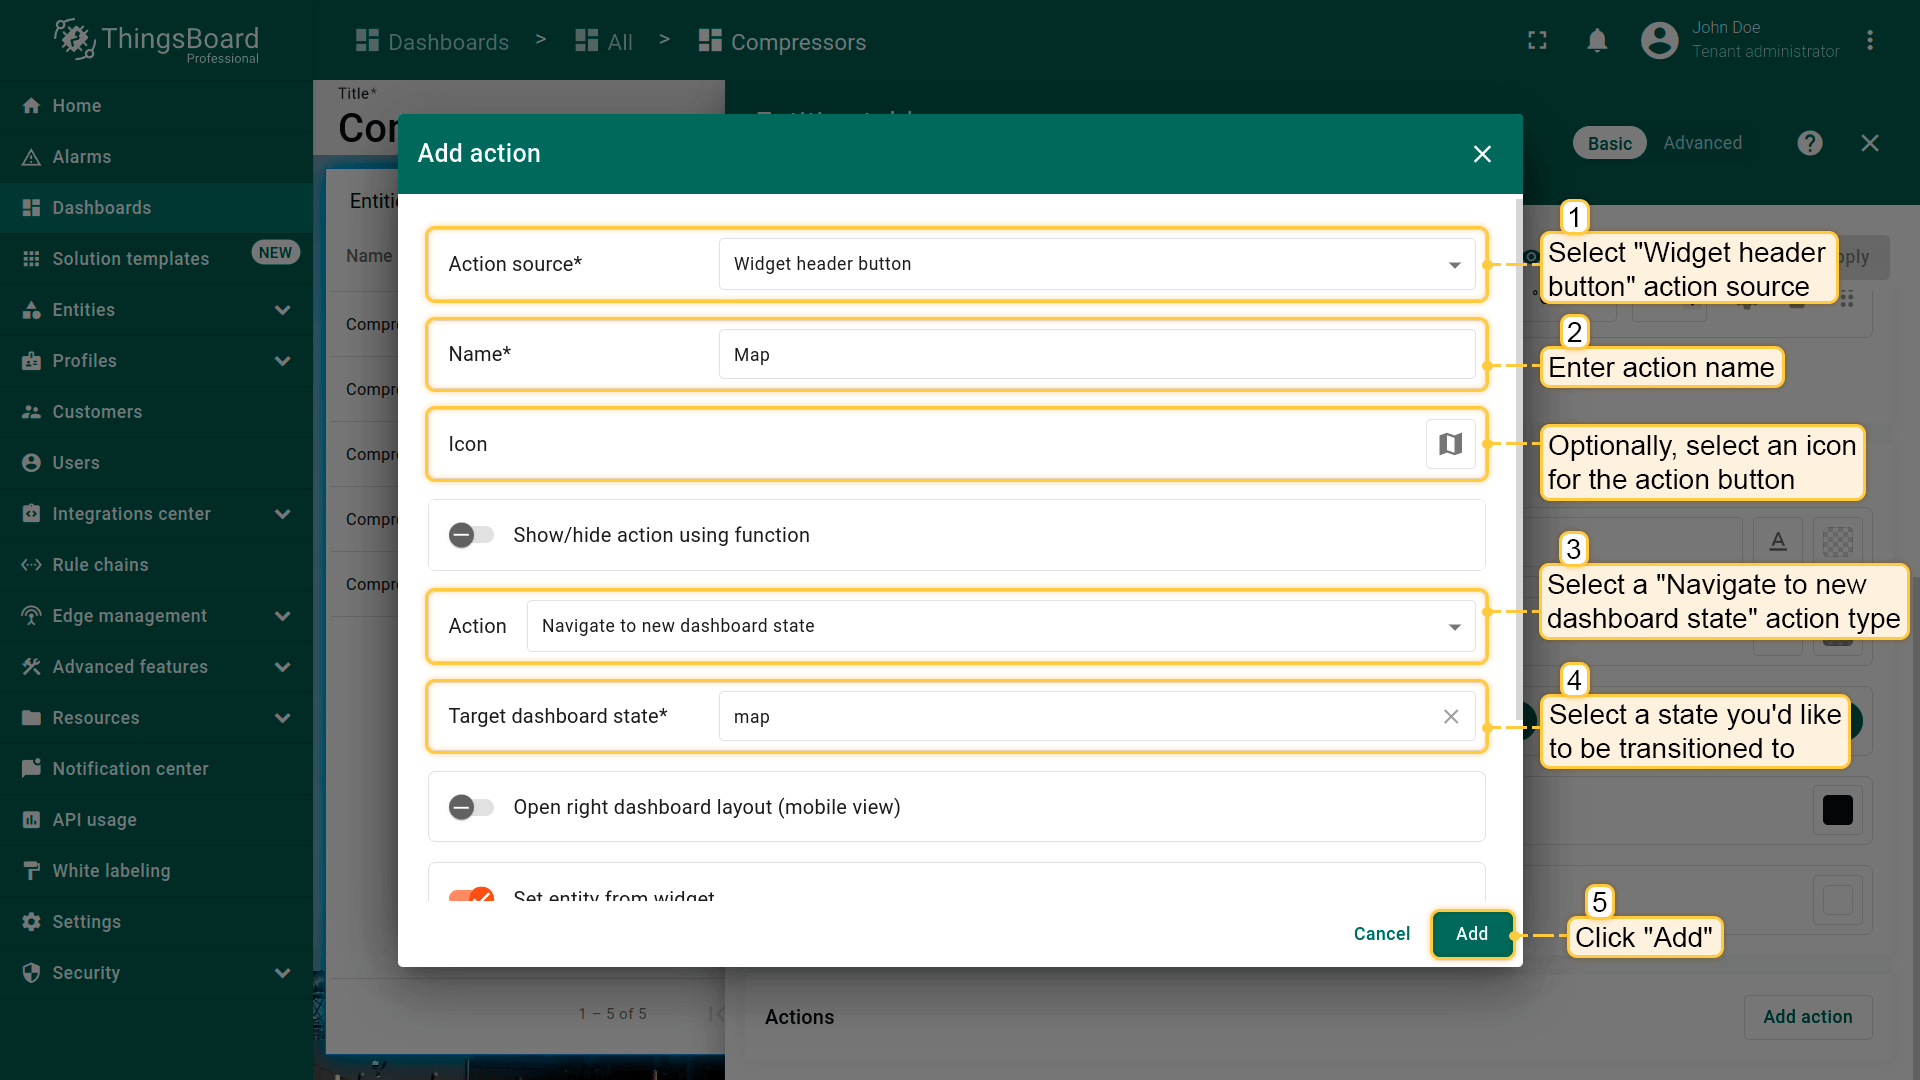
假设已在dashboard上添加新 state并熟悉“Add action”步骤,直接进行action配置:
- 进入部件编辑模式,打开“Add action”窗口;
- 选择“Widget header button”作为action来源;
- 输入action名称并选择表示按钮的图标;
- 在“Action”下拉菜单中选择“Navigate to new dashboard state”类型;
- 选择后会出现“Target dashboard state”下拉菜单,选择要跳转的已创建 state;
- 选择state后,点击“Add action”窗口底部的“Add”按钮;
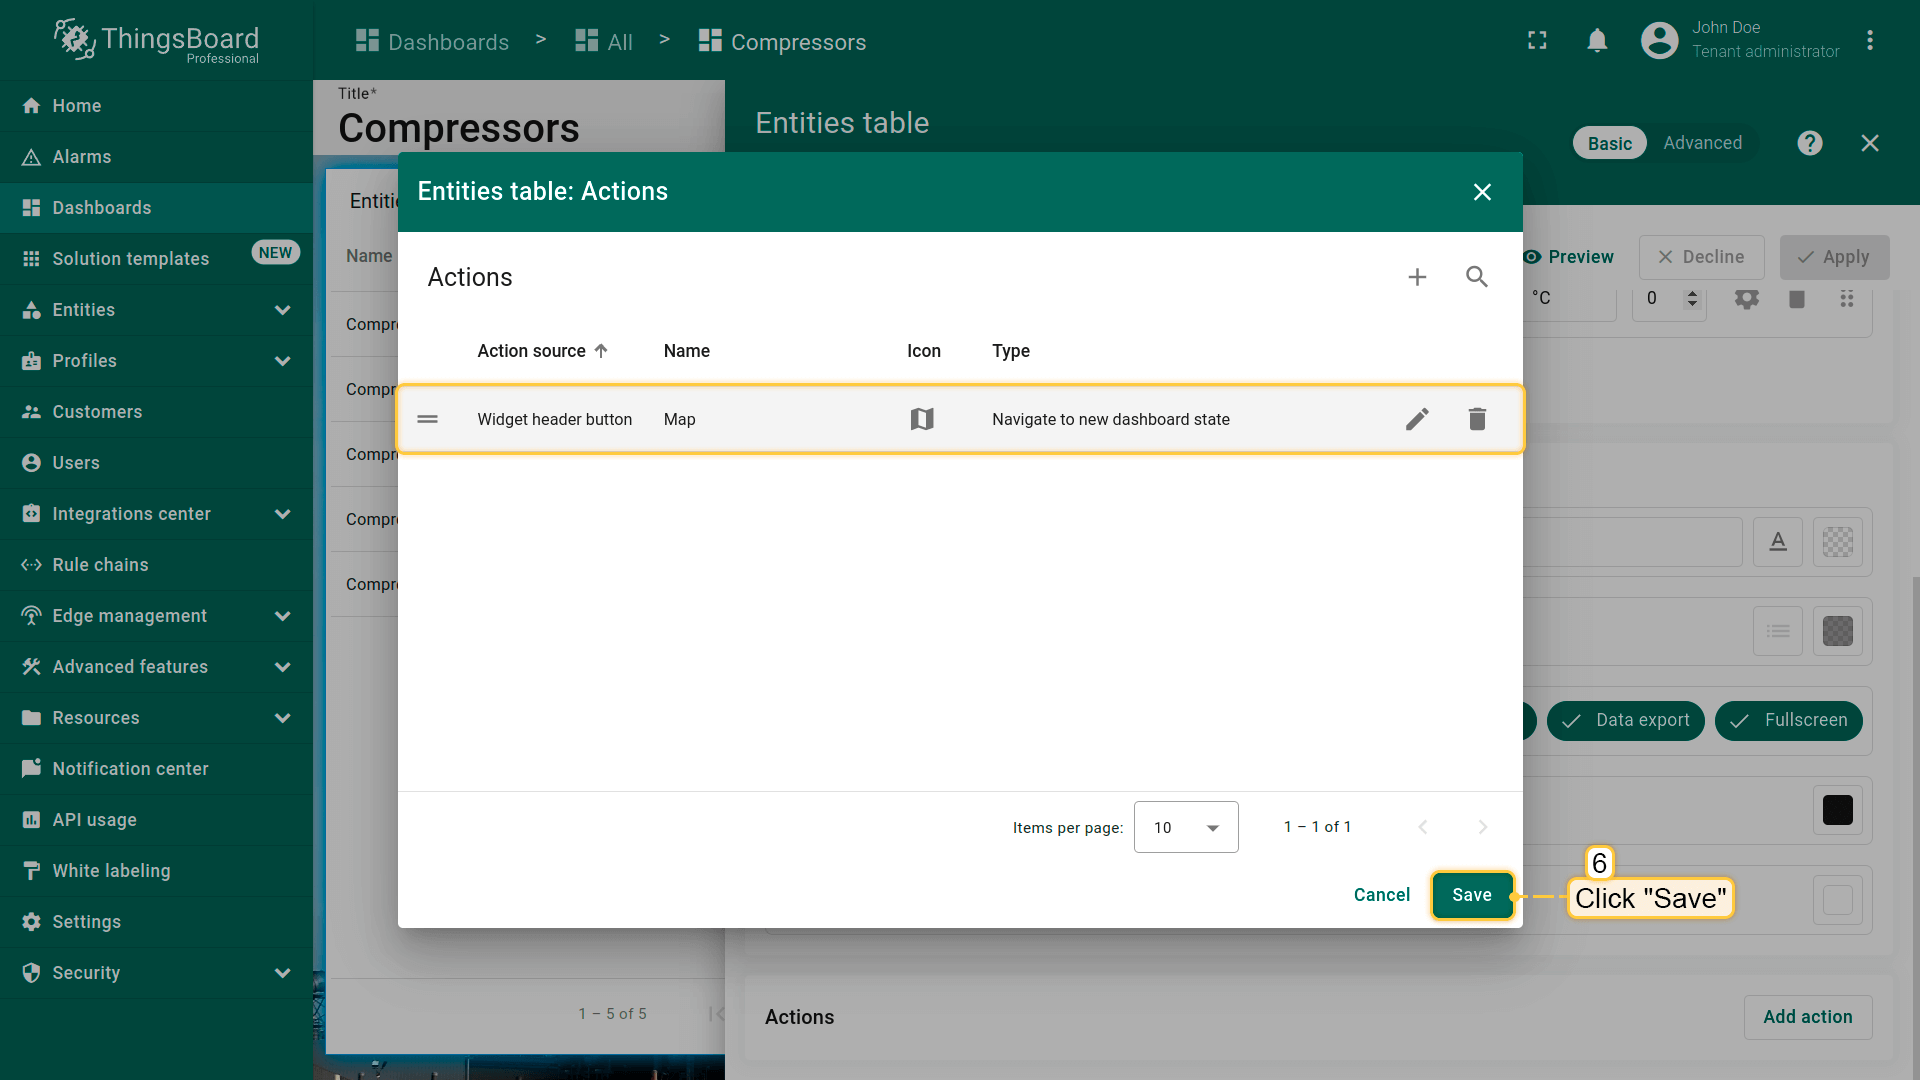
- 在“Actions”窗口中查看已配置action,核对来源、图标和类型。点击“Save”,再点“Apply”保存部件设置;
- 点击dashboard页面右上角“Save”保存dashboard。
此时部件标题栏会出现action按钮。点击后即执行action,即跳转到所选state。
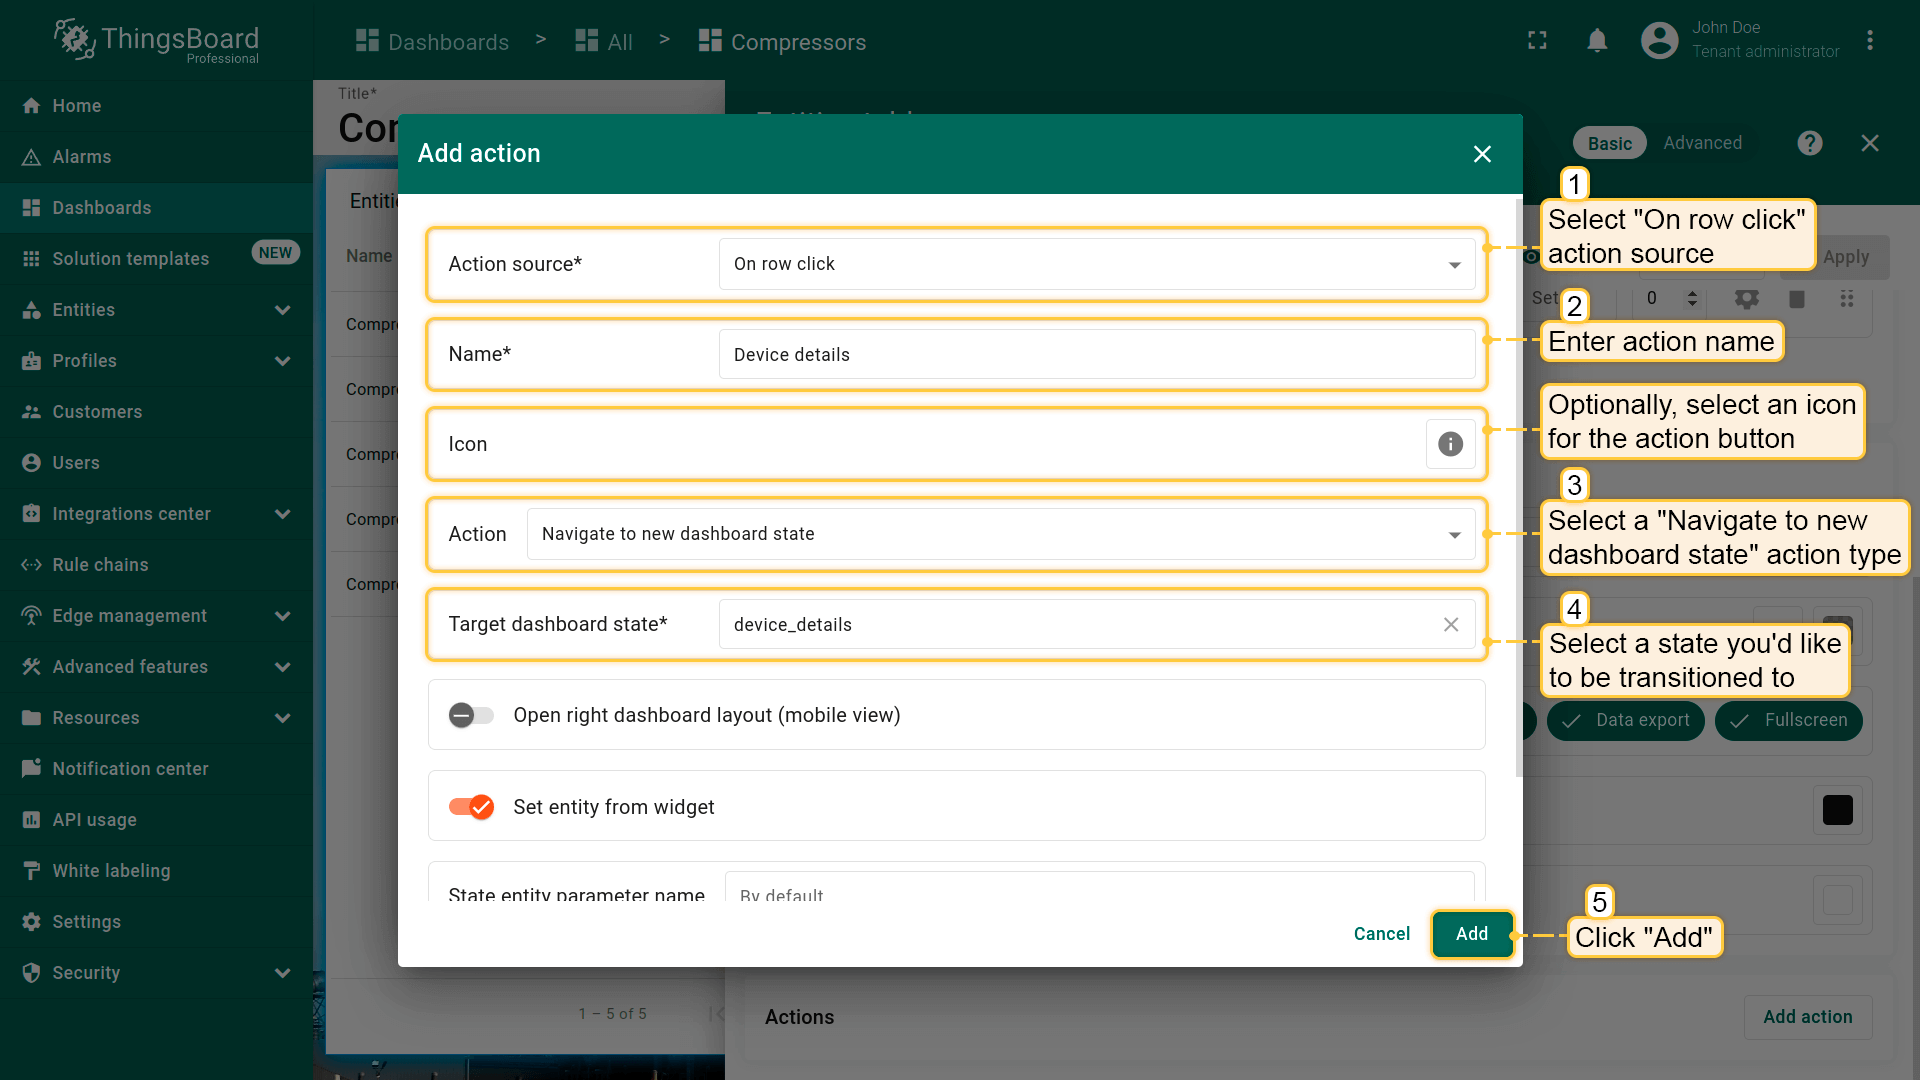
行点击事件
“On row click”在点击部件中某行时触发action。常用于“Entity table”部件。以该部件为例说明:点击所选实体行将跳转到显示该实体详细信息的state。
假设已在dashboard上添加新 state并熟悉“Add action”步骤,直接进行action配置:
- 进入部件编辑模式,打开“Add action”窗口;
- 选择“On row click”作为action来源;
- 输入action名称,可选选择图标;
- 在“Action”下拉菜单中选择“Navigate to new dashboard state”类型;
- 选择后会出现“Target dashboard state”下拉菜单,选择要跳转的已创建 state;
- 选择state后,点击“Add action”窗口底部的“Add”按钮;
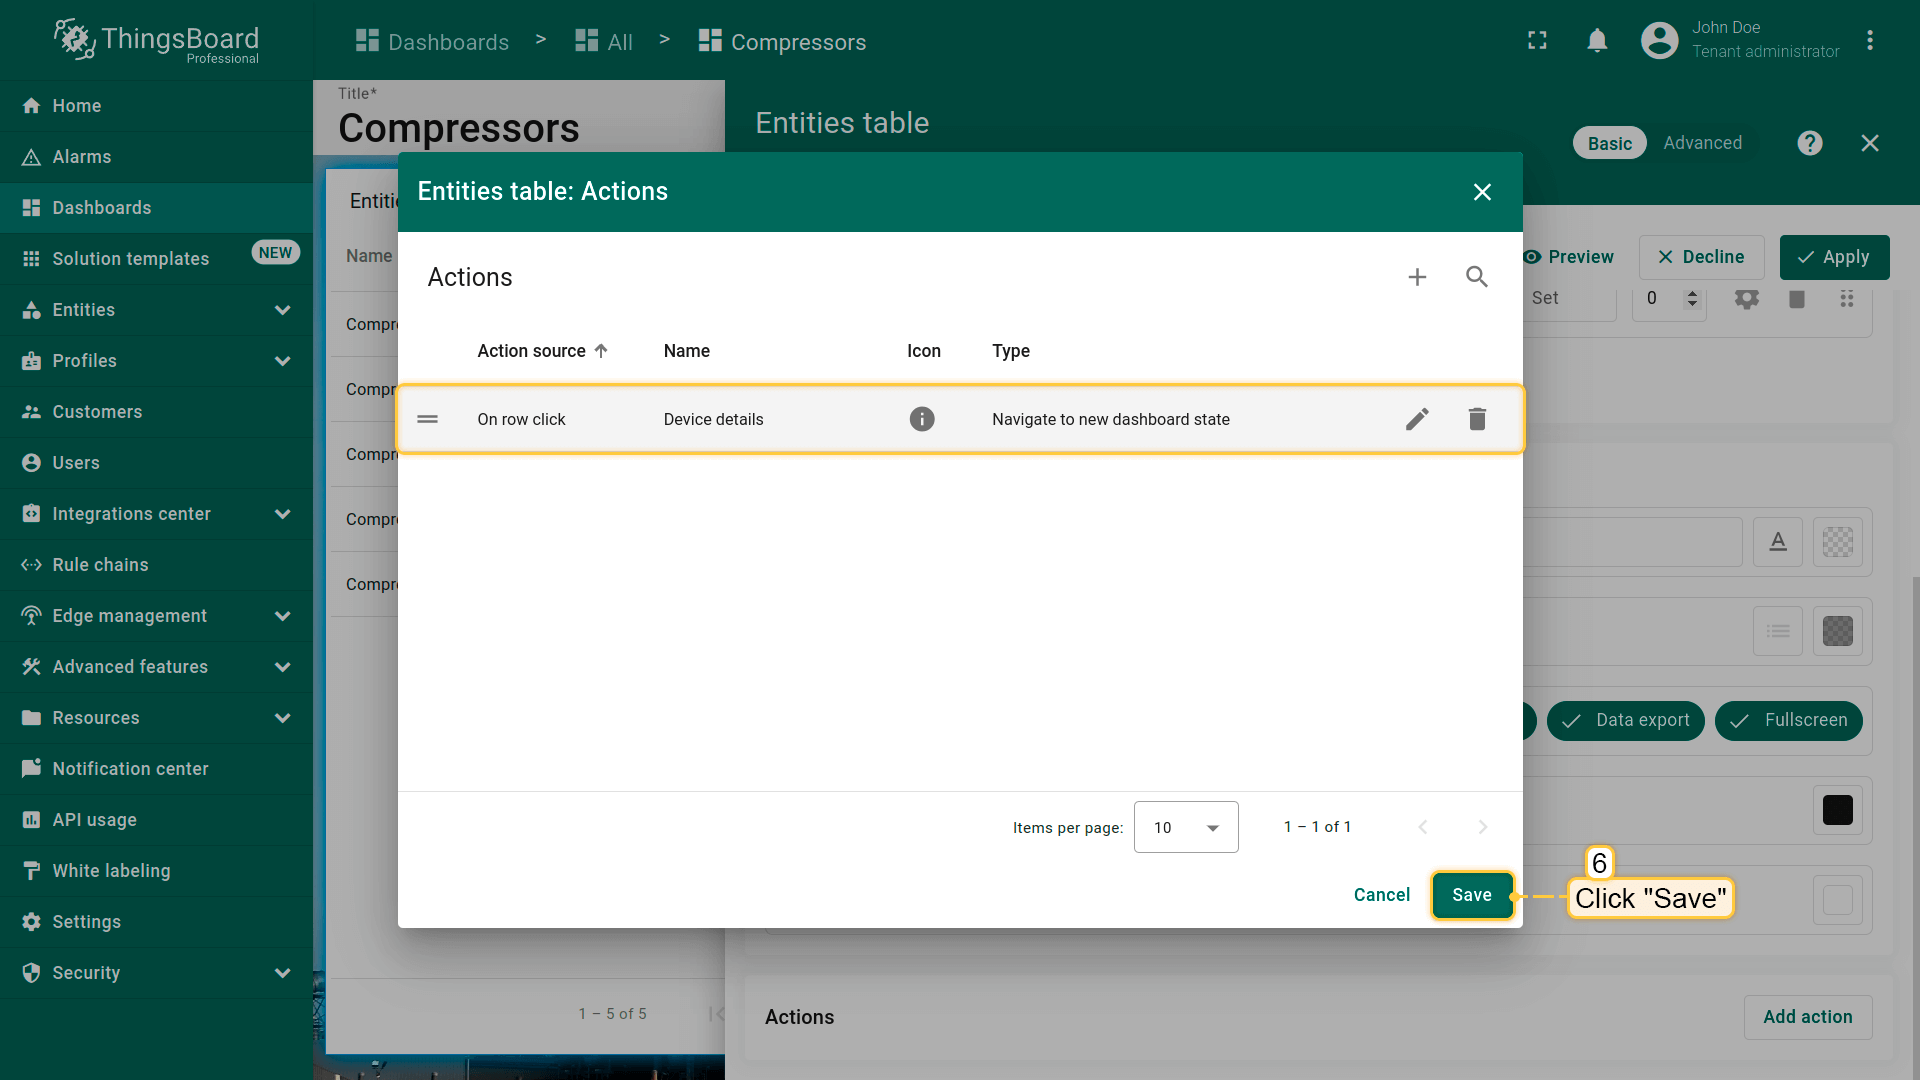
- 在“Actions”窗口中查看已配置action,核对来源、图标和类型。点击“Save”,再点“Apply”保存部件设置;
- 点击dashboard页面右上角“Save”保存dashboard。


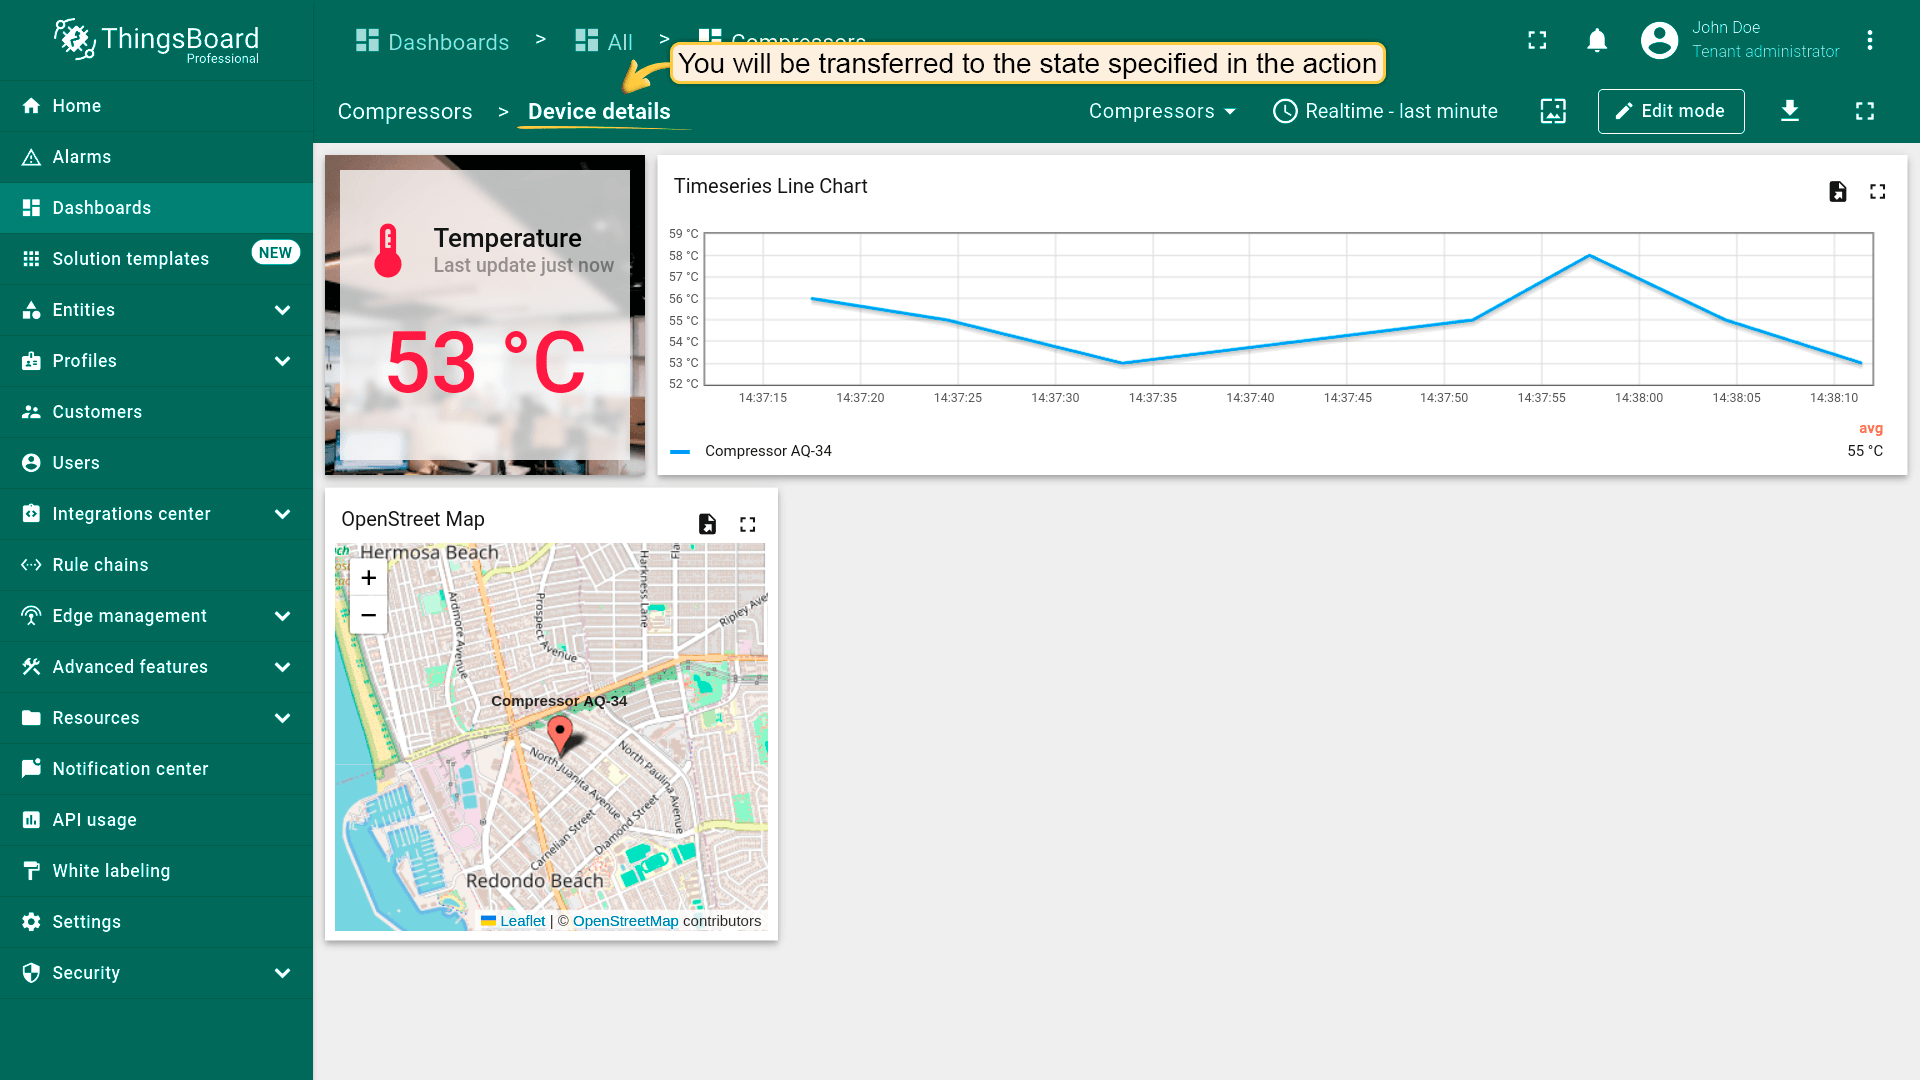
点击任意实体行即可执行action,即跳转到所选state并显示所选设备详细信息。

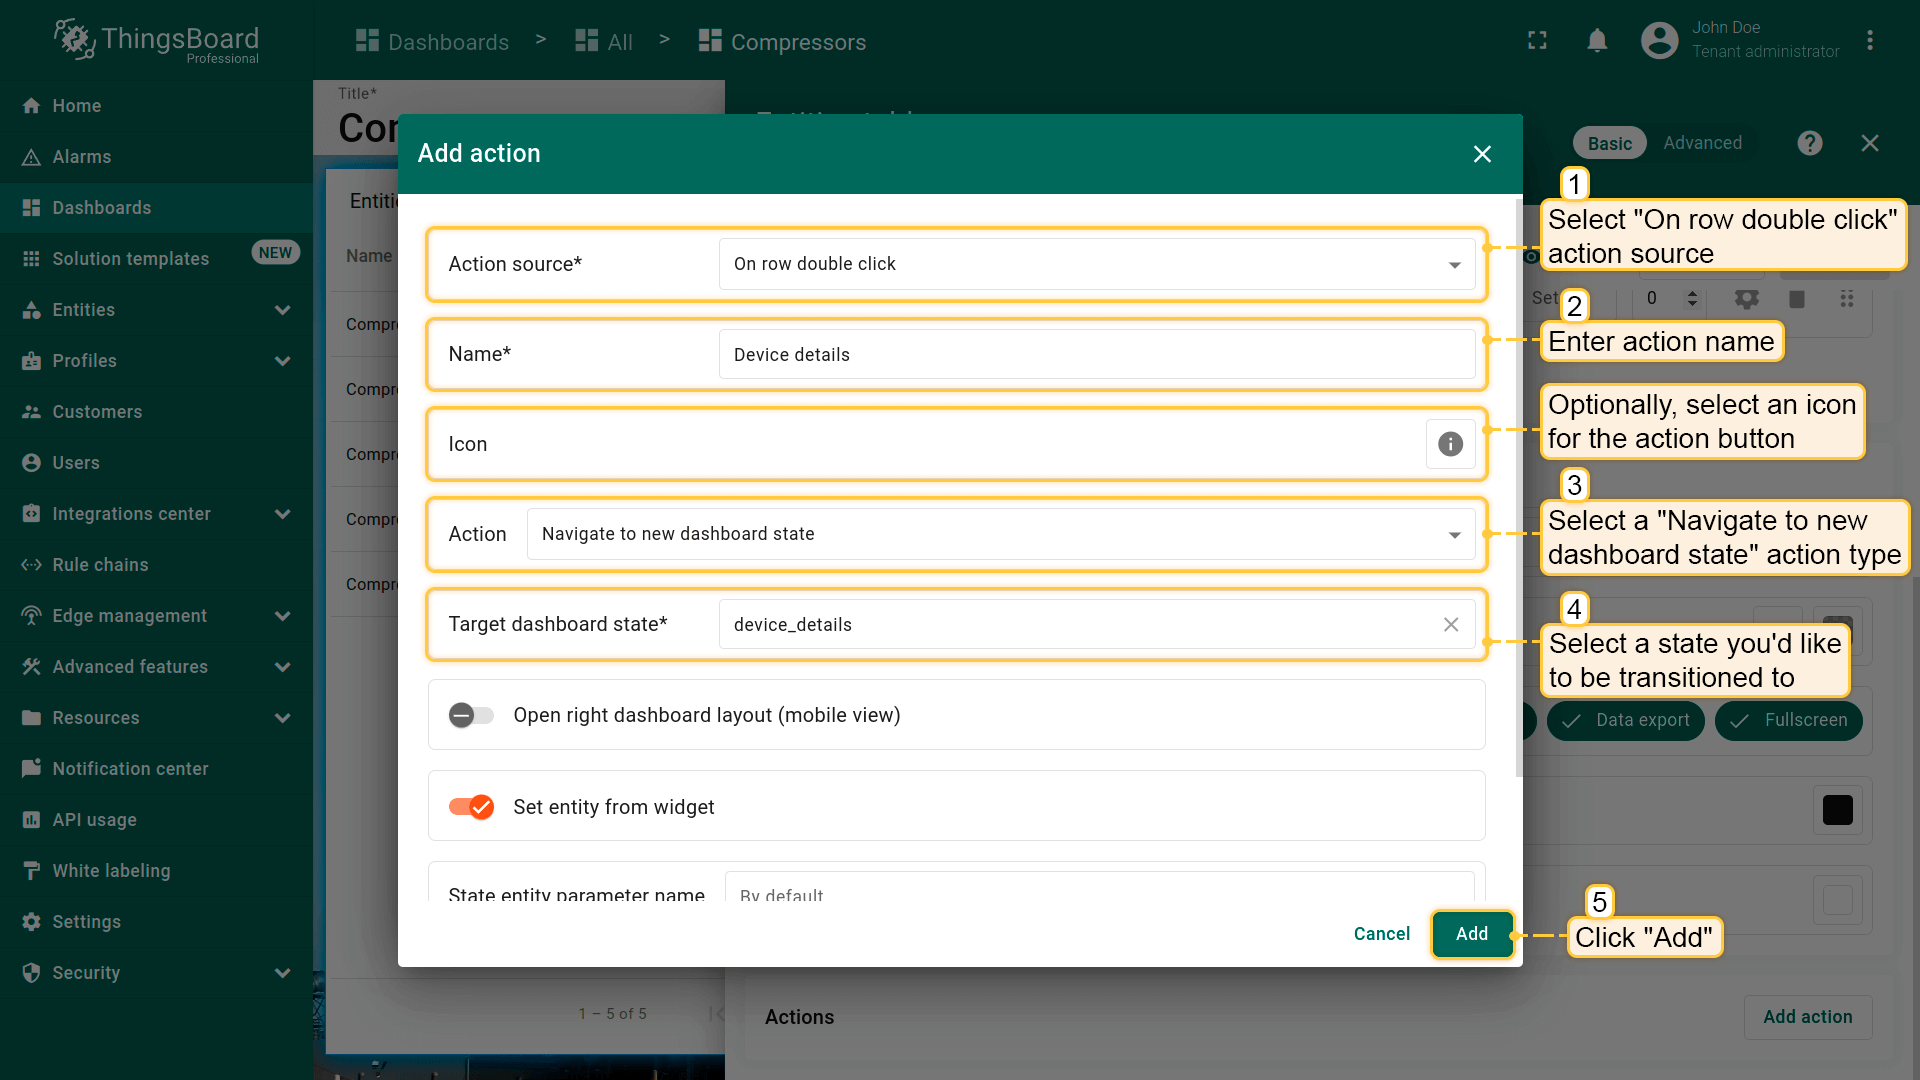
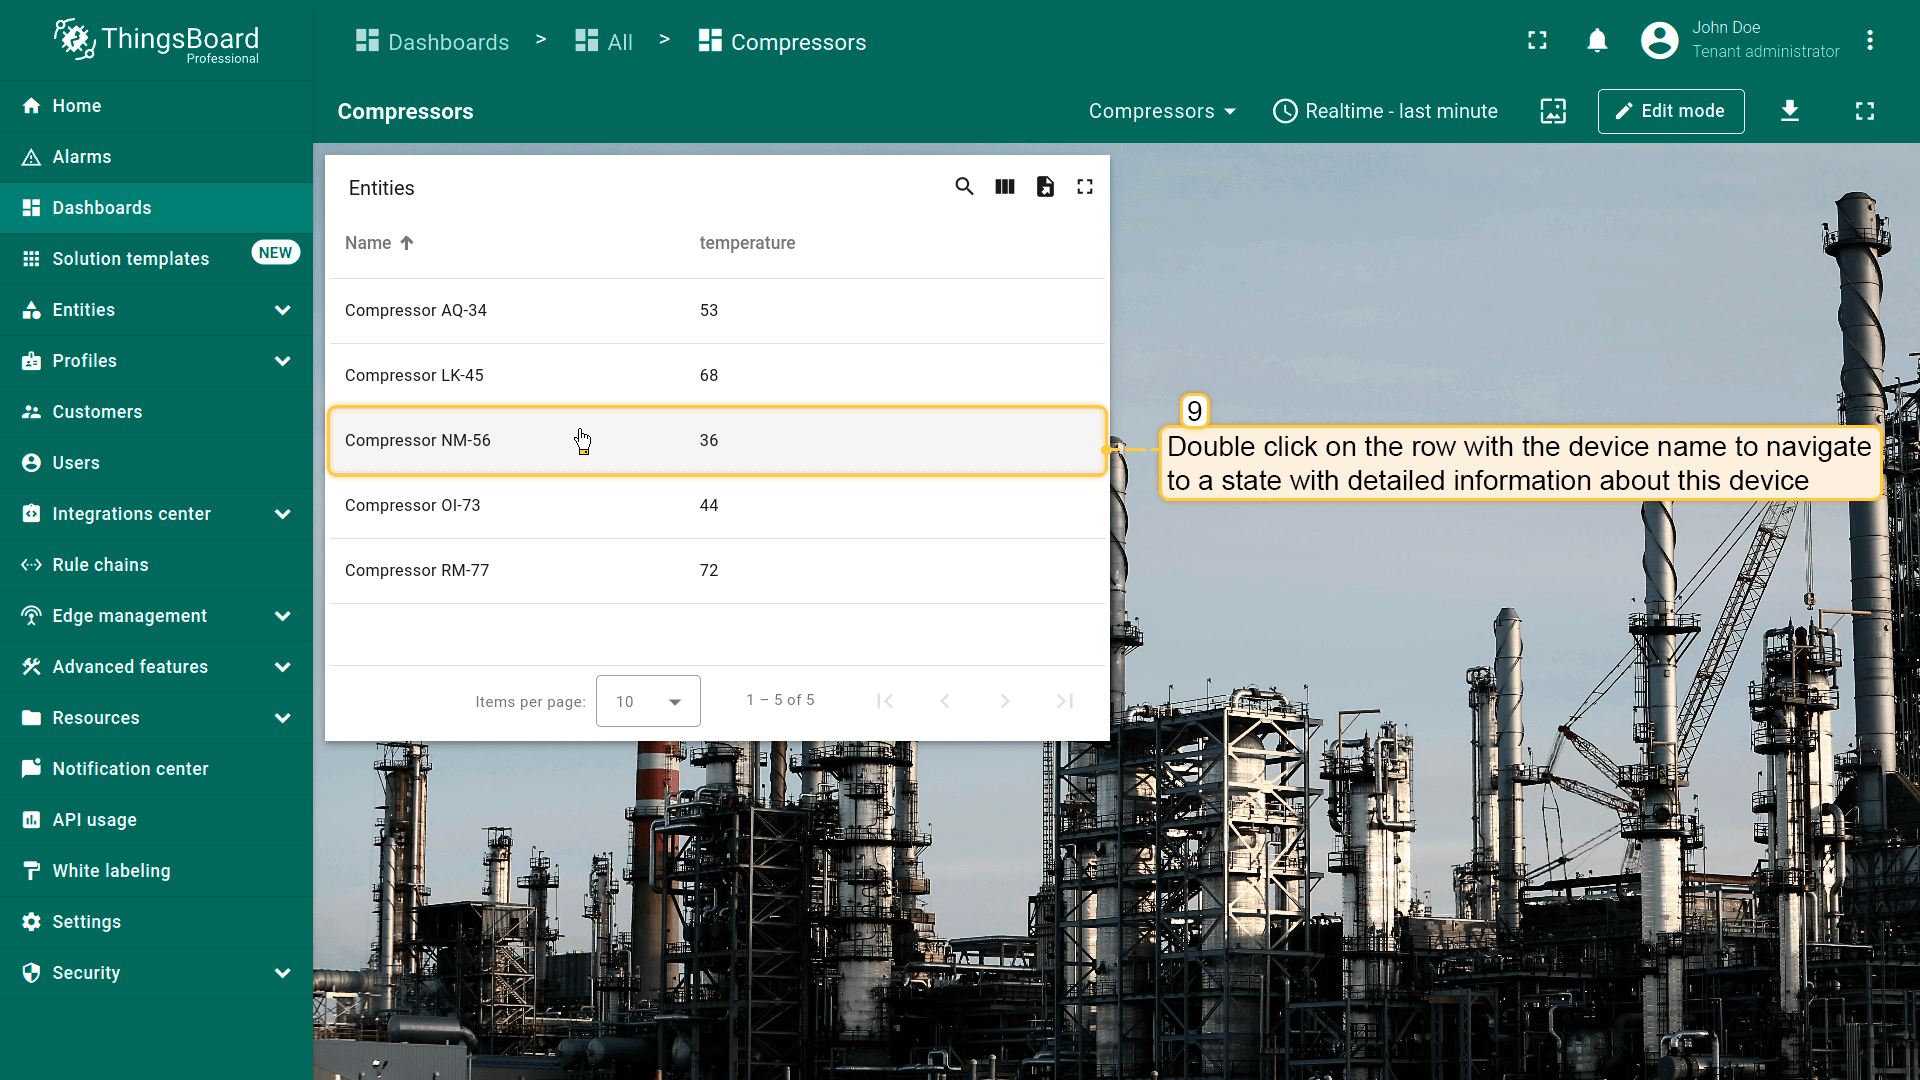
行双击事件
“On row double click”在双击部件中某行时触发action。常用于“Entities table”部件。 双击所选实体行将跳转到显示该实体详细信息的state。
假设已在dashboard上添加新 state并熟悉“Add action”步骤,直接进行action配置:
- 进入部件编辑模式,打开“Add action”窗口;
- 选择“On row double click”作为action来源;
- 输入action名称,可选选择图标;
- 在“Action”下拉菜单中选择“Navigate to new dashboard state”类型;
- 选择后会出现“Target dashboard state”下拉菜单,选择要跳转的已创建 state;
- 选择state后,点击“Add action”窗口底部的“Add”按钮;
- 在“Actions”窗口中查看已配置action,核对来源、图标和类型。点击“Save”,再点“Apply”保存部件设置;
- 点击dashboard页面右上角“Save”保存dashboard。


双击实体行即可执行action,即跳转到所选state。本例中,点击节点将跳转到显示所选节点详情的state。
节点选中事件
* 仅适用于Entities Hierarchy部件。
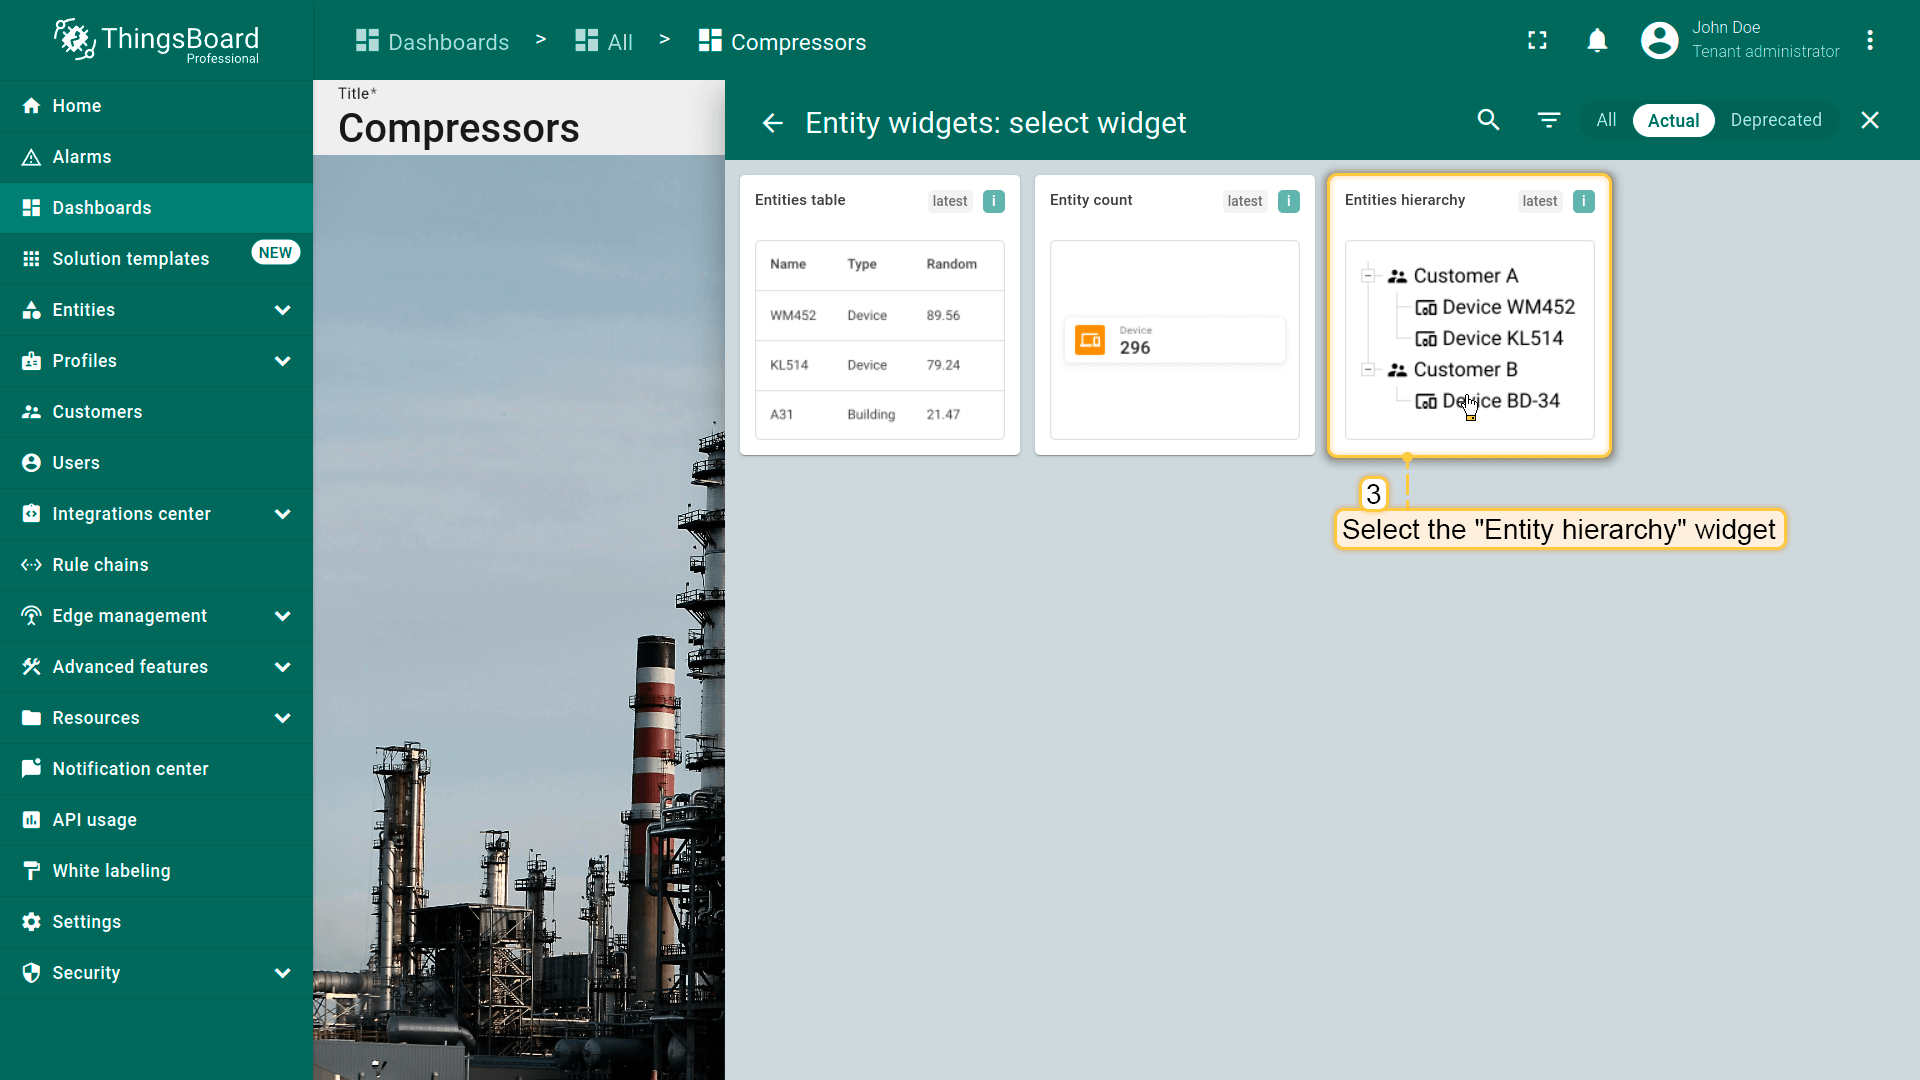
本例将在dashboard上添加“Entity hierarchy”部件。Entities Hierarchy部件按实体关系显示实体层级。 有关实体和relations的更多信息见此处。点击Entities hierarchy中任意实体(节点)将执行已配置的action。
假设已在dashboard上添加新 state。开始配置action:
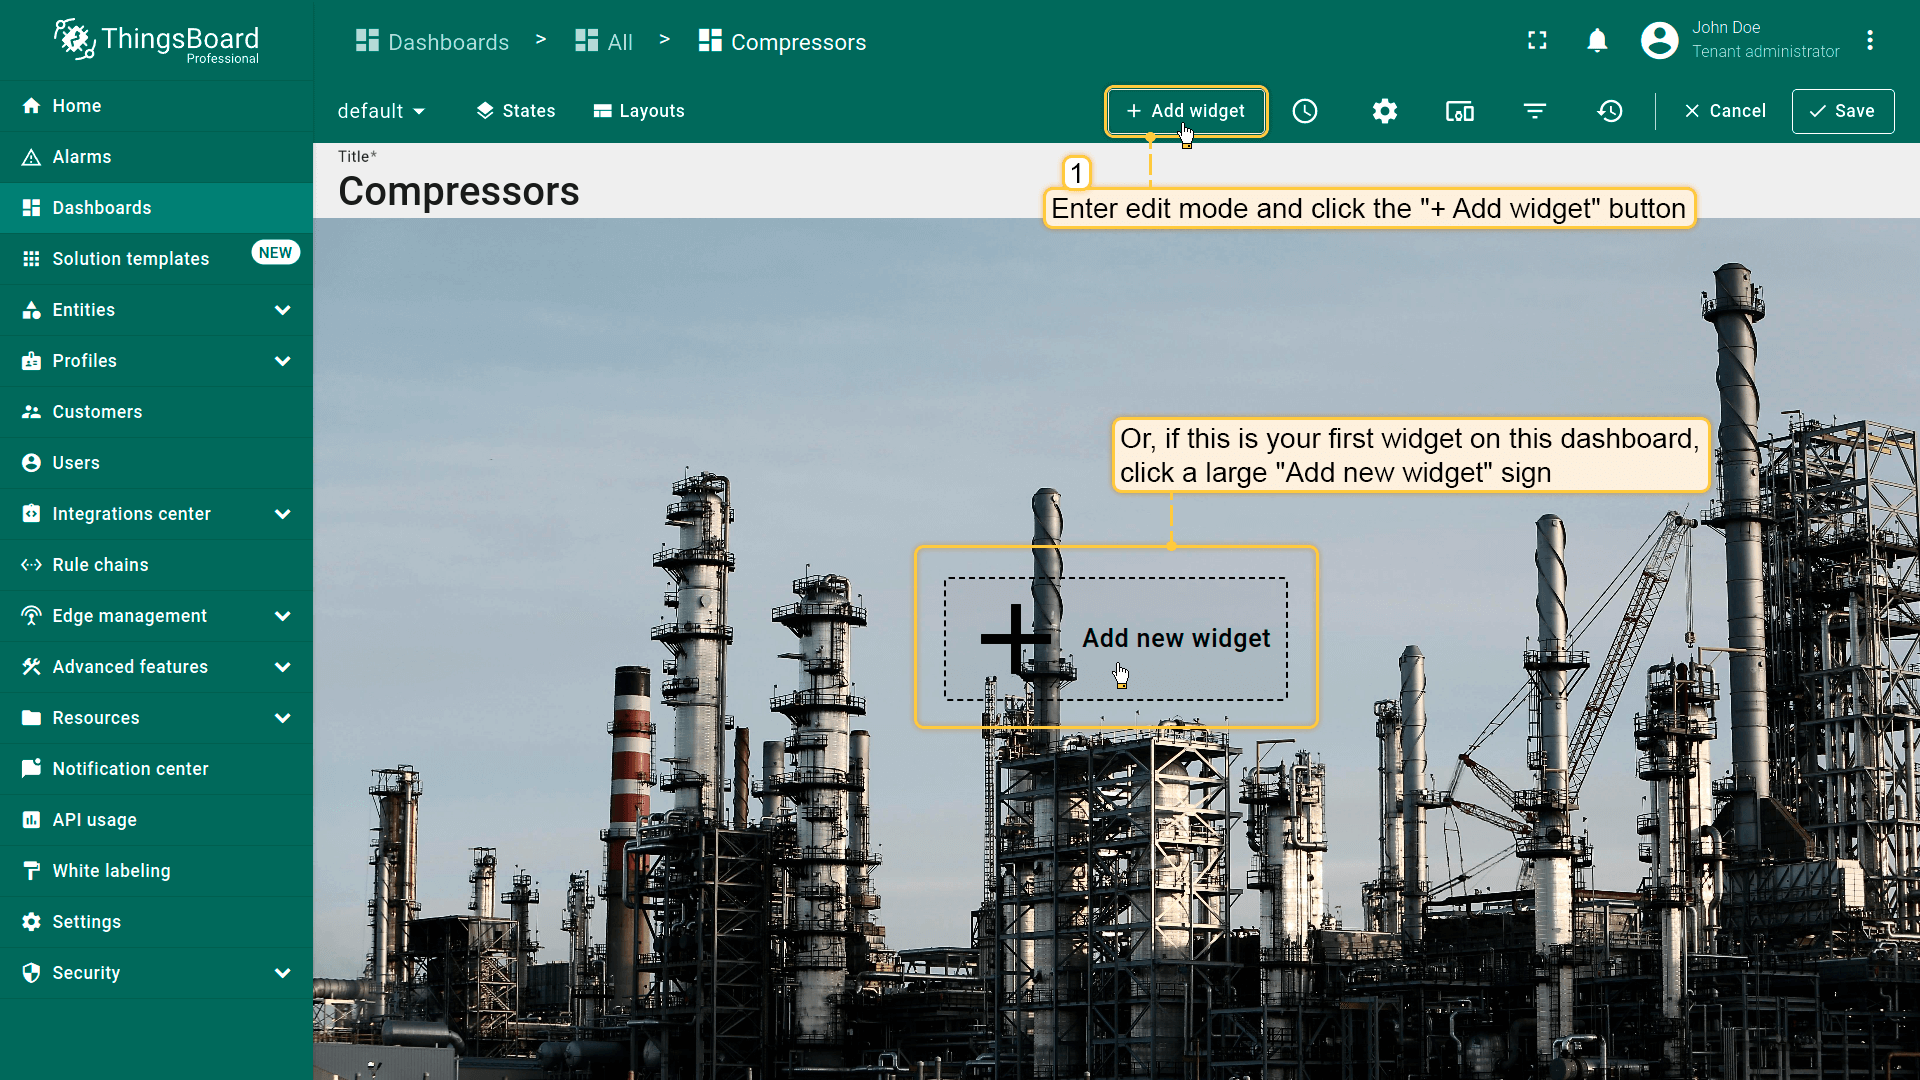
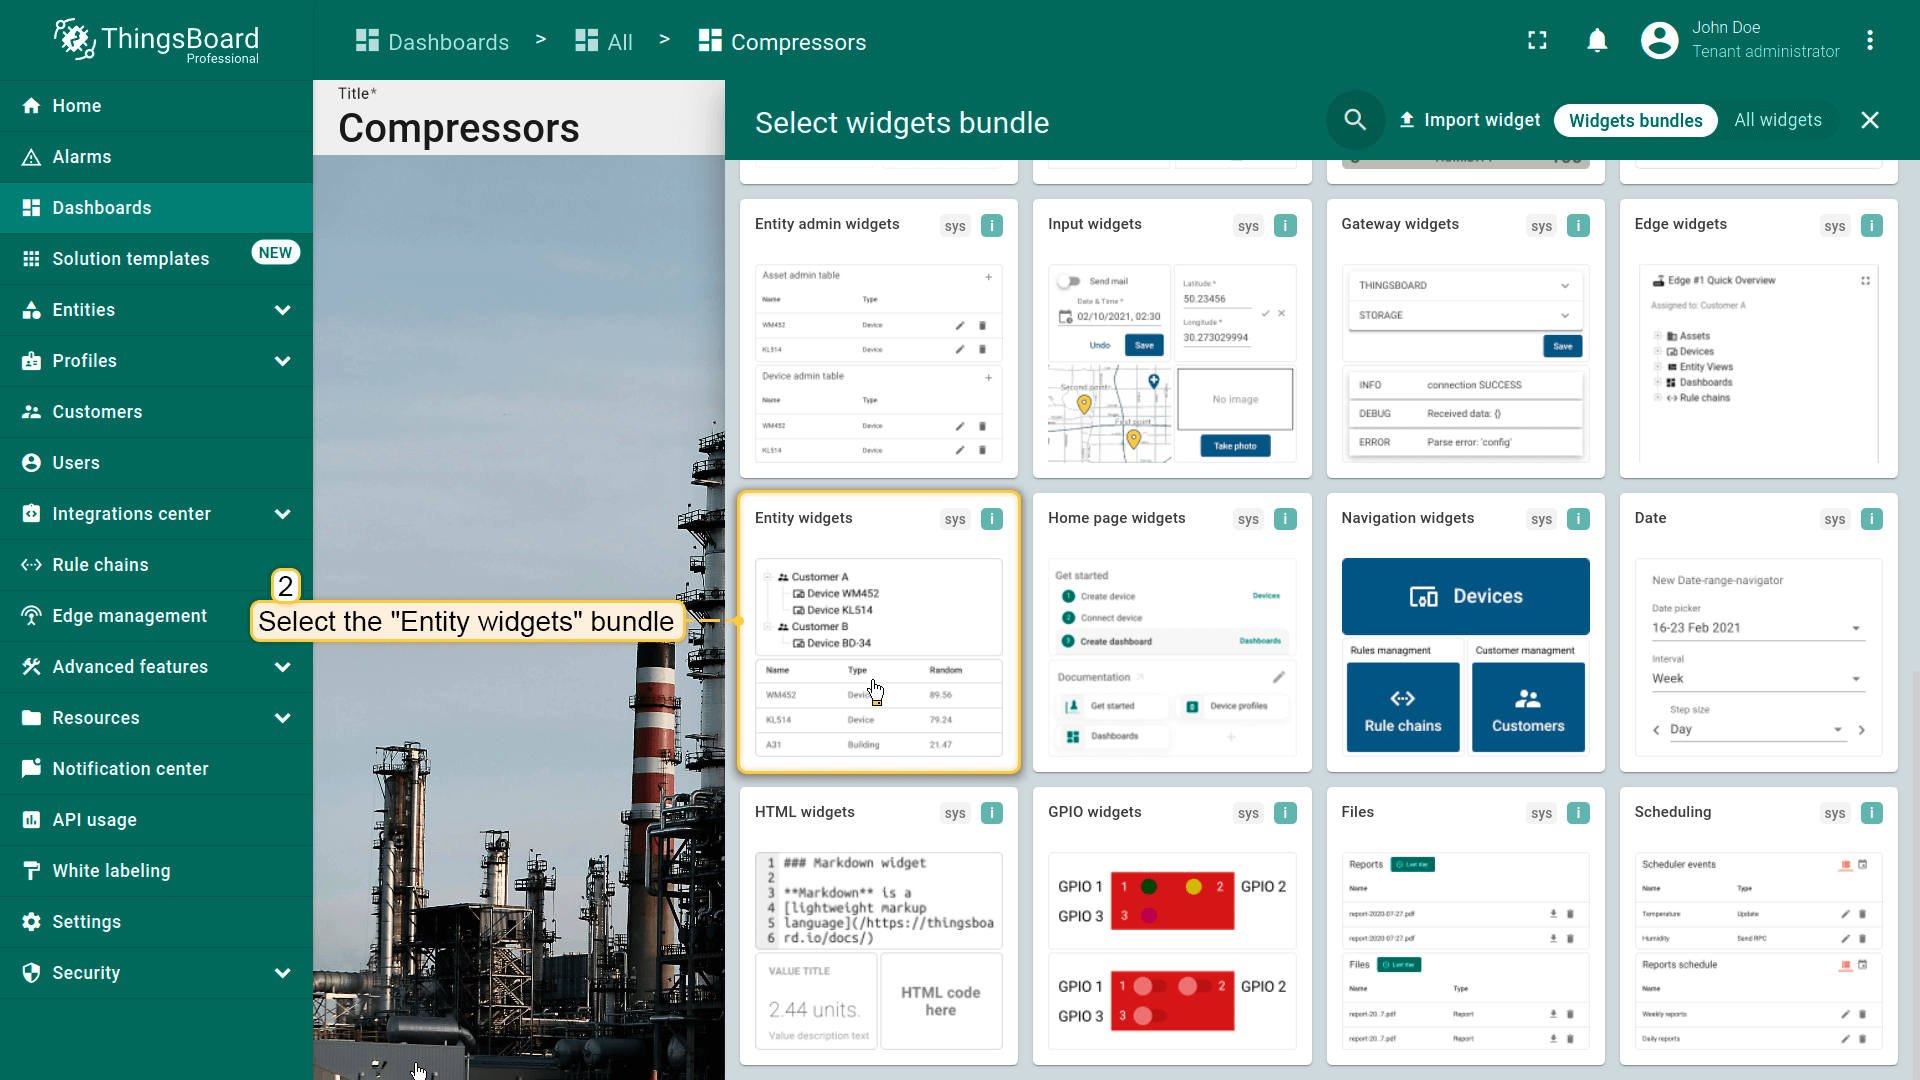
- Enter dashboard edit mode. Click the "Add widget" button at the top of the screen or click the large "Add new widget" icon in the center of the screen (if this is your first widget on this dashboard);
- Find the "Entity widgets" widget bundle and click on it;
- Select the "Entity hierarchy" widget;
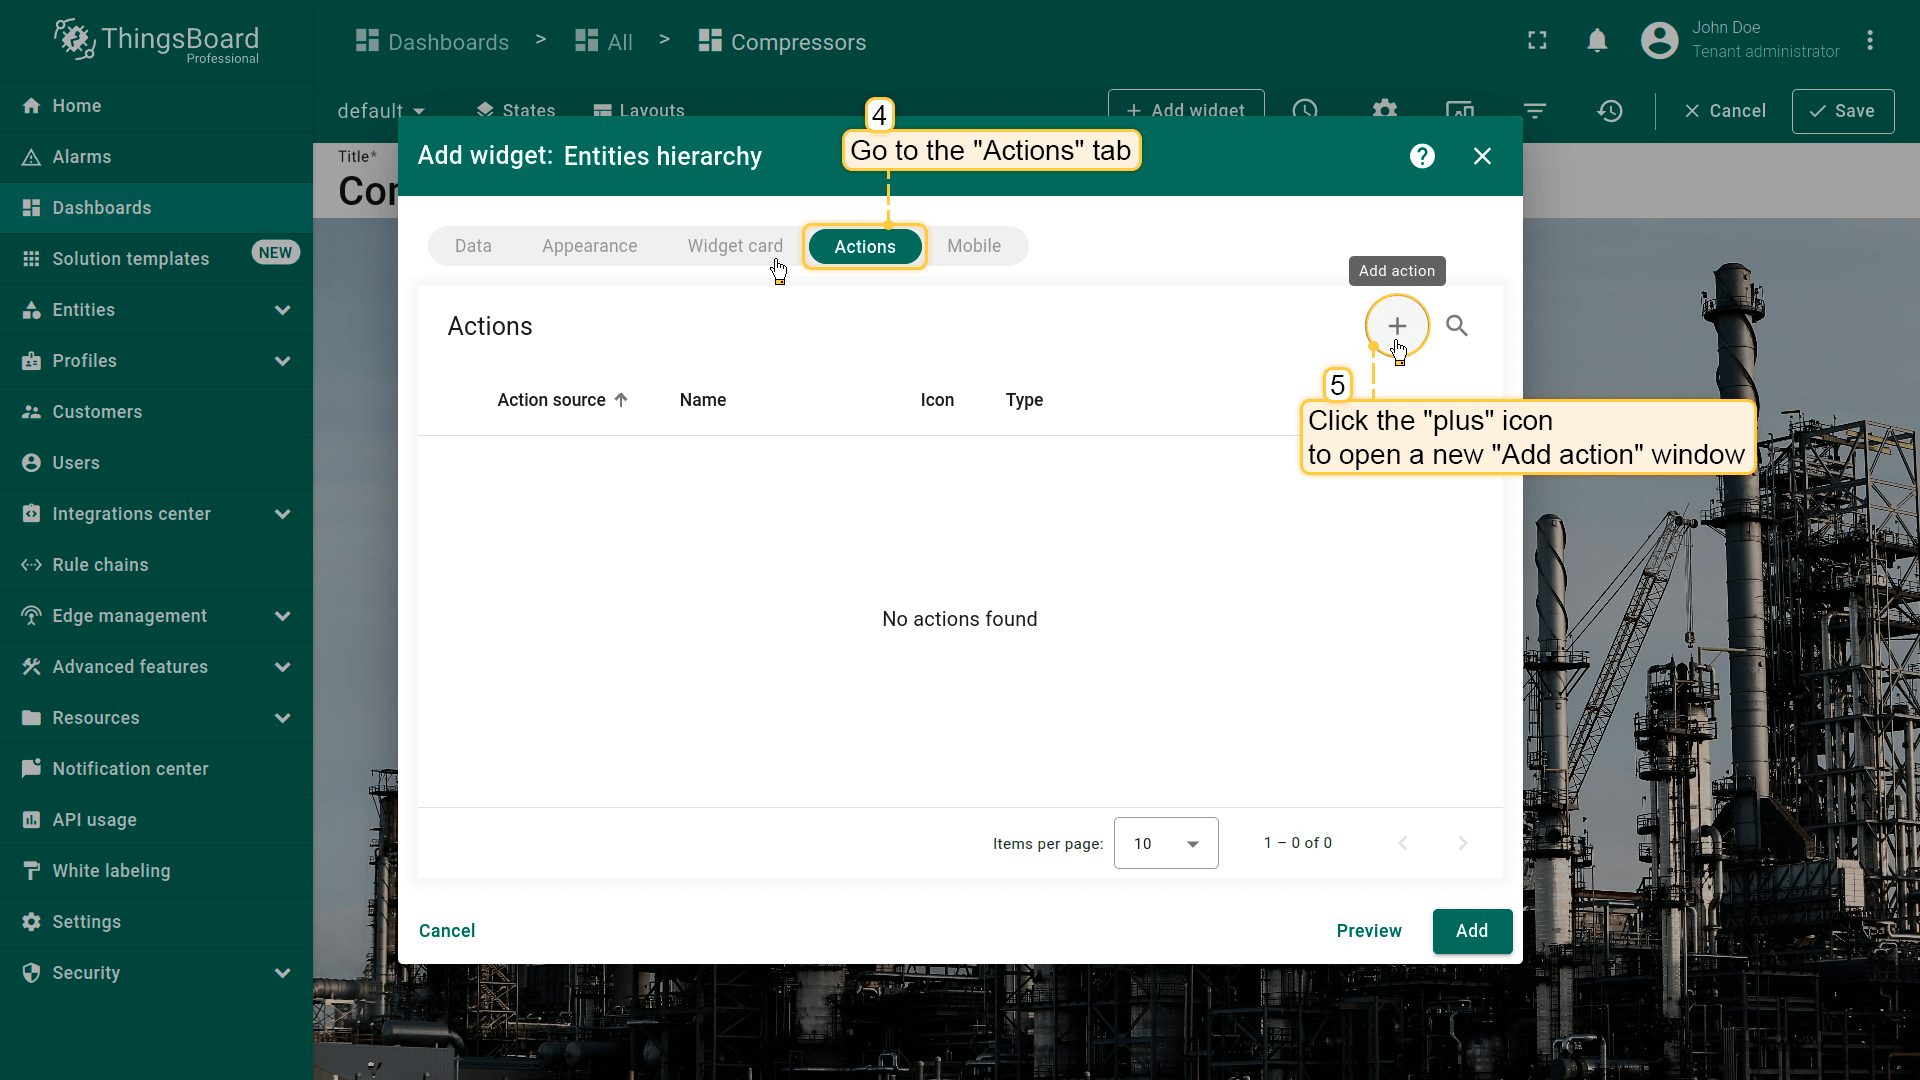
- Specify the data source for the widget and navigate to the "Actions" tab. Click the "plus" icon in the top right corner of the screen to open a new "Add action" window;
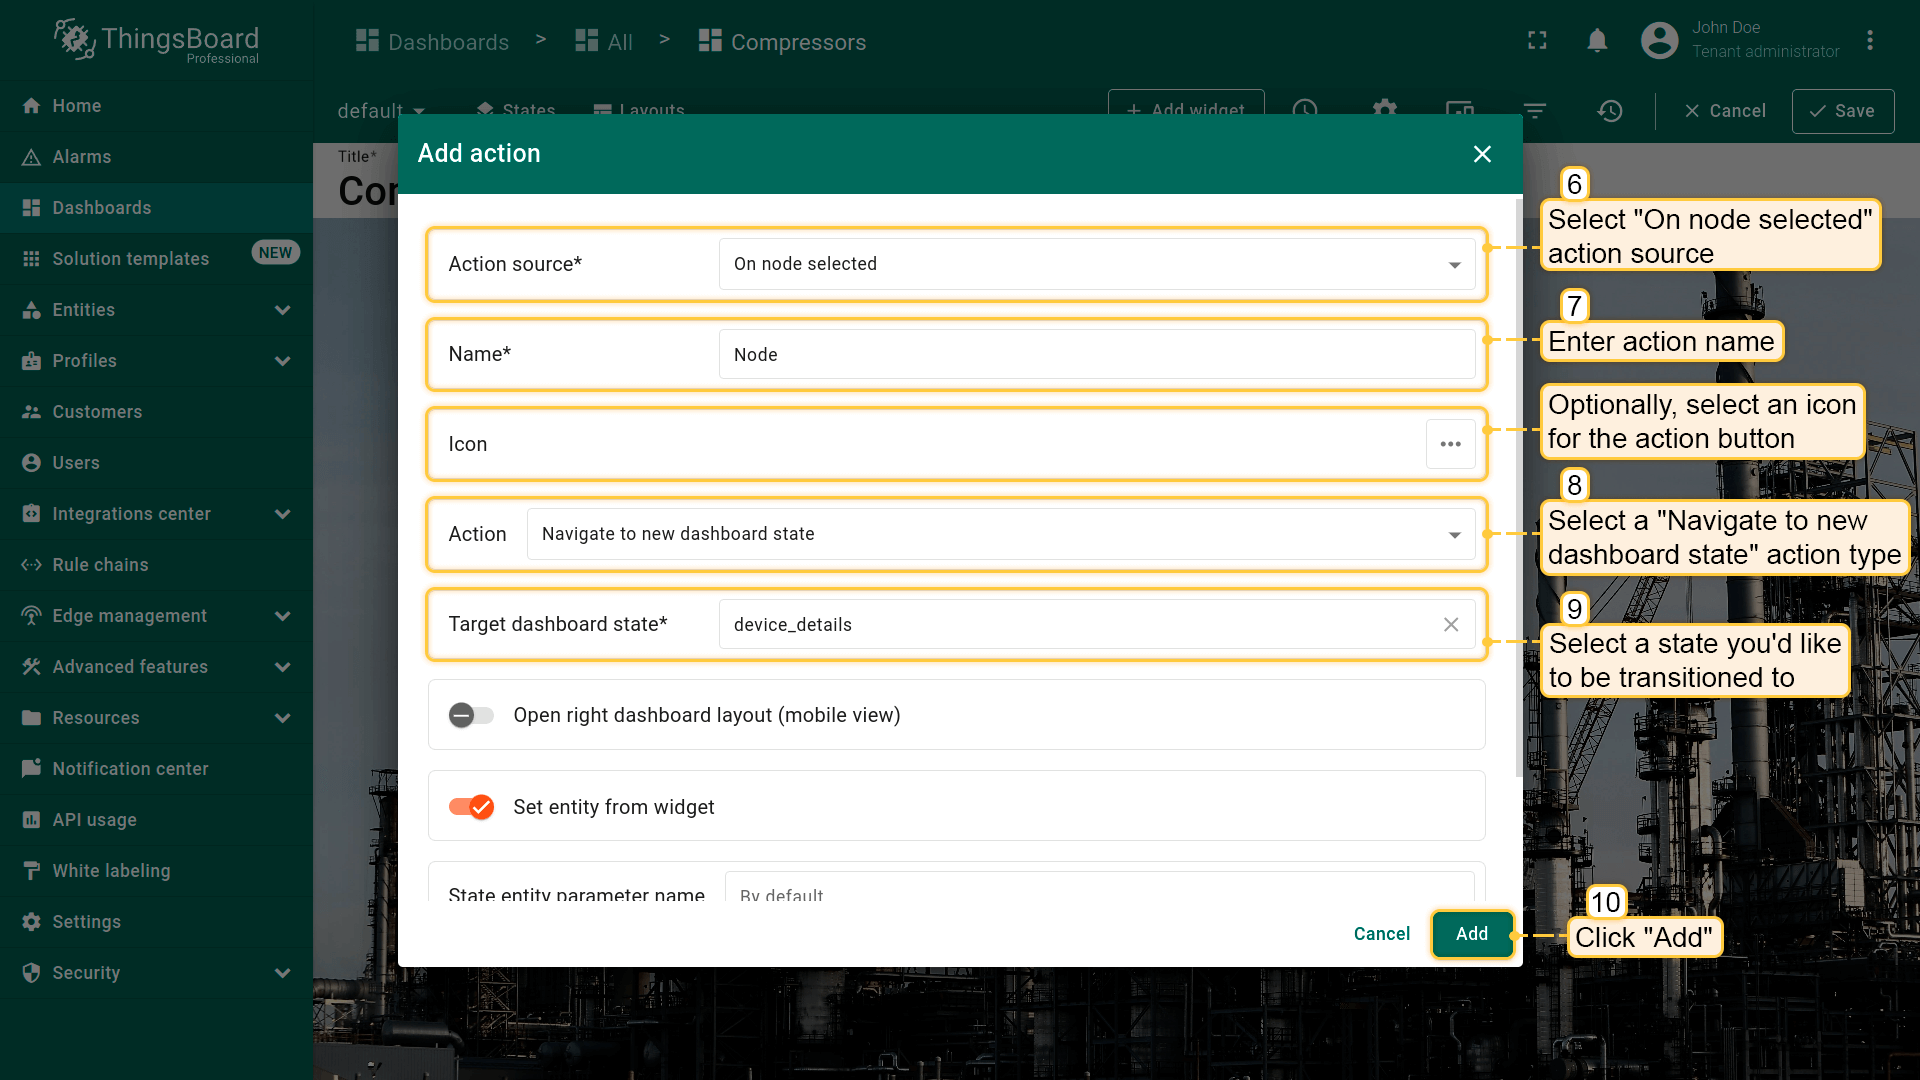
- Select "On node selected" as the action source. Input a name for the action. Optionally, select an icon. Select a "Navigate to new dashboard state" action type from the "Action" drop-down menu. After choosing an action type, the "Target dashboard state" drop-down menu appears. Select a previously created state you'd like to be transitioned to. When the desired state has been selected, click the "Add" button;
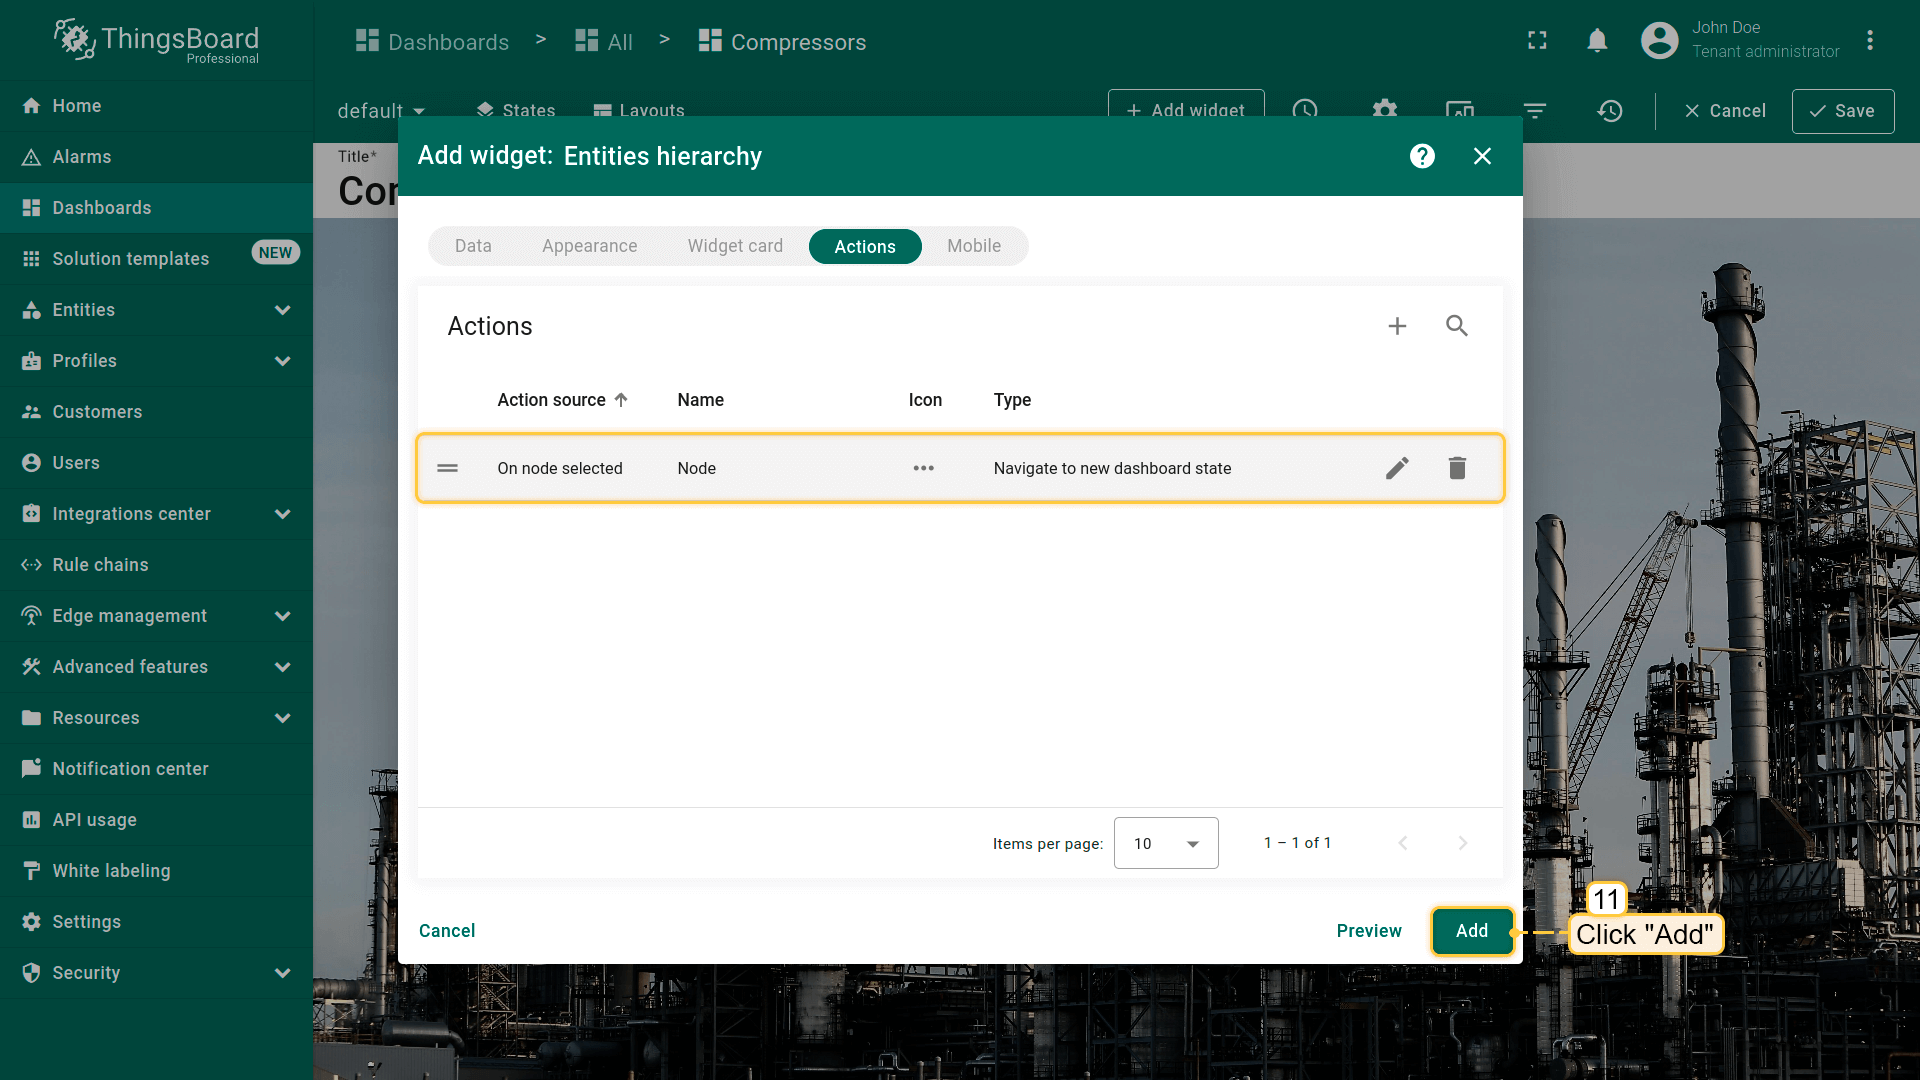
- Now in the "Actions" window, you can see the configured action. Click "Apply" to save the widget settings;
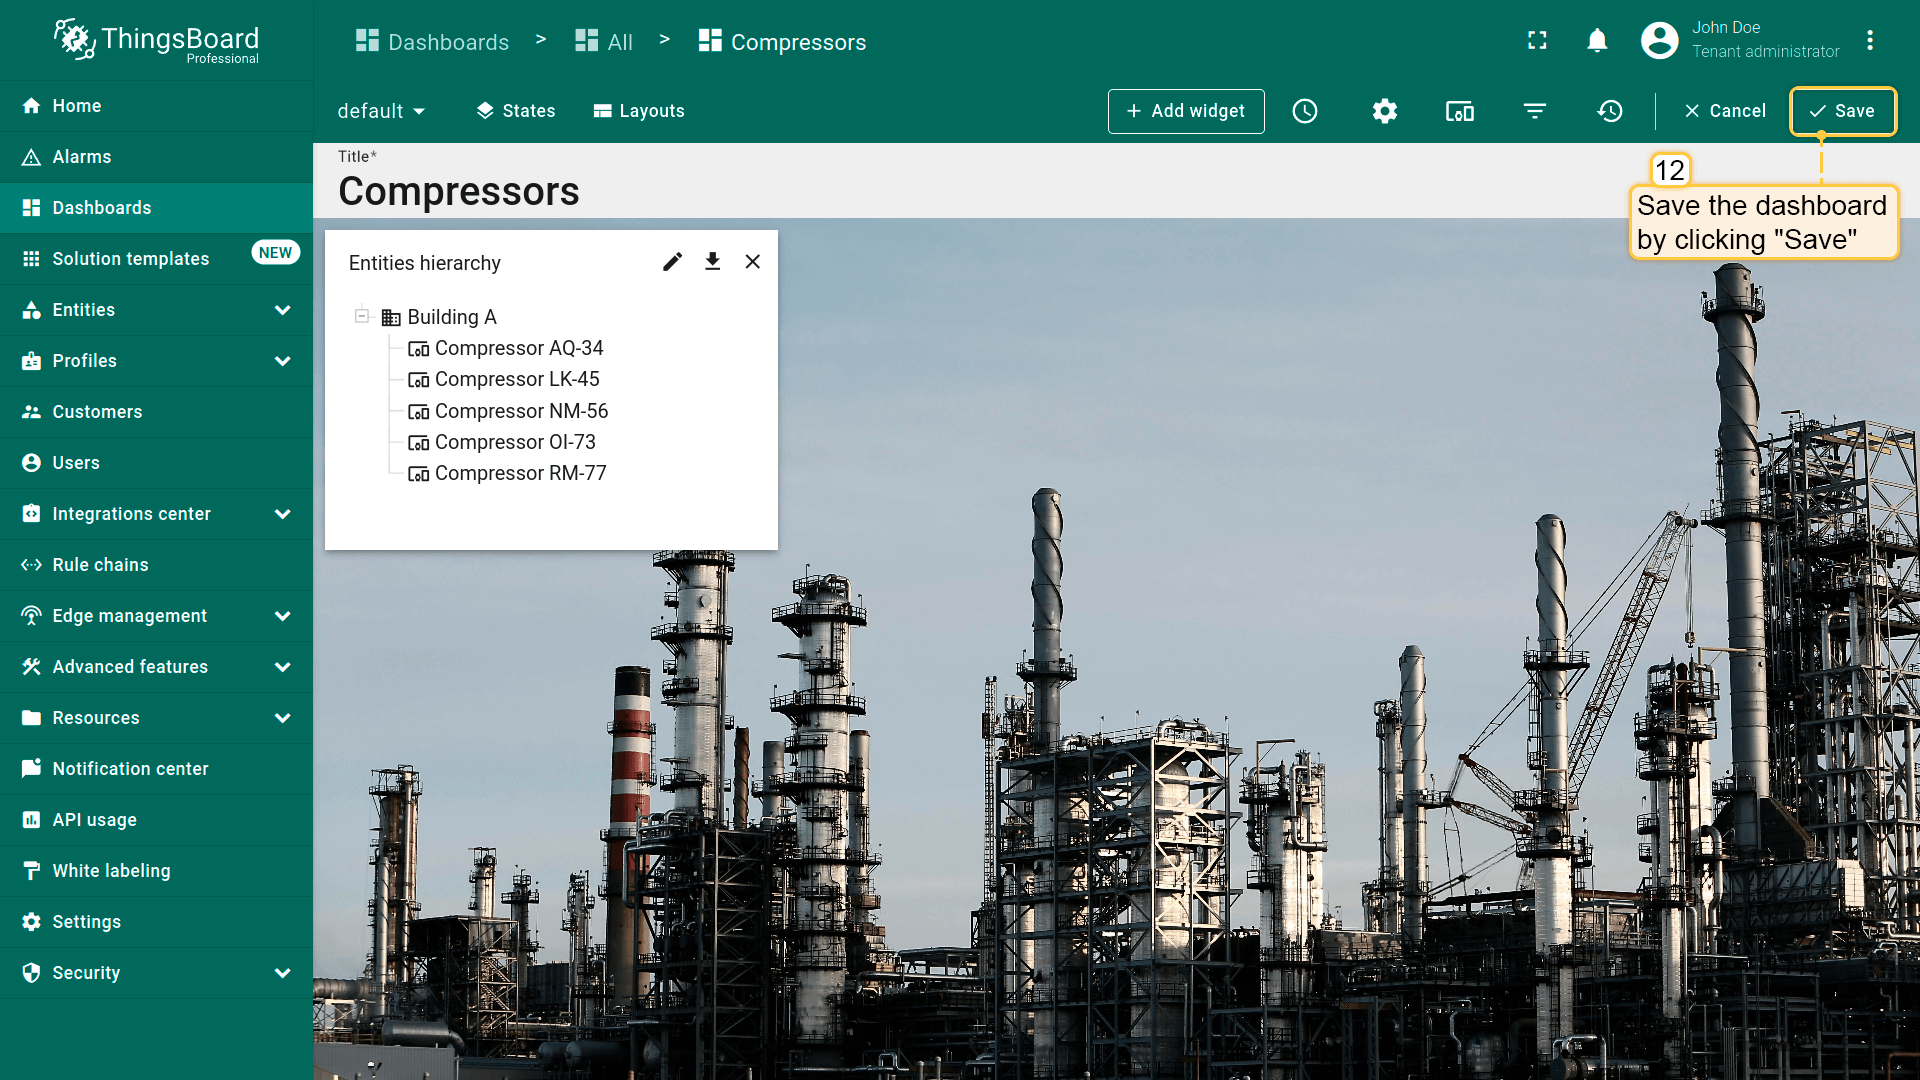
- Save the dashboard by clicking "Save" in the upper right corner of the dashboard page.
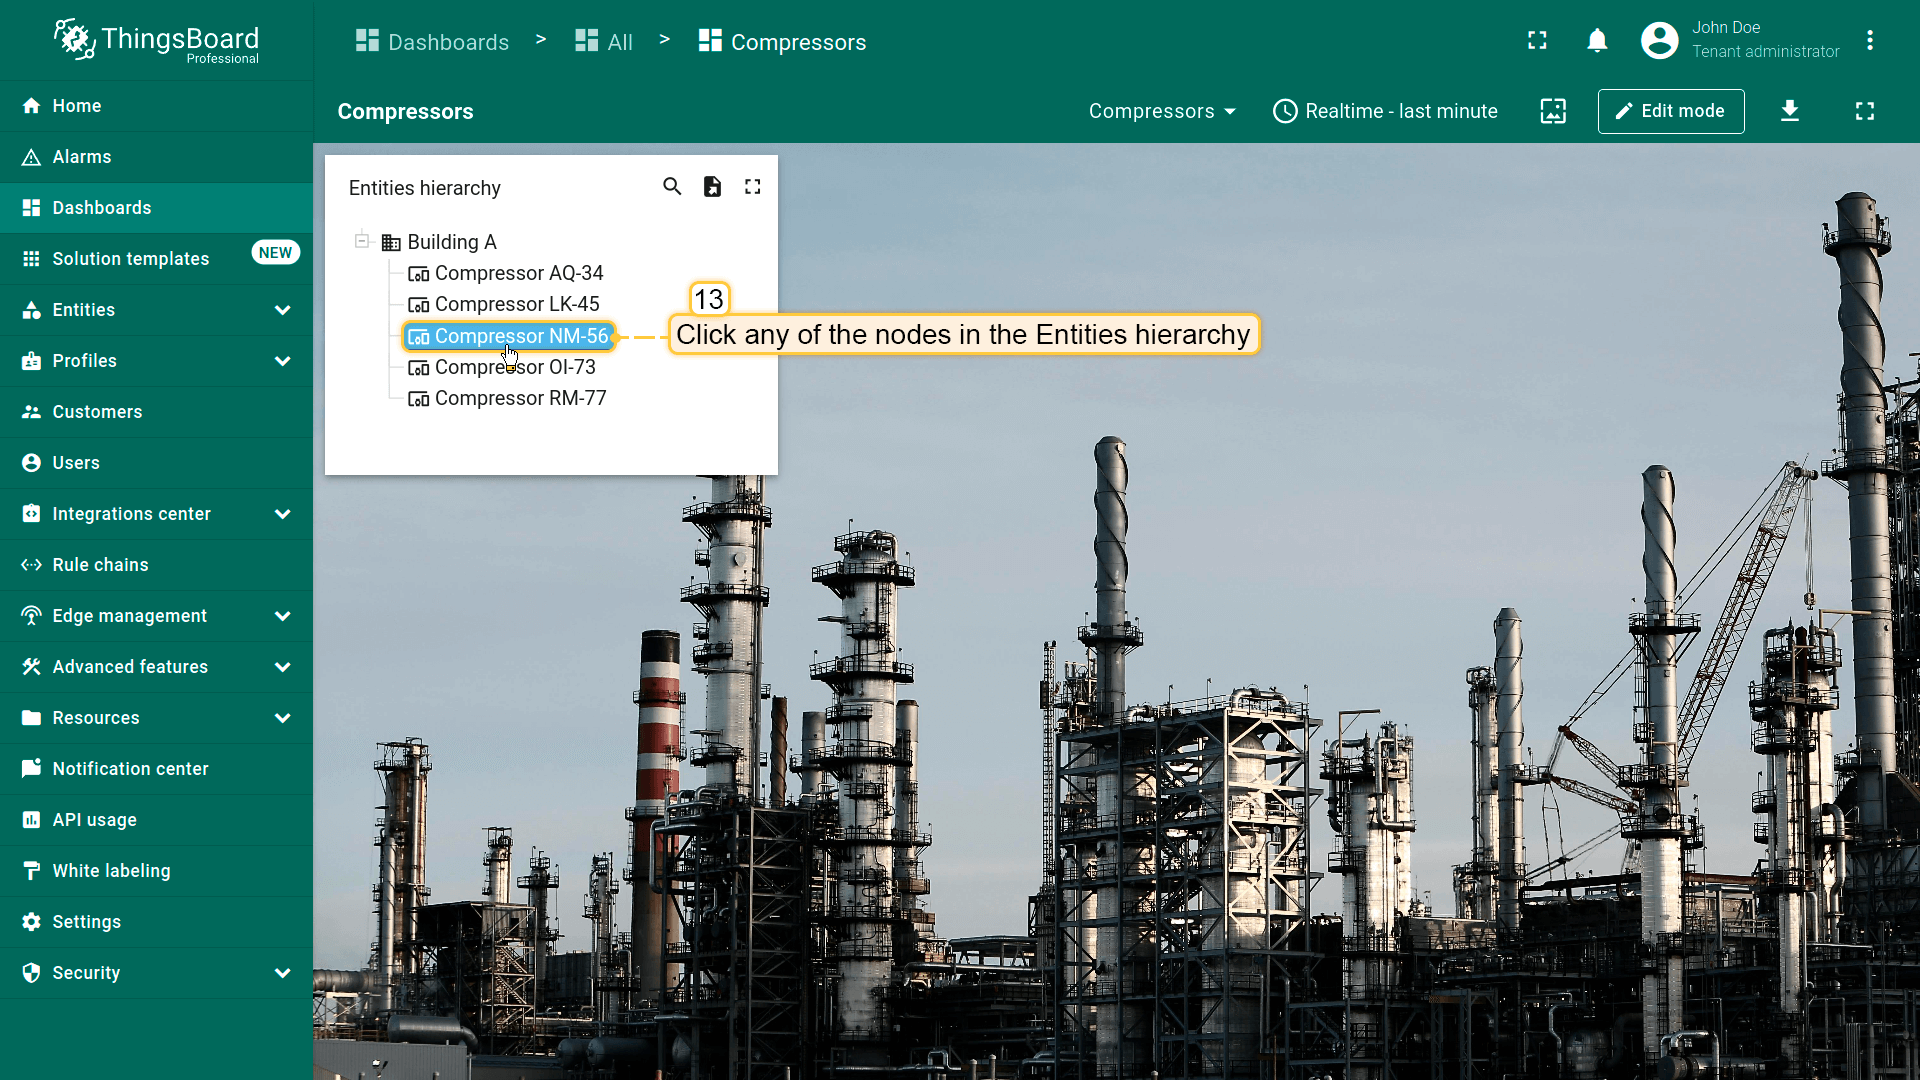
点击Entities hierarchy中任意节点即可执行action。本例中,点击节点将跳转到显示所选节点详情的state。

HTML元素点击事件
| 仅适用于HTML部件 |
On HTML element click 允许在用户点击部件HTML布局中的元素时触发action(跳转state、打开链接、执行custom action等)。
工作原理
配置 On HTML element click 时,id 属性是部件 HTML代码与部件 Actions 选项卡中定义的 action 之间的关联。
可将 id 赋给任意HTML元素(如 <div>、<span>、<p>、<h1>、<button>)。通常 id 用于容器元素(如 <p> 或 <div>),使整个块可点击。
1
2
3
<p id="details" class="blue-box">
    Current temperature: <span>22.5 °C</span>
</p>
提示
- 仅适用于HTML部件;表格、图表等请使用其专用action来源(On row click、On cell click、On node selected 等)。
ID必须与 Name 完全一致(区分大小写)。- 更复杂场景(对话框、表单)请使用支持它的部件中的 Custom action with HTML template / widgetContext.dialogs / widgetContext.customDialog。
逐步配置
- 进入 部件编辑模式 → 打开 Actions 选项卡 → 点击 +(Add action)。
- 在Action source中选择 On HTML element click。
- 设置 Name(同时作为HTML元素的 ID)。
- 在 Action 中选择action类型(如 Navigate to new dashboard state)并指定目标state。
- 保存action(Add)。
- 进入 Appearance 选项卡 → HTML 部分,添加
id与action的Name完全一致的元素。 - 应用更改(Apply)并保存dashboard。
保存后,ThingsBoard会监听该部件中id与已创建action的Name匹配的元素的点击。若匹配,则执行所选action类型(跳转、更新state、custom action等)。
示例:Markdown/HTML Card部件 — 点击蓝色区域
准备:
- 使用下方提供的HTML和CSS将 Markdown/HTML Card 部件添加到dashboard。
- 创建新 dashboard state,包含设备温度详情。
可选: 可下载预配置 dashboard(已含Markdown/HTML Card部件和details state),然后导入到ThingsBoard实例。
重要: 导入后,更新部件datasource中的 target entity 和 data key。
添加Markdown/HTML Card
Markdown/HTML pattern:
1
2
3
4
5
const entity = data[0];
const color = entity.temperature > 25 ? "red" : entity.temperature > 20 ? 'green' : 'blue'
const entityName = `### Temperature value card\n - Current entity: <span >${entity.entityName}</span>\n `
const temp = `- Current temperature: <span style="color:${color};">${entity.temperature.toFixed(1)} °C</span>\n `
return entityName + temp;
Markdown/HTML CSS:
添加action
- 进入 部件编辑模式 → 打开 Actions 选项卡 → 点击 +(Add action)。
- 选择 Action source:On HTML element click。
- 将 action name 设为 details。
- 在 Action 中选择 Navigate to new dashboard state。
- 在 Target dashboard state 中选择此前创建的state。
- 点击 Add 保存action。
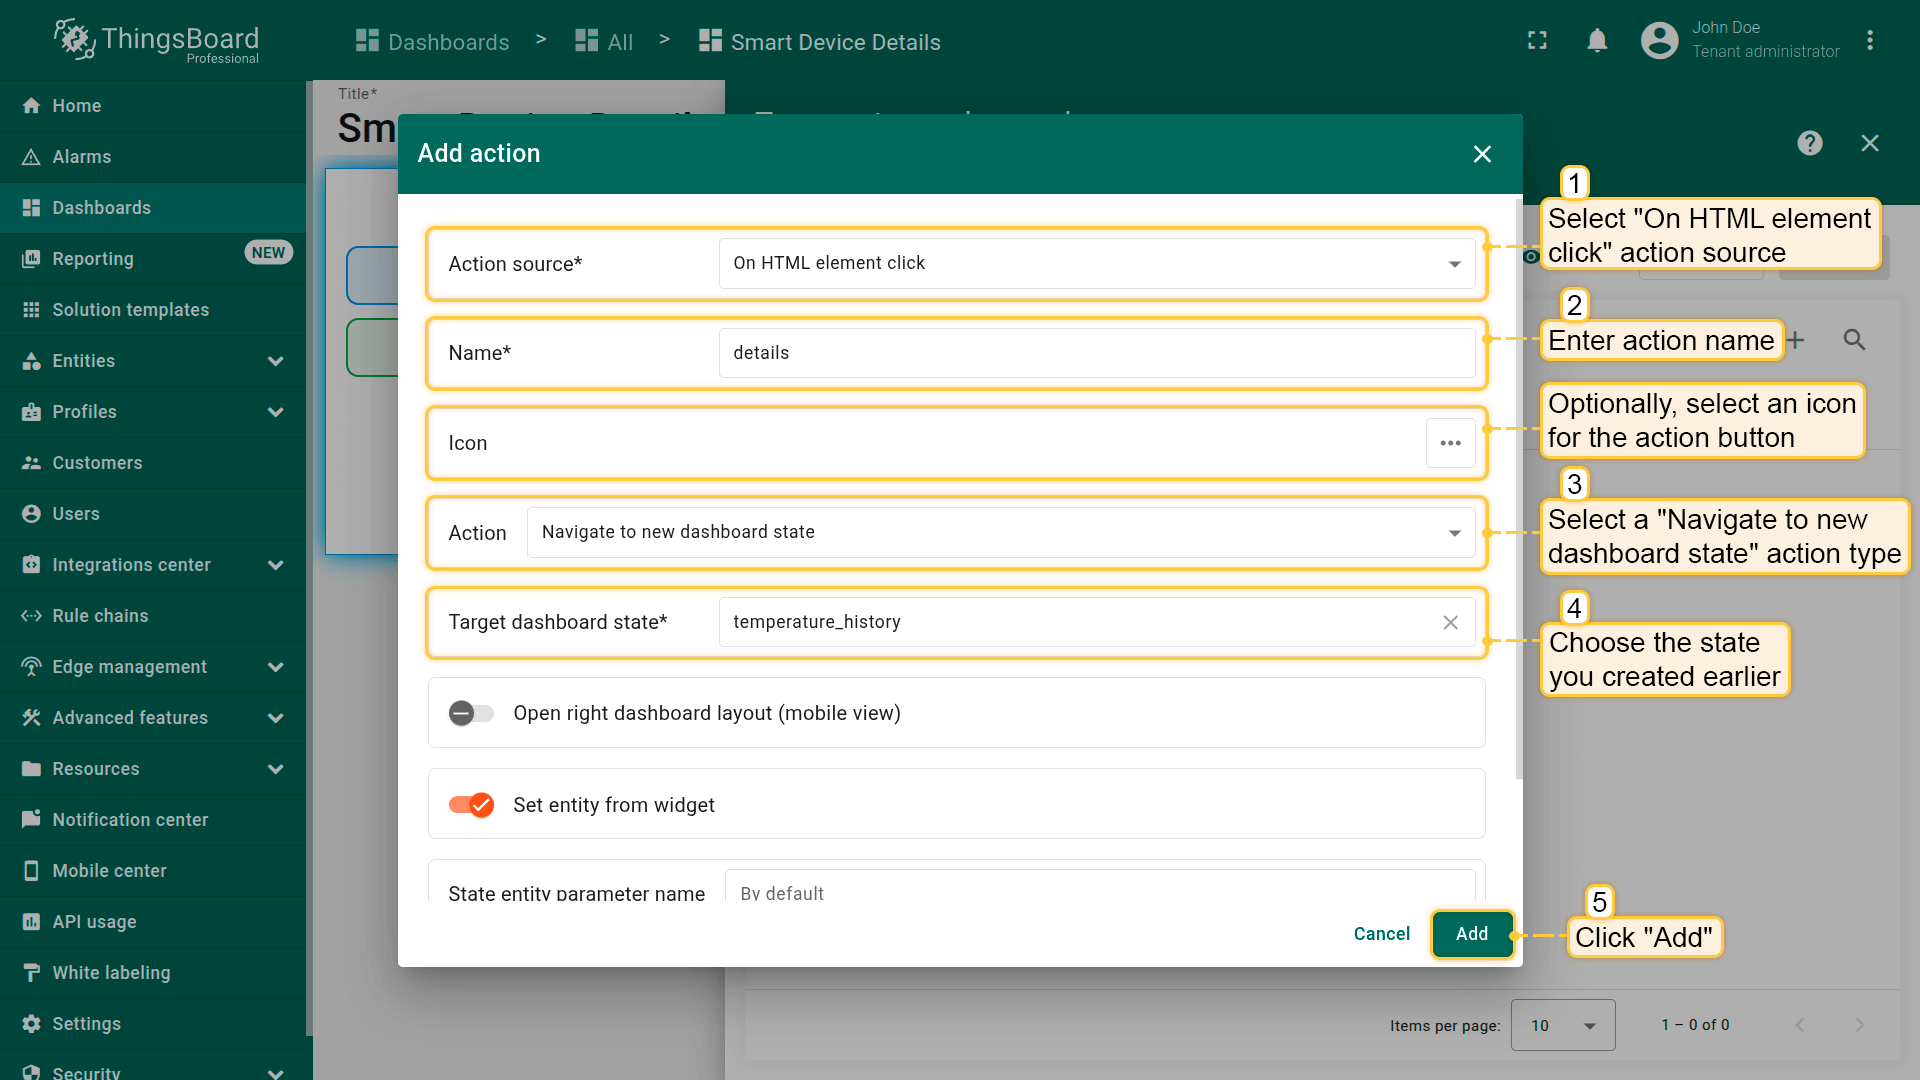
Add the action: Choose Action source: On HTML element click; Enter details as the action name; In Action, select Navigate to new dashboard state; In Target dashboard state, select the state you created earlier; Click Add to save the action.
在HTML中添加id
- 进入 Appearance 选项卡 → HTML 部分。
-
将
id=details添加到<p class="blue-box">行。 替换为:1
<p id="details" class="blue-box">
使整个蓝色块可点击,并与 details action关联。
- 应用更改(Apply)并保存dashboard。

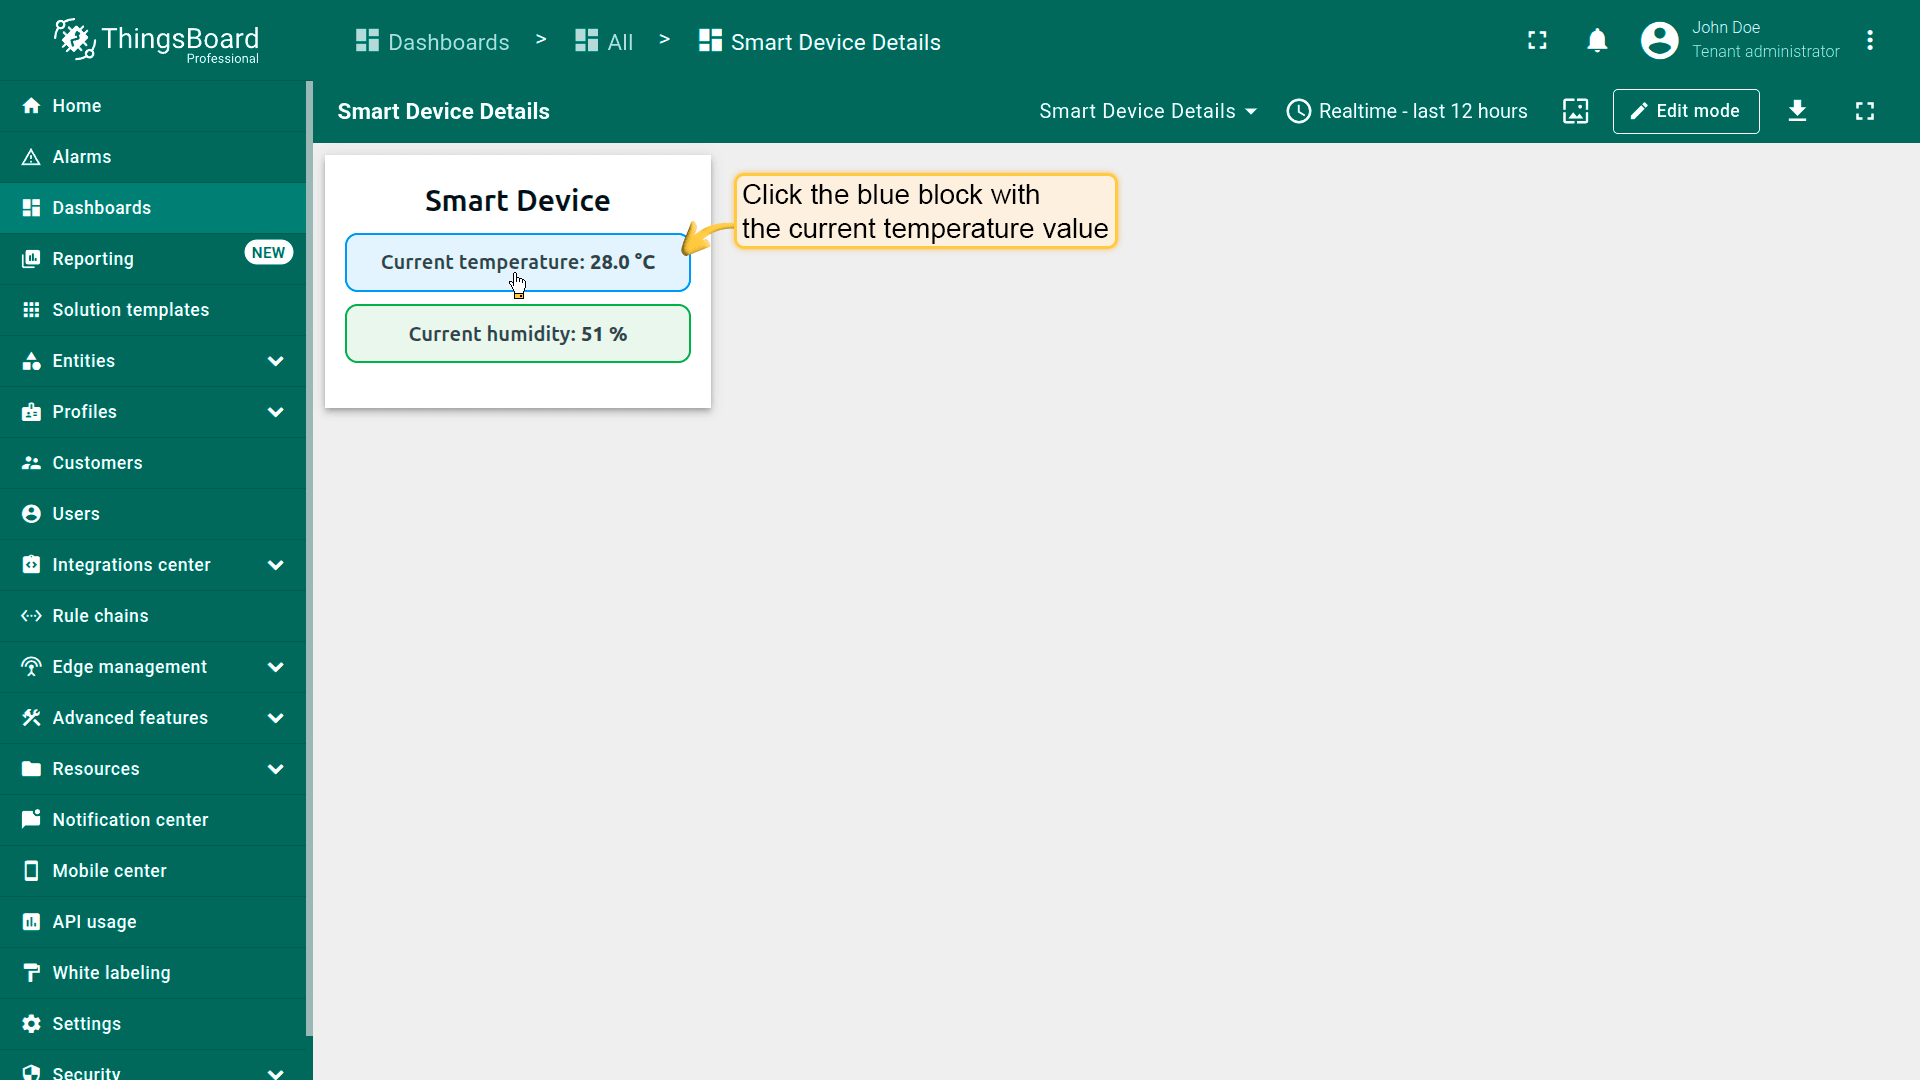
结果
点击包含当前温度的蓝色块将执行已配置的action并跳转到目标state。
地图部件操作来源
Map部件有独立的action来源,需单独说明。
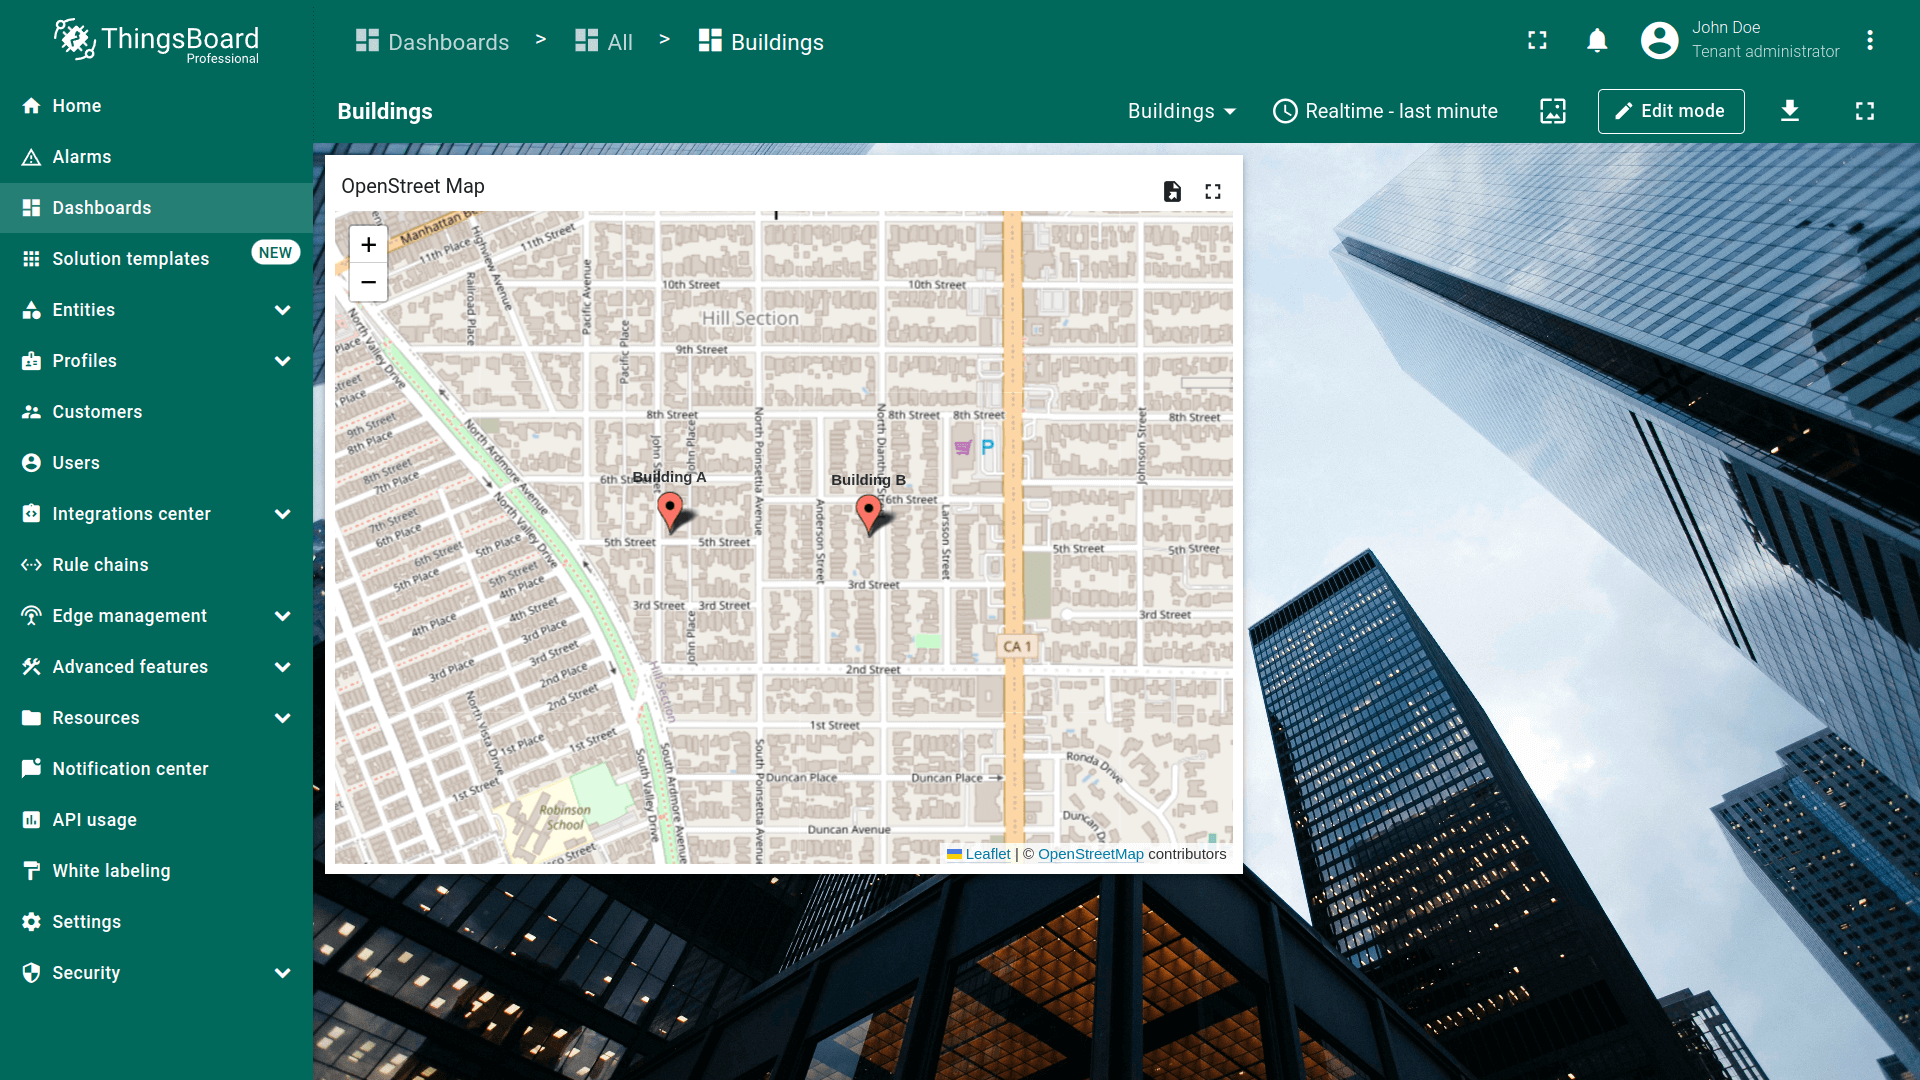
先添加地图部件(如OpenStreetMap部件)。另有创建和配置地图部件的指南,请先阅读。
下面添加action。 后续关于action的说明均假定你已在dashboard上添加新 state并熟悉“Add action”步骤,直接进行action配置。
圆形点击事件
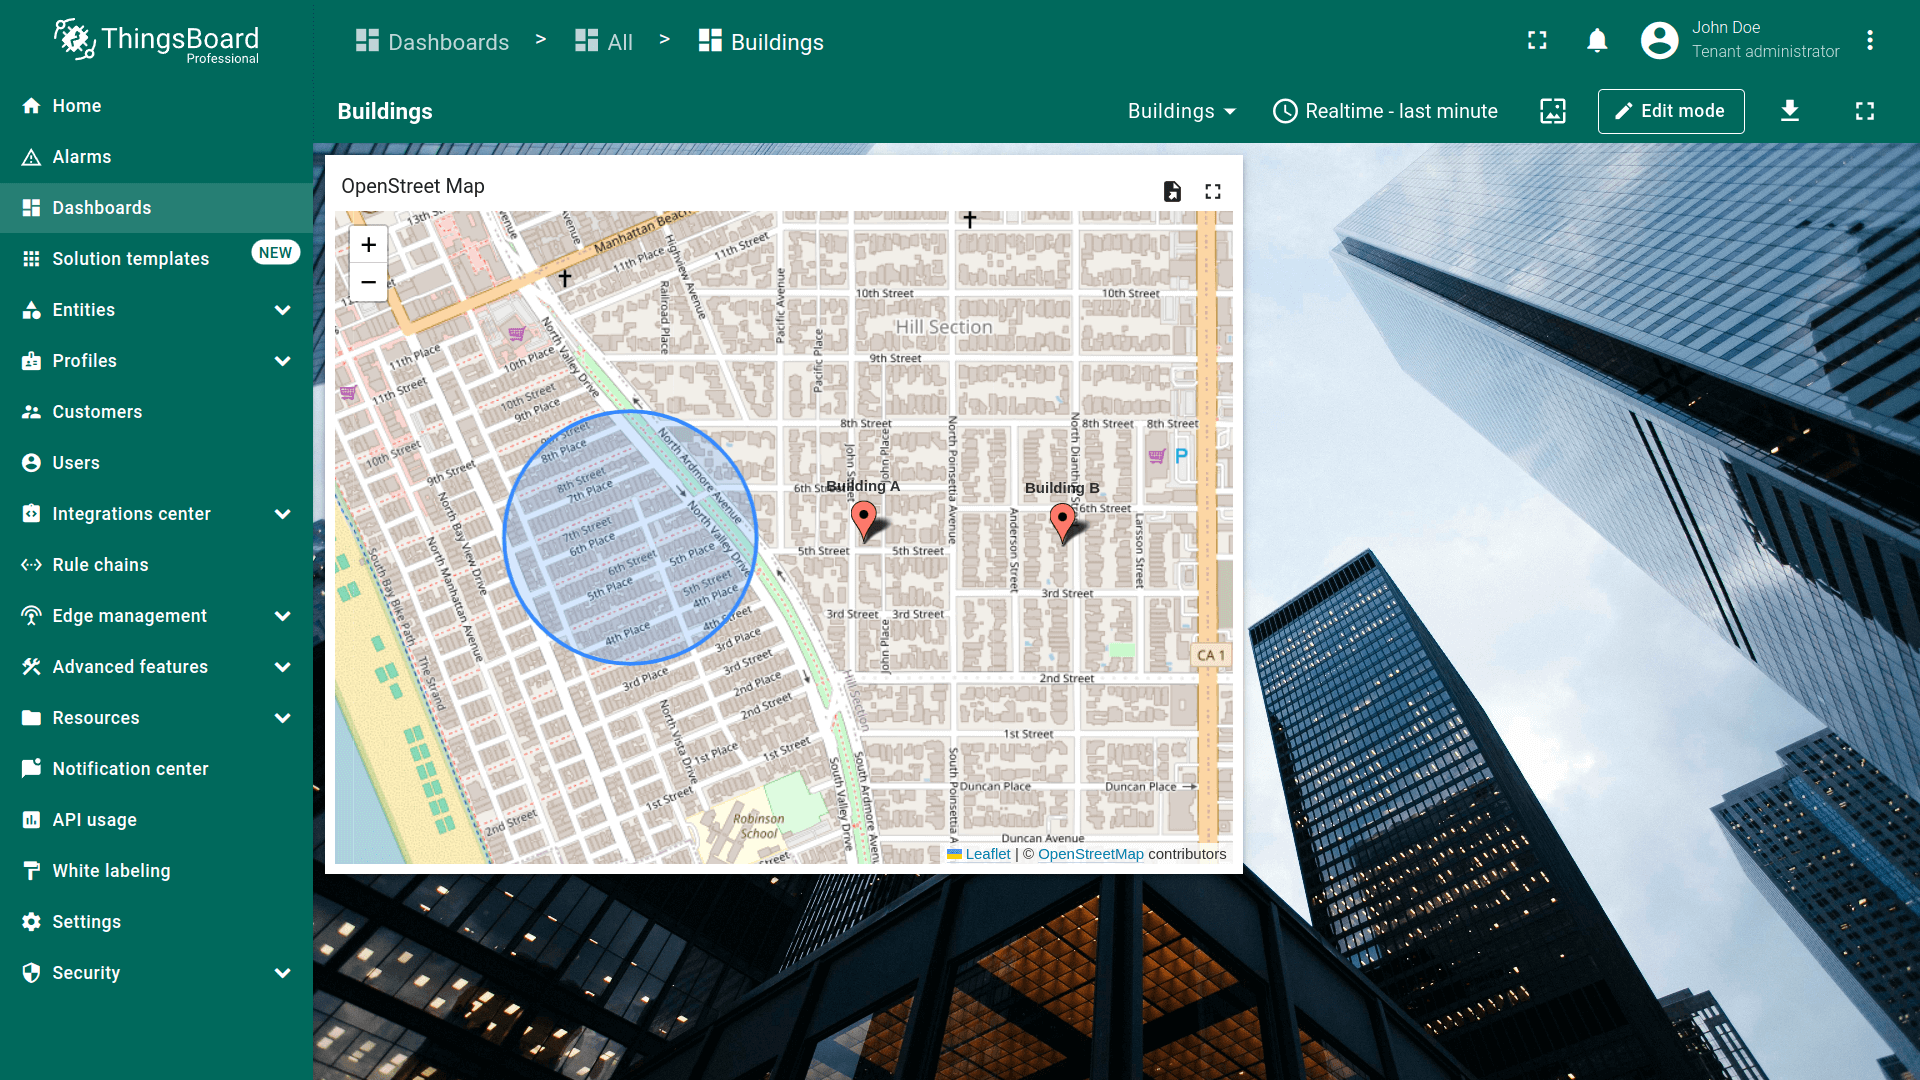
Circle是平面上所有边界点到固定中心距离相等的图形。我们使用的circle基于设备中指定的坐标。 如何在地图部件上添加circle见此处。
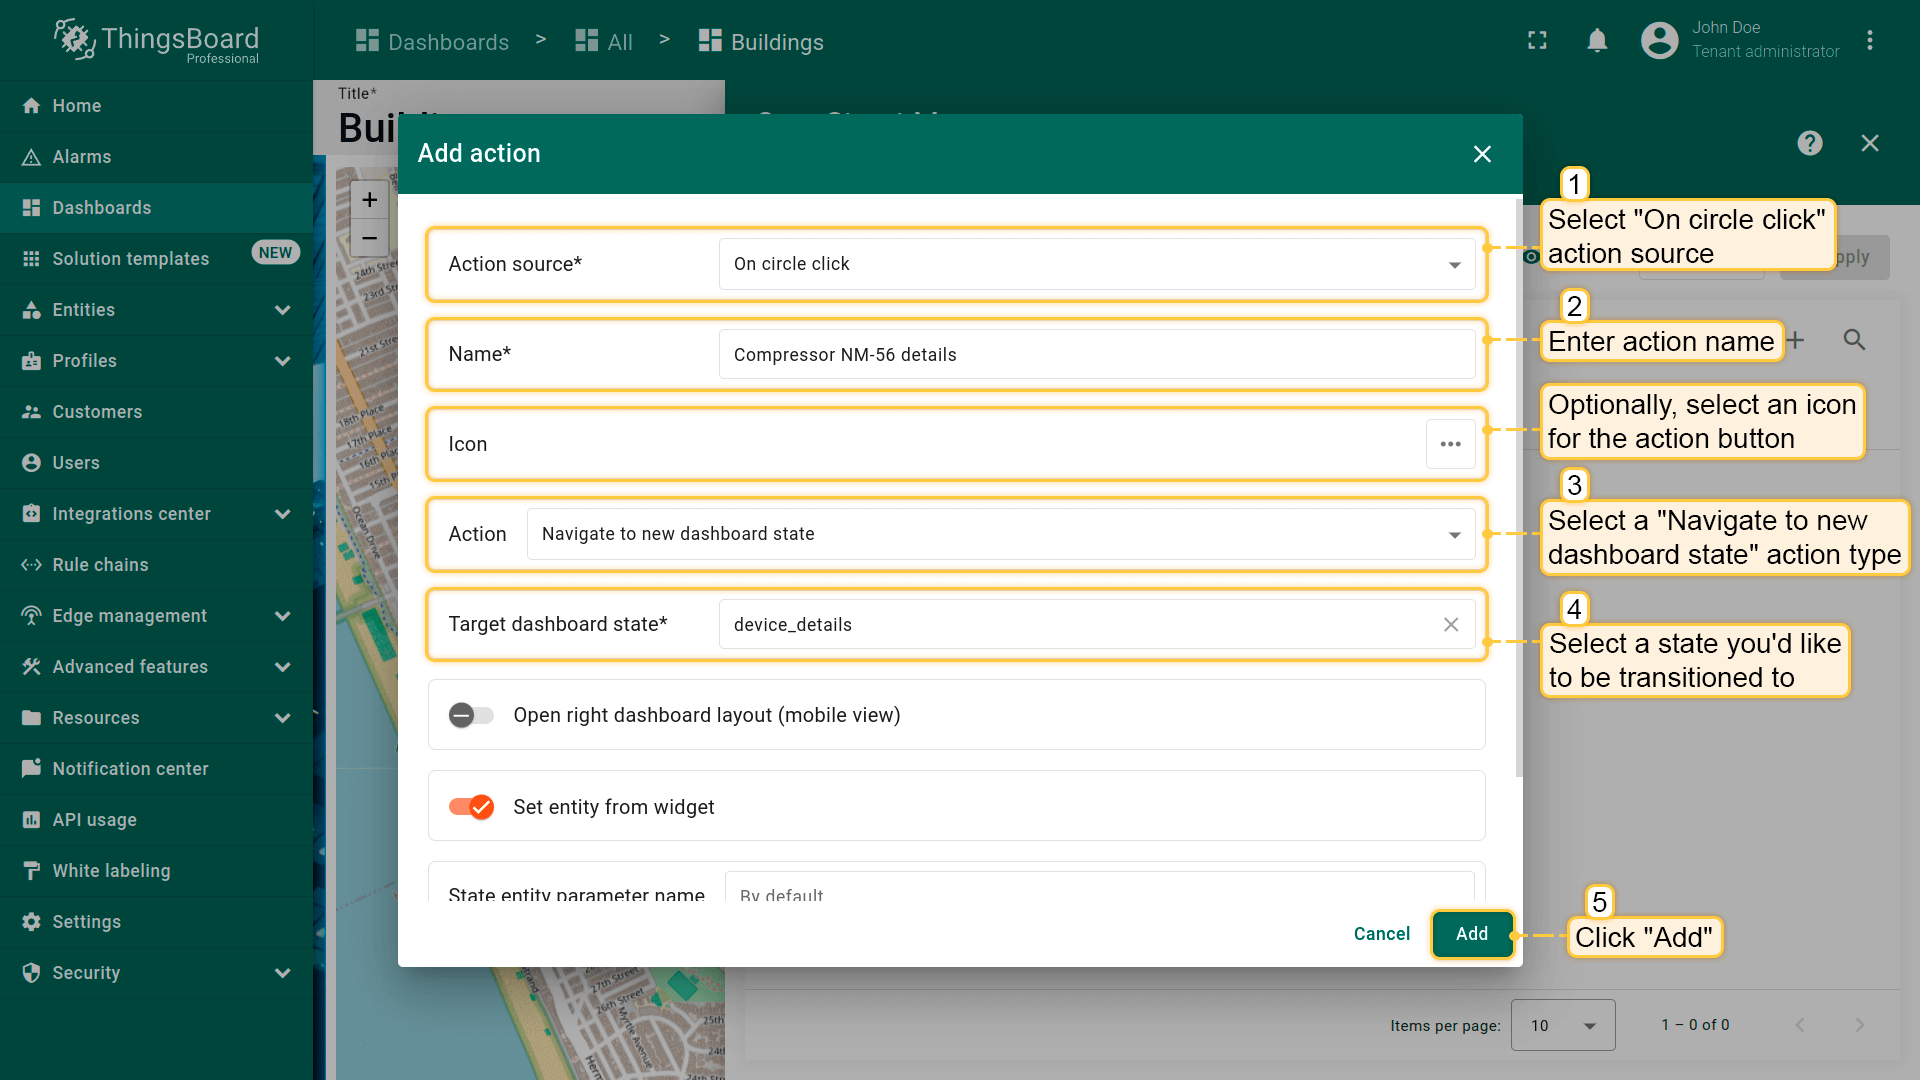
- 进入部件编辑模式,打开“Add action”窗口;
- 选择“On circle click”作为action来源;
- 输入action名称,可选选择图标;
- 在“Action”下拉菜单中选择“Navigate to new dashboard state”类型;
- 选择后会出现“Target dashboard state”下拉菜单,选择要跳转的已创建 state;
- 选择state后,点击“Add action”窗口底部的“Add”按钮;
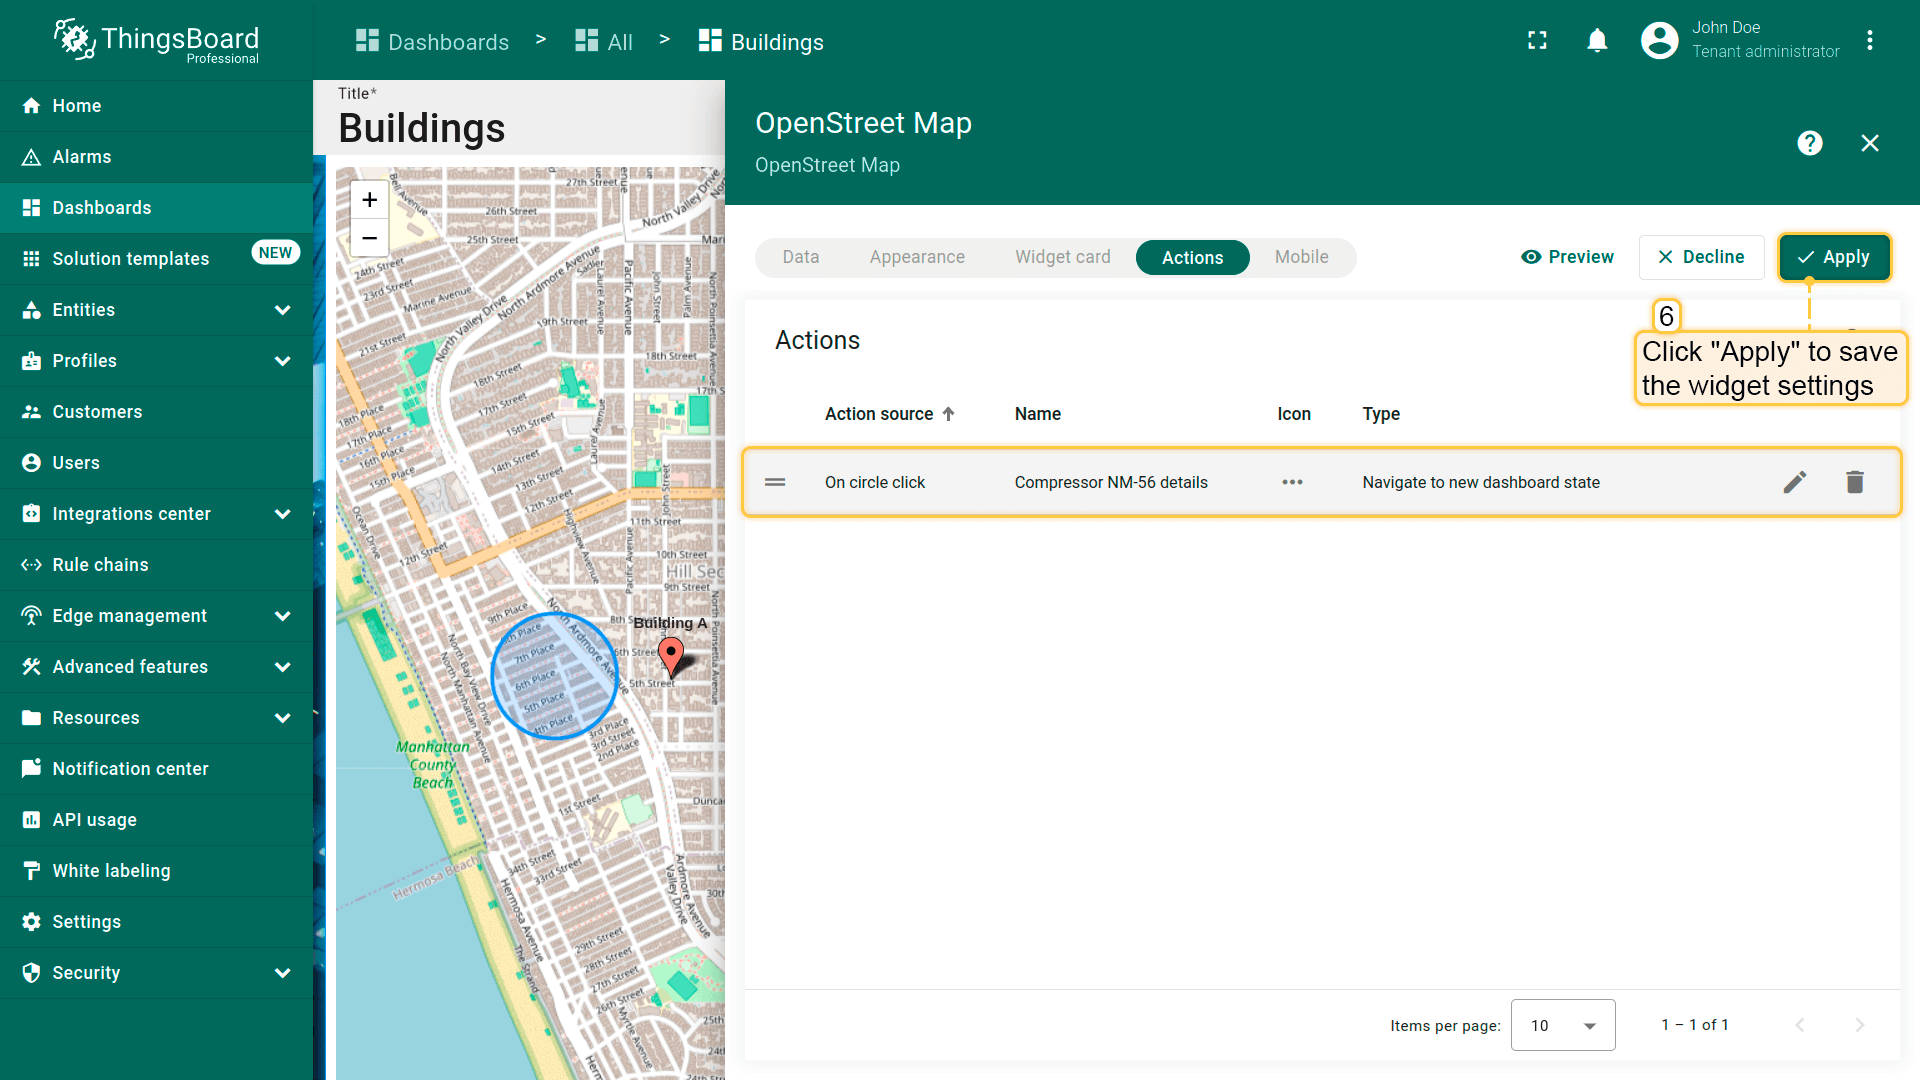
- 在“Actions”窗口中查看已配置action,核对来源、图标和类型。点击“Save”,再点“Apply”保存部件设置;
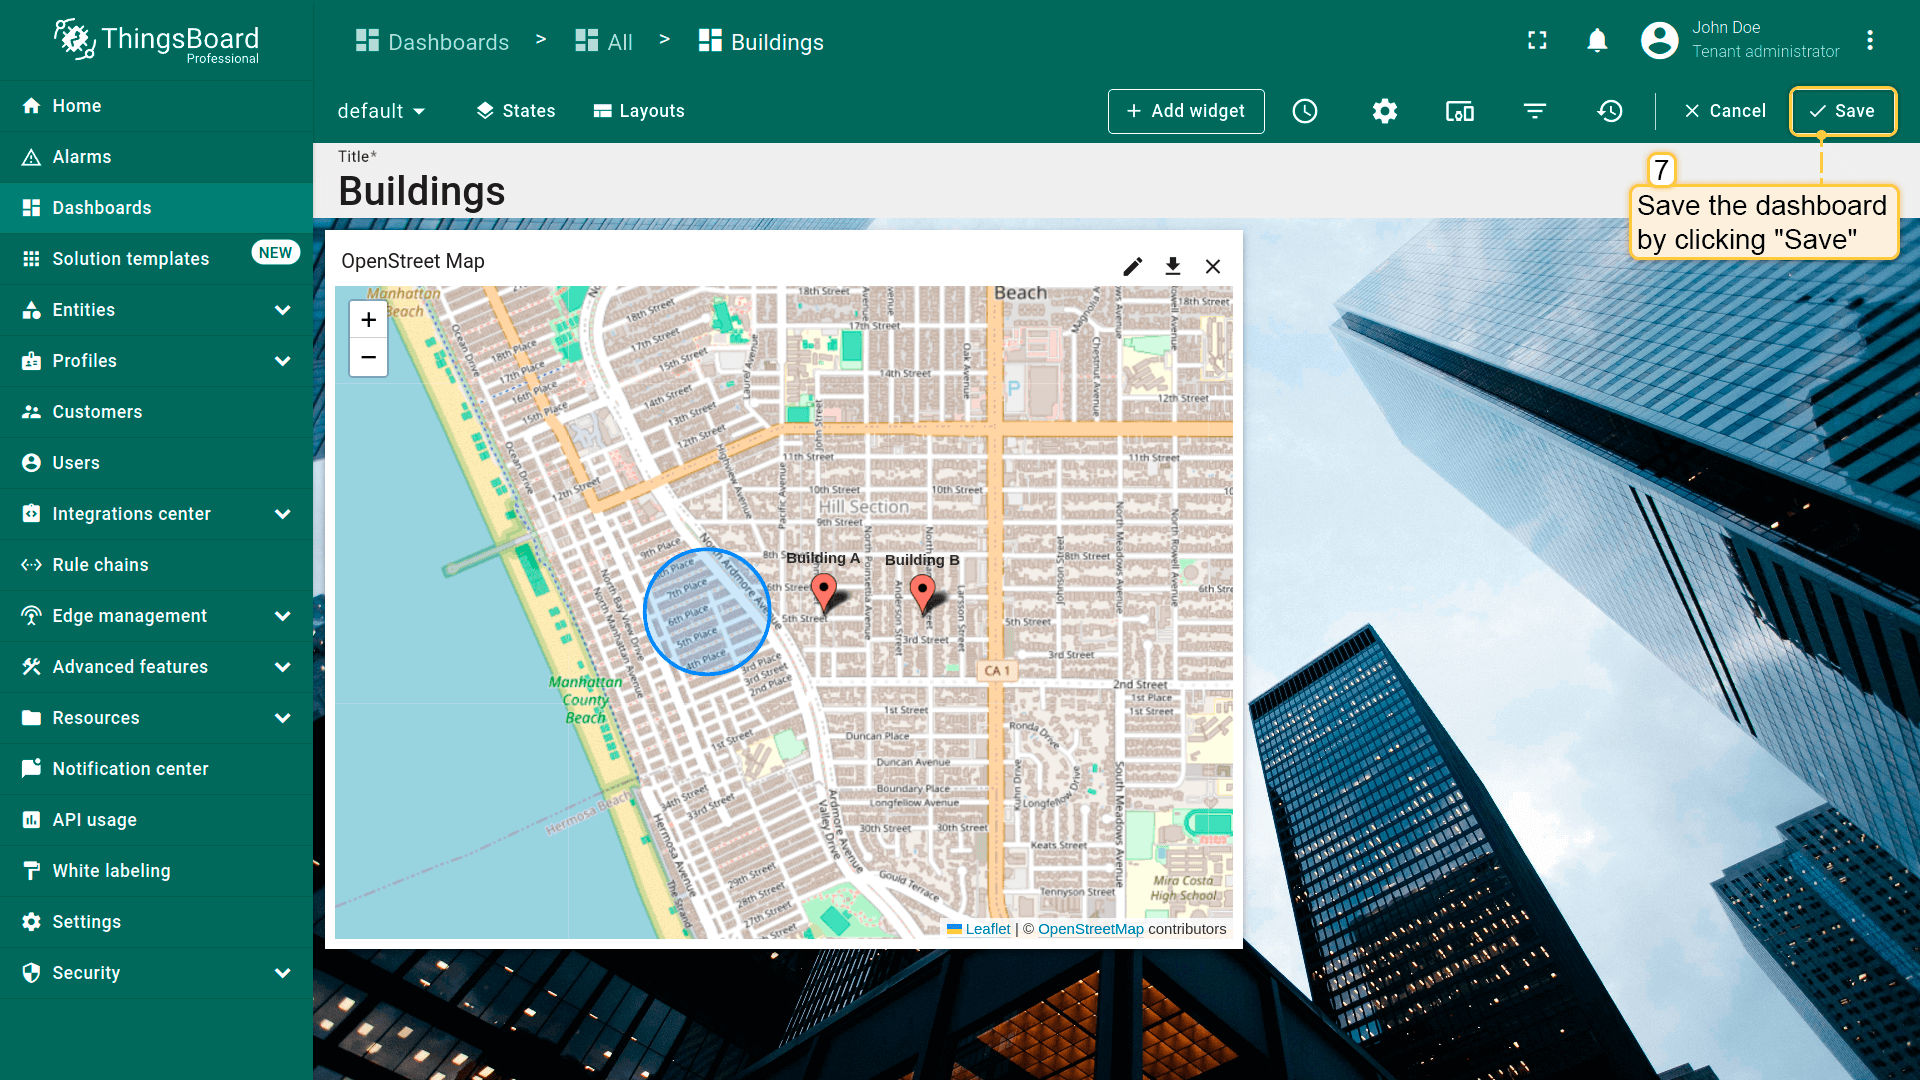
- 点击dashboard页面右上角“Save”保存dashboard。
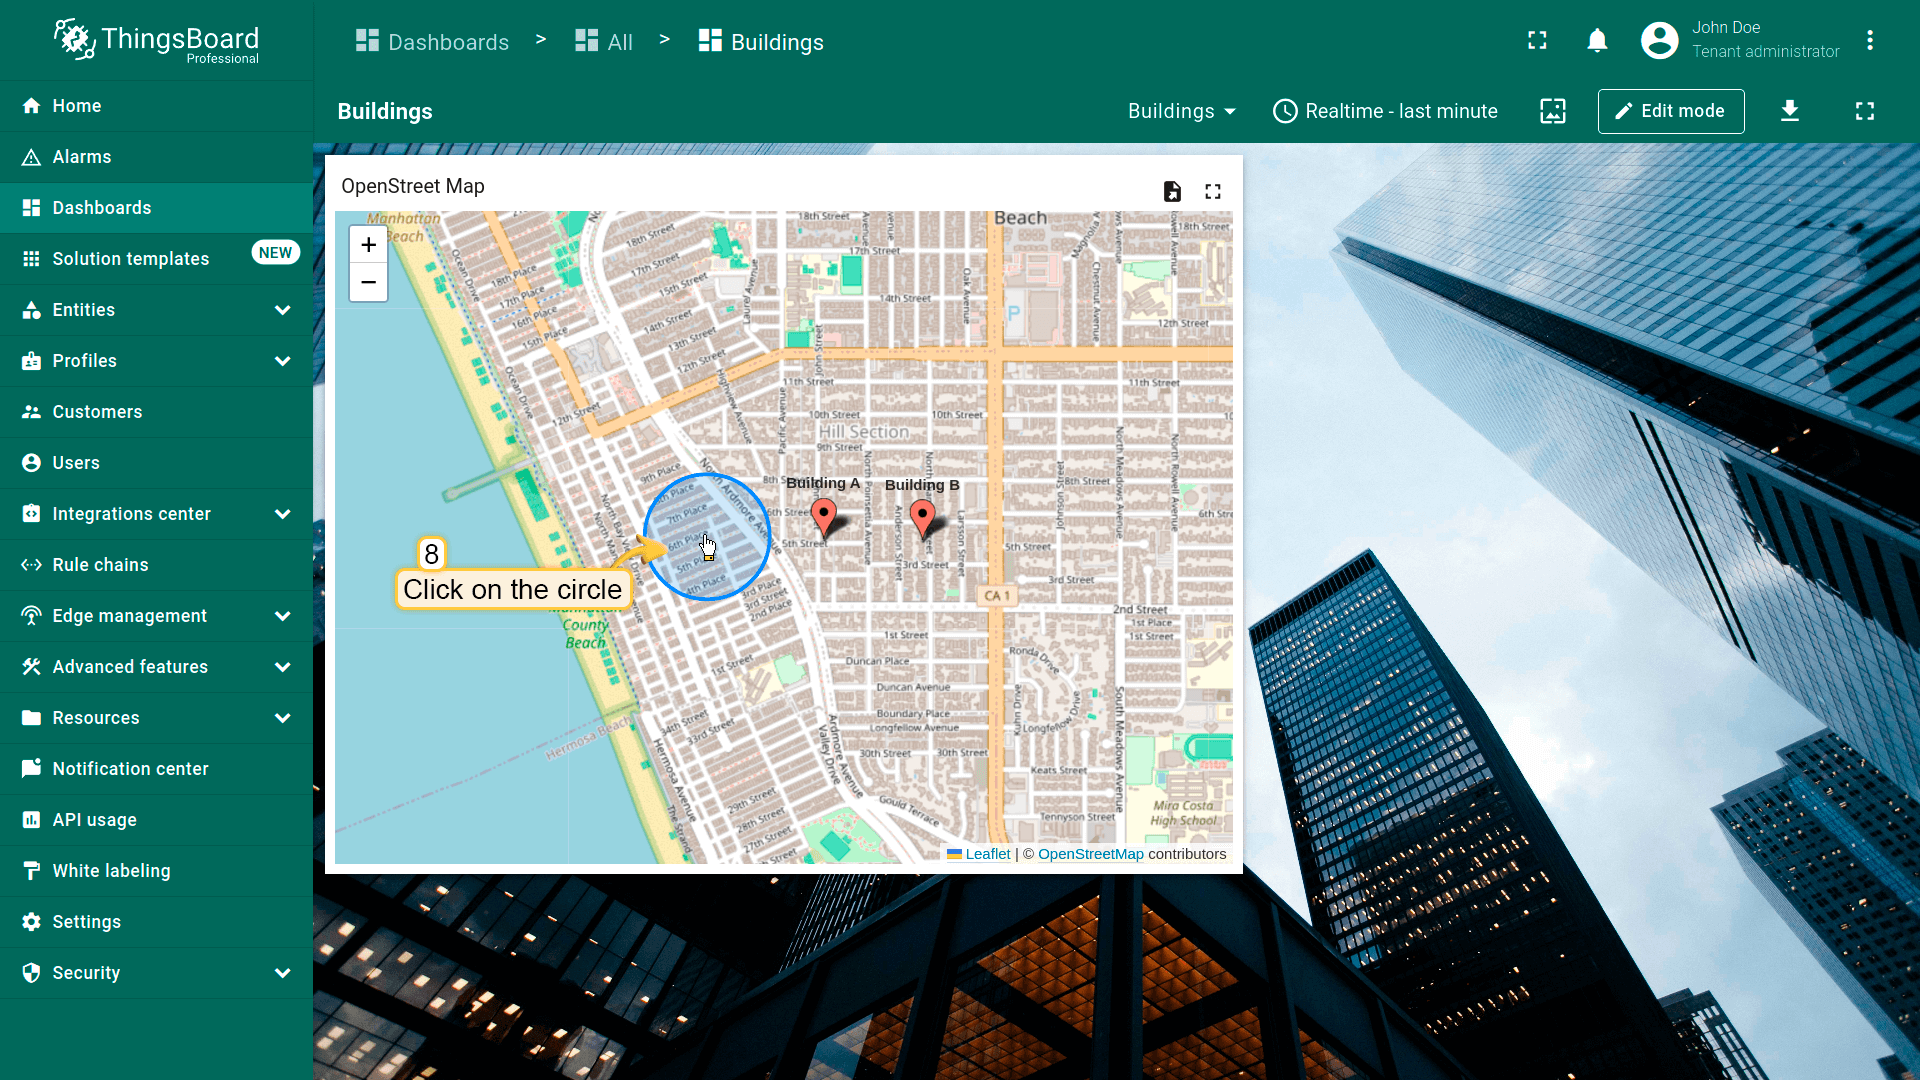
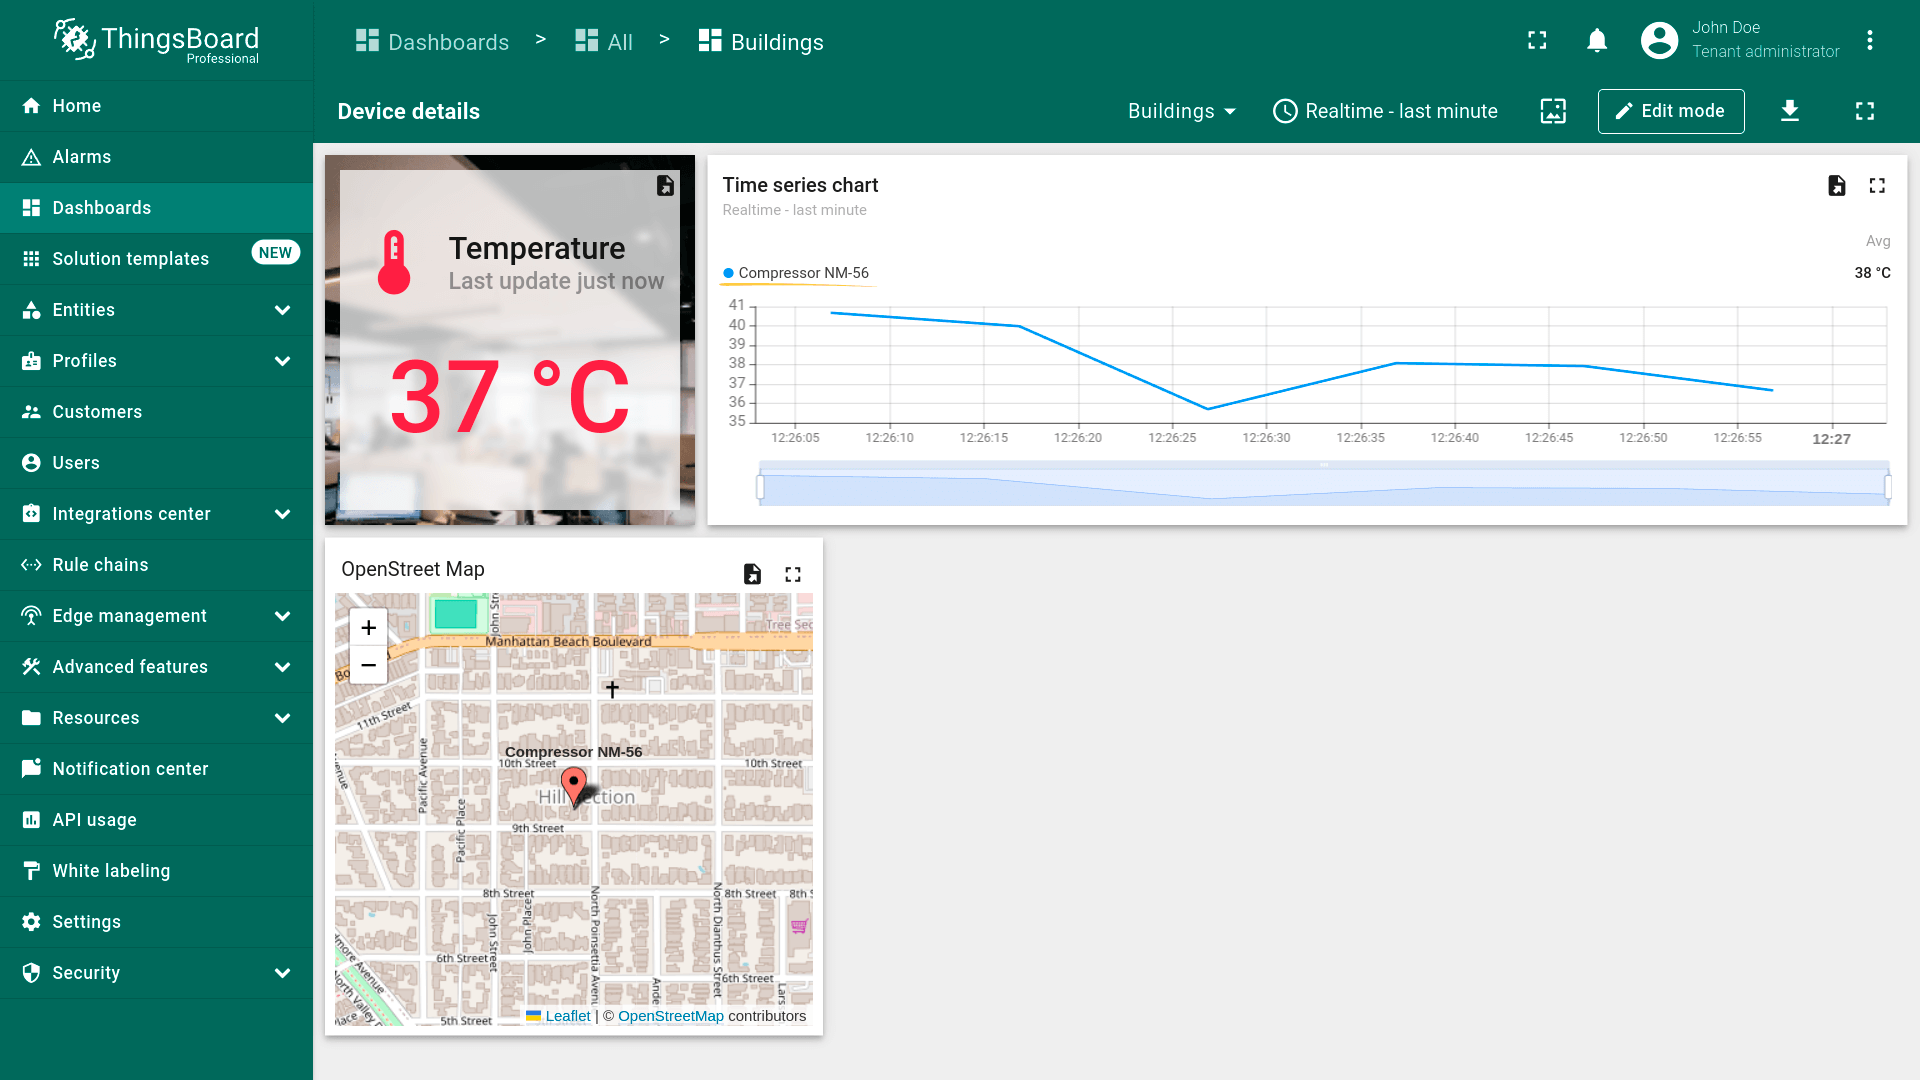
点击地图上的circle将执行action,即跳转到指定state。
标记点击事件
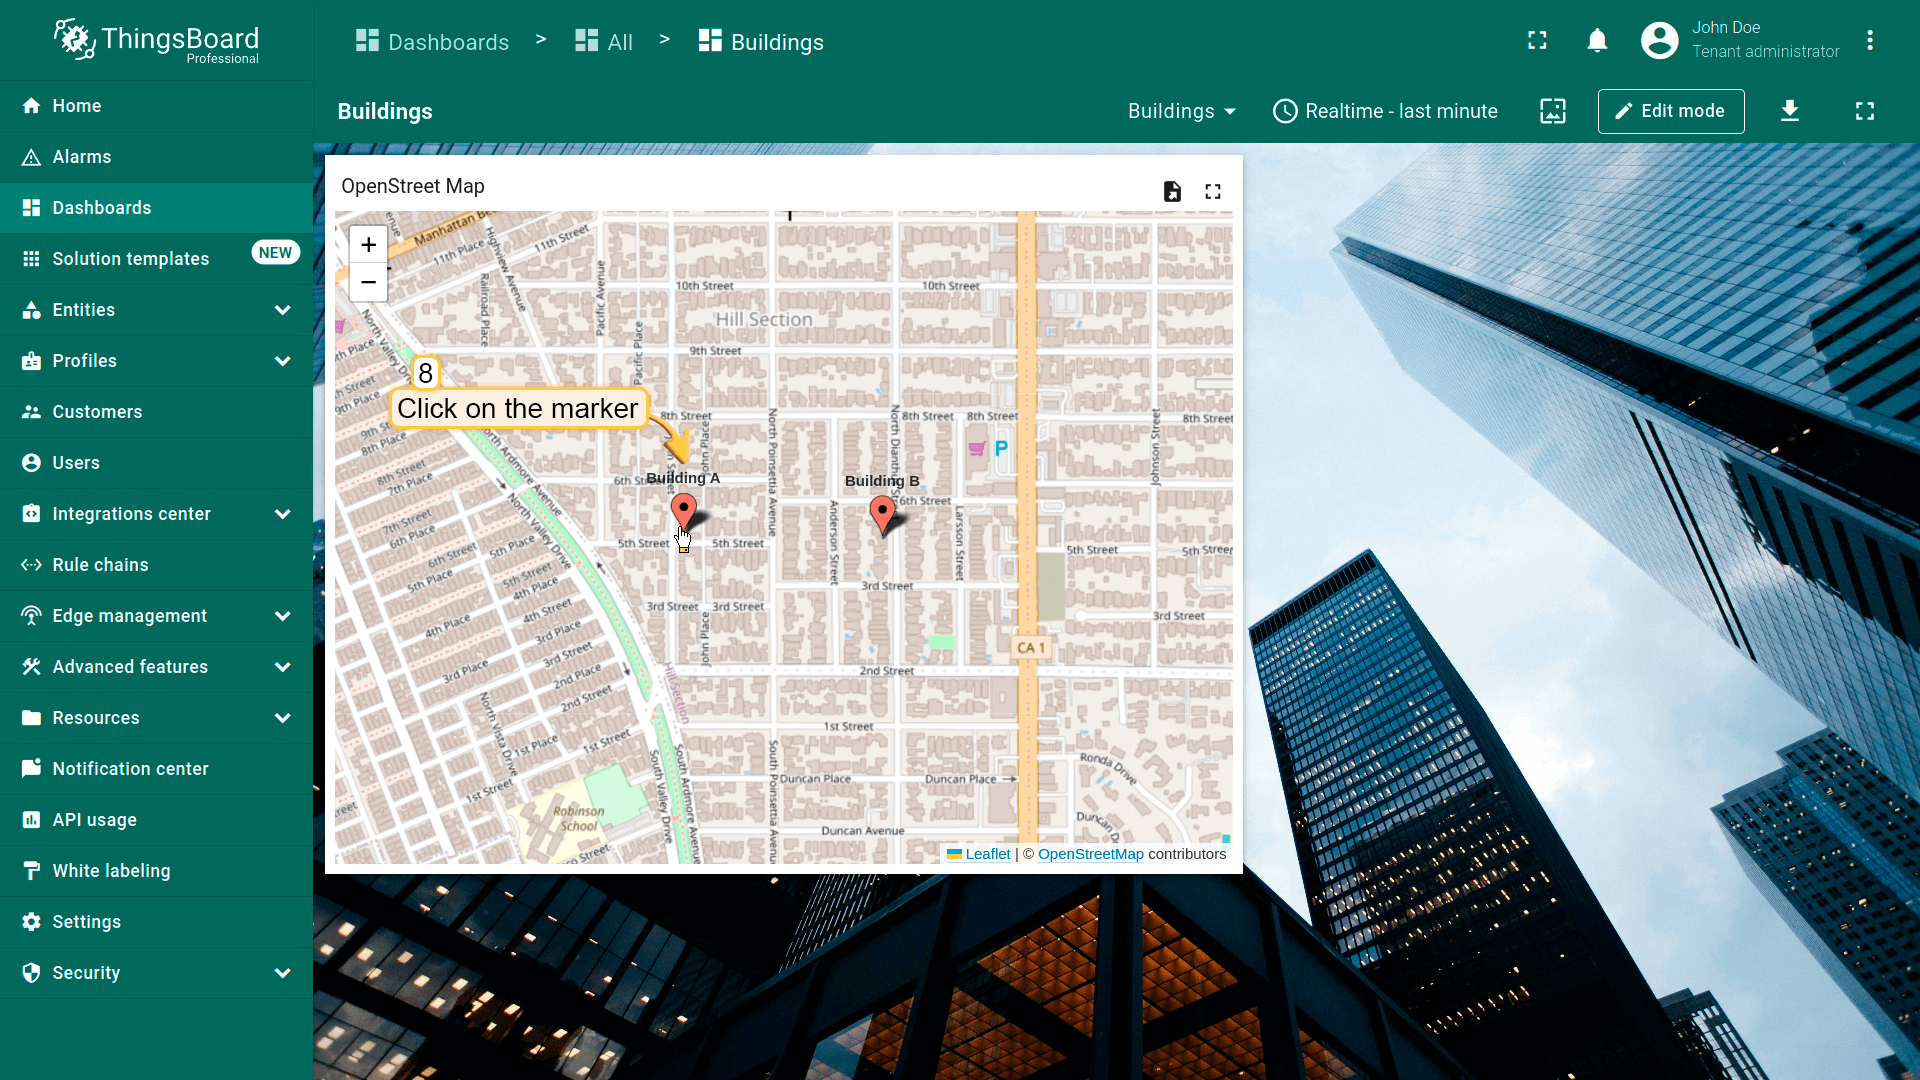
点击地图上的红色实体marker将执行action。
- 进入部件编辑模式并打开「Add action」窗口;
- 选择「On marker click」作为action来源;
- 输入action名称,可选选择图标;
- 在「Action」下拉菜单中选择「Navigate to new dashboard state」action类型;
- 选择action类型后,「Target dashboard state」下拉菜单会出现,选择要跳转到的已创建 state;
- 选择所需state后,点击「Add action」窗口底部的「Add」按钮;
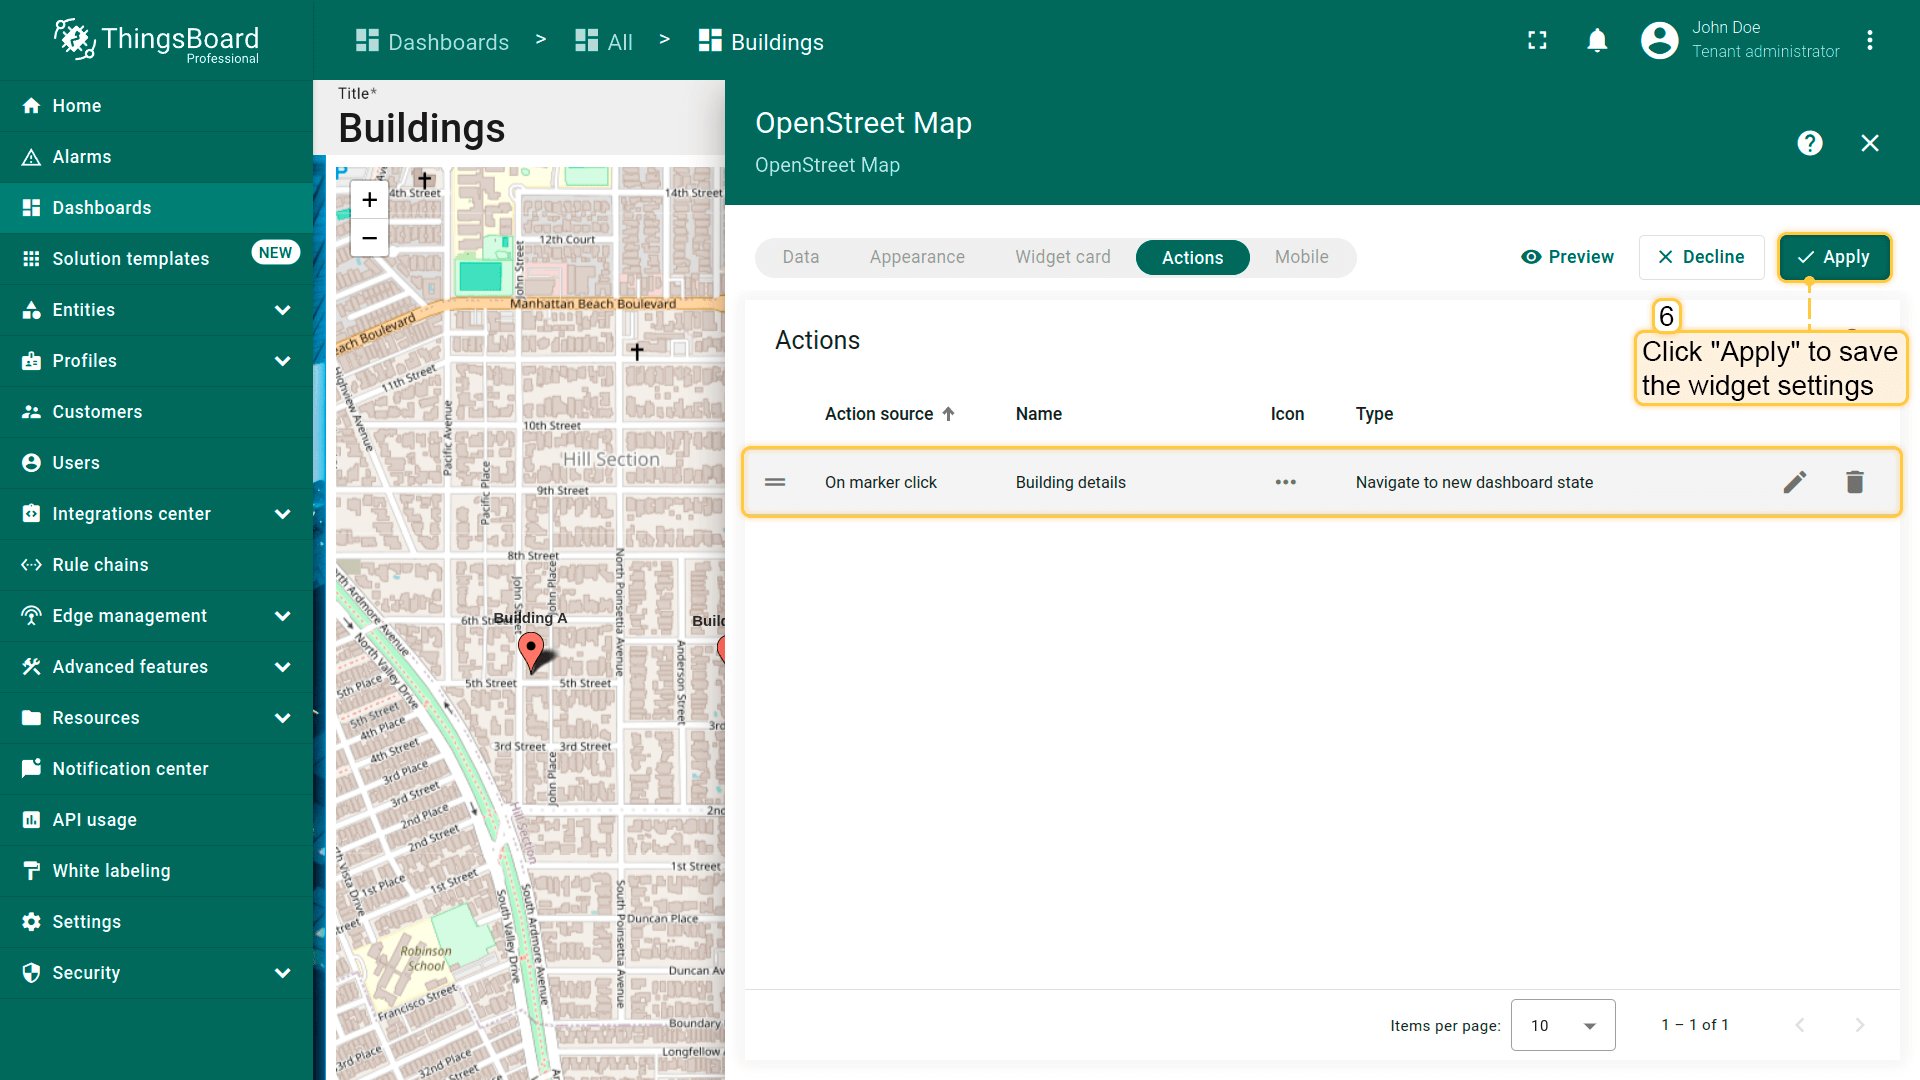
- 在「Actions」窗口中可看到已配置的action,可核对action来源、图标和类型。点击「Save」,然后点击「Apply」保存部件设置。
- 点击dashboard右上角「Save」保存dashboard。


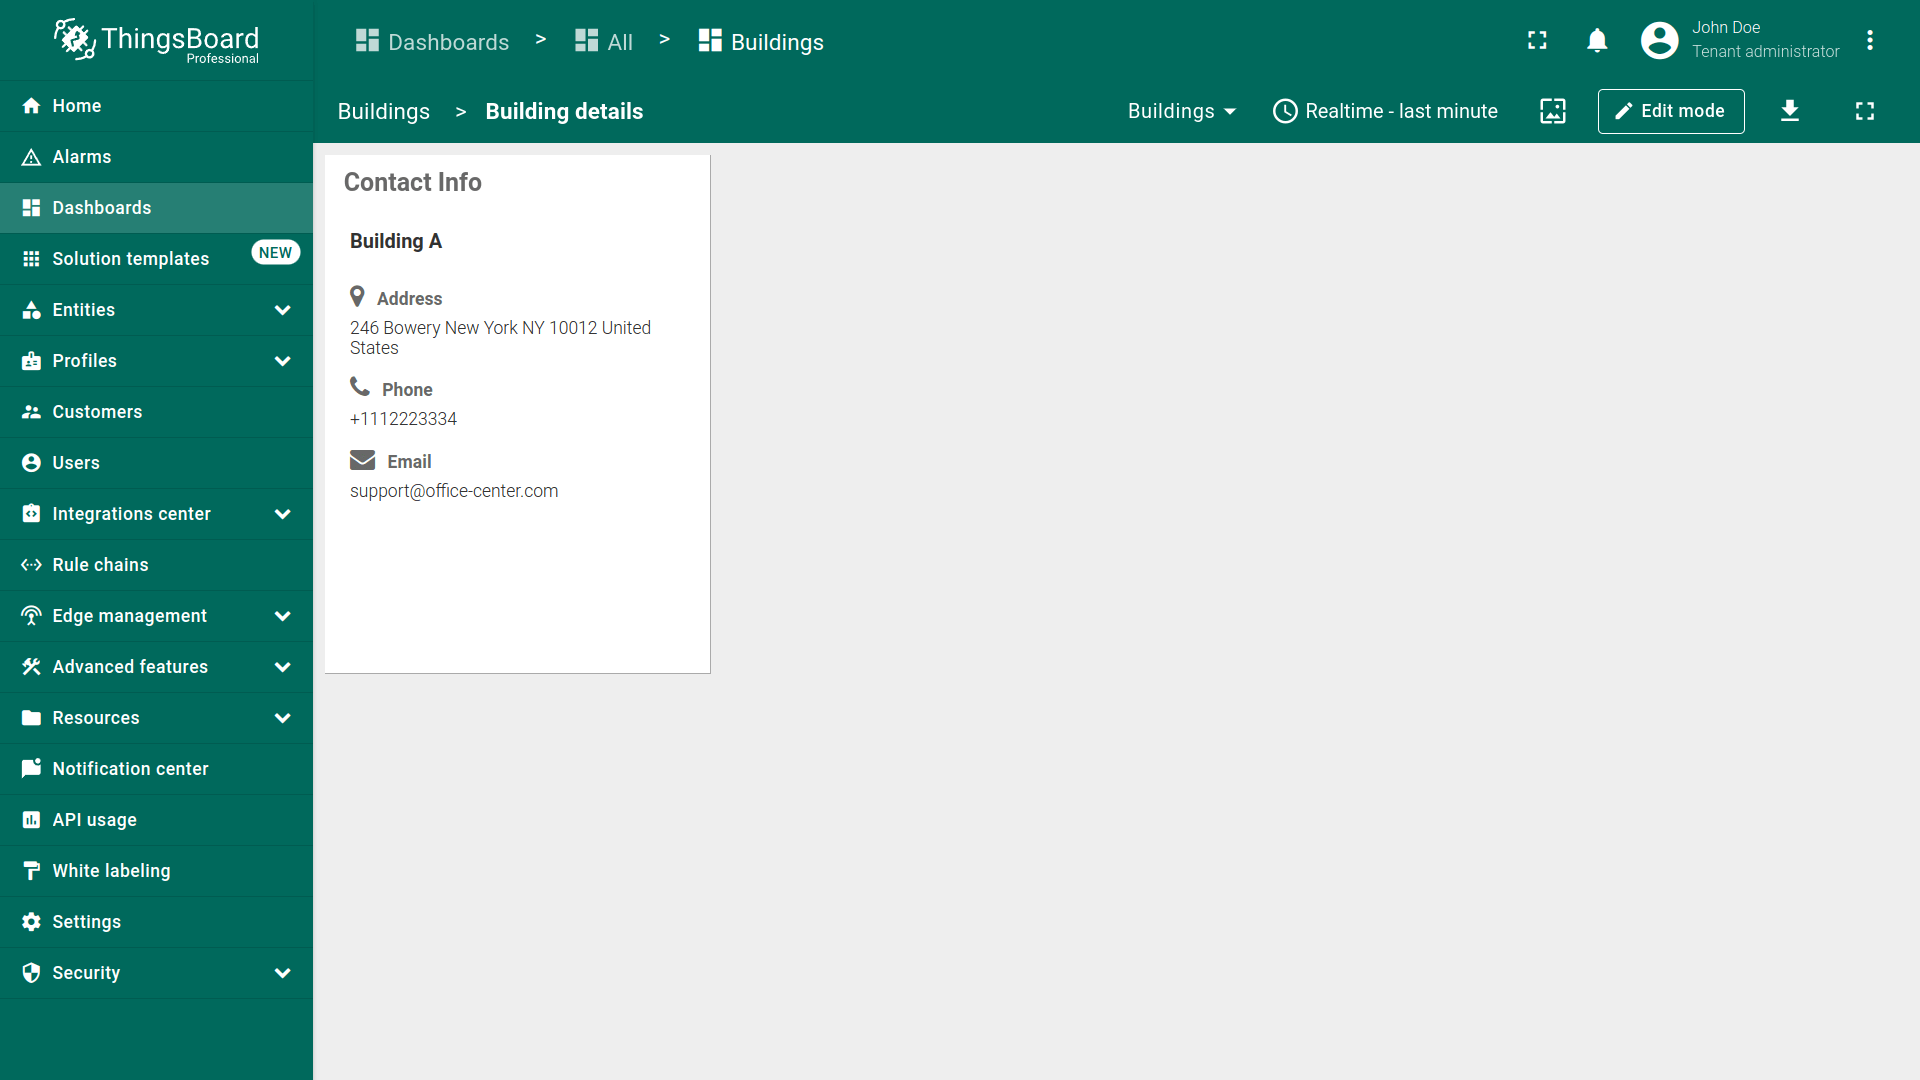
点击地图上的marker将跳转到指定state。
多边形点击事件
Polygon是由有限个点描述的平面图形。原句: that’s described by a finite number of dots. 我们使用的polygon基于设备中指定的坐标,也可使用其它实体。 可使用polygon选项标注资产和其它实体。 如何在地图部件上添加polygon见此处。
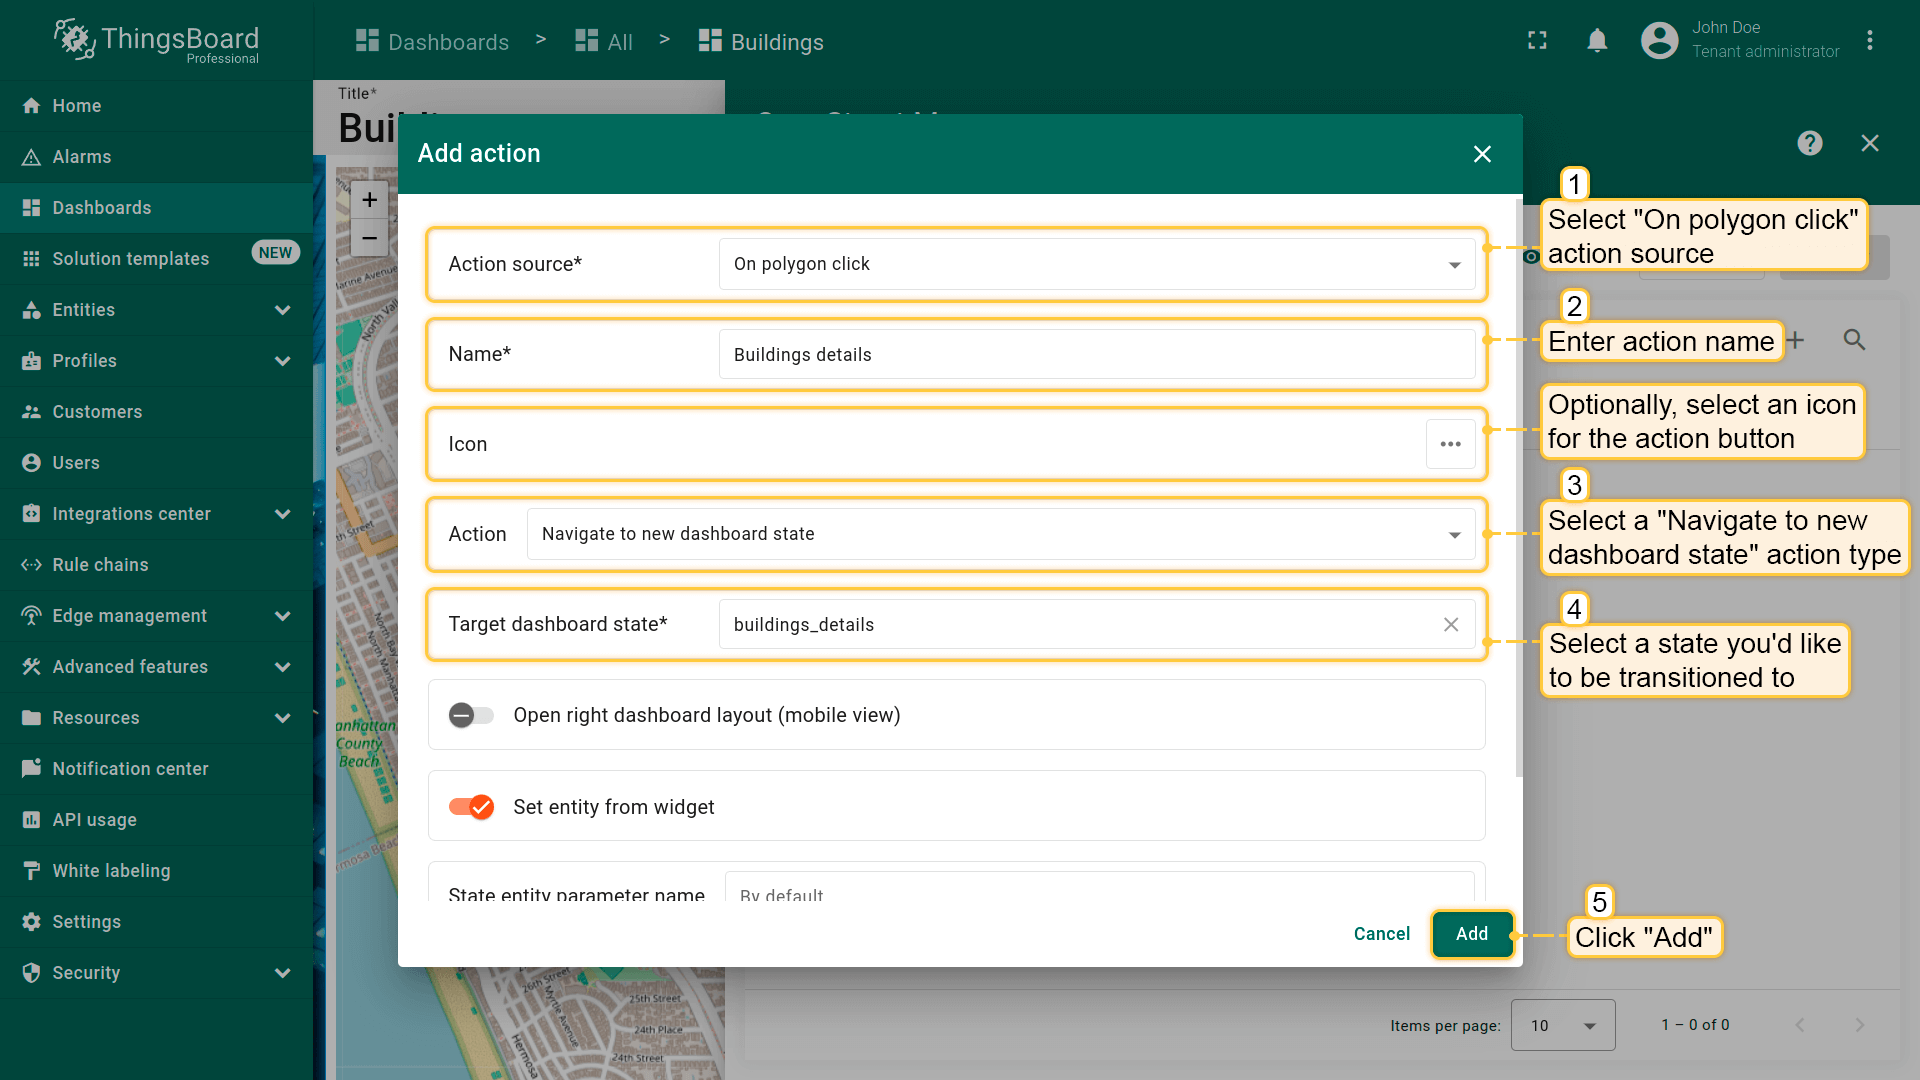
- 进入部件编辑模式并打开「Add action」窗口;
- 选择「On polygon click」作为action来源;
- 输入action名称,可选选择图标;
- 在「Action」下拉菜单中选择「Navigate to new dashboard state」action类型;
- 选择action类型后,「Target dashboard state」下拉菜单会出现,选择要跳转到的已创建 state;
- 选择所需state后,点击「Add action」窗口底部的「Add」按钮;
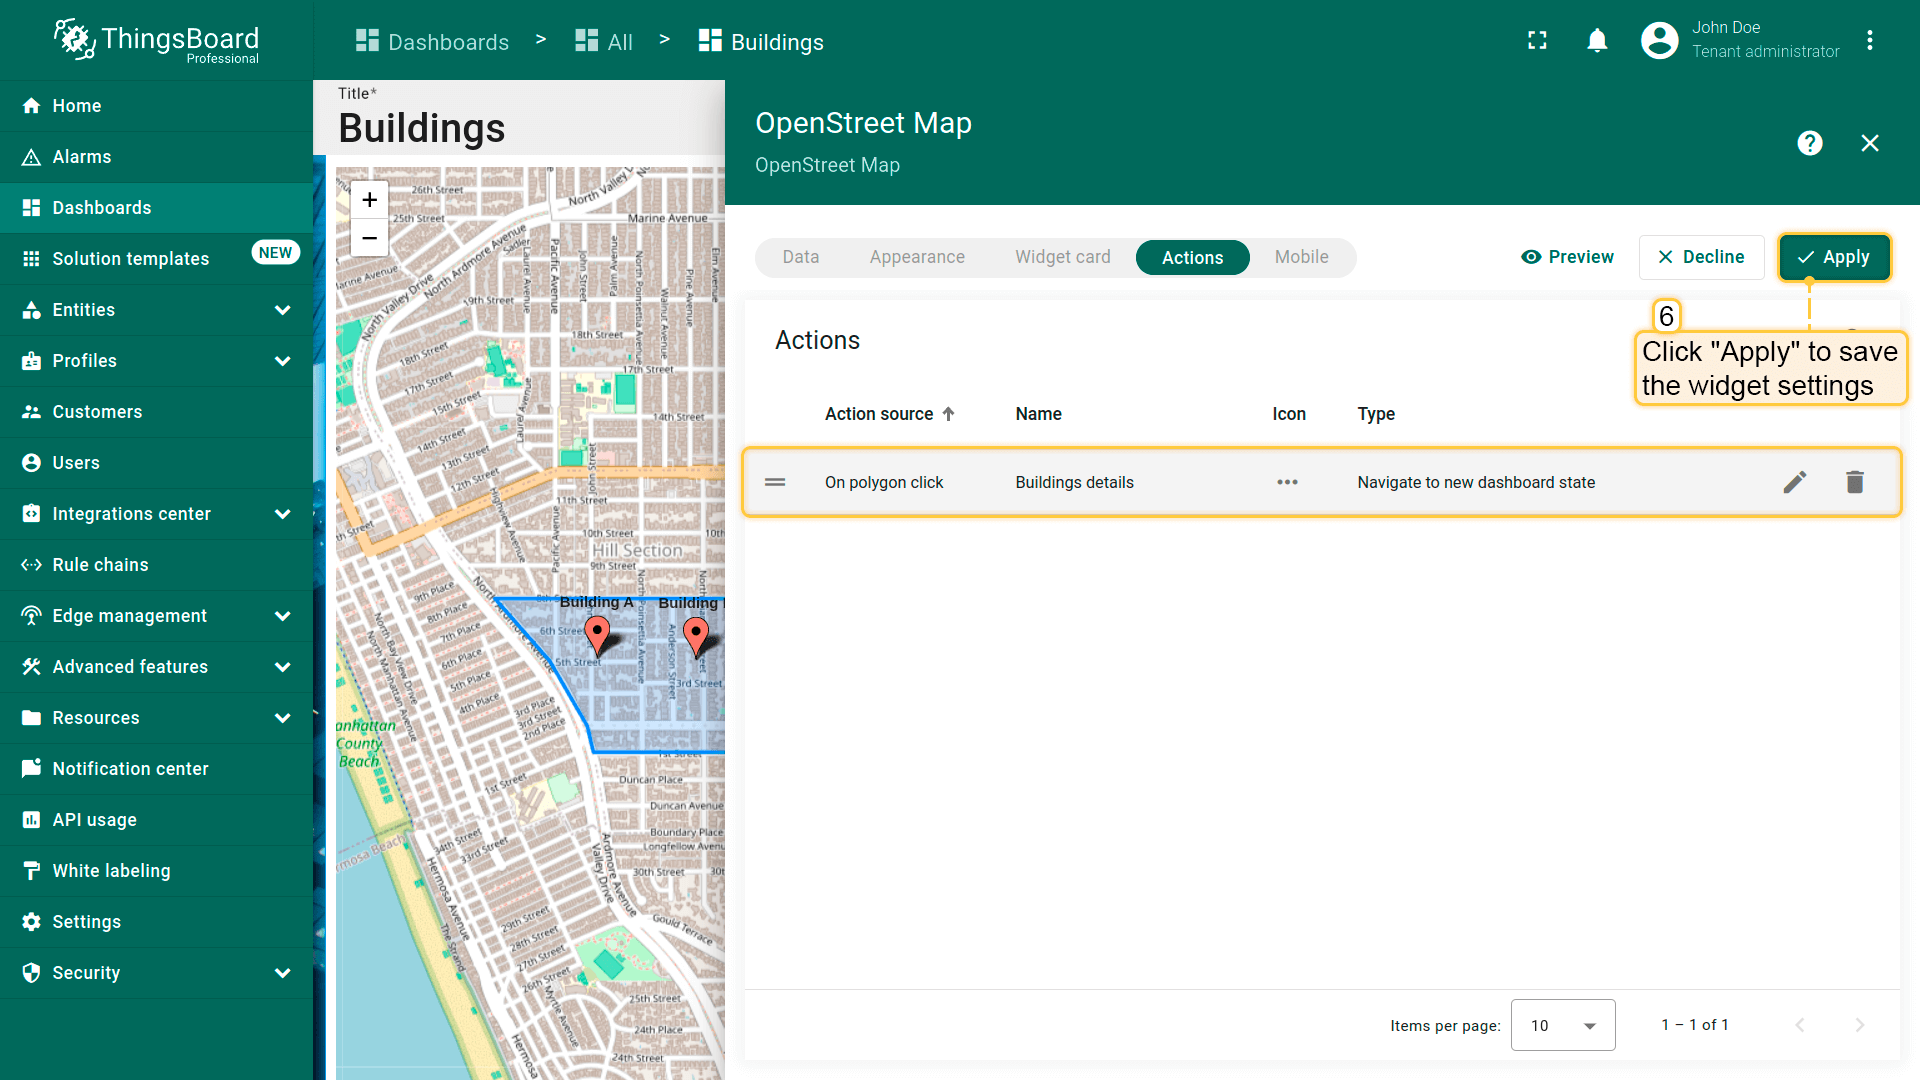
- 在「Actions」窗口中可看到已配置的action,可核对action来源、图标和类型。点击「Save」,然后点击「Apply」保存部件设置。
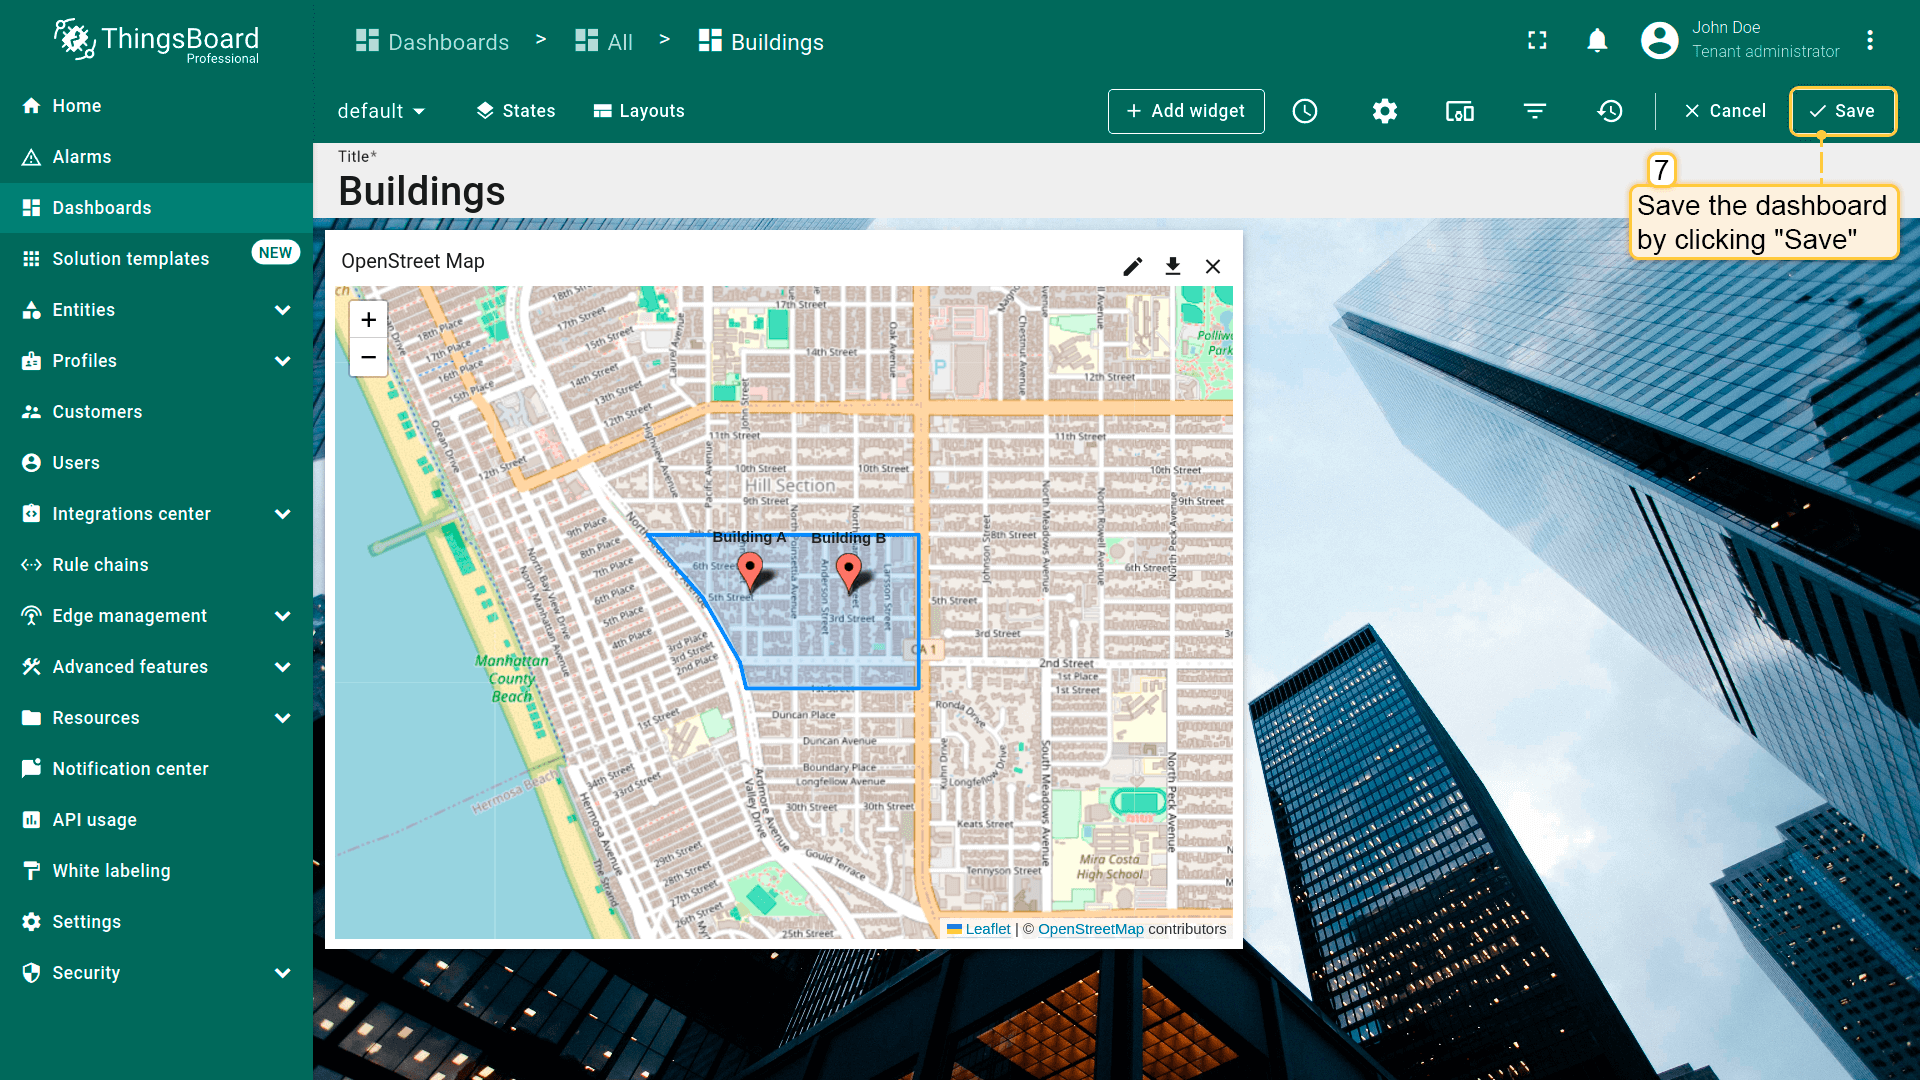
- 点击dashboard右上角「Save」保存dashboard。
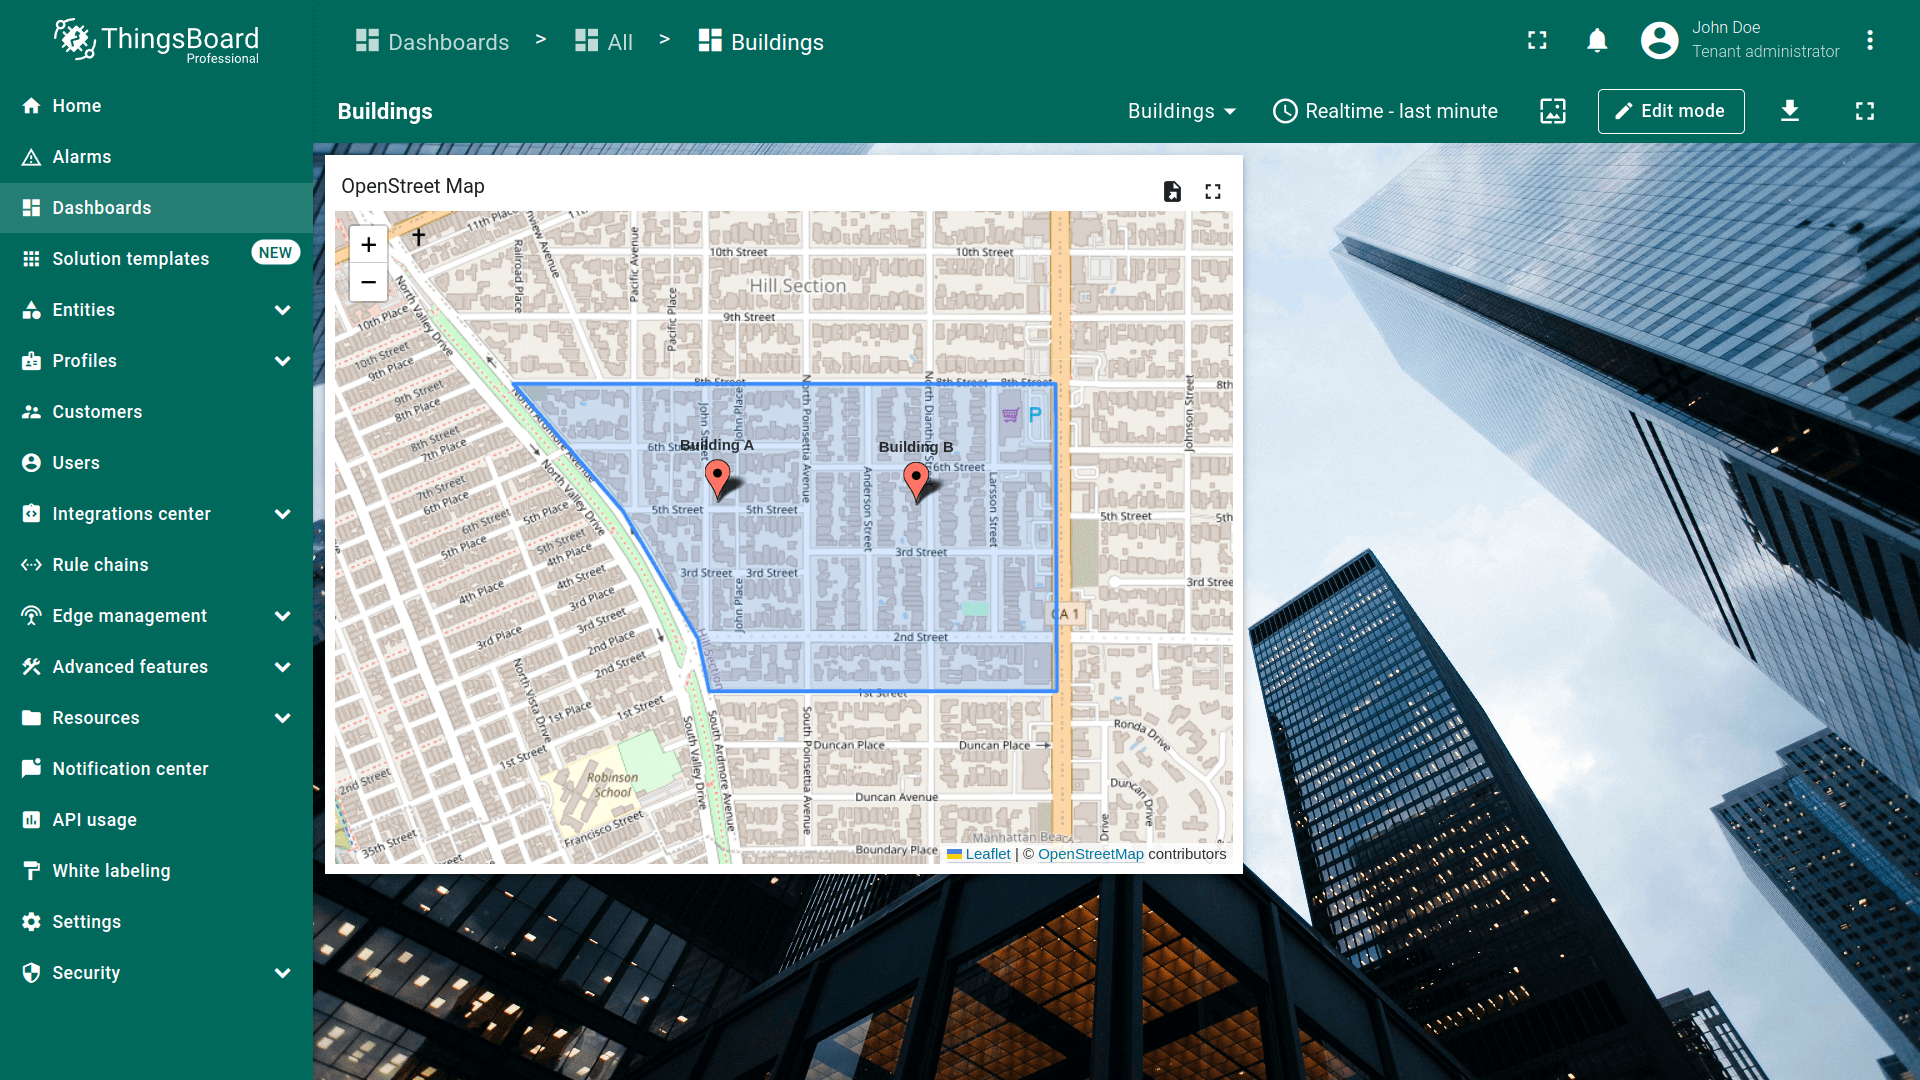
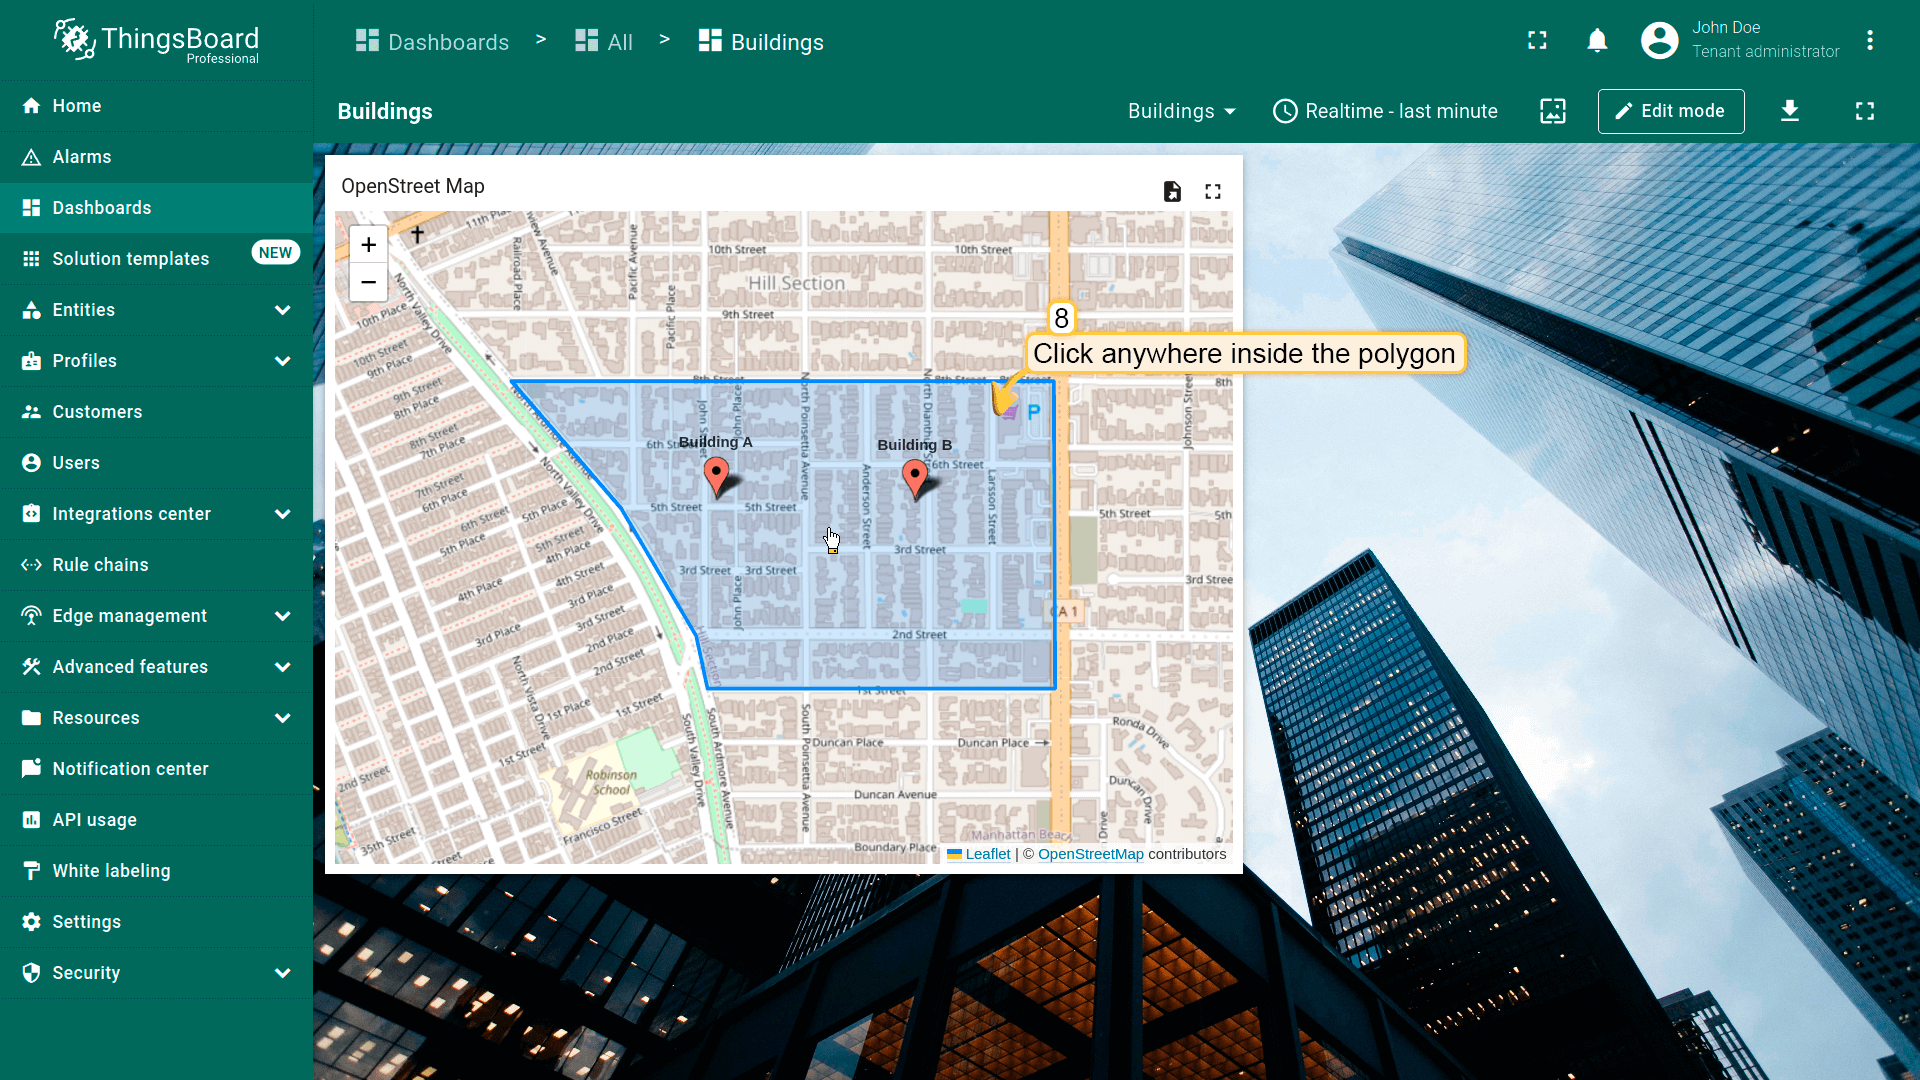
在polygon内任意位置点击即可执行action。
工具提示标签操作
可配置地图部件,使点击marker时显示tooltip。Tooltip可包含用于执行已配置action的链接。 本指南仅说明tooltip tag action来源的基本用法。可为不同设备/资产配置返回不同值的多个链接。 使用地图部件高级模式下的 tooltip 函数 实现。
- 进入部件编辑模式并打开「Add action」窗口;
- 选择「Tooltip tag action」作为action来源;
- 输入action名称,可选选择图标;
- 在「Action」下拉菜单中选择「Navigate to new dashboard state」action类型;
- 选择action类型后,「Target dashboard state」下拉菜单会出现,选择要跳转到的已创建 state;
- 选择所需state后,点击「Add action」窗口底部的「Add」按钮;
- 在「Actions」窗口中可看到已配置的action,可核对action来源、图标和类型。
- 进入部件的「Appearance」选项卡;
- 向下滚动到Tooltip配置,勾选「Show tooltip」复选框;
- 在Tooltip行中找到link-act name,输入action的ID(即其名称),格式如下:
1
<link-act name='TooltipTag'>Navigate to the ${entityName}</link-act>
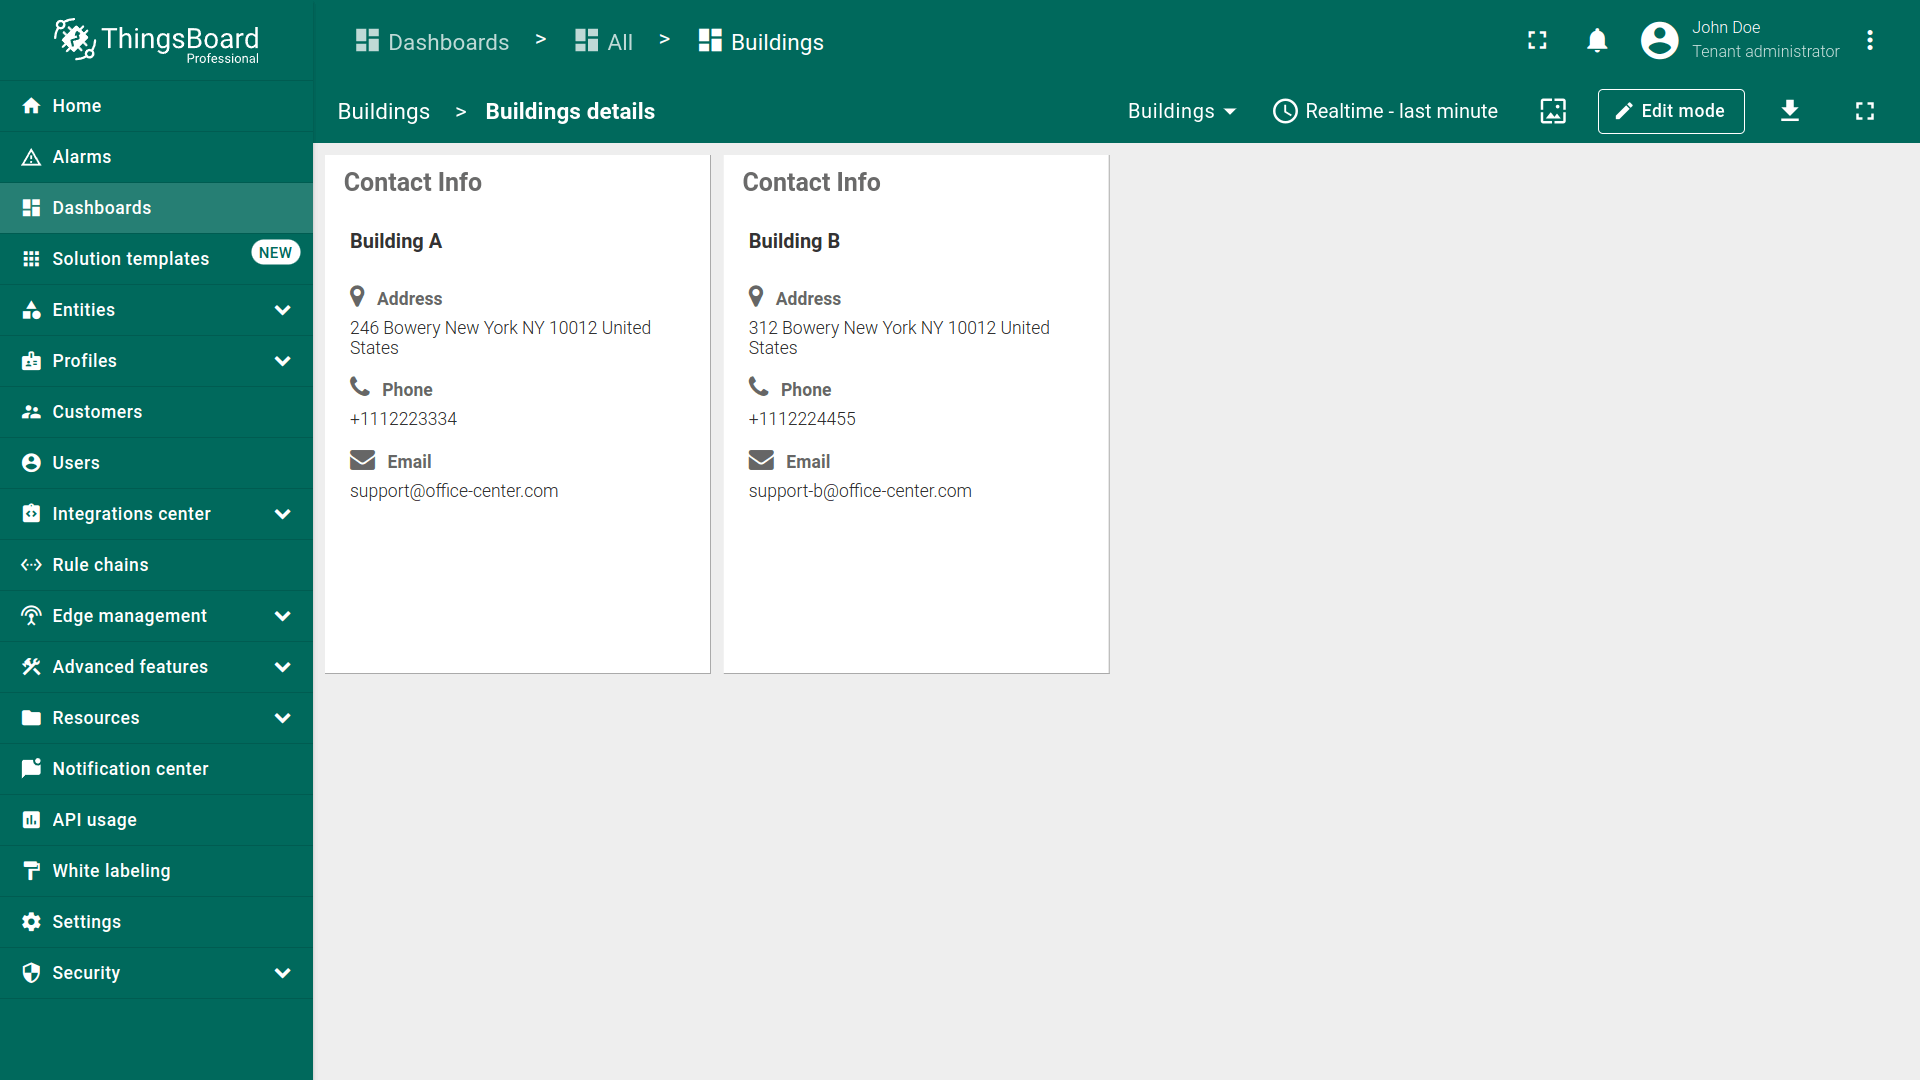
其中 TooltipTag 为action名称,Navigate to the Building A 为tooltip中显示为链接的文本。
- 点击“Apply”保存部件设置;
- 点击dashboard页面右上角“Save”保存dashboard。


点击地图上的marker显示tooltip。要执行action,点击tooltip底部的链接文本。


特殊操作设置
打开右侧仪表板布局(移动视图)
若使用 ThingsBoard PE Mobile Application,这些设置会很有用。若尚未使用,不妨试试!随时随地掌握IoT方案中的各类事件。
用户常需要在相邻部件上查看某实体的更新信息。例如,“Entity table”部件中有资产列表,希望在旁边的“Time series chart”部件中查看其详情。 在桌面上,可将两个部件并排放置并选择action类型“Update current dashboard state”轻松实现。 但在 ThingsBoard PE Mobile Application 的响应式屏幕上,部件会自动纵向排列。这意味着需要向下滚动才能看到第二个部件上的相关信息。
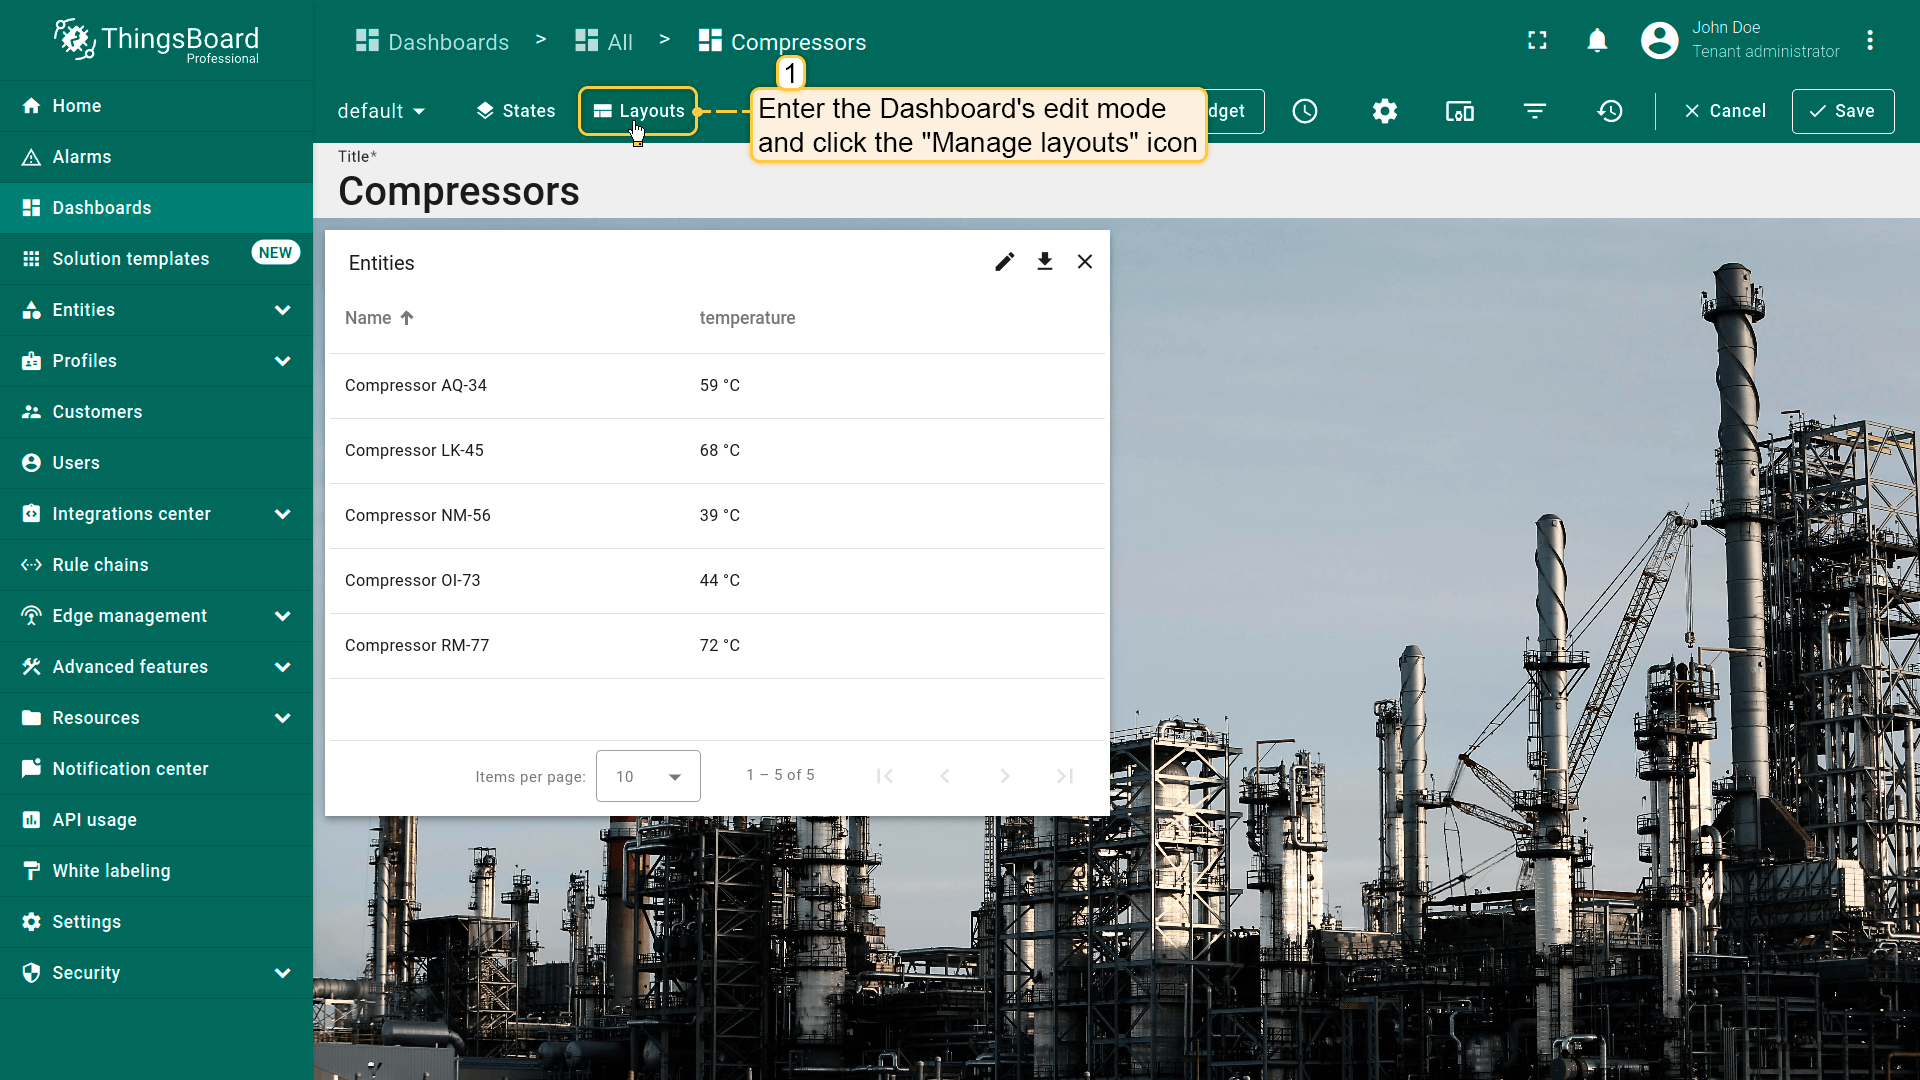
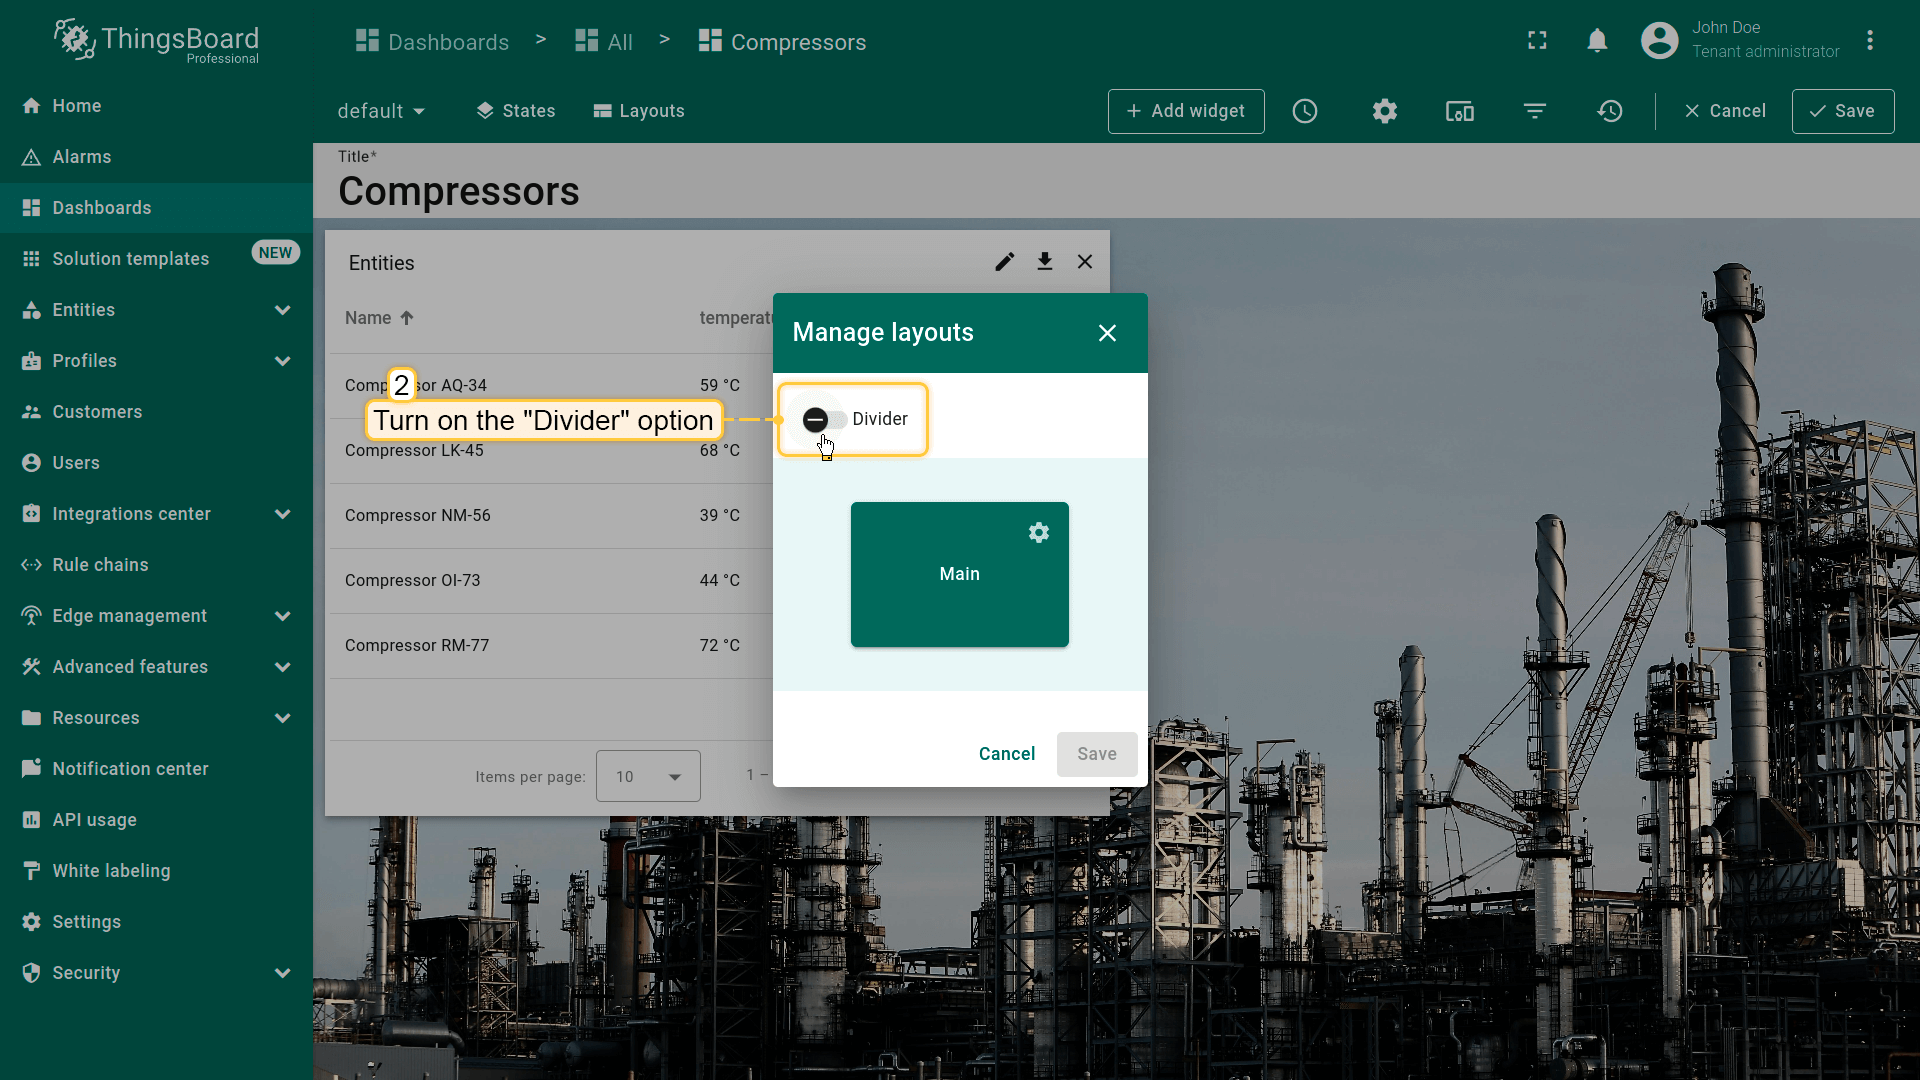
Layouts 功能可解决此问题。配置layouts步骤如下:
- Enter the Dashboard's edit mode On the left top of the window click "Manage layouts" icon;
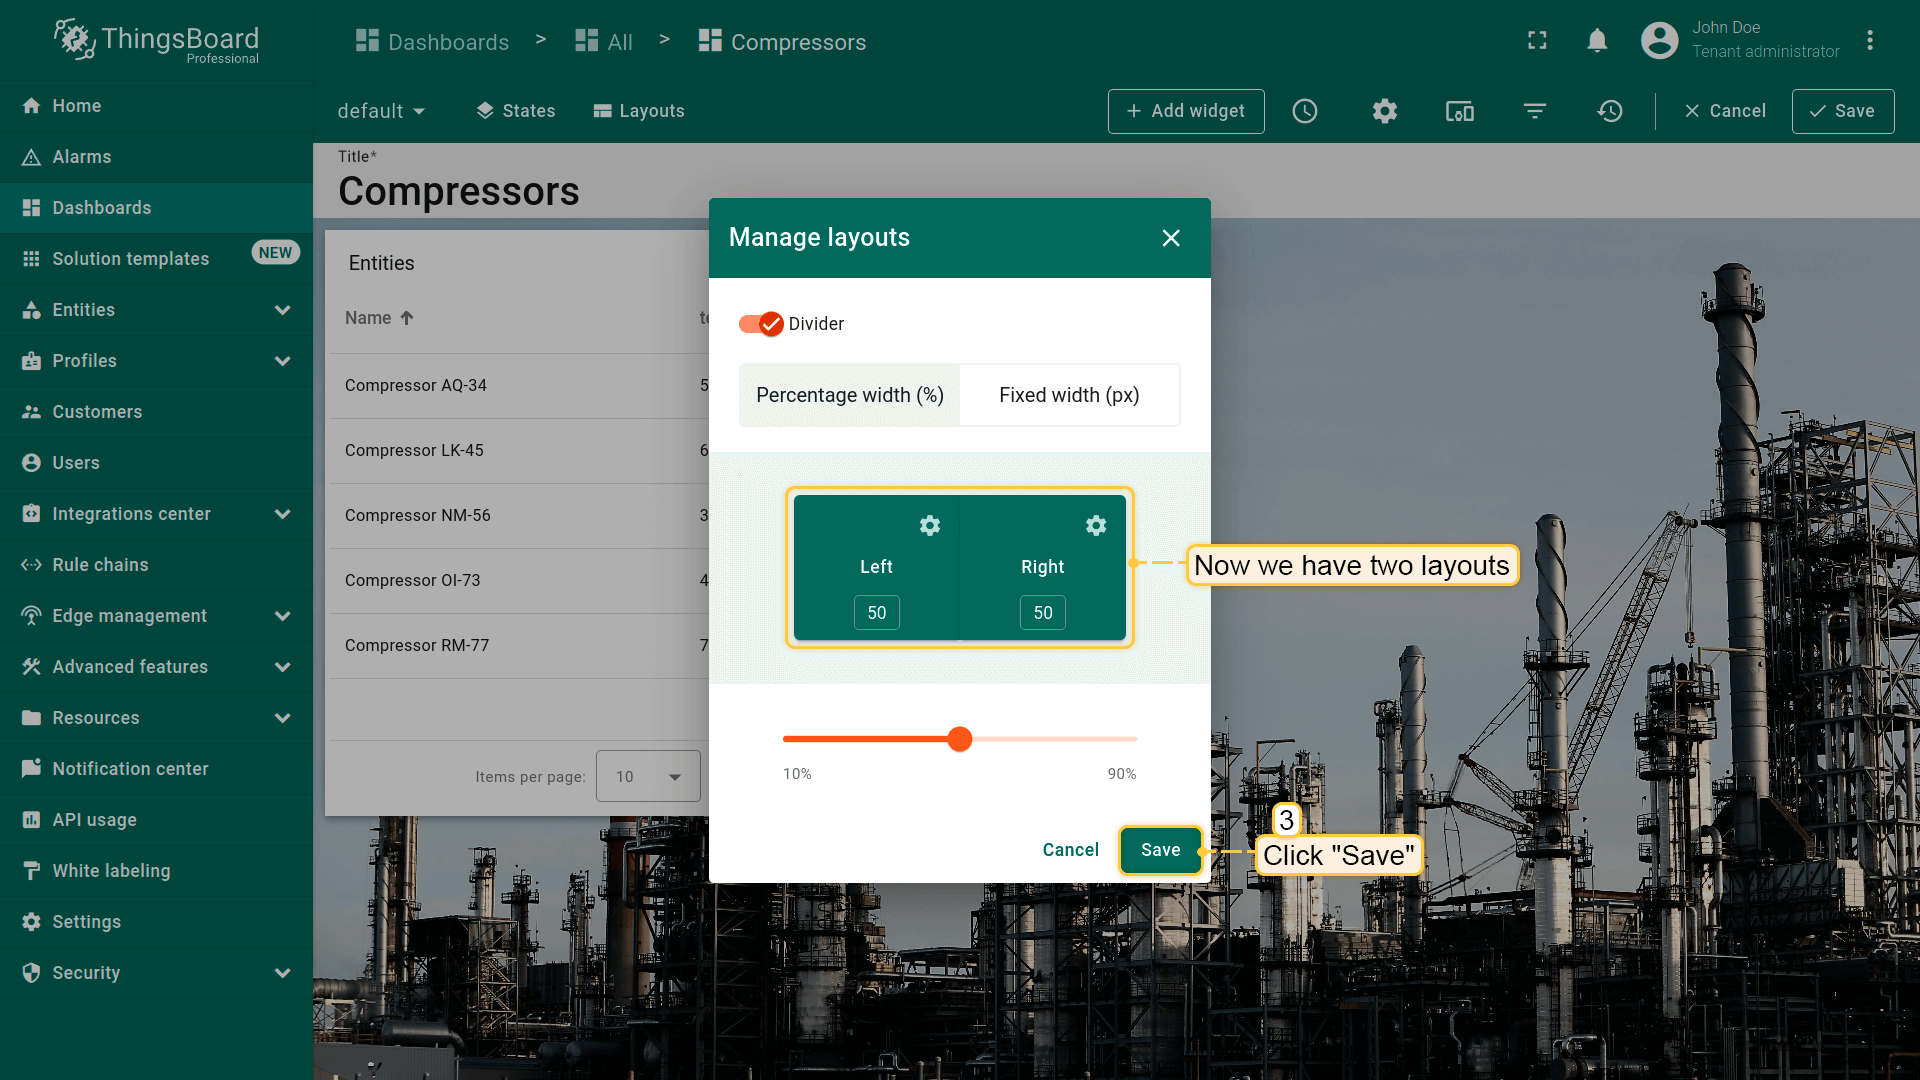
- In the opened "Manage layouts" window, turn on the "Divider" option;
- Now we have two layouts. Optionally, you can adjust the size of the windows in a certain percentage ratio relative to each other. Click "Save";
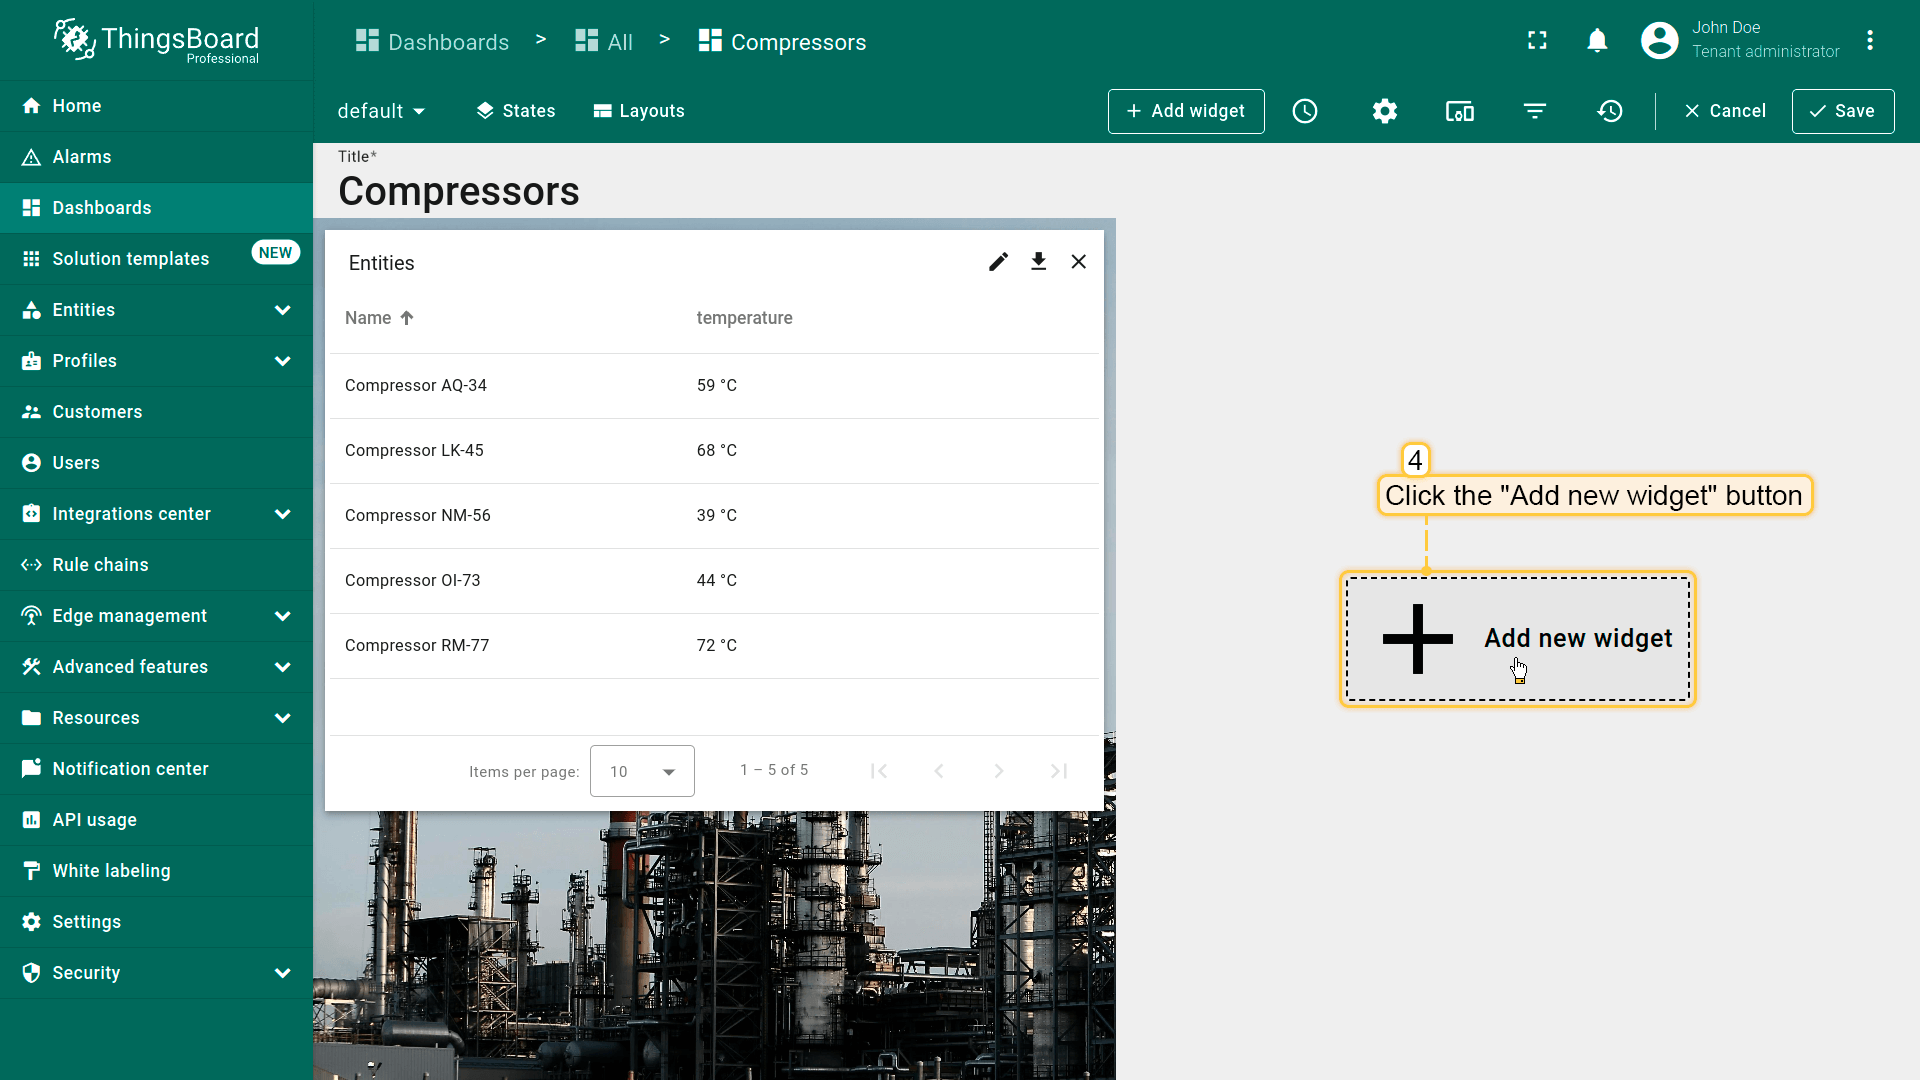
下面将“Time series chart”部件添加到右侧layout:
- Click the "Add new widget" button in the center of the right layout;
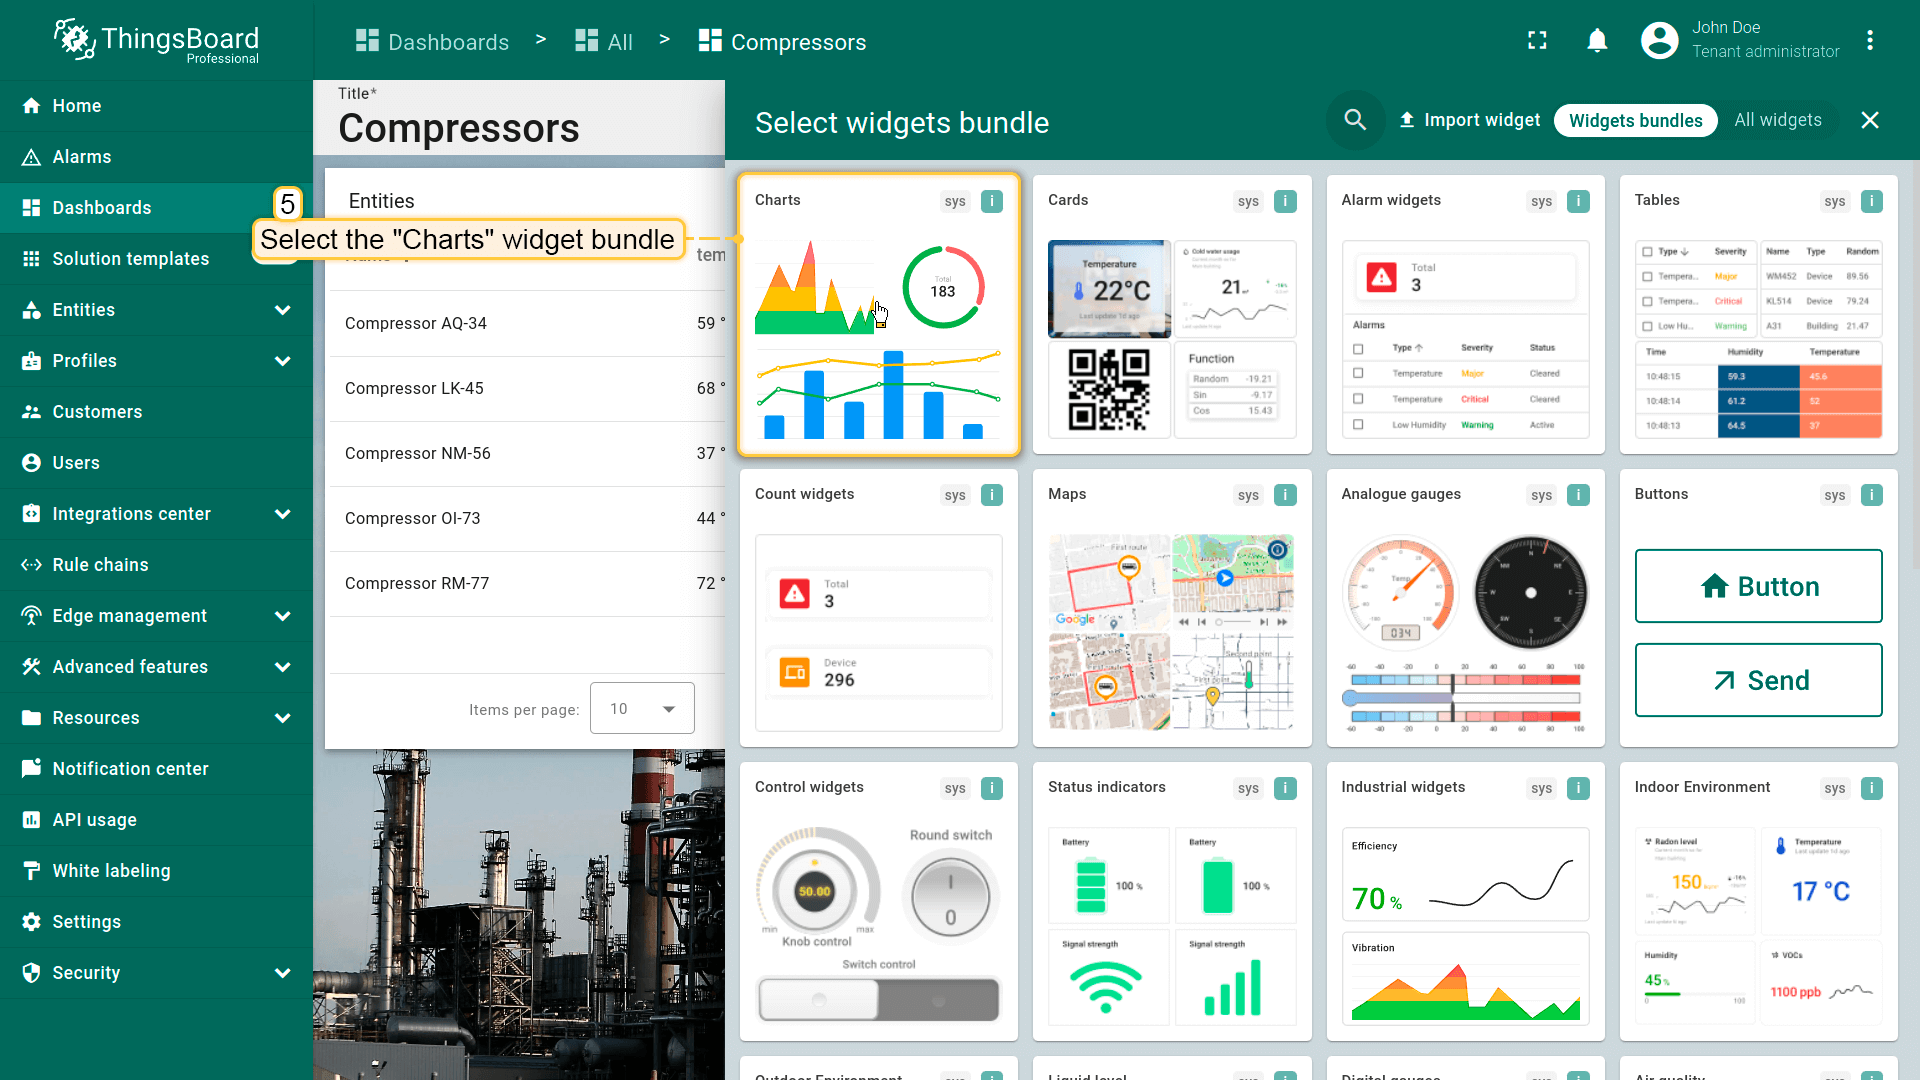
- Find the "Charts" widget bundle and click on it;
- Select the "Time series chart" widget;
- Navigate to the "Entity alias" tab in the "Datasource" section. Enter the desirable alias name in the "Entity alias" field and click the "Create a new one!" button;
- Select the "Entity from dashboard state" from the "Filter type" field and click "Add";
- Replace the label of the "temperature" key with ${entityName}. Then, click "Add" to add new widget on the dashboard;
- Resize the "Time series chart" widget until you are happy with its size.


为“Entities table”部件的每个实体添加类型为“Update current dashboard state”的action按钮。 假设已熟悉“Add action”步骤,直接进行action配置:
- 进入“Time series chart”部件的编辑模式,打开“Add action”窗口;
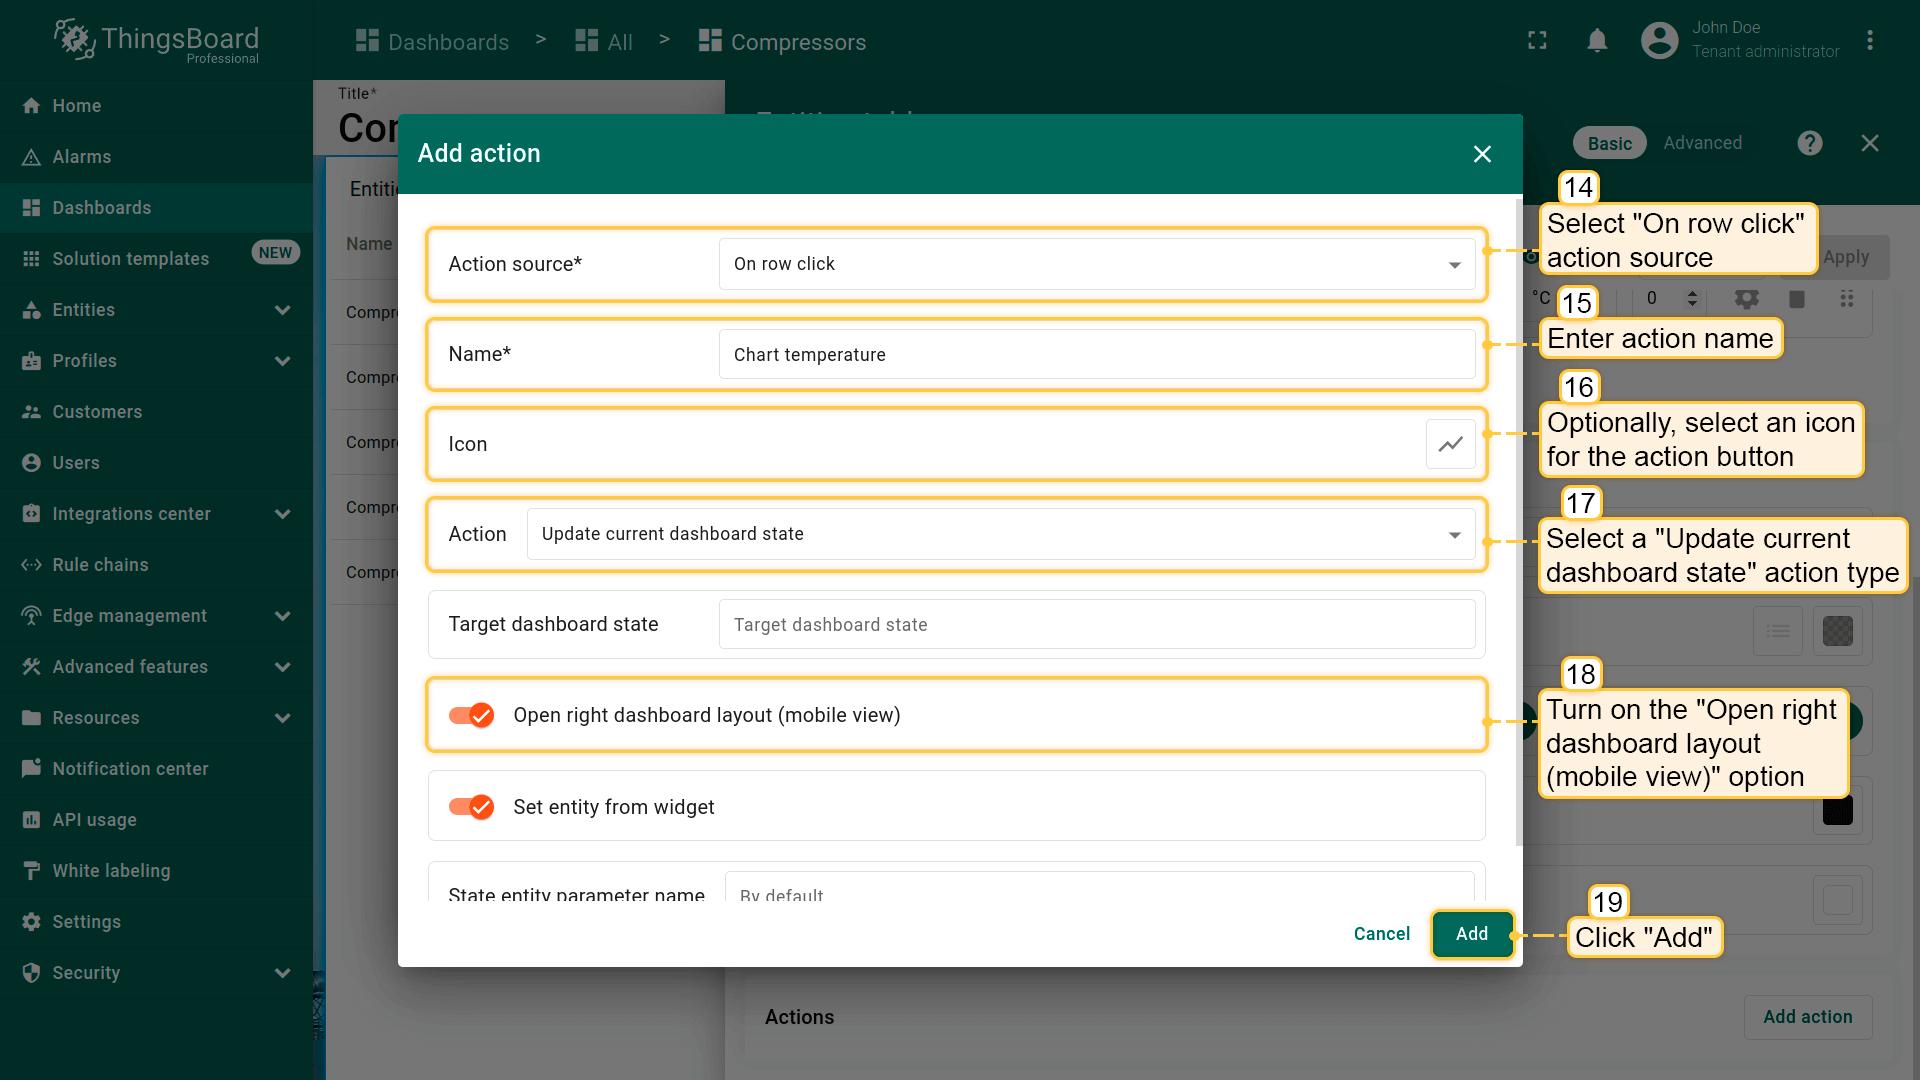
- 本指南以“On row click”为例,选择该action来源;
- 输入action名称并选择表示按钮的图标;
- 在“Action”下拉菜单中选择“Update current dashboard state”类型;
- 开启“Open right dashboard layout (mobile view)”选项;
- 点击“Add action”窗口底部的“Add”按钮;
- 在“Actions”窗口中查看已配置action,核对来源、图标和类型。点击“Save”,再点“Apply”保存部件设置;
- 点击dashboard页面右上角“Save”保存dashboard。
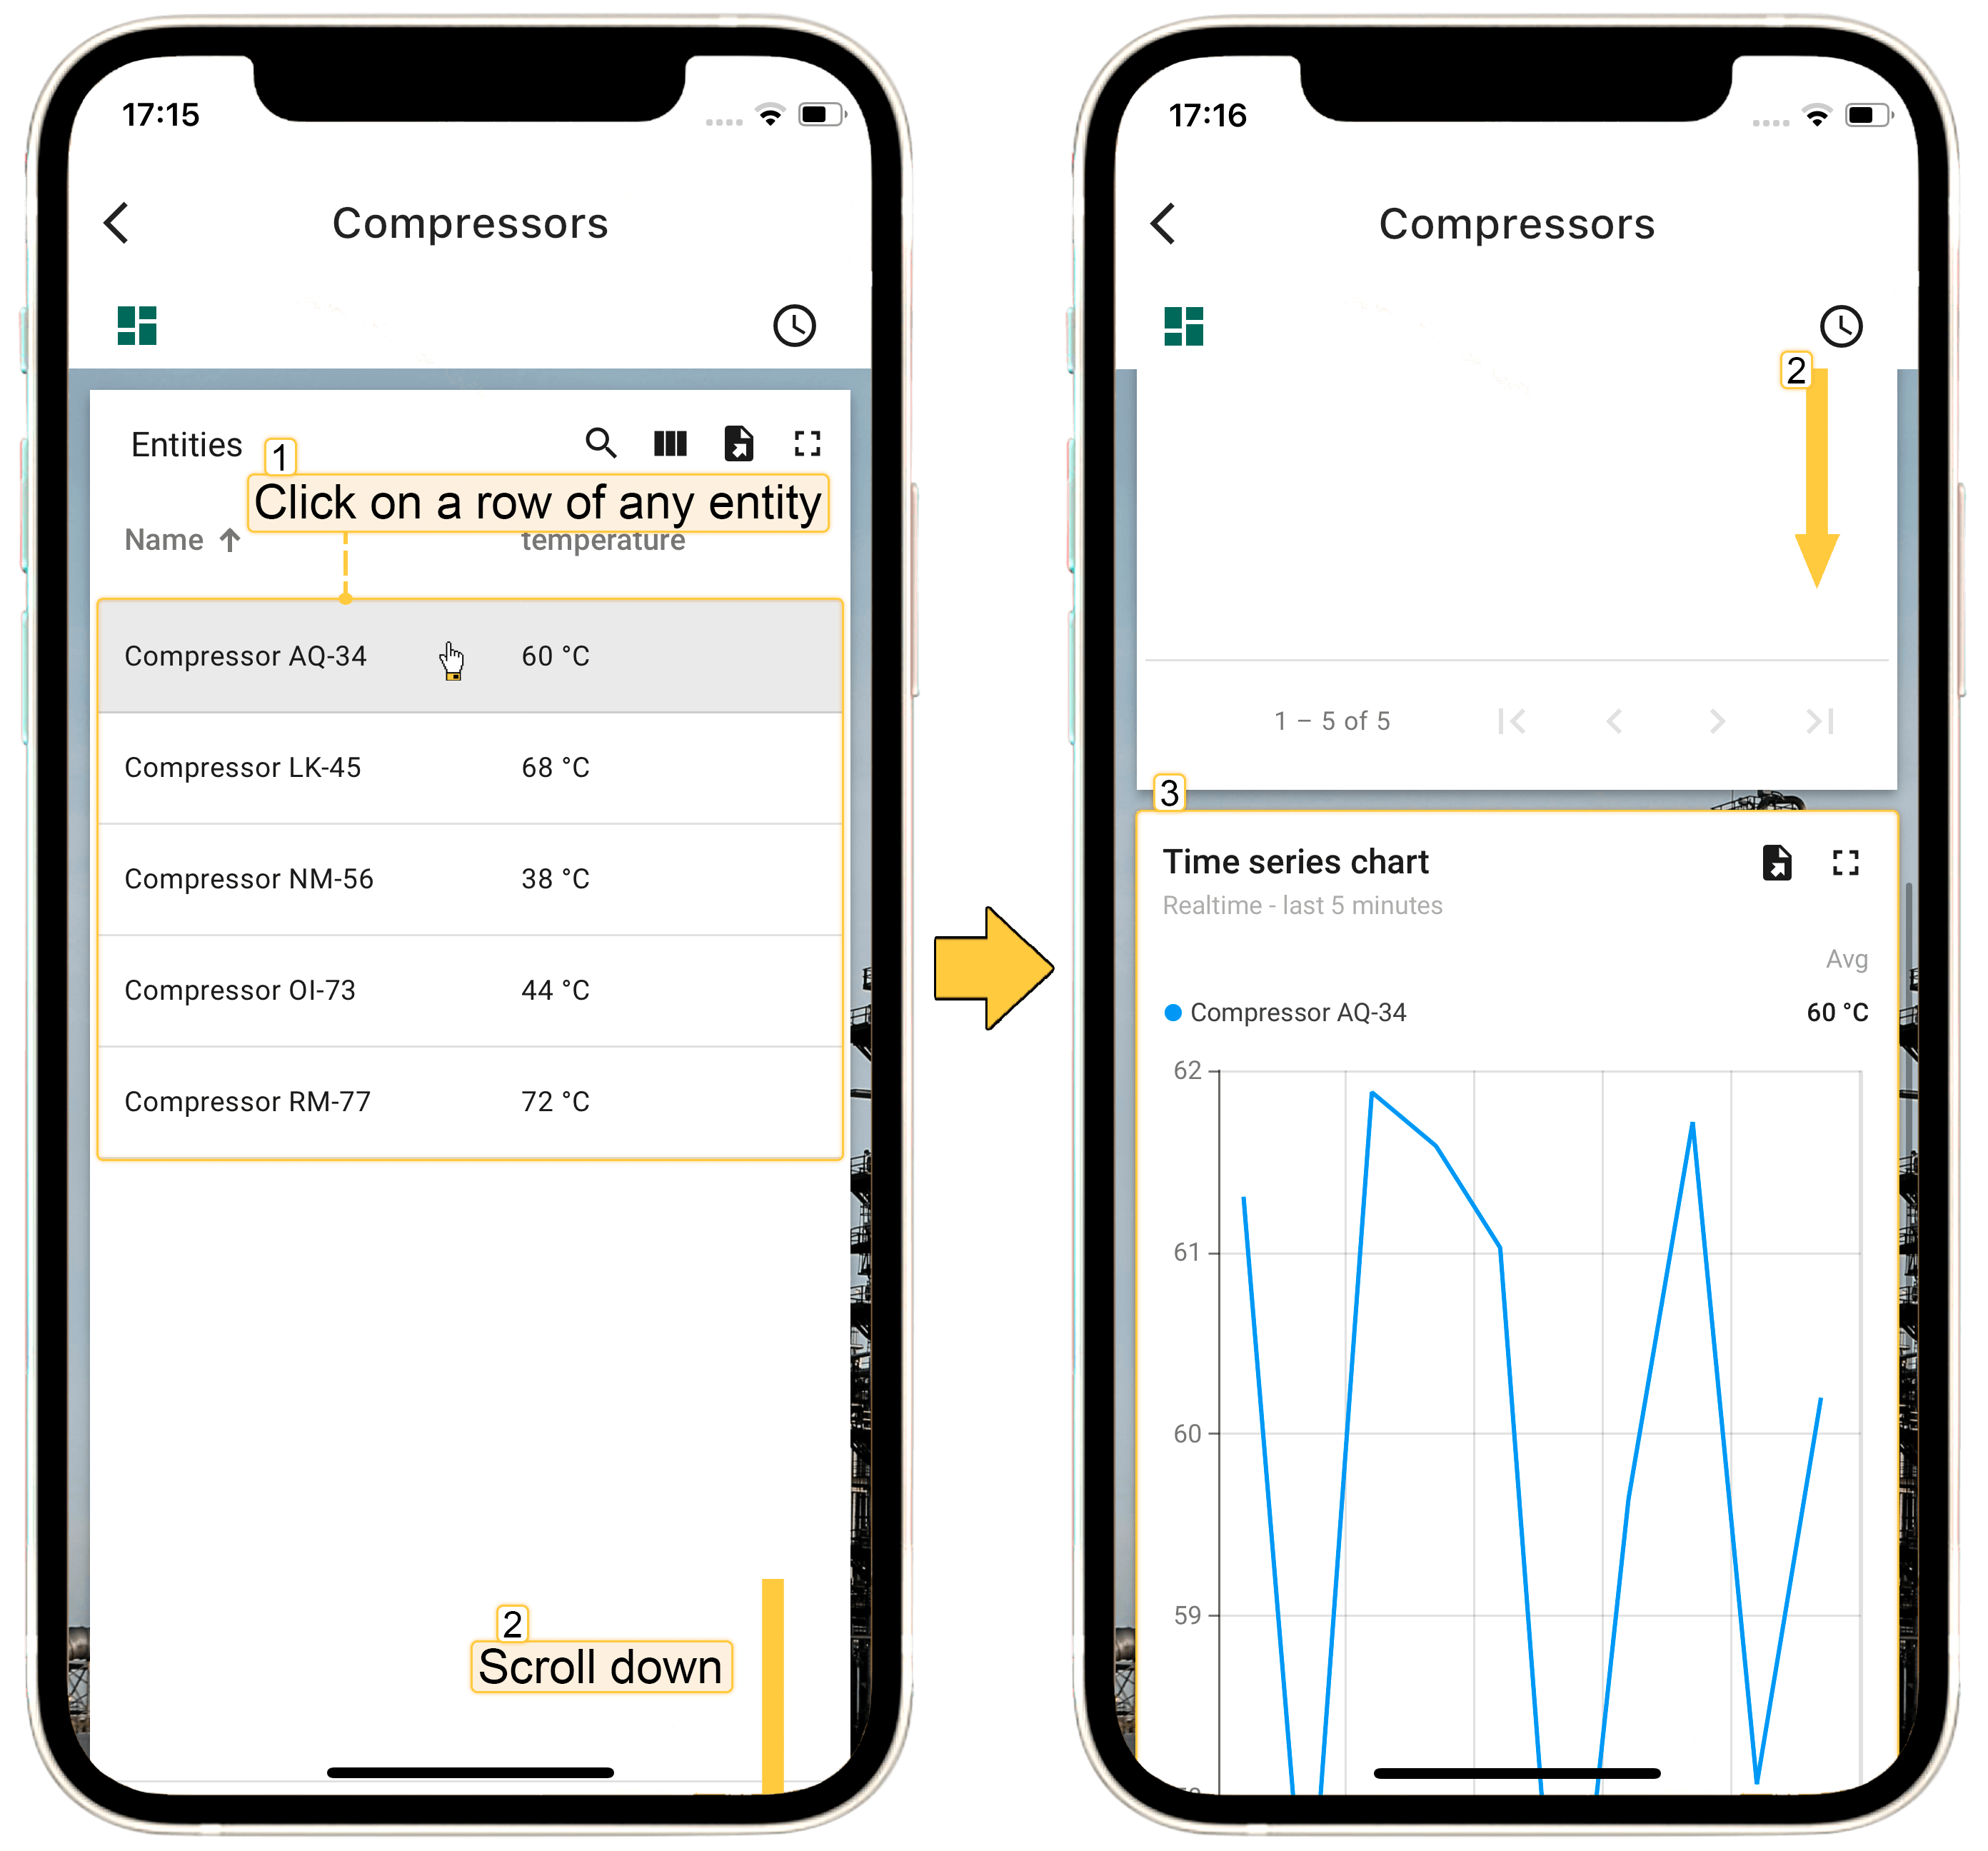
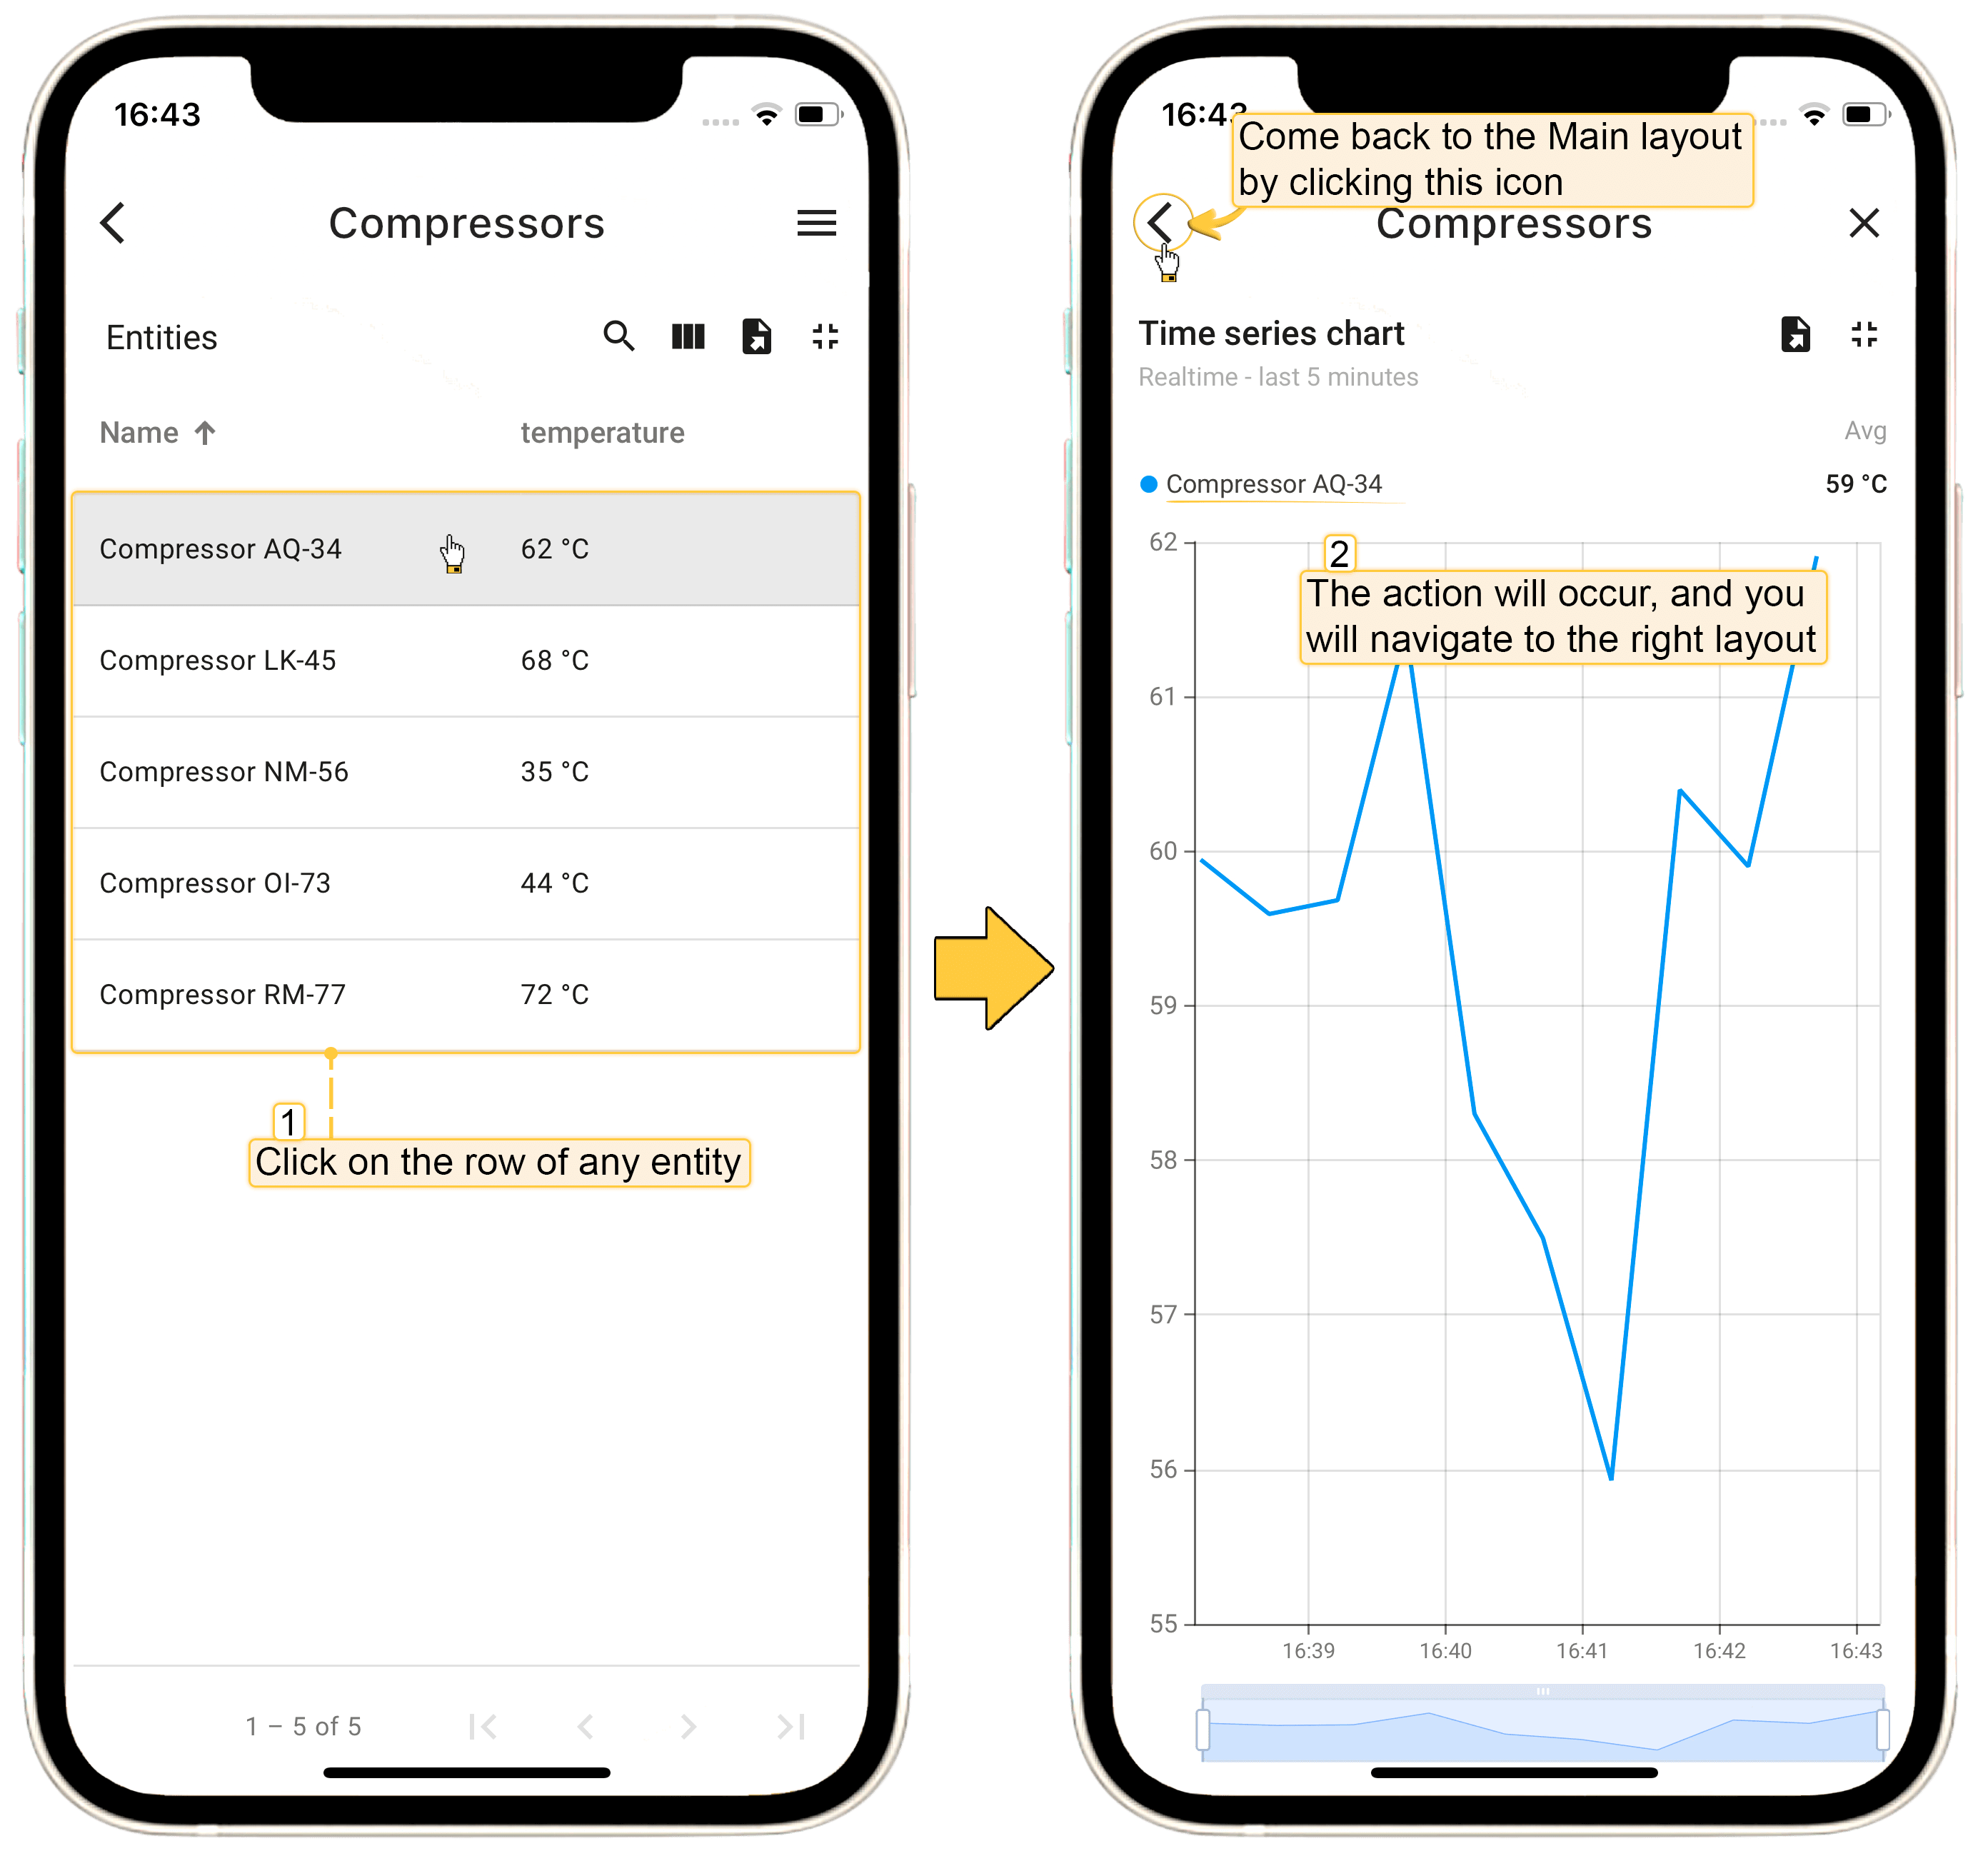
点击“Entity Table”部件中任意实体行即可执行action,即更新所选实体的详情。该实体数据将显示在当前dashboard的“Time series chart”部件上。
在 ThingsBoard PE Mobile Application 中打开该dashboard。点击“Entity table”部件中任意实体行,将直接跳转到“Time series chart”部件,查看主部件所选实体的详情。
Set entity from widget
Set entity from widget 复选框用于将部件中的特定实体加入state。通过创建“Entity from dashboard state”或其它别名,可在目标dashboard state中使用该实体。例如,表格部件中有设备列表,希望点击表格行时显示对应设备详情。
有时需在state中保存多个实体。例如,先进入客户列表,再进入该客户的设备列表,最后进入某设备详情。此时可有三个state:“Main”、“Customer Devices”和“Device Details”。 在“Device Details”state中可使用两个不同的state entity参数引用当前客户(如“currentCustomer”)和当前设备(如“currentDevice”)。