立即试用 商务报价
社区版
指南 > Hardware samples > LinkIt ONE > GPS data upload and visualization using LinkIt ONE and ThingsBoard

本页目录

GPS data upload and visualization using LinkIt ONE and ThingsBoard

Introduction

ThingsBoard is an open-source server-side platform that allows you to monitor and control IoT devices. It is free for both personal and commercial usage and you can deploy it anywhere. If this is your first experience with the platform we recommend to review what-is-thingsboard page and getting-started guide.

This sample application shows the capability to track GPS location of LinkIt ONE device and perform further visualization on the map. It performs collection of latitude and longitude values produced by GPS module. Collected data is pushed to ThingsBoard for storage and visualization. The purpose of this application is to demonstrate ThingsBoard data collection API and visualization capabilities.

The GPS module is a built-in module of LinkIt ONE. LinkIt ONE pushes data to ThingsBoard server via MQTT protocol by using PubSubClient library for Arduino. Data is visualized using the map widget which is a part of a customizable dashboard. The application that is running on LinkIt ONE is written using Arduino SDK which is quite simple and easy to understand.

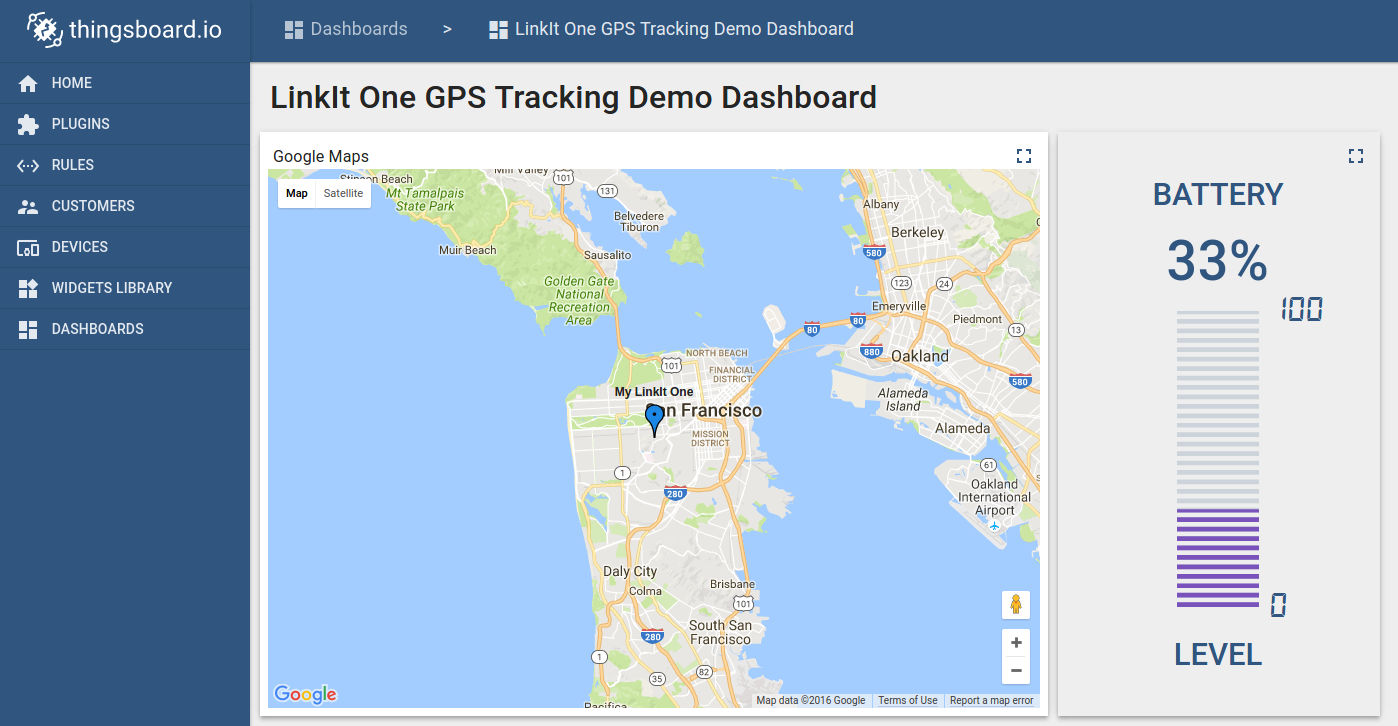
Once you complete this sample/tutorial, you will see your device GPS and battery data on the following dashboard.

image

必备条件

你需要启动并运行ThingsBoard服务, 建议使用演示服务。

另一种选项是通过安装指南进行独立部署 Windows用户应遵循本指南,已经安装docker的Linux用户执行以下命令:

1
2
3
4
5
mkdir -p ~/.mytb-data && sudo chown -R 799:799 ~/.mytb-data
mkdir -p ~/.mytb-logs && sudo chown -R 799:799 ~/.mytb-logs
docker run -it -p 9090:9090 -p 7070:7070 -p 1883:1883 -p 5683-5688:5683-5688/udp -v ~/.mytb-data:/data \
-v ~/.mytb-logs:/var/log/thingsboard --name mytb --restart always thingsboard/tb-postgres

以上命令可以完成ThingsBoard安装和生成演示数据。

你可以通过ThingsBoard页面地址http://localhost:8080、 用户名tenant@thingsboard.org和密码tenant进行访问, 有关模拟帐户请参见此处

This tutorial was prepared for Windows OS users. However, it is possible to run it on other OS (Linux or MacOS).

List of hardware

  • LinkIt One

    GPS and WIFI Antenna are shipped with a board.

ThingsBoard configuration

Note ThingsBoard configuration steps are necessary only in case of local ThingsBoard installation. If you are using Live Demo instance all entities are pre-configured for your demo account. However, we recommend reviewing this steps because you will still need to get device access token to send requests to ThingsBoard.

Provision your device

This step contains instructions that are necessary to connect your device to ThingsBoard.

Open ThingsBoard Web UI (http://localhost:8080) in browser and login as tenant administrator

  • login: tenant@thingsboard.org
  • password: tenant

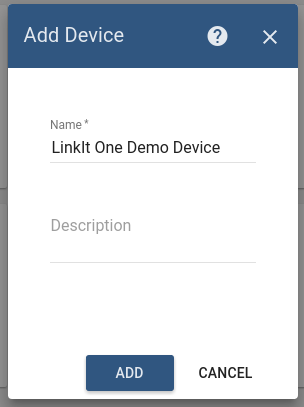
Go to “Devices” section. Click “+” button and create a device with the name “LinkIt One Demo Device”.

image

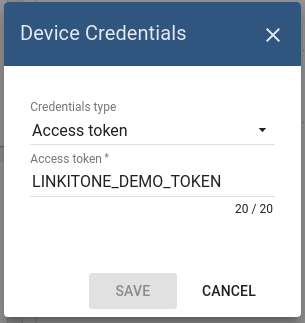
Once device created, open its details and click “Manage credentials”.

Copy auto-generated access token from the “Access token” field. Please save this device token. It will be referred to later as $ACCESS_TOKEN.

image

Click “Copy Device ID” in device details to copy your device id to the clipboard. Paste your device id to some place, this value will be used in further steps.

Provision your dashboard

Download the dashboard file using this link. Use import/export instructions to import the dashboard to your ThingsBoard instance.

Programming the LinkIt One device

If you already familiar with basics of LinkIt One programming using Arduino IDE you can skip the following step and proceed with step 2.

Step 1. LinkIt ONE and Arduino IDE setup.

In order to start programming LinkIt One device, you will need Arduino IDE installed and all related libraries. Please follow this guide in order to install the Arduino IDE and LinkIt One SDK:

It’s recommended to update your firmware by following this guide. To try your first LinkIt One sample, please follow this guide.

Step 2. PubSubClient library installation.

Open Arduino IDE and go to Sketch -> Include Library -> Manage Libraries. Find PubSubClient by Nick O’Leary and install it.

Note that this tutorial was tested with PubSubClient 2.6.

Download and open gps_tracker.ino sketch.

Note You need to edit following constants and variables in the sketch:

  • WIFI_AP - name of your access point
  • WIFI_PASSWORD - access point password
  • WIFI_AUTH - choose one of LWIFI_OPEN, LWIFI_WPA, or LWIFI_WEP.
  • TOKEN - the $ACCESS_TOKEN from ThingsBoard configuration step.
  • thingsboardServer - ThingsBoard HOST/IP address that is accessible within your wifi network. Specify “demo.thingsboard.io” if you are using live demo server.
1
2
3
4
5
6
7
8
9
10
11
12
13
14
15
16
17
18
19
20
21
22
23
24
25
26
27
28
29
30
31
32
33
34
35
36
37
38
39
40
41
42
43
44
45
46
47
48
49
50
51
52
53
54
55
56
57
58
59
60
61
62
63
64
65
66
67
68
69
70
71
72
73
74
75
76
77
78
79
80
81
82
83
84
85
86
87
88
89
90
91
92
93
94
95
96
97
98
99
100
101
102
103
104
105
106
107
108
109
110
111
112
113
114
115
116
117
118
119
120
121
122
123
124
125
126
127
128
129
130
131
132
133
134
135
136
137
138
139
140
141
142
143
144
145
146
147
148
149
150
151
152
153
154
155
156
157
158
159
160
161
162
163
164
165
166
167
168
169
170
171
172
173
174
175
176
177
178
179
180
181
182
183
184
185
186
187
188
189
190
191
192
193
194
195
196
197
198
199
200
201
202
203
204
205
206
207
208
209
210
211
212
213
214
215
216
217
218
219
220
221
222
223
224
225
226
227
228
229
230
231
232
233
234
235
236
237
238
239
240
241
242
243
244
245
246
247
248
249
250
251
252
253
254
255
256
257
258
#include <PubSubClient.h>

#include <LWiFi.h>
#include <LWiFiClient.h>
#include <LGPS.h>
#include <LBattery.h>

#define WIFI_AP "YOUR_WIFI_AP"
#define WIFI_PASSWORD "YOUR_WIFI_PASSWORD"
#define WIFI_AUTH LWIFI_WPA  // choose from LWIFI_OPEN, LWIFI_WPA, or LWIFI_WEP.

#define TOKEN "YOUR_ACCESS_TOKEN"

gpsSentenceInfoStruct gpsInfo;

char thingsboardServer[] = "YOUR_THINGSBOARD_HOST_OR_IP";

LWiFiClient wifiClient;

PubSubClient client( wifiClient );

unsigned long lastSend;

void setup()
{
  Serial.begin(115200);
  LGPS.powerOn();
  Serial.println("GPS started.");
  InitLWiFi();
  client.setServer( thingsboardServer, 1883 );
  lastSend = 0;
}

void loop()
{
  LWifiStatus ws = LWiFi.status();
  boolean status = wifi_status(ws);
  if (!status) {
    Serial.println("Connecting to AP ...");
    while (0 == LWiFi.connect(WIFI_AP, LWiFiLoginInfo(WIFI_AUTH, WIFI_PASSWORD)))
    {
      delay(500);
    }
    Serial.println("Connected to AP");
  }

  if ( !client.connected() ) {
    reconnect();
  }

  if ( millis() - lastSend > 1000 ) { // Update and send only after 1 seconds
    getAndSendGPSData();
    lastSend = millis();
  }

  client.loop();

}

void getAndSendGPSData()
{
  Serial.println("Collecting GPS data.");
  LGPS.getData(&gpsInfo);
  Serial.println((char*)gpsInfo.GPGGA);

  char latitude[20];
  char lat_direction[1];
  char longitude[20];
  char lon_direction[1];
  char buf[20];
  char time[30];

  const char* p = (char*)gpsInfo.GPGGA;

  p = nextToken(p, 0); // GGA
  p = nextToken(p, time); // Time
  p = nextToken(p, latitude); // Latitude
  p = nextToken(p, lat_direction); // N or S?
  p = nextToken(p, longitude); // Longitude
  p = nextToken(p, lon_direction); // E or W?
  p = nextToken(p, buf); // fix quality

  const int coord_size = 8;
  char lat_fixed[coord_size], lon_fixed[coord_size];
  convertCoords(latitude, longitude, lat_direction, lon_direction, lat_fixed, lon_fixed, coord_size);

  Serial.print("Latitude:");
  Serial.println(lat_fixed);

  Serial.print("Longitude:");
  Serial.println(lon_fixed);

  if (buf[0] == '1')
  {
    // GPS fix
    p = nextToken(p, buf); // number of satellites
    Serial.print("GPS is fixed:");
    Serial.print(atoi(buf));
    Serial.println(" satellite(s) found!");
  }
  else
  {
    Serial.println("GPS is not fixed yet.");
  }

  // Obtain battery level
  String batteryLevel = String(LBattery.level());
  String batteryCharging = LBattery.isCharging() == 1 ? "true" : "false";

  // Just debug messages
  Serial.print( "Sending gps location and battery level: [" );
  Serial.print( lat_fixed ); Serial.print( lon_fixed );
  Serial.print(" Battery level: "); Serial.print( batteryLevel );
  Serial.print(" Battery charging: "); Serial.print( batteryCharging );
  Serial.print( "]   -> " );

  // Prepare a JSON payload string
  String payload = "{";
  payload += "\"latitude\":"; payload += lat_fixed; payload += ", ";
  payload += "\"longitude\":"; payload += lon_fixed; payload += ", ";
  payload += "\"batteryLevel\":"; payload += batteryLevel;  payload += ", ";
  payload += "\"batteryCharging\":"; payload += batteryCharging;
  payload += "}";

  // Send payload
  char attributes[100];
  payload.toCharArray( attributes, 100 );
  client.publish( "v1/devices/me/attributes", attributes );
  Serial.println( attributes );
}

void InitLWiFi()
{
  LWiFi.begin();
  // Keep retrying until connected to AP
  Serial.println("Connecting to AP ...");
  while (0 == LWiFi.connect(WIFI_AP, LWiFiLoginInfo(WIFI_AUTH, WIFI_PASSWORD))) {
    delay(500);
  }
  Serial.println("Connected to AP");
}

void reconnect() {
  // Loop until we're reconnected
  while (!client.connected()) {
    Serial.print("Connecting to ThingsBoard node ...");
    // Attempt to connect (clientId, username, password)
    if ( client.connect("LinkIt One Device", TOKEN, NULL) ) {
      Serial.println( "[DONE]" );
    } else {
      Serial.print( "[FAILED] [ rc = " );
      Serial.print( client.state() );
      Serial.println( " : retrying in 5 seconds]" );
      // Wait 5 seconds before retrying
      delay( 5000 );
    }
  }
}

void convertCoords(const char* latitude, const char* longitude, const char* lat_direction,
                   const char* lon_direction, char* lat_return, char* lon_return, int buff_length)
{
  char lat_deg[3];

  // extract the first 2 chars to get the latitudinal degrees
  strncpy(lat_deg, latitude, 2);

  // null terminate
  lat_deg[2] = 0;

  char lon_deg[4];

  // extract first 3 chars to get the longitudinal degrees
  strncpy(lon_deg, longitude, 3);

  // null terminate
  lon_deg[3] = 0;

  // convert to integer from char array
  int lat_deg_int = arrayToInt(lat_deg);
  int lon_deg_int = arrayToInt(lon_deg);

  // must now take remainder/60
  // this is to convert from degrees-mins-secs to decimal degrees
  // so the coordinates are "google mappable"

  // convert the entire degrees-mins-secs coordinates into a float - this is for easier manipulation later
  float latitude_float = arrayToFloat(latitude);
  float longitude_float = arrayToFloat(longitude);

  // remove the degrees part of the coordinates - so we are left with only minutes-seconds part of the coordinates
  latitude_float = latitude_float - (lat_deg_int * 100);
  longitude_float = longitude_float - (lon_deg_int * 100);

  // convert minutes-seconds to decimal
  latitude_float /= 60;
  longitude_float /= 60;

  // add back on the degrees part, so it is decimal degrees
  latitude_float += lat_deg_int;
  longitude_float += lon_deg_int;

  if (strcmp (lat_direction, "S") == 0) {
    latitude_float *= -1;
  }

  if (strcmp (lon_direction, "W") == 0) {
    longitude_float *= -1;
  }

  // format the coordinates nicey - no more than 6 decimal places
  snprintf(lat_return, buff_length, "%2.6f", latitude_float);
  snprintf(lon_return, buff_length, "%3.6f", longitude_float);
}

int arrayToInt(const char* char_array)
{
  int temp;
  sscanf(char_array, "%d", &temp);
  return temp;
}

float arrayToFloat(const char* char_array)
{
  float temp;
  sscanf(char_array, "%f", &temp);
  return temp;
}

const char *nextToken(const char* src, char* buf)
{
  int i = 0;
  while (src[i] != 0 && src[i] != ',')
    i++;
  if (buf)
  {
    strncpy(buf, src, i);
    buf[i] = 0;
  }
  if (src[i])
    i++;
  return src + i;
}

boolean wifi_status(LWifiStatus ws) {
  switch (ws) {
    case LWIFI_STATUS_DISABLED:
      return false;
      break;
    case LWIFI_STATUS_DISCONNECTED:
      return false;
      break;
    case LWIFI_STATUS_CONNECTED:
      return true;
      break;
  }
  return false;
}

Connect your LinkIt One device via USB cable and select Serial Debug COM port in Arduino IDE. Compile and Upload your sketch to the device using “Upload” button.

After application will be uploaded and started it will try to connect to ThingsBoard node using mqtt client and upload “latitude” and “longitude” attributes once per second.

Troubleshooting

When the application is running you can connect your device to Serial Debug COM port in Arduino IDE and open “Serial Monitor” in order to view debug information produced by serial output.

Data visualization

Finally, open ThingsBoard Web UI. You can access this dashboard by logging in as a tenant administrator. Use

  • login: tenant@thingsboard.org
  • password: tenant

in case of local ThingsBoard installation.

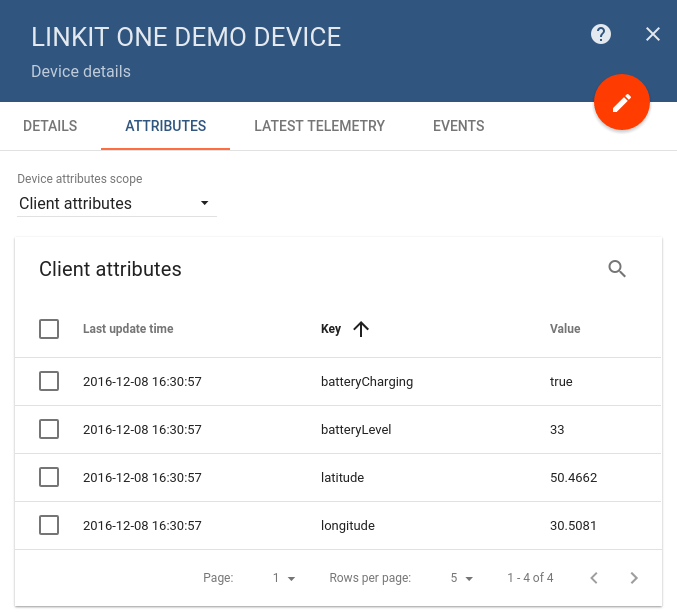
Go to “Devices” section and locate “LinkIt One Demo Device”, open device details and switch to “Attributes” tab. If all is configured correctly you should be able to see “latitude”, “longitude” and battery status attributes and their latest values in the table.

image

After, open “Dashboards” section then locate and open “LinkIt One GPS Tracking Demo Dashboard”. As a result, you will see the map widget with a pointer indicating your device location and a battery level widget (similar to dashboard image in the introduction).

See also

Browse other samples or explore guides related to main ThingsBoard features:

Your feedback

Don’t hesitate to star ThingsBoard on github to help us spread the word. If you have any questions about this sample - post it on the issues.

Next steps

  • 入门指南 - 快速学习ThingsBoard相关功能。

  • 安装指南 - 学习如何在各种操作系统上安装ThingsBoard。

  • 连接设备 - 学习如何根据你的连接方式或解决方案连接设备。

  • 可 视 化 - 学习如何配置复杂的ThingsBoard仪表板说明。

  • 数据处理 - 学习如何使用ThingsBoard规则引擎。

  • 数据分析 - 学习如何使用规则引擎执行基本的分析任务。

  • 高级功能 - 学习高级ThingsBoard功能。

  • 开发指南 - 学习ThingsBoard中的贡献和开发。