- Overview
- Prerequisites
- Create Converter templates
- Create Integration template
- Modify the Edge Root Rule chain for Downlinks
- Assign Integration to Edge
- Installing and running external TCP Integration
- Send uplink message
- Send a downlink message
- 下一步
Edge TCP Integration 与 TCP Integration 实现方式类似。 区别仅在于 integration 的创建与部署方式。 操作前请参阅 TCP Integration 文档。
Overview
TCP Integration 允许使用 TCP 传输协议的设备将数据流式传输至 ThingsBoard Edge, 并将这些设备的 payload 转换为 ThingsBoard Edge 格式。
TCP Integration 只能作为 Remote Integration 启动。 可在 TB Edge 实例所在的同一台机器上启动, 也可在能通过网络访问 TB Edge 实例的另一台机器上启动。
To learn more, review the integration diagram:

Prerequisites
In this tutorial, we will use:
- ThingsBoard Edge Professional Edition;
- TCP Integration: The integration that runs externally and is connected to the ThingsBoard Edge instance.
- echo command: To display a line of text, and redirect its output to the netcat (nc) utility.
- netcat (nc) utility: To establish TCP connections, receive data from there, and transmit it.
Let’s assume that we have a sensor which is sending current temperature and humidity readings. Our sensor device SN-002 publishes its temperature and humidity readings to TCP Integration on port 10560 on the machine where TCP Integration is running.
For demonstration purposes, we assume that our device is smart enough to send data in 3 different payload types:
- Text: The payload is
1
SN-002,default,temperature,25.7\n\rSN-002,default,humidity,69
- JSON: The payload is:
1
2
3
4
5
6
7
8
[
  {
    "deviceName": "SN-002",
    "deviceType": "default",
    "temperature": 25.7,
    "humidity": 69
  }
]
- Binary: The binary payload is (in HEX string):
1
\x30\x30\x30\x30\x11\x53\x4e\x2d\x30\x30\x32\x64\x65\x66\x61\x75\x6c\x74\x32\x35\x2e\x37\x00\x00\x00
- The bytes description in this payload is following:
- 0-3 bytes: \x30\x30\x30\x30 - These are the “dummy” bytes. They show how to skip certain prefix bytes in your payload and are included as an example.
- 4 byte: \x11 - The payload length. If we convert it to decimal, it is 17. So, in this case, our payload is limited to 17 bytes from the incoming TCP frame.
- 5-10 bytes: \x53\x4e\x2d\x30\x30\x32 - The device name. If we convert it to text, it is SN-002.
- 11-17 bytes: \x64\x65\x66\x61\x75\x6c\x74 - The device type. If we convert it to text, it is default.
- 18-21 bytes: \x32\x35\x2e\x37 - The temperature telemetry. If we convert it to text, it is 25.7.
- 22-24 bytes: \x00\x00\x00 - These are the “dummy” bytes. We will ignore them because the payload size is 17 bytes (from 5 to 21 byte). These bytes are included as an example.
Select the payload type based on your device capabilities and business cases.
在运行远程 TCP Integration 的机器上,必须为入站连接开放端口 10560——nc 工具必须能连接到 TCP socket。 若在本地运行,通常无需额外更改。
Create Converter templates
To create Converter and Integration templates, log in to the Cloud instance as Tenant administrator.
Uplink Converter template
Before creating the Integration template, create an Uplink and Downlink converter templates in Converters templates section.
The uplink data converter is needed to convert the incoming data from the device into the format required for display on ThingsBoard Edge.
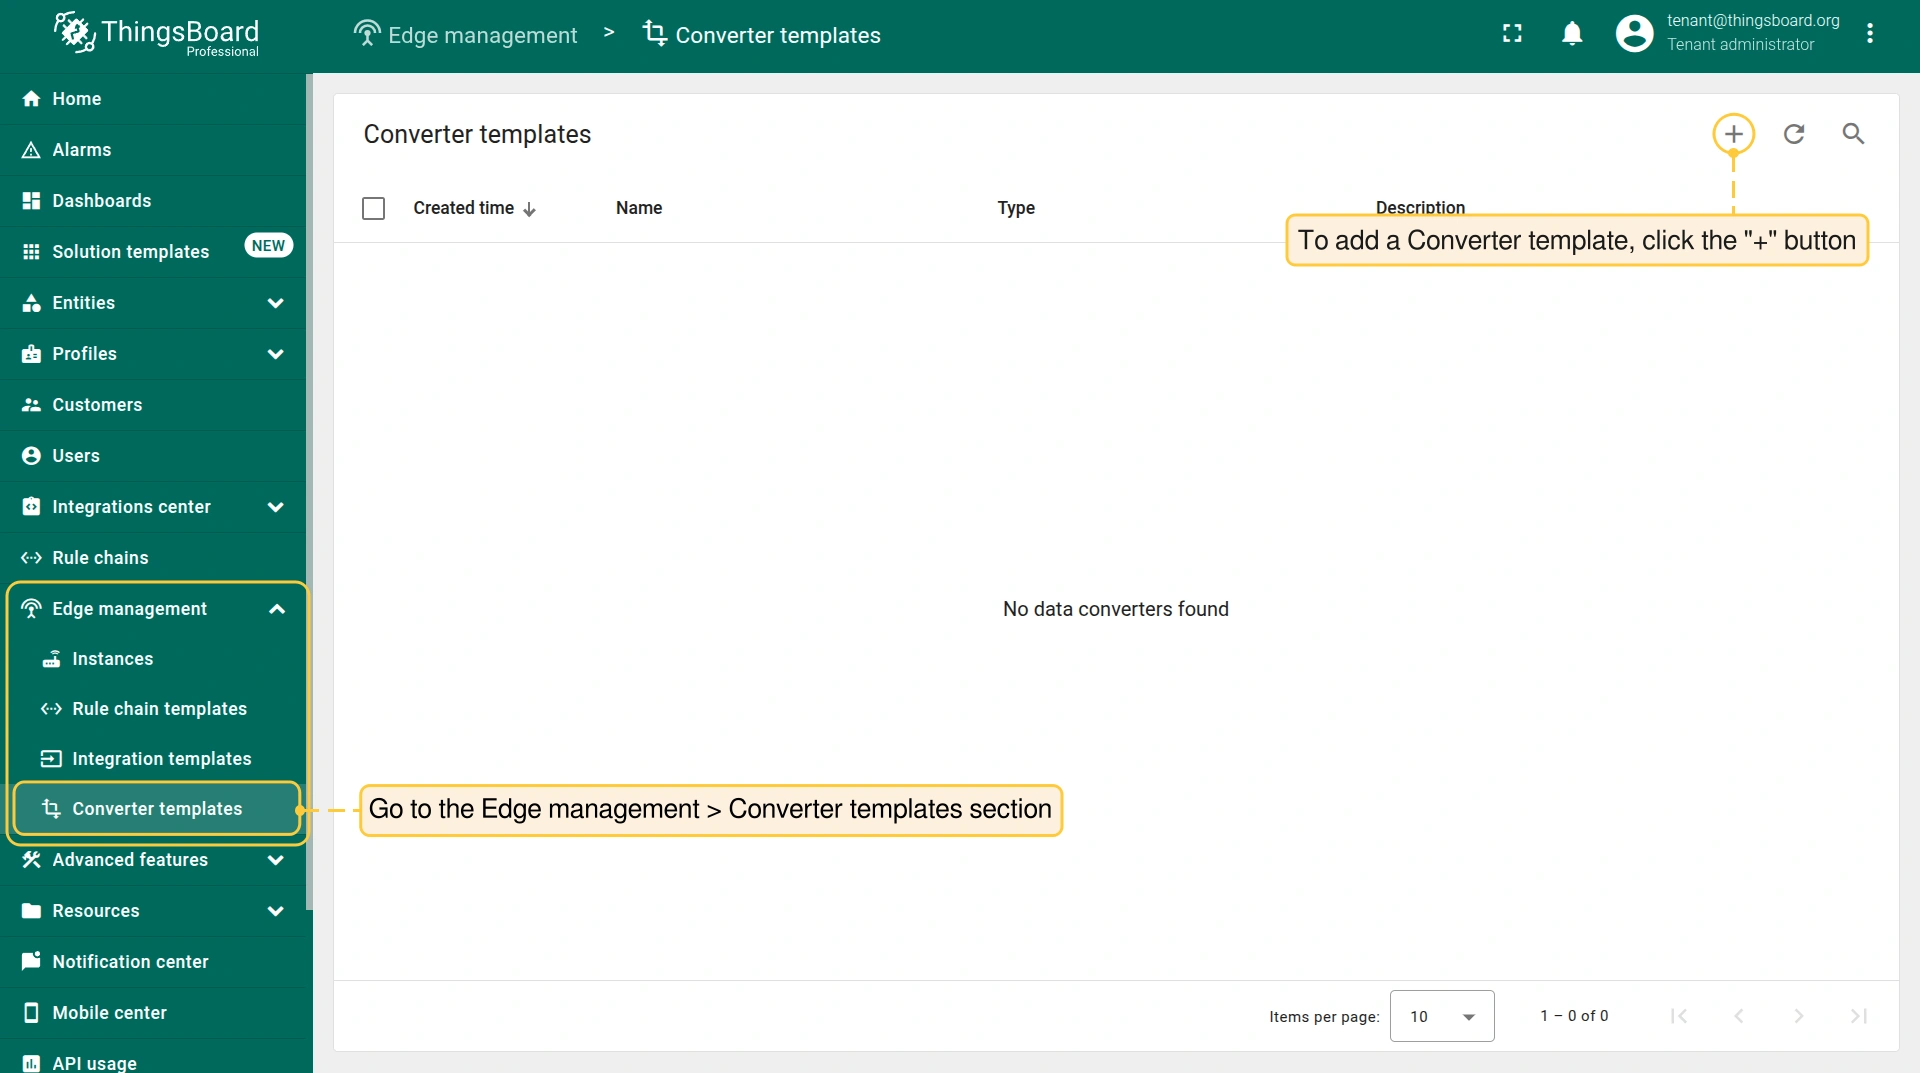
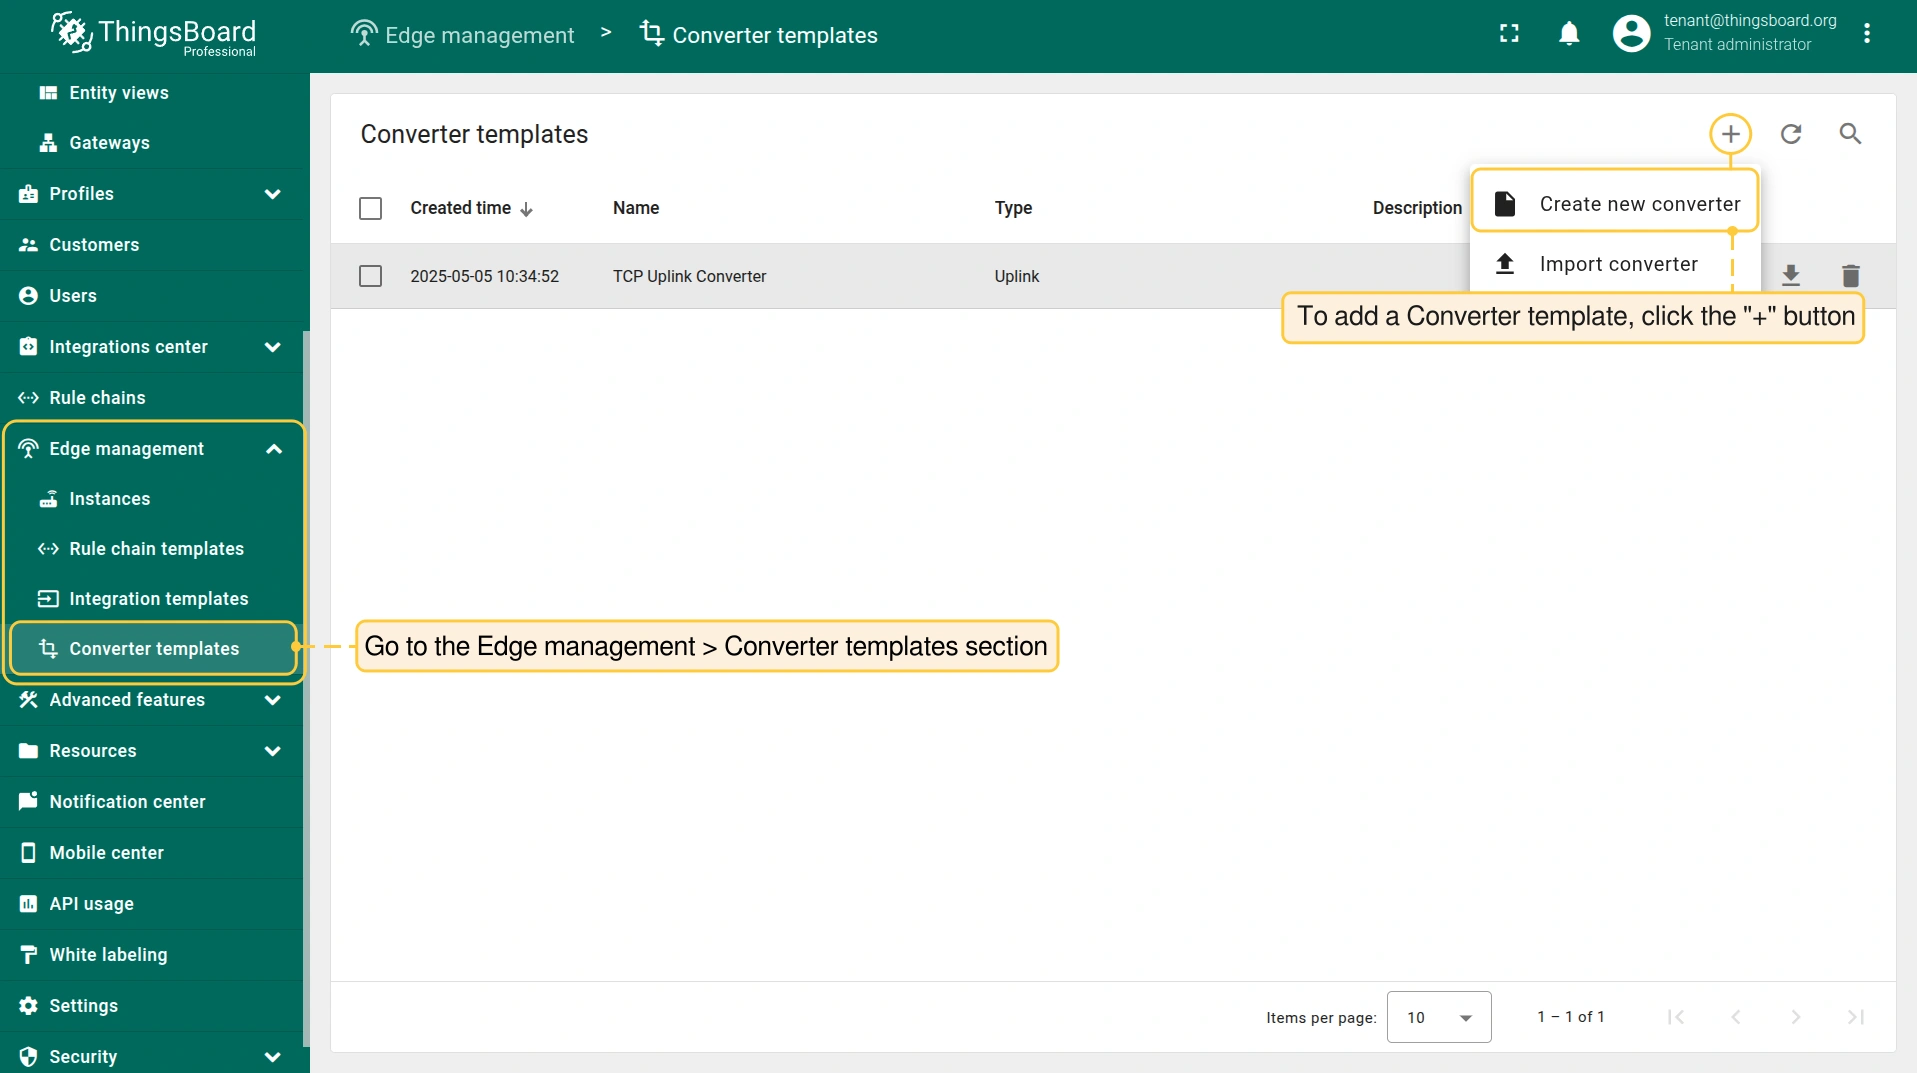
- Log in to the Cloud and go to the Edge management > Converter templates section. To create a Converter template, click the “Add data converter” button (the + icon) and select the “Create new converter” option.
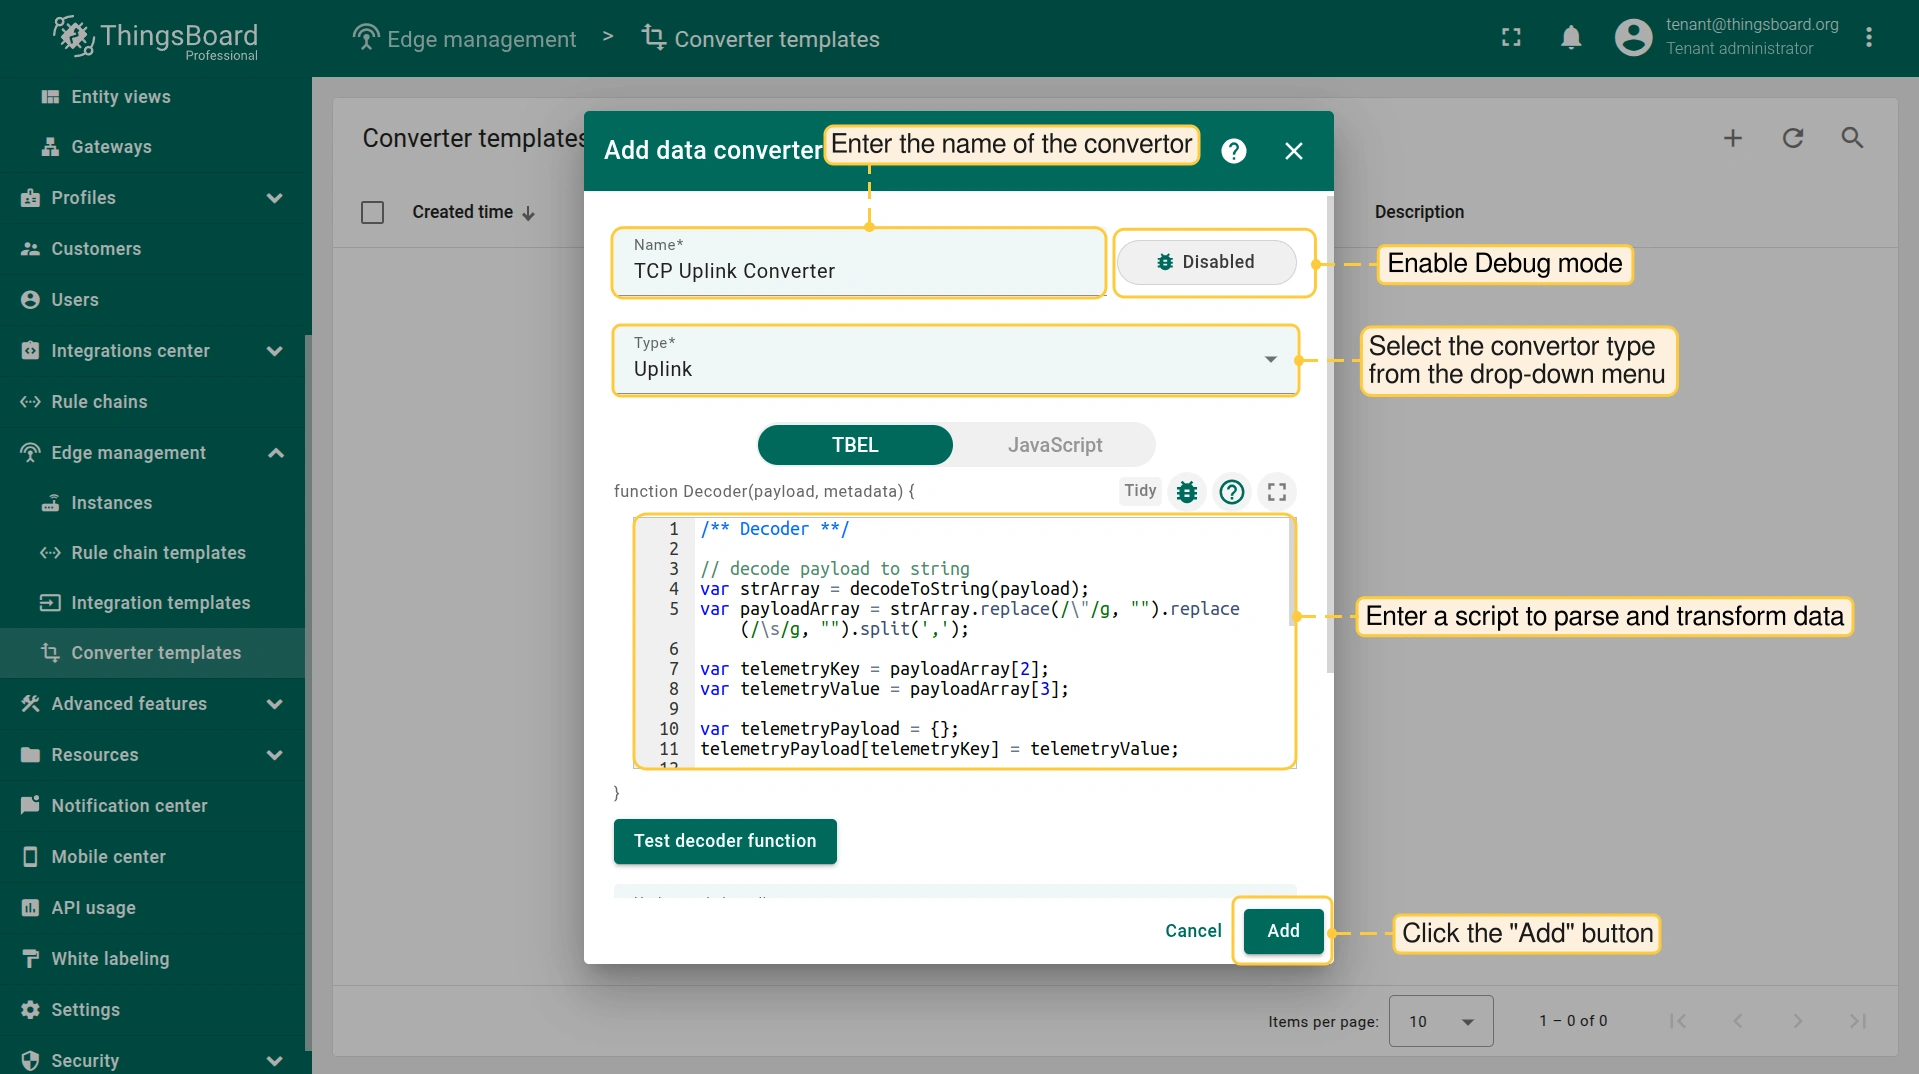
- In the “Add data converter” pop-up window:
- Name: Enter the name of the data converter.
- Type: Select the “Uplink” converter type from the drop-down menu.
- To view the events, enable Debug mode.
- function Decoder: Enter a script to parse and transform data.
- Click the “Add” button.
Debug 模式在开发与故障排查中非常有用,但在生产环境中保持启用会显著增加数据库存储需求,因为所有调试数据均会存入数据库。
强烈建议在调试完成后 禁用 Debug 模式。
Select the device payload type to use for a decoder configuration:
请将以下脚本复制并粘贴到 Decoder function 区域: Decoder function 用于将入站数据和 metadata 解析为 ThingsBoard 可消费的格式。 deviceName and deviceType are required, while attributes and telemetry are optional. attributes and telemetry are flat key-value objects. Nested objects are not supported. |
请将以下脚本复制并粘贴到 Decoder function 区域: Decoder function 用于将入站数据和 metadata 解析为 ThingsBoard 可消费的格式。 deviceName 和 deviceType 为必填,attributes 和 telemetry 为可选。 attributes 和 telemetry 为扁平键值对象,不支持嵌套对象。 |
请将以下脚本复制并粘贴到 Decoder function 区域: |
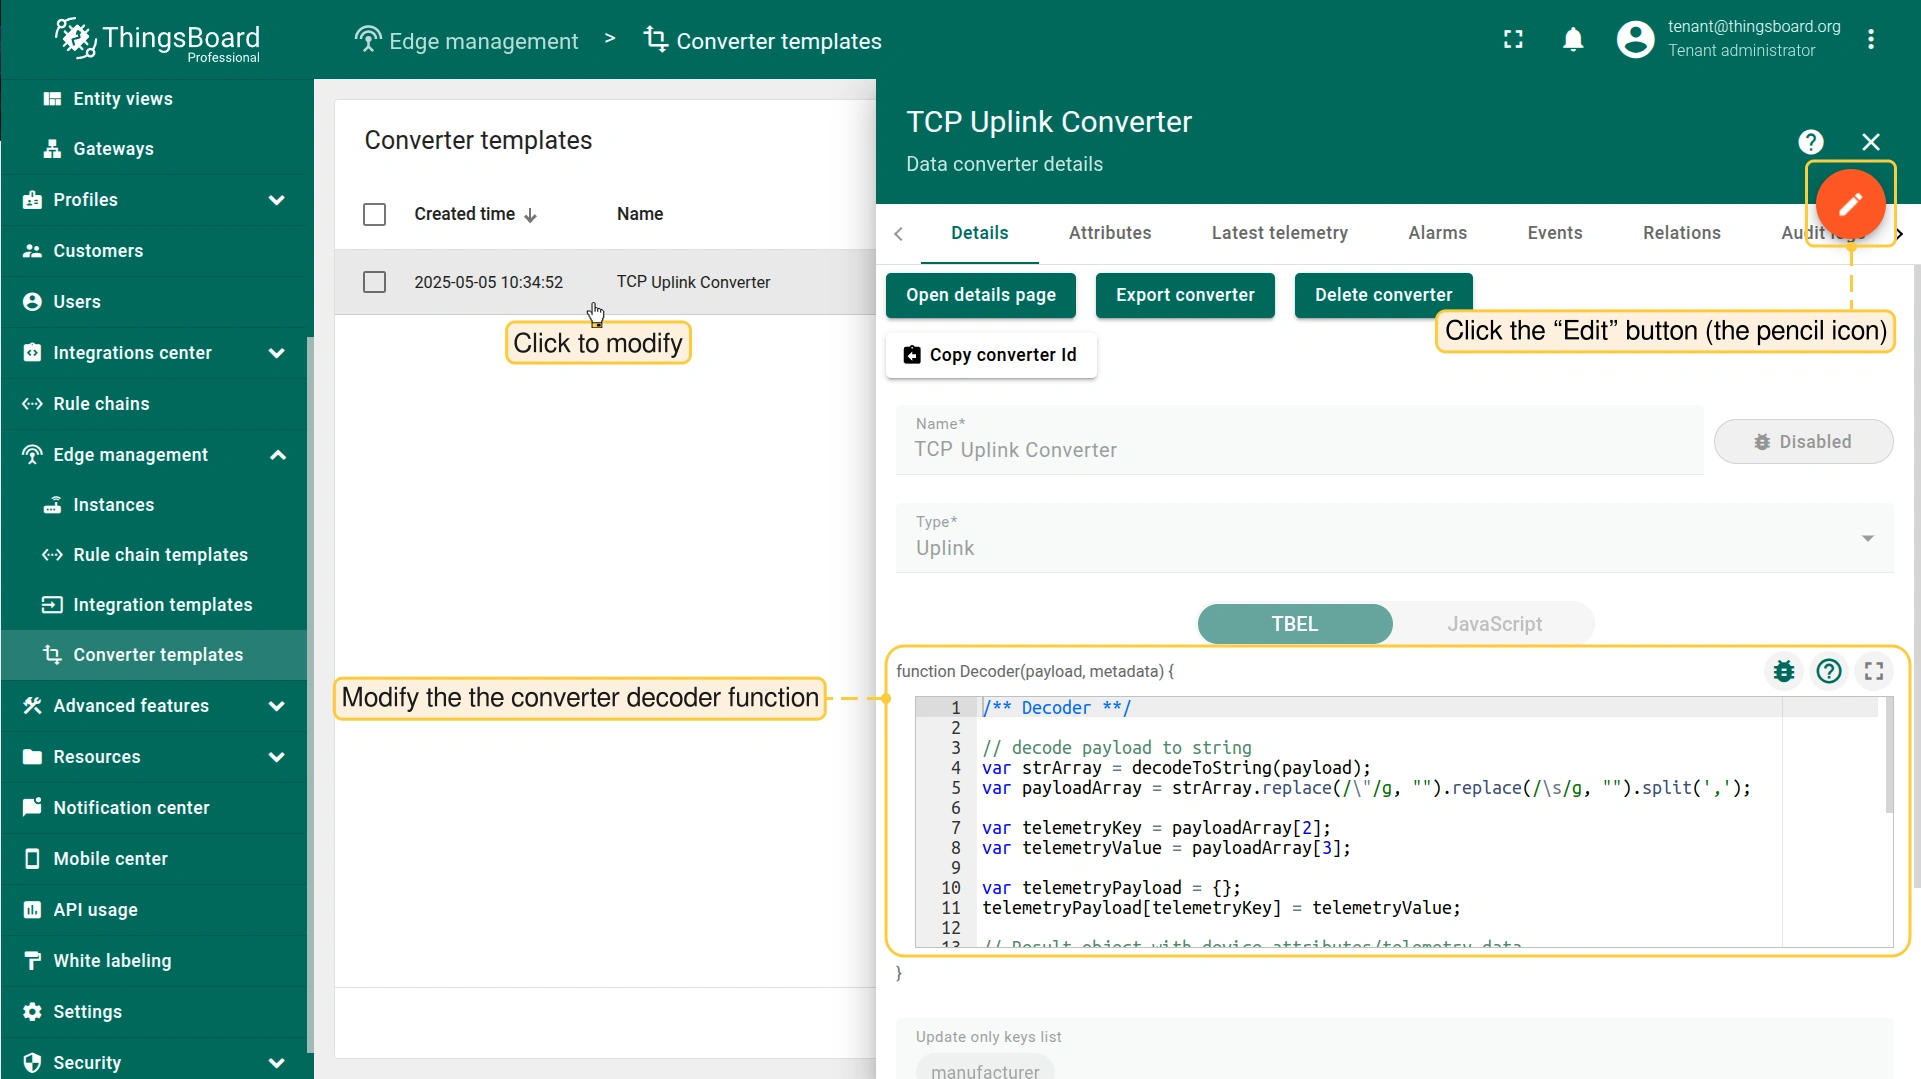
You can change the function Decoder while creating the converter or after creating it:
- If the converter has already been created, click it to open the “Data converter details” window.
- Click the “Edit” buton (the pencil icon) to edit the data converter.
- Copy the configuration example or create your own converter configuration and paste it into the “function Decoder” field.
- To save the changes, click the “Save” button (the checkmark icon).
Downlink Converter template
Also create the Downlink Converter Template in the Converter Templates section.
- On the Edge management > Converter templates section page, click the “Add data converter” button (the + icon) to create another Converter template, and select the “Create new converter” option.
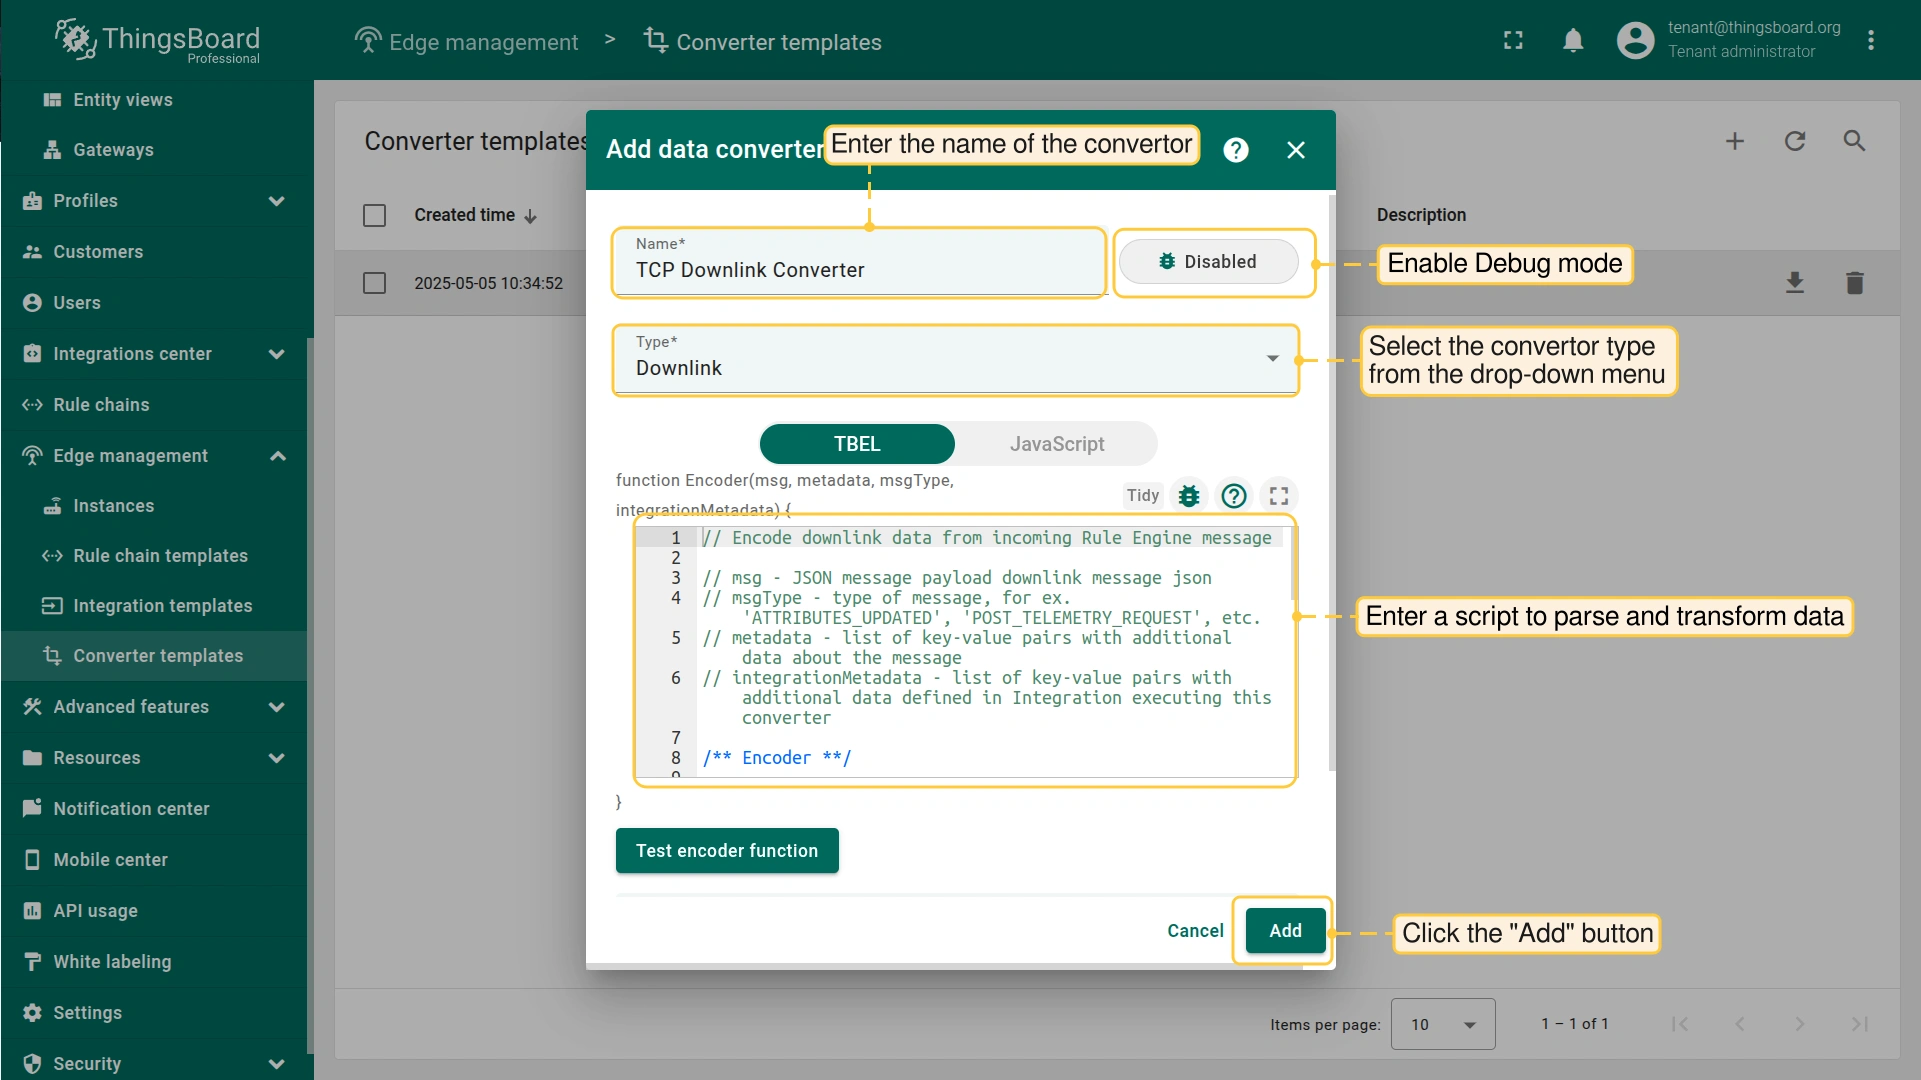
- In the “Add data converter” pop-up window:
- Name: Enter the name of the data converter.
- Type: Select the “Downlink” converter type from the drop-down menu.
- To view the events, enable Debug mode.
- function Decoder: Enter a script to parse and transform data.
- Click the “Add” button.
You can customize a downlink according to your configuration. Let’s consider an example where we send an attribute update message. An example of a downlink converter:
1
2
3
4
5
6
7
8
9
10
11
12
13
14
15
16
17
18
19
20
21
// Encode downlink data from incoming Rule Engine message

// msg - JSON message payload downlink message json
// msgType - type of message, for ex. 'ATTRIBUTES_UPDATED', 'POST_TELEMETRY_REQUEST', etc.
// metadata - list of key-value pairs with additional data about the message
// integrationMetadata - list of key-value pairs with additional data defined in Integration executing this converter

var result = {

    // downlink data content type: JSON, TEXT or BINARY (base64 format)
    contentType: "JSON",

    // downlink data
    data: JSON.stringify(msg),

    // Optional metadata object presented in key/value format
    metadata: {
    }
};

return result;
Create Integration template
Now that the Uplink and Downlink converter templates have been created, it is possible to create the Integration:
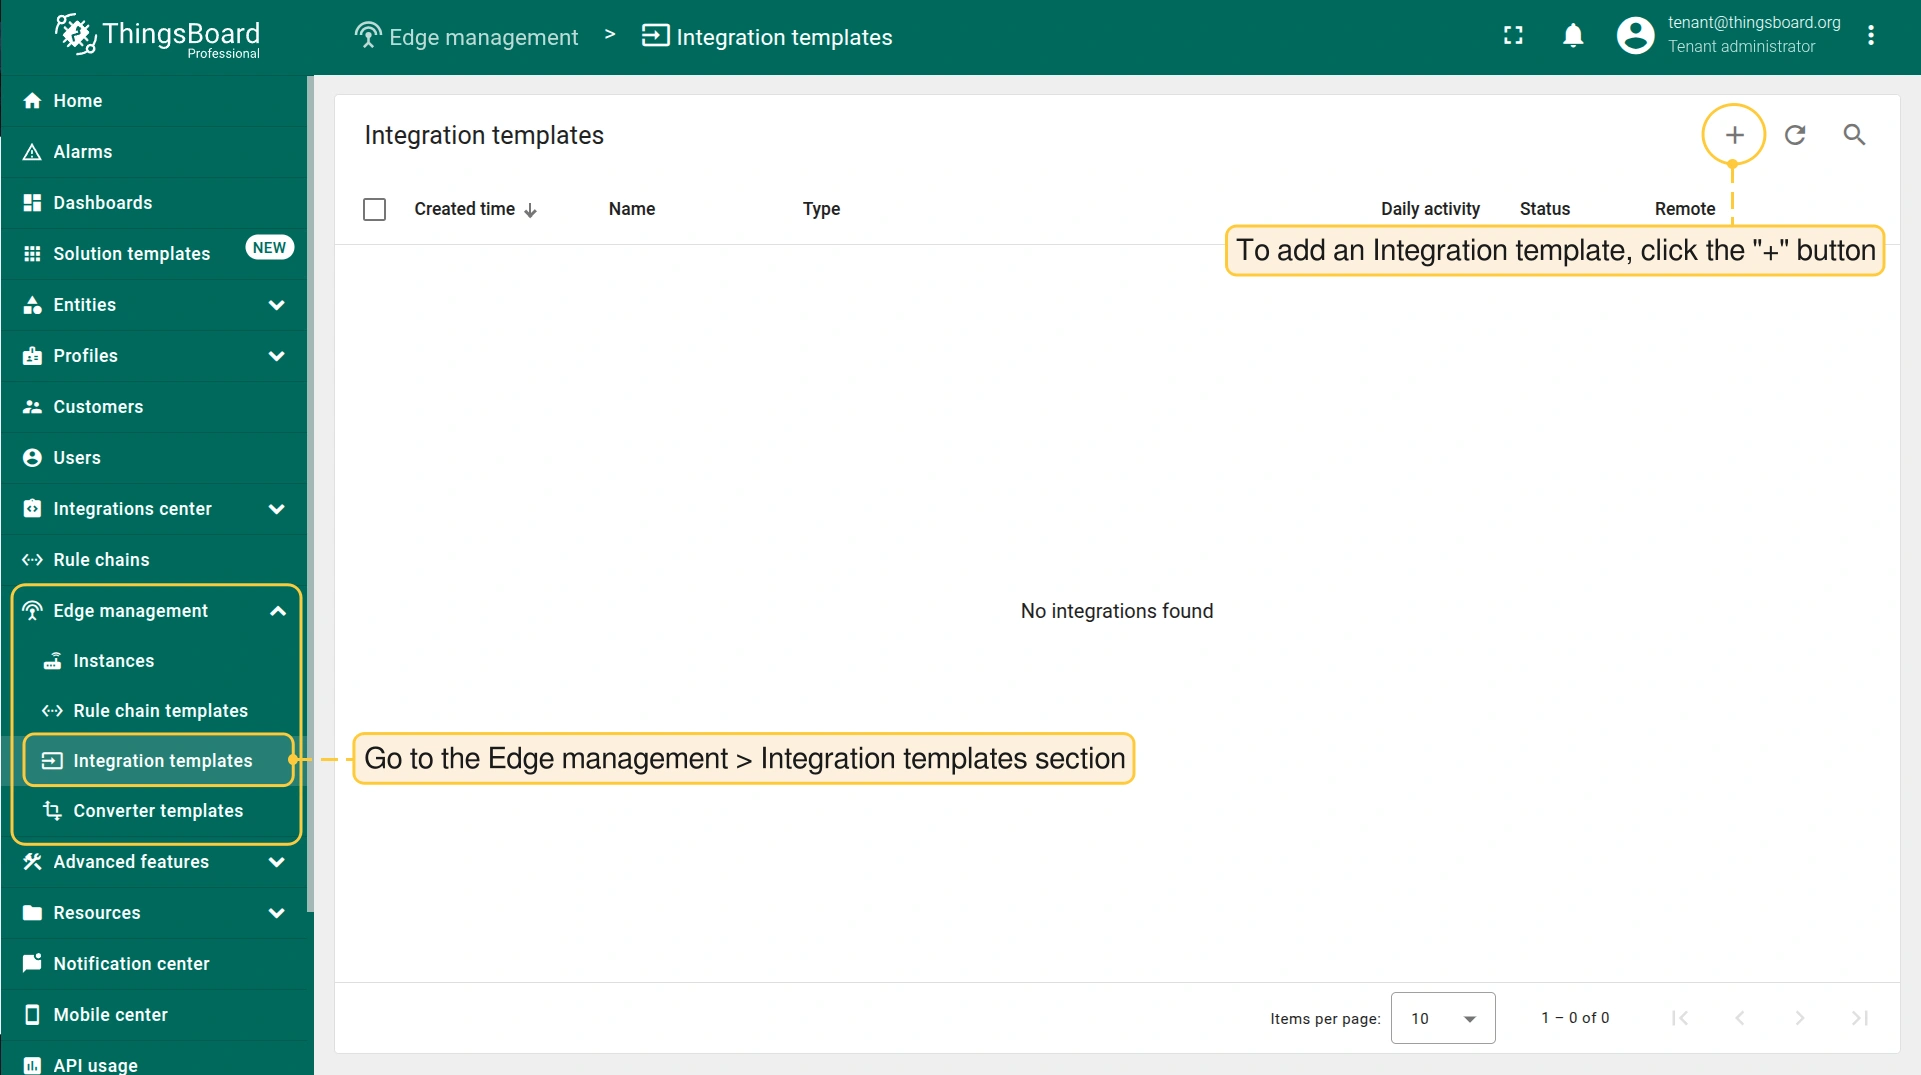
- Go to the Edge management > Integration templates section, click the “Add new integration” button (the + icon) and select the “Create new integration” option.
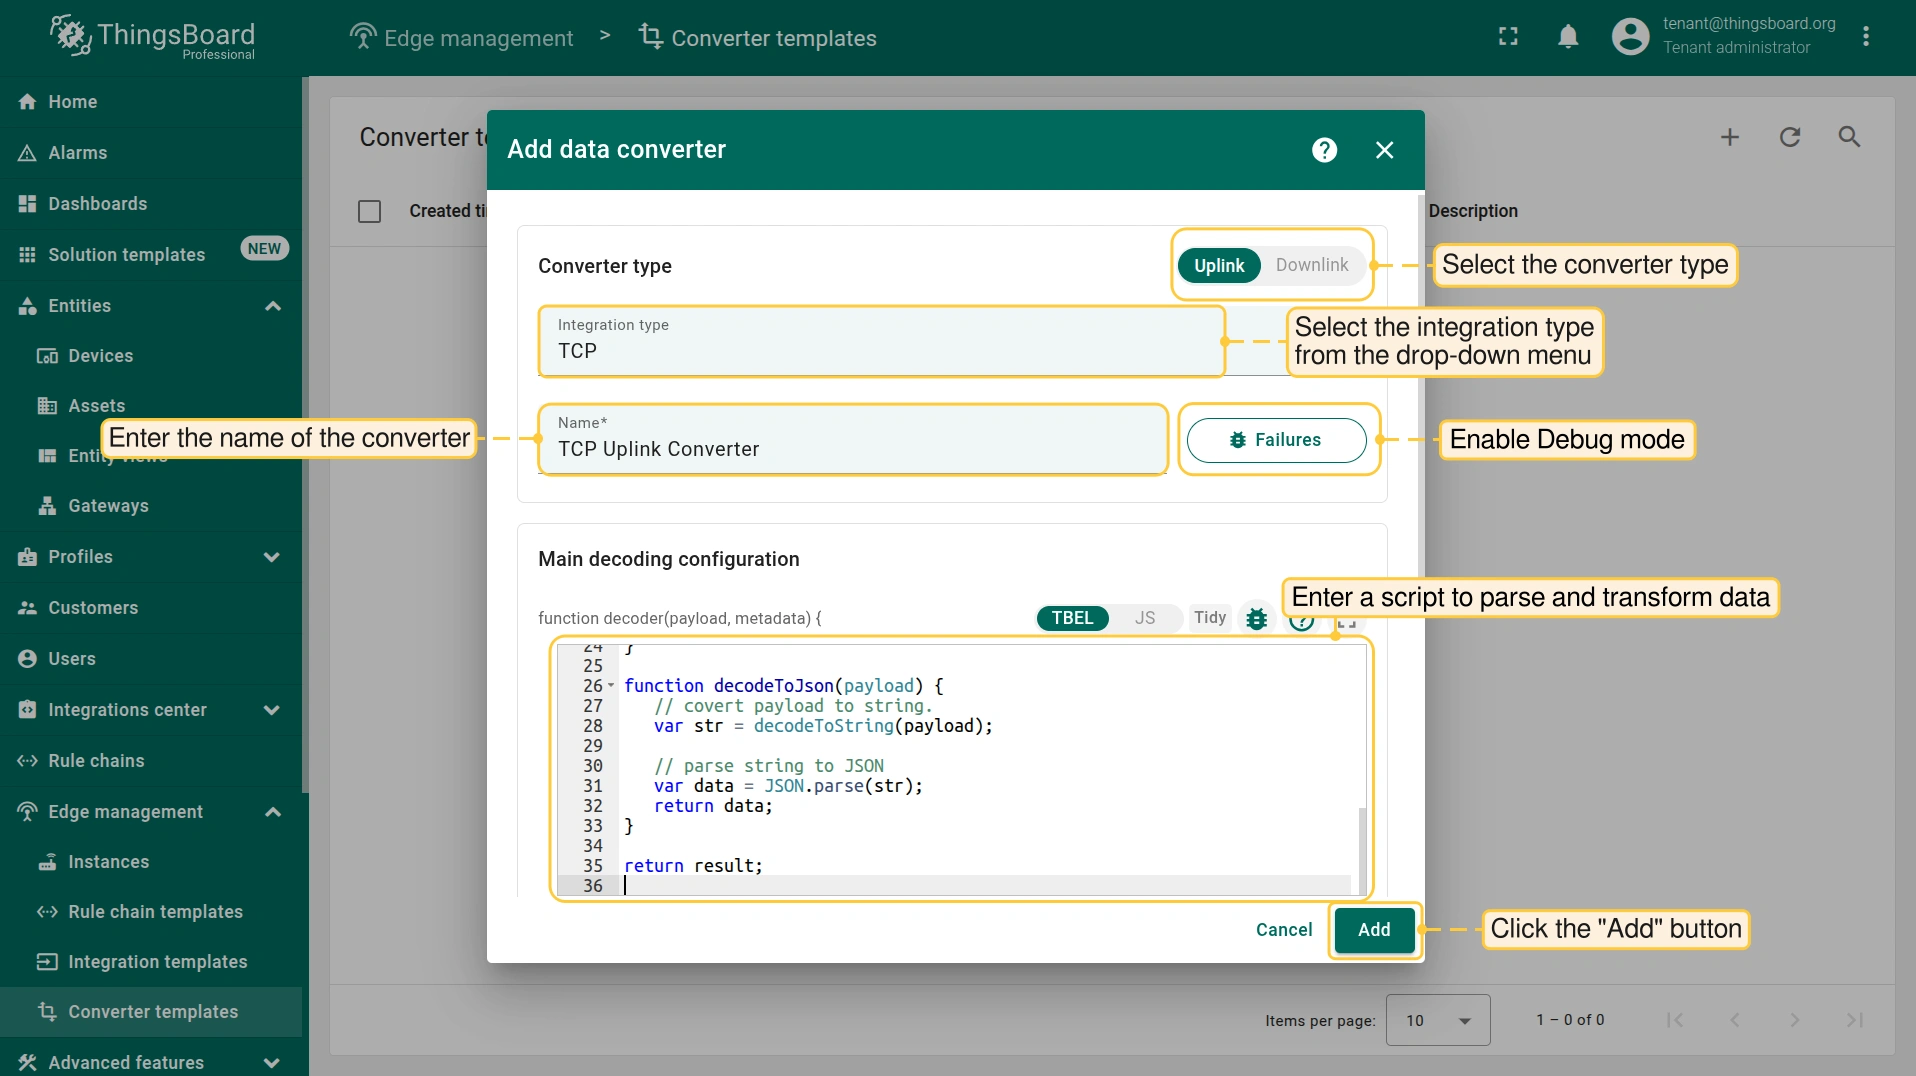
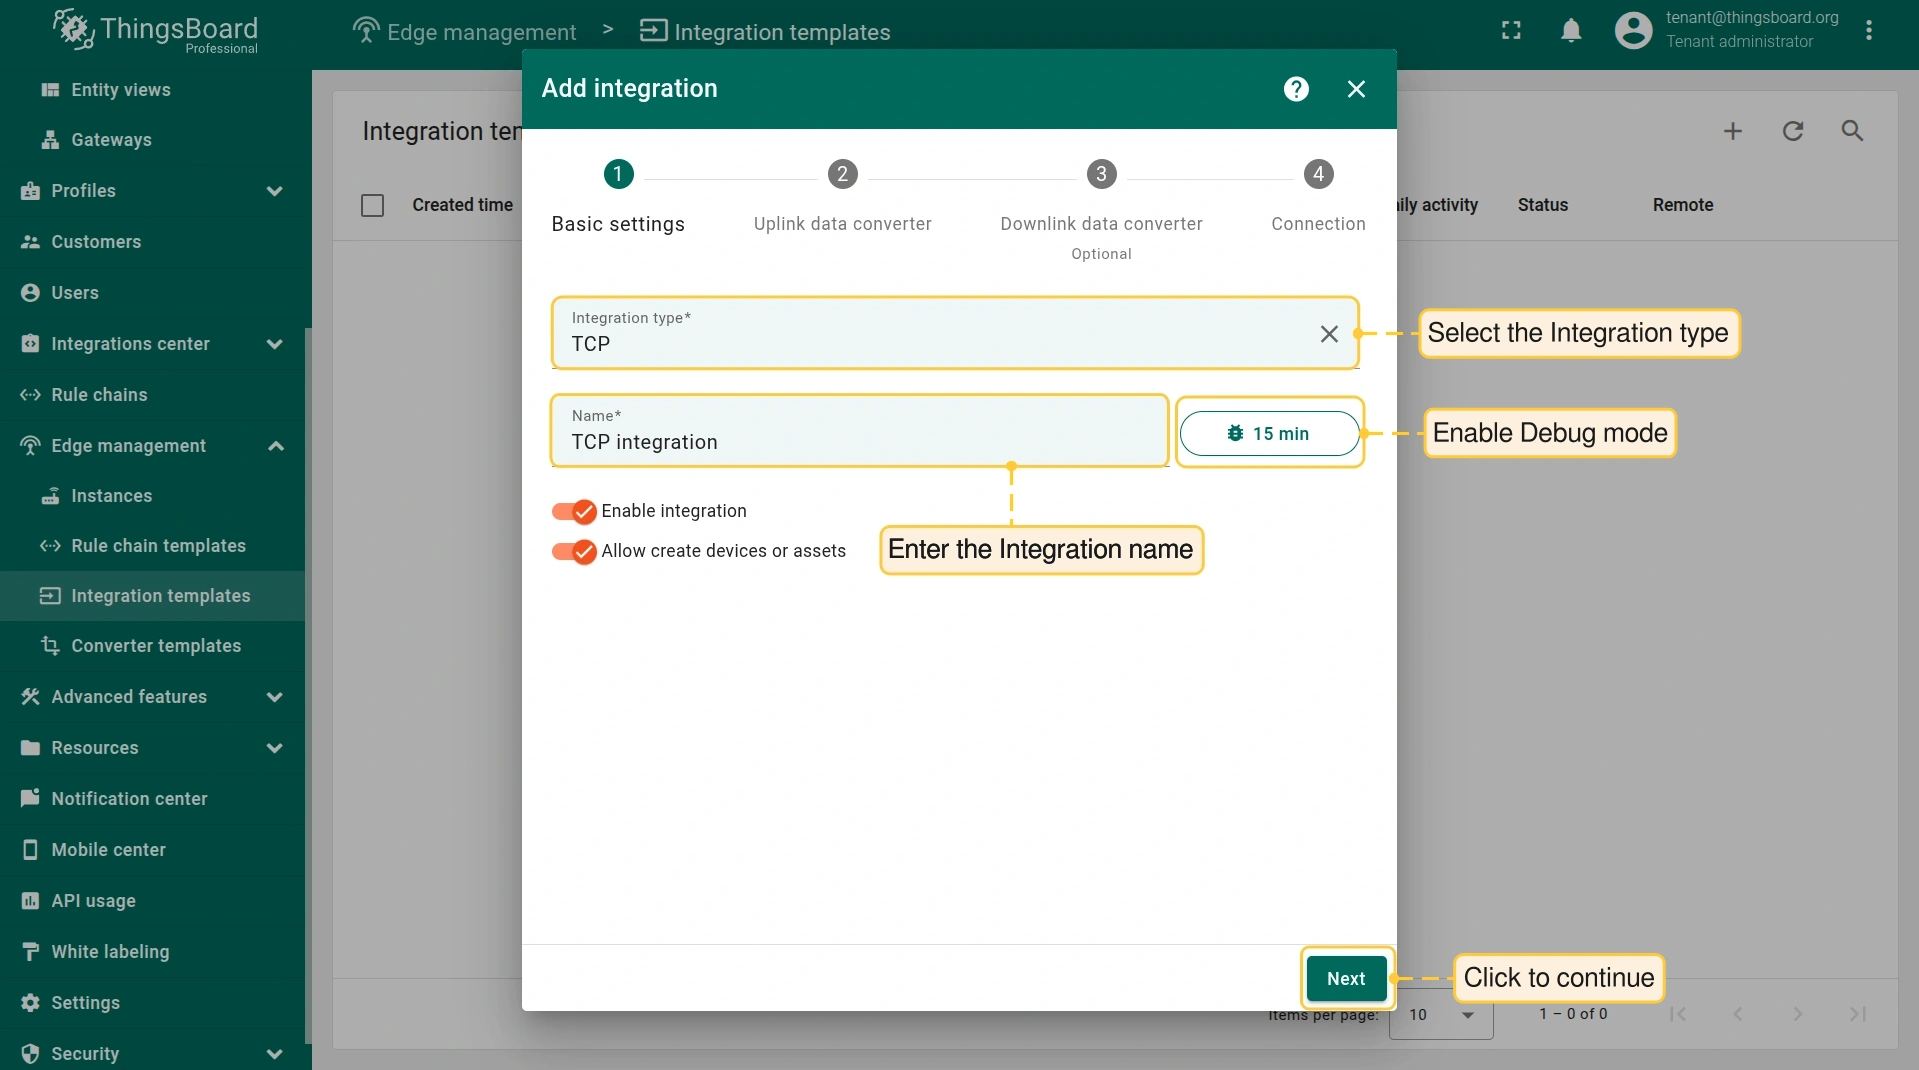
- In the “Add integration” pop-up window and fill out the “Basic settings” block:
- Integration type: Select the “TCP” integration type from the drop-down menu.
- Name: Enter the name of the integration.
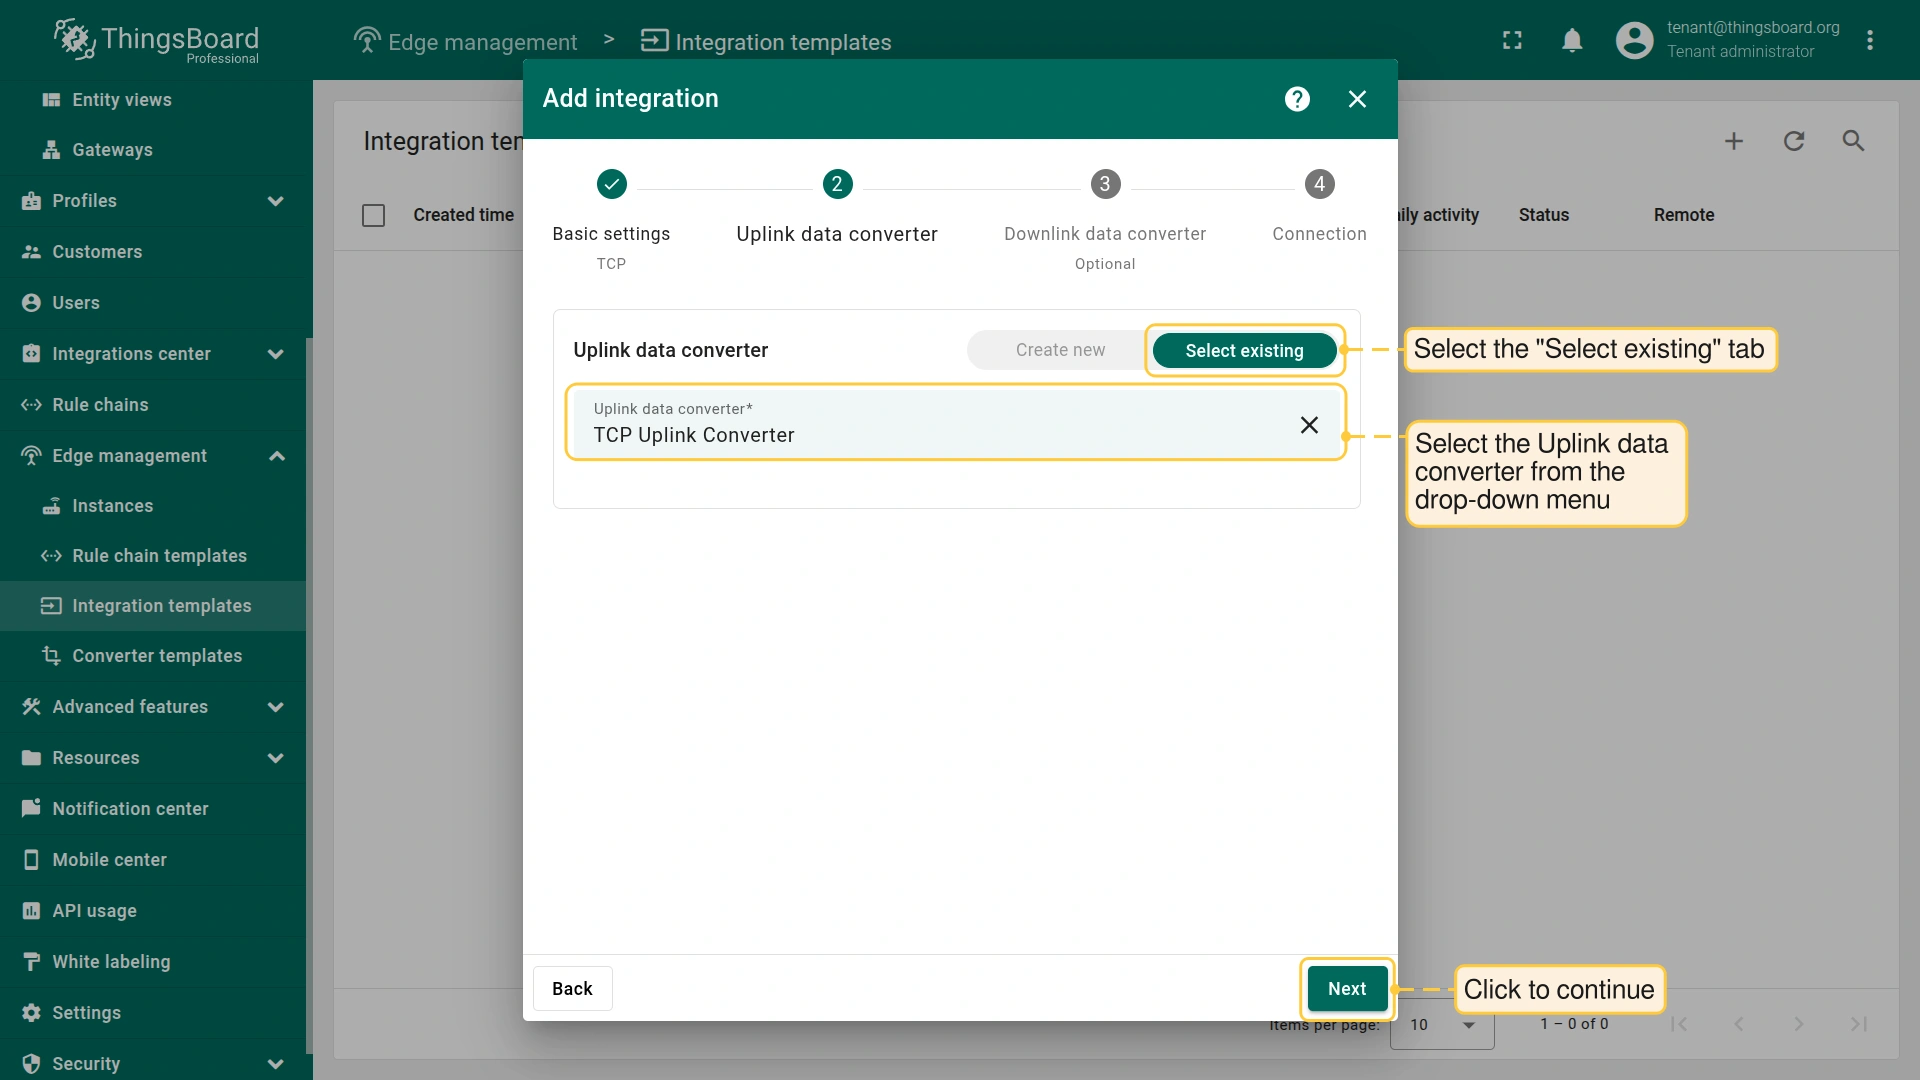
- In the “Uplink data converter” block:
- Select the “Select existing” tab.
- Uplink data converter: Select the uplink data converter from the drop-down menu.
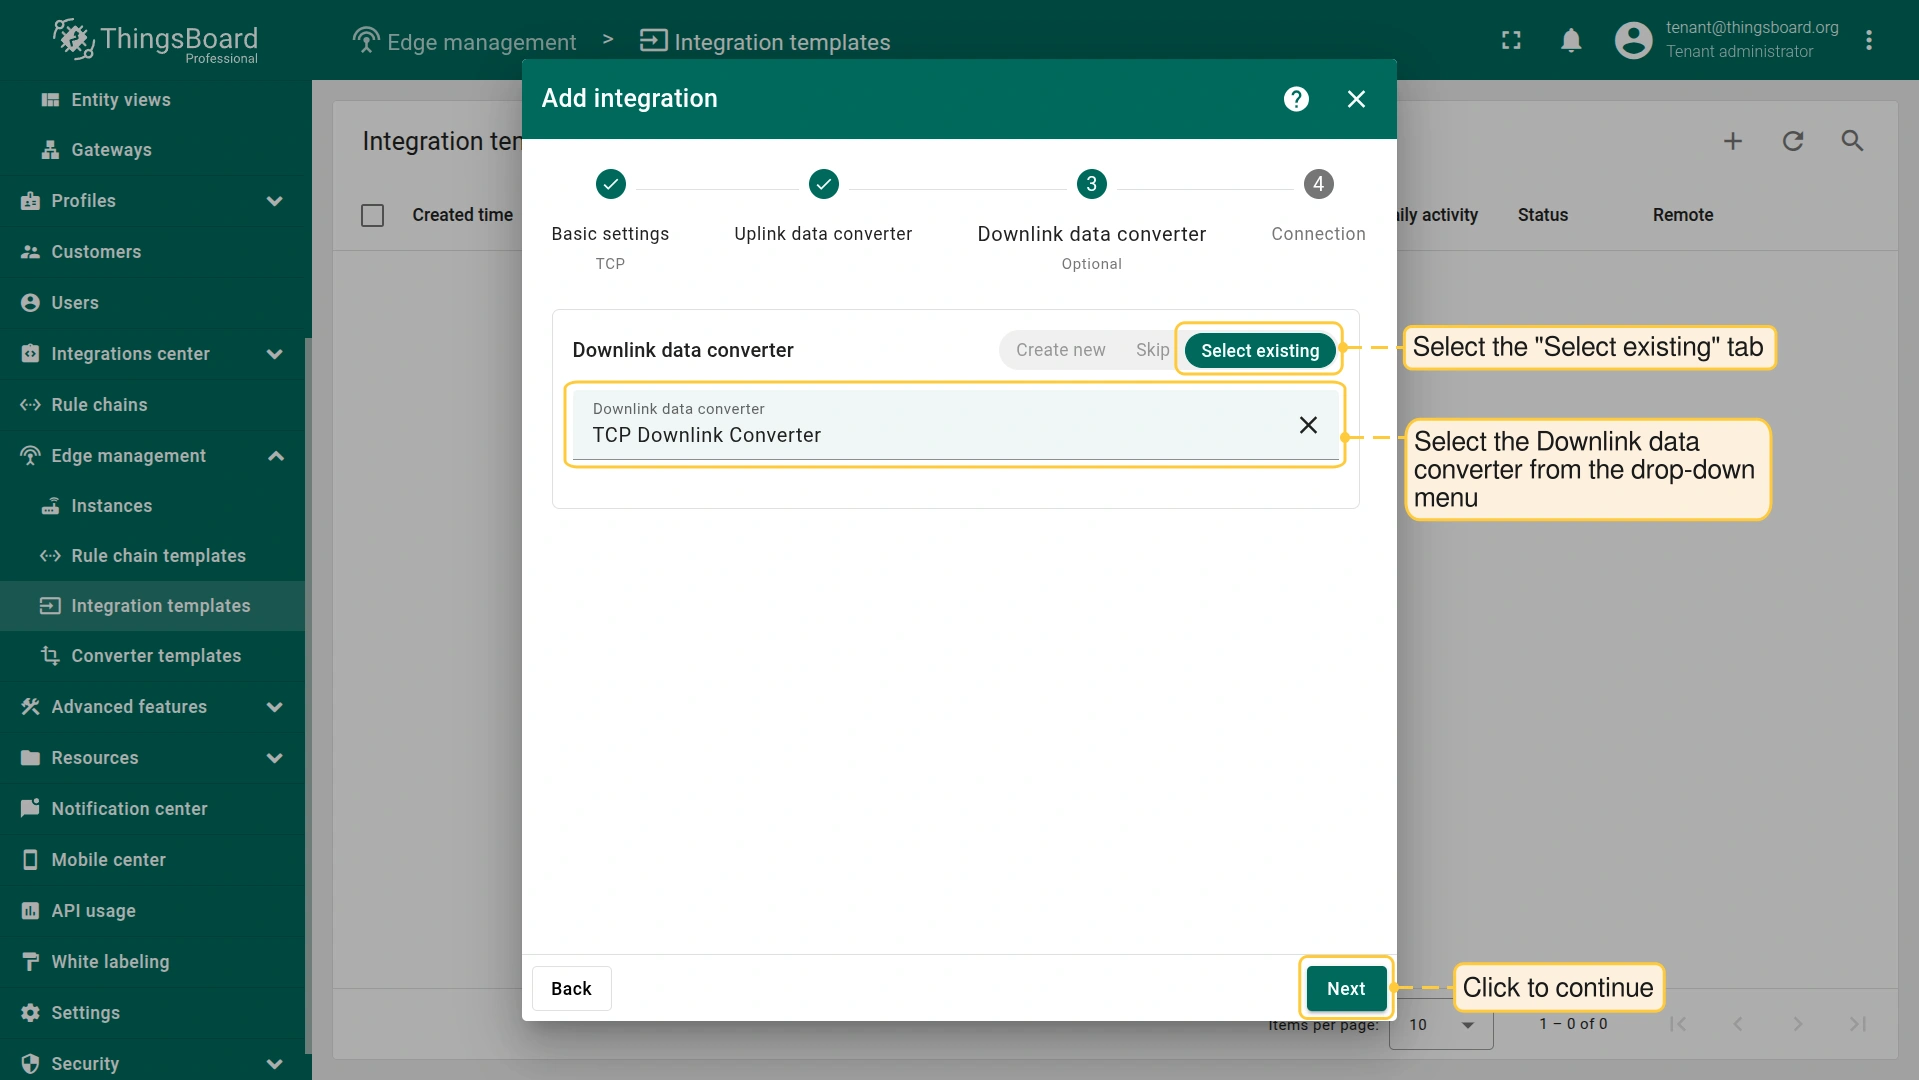
- In the “Downlink data converter” block:
- Select the “Select existing” tab.
- Downlink data converter: Select the uplink data converter from the drop-down menu.
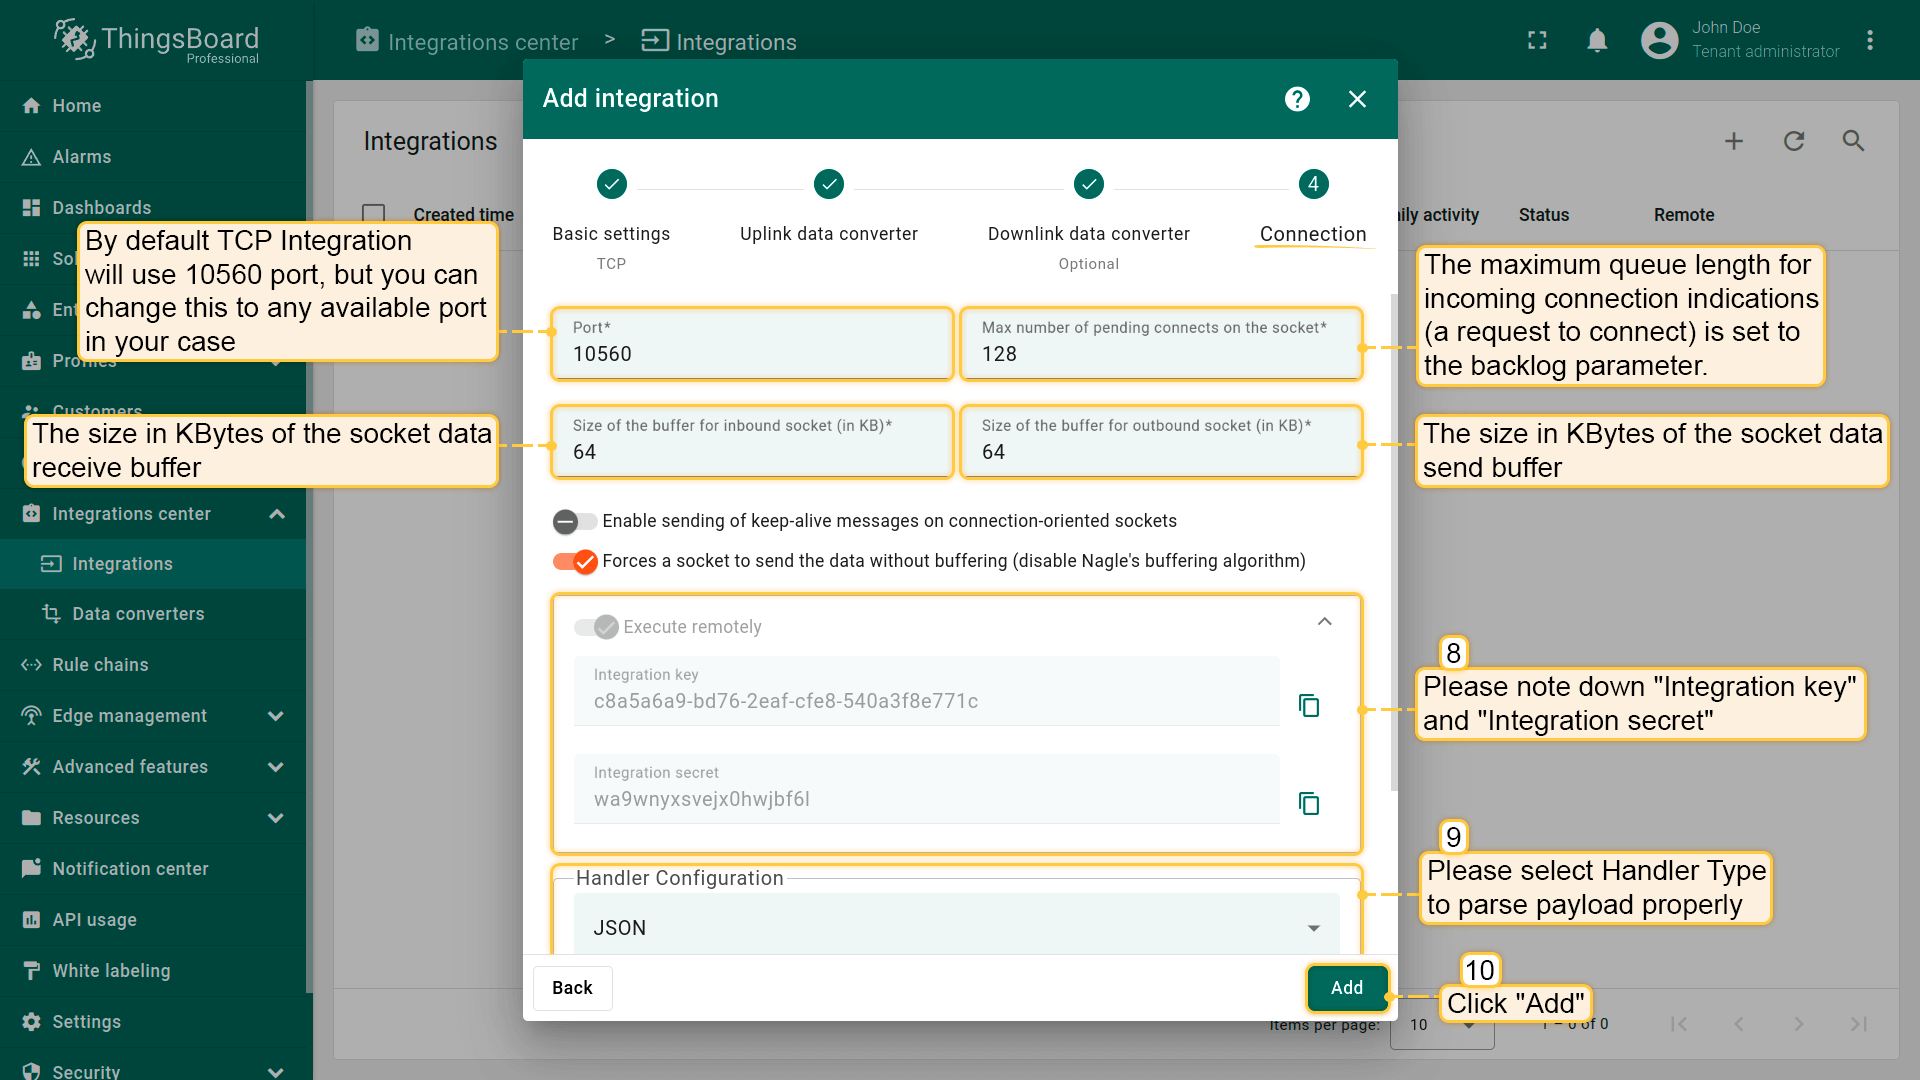
- In the “Connection” block:
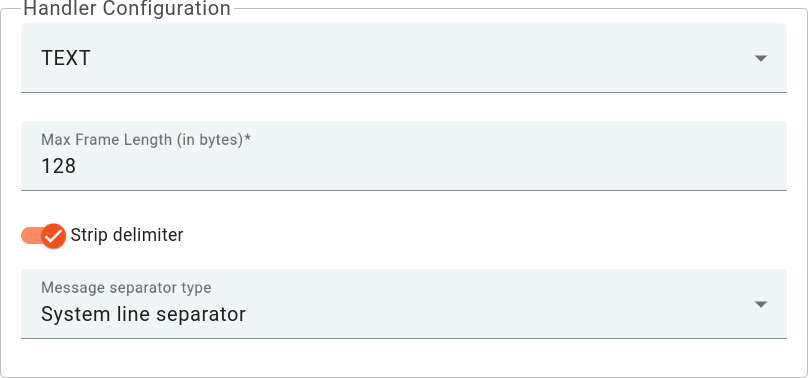
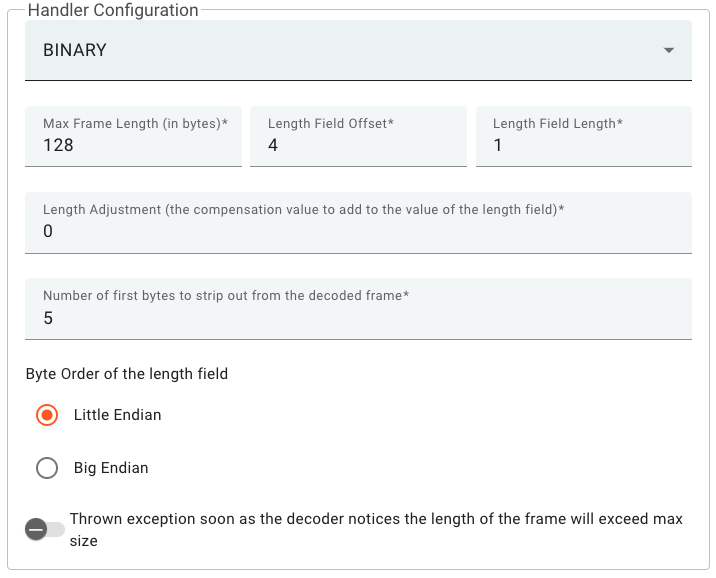
- Handler Configuration: Select the device payload type from the drop-down menu.
The Execute remotely option is selected by default and cannot be changed, the TCP Integration can only be the remote type.
We keep other options by default, but there is a short description of them:
- Max number of pending connects on the socket: The maximum queue length for incoming connection indications (a request to connect) is set by the backlog parameter. If a connection indication arrives when the queue is full, the connection is denied.
- Size of the buffer for inbound socket: Specifies the size (in kilobytes) of the socket’s data receive buffer.
- Size of the buffer for outbound socket: Specifies the size (in kilobytes) of the socket’s data send buffer.
- Enable sending of keep-alive messages on connection-oriented sockets: When enabled, the socket will periodically send keep-alive probes across the network to the peer, to ensure that the connection remains active.
- Forces a socket to send the data without buffering (disable Nagle’s buffering algorithm): Disables Nagle’s algorithm on the socket, ensuring that data is sent immediately rather than waiting for a larger amount of data to accumulate.

Select the device payload type for Handler Configuration:
为正确解析 payload,请确保设置以下值:
|

|

为正确解析 payload,请确保设置以下值:
|

Modify the Edge Root Rule chain for Downlinks
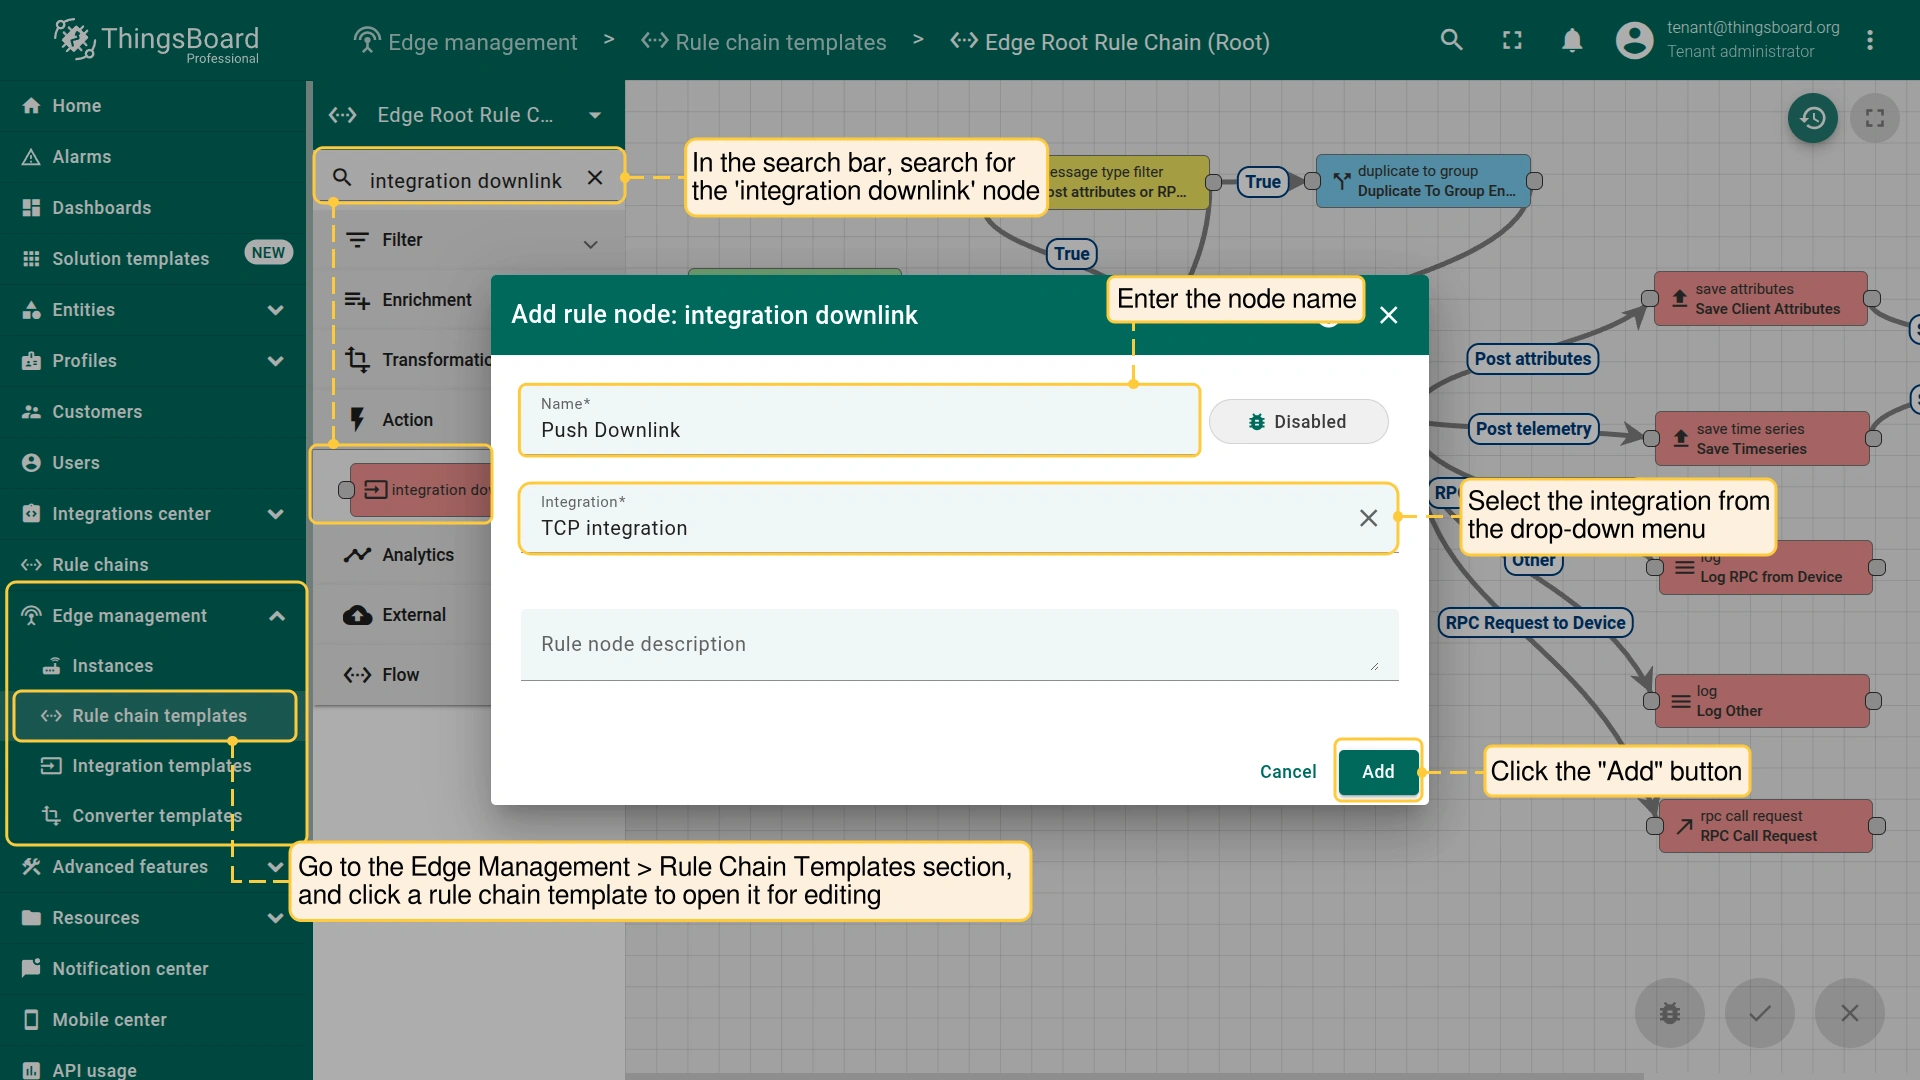
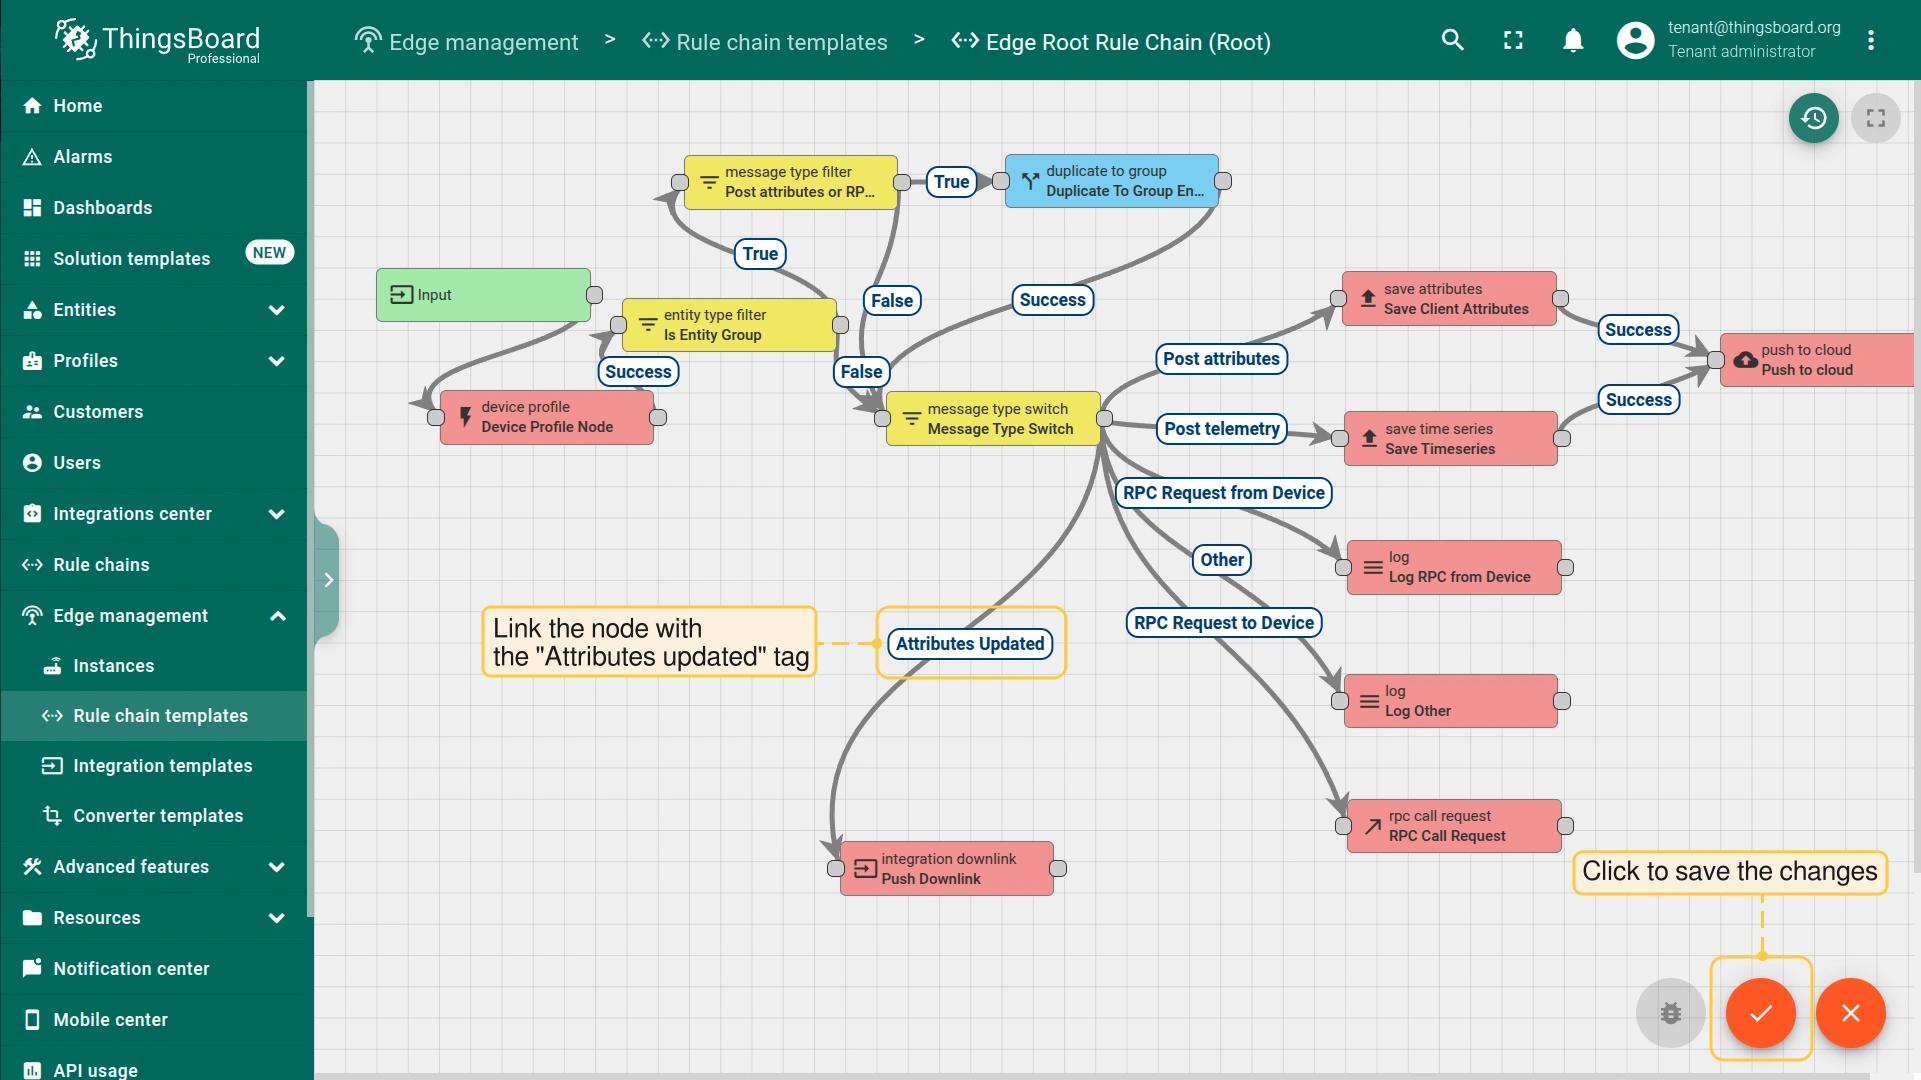
We can send a downlink message to the device from the Rule chain using the rule node. To send downlink via integration, modify the Edge Root Rule chain.
Please note!
If you use earlier versions of Edge, you cannot create or edit a Rule Chain on the Edge itself. It must be configured as a template in the Cloud (Server), and then assigned to the Edge instance.
Starting with Edge version 4.0, you can create and edit a Rule Chain on the Edge.
For example, create an integration downlink node and set the ‘Attributes updated’ link to it. When changes are made to the device attribute, the downlink message is sent to the integration.
Assign Integration to Edge
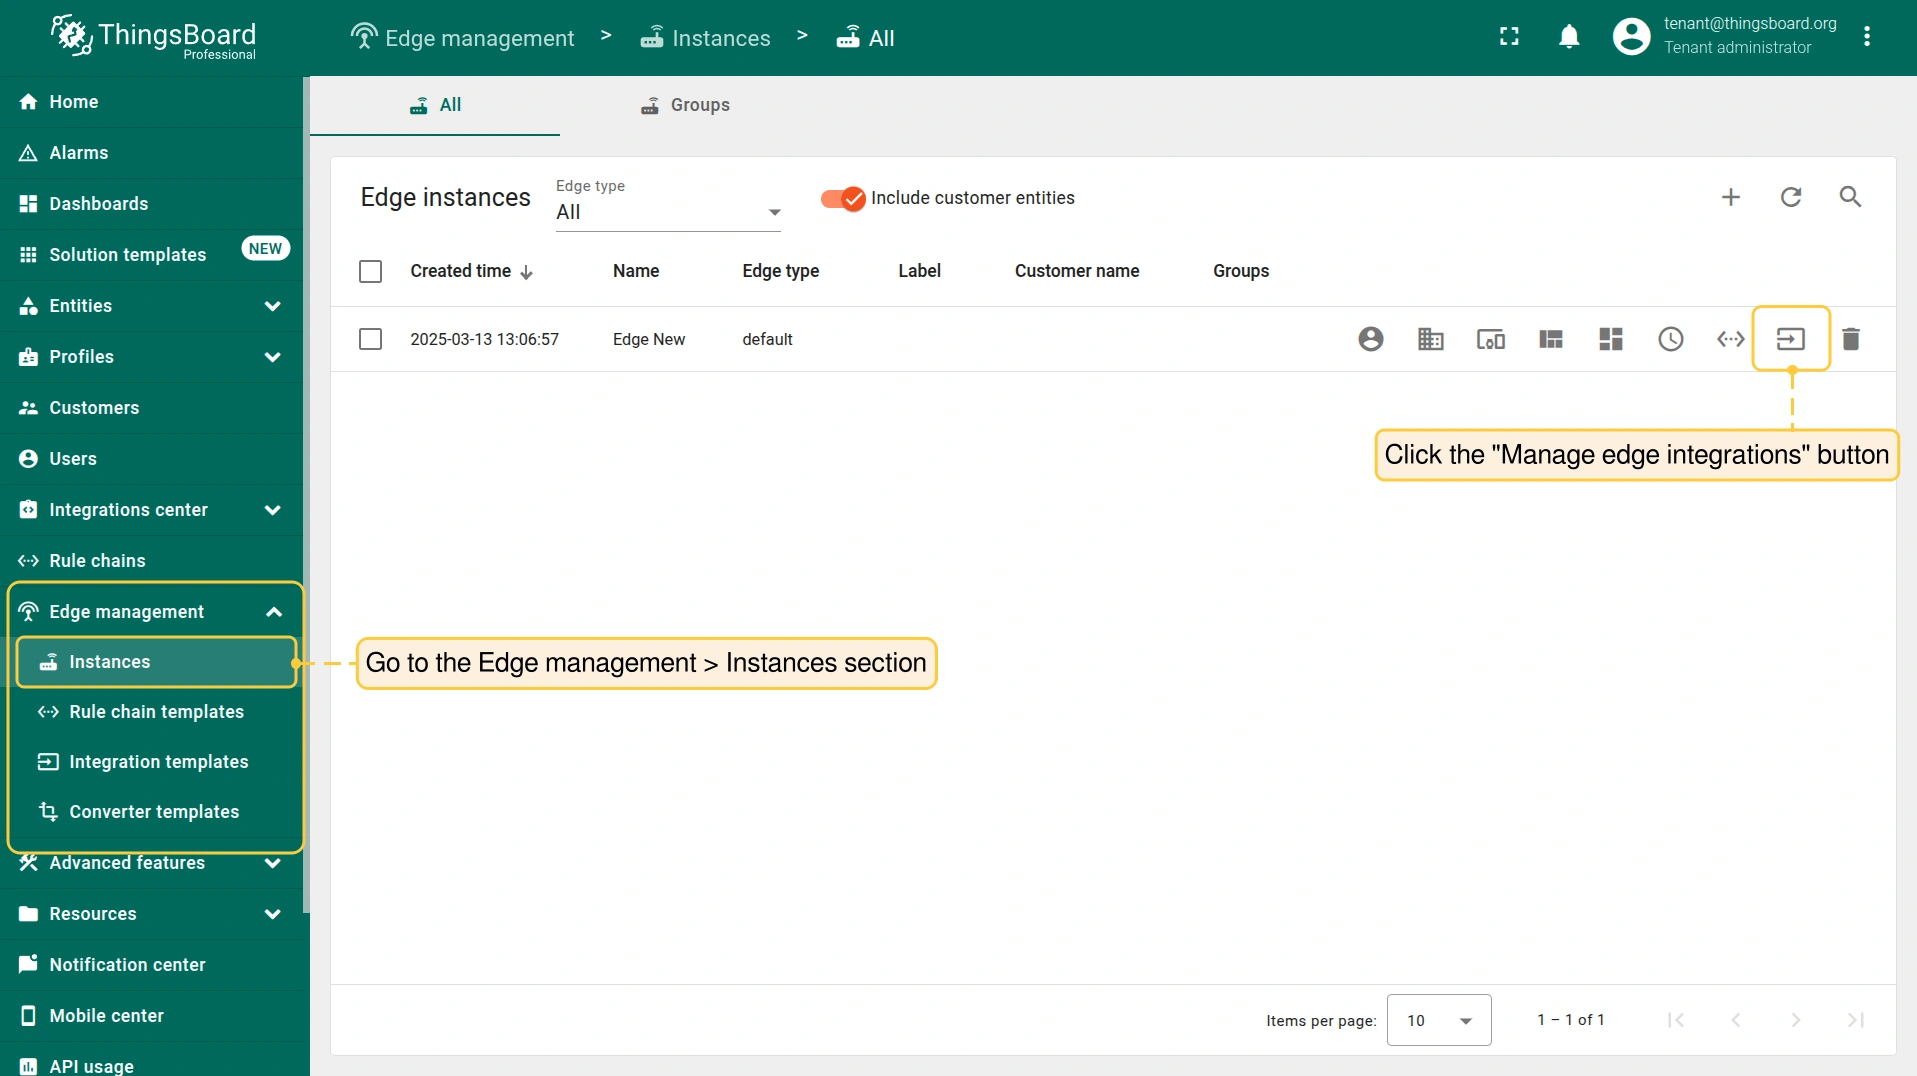
Once the converter and integration templates are created, we can assign the Integration template to the Edge.
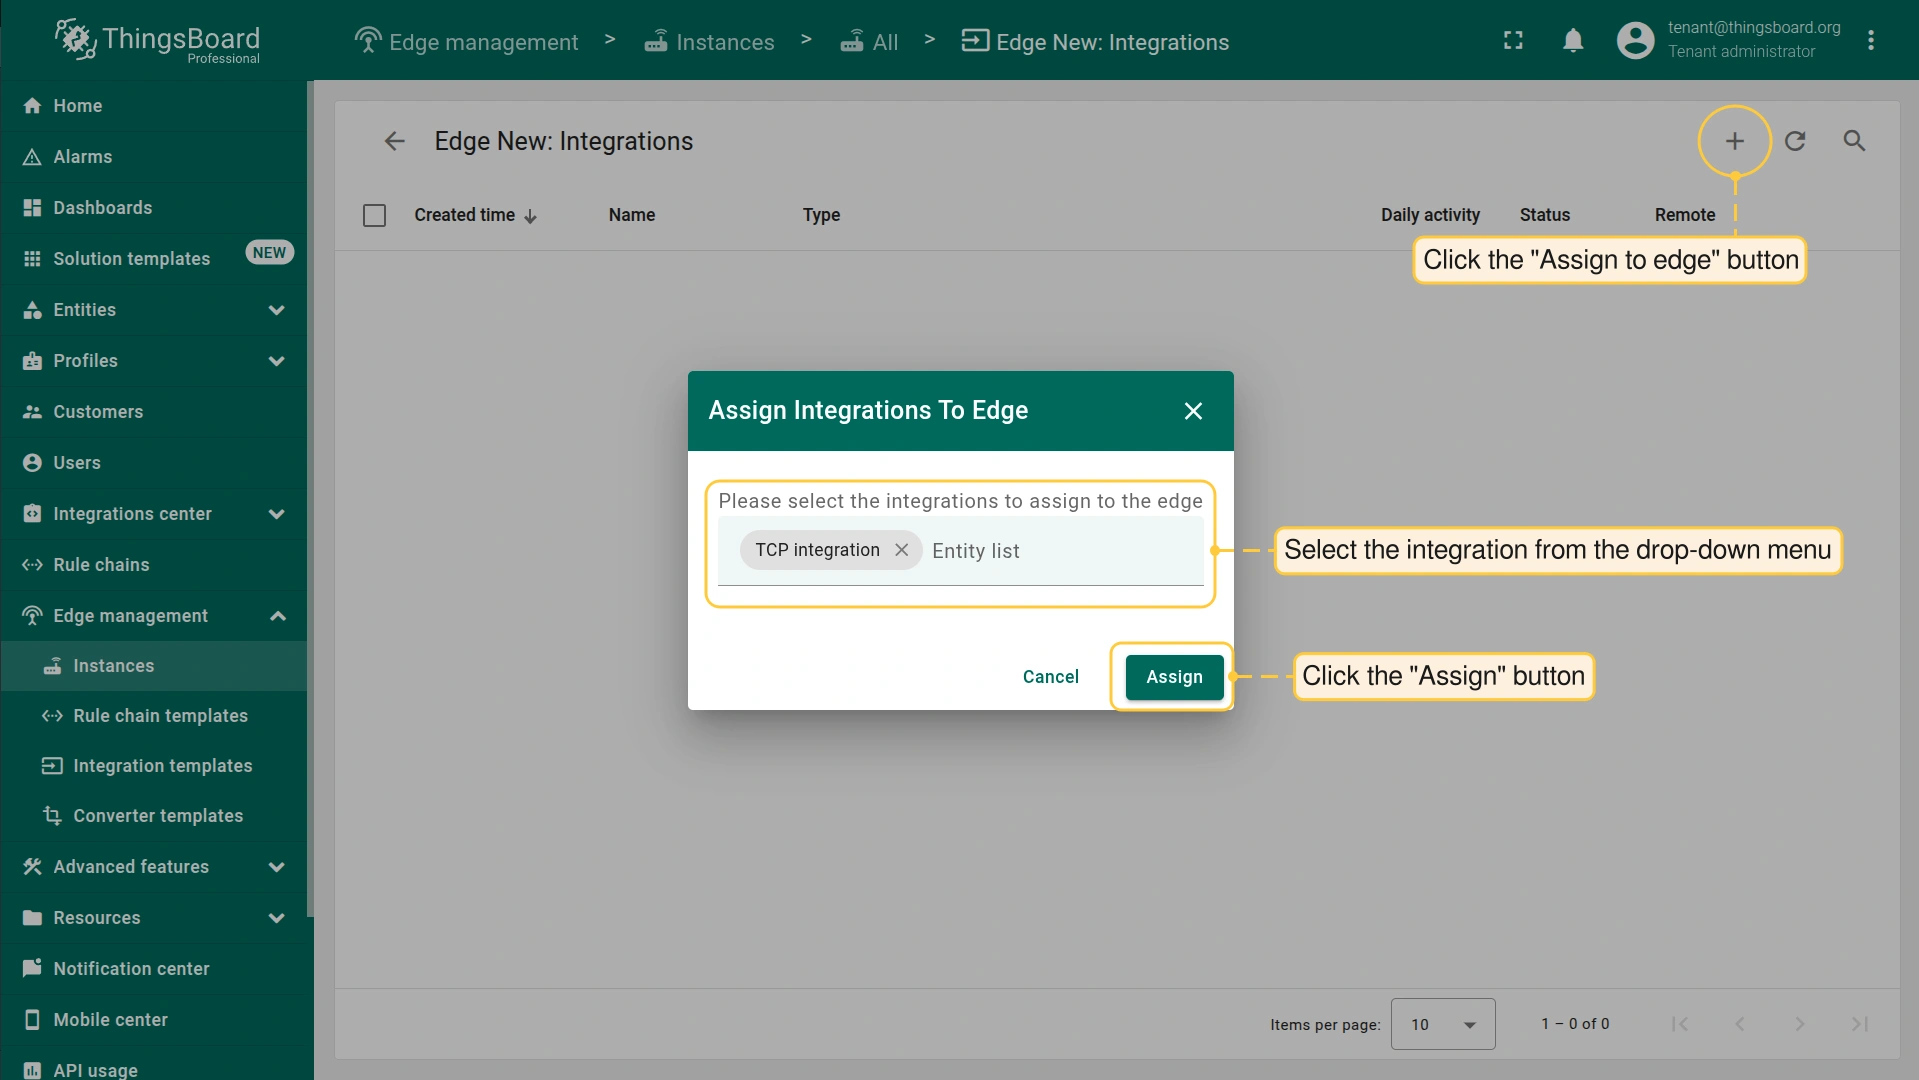
- Go to the Edge management > Instances section and click the Manage edge integrations button.
- On the Integration page, click the "Assign to edge" button. In the "Assign the Integration to the Edge" pop-up window, select the integration from the drop-down menu and click the "Assign" button.
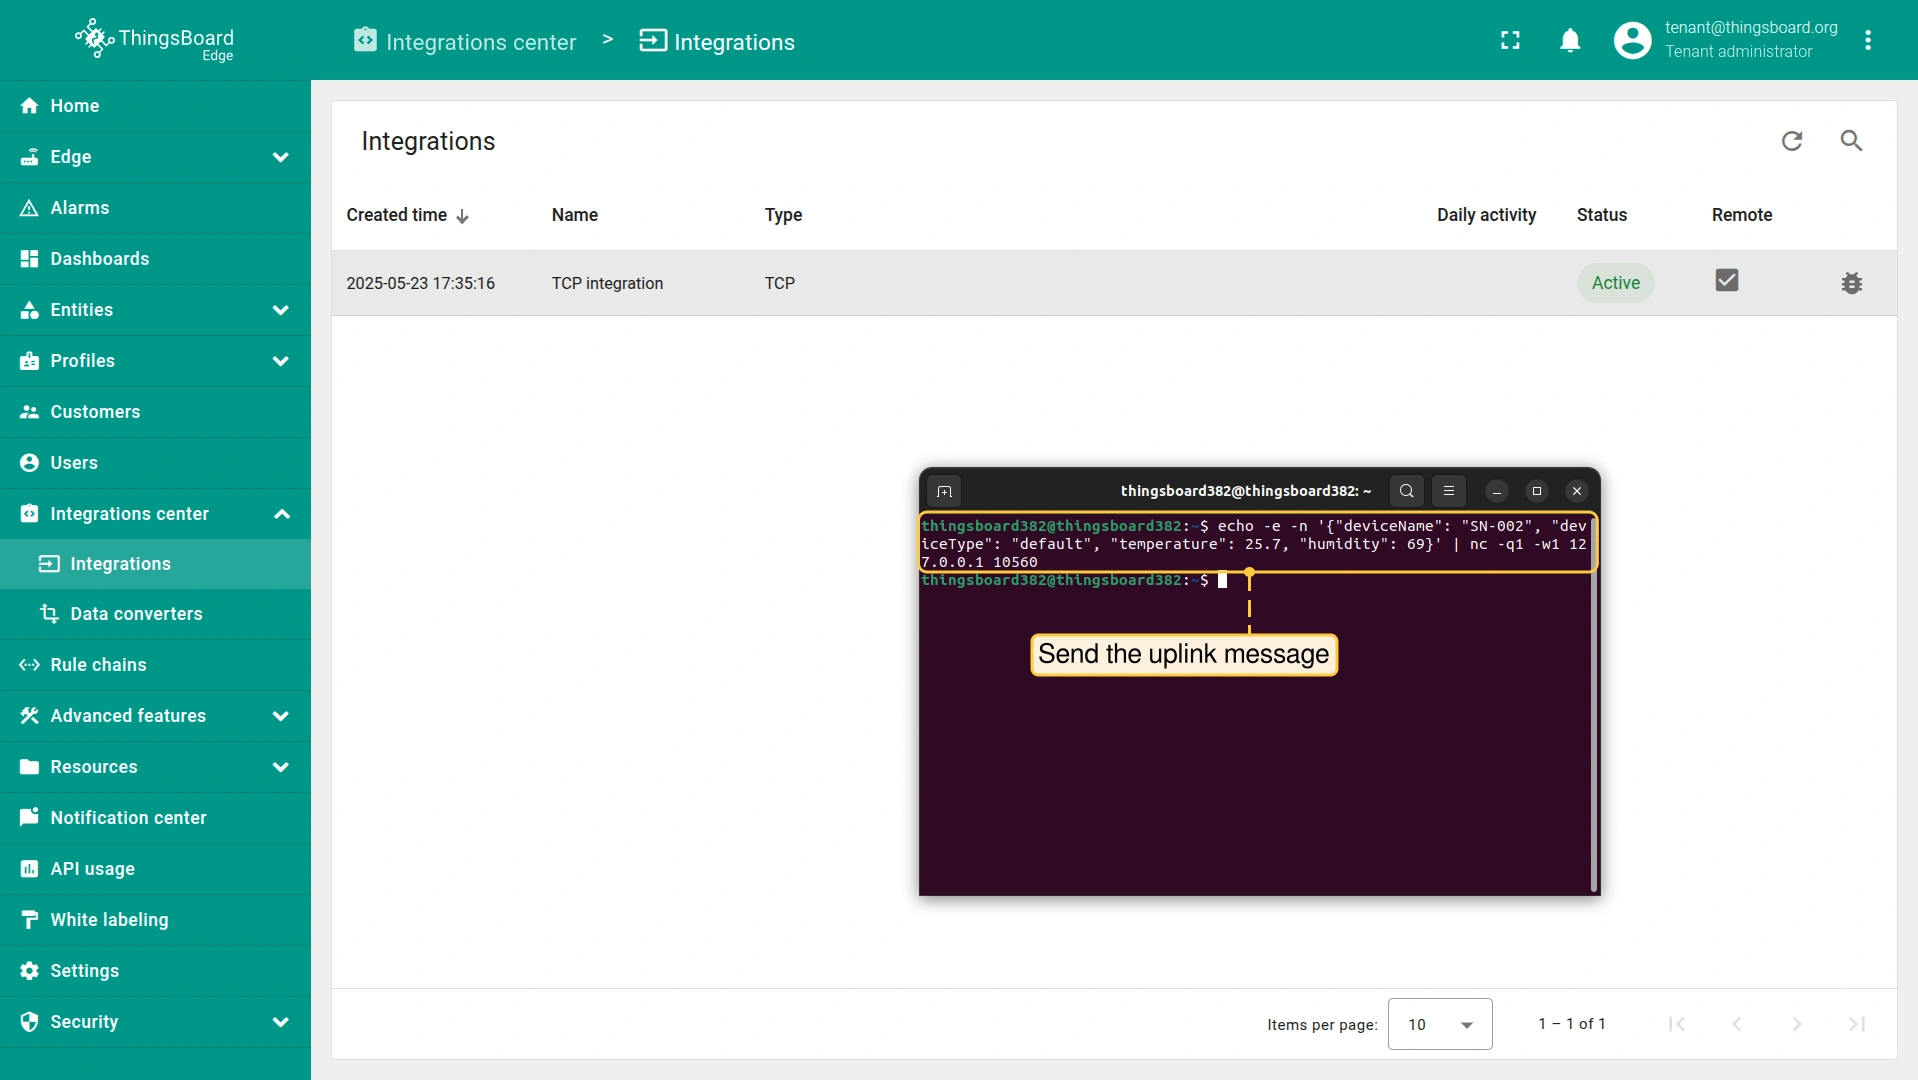
- Login to your ThingsBoard Edge instance and go to the Integrations center > Integrations section. Confirm the TCP integration on the Edge.

Installing and running external TCP Integration
To install the remote TCP Integration service on a local or separate machine, select the appropriate platform.
Use the Integration key and Integration secret to complete the TCP Integration configuration.
要通过 Docker 运行集成,请确保已 安装 Docker CE 执行以下命令拉取镜像: 为集成日志创建卷(799 为非 root ThingsBoard Docker 用户的用户 ID): 执行以下命令运行集成: 参数说明:
执行此命令后,可打开位于 ~/.tb-pe-tcp-udp-integration-logs 的日志。 您应能看到包含从服务器接收的最新集成配置的 INFO 日志消息。 要保持容器在后台运行并脱离当前终端会话,请按 Ctrl+p 后按 Ctrl+q。 重新附加、停止和启动命令要重新连接到终端(查看 ThingsBoard 远程集成日志)请运行: 停止容器: 启动容器: 故障排查注意 若出现与 DNS 相关的错误,例如: |
要通过 Docker 运行集成,请确保已 安装 Docker Toolbox for Windows Windows 用户应使用 Docker 托管卷存储远程集成日志。 在执行 docker 命令前创建 Docker 卷(如 tb-tcp-udp-integration-logs)。 打开 Docker Quickstart Terminal 并执行以下命令: 执行以下命令运行集成: 参数说明:
执行此命令后,可打开卷对应位置的日志。 您应能看到包含从服务器接收的最新集成配置的 INFO 日志消息。 要保持容器在后台运行并脱离当前终端会话,请按 Ctrl+p 后按 Ctrl+q。 重新附加、停止和启动命令要重新连接到终端(查看 ThingsBoard 远程集成日志)请运行: 停止容器: 启动容器: 故障排查注意 若出现与 DNS 相关的错误,例如: 可将系统配置为使用 Google 公共 DNS 服务器。 |
安装 Java 17 (OpenJDK)ThingsBoard 服务运行在 Java 17 上。请按以下说明安装 OpenJDK 17: 将您的操作系统配置为默认使用 OpenJDK 17。您可以通过运行以下命令来配置默认版本: 要检查系统上已安装的 Java 版本,请使用以下命令: 预期输出为: 下载安装包: 以服务方式安装集成: 打开配置文件进行编辑: 找到如下配置块: 填入配置参数:
请取消注释 export 语句。示例: 启动 ThingsBoard 集成: 高级配置可在 tb-tcp-udp-integration.conf 中查看并修改更多配置参数。 使用以下命令编辑文件: 修改配置后,可在 /var/log/tb-tcp-udp-integration/ 下查看日志以验证集成是否正常运行。 可查找 INFO 级别日志,确认已收到服务器下发的集成配置。 |
安装 Java 17 (OpenJDK)ThingsBoard 服务运行在 Java 17 上。请按以下说明安装 OpenJDK 17: 请勿忘记将您的操作系统配置为默认使用 OpenJDK 17。您可以使用以下命令配置默认版本: 您可以使用以下命令检查安装: 预期命令输出为: 下载安装包: 以服务方式安装集成: 打开配置文件进行编辑: 找到如下配置块: 填入配置参数:
请取消注释 export 语句。示例: 启动 ThingsBoard 集成: 高级配置可在 tb-tcp-udp-integration.conf 中查看并修改更多配置参数。 使用以下命令编辑文件: 修改配置后,可在 /var/log/tb-tcp-udp-integration/ 下查看日志以验证集成是否正常运行。 可查找 INFO 级别日志,确认已收到服务器下发的集成配置。 |
Send uplink message
Once the ThingsBoard TCP Integration has been created, the TCP server starts, and then it waits for data from the devices.
To send the uplink message, select the device payload type:
向运行在 localhost(127.0.0.1)上的 TCP 服务器发送消息的命令如下:
也可在一行内发送多条消息,使用 Message Separator(System Line Delimiter)分隔。 换行符(\n)将用于将 payload 拆分为多条消息。 此情况下,命令如下:
|


向运行在 localhost(127.0.0.1)上的 TCP 服务器发送消息的命令如下:
|

向运行在 localhost(127.0.0.1)上的 TCP 服务器发送消息的命令如下:
|

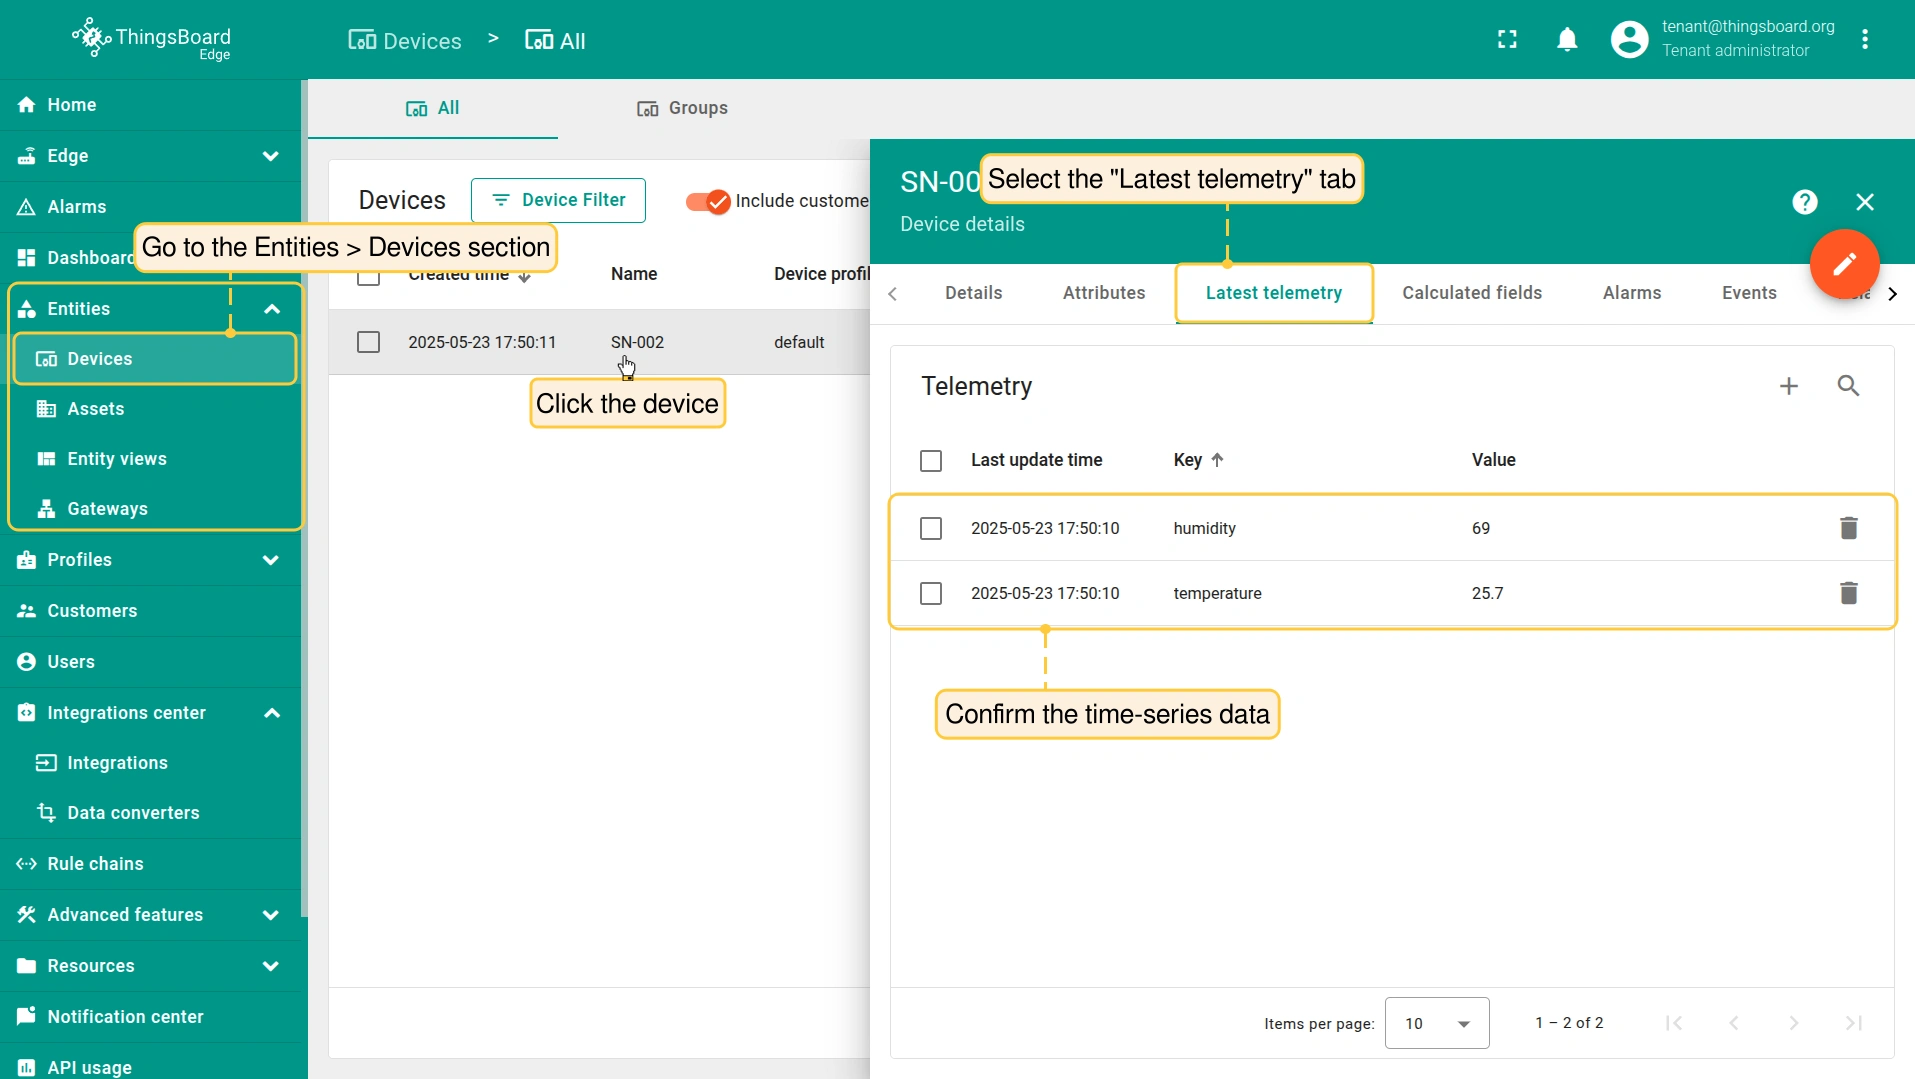
To view the received time-series data, go to the Entities > Devices section, click the device and select the “Latest telemetry” tab:
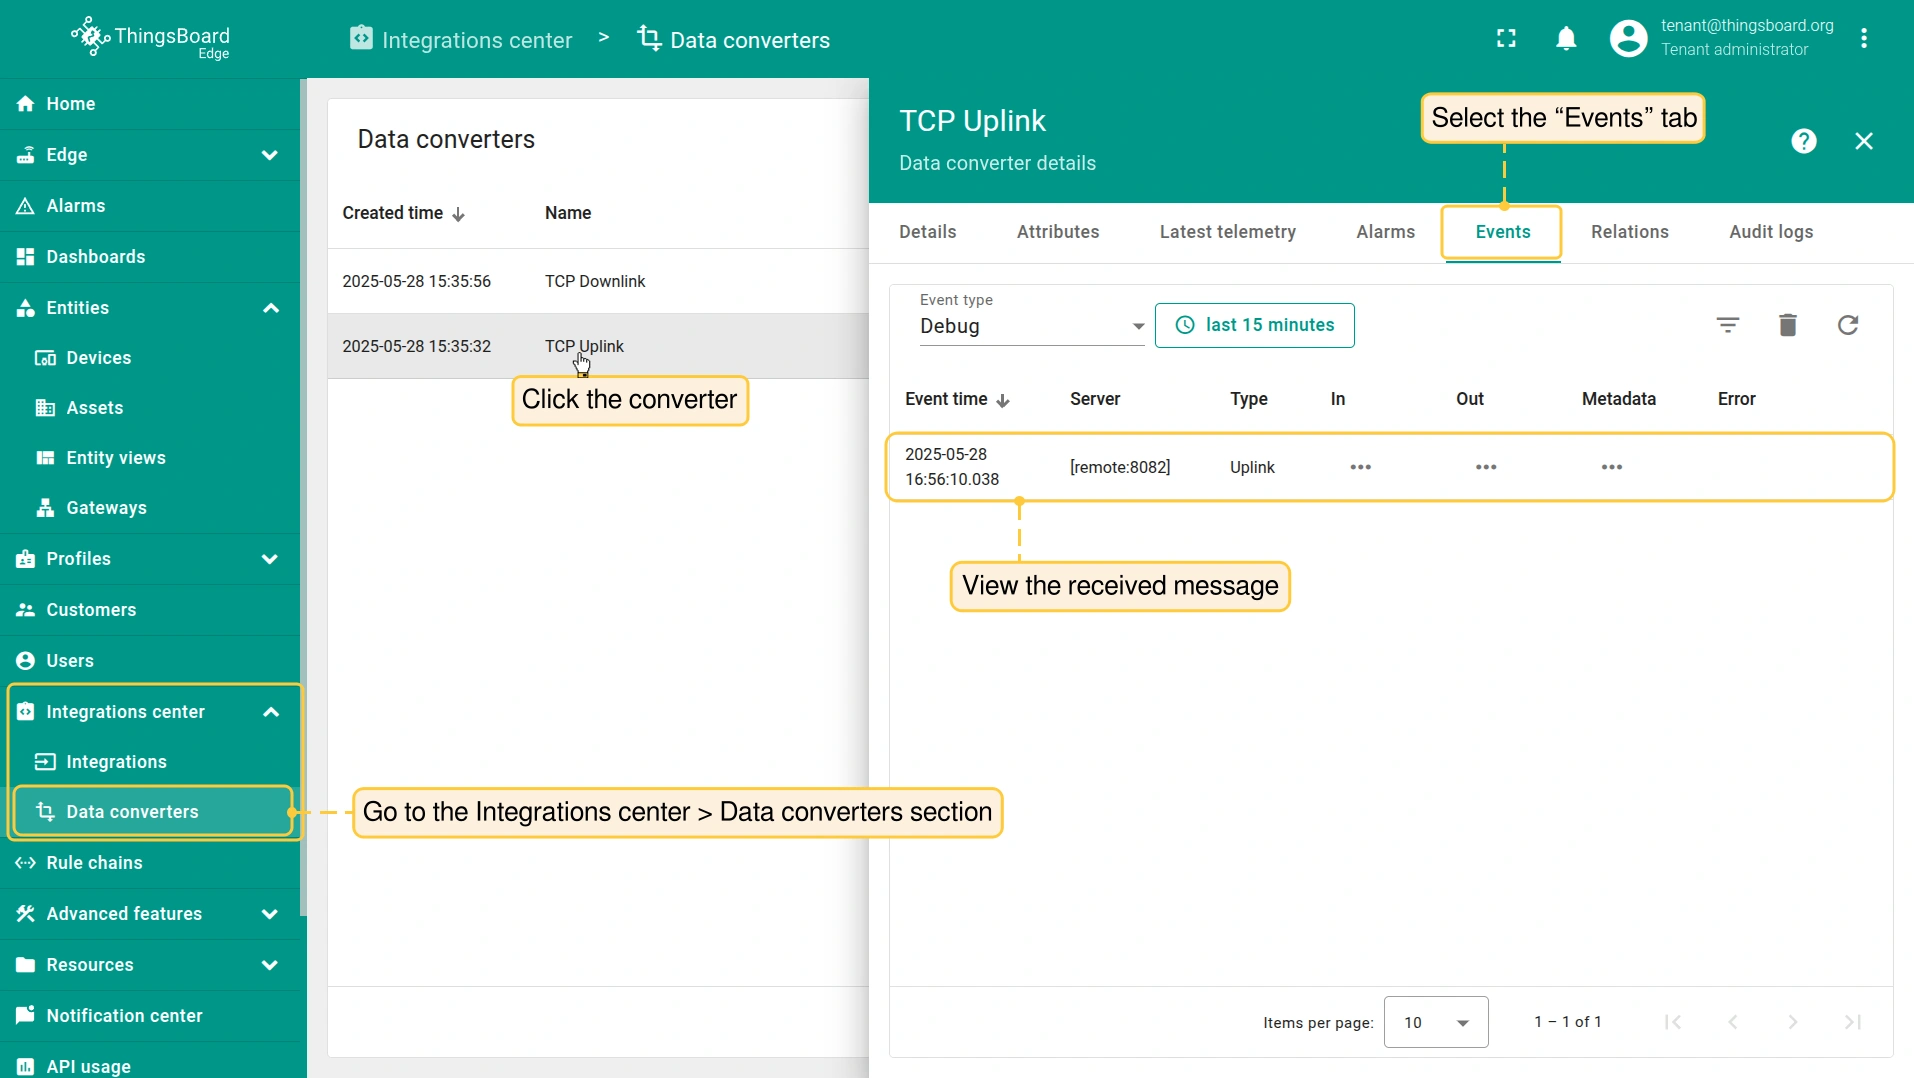
The received data can be viewed in the Uplink converter:
- Go to the Integrations center > Data converters section and click the Uplink converter.
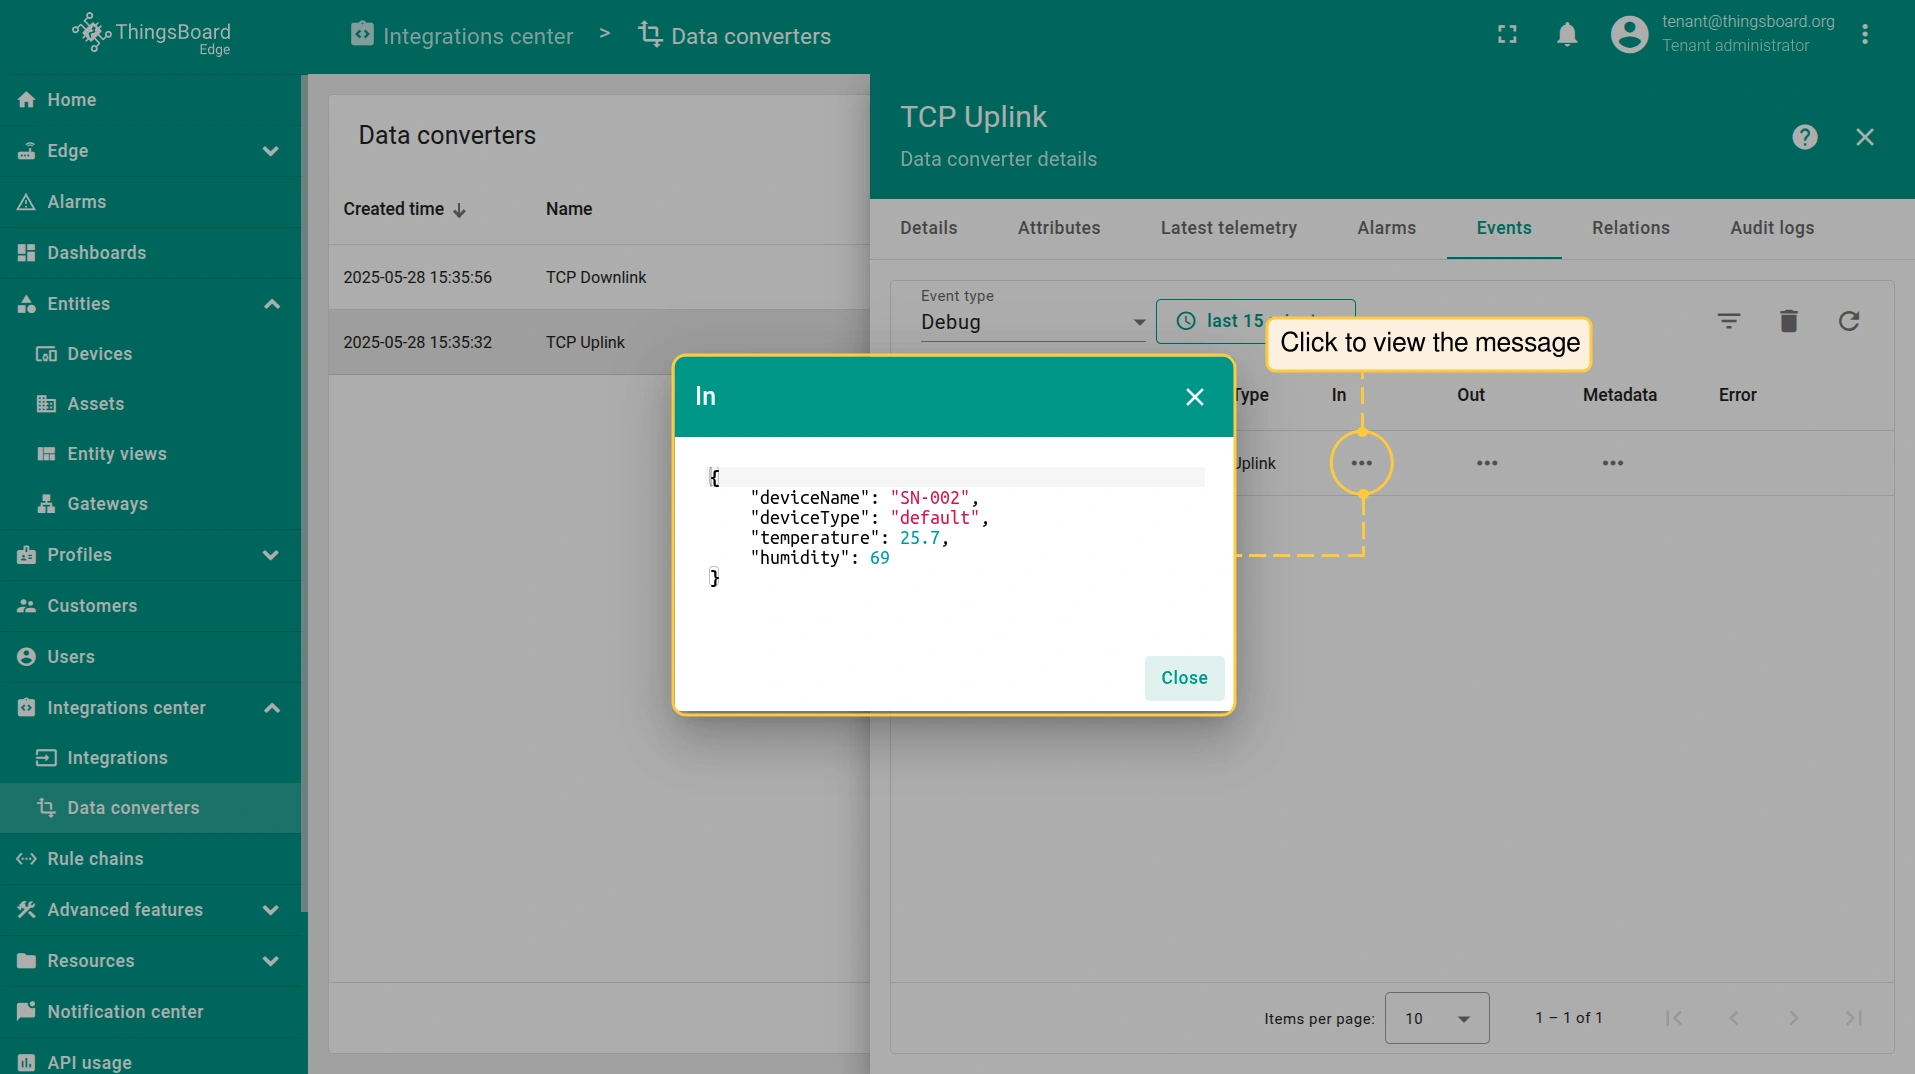
- On the “Data converter details” page, select the “Events” tab.
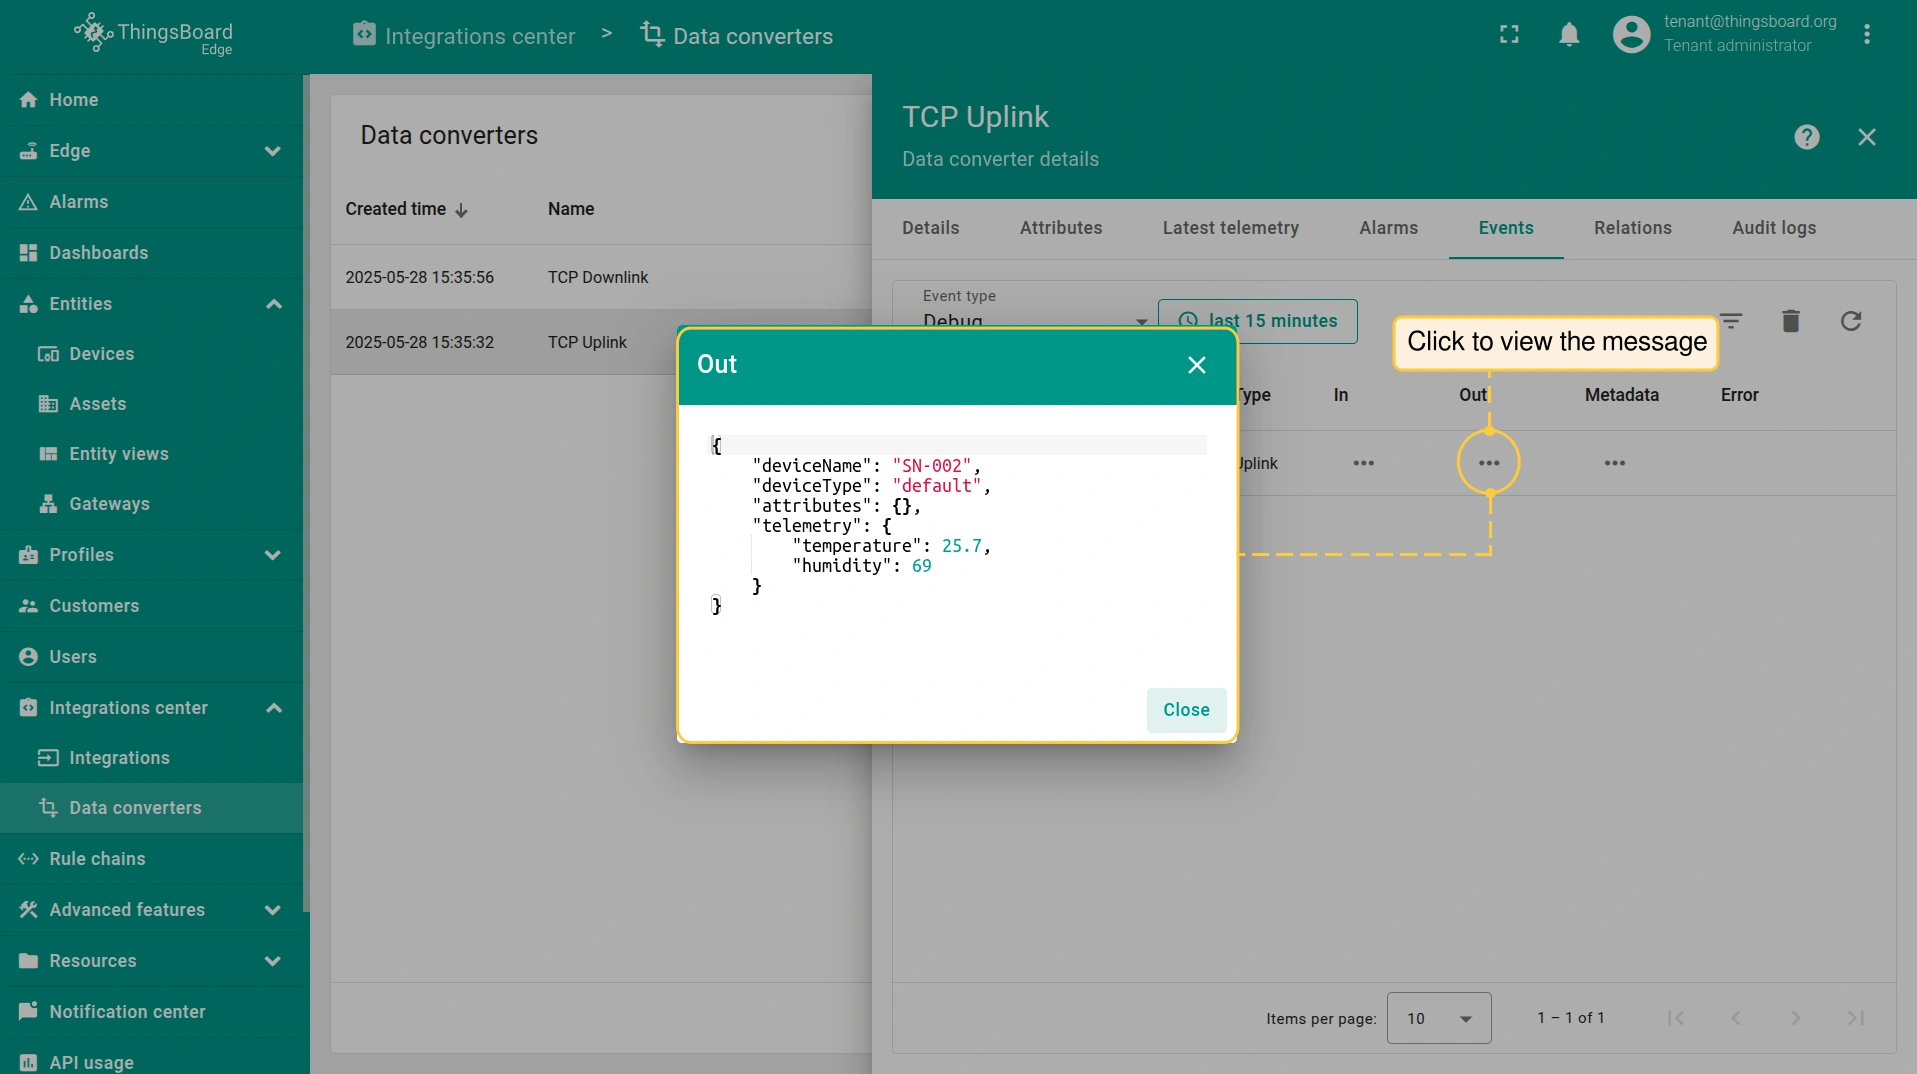
- View the message details in the “In” and “Out” columns.
Send a downlink message
To check the downlink functionality. Let’s add the firmware shared attribute:
- Go to the Entities > Devices section, click the device to open the “Device details” page.
- Select the “Attributes” tab and the “Shared attributes” scope.
- To add the firmware attribute, click the “Add” button and enter the configuration parameters.

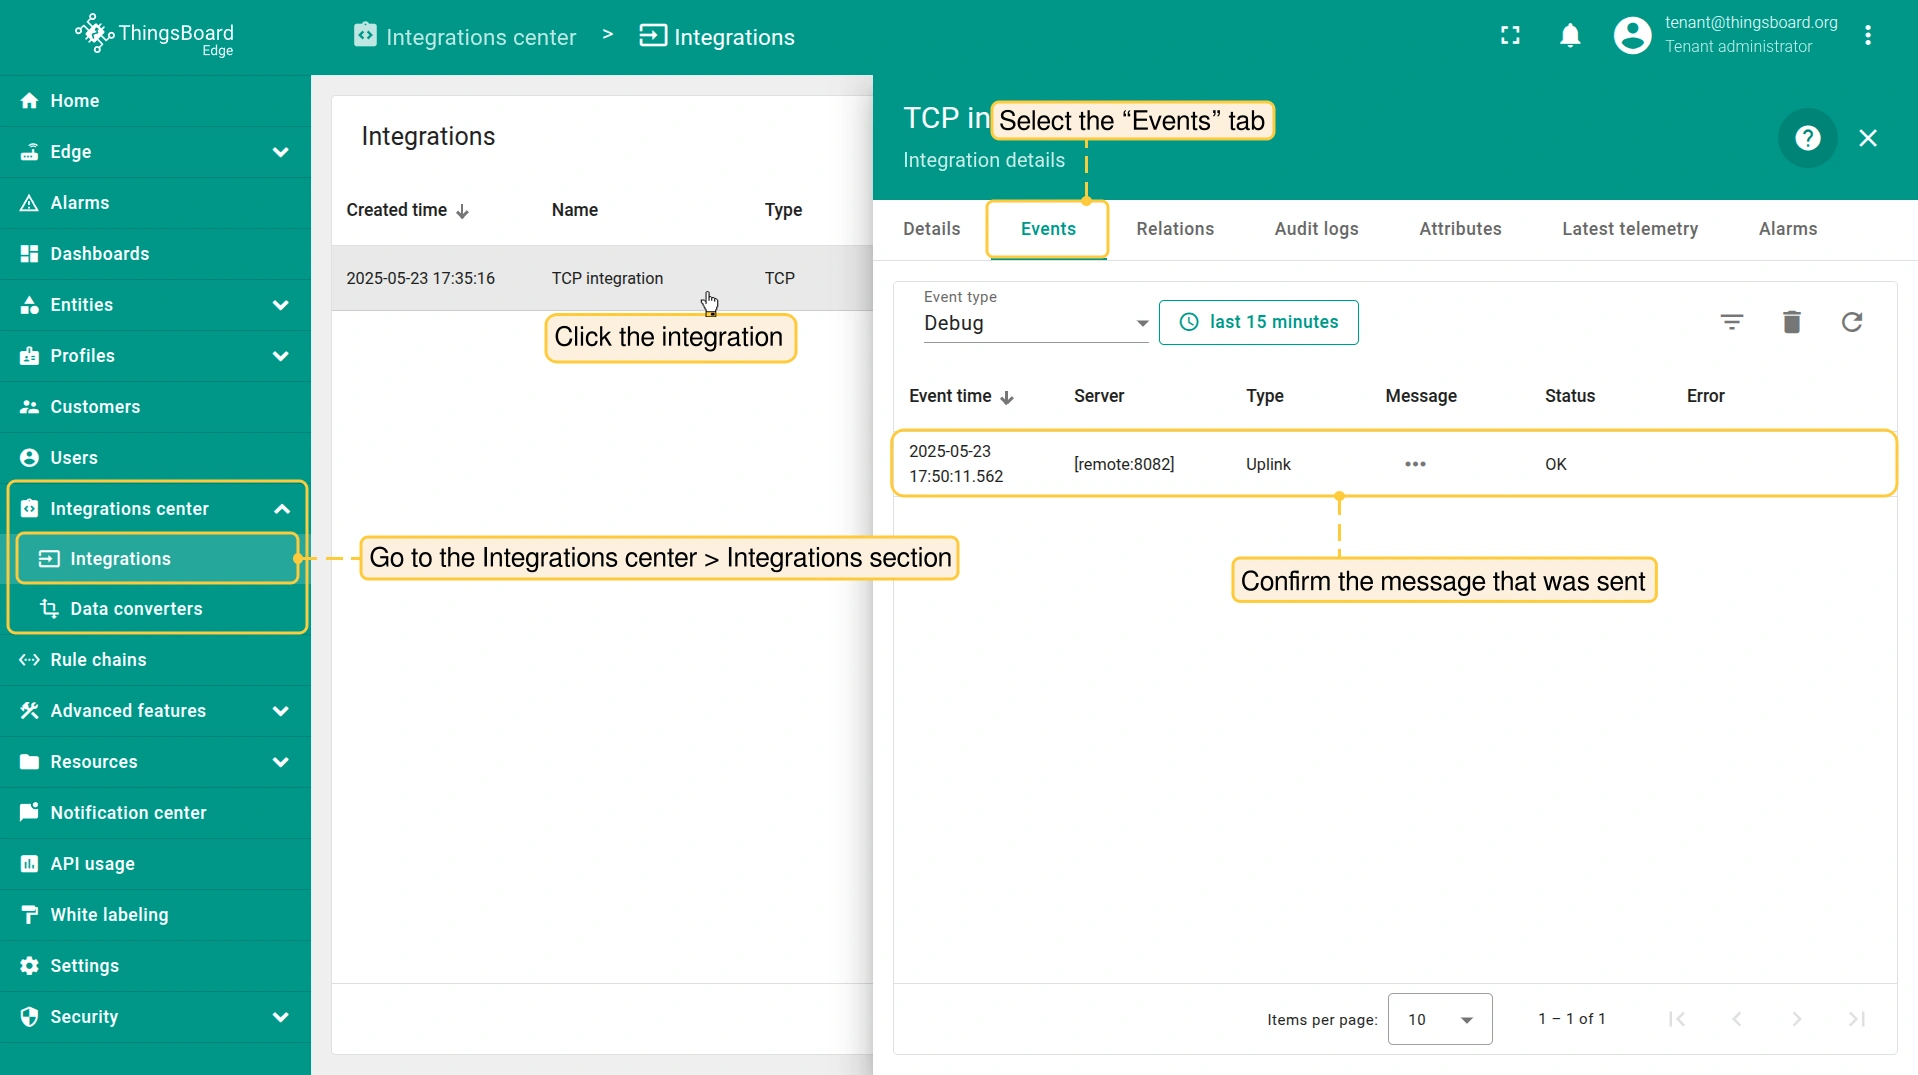
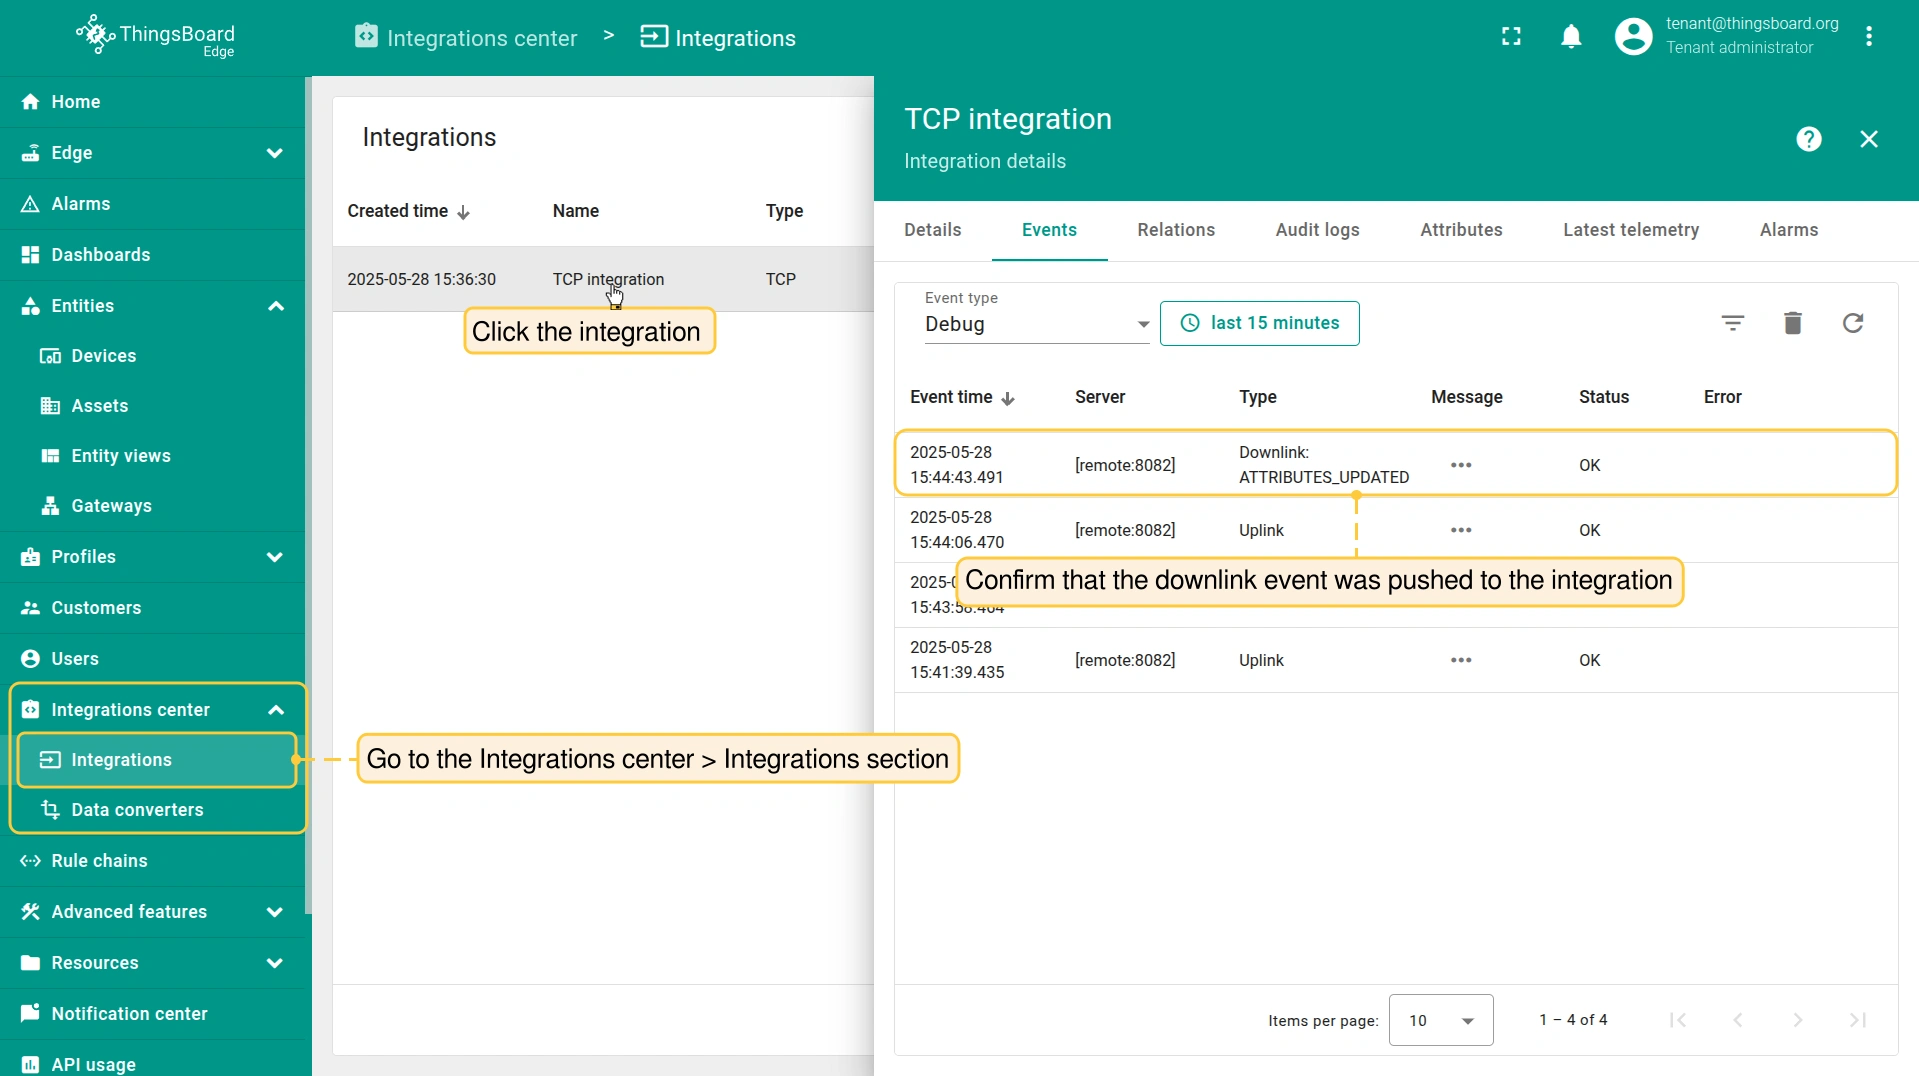
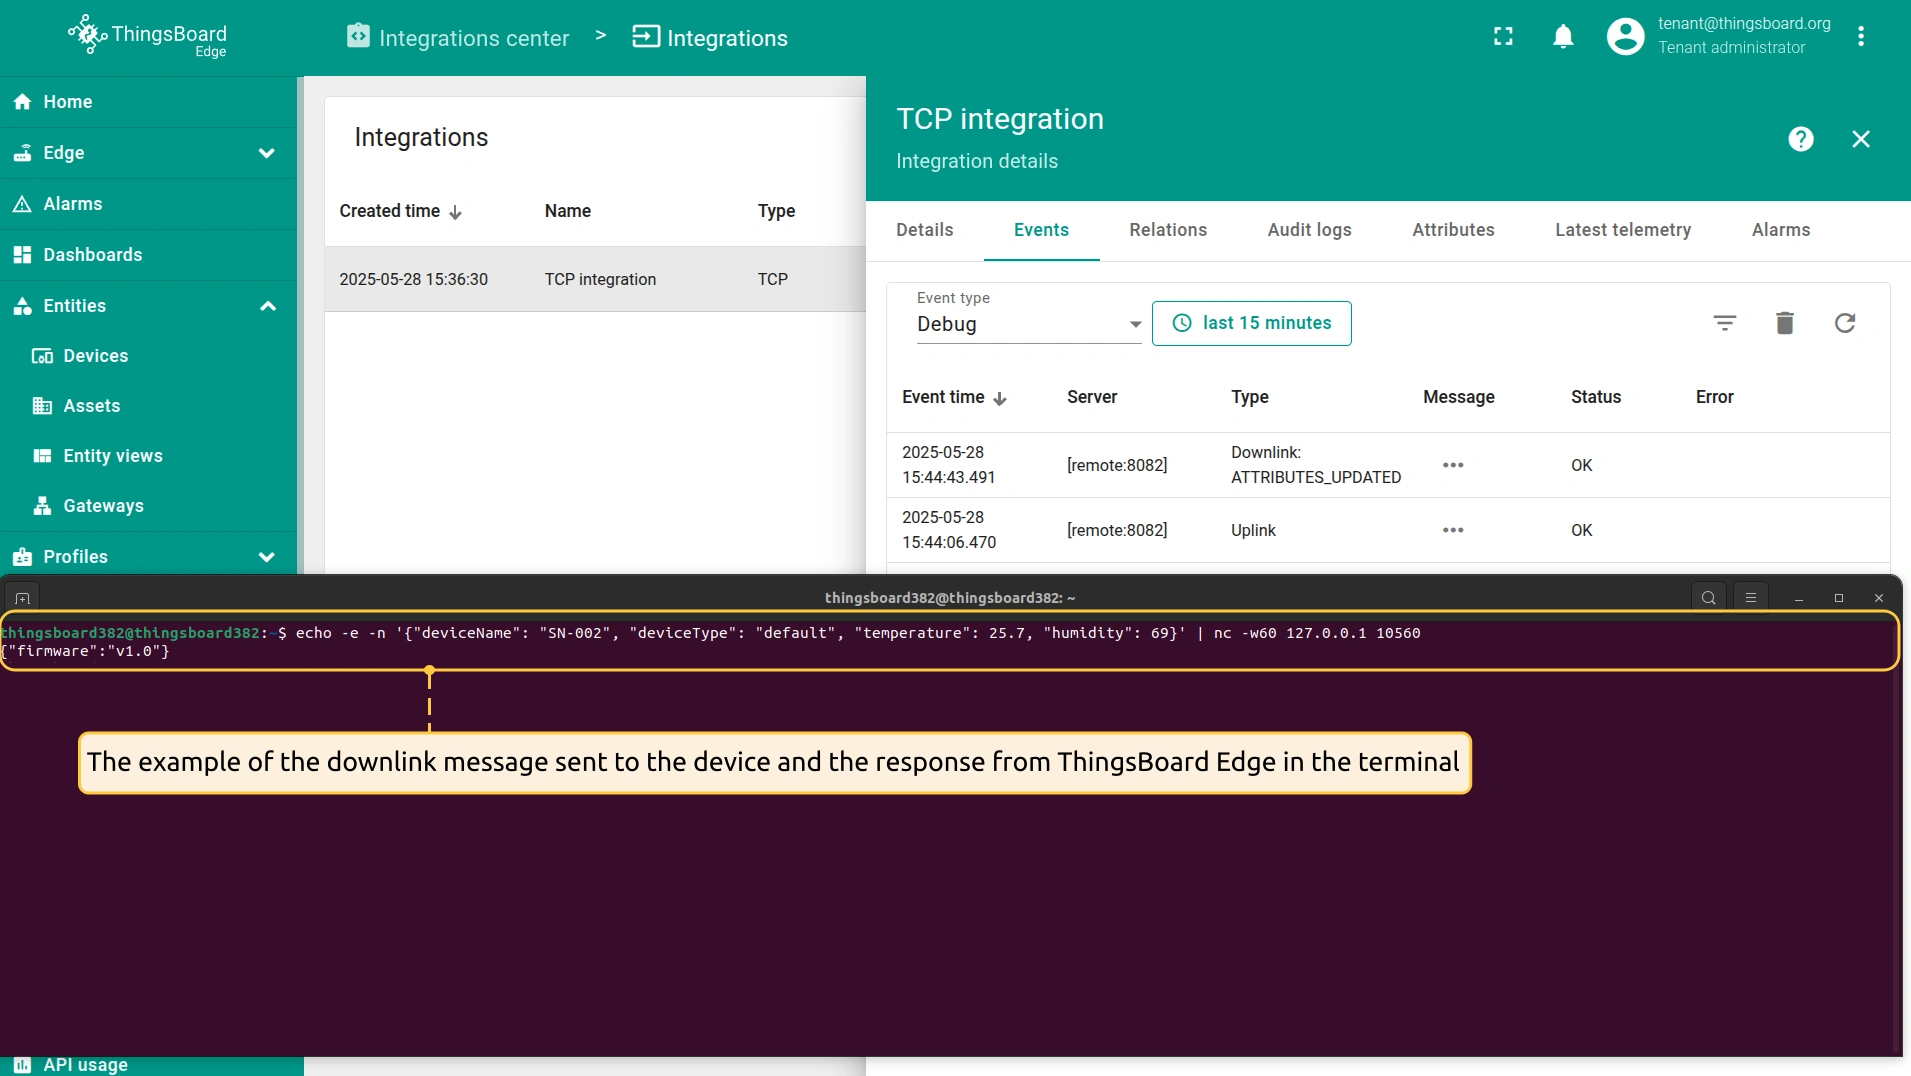
To confirm the downlink message sent to the device, go to the Integrations center > Integrations section, click the TCP integration and select the “Events” tab:
To see the downlink response, select and send another message to the TCP integration:
|
|
|
|
An example of the message sent to the device and the response from ThingsBoard Edge in the terminal:
下一步
-
Getting started guide(入门指南)- 快速概览 ThingsBoard Edge 主要功能。预计 15–30 分钟完成:
-
Installation guides(安装指南)- 了解如何在各种操作系统上安装 ThingsBoard Edge 并连接到 ThingsBoard Server。
-
Edge 规则引擎:
-
Rule Chain Templates(规则链模板)- 了解如何使用 ThingsBoard Edge 规则链模板。
-
Provision Rule Chains from cloud to edge(从云端向 Edge 下发规则链)- 了解如何从云端向 Edge 下发边缘规则链。
-
- 安全:
- gRPC over SSL/TLS - 了解如何为 Edge 与云端之间的通信配置 gRPC over SSL/TLS。
-
功能:
-
Edge Status(Edge 状态)- 了解 ThingsBoard Edge 上的 Edge Status 页面。
-
Cloud Events(云端事件)- 了解 ThingsBoard Edge 上的 Cloud Events 页面。
-
-
使用场景:
-
Manage alarms and RPC requests on edge devices(在边缘设备上管理告警和 RPC 请求)- 本指南展示如何在 Edge 上生成本地告警并向连接到 Edge 的设备发送 RPC 请求:
-
Data filtering and traffic reduce(数据过滤与流量削减)- 本指南展示如何从 Edge 向云端仅发送过滤后的设备数据:
-
- Roadmap(路线图)- ThingsBoard Edge 路线图。