It is possible to run any ThingsBoard Integration remotely from the main ThingsBoard Edge instance.
This guide provides step-by-step instructions for launching ThingsBoard integration remotely.
We’ll demonstrate how to set up a remote HTTP integration to push data to ThingsBoard Edge.
A running ThingsBoard Edge instance, already connected to the Server, with access as a Tenant administrator.
ThingsBoard Server configuration steps
To create Converter and Integration templates, log in to the Cloud instance as Tenant administrator.
Before creating the Integration template, create an Uplink converter template in the Converters templates section.
Step 1. Create Uplink Converter
The uplink data converter is needed to convert the incoming data from the device into the format required for display on ThingsBoard Edge.
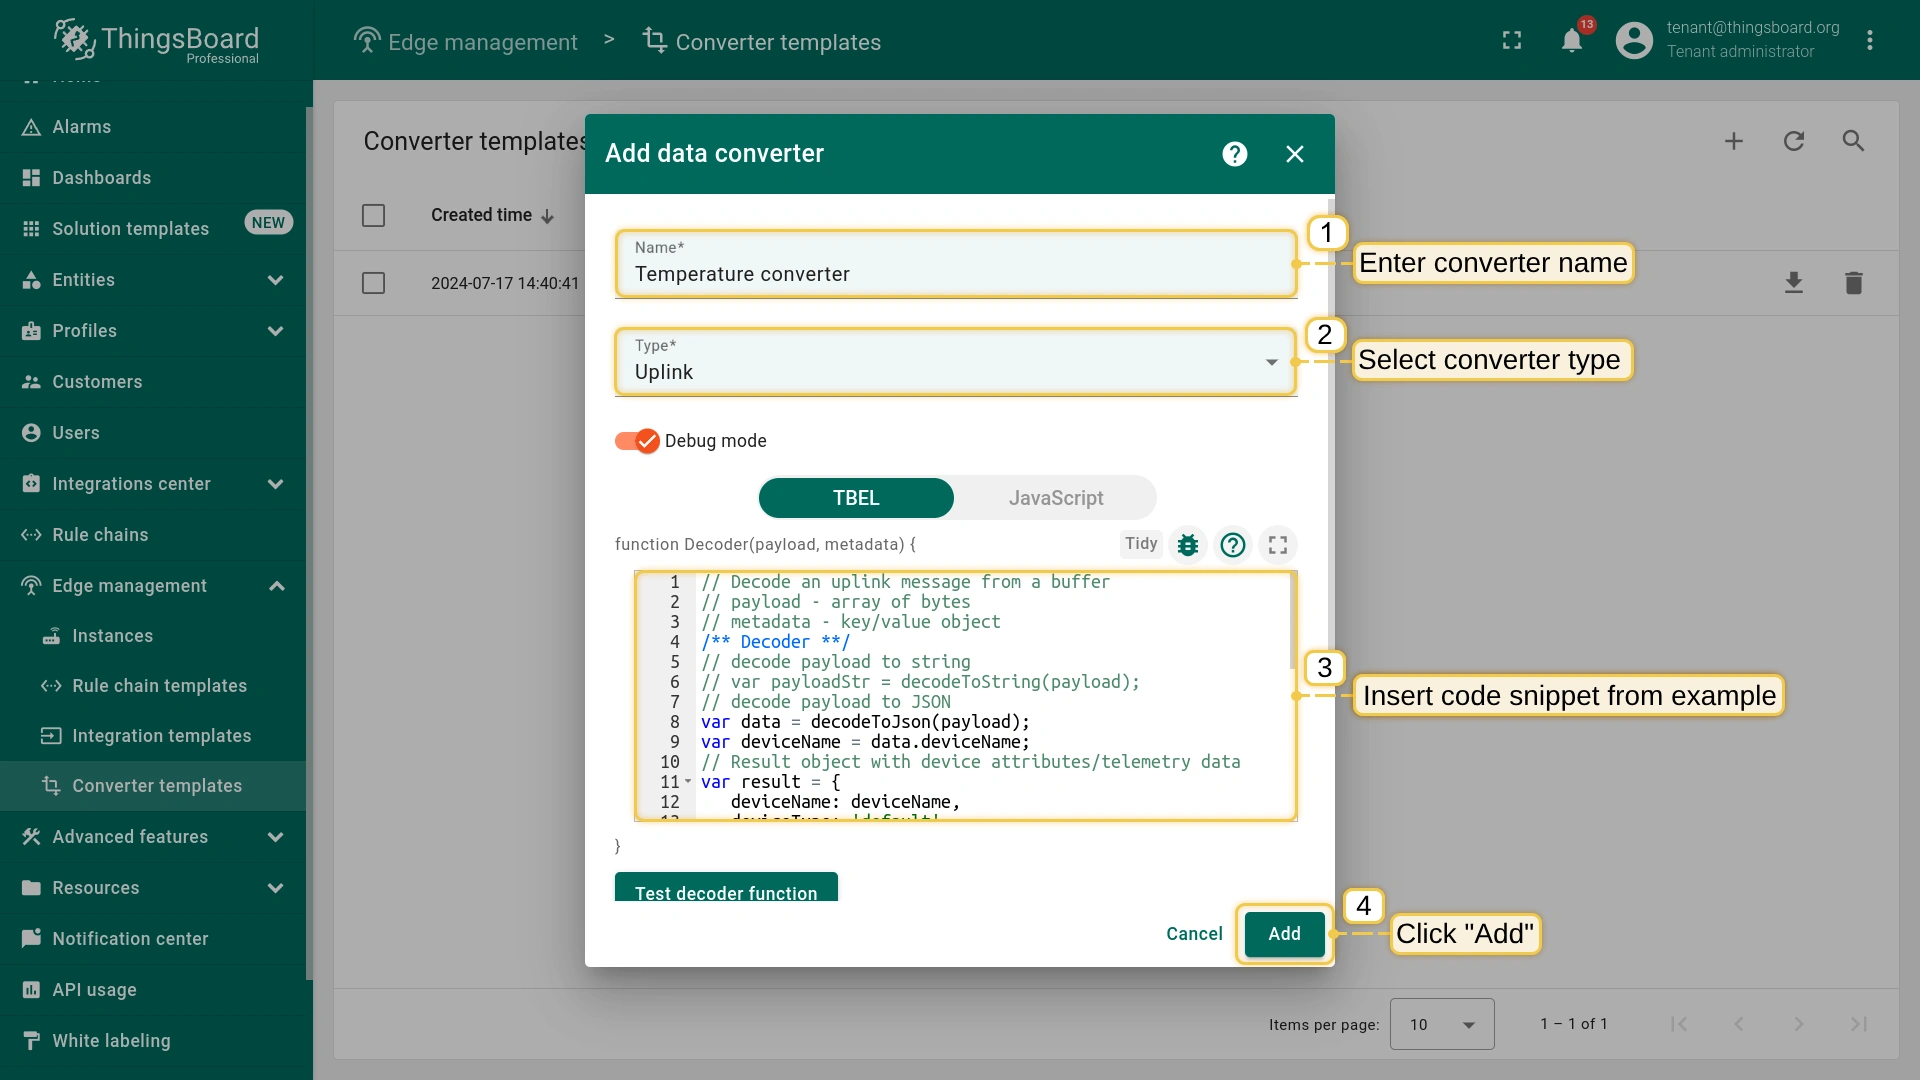
Log in to the Cloud and go to the Edge management > Converter templates section. To create a Converter template, click the “Add data converter” button (the + icon) and select the “Create new converter” option.
In the “Add data converter” pop-up window:
Name: Enter the name of the data converter.
Type: Select the “Uplink” converter type from the drop-down menu.
To view the events, enable Debug mode.
function Decoder: Enter a script to parse and transform data.
Once the Uplink converter template is created, you can proceed to create the Integration:
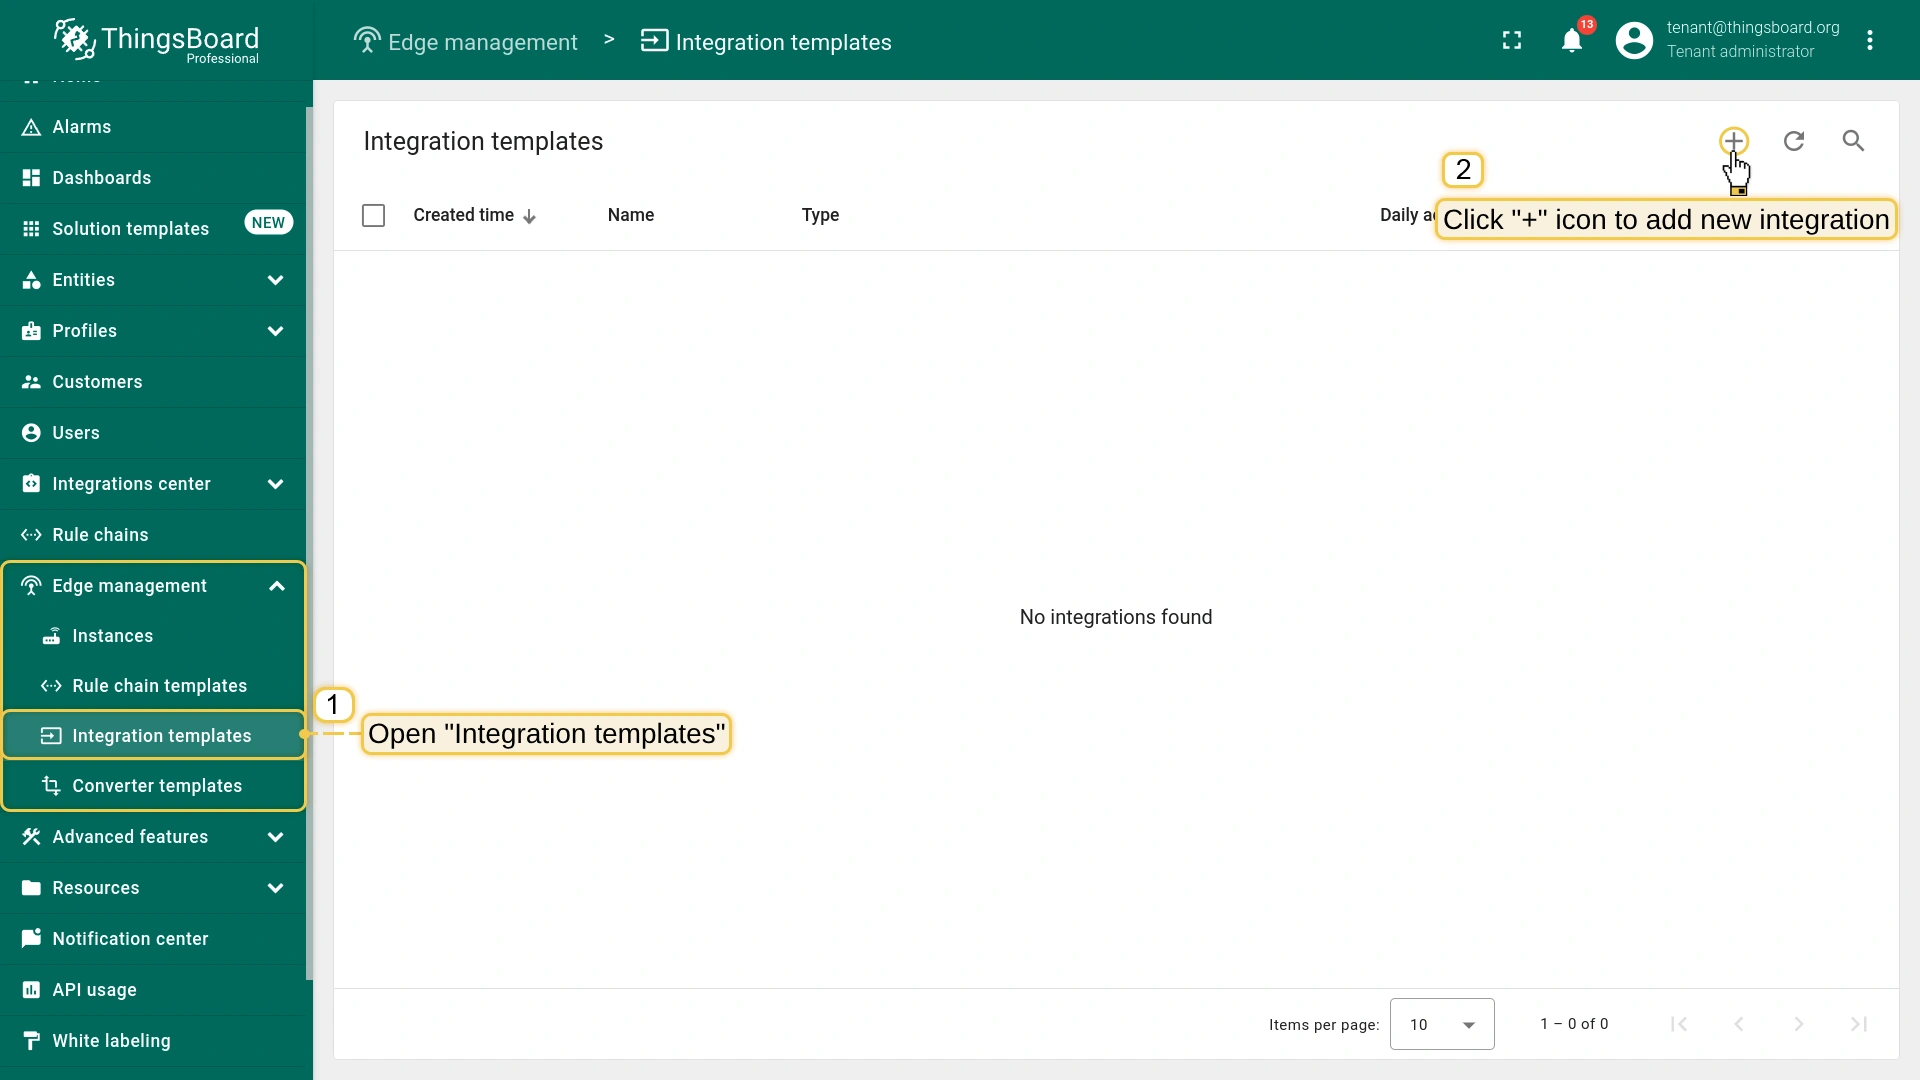
Go to the Edge management > Integration templates section, click the “Add new integration” button (the + icon) and select the “Create new integration” option.
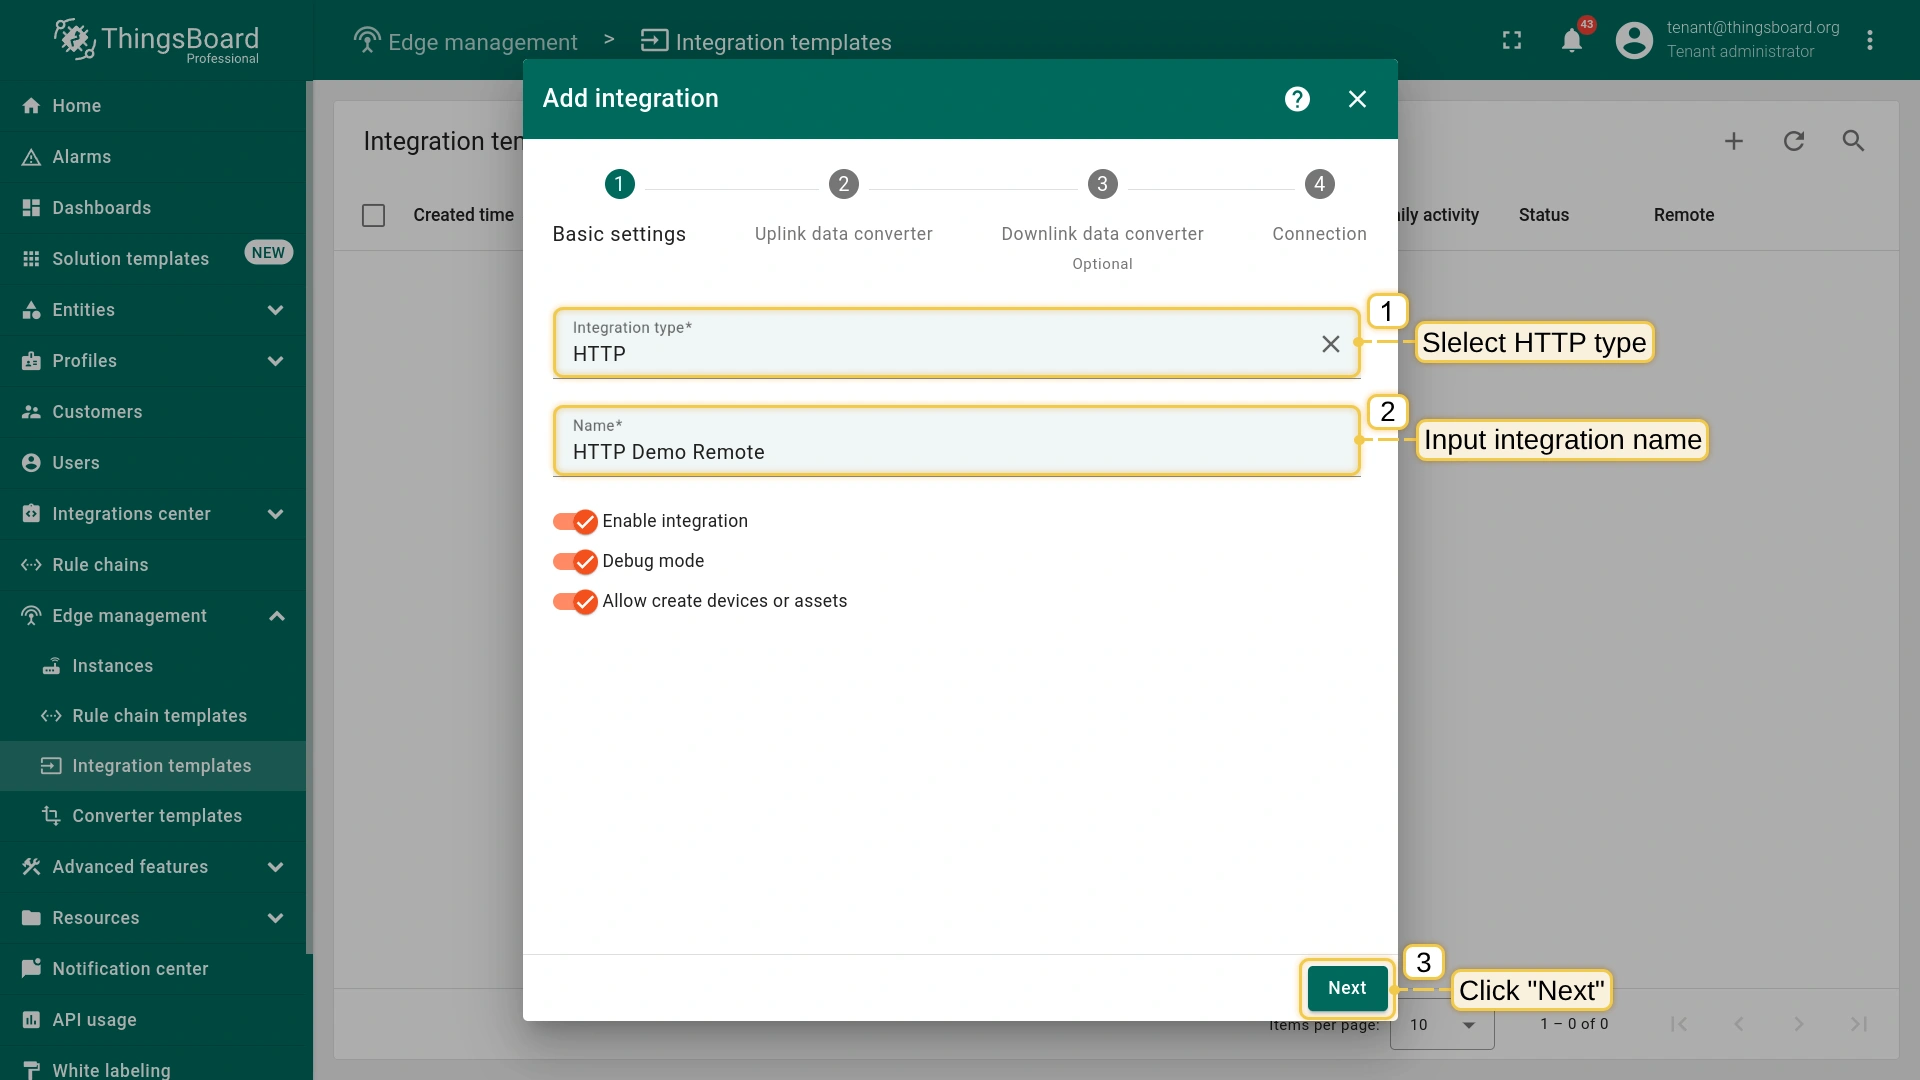
In the “Add integration” pop-up window and fill out the “Basic settings” block:
Integration type: Select the “HTTP” integration type from the drop-down menu.
Name: Enter the name of the integration.
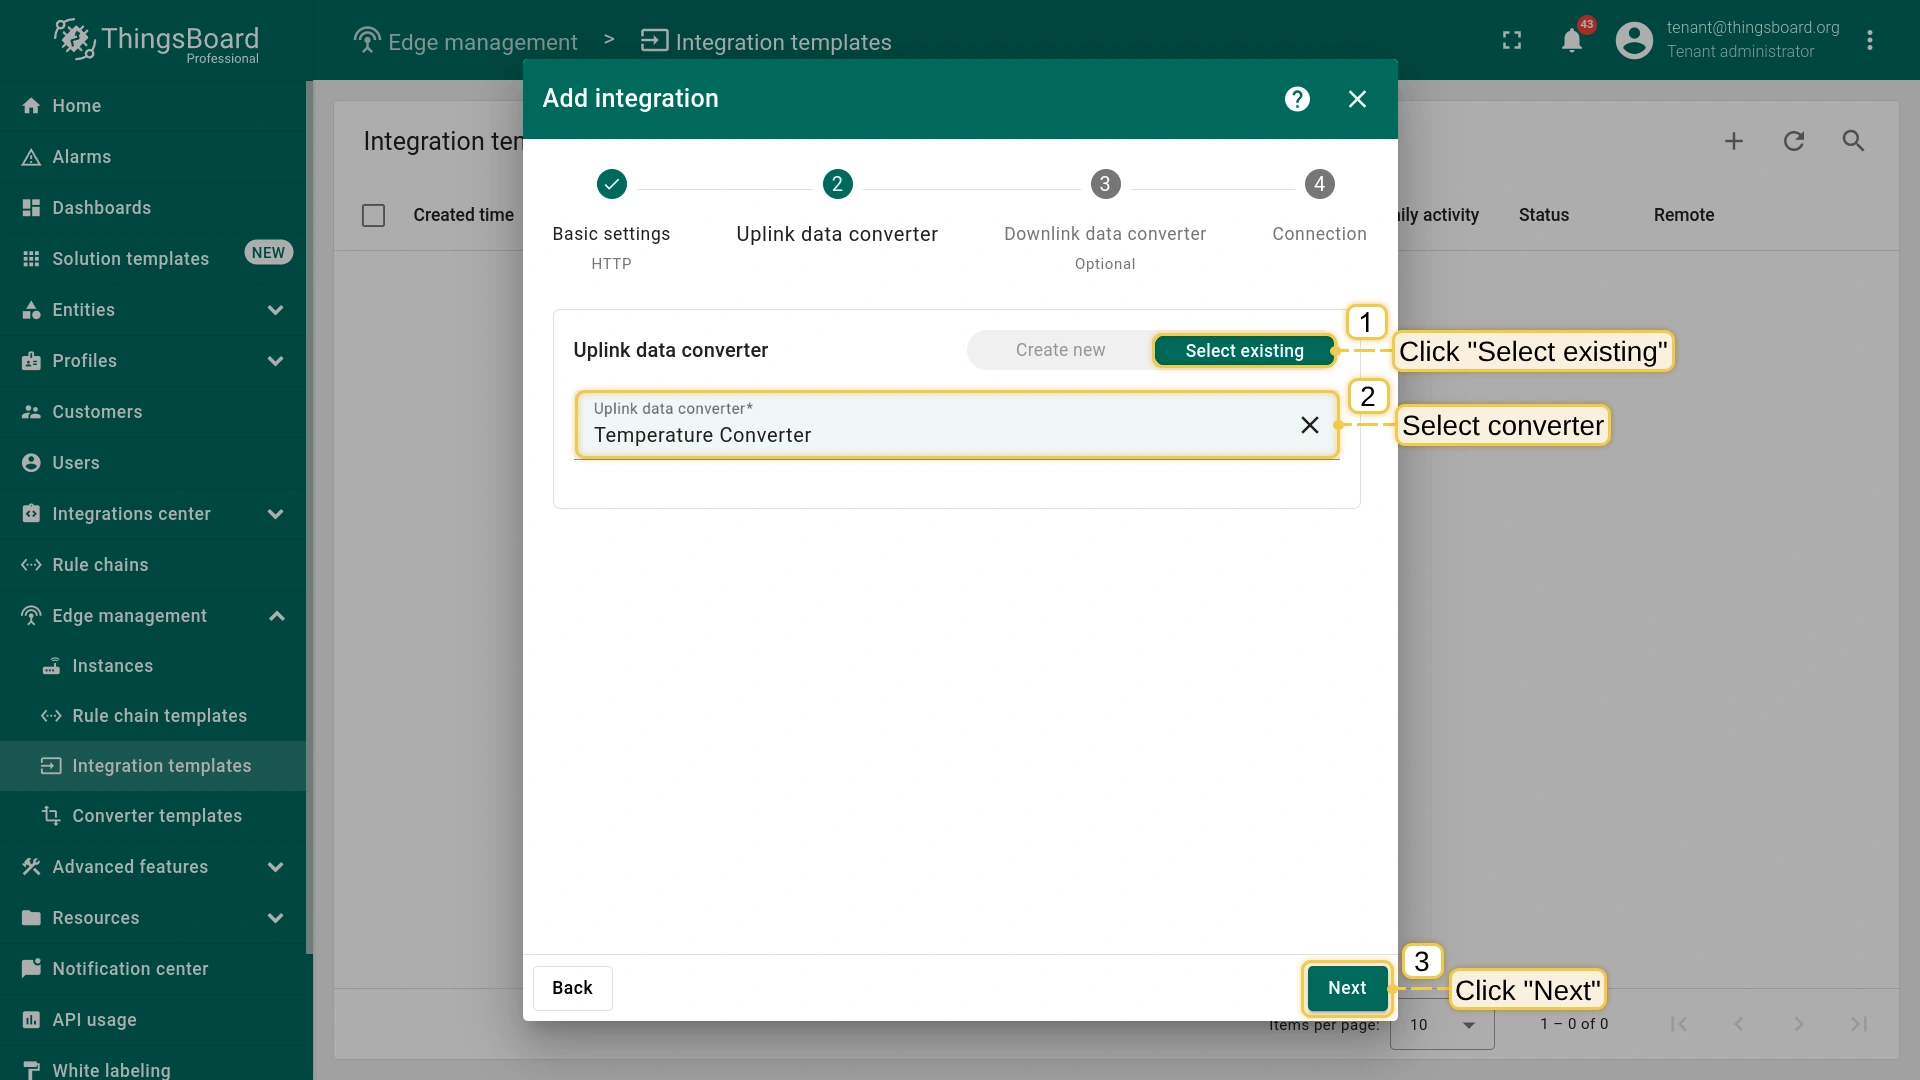
In the “Uplink data converter” block:
Select the “Select existing” tab.
Uplink data converter: Select the uplink data converter from the drop-down menu.
The “Downlink data converter” block is optional and can be skipped.
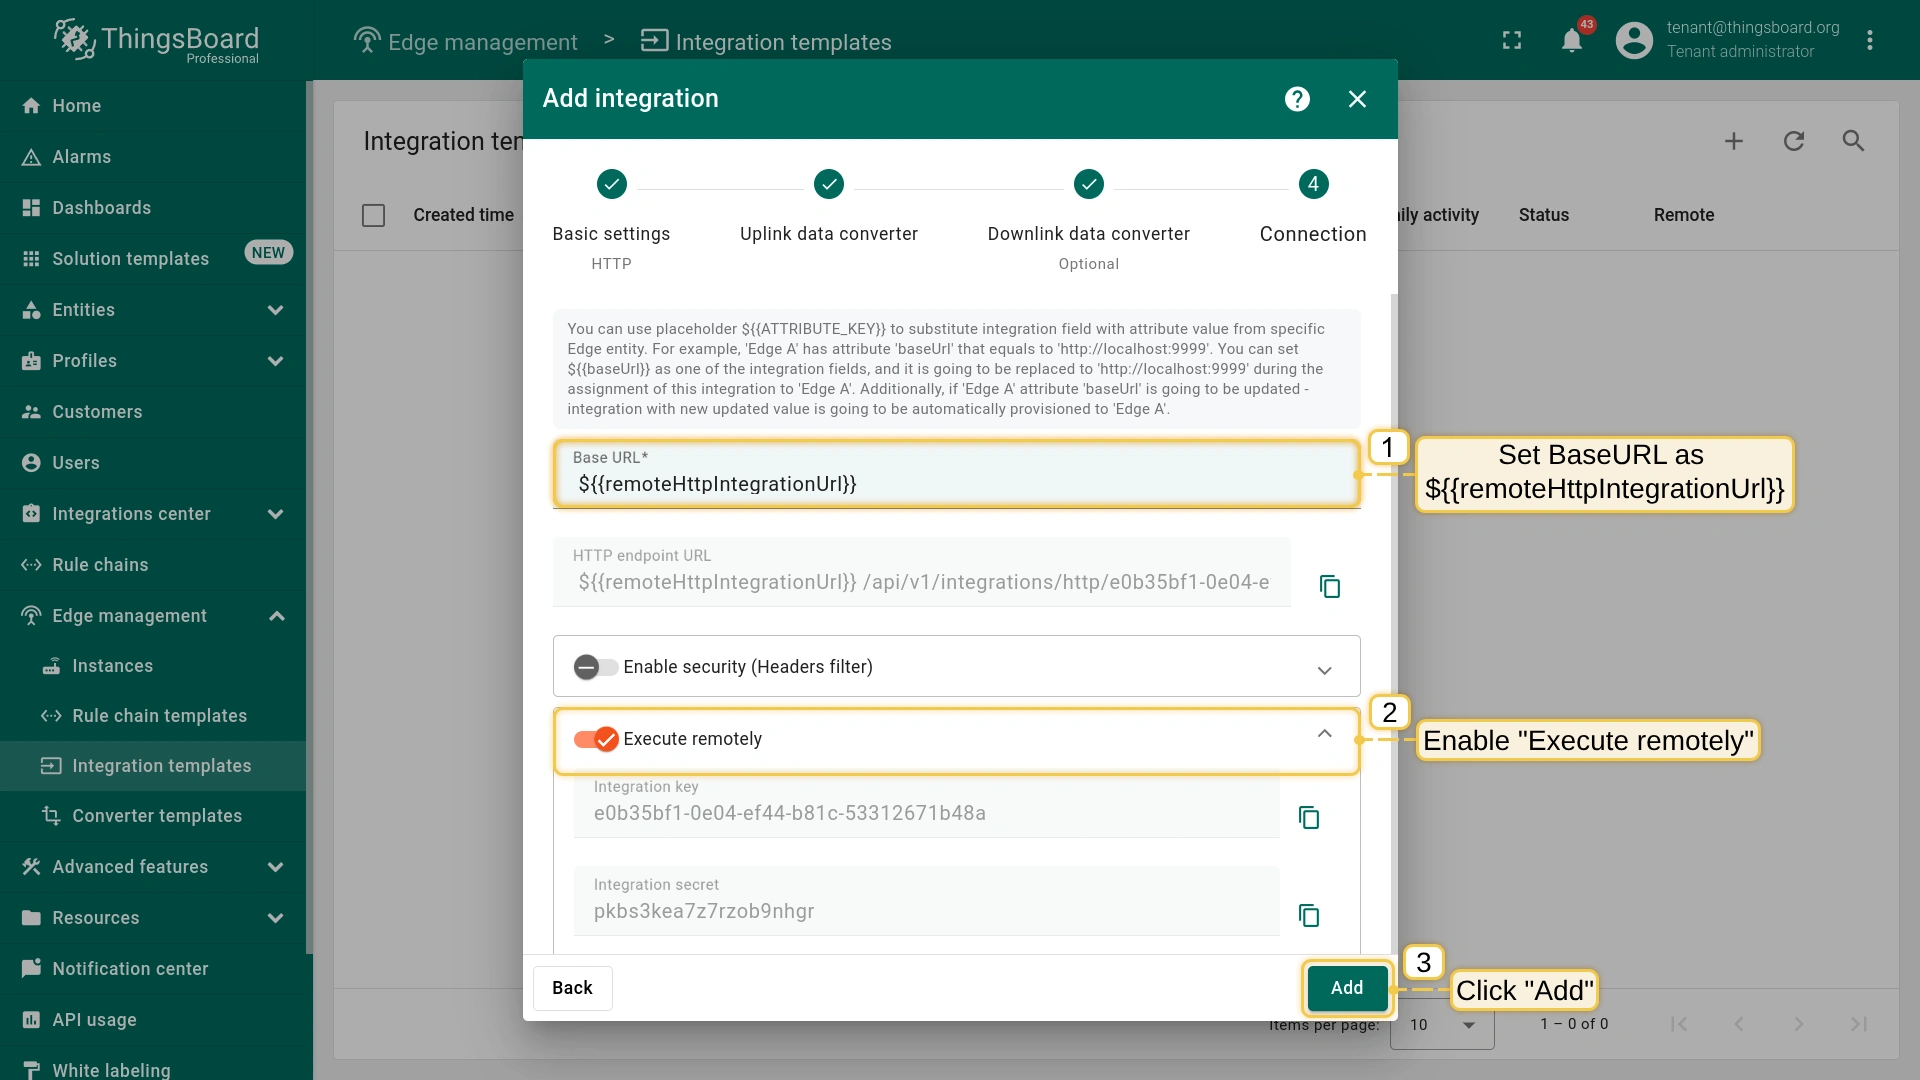
In the “Connection” block:
Base URL: Set ${{remoteHttpIntegrationUrl}} as the base URL.
Execute remotely: Toggle this option to enable remote execution of the integration.
To save the Integration, click the Add button.
1. Open Integration templates menu page. 2. Click the ("+") icon to add a new integration.
1. Select integration type: HTTP. 2. Input integration name, e.g., HTTP Demo Remote. 3. Click Next button.
1. Click Select existing button. 2. Select uplink data converter: Temperature Converter. 3. Click Next button.
Enter the converter name, e.g., Temperature converter. 2. Select converter type: Uplink. 3. Insert the code snippet from the example. 4. Click the Add button.
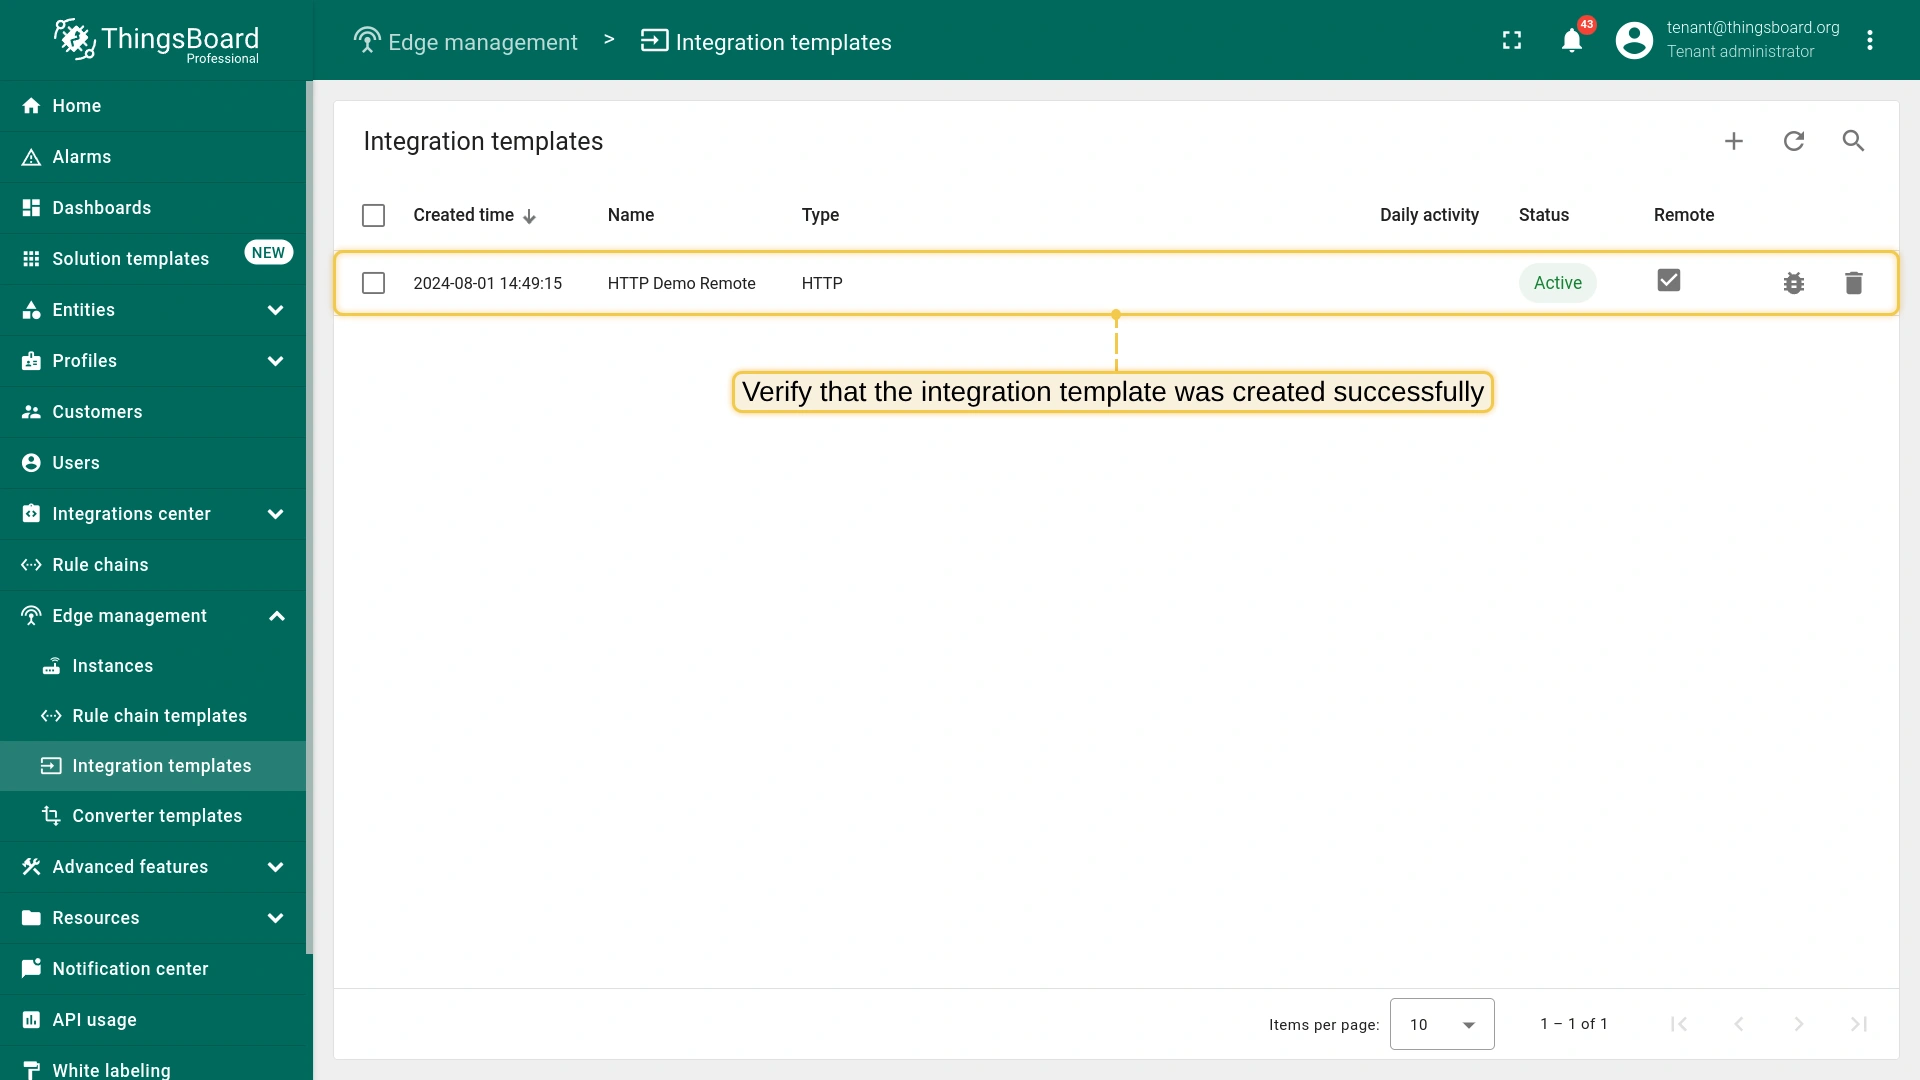
Verify that our HTTP Demo Remote integration template was created successfully.
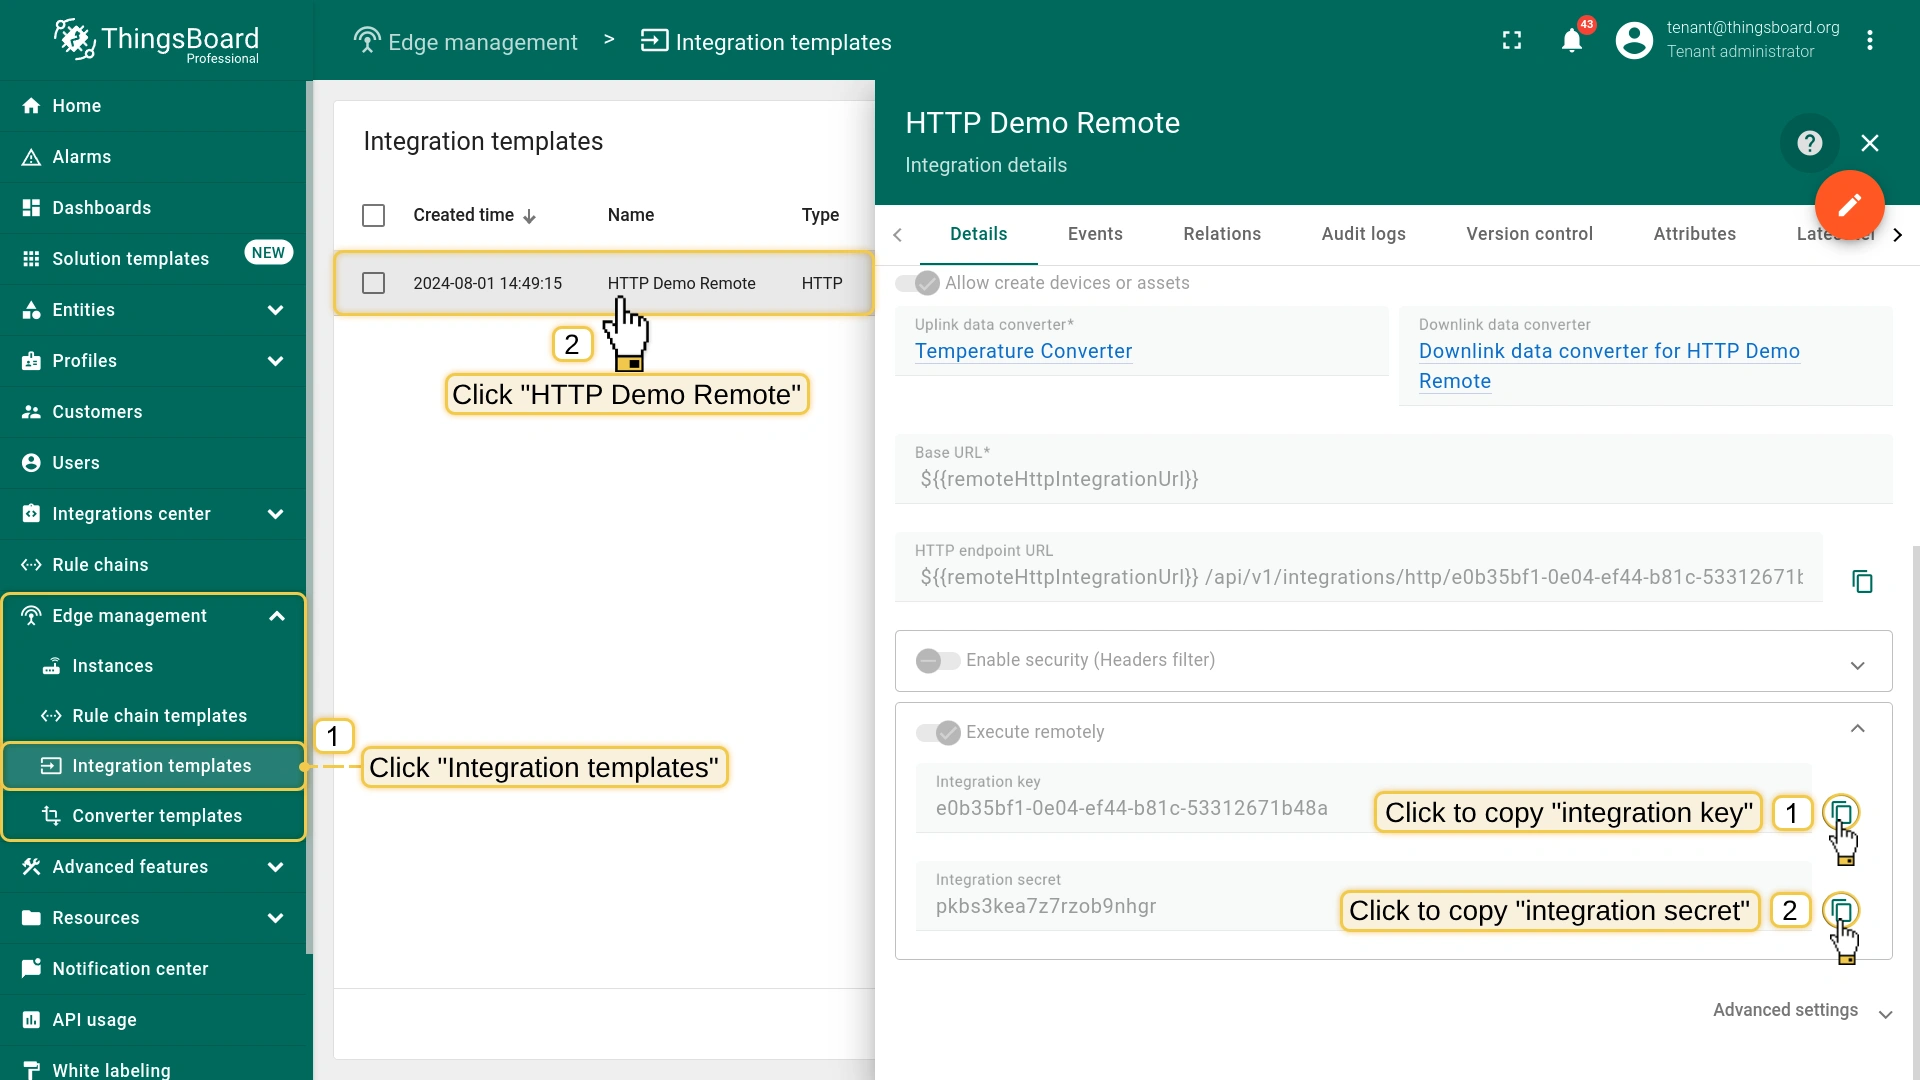
Step 3. Save Remote Integration credentials.
Later during the Remote integration installation steps, we’ll use integration credentials.
To view and copy the credentials, go to the Edge management > Integration templates section and click the integration.
On the “Integration details” page, in the “Execute remotely” block copy the Integration key and Secret by clicking the corresponding button.
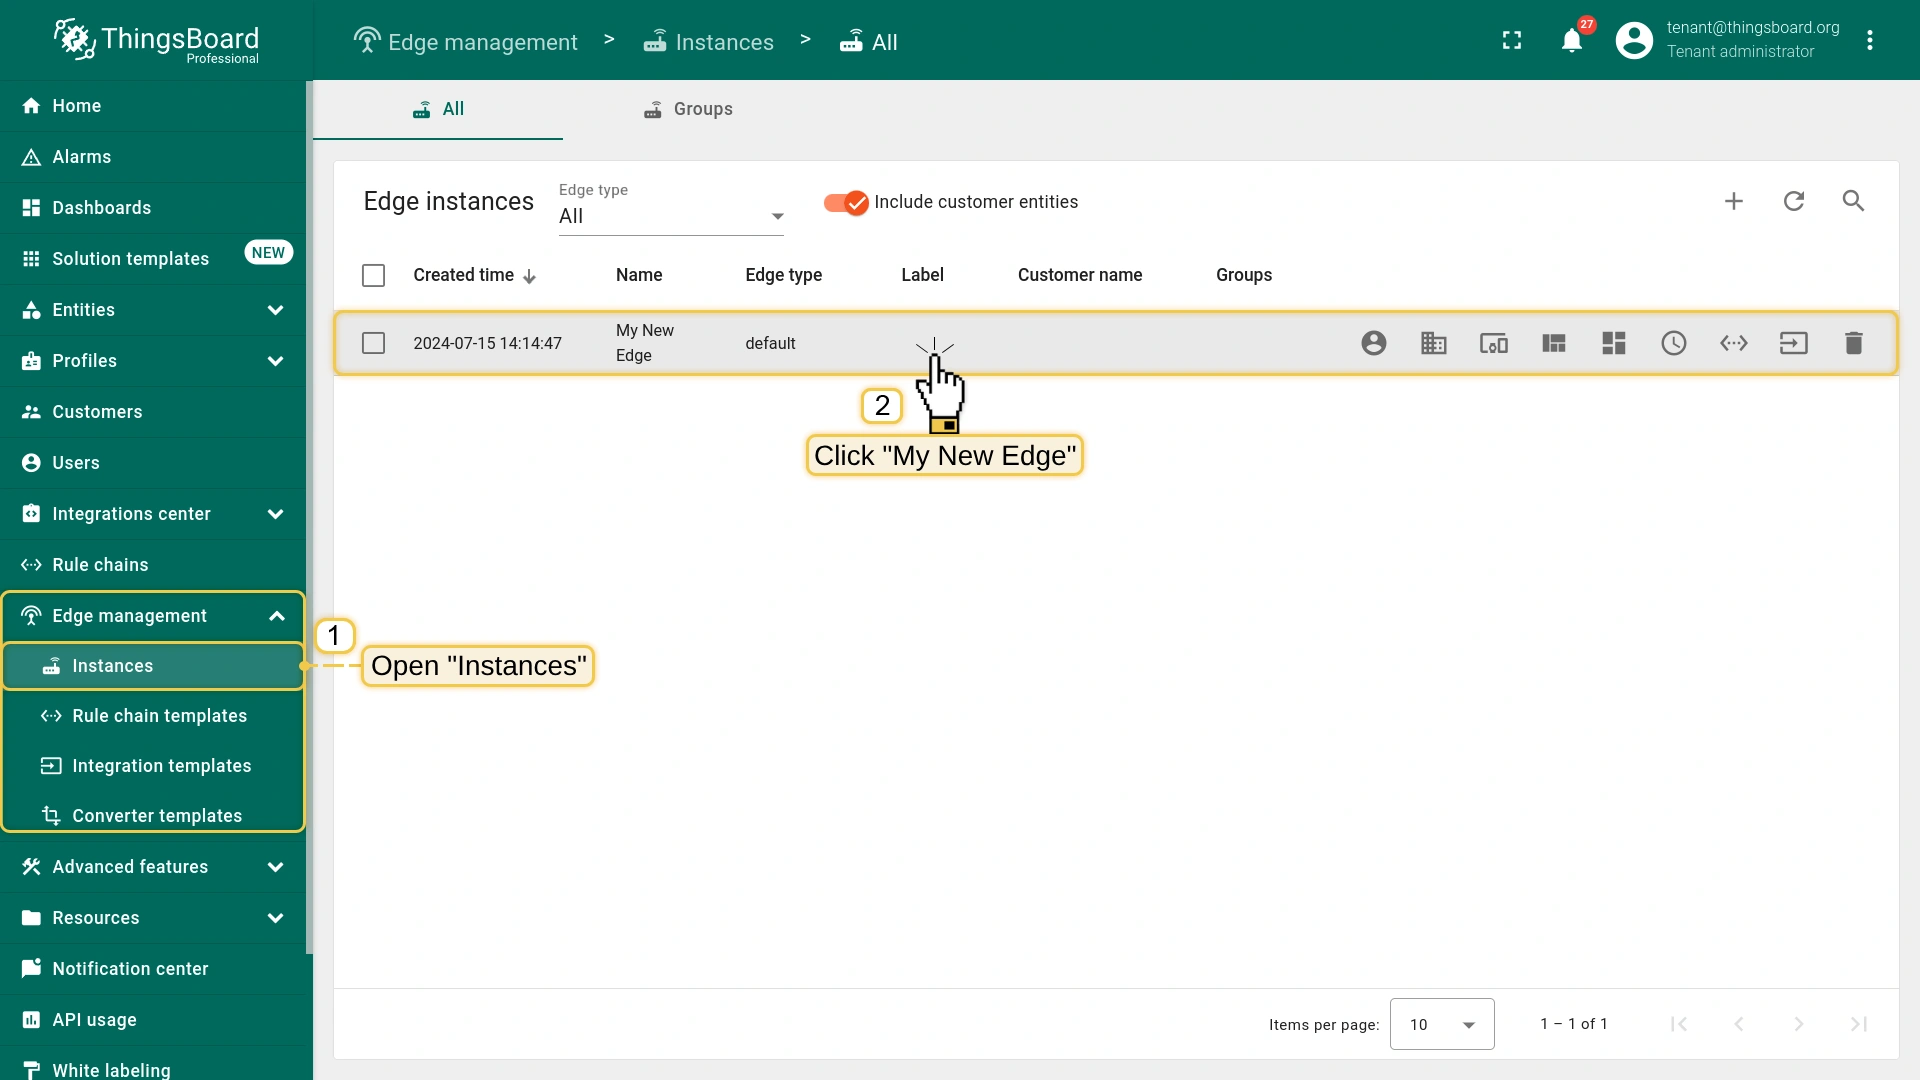
Step 4. Assign Integration to Edge.
Once the converter and integration templates are created, we can assign the Integration template to the Edge.
Since we are using the ${{remoteHttpIntegrationUrl}} placeholder in the integration configuration, we must first add the remoteHttpIntegrationUrl attribute to the Edge.
Provide the IP address and port of your remote HTTP integration as the remoteHttpIntegrationUrl attribute.
By default, the HTTP remote integration uses port 8082.
We will use the same port in the demo, and the IP address will be set as the IP of the machine where the remote integration service will be launched.
Once the attribute is added, we are ready to assign the integration and verify that it has been added.
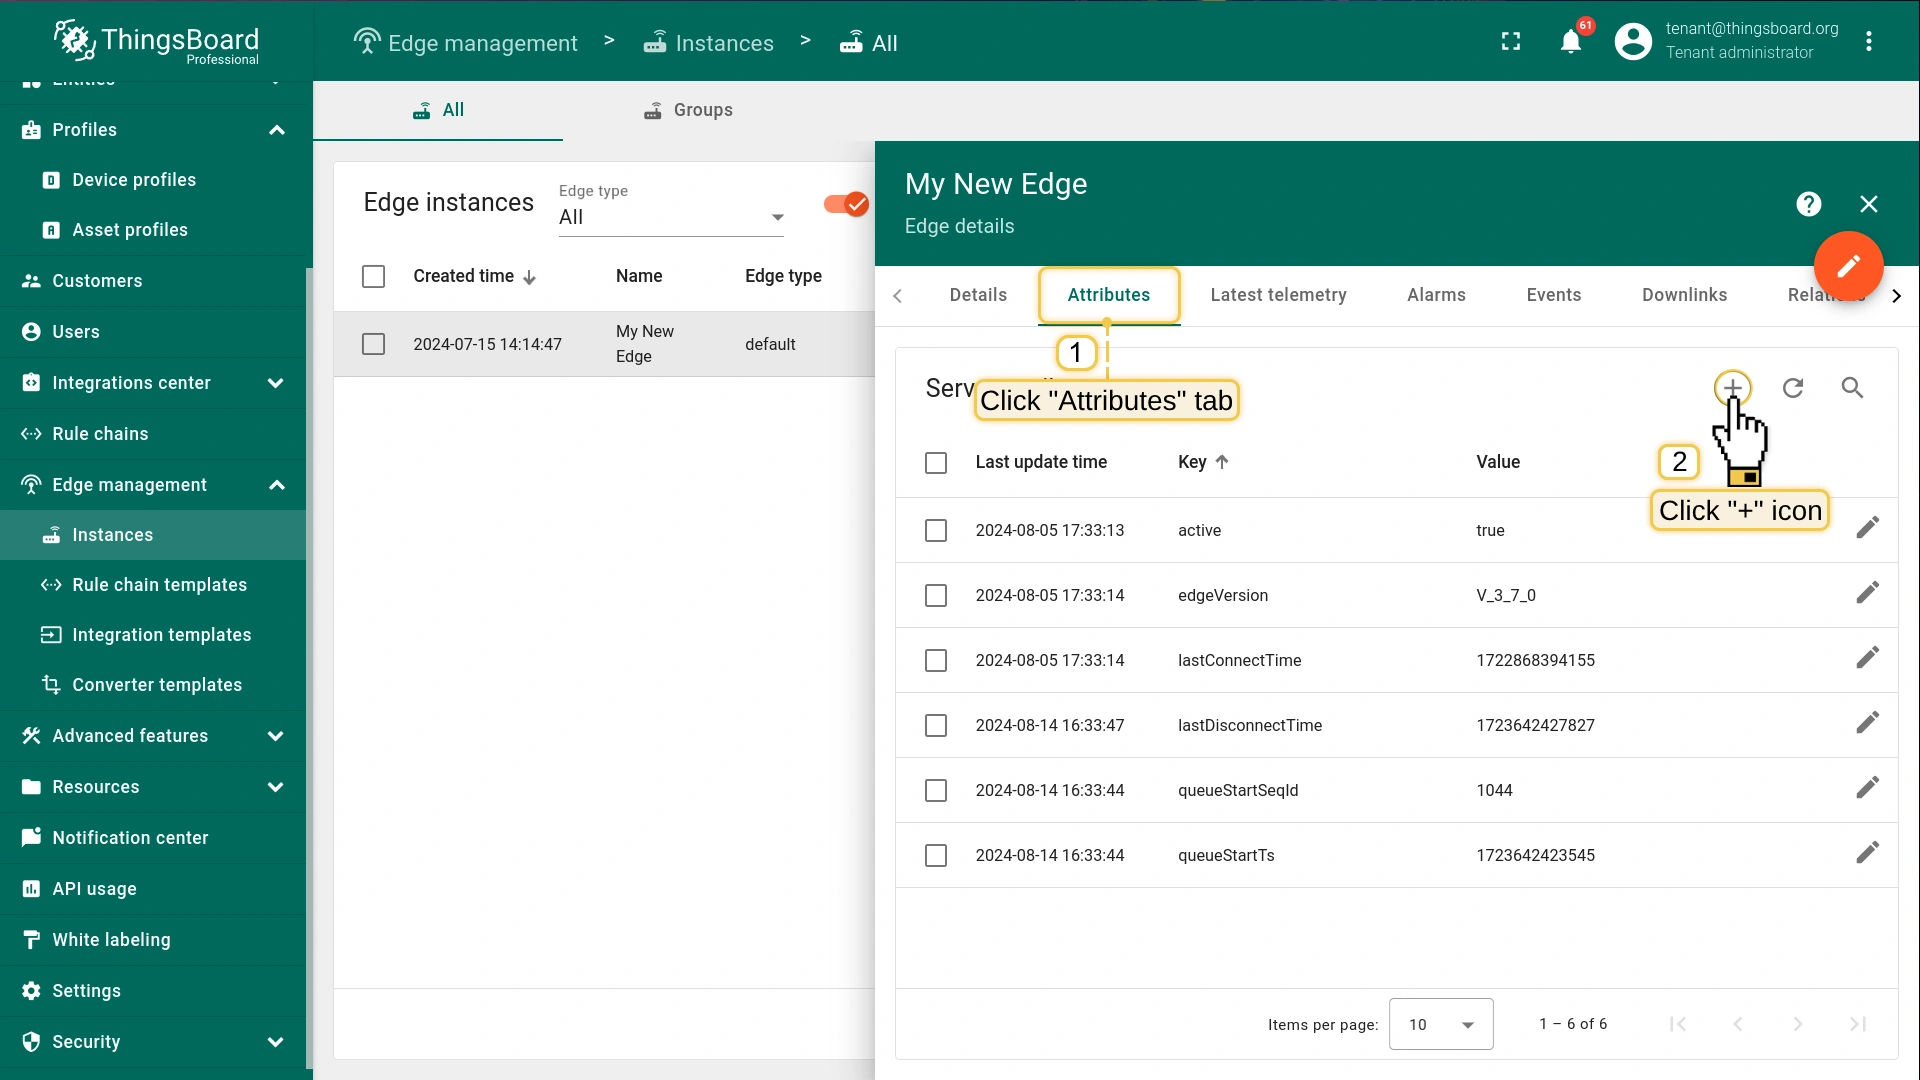
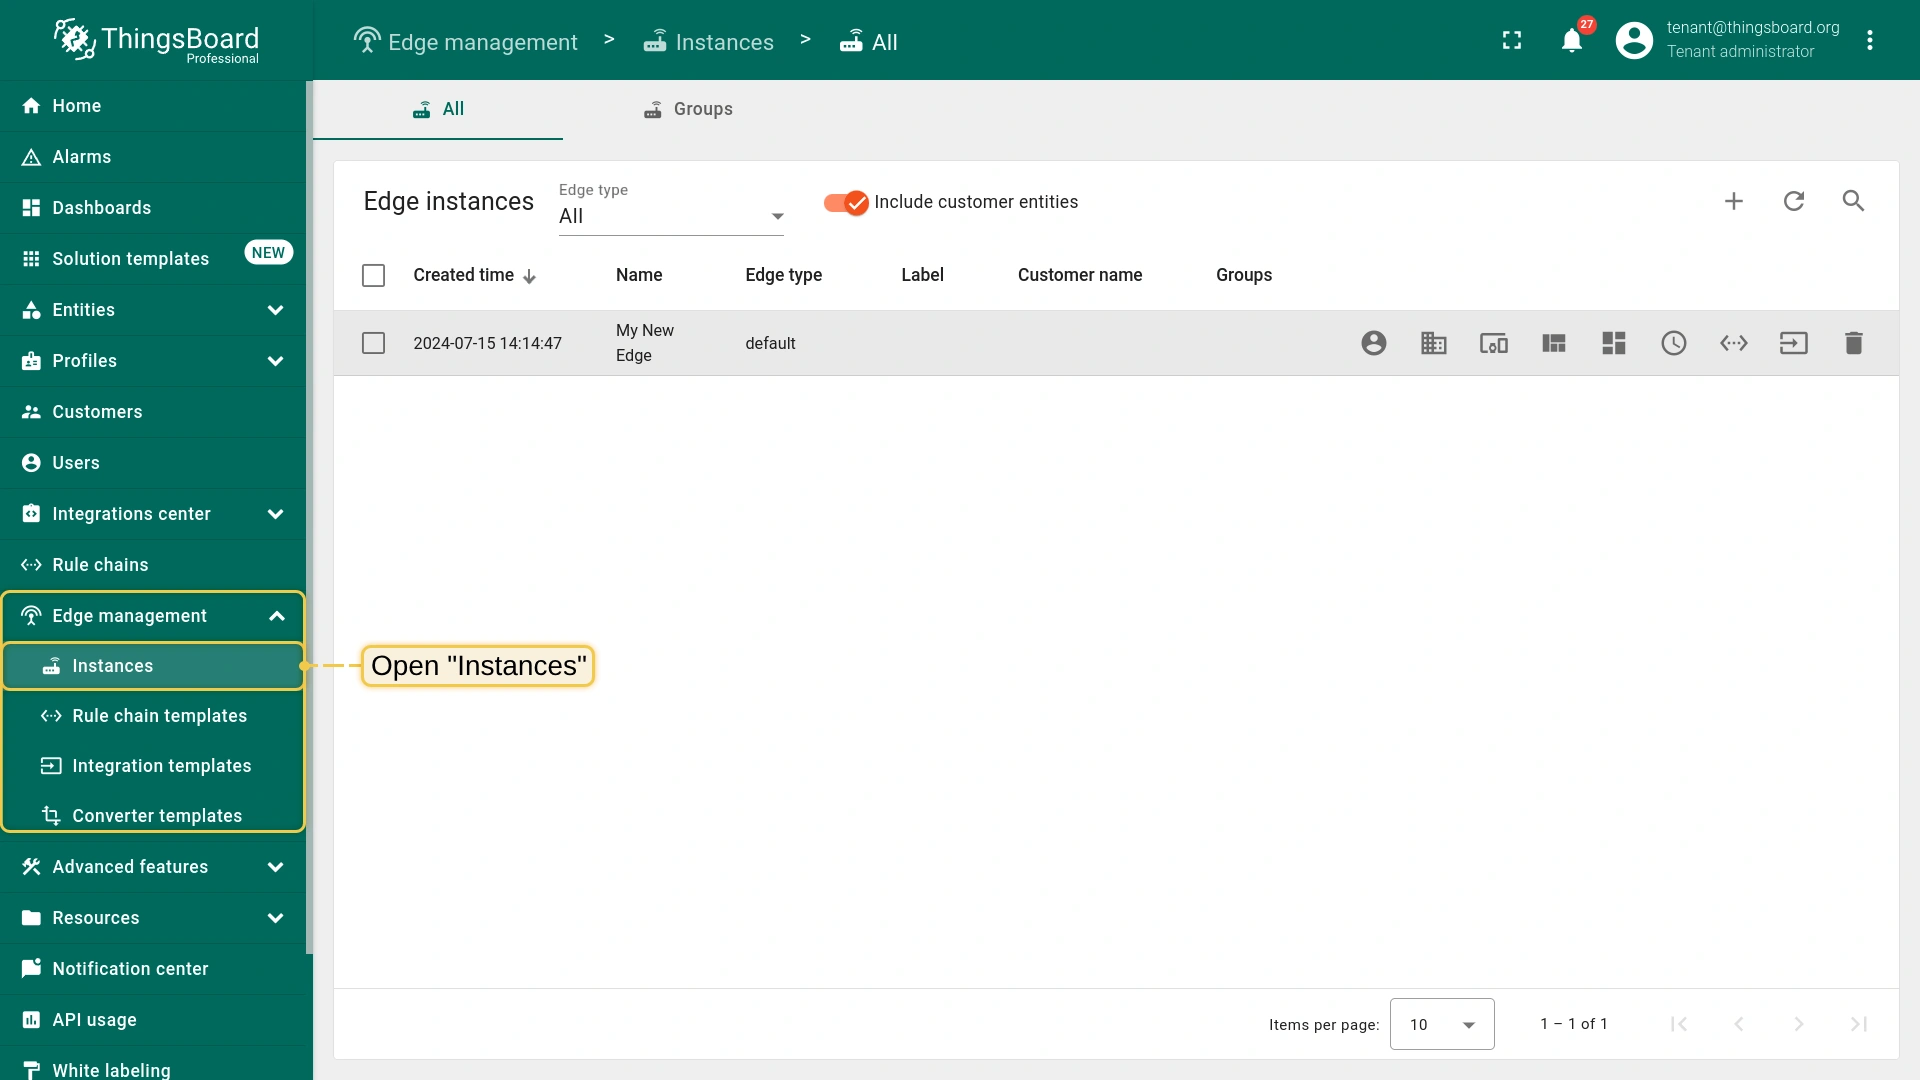
Go to the Edge management > Instances section and click on the corresponding Edge instance.
On the Edge details page, select the Attributes tab and add click the "Add" button to add a new attribute.
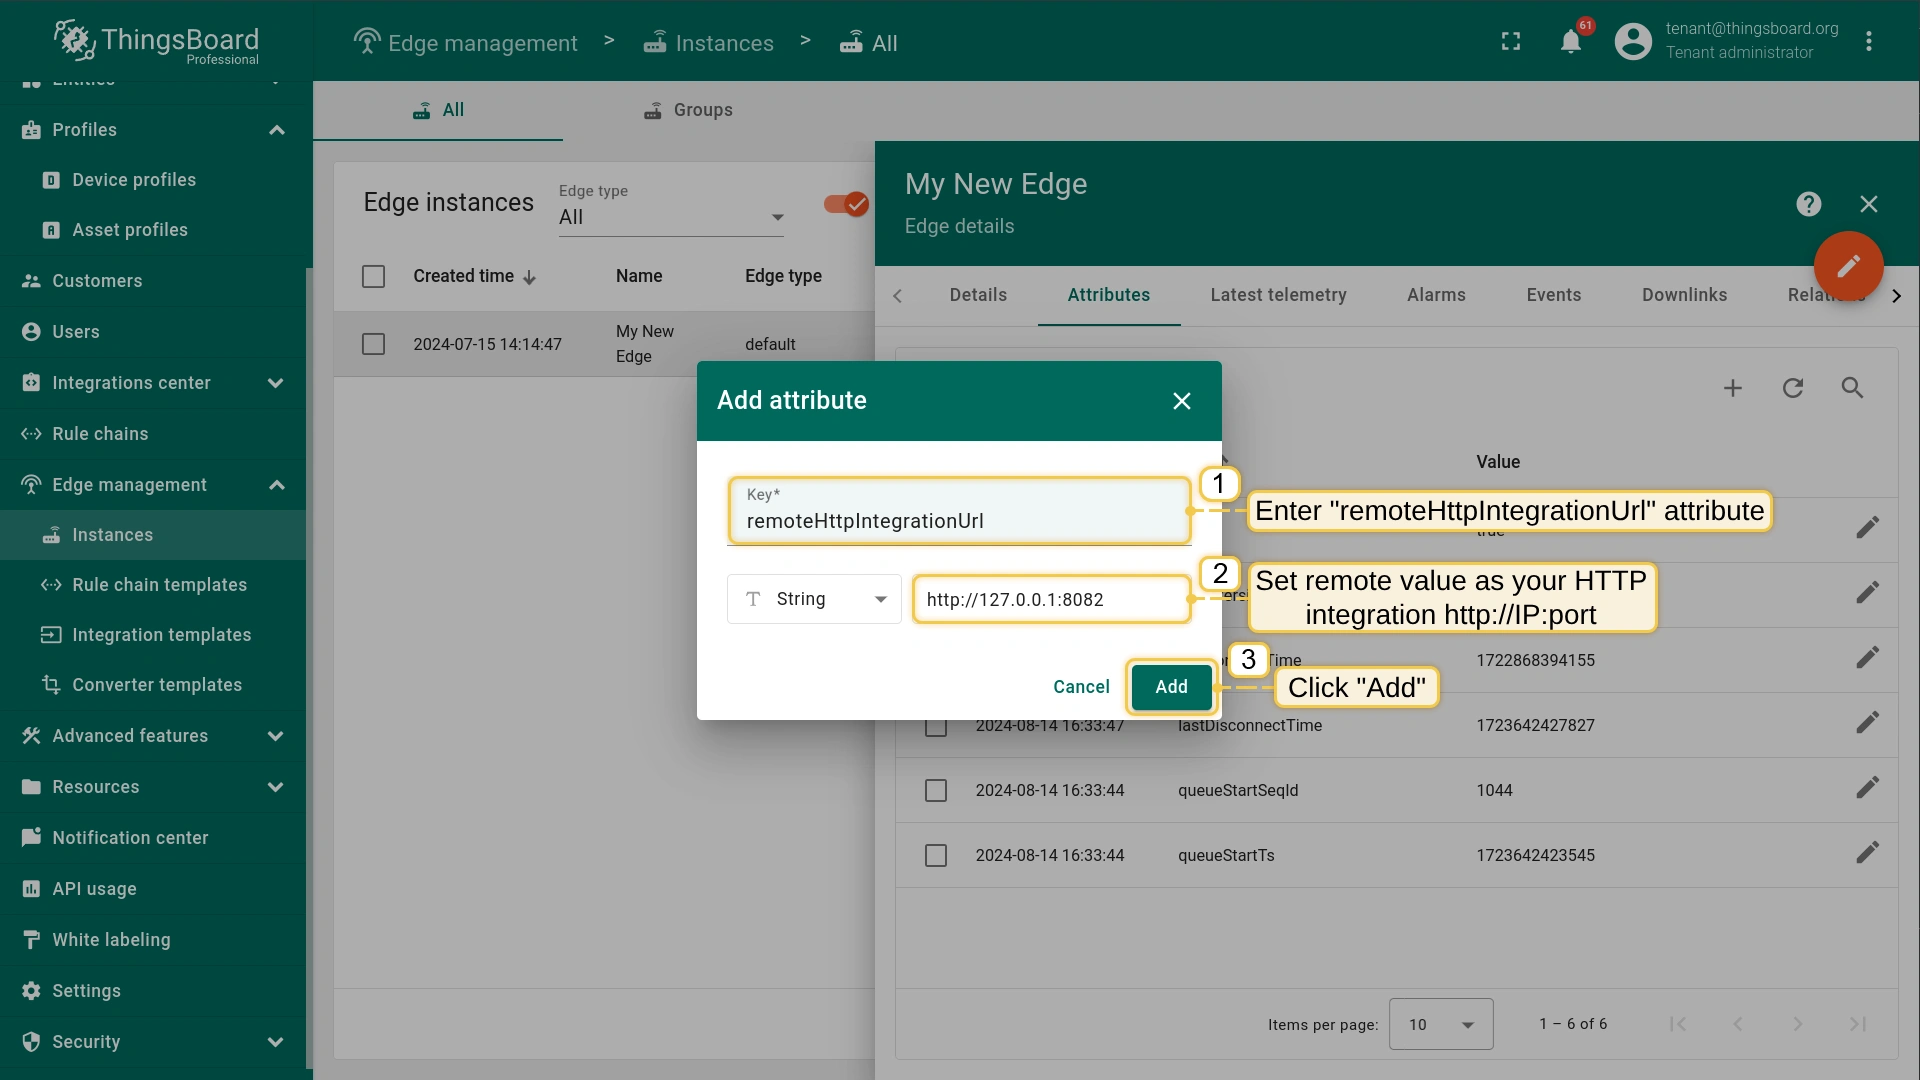
In the "Add attribute" pop-up window, enter the remoteHttpIntegrationUrl attribute. Set http://IP:port as the remote URL for your HTTP integration and click the Add button.
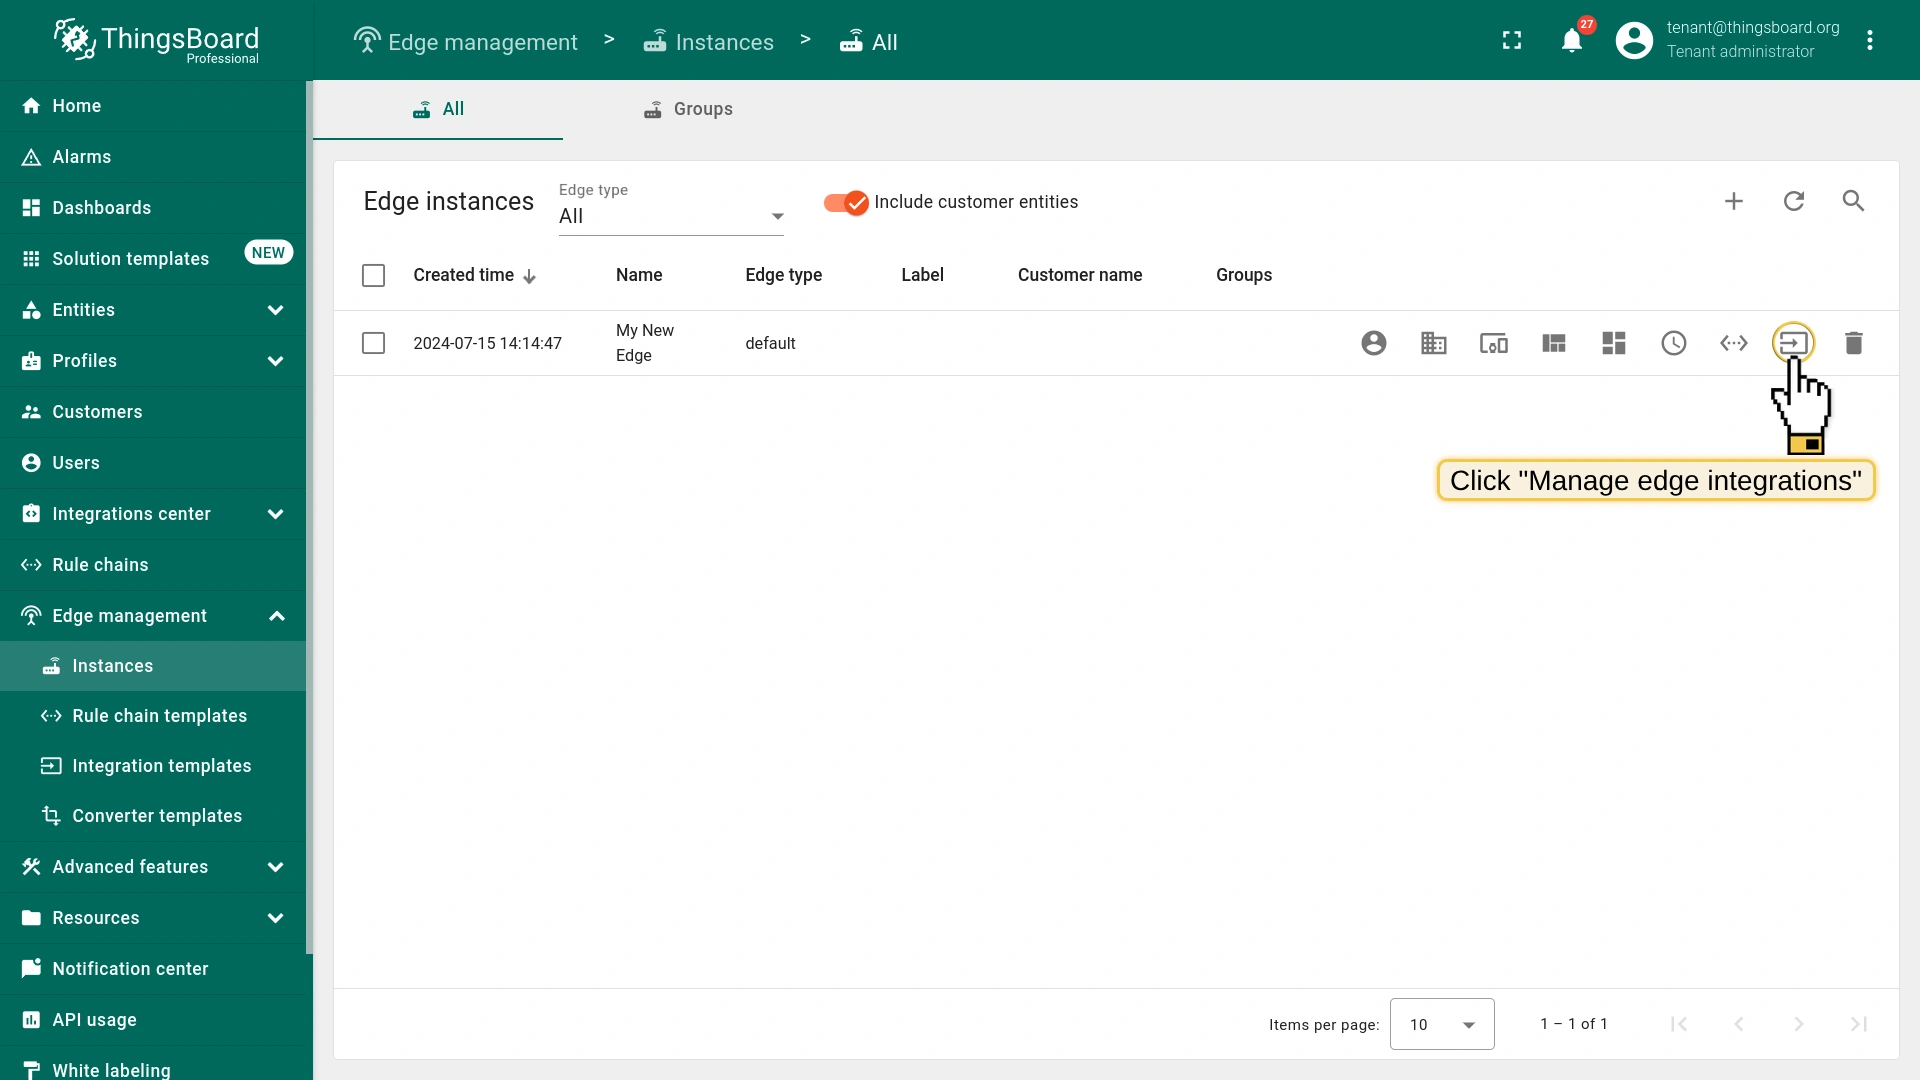
Once you added the new attribute, close the Edge details page and stay on the Instances section.
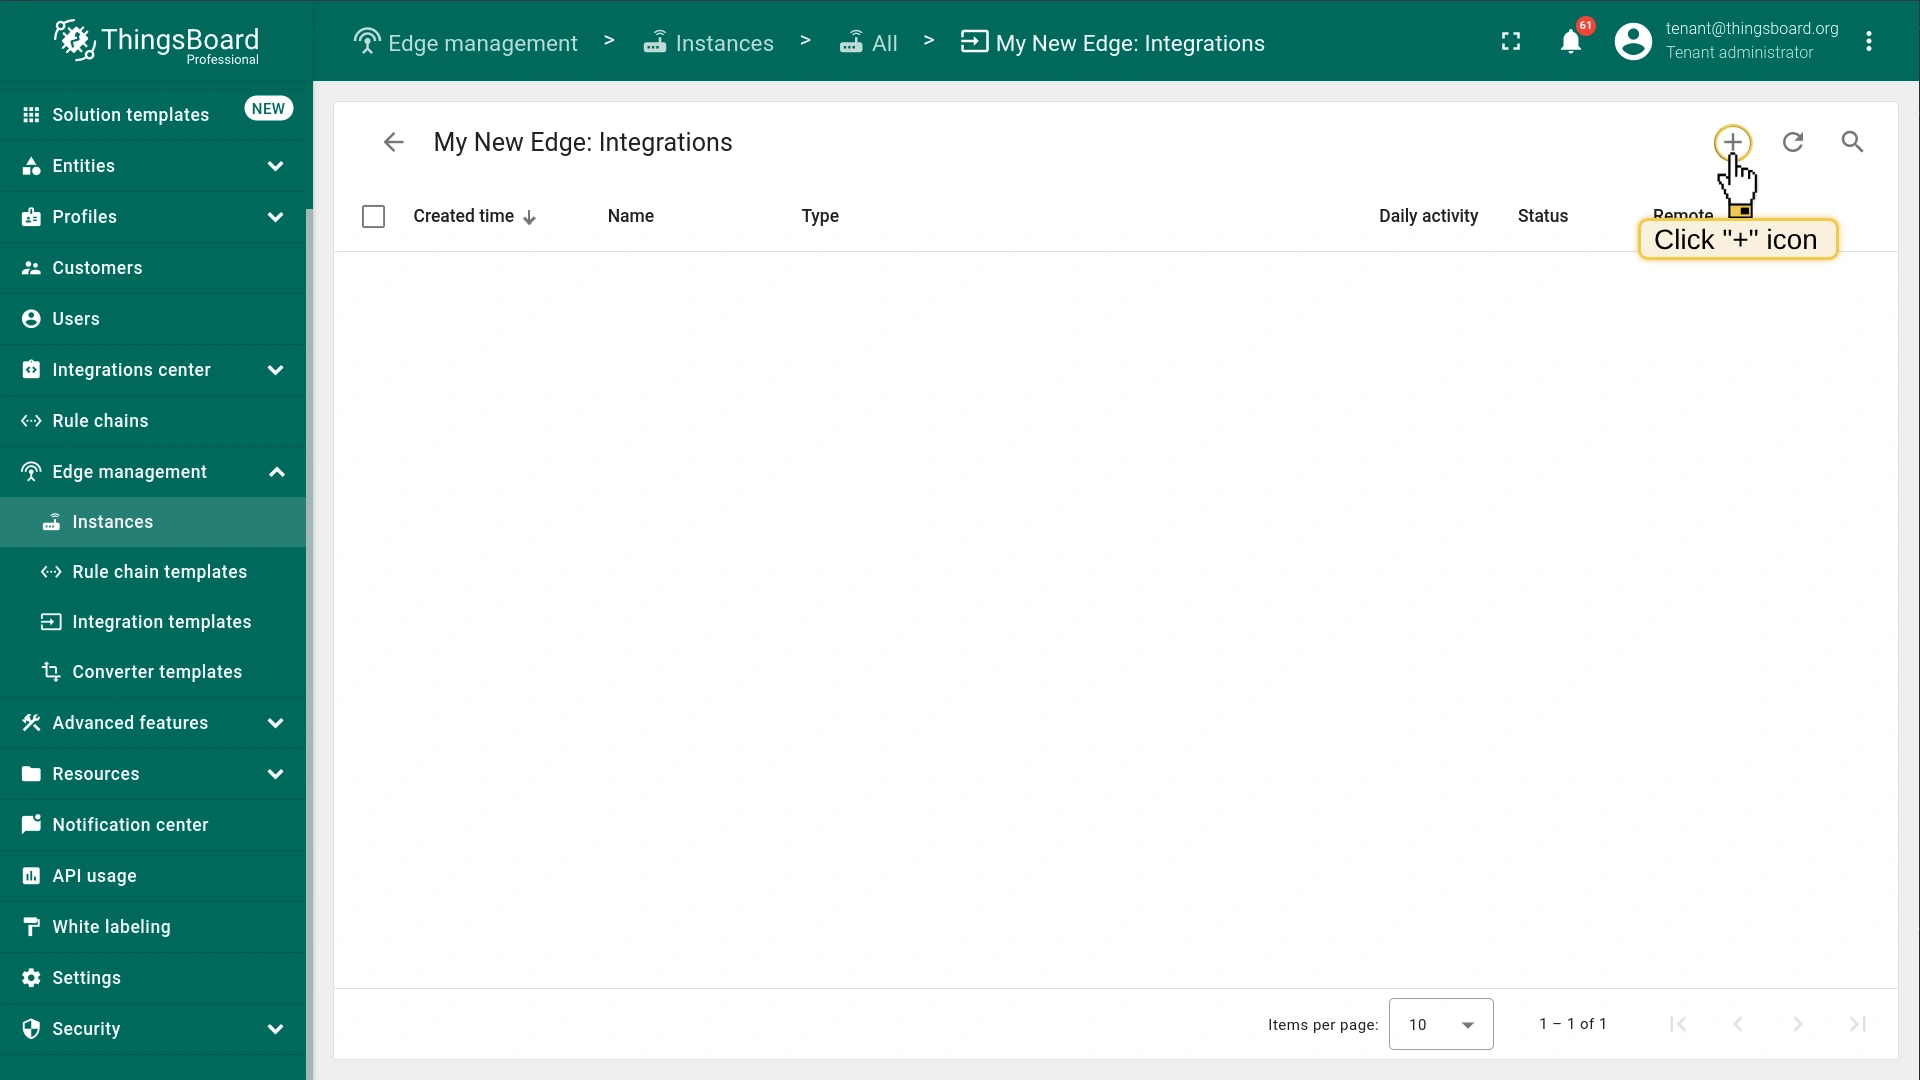
To assign the integration to the Edge, click the "Manage edge integrations" button.
Click the Assign to edge button.
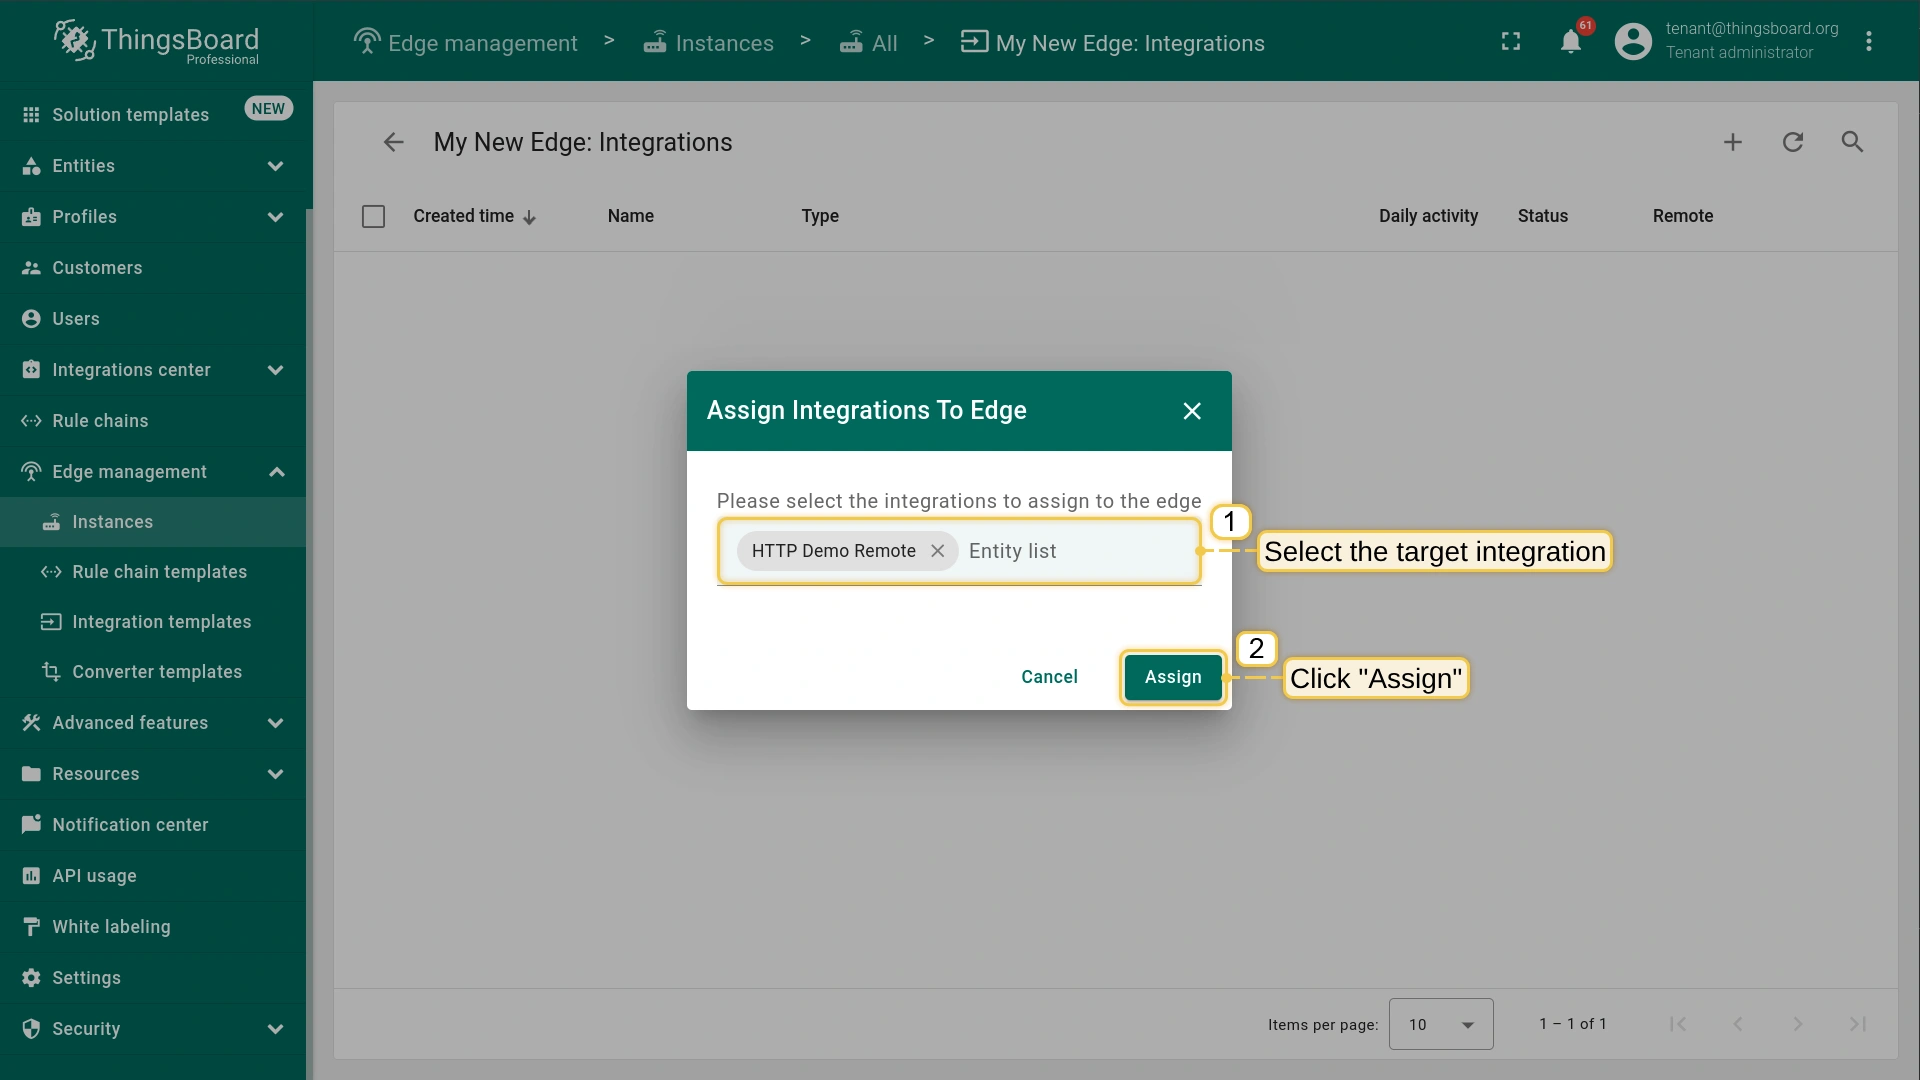
In the "Assign Integrations To Edge" pop-up window, select the target integration from the "Entity list" drop-down menu and click the Assign button.
Open the Edge instance and go to the Integrations center > Integrations section. Click on HTTP Demo Remote integration to check that placeholder is substituted with the value of the attribute.
Go to the Edge management > Instances section and click on the corresponding Edge instance.
On the Edge details page, select the Attributes tab and add click the "Add" button to add a new attribute.
In the "Add attribute" pop-up window, enter the remoteHttpIntegrationUrl attribute. Set http://IP:port as the remote URL for your HTTP integration and click the Add button.
Once you added the new attribute, close the Edge details page and stay on the Instances section.
To assign the integration to the Edge, click the "Manage edge integrations" button.
Click the Assign to edge button.
In the "Assign Integrations To Edge" pop-up window, select the target integration from the "Entity list" drop-down menu and click the Assign button.
Open the Edge instance and go to the Integrations center > Integrations section. Click on HTTP Demo Remote integration to check that placeholder is substituted with the value of the attribute.
Remote integration installation steps
Choose your platform and install
You can install the ThingsBoard integration via Docker, Debian or RPM packages. Please use one of the following steps.
# UNCOMMENT NEXT LINES AND PUT YOUR CONNECTION PARAMETERS:# export RPC_HOST=thingsboard.cloud# export RPC_PORT=9090# export INTEGRATION_ROUTING_KEY=YOUR_INTEGRATION_KEY# export INTEGRATION_SECRET=YOUR_INTEGRATION_SECRET
填入配置参数:
RPC_HOST: 使用 Edge 实例的 IP 地址,若在同一台机器运行则使用 localhost。
# UNCOMMENT NEXT LINES AND PUT YOUR CONNECTION PARAMETERS:export RPC_HOST=127.0.0.1 # THE IP ADDRESS OF YOUR EDGE INSTANCEexport RPC_PORT=9090
export INTEGRATION_ROUTING_KEY=b75**************************34d
export INTEGRATION_SECRET=vna**************mik
Execute the following command to start ThingsBoard integration:
# UNCOMMENT NEXT LINES AND PUT YOUR CONNECTION PARAMETERS:# export RPC_HOST=thingsboard.cloud# export RPC_PORT=9090# export INTEGRATION_ROUTING_KEY=YOUR_INTEGRATION_KEY# export INTEGRATION_SECRET=YOUR_INTEGRATION_SECRET
填入配置参数:
RPC_HOST: 使用 Edge 实例的 IP 地址,若在同一台机器运行则使用 localhost。
# UNCOMMENT NEXT LINES AND PUT YOUR CONNECTION PARAMETERS:export RPC_HOST=127.0.0.1 # THE IP ADDRESS OF YOUR EDGE INSTANCEexport RPC_PORT=9090
export INTEGRATION_ROUTING_KEY=b75**************************34d
export INTEGRATION_SECRET=vna**************mik
修改配置后,可在 /var/log/tb-coap-integration/ 下查看日志以验证集成是否正常运行。
可查找 INFO 级别日志,确认已收到服务器下发的集成配置。
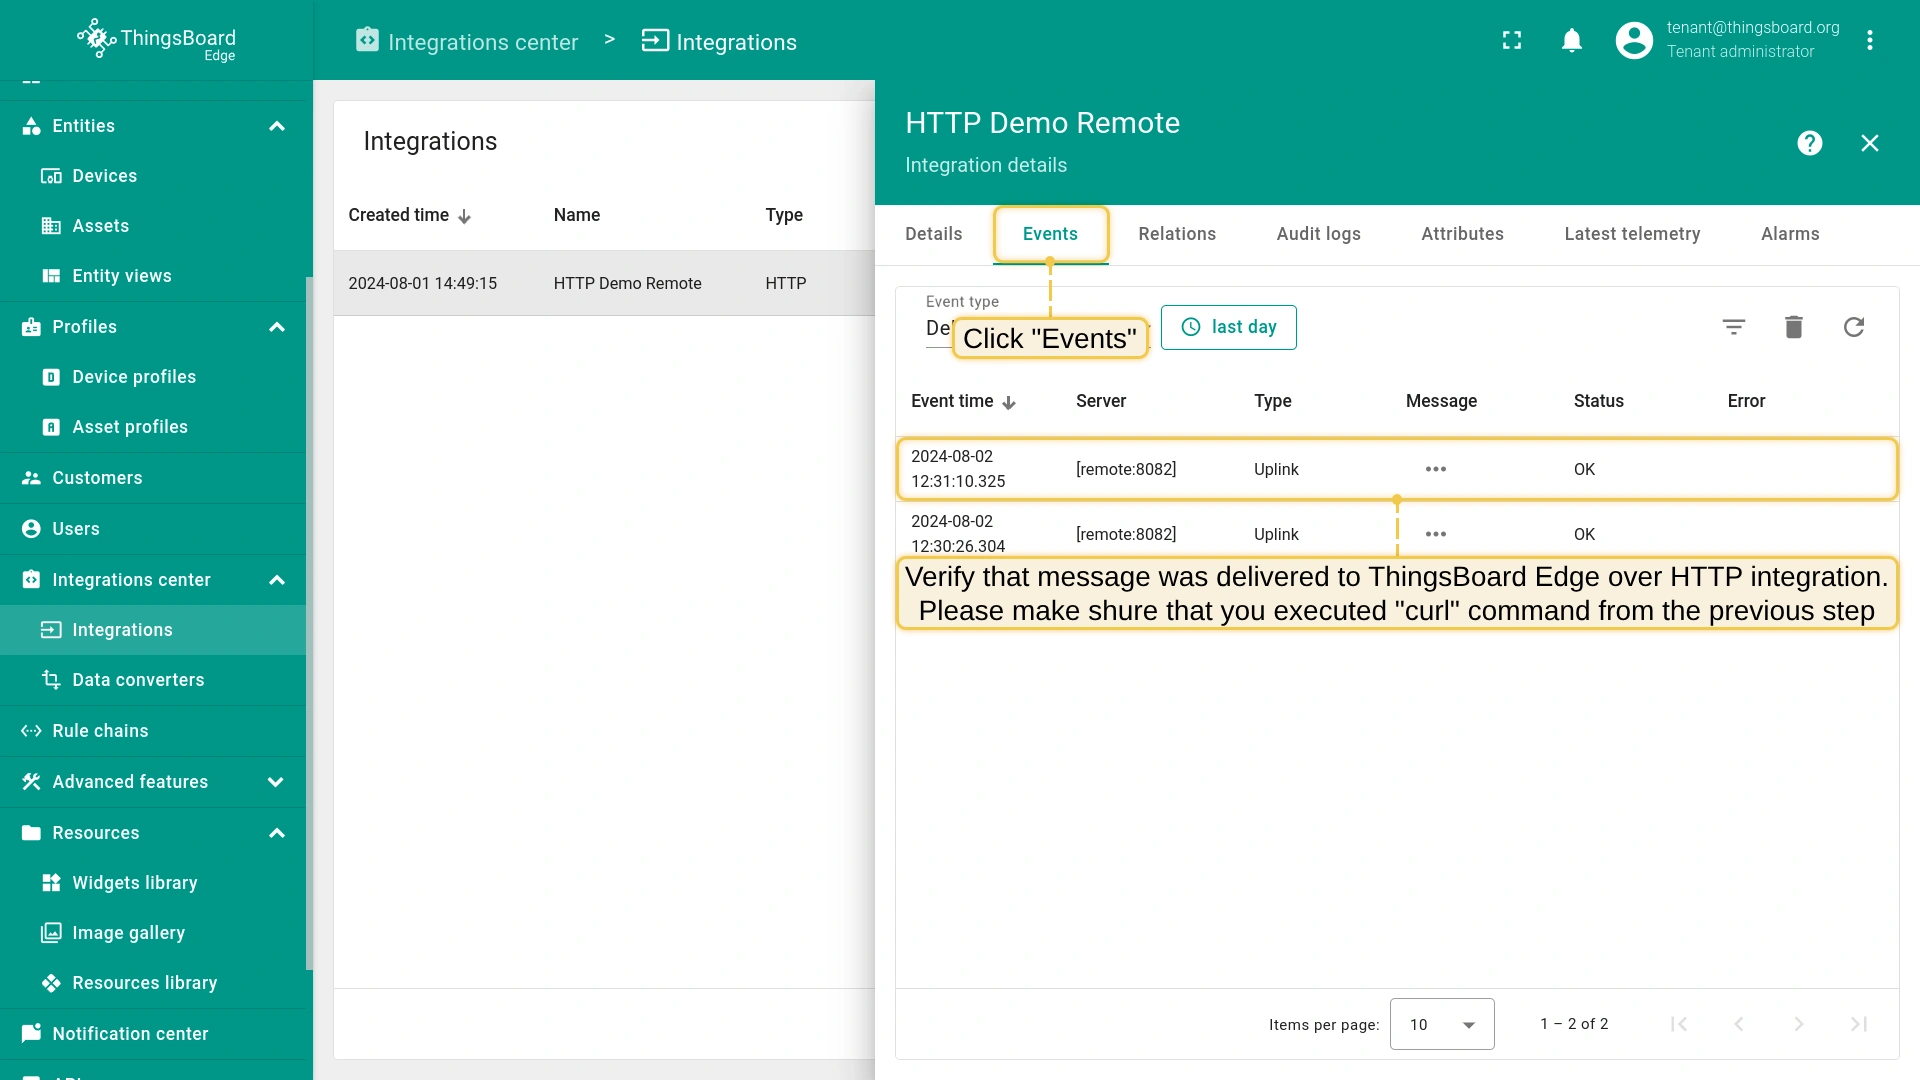
Remote HTTP integration validation
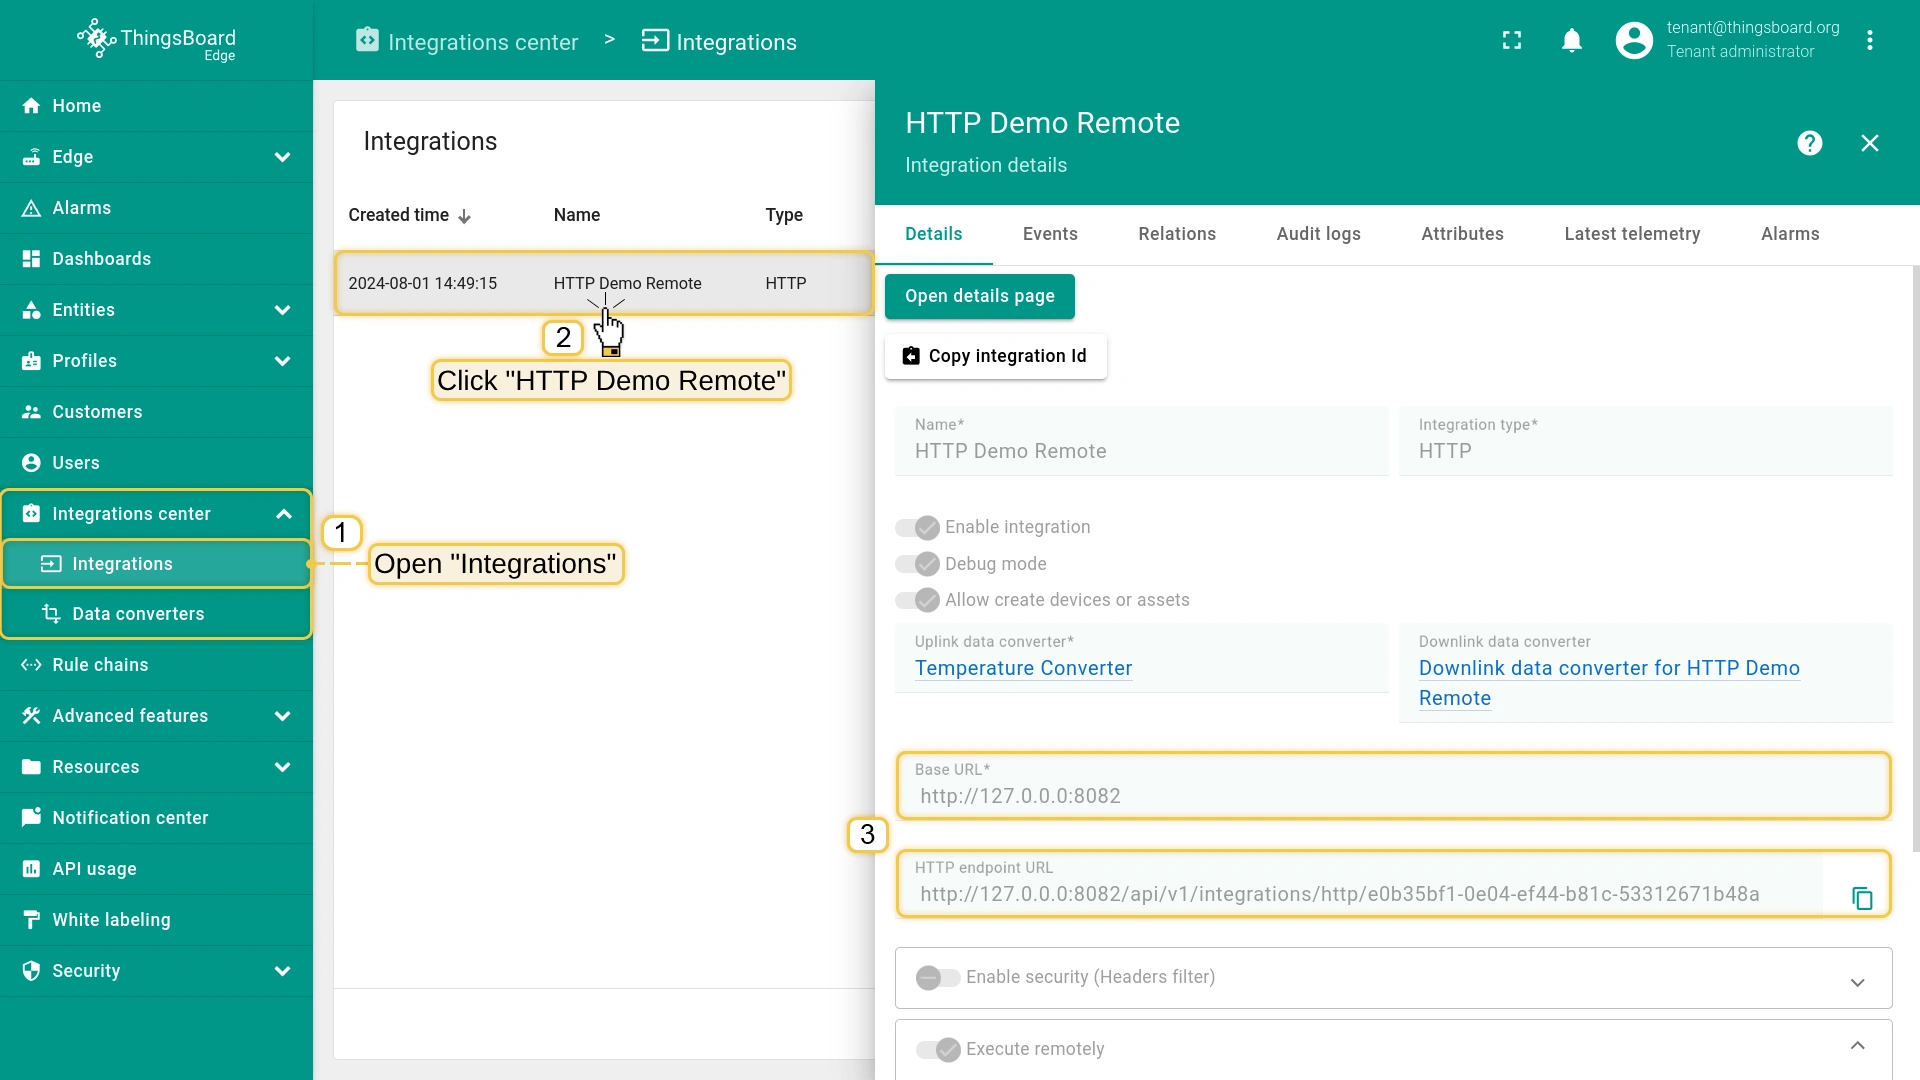
To send an uplink message, you need an HTTP endpoint URL from the integration.
Let’s log in to the ThingsBoard Edge and go to the Integrations section.
Find the HTTP integration and click it. There you can find the HTTP endpoint URL. Click the icon to copy the URL.
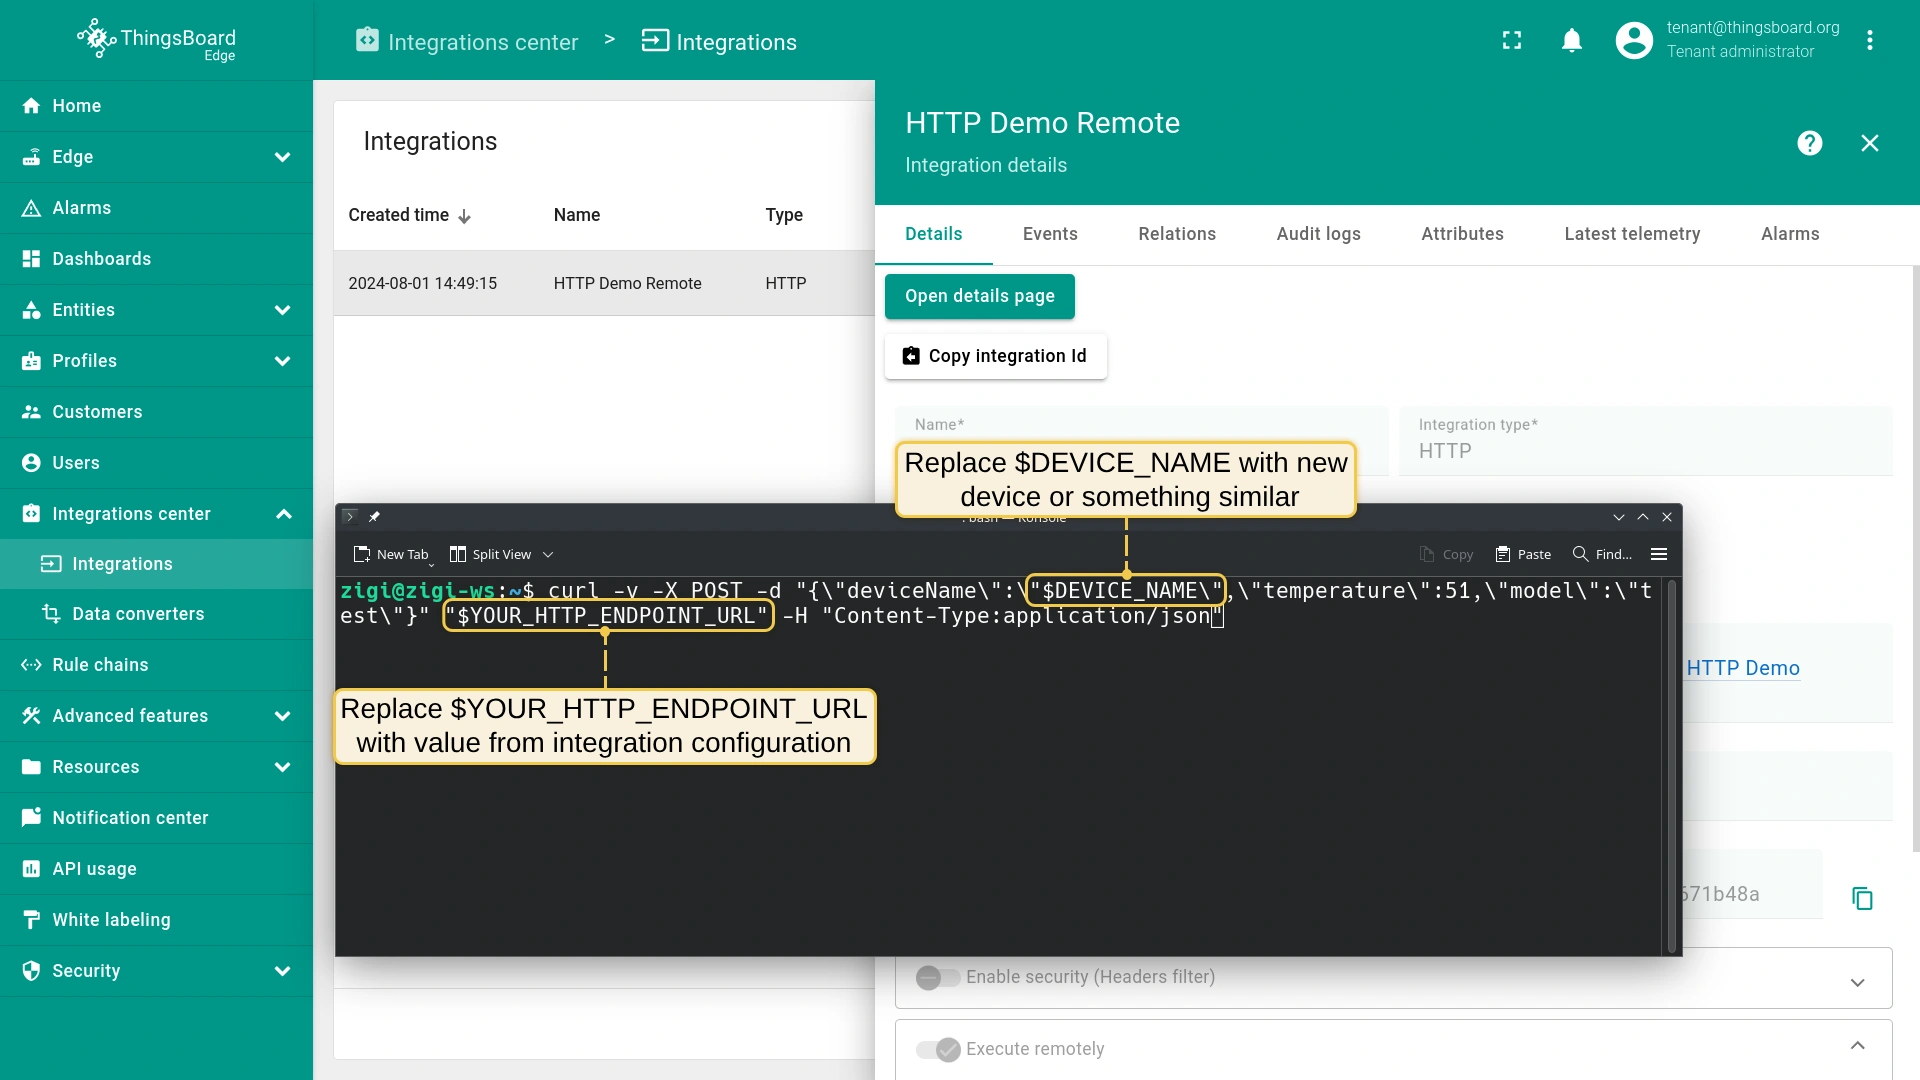
Important!
Please make sure that your machine is able to access the machine on which the remote HTTP integration is running, and the port 8082 is not blocked by any firewall rules.
To send the message, use the following command. Replace $DEVICE_NAME and $YOUR_HTTP_ENDPOINT_URL with the corresponding values.
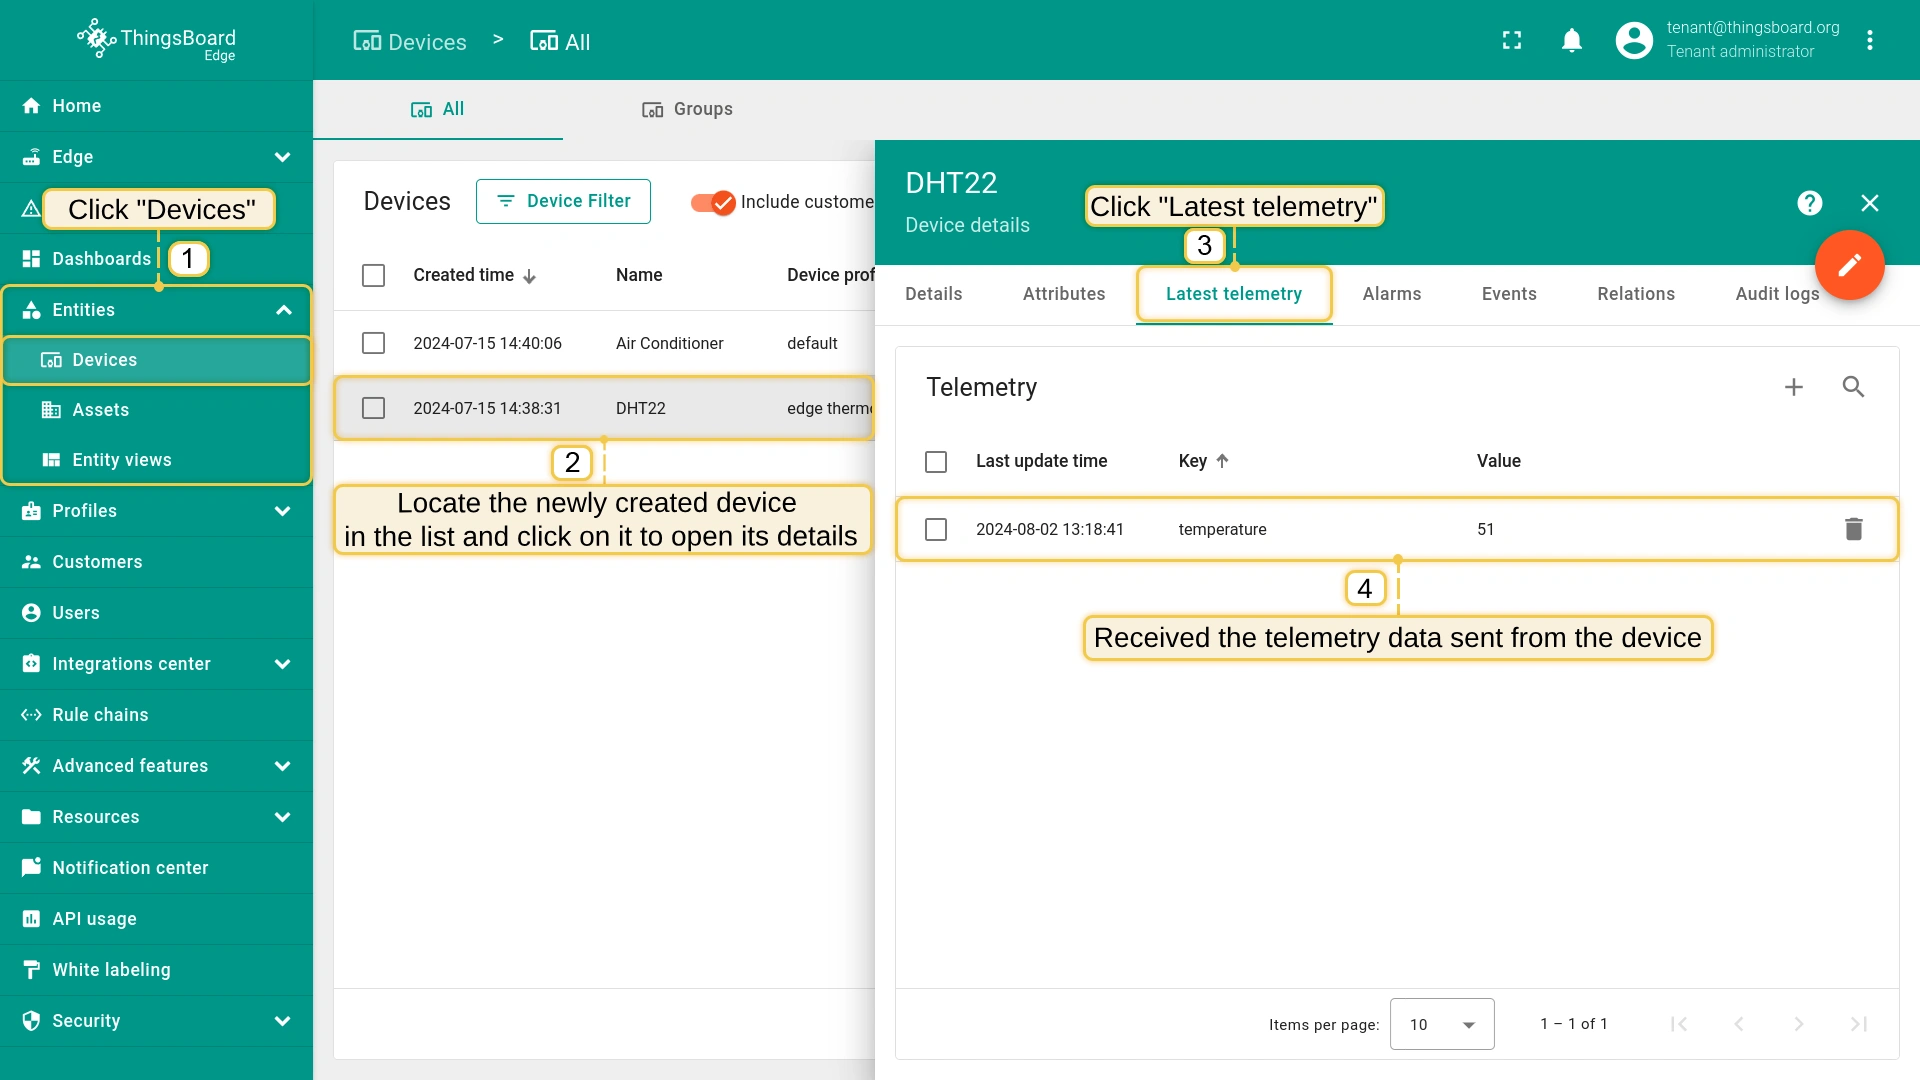
The created device with data can be viewed in the Device groups > All on the Edge section:
Go to the "Entities" section -> "Devices" page on the Edge to see the created device with data.
Remote integration configuration
Configuring remote integrations is done through the ThingsBoard interface, with no special steps required.
Explore the following guides and video tutorials related to the specific integrations: