- Overview
- Create converter and integration templates
- Modify Edge Root Rule Chain for downlinks
- Assign Integration to Edge
- Send uplink message
- Send downlink message
- 下一步
Edge HTTP Integration 与 HTTP Integration 实现方式类似。 区别仅在于 integration 的创建与部署方式。 操作前请参阅 HTTP Integration 文档。
Overview
HTTP integration allows existing protocols and payload formats to be converted to the ThingsBoard Edge message format and is useful in multiple deployment scenarios:
- Stream device and/or asset data from an external system, IoT platform or connectivity provider back-end.
- Stream device and/or asset data from your custom application running in the cloud.
- Connect the existing device to ThingsBoard Edge using a custom HTTP-based protocol.
Create converter and integration templates
Only the ThingsBoard Professional Edition creates converters and integration templates. So please use ThingsBoard Cloud or install your own platform instance to log in as a Tenant administrator.
Follow the steps below to add the HTTP integration:
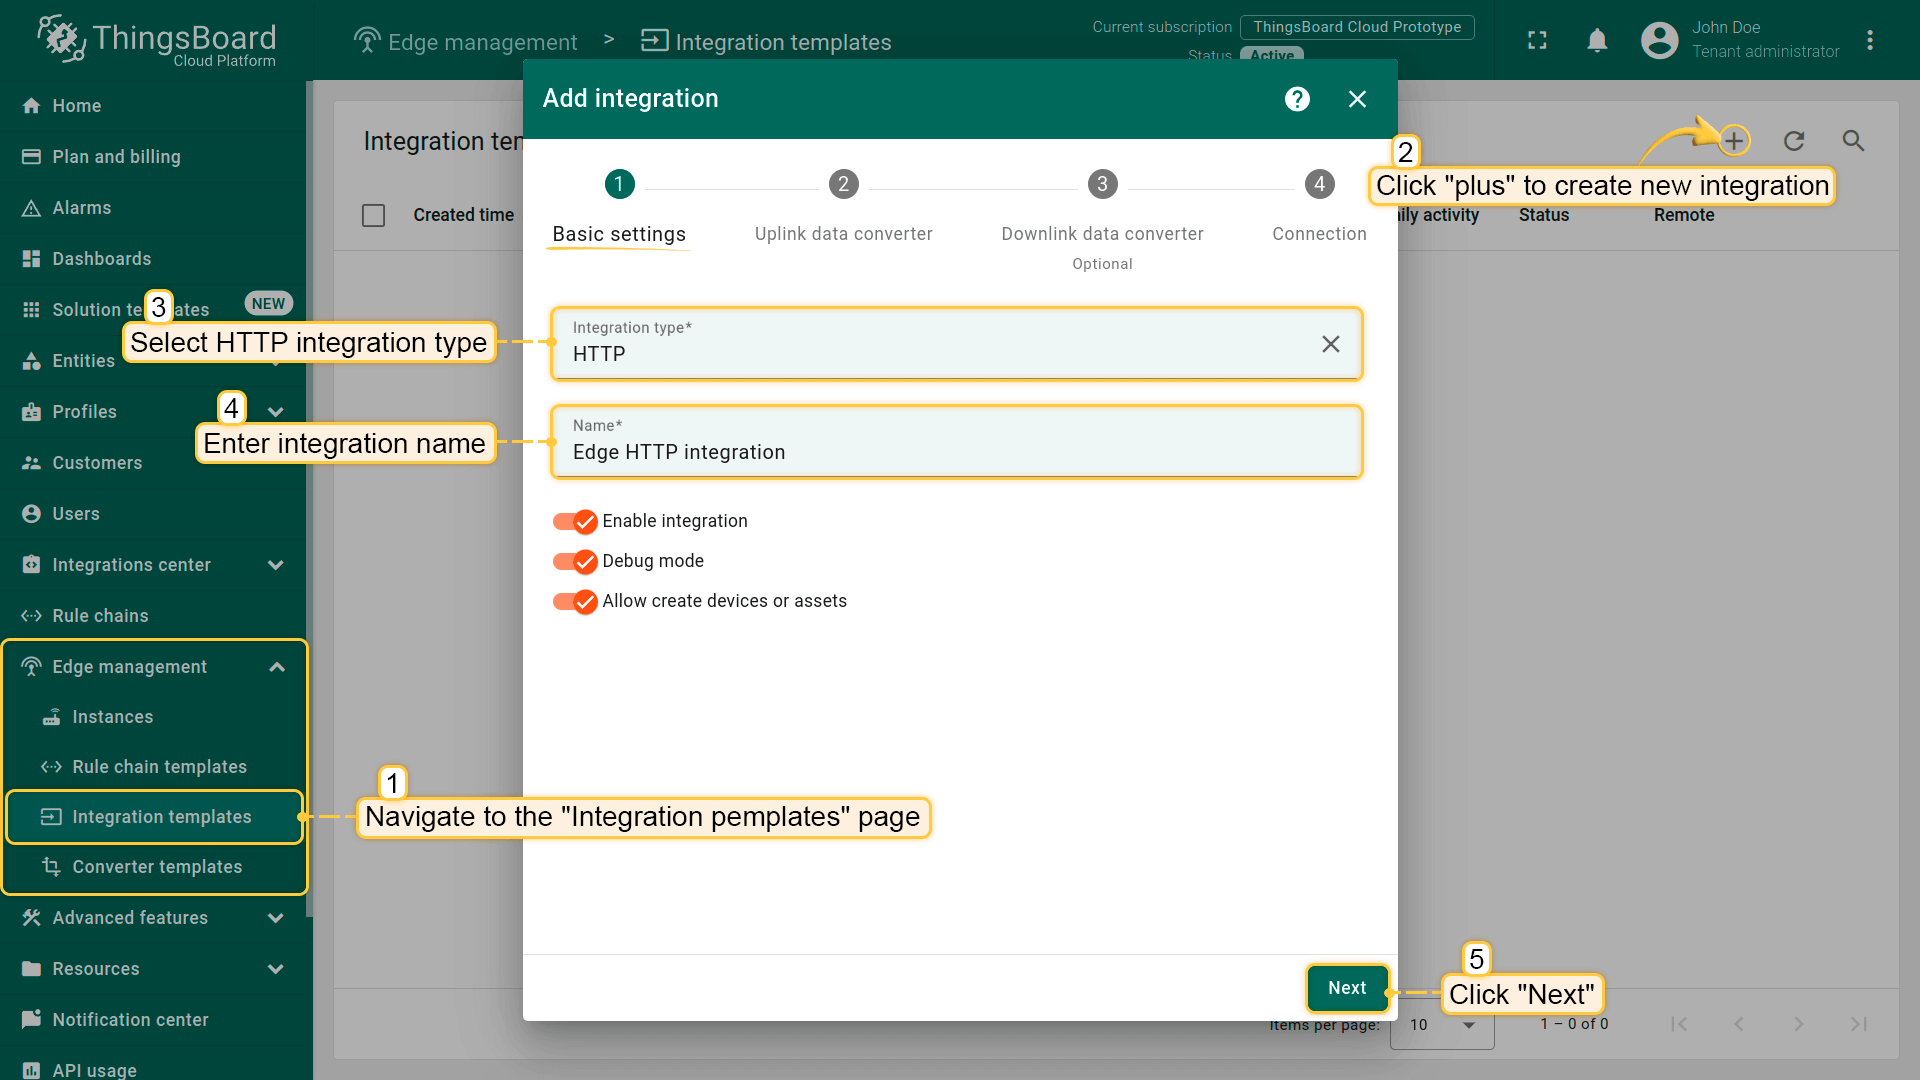
- Go to theEdge management > Integration templates section and click the “plus” button to add a new integration. Select the “HTTP” type. Name it “Edge HTTP Integration”. Then click Next;
Debug 模式在开发与故障排查中非常有用,但在生产环境中保持启用会显著增加数据库存储需求,因为所有调试数据均会存入数据库。
强烈建议在调试完成后 禁用 Debug 模式。
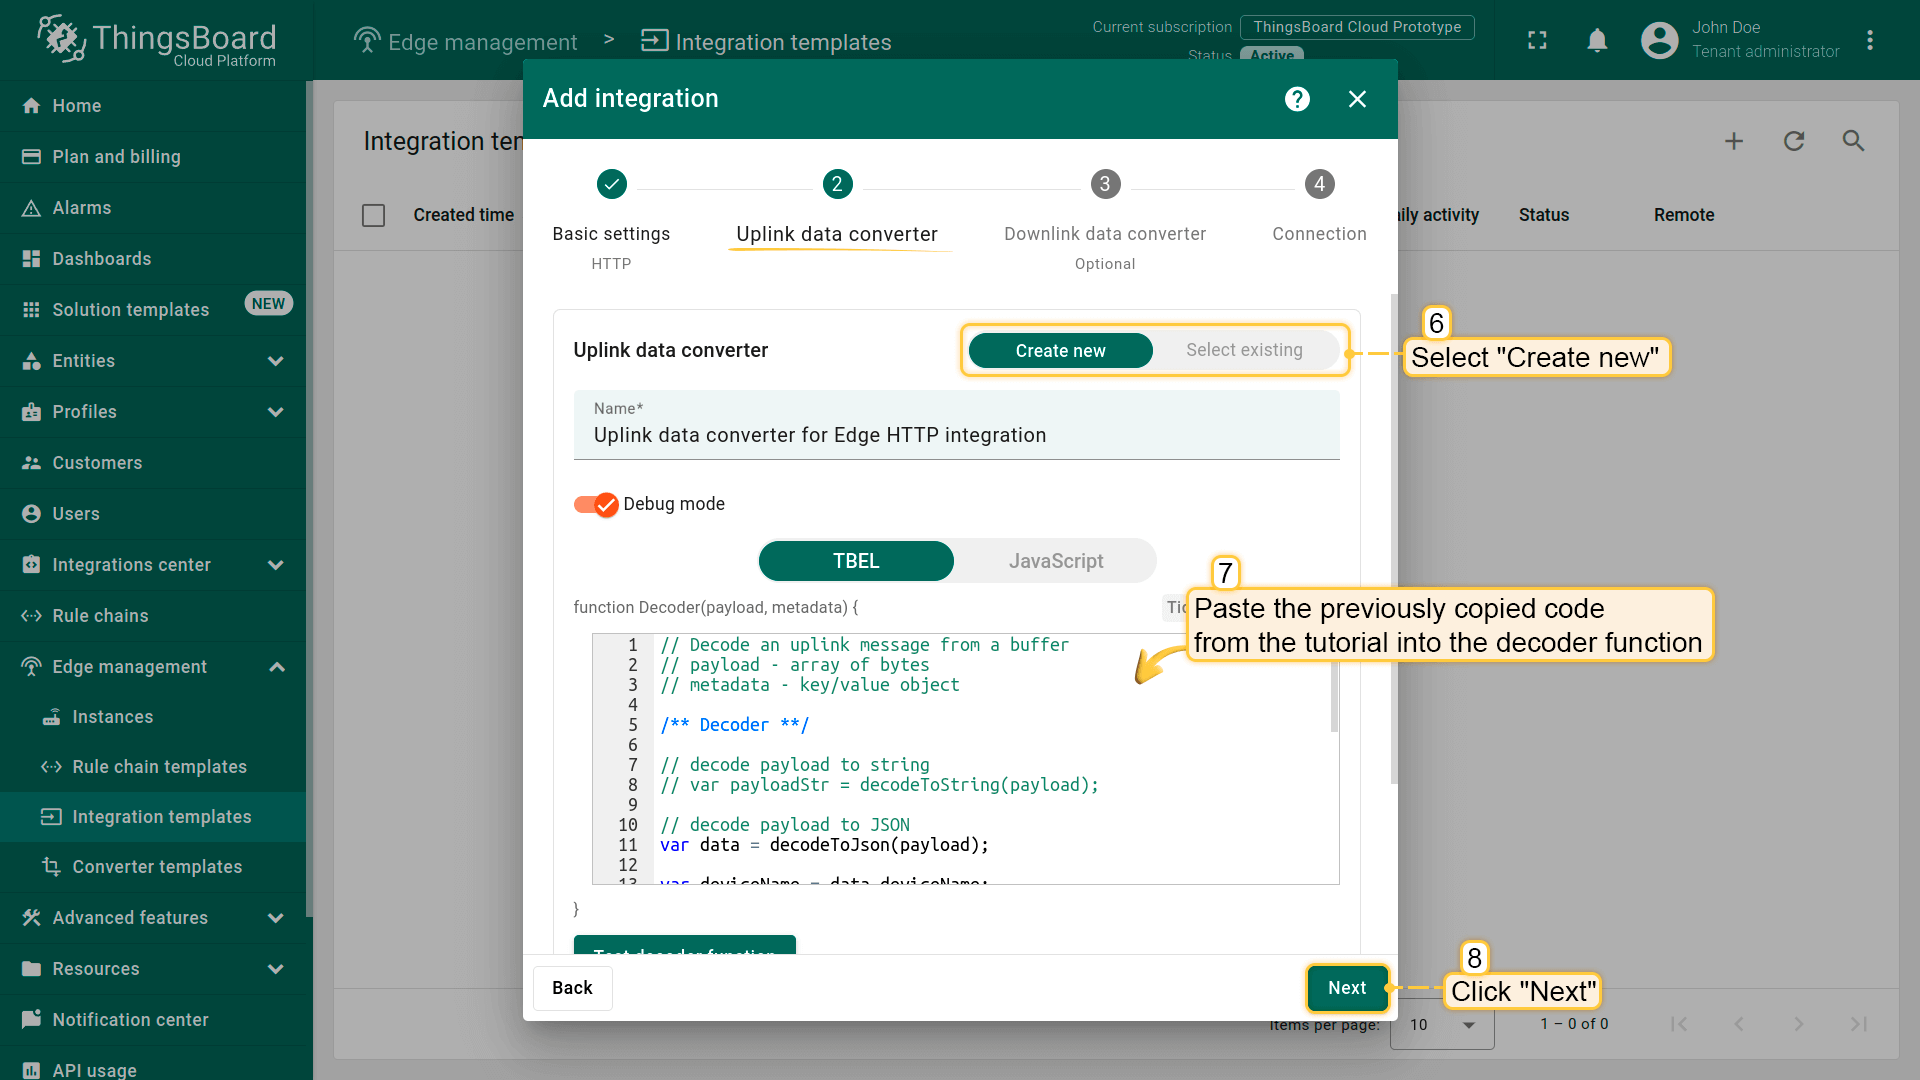
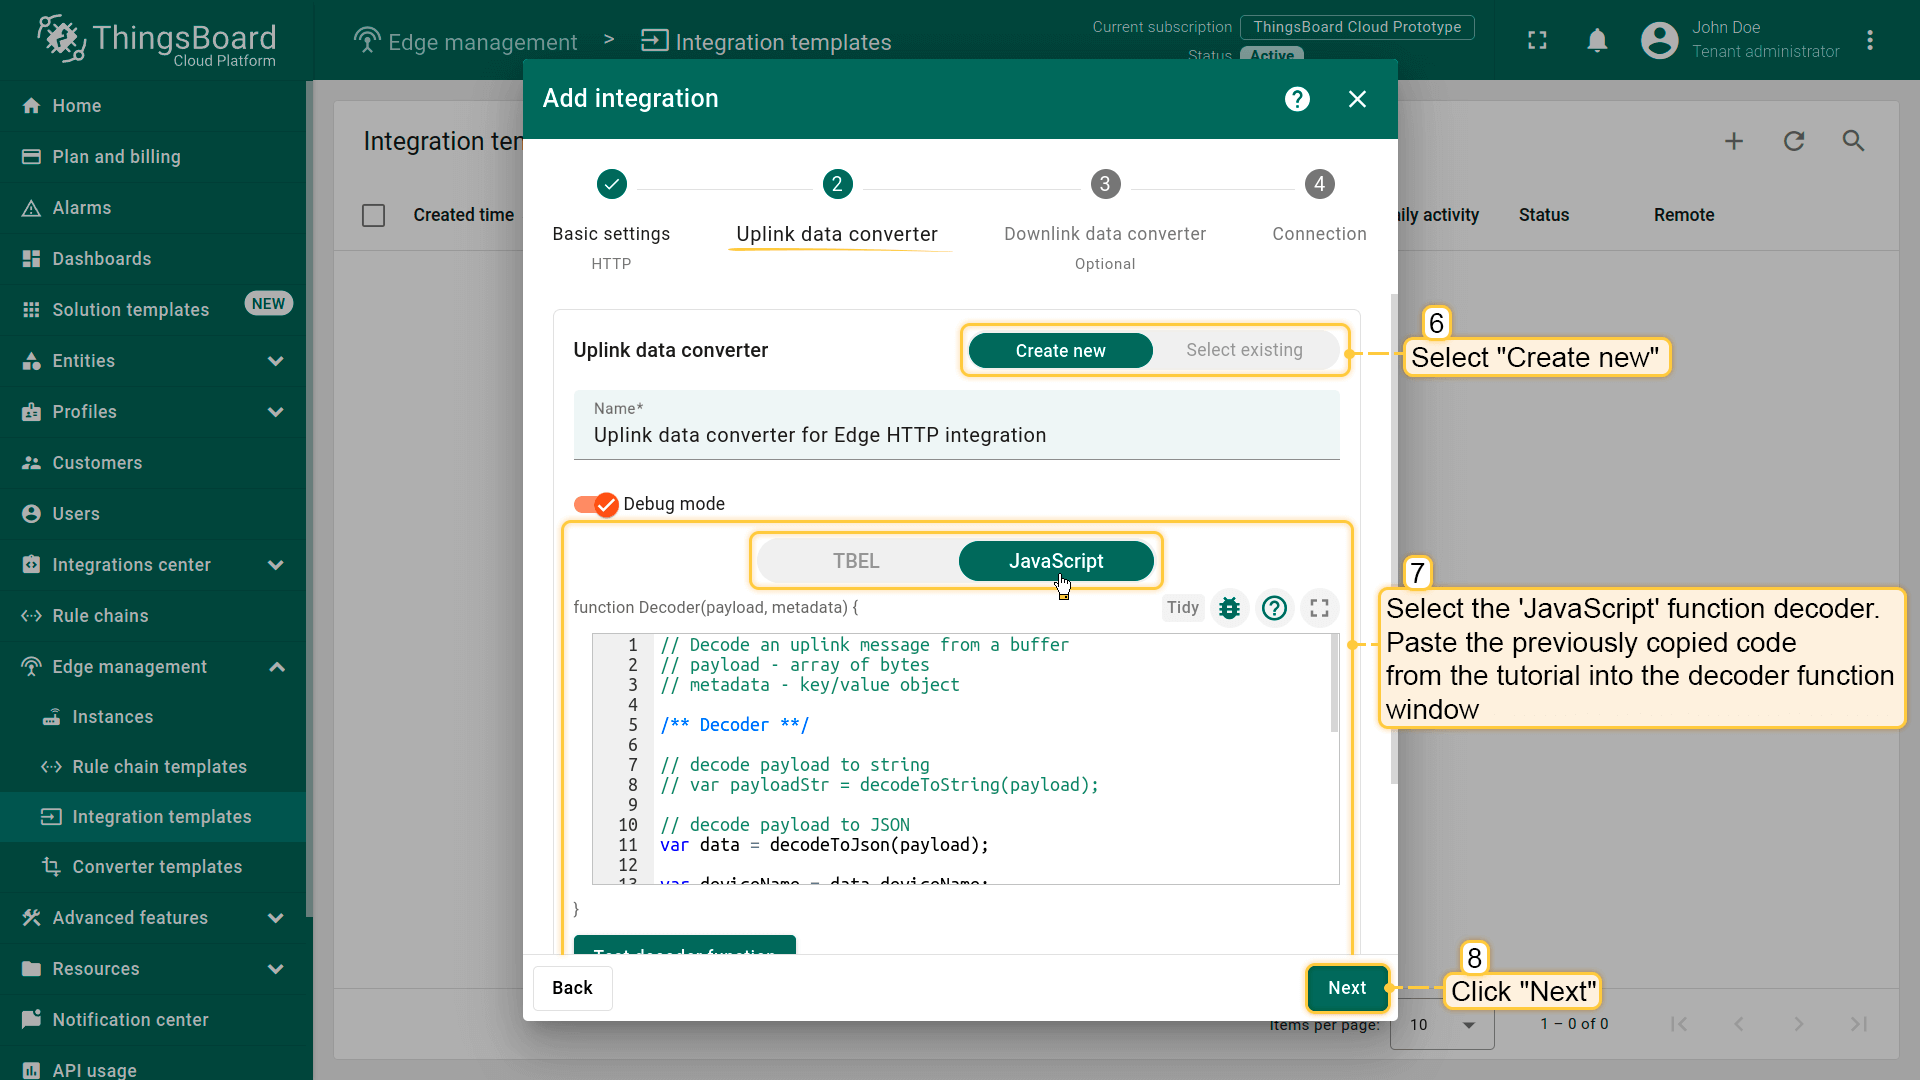
- The next step is to create an Uplink data converter.
Uplink is needed to convert the data coming from the device into the format needed to display it on ThingsBoard. For this example, use the following code:
可使用 TBEL(TBEL)或 JavaScript 开发用户自定义函数。 建议使用 TBEL,其在ThingsBoard 中的执行效率远高于 JS。
|
复制以下脚本: 选择「创建新转换器」并将代码粘贴到 Decoder 函数区域,点击「下一步」;
|
|
复制以下脚本: 选择「Create new」并将复制的代码粘贴到 Decoder 函数部分。点击「Next」;
|
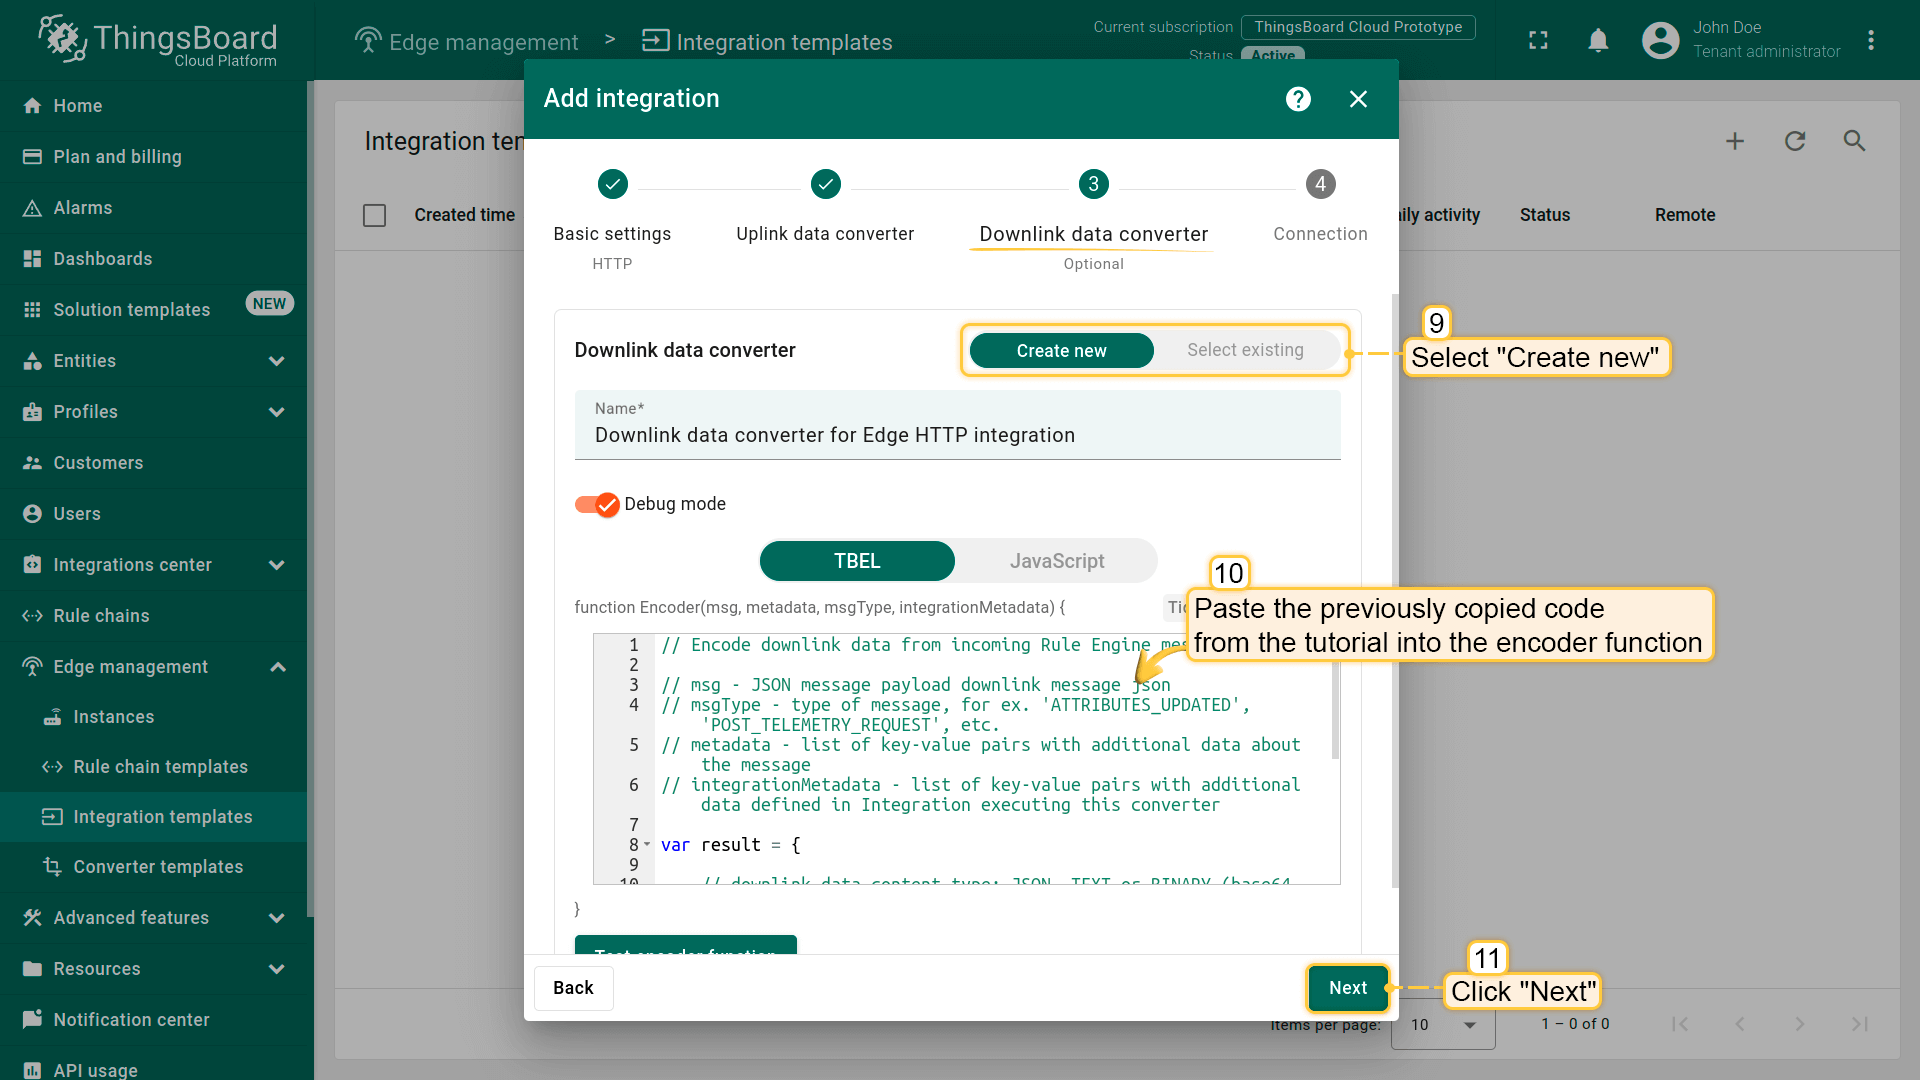
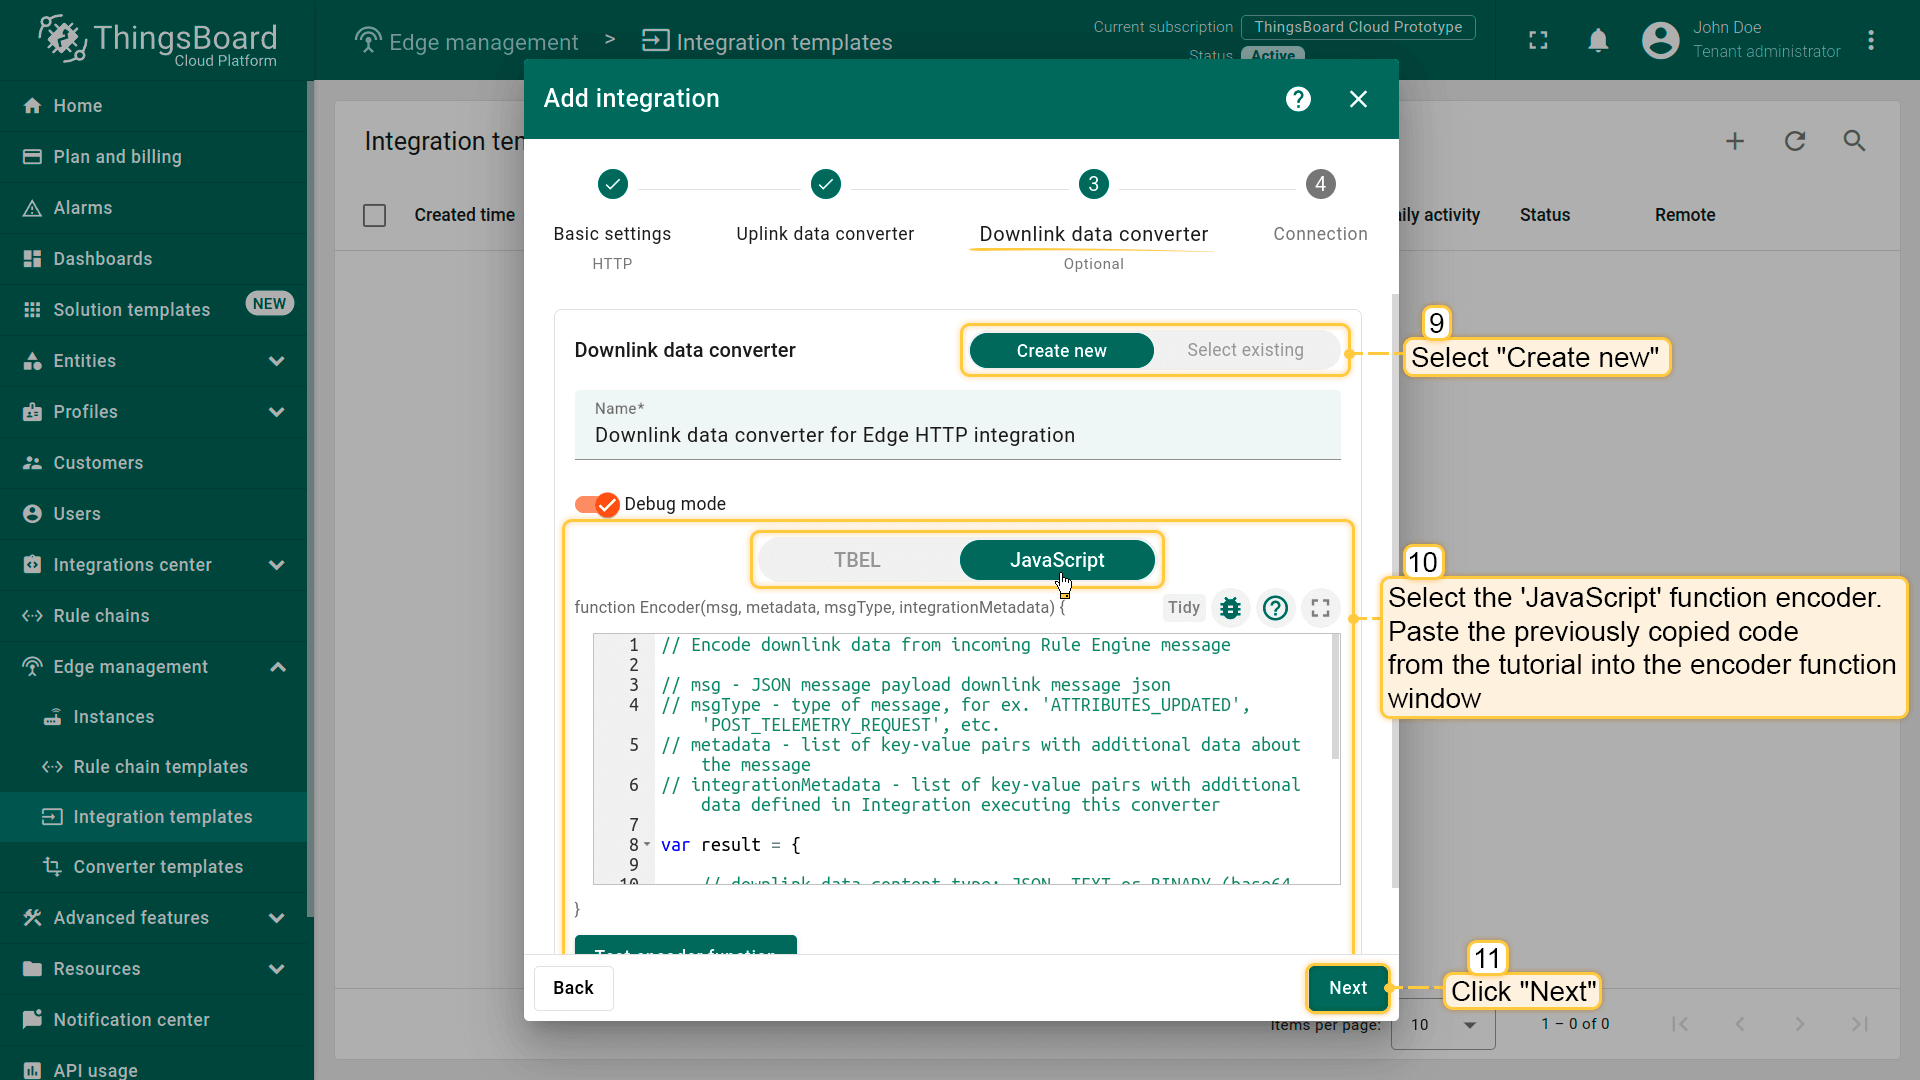
- The next step is to create a Downlink Converter.
The downlink converter converts the outbound RPC message and then the integration sends it to your device. You can customize a downlink according to your configuration. Let’s consider an example where we send an attribute update message. For this example, use the following code.
可使用 TBEL(TBEL)或 JavaScript 开发用户自定义函数。 建议使用 TBEL,其在ThingsBoard 中的执行效率远高于 JS。
|
复制以下脚本: 选择「Create new」并将复制的代码粘贴到 Encoder 函数部分。点击「Next」;
|
|
复制以下脚本: 选择「Create new」并将复制的代码粘贴到编码器函数区域,点击「Next」;
|
-
Finally, we go to the “Connection” page:
- Enter the IP address and port of your Edge instance in the format ‘host:port’ as the Base URL. Or, you can use the placeholder ${{ATTRIBUTE_KEY}} to replace the integration field with an attribute value from a specific Edge entity. In this example, we will use the placeholder ${{baseUrl}} for Base URL.
- Then click the “Add” button.
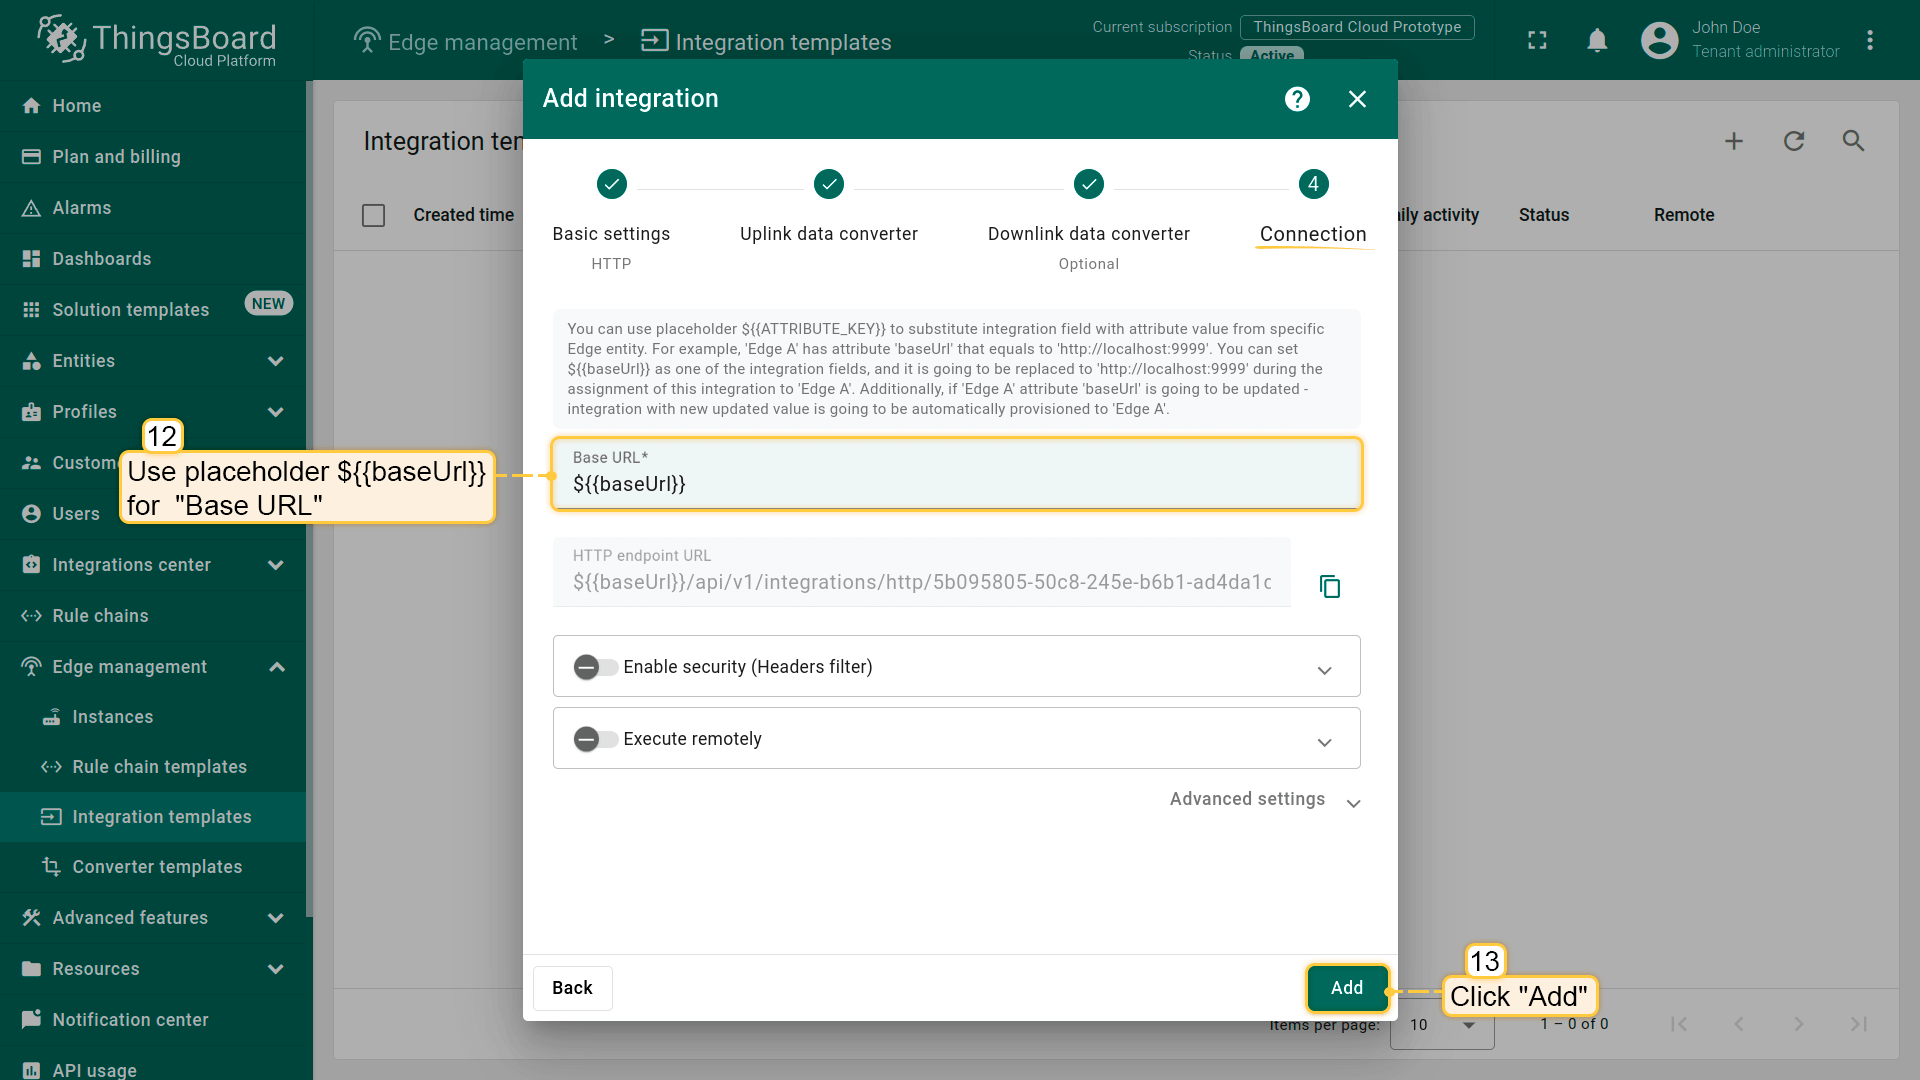
HTTP integration is created.
Modify Edge Root Rule Chain for downlinks
We can send a downlink message to the device from the Rule chain using the rule node. To send downlink over integration, we need to modify Edge Root Rule chain.
Please note!
If you use earlier versions of Edge, you cannot create or edit a Rule Chain on the Edge itself. It must be configured as a template in the Cloud (Server), and then assigned to the Edge instance.
Starting with Edge version 4.0, you can create and edit a Rule Chain on the Edge.
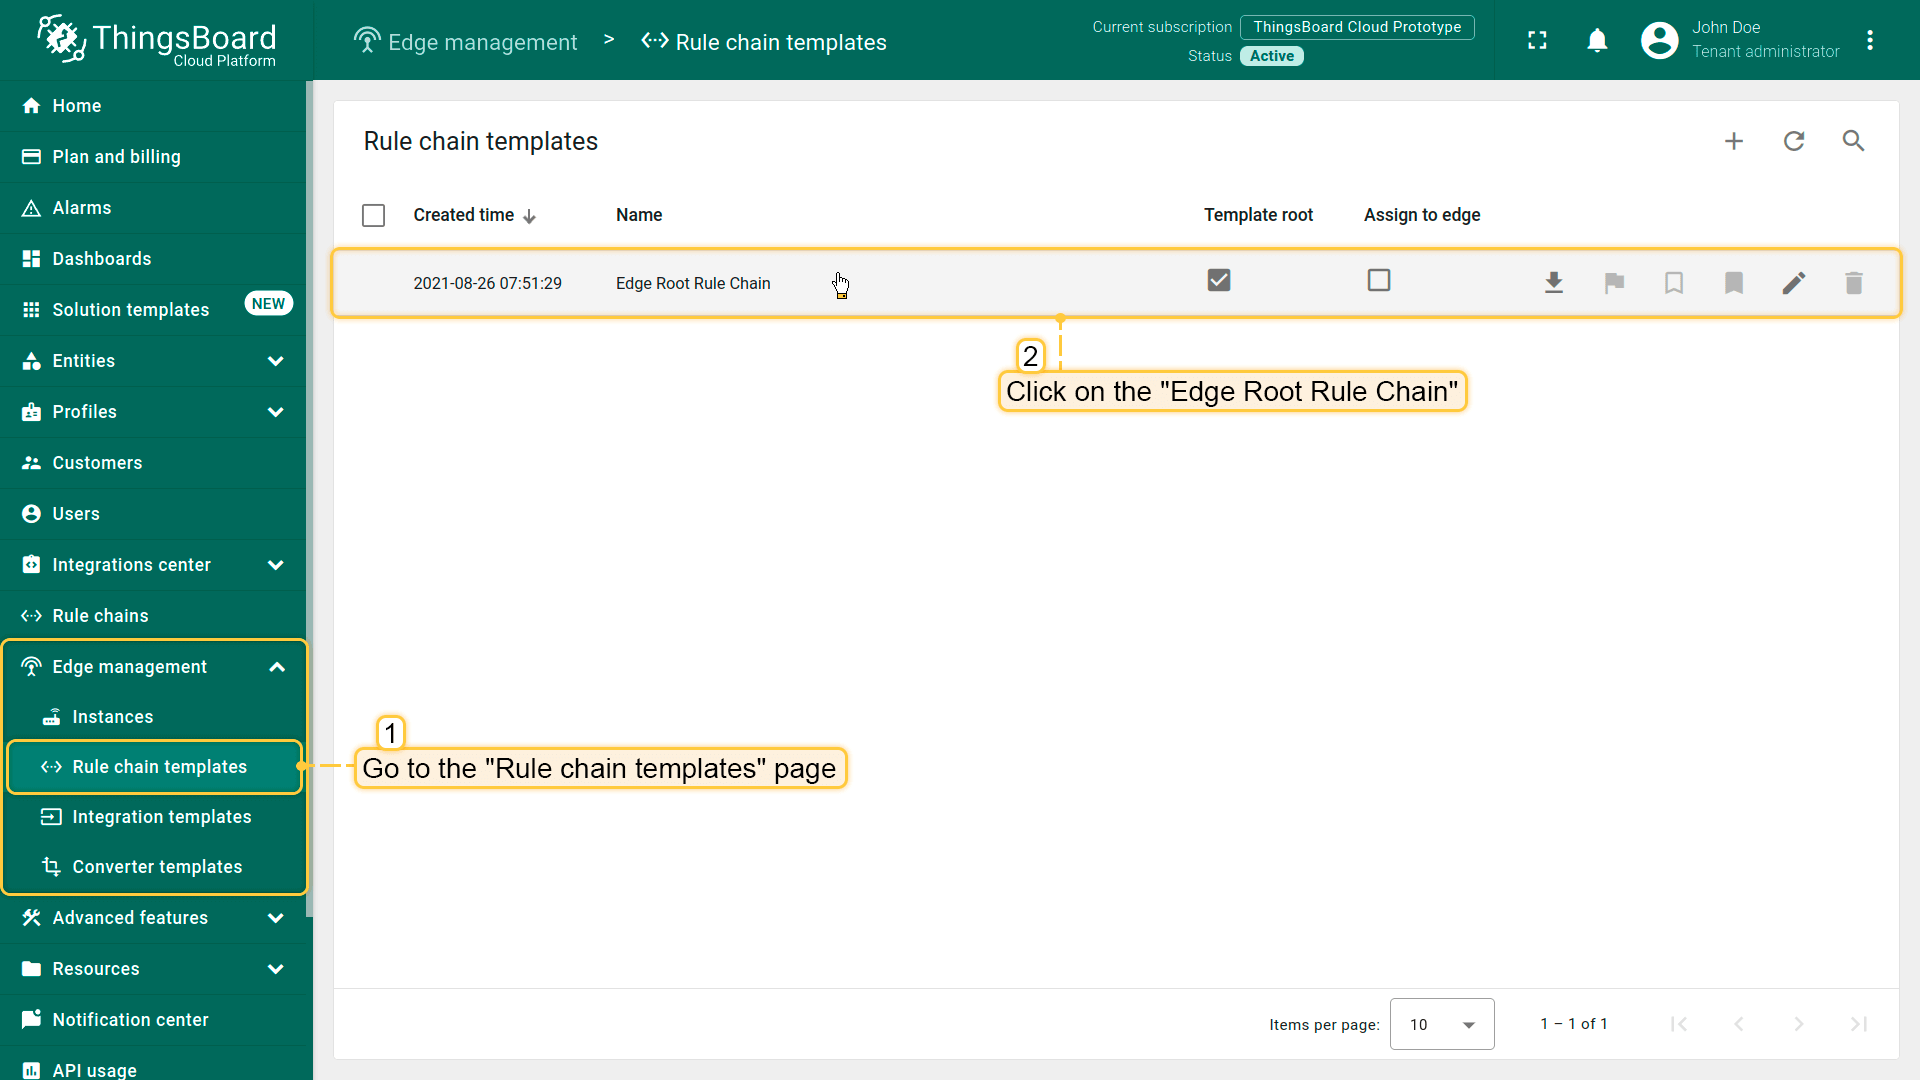
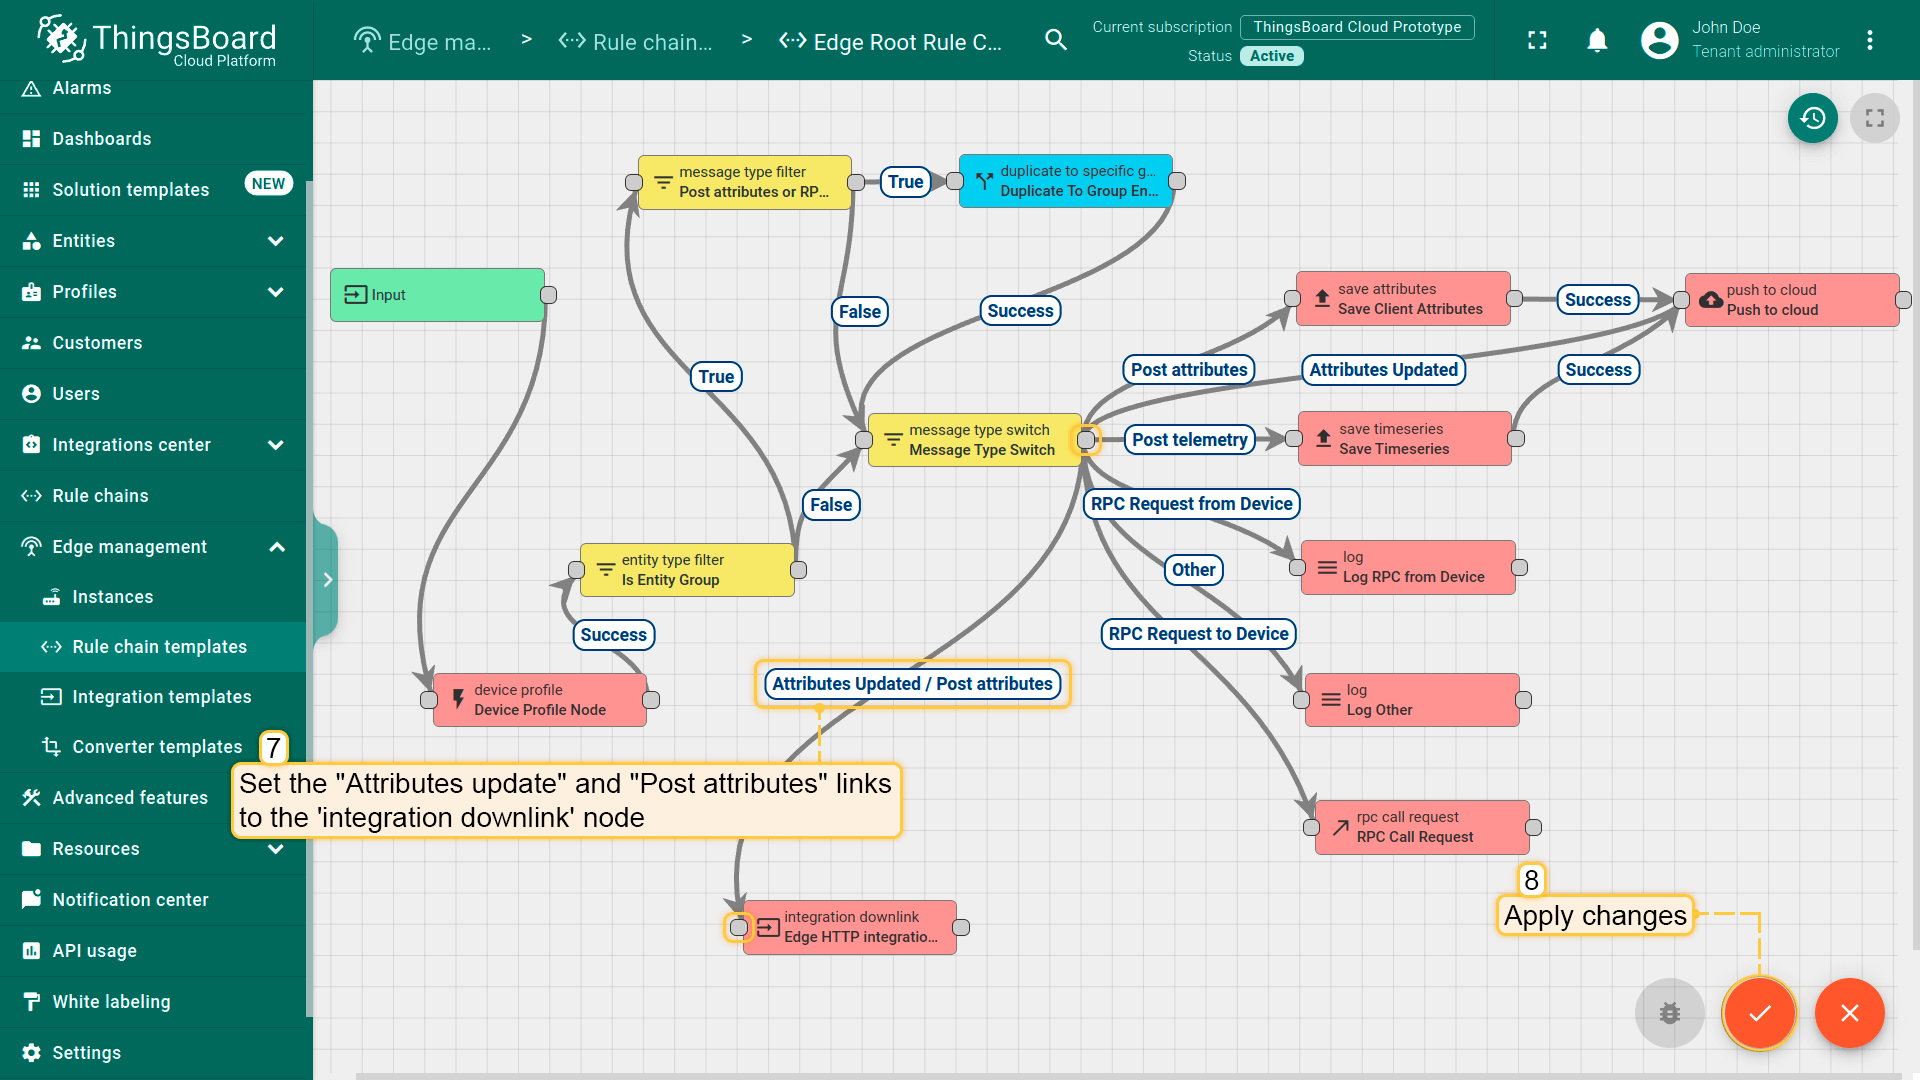
- Go to the Edge management > Rule chain templates section and click on the "Edge Root Rule Chain" to open it.
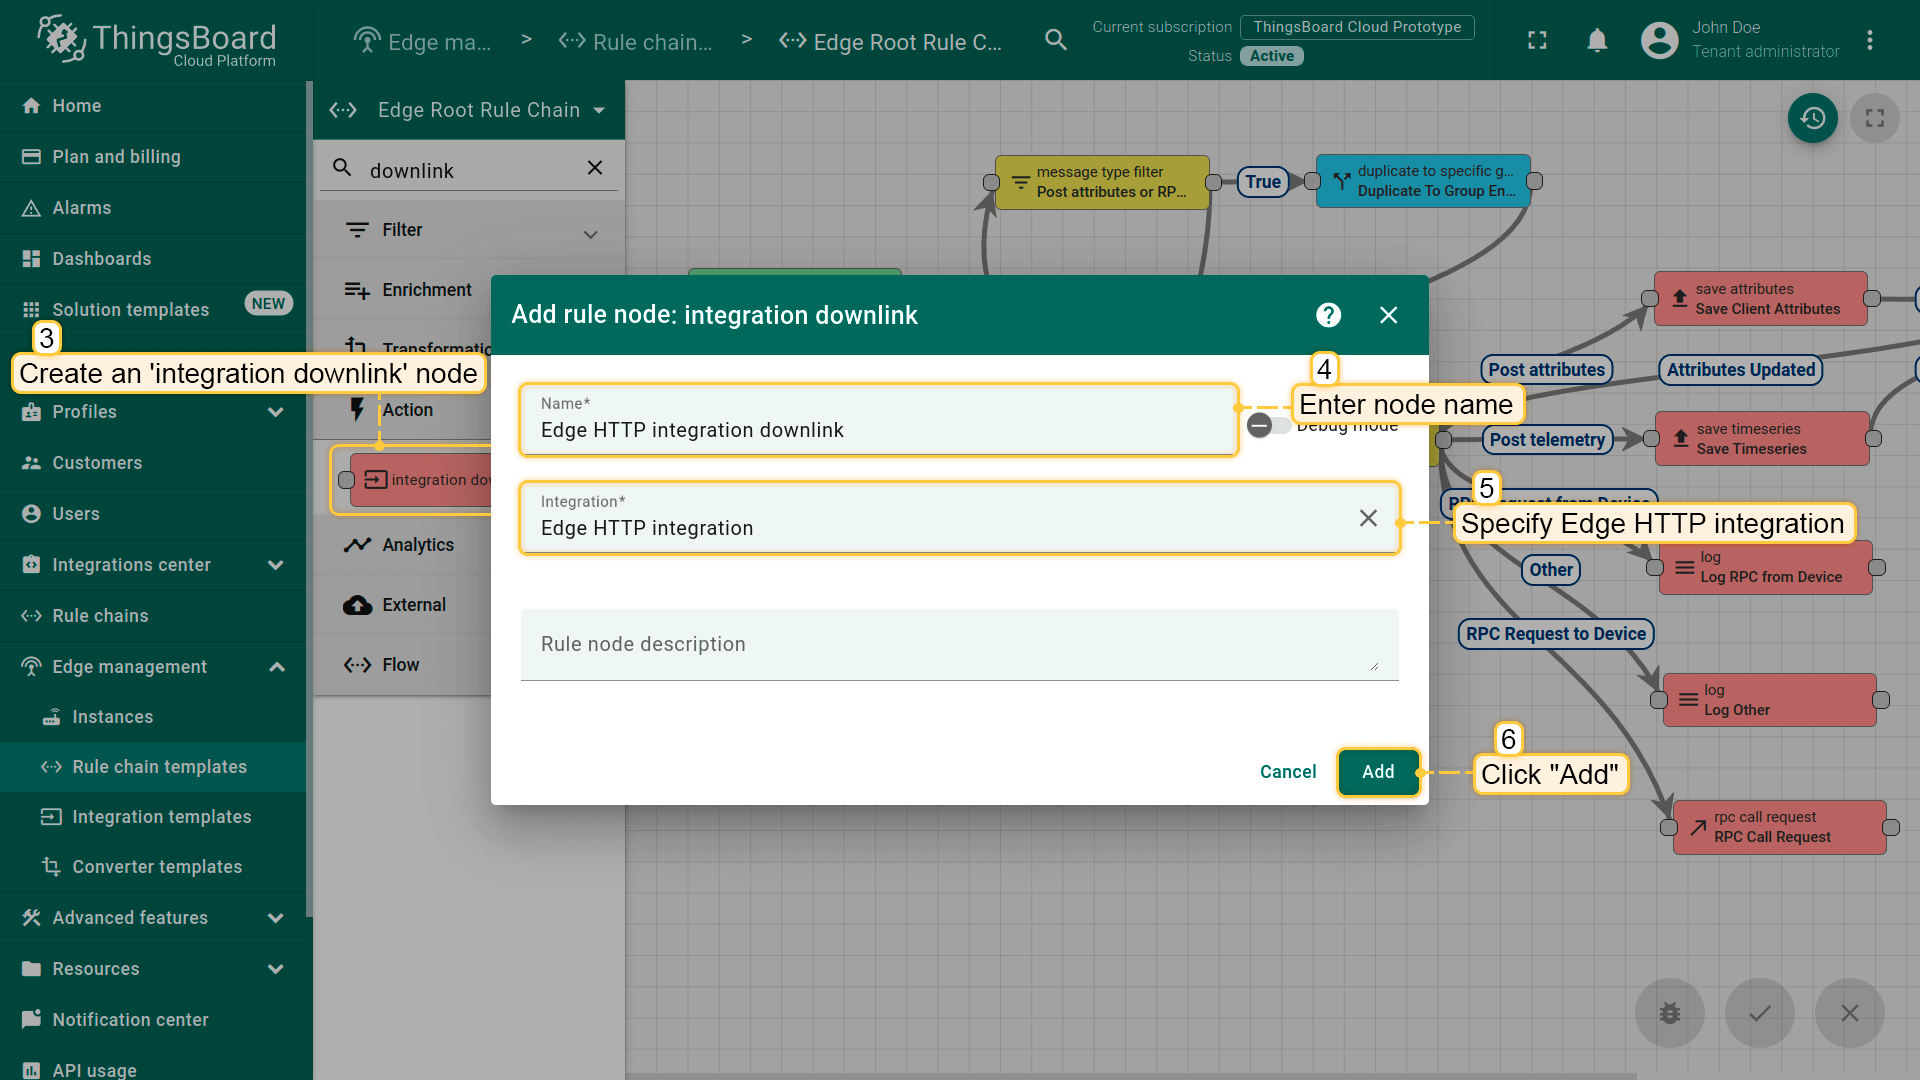
- Create an 'integration downlink' node. Specify your integration in the settings;
- Set the "Attributes Updated" and "Post attributes" links from the 'message type switch' node to the 'integration downlink' node. When the attribute is created or changes are made to the attribute, the downlink message is sent to the integration. Apply the changes.
Assign Integration to Edge
Once the converter and integration templates are created, we can assign the Integration template to Edge. Since we are using placeholder ${{baseUrl}} in the integration configuration, we need to add attribute baseUrl to Edge first. You need to provide IP address and port of your Edge instance as baseUrl attribute. Once the attribute is added, we’re ready to assign integration and verify that it’s added.
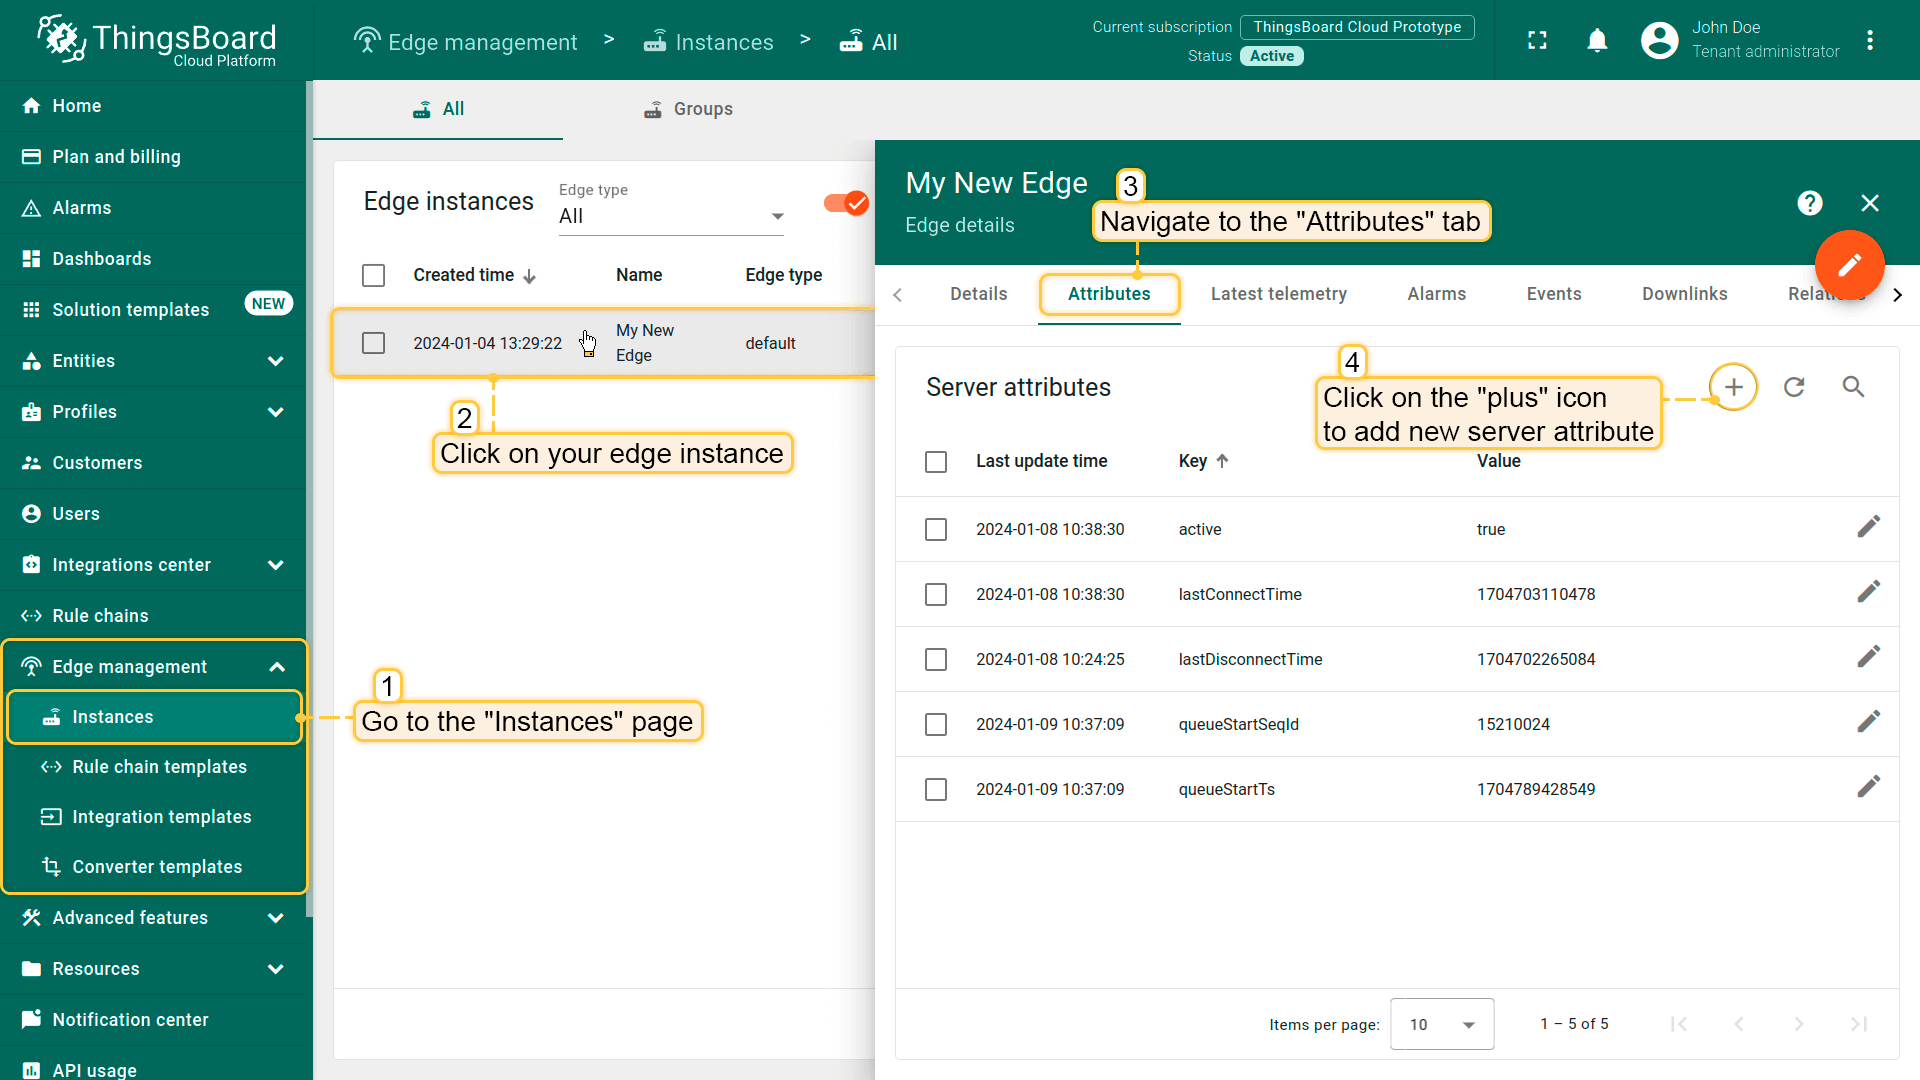
- Go to the Edge management > Instances section, click on your edge instance to open the "Edge details" window, and navigate to the "Attributes" tab. Click the "plus" button to add a new server attribute to the Edge.
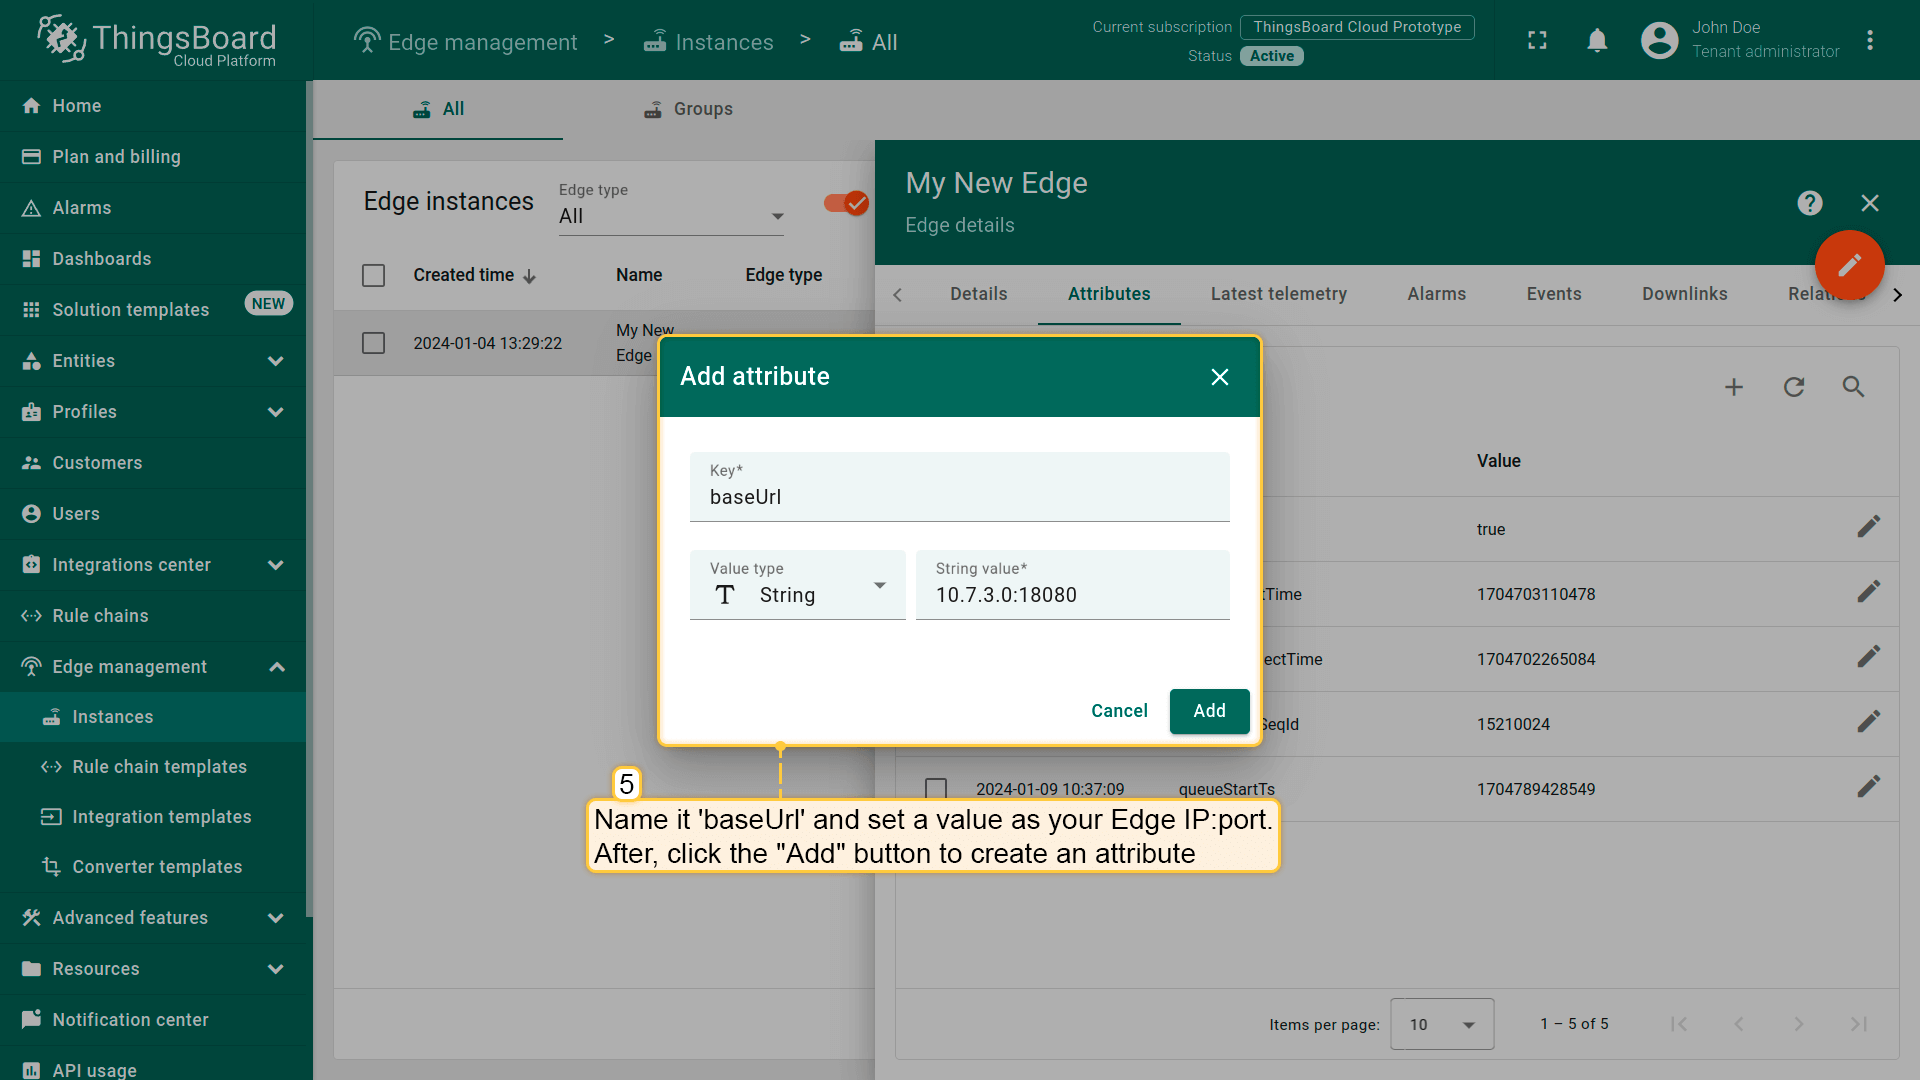
- Enter the new attribute name - "baseUrl, and set the value IP:port. Then click the "Add" button.
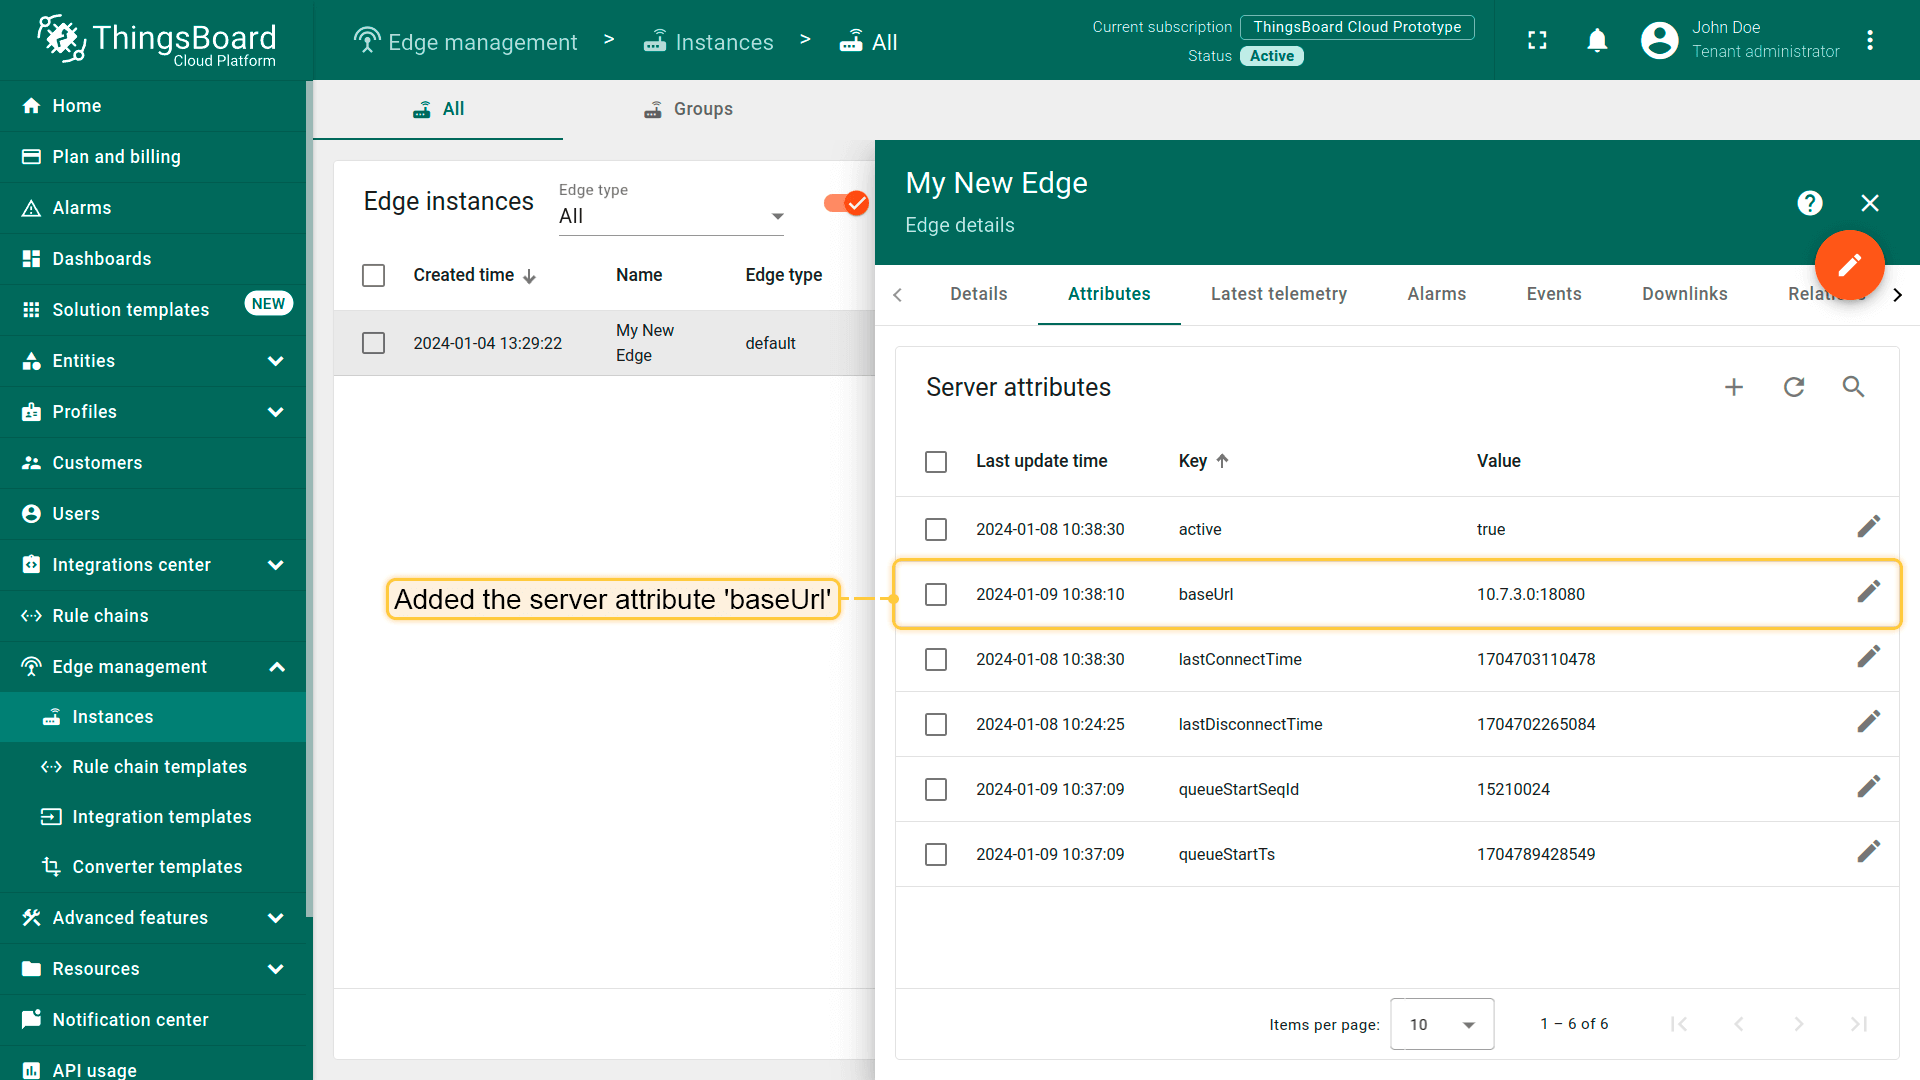
- The "baseUrl" server attribute is now added to the edge.
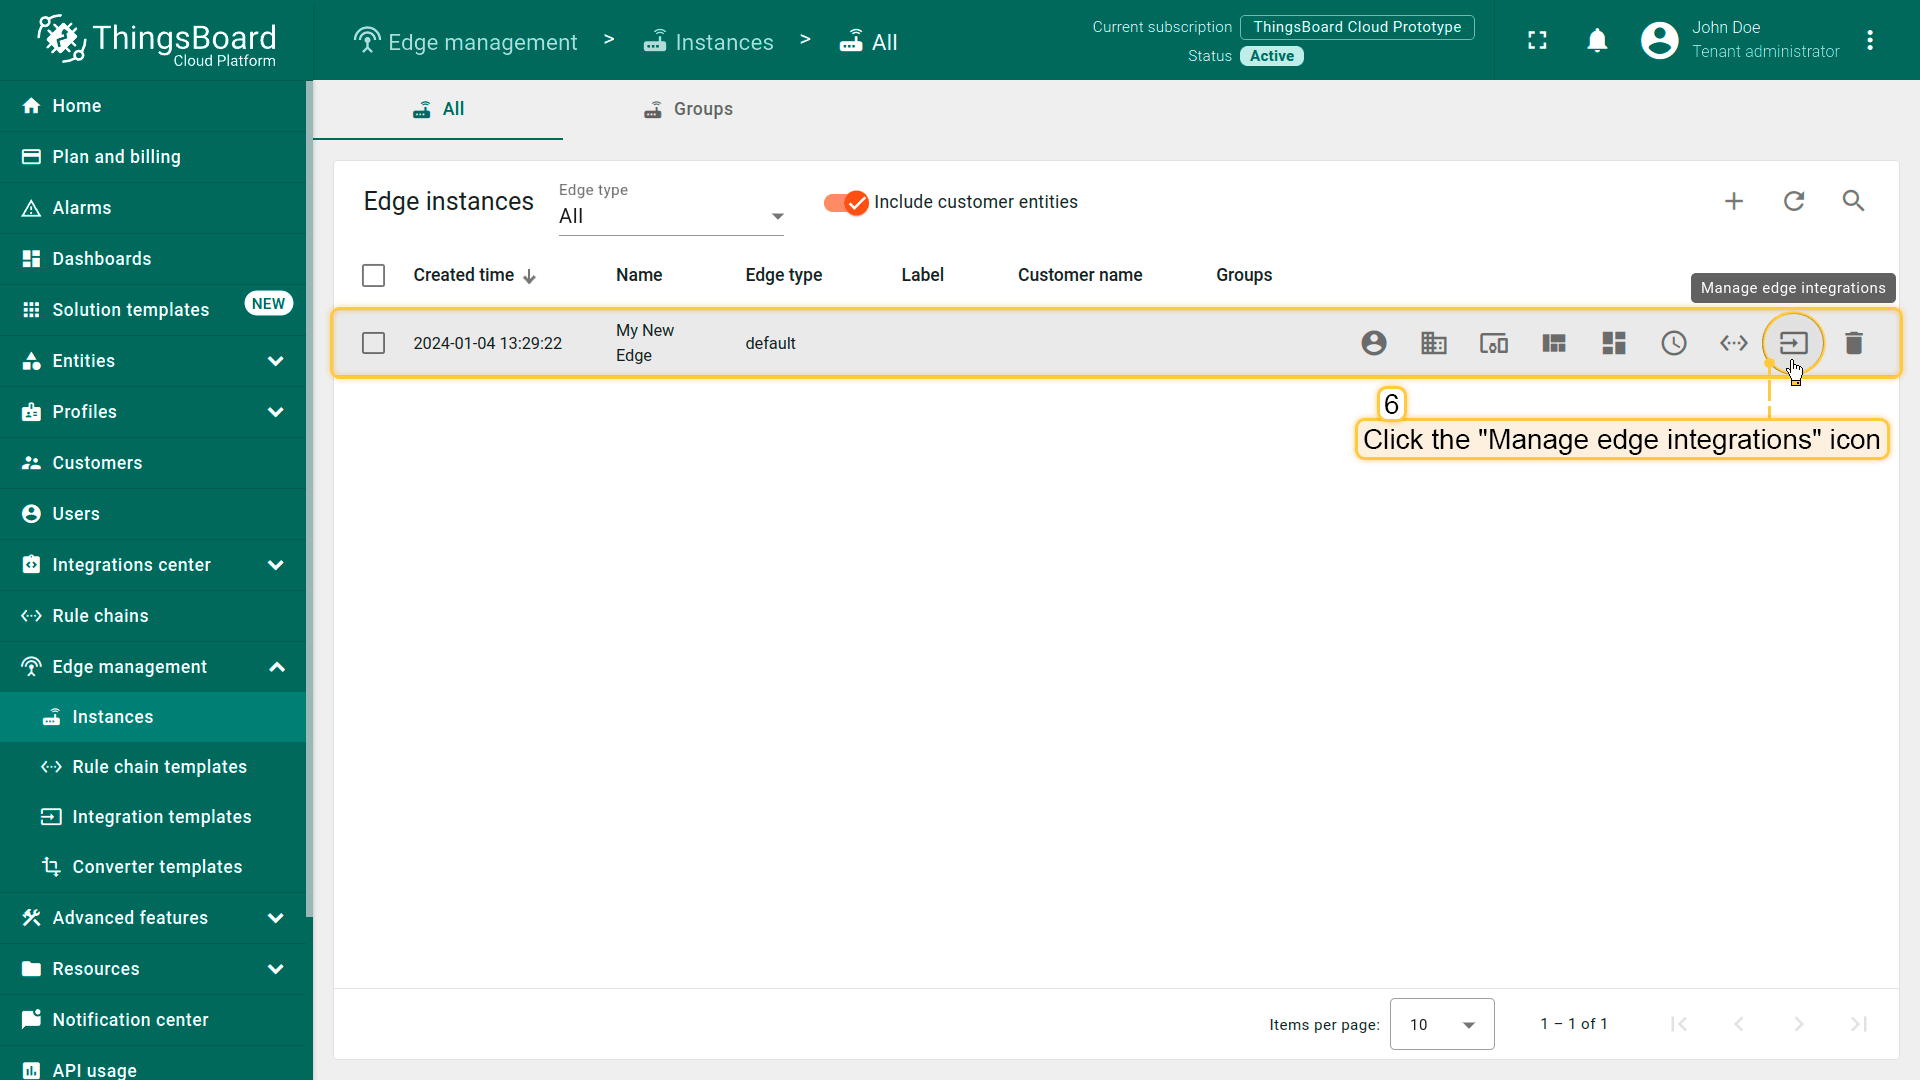
- To assign the integration to the Edge, click the "Manage edge integrations" button.
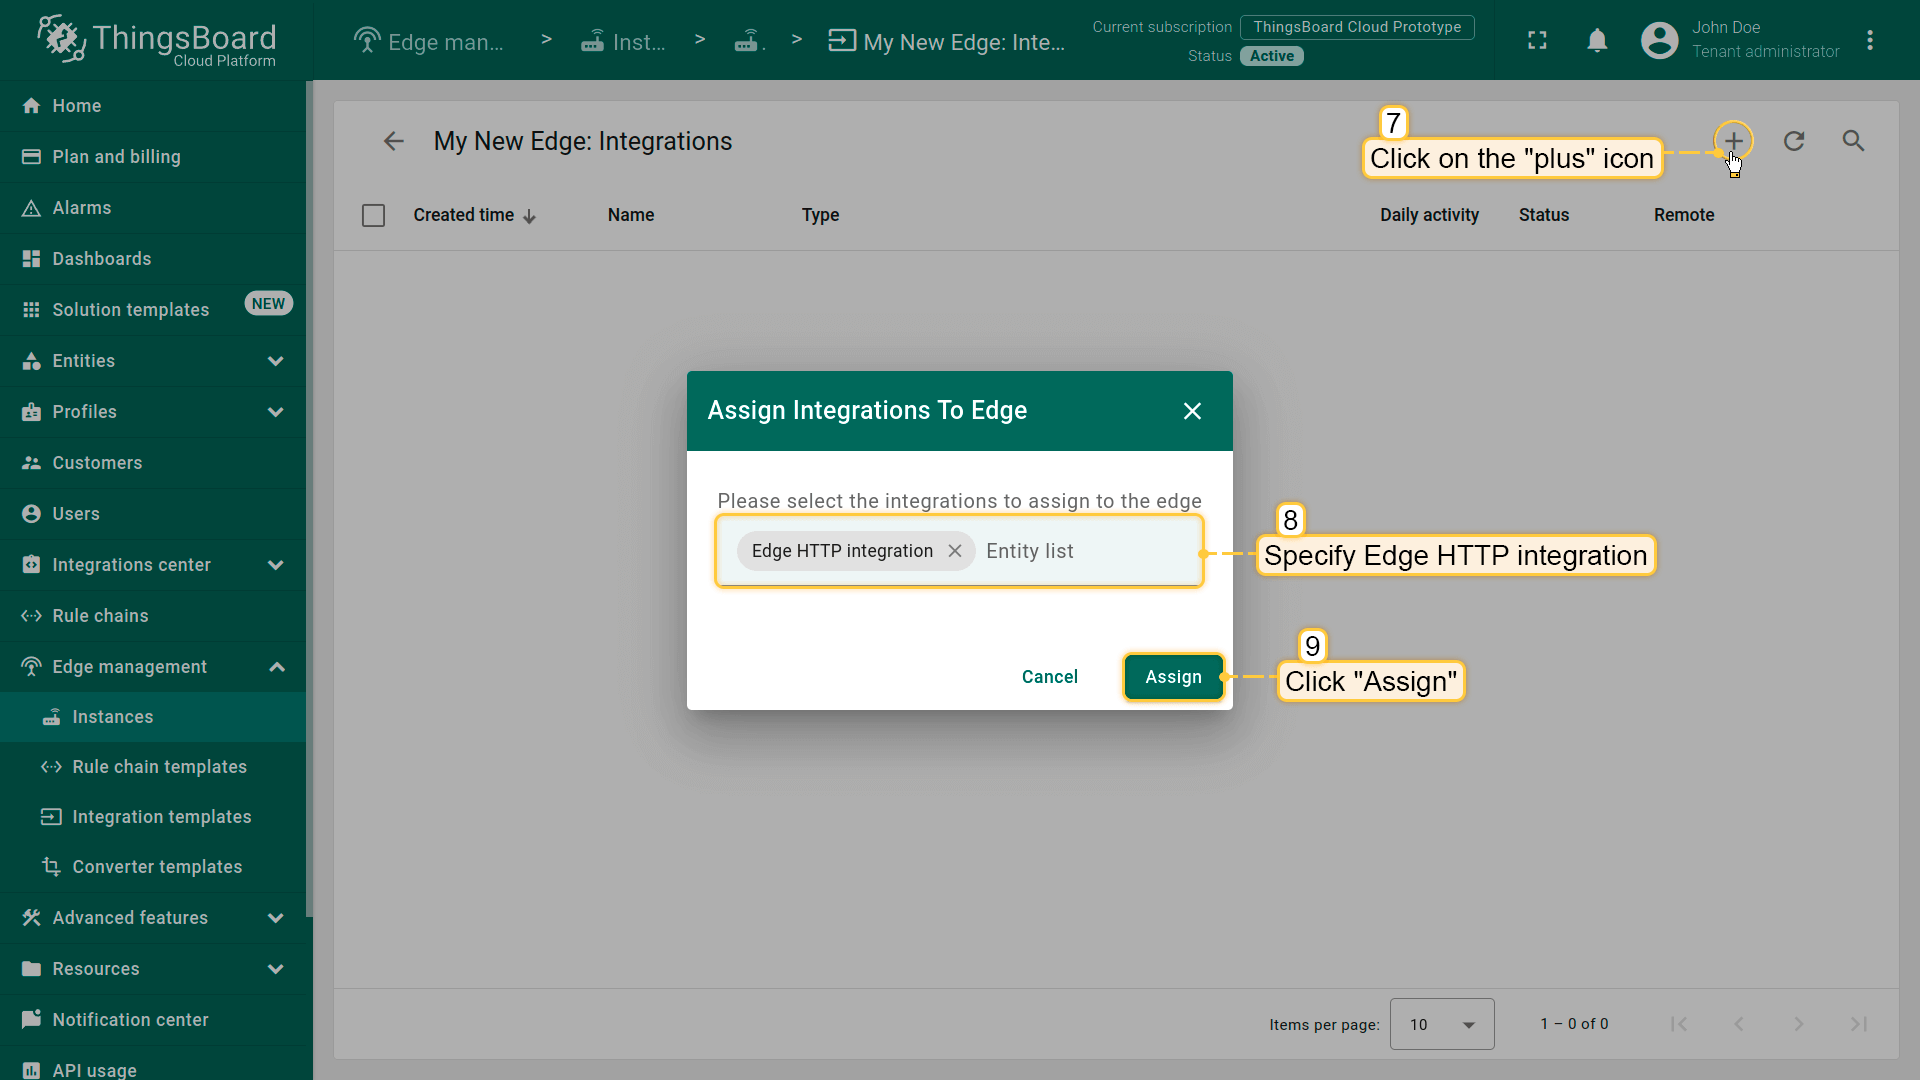
- Click the "+" button at the top right of the corner. Select your integration from the drop-down menu and click the "Assign" button.
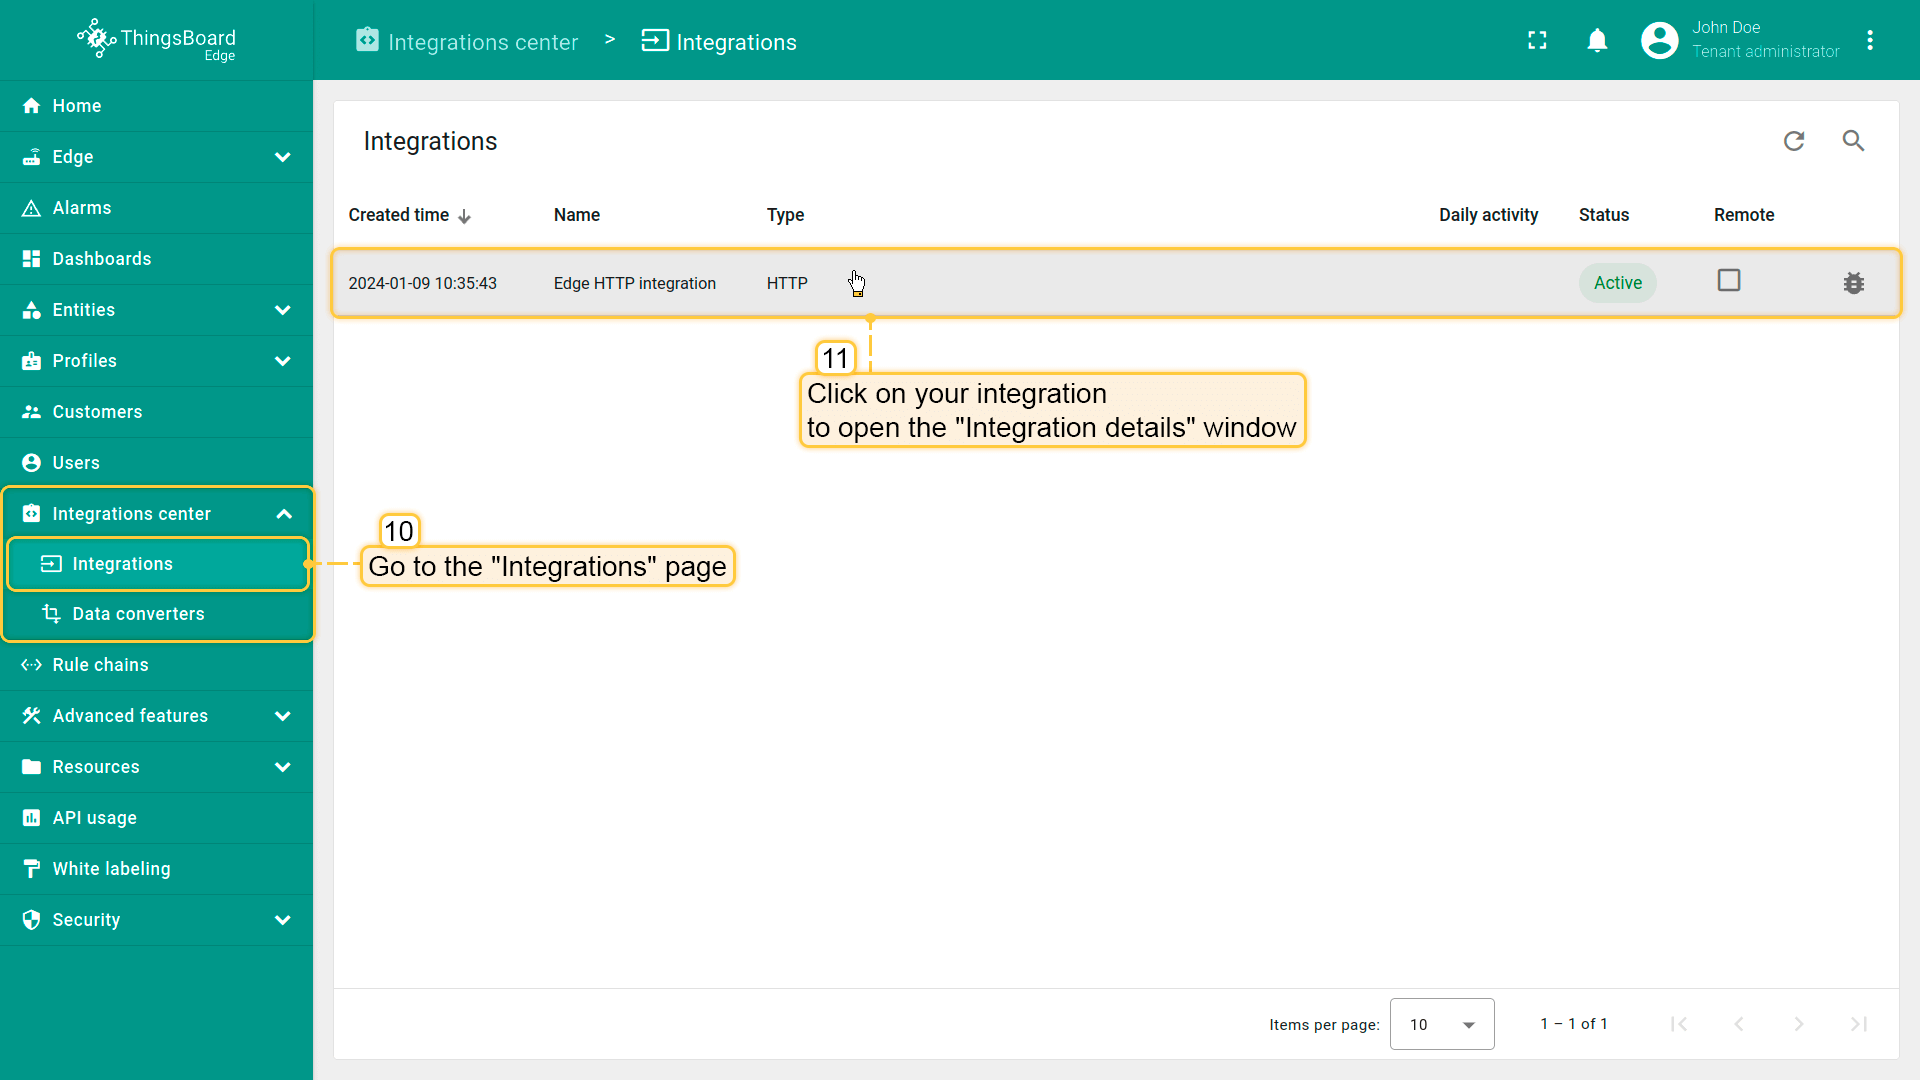
- Login to your ThingsBoard Edge instance and go to the Integrations center > Integrations section. You should see your integration. Click on it.
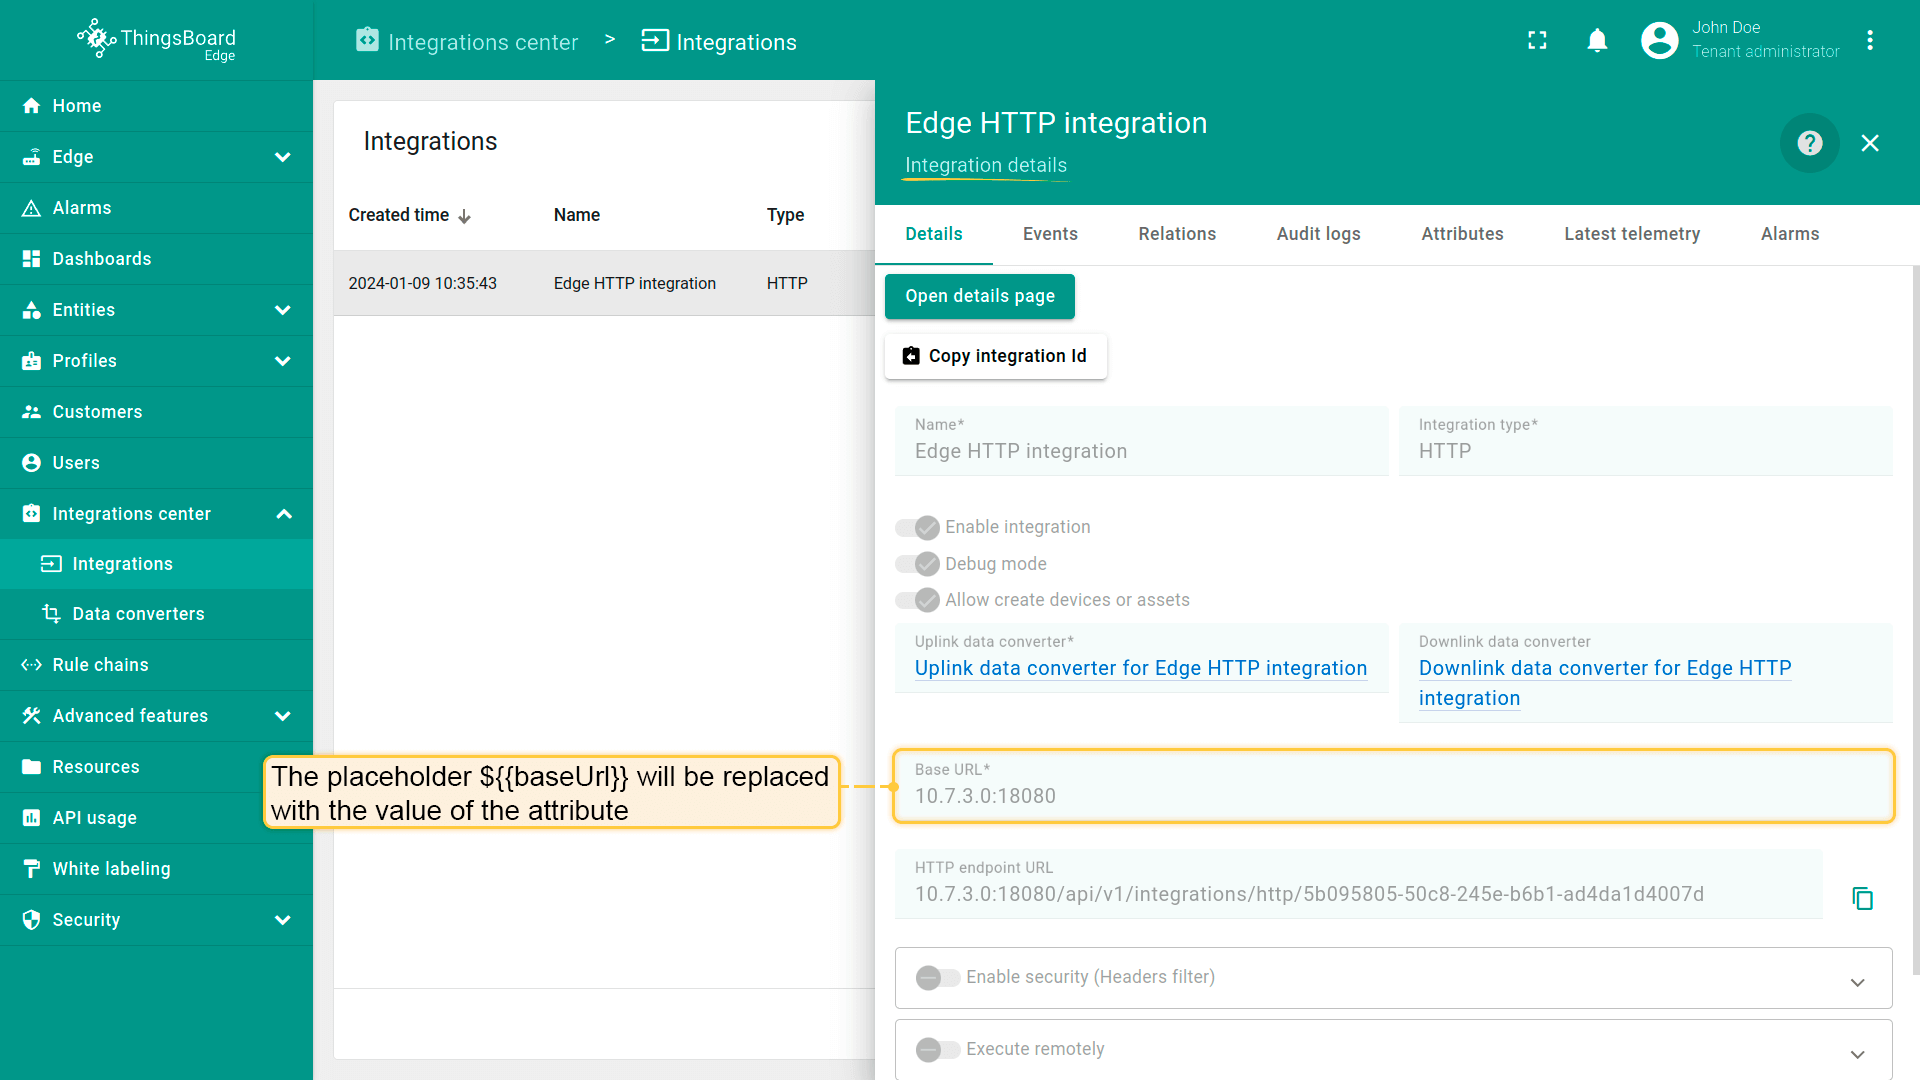
- In the "Integration details" window, the ${{baseUrl}} placeholder will be replaced with the value of the attribute.
Send uplink message
To send an uplink message, you need the HTTP endpoint URL from the integration. Log in to ThingsBoard Edge and go to the Integrations center > Integrations section. Find your HTTP integration and click it. Find and copy the “HTTP endpoint URL”.
Use the command below to send a message. Remember to replace $DEVICE_NAME and $YOUR_HTTP_ENDPOINT_URL with the corresponding values.
1
curl -v -X POST -d "{\"deviceName\":\"$DEVICE_NAME\",\"temperature\":33,\"model\":\"test\"}" $YOUR_HTTP_ENDPOINT_URL -H "Content-Type:application/json"

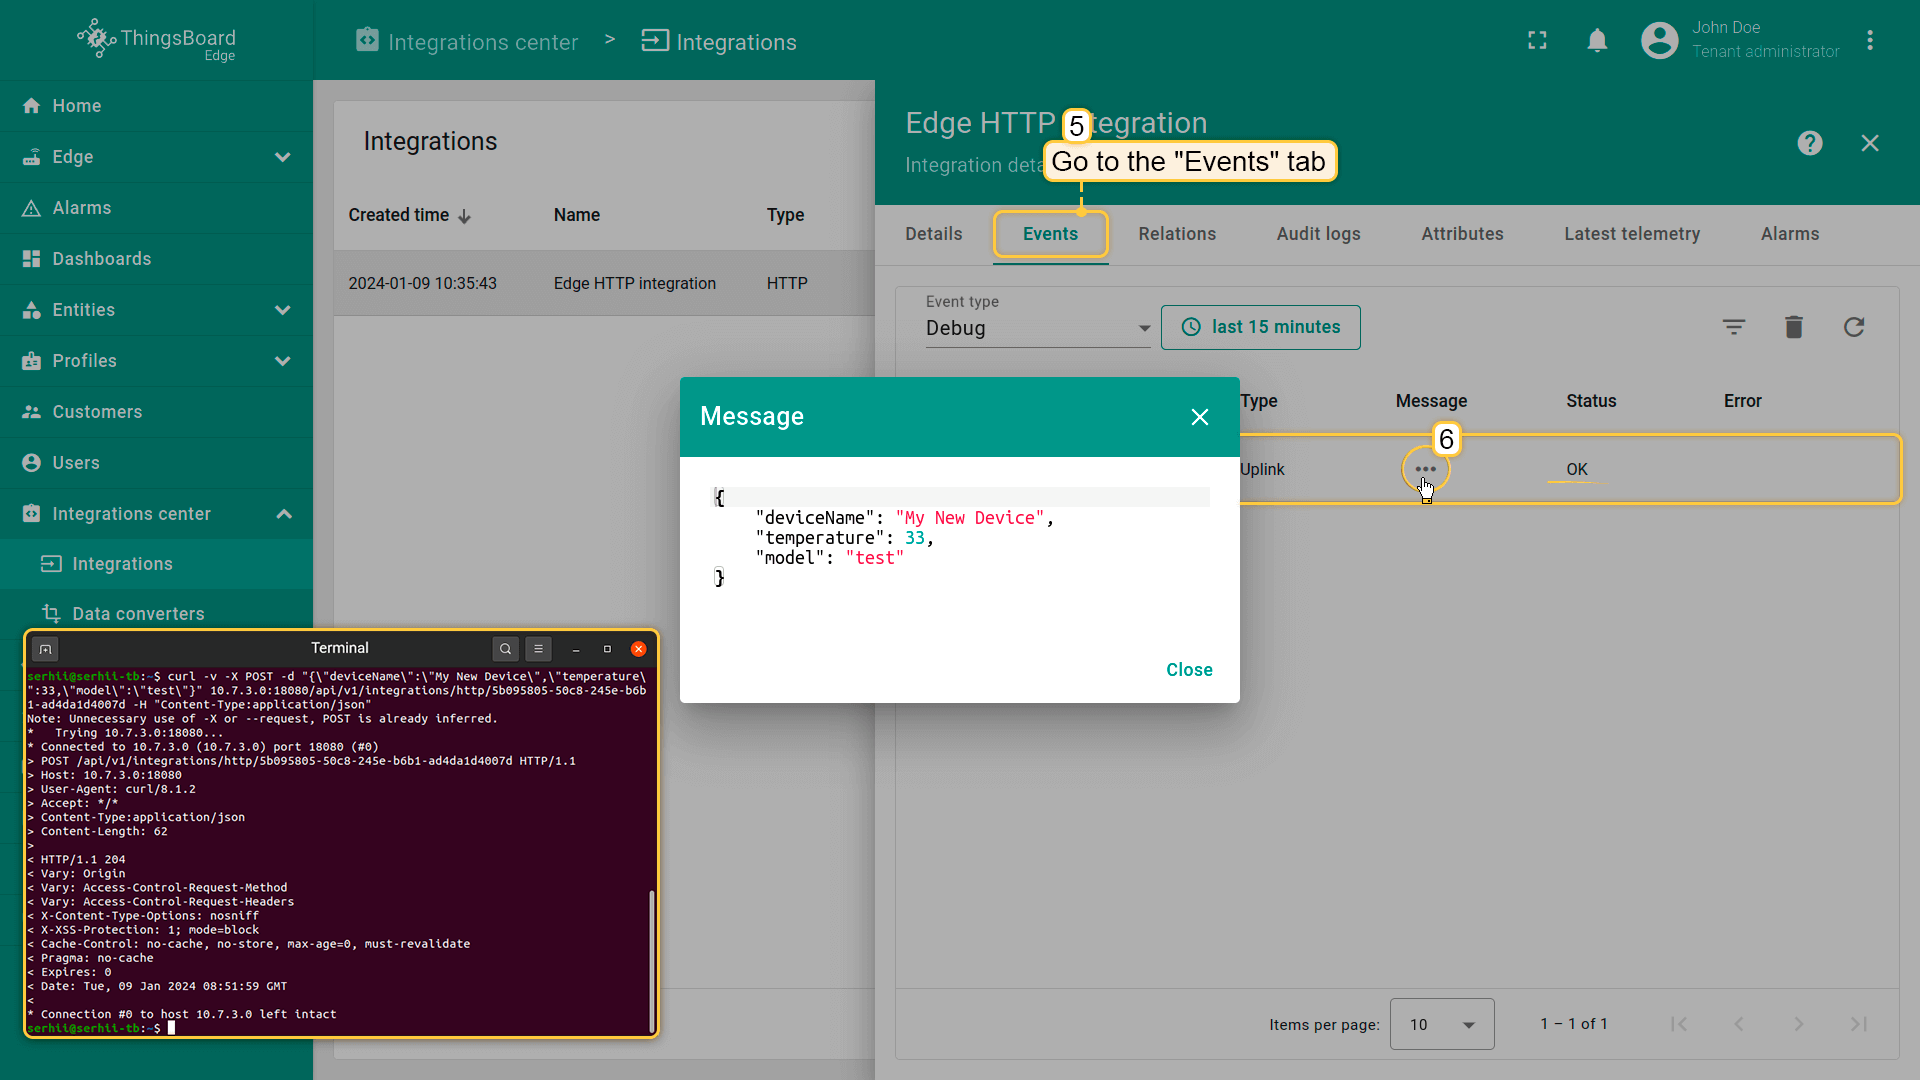
Now, select the “Events” tab in your HTTP integration. If you have done everything correctly, you will see an uplink message with the status ‘OK’. To see the message itself, click on the three dots in the “Message” column.
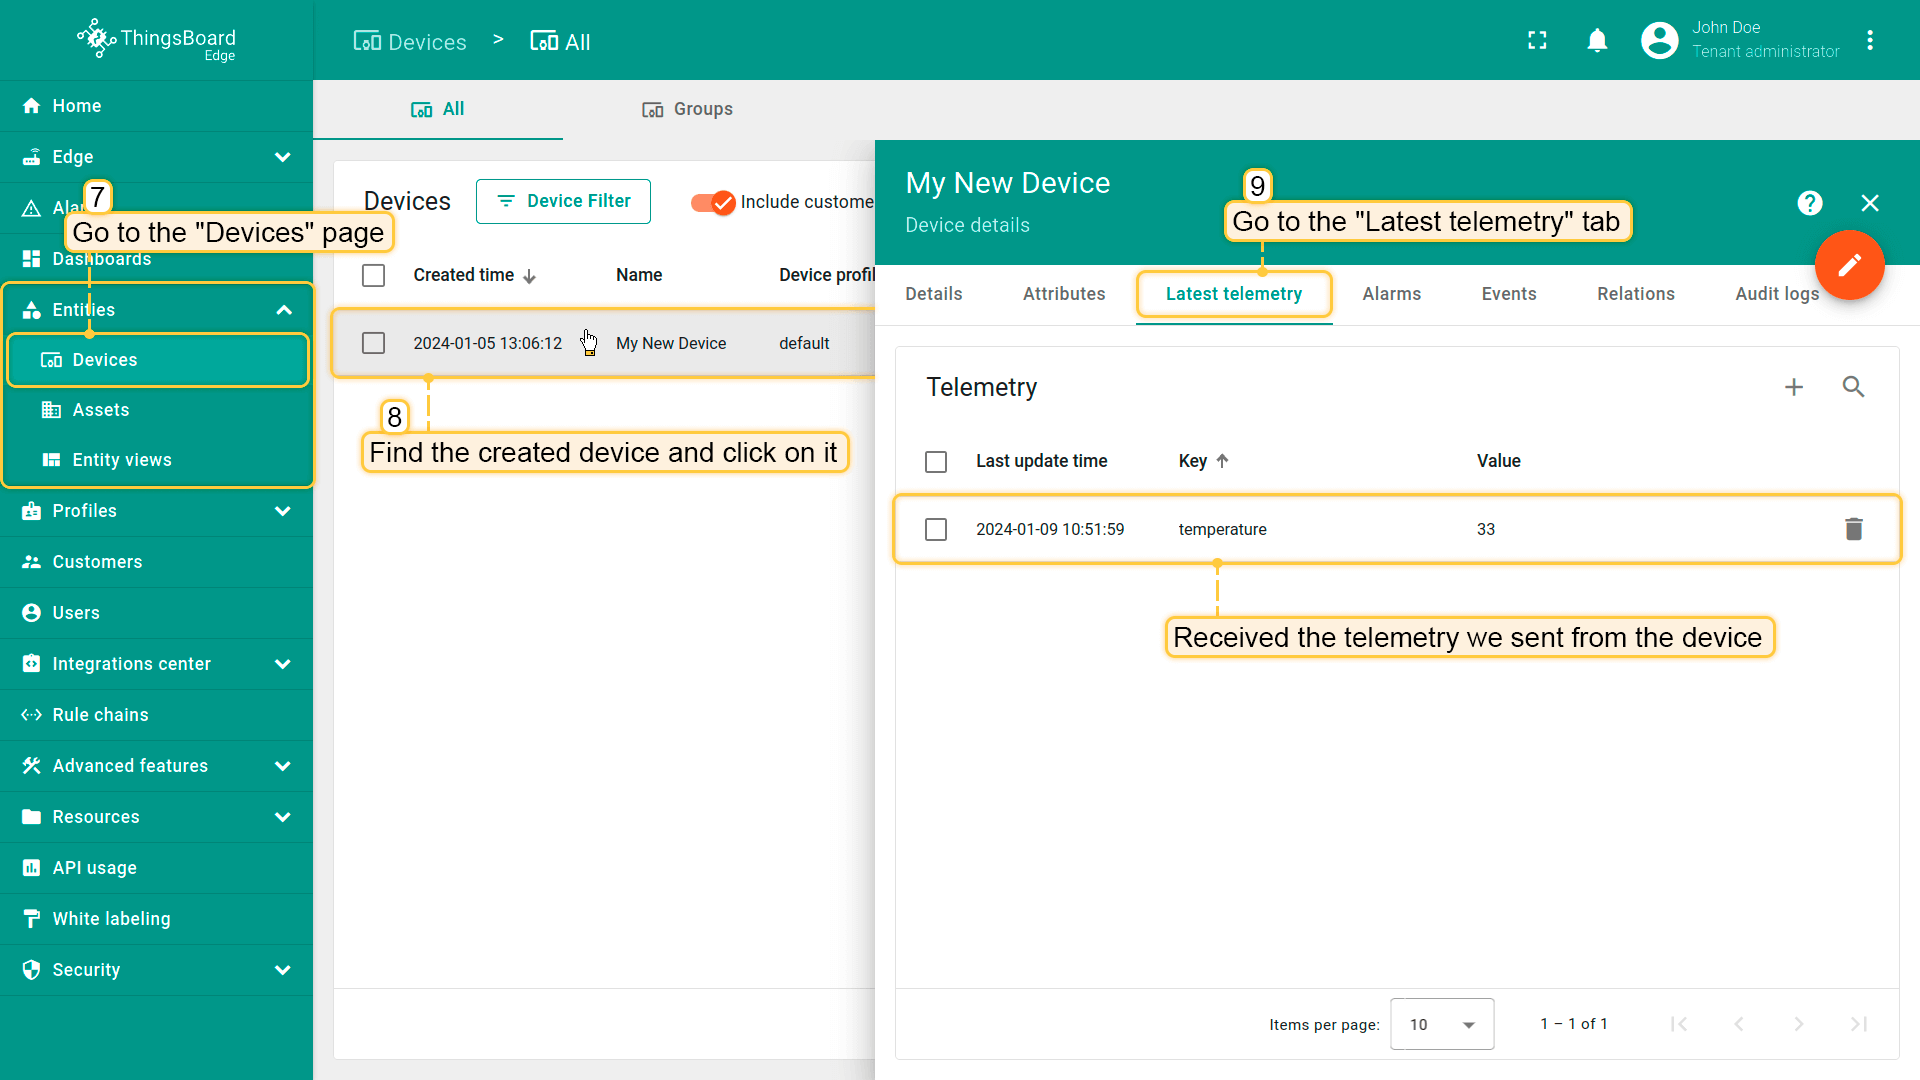
When you sent the message, a new device was created. The created device with data can be seen in the Entities > Devices section on the Edge:
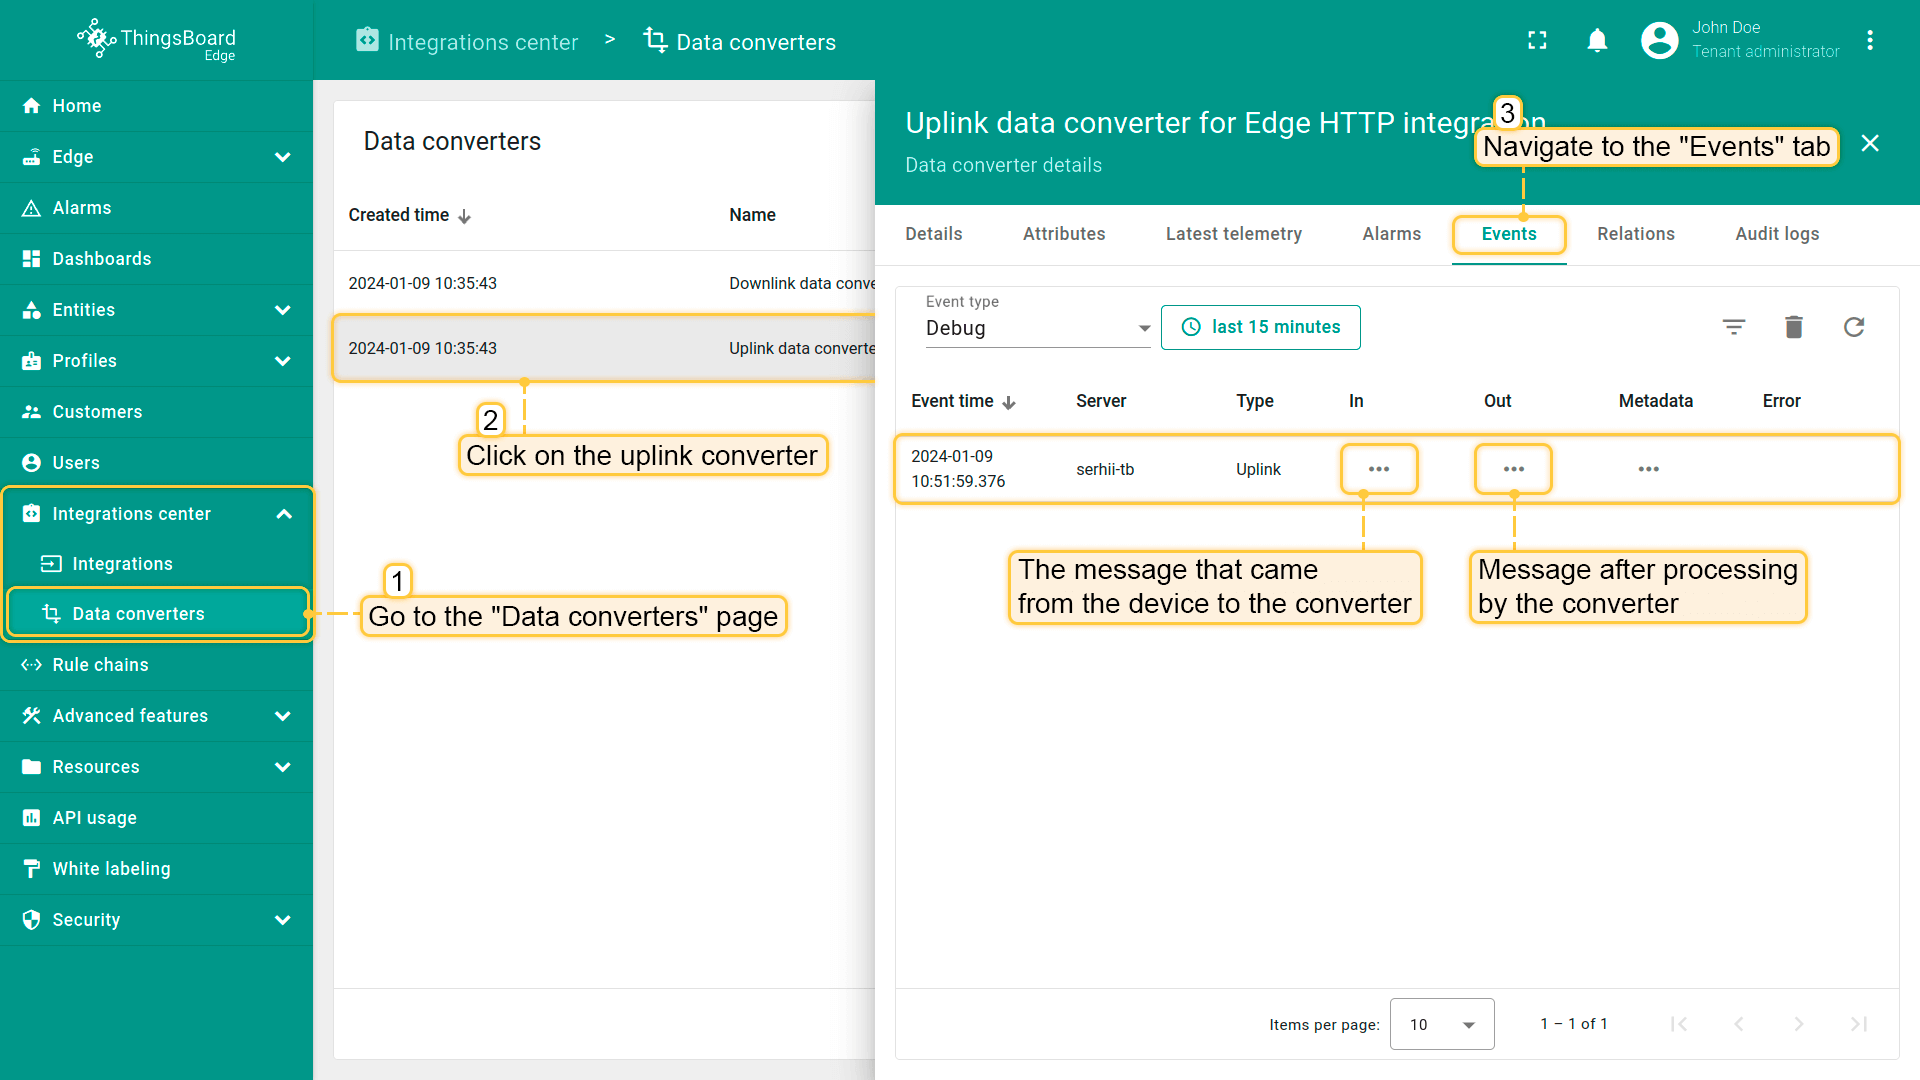
You can also view the received data in the Uplink Converter. In the “In” and “Out” blocks of the “Events” tab:

Send downlink message
Now let’s check the downlink functionality.
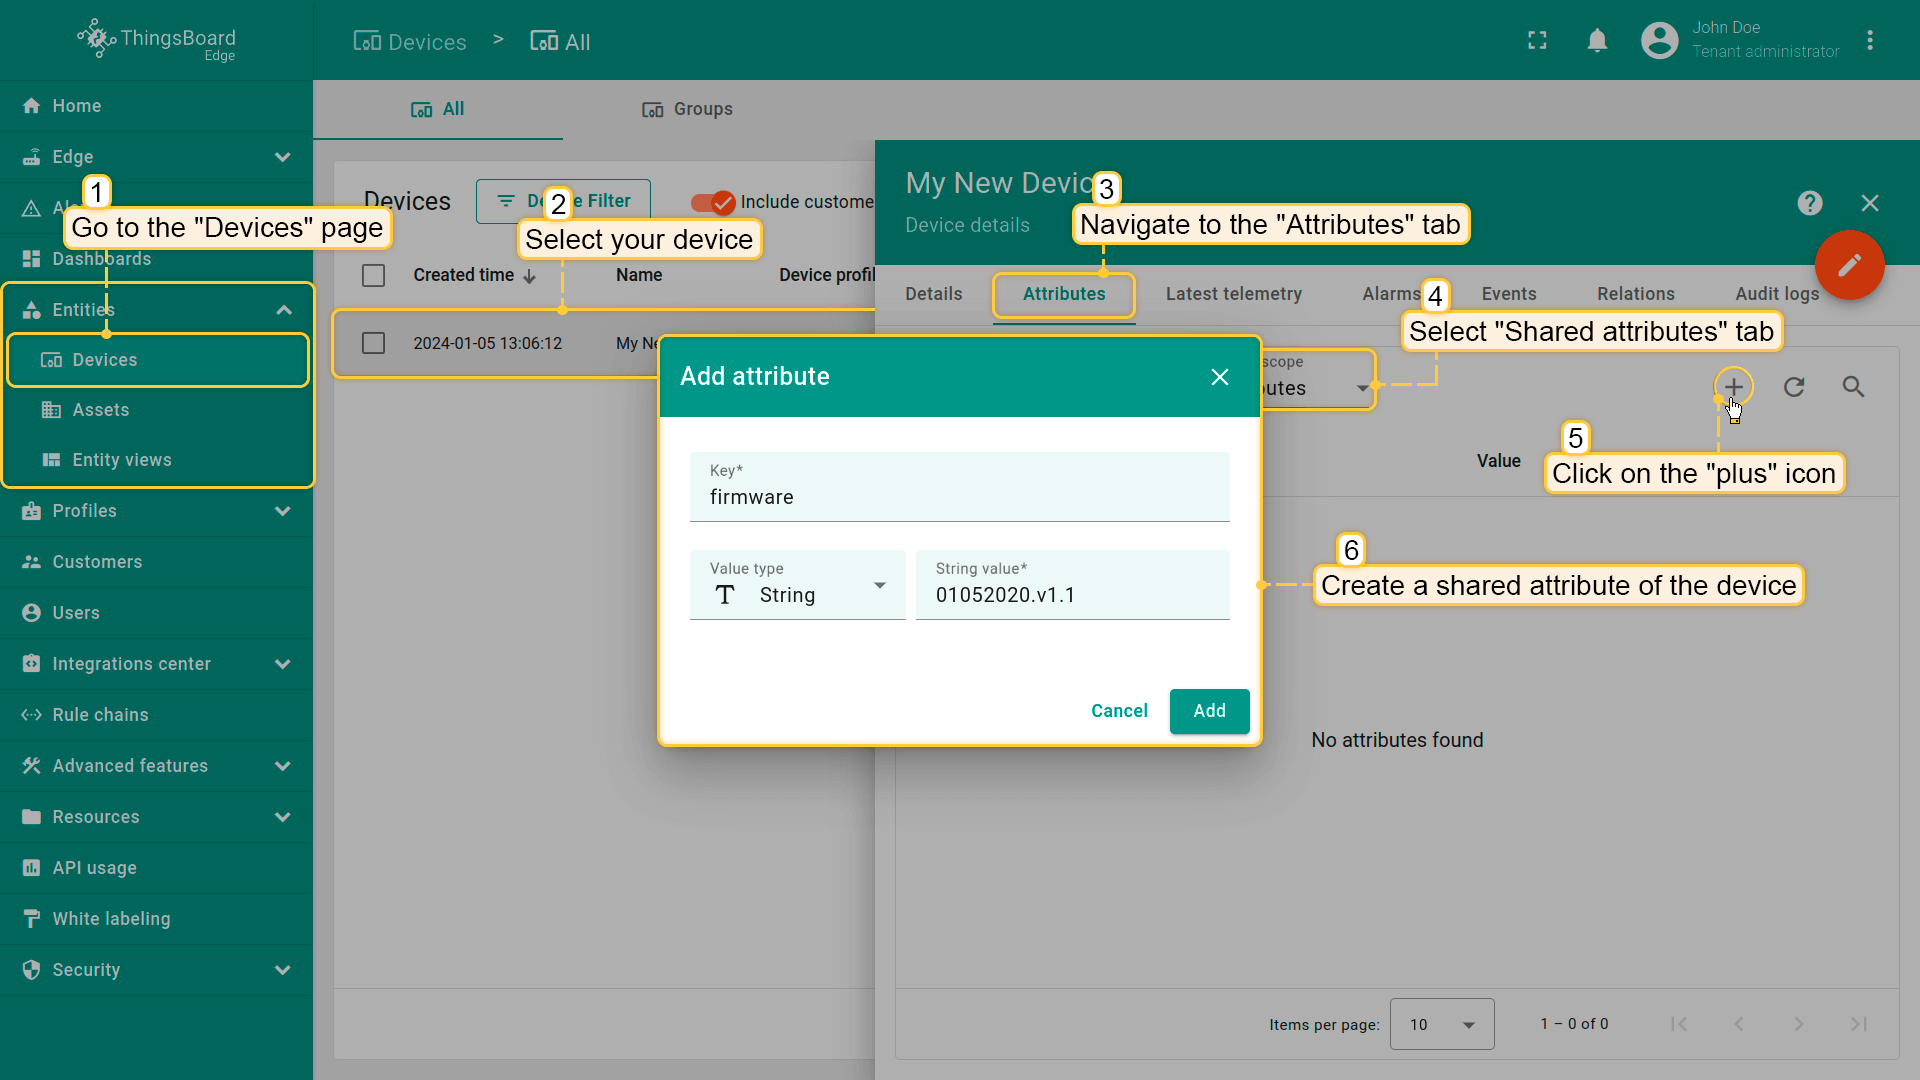
Let’s add a ‘firmware’ shared attribute. Go to the “Devices” section, select your device, and open the “Attributes” tab on the ThingsBoard Edge. Select the “Shared attributes” scope and click the “plus” button to create new attribute. Then set the attribute name and value (e.g., the key name is ‘firmware’, value: ‘01052020.v1.1’), and save the data.
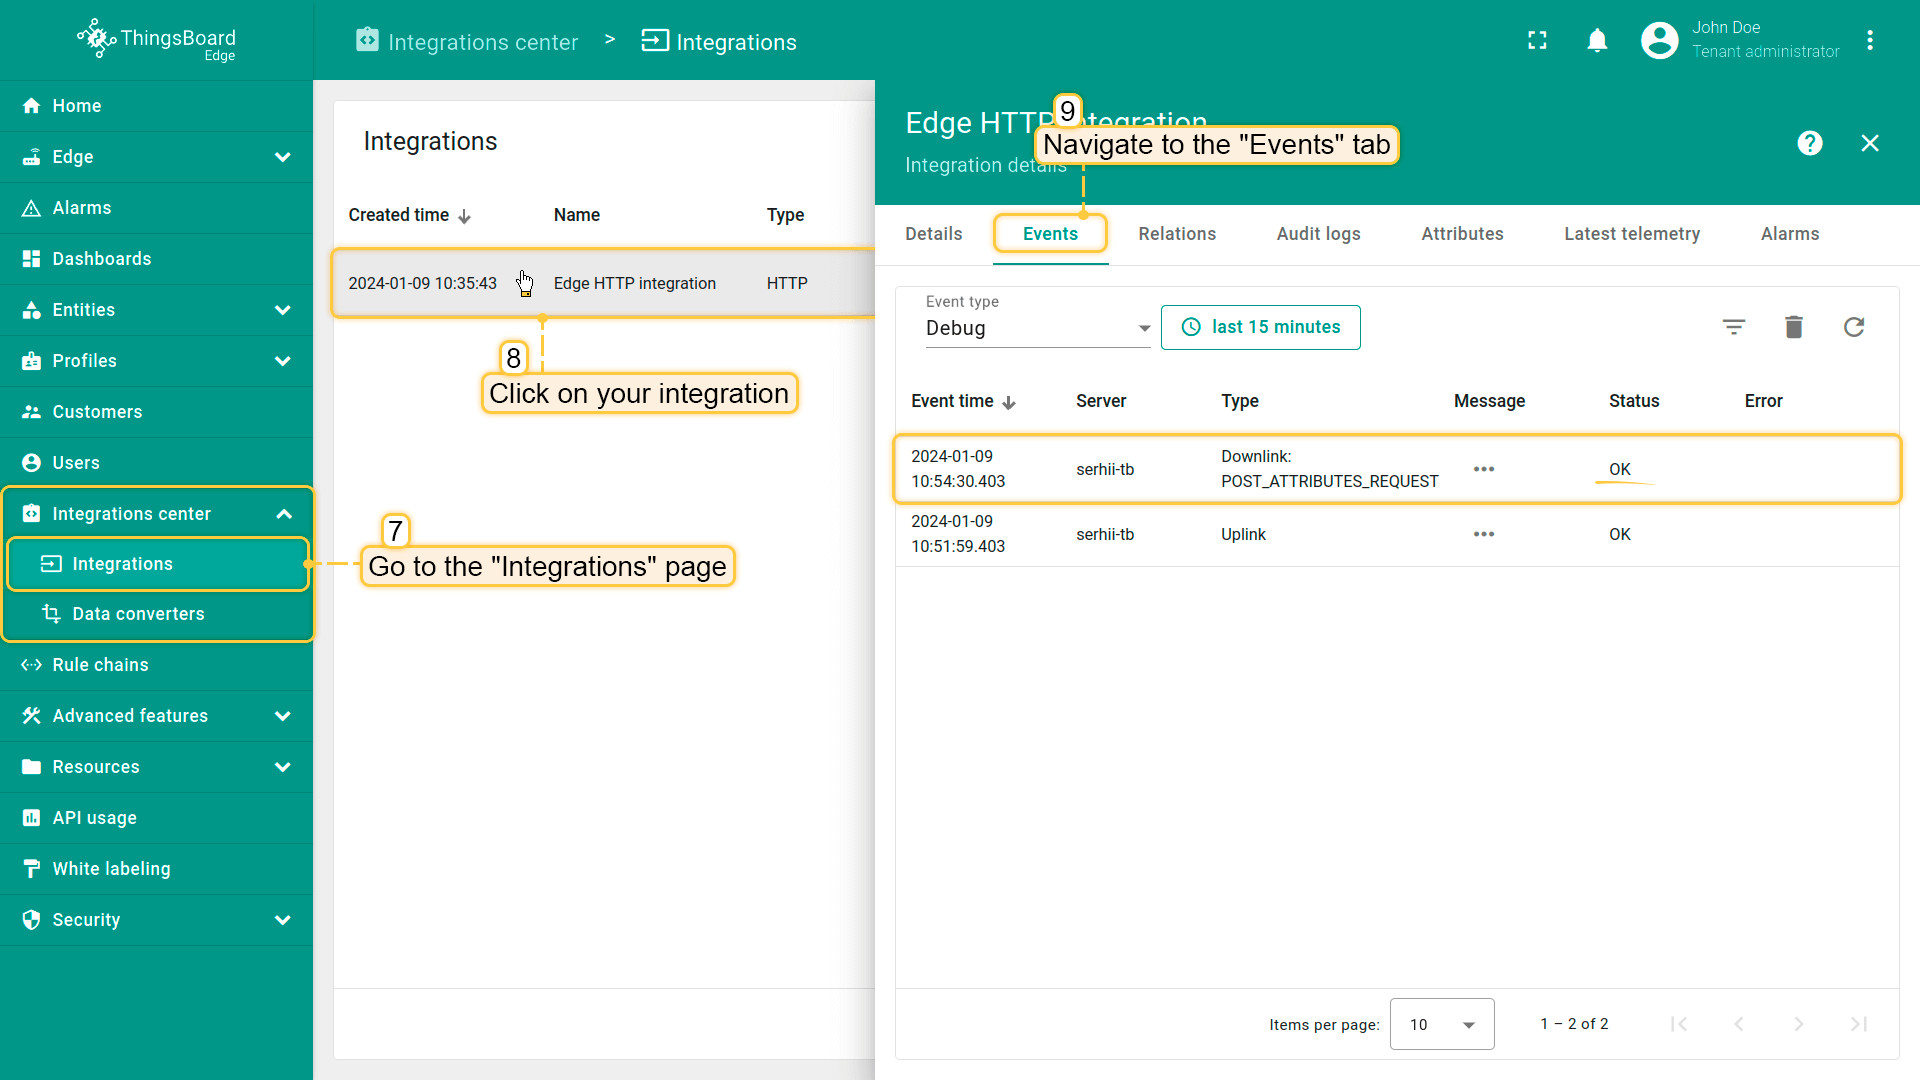
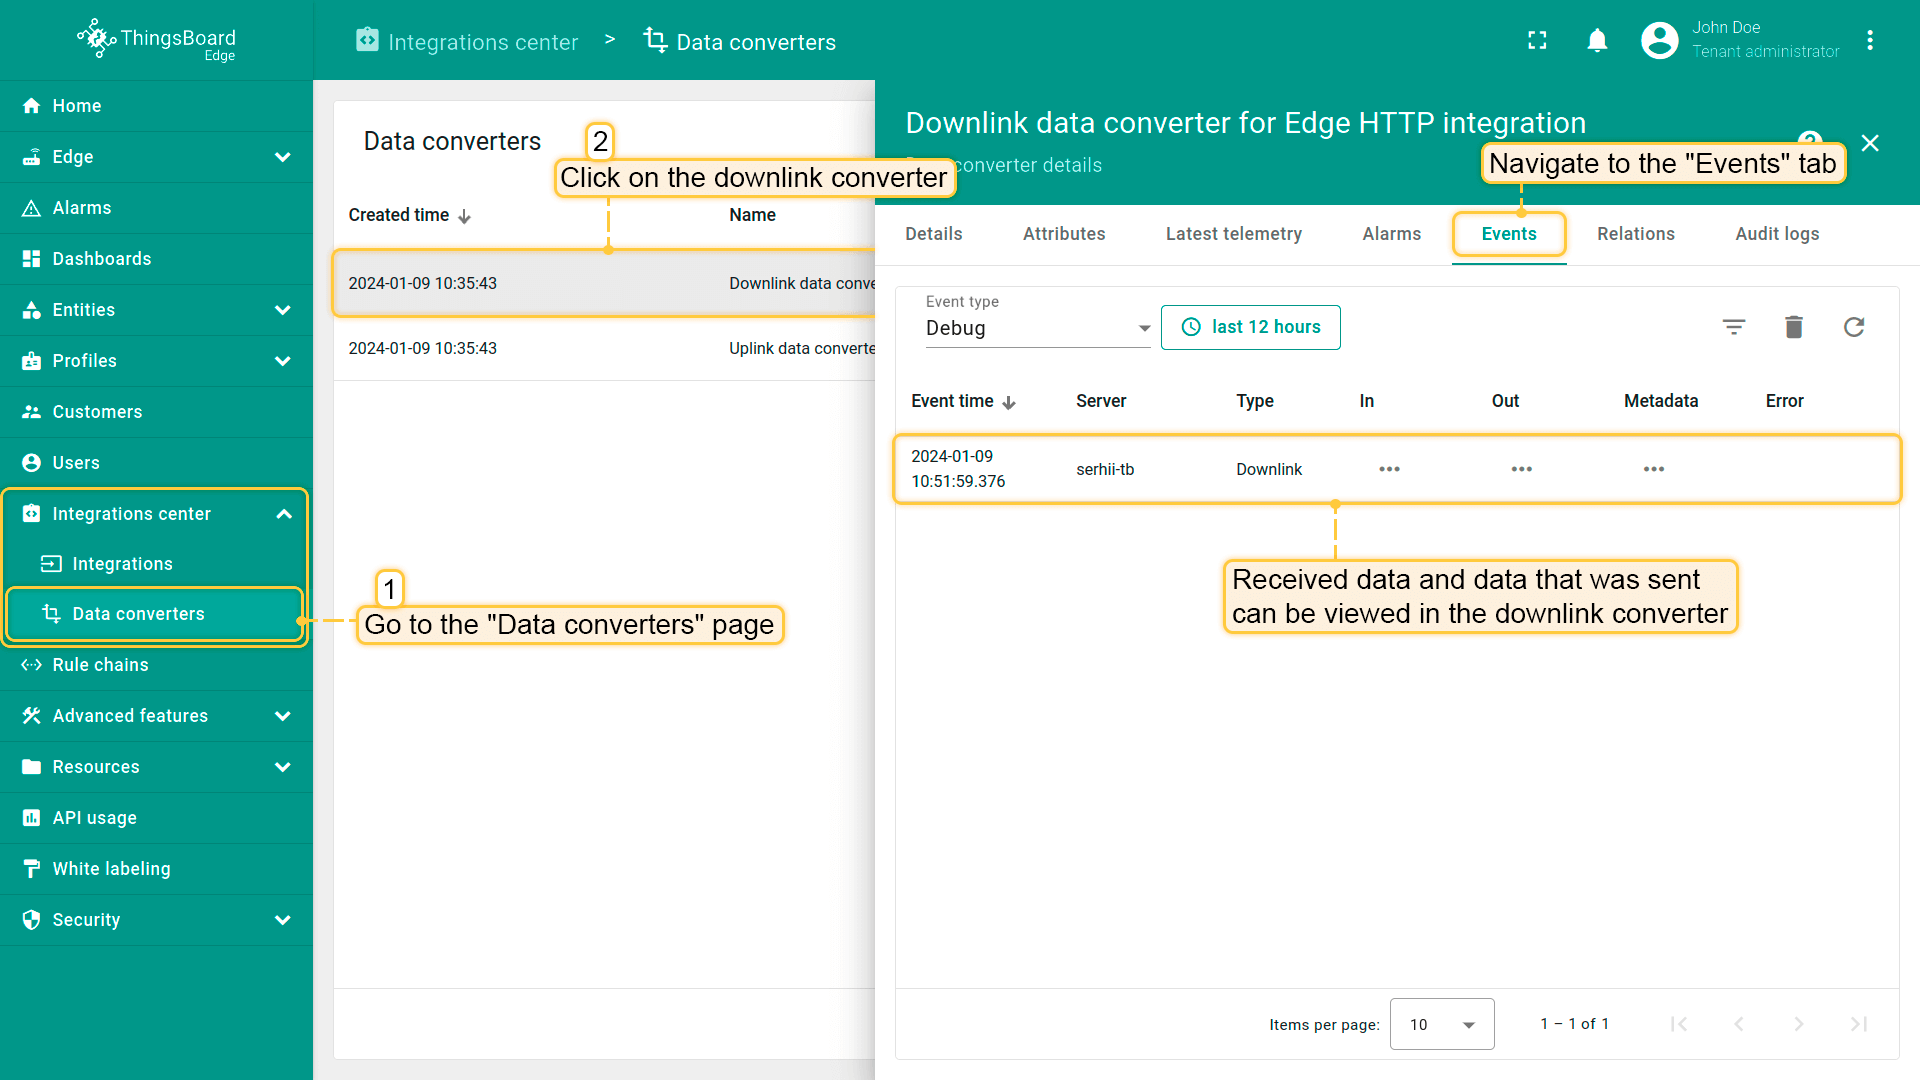
To make sure that downlink message is sent to integration, check the Events tab of the integration:
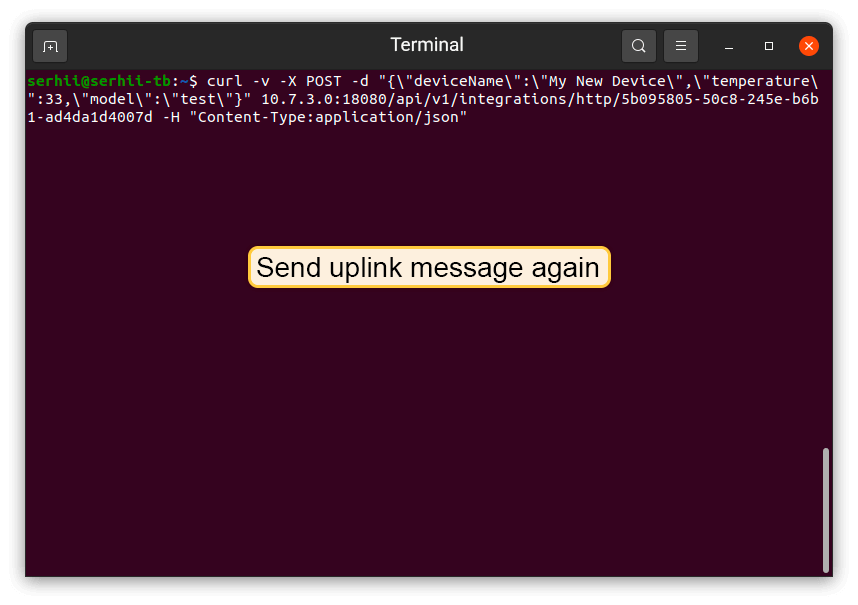
Now we need to send another message to the HTTP integration. Use the same command you used before. Remember to replace $DEVICE_NAME and $YOUR_HTTP_ENDPOINT_URL with the corresponding values.
1
curl -v -X POST -d "{\"deviceName\":\"$DEVICE_NAME\",\"temperature\":33,\"model\":\"test\"}" $YOUR_HTTP_ENDPOINT_URL -H "Content-Type:application/json"
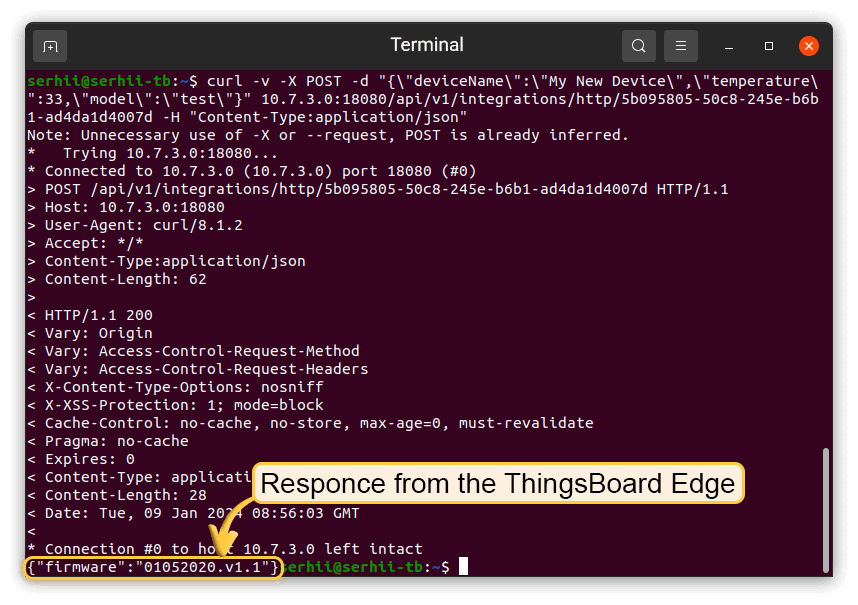
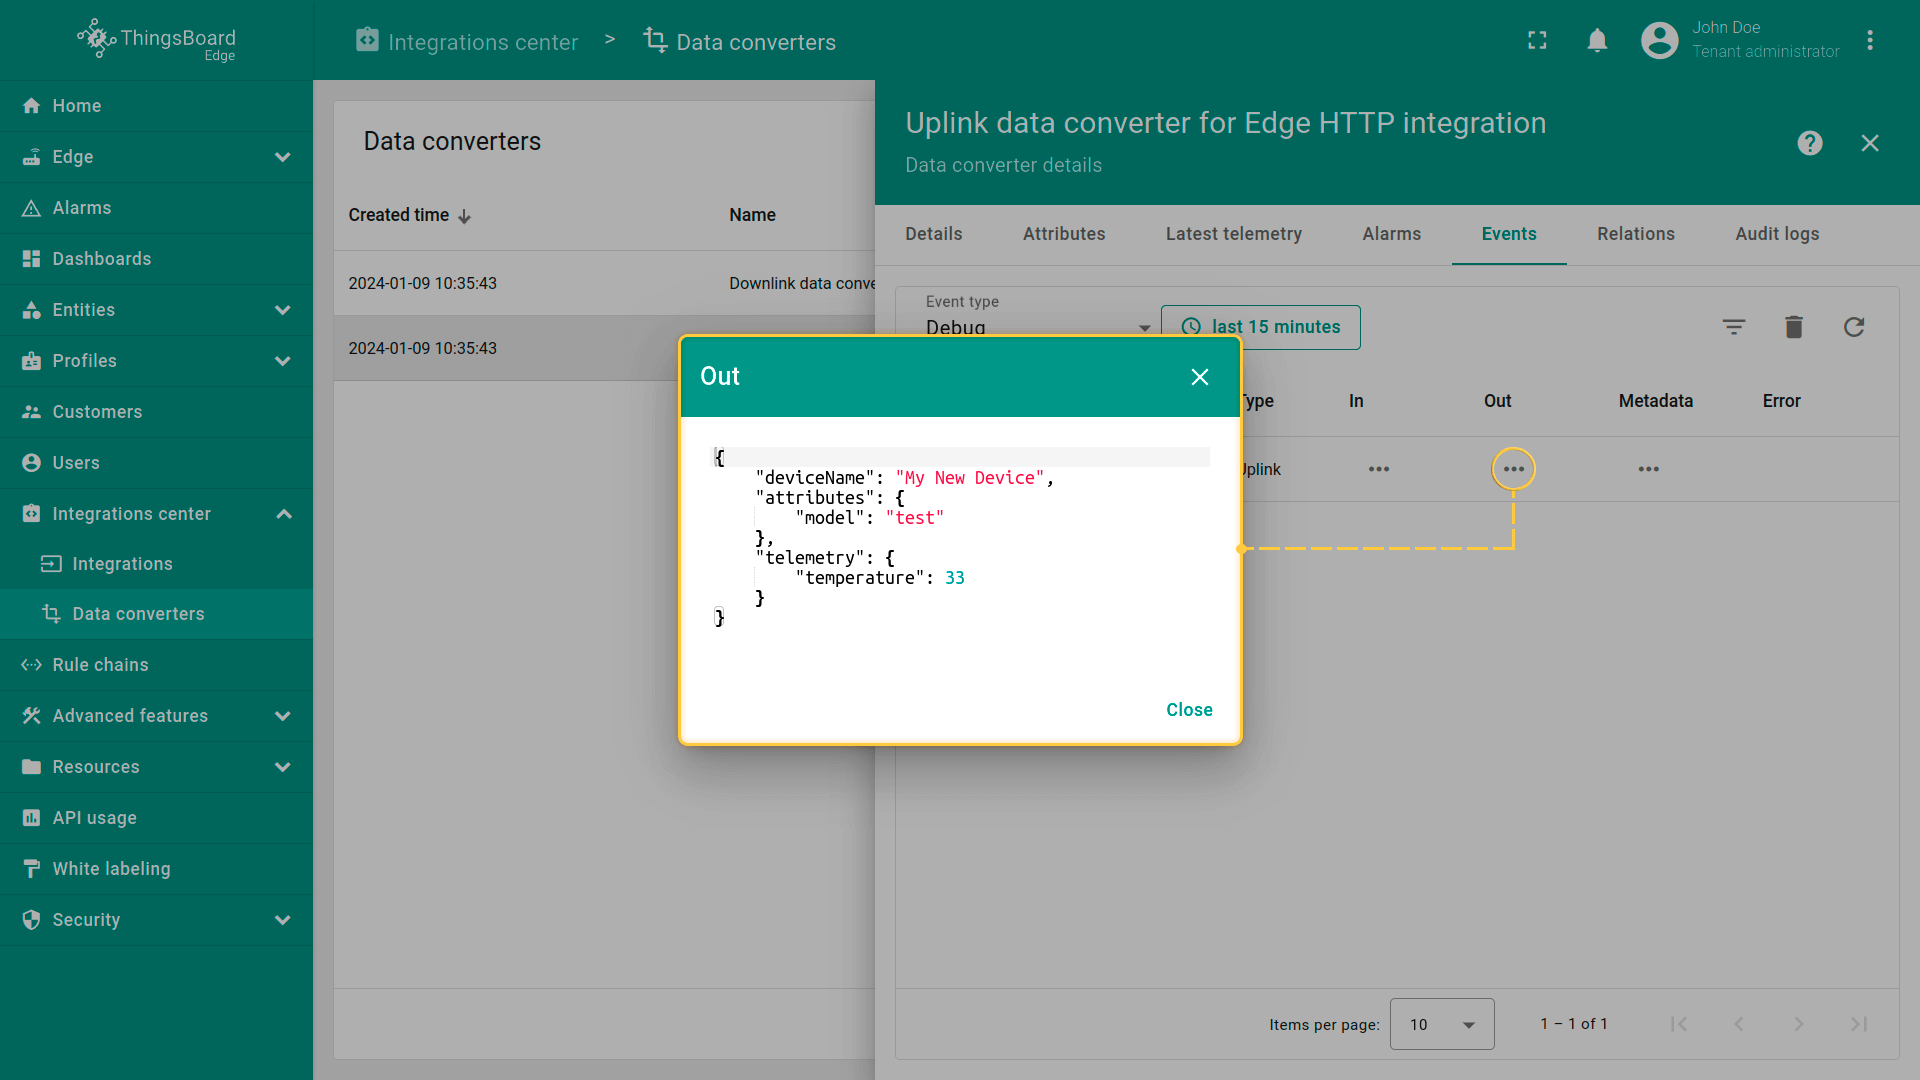
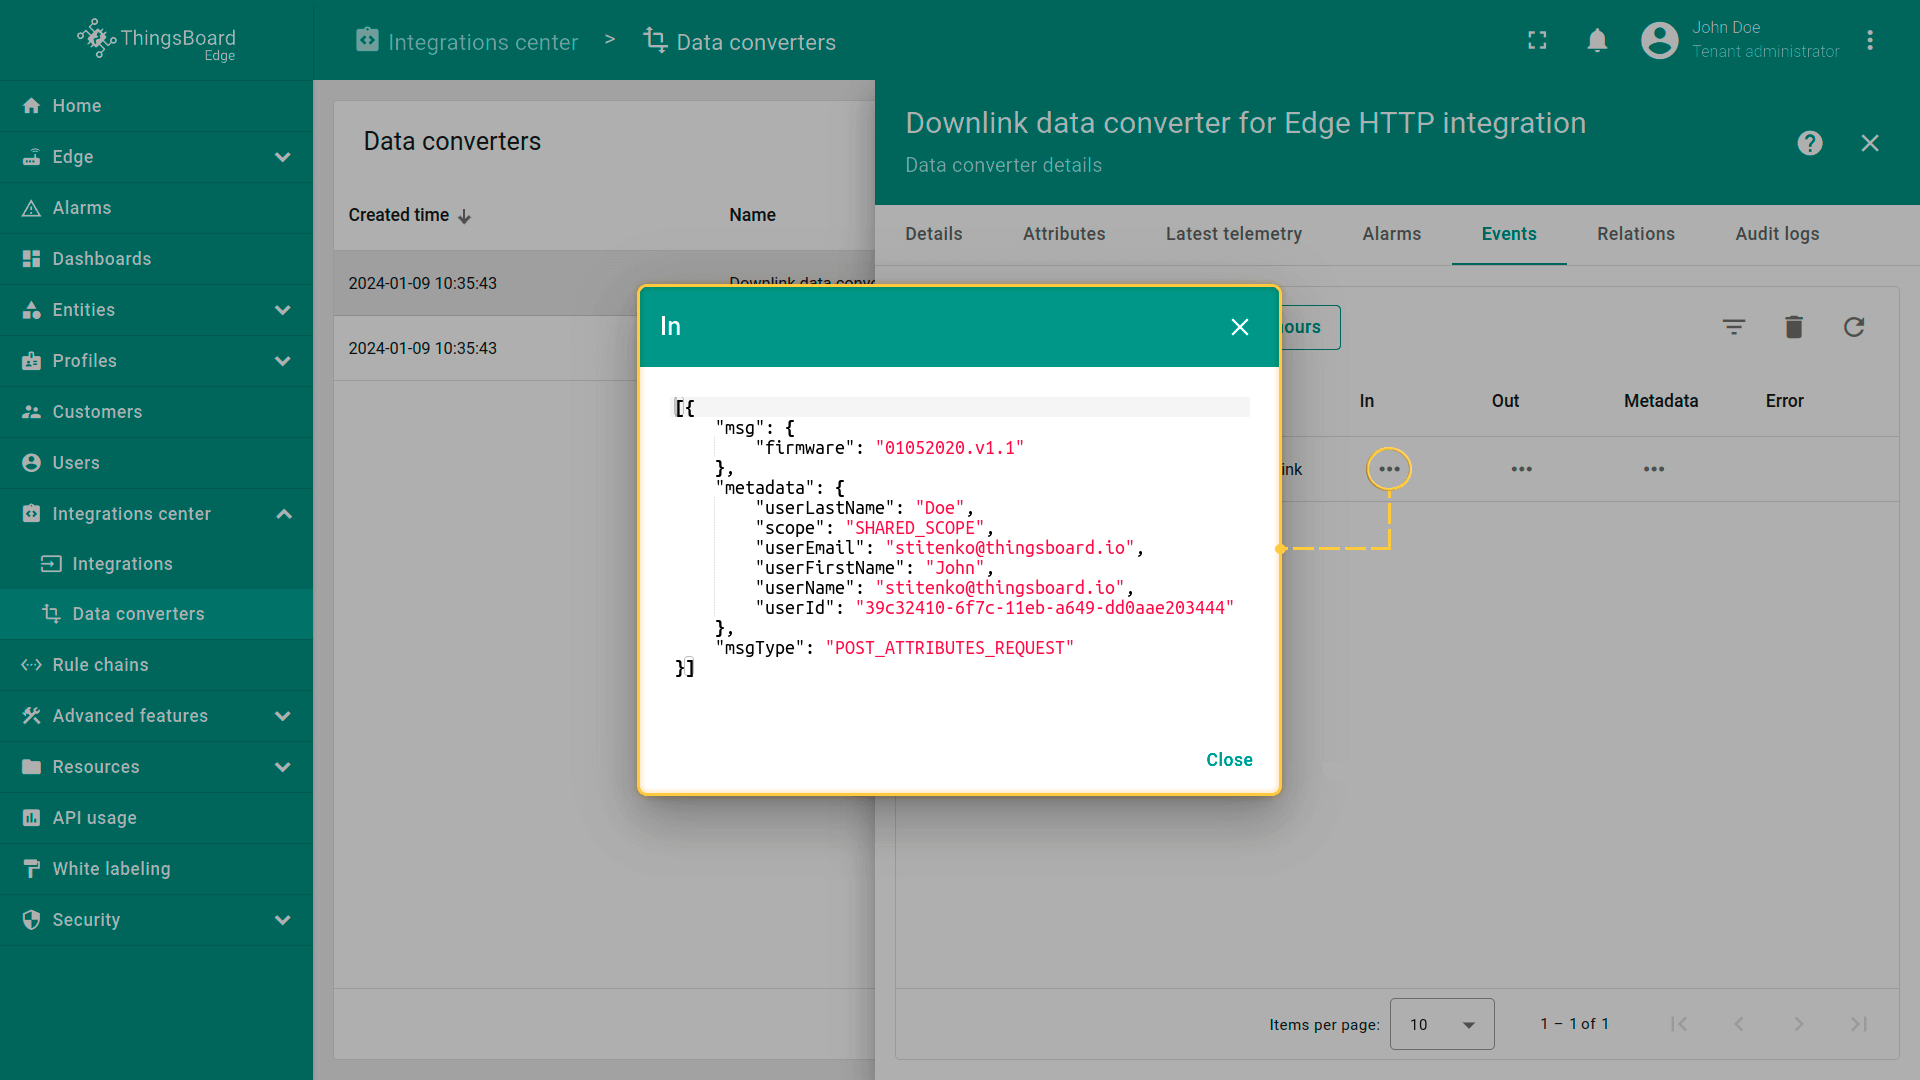
The received and sent data can be viewed in the downlink converter. The received data is displayed in “In” block of the “Events” tab.
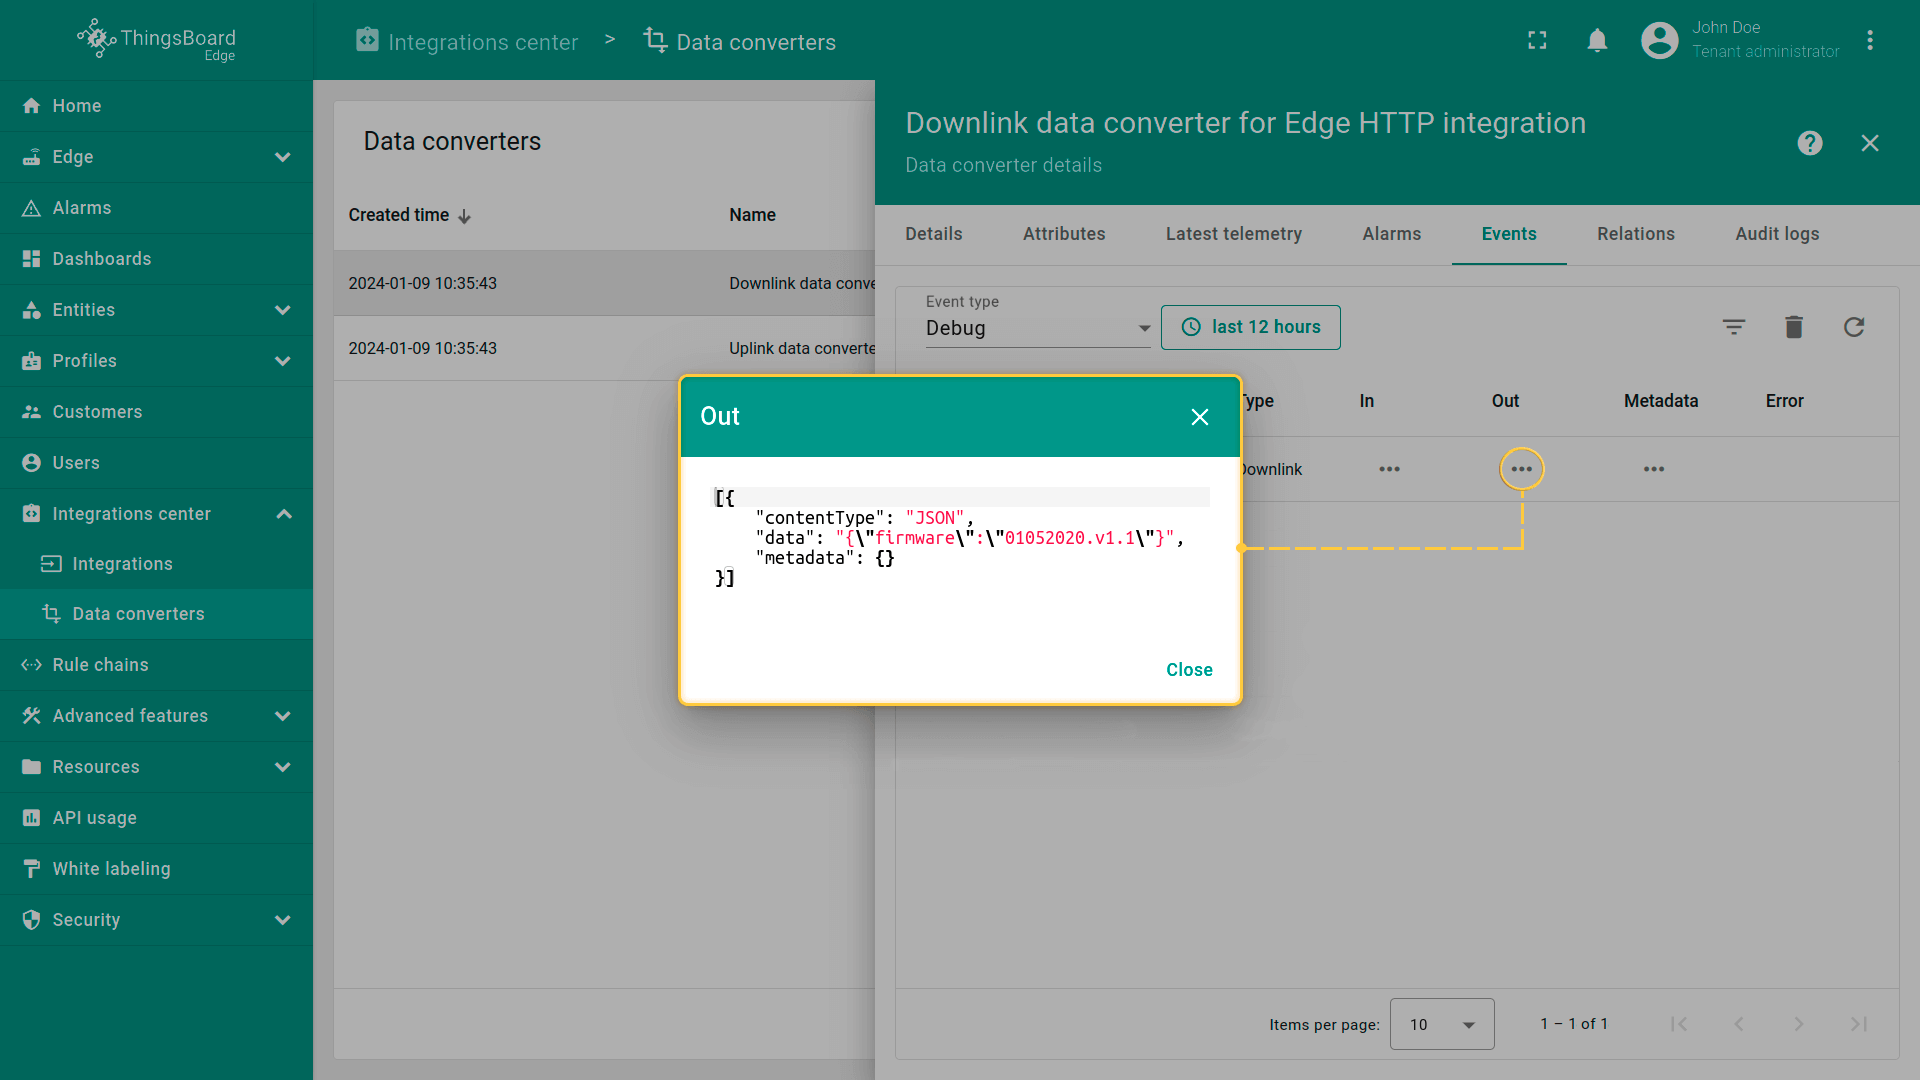
The “Out” field shows the message sent to the device:
下一步
-
Getting started guide(入门指南)- 快速概览 ThingsBoard Edge 主要功能。预计 15–30 分钟完成:
-
Installation guides(安装指南)- 了解如何在各种操作系统上安装 ThingsBoard Edge 并连接到 ThingsBoard Server。
-
Edge 规则引擎:
-
Rule Chain Templates(规则链模板)- 了解如何使用 ThingsBoard Edge 规则链模板。
-
Provision Rule Chains from cloud to edge(从云端向 Edge 下发规则链)- 了解如何从云端向 Edge 下发边缘规则链。
-
- 安全:
- gRPC over SSL/TLS - 了解如何为 Edge 与云端之间的通信配置 gRPC over SSL/TLS。
-
功能:
-
Edge Status(Edge 状态)- 了解 ThingsBoard Edge 上的 Edge Status 页面。
-
Cloud Events(云端事件)- 了解 ThingsBoard Edge 上的 Cloud Events 页面。
-
-
使用场景:
-
Manage alarms and RPC requests on edge devices(在边缘设备上管理告警和 RPC 请求)- 本指南展示如何在 Edge 上生成本地告警并向连接到 Edge 的设备发送 RPC 请求:
-
Data filtering and traffic reduce(数据过滤与流量削减)- 本指南展示如何从 Edge 向云端仅发送过滤后的设备数据:
-
- Roadmap(路线图)- ThingsBoard Edge 路线图。