vardata=decodeToJson(payload);vardeviceName=data.deviceInfo.deviceName;vardeviceType=data.deviceInfo.deviceProfileName;vargroupName='IAQ devices';// var customerName = 'Customer A';// use assetName and assetType instead of deviceName and deviceType// to automatically create assets instead of devices.// var assetName = 'Asset A';// var assetType = 'building';// If you want to parse incoming data somehow, you can add your code to this function.// input: bytes// expected output:// {// "attributes": {"attributeKey": "attributeValue"},// "telemetry": {"telemetryKey": "telemetryValue"}// }//// In the example - bytes will be saved as HEX string and also parsed as light level, battery level and PIR sensor value.//functiondecodePayload(input){varoutput={attributes:{},telemetry:{}};// --- Decoding code --- //output.telemetry.HEX_bytes=bytesToHex(input);// If the length of the input byte array is odd - we cannot parse it using the example belowif(input.length>0){for(vari=0;i<input.length;){varchannel_id=input[i++];if(i<input.length){varchannel_type=input[i++];// BATTERYif(channel_id===0x01&&channel_type===0x75){output.telemetry.battery=input[i];i+=1;}// PIRelseif(channel_id===0x03&&channel_type===0x00){output.telemetry.pir=input[i]===0?"normal":"trigger";i+=1;}// DAYLIGHTelseif(channel_id===0x04&&channel_type===0x00){output.telemetry.daylight=input[i]===0?"dark":"light";i+=1;}}}}// --- Decoding code --- //returnoutput;}// --- attributes and telemetry objects ---vartelemetry={};varattributes={};// --- attributes and telemetry objects ---// --- Timestamp parsingvardateString=data.time;vartimestamp=-1;if(dateString!=null){timestamp=newDate(dateString).getTime();if(timestamp==-1){varsecondsSeparatorIndex=dateString.lastIndexOf('.')+1;varmillisecondsEndIndex=dateString.lastIndexOf('+');if(millisecondsEndIndex==-1){millisecondsEndIndex=dateString.lastIndexOf('Z');}if(millisecondsEndIndex==-1){millisecondsEndIndex=dateString.lastIndexOf('-');}if(millisecondsEndIndex==-1){if(dateString.length>=secondsSeparatorIndex+3){dateString=dateString.substring(0,secondsSeparatorIndex+3);}}else{dateString=dateString.substring(0,secondsSeparatorIndex+3)+dateString.substring(millisecondsEndIndex,dateString.length);}timestamp=newDate(dateString).getTime();}}// If we cannot parse timestamp - we will use the current timestampif(timestamp==-1){timestamp=Date.now();}// --- Timestamp parsing// You can add some keys manually to attributes or telemetryattributes.deduplicationId=data.deduplicationId;// You can exclude some keys from the resultvarexcludeFromAttributesList=["deviceName","rxInfo","confirmed","data","deduplicationId","time","adr","dr","fCnt"];varexcludeFromTelemetryList=["data","deviceInfo","txInfo","devAddr","adr","time","fPort","region_common_name","region_config_id","deduplicationId"];// Message parsing// To avoid paths in the decoded objects we passing false value to function as "pathInKey" argument.// Warning: pathInKey can cause already found fields to be overwritten with the last value found.vartelemetryData=toFlatMap(data,excludeFromTelemetryList,false);varattributesData=toFlatMap(data,excludeFromAttributesList,false);varuplinkDataList=[];// Passing incoming bytes to decodePayload function, to get custom decodingvarcustomDecoding=decodePayload(base64ToBytes(data.data));// Collecting data to resultif(customDecoding.?telemetry.size()>0){telemetry.putAll(customDecoding.telemetry);}if(customDecoding.?attributes.size()>0){attributes.putAll(customDecoding.attributes);}telemetry.putAll(telemetryData);attributes.putAll(attributesData);varresult={deviceName:deviceName,deviceType:deviceType,// assetName: assetName,// assetType: assetType,// customerName: customerName,groupName:groupName,attributes:attributes,telemetry:{ts:timestamp,values:telemetry}};returnresult;
// Decode an uplink message from a buffer// payload - array of bytes// metadata - key/value object/** Decoder **/// decode payload to stringvarpayloadStr=decodeToString(payload);// decode payload to JSON// var data = decodeToJson(payload);vardeviceName='Device A';vardeviceType='thermostat';varcustomerName='Customer C';vargroupName='thermostat devices';varmanufacturer='Example corporation';// use assetName and assetType instead of deviceName and deviceType// to automatically create assets instead of devices.// var assetName = 'Asset A';// var assetType = 'building';// Result object with device/asset attributes/telemetry datavarresult={// Use deviceName and deviceType or assetName and assetType, but not both.deviceName:deviceName,deviceType:deviceType,// assetName: assetName,// assetType: assetType,// customerName: customerName,groupName:groupName,attributes:{model:'Model A',serialNumber:'SN111',integrationName:metadata['integrationName'],manufacturer:manufacturer},telemetry:{temperature:42,humidity:80,rawData:payloadStr}};/** Helper functions **/functiondecodeToString(payload){returnString.fromCharCode.apply(String,payload);}functiondecodeToJson(payload){// covert payload to string.varstr=decodeToString(payload);// parse string to JSONvardata=JSON.parse(str);returndata;}returnresult;
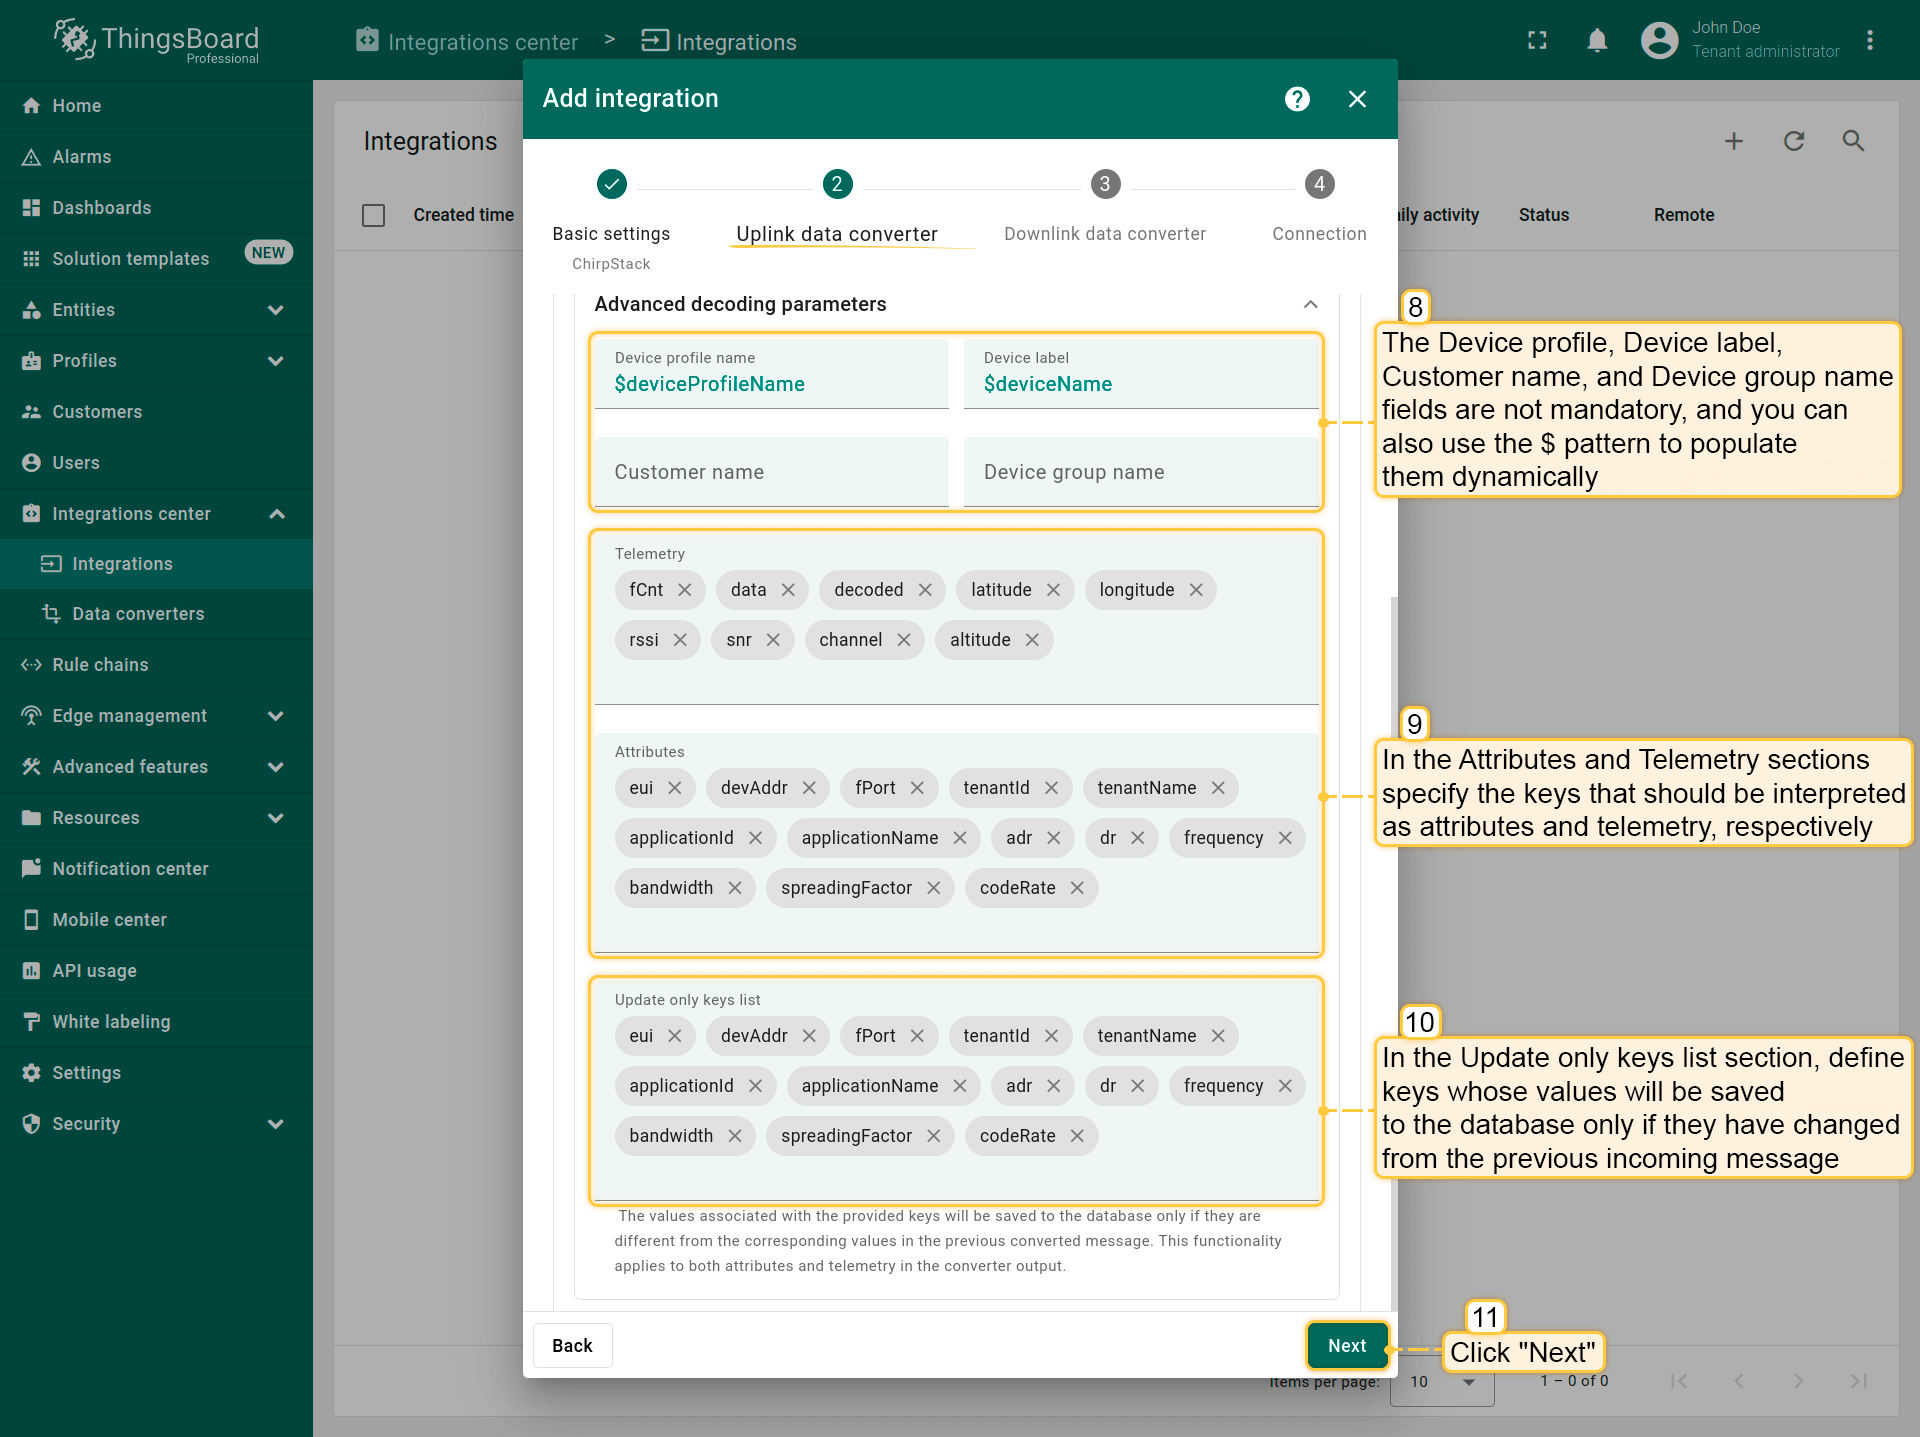
“Advanced decoding parameters“部分:
Device profile、Device label、Customer name和Device group name字段不是必填项,您也可以使用$模式动态填充它们。
在Attributes和Telemetry部分,分别指定应解释为属性和遥测的键。
在Update only keys list部分,定义仅在值与上一条传入消息相比发生变化时才保存到数据库的键。这适用于属性和遥测,有助于优化数据存储。
上行转换器设置完成后,点击”Next“。
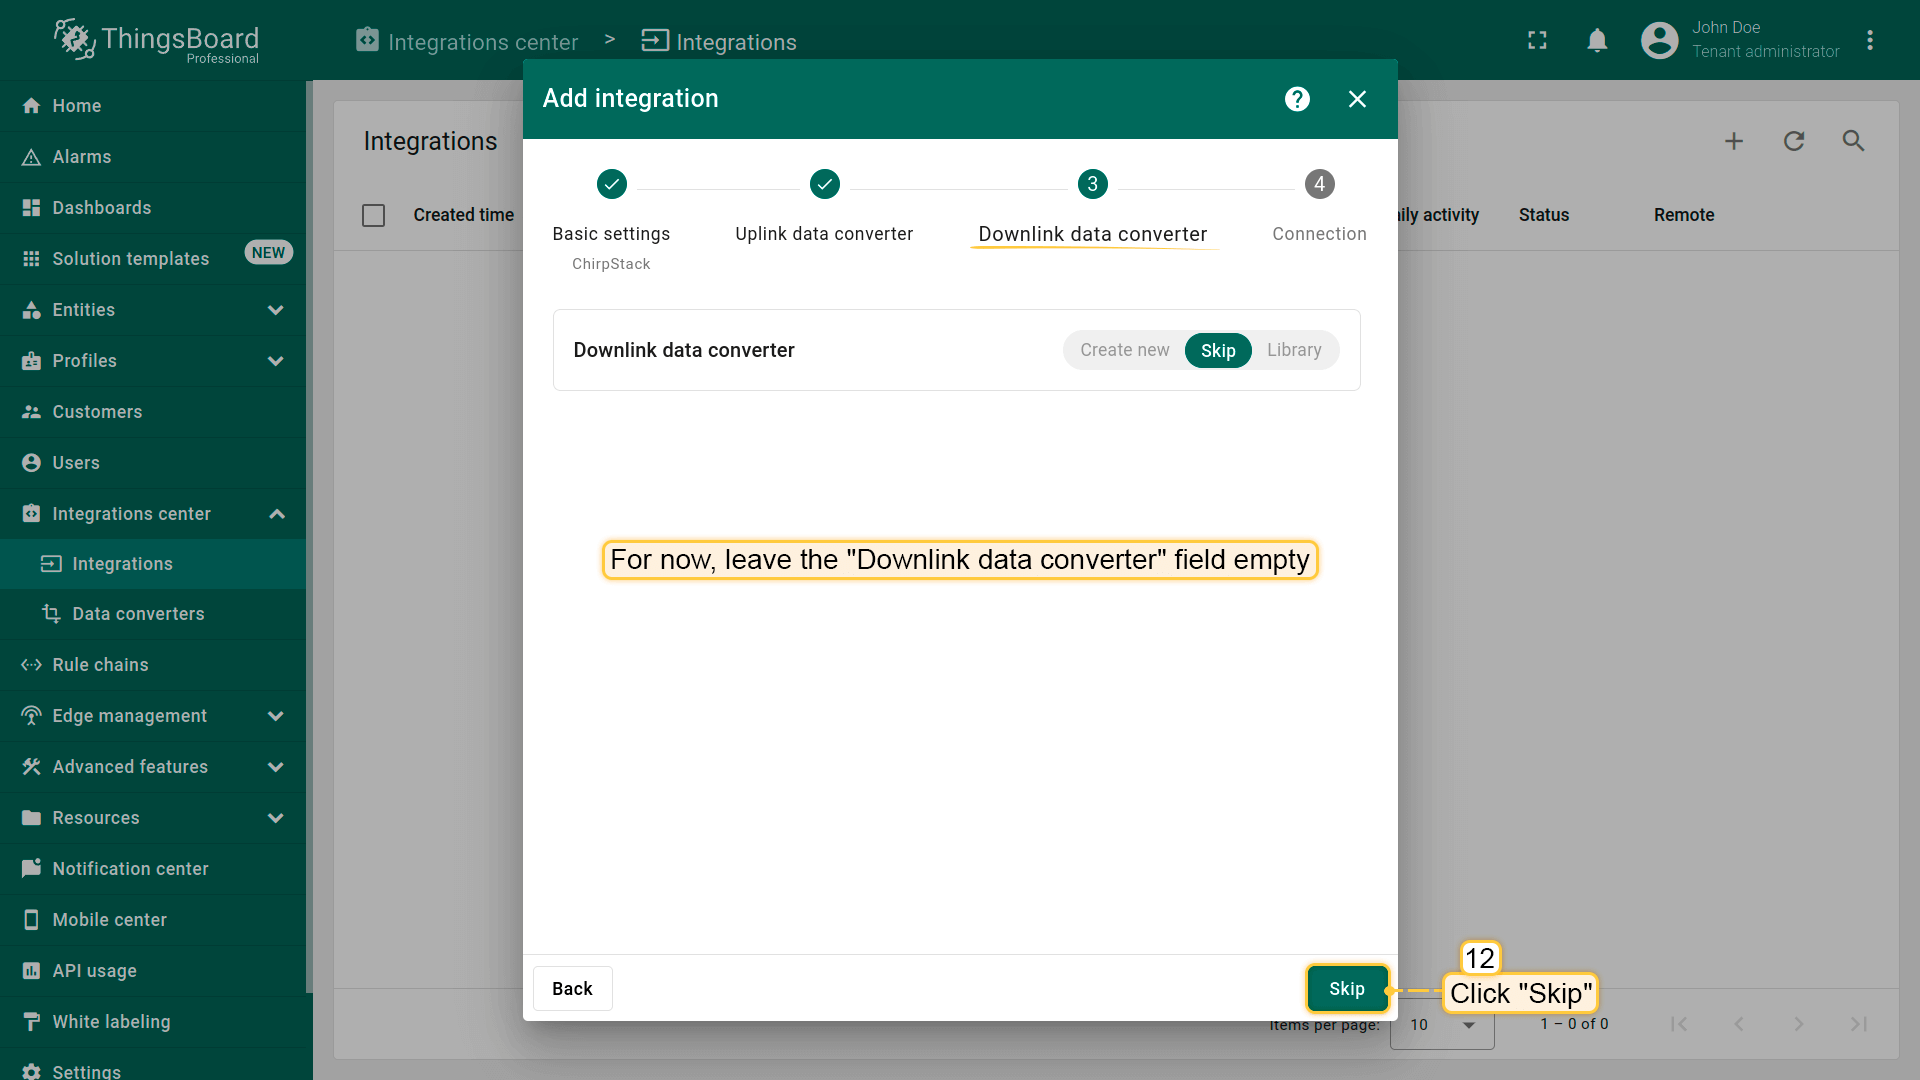
3. 下行数据转换器。
在添加下行转换器的步骤中,您也可以选择之前创建的转换器或创建新的下行转换器。但目前先将”Downlink data converter”字段留空,点击”Skip“;
4. 连接。
要完成集成的添加,您需要:
指定您的”Base URL”;
记下”HTTP endpoint URL”,我们稍后会用到此值;
指定”Application server URL”——应用服务器或REST API服务的地址。通常在标准安装中,只需将端口更改为8090;
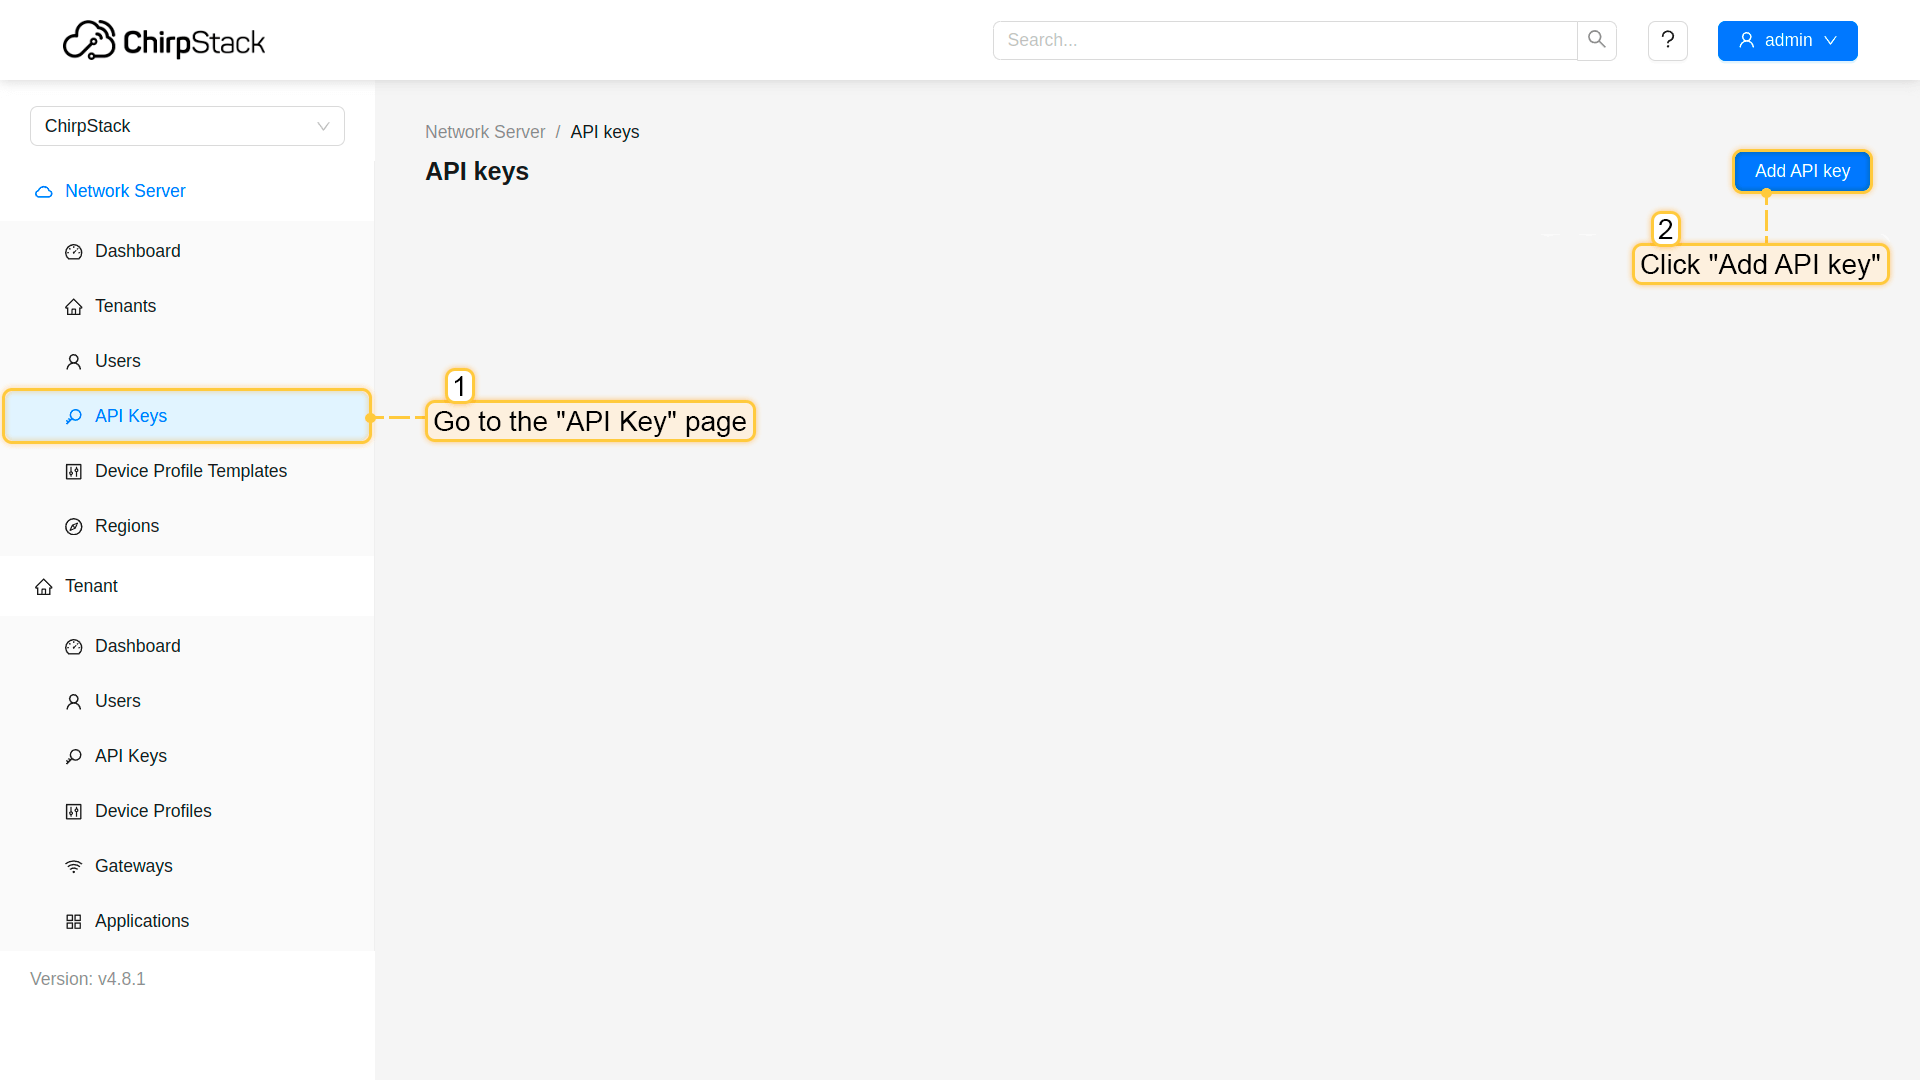
指定”Application server API Token”——从应用服务器获取。获取方法:打开ChirpStack应用服务器界面,从左上角菜单导航到”API keys”页面,创建新的API密钥。
Go to the "API keys" page, and click "Add API key";
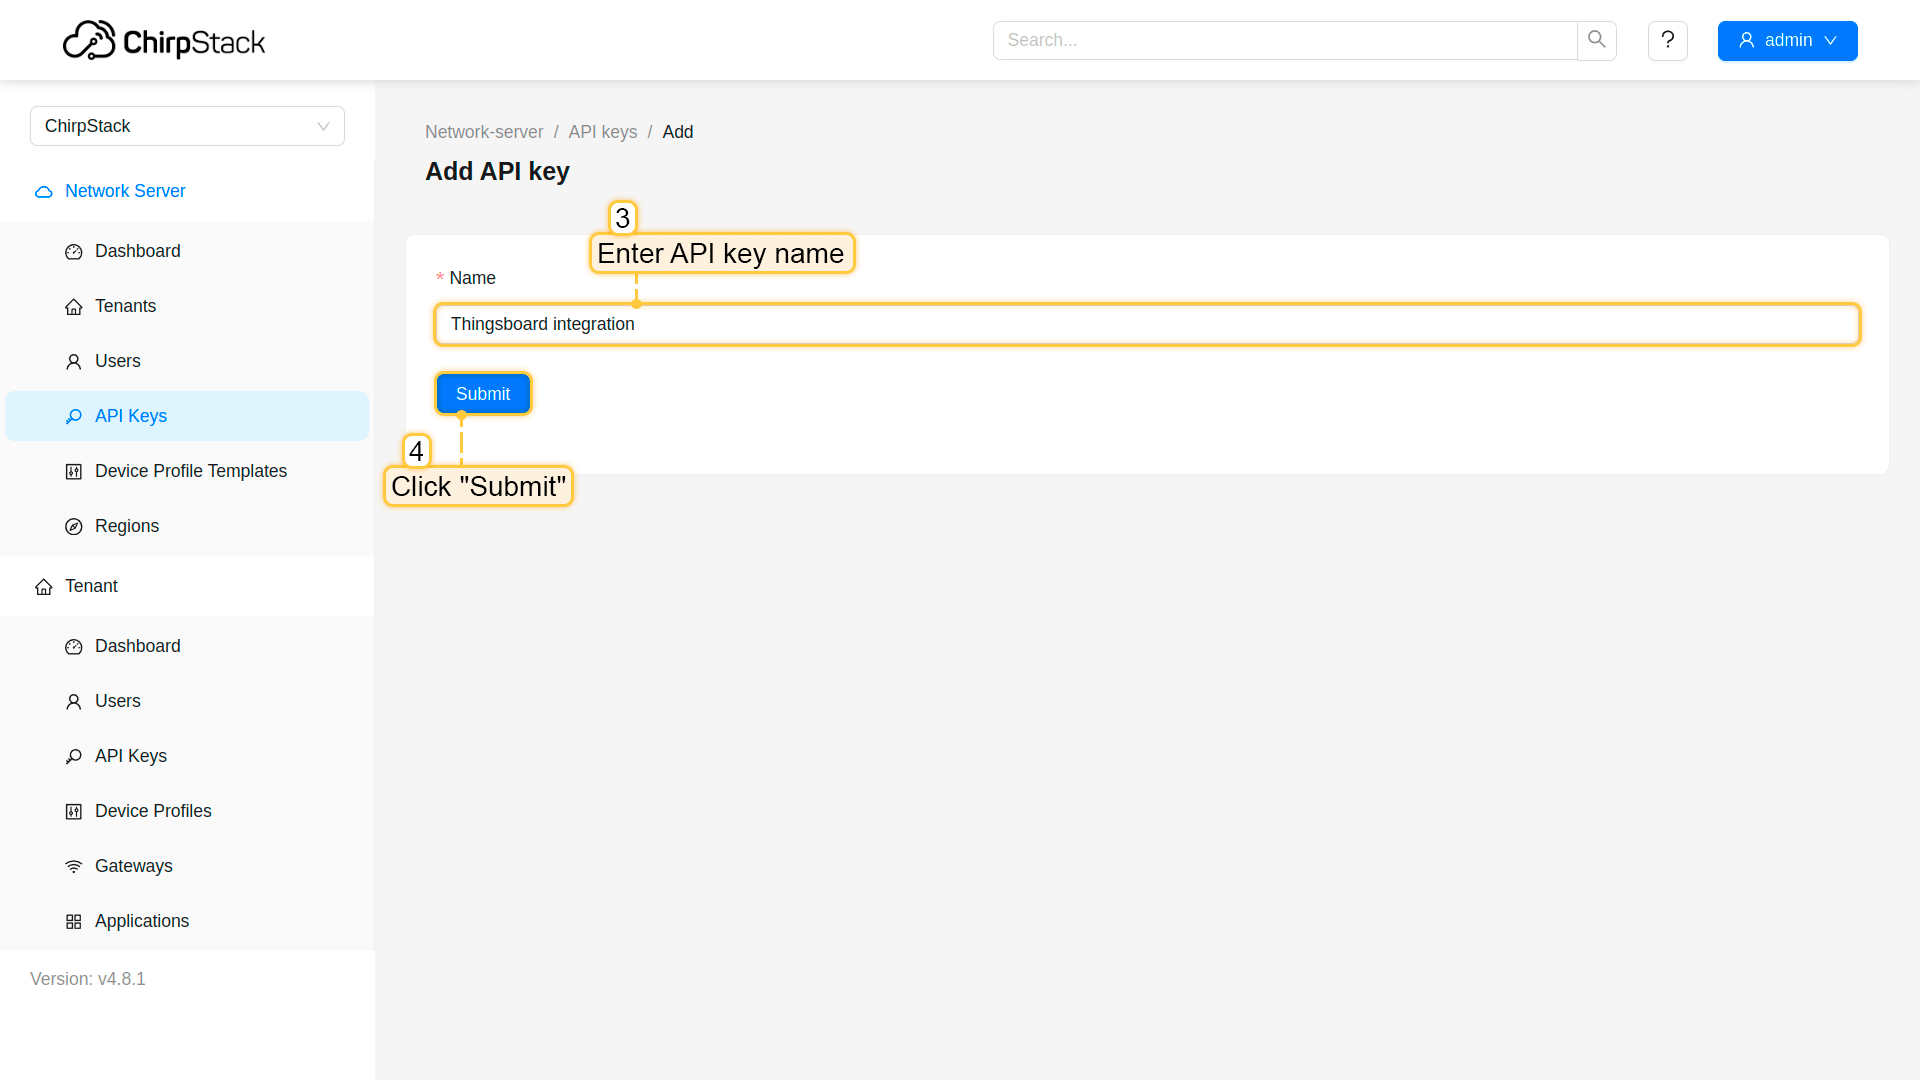
Enter API key name, and click "Submit";
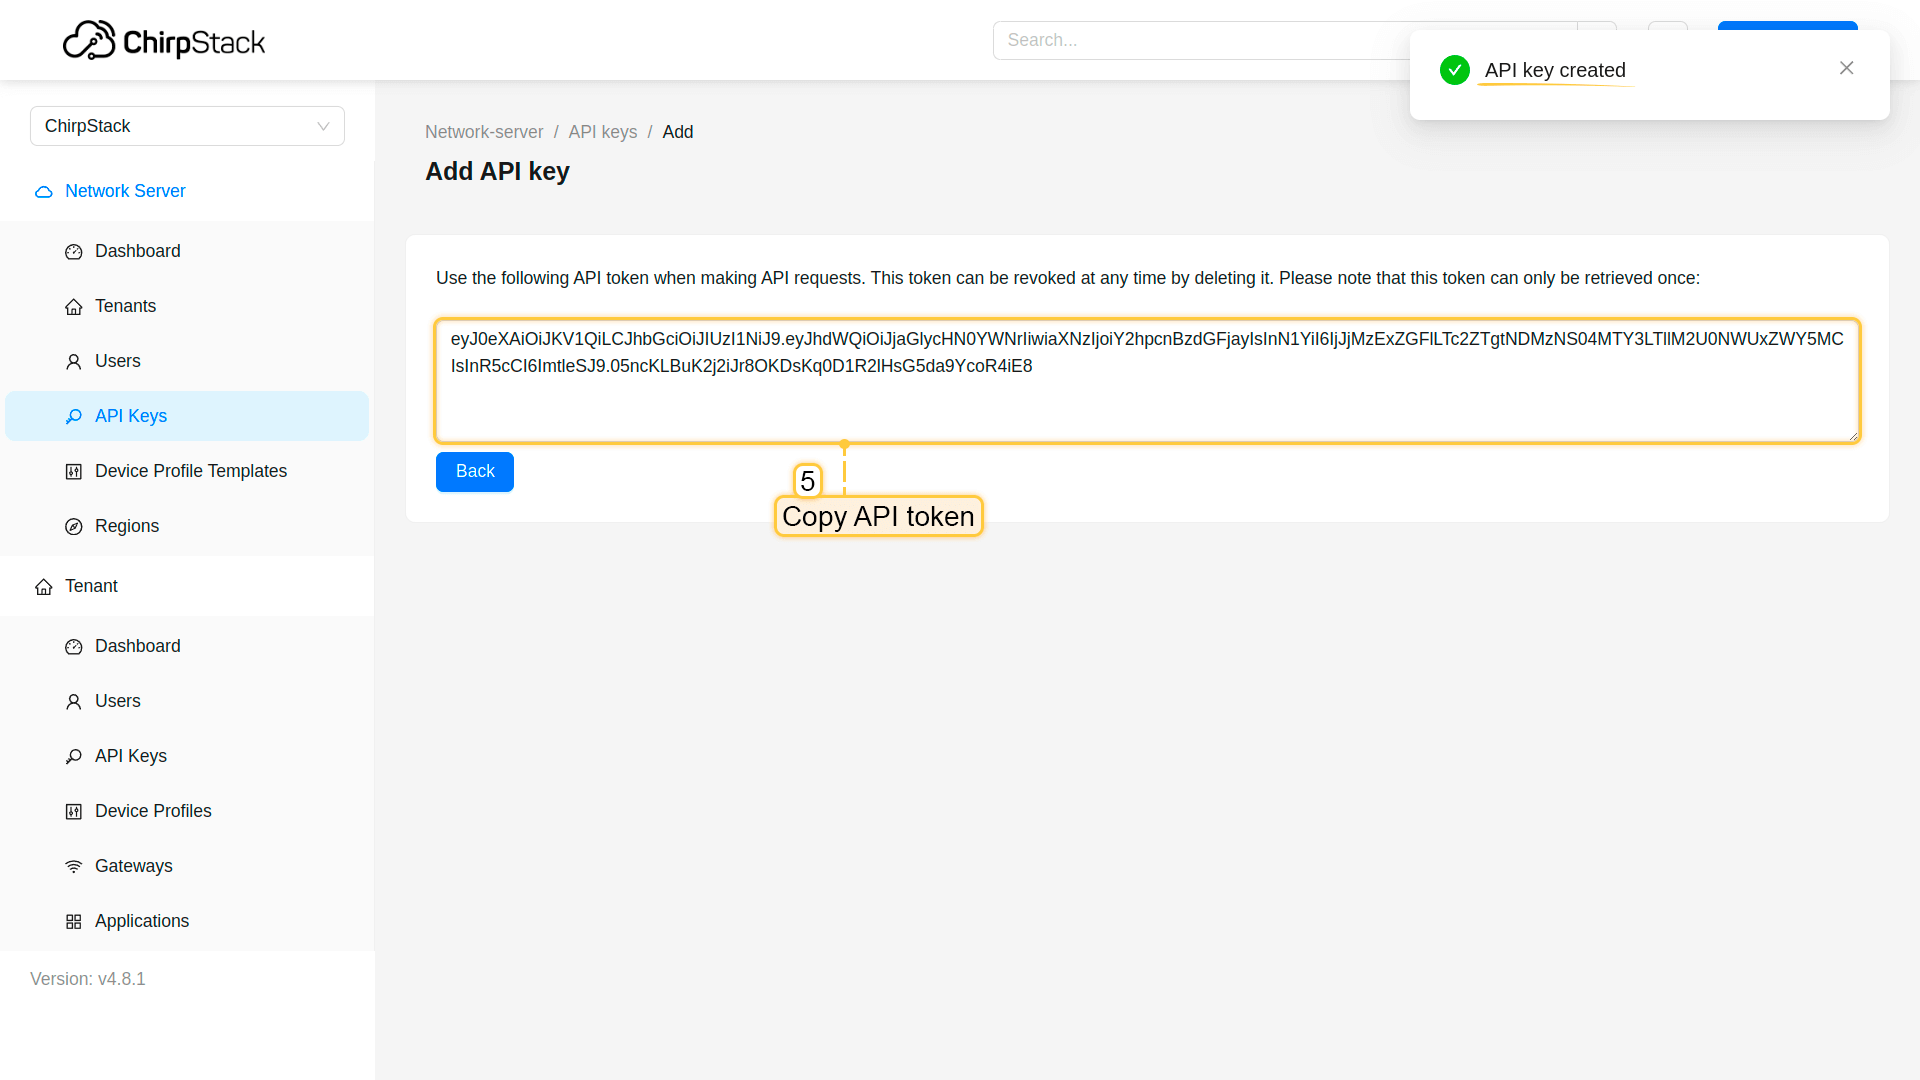
API key created. Copy API token.
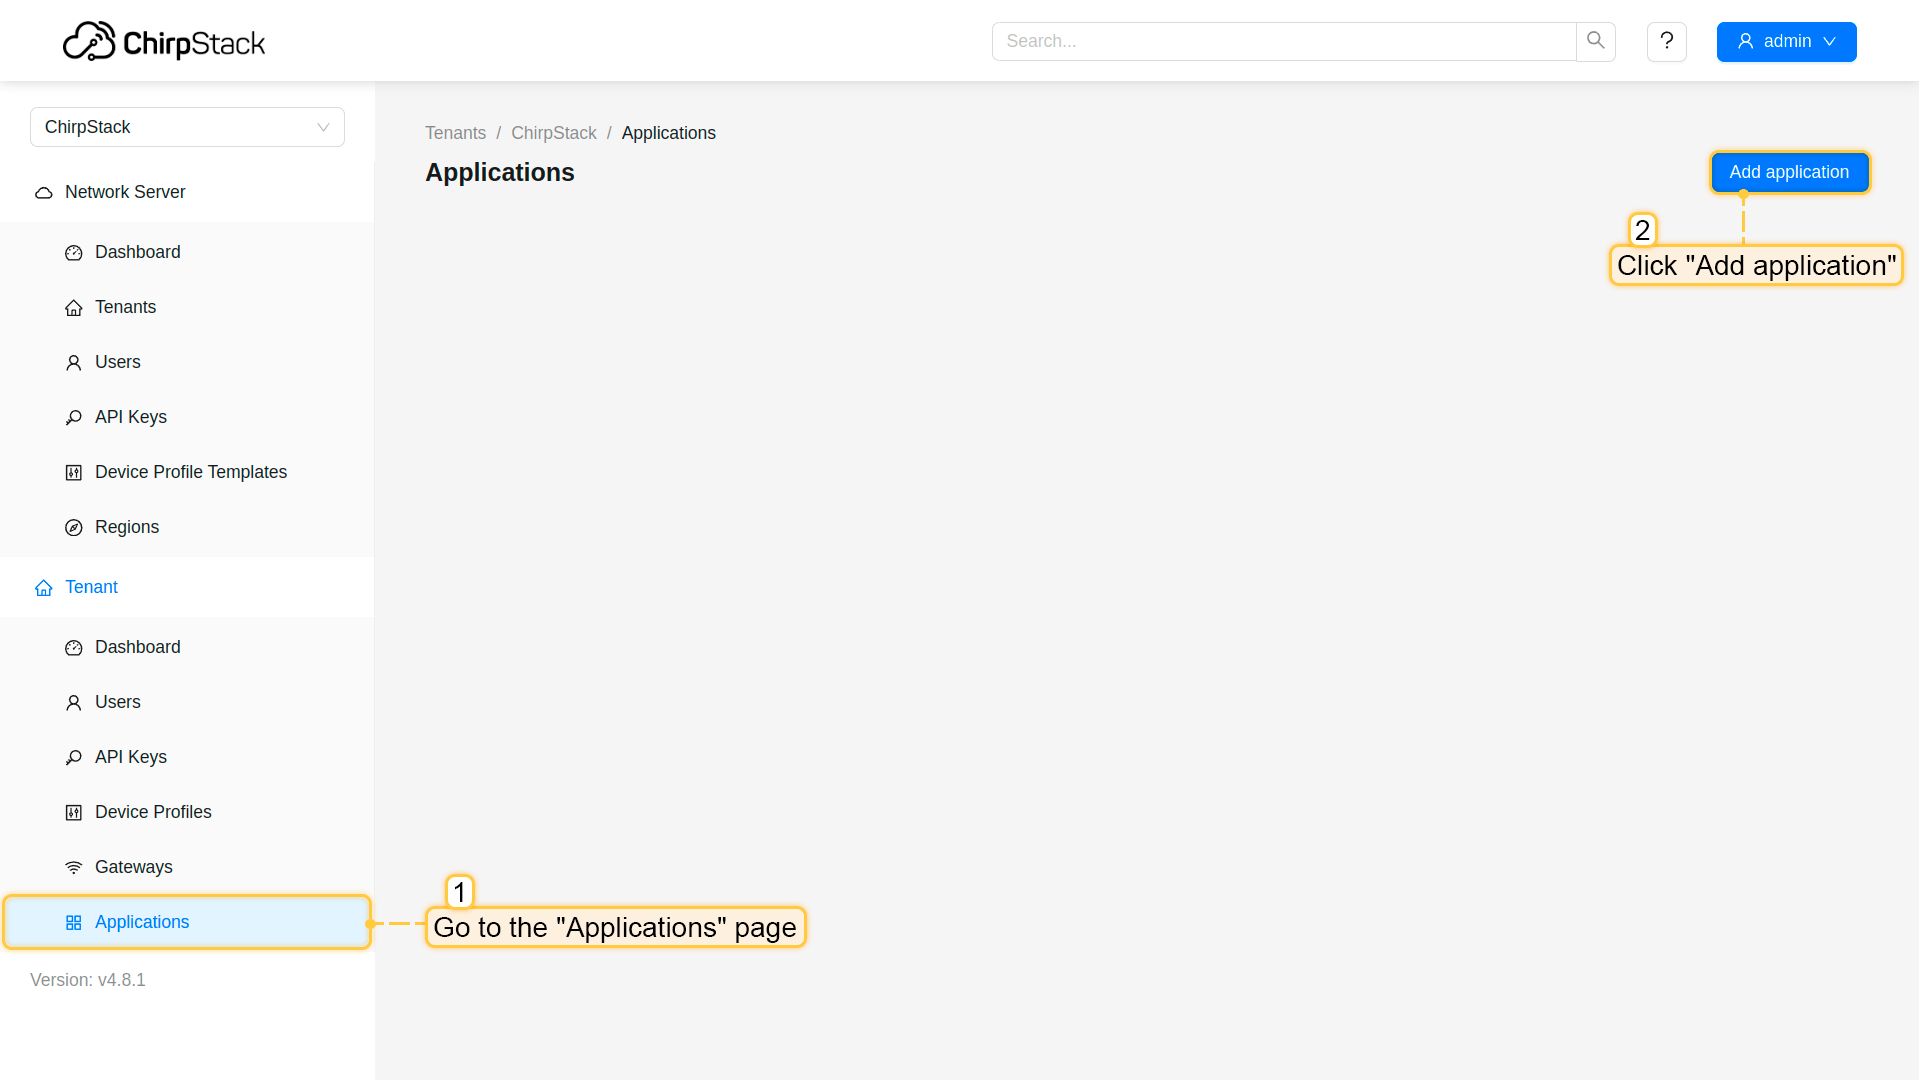
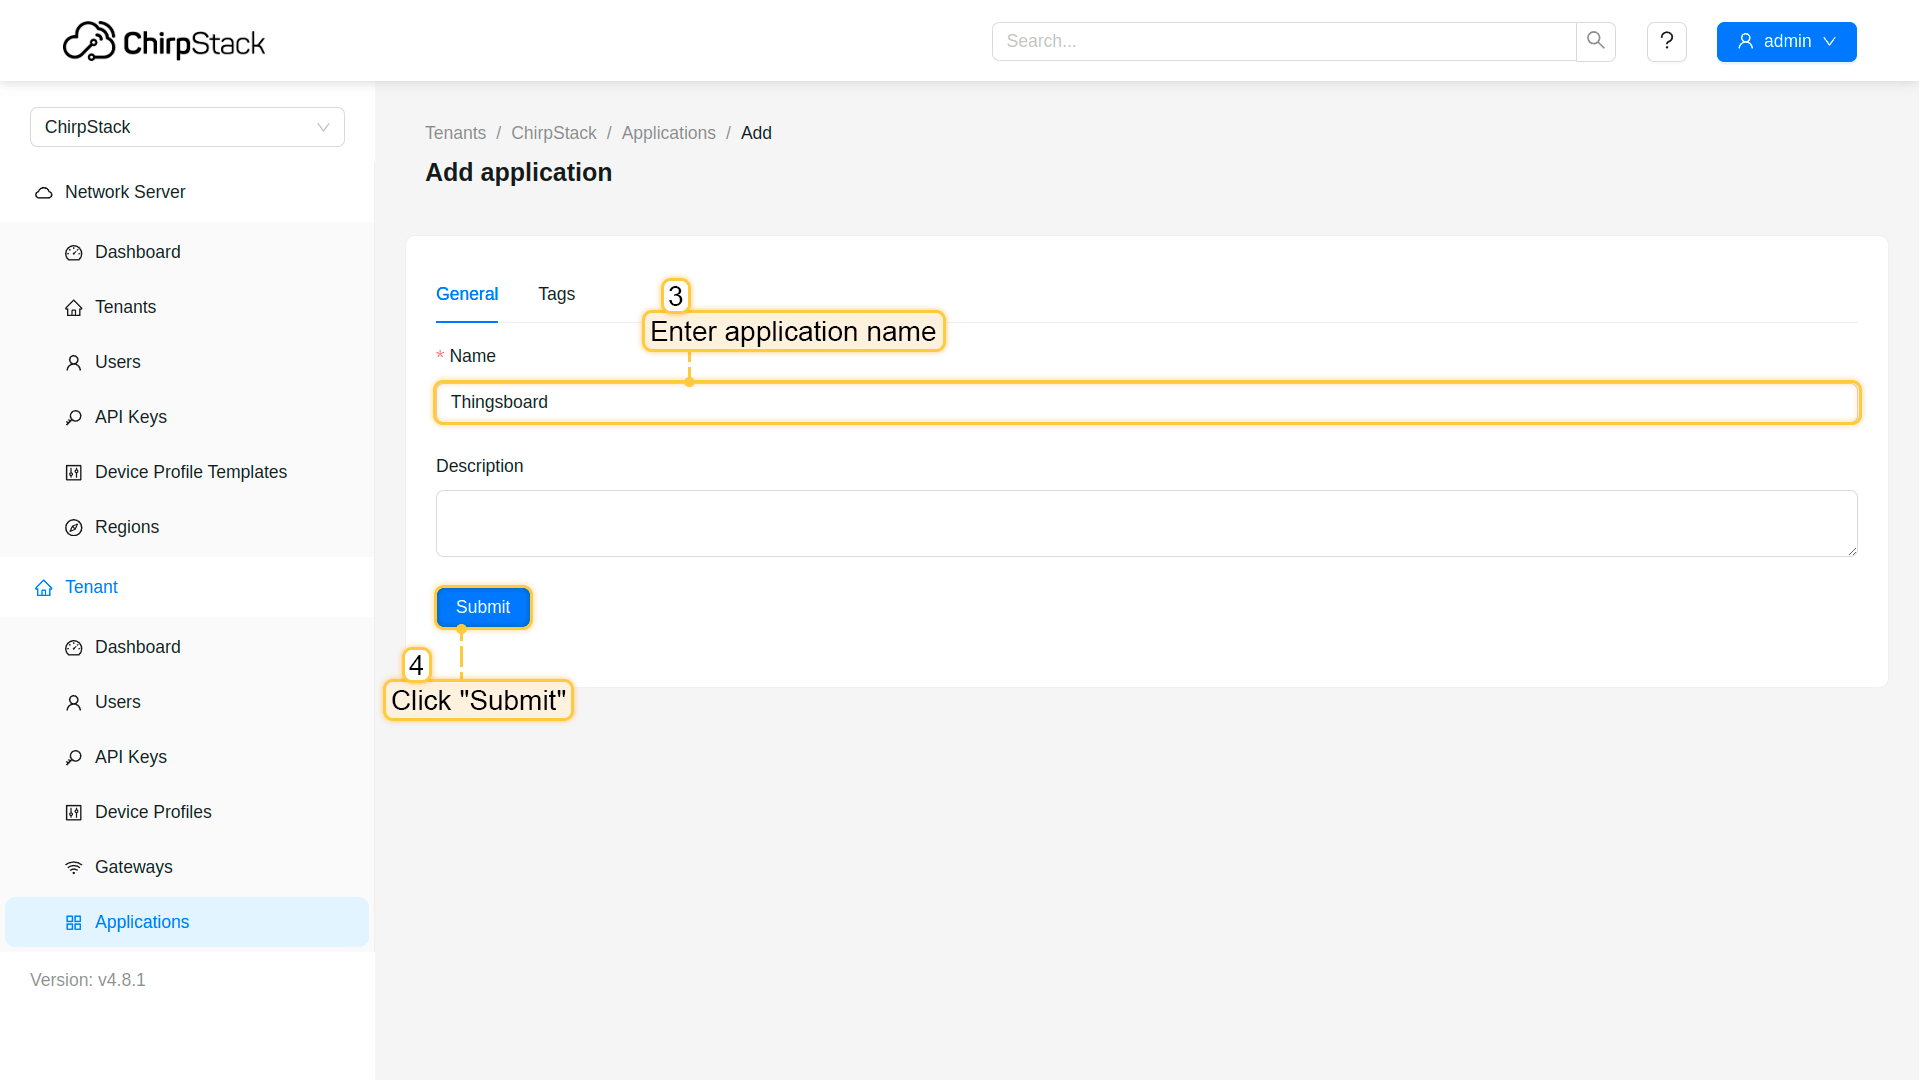
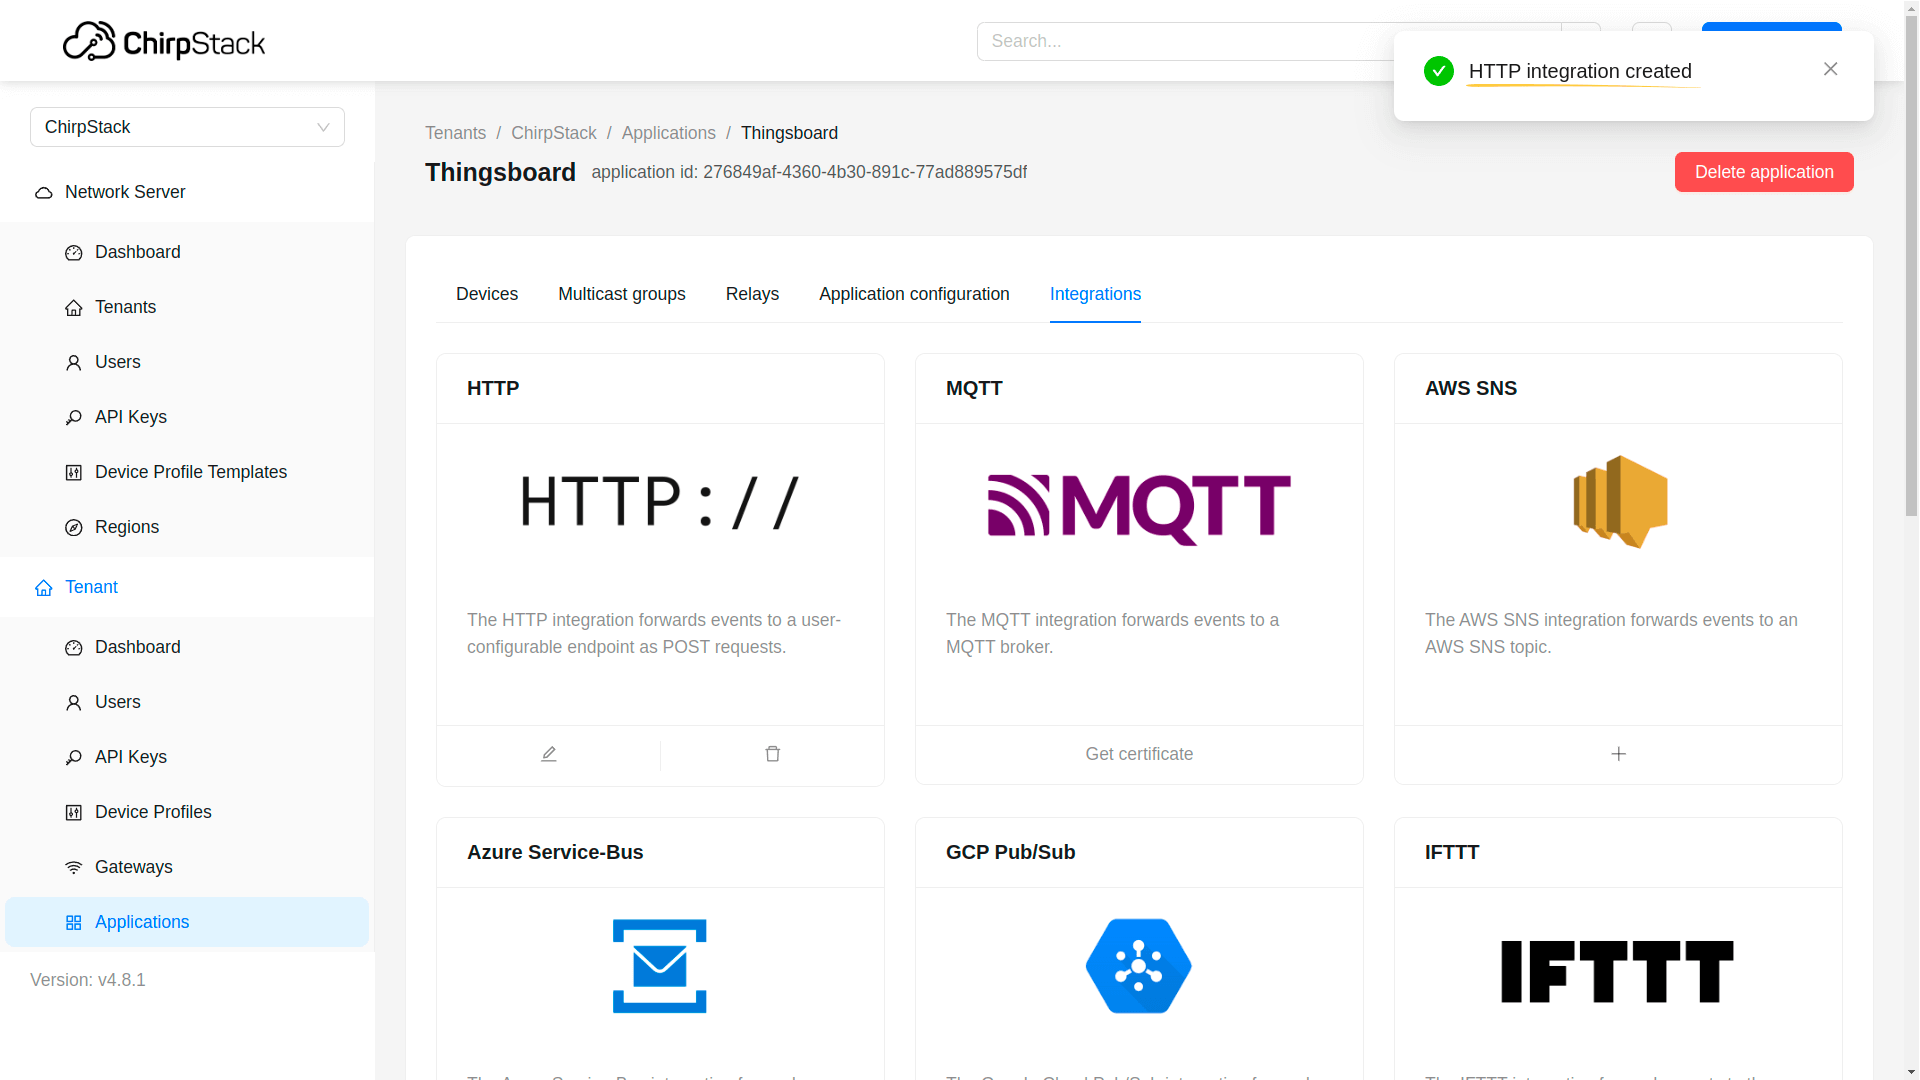
Go to the "Applications" page in the left menu of the ChirpStack Network server user interface, and click "Add application" button;
Named it and click "Submit" button;
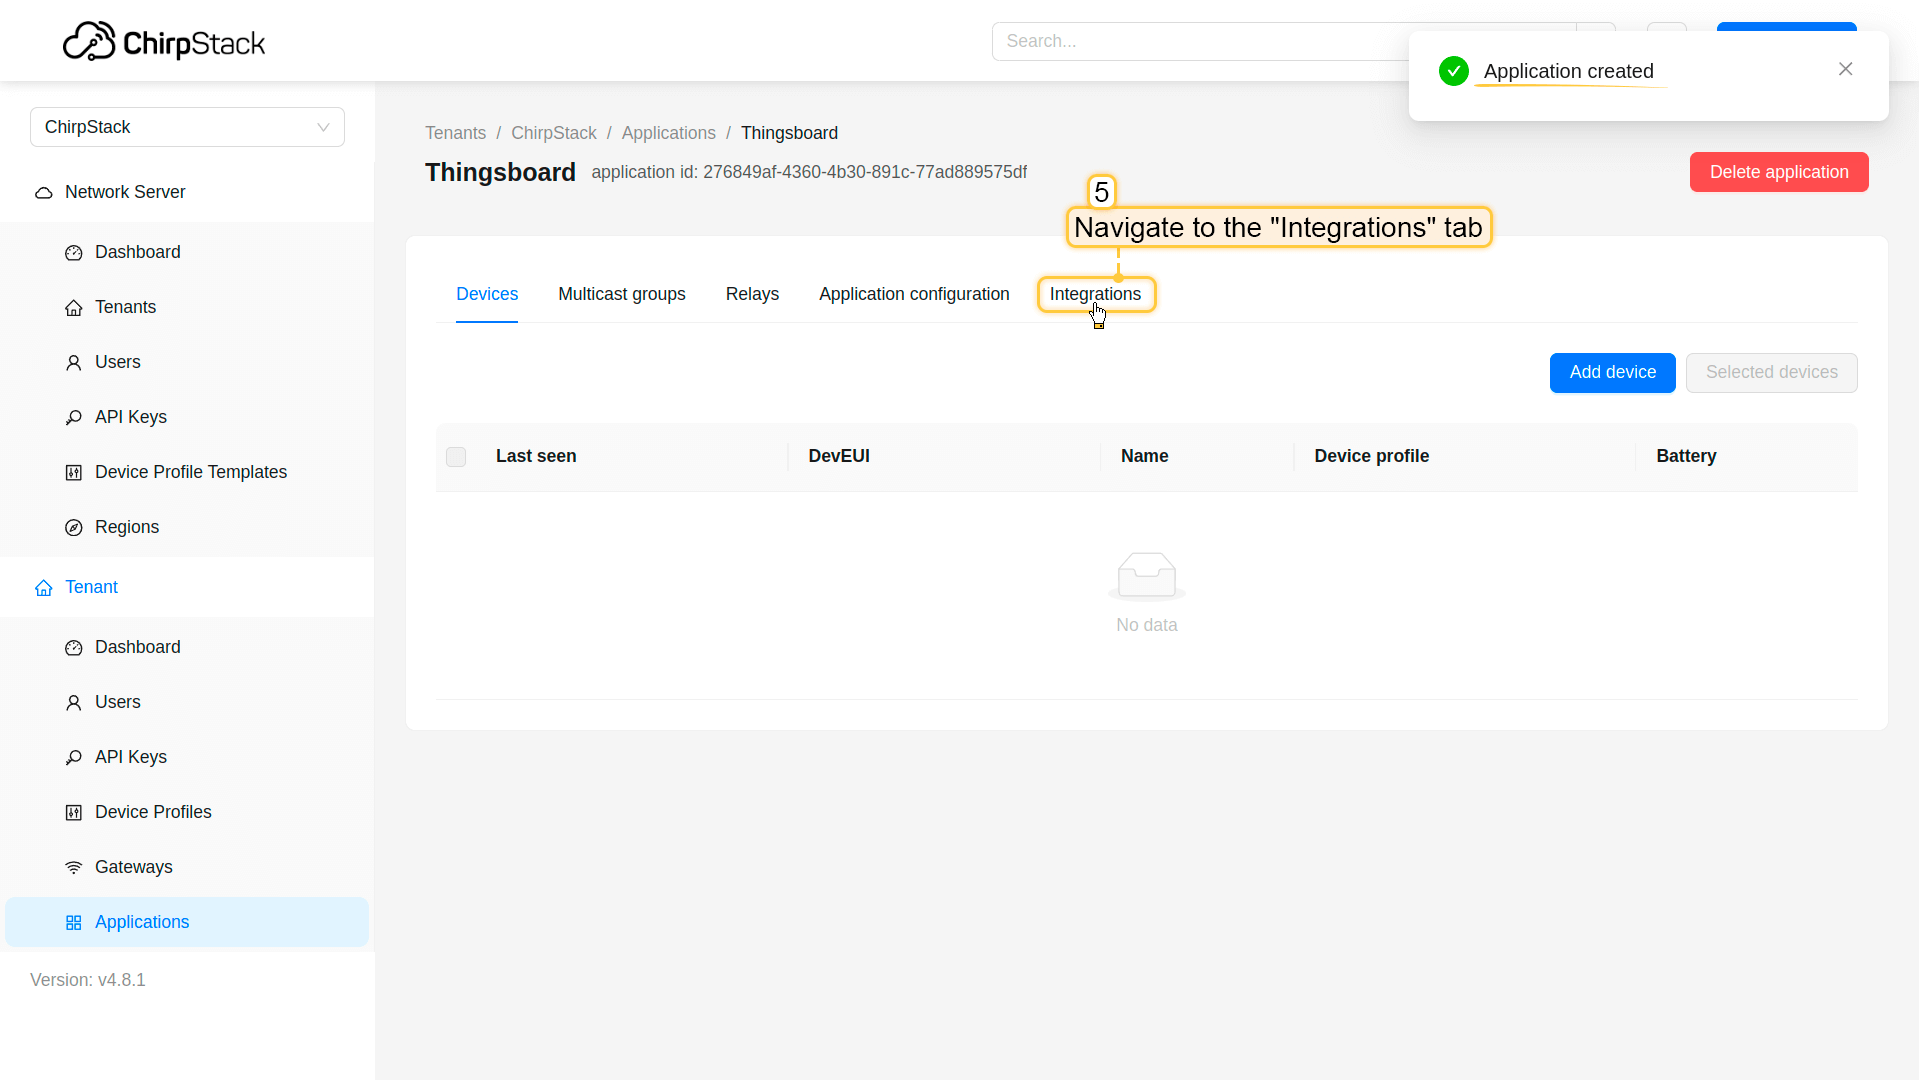
Application created. Now, navigate to the "Integrations" tab;
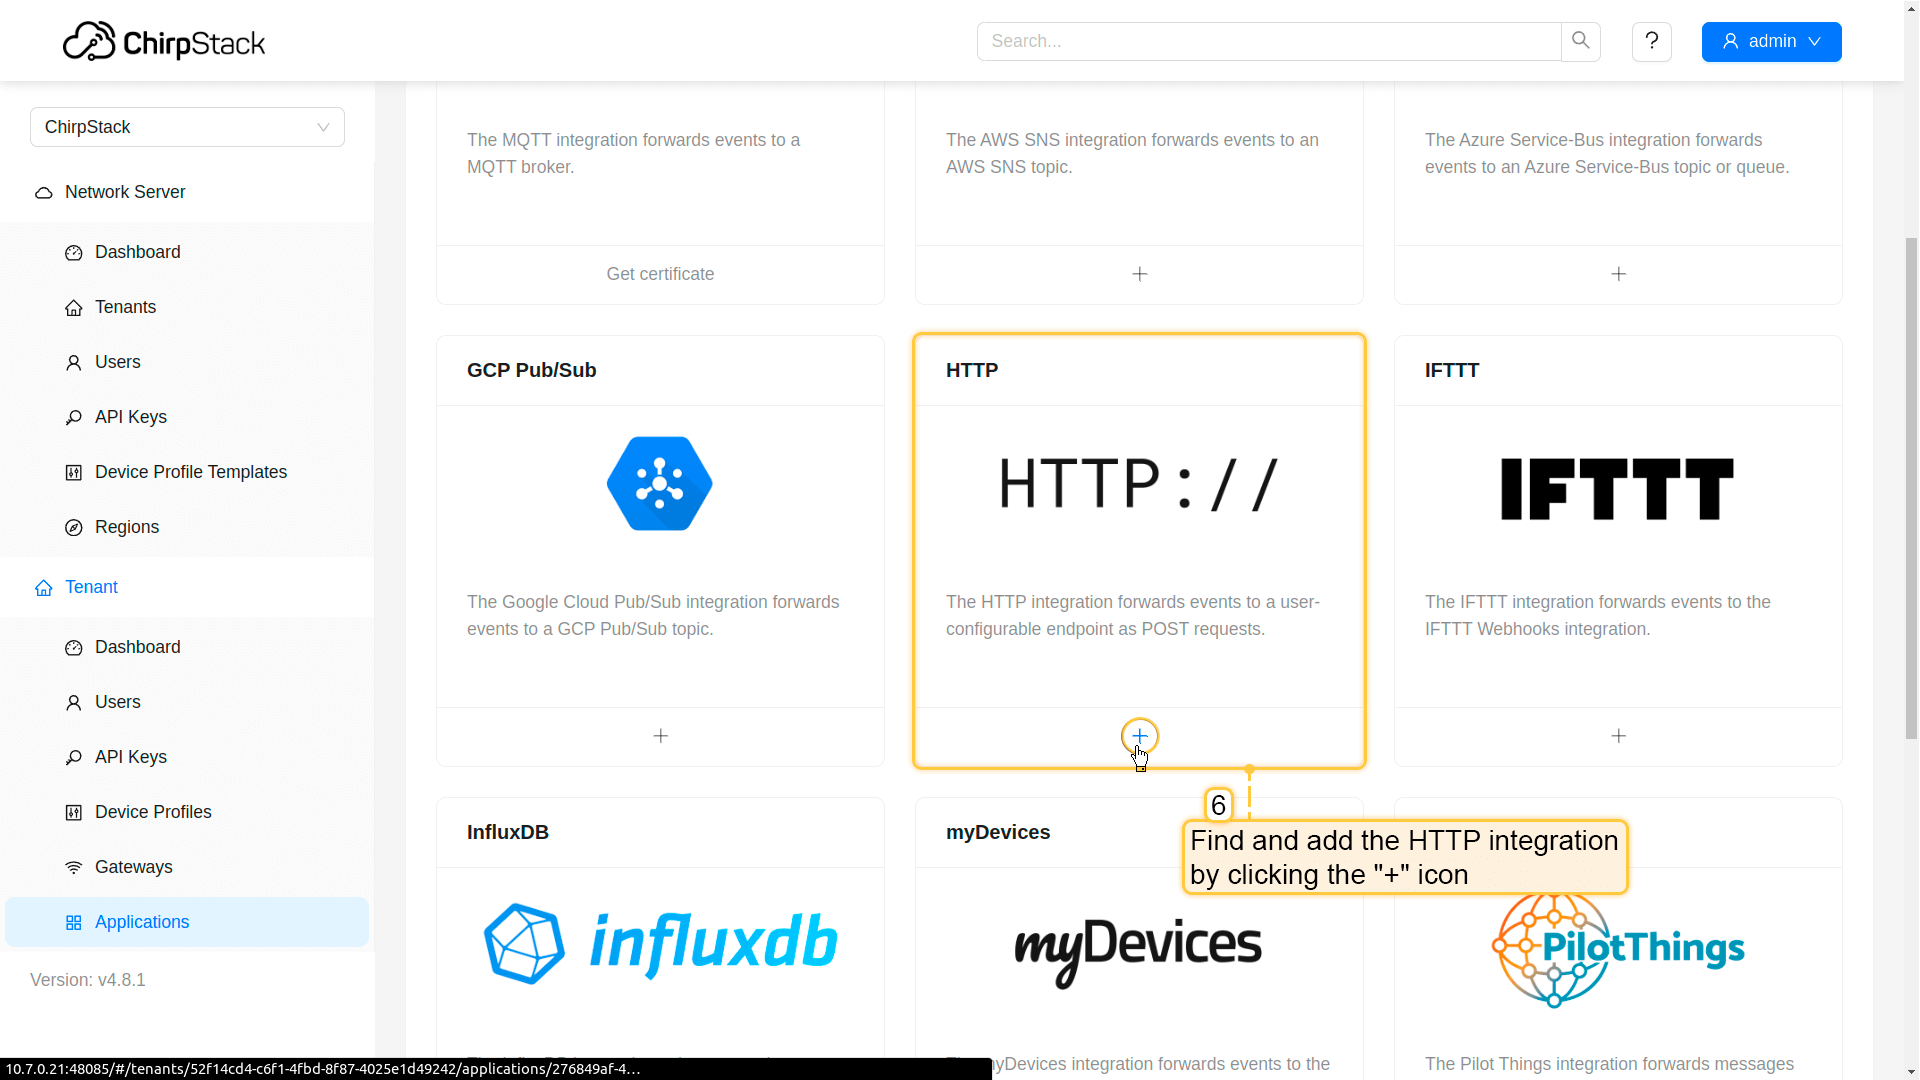
Find and add a "HTTP" integration by clicking "+" icon;
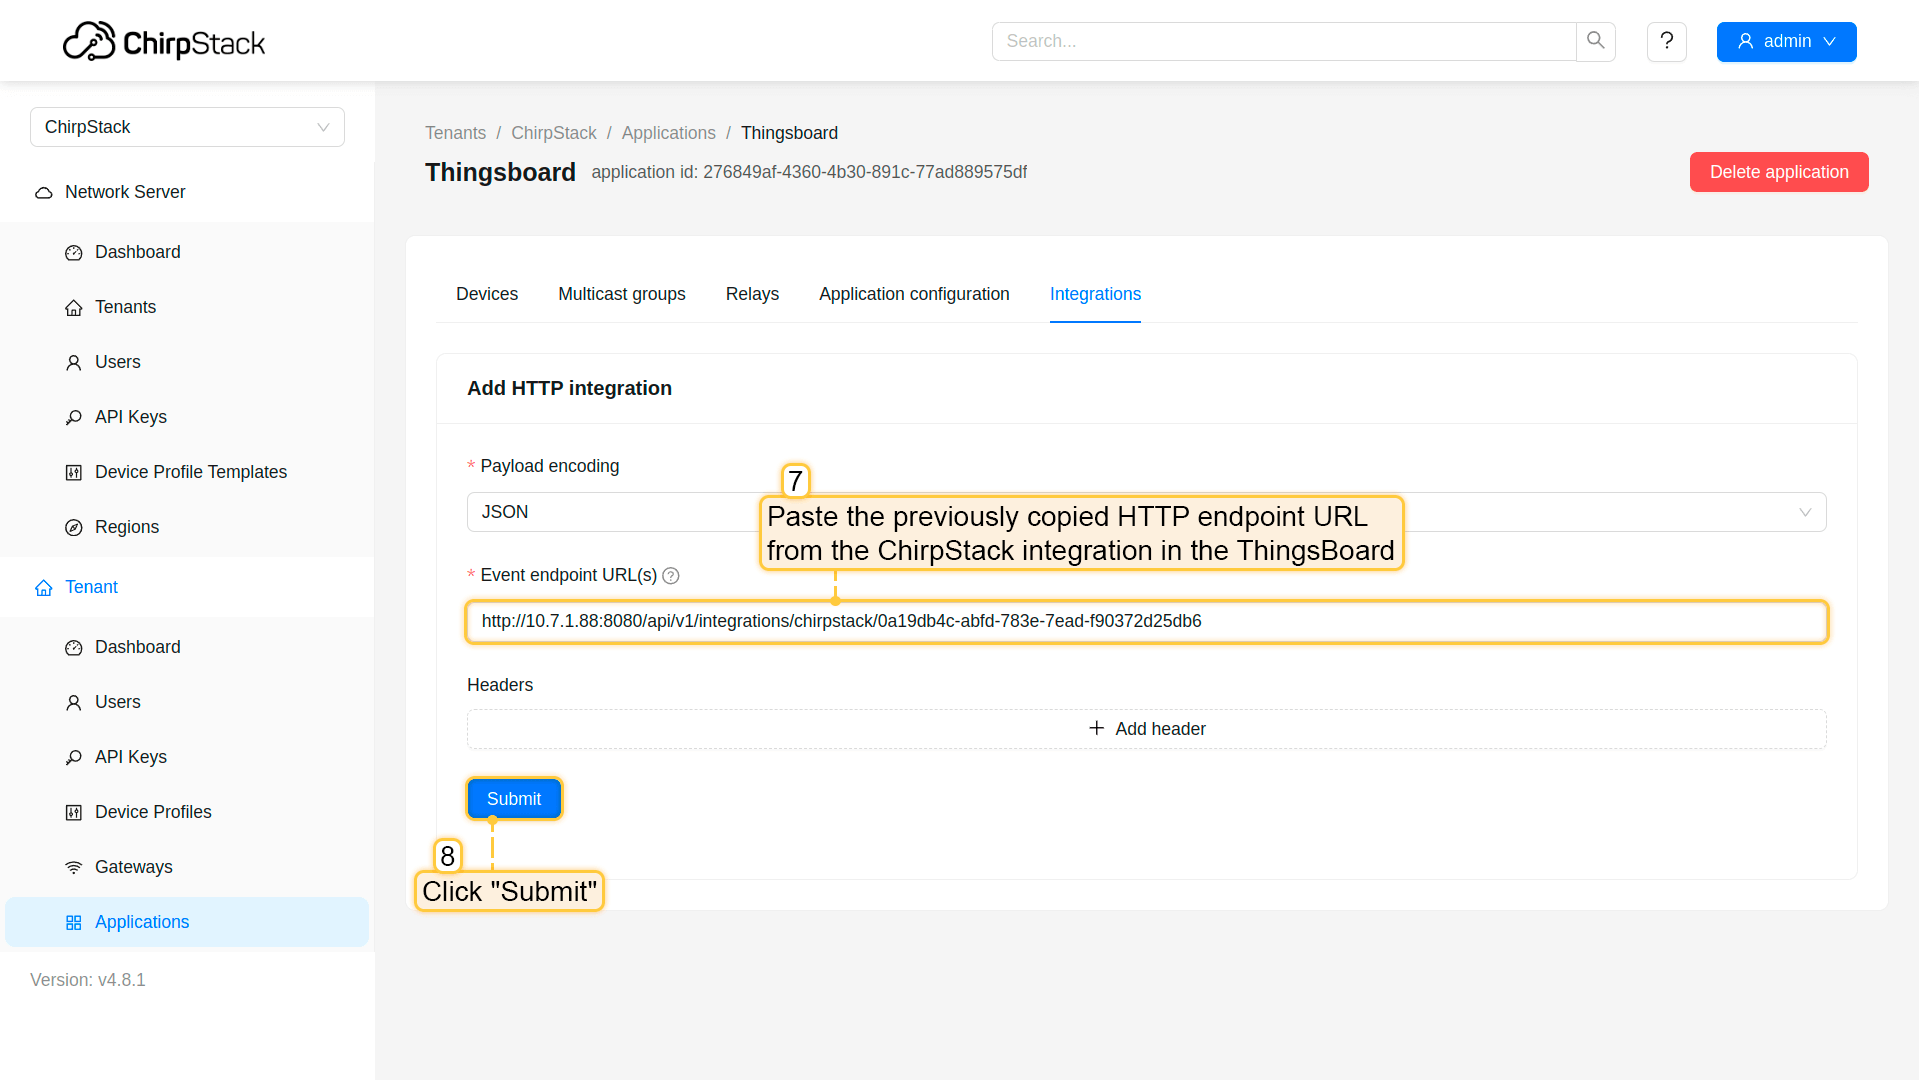
Fill in the field with the "HTTP endpoint URL" previously copied from the ChirpStack integration in the ThingsBoard. Then, click "Submit" button;
HTTP integration created.
处理上行消息
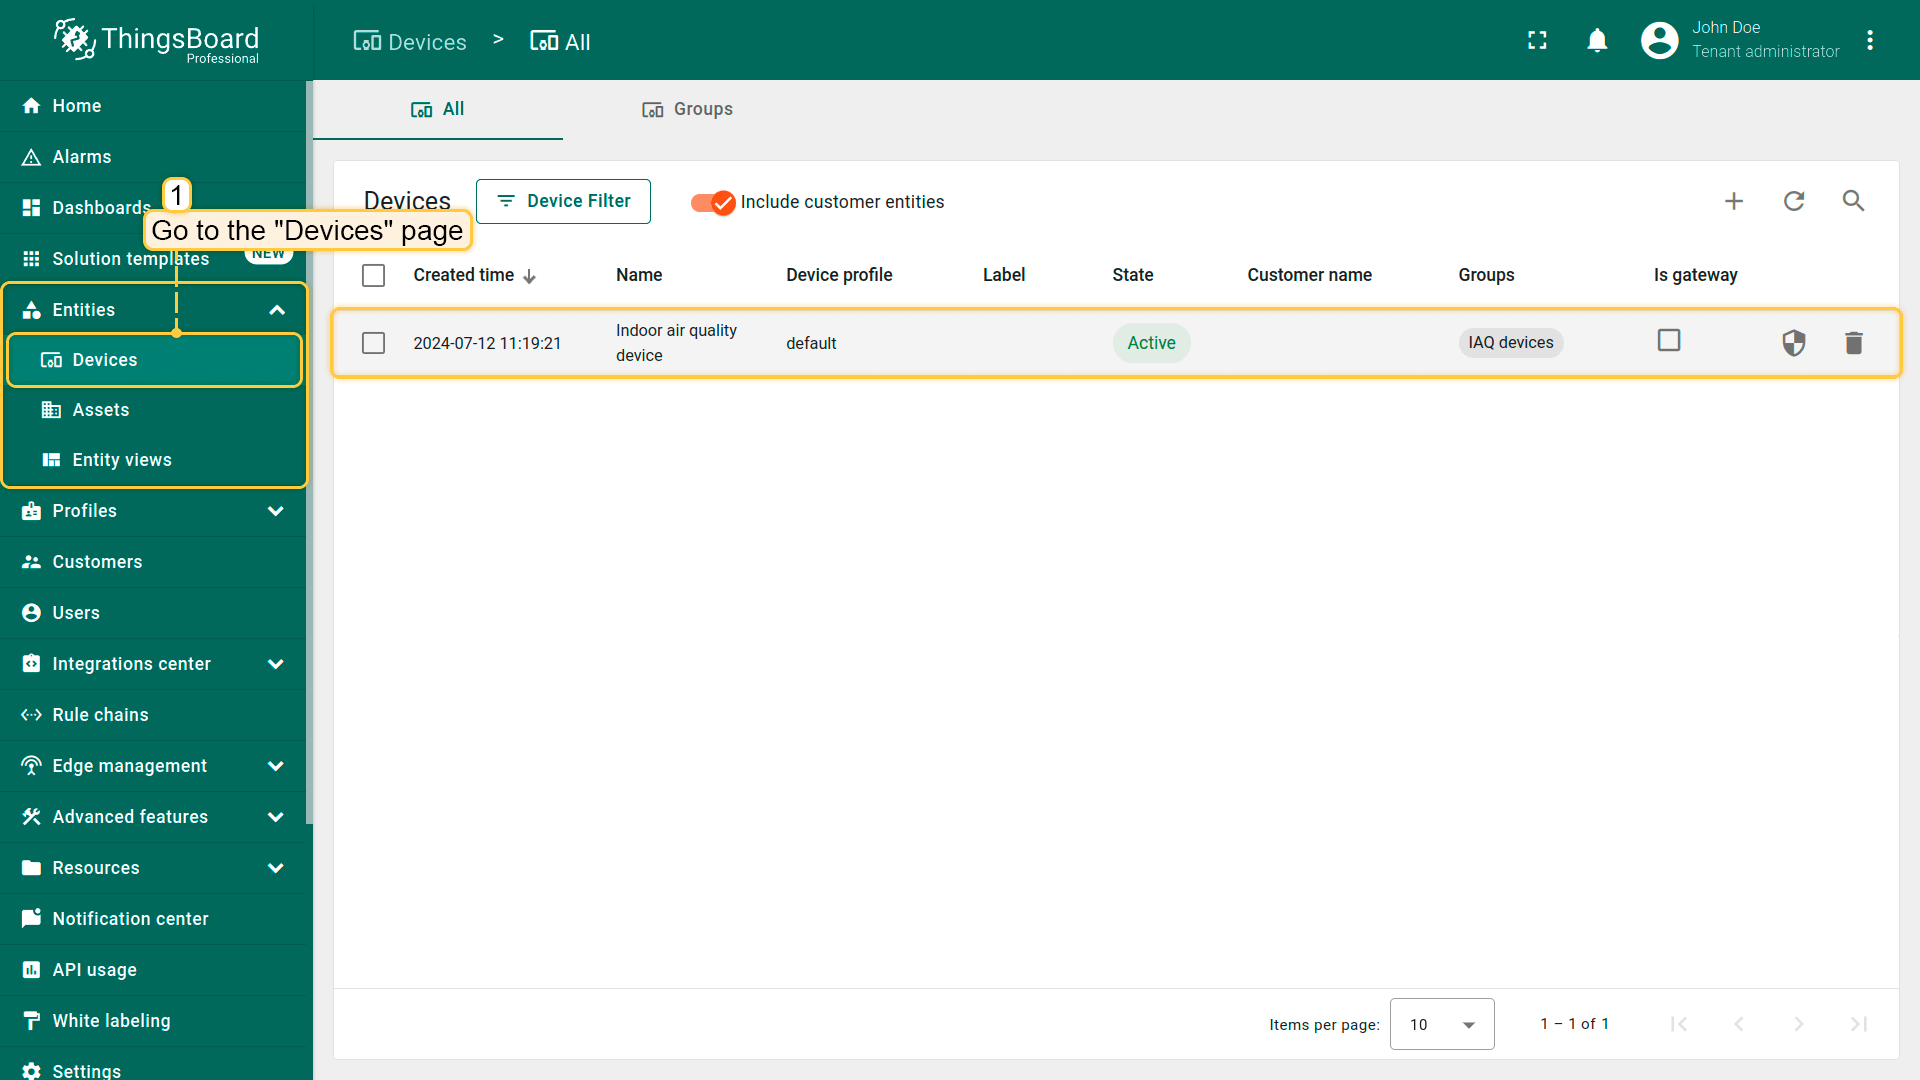
当您的设备发送上行消息时,ThingsBoard用户界面中将出现一个新设备。
When your device sends an uplink message, a new device will appear in the ThingsBoard user interface.
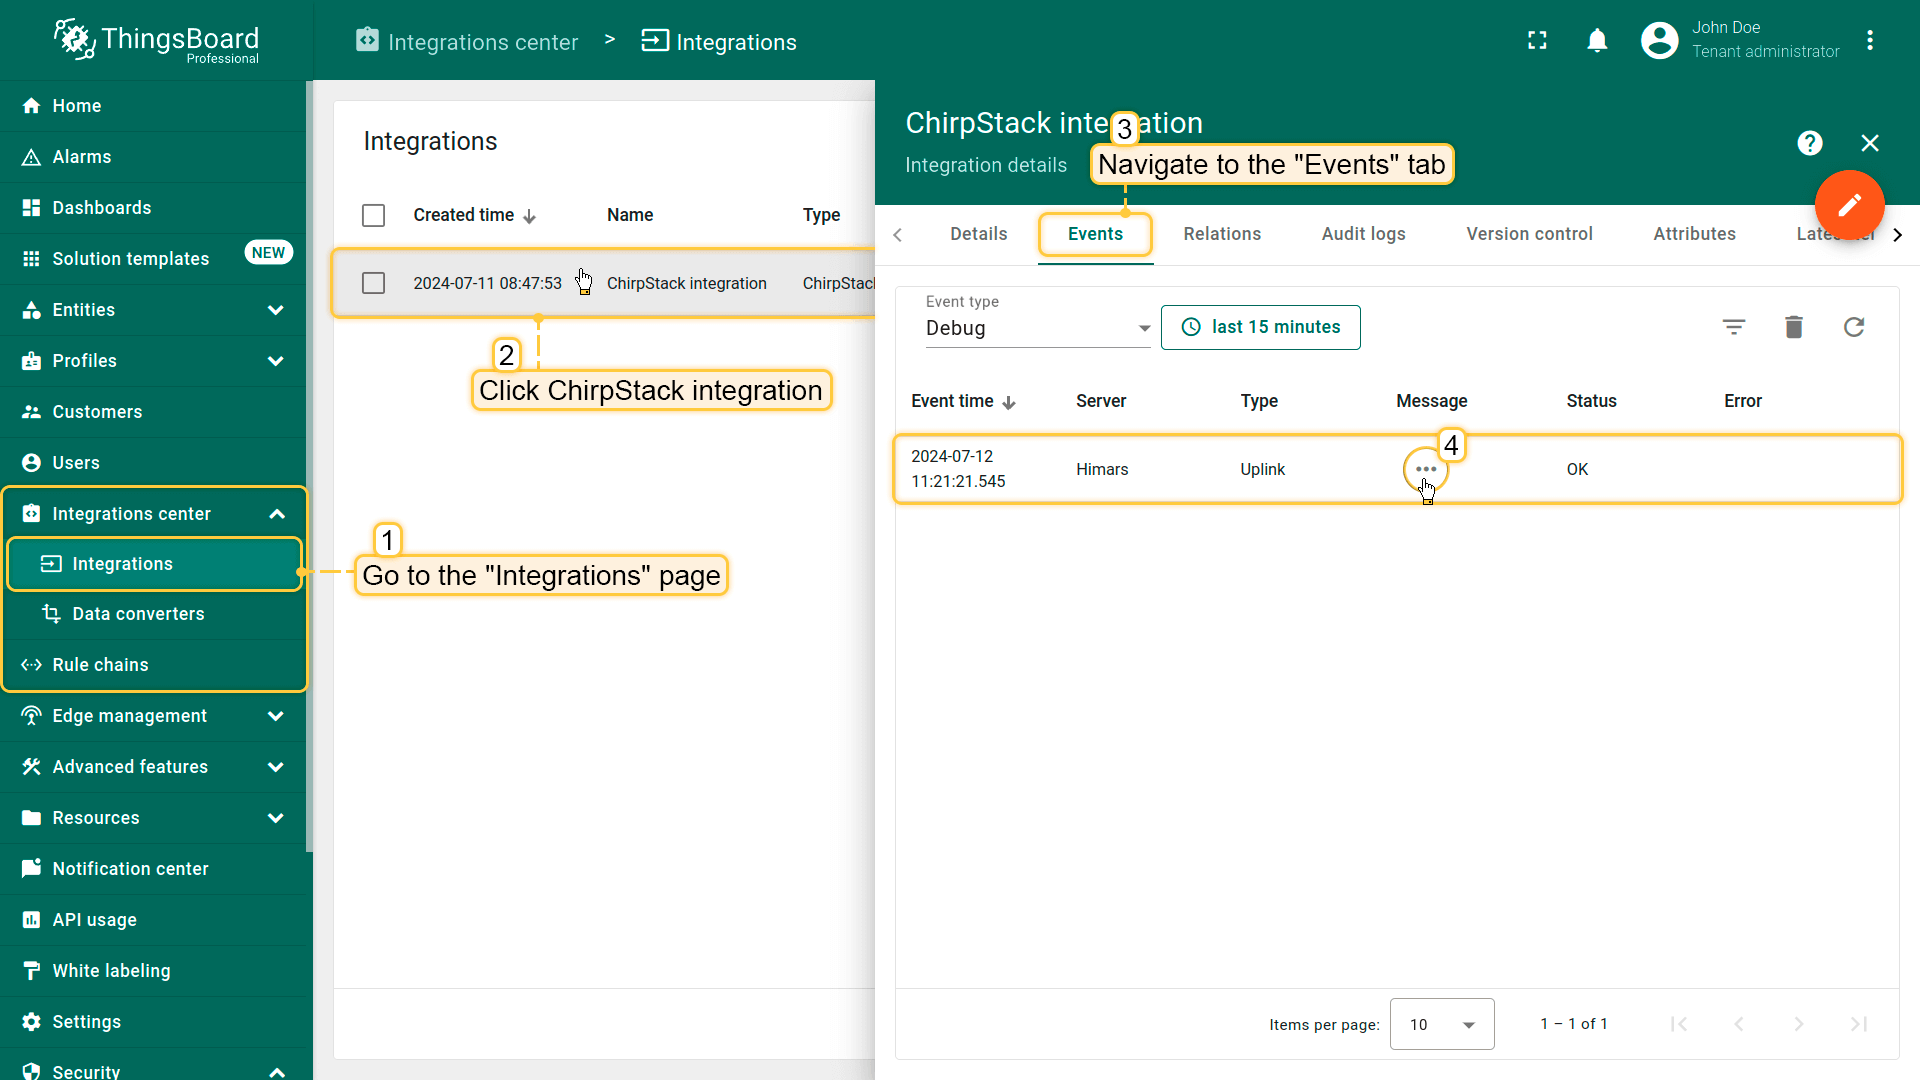
您将在ChirpStack集成中收到一个上行事件。
You will receive an uplink event in the ChirpStack integration.
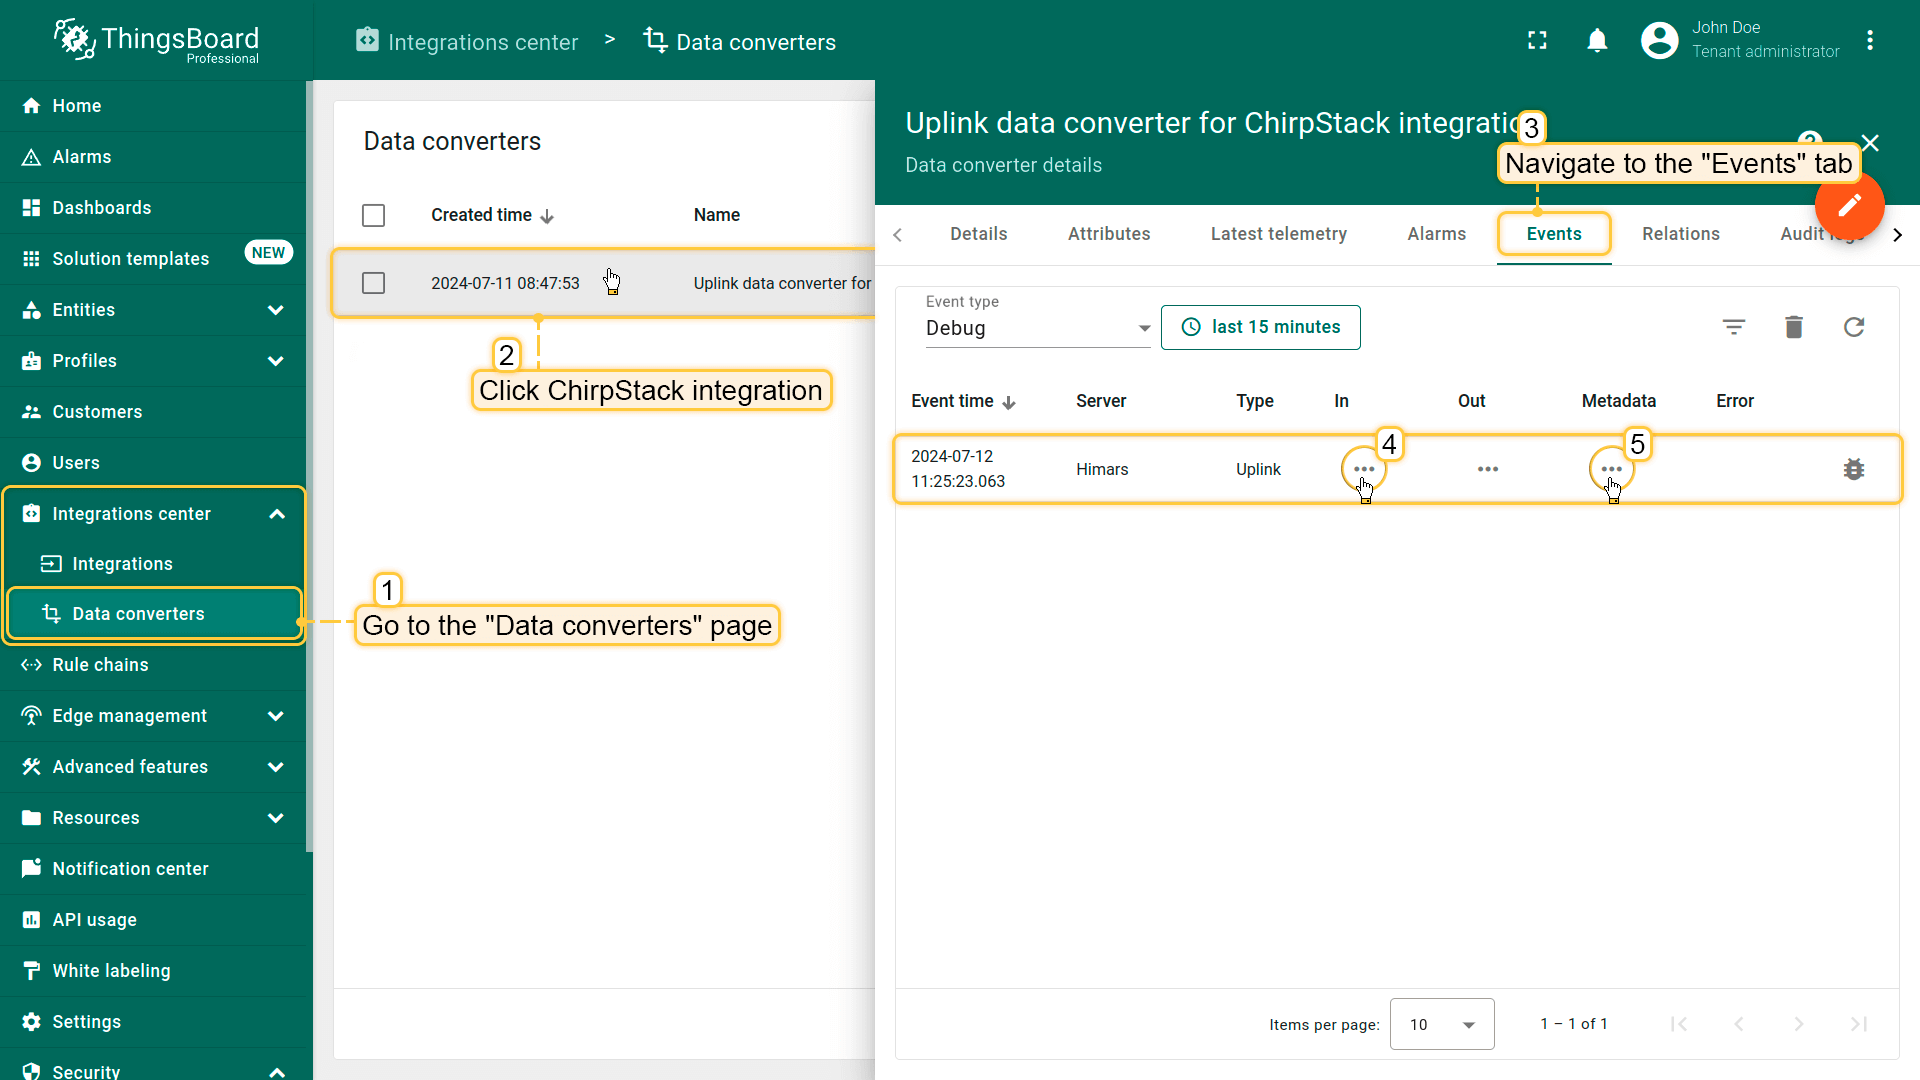
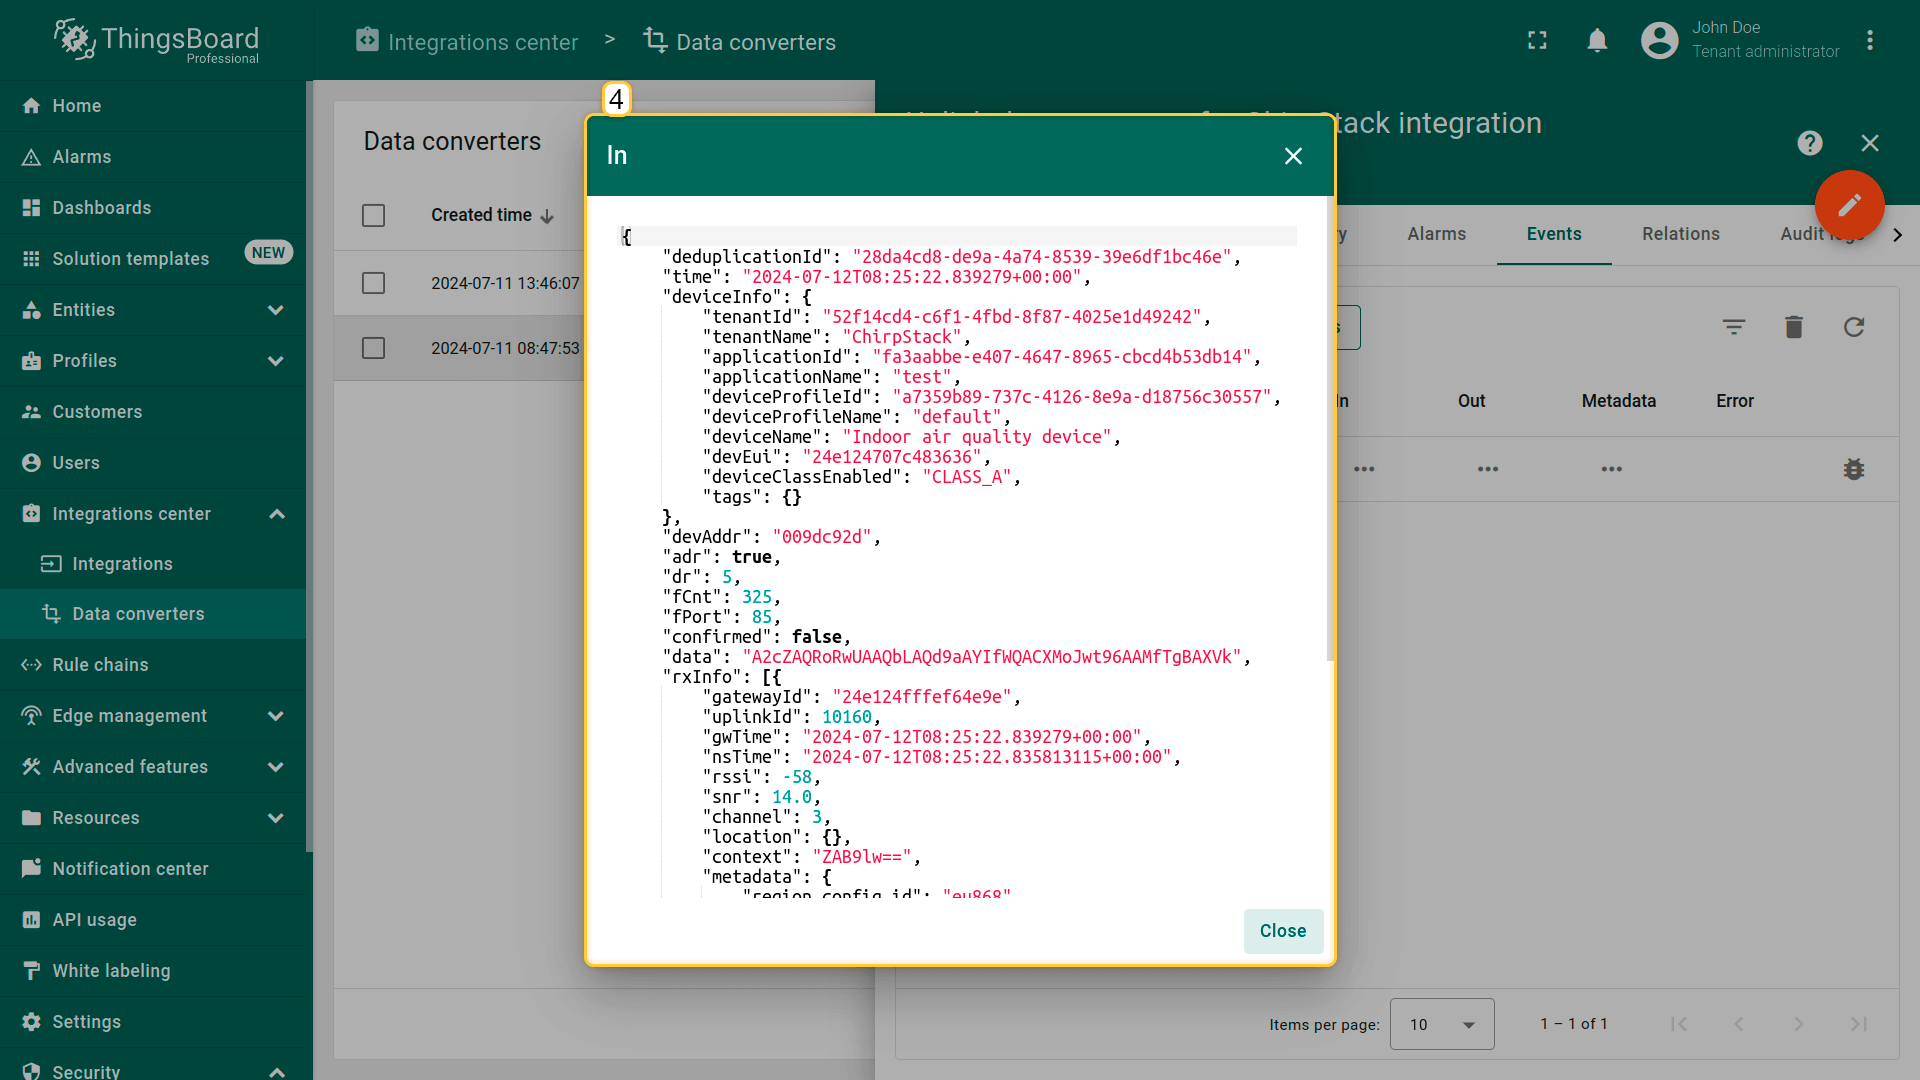
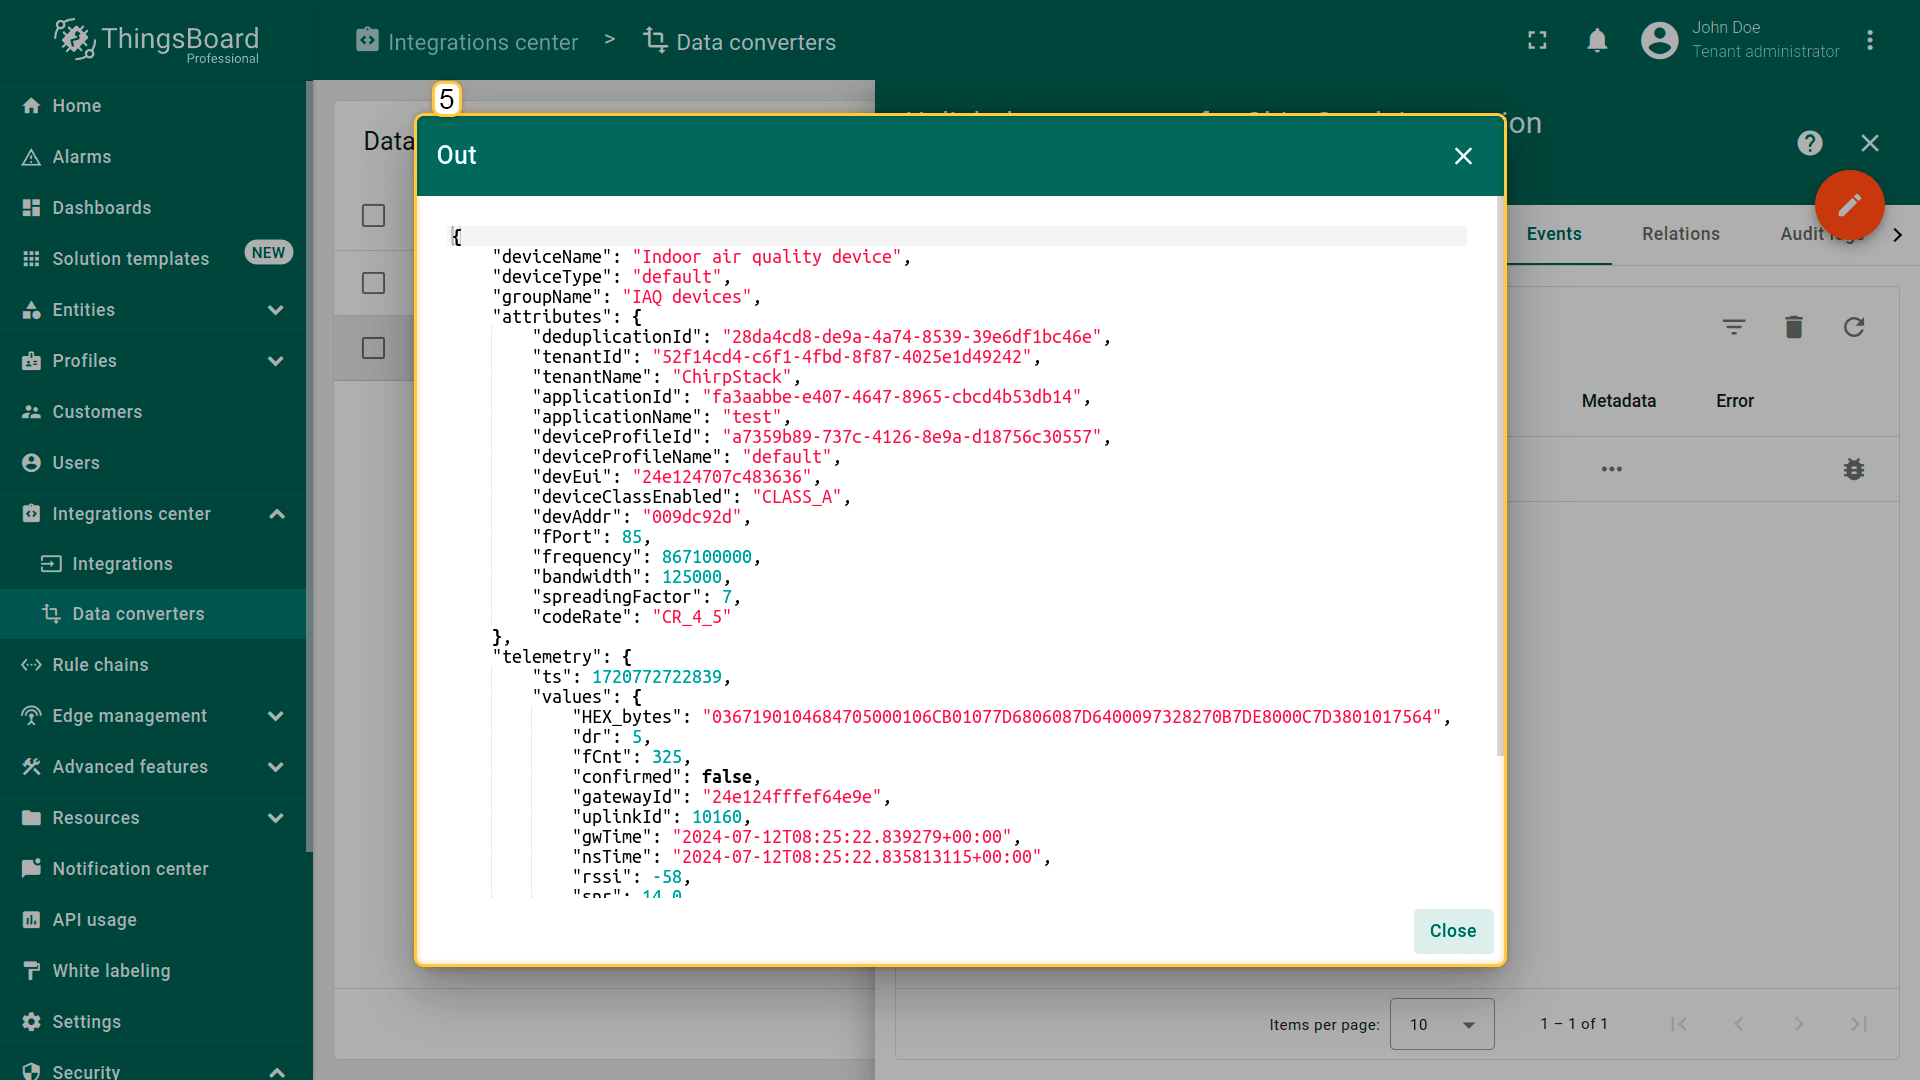
接收到的数据可在上行转换器中查看,位于”Events”选项卡的”In”和”Out”区块中:
Received data can be viewed in the uplink converter. In the "In" and "Out" blocks of the "Events" tab;
Incoming data to converter from ChirpStack
Outgoing data from converter.
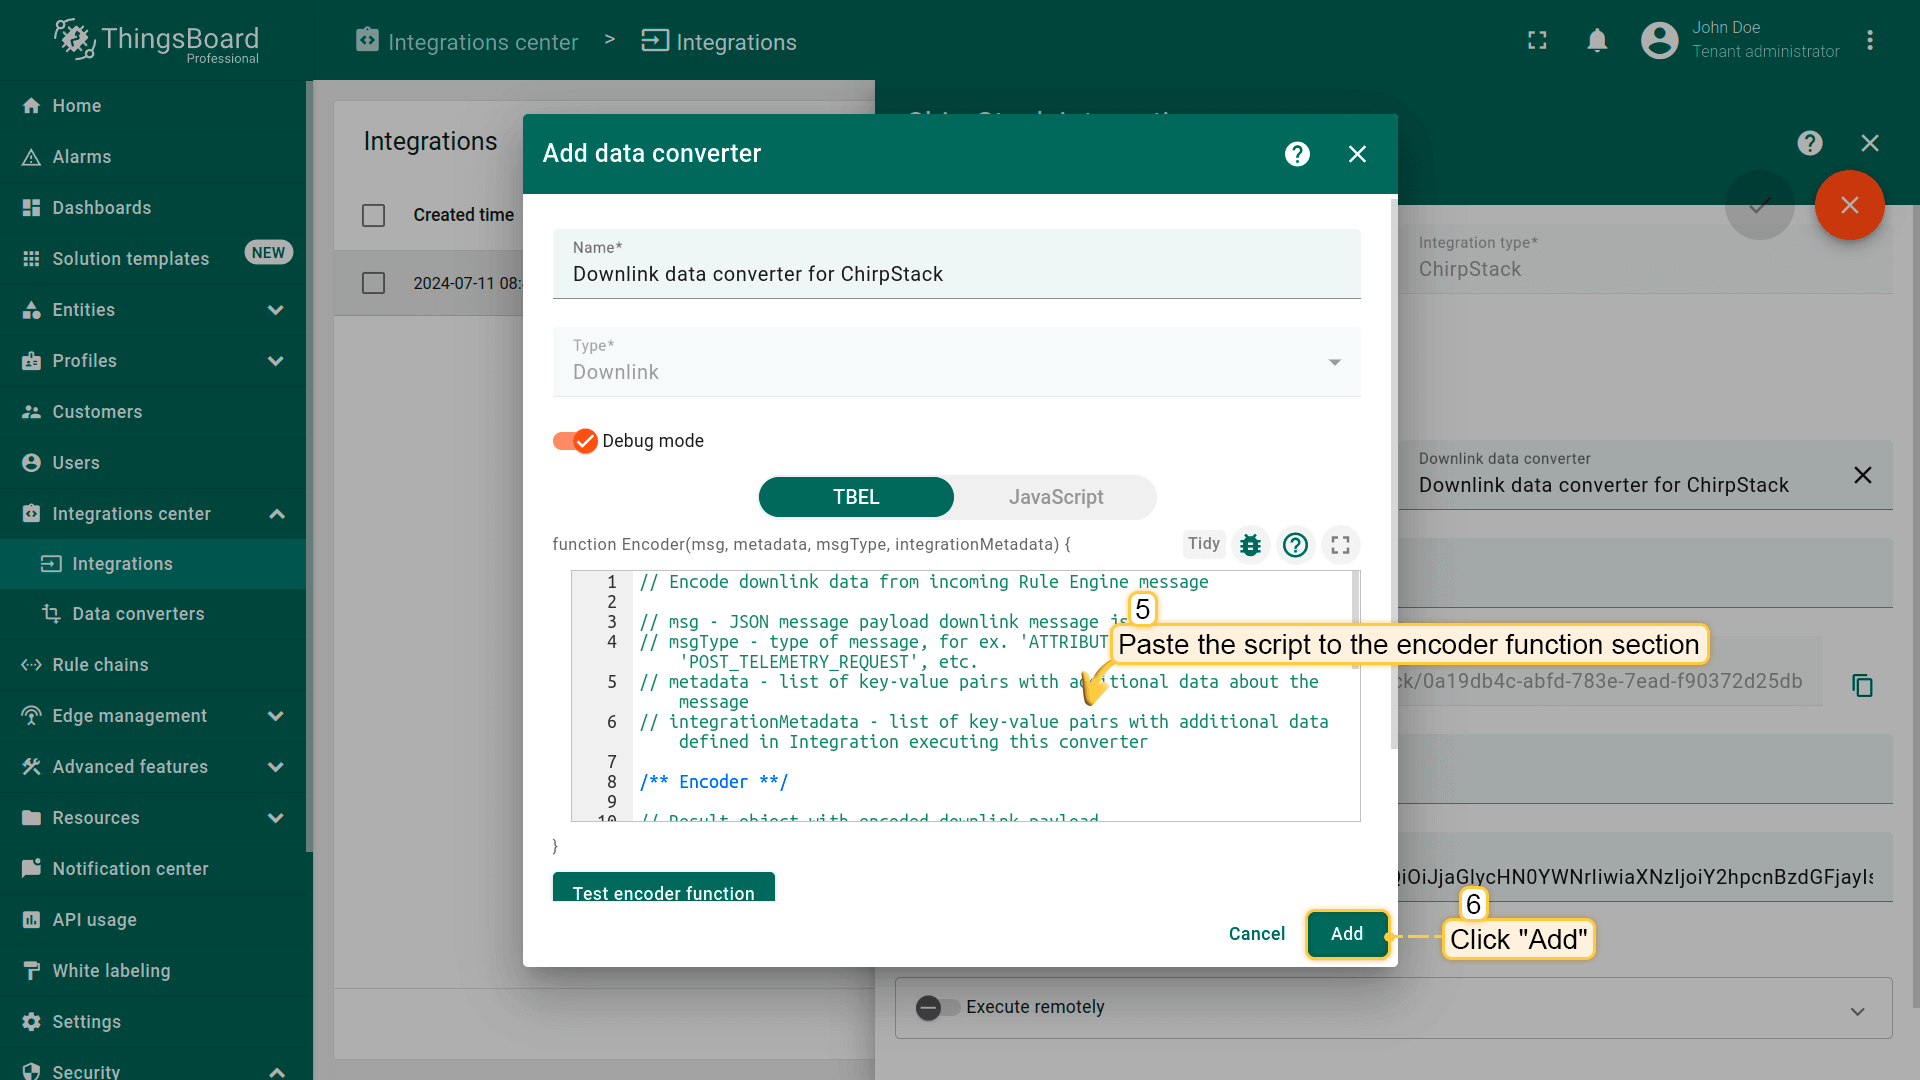
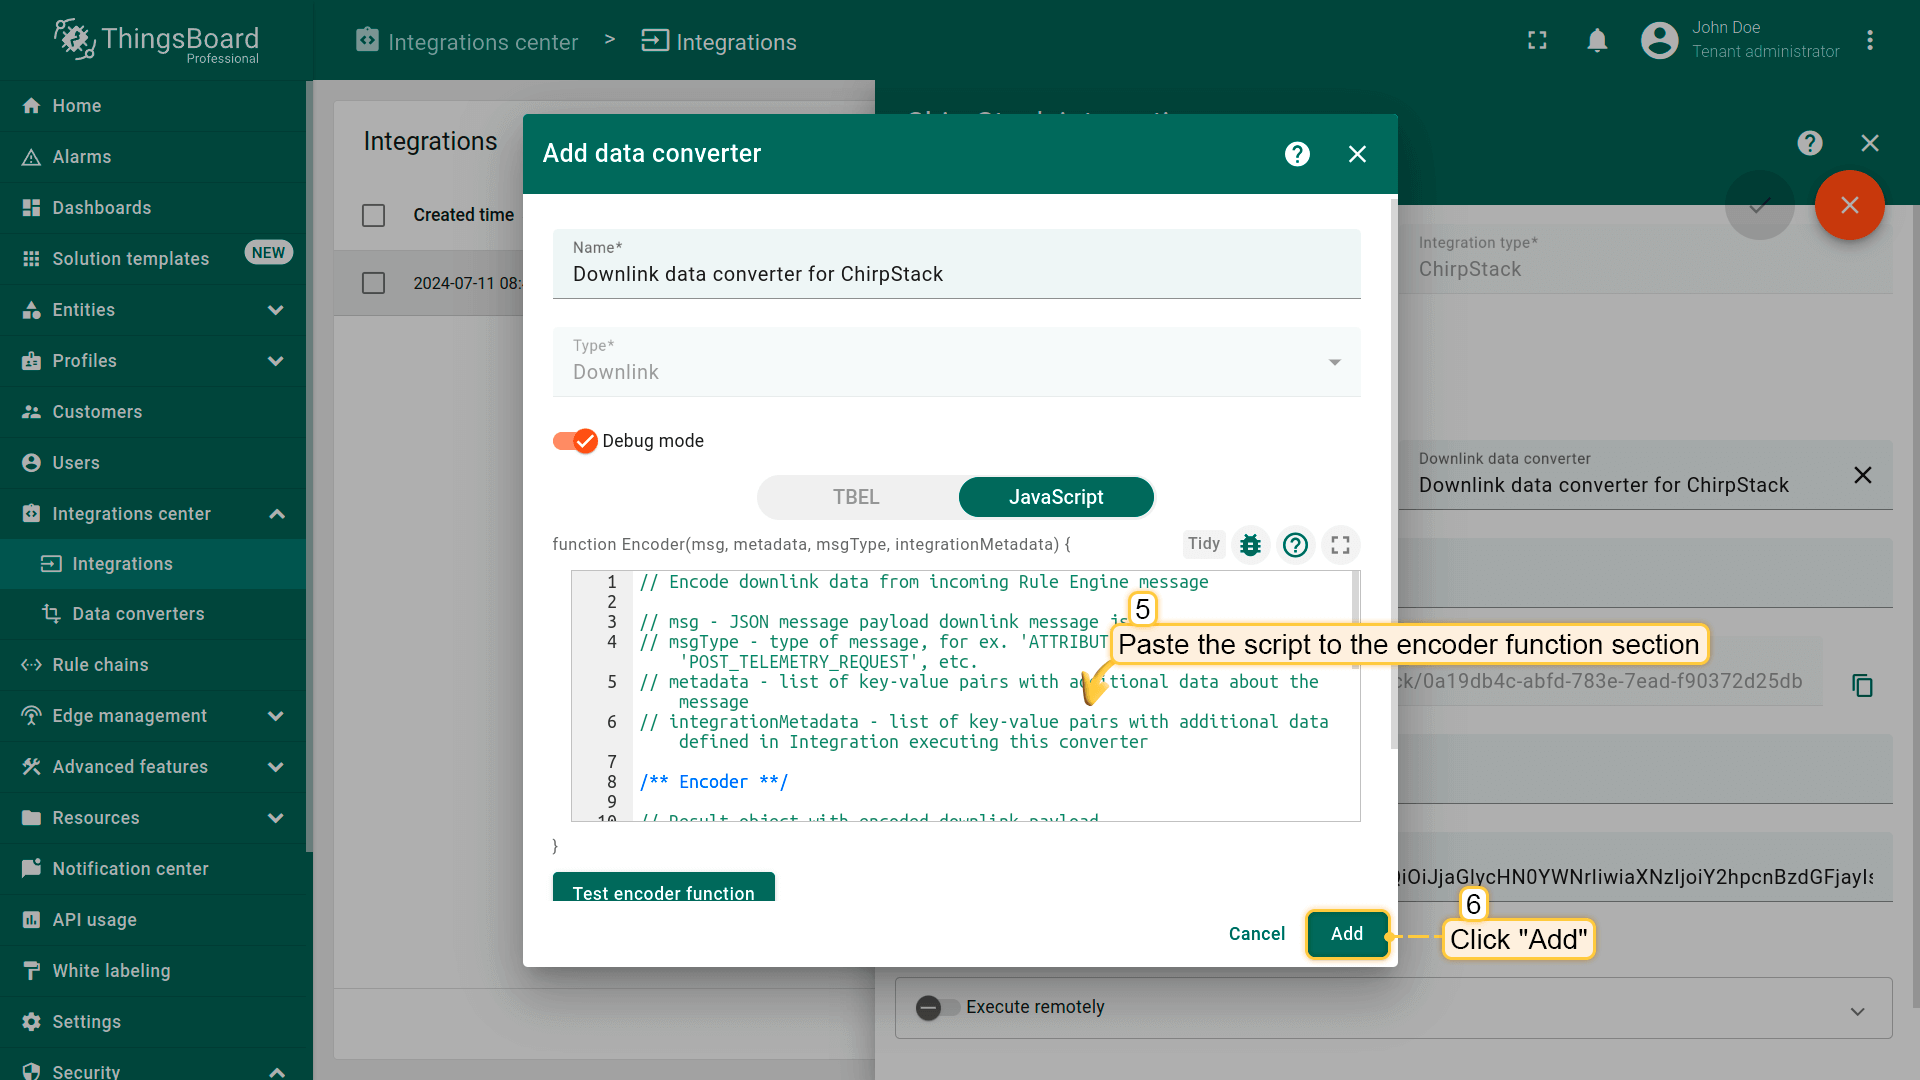
// Encode downlink data from incoming Rule Engine message// msg - JSON message payload downlink message json// msgType - type of message, for ex. 'ATTRIBUTES_UPDATED', 'POST_TELEMETRY_REQUEST', etc.// metadata - list of key-value pairs with additional data about the message// integrationMetadata - list of key-value pairs with additional data defined in Integration executing this converter/** Encoder **/// Result object with encoded downlink payloadvarresult={// downlink data content type: JSON, TEXT or BINARY (base64 format)contentType:"TEXT",// downlink datadata:btoa(msg.downlink),// Optional metadata object presented in key/value formatmetadata:{DevEUI:metadata.cs_devEui,fPort:metadata.cs_fPort}};returnresult;
按以下步骤向 integration 添加 downlink converter:
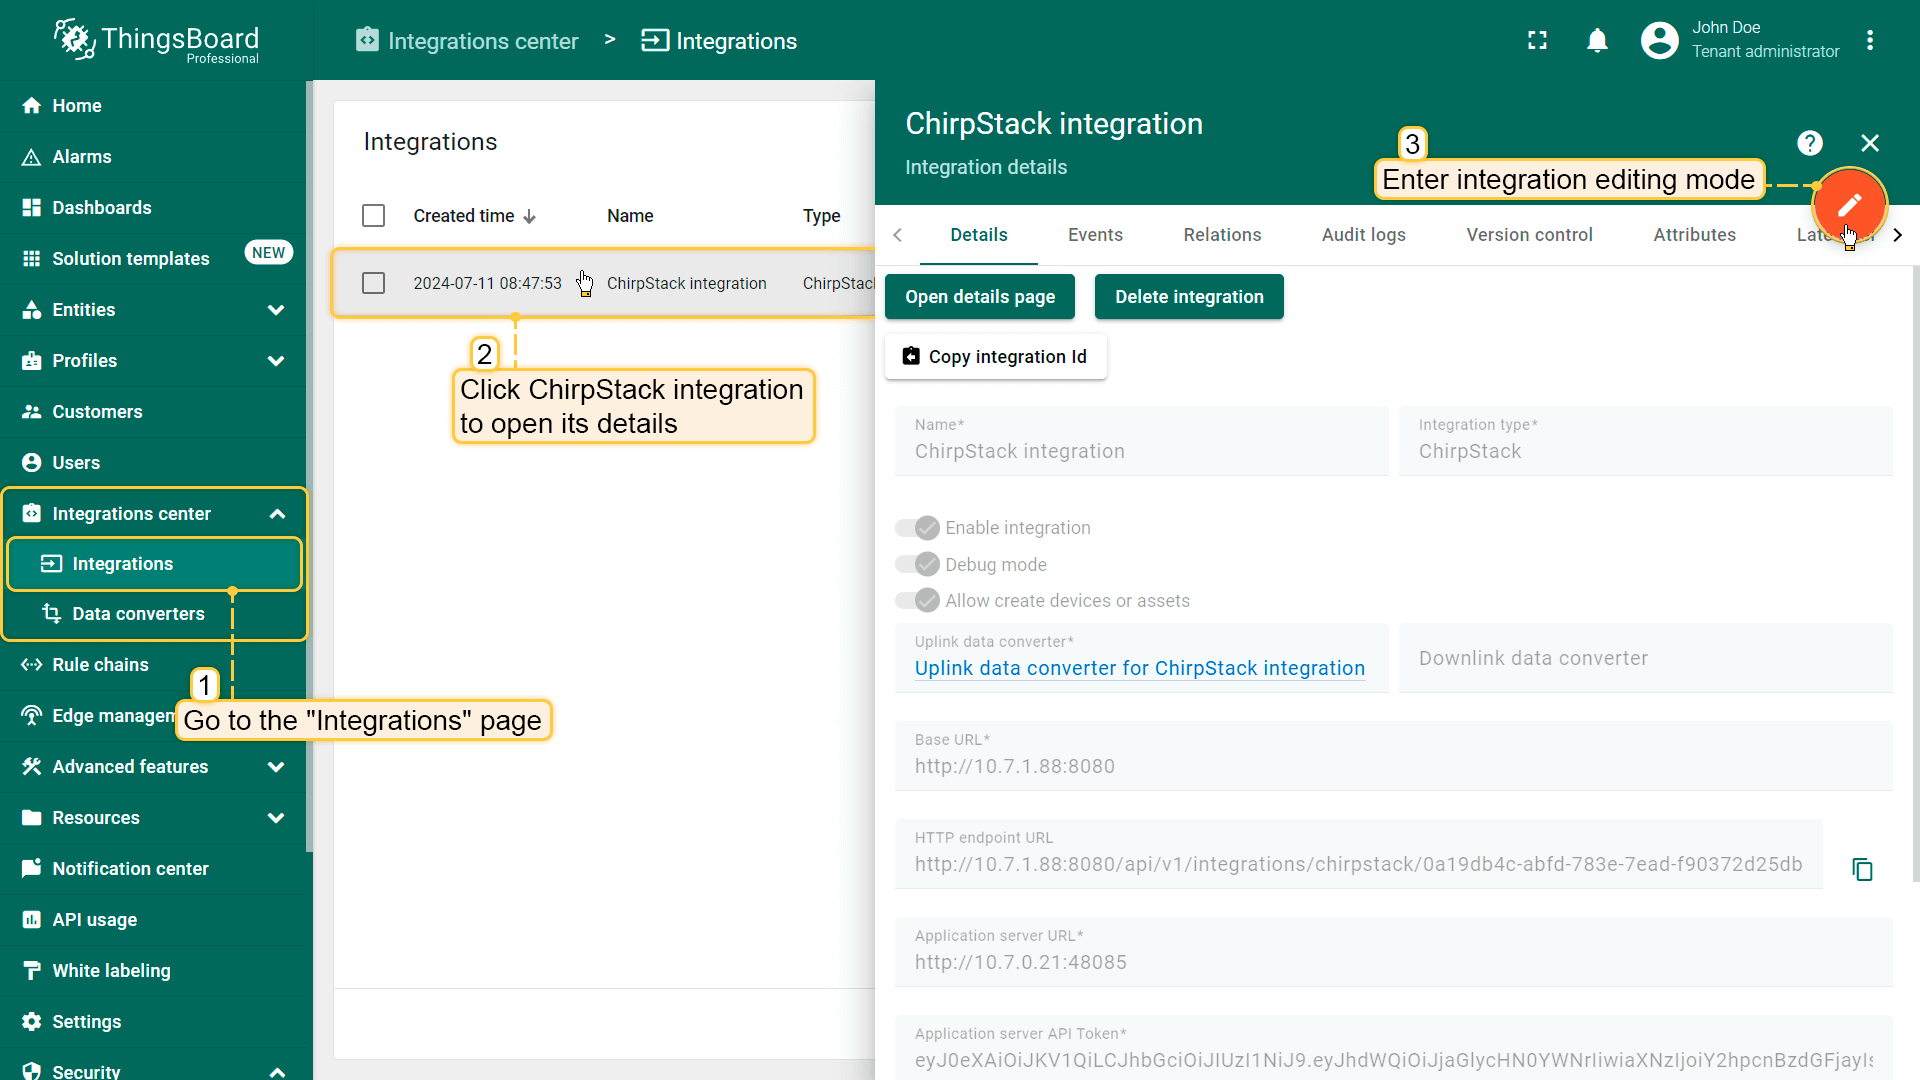
Go to the “Integrations” page, click ChirpStack integration to open its details, and enter integration editing mode by clicking the “pencil” icon;
Enter a name for the downlink data converter and click “Create new converter”;
Paste the script to the encoder function section, and click “Add”;
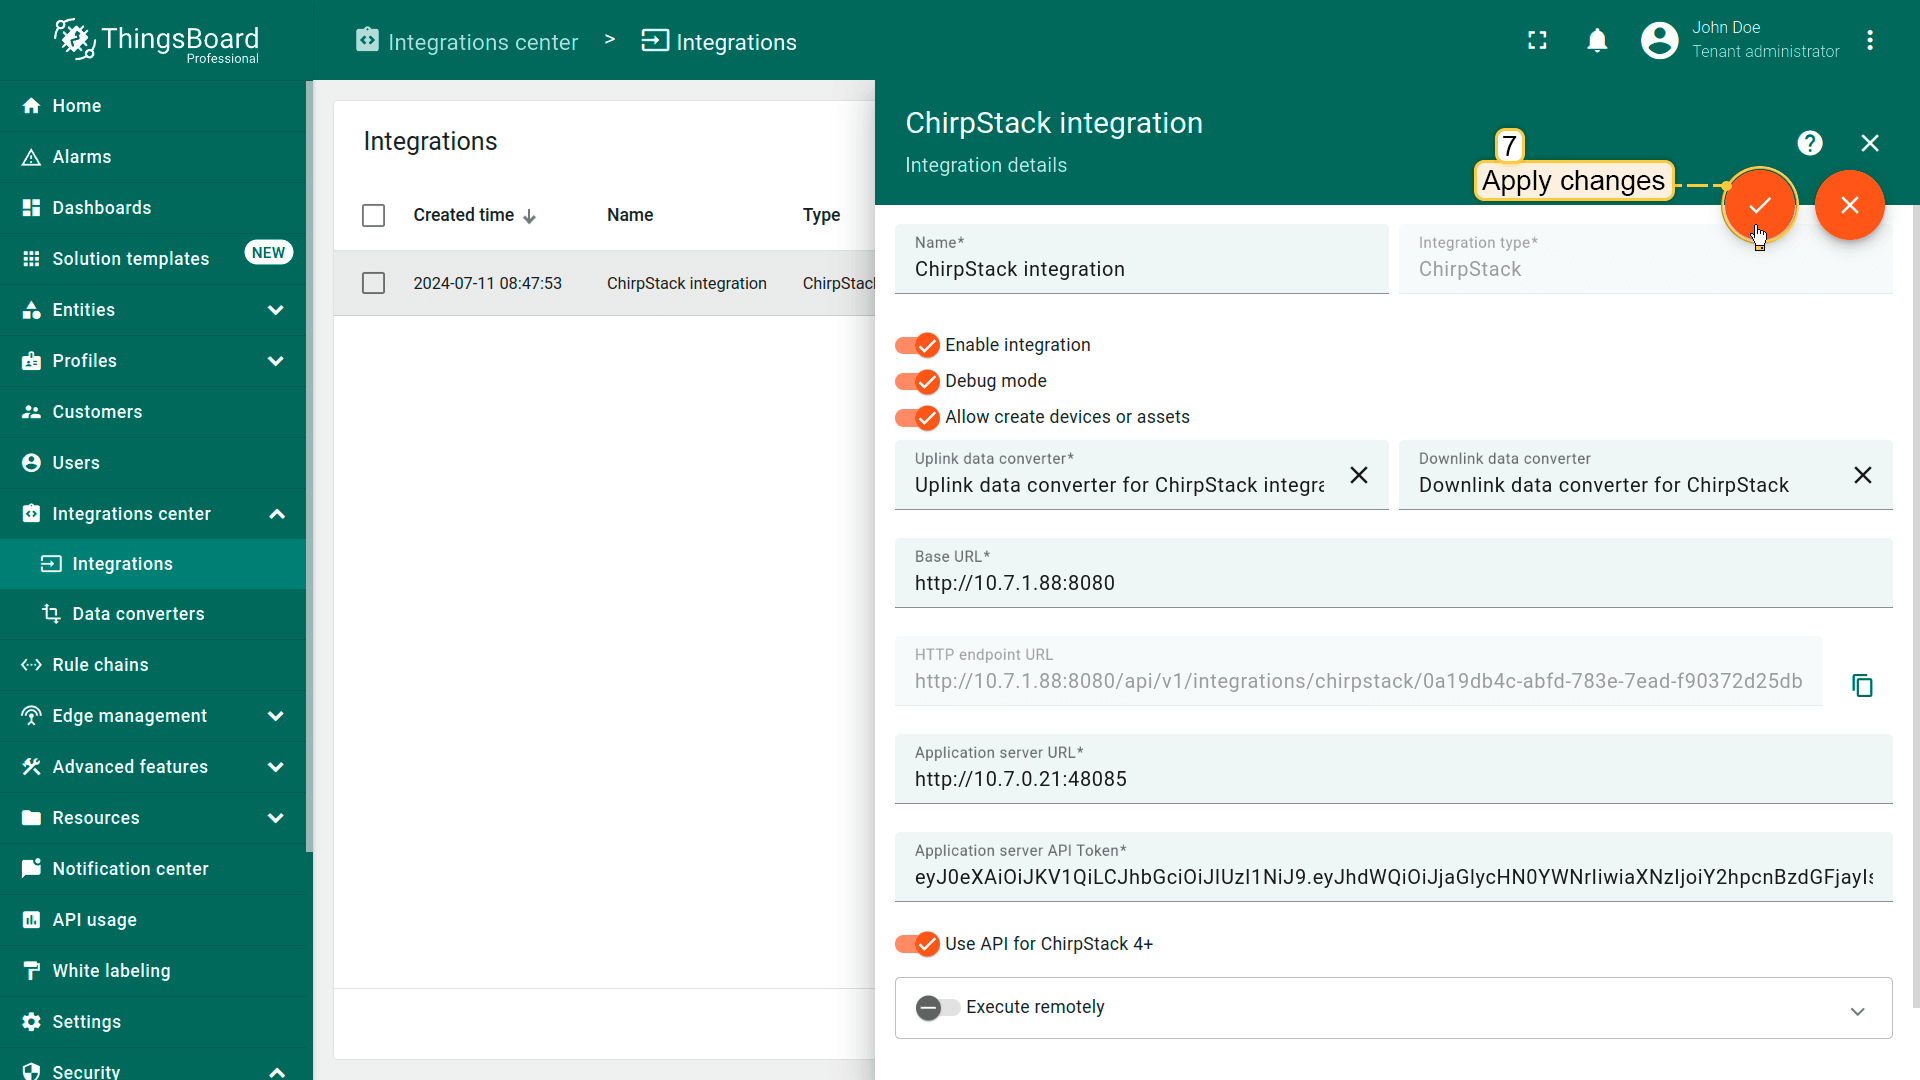
Apply changes.
Go to the “Integrations” page, click ChirpStack integration to open its details, and enter integration editing mode by clicking the “pencil” icon;
Enter a name for the downlink data converter and click “Create new converter”;
Paste the script to the encoder function section, and click “Add”;
// Encode downlink data from incoming Rule Engine message// msg - JSON message payload downlink message json// msgType - type of message, for ex. 'ATTRIBUTES_UPDATED', 'POST_TELEMETRY_REQUEST', etc.// metadata - list of key-value pairs with additional data about the message// integrationMetadata - list of key-value pairs with additional data defined in Integration executing this converter/** Encoder **/// Result object with encoded downlink payloadvarresult={// downlink data content type: JSON, TEXT or BINARY (base64 format)contentType:"TEXT",// downlink datadata:btoa(msg.downlink),// Optional metadata object presented in key/value formatmetadata:{DevEUI:metadata.cs_devEui,fPort:metadata.cs_fPort}};returnresult;
按以下步骤向 integration 添加 downlink converter:
Go to the “Integrations” page, click ChirpStack integration to open its details, and enter integration editing mode by clicking the “pencil” icon;
Enter a name for the downlink data converter and click “Create new converter”;
Paste the script to the encoder function section, and click “Add”;
Apply changes.
Go to the “Integrations” page, click ChirpStack integration to open its details, and enter integration editing mode by clicking the “pencil” icon;
Enter a name for the downlink data converter and click “Create new converter”;
Paste the script to the encoder function section, and click “Add”;
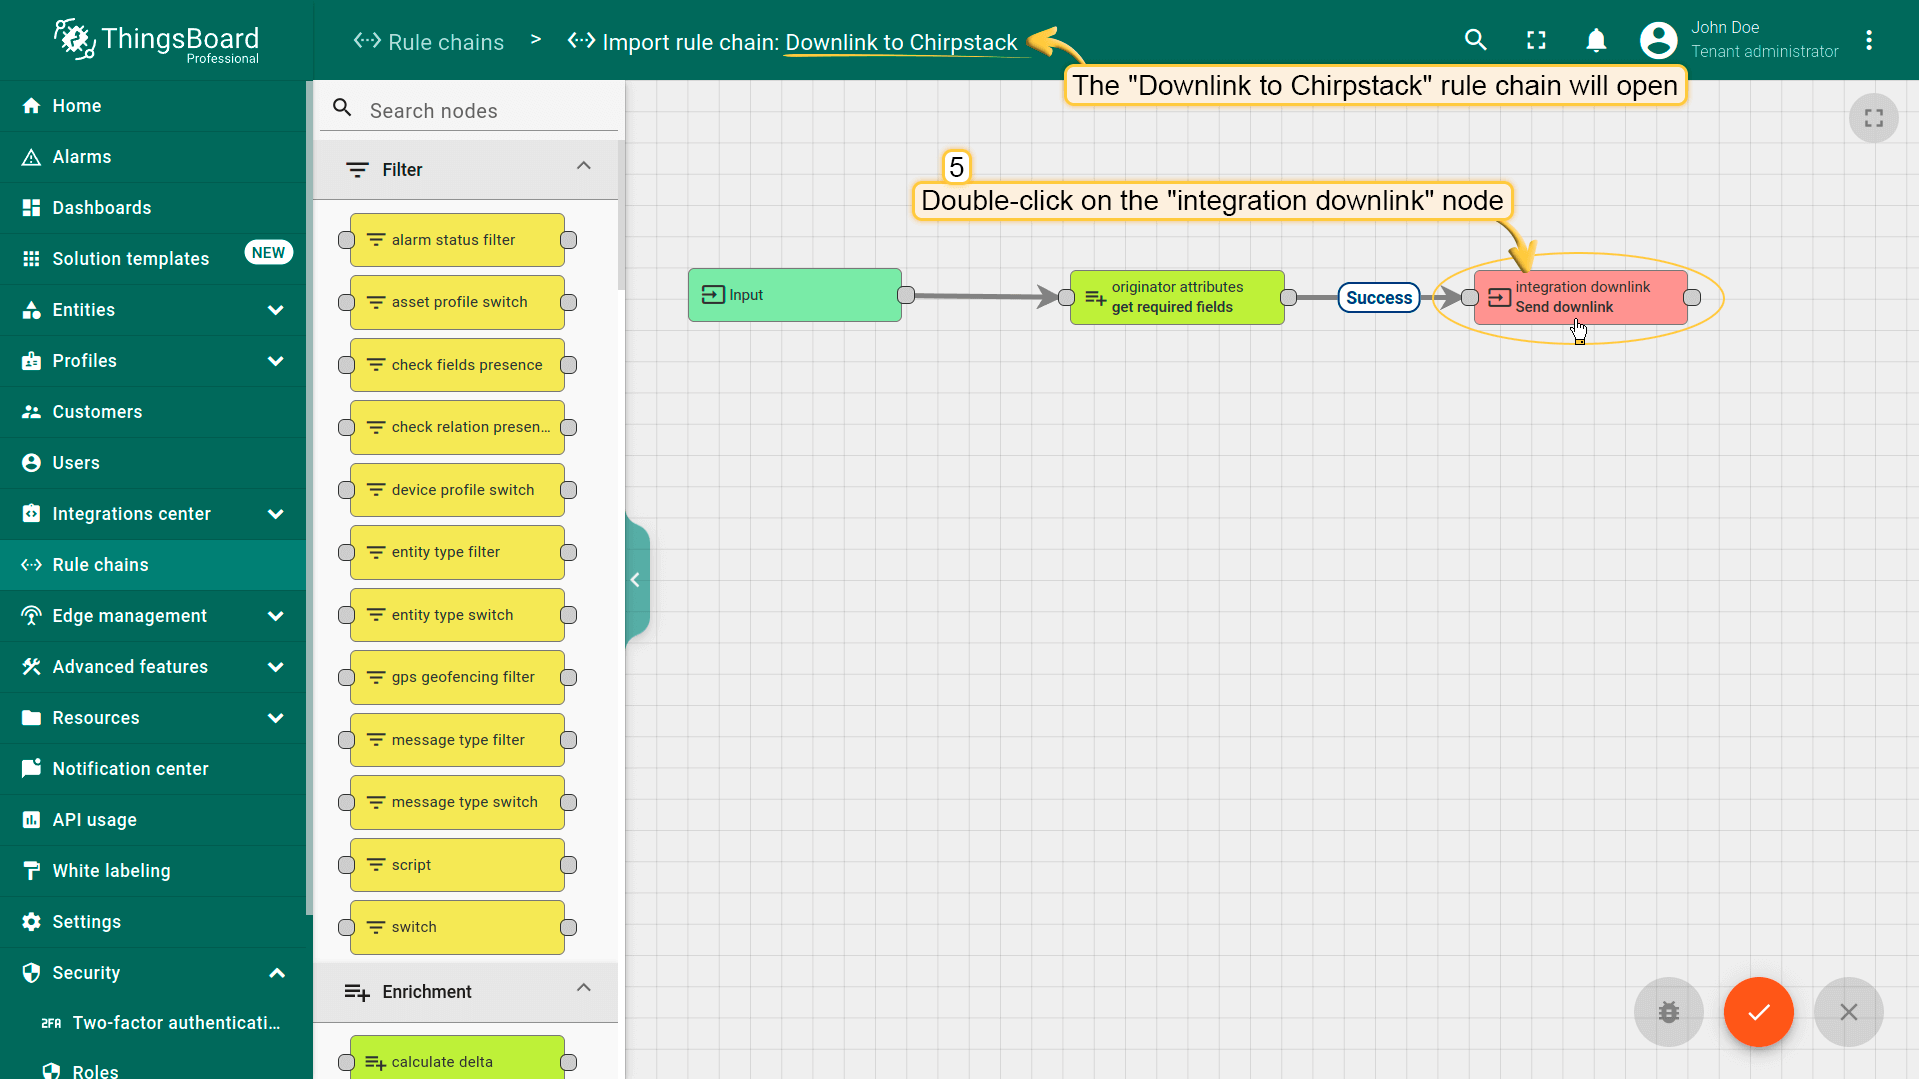
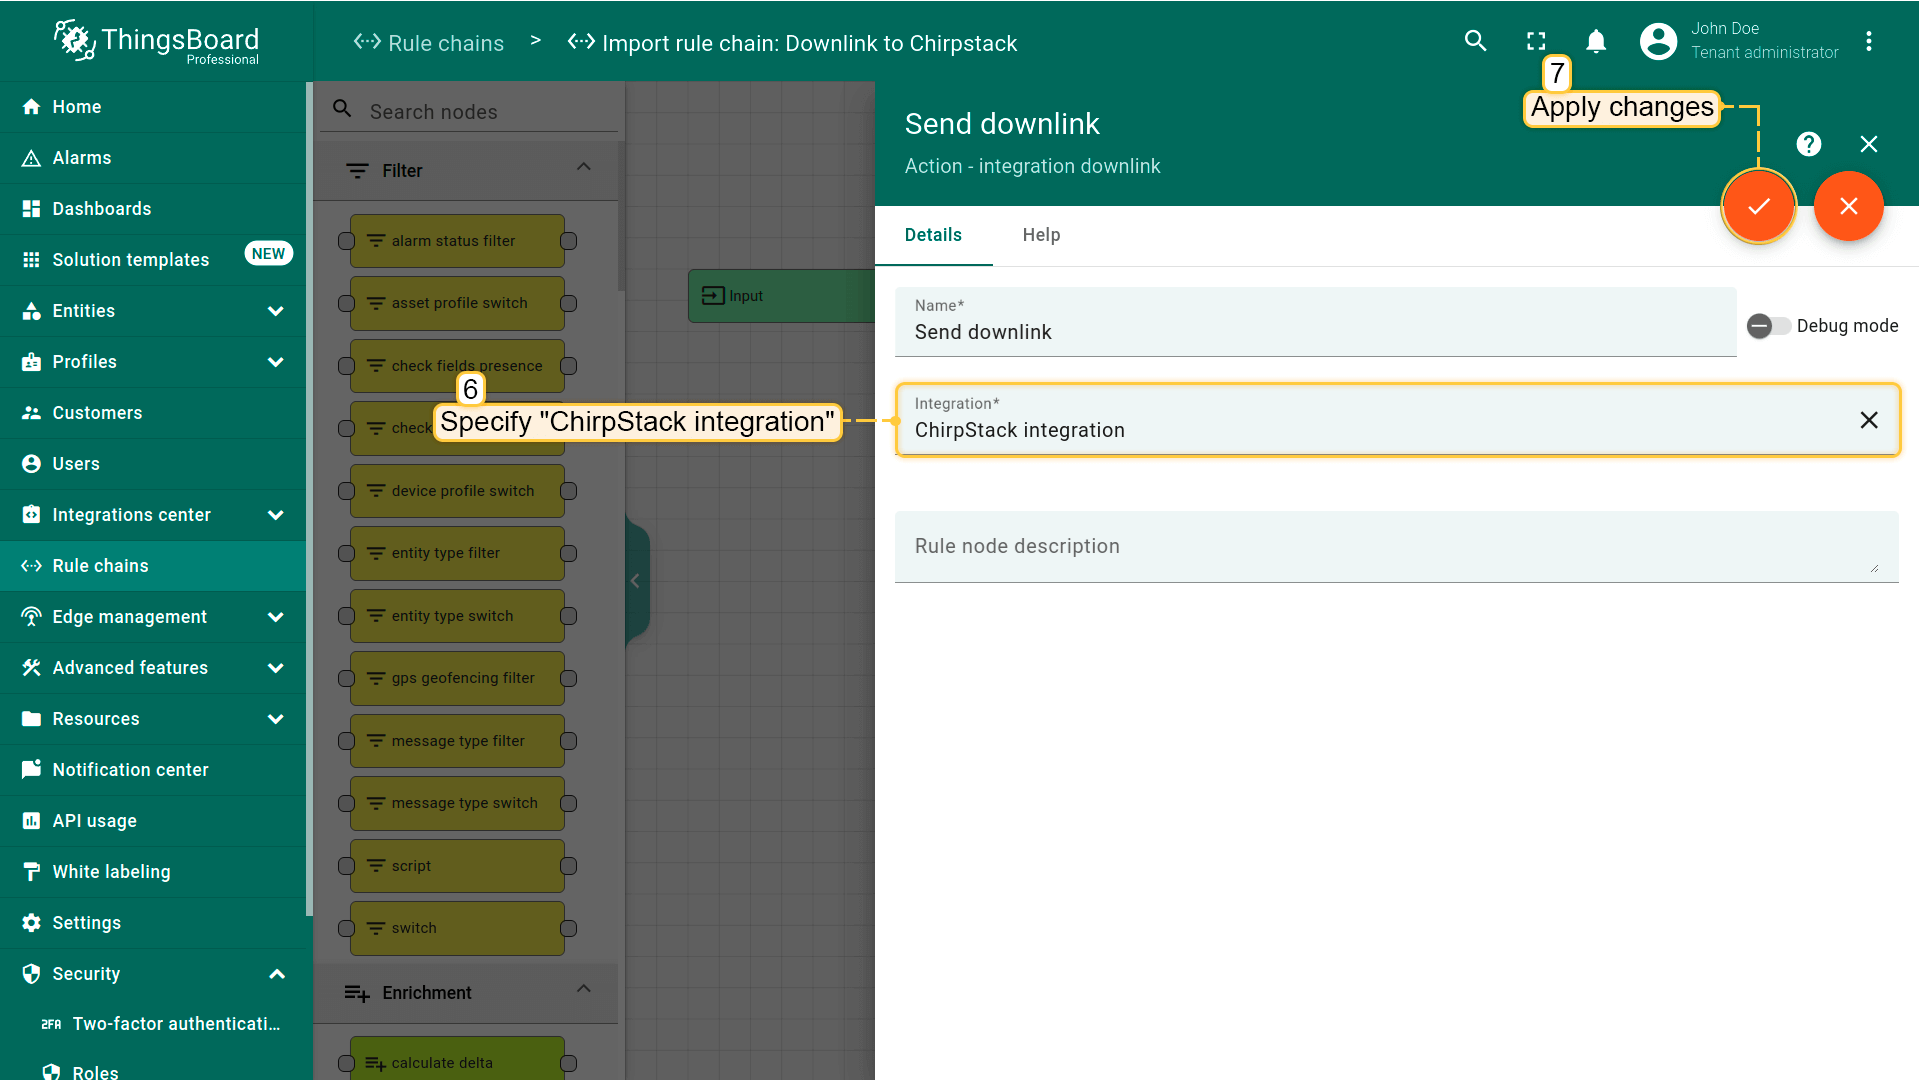
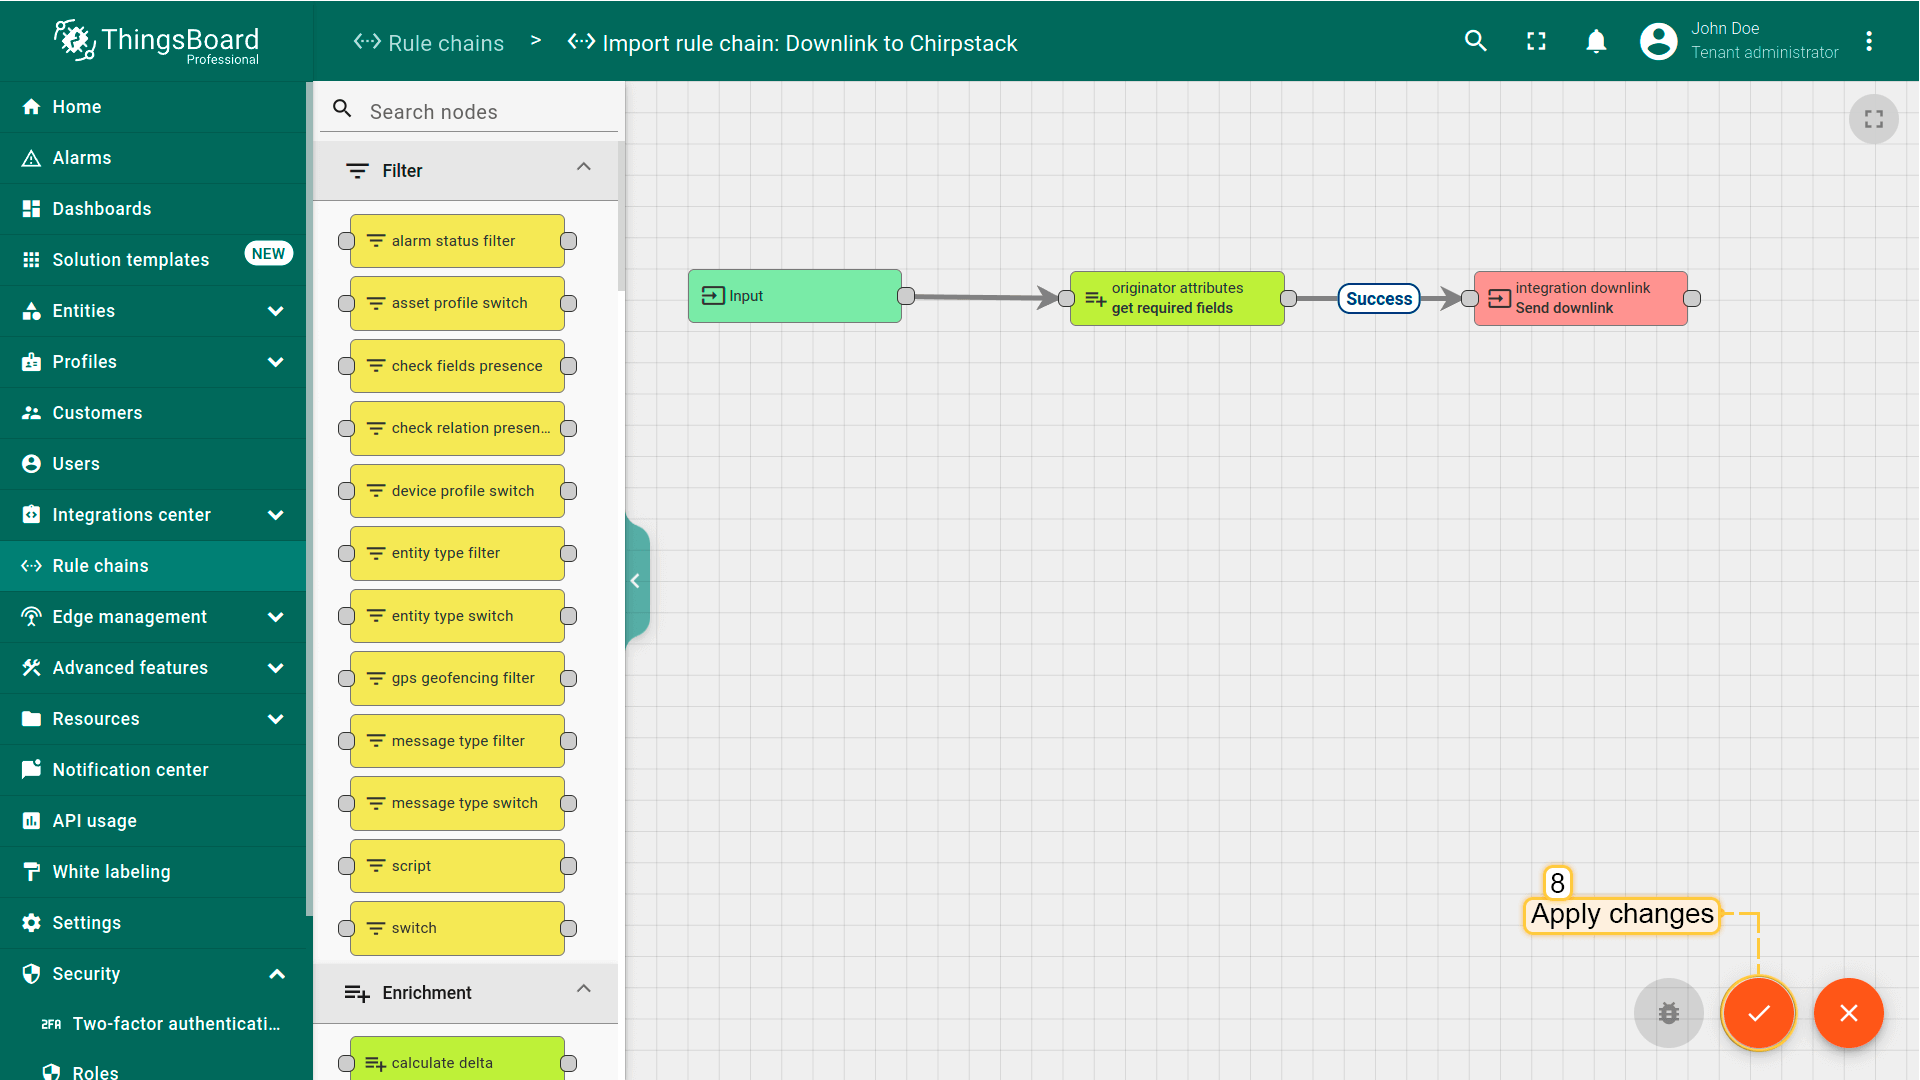
“Downlink to Chirpstack”规则链将打开。双击”integration downlink”节点,在”Integration”字段中指定ChirpStack集成并保存更改;
点击对勾保存规则链。
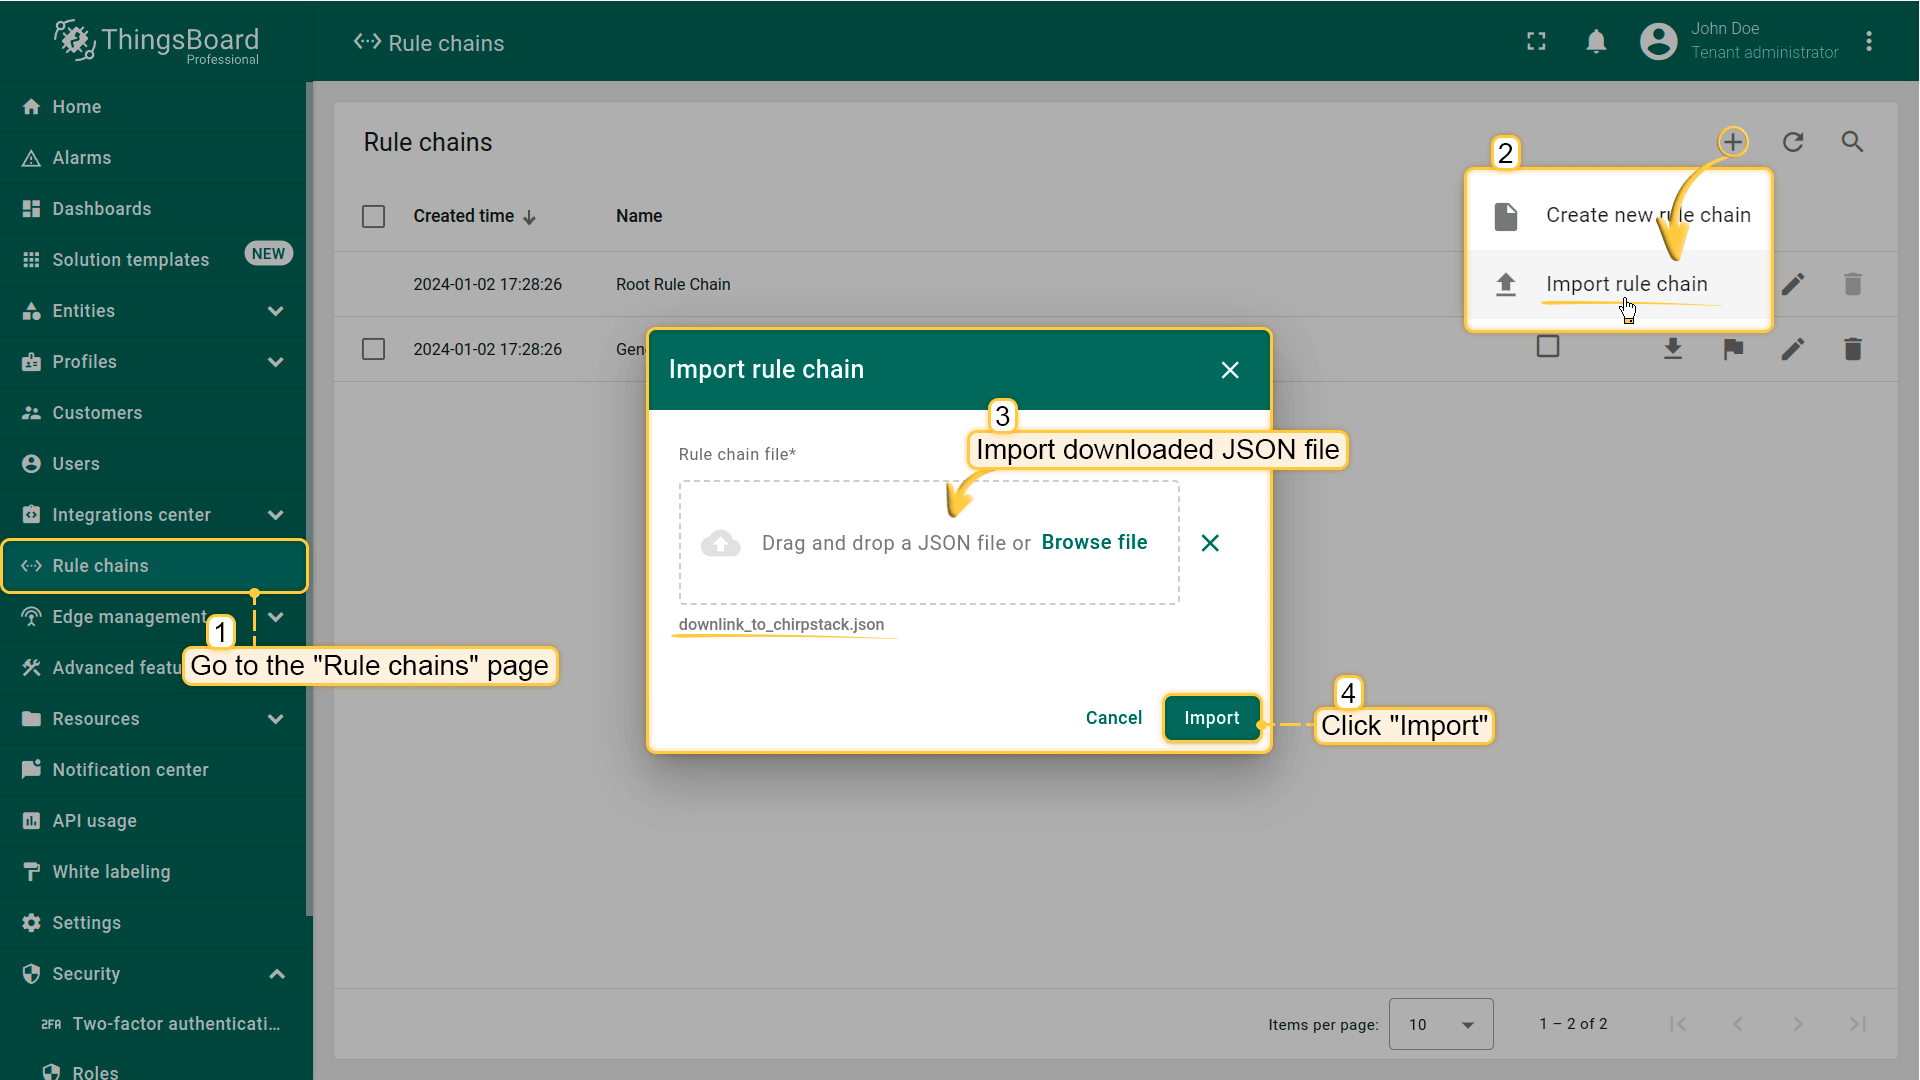
Go to the "Rule Chains" page. To import this JSON file, click the + icon in the upper right corner of the screen and select "Import rule chain". Drag the downloaded JSON file into the import rule chain window. Click "Import";
The "Downlink to Chirpstack" rule chain will open. Double-click on the "integration downlink" node;
Specify ChirpStack integration in the "Integration" field;
Save rule chain by pressing on checkmark.
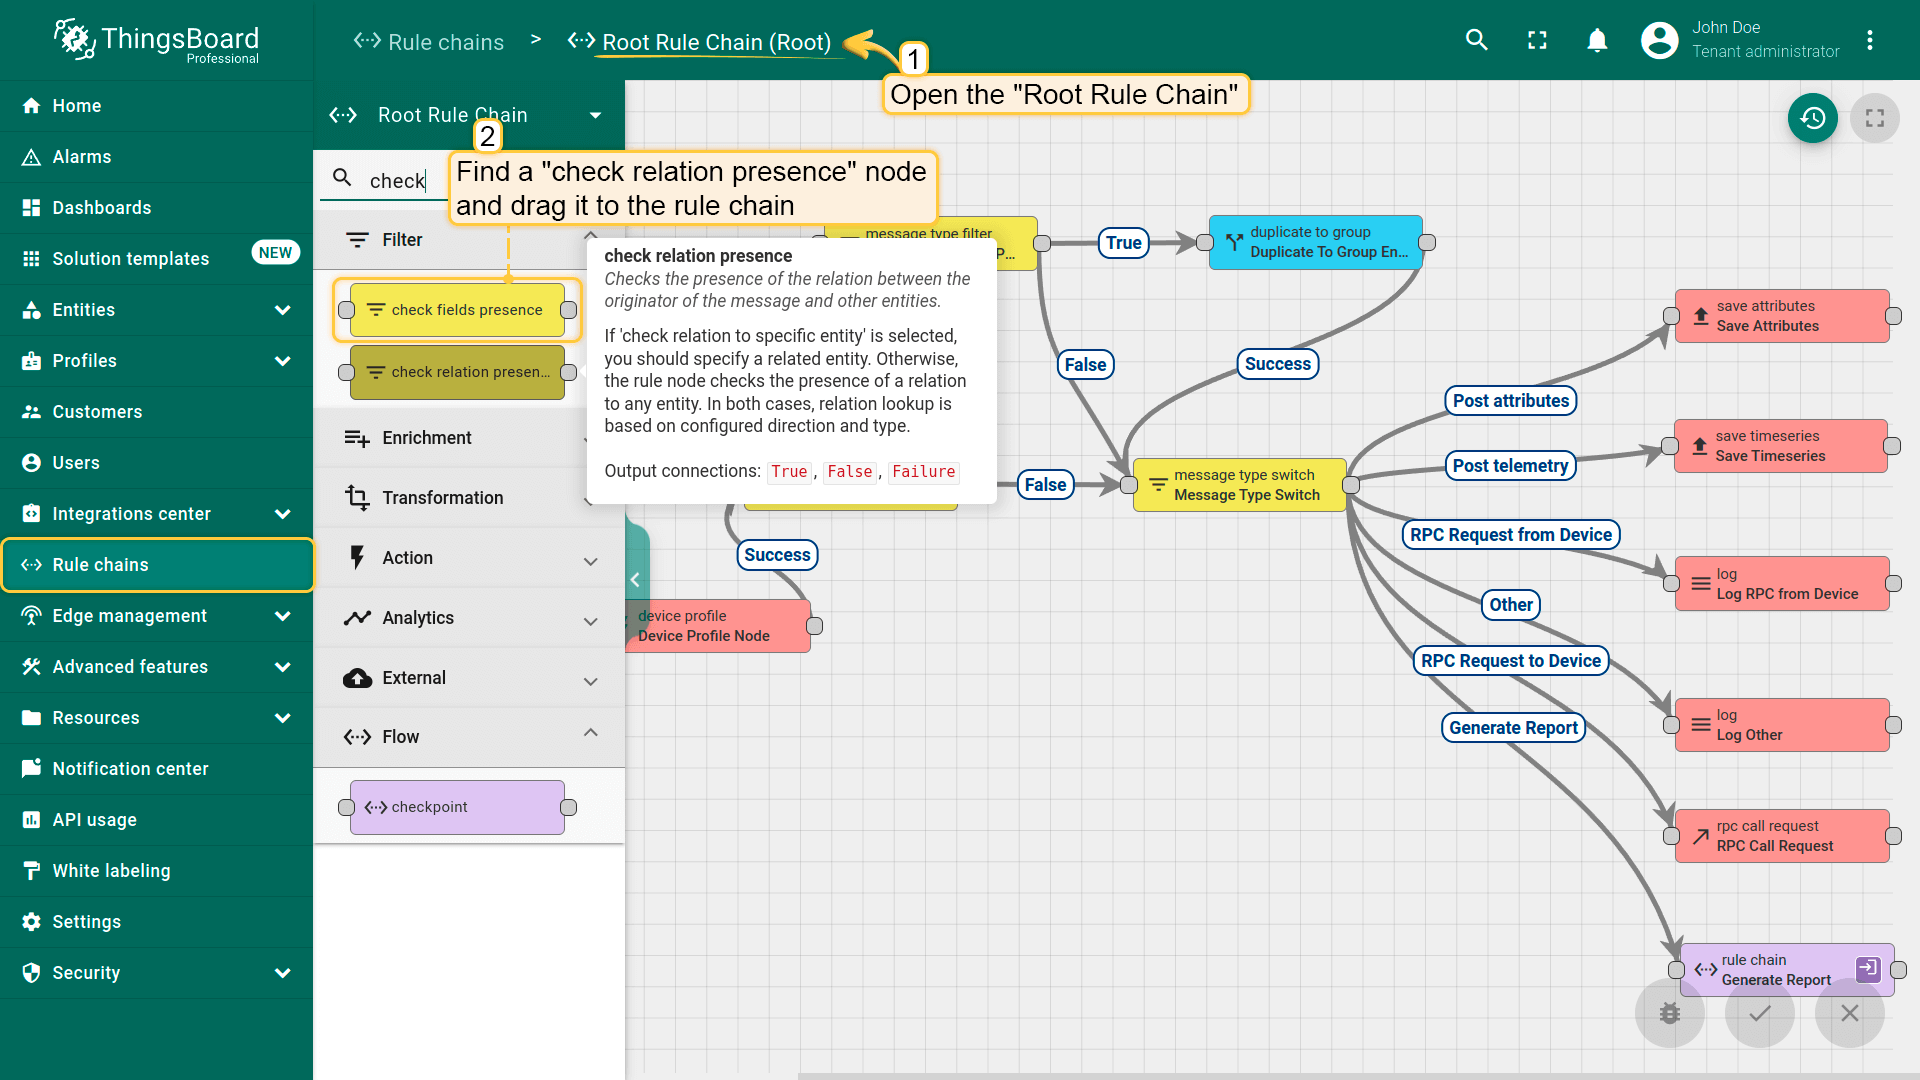
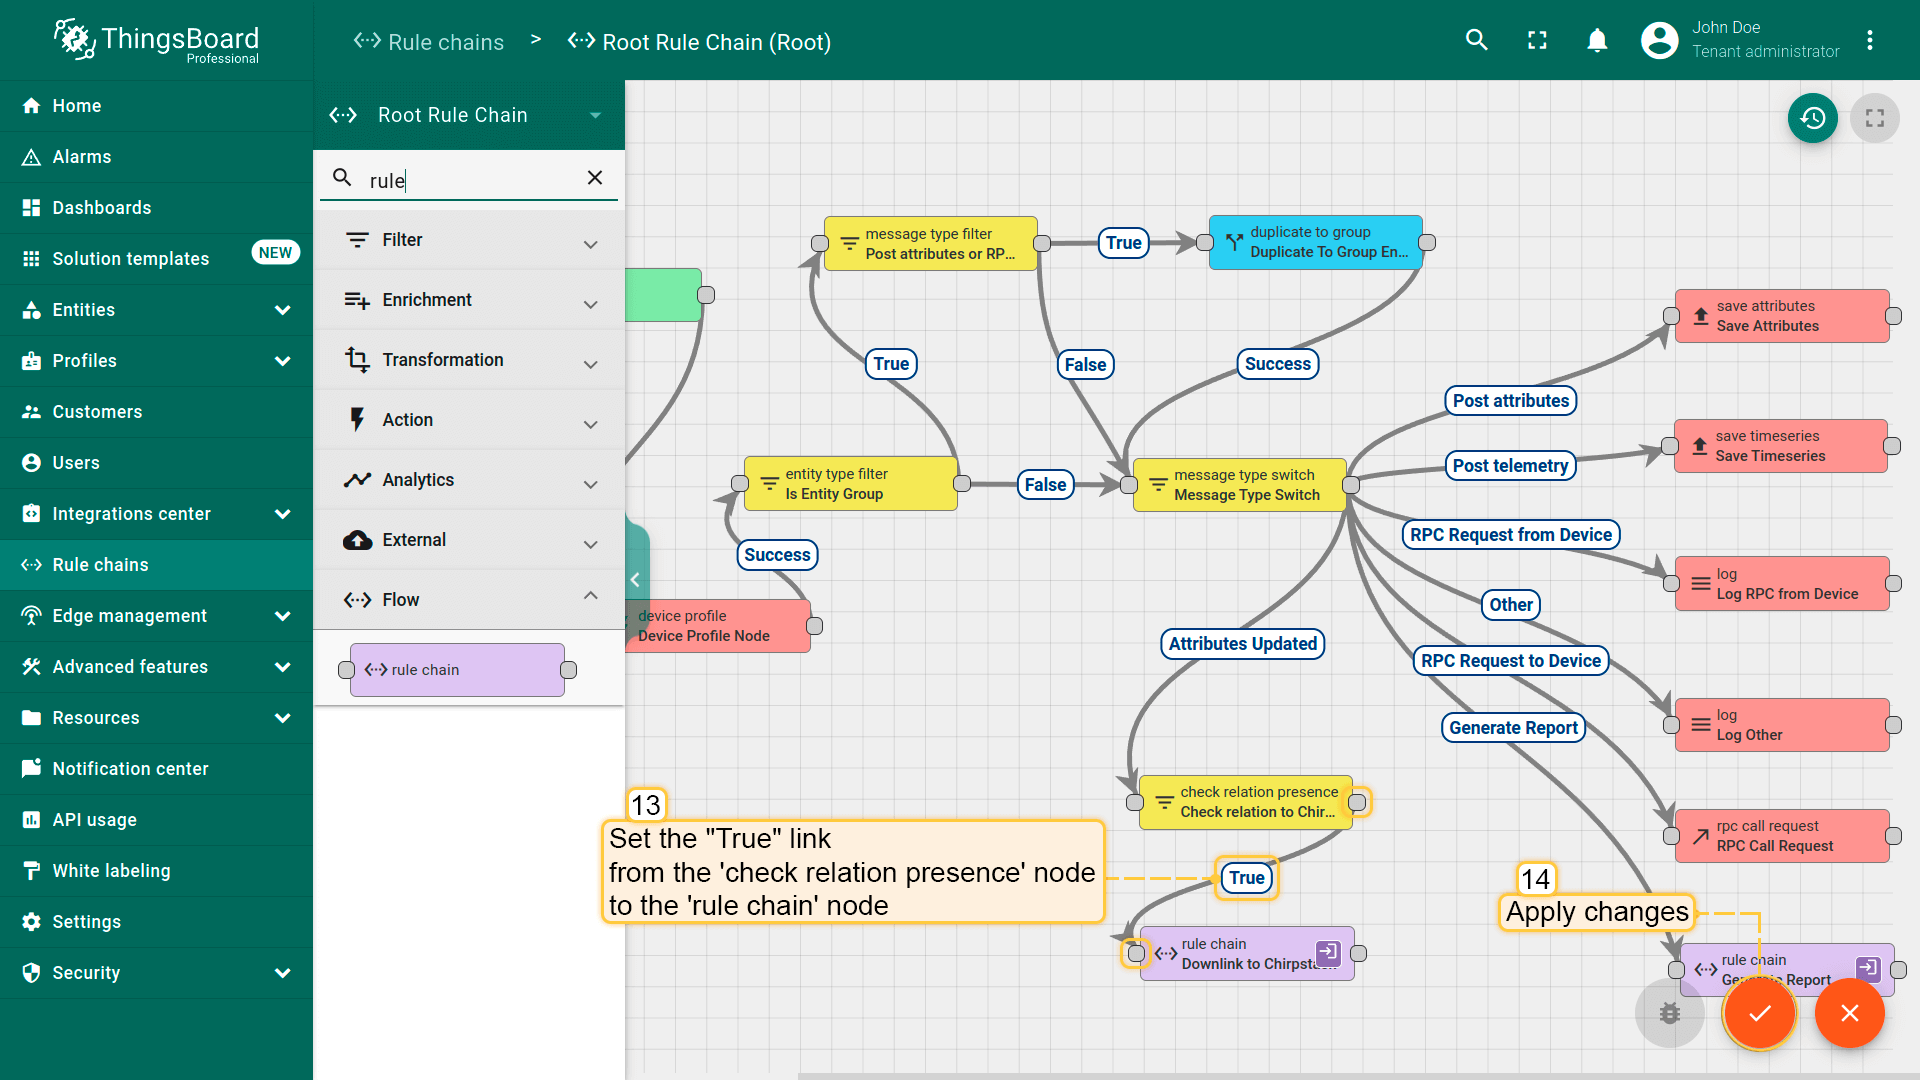
现在您需要配置根规则链:
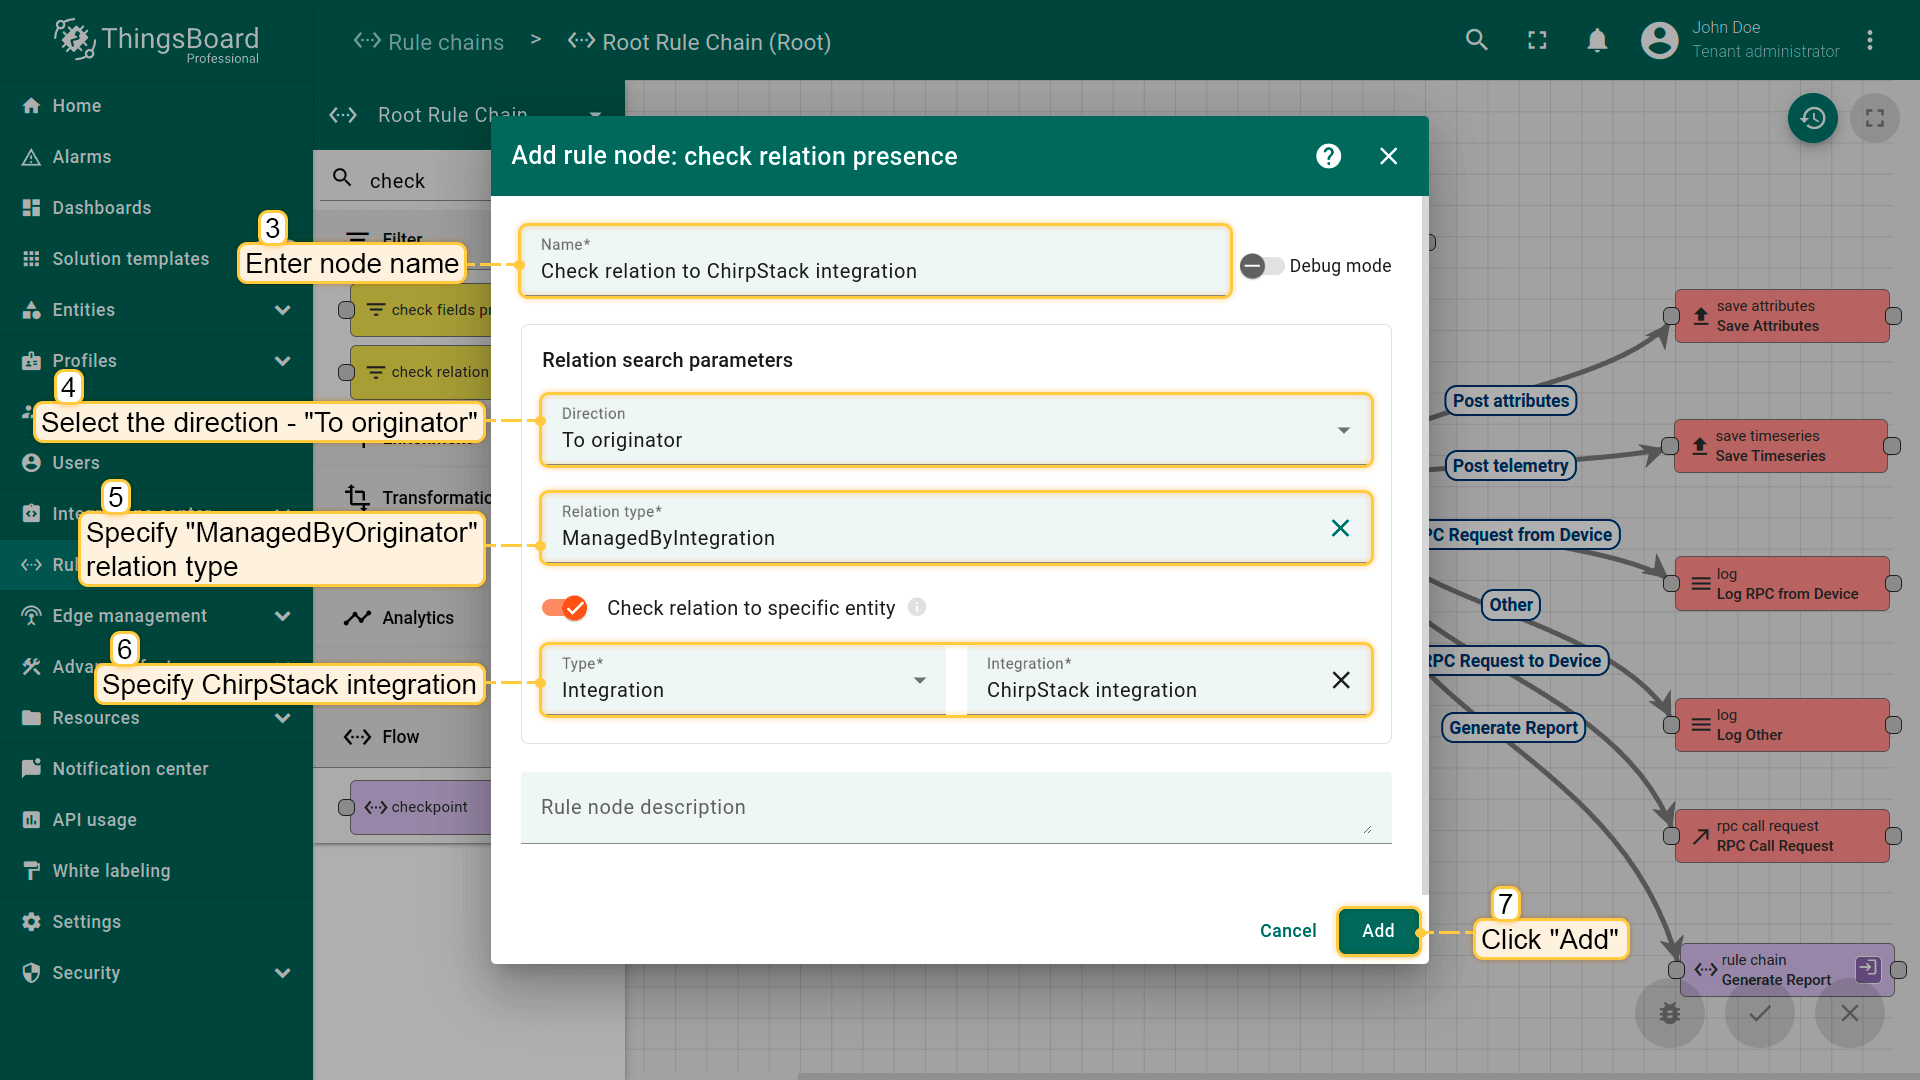
Open the "Root Rule Chain", and find a "check relation presence" node;
Drag it to the rule chain. Name it "Check relation to ChirpStack integration", select the direction - "To originator", specify "ManagedByOriginator" relation type. Specify ChirpStack integration and click "Add";
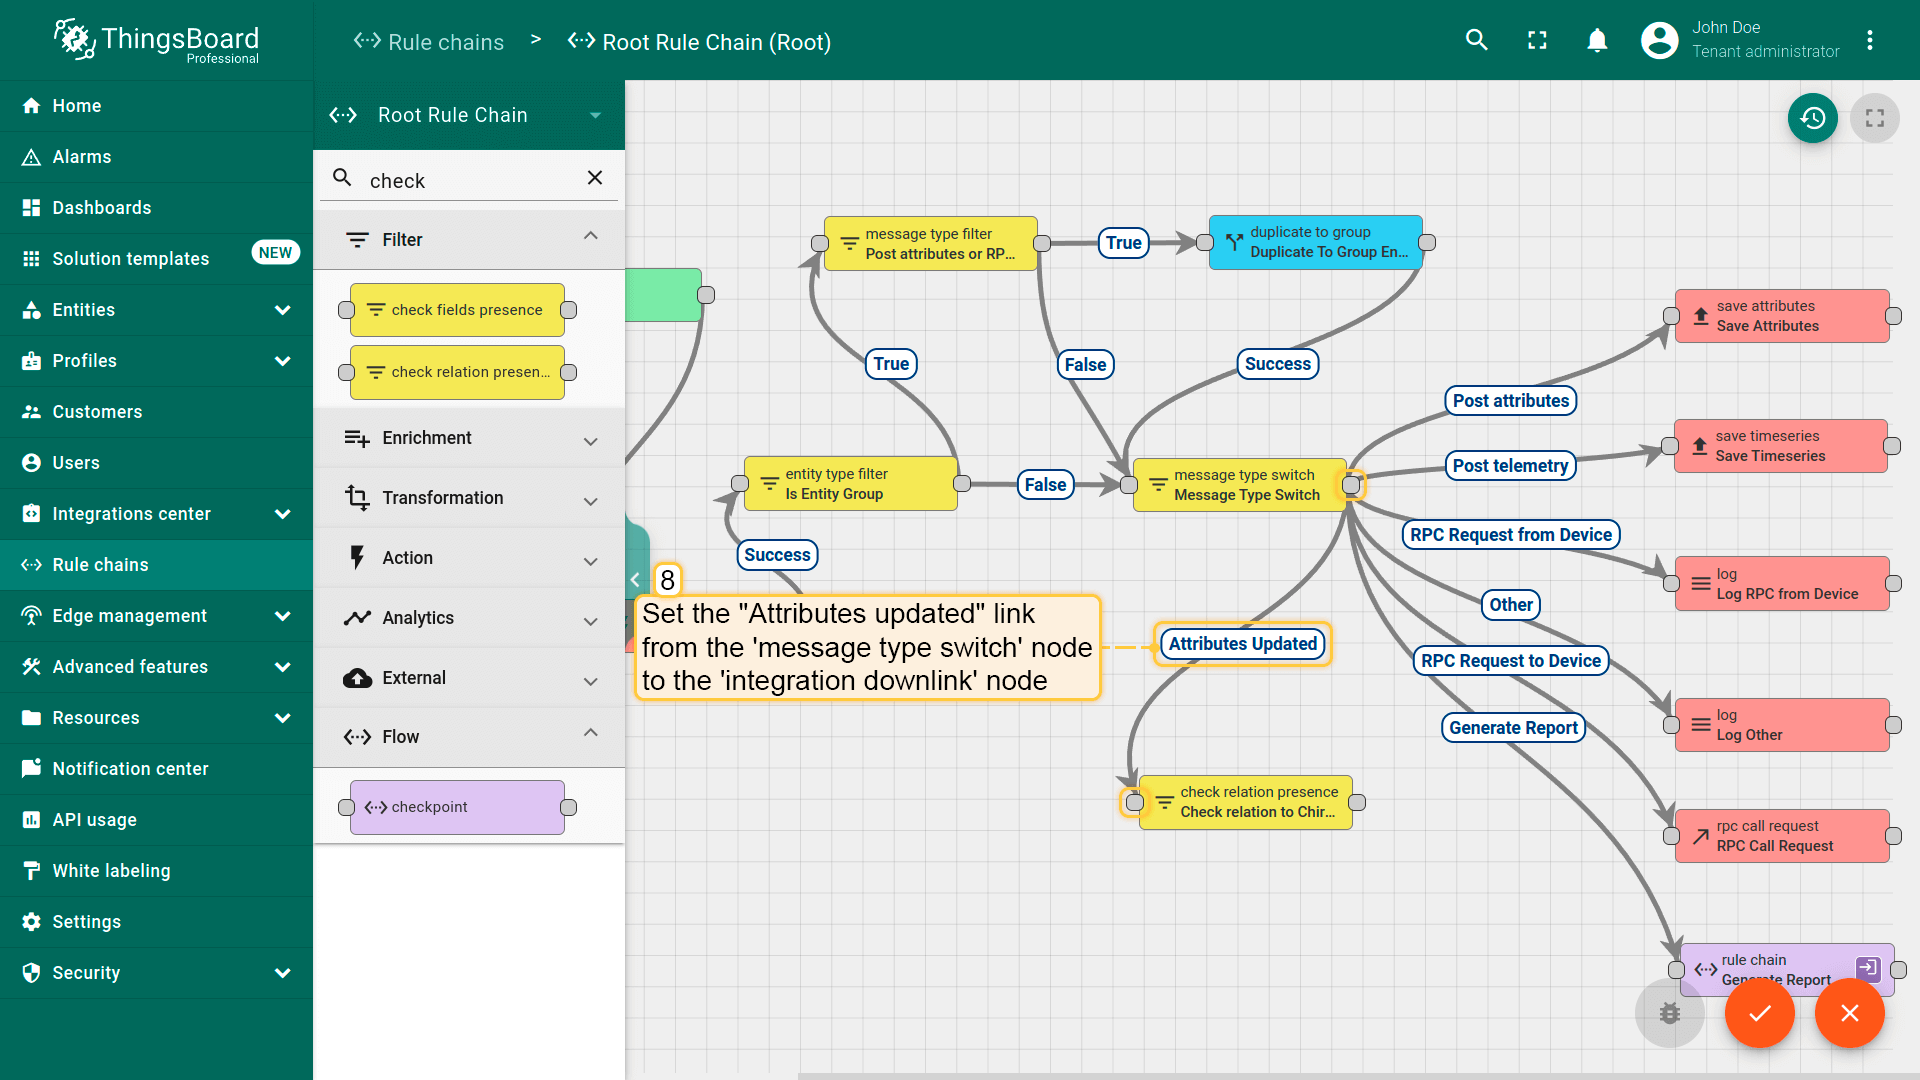
Tap on a right grey circle of "message type switch" node and drag this circle to the left side of "check relation presence" node. Here, add the "Attributes Updated" link, and click "Add";
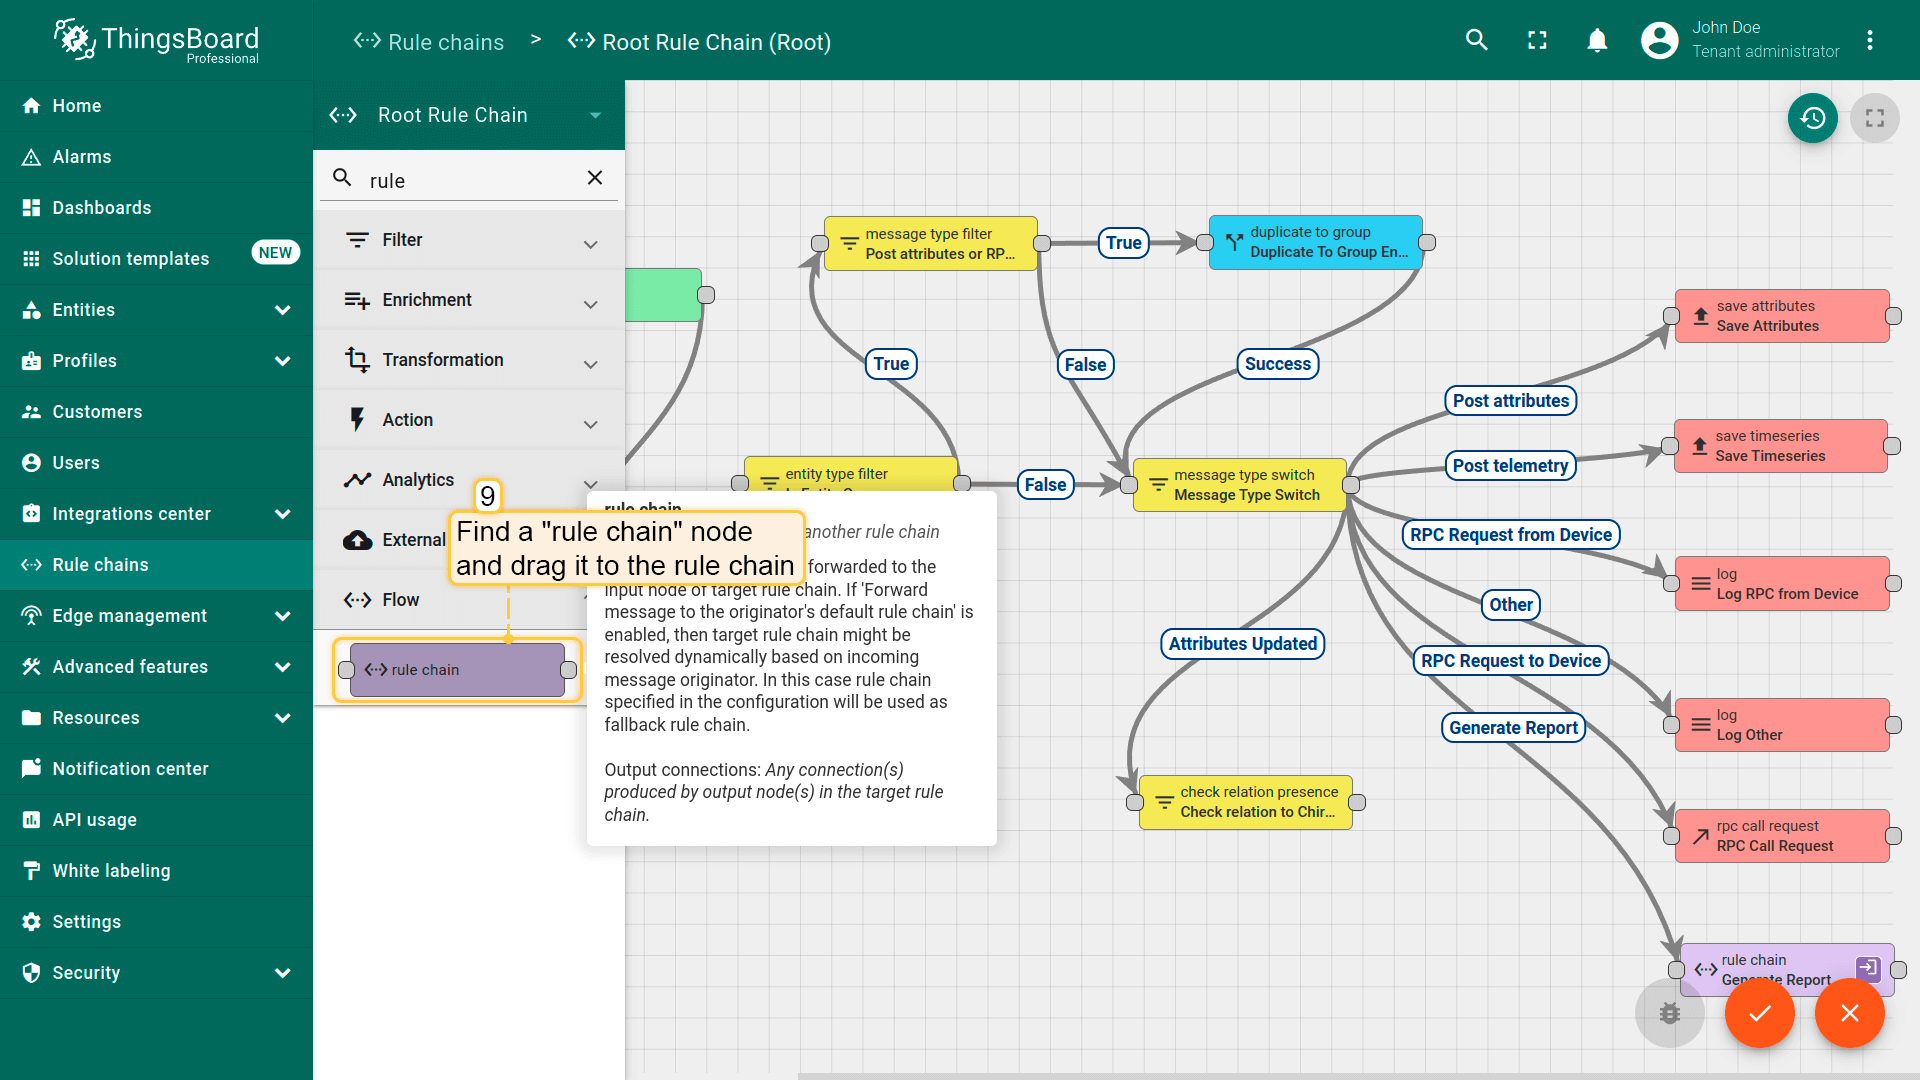
Find a "rule chain" node;
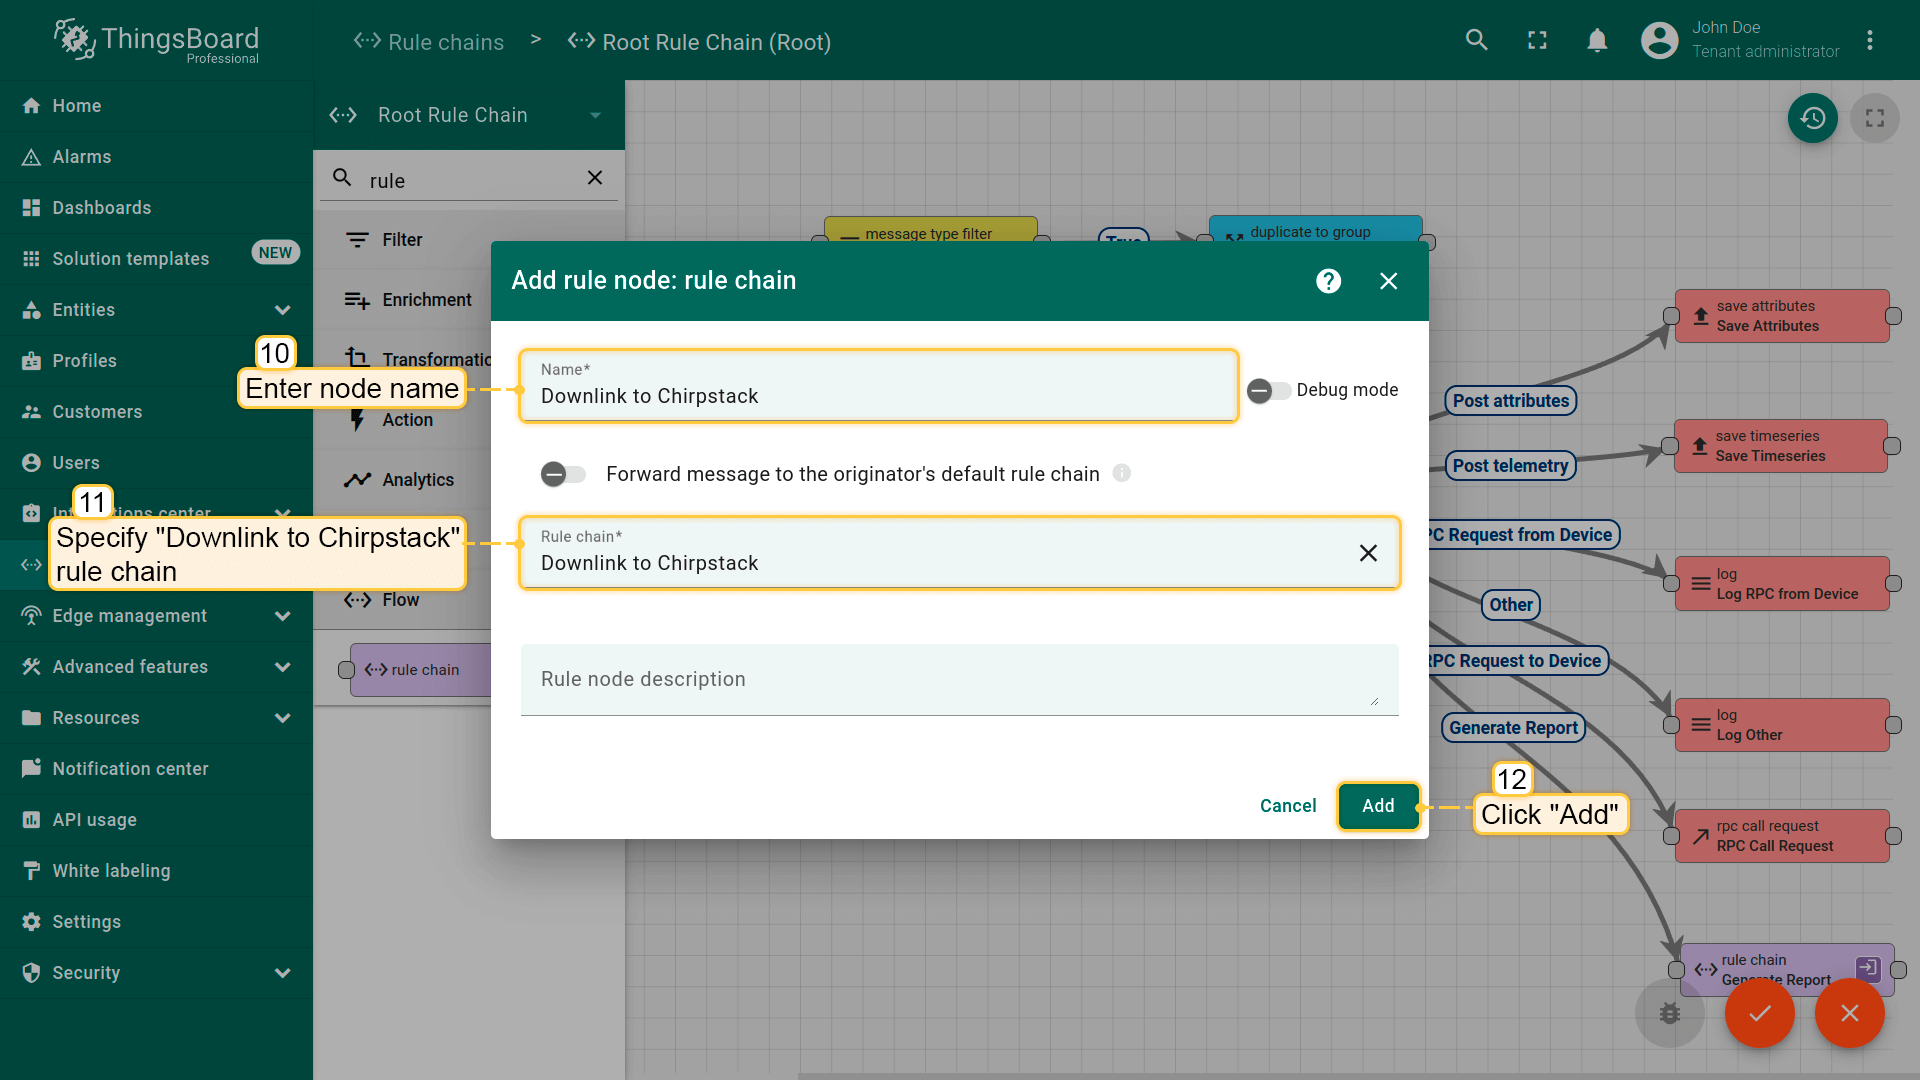
Drag it to the rule chain. Name it "Downlink to Chirpstack", specify "Downlink to Chirpstack" rule chain, and click "Add";
Tap on the right grey circle of the "check relation presence" node and drag this circle to left side of “rule chain” node. Here, select the "True" link, and click "Add". Finally, save Root Rule Chain.
Open the "Root Rule Chain", and find a "check relation presence" node;
Drag it to the rule chain. Name it "Check relation to ChirpStack integration", select the direction - "To originator", specify "ManagedByOriginator" relation type. Specify ChirpStack integration and click "Add";
Tap on a right grey circle of "message type switch" node and drag this circle to the left side of "check relation presence" node. Here, add the "Attributes Updated" link, and click "Add";
Find a "rule chain" node;
Drag it to the rule chain. Name it "Downlink to Chirpstack", specify "Downlink to Chirpstack" rule chain, and click "Add";
Tap on the right grey circle of the "check relation presence" node and drag this circle to left side of “rule chain” node. Here, select the "True" link, and click "Add". Finally, save Root Rule Chain.
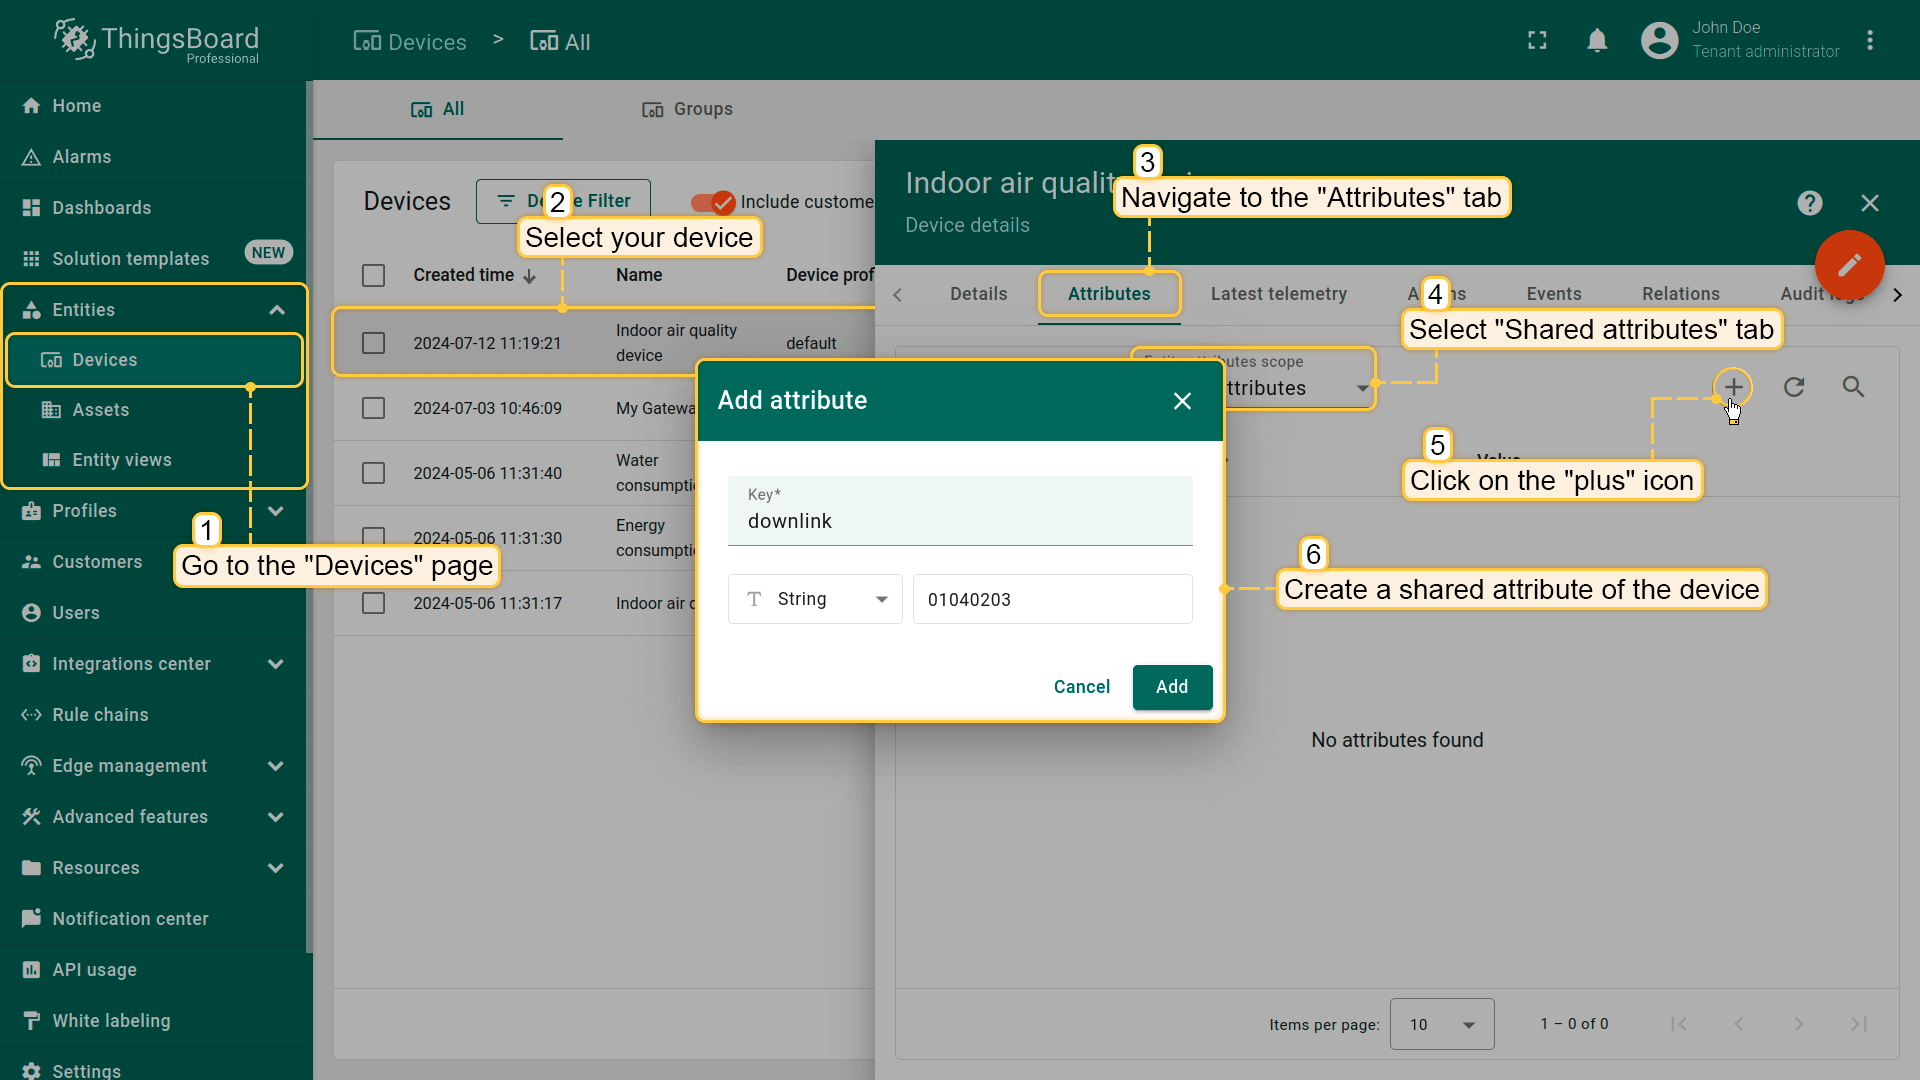
Go to the "Devices" page. Select your device and navigate to the "Attributes" tab. Select "Shared attributes" and click on the "plus" icon to add new attribute. Then enter the attribute name and its value (for example, the key name is 'downlink', value: '01040203') and click "Add".
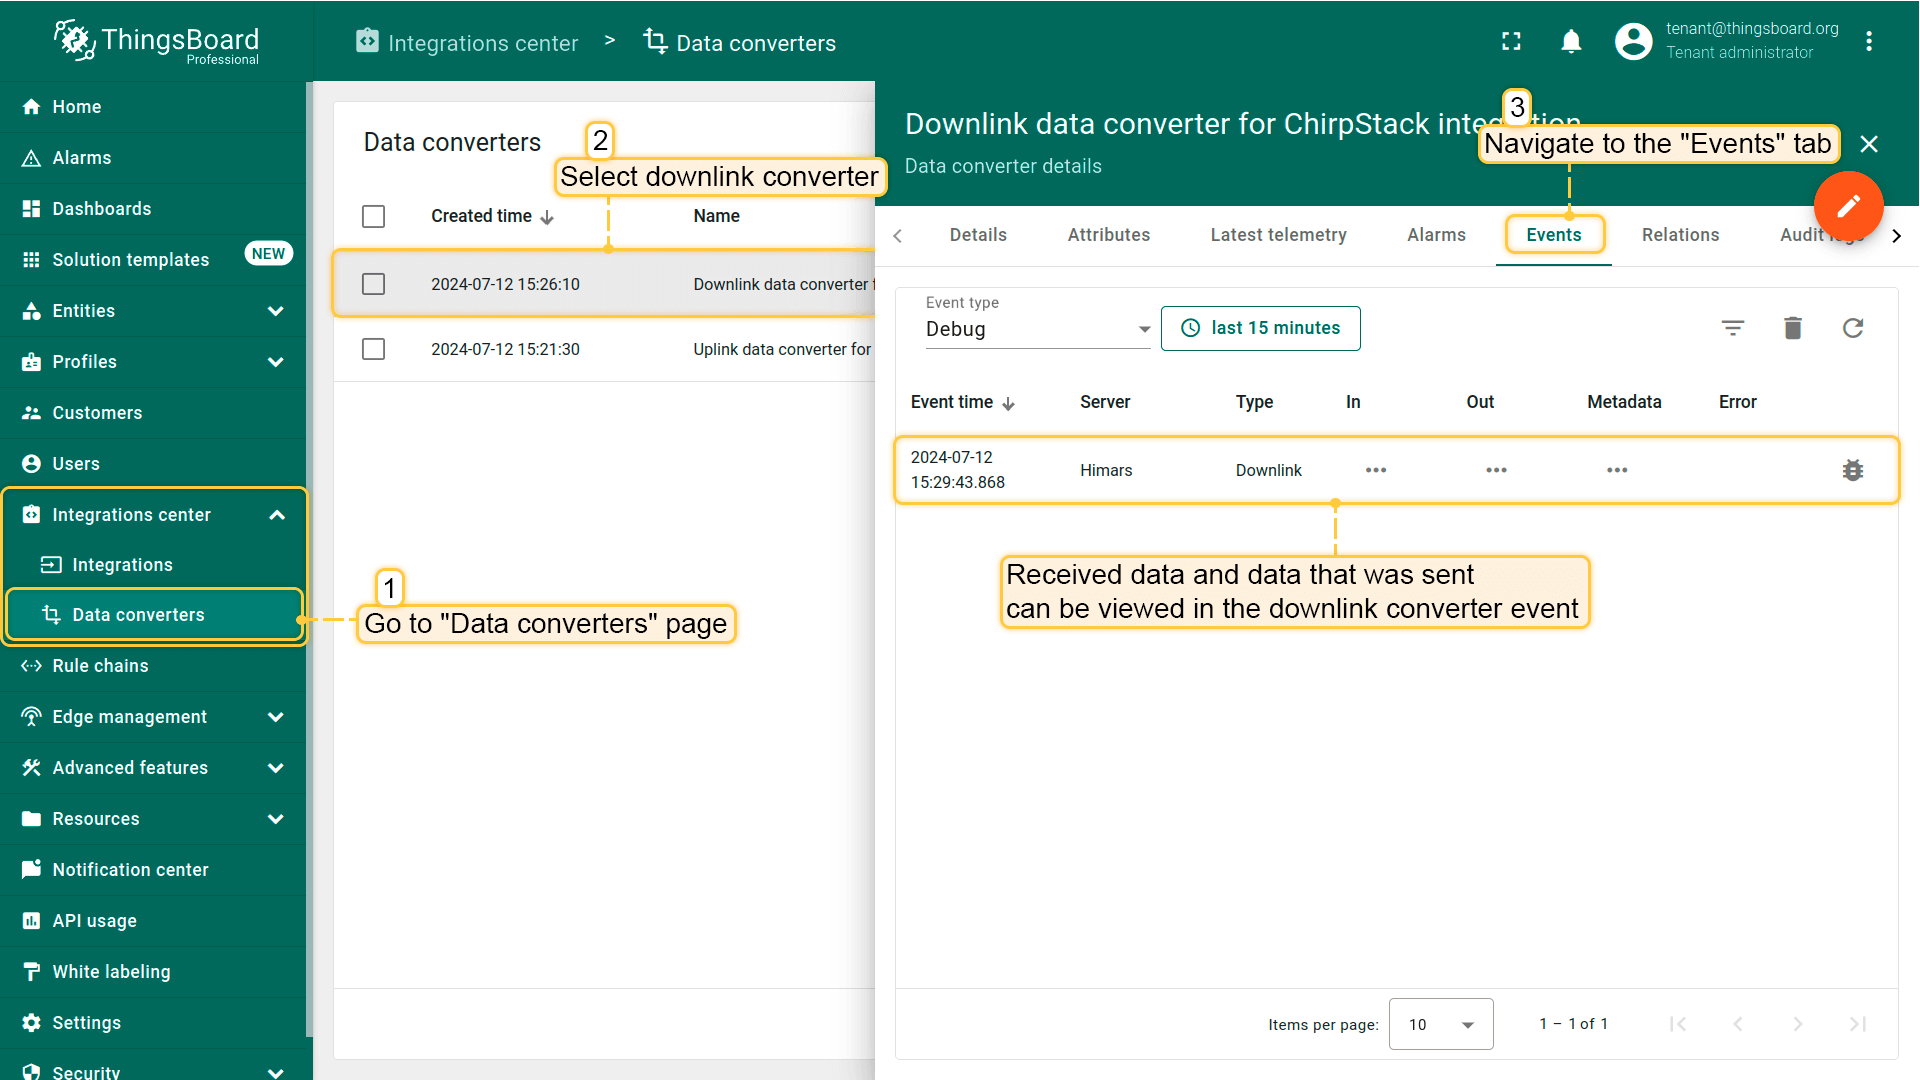
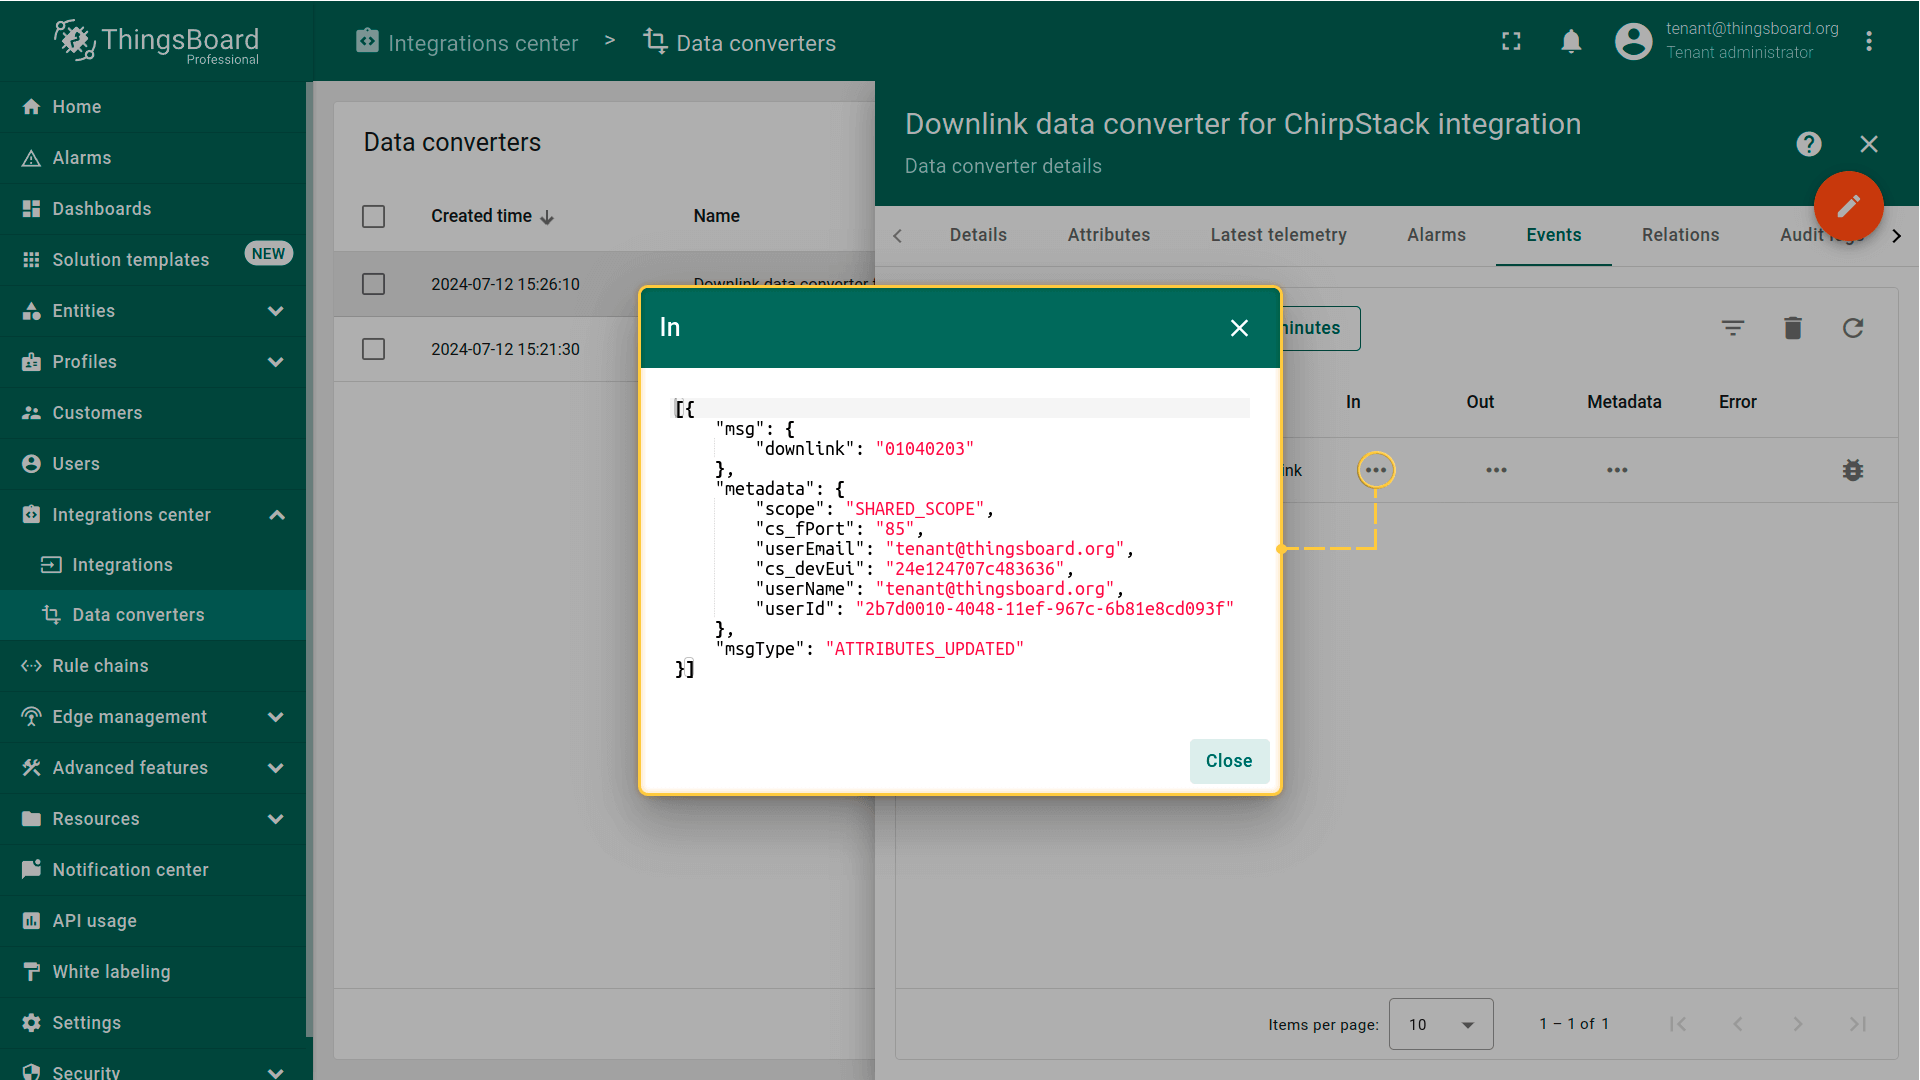
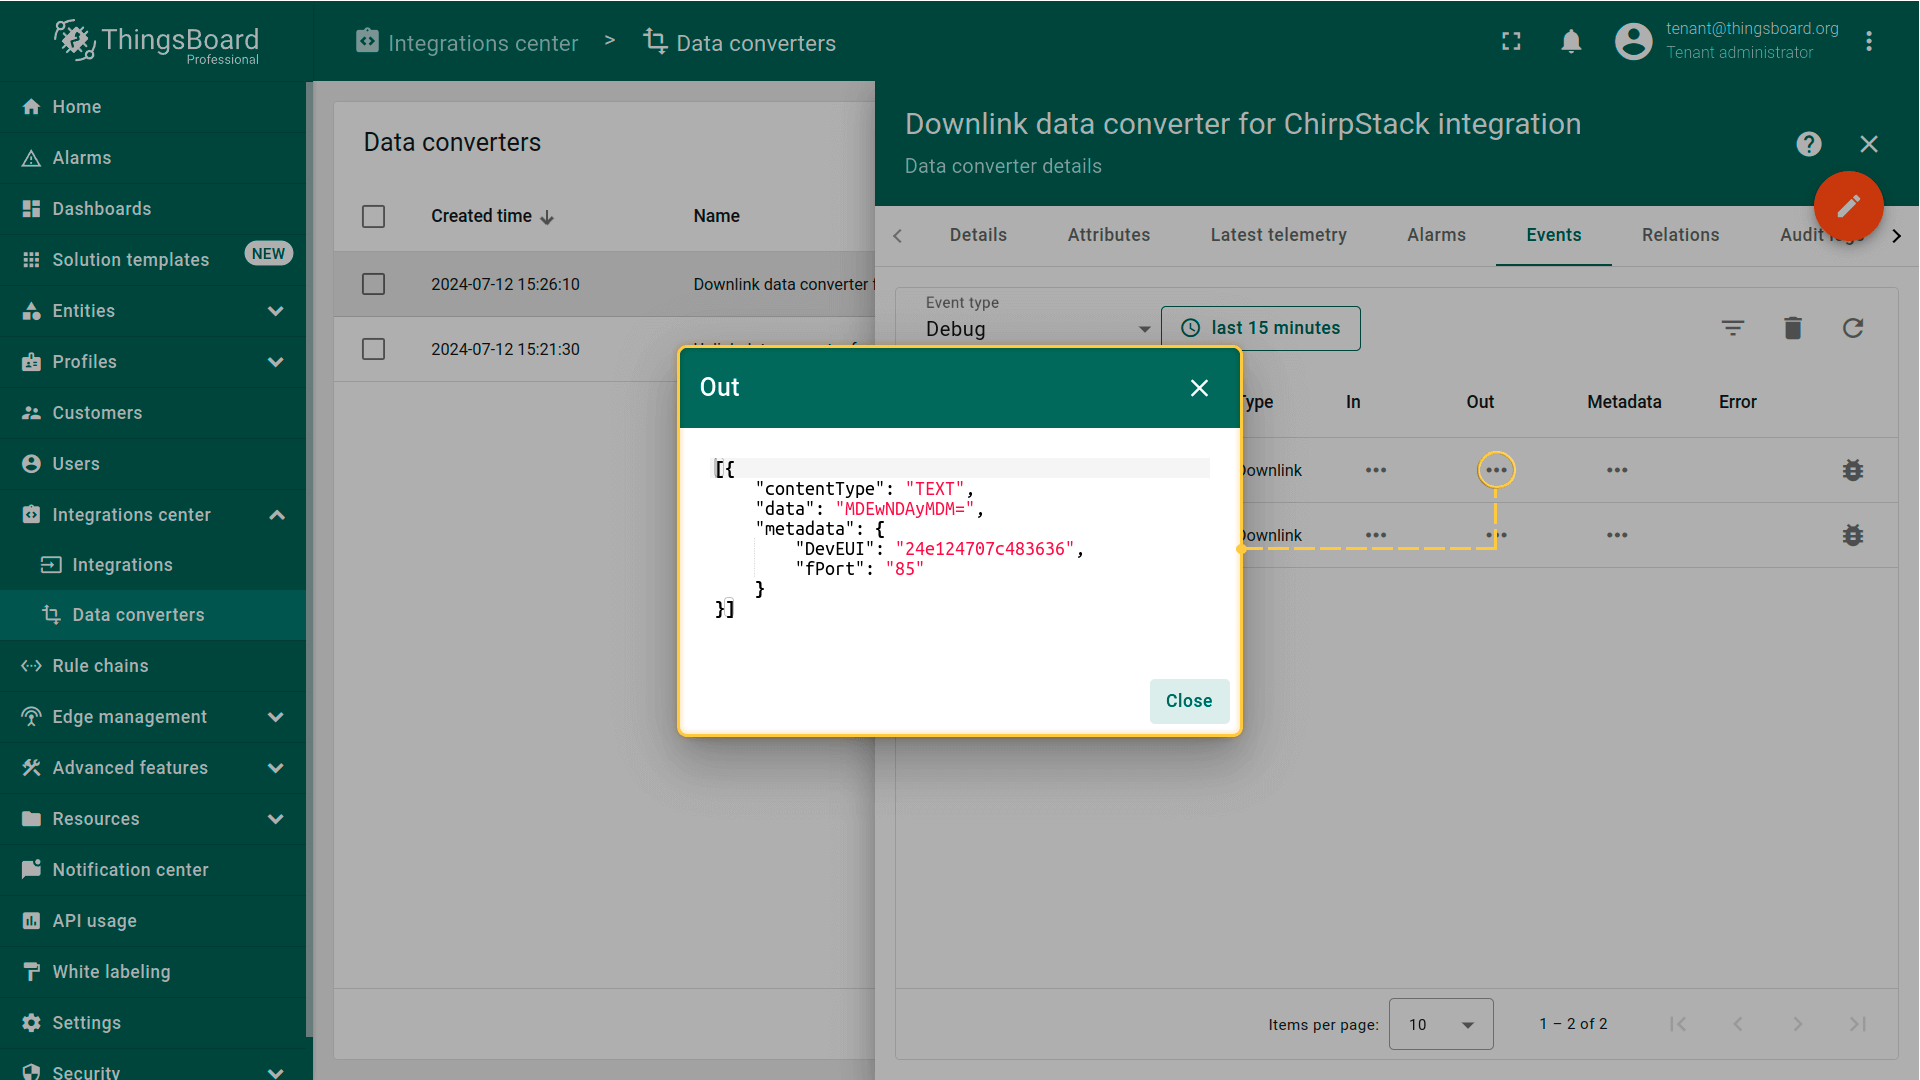
Received data can be viewed in the downlink converter. In the "In" and "Out" blocks of the "Events" tab;
Input data to downlink converter;
Output data from downlink converter.