- Use case
- Prerequisites
- Configure Alarm Rules
- Provision devices
- Configure edge rule engine to handle alarms and send RPC calls
- Connect “Air Conditioner” to edge and subscribe for RPC commands
- Post telemetry to “DHT22” sensor to create alarm
- Verify that RPC request was send to “Air Conditioner” device
- 下一步
Use case
假设您有一个仓库,其中两台设备连接到 ThingsBoard Edge:
- DHT22 温度传感器
- 空调
ThingsBoard Edge 的职责包括:
- 从 DHT22 传感器 采集温度读数
- 若仓库温度超过 50 °C,创建并更新告警
- 当温度达到临界值时,ThingsBoard Edge 通过 发送 RPC 调用请求 至空调设备开启制冷系统
- 将遥测数据推送至云端
请注意,这仅为演示平台能力的简单理论场景。 您可将本教程作为更复杂场景的基础。
Prerequisites
我们假设您已完成以下指南并阅读了以下文章:
- Getting Started 指南。
- Rule Engine Overview 文章。
- ThingsBoard Edge Getting Started 文章。
- Edge Rule Chain Templates 指南。
请确保 ThingsBoard 服务器已启动并运行。此外,ThingsBoard Edge 必须已启动、运行并已连接到云端。
若以上前置条件均已就绪,可继续下一步。
否则请访问此链接,以配置、安装并将 Edge 连接到服务器:指南。
为简化表述,无论 ThingsBoard 服务器是在本地部署还是云端主机版本,本教程中将服务器 UI URL 统一称为 SERVER_URL。 Edge UI URL 则统一称为 EDGE_URL。
若Edge安装时将HTTP bind port修改为18080,请通过 http://localhost:18080 访问 ThingsBoard Edge 实例。
Configure Alarm Rules
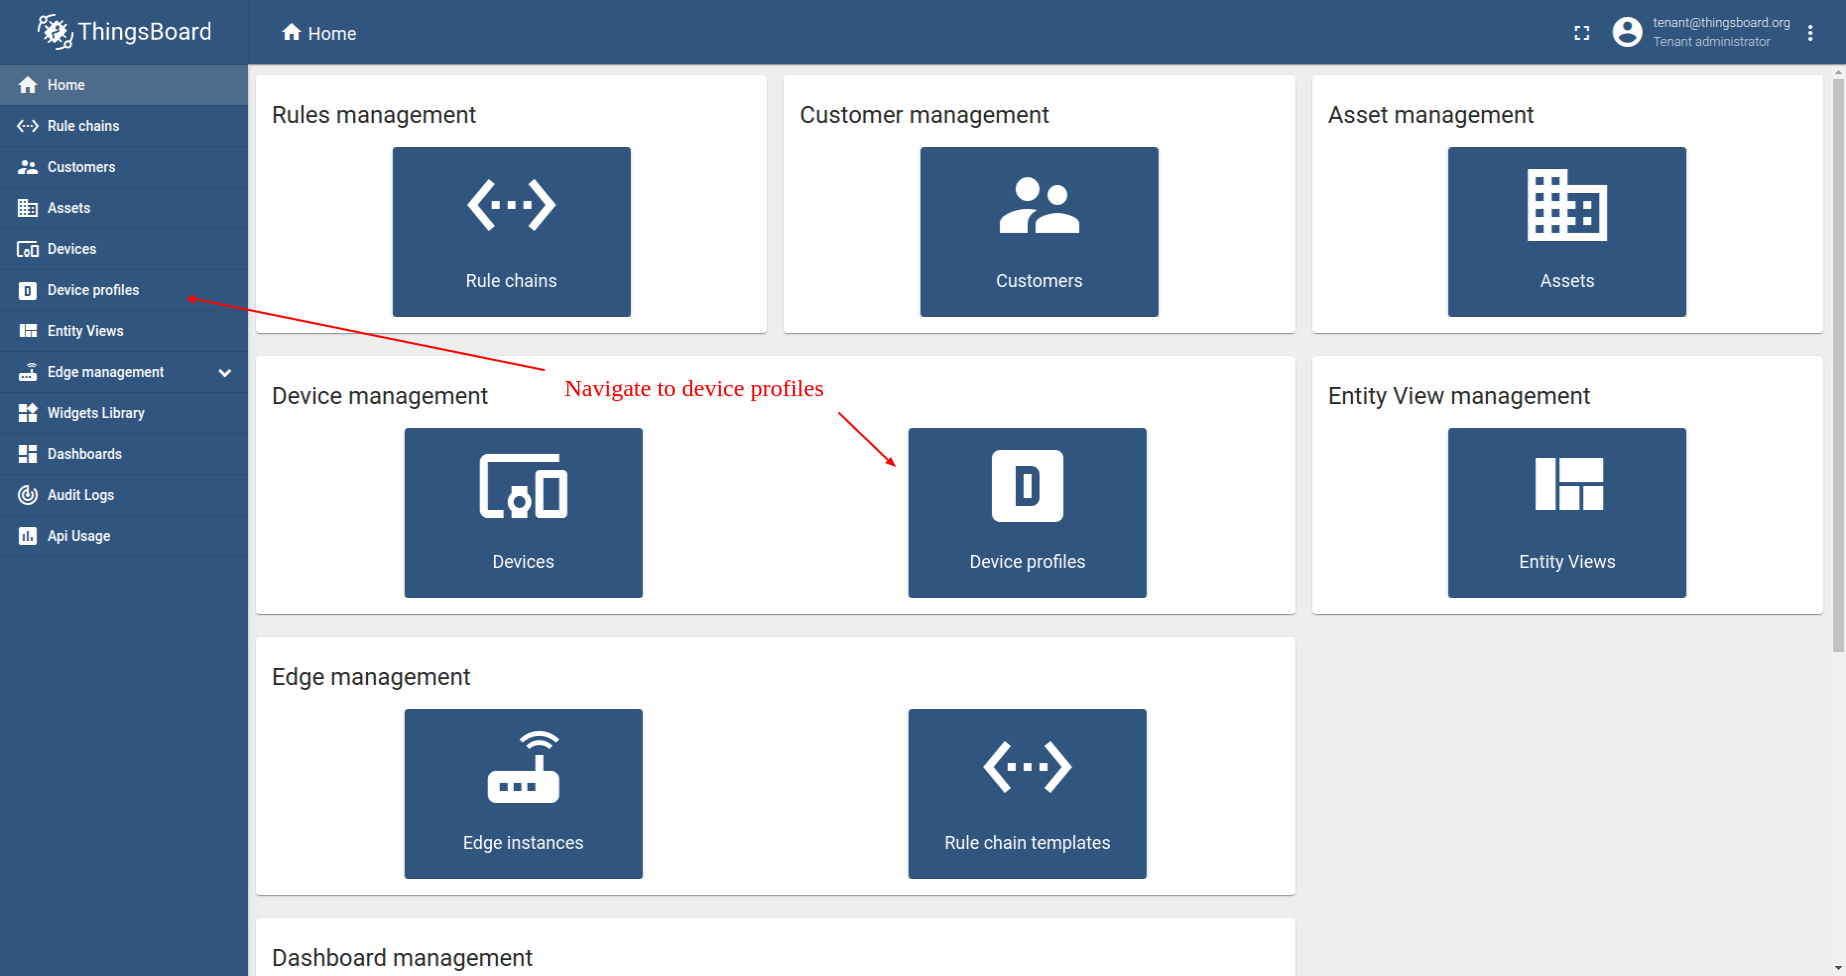
我们将使用 alarm rules(告警规则)功能,在温度读数超过 50 °C 时触发告警。 为此,需创建新设备配置并添加新告警规则。建议为每种设备类型创建专用的 device profiles(设备配置)。我们创建一个名为「edge thermostat」的新设备配置。
- Login to your ThingsBoard instance and open Device profiles menu page.
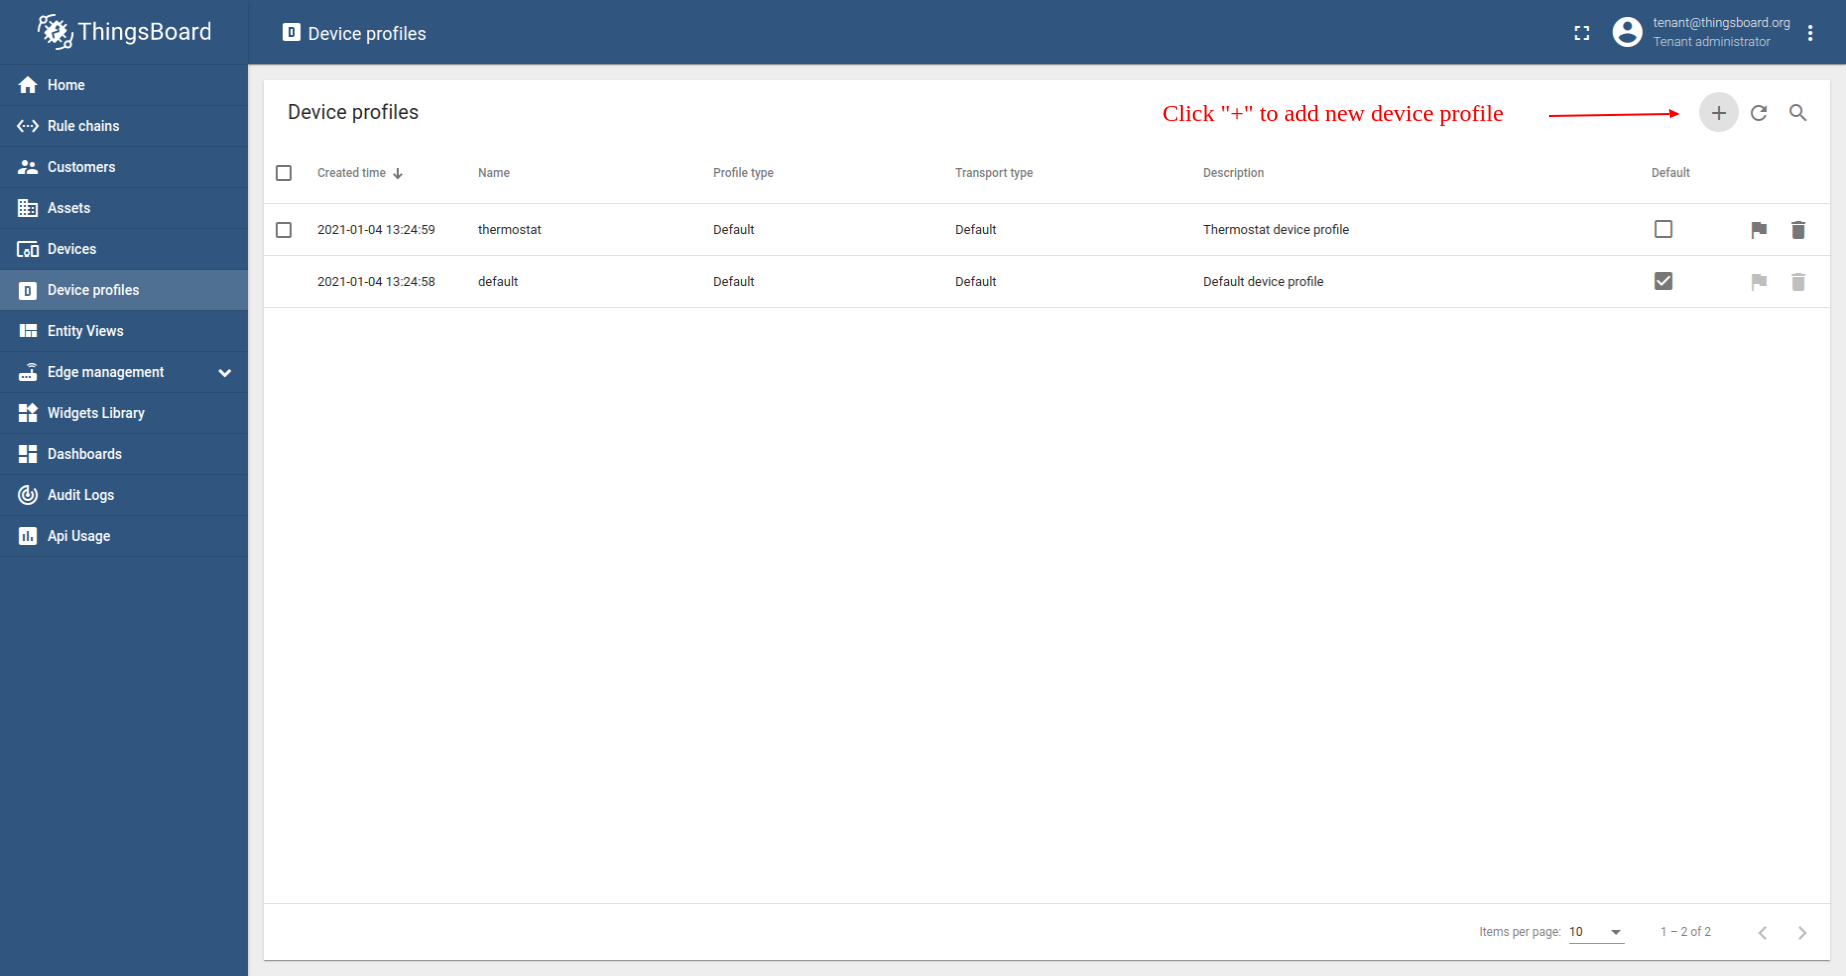
- Click the ("+") icon to add new device profile.
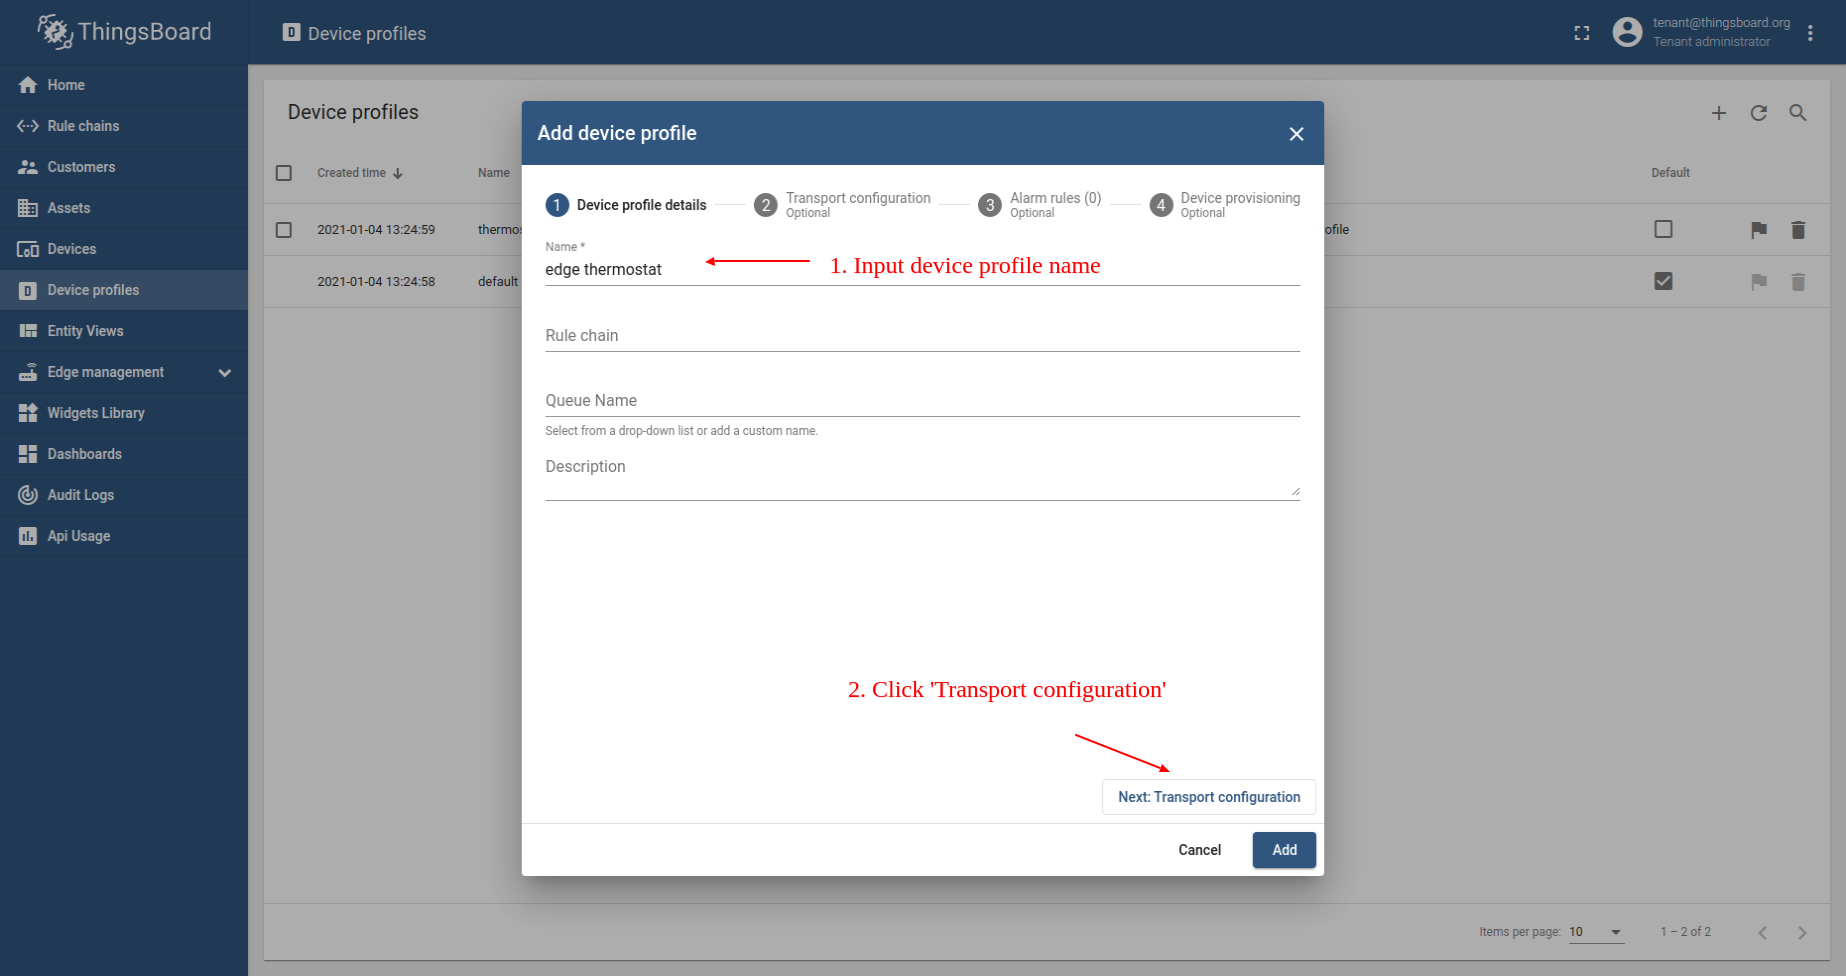
- 1. Input device profile name. For e.g., edge thermostat. 2. Click on the Transport configuration to proceed.
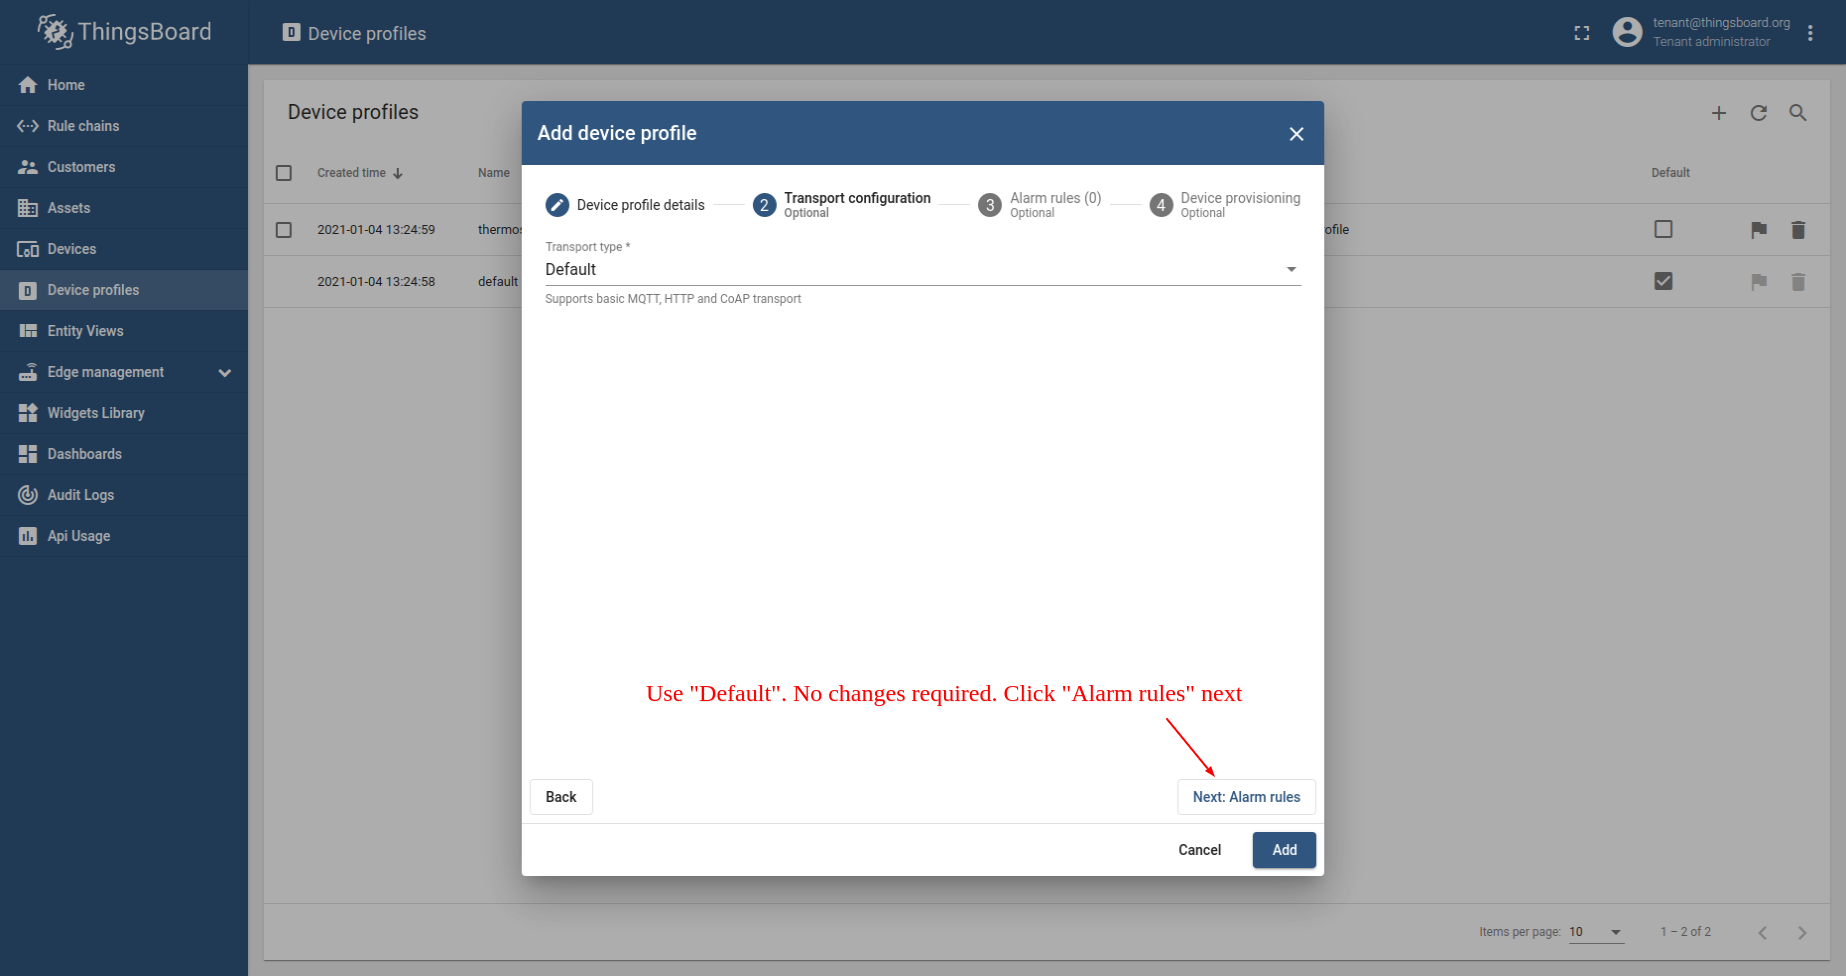
- For this example we will use default transport configuration. Click on the Alarm rules to proceed.
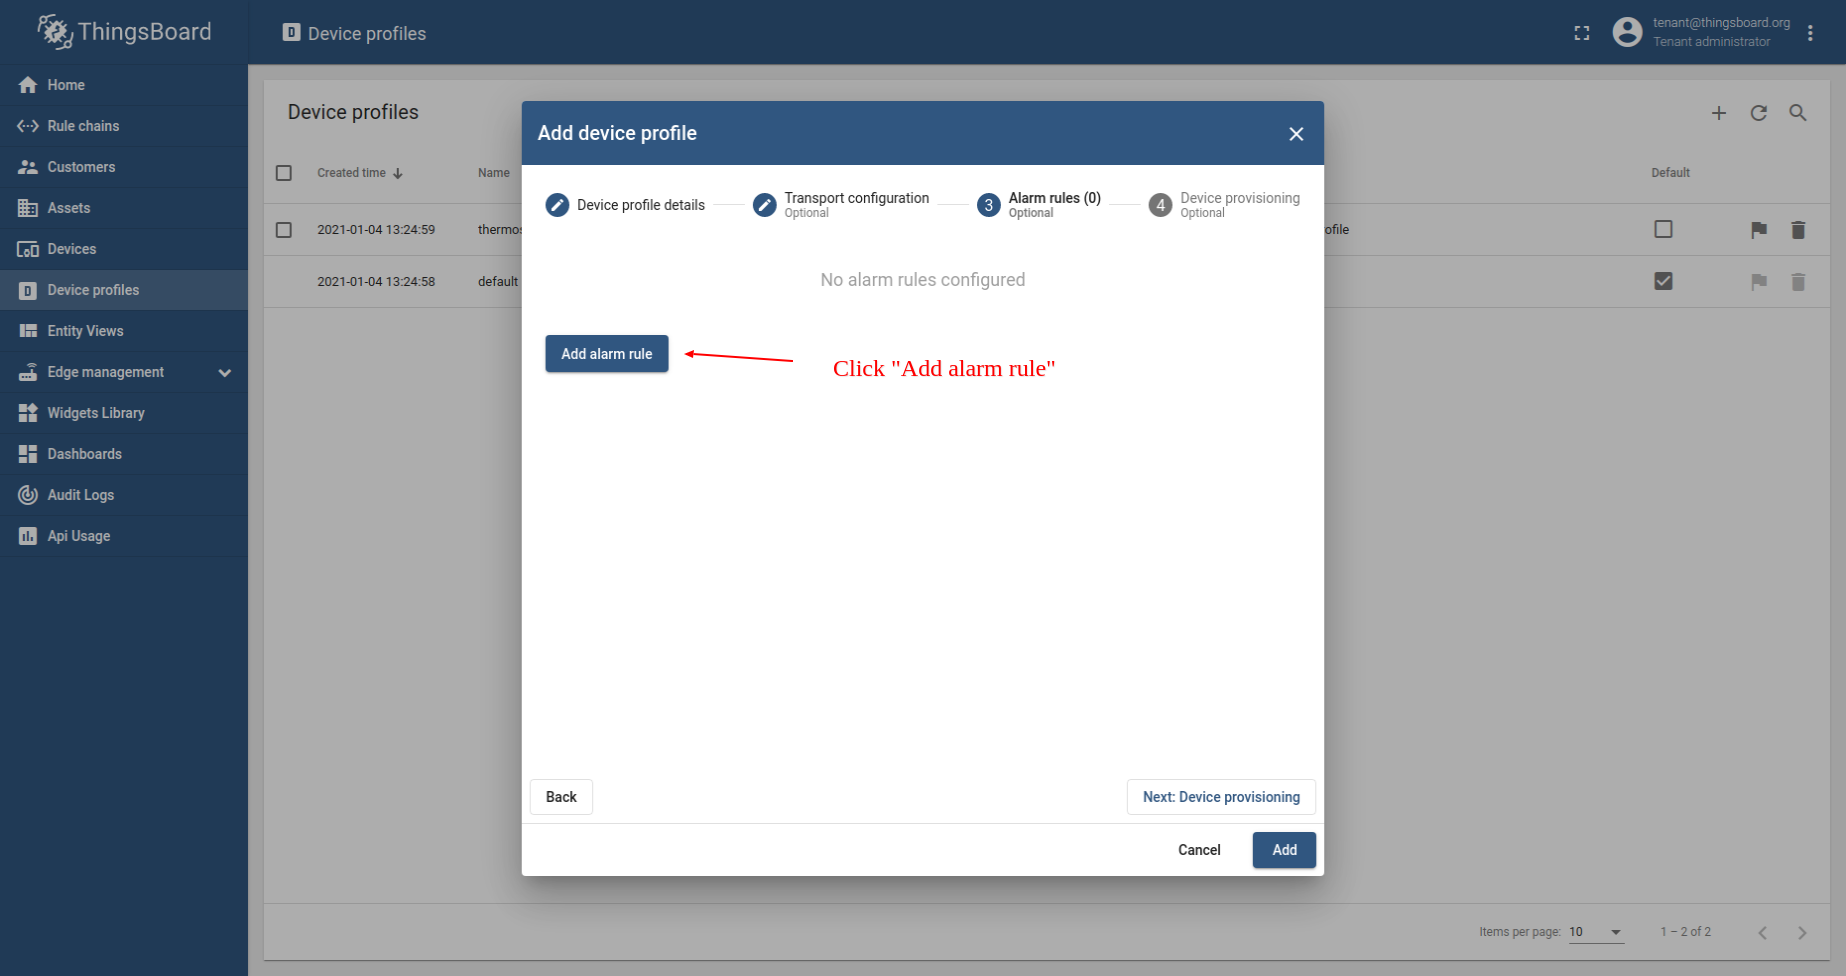
- Click on the Add alarm rule button.
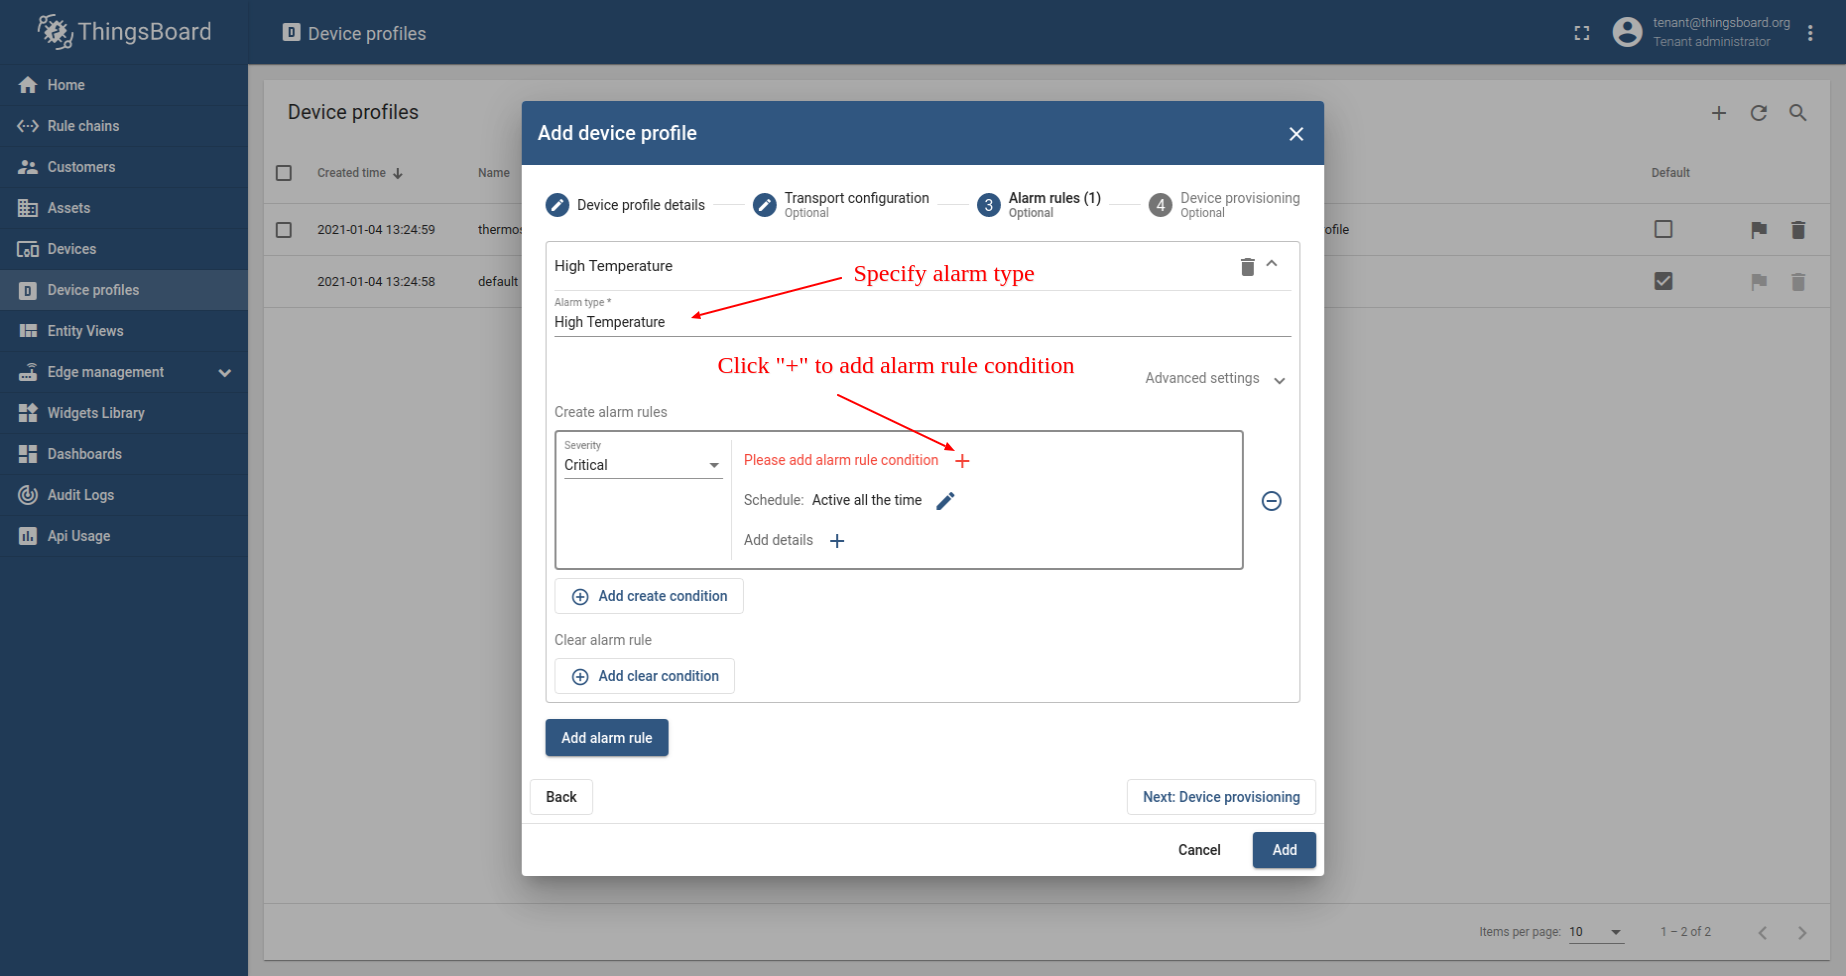
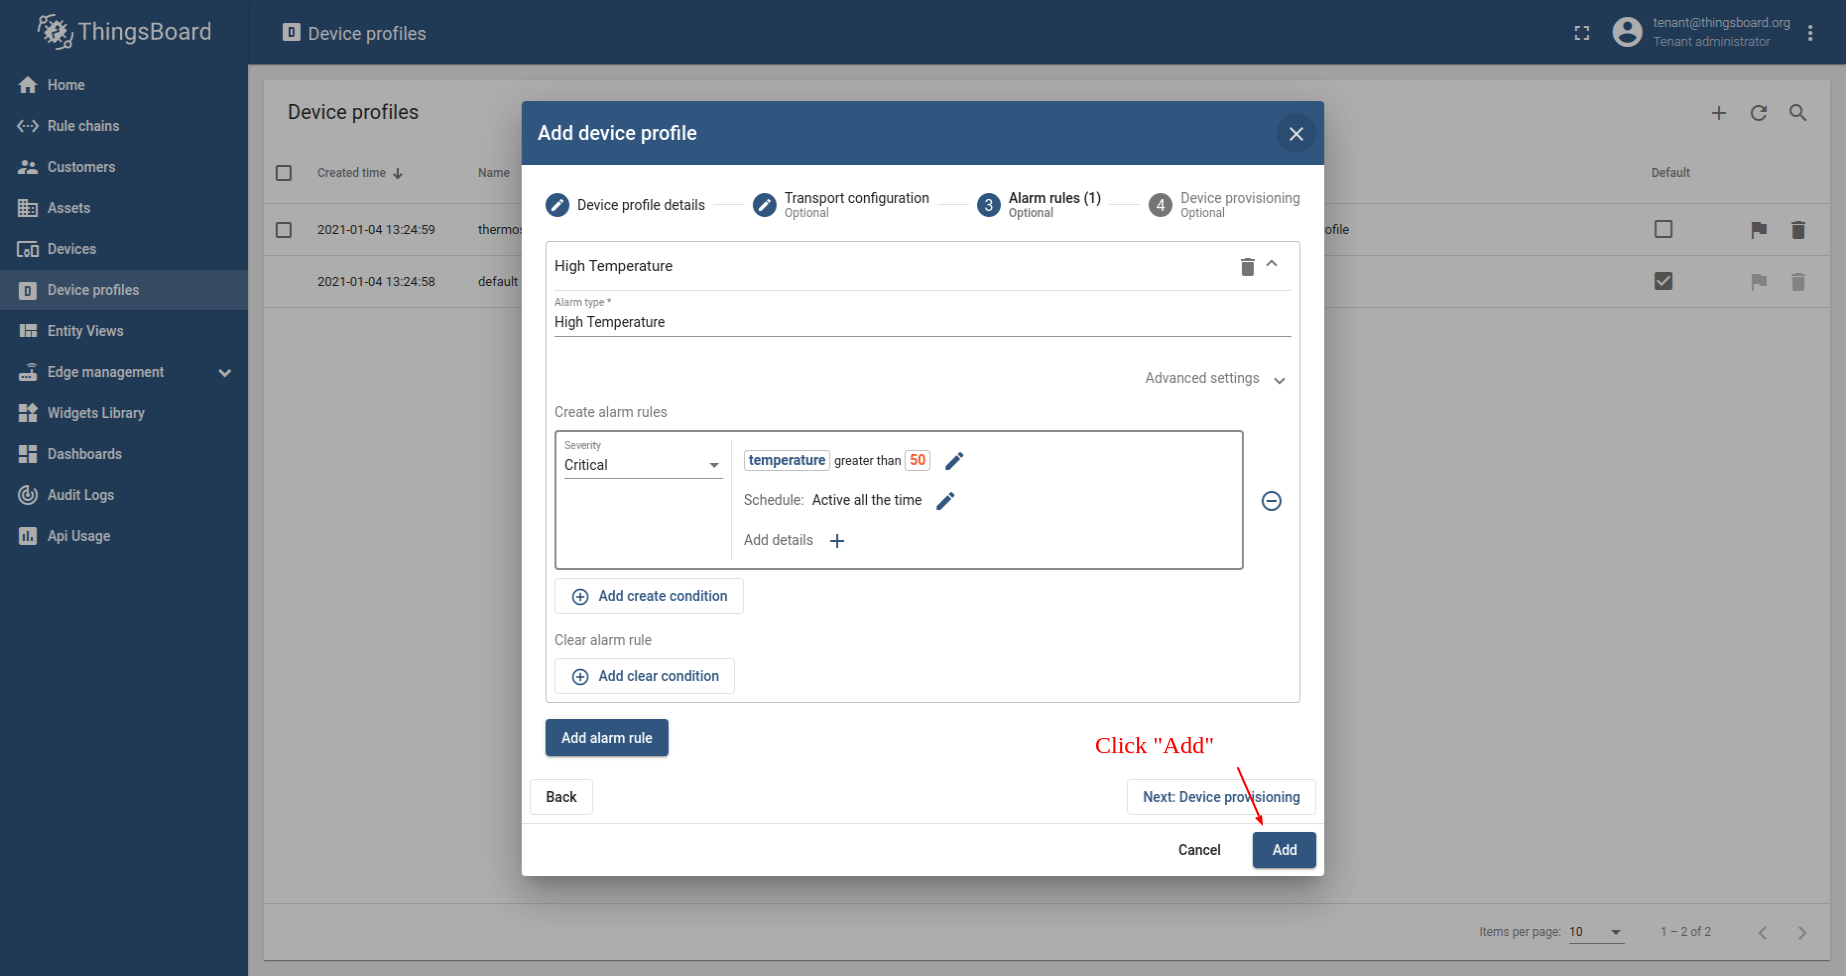
- 1. Specify alarm type. For e.g., High temperature. 2. Click on the ("+") icon to add new alarm condition.
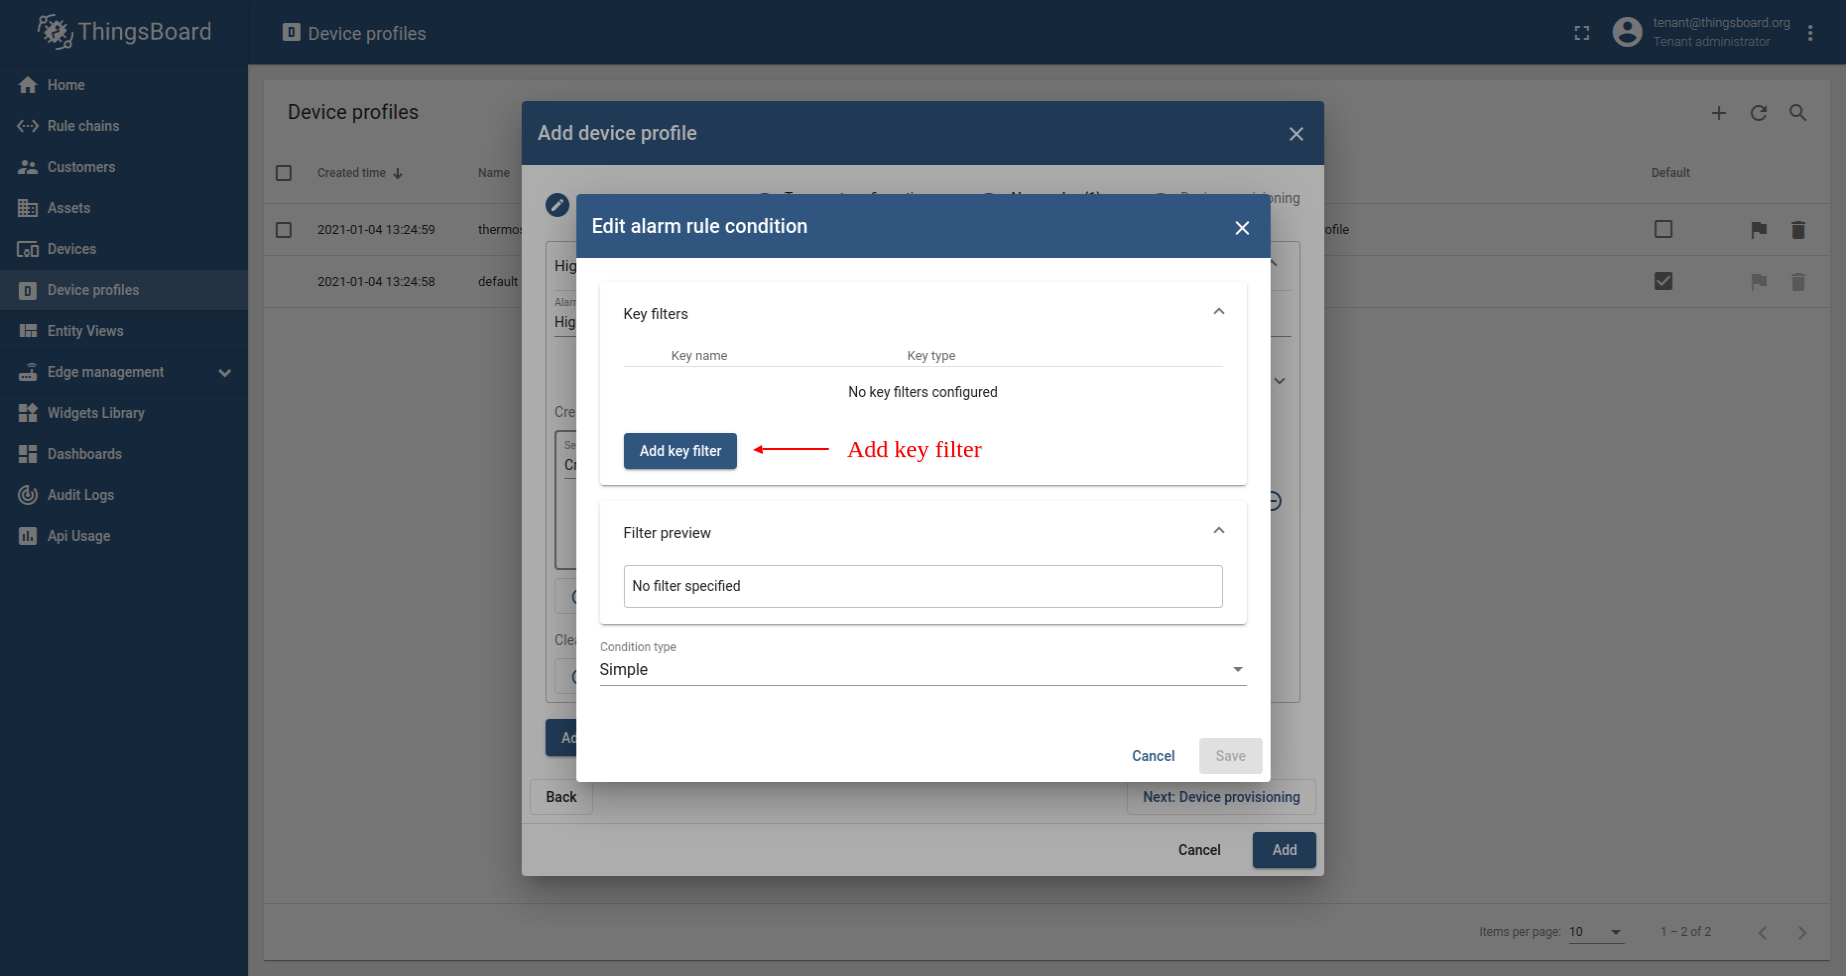
- Click on the Add key filter button.
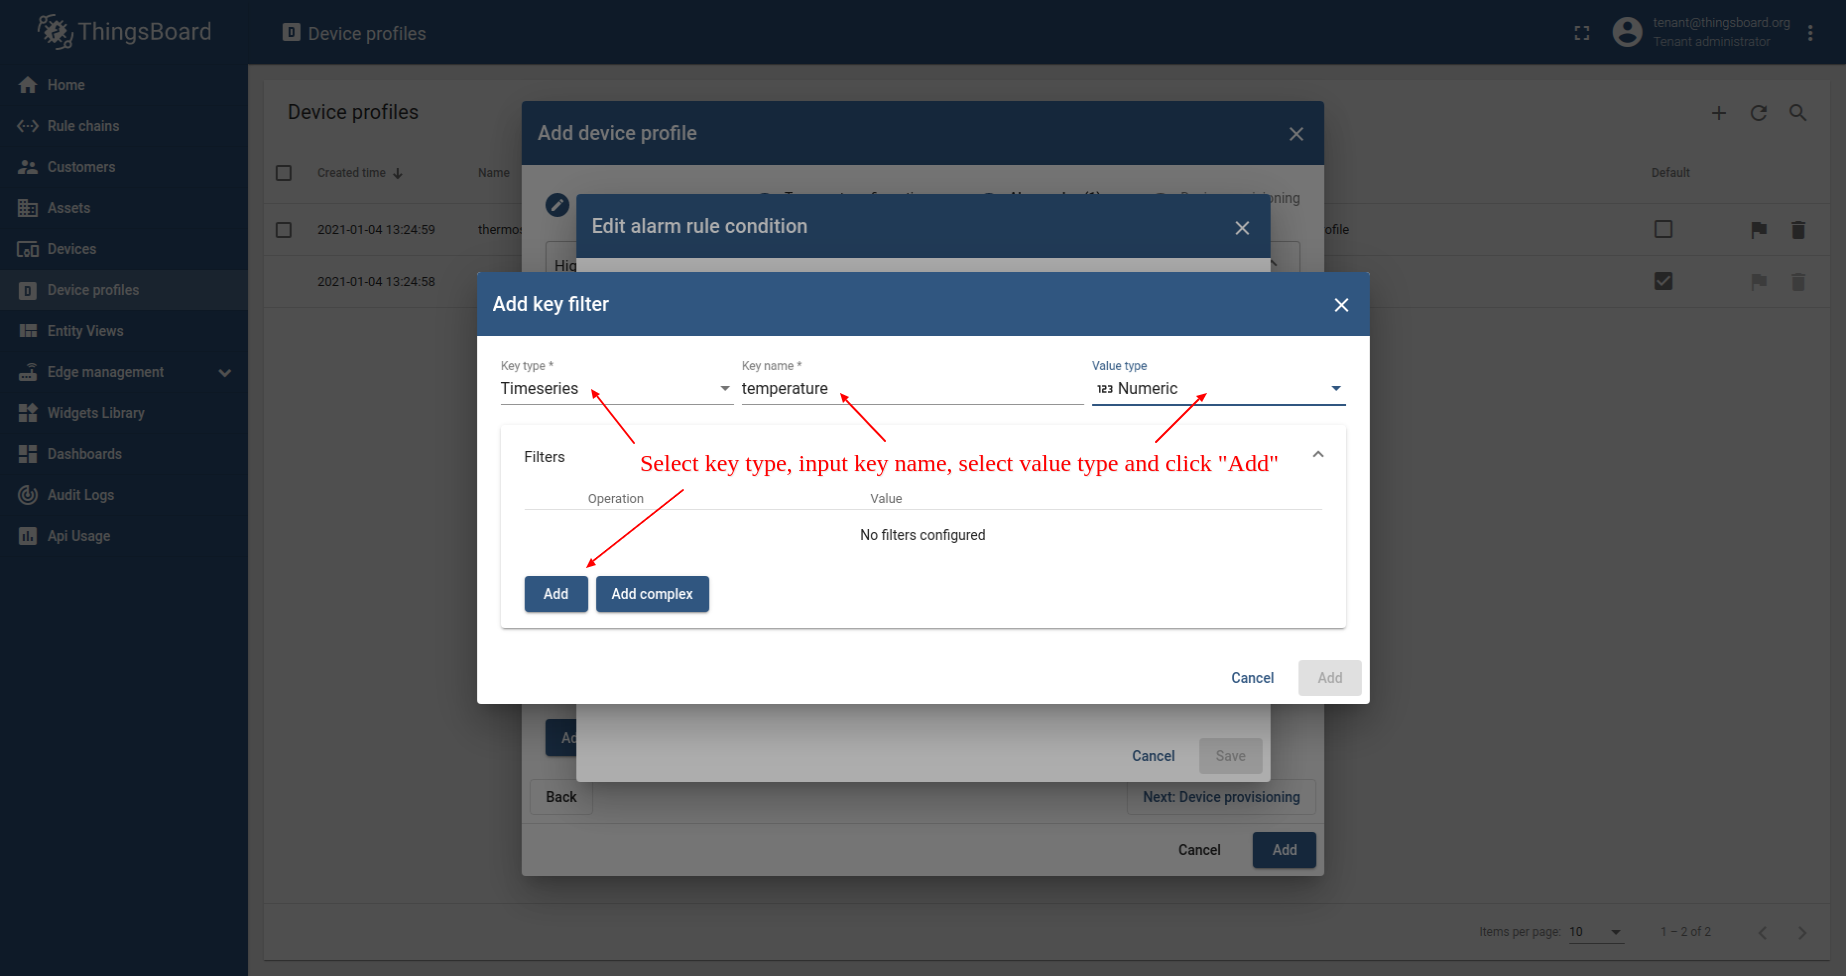
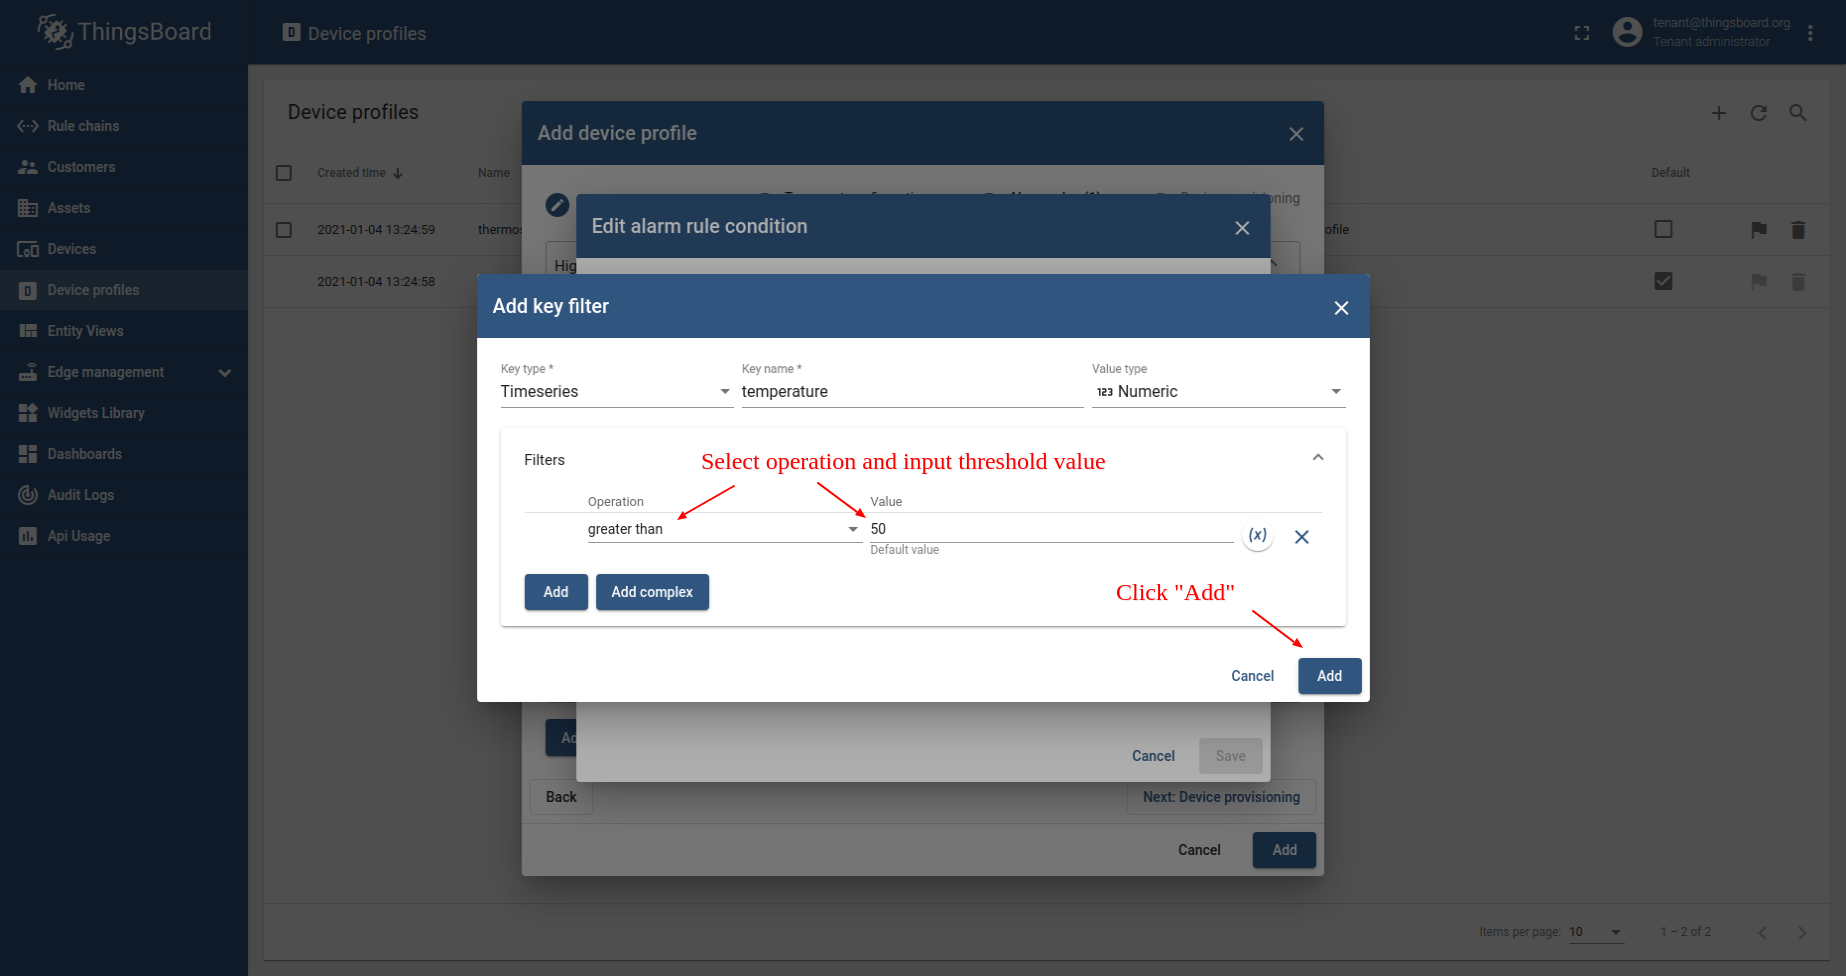
- 1. Select key type Time series. 2. Input key name temperature. 3. Select value type Numeric. 4. Click on the Add button.
- 1. Select operation greater than. 2. Input threshold value 50. 3. Click on the Add button.
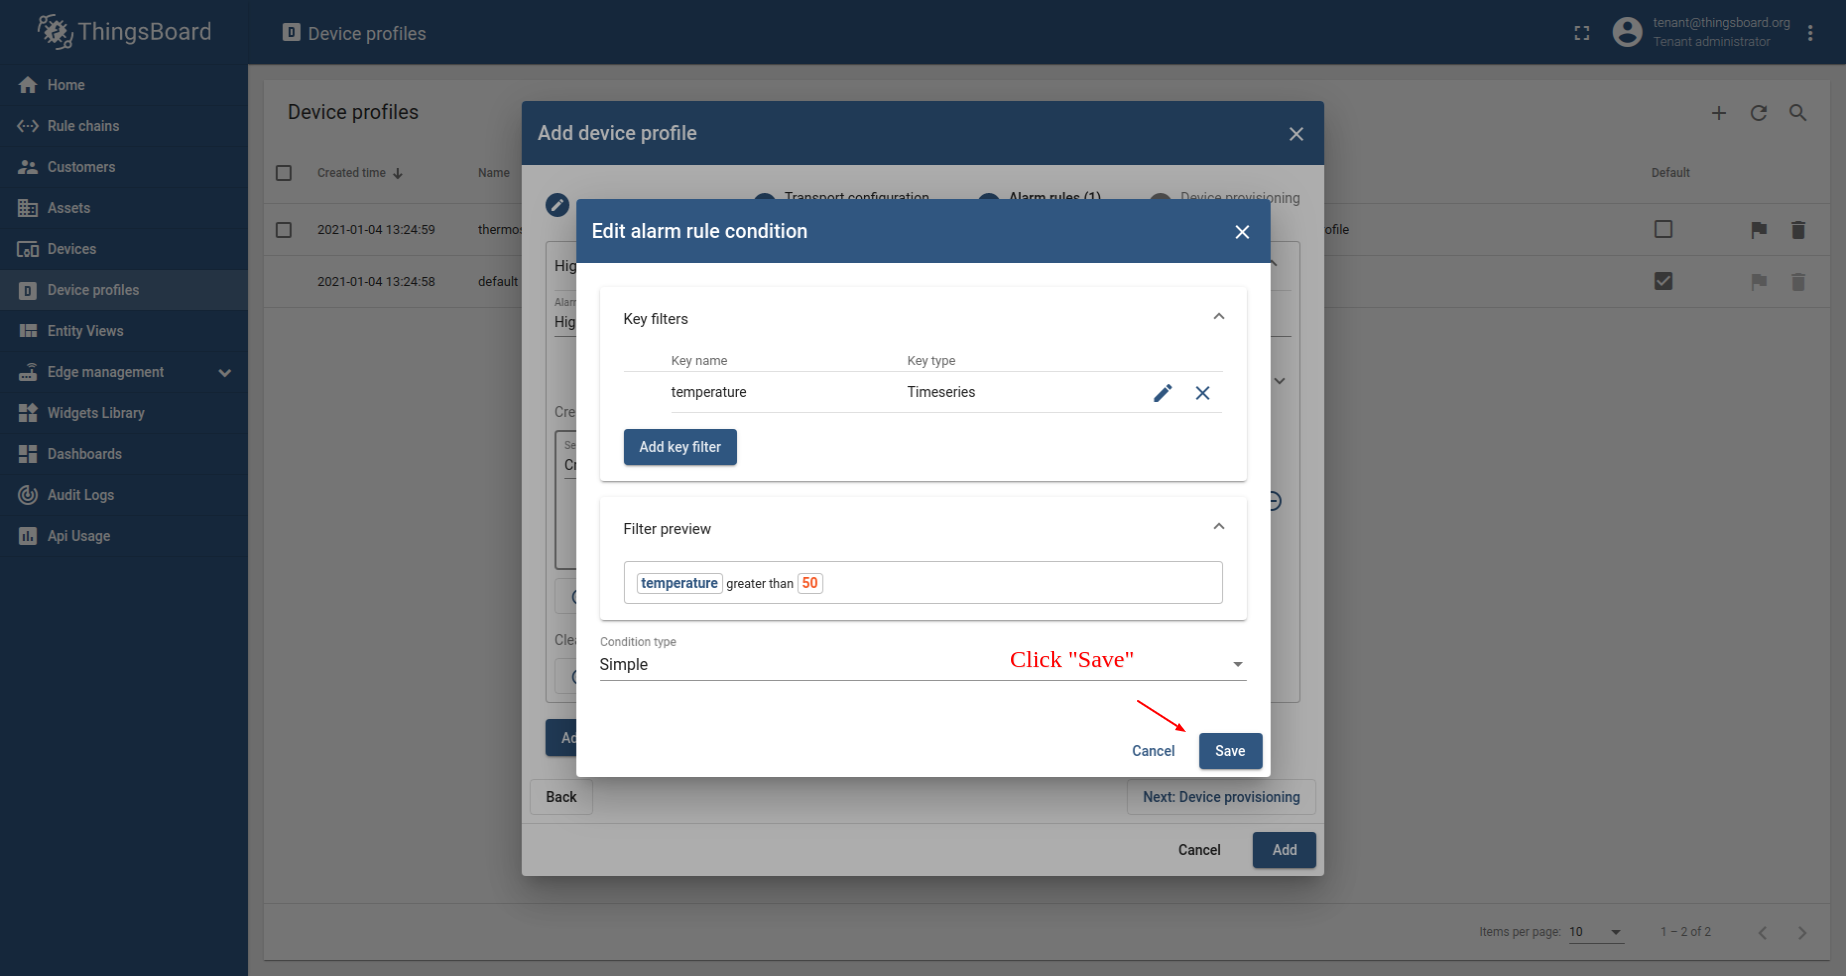
- Click on the Save button.
- Click on the Add button.
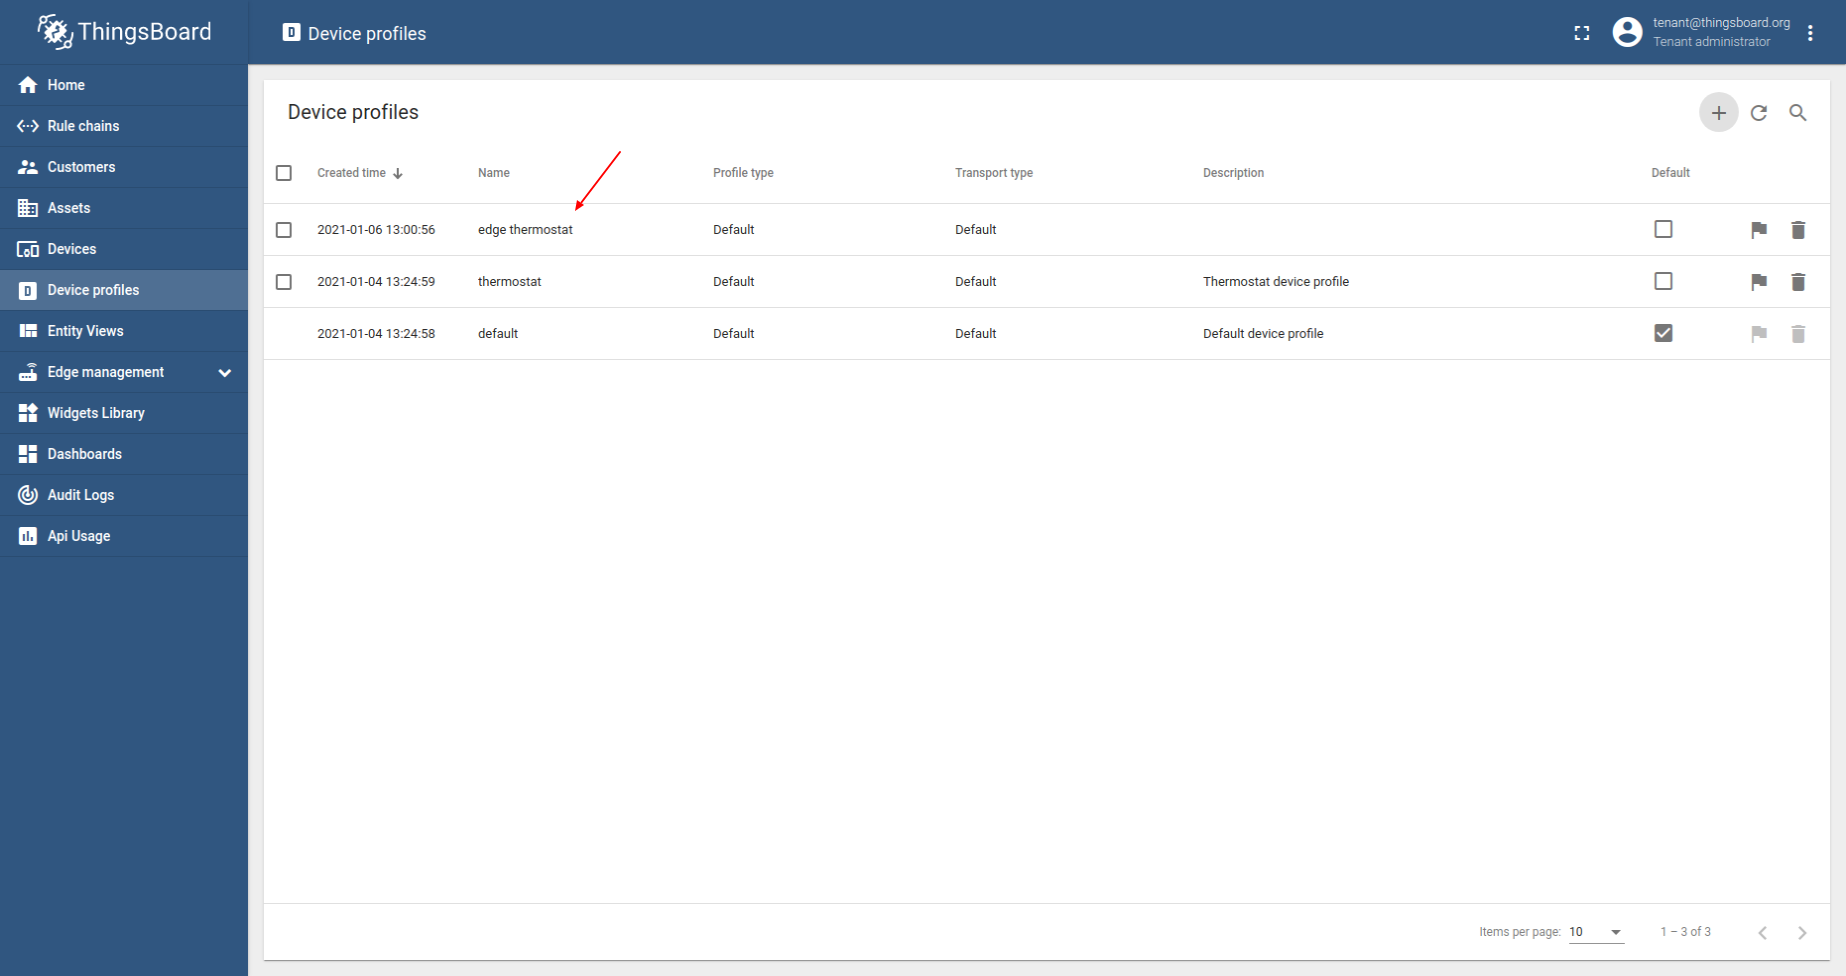
- Newly create device profile will be show first in the list, because default sort order is by created time.
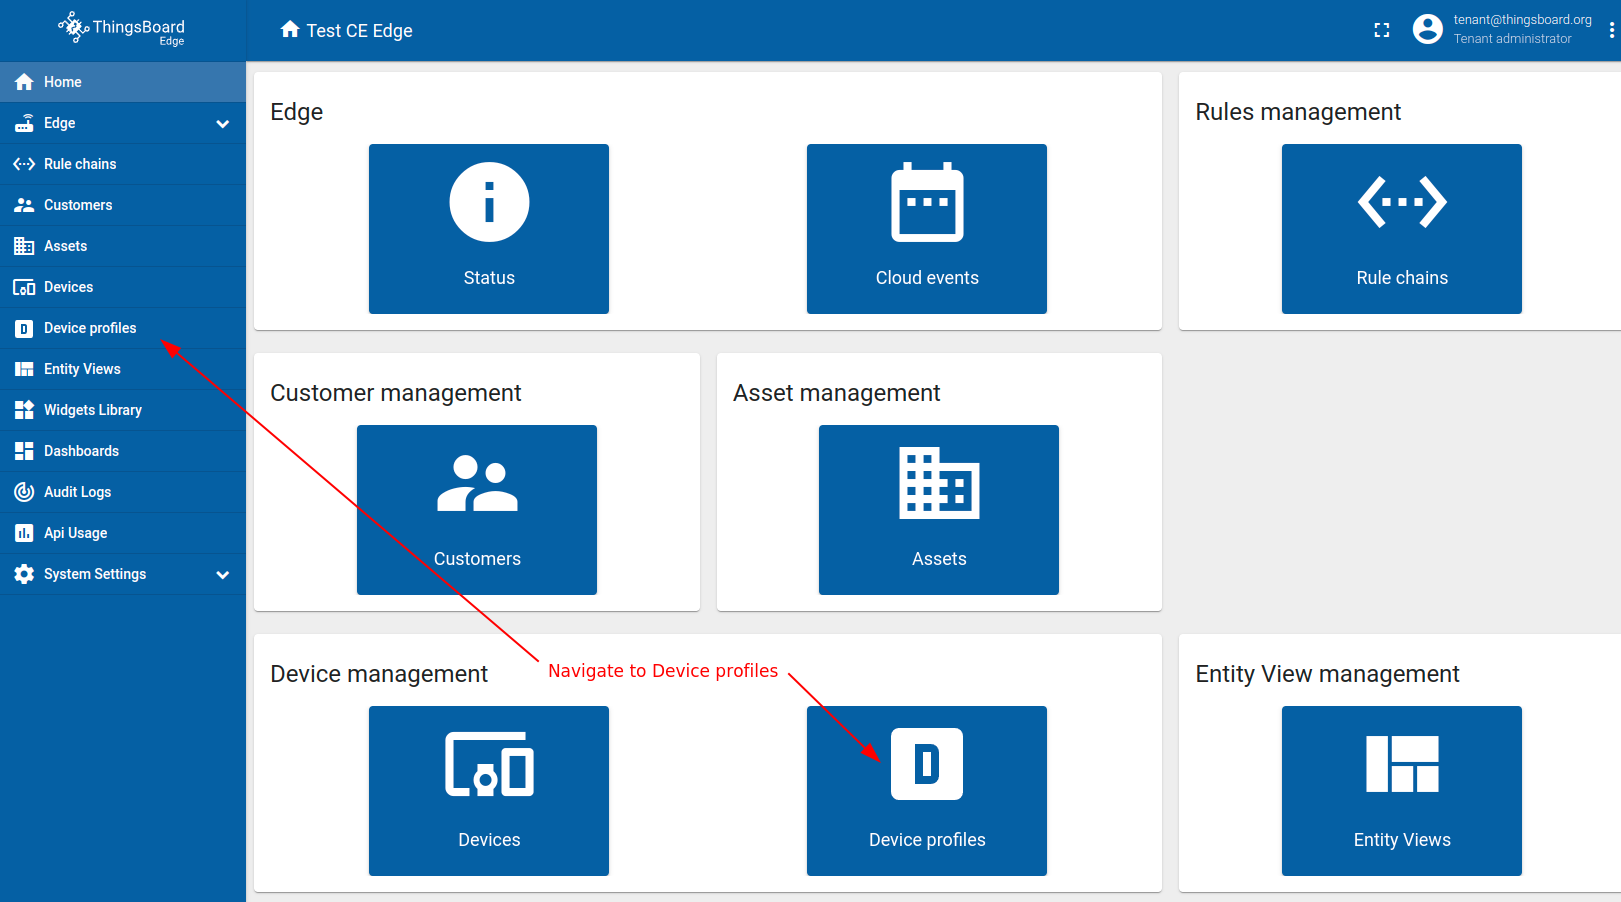
请使用 URL EDGE_URL 打开 ThingsBoard Edge UI 查看已配置的设备配置。
- Login to your ThingsBoard Edge instance and open Device profiles menu page.
- Verify that edge thermostat was provisioned to edge as well.
Provision devices
为简化操作,我们将通过 UI 手动配置设备。
首先在 Edge 上创建 DHT22 温度传感器 和 空调 设备,并为二者建立关联。该关联将用于在 DHT22 温度传感器 上报临界温度时查找对应的 空调 设备。
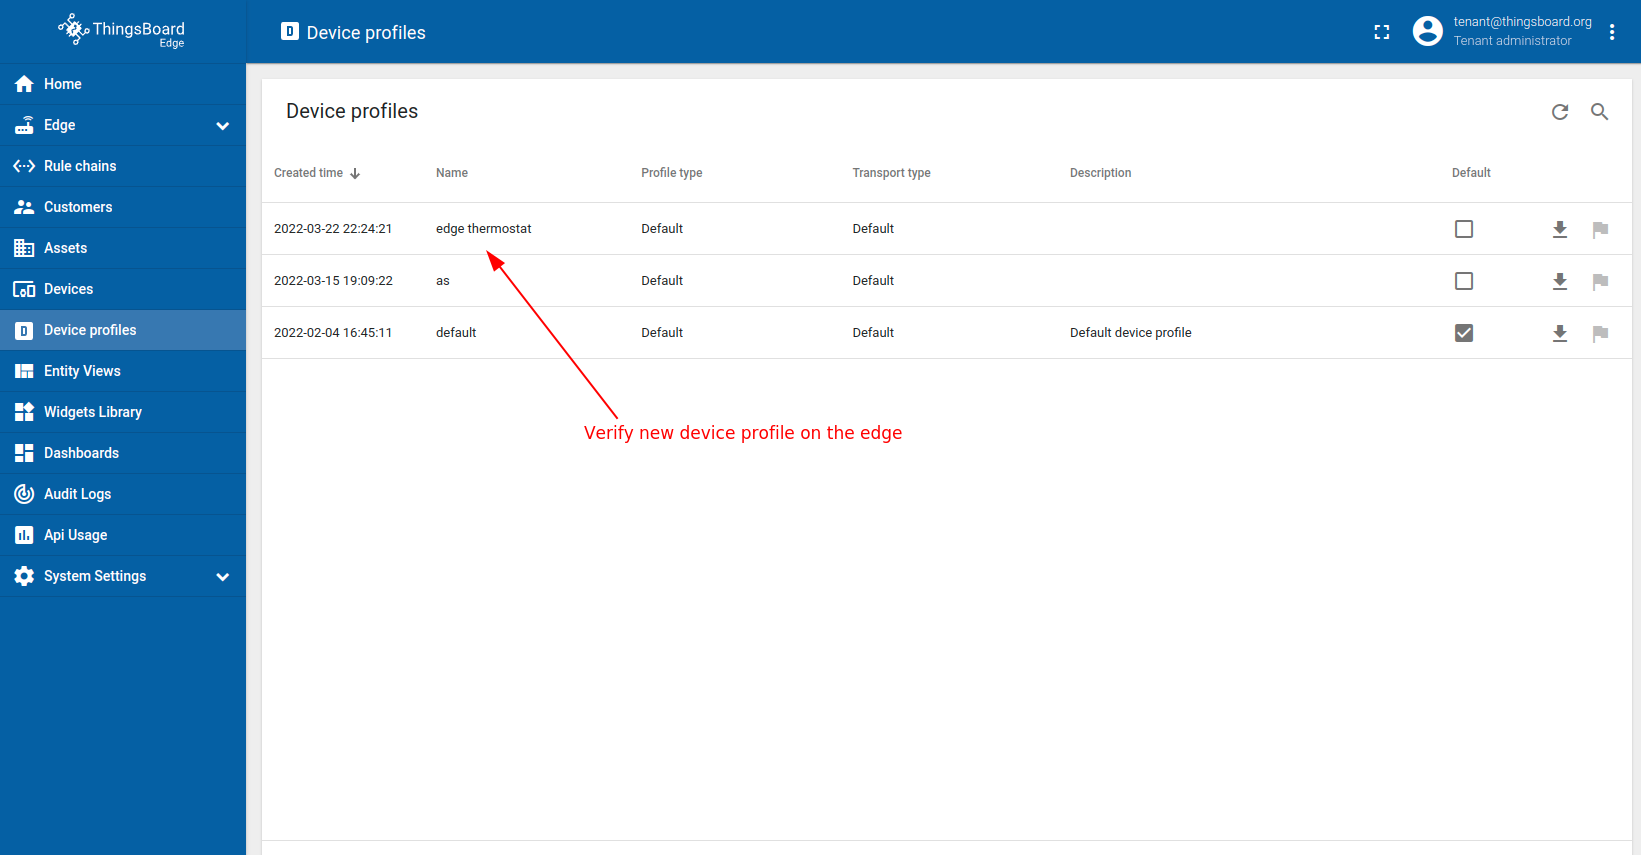
我们将在 Edge 上配置设备。请使用 URL EDGE_URL 打开 ThingsBoard Edge UI。
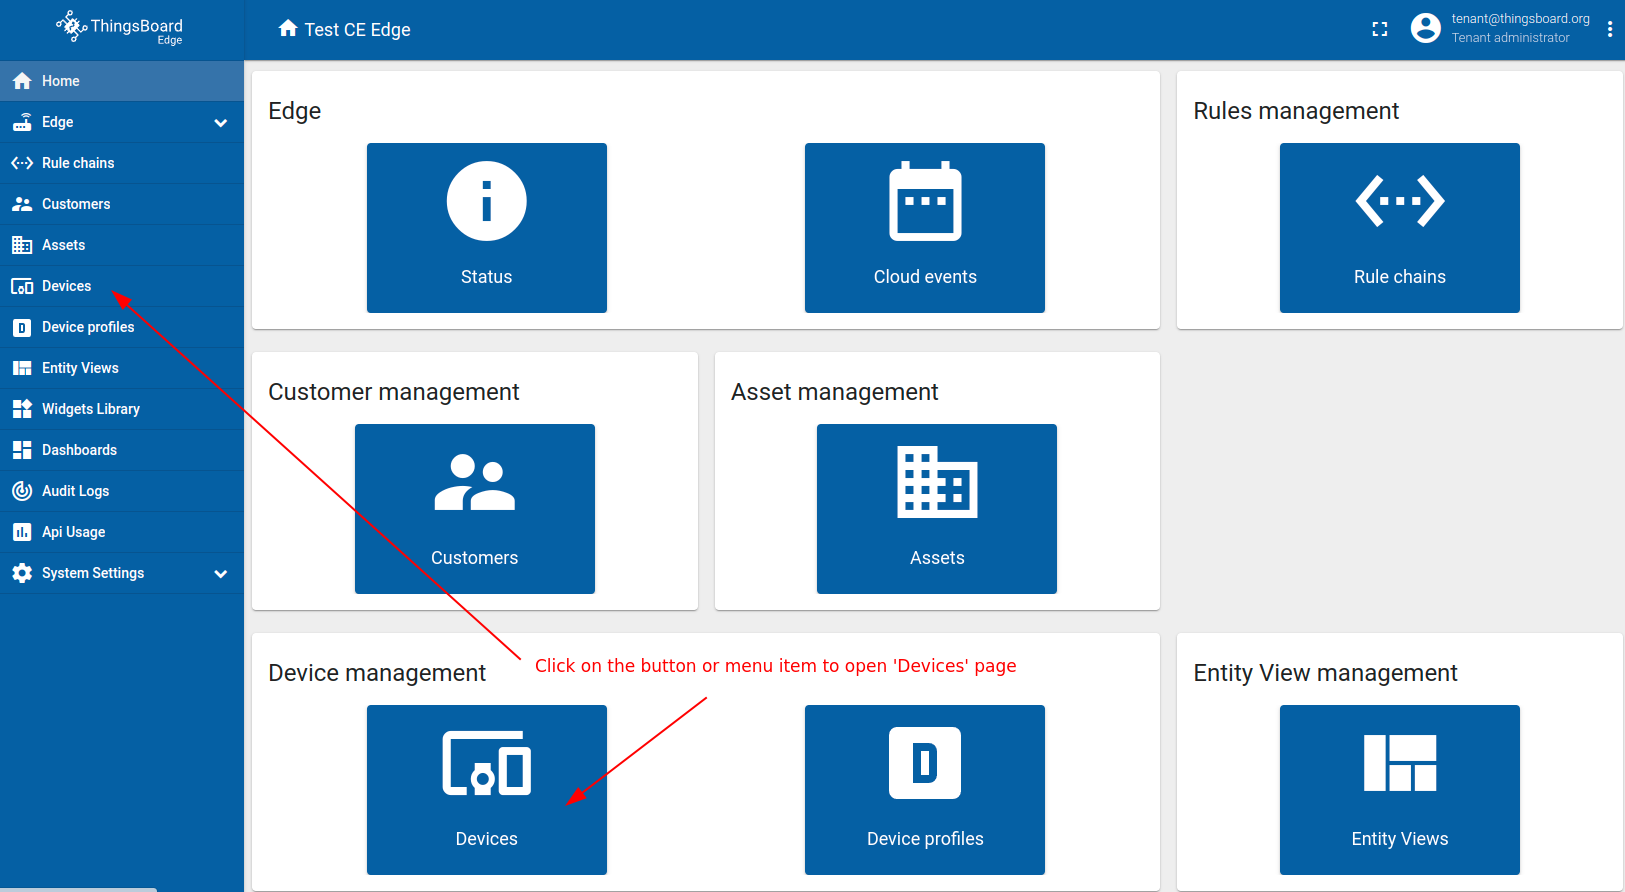
- Login to your ThingsBoard Edge instance and open Devices menu page.
- Click on the ("+") icon in the top right corner of the table.
- 1. Input device name. For e.g., DHT22. 2. Select edge thermostat from device profiles list. No other changes required at this time. 3. Click Add to add the device.
- Now your DHT22 device should be listed first, since table sort devices using created time by default.
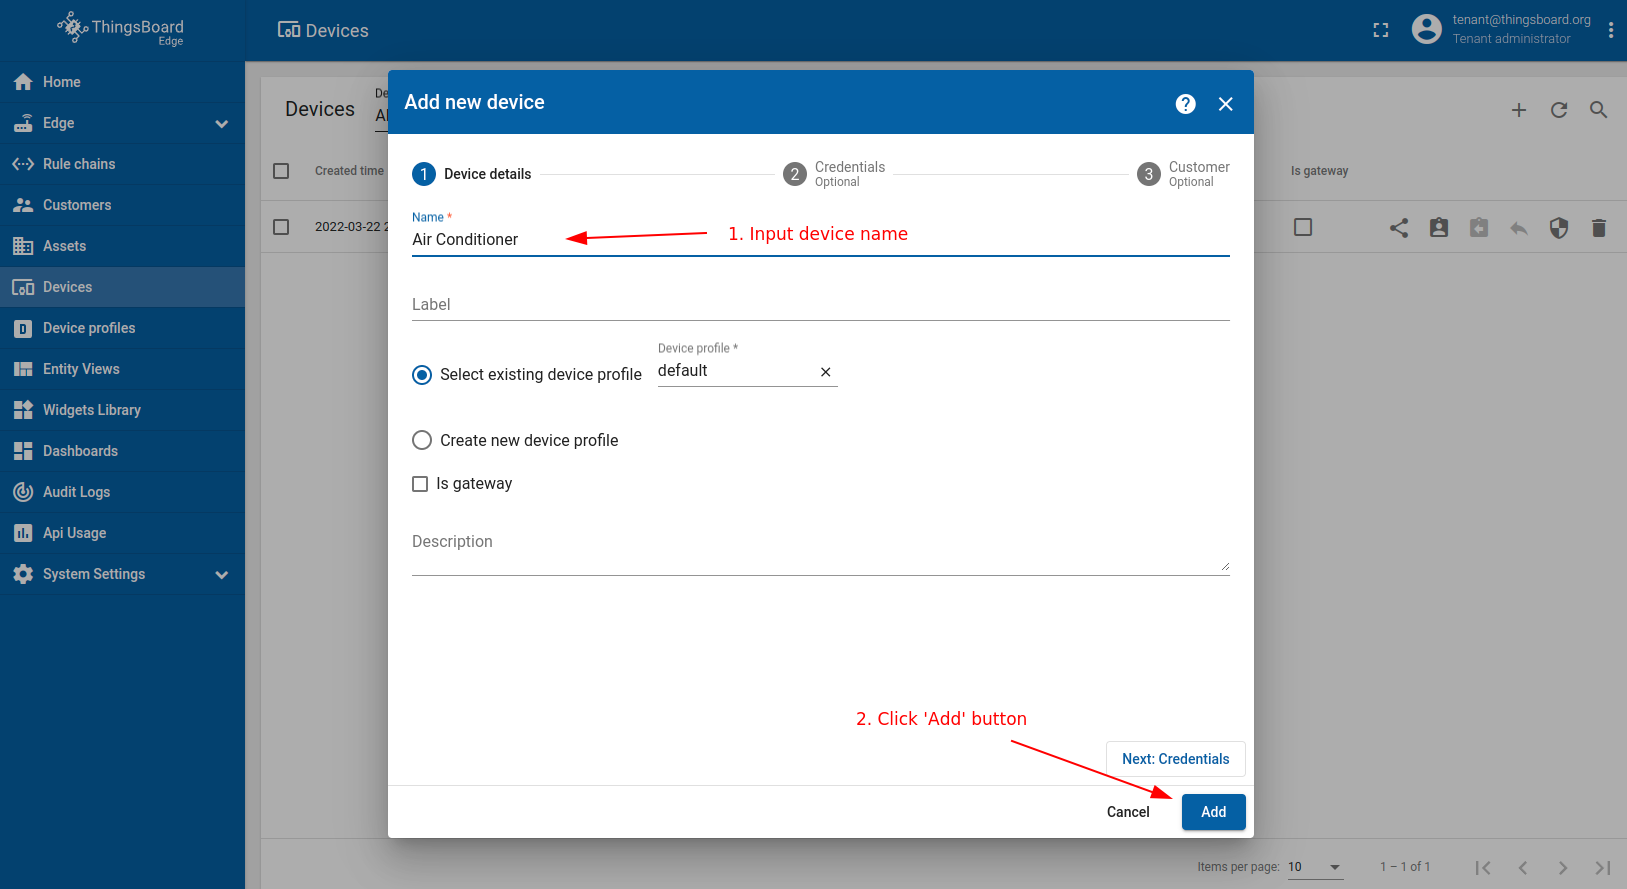
- To add more devices, click on the ("+") icon then Add new device.
- 1. Input device name. For e.g., Air Conditioner. No other changes required at this time. 2. Click on the Add to add the device.
- Now your Air Conditioner device should be listed first, since table sort devices using created time by default.
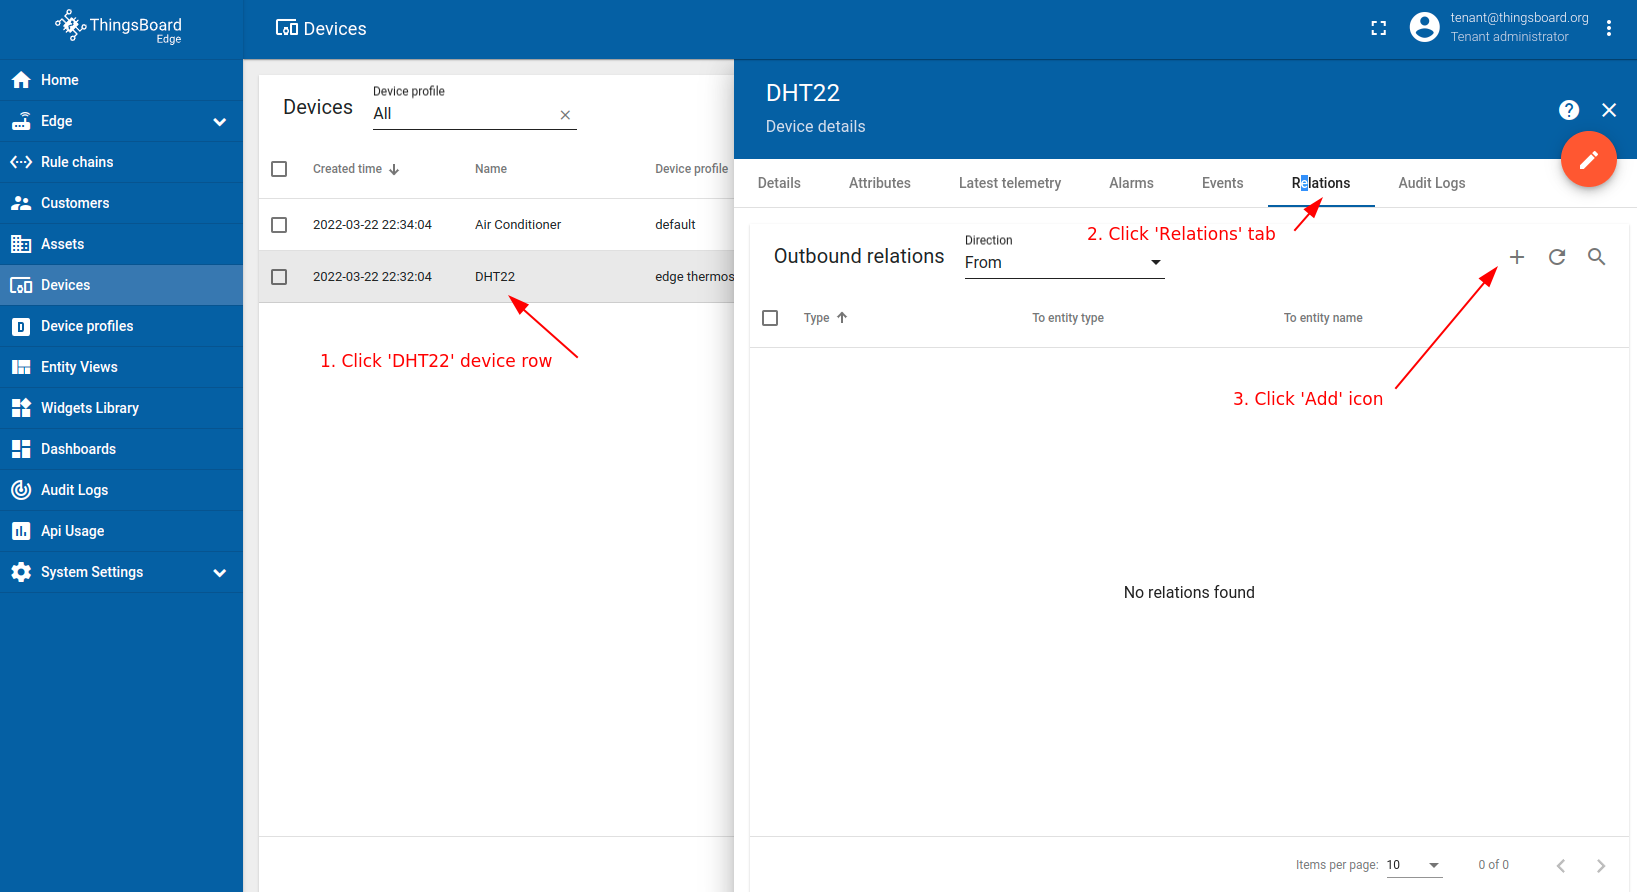
- 1. Click on the DHT22. 2. Click on the Relations. 3. Click on the ("+") icon.
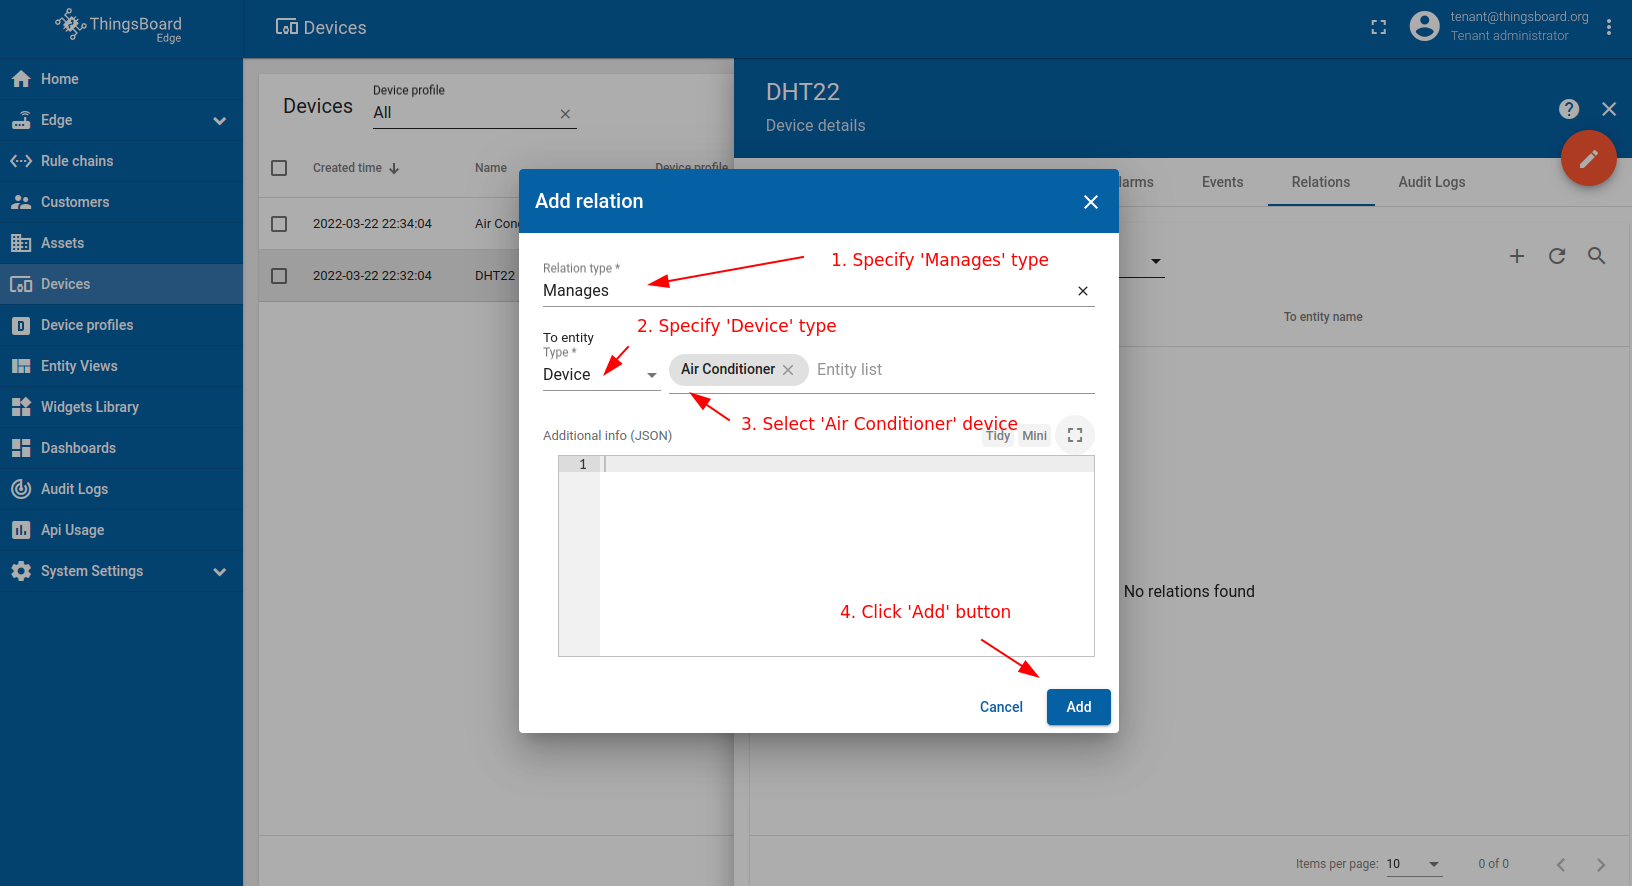
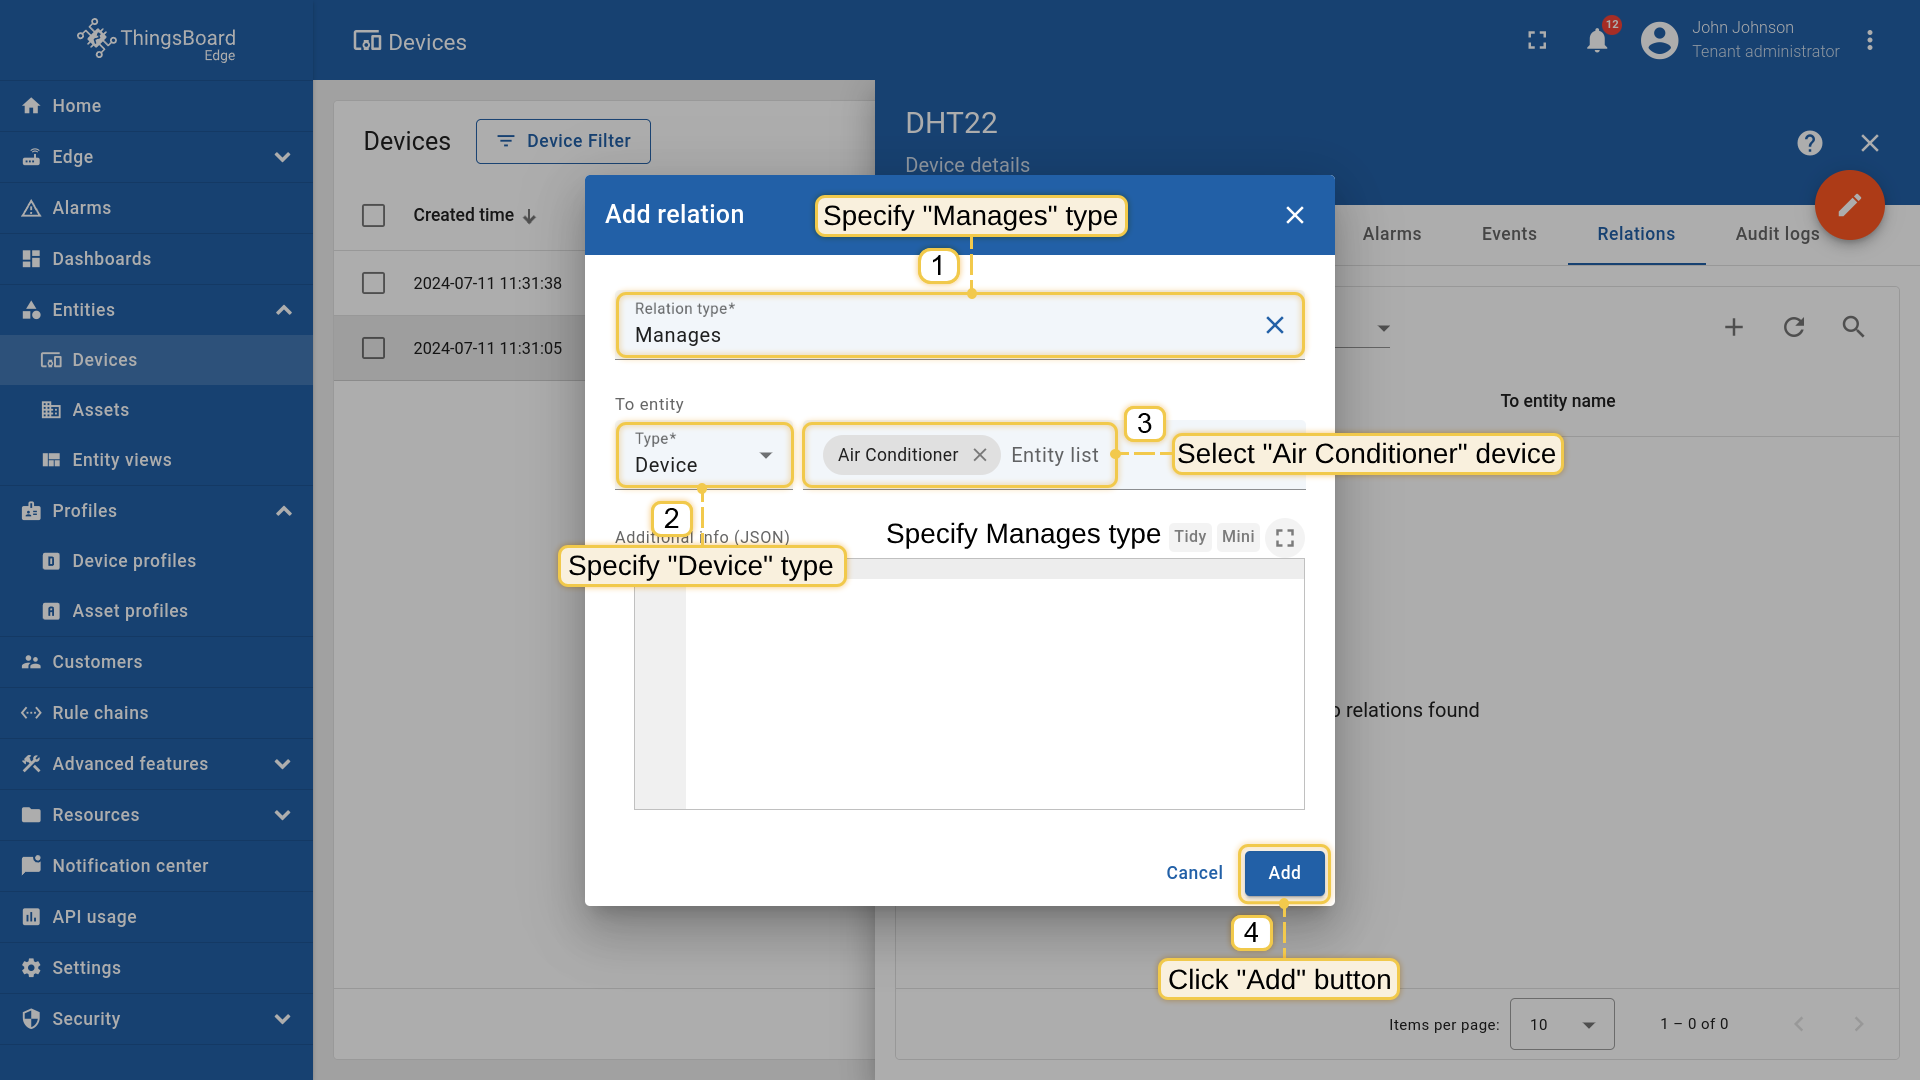
- 1. Specify Manages type. 2. Specify Device type. 3. Select Air Conditioner device. 4. Click on the "Add" button. Now we verify that devices were provisioned to cloud.


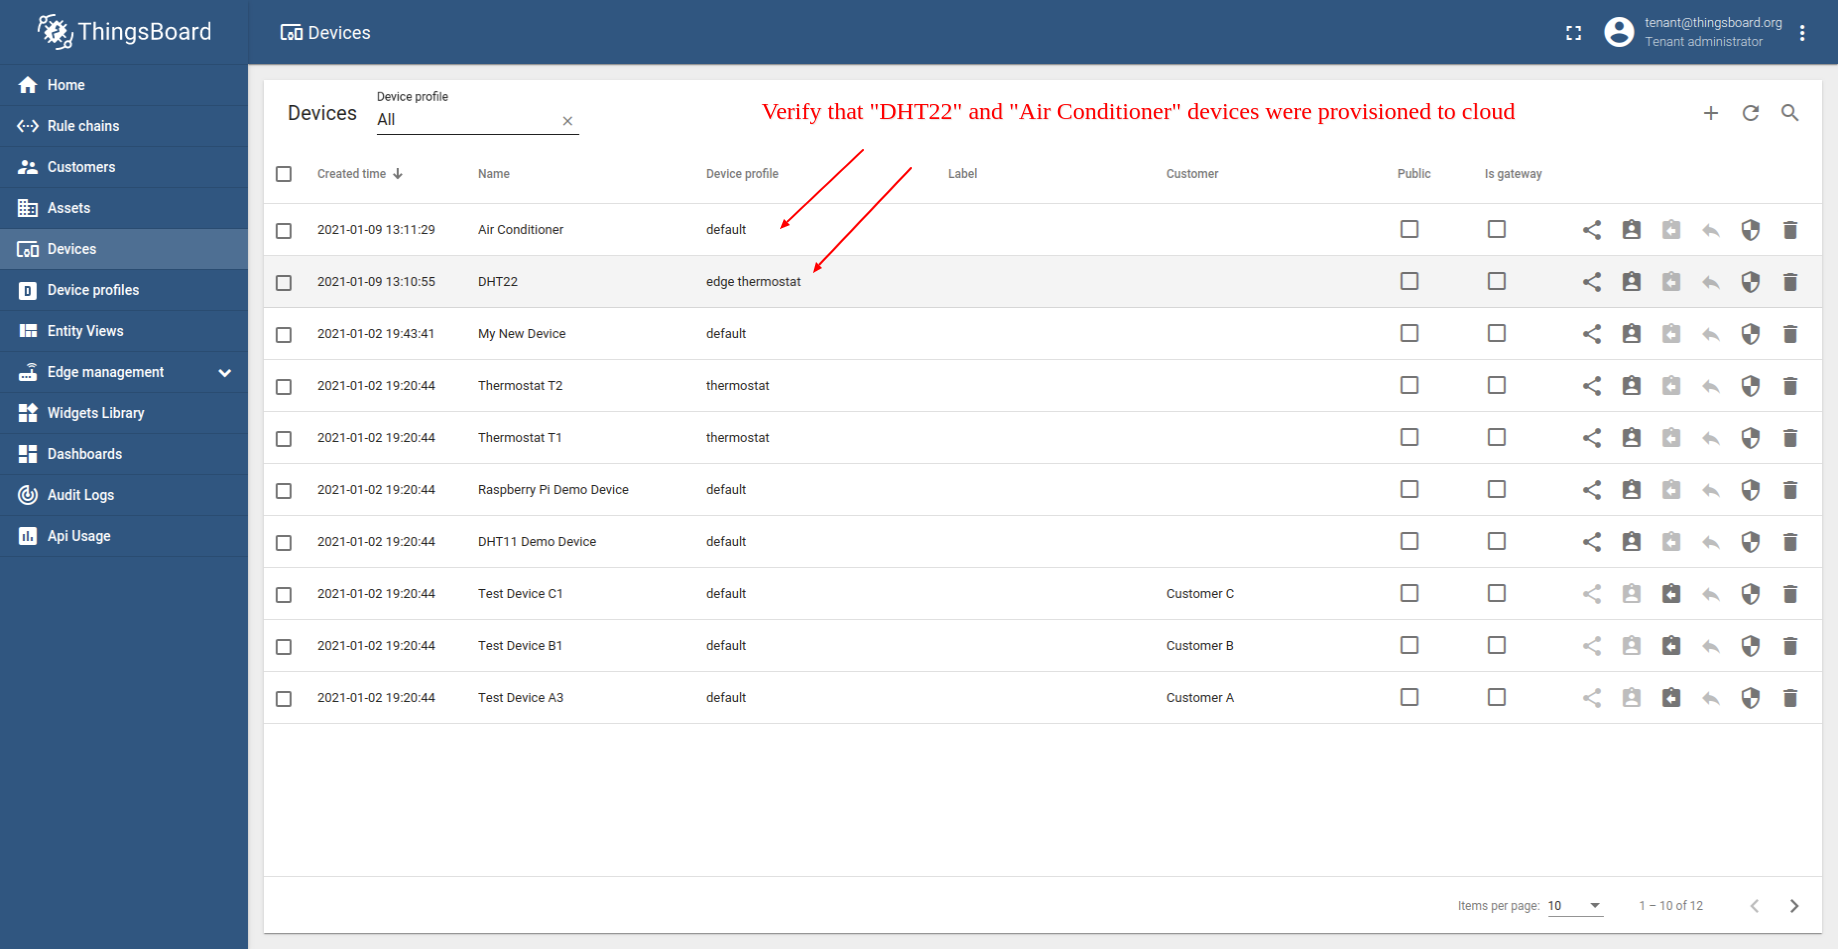
请使用 URL SERVER_URL 打开 ThingsBoard:
- Login to your ThingsBoard instance and open Devices menu page.
- Make sure that DHT22 and Air Conditioner devices are in the devices list.
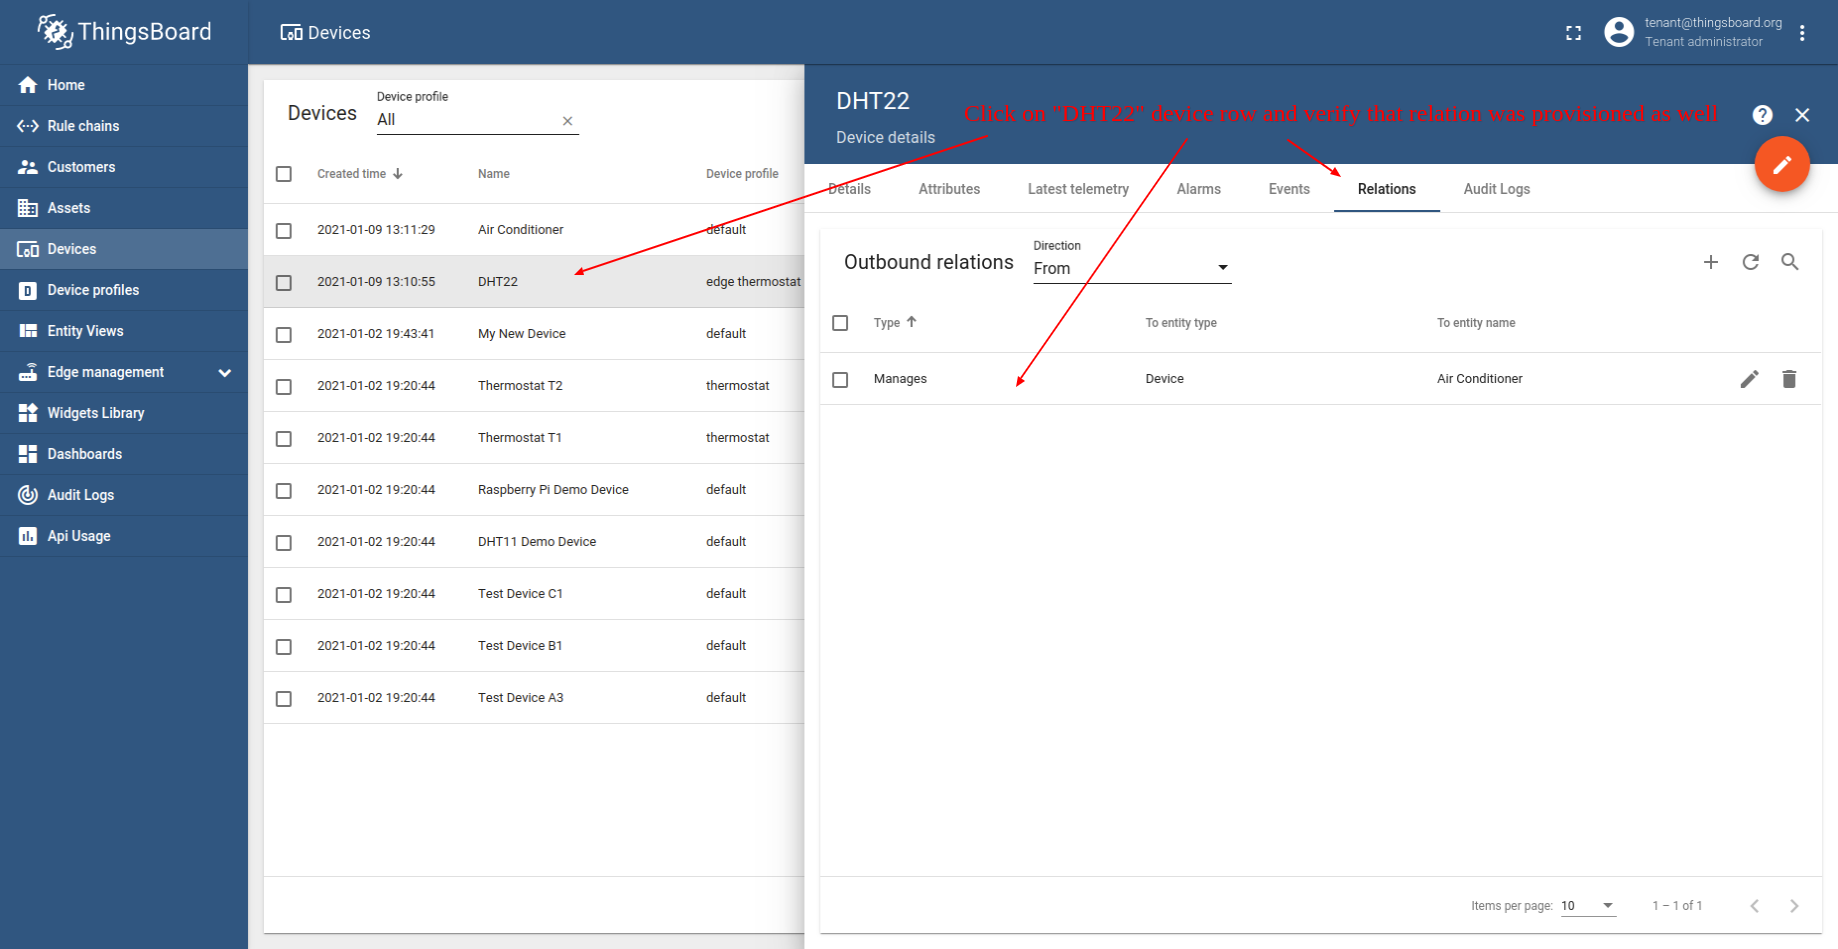
- Verify that relation from DHT22 to Air Conditioner was provisioned as well.

Configure edge rule engine to handle alarms and send RPC calls
我们将更新「Edge Root Rule Chain」,使其处理「DHT22」传感器的 Alarm Created 事件,并向「空调」设备发送相应命令。 以下是 Edge root 规则链的最终配置:

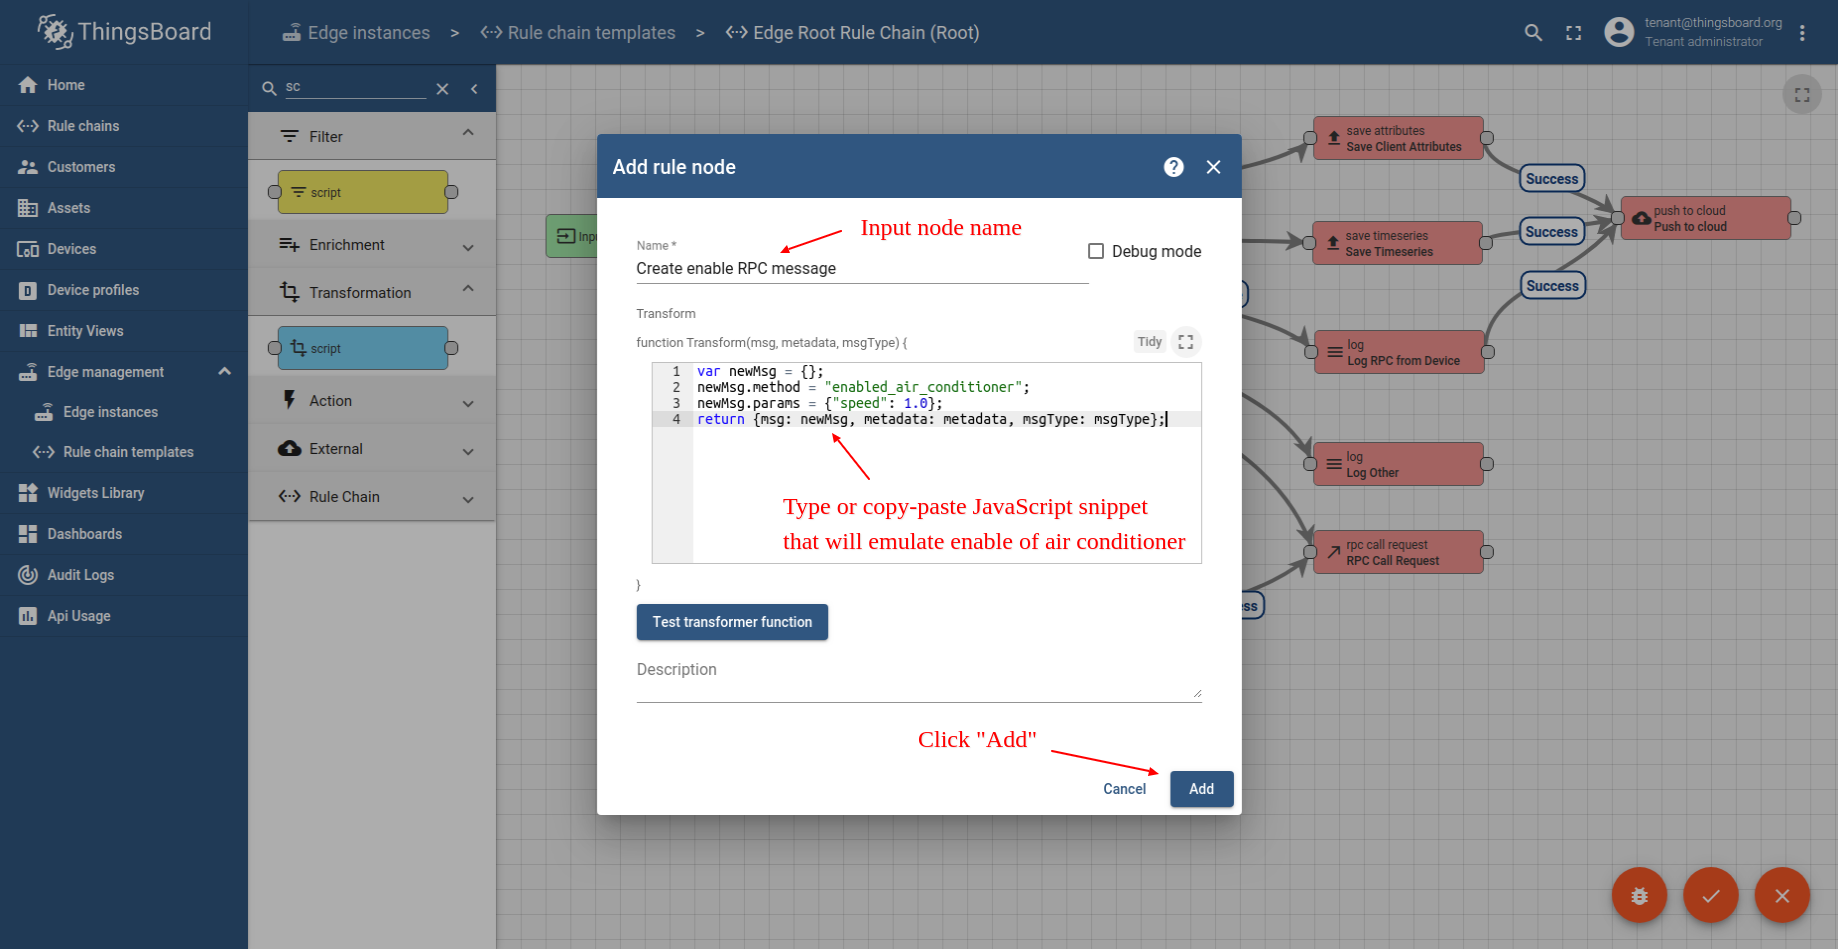
下一步将创建 TBEL 脚本语言节点,以生成向 空调 设备发送的 RPC 命令。 用于模拟开启空调的脚本节点 JavaScript 代码:
1
2
3
4
var newMsg = {};
newMsg.method = "enabled_air_conditioner";
newMsg.params = {"speed": 1.0};
return { msg: newMsg, metadata: metadata, msgType: msgType };
若需要,请在后续步骤中使用此代码片段。
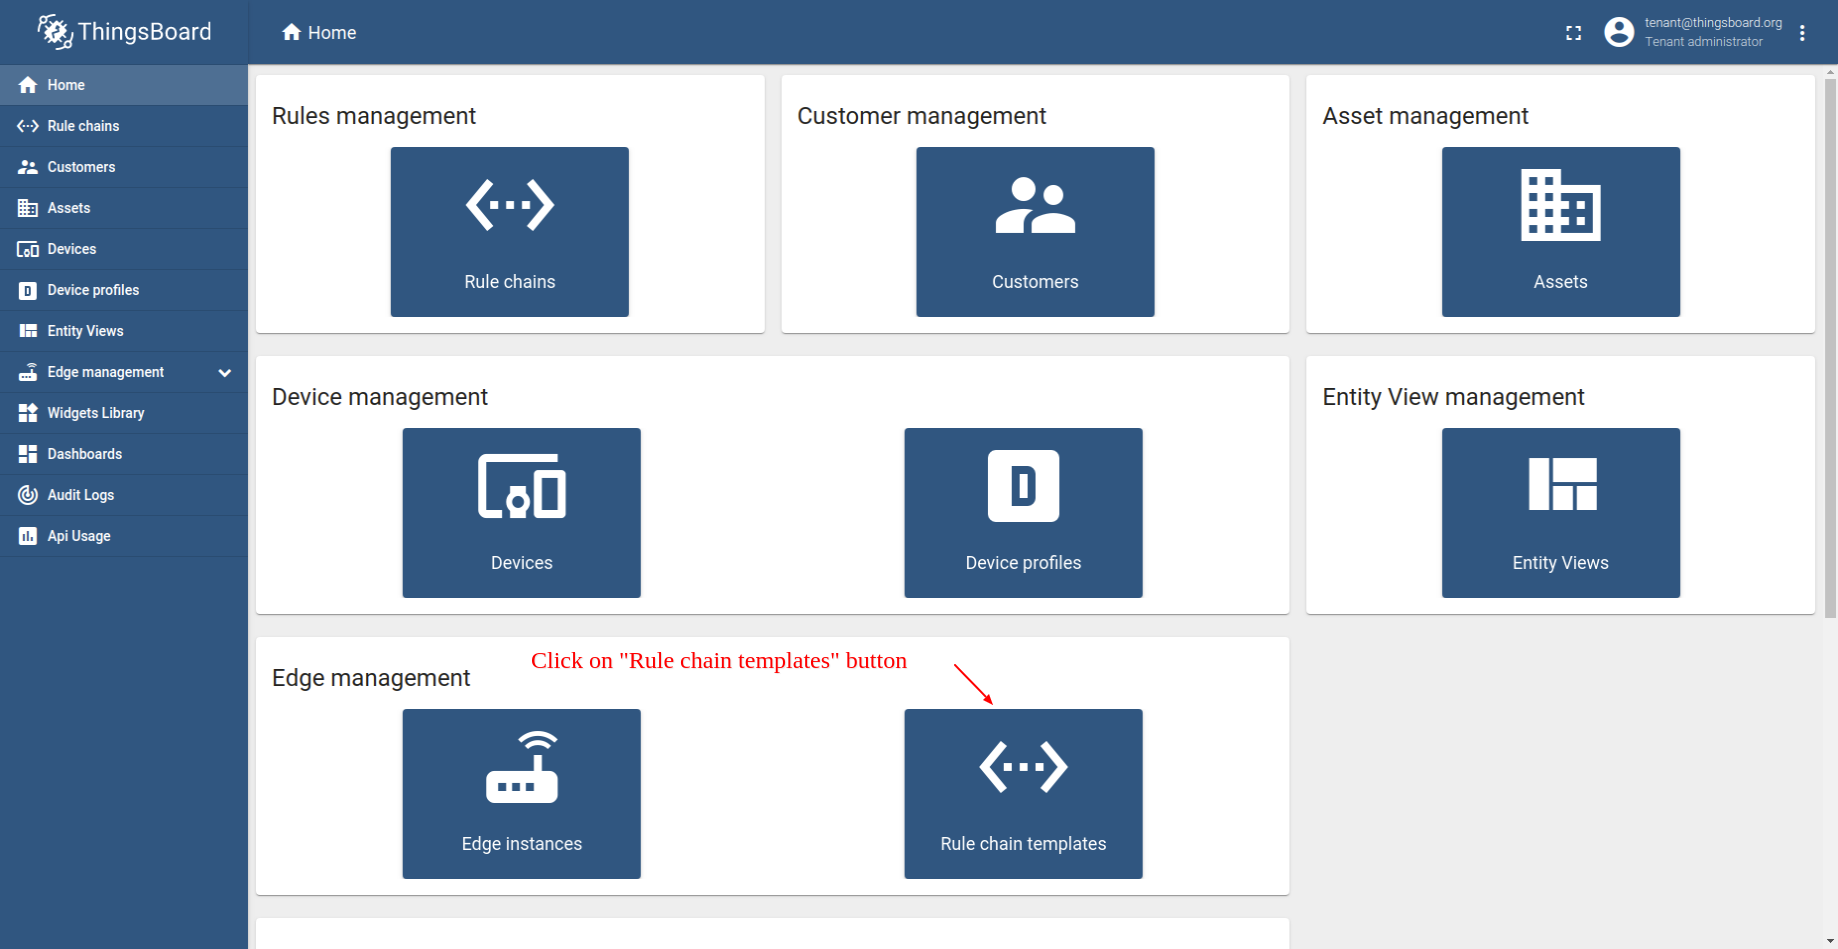
以下为将默认 Edge「Root Rule Chain」更新为上述规则链的步骤:
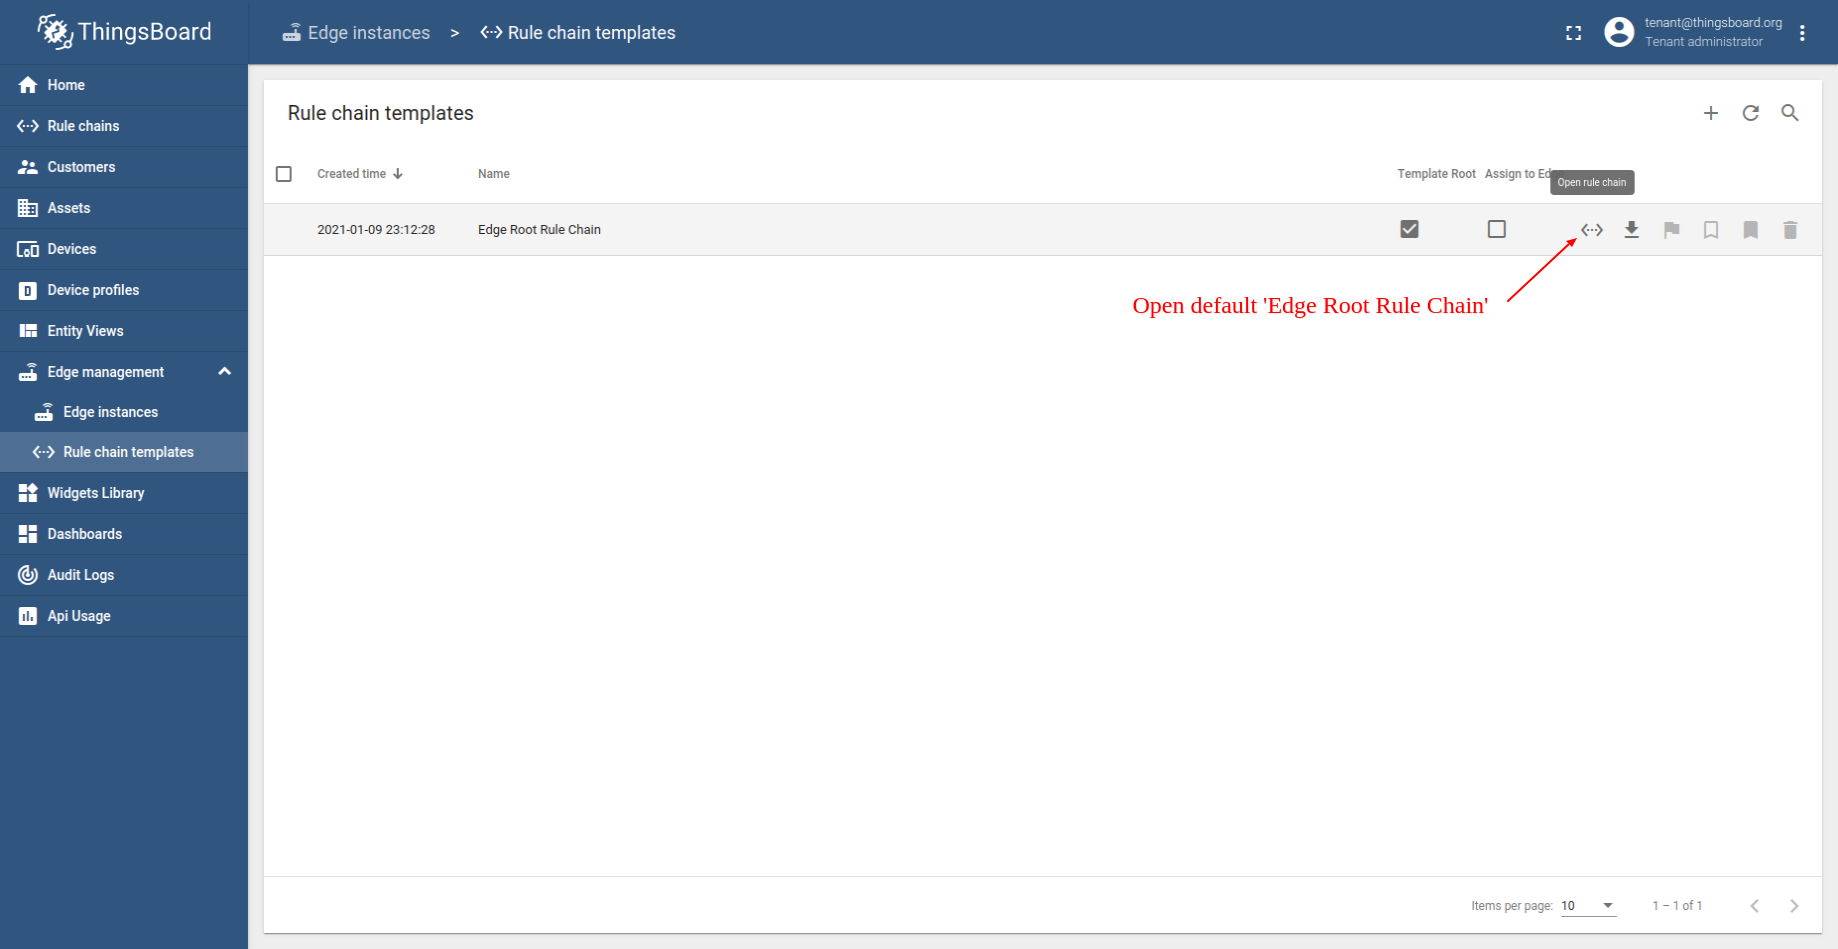
- Login to your ThingsBoard instance and open Rule chain templates menu page.
- Open default Edge Root Rule Chain.
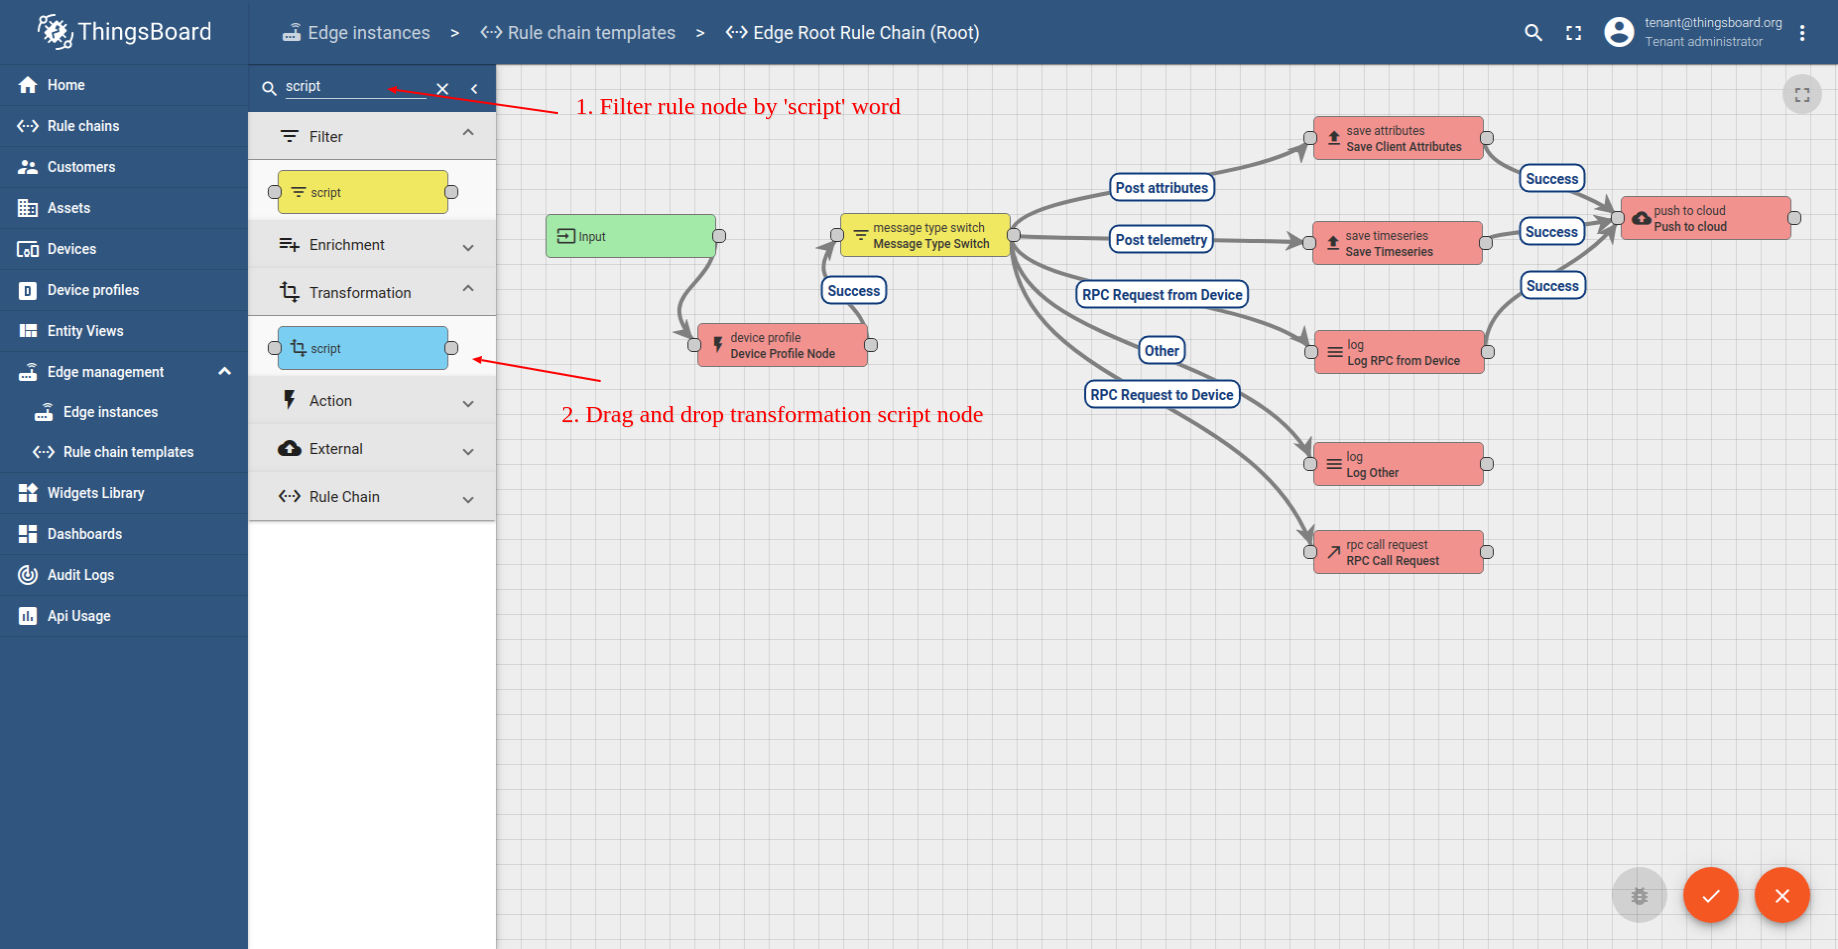
- Filter node by script word and drag script node (Transformation) to rule chain.
- Input node name and add TBEL script language code (you can copy and paste it from the snippet above) to create proper enable command for Air Conditioner device. Click Add to proceed.
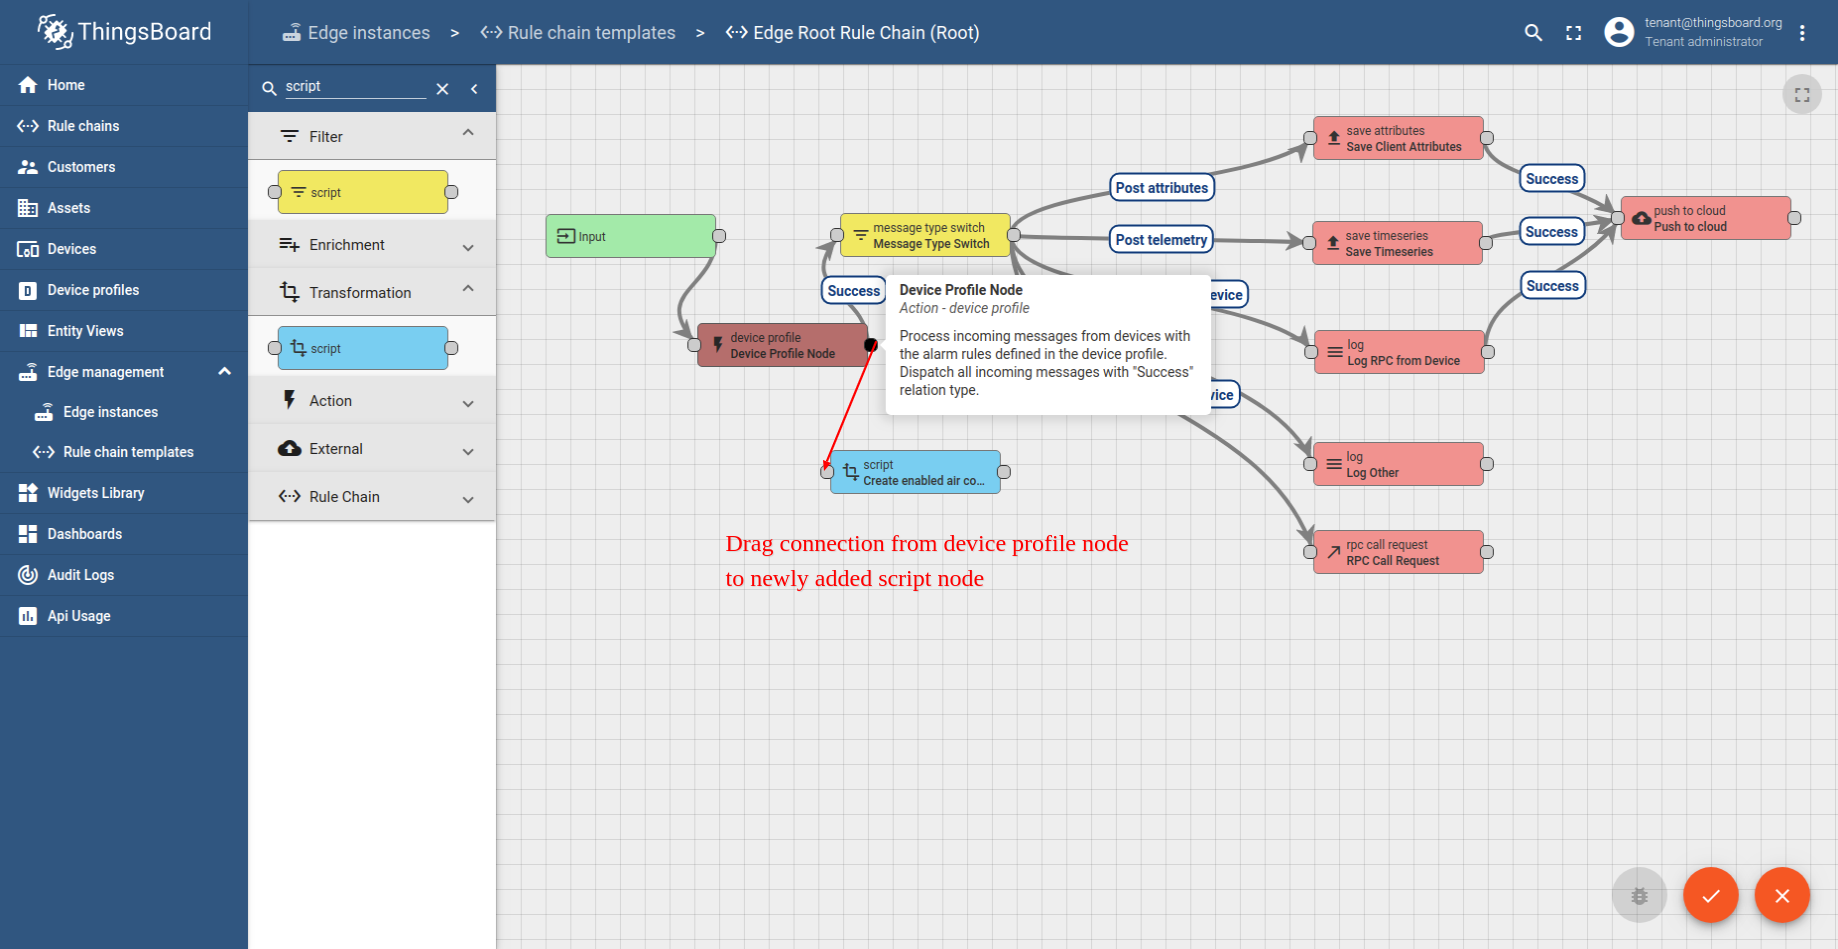
- Drag connection from Device Profile Node to newly added enabled script node.
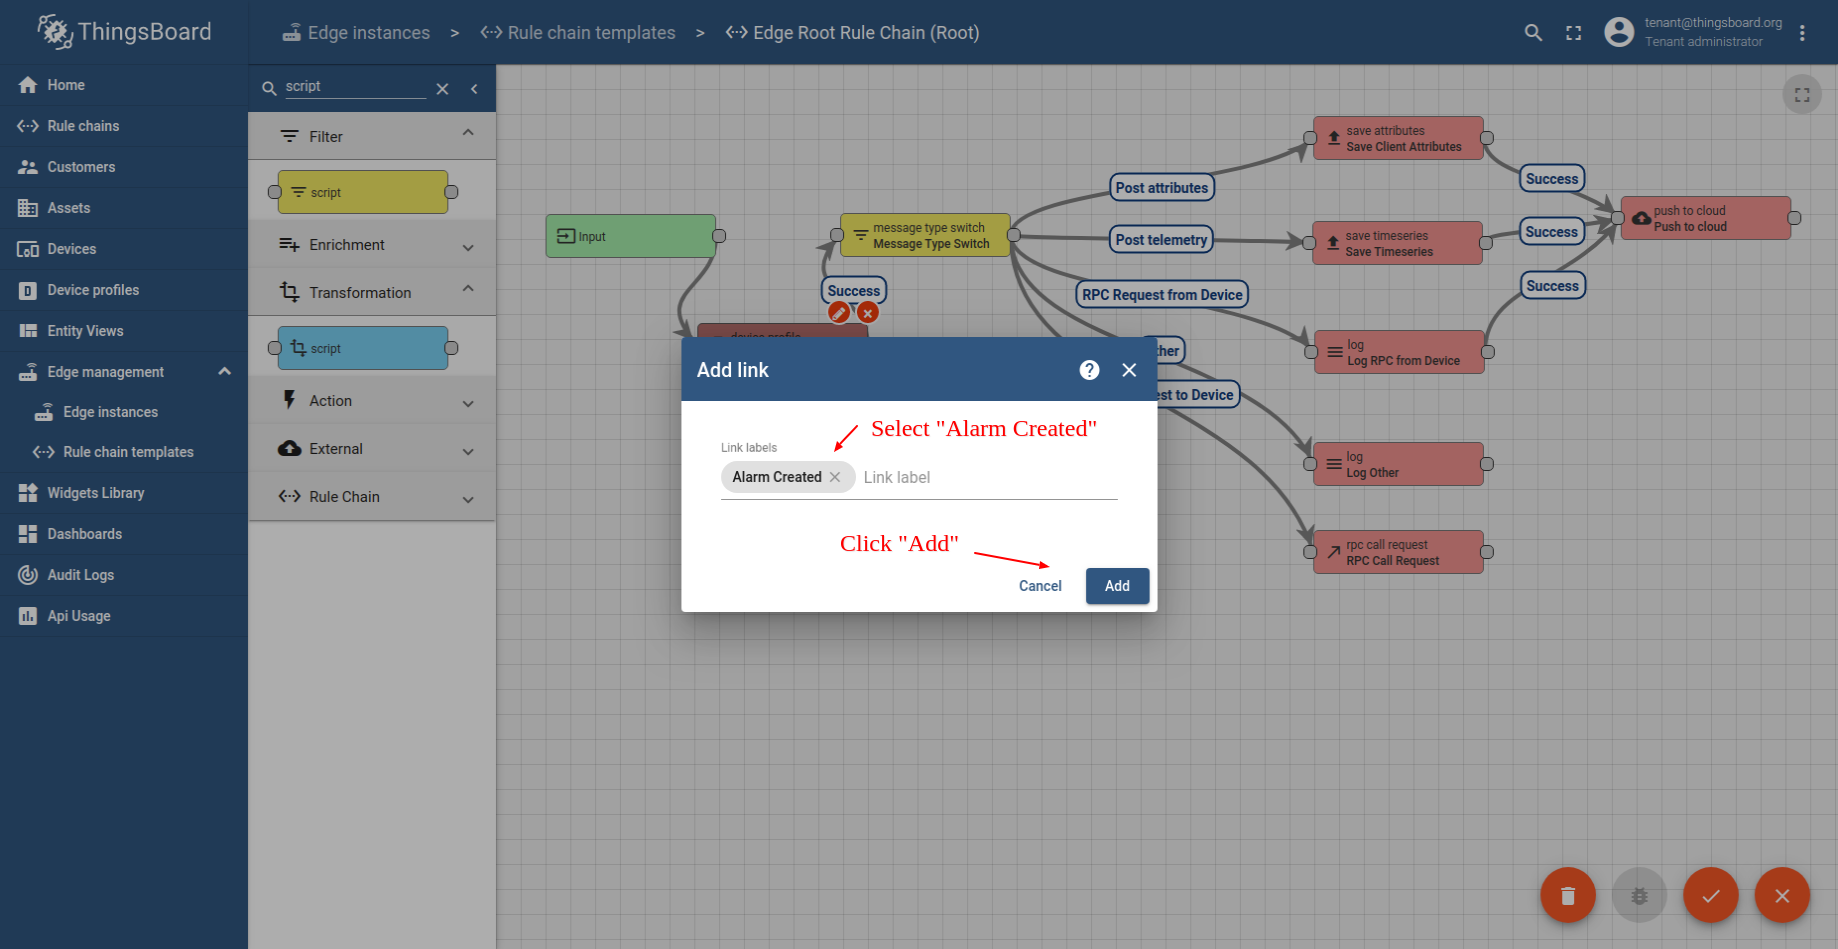
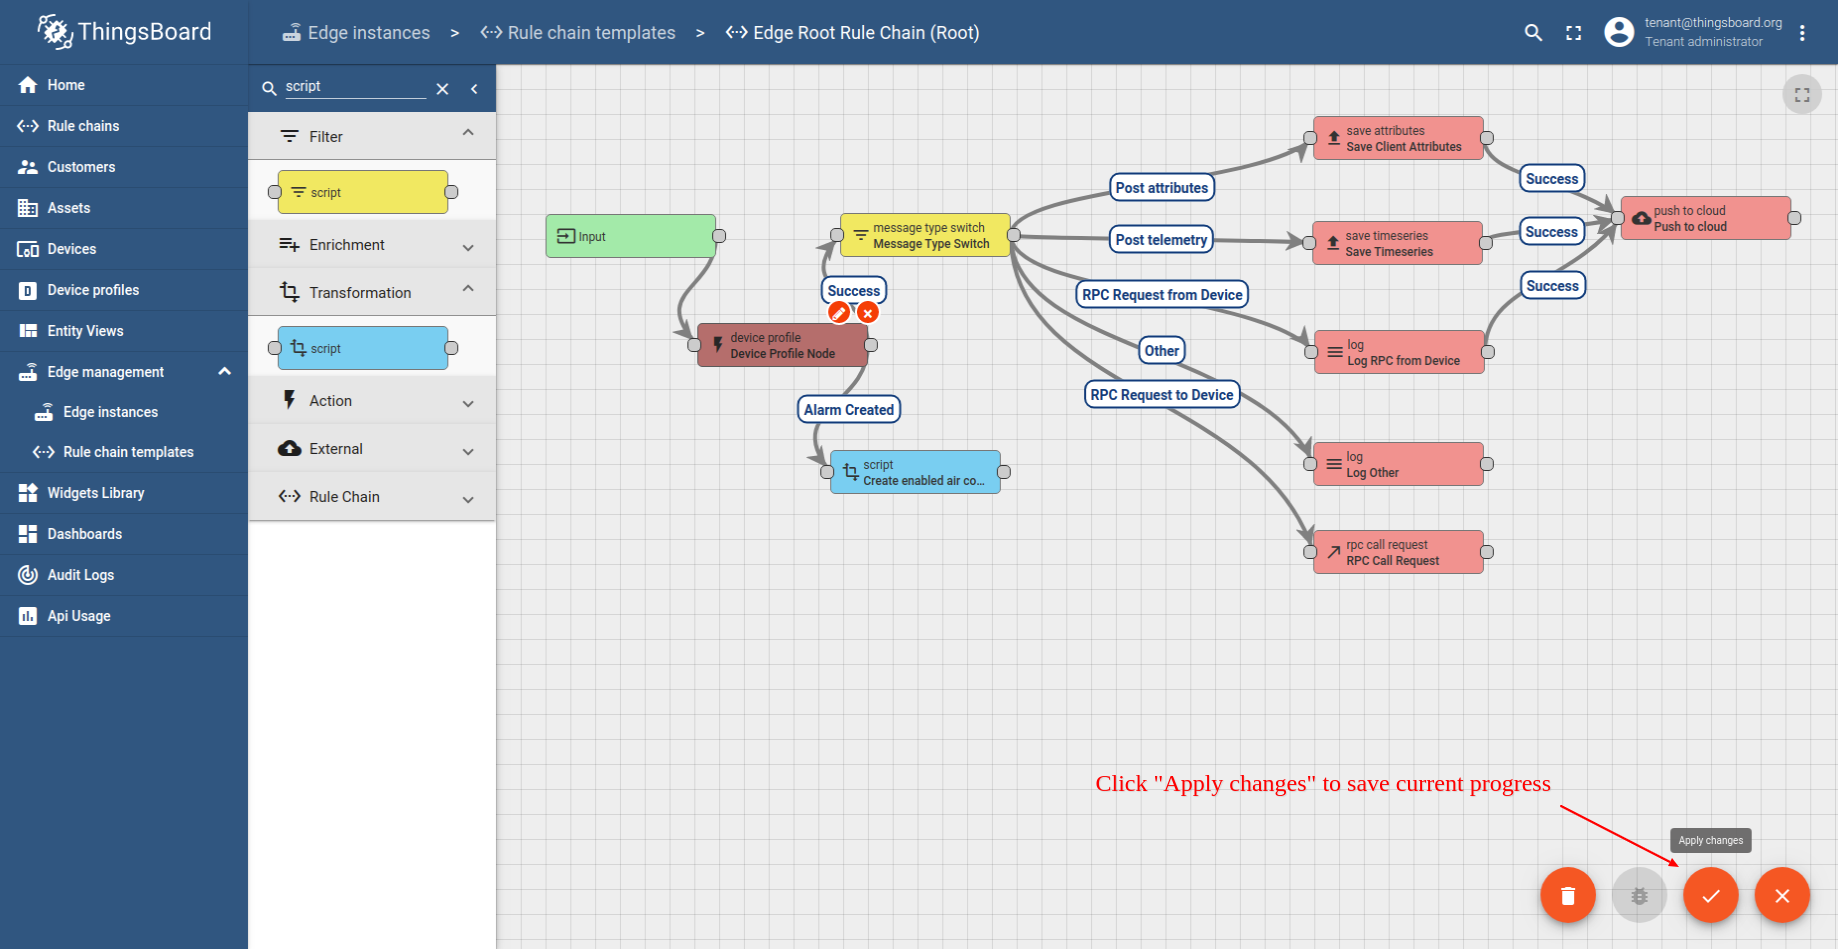
- Select Alarm Created from the list and click on the Add button.
- Click on the Apply changes button to save current progress.
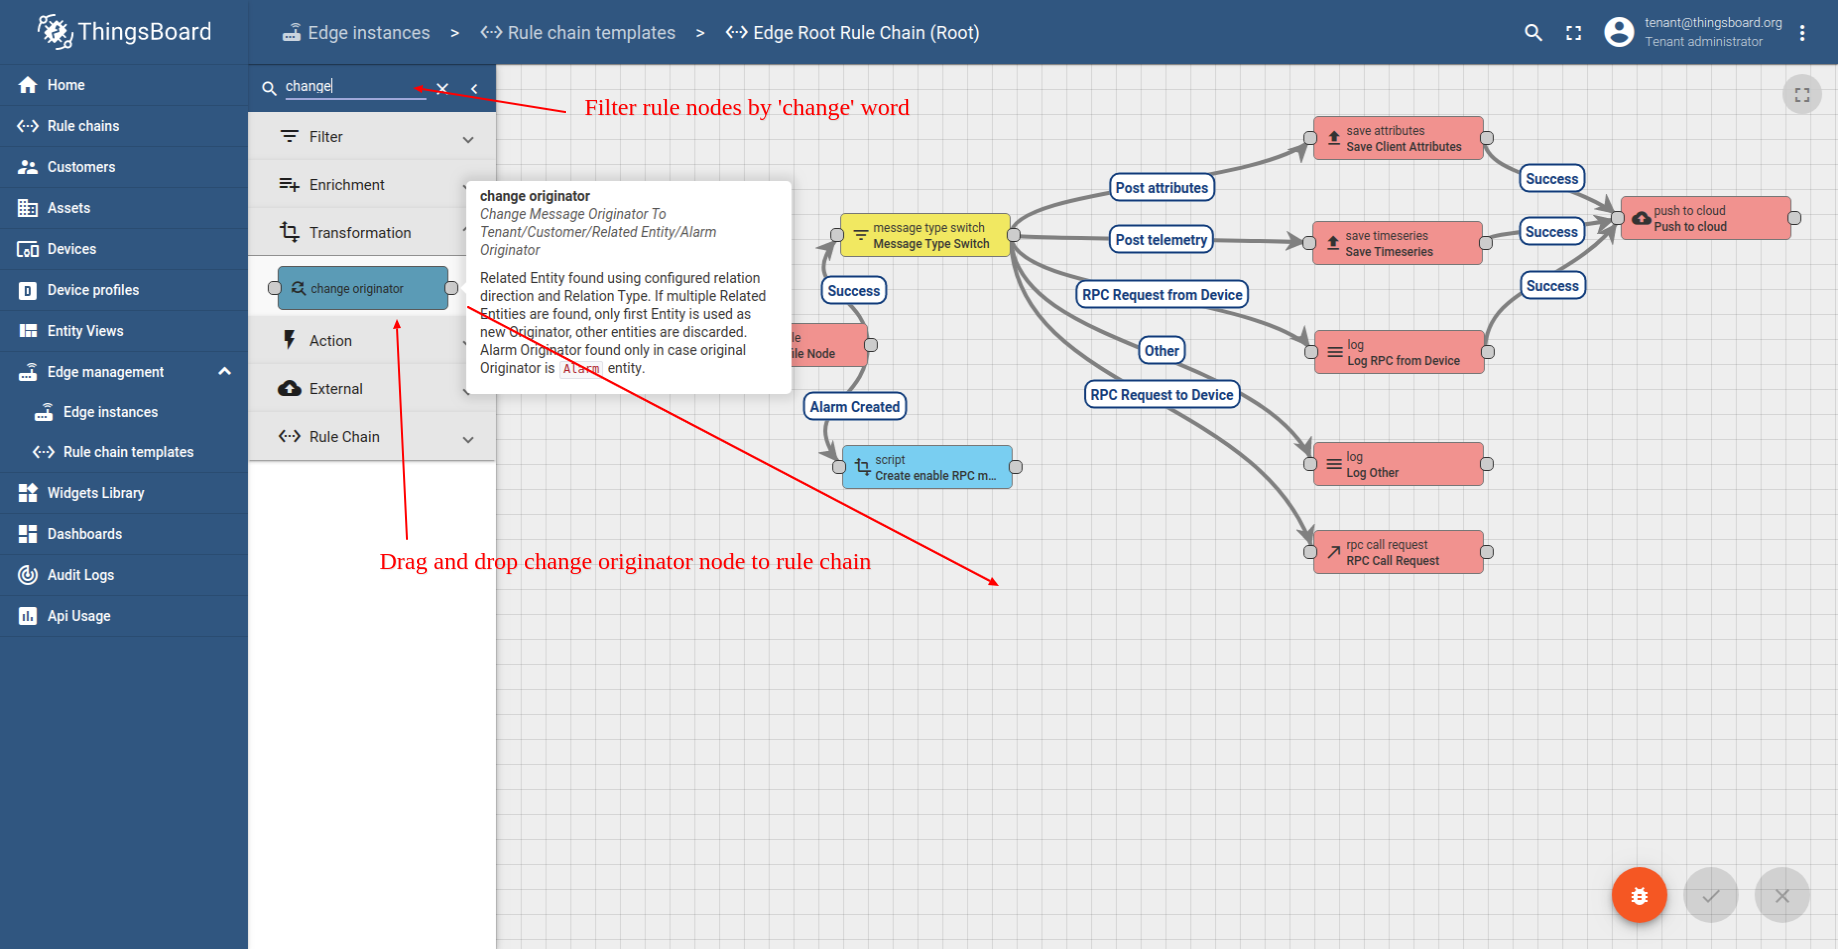
- Filter rule nodes by change word and add change originator node to rule chain.
- 1. Input Switch to Air Conditioner. 2. Select Related entity. 3. Select Manages. 4. Select Device type. 5. Click on the "Add" button
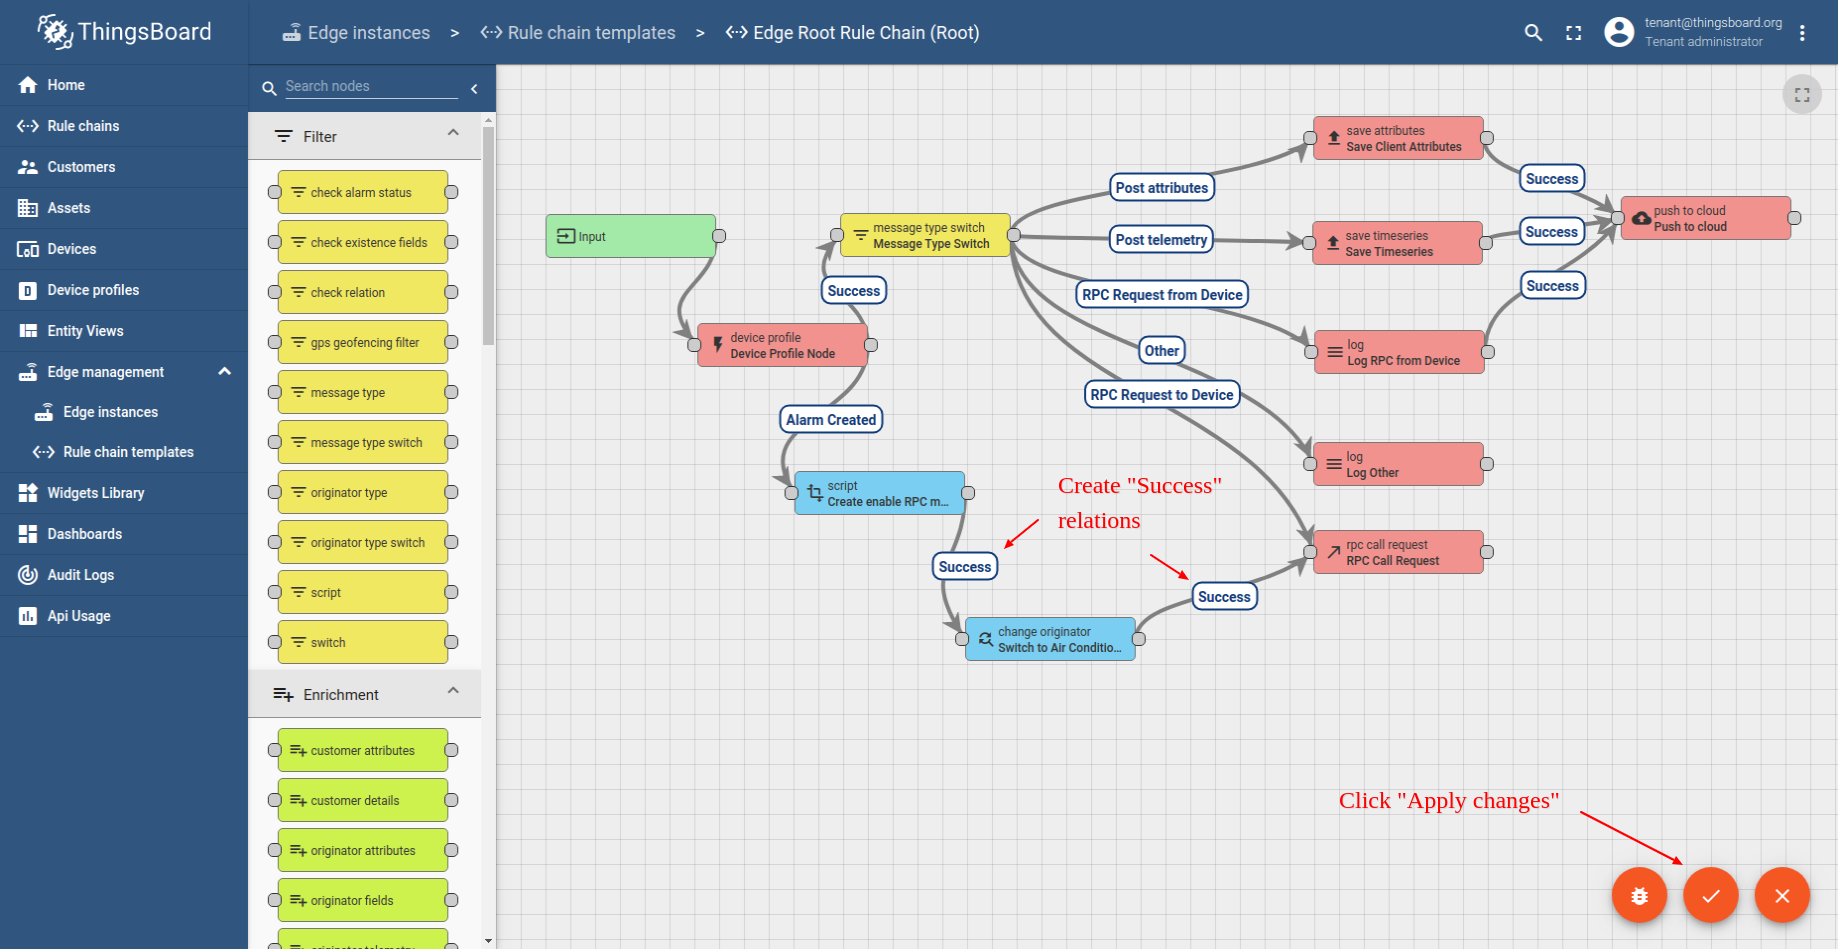
- Add Success relations from script node to change originator and Success relation from change originator to RPC Call Request node. Save changes.

现在打开 ThingsBoard Edge UI 查看更新后的 root 规则链:
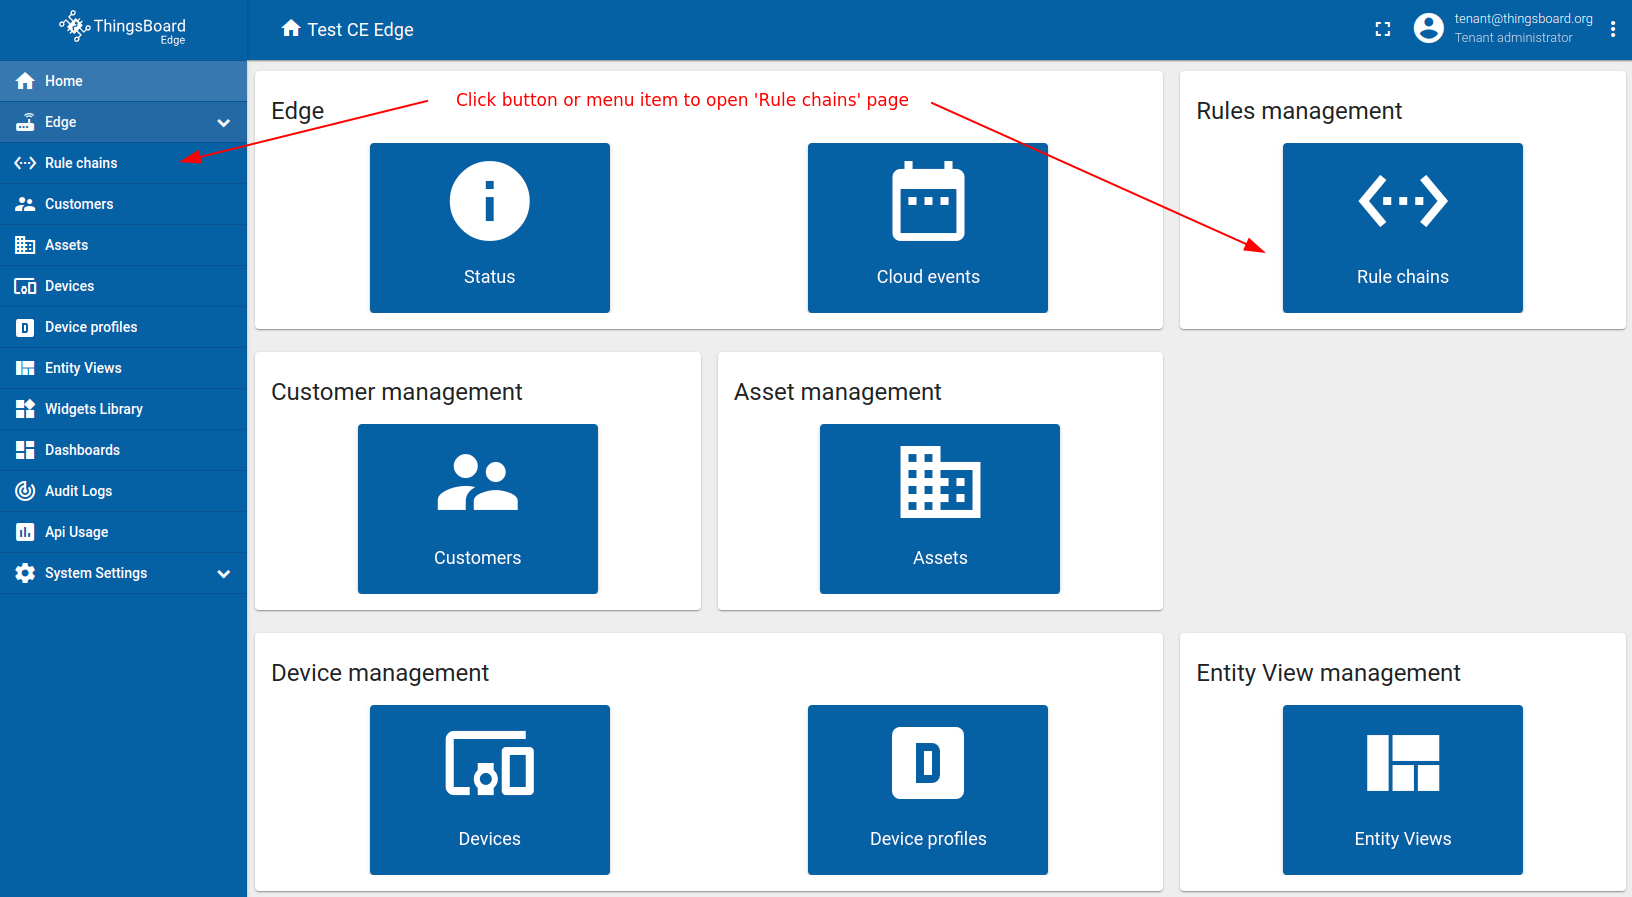
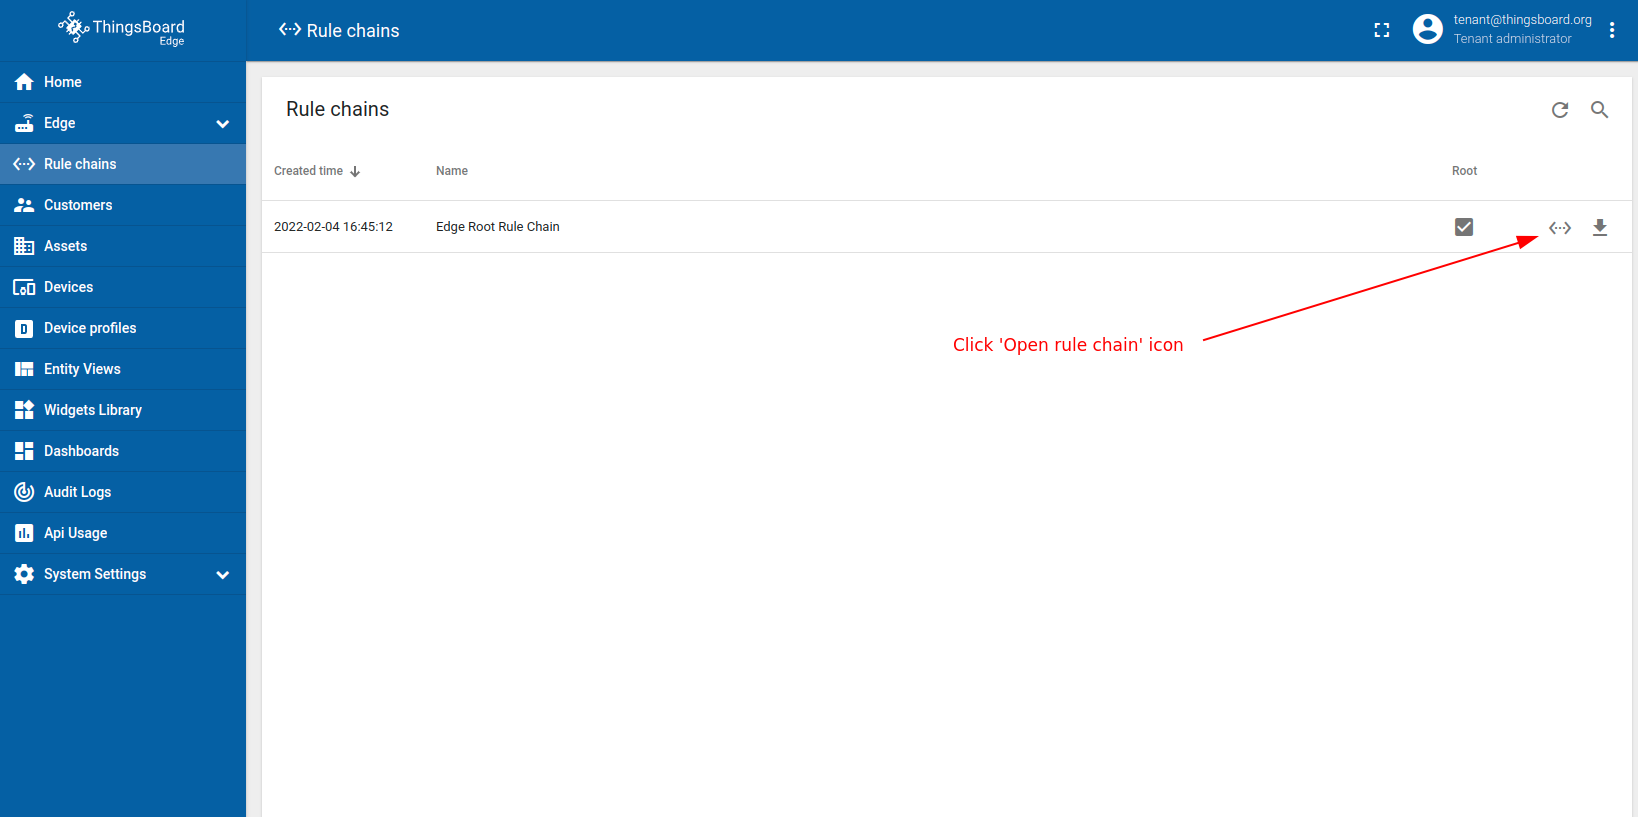
- Login to your ThingsBoard Edge instance and open Rule chains menu page.
- Open Edge Root Rule Chain to verify changes.
Connect “Air Conditioner” to edge and subscribe for RPC commands
要订阅 空调 设备从 Edge 下发的 RPC 命令,需先获取 空调 设备的凭证。 ThingsBoard 支持多种设备凭证。本指南建议使用默认自动生成的凭证,即访问令牌。
请使用 URL EDGE_URL 打开 ThingsBoard Edge UI。
- Open Devices menu page in the ThingsBoard Edge instance.
- Click on the Air Conditioner device row in the table to open device details.
- Click on the Copy access token. Token will be copied to your clipboard. Save it to a safe place.


现在可以订阅空调设备的 RPC 命令。 本示例将使用简单命令通过 MQTT 协议订阅 RPC 命令。
请将以下脚本下载到本地目录:
我们假设您的本地 PC 上已安装 Node.js 和 NPM。
运行脚本前,请相应修改 mqtt-js.sh:
-
将 YOUR_ACCESS_TOKEN 替换为上述步骤复制的 空调 设备访问令牌。
-
将 YOUR_TB_EDGE_HOST 替换为 ThingsBoard Edge 主机。例如 localhost。
-
将 YOUR_TB_EDGE_MQTT_PORT 替换为 ThingsBoard Edge MQTT 端口。例如 11883 或 1883。
打开终端,进入包含 mqtt-js.sh 和 cooler.js 的目录,并确保脚本可执行:
1
 chmod +x *.sh
安装 mqtt Node 模块以在 cooler.js 脚本中使用 mqtt 包:
1
npm install mqtt --save
然后执行以下命令:
1
bash mqtt-js.sh
您应看到如下输出(含您的主机和设备令牌):
1
2
3
pc@pc-XPS-15-9550:~/alarm-tutorial$ bash mqtt-js.sh
Connecting to: localhost:1883 using access token: sFqoF18PTyViO8L0qo7c
Cooler is connected!
请打开新的终端标签页推送温度遥测到设备,并让当前终端在后台运行直至本指南结束。
Post telemetry to “DHT22” sensor to create alarm
要向 DHT22 传感器上传温度遥测,需先获取 DHT22 传感器的凭证。 ThingsBoard 支持多种设备凭证。本指南建议使用默认自动生成的凭证,即访问令牌。
请使用 URL EDGE_URL 打开 ThingsBoard Edge UI。
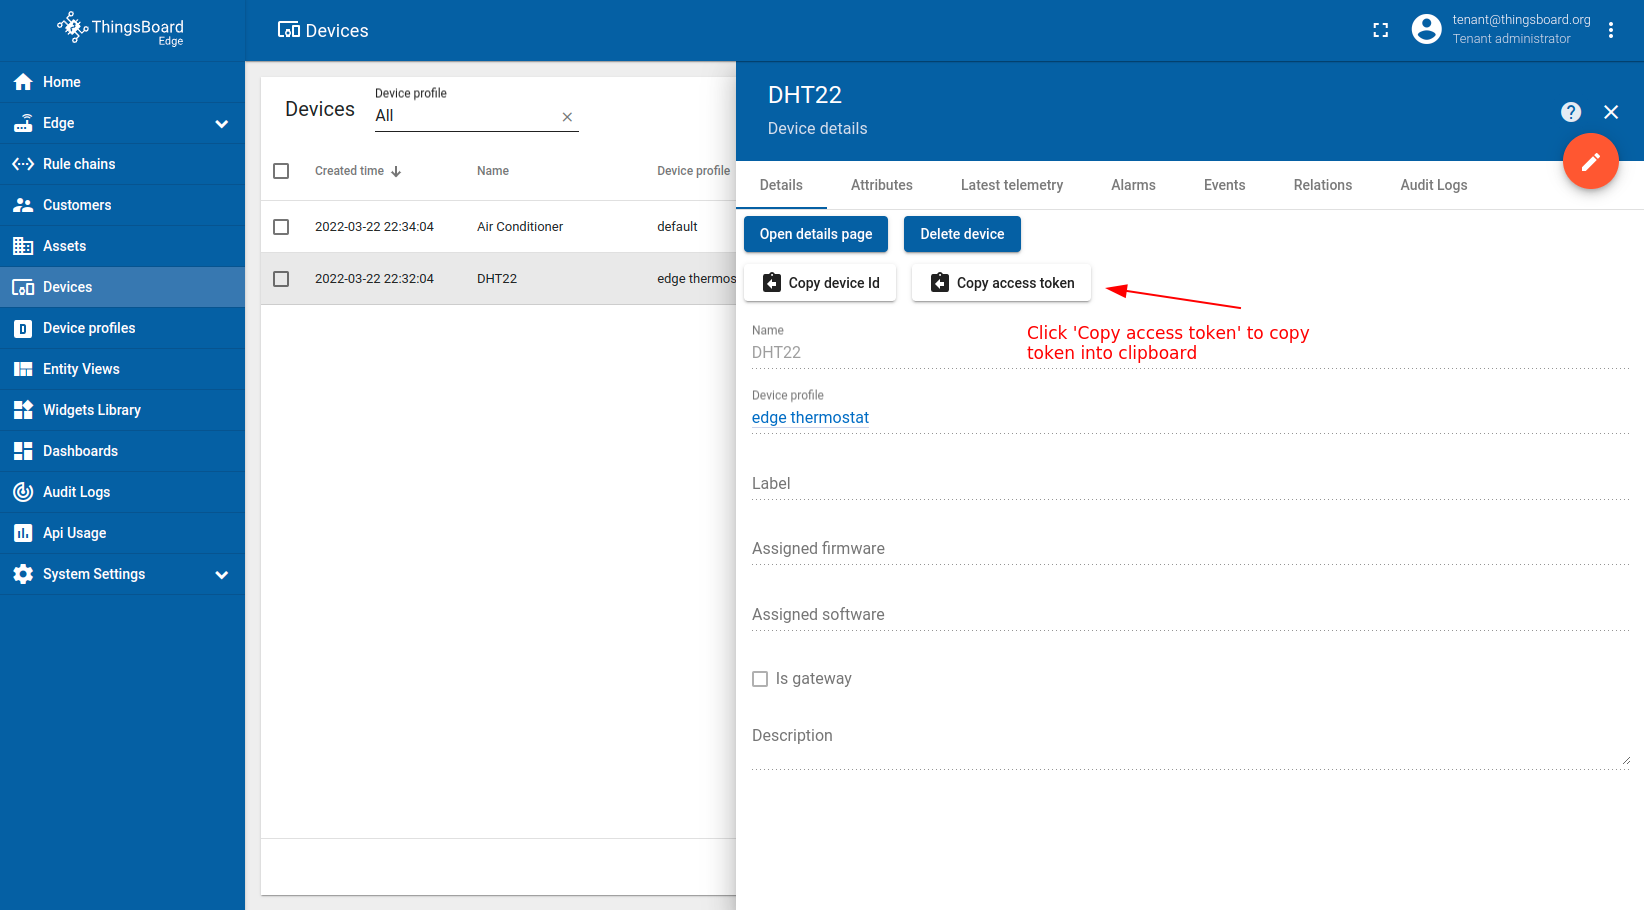
- Open Devices menu page in the ThingsBoard Edge instance.
- Click on the DHT22 device row in the table to open device details.
- Click on the Copy access token. Token will be copied to your clipboard. Save it to a safe place.

现在可以代表设备发布温度遥测数据。 本示例将使用简单命令通过 HTTP 或 MQTT 发布温度数据。
在Ubuntu上安装cURL: 在macOS上安装cURL: 在Windows上安装cURL: 自Windows 10 b17063起,cURL已默认可用。 更多信息请参阅MSDB博客 文章。 若您使用较旧版本的Windows,可在此处 官方安装指南 查找。 以下命令适用于Windows、Ubuntu和macOS,前提是cURL工具已安装。请将$HOST_NAME和$ACCESS_TOKEN替换为对应值。 例如,$HOST_NAME指向您本地的ThingsBoard Edge安装,访问令牌为ABC123: |
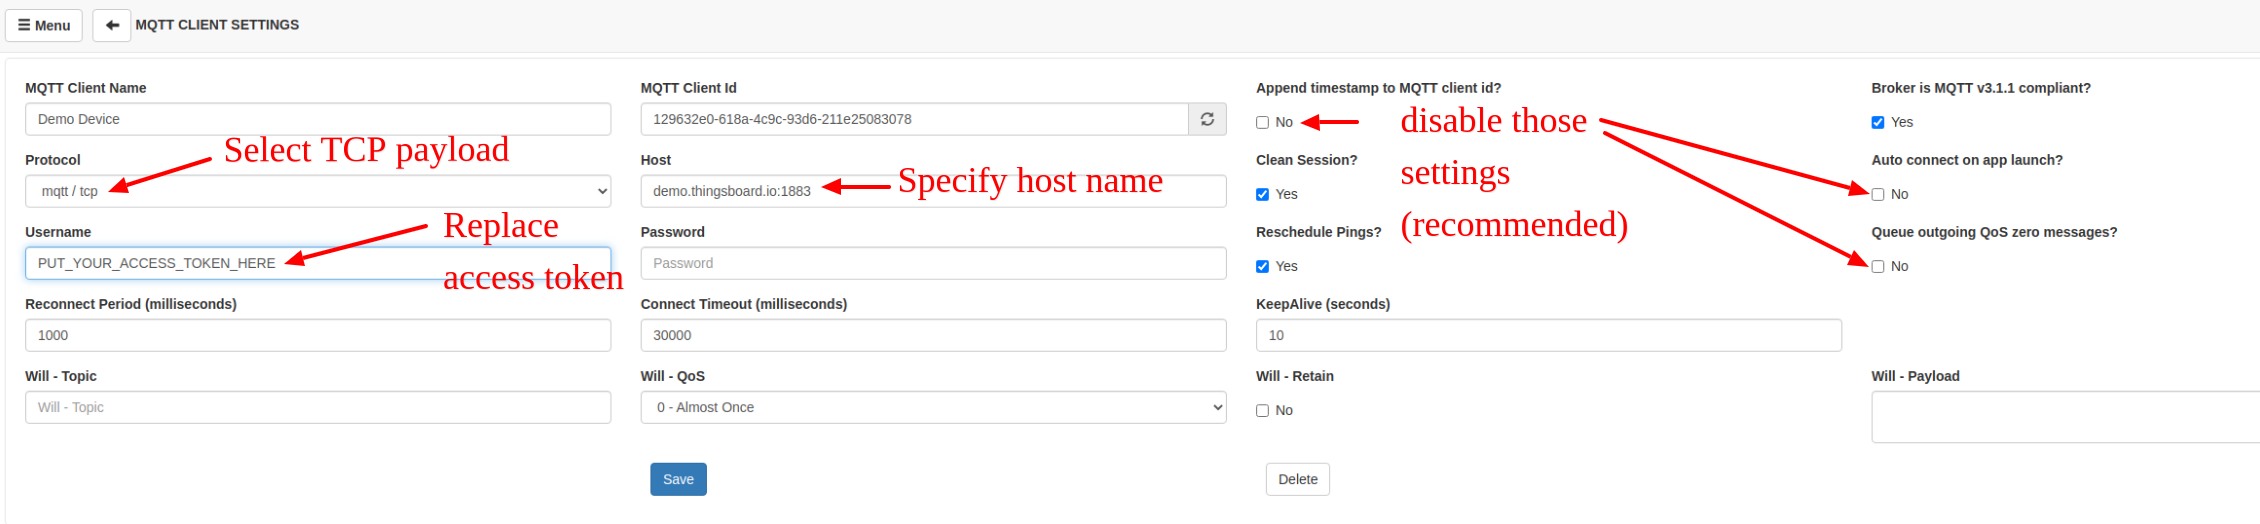
在Ubuntu上安装MQTT客户端: 在macOS上安装: 请将$HOST_NAME、$MQTT_PORT和$ACCESS_TOKEN替换为对应值。 例如,$HOST_NAME指向您本地的ThingsBoard Edge安装,MQTT端口为1883,访问令牌为ABC123: 成功输出应类似以下内容: 注意: 自ThingsBoard 3.2起,您可以使用基本MQTT凭据(client id、user name和password组合),并通过Device Profile自定义主题名称和载荷类型。更多信息请参阅 此处。 |
  |
安装coap-cli。假设您的Windows/Linux/MacOS设备已安装Node.js和NPM,请执行以下命令: 请将$HOST_NAME、$COAP_PORT和$ACCESS_TOKEN替换为对应值。若未指定$COAP_PORT,默认使用5683。 例如,$HOST_NAME指向您本地的ThingsBoard Edge安装,CoAP端口为5683,访问令牌为ABC123: |
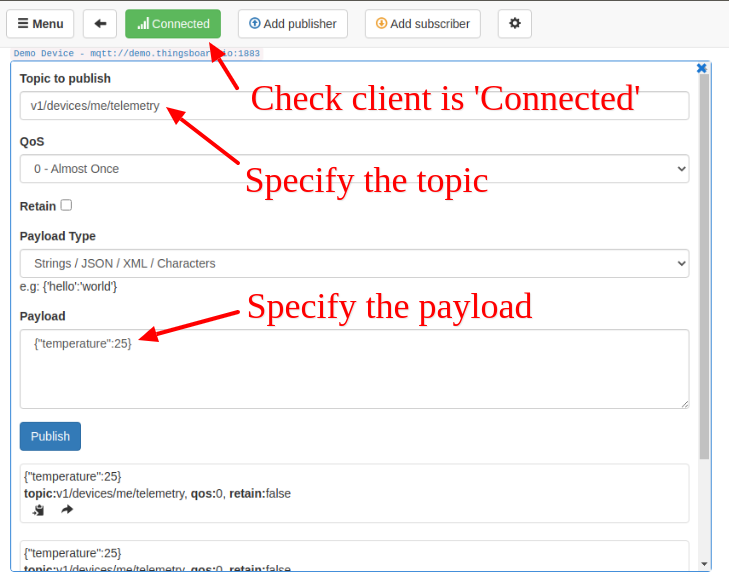
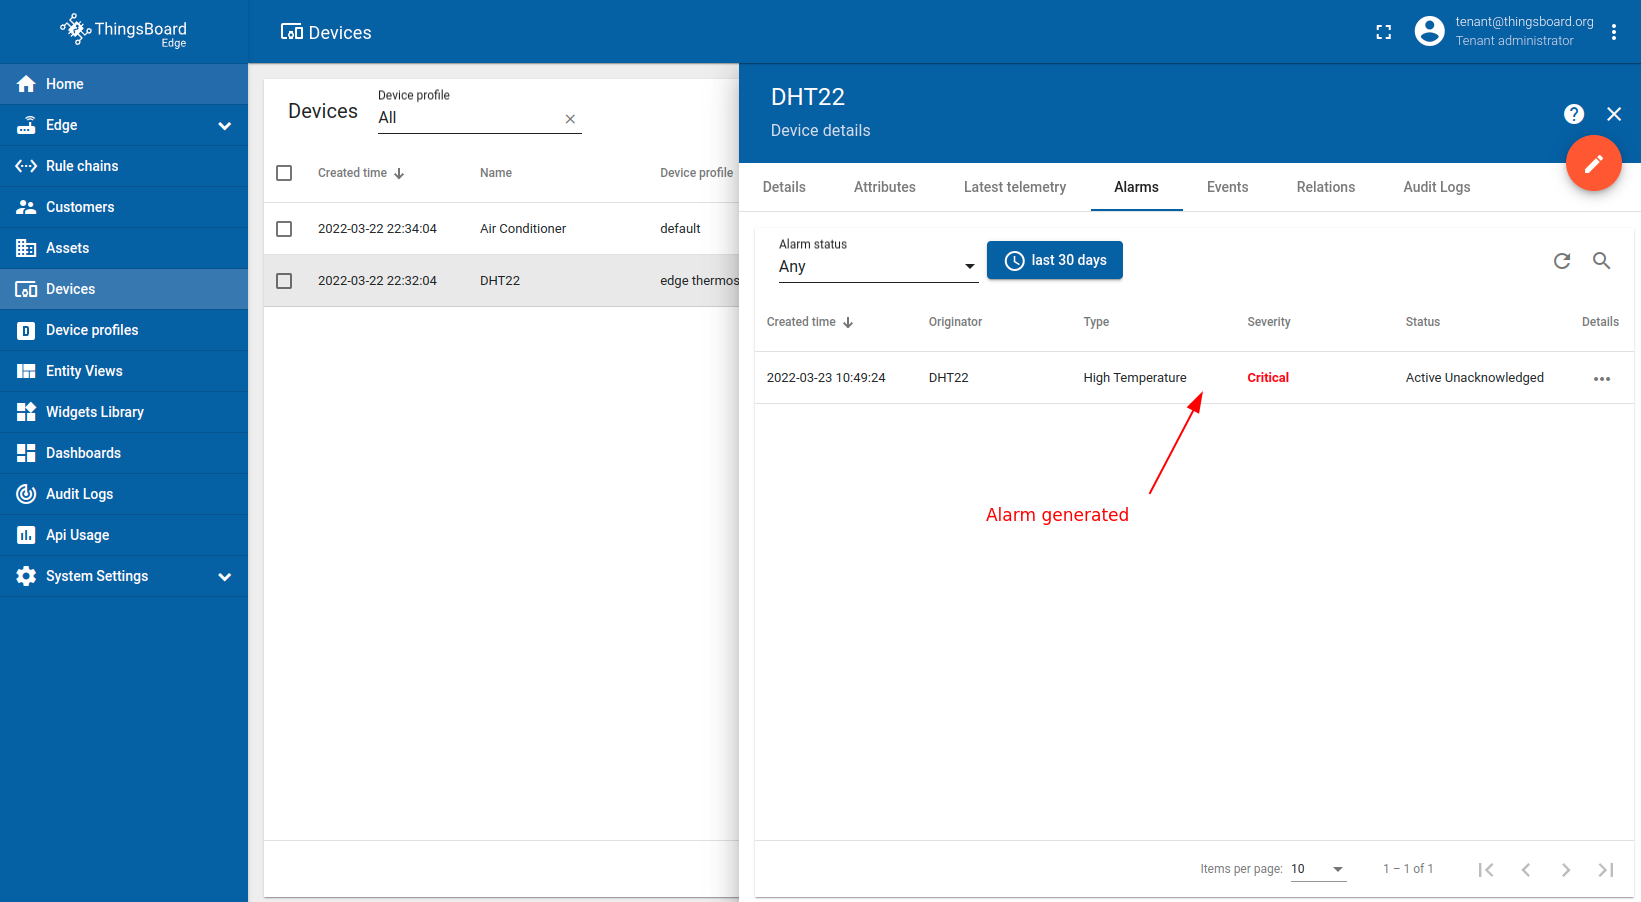
成功发布温度为 51 的「temperature」读数后:
|
|
请使用 MQTTBox 发布温度为 51 的遥测数据。 |
|
您应能在设备告警选项卡中立即看到告警:
- Click on the row of the DHT22 device in the table to view the device details
- Navigate to the alarm tab.
Verify that RPC request was send to “Air Conditioner” device
打开运行 mqtt-js.sh 脚本的终端。 您应看到类似以下输出:
1
2
3
4
5
6
pc@pc-XPS-15-9550:~/alarm-tutorial$ bash mqtt-js.sh
Connecting to: localhost:1883 using access token: sFqoF18PTyViO8L0qo7c
Cooler is connected!
Received RPC command from edge!
Method: enabled_air_conditioner
Speed params: 1
恭喜!RPC 请求已基于 DHT22 传感器的温度读数成功发送至 空调 设备。
下一步
-
Getting started guide(入门指南)- 快速概览 ThingsBoard Edge 主要功能。预计 15–30 分钟完成:
-
Installation guides(安装指南)- 了解如何在各种操作系统上安装 ThingsBoard Edge 并连接到 ThingsBoard Server。
-
Edge 规则引擎:
-
Rule Chain Templates(规则链模板)- 了解如何使用 ThingsBoard Edge 规则链模板。
-
Provision Rule Chains from cloud to edge(从云端向 Edge 下发规则链)- 了解如何从云端向 Edge 下发边缘规则链。
-
- 安全:
- gRPC over SSL/TLS - 了解如何为 Edge 与云端之间的通信配置 gRPC over SSL/TLS。
-
功能:
-
Edge Status(Edge 状态)- 了解 ThingsBoard Edge 上的 Edge Status 页面。
-
Cloud Events(云端事件)- 了解 ThingsBoard Edge 上的 Cloud Events 页面。
-
-
使用场景:
- Data filtering and traffic reduce(数据过滤与流量削减)- 本指南展示如何从 Edge 向云端仅发送过滤后的设备数据:
- Roadmap(路线图)- ThingsBoard Edge 路线图。