- Use case
- Prerequisites
- Create device
- Configure edge rule engine to push filtered data to the cloud
- Connect device to edge and post telemetry
- Create dashboard
- 下一步
Use case
本使用场景演示如何配置连接至 ThingsBoard Edge 平台的「车载 IoT 监控系统」。
目标是采集多类传感器数据,在 Edge 上本地处理,并选择性地将相关数据(如里程读数)推送到云端。该配置可高效追踪下次换油前的剩余里程。
为此,将配置「Edge Root Rule Chain」在ThingsBoard Edge 平台上本地处理传感器读数。该配置将处理全部 10 个传感器的输入,并使用规则节点过滤并仅将 distance(里程)读数转发至云端。
「车载 IoT 监控系统」包含 10 个传感器:
- 里程
- 燃油消耗
- 车速
- 发动机温度
- 环境温度
- 轮胎温度
- 各轮胎气压(4x)
ThingsBoard Edge 的职责包括:
- 采集全部 10 个传感器的读数
- 仅将「distance」读数发送至云端
请注意,这仅为演示平台能力的简单理论场景。您可将本教程作为更复杂场景的基础。
Prerequisites
我们假设您已完成以下指南并阅读了以下文章:
- Getting Started 指南。
- Rule Engine Overview 文章。
- ThingsBoard Edge Getting Started 文章。
- Edge Rule Chain Templates 指南。
请确保 ThingsBoard 服务器已启动并运行。此外,ThingsBoard Edge 必须已启动、运行并已连接到云端。
若以上前置条件均已就绪,可继续下一步。
否则请访问此链接,以配置、安装并将 Edge 连接到服务器:指南。
为简化表述,无论 ThingsBoard 服务器是在本地部署还是云端主机版本,本教程中将服务器 UI URL 统一称为 SERVER_URL。 Edge UI URL 则统一称为 EDGE_URL。
若Edge安装时将HTTP bind port修改为18080,请通过 http://localhost:18080 访问 ThingsBoard Edge 实例。
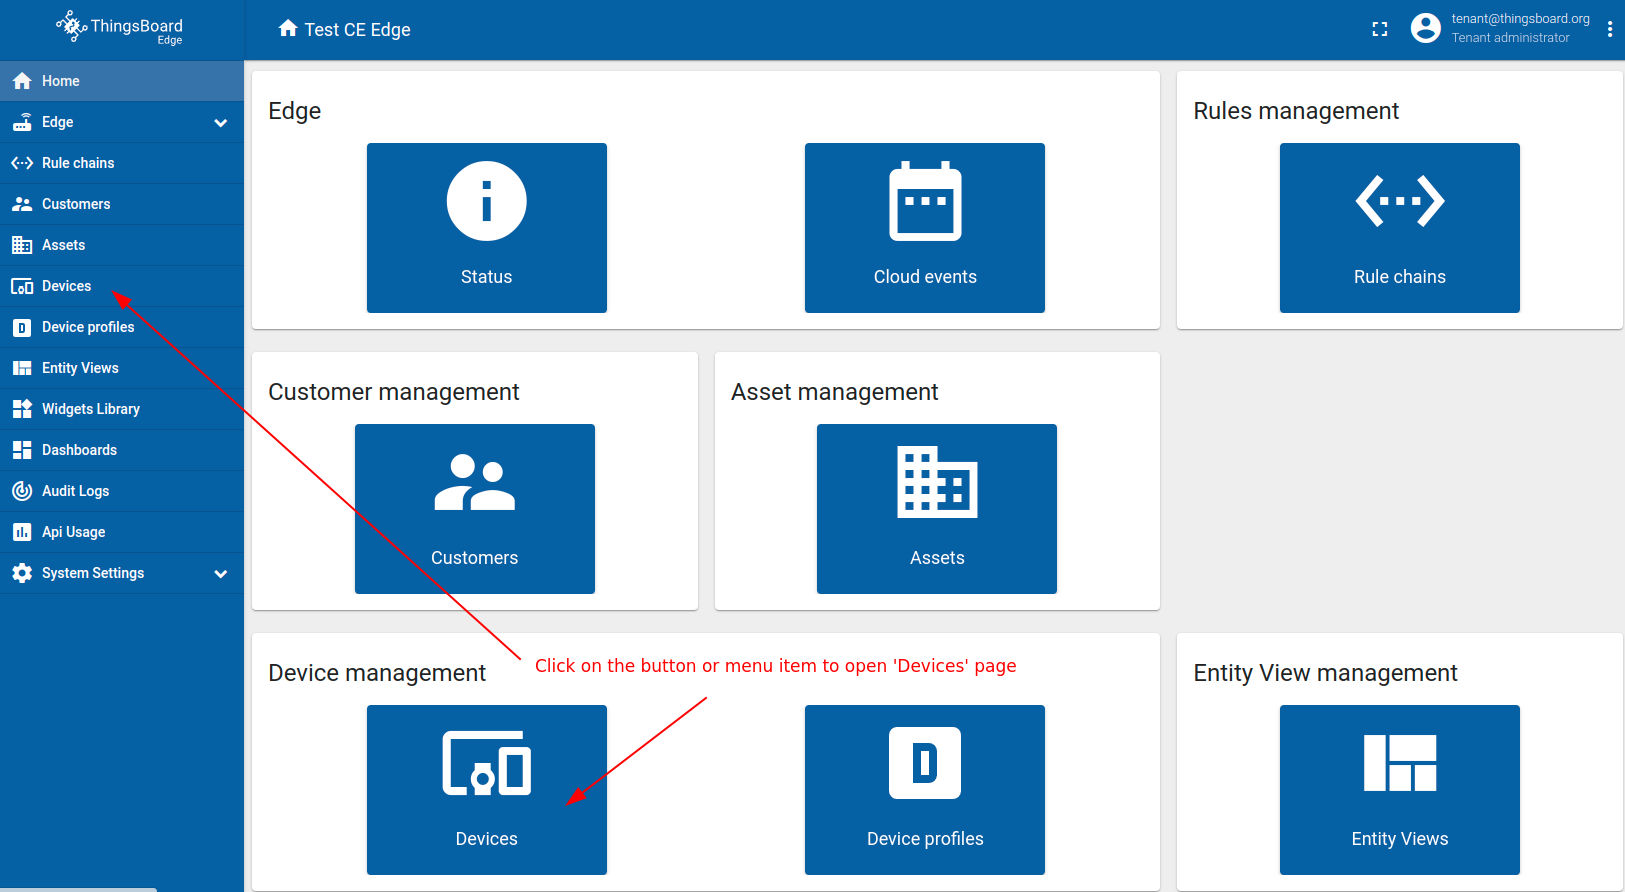
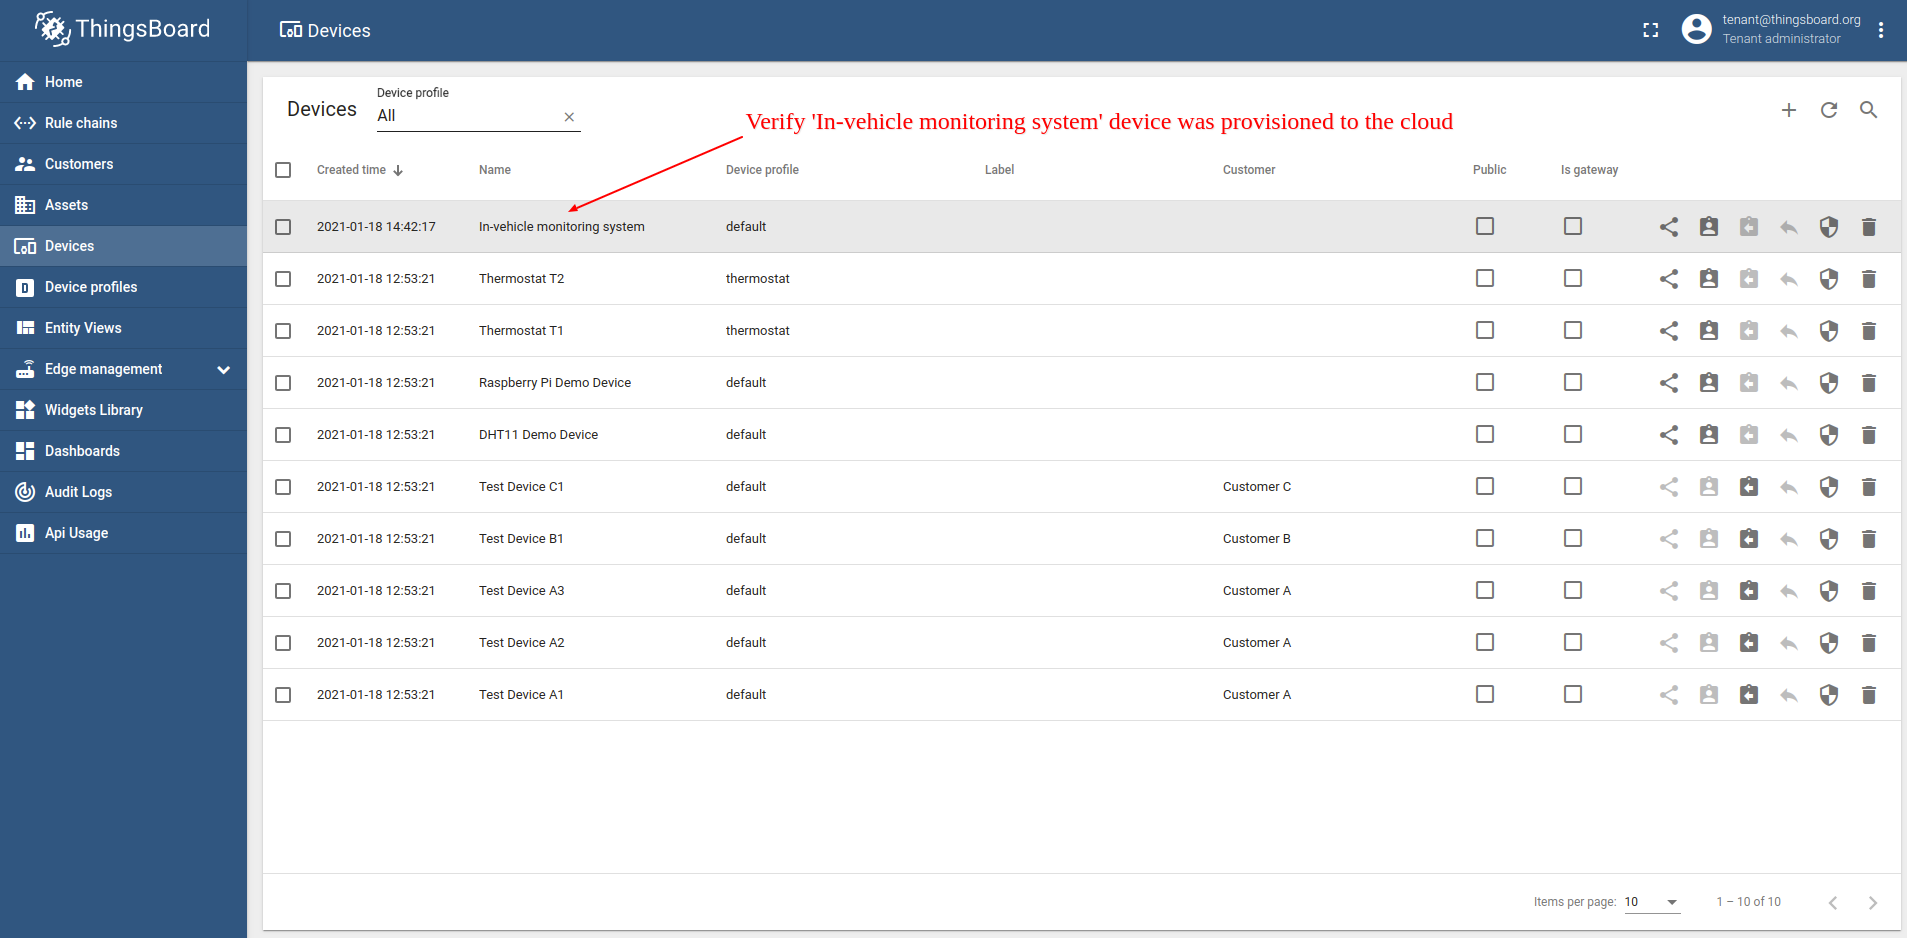
Create device
首先,在 Edge 上创建名为「车载 IoT 监控系统」的新设备。
请使用 URL EDGE_URL 打开 ThingsBoard Edge UI。
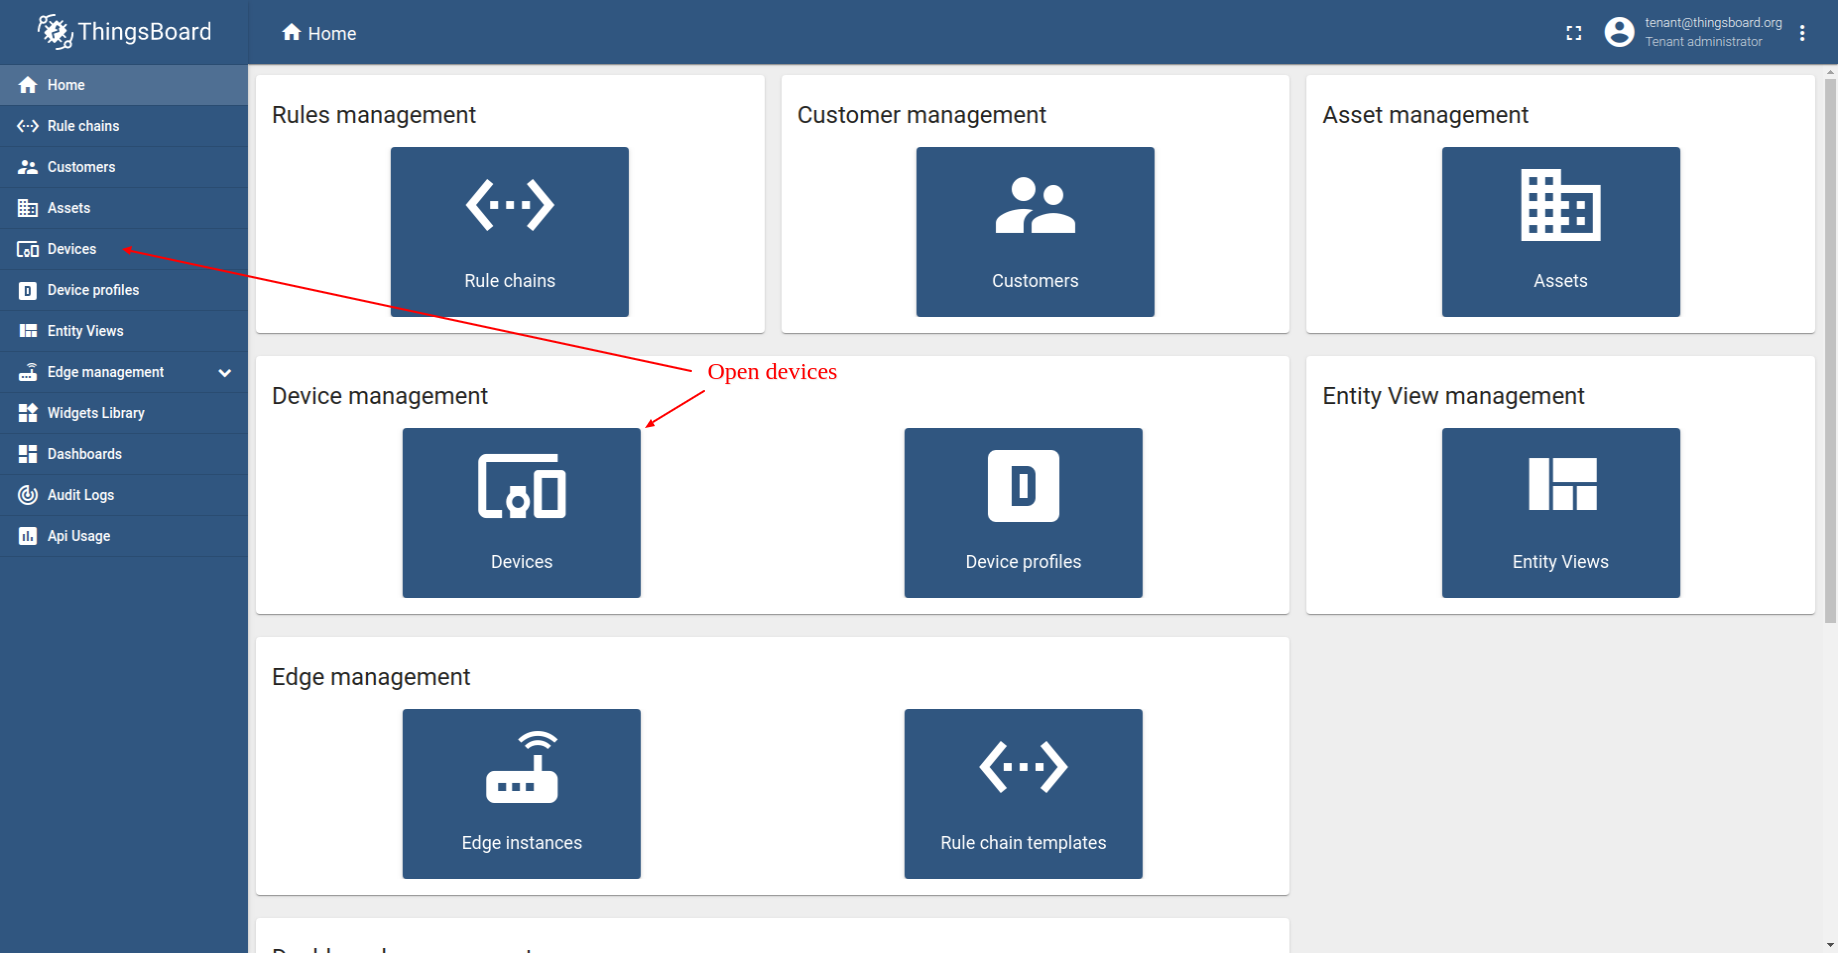
- Log in to your ThingsBoard Edge instance and navigate to the "Devices" page.
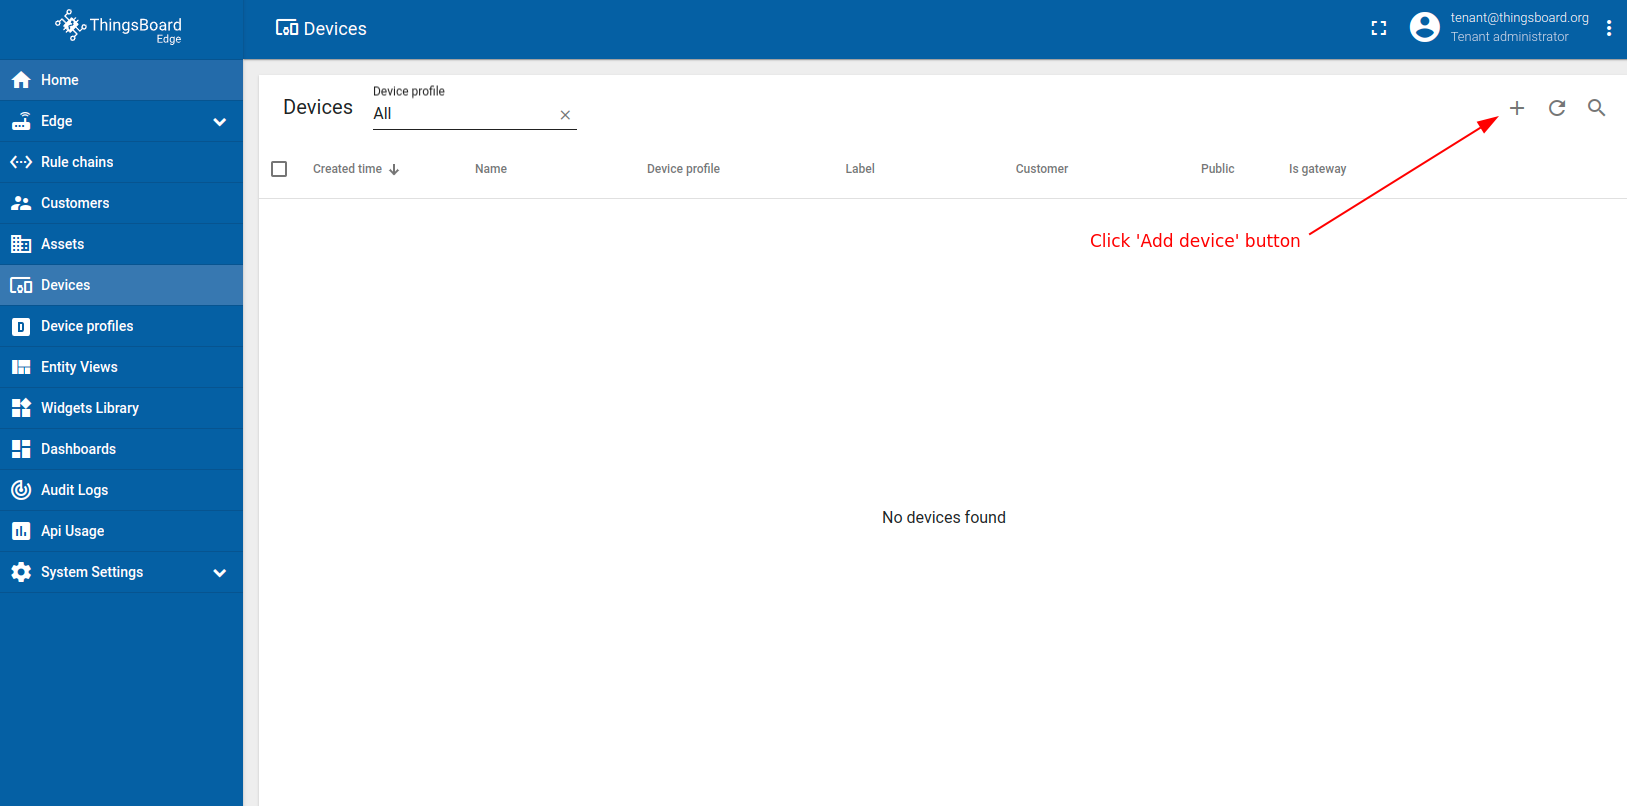
- Click on the ("+") icon located in the top right corner. Then, click "Add new device" button.
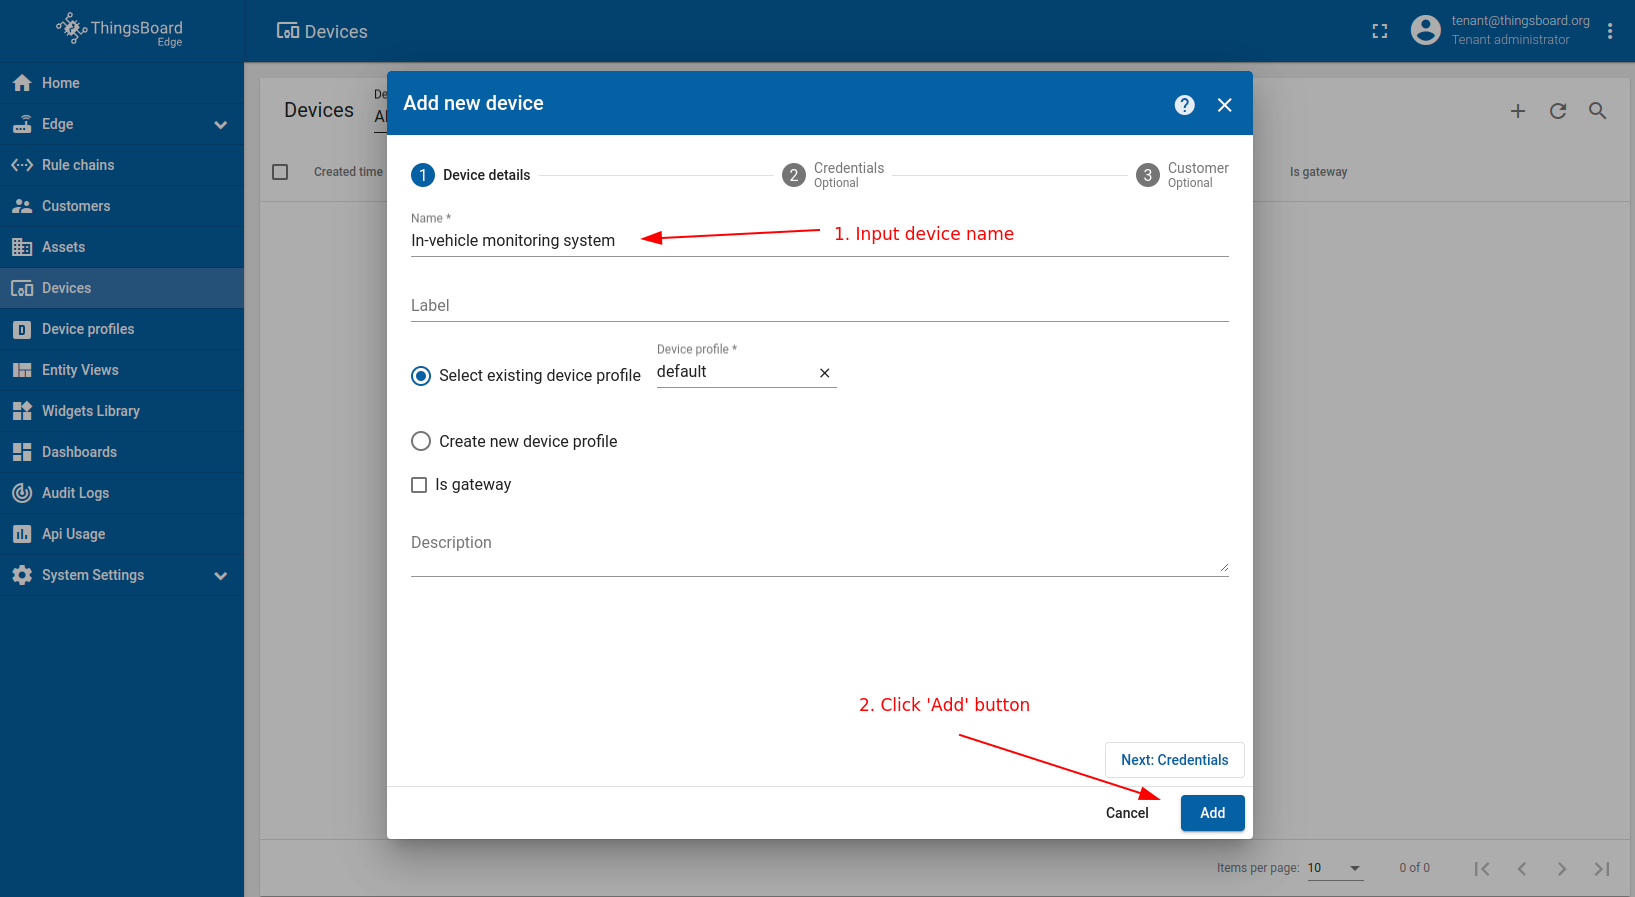
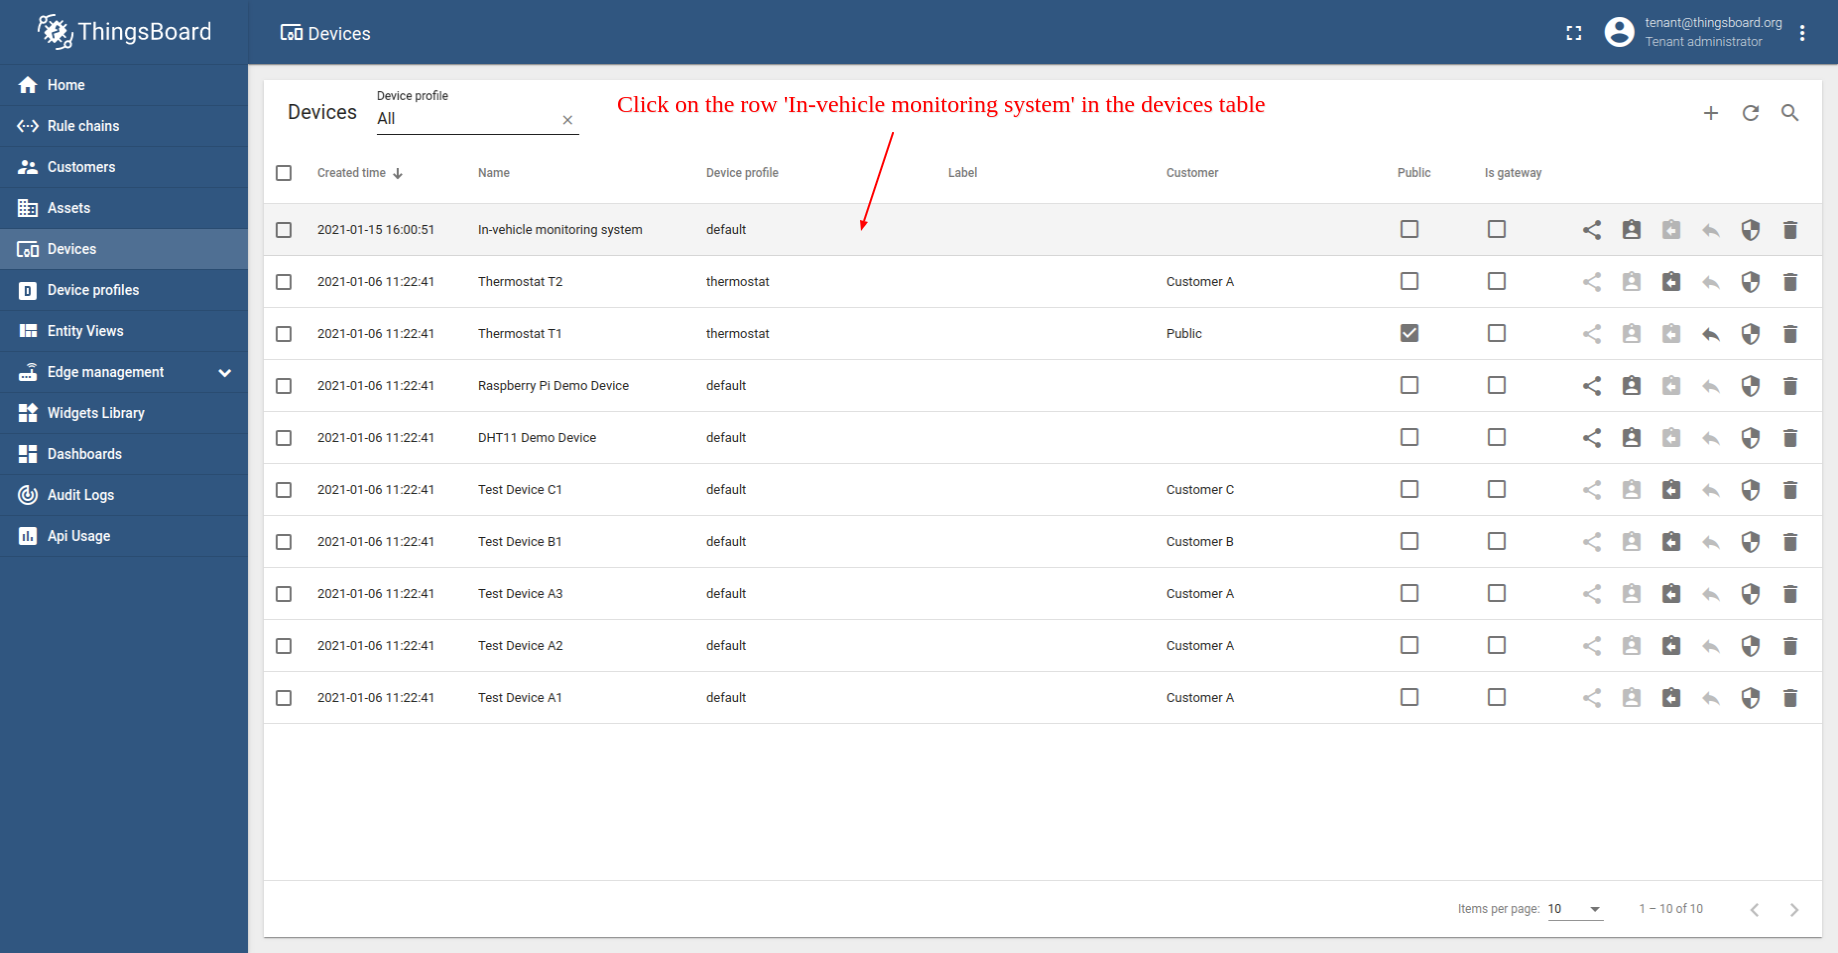
- Enter the Name of the input device, for example, "In-vehicle monitoring system", then click "Add" button.
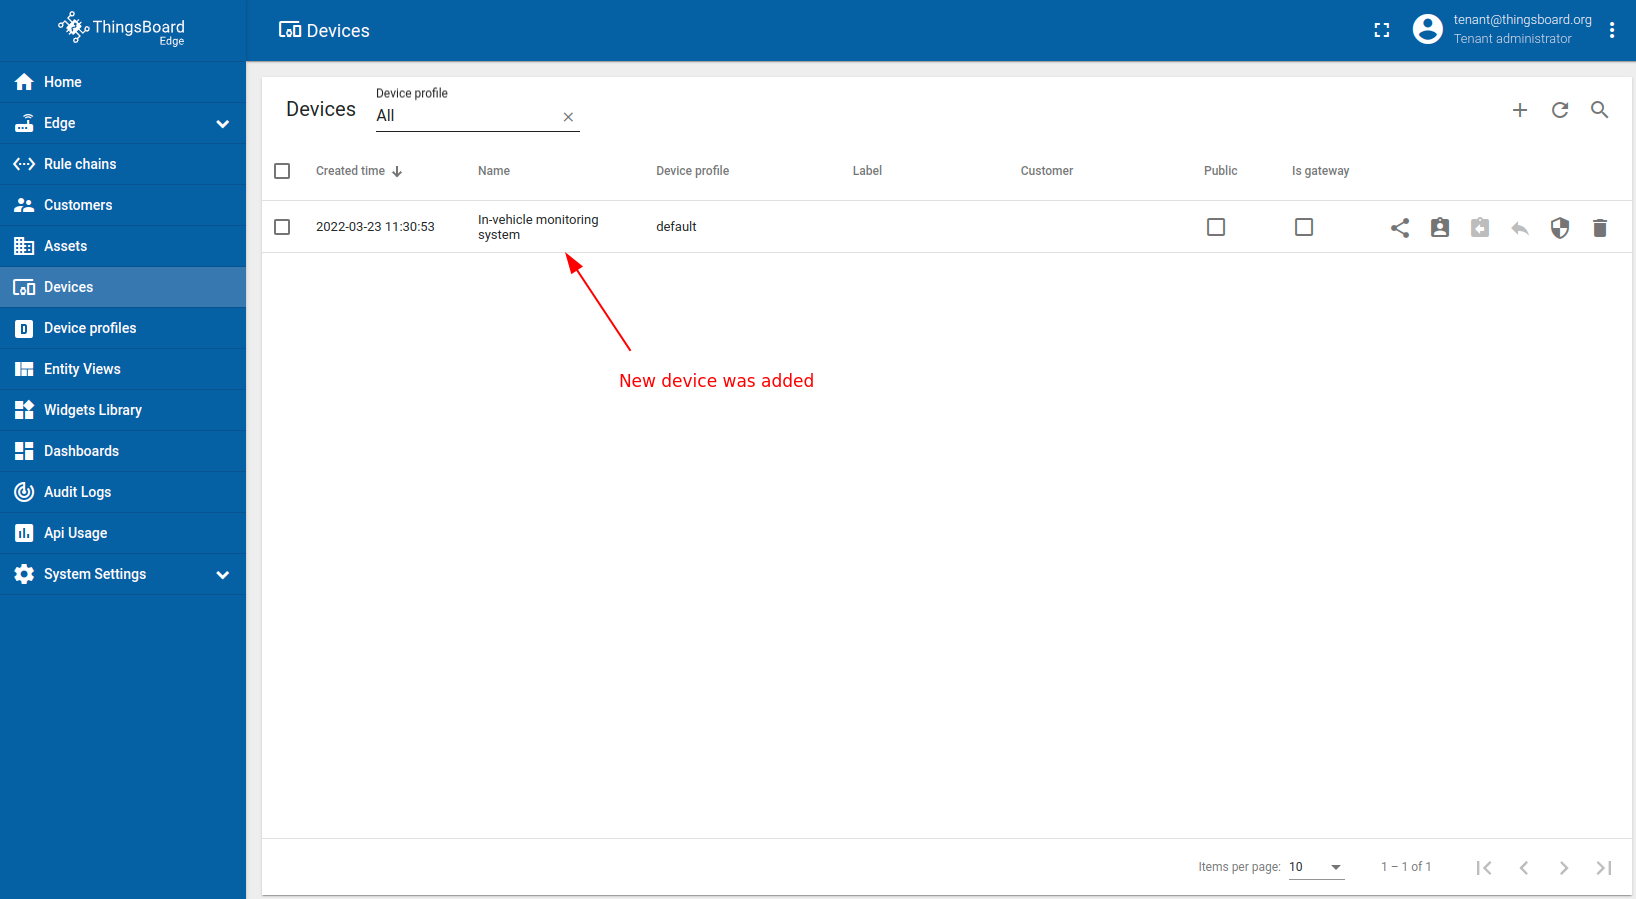
- Now, your device named "In-vehicle monitoring system" should appear in the devices table.
请使用 URL SERVER_URL 打开 ThingsBoard:
- Log in to your ThingsBoard server instance and navigate to the "Devices" page.
- Please verify that the device "In-vehicle monitoring system" is listed in the devices list.

Configure edge rule engine to push filtered data to the cloud
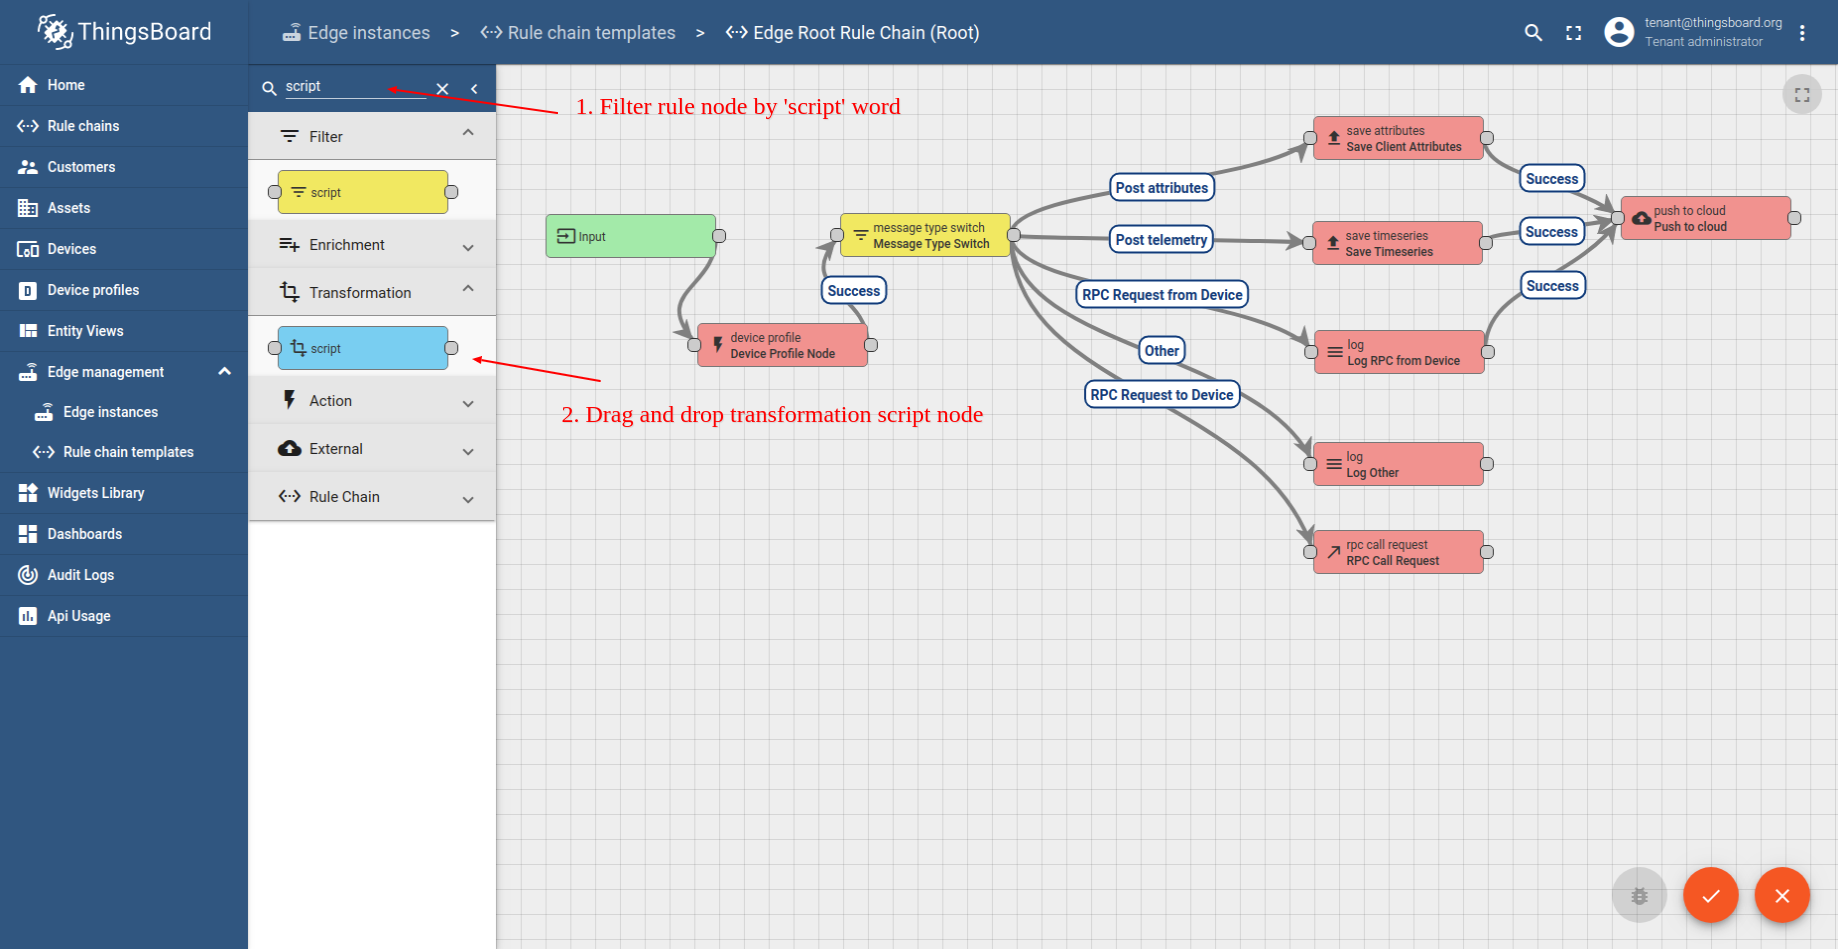
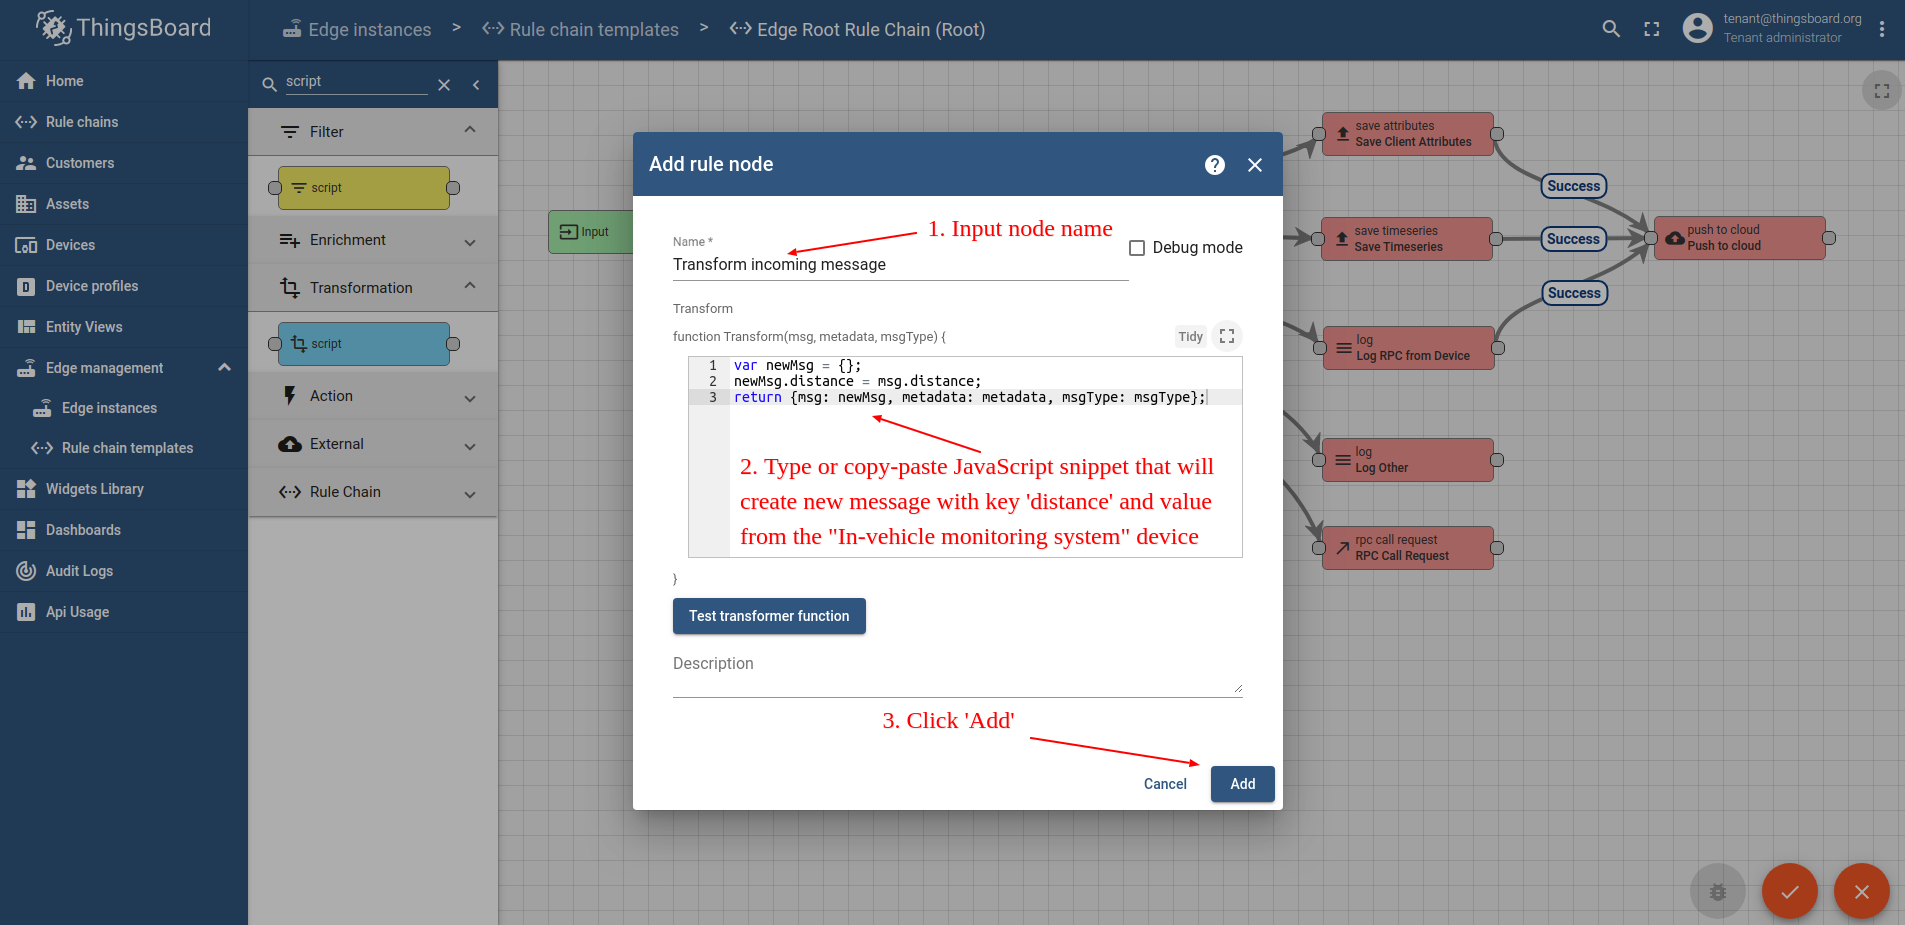
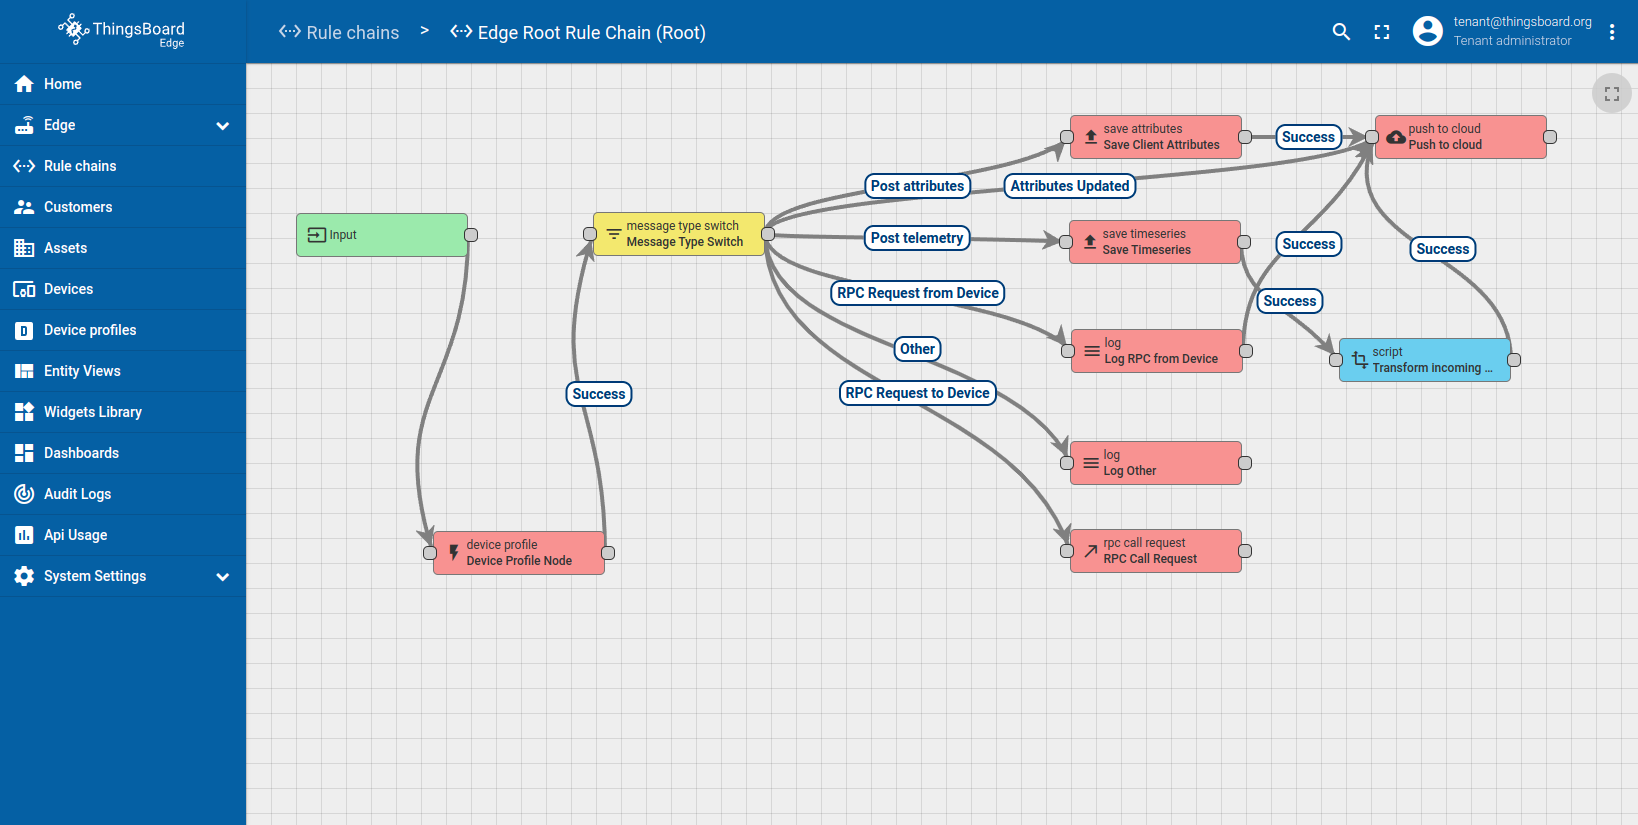
我们将更新「Edge Root Rule Chain」,使其在 Edge 上保存 10 个传感器读数。在规则链中添加规则节点,用于转换传入消息,仅将包含 distance 读数的消息推送至云端。以下是 Edge root 规则链的最终配置:
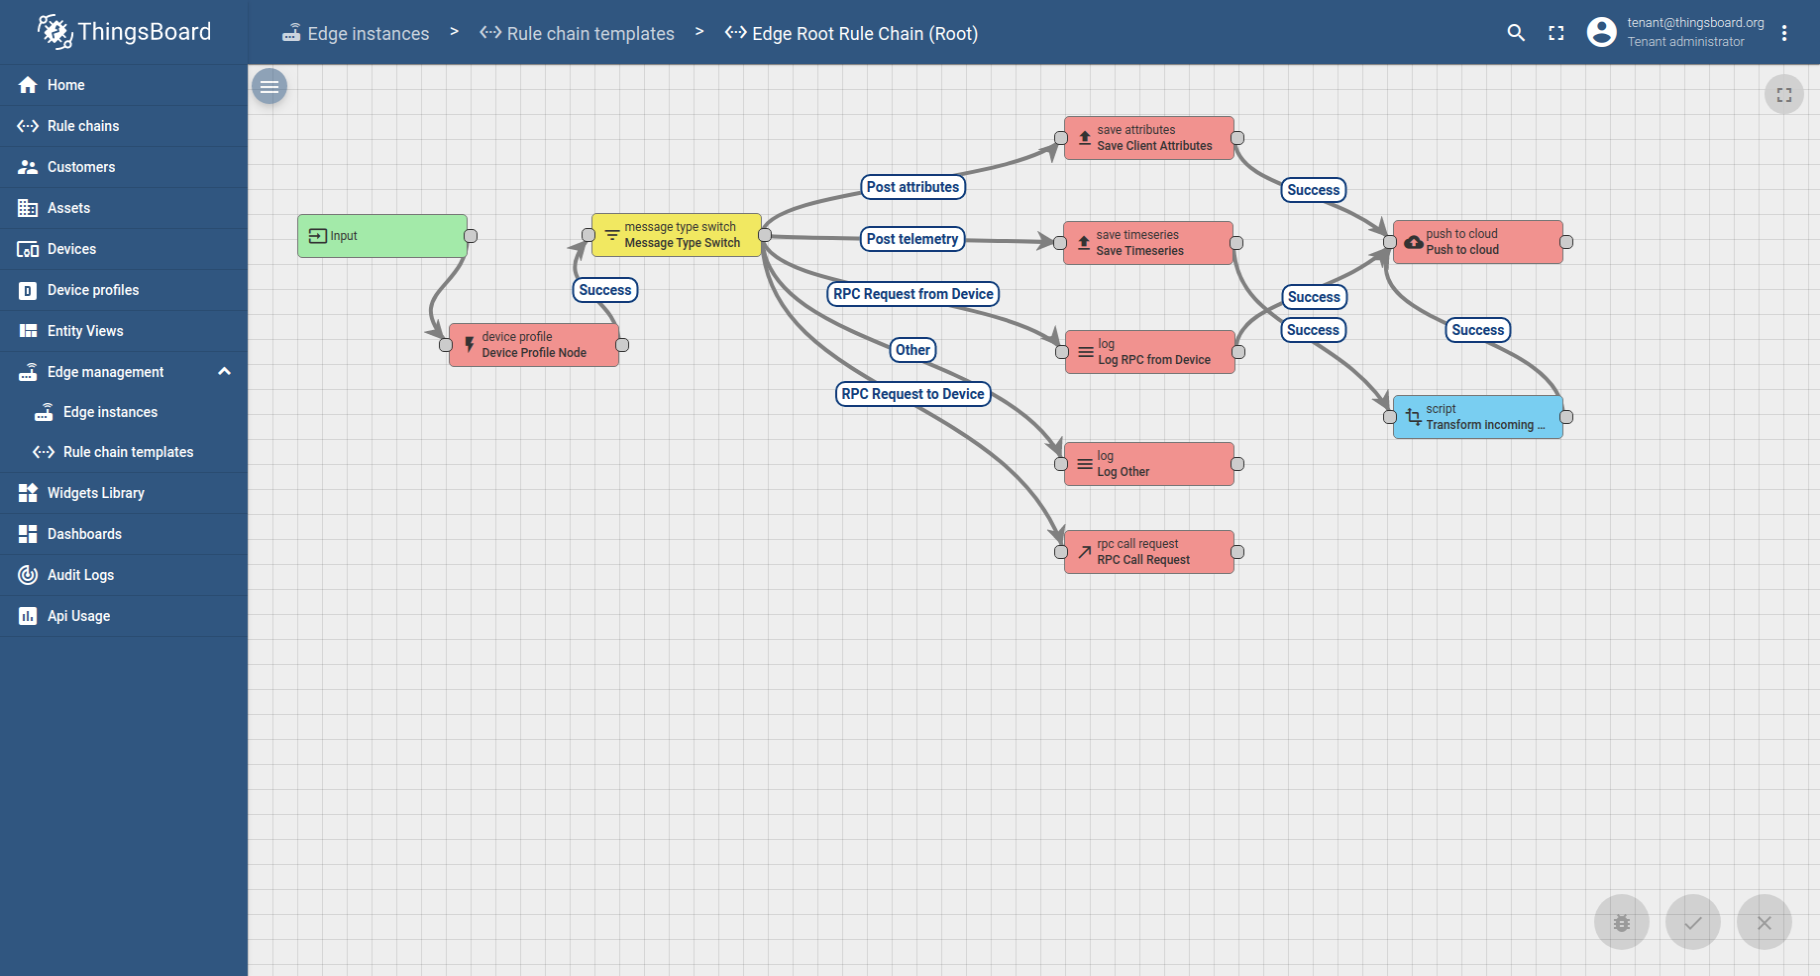
下一步将创建 TBEL 节点进行数据过滤。TBEL 脚本语言节点将创建空对象 newMsg, 添加名为「distance」的属性,其值来自「In-vehicle monitoring system」,然后将 newMsg 作为新消息发送。
1
2
3
var newMsg = {};
newMsg.distance = msg.distance;
return { msg: newMsg, metadata: metadata, msgType: msgType };
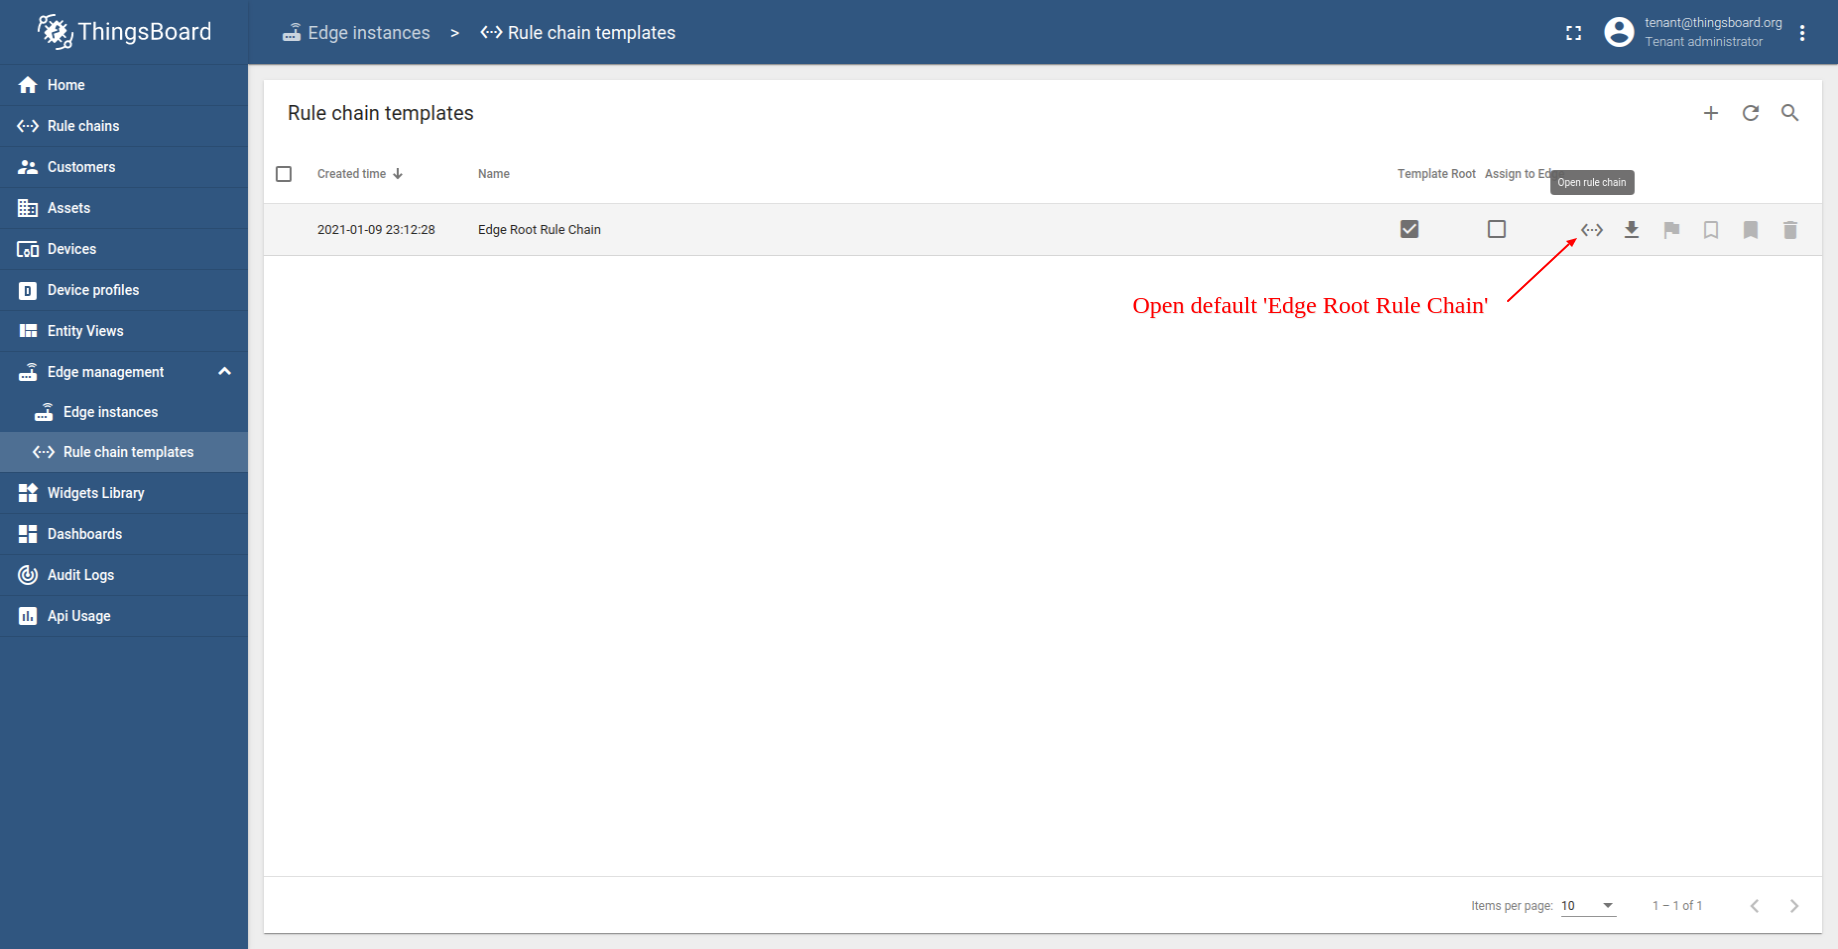
以下为使用所提供的规则链更新默认 Edge「Root Rule Chain」的步骤:
- Log in to your ThingsBoard instance. Open the "Rule chain templates" page. Navigate to "Edge management" and select "Rule chain templates". Finally, click on "Edge Root Rule Chain".
- Use the filter to search for nodes containing the word "script". Drag the Script node (Transformation) to the rule chain.
- Input the node name, e.g., "Transform Incoming Message" and add the JavaScript code (please copy and paste it from the snippet above) to send further only "distance" readings.
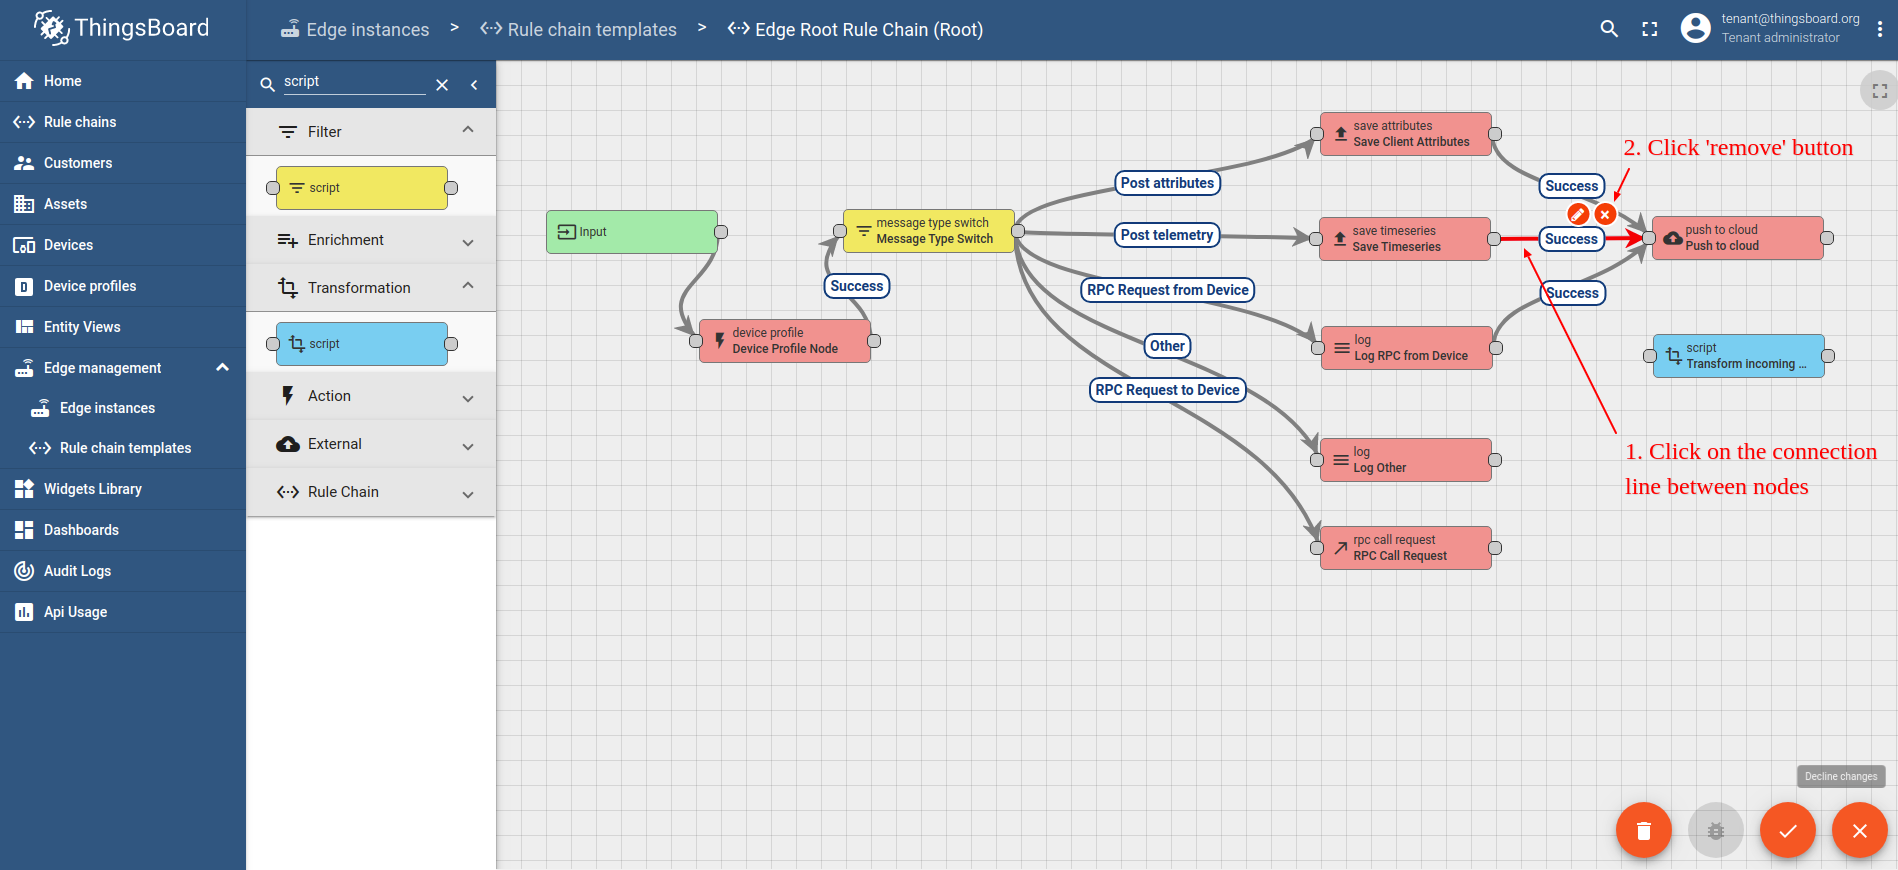
- Delete the connection between the "save timeseries" and "push to cloud" nodes. Select the connection path, then click on the ("X") icon to delete it.
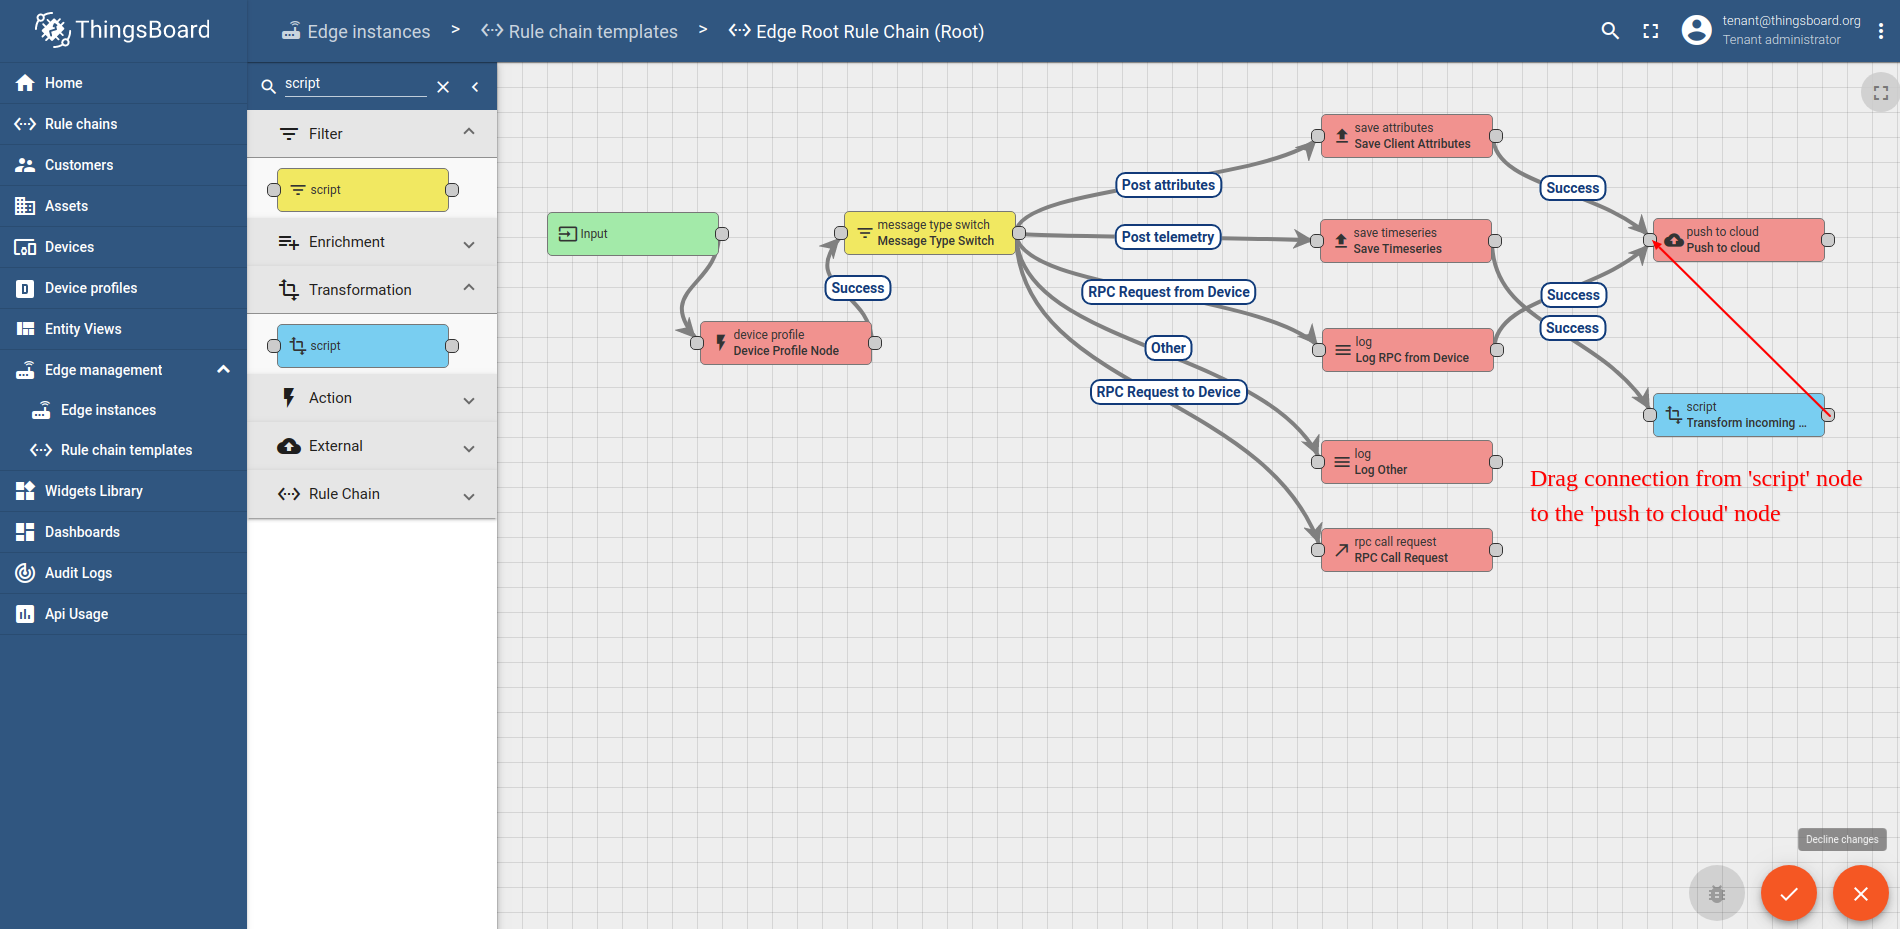
- Drag a connection from the "save timeseries" to the transformation script node.
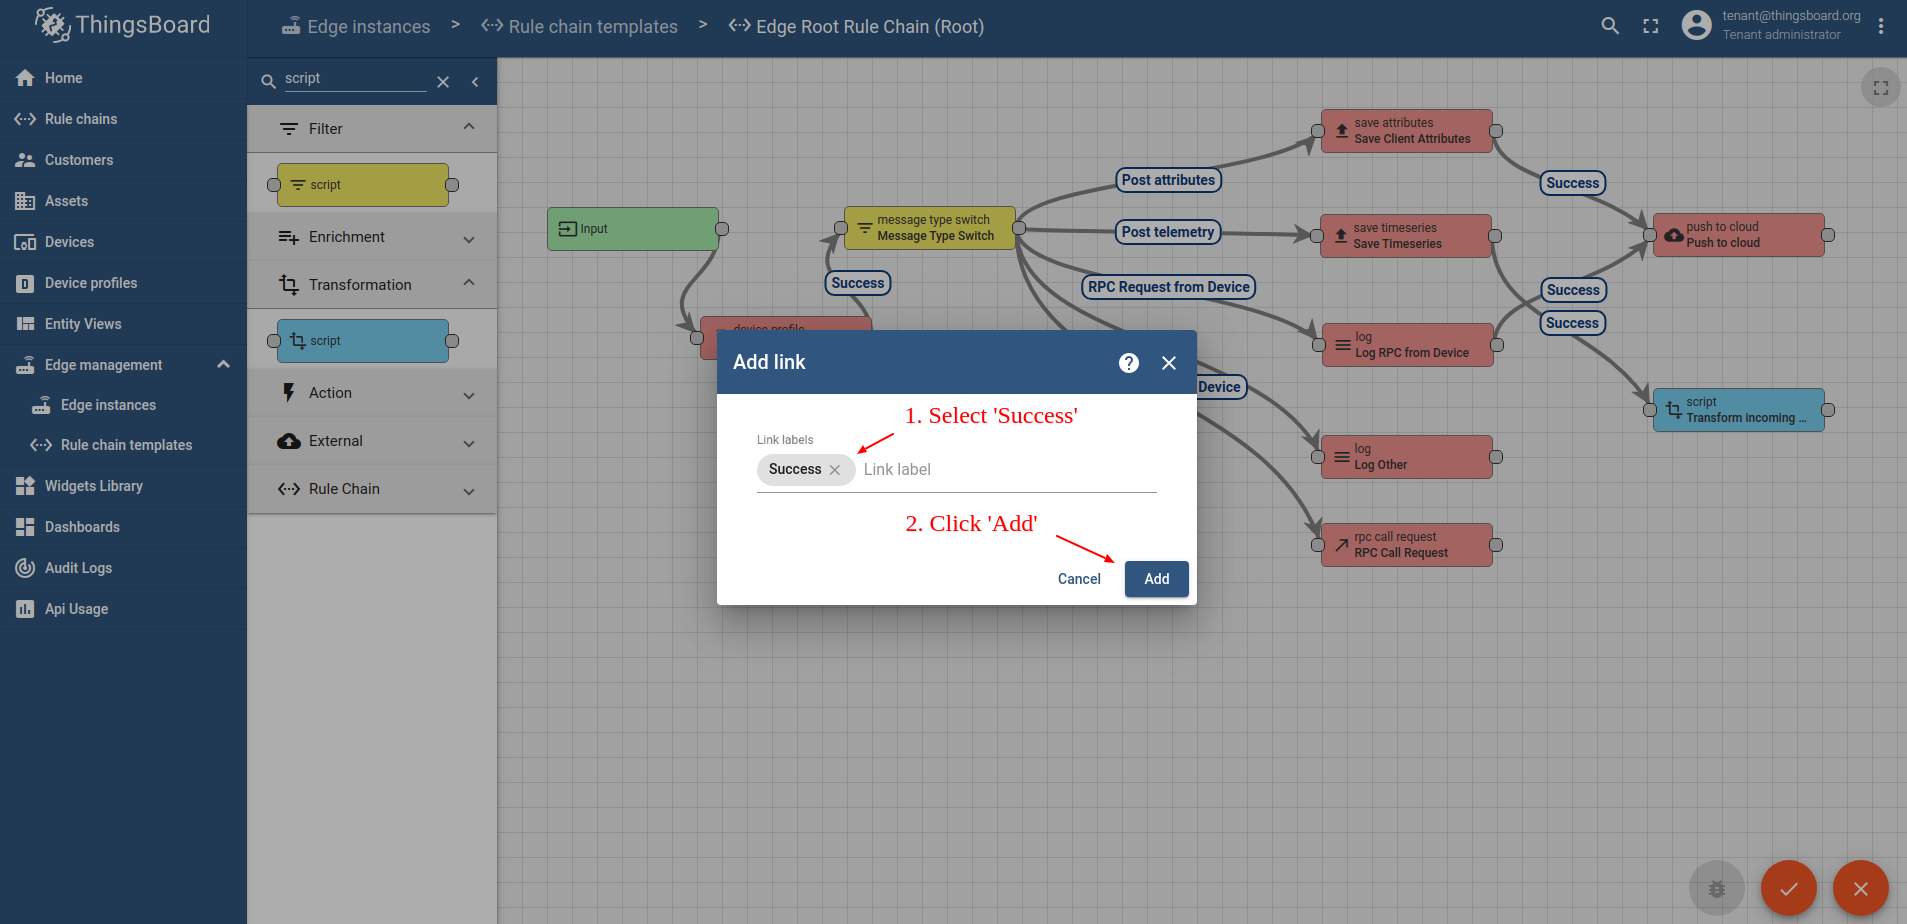
- Choose "Success" from the dropdown list, and click the "Add" button.
- Drag a connection from "Transform Incoming Message" to the "push to cloud" node.
- Choose "Success" from the dropdown list, and click the "Add" button.
- Click "Apply Changes" to save your progress.


现在打开 ThingsBoard Edge UI 查看更新后的 Root Rule Chain:
- Log in to your ThingsBoard Edge instance and navigate to the "Rule chains" page.
- Open the "Edge Root Rule Chain" to verify the changes.
- You should see the same configuration of rule chain nodes as on the cloud.


Connect device to edge and post telemetry
要将「车载 IoT 监控系统」连接到 ThingsBoard Edge,需先获取设备凭证。 ThingsBoard 支持多种设备凭证。本指南建议使用默认自动生成的凭证,即访问令牌。
请使用 URL EDGE_URL 打开 ThingsBoard Edge UI。
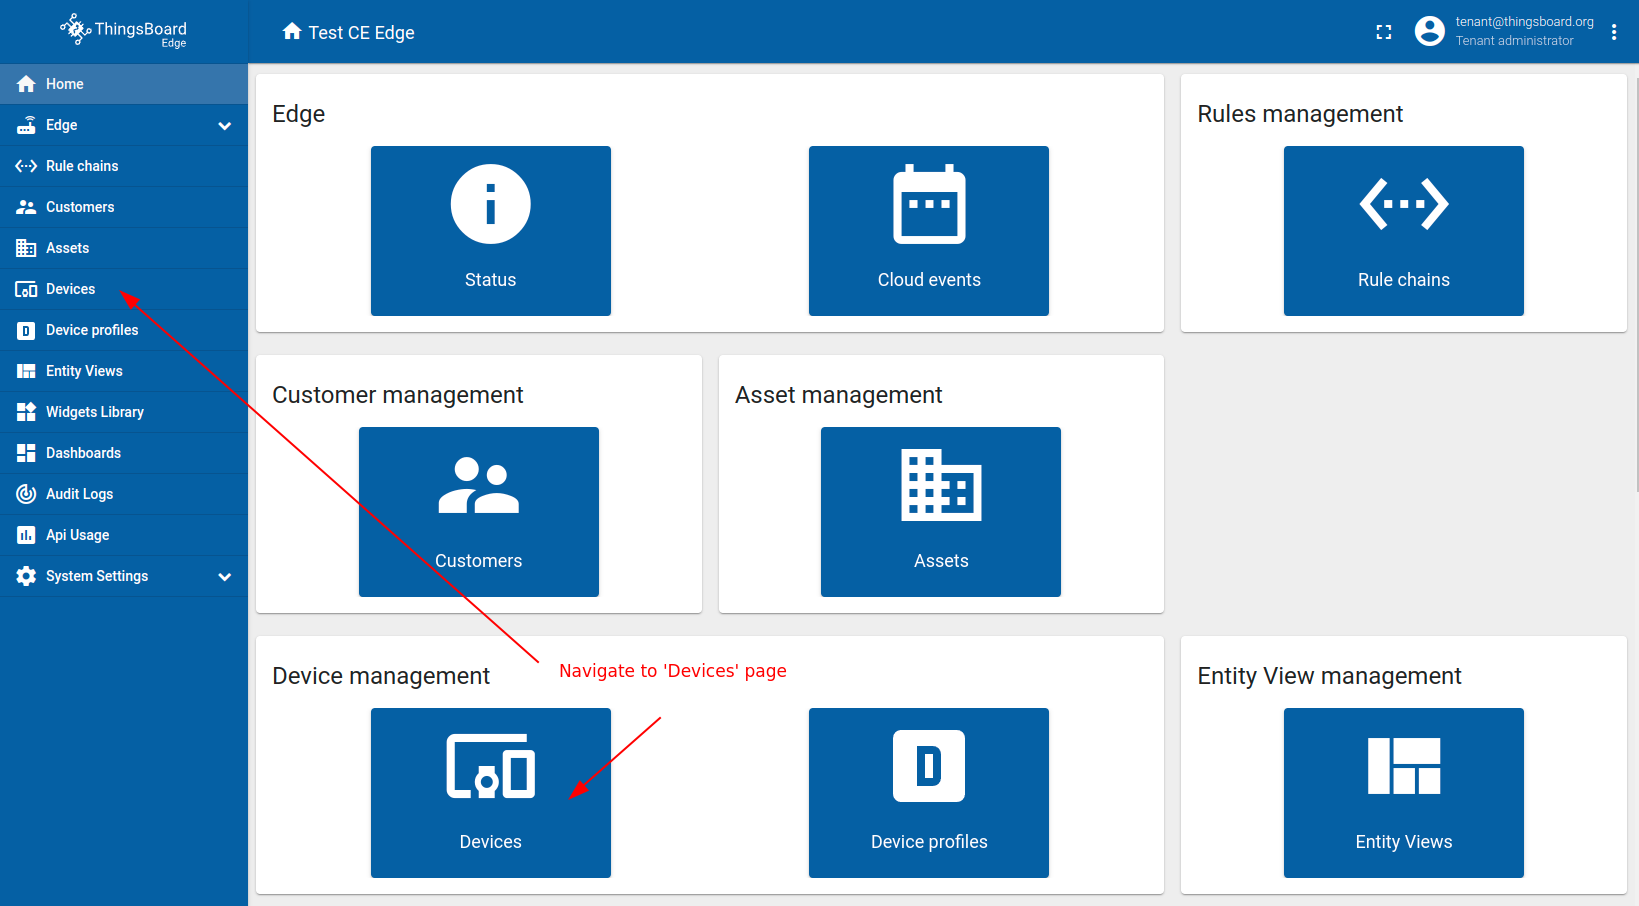
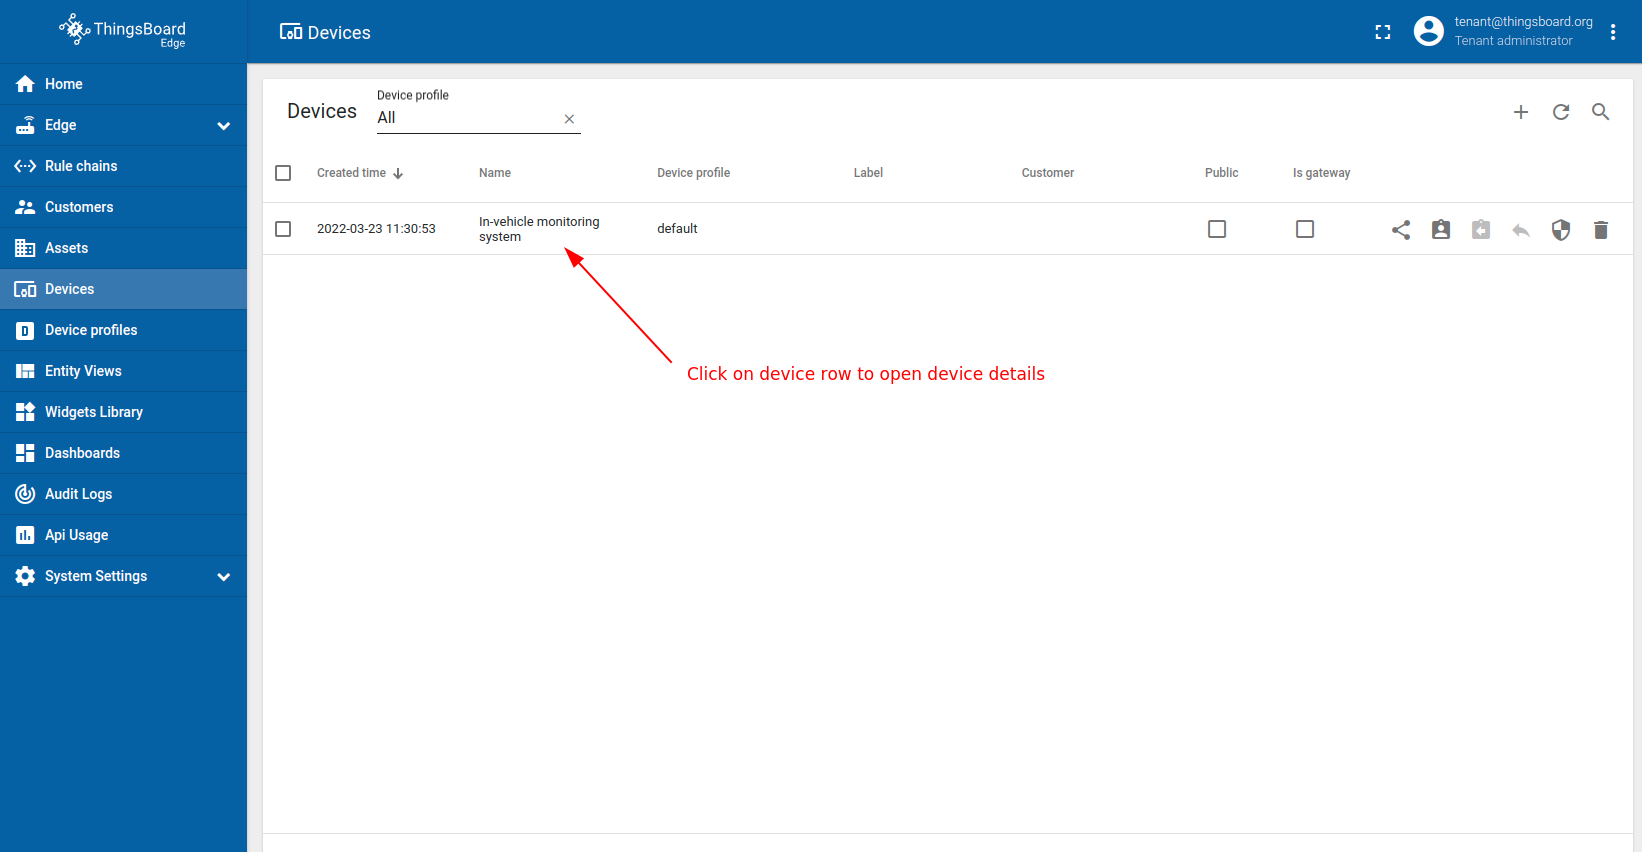
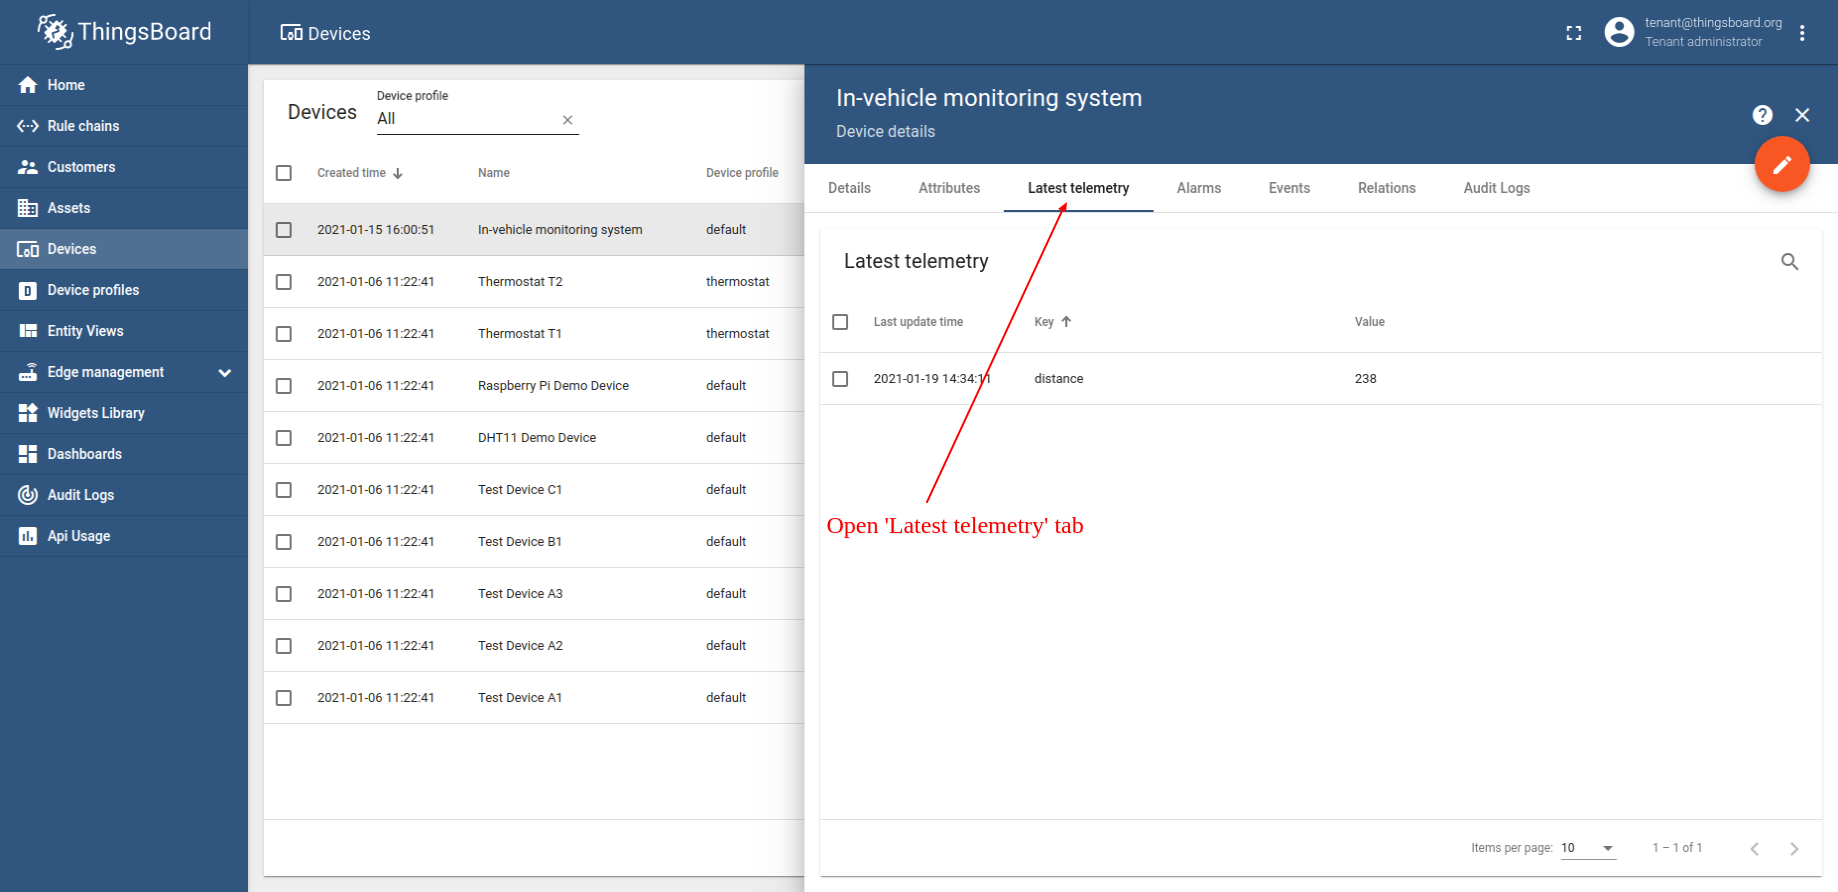
- Open Devices page in the ThingsBoard Edge instance.
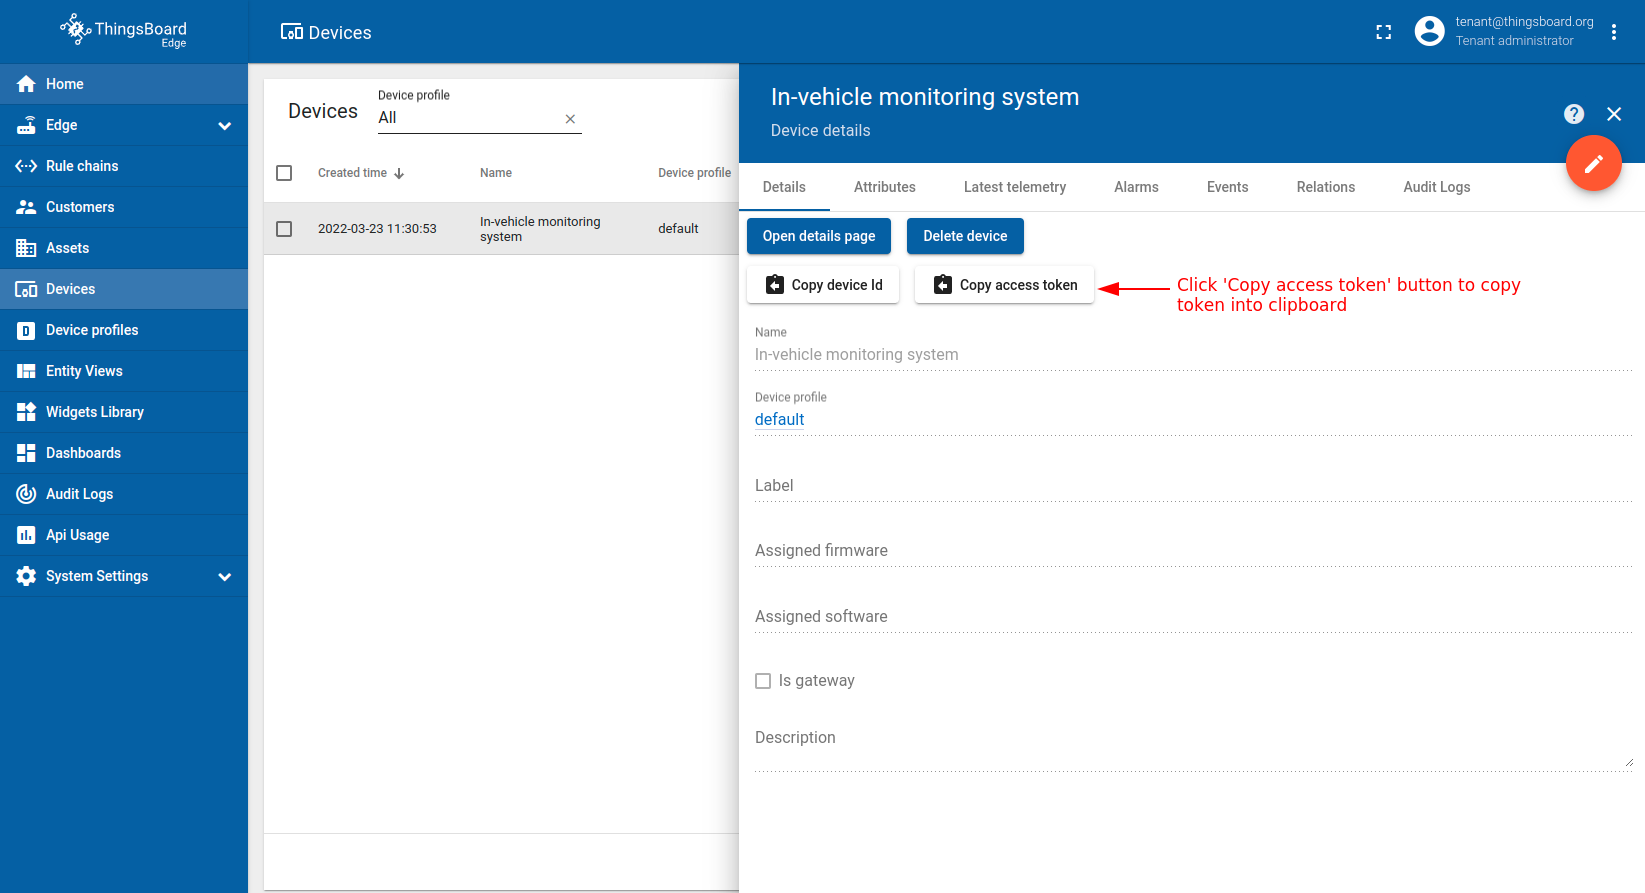
- Click on the "In-vehicle monitoring system" device row in the table to open device details.
- Click on the "Copy access token" button. The token will be copied to your clipboard.

我们将使用简单命令为「车载 IoT 监控系统」设备生成随机遥测,并通过 MQTT 协议发布至 ThingsBoard Edge。
请将以下脚本下载到本地目录:
运行脚本前,请按以下方式修改 mqtt-generator.py:
-
将 YOUR_ACCESS_TOKEN 替换为前述步骤复制的 「车载 IoT 监控系统」 设备的访问令牌。
-
将 YOUR_TB_EDGE_HOST 替换为 ThingsBoard Edge 主机地址。例如 localhost。
-
将 YOUR_TB_EDGE_MQTT_PORT 替换为 ThingsBoard Edge MQTT 端口号。例如 11883 或 1883。
打开终端,使用以下命令安装 MQTT Python 库:
1
sudo pip install paho-mqtt
进入包含 Python 脚本的目录,使用以下命令启动应用:
1
python mqtt-generator.py
打开 ThingsBoard Edge UI,确认设备是否成功接收遥测:
- Navigate to the "Devices" page.
- Click on the "In-vehicle monitoring system" device row in the table to open the device details.
- Click on the "Copy Access Token" button. The token will be copied to your clipboard.

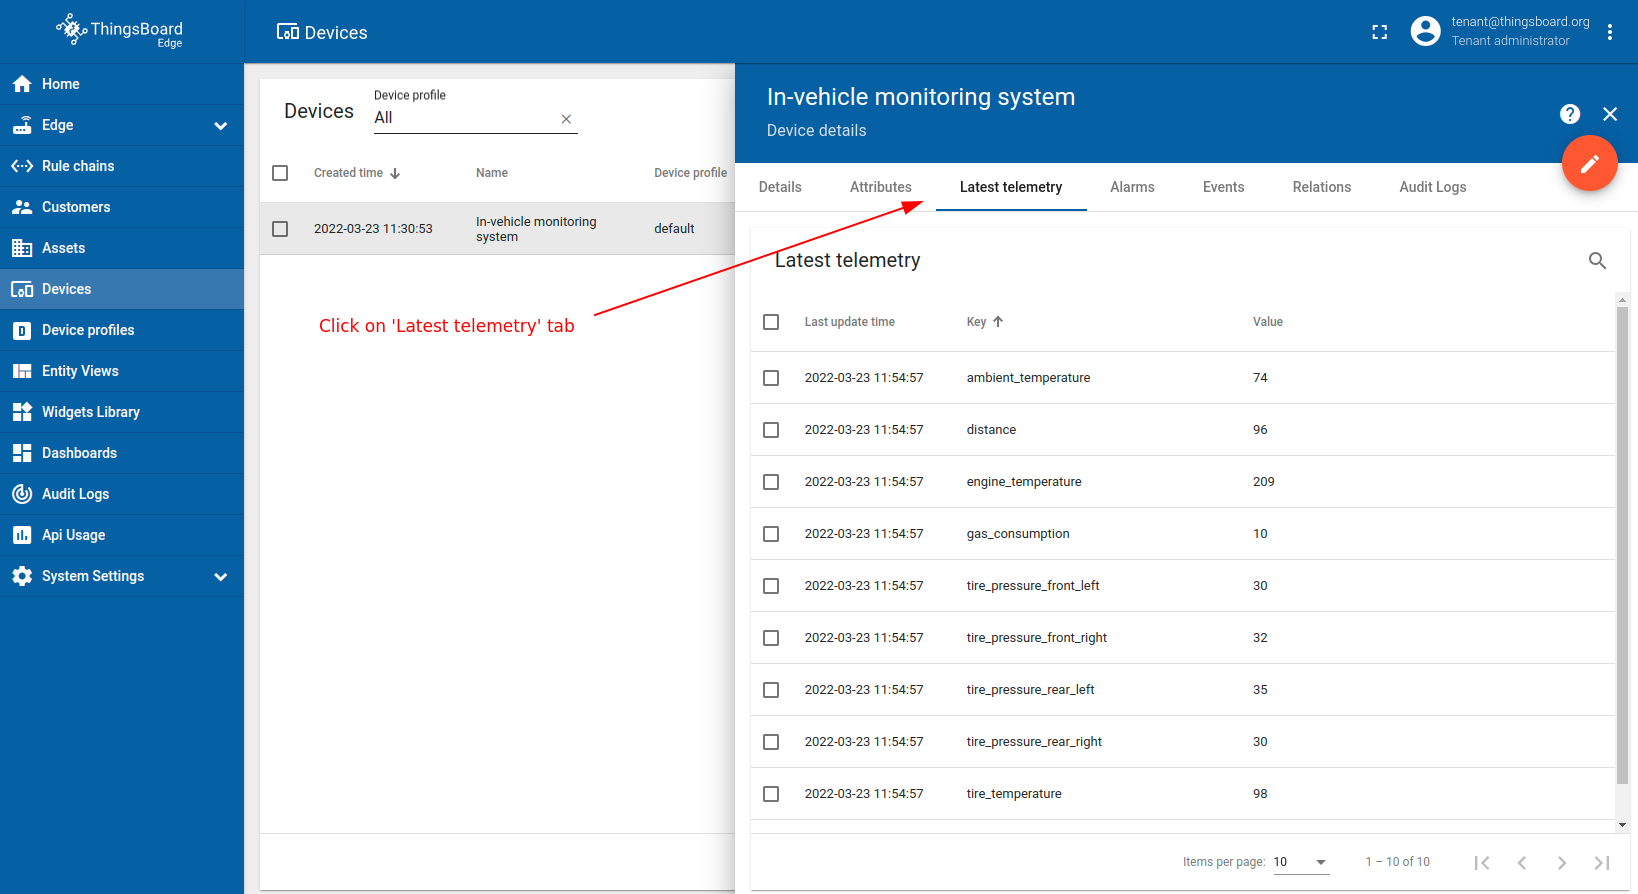
打开 ThingsBoard UI,确认 Edge 是否成功将数据推送至云端:
- Log in in to your ThingsBoard instance and open "Devices" page.
- Click on the row labeled "In-vehicle monitoring system" in the table to view its details.
- Click on the "Latest telemetry" tab to confirm that distance readings are successfully being pushed from the edge to the cloud.
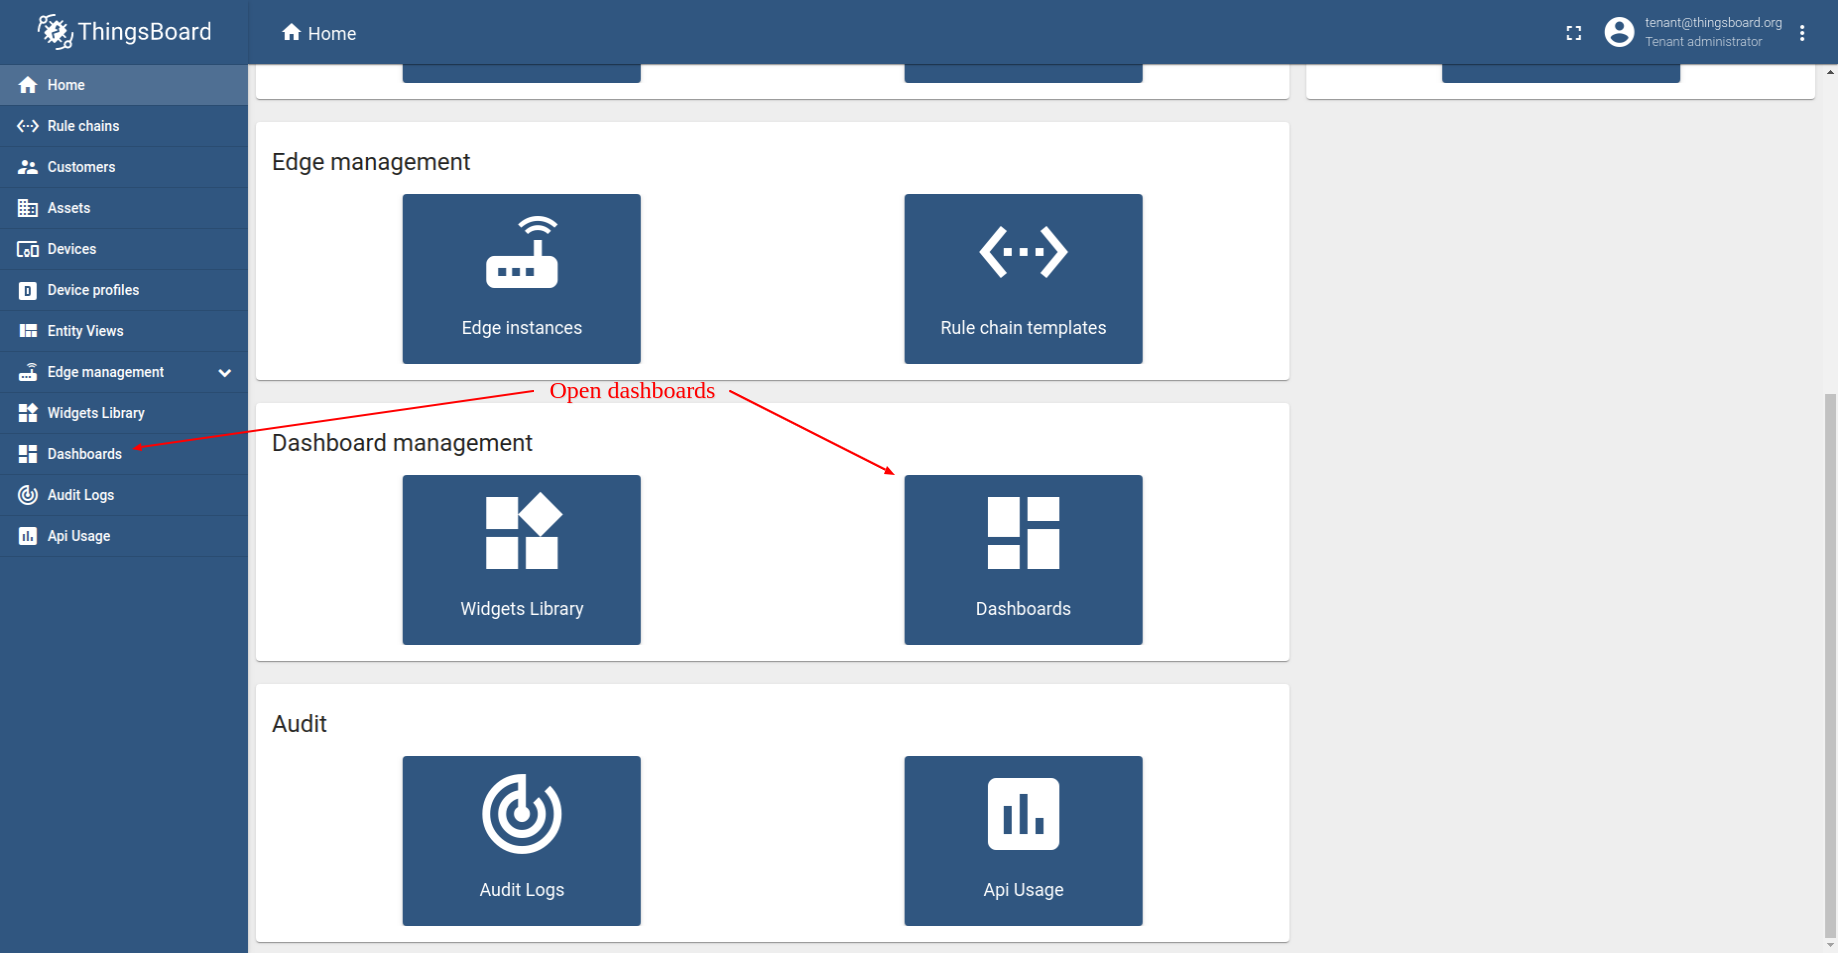
Create dashboard
以下步骤中,我们将创建展示车辆总行驶里程和下次换油剩余里程的仪表板。
请打开 ThingsBoard 创建新仪表板:
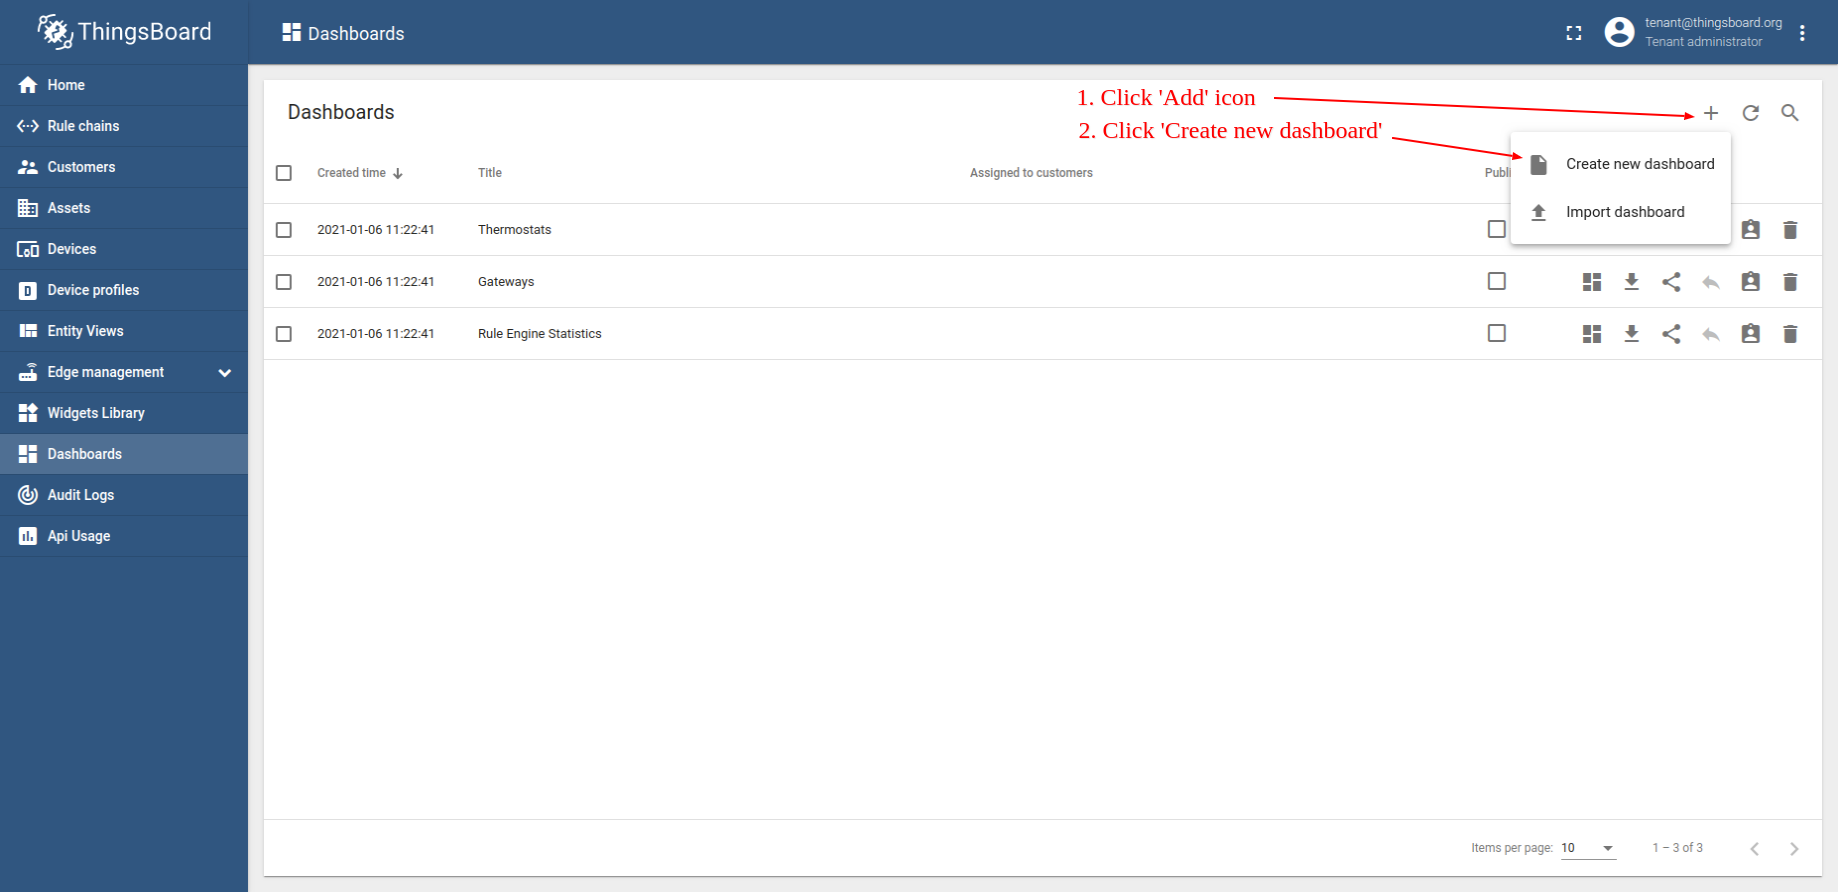
- Log in to your ThingsBoard instance. Navigate to the "Dashboards" page.
- Click on the ("+") "Add" icon and select "Create new dashboard".
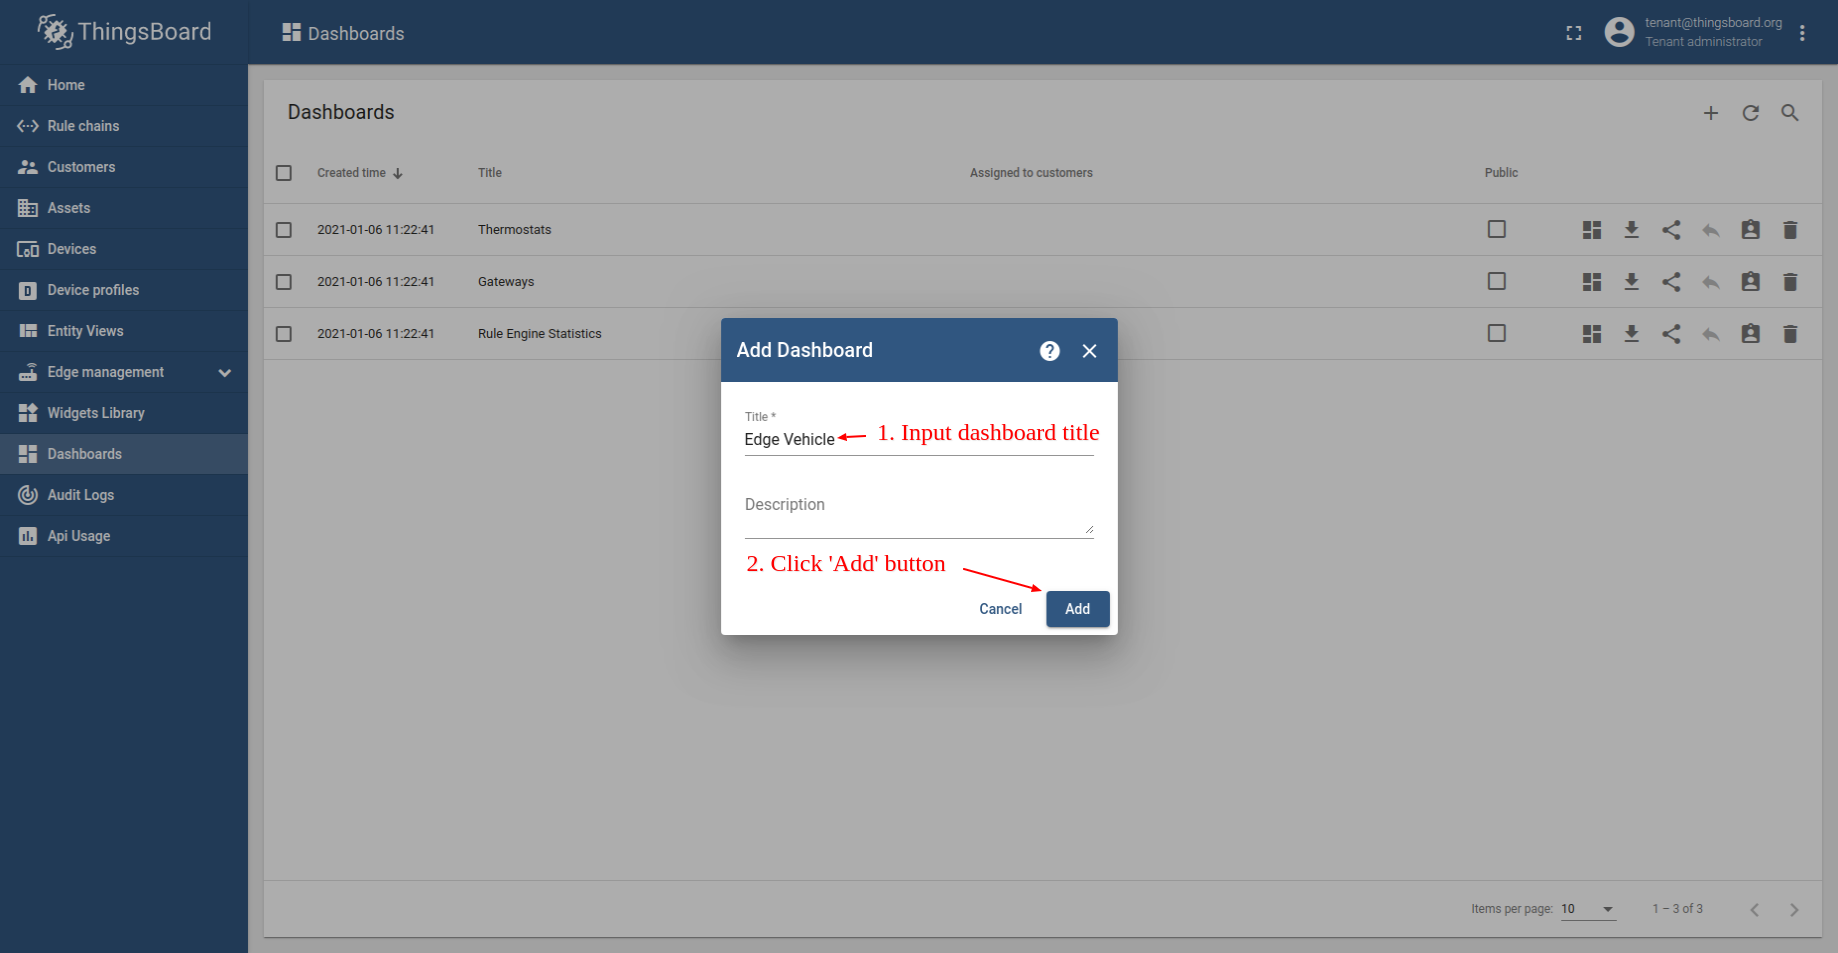
- Enter a title for the new dashboard, e.g., "Edge Vehicle". Click on the "Add" button to create the dashboard.
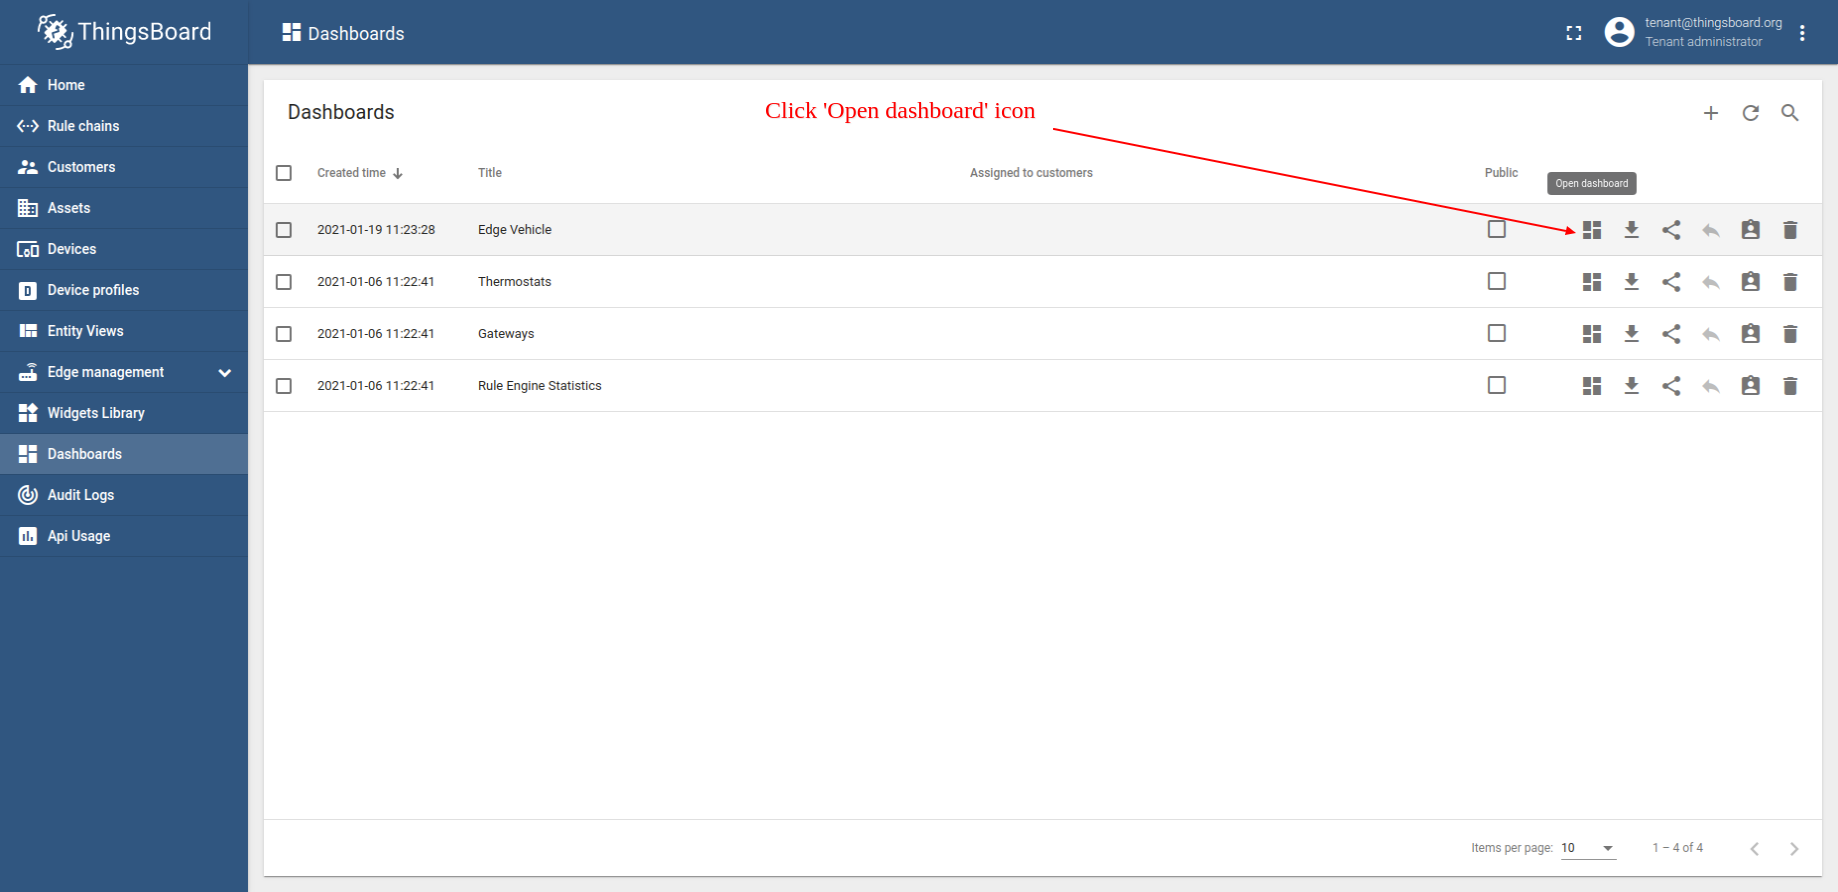
- Click on the "Edge Vehicle" dashboard in the table to start editing it.
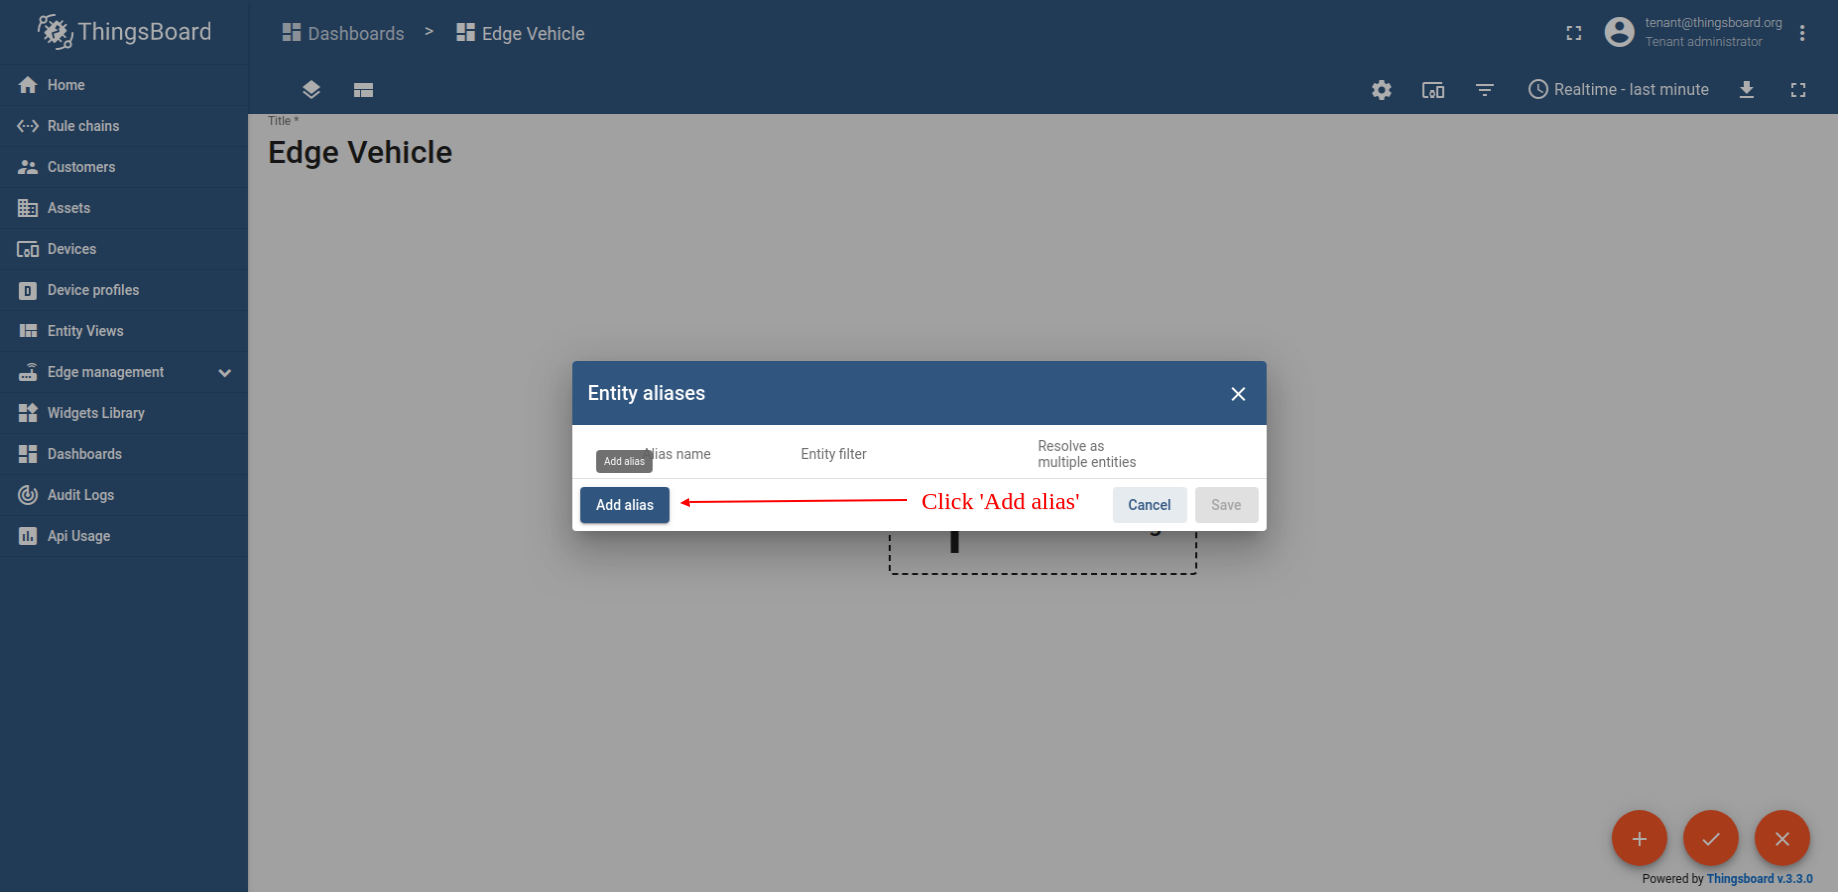
- Click on the "Entity aliases" icon located in the toolbar at the top right to open the "Entity aliases" menu.
- Click on the "Add alias" button.
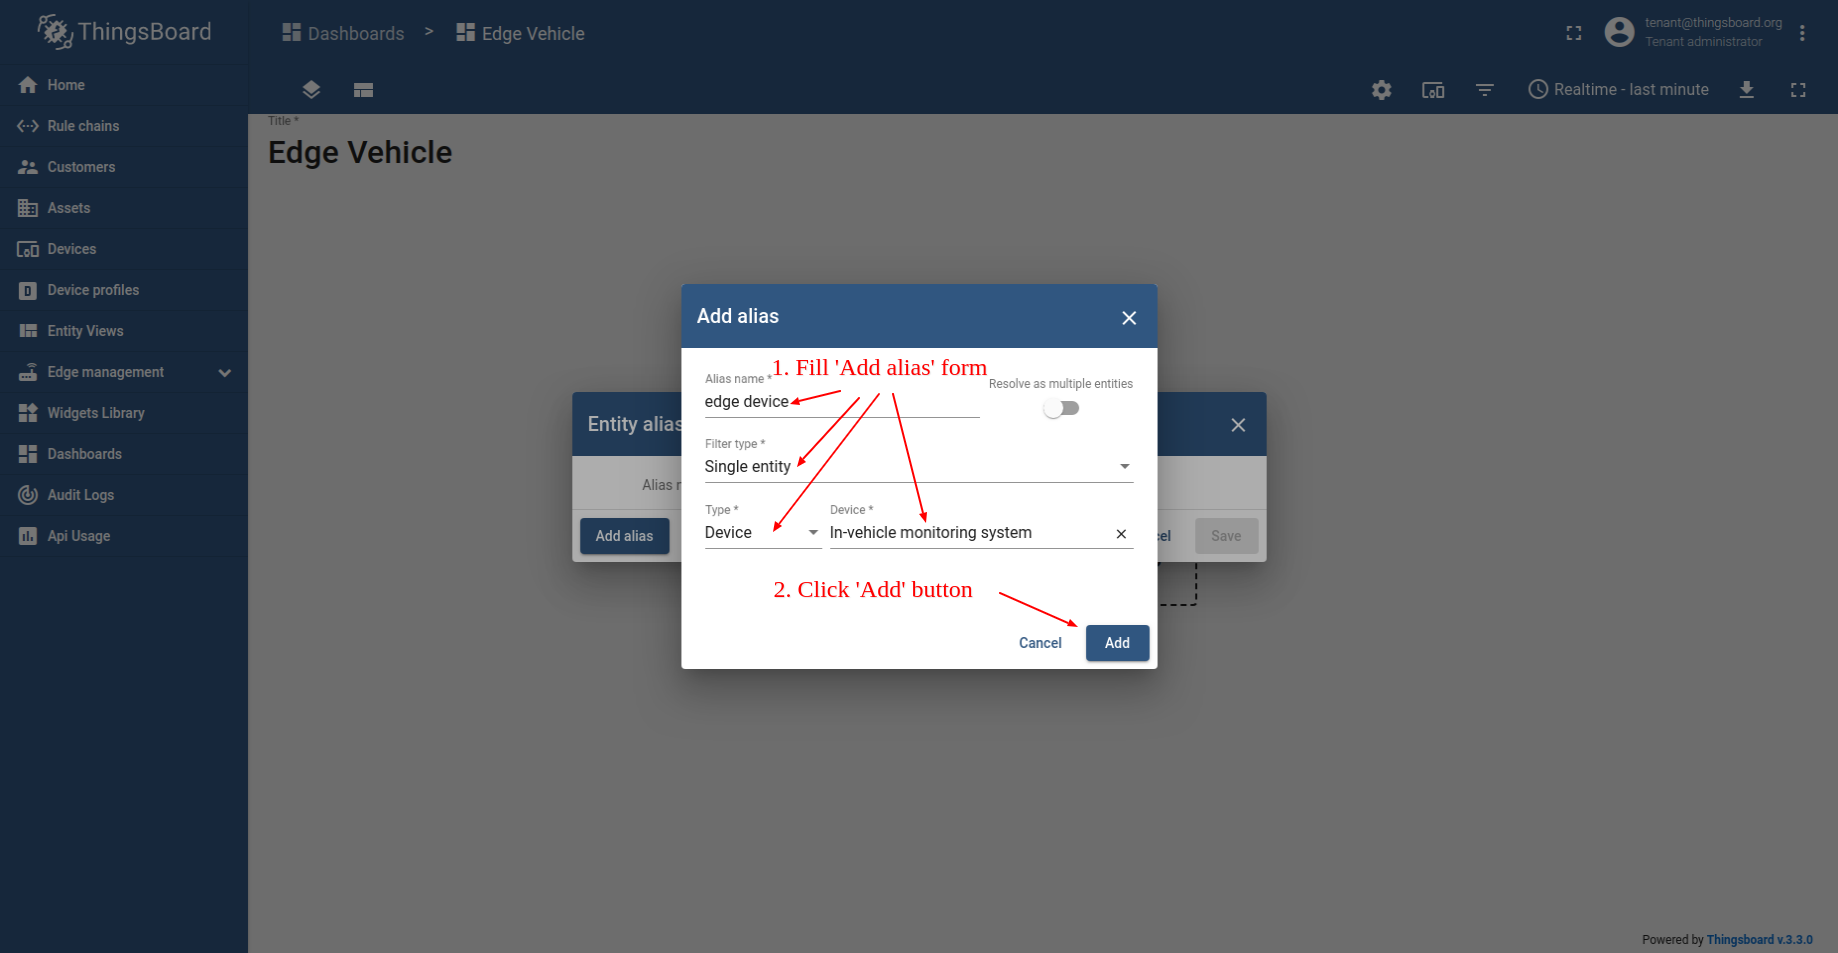
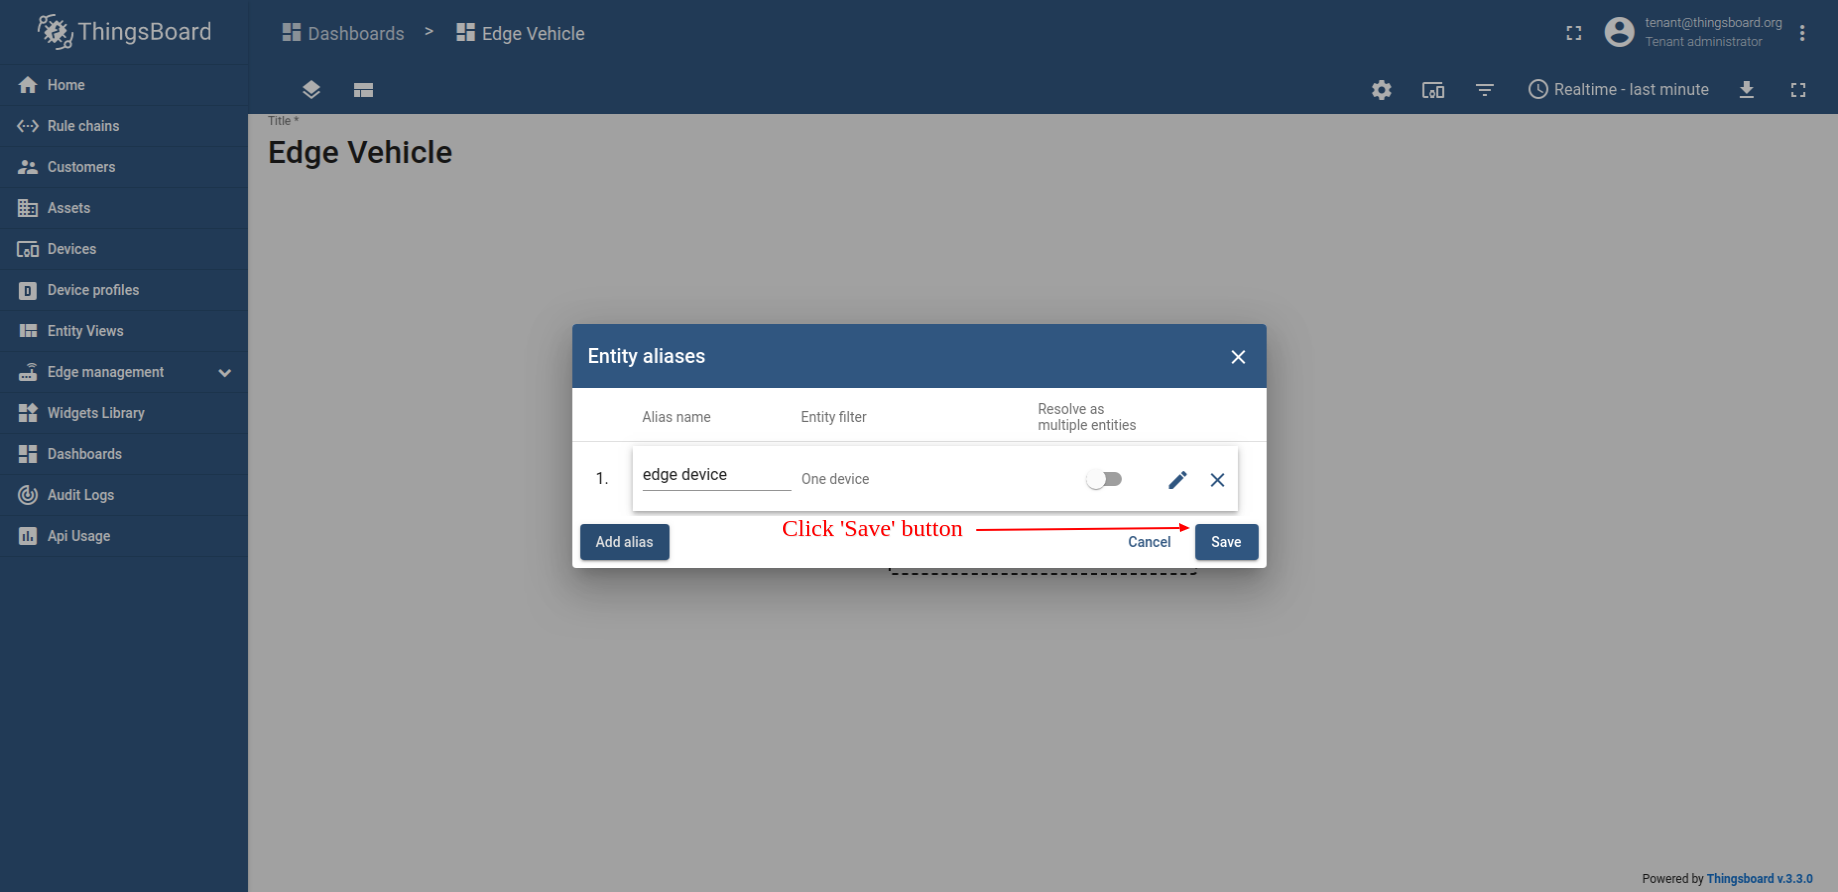
- Enter "edge device" into the Alias name field. For the Filter type, select "Single entity". In the Type field, choose "Device". Then, in the Device field, select "In-vehicle monitoring system". Finally, click the "Save" button.
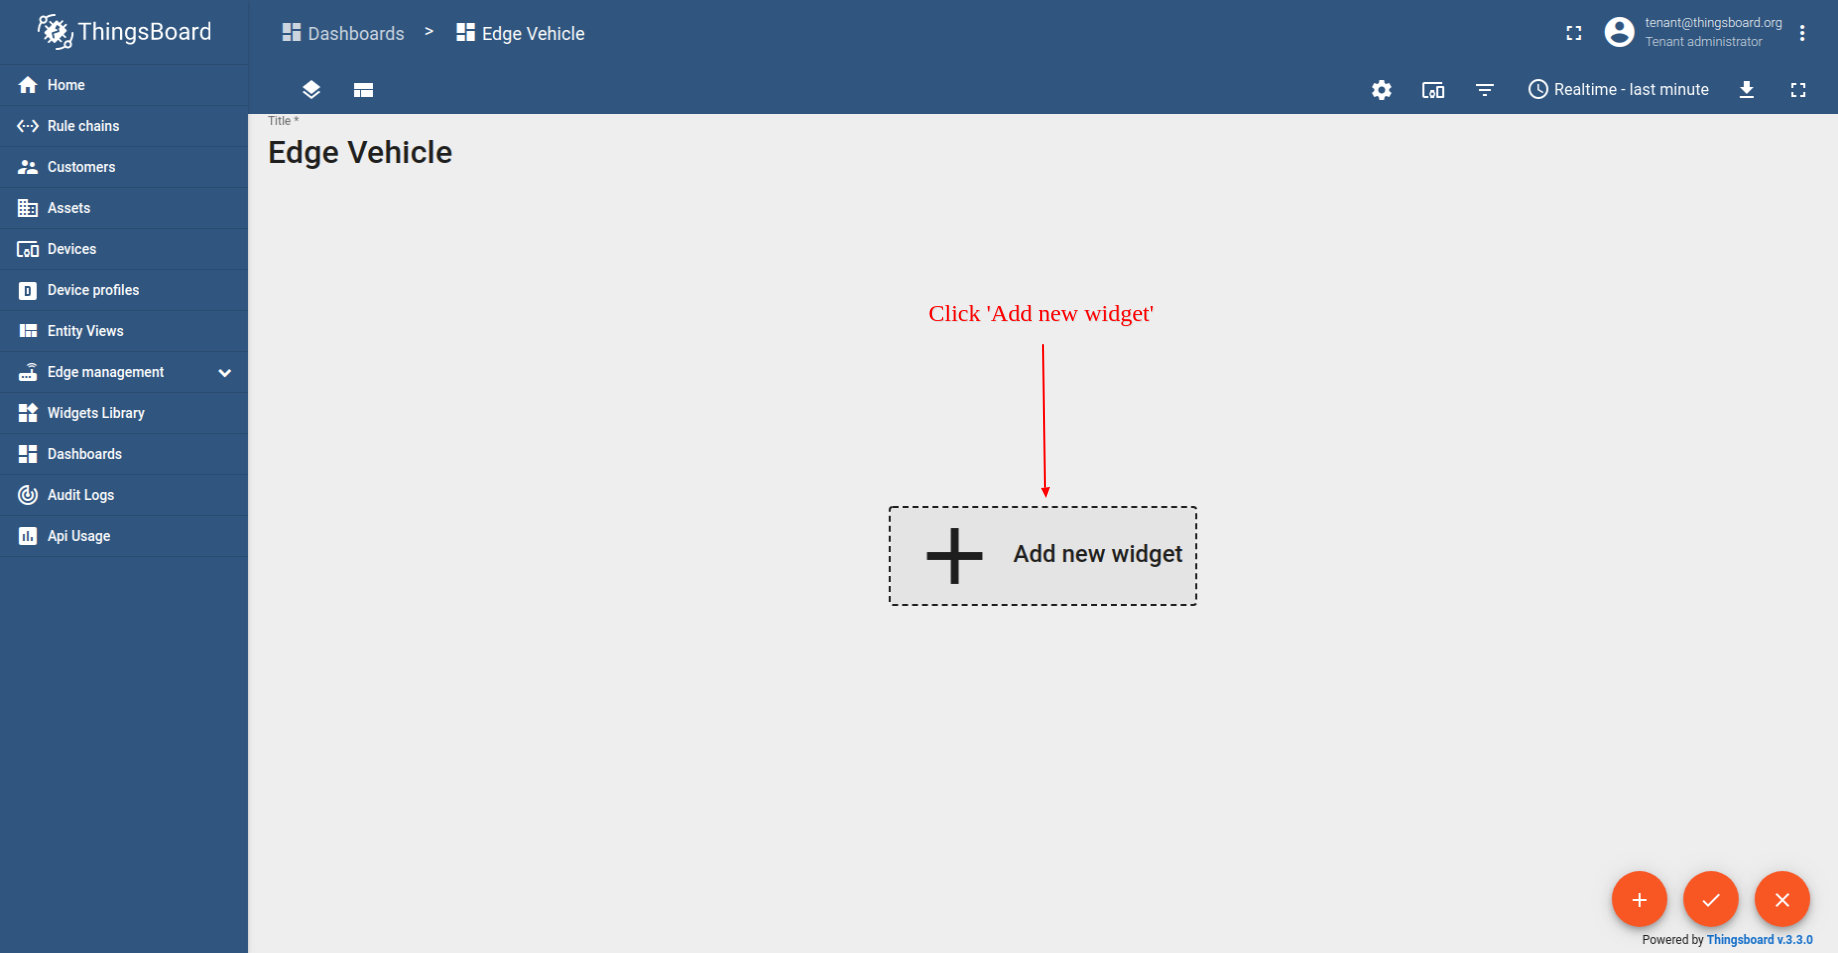
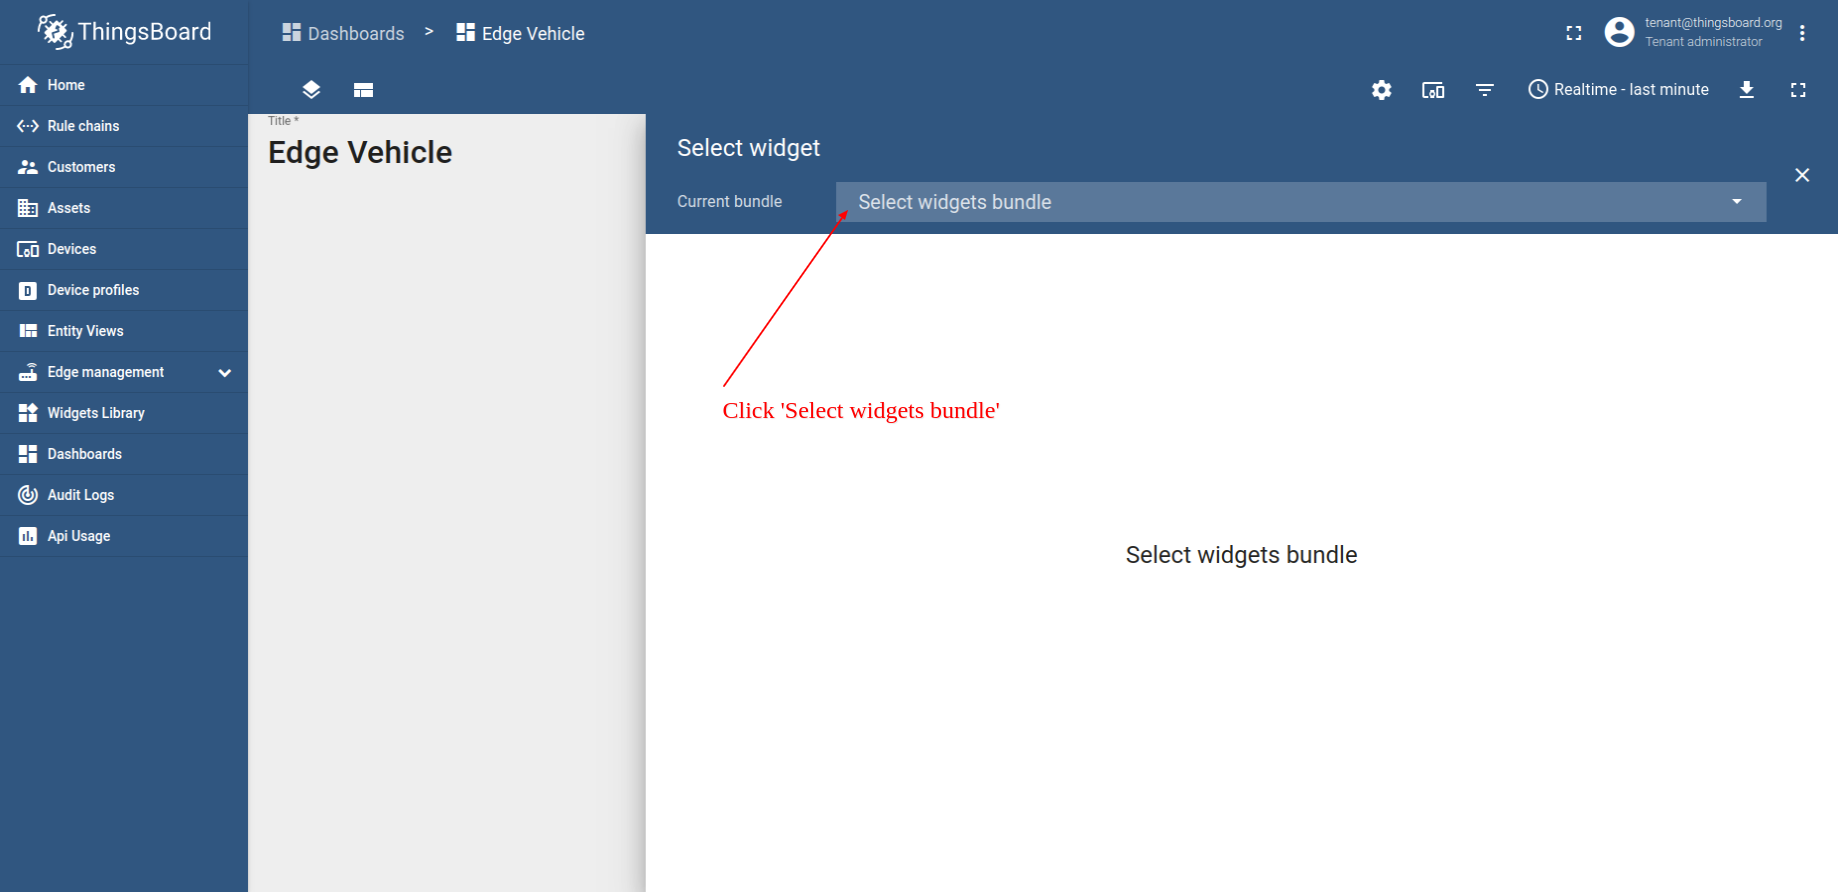
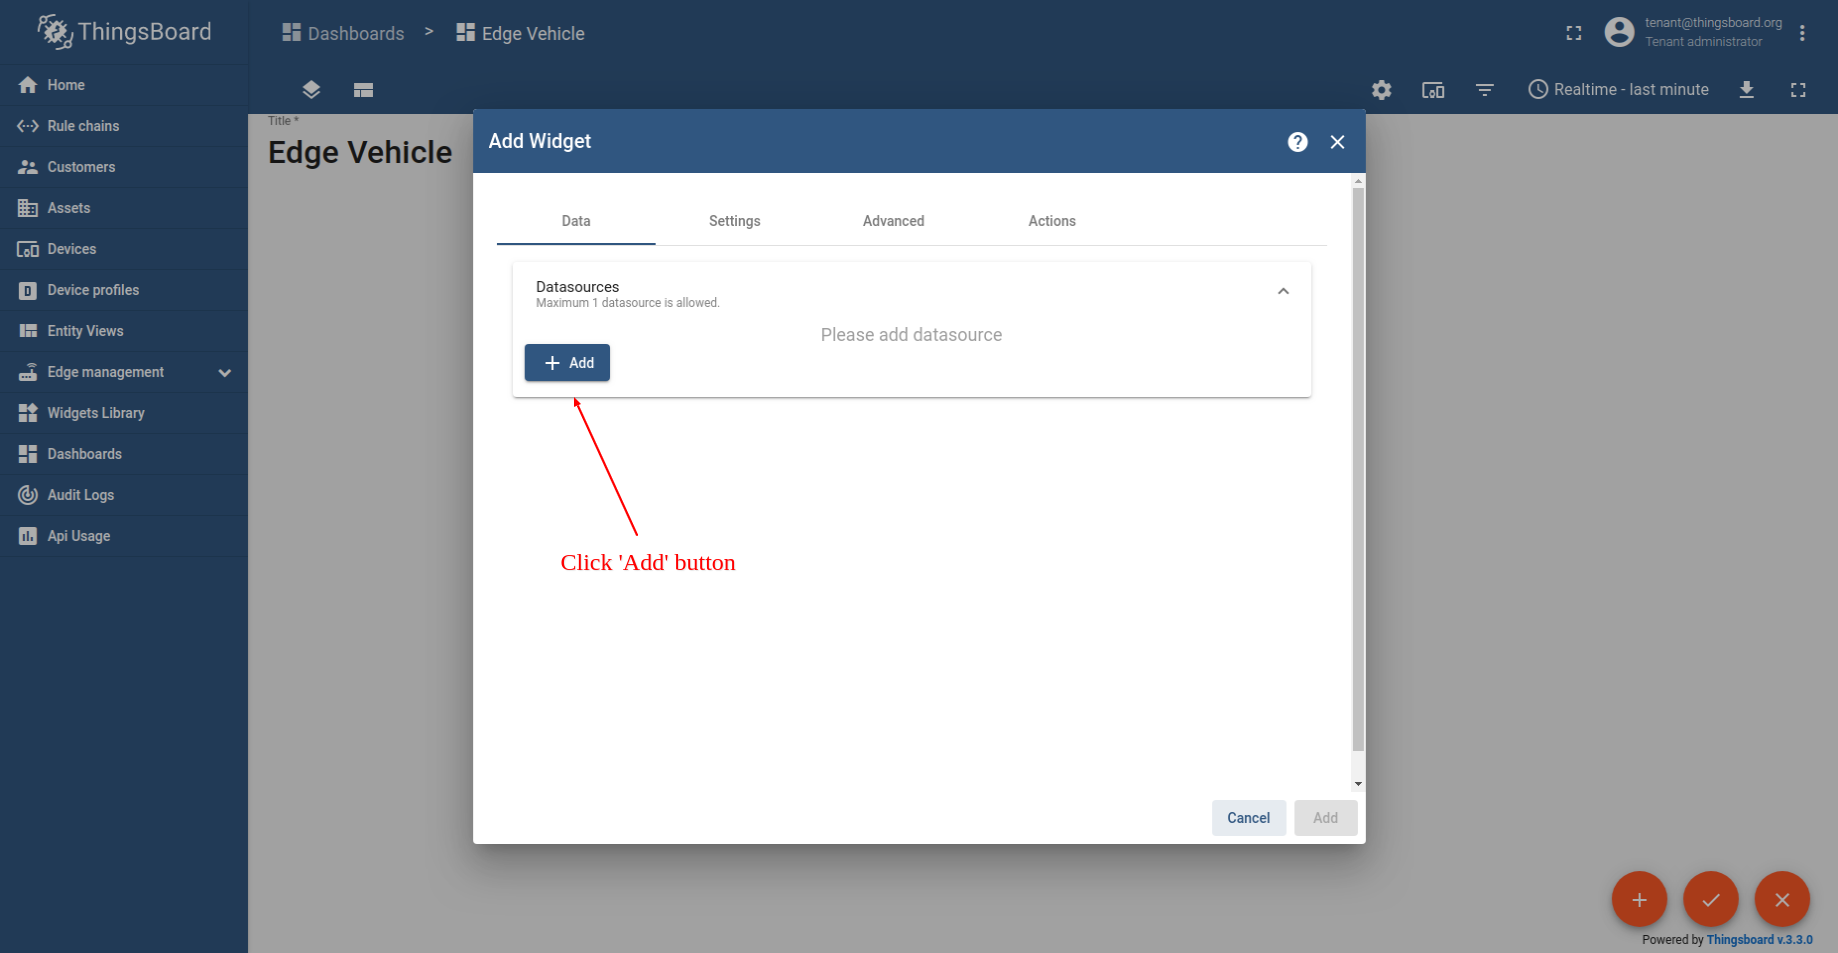
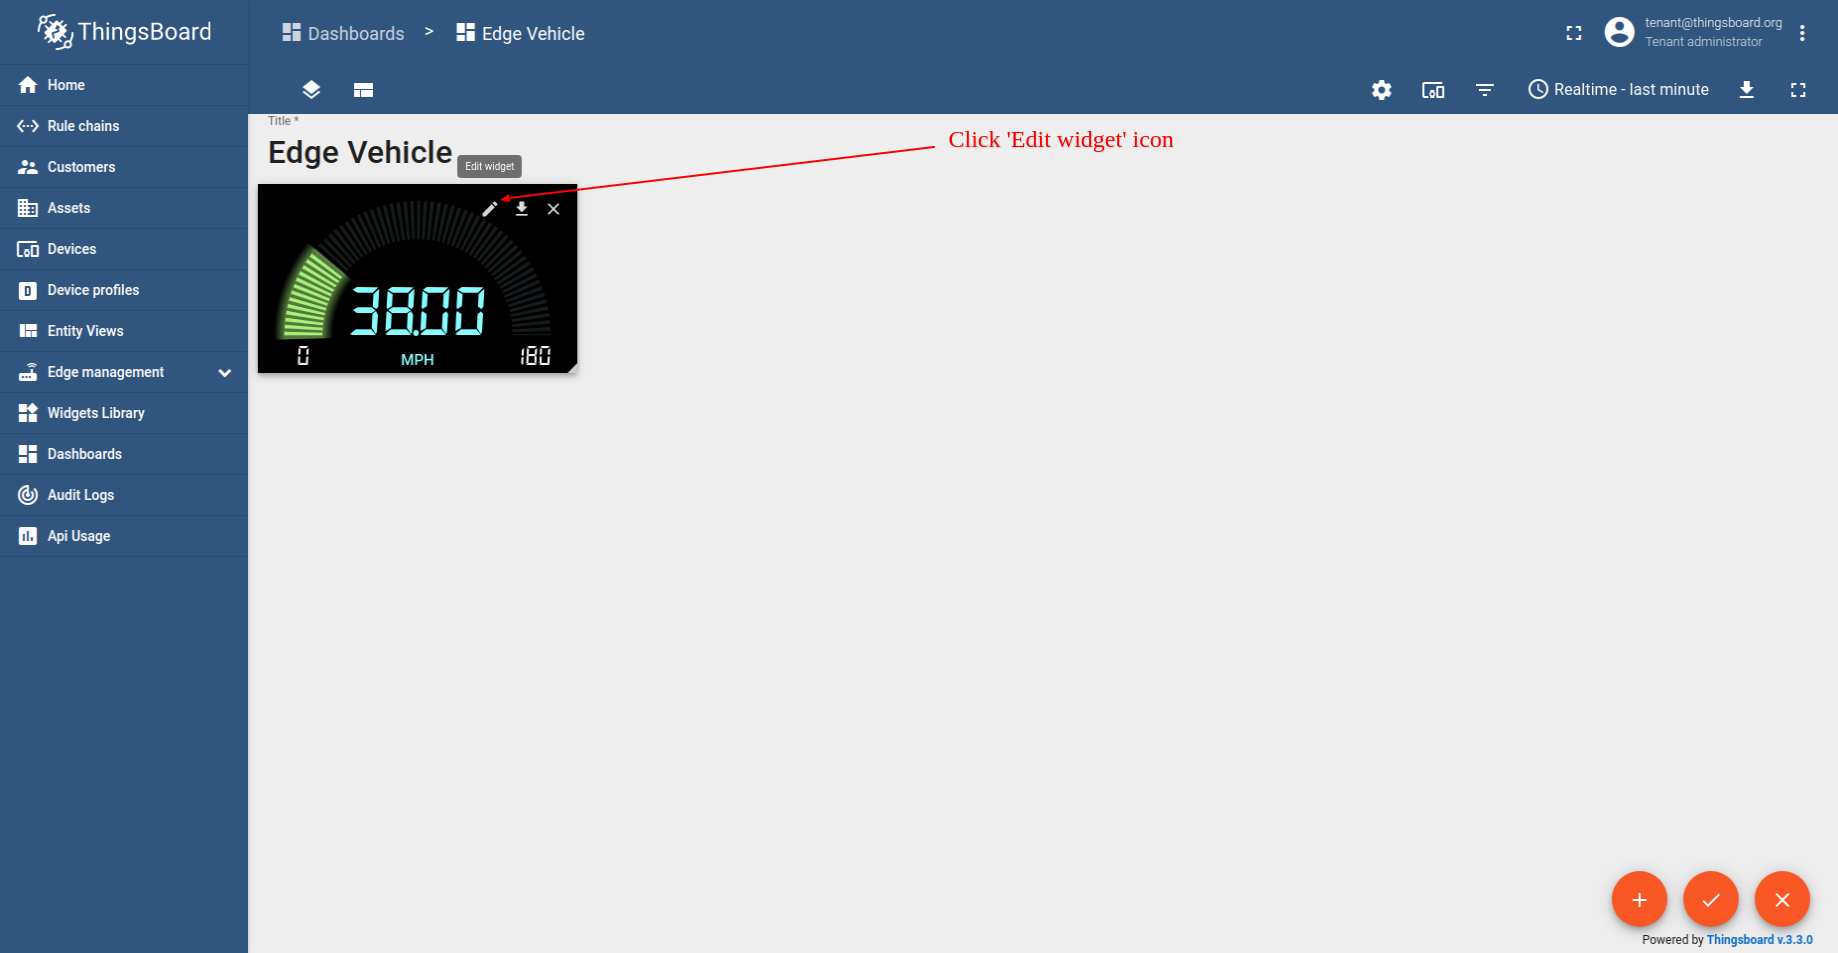
- Click on the "Add Widget" button.
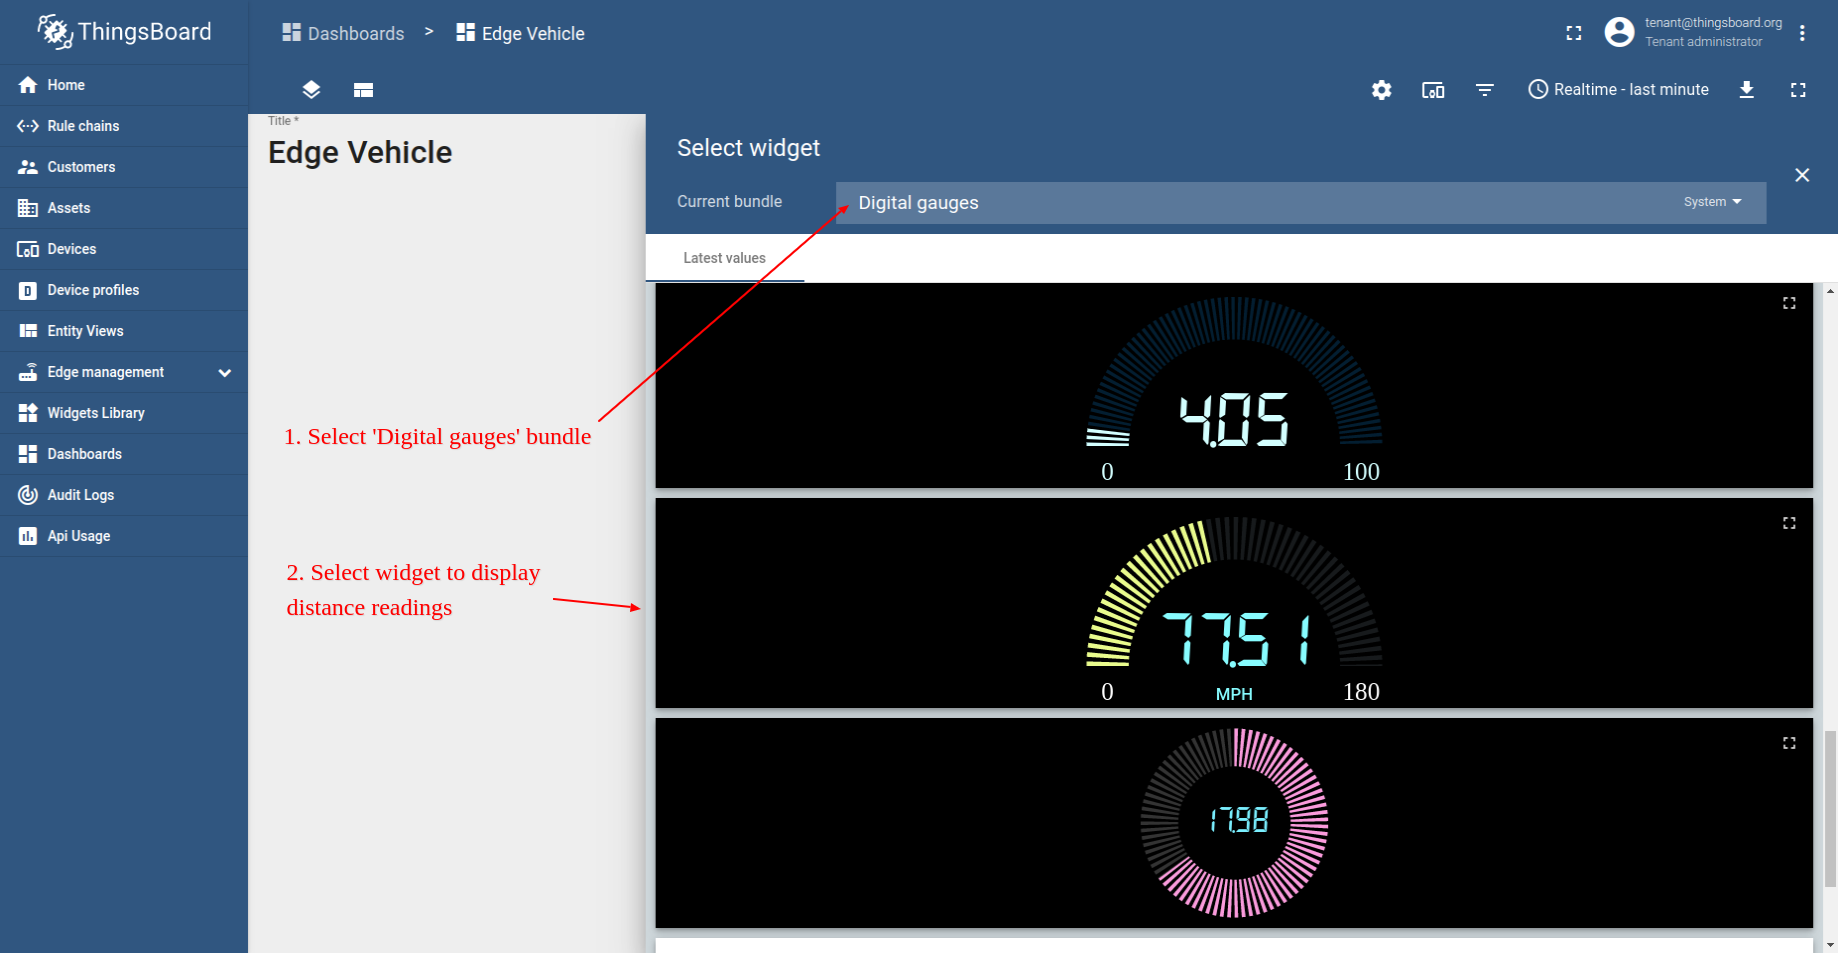
- Click on the "Widgets Bundle" and find "Digital gauges". Click on it to open the widget list group.
- Select the widget from the list that matches the image provided in the guide, then click on it to start adding a data source.
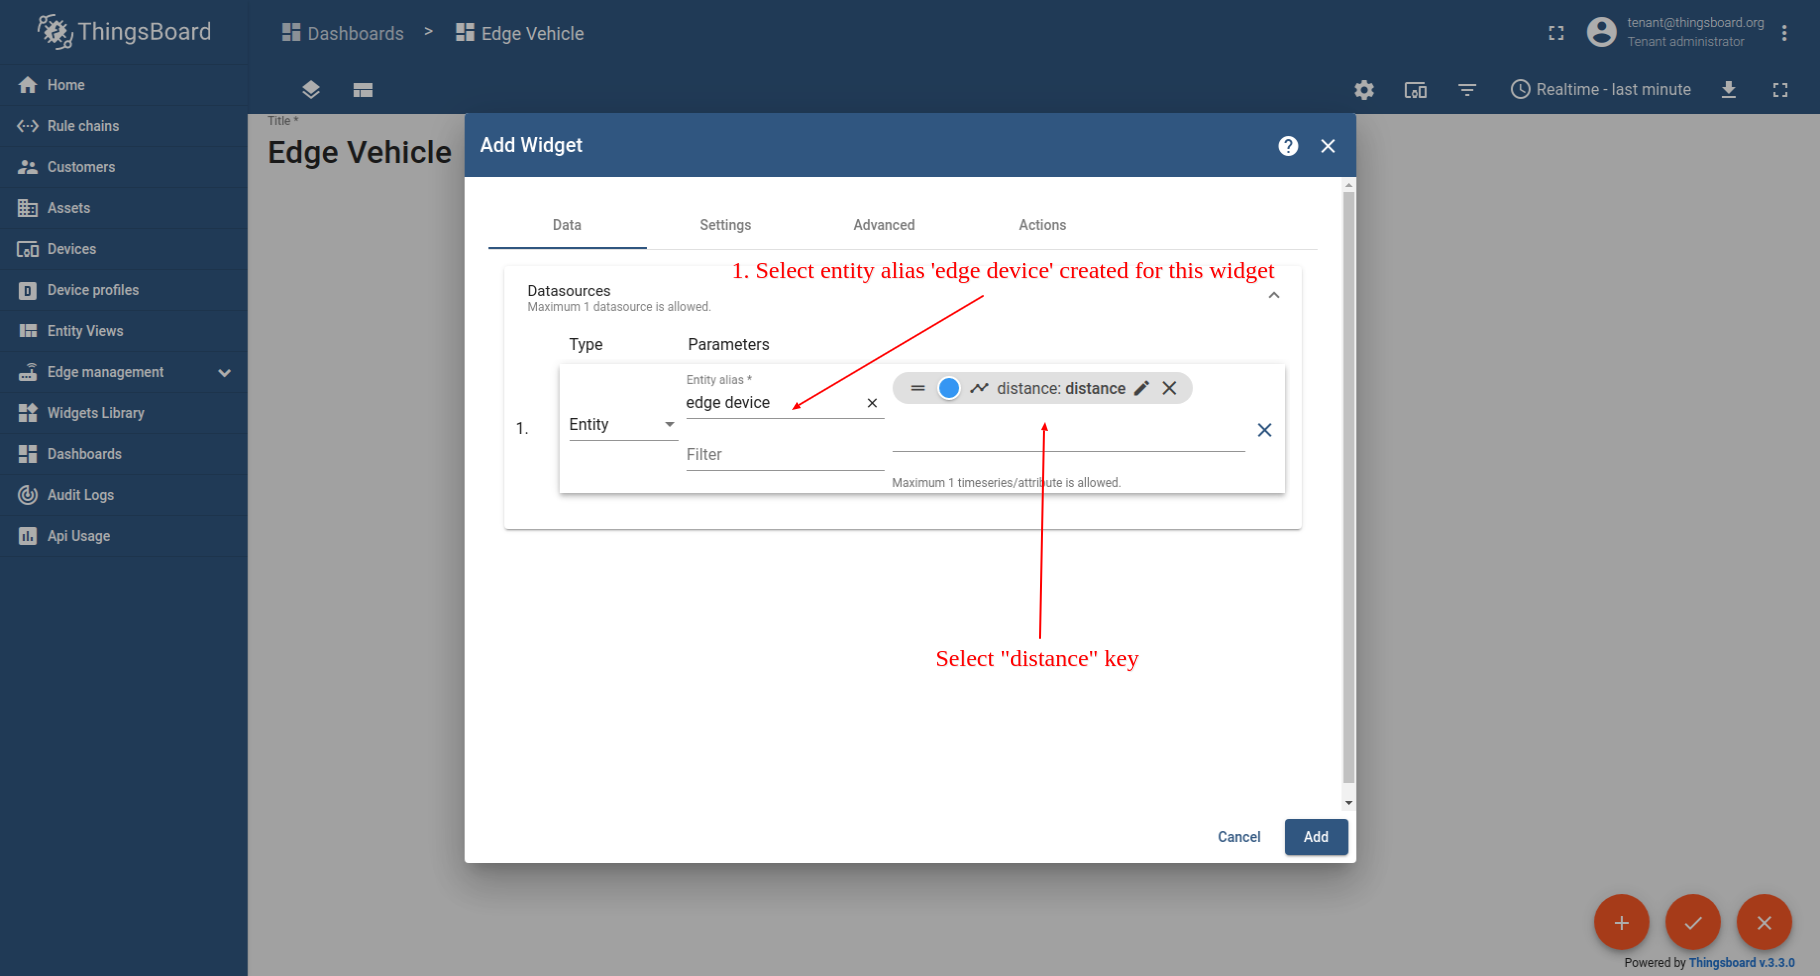
- In the "Type" dropdown menu, select "Entity". In the "Entity Alias" dropdown menu, select "edge device". In the "Data Key" field, select "distance". Then click the "Add" button to apply changes.
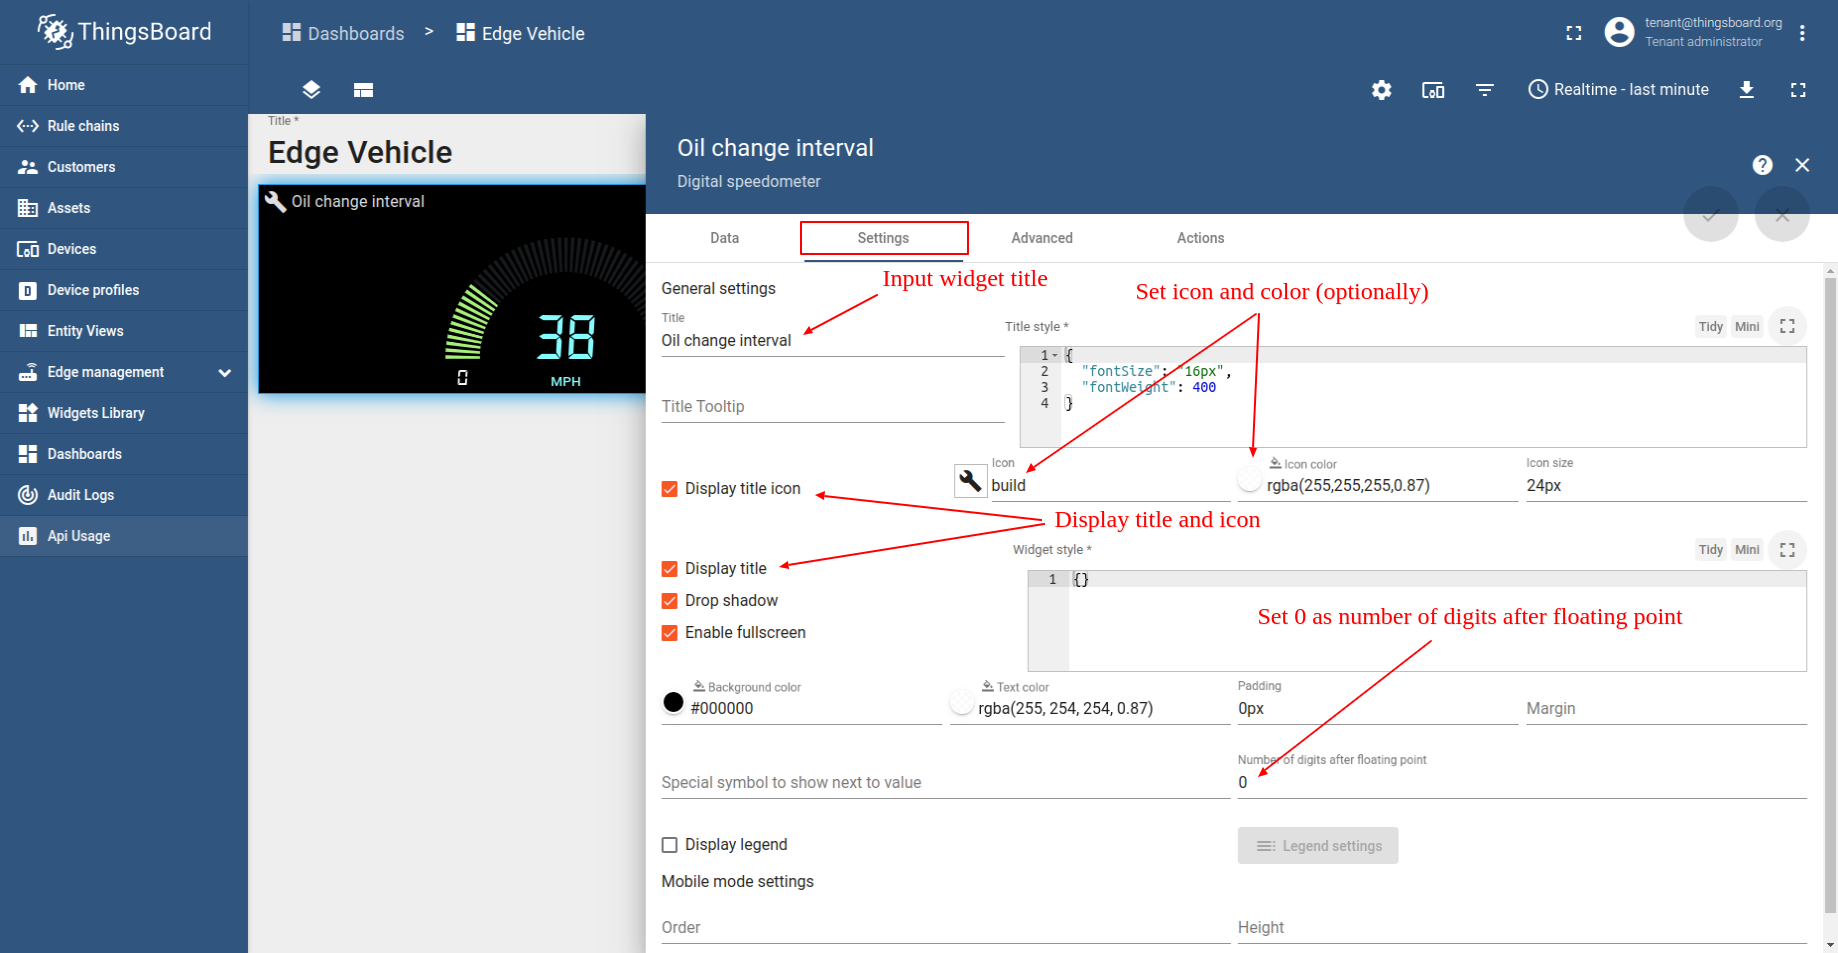
- Click on the "Edit Widget" icon in the upper right corner of the widget to add style.
- Select the "Appearance" tab to customize your dashboard widget.
- Set max value to "10000".
- Input the unit title as "MLS". Click the "Add" button to apply changes.
- Dashboard widget successfully created.


恭喜! 您已成功从设备发送遥测数据、在 Edge 上保存、将过滤后的数据推送至云端,并在仪表板上完成可视化。
下一步
-
Getting started guide(入门指南)- 快速概览 ThingsBoard Edge 主要功能。预计 15–30 分钟完成:
-
Installation guides(安装指南)- 了解如何在各种操作系统上安装 ThingsBoard Edge 并连接到 ThingsBoard Server。
-
Edge 规则引擎:
-
Rule Chain Templates(规则链模板)- 了解如何使用 ThingsBoard Edge 规则链模板。
-
Provision Rule Chains from cloud to edge(从云端向 Edge 下发规则链)- 了解如何从云端向 Edge 下发边缘规则链。
-
- 安全:
- gRPC over SSL/TLS - 了解如何为 Edge 与云端之间的通信配置 gRPC over SSL/TLS。
-
功能:
-
Edge Status(Edge 状态)- 了解 ThingsBoard Edge 上的 Edge Status 页面。
-
Cloud Events(云端事件)- 了解 ThingsBoard Edge 上的 Cloud Events 页面。
-
-
使用场景:
- Data filtering and traffic reduce(数据过滤与流量削减)- 本指南展示如何从 Edge 向云端仅发送过滤后的设备数据:
- Roadmap(路线图)- ThingsBoard Edge 路线图。