- 前置条件
- 步骤1. 安装Java 17 (OpenJDK)
- 步骤2. ThingsBoard服务安装
- 步骤3. 获取并配置许可证密钥
- 步骤4. 配置ThingsBoard数据库
- 步骤5. 选择ThingsBoard队列服务
- 步骤6. [可选] 低配机器内存更新
- 步骤7. 运行安装脚本
- 步骤8. 启动ThingsBoard服务
- 步骤9. 安装ThingsBoard Web Report Server组件
- 安装后步骤
- 故障排查
- Windows防火墙设置
- 下一步
建议考虑使用 Linux 安装方式,因为 Linux 是运行 ThingsBoard 最稳定的平台。Windows 安装将在未来弃用。可在 安装指南 页面查找 Linux 安装指南。
前置条件
本指南介绍如何在Windows机器上安装ThingsBoard。 以下说明适用于Windows 11/10。 硬件要求取决于所选数据库及连接系统的设备数量。 在同一台机器上运行ThingsBoard和PostgreSQL至少需要4GB内存。 在同一台机器上运行ThingsBoard和Cassandra至少需要8GB内存。
步骤1. 安装Java 17 (OpenJDK)
ThingsBoard 服务运行于 Java 17。请按以下说明安装 OpenJDK 17。
- 访问 Open JDK 下载页。进入 “Other platforms and versions”,选择 “Operating System” 为 “Windows”、”Architecture” 为 “x64”、”Version” 为 “17 - LTS”,下载 JDK .msi 安装包。
- 运行下载的 MSI 安装包并按照提示操作。 确保将 “Add to PATH” 和 “Set JAVA_HOME variable” 选项设为 “Will be installed on local hard drive”。
- 访问 PostgreSQL JDBC 下载页 下载 PostgreSQL JDBC Driver。选择最新可用版本。
- 创建文件夹 C:\Program Files\JDBC 并将下载的文件复制到其中。然后添加新的全局变量——以管理员身份运行 PowerShell 并执行以下命令。请勿忘记将命令中的 “postgresql-42.2.18.jar” 替换为下载的版本名称。
1
[System.Environment]::SetEnvironmentVariable("CLASSPATH", '.;"C:\Program Files\JDBC\postgresql-42.2.18.jar"', [System.EnvironmentVariableTarget]::Machine)
可使用以下命令(在命令提示符中)检查安装:
1
java -version
预期命令输出为:
1
2
3
4
C:\Users\User>java -version
openjdk version "17.x.xx"
OpenJDK Runtime Environment Temurin-17.x.xx (...)
OpenJDK 64-Bit Server VM Temurin-17.x.xx (...)
步骤2. ThingsBoard服务安装
下载并解压安装包。
1
https://dist.thingsboard.io/thingsboard-windows-setup-4.3.0.1pe.exe
注意:我们假设您已将ThingsBoard安装到默认路径:C:\Program Files (x86)\thingsboard
步骤3. 获取并配置许可证密钥
我们假设您已经选择了订阅计划或决定购买永久许可证。 如果尚未选择,请前往定价页面选择最适合您的许可证方案。 详情请参考如何获取按需订阅或如何获取永久许可证。
获取许可证密钥后,需要将其写入ThingsBoard配置文件。
以管理员身份打开记事本或其他编辑器(右键单击应用图标,选择“以管理员身份运行”)。 打开以下文件进行编辑(在文件选择对话框中选择“所有文件”而非“文本文档”,编码为UTF-8):
1
C:\Program Files (x86)\thingsboard\conf\thingsboard.yml
滚动到文件底部,找到以下配置块:
1
2
license:
    secret: "${TB_LICENSE_SECRET:}" # license secret obtained from ThingsBoard License Portal (https://license.thingsboard.io)
填入您的许可证密钥。参考以下示例:
1
2
license:
    secret: "${TB_LICENSE_SECRET:YOUR_LICENSE_SECRET_HERE}" # license secret obtained from ThingsBoard License Portal (https://license.thingsboard.io)
步骤4. 配置ThingsBoard数据库
ThingsBoard 可使用 SQL 或混合数据库方案。详见对应架构 页面。
|
ThingsBoard 团队建议在负载合理(< 5000 条消息/秒)的开发和生产环境中使用 PostgreSQL。 许多云服务商提供托管 PostgreSQL 服务,对大多数 ThingsBoard 实例而言是成本效益较高的解决方案。 PostgreSQL 安装从此处下载安装文件(PostgreSQL 15 或更新版本)并按照安装说明操作。 在 PostgreSQL 安装过程中,系统会提示您输入超级用户 (postgres) 密码。 请勿忘记此密码,后续将使用。为简便起见,我们将用 “postgres” 代替。 创建 ThingsBoard 数据库安装完成后,启动 “pgAdmin” 软件并以超级用户 (postgres) 登录。 ThingsBoard 配置若您已将 PostgreSQL 超级用户密码设为 “postgres”,可跳过此步骤。 以管理员身份打开记事本或其他编辑器(右键点击应用图标并选择“以管理员身份运行”)。 并找到 “# SQL DAO Configuration” 配置块。请勿忘记将 “postgres” 替换为您的实际 postgres 用户密码: 找到 “SQL_POSTGRES_TS_KV_PARTITIONING” 参数以覆盖时间戳键值存储分区大小的默认值: |
步骤5. 选择ThingsBoard队列服务
ThingsBoard 平台目前支持两种消息 broker 用于存储消息及 ThingsBoard 服务间通信:In-memory 和基于 Kafka 的 broker。
-
In Memory queue 实现为内置且默认。 适用于开发(PoC)环境,不适合生产部署或任何集群部署。
-
Kafka 推荐用于生产部署。该 queue 现已在多数 ThingsBoard 生产环境中使用。 适用于本地部署和私有云部署。若希望独立于云提供商,同样适用。 部分云提供商也提供 Kafka 托管服务,如 AWS MSK。
-
Confluent Cloud 是基于 Kafka 的全托管流平台。适用于云无关部署。
In Memory 队列已内置且默认启用,无需额外配置。 |
Kafka 安装Apache Kafka 是一款开源流处理软件平台。 安装 Kafka使用以下说明在 Docker 容器中安装 Kafka。 将以下内容添加到 docker-compose-kafka.yml 文件: 启动容器: ThingsBoard 配置以管理员身份打开记事本或其他编辑器(右键点击应用图标并选择“以管理员身份运行”)。 并找到 “queue:” 配置块。确保队列类型为 “kafka”,且请勿忘记将 “localhost:9092” 替换为您的实际 Kafka 引导服务器地址: |
Confluent Cloud 配置要访问 Confluent Cloud,您需要先创建账户,然后创建 Kafka 集群并获取您的 API Key。 ThingsBoard 配置以管理员身份打开记事本或其他编辑器(右键点击应用图标并选择“以管理员身份运行”)。 并找到 “queue:” 配置块。确保队列类型为 “kafka”,副本因子为 “3”,use confluent cloud 为 “true”。 请勿忘记将 “CLUSTER_API_KEY”、”CLUSTER_API_SECRET” 和 “localhost:9092” 替换为您的实际 Confluent Cloud 引导服务器地址: 这些参数影响每个队列每个分区的每秒请求数。 发往特定消息队列的请求数按以下公式计算: ((Number of Rule Engine and Core Queues) * (Number of partitions per Queue) + (Number of transport queues) + (Number of microservices) + (Number of JS executors)) * 1000 / POLL_INTERVAL_MS 例如,基于默认参数的请求数为: 规则引擎队列: Main 10 partitions + HighPriority 10 partitions + SequentialByOriginator 10 partitions = 30 核心队列 10 个分区 传输请求队列 + 响应队列 = 2 规则引擎传输通知队列 + 核心传输通知队列 = 2 总计 = 44 每秒请求数 = 44 * 1000 / 25 = 1760 个请求 根据使用场景,若消息负载较低,您可在延迟与队列分区数/请求数之间权衡,减少分区或请求数。 通过 UI 为规则引擎队列设置参数:interval (1000) 和 partitions (1)。 以下为“单体”部署下实现每秒 10 个请求的示例参数: 您可通过 UI 更新默认规则引擎队列配置。有关 ThingsBoard 规则引擎队列的更多信息,请参阅文档。 |
步骤6. [可选] 低配机器内存更新
以管理员身份打开记事本或其他编辑器(右键点击应用图标并选择“以管理员身份运行”)。
打开以下文件进行编辑(在文件选择对话框中选择“所有文件”而非“文本文档”,编码为 UTF-8):
1
C:\Program Files (x86)\thingsboard\thingsboard.xml
在配置文件中找到以下行。
1
2
<startargument>-Xms512m</startargument>
<startargument>-Xmx1024m</startargument>
并将其修改为
1
2
<startargument>-Xms2048m</startargument>
<startargument>-Xmx2048m</startargument>
将 “2048m” 改为约为总内存的 1/3(单位为 MB)
步骤7. 运行安装脚本
以管理员身份打开Windows命令提示符,切换到ThingsBoard安装目录。
执行install.bat脚本将ThingsBoard安装为Windows服务(或运行”.\install.bat –loadDemo”安装并加载演示数据)。 这意味着ThingsBoard将在系统启动时自动运行。 类似地,uninstall.bat将从Windows服务中卸载ThingsBoard。 输出应类似于:
1
2
3
4
5
6
7
C:\Program Files (x86)\thingsboard>.\install.bat --loadDemo
Detecting Java version installed.
CurrentVersion 170
Java 17 found!
Installing thingsboard ...
...
ThingsBoard installed successfully!
步骤8. 启动ThingsBoard服务
现在启动 ThingsBoard 服务! 以管理员身份打开命令提示符并执行以下命令:
1
net start thingsboard
预期输出:
1
2
The ThingsBoard Server Application service is starting.
The ThingsBoard Server Application service was started successfully.
要重启 ThingsBoard 服务,可执行以下命令:
1
2
net stop thingsboard
net start thingsboard
启动后,可通过以下链接打开 Web UI:
1
http://localhost:8080/
若在运行安装脚本时指定了 –loadDemo,可使用以下默认凭证:
- System Administrator:sysadmin@thingsboard.org / sysadmin
- Tenant Administrator:tenant@thingsboard.org / tenant
- Customer User:customer@thingsboard.org / customer
可随时在账户资料页面修改各账户密码。
Web UI启动最多可能需要90秒。
步骤9. 安装ThingsBoard Web Report Server组件
下载并解压安装包。
1
https://dist.thingsboard.io/tb-web-report-windows-4.3.0.1pe.zip
注意:我们假设您已将ThingsBoard Web Report Server解压到默认路径:C:\Program Files (x86)\tb-web-report
以管理员身份打开Windows命令提示符,切换到ThingsBoard安装目录。
执行install.bat脚本将ThingsBoard Web Report Server安装为Windows服务。 这意味着它将在系统启动时自动运行。 类似地,uninstall.bat将从Windows服务中卸载ThingsBoard。 输出应类似于:
1
2
3
C:\Program Files (x86)\tb-web-report>install.bat
Installing tb-web-report ...
tb-web-report installed successfully!
现在启动ThingsBoard服务! 以管理员身份打开命令提示符,执行以下命令:
1
net start tb-web-report
预期输出:
1
2
3
C:\Program Files (x86)\tb-web-report>net start tb-web-report
The Thingsboard Web Report Microservice service is starting.
The Thingsboard Web Report Microservice service was started successfully.
安装后步骤
升级到新版本ThingsBoard
保持平台安全与更新
当有新 ThingsBoard 版本发布时,我们提供简化的更新流程,确保系统获得最新功能和安全补丁,且不危及您的数据。
为保持数据库完整性和系统稳定性,请按顺序进行升级(例如 v4.0.2 → v4.1.0 → v4.2.0)。
请参阅官方 升级说明,获取针对您当前部署环境的详细步骤。
故障排查
日志文件位于logs文件夹中(本例中为“C:\Program Files (x86)\thingsboard\logs”)。
thingsboard.log文件中应包含以下行:
1
YYYY-MM-DD HH:mm:ss,sss [main] INFO  o.t.s.ThingsboardServerApplication - Started ThingsboardServerApplication in x.xxx seconds (JVM running for x.xxx)
Windows防火墙设置
要从外部访问ThingsBoard Web UI和设备连接(HTTP、MQTT、CoAP),需要在“高级安全Windows防火墙”中创建新的入站规则。
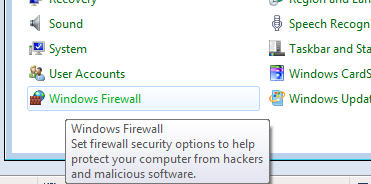
- 从“控制面板”打开“Windows防火墙”:
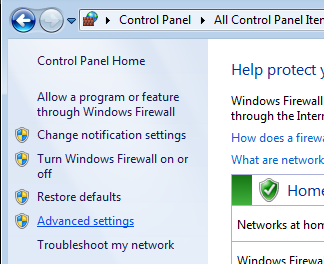
- 单击左侧面板的“高级设置”:
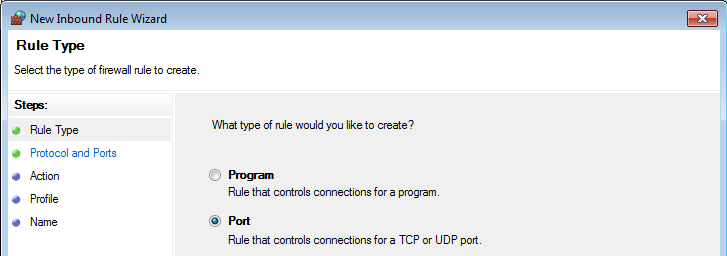
- 在左侧面板选择“入站规则”,然后在右侧“操作”面板单击“新建规则…”:

- 在弹出的“新建入站规则向导”窗口中,在“规则类型”步骤选择“端口”选项:
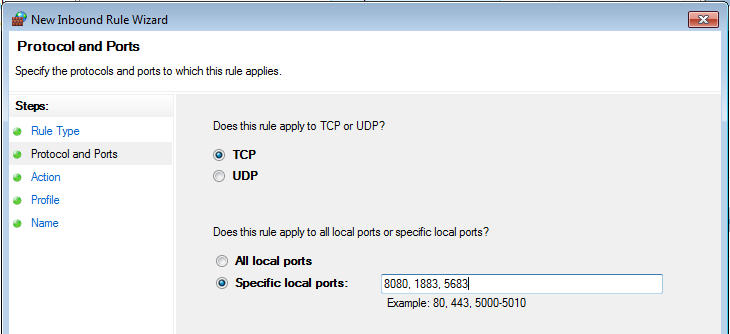
- 在“协议和端口”步骤选择“TCP”协议,并在“特定本地端口”字段中输入端口列表8080, 1883, 5683:
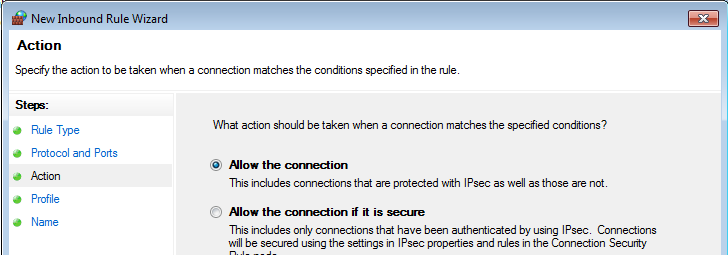
- 在“操作”步骤保持选择“允许连接”选项:
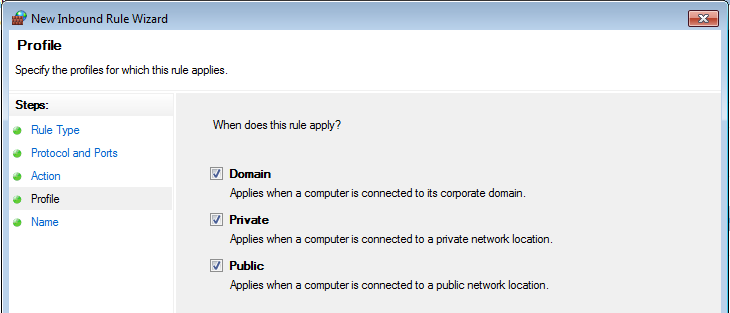
- 在“配置文件”步骤选择应用此规则的Windows网络配置文件:
- 最后,为此规则命名(例如“ThingsBoard Service Networking”),然后单击“完成”。
