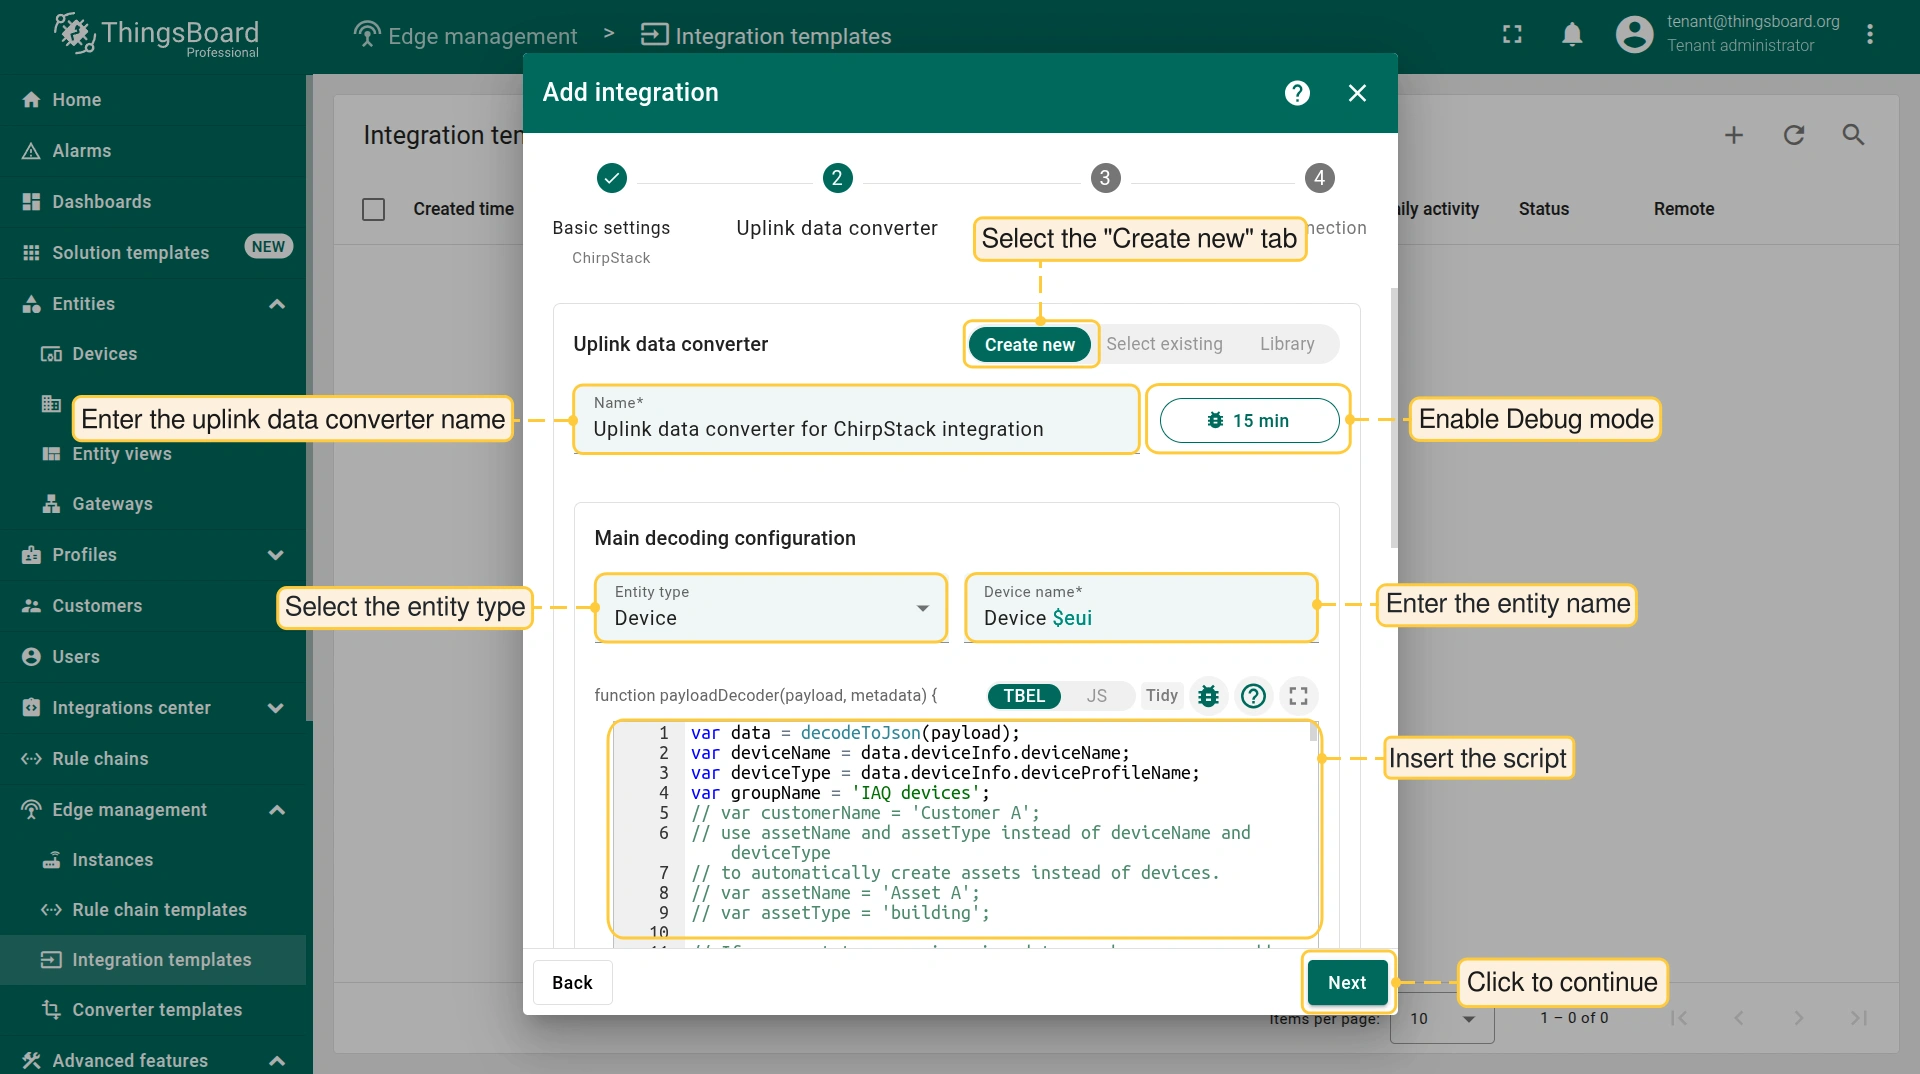
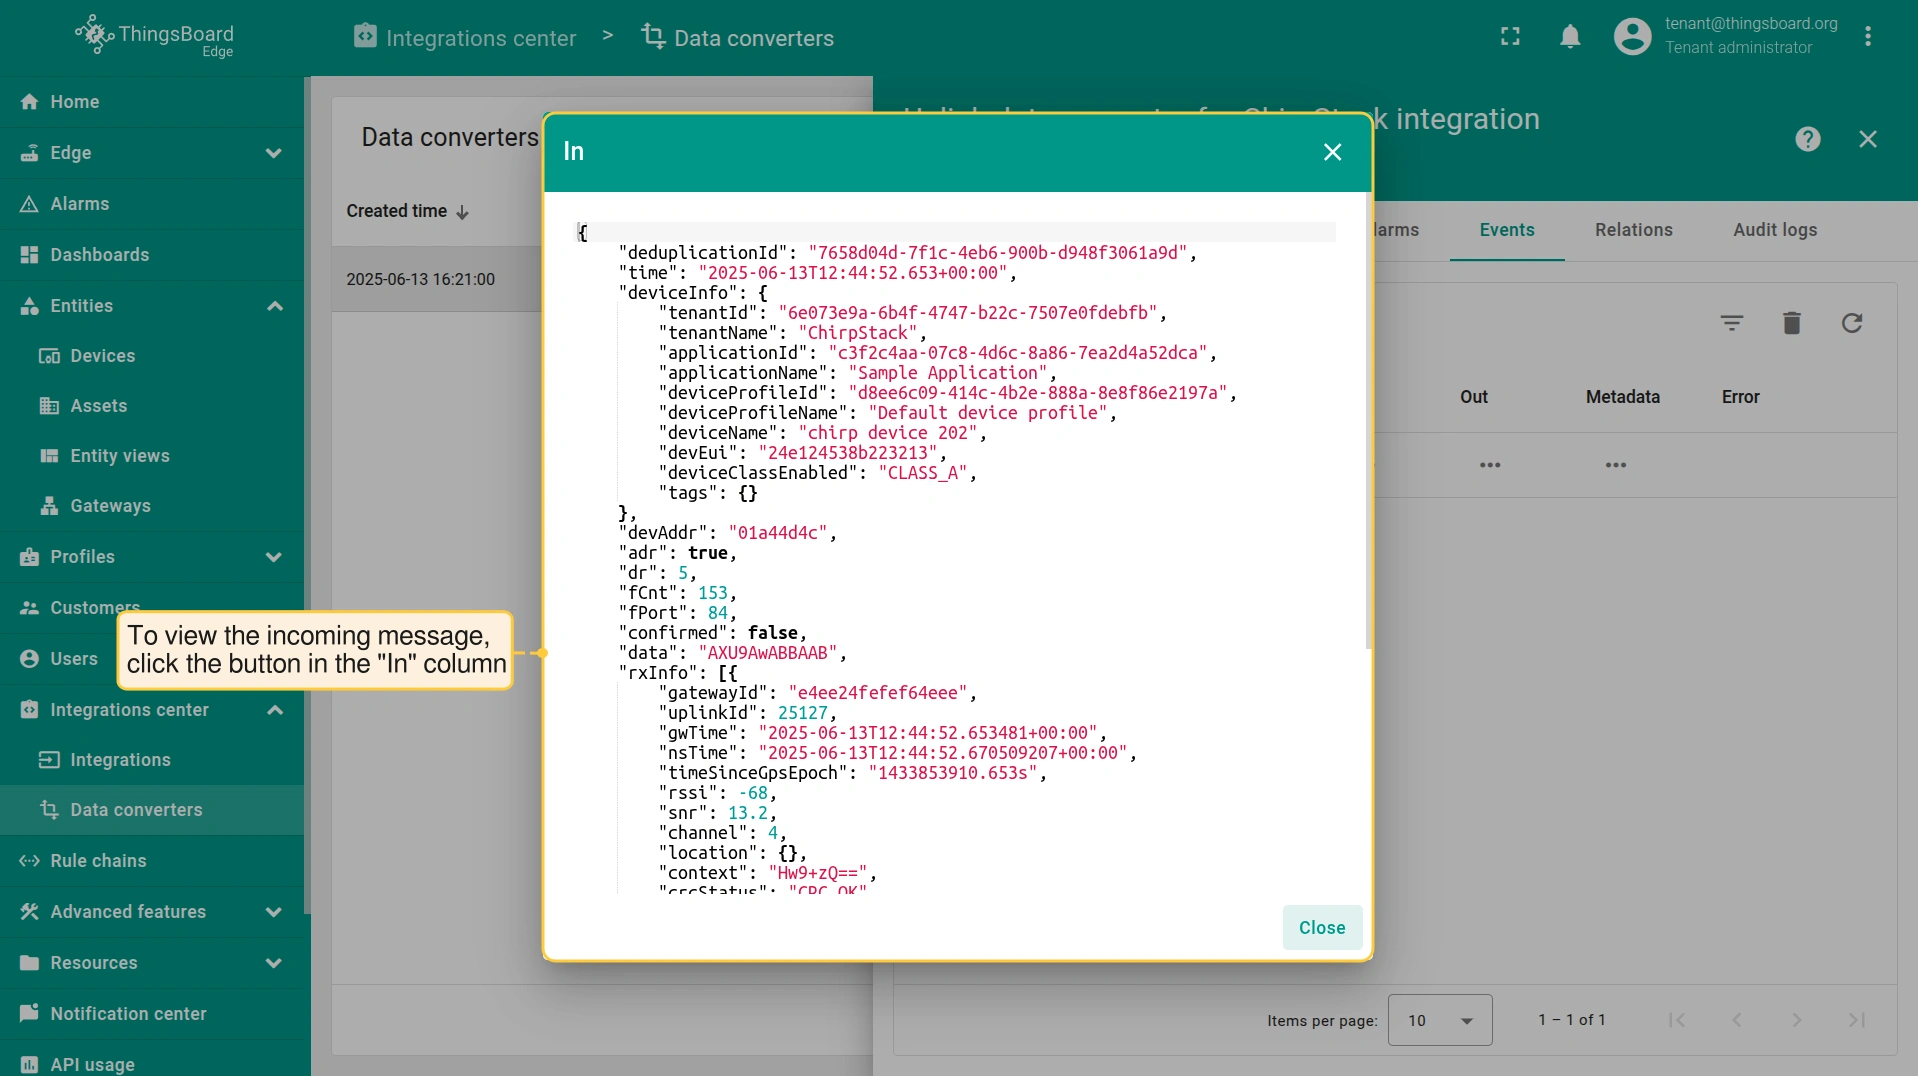
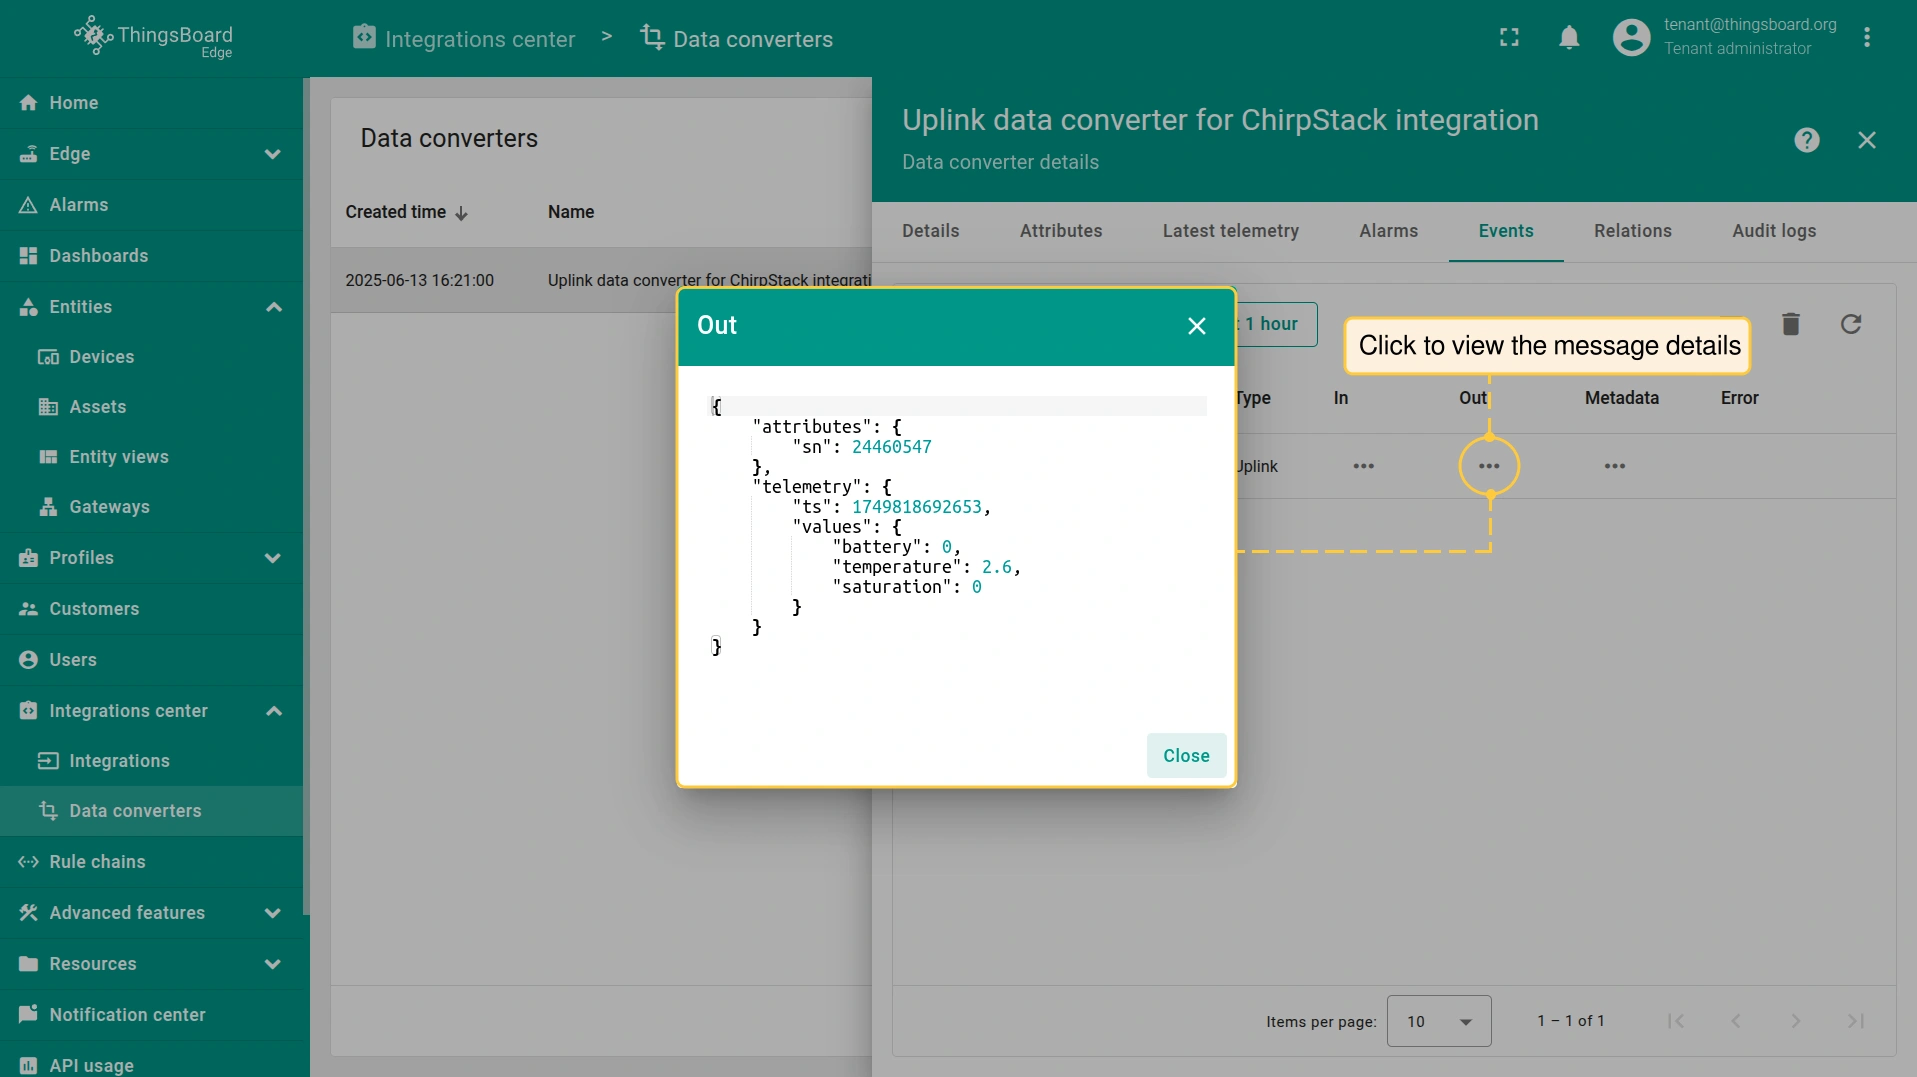
产品定价 立即试用
PE边缘
文档 > 集成 > ChirpStack
入门
安装 架构 API 常见问题
目录

ChirpStack 集成

文档信息图标

Edge ChirpStack IntegrationChirpStack Integration 实现方式类似。 区别仅在于 integration 的创建与部署方式。 操作前请参阅 ChirpStack Integration 文档。

概述

ChirpStack 是一款 开源LoRaWAN Network Server,可用于搭建LoRaWAN网络。 将ChirpStack与 ThingsBoard Edge 集成后,可在边缘本地连接、处理并可视化设备数据,实现低延迟洞察与离线能力。

详情请参阅集成示意图。

image

前置条件

  • ThingsBoard Edge Professional Edition 已运行。
  • 通过 Docker ComposeUbuntu 安装 ChirpStack Network Server
  • 设备已连接至网络。连接 LoRaWAN设备ChirpStack 的方法请参阅相关文档。

创建converter与integration模板

ThingsBoard Professional Edition 可创建converter和integration模板。 因此请使用 ThingsBoard Cloud安装 自有平台实例,以 Tenant administrator 身份登录。

基本设置

添加 ChirpStack集成

  • 进入 Edge management > Integration templates 部分,点击 “Add” 按钮添加新集成。
  • 选择 ChirpStack 类型并输入 integration name
  • 点击 “Next” 按钮。
文档信息图标

Debug mode 对开发和排查非常有用。但长期开启会显著增加数据库占用的磁盘空间,因为所有调试数据都会保存其中。

因此,自 version 3.9 起,ThingsBoard 仅在集成的前 15分钟 内保存所有debug事件。之后仅保留失败事件。这些设置可组合或完全禁用。

Uplink数据converter

Uplink 用于将设备传入数据转换为在 ThingsBoard 中显示所需的格式。

  • 选择 “Create new” 选项卡
  • 输入 Converter name
  • Main decoding configuration 区块:
    • 从下拉菜单选择 Entity typeDevice或Asset)并输入 entity name。集成执行后将创建对应实体。
文档信息图标

$eui 占位符会自动替换为设备的 唯一标识符例如70B3D57ED003B6F5),来源为 Loriot(或ChirpStack、类似MQTT消息)的payload。
例如,若设备实体命名为 “Loriot Device $eui”,创建的设备名可能为 “Loriot Device 70B3D57ED003B6F5”

  • “function payloadDecoder” 字段中输入脚本。Edge 3.9及更早版本 可使用以下脚本:

示例中使用的脚本:

1
2
3
4
5
6
7
8
9
10
11
12
13
14
15
16
17
18
19
20
21
22
23
24
25
26
27
28
29
30
31
32
33
34
35
36
37
38
39
40
41
42
43
44
45
46
47
48
49
50
51
52
53
54
55
56
57
58
59
60
61
62
63
64
65
66
67
68
69
70
71
72
73
74
75
76
77
78
79
80
81
82
83
84
85
86
87
88
89
90
91
92
93
94
95
96
97
98
99
100
101
102
103
104
105
106
107
108
109
110
111
112
113
114
115
116
117
118
119
120
121
122
123
124
125
126
127
128
129
130
131
132
133
134
135
136
137
138
var data = decodeToJson(payload);
var deviceName = data.deviceInfo.deviceName;
var deviceType = data.deviceInfo.deviceProfileName;
var groupName = 'IAQ devices';
// var customerName = 'Customer A';
// use assetName and assetType instead of deviceName and deviceType
// to automatically create assets instead of devices.
// var assetName = 'Asset A';
// var assetType = 'building';

// If you want to parse incoming data somehow, you can add your code to this function.
// input: bytes
// expected output:
//  {
//    "attributes": {"attributeKey": "attributeValue"},
//    "telemetry": {"telemetryKey": "telemetryValue"}
//  }
//
// In the example - bytes will be saved as HEX string and also parsed as light level, battery level and PIR sensor value.
//

function decodePayload(input) {
var output = { attributes:{}, telemetry: {} };
// --- Decoding code --- //

    output.telemetry.HEX_bytes = bytesToHex(input);

    // If the length of the input byte array is odd - we cannot parse it using the example below
    if (input.length > 0) {
        for (var i = 0; i < input.length; ) {
            var channel_id = input[i++];
            if (i < input.length) {
                var channel_type = input[i++];
                // BATTERY
                if (channel_id === 0x01 && channel_type === 0x75) {
                    output.telemetry.battery = input[i];
                    i += 1;
                }
                // PIR
                else if (channel_id === 0x03 && channel_type === 0x00) {
                    output.telemetry.pir = input[i] === 0 ? "normal" : "trigger";
                    i += 1;
                }
                // DAYLIGHT
                else if (channel_id === 0x04 && channel_type === 0x00) {
                    output.telemetry.daylight = input[i] === 0 ? "dark" : "light";
                    i += 1;
                }
            }
        }
    }

    // --- Decoding code --- //
    return output;
}

// --- attributes and telemetry objects ---
var telemetry = {};
var attributes = {};
// --- attributes and telemetry objects ---

// --- Timestamp parsing
var dateString = data.time;
var timestamp = -1;
if (dateString != null) {
  timestamp = new Date(dateString).getTime();
  if (timestamp == -1) {
    var secondsSeparatorIndex = dateString.lastIndexOf('.') + 1;
    var millisecondsEndIndex = dateString.lastIndexOf('+');
    if (millisecondsEndIndex == -1) {
      millisecondsEndIndex = dateString.lastIndexOf('Z');
    }
    if (millisecondsEndIndex == -1) {
      millisecondsEndIndex = dateString.lastIndexOf('-');
    }
    if (millisecondsEndIndex == -1) {
      if (dateString.length >= secondsSeparatorIndex + 3) {
        dateString = dateString.substring(0, secondsSeparatorIndex + 3);
      }
    } else {
      dateString = dateString.substring(0, secondsSeparatorIndex + 3) +
        dateString.substring(millisecondsEndIndex, dateString.length);
    }
    timestamp = new Date(dateString).getTime();
  }
}
// If we cannot parse timestamp - we will use the current timestamp
if (timestamp == -1) {
timestamp = Date.now();
}
// --- Timestamp parsing

// You can add some keys manually to attributes or telemetry
attributes.deduplicationId = data.deduplicationId;

// You can exclude some keys from the result
var excludeFromAttributesList = ["deviceName", "rxInfo", "confirmed", "data", "deduplicationId","time", "adr", "dr", "fCnt"];
var excludeFromTelemetryList = ["data", "deviceInfo", "txInfo", "devAddr", "adr", "time", "fPort", "region_common_name", "region_config_id", "deduplicationId"];

// Message parsing
// To avoid paths in the decoded objects we passing false value to function as "pathInKey" argument.
// Warning: pathInKey can cause already found fields to be overwritten with the last value found.

var telemetryData = toFlatMap(data, excludeFromTelemetryList, false);
var attributesData = toFlatMap(data, excludeFromAttributesList, false);

var uplinkDataList = [];

// Passing incoming bytes to decodePayload function, to get custom decoding
var customDecoding = decodePayload(base64ToBytes(data.data));

// Collecting data to result
if (customDecoding.?telemetry.size() > 0) {
  telemetry.putAll(customDecoding.telemetry);
}

if (customDecoding.?attributes.size() > 0) {
  attributes.putAll(customDecoding.attributes);
}

telemetry.putAll(telemetryData);
attributes.putAll(attributesData);

var result = {
    deviceName: deviceName,
    deviceType: deviceType,
    //  assetName: assetName,
    //  assetType: assetType,
    //  customerName: customerName,
    groupName: groupName,
    attributes: attributes,
    telemetry: {
    ts: timestamp,
    values: telemetry
    }
};

return result;

示例中使用的脚本:

1
2
3
4
5
6
7
8
9
10
11
12
13
14
15
16
17
18
19
20
21
22
23
24
25
26
27
28
29
30
31
32
33
34
35
36
37
38
39
40
41
42
43
44
45
46
47
48
49
50
51
52
53
54
55
56
57
58
59
60
// Decode an uplink message from a buffer
// payload - array of bytes
// metadata - key/value object

/** Decoder **/

// decode payload to string
var payloadStr = decodeToString(payload);

// decode payload to JSON
// var data = decodeToJson(payload);

var deviceName = 'Device A';
var deviceType = 'thermostat';
var customerName = 'Customer C';
var groupName = 'thermostat devices';
var manufacturer = 'Example corporation';
// use assetName and assetType instead of deviceName and deviceType
// to automatically create assets instead of devices.
// var assetName = 'Asset A';
// var assetType = 'building';

// Result object with device/asset attributes/telemetry data
var result = {
// Use deviceName and deviceType or assetName and assetType, but not both.
  deviceName: deviceName,
  deviceType: deviceType,
// assetName: assetName,
// assetType: assetType,
// customerName: customerName,
  groupName: groupName,
  attributes: {
    model: 'Model A',
    serialNumber: 'SN111',
    integrationName: metadata['integrationName'],
    manufacturer: manufacturer
  },
  telemetry: {
    temperature: 42,
    humidity: 80,
    rawData: payloadStr
  }
};

/** Helper functions **/

function decodeToString(payload) {
  return String.fromCharCode.apply(String, payload);
}

function decodeToJson(payload) {
  // covert payload to string.
  var str = decodeToString(payload);

  // parse string to JSON
  var data = JSON.parse(str);
  return data;
}

return result;

Edge 4.0 起,可以:

  • 选择 “Library” 选项卡,在 “Vendor”“Model” 下拉菜单中选择厂商并找到对应型号。
  • 或使用converter中提供的默认脚本。
  • Advanced decoding parameters 区块:
    • “Device profile”“Device label”“Customer name”“Device group name” 字段非必填,也可使用 $-pattern 动态填充。
    • AttributesTelemetry 部分指定应解释为属性或遥测的keys。
    • Update only keys list 部分,定义仅在值相对上一条消息发生变化时才保存到数据库的keys。适用于Attributes和Telemetry,有助于优化数据存储。
  • 点击 “Next” 按钮。

Downlink数据converter(可选)

配置 Downlink data converter 为可选,若不需要可省略。 要跳过downlink converter配置,选择 “Skip” 选项卡并点击 “Skip” 按钮。

连接

在配置 Connection 之前,请在 ChirpStack UI 中创建 Application server API Token

  • http://chipstack-server-ip:8080例如 http://10.7.2.193:8080/)打开 ChirpStack UI 并使用凭据登录。
    • 若未修改凭据,可使用:
      Username: admin
      Password: admin
  • 进入 Tenant > API Keys 部分,点击 “Add API Key” 按钮。
  • 输入 API key name 并点击 “Submit” 按钮。
  • 创建 API key name 后,复制并粘贴到 ThingsBoard UI“Application server API Token” 字段。

ThingsBoard UI 中继续 Connection 配置。填写以下字段:

  • Base URL: 按格式输入:http://edge-ip:edge-port例如 http://10.7.2.193:8080)。
  • HTTP endpoint URL: 复制以备配置 ChirpStack application 时使用。
  • Application server URL: 输入application server或REST API服务的地址,格式:http://chipstack-server-ip:8090例如 http://10.7.2.193:8090)。
  • Application server API Token: 粘贴从 ChirpStack UI 获取的 API Token
  • 点击 “Add” 按钮。

在ChirpStack应用中配置集成

要将设备数据从 ChirpStack 转发到 ThingsBoard,还需配置 ChirpStack Application Integration。 在 http://chipstack-server-ip:8080 登录 ChirpStack UI 继续。

添加device profile

在配置 ChirpStack Application 之前先创建device profile。填写必填项:

  • 进入 Tenant > Device Profiles 部分,点击 “Add device profile” 按钮。
  • “General” 选项卡中填写以下字段:
    • Name: 输入device profile名称。
    • Region: 输入LoRaWAN区域参数。
    • MAC Version: 设备使用的LoRaWAN MAC版本。
    • Regional parameters revision: 您所在区域的参数集版本。
    • ADR Algorithm: 自适应数据速率逻辑。
    • Expect uplink interval (secs): 输入ChirpStack预期设备发送uplink消息的秒数。
  • 点击 “Submit” 按钮。

添加integration

ChirpStack 应用中配置integration:

  • 进入 Tenant > Applications 部分,点击 “Add application” 按钮。
  • 输入 application name 并点击 “Submit” 按钮。
  • 选择 “Integrations” 选项卡。
  • 在列表中找到 HTTP integration,点击 ”+” 按钮将其添加到application。
  • ThingsBoard UI Connection 配置步骤中获取的 HTTP endpoint URL 粘贴到对应字段。
  • 点击 “Submit” 按钮。

添加设备

添加integration后添加设备:

  • 选择 “Devices” 选项卡,点击 “Add device” 按钮。
  • “Device” 选项卡中输入设备 name
  • Device EUI (EUI64): 输入分配给LoRaWAN设备的唯一64位(8字节)标识符。
    • 选择DevEUI表示或传输的字节序(MSB或LSB)。
  • Device profile: 从下拉菜单选择device profile。
  • 点击 “Submit” 按钮。

添加gateway(可选)

在测试环境中可省略添加gateway。 但设备本身会通过gateway发送数据。添加gateway:

  • 进入 Tenant > Gateways 部分,点击 “Add gateways” 按钮。
  • 输入 gateway namegateway ID 以及gateway预期发送统计信息的秒数。

将integration分配到Edge

创建 integration模板 并完成 ChirpStack Application Integration 配置后,将 integration模板 分配到 Edge 实例:

  • 进入 Edge management > Instances 部分,点击 “Manage edge integrations” 按钮。
  • “Integration” 页面点击 “Assign to edge” 按钮。在 “Assign the Integration to the Edge” 弹窗中,从下拉菜单选择integration并点击 “Assign” 按钮。
  • 要确认 ChirpStack 集成在 Edge 上,请登录 ThingsBoard Edge 实例并进入 Integrations center > Integrations 部分。

发送uplink消息

要模拟uplink,可使用 ChirpStack Device Simulator 或手动向 ChirpStack Application Server 发送 HTTP消息

HTTP消息 示例:

1
2
3
4
5
6
7
8
9
10
11
12
13
14
15
16
17
18
19
20
21
22
23
24
25
26
27
28
29
30
31
32
33
34
35
36
37
38
39
40
41
42
43
44
45
46
47
curl -v -X POST -d '{
    "deduplicationId": "7658d04d-7f1c-4eb6-900b-d948f3061a9d",
    "time": "2025-06-13T12:44:52.653+00:00",
    "deviceInfo": {
        "tenantId": "6e073e9a-6b4f-4747-b22c-7507568debfb",
        "tenantName": "ChirpStack",
        "applicationId": "c3f2c4aa-07c8-4d6c-8a86-7ea2d4a31dca",
        "applicationName": "Sample Application",
        "deviceProfileId": "d8ee6c09-414c-4b2e-888a-8e8f86e3187a",
        "deviceProfileName": "Default device profile",
        "deviceName": "chirp device",
        "devEui": "24e124538b223213",
        "deviceClassEnabled": "CLASS_A",
        "tags": {}
    },
    "devAddr": "01a44c4c",
    "adr": true,
    "dr": 5,
    "fCnt": 153,
    "fPort": 84,
    "confirmed": false,
    "data": "AXU9AwABBAAB",
    "rxInfo": [{
        "gatewayId": "e4e124dadef64eee",
        "uplinkId": 25127,
        "gwTime": "2025-06-13T12:44:52.653481+00:00",
        "nsTime": "2025-06-13T12:44:52.670509207+00:00",
        "timeSinceGpsEpoch": "1433853910.653s",
        "rssi": -68,
        "snr": 13.2,
        "channel": 4,
        "location": {},
        "context": "Hw9+zQ==",
        "crcStatus": "CRC_OK"
    }],
    "txInfo": {
        "frequency": 867300000,
        "modulation": {
            "lora": {
                "bandwidth": 125000,
                "spreadingFactor": 7,
                "codeRate": "CR_4_5"
            }
        }
    },
    "regionConfigId": "eu868"
}'  $YOUR_HTTP_ENDPOINT_URL -H "Content-Type:application/json"

其中:

  • deduplicationId: 测试用途可生成任意有效UUID v4。仅用于模拟真实性和调试依赖它的集成。
  • tenantId: 替换为您的ChirpStack租户ID。
  • applicationId: 替换为ChirpStack Application ID。
  • applicationName: 替换为ChirpStack Application名称。
  • deviceProfileId: 替换为ChirpStack device profile ID。
  • deviceProfileName: 替换为ChirpStack device profile名称。
  • devEui: 替换为在ChirpStack设备中添加的Device EUI。
  • gatewayId: 替换为ChirpStack gateway ID。
  • $YOUR_HTTP_ENDPOINT_URL: 替换为ThingsBoard集成中获取的实际值。

在生产环境中,设备会自动定期发送uplink消息或在事件触发时发送,无需人工干预。

发送消息后,ThingsBoard Edge 用户界面将创建新设备。

  • 查看接收的时序数据:进入 Entities > Devices 部分,点击 device 并选择 “Latest telemetry” 选项卡。

查看接收的uplink消息:

  • 进入 Integrations center > Integrations 部分,点击 ChirpStack integration 并选择 “Events” 选项卡。

接收的数据可在 Uplink converter 中查看:

  • 进入 Integrations center > Data converters 部分,点击 Uplink converter
  • “Data converter details” 页面选择 “Events” 选项卡。
  • “In”“Out” 列查看消息详情。

下一步

  • Getting started guide(入门指南)- 快速概览 ThingsBoard Edge 主要功能。预计 15–30 分钟完成:

  • Installation guides(安装指南)- 了解如何在各种操作系统上安装 ThingsBoard Edge 并连接到 ThingsBoard Server。

  • Edge 规则引擎:

  • 安全:
    • gRPC over SSL/TLS - 了解如何为 Edge 与云端之间的通信配置 gRPC over SSL/TLS。
  • 功能:

    • Edge Status(Edge 状态)- 了解 ThingsBoard Edge 上的 Edge Status 页面。

    • Cloud Events(云端事件)- 了解 ThingsBoard Edge 上的 Cloud Events 页面。

  • 使用场景:

  • Roadmap(路线图)- ThingsBoard Edge 路线图。