- Introduction
- List of hardware
- Hardware setup
- Preparing ESP32
- Preparing MI Sensor
- Preparing Raspberry Pi
- Device provisioning
- Provision your dashboard
- Data visualization
- Troubleshooting
- See also
- Your feedback
- Next steps
Introduction
ThingsBoard is an open-source server-side platform that allows you to monitor and control IoT devices. It is free for both personal and commercial usage and you can deploy it anywhere. If this is your first experience with the platform we recommend to review what-is-thingsboard page and getting-started guide.
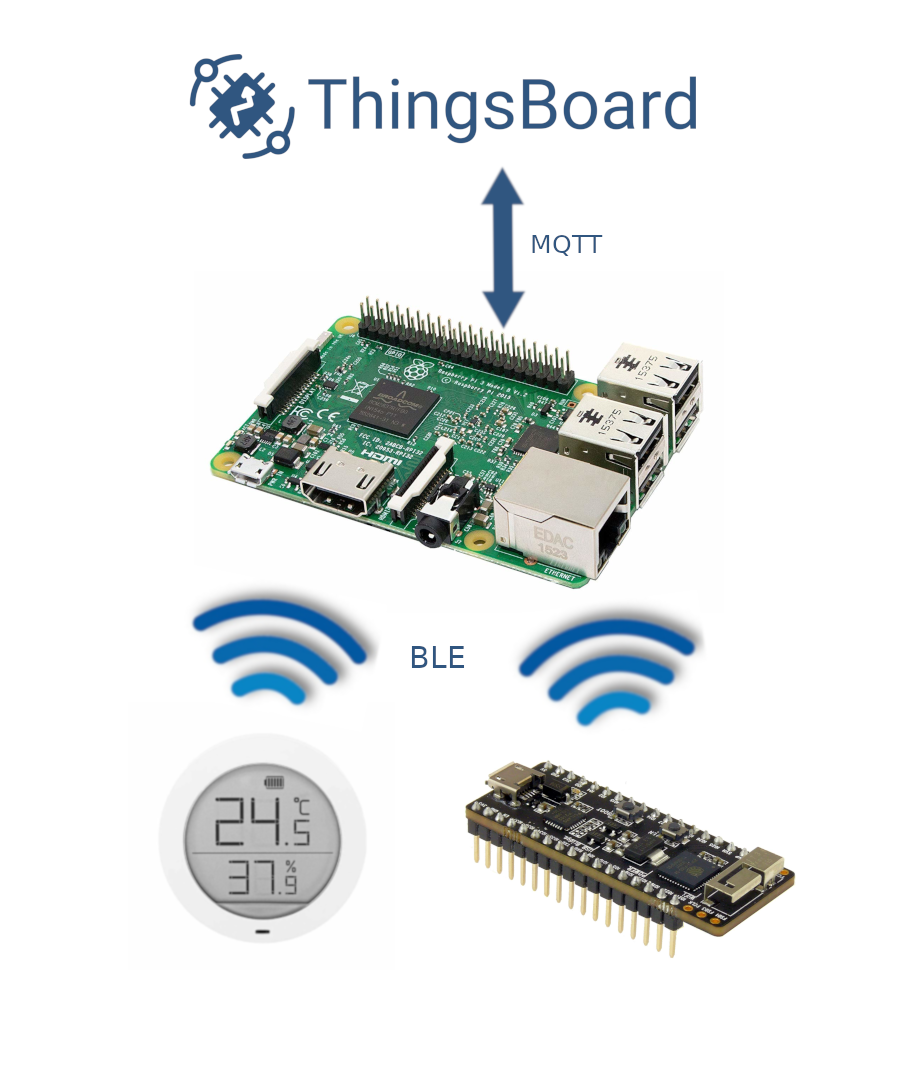
This sample demo performs collection of temperature and humidity values produced by BLE broadcasting devices and further visualization on the real-time web dashboard. In this example we use HTU21D connected to ESP32 and Xiaomi Smart Temperature & Humidity Sensor. The purpose of this application is to demonstrate ThingsBoard data collection API , visualization capabilities, gateway API and the capabilities of Bluetooth Low Energy protocol, which you can use with both custom and mass-produce devices.
Data is collected by a python script that is running on Raspberry Pi. It pushes data to ThingsBoard server via MQTT protocol by using ThingsBoard MQTT client Python SDK library. Data is visualized using built-in customizable dashboard. Demo that is running on Raspberry Pi is written in Python which is quite simple and easy to understand.
List of hardware
-
-
HTU21D Digital Relative Humidity Sensor

- Breadboard
- 4 female-to-male jumper wires
-

-
Xiaomi Smart Temperature & Humidity Sensor

Hardware setup
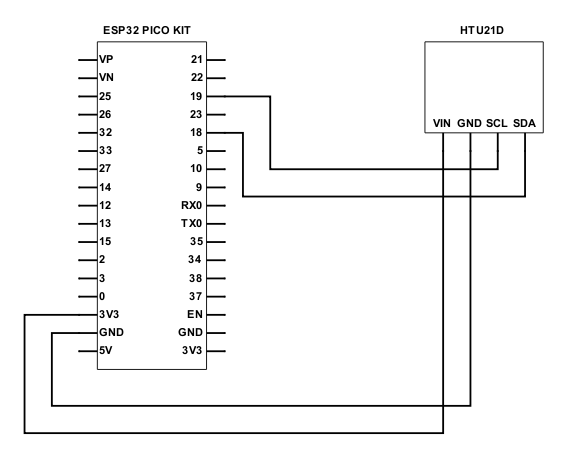
ESP32 Wiring scheme
| ESP32 | HTU21D |
|---|---|
| 3V3 | VIN |
| GND | GND |
| 18 | SDA |
| 19 | SCL |
The following picture summarizes the connection of ESP32 and HTU21D:
Raspberry Pi
In this setup we use Raspberry Pi 2 Model B V1.1 with Raspbian GNU/Linux 9.8 (stretch) installed on it. Raspbian is a free operating system based on Debian optimized for the Raspberry Pi hardware. This model does’t support Bluetooth, so it needs a usb dongle. We use Grand-X BT40G. Make sure your dongle is recognized by system. You can check it with the following command:
1
2
3
4
5
$> lsusb
...
Cambridge Silicon Radio, Ltd Bluetooth Dongle (HCI mode)
...
Whole setup:

Preparing ESP32
Application capabilities
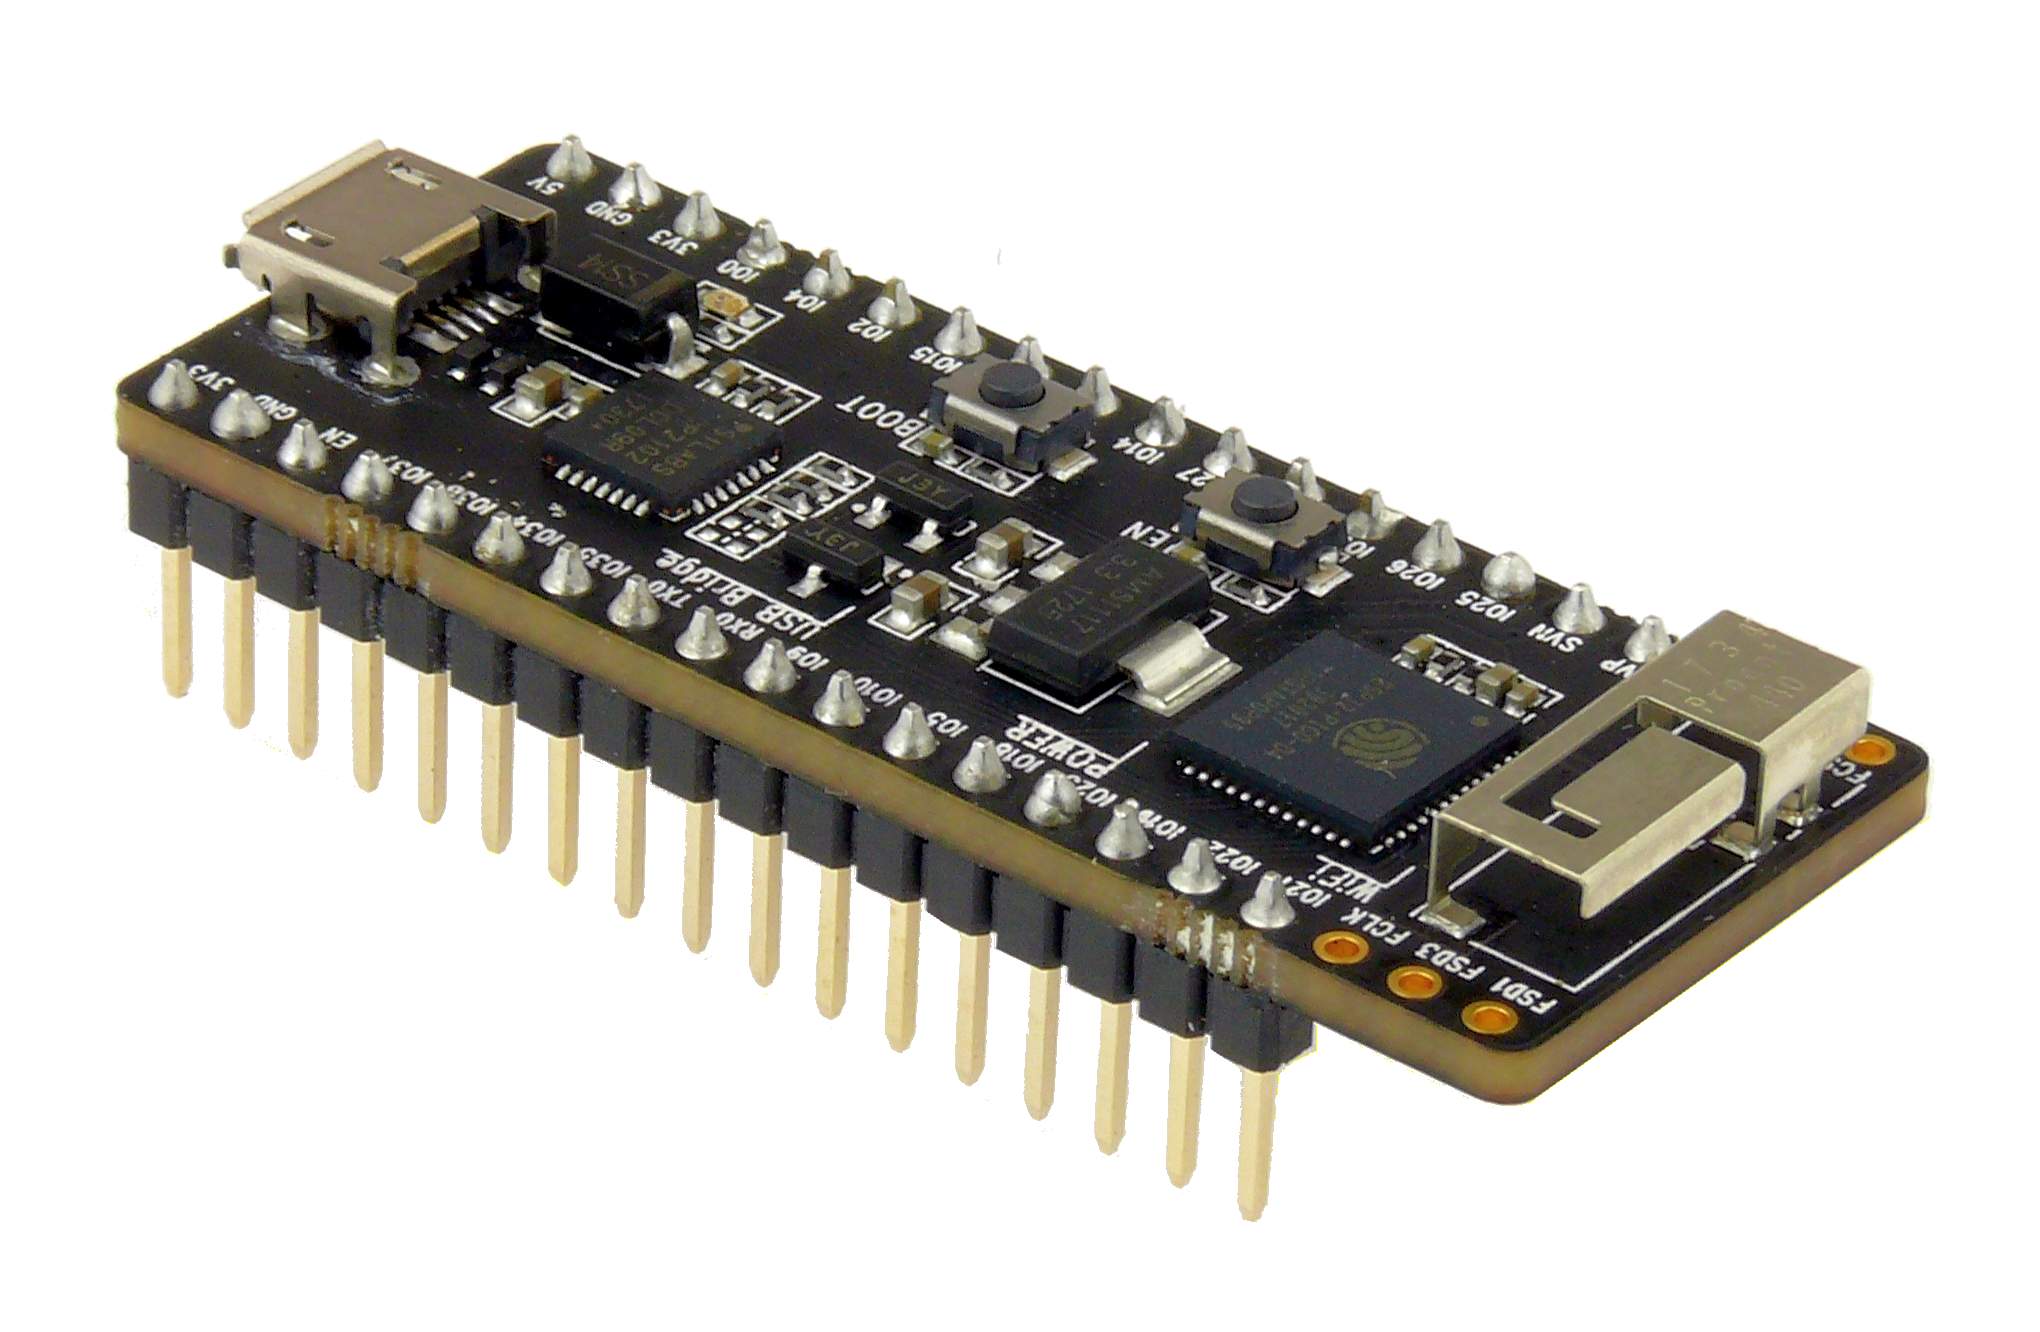
In this project ESP is a GATT server, which creates BLE service with two characteristics, one is read-only, and the second is for both reading and writing. Also it reads temperature and humidity data from connected HTU21D sensor and broadcast it as notifications to all nearby BLE devices. You can find the source code here. It is based on Espressif GATT demo server example and uses this library to interact with HTU21D.
Flashing ESP32 BT firmware
You need ESP-IDF (Espressif IoT Development Framework) to program your ESP32. It is the official development framework for the ESP32 chip. Install it with the following instructions:
1
2
3
4
mkdir ~/esp
cd ~/esp
git clone --recursive https://github.com/espressif/esp-idf.git
git checkout 3bf56cdd1
Set up IDF_PATH before running any other command:
1
export IDF_PATH=~/esp/esp-idf
The python packages required by ESP-IDF are located in IDF_PATH/requirements.txt. You can install them by running:
1
python -m pip install --user -r $IDF_PATH/requirements.txt
Note
Please check the version of the Python interpreter that you will be using with ESP-IDF. For this, run the command python --version and depending on the result, you might want to use python2, python2.7 or similar instead of just python, e.g.
See this guide for more info.
Now you can flash your ESP:
1
2
3
git clone https://github.com/thingsboard/gatts_demo
cd gatts_demo
make flash
Run make monitor if you want to see logs of ESP and check if everything is okay.
Example of output:
1
2
3
4
5
6
7
8
9
10
11
12
13
14
15
16
17
18
19
20
21
22
23
24
25
26
27
28
29
30
31
32
33
34
35
36
37
38
39
40
41
42
43
44
45
46
47
48
49
50
51
I (30) boot: ESP-IDF v4.0-dev-584-g3bf56cdd1 2nd stage bootloader
I (30) boot: compile time 14:00:10
I (30) boot: Enabling RNG early entropy source...
I (36) boot: SPI Speed      : 40MHz
I (40) boot: SPI Mode       : DIO
I (44) boot: SPI Flash Size : 4MB
I (48) boot: Partition Table:
I (52) boot: ## Label            Usage          Type ST Offset   Length
I (59) boot:  0 nvs              WiFi data        01 02 00009000 00006000
I (66) boot:  1 phy_init         RF data          01 01 0000f000 00001000
I (74) boot:  2 factory          factory app      00 00 00010000 00100000
I (81) boot: End of partition table
I (85) esp_image: segment 0: paddr=0x00010020 vaddr=0x3f400020 size=0x23384 (144260) map
I (145) esp_image: segment 1: paddr=0x000333ac vaddr=0x3ffbdb60 size=0x02c5c ( 11356) load
I (150) esp_image: segment 2: paddr=0x00036010 vaddr=0x40080000 size=0x00400 (  1024) load
0x40080000: _WindowOverflow4 at /home/yulia/esp/esp-idf/components/freertos/xtensa_vectors.S:1779

I (152) esp_image: segment 3: paddr=0x00036418 vaddr=0x40080400 size=0x09bf8 ( 39928) load
I (177) esp_image: segment 4: paddr=0x00040018 vaddr=0x400d0018 size=0x71ea0 (466592) map
0x400d0018: _flash_cache_start at ??:?

I (341) esp_image: segment 5: paddr=0x000b1ec0 vaddr=0x40089ff8 size=0x08d50 ( 36176) load
0x40089ff8: r_lld_pdu_rx_handler at ??:?

I (367) boot: Loaded app from partition at offset 0x10000
I (367) boot: Disabling RNG early entropy source...
I (368) cpu_start: Pro cpu up.
I (371) cpu_start: Application information:
I (376) cpu_start: Project name:     gatt_server_demos
I (382) cpu_start: App version:      b2732e4-dirty
I (387) cpu_start: Compile time:     Jun  3 2019 17:06:46
I (393) cpu_start: ELF file SHA256:  2d3d593eed804970...
I (399) cpu_start: ESP-IDF:          v4.0-dev-584-g3bf56cdd1
I (406) cpu_start: Starting app cpu, entry point is 0x400810e0
0x400810e0: call_start_cpu1 at /home/yulia/esp/esp-idf/components/esp32/cpu_start.c:267

I (0) cpu_start: App cpu up.
I (416) heap_init: Initializing. RAM available for dynamic allocation:
I (423) heap_init: At 3FFAFF10 len 000000F0 (0 KiB): DRAM
I (429) heap_init: At 3FFB6388 len 00001C78 (7 KiB): DRAM
I (435) heap_init: At 3FFB9A20 len 00004108 (16 KiB): DRAM
I (441) heap_init: At 3FFBDB5C len 00000004 (0 KiB): DRAM
I (447) heap_init: At 3FFC8EA0 len 00017160 (92 KiB): DRAM
I (453) heap_init: At 3FFE0440 len 00003AE0 (14 KiB): D/IRAM
I (460) heap_init: At 3FFE4350 len 0001BCB0 (111 KiB): D/IRAM
I (466) heap_init: At 40092D48 len 0000D2B8 (52 KiB): IRAM
I (472) cpu_start: Pro cpu start user code
I (155) cpu_start: Starting scheduler on PRO CPU.
I (0) cpu_start: Starting scheduler on APP CPU.
I (157) GATTS_DEMO: starting ESP gatt demo
Preparing MI Sensor
Install the battery in sensor.
Preparing Raspberry Pi
Demo script scans for available BLE devices and connects to them. It can read a direct value of BLE characteristic from ESP and receive notifications from both ESP and Mi. If needed, a re-scan command can be issues from the dashboard to connect to new devices.
Implementation details
If you are not interested in modifying or extending a list of supported devices, you can skip this sub-section. The demo script consists of few modules: the main module and couple of extension modules.
The main module is responsible for receiving commands from ThingsBoard and sending telemetry data. It also scans nearby devices and connects to them.
Extensions are modules that responsible for extracting application-specific data from the BLE device. If you want to implement support for a new device, you can create additional extension class and inherit it from provided intarface. Use this as an example.
Installing gateway scripts on Raspberry Pi
Login to your Raspberry PI using SSH and install demo. It requires at least python3.4. Also script requires superuser rights for Bluetooth management, so you need to install it system-wide.
1
2
sudo apt-get install libglib2.0-dev
sudo pip3 install tb-ble-adapter
Device provisioning
Run python script before importing dashboard. For this you have to create gateway device and specify it in command arguments:
1
sudo tb_ble_adapter -t $GATEWAY_ACCESS_TOKEN
Example of logs with device scanning, discovery of known devices and device connection:
1
2
3
4
5
6
7
8
9
10
11
12
13
14
15
16
17
18
19
20
21
22
23
24
25
26
27
28
29
30
31
32
33
34
35
36
37
38
39
40
41
42
43
44
45
46
47
48
49
50
51
52
53
54
55
56
57
58
59
60
61
62
63
64
65
66
67
68
69
70
71
72
73
74
75
76
77
78
79
80
Loading MiTempHumidityExtension extension...
Loading EspGattDemoExtension extension...
Scanning BLE devices...
Discovered BT device: 10:73:48:30:84:49
Discovered BT device: d8:a0:1d:40:93:fa
Discovered BT device: 3d:0b:d8:a9:ab:9d
Discovered BT device: 4e:8e:10:d8:c4:a1
Discovered BT device: 1b:83:77:79:2e:29
Discovered BT device: 00:1e:c0:75:d0:a3
Discovered BT device: 4c:65:a8:df:8e:3f
Discovered BT device: 4c:65:a8:df:85:c0
Discovered BT device: 4c:65:a8:df:94:d1
Received new data from: 4c:65:a8:df:8e:3f
Received new data from: 4c:65:a8:df:85:c0
Received new data from: 4c:65:a8:df:94:d1
Received new data from: 4c:65:a8:df:8e:3f
Received new data from: 4c:65:a8:df:8e:3f
Received new data from: 4c:65:a8:df:85:c0
Received new data from: 4c:65:a8:df:94:d1
Received new data from: 4c:65:a8:df:8e:3f
Received new data from: 4c:65:a8:df:85:c0
Received new data from: 4c:65:a8:df:94:d1
Discovered BT device: 2e:ff:58:11:60:71
Discovered BT device: 49:91:8f:6c:7a:17
Received new data from: 4c:65:a8:df:8e:3f
Received new data from: 4c:65:a8:df:8e:3f
Received new data from: 4c:65:a8:df:85:c0
Received new data from: 4c:65:a8:df:8e:3f
Received new data from: 4c:65:a8:df:85:c0
Received new data from: 4c:65:a8:df:94:d1
Received new data from: 4c:65:a8:df:8e:3f
Device 10:73:48:30:84:49 (random), RSSI=-52 dB
  Manufacturer = 06000109200298bf2a039d57aa7fda15c7cc1772001b3cd9881bf3e8e0
Device d8:a0:1d:40:93:fa (public), RSSI=-43 dB
  Flags = 06
  Complete Local Name = ESP_GATTS_DEMO
    [!] Known device found: ESP_GATTS_DEMO
  Tx Power = 03
  Complete 16b Services = 000000ee-0000-1000-8000-00805f9b34fb,000000ff-0000-1000-8000-00805f9b34fb
Device 3d:0b:d8:a9:ab:9d (random), RSSI=-76 dB
  Manufacturer = 0600010920029944e816d9764a15972cd9df7db619bf8dc0875737d50a
Device 4e:8e:10:d8:c4:a1 (random), RSSI=-72 dB
  Flags = 1a
  Manufacturer = 4c001005131c9659d5
Device 1b:83:77:79:2e:29 (random), RSSI=-91 dB
  Manufacturer = 060001092002fd5da974543017b16d0518788003bed6946bb155378f84
Device 00:1e:c0:75:d0:a3 (public), RSSI=-90 dB
  Flags = 06
  Complete 128b Services = 00035b03-58e6-07dd-021a-08123a000300
  Complete Local Name = D1900924
Device 4c:65:a8:df:8e:3f (public), RSSI=-59 dB
  Flags = 06
  16b Service Data = ffffe0845fe76916
  Complete Local Name = MJ_HT_V1
    [!] Known device found: MJ_HT_V1
  Complete 16b Services = 0000180f-0000-1000-8000-00805f9b34fb,0000180a-0000-1000-8000-00805f9b34fb
Device 4c:65:a8:df:85:c0 (public), RSSI=-51 dB
  Flags = 06
  16b Service Data = ffffca4e2ef743aa
  Complete Local Name = MJ_HT_V1
    [!] Known device found: MJ_HT_V1
  Complete 16b Services = 0000180f-0000-1000-8000-00805f9b34fb,0000180a-0000-1000-8000-00805f9b34fb
Device 4c:65:a8:df:94:d1 (public), RSSI=-57 dB
  Flags = 06
  16b Service Data = fffff61d60016488
  Complete Local Name = MJ_HT_V1
    [!] Known device found: MJ_HT_V1
  Complete 16b Services = 0000180f-0000-1000-8000-00805f9b34fb,0000180a-0000-1000-8000-00805f9b34fb
Device 2e:ff:58:11:60:71 (random), RSSI=-96 dB
  Manufacturer = 06000109200232a466069323755cf0a3f6333f3575276dd81e6a2940ba
Device 49:91:8f:6c:7a:17 (random), RSSI=-71 dB
  Flags = 1a
  Manufacturer = 4c001005131cc5c74c
Connecting to device: MJ_HT_V1_4C65A8DF8E3F
Polling data from: MJ_HT_V1_4C65A8DF8E3F
Received data: b'T=23.9 H=43.5\x00'
Data received: {'temperature': 23.9, 'humidity': 43.5}
Sending data to TB: {'ts': 1559827797240, 'values': {'temperature': 23.9, 'humidity': 43.5}}
Disconnecting from device
It creates devices:

Provision your dashboard
Download the dashboard file using this link. Now you have to import it. To do this, configure aliases in such way (use gateway device from Device provisioning section):
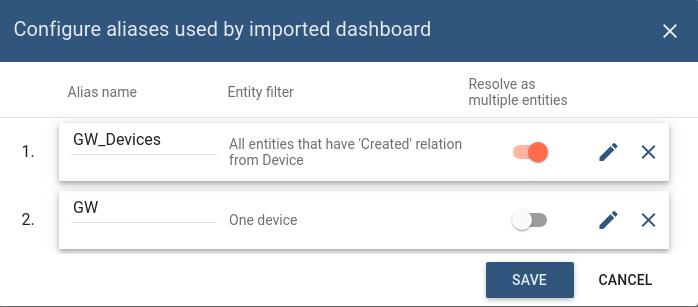
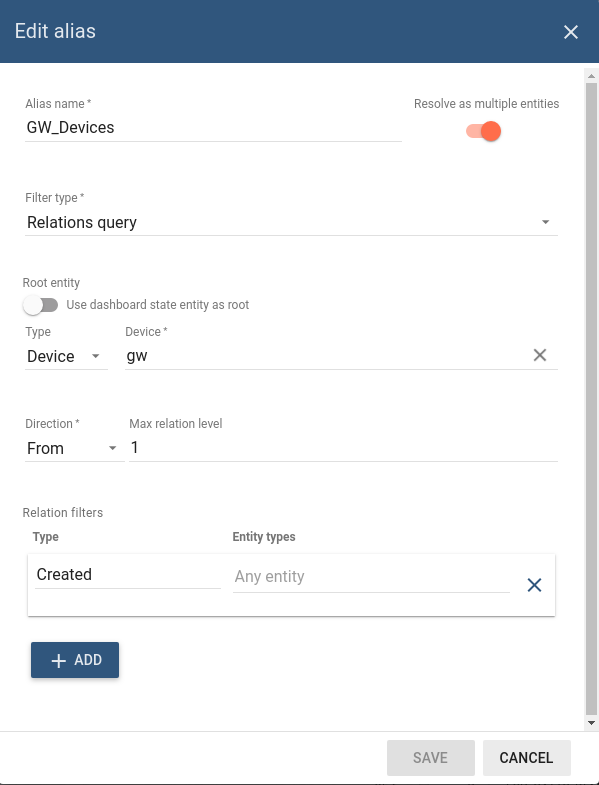
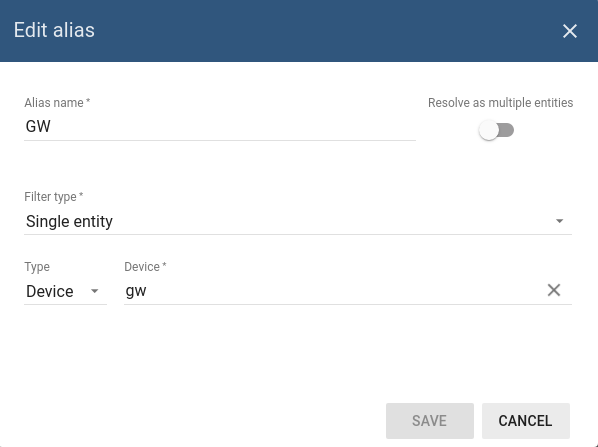
Also this dashboard needs a custom widget bundle. Download it with this link and import using import/export instructions.
Data visualization
Finally, open ThingsBoard Web UI. You can access this dashboard by logging in as a tenant administrator.
In case of local installation:
- login: tenant@thingsboard.org
- password: tenant
In case of live-demo server:
- login: your live-demo username (email)
- password: your live-demo password
See live-demo page for more details how to get your account.
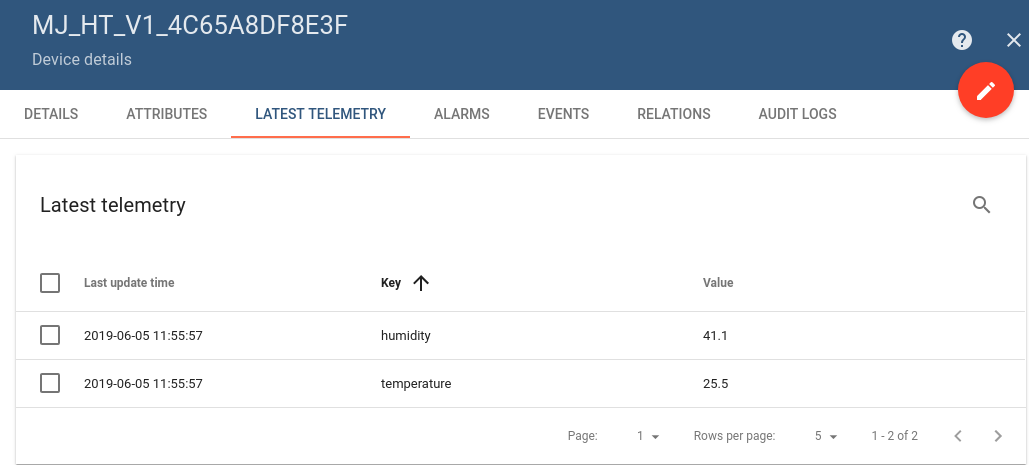
Go to “Devices” section, open created devices details and switch to “Latest telemetry” tab. If all is configured correctly you should be able to see latest telemetry values sent via BLE in the table.
After, open “Dashboards” section and find previously imported dashboard “Device GW” and observe the following picture:

Troubleshooting
In order to perform troubleshooting, you must check demo script output. It displays connection status with every device, as well as received and sent data.
See also
Browse other samples or explore guides related to main ThingsBoard features:
- Device attributes - how to use device attributes.
- Telemetry data collection - how to collect telemetry data.
- Using RPC capabilities - how to send commands to/from devices.
- Rule Engine - how to use rule engine to analyze data from devices.
- Data Visualization - how to visualize collected data.
Your feedback
Don’t hesitate to star ThingsBoard on github to help us spread the word. If you have any questions about this sample - post it on the issues.
Next steps
-
入门指南 - 快速学习ThingsBoard相关功能。
-
安装指南 - 学习如何在各种操作系统上安装ThingsBoard。
-
连接设备 - 学习如何根据你的连接方式或解决方案连接设备。
-
可 视 化 - 学习如何配置复杂的ThingsBoard仪表板说明。
-
数据处理 - 学习如何使用ThingsBoard规则引擎。
-
数据分析 - 学习如何使用规则引擎执行基本的分析任务。
-
高级功能 - 学习高级ThingsBoard功能。
-
开发指南 - 学习ThingsBoard中的贡献和开发。
