- Water meter Pulse Sensor LoRaWAN “Smartico P22-LR” telemetry upload
- Introduction
- Prerequisites
- Step 1. Creation UpLink Data Converters
- Step 2. Integration configuration.
- Step 3. Verifying the receipt of data from the device.
- Step 4. Creation Pulse Sensor Asset.
- Step 5. Rule chain import and configuration.
- Step 6. Dashboard import and configuration.
- See also
- Your feedback
- Next steps
Water meter Pulse Sensor LoRaWAN “Smartico P22-LR” telemetry upload
Introduction
The device Pulse Sensor LoRaWAN “Smartico P22-LR” is used in various fields of industry, utilities and automation for remote data collection and transmission via LoRaWAN networks. The device has two universal pulse inputs with control of the integrity of the communication. In this example, two water meters are connected to the device. The figure shows a dashboard with processed telemetry results.

Prerequisites
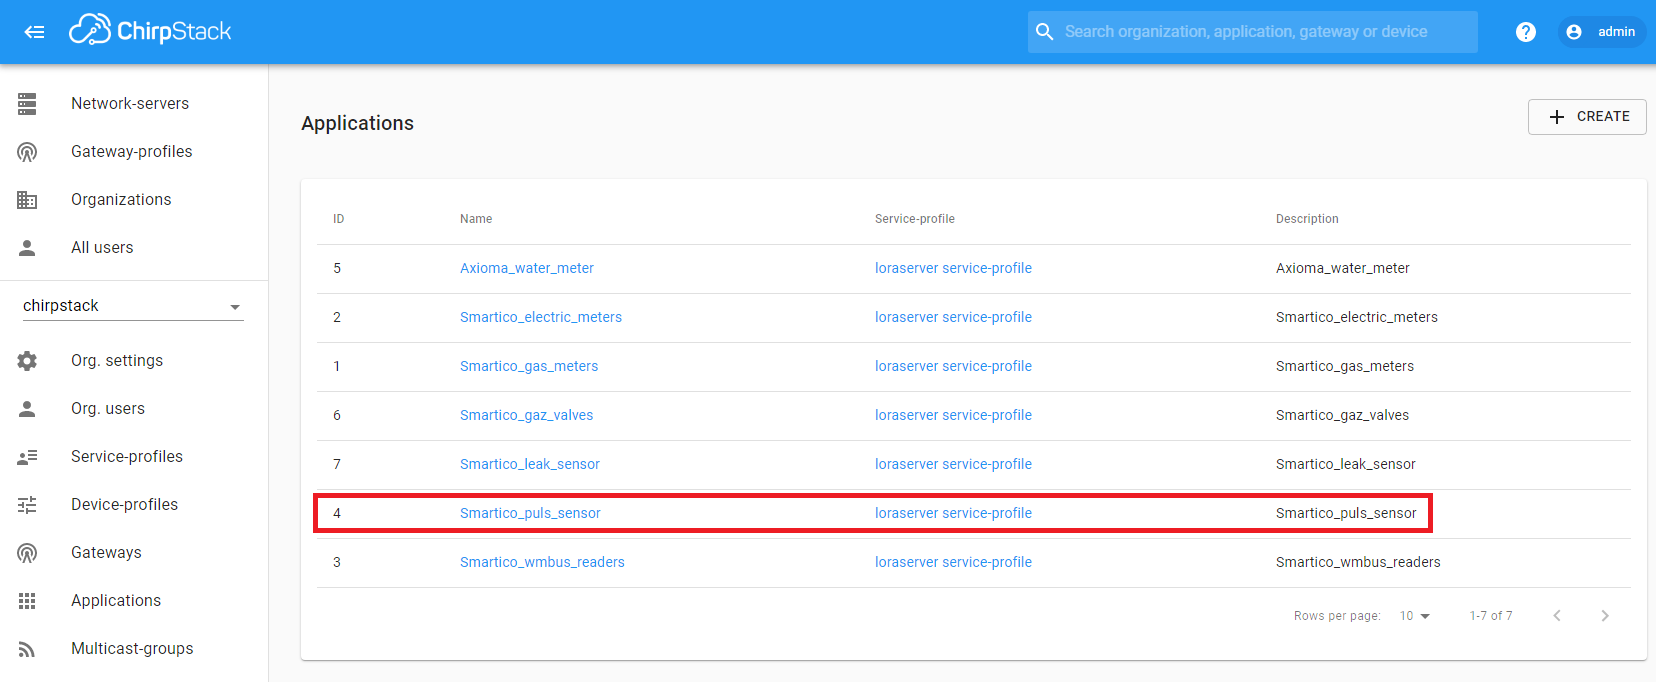
LoRaWAN technology is used to transfer data from the Pulse Sensor P22-LR to the ThingsBoard platform. This is the wireless communication technology that allows small amounts of data to be exchanged over a long distance. First of all, you need to configure the LoRaWAN server and make sure that data from the device goes to the server. This guide uses ChirpStack open-source LoRaWAN Network Server. After finishing the server configuration on the Applications page, an entry with the device type should appear in the table.
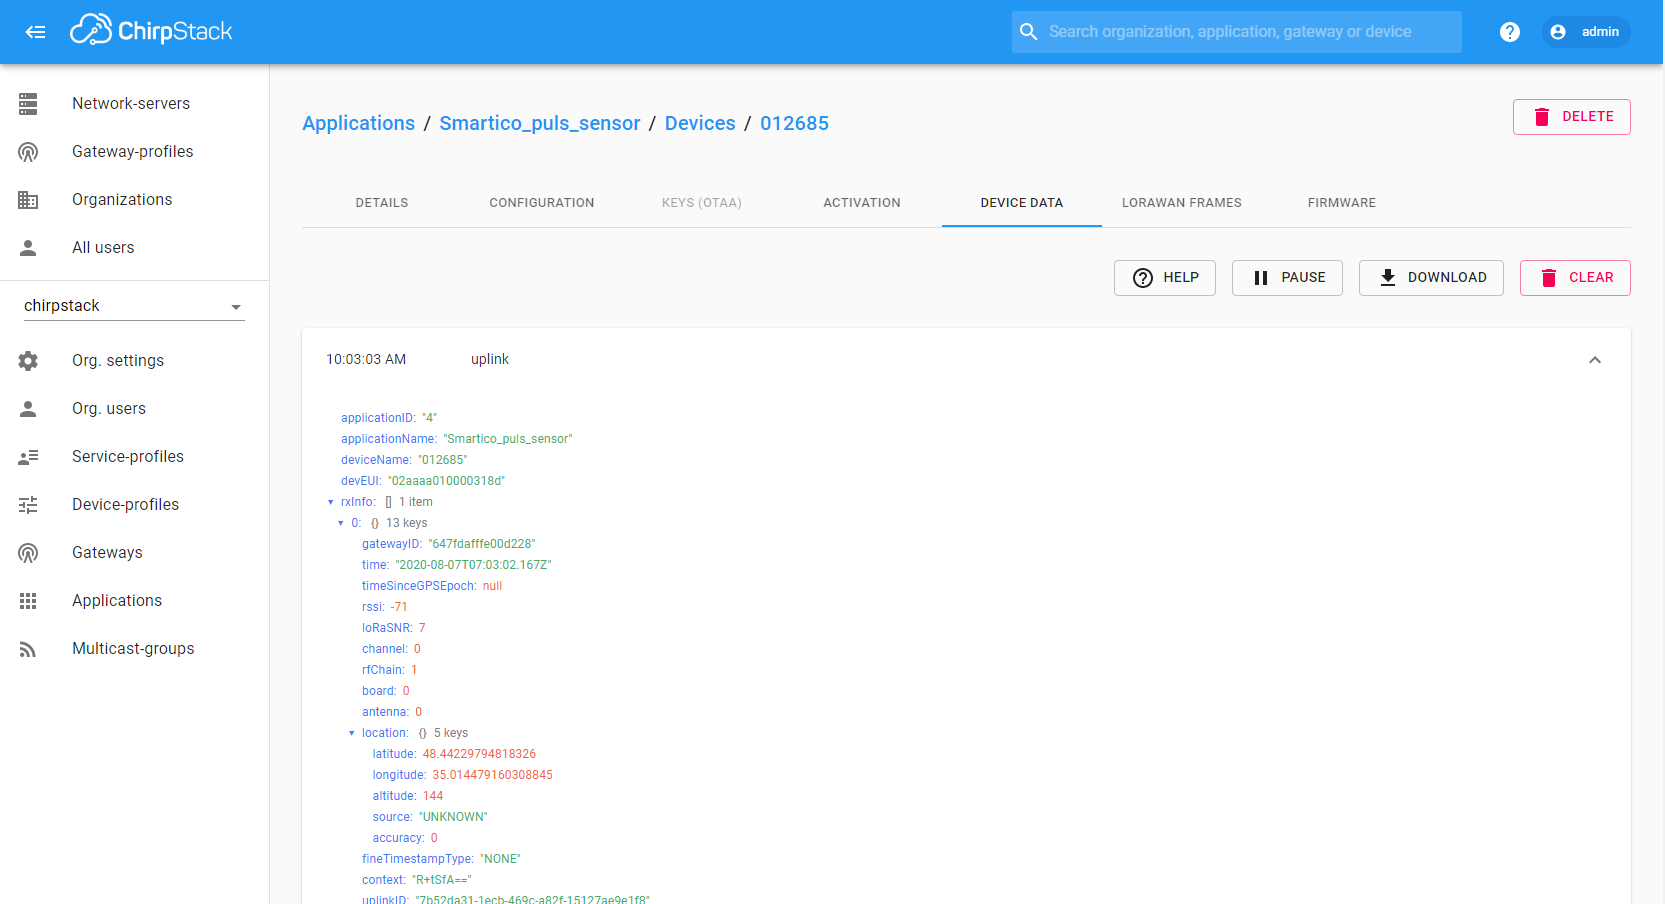
For example, we connected a device with the serial number 12685. With the correct configuration of the LoRaWAN server, we should see the data flow from the device. The frequency of data transmission from the device depends on the Pulse Sensor settings.
To be able to receive data via the MQTT protocol, you need to integrate the LoRaWAN server and the Mosquitto MQTT broker.
Step 1. Creation UpLink Data Converters
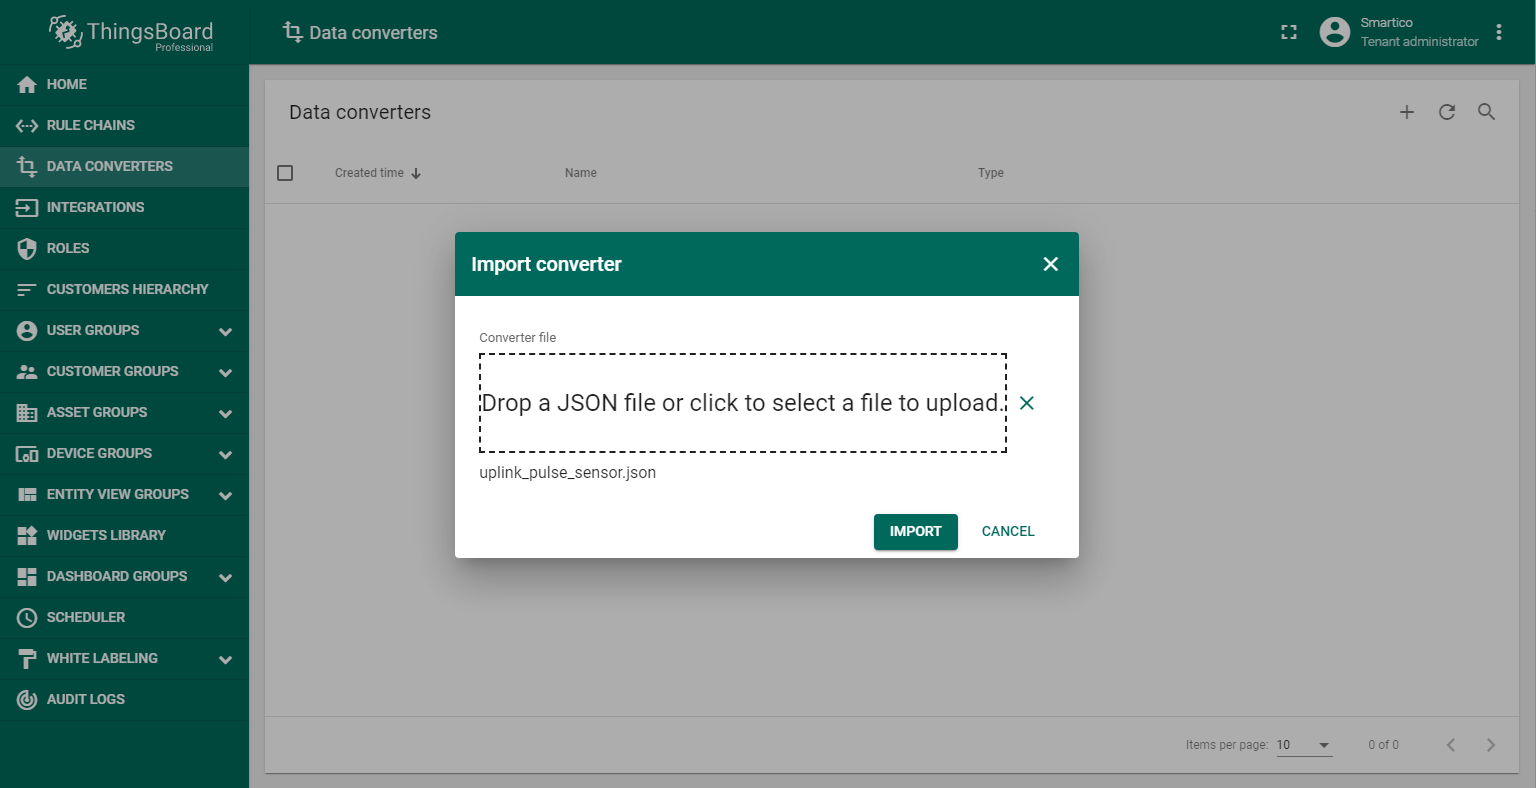
First, you should create the Uplink Data Converter according to the device protocol. The converter will decode incoming telemetry payload data from Pulse Sensor LoRaWAN “Smartico P22-LR” that contains in encoded Base64 string to human readable, simplified ThingsBoard data format. Import uplink_pulse_sensor.json file with Uplink data converter.
Step 2. Integration configuration.
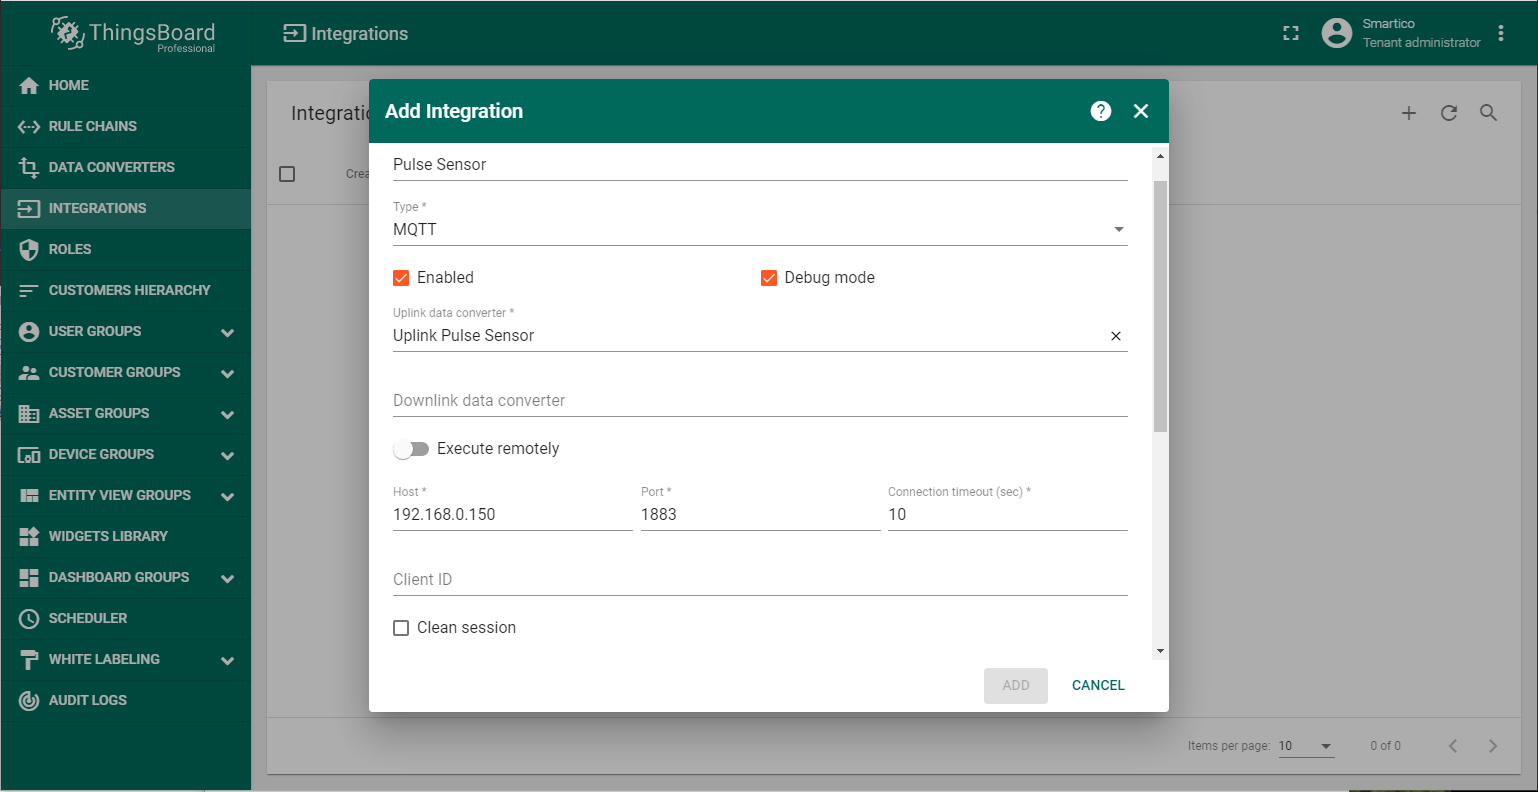
To integrate Pulse Sensor LoRaWAN “Smartico P22-LR” into ThingsBoard platform you should create a new integration as shown on the figure.
Also below you should add the topic filter according to LoRaWAN server configuration (in this example application/4/device/+/rx). In the Host and Port fields, enter the ip-address where the MQTT broker is installed and port for working with it.
Step 3. Verifying the receipt of data from the device.
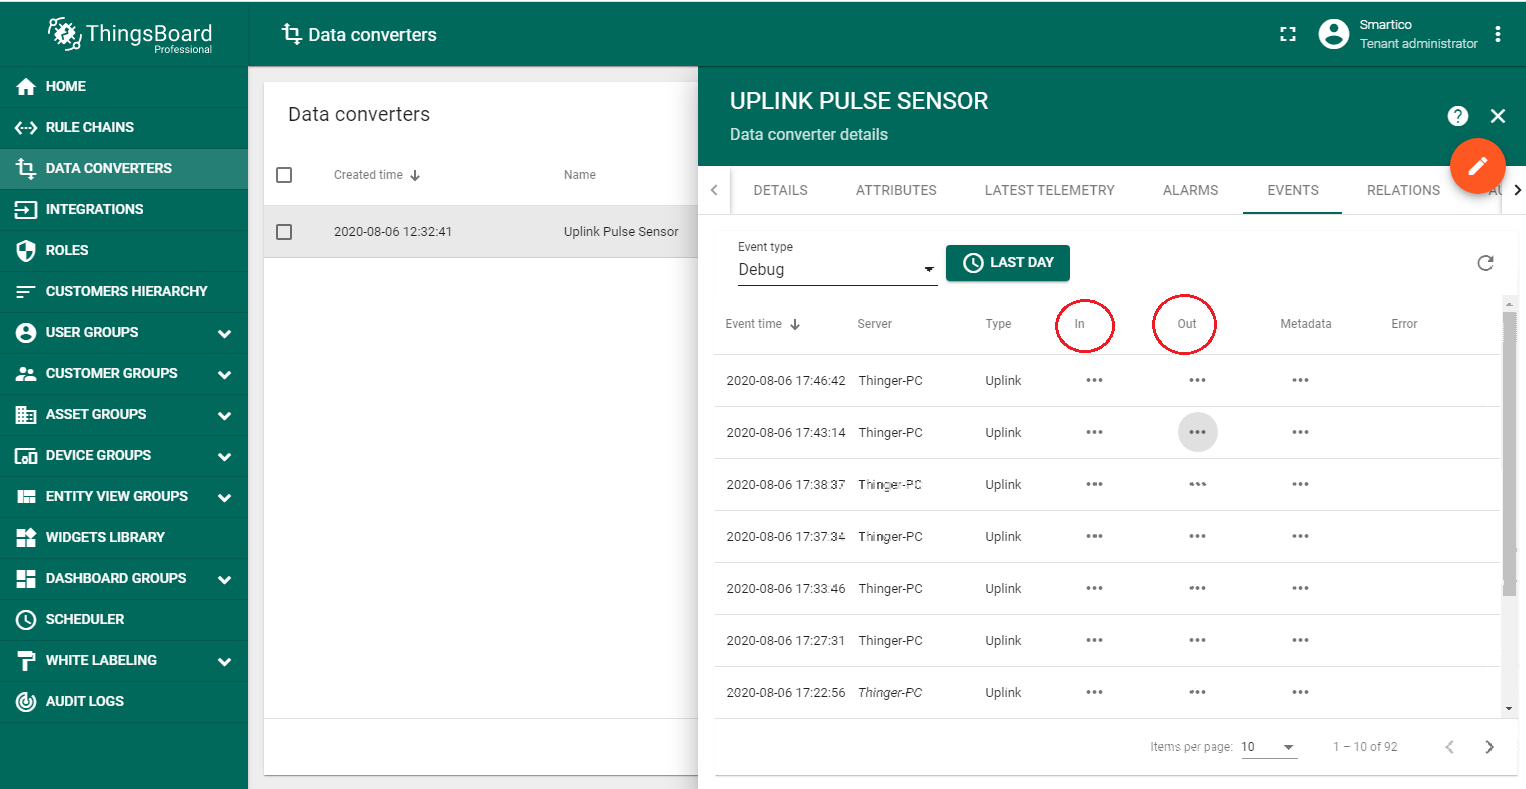
Connect Pulse Sensor P22-LR to transfer information. If the integration was performed without errors, after the transmission of the first telemetry, a new device with the name “012685” will appear in the DEVICE GROUPS → All. Also you can verify the input and output data, respectively, before and after conversion in DATA CONVERTERS → Uplink Pulse Sensor → EVENTS.
Input data from Pulse Sensor looks like this:
1
2
3
4
5
6
7
8
9
10
11
12
13
14
15
16
17
18
19
20
21
22
23
24
25
26
27
{
    "applicationID": "4",
    "applicationName": "Smartico_puls_sensor",
    "deviceName": "012685",
    "devEUI": "02aaaa010000318d",
    "rxInfo": [{
        "gatewayID": "647fdafffe00d228",
        "uplinkID": "7ee7327f-9bde-4039-b993-4f8a2d593166",
        "name": "tectelic_micro_lite_TECH",
        "rssi": -72,
        "loRaSNR": 4,
        "location": {
            "latitude": 48.44229794818326,
            "longitude": 35.014479160308845,
            "altitude": 144
        }
    }],
    "txInfo": {
        "frequency": 868500000,
        "dr": 0
    },
    "adr": true,
    "fCnt": 6368,
    "fPort": 7,
    "data": "YgASAACBBAAAAAk="
}
The payload is contained in the “data” field and encrypted in Base64. After decoding output data will look like this:
1
2
3
4
5
6
7
8
9
10
11
12
13
14
15
16
17
18
19
20
21
22
23
24
25
26
{
    "deviceName": "012685",
    "deviceType": "Water Pulse",
    "attributes": {
        "integrationName": "Pulse Sensor"
    },
    "telemetry": {
        "NAME_DEV": "Water meter Pulse Sensor LoRaWAN 'Smartico P22-LR'",
        "SN": "012685",
        "REAL_TIME": "27.08.2020 10:14:19",
        "WATER_PULSE_VALUE_1": 330.28000000000003,
        "WATER_PULSE_VALUE_2": 0.09,
        "FRAUD_1": 2,
        "FRAUD_2": 2,
        "FLG_ERR_PULSE_1": 0,
        "FLG_ERR_PULSE_2": 0,
        "FLG_LOW_BAT": 0,
        "FLG_MOTION_DETECT": 1,
        "FLG_MAGNET_DETECT": 0,
        "FLG_TAMPER_DETECT": 0,
        "FLG_POWER_ON": 0,
        "FLG_POWER_BAT": 1,
        "FLG_ERR_TIME": 1,
        "FLG_CFG_DONE": 0
    }
}
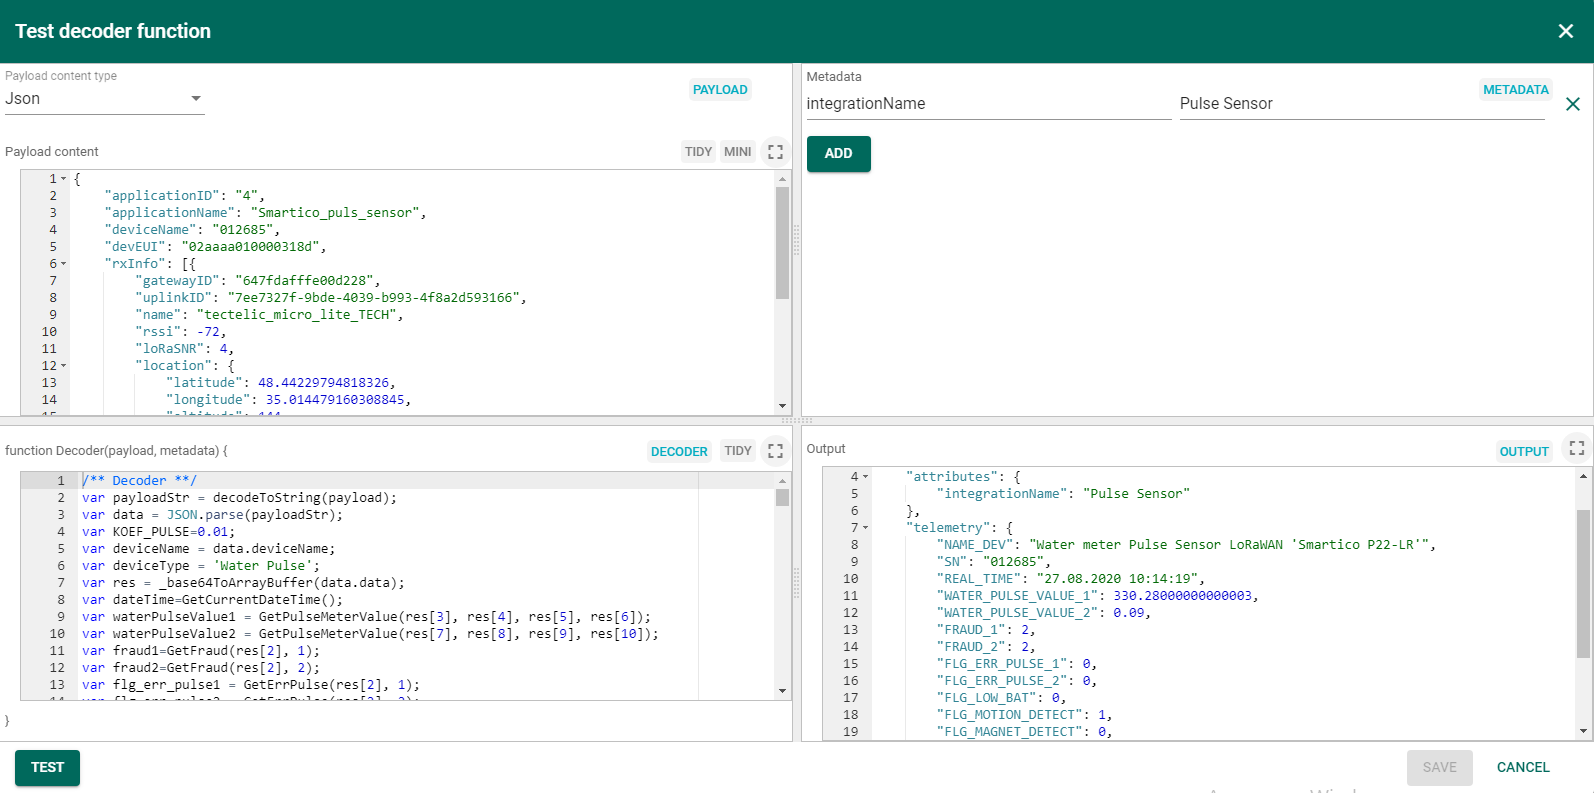
The input and output data are for example purposes only and not related to the dashboard shown at the beginning of the guide. Before turning on the device, you can verify the functionality of programming code from uplink_pulse_sensor.json file. For this purpose, open the Test decoder function for Uplink Pulse Sensor in the DATA CONVERTERS and copy the input data from this guide into Payload content field. Press TEST button then in Output field should appear decoding output data as shown on the figure (the REAL_TIME field displays the current date and time).
Step 4. Creation Pulse Sensor Asset.
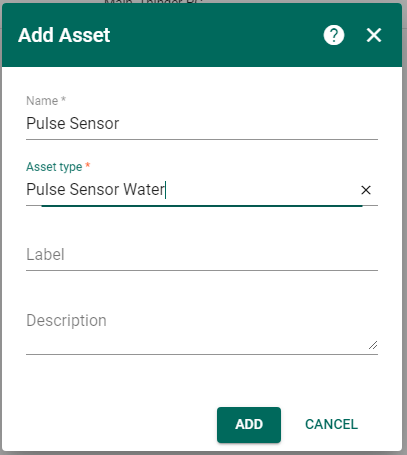
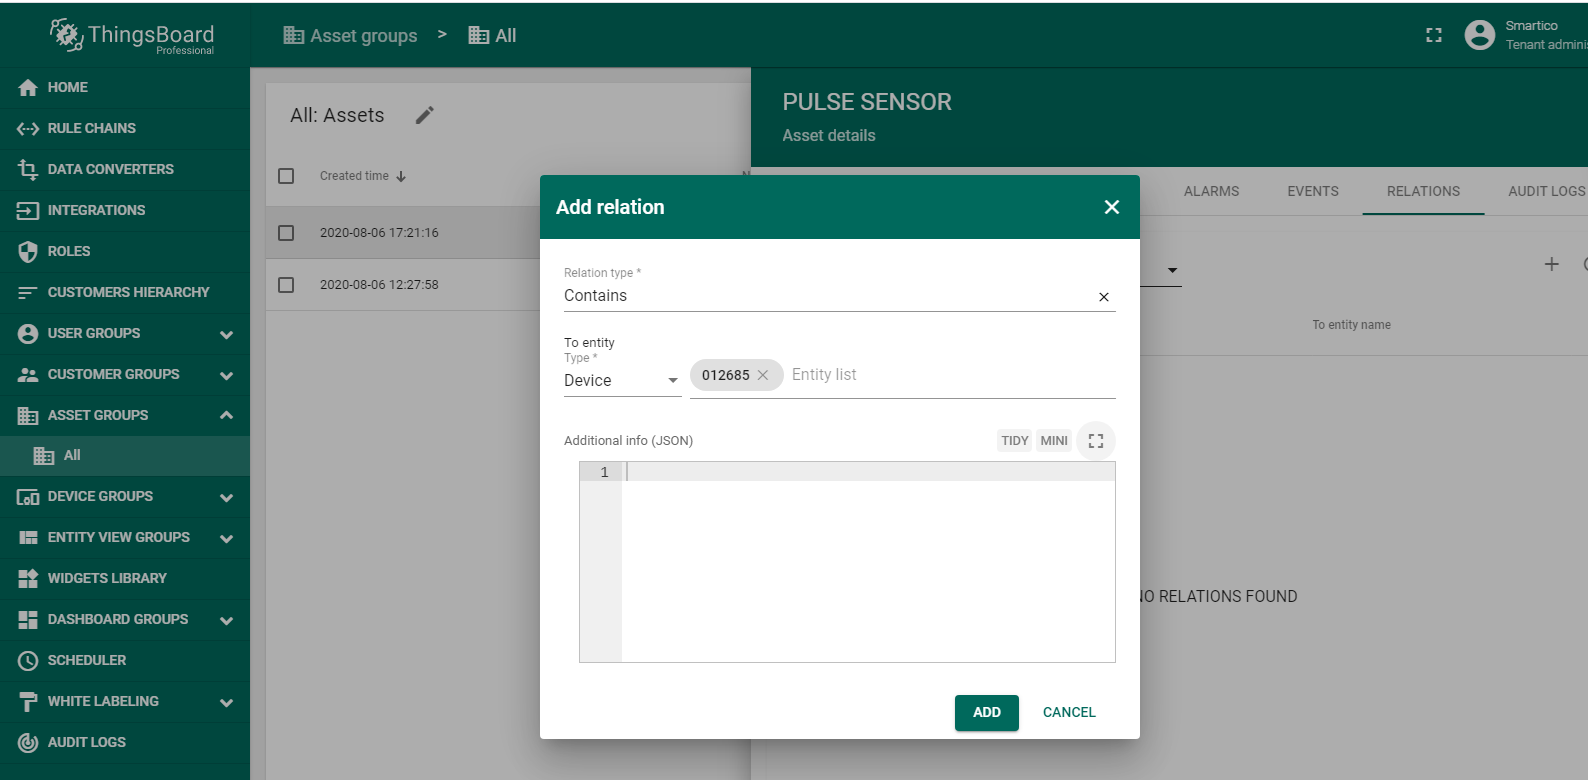
To be able to display data in the dashboard, you should first create an asset and add device 012685 in the RELATIONS, as shown in the figures.
Step 5. Rule chain import and configuration.
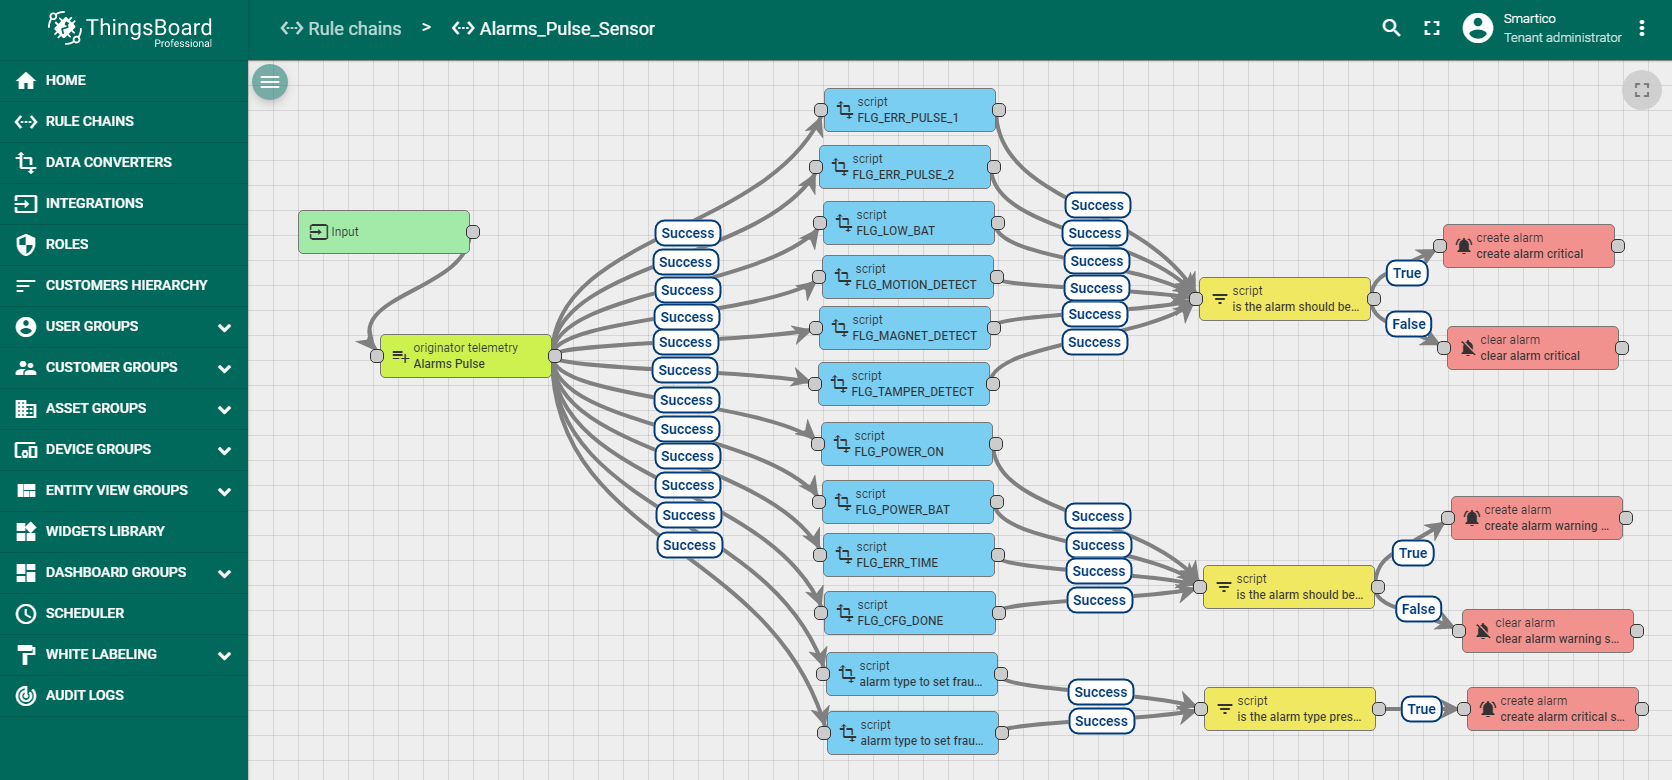
In addition to meter readings, it is possible to monitor the status of the device. For example, you can get information about a low battery, opening the device case, exposure to a magnetic field, and others. This information is displayed in the Alarm widget. Therefore, you should set up Rule chain first. Import alarms_pulse_sensor.json file with alarms and save the configuration of the Rule chain in ThingsBoard.
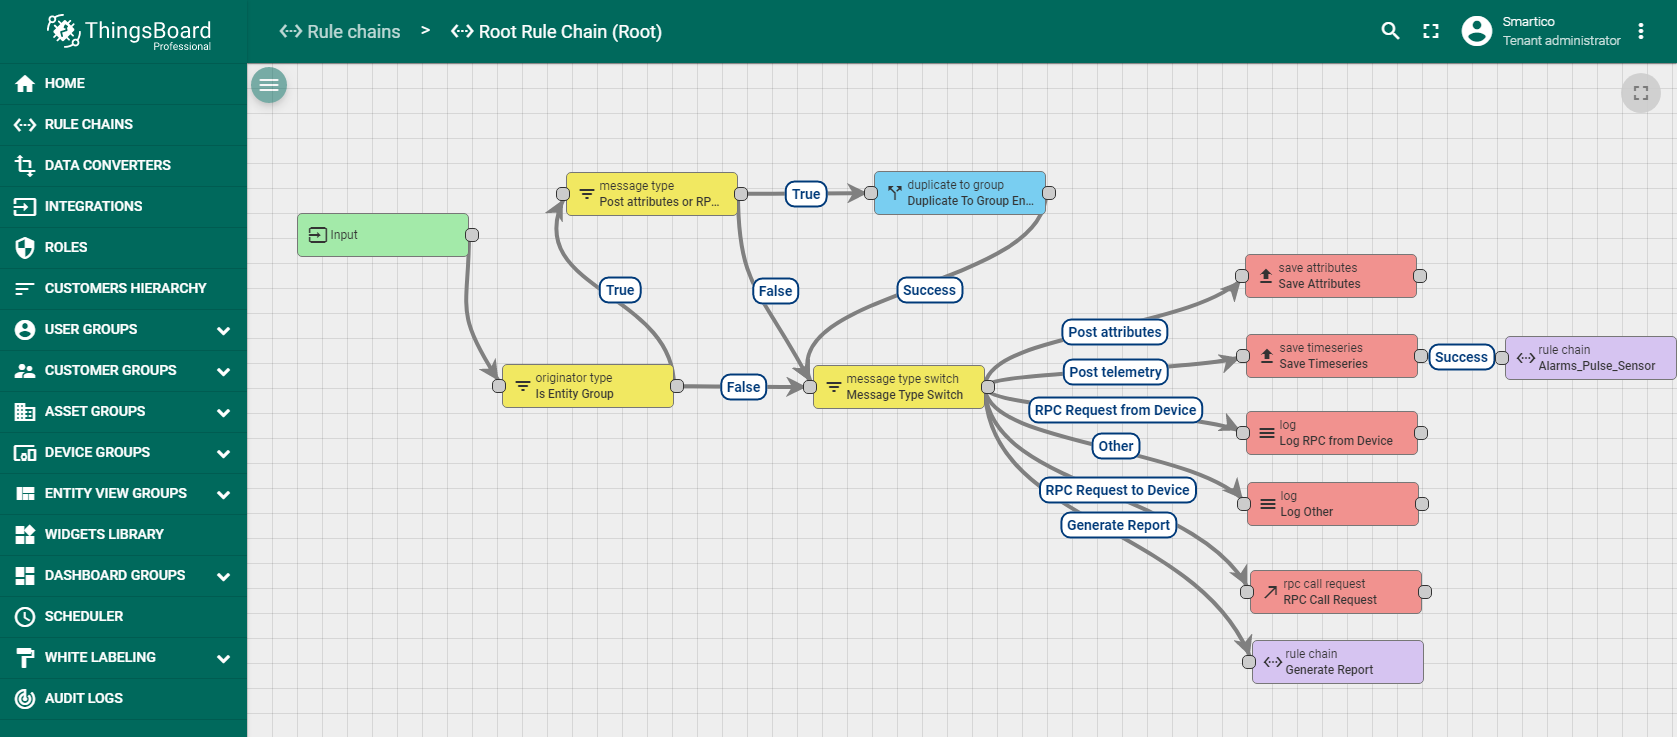
Then configure Root Rule chain. You should add in Root Rule chain Alarms Pulse Sensor as it shown on the figure.
Step 6. Dashboard import and configuration.
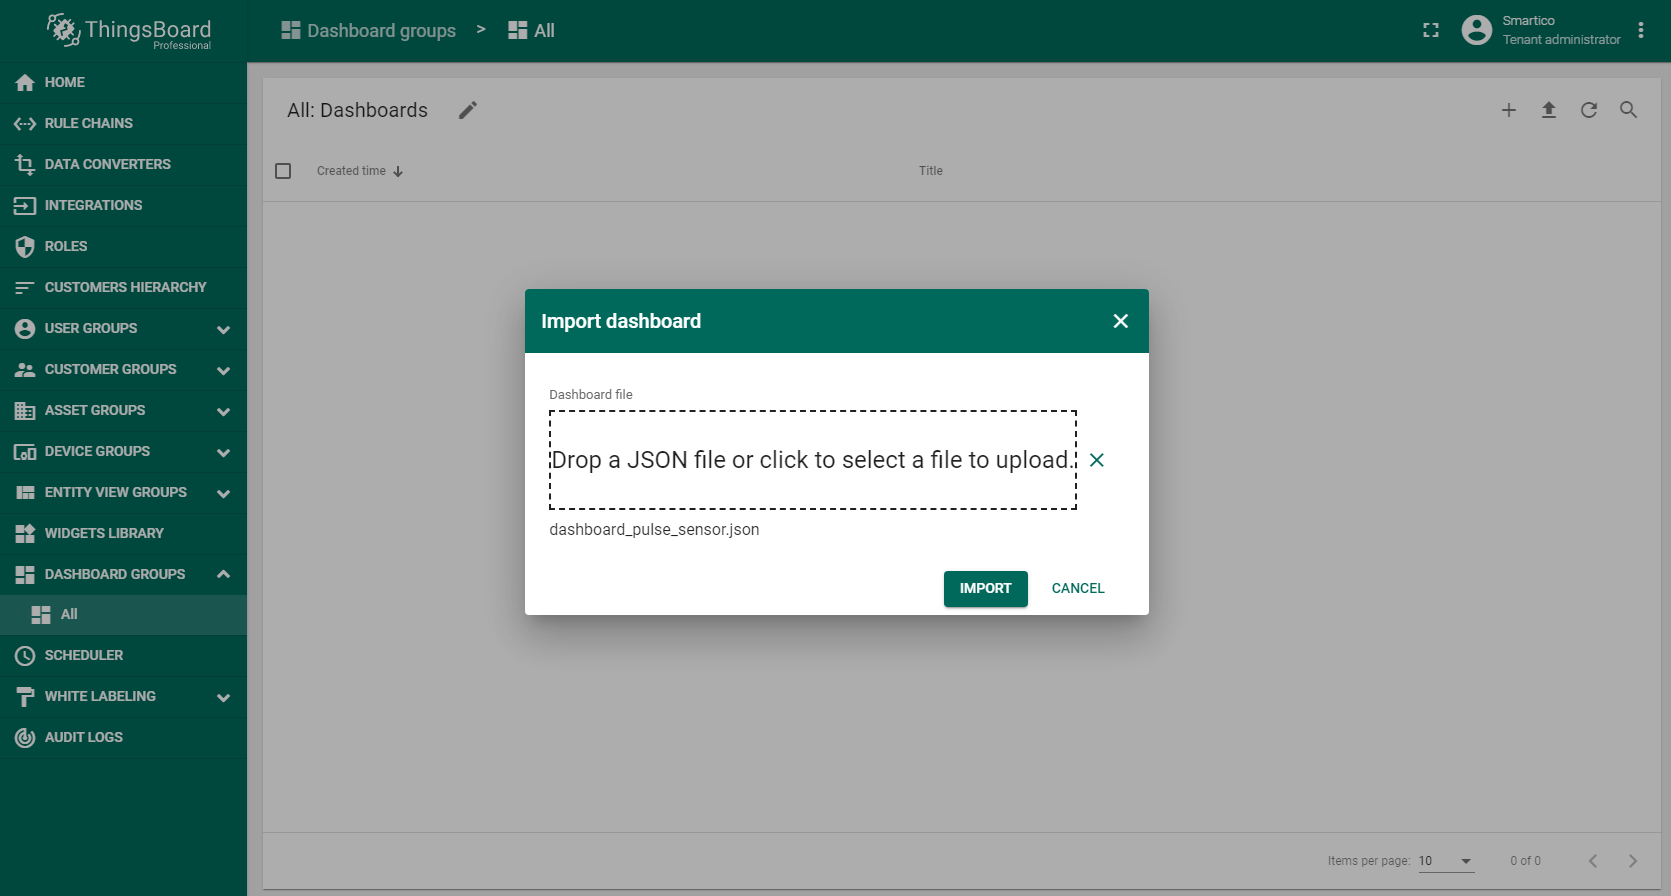
To display data to users, you need to create a dashboard that can be imported from the dashboard_pulse_sensor.json file.
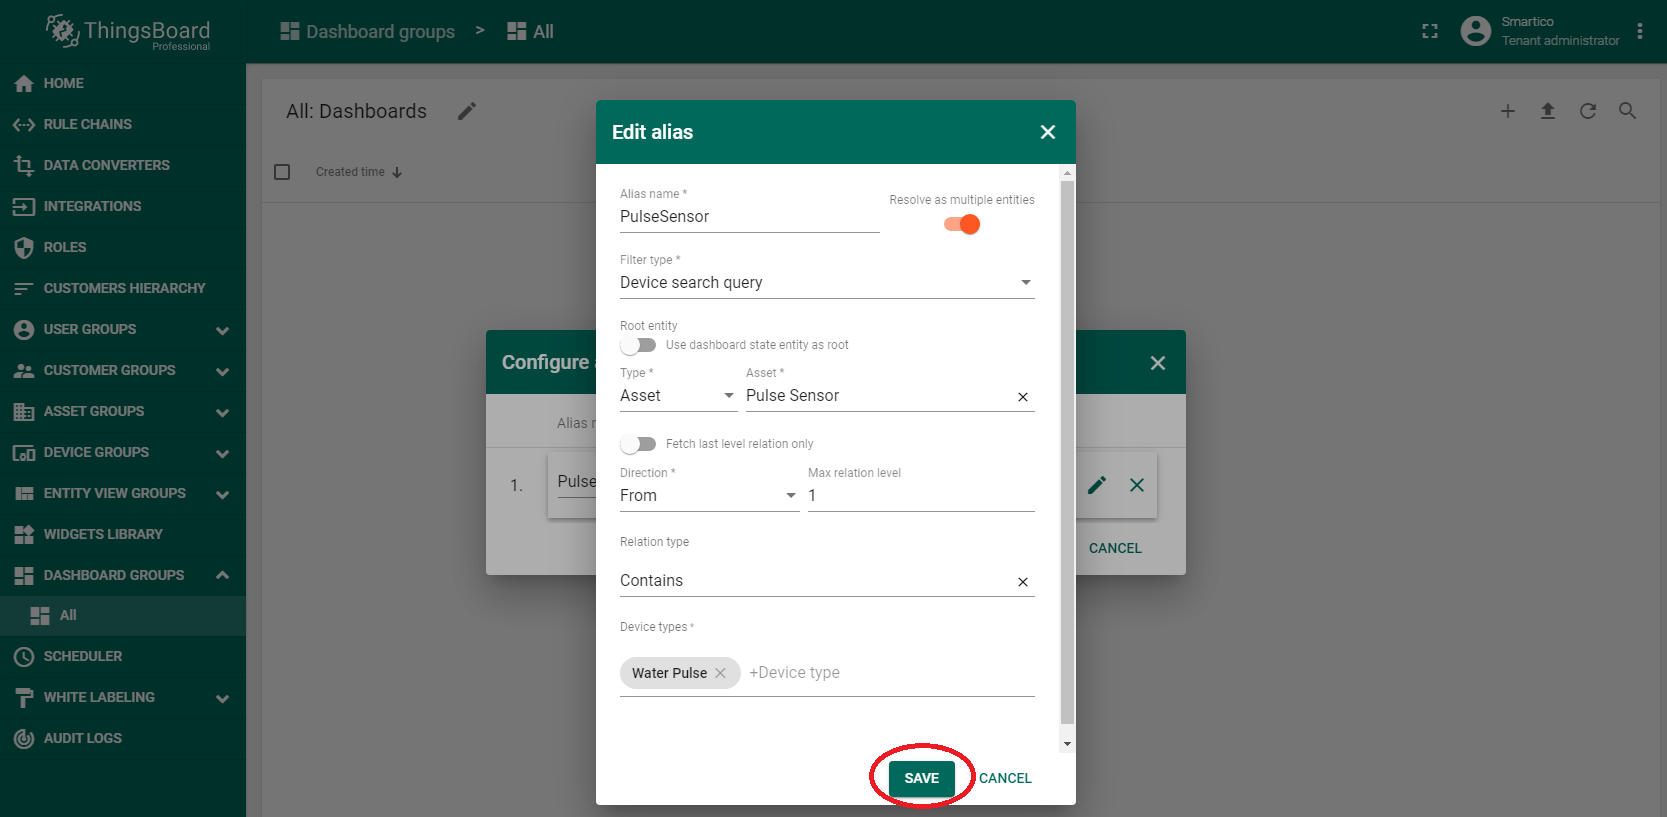
When importing a dashboard, it will be necessary to create an alias, as shown in the figure.
If everything was done correctly, in DASHBOARD GROUPS → All you will see the new dashboard Water meter Pulse Sensor LoRaWAN “Smartico P22-LR” that was provided at the beginning of the guide.
See also
Browse other samples or explore guides related to main ThingsBoard features:
- Device attributes - how to use device attributes.
- Telemetry data collection - how to collect telemetry data.
- Using RPC capabilities - how to send commands to/from devices.
- Rule Engine - how to use rule engine to analyze data from devices.
- Data Visualization - how to visualize collected data.
Your feedback
Don’t hesitate to star ThingsBoard on github to help us spread the word. If you have any questions about this sample - post it on the issues.
Next steps
-
入门指南 - 快速学习ThingsBoard相关功能。
-
安装指南 - 学习如何在各种操作系统上安装ThingsBoard。
-
连接设备 - 学习如何根据你的连接方式或解决方案连接设备。
-
可 视 化 - 学习如何配置复杂的ThingsBoard仪表板说明。
-
数据处理 - 学习如何使用ThingsBoard规则引擎。
-
数据分析 - 学习如何使用规则引擎执行基本的分析任务。
-
高级功能 - 学习高级ThingsBoard功能。
-
开发指南 - 学习ThingsBoard中的贡献和开发。
