MQTT是一种轻量级发布/订阅消息协议,可能是最适合各类物联网设备的协议。
ThingsBoard服务节点充当MQTT代理,支持: • QoS 0(最多一次) • QoS 1(至少一次) • 通过设备配置配置MQTT主题
更多MQTT信息请见mqtt.org。
客户端库配置
不同平台和语言有多种MQTT客户端库可用。
本指南示例使用: • Mosquitto(命令行工具) • MQTT.js(JavaScript)
按以下说明安装命令行工具: • mosquitto_pub • mosquitto_sub
选择您的操作系统继续安装:
|
为 Ubuntu 安装 MQTT 客户端: 为 macOS 安装 MQTT 客户端: |
|
请按以下步骤在 Windows 中下载、安装、配置并运行 mosquitto_pub:
将 Mosquitto 目录添加到「Path」变量的步骤如下:
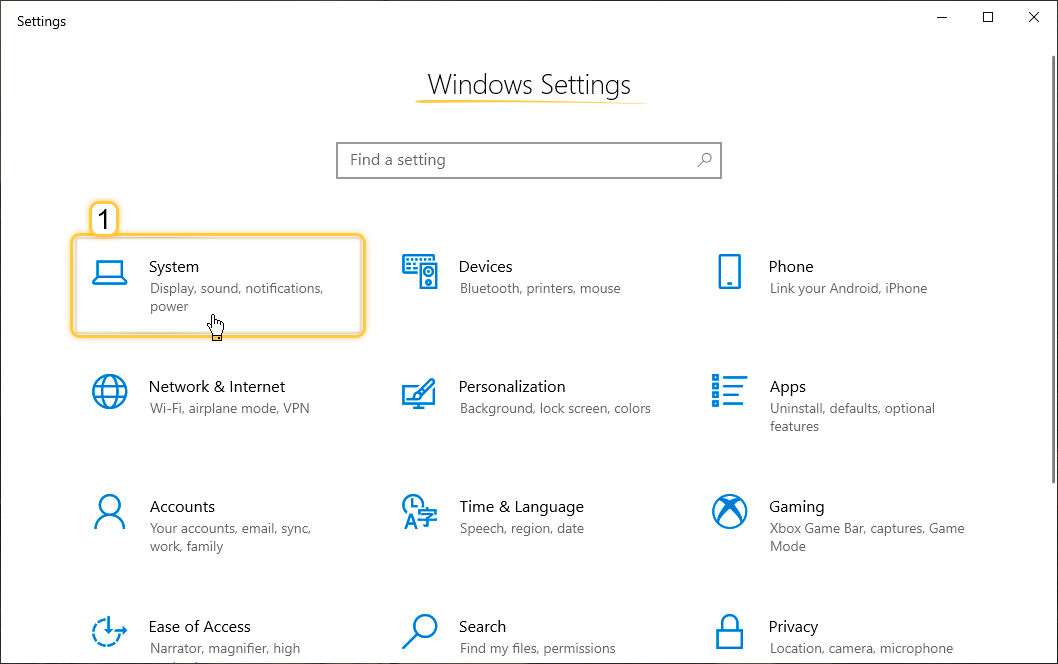 按 Win + X,选择「System」,然后点击「System」页面; 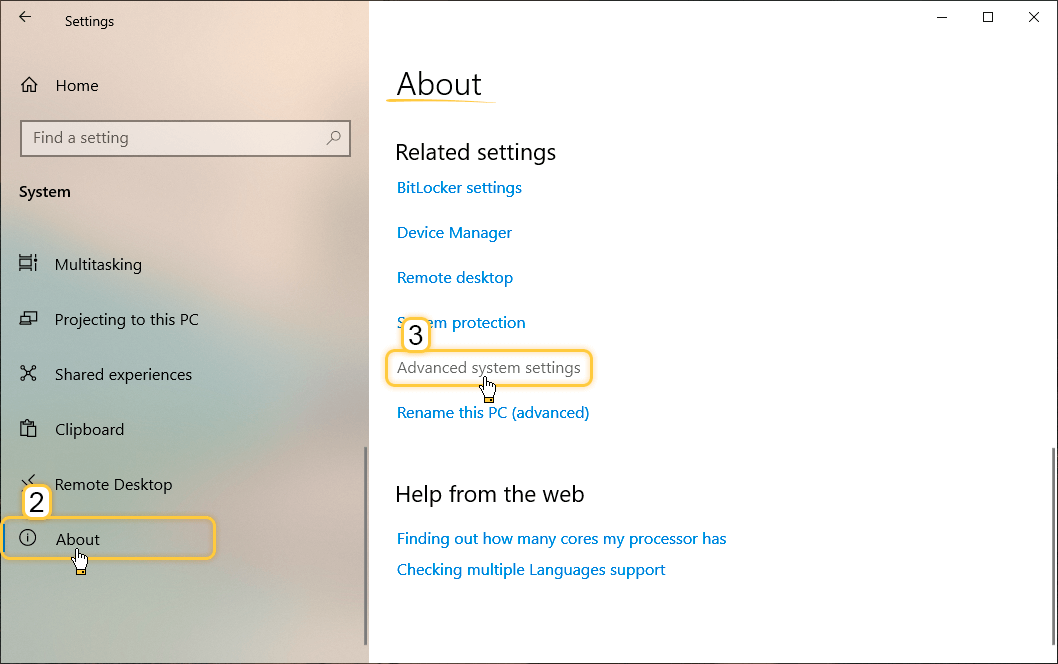 进入「About」部分,点击「Advanced system settings」; 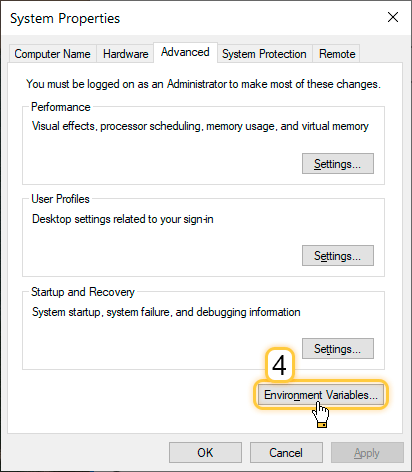 在「System Properties」弹出窗口中,点击「Advanced」选项卡上的「Environment Variables」按钮; 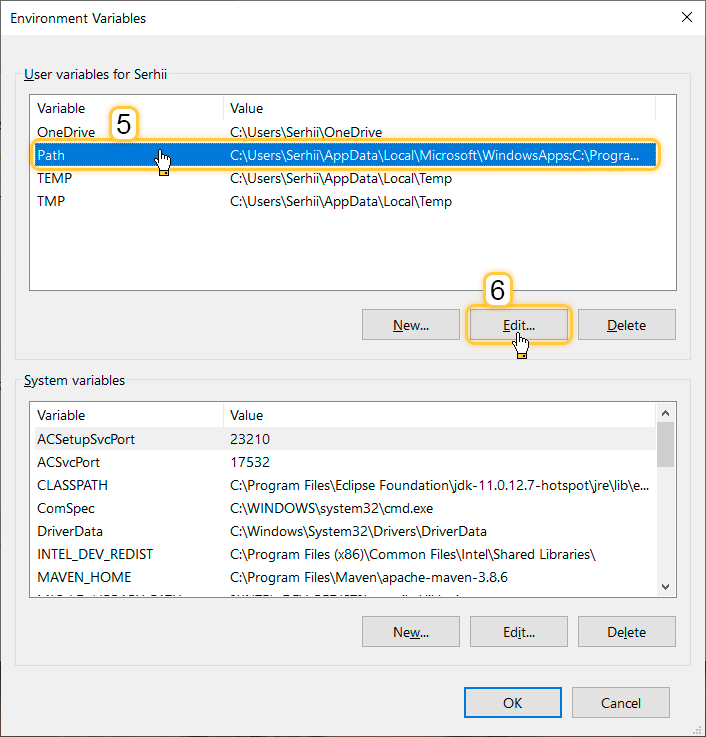 在「Environment Variables」弹出窗口中选中「Path」,点击「Edit」按钮; 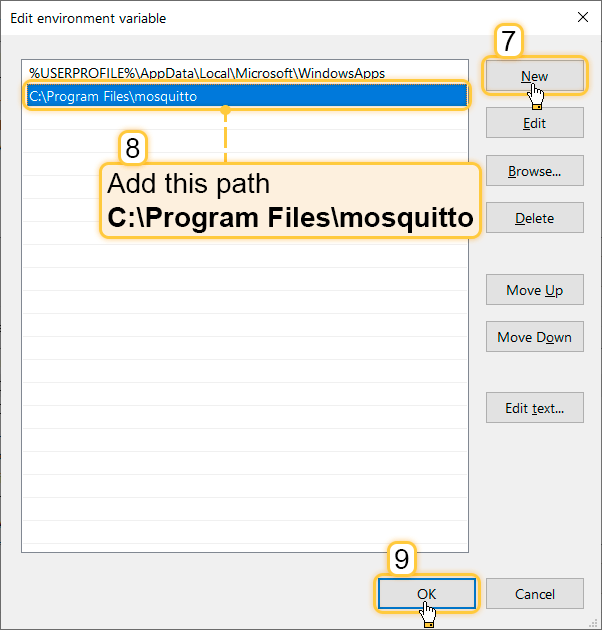 In the “Edit environment variable” pop-up window click on the “New” button and add the path to the directory containing 'mosquitto_pub.exe' and 'mosquitto_sub.exe' ('C:\Program Files\mosquitto' by default). Click “OK” button; 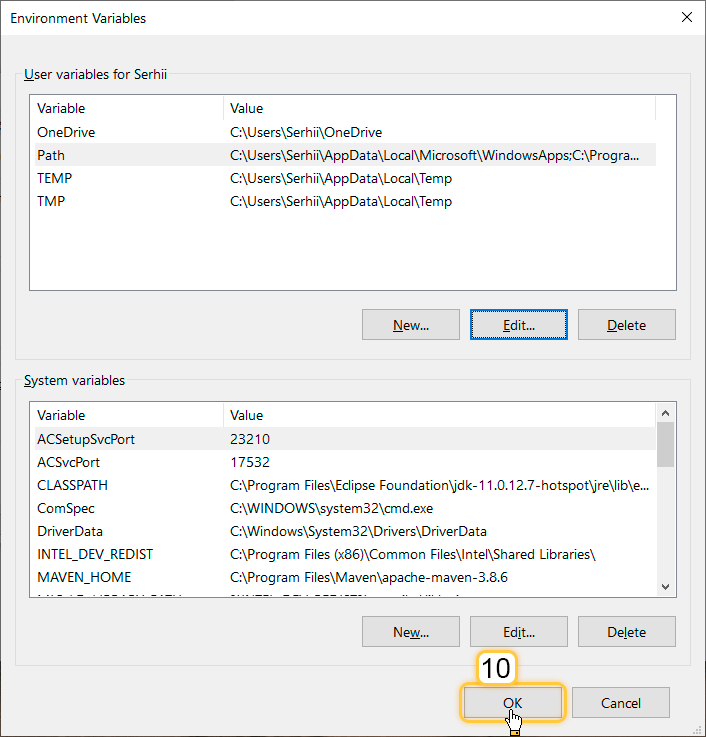 点击「OK」保存环境变量更改; 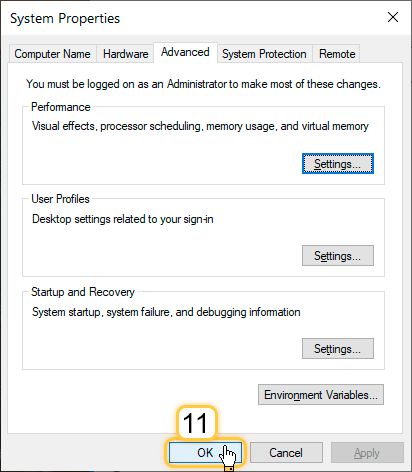 最后点击「OK」应用系统属性中的所有更改。 |
认证方式
ThingsBoard支持多种认证方式以保护MQTT连接。
支持的方式:
- Access token。使用唯一设备访问令牌作为CONNECT包中的MQTT username。
此方式无需证书或额外凭据即可简单、安全地认证设备。 - X.509 certificates。使用数字证书认证设备,基于公钥基础设施(PKI)建立安全通信。
- Basic MQTT credentials。使用MQTT CONNECT包中发送的认证数据——可选的client ID、username和password组合。
MQTT通信的主题名称和载荷格式通过设备配置配置。详见此处。
本指南示例采用基于access token的认证。
发布测试遥测
使用以下命令发布测试遥测数据。
⚠️ 请勿忘记替换:
•$THINGSBOARD_HOST_NAME为您的ThingsBoard主机名或IP地址。
•$ACCESS_TOKEN为您的设备访问令牌。
1
mosquitto_pub -d -q 1 -h "$THINGSBOARD_HOST_NAME" -p "1883" -t "v1/devices/me/telemetry" -u "$ACCESS_TOKEN" -m {"temperature":25}
示例
此例中$THINGSBOARD_HOST_NAME指您的本地ThingsBoard安装,$ACCESS_TOKEN设置为ABC123。
1
mosquitto_pub -d -q 1 -h "localhost" -p "1883" -t "v1/devices/me/telemetry" -u "ABC123" -m {"temperature":25}
成功的遥测发布会产生类似以下输出:
1
2
3
4
5
Client mosqpub|xxx sending CONNECT
Client mosqpub|xxx received CONNACK
Client mosqpub|xxx sending PUBLISH (d0, q1, r0, m1, 'v1/devices/me/telemetry', ... (16 bytes))
Client mosqpub|xxx received PUBACK (Mid: 1)
Client mosqpub|xxx sending DISCONNECT
可能的MQTT连接响应
连接过程中,MQTT代理可能返回以下响应码:
- 0x00 Connected - 成功连接ThingsBoard MQTT服务器。
- 0x04 Connection Refused, bad username or password - 用户名为空。
- 0x05 Connection Refused, not authorized - 用户名包含无效access token。
Key-value 格式
默认情况下,ThingsBoard 支持 JSON 形式的 key-value 内容。Key 始终为字符串,value 可为 string、boolean、double、long 或 JSON。 例如:
1
2
3
4
5
6
7
8
9
10
11
{
 "stringKey":"value1",
 "booleanKey":true,
 "doubleKey":42.0,
 "longKey":73,
 "jsonKey": {
    "someNumber": 42,
    "someArray": [1,2,3],
    "someNestedObject": {"key": "value"}
 }
}
也可通过Protocol Buffers发送数据。 详见设备配置文档中的MQTT传输类型配置章节。
也可使用自定义二进制格式或序列化框架。详见协议自定义。
遥测上传API
向ThingsBoard服务节点发布遥测数据时,向以下主题发送PUBLISH消息:
1
v1/devices/me/telemetry
支持的最简数据格式为:
1
{"key1":"value1", "key2":"value2"}
or
1
[{"key1":"value1"}, {"key2":"value2"}]
请注意:在此情况下,将使用服务器端时间戳作为上传数据的时间戳!
若设备能获取客户端时间戳,可使用以下格式:
1
{"ts":1451649600512, "values":{"key1":"value1", "key2":"value2"}}
其中 1451649600512 为毫秒精度的Unix时间戳。例如 ‘1451649600512’ 对应 ‘Fri, 01 Jan 2016 12:00:00.512 GMT’。
示例
以下为发布不同类型遥测数据的命令示例。
⚠️ 请勿忘记替换
•$THINGSBOARD_HOST_NAME为您的ThingsBoard主机名或IP地址。
•$ACCESS_TOKEN为您的设备访问令牌。
示例1。
以对象形式发布无时间戳数据(将使用服务器端时间戳)。
执行命令:
|
|
遥测数据:
1
{"temperature":42}
示例2。
以对象形式发布无时间戳数据(将使用服务器端时间戳),数据来自telemetry-data-as-object.json文件。
执行命令:
|
|
JSON文件内容:
1
2
3
4
5
6
7
8
9
10
11
{
  "stringKey": "value1",
  "booleanKey": true,
  "doubleKey": 42.0,
  "longKey": 73,
  "jsonKey": {
    "someNumber": 42,
    "someArray": [1,2,3],
    "someNestedObject": {"key": "value"}
  }
}
示例3。
以对象数组形式发布无时间戳数据(将使用服务器端时间戳),数据来自telemetry-data-as-array.json文件。
执行命令:
|
|
JSON文件内容:
1
[{"key1":"value1"}, {"key2":true}]
示例4。
以带时间戳的对象形式发布数据(将使用遥测时间戳),数据来自telemetry-data-with-ts.json文件。
执行命令:
|
|
JSON文件内容:
1
2
3
4
5
6
7
8
9
10
11
12
13
14
15
16
{
  "ts": 1451649600512,
  "values": {
    "stringKey": "value1",
    "booleanKey": true,
    "doubleKey": 42.0,
    "longKey": 73,
    "jsonKey": {
      "someNumber": 42,
      "someArray": [1, 2, 3],
      "someNestedObject": {
        "key": "value"
      }
    }
  }
}
Attributes API
ThingsBoard属性API允许设备:
向服务器发布属性更新
为将客户端设备属性发布至ThingsBoard服务节点,向以下主题发送PUBLISH消息:
1
v1/devices/me/attributes
示例
以下为发布客户端设备属性的示例。
⚠️ 请勿忘记替换
•$THINGSBOARD_HOST_NAME为您的ThingsBoard主机名或IP地址。
•$ACCESS_TOKEN为您的设备访问令牌。
示例1。
发布客户端属性更新。
遥测数据:
1
{"attribute1": "value1", "attribute2": true}
执行命令:
1
mosquitto_pub -d -h "$THINGSBOARD_HOST_NAME" -t "v1/devices/me/attributes" -u "$ACCESS_TOKEN" -m "{"attribute1": "value1", "attribute2": true}"
示例2。
使用new-attributes-values.json文件数据发布客户端属性更新。
“new-attributes-values.json” 文件内容:
1
2
3
4
5
6
7
8
9
10
11
{
  "attribute1": "value1",
  "attribute2": true,
  "attribute3": 42.0,
  "attribute4": 73,
  "attribute5": {
    "someNumber": 42,
    "someArray": [1,2,3],
    "someNestedObject": {"key": "value"}
  }
}
执行命令:
|
|
从服务器请求属性值
为从ThingsBoard服务节点请求客户端或共享设备属性,向以下主题发送PUBLISH消息:
1
v1/devices/me/attributes/request/$request_id
其中 $request_id 为整数请求标识符。 发送带请求的PUBLISH消息前,客户端需订阅
1
v1/devices/me/attributes/response/+
示例
以下示例基于mqtt.js编写。纯命令行示例不可用,因订阅与发布须在同一MQTT会话中进行。
1. 将mqtt-js-attributes-request.js文件保存到您的电脑。
⚠️ 此例中主机名指本地ThingsBoard安装。
若ThingsBoard实例部署在其他主机,请将localhost替换为对应主机名或IP地址。
|
2. 执行命令。
⚠️ 请将
$ACCESS_TOKEN替换为您的设备访问令牌。
1
2
export TOKEN=$ACCESS_TOKEN
node mqtt-js-attributes-request.js
结果:
1
{"client":{"attribute1":"value1","attribute2":true}}
请注意:客户端与共享设备属性键存在交集是不佳实践! 但仍可为client、shared甚至server-side属性使用相同键。
订阅来自服务器的属性更新
为订阅共享设备属性变更,向以下主题发送SUBSCRIBE消息:
1
v1/devices/me/attributes
当共享属性被任一服务端组件(如REST API或规则链)修改时,客户端将收到以下更新:
1
{"key1":"value1"}
⚠️ 请勿忘记替换
•$THINGSBOARD_HOST_NAME为您的ThingsBoard主机名或IP地址。
•$ACCESS_TOKEN为您的设备访问令牌。
执行命令:
|
|
JSON值支持
我们为遥测和属性 API 增加了 JSON 数据结构支持,以便简化设备配置操作。 JSON 支持允许从设备上传数据,并将嵌套对象推送到设备。 可将一份配置 JSON 存为共享属性并推送到设备,也可在规则引擎中处理 JSON 数据并触发告警等。
因此,该改进在ThingsBoard 存储数据时减少了数据库操作次数。 例如,「temperature」和「humidity」会作为独立行存储在 SQL 或 NoSQL 数据库中,以便高效聚合用于可视化。 由于 JSON 数据无需聚合,可将全部内容存为一行,而无需为每个配置项单独成行。 在某些环境中,通过在单个 JSON 中聚合多个参数,可将数据库操作次数减少 10 倍以上。
通过该 视频 了解更多 JSON 值支持内容。
RPC API
Server-side RPC
为订阅来自服务器的RPC命令,向以下主题发送SUBSCRIBE消息:
1
v1/devices/me/rpc/request/+
订阅后,客户端将在对应主题收到作为PUBLISH消息的单独命令:
1
v1/devices/me/rpc/request/$request_id
其中 $request_id 为整数请求标识符。
客户端应将响应发布至以下主题:
1
v1/devices/me/rpc/response/$request_id
示例
以下示例基于mqtt.js编写。纯命令行示例不可用,因订阅与发布须在同一MQTT会话中进行。
1. 将mqtt-js-rpc-from-server.js文件保存到您的电脑。
⚠️ 此例中主机名指本地ThingsBoard安装。
若ThingsBoard实例部署在其他主机,请将localhost替换为对应主机名或IP地址。
|
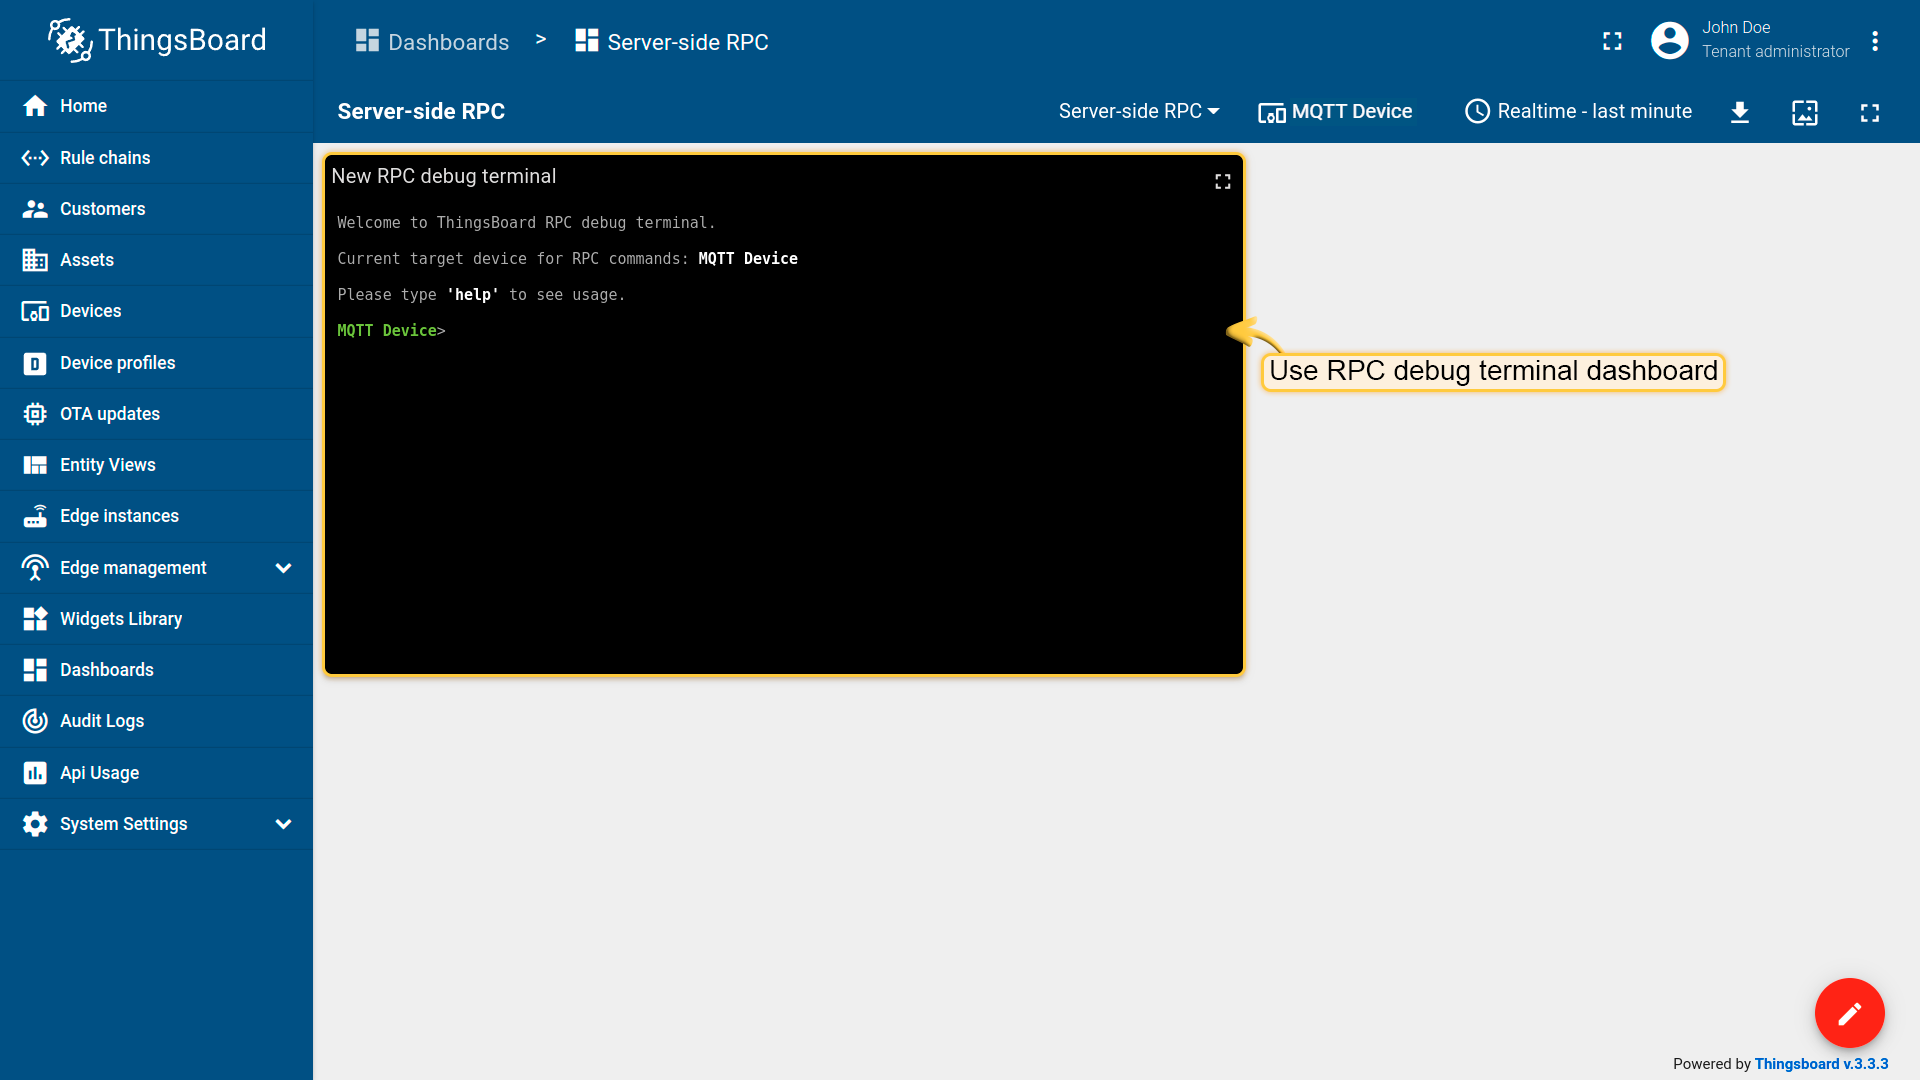
2. 按以下步骤操作:
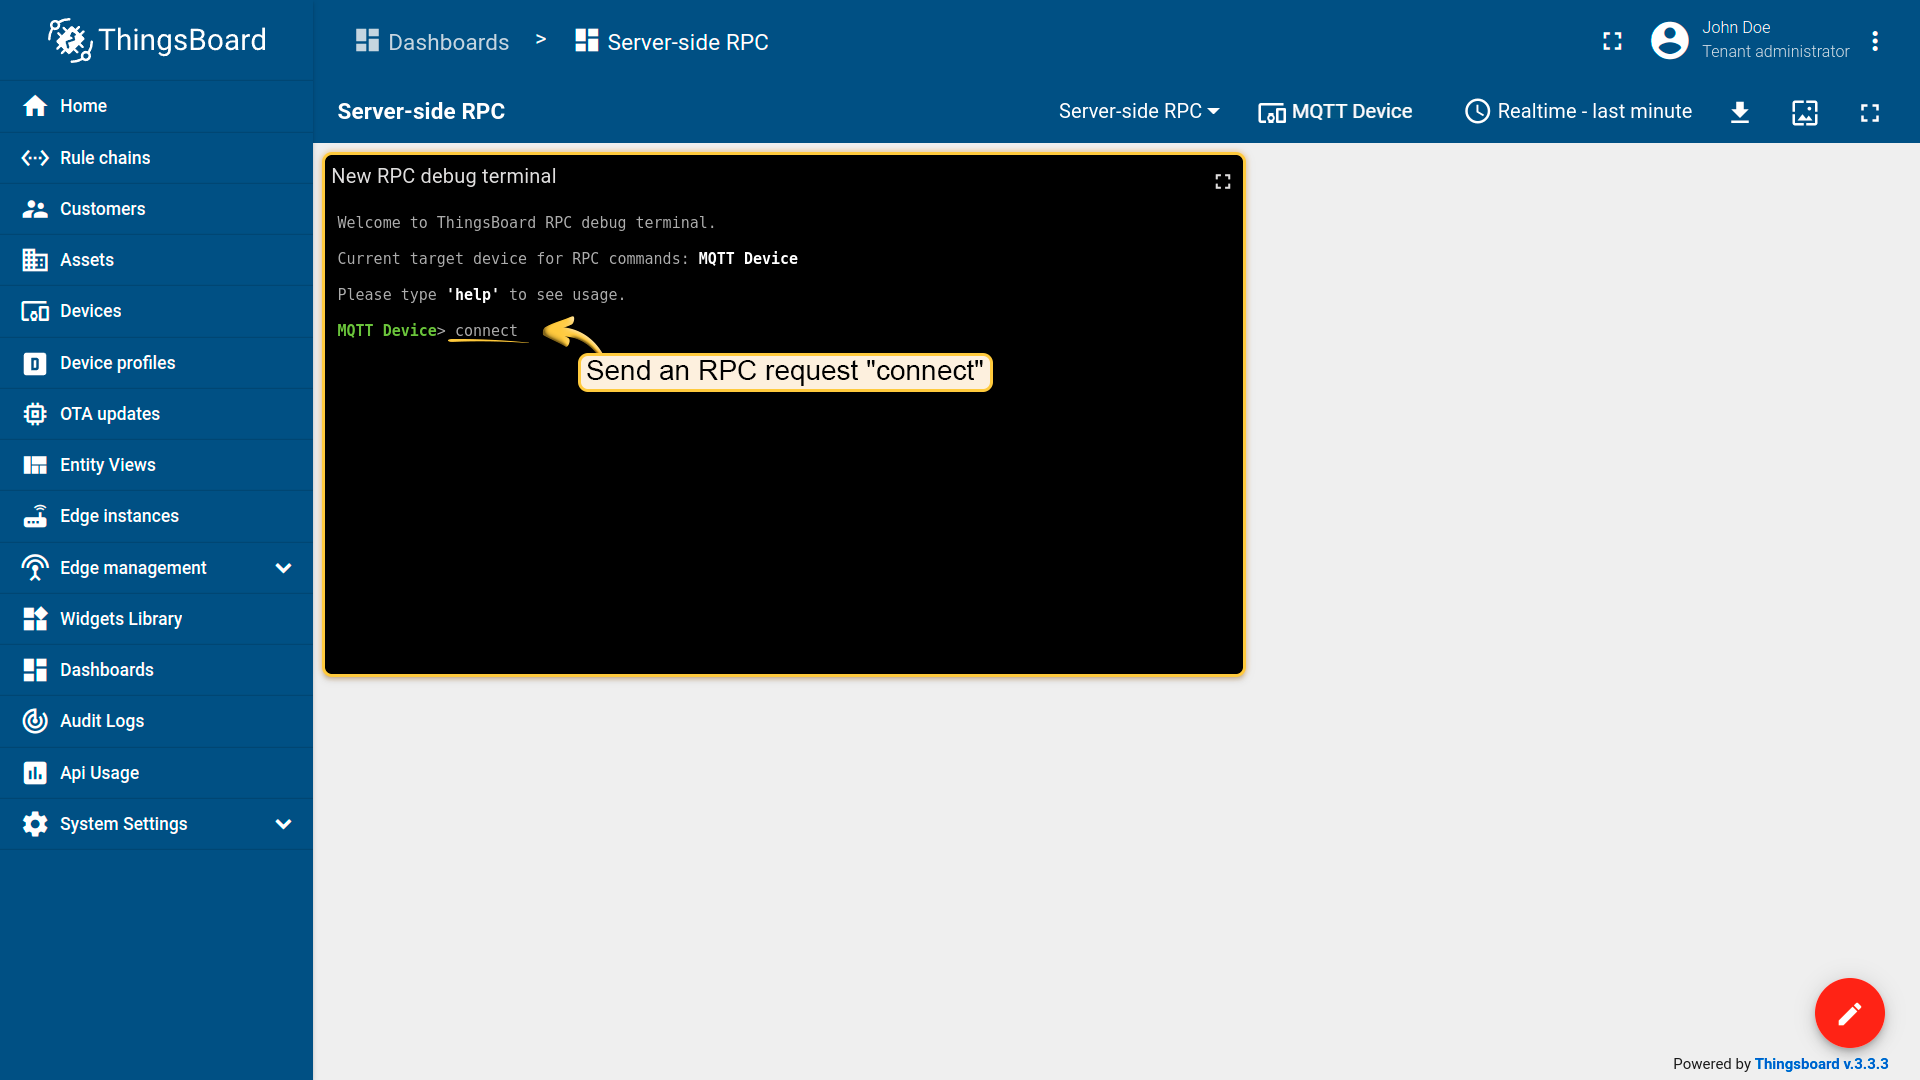
- 在ThingsBoard实例中使用RPC调试终端部件;
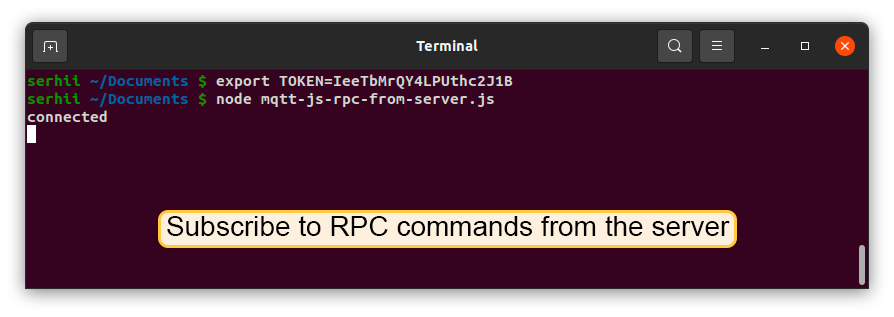
- 使用以下命令执行以订阅来自服务器的RPC命令。
⚠️ 请将
$ACCESS_TOKEN替换为您的设备访问令牌。
1
2
export TOKEN=$ACCESS_TOKEN
node mqtt-js-rpc-from-server.js
- 使用RPC调试终端部件向设备发送RPC请求 “connect”;
- 您应能收到设备响应。

若MQTT设备为网关,ThingsBoard会发送关于预配置设备实体变更的服务端RPC(通知)。
您的MQTT网关设备将收到关于设备移除或重命名的服务RPC,以便正确处理此类事件。
Client-side RPC
为向服务器发送RPC命令,向以下主题发送PUBLISH消息:
1
v1/devices/me/rpc/request/$REQUEST_ID
其中
$REQUEST_ID为整数请求标识符。
服务器响应将发布至以下主题:
1
v1/devices/me/rpc/response/$request_id
示例
以下示例基于mqtt.js编写。纯命令行示例不可用,因订阅与发布须在同一MQTT会话中进行。
1. 将mqtt-js-rpc-from-client.js文件保存到您的电脑。
⚠️ 此例中主机名指本地ThingsBoard安装。
若ThingsBoard实例部署在其他主机,请将localhost替换为对应主机名或IP地址。
|
2. 按以下步骤操作:
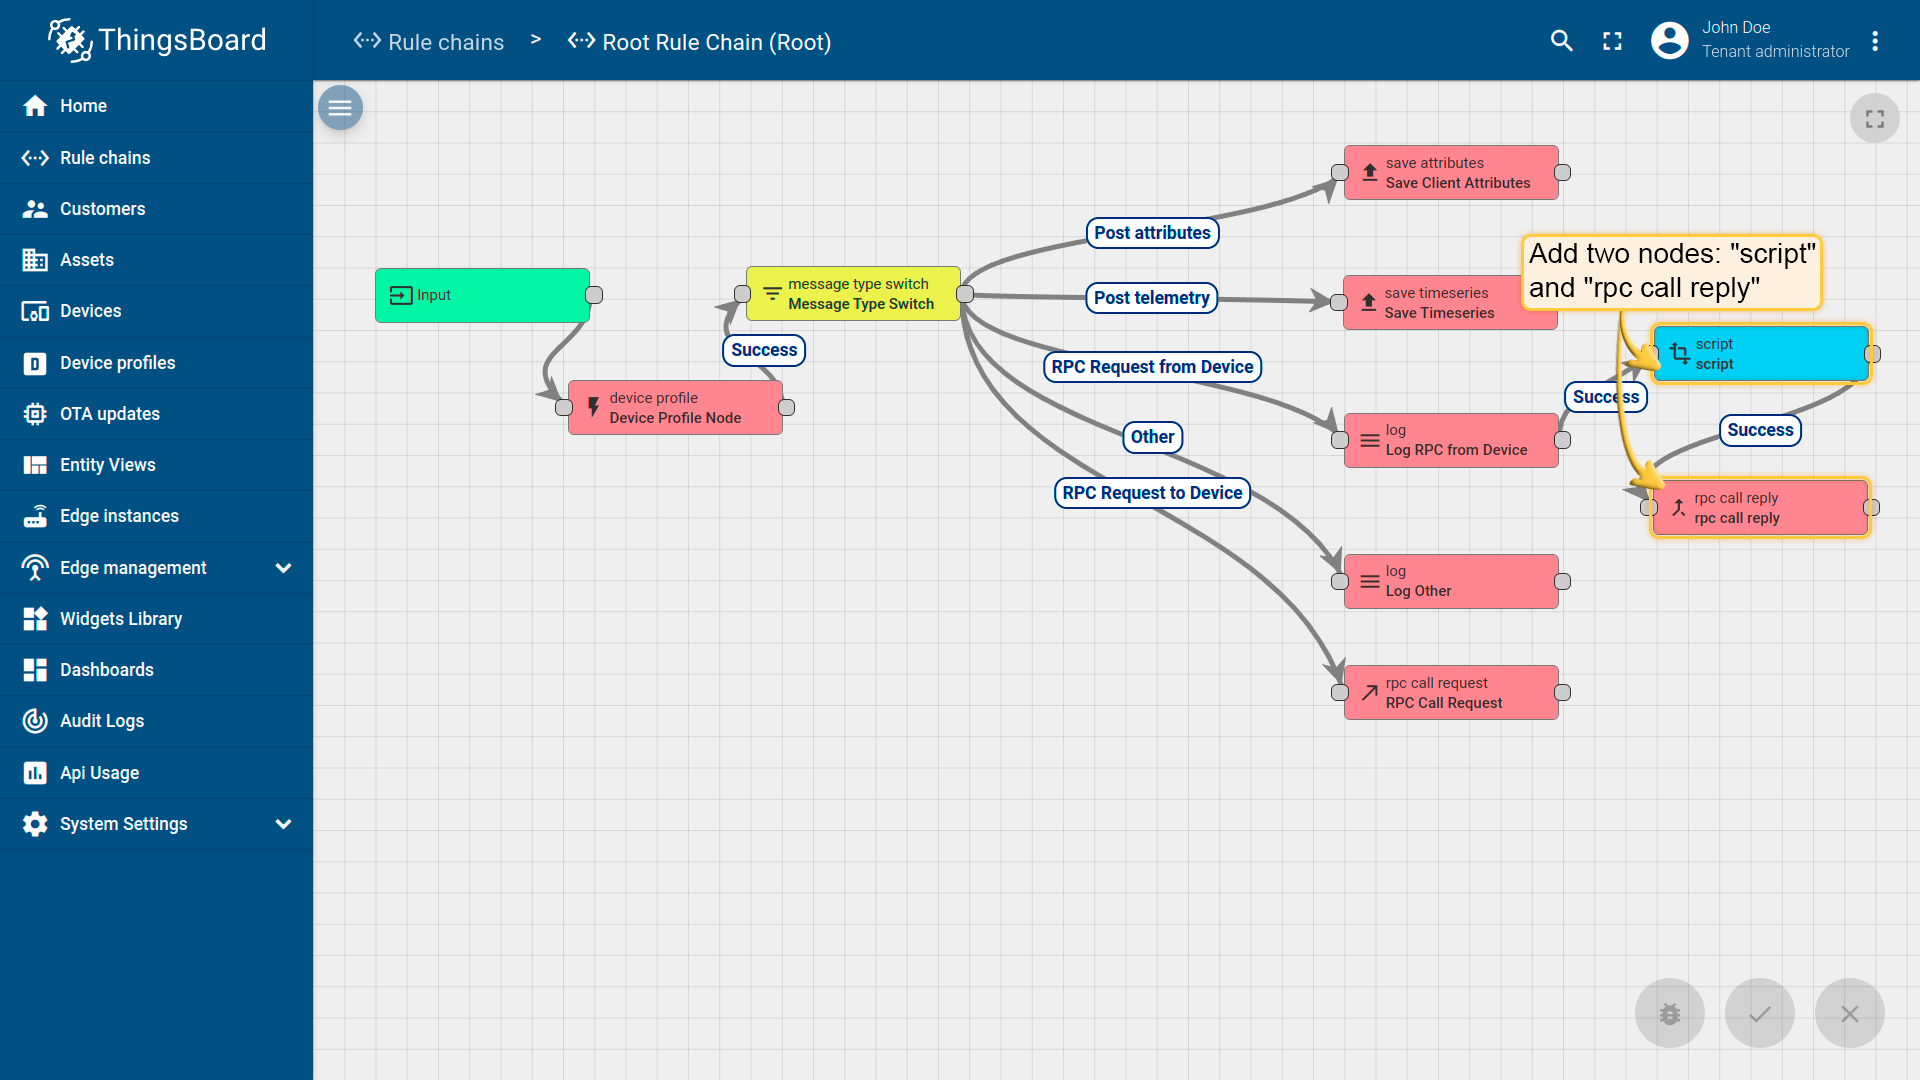
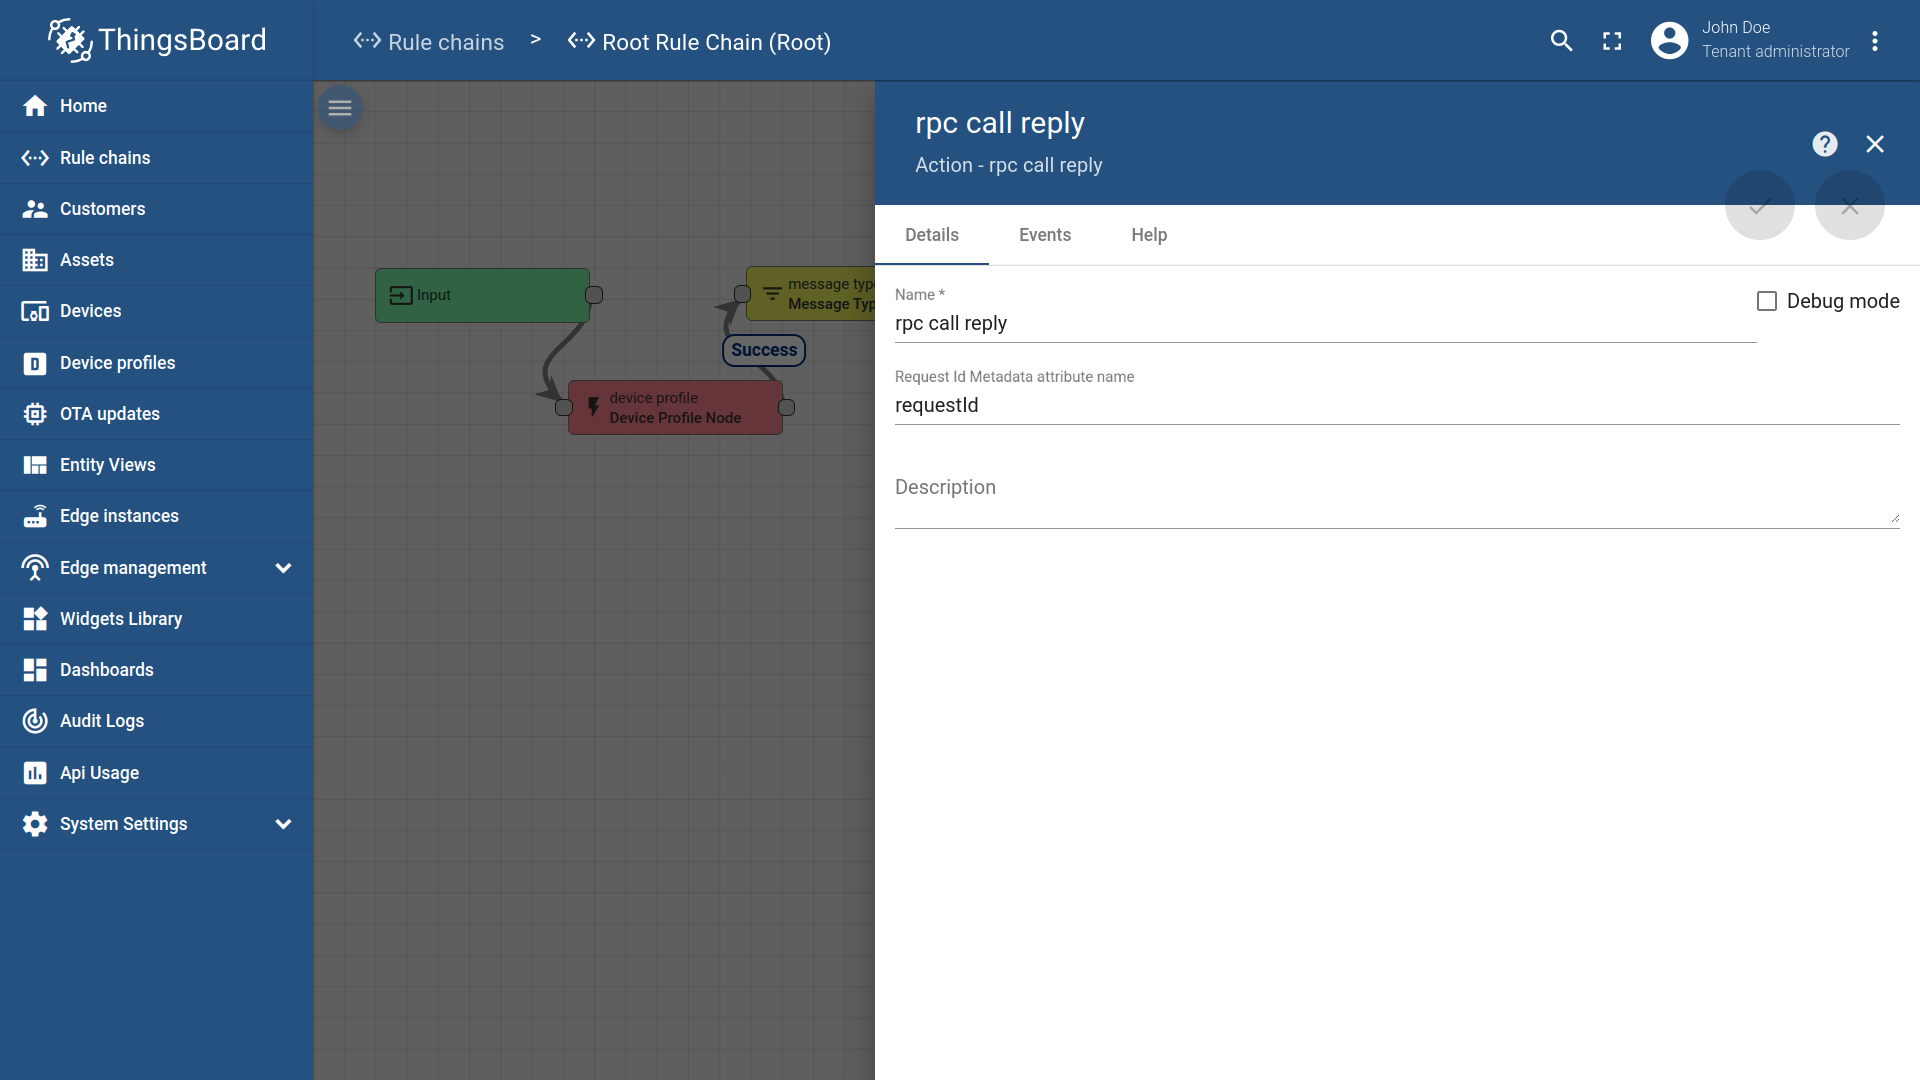
- 在根规则链中添加两个节点:脚本转换和RPC调用回复。将它们通过“成功”链接连接到”记录来自设备的RPC“动作节点。
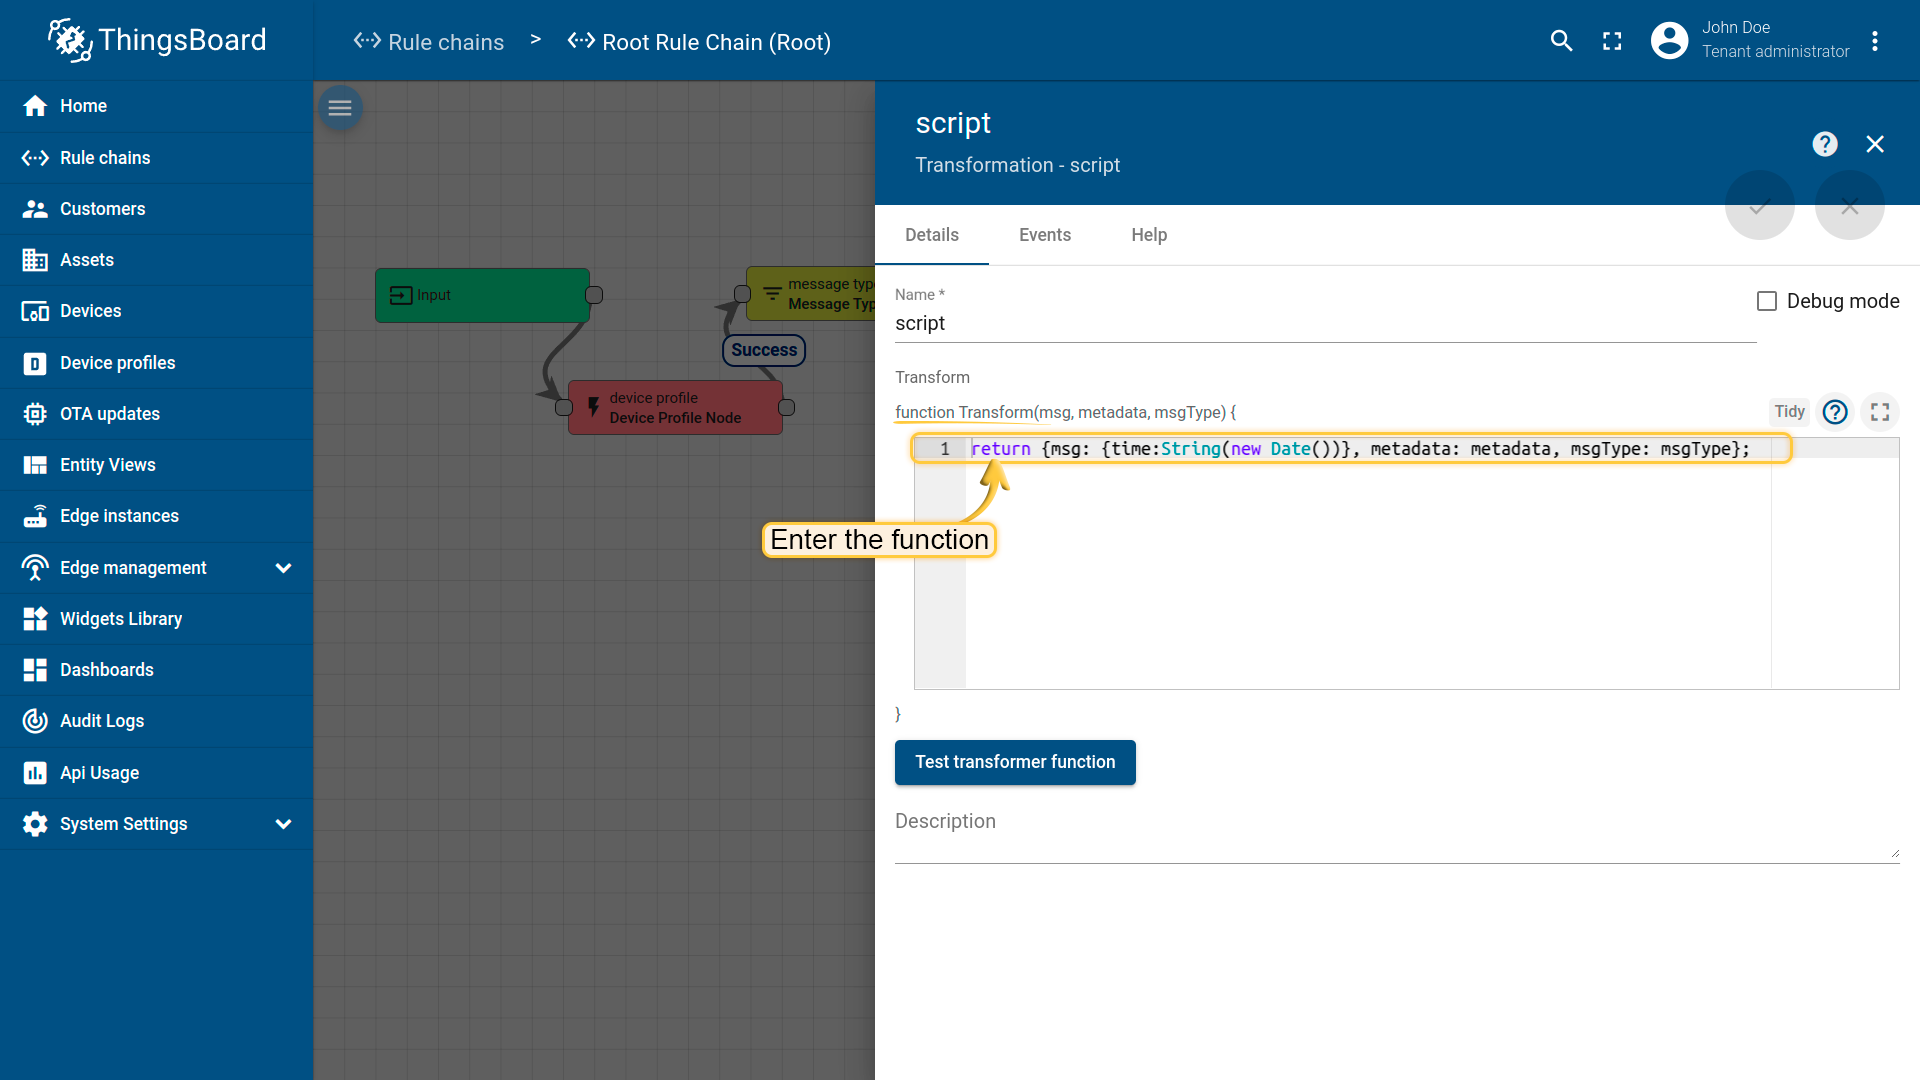
- 在脚本节点中输入函数:
1
return {msg: {time: new Date()}, metadata: metadata, msgType: msgType};
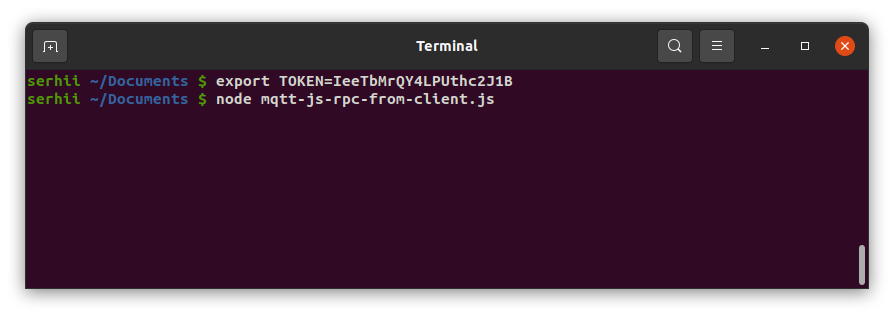
- 向服务器发送请求。
⚠️ 请将
$ACCESS_TOKEN替换为您的设备访问令牌。
1
2
export TOKEN=$ACCESS_TOKEN
node mqtt-js-rpc-from-client.js
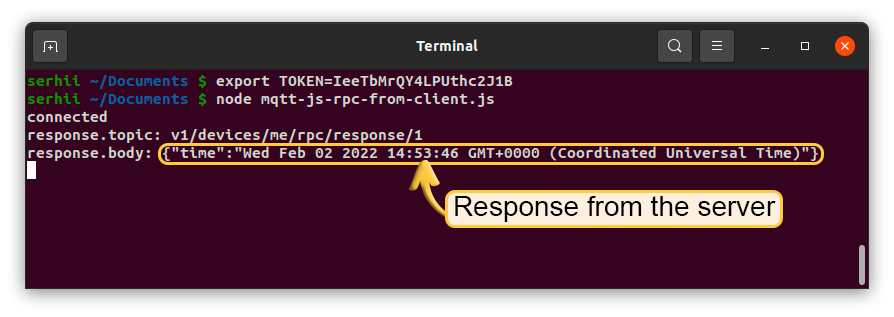
您将收到服务器响应:
1
{"time":"Thursday, February 5, 2026, 9:08:22 AM Coordinated Universal Time"}
RPC会话限制
getSessionLimits RPC方法允许设备制造商和开发者获取ThingsBoard服务器强制执行的MQTT传输限制。
了解这些限制有助于确保设备在支持的参数范围内运行,并避免消息拒绝、限流或连接丢失等问题。
请求格式
为请求会话限制,设备发送以下RPC请求:
1
2
3
4
{
  "method": "getSessionLimits",
  "params": {}
}
响应格式
处理请求后,ThingsBoard以以下格式在RPC响应中返回会话限制:
1
2
3
4
5
6
7
8
9
{
  "maxPayloadSize": 65536,
  "maxInflightMessages": 100,
  "rateLimits": {
    "messages": "200:1,6000:60,14000:3600",
    "telemetryMessages": "100:1,3000:60,7000:3600",
    "telemetryDataPoints": "200:1,6000:60,14000:3600"
  }
}
响应字段说明
- maxPayloadSize - MQTT消息负载的最大允许大小,单位为字节。
- maxInflightMessages - 任一时刻可发送但未确认(进行中)的MQTT消息最大数量。
- rateLimits - 嵌套对象,定义不同消息类别的速率限制:
- messages - 整体消息速率限制。
- telemetryMessages - 可发送的遥测消息最大数量。
- telemetryDataPoints - 设备可发送的遥测数据点数量。
速率限制格式说明
速率限制值例如:
1
200:1,6000:60,14000:3600
- 200:1 — 每秒最多200条消息
- 6000:60 — 60秒内最多6,000条消息
- 14000:3600 — 3,600秒内最多14,000条消息
这些限制同时生效。
网关专用会话限制
若设备为网关,响应会包含适用于通过该网关连接的设备的额外限制。
网关响应格式
1
2
3
4
5
6
7
8
9
10
11
12
13
14
{
  "maxPayloadSize": 65536,
  "maxInflightMessages": 100,
  "rateLimits": {
    "messages": "200:1,6000:60,14000:3600",
    "telemetryMessages": "100:1,3000:60,7000:3600",
    "telemetryDataPoints": "200:1,6000:60,14000:3600"
  },
  "gatewayRateLimits": {
    "messages": "200:1,6000:60,14000:3600",
    "telemetryMessages": "100:1,3000:60,7000:3600",
    "telemetryDataPoints": "200:1,6000:60,14000:3600"
  }
}
网关速率限制说明
- rateLimits - 适用于网关设备本身的速率限制。
- gatewayRateLimits - 适用于通过网关连接的单个设备的速率限制。
这些限制有助于在多设备通过单一网关连接通信时控制负载并确保稳定运行。
设备认领
设备认领功能允许终端用户在设备部署并连接到ThingsBoard后,安全地将其与自己的账户关联。 设备认领流程及所支持场景的详细说明,请参阅设备认领文档。
为发起设备认领,向以下主题发送PUBLISH消息:
1
v1/devices/me/claim
支持的数据格式为:
1
{"secretKey":"value", "durationMs":60000}
请注意:上述字段均为可选。若未指定secretKey,则默认使用空字符串。 若未指定durationMs,则使用系统参数device.claim.duration(位于/etc/thingsboard/conf/thingsboard.yml文件中)。
设备预配置
设备预配置允许设备在无需于ThingsBoard界面手动创建的情况下动态注册。 预配置流程及所支持场景的详细说明,请参阅设备预配置文档。
预配置请求
为发起设备预配置,向以下主题发送预配置请求:
1
/provision
同时,应将username或clientId设为provision。
请求负载
预配置请求必须使用以下JSON格式:
1
2
3
4
5
{
  "deviceName": "DEVICE_NAME",
  "provisionDeviceKey": "u7piawkboq8v32dmcmpp",
  "provisionDeviceSecret": "jpmwdn8ptlswmf4m29bw"
}
负载字段
- deviceName — 待预配置设备的名称。
- provisionDeviceKey — 在ThingsBoard中配置的预配置密钥。
- provisionDeviceSecret — 与预配置密钥关联的预配置密文。
若提供的凭证有效,ThingsBoard将自动创建设备(如尚不存在)并返回设备凭证,使设备得以开始与平台通信。
固件API
当ThingsBoard发起MQTT设备固件更新时,会设置fw_title、fw_version、fw_checksum、fw_checksum_algorithm共享属性。 为接收共享属性更新,设备须订阅
1
v1/devices/me/attributes/response/+
其中
+ 为通配符。
当MQTT设备收到fw_title和fw_version共享属性更新后,须向以下主题发送PUBLISH消息
1
v2/fw/request/${requestId}/chunk/${chunkIndex}
其中
${requestId} - 对应固件更新次数的数字。每次固件更新${requestId}须不同。
${chunkIndex} - 对应固件块索引的数字。${chunkIndex}从0开始计数。设备须在每次请求中递增块索引,直至接收到的块大小为0。
MQTT负载应为固件块大小的字节数。
每次新的固件更新时,您需更改请求ID并订阅
1
v2/fw/response/+/chunk/+
其中
+ 为通配符。
协议自定义
可通过修改对应的模块,针对特定用例对MQTT传输进行完全定制。