仅专业版支持Platform Integrations功能。
请使用ThingsBoard Cloud或自行安装平台实例。
本指南介绍如何使用MQTT集成将TBMQ与ThingsBoard连接。 我们使用类型为APPLICATION的TBMQ客户端凭据,将ThingsBoard集成作为APPLICATION客户端连接。 APPLICATION客户端专注于订阅高消息率的主题。 客户端离线时消息将持久化,上线后投递,确保关键数据可用。 有关APPLICATION客户端的更多信息请参阅此处。
ThingsBoard MQTT集成充当MQTT客户端。它订阅主题并将接收的数据转换为遥测和属性更新。 对于下行消息,MQTT集成将其转换为设备适用的格式并推送到TBMQ。 注意:TBMQ应与ThingsBoard实例同地部署,或在云端部署并具有有效DNS名称或公网静态IP。 部署在云端的ThingsBoard实例无法连接到部署在无互联网连接的本地网络中的TBMQ。
前提条件
本教程使用:
- 本地安装的ThingsBoard专业版实例;
- 本地安装的TBMQ,且ThingsBoard PE实例可访问;
- 用于发送消息的mosquitto_pub MQTT客户端。
TBMQ配置
首先,需创建TBMQ客户端凭据,用于将ThingsBoard集成连接到TBMQ。
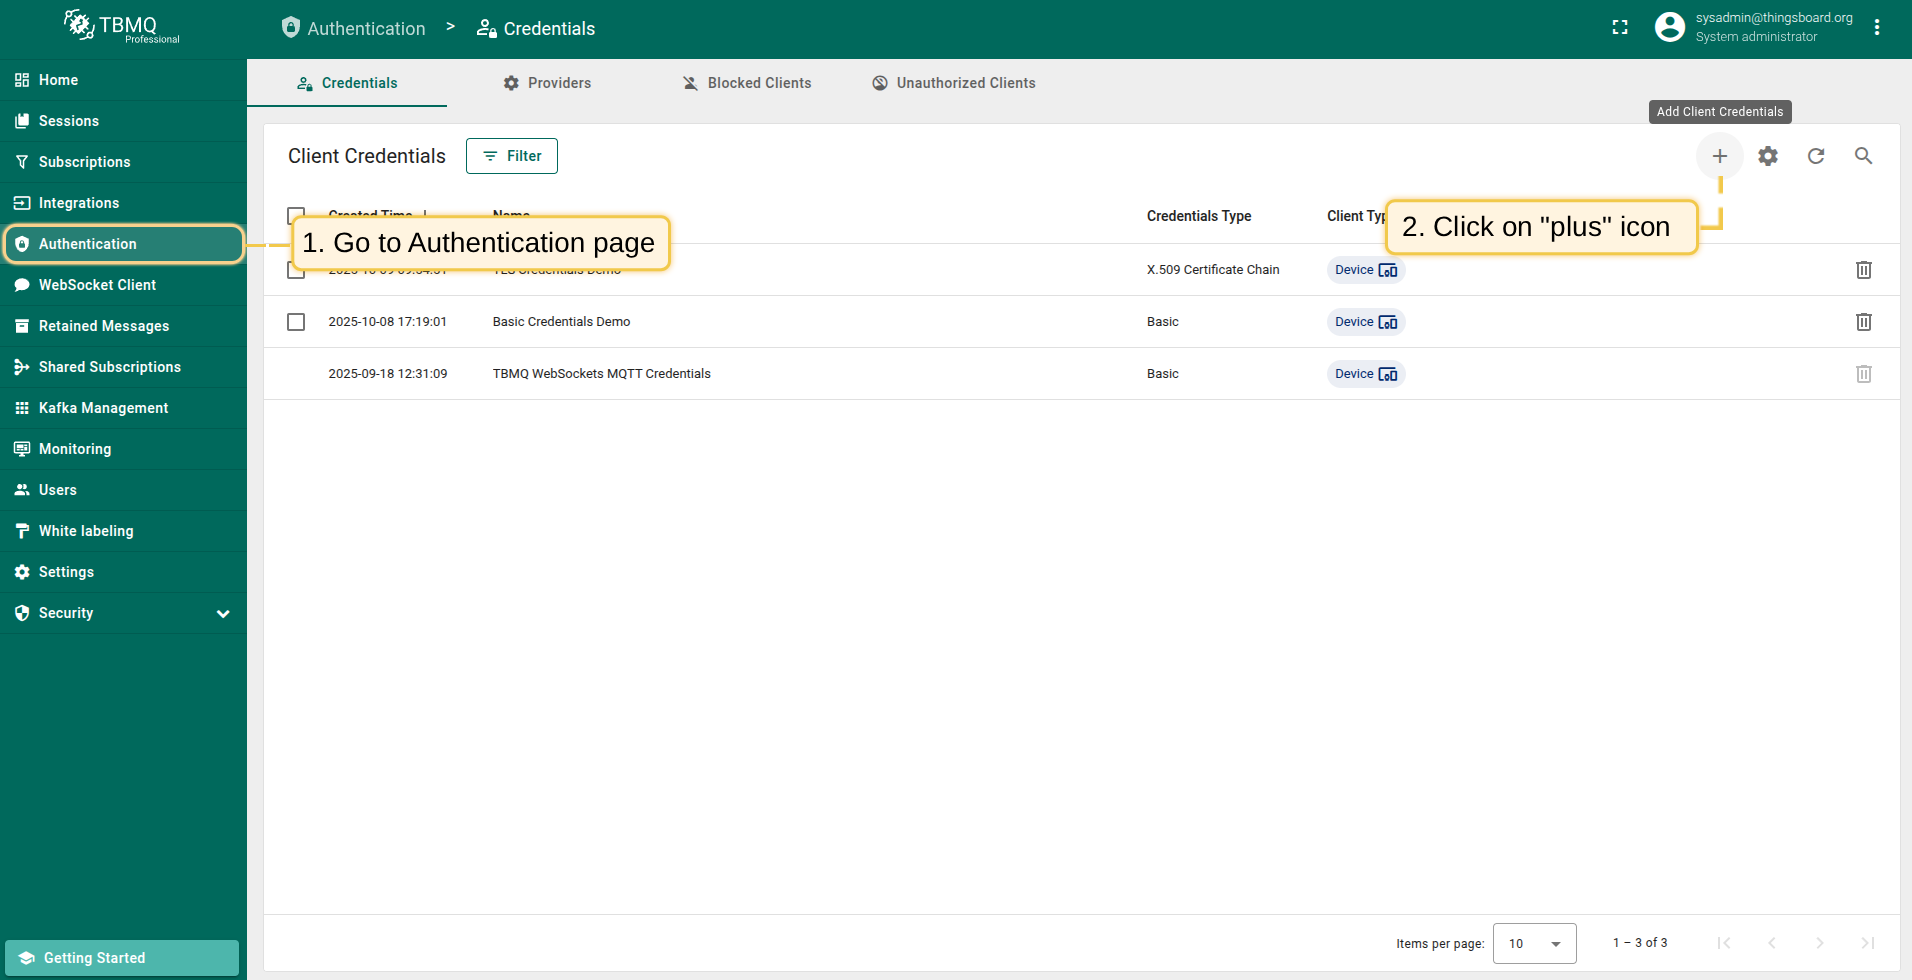
为此,登录TBMQ用户界面并按以下步骤操作。
- Navigate to "Credentials" tab, click on the "plus" icon in the top right corner of the table;
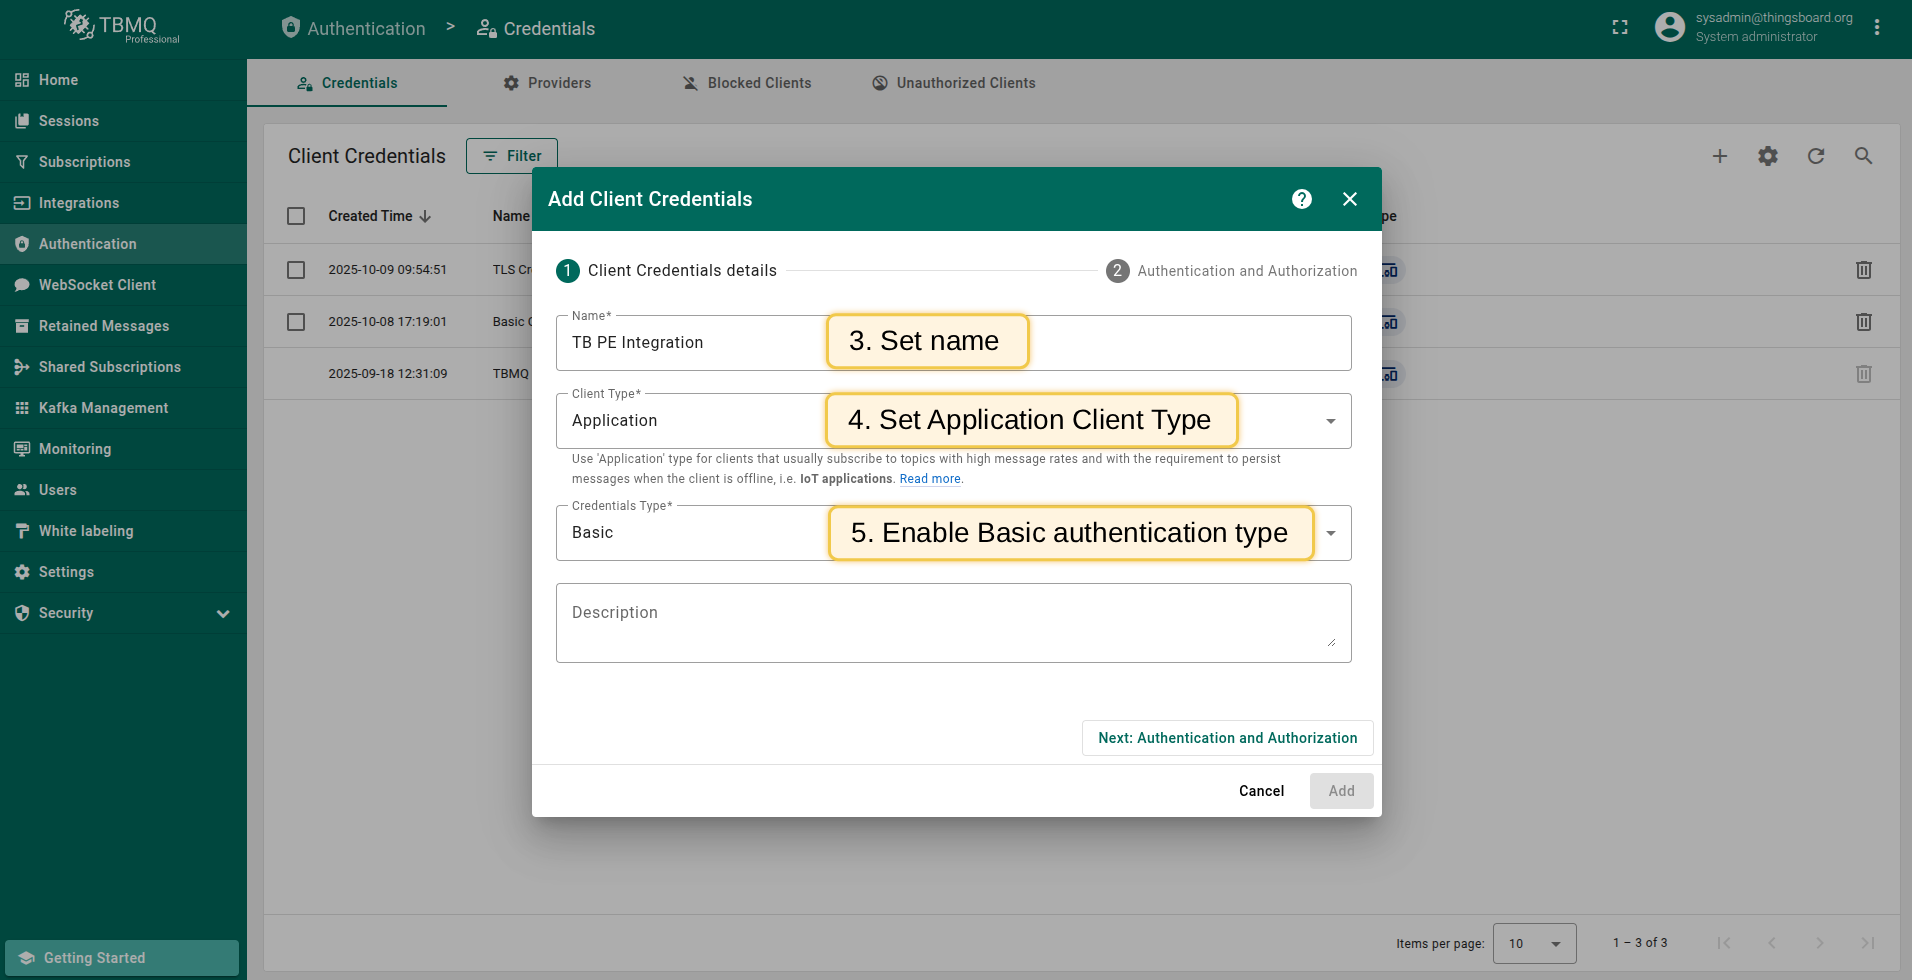
- Input client credentials name, select client type. Enable "Basic" authentication type.
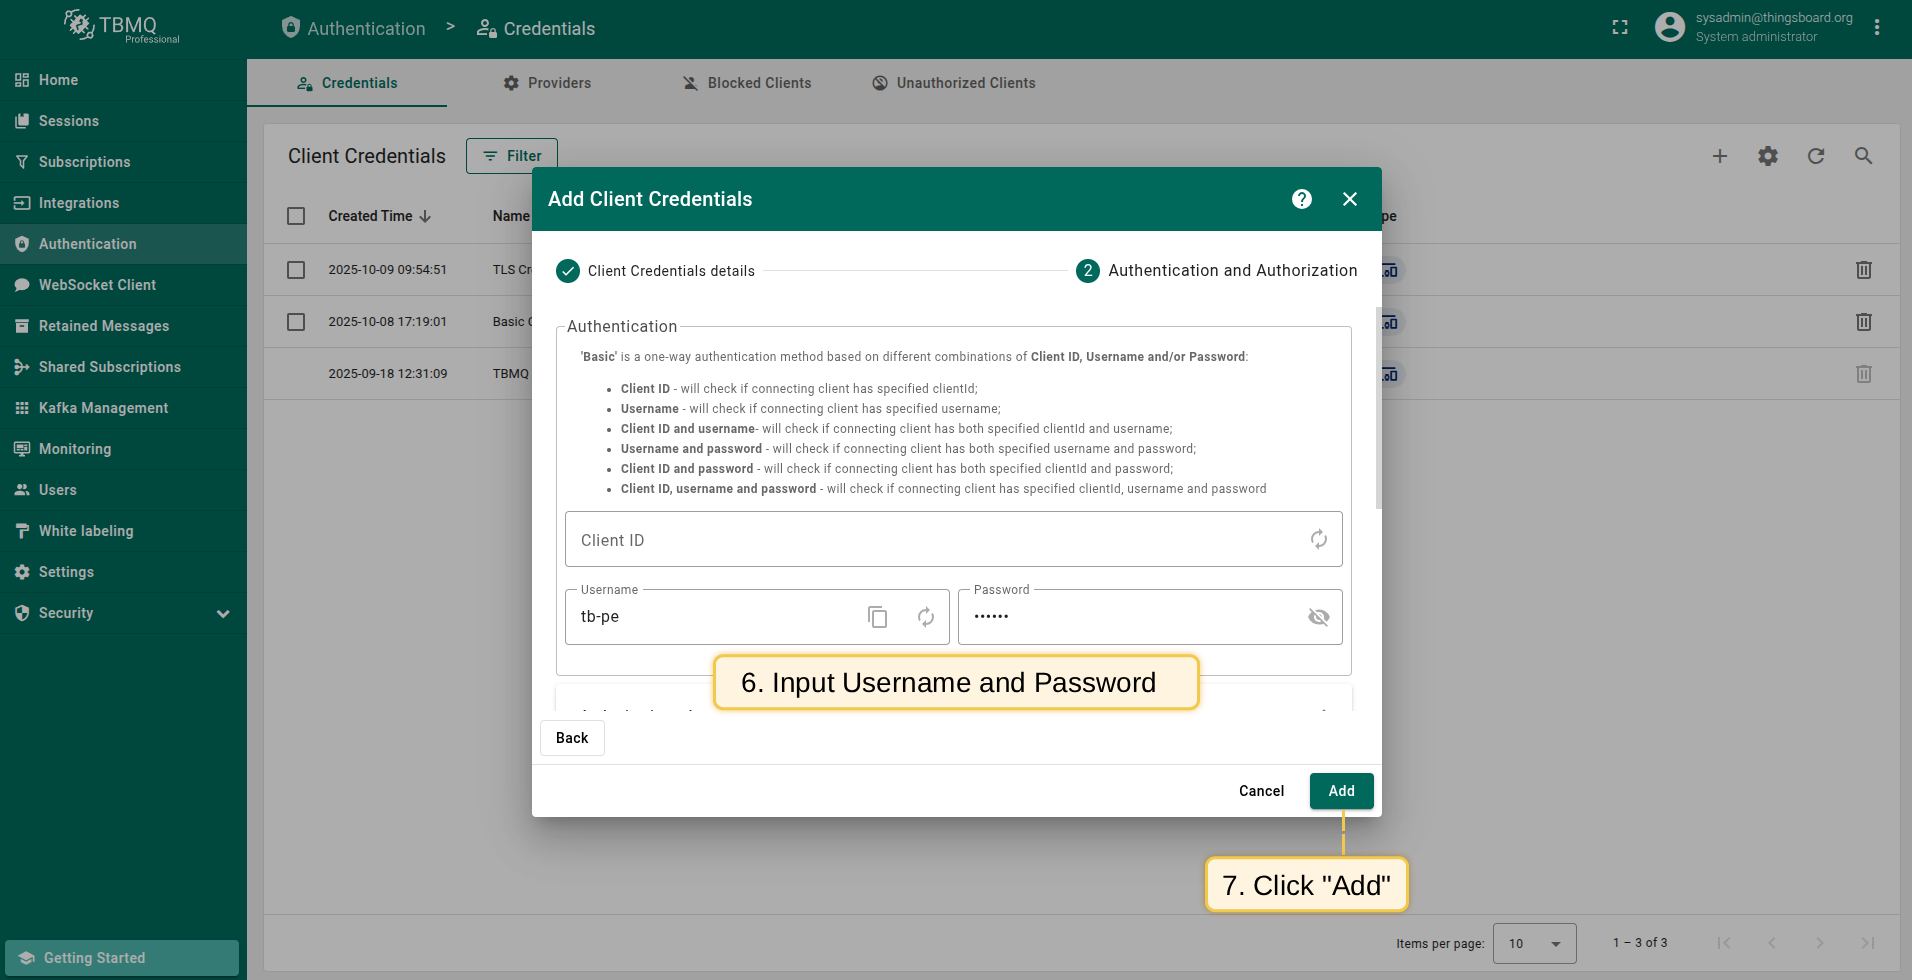
- Input "Username" and "Password" with chosen values. For example, use `tb-pe` value for Username and `secret` for Password fields. Click "Add" to save credentials.
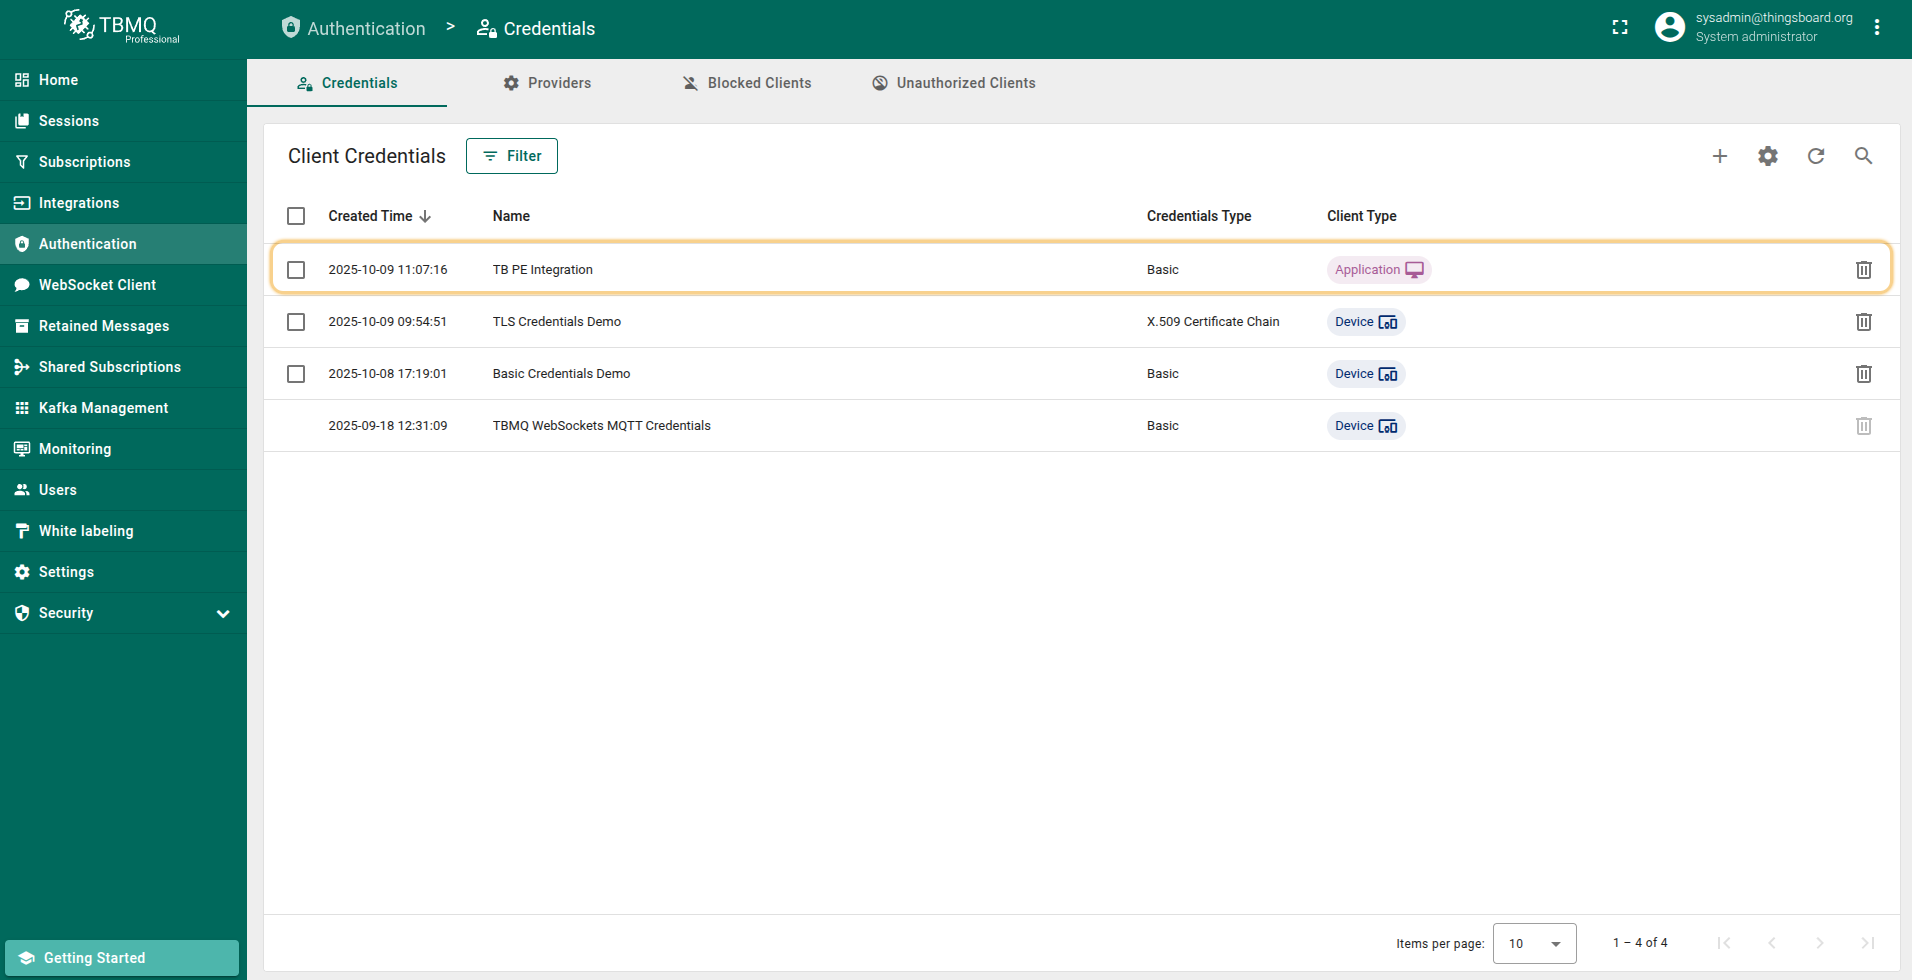
- New client credential is created.
请注意:
必须启用 Basic认证。
现在可继续下一步:配置ThingsBoard集成。
ThingsBoard配置
本示例使用MQTT集成将ThingsBoard连接到TBMQ。 配置MQTT集成前,需创建uplink converter。
Uplink Converter
解码函数的目的是将入站数据和元数据解析为ThingsBoard可消费的格式。
创建uplink converter:进入 “Integrations center” 部分 -> “Data converters” 页面,点击 “plus” 图标。命名为 “TBMQ Uplink Converter” 并选择类型 “Uplink”。将下方解码脚本粘贴到decoder functions部分。点击 “Add”。
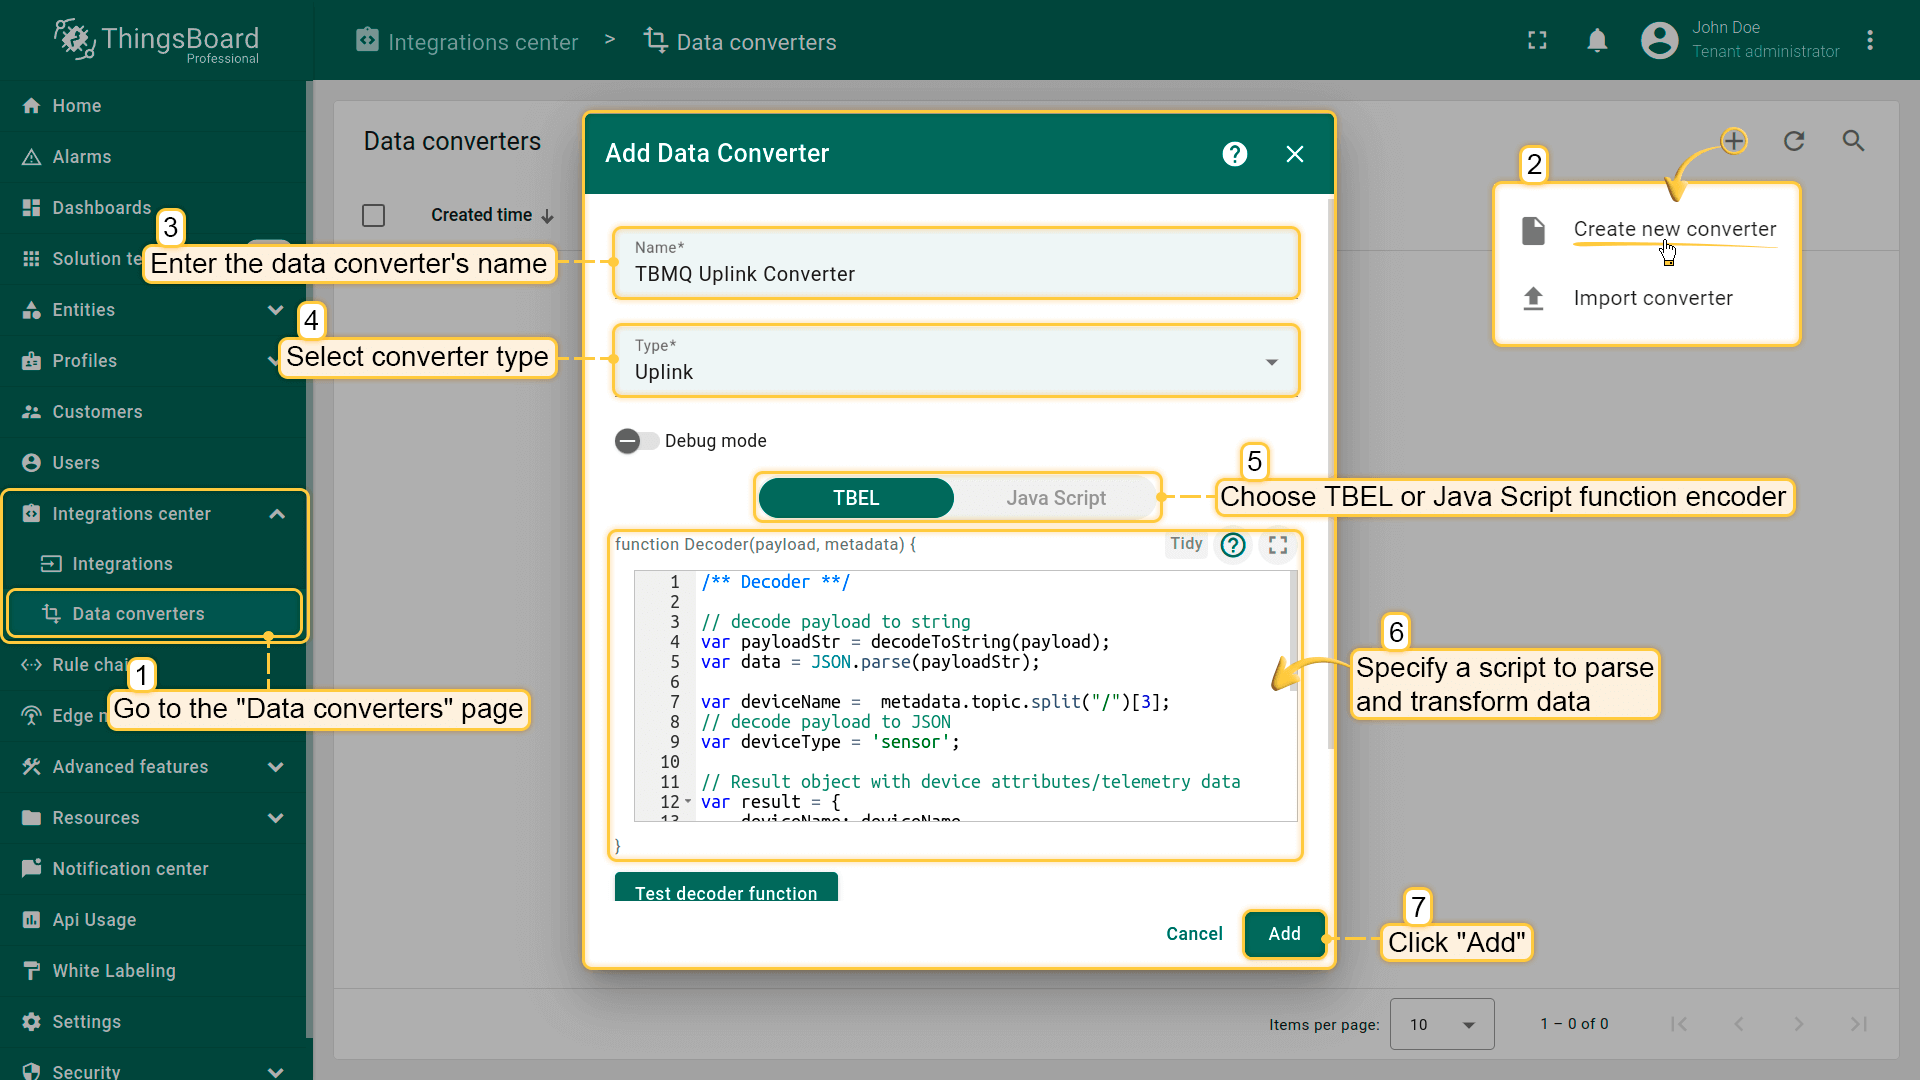
本示例中,decoder function部分使用以下脚本:
可使用 TBEL(TBEL)或 JavaScript 开发用户自定义函数。 建议使用 TBEL,其在ThingsBoard 中的执行效率远高于 JS。
|
|
MQTT Integration Setup
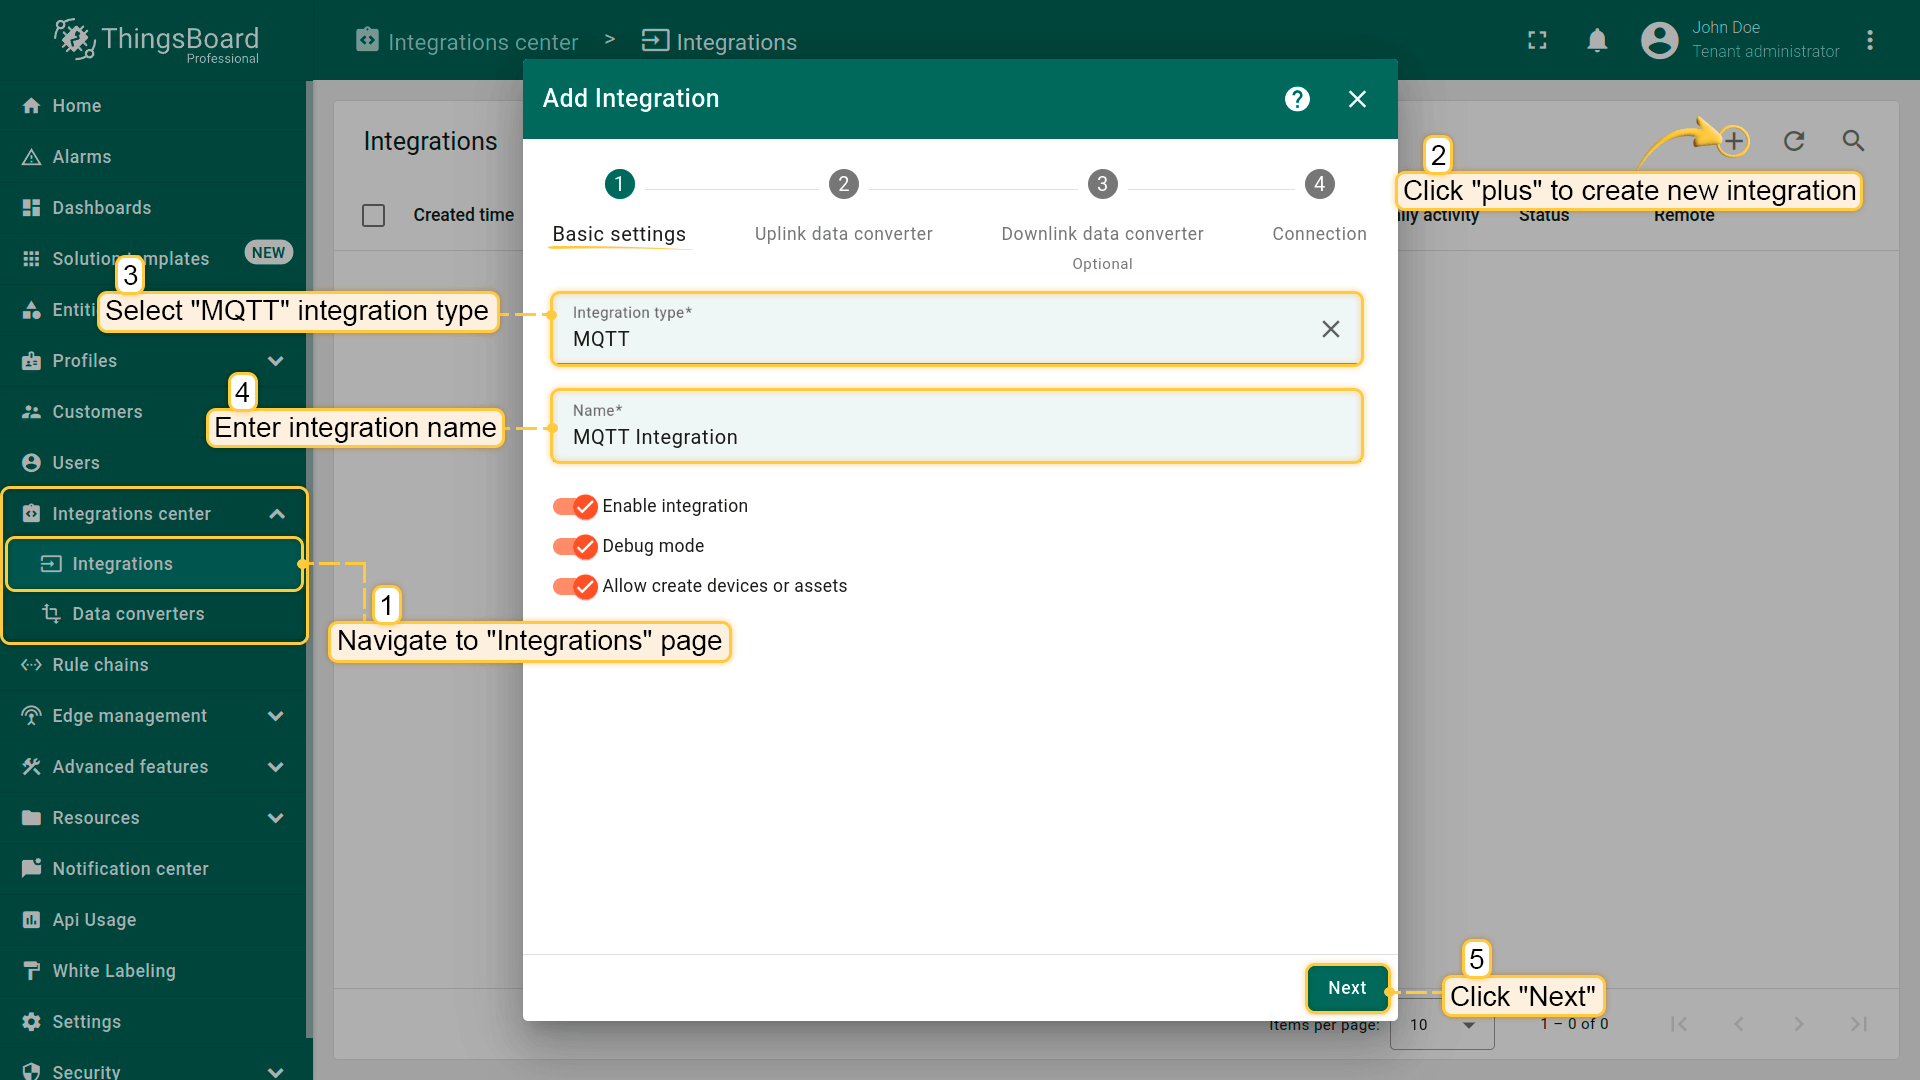
现在创建集成。
- Go to the "Integrations center" section -> "Integrations" page and click "plus" icon to add a new integration. Name it "MQTT Integration", select type "MQTT";
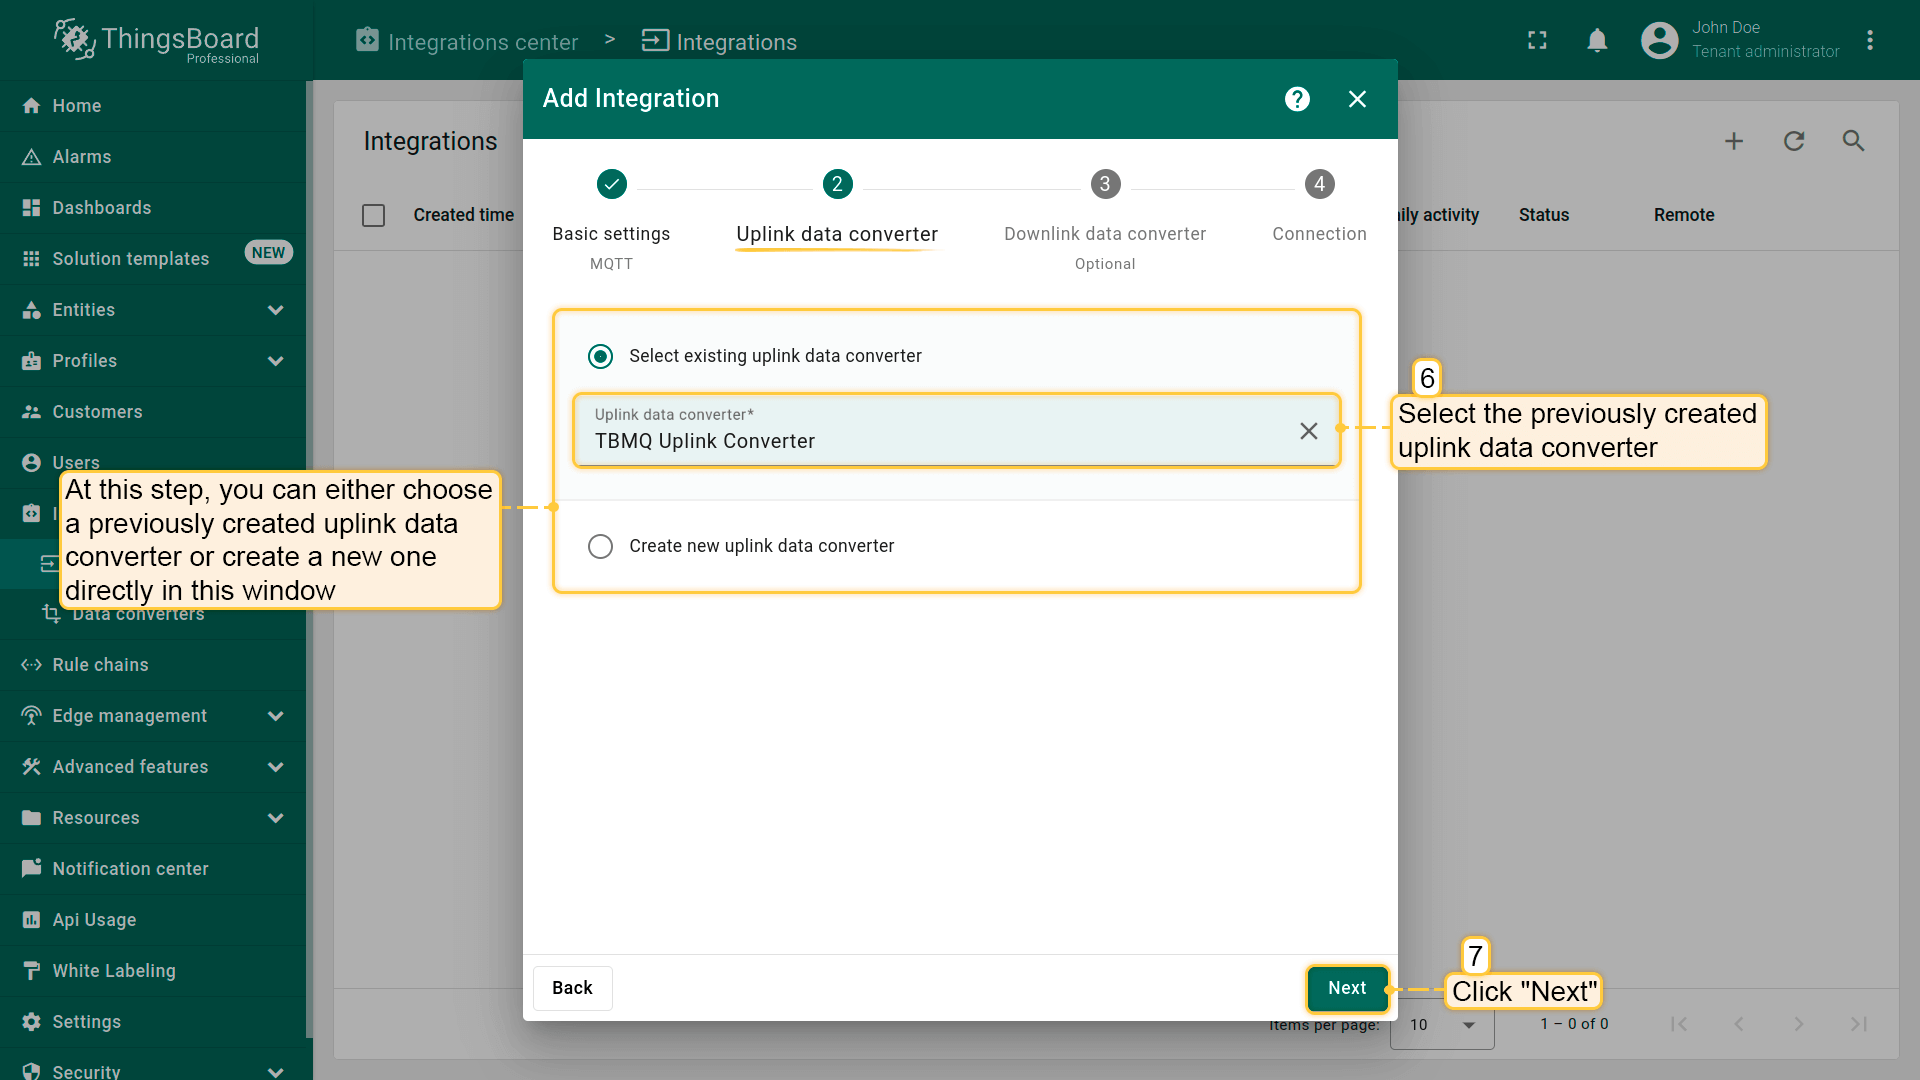
- Add the recently created uplink converter;
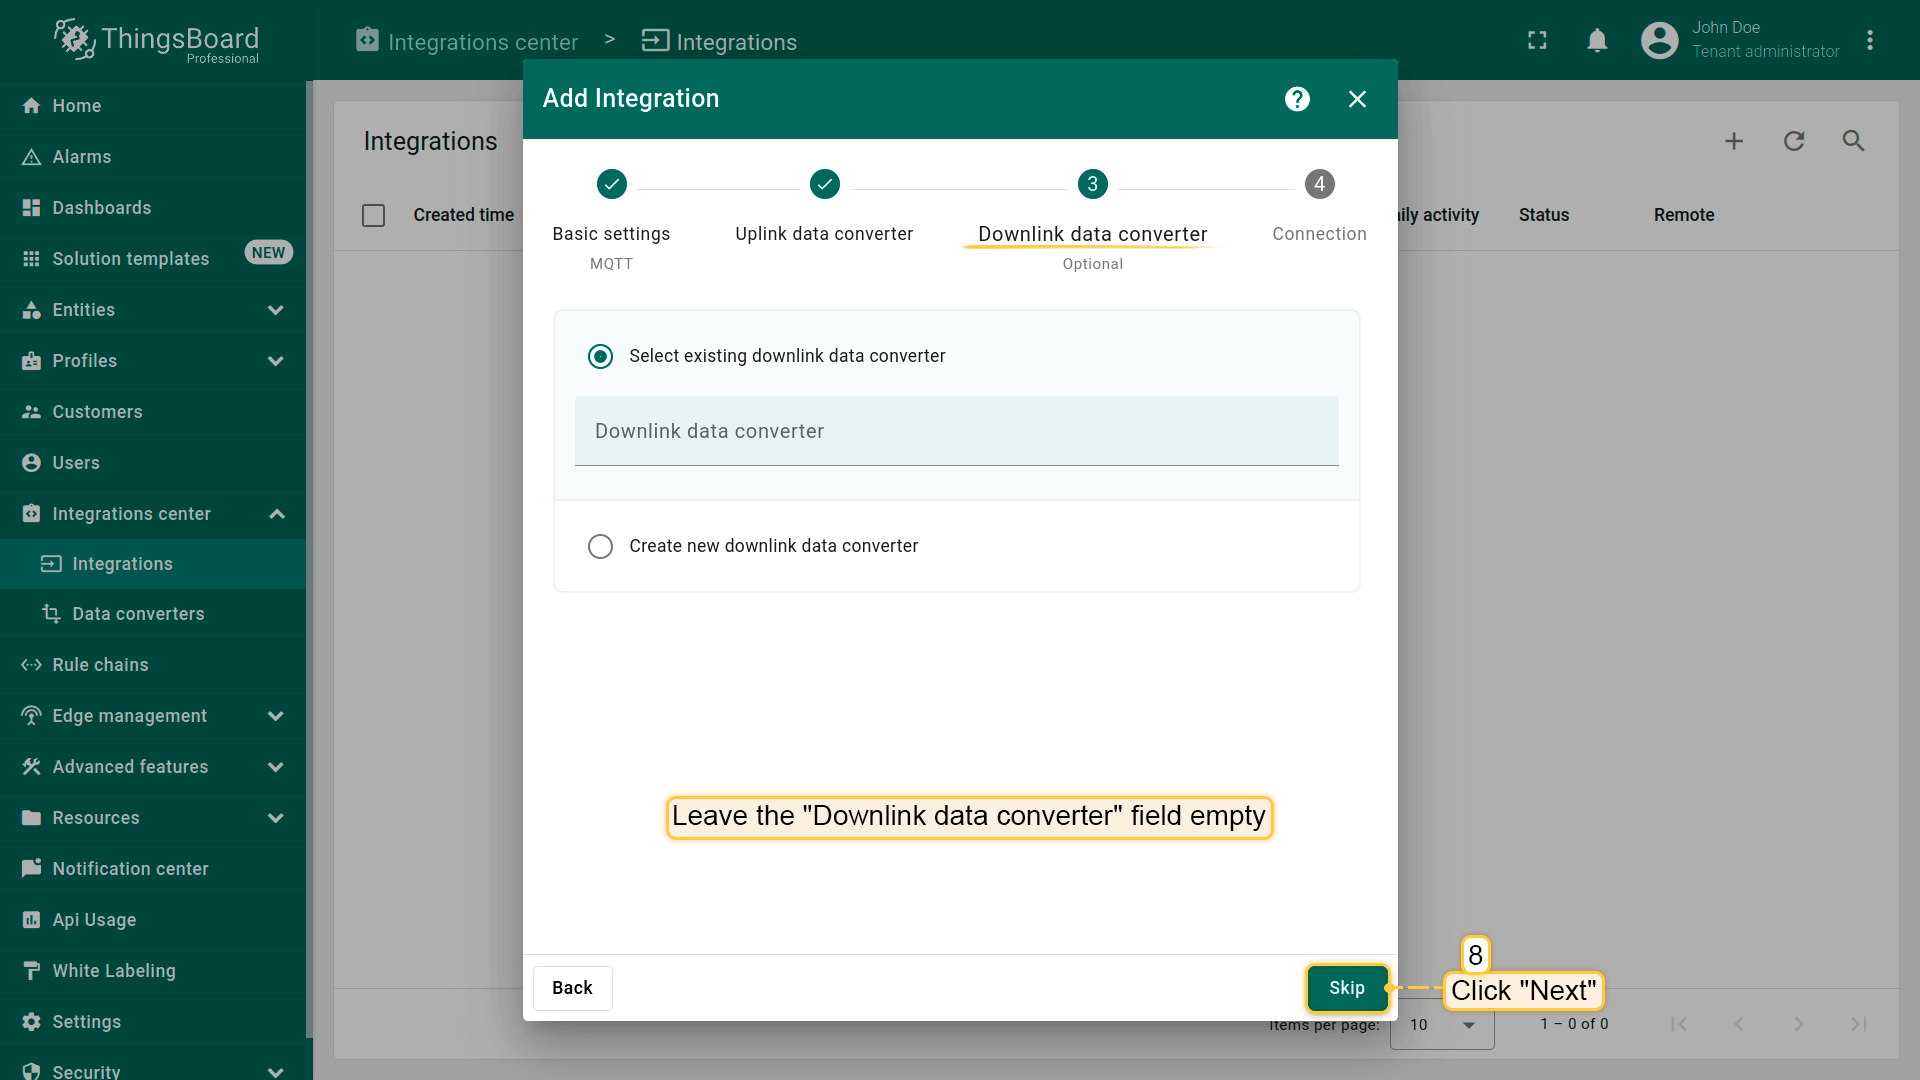
- Leave the "Downlink data converter" field empty. Click "Skip";
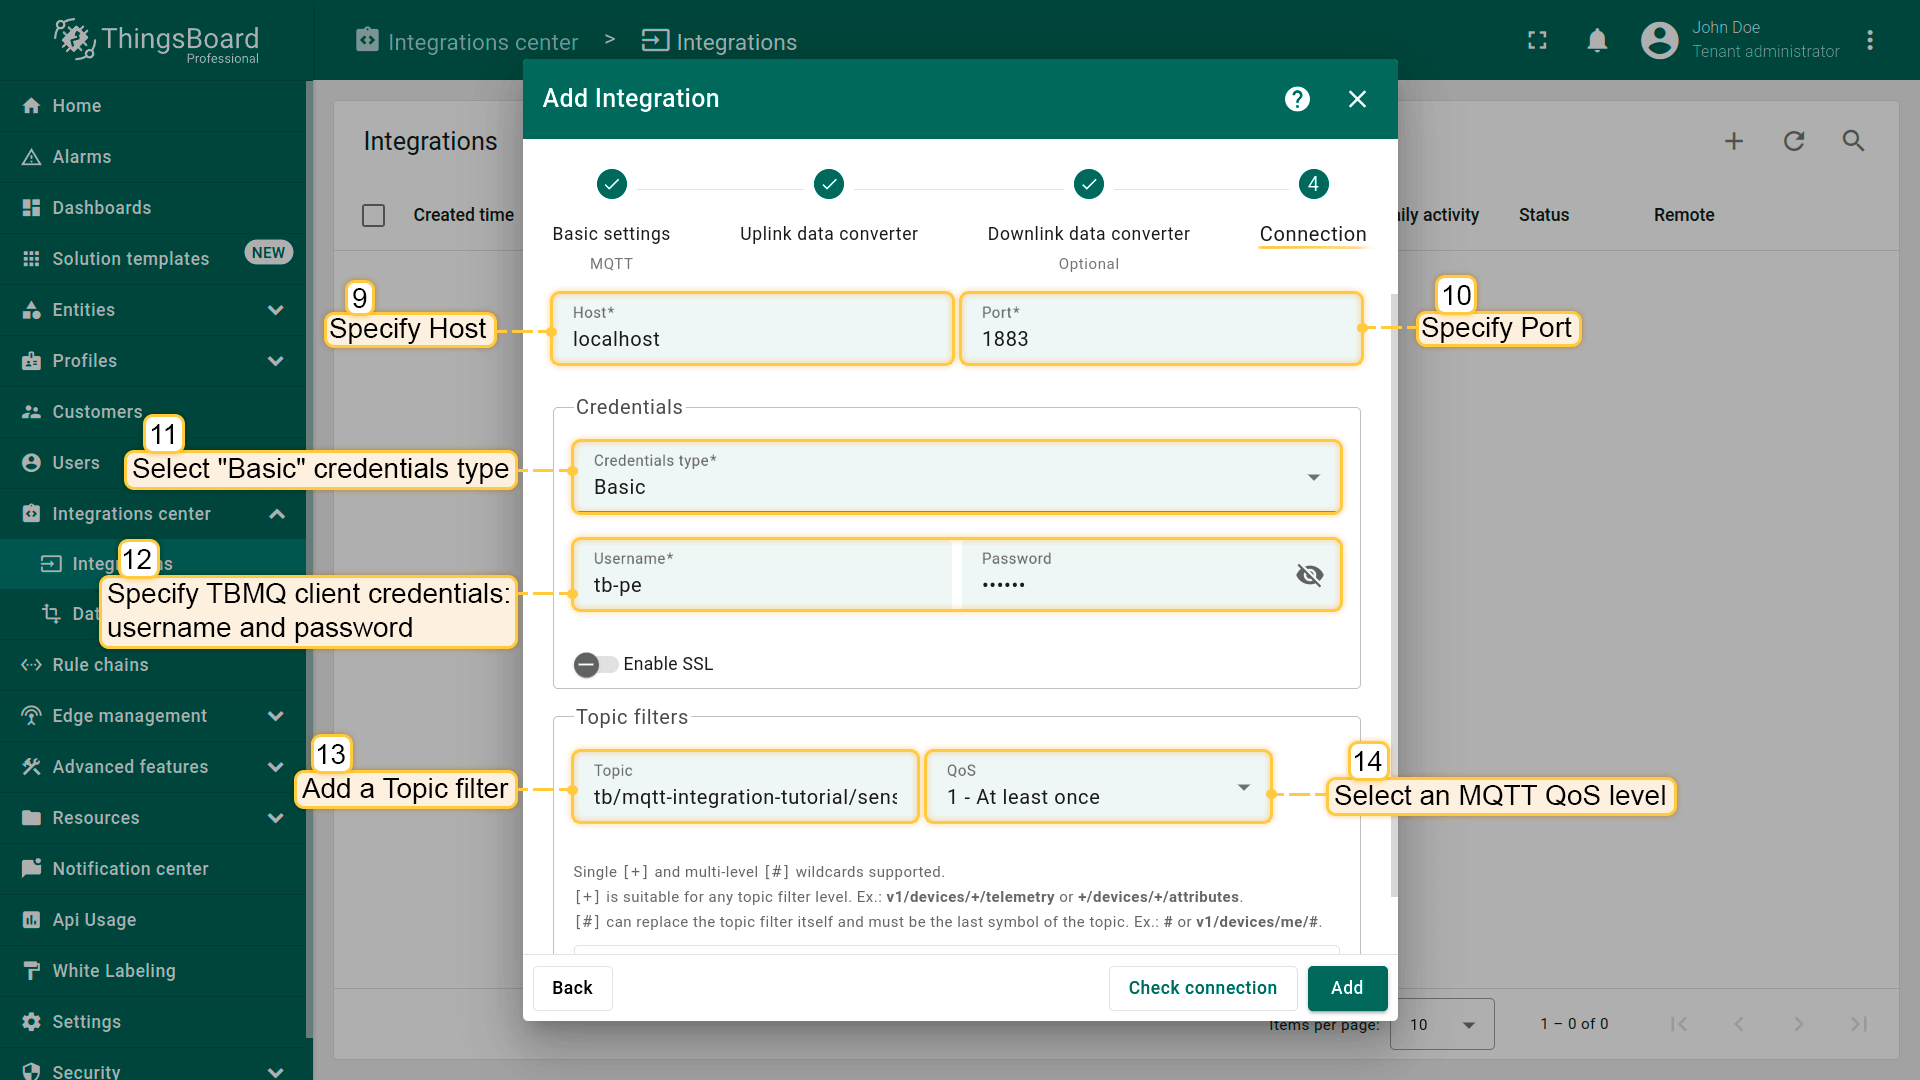
- Specify host and port of TBMQ instance. Select "Basic" credentials type and specify TBMQ client credentials. Add a topic filter: "tb/mqtt-integration-tutorial/sensors/+/temperature" and select an MQTT QoS level higher than 0;
- Now go to the advanced settings. Uncheck the "Clean session" parameter and specify client ID as `tbpeintegration`;
- [Optional] Click on Check connection button to check connection to TBMQ. Click Add button to create the integration.
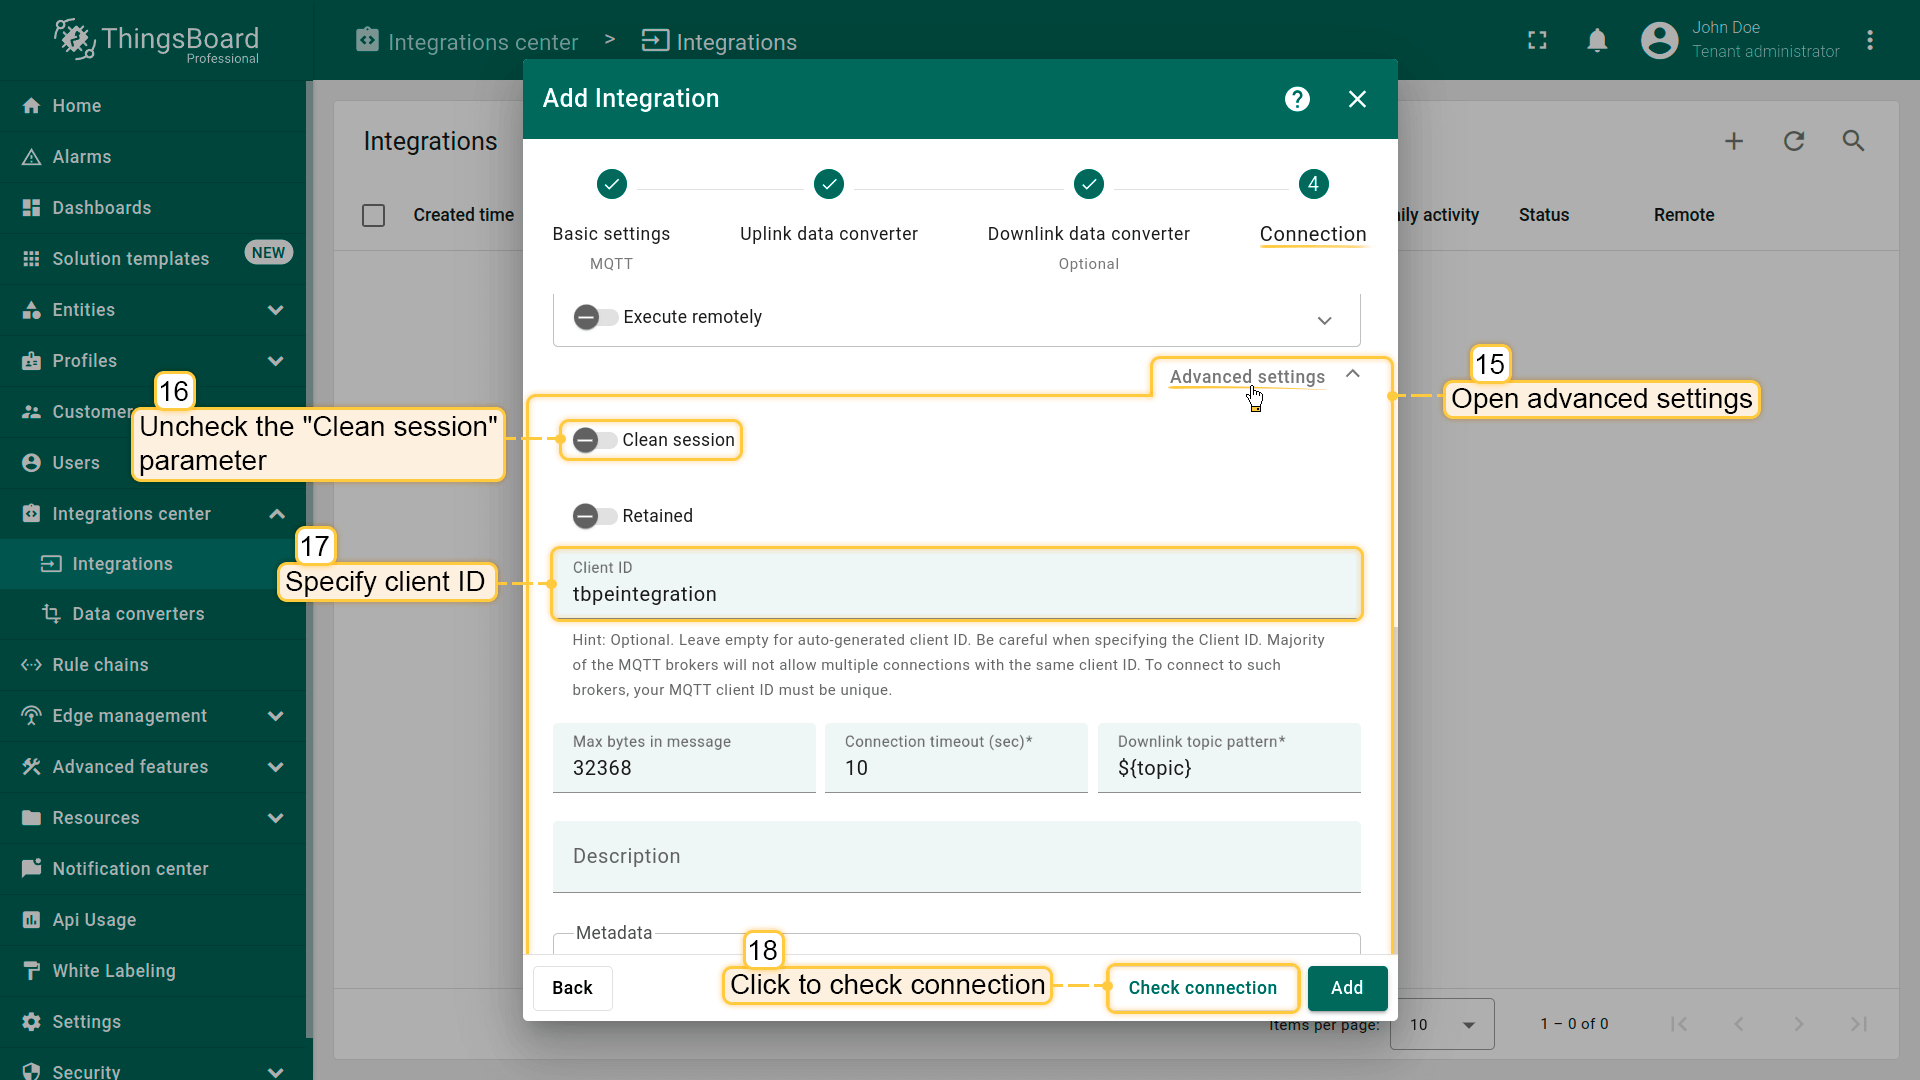
![[Optional] Click on Check connection button to check connection to TBMQ. Click Add button to create the integration.](/images/mqtt-broker/user-guide/integrations/how-to-connect-tbqm-to-thingsboard/tbmq-integration-add-integration-6-pe.png)
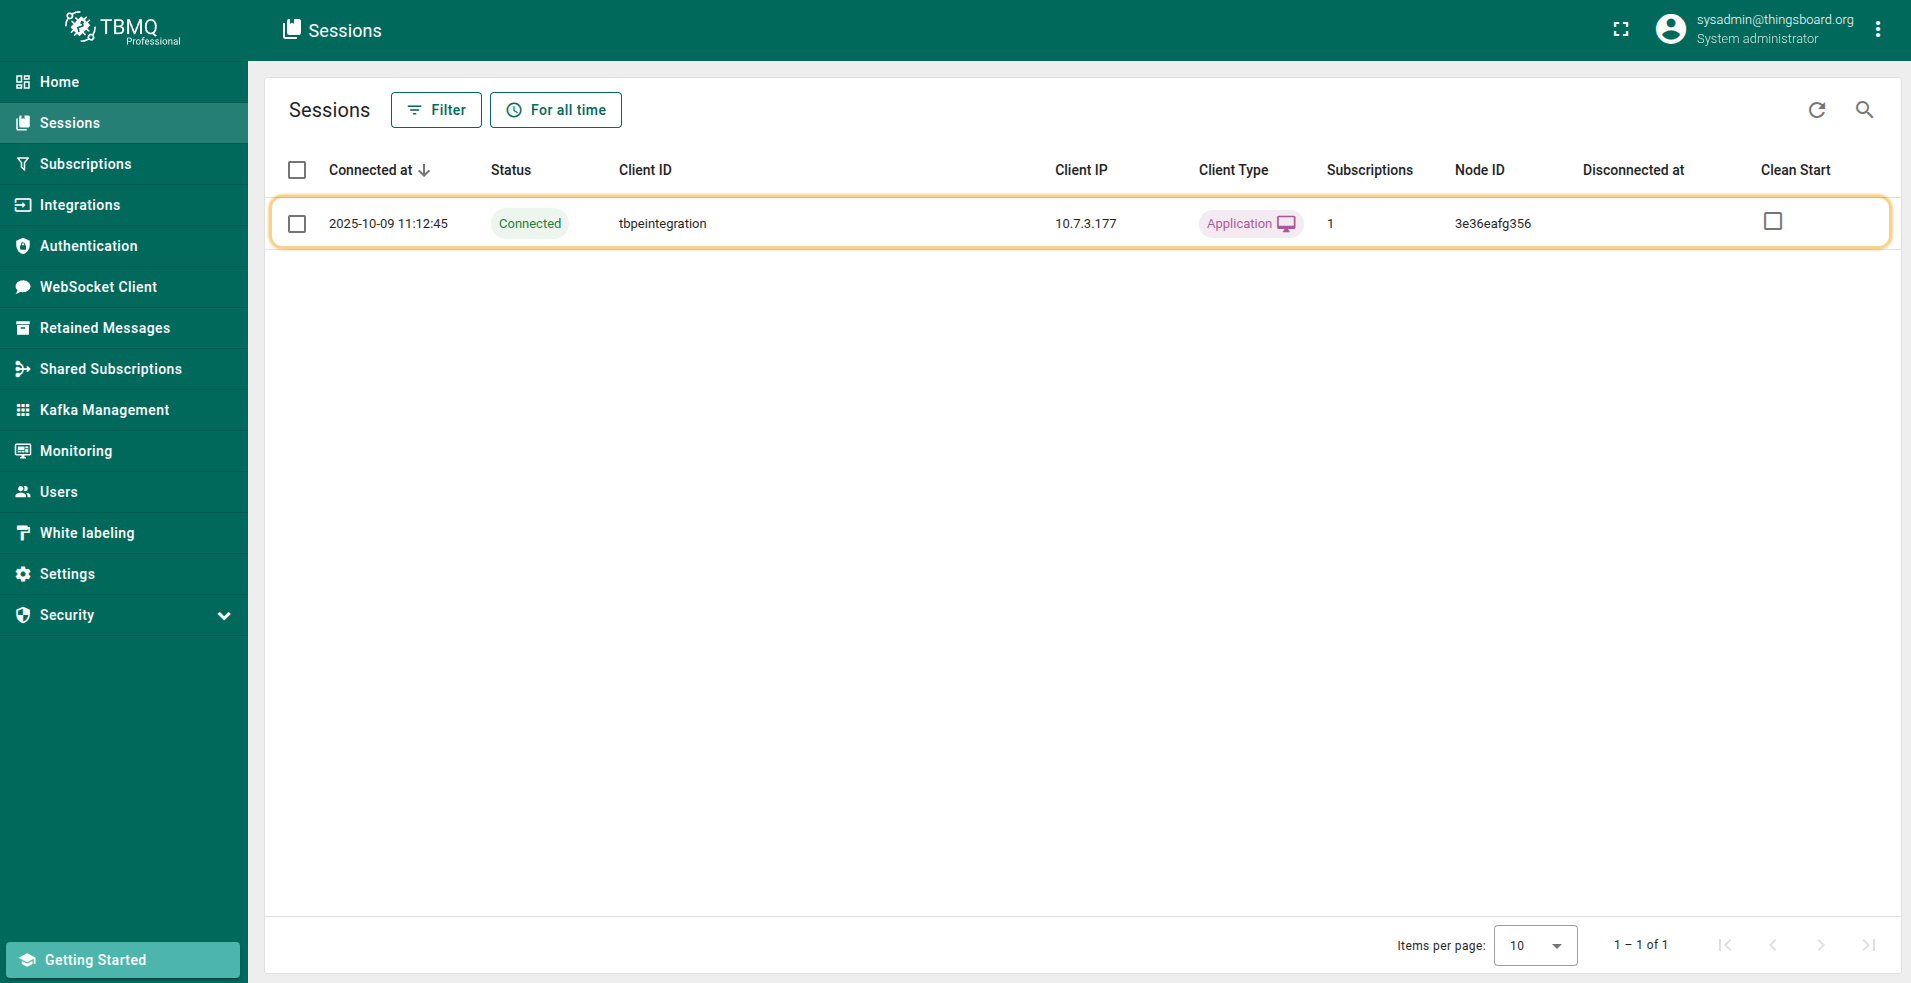
然后在TBMQ UI中进入 “Sessions” 页面。ThingsBoard与TBMQ成功建立连接后,我们将看到新会话及其状态 “Connected”。
在 “Kafka Management” 菜单的 “Topics” 页面,可看到Kafka topic名称(对应MQTT集成中指定的client ID)、分区数、副本因子和topic大小。

发送Uplink消息
现在模拟设备向TBMQ发送温度读数。
打开终端并执行以下命令,以简单格式 {"value":25.1} 向主题 “tb/mqtt-integration-tutorial/sensors/SN-001/temperature” 发送包含温度读数的消息:
1
mosquitto_pub -h $THINGSBOARD_MQTT_BROKER_HOST_NAME -p 1883 -q 1 -t "tb/mqtt-integration-tutorial/sensors/SN-001/temperature" -m '{"value":25.1}' -u "username" -P "password"
将 $THINGSBOARD_MQTT_BROKER_HOST_NAME 替换为broker的正确公网IP或DNS名称,username 和 password 替换为已配置凭据中的值。
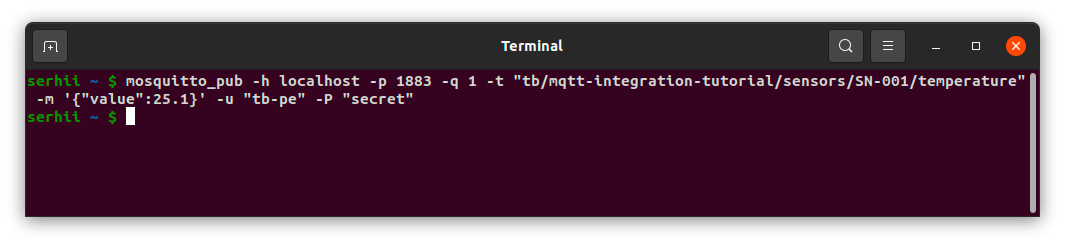
本示例使用以下命令:
1
mosquitto_pub -h localhost -p 1883 -q 1 -t "tb/mqtt-integration-tutorial/sensors/SN-001/temperature" -m '{"value":25.1}' -u "tb-pe" -P "secret"
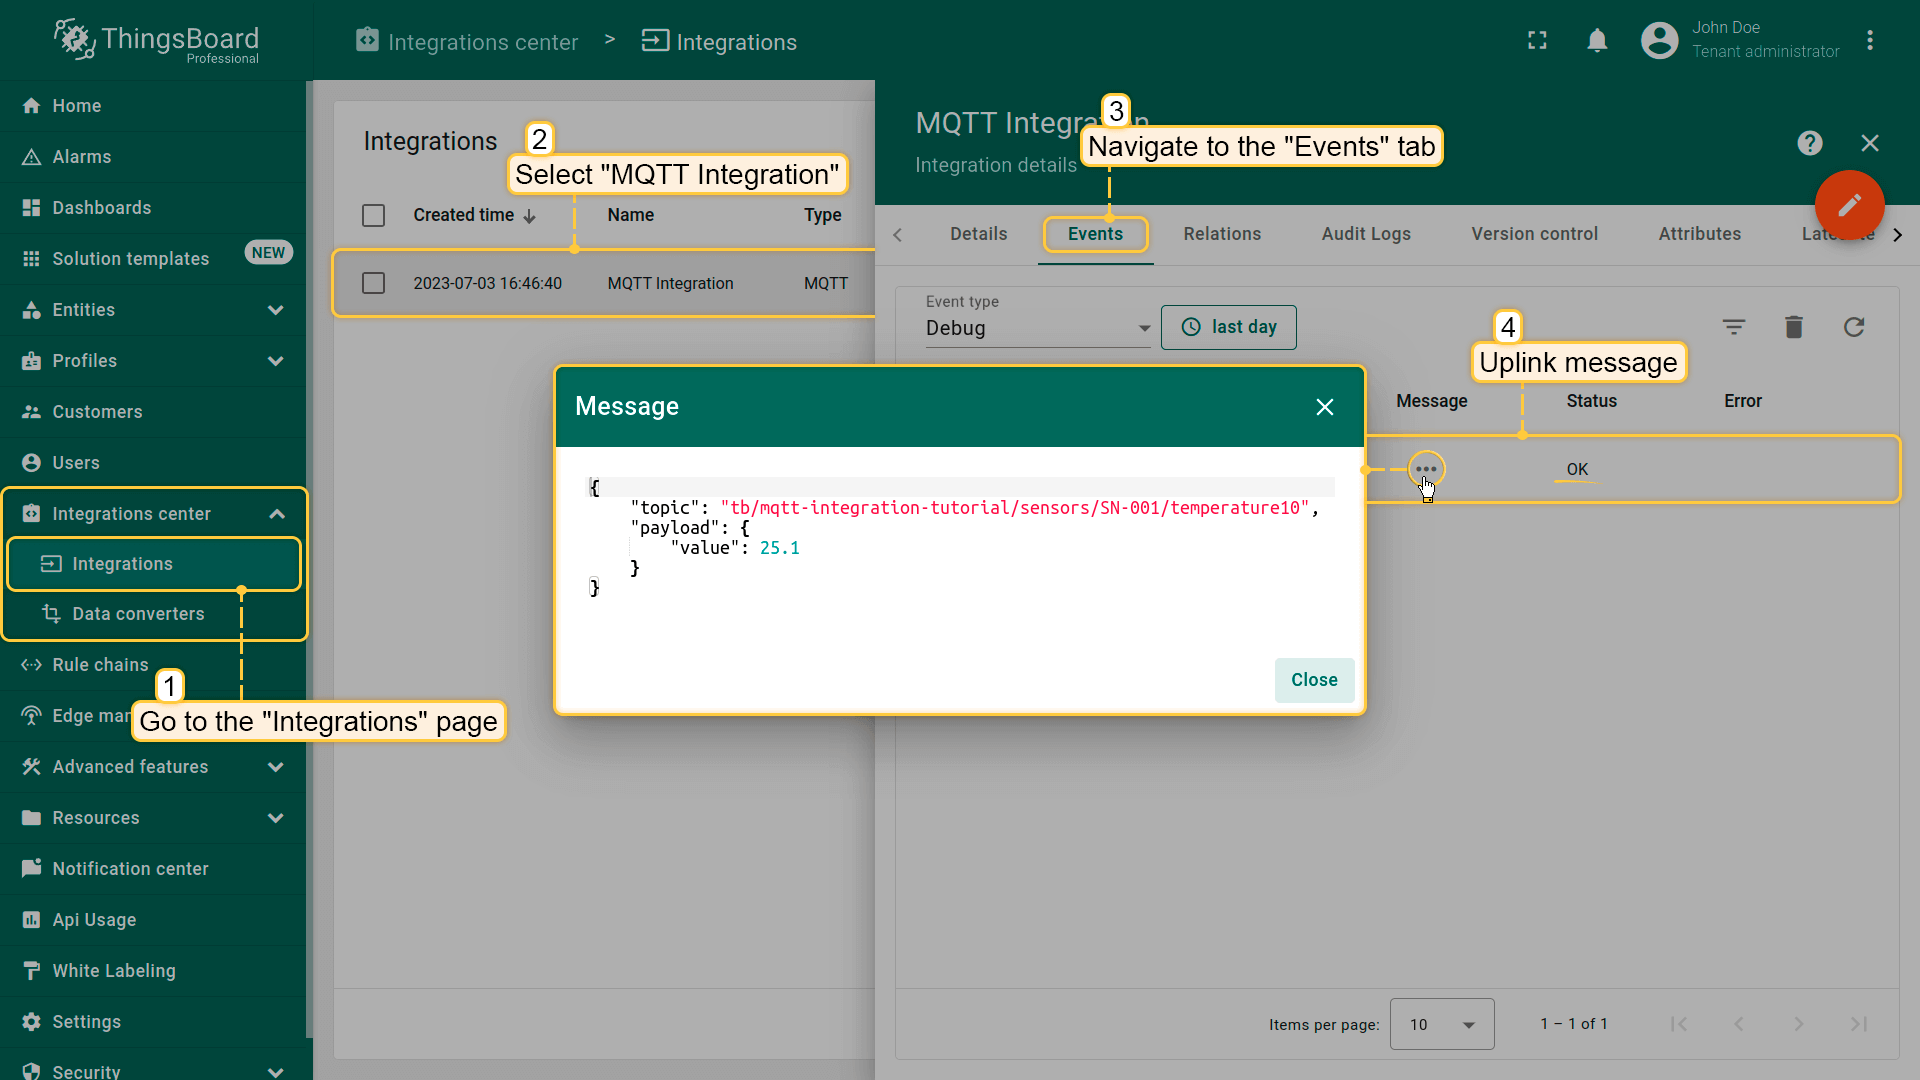
发送uplink消息后,在ThingsBoard UI中进入集成并打开 “Events” 选项卡。此处可看到 “MQTT Integration” 消费的消息。
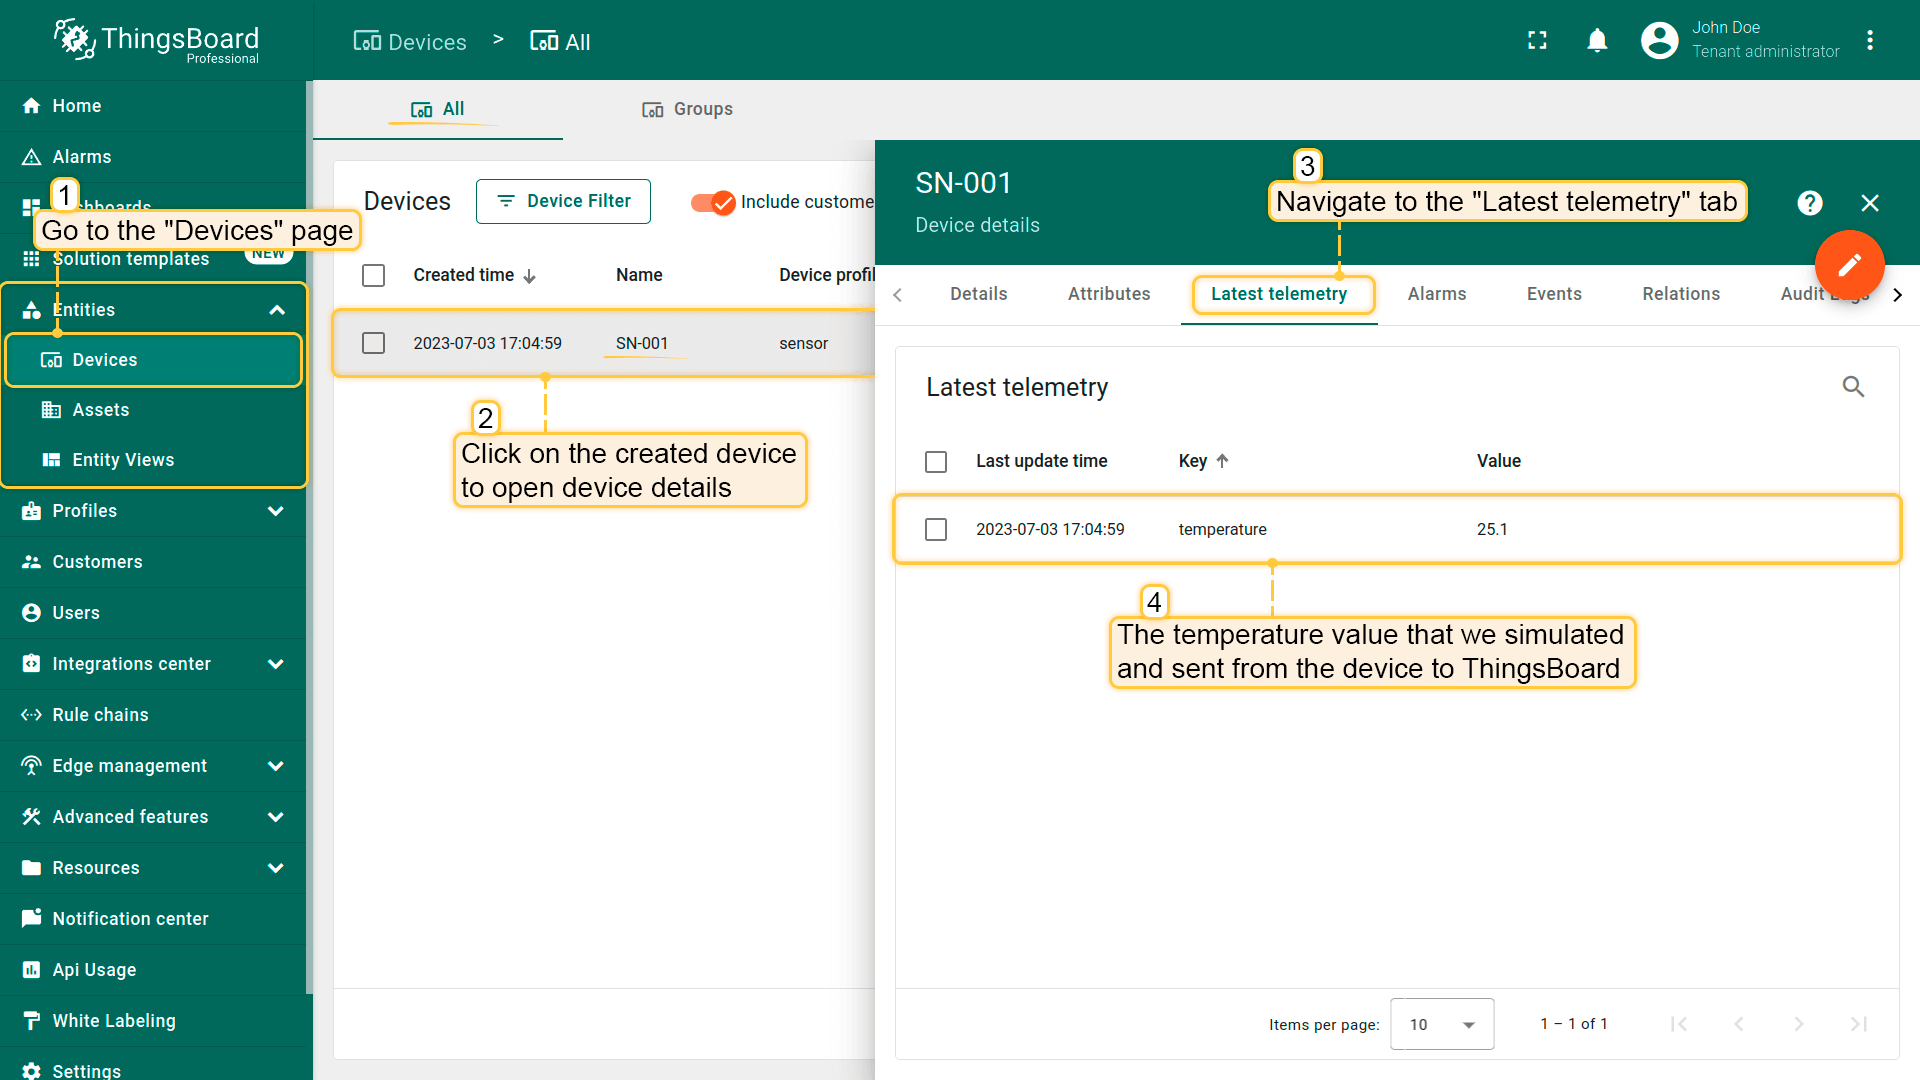
进入 “Entities” 部分 -> “Devices” 页面。可找到由集成预置的SN-001设备。 点击设备,进入 “Latest Telemetry” 选项卡查看 “temperature” 键及其值(25.1)。
下一步
-
快速入门指南 - 本指南提供 TBMQ 的快速概览。
-
安装指南 - 学习如何使用 Docker 配置 TBMQ 或在 AWS、GCP、Azure 的 K8S 环境中部署。
-
安全指南 - 学习如何为 MQTT 客户端启用认证与授权。
-
配置指南 - 了解 TBMQ 配置文件和参数。
-
MQTT 客户端类型指南 - 了解 TBMQ 客户端类型。