- Adding alarm rules
- Adding alarms table widget
- Alarm trigger testing
- Adding alarm widget to all other states
- Final view of the dashboard for this lesson
- Next step
我们继续开发dashboard。上节课已为每台设备添加并配置独立states,并配置展示telemetry数据。
若尚未完成上节课,强烈建议先完成后再继续。
Lesson 3: Adding and configuring individual states for each device
本课聚焦配置alarm rules并在dashboard上可视化alarms。 具体包括:
- 为Indoor Air Quality Sensor配置alarm rules,在温度或湿度超出阈值或CO₂ 超过设定限值时生成alarms。
- 添加dashboard部件以监控活动alarms。
- 测试alarm的触发、确认和清除。
开始吧。

alarm 为IoT系统中检测到 alarm rules 中定义的关键条件时生成的通知。
关于 working with alarms 和 configuring alarm rules 的更多信息,请参阅相关文档。
Adding alarm rules
The Indoor Air Quality sensor device that sends telemetry data such as temperature, humidity, and CO₂ levels to ThingsBoard uses the air-sensor device profile.
Configure alarm rules for this profile to ensure they are applied to all sensors using the profile.
High temperature alarm rule
First, configure an alarm rule with the High temperature type using the following conditions:
- If the temperature exceeds 24 °C but does not exceed 26 °C (inclusive), a Major severity alarm is created.
- If the temperature exceeds 26 °C, a Critical severity alarm is created.
- If the temperature drops below 24 °C, the alarm is automatically cleared.
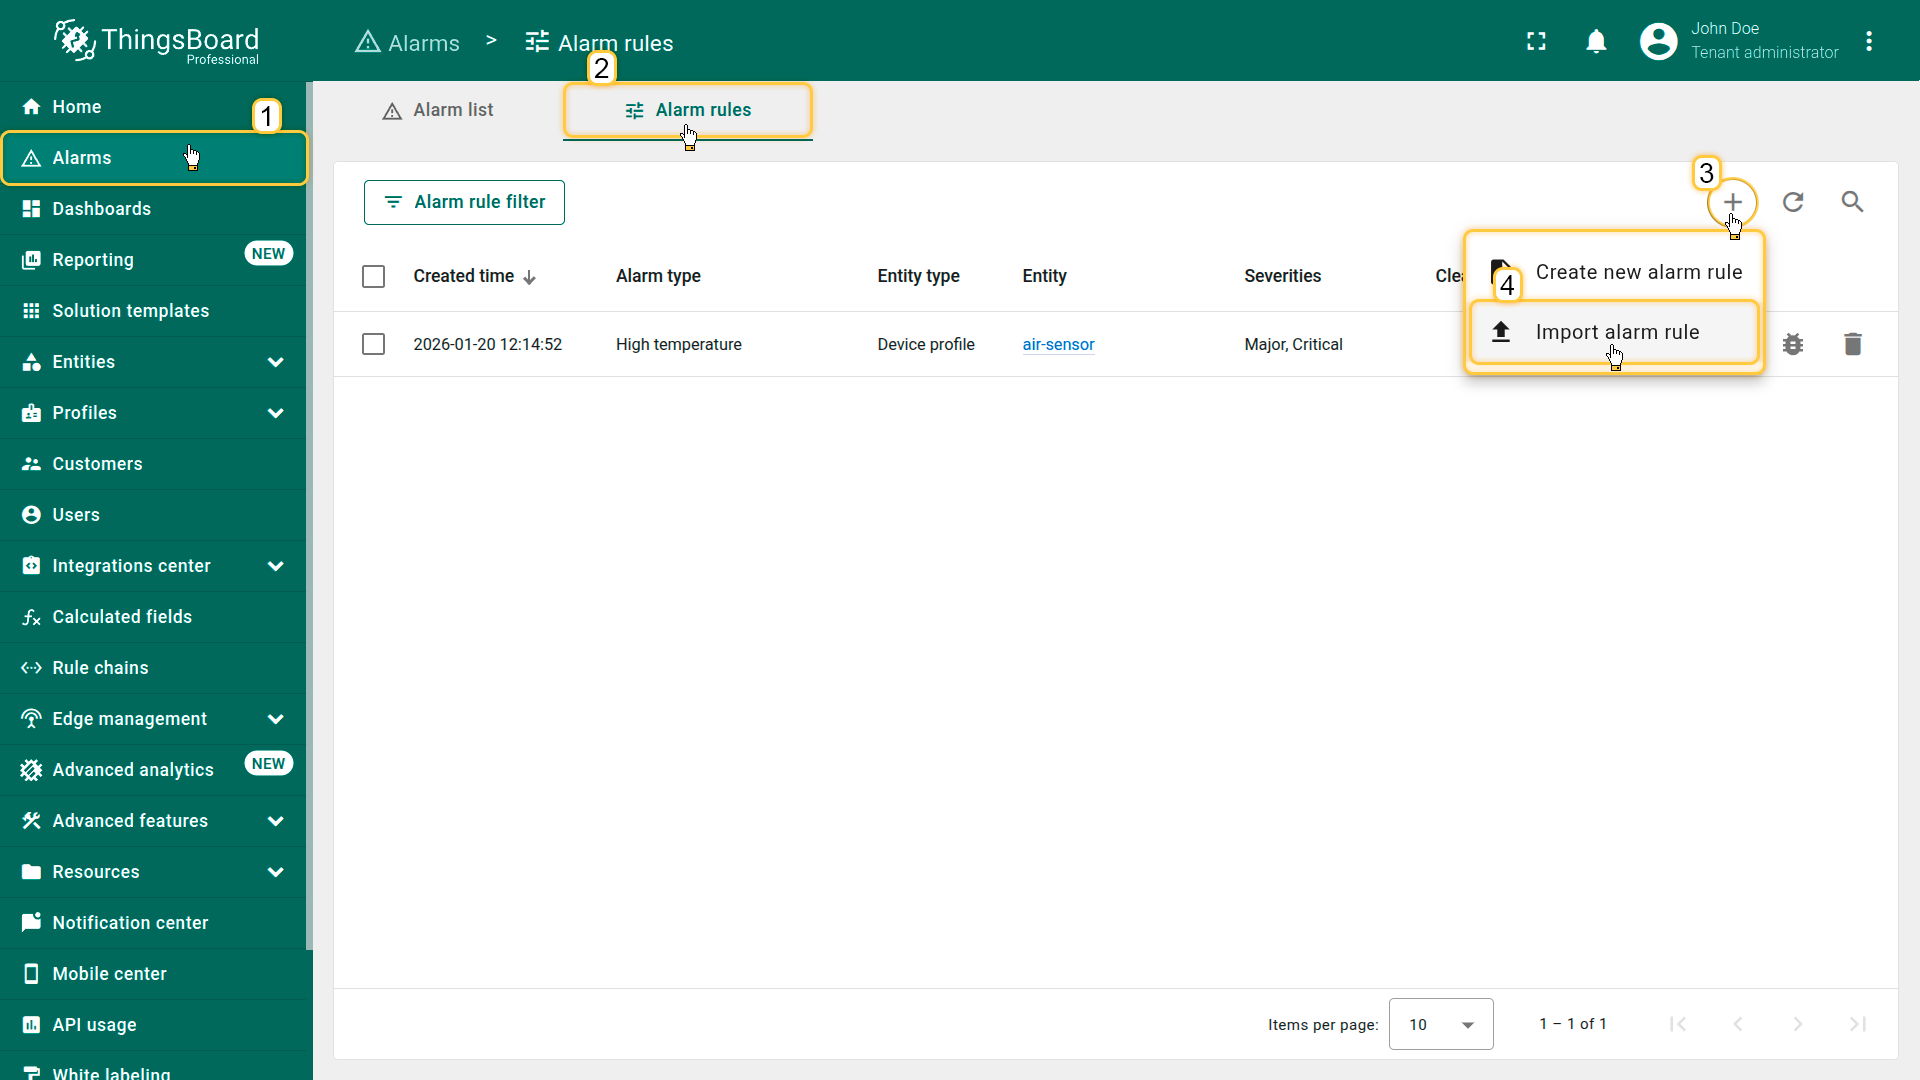
1. Create new alarm rule
- Go to the Alarm rules tab of the Alarms page.
- Click the “+” button in the top-right corner and select Create new alarm rule.
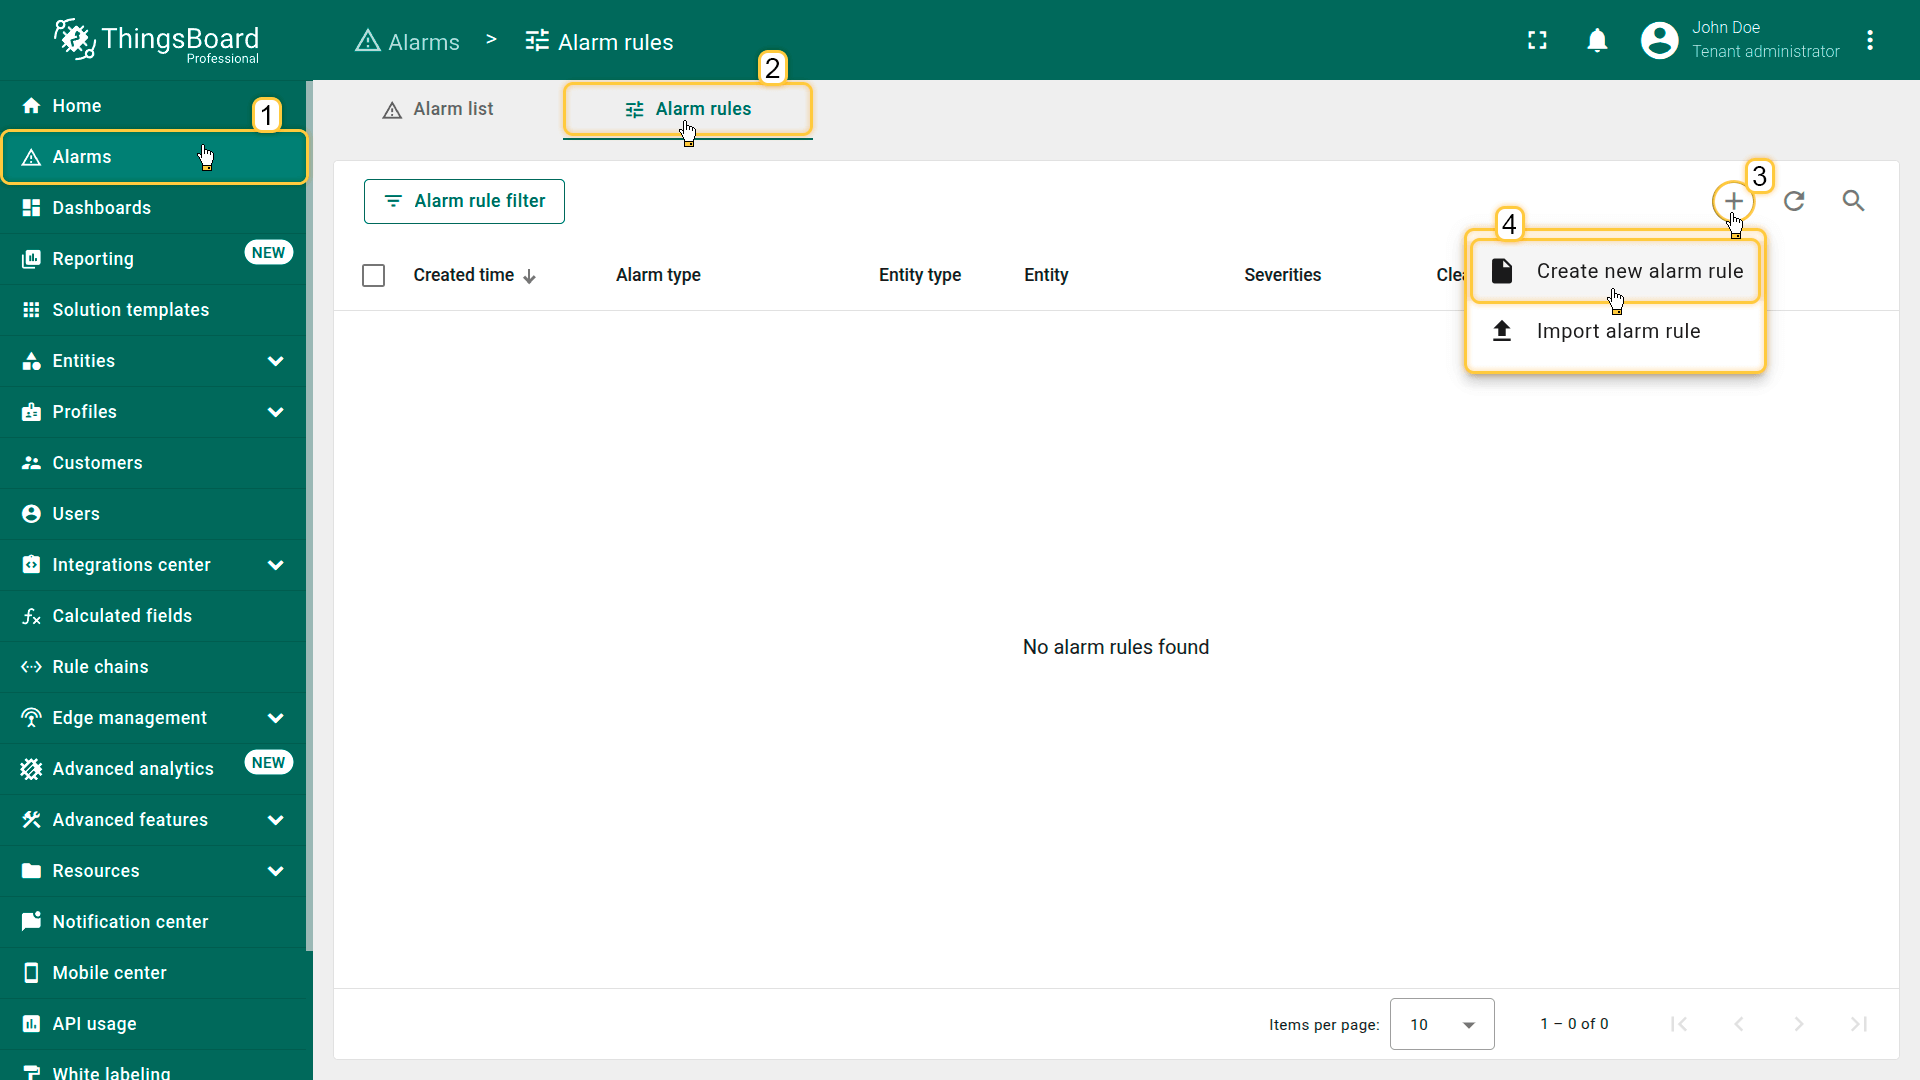
- 点击右上角的「+」按钮(3),选择Create new alarm rule(4)。
2. Configure the General parameters
In the General section, specify the following settings:
- Alarm type: High temperature
- Entity type: Device profile
- Device profile: air-sensor
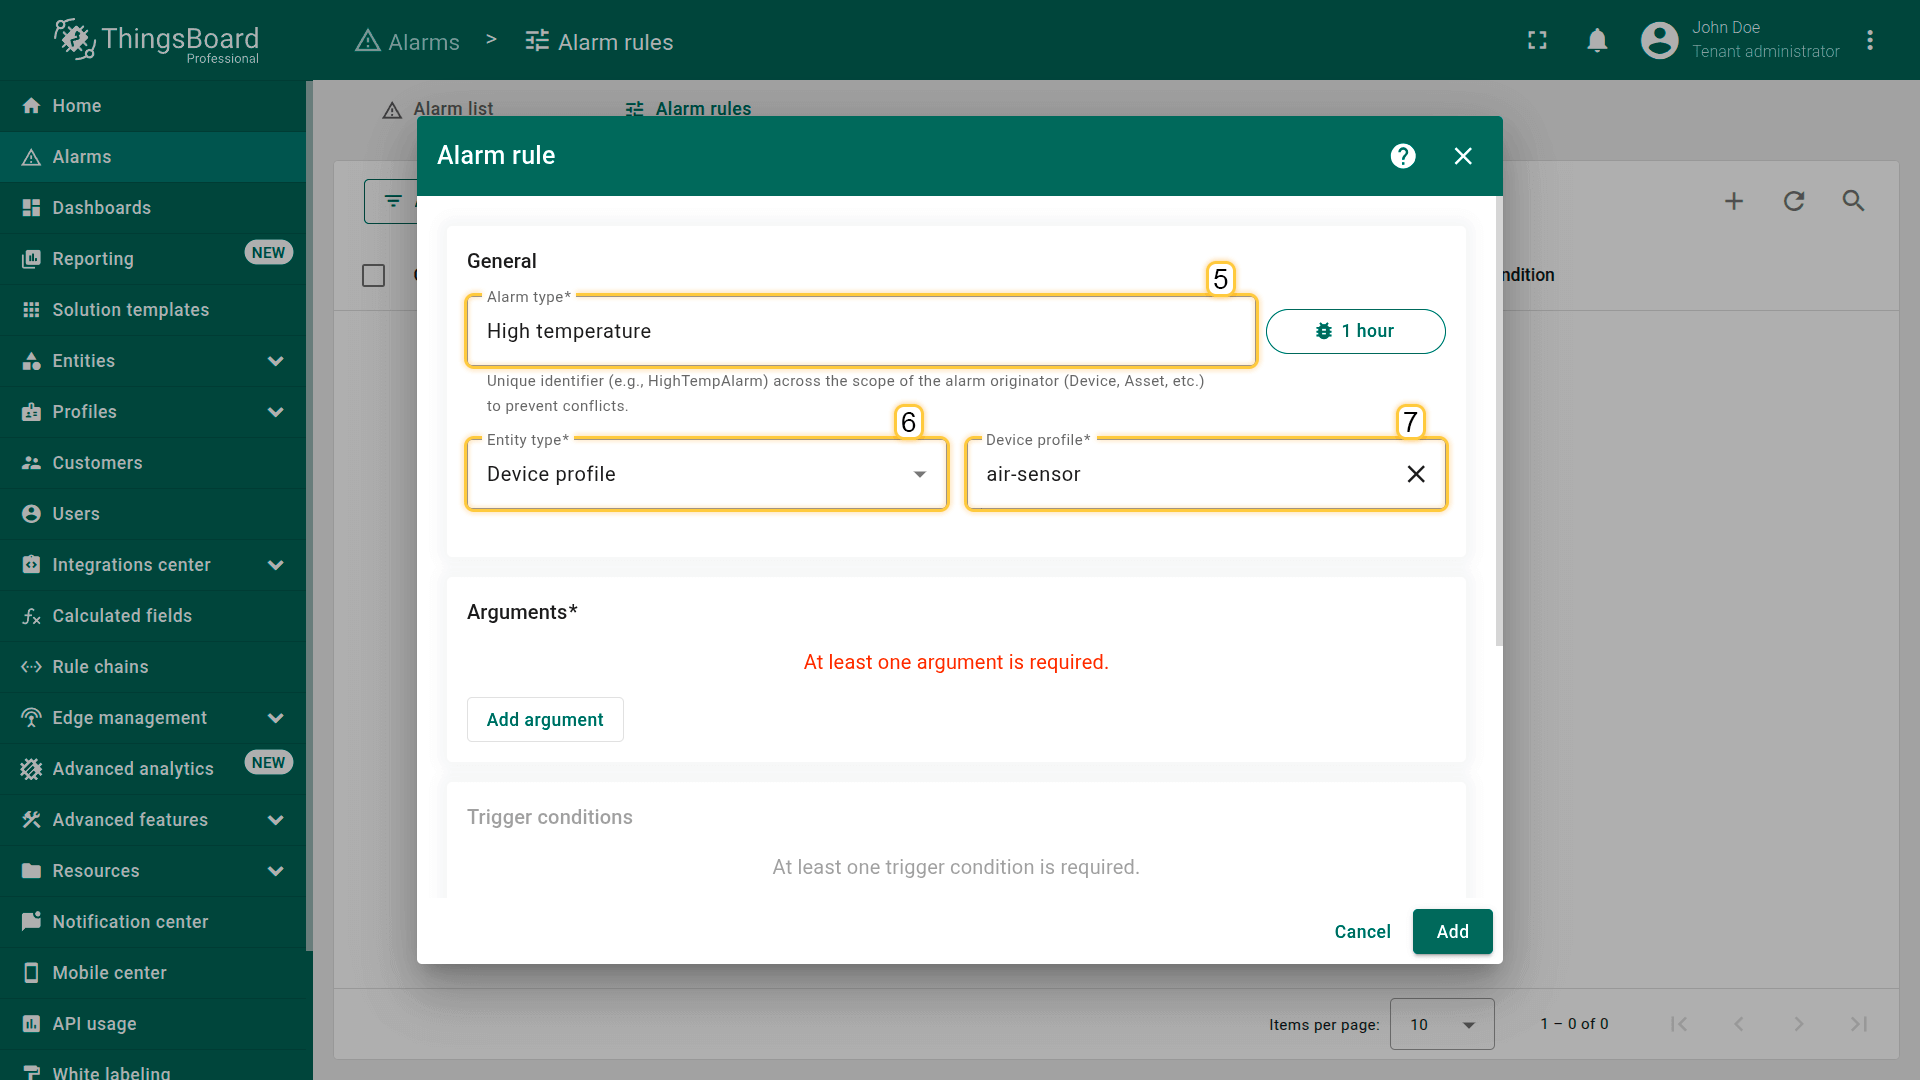
- Alarm type(5):High temperature
- Entity type(6):Device profile
- Device profile(7):air-sensor
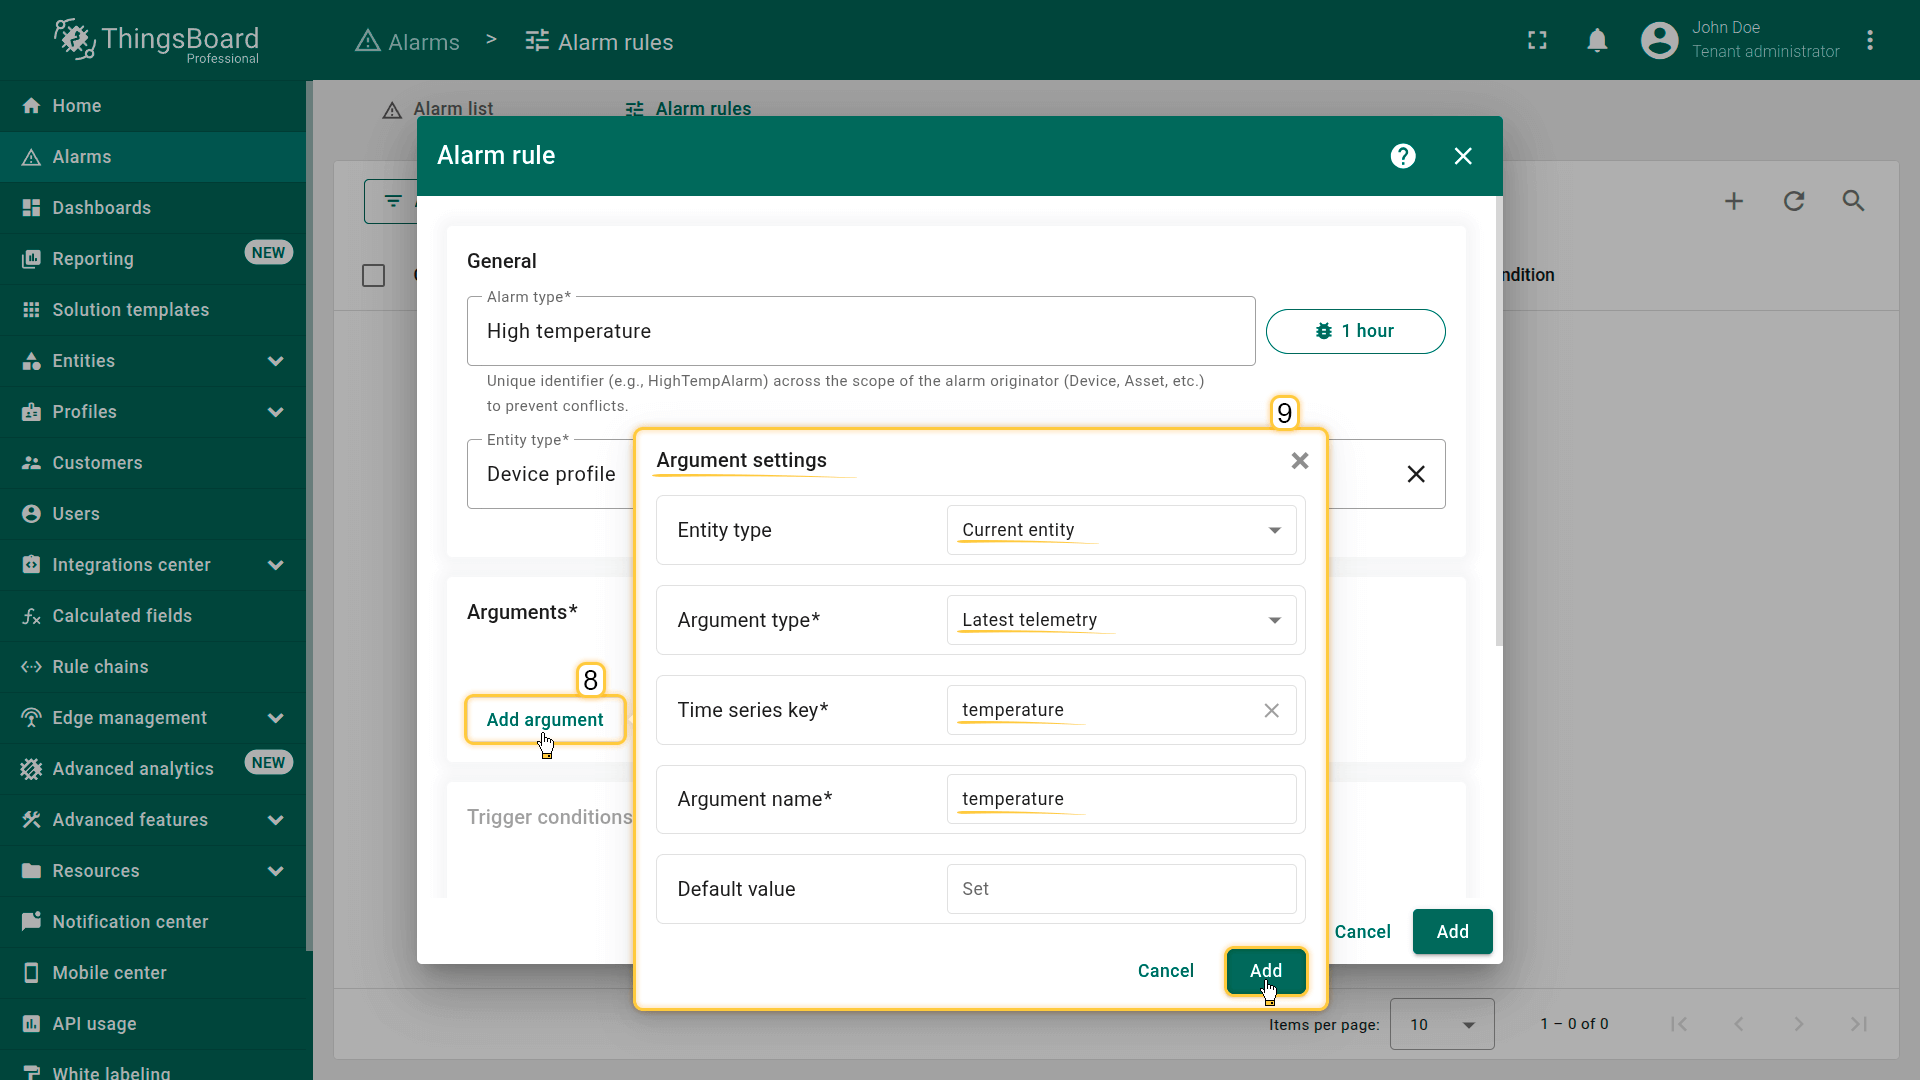
3. Add an argument
Add an argument — the variable whose data will be used in the rule condition.
In the Arguments section:
- Click Add argument and fill in:
- Entity type: Current entity
- Argument type: Latest telemetry
- Time series key: temperature
- Argument name: temperature
- Click Add.
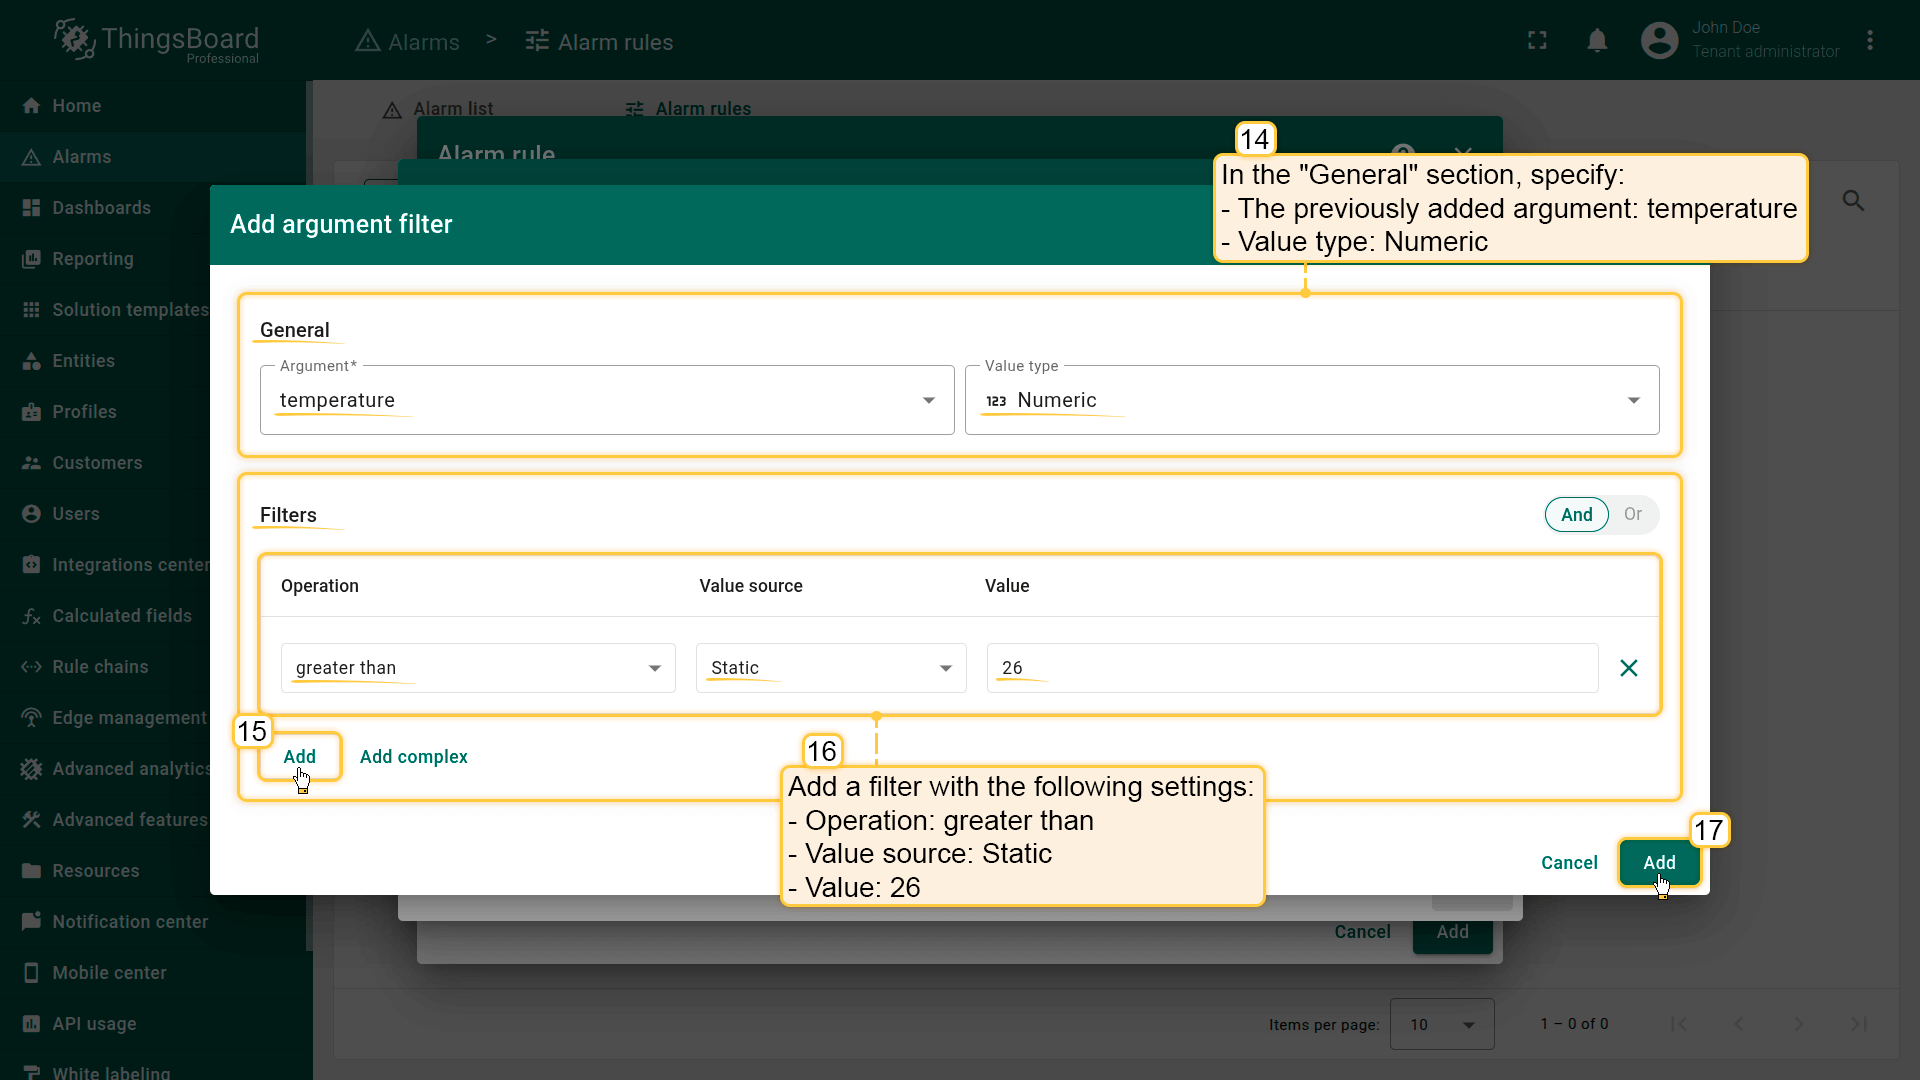
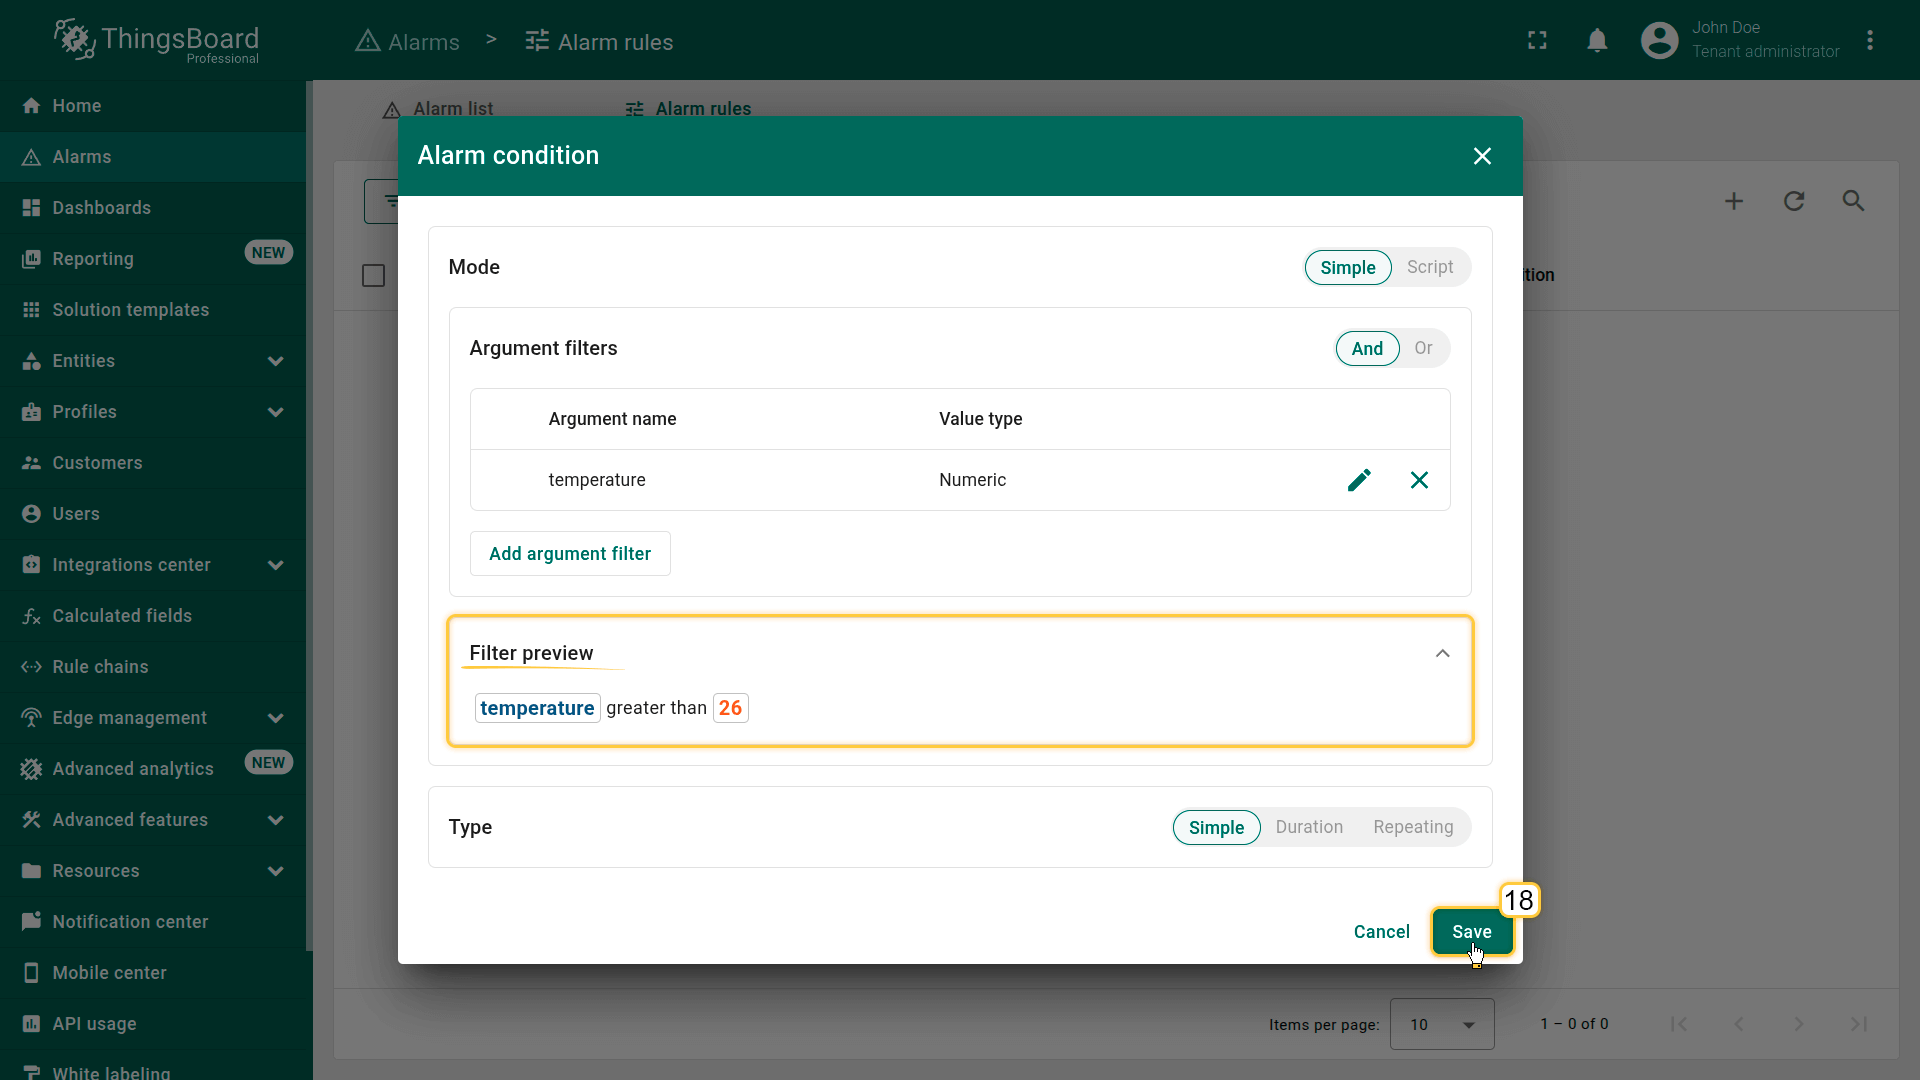
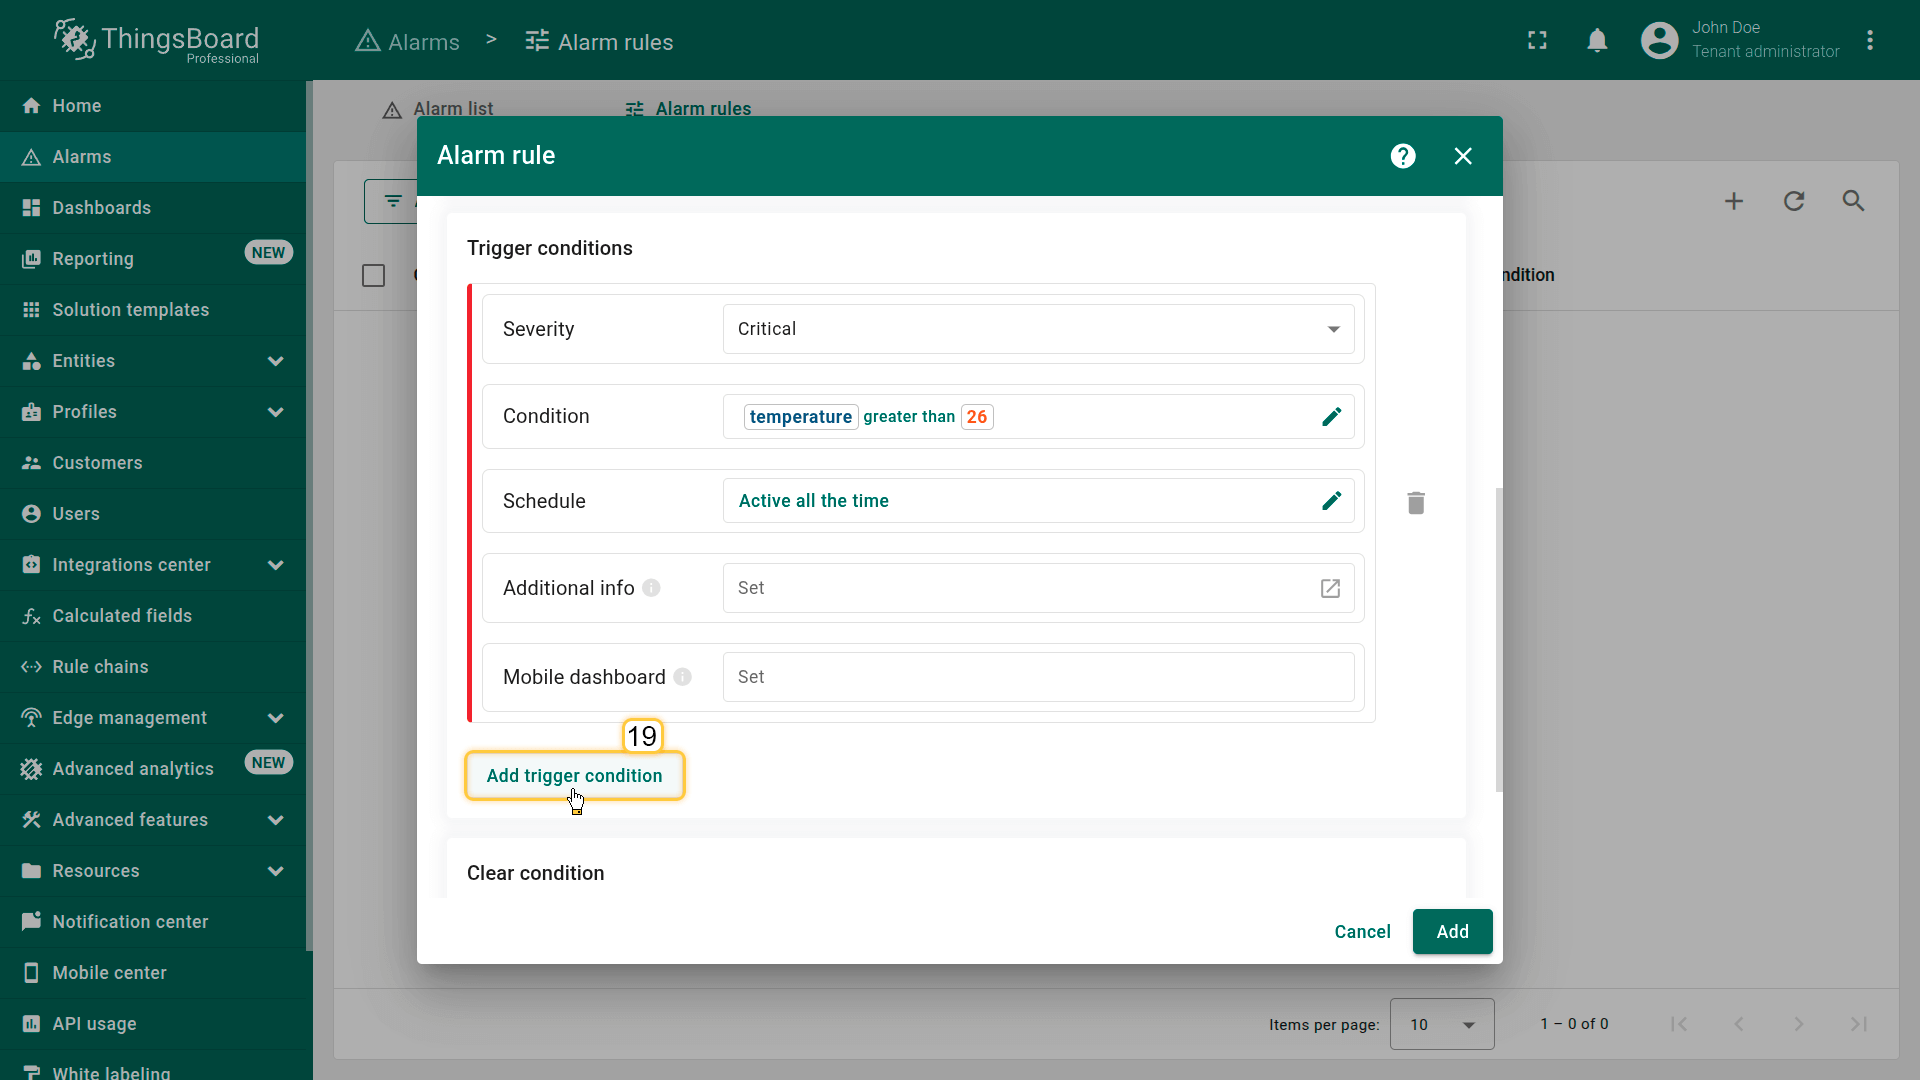
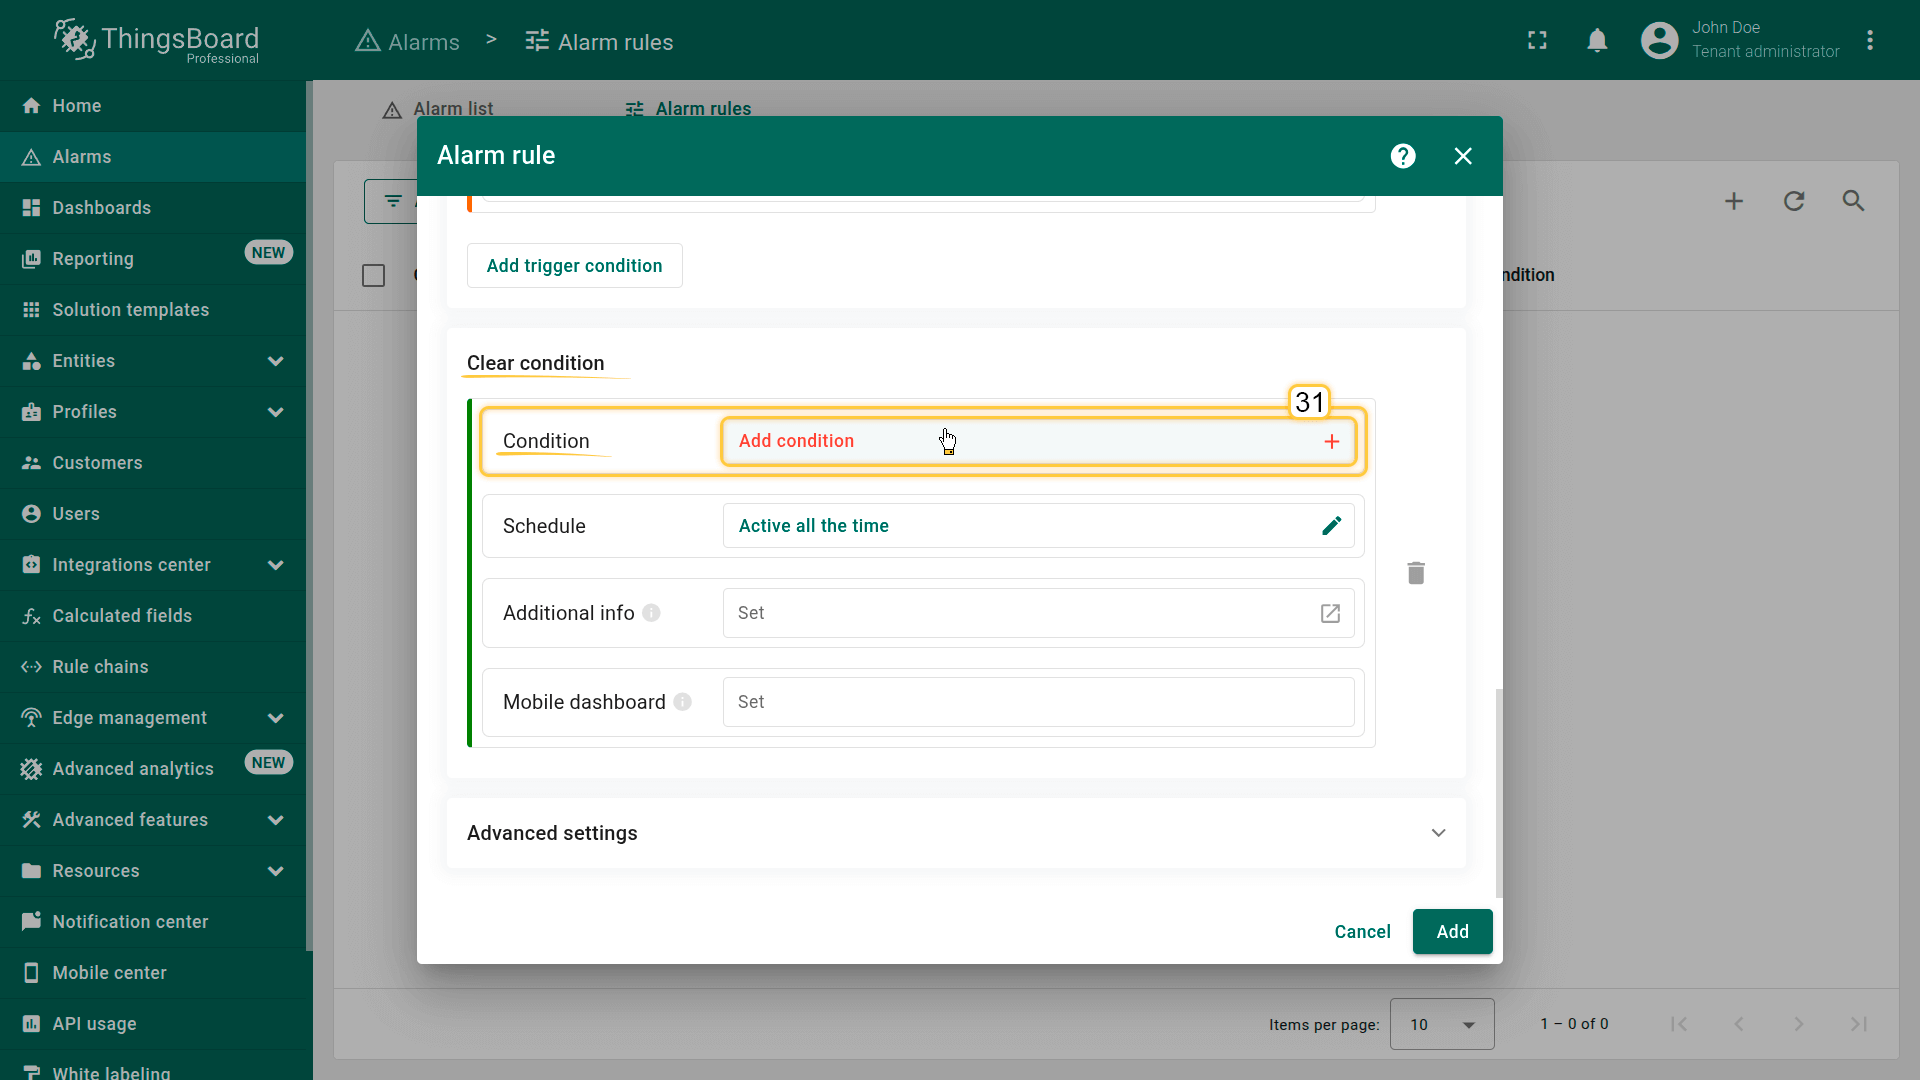
4. Add "Critical" trigger condition
Add an alarm trigger condition with “Critical” severity that is activated when the temperature exceeds 26 °C.
In the Create condition section, click Add create condition.
- Severity: Critical
- Condition
- Click Add condition.
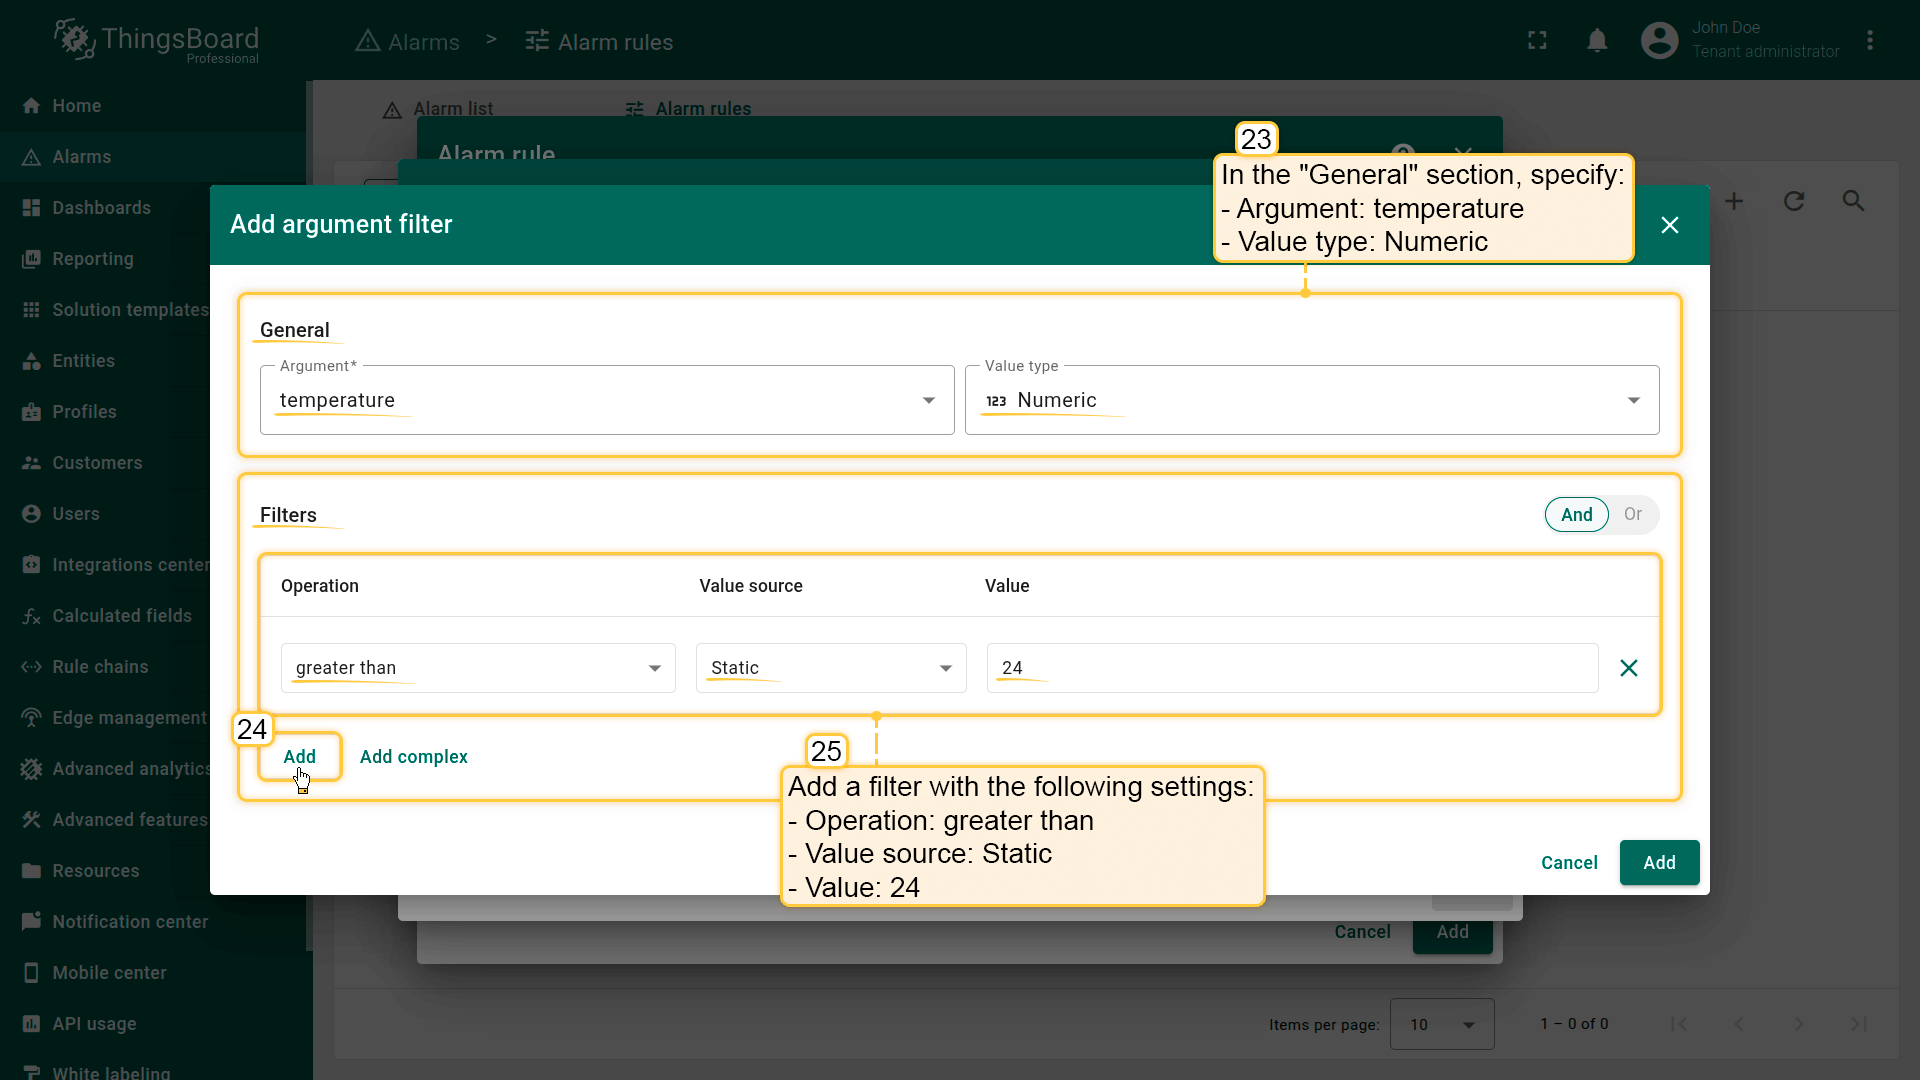
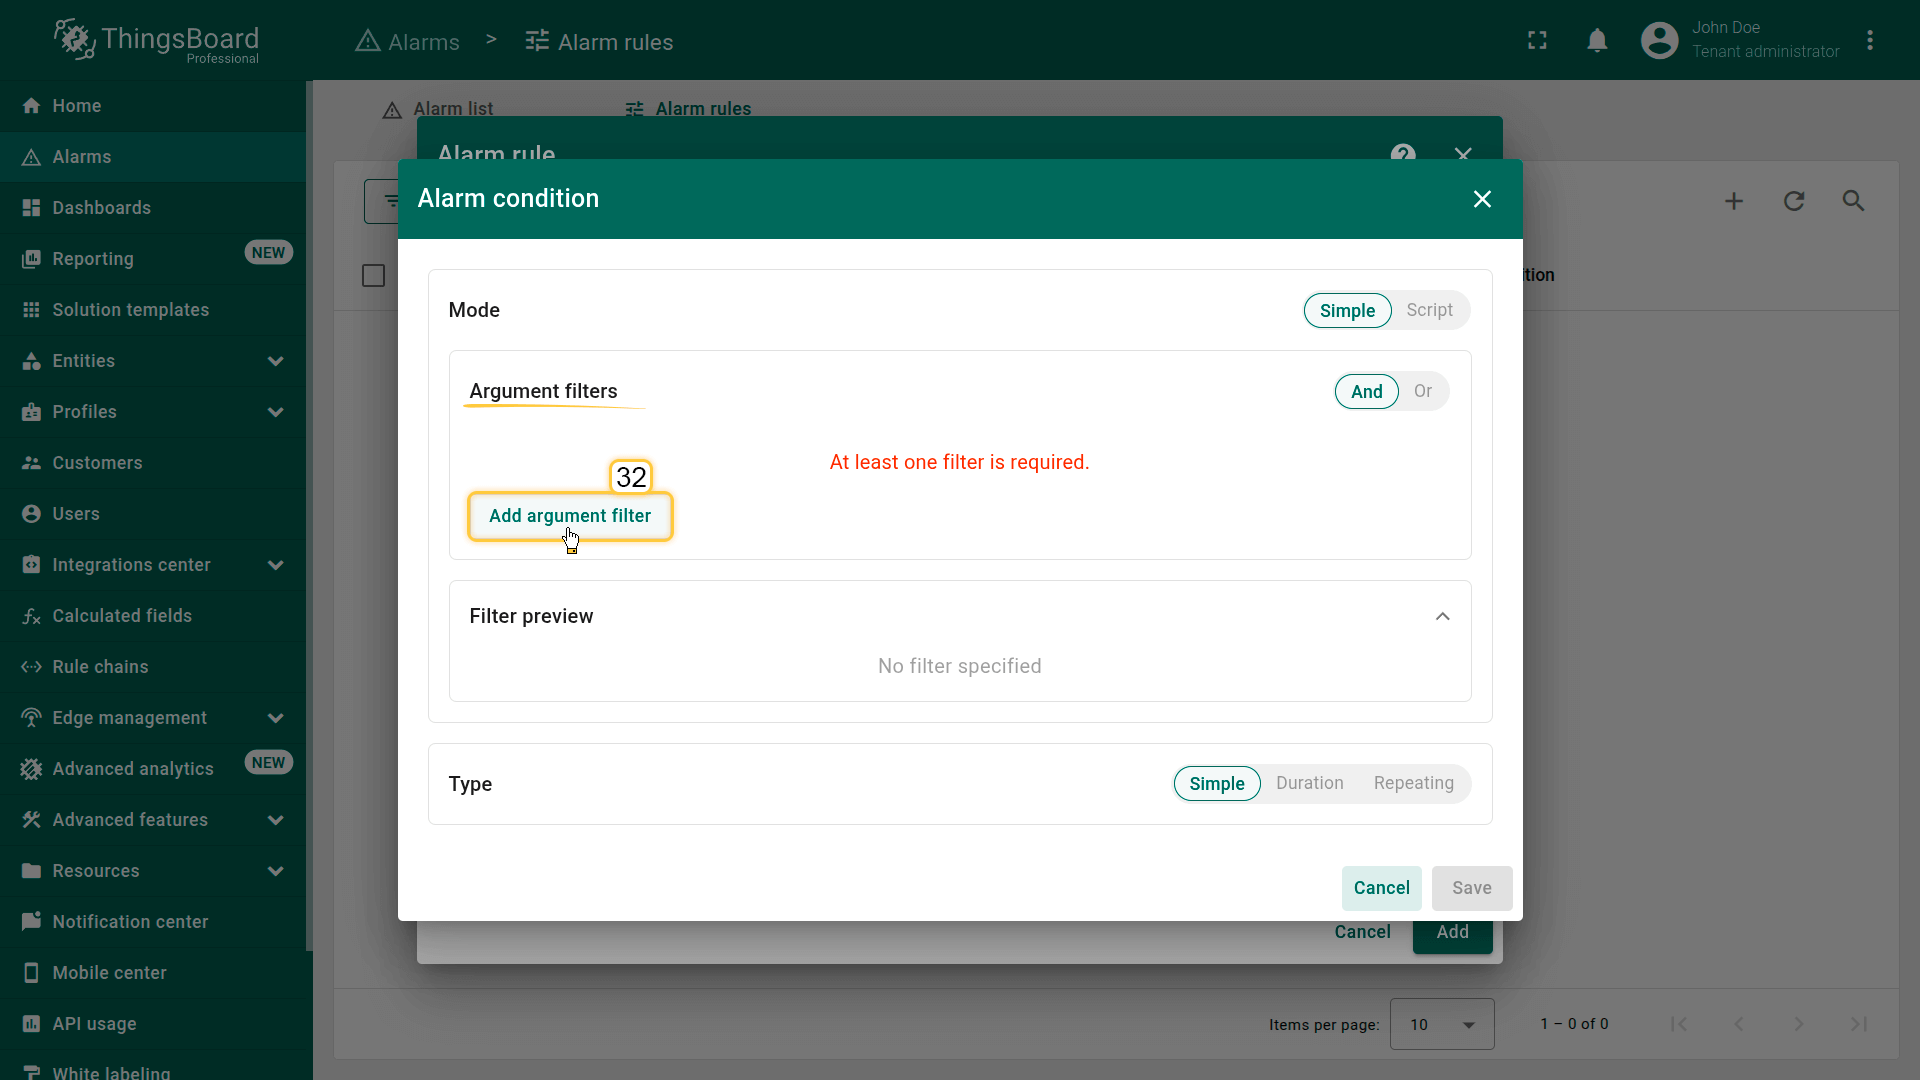
- In the configuration window, click Add argument filter and specify:
- General block:
- Argument: temperature (the argument added earlier)
- Value type: Numeric
- Filters block:
- Click Add filter:
- Operation: greater than
- Value source: Static
- Value: 26
- Click Add filter:
- Click Add.
- General block:
- Click Save.

将严重级别设为Critical(11),点击Add condition(12)。

Filters:点击Add添加新过滤器(15):Operation(16):greater than;Value source:Static;Value:26。
点击Add(17)。
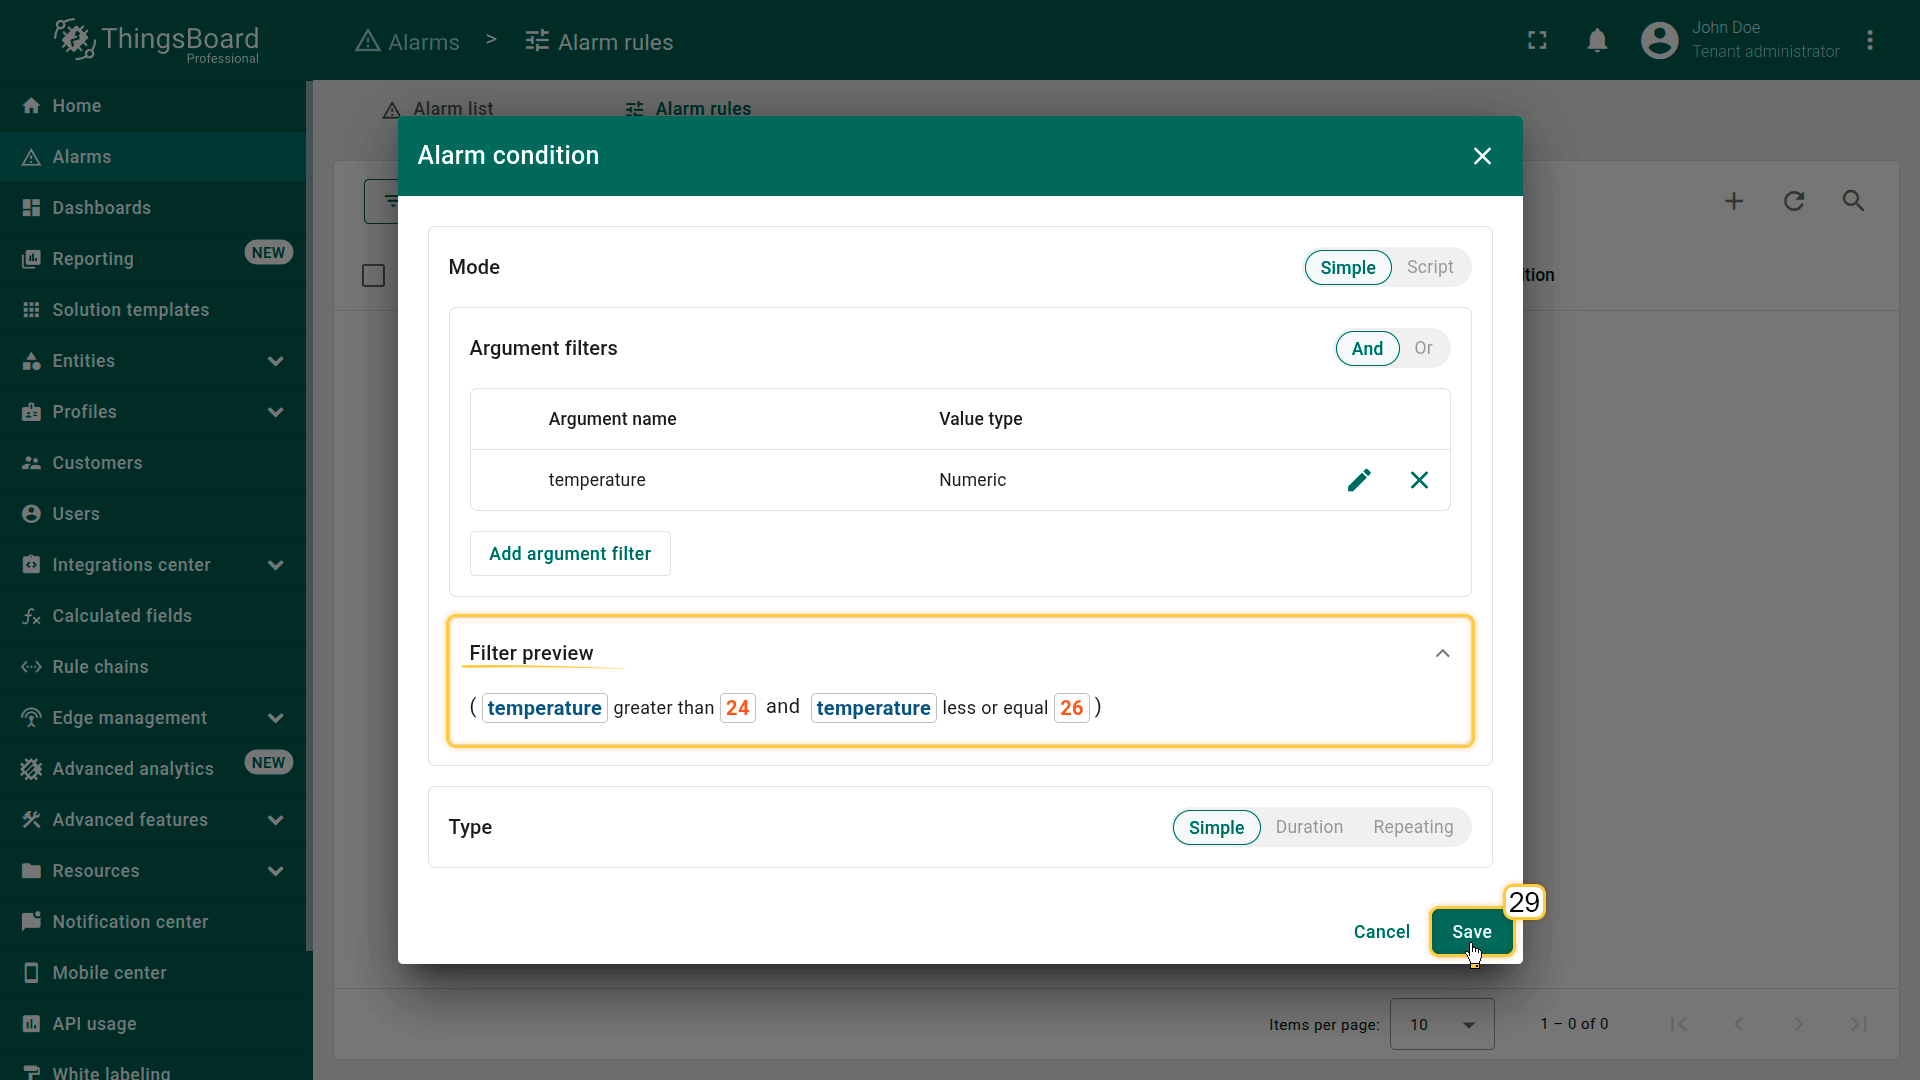
5. Add "Major" trigger condition
Add an alarm trigger condition with “Major” severity that is activated when the temperature is between 24 °C and 26 °C, inclusive.
Click Add create condition.
- Severity: Major
- Condition
- Click Add condition.
- In the configuration window, click Add argument filter and specify:
- General block:
- Argument: temperature
- Value type: Numeric
- Filters block:
- Click Add filter:
- Operation: greater than
- Value source: Static
- Value: 24
- Add another condition. Click Add
- Operation: less or equal
- Value source: Static
- Value: 26
- Click Add filter:
- Click Add.
- General block:
- Click Save.


Filters:点击Add添加过滤器(24):Operation(25):greater than;Value source:Static;Value:24。

6. Add alarm clearing condition
Add an automatic alarm clear condition that is triggered when the temperature drops below 24 °C.
Click Add clearing condition.
- Severity: Major
- Condition
- Click Add clearing condition.
- In the configuration window, click Add argument filter and specify:
- General block:
- Argument: temperature
- Value type: Numeric
- Filters block:
- Click Add:
- Operation: less or equal
- Value source: Static
- Value: 24
- Click Add:
- Click Add.
- General block:
- Click Save.
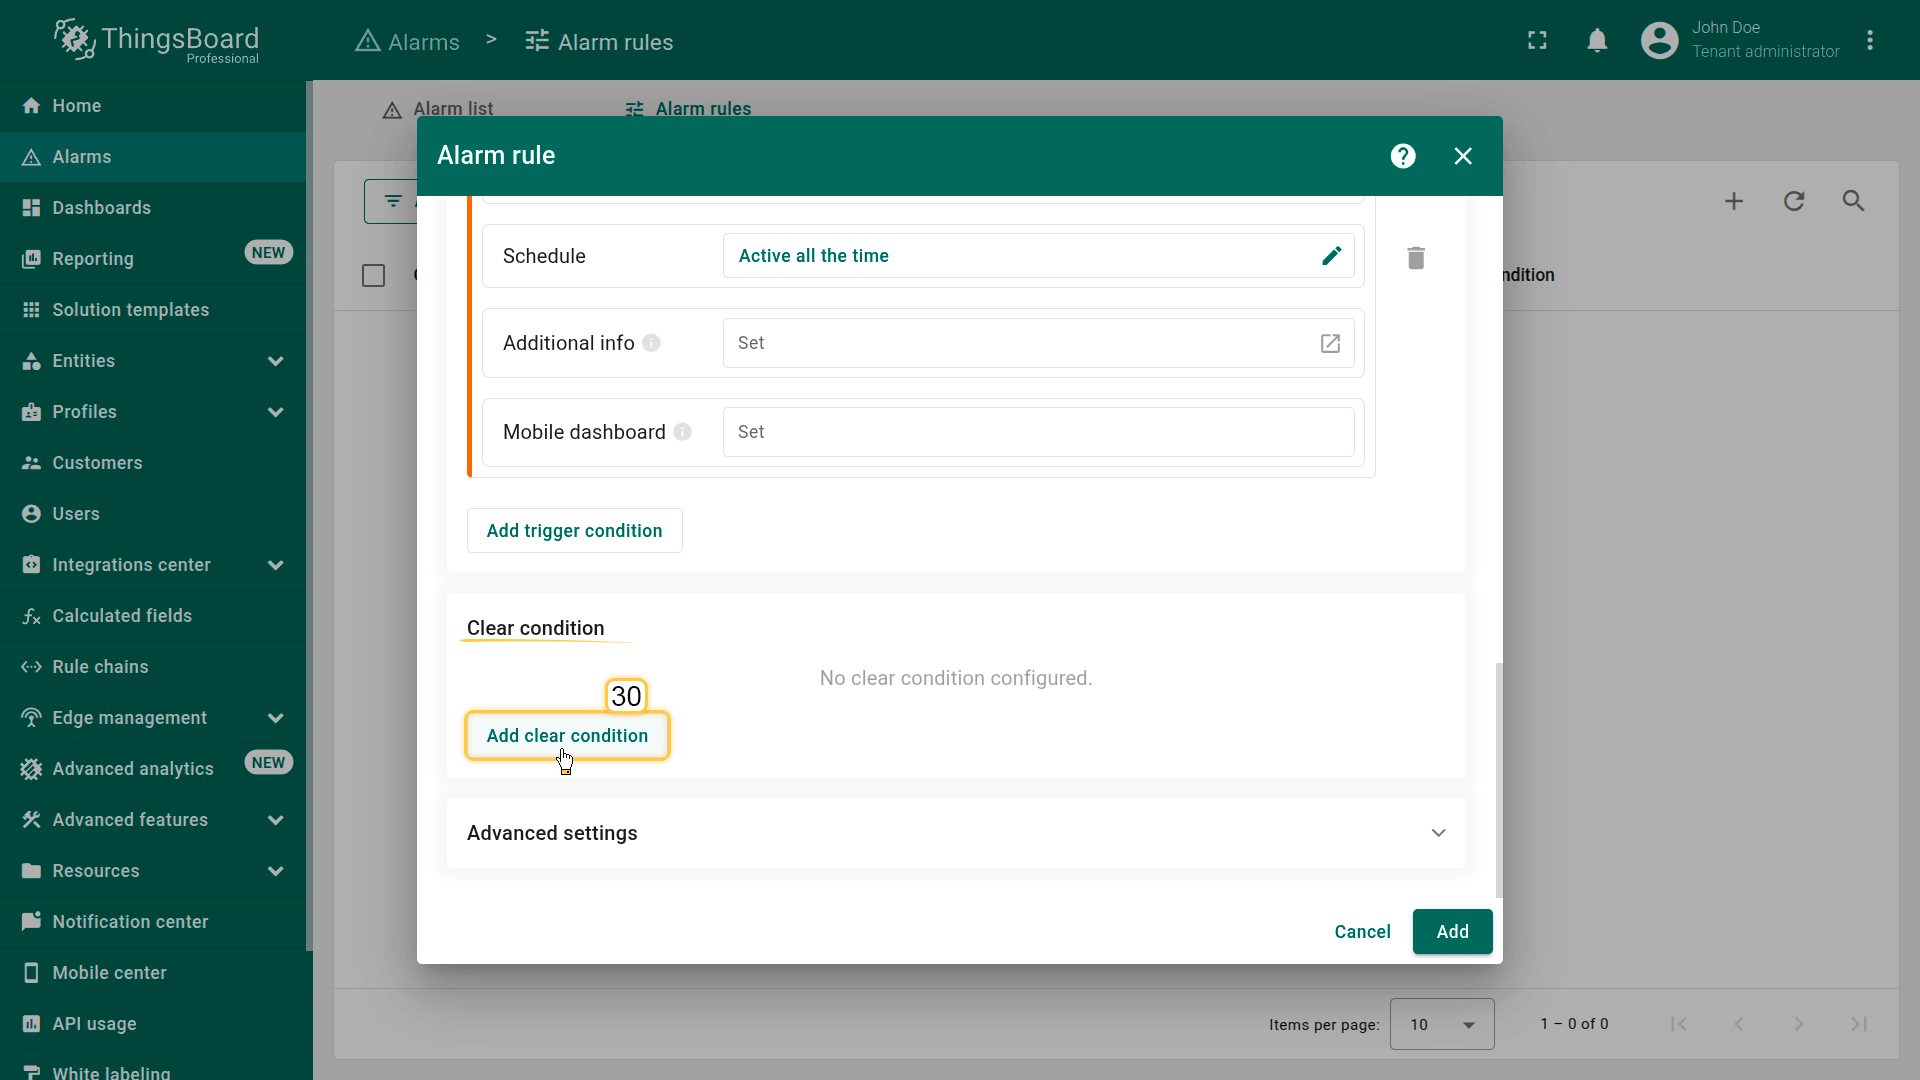

Filters:点击Add添加新过滤器(34):Operation(35):less or equal;Value source:Static;Value:24。
点击Add(36)。

7. Propagate alarm to related entities and save the rule
- Enable Propagate alarm to related entities in the advanced settings to automatically propagate the alarm to the asset and then to the building linked to this device.
Set Relation type to “Contains”. - Click Add to save the rule configuration.
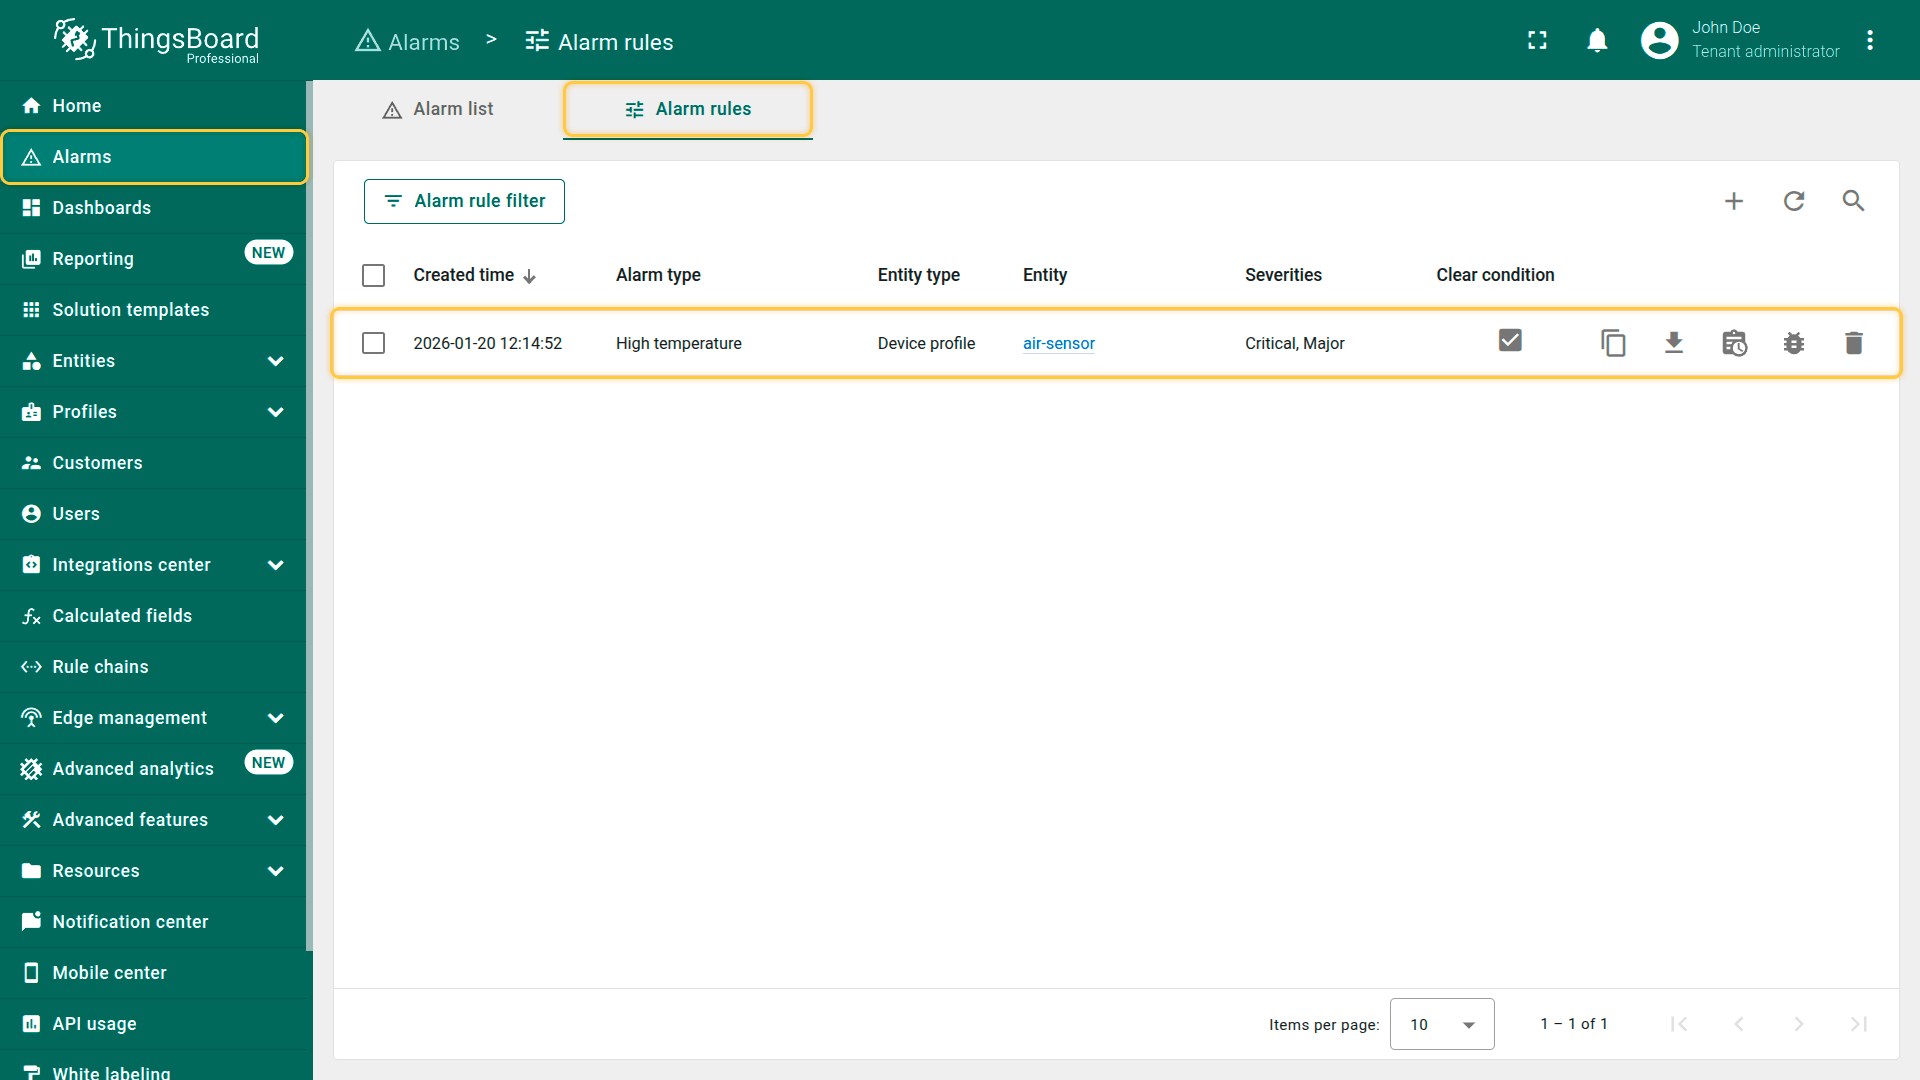
The High temperature alarm rule will be created and activated.
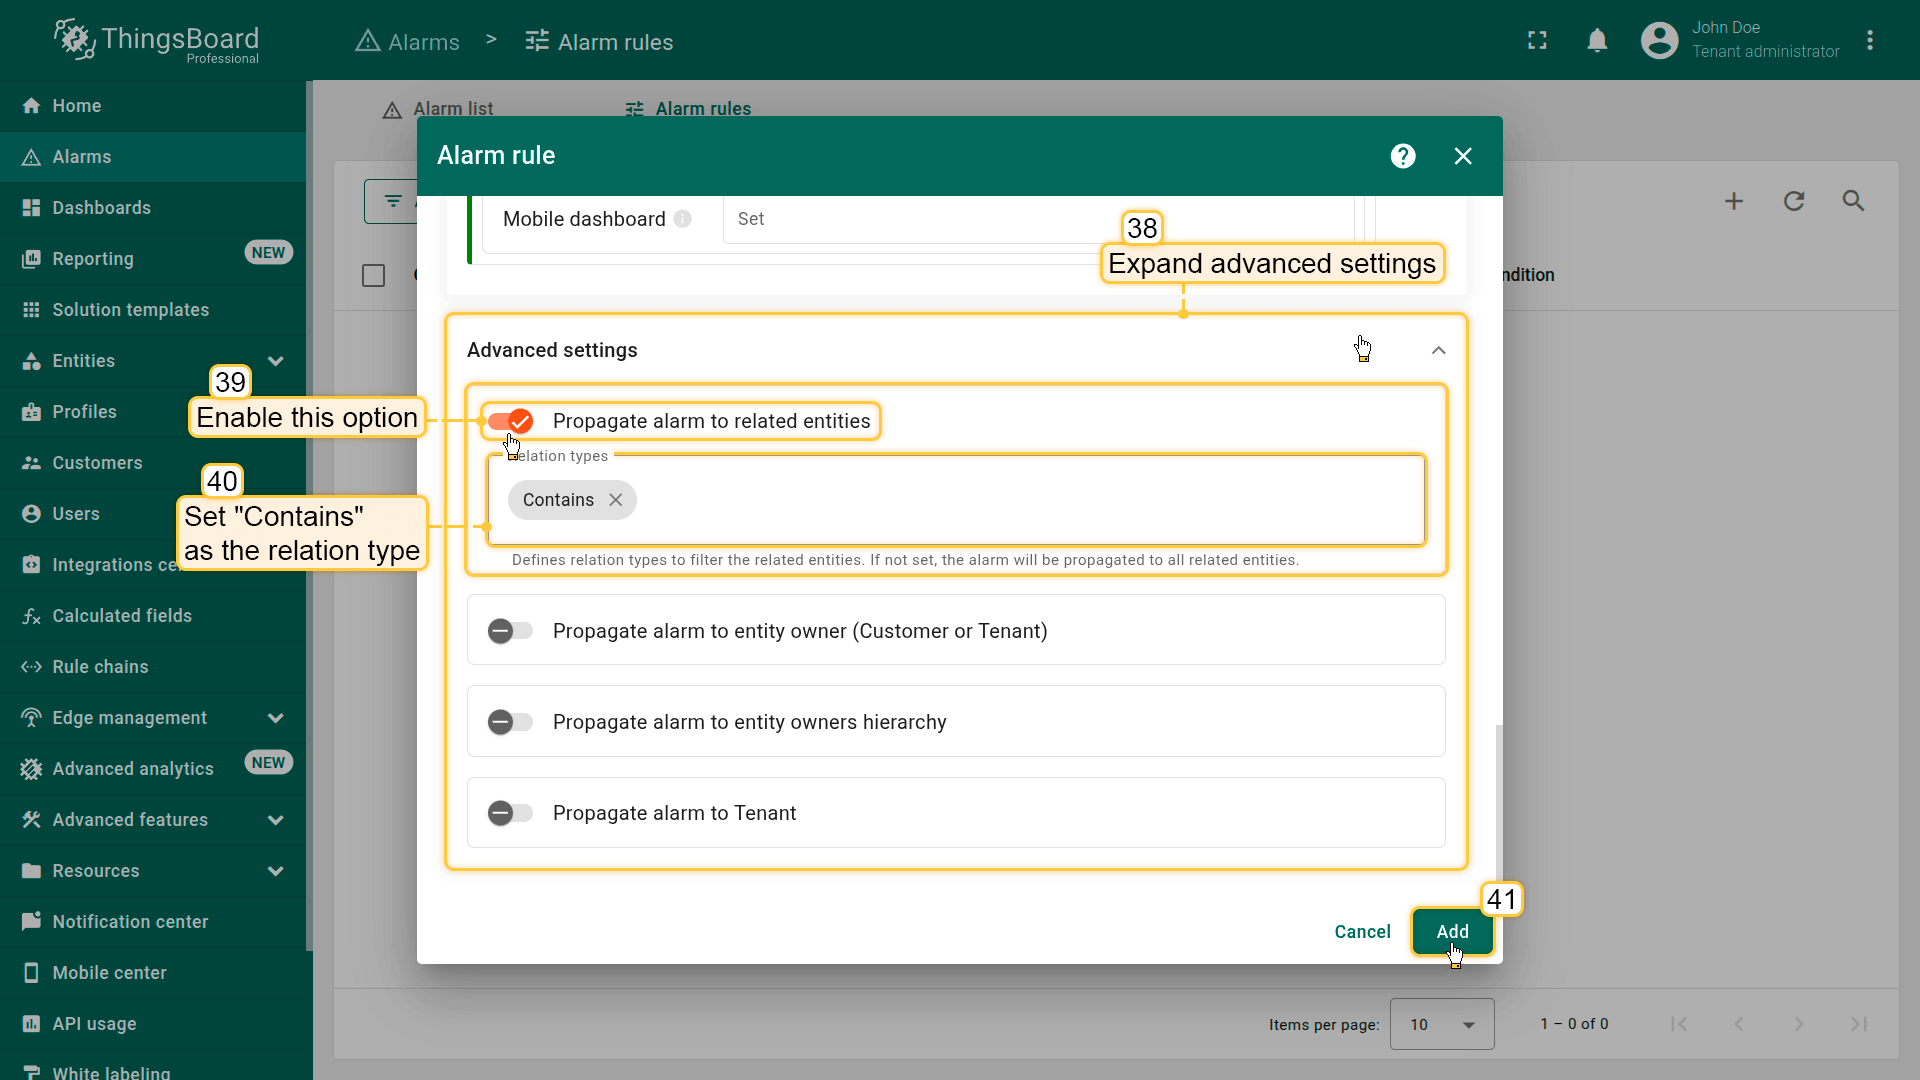
- 开启Propagate alarm to related entities选项(39),并指定设备-资产关系中使用的Relation type:Contains(40)。
最后点击Add(41)。
You can download a JSON configuration file containing predefined high-temperature alarm rules and import it into your ThingsBoard instance.
Creating additional alarm rules
Using the same approach, configure the remaining alarm rules on your own.
⚠️ Alternatively, you can download the preconfigured alarm rule configurations and import them into your ThingsBoard instance.
Make sure to set the “air-sensor” device profile as the target entity of the alarm rule.
- 点击右上角「+」按钮,从下拉菜单中选择Import alarm rule。
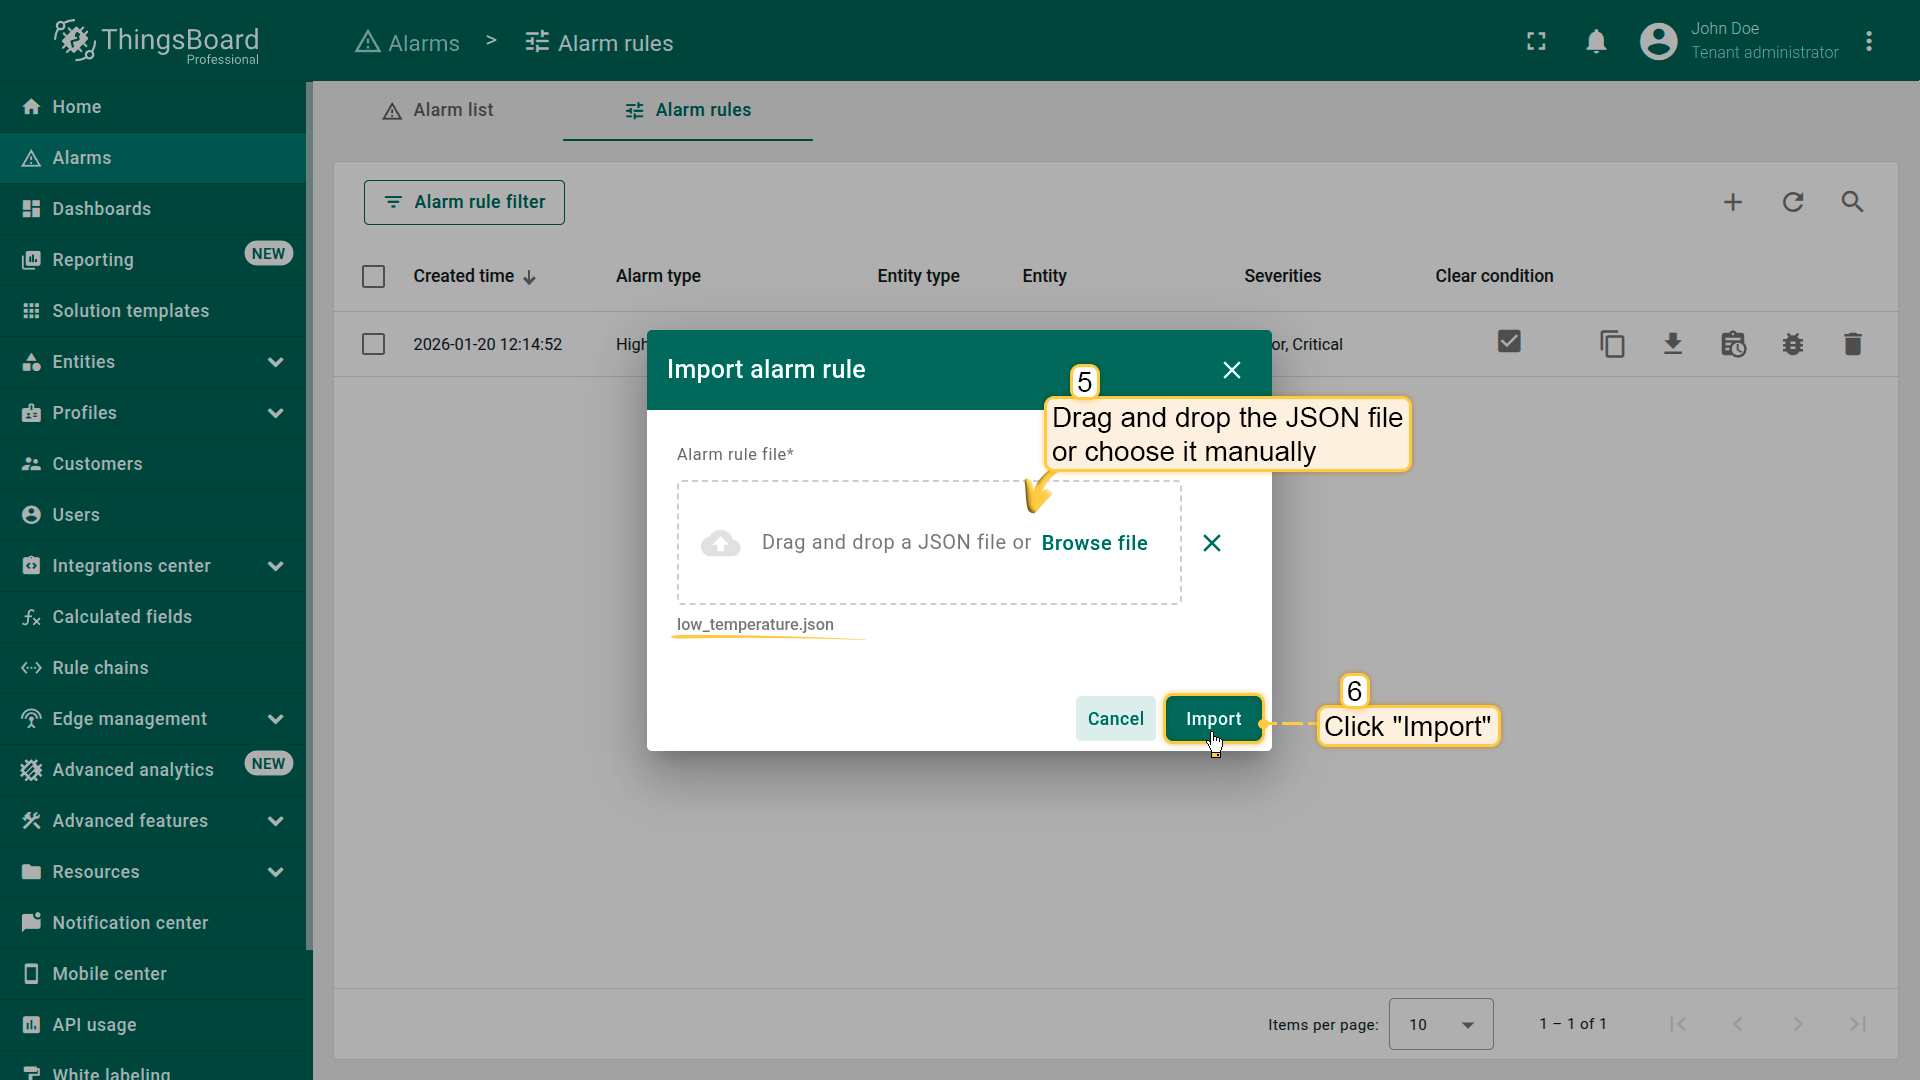
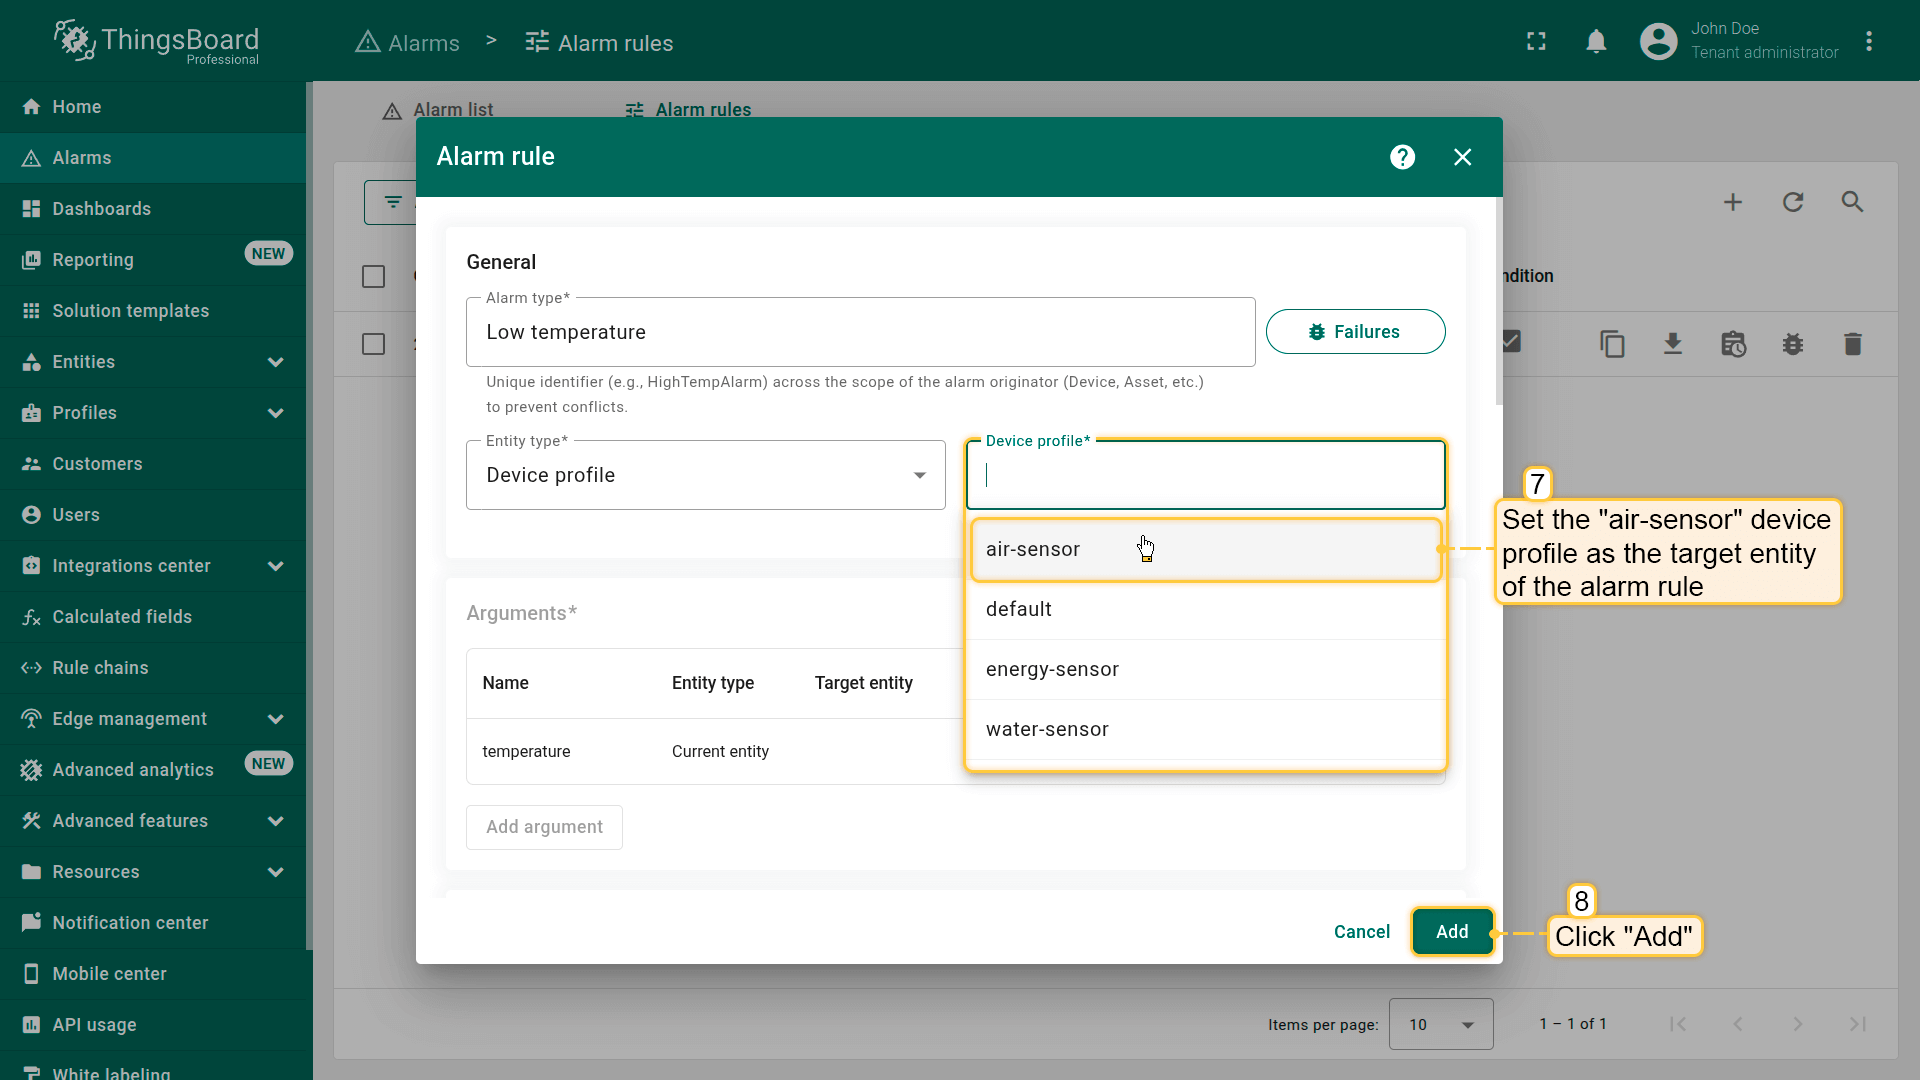
最后点击Add保存规则。

Low temperature
Click to download the “Low temperature” alarm rule configuration (JSON).
Configuration:
– Alarm creation:
– If the temperature drops below 20 °C but not below 18 °C (inclusive), an alarm of the severity type “Major” will be created.
– If the temperature drops below 18 °C, an alarm of the severity type “Critical” will be created.
– Alarm clearing:
– When the temperature rises above 20 °C, the alarm will be cleared.
High humidity
Click to download the “High humidity” alarm rule configuration (JSON).
Configuration:
– Alarm creation:
– An alarm with severity type “Major” will be created if humidity rises above 60 % but does not exceed 65 % (inclusive).
– An alarm with severity type “Critical” will be created if humidity exceeds 65 %.
– Alarm clearing:
– The alarm will clear when humidity drops below 60 %.
Low humidity
Click to download the “Low humidity” alarm rule configuration (JSON).
Configuration:
– Alarm creation:
– An alarm with severity type “Major” will be created if humidity drops below 40 % but does not fall below 35 % (inclusive).
– An alarm with severity type “Critical” will be created if humidity drops below 35 %.
– Alarm clearing:
– The alarm will clear when humidity rises above 40 %.
High CO₂ levels
Click to download the “High CO₂” alarm rule configuration (JSON).
Configuration:
– Alarm creation:
– If the CO₂ level is equal to or exceeds 490 ppm but does not exceed 500 ppm, the alarm with severity type “Major” will be created.
– If the CO₂ level exceeds 500 ppm, the alarm with severity type “Critical” will be triggered.
– Alarm clearing:
– The alarm will be cleared when the CO₂ level drops below 490 ppm.
Configuring alarm rules for the Energy Meter and Water Flow Meter devices is slightly more complex. This is because the alarm must be triggered not by a single value, but by the hourly sum of telemetry values. To achieve this, we will use Calculated fields feature for additional calculations. Alarm rule configuration for these devices is covered in the next lessons.
Now that we have defined all the alarm rules for the air-sensor device profile, the next step is to add a widget to manage the alarms.
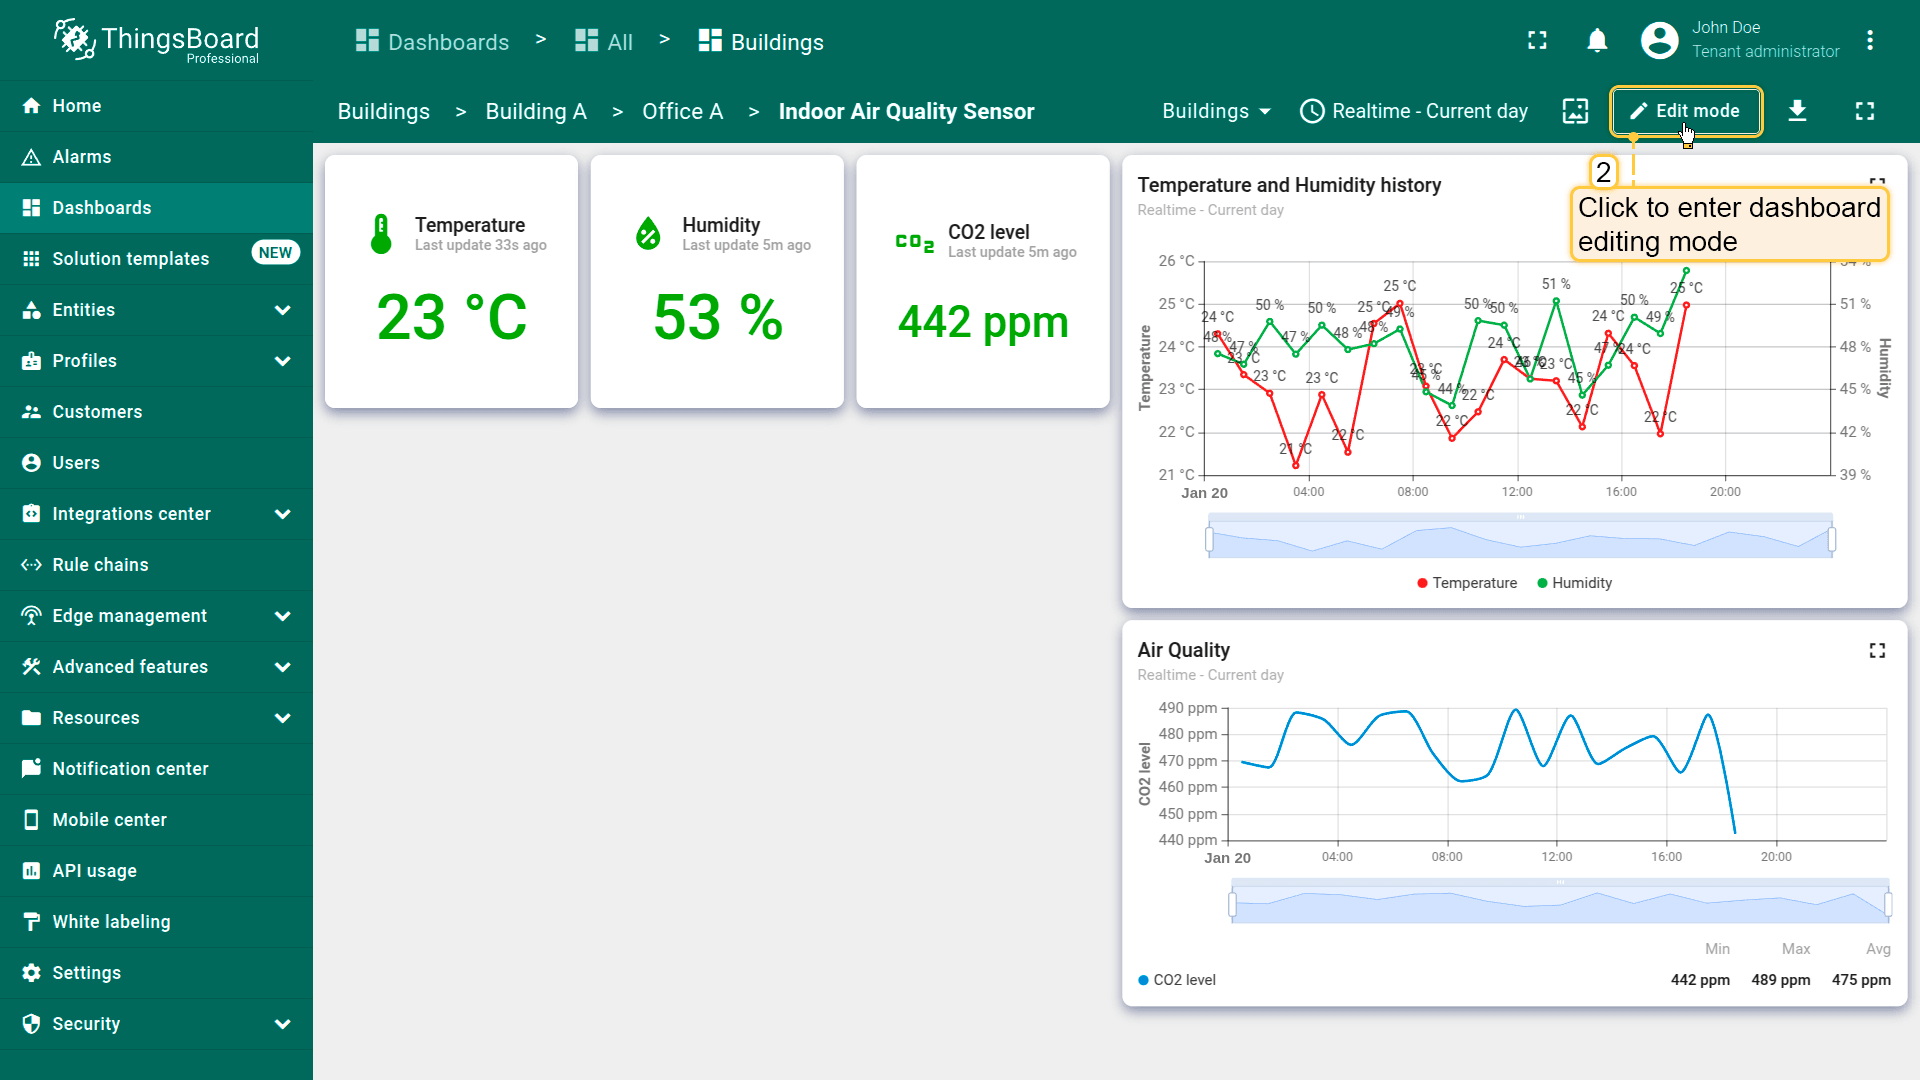
Adding alarms table widget
Displaying alarms in a user-friendly format is essential for monitoring and managing them effectively. The “Alarms table” widget in ThingsBoard provides a customizable interface for easy monitoring and interaction with alarms.
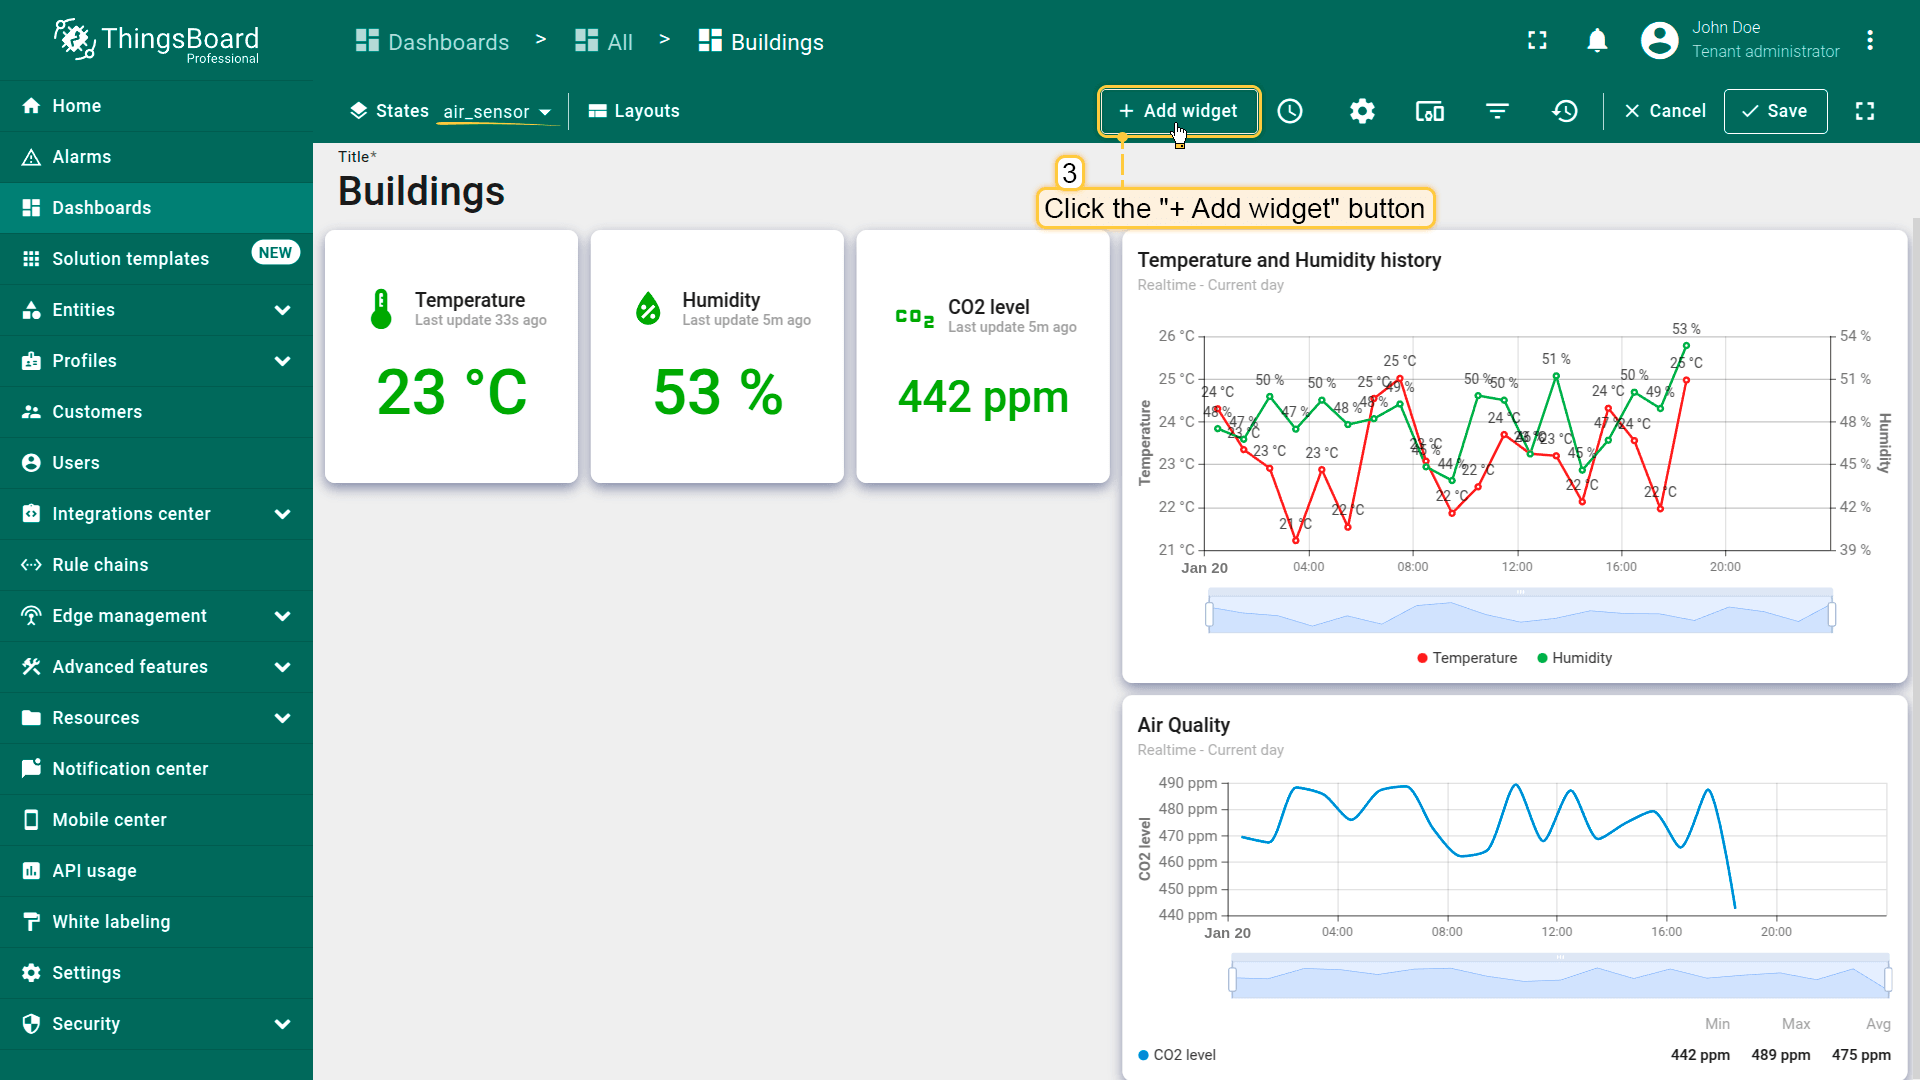
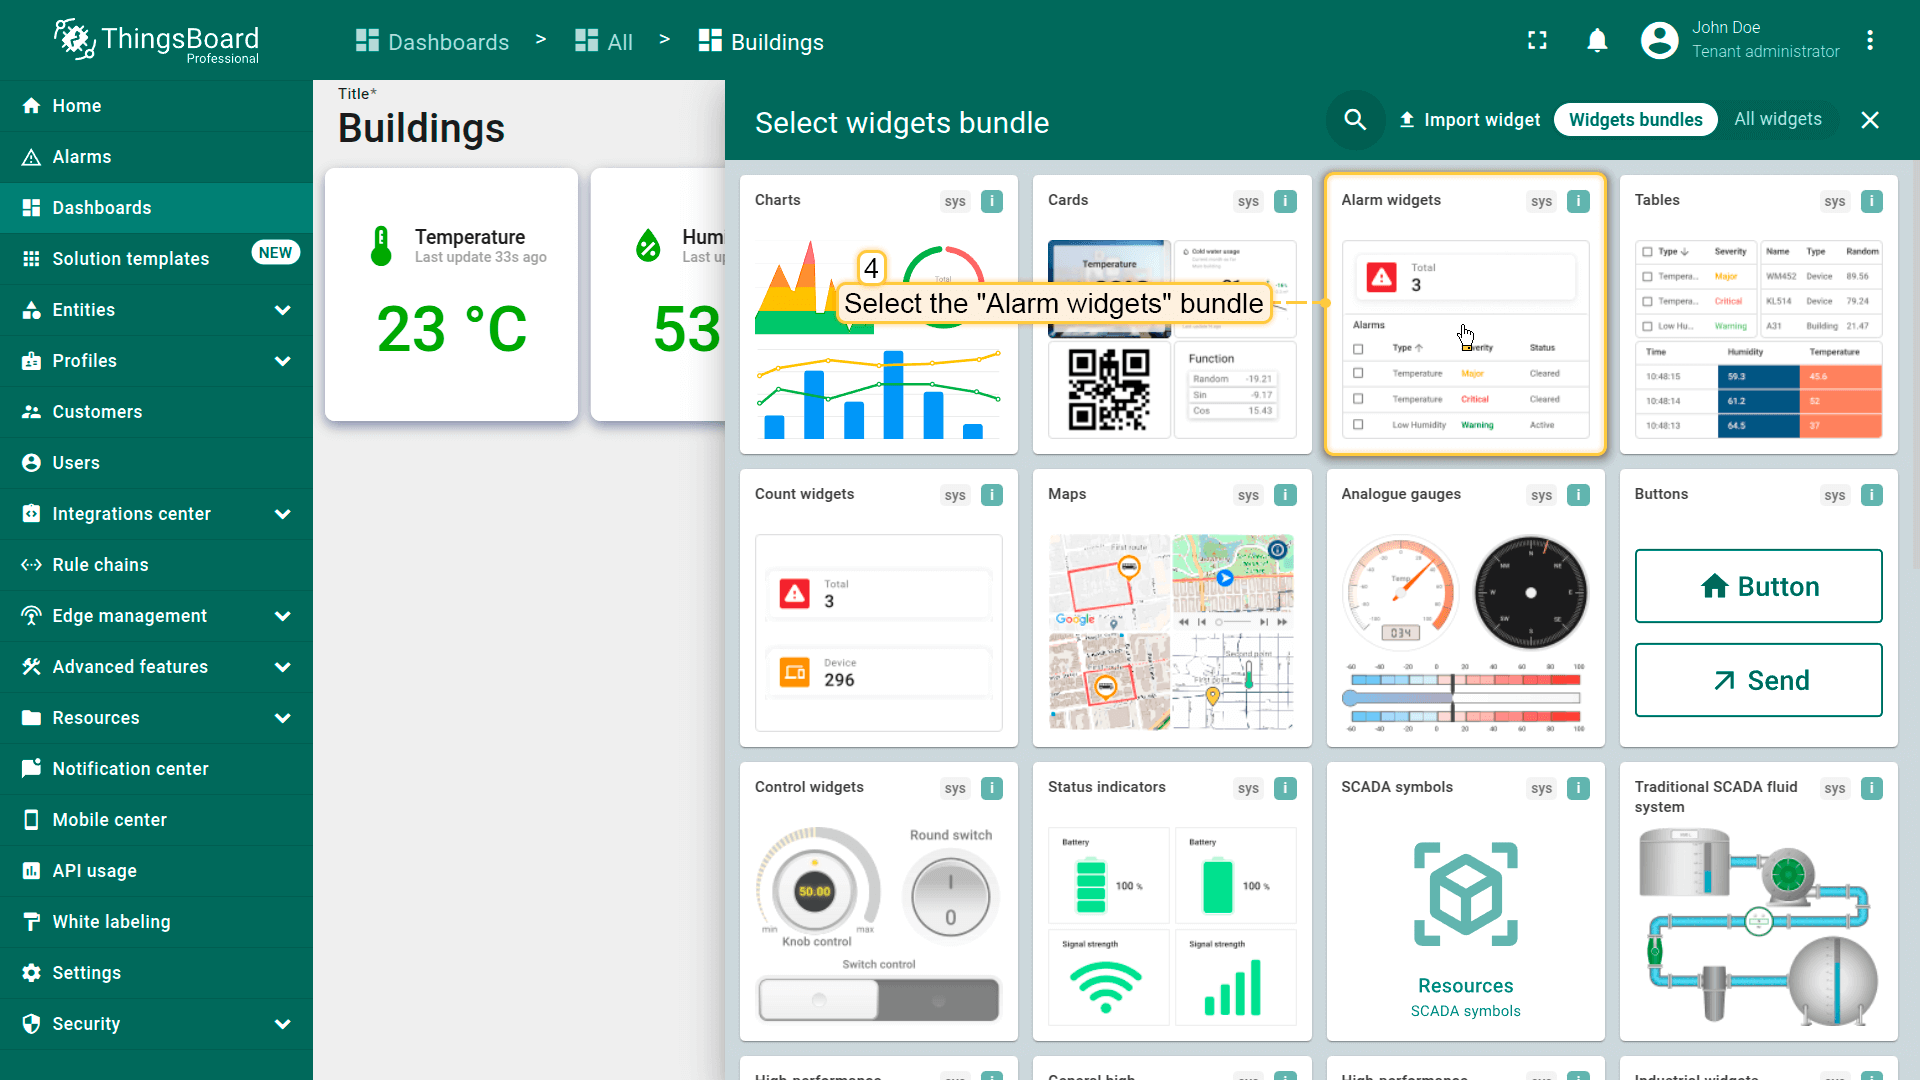
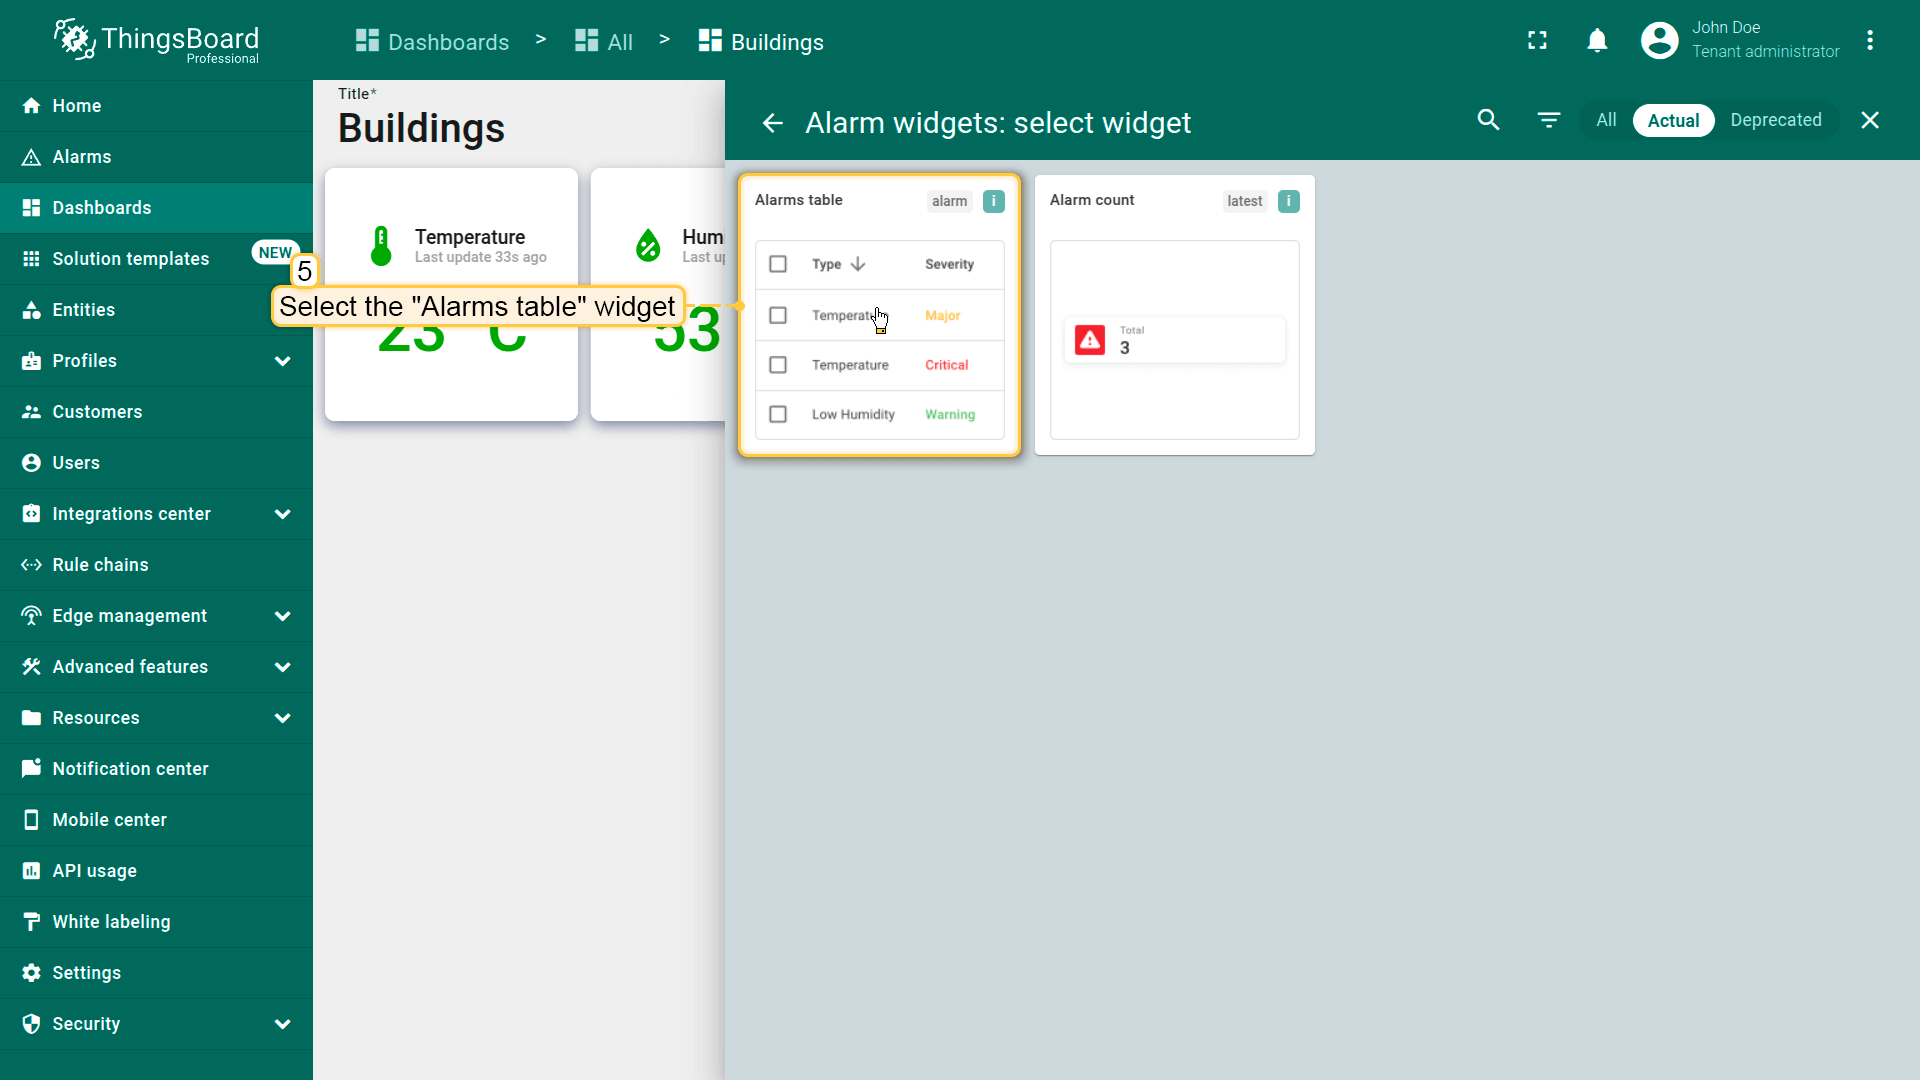
Steps to add the “Alarm table” widget:
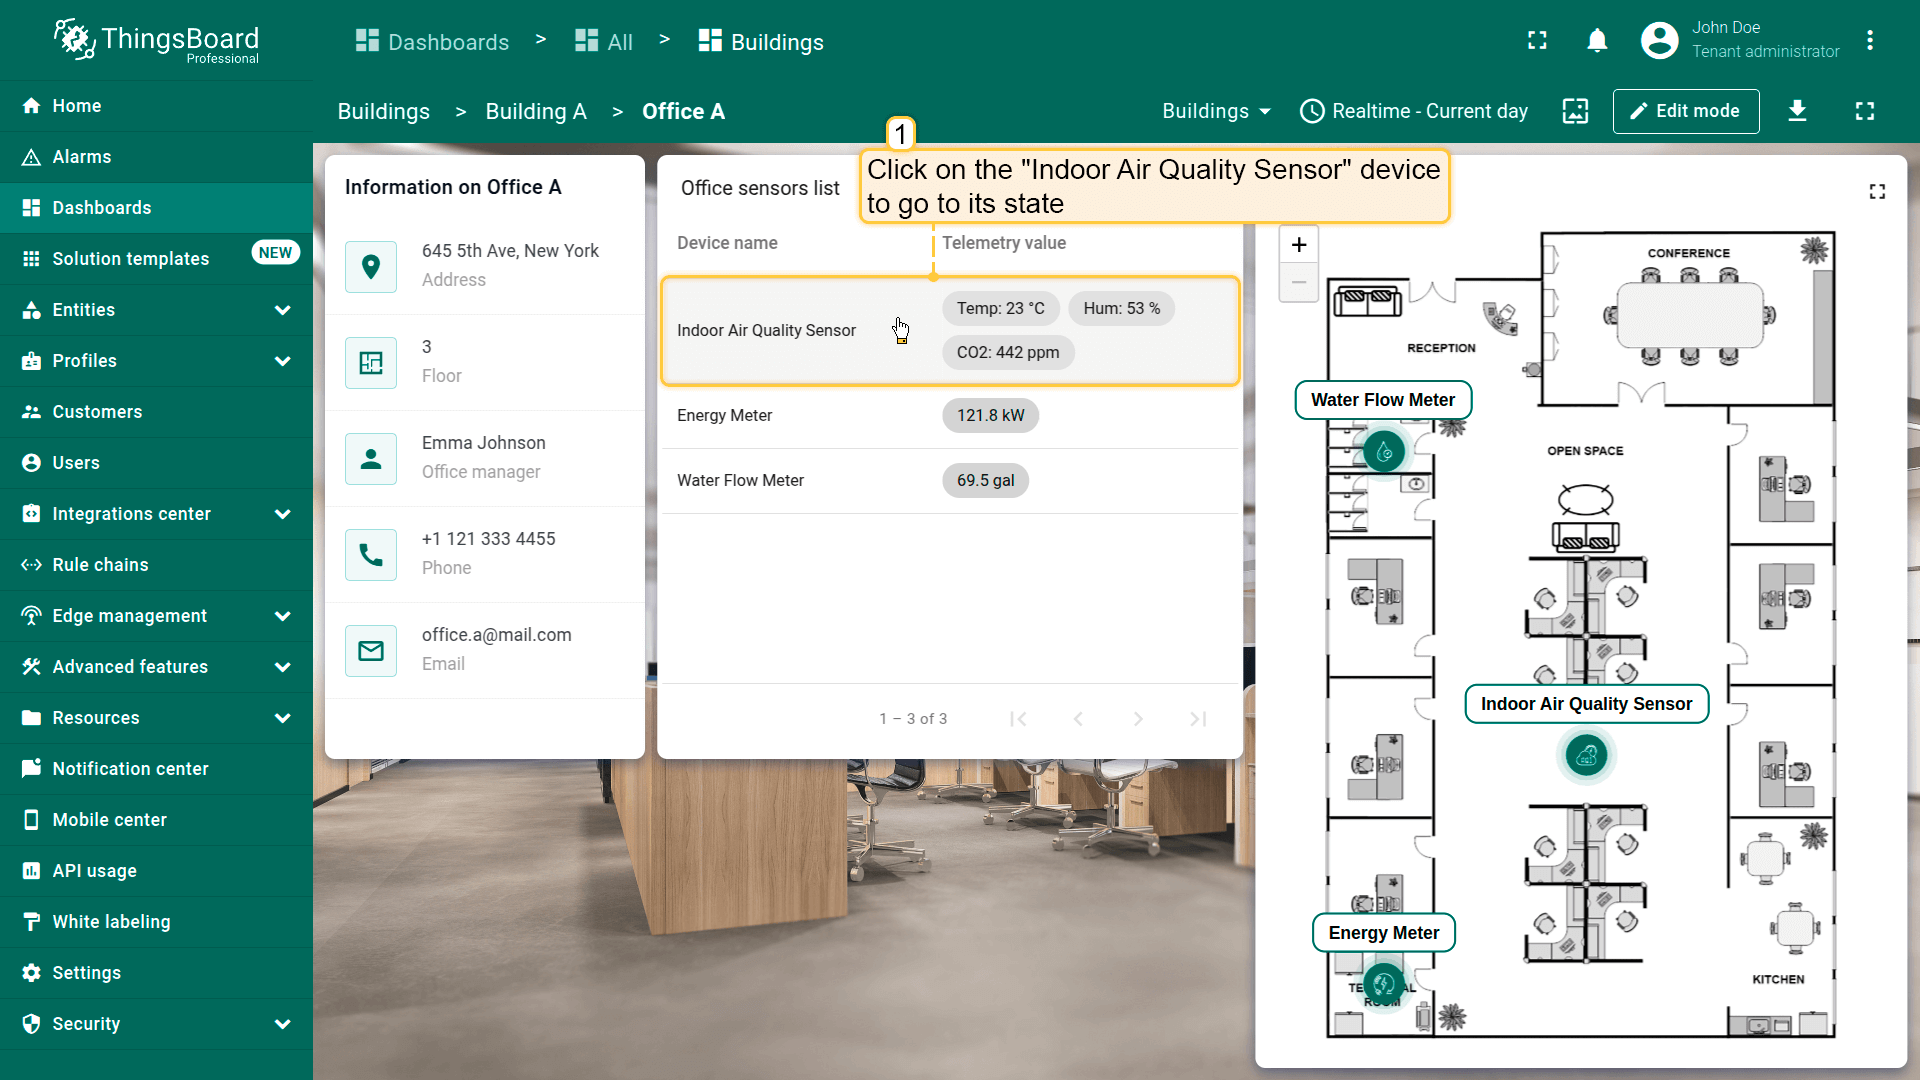
- 点击「办公室传感器列表」部件中的「Indoor Air Quality Sensor」设备行以切换到其状态;
- 进入仪表板编辑模式;
- 点击屏幕顶部的「+ Add widget」按钮;
- 找到「Alarm widgets」部件包并点击;
- 选择「Alarms table」部件;
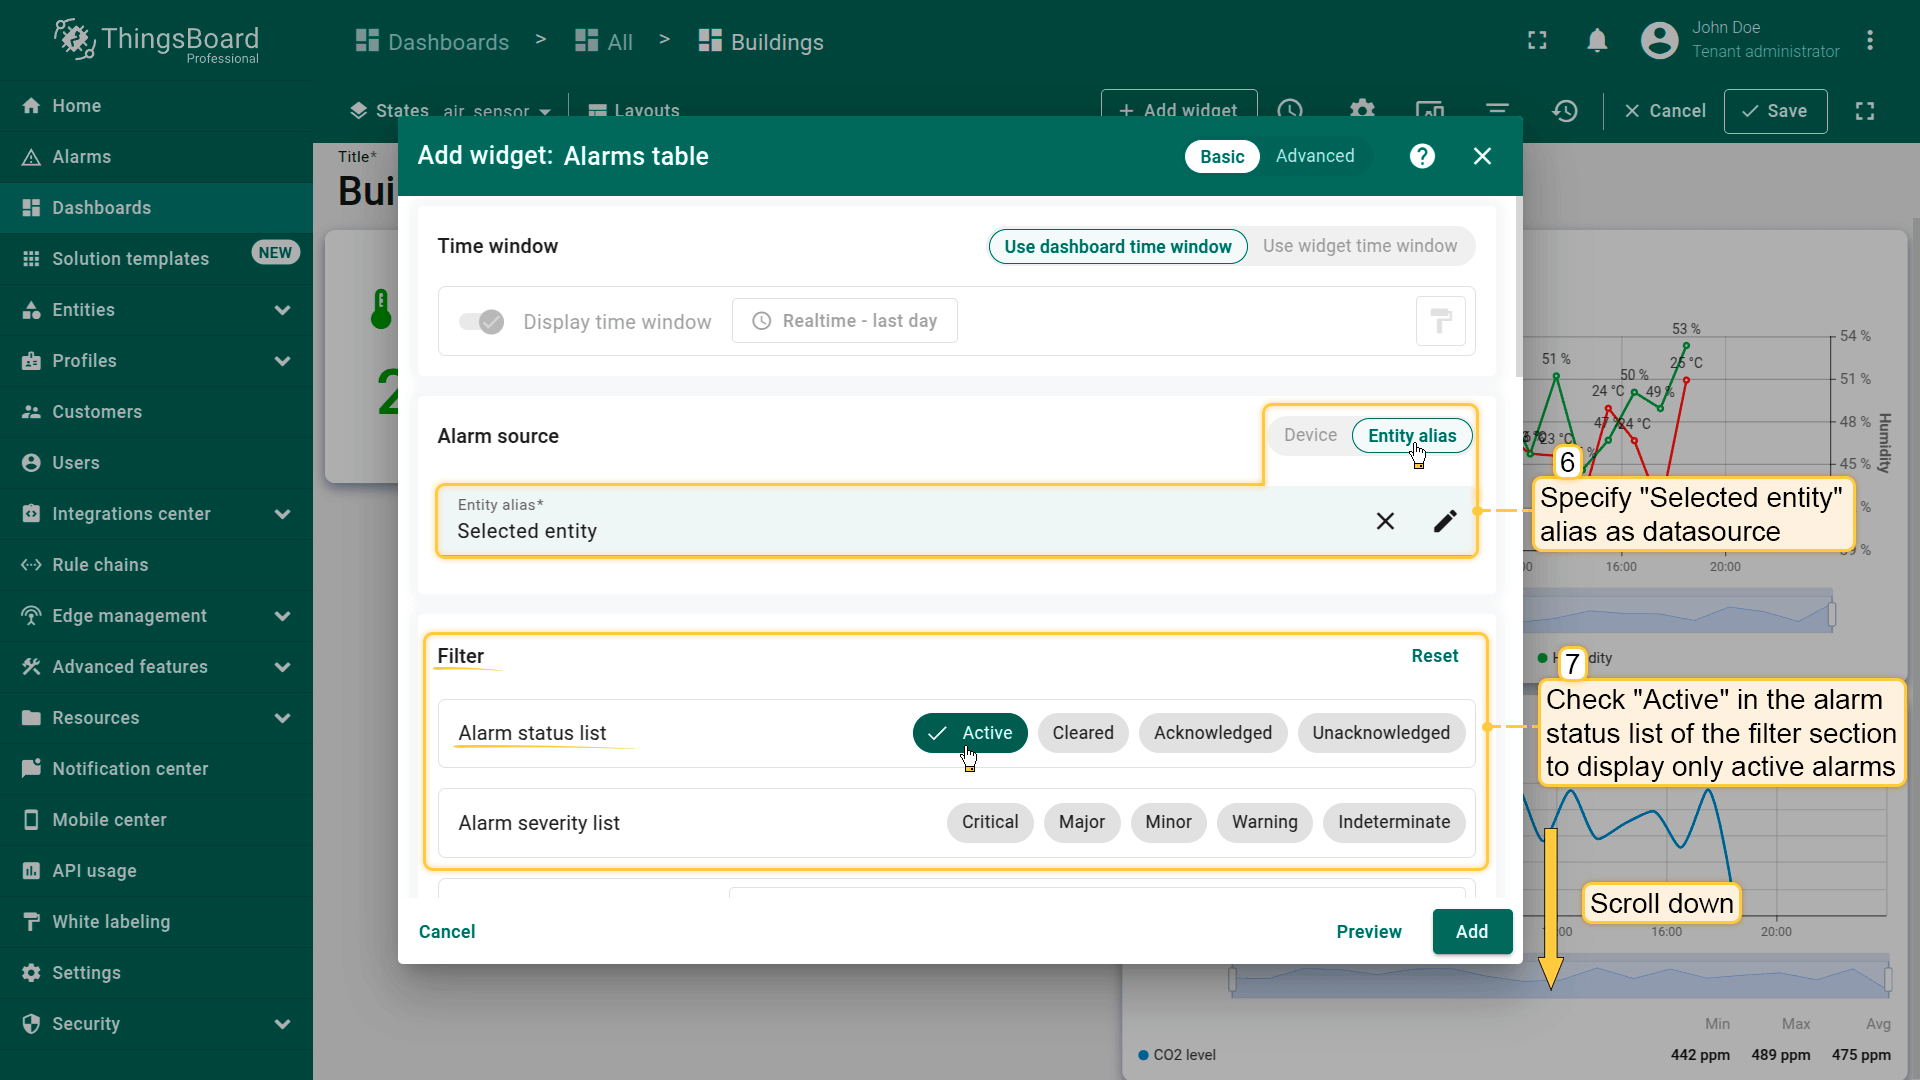
- 将「Selected entity」别名指定为数据源。在过滤器区域的告警状态列表中勾选「Active」以仅显示活动告警;
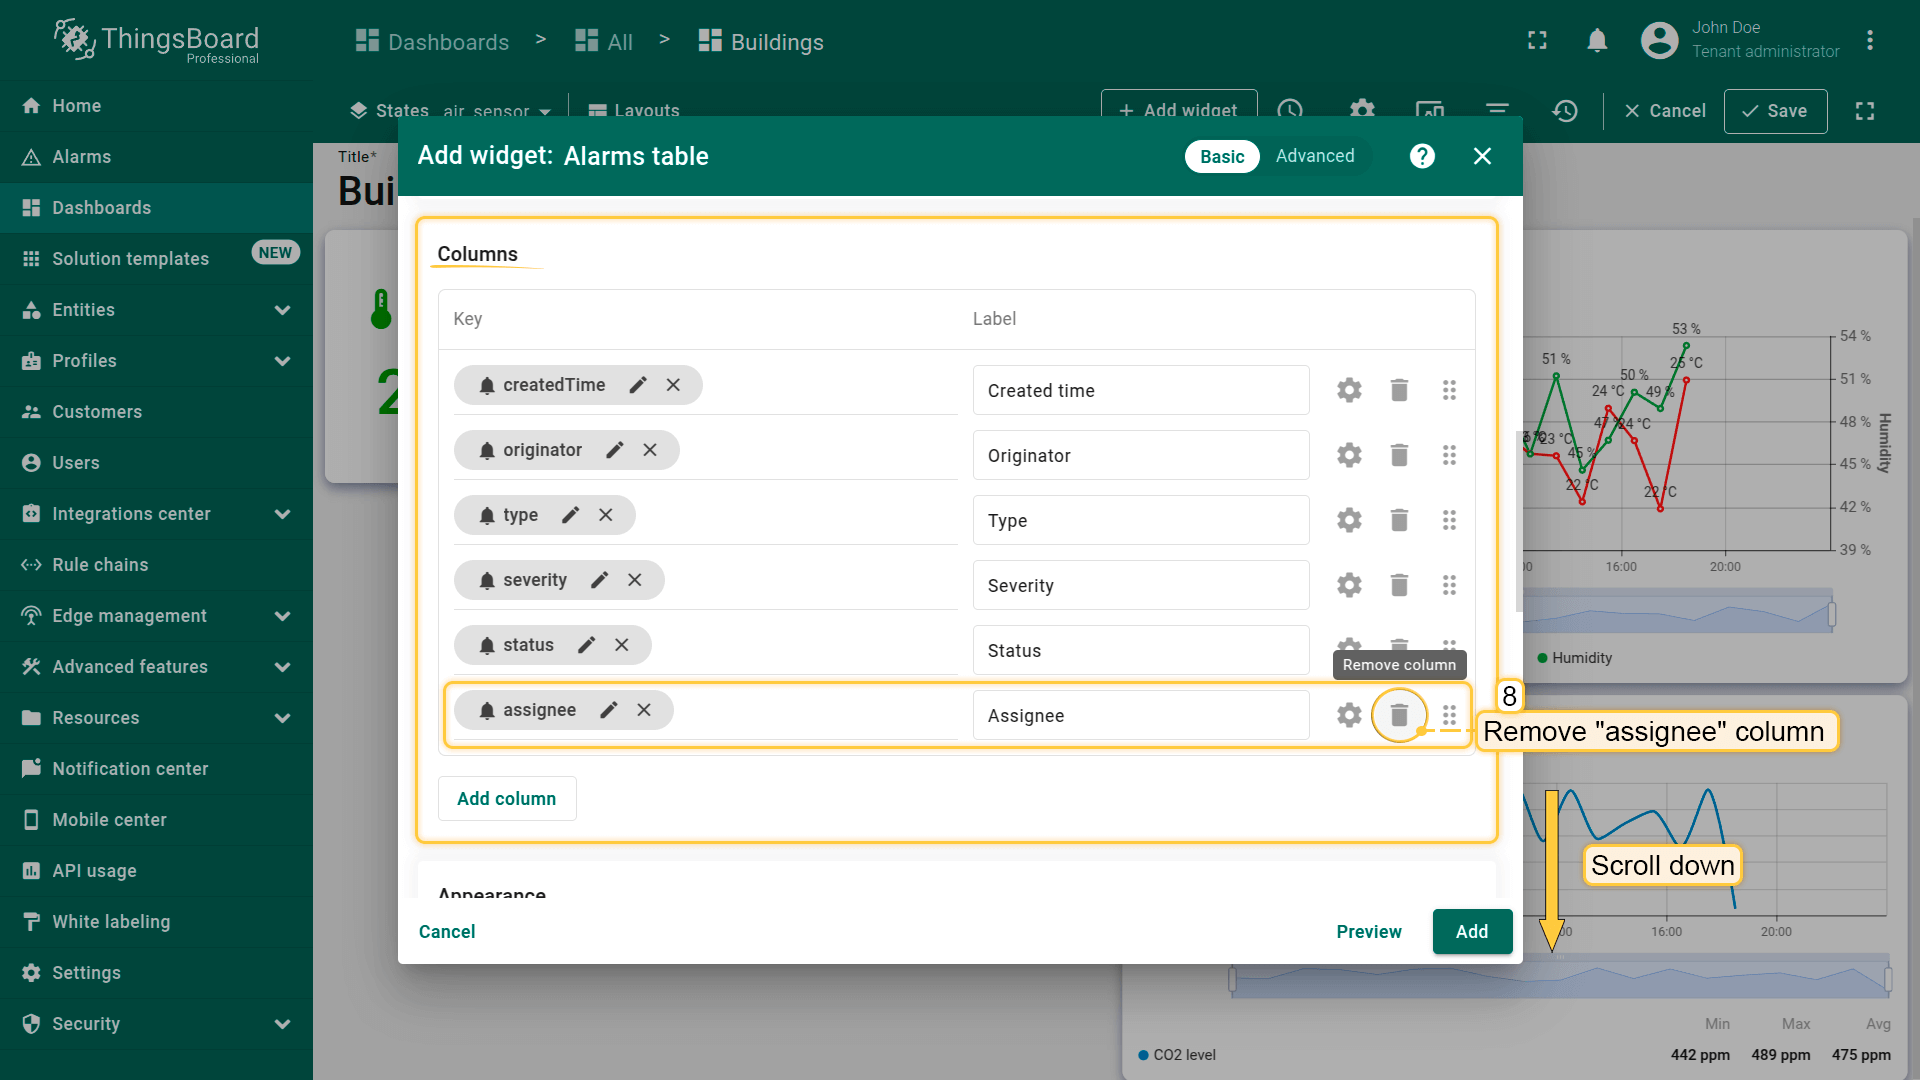
- 移除「assignee」列;
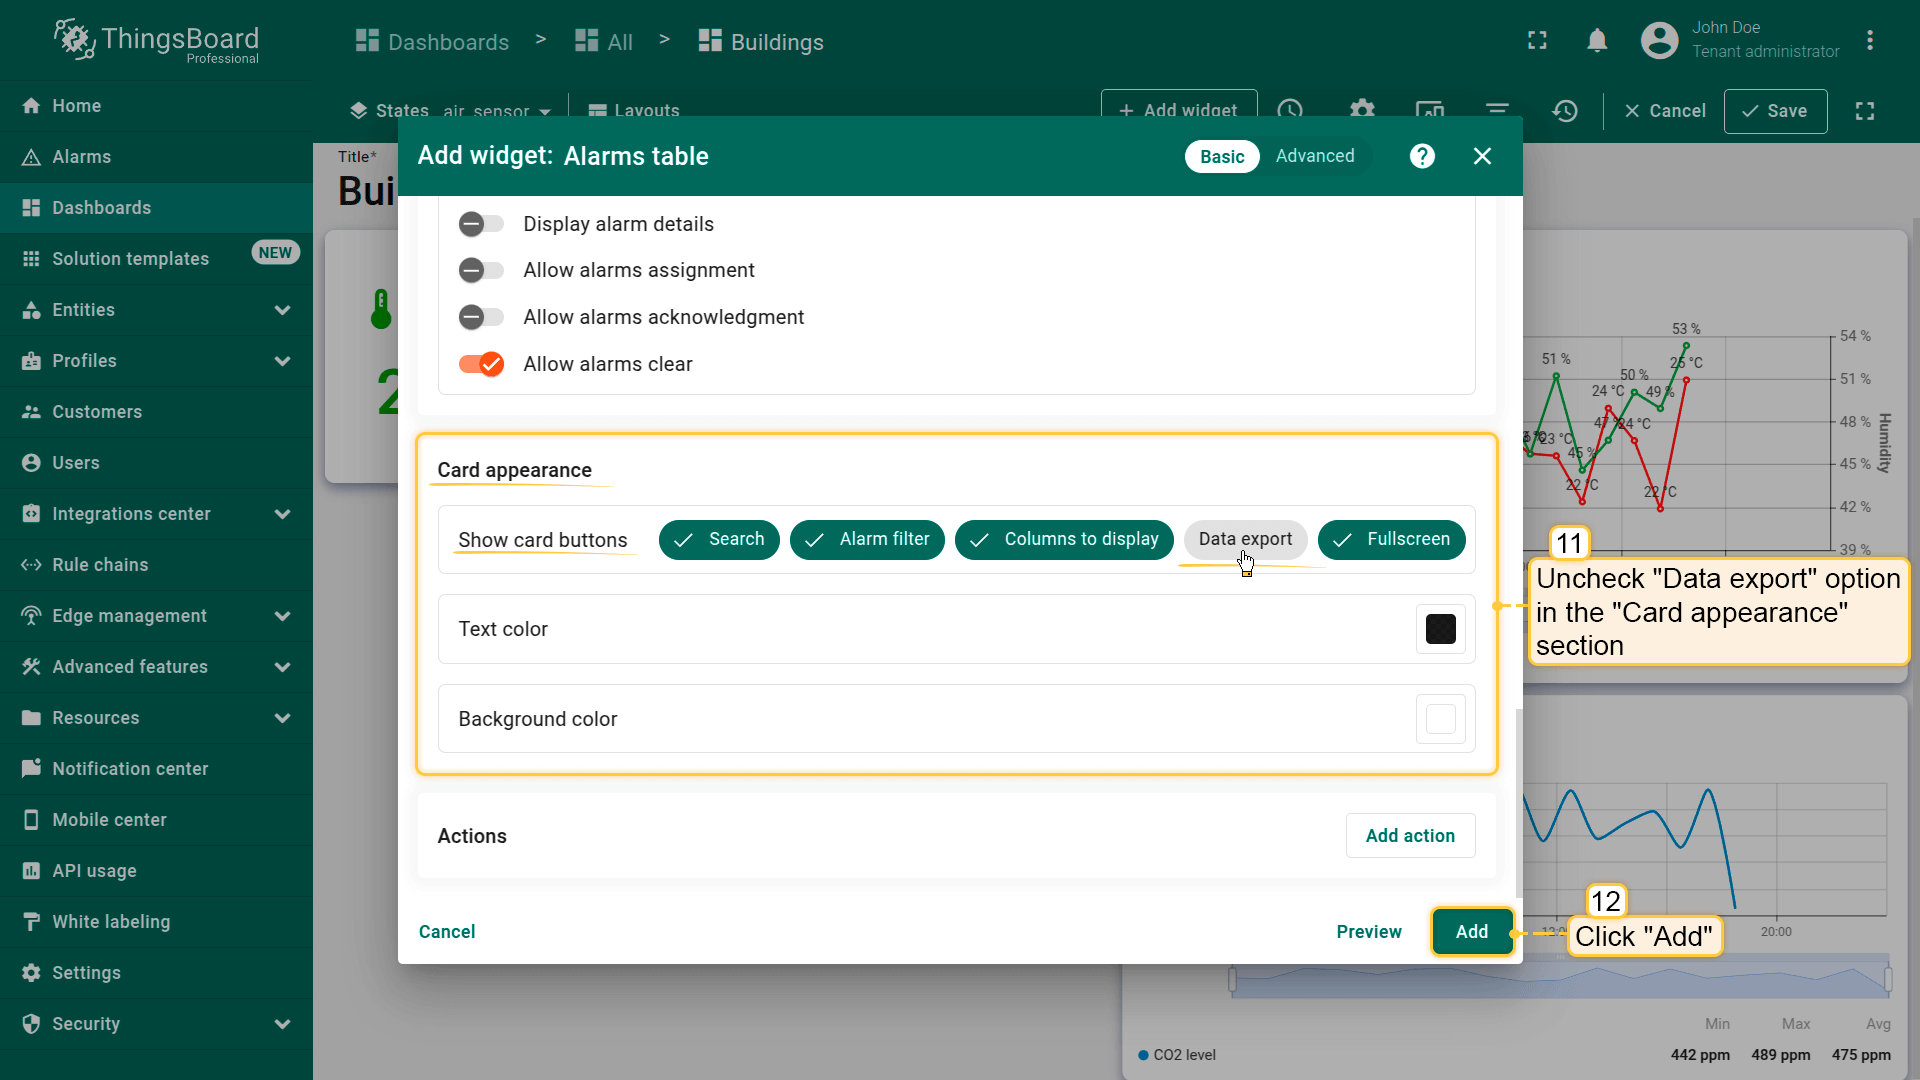
- 将部件标题改为「Air sensor alarms」。在「Table buttons」中仅保留开启「Allow alarms acknowledgment」和「Allow alarms clear」;
- 取消勾选「Card appearance」中的「Data export」。然后点击「Add」确认添加部件;
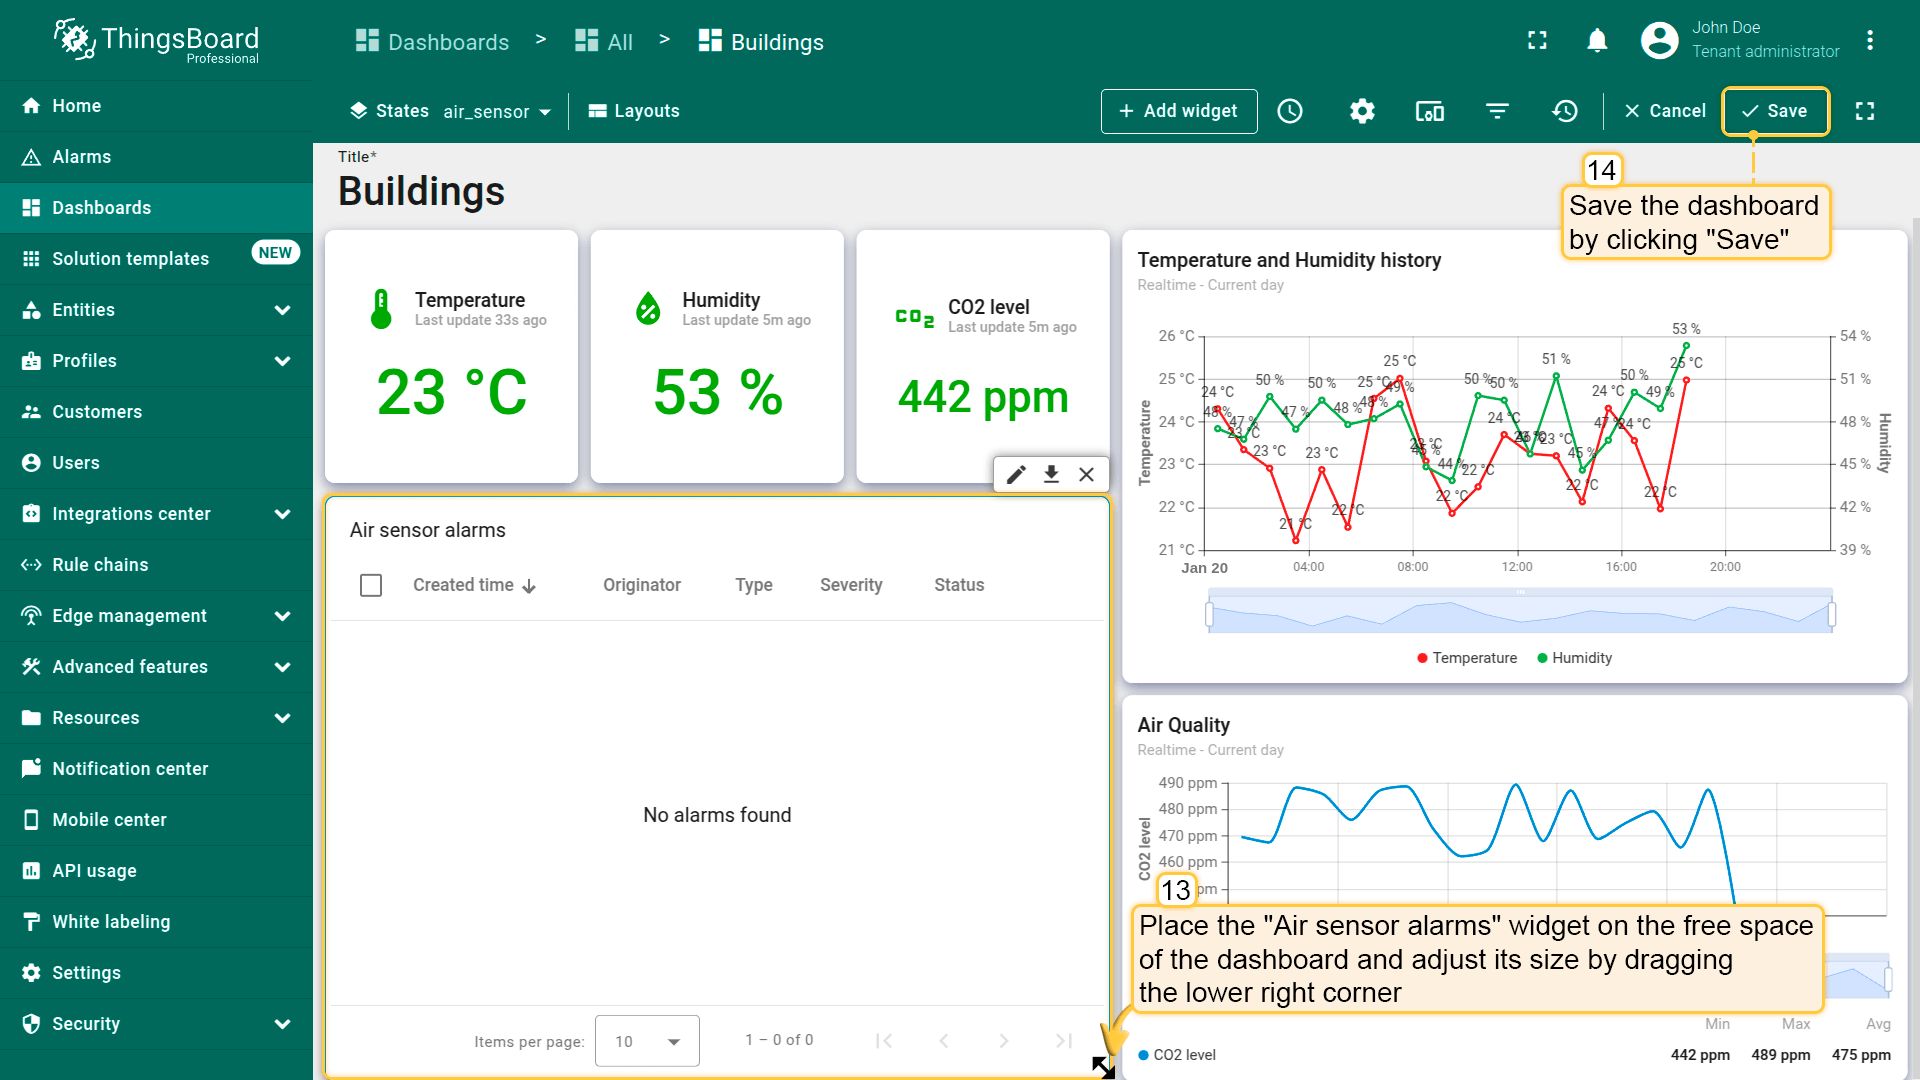
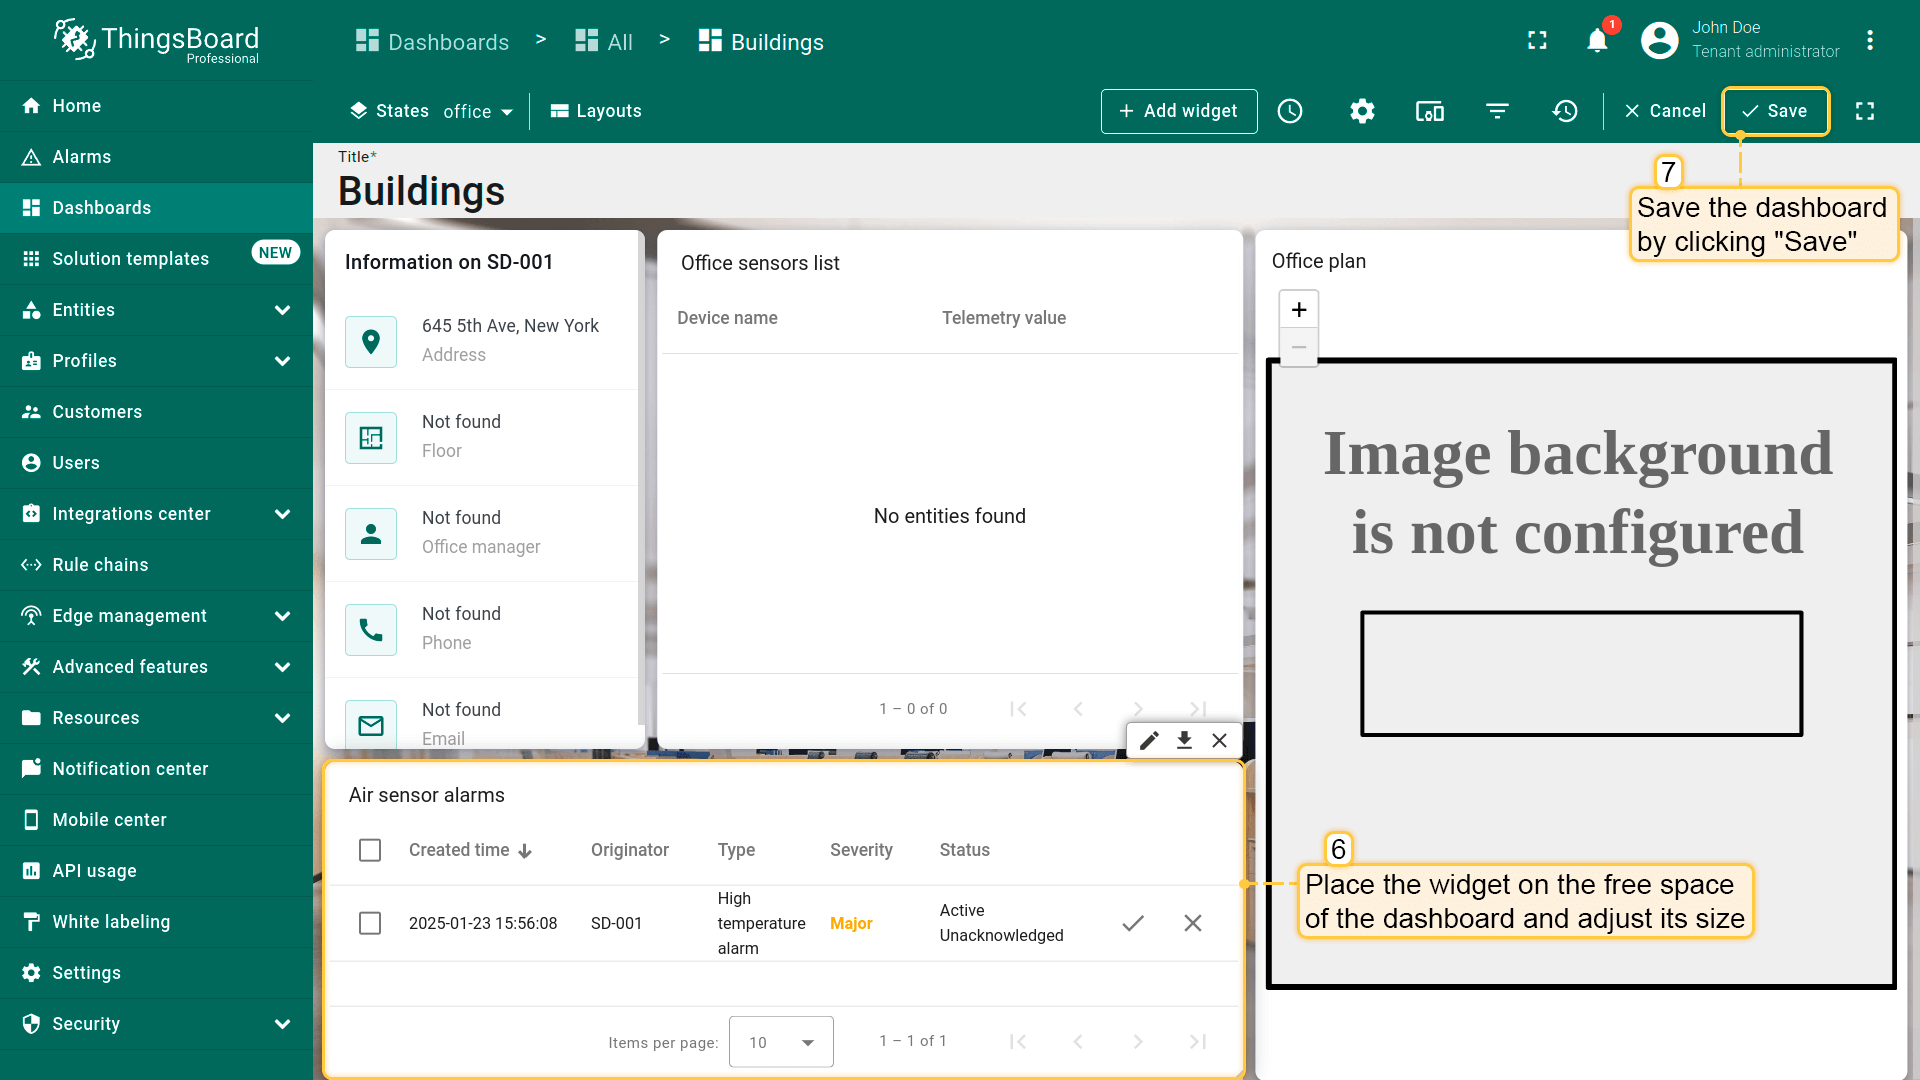
- 已添加用于显示设备活动告警的部件。将「Air sensor alarms」部件放置在仪表板空白处,拖拽右下角调整大小。然后保存仪表板。

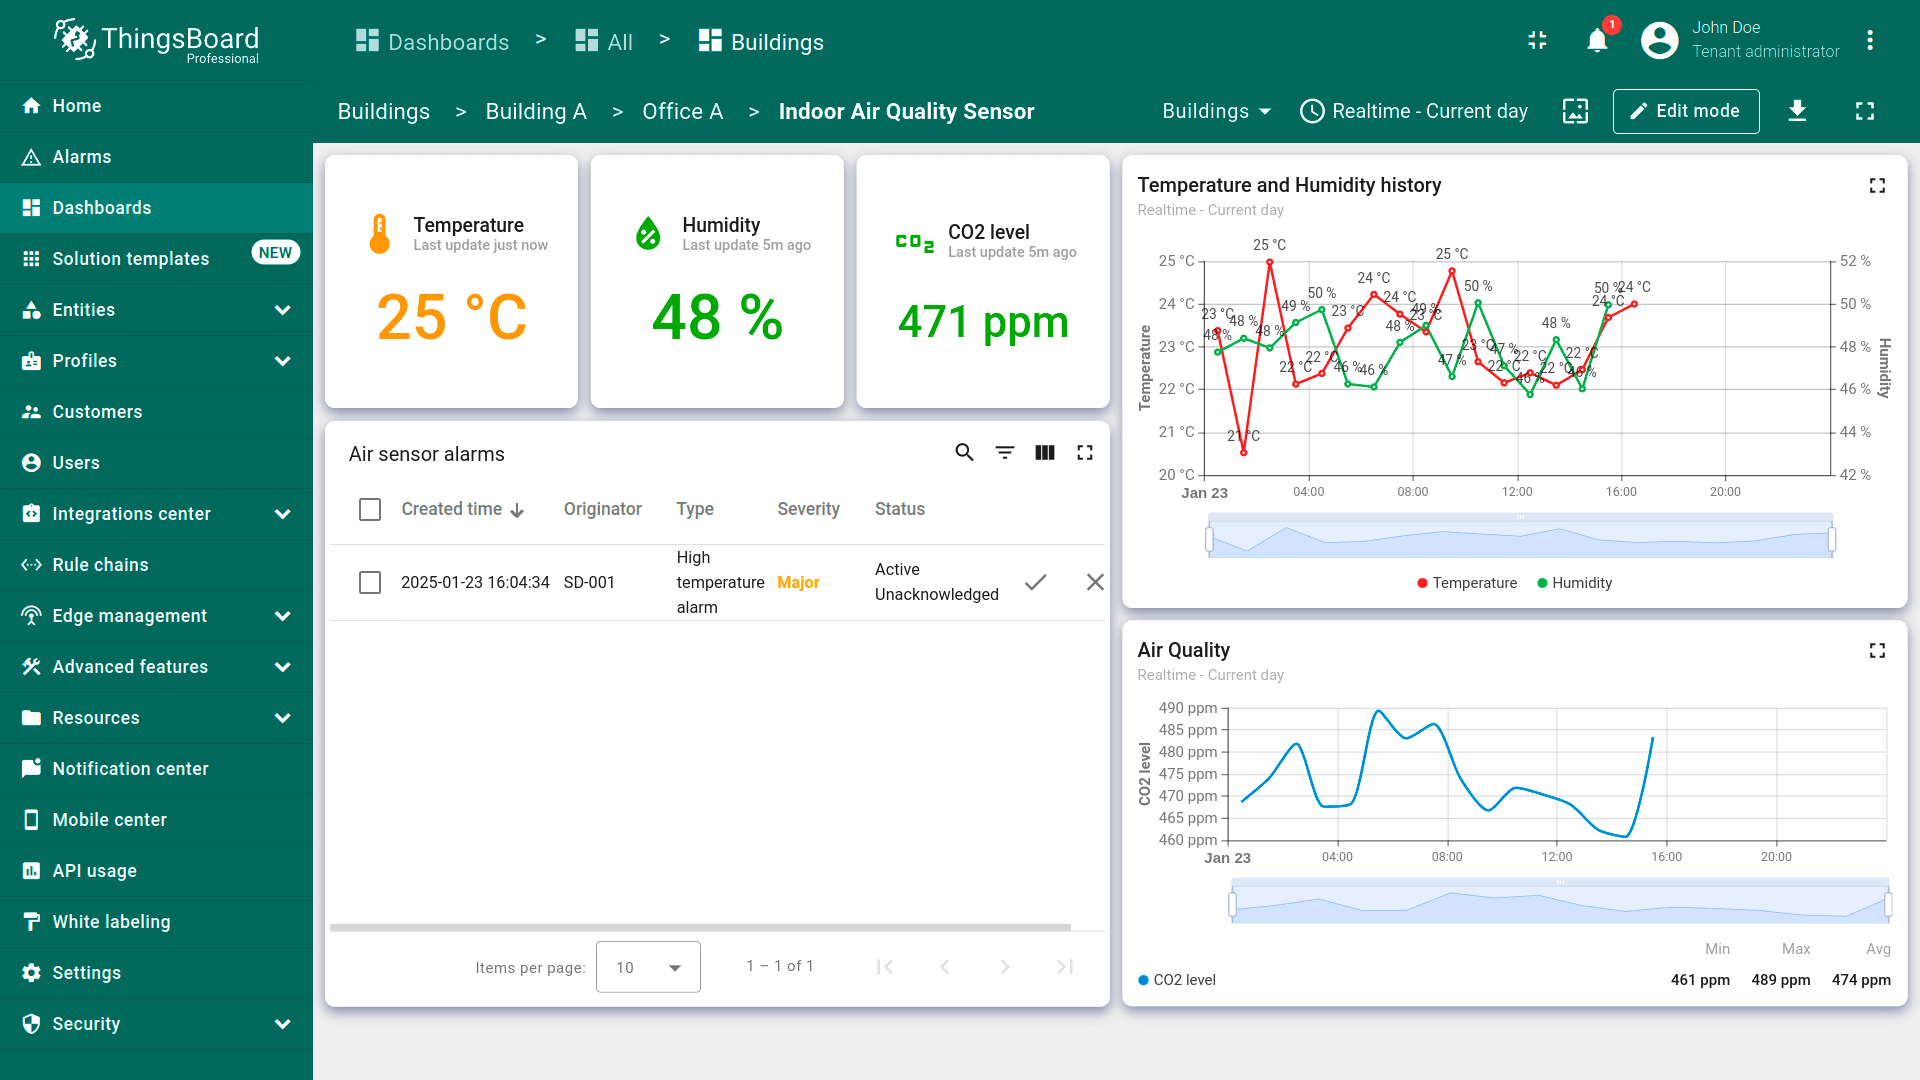
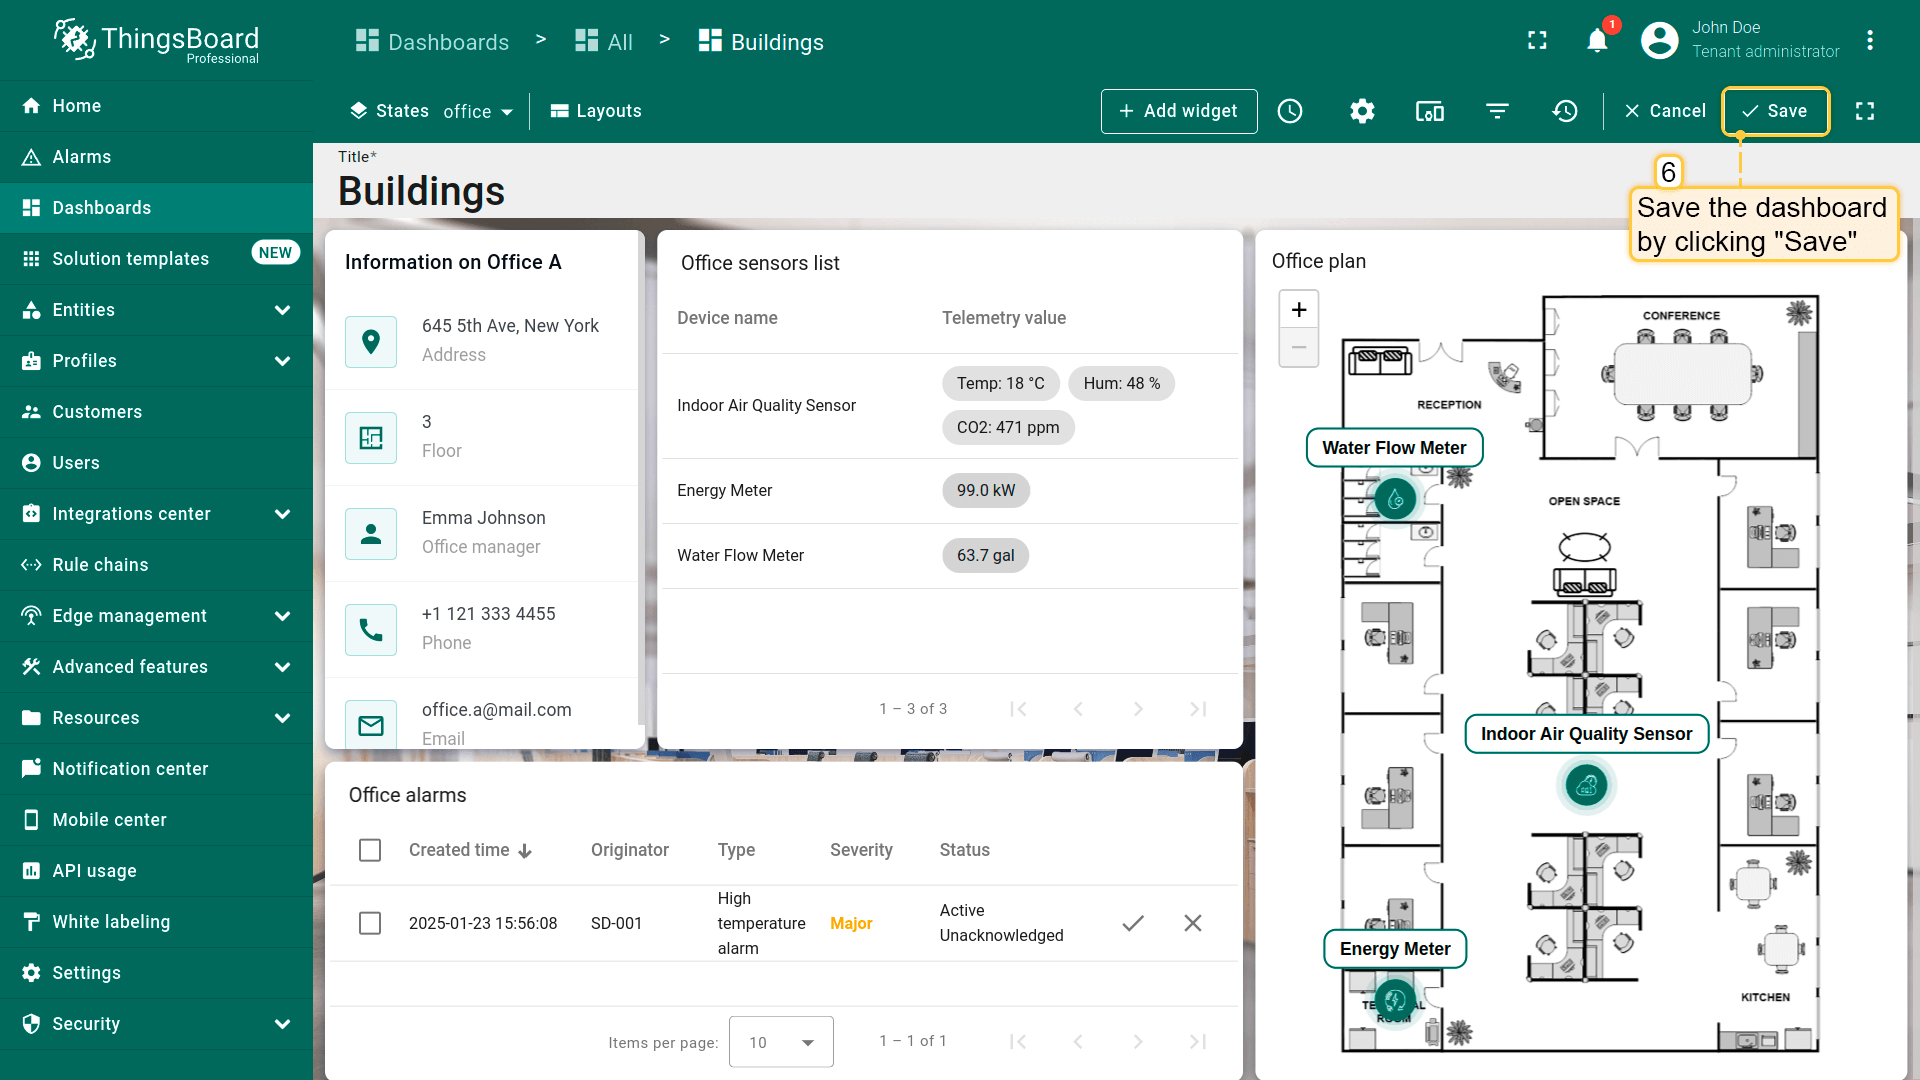
A fully configured air_sensor state should look like this:
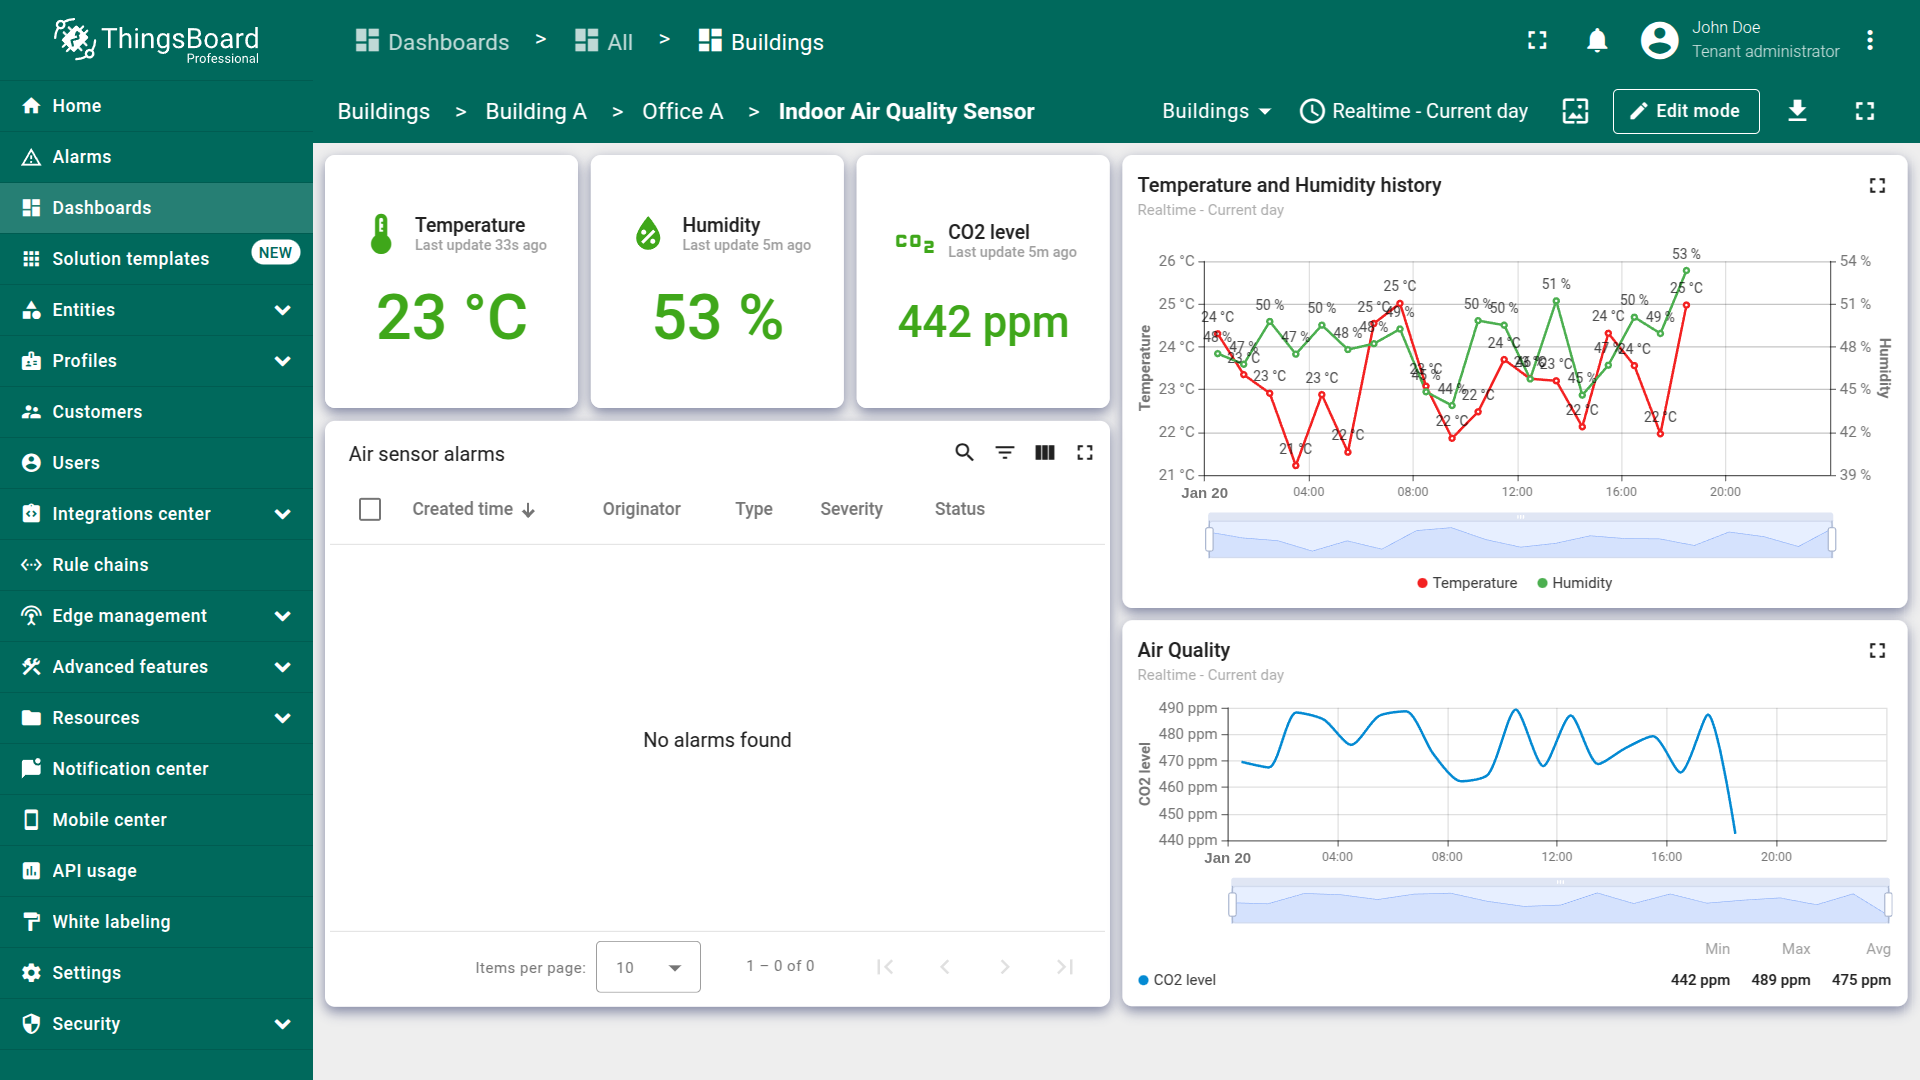
Now that the alarm rules have been defined and the widget for displaying active alarms has been added, let's test its functionality by sending telemetry values that exceed the threshold specified in the alarm rule.
Alarm trigger testing
To test the alarm triggering, it is not necessary to wait for the generator node to produce telemetry values exceeding the threshold. We can manually send telemetry with a value that exceeds the threshold specified in the alarm rule. As you may recall, if the temperature value exceeds 24 °C, an alarm with a severity type of “Major” is triggered.
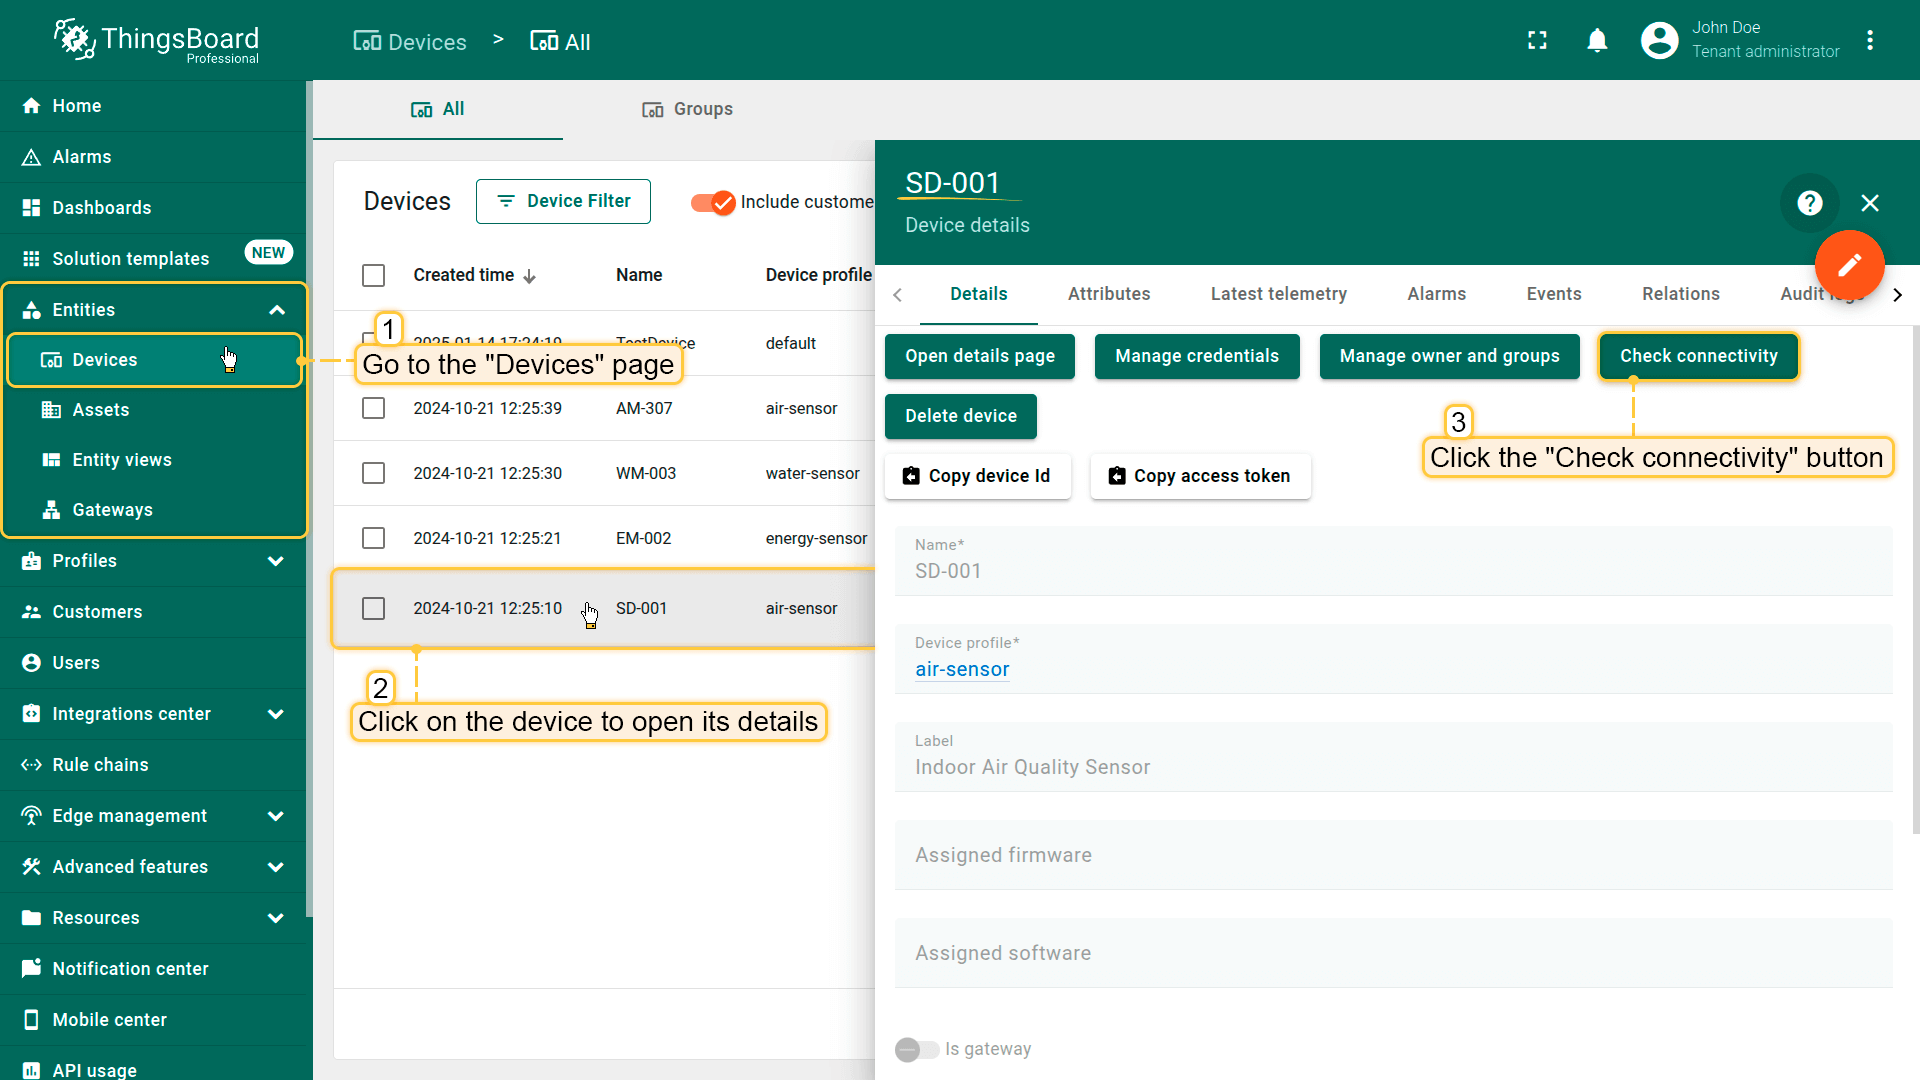
- 进入「Devices」页面。选择「Indoor Air Quality Sensor」设备,在「Device details」窗口中点击「Check connectivity」按钮;
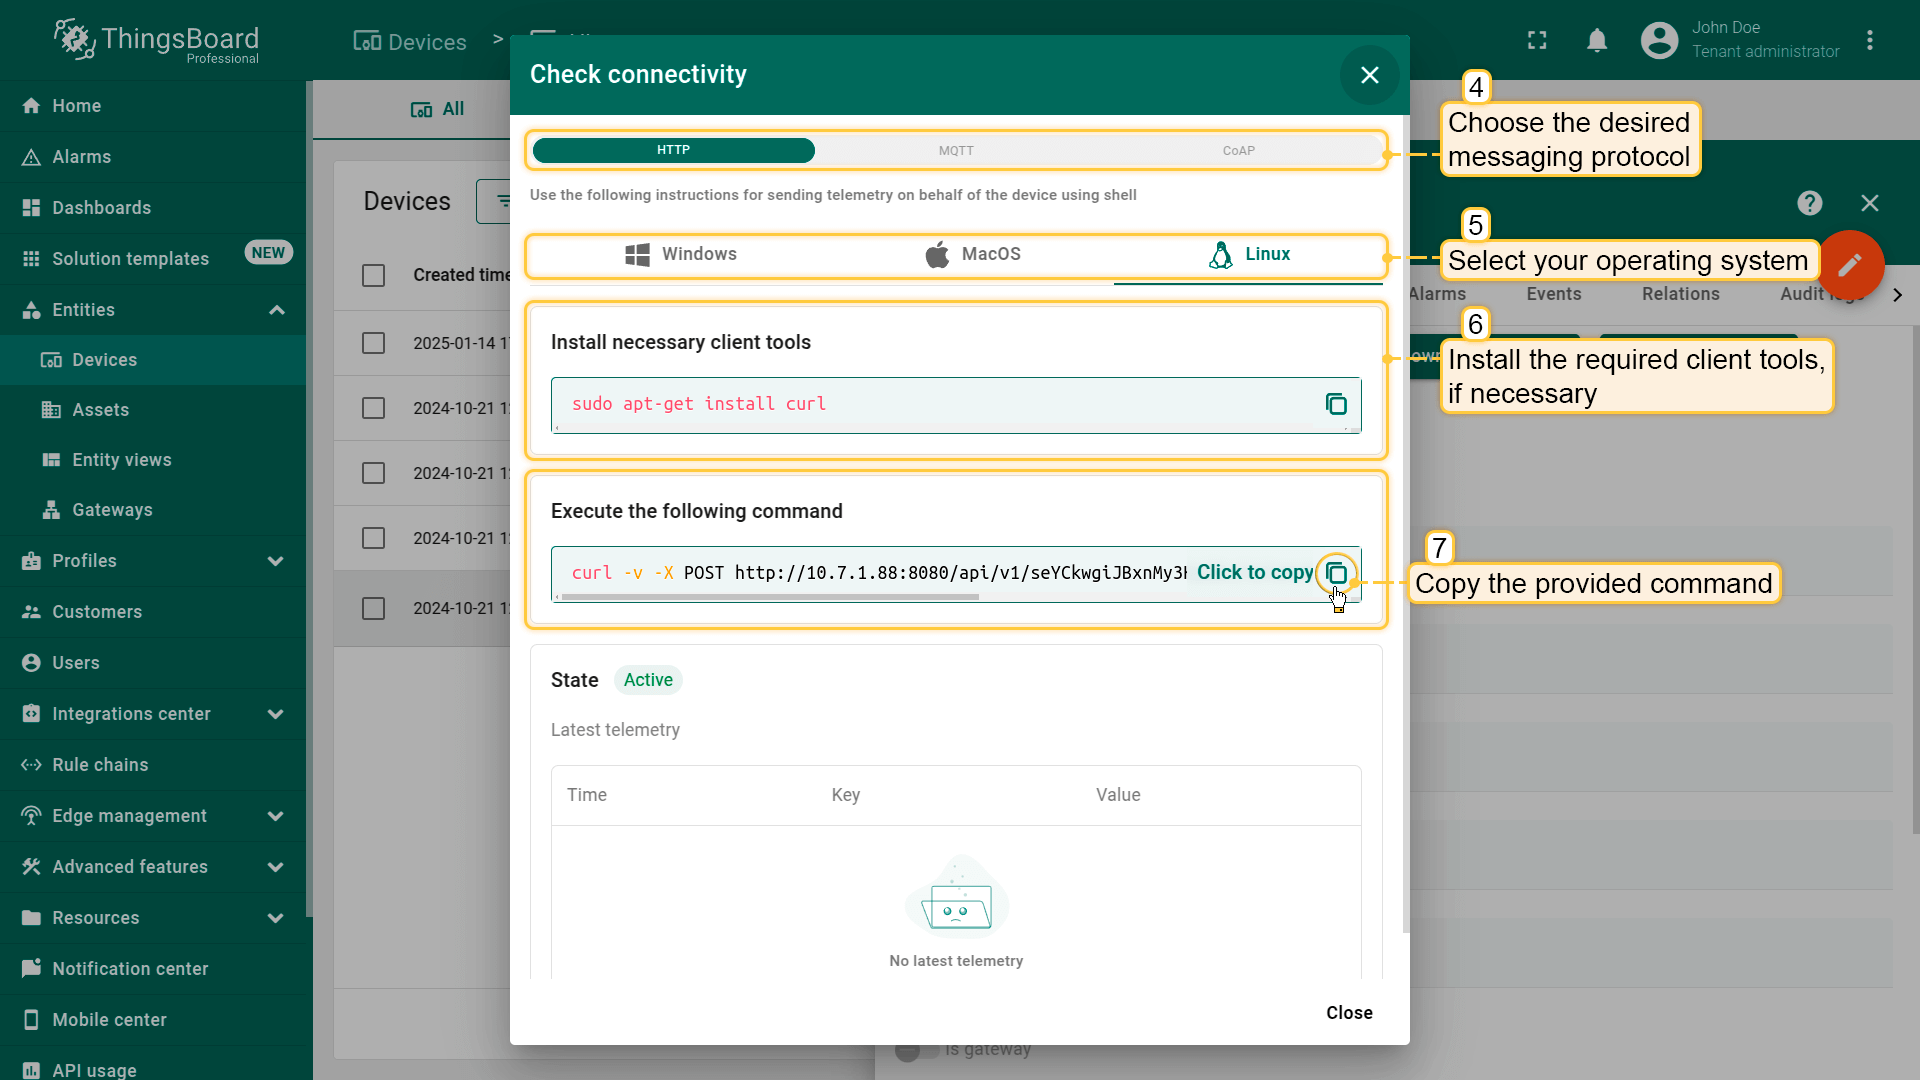
- 在打开窗口中选择所需消息协议和操作系统。必要时安装所需客户端工具。然后复制提供的包含遥测数据的命令;
- 打开Terminal并粘贴复制的命令。该命令将向 ThingsBoard 服务器发送包含 {"temperature":25} 的 POST 请求。执行命令。成功执行后「temperature」读数将发布。然后关闭连接窗口。
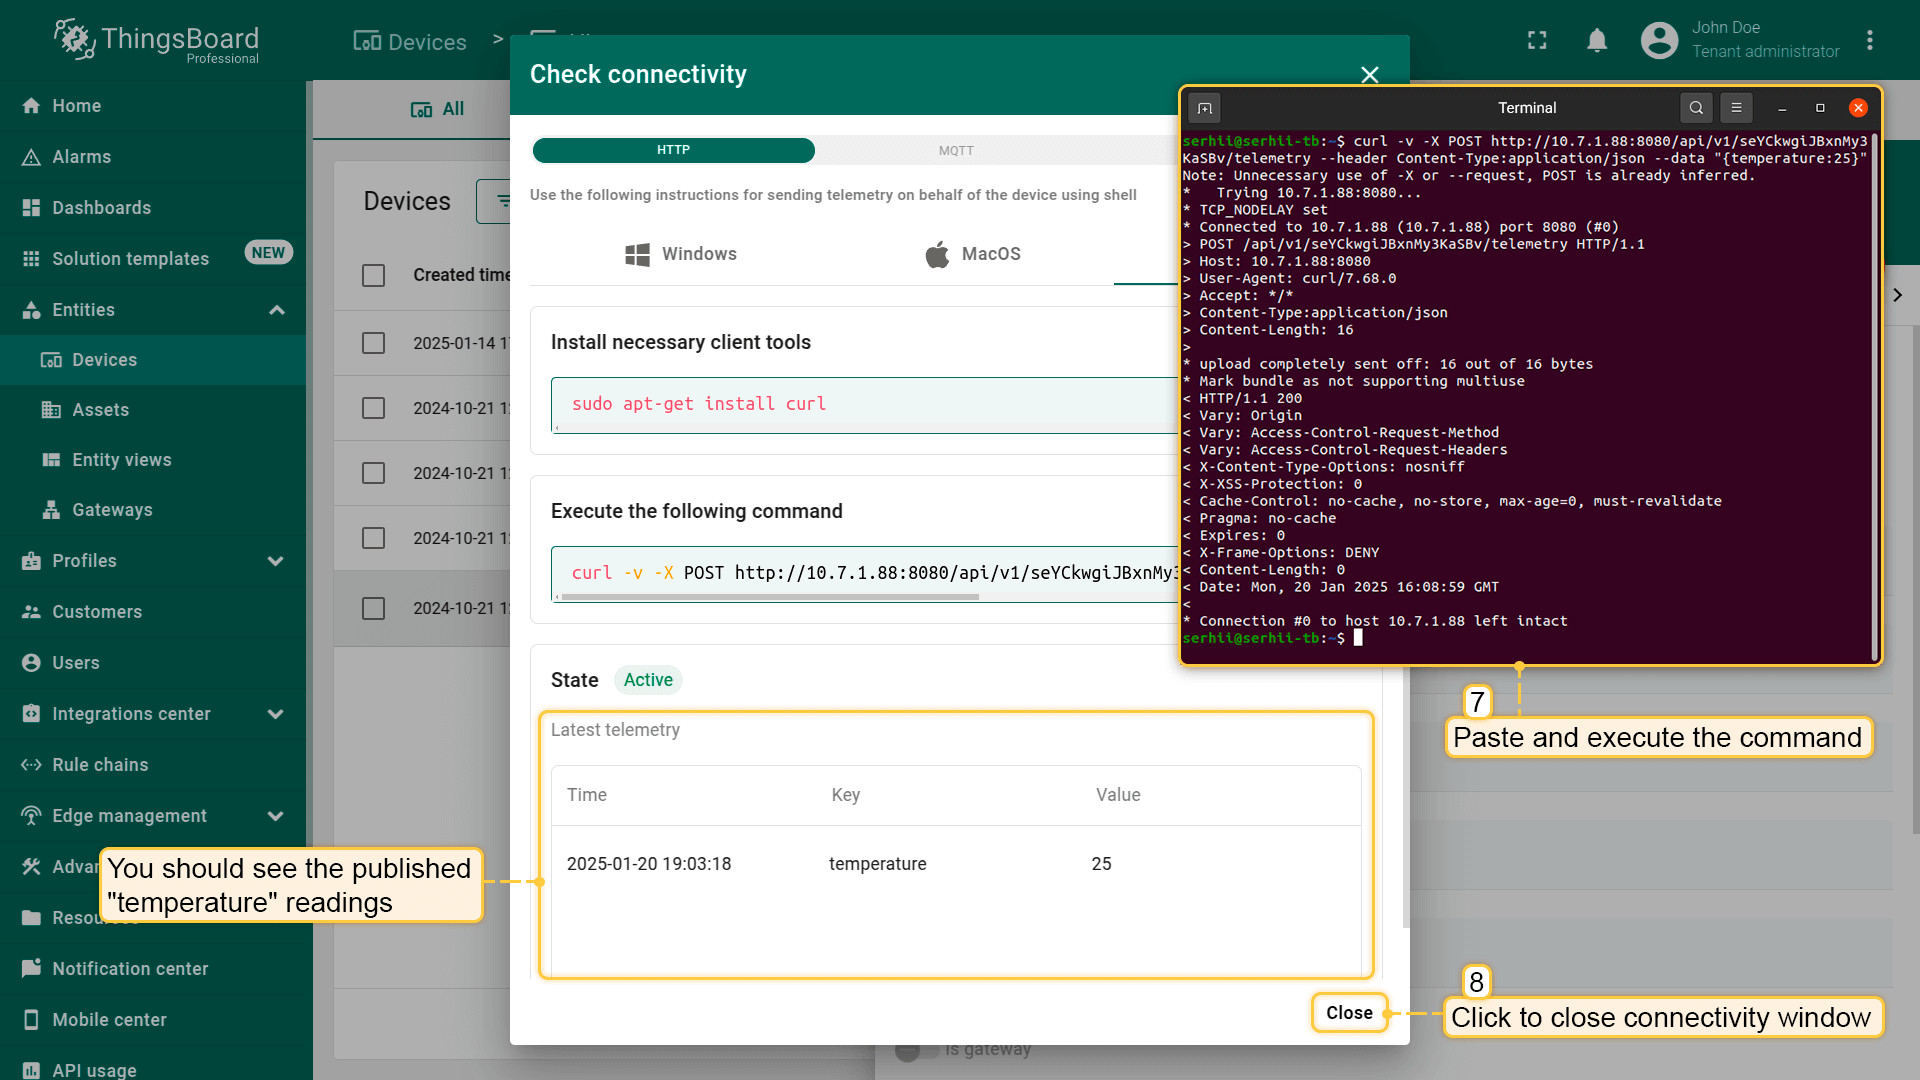
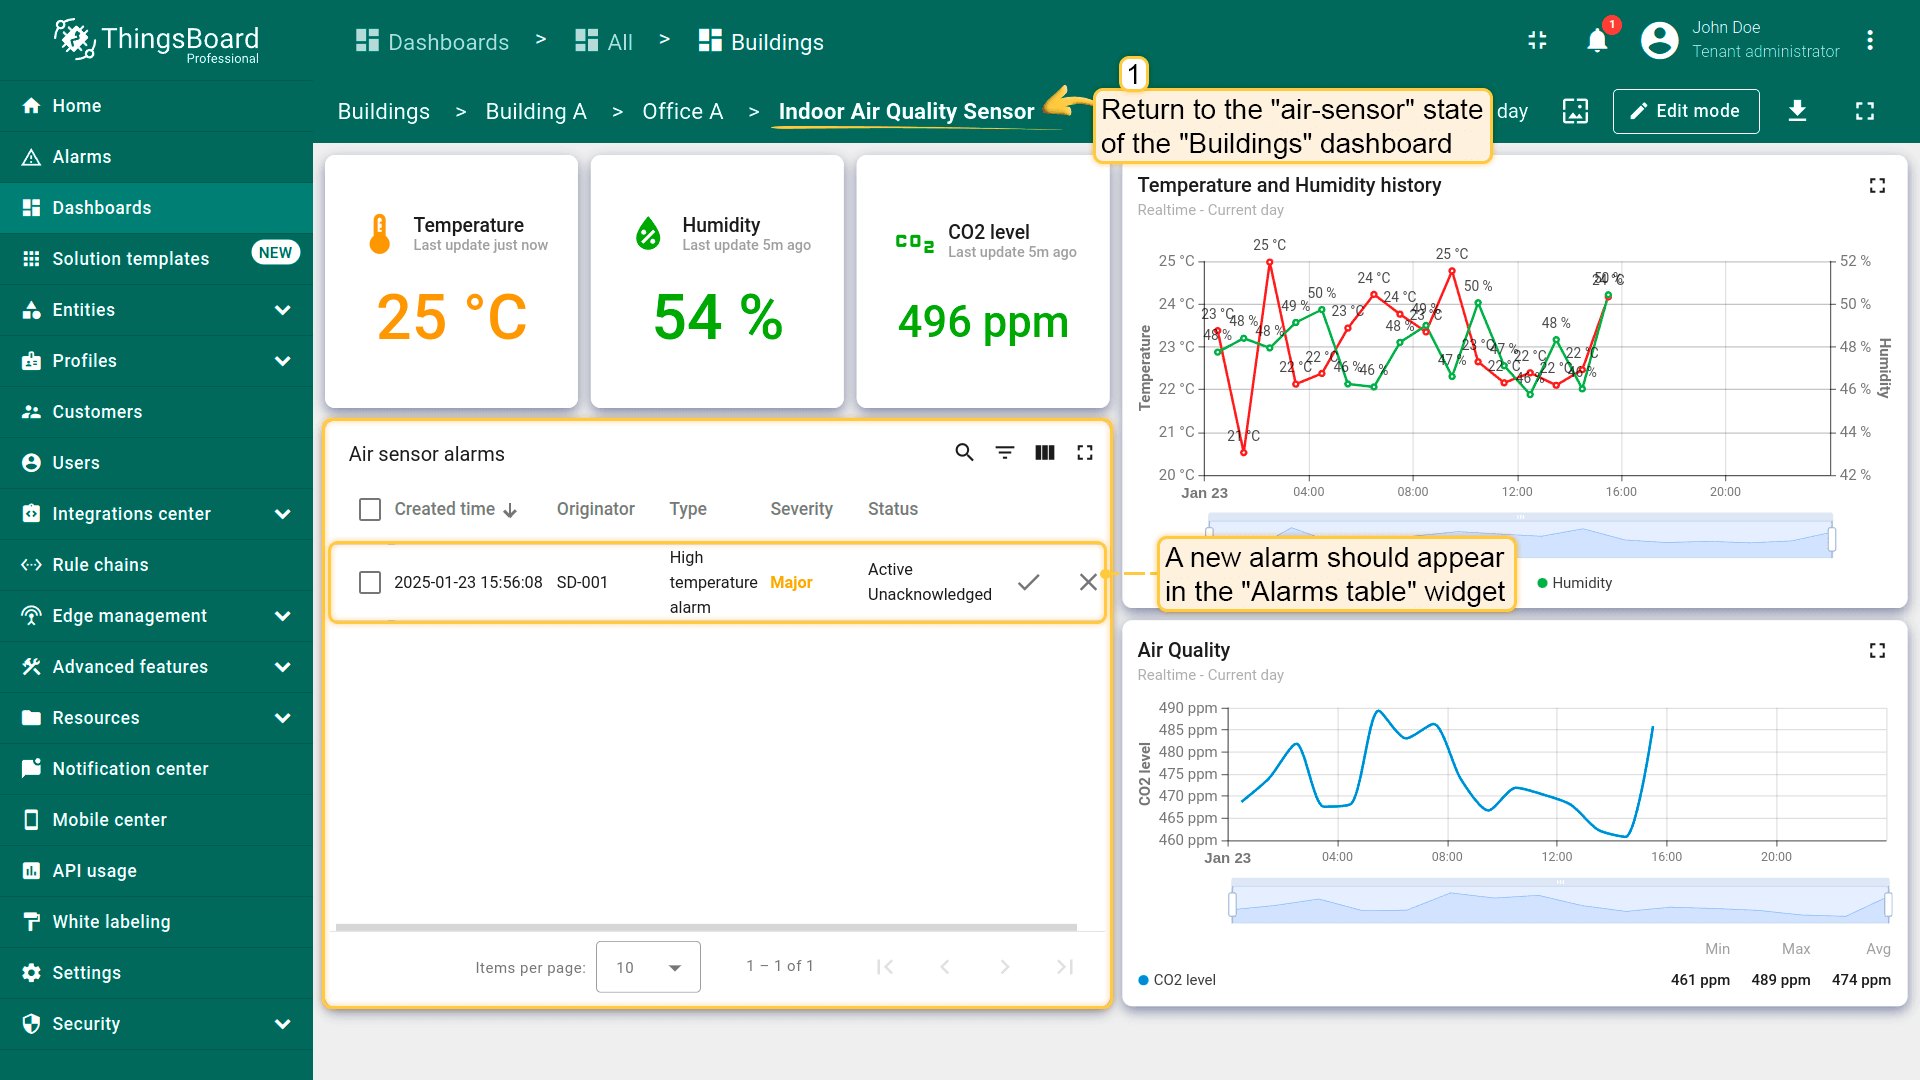
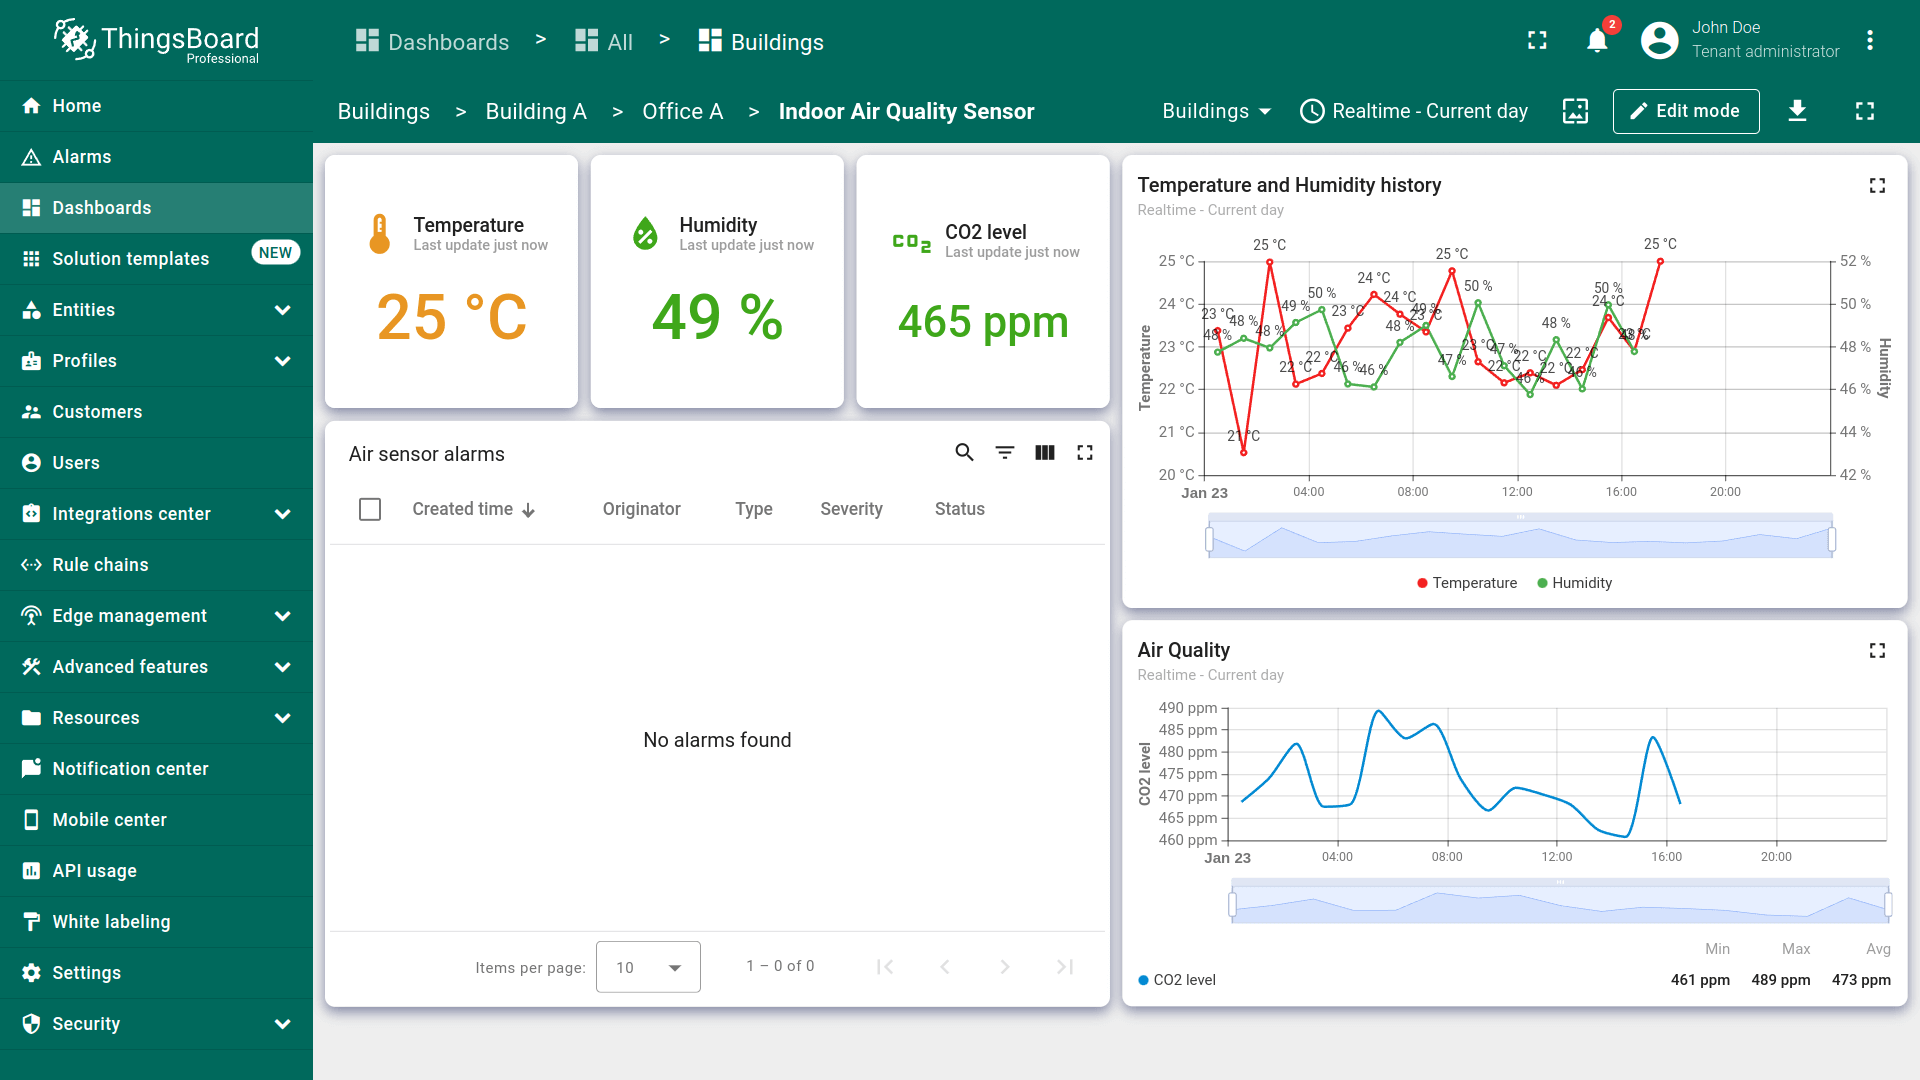
Return to the air_sensor dashboard state. In the “Alarms table” widget, an alarm should appear displaying the created time, originator of the alarm, its severity and its status. When an alarm is triggered, it initially has the status “Active” and “Unacknowledged”. A user can acknowledge the alarm, changing its status to “Acknowledged”. However, it will remain active until it is resolved (cleared).
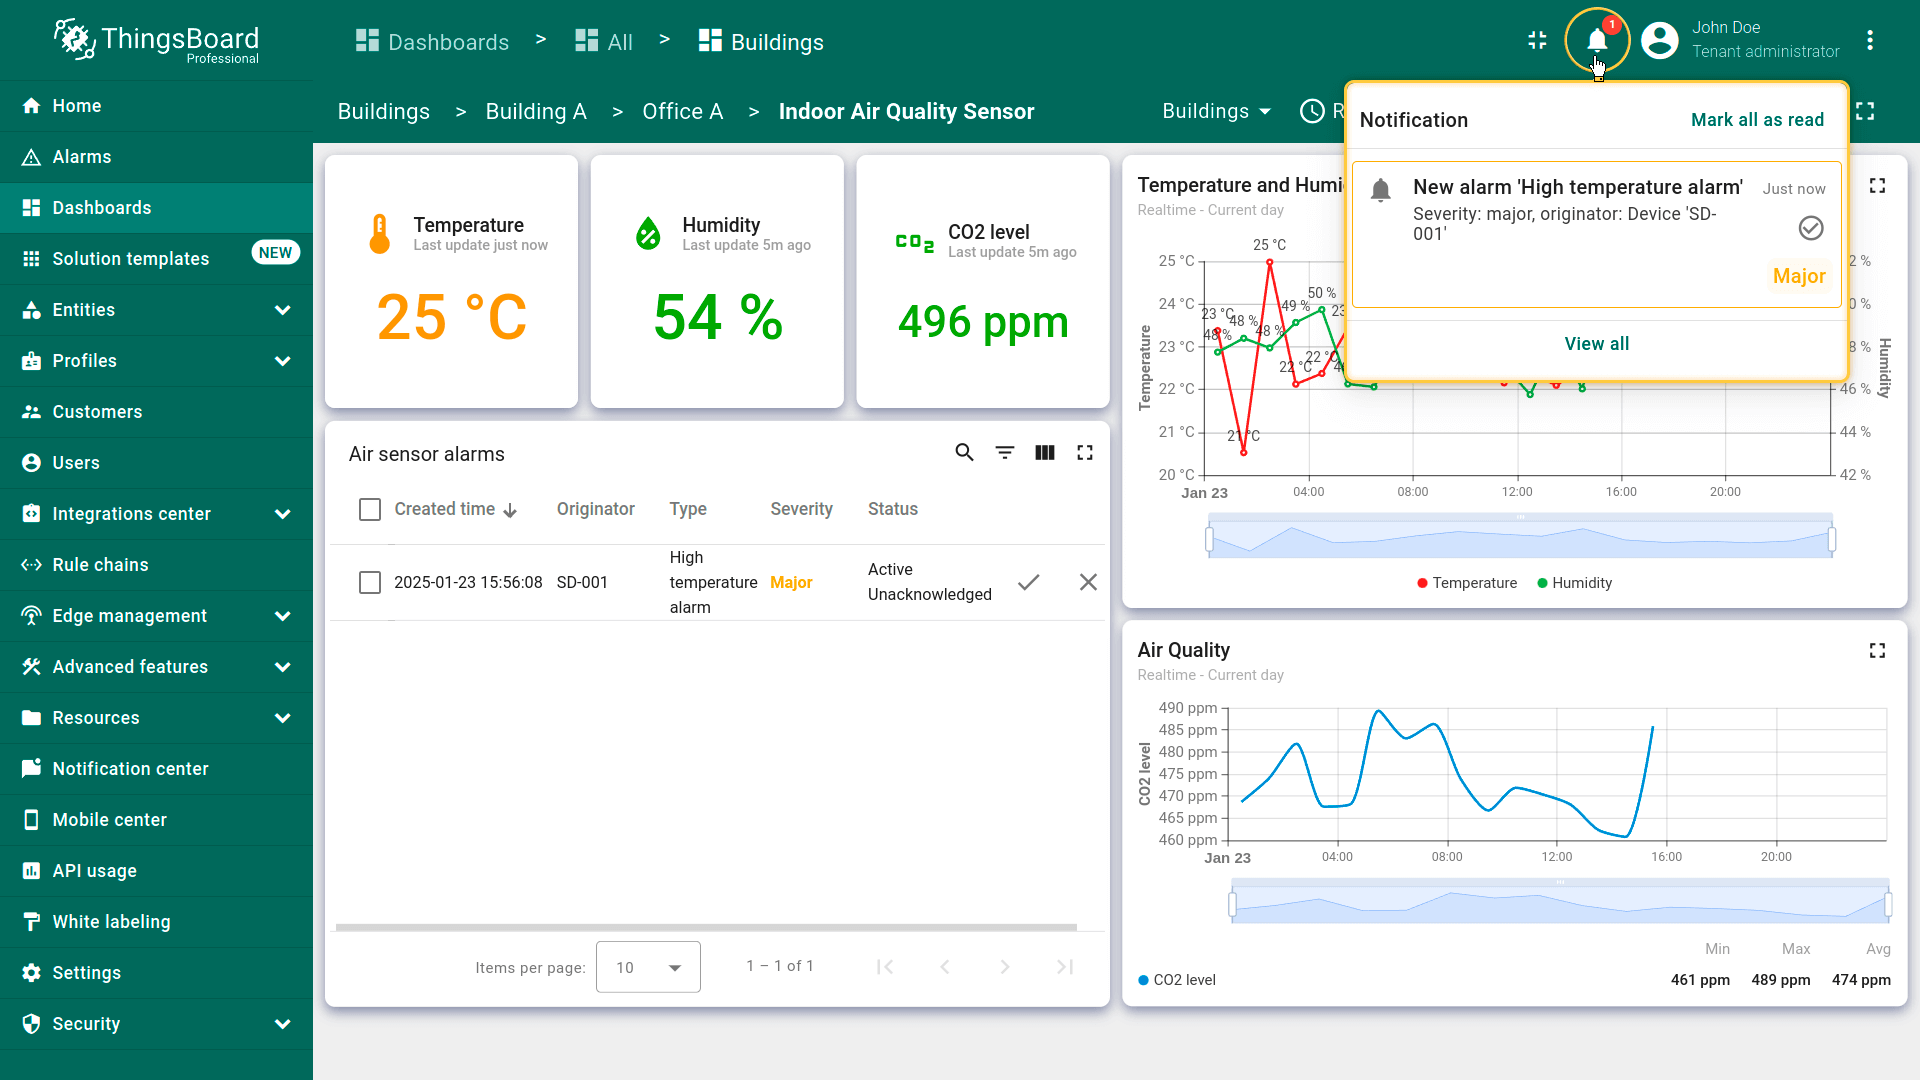
You will also receive a notification about the triggered alarm in the Notification center. Learn more about notifications and how to configure them here.
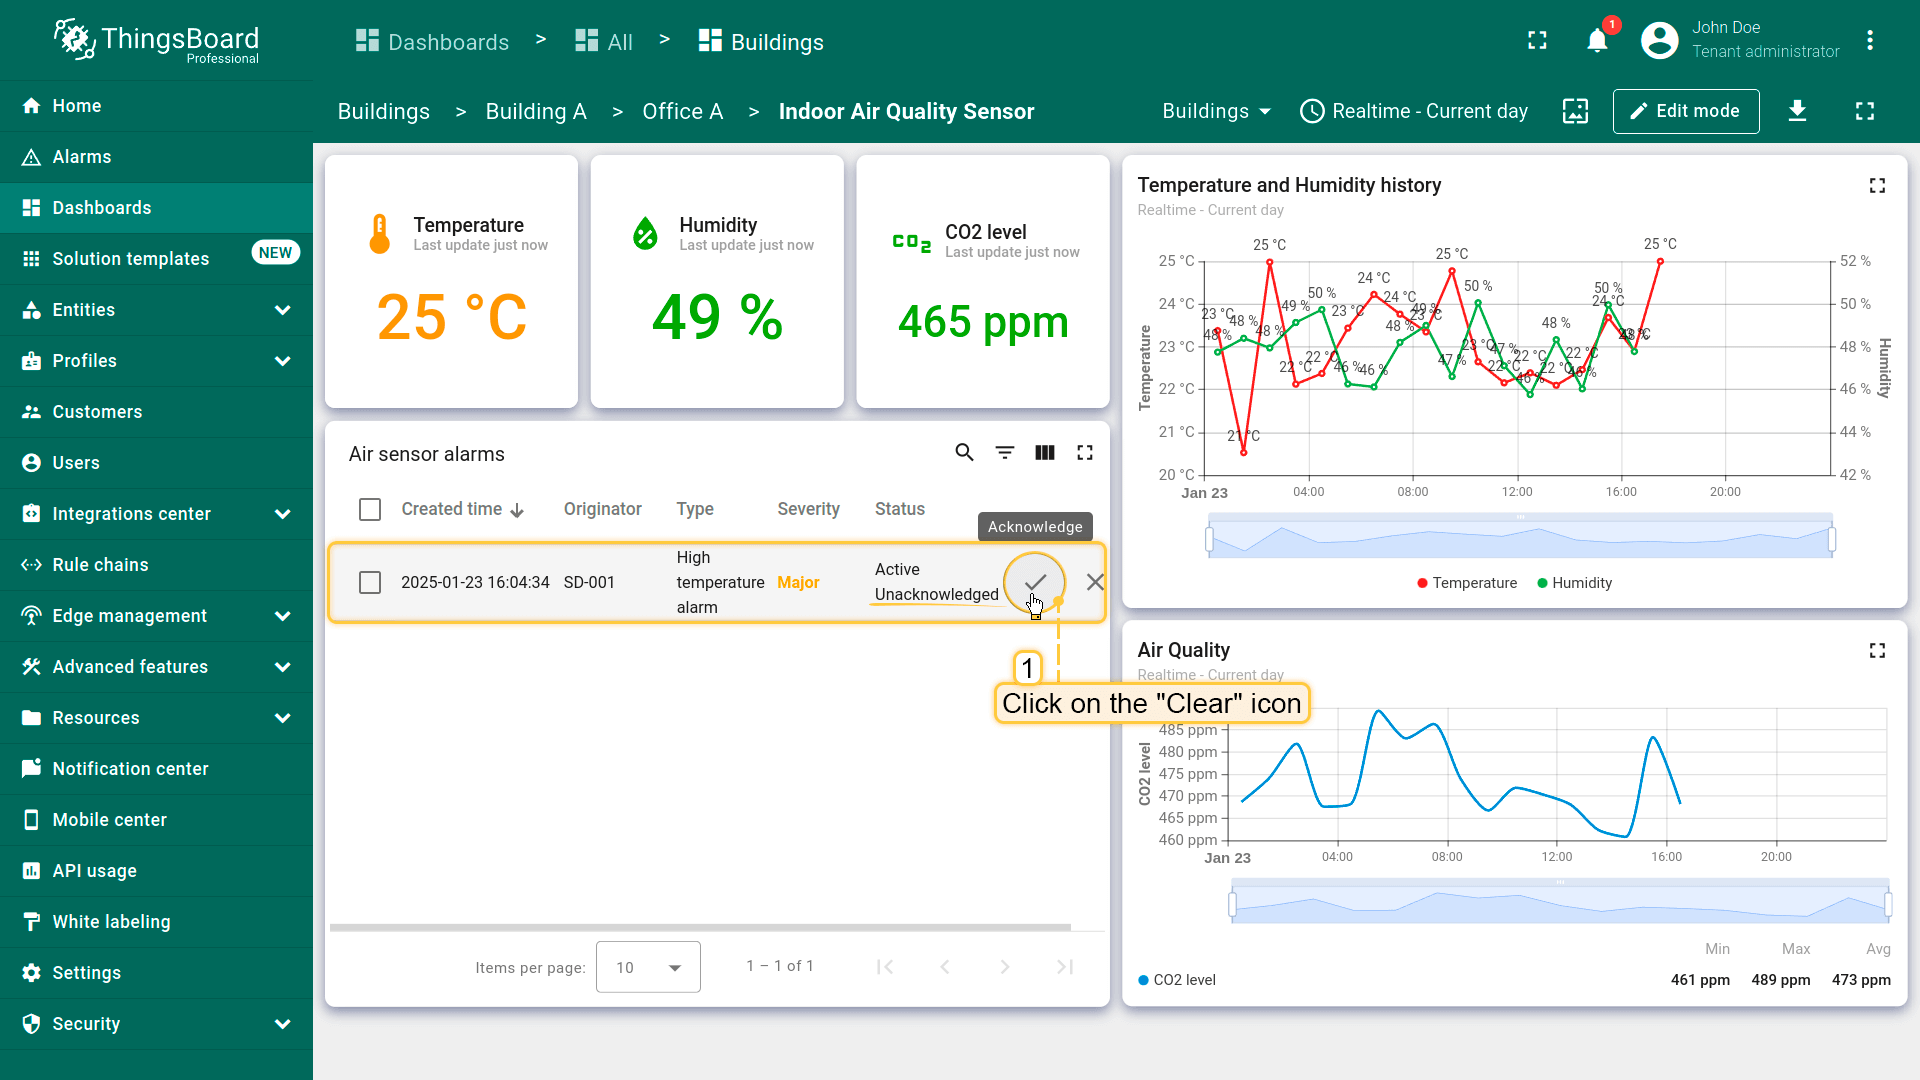
Acknowledge alarm
To acknowledge an alarm, click the “Acknowledge” icon next to the alarm event and confirm the action.


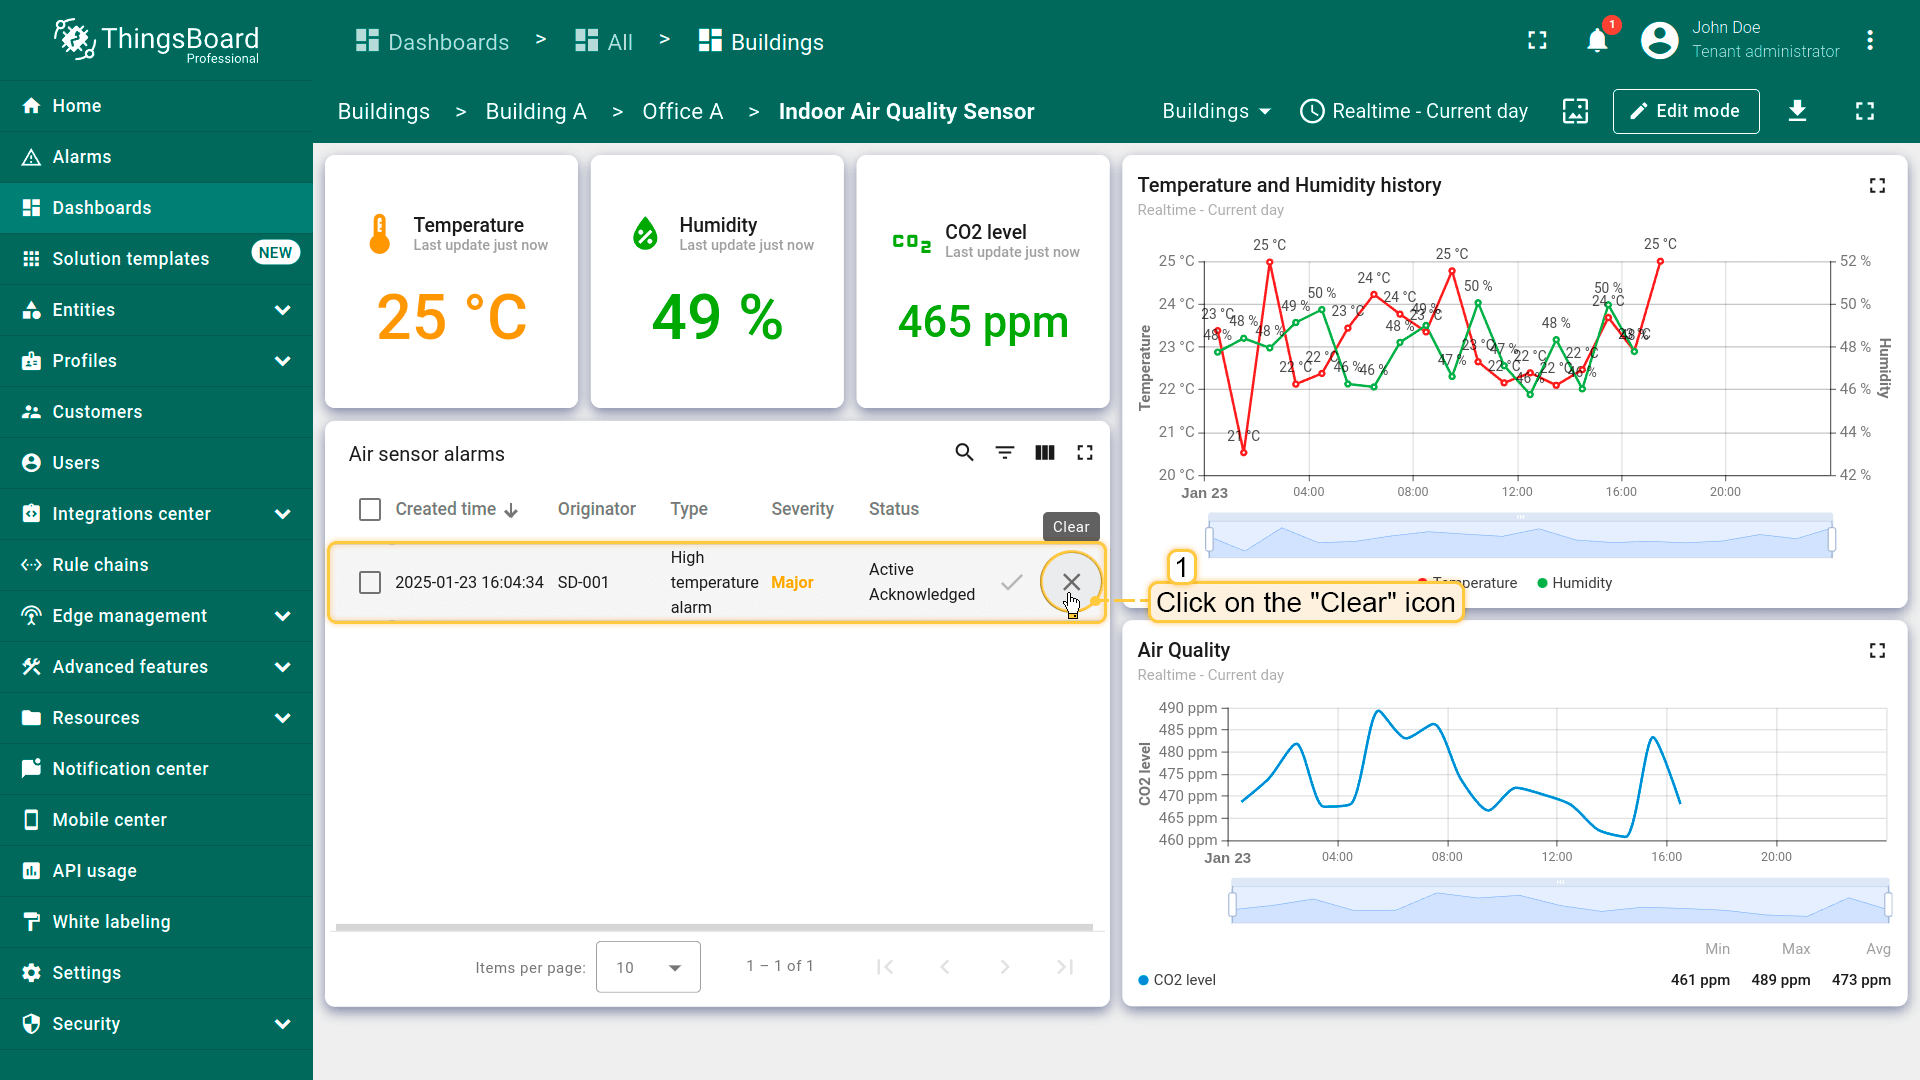
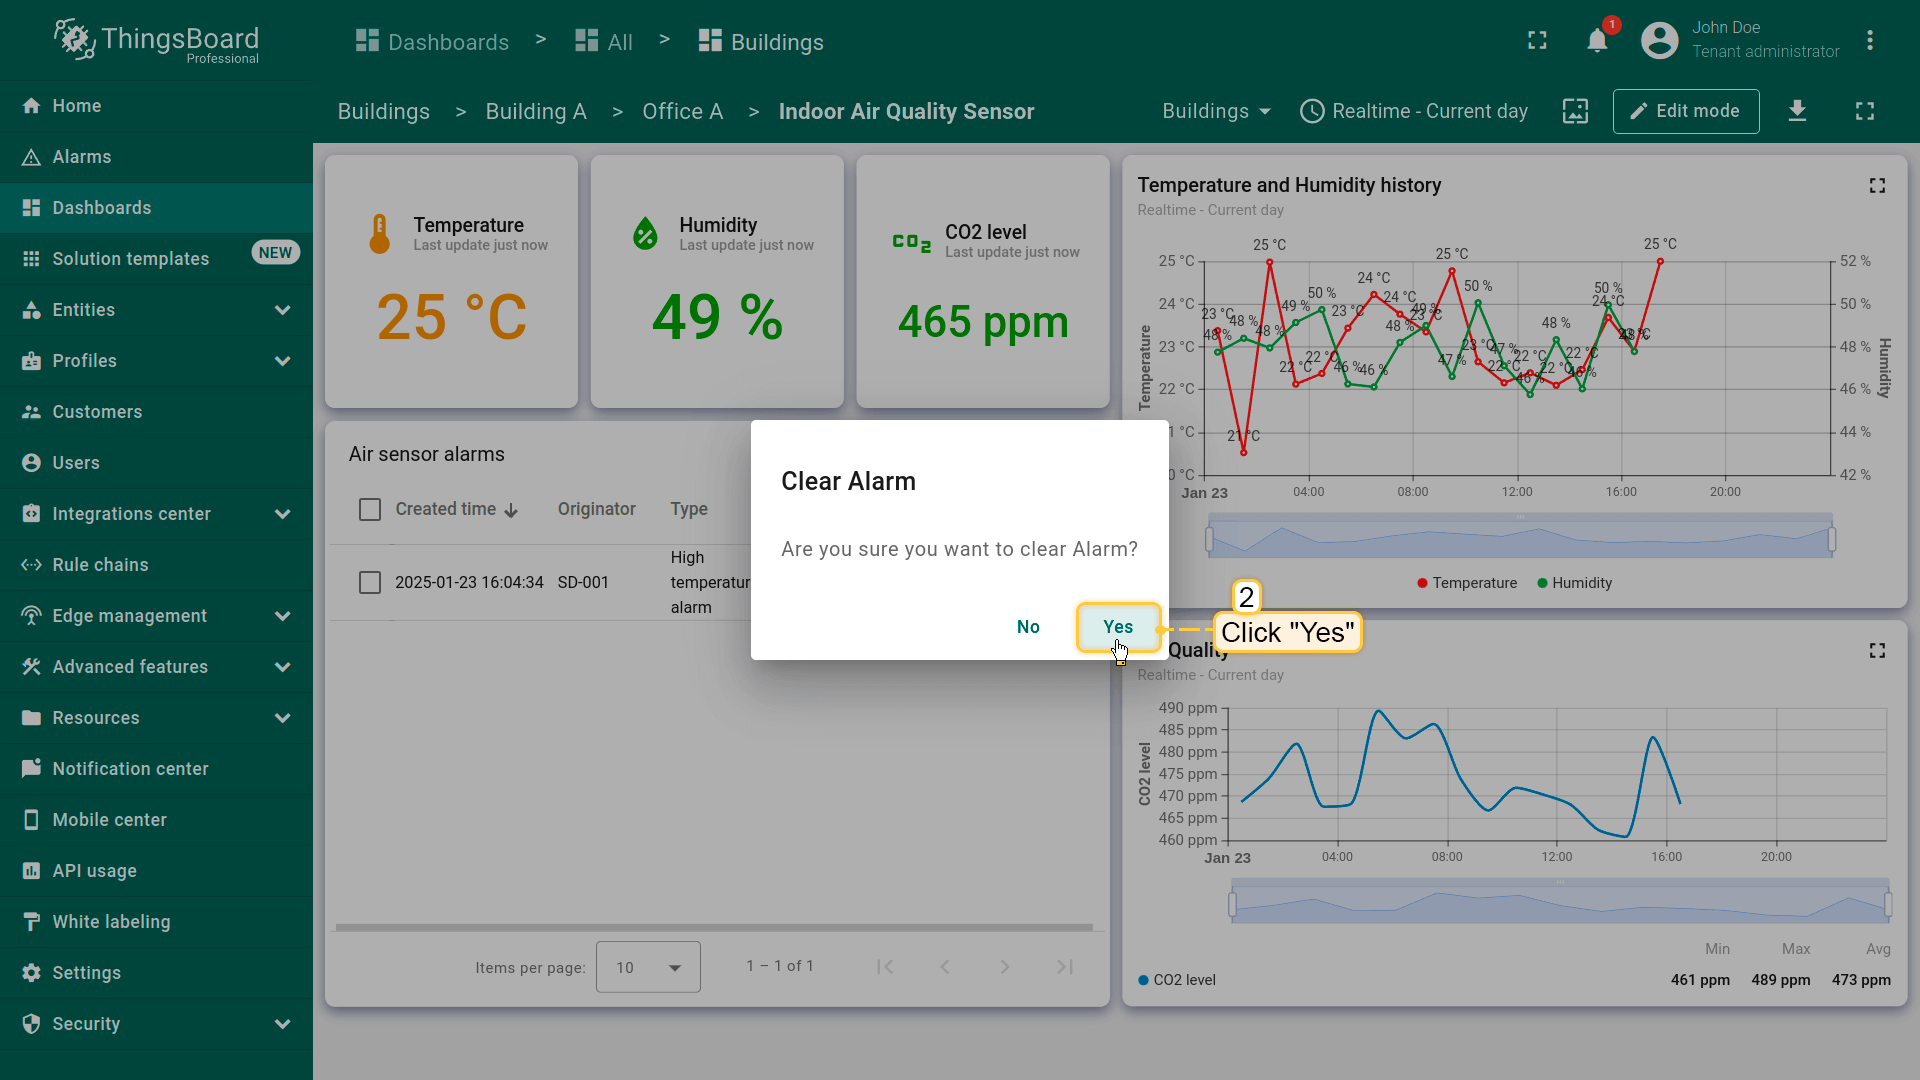
Clear alarm
To clear an alarm, click the “Clear” icon next to the alarm event and confirm the action.
Adding alarm widget to all other states
Next, we will add the alarm widget to each state of the dashboard to monitor alarms that appear on your device at any level of the dashboard.
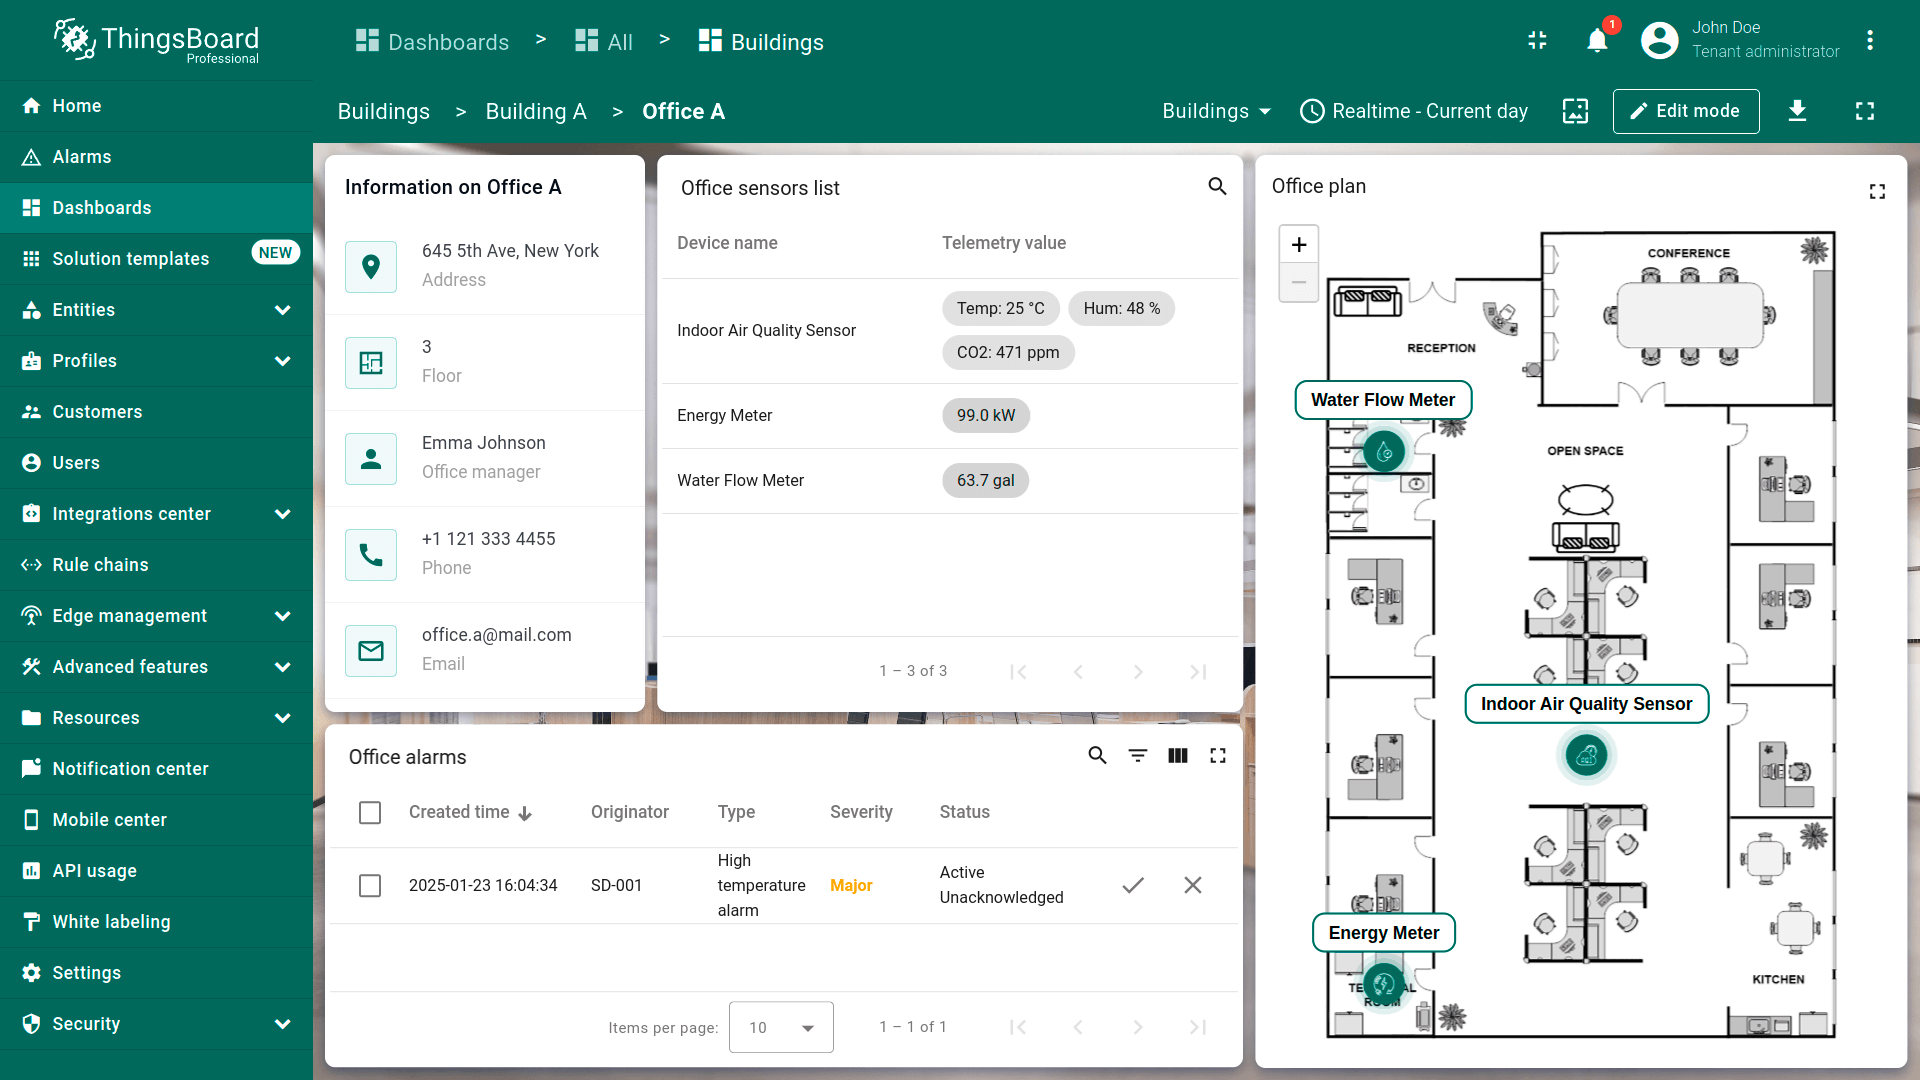
Adding alarm widget to office state
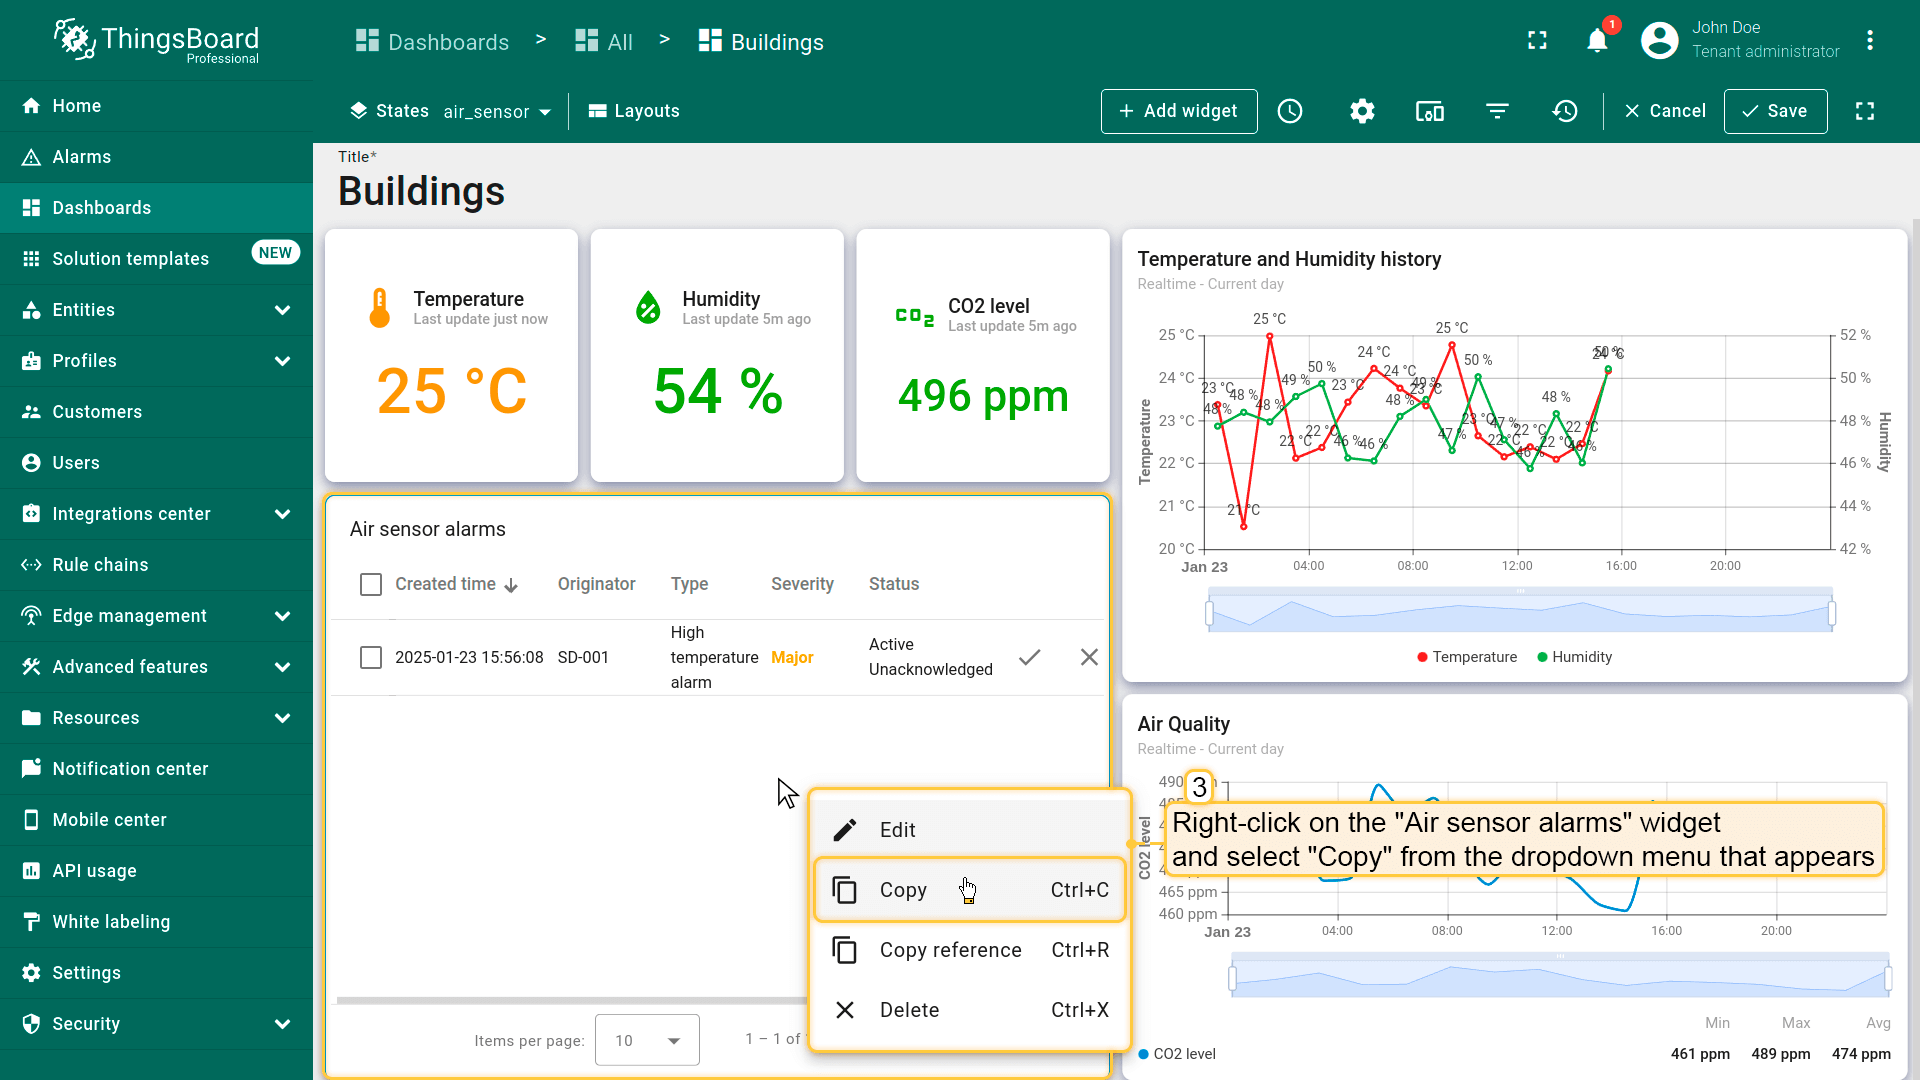
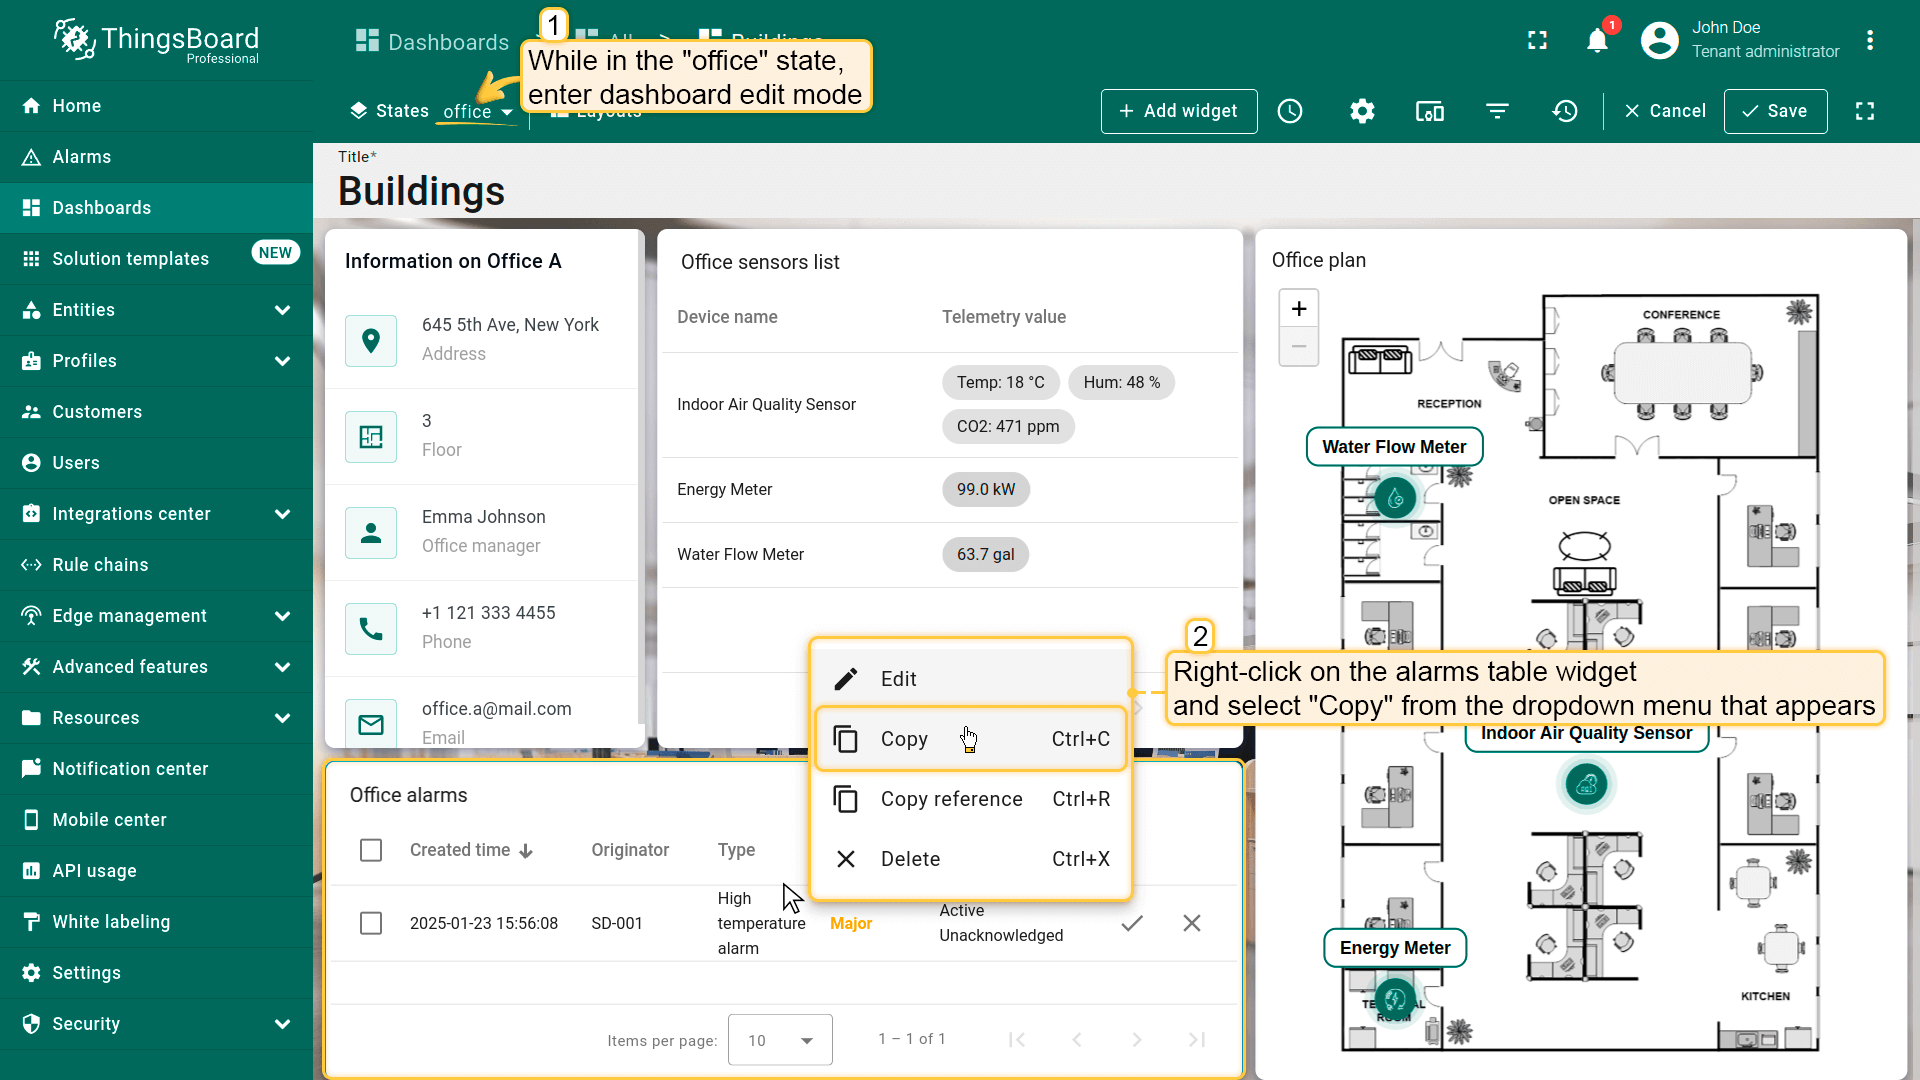
Add an alarm widget to the office state. This widget will display alarms from all devices associated with the selected office. We'll add this widget using the copy method.
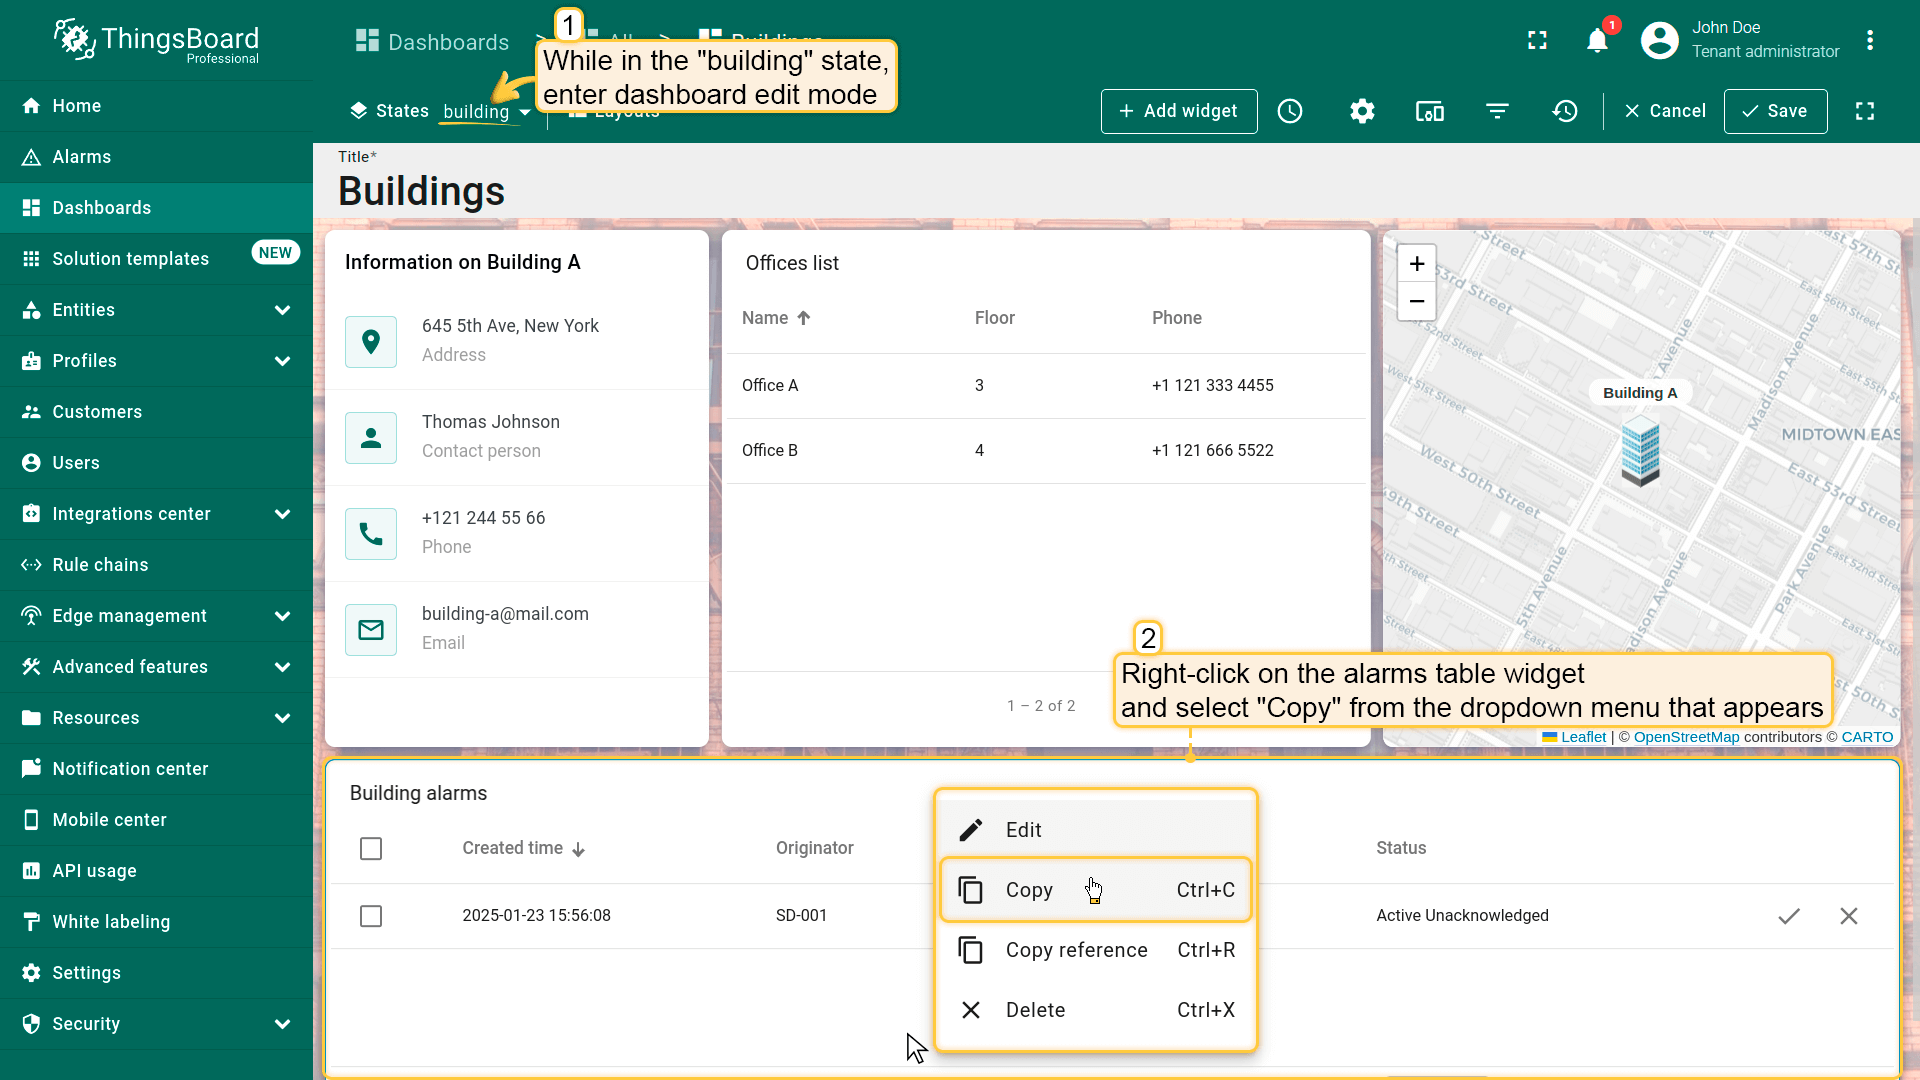
- 进入air_sensor状态,进入仪表板编辑模式;
- 右键点击告警部件,从下拉菜单中选择「Copy」;
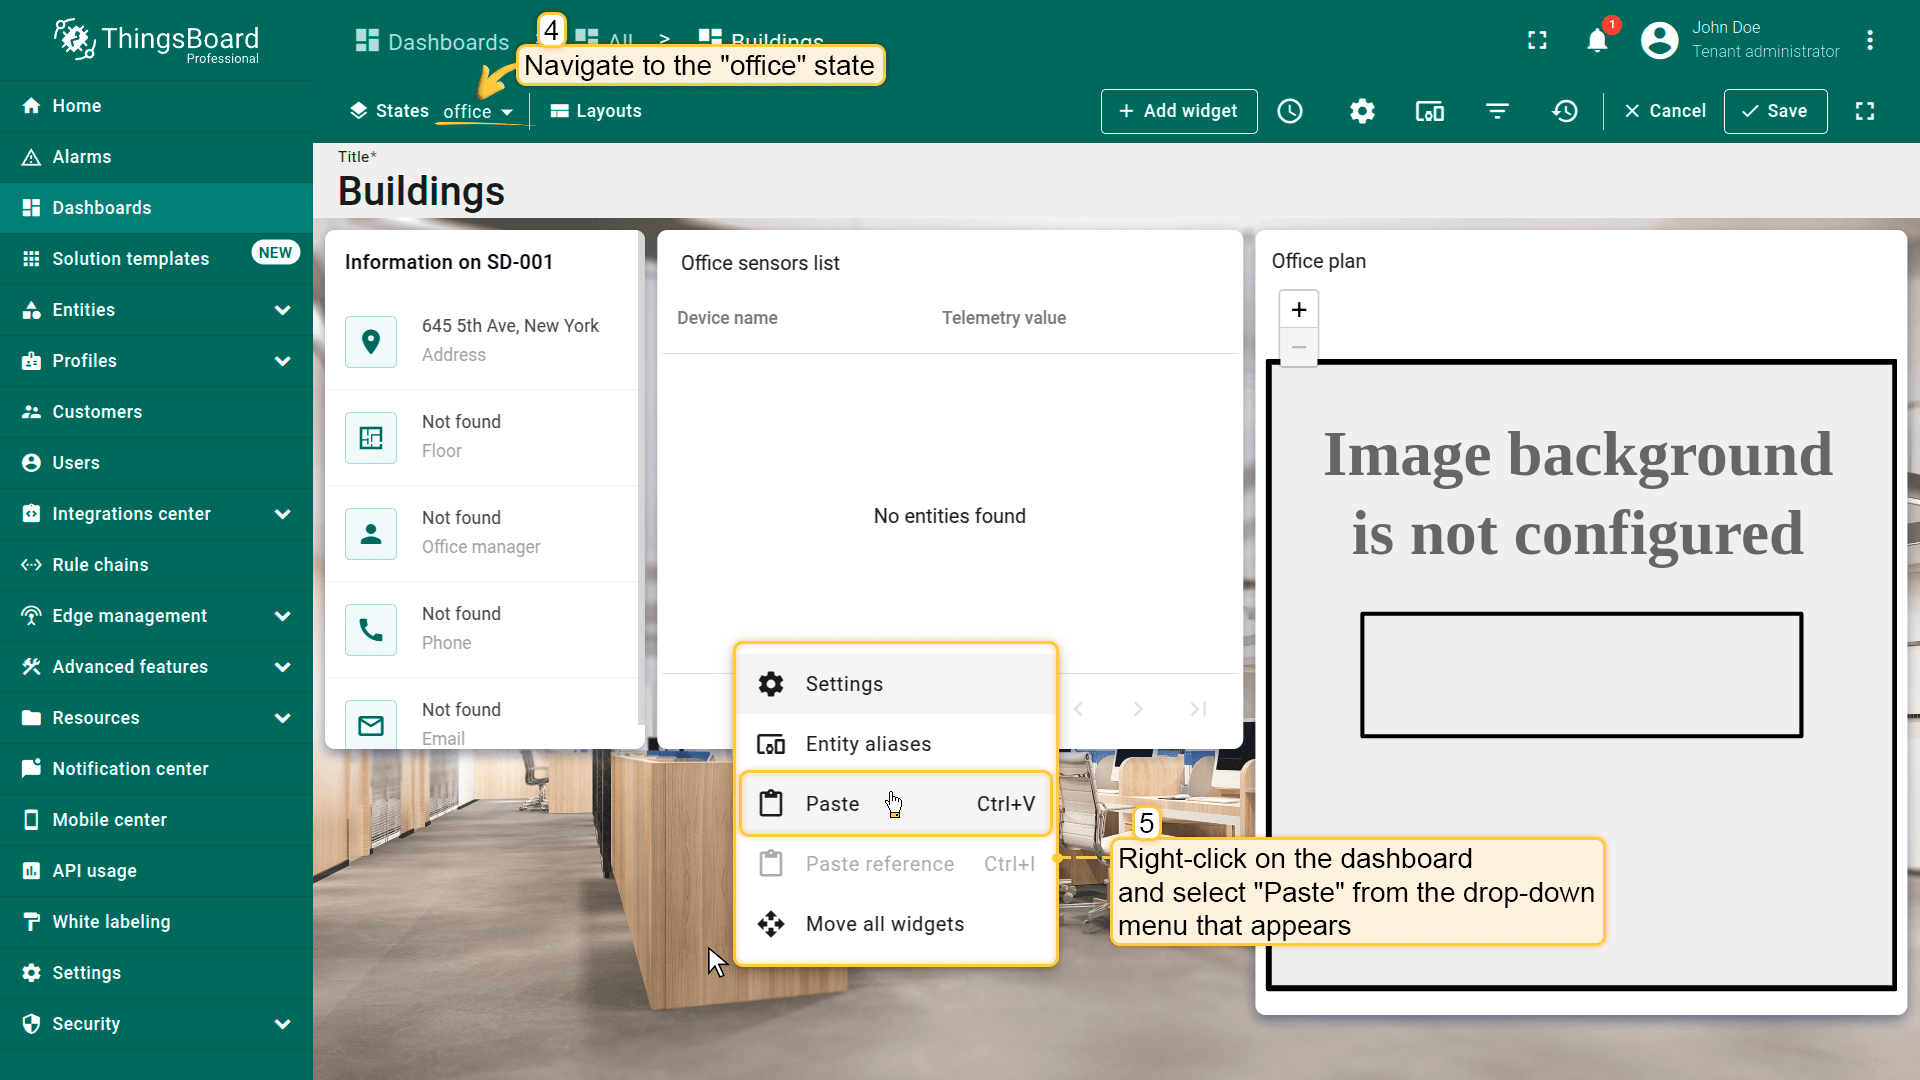
- 进入office状态,在仪表板空白处右键点击,选择「Paste」;
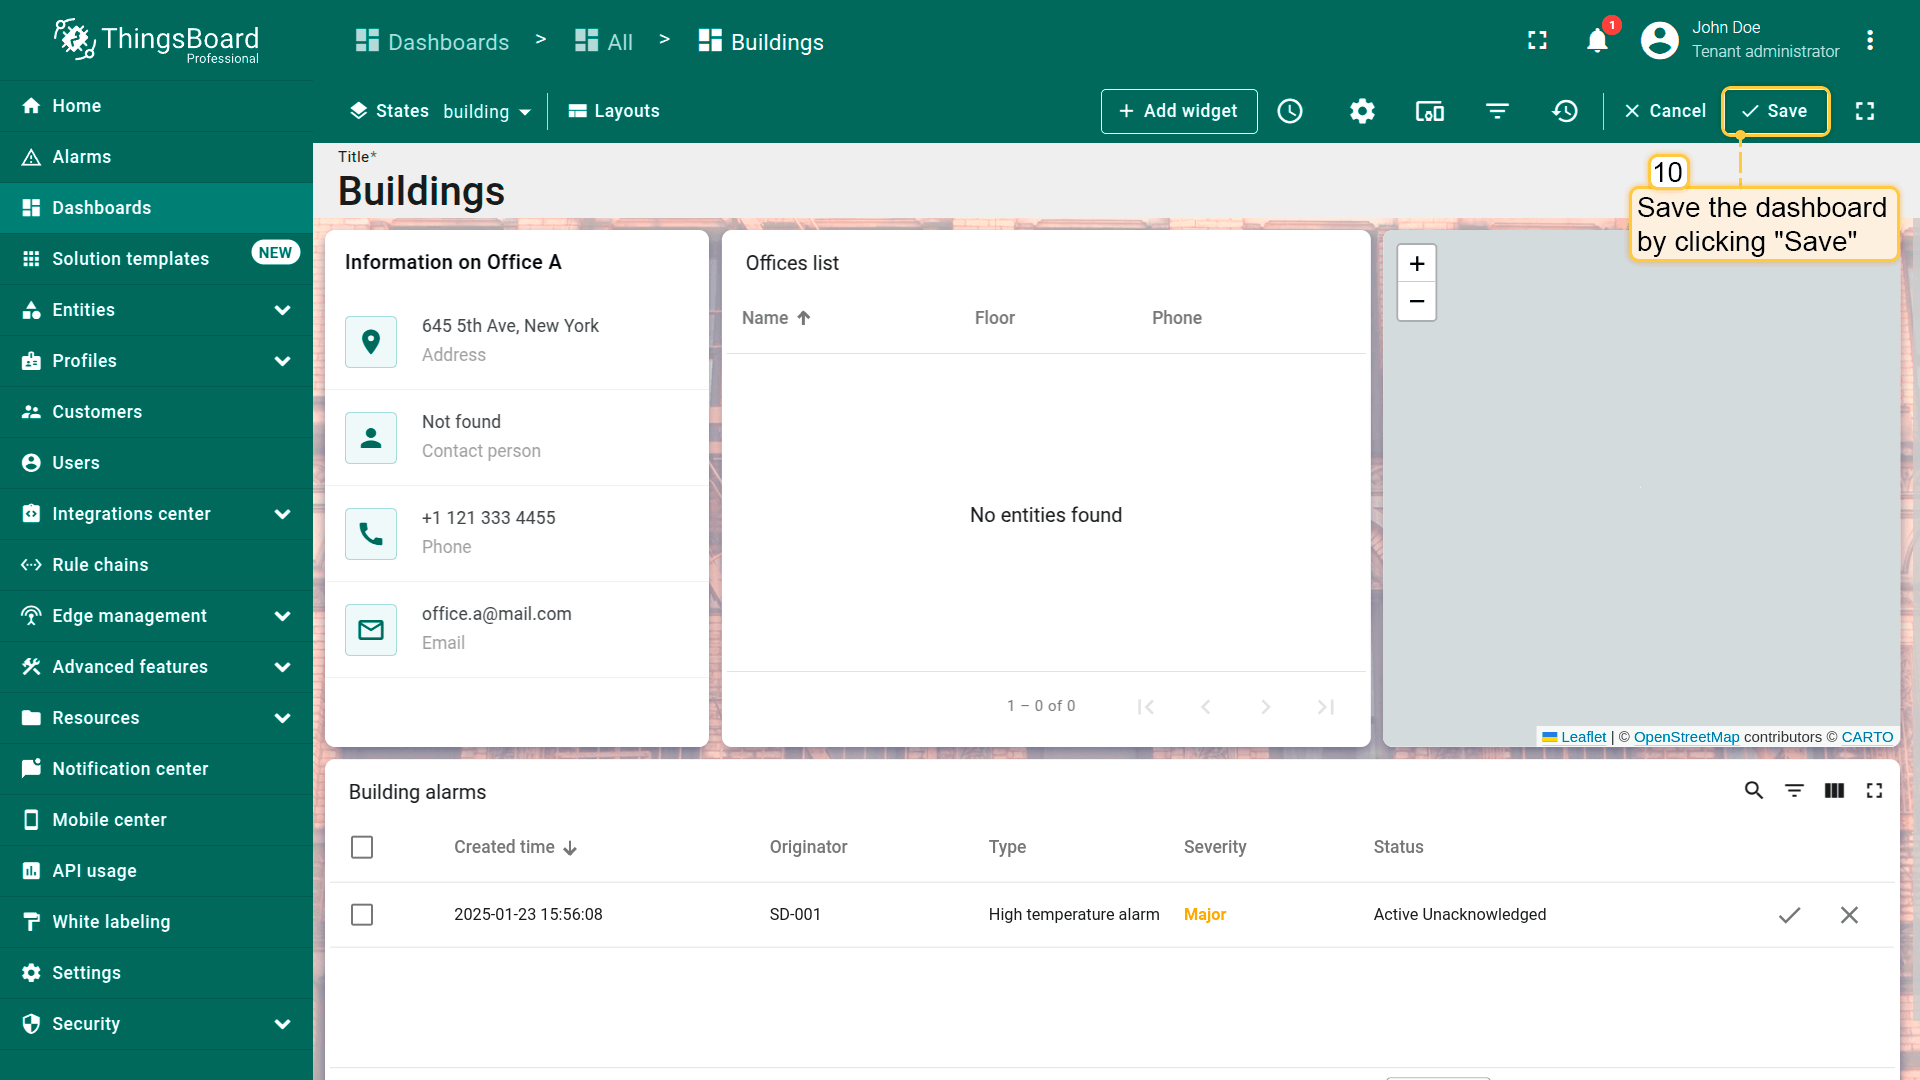
- 将部件放置在仪表板空白处并调整大小。然后保存仪表板;

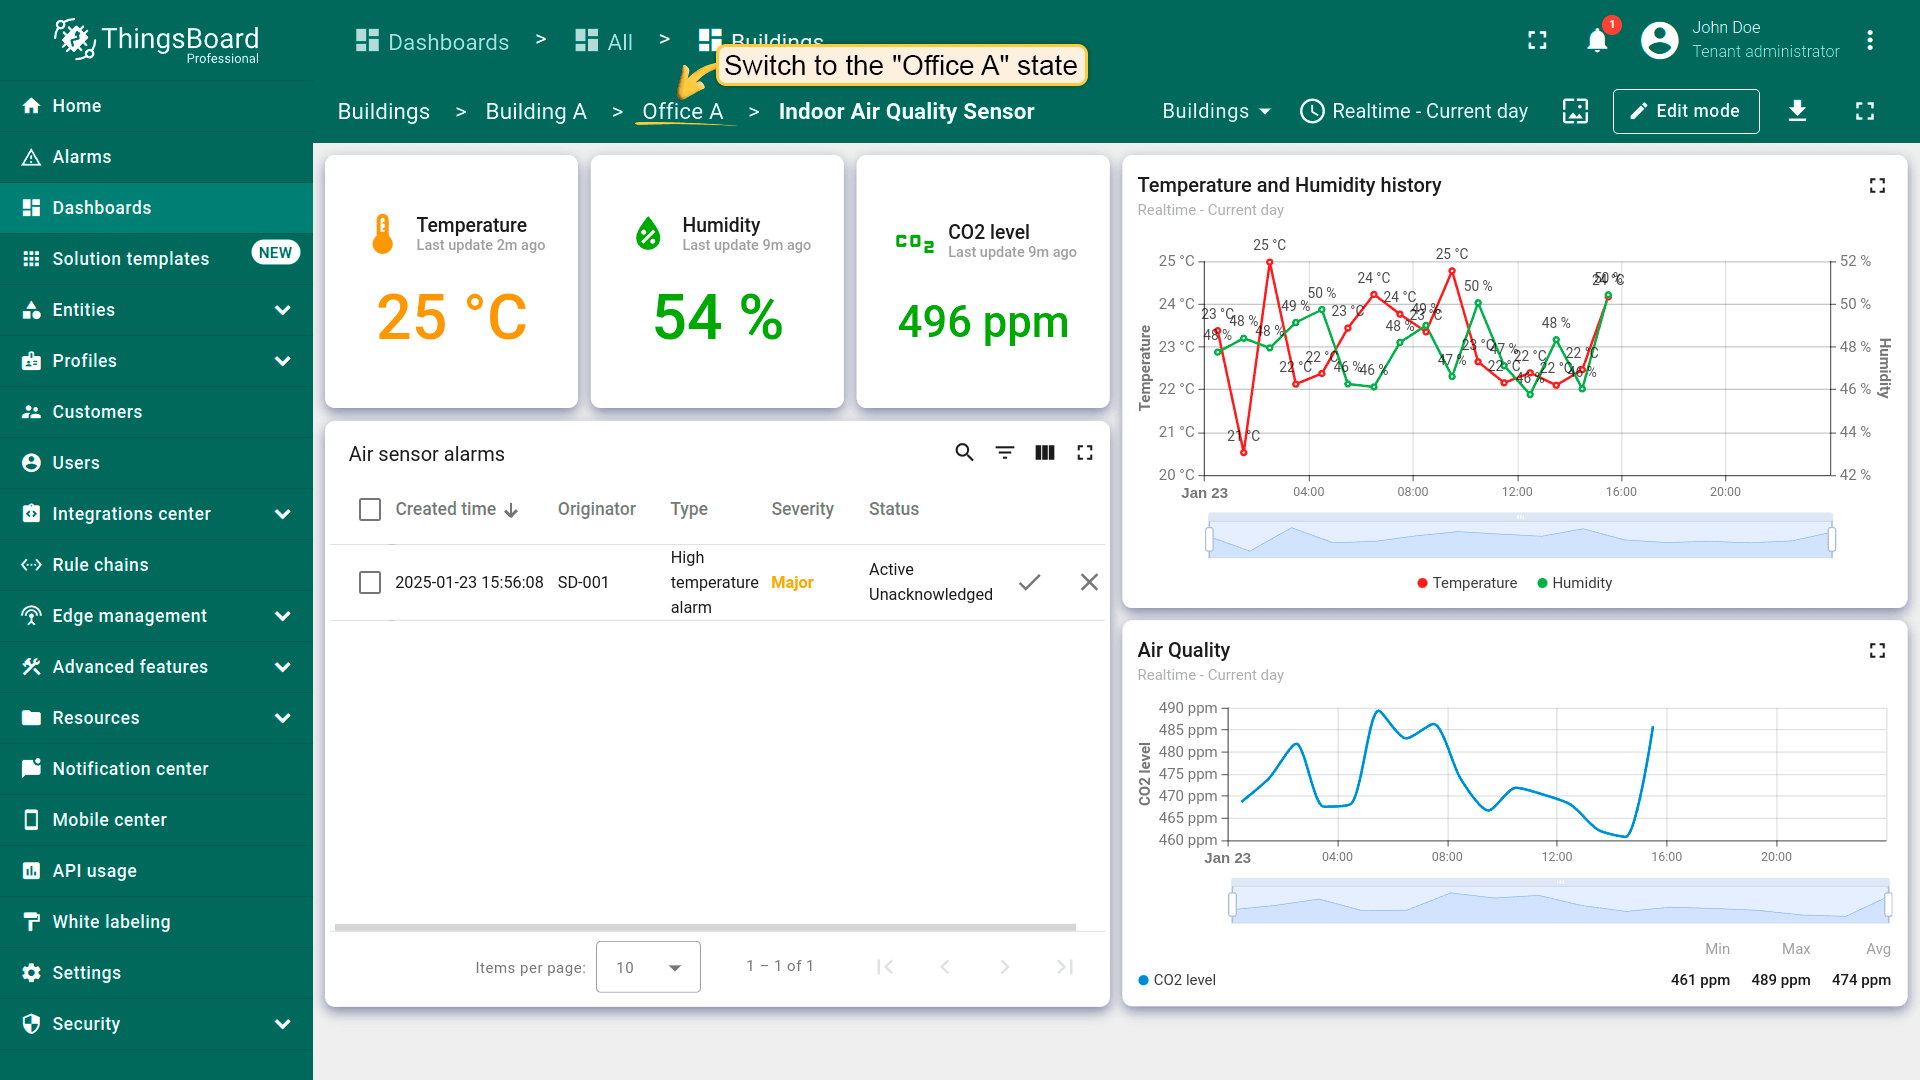
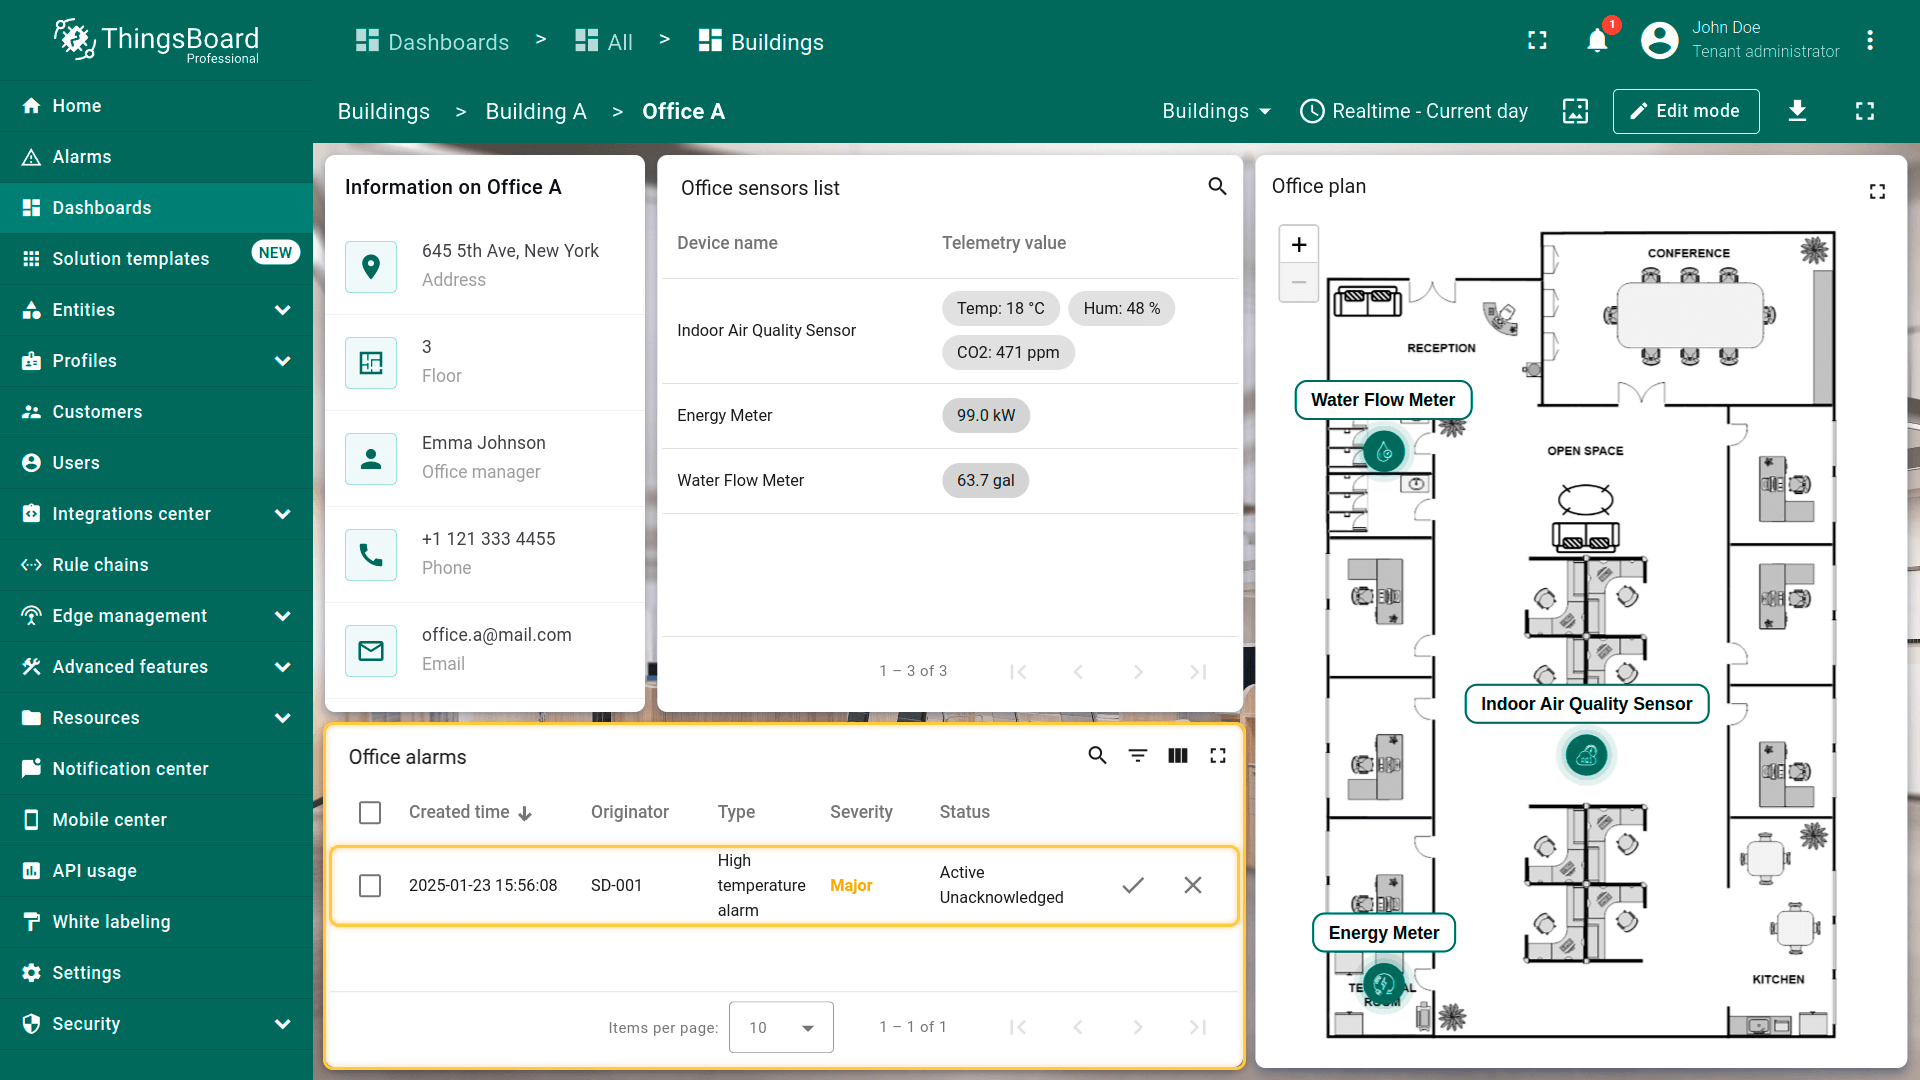
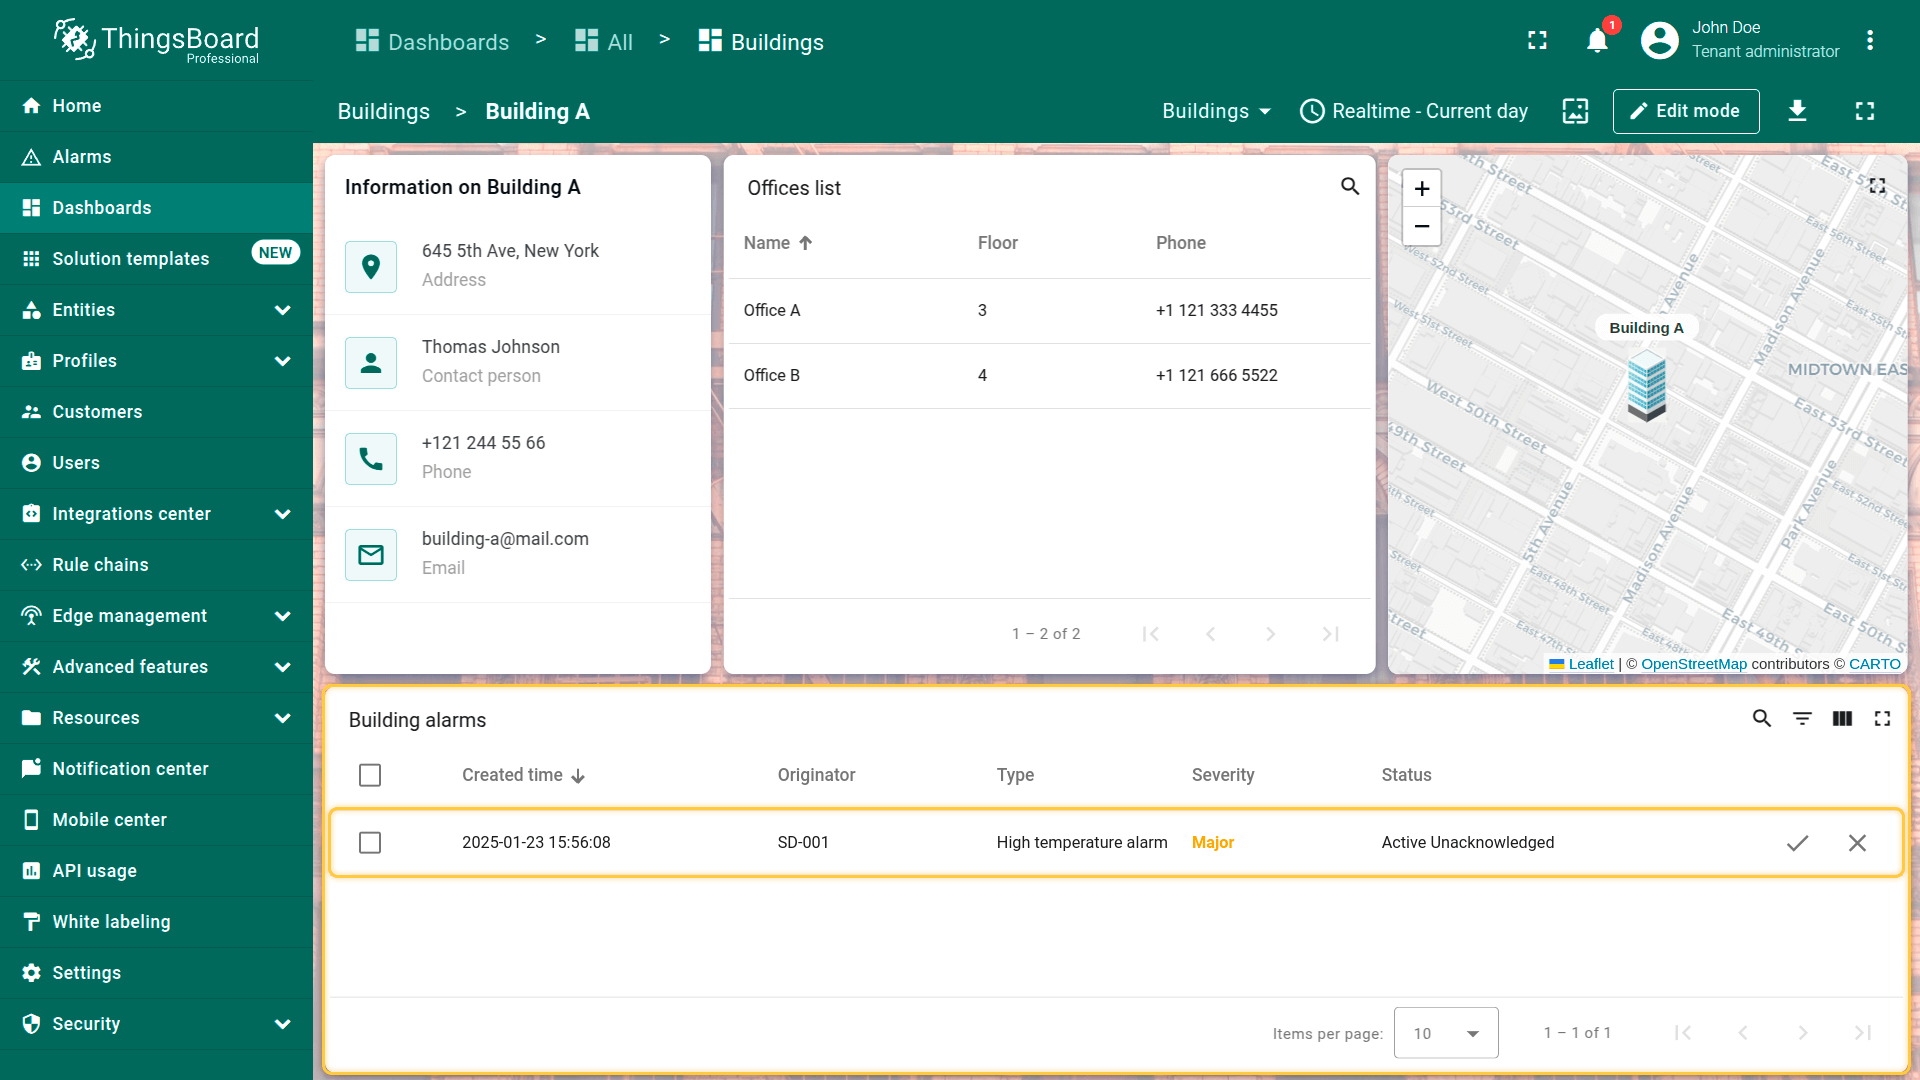
After saving the changes, you will automatically be redirected to the air_sensor state. Switch to the Office A state to check the result.
As you may notice, active alarms are not displayed in the widget. This happens because the “Office A” entity is currently selected, while the alarm was created on a device that has a relationship with this office. Previously, in the alarm rule, we specified that the alarm should propagate to related entities.
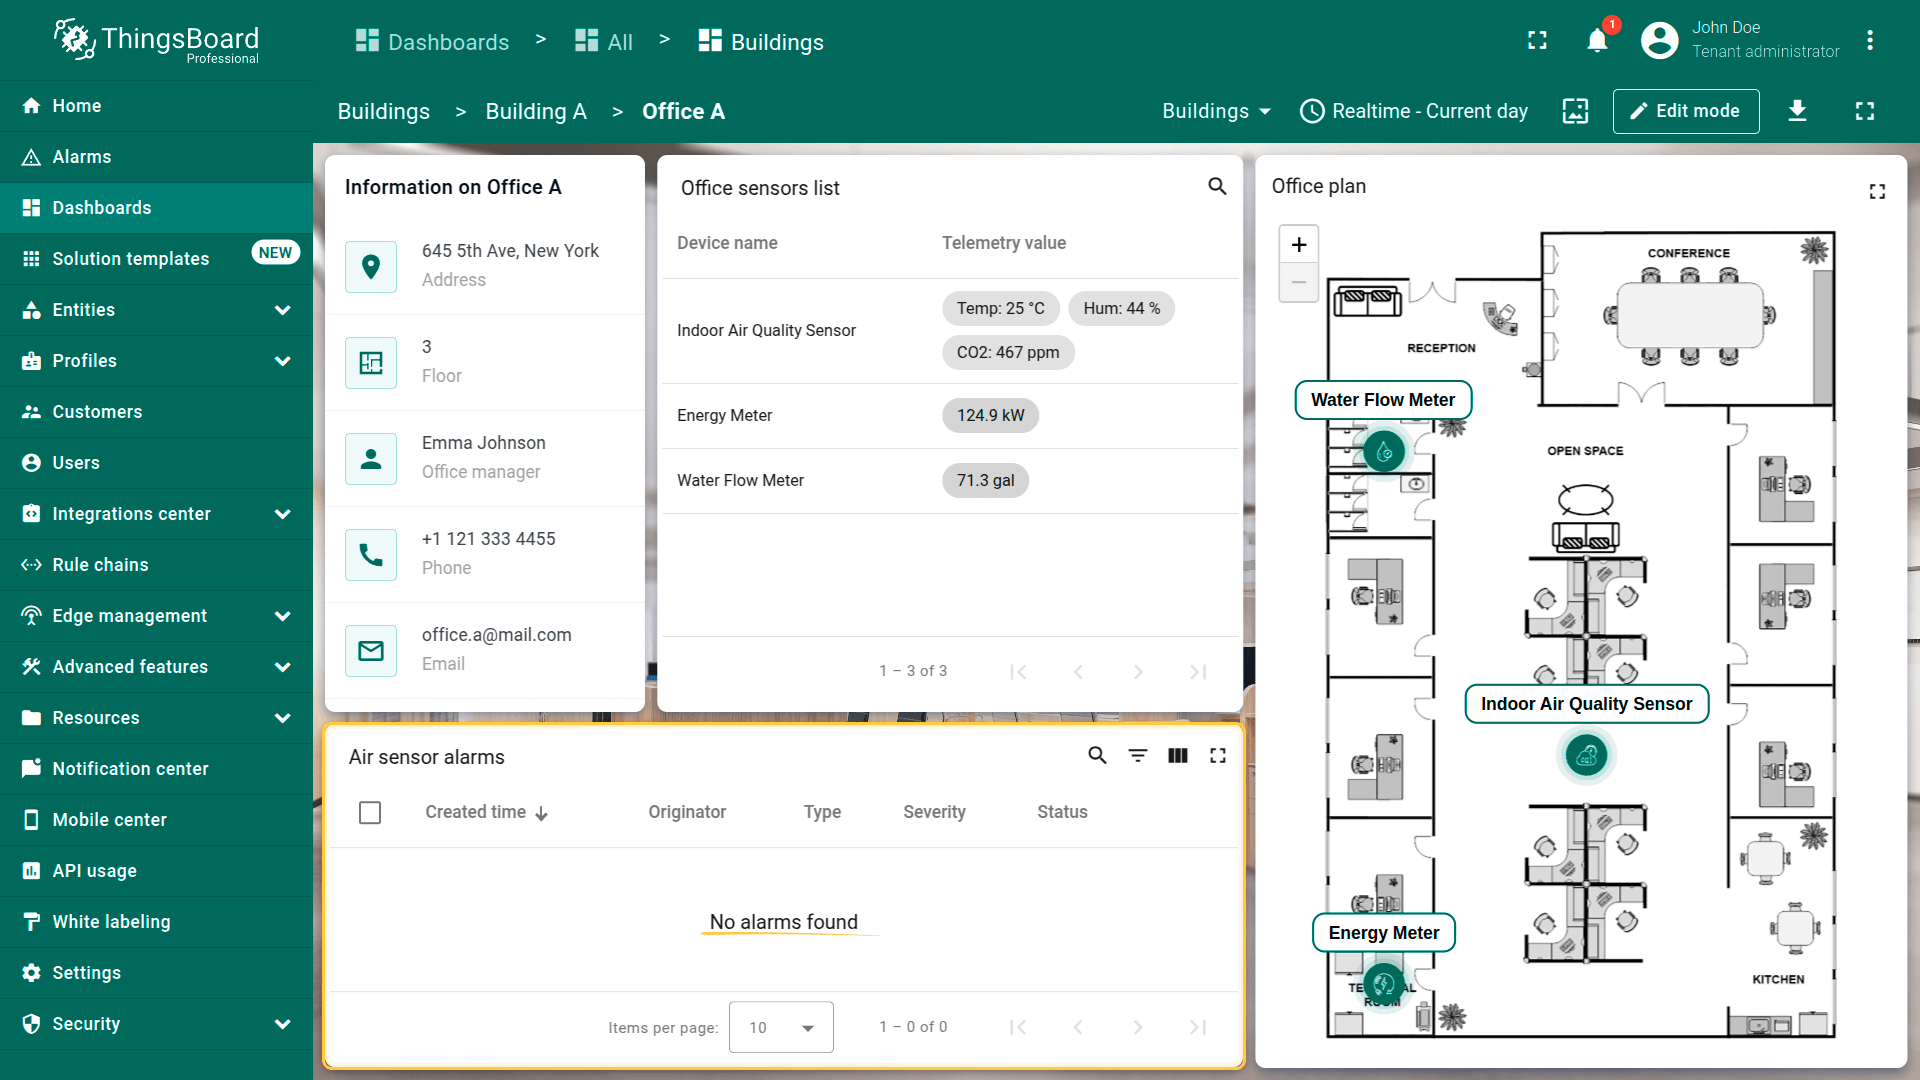
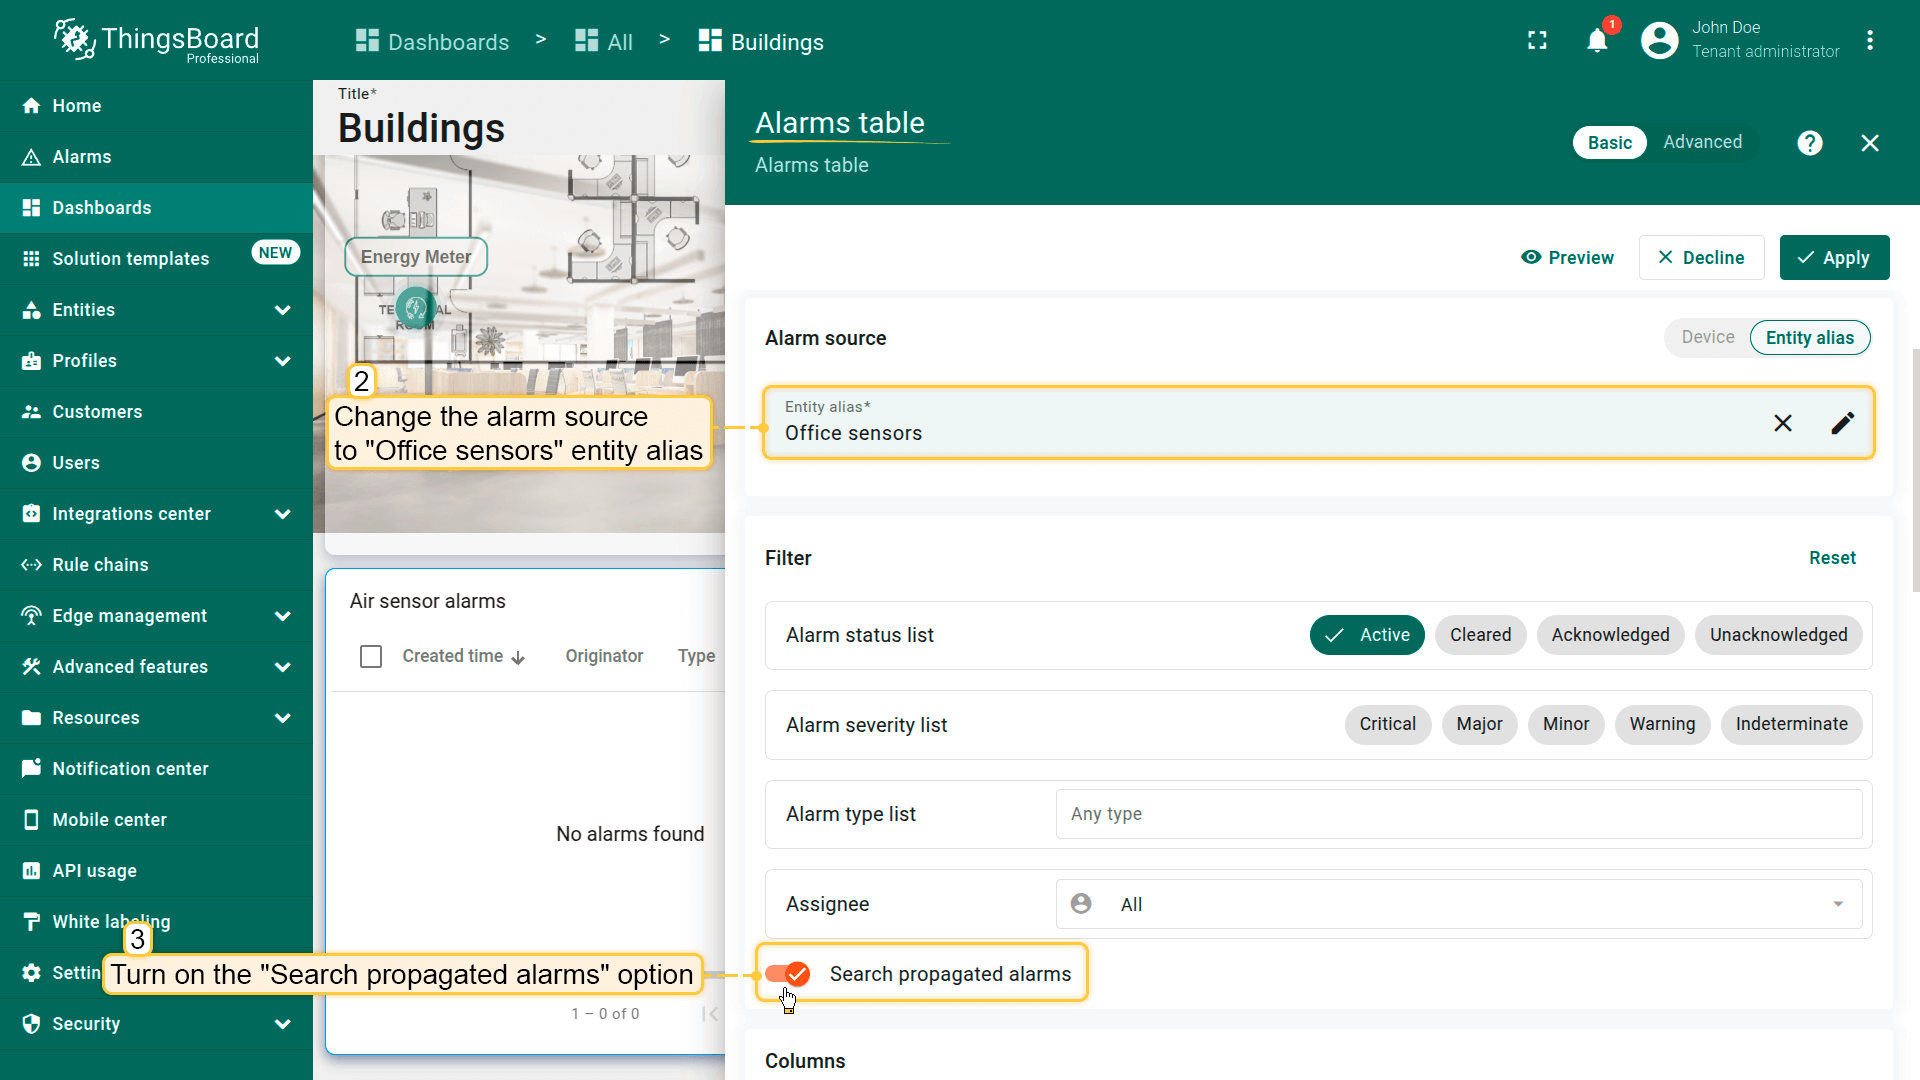
Now we need to configure the widget to search for and display alarms for both the selected entity and its child entities, provided that relationships exist between them:
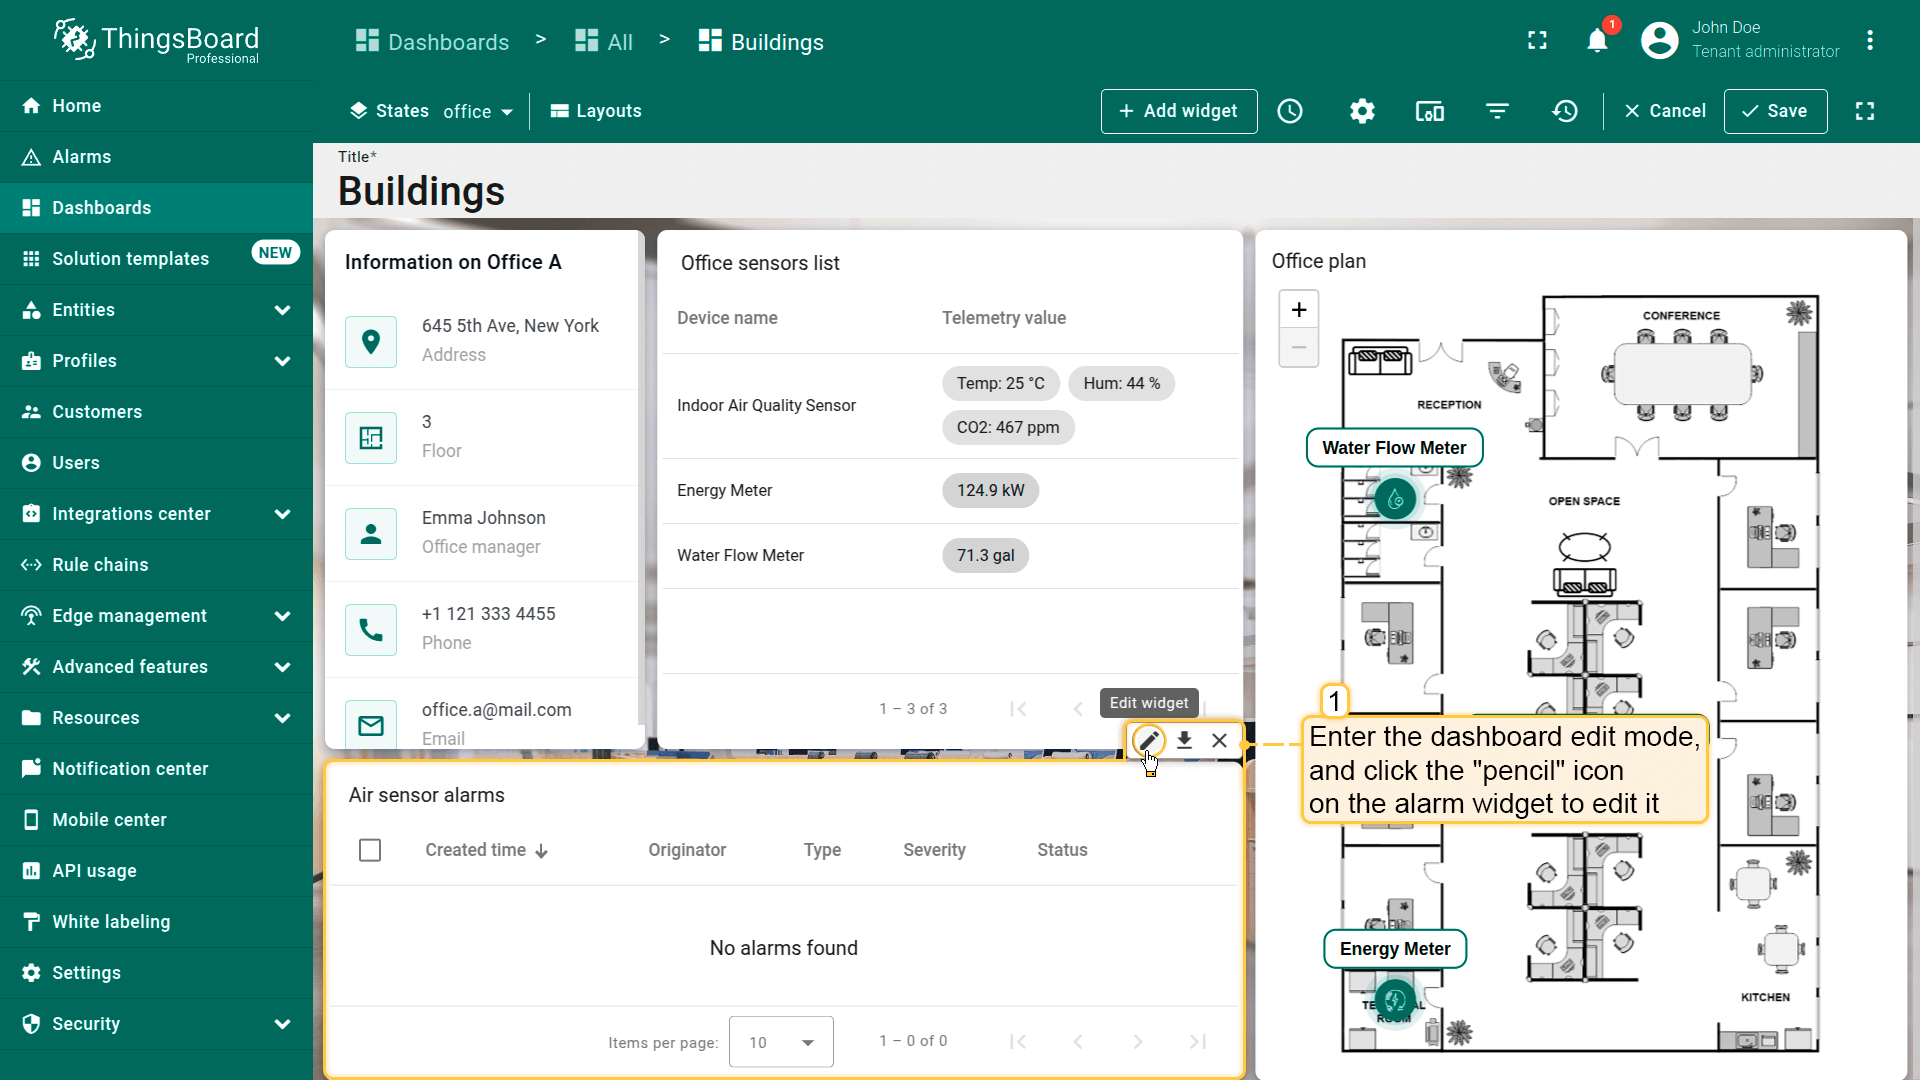
- 进入仪表板编辑模式,点击告警部件上的「铅笔」图标进行编辑;
- 将告警来源改为「Office sensors」实体别名。开启「Search propagated alarms」选项。该选项可在存在关联的情况下显示所选实体及其子实体的告警;
- 将部件标题改为「Office alarms」。然后应用更改;
- 保存仪表板。

Now, as you can see, the widget displays the alarms of the devices that have a relation to the selected office.
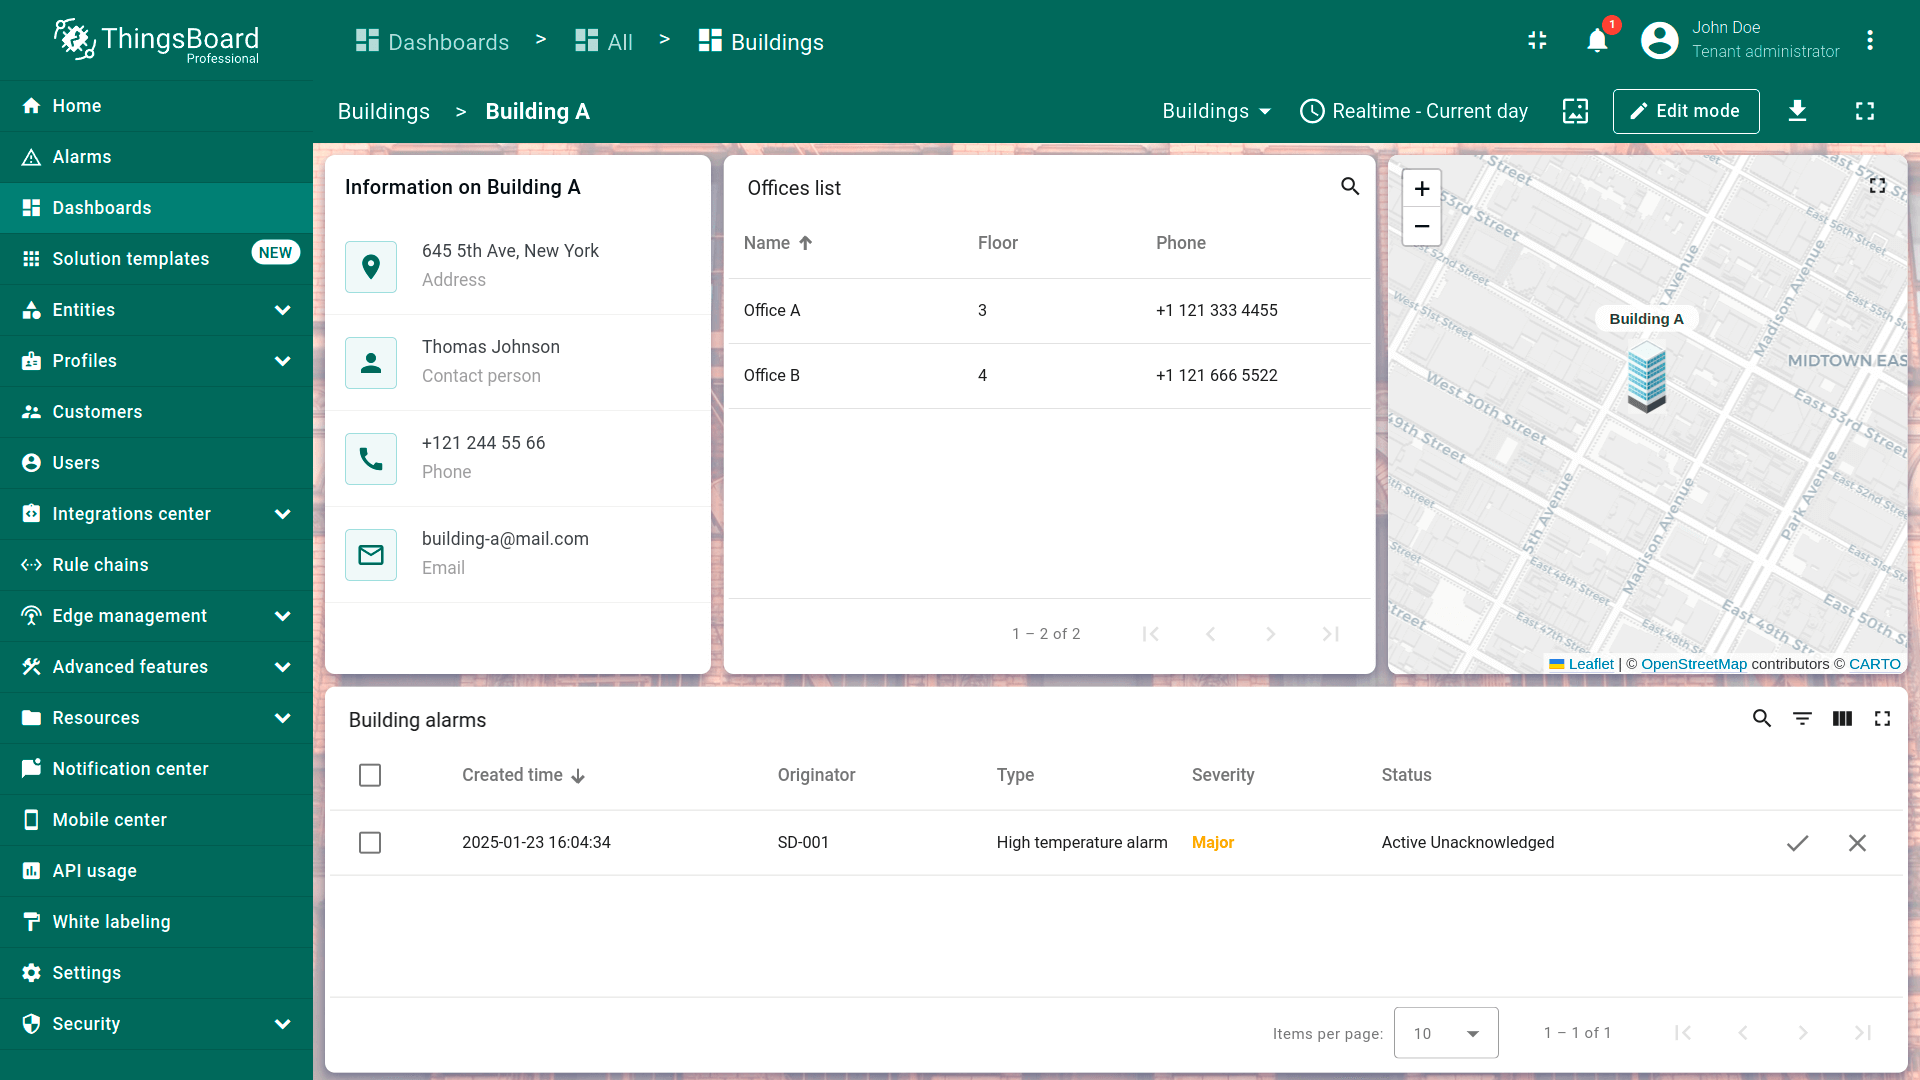
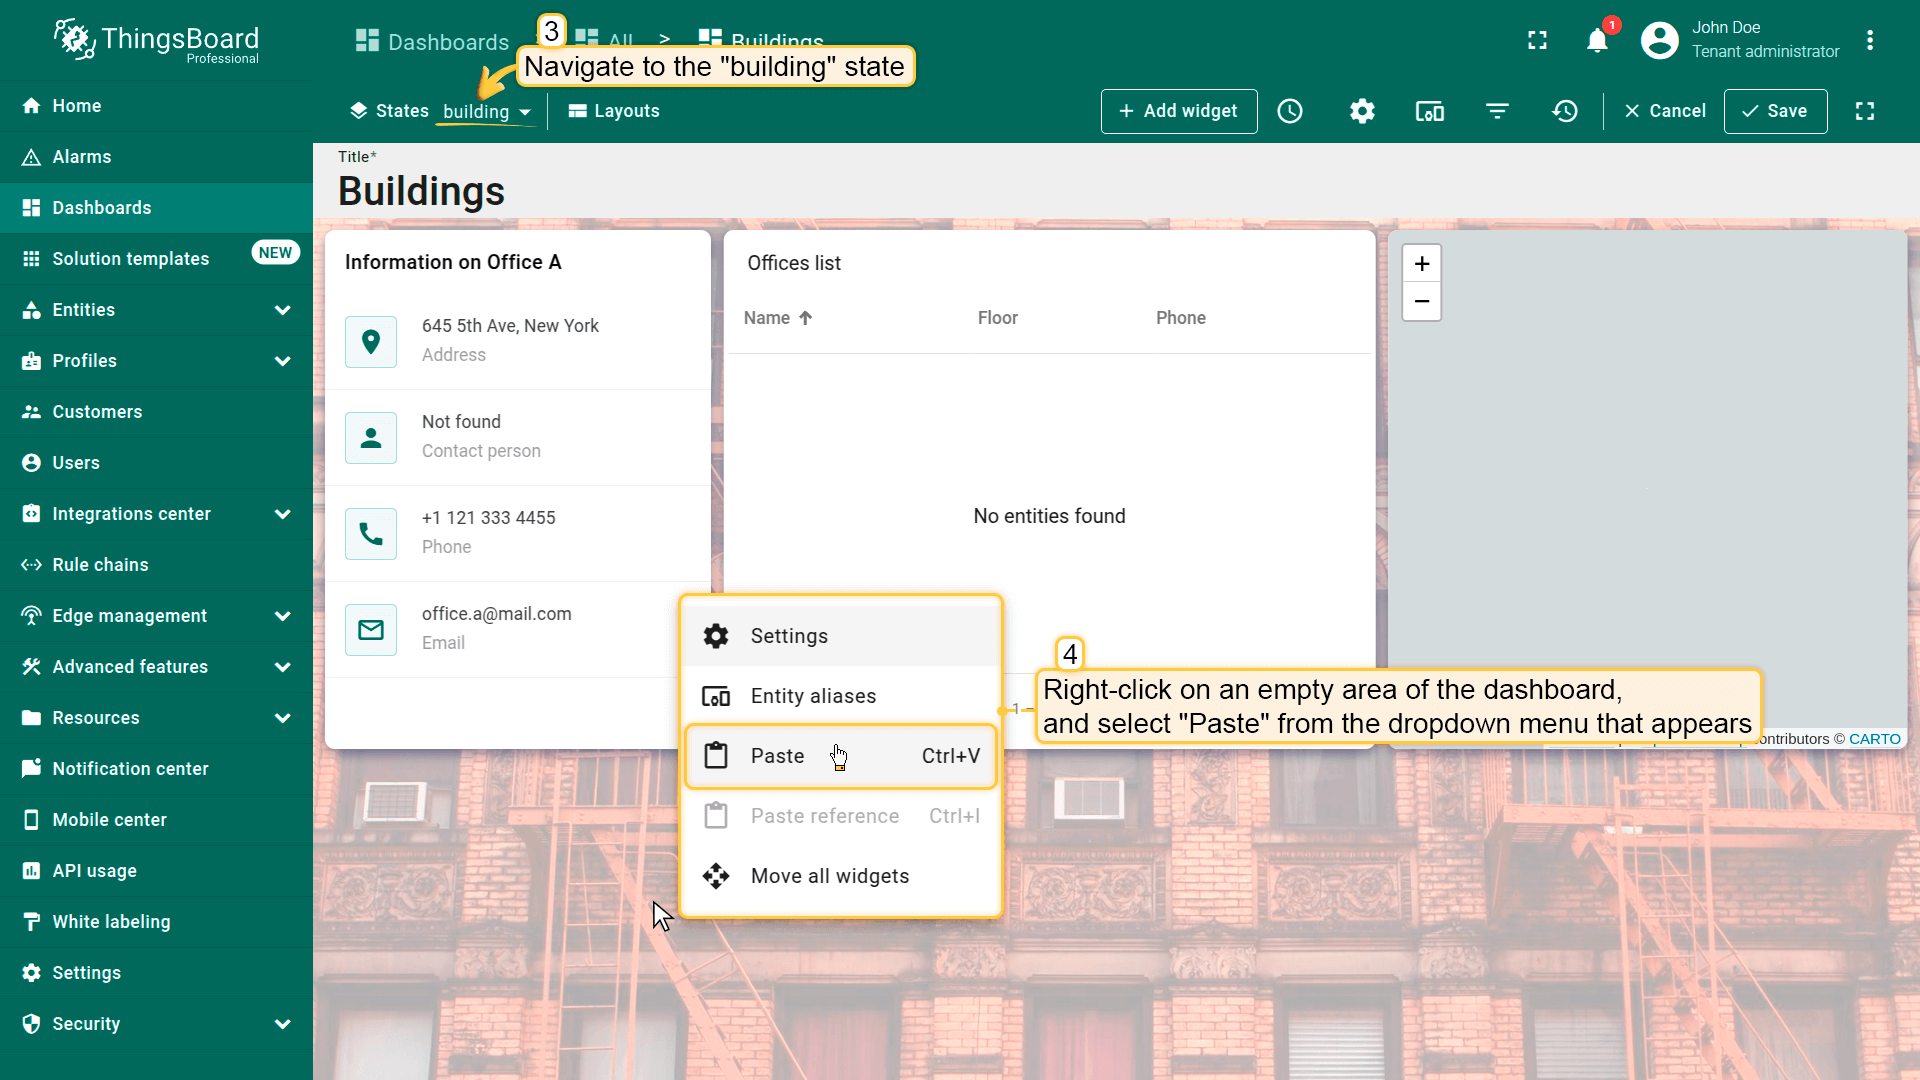
Adding alarm widget to building state
Similar to the previous steps, we will add an alarm widget to the building state. This widget will display alarms from all devices associated with the selected building. We will also add this widget using the copy method.
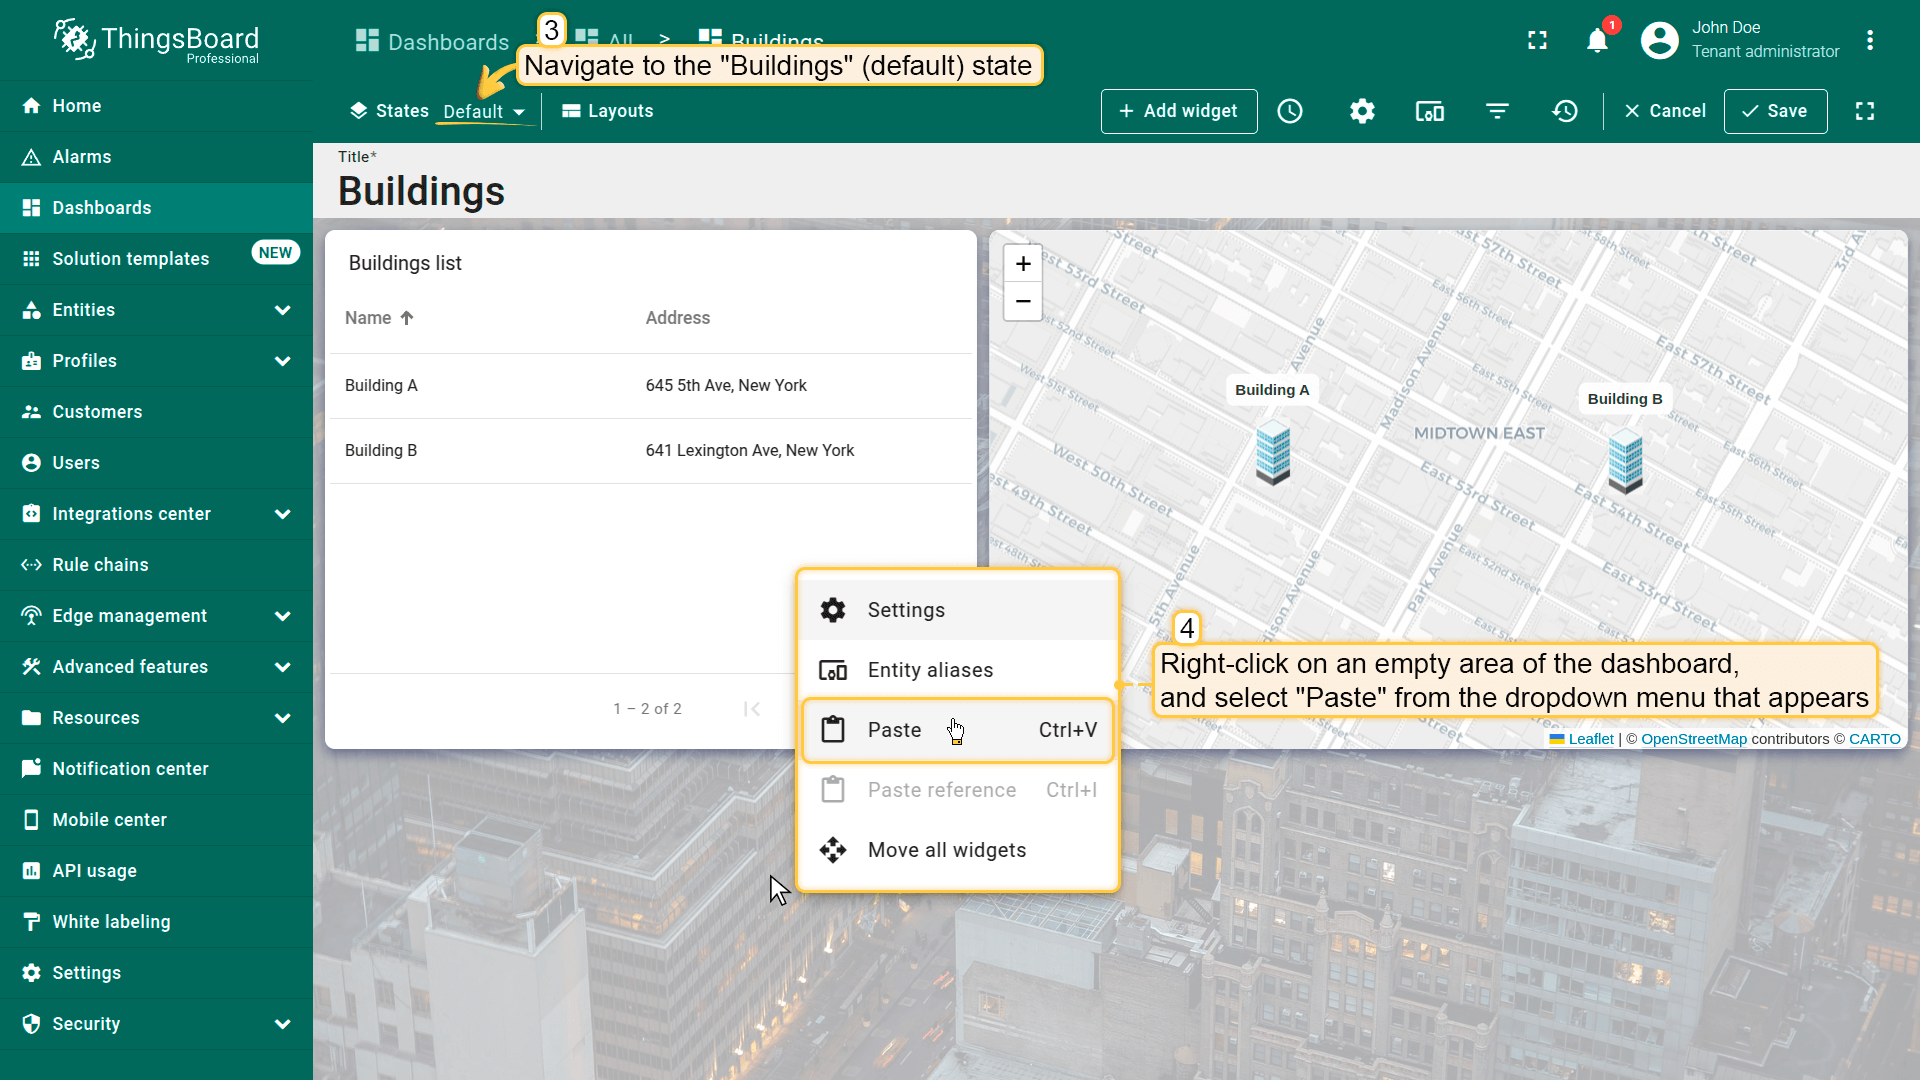
- 在office状态下,进入仪表板编辑模式。右键点击告警部件,从下拉菜单中选择「Copy」;
- 进入Buildings(默认)状态,在仪表板空白处右键点击,选择「Paste」;
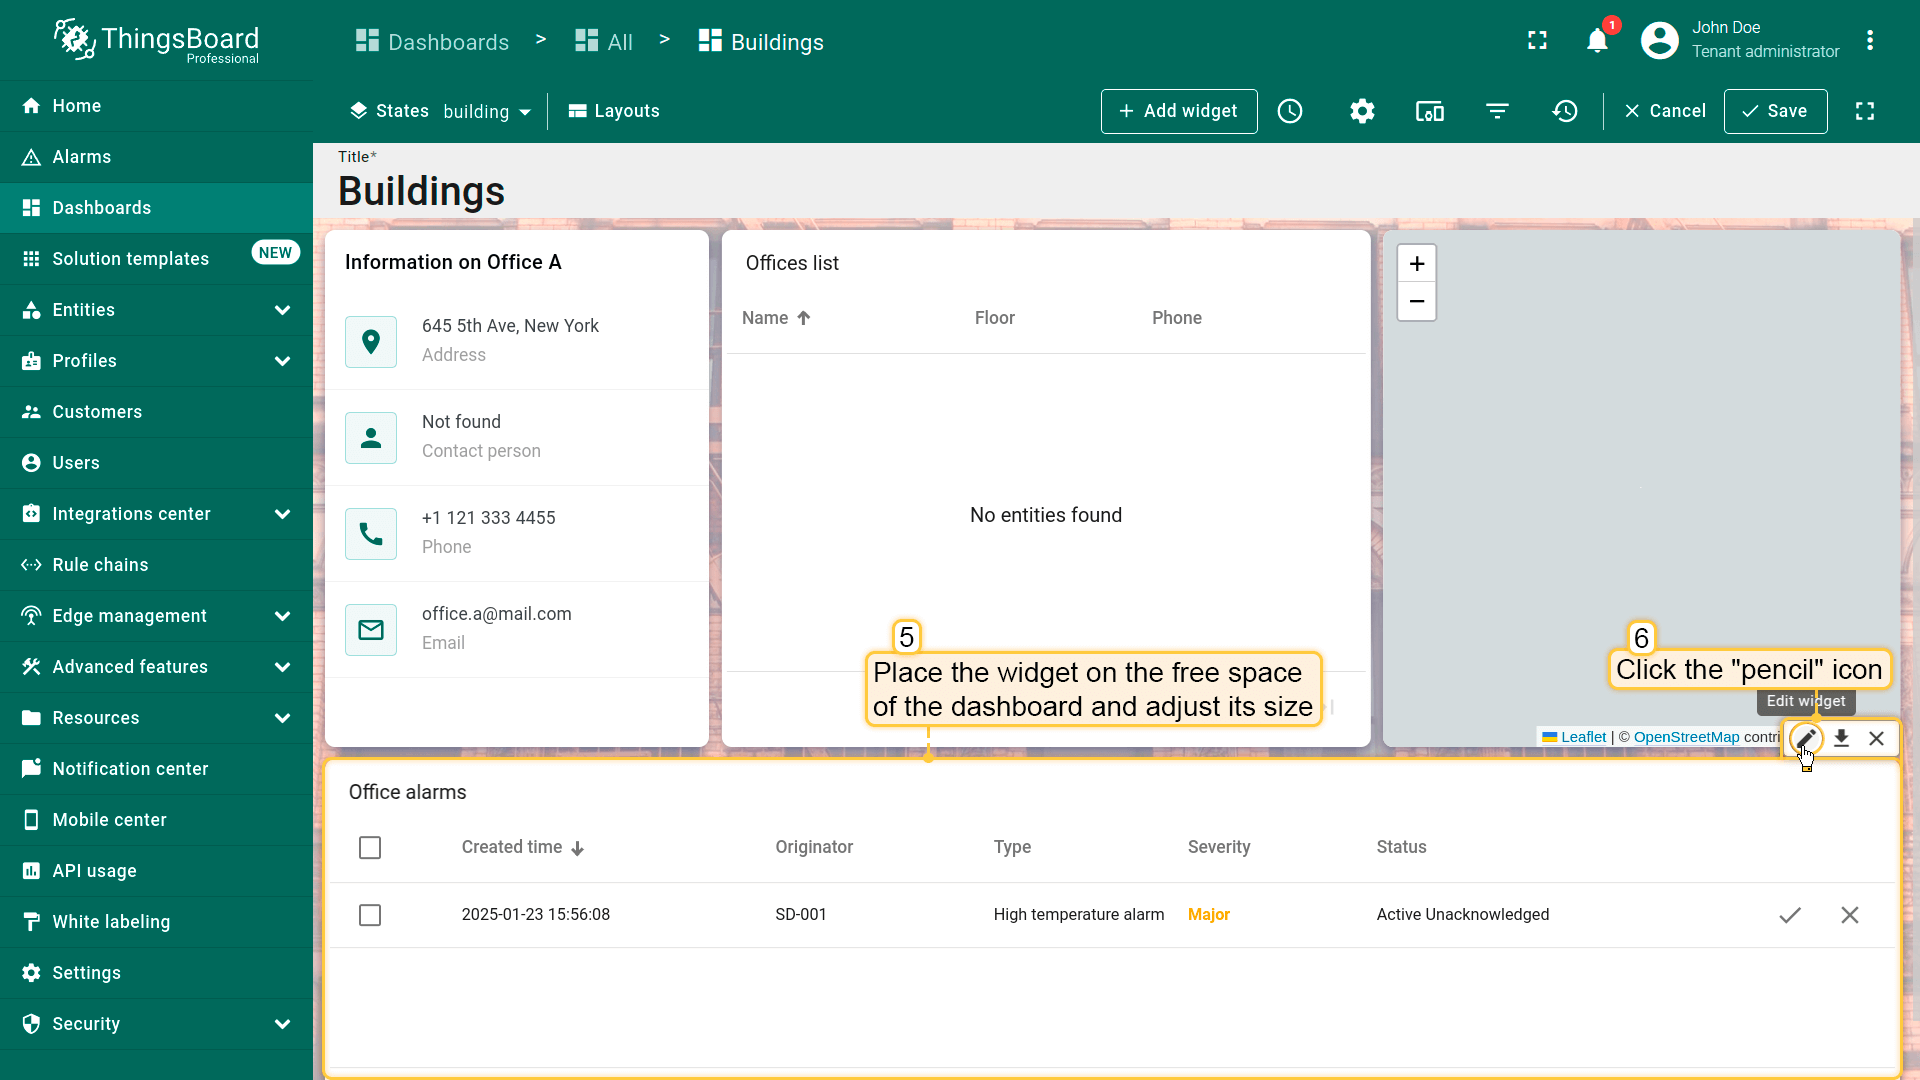
- 将部件放置在仪表板空白处并调整大小。点击告警部件上的「铅笔」图标进行编辑;
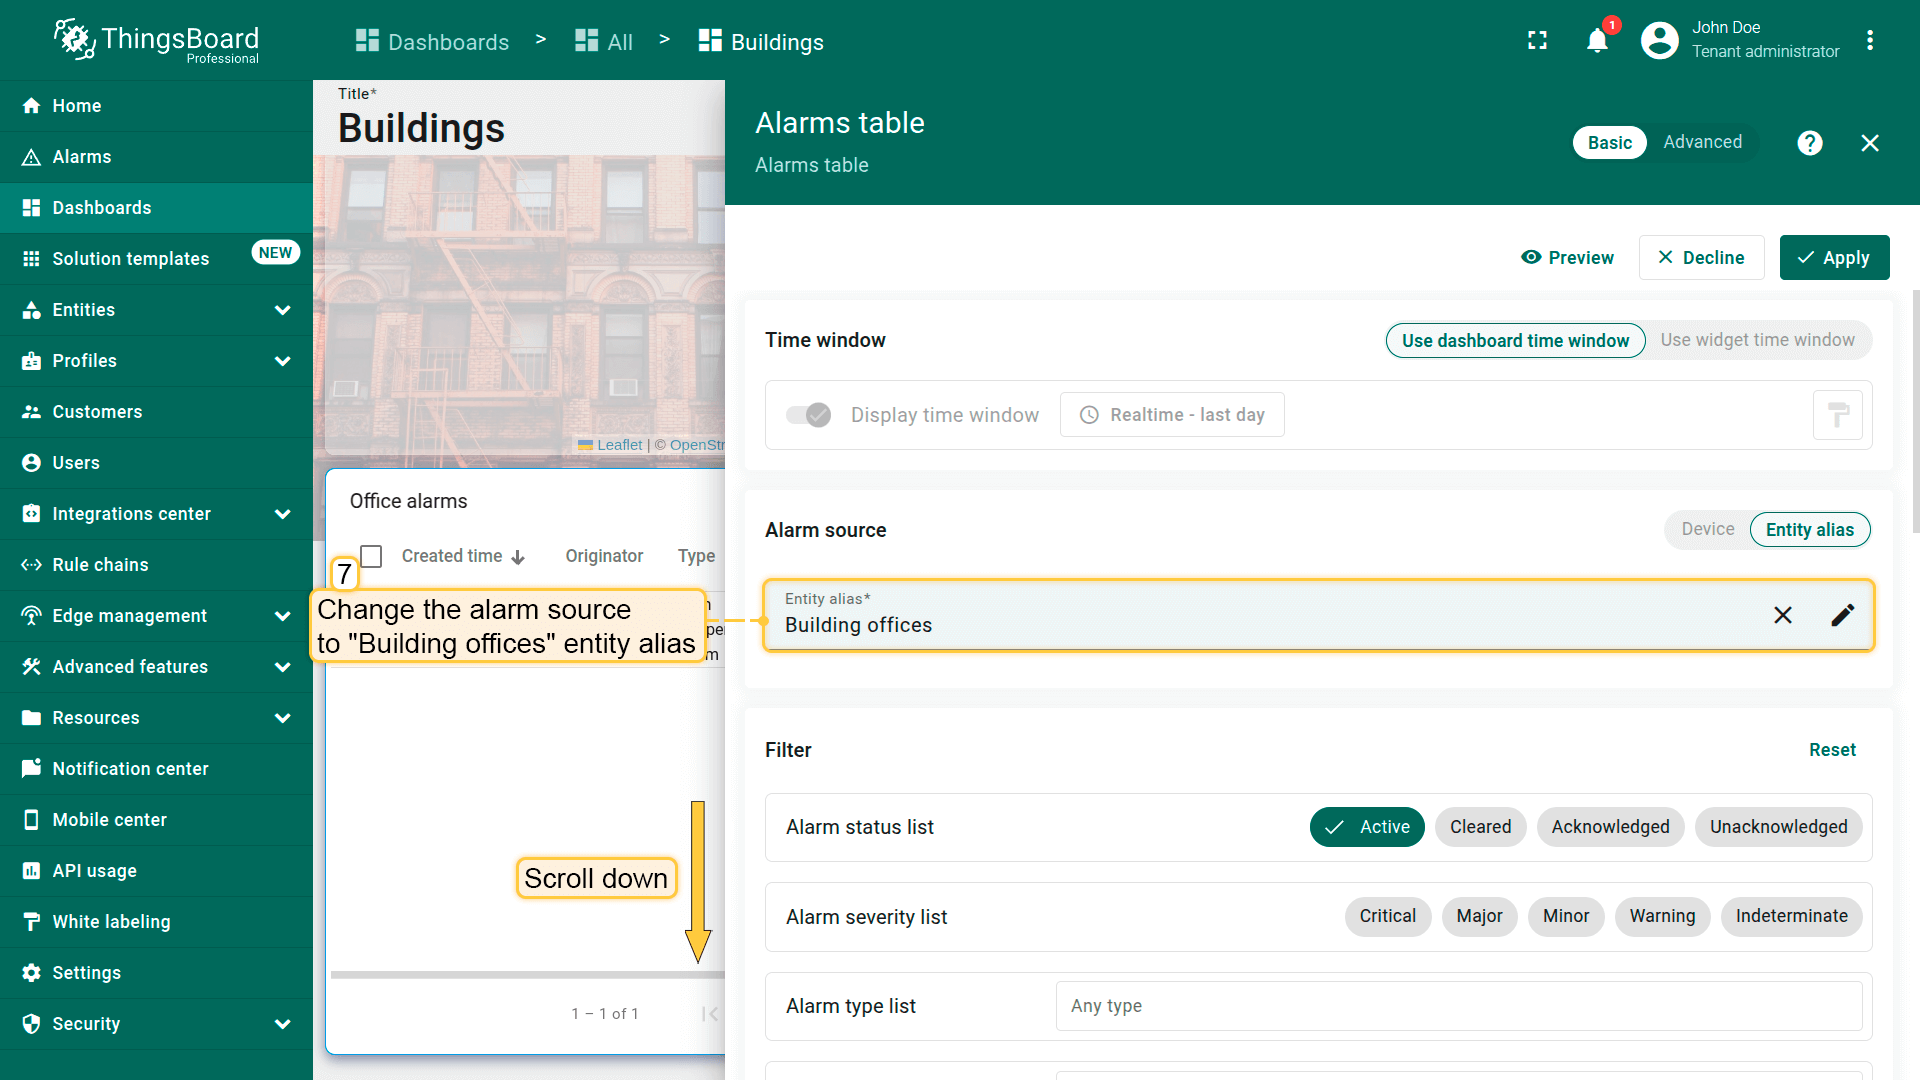
- 将告警来源改为「Building offices」实体别名;
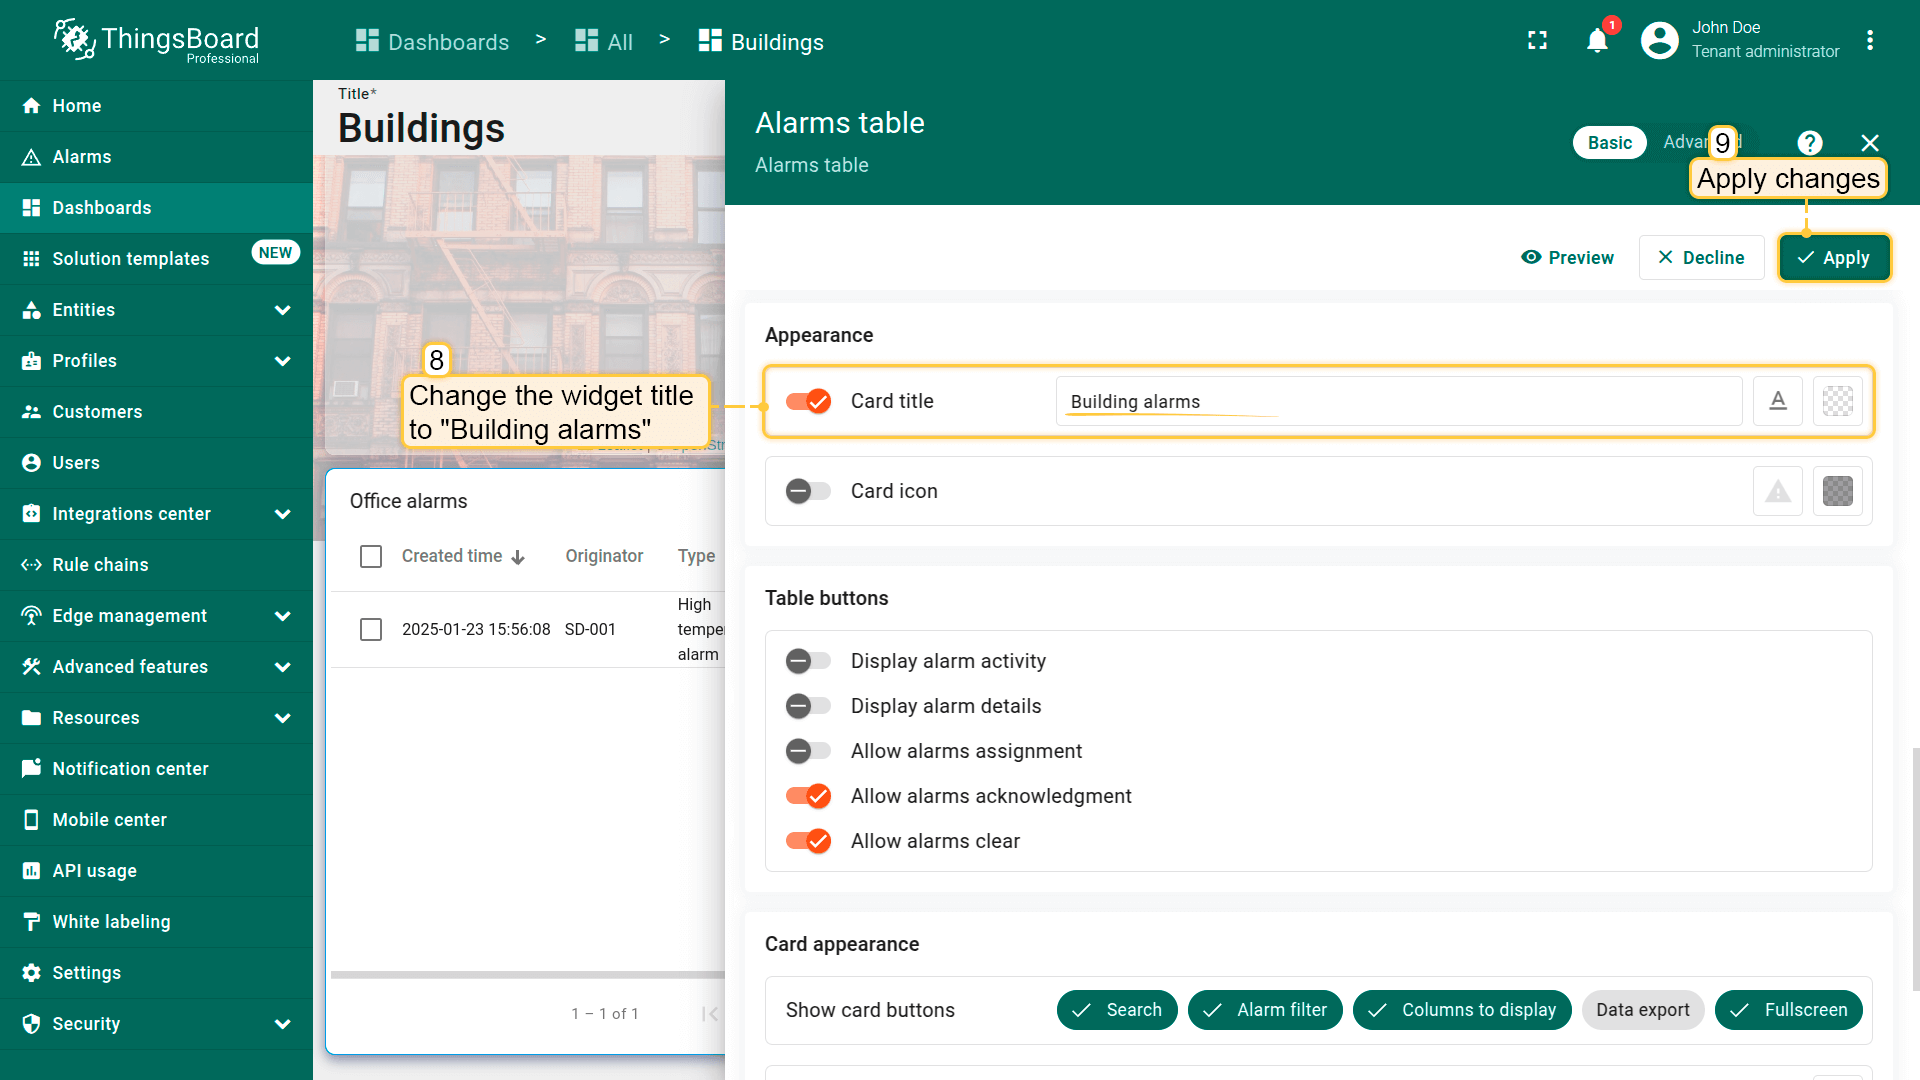
- 将部件标题改为「Building alarms」。然后应用更改;
- 保存仪表板。
The alarm widget displays the alarms of the devices related to the selected building.
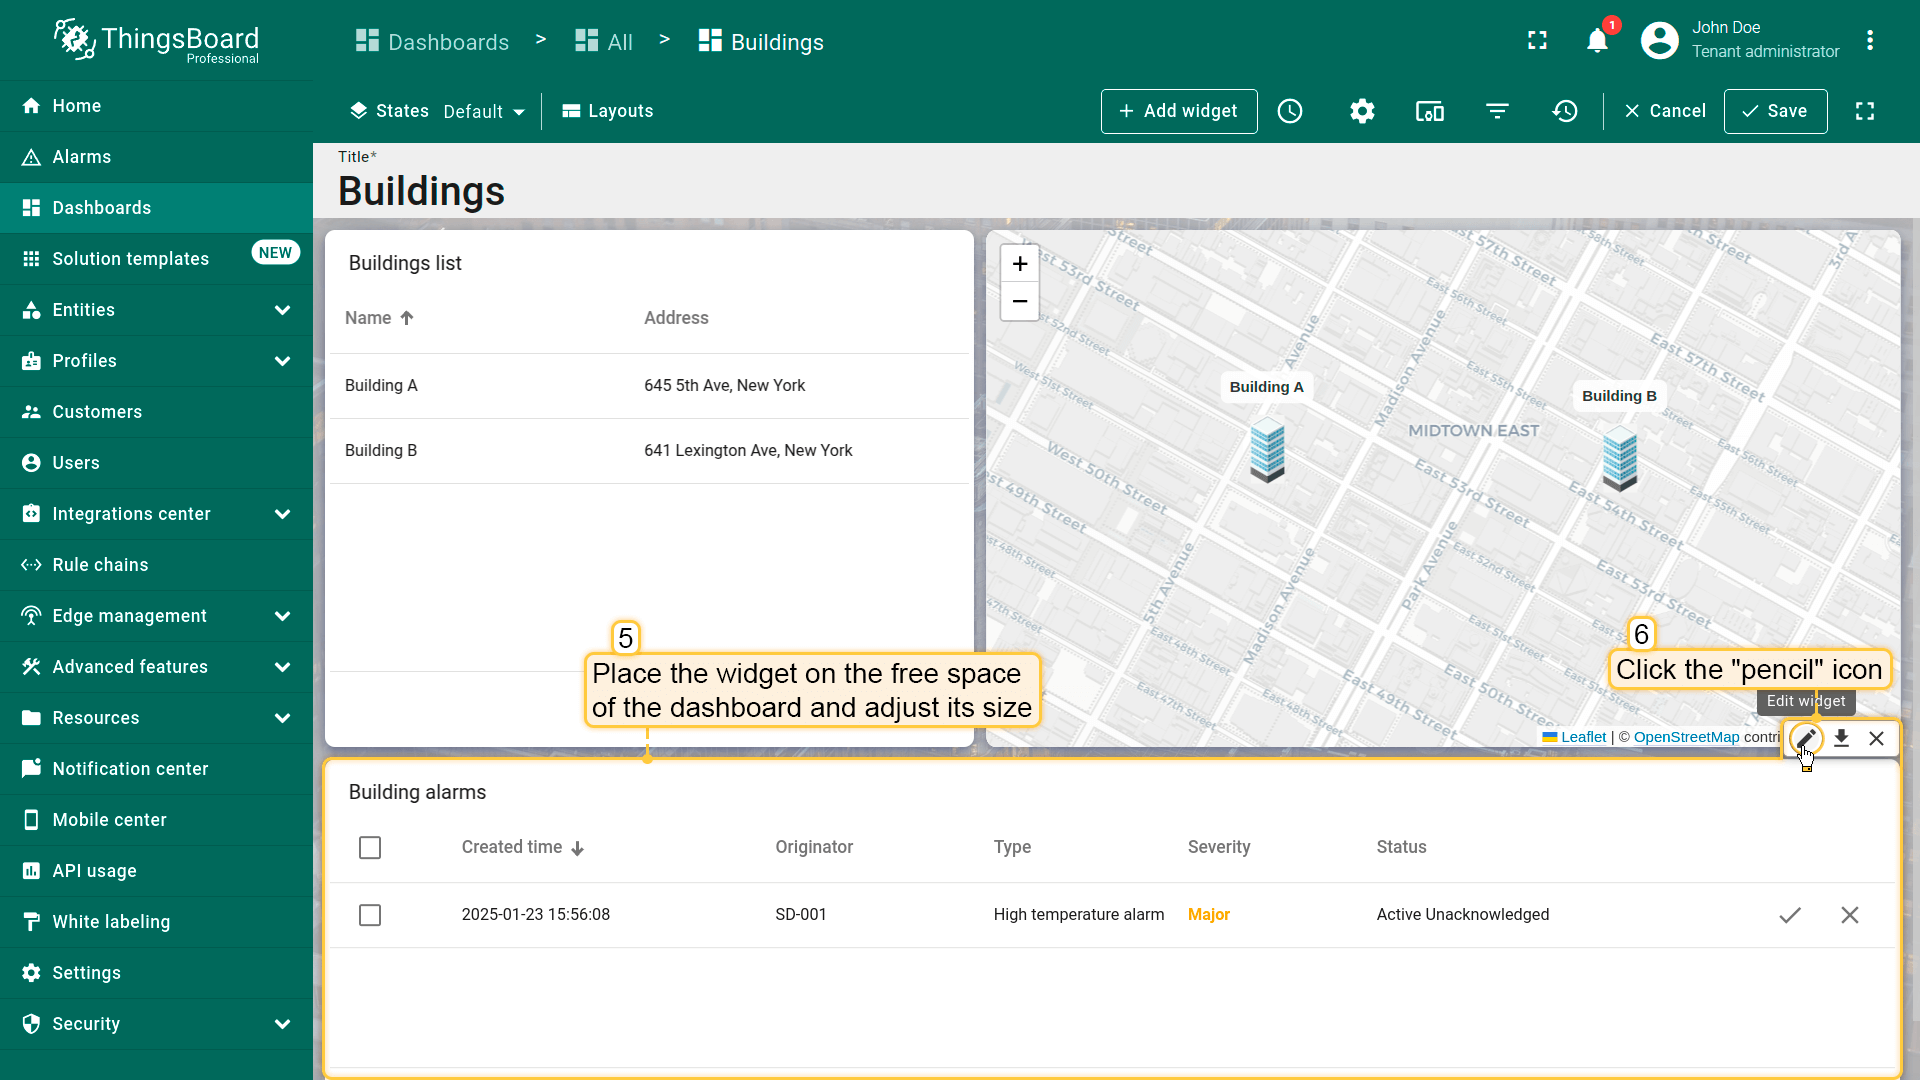
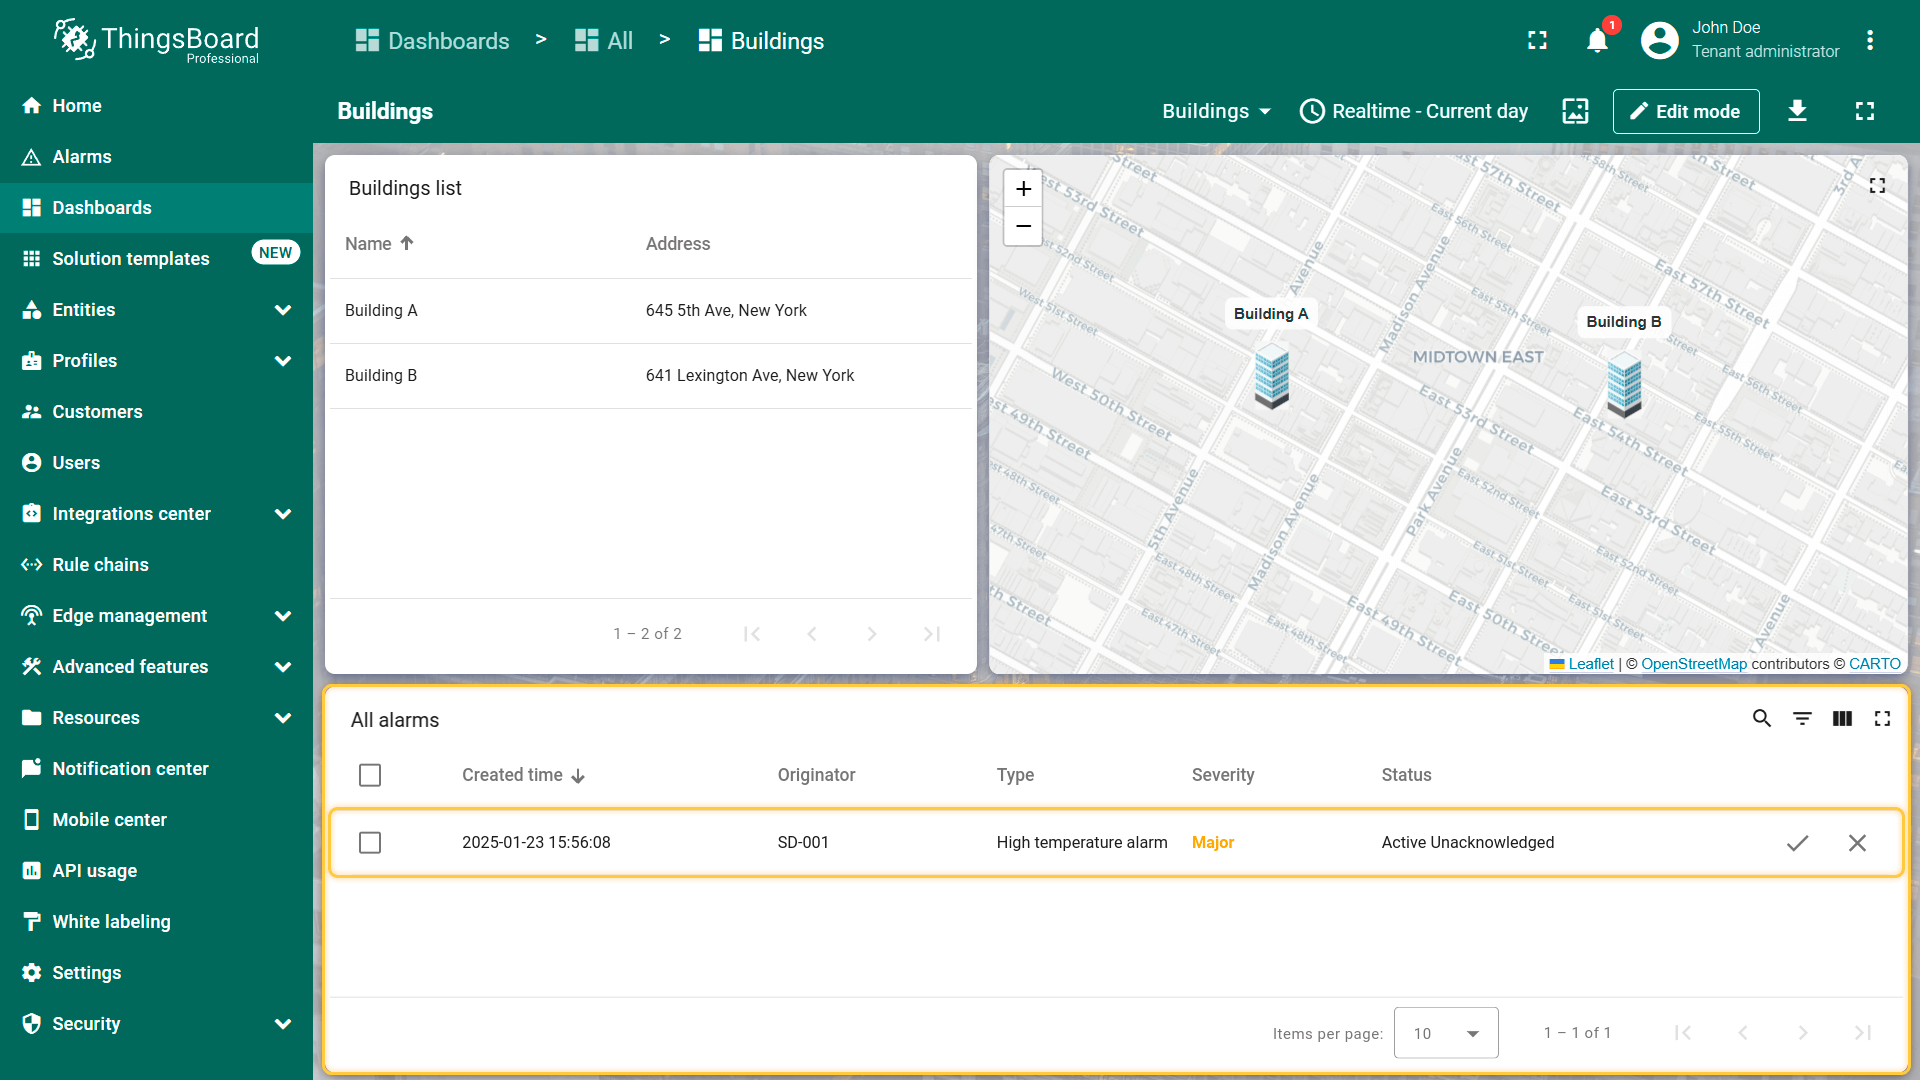
Adding alarm widget to buildings (default) state
Now it remains to add the alarm widget to the Building (default) state. Also by copying method:
- 在office状态下,进入仪表板编辑模式。右键点击告警部件,从下拉菜单中选择「Copy」;
- 进入Buildings(默认)状态,在仪表板空白处右键点击,选择「Paste」;
- 将部件放置在仪表板空白处并调整大小。然后点击告警部件上的「铅笔」图标进行编辑;
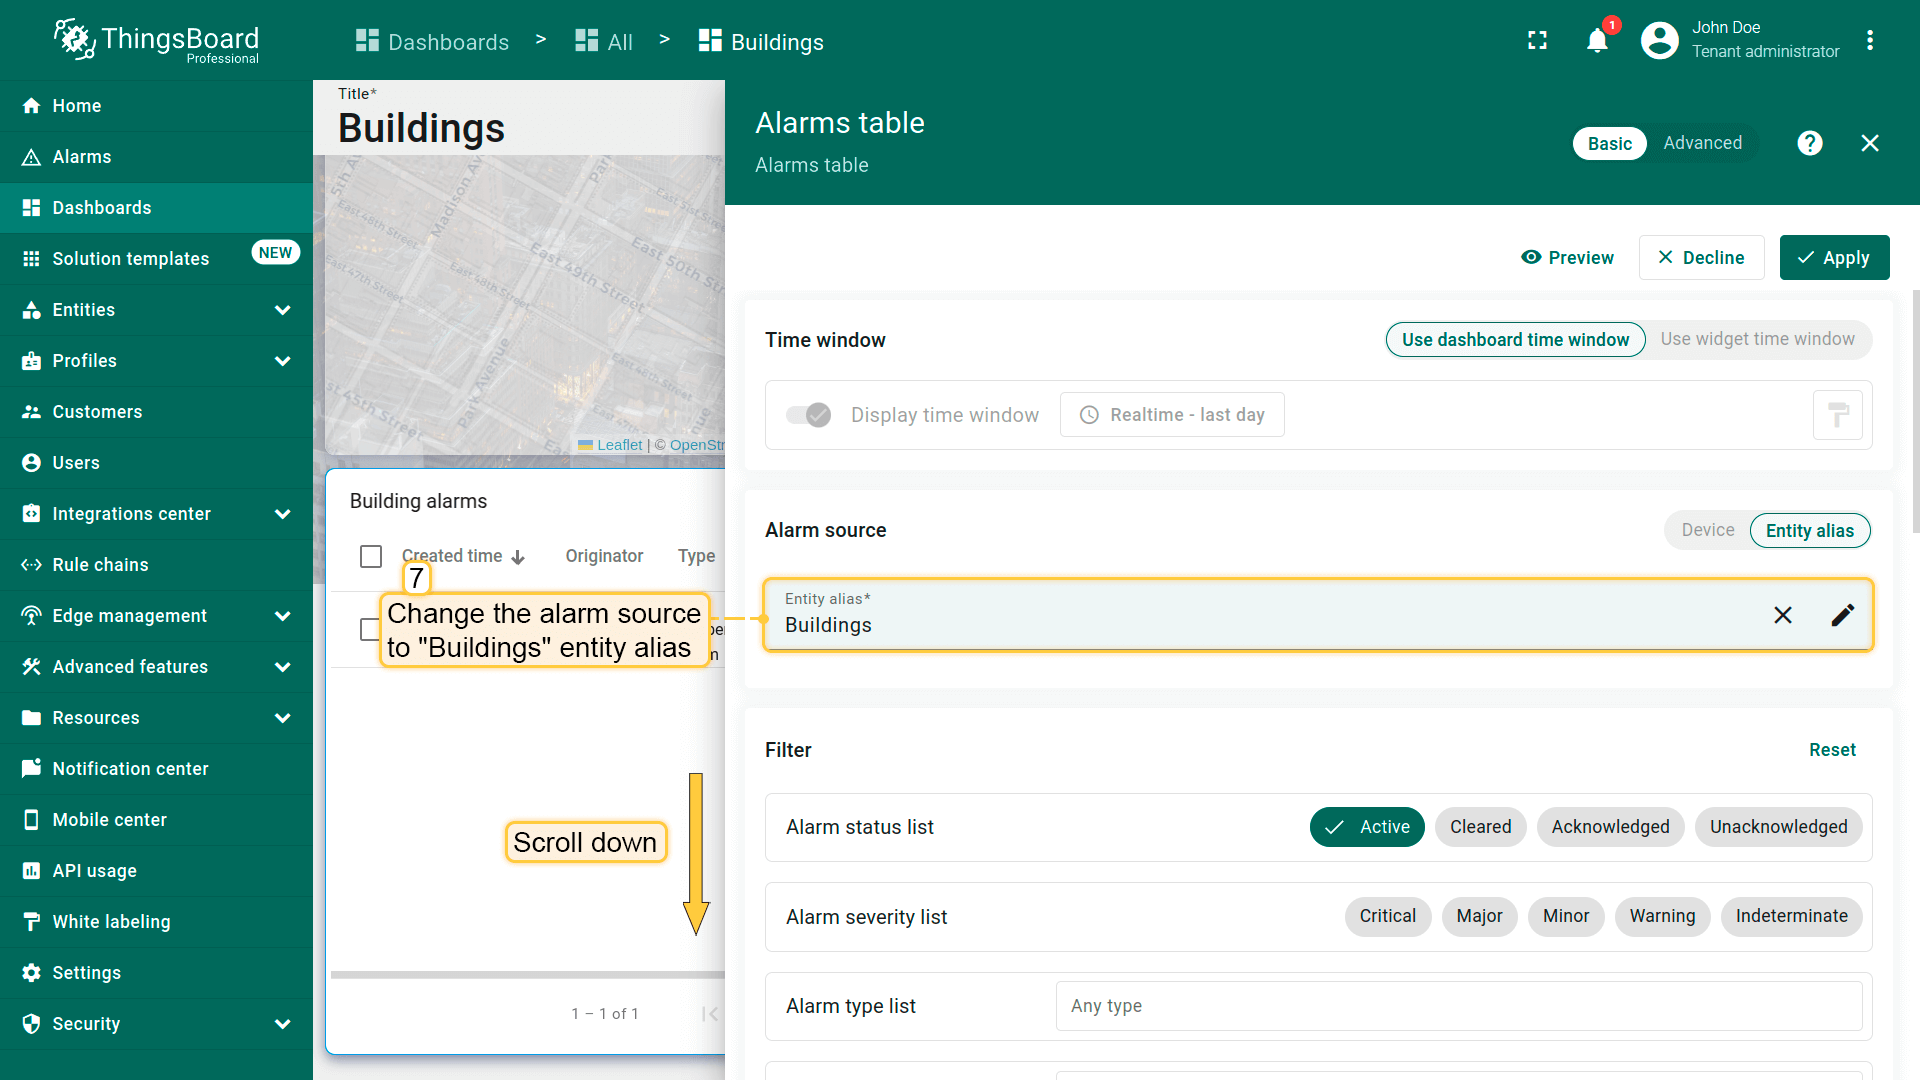
- 将告警来源改为「Buildings」实体别名;
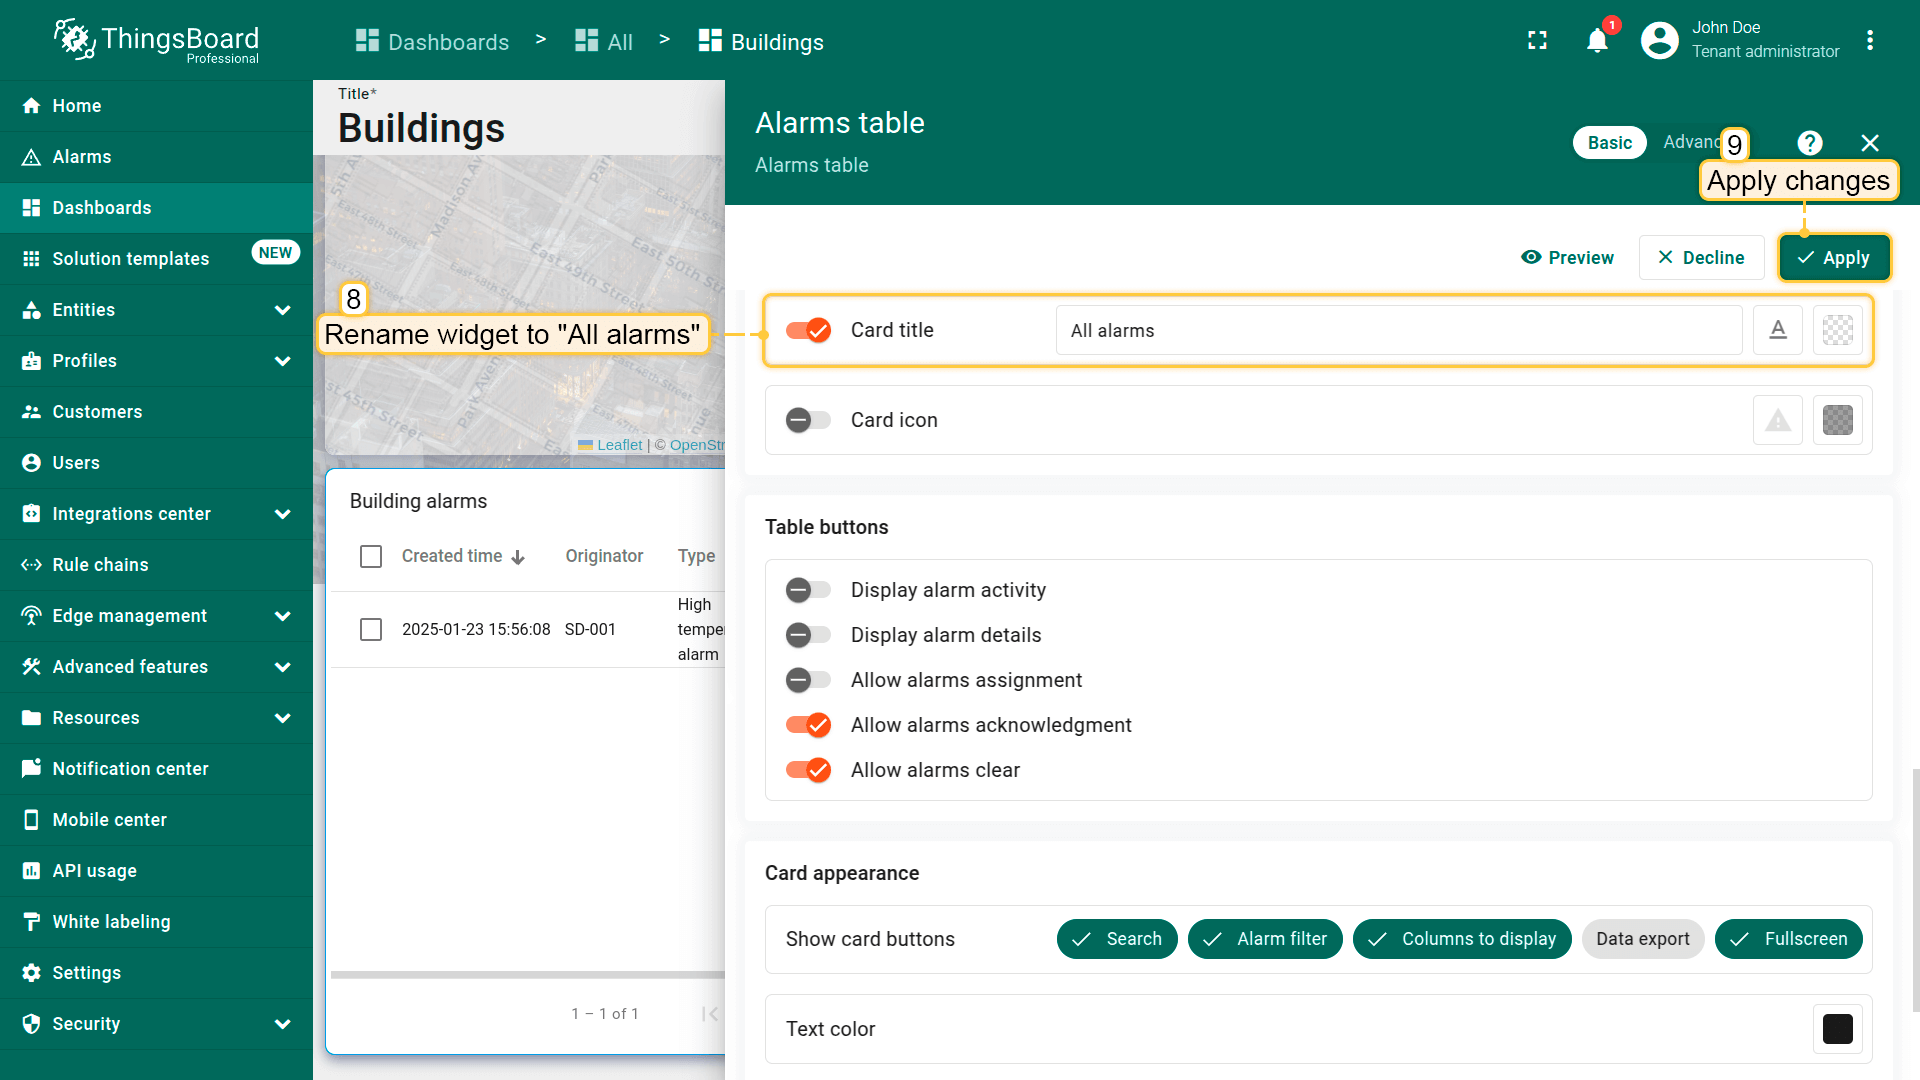
- 将部件重命名为「All alarms」,应用更改;
- 最后保存仪表板。
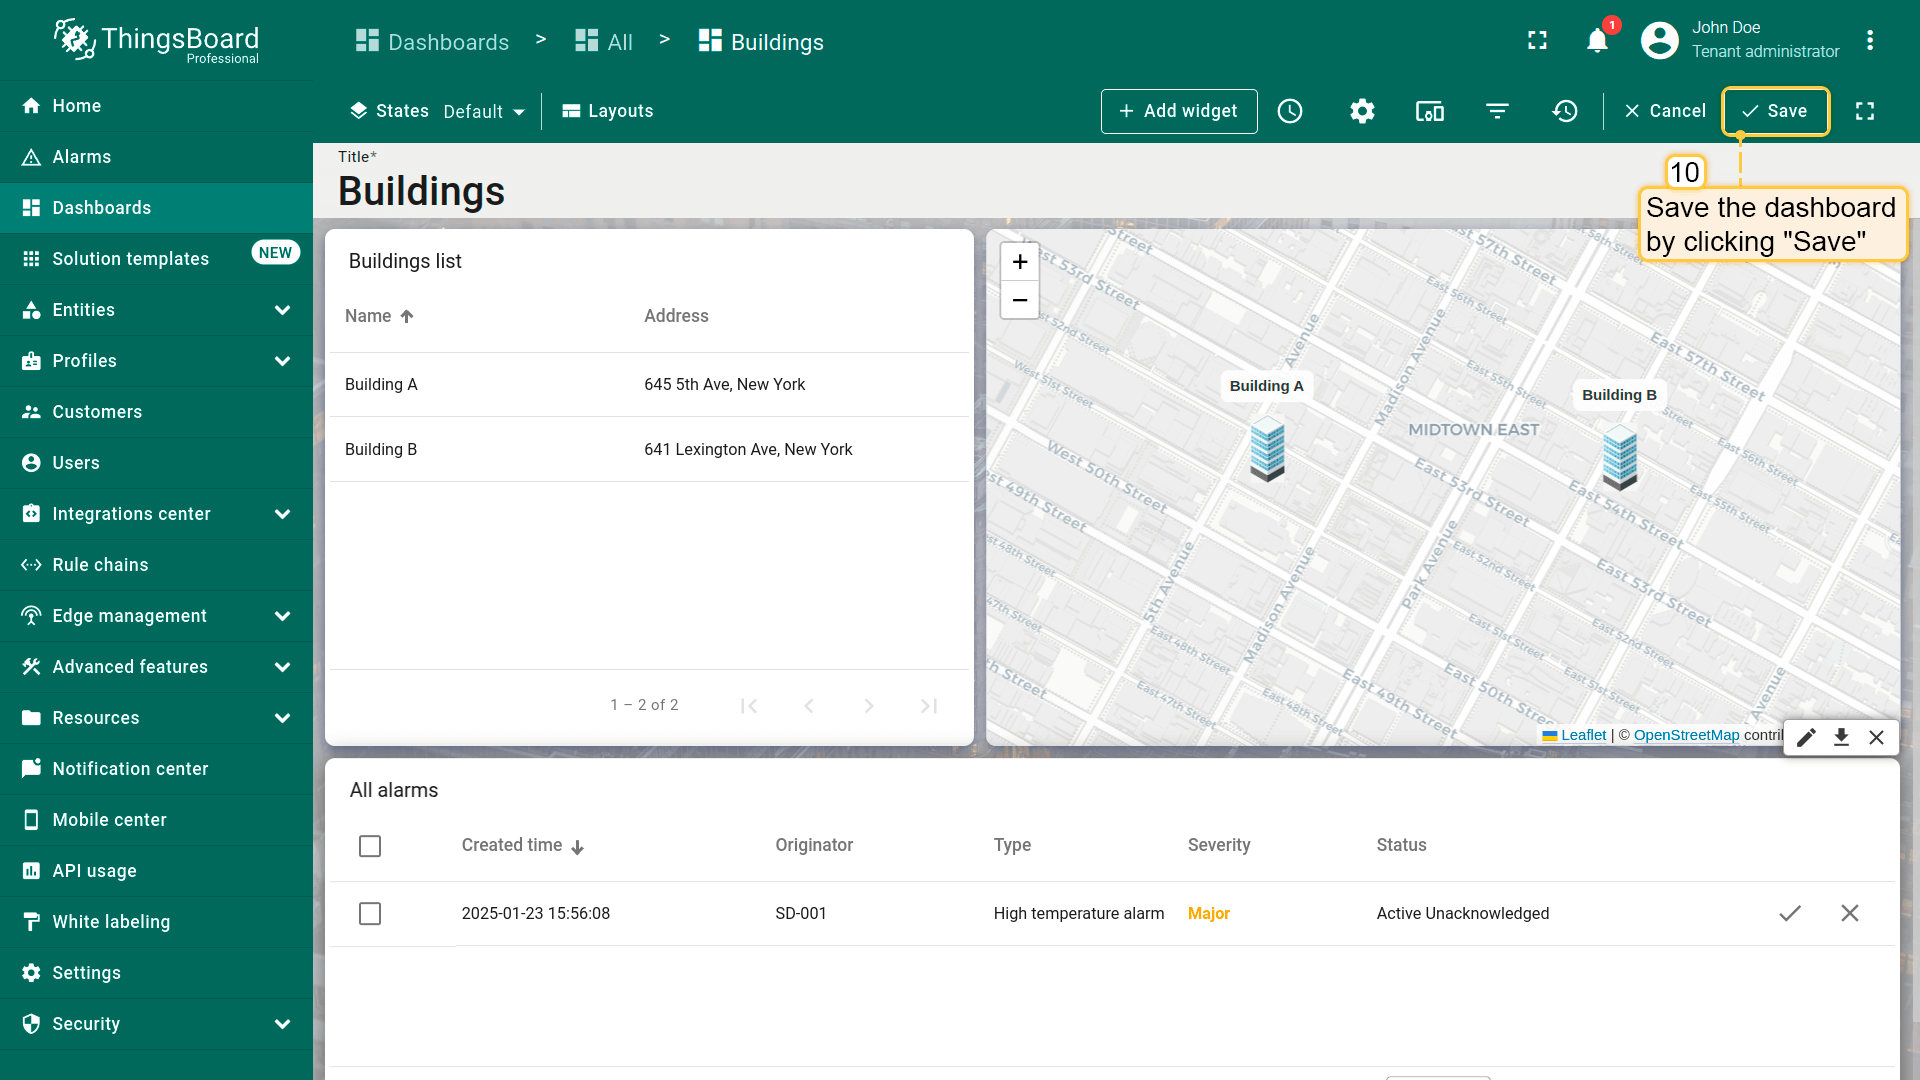
Now, if there are alarms on your devices, they will be displayed in the alarms widget in the Building (default) state.
Final view of the dashboard for this lesson
Next step
In the next lesson, we will share this dashboard with customers. When you are ready to proceed, simply click the button below.