本指南演示ThingsBoard常用功能的基本用法。您将学习如何:
- 将设备连接至ThingsBoard
- 从设备向ThingsBoard推送数据
- 构建实时仪表板
- 创建客户并与他们共享仪表板
- 定义阈值并触发告警
- 通过邮件、SMS、移动应用或第三方服务配置通知
为简化说明,我们将以温度传感器数据为例进行可视化。
更偏好视频学习?可观看分步视频教程。
开始前
只需一个 ThingsBoard Cloud 账号。可注册账号,无需信用卡,永久免费。
步骤1. 配置设备
示例:添加一台向ThingsBoard平台发送以下数据的设备:设备名称及温度遥测读数。
按以下步骤添加新设备:
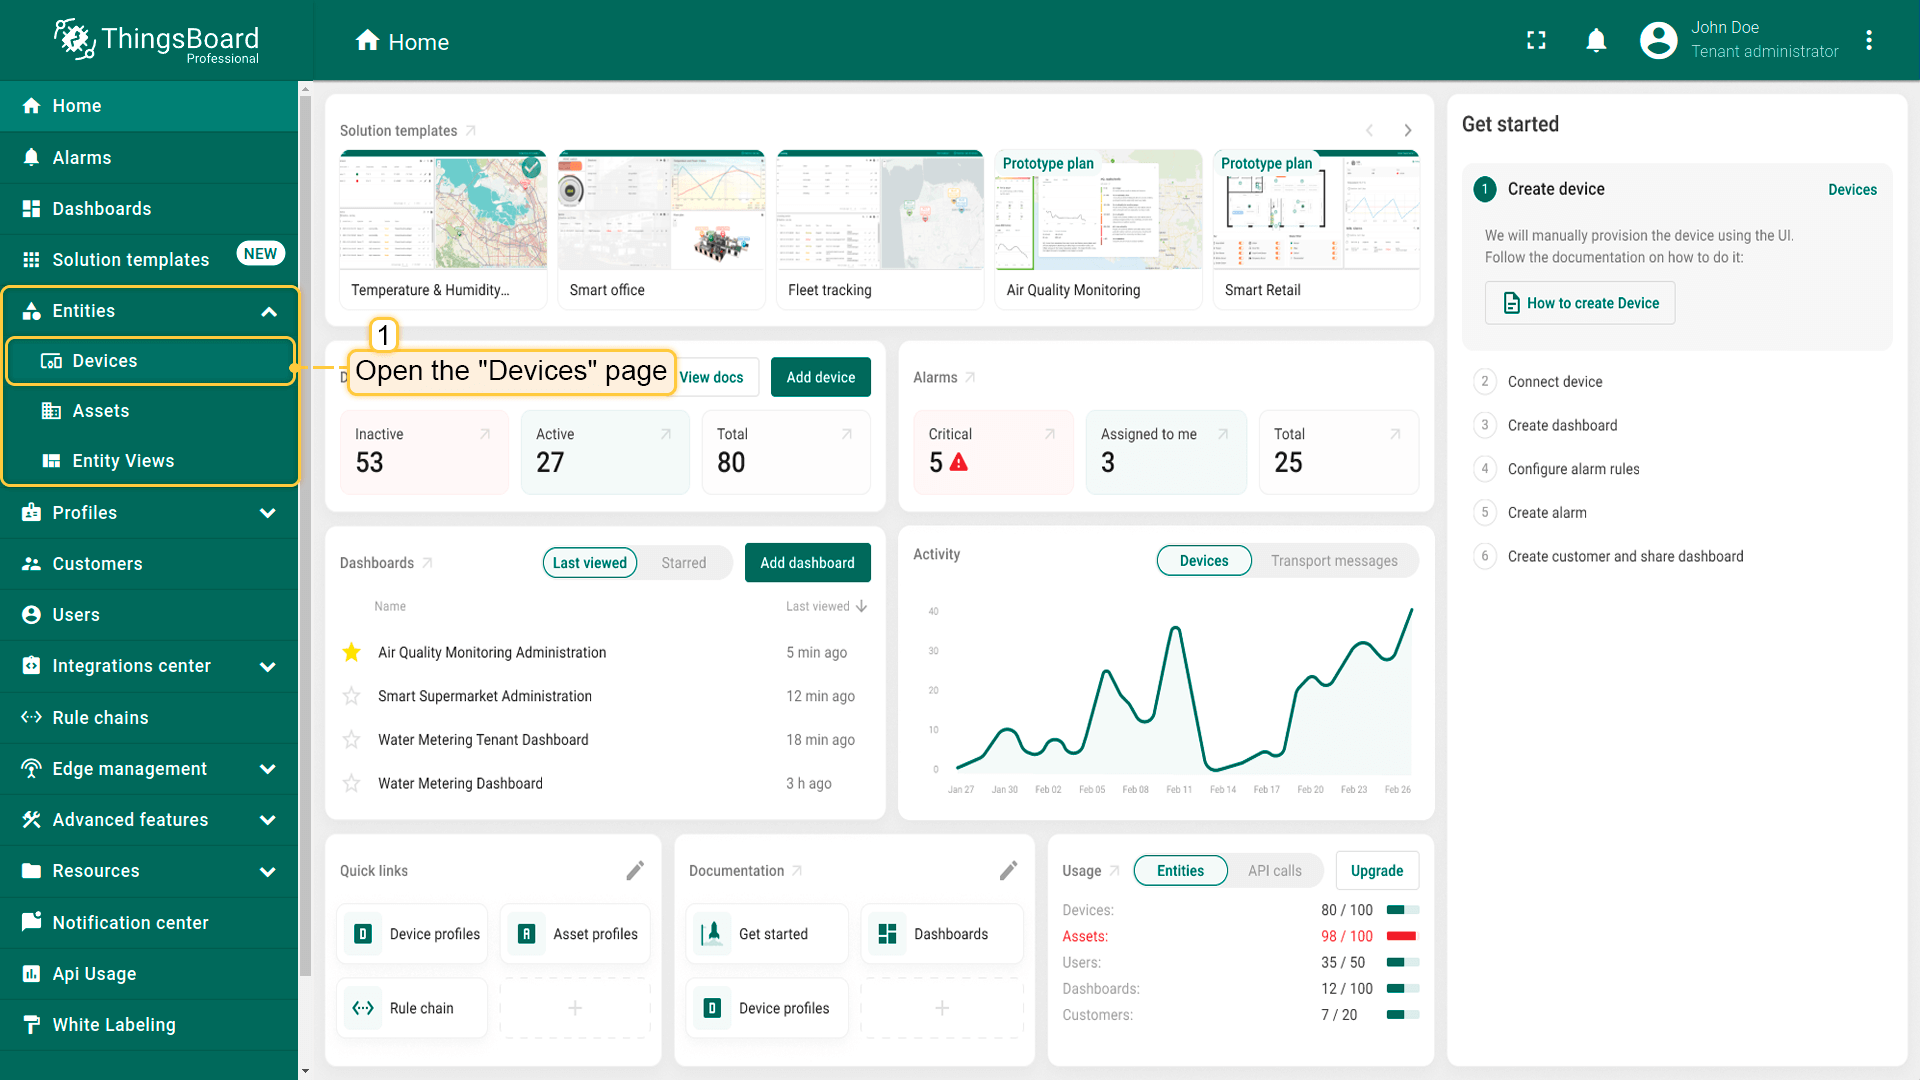
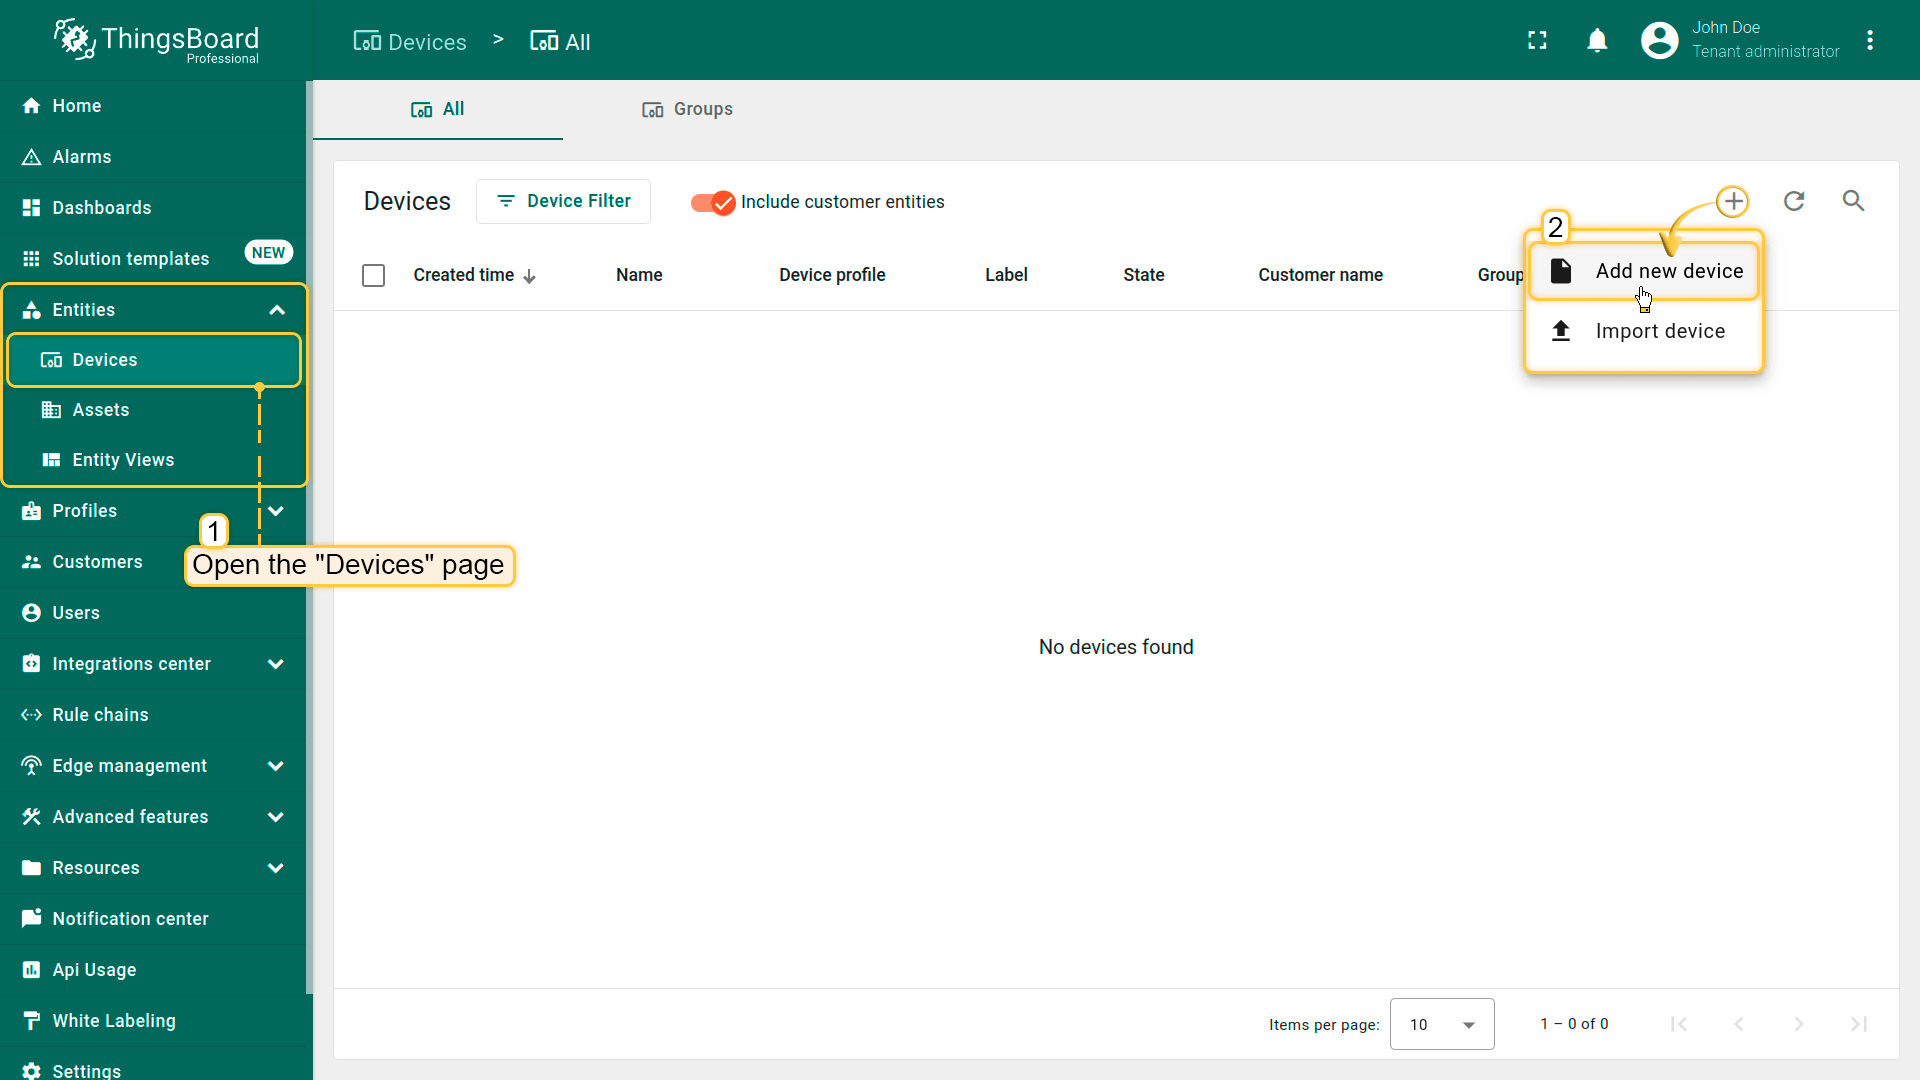
- 登录 ThingsBoard 实例,进入「实体」部分的「设备」页面;
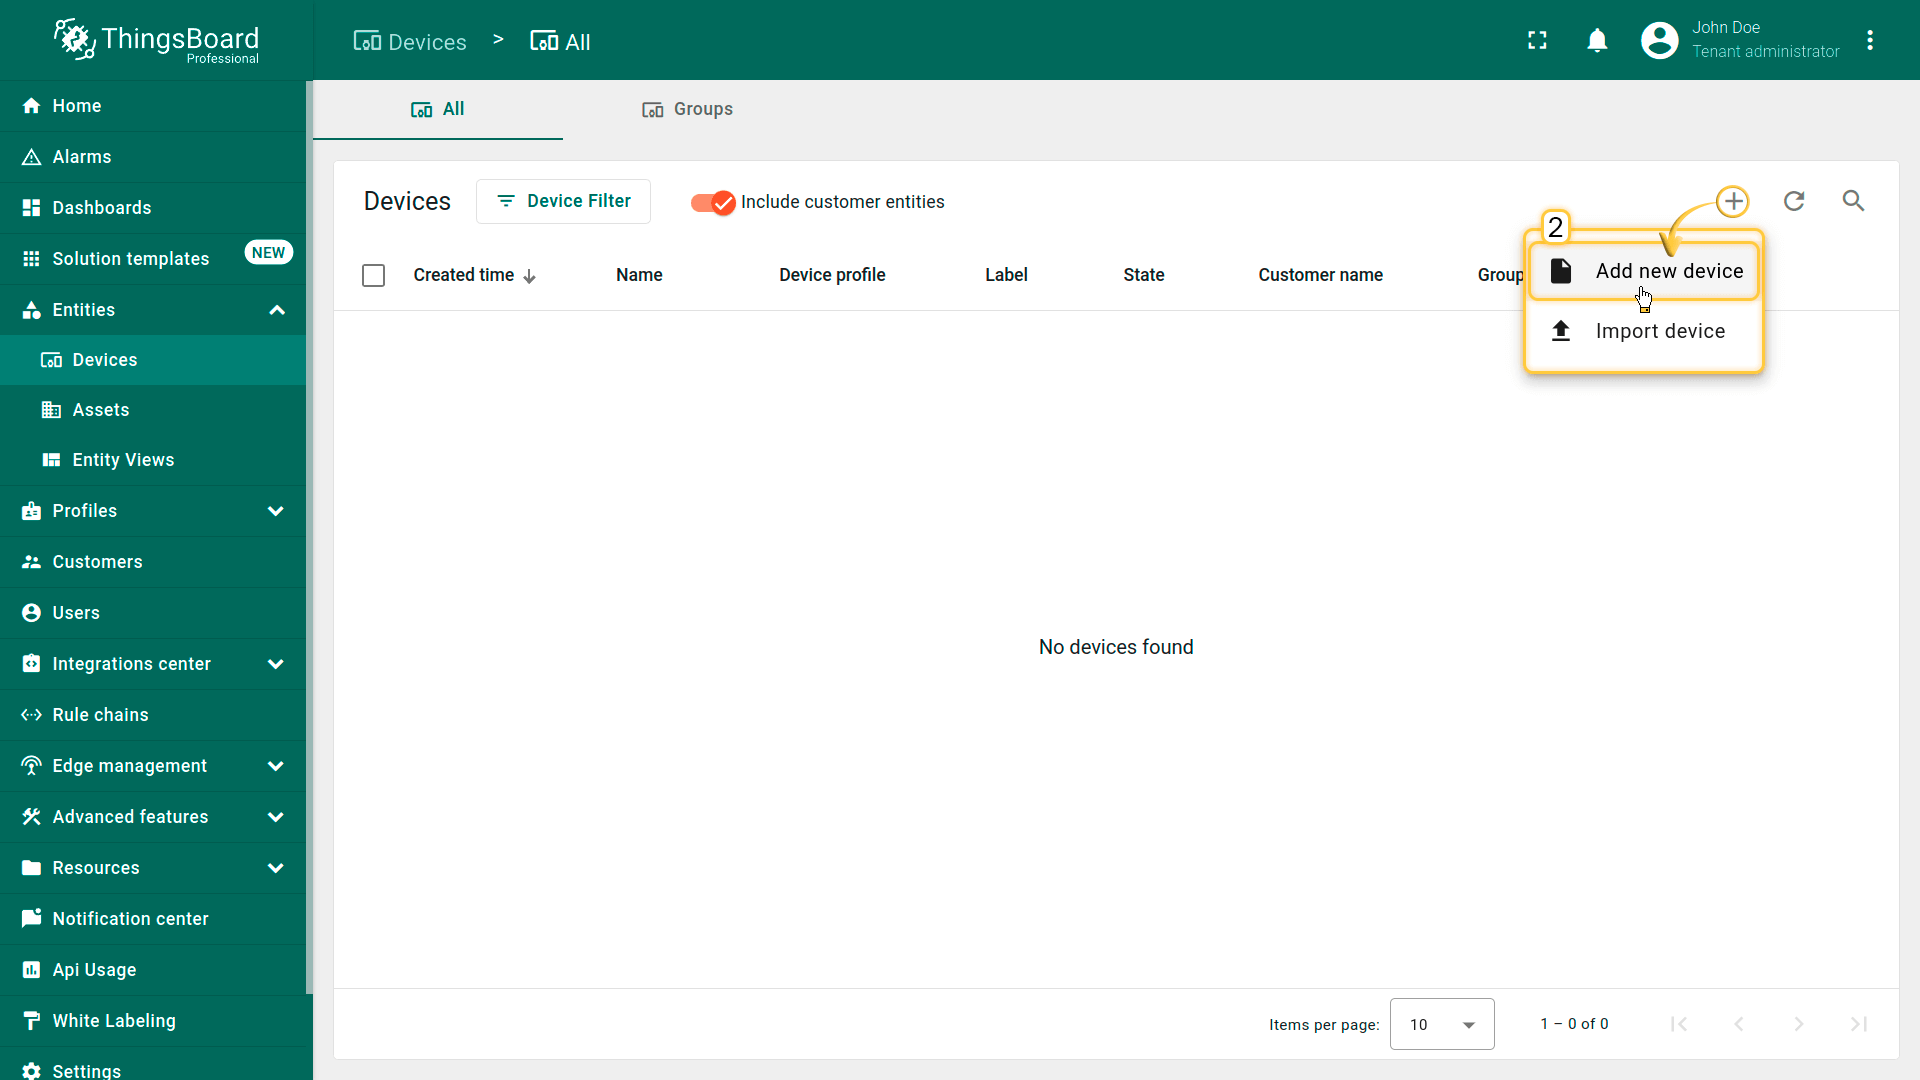
- 默认进入设备组 “All”. Click on the "+" icon in the top right corner of the table and then select "Add new device" from drop-down menu;
- Enter the device name. For example, "My New Device". No other changes are required at this time. Click "Add";
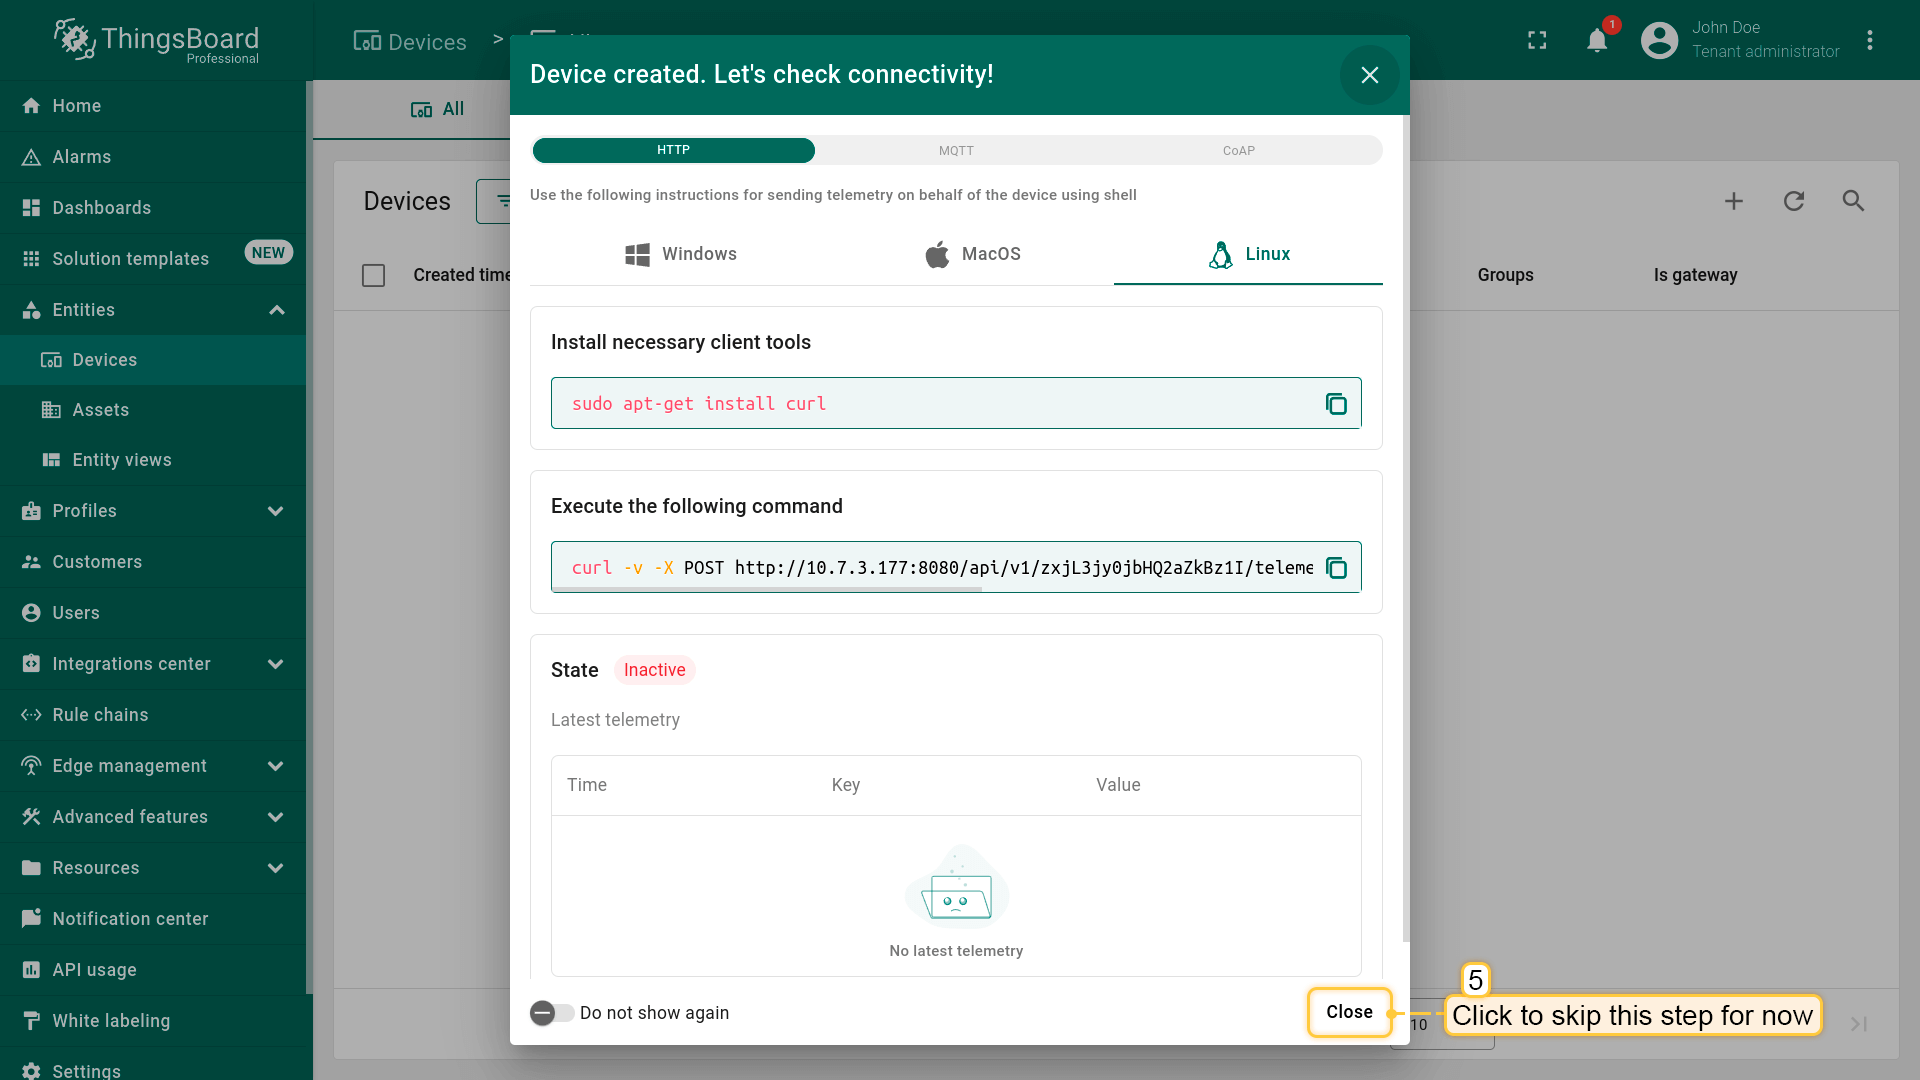
- A window will open where you can check the device's connection to ThingsBoard. This step is optional. Let's close this window for now and return to checking the connection in the next step in more detail;
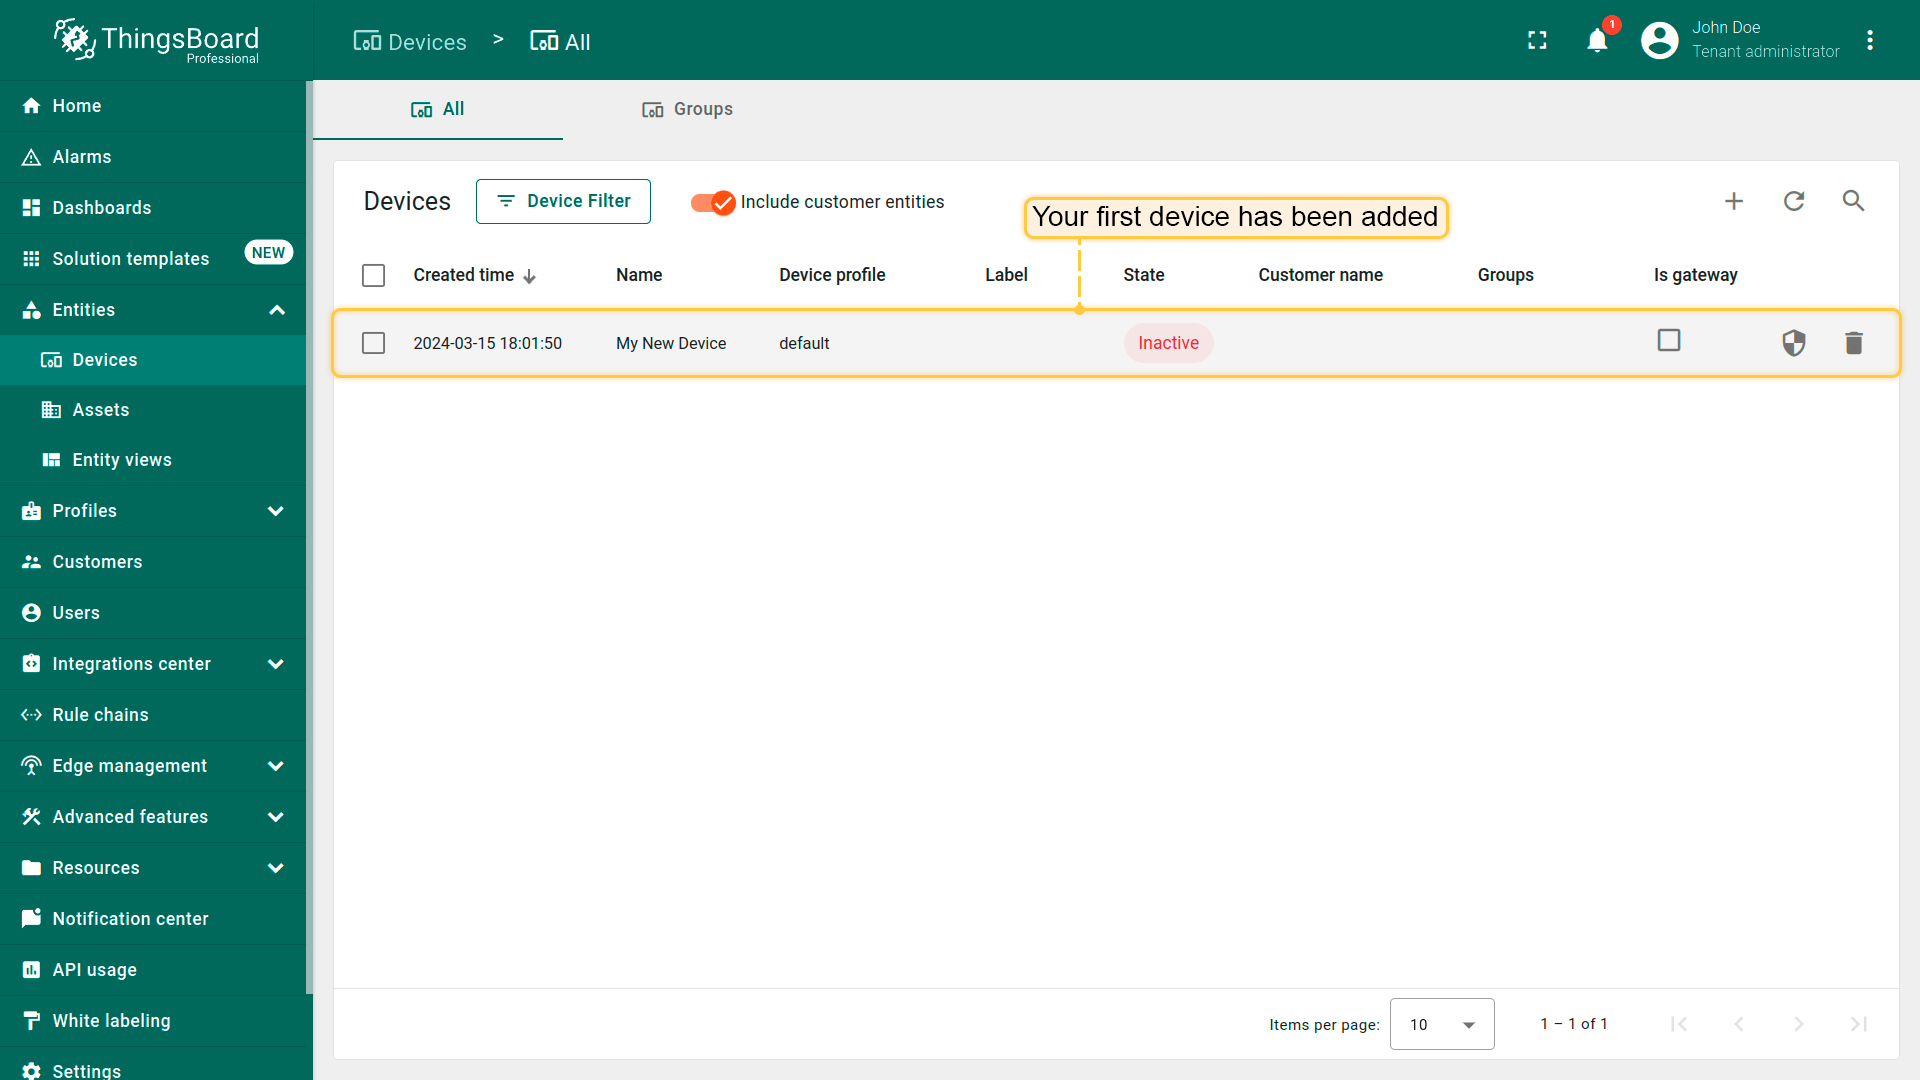
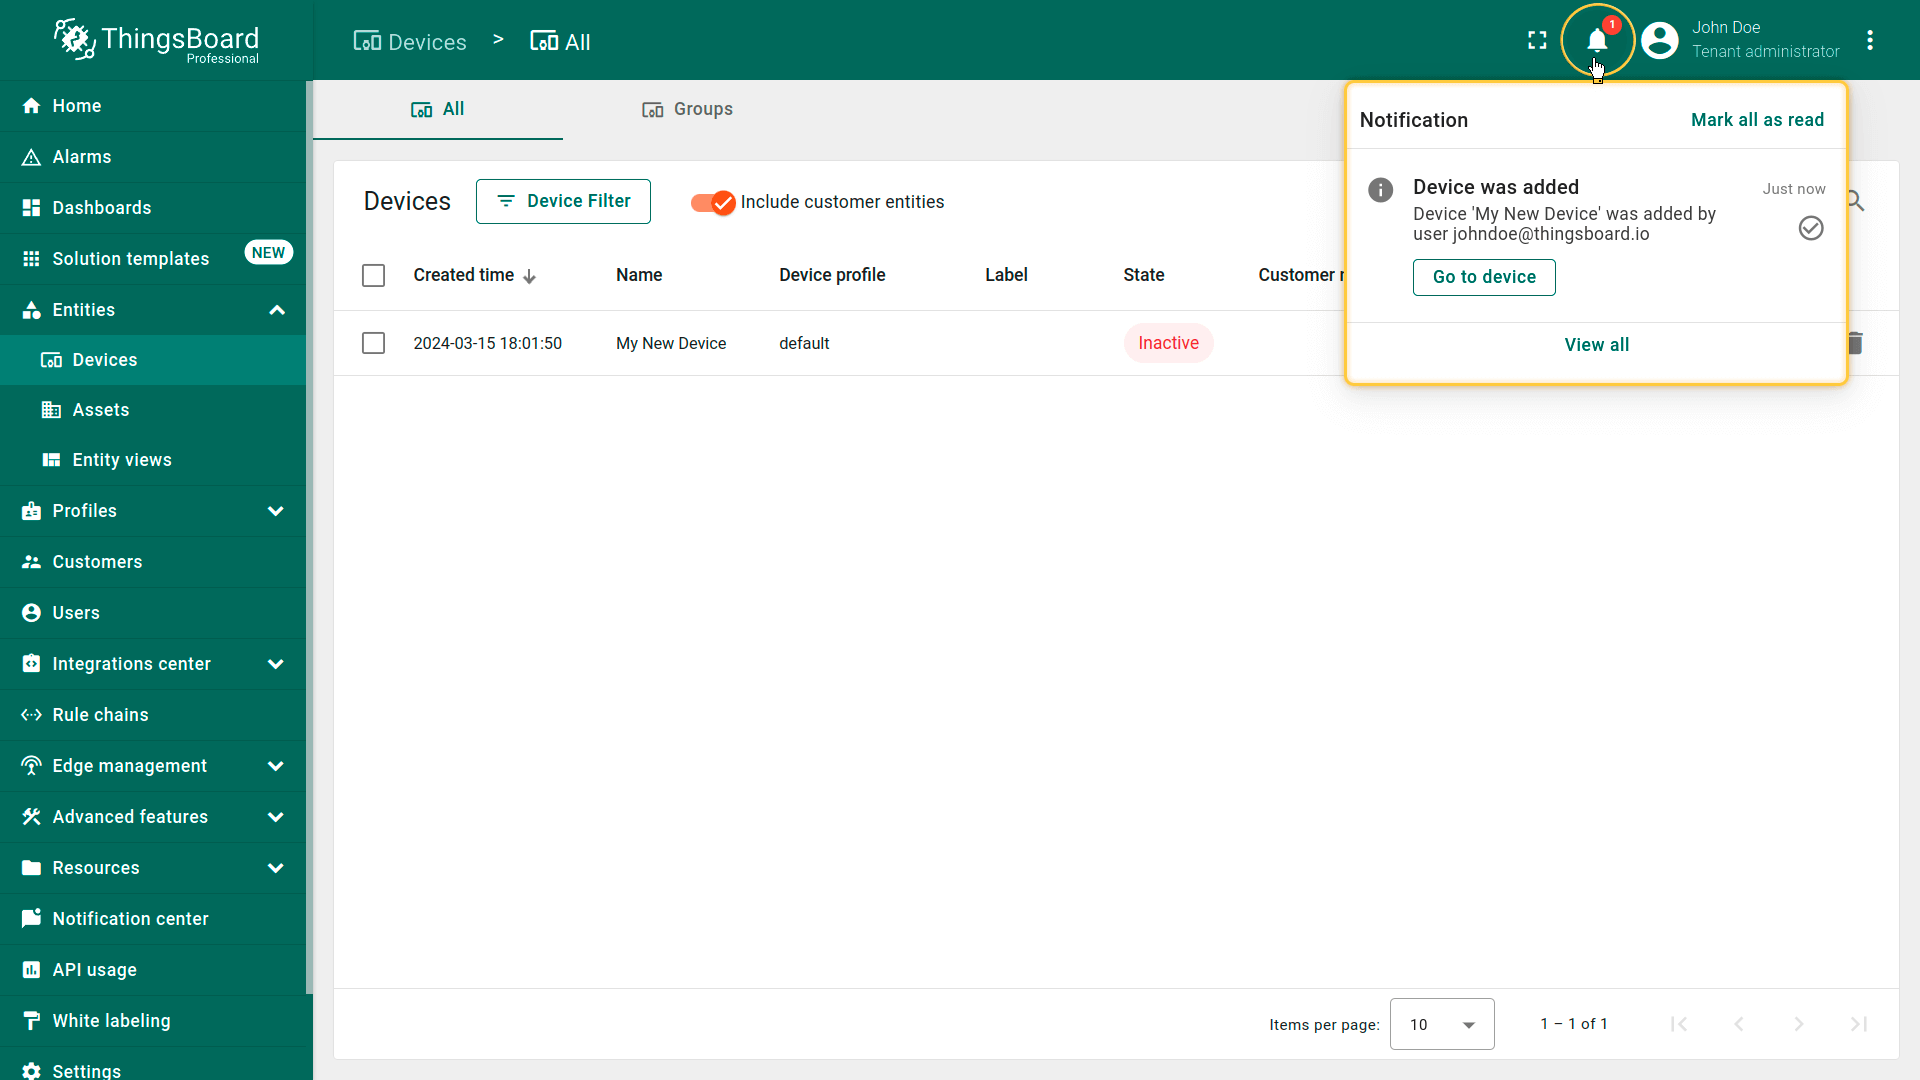
- Congratulations on adding your first device! As you add more devices, they will be added at the top of the table, as the table automatically sorts devices by their creation time, with the newest ones listed first.

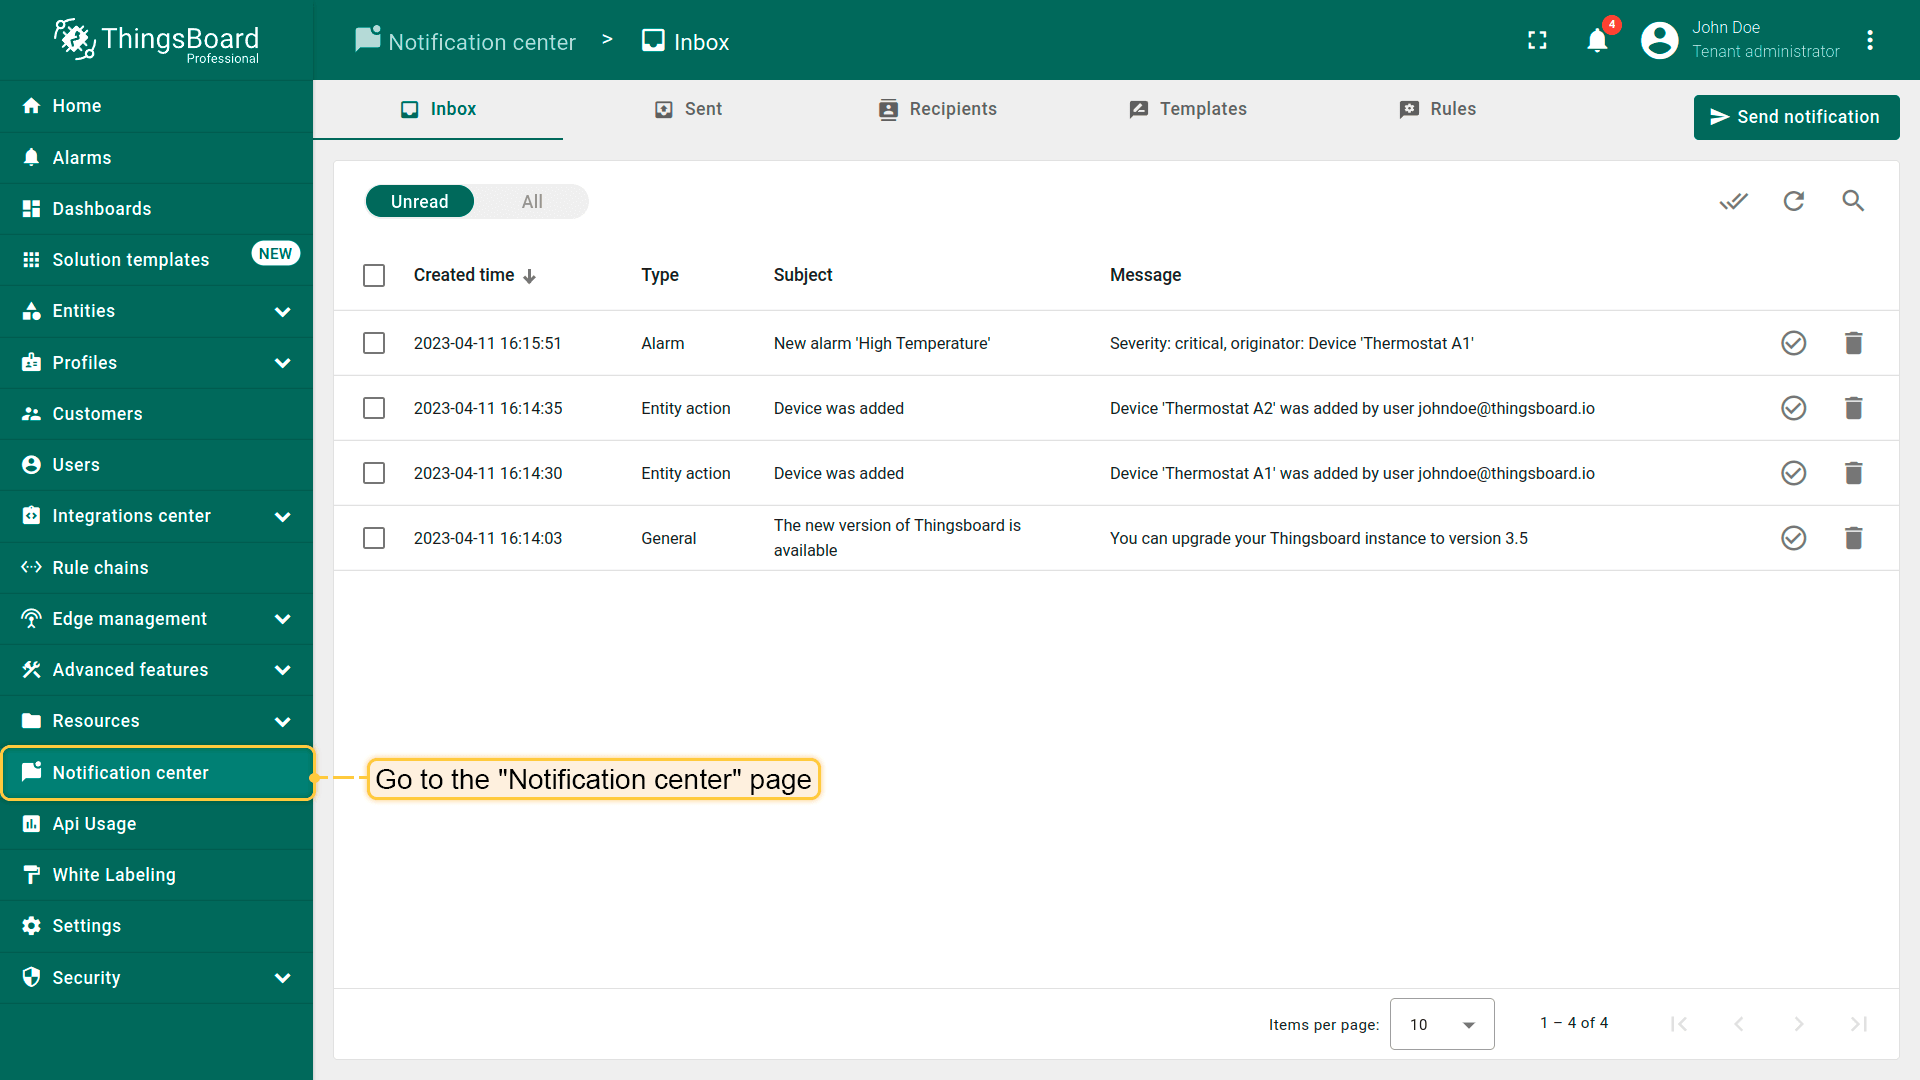
添加设备时您也会收到通知。点击右上角 铃铛图标 可查看通知。
其他配置方式
步骤2. 连接设备
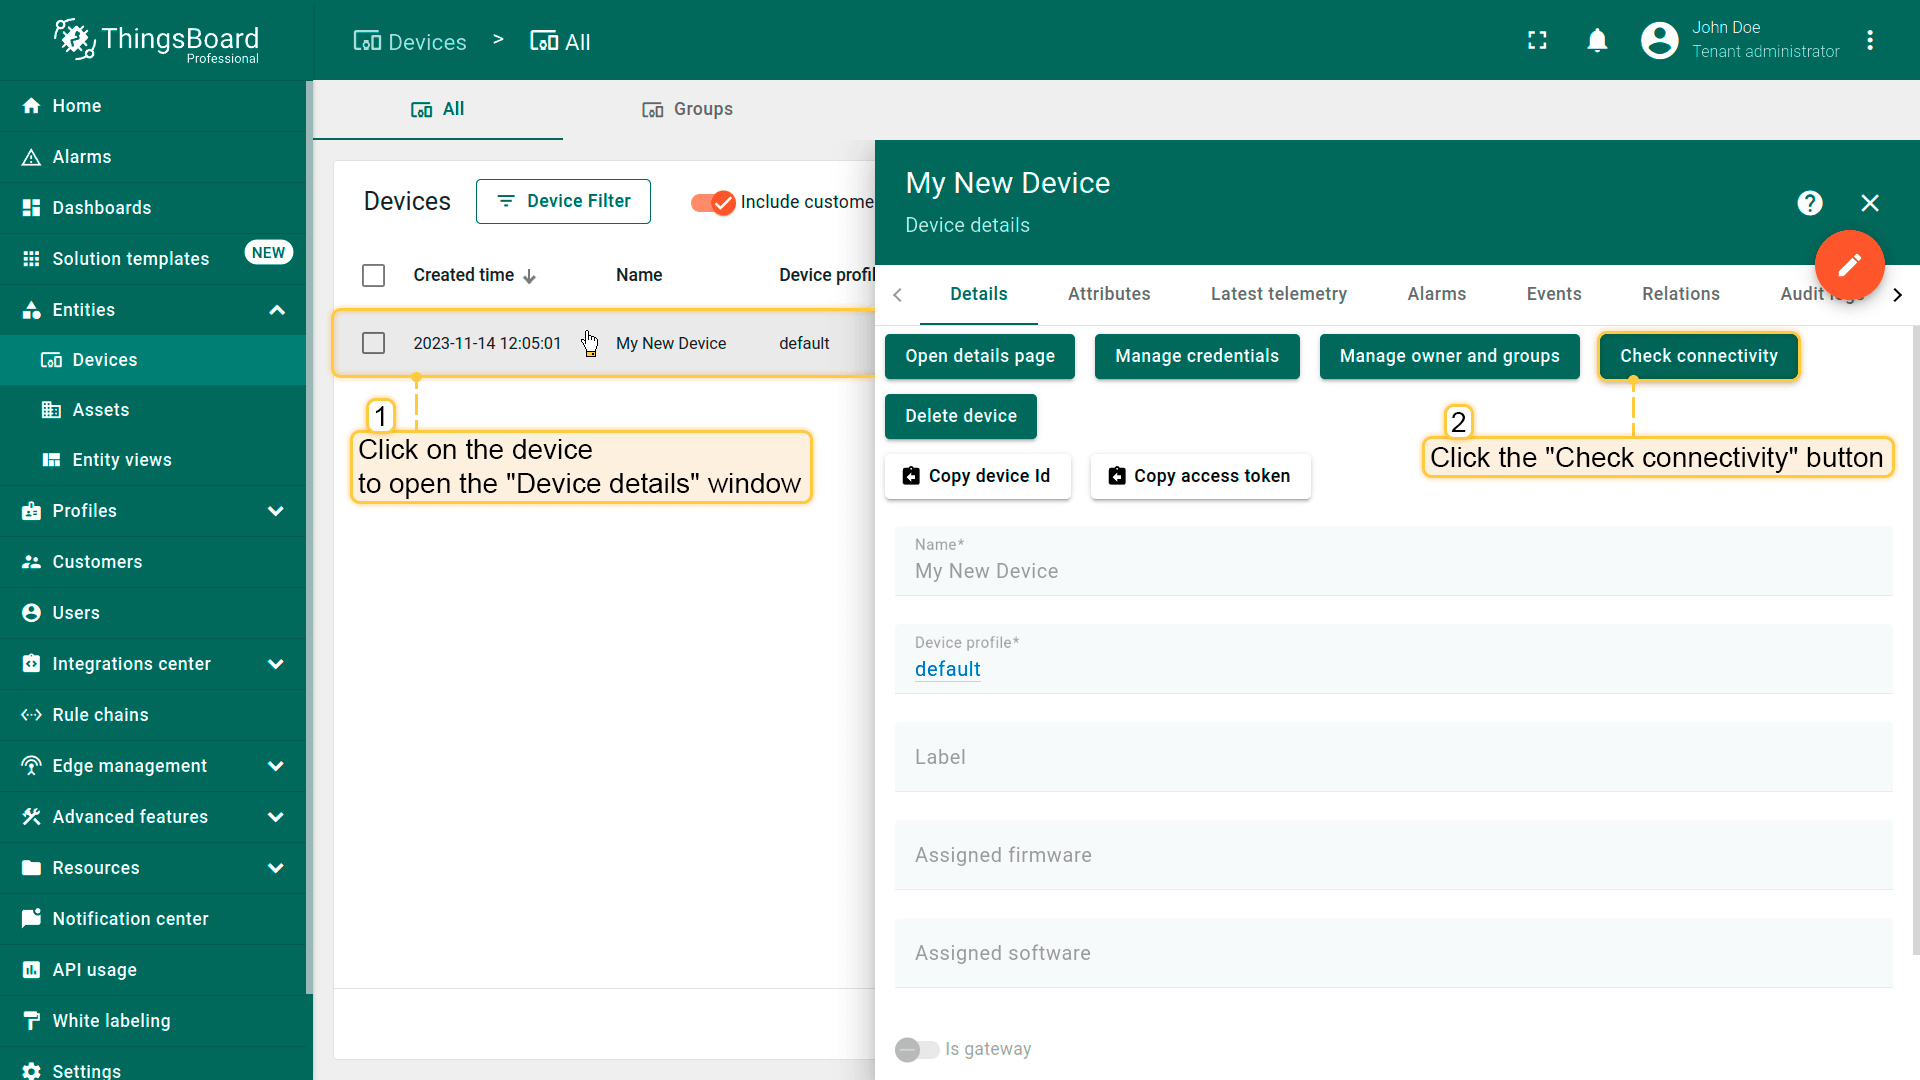
验证设备与ThingsBoard的连接:
- Click on your device, then click the "Check connectivity” button in the "Device details" window;
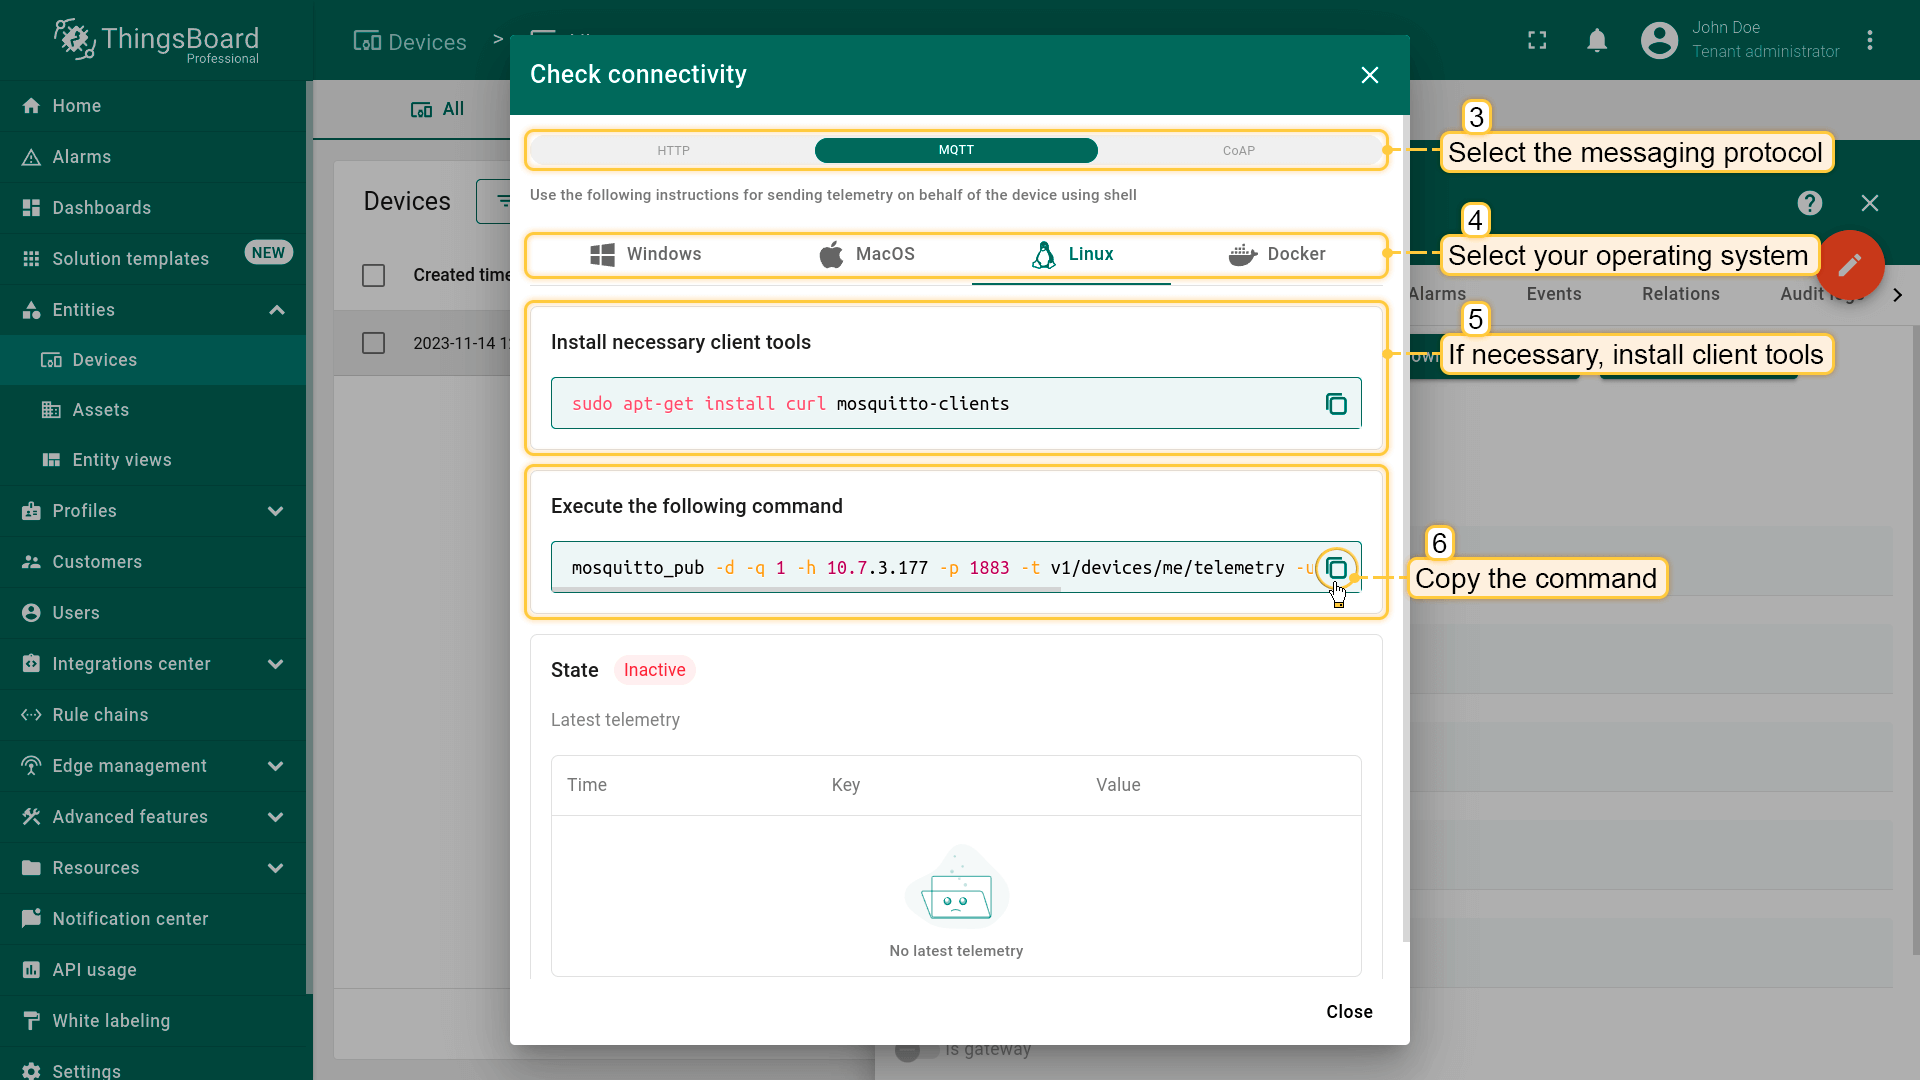
- In the opened window select the messaging protocol and your operating system. Install the necessary client tools and copy the command;
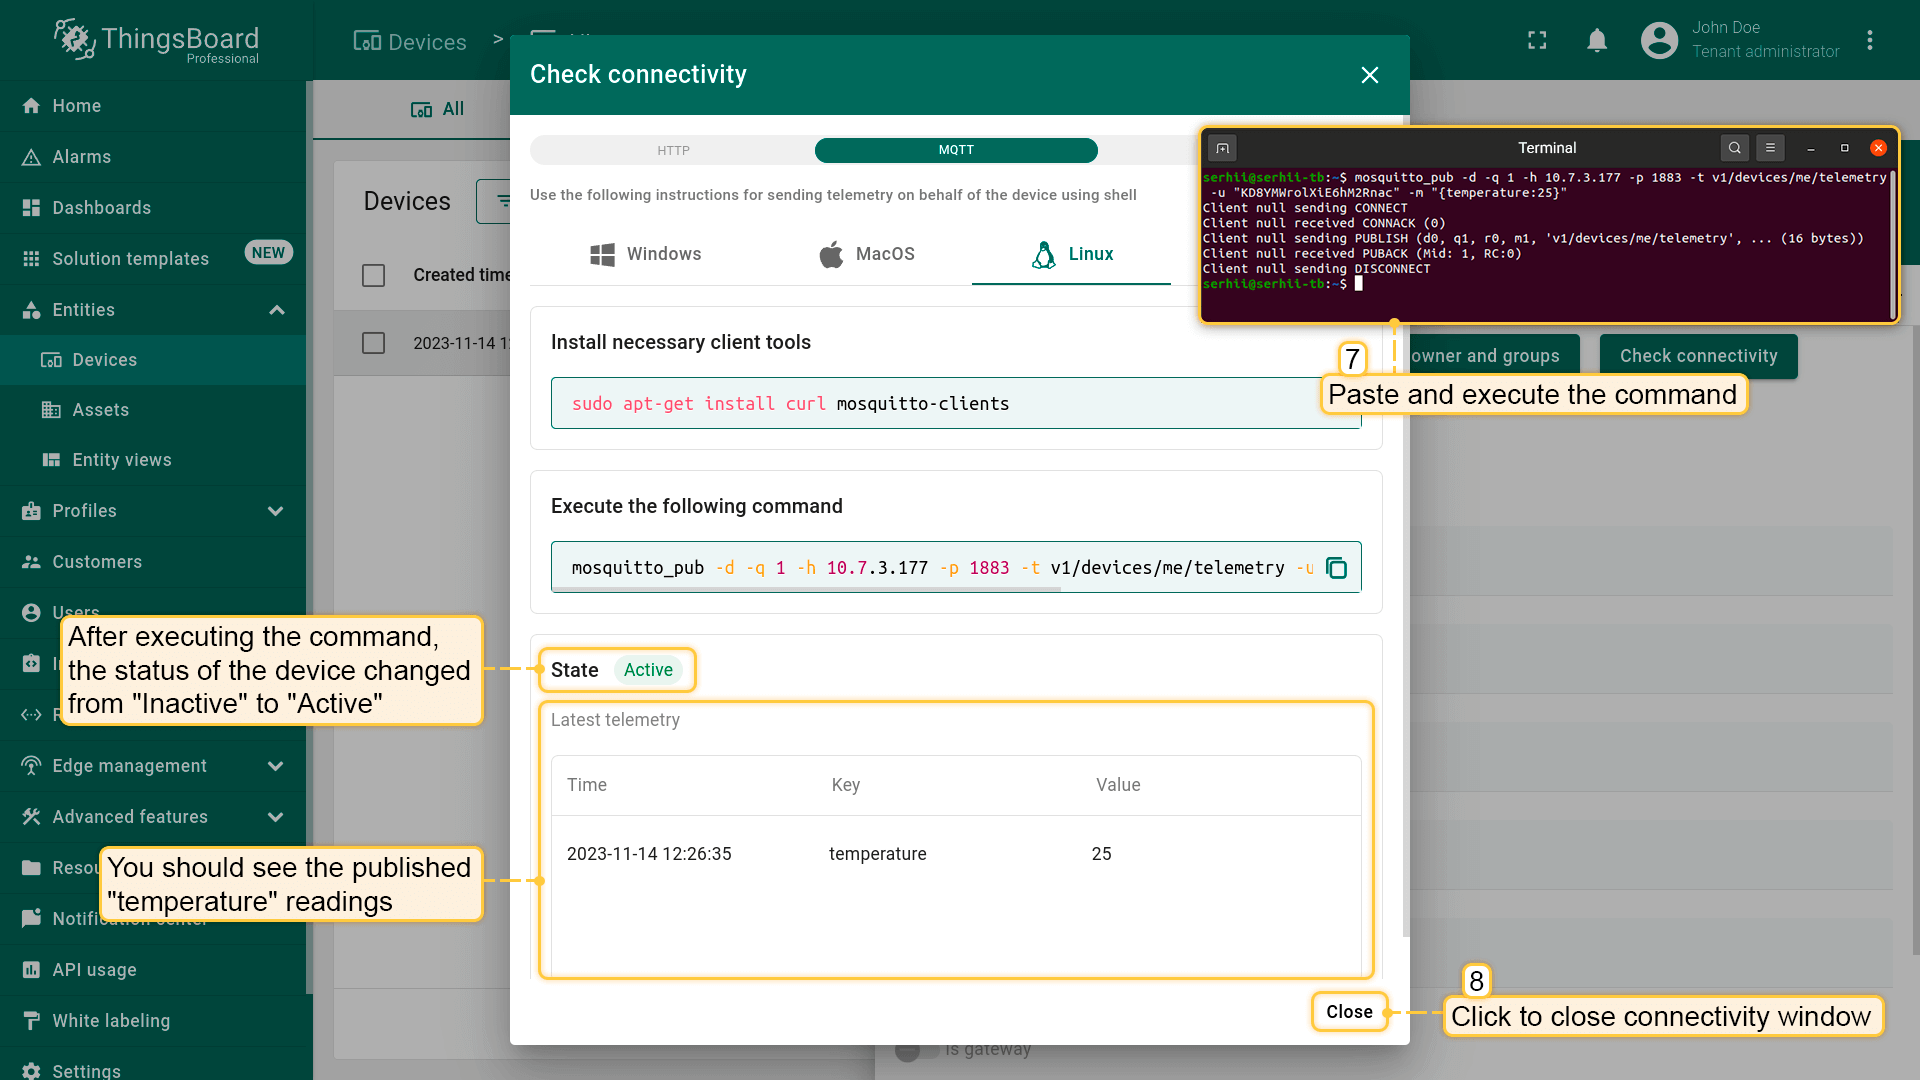
- Execute previously copied command. Once you have successfully published the “temperature” readings, the device state should be changed from "Inactive" to "Active" and you should see the published "temperature" readings. Now, close the connectivity window.
查看ThingsBoard API参考,获取设备连接所支持协议的更详细说明。
步骤3. 创建仪表板
ThingsBoard中的仪表板用于可视化和监控从IoT设备采集的数据。
创建仪表板并添加三个部件,用于展示实体列表及其最新值,以及指定实体的告警信息。
步骤3.1创建空仪表板
按以下步骤创建新仪表板:
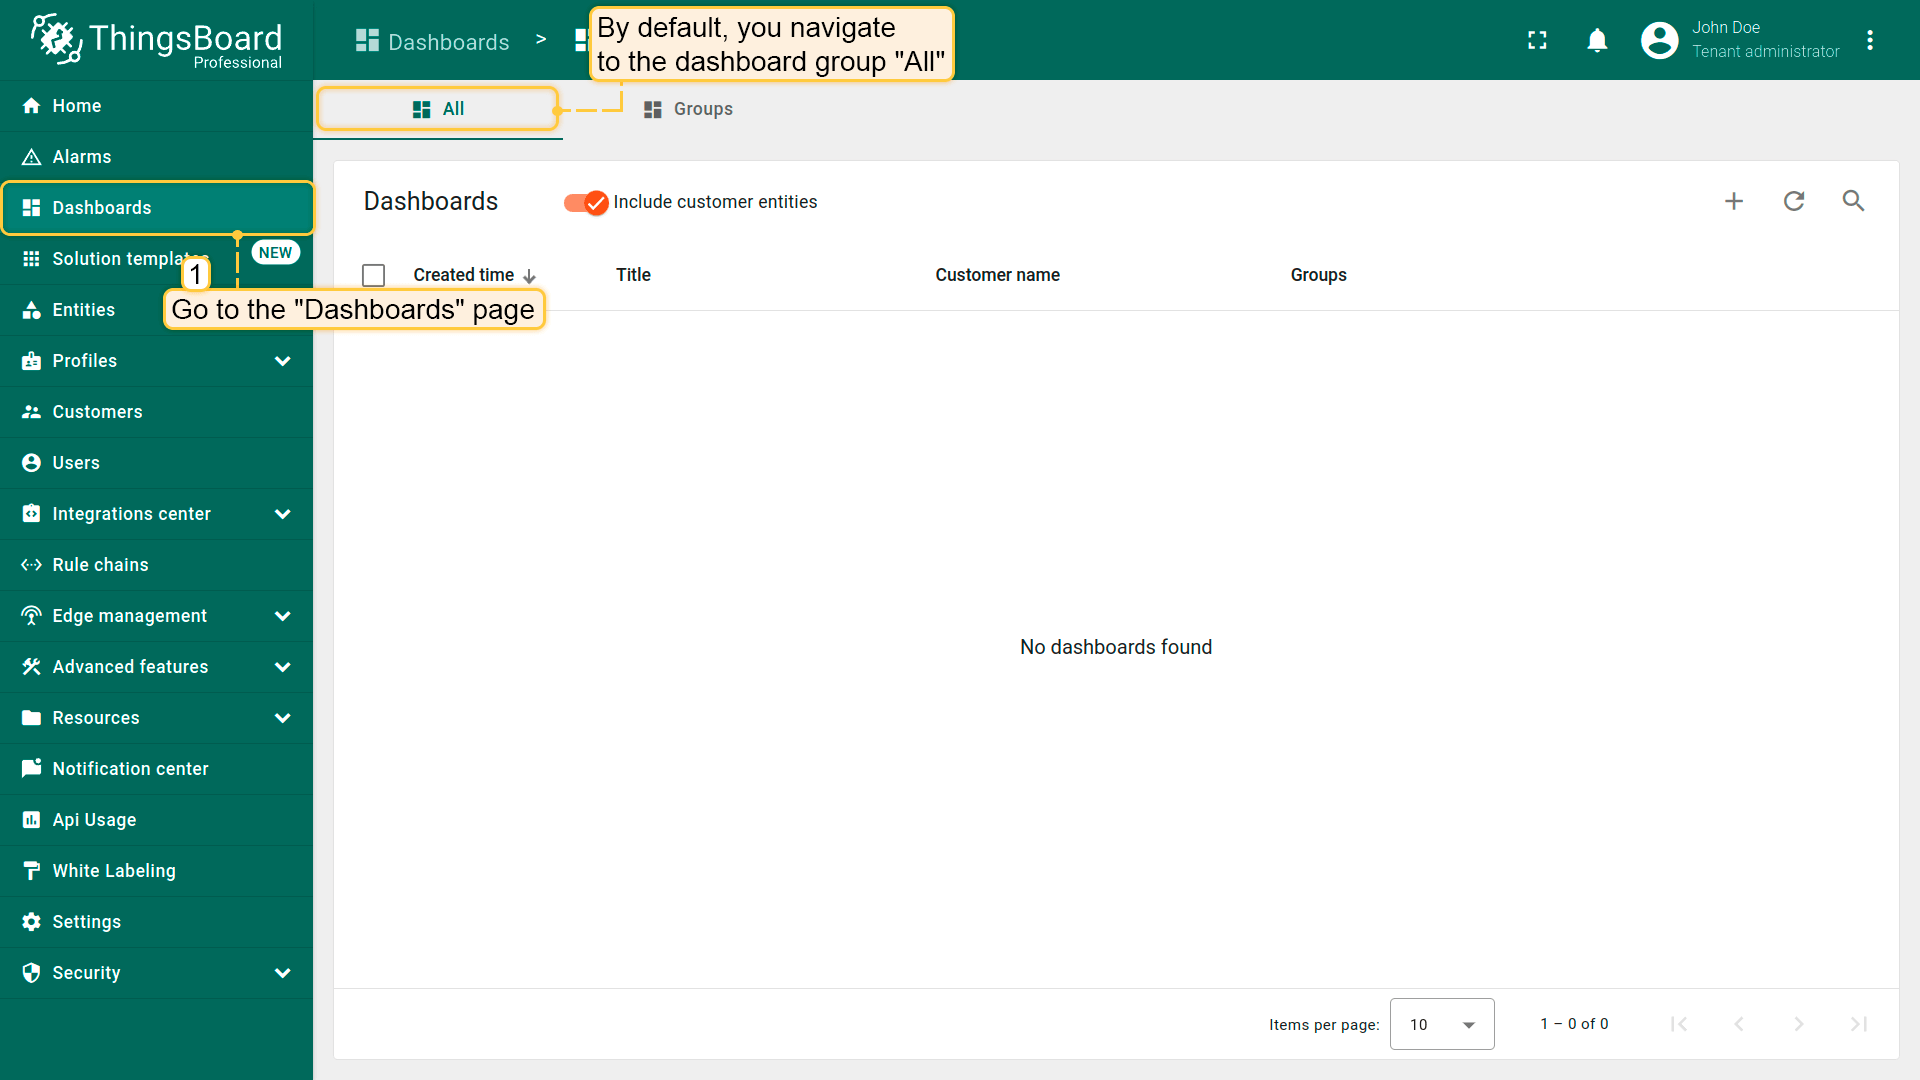
- Navigate to the "Dashboards" page through the main menu on the left of the screen. By default, you navigate to the dashboard group "All";
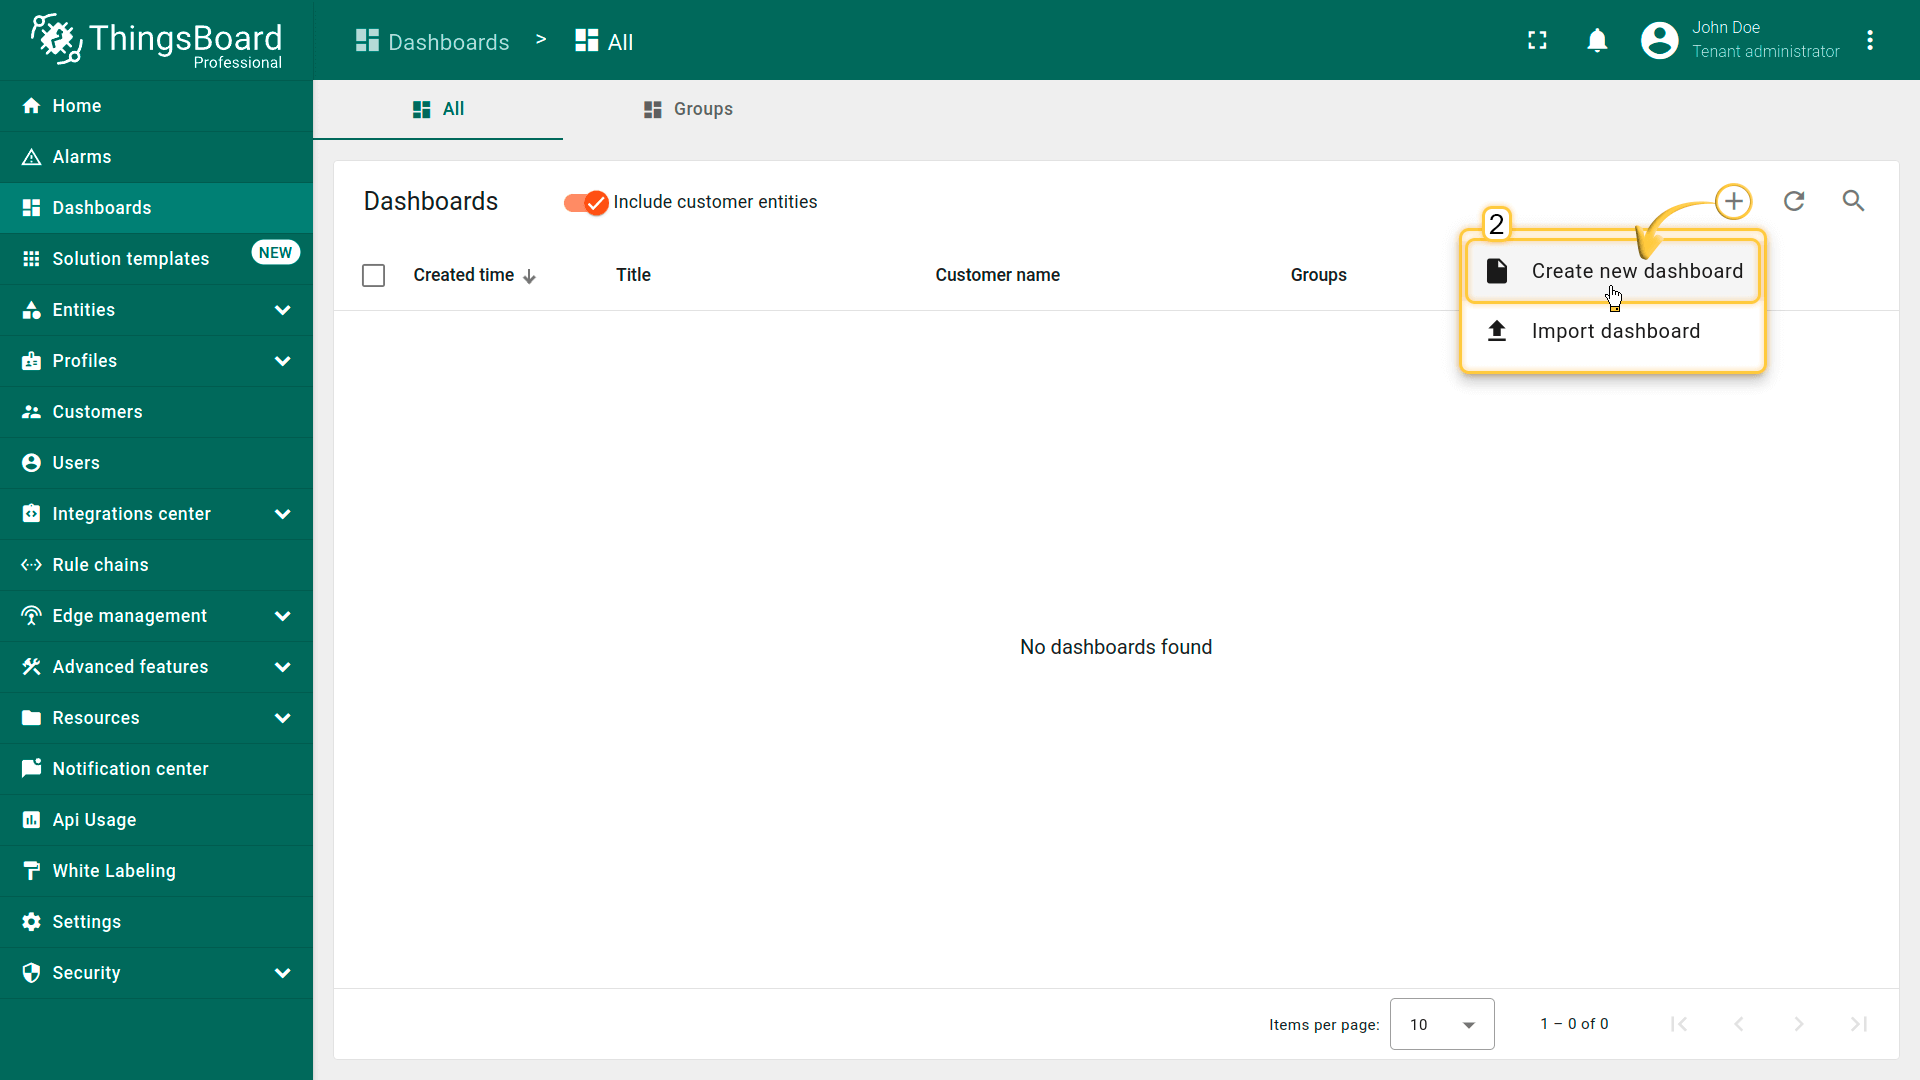
- Click the "+" sign in the upper right corner of the screen, and select "Create new dashboard" from the drop-down menu;
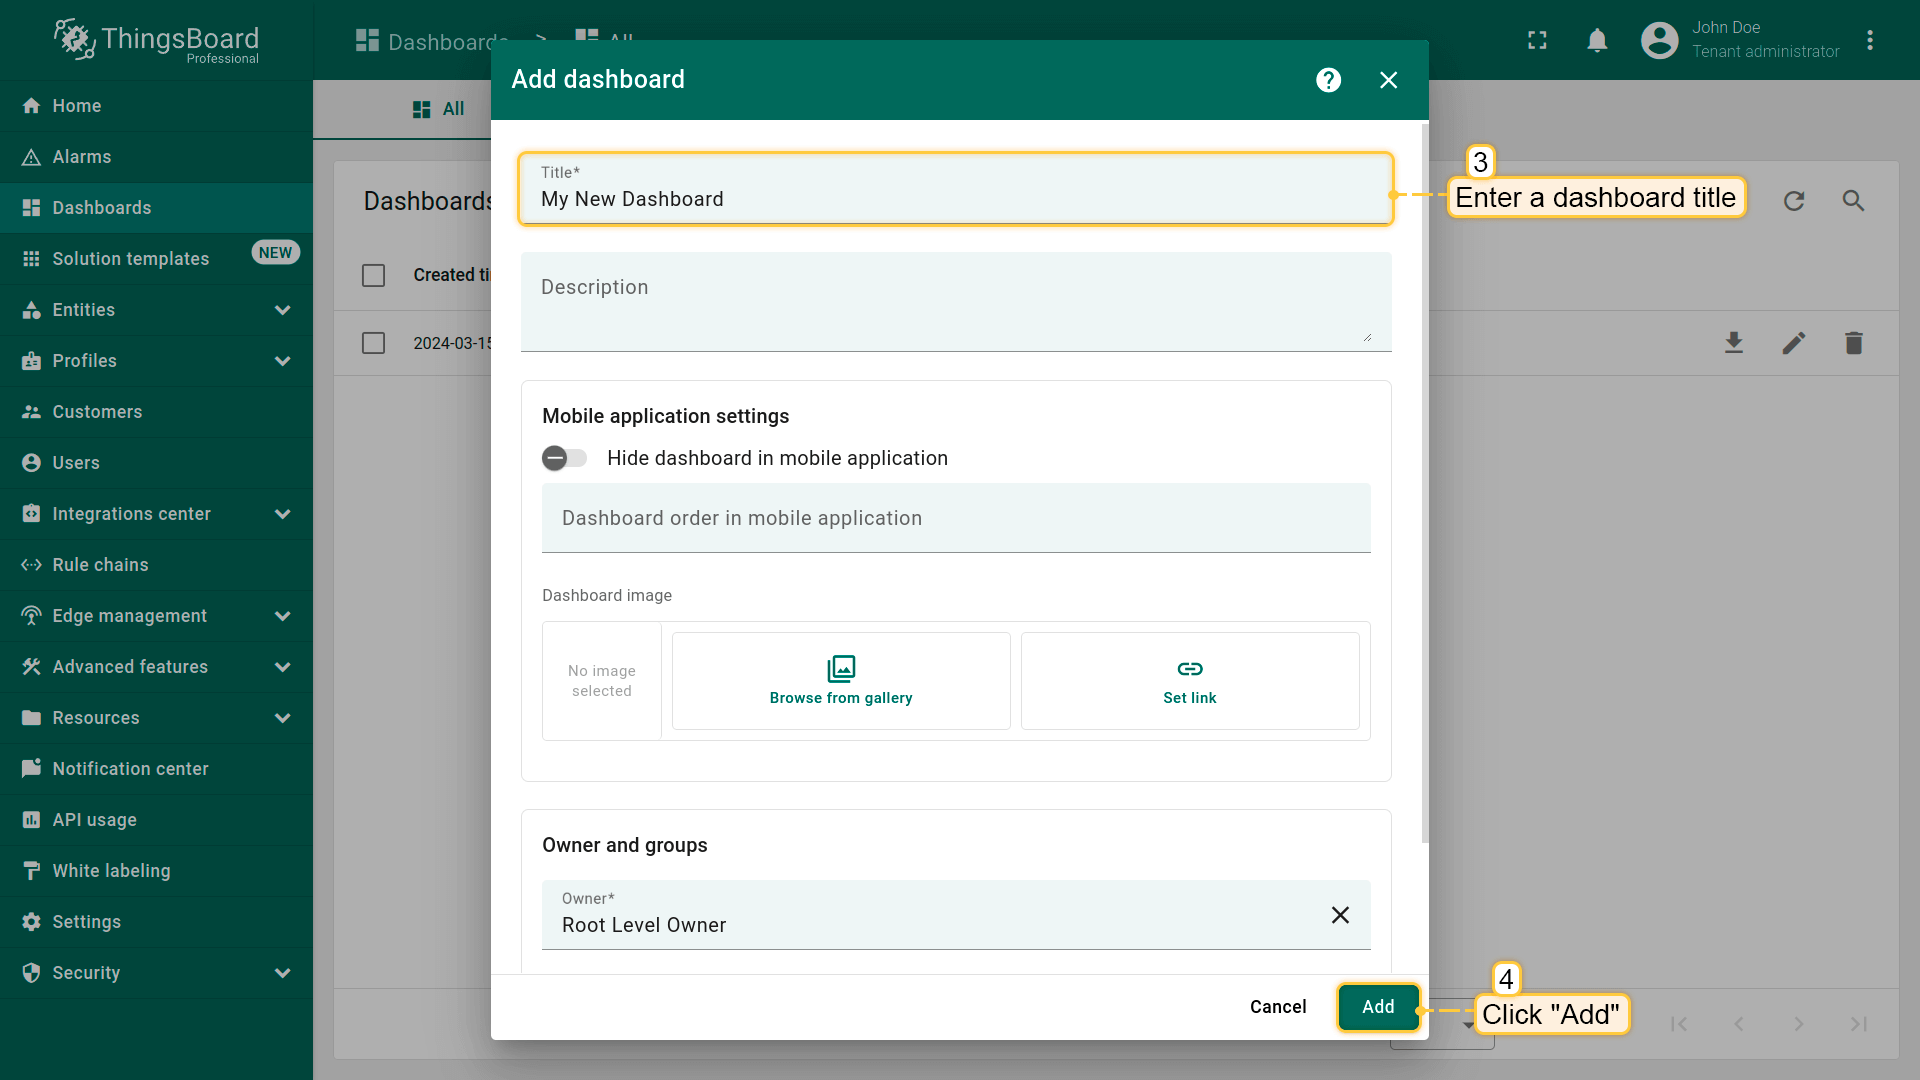
- In the opened dialog, it is necessary to enter a dashboard title, description is optional. Click "Add";
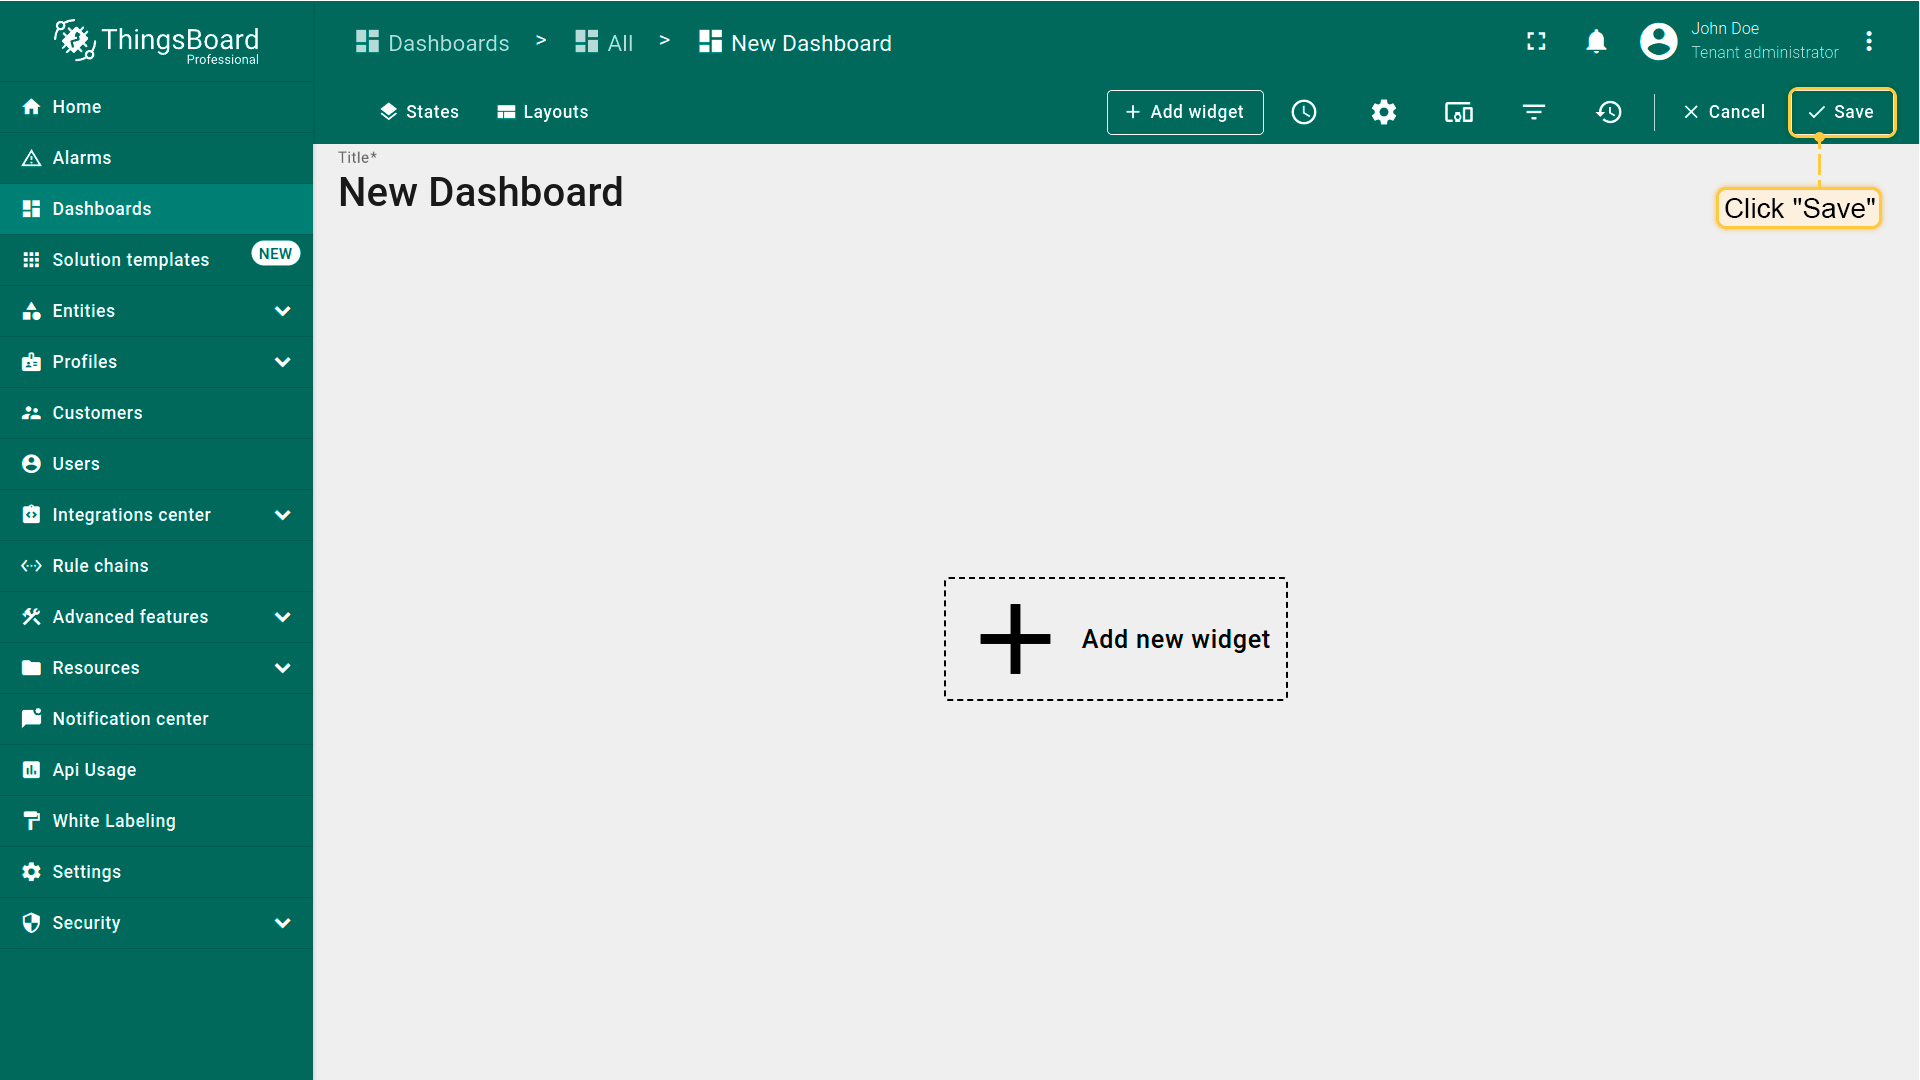
- After creating the dashboard, it will open automatically, and you can immediately start adding widgets to it. To save the dashboard, click "Save" button in the upper right corner;
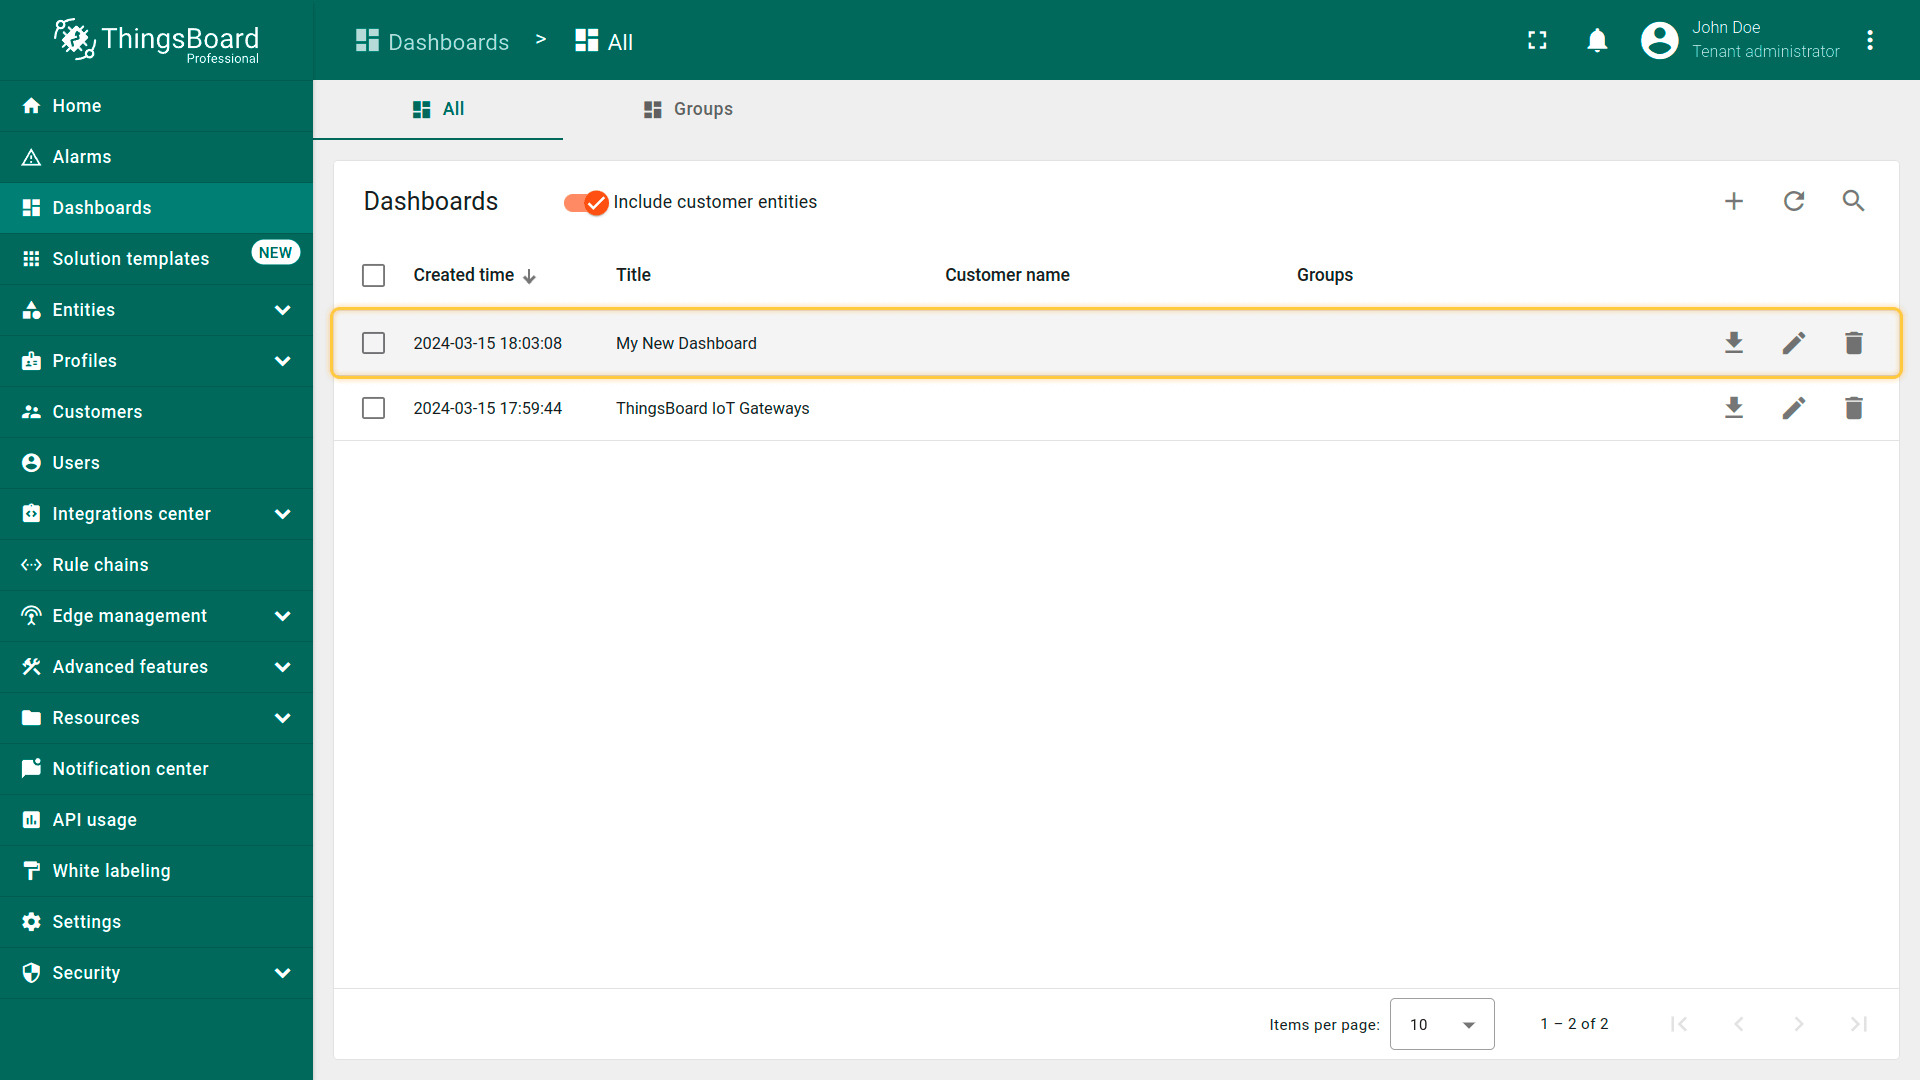
- Your first dashboard has been successfully created. As you continue to add new dashboards, they will appear at the top of the list. This default sorting is based on the creation timestamp.
步骤3.2添加实体表部件
「实体表」部件展示实体列表及其最新值。 实体列表对应所选设备或其他实体,支持全文搜索和分页过滤。
添加表格部件时需从部件库中选择。部件按部件包分组。 每个部件有数据源,用于确定要展示的数据。 为查看步骤2中发送的「temperature」数据最新值,需配置数据源。
添加第一个部件:
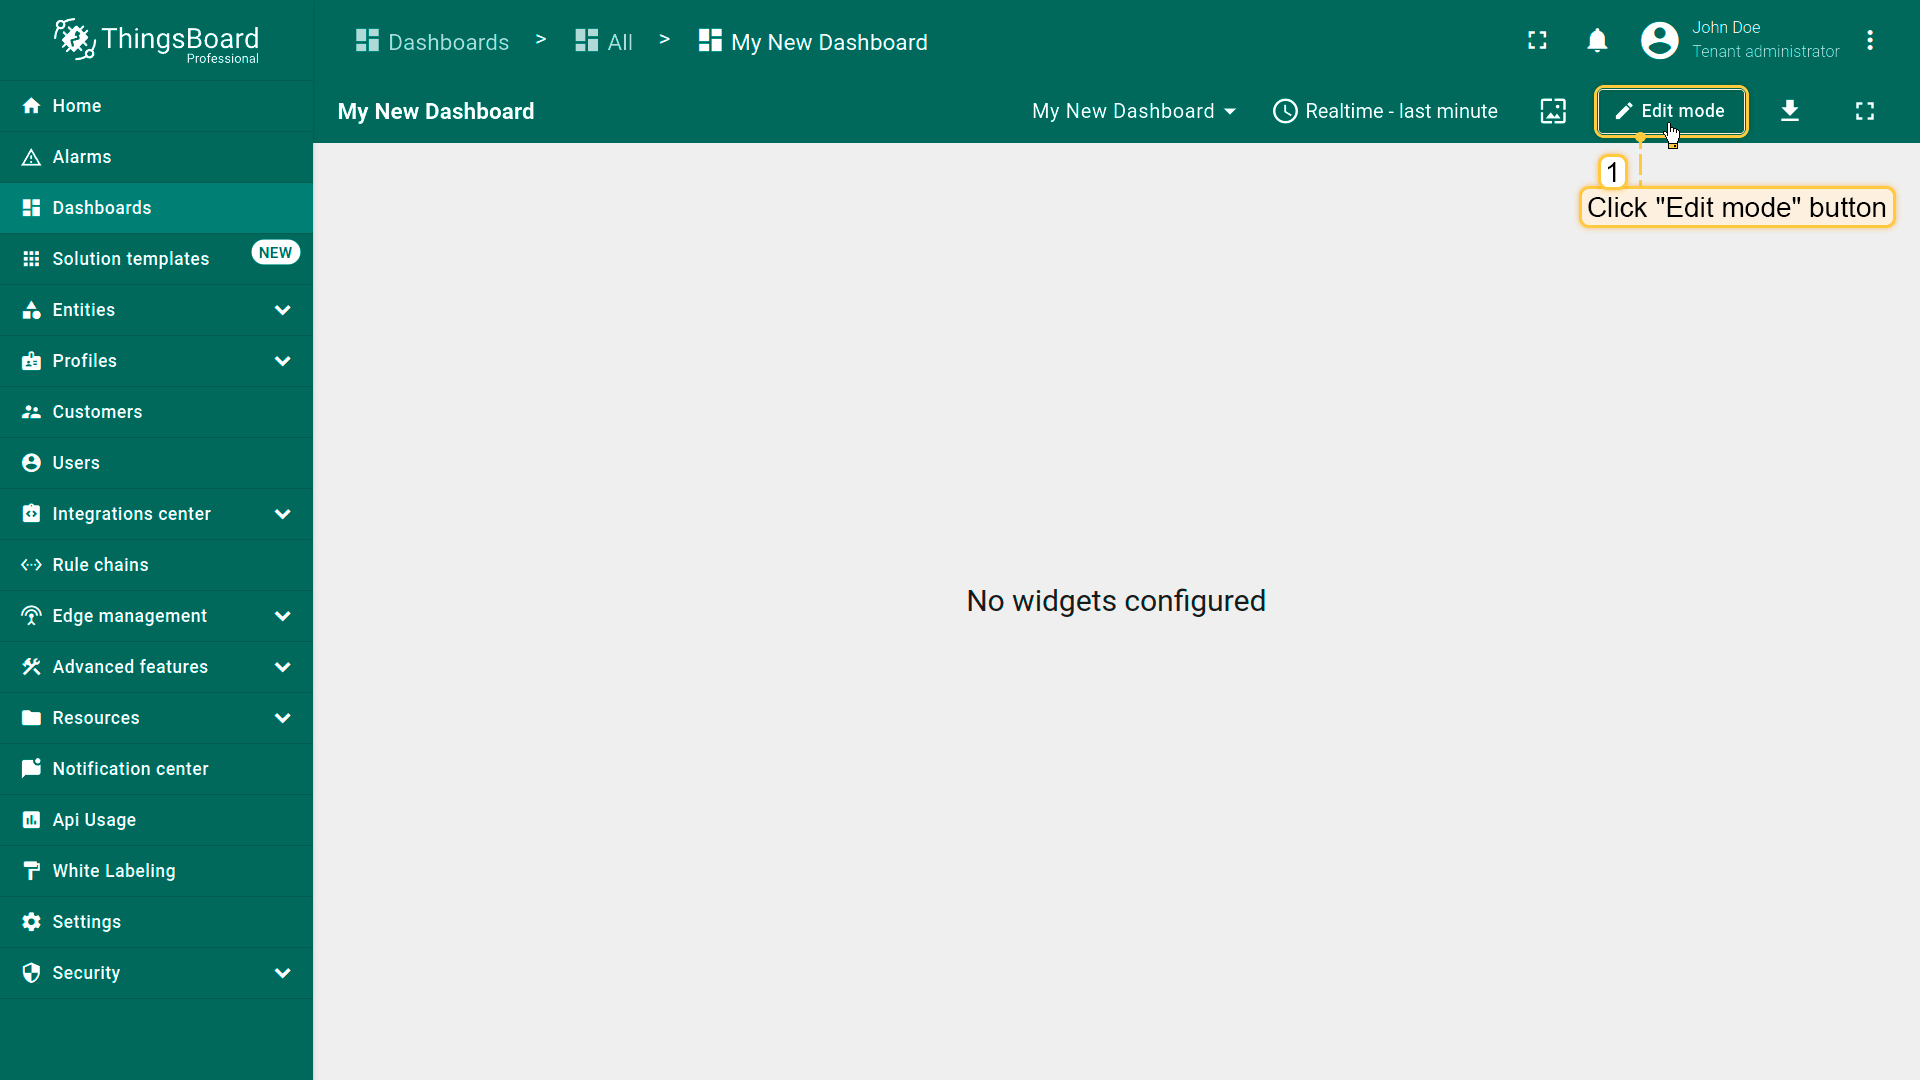
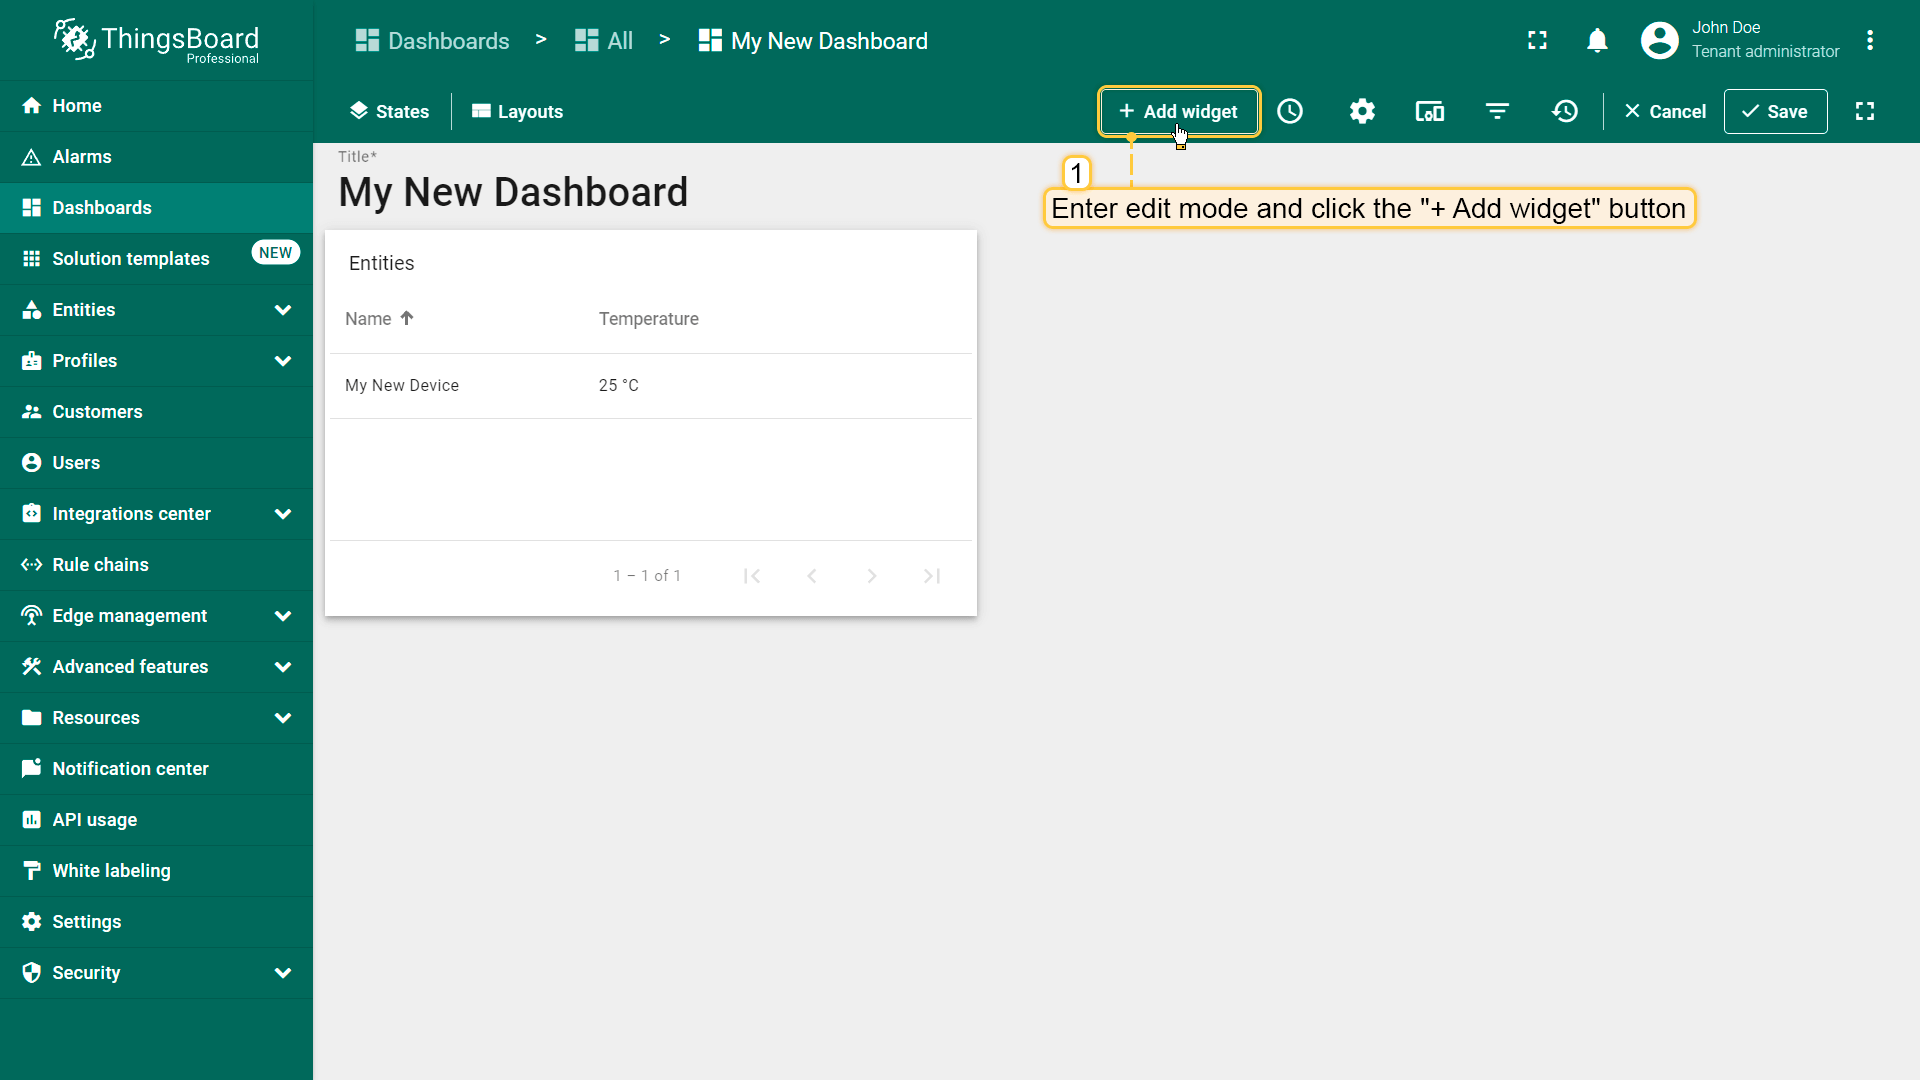
- Enter dashboard edit mode. Simply open the dashboard and click the "Edit mode" button found in the upper right corner of the screen;
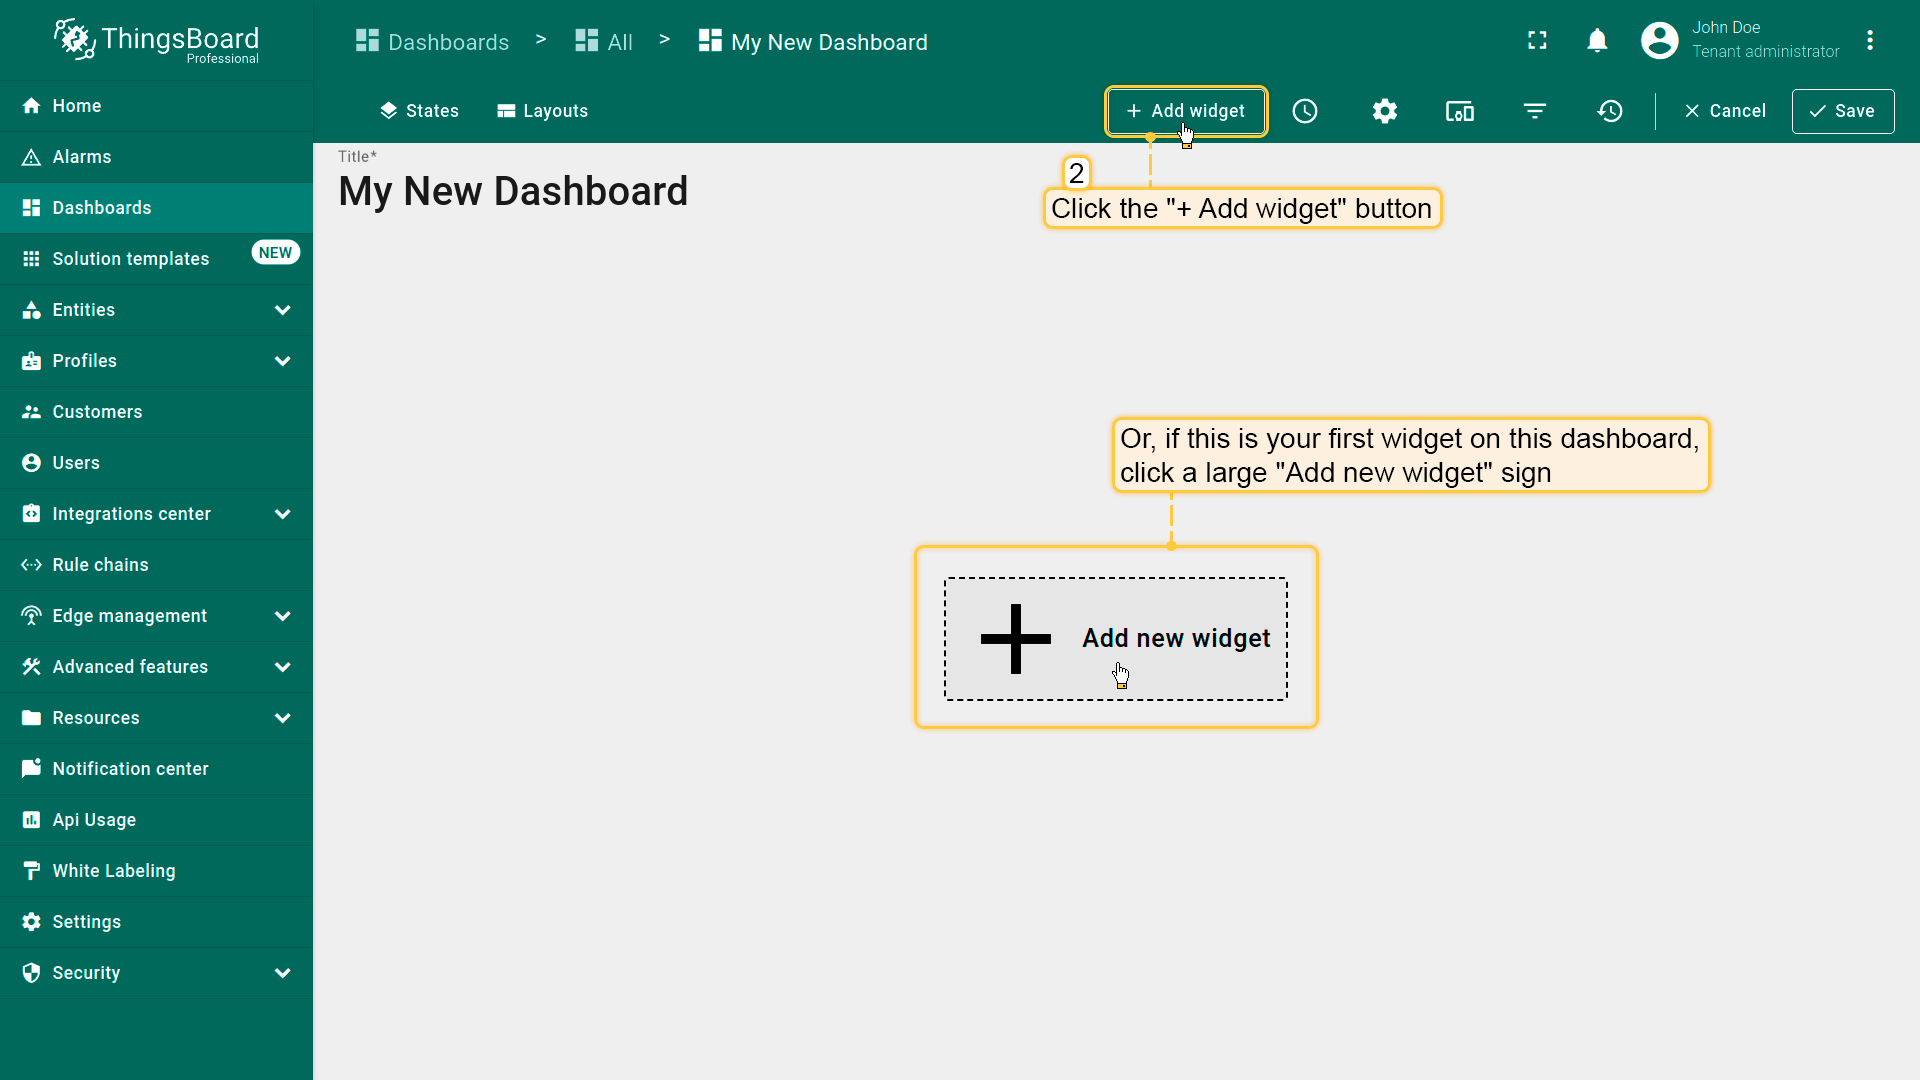
- Click the "Add widget" button at the top of the screen or click the large "Add new widget" icon in the center of the screen (if this is your first widget on this dashboard);
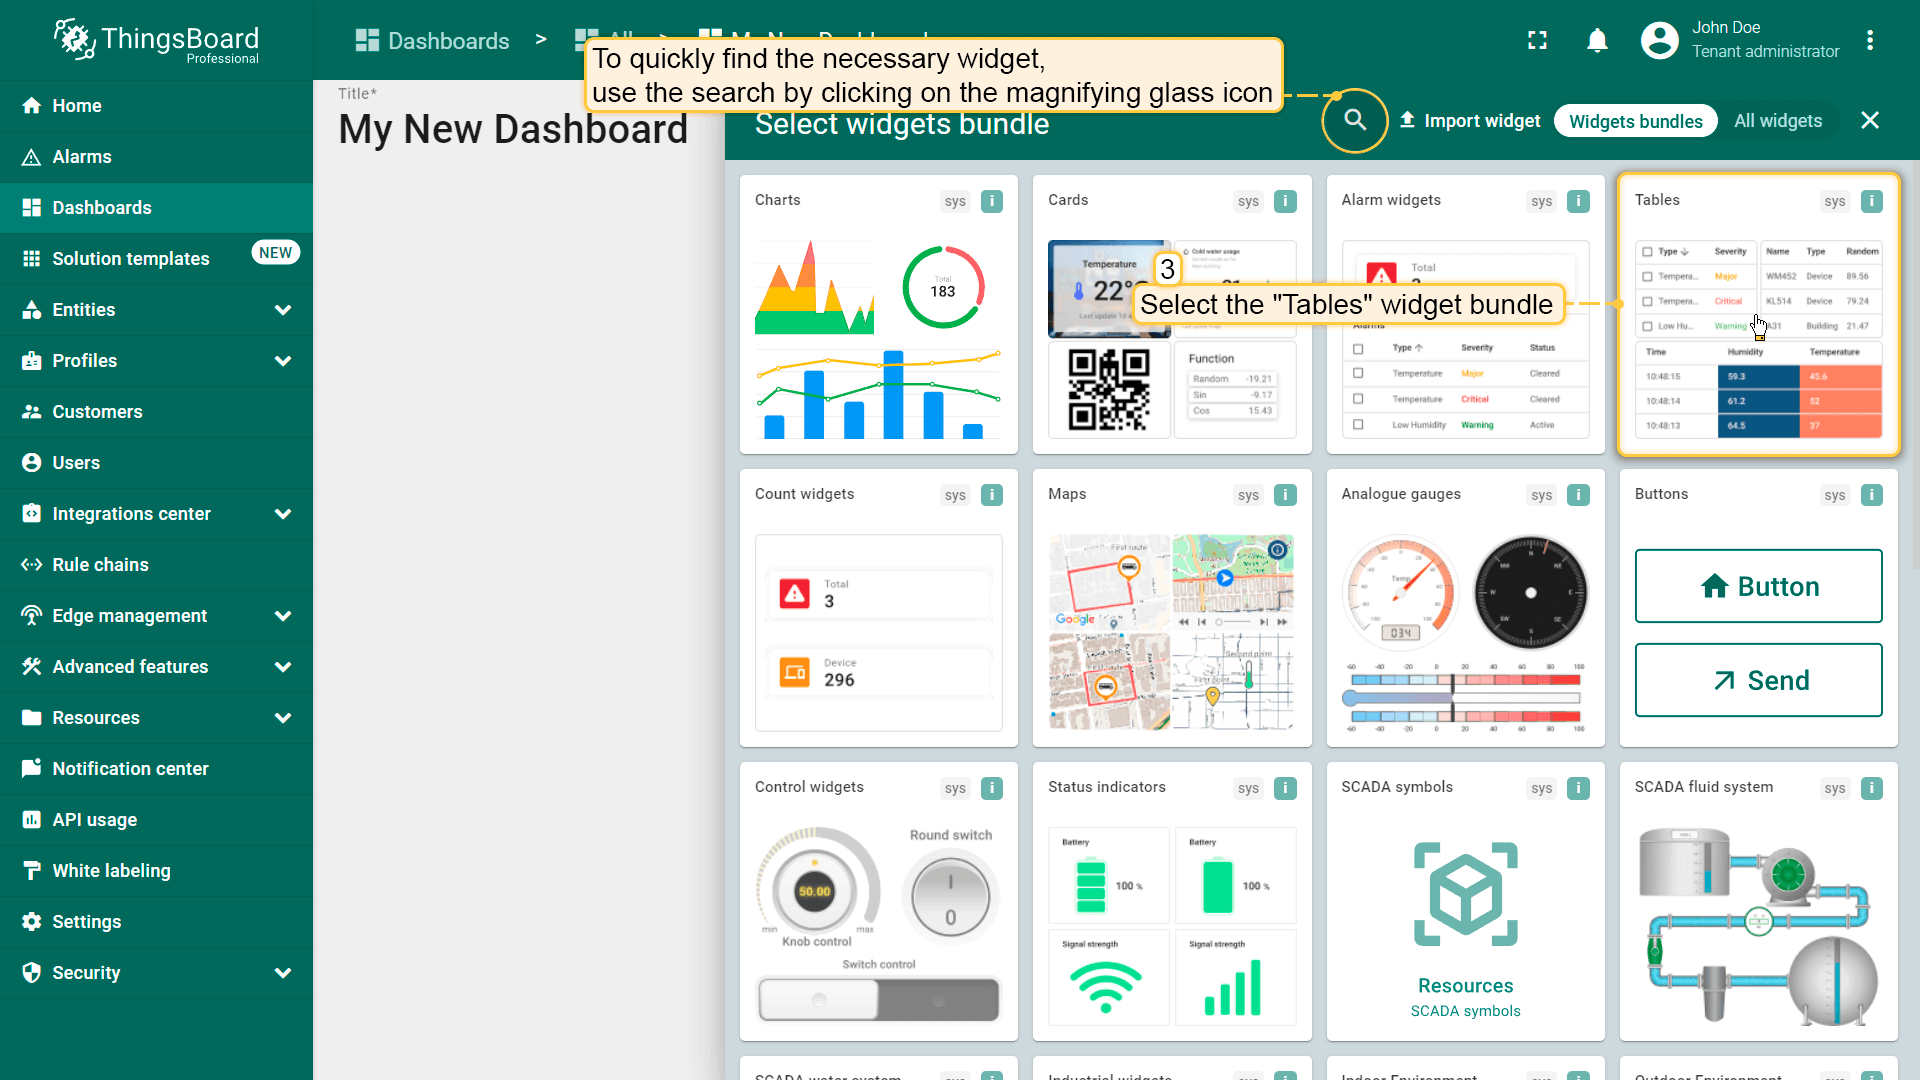
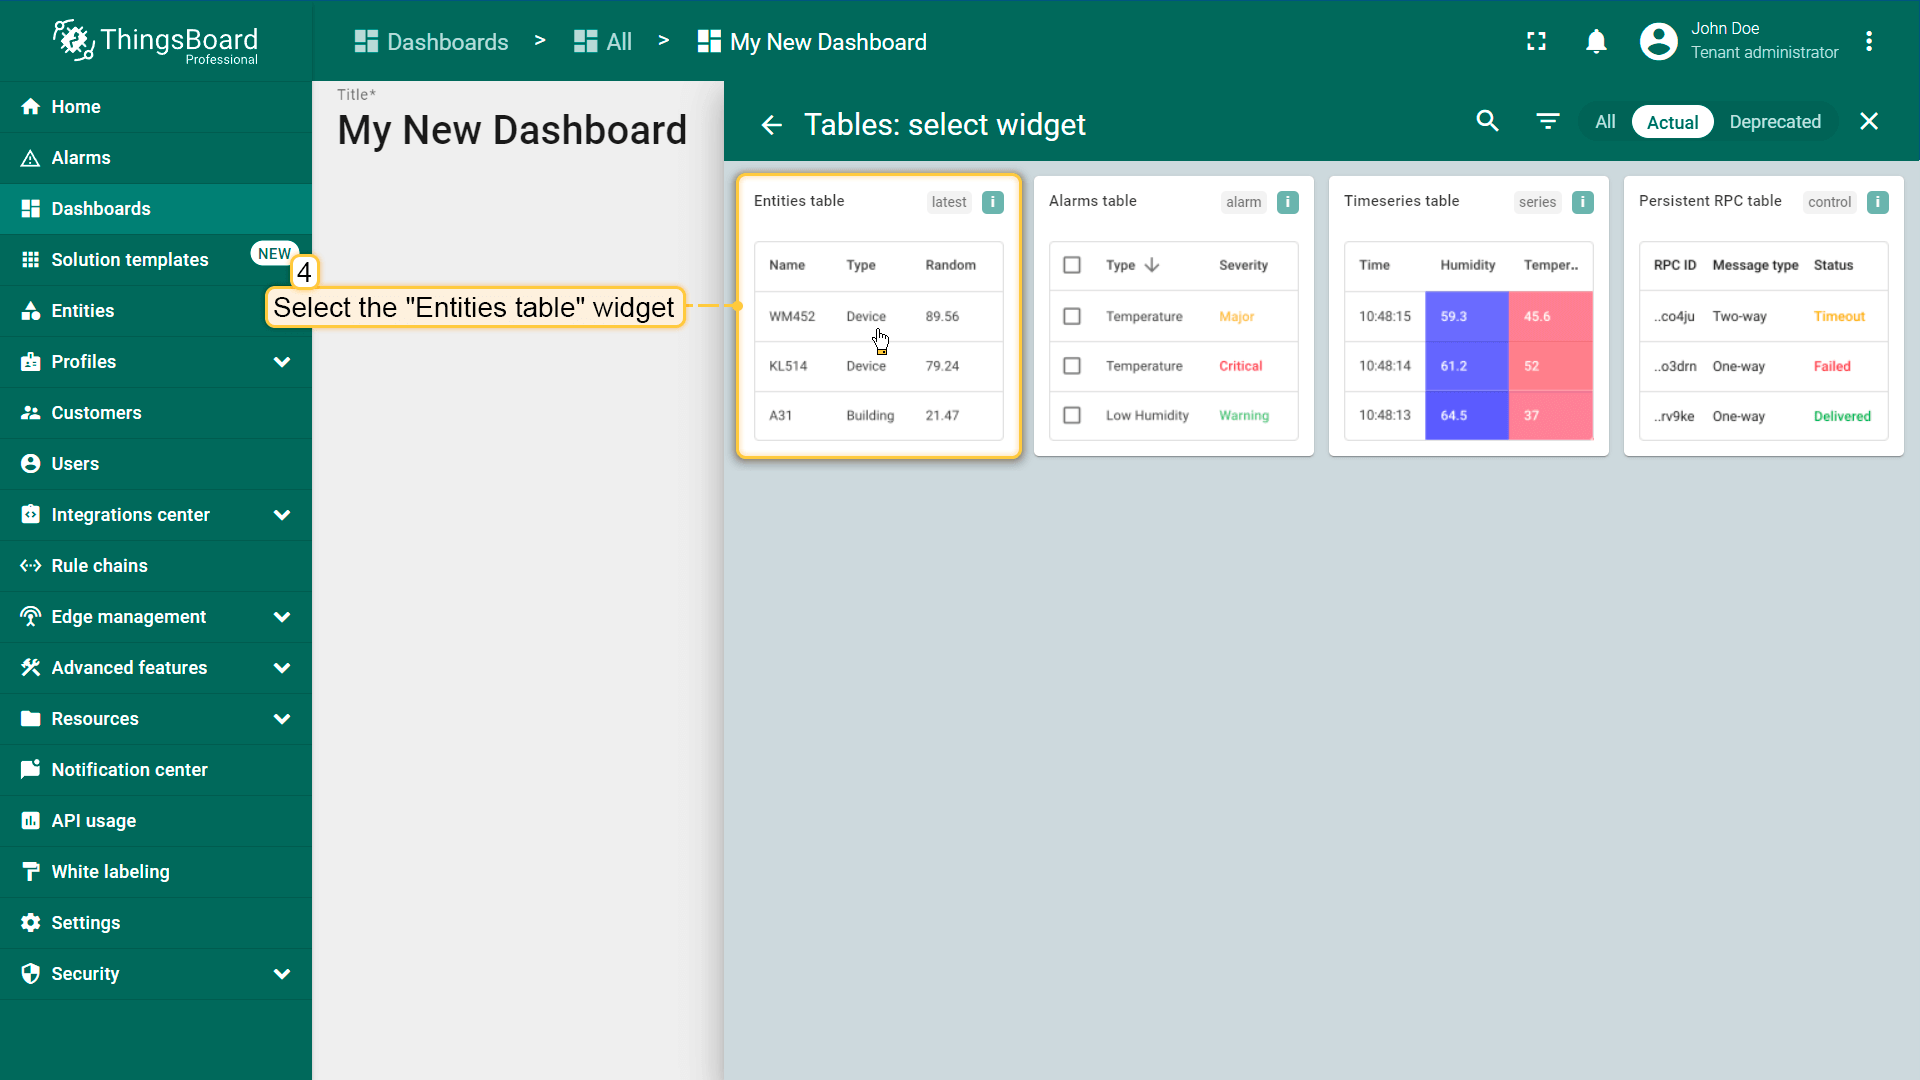
- Find the "Tables" widget bundle and click on it;
- Select the "Entities table" widget;
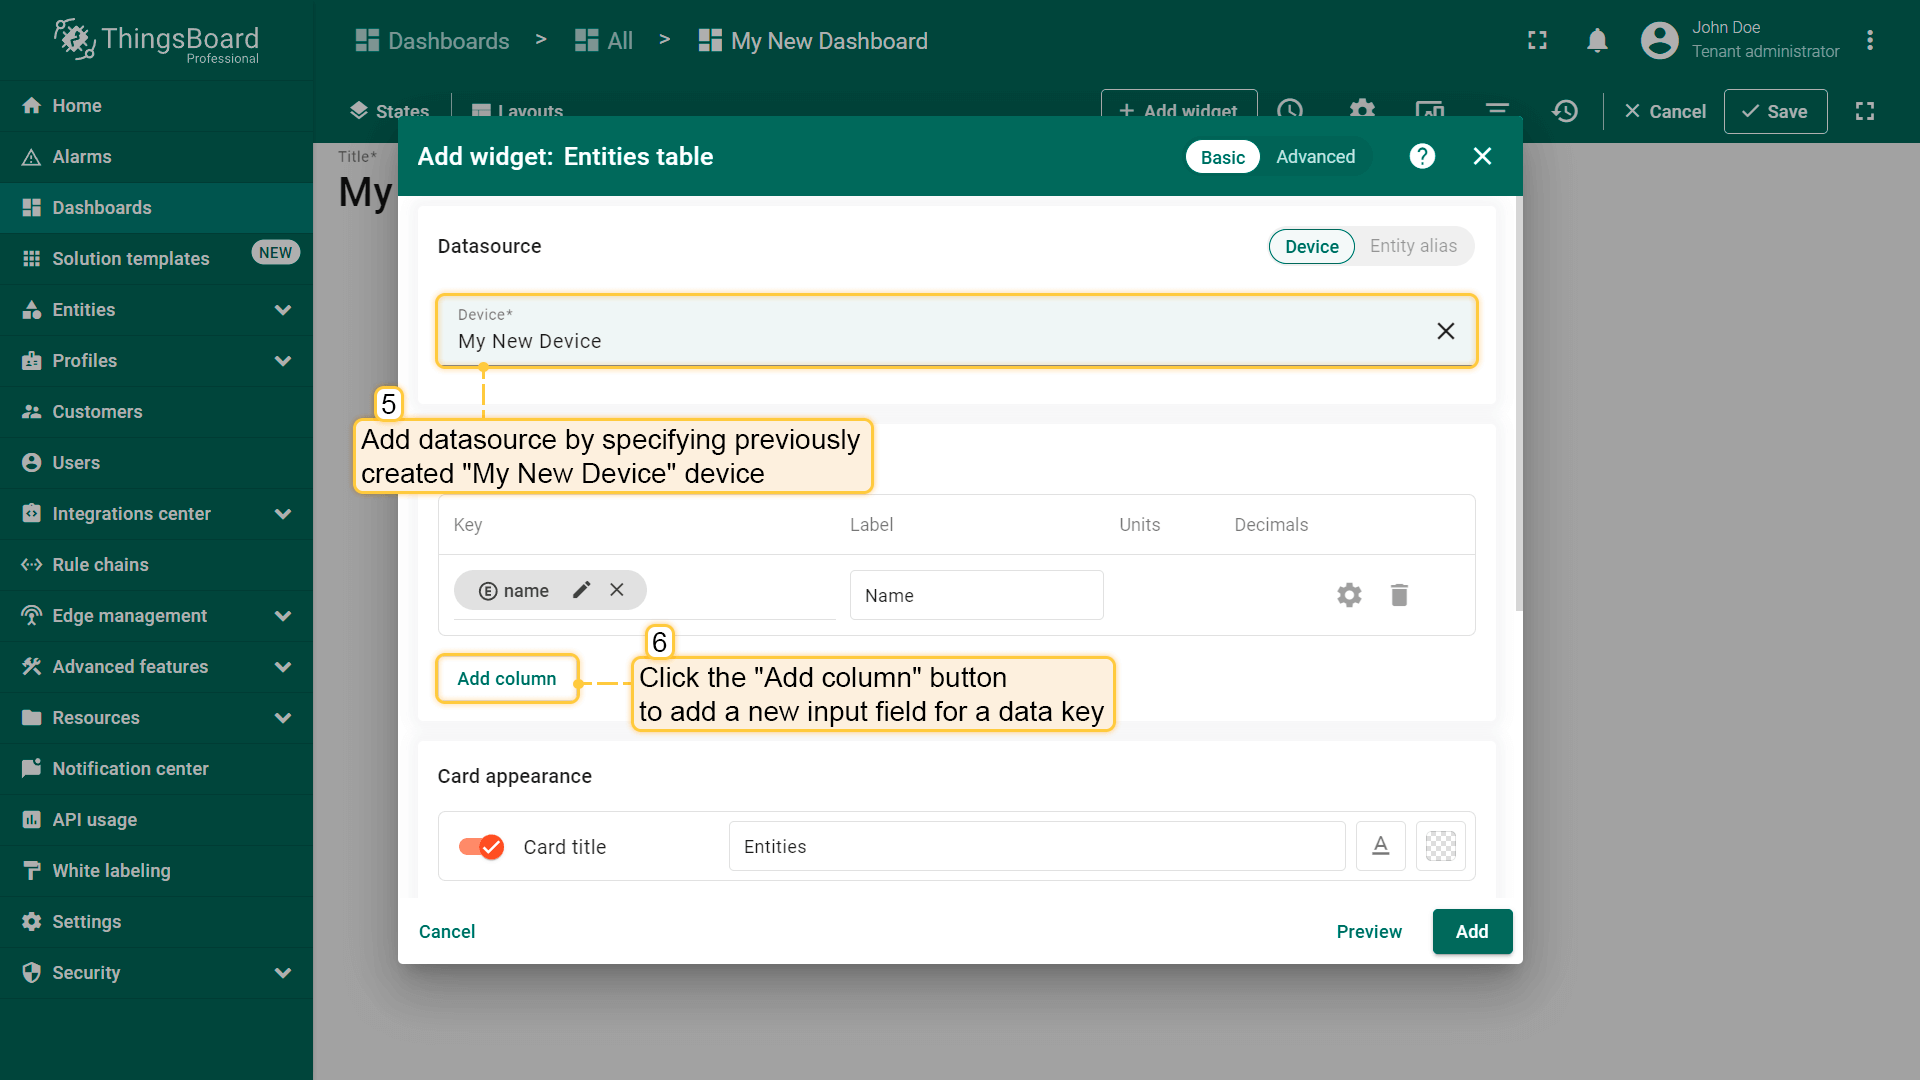
- The "Add Widget" window will appear. Specify the previously created device "My New Device" as the data source in the "Device" field. The “name” key has already been added to the “Columns” section, which is responsible for the column with the device name. You need to add another column that will display the value of the "temperature" key. To do this, click "Add column" to add a new field to enter the data key;
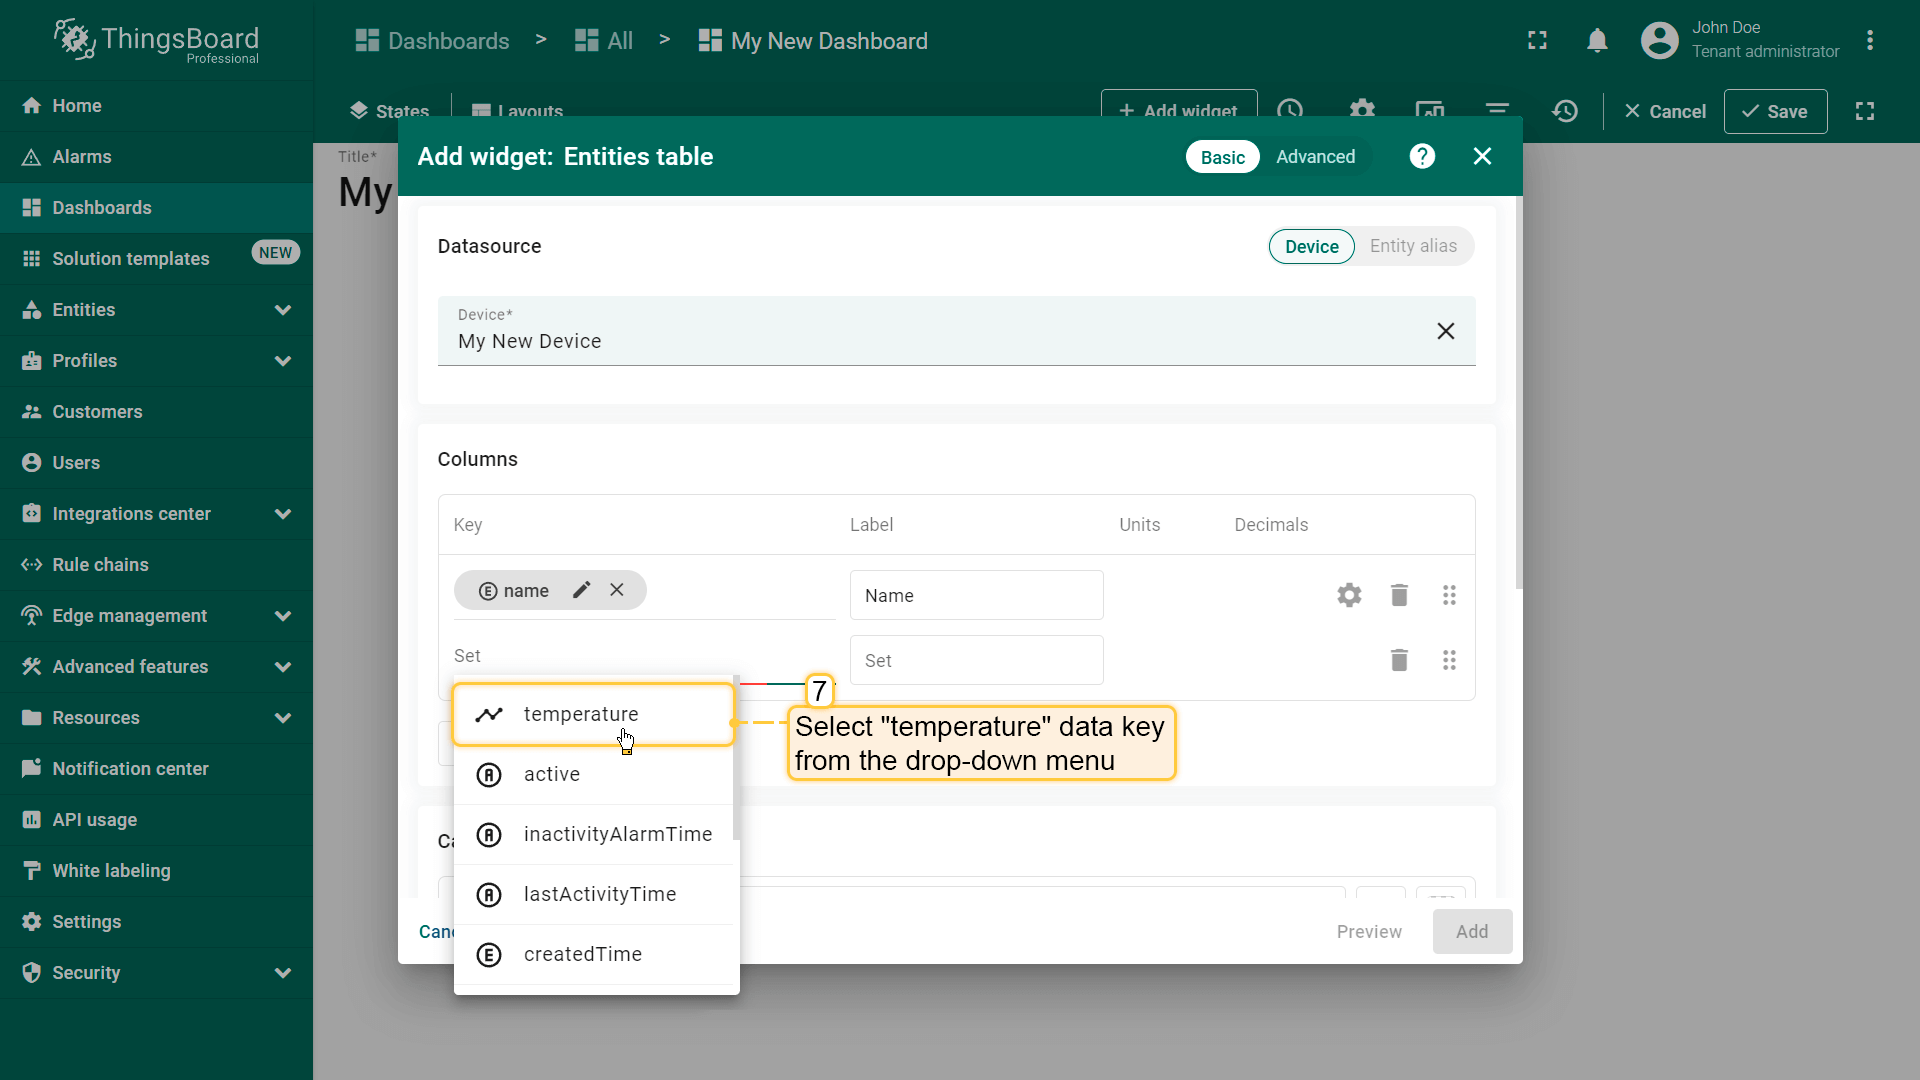
- Click on the newly appeared data key input field. A list of available data keys will open. Select "temperature" data key;
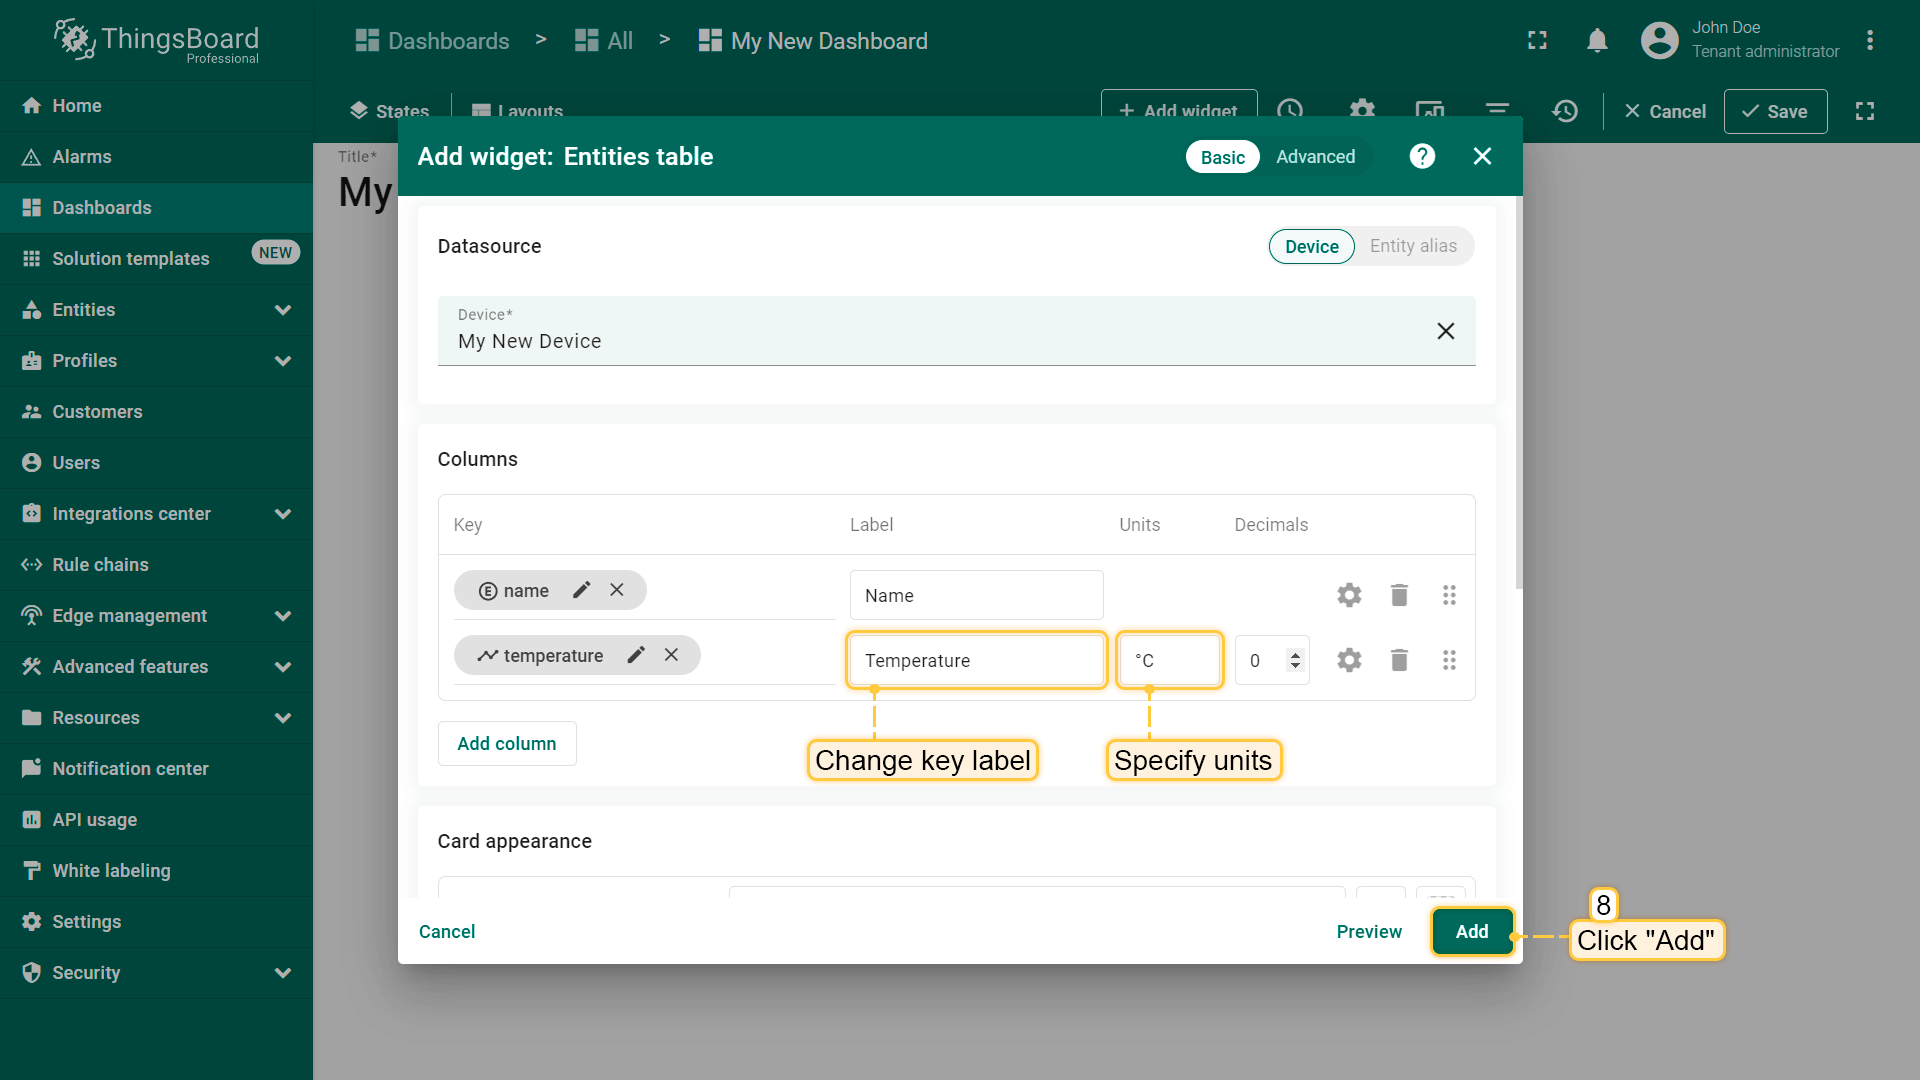
- Click the "Add" button in the bottom right corner of the widget to complete adding the widget;.
- To make the widget slightly larger, simply grab the bottom right corner and drag it. Once you're happy with the new size, don't forget to click "Save" to save your changes to the dashboard.

恭喜!您已添加第一个部件。
「实体表」部件包含两列。 第一列显示设备名称,第二列显示「temperature」键(设备遥测)的值。 每列对应一个添加的键。
现在可发送新的遥测读数(同步骤1),它会立即显示在表格中。
步骤3.3添加图表部件
图表部件用于展示时序数据,支持可定制的折线图和柱状图。
添加图表部件时需从部件库中选择。 图表部件显示同一数据键的多个历史值(本例为「temperature」)。 还需配置时间窗口以使用图表部件。
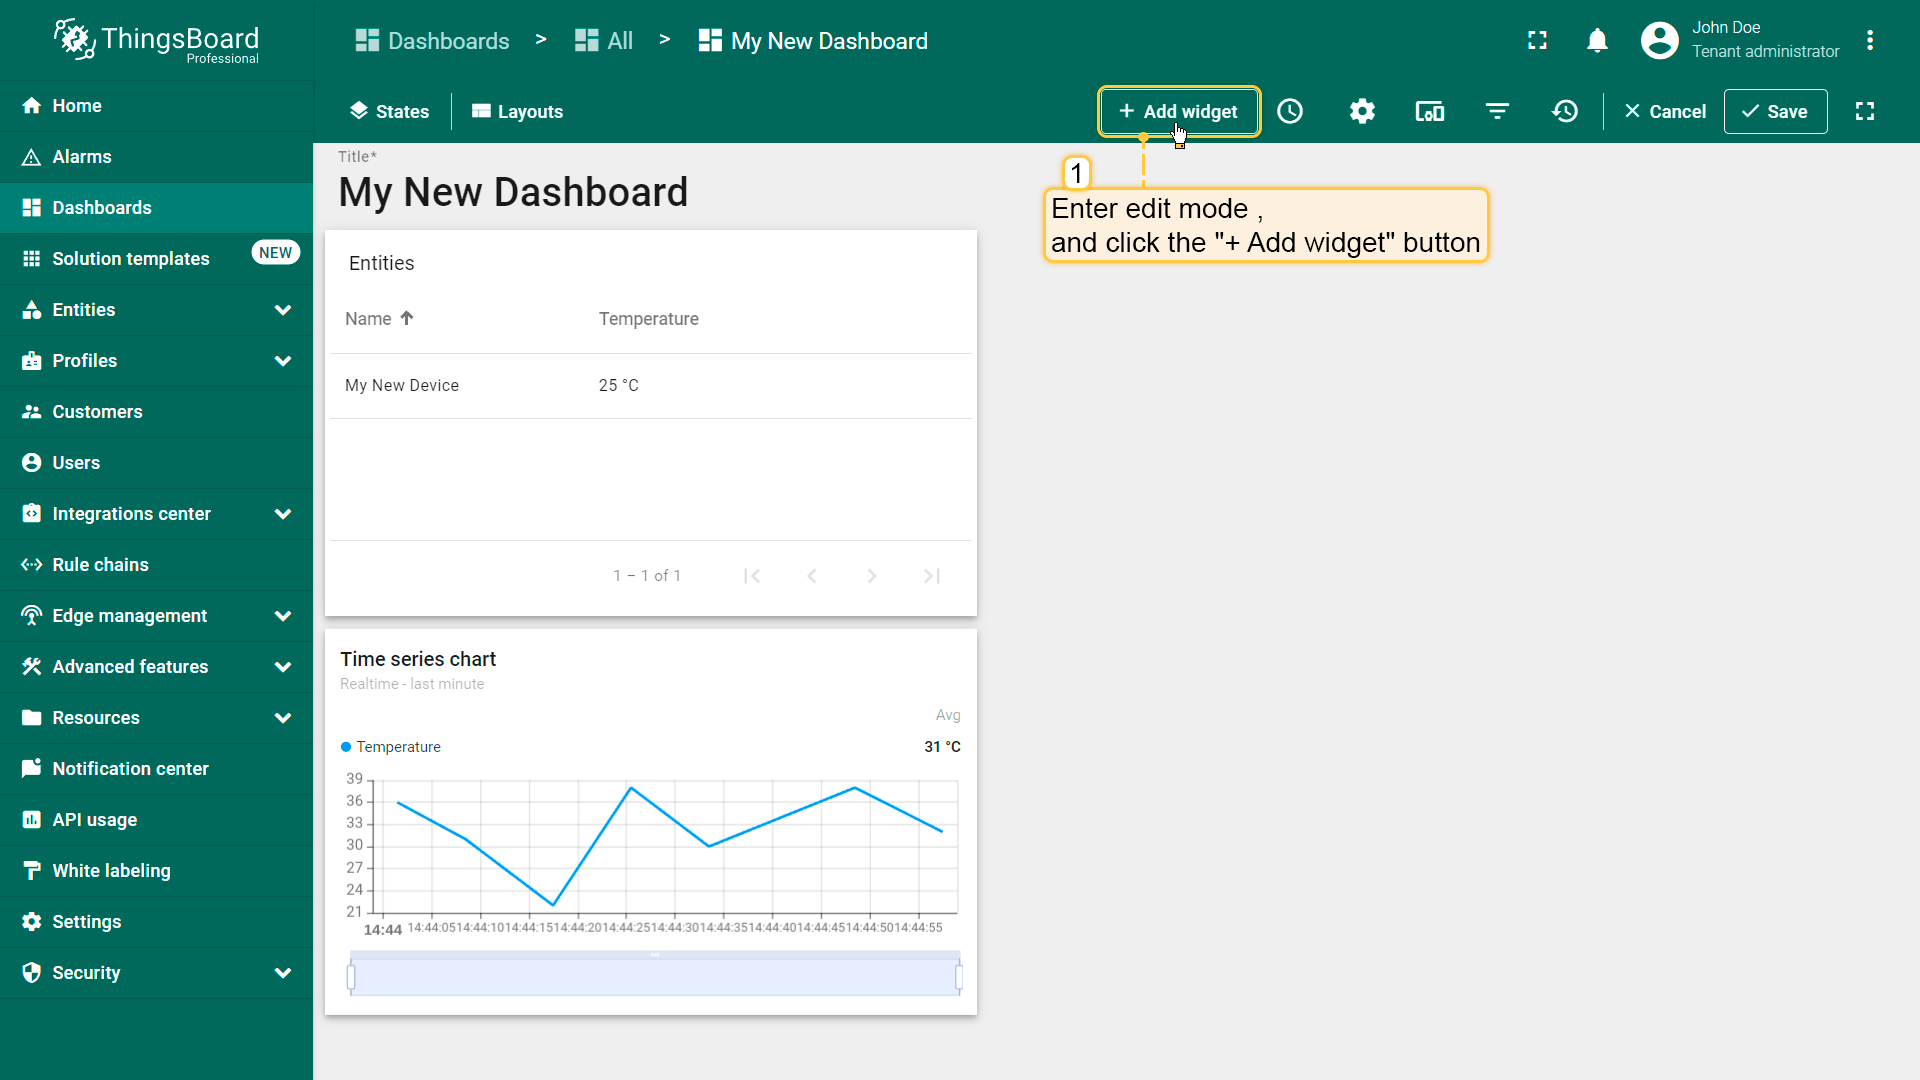
- Enter edit mode and click the "Add new widget" button at the top of the screen;
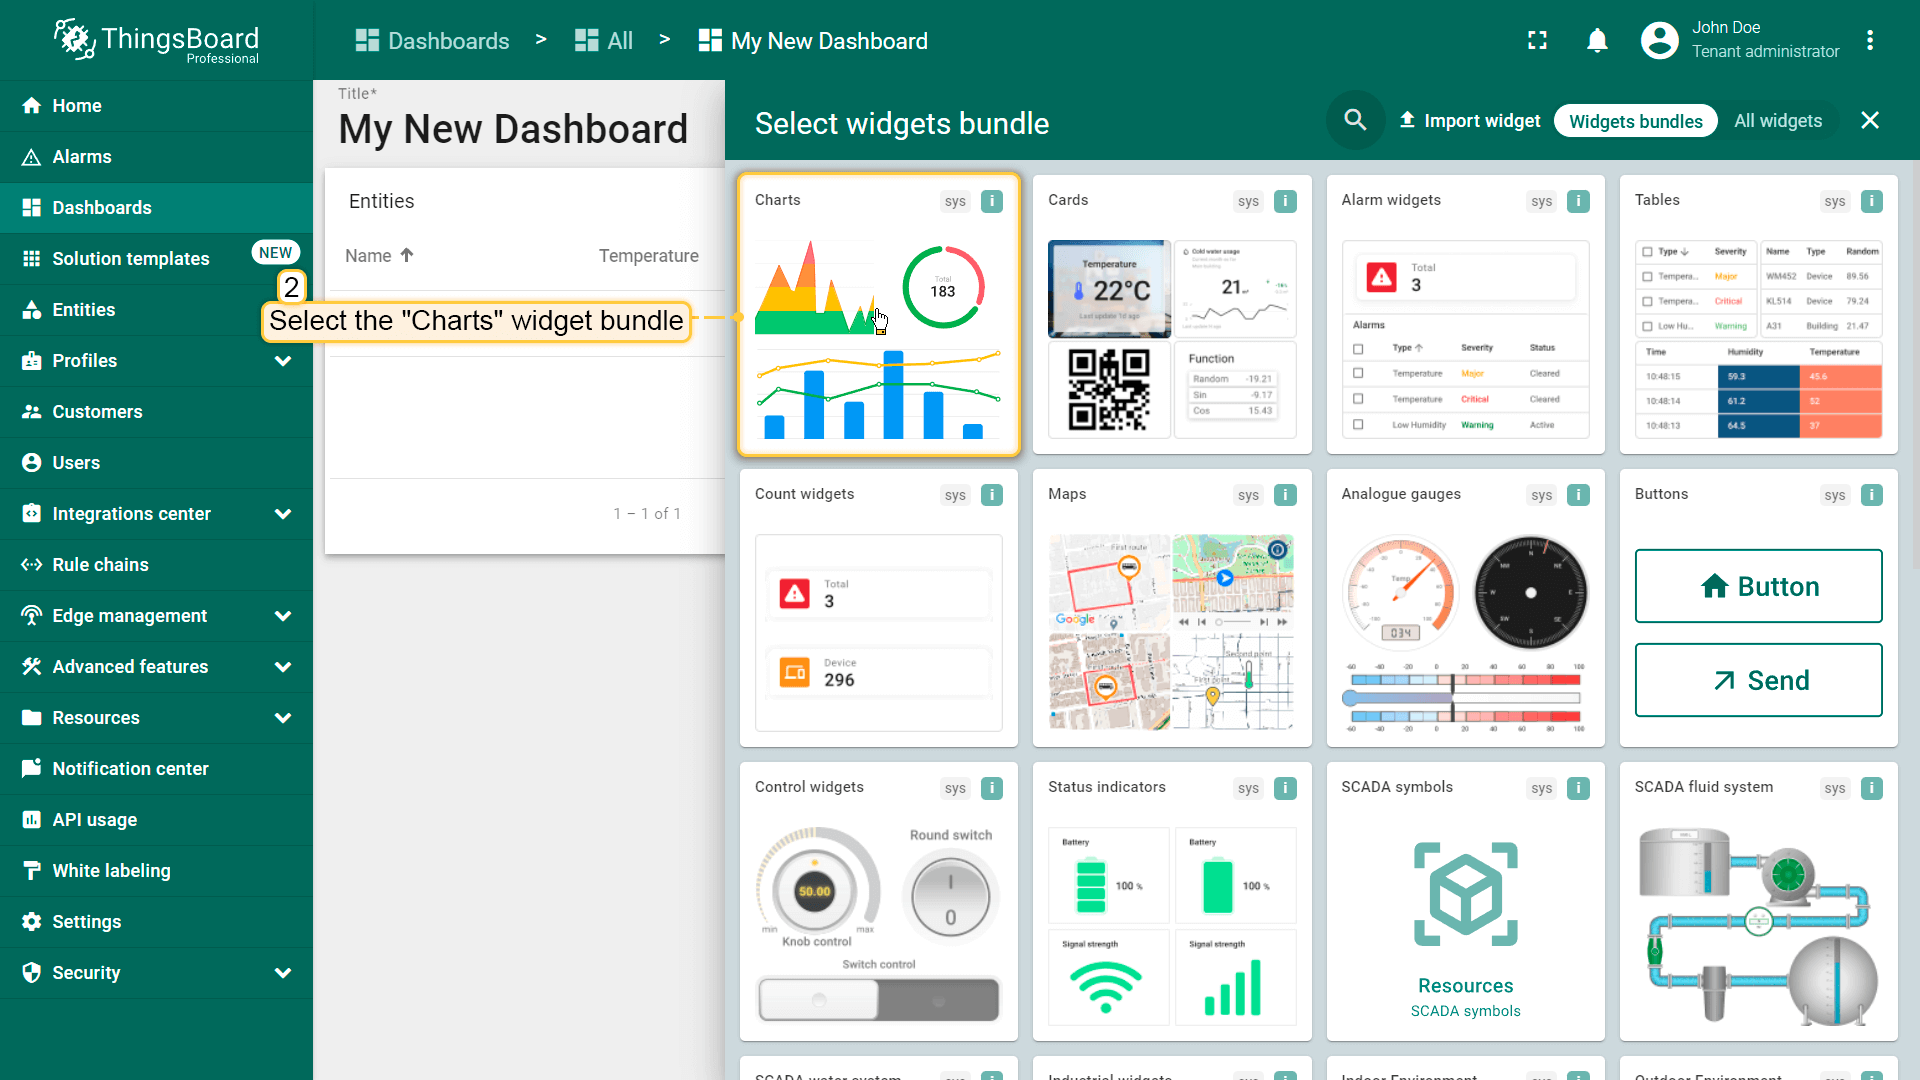
- Find the "Charts" widget bundle and click on it;
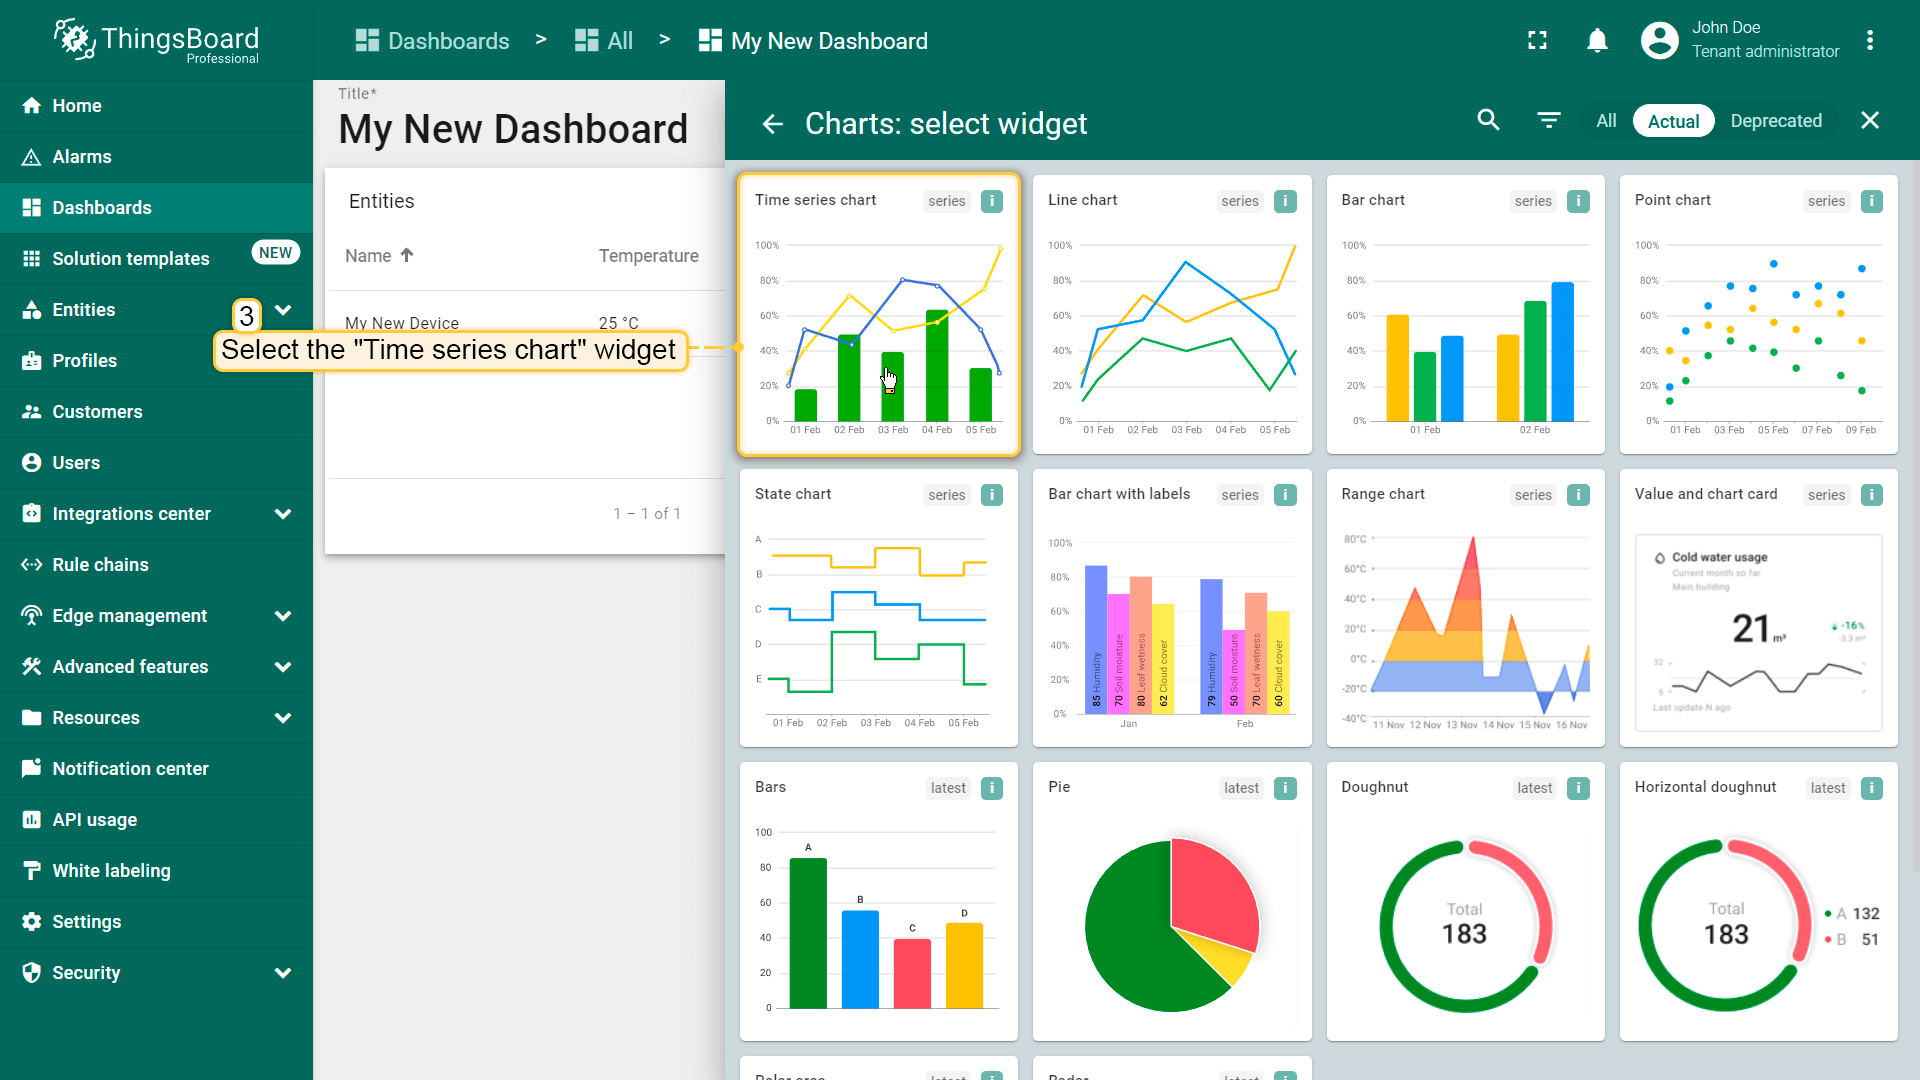
- Select the "Time series сhart" widget;
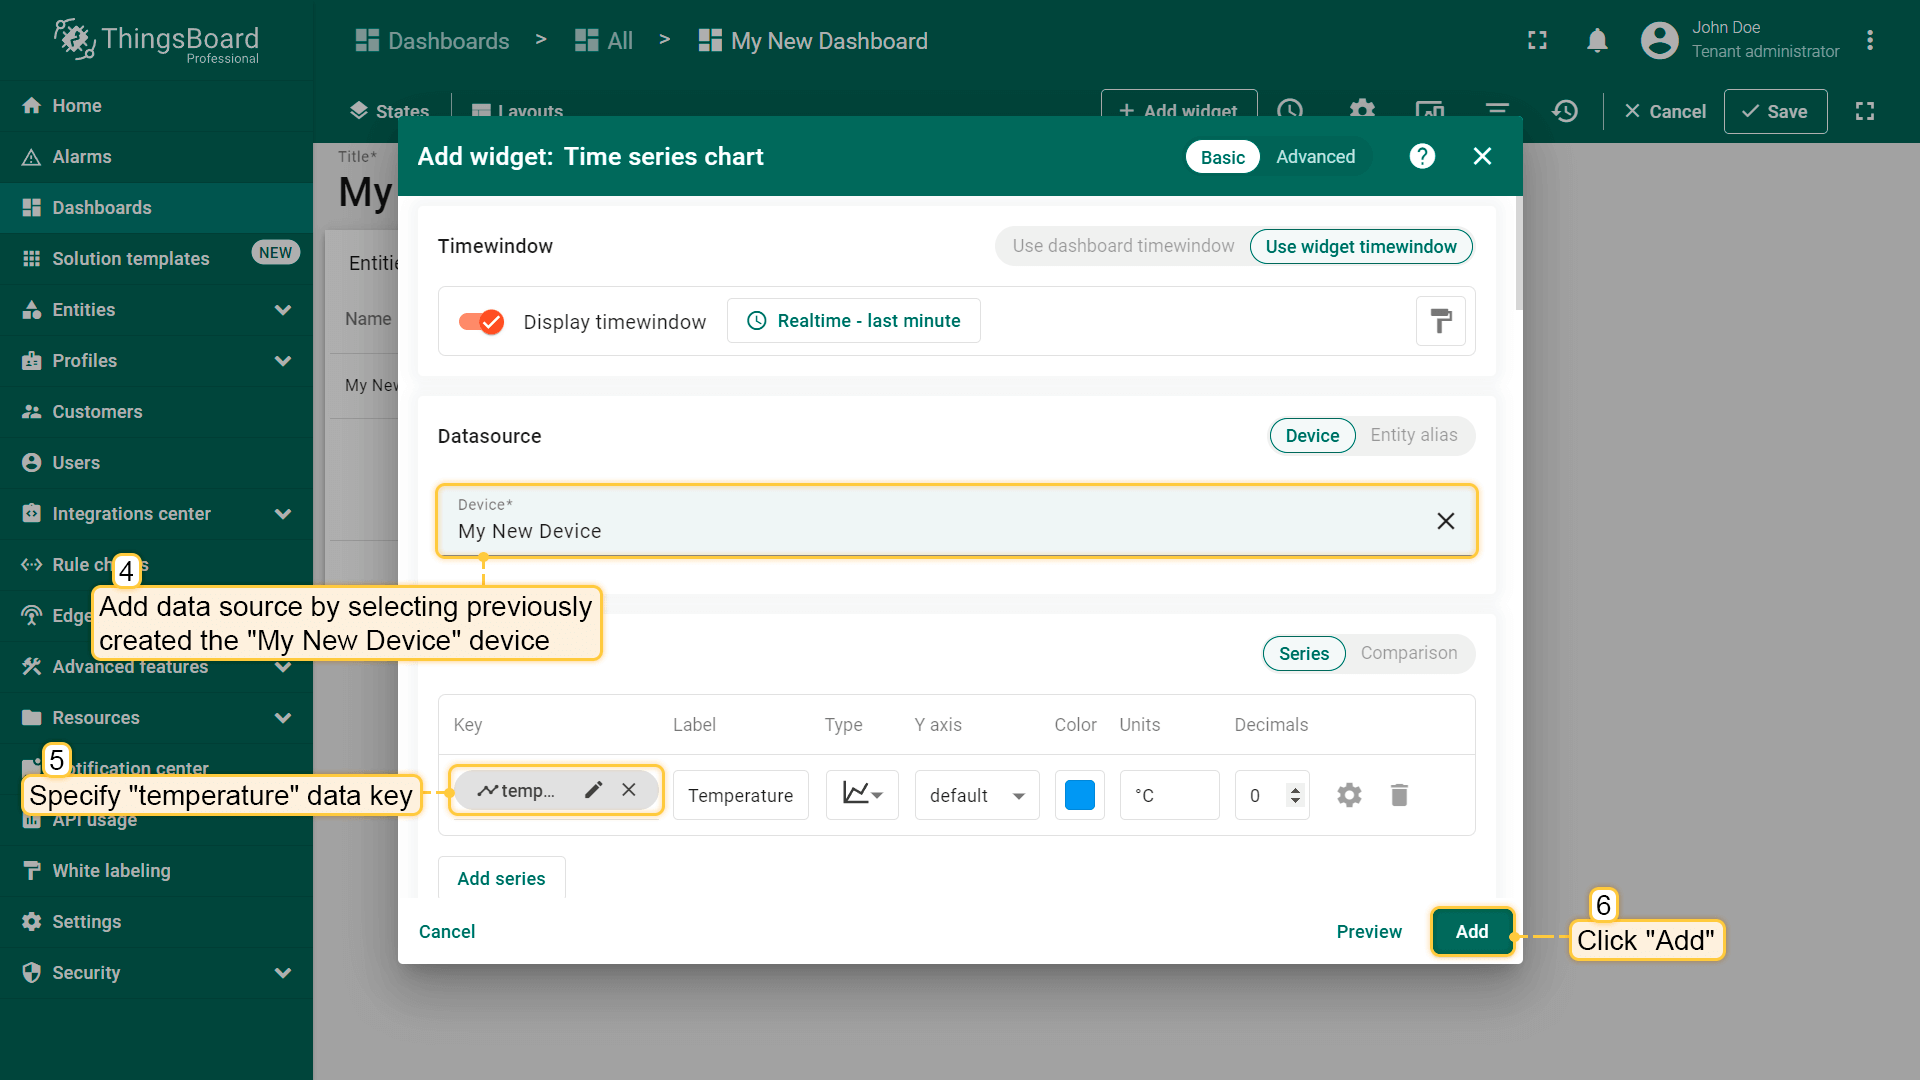
- Specify the previously created device "My New Device" as the data source in the "Device" field. In the "Series" section, specify the data key "temperature" to start monitoring the temperature values of the device. Then, click "Add";
- Resize the widget and apply changes. Publish different telemetry values multiple times, as in Step 2. Note that the widget displays only one minute of data by default. Click "Save" to apply changes;
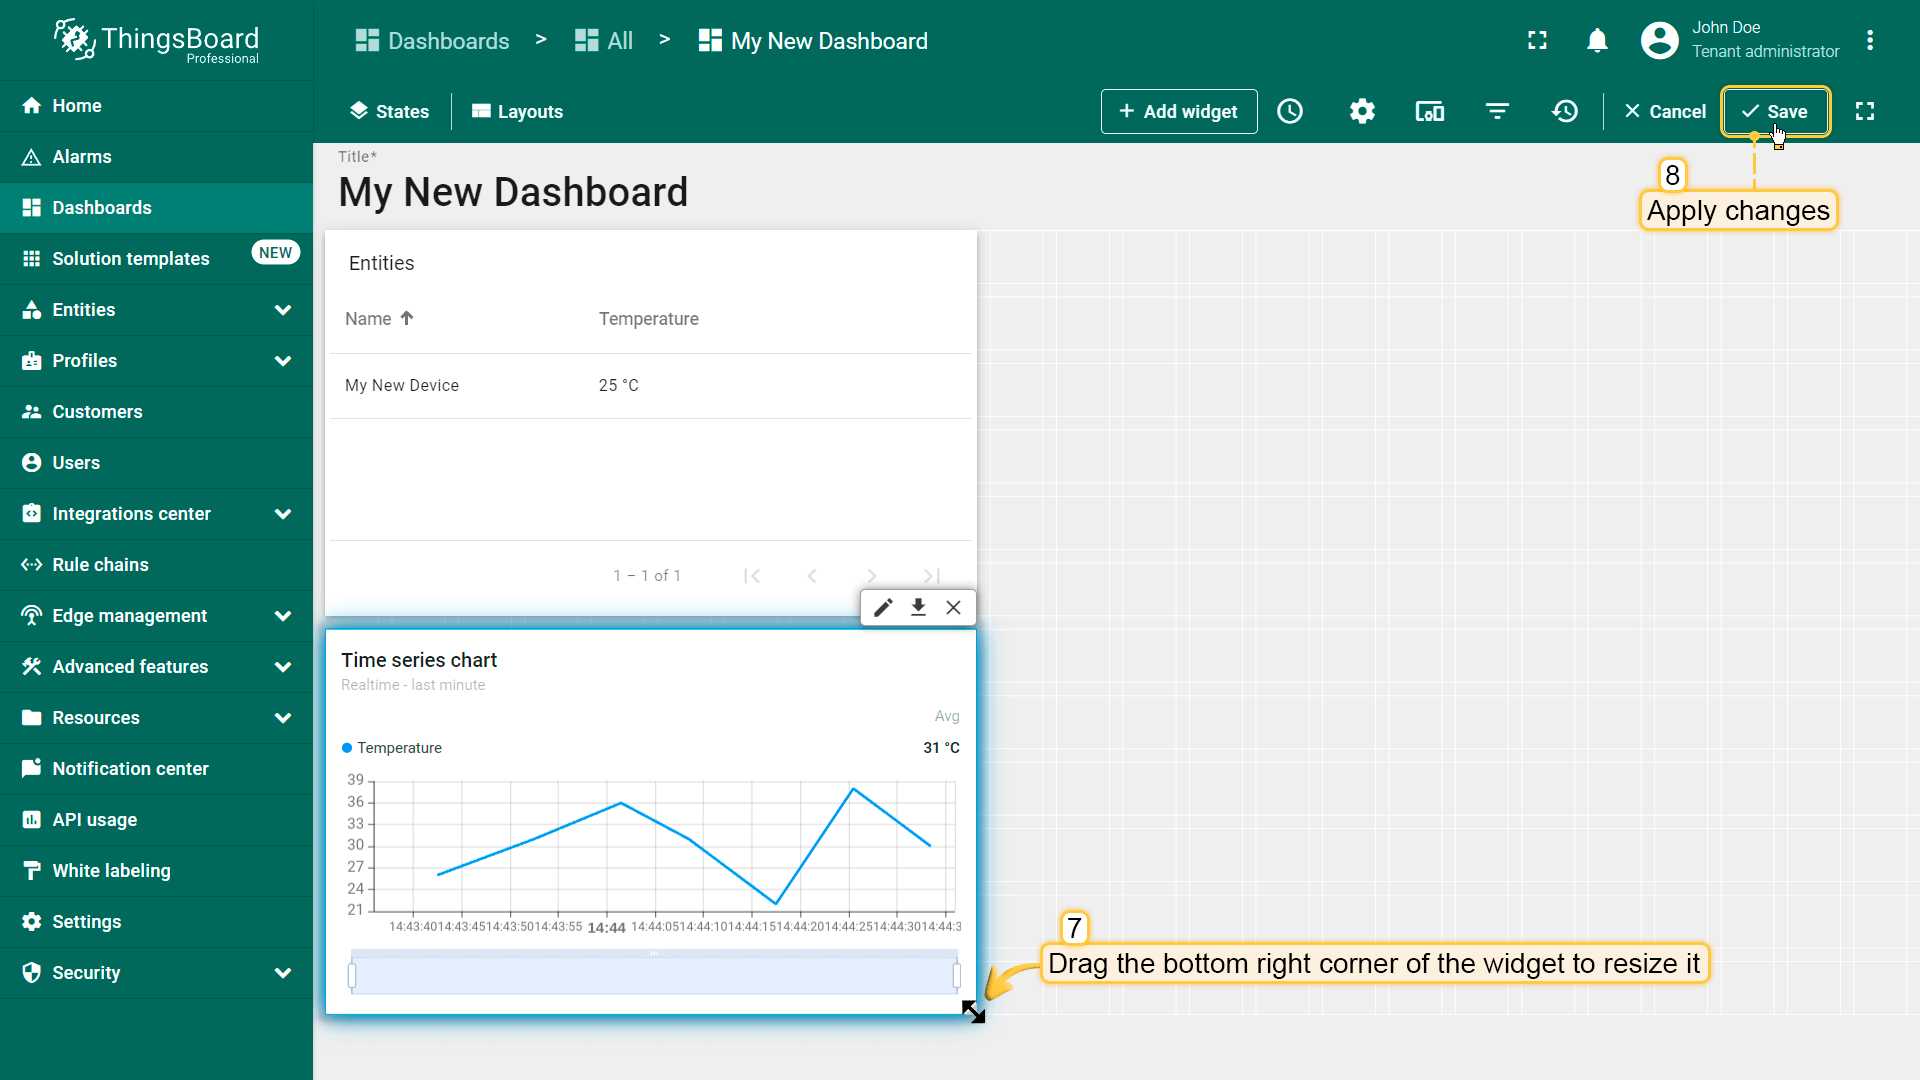
恭喜!您已添加图表部件。现在可发送新的遥测读数,它会立即显示在图表中。
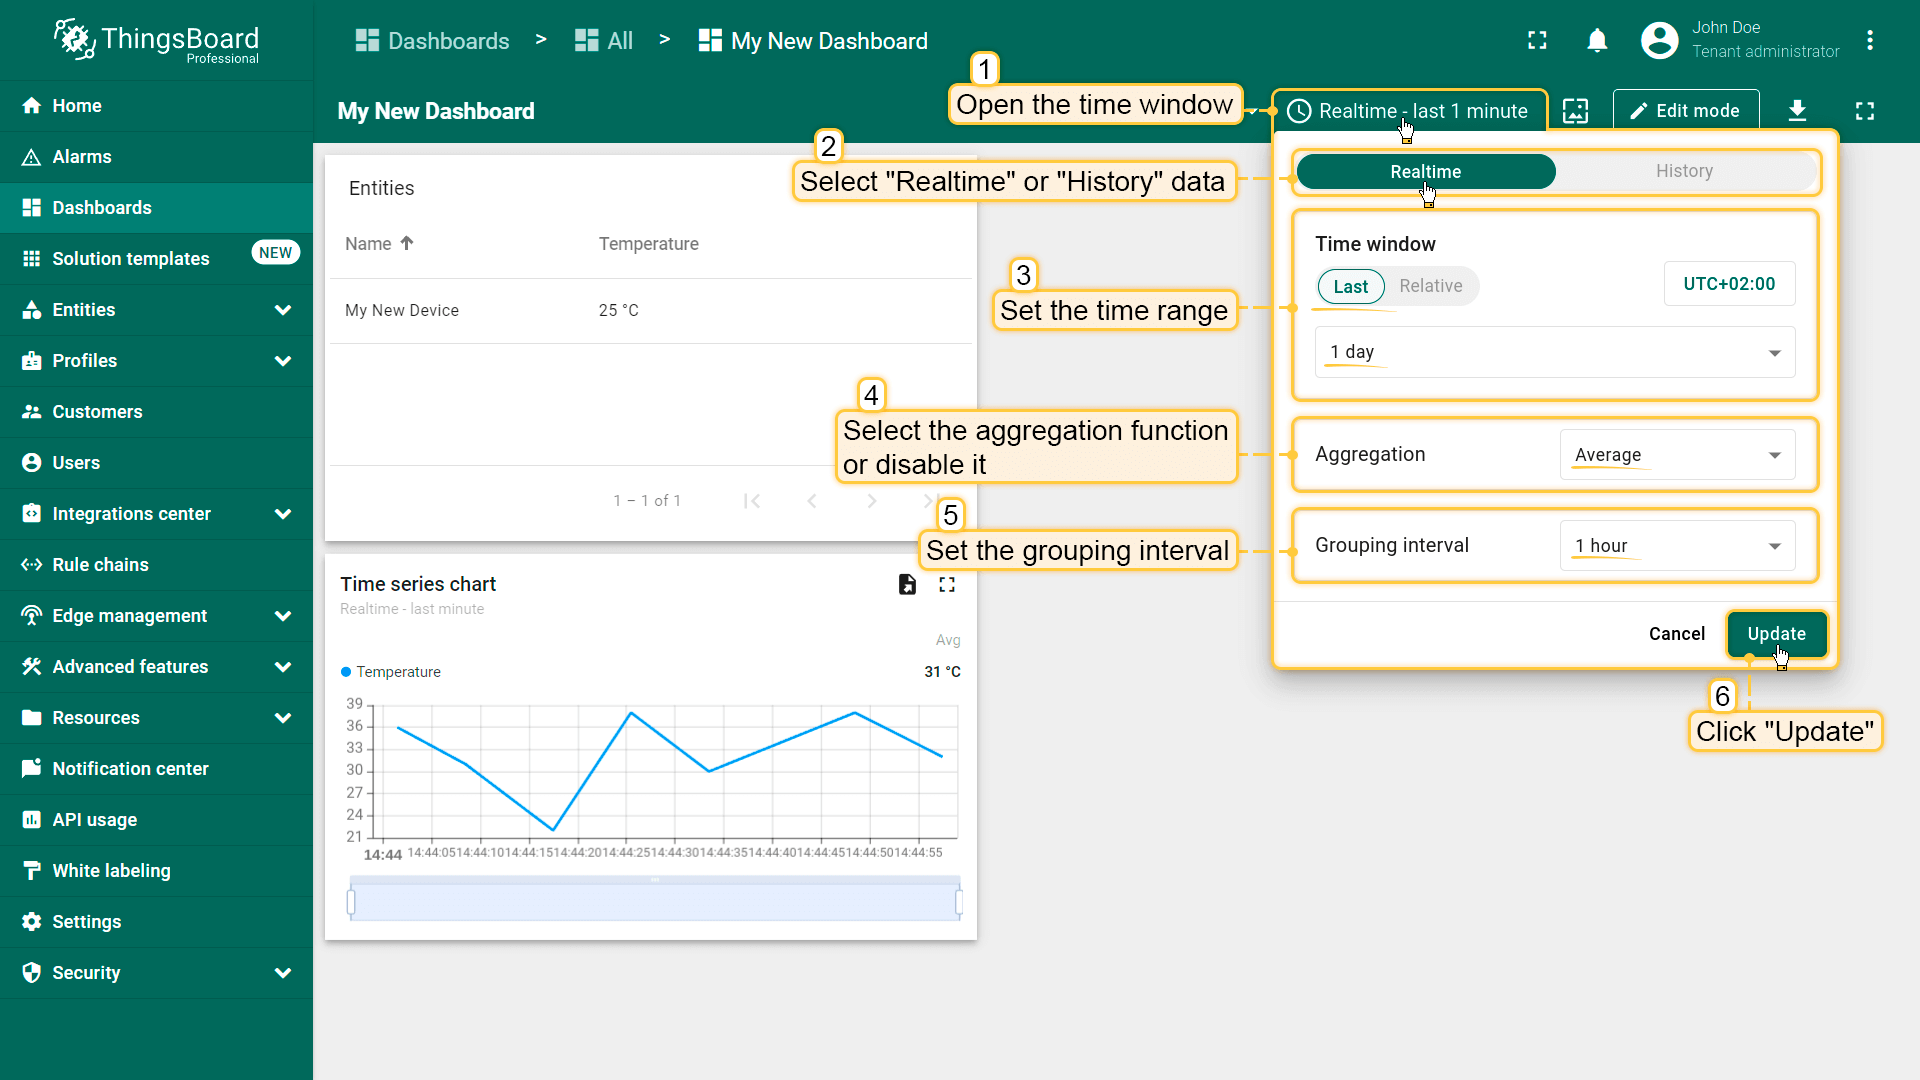
还可调整部件中数据展示的时间间隔、修改聚合函数、指定分组间隔。 打开时间窗口并进行设置,然后点击「更新」按钮应用时间窗口配置。
步骤3.4添加告警表部件
告警表部件在指定时间窗口内显示与指定实体相关的告警。 通过指定实体为告警源并配置对应告警字段来配置告警部件。
- Enter edit mode and click the "Add new widget" button at the top of the screen;
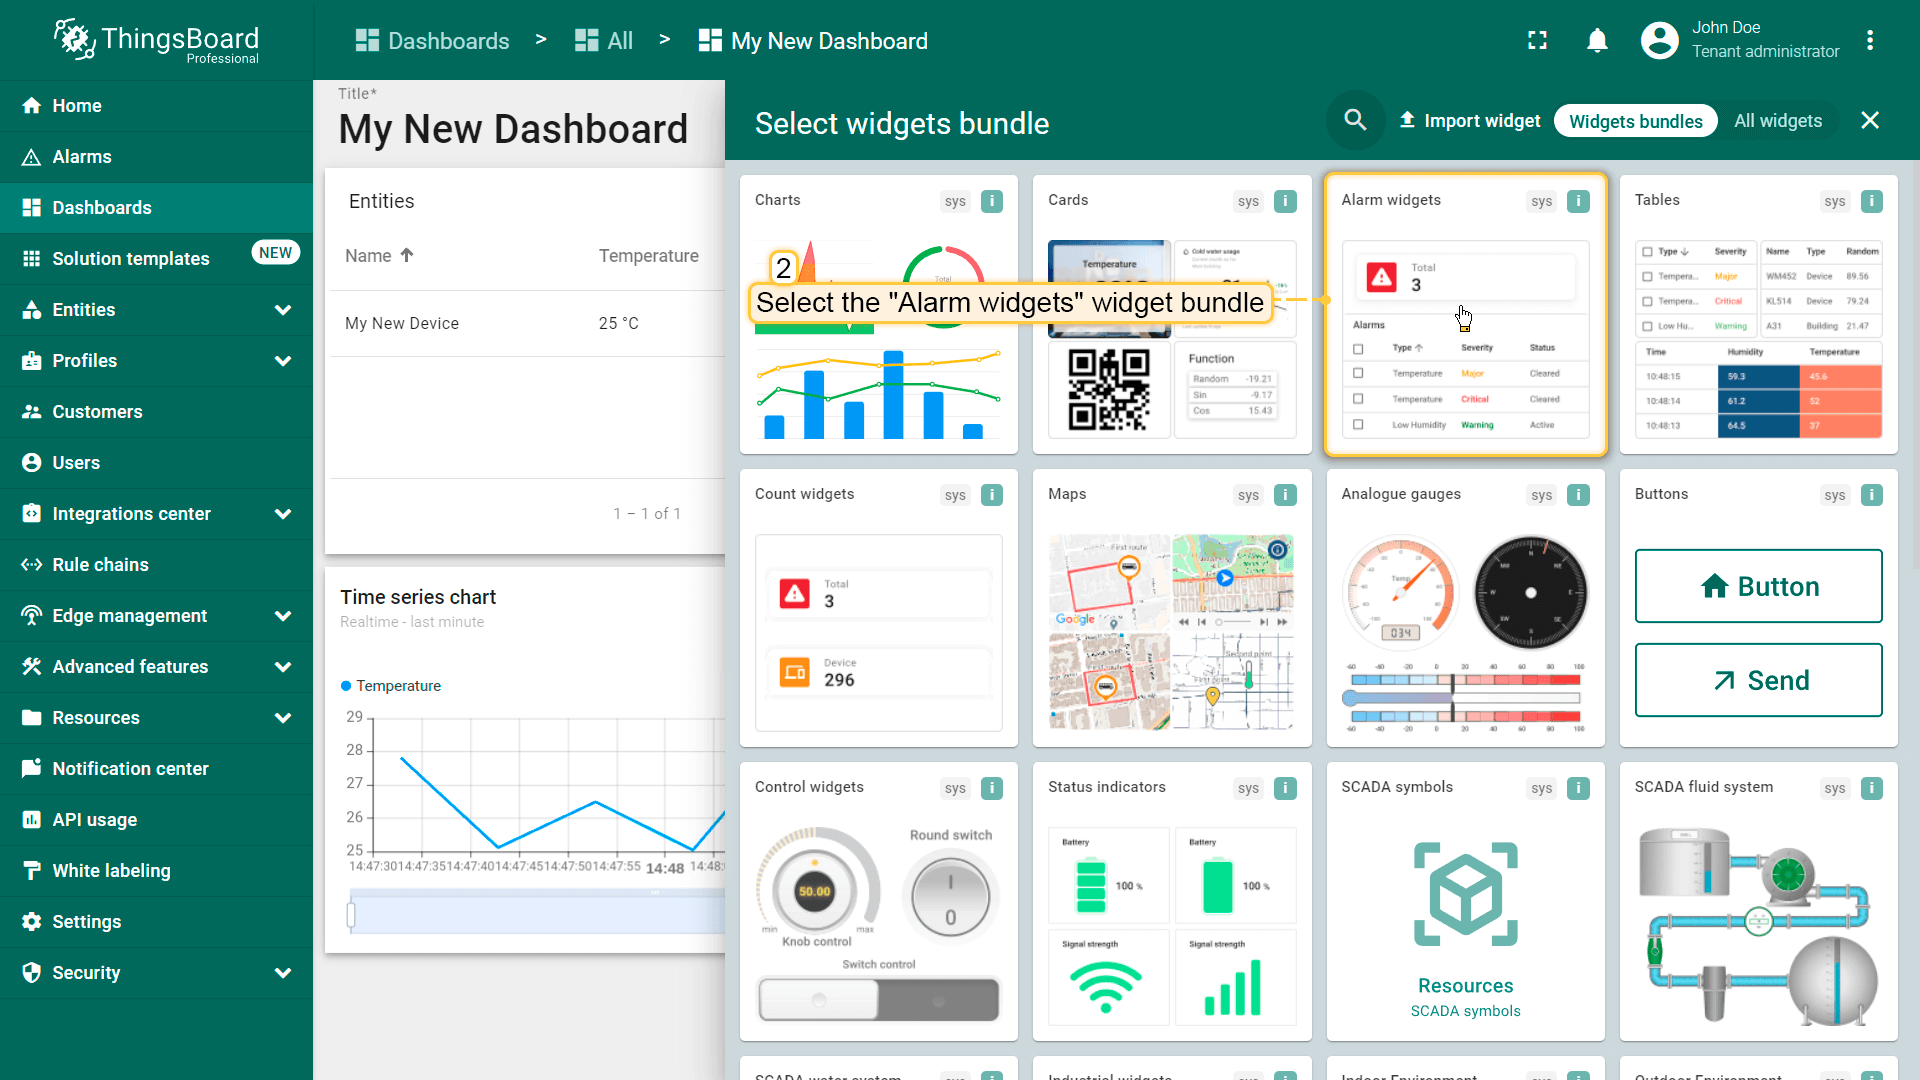
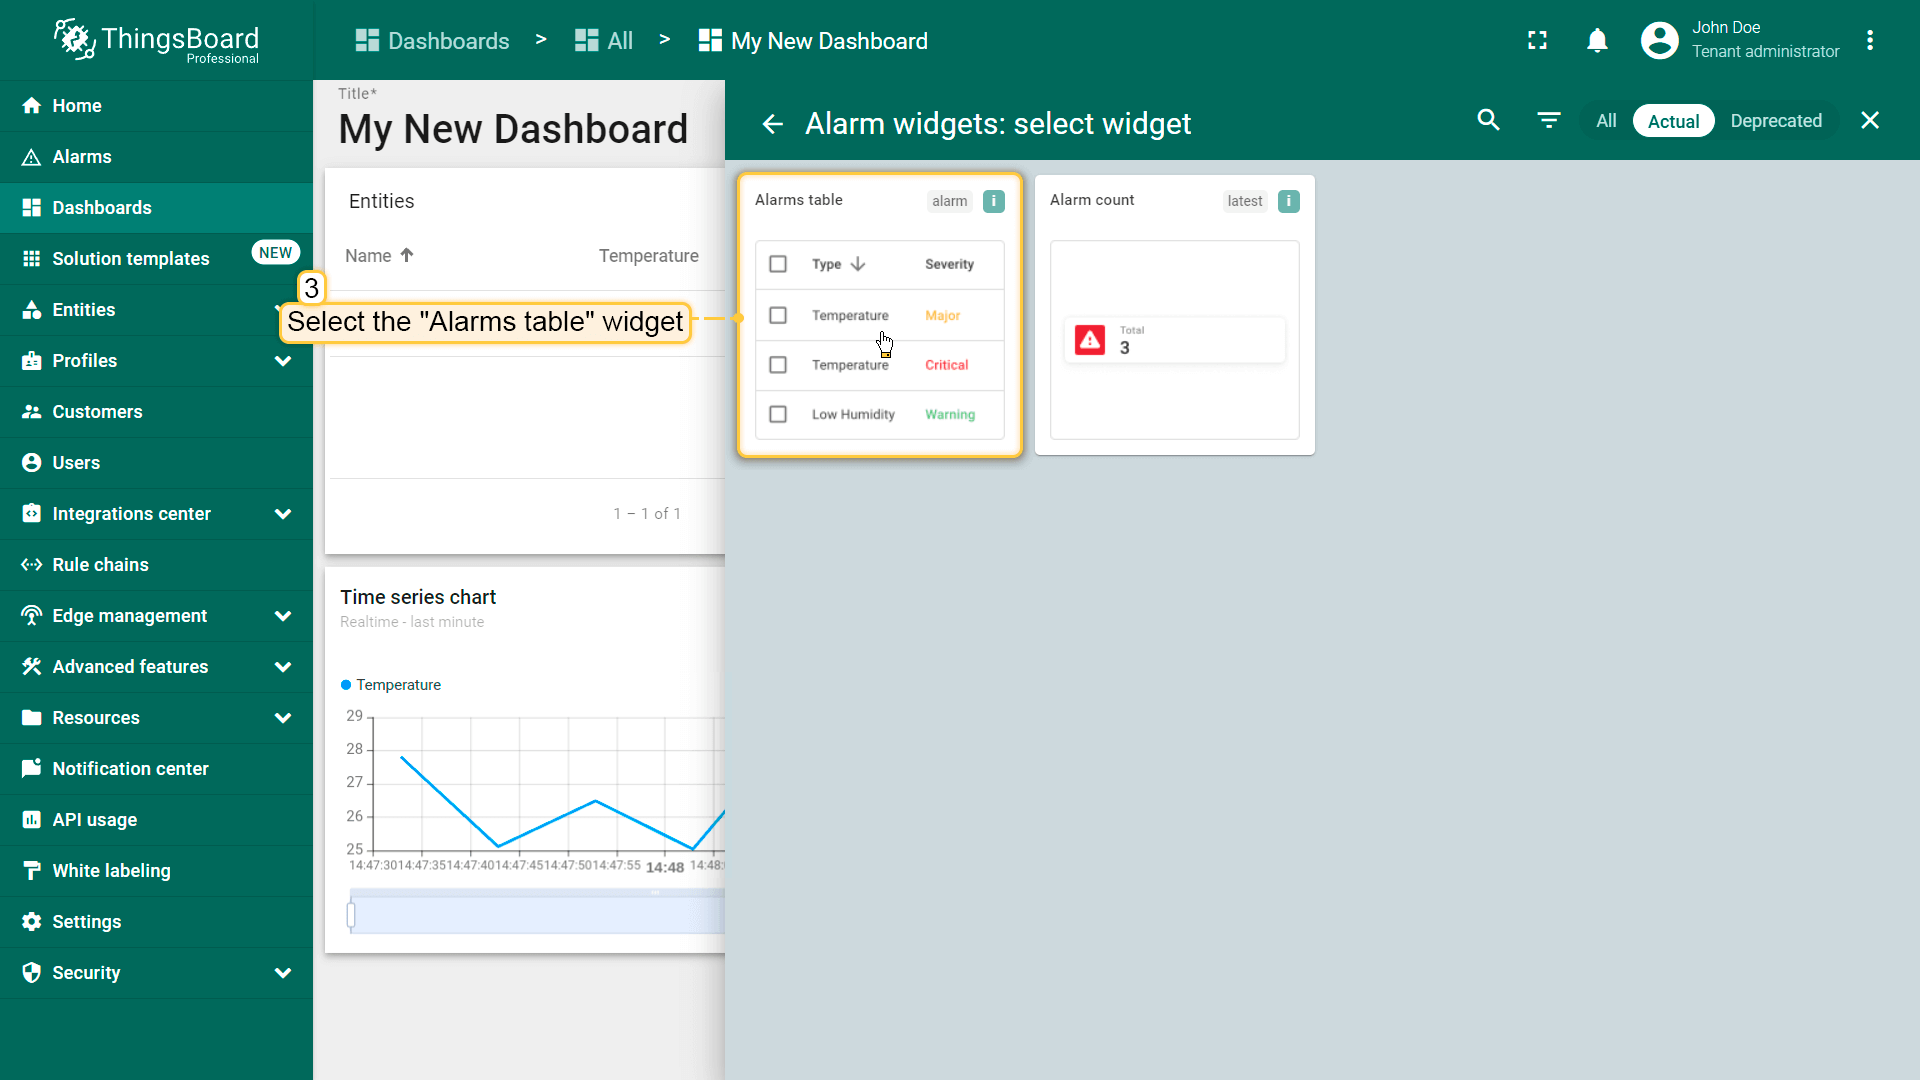
- Find the "Alarm widgets" bundle and click on it;
- Select "Alarms table" widget;
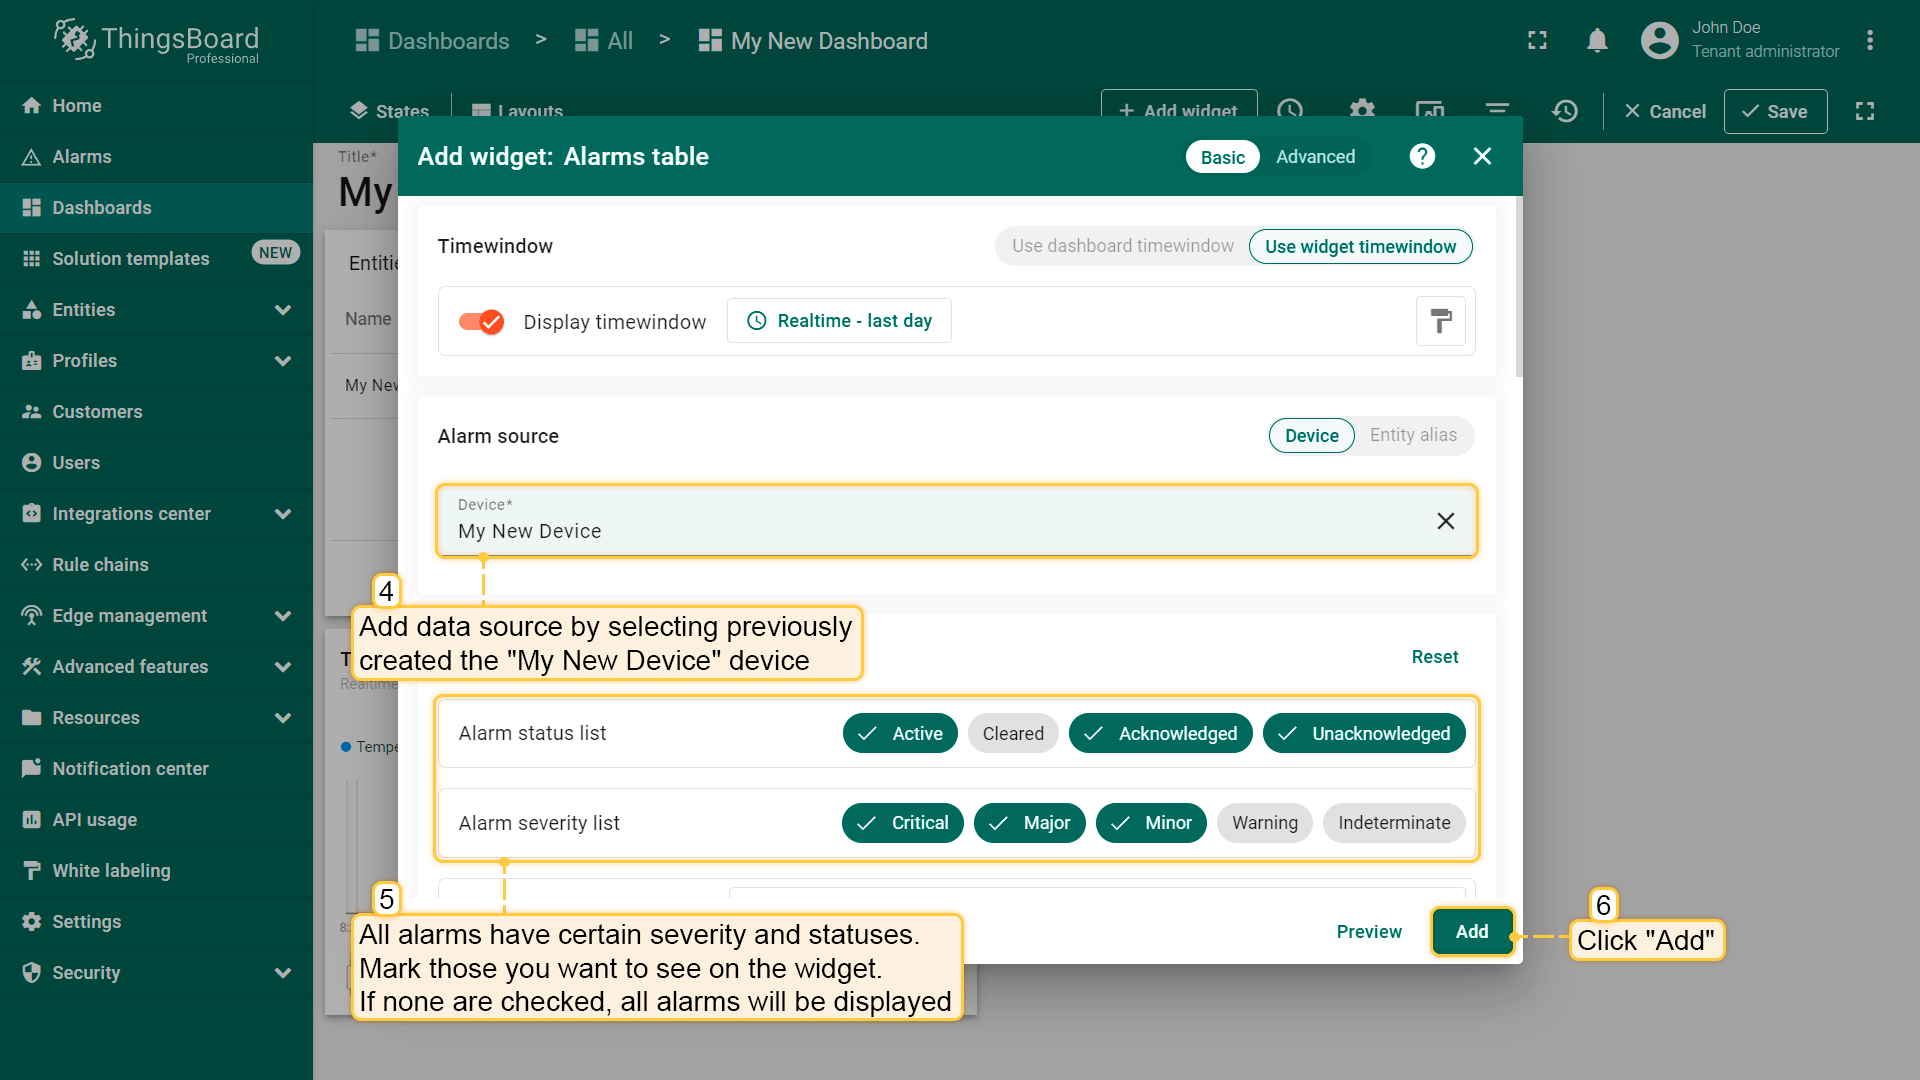
- Specify the previously created device "My New Device" as the data source in the "Device" field. Next, we will configure the filters. All alarms have specific severities and statuses. Mark those you want to see in the widget. If none are marked, all alarms will be displayed regardless of their status or severity;
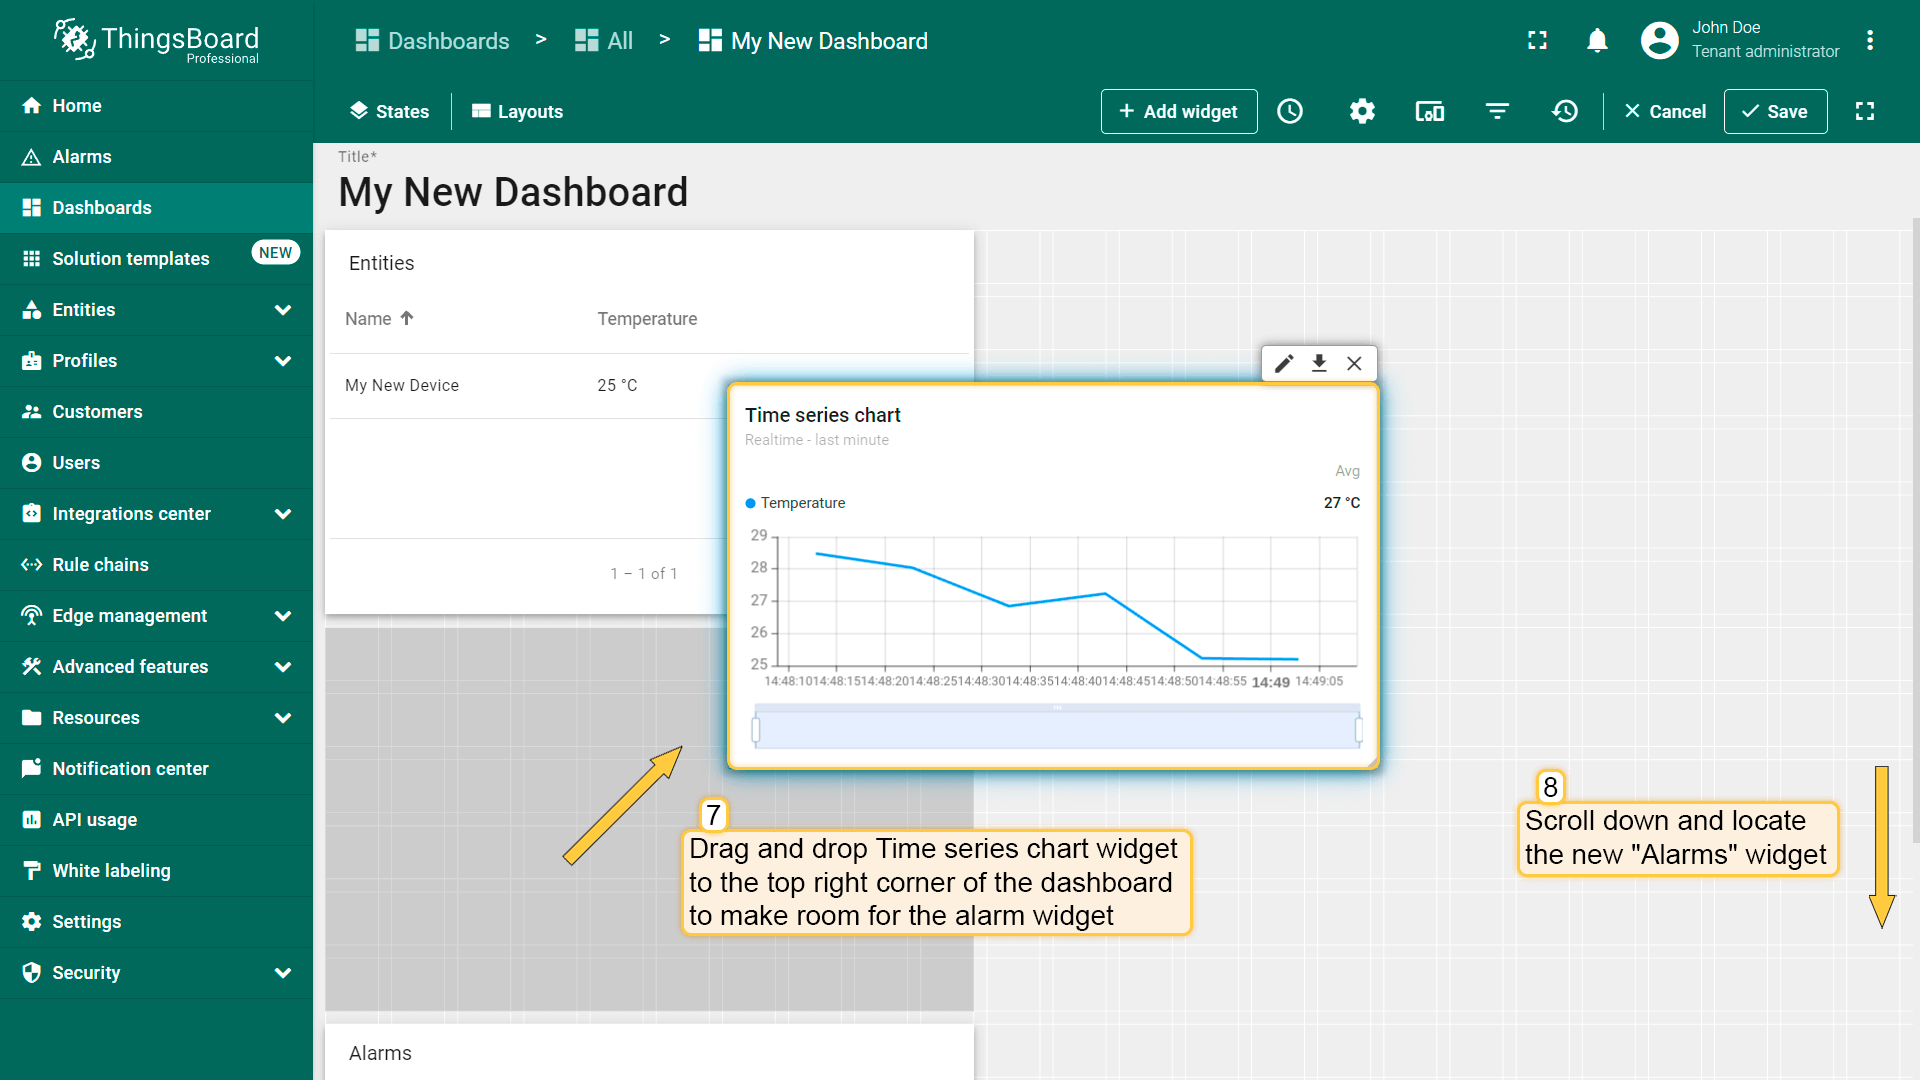
- Congratulations! You have added the alarm widget. By default, new widgets are added one below the other, stacking downwards. Let's organize our widgets a bit to tidy up their arrangement. Drag the "Time series chart" widget to the top right corner of the dashboard to make room for the "Alarms table" widget;
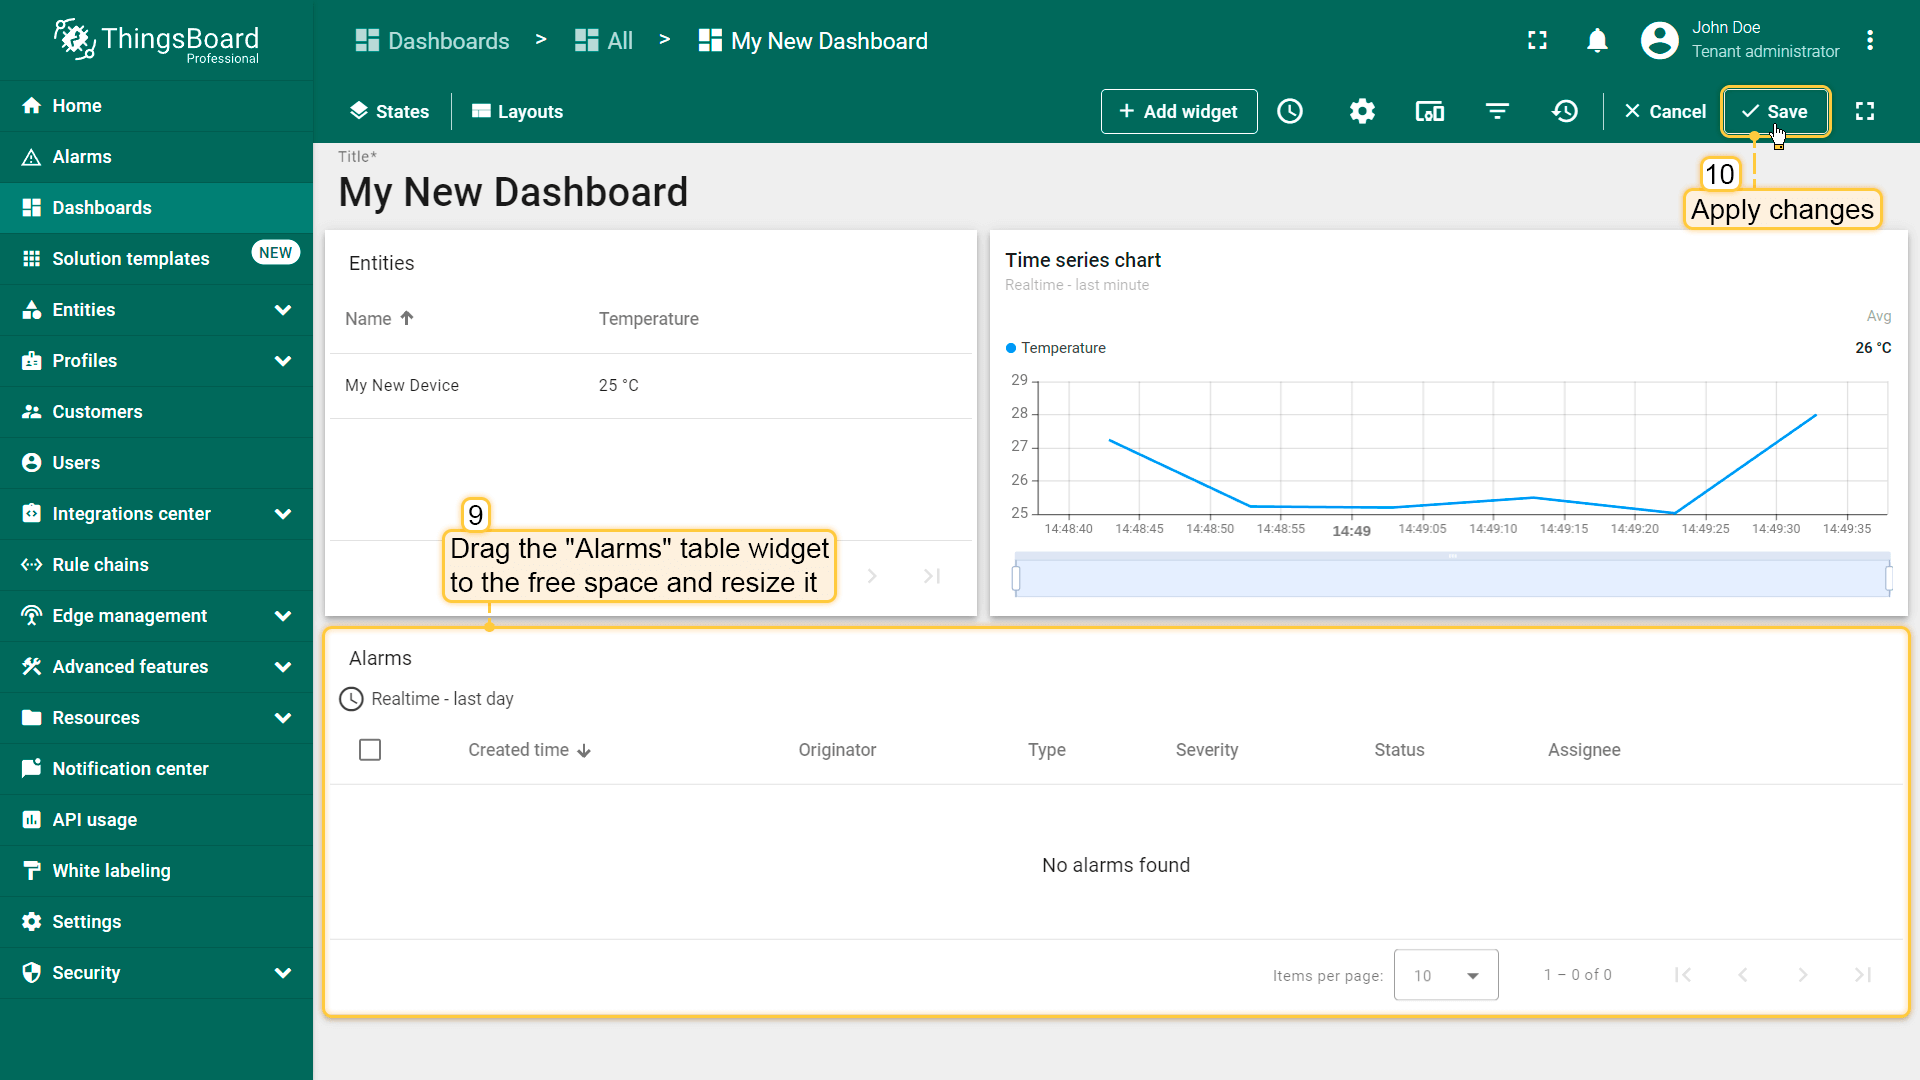
- Scroll down, find the "Alarms table" widget, and drag it over to a free spot. Adjust its size to fit your needs. After you're done tweaking, click "Save" to save the dashboard.
接下来配置告警规则并触发告警。
说明:本文档以单个设备作为部件数据源。 若要以动态实体(如某类设备或某资产下的设备)为数据源,需使用alias。 Alias是部件中使用的单个实体或实体组的引用。 可在此了解不同类型alias。
步骤4. 配置告警规则
使用告警规则功能定义:当温度超过25°C时触发。
告警规则可在设备级别或目标设备使用的设备配置级别配置。
建议:若同一规则需应用于多台设备,请在设备配置级别创建。
便于集中管理告警逻辑、简化维护,并避免配置重复。
本示例中,我们将在设备「My New Device」上直接配置告警规则。
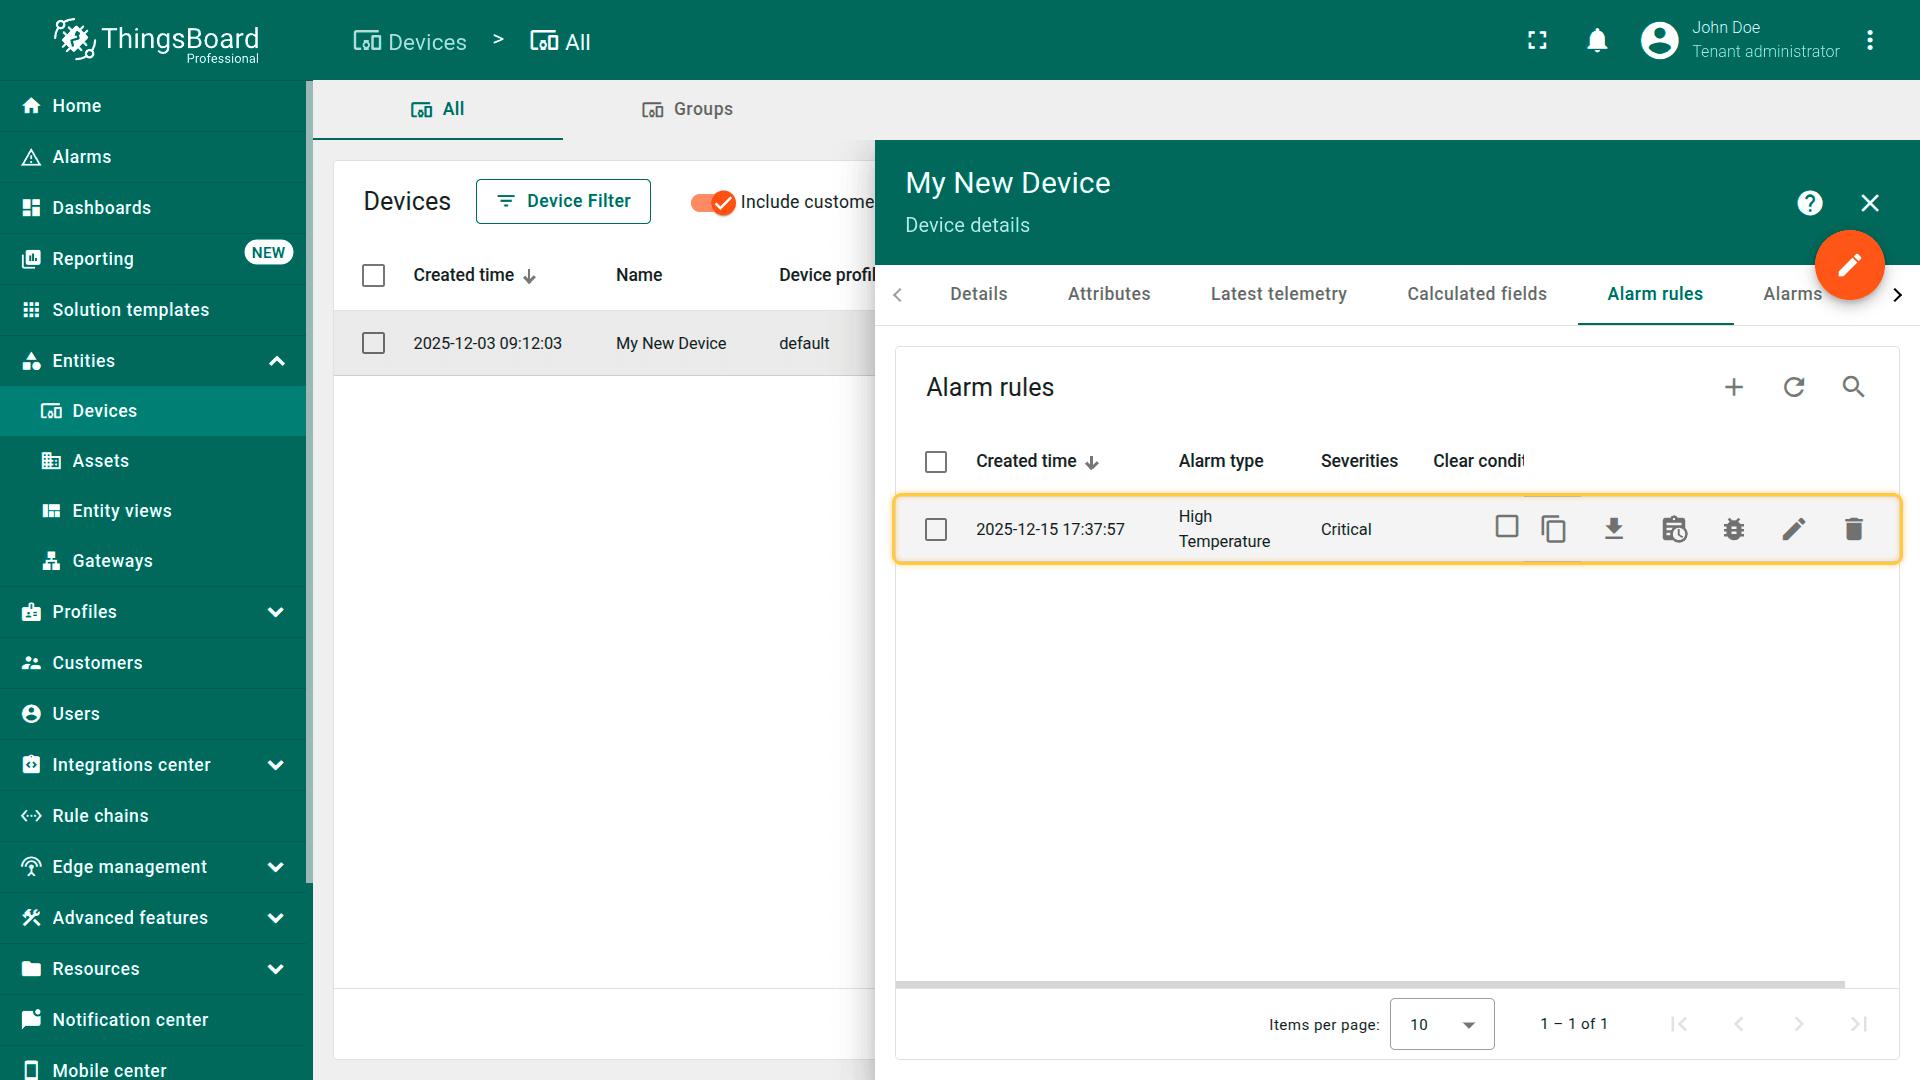
步骤4.1打开设备设置
- 进入 实体 下的 设备 页面。
- 点击 My New Device 打开详情。
- 切换到 告警规则 选项卡。
- 点击「+」并选择 创建新告警规则。
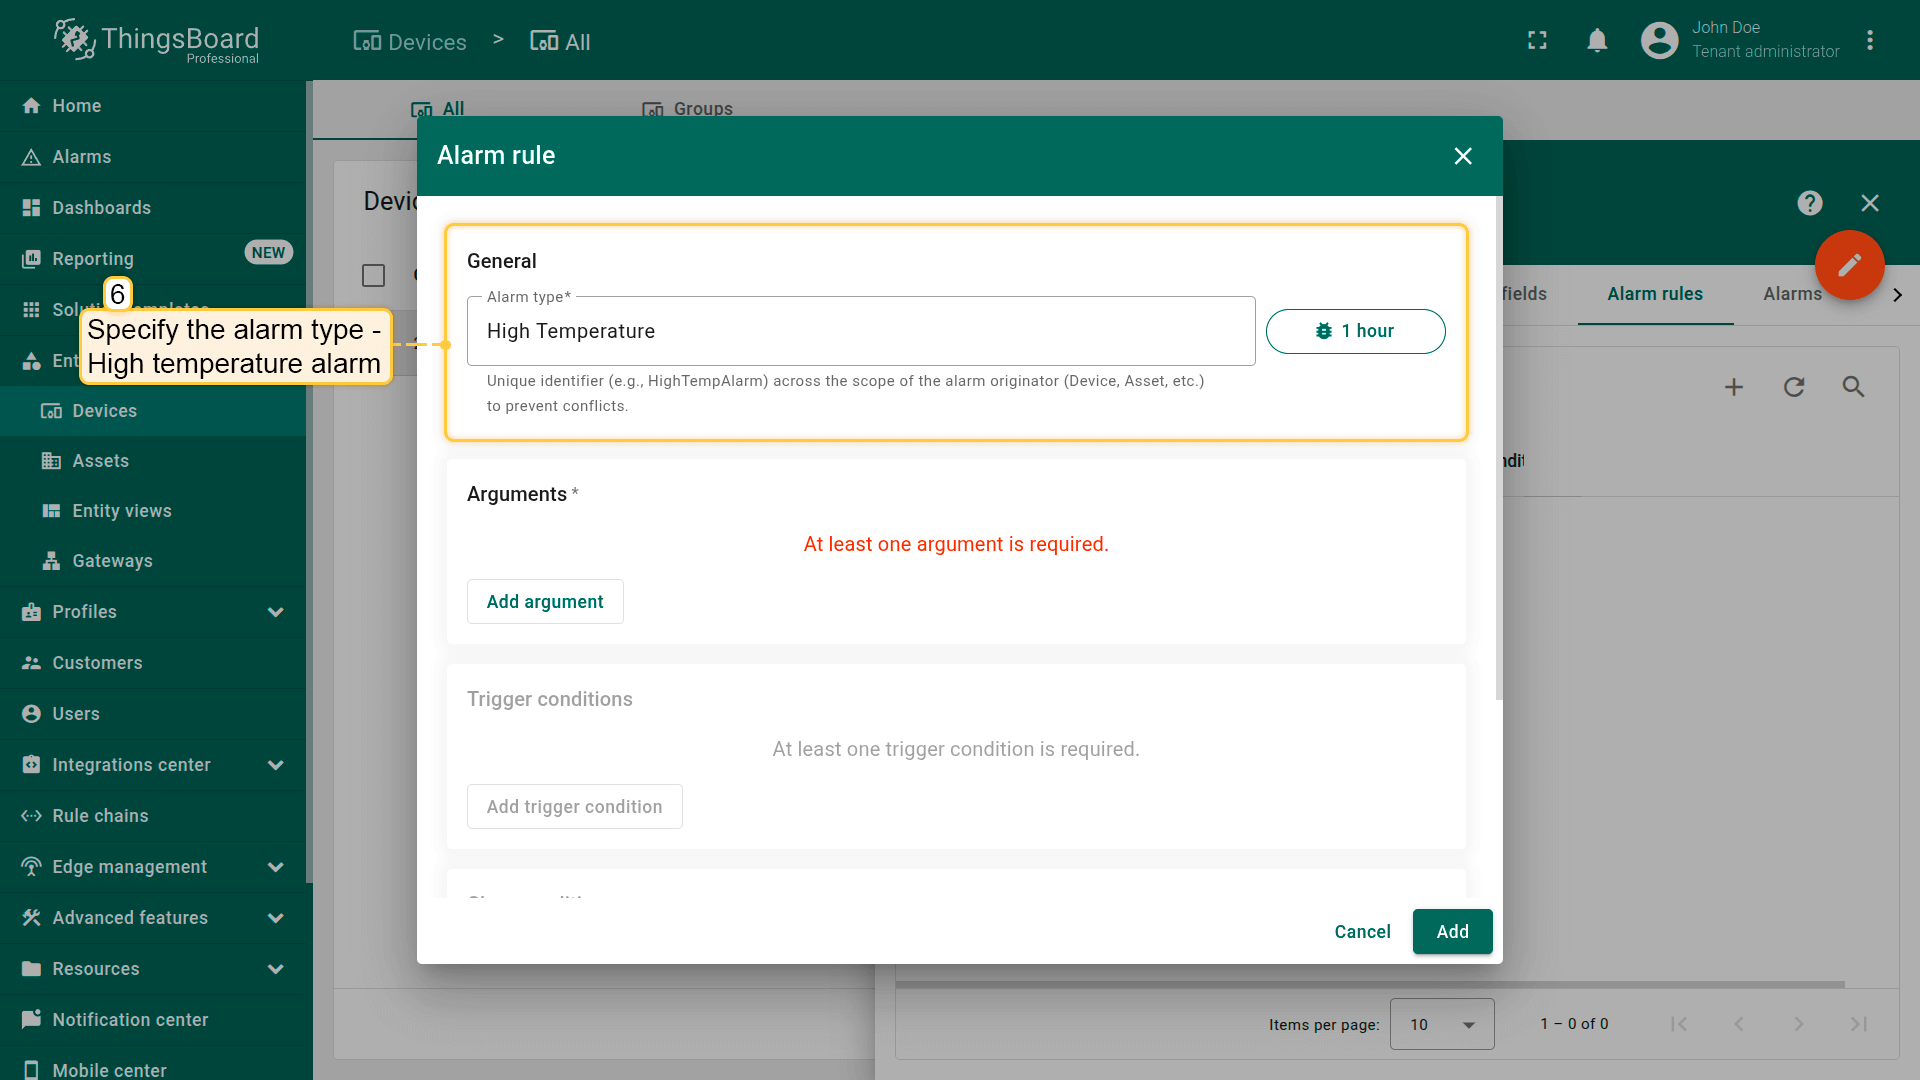
步骤4.2配置通用参数
在 通用 部分,填写 告警类型 —— 高温(或您喜欢的其他名称)—— 作为告警名称和唯一标识。
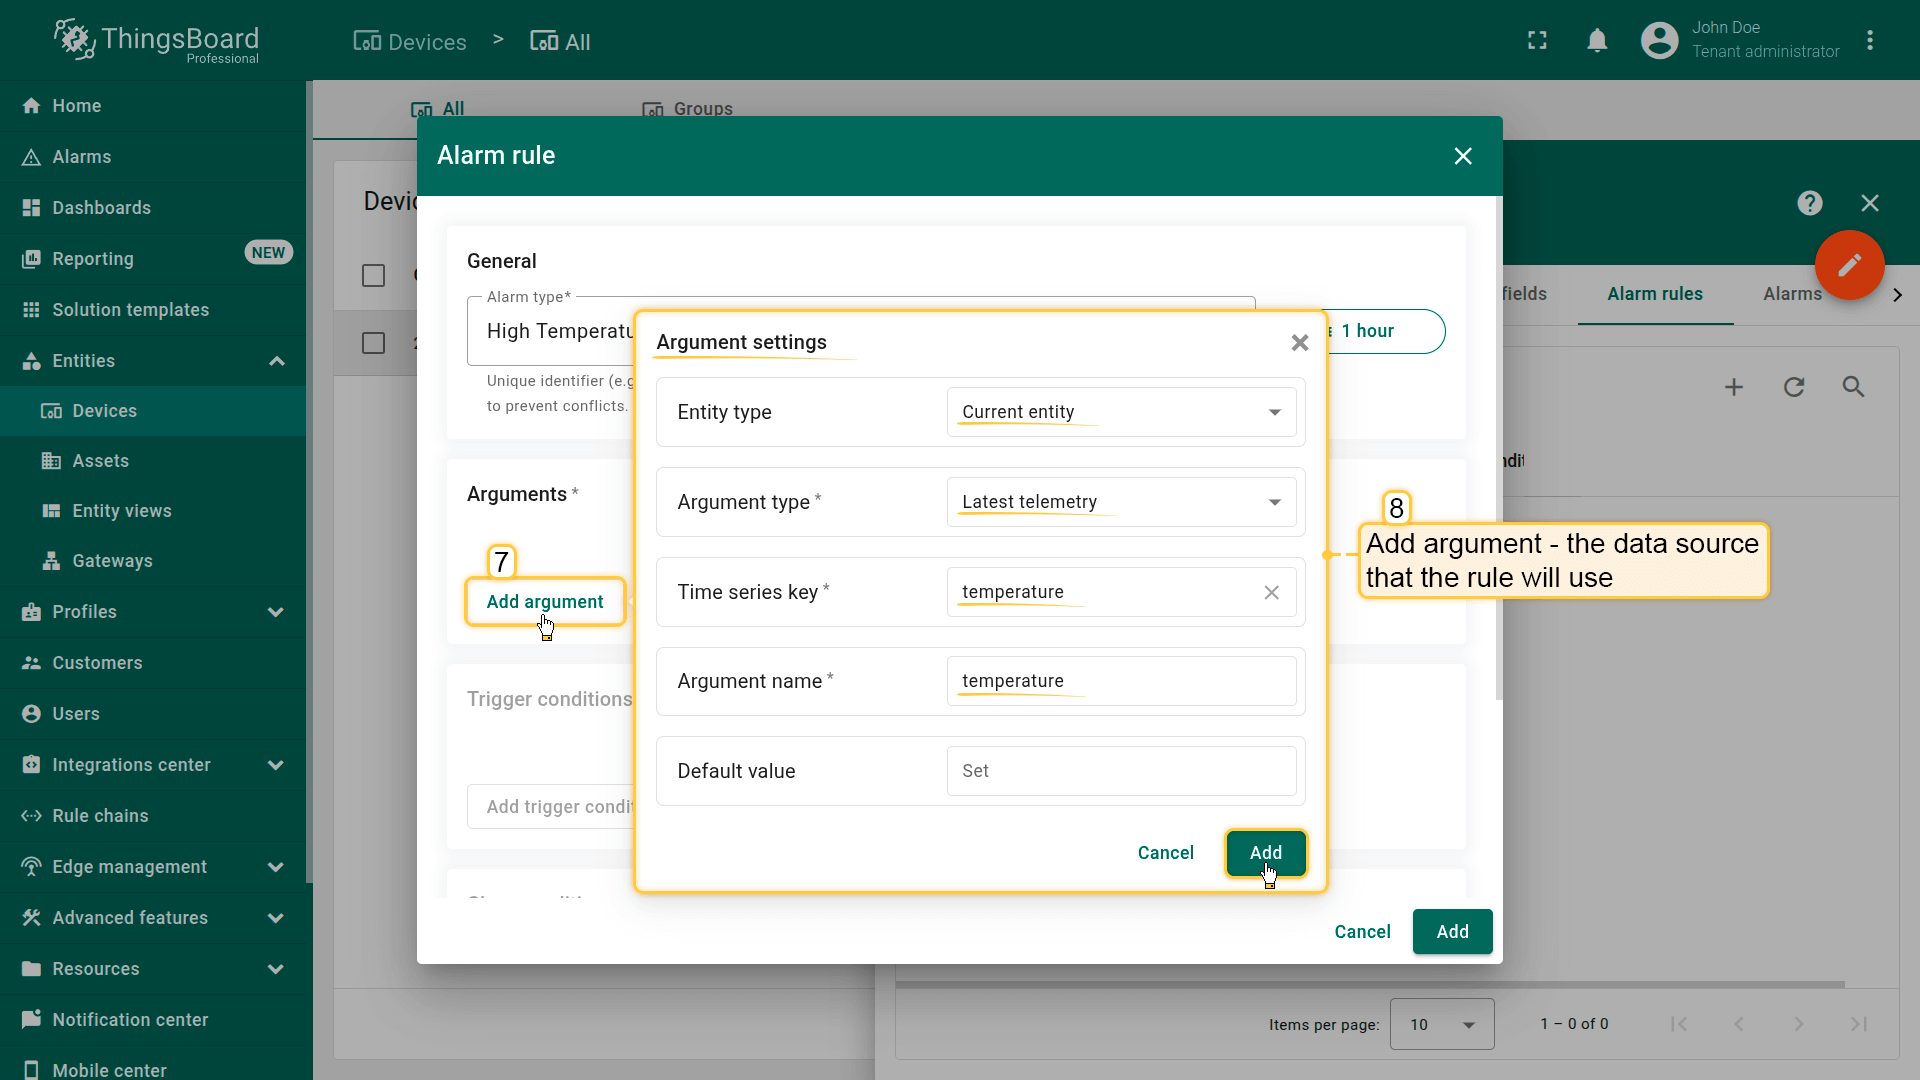
步骤4.3添加参数
定义告警触发条件前,需至少添加一个 参数 —— 规则使用的数据源。
在 参数 部分点击 添加参数 并填写:
- 实体类型:当前实体
- 参数类型:最新遥测
- 时序键:temperature
- 参数名:temperature
- 点击 添加。
这将创建告警规则条件中使用的 temperature 变量。
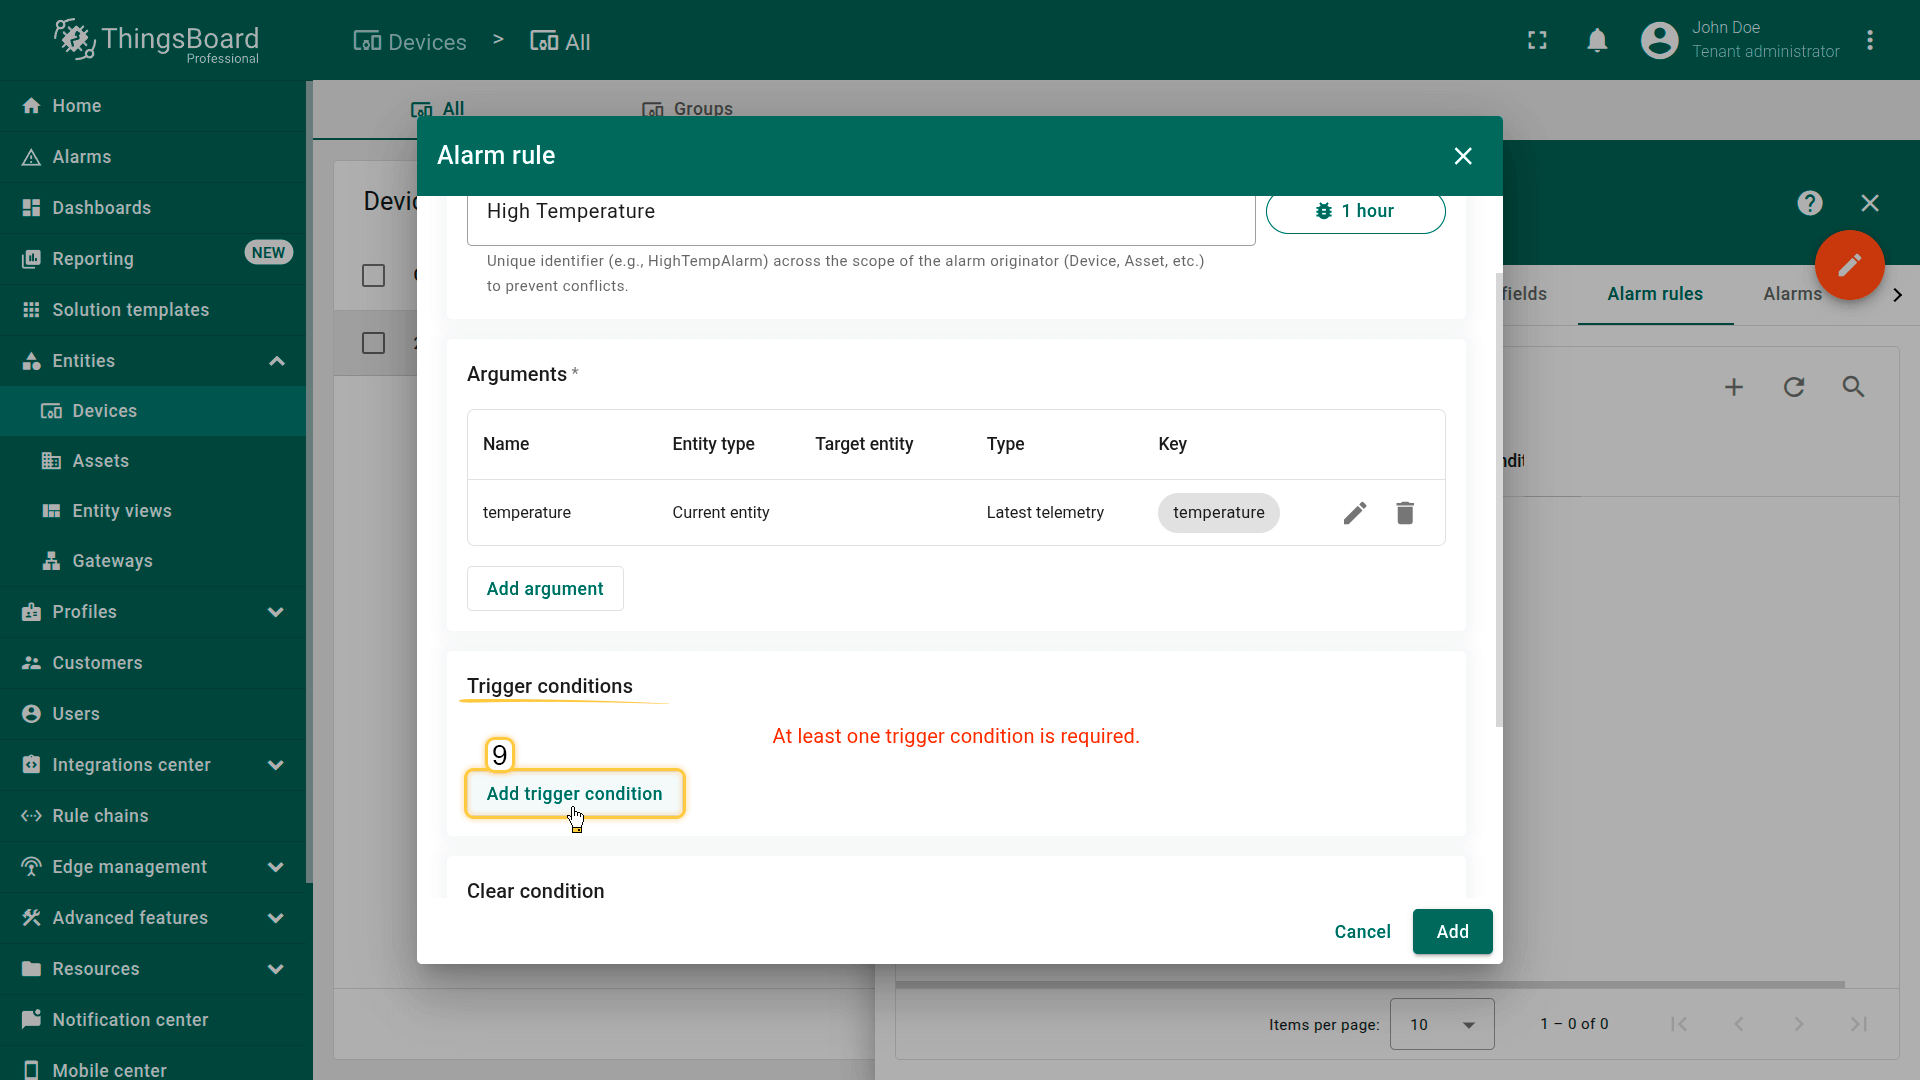
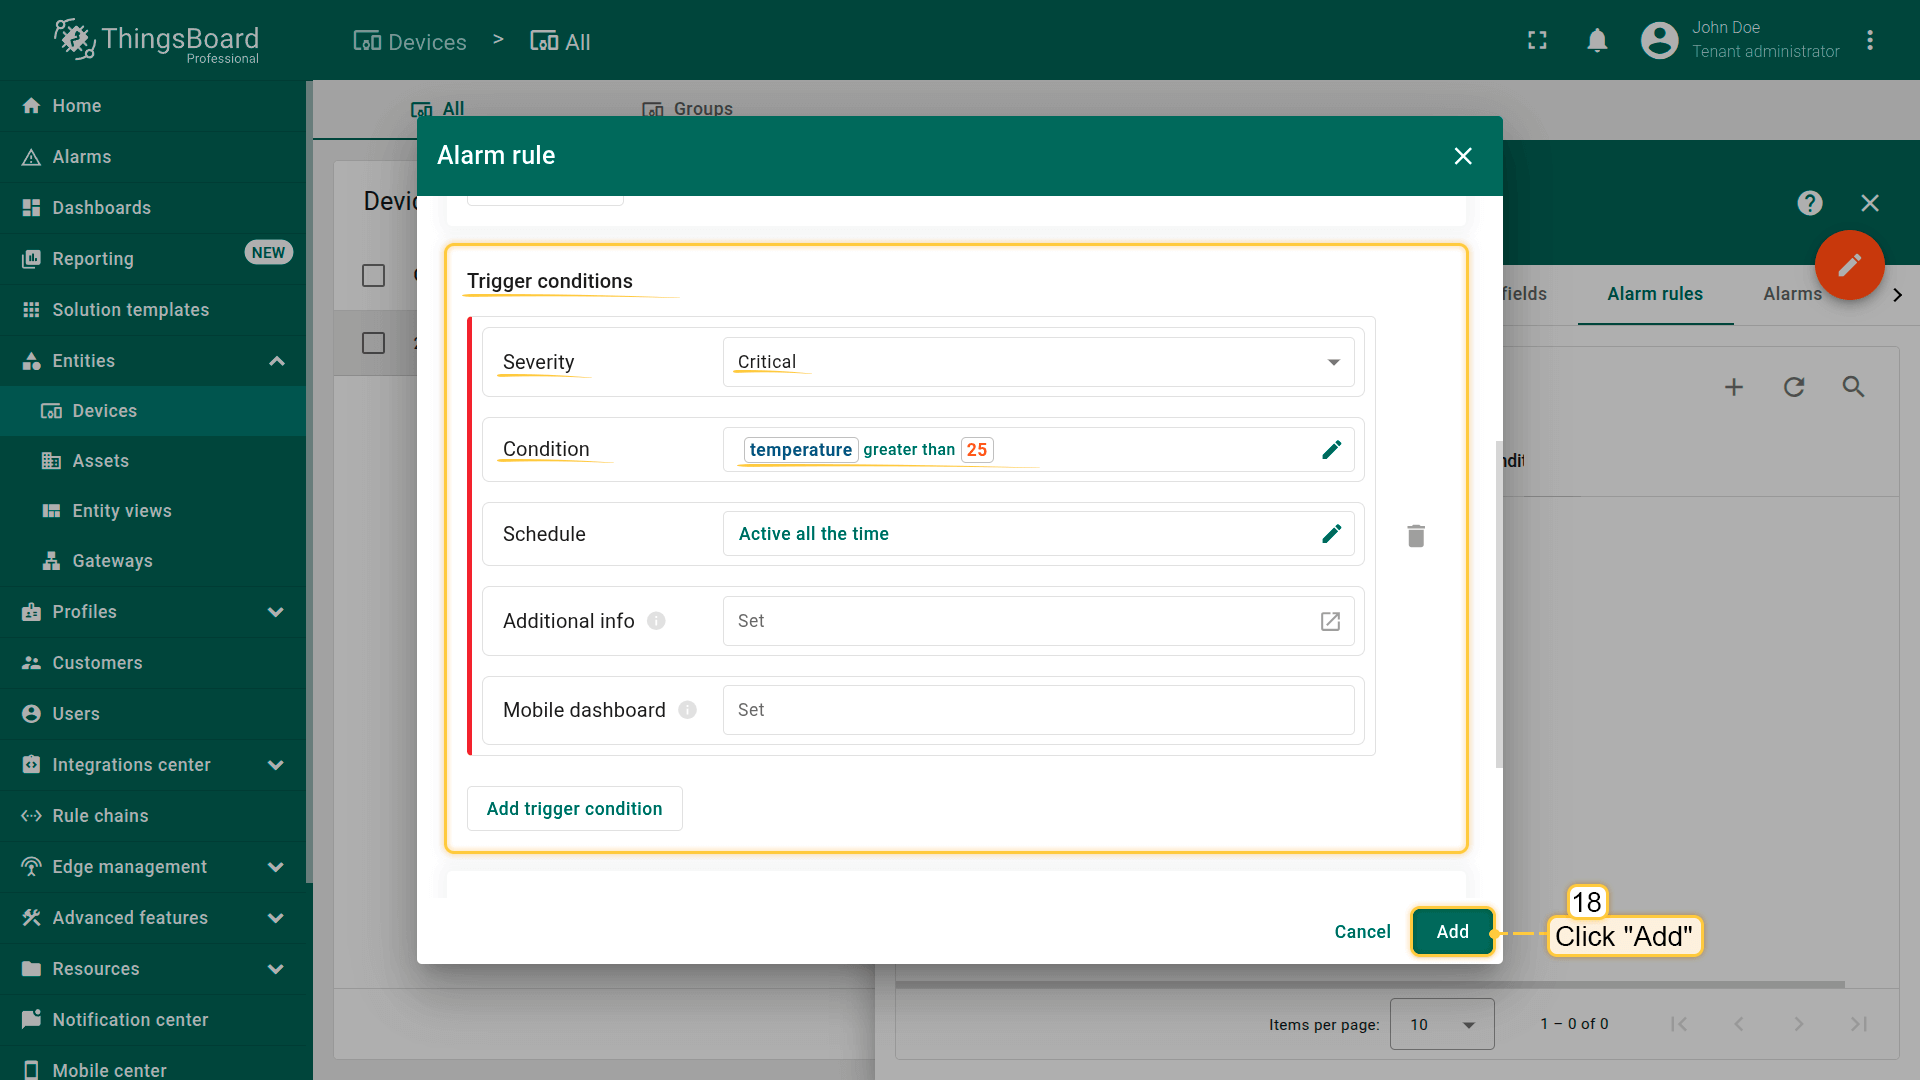
步骤4.4配置告警触发条件
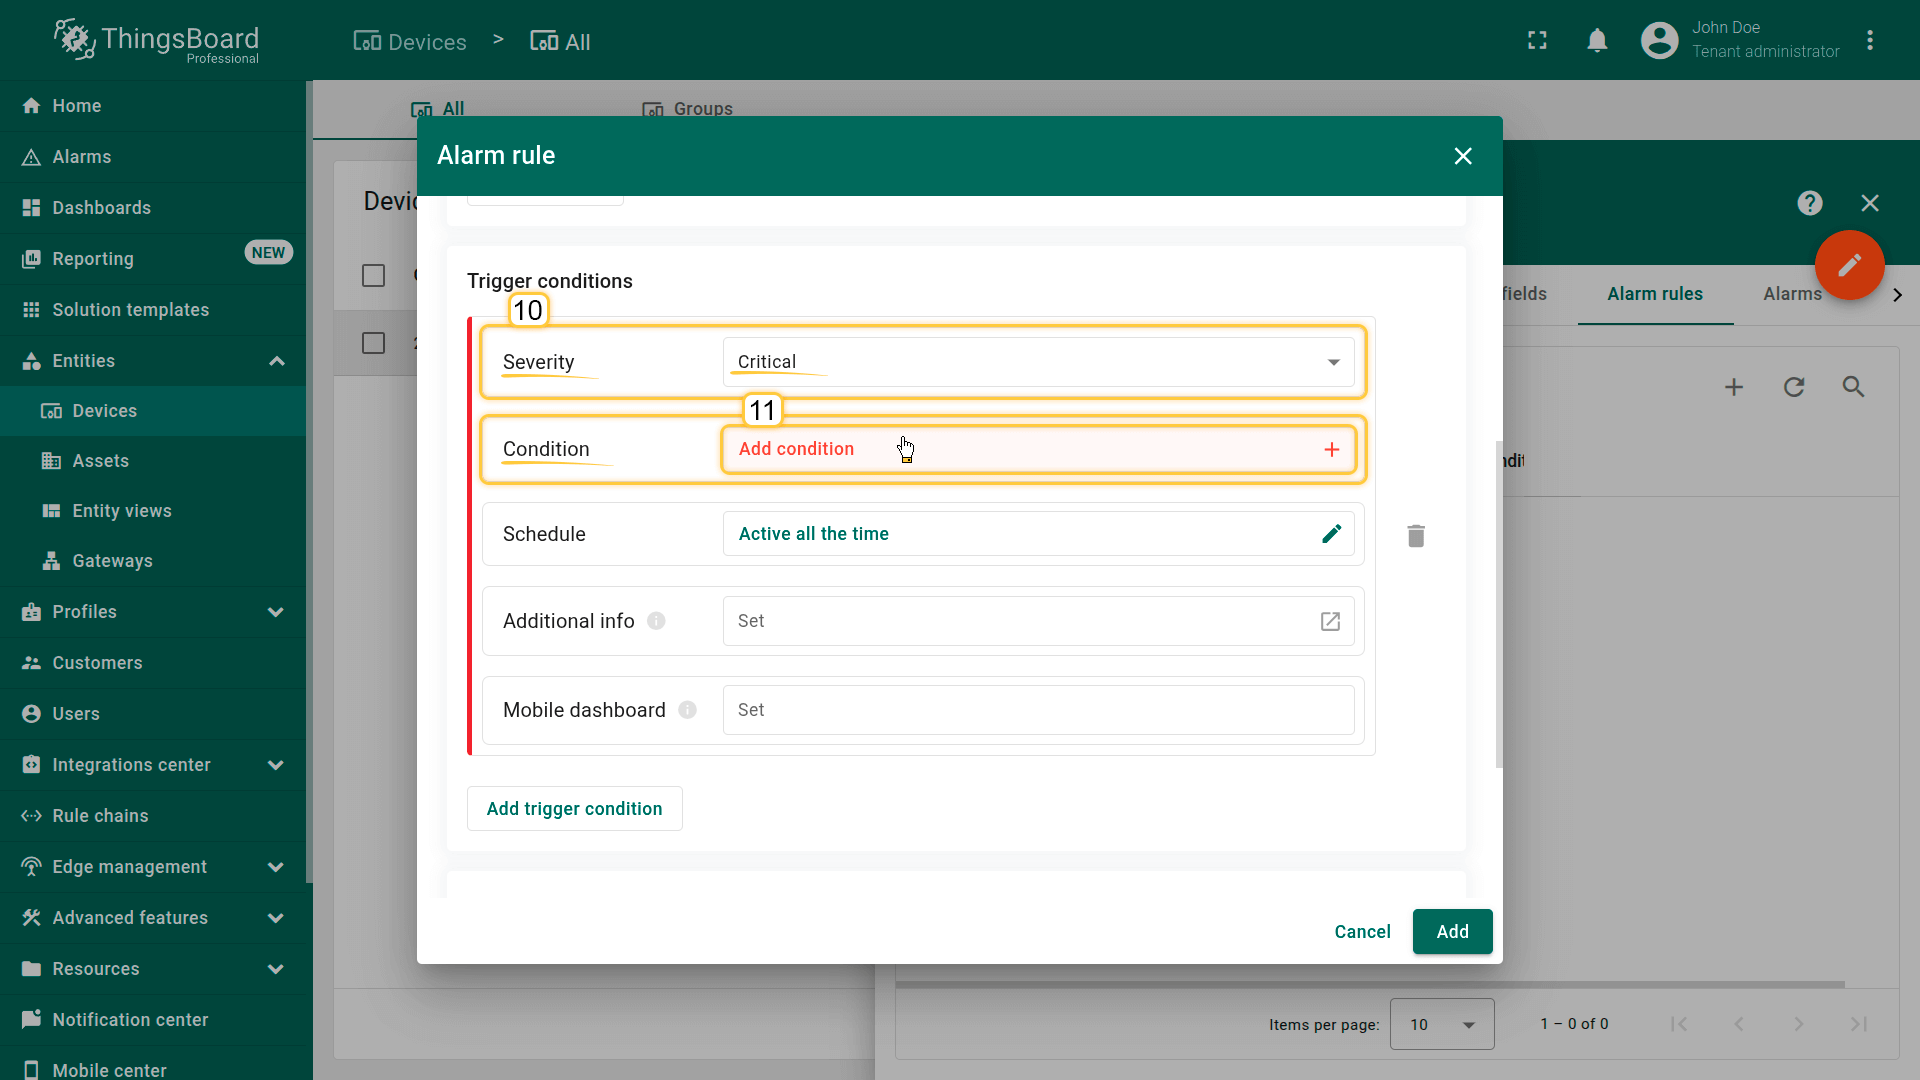
在 触发条件 部分点击 添加触发条件。
- 严重程度:严重
- 条件
- 点击 添加条件。
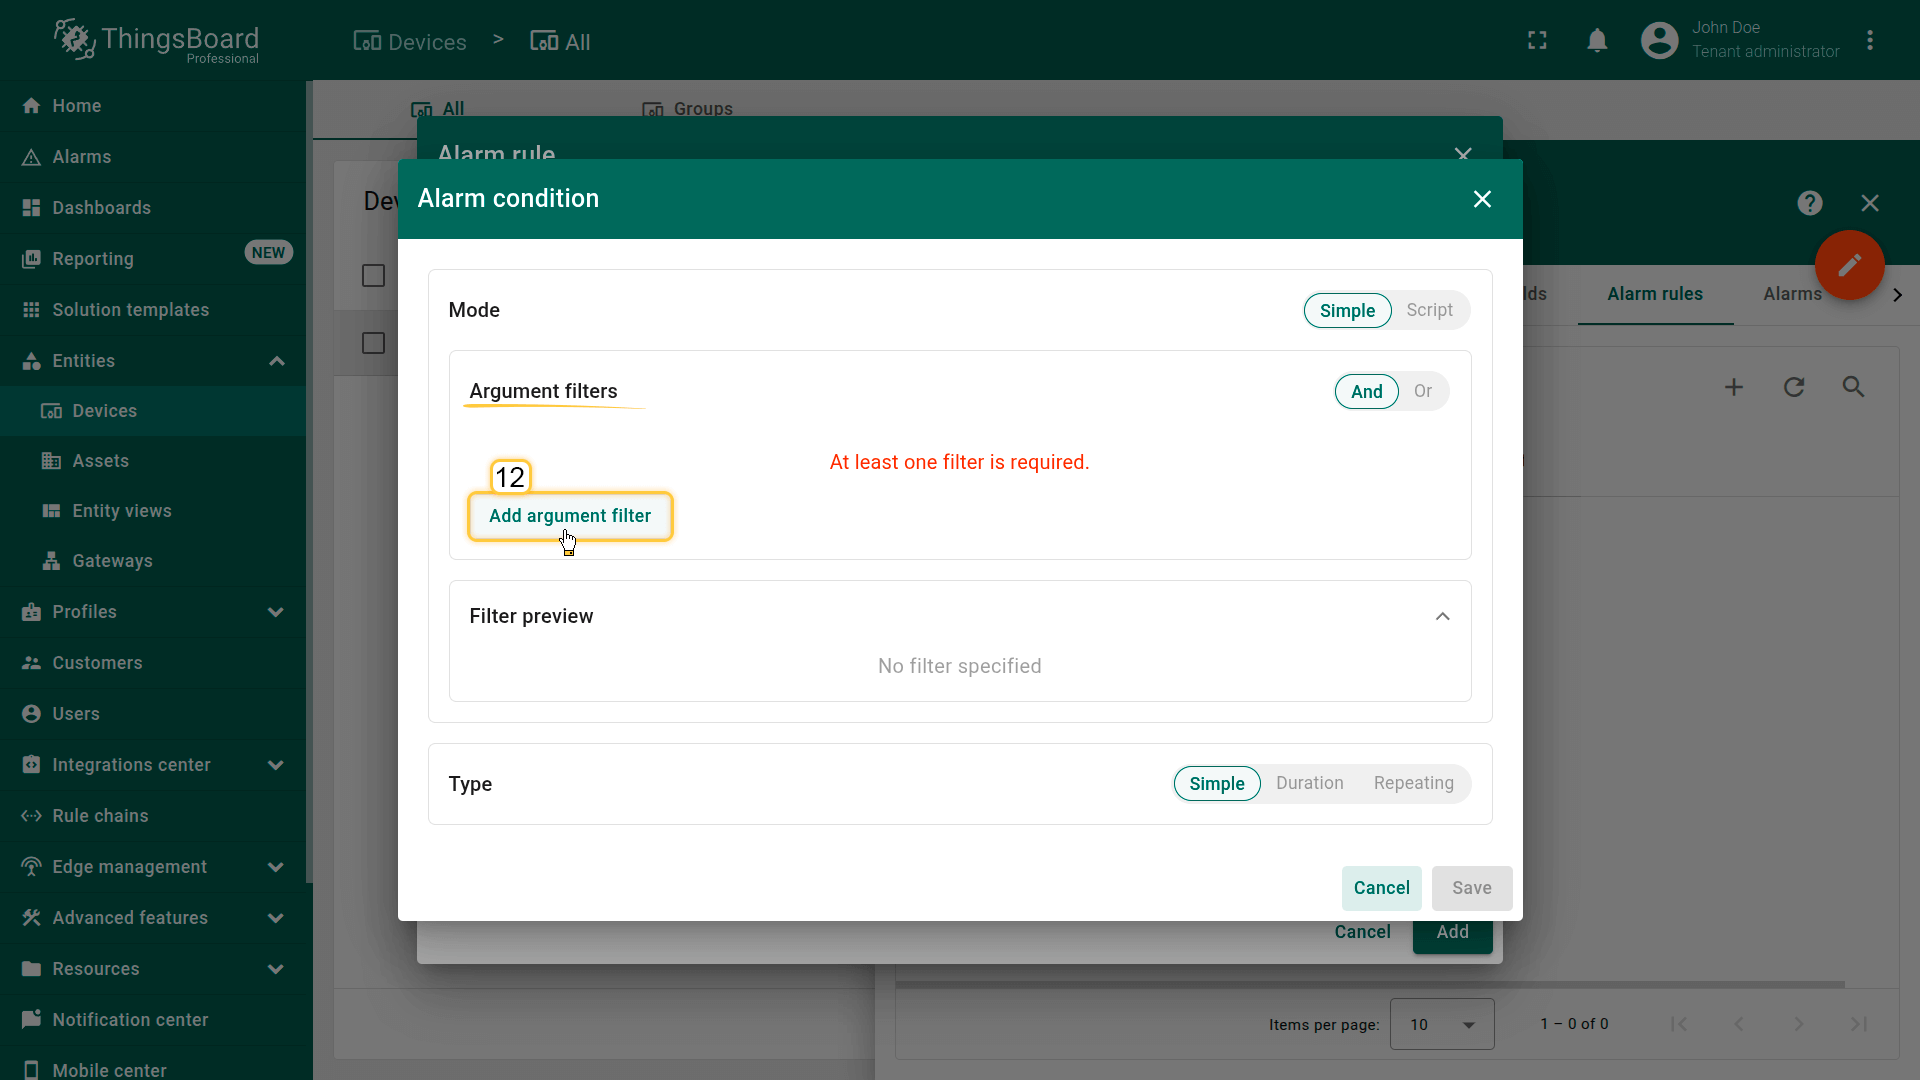
- 在配置窗口中点击 添加参数过滤器 并设置:
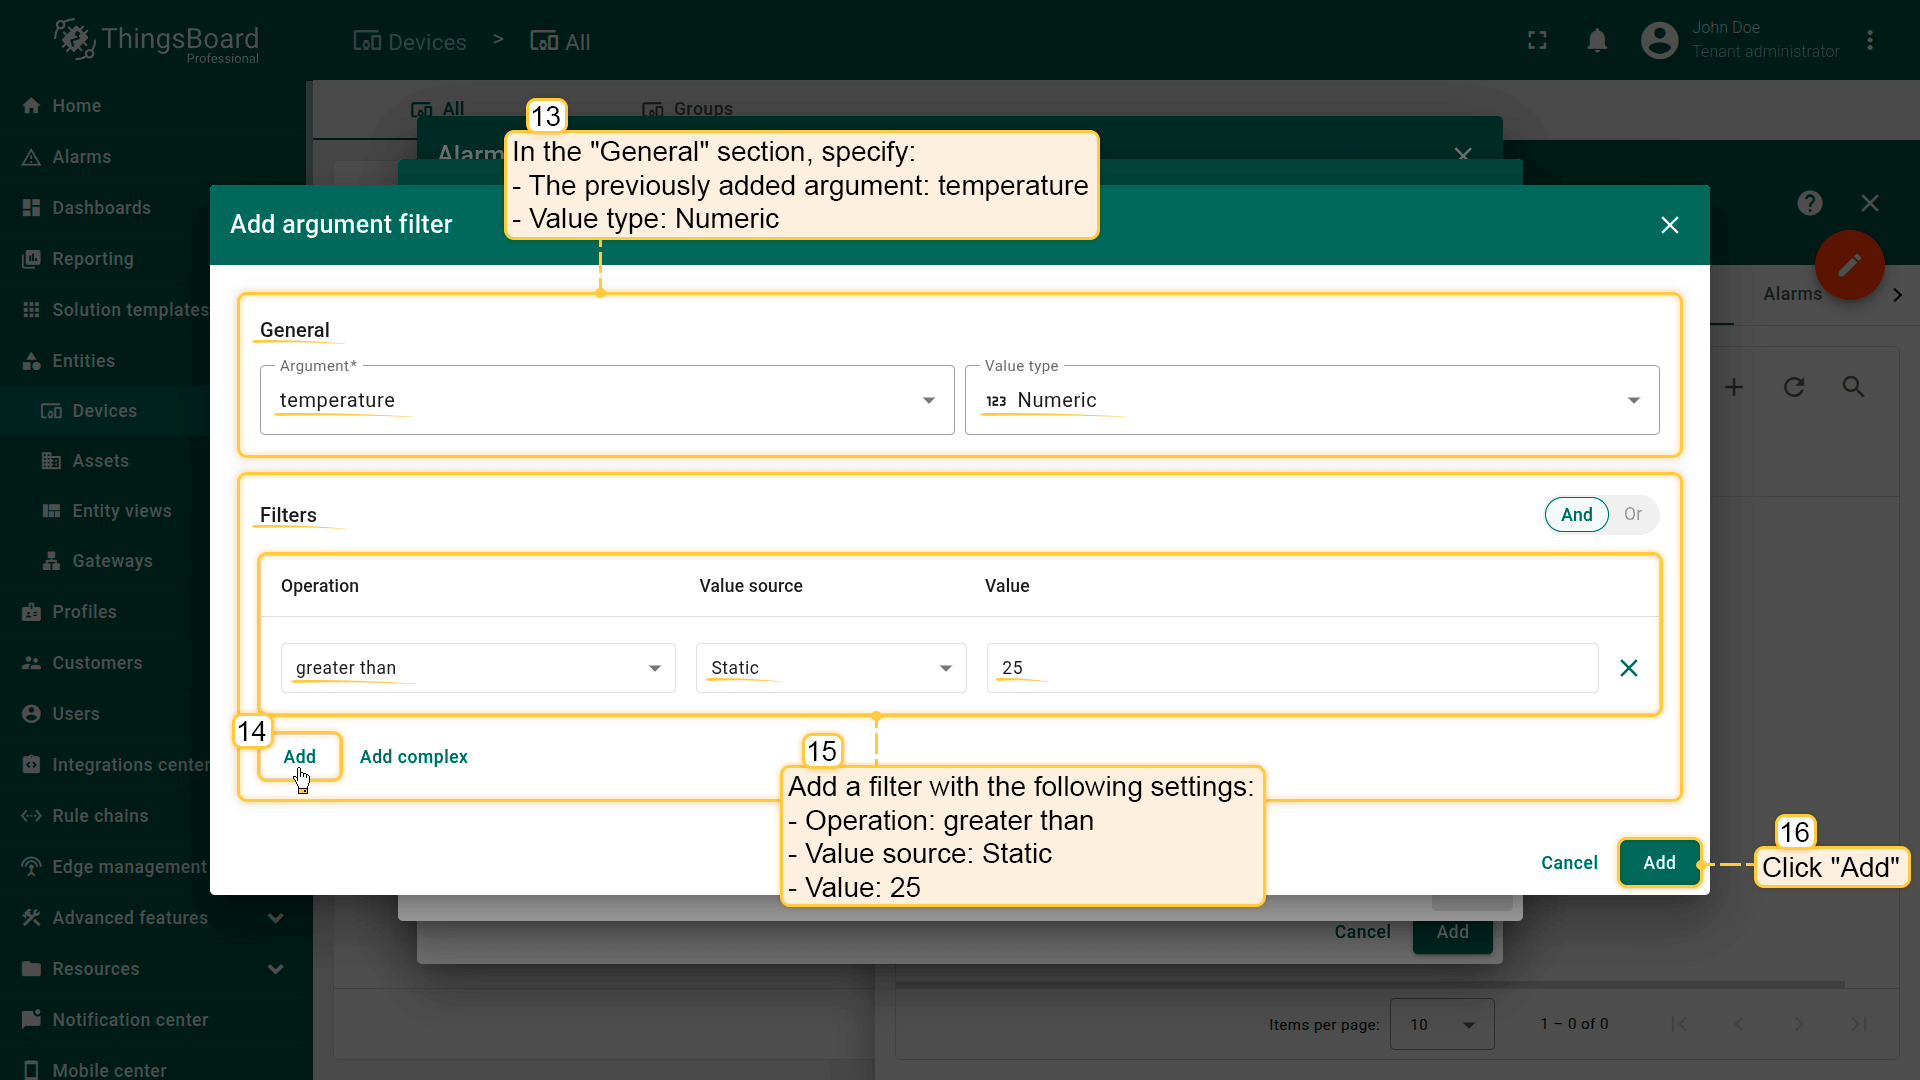
- 通用 块:
- 参数:temperature(之前添加的参数)
- 值类型:数值
- 过滤器 块:
- 点击 添加
- 操作:大于
- 值来源:静态
- 值:25
- 点击 添加。
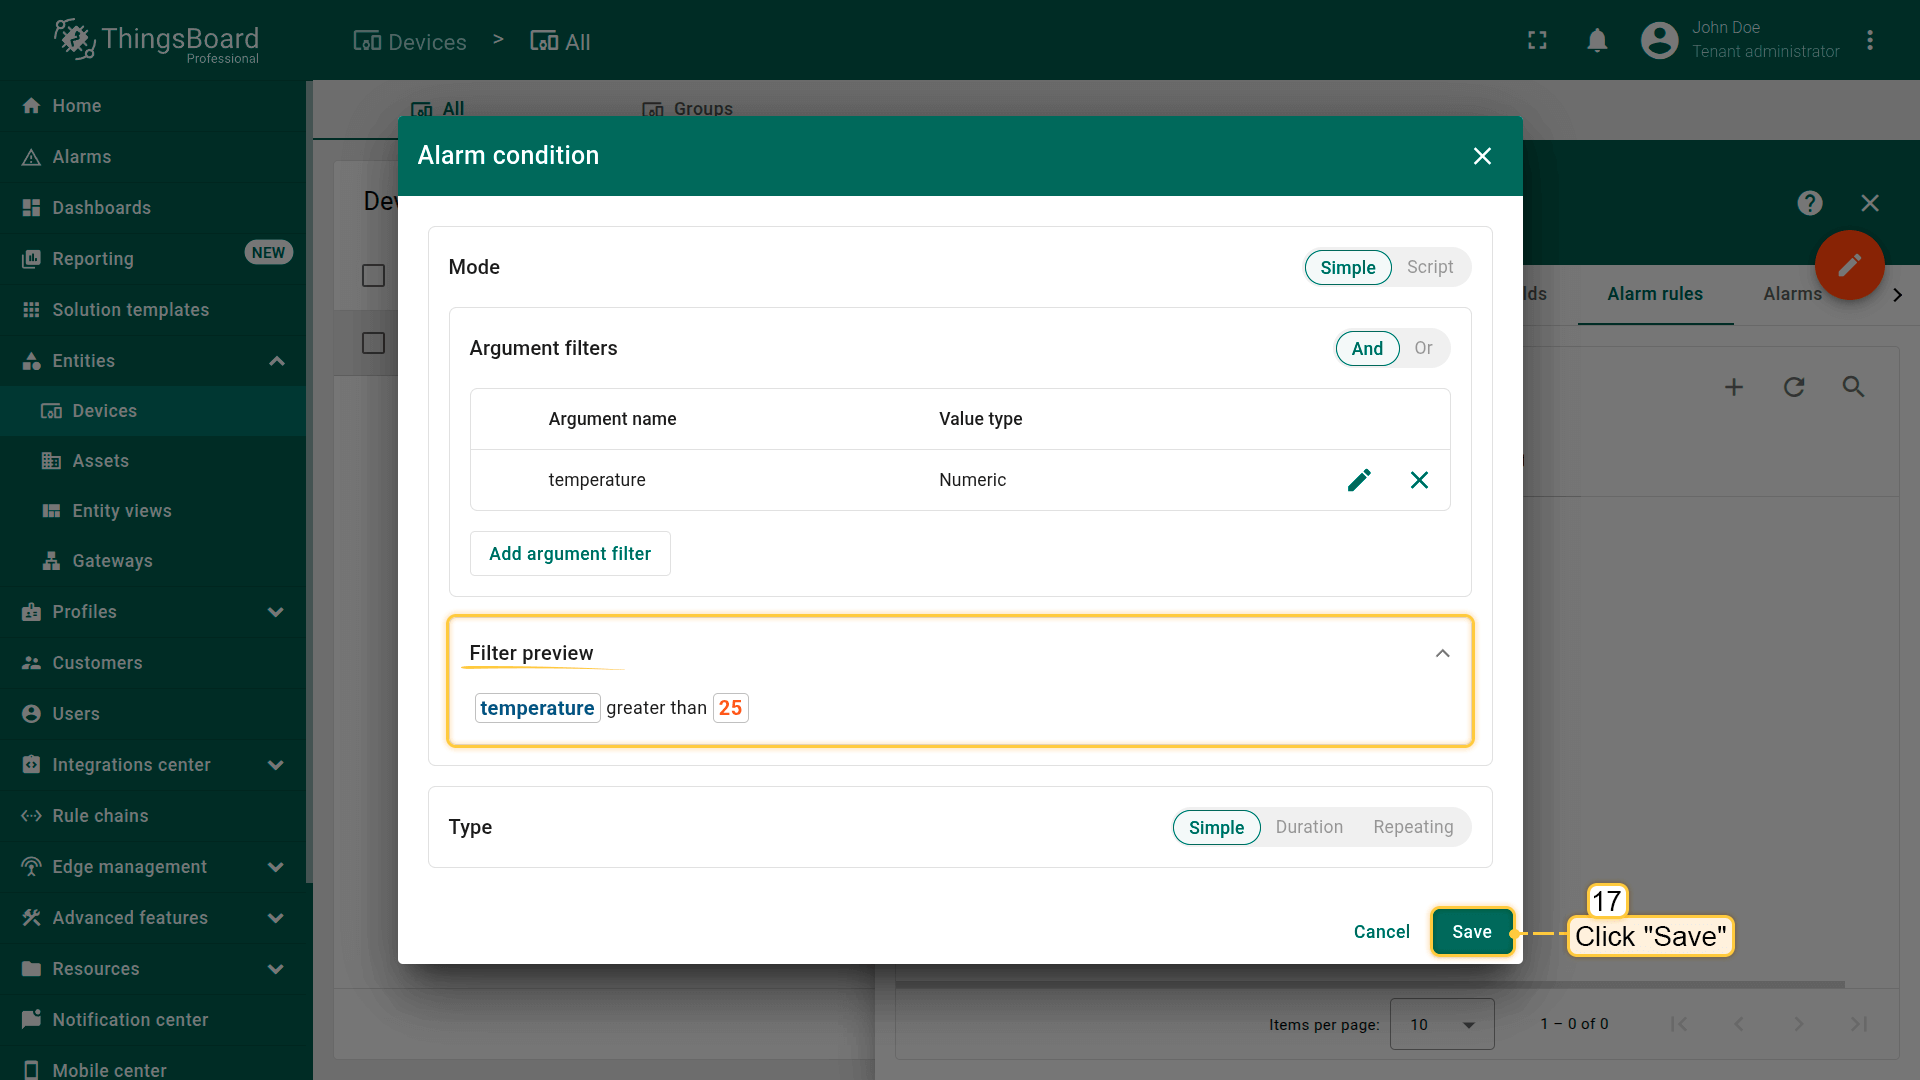
- 通用 块:
- 类型:简单
- 点击 保存。
配置完成后,温度超过 25°C 时将立即触发告警。
保存规则
点击 添加 保存新的告警创建规则。
保存后规则立即生效。
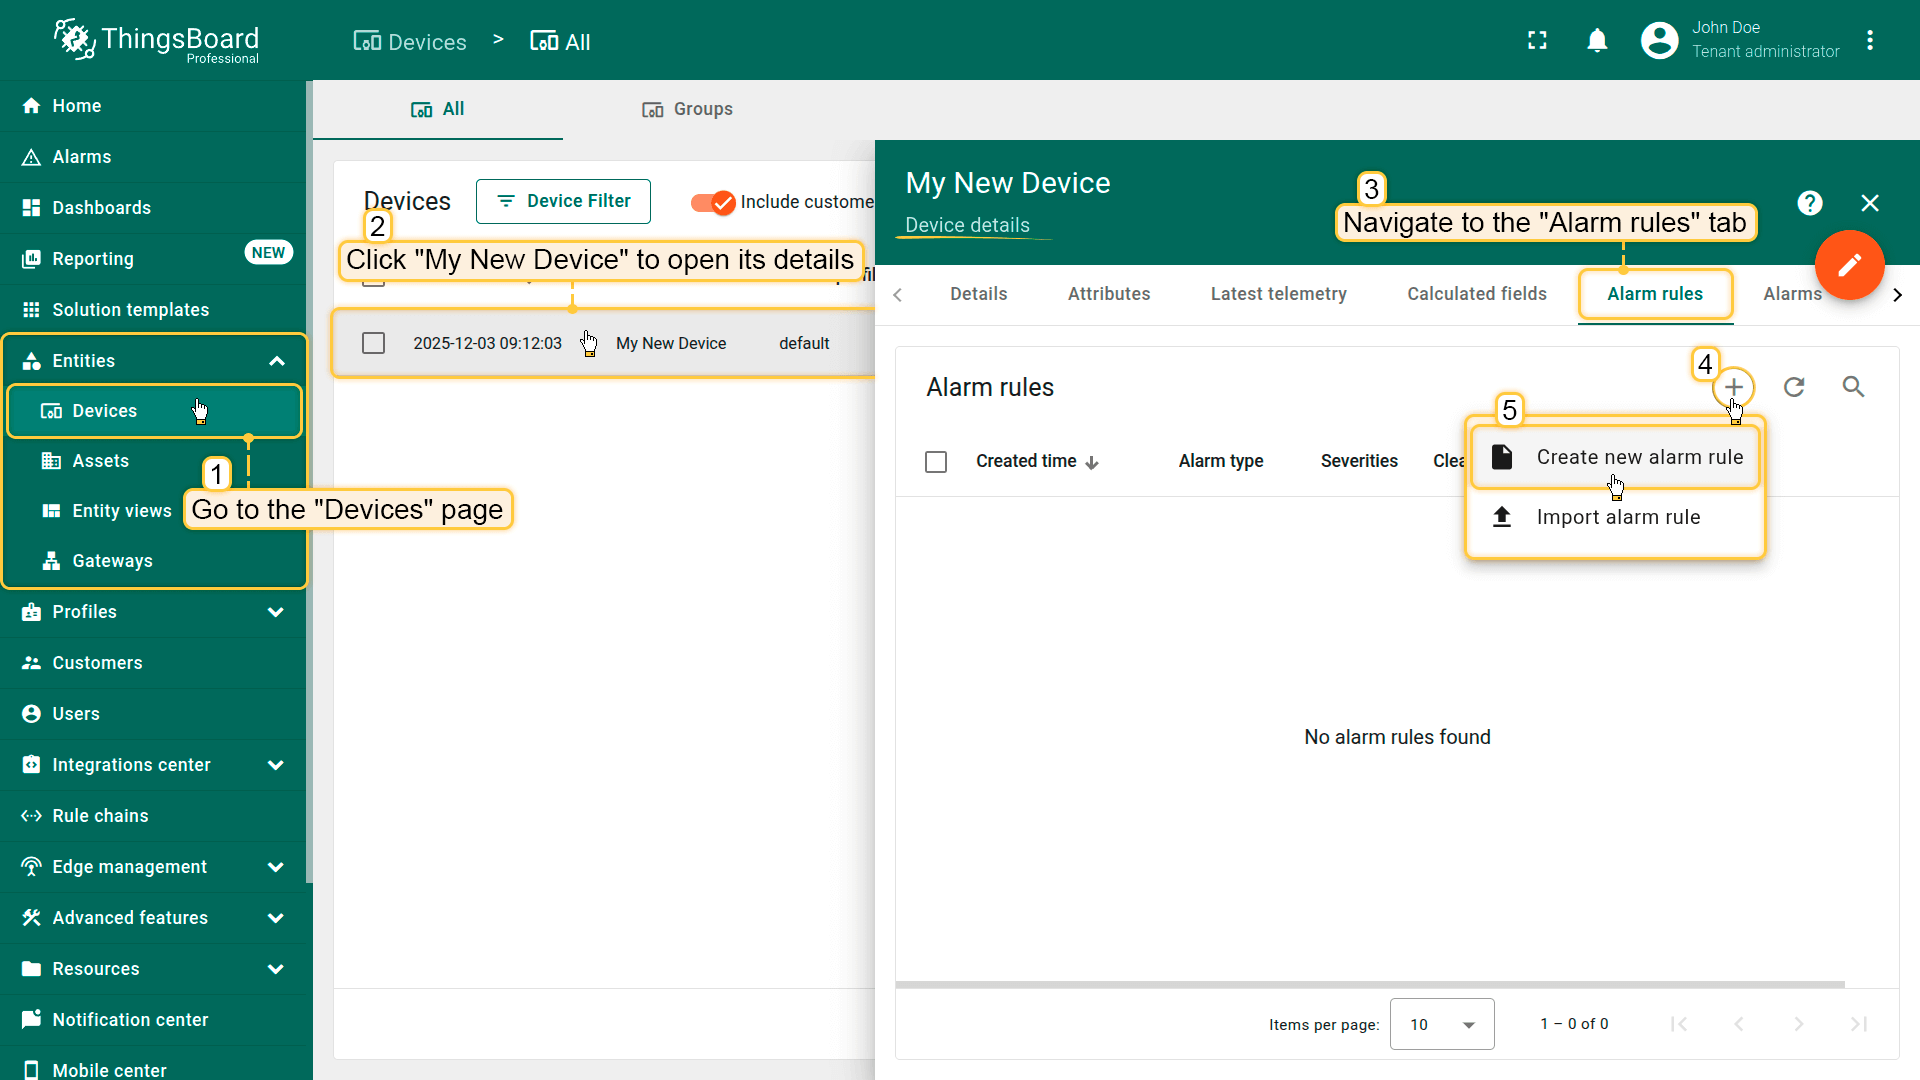
Click My New Device to open its details, and navigate to the Alarm rules tab.
Click the "+" button, and select Create new alarm rule.
Filters: Click Add; Operation: greater than; Value source: Static; Value: 25.
Click Add.
Save condition.
建议参考告警规则配置示例。
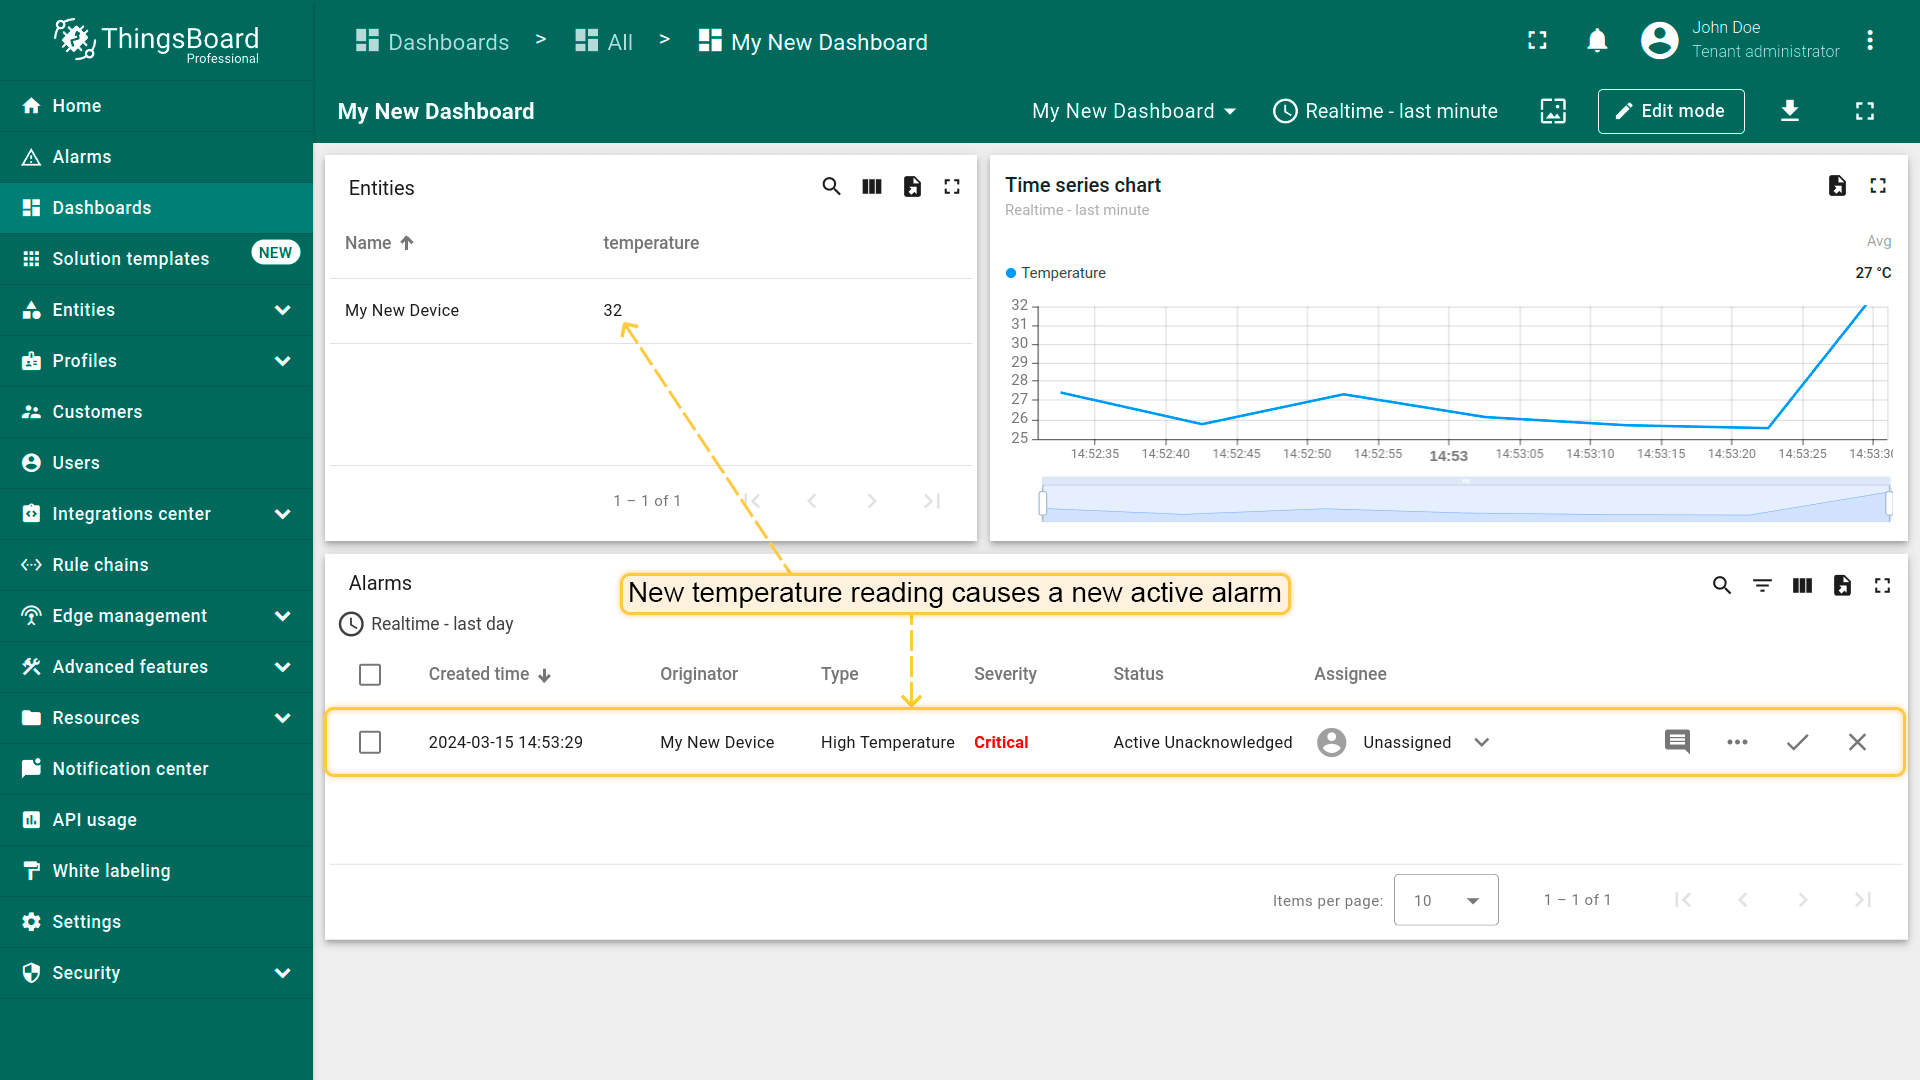
步骤5. 创建告警
告警规则已生效(见步骤4),需从设备发送新的遥测数据(见步骤2)以触发告警。
注意:仅当温度值超过告警创建条件中定义的25°C阈值时,系统才会创建告警。
发送遥测后将发生什么
- As soon as a new temperature value goes above the threshold, a new active alarm will appear on the dashboard.
- You can acknowledge and clear alarms using the Alarm table widget.
- After the alarm is created, you will also receive a notification in the Notification center. Click the bell icon in the top-right corner to view the latest notifications.

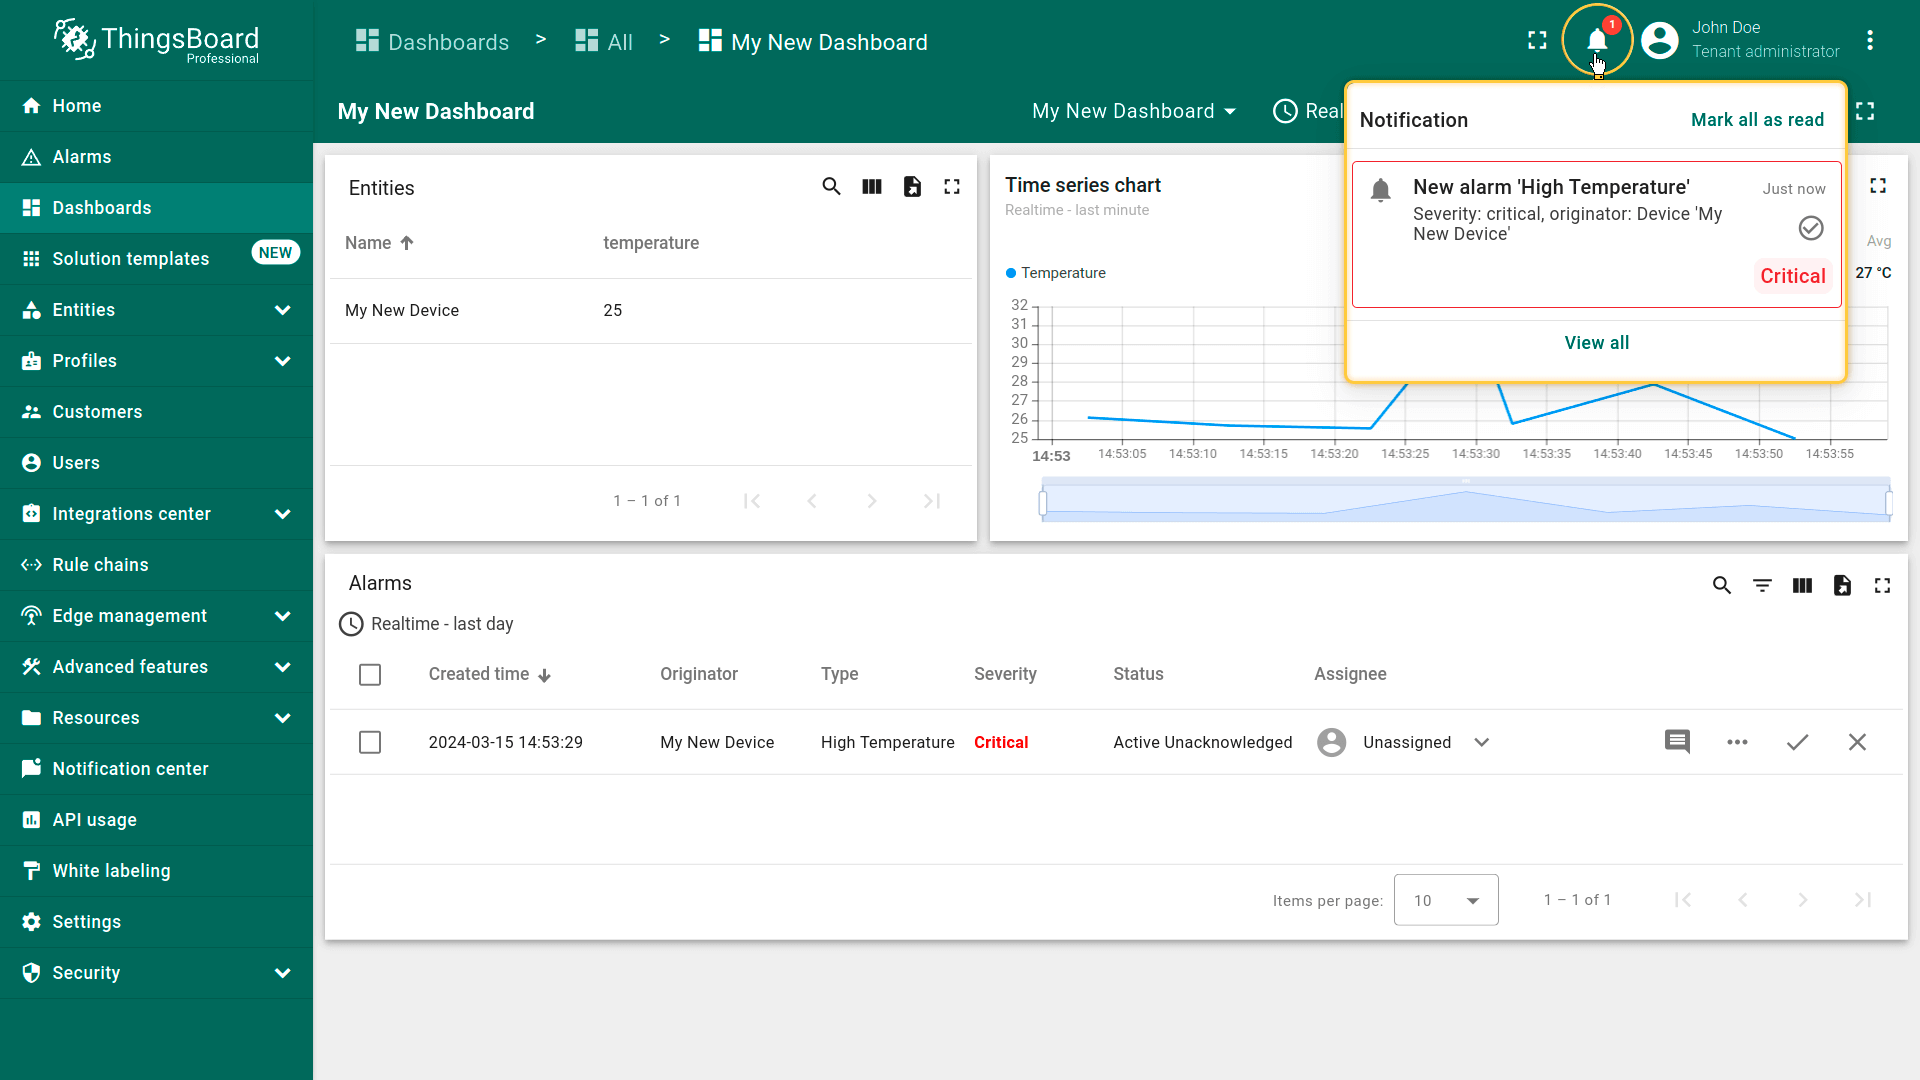
步骤6. 告警通知
ThingsBoard通知中心可向最终用户发送与设备活动、环境变化或IoT生态事件相关的个性化通知。 通知可通过邮件、SMS或集成的第三方系统送达。
此外,ThingsBoard PE移动应用可直接向手机推送即时通知,帮助您随时了解关键事件。
按此指南安装ThingsBoard移动应用并配置通知。
欢迎继续探索ThingsBoard!
步骤7. 与客户共享仪表板
ThingsBoard的重要功能之一是为最终用户创建仪表板。 每位客户用户应仅能看到自己的设备,不能看到属于其他客户的设备或数据。
我们已创建设备(见步骤1)、创建仪表板并添加部件(见步骤3)。 接下来创建客户和客户用户,并确保他们能访问设备数据与仪表板。 租户管理员可通过以下两种方式向客户授予对实体(设备、仪表板、资产等)的访问权限:
步骤7.1创建客户
创建标题为「My New Customer」的客户,按以下说明操作:
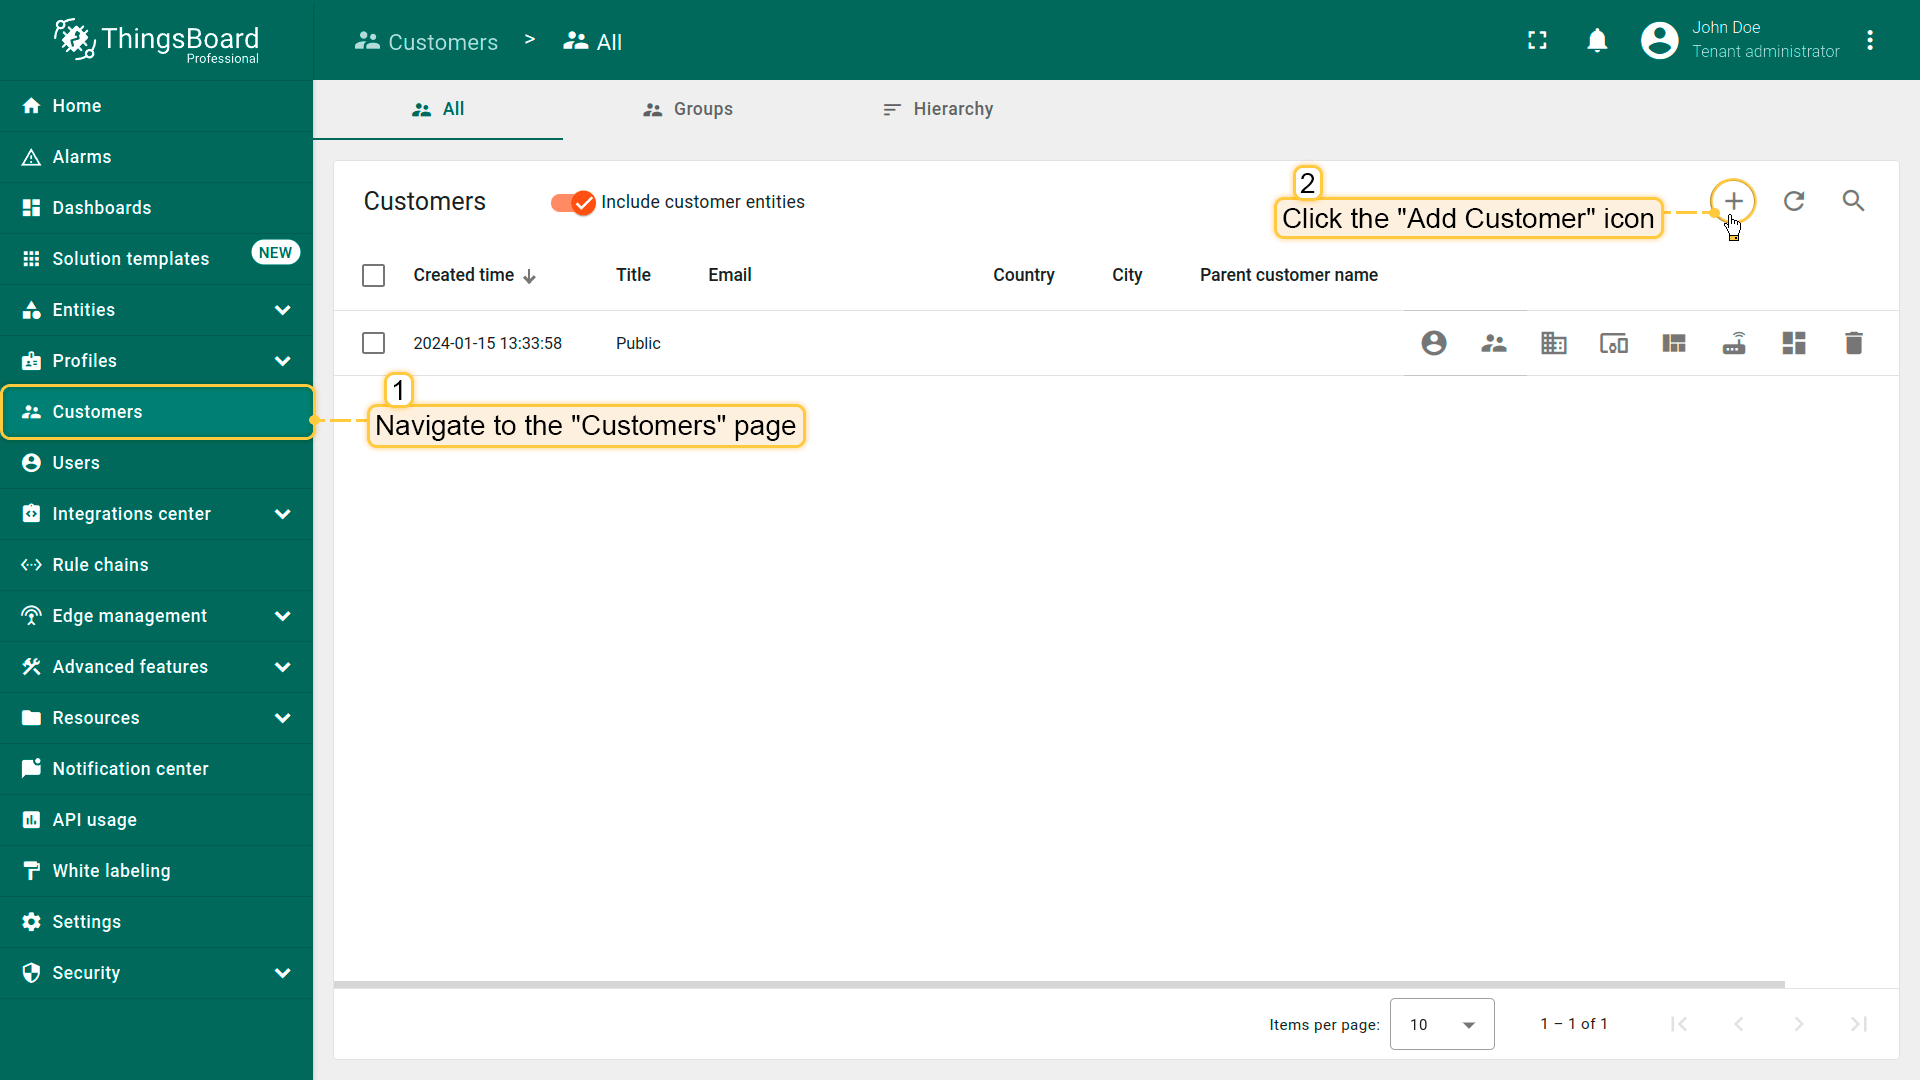
- Navigate to the "Customers" page. By default, you navigate to the customer group "All". Click the "+" sign to add a new customer;
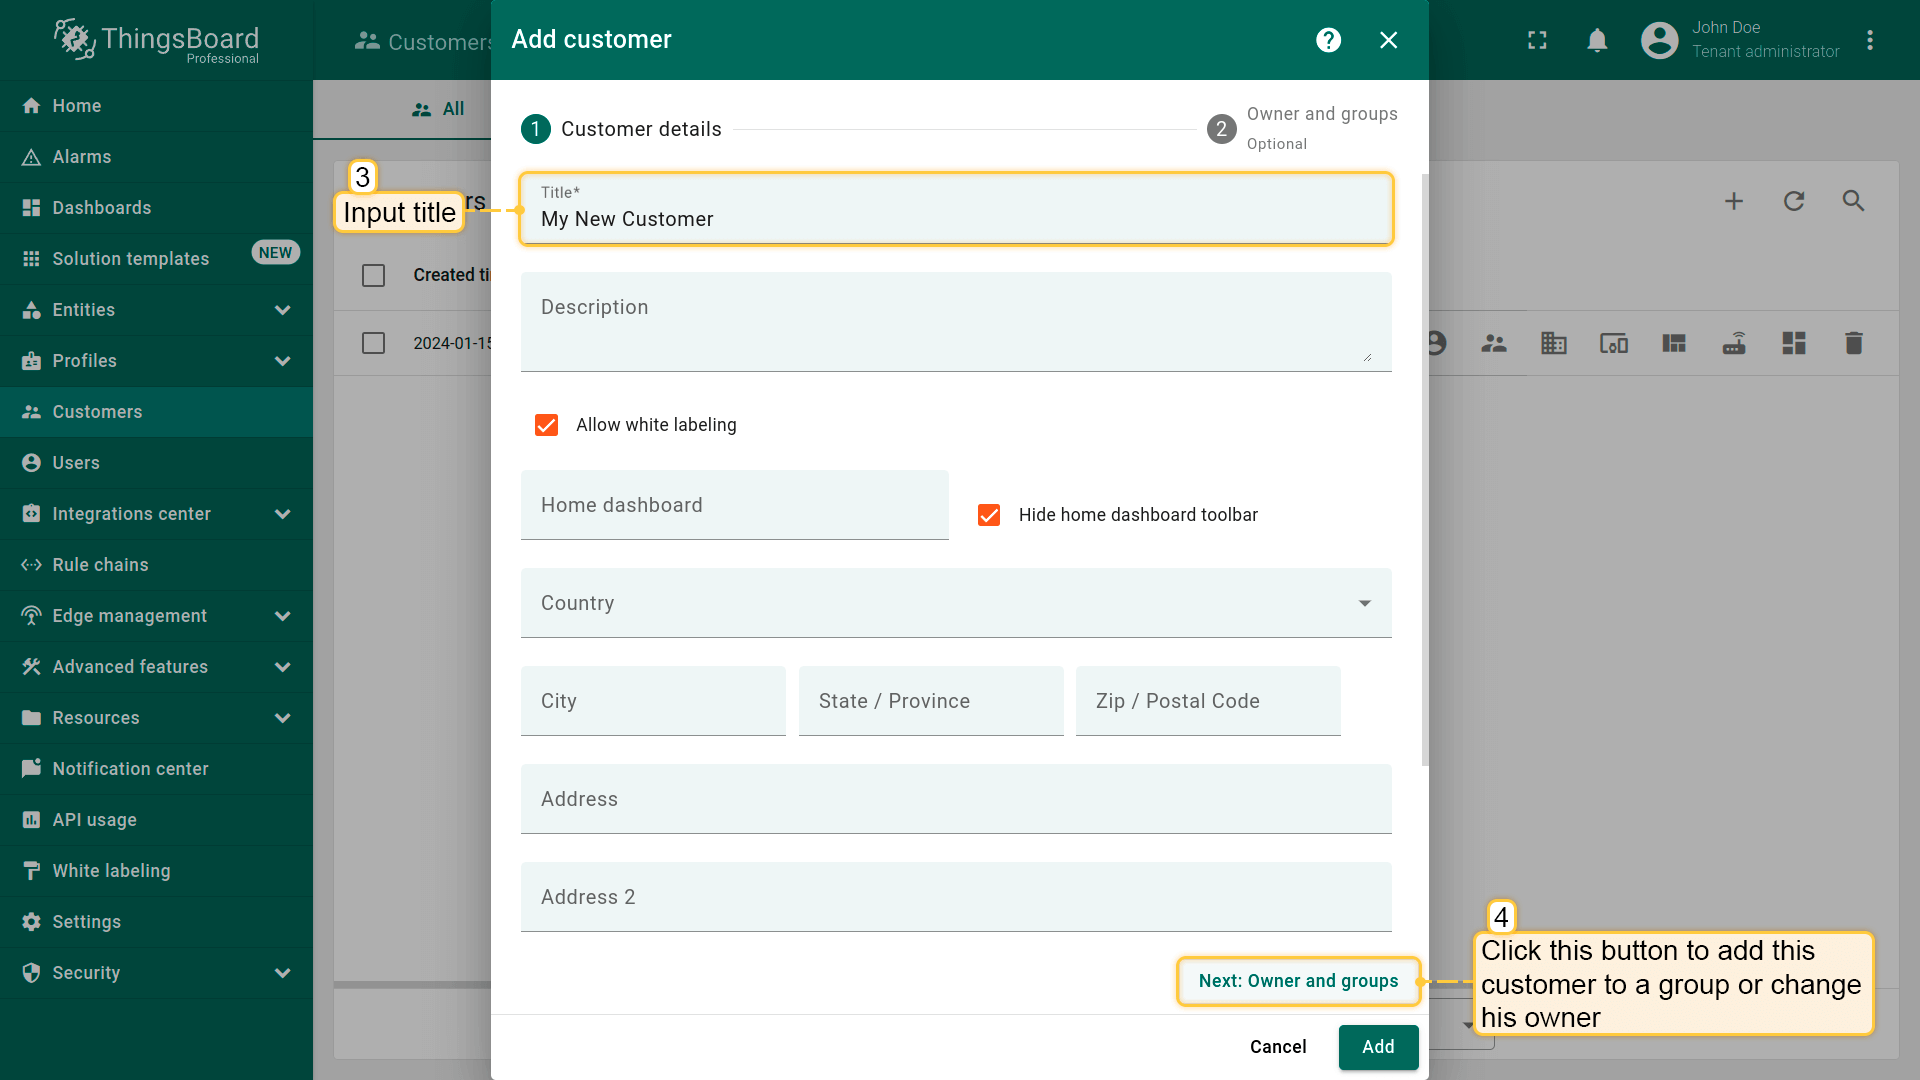
- Input the customer title. Additionally, you can input personal details for the customer and assign a home dashboard. To finalize the customer creation, you can click the "Add" button. In this case, the new customer will be created and located in the "All" customers folder. Let`s create a separate group for our customer. To do this, click on "Next: Owner and groups" button;
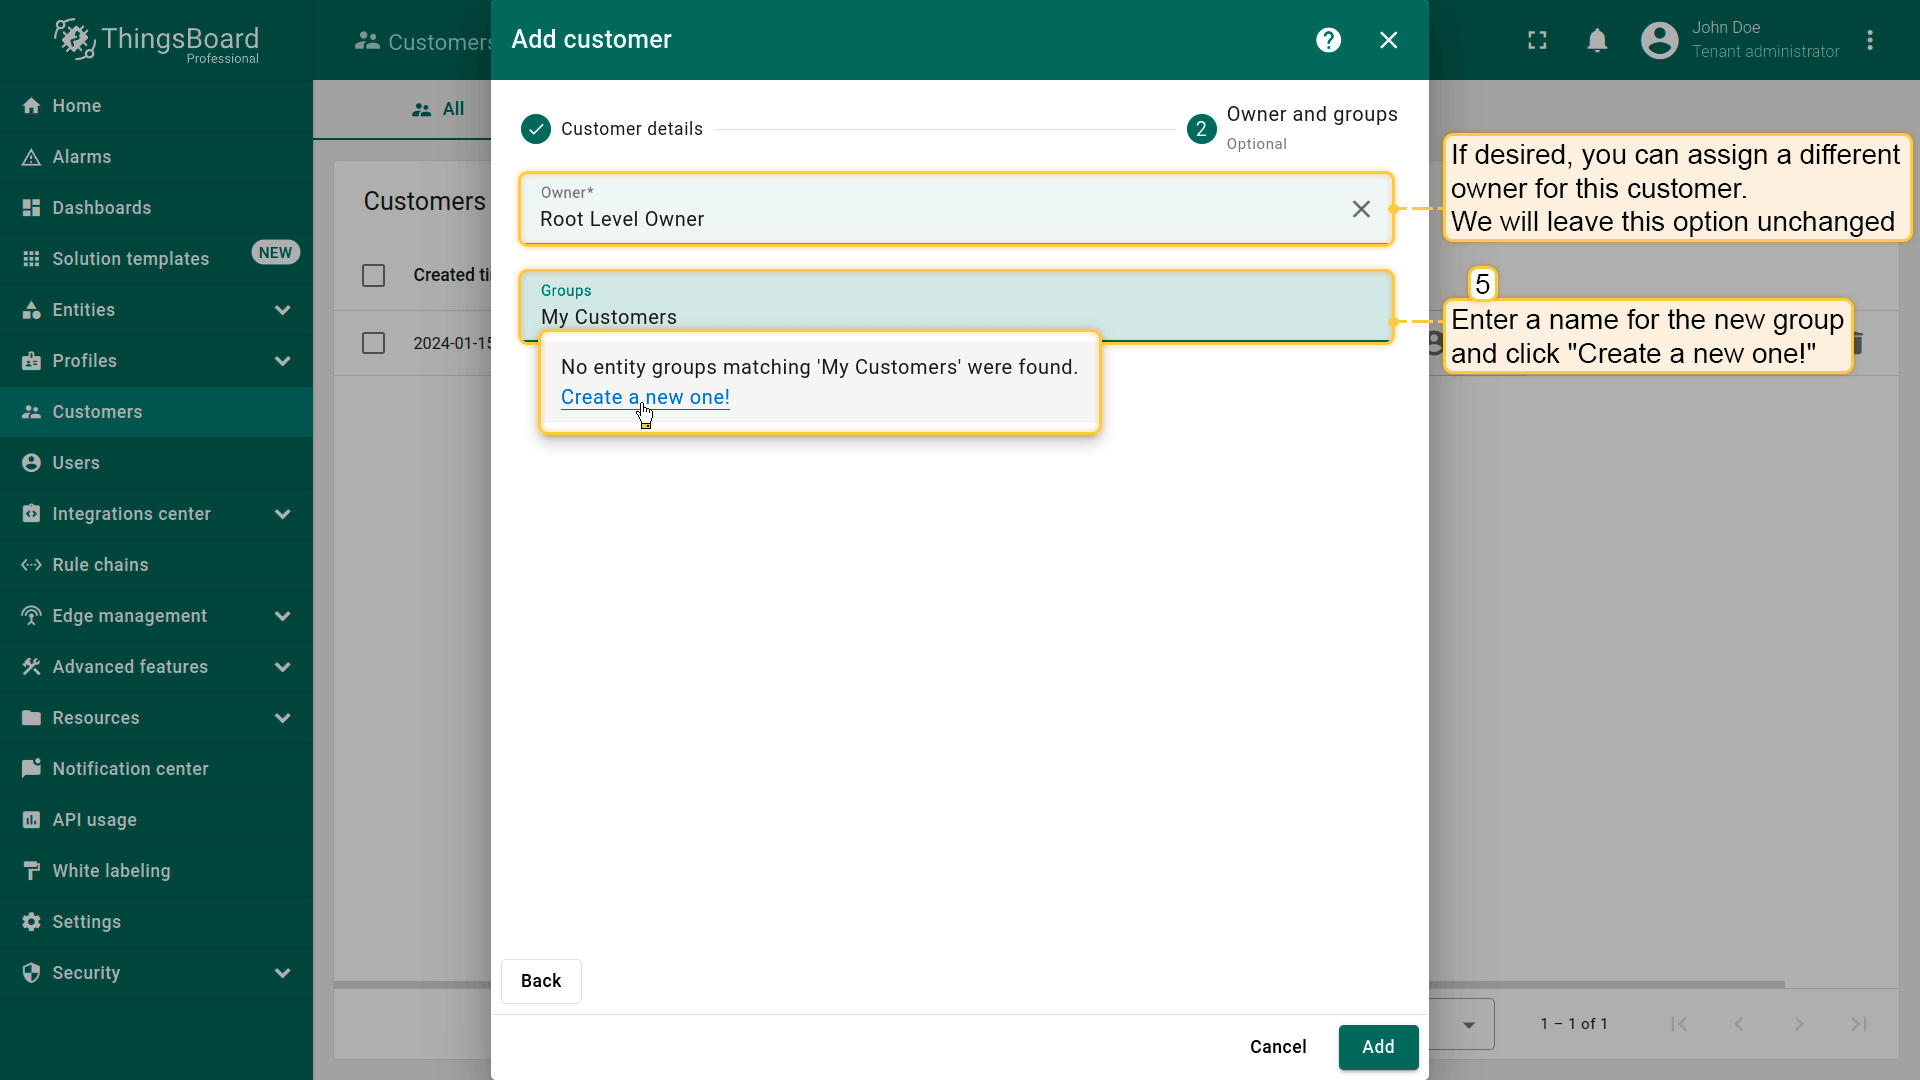
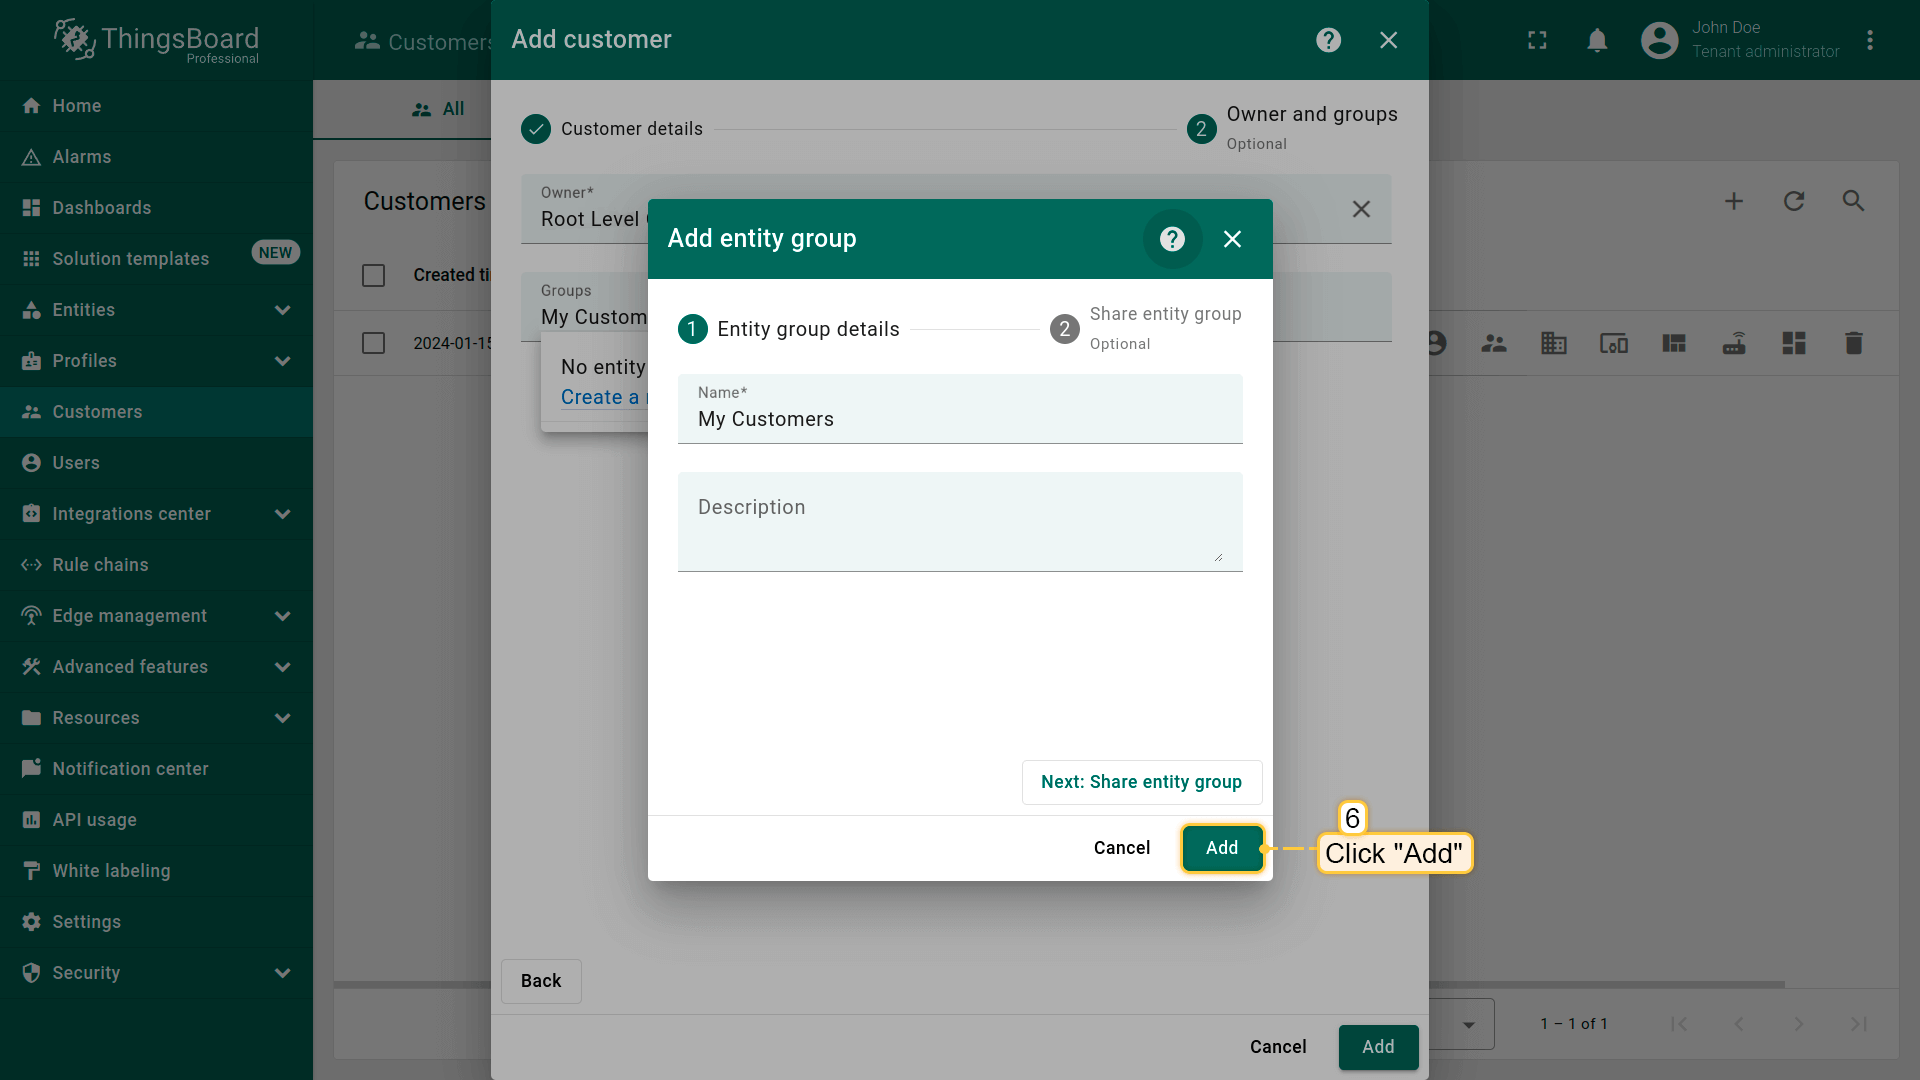
- If needed, you can assign a different owner for this customer. We will leave this option unchanged. Enter a name for the new group and click "Create a new one!";
- Click "Add" to create a new customers group;
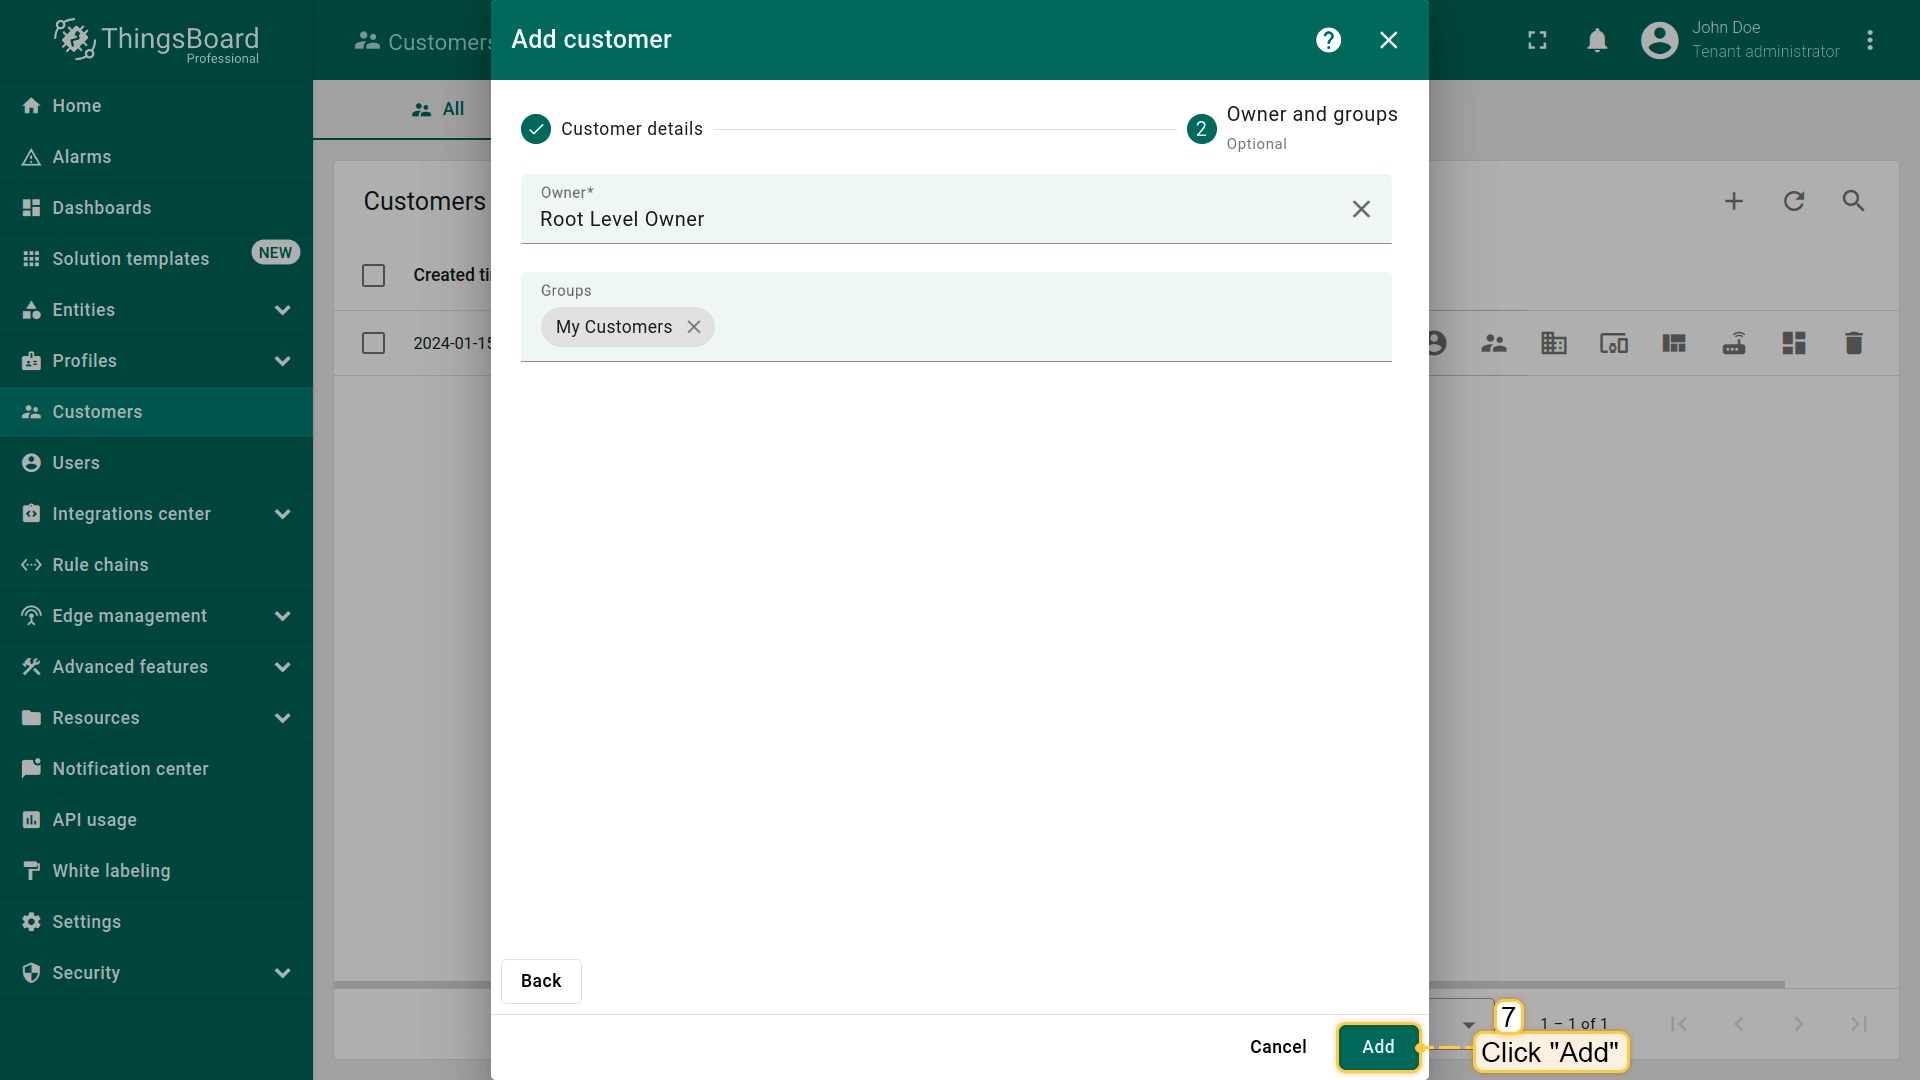
- Now, click "Add" to create a new customer;
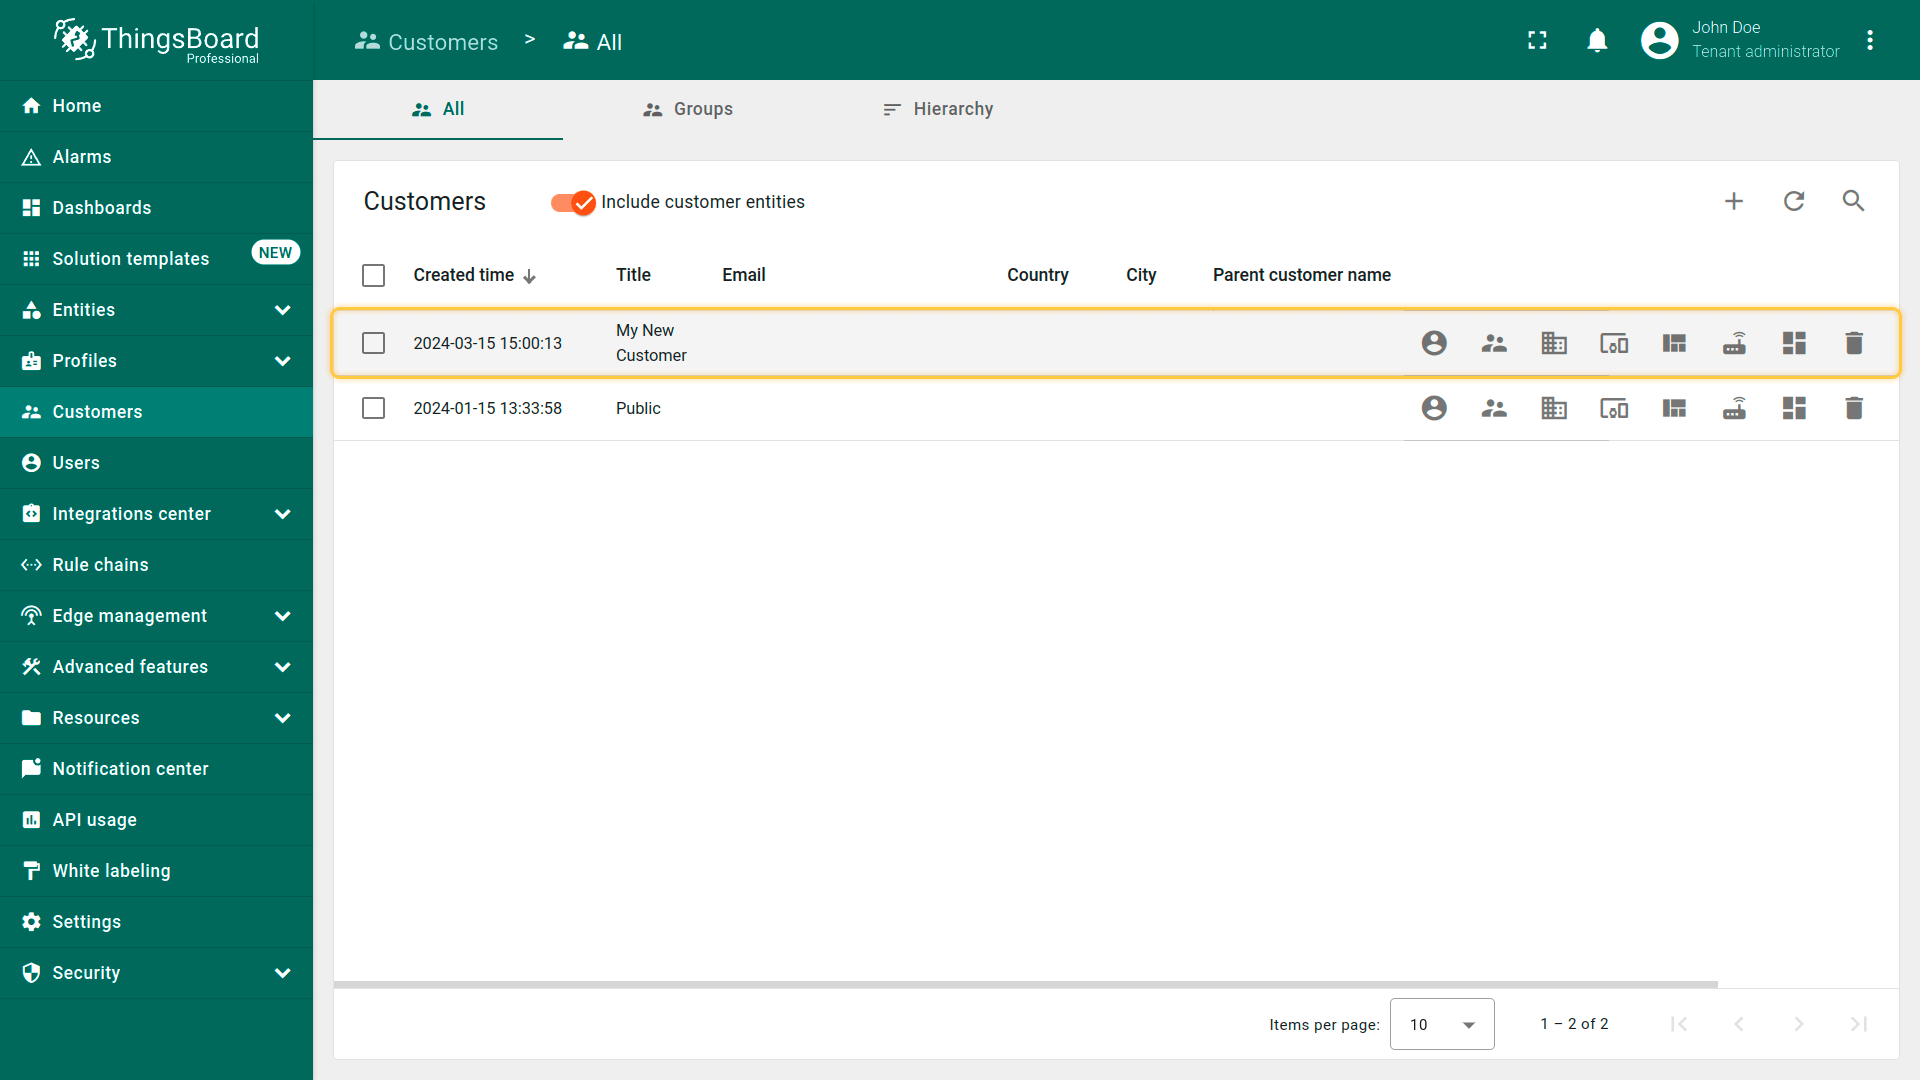
- The customer has been created and is located in the "My Customers" group.
步骤7.2更改设备所有者
将客户指定为设备所有者。同时创建设备组并将设备加入其中。
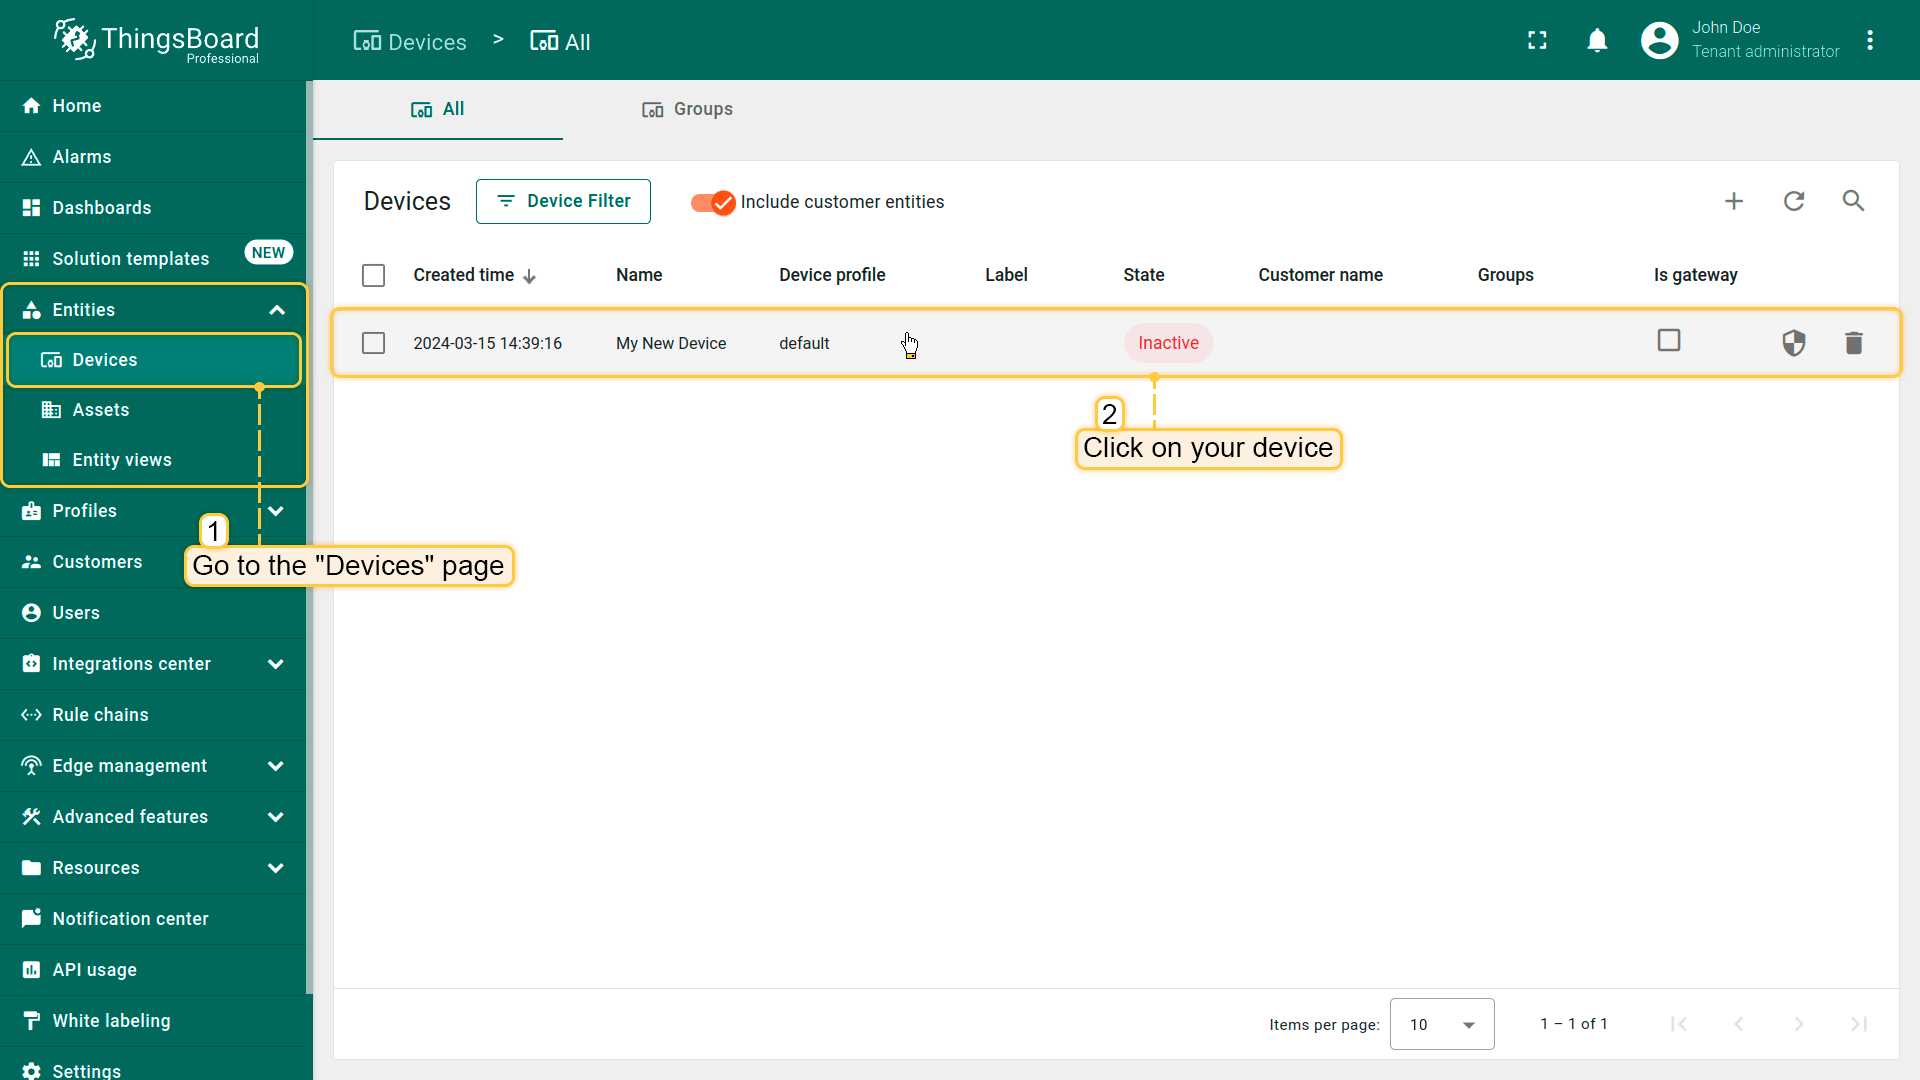
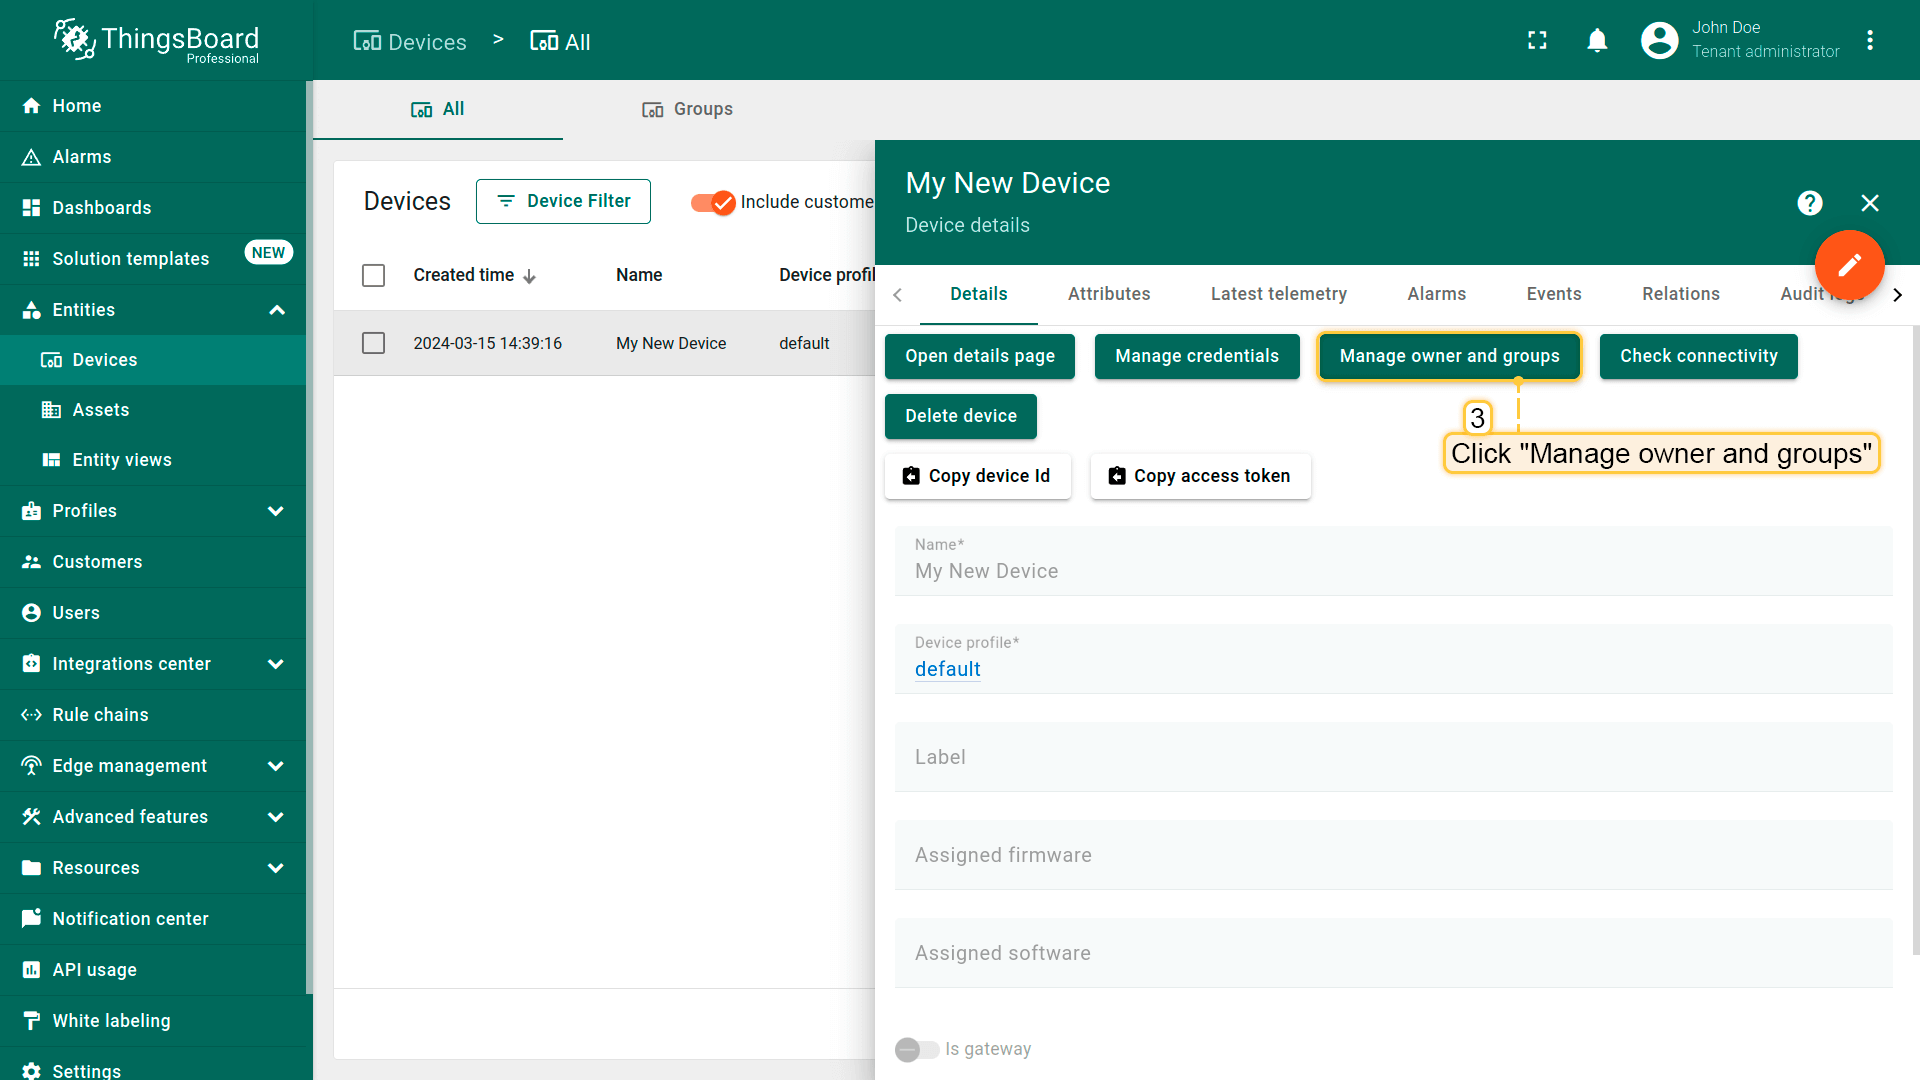
- Open "Devices" page. Click on your device to open its details;
- Click "Manage owner and groups" button;
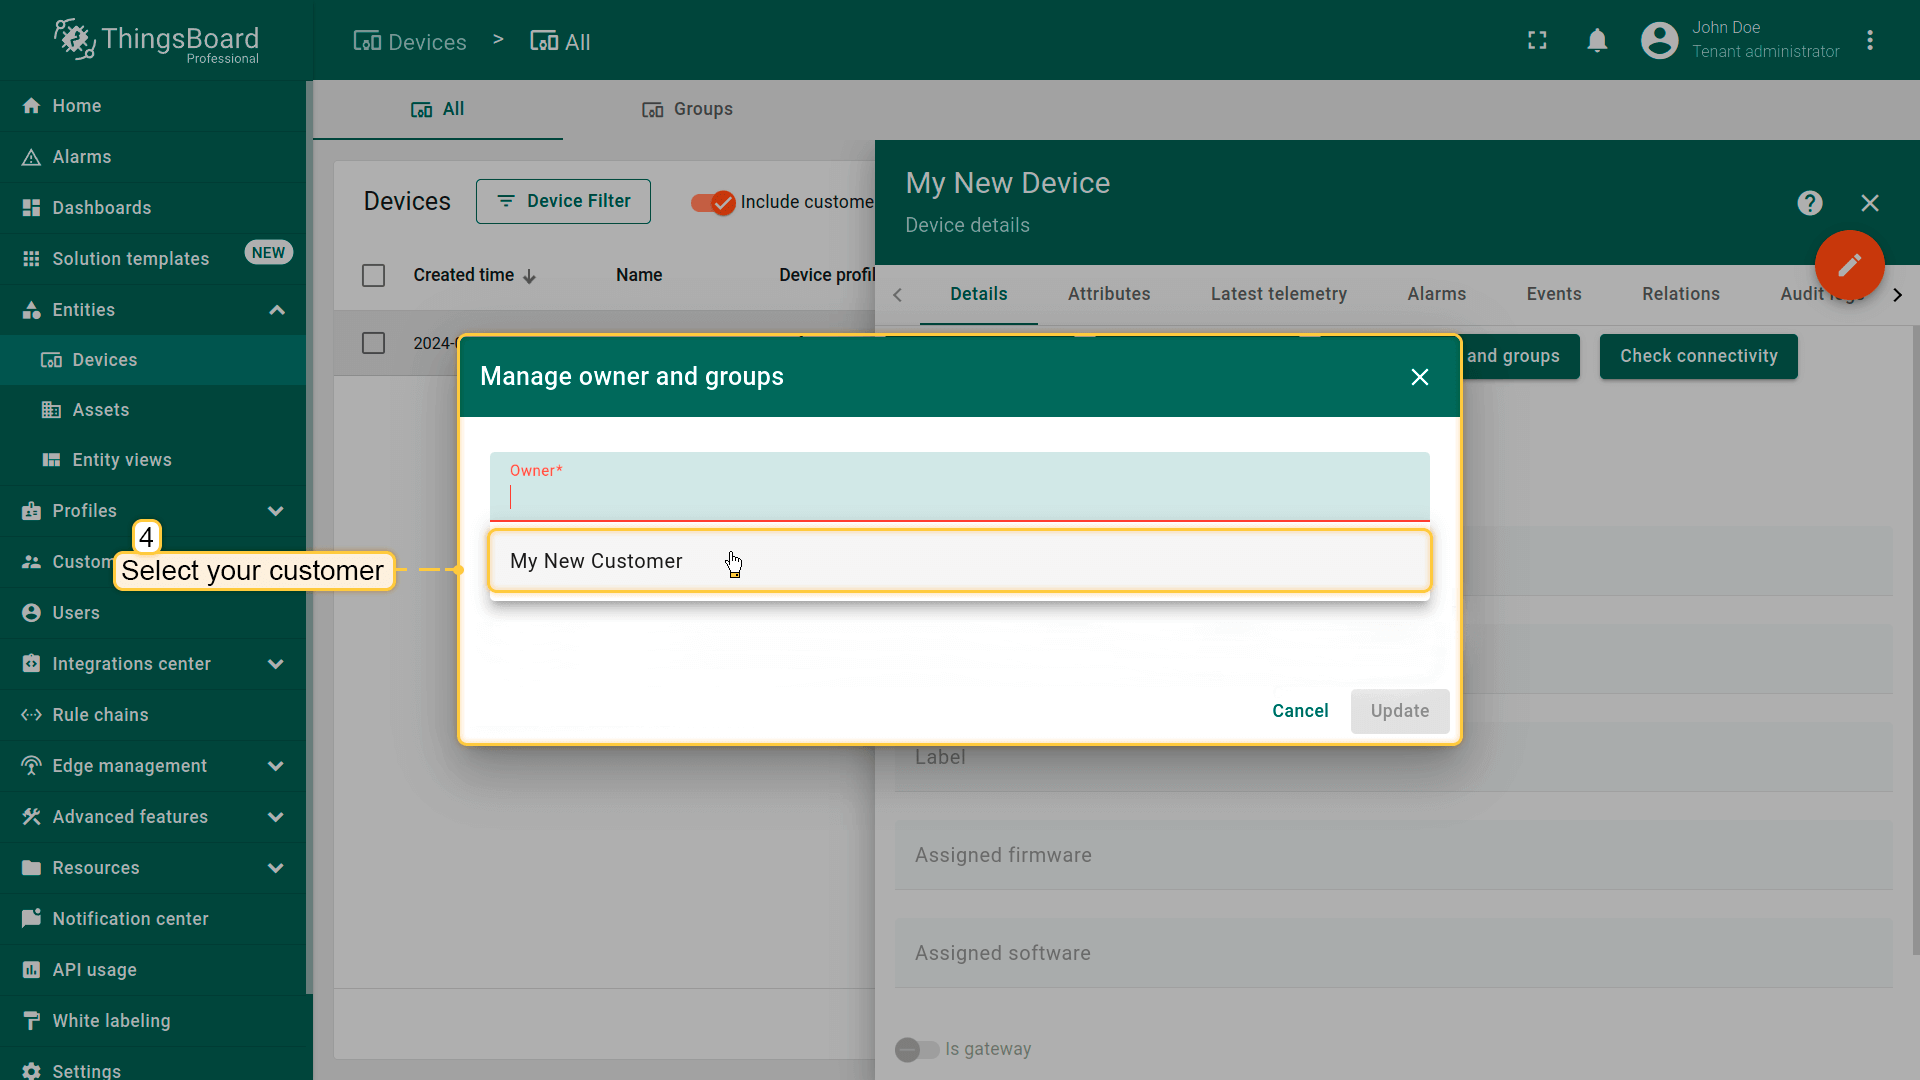
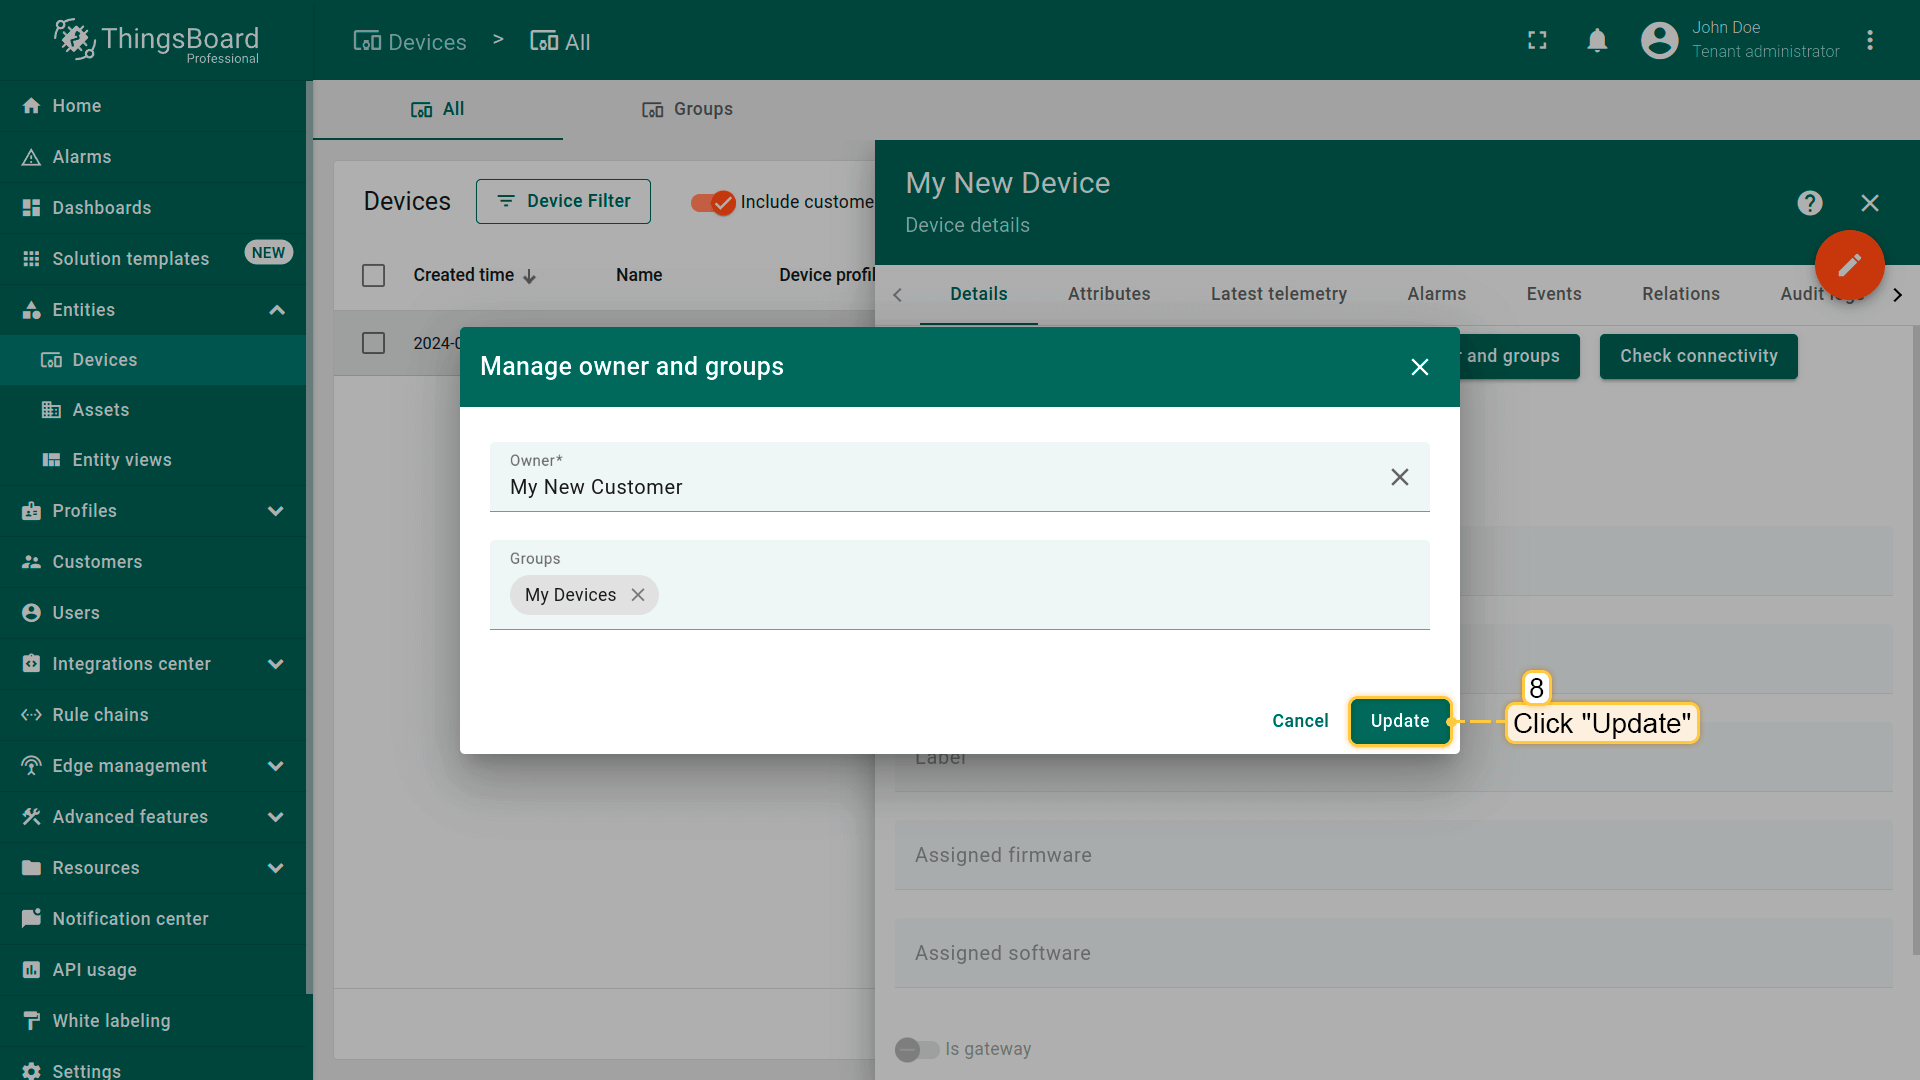
- In the "Owner" line, start typing the customer name and then select the customer;
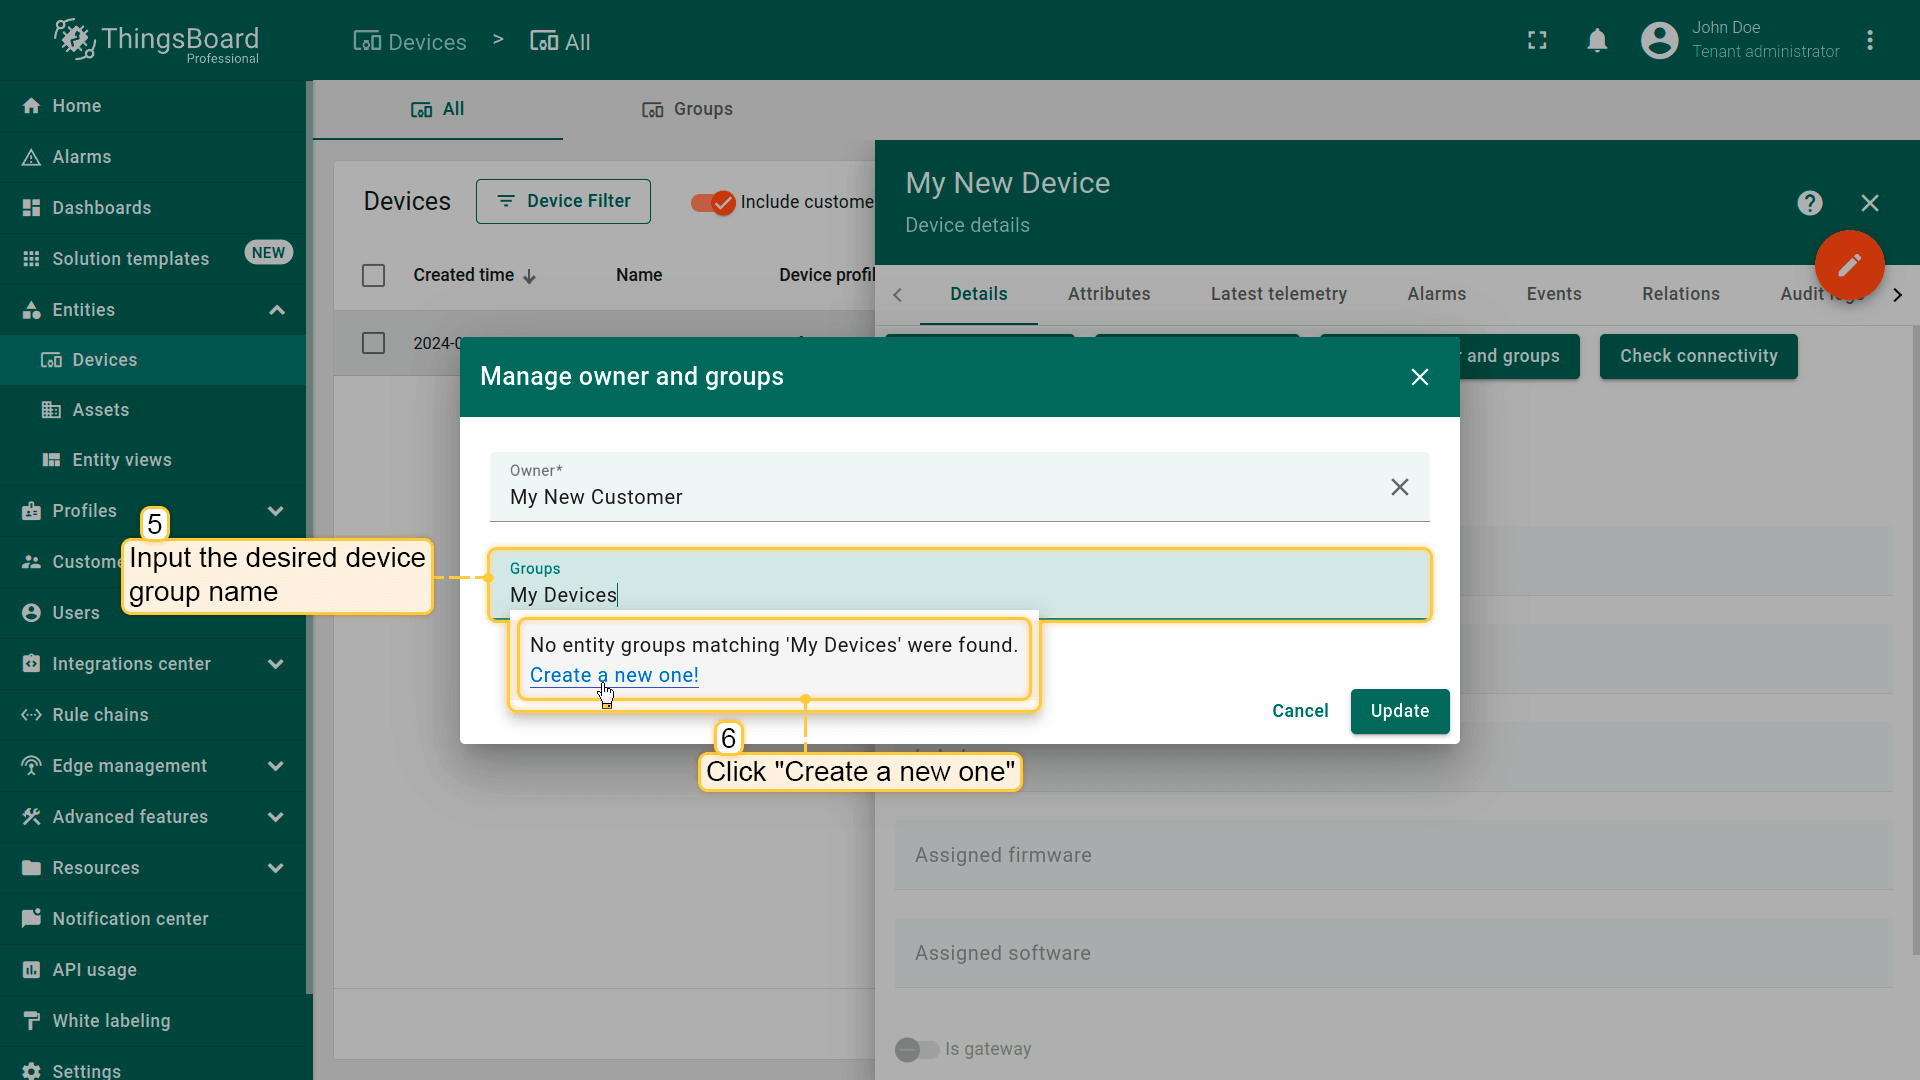
- Now, create a device group. In the "Groups" line, input the desired device group name. Then, click "Create a new one!";
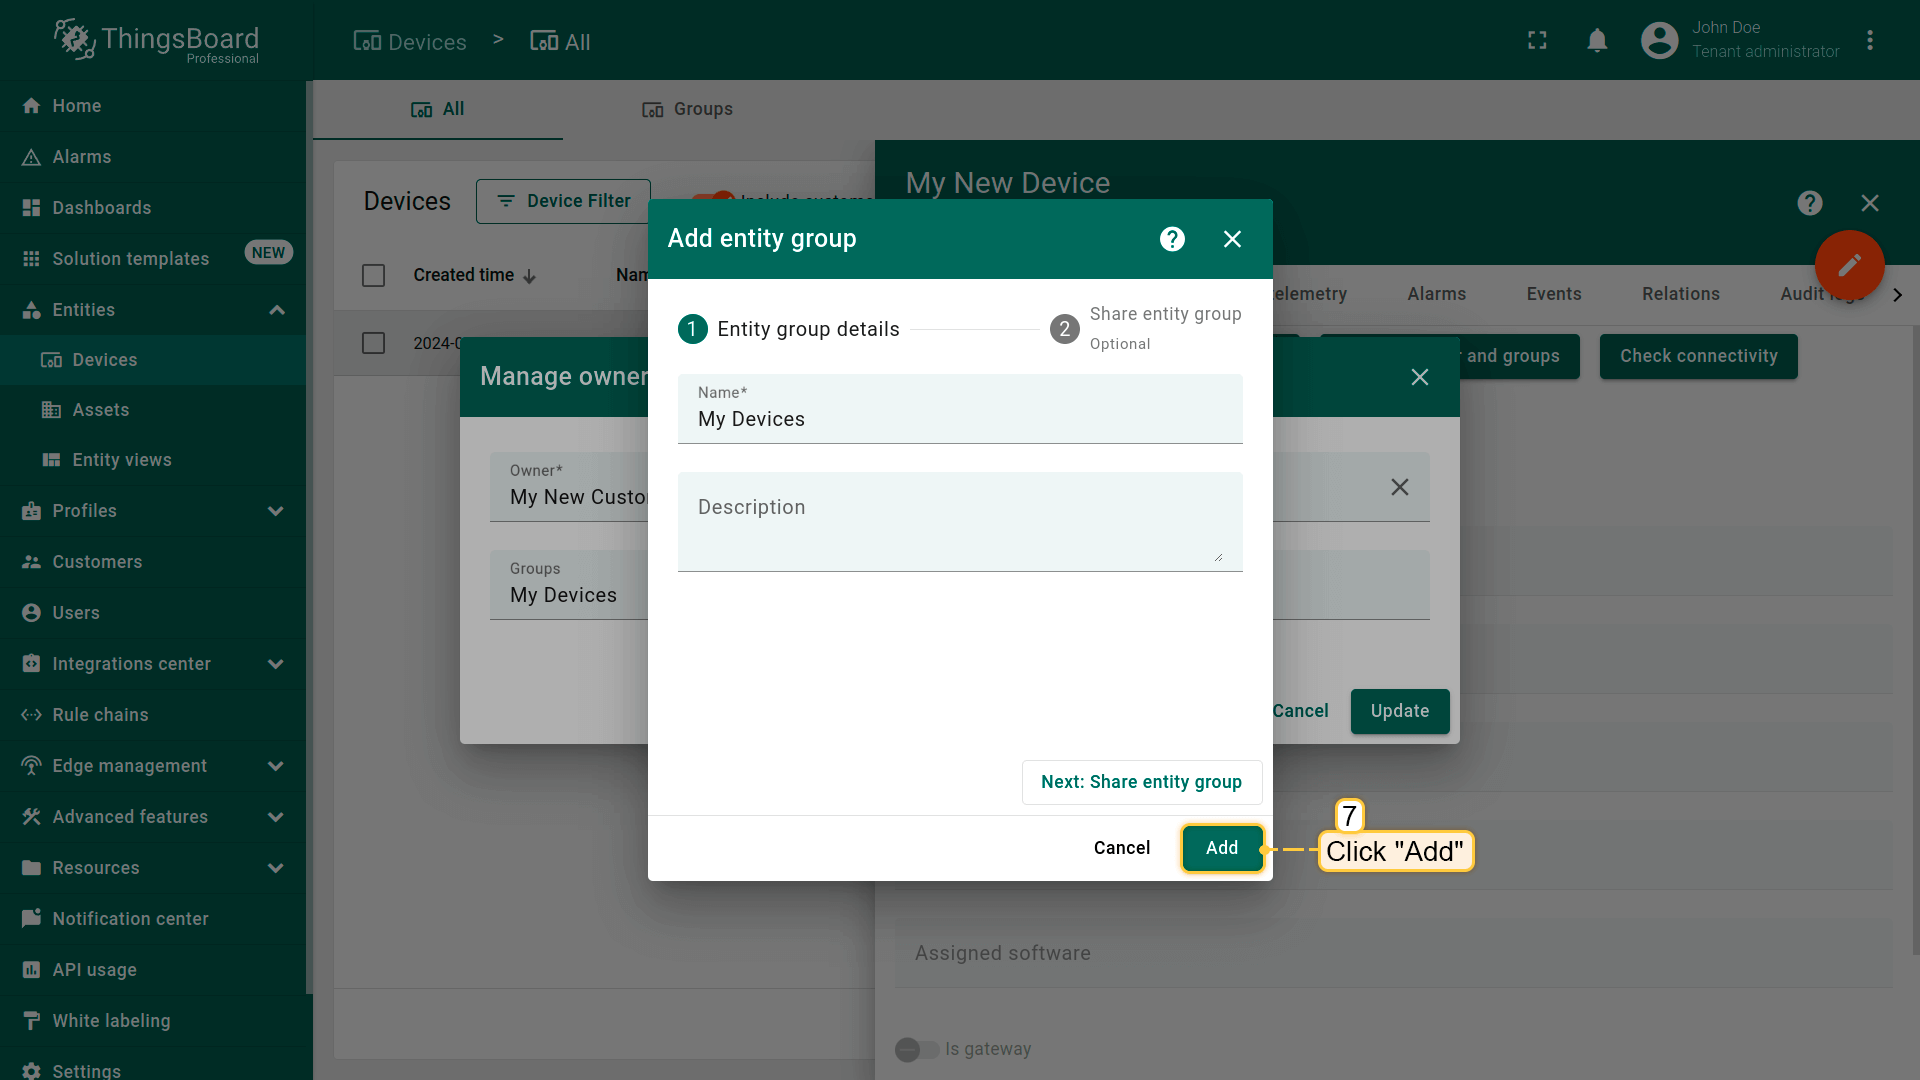
- In the next window, click "Add" button to create a device group;
- Click "Update" to add to the group and change the owner of your device. You can always change the owner back to the tenant;
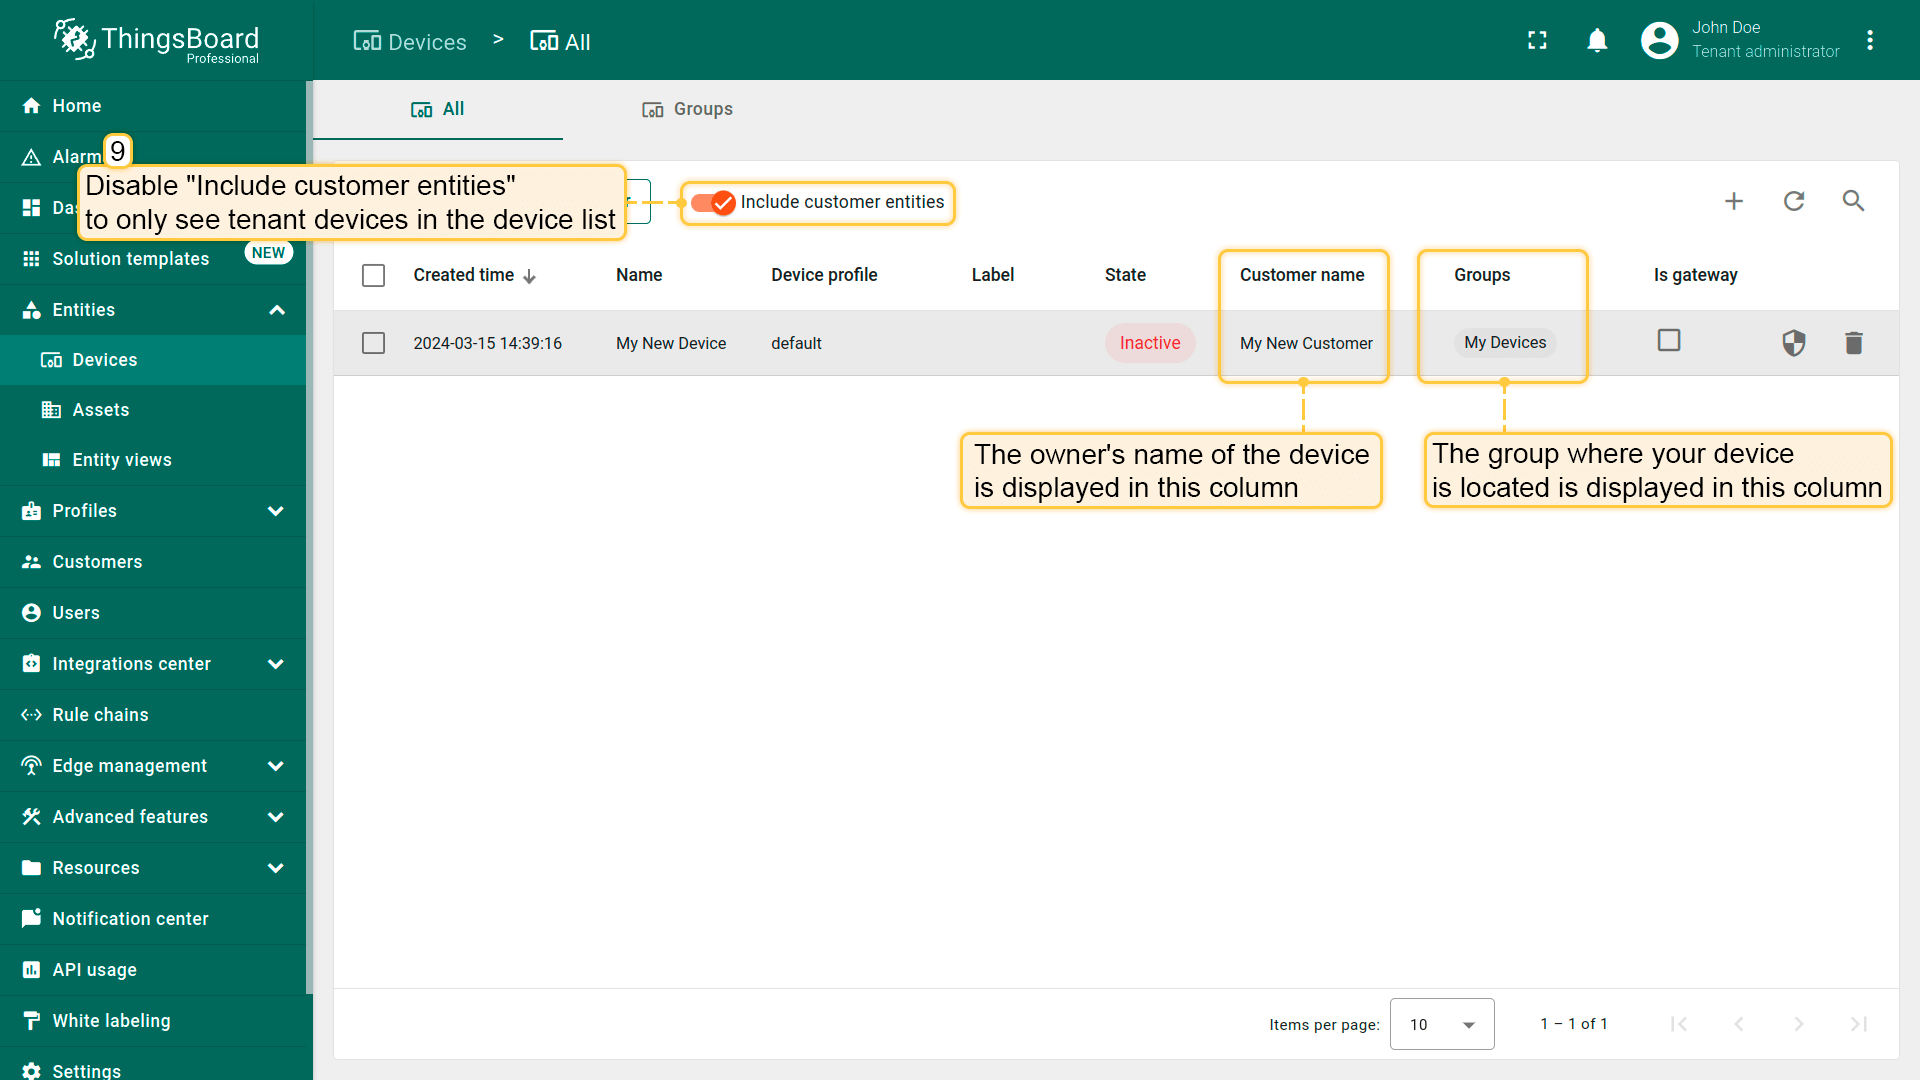
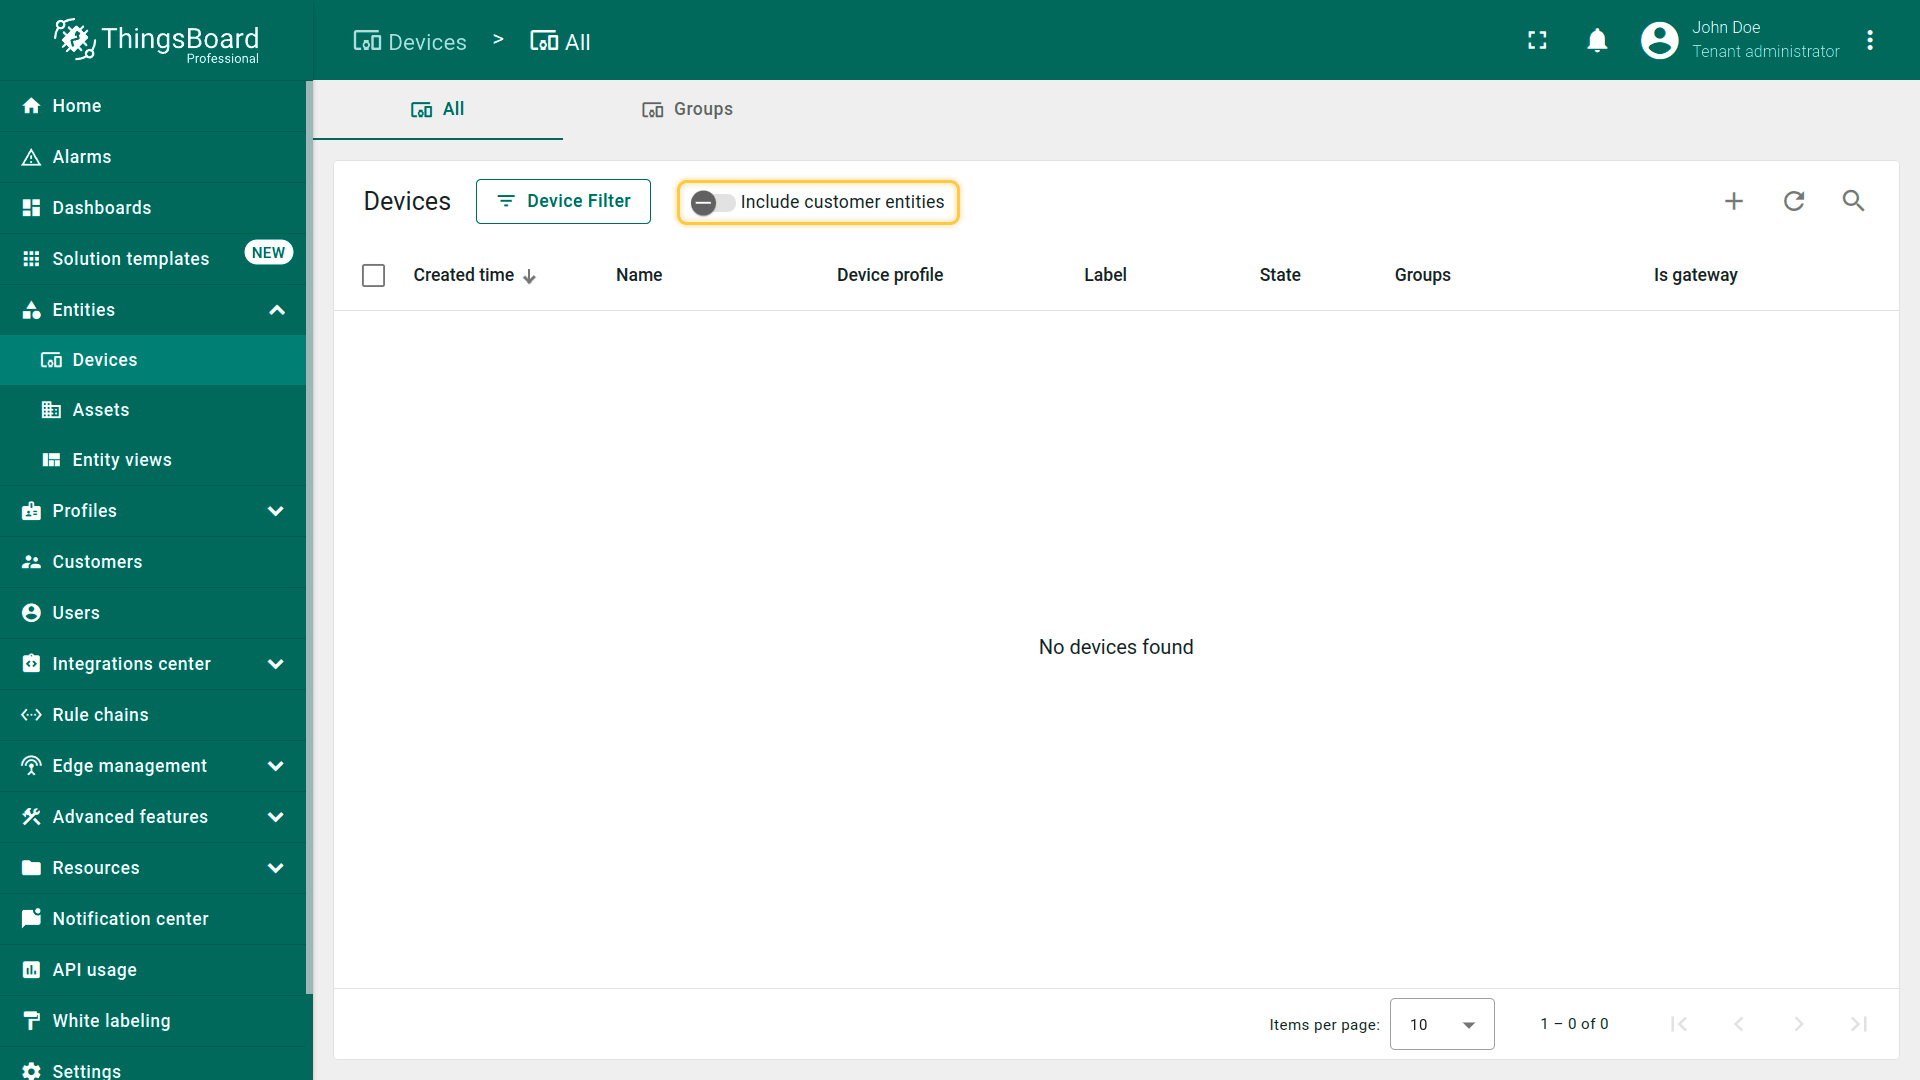
- By default, the general device list displays both tenant devices and devices of your customers. Disable "Include customer entities" to only see tenant devices in the device list;
- Your device list should be empty now.
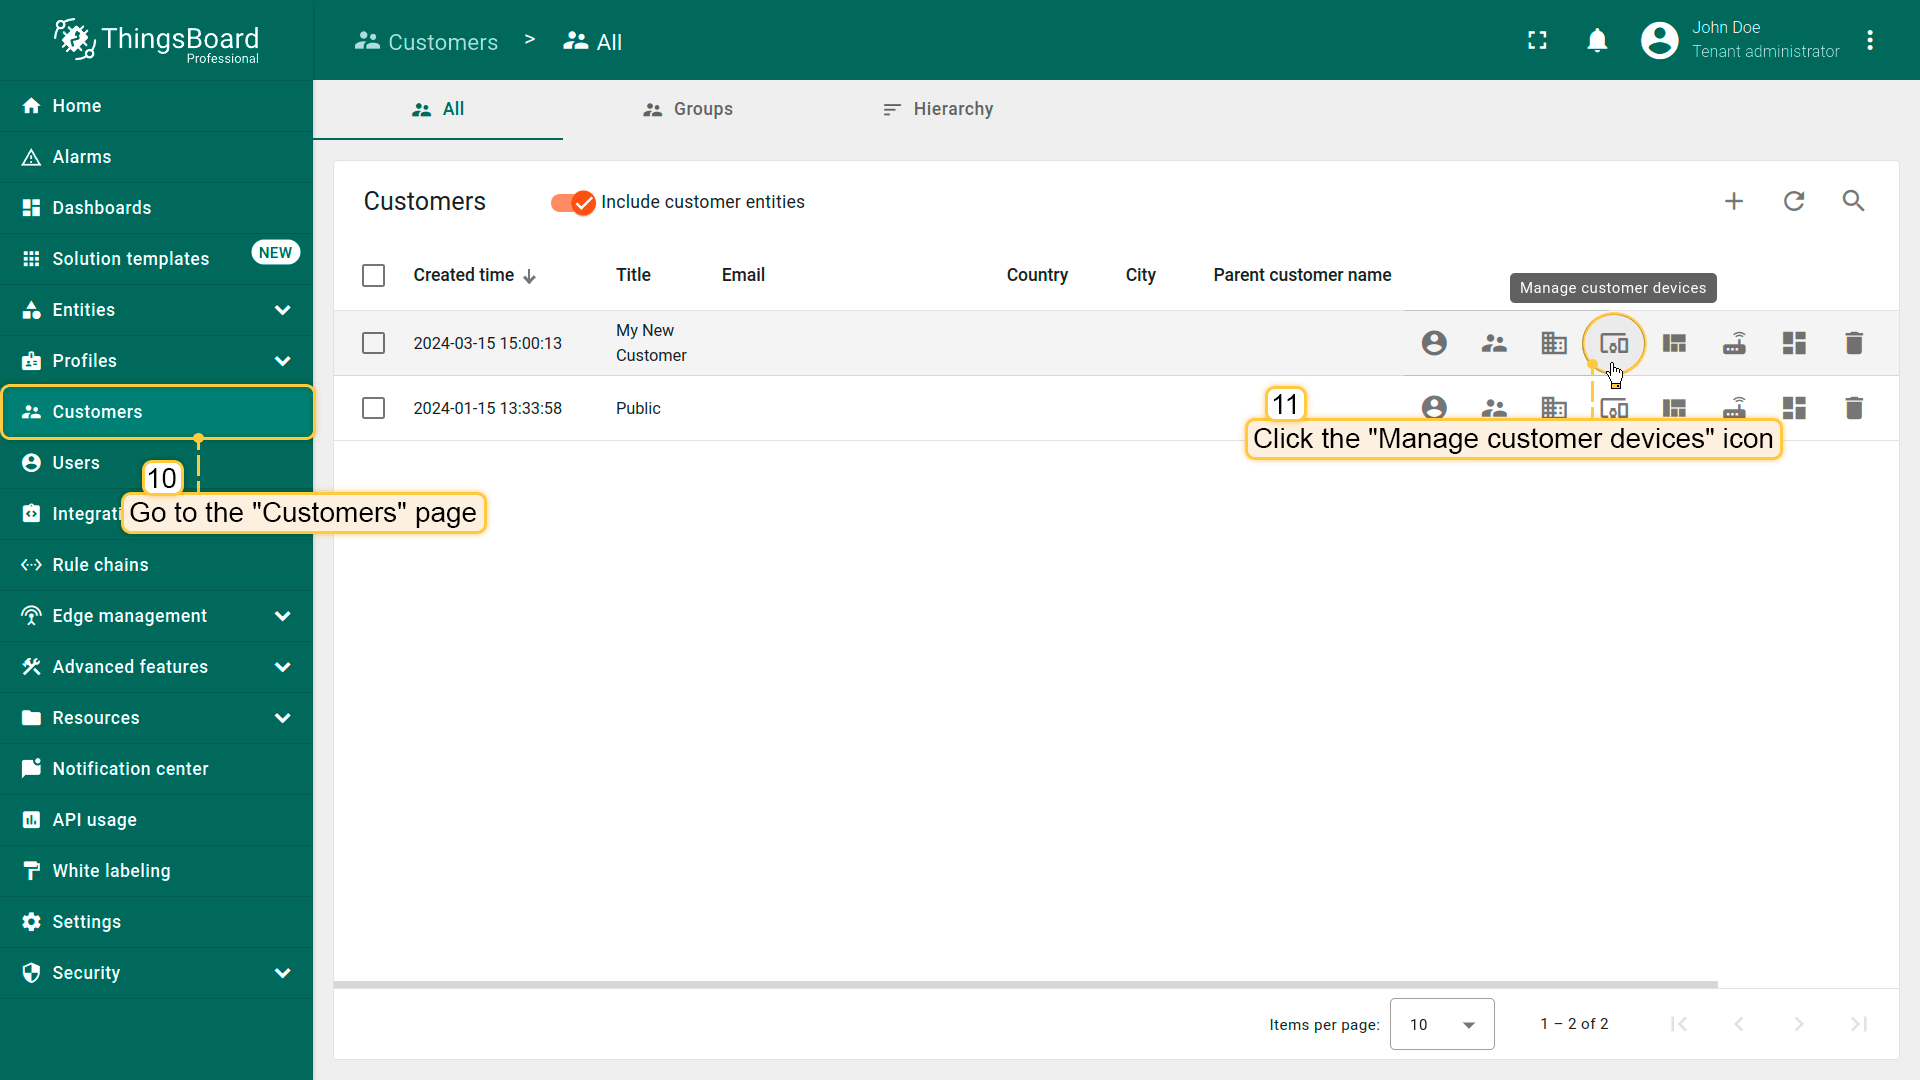
确认设备已分配给您的客户。
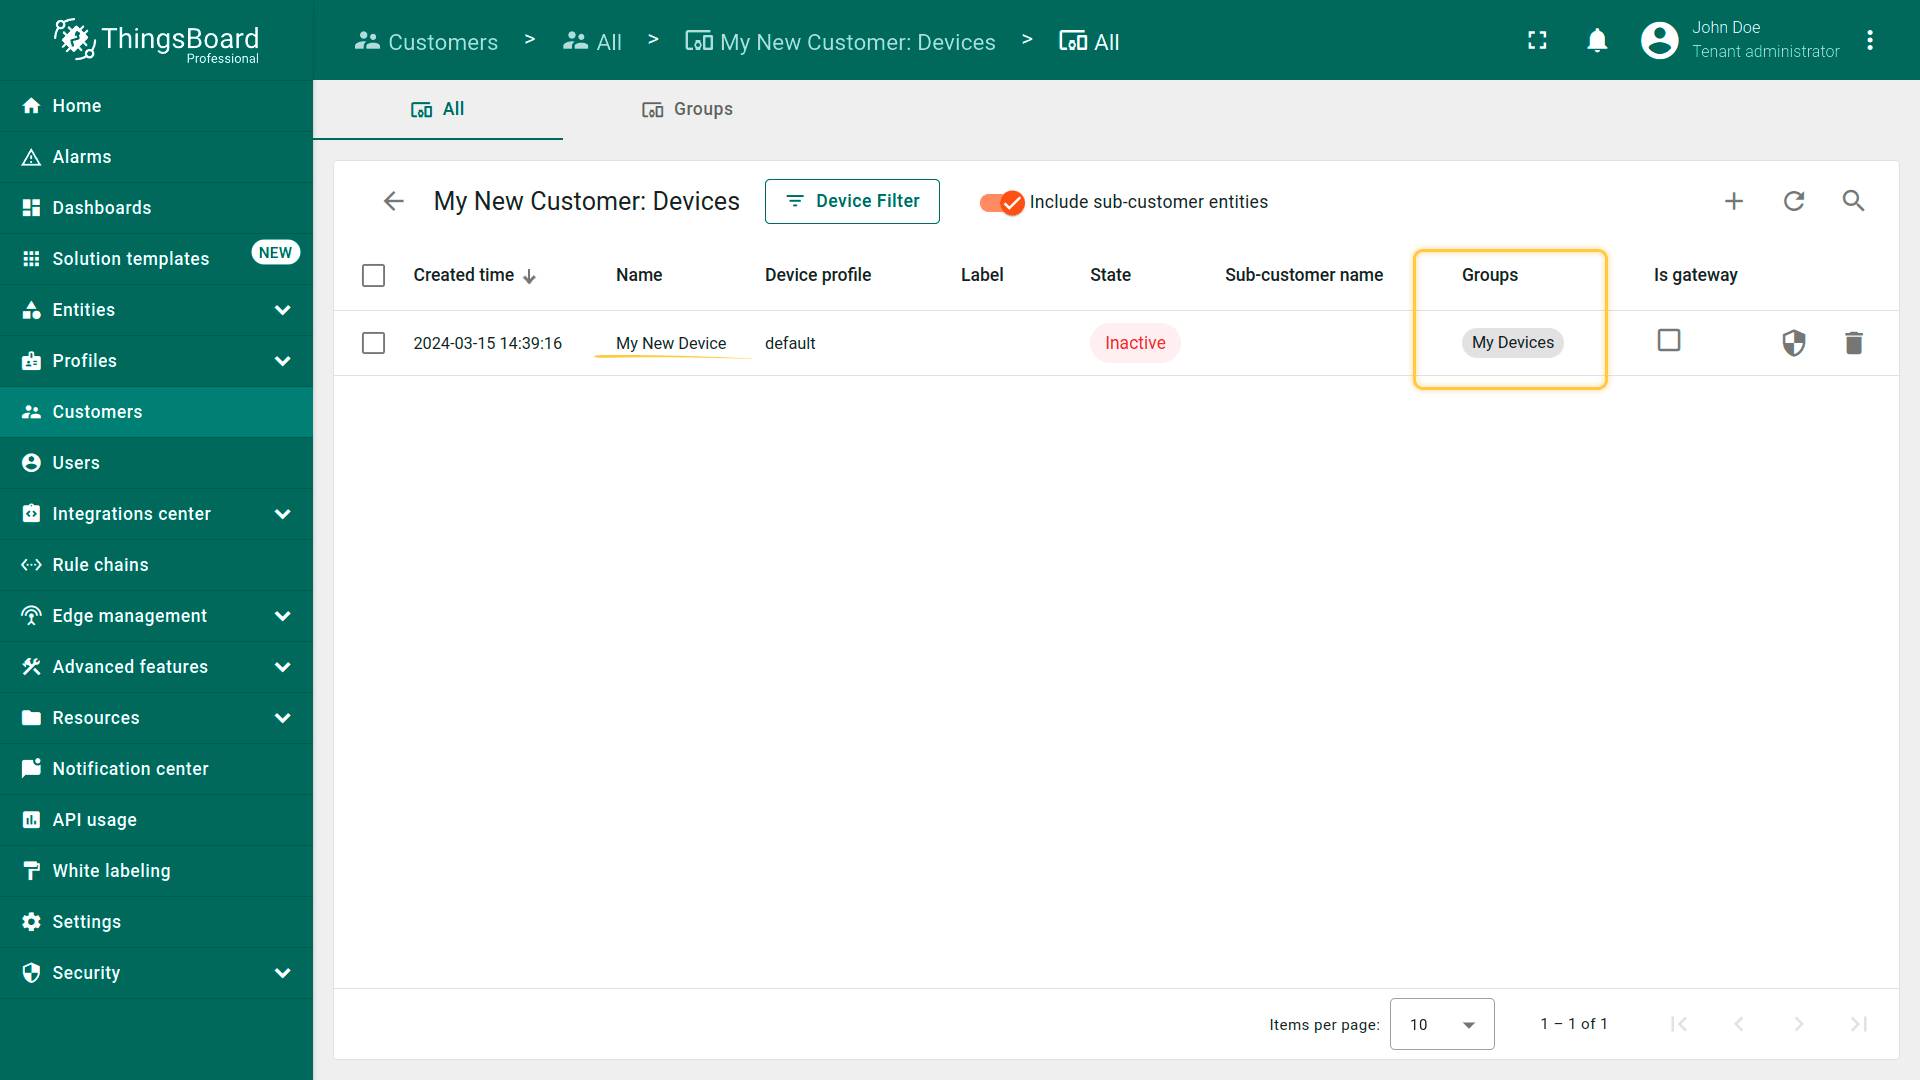
- Navigate to "Customers" page. Find your customer in the list of customers and then click on the "Manage customer devices" icon;
- Your device is owned by the customer and is located in the customer's device group "My Devices".
可在创建设备时直接将客户设为所有者。按以下步骤操作:
- Open the "Devices" page. Click on the "+" icon in the top right corner of the table and then select "Add new device" from drop-down menu;
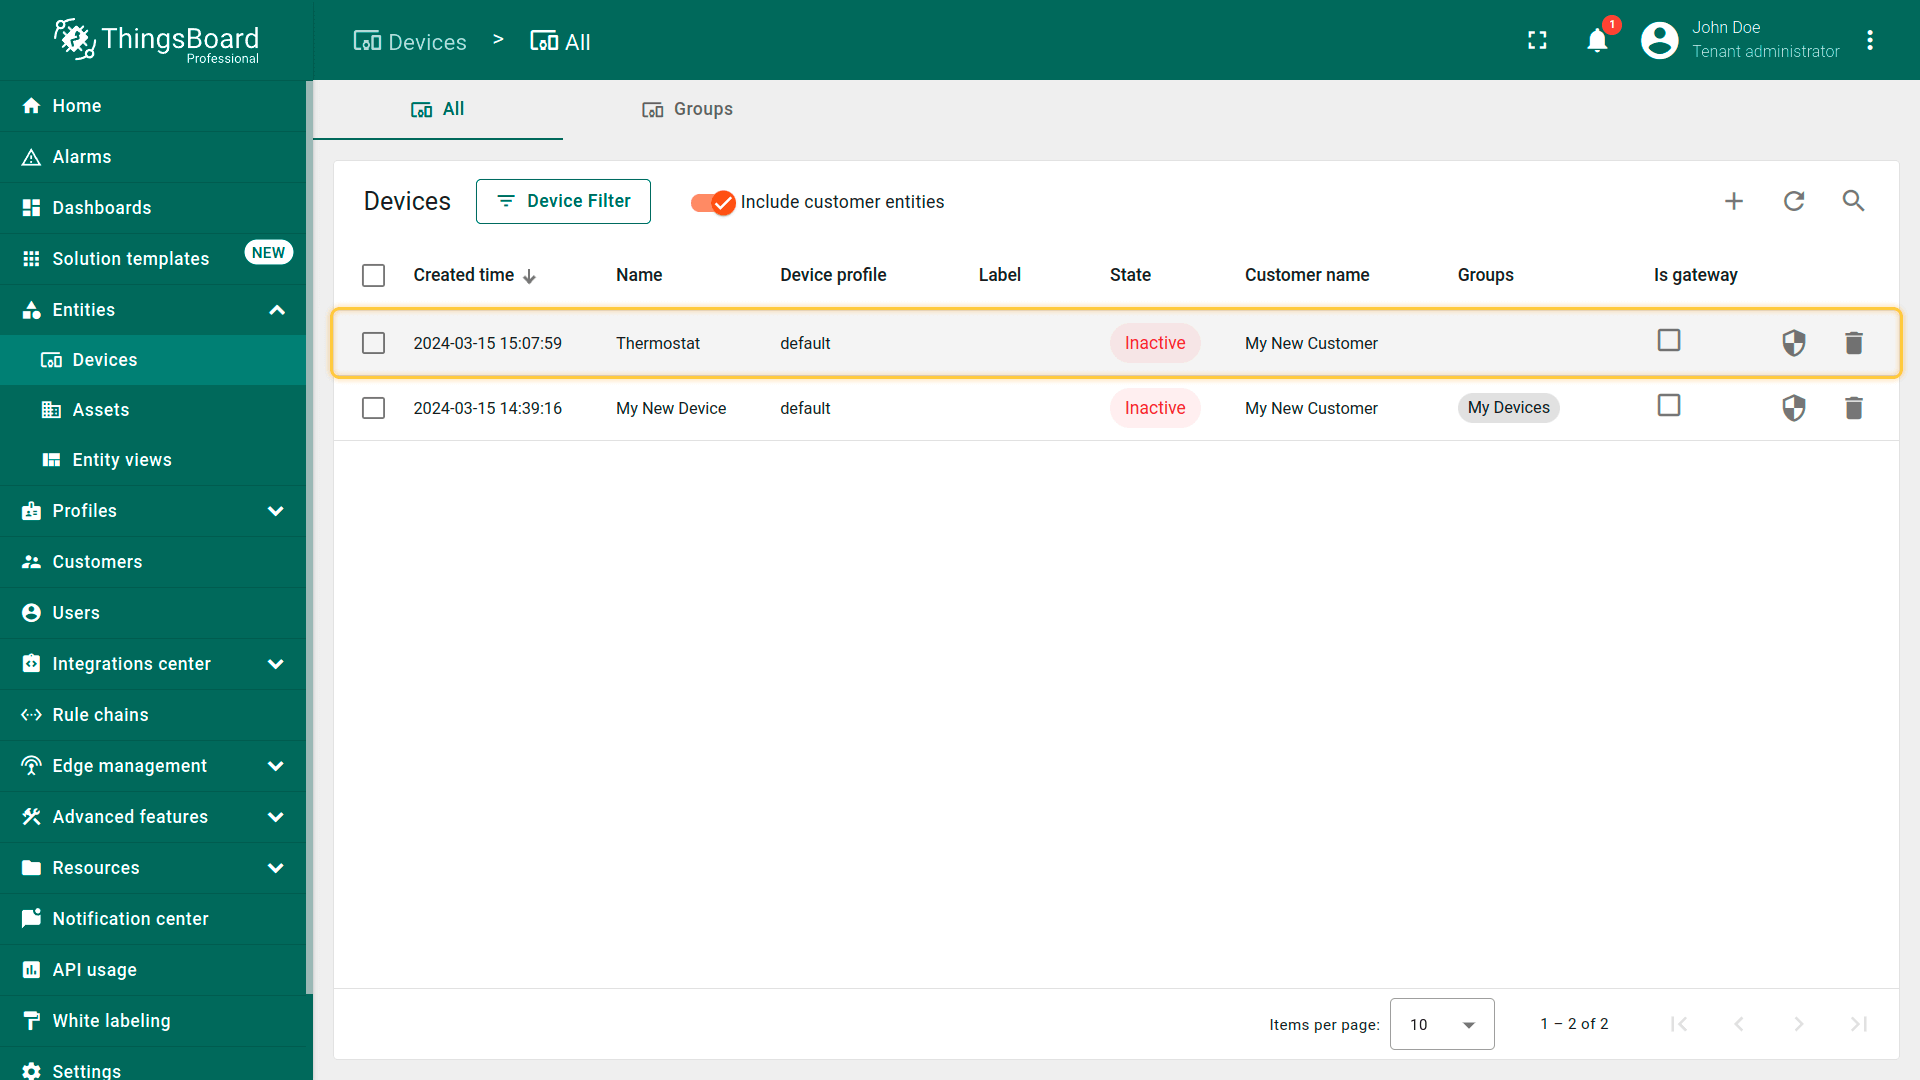
- Input device name (for example, "Thermostat") and select the new owner in the "Owner" field. Then, click "Add";
- Close check connectivity window;
- The device has been created, and it immediately belongs to your customer.


步骤7.3共享仪表板
将仪表板共享给客户。 在ThingsBoard中不能直接共享单个仪表板,只能共享包含该仪表板的仪表板组。 默认情况下,仪表板位于「全部」组。 推荐做法是创建专用仪表板组并将仪表板移入其中;为简化说明,本指南使用已有的「全部」组。
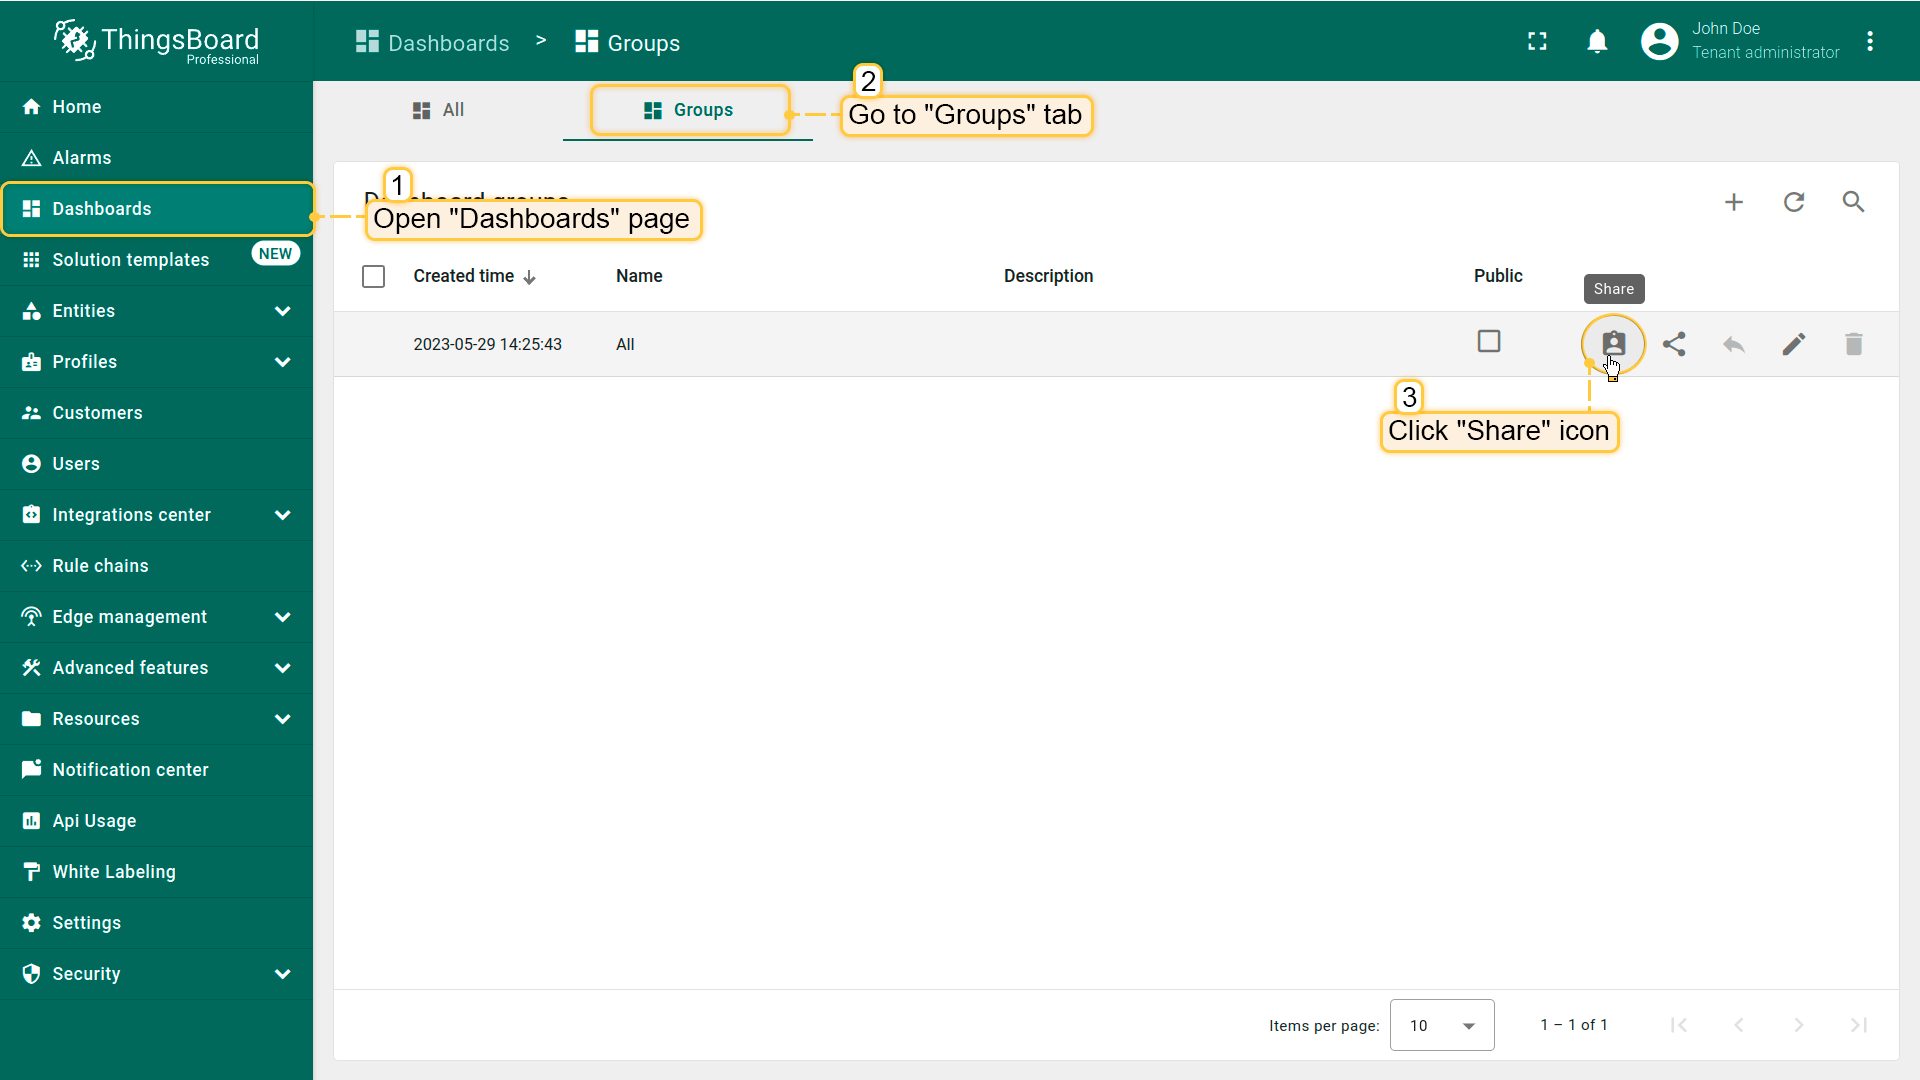
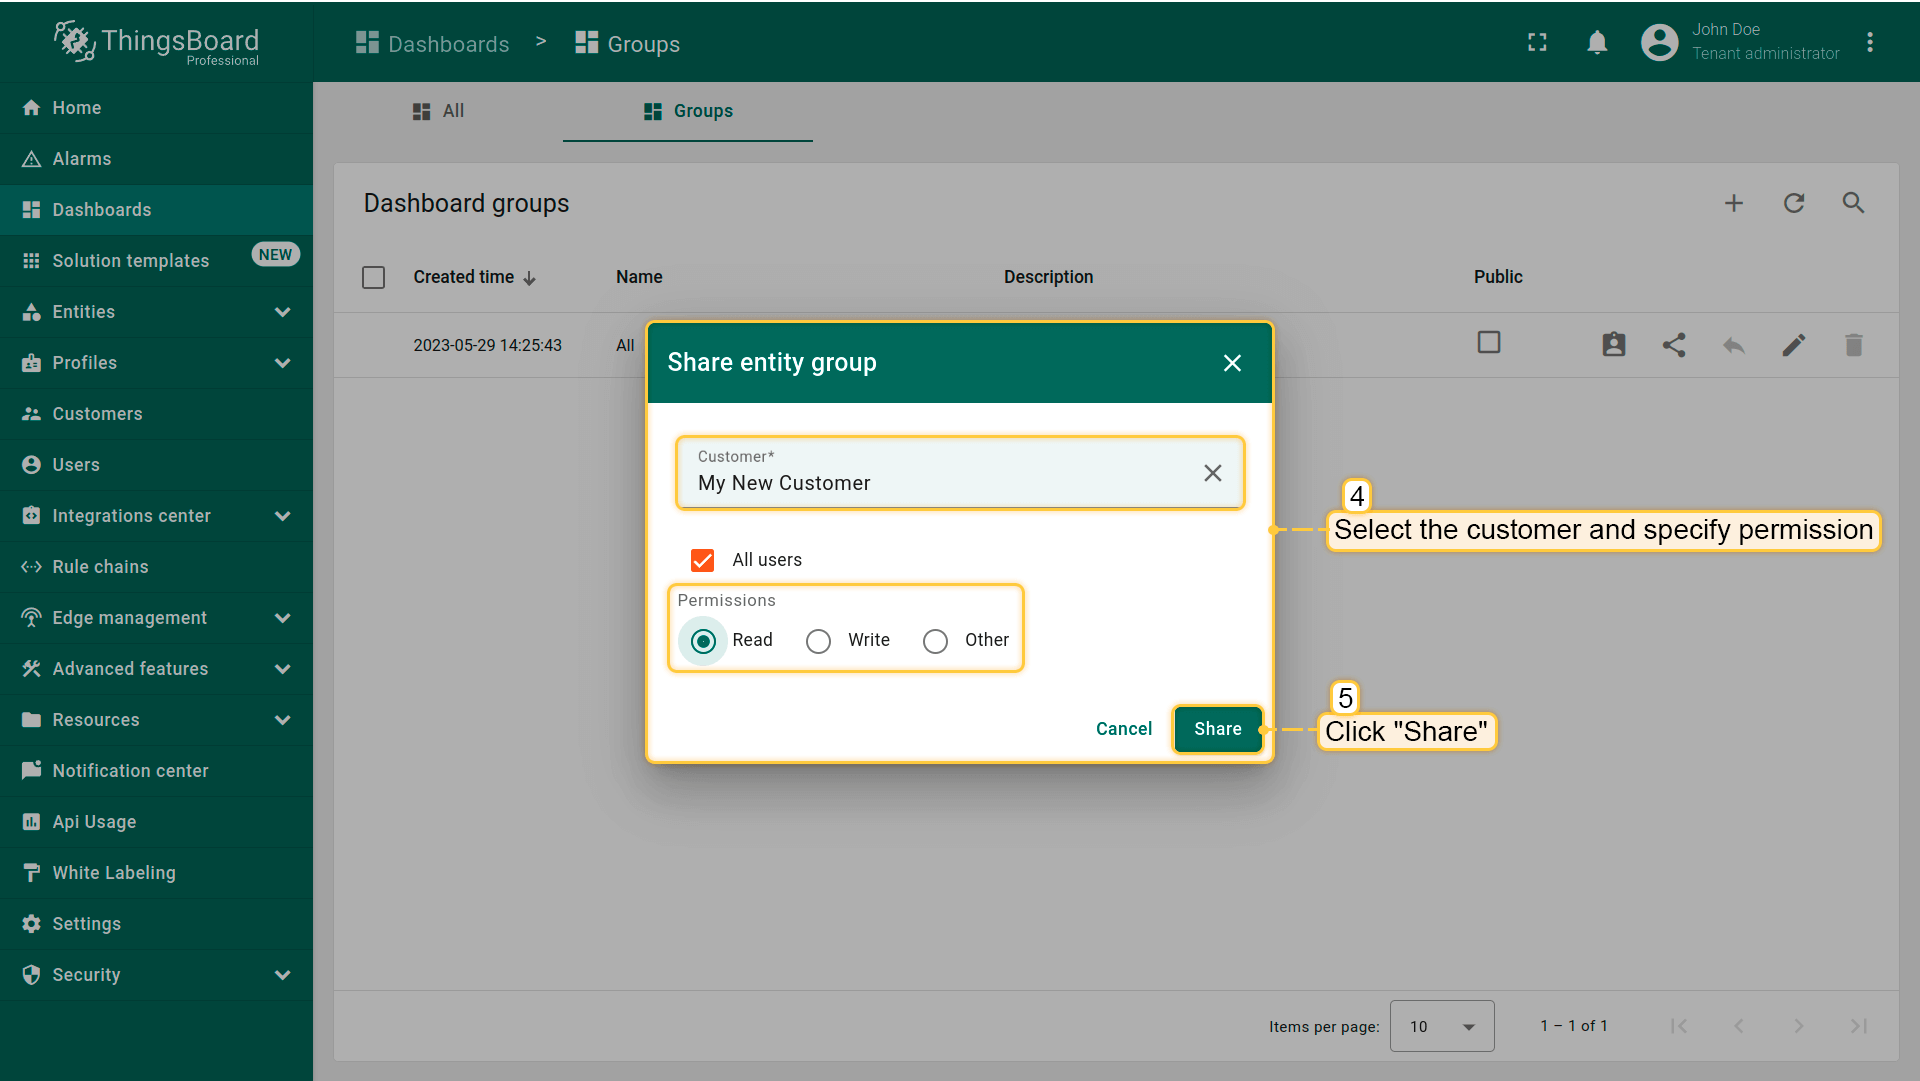
- Open the "Dashboards" page and go to the "Groups" tab. Click the "Share" icon next to the "All" dashboard group;
- Select the customer you want to share the dashboard with and set the permission level. In this case, choose "Read", then click "Share".
也可在创建仪表板时即与客户共享:
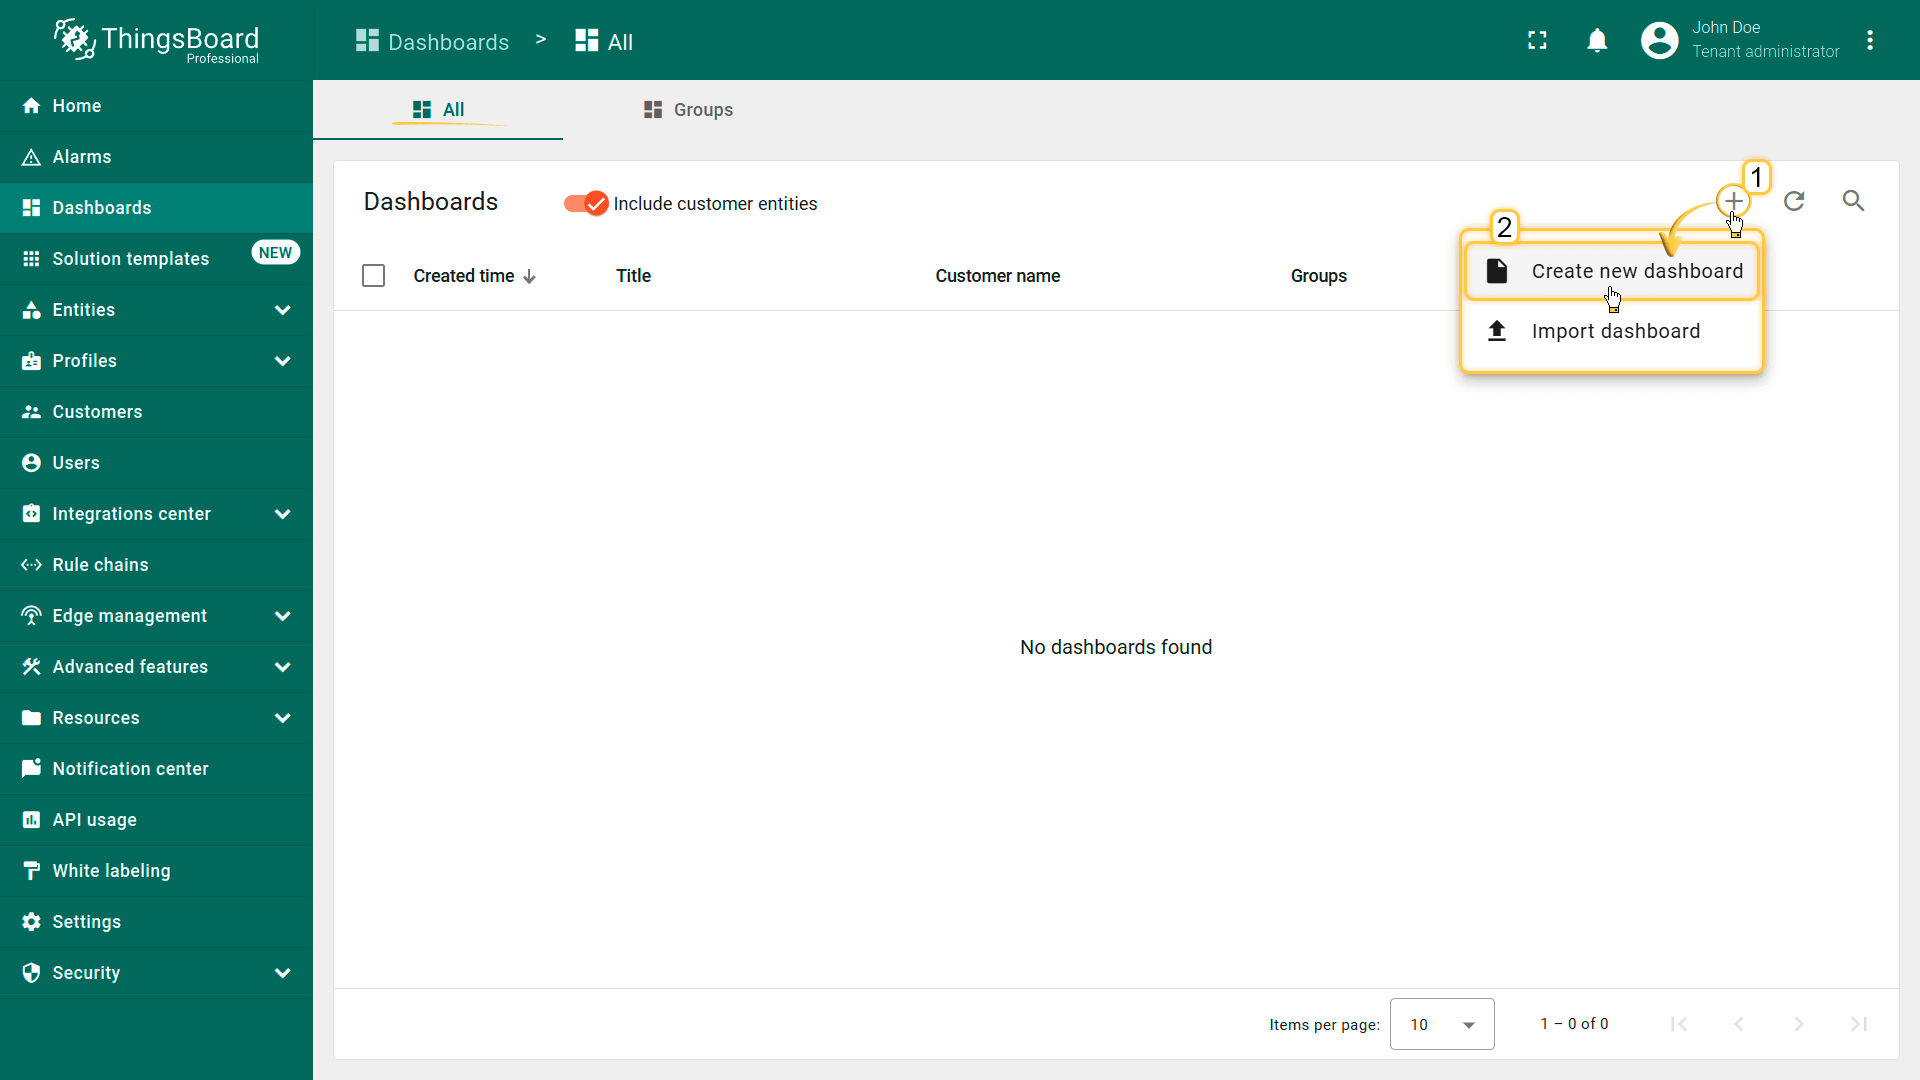
- On the "All" tab of the "Dashboards" page, click on the "+" icon in the top right corner of the table and select "Create new dashboard" from the drop-down menu;
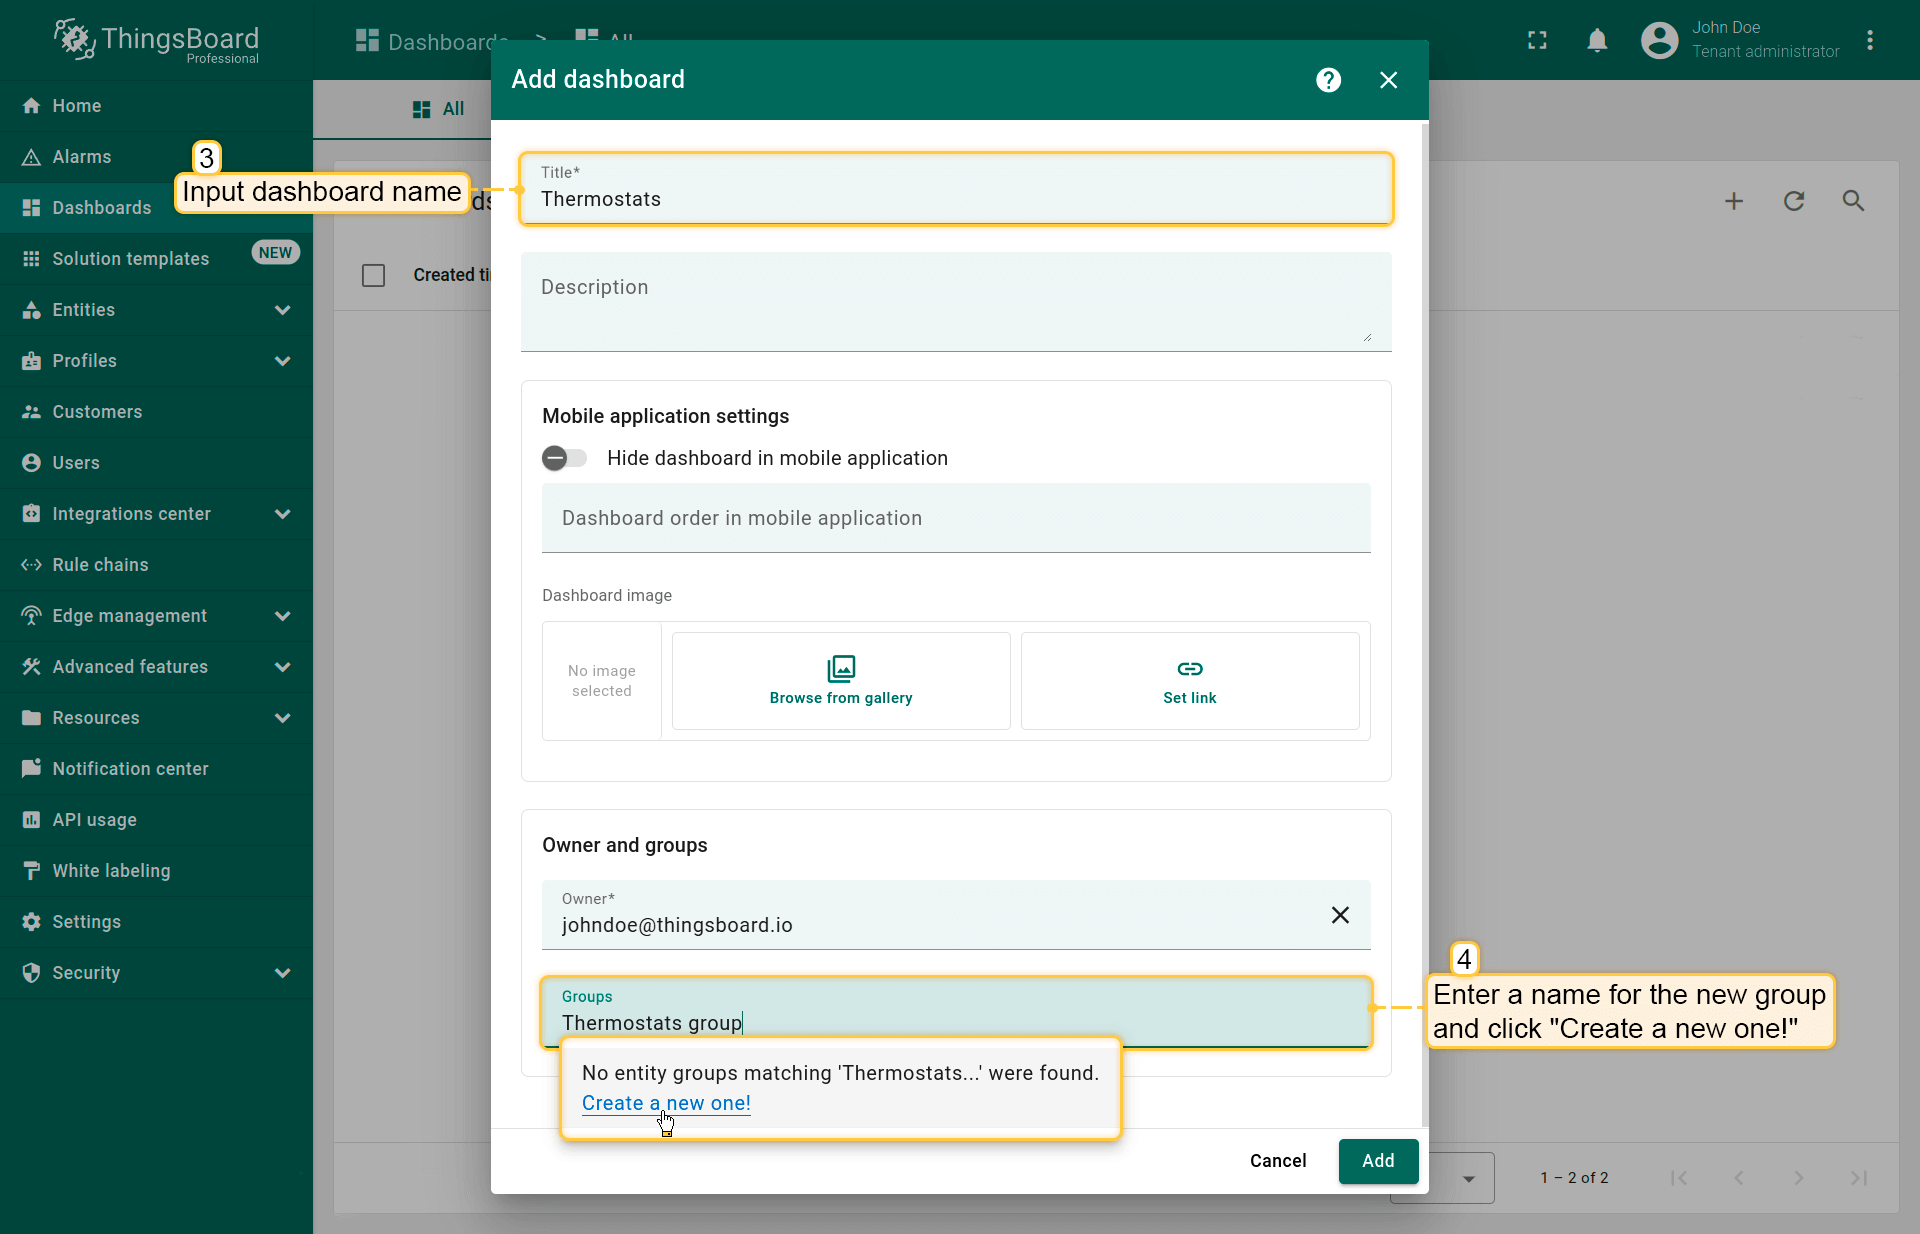
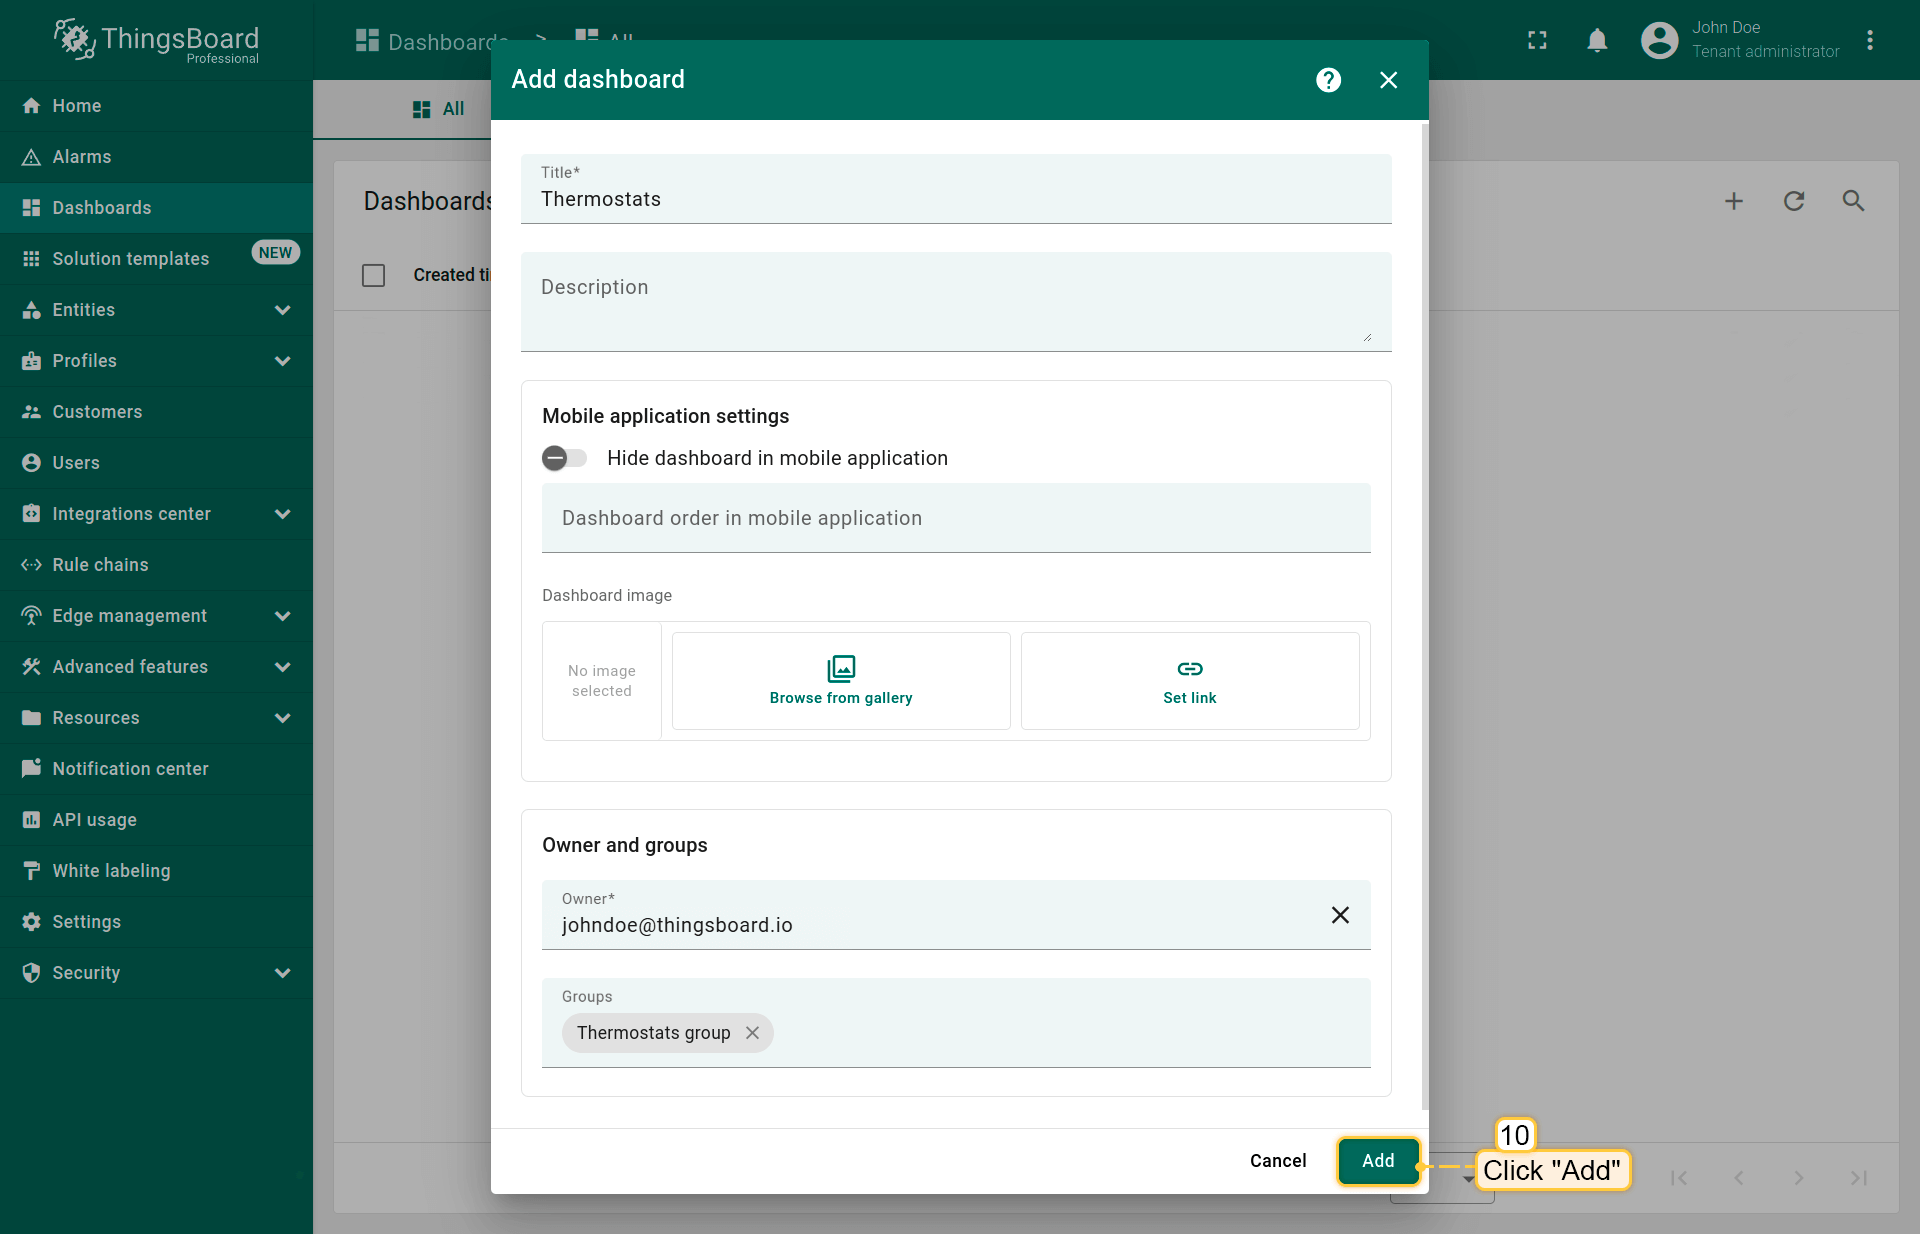
- Enter a name for the dashboard (e.g., "Thermostats"). In the "Groups" field of the "Owner and groups" section, select an existing group or enter a name for a new dashboard group (for example, "Thermostats group") and click "Create a new one!";
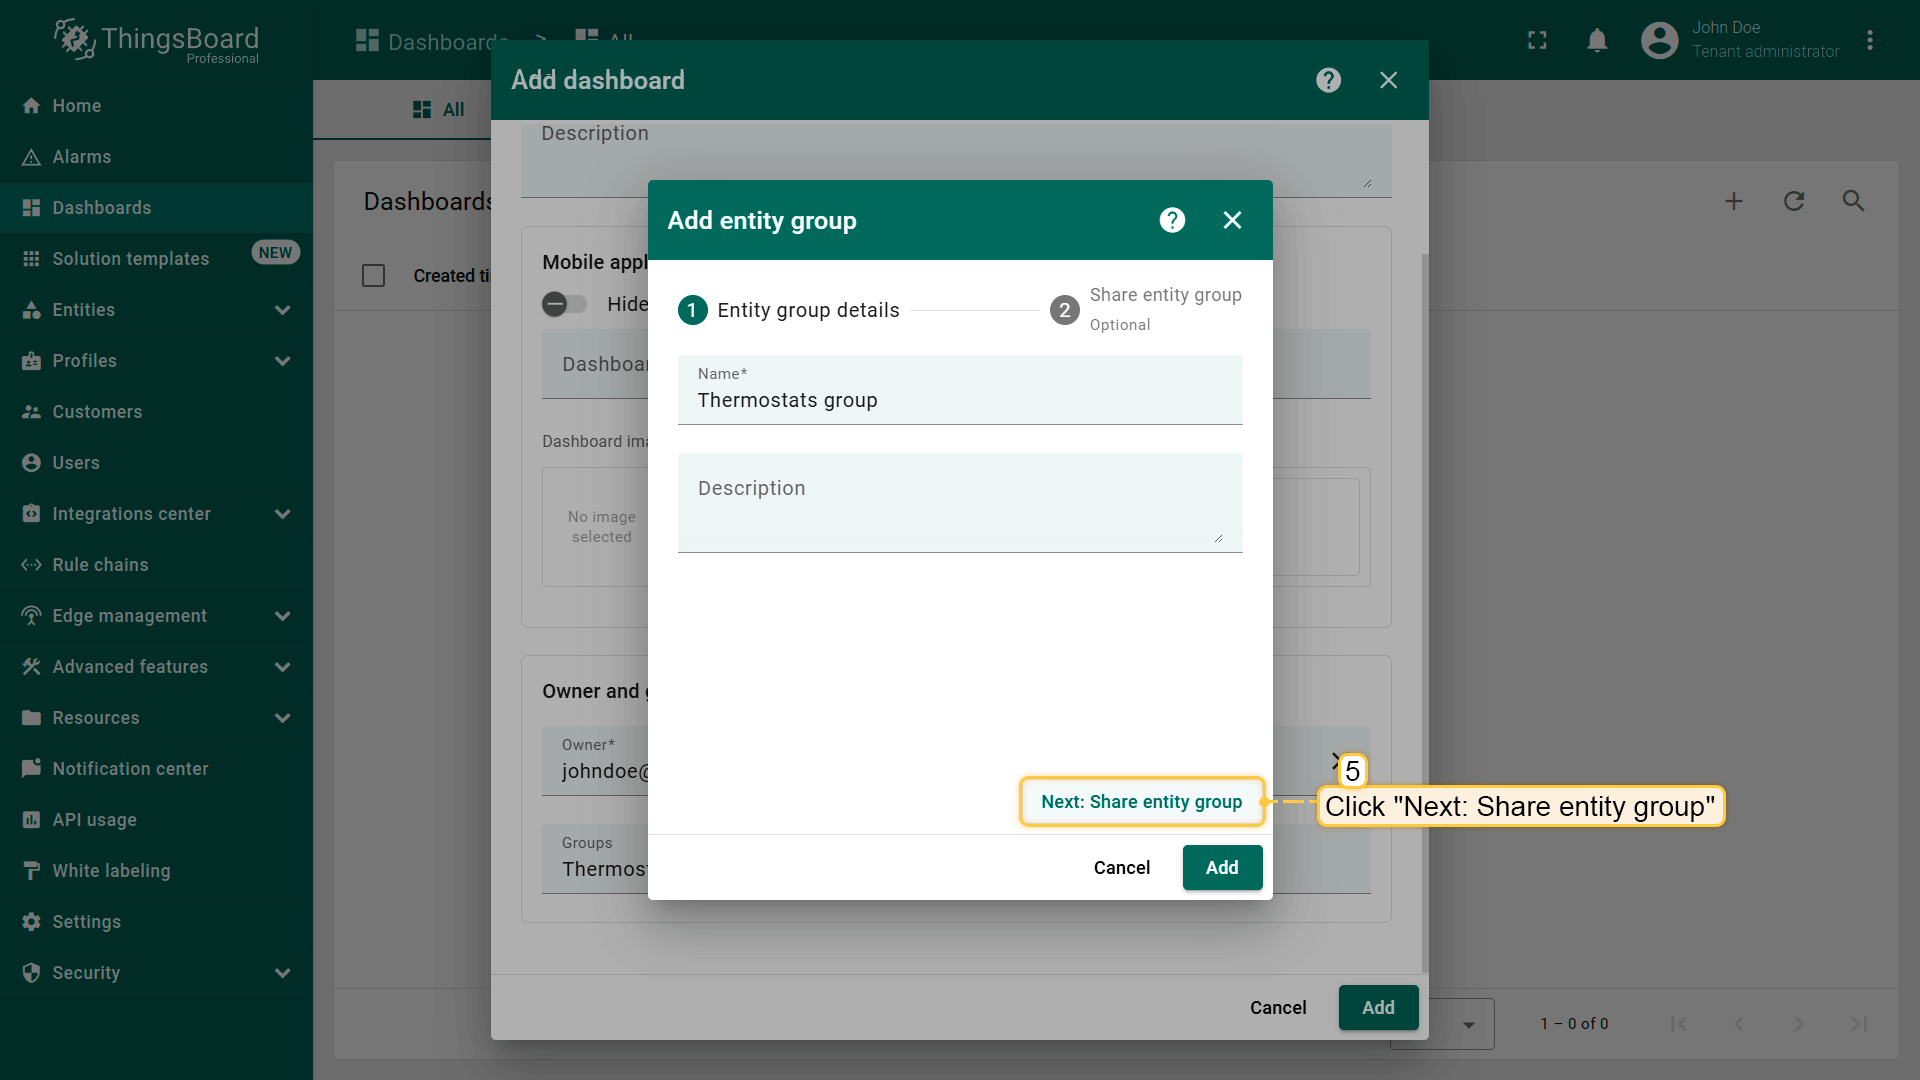
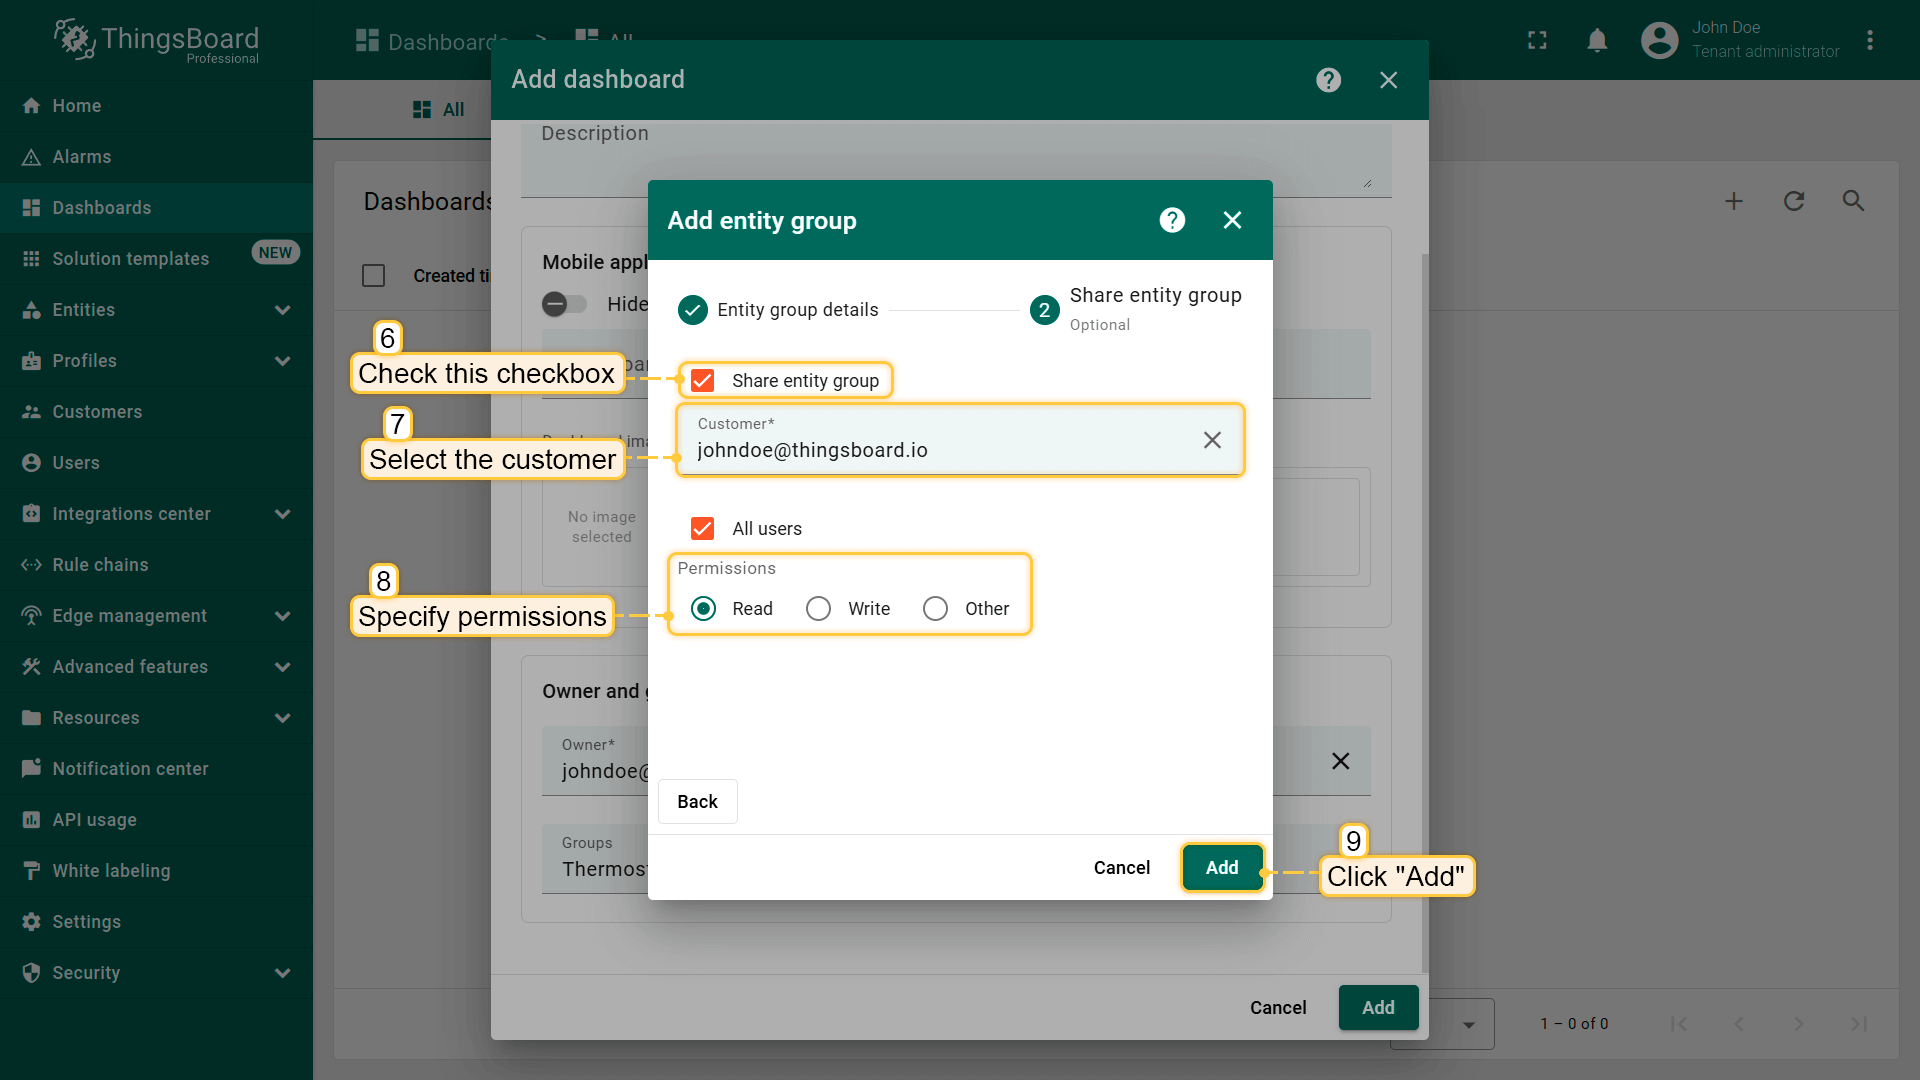
- In the "Add entity group" window that opens, click "Next: Share entity group";
- Check the "Share entity group" box, select the customer to share the dashboard with, and set their permissions. Then click "Add";
- Click "Add" again to confirm dashboard creation;
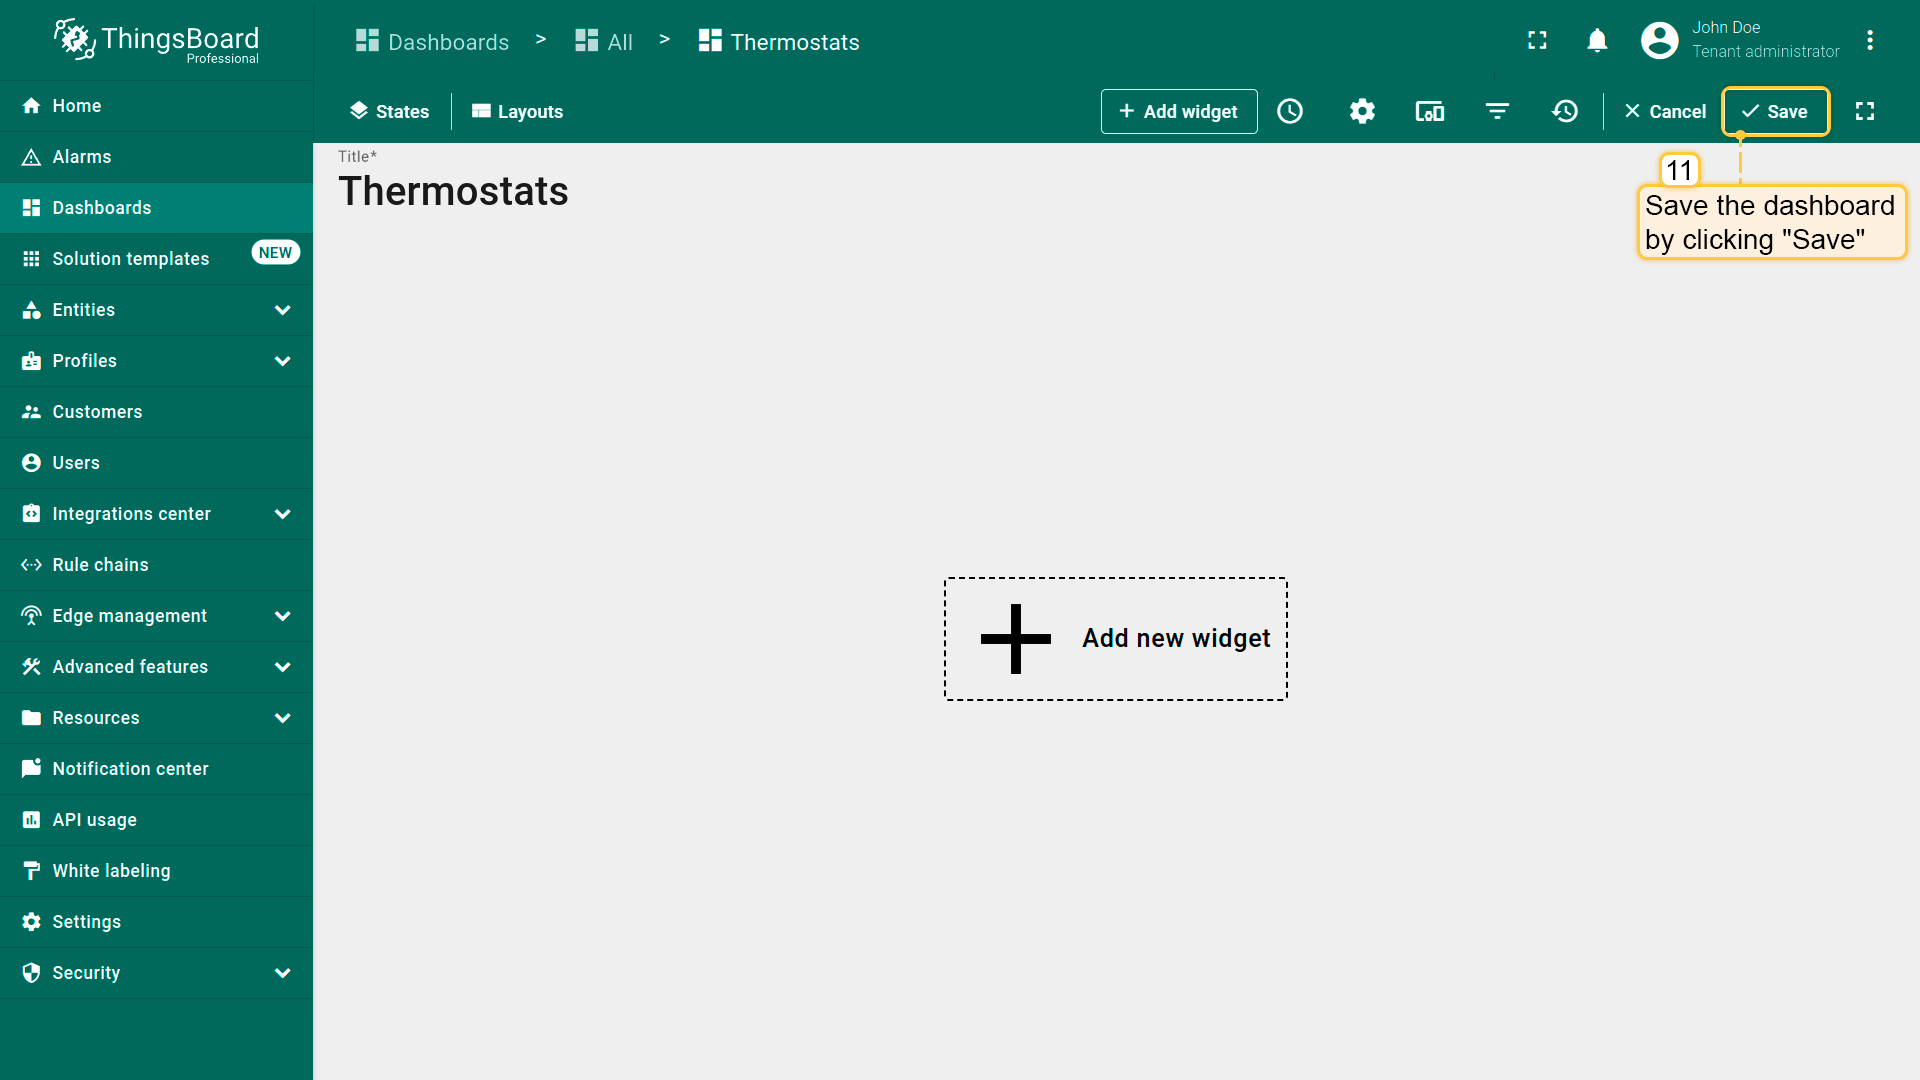
- The new dashboard will open automatically — click "Save" in the top-right corner;
- Your dashboard has been created and placed in the "Thermostats group". You can quickly access it by clicking the group name.

步骤7.4创建客户用户
创建属于该客户且对仪表板与设备具有 只读 权限的用户。
可选择性配置用户登录平台Web界面后直接显示该仪表板。
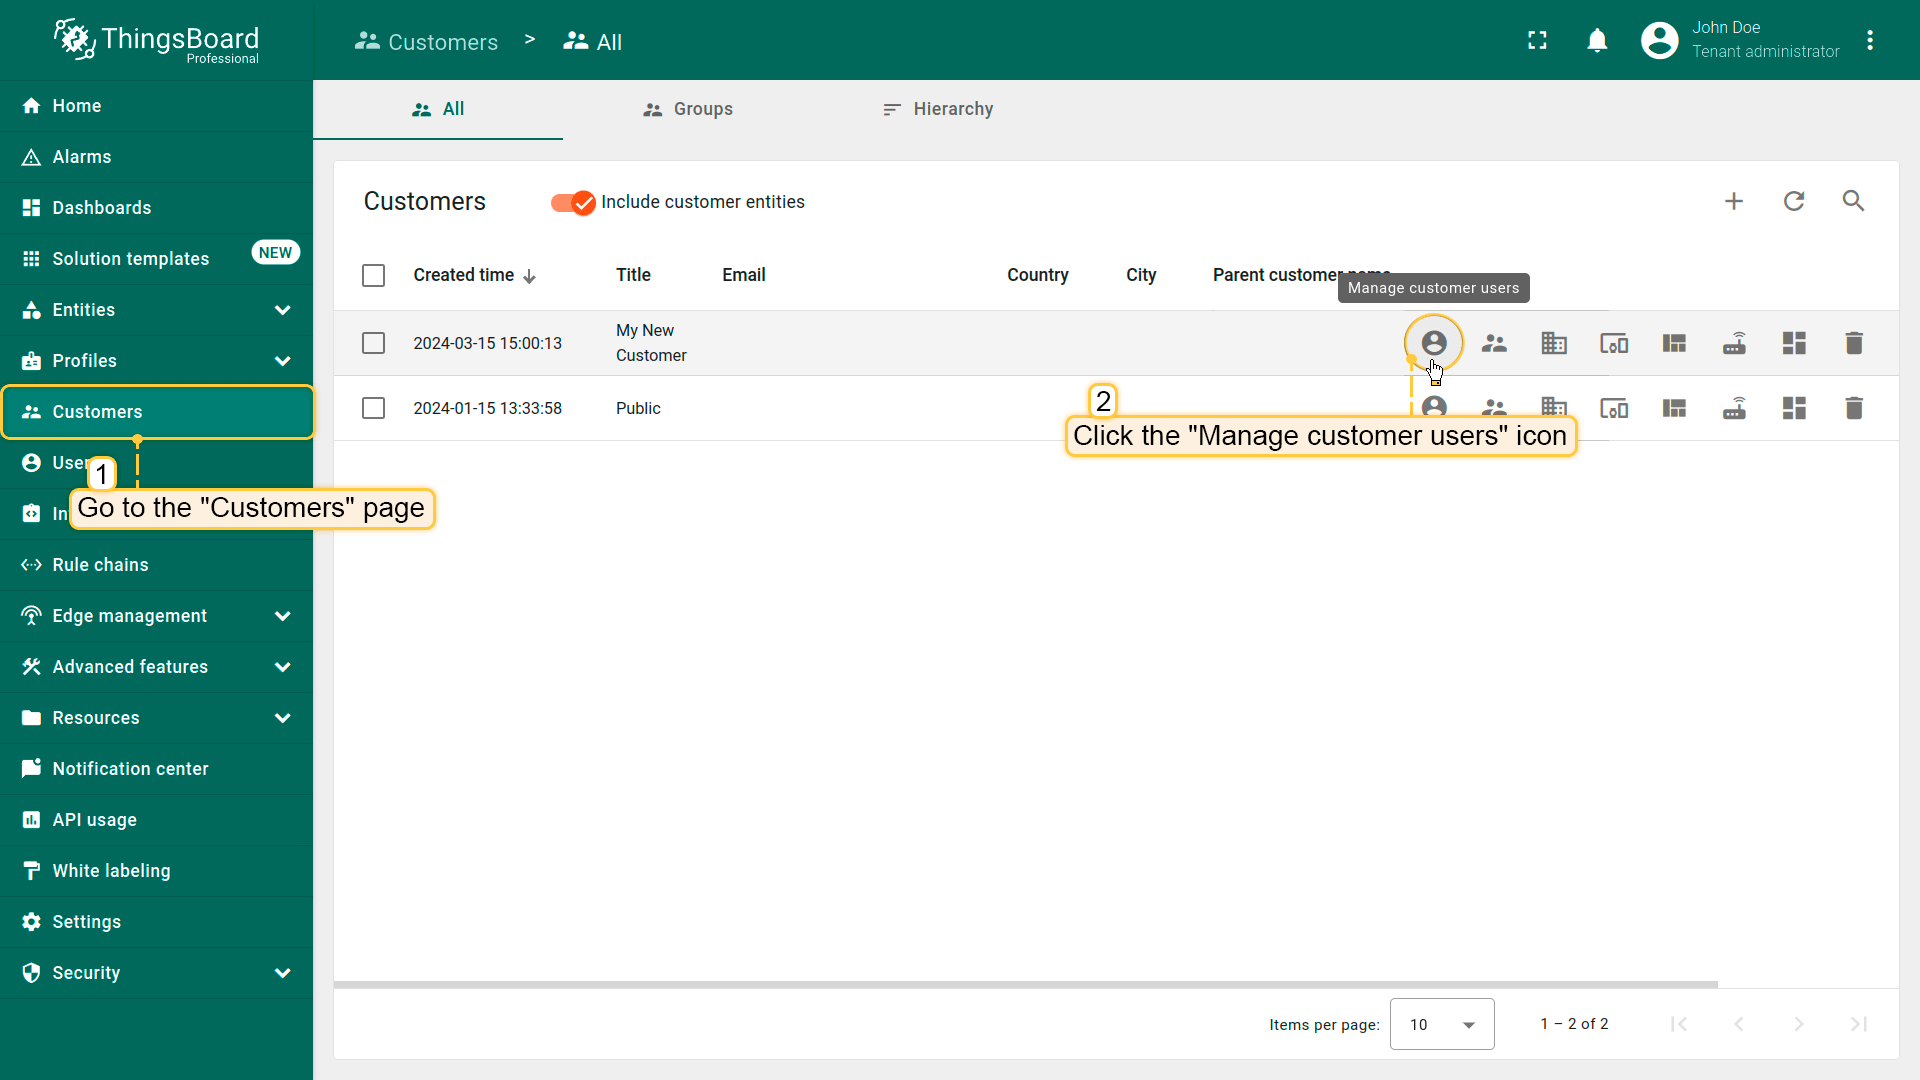
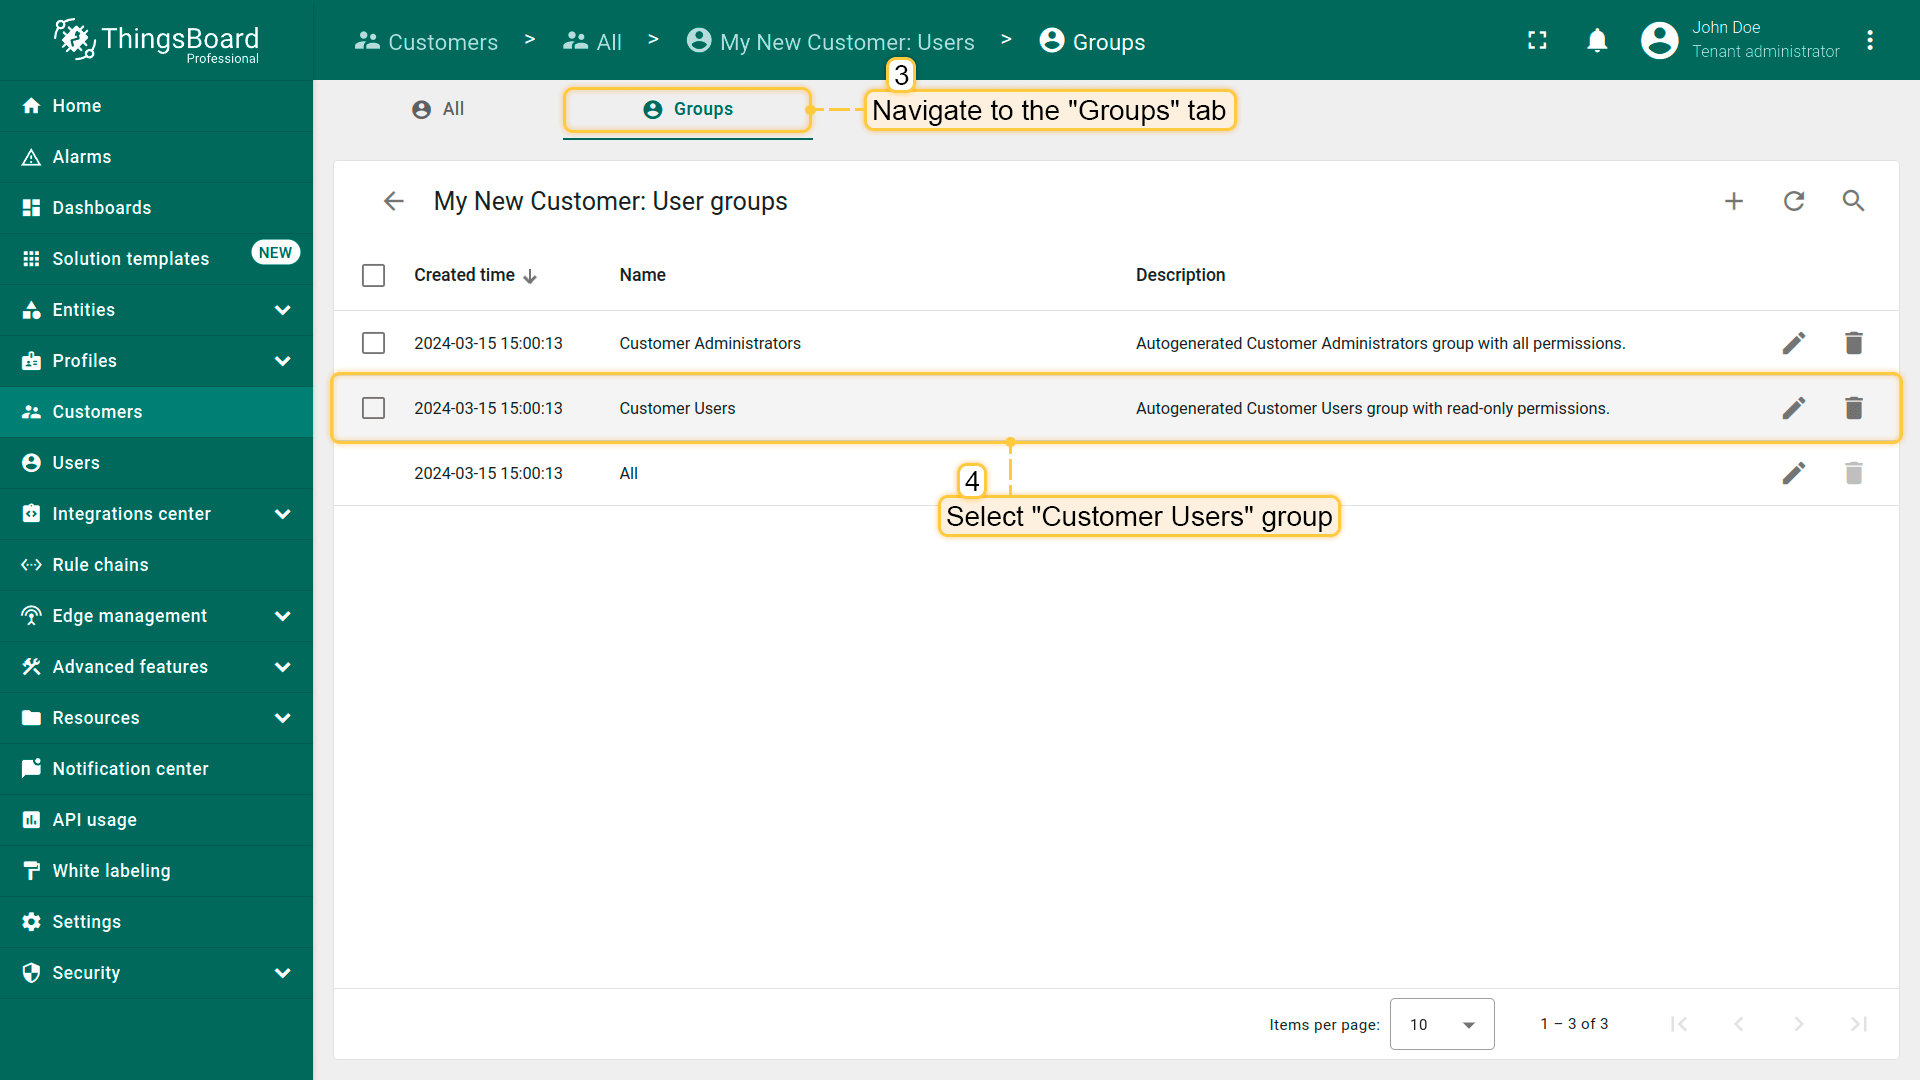
- Navigate to "Customers" page. Find your customer in the list of customers and then click on the "Manage customer users" icon;
- Navigate to the "Groups" tab and select "Customer Users" group;
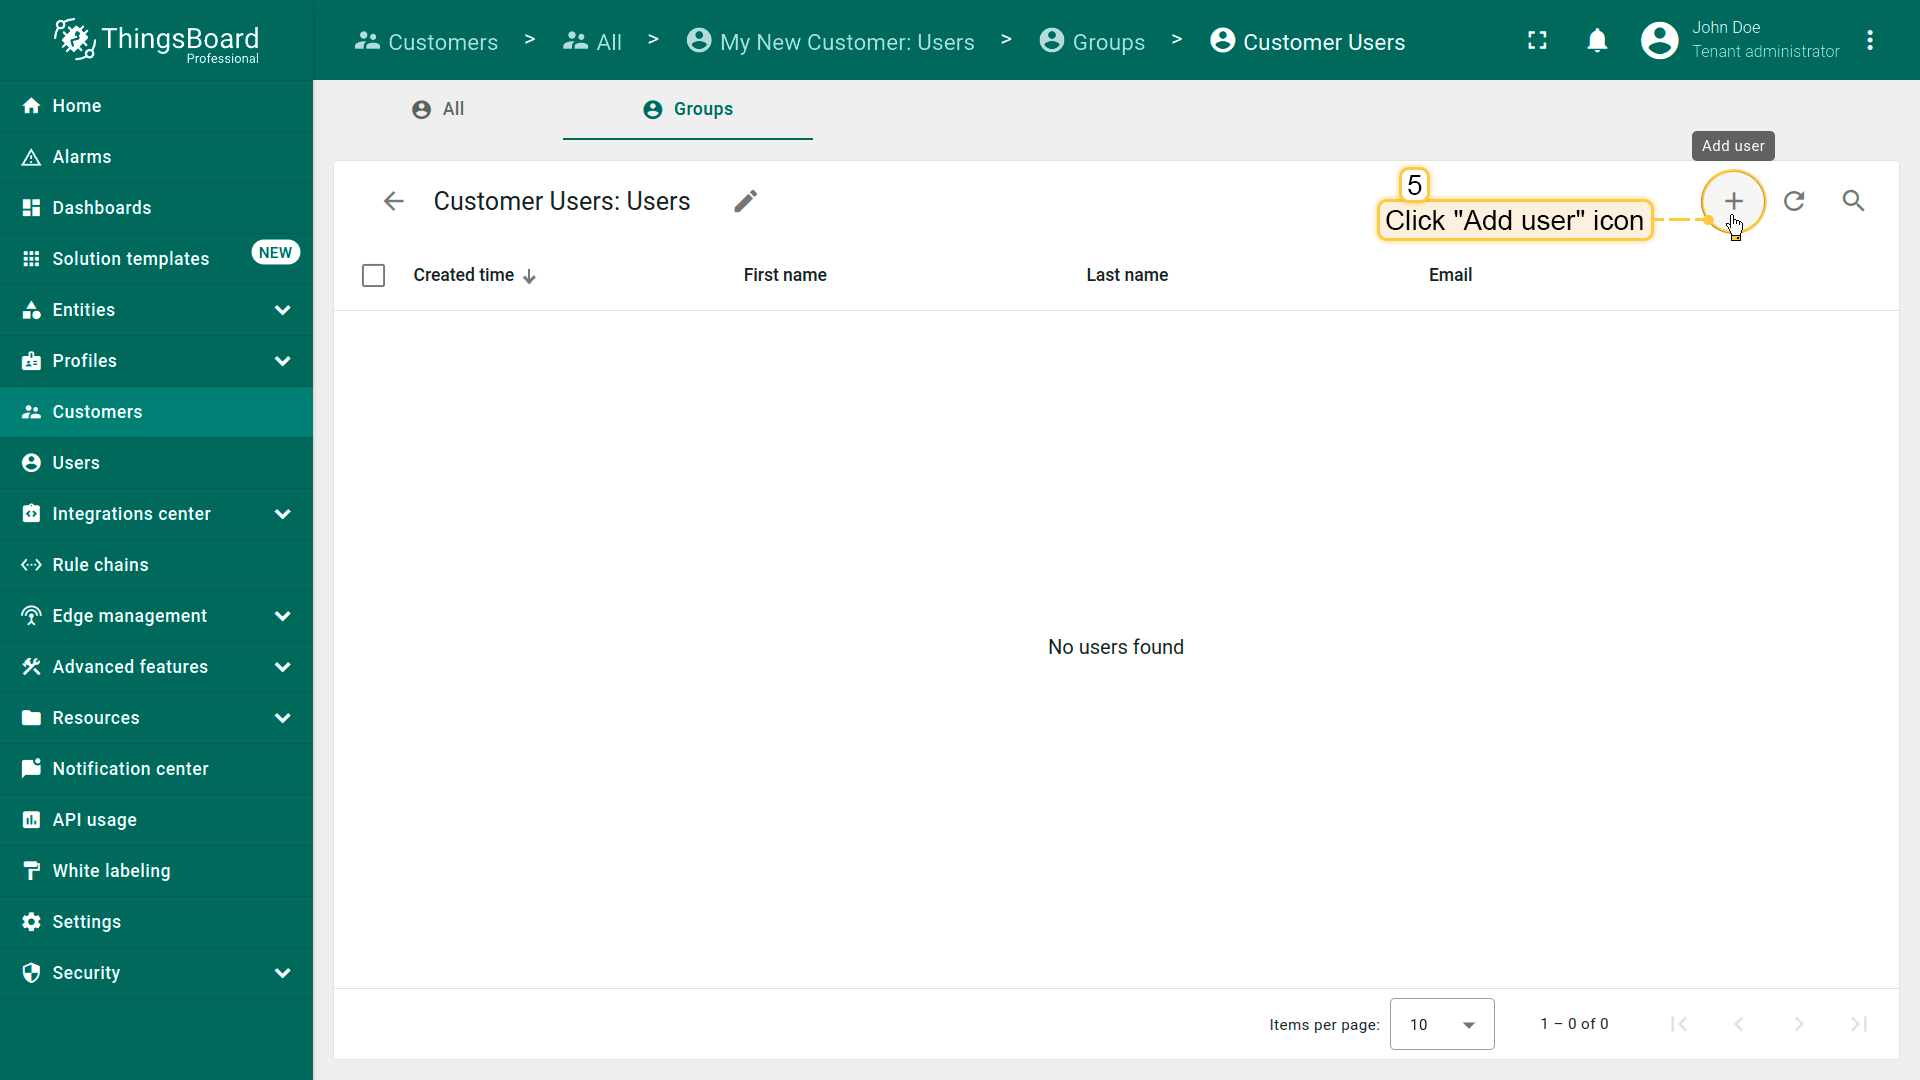
- Click "plus" icon in the top right corner;
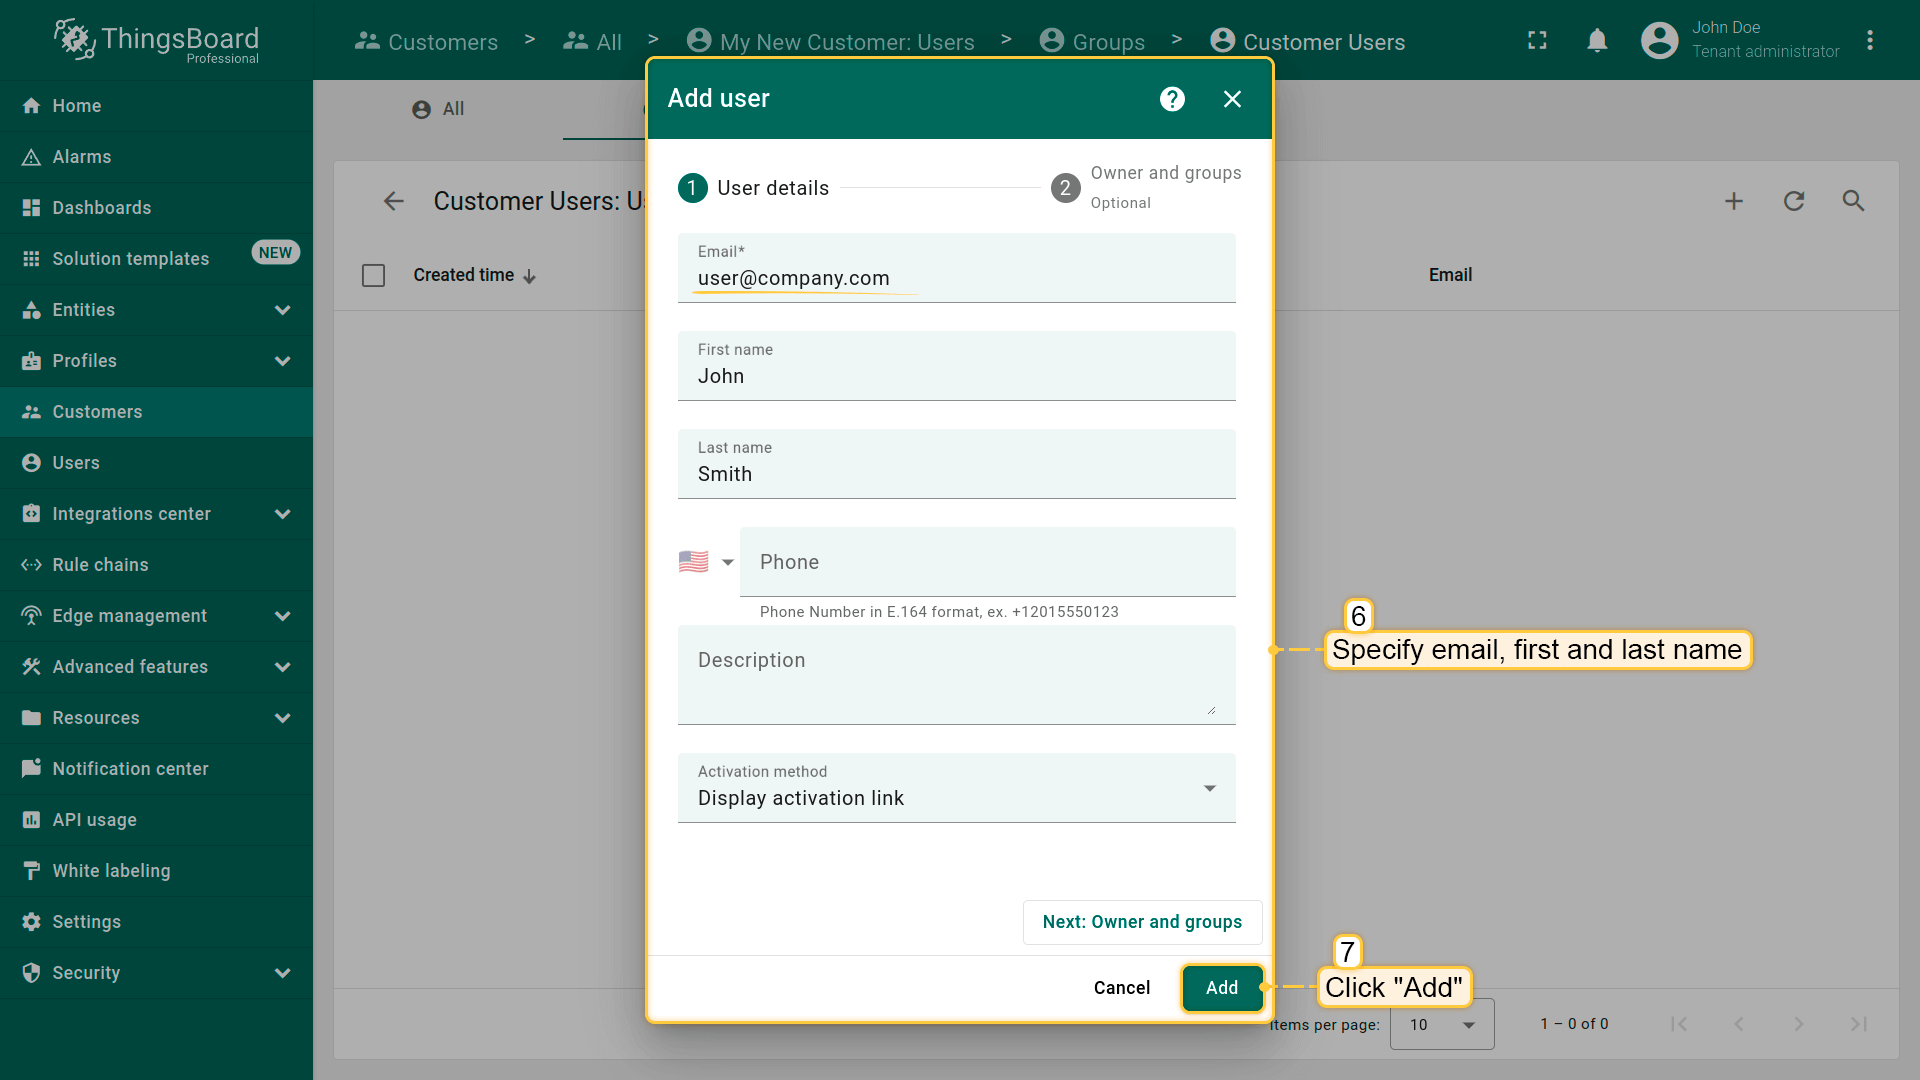
- Enter the user's email. Additionally, specify the first and last name. Click "Add";
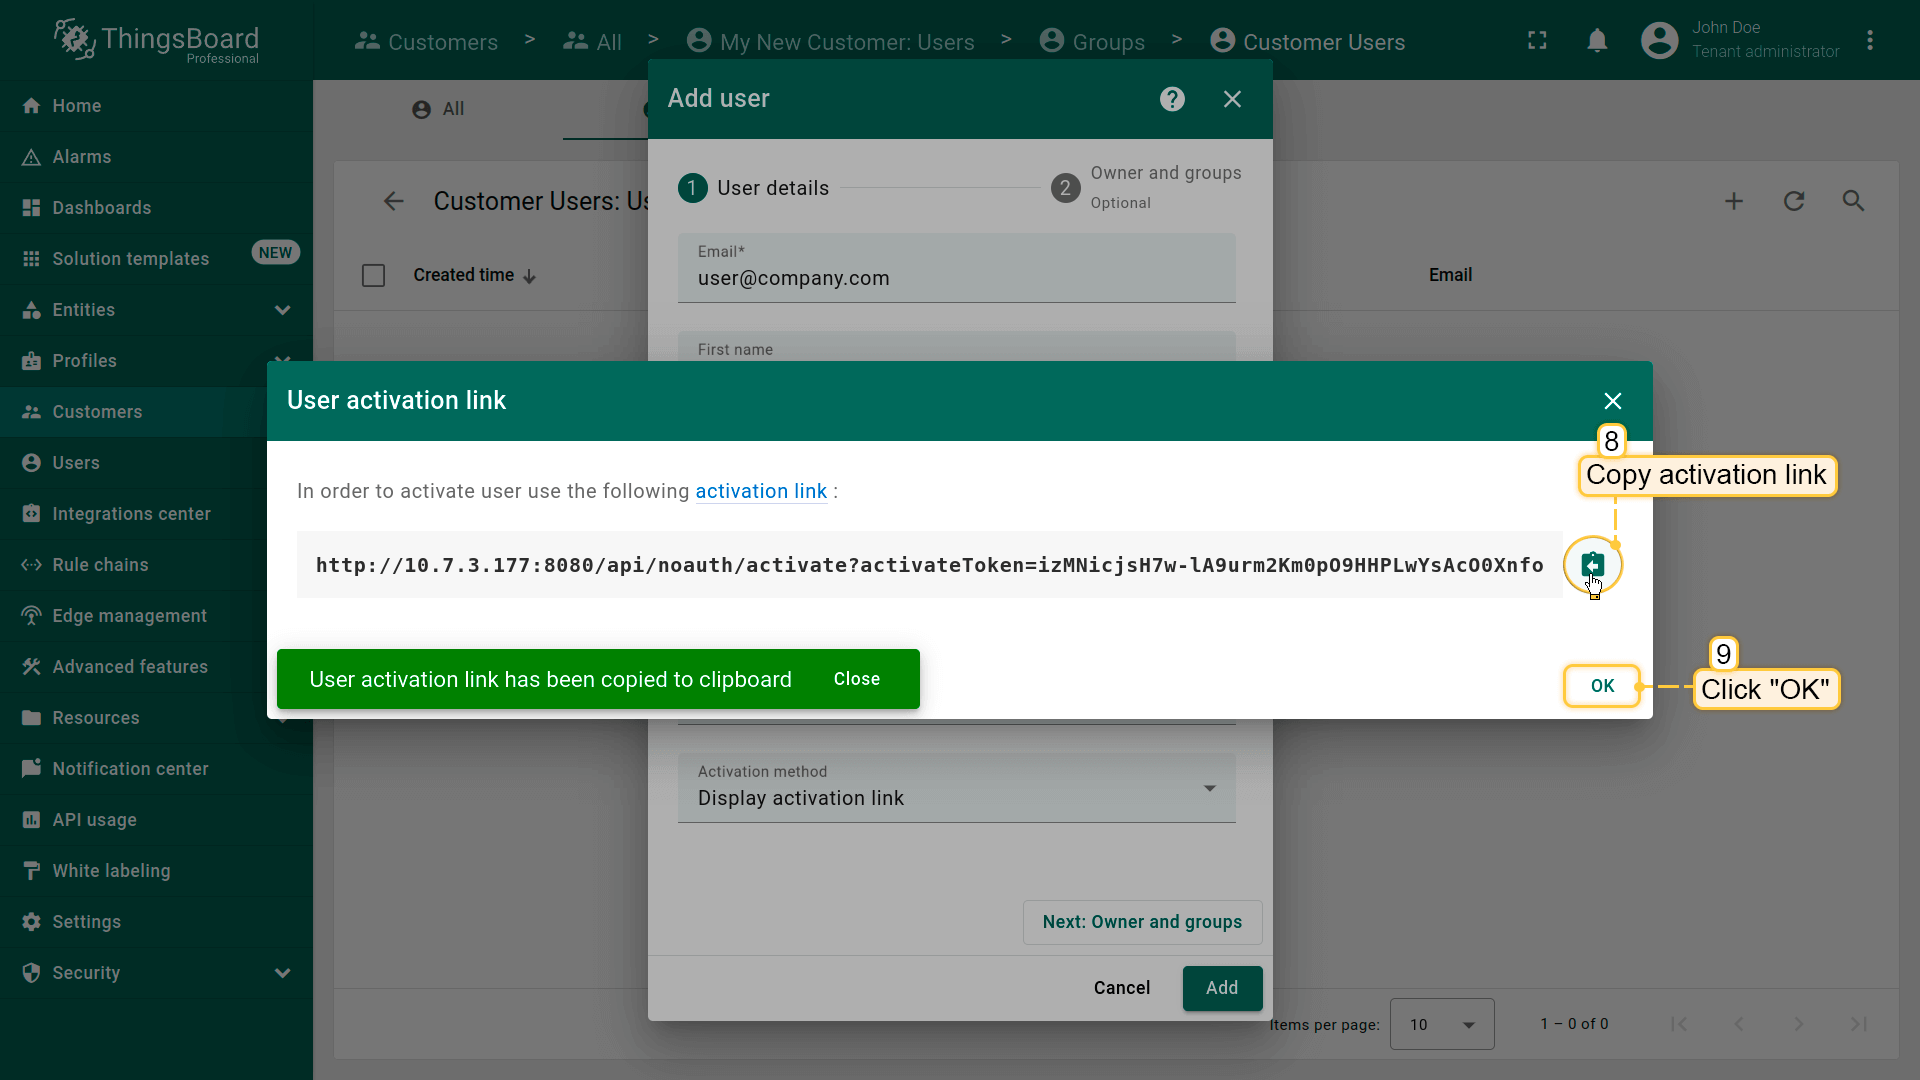
- Copy the activation link and save it to a safe place. Then click "OK";
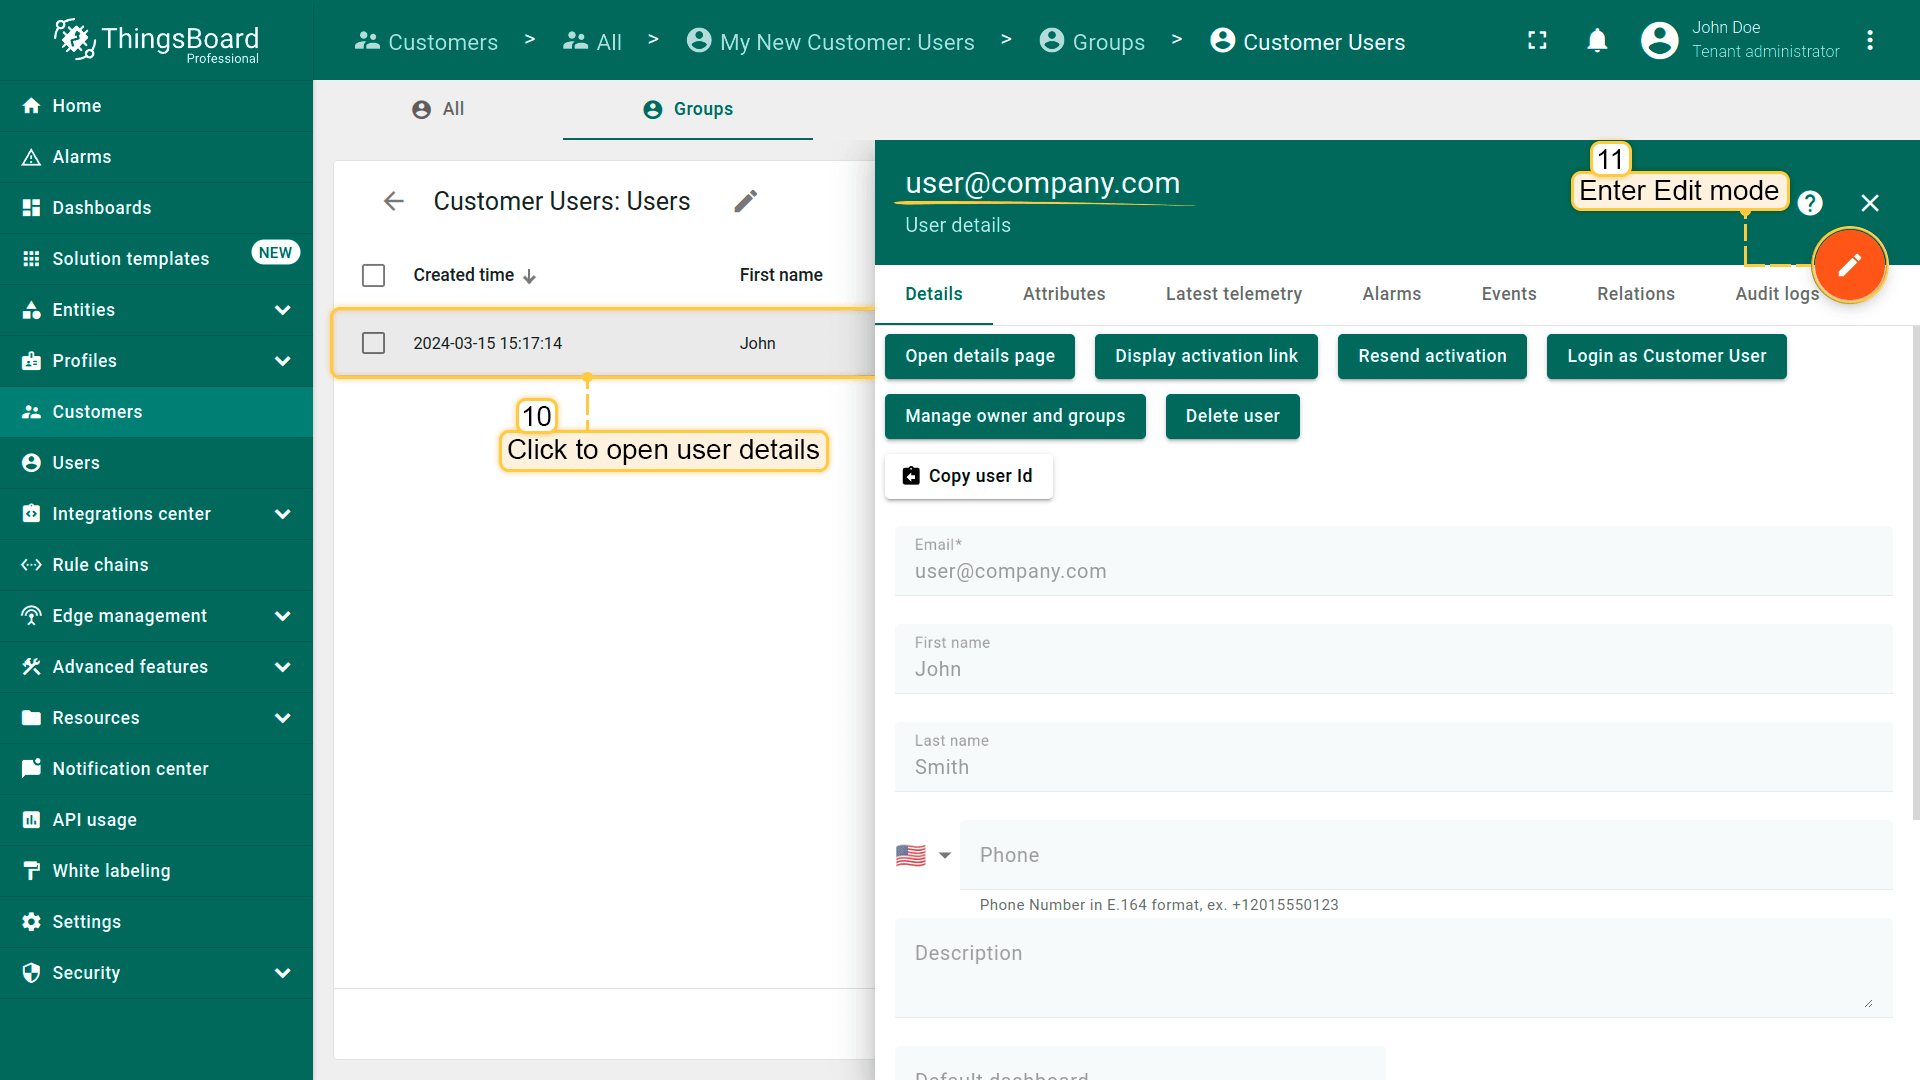
- Click on the created user to open details. Click "pencil" icon to enter edit mode;
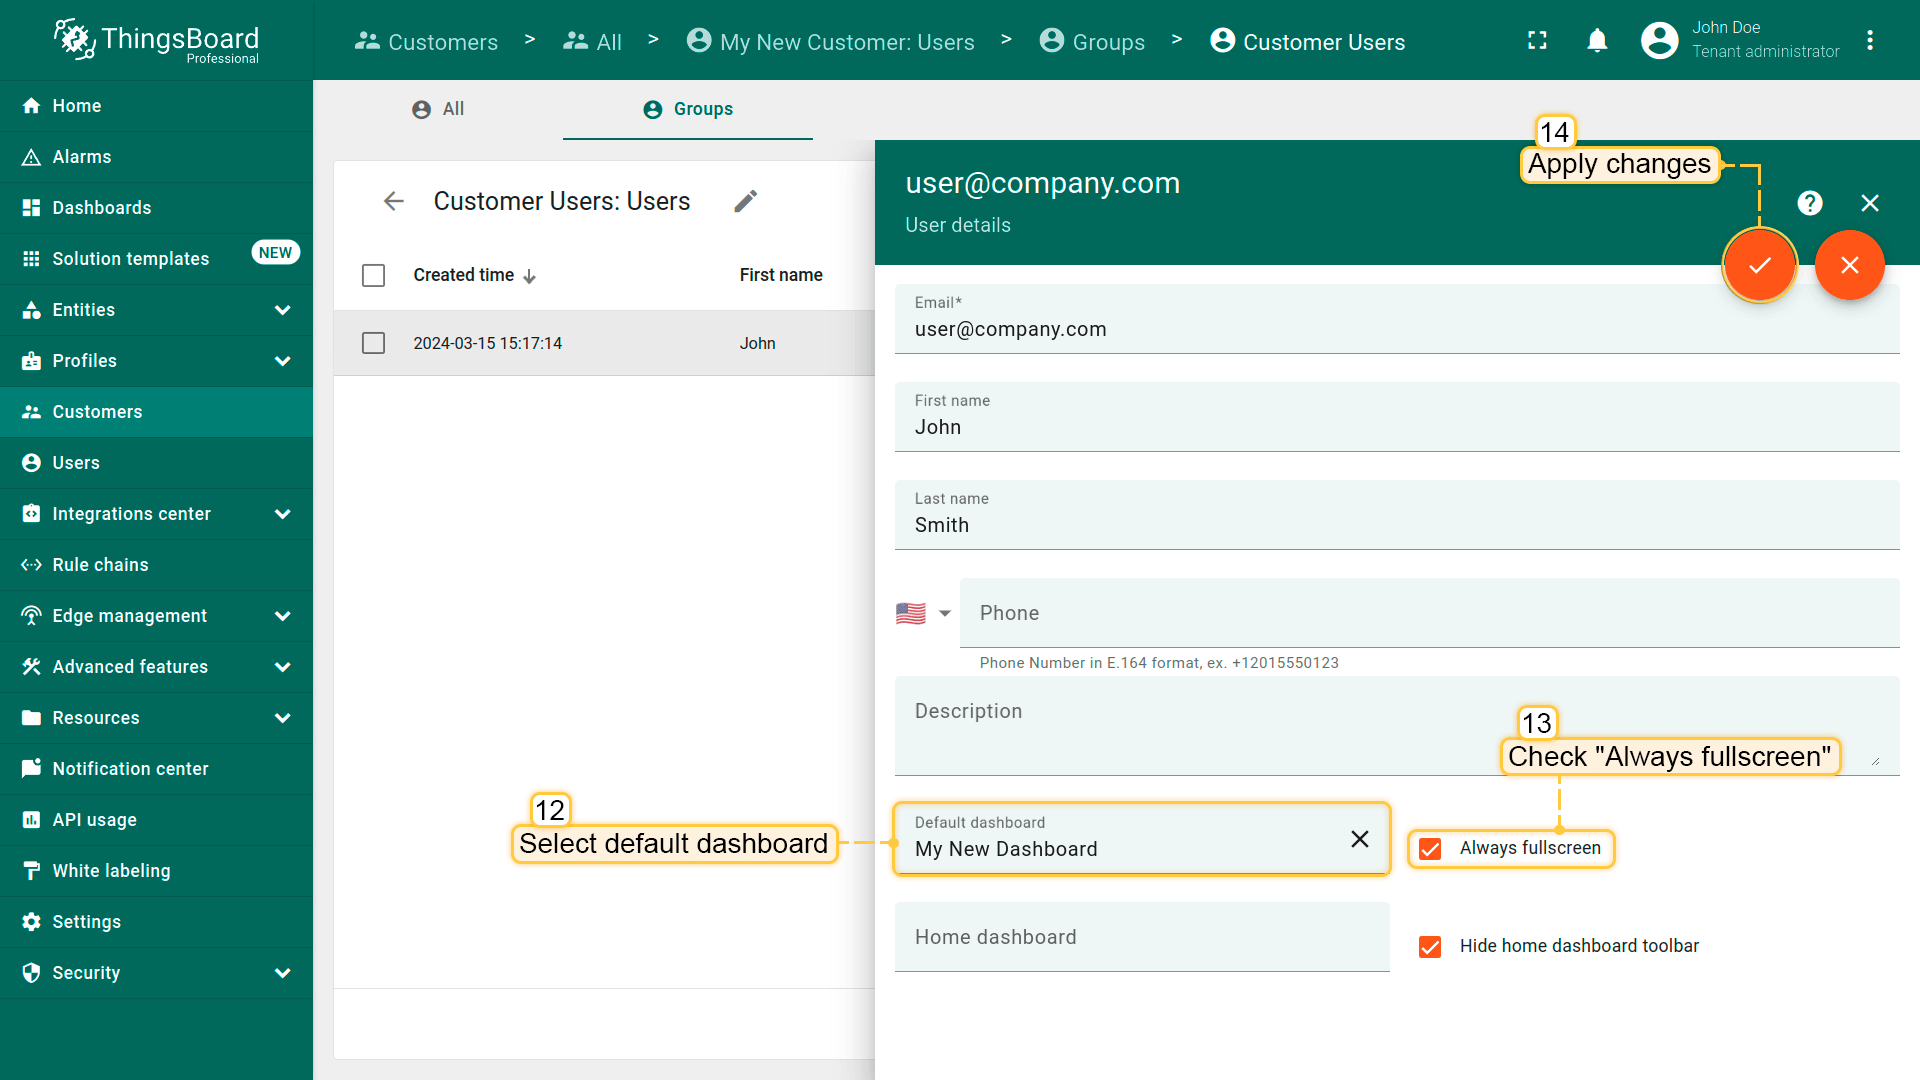
- Select your "My New Dashboard" as default dashboard and check "Always fullscreen". Apply changes.
步骤7.5激活客户用户
最后,以客户用户身份登录ThingsBoard。
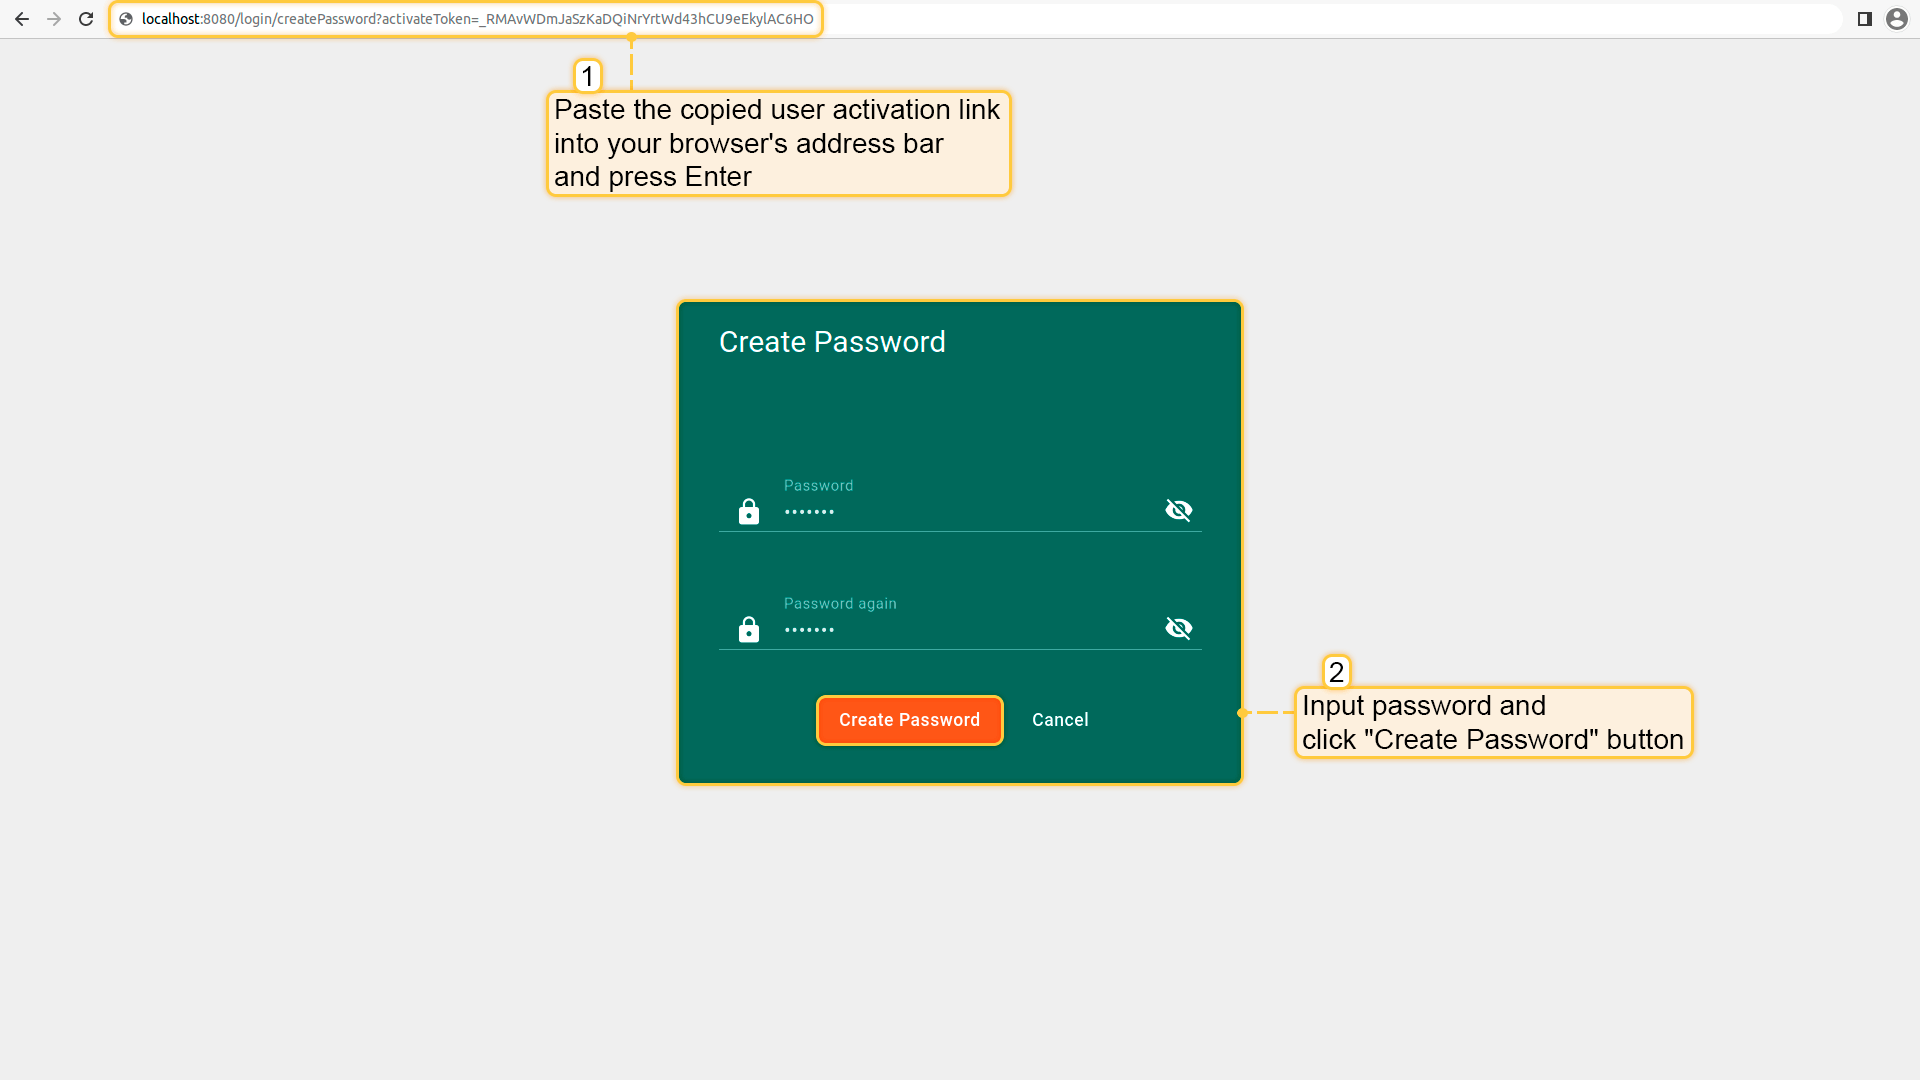
- 将之前复制的链接粘贴到新标签页并按「Enter」。输入两次密码并点击「创建密码」完成密码设置。
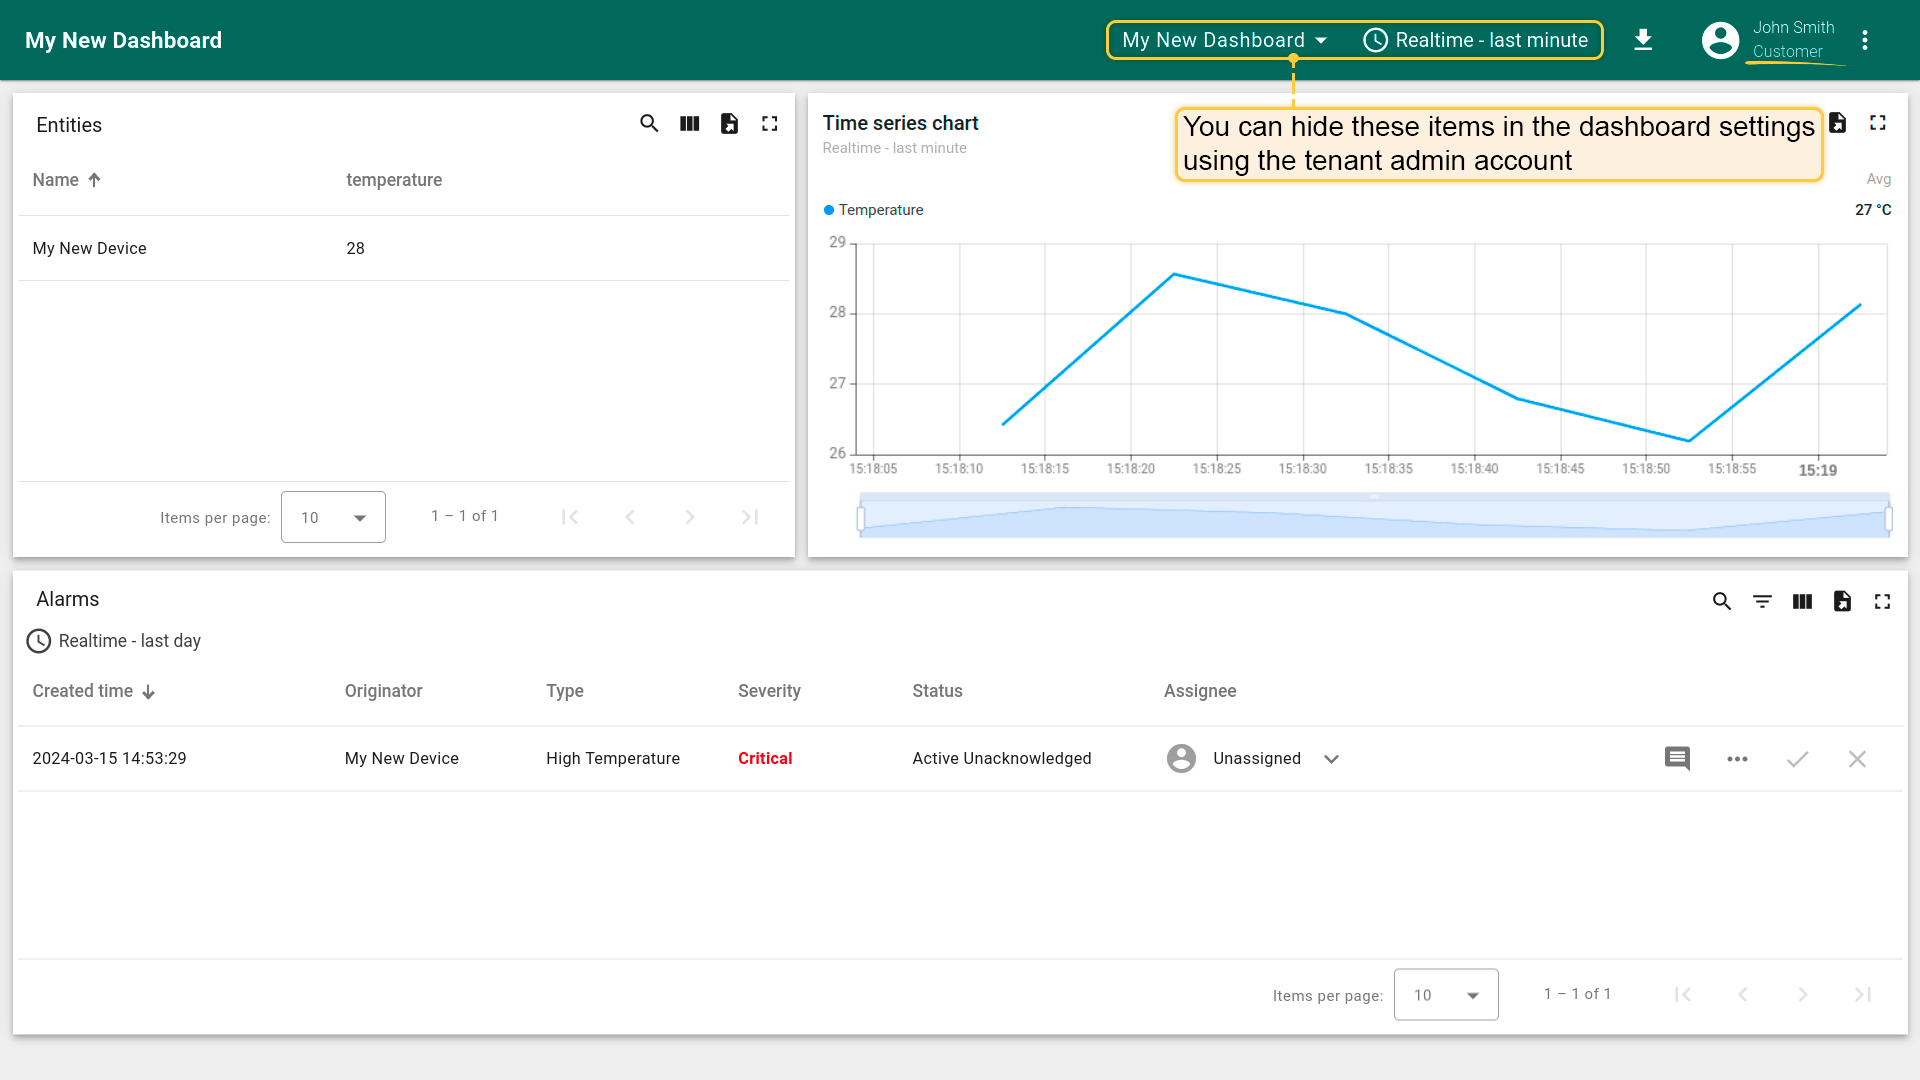
- 您现在已以客户用户身份登录。由于该用户仅有只读权限,可查看设备数据与告警,但无法确认或清除告警。
了解更多权限与基于角色的访问控制(RBAC),请点击此处。
下一步
-
连接设备 - 根据连接技术或方案学习如何连接设备。
-
数据可视化 - 配置ThingsBoard复杂仪表盘的说明。
-
数据处理与操作 - 学习使用ThingsBoard规则引擎。
-
IoT数据分析 - 学习使用规则引擎执行基本分析任务。
-
高级功能 - 了解ThingsBoard高级功能。