产品定价 立即试用
MQTT Broker
文档 > 安全 > 认证 > X.509证书链
入门
安装 架构 API 常见问题
目录

X.509 证书链认证

X.509证书链认证是企业环境和需要强身份验证的IoT部署中广泛使用的MQTT连接安全方法。 客户端在TLS握手期间提交证书,而非依赖用户名和密码,使broker能够基于证书的通用名(CN)属性进行身份认证。

X.509认证概述

使用X.509证书链认证时,客户端在TLS握手过程中提交其证书链。 TBMQ从客户端证书或证书链中的任意证书提取通用名(CN),生成credentialsId并与已配置的MQTT客户端凭据进行匹配。

TBMQ supports two matching modes:

  • 精确匹配 — 证书中的CN必须与配置的模式完全匹配。
  • 正则表达式(regex)匹配 — CN必须匹配regex模式,支持对证书组的灵活匹配。

匹配成功后,客户端通过认证。为提升性能并降低查询延迟,TBMQ在Redis中缓存凭证,PostgreSQL负责持久化存储。 以下各节说明提供者配置、凭证匹配、credentialsId 生成以及认证成功后的授权应用方式。

配置提供者

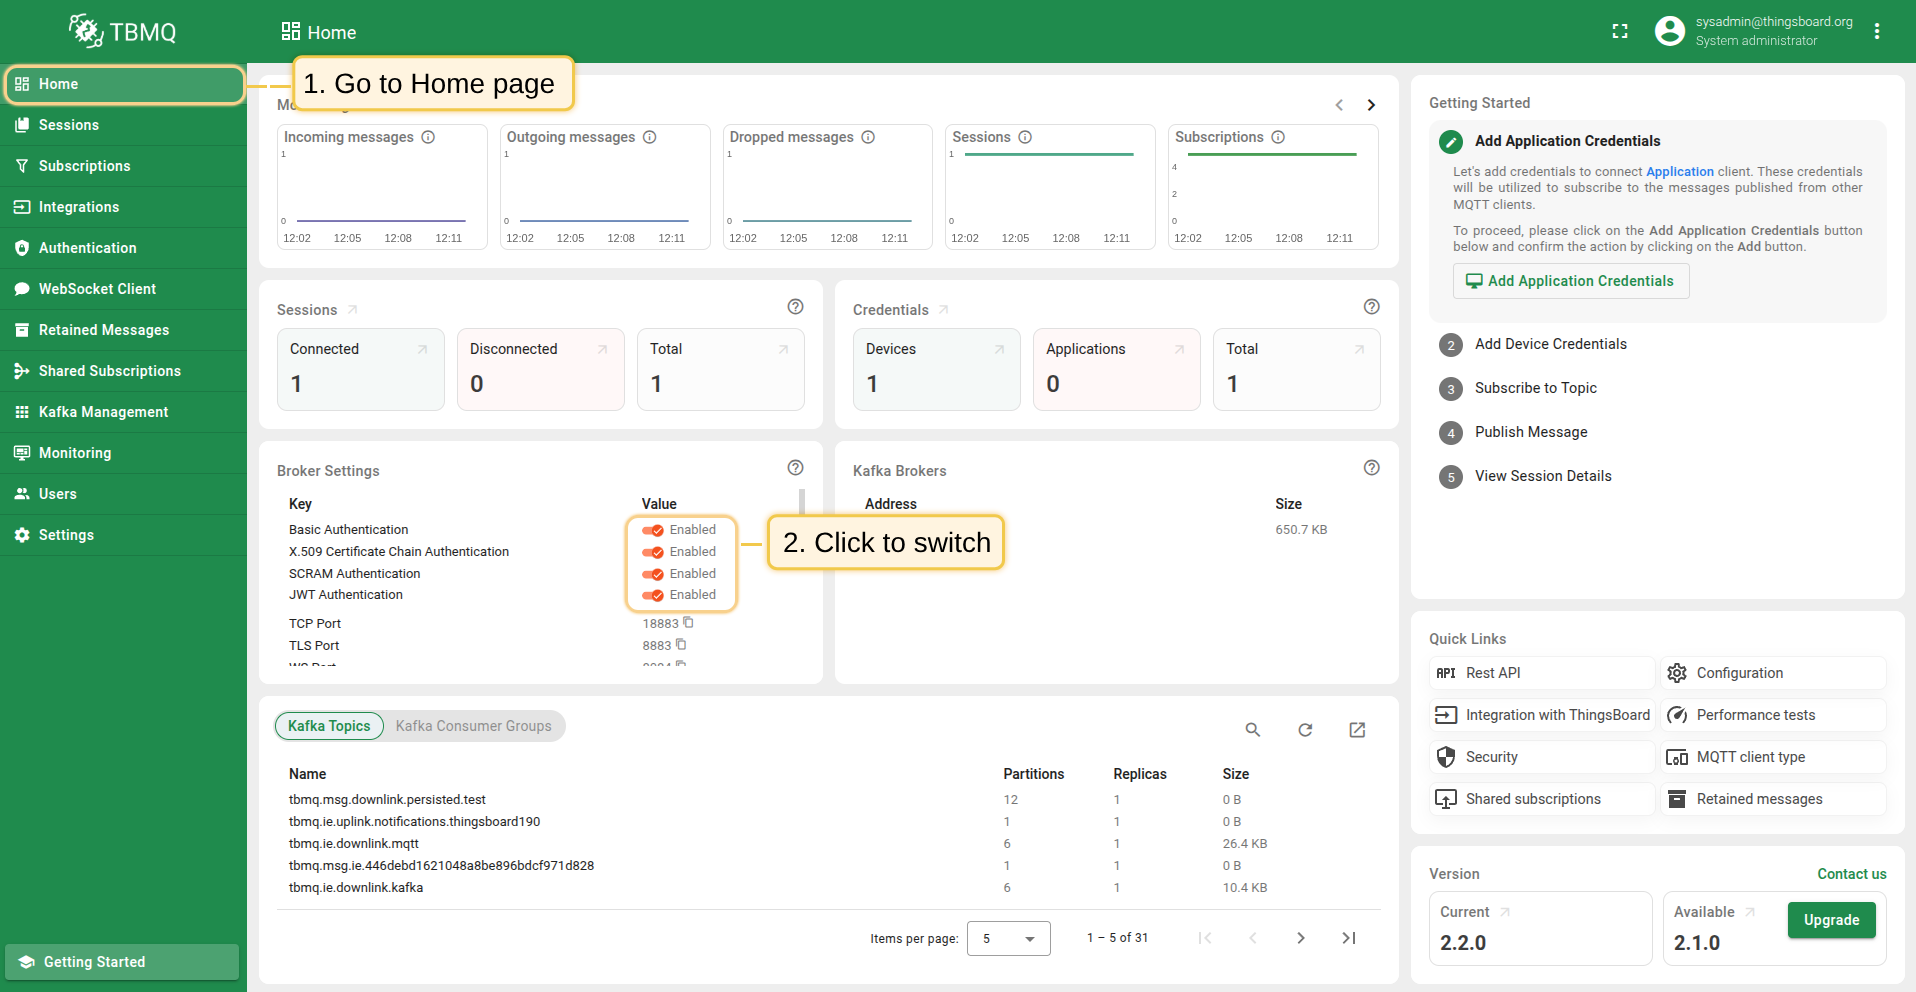
您可直接在TBMQ用户界面中查看认证提供者状态、启用或禁用它们,无需修改配置文件或重启broker即可轻松管理认证行为。

  • 首页Broker Settings 卡片中,可找到每个可用认证提供者的快捷切换按钮。 点击目标提供者旁的按钮即可启用或禁用。
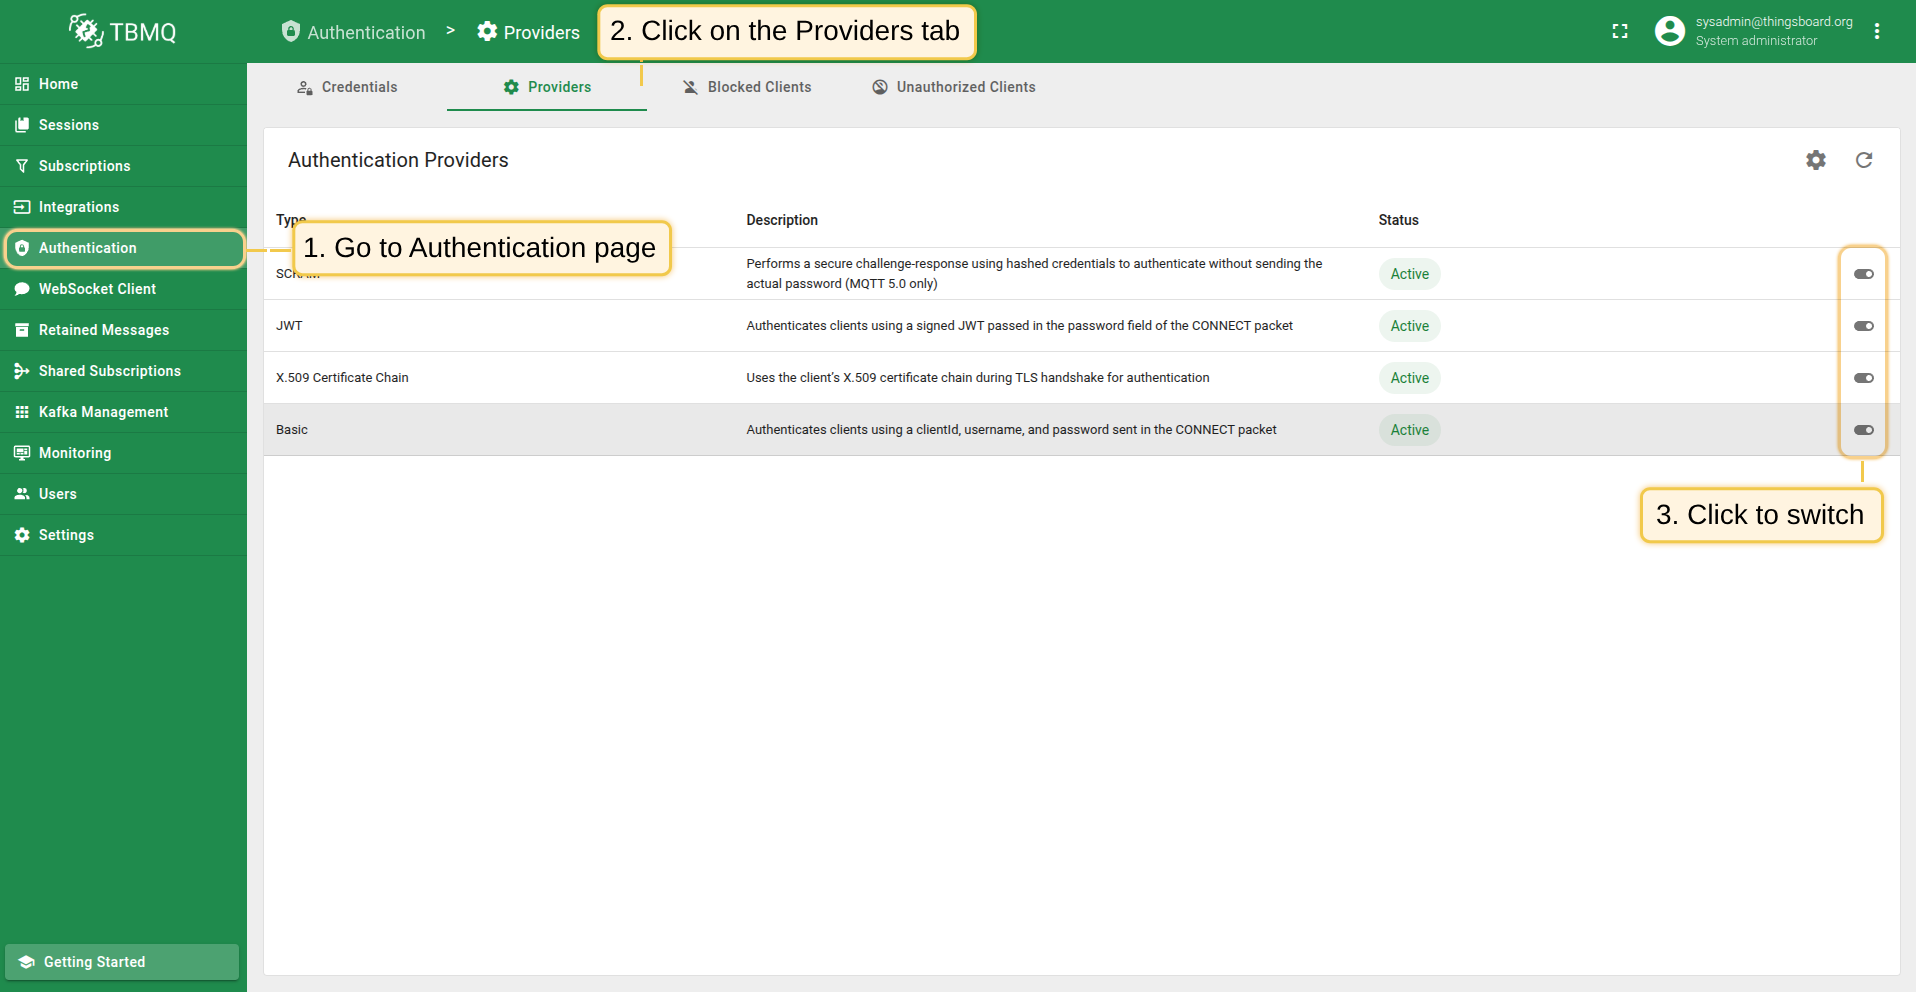
  • Authentication Providers 页面,可进行更精细的控制和查看:
    • 通过点击表格对应行的Switch按钮,可直接启用或禁用提供者。
    • 如需更细致的管理,点击提供者打开详情页,可修改状态或其他参数。
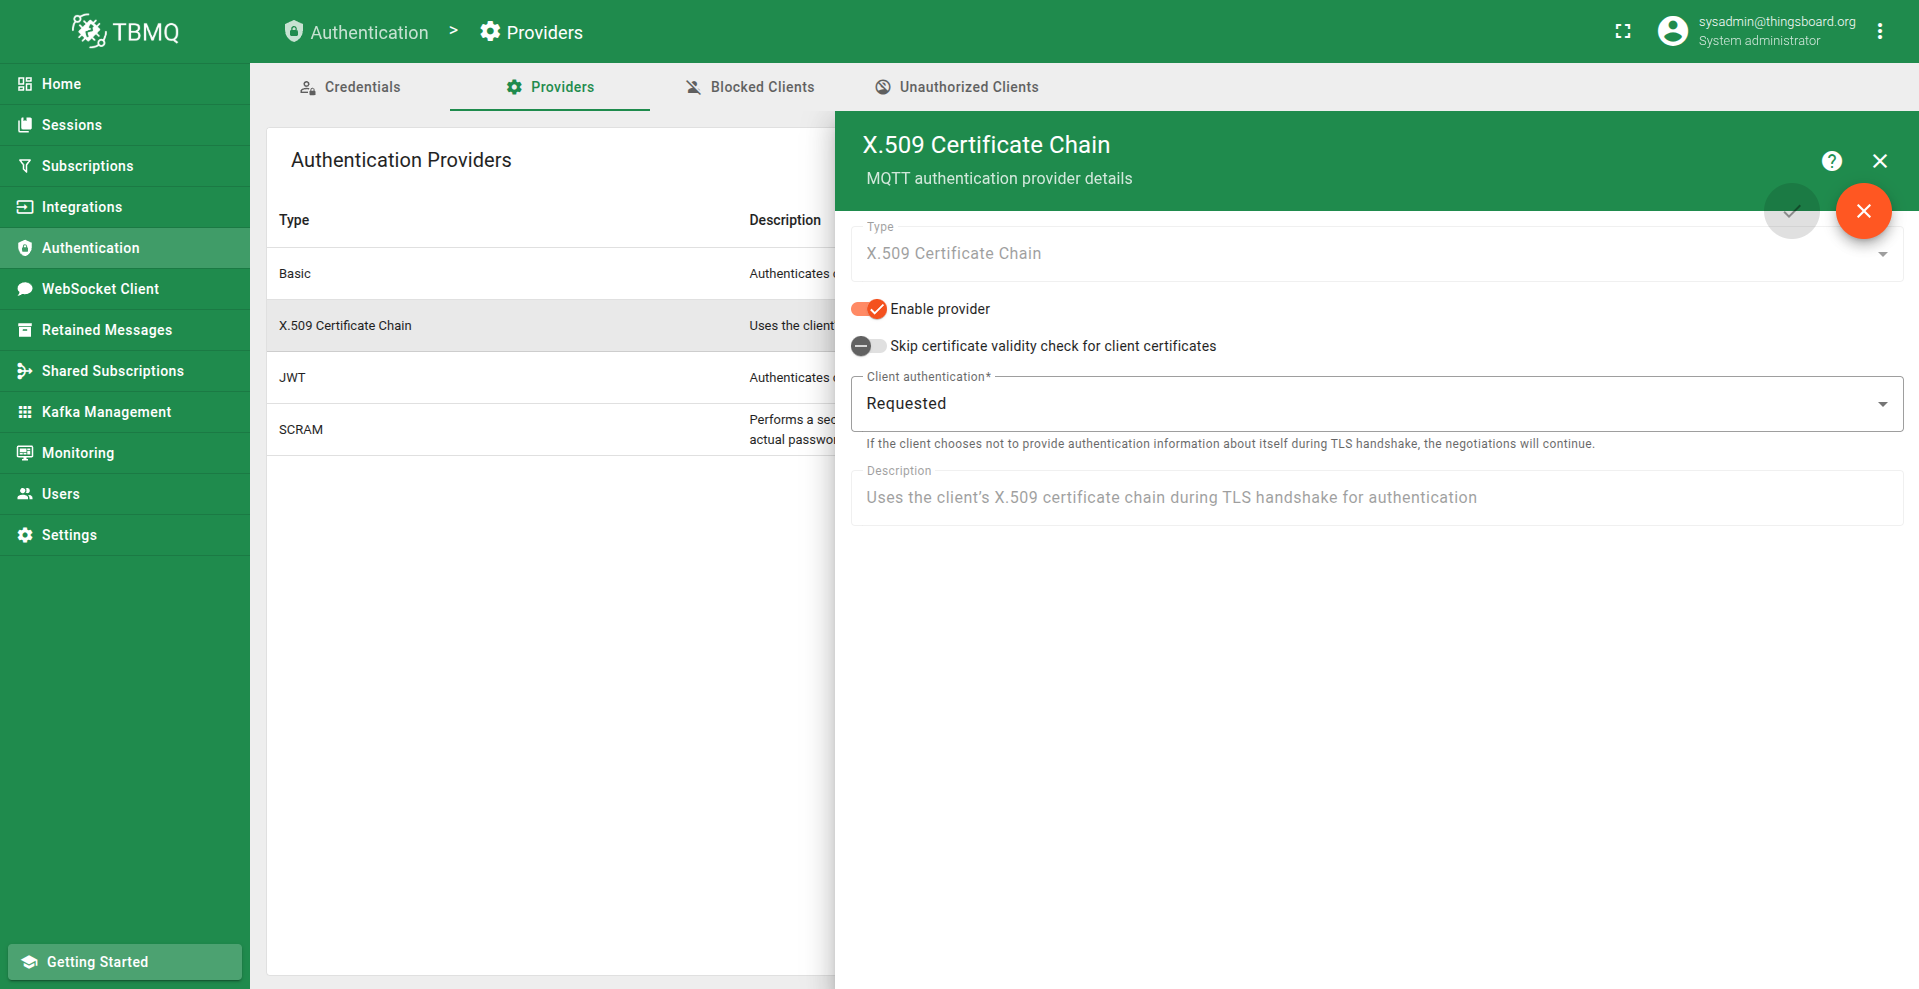
跳过客户端证书有效期检查

X.509证书链认证中的Skip certificate validity check for client certificates参数控制broker在认证过程中是否验证客户端证书的有效期。

  • 启用时,TBMQ跳过证书中Not Before和Not After日期的验证,即过期或尚未生效的证书仍然会被接受。
  • 禁用时,broker执行标准有效期检查,若证书过期或尚未生效,认证将失败。

此设置在测试或特定信任受控环境中可能有用,但在生产部署中不建议设为true,因为这会削弱基于证书的安全模型。
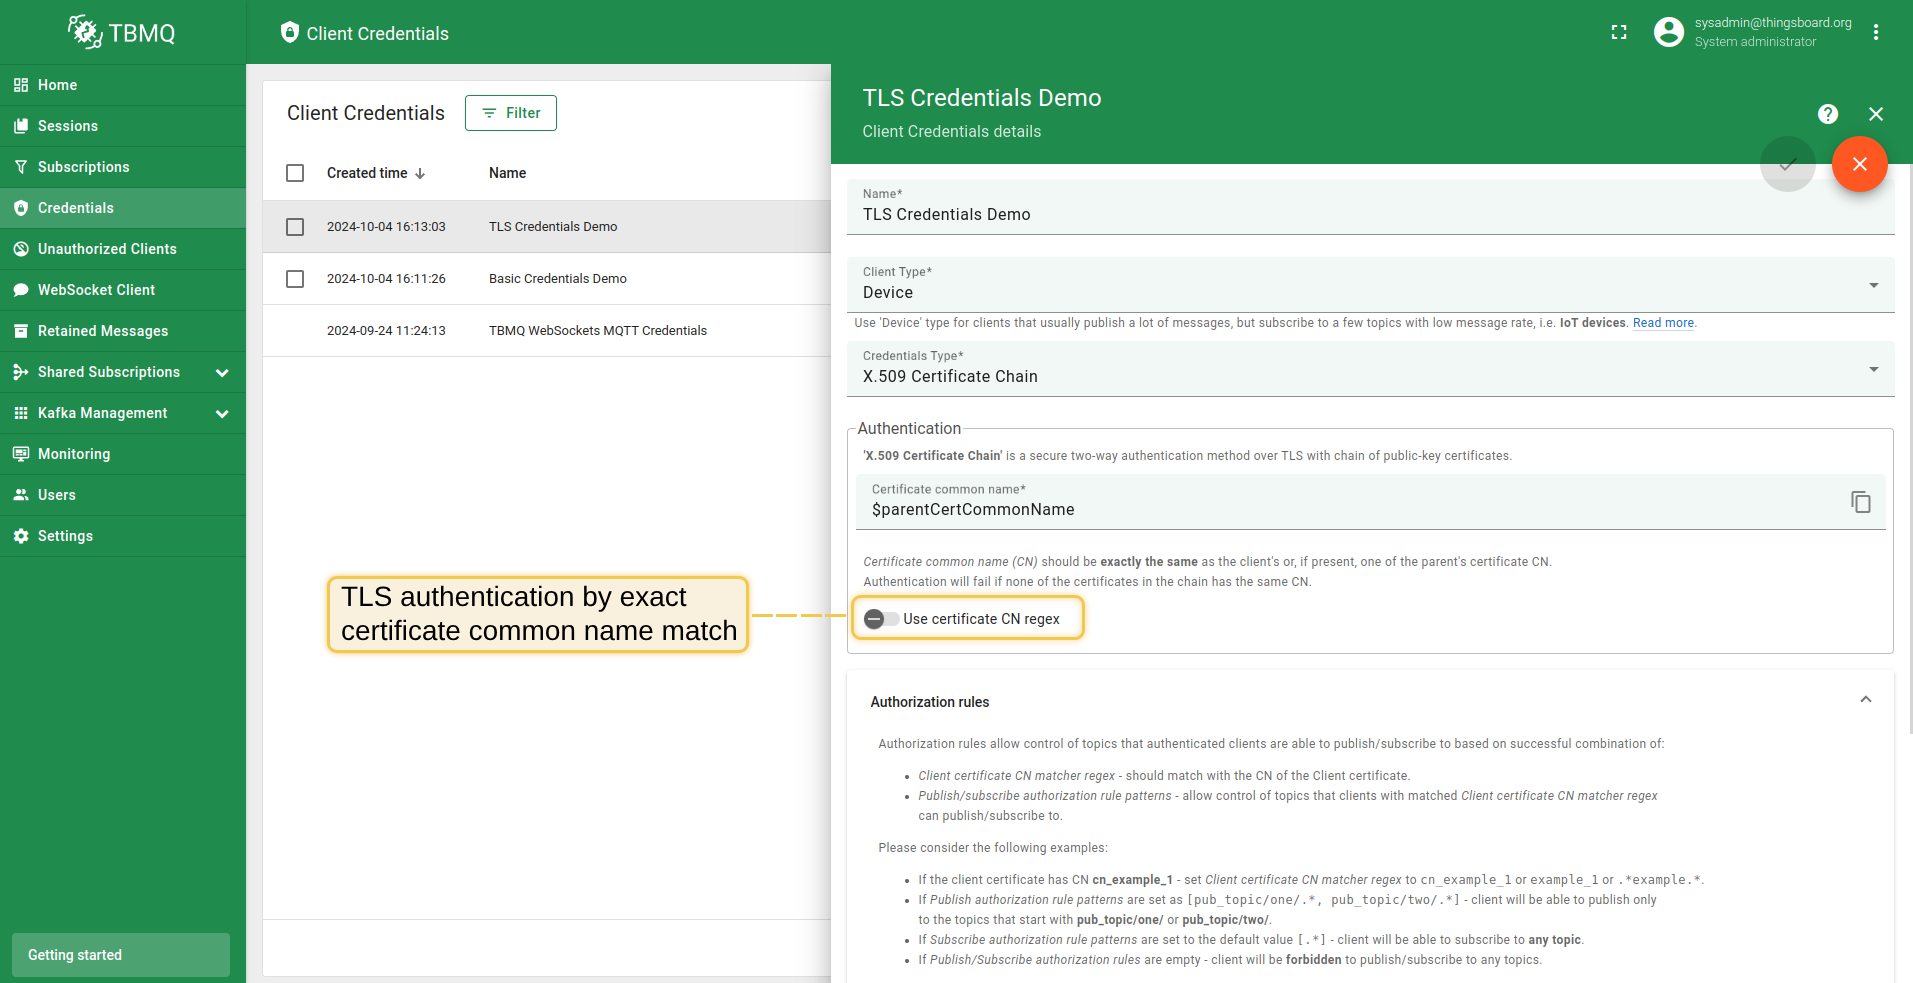
凭据匹配

“X.509 Certificate Chain”凭据有一个“Use certificate CN regex”选项,控制凭据的匹配方式。

  • 禁用”Use certificate CN regex”时: “Certificate common name (CN)”必须与客户端证书或证书链中父证书(如有)的CN精确匹配。 若证书链中没有任何证书的CN精确匹配,认证将失败。

  • 启用”Use certificate CN regex”时: “Certificate common name (CN) matcher regex”必须匹配客户端证书或证书链中父证书(如有)的CN。 若证书链中没有任何证书的CN匹配该正则表达式,认证将失败。

凭据ID

credentialsId的生成方式如下:

  • credentialsId = ssl|$CERTIFICATE_COMMON_NAME;
  • credentialsId = ssl|$CERTIFICATE_COMMON_NAME_REGEX

其中$CERTIFICATE_COMMON_NAME是证书链中证书的通用名,$CERTIFICATE_COMMON_NAME_REGEX是基于正则表达式的字符串, 用于与证书链中证书的CN进行匹配。

授权

用户认证成功后,可限制客户端对可发布或订阅主题的访问。

TBMQ使用正则表达式提供灵活的授权规则控制。

例如,要允许客户端发布或订阅所有city/开头的主题,应创建值为city/.*的授权规则。

对于TLS类型,授权通过对应MQTT客户端凭据的authRulesMapping字段配置。 凭据值的模型如下:

1
2
3
4
5
{
    "certCnPattern": $certCnPattern,
    "certCnIsRegex": $certCnIsRegex,
    "authRulesMapping": $authRulesMapping
}

其中:

  • $certCnPattern - 证书链中应存在的通用名模式。
  • $certCnIsRegex - 控制通用名(CN)模式是否作为正则表达式进行匹配的选项。
  • $authRulesMapping - 用于配置不同关键字访问限制的映射。 例如,
    1
    2
    3
    4
    5
    6
    7
    8
    9
    10
    
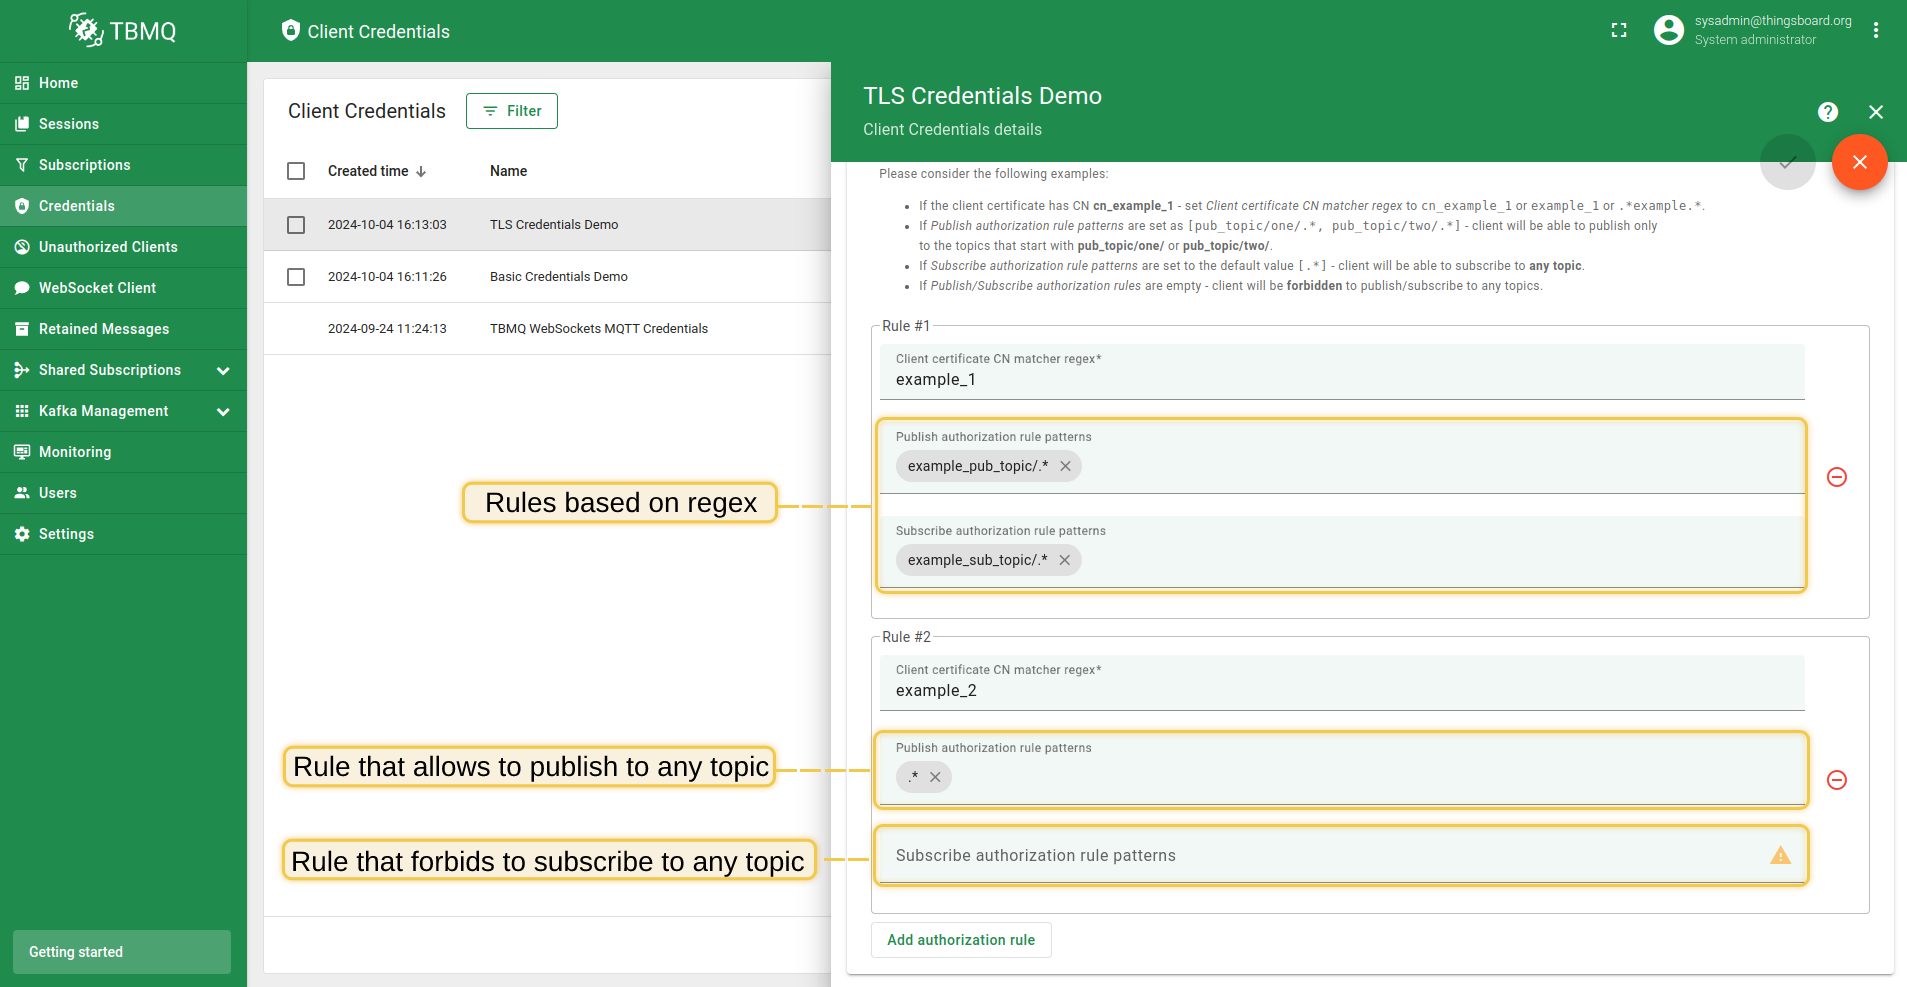
    {
        "example_1": {
            "pubAuthRulePatterns": ["example_pub_topic/.*"],
            "subAuthRulePatterns": ["example_sub_topic/.*"]
        },
        "example_2": {
            "pubAuthRulePatterns": [".*"],
            "subAuthRulePatterns": [".*"]
        }
    }
    

此配置允许证书CN中包含example_1的客户端仅向以example_pub_topic/开头的主题发布消息, 并订阅以example_sub_topic/开头的主题。证书CN中包含example_2的客户端则允许向任何主题发布和订阅。

注意: 如果pubAuthRulePatternssubAuthRulePatterns设置为null或空列表([]),客户端将无法向任何主题发布或订阅。

示例

X.509证书用于为MQTT over TLS设置双向认证。 以下说明介绍如何使用X.509证书将MQTT客户端连接到TBMQ。

具体而言,有两种策略可用于建立客户端与TBMQ之间的连接:

  • X.509证书链
    配置TBMQ信任来自特定信任锚点(中间证书)的所有客户端证书。 此特性在证书轮换时无需手动更新每个MQTT客户端凭据。
  • X.509证书。
    配置TBMQ接受使用预配置客户端证书的特定设备连接。

步骤 1. 准备服务器与 Client 证书链

若自托管 TBMQ,请按 MQTT over SSL 指南配置服务器证书。

配置完成后,准备 pem 格式的 CA root 证书。MQTT 客户端将使用该证书校验服务器证书。 将 CA root 证书保存到工作目录,命名为 “ca.pem“。

Step 2. 生成 Client 证书链

需生成具有合理 Common Names (CN) 的证书链。将使用中间证书为设备签发证书。 例如,证书链 CN 可如下:

  • Root 证书 CN: company-name.com;
  • Intermediate 证书: device-group-name.company-name.com;
  • Device 证书: device-name.device-group-name.company-name.com;

使用以下命令为各级链生成自签名私钥、证书签发请求和 x509 证书。 命令基于 OpenSSL 工具,工作机通常已安装:

步骤 2.1 生成 root 证书

生成 Root 证书和私钥,使用以下命令。提示时请填写正确的 CN:

1
openssl req -x509 -newkey rsa:4096 -keyout rootKey.pem -out rootCert.pem -sha256 -days 365 -nodes
示例输出,CN 为 *company.com*
1
2
3
4
5
6
7
8
9
10
11
12
13
14
15
16
17
Generating a RSA private key
writing new private key to 'rootKey.pem'
-----
You are about to be asked to enter information that will be incorporated
into your certificate request.
What you are about to enter is what is called a Distinguished Name or a DN.
There are quite a few fields but you can leave some blank
For some fields there will be a default value,
If you enter '.', the field will be left blank.
-----
Country Name (2 letter code) [AU]:
State or Province Name (full name) [Some-State]:
Locality Name (eg, city) []:
Organization Name (eg, company) [Internet Widgits Pty Ltd]:
Organizational Unit Name (eg, section) []:
Common Name (e.g. server FQDN or YOUR name) []:company.com
Email Address []:


步骤 2.2 生成 intermediate 证书

生成 intermediate 密钥和证书请求,使用以下命令。提示时请填写正确的 CN:

1
openssl req -new -newkey rsa:4096 -keyout intermediateKey.pem -out intermediate.csr -sha256 -nodes
示例输出,CN 为 *group.company.com*
1
2
3
4
5
6
7
8
9
10
11
12
13
14
15
16
17
18
19
20
21
22
Generating a RSA private key
writing new private key to 'intermediateKey.pem'
-----
You are about to be asked to enter information that will be incorporated
into your certificate request.
What you are about to enter is what is called a Distinguished Name or a DN.
There are quite a few fields but you can leave some blank
For some fields there will be a default value,
If you enter '.', the field will be left blank.
-----
Country Name (2 letter code) [AU]:
State or Province Name (full name) [Some-State]:
Locality Name (eg, city) []:
Organization Name (eg, company) [Internet Widgits Pty Ltd]:
Organizational Unit Name (eg, section) []:
Common Name (e.g. server FQDN or YOUR name) []:group.company.com
Email Address []:

Please enter the following 'extra' attributes
to be sent with your certificate request
A challenge password []:
An optional company name []:


生成 intermediate 证书,使用以下命令:

1
openssl x509 -req -in intermediate.csr -out intermediateCert.pem -CA rootCert.pem -CAkey rootKey.pem -days 365 -sha256 -CAcreateserial -extfile <(echo "basicConstraints=CA:TRUE,pathlen:0")
示例输出
1
2
3
Signature ok
subject=C = AU, ST = Some-State, O = Internet Widgits Pty Ltd, CN = group.company.com
Getting CA Private Key


步骤 2.3 生成 device 证书

生成 device 密钥和证书请求,使用以下命令。提示时请填写正确的 CN:

1
openssl req -new -newkey rsa:4096 -keyout deviceKey.pem -out device.csr -sha256 -nodes
示例输出,CN 为 device123.group.company.com
1
2
3
4
5
6
7
8
9
10
11
12
13
14
15
16
17
18
19
20
21
22
Generating a RSA private key
writing new private key to 'deviceKey.pem'
-----
You are about to be asked to enter information that will be incorporated
into your certificate request.
What you are about to enter is what is called a Distinguished Name or a DN.
There are quite a few fields but you can leave some blank
For some fields there will be a default value,
If you enter '.', the field will be left blank.
-----
Country Name (2 letter code) [AU]:
State or Province Name (full name) [Some-State]:
Locality Name (eg, city) []:
Organization Name (eg, company) [Internet Widgits Pty Ltd]:device.group.company.com
Organizational Unit Name (eg, section) []:
Common Name (e.g. server FQDN or YOUR name) []:
Email Address []:

Please enter the following 'extra' attributes
to be sent with your certificate request
A challenge password []:
An optional company name []:


生成 device 证书,使用以下命令:

1
openssl x509 -req -in device.csr -out deviceCert.pem -CA intermediateCert.pem -CAkey intermediateKey.pem -days 365 -sha256 -CAcreateserial
示例输出
1
2
3
Signature ok
subject=C = AU, ST = Some-State, O = Internet Widgits Pty Ltd, CN = device.group.company.com
Getting CA Private Key


最后,需将证书自 device 证书至 root 依次拼接为链:

1
cat deviceCert.pem intermediateCert.pem rootCert.pem > chain.pem

命令将输出各级链的私钥和证书。后续步骤将使用 device 私钥文件 deviceKey.pem 和证书链 chain.pem

步骤 3. 在 MQTT Client Credentials 中配置 Intermediate 公钥

进入 TBMQ Web UI -> Authentication -> Credentials -> Create new or update exising one。 选择 X.509 Certificate Chain 类型,粘贴 intermediateCert.pem 的 CN。

步骤 4. 信任证书

MQTT 客户端建立安全 TLS 连接前,签发其证书的 CA (Certificate Authority) 必须被信任。 若证书由知名公共 CA 签发,默认已受信任。 若 TBMQ 与 clients 均使用同一 CA 签发的证书,无需额外配置。 若为其他私有或内部 CA,需将 CA 证书 (rootCert.pem) 添加到 TBMQ 使用的 Java truststore。

执行以下命令将 CA 证书导入 truststore。

步骤 5. 测试连接

执行以下命令,通过安全通道向 TBMQ 上报温度数据:

1
2
mosquitto_pub --cafile ca.pem -d -q 1 -h "YOUR_TBMQ_HOST" -p "8883" \
-t "sensors/temperature" --key deviceKey.pem --cert chain.pem -m {"temperature":25}

自签名 服务器证书的类似命令:

1
2
mosquitto_pub --insecure --cafile server.pem -d -q 1 -h "YOUR_TBMQ_HOST" -p "8883" \
-t "sensors/temperature" --key deviceKey.pem --cert chain.pem -m {"temperature":25}

请将 YOUR_TBMQ_HOST 替换为您的 TBMQ 实例 host。

步骤 1. 准备服务器与 Client 证书

若自托管 TBMQ,请按 MQTT over SSL 指南配置服务器证书。

配置完成后,准备 pem 格式的 CA root 证书。MQTT 客户端将使用该证书校验服务器证书。 将 CA root 证书保存到工作目录,命名为 “ca.pem“。

步骤 2. 生成 Client 证书

使用以下命令生成自签名私钥和 x509 证书。 命令基于 openssl 工具,工作机通常已安装:

生成 RSA 密钥和证书:

1
openssl req -x509 -newkey rsa:4096 -keyout key.pem -out cert.pem -sha256 -days 365 -nodes

生成 EC 密钥和证书:

1
2
openssl ecparam -out key.pem -name prime256v1 -genkey
openssl req -new -key key.pem -x509 -nodes -days 365 -out cert.pem 

命令输出为私钥文件 key.pem 和公钥证书 cert.pem。 后续步骤将使用这两个文件。

步骤 3. 在 MQTT Client Credentials 中配置 Client 公钥

进入 TBMQ Web UI -> Authentication -> Credentials -> Create new or update exising one。 选择 X.509 Certificate Chain 类型,粘贴 cert.pem 的 CN。

步骤 4. 信任证书

MQTT 客户端建立安全 TLS 连接前,其证书必须被信任。 若证书由知名公共 CA 签发,默认已受信任。 若为自签名证书,需将 client 证书 (cert.pem) 导入 TBMQ 使用的 Java truststore。

执行以下命令将证书导入 truststore。

步骤 5. 测试连接

执行以下命令,通过安全通道向 TBMQ 上报温度数据:

1
2
mosquitto_pub --cafile ca.pem -d -q 1 -h "YOUR_TBMQ_HOST" -p "8883" \
-t "sensors/temperature" --key key.pem --cert cert.pem -m {"temperature":25}

请将 YOUR_TBMQ_HOST 替换为您的 TBMQ 实例 host。

下一步