- Hardware type: Gateways
- Connectivity: LoRaWAN, HTTP, MQTT, LTE, UDP, 3G
- Industry: Smart Cities, Industrial Manufacturing
- Use cases: Smart energy, Environment Monitoring, Smart Office, Smart Retail, Smart Farming, Fleet Tracking, Health Care, Air Quality Monitoring, Waste Management, Tank Level Monitoring
- Platforms: Community Edition, Professional Edition, Cloud
概述
UG65 LoRaWAN® Gateway是一款坚固的8通道室内LoRaWAN® 网关。采用SX1302 LoRa芯片与高性能四核CPU,支持超过2000个节点连接。
主要特性:
- 大内存四核工业处理器
- 搭载SX1302芯片,更高吞吐、更低功耗
- 8个半双工/全双工通道
- IP65外壳,工业设计,可应对屋檐等半户外场景
- 桌面、壁挂或抱杆安装
- 以太网、蜂窝(4G/3G)、Wi-Fi多回传备份
- DeviceHub与Milesight IoT Cloud便于远程设备集中管理
- 支持IPsec/OpenVPN/L2TP/PPTP/DMVPN等多种VPN安全通信
- 兼容The Things Industries、ChirpStack等主流网络服务器
- 噪声检测与分析,提供直观部署图
- 内置网络服务器及MQTT/HTTP/HTTPS API,便于集成
- 嵌入式Python SDK支持二次开发
- 基于Node-RED的快速可视化开发
仅专业版支持Platform Integrations功能。
请使用ThingsBoard Cloud或自行安装平台实例。
完成本指南中的步骤后,您将在网络服务器上获得已连接并配置好的网关,并在ThingsBoard中完成集成,从而添加设备、接收并处理数据。
前置条件
继续本指南前,需准备以下内容:
网关连接
根据官方用户手册和本指南,您可以通过以下两种方式将网关接入网络并访问Web界面:
- 无线连接:
- 在电脑上启用无线网络连接,搜索并连接接入点”Gateway_**“。
- 在电脑上打开浏览器,输入IP地址 192.168.1.1 访问Web管理界面。
- 输入用户名(默认:admin)和密码(默认:password),点击 登录。
-
有线连接: 将电脑通过网线直连UG65的Ethernet口,或通过PoE注入器连接,以访问网关Web界面。以下步骤以Windows 10为例。
- 打开“控制面板”→“网络和Internet”→“网络和共享中心”,点击“Ethernet”(名称可能不同)。
- 进入“属性”→“Internet协议版本4(TCP/IPv4)”,选择“使用下面的IP地址”,手动设置与网关同网段的静态IP。
- 在电脑上打开浏览器,输入IP地址 192.168.23.150 访问Web管理界面。
- 输入用户名和密码,点击“登录”。
-
此时您已可以配置网关。
此时您已可以配置网关。
-
在左侧菜单中打开 Packet Forwarder,记录 Gateway EUI 和 Gateway ID,用于在网络服务器上创建网关。
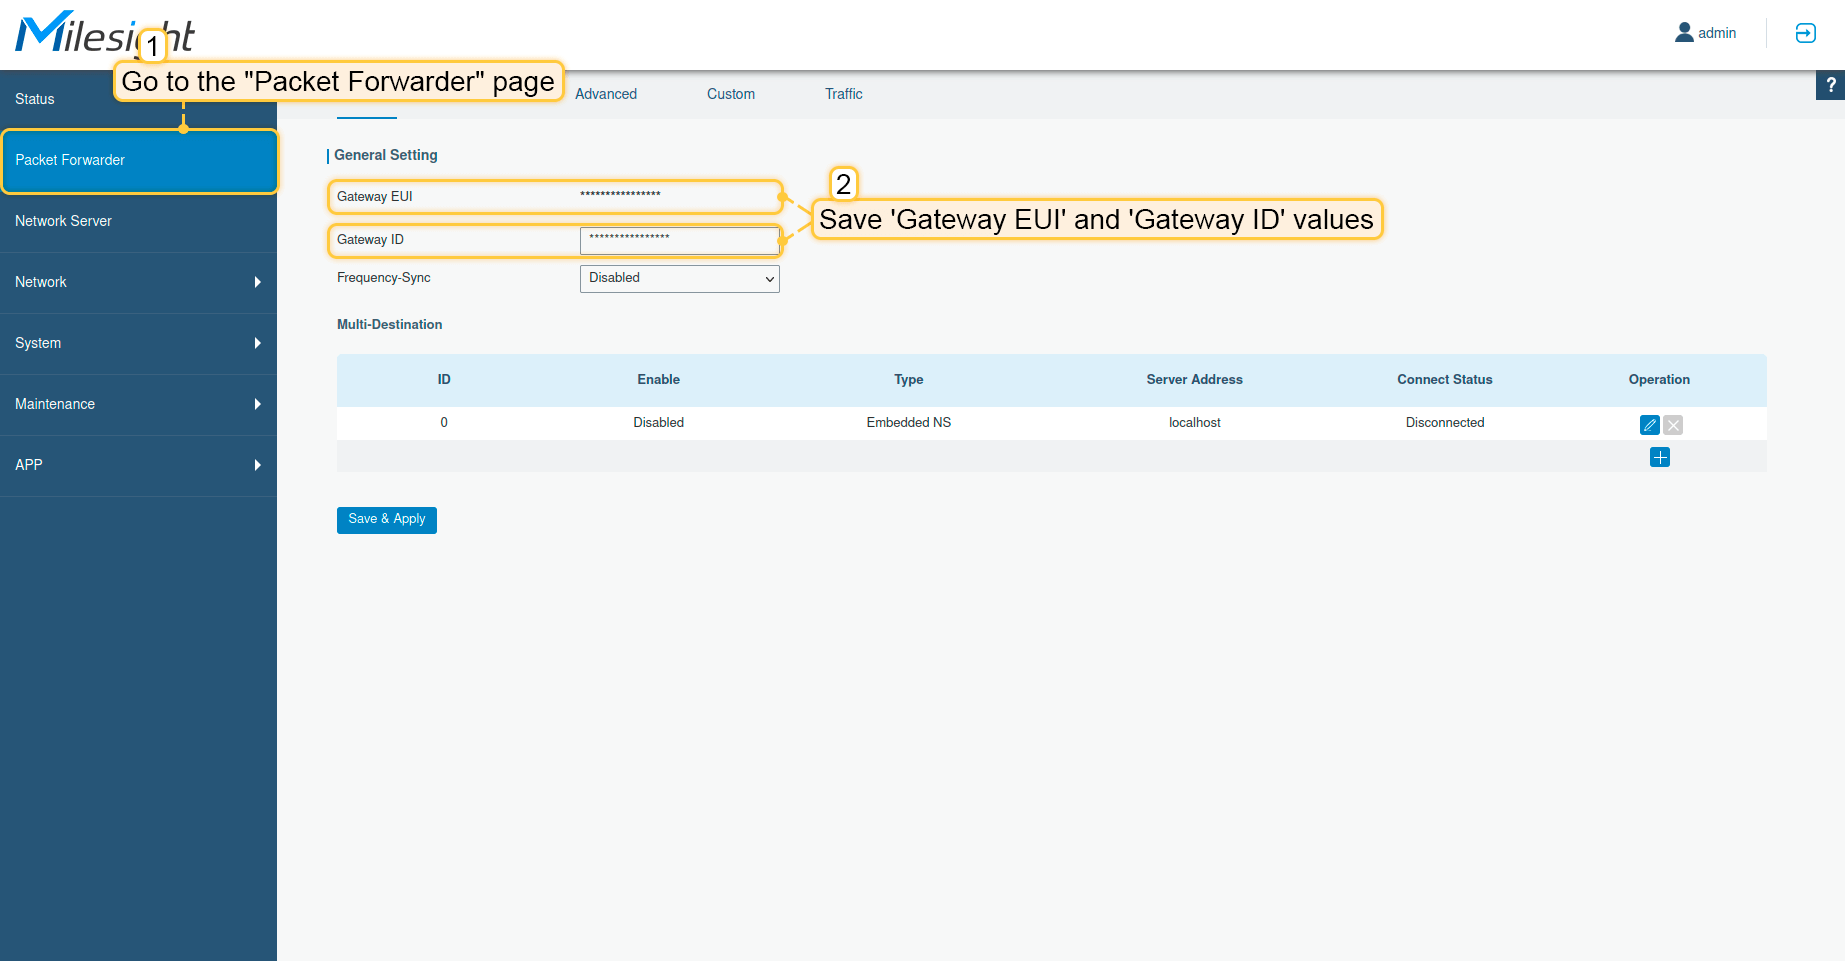
在左侧菜单中打开 Packet Forwarder,记录 Gateway EUI 和 Gateway ID,用于在网络服务器上创建网关。
默认情况下,Gateway EUI与Gateway ID相同。
下一步将说明如何将网关连接到网络服务器。
配置
要与网络服务器建立集成,请先选择以下受支持的网络服务器之一:
在ChirpStack上添加网关我们需要在 ChirpStack 上添加网关。 要添加网关,请按以下步骤操作:
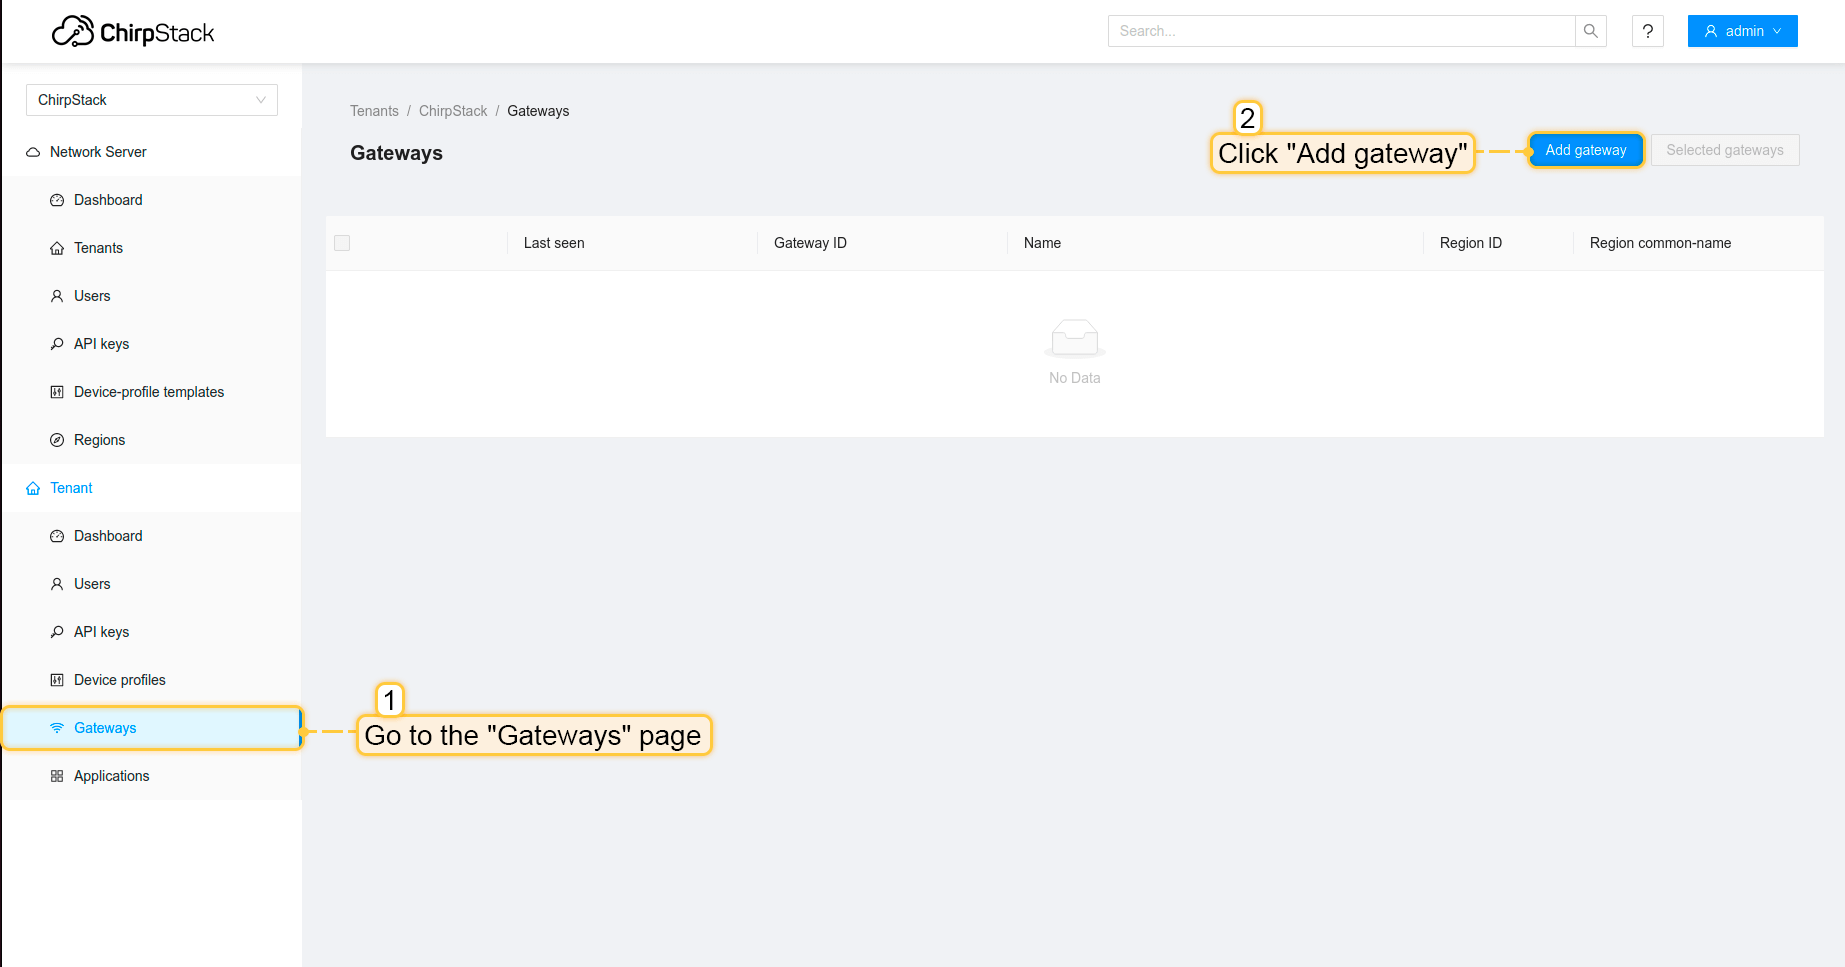 登录ChirpStack服务器。进入“网关”页面,点击“添加网关”按钮。 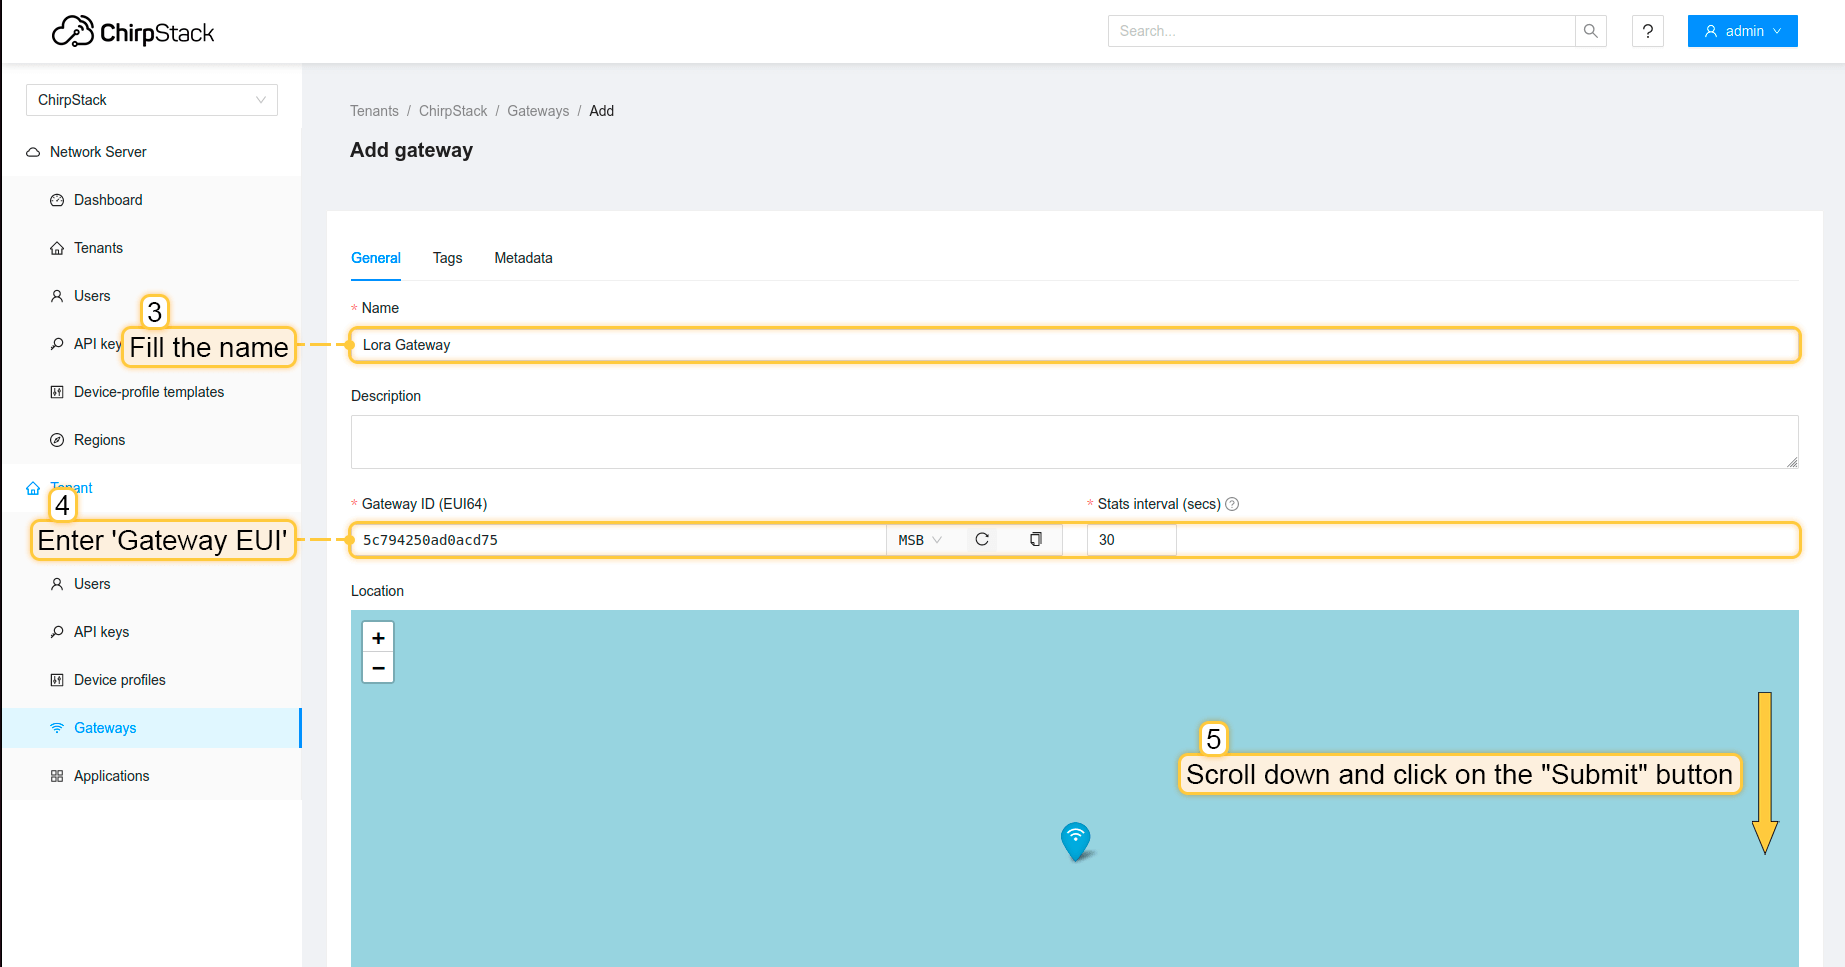 填写 名称、网关EUI(根据您的网关而定,可在网关控制面板上查看),向下滚动并点击“提交”按钮。 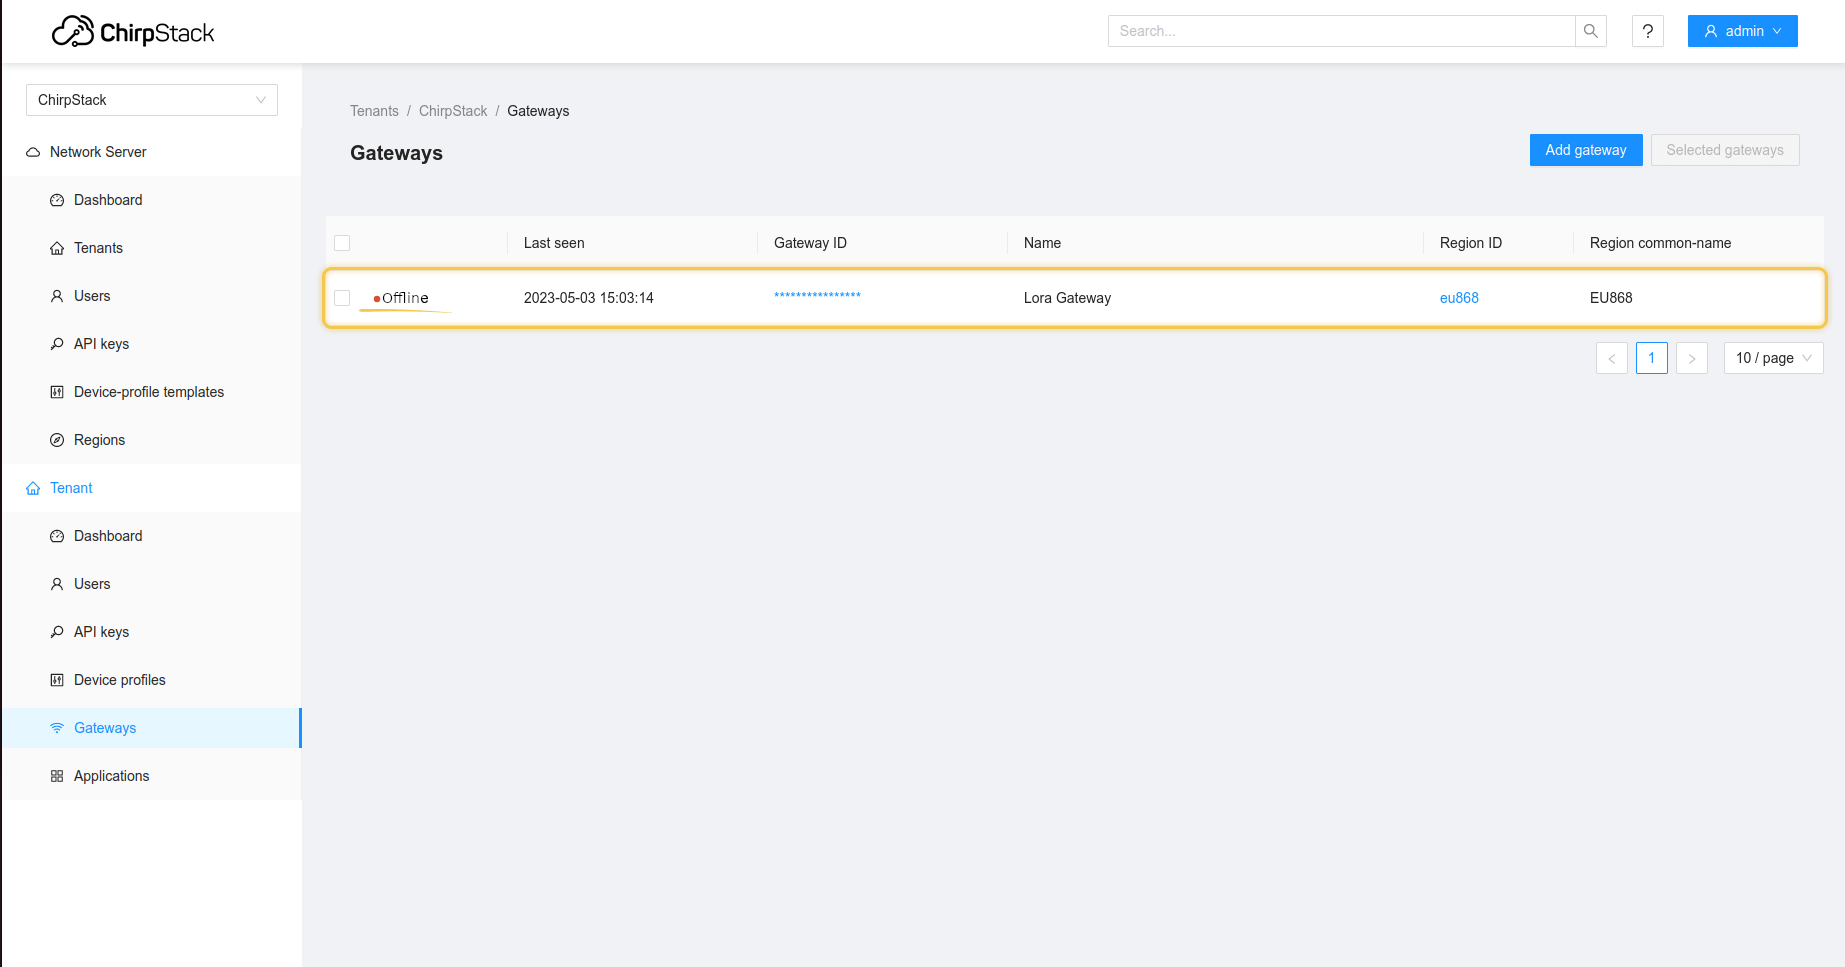 网关已添加。在网关列表中可查看其状态。 配置网关以发送数据要将网关连接并发送数据到ChirpStack,需要配置网关。 请按以下步骤操作:
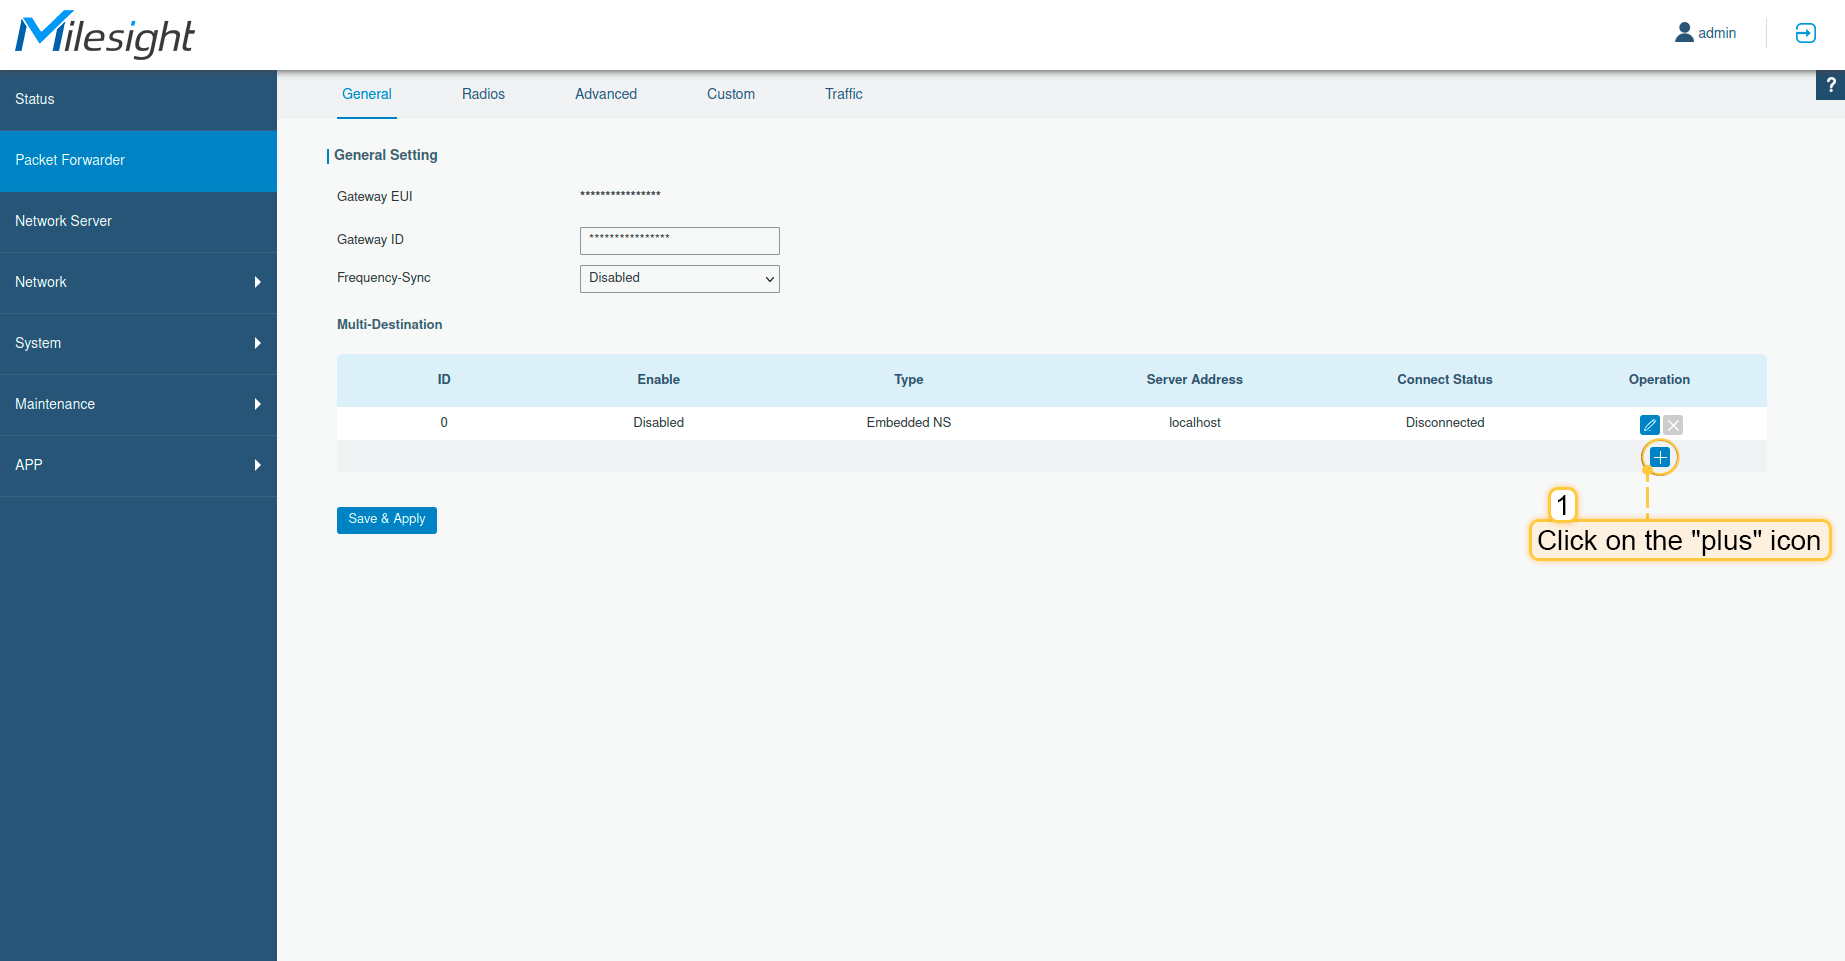 打开网关控制面板。进入“Packet Forwarder”页面,点击“加号”按钮添加新转发器。 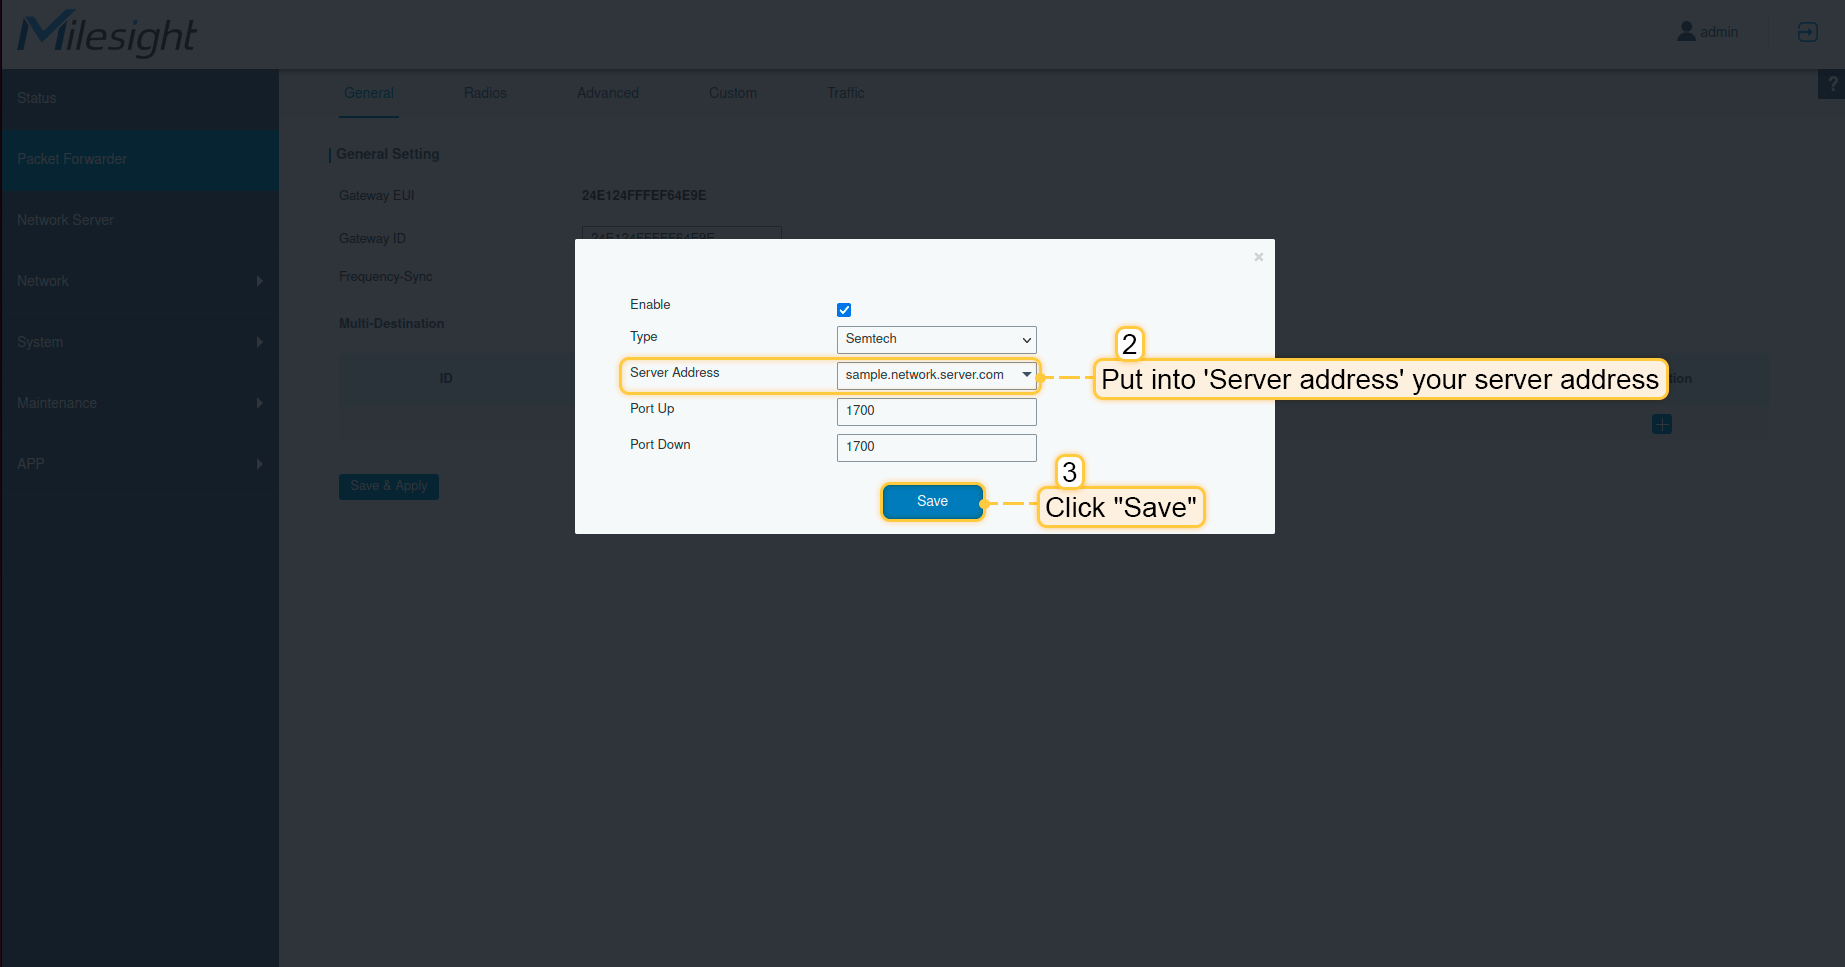 在“服务器地址”中填入您的服务器地址,我们的示例为 sample.network.server.com。点击“保存”按钮。  点击“保存并应用”按钮。 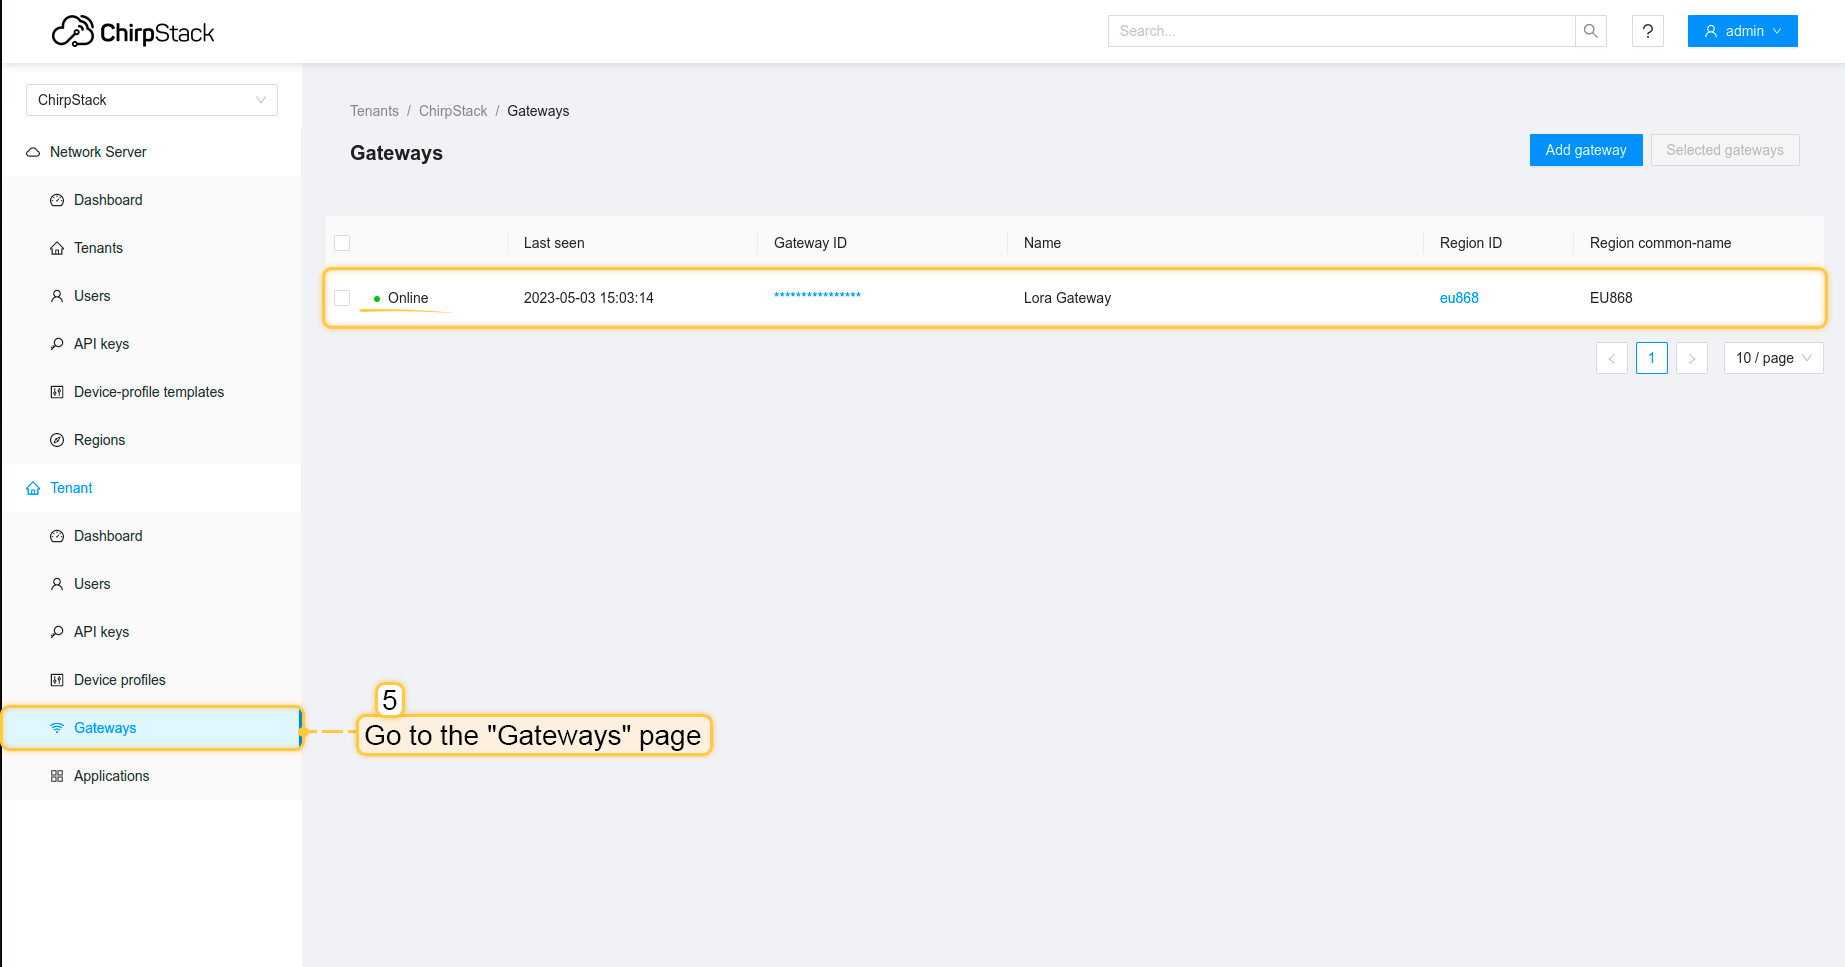 现在可以在ChirpStack上检查网关状态,应显示为在线。 至此,网关已能够向网络服务器发送数据。 在ChirpStack上配置应用现在需要在ChirpStack上配置应用。请按以下步骤操作:
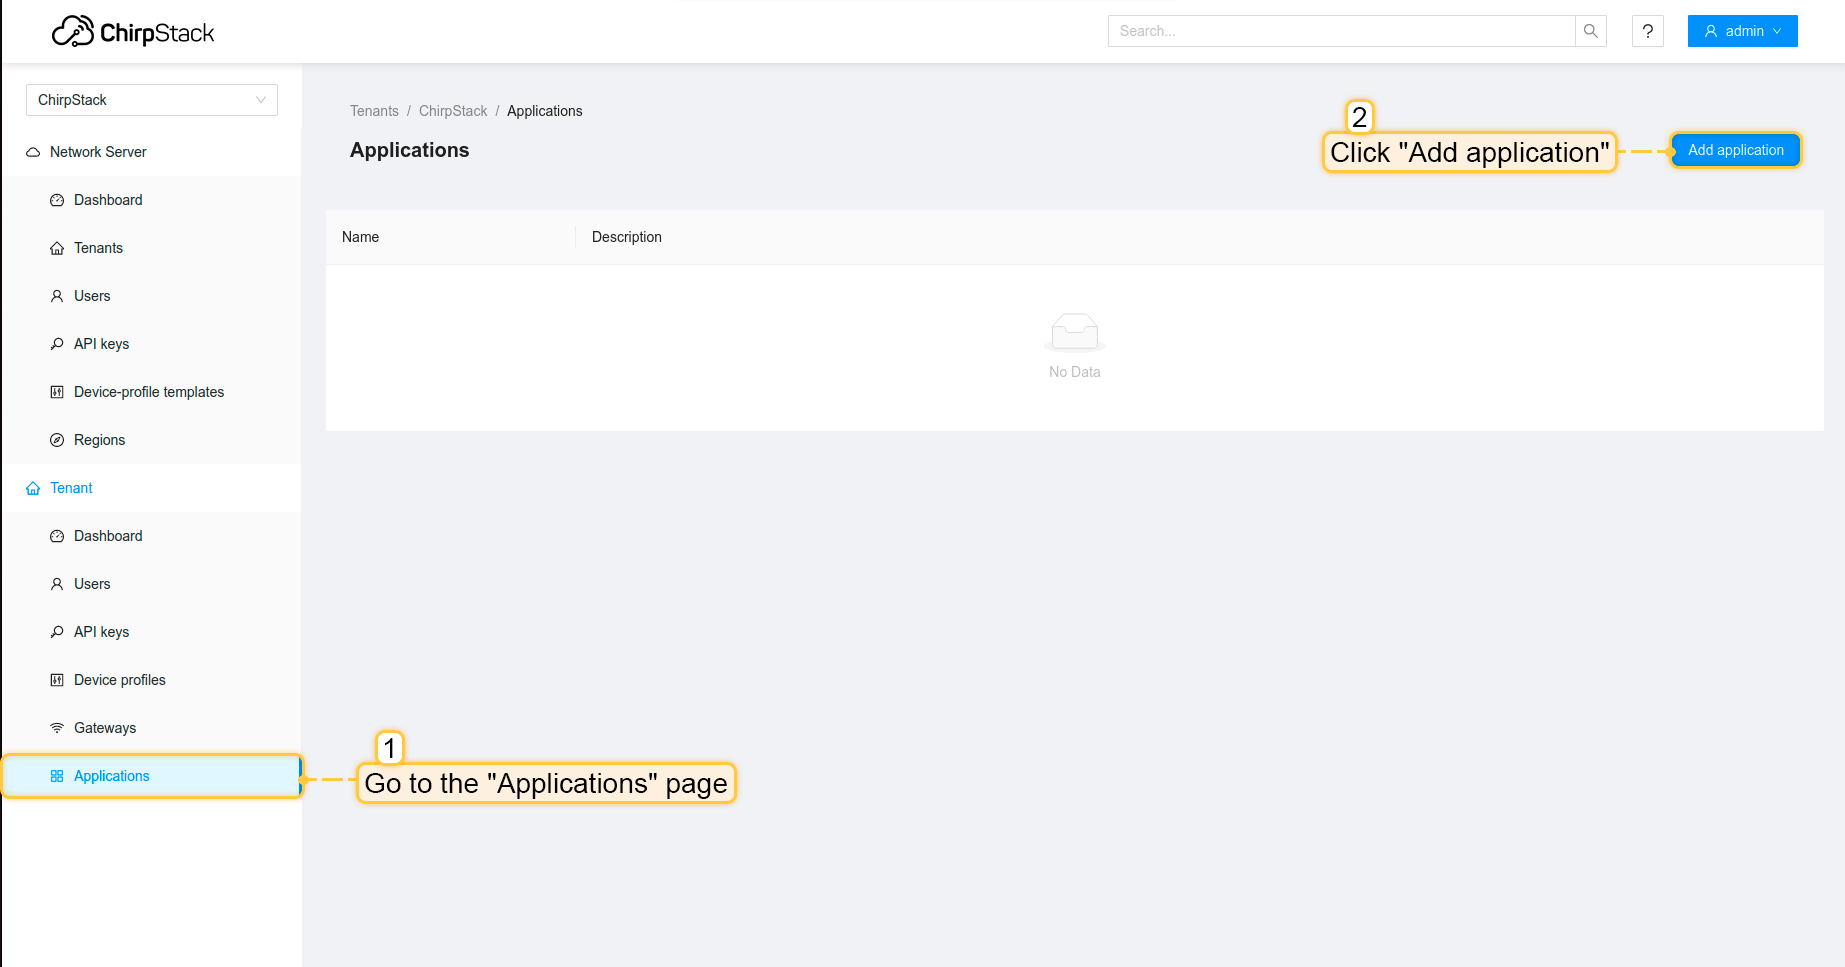 在左侧菜单中进入“应用”页面,点击“添加应用”按钮。 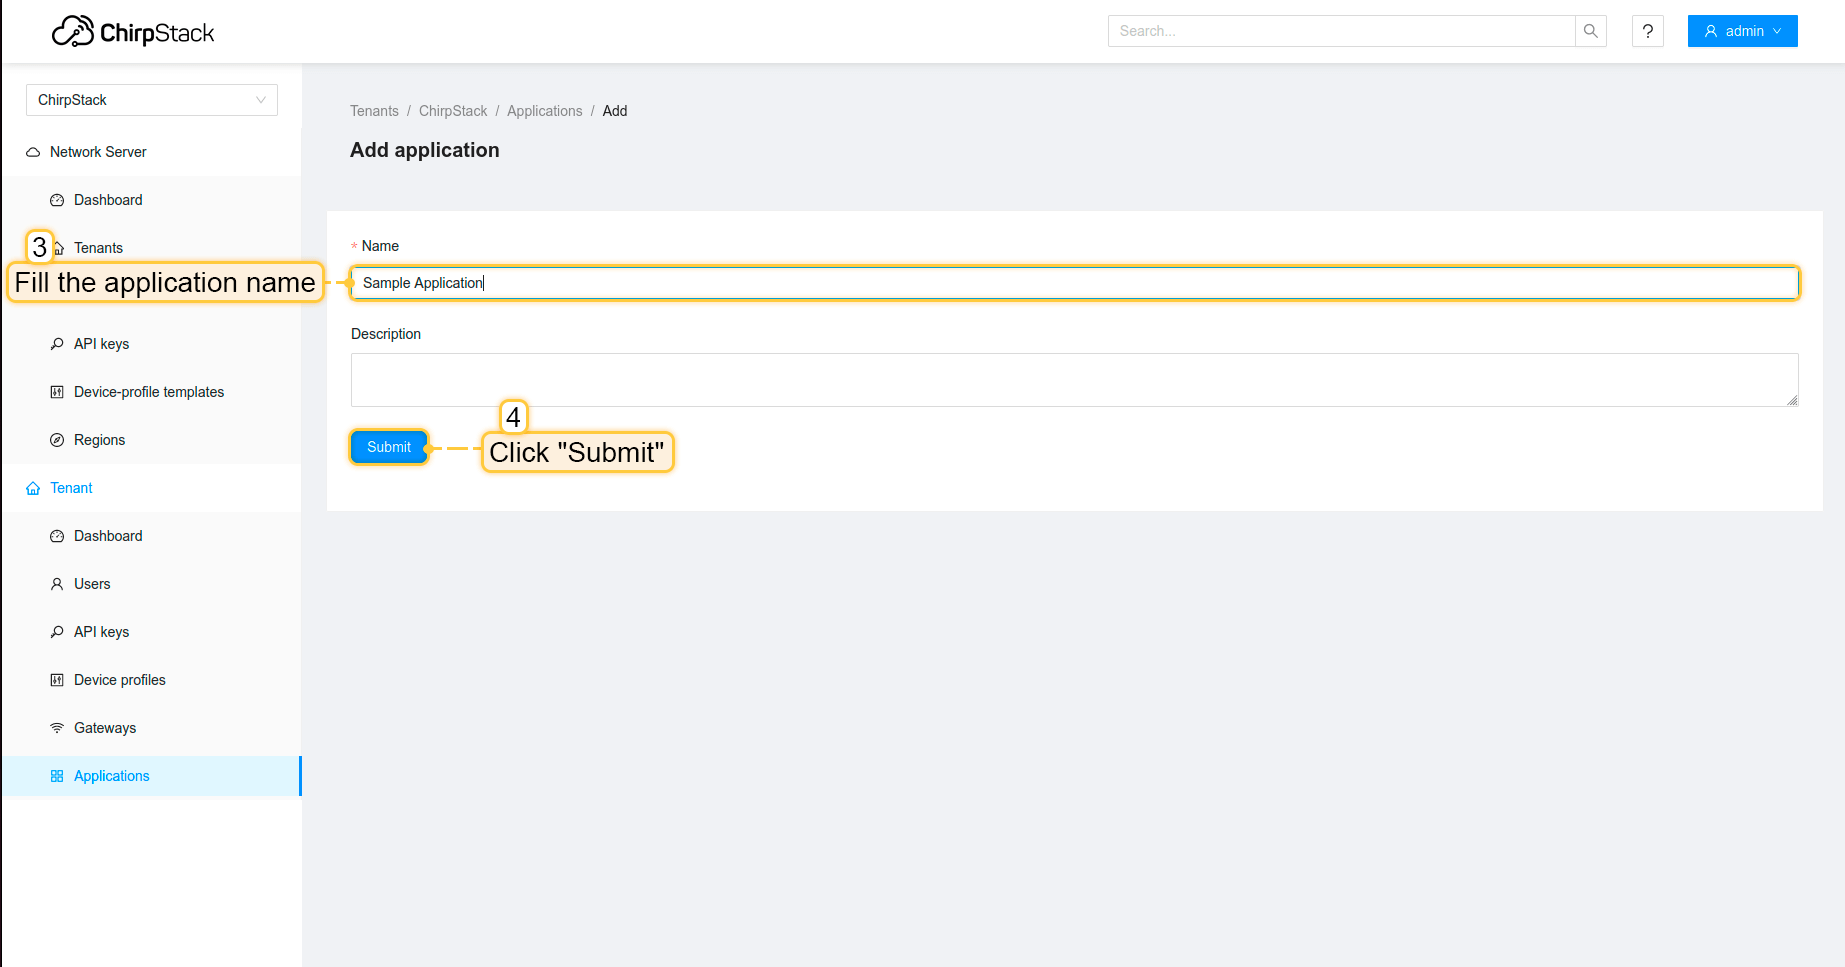 填写应用名称并点击“提交”按钮。 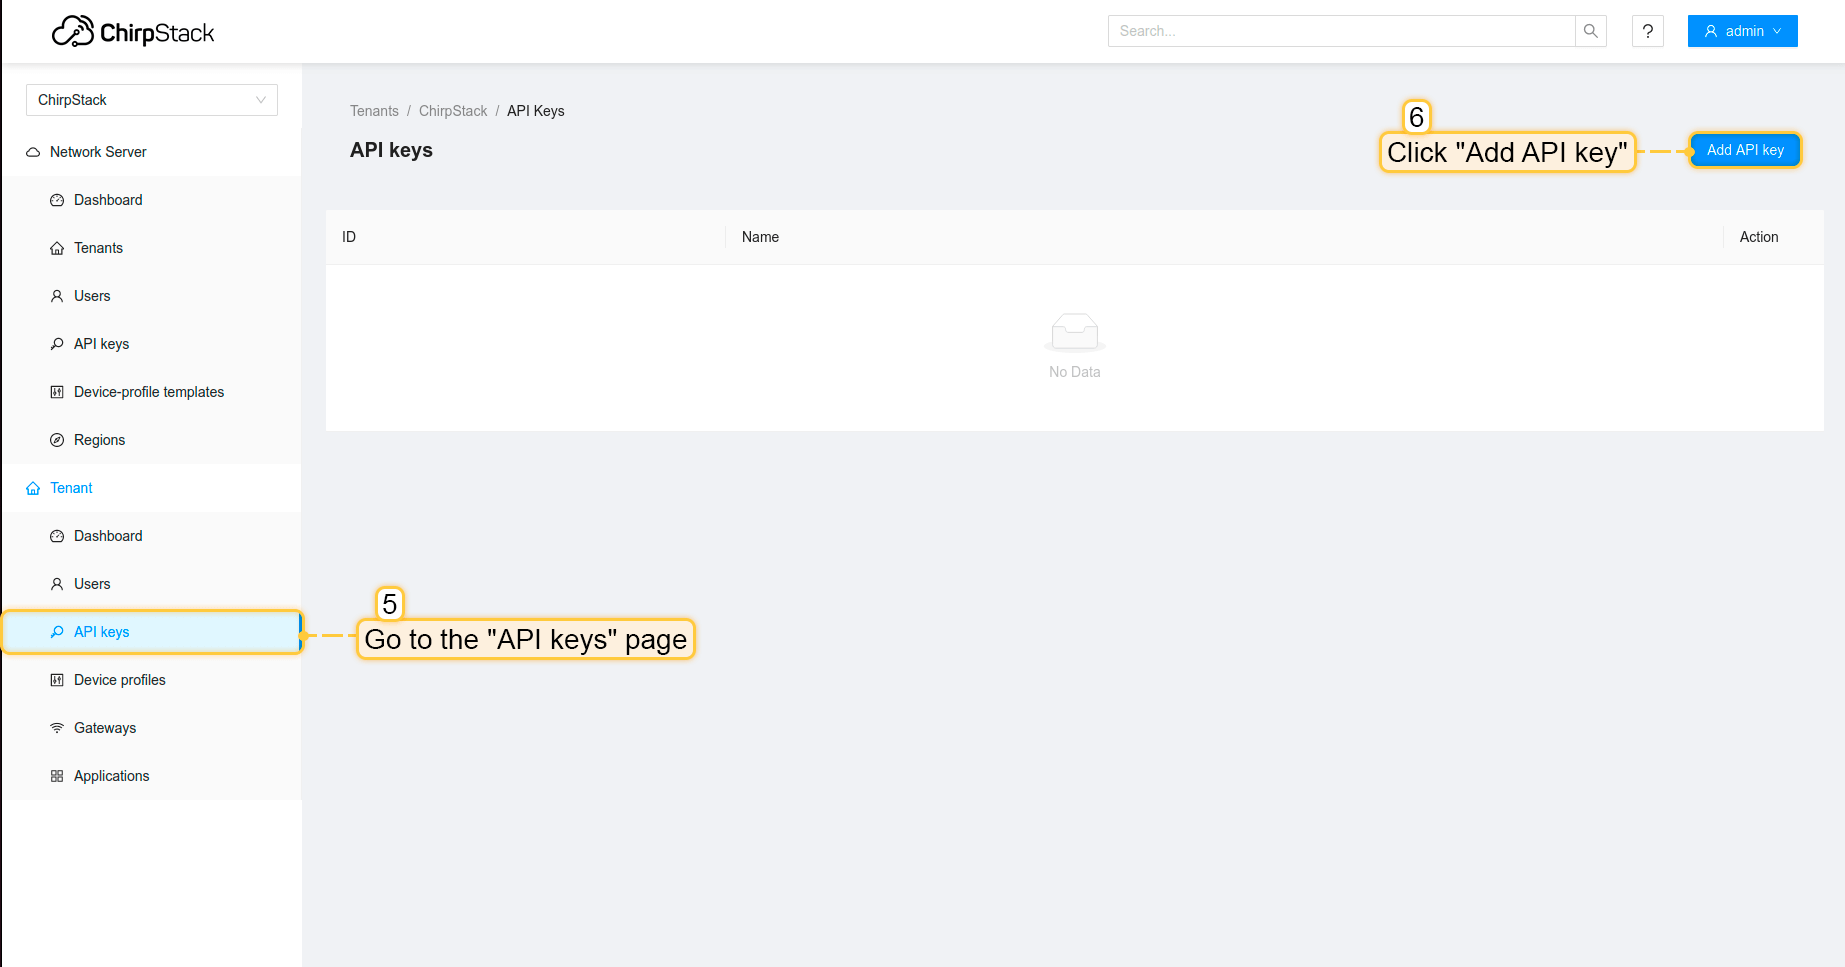 在左侧菜单中进入 API密钥 页面,点击“添加API密钥”按钮。 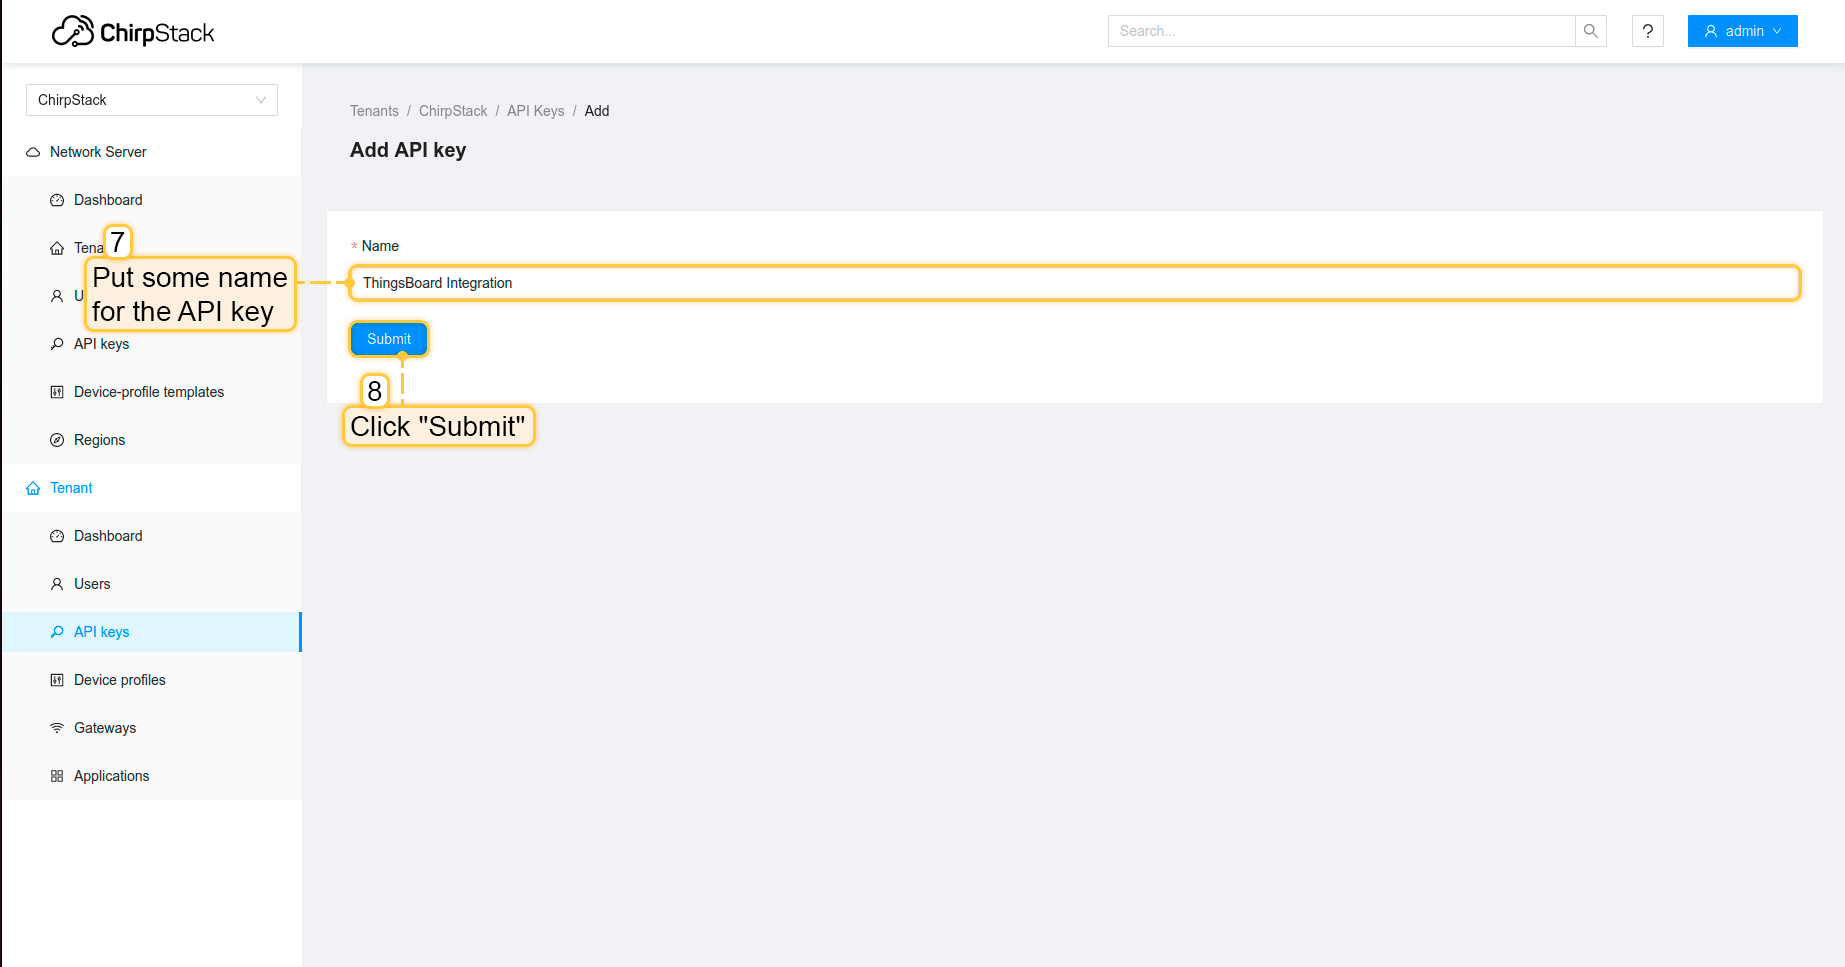 为API密钥设置名称并点击“提交”按钮。 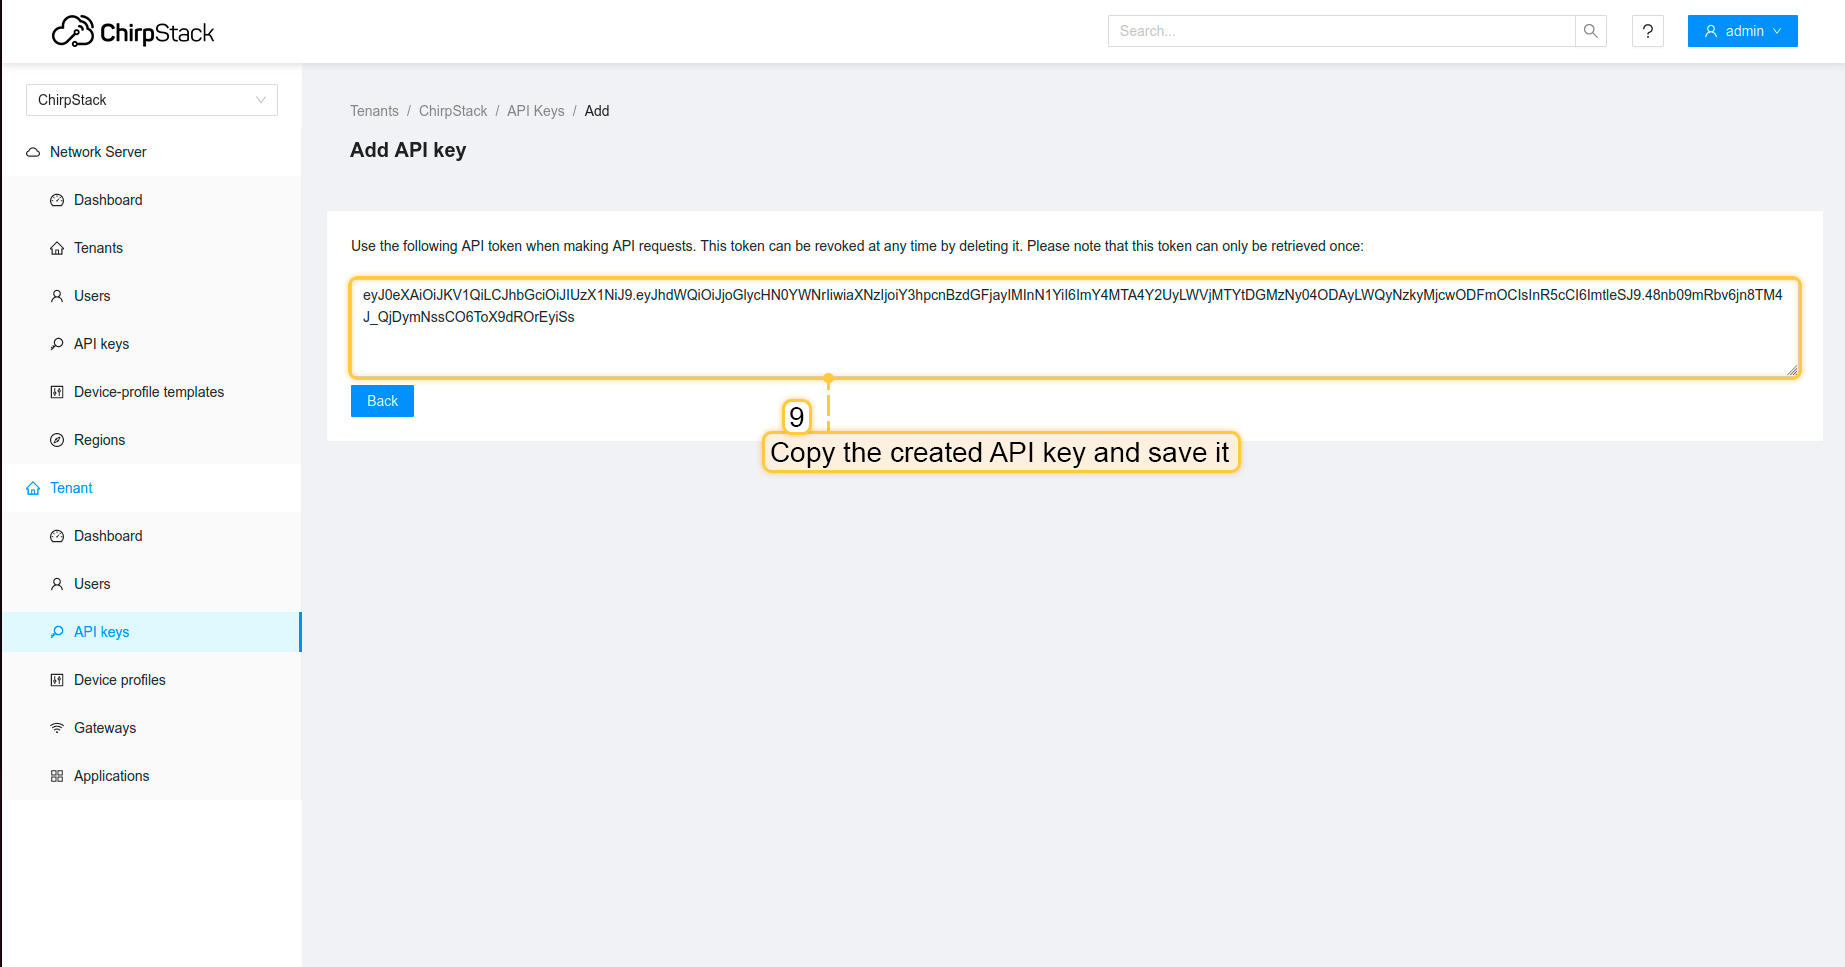 复制创建的API密钥并保存,稍后在ThingsBoard上配置集成时需要用到。 现在可以前往ThingsBoard配置集成。 在ThingsBoard中创建集成接下来,我们将在ThingsBoard中创建与ChirpStack的集成,并在ChirpStack上配置集成。 首先,复制以下代码,创建上行数据转换器时需要用到: 请按以下步骤添加集成:
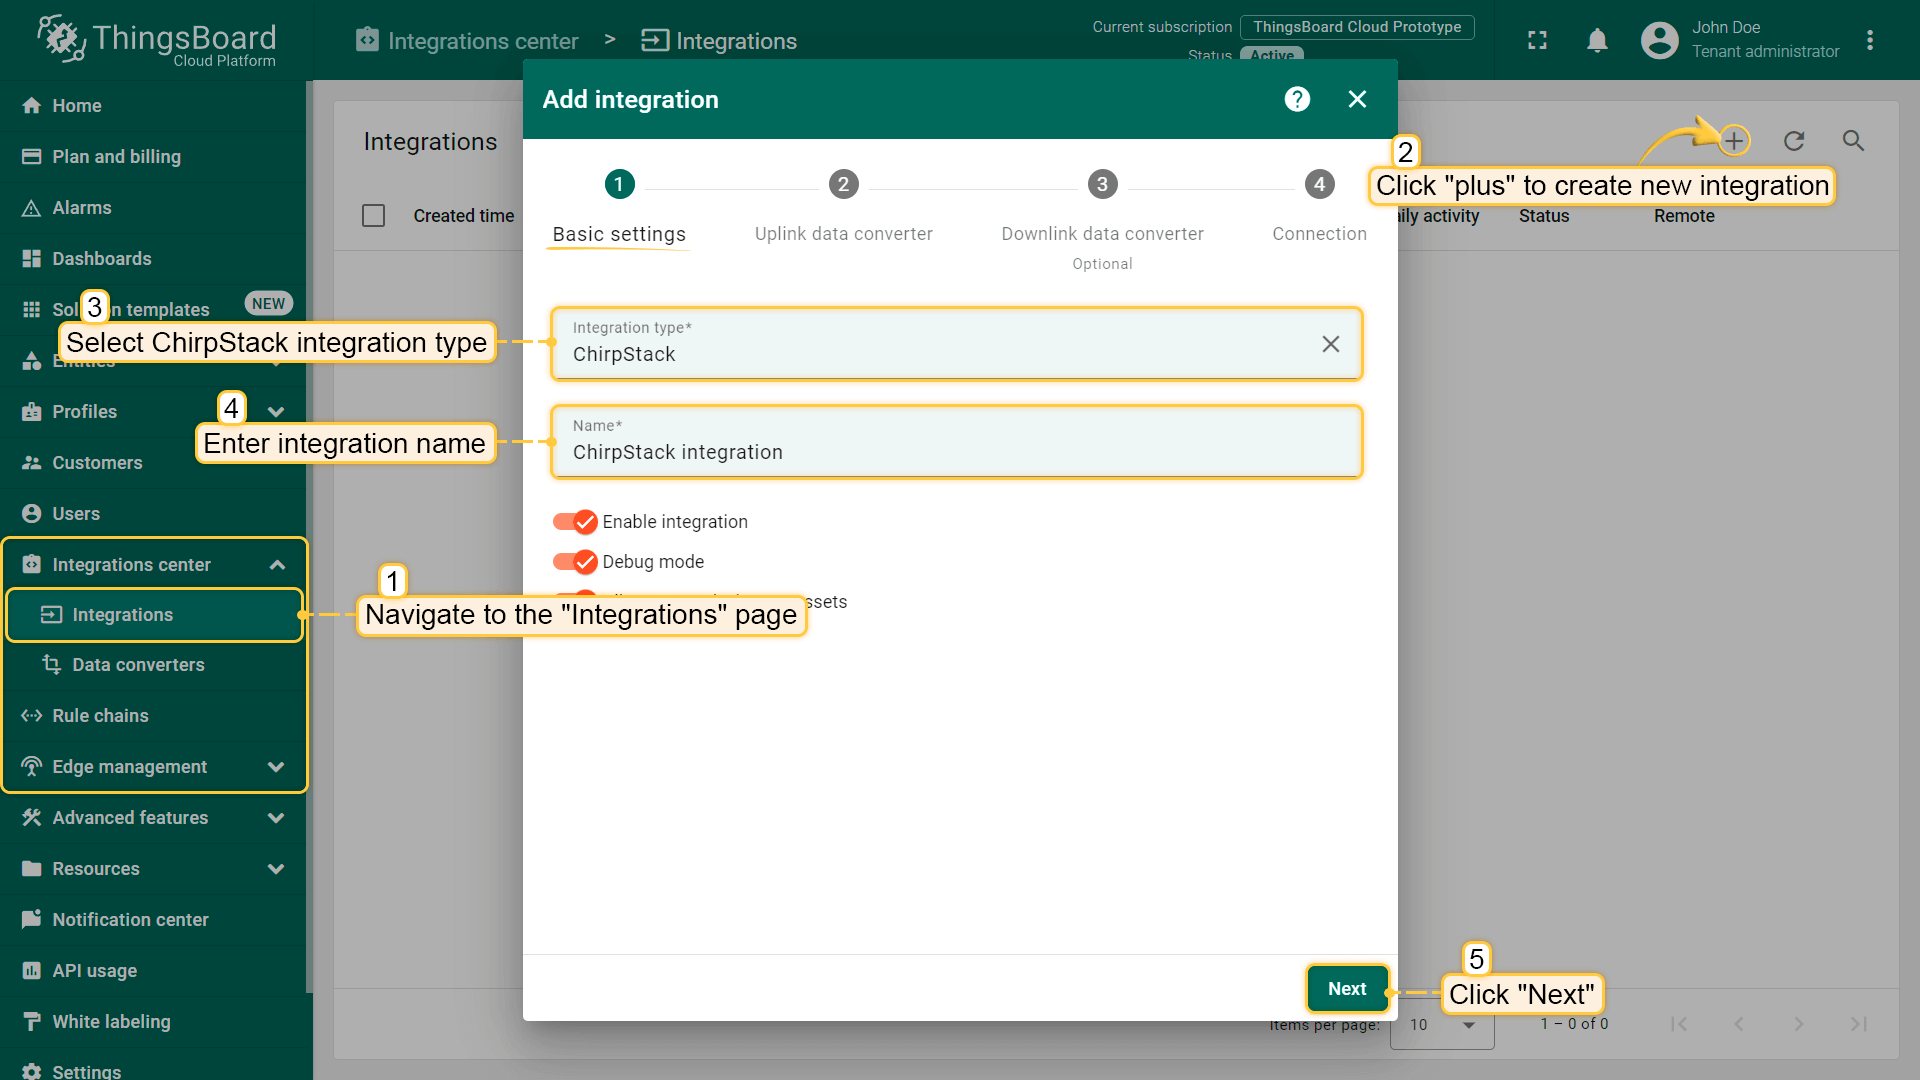 进入“集成中心”部分的“集成”页面,点击“加号”按钮添加新集成。选择类型“Chirpstack”。然后点击“下一步”。  将先前复制的脚本粘贴到解码器函数区域。点击“下一步”。 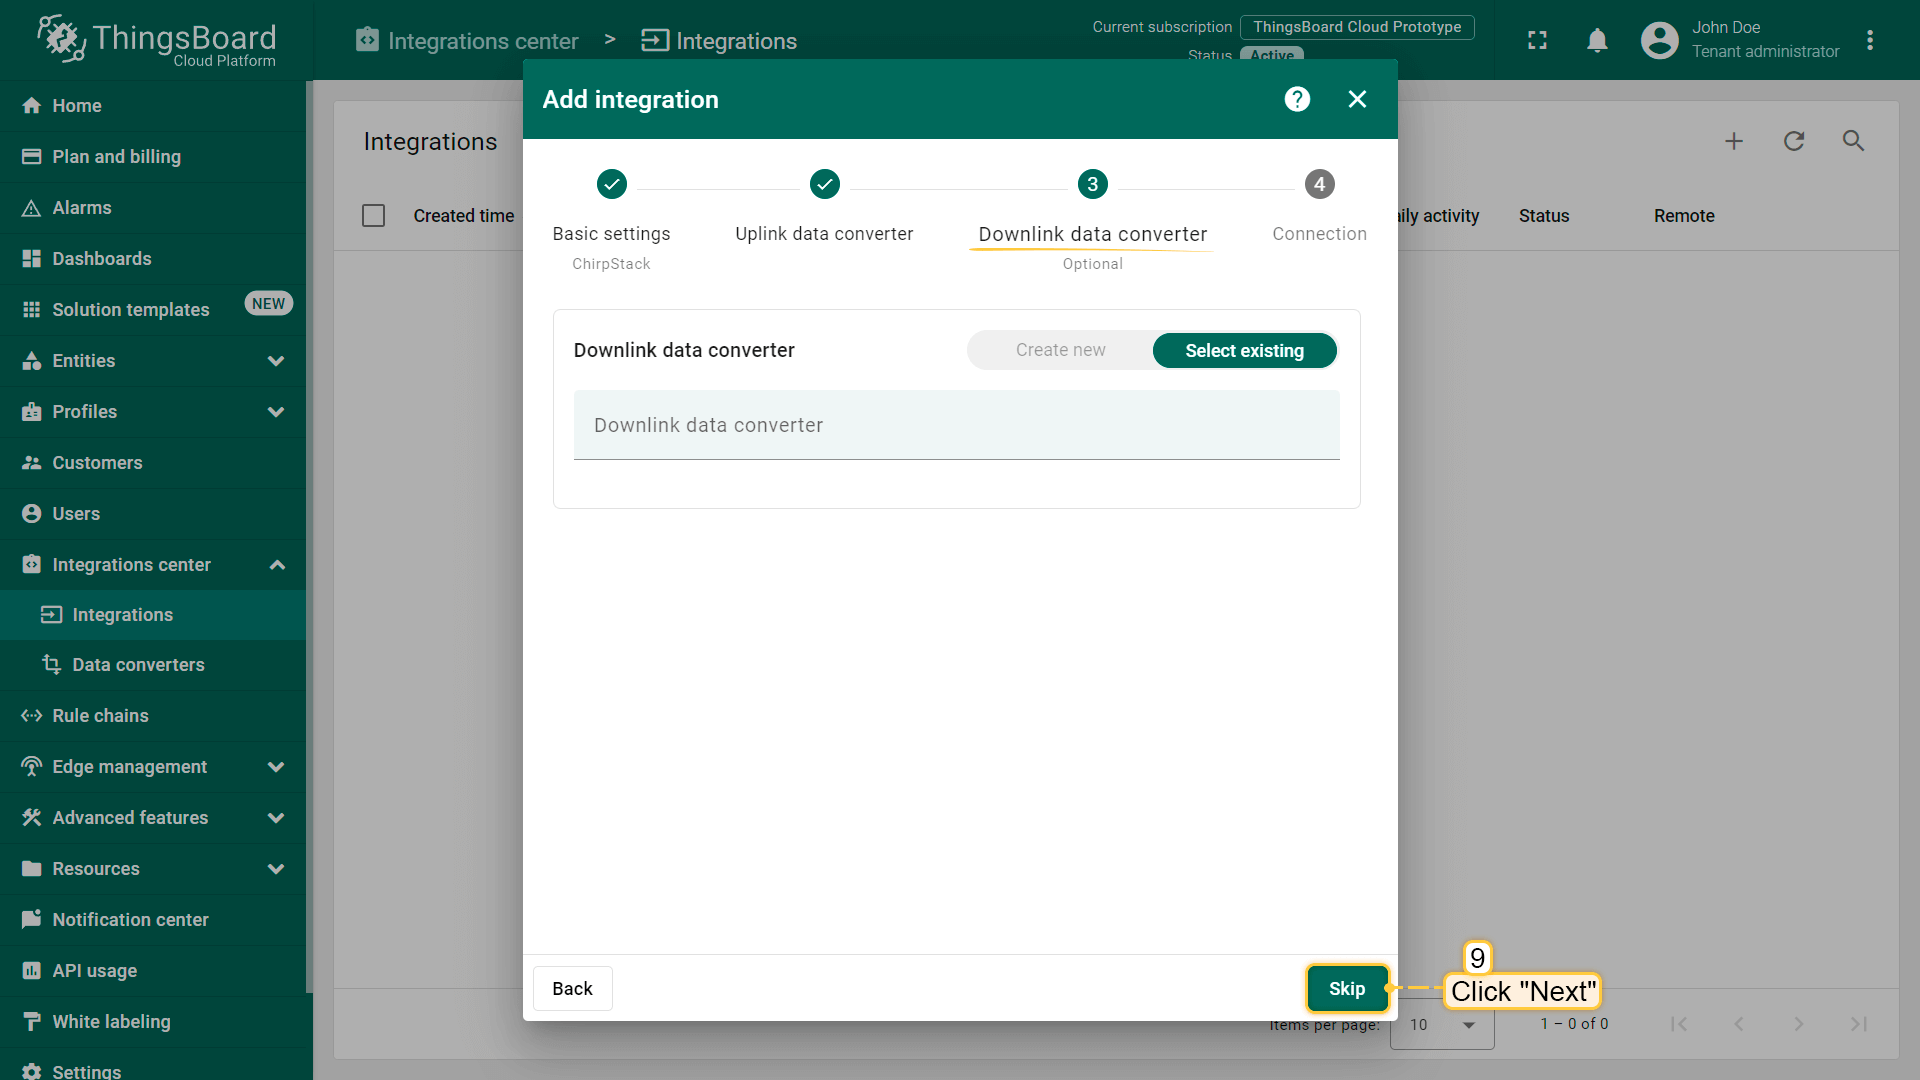 将“下行数据转换器”字段留空。点击“跳过”按钮。 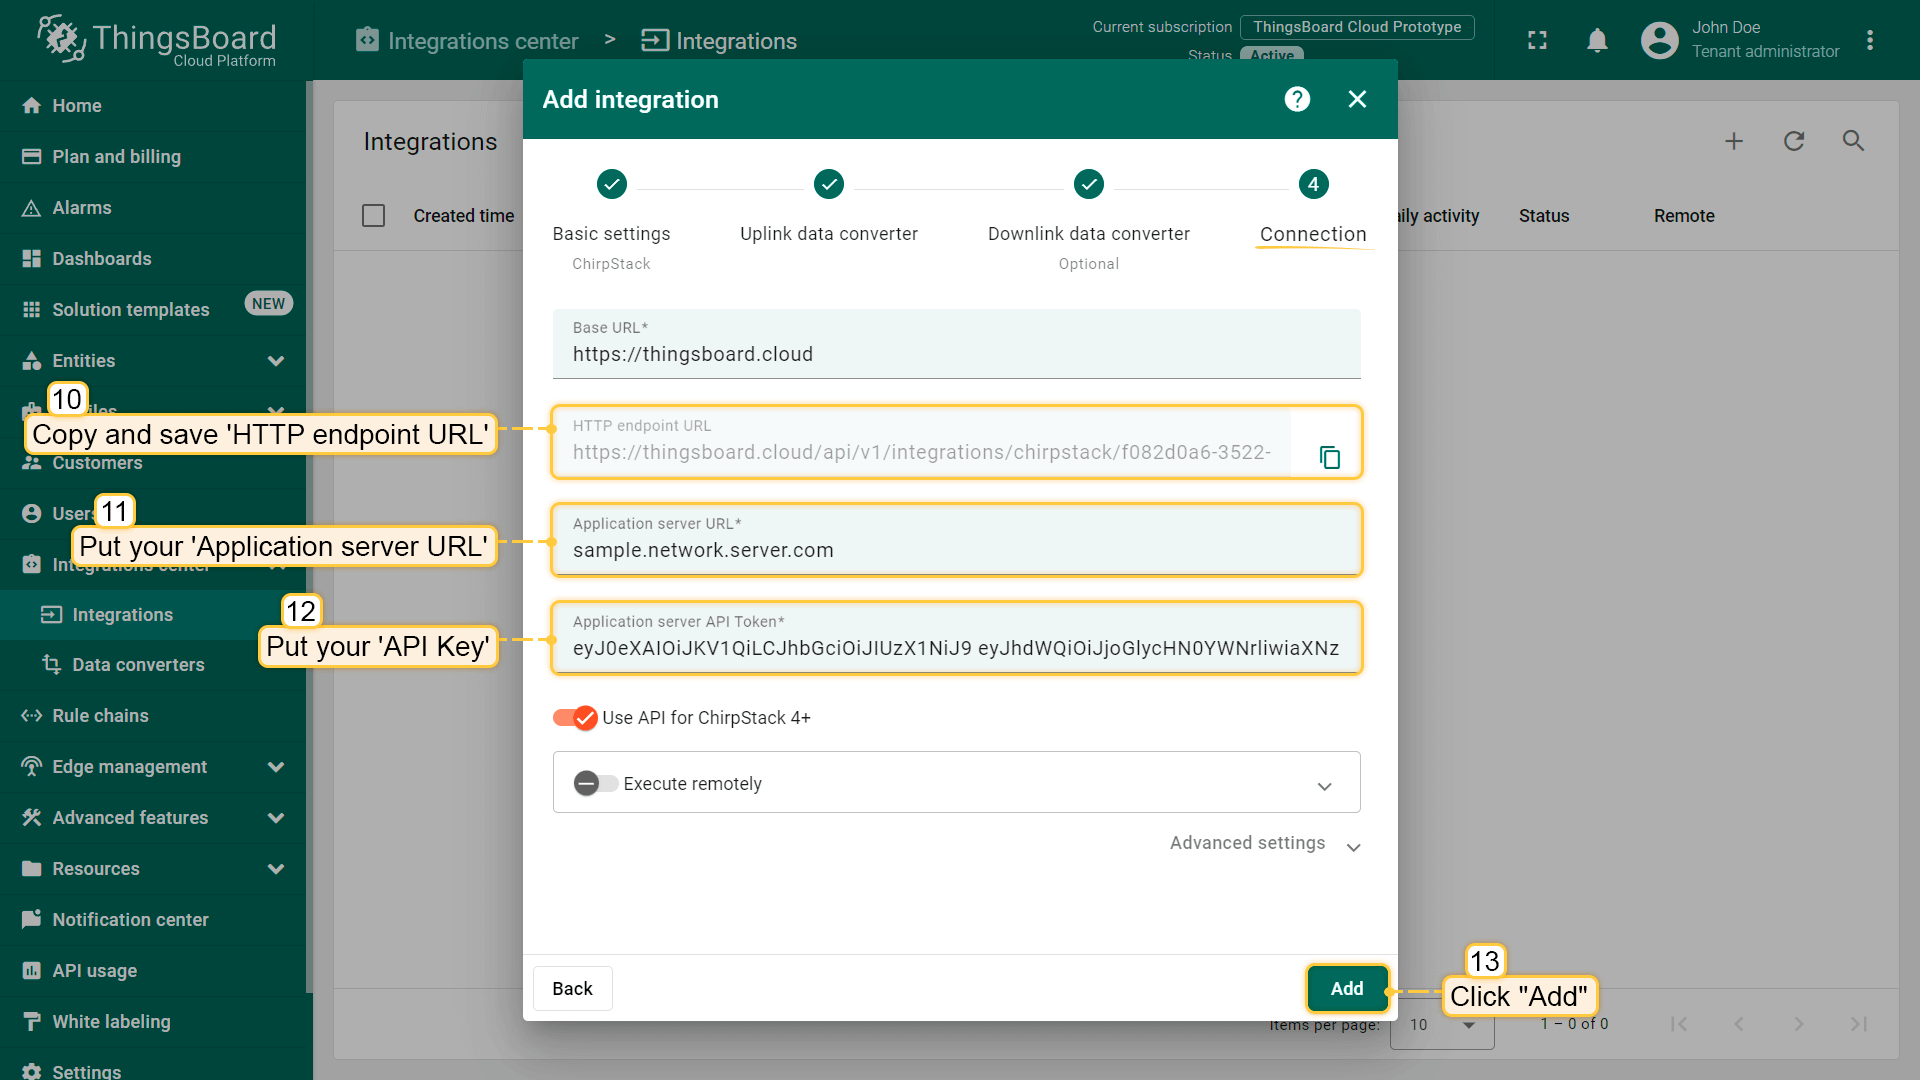 填入ChirpStack的“应用服务器URL”和“API密钥”,并复制“HTTP端点URL”。点击“添加”按钮。 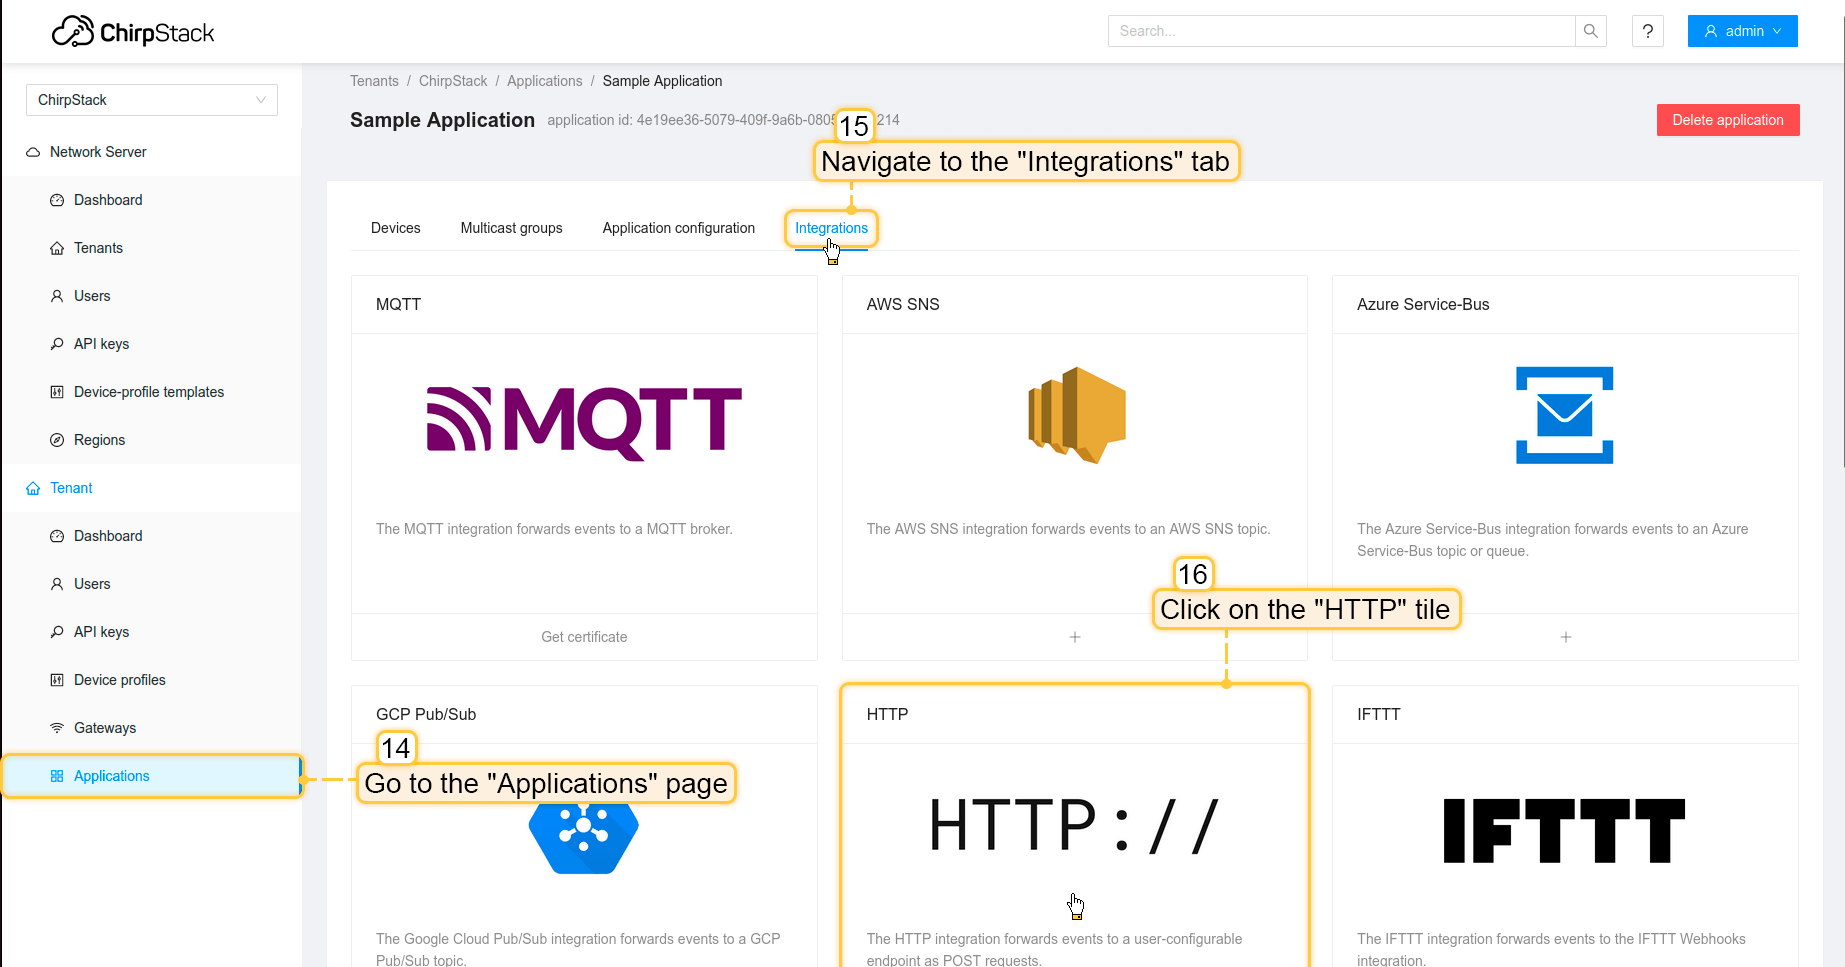 现在打开ChirpStack,进入“应用”页面 -> 您的应用 ->“集成”选项卡,找到并点击 HTTP 磁贴。 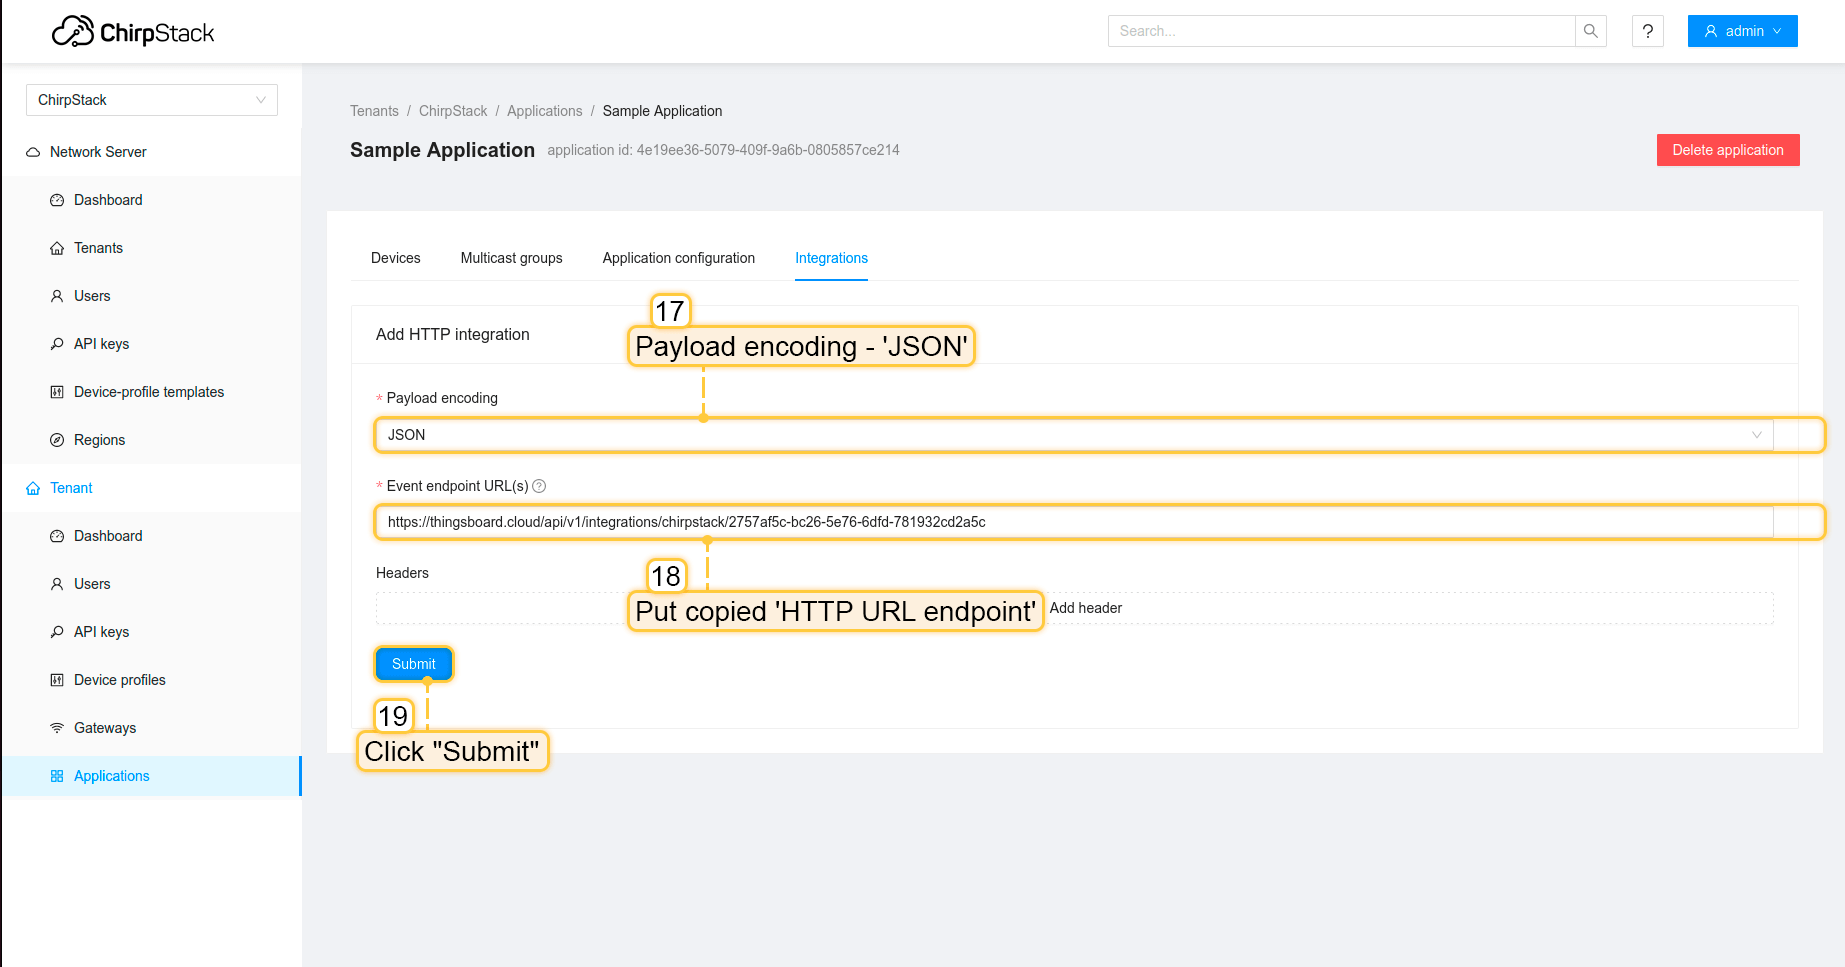 将“HTTP URL端点”填入“Event Endpoint URL(s)”字段,点击“提交”按钮。 集成已创建。
若看到 STARTED 事件且状态为 Success,则表示集成已成功启动,可以接收消息。
|
在The Things Stack社区版上添加网关我们需要在 The Things Stack社区版 上添加网关。 要添加网关,请按以下步骤操作:
 登录云端并打开控制台。 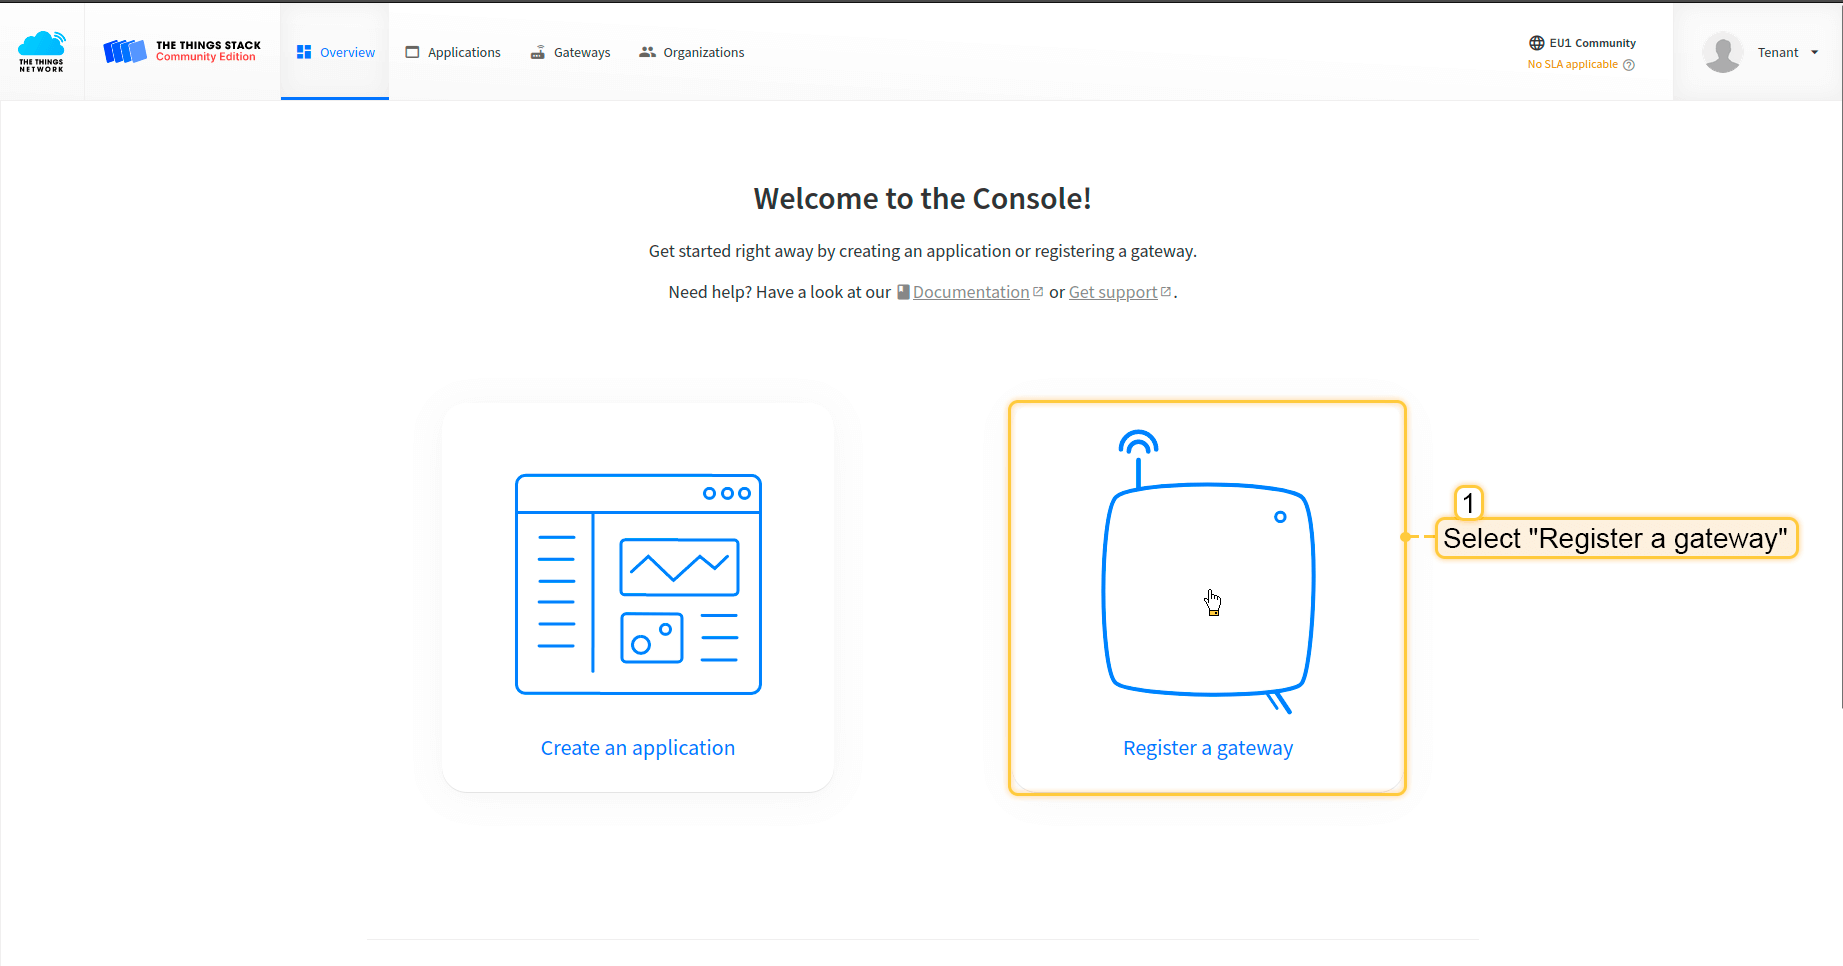 选择“注册网关”。 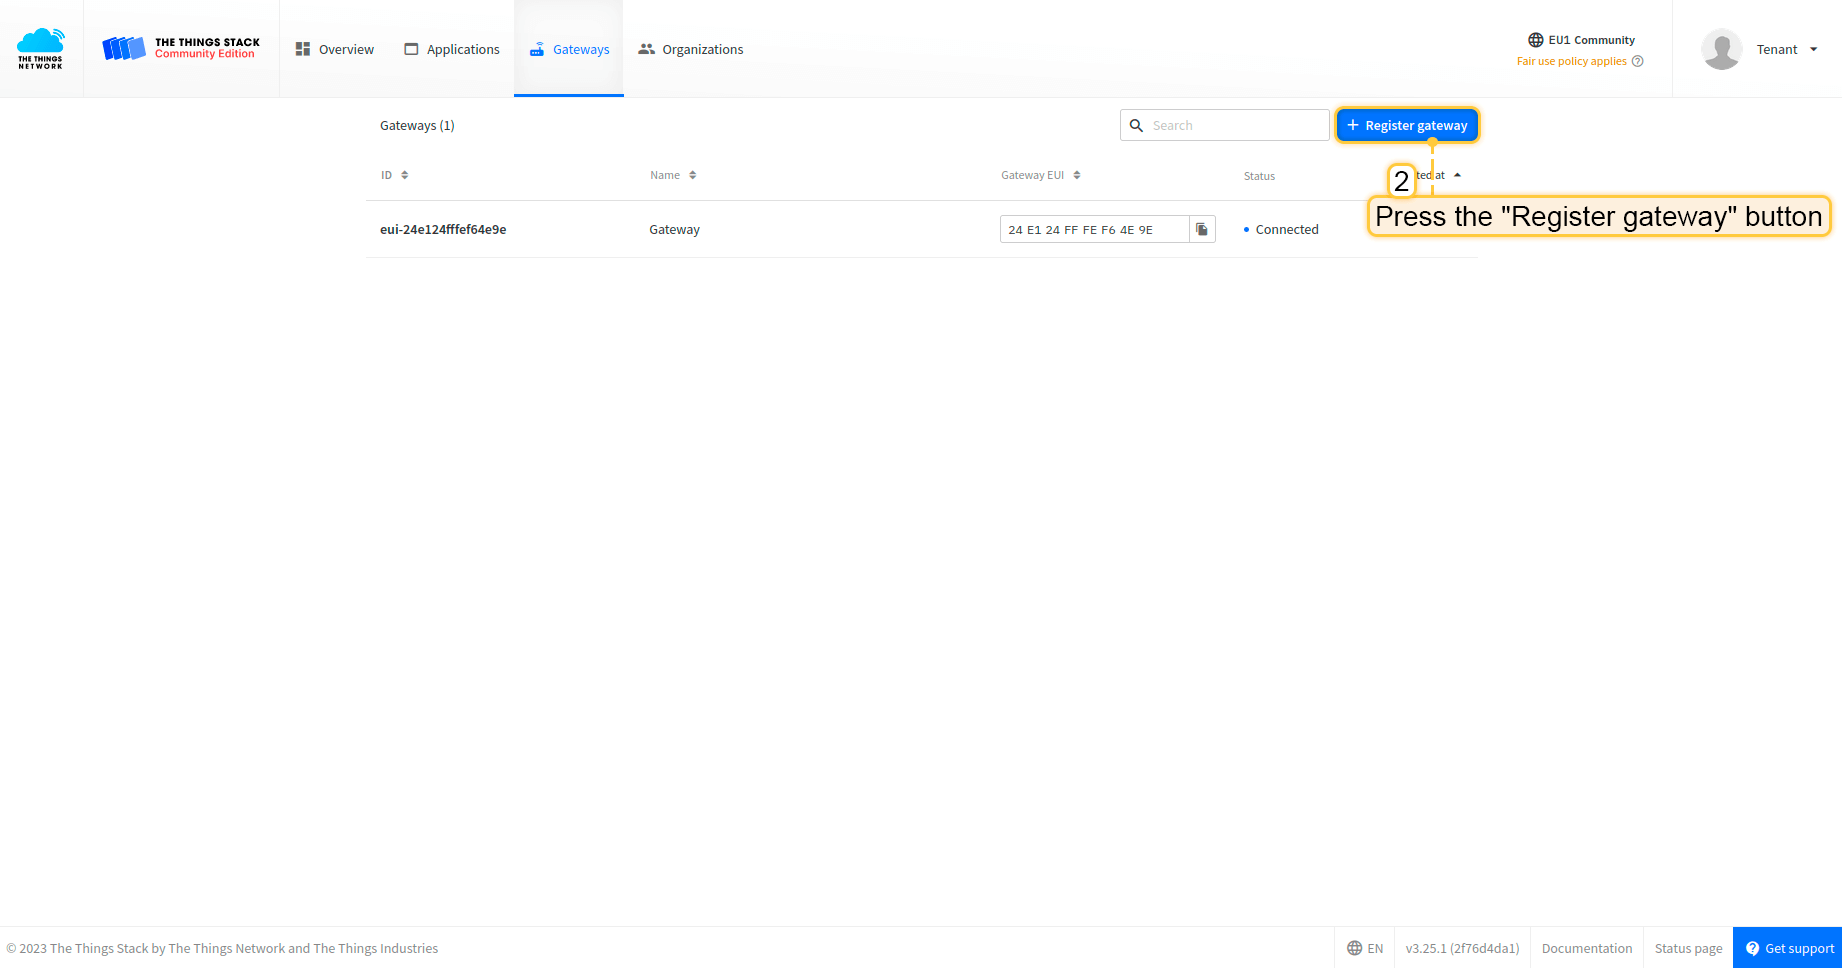 点击“注册网关”按钮。 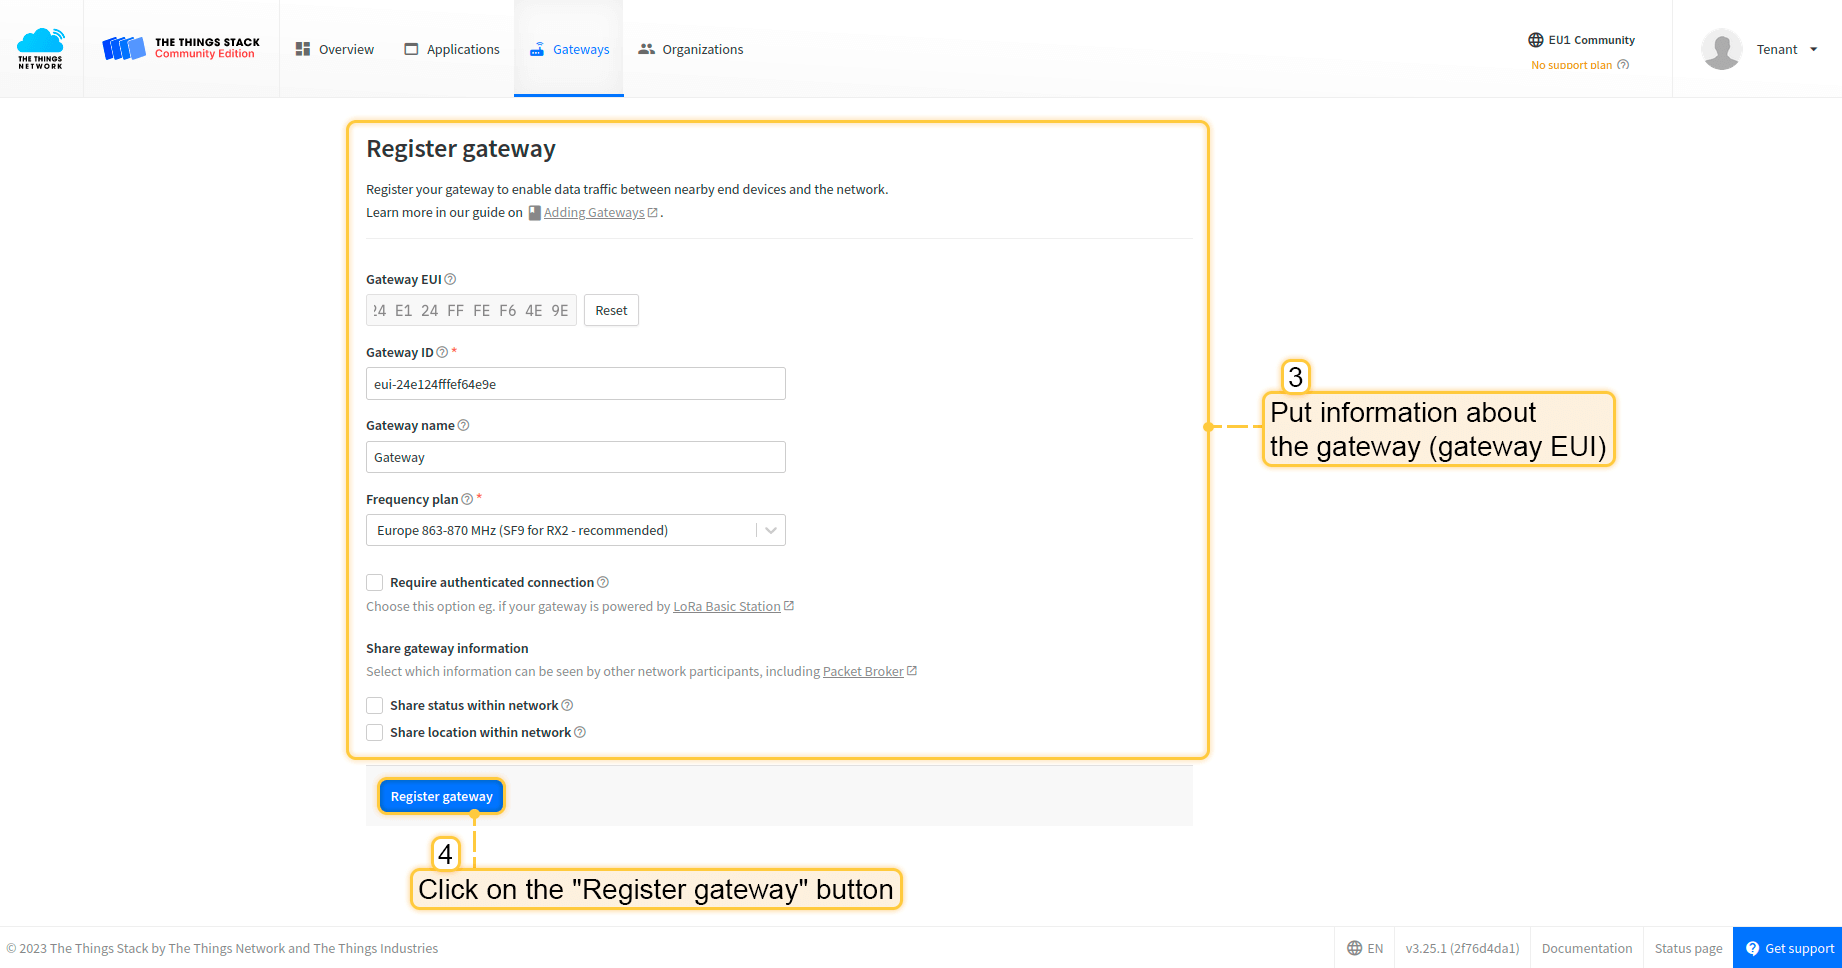 填写网关信息(网关EUI)并点击“注册网关”按钮。 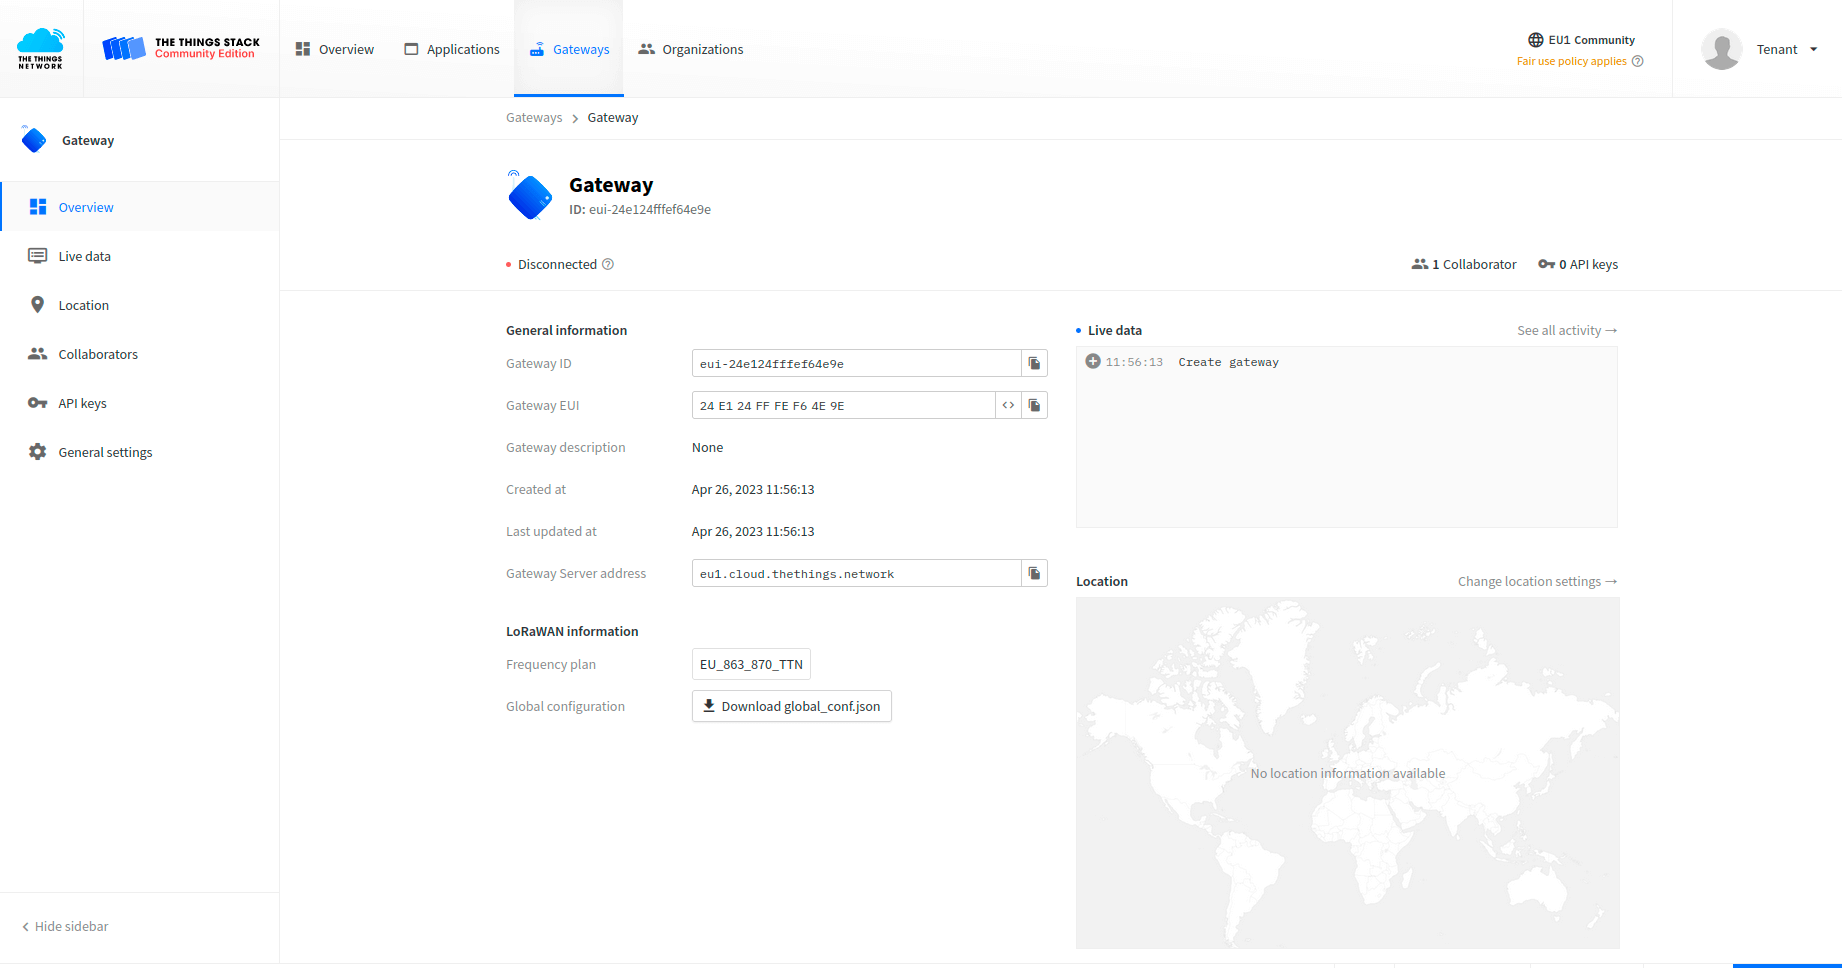 网关已添加。您可看到其状态为已断开连接。 配置网关以发送数据要将网关连接并发送数据到The Things Stack社区版,需要配置网关。 请按以下步骤操作:
打开网关控制面板。进入“Packet Forwarder”页面,点击“加号”按钮添加新转发器。 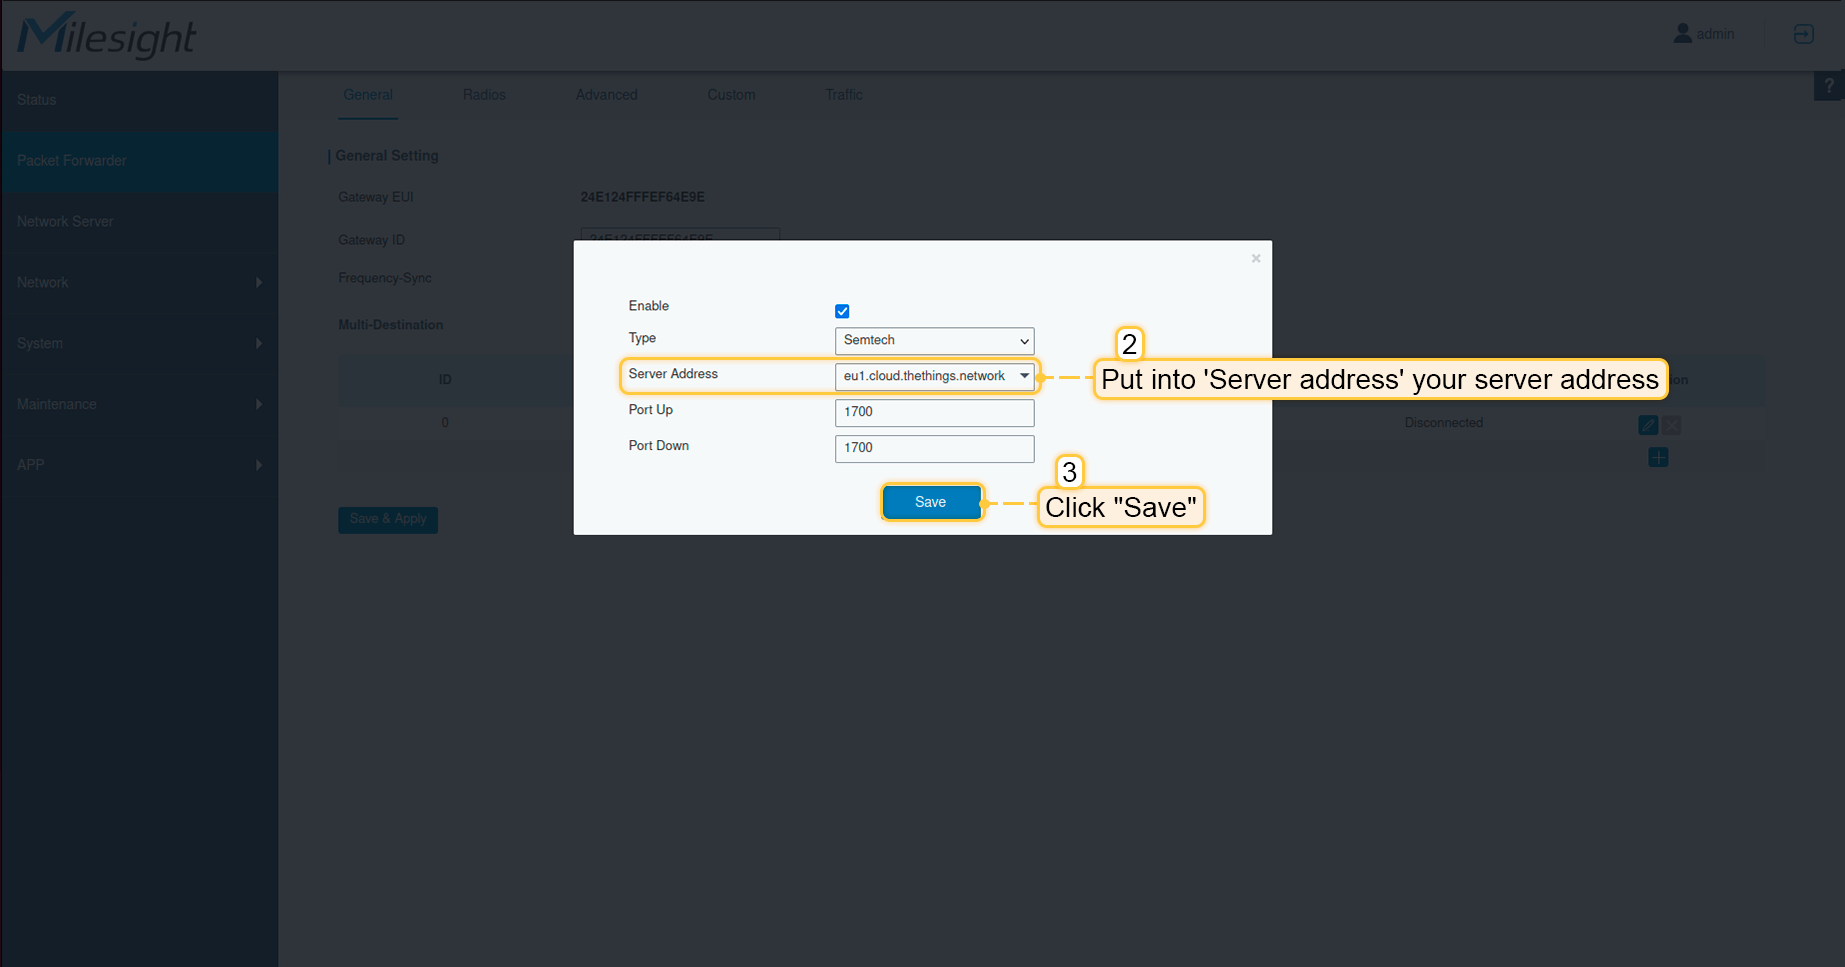 在 服务器地址 中填入您的服务器地址,我们的示例为 eu1.cloud.thethings.network。点击“保存”按钮。 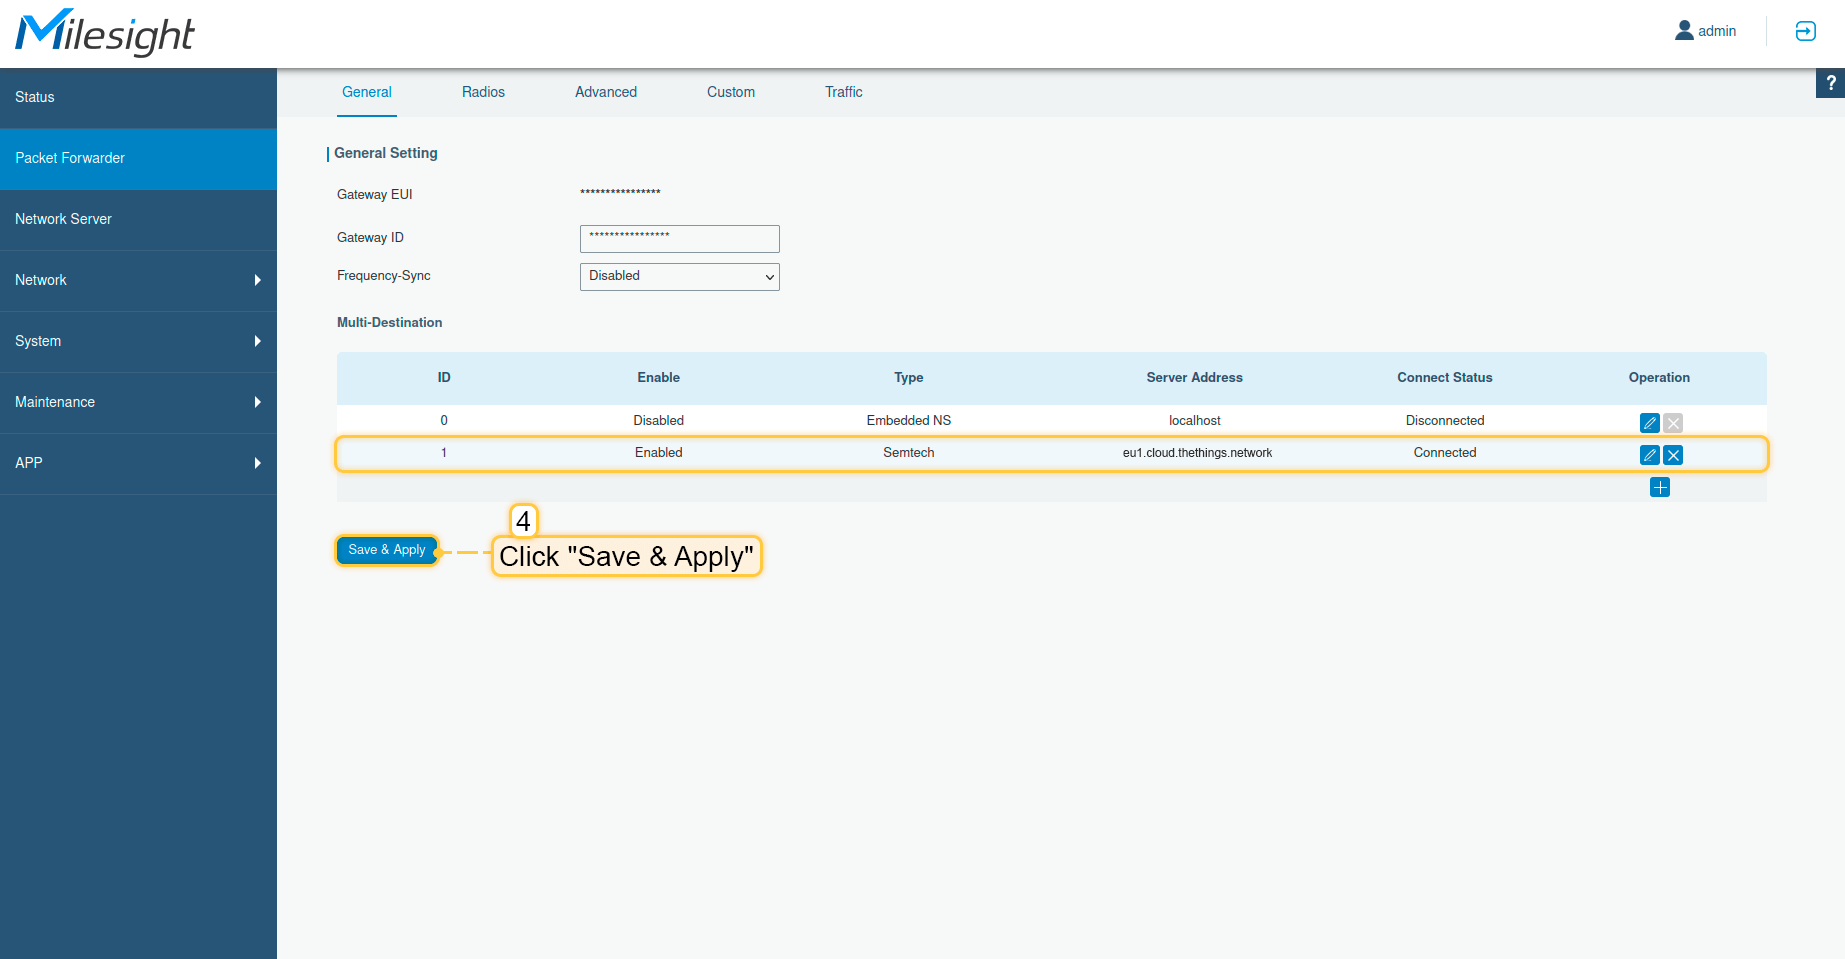 点击“保存并应用”按钮。 至此,网关已能够向网络服务器发送数据。 在The Things Stack社区版上配置应用现在需要在The Things Stack上配置应用。请按以下步骤操作:
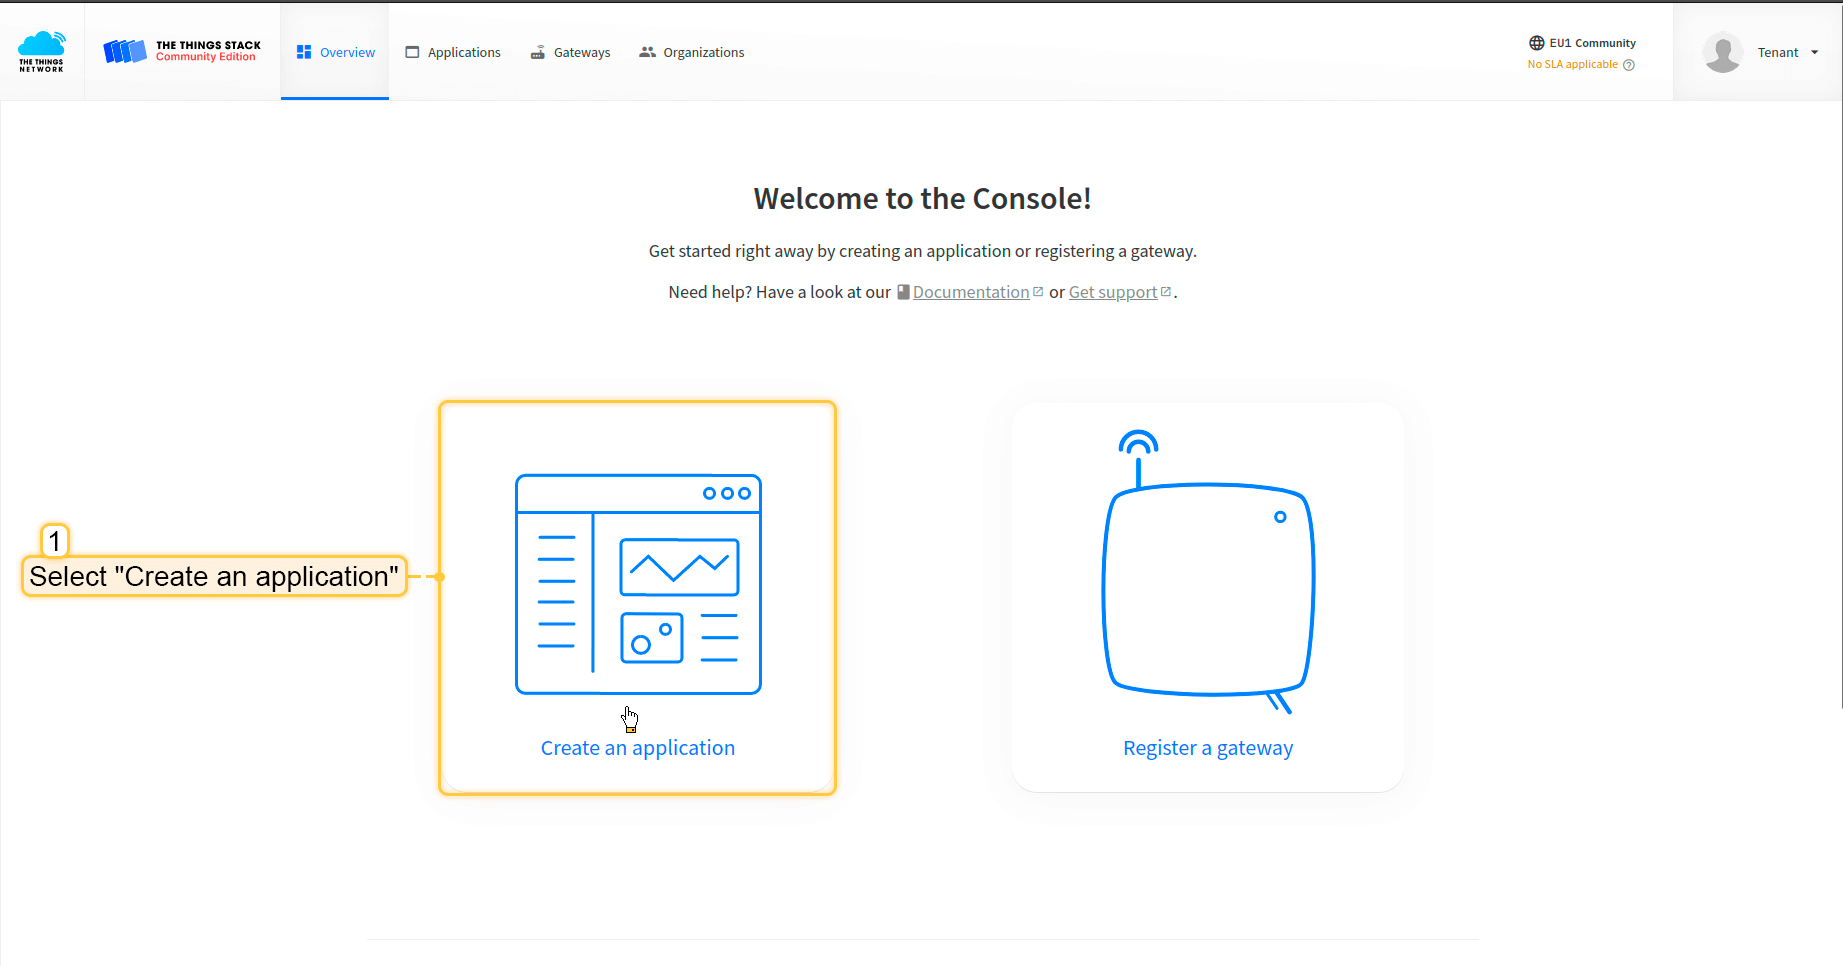 打开控制台,点击“创建应用”。 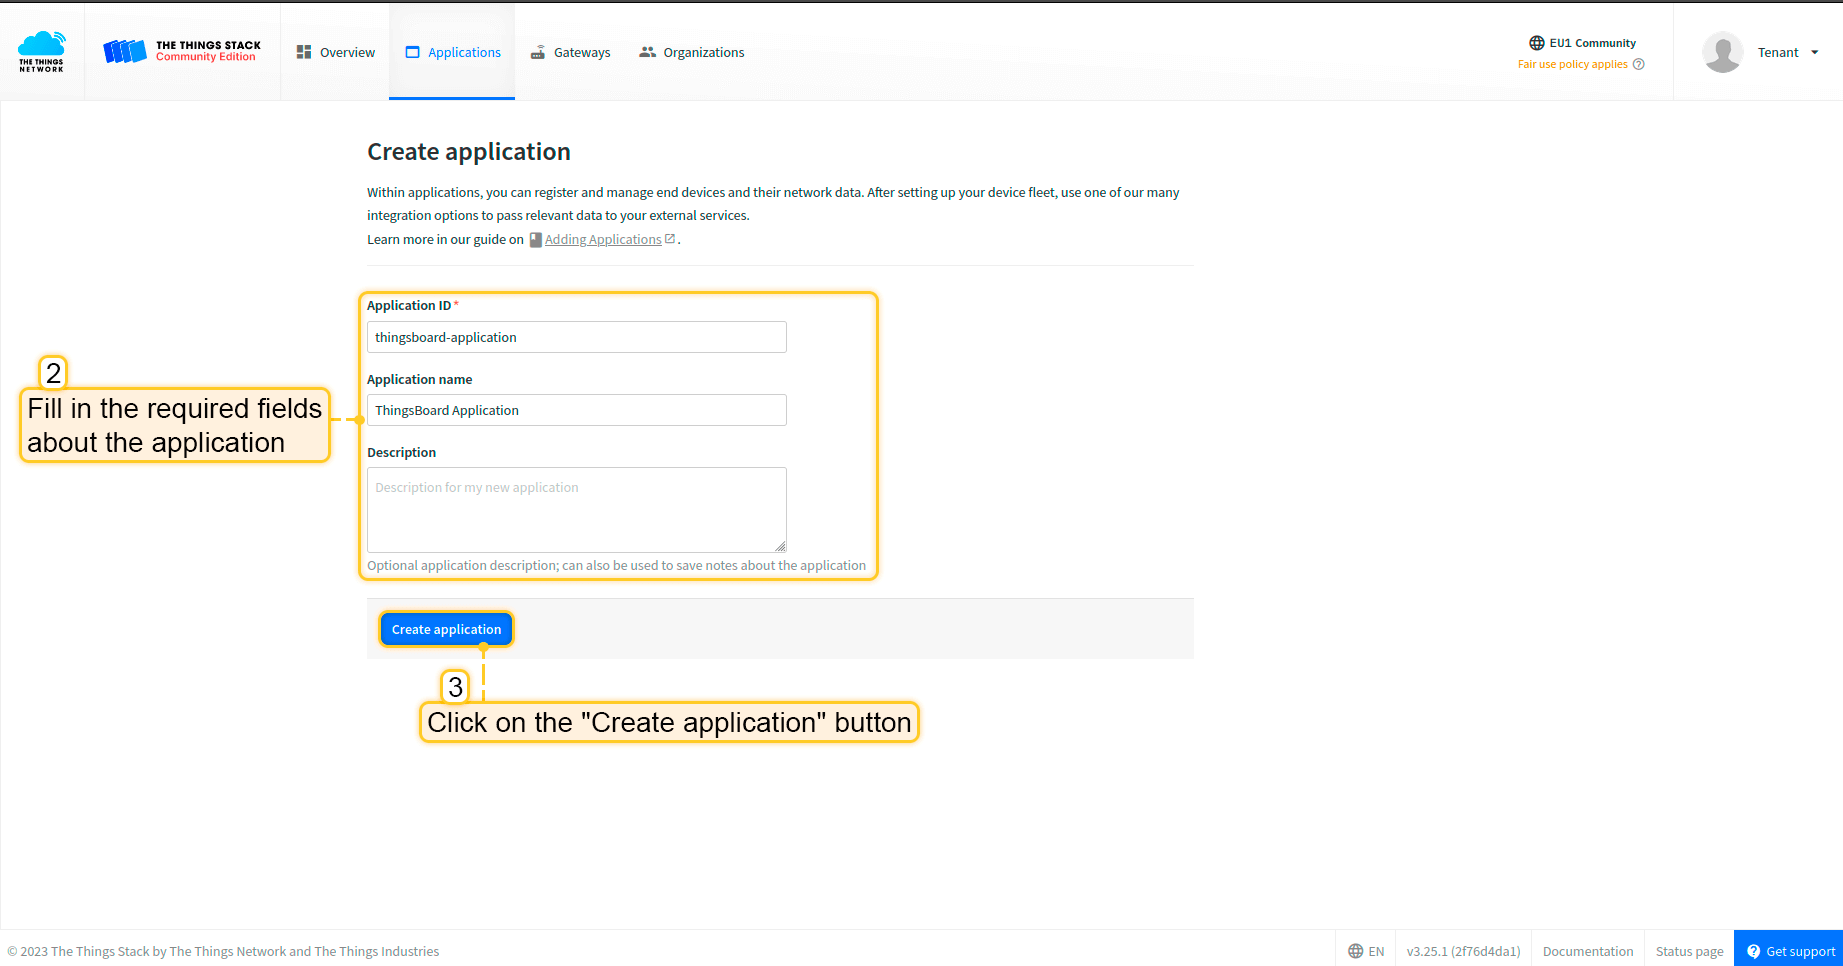 填写应用所需字段。然后点击“创建应用”按钮。 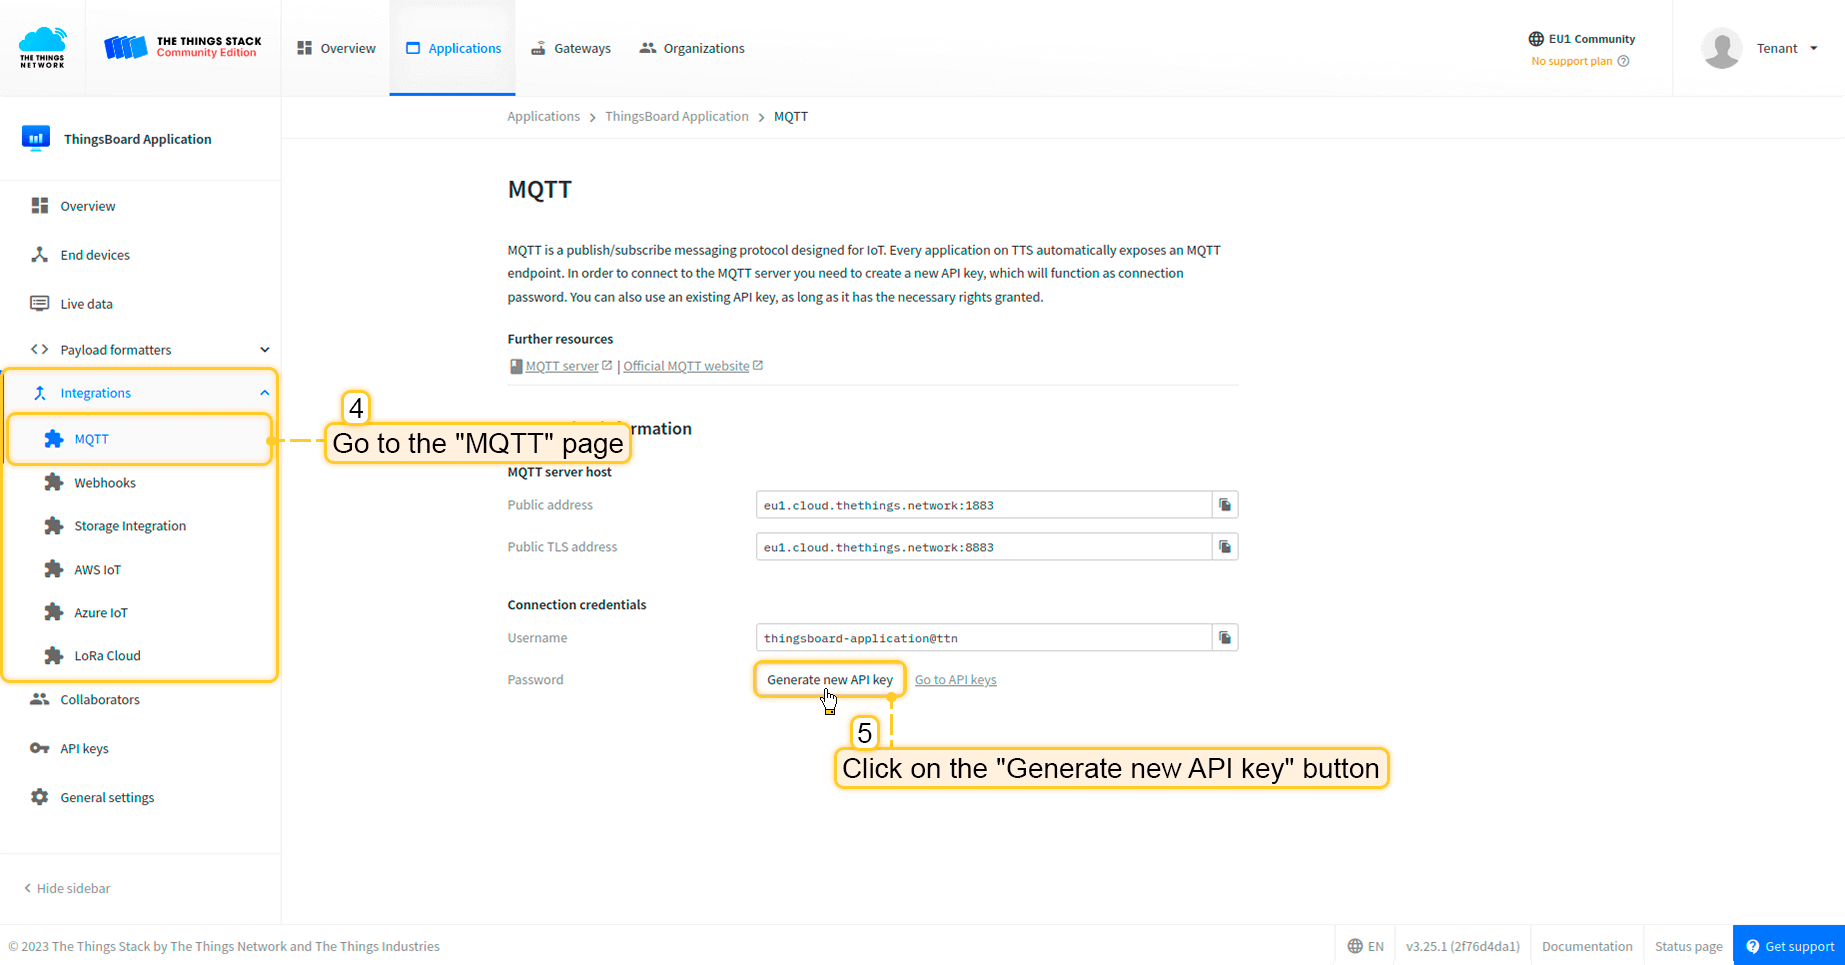 进入“集成”-> 在左侧菜单中打开“MQTT”页面。然后点击“生成新API密钥”按钮。 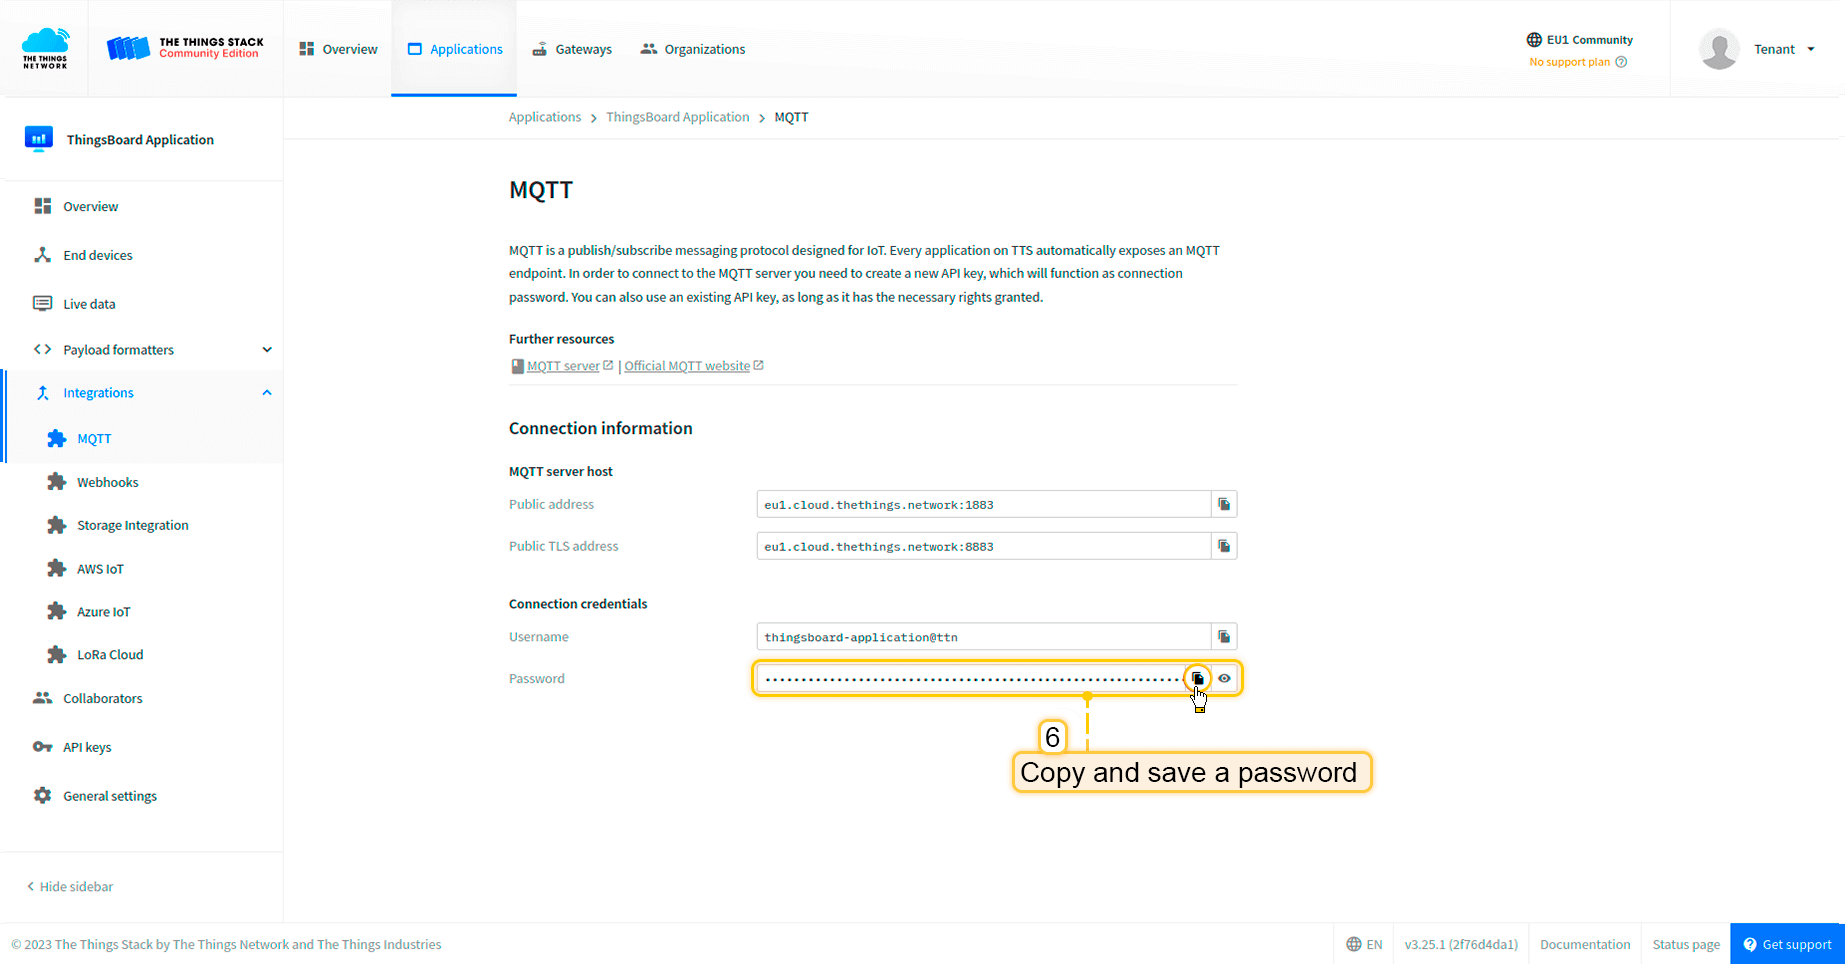 复制并保存 密码(API密钥)(离开页面后将无法再次查看)。 现在可以前往ThingsBoard配置集成。 在ThingsBoard中创建集成接下来,我们将在ThingsBoard中创建“The Things Stack”(TTS)集成。 首先,复制以下代码,创建上行数据转换器时需要用到: 在“连接”步骤中,您需要以下参数:
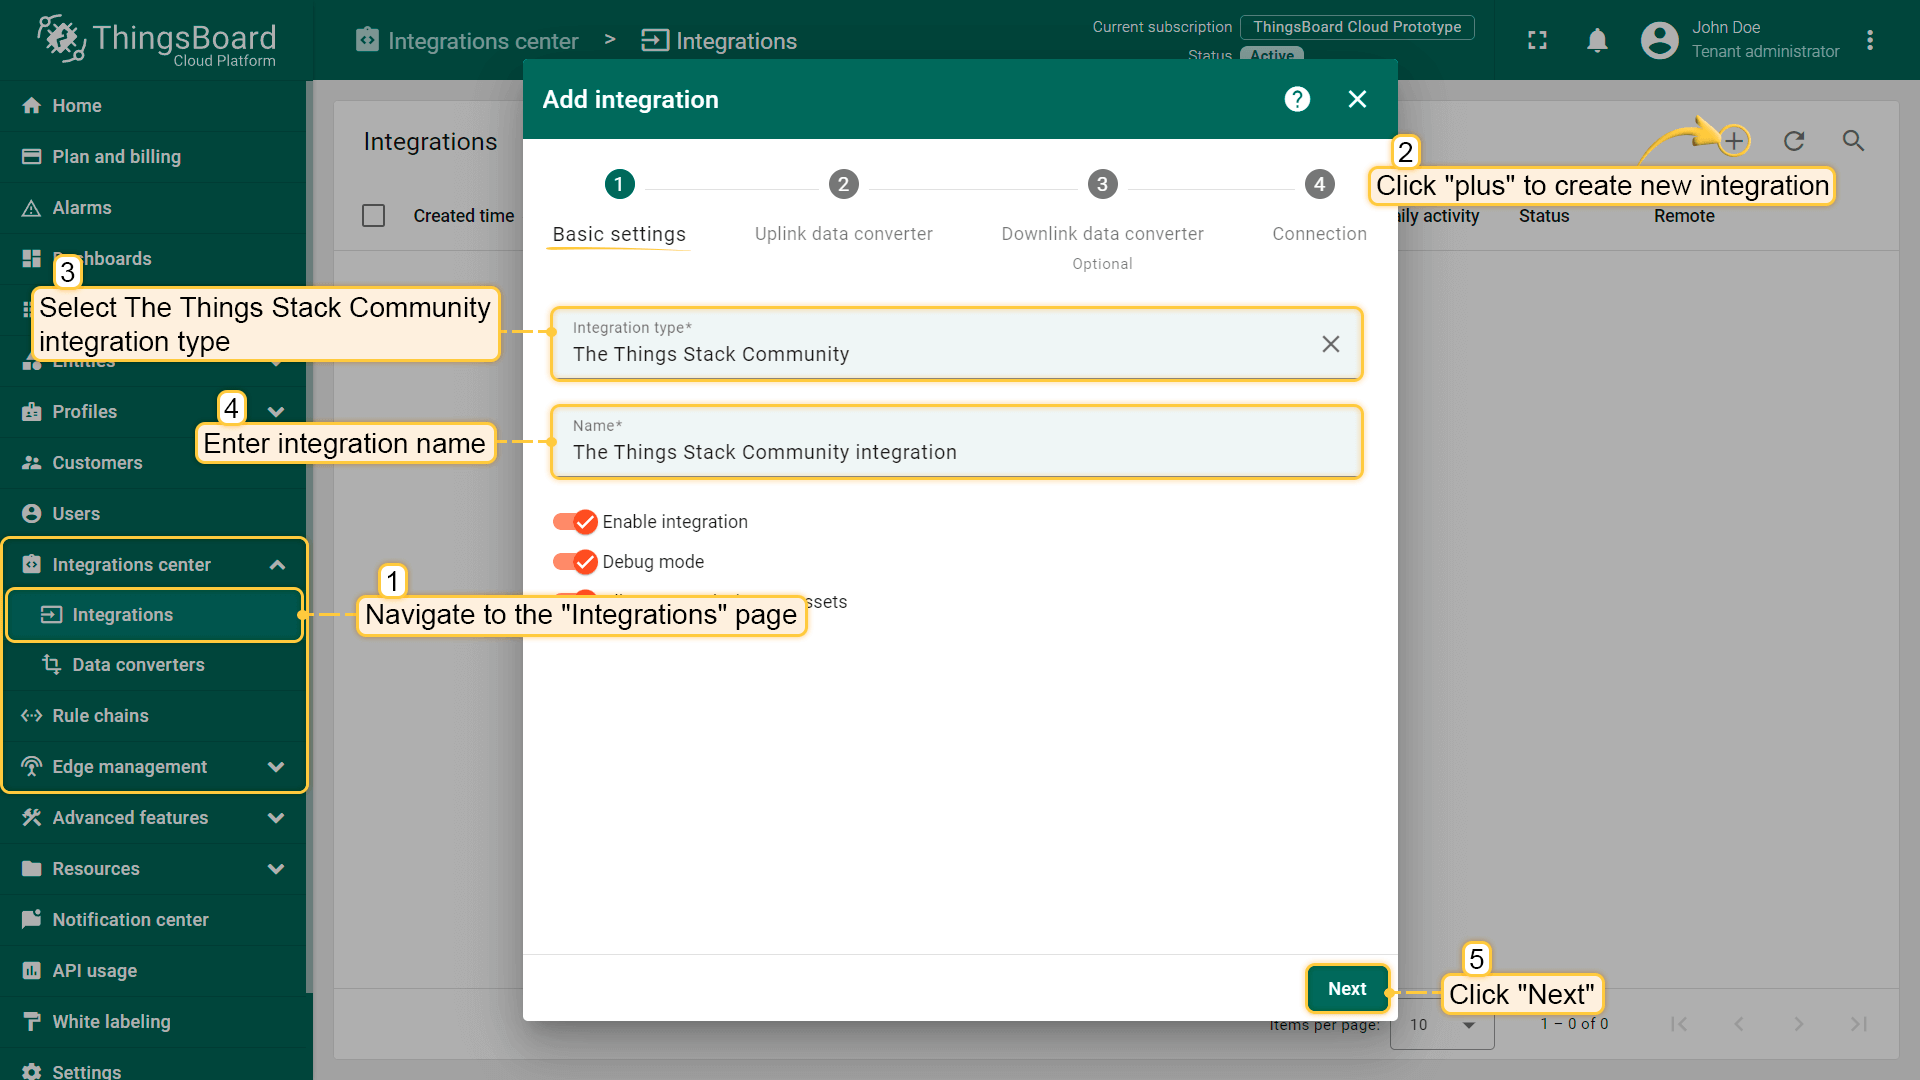 点击右上角的“加号”图标添加新集成。选择类型“The Things Stack社区”。然后点击“下一步”。 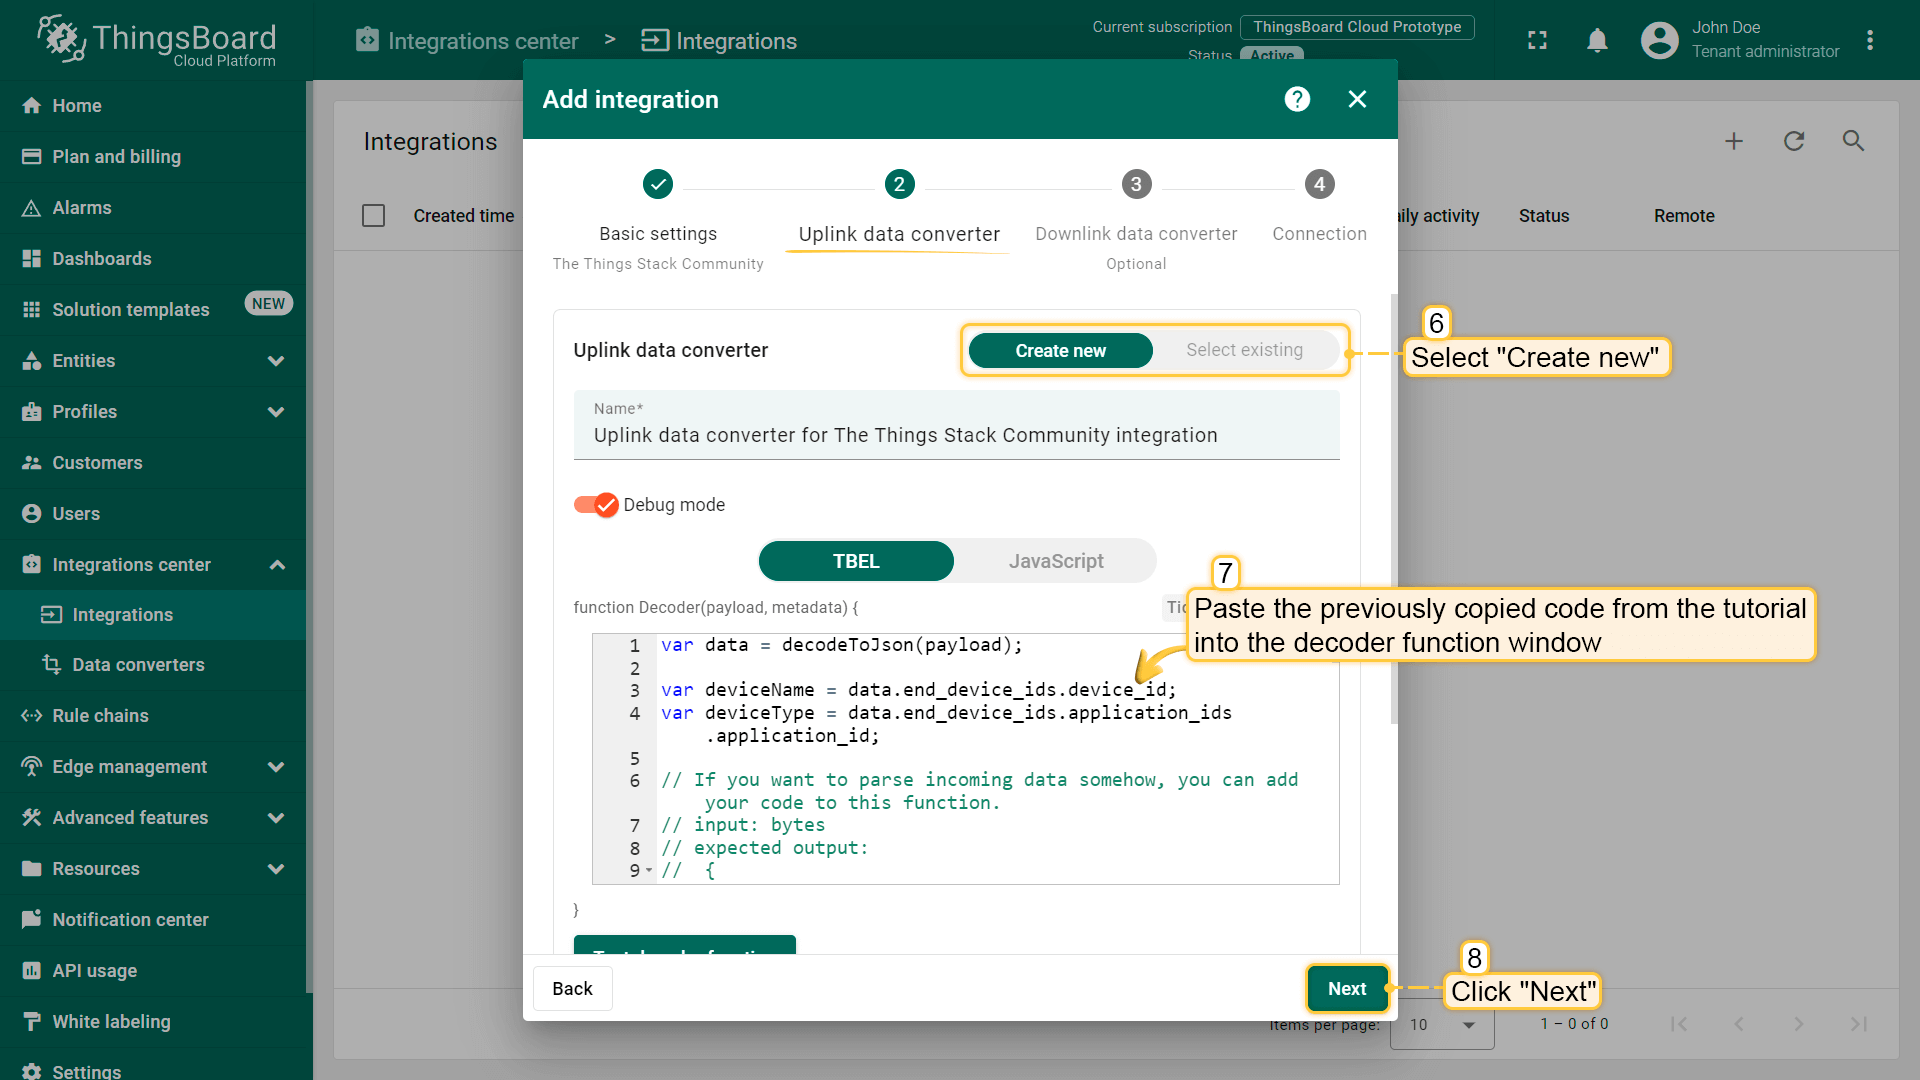 将先前复制的脚本粘贴到解码器函数区域。点击“下一步”。  将“下行数据转换器”字段留空。点击“跳过”按钮。 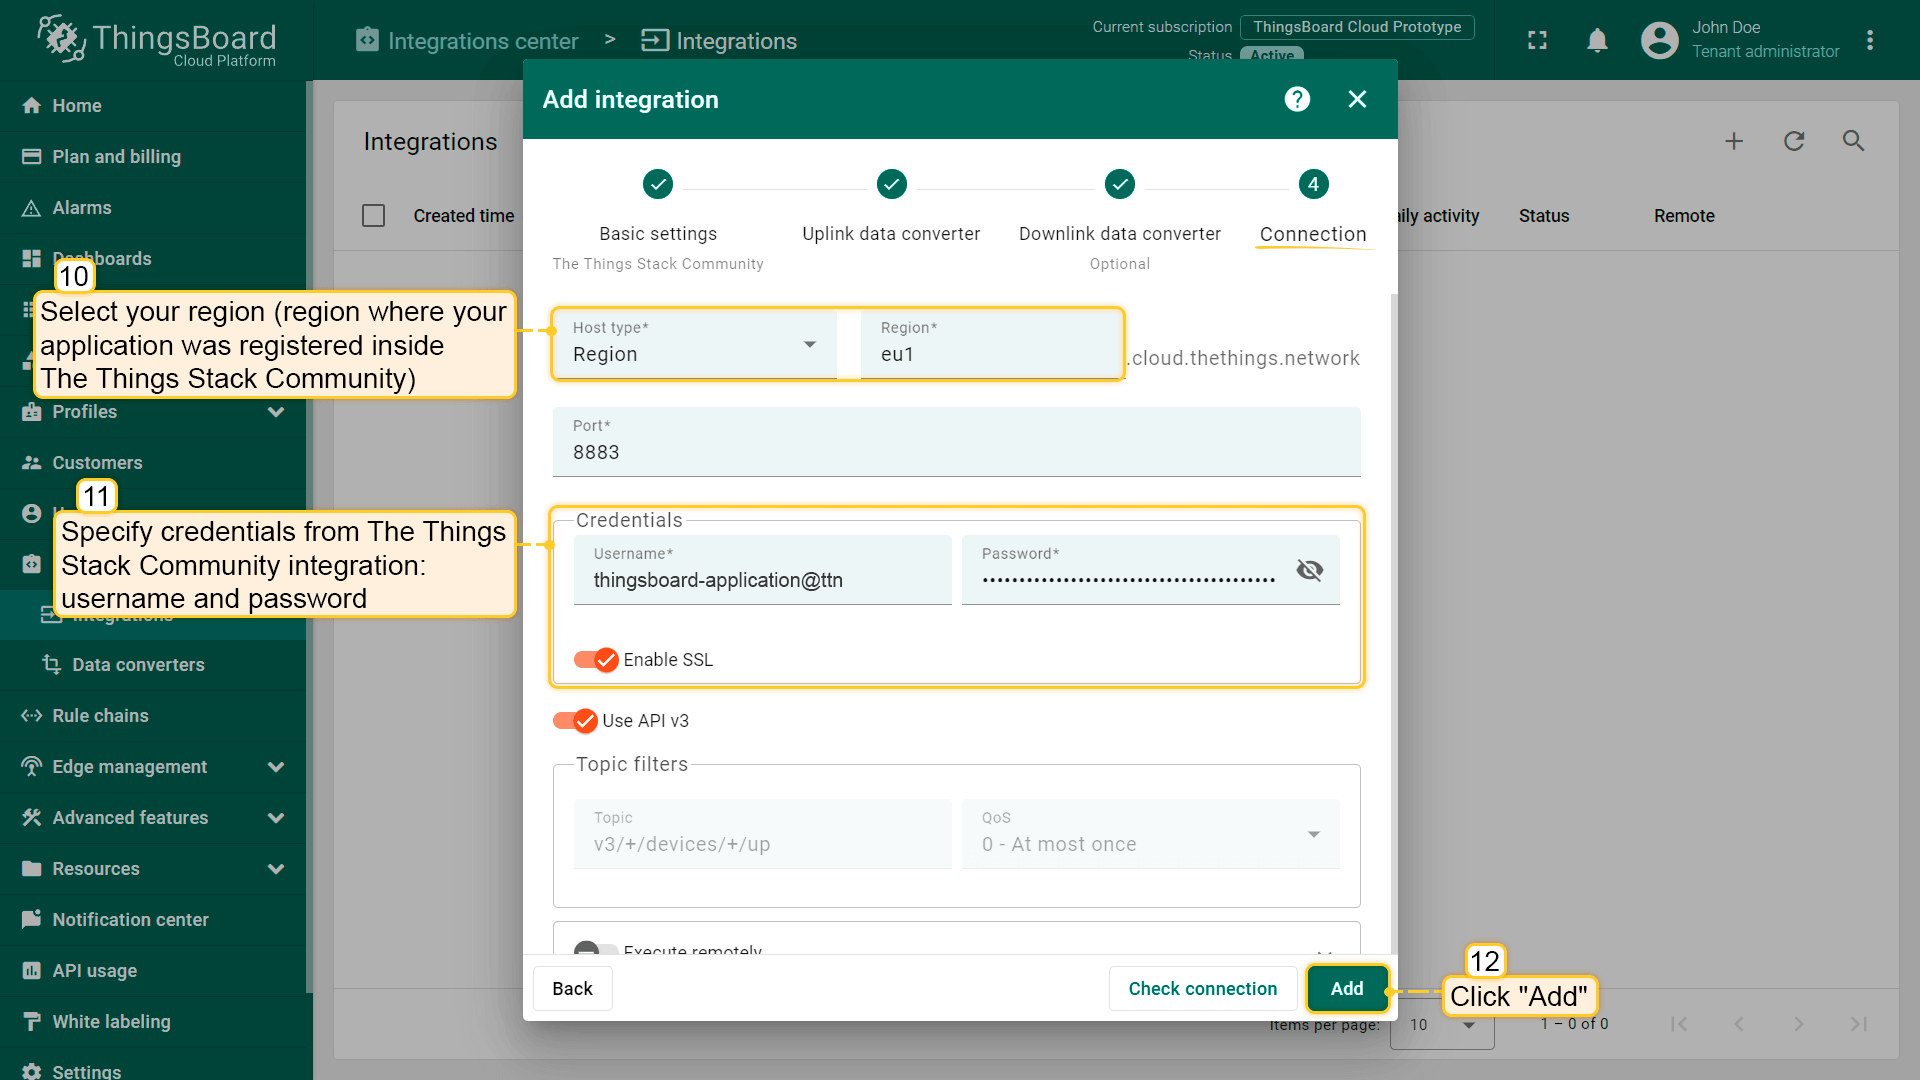 填写您的参数,然后点击“添加”按钮。 集成已创建。
若看到 STARTED 事件且状态为 Success,则表示集成已成功启动,可以接收消息。
|
在The Things Industries上添加网关我们需要在 The Things Industries云 上添加网关。 要添加网关,请按以下步骤操作:
 登录云端并打开控制台。 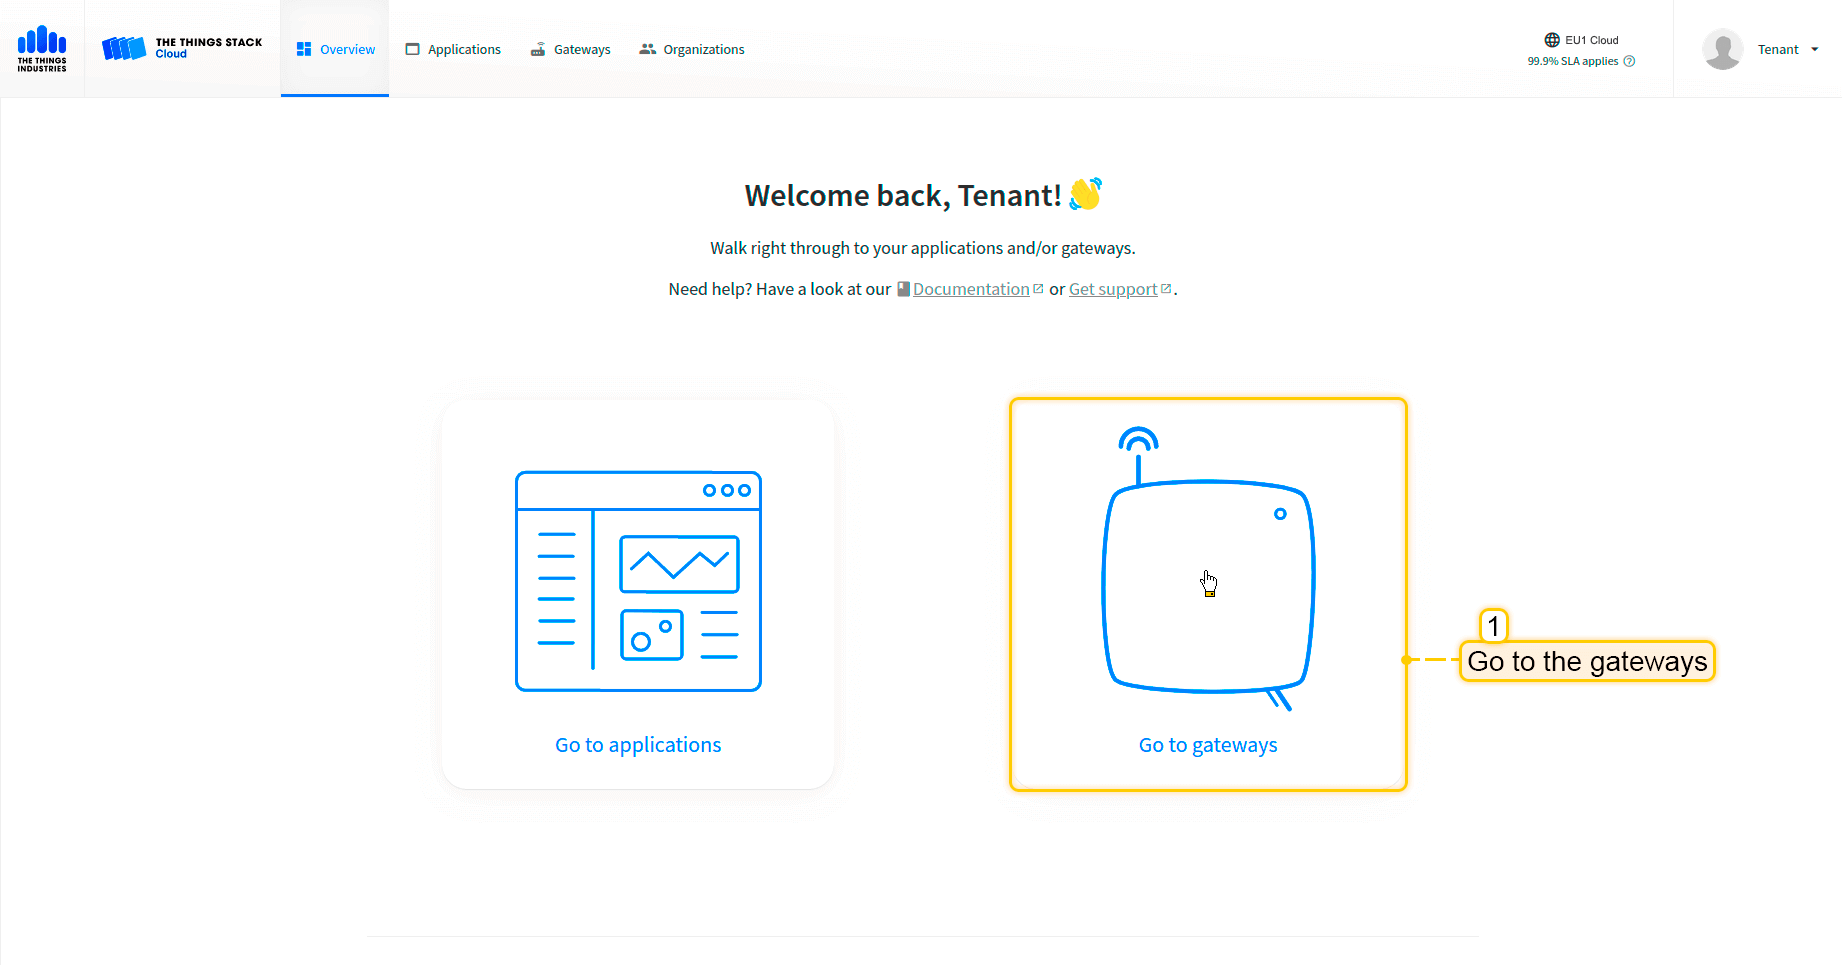 选择“前往网关”。 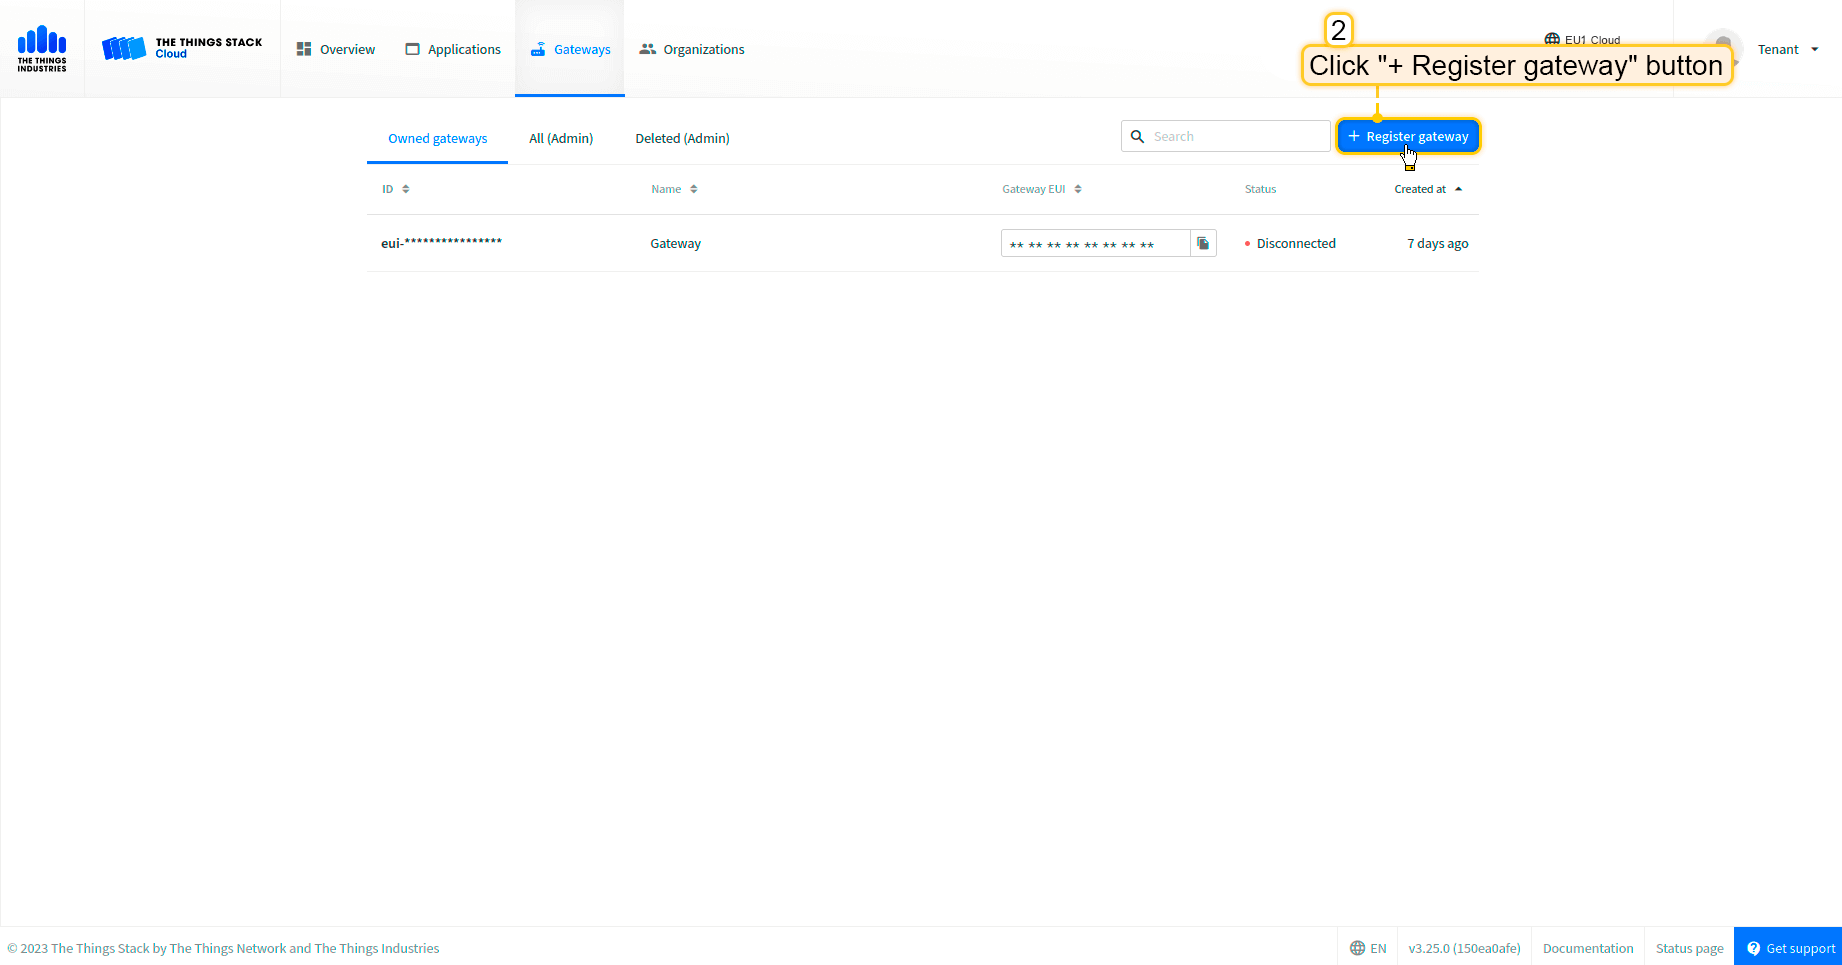 点击“注册网关”按钮。  填写网关信息(网关EUI)并点击“注册网关”按钮。 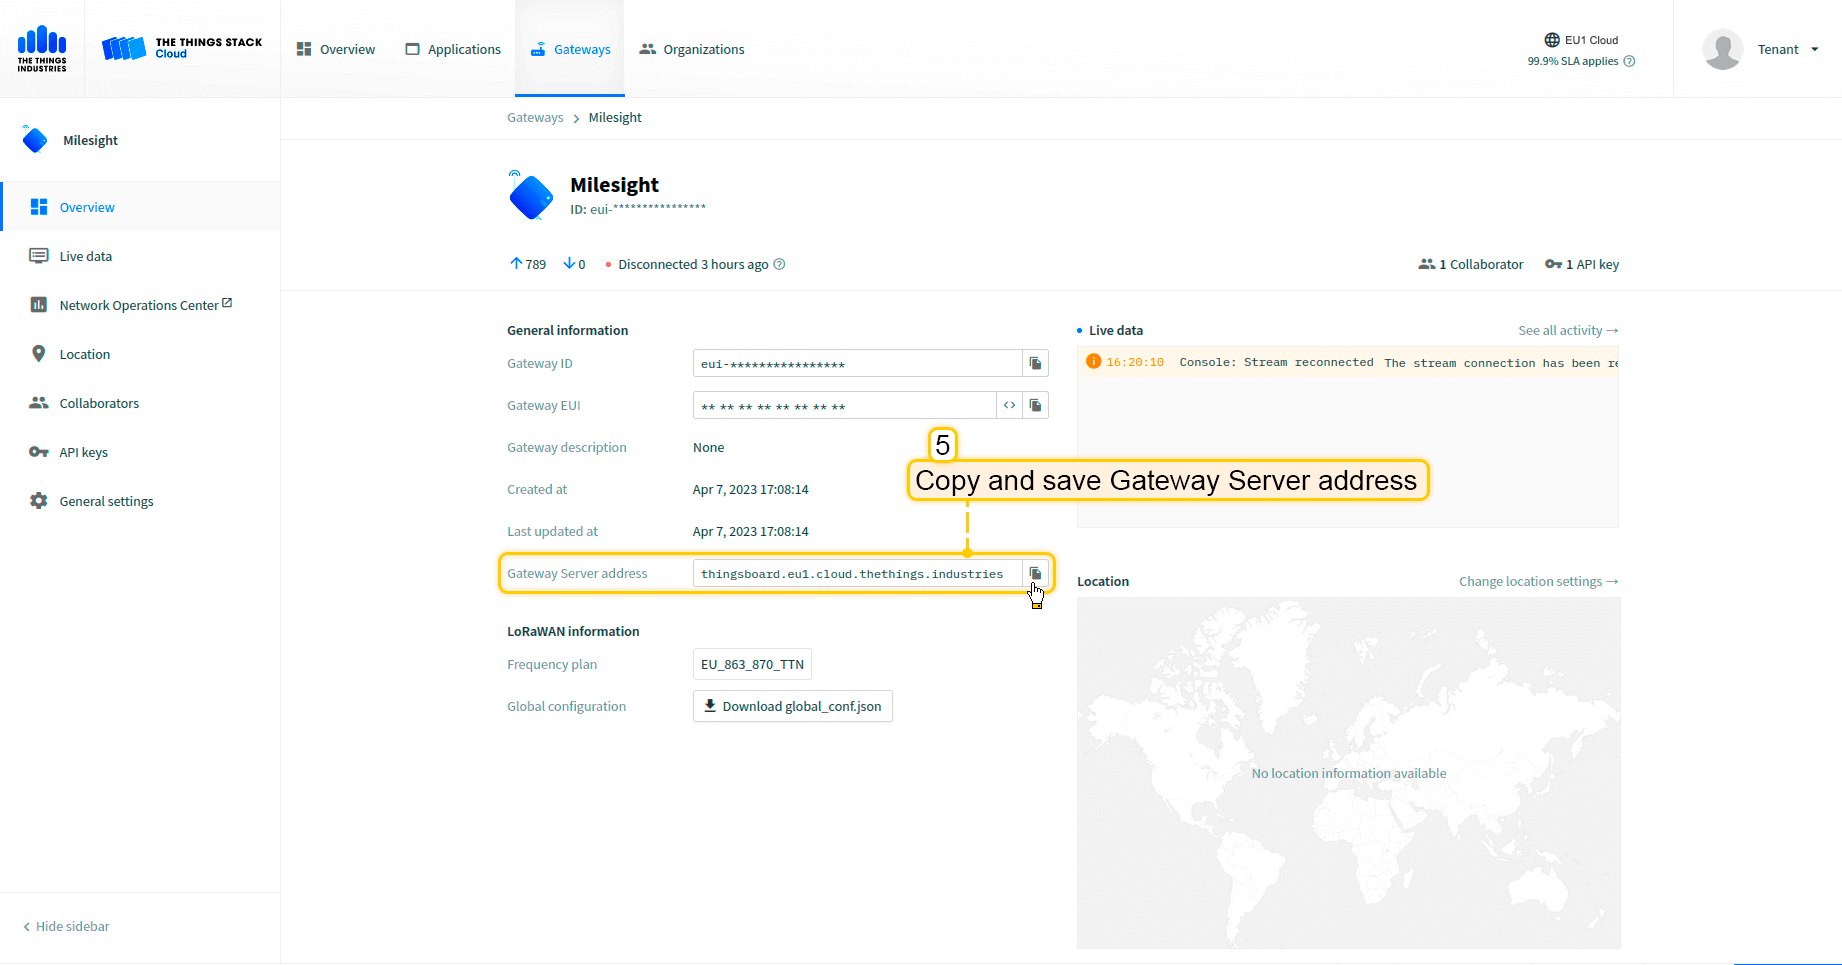 网关已添加。复制并保存“网关服务器地址”,稍后需要用到。 配置网关以发送数据要将网关连接并发送数据到The Things Industries云,需要配置网关。 请按以下步骤操作:
打开网关控制面板。进入“Packet Forwarder”页面,点击“加号”按钮添加新转发器。 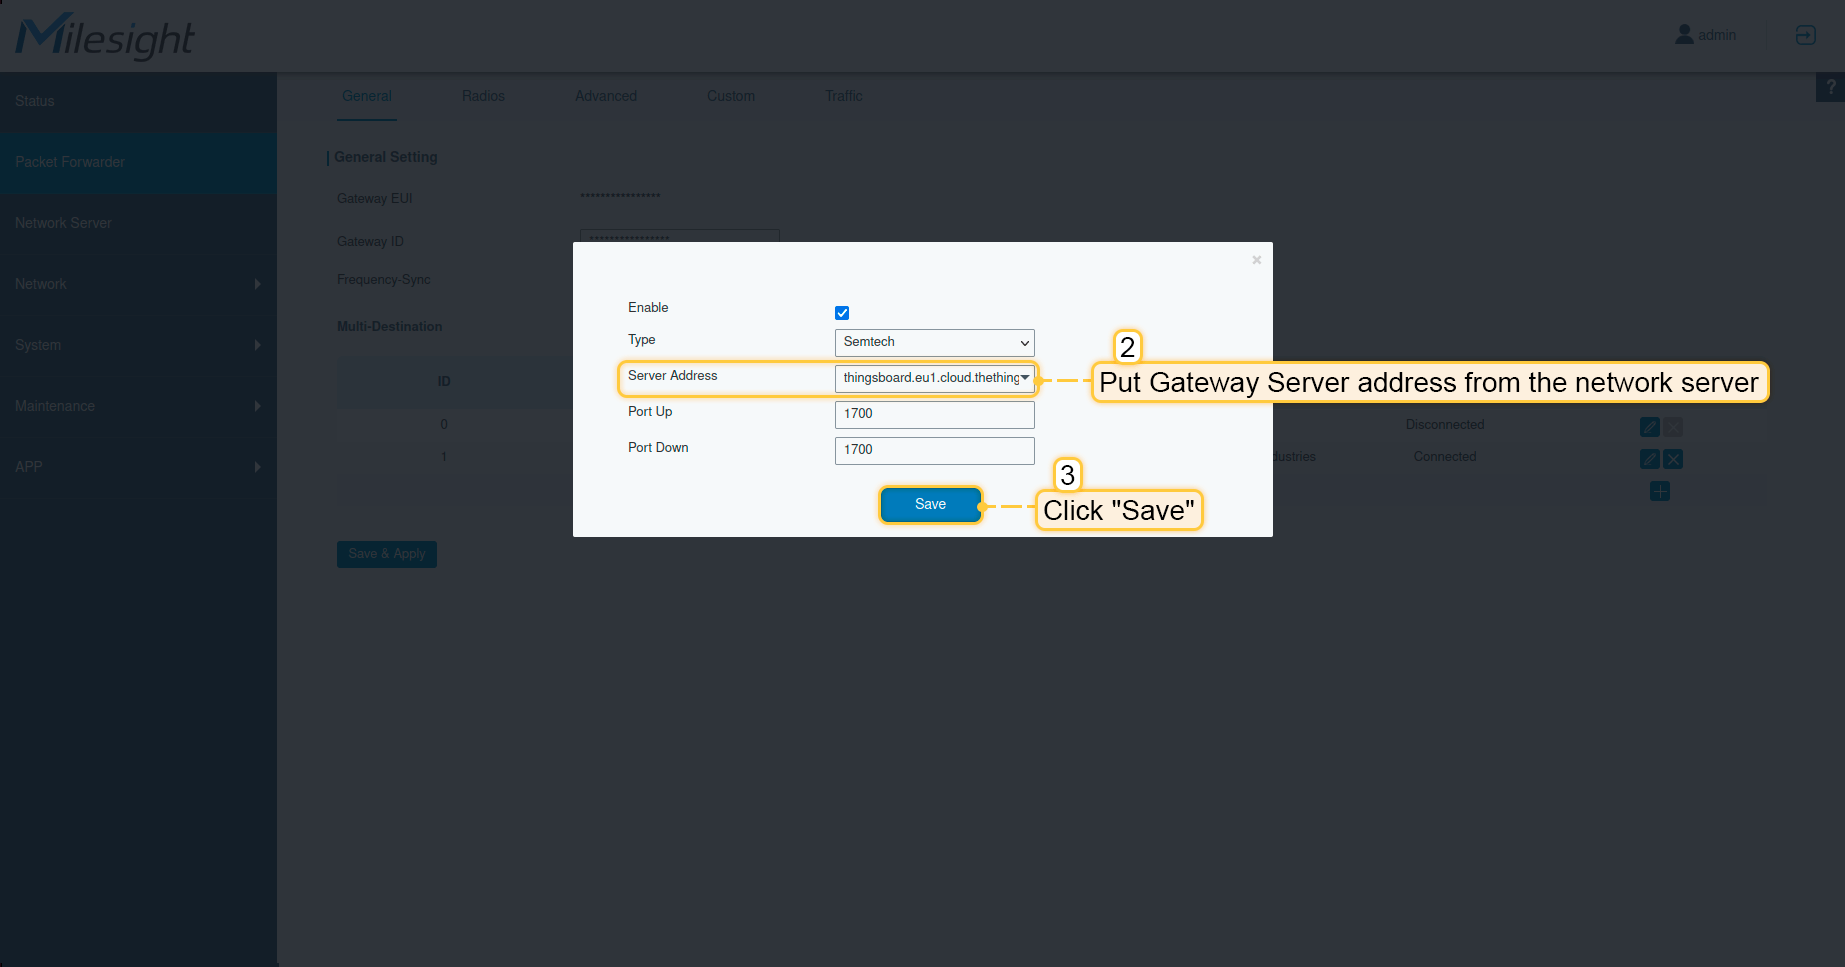 在“服务器地址”中填入网络服务器的地址。点击“保存”按钮。  点击“保存并应用”按钮。 至此,网关已能够向网络服务器发送数据。 在The Things Industries云上配置应用现在需要在The Things Industries上配置集成。请按以下步骤操作:
 打开控制台,点击“创建应用”。 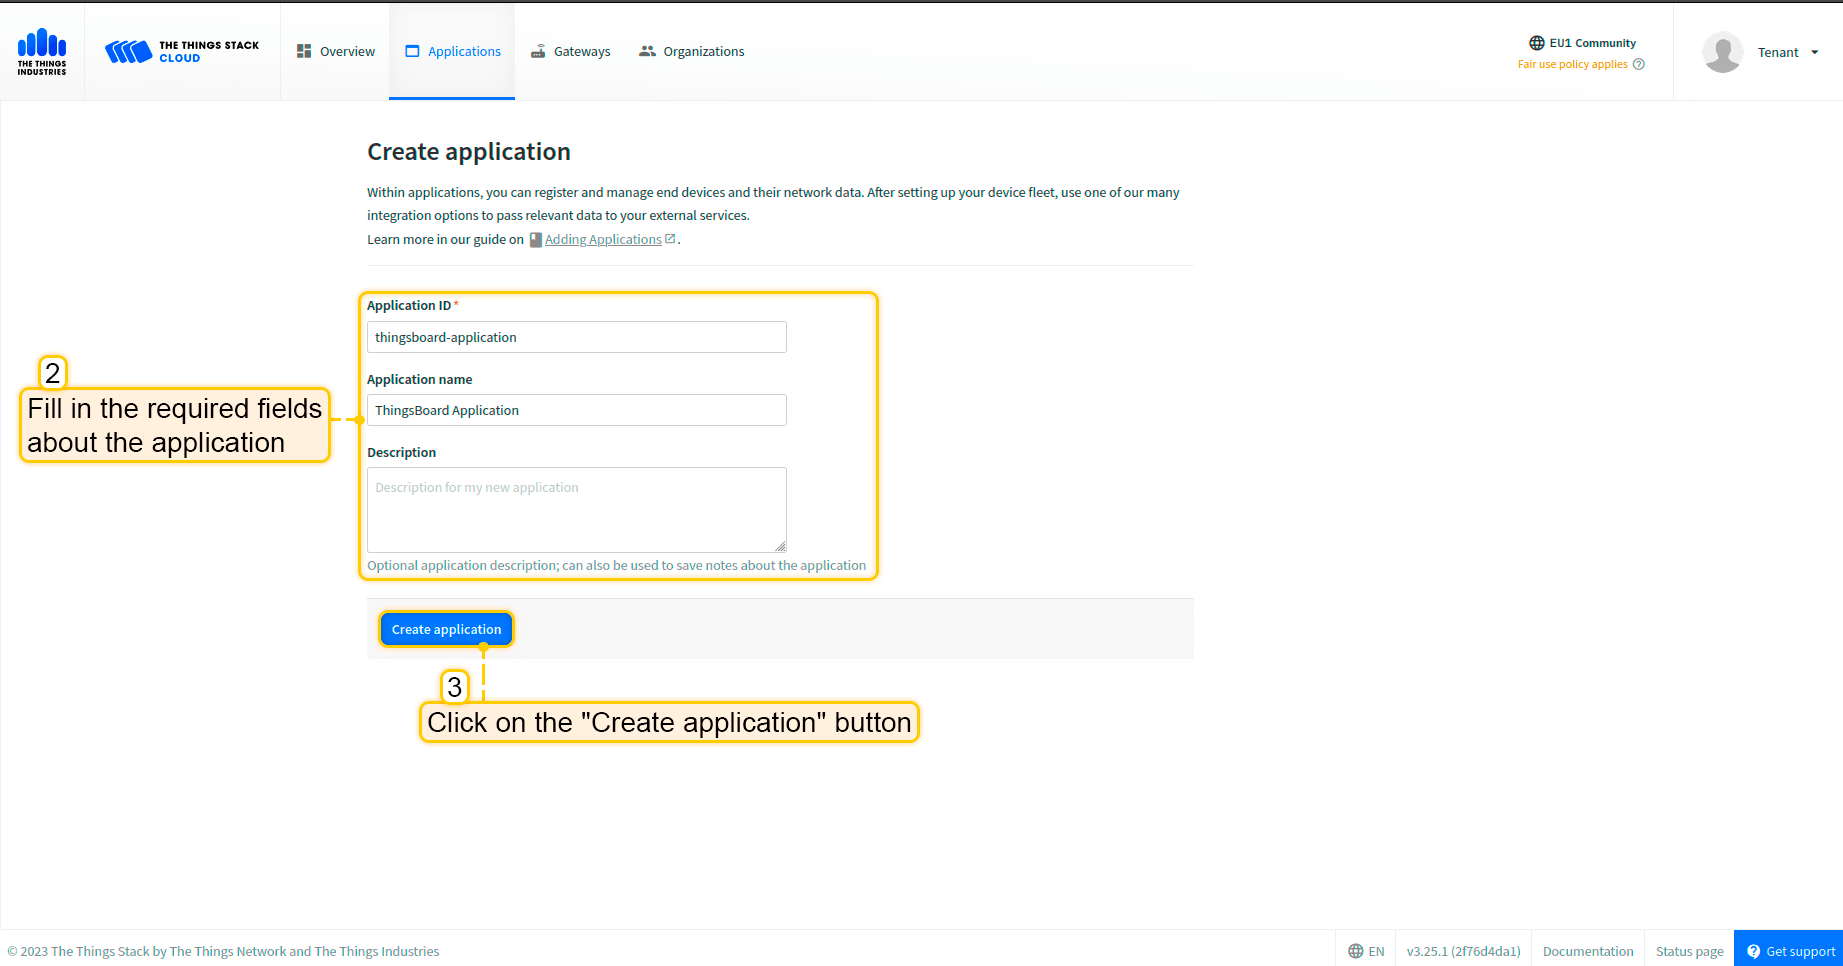 填写应用所需字段。然后点击“创建应用”按钮。 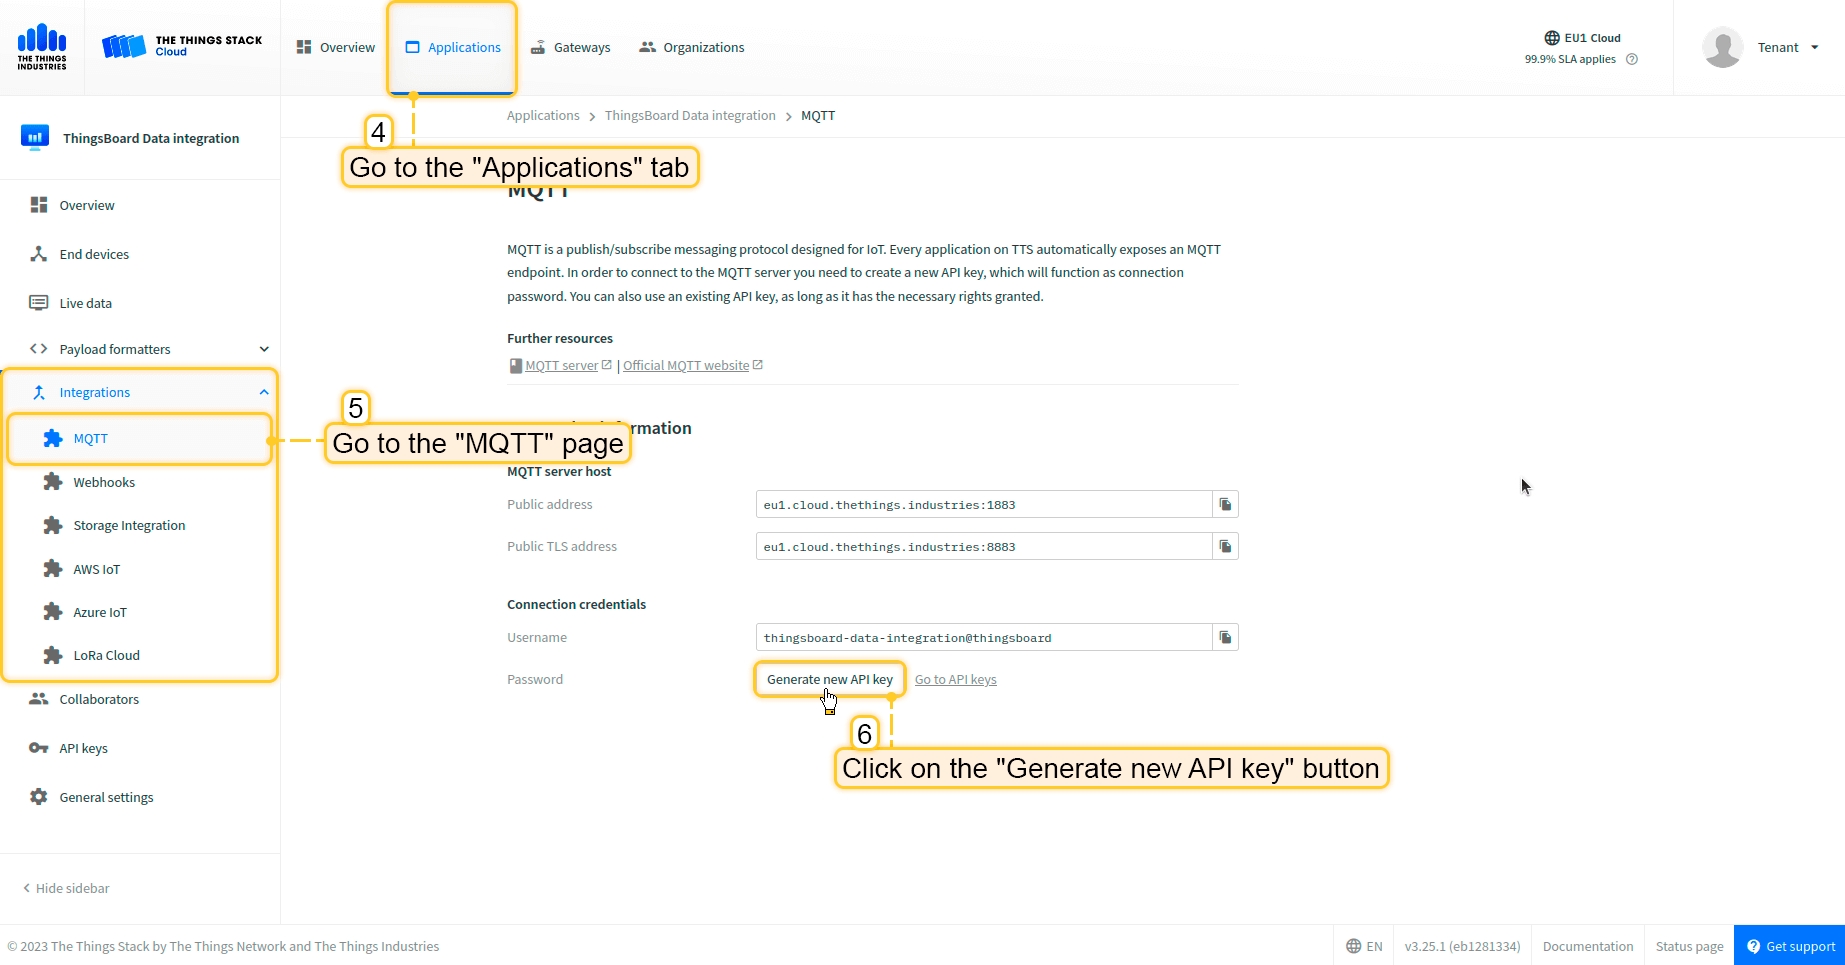 进入“集成”-> 在左侧菜单中打开“MQTT”页面。然后点击“生成新API密钥”按钮。 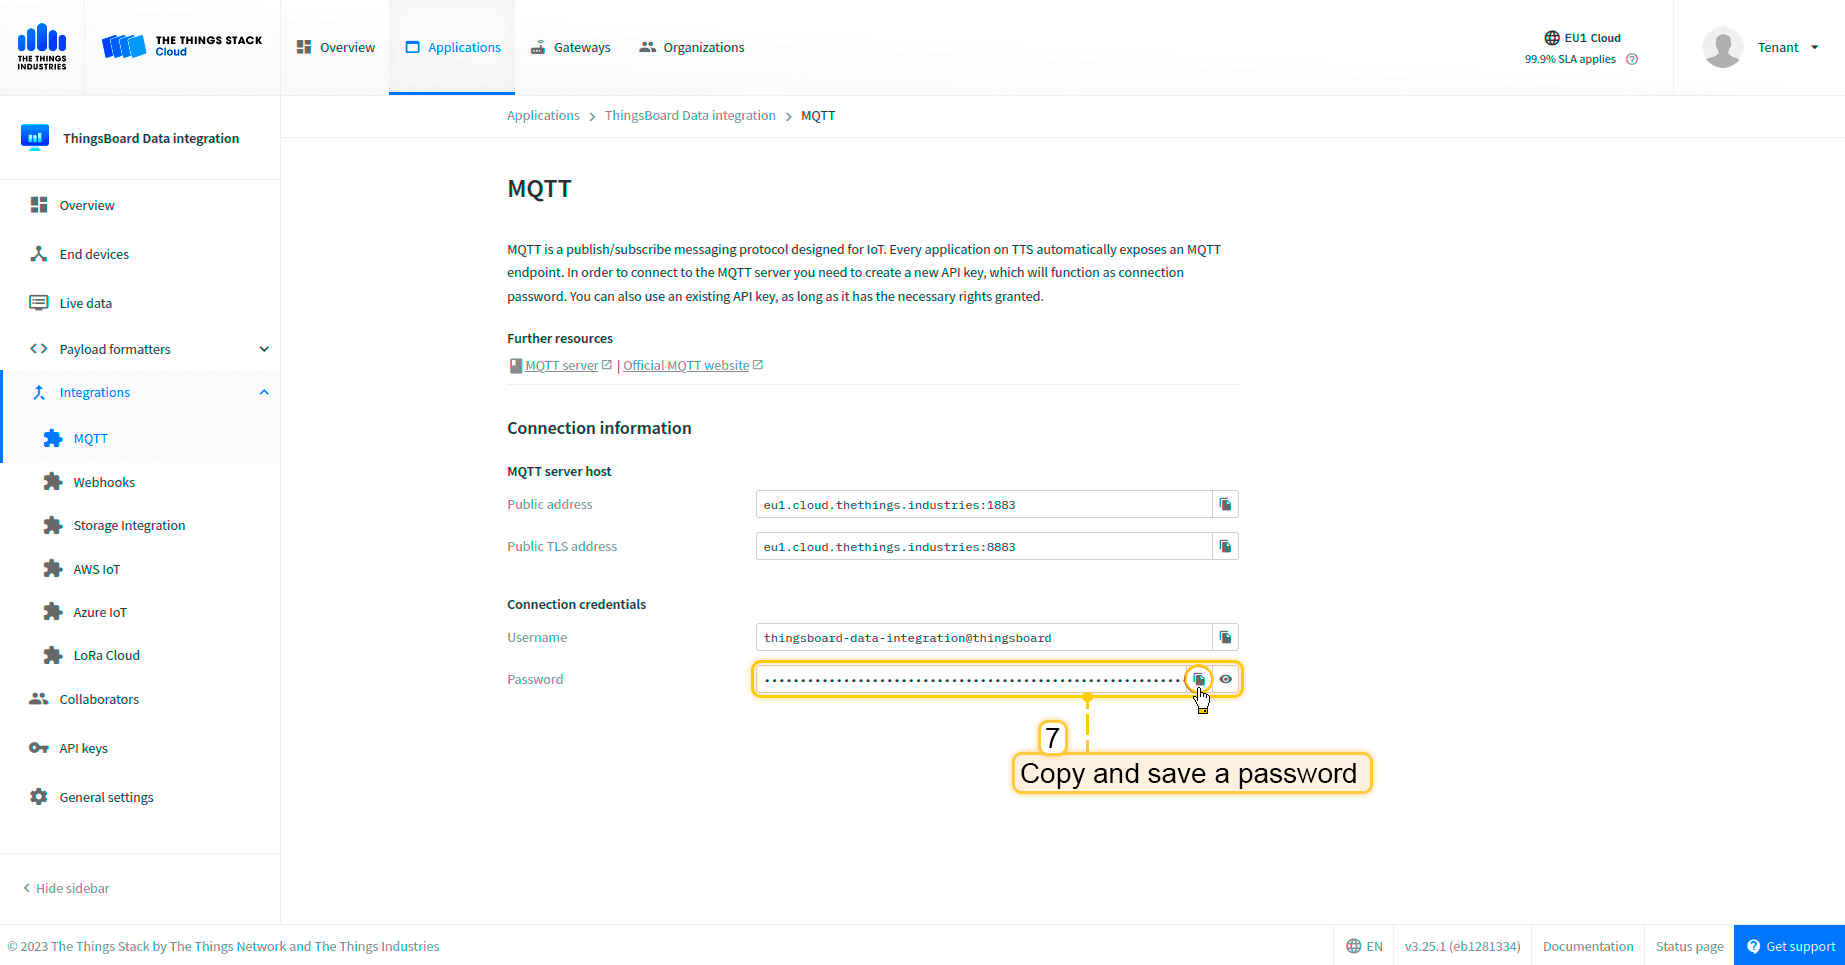 复制并保存 密码(API密钥)(离开页面后将无法再次查看)。 现在可以前往ThingsBoard配置集成。 在ThingsBoard中创建集成接下来,我们将在 ThingsBoard 中创建“The Things Industries”集成。 首先,复制以下代码,创建上行数据转换器时需要用到: 在“连接”步骤中,您需要以下参数:
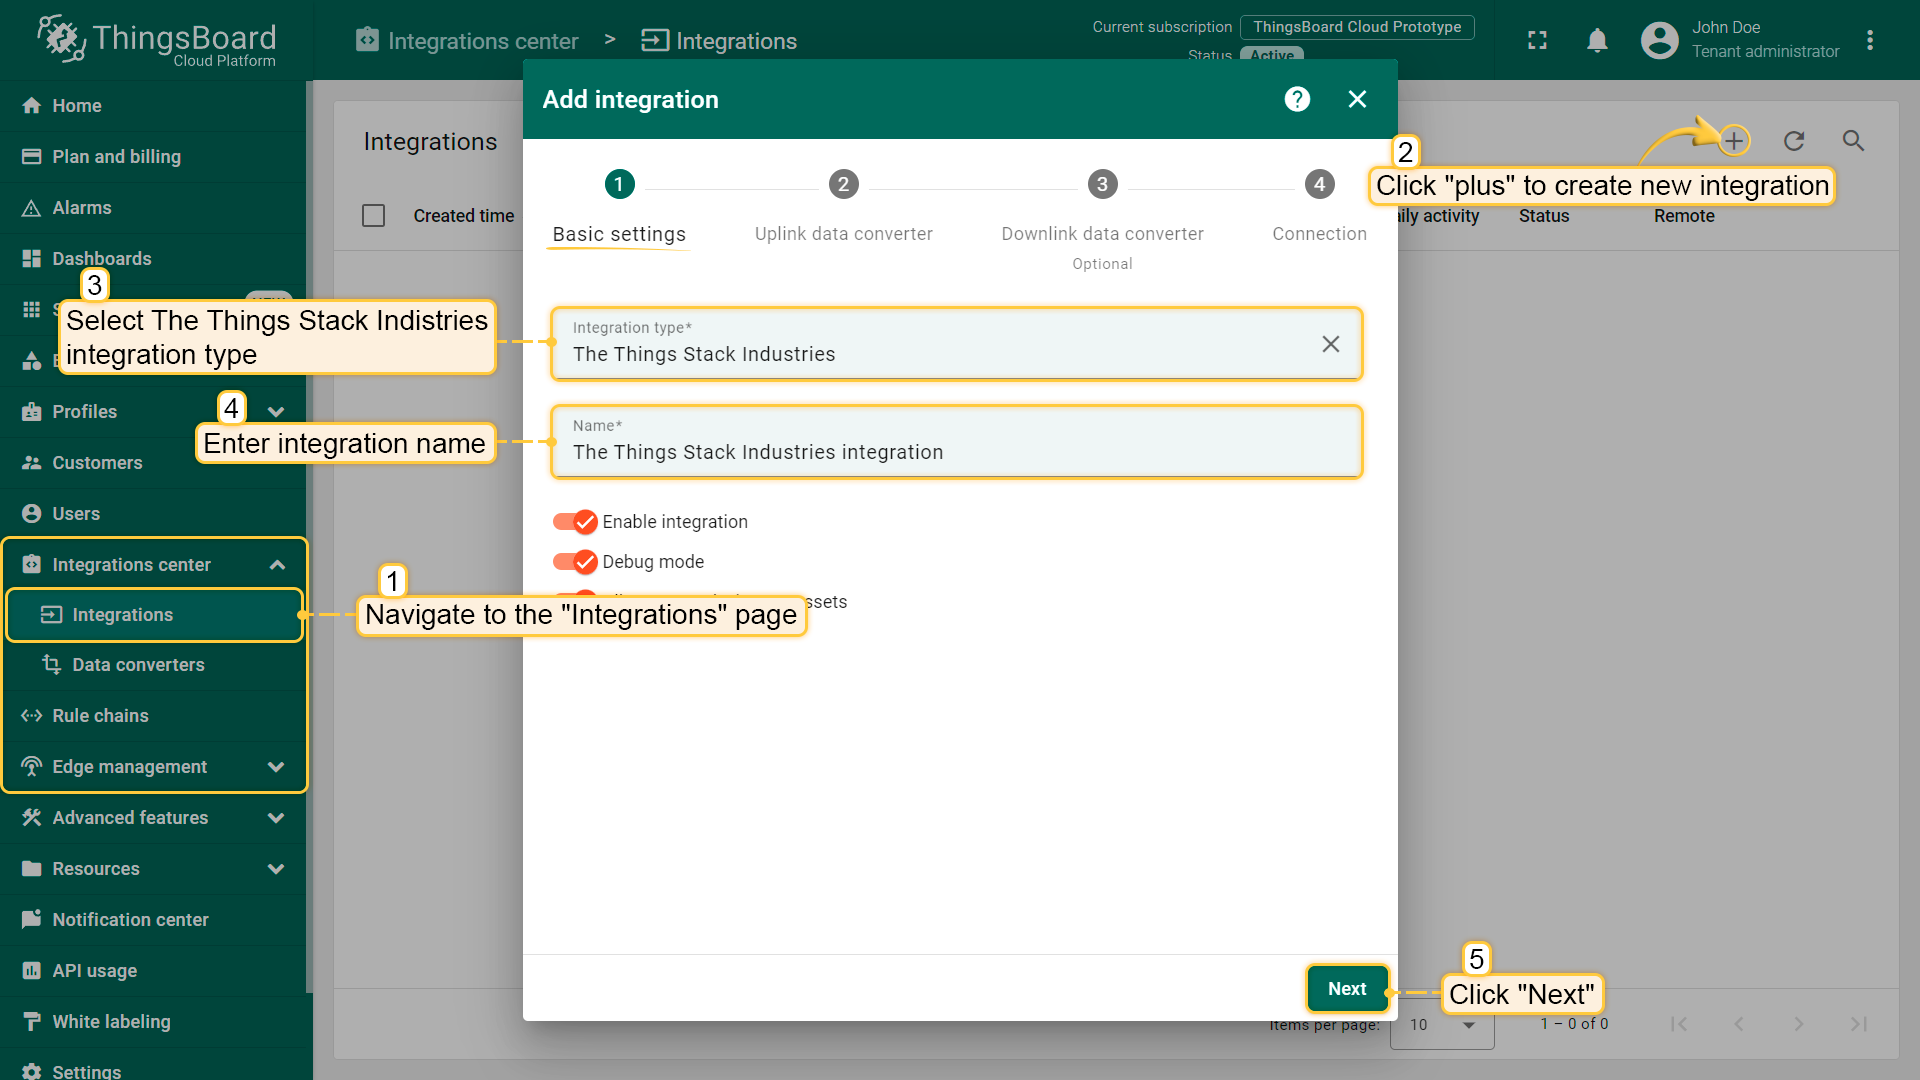 点击右上角的“加号”图标添加新集成。选择类型“The Things Industries集成”。然后点击“下一步”。 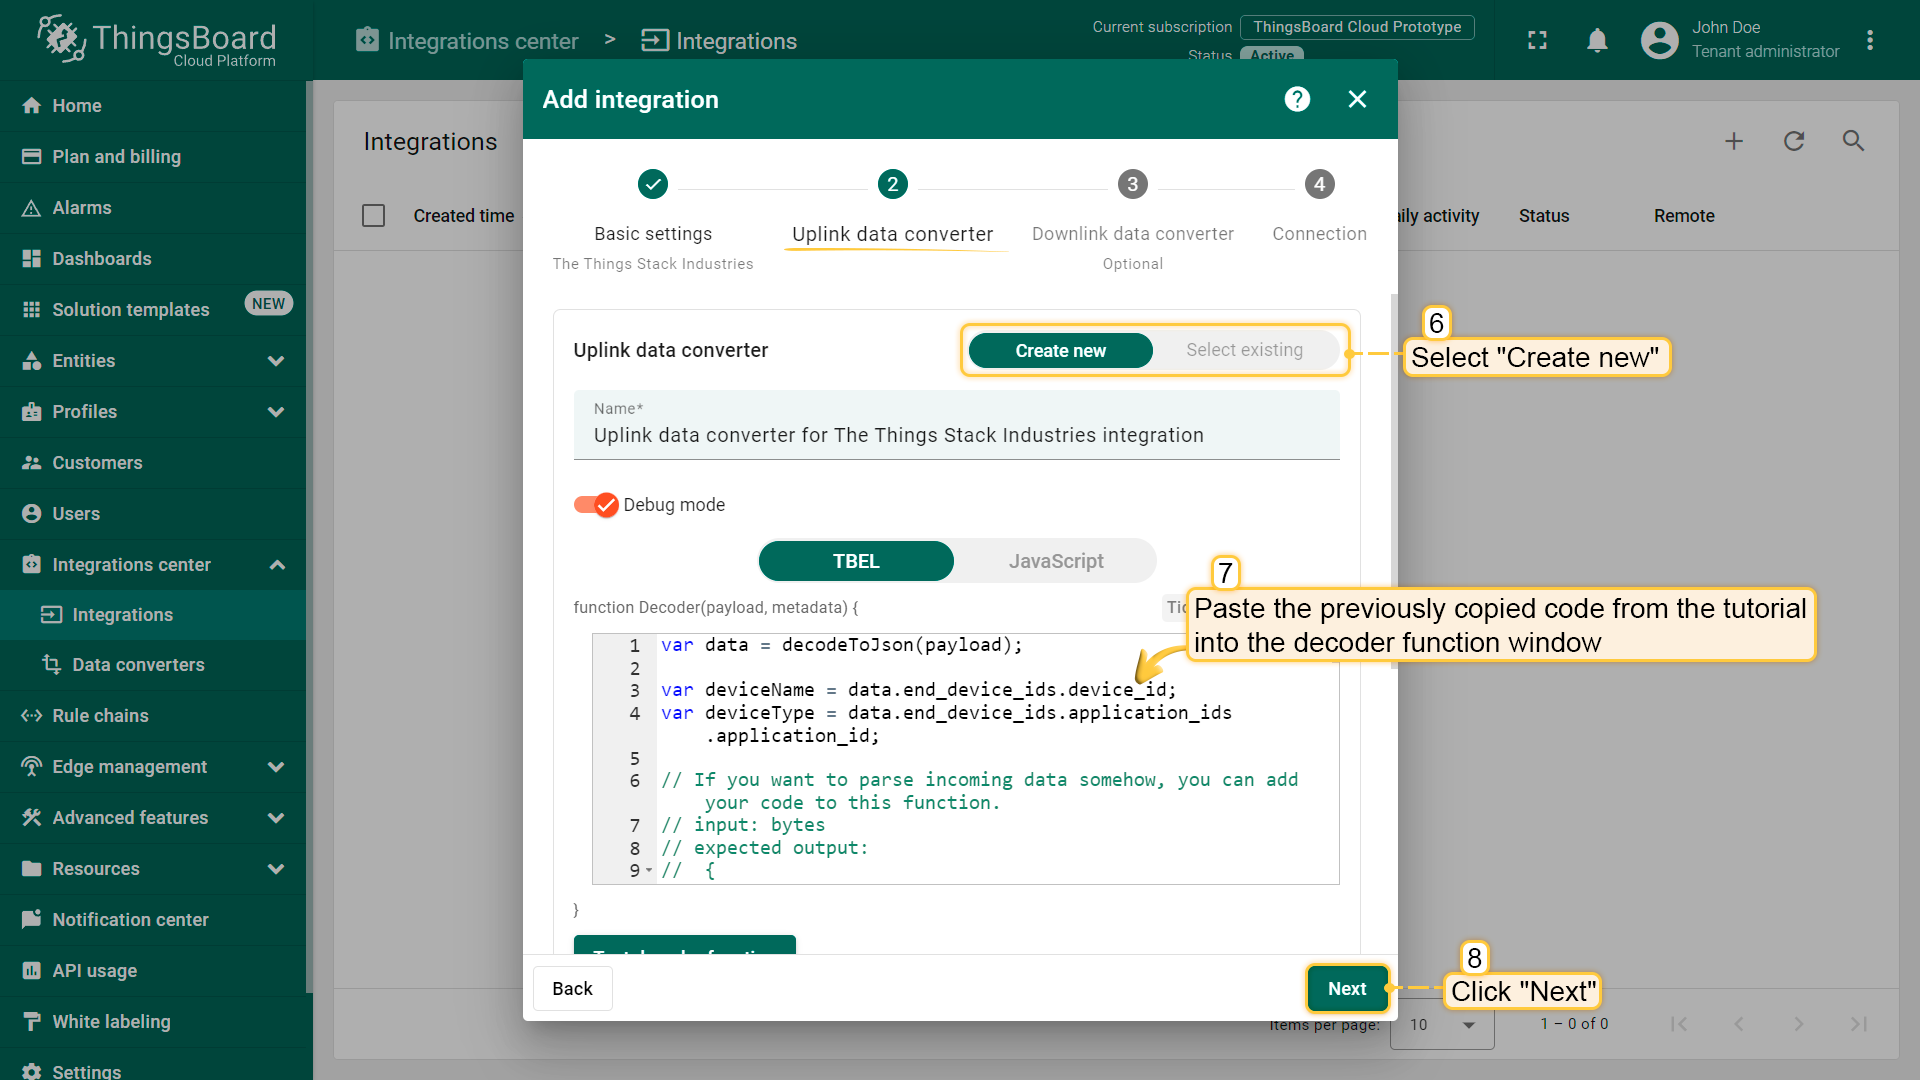 将先前复制的脚本粘贴到解码器函数区域。点击“下一步”。  将“下行数据转换器”字段留空。点击“跳过”按钮。 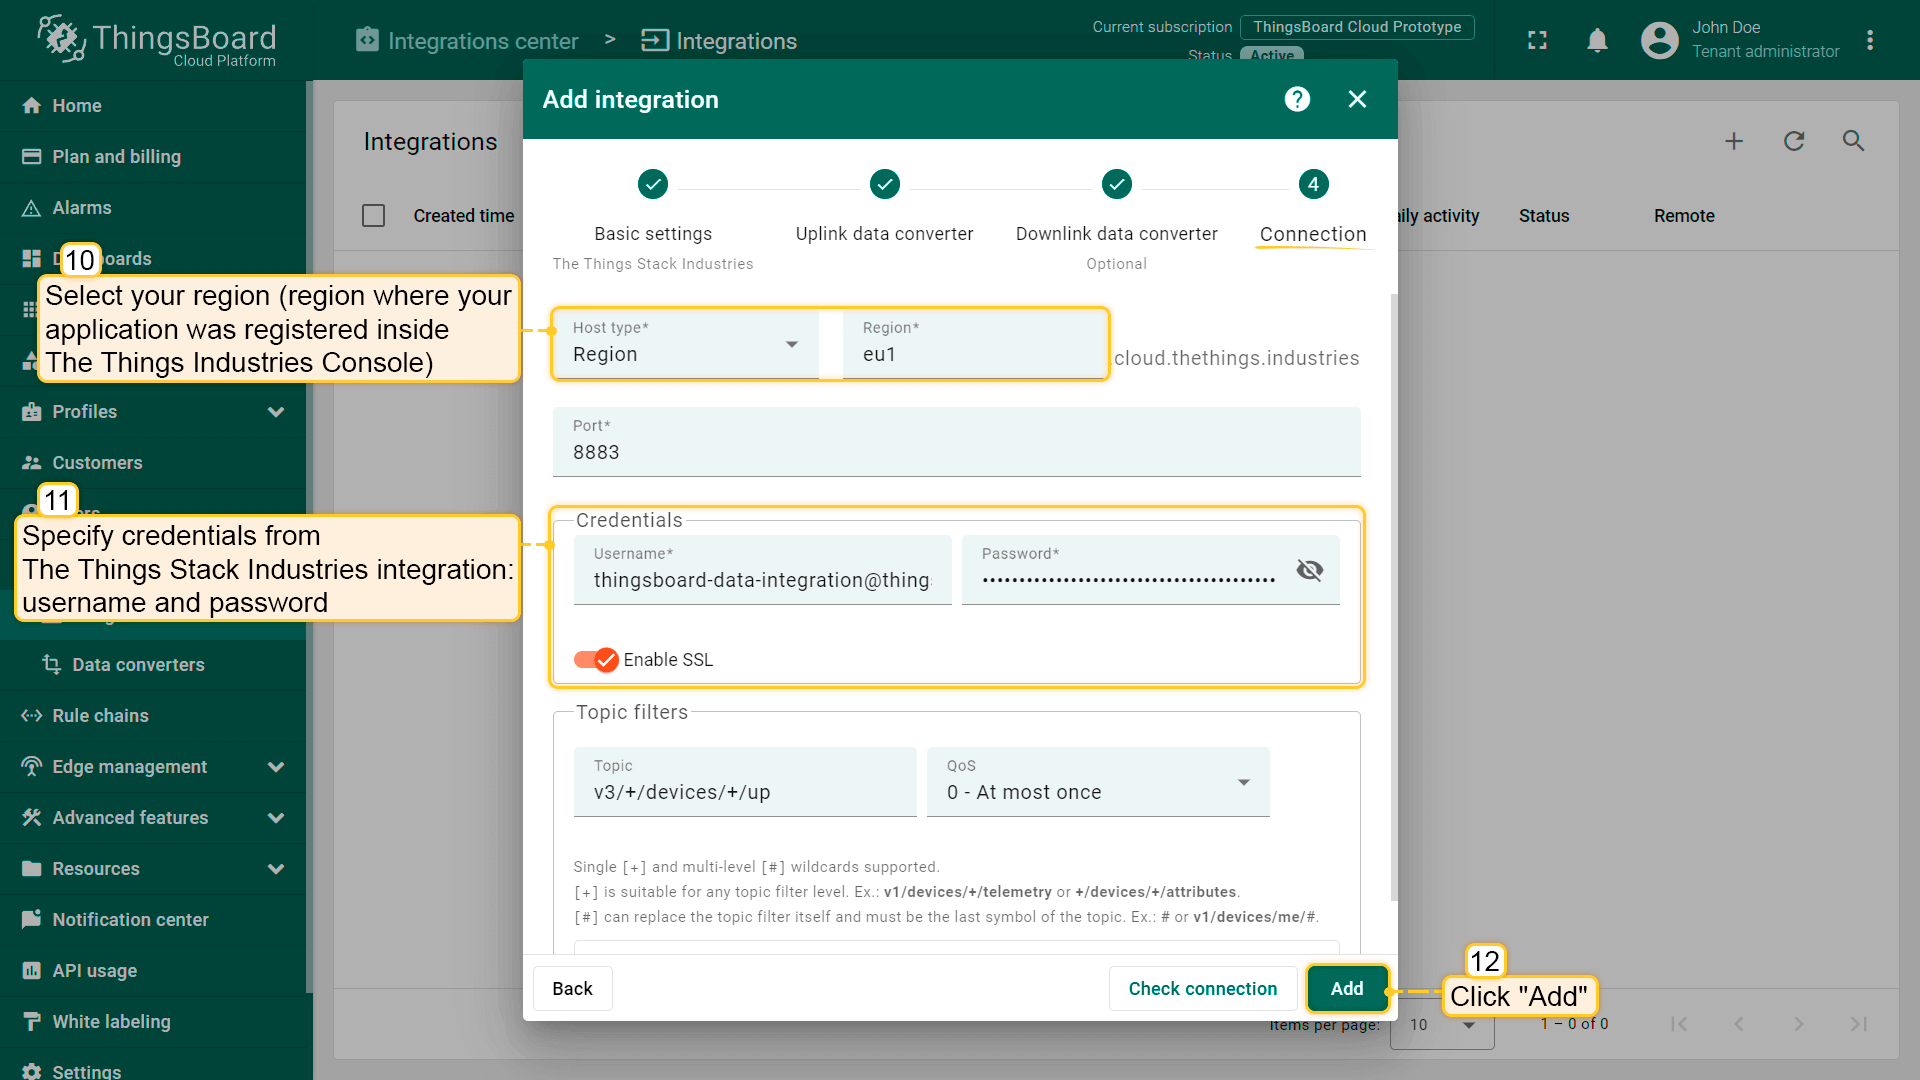 填写您的参数,然后点击“添加”按钮。 集成已创建。
若看到 STARTED 事件且状态为 Success,则表示集成已成功启动,可以接收消息。
|
在Loriot上添加网关我们需要在 Loriot 上添加网关。 要添加网关,请按以下步骤操作:
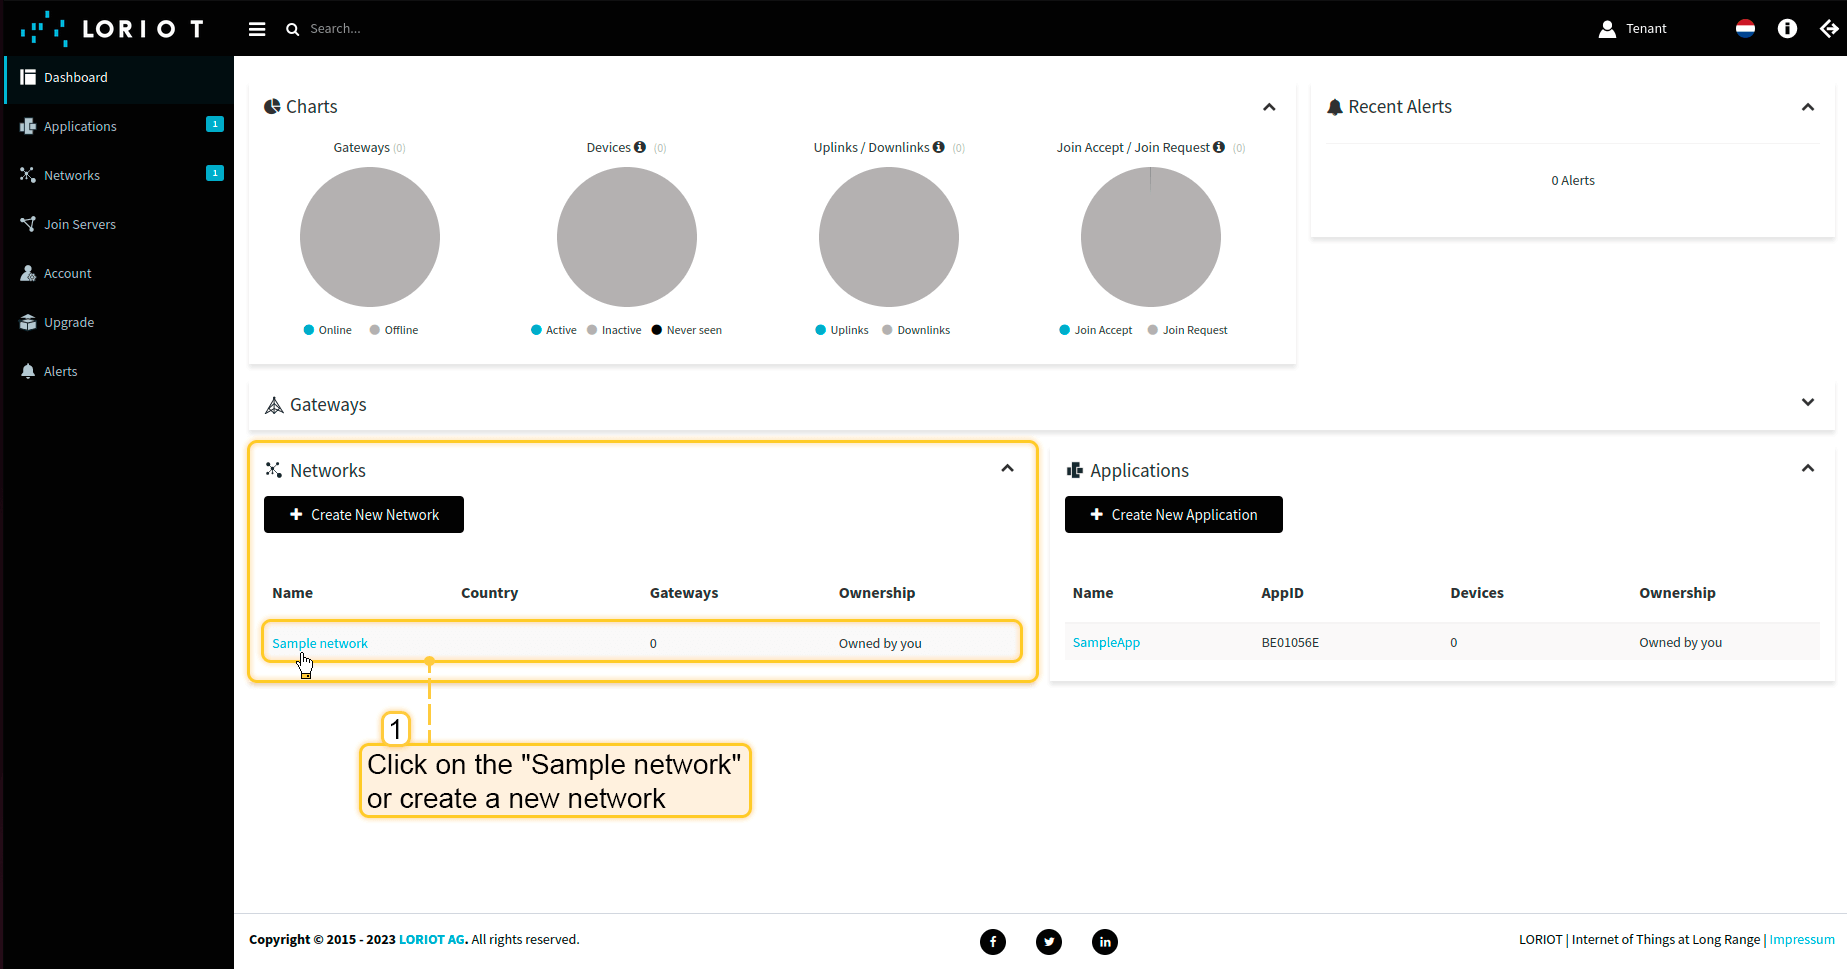 登录Loriot服务器。在“网络”部分打开“示例网络”或创建新网络。 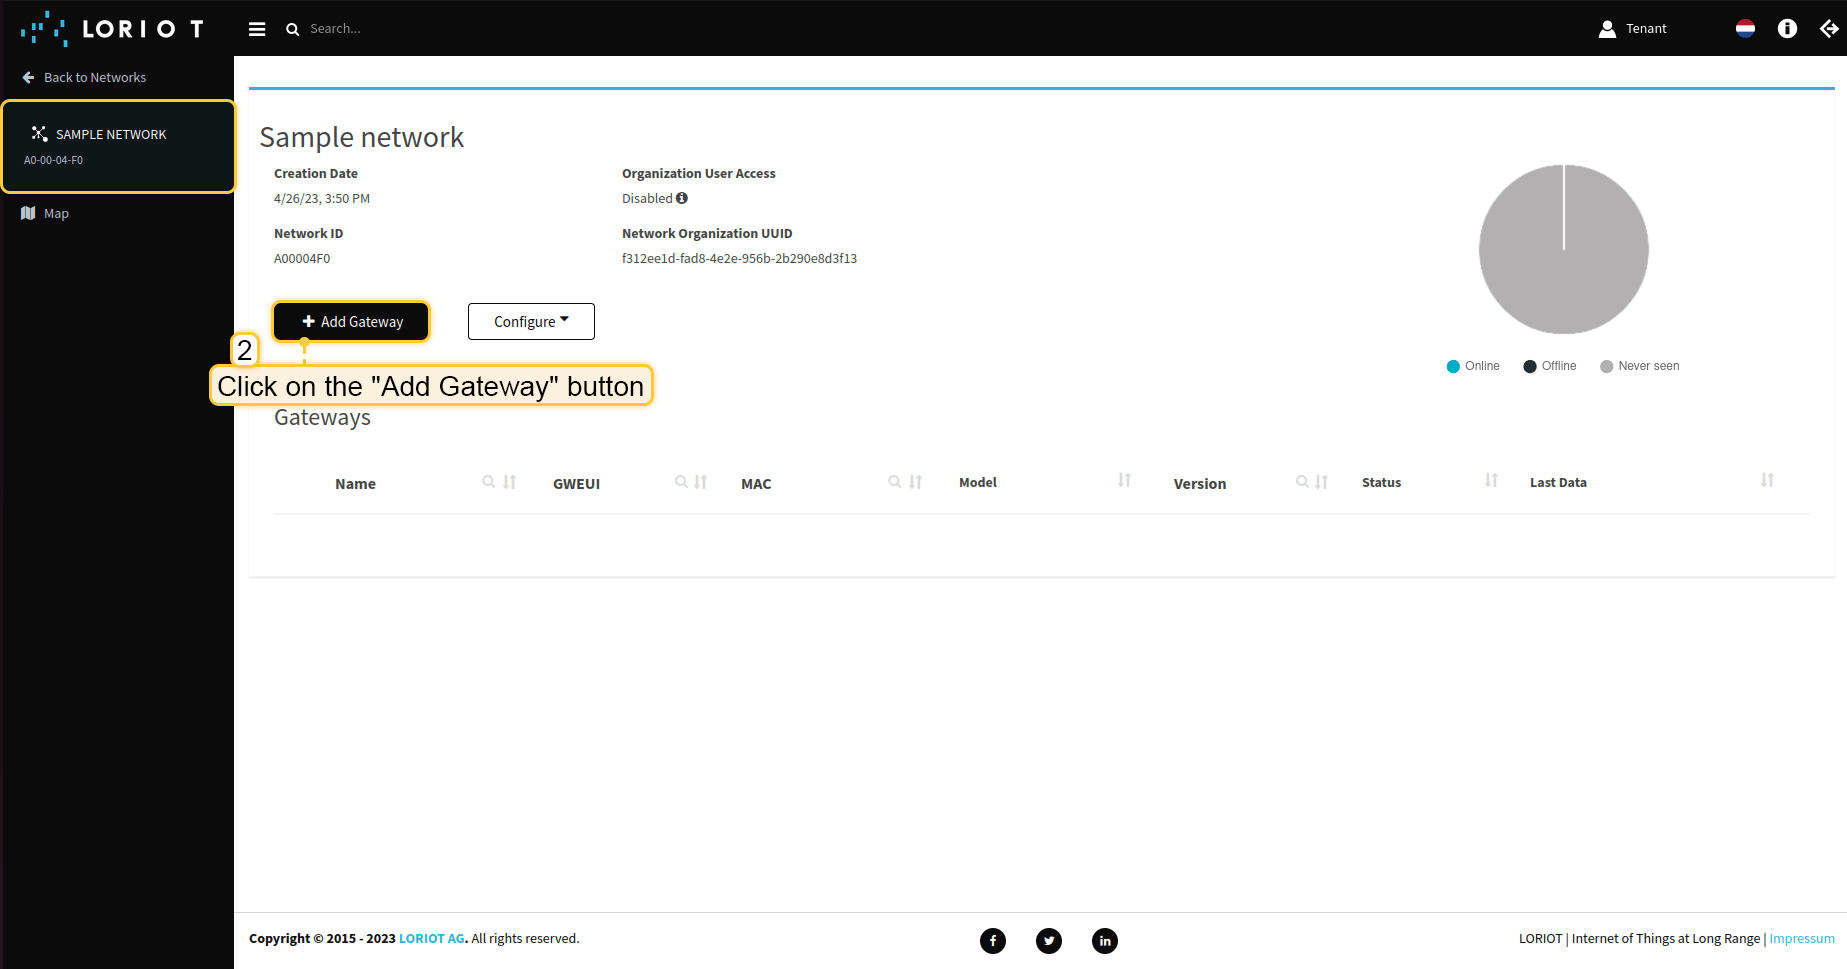 点击“添加网关”按钮。 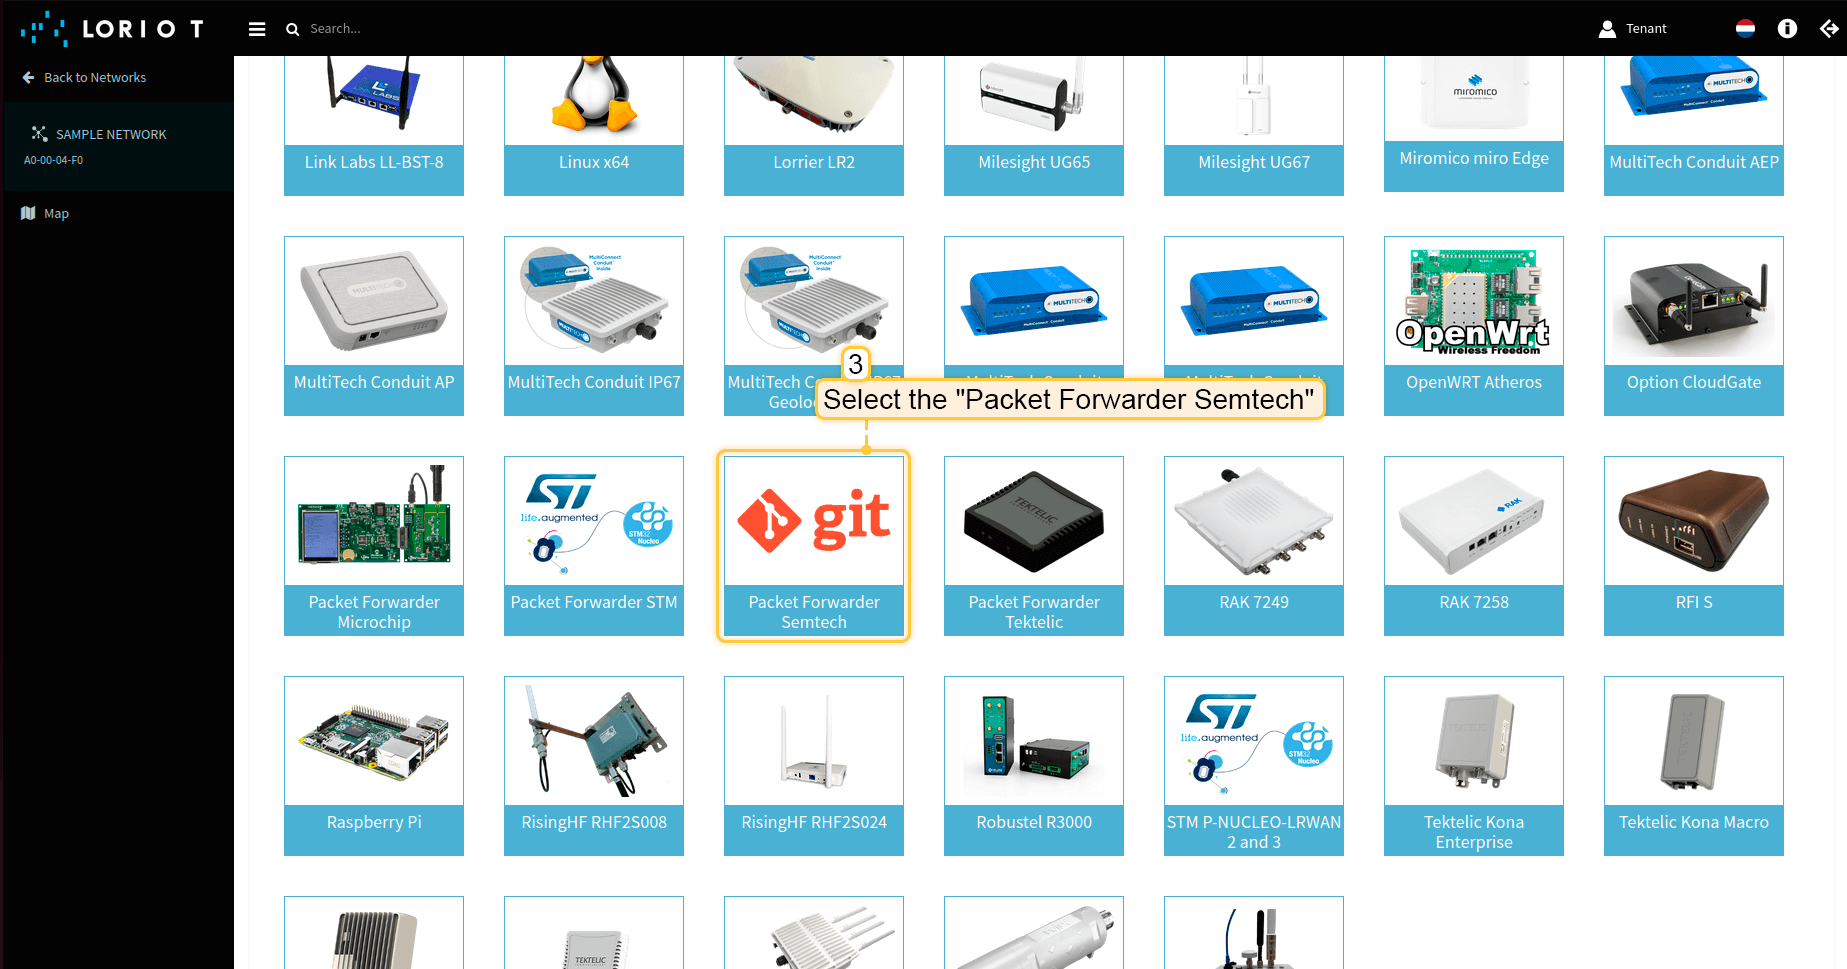 向下滚动并选择“Packet Forwarder Semtech”。 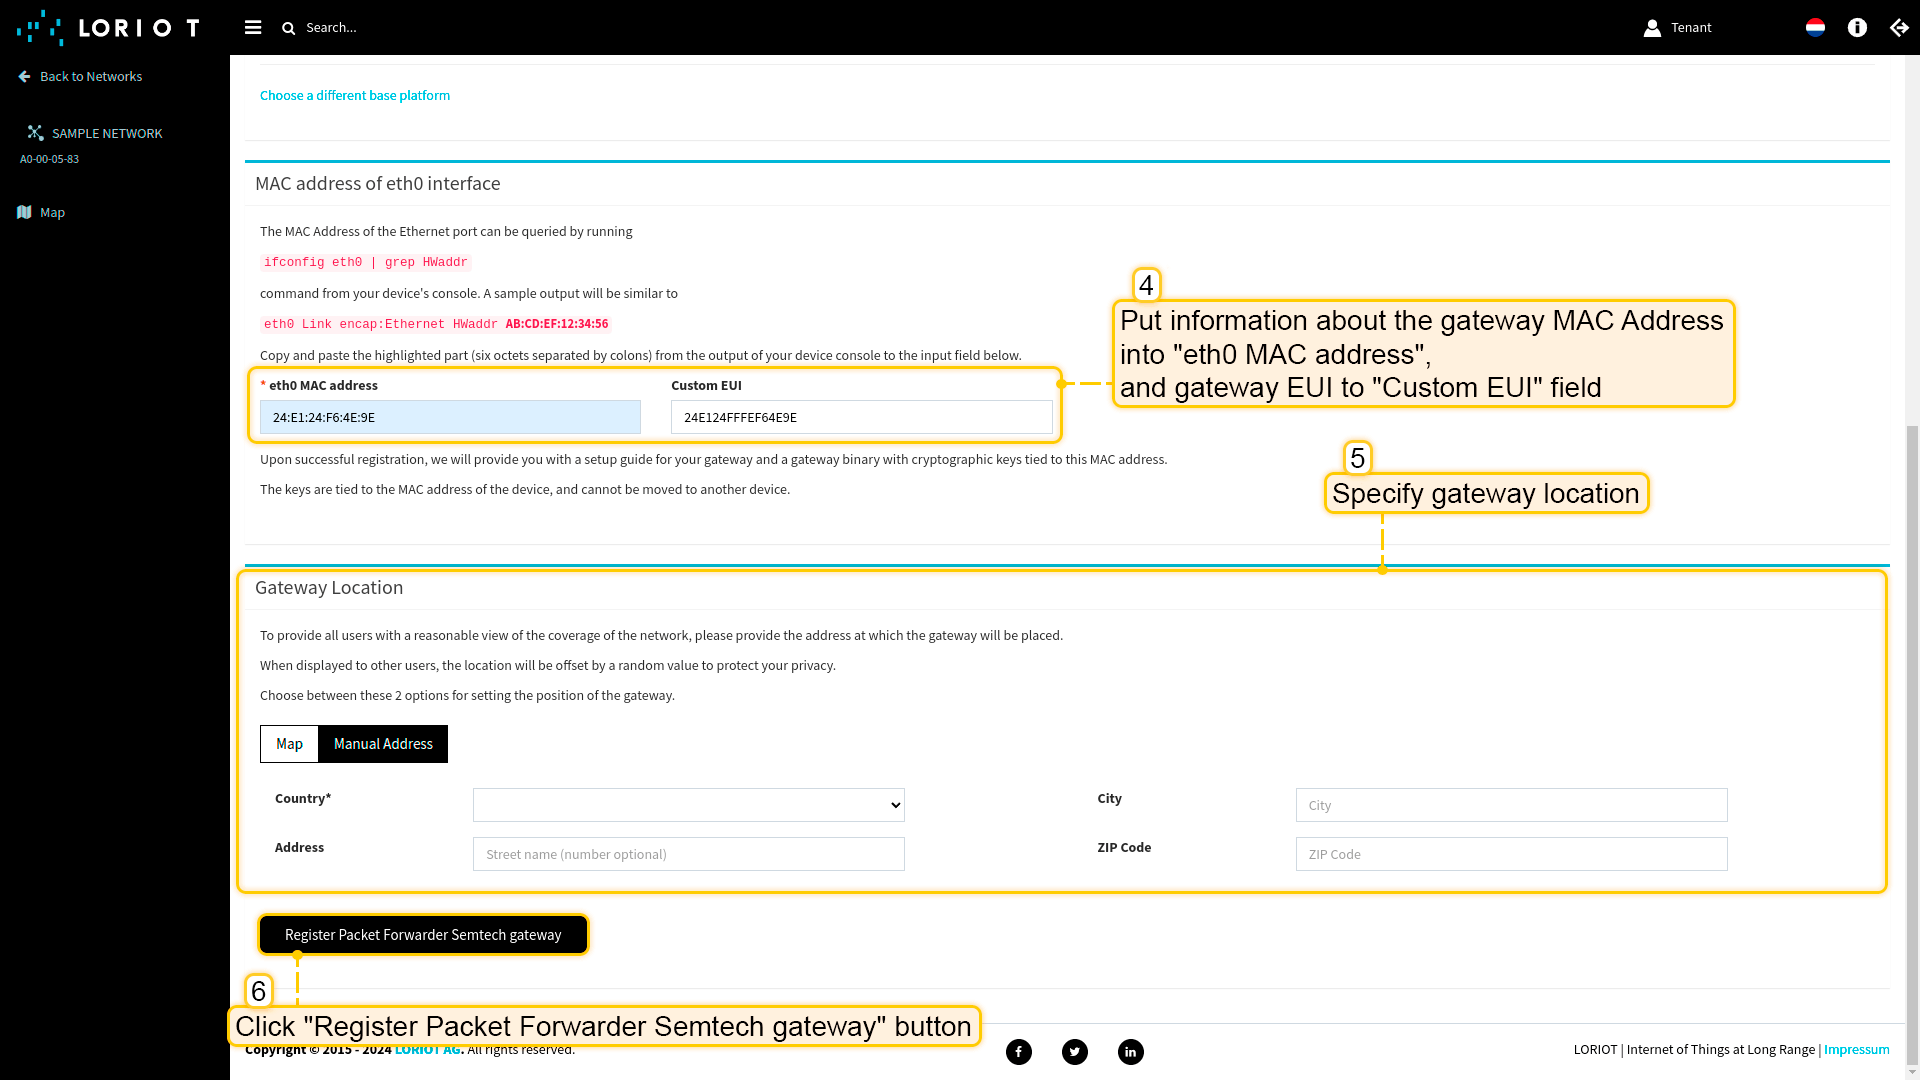 向上滚动,将网关的 MAC地址(从网关EUI中去除中间的 FFFF 或 FFFE 后得到)填入 eth0 MAC address 字段,将网关EUI填入 Custom EUI 字段。  网关已添加。您可看到其状态为已断开连接。 配置网关以发送数据要将网关连接并发送数据到Loriot,需要配置网关。 请按以下步骤操作:
打开网关控制面板。进入“Packet Forwarder”页面,点击“加号”按钮添加新转发器。 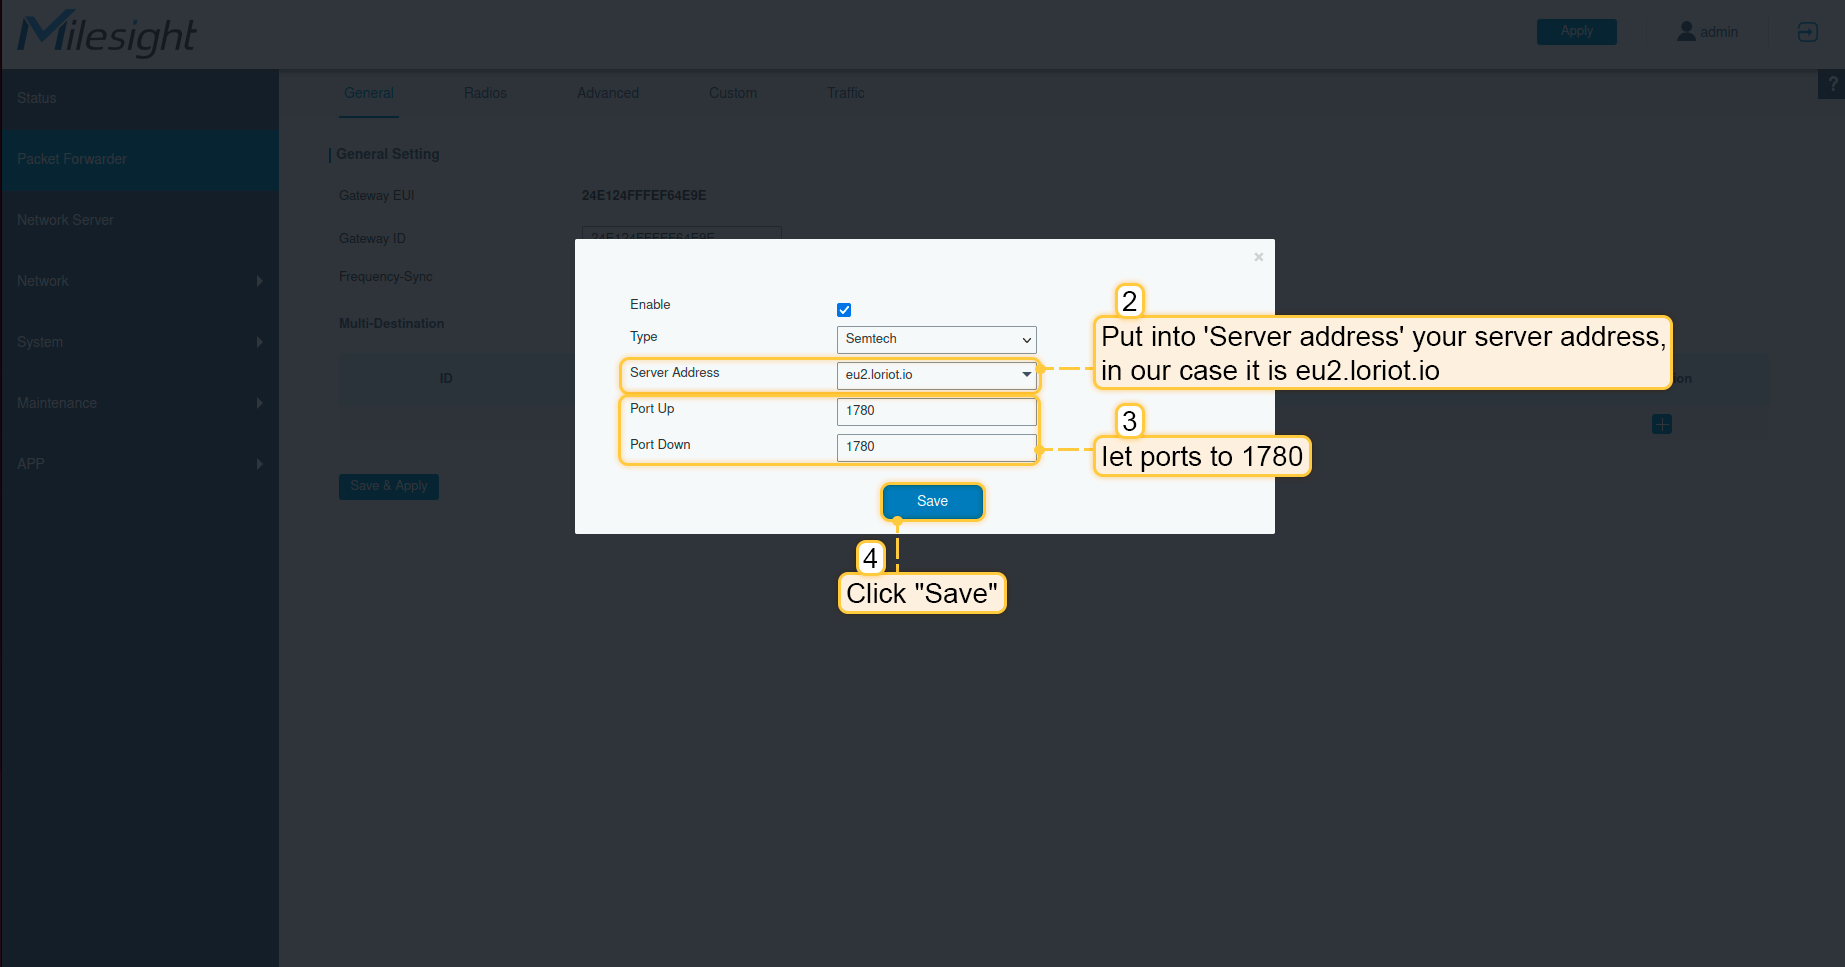 在 服务器地址 中填入您的服务器地址,我们的示例为 eu2.loriot.io。将端口设置为 1780。点击“保存”按钮。 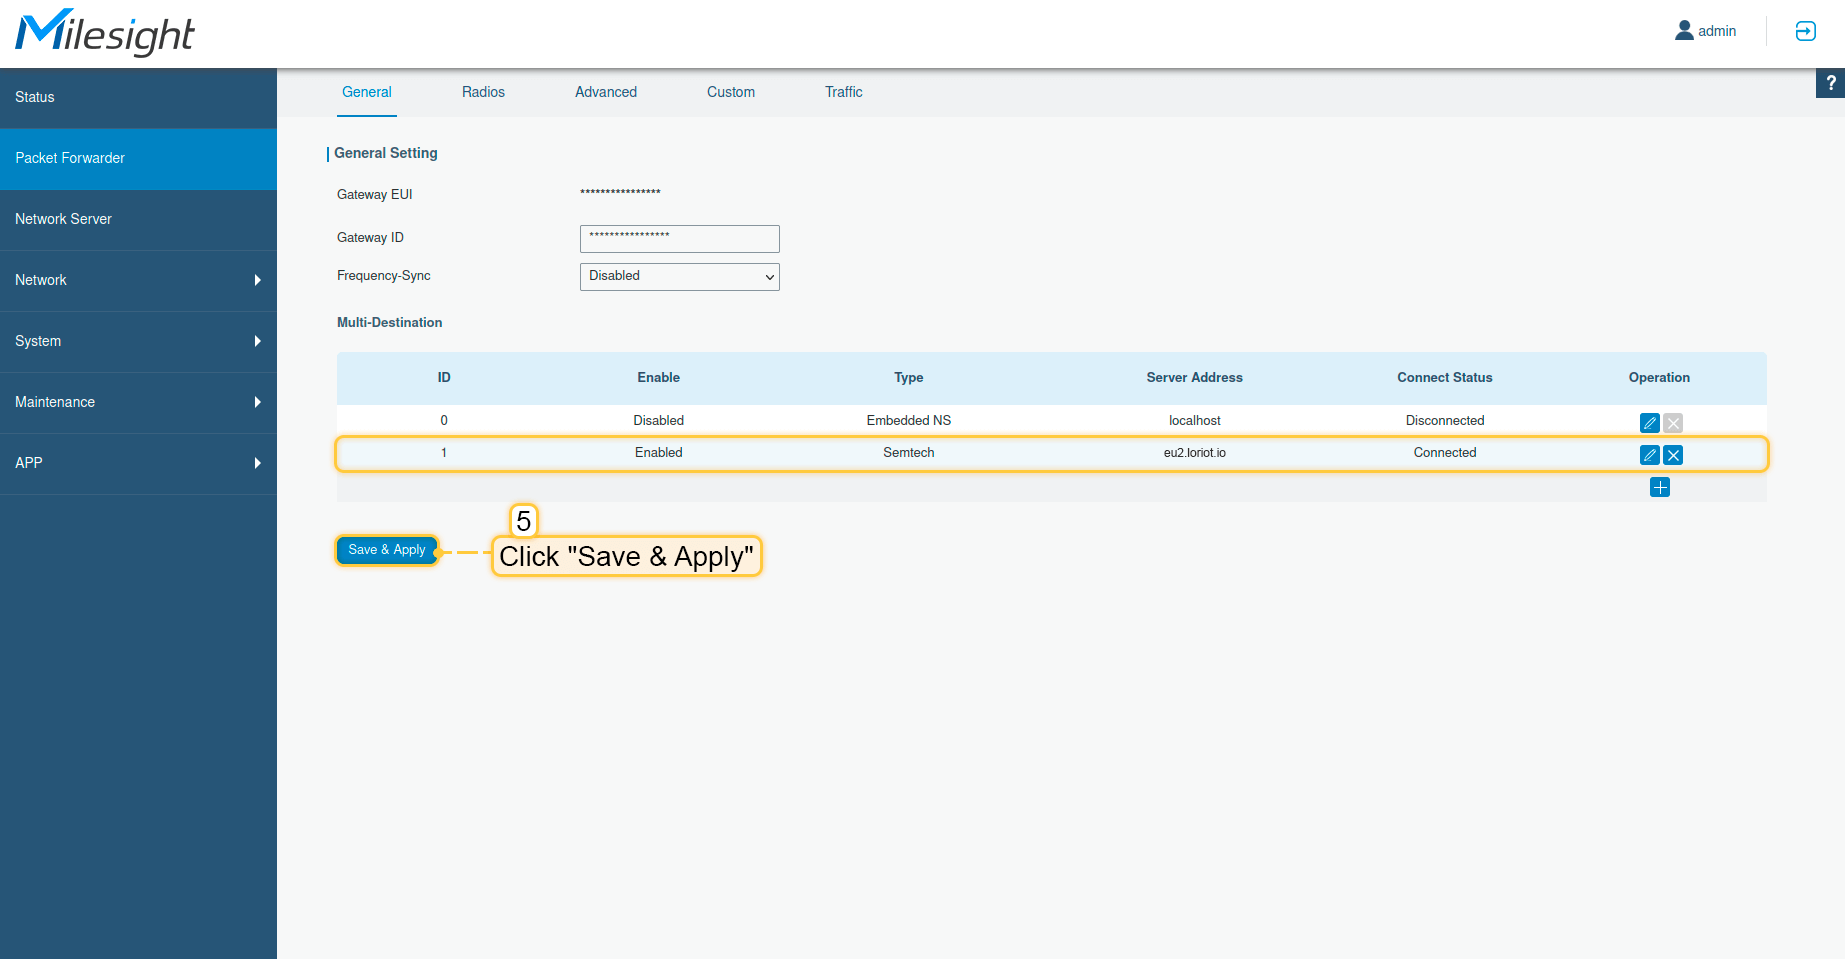 点击“保存并应用”按钮。 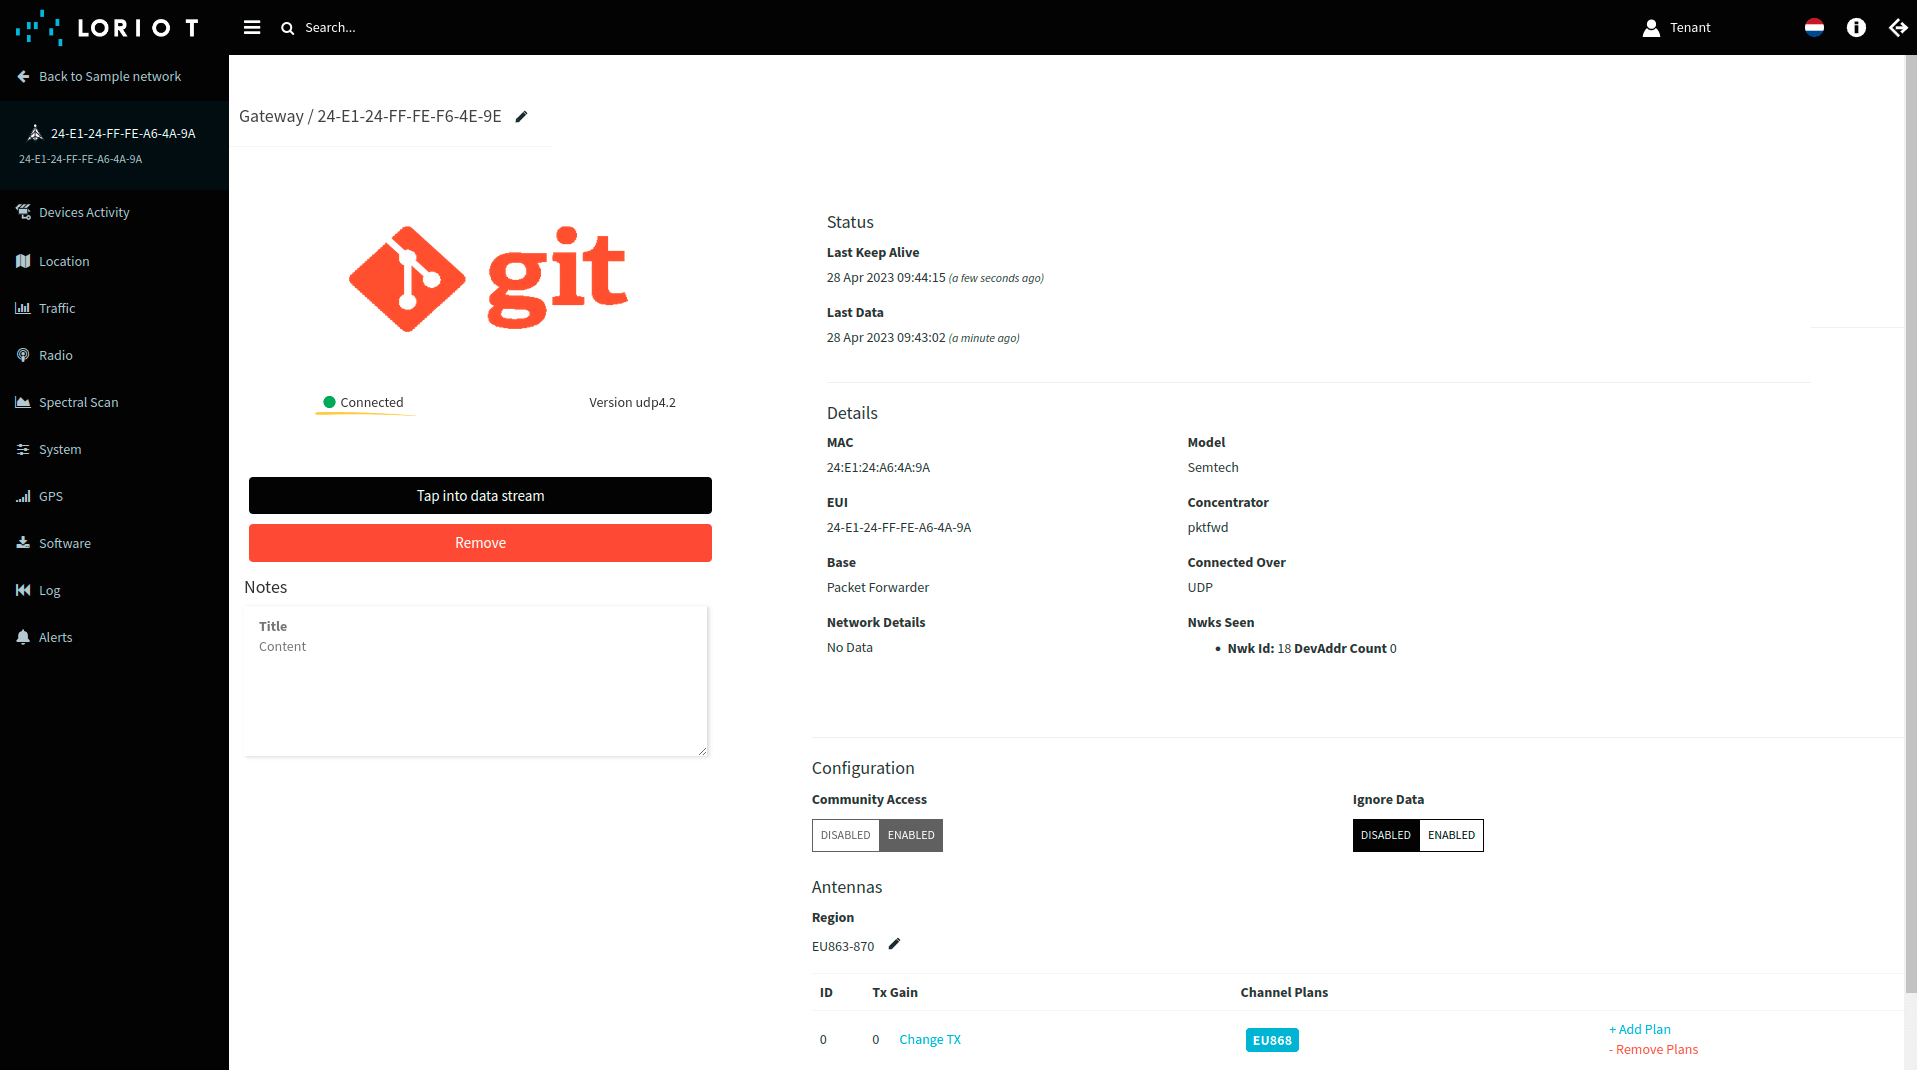 现在可以在Loriot上检查网关状态,应显示为已连接。 至此,网关已能够向网络服务器发送数据。 在Loriot上配置应用现在需要在Loriot中复制“应用ID”。在ThingsBoard中配置集成时需要用到。 请按以下步骤操作:
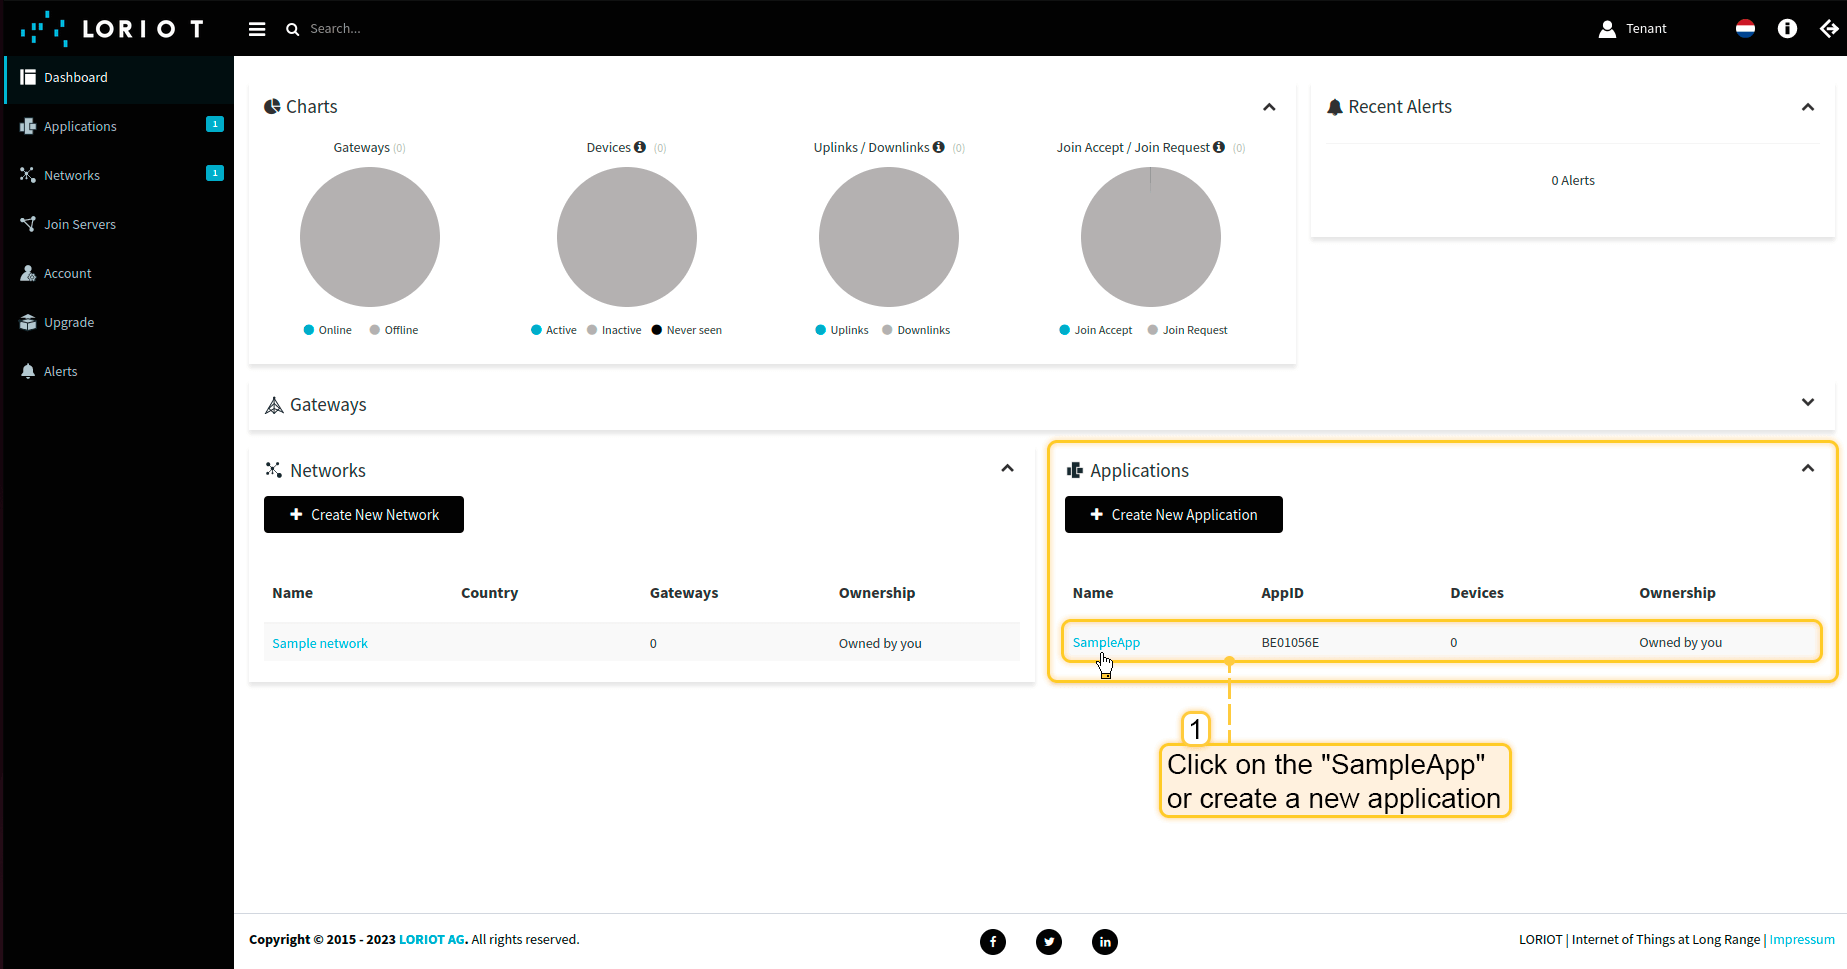 在左侧菜单中进入“应用”,选择“SampleApp”或创建新应用。 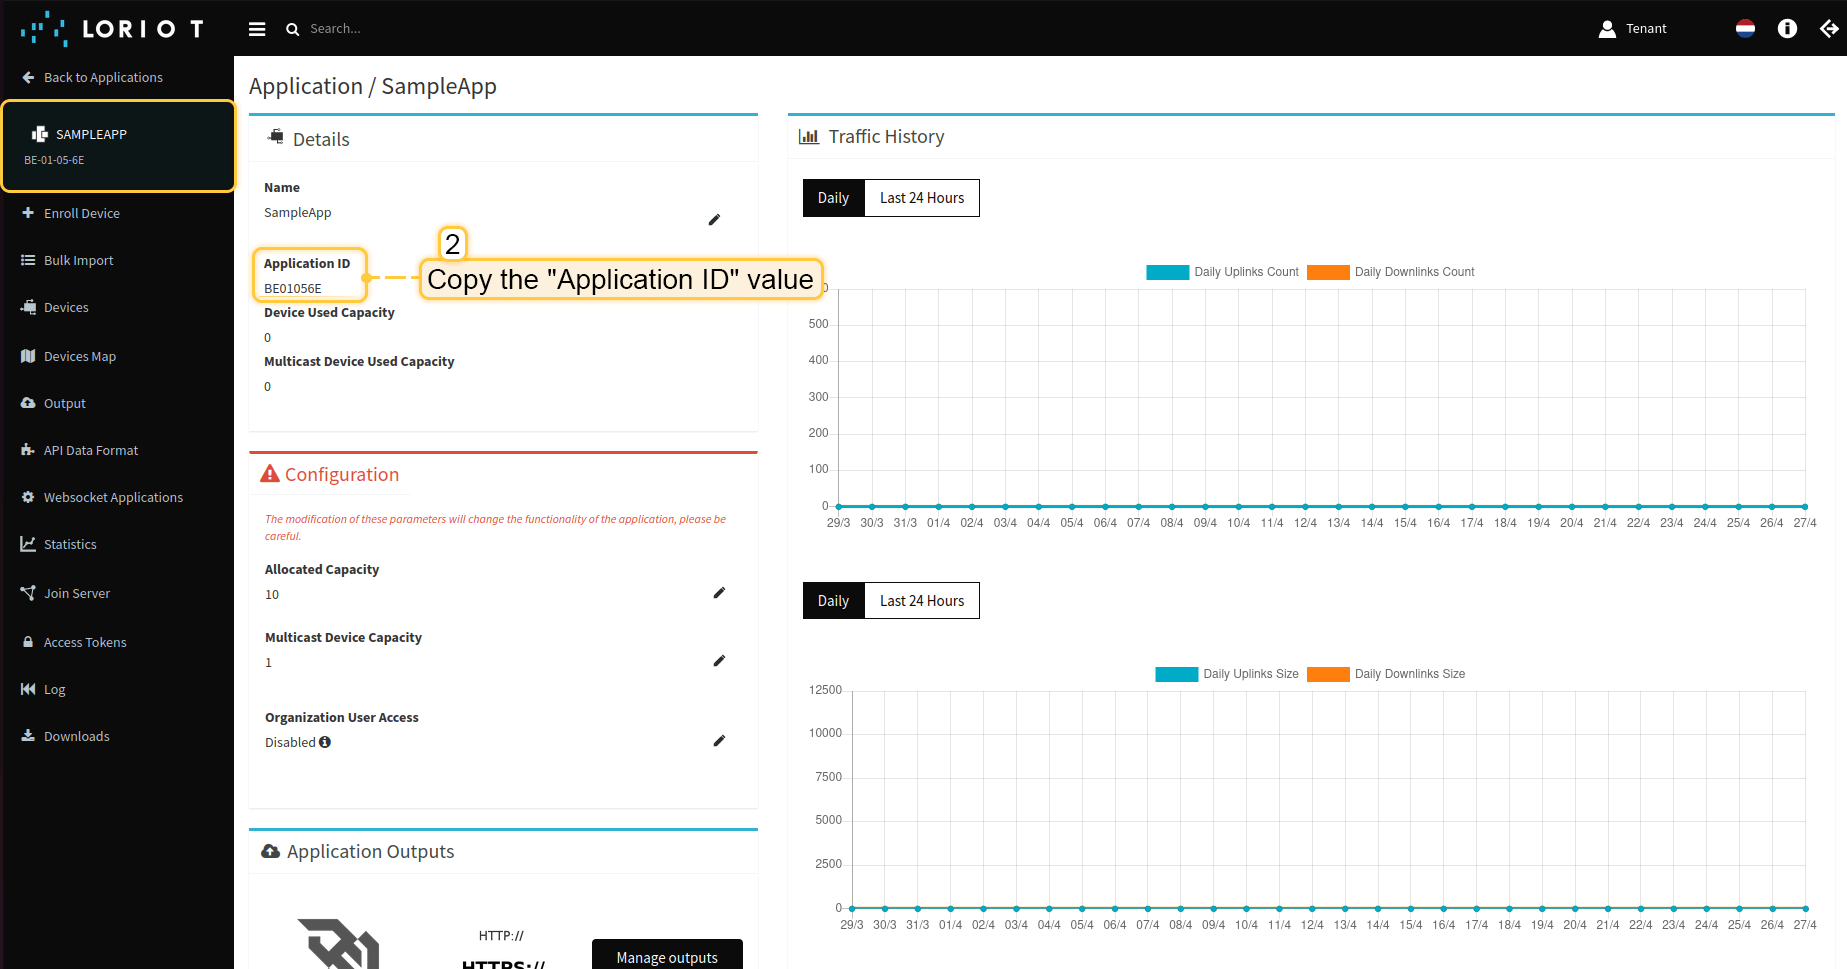 复制“应用ID”值并保存。 现在可以前往ThingsBoard配置集成。 在ThingsBoard中创建集成接下来,我们将在ThingsBoard中创建与Loriot的集成。 首先,复制以下代码,创建上行数据转换器时需要用到:
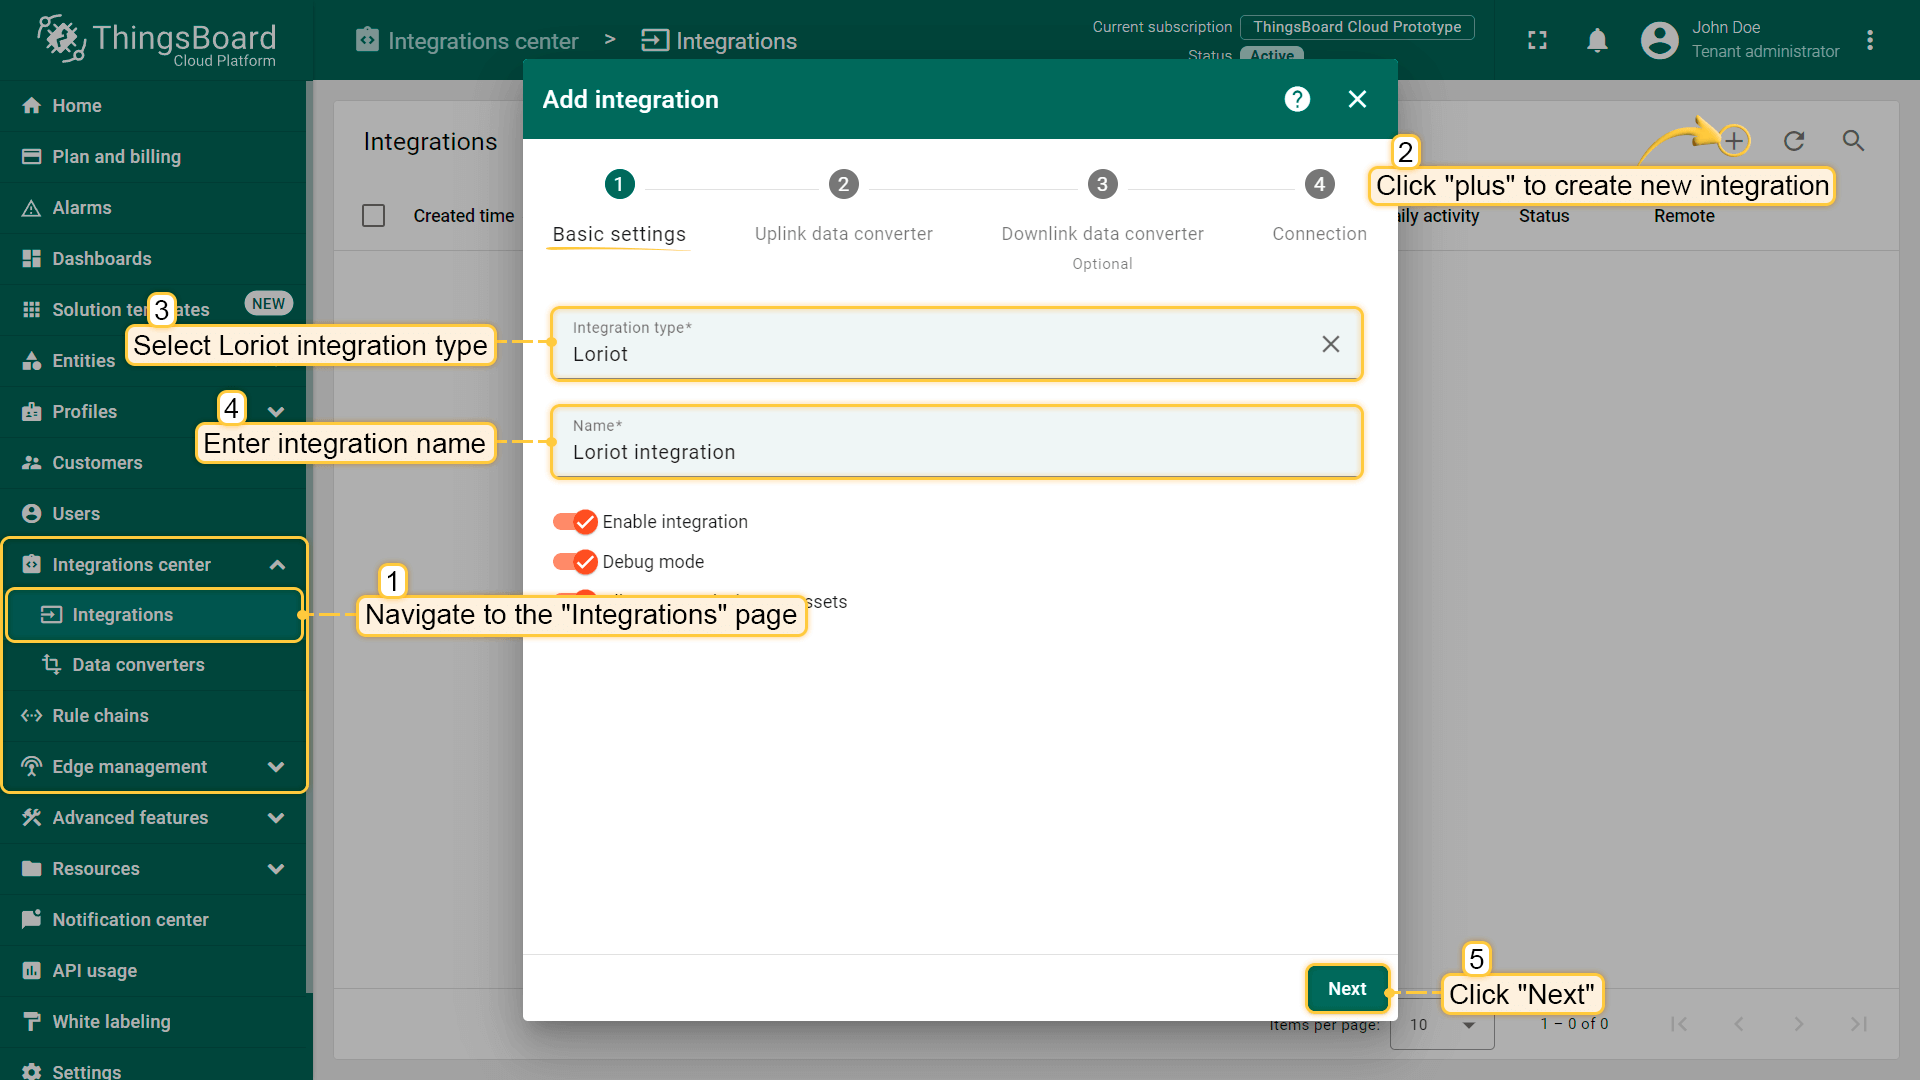 点击“加号”按钮添加新集成。选择类型“Loriot”。然后点击“下一步”。 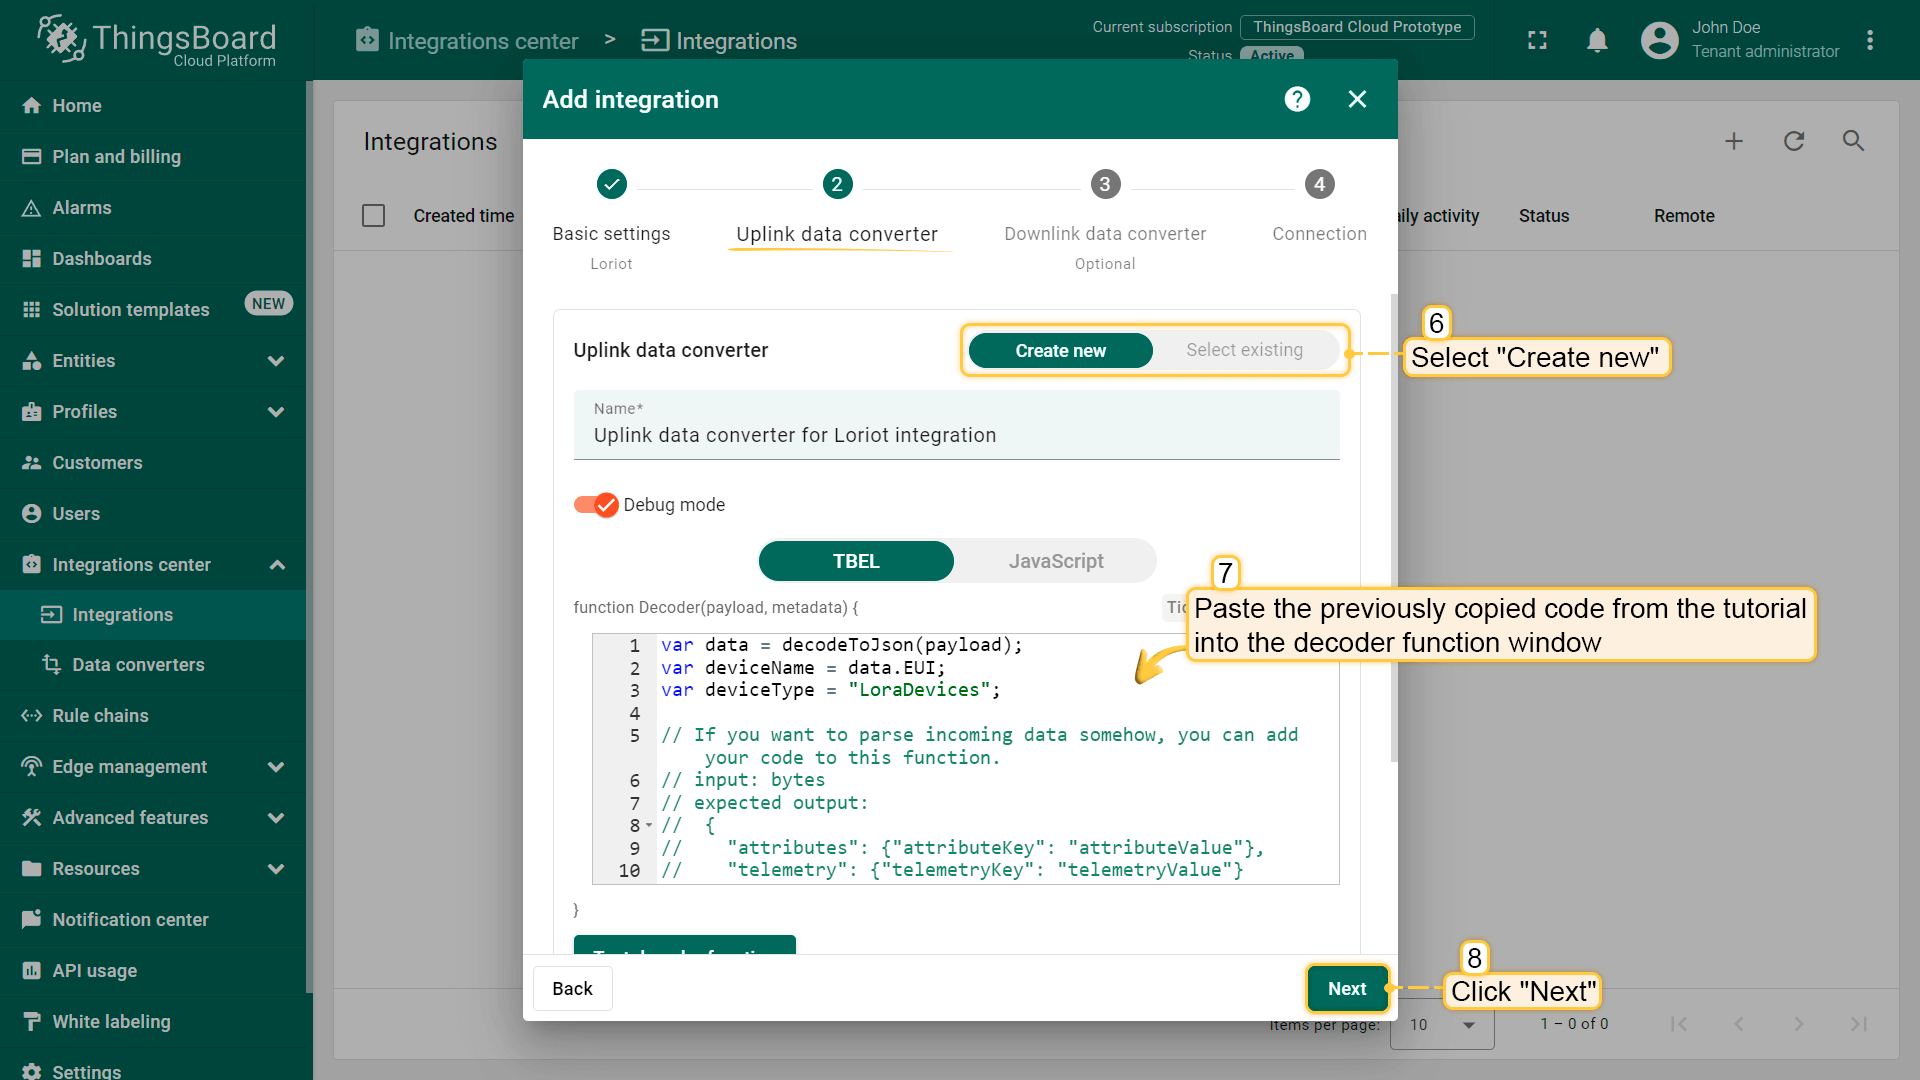 将先前复制的脚本粘贴到解码器函数区域。点击“下一步”。  将“下行数据转换器”字段留空。点击“跳过”按钮。 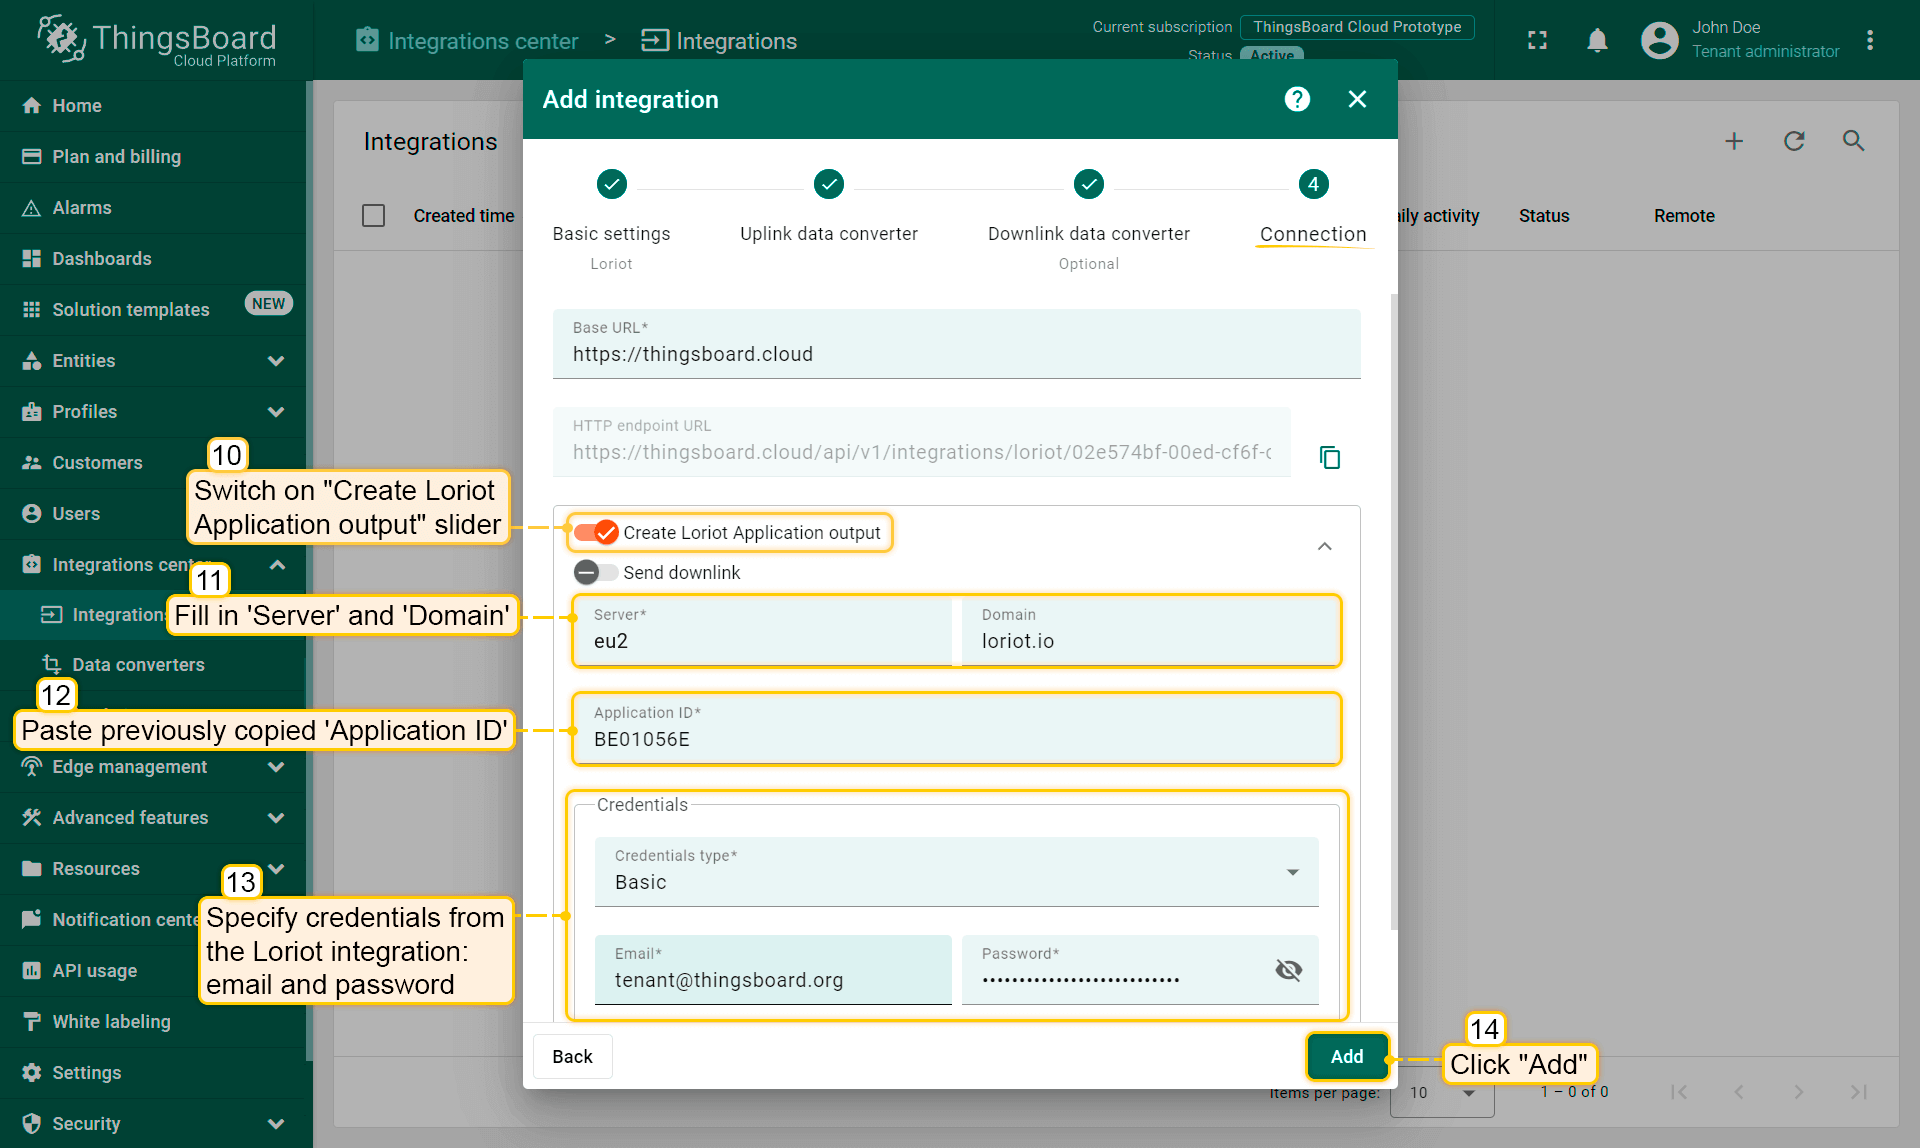 填写您的参数,然后点击“添加”按钮。 集成已创建。
若看到 STARTED 事件且状态为 Success,则表示集成已成功启动,可以接收消息。
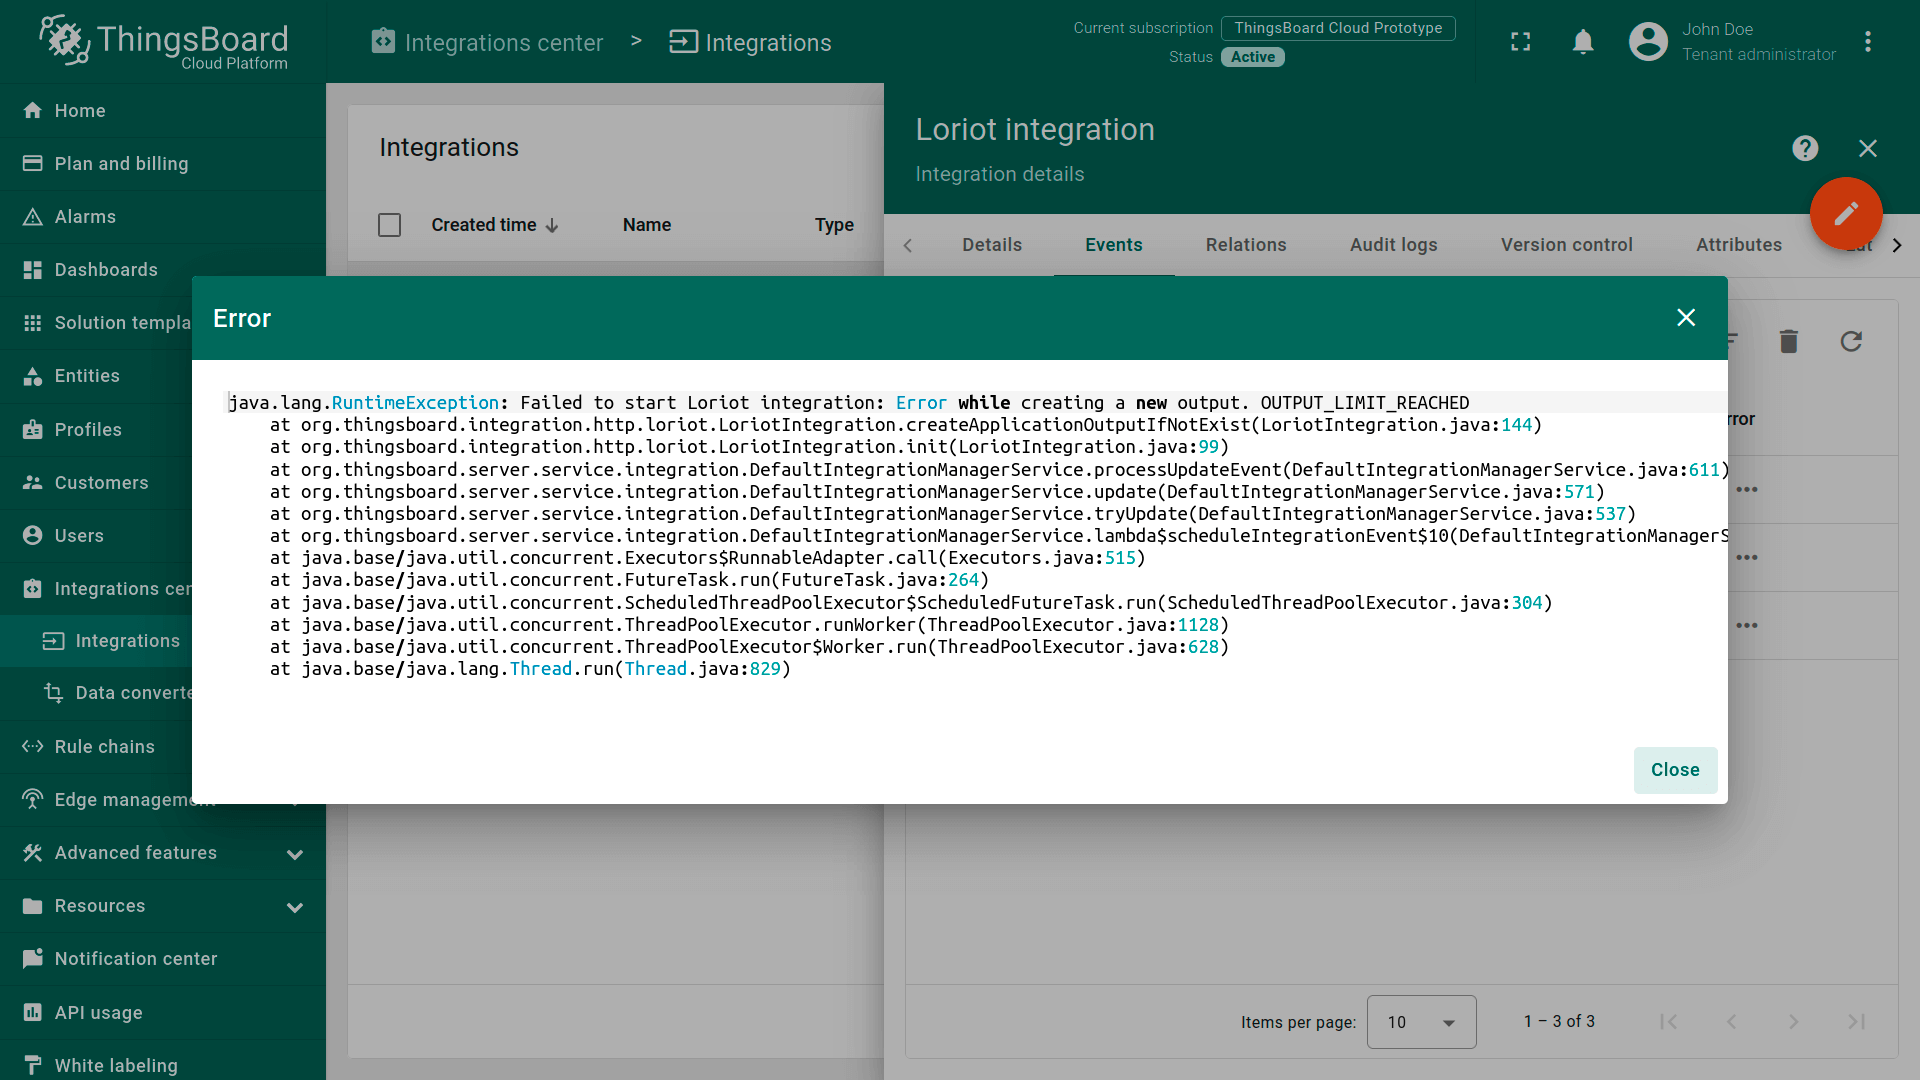
故障排查若看到以下错误信息,表示输出未自动创建。
您可以手动配置:
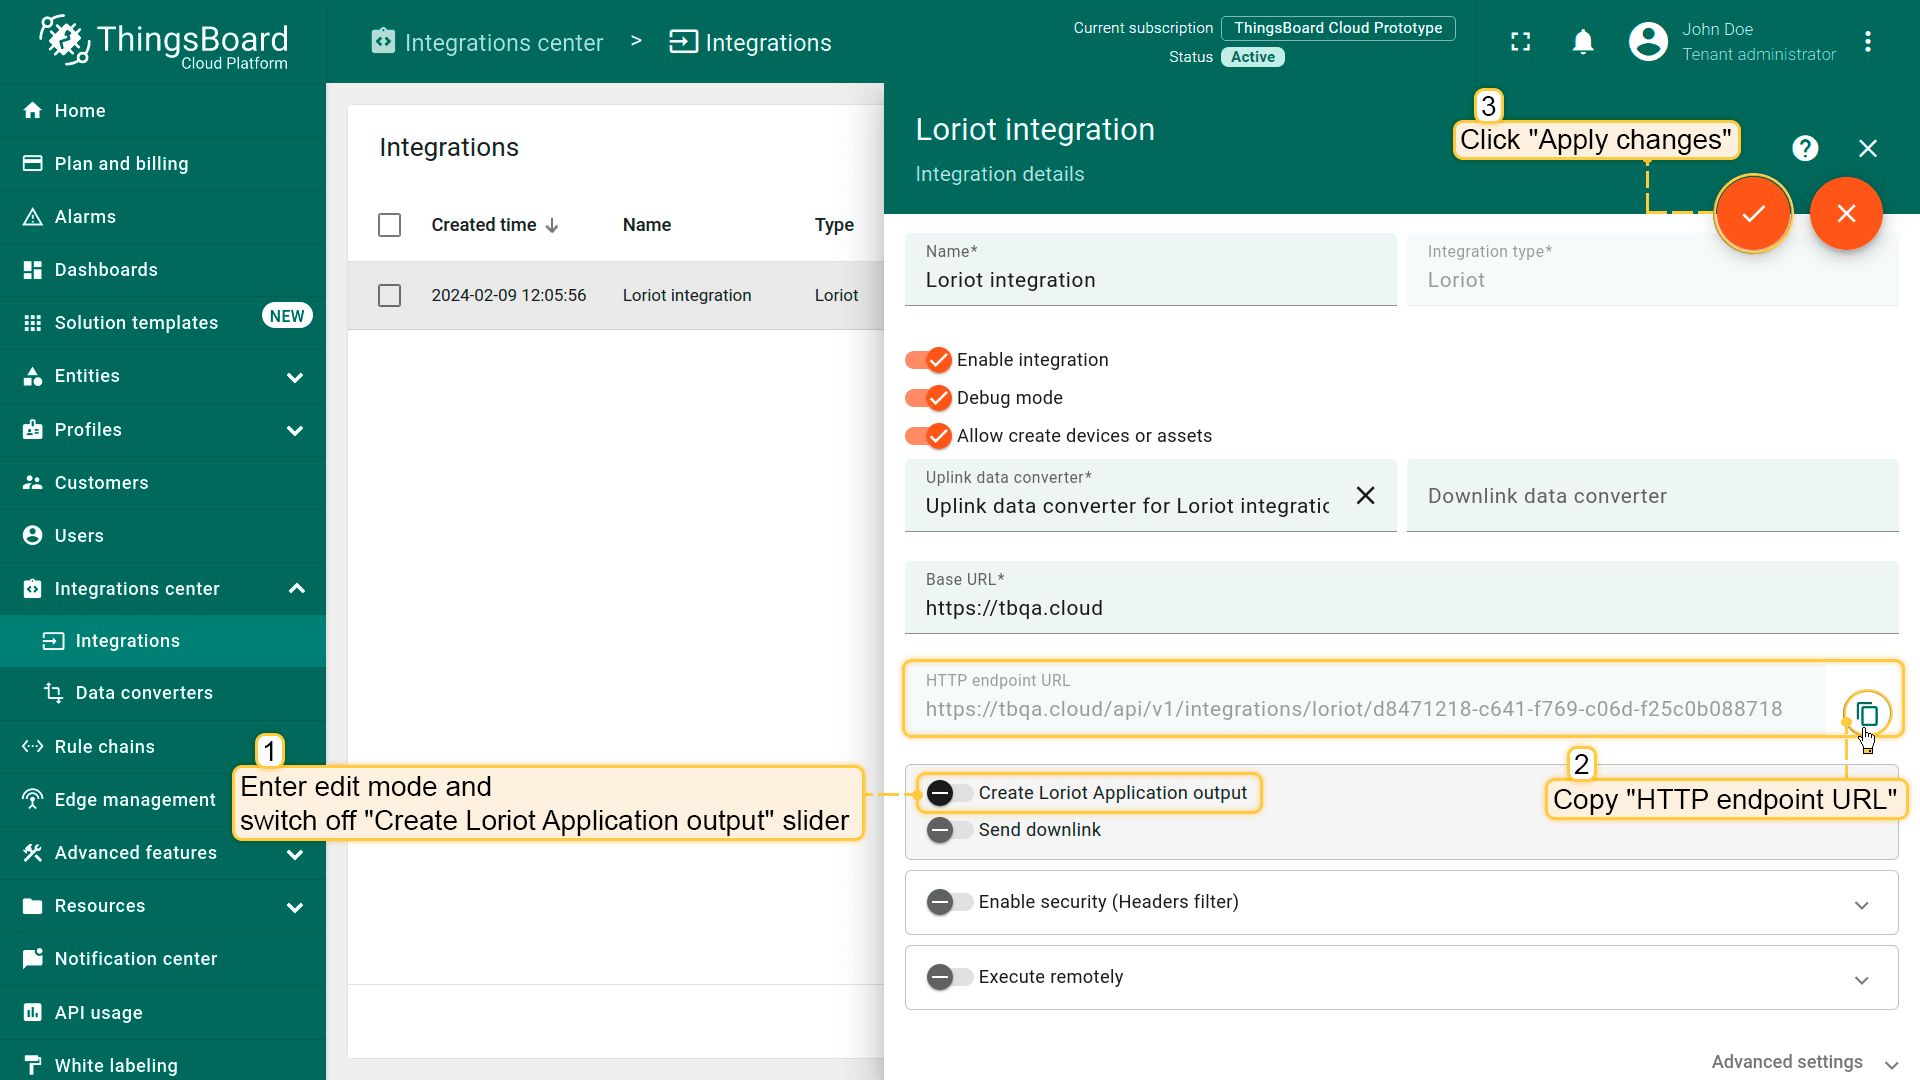 进入ThingsBoard Loriot集成的编辑模式,关闭 “创建Loriot应用输出” 开关并复制 “HTTP端点URL”。然后应用更改; 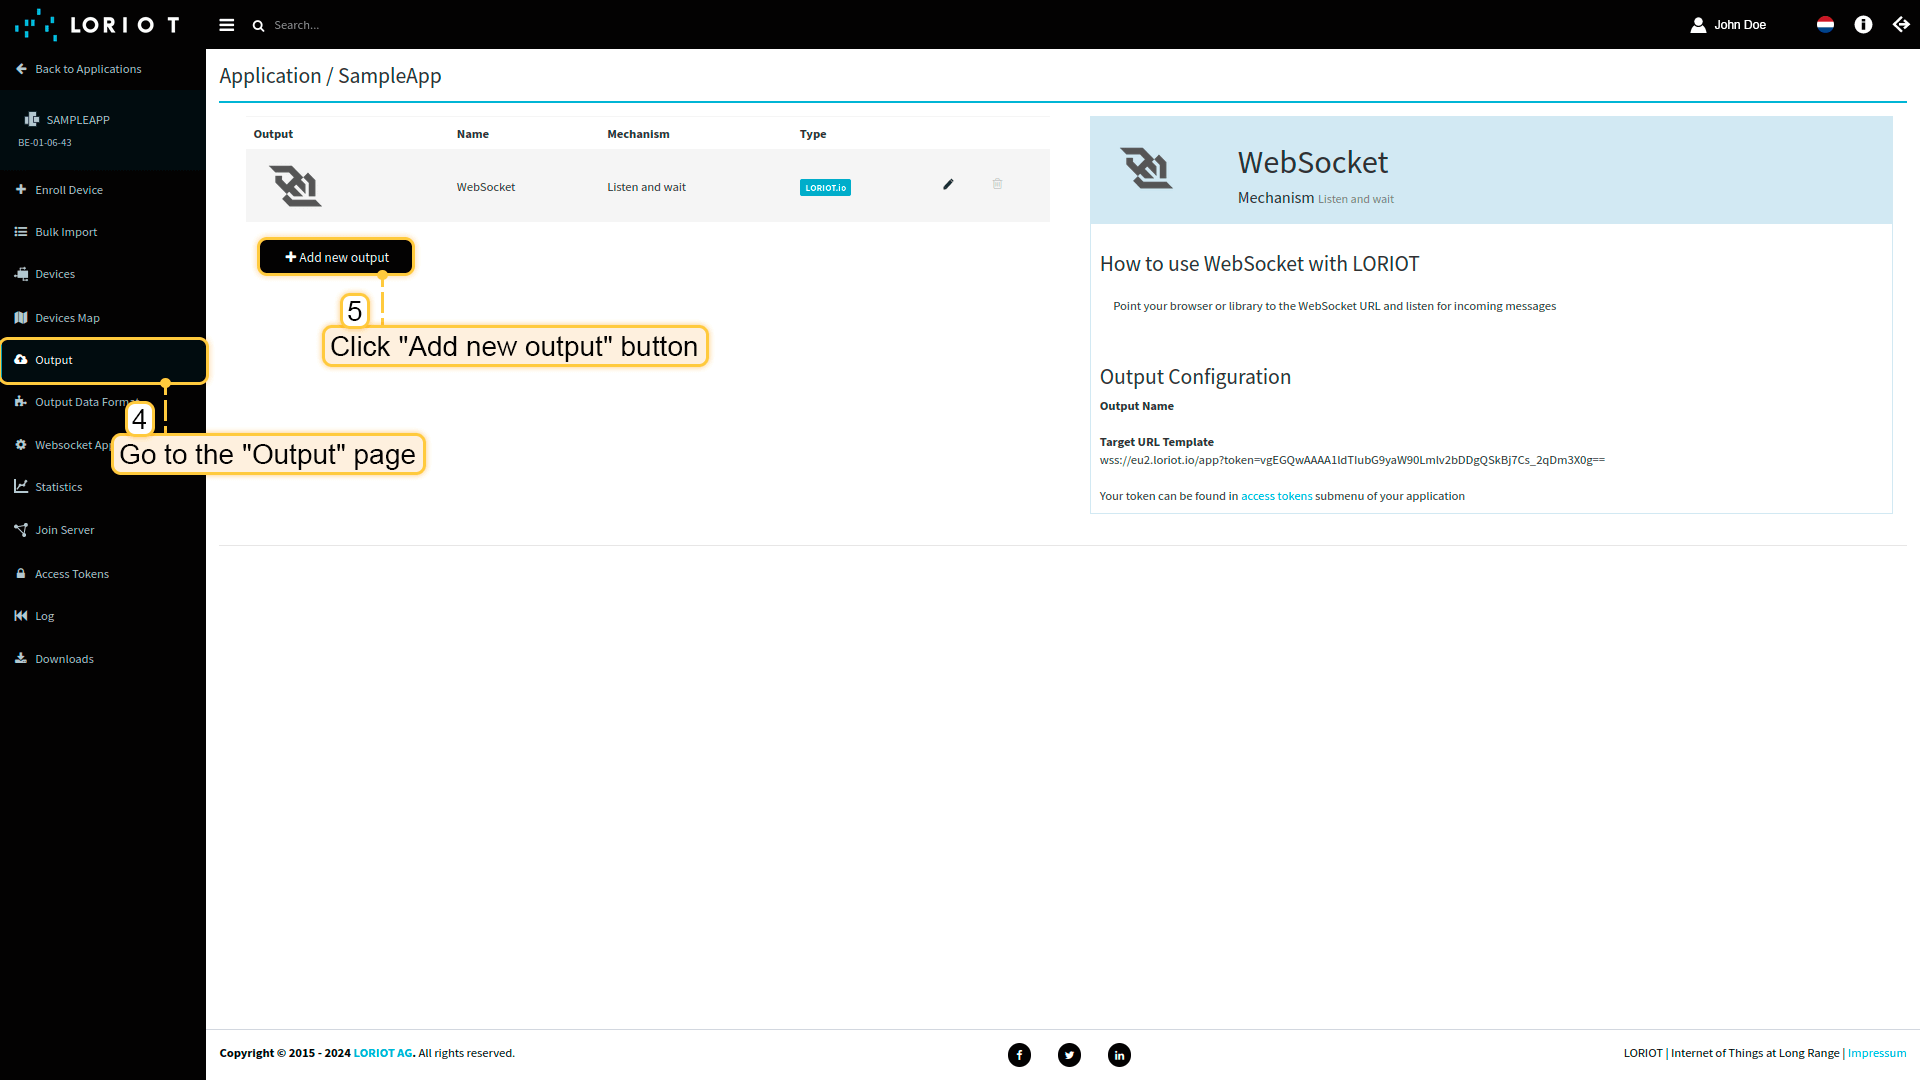 打开 eu2.loriot.io,在左侧面板中进入 “输出” 页面,点击 “添加新输出” 按钮; 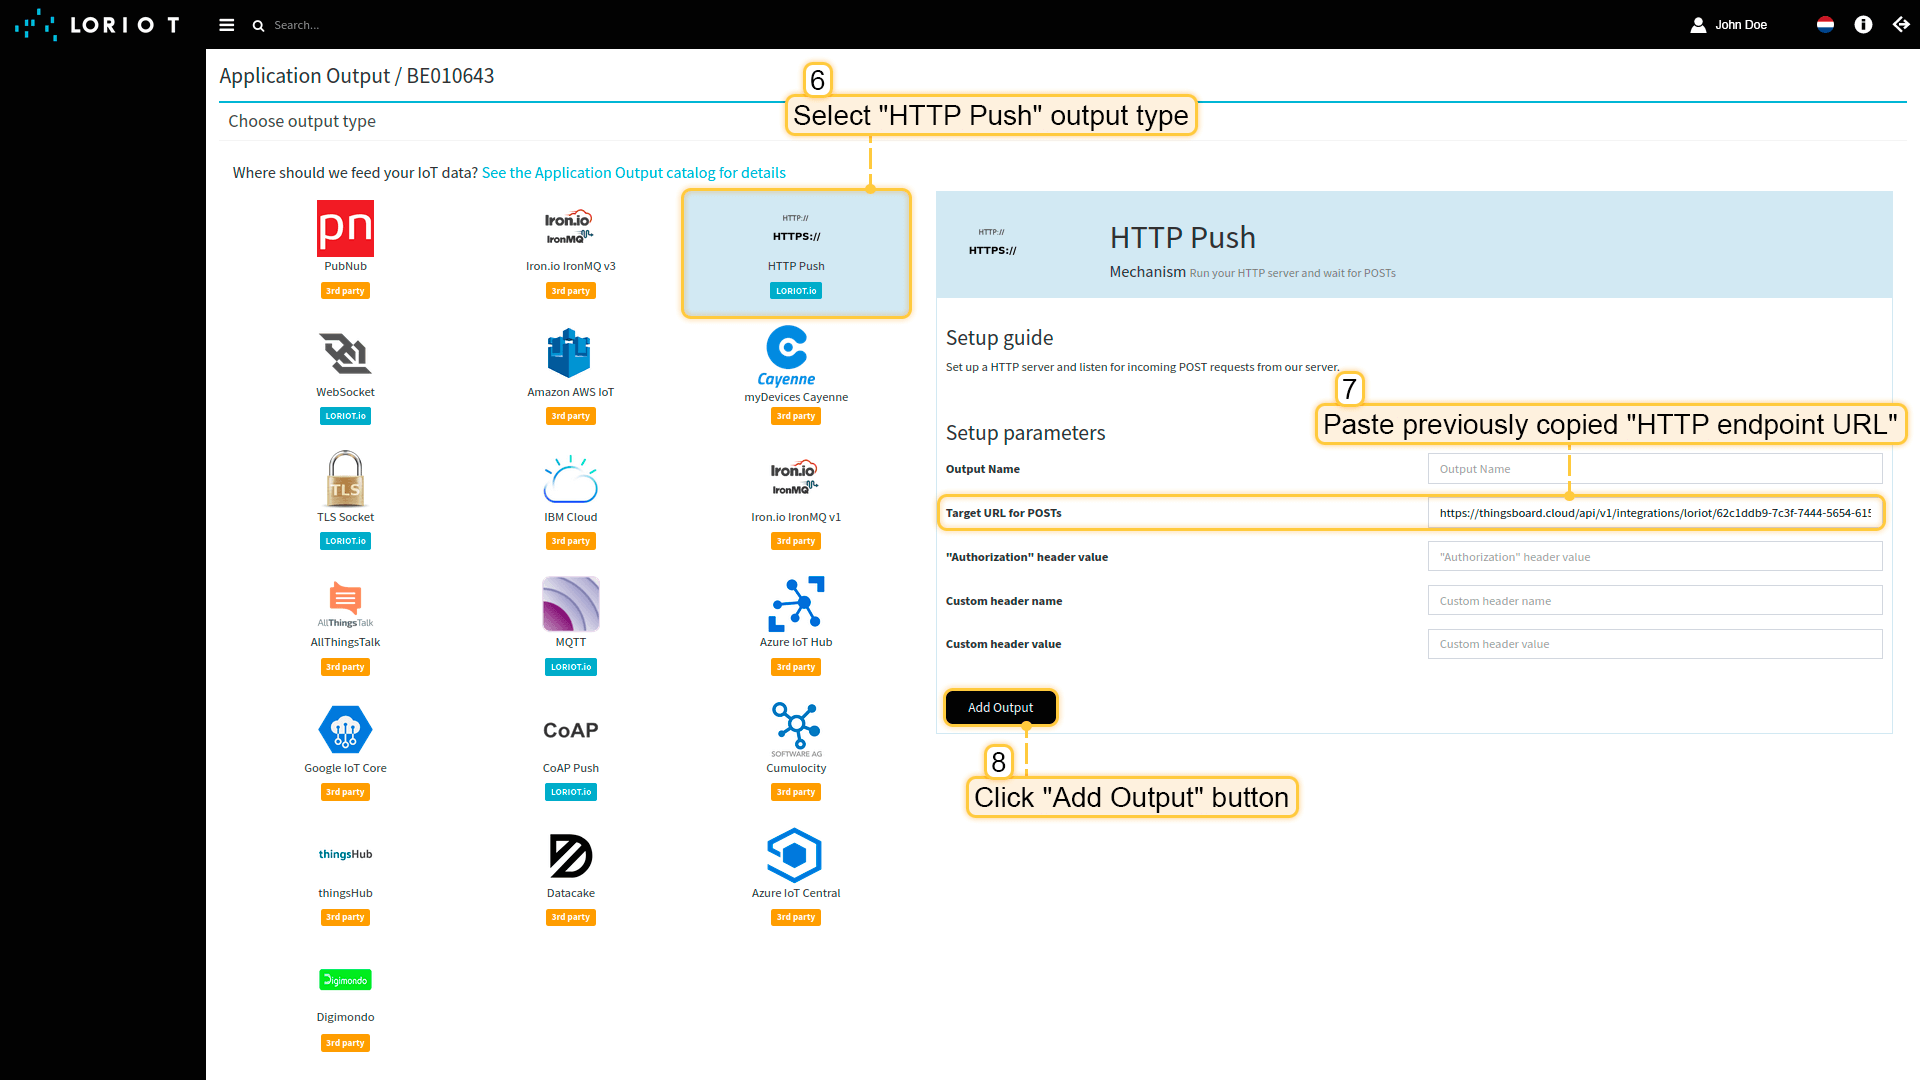 选择 “HTTP Push”。将 “HTTP端点URL” 粘贴到 “Target URL for POSTs” 字段。点击 “添加输出” 按钮; 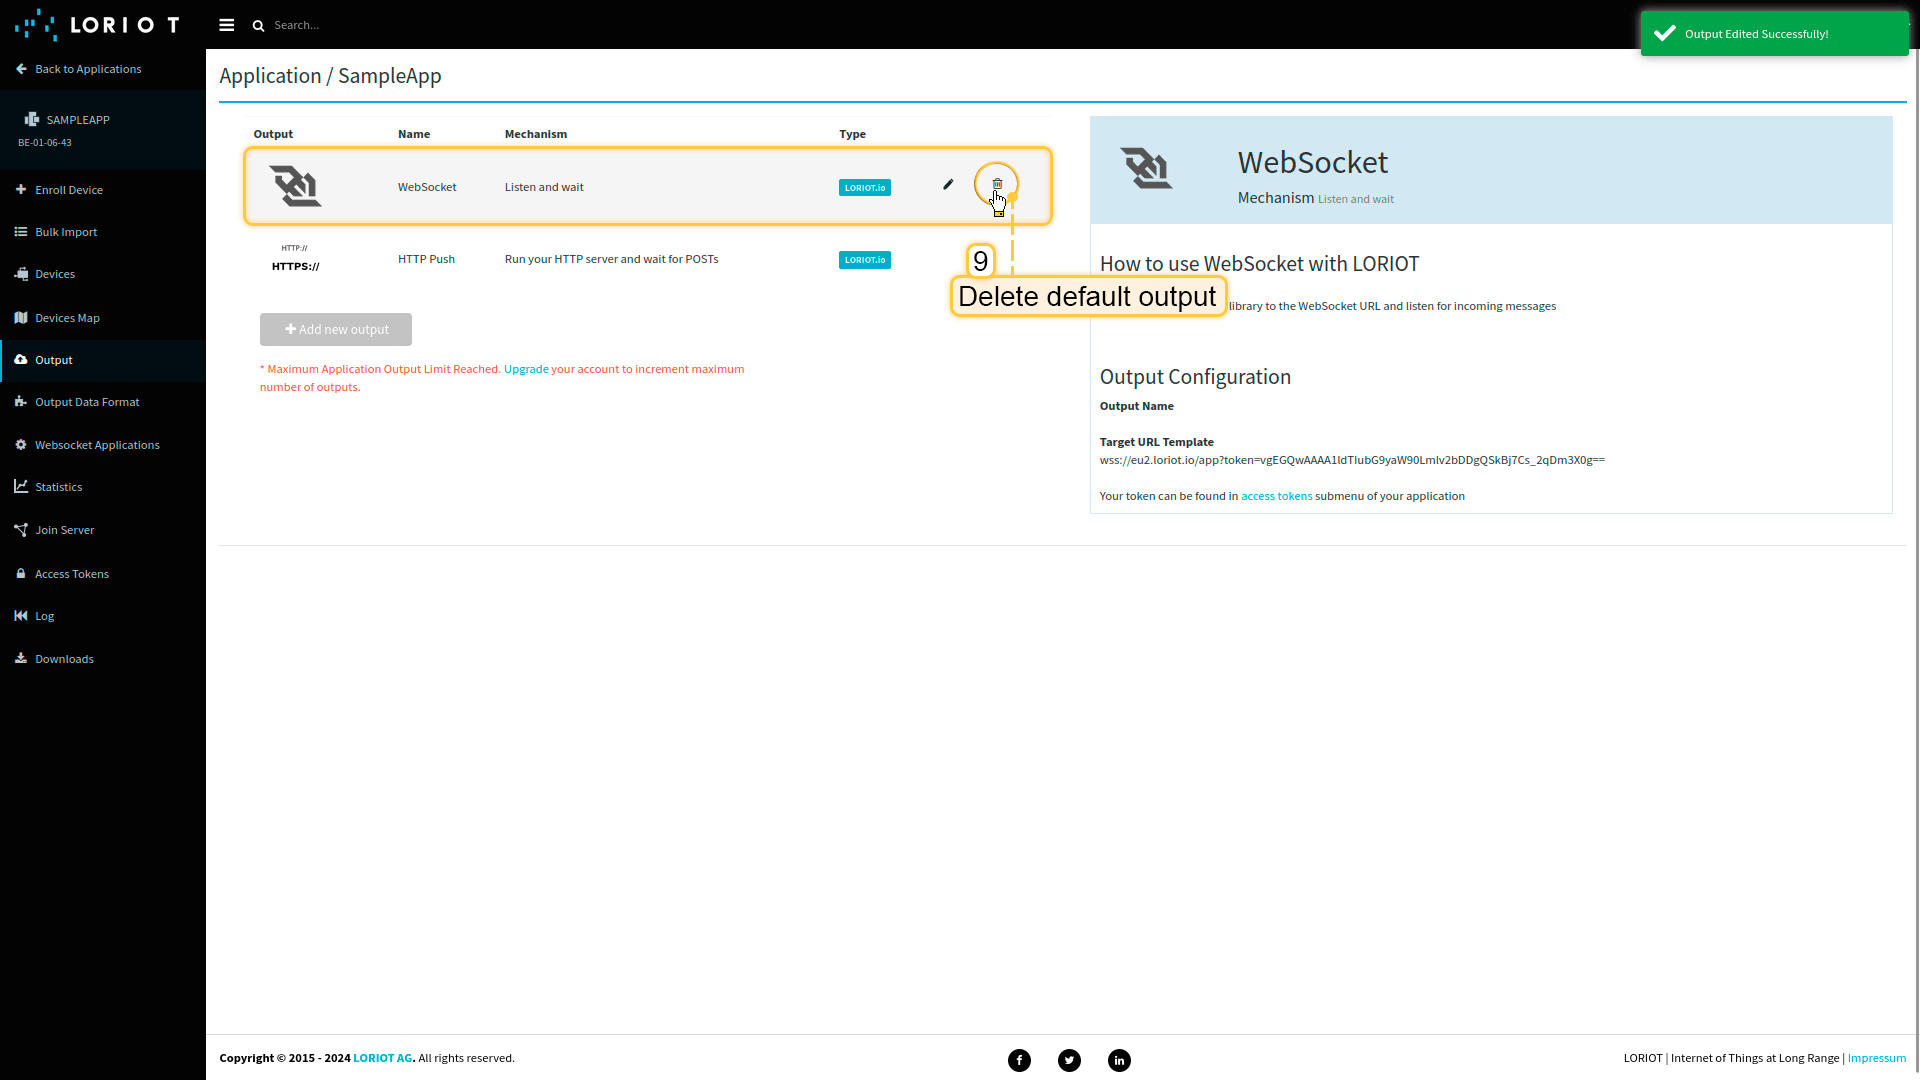 删除默认输出; 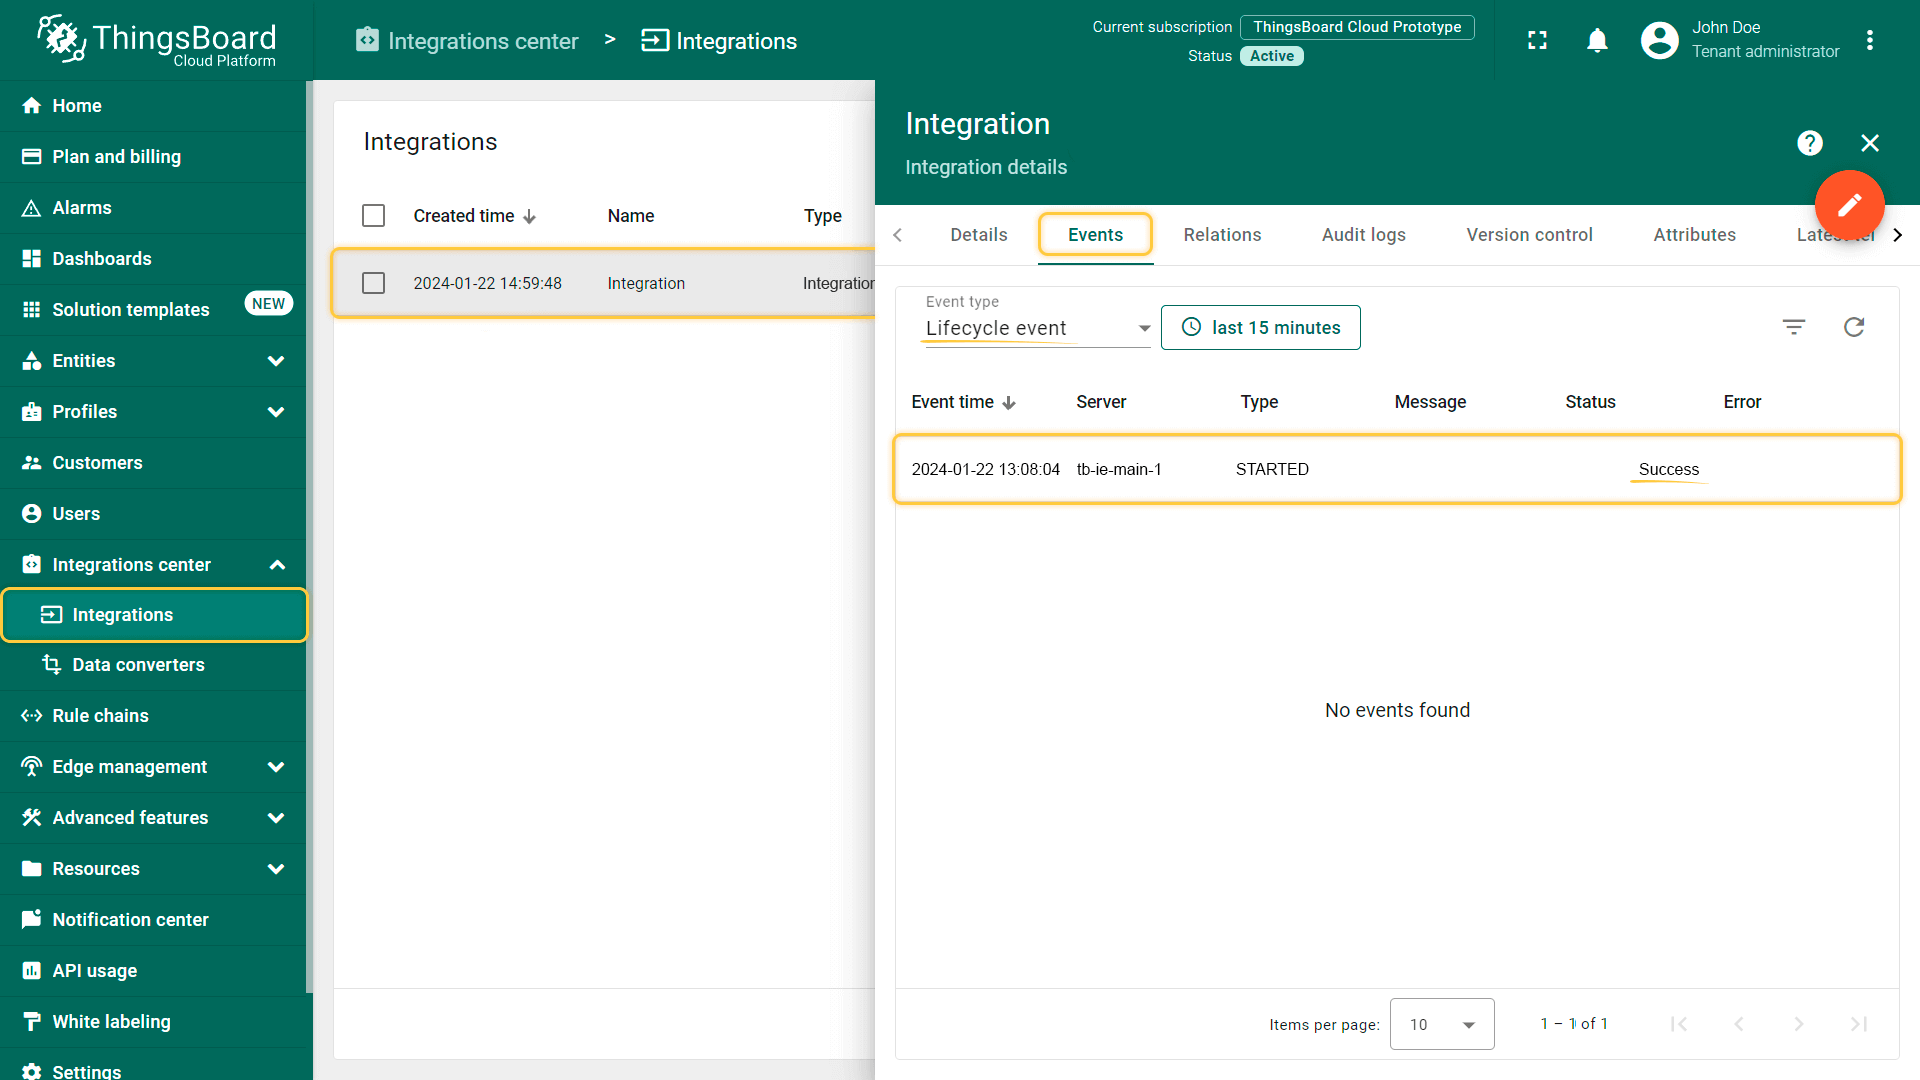 前往云端检查连接状态。 |
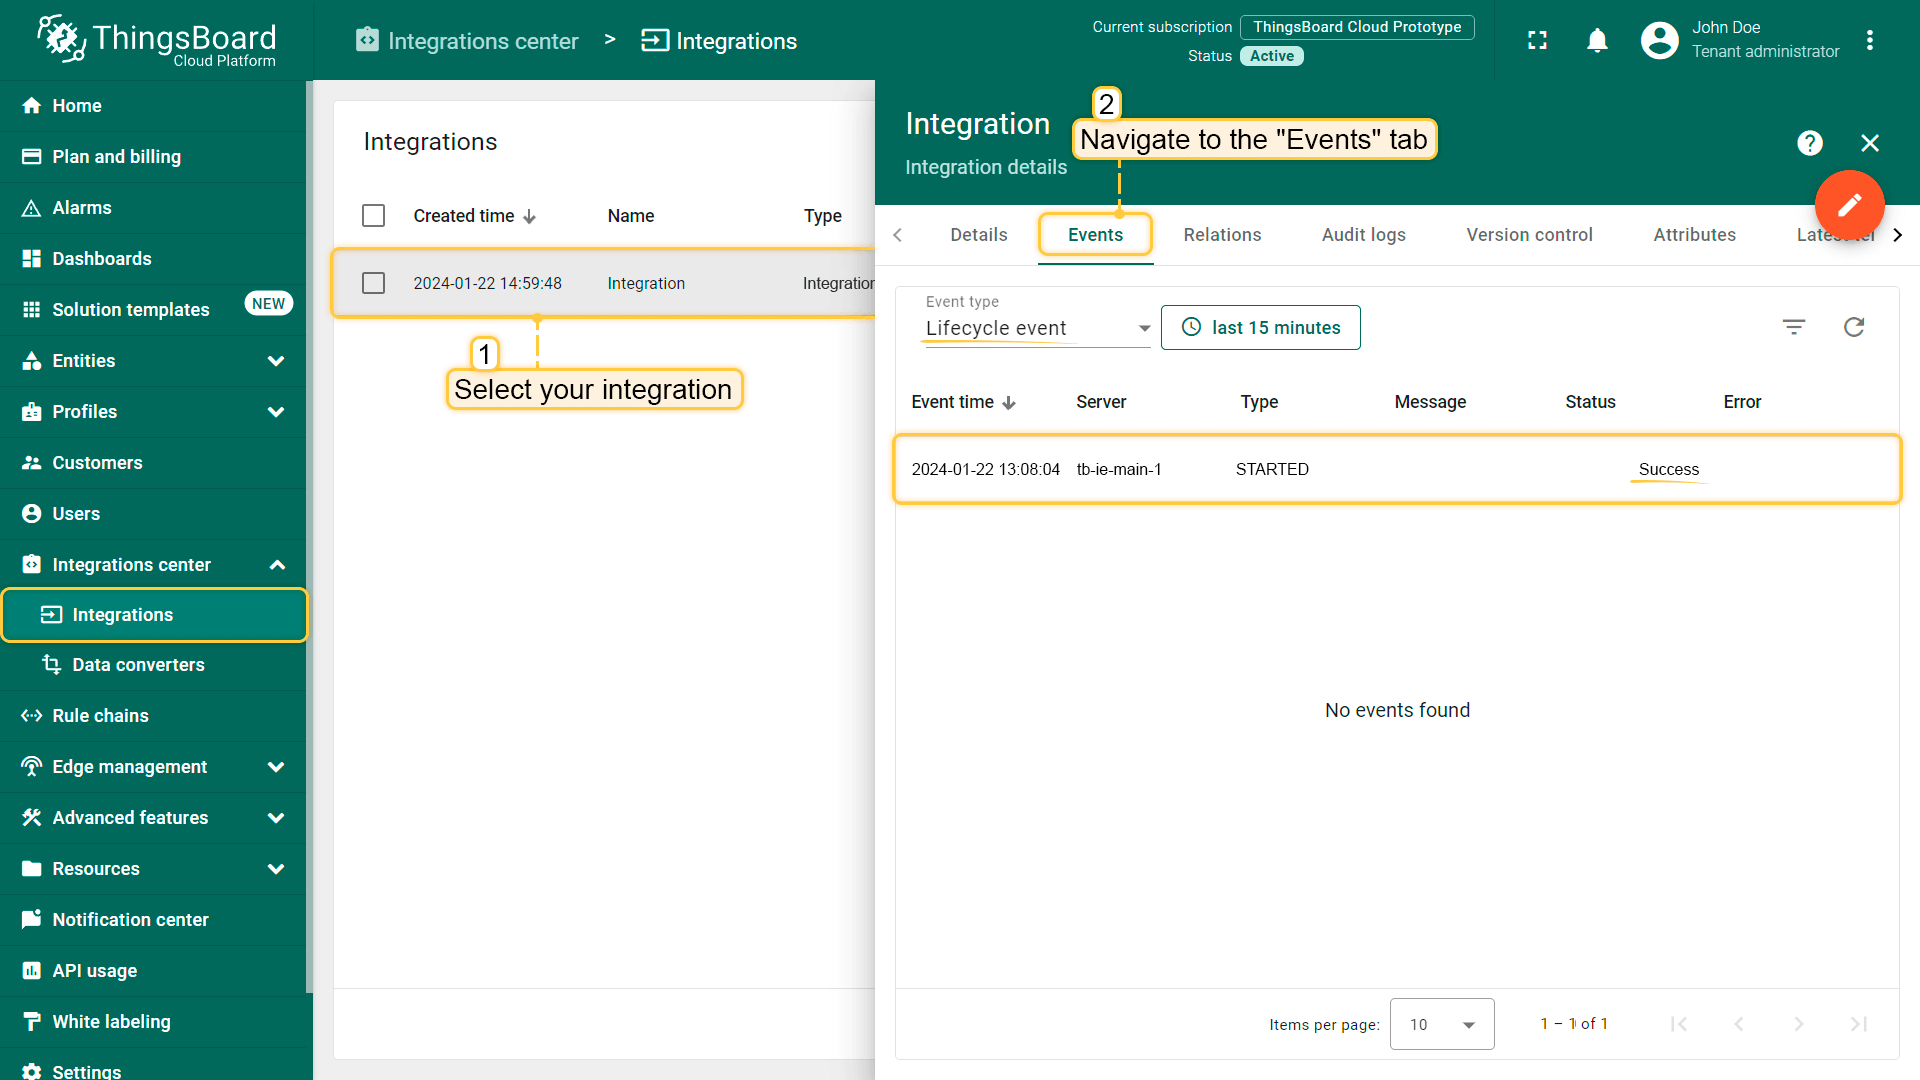
检查集成连接可按以下方式操作:
- 点击列表中的集成行;
- 进入 事件 选项卡;
- 从 事件类型 下拉列表中选择 生命周期事件。
若看到事件 STARTED 且状态为 Success,表示集成已成功启动并可接收消息。
总结
掌握本指南内容后,您可以轻松连接 UG65 LoRaWAN® Semi-Industrial Gateway,并利用内置集成从连接的设备获取数据。
您可以在设备库中找到部分LoRaWAN设备,并通过网络服务器上的网关连接这些设备或其他设备。
设备连接到网关后,即可在ThingsBoard上查看并处理设备上报的数据。
了解更多核心概念与功能,请查阅平台文档。