
- Hardware type: Microcontrollers
- Connectivity: HTTP, MQTT, WIFI, Bluetooth
- Chip: ESP32
- Industry: Industrial Manufacturing
- Use cases: Smart energy, Environment Monitoring, Smart Office, Smart Retail, Smart Farming, Fleet Tracking, Health Care, Air Quality Monitoring, Waste Management, Tank Level Monitoring
- Platforms: Community Edition, Professional Edition, Cloud
概述
ESP32 PICO KIT是乐鑫基于ESP32打造的开发板。
开发板配备USB转UART桥接电路,方便开发者将板子连接到计算机USB口进行烧录和调试。
官方文档见此处。
本指南将介绍如何在ThingsBoard上创建设备、
安装所需库与工具。
随后将修改代码并上传到设备,
并查看运行结果及通过导入的仪表板在ThingsBoard上查看数据。
设备将借助客户端与共享属性请求功能与ThingsBoard保持同步。
同时,我们将使用共享属性或 RPC 请求控制设备。
前置条件
继续本指南前,需具备:
- ESP32 Pico Kit
- Arduino IDE
- ThingsBoard Cloud(欧洲地区)或ThingsBoard Cloud(美洲)
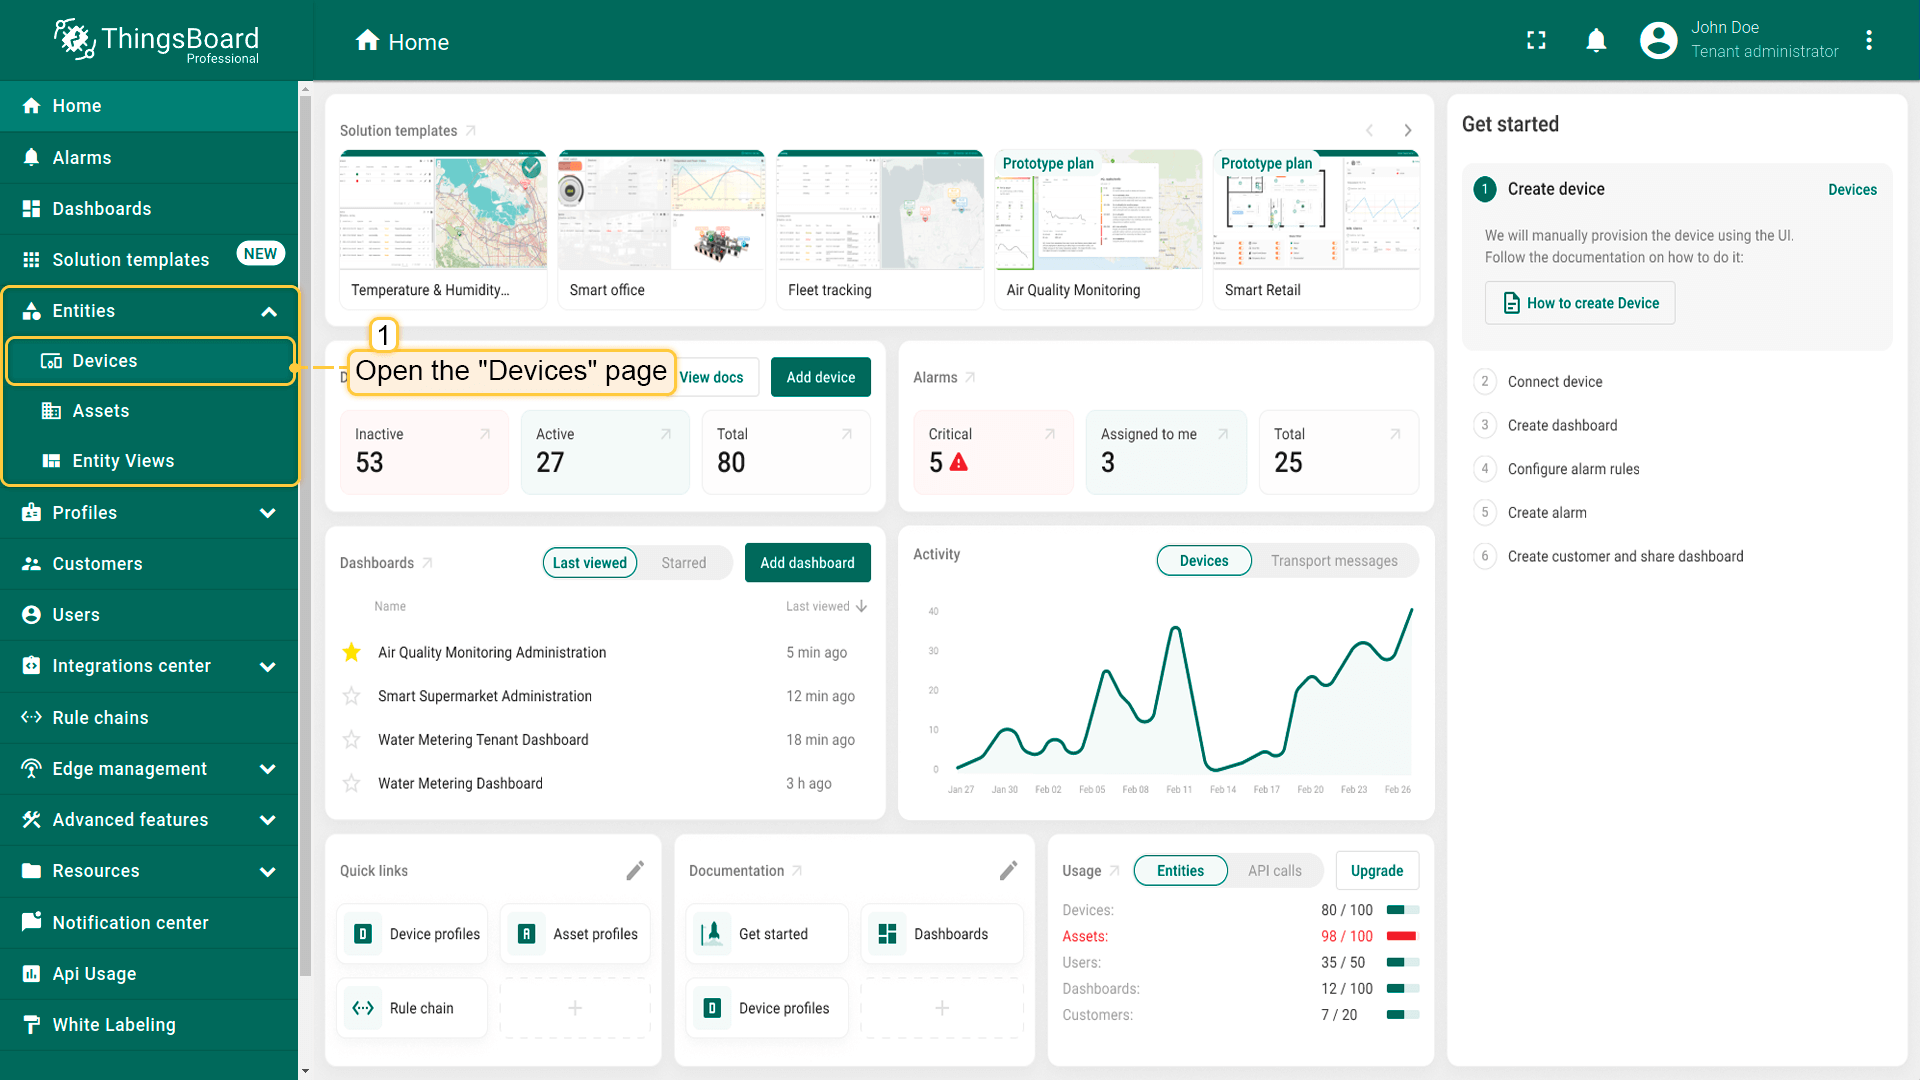
在ThingsBoard中创建设备
为简化流程,我们将在界面中手动创建设备。
-
登录ThingsBoard实例并进入 实体 > 设备 页面。
-
默认将进入设备组“全部”。点击右上角 ”+” 按钮并选择 添加新设备。
-
输入设备名称,例如 “My Device”。其他字段可保持默认,点击 添加 创建设备。
-
首个设备已添加完成。
登录ThingsBoard实例并进入 实体 > 设备 页面。
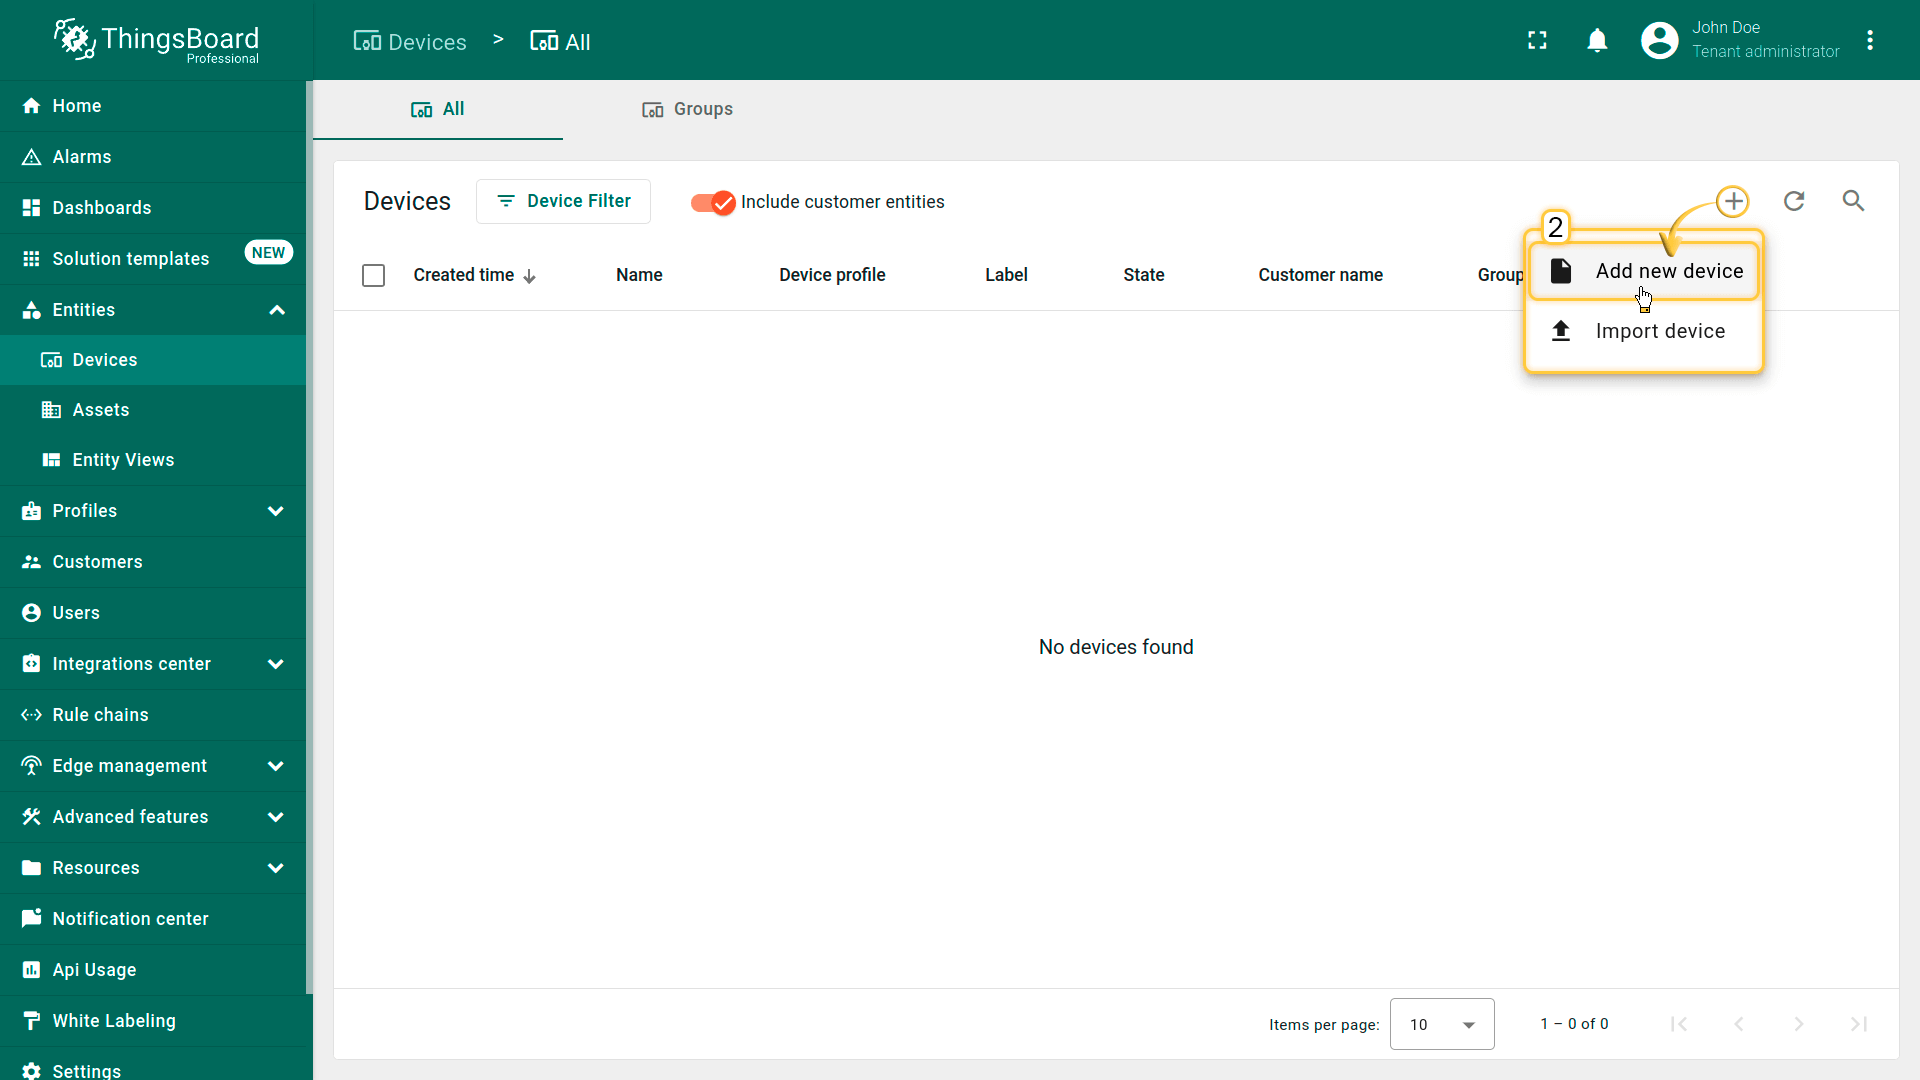
默认将进入设备组“全部”。点击右上角 ”+” 按钮并选择 添加新设备。

输入设备名称,例如 “My Device”。其他字段可保持默认,点击 添加 创建设备。
首个设备已添加完成。
安装所需库和工具
为Arduino IDE安装开发板:
进入 文件 > 首选项,将以下URL添加到 附加开发板管理器网址 字段。
1
2
3
4
5
6
7
8
9
10
11
12
13
14
15
16
17
18
19
20
21
22
23
24
25
26
27
28
29
30
31
32
33
34
35
36
37
38
39
40
41
42
43
44
45
46
47
48
49
50
51
52
53
54
55
56
57
58
59
60
61
62
63
64
65
66
67
68
69
70
71
72
73
74
75
76
77
78
79
80
81
82
83
84
85
86
87
88
89
90
91
92
93
94
95
96
97
98
99
100
101
102
103
104
105
106
107
108
109
110
111
112
113
114
115
116
117
118
119
120
121
122
123
124
125
126
127
128
129
130
131
132
133
134
135
136
137
138
139
140
141
142
143
144
145
146
147
148
149
150
151
152
153
154
155
156
157
158
159
160
161
162
163
164
165
166
167
168
169
170
171
172
173
174
175
176
177
178
179
180
181
182
183
184
185
186
187
188
189
190
191
192
193
194
195
196
197
198
199
200
201
202
203
204
205
206
207
208
209
210
211
212
213
214
215
216
217
218
219
220
221
222
223
224
225
226
227
228
229
230
231
232
233
234
235
236
237
238
239
240
241
242
243
244
245
246
247
248
249
250
251
252
253
254
255
256
257
258
259
260
261
262
263
264
265
266
267
268
269
270
271
272
273
274
275
276
277
278
279
280
281
282
283
284
285
286
287
288
289
290
291
292
293
294
295
296
297
298
299
300
301
302
303
304
305
306
307
308
309
310
311
312
313
314
315
316
317
318
319
320
321
322
323
324
325
326
327
328
329
330
331
332
333
334
335
336
337
338
339
340
341
342
343
344
345
346
347
348
349
350
351
352
353
354
355
356
357
358
359
360
361
362
363
364
365
366
367
368
369
370
371
372
373
374
375
376
377
378
379
380
381
382
383
384
385
386
387
388
389
390
391
392
393
394
395
396
397
398
399
400
401
402
403
404
405
406
407
408
409
410
411
412
413
414
415
416
417
418
419
420
421
422
423
424
425
426
427
428
429
430
431
432
433
434
435
436
437
438
439
440
441
442
443
444
445
446
447
448
449
450
451
452
453
454
455
456
457
458
459
460
461
462
463
464
465
466
467
468
469
470
471
472
473
474
475
476
477
478
479
480
481
482
483
484
485
486
487
488
489
490
491
492
493
494
495
496
497
498
499
500
501
502
503
504
505
506
507
508
509
510
511
512
513
514
515
516
517
518
519
520
521
522
523
524
525
526
527
528
529
530
531
532
533
534
535
536
537
538
539
540
541
542
543
544
545
546
547
548
549
550
551
552
553
554
555
556
557
558
559
560
561
562
563
564
565
566
567
568
569
570
571
572
573
574
575
576
577
578
579
580
581
582
583
584
585
586
587
588
589
590
591
592
593
594
595
596
597
598
599
600
601
602
603
604
605
606
607
608
609
610
611
612
613
614
615
616
617
618
619
620
621
622
623
624
625
626
627
628
629
630
631
632
633
634
635
636
637
638
639
640
641
642
643
644
645
646
647
648
649
650
651
652
653
654
655
656
657
658
659
660
661
662
663
664
665
666
667
668
669
670
671
672
673
674
675
676
677
678
679
680
681
682
683
684
685
686
687
688
689
690
691
692
693
694
695
696
697
698
699
700
701
702
703
704
705
706
707
708
709
710
711
712
713
714
715
716
717
718
719
720
721
722
723
724
725
726
727
728
729
730
731
732
733
734
735
736
737
738
739
740
741
742
743
744
745
746
747
748
749
750
751
752
753
754
755
756
757
758
759
760
761
762
763
764
765
766
767
768
769
770
771
772
773
774
775
776
777
778
779
780
781
782
783
784
785
786
787
788
789
790
791
792
793
794
795
796
797
798
799
800
801
802
803
804
805
806
807
808
809
810
811
812
813
814
815
816
817
818
819
820
821
822
823
824
825
826
827
828
829
830
831
832
833
834
835
836
837
838
839
840
841
842
843
844
845
846
847
848
849
850
851
852
853
854
855
856
857
858
859
860
861
862
863
864
865
866
867
868
869
870
871
872
873
874
875
876
877
878
879
880
881
882
883
884
885
886
887
888
889
890
891
892
893
894
895
896
897
898
899
900
901
902
903
904
905
906
907
908
909
910
911
912
913
914
915
916
917
918
919
920
921
922
923
924
925
926
927
928
https://dl.espressif.com/dl/package_esp32_index.json
{:.copy-code}
<ul>
</ul>
<div itemscope itemtype="https://schema.org/ImageGallery" class="images-gallery"
style="justify-content: start;">
<figure itemprop="associatedMedia" itemscope itemtype="https://schema.org/ImageObject"
style="max-width: min(225px, 100%);
max-height: min(225px, 100%);"
>
<a href="/images/devices-library/basic/arduino-ide/preferences.png" itemprop="contentUrl">
<img src="/images/devices-library/basic/arduino-ide/preferences-preview.png" itemprop="thumbnail" alt=''>
</a>
<figcaption itemprop="caption description">
</figcaption>
</figure>
</div>
然后进入 **工具** > **开发板** > **开发板管理器** 并安装 ***ESP32 by Espressif Systems*** 开发板。
<ul>
</ul>
<div itemscope itemtype="https://schema.org/ImageGallery" class="images-gallery"
style="justify-content: start;">
<figure itemprop="associatedMedia" itemscope itemtype="https://schema.org/ImageObject"
style="max-width: min(225px, 100%);
max-height: min(225px, 100%);"
>
<a href="/images/devices-library/basic/microcontrollers/esp32-arduino-ide-board-manager.png" itemprop="contentUrl">
<img src="/images/devices-library/basic/microcontrollers/esp32-arduino-ide-board-manager-preview.png" itemprop="thumbnail" alt=''>
</a>
<figcaption itemprop="caption description">
</figcaption>
</figure>
</div>
安装完成后,通过 **工具** > **开发板** > **ESP32** > **ESP32 Pico-D4** (Old name is ESP32 Pico Kit) 选择开发板。
用 USB 线连接设备与电脑,并在 **工具** > **端口** > **/dev/ttyUSB0** 中选择设备端口。
端口随操作系统不同而不同:
- Linux 下为 **/dev/ttyUSB**X
- MacOS 下为 **usb.serial**X.. 或 **usb.modem**X..
- Windows 下为 **COM**X。
X 为系统分配的编号。
安装ThingsBoard Arduino SDK需执行以下步骤:
<ul>
<li> <p>进入 <strong>工具</strong> 选项卡,点击 <strong>管理库</strong>。</p>
</li>
<li> <p>在搜索框中输入 <strong>ThingsBoard</strong> 并点击找到的库的 <strong>安装</strong> 按钮。</p>
</li>
</ul>
<div itemscope itemtype="https://schema.org/ImageGallery" class="images-gallery"
style="justify-content: start;">
<figure itemprop="associatedMedia" itemscope itemtype="https://schema.org/ImageObject"
style="max-width: min(225px, 100%);
max-height: min(225px, 100%);"
class="list-item">
<a href="/images/devices-library/basic/arduino-ide/tools-manage-libraries.png" itemprop="contentUrl">
<img src="/images/devices-library/basic/arduino-ide/tools-manage-libraries-preview.png" itemprop="thumbnail" alt='进入 工具 选项卡,点击 管理库。'>
</a>
<figcaption itemprop="caption description"><p>进入 <strong>工具</strong> 选项卡,点击 <strong>管理库</strong>。</p>
</figcaption>
</figure>
<figure itemprop="associatedMedia" itemscope itemtype="https://schema.org/ImageObject"
style="max-width: min(225px, 100%);
max-height: min(225px, 100%);"
class="list-item">
<a href="/images/devices-library/basic/arduino-ide/manage-libraries-thingsboard.png" itemprop="contentUrl">
<img src="/images/devices-library/basic/arduino-ide/manage-libraries-thingsboard-preview.png" itemprop="thumbnail" alt='在搜索框中输入 ThingsBoard 并点击找到的库的 安装 按钮。'>
</a>
<figcaption itemprop="caption description"><p>在搜索框中输入 <strong>ThingsBoard</strong> 并点击找到的库的 <strong>安装</strong> 按钮。</p>
</figcaption>
</figure>
</div>
<div class="warn-banner">
<img src="/images/doc-warn-icon.svg" alt="文档警告图标">
<div>
<p>所有示例代码均需ThingsBoard库版本 <strong>0.14.0</strong>.</p>
</div>
</div>
至此已安装全部所需库与工具。
## 连接设备到ThingsBoard {#connect-device-to-thingsboard}
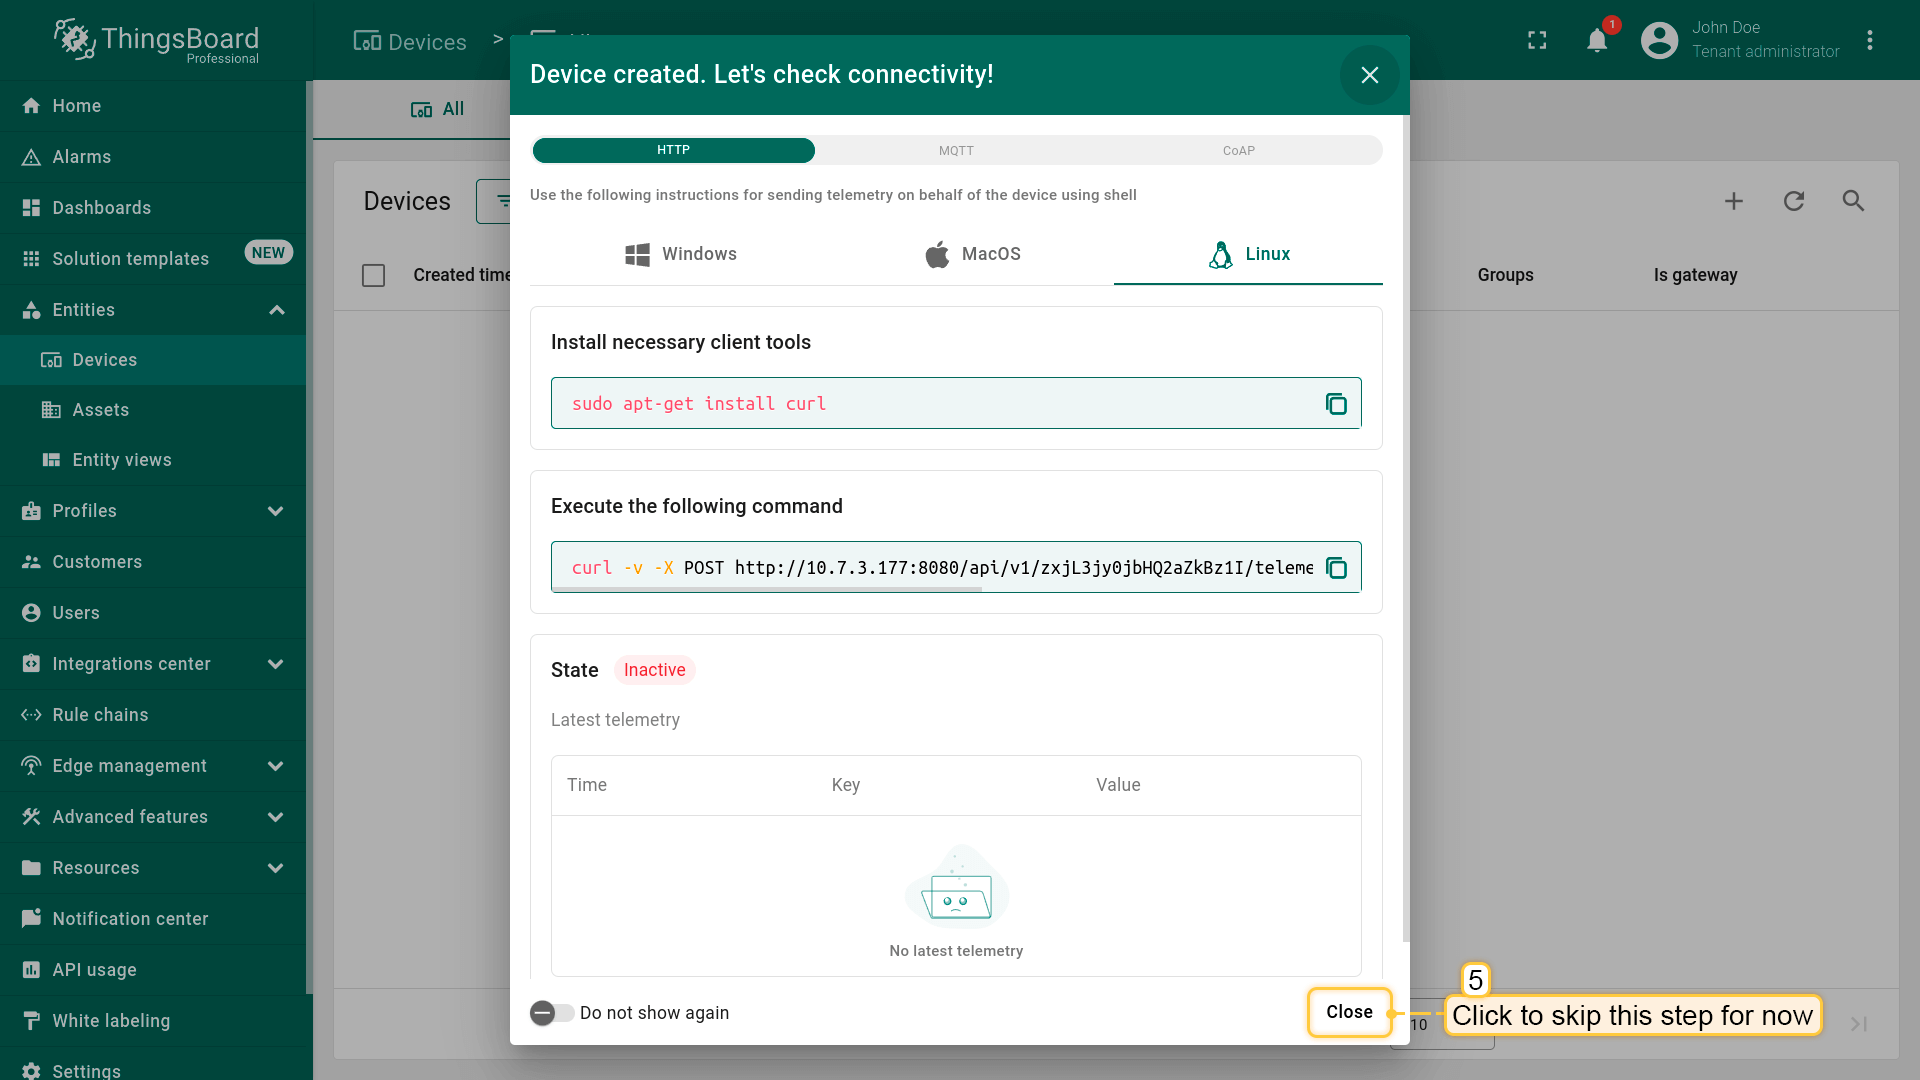
连接设备前,需先获取其凭证。
**ThingsBoard** 支持多种设备凭证类型,本指南使用默认自动生成的访问令牌(access token)。
<ul>
<li> <p>点击设备列表中的行以打开设备详情。</p>
</li>
<li> <p>点击“<strong>复制访问令牌</strong>”。令牌将复制到剪贴板,请妥善保存。</p>
</li>
</ul>
<div itemscope itemtype="https://schema.org/ImageGallery" class="images-gallery"
style="justify-content: start;">
<figure itemprop="associatedMedia" itemscope itemtype="https://schema.org/ImageObject"
style="max-width: min(225px, 100%);
max-height: min(225px, 100%);"
class="list-item">
<a href="/images/helloworld/getting-started-pe/hello-world-2-1-connect-device-1-pe.png" itemprop="contentUrl">
<img src="/images/helloworld/getting-started-pe/hello-world-2-1-connect-device-1-pe-preview.png" itemprop="thumbnail" alt='点击设备列表中的行以打开设备详情。'>
</a>
<figcaption itemprop="caption description"><p>点击设备列表中的行以打开设备详情。</p>
</figcaption>
</figure>
<figure itemprop="associatedMedia" itemscope itemtype="https://schema.org/ImageObject"
style="max-width: min(225px, 100%);
max-height: min(225px, 100%);"
class="list-item">
<a href="/images/helloworld/getting-started-pe/hello-world-2-1-connect-device-2-pe.png" itemprop="contentUrl">
<img src="/images/helloworld/getting-started-pe/hello-world-2-1-connect-device-2-pe-preview.png" itemprop="thumbnail" alt='点击“复制访问令牌”。令牌将复制到剪贴板,请妥善保存。'>
</a>
<figcaption itemprop="caption description"><p>点击“<strong>复制访问令牌</strong>”。令牌将复制到剪贴板,请妥善保存。</p>
</figcaption>
</figure>
</div>
接下来将开发板接入ThingsBoard并烧录程序。
可使用下方代码,其中包含本指南所需的全部功能。
```cpp
#if defined(ESP8266)
#include <ESP8266WiFi.h>
#define THINGSBOARD_ENABLE_PROGMEM 0
#elif defined(ESP32) || defined(RASPBERRYPI_PICO) || defined(RASPBERRYPI_PICO_W)
#include <WiFi.h>
#endif
#ifndef LED_BUILTIN
#define LED_BUILTIN 99
#endif
#include <Arduino_MQTT_Client.h>
#include <Server_Side_RPC.h>
#include <Attribute_Request.h>
#include <Shared_Attribute_Update.h>
#include <ThingsBoard.h>
constexpr char WIFI_SSID[] = "YOUR_WIFI_SSID";
constexpr char WIFI_PASSWORD[] = "YOUR_WIFI_PASSWORD";
// See https://thingsboard.io/docs/pe/getting-started-guides/helloworld/
// to understand how to obtain an access token
constexpr char TOKEN[] = "YOUR_ACCESS_TOKEN";
// Thingsboard we want to establish a connection too
constexpr char THINGSBOARD_SERVER[] = "localhost";
// MQTT port used to communicate with the server, 1883 is the default unencrypted MQTT port.
constexpr uint16_t THINGSBOARD_PORT = 1883U;
// Maximum size packets will ever be sent or received by the underlying MQTT client,
// if the size is to small messages might not be sent or received messages will be discarded
constexpr uint32_t MAX_MESSAGE_SIZE = 1024U;
// Baud rate for the debugging serial connection.
// If the Serial output is mangled, ensure to change the monitor speed accordingly to this variable
constexpr uint32_t SERIAL_DEBUG_BAUD = 115200U;
// Maximum amount of attributs we can request or subscribe, has to be set both in the ThingsBoard template list and Attribute_Request_Callback template list
// and should be the same as the amount of variables in the passed array. If it is less not all variables will be requested or subscribed
constexpr size_t MAX_ATTRIBUTES = 3U;
constexpr uint64_t REQUEST_TIMEOUT_MICROSECONDS = 5000U * 1000U;
// Attribute names for attribute request and attribute updates functionality
constexpr const char BLINKING_INTERVAL_ATTR[] = "blinkingInterval";
constexpr const char LED_MODE_ATTR[] = "ledMode";
constexpr const char LED_STATE_ATTR[] = "ledState";
// Initialize underlying client, used to establish a connection
WiFiClient wifiClient;
// Initalize the Mqtt client instance
Arduino_MQTT_Client mqttClient(wifiClient);
// Initialize used apis
Server_Side_RPC<3U, 5U> rpc;
Attribute_Request<2U, MAX_ATTRIBUTES> attr_request;
Shared_Attribute_Update<3U, MAX_ATTRIBUTES> shared_update;
const std::array<IAPI_Implementation*, 3U> apis = {
&rpc,
&attr_request,
&shared_update
};
// Initialize ThingsBoard instance with the maximum needed buffer size, stack size and the apis we want to use
ThingsBoard tb(mqttClient, MAX_MESSAGE_SIZE, Default_Max_Stack_Size, apis);
// handle led state and mode changes
volatile bool attributesChanged = false;
// LED modes: 0 - continious state, 1 - blinking
volatile int ledMode = 0;
// Current led state
volatile bool ledState = false;
// Settings for interval in blinking mode
constexpr uint16_t BLINKING_INTERVAL_MS_MIN = 10U;
constexpr uint16_t BLINKING_INTERVAL_MS_MAX = 60000U;
volatile uint16_t blinkingInterval = 1000U;
uint32_t previousStateChange;
// For telemetry
constexpr int16_t telemetrySendInterval = 2000U;
uint32_t previousDataSend;
// List of shared attributes for subscribing to their updates
constexpr std::array<const char *, 2U> SHARED_ATTRIBUTES_LIST = {
LED_STATE_ATTR,
BLINKING_INTERVAL_ATTR
};
// List of client attributes for requesting them (Using to initialize device states)
constexpr std::array<const char *, 1U> CLIENT_ATTRIBUTES_LIST = {
LED_MODE_ATTR
};
/// @brief Initalizes WiFi connection,
// will endlessly delay until a connection has been successfully established
void InitWiFi() {
Serial.println("Connecting to AP ...");
// Attempting to establish a connection to the given WiFi network
WiFi.begin(WIFI_SSID, WIFI_PASSWORD);
while (WiFi.status() != WL_CONNECTED) {
// Delay 500ms until a connection has been succesfully established
delay(500);
Serial.print(".");
}
Serial.println("Connected to AP");
}
/// @brief Reconnects the WiFi uses InitWiFi if the connection has been removed
/// @return Returns true as soon as a connection has been established again
const bool reconnect() {
// Check to ensure we aren't connected yet
const wl_status_t status = WiFi.status();
if (status == WL_CONNECTED) {
return true;
}
// If we aren't establish a new connection to the given WiFi network
InitWiFi();
return true;
}
/// @brief Processes function for RPC call "setLedMode"
/// RPC_Data is a JSON variant, that can be queried using operator[]
/// See https://arduinojson.org/v5/api/jsonvariant/subscript/ for more details
/// @param data Data containing the rpc data that was called and its current value
void processSetLedMode(const JsonVariantConst &data, JsonDocument &response) {
Serial.println("Received the set led state RPC method");
// Process data
int new_mode = data;
Serial.print("Mode to change: ");
Serial.println(new_mode);
StaticJsonDocument<1> response_doc;
if (new_mode != 0 && new_mode != 1) {
response_doc["error"] = "Unknown mode!";
response.set(response_doc);
return;
}
ledMode = new_mode;
attributesChanged = true;
// Returning current mode
response_doc["newMode"] = (int)ledMode;
response.set(response_doc);
}
// Optional, keep subscribed shared attributes empty instead,
// and the callback will be called for every shared attribute changed on the device,
// instead of only the one that were entered instead
const std::array<RPC_Callback, 1U> callbacks = {
RPC_Callback{ "setLedMode", processSetLedMode }
};
/// @brief Update callback that will be called as soon as one of the provided shared attributes changes value,
/// if none are provided we subscribe to any shared attribute change instead
/// @param data Data containing the shared attributes that were changed and their current value
void processSharedAttributes(const JsonObjectConst &data) {
for (auto it = data.begin(); it != data.end(); ++it) {
if (strcmp(it->key().c_str(), BLINKING_INTERVAL_ATTR) == 0) {
const uint16_t new_interval = it->value().as<uint16_t>();
if (new_interval >= BLINKING_INTERVAL_MS_MIN && new_interval <= BLINKING_INTERVAL_MS_MAX) {
blinkingInterval = new_interval;
Serial.print("Blinking interval is set to: ");
Serial.println(new_interval);
}
} else if (strcmp(it->key().c_str(), LED_STATE_ATTR) == 0) {
ledState = it->value().as<bool>();
if (LED_BUILTIN != 99) {
digitalWrite(LED_BUILTIN, ledState);
}
Serial.print("LED state is set to: ");
Serial.println(ledState);
}
}
attributesChanged = true;
}
void processClientAttributes(const JsonObjectConst &data) {
for (auto it = data.begin(); it != data.end(); ++it) {
if (strcmp(it->key().c_str(), LED_MODE_ATTR) == 0) {
const uint16_t new_mode = it->value().as<uint16_t>();
ledMode = new_mode;
}
}
}
// Attribute request did not receive a response in the expected amount of microseconds
void requestTimedOut() {
Serial.printf("Attribute request timed out did not receive a response in (%llu) microseconds. Ensure client is connected to the MQTT broker and that the keys actually exist on the target device\n", REQUEST_TIMEOUT_MICROSECONDS);
}
const Shared_Attribute_Callback<MAX_ATTRIBUTES> attributes_callback(&processSharedAttributes, SHARED_ATTRIBUTES_LIST.cbegin(), SHARED_ATTRIBUTES_LIST.cend());
const Attribute_Request_Callback<MAX_ATTRIBUTES> attribute_shared_request_callback(&processSharedAttributes, REQUEST_TIMEOUT_MICROSECONDS, &requestTimedOut, SHARED_ATTRIBUTES_LIST);
const Attribute_Request_Callback<MAX_ATTRIBUTES> attribute_client_request_callback(&processClientAttributes, REQUEST_TIMEOUT_MICROSECONDS, &requestTimedOut, CLIENT_ATTRIBUTES_LIST);
void setup() {
// Initialize serial connection for debugging
Serial.begin(SERIAL_DEBUG_BAUD);
if (LED_BUILTIN != 99) {
pinMode(LED_BUILTIN, OUTPUT);
}
delay(1000);
InitWiFi();
}
void loop() {
delay(10);
if (!reconnect()) {
return;
}
if (!tb.connected()) {
// Connect to the ThingsBoard
Serial.print("Connecting to: ");
Serial.print(THINGSBOARD_SERVER);
Serial.print(" with token ");
Serial.println(TOKEN);
if (!tb.connect(THINGSBOARD_SERVER, TOKEN, THINGSBOARD_PORT)) {
Serial.println("Failed to connect");
return;
}
// Sending a MAC address as an attribute
tb.sendAttributeData("macAddress", WiFi.macAddress().c_str());
Serial.println("Subscribing for RPC...");
// Perform a subscription. All consequent data processing will happen in
// processSetLedState() and processSetLedMode() functions,
// as denoted by callbacks array.
if (!rpc.RPC_Subscribe(callbacks.cbegin(), callbacks.cend())) {
Serial.println("Failed to subscribe for RPC");
return;
}
if (!shared_update.Shared_Attributes_Subscribe(attributes_callback)) {
Serial.println("Failed to subscribe for shared attribute updates");
return;
}
Serial.println("Subscribe done");
// Request current states of shared attributes
if (!attr_request.Shared_Attributes_Request(attribute_shared_request_callback)) {
Serial.println("Failed to request for shared attributes");
return;
}
// Request current states of client attributes
if (!attr_request.Client_Attributes_Request(attribute_client_request_callback)) {
Serial.println("Failed to request for client attributes");
return;
}
}
if (attributesChanged) {
attributesChanged = false;
if (ledMode == 0) {
previousStateChange = millis();
}
tb.sendTelemetryData(LED_MODE_ATTR, ledMode);
tb.sendTelemetryData(LED_STATE_ATTR, ledState);
tb.sendAttributeData(LED_MODE_ATTR, ledMode);
tb.sendAttributeData(LED_STATE_ATTR, ledState);
}
if (ledMode == 1 && millis() - previousStateChange > blinkingInterval) {
previousStateChange = millis();
ledState = !ledState;
tb.sendTelemetryData(LED_STATE_ATTR, ledState);
tb.sendAttributeData(LED_STATE_ATTR, ledState);
if (LED_BUILTIN == 99) {
Serial.print("LED state changed to: ");
Serial.println(ledState);
} else {
digitalWrite(LED_BUILTIN, ledState);
}
}
// Sending telemetry every telemetrySendInterval time
if (millis() - previousDataSend > telemetrySendInterval) {
previousDataSend = millis();
tb.sendTelemetryData("temperature", random(10, 20));
tb.sendAttributeData("rssi", WiFi.RSSI());
tb.sendAttributeData("channel", WiFi.channel());
tb.sendAttributeData("bssid", WiFi.BSSIDstr().c_str());
tb.sendAttributeData("localIp", WiFi.localIP().toString().c_str());
tb.sendAttributeData("ssid", WiFi.SSID().c_str());
}
tb.loop();
}
{:.copy-code.expandable-20}
<div class="info-banner">
<img src="/images/doc-info-icon.svg" alt="文档信息图标">
<div>
<p>请勿忘记将占位符替换为您的真实 Wi-Fi 网络 SSID、密码及 ThingsBoard 设备访问令牌。</p>
</div>
</div>
连接所需变量:
| 变量名 | 默认值 | 说明 |
|-|------------------------------|-|
| WIFI_SSID | **YOUR_WIFI_SSID** | 您的 WiFi 网络名称。 |
| WIFI_PASSWORD | **YOUR_WIFI_PASSWORD** | 您的 WiFi 网络密码。 |
| TOKEN | **YOUR_DEVICE_ACCESS_TOKEN** | 设备访问令牌。获取方式参见 #connect-device-to-thingsboard |
| THINGSBOARD_SERVER | **localhost** | 您的 ThingsBoard 主机或 IP 地址。 |
| THINGSBOARD_PORT | **1883U** | ThingsBoard 服务 MQTT 端口。本指南可使用默认值。 |
| MAX_MESSAGE_SIZE | **256U** | MQTT 消息最大尺寸。本指南可使用默认值。 |
| SERIAL_DEBUG_BAUD | **1883U** | 串口波特率。本指南可使用默认值。 |
```cpp
...
constexpr char WIFI_SSID[] = "YOUR_WIFI_SSID";
constexpr char WIFI_PASSWORD[] = "YOUR_WIFI_PASSWORD";
constexpr char TOKEN[] = "YOUR_ACCESS_TOKEN";
constexpr char THINGSBOARD_SERVER[] = "hostName";
constexpr uint16_t THINGSBOARD_PORT = 1883U;
constexpr uint32_t MAX_MESSAGE_SIZE = 256U;
constexpr uint32_t SERIAL_DEBUG_BAUD = 115200U;
...
数据发送部分(默认示例发送 **temperature** 的随机值及部分WiFi信息):
```cpp
...
tb.sendTelemetryData("temperature", random(10, 20));
tb.sendAttributeData("rssi", WiFi.RSSI());
tb.sendAttributeData("bssid", WiFi.BSSIDstr().c_str());
tb.sendAttributeData("localIp", WiFi.localIP().toString().c_str());
tb.sendAttributeData("ssid", WiFi.SSID().c_str());
tb.sendAttributeData("channel", WiFi.channel());
...
然后按上传按钮或 Ctrl+U 将代码上传到设备。
<div itemscope itemtype="https://schema.org/ImageGallery" class="images-gallery"
style="justify-content: start;">
<figure itemprop="associatedMedia" itemscope itemtype="https://schema.org/ImageObject"
style="max-width: min(225px, 100%);
max-height: min(225px, 100%);"
>
<a href="/images/devices-library/basic/arduino-ide/upload.png" itemprop="contentUrl">
<img src="/images/devices-library/basic/arduino-ide/upload-preview.png" itemprop="thumbnail" alt=''>
</a>
<figcaption itemprop="caption description">
</figcaption>
</figure>
</div>
若无法上传并出现错误 `Property 'upload.tool.serial' is undefined`,可尝试以下操作:
<ul>
<li> <p>进入 <strong>工具</strong> > <strong>烧录器</strong> 并选择 <strong>Esptool</strong>。</p>
</li>
<li> <p>进入 <strong>项目</strong> > <strong>使用烧录器上传</strong>。</p>
</li>
</ul>
<div itemscope itemtype="https://schema.org/ImageGallery" class="images-gallery"
style="justify-content: start;">
<figure itemprop="associatedMedia" itemscope itemtype="https://schema.org/ImageObject"
style="max-width: min(225px, 100%);
max-height: min(225px, 100%);"
class="list-item">
<a href="/images/devices-library/basic/arduino-ide/select-esptool-programmer.png" itemprop="contentUrl">
<img src="/images/devices-library/basic/arduino-ide/select-esptool-programmer-preview.png" itemprop="thumbnail" alt='进入 工具 > 烧录器 并选择 Esptool。'>
</a>
<figcaption itemprop="caption description"><p>进入 <strong>工具</strong> > <strong>烧录器</strong> 并选择 <strong>Esptool</strong>。</p>
</figcaption>
</figure>
<figure itemprop="associatedMedia" itemscope itemtype="https://schema.org/ImageObject"
style="max-width: min(225px, 100%);
max-height: min(225px, 100%);"
class="list-item">
<a href="/images/devices-library/basic/arduino-ide/upload-using-programmer.png" itemprop="contentUrl">
<img src="/images/devices-library/basic/arduino-ide/upload-using-programmer-preview.png" itemprop="thumbnail" alt='进入 项目 > 使用烧录器上传。'>
</a>
<figcaption itemprop="caption description"><p>进入 <strong>项目</strong> > <strong>使用烧录器上传</strong>。</p>
</figcaption>
</figure>
</div>
## 在ThingsBoard上查看数据 {#check-data-on-thingsboard}
ThingsBoard支持创建和自定义用于监控与管理数据、设备的交互式可视化(仪表板)。
通过ThingsBoard仪表板,您可以高效管理与监控IoT设备及数据。下面为我们的设备创建仪表板。
将仪表板添加到ThingsBoard需要导入。请按以下步骤操作:
- 首先下载 [检查并控制设备数据仪表板](/docs/devices-library/resources/dashboards/microcontrollers/basic/dashboard.json){:target="_blank" download="dashboard.json"} 文件。
<ul>
<li> <p>进入 <strong>仪表板</strong> 页面。默认进入仪表板组 “All”。点击右上角 <strong>+</strong> 图标,选择 <strong>导入仪表板</strong>。</p>
</li>
<li> <p>在仪表板导入窗口中上传JSON文件并点击 <strong>导入</strong> 按钮。</p>
</li>
<li> <p>仪表板已导入。</p>
</li>
</ul>
<div itemscope itemtype="https://schema.org/ImageGallery" class="images-gallery"
style="justify-content: start;">
<figure itemprop="associatedMedia" itemscope itemtype="https://schema.org/ImageObject"
style="max-width: min(225px, 100%);
max-height: min(225px, 100%);"
class="list-item">
<a href="/images/user-guide/dashboards/managing-dashboard/import-dashboard-1-pe.png" itemprop="contentUrl">
<img src="/images/user-guide/dashboards/managing-dashboard/import-dashboard-1-pe-preview.png" itemprop="thumbnail" alt='进入 仪表板 页面。默认进入仪表板组 "All"。点击右上角 + 图标,选择 导入仪表板。'>
</a>
<figcaption itemprop="caption description"><p>进入 <strong>仪表板</strong> 页面。默认进入仪表板组 “All”。点击右上角 <strong>+</strong> 图标,选择 <strong>导入仪表板</strong>。</p>
</figcaption>
</figure>
<figure itemprop="associatedMedia" itemscope itemtype="https://schema.org/ImageObject"
style="max-width: min(225px, 100%);
max-height: min(225px, 100%);"
class="list-item">
<a href="/images/user-guide/dashboards/managing-dashboard/import-dashboard-2-pe.png" itemprop="contentUrl">
<img src="/images/user-guide/dashboards/managing-dashboard/import-dashboard-2-pe-preview.png" itemprop="thumbnail" alt='在仪表板导入窗口中上传JSON文件并点击 导入 按钮。'>
</a>
<figcaption itemprop="caption description"><p>在仪表板导入窗口中上传JSON文件并点击 <strong>导入</strong> 按钮。</p>
</figcaption>
</figure>
<figure itemprop="associatedMedia" itemscope itemtype="https://schema.org/ImageObject"
style="max-width: min(225px, 100%);
max-height: min(225px, 100%);"
class="list-item">
<a href="/images/user-guide/dashboards/managing-dashboard/import-dashboard-3-pe.png" itemprop="contentUrl">
<img src="/images/user-guide/dashboards/managing-dashboard/import-dashboard-3-pe-preview.png" itemprop="thumbnail" alt='仪表板已导入。'>
</a>
<figcaption itemprop="caption description"><p>仪表板已导入。</p>
</figcaption>
</figure>
</div>
检查并控制设备数据仪表板结构:
<ul>
<li> <p>点击表格中的仪表板以打开导入的仪表板,查看设备数据。</p>
</li>
<li> <p>检查数据和控制设备的仪表板视图。</p>
</li>
<li> <p>从设备接收的属性。</p>
</li>
<li> <p>ThingsBoard服务器上的设备信息。</p>
</li>
<li> <p>查看LED模式变化历史的部件。</p>
</li>
<li> <p>查看模拟温度历史的部件。</p>
</li>
</ul>
<div itemscope itemtype="https://schema.org/ImageGallery" class="images-gallery"
style="justify-content: start;">
<figure itemprop="associatedMedia" itemscope itemtype="https://schema.org/ImageObject"
style="max-width: min(225px, 100%);
max-height: min(225px, 100%);"
class="list-item">
<a href="/images/devices-library/paas/thingsboard-open-dashboard-click-on-row.png" itemprop="contentUrl">
<img src="/images/devices-library/paas/thingsboard-open-dashboard-click-on-row-preview.png" itemprop="thumbnail" alt='点击表格中的仪表板以打开导入的仪表板,查看设备数据。'>
</a>
<figcaption itemprop="caption description"><p>点击表格中的仪表板以打开导入的仪表板,查看设备数据。</p>
</figcaption>
</figure>
<figure itemprop="associatedMedia" itemscope itemtype="https://schema.org/ImageObject"
style="max-width: min(225px, 100%);
max-height: min(225px, 100%);"
class="list-item">
<a href="/images/devices-library/basic/microcontrollers/dashboard/thingsboard-general-view-of-example-dashboard.png" itemprop="contentUrl">
<img src="/images/devices-library/basic/microcontrollers/dashboard/thingsboard-general-view-of-example-dashboard-preview.png" itemprop="thumbnail" alt='检查数据和控制设备的仪表板视图。'>
</a>
<figcaption itemprop="caption description"><p>检查数据和控制设备的仪表板视图。</p>
</figcaption>
</figure>
<figure itemprop="associatedMedia" itemscope itemtype="https://schema.org/ImageObject"
style="max-width: min(225px, 100%);
max-height: min(225px, 100%);"
class="list-item">
<a href="/images/devices-library/basic/microcontrollers/dashboard/thingsboard-example-dashboard-device-attributes.png" itemprop="contentUrl">
<img src="/images/devices-library/basic/microcontrollers/dashboard/thingsboard-example-dashboard-device-attributes-preview.png" itemprop="thumbnail" alt='从设备接收的属性。'>
</a>
<figcaption itemprop="caption description"><p>从设备接收的属性。</p>
</figcaption>
</figure>
<figure itemprop="associatedMedia" itemscope itemtype="https://schema.org/ImageObject"
style="max-width: min(225px, 100%);
max-height: min(225px, 100%);"
class="list-item">
<a href="/images/devices-library/basic/microcontrollers/dashboard/thingsboard-example-dashboard-device-info.png" itemprop="contentUrl">
<img src="/images/devices-library/basic/microcontrollers/dashboard/thingsboard-example-dashboard-device-info-preview.png" itemprop="thumbnail" alt='ThingsBoard服务器上的设备信息。'>
</a>
<figcaption itemprop="caption description"><p>ThingsBoard服务器上的设备信息。</p>
</figcaption>
</figure>
<figure itemprop="associatedMedia" itemscope itemtype="https://schema.org/ImageObject"
style="max-width: min(225px, 100%);
max-height: min(225px, 100%);"
class="list-item">
<a href="/images/devices-library/basic/microcontrollers/dashboard/thingsboard-example-dashboard-led-mode-history.png" itemprop="contentUrl">
<img src="/images/devices-library/basic/microcontrollers/dashboard/thingsboard-example-dashboard-led-mode-history-preview.png" itemprop="thumbnail" alt='查看LED模式变化历史的部件。'>
</a>
<figcaption itemprop="caption description"><p>查看LED模式变化历史的部件。</p>
</figcaption>
</figure>
<figure itemprop="associatedMedia" itemscope itemtype="https://schema.org/ImageObject"
style="max-width: min(225px, 100%);
max-height: min(225px, 100%);"
class="list-item">
<a href="/images/devices-library/basic/microcontrollers/dashboard/thingsboard-example-dashboard-temperature-history.png" itemprop="contentUrl">
<img src="/images/devices-library/basic/microcontrollers/dashboard/thingsboard-example-dashboard-temperature-history-preview.png" itemprop="thumbnail" alt='查看模拟温度历史的部件。'>
</a>
<figcaption itemprop="caption description"><p>查看模拟温度历史的部件。</p>
</figcaption>
</figure>
</div>
## 使用客户端和共享属性请求同步设备状态 {#synchronize-device-state-using-client-and-shared-attribute-requests}
为在启动时从ThingsBoard获取设备状态,代码中实现了相应[功能](/docs/pe/reference/mqtt-api/#request-attribute-values-from-the-server)。
以下为示例代码的相关部分:
- 引入模块以使用API功能:
```cpp
...
#include <AttributeRequest.h>
...
Attribute_Request<2U, MAX_ATTRIBUTES> attr_request;
...
const std::array<IAPI_Implementation*, ...> apis = {
...
&attr_request,
...
};
...
需在代码中定义要使用的API。
- 属性回调:
1
2
3
4
5
6
7
8
9
10
11
12
13
14
15
16
17
18
19
20
21
22
23
24
25
26
27
28
29
30
31
32
33
34
35
36
37
...
void processSharedAttributes(const JsonObjectConst &data) {
  for (auto it = data.begin(); it != data.end(); ++it) {
    if (strcmp(it->key().c_str(), BLINKING_INTERVAL_ATTR) == 0) {
      const uint16_t new_interval = it->value().as<uint16_t>();
      if (new_interval >= BLINKING_INTERVAL_MS_MIN && new_interval <= BLINKING_INTERVAL_MS_MAX) {
        blinkingInterval = new_interval;
        Serial.print("Updated blinking interval to: ");
        Serial.println(new_interval);
      }
    } else if(strcmp(it->key().c_str(), LED_STATE_ATTR) == 0) {
      ledState = it->value().as<bool>();
      digitalWrite(LED_BUILTIN, ledState ? HIGH : LOW);
      Serial.print("Updated state to: ");
      Serial.println(ledState);
    }
  }
  attributesChanged = true;
}

void processClientAttributes(const JsonObjectConst &data) {
  for (auto it = data.begin(); it != data.end(); ++it) {
    if (strcmp(it->key().c_str(), LED_MODE_ATTR) == 0) {
      const uint16_t new_mode = it->value().as<uint16_t>();
      ledMode = new_mode;
    }
  }
}
...
// Attribute request did not receive a response in the expected amount of microseconds
void requestTimedOut() {
  Serial.printf("Attribute request timed out did not receive a response in (%llu) microseconds. Ensure client is connected to the MQTT broker and that the keys actually exist on the target device\n", REQUEST_TIMEOUT_MICROSECONDS);
}
...
const Attribute_Request_Callback<MAX_ATTRIBUTES> attribute_shared_request_callback(&processSharedAttributes, REQUEST_TIMEOUT_MICROSECONDS, &requestTimedOut, SHARED_ATTRIBUTES_LIST);
const Attribute_Request_Callback<MAX_ATTRIBUTES> attribute_client_request_callback(&processClientAttributes, REQUEST_TIMEOUT_MICROSECONDS, &requestTimedOut, CLIENT_ATTRIBUTES_LIST);
...
共有三个回调:
- 共享属性回调:专用于共享属性,主要接收包含闪烁间隔的响应,以确定合适的闪烁周期;
- 客户端属性回调:专用于客户端属性,接收LED模式与状态信息,收到后保存并应用这些参数;
- 请求超时回调:在属性数据请求超时时触发,用于处理超时。
此功能使设备在重启后能保持实际状态。
- 属性请求:
1
2
3
4
5
6
7
8
9
10
11
12
13
...
  // Request current states of shared attributes
  if (!attr_request.Shared_Attributes_Request(attribute_shared_request_callback)) {
    Serial.println("Failed to request for shared attributes");
    return;
  }

  // Request current states of client attributes
  if (!attr_request.Client_Attributes_Request(attribute_client_request_callback)) {
    Serial.println("Failed to request for client attributes");
    return;
  }
...
为使回调能接收数据,需向ThingsBoard发送请求。
使用共享属性控制设备
还可通过共享属性更新功能修改闪烁周期。
-
修改闪烁周期只需在仪表板上更改数值即可。
-
按勾选图标应用后,将显示确认消息。
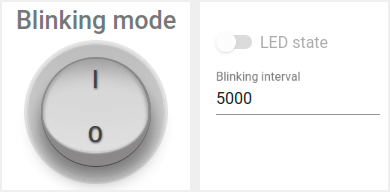
修改闪烁周期只需在仪表板上更改数值即可。
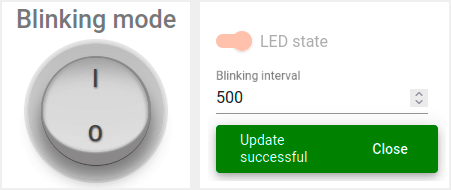
按勾选图标应用后,将显示确认消息。
在关闭闪烁时改变状态,可使用同一部件中的开关:
-
仅当关闭闪烁模式时方可操作。
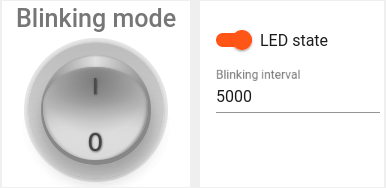
仅当关闭闪烁模式时方可操作。
该开发板无内置可控LED指示灯。
可通过串口监视器(工具 -> 串口监视器)检查共享属性变更结果,波特率选择115200。
实现该功能使用变量 “blinkingInterval”,出现在以下代码中:
- Connecting modules to use API functionality:
1
2
3
4
5
6
7
8
9
10
11
...
#include <AttributeRequest.h>
...
Attribute_Request<2U, MAX_ATTRIBUTES> attr_request;
...
const std::array<IAPI_Implementation*, ...> apis = {
  ...
  &shared_update
  ...
};
...
使用属性请求功能需引入相关模块并将其作为所用API的一部分。
- 共享属性更新回调:
1
2
3
4
5
6
7
8
9
10
11
12
13
14
15
16
17
18
19
20
21
22
23
24
25
26
27
28
29
...

void processSharedAttributes(const JsonObjectConst &data) {
  for (auto it = data.begin(); it != data.end(); ++it) {
    if (strcmp(it->key().c_str(), BLINKING_INTERVAL_ATTR) == 0) {
      const uint16_t new_interval = it->value().as<uint16_t>();
      if (new_interval >= BLINKING_INTERVAL_MS_MIN && new_interval <= BLINKING_INTERVAL_MS_MAX) {
        blinkingInterval = new_interval;
        Serial.print("Updated blinking interval to: ");
        Serial.println(new_interval);
      }
    } else if(strcmp(it->key().c_str(), LED_STATE_ATTR) == 0) {
      ledState = it->value().as<bool>();
      digitalWrite(LED_BUILTIN, ledState ? HIGH : LOW);
      Serial.print("Updated state to: ");
      Serial.println(ledState);
    }
  }
  attributesChanged = true;
}

...
// Attribute request did not receive a response in the expected amount of microseconds
void requestTimedOut() {
  Serial.printf("Attribute request timed out did not receive a response in (%llu) microseconds. Ensure client is connected to the MQTT broker and that the keys actually exist on the target device\n", REQUEST_TIMEOUT_MICROSECONDS);
}
...
const Attribute_Request_Callback<MAX_ATTRIBUTES> attribute_shared_request_callback(&processSharedAttributes, REQUEST_TIMEOUT_MICROSECONDS, &requestTimedOut, SHARED_ATTRIBUTES_LIST);
...
- 订阅共享属性更新:
1
2
3
4
5
6
...
    if (!shared_update.Shared_Attributes_Request(attribute_shared_request_callback)) {
      Serial.println("Failed to request for shared attributes");
      return;
    }
...
- 闪烁相关代码:
1
2
3
4
5
6
7
8
9
10
11
12
13
14
...

  if (ledMode == 1 && millis() - previousStateChange > blinkingInterval) {
    previousStateChange = millis();
    ledState = !ledState;
    digitalWrite(LED_BUILTIN, ledState);
    tb.sendTelemetryData(LED_STATE_ATTR, ledState);
    tb.sendAttributeData(LED_STATE_ATTR, ledState);
    if (LED_BUILTIN == 99) {
      Serial.print("LED state changed to: ");
      Serial.println(ledState);
    }
  }
...
可修改逻辑以实现目标,并添加自定义属性处理。
使用RPC控制设备
可手动切换LED状态,并在常亮与闪烁模式间切换。 可使用仪表板中的以下部分:
-
使用开关部件将LED设为常亮。
-
使用圆形开关部件将LED设为闪烁模式。
使用开关部件将LED设为常亮。
使用圆形开关部件将LED设为闪烁模式。
注意:仅在关闭闪烁模式时可更改LED状态。
示例代码中实现了 RPC 命令 处理。
实现设备控制使用了以下代码部分:
- Connecting modules to use API functionality:
1
2
3
4
5
6
7
8
9
10
11
12
...
#include <Server_Side_RPC.h>
...
Server_Side_RPC<..., ...> rpc;
...

const std::array<IAPI_Implementation*, ...> apis = {
    ...
    &rpc,
    ...
    }
...
使用RPC需引入相关模块并将其作为所用API的一部分。
- RPC请求回调:
1
2
3
4
5
6
7
8
9
10
11
12
13
14
15
16
17
18
19
20
21
22
23
24
25
26
27
28
29
30
31
32
33
34
35
...

void processSetLedMode(const JsonVariantConst &data, JsonDocument &response) {
  Serial.println("Received the set led state RPC method");

  // Process data
  int new_mode = data;

  Serial.print("Mode to change: ");
  Serial.println(new_mode);
  StaticJsonDocument<1> response_doc;

  if (new_mode != 0 && new_mode != 1) {
    response_doc["error"] = "Unknown mode!";
    response.set(response_doc);
    return;
  }

  ledMode = new_mode;

  attributesChanged = true;


  response_doc["newMode"] = (int)ledMode;
  // Returning current mode
  response.set(response_doc);
}

...

const std::array<RPC_Callback, 1U> callbacks = {
  RPC_Callback{ "setLedMode", processSetLedMode }
};

...
- 订阅RPC请求:
1
2
3
4
5
6
...
    if (!rpc.RPC_Subscribe(callbacks.cbegin(), callbacks.cend())) {
      Serial.println("Failed to subscribe for RPC");
      return;
    }
...
可修改代码以实现您的目标,并添加自定义RPC命令处理。
总结
现在您可以轻松将ESP32 Pico Kit连接到ThingsBoard并开始发送数据。
进一步了解可查阅ThingsBoard文档, 学习创建仪表板可视化遥测、 配置告警规则实时监控设备行为等核心功能。