- Hardware type: Other devices
- Connectivity: LoRaWAN
- Industry: Security, Smart Buildings
- Use cases: Health Care
- Platforms: Community Edition, Professional Edition, Cloud
概述
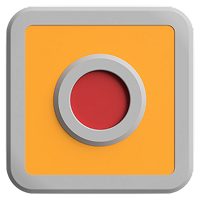
ioButton紧急按钮 ioButton是一款多功能解决方案,预配置适用于多种紧急场景。当紧急按钮被激活时,用户会通过醒目的LED灯环立即收到通知,并伴有振动马达的触觉反馈。标准电池续航超过10年,几乎无需维护。 ioButton在SF-7下可发送1,000,000条消息,在SF-12下可发送100,000条消息! 默认情况下,ioButton每4小时发送一次心跳消息。
仅专业版支持Platform Integrations功能。
请使用ThingsBoard Cloud或自行安装平台实例。
前置条件
继续本指南前,需准备以下内容:
- ioButton Panic button
- LoRaWAN® gateway (in our case UG56 LoRaWAN® Gateway)
- Configured integration on networks server and ThingsBoard
- ThingsBoard 账户
设备连接
Device configuration
连接并发送数据前,需配置设备和网络服务器。
首先配置设备,并保存网络服务器配置所需信息。
要将设备加入网络服务器并从中获取信息,需准备以下设备参数:
- Device EUI — device identifier
- Application EUI — application identifier
- Application Key — application key to identify device. We recommend to use a generated key, not from the example!
以上参数为连接所必需。
根据网络服务器要求,可能还需提供接入类型(OTAA)和LoRaWAN版本。
Prerequisites
- Android app & account
Install the ioTracker Configurator app from Google Play and log in with your ioTracker account. - Device compatibility
Only with ioTracker accounts after February 1, 2022 are supported. - Bluetooth & permissions
Enable Bluetooth and grant Location/”Nearby devices” permissions to the app.
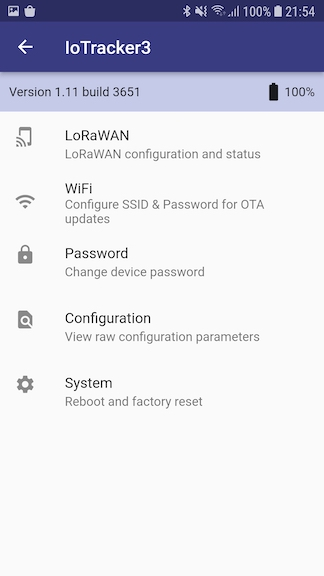
1. Scanning & Connecting
- Open ioTracker Configurator and tap Refresh (or Scan) to discover devices.
- Select your ioTracker or ioButton from the list and tap Login; enter your credentials to establish Bluetooth.
2. LoRaWAN Menu
From the Main menu, tap Configuration to access LoRaWAN functions.
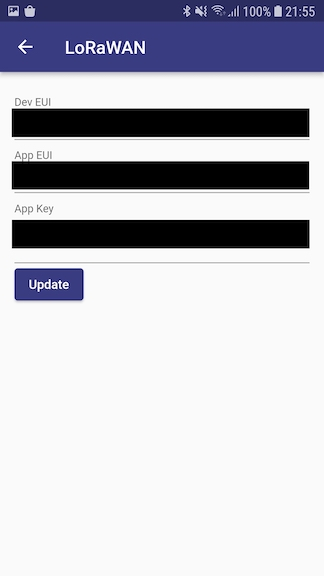
Change LoRaWAN Keys
- Click the edit/pencil icon next to DevEUI, AppEUI, and AppKey.
- Enter your new LoRaWAN DevEUI, AppEUI, and AppKey.
- Click Update.
- Reboot the device to activate the new keys.
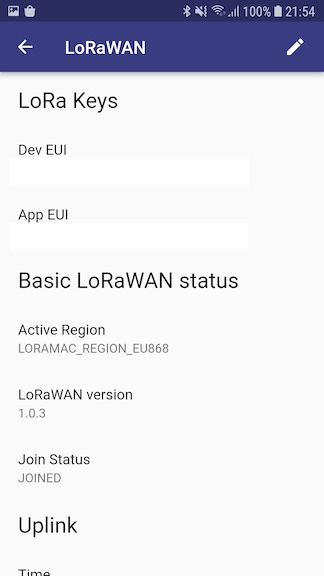
Check LoRaWAN Status
- Active Region: the frequency band in use.
- LoRaWAN Version: the specification version.
- Join Status: JOINED or NOT JOINED.
- Last Uplink: timestamp, payload, message type, DataRate, channel, TxPower, TxToA, UpCntr.
- Last Downlink: timestamp, payload, DataRate, RxSlot, port, RSSI, SNR, ACK flag, DownCntr.
To configure the device we also need to add it to a network server, so select the network server your gateway is connected to:
在ChirpStack上添加设备我们需要在 ChirpStack 上添加设备。 要添加设备,请按以下步骤操作:
 登录ChirpStack服务器。 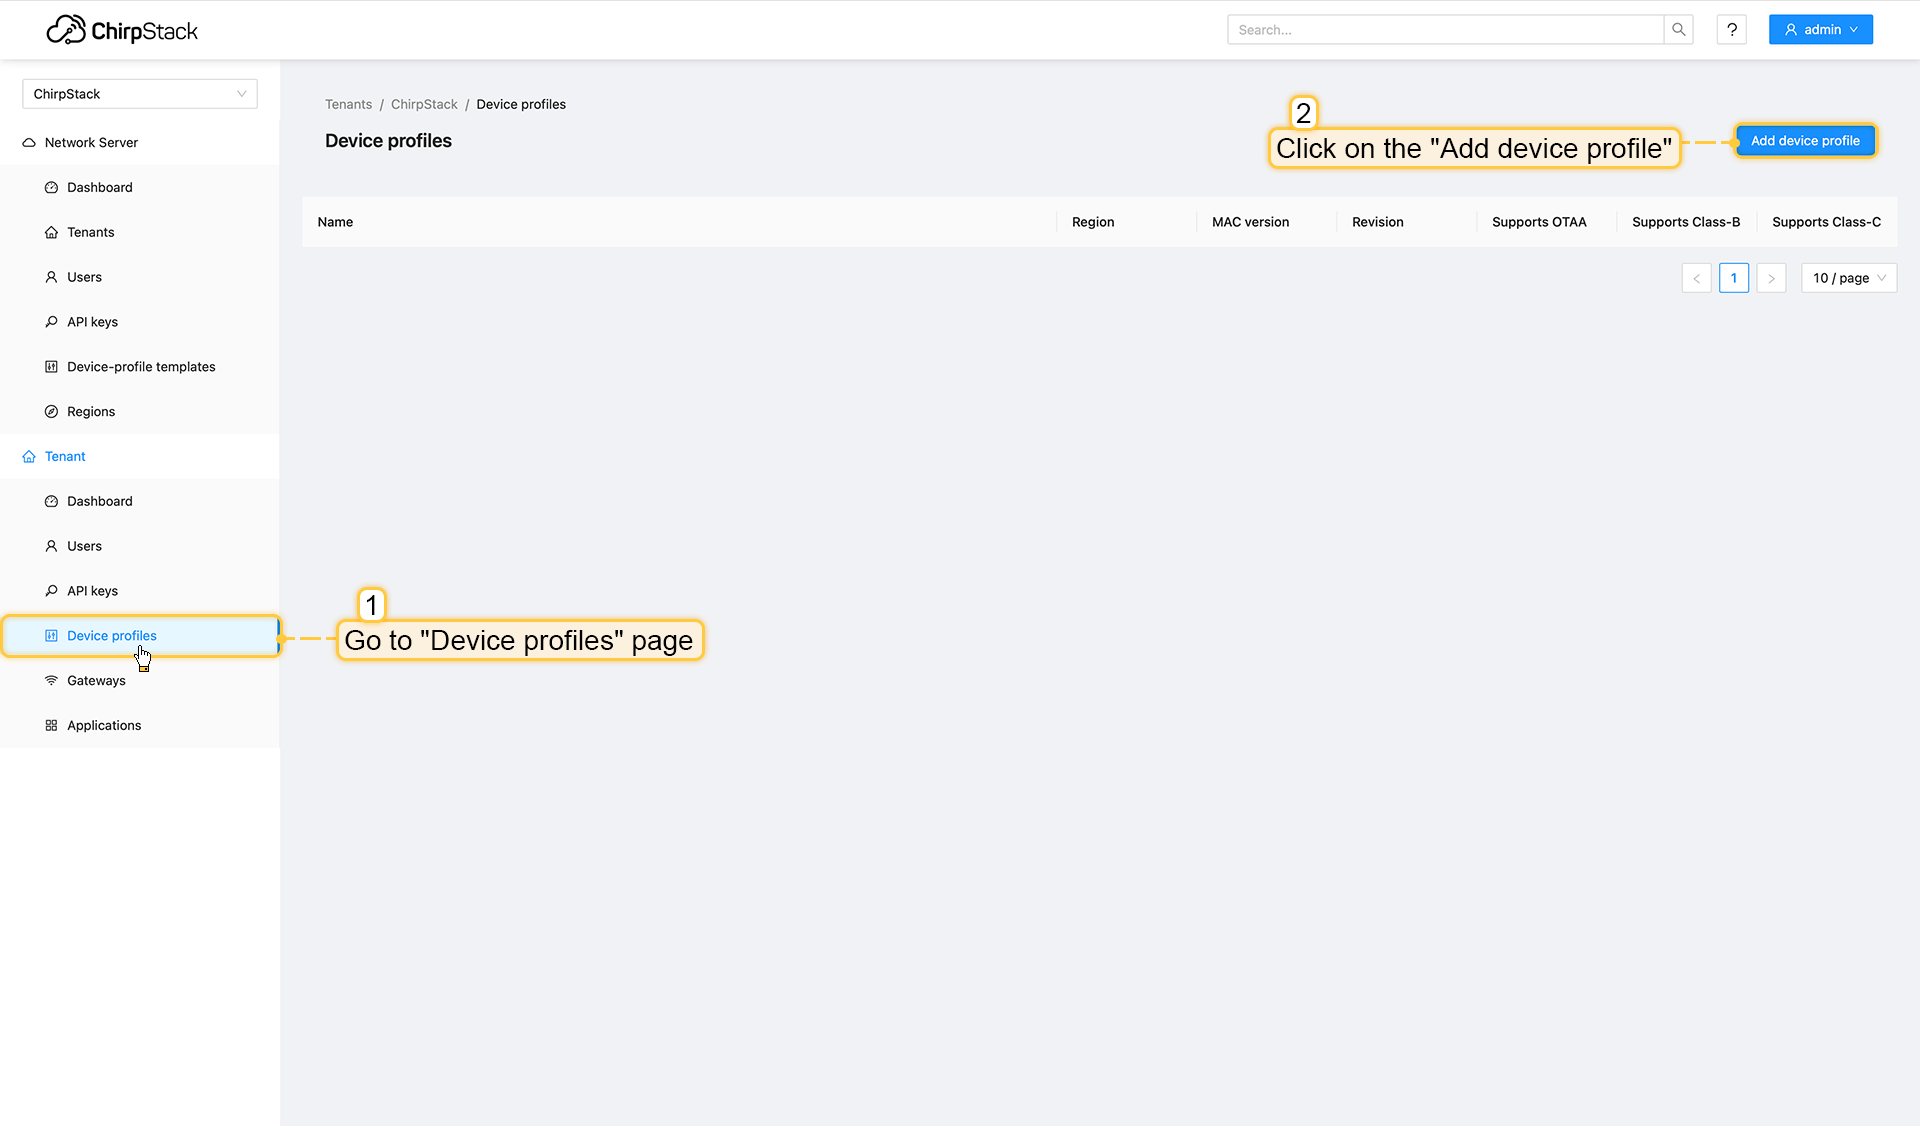 进入设备配置页面,点击添加设备配置按钮。 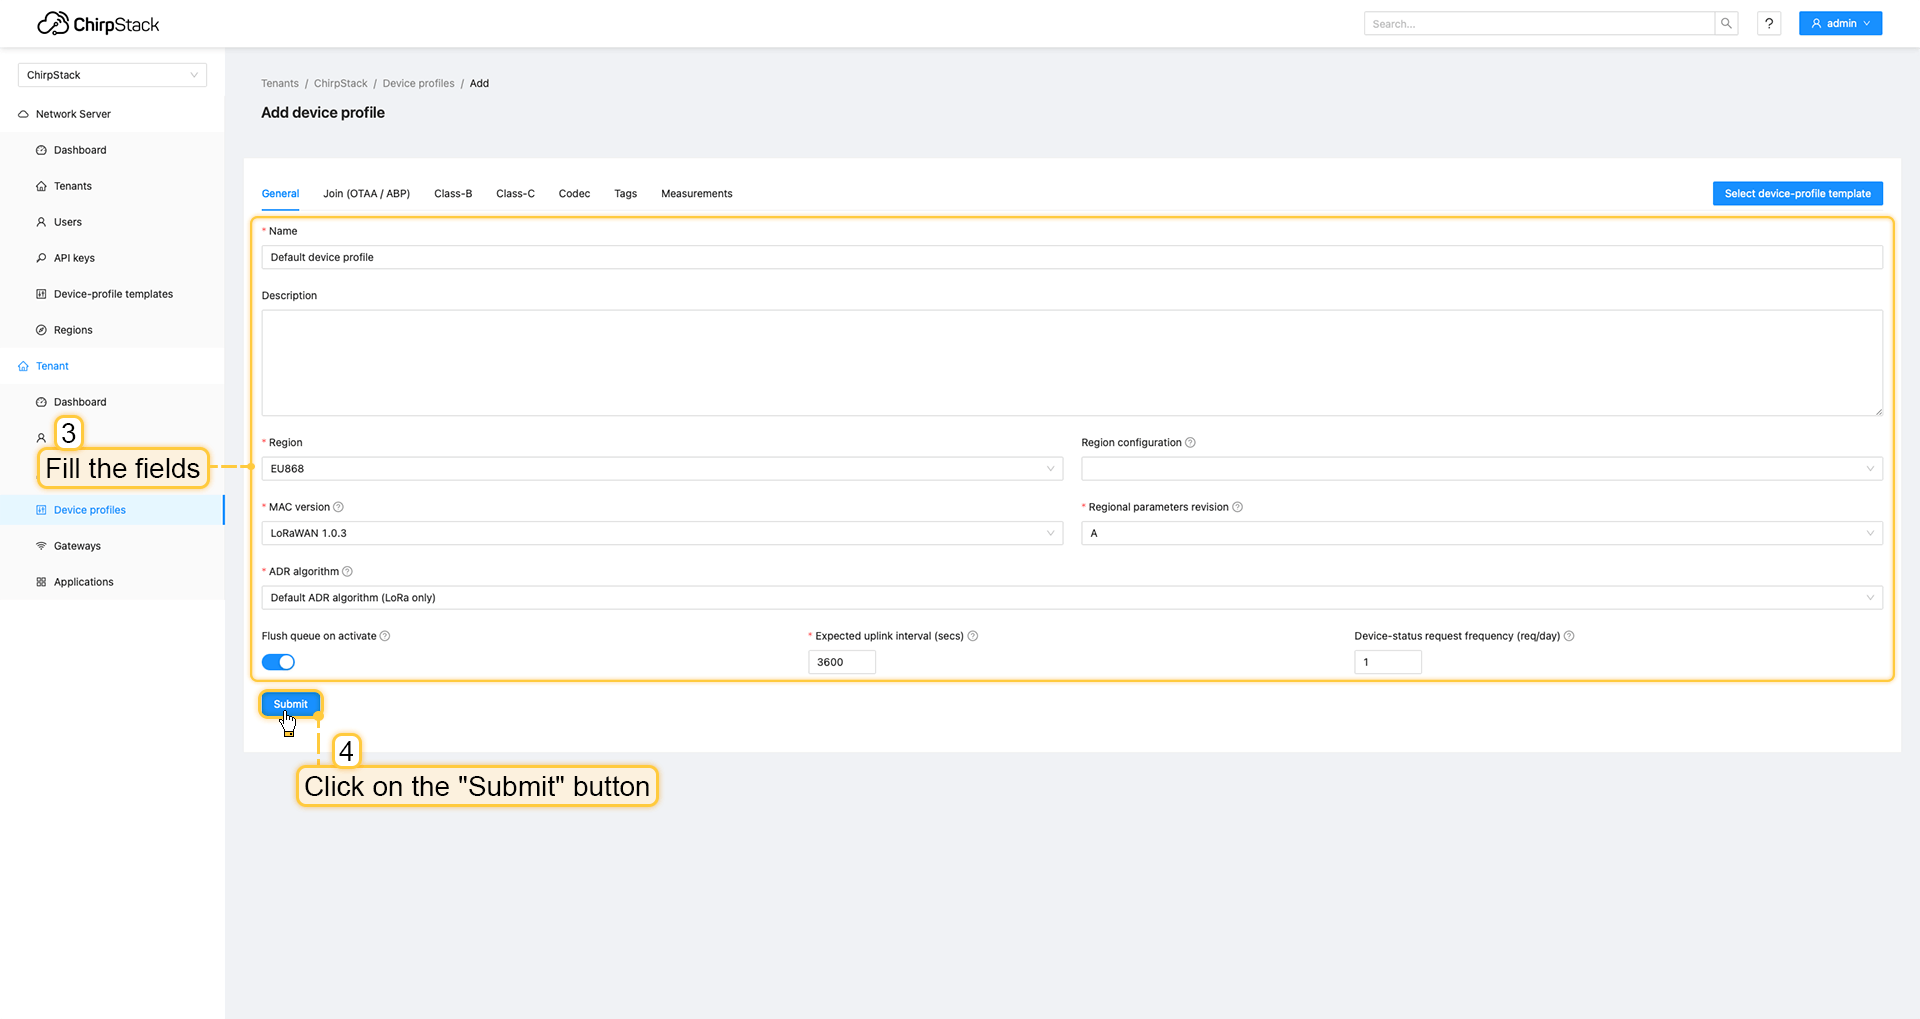 填写字段并点击提交按钮。 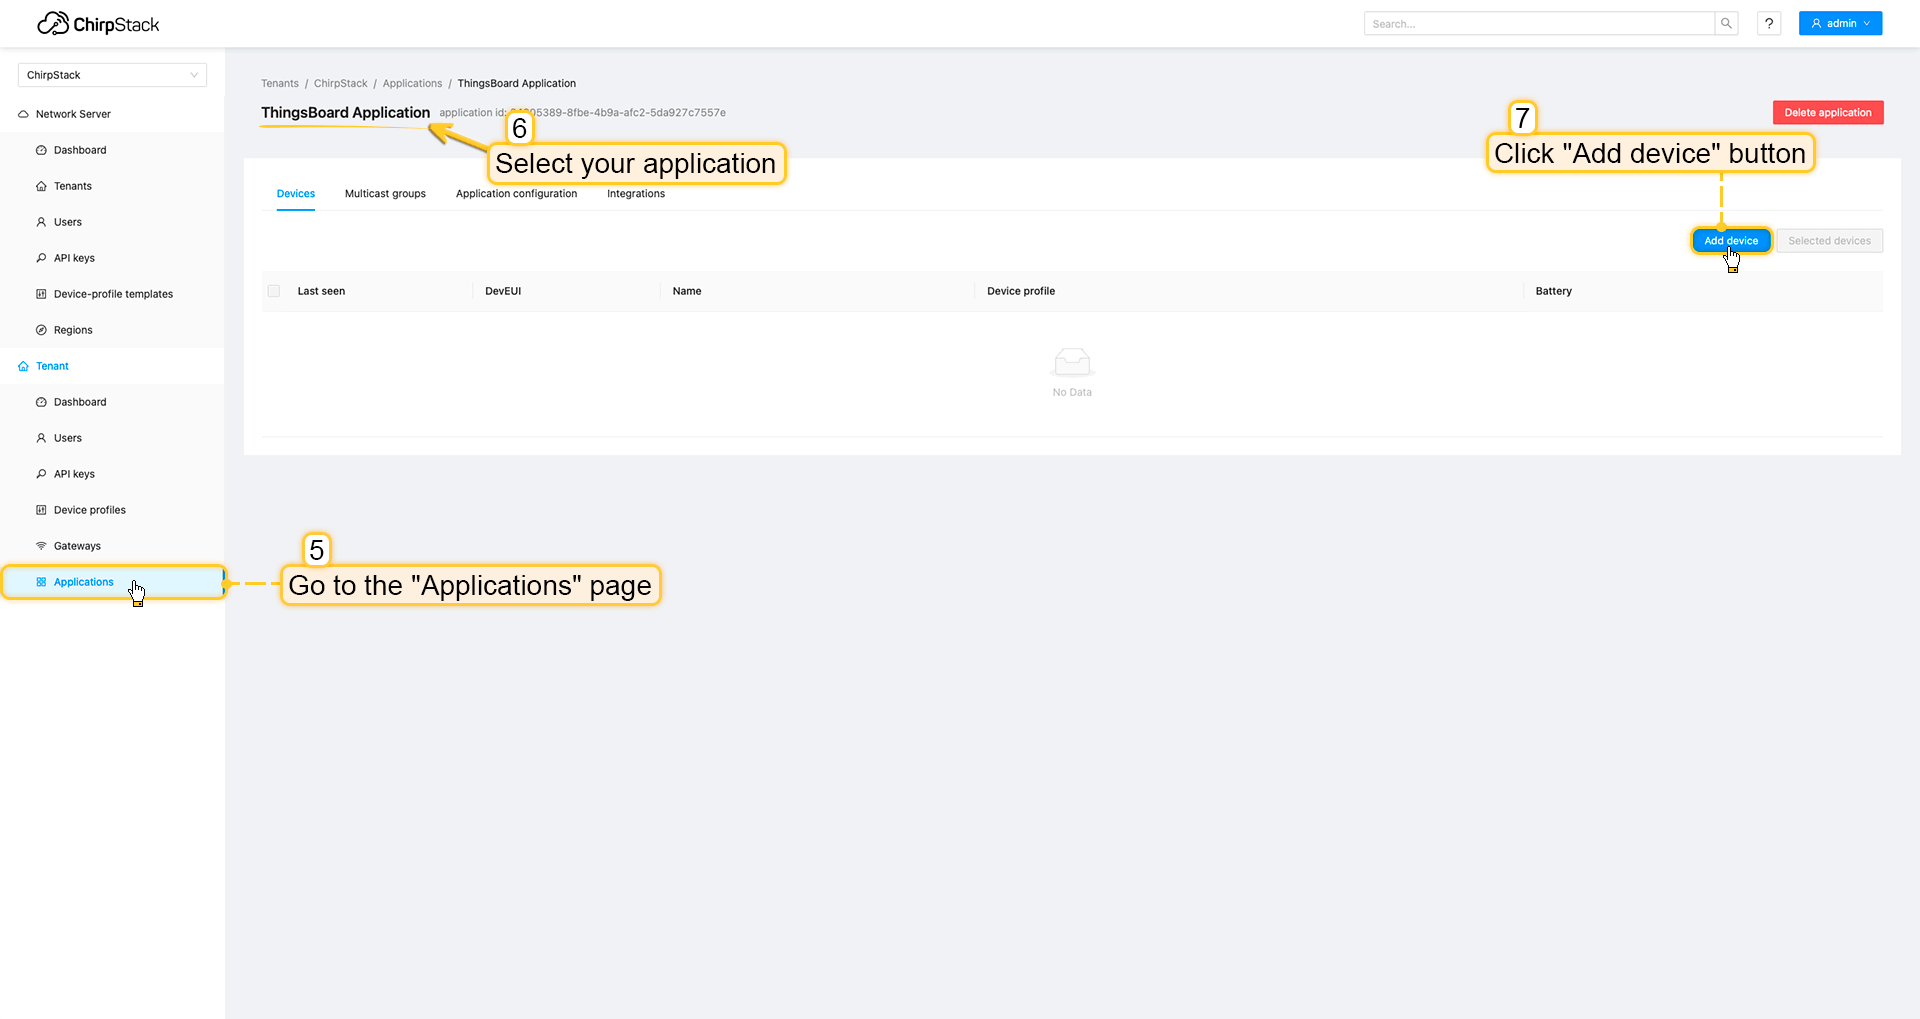 进入应用页面,点击您的应用后按添加设备按钮。 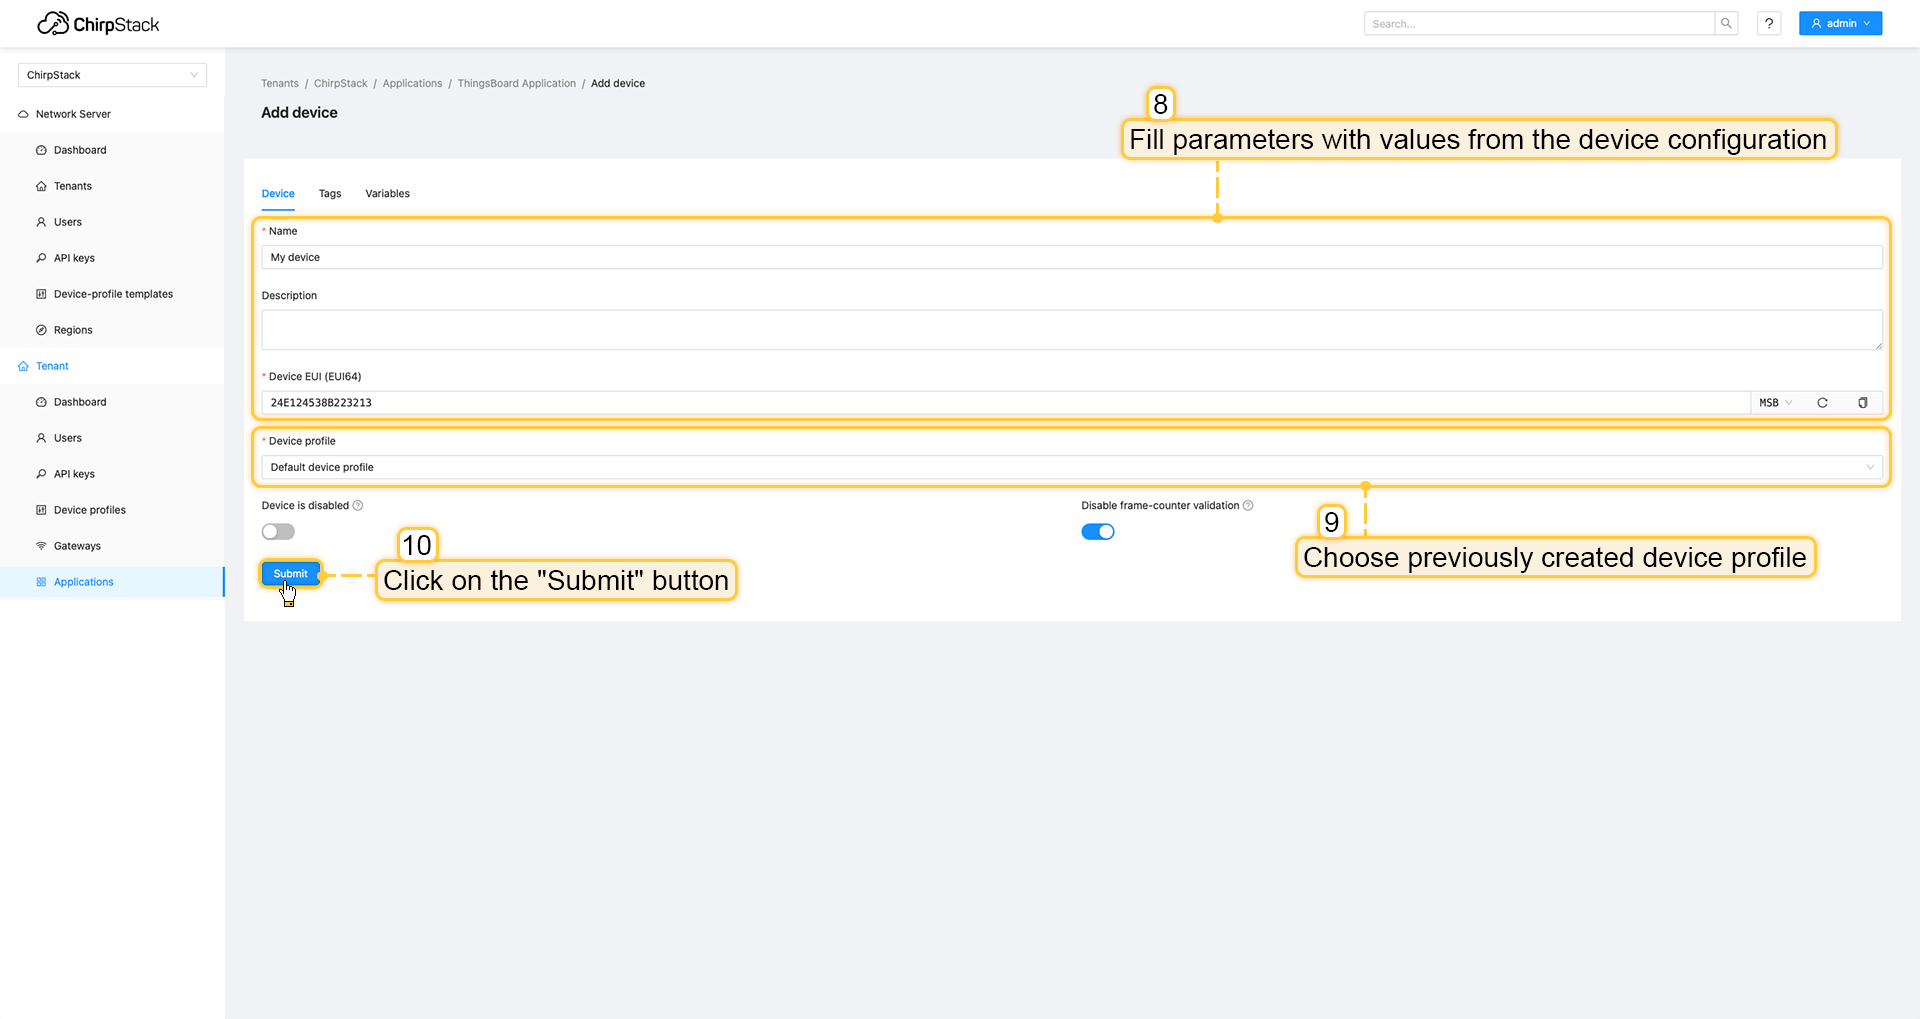 使用设备配置中的值填写参数。然后选择之前创建设备配置并点击提交按钮。 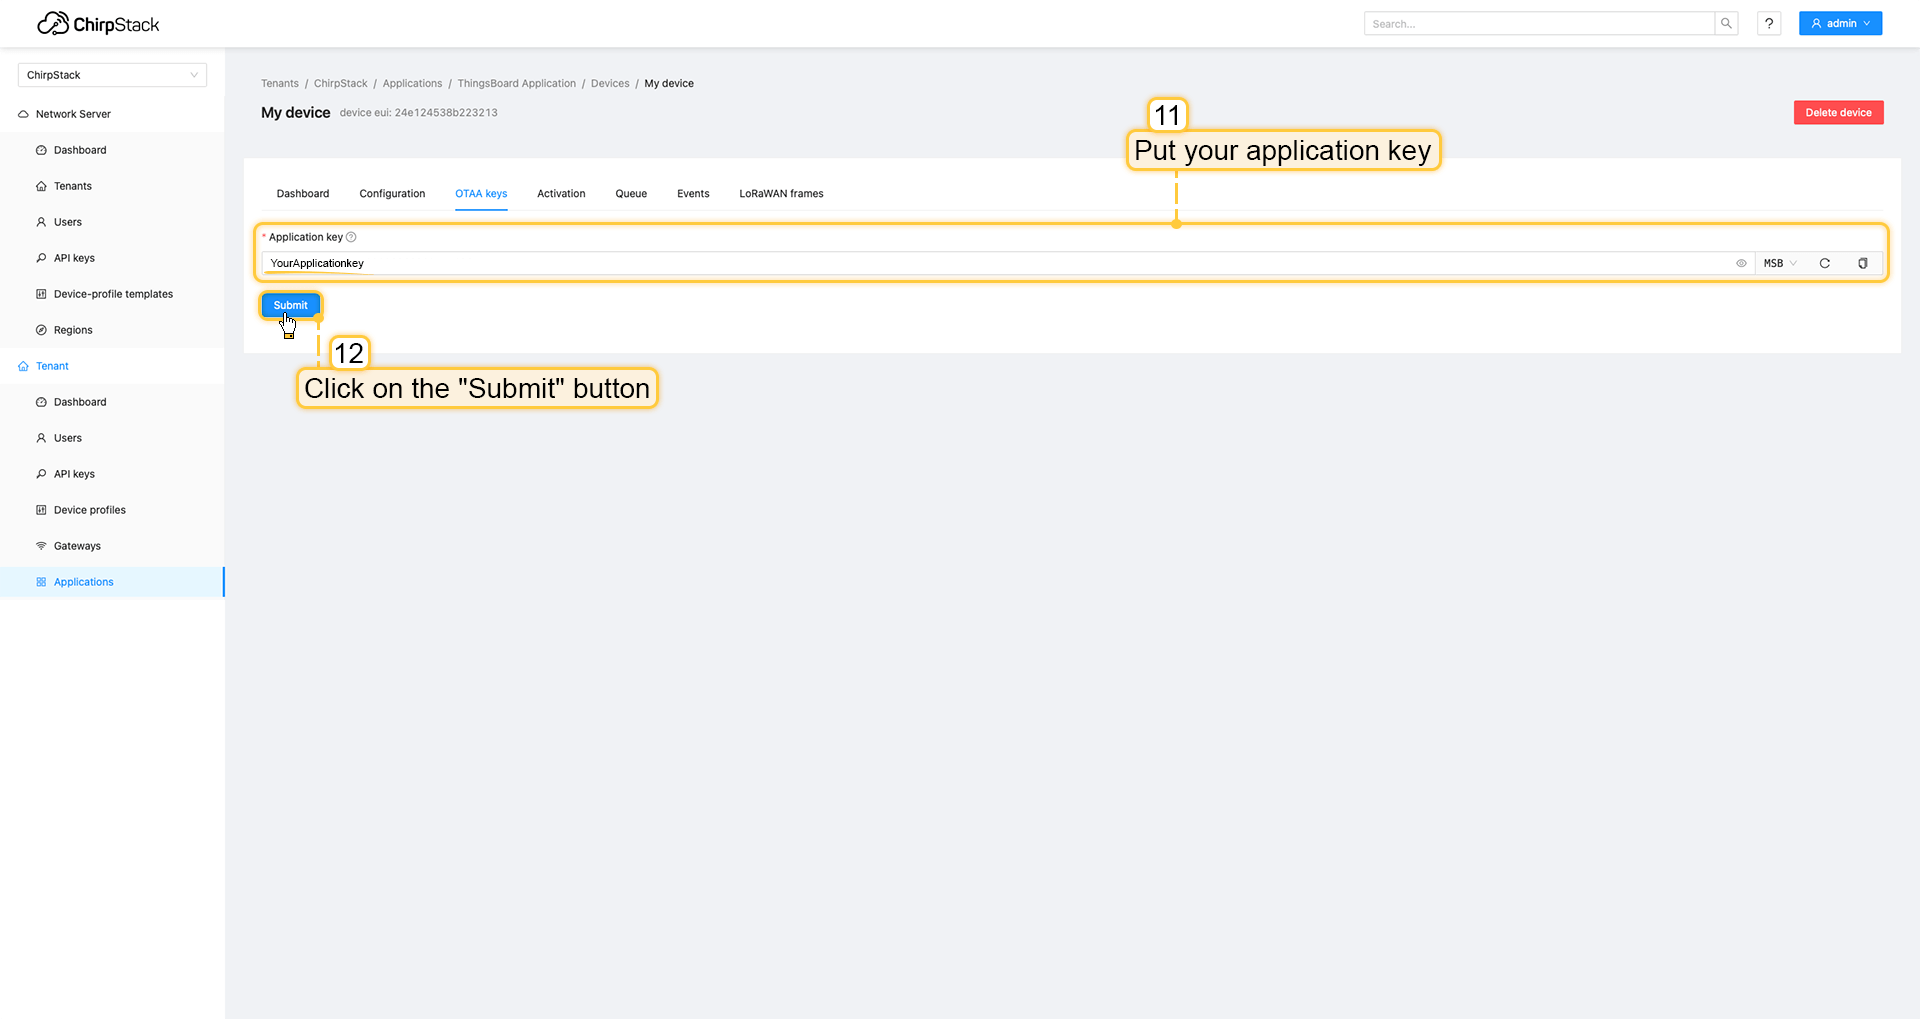 将应用密钥填入相应字段并点击提交按钮保存设备。 ThingsBoard集成中的上行数据转换器步骤1:下载JSON文件 点击下方按钮下载包含上行数据转换器配置的JSON文件。
下载包含上行数据转换器配置的文件后,将其导入ThingsBoard:
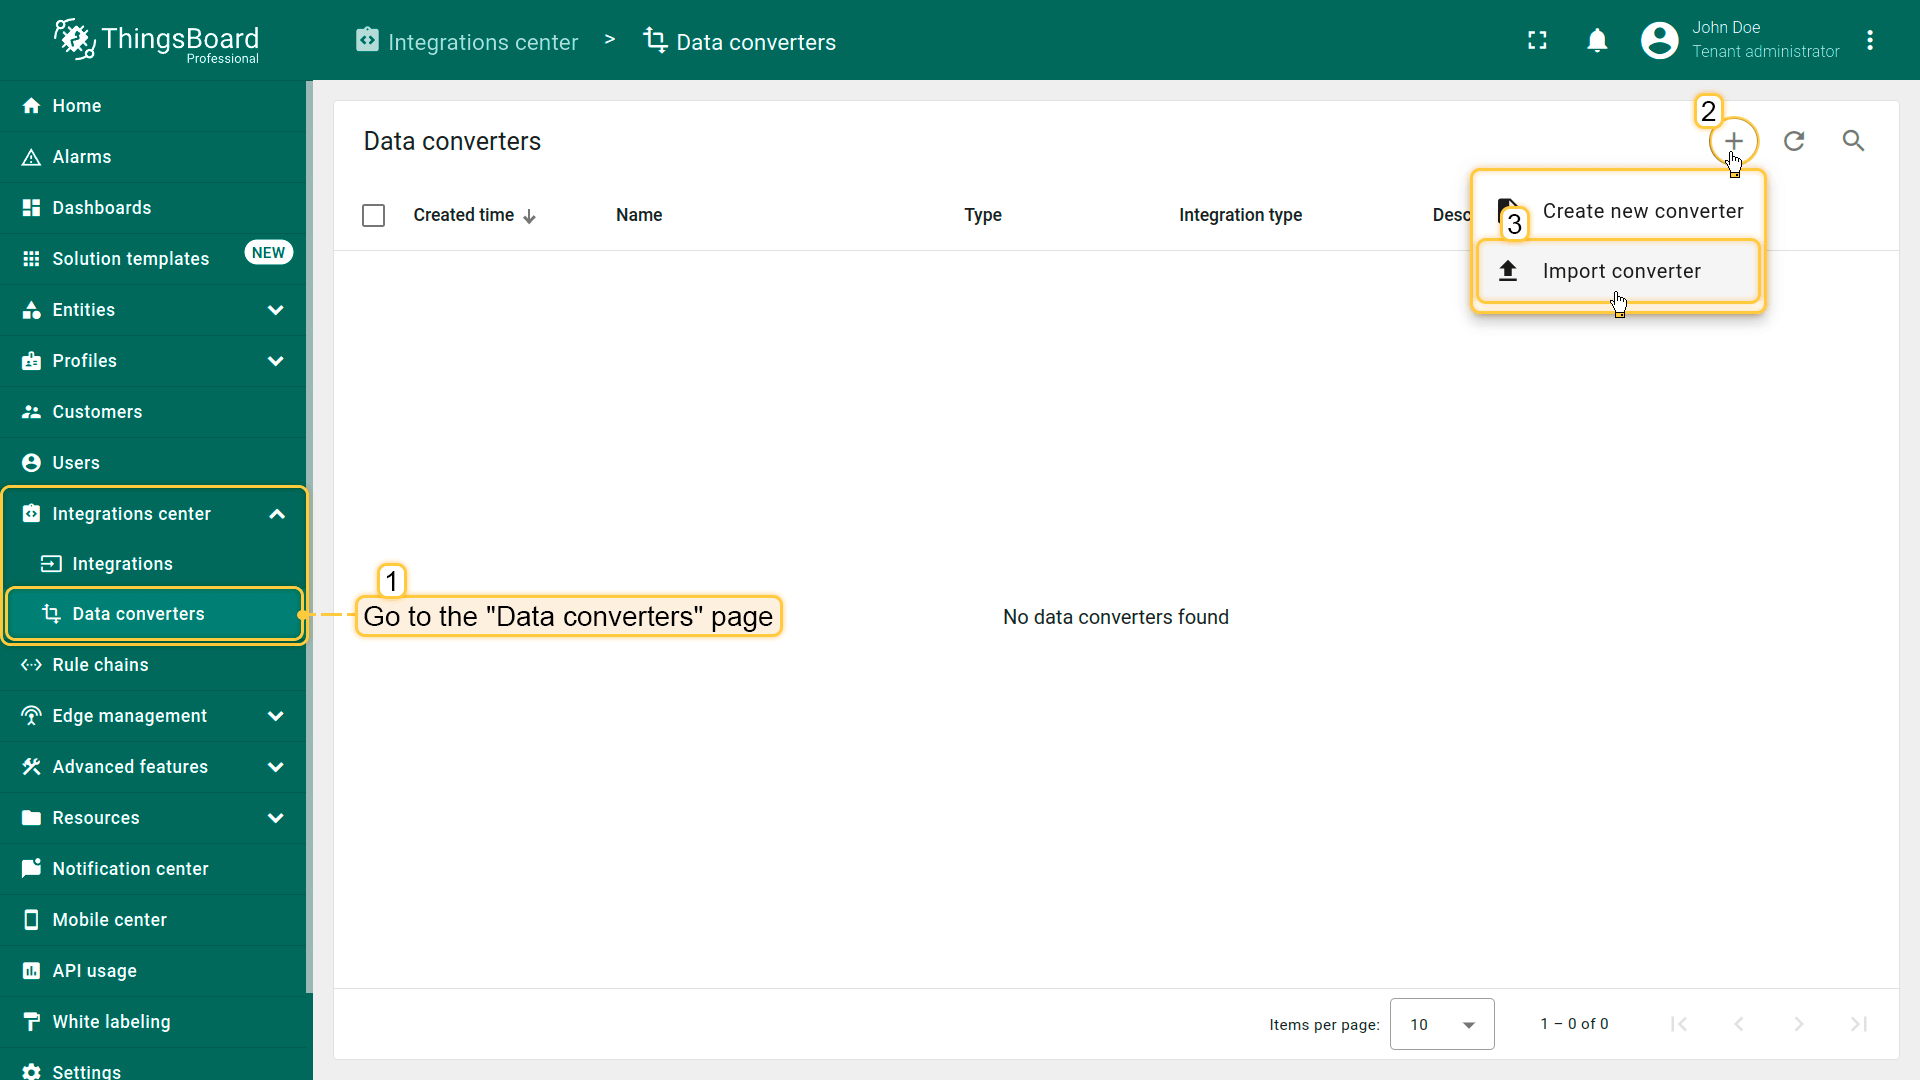 在集成中心部分的数据转换器页面中操作。点击页面右上角的+图标,从下拉菜单选择导入转换器。 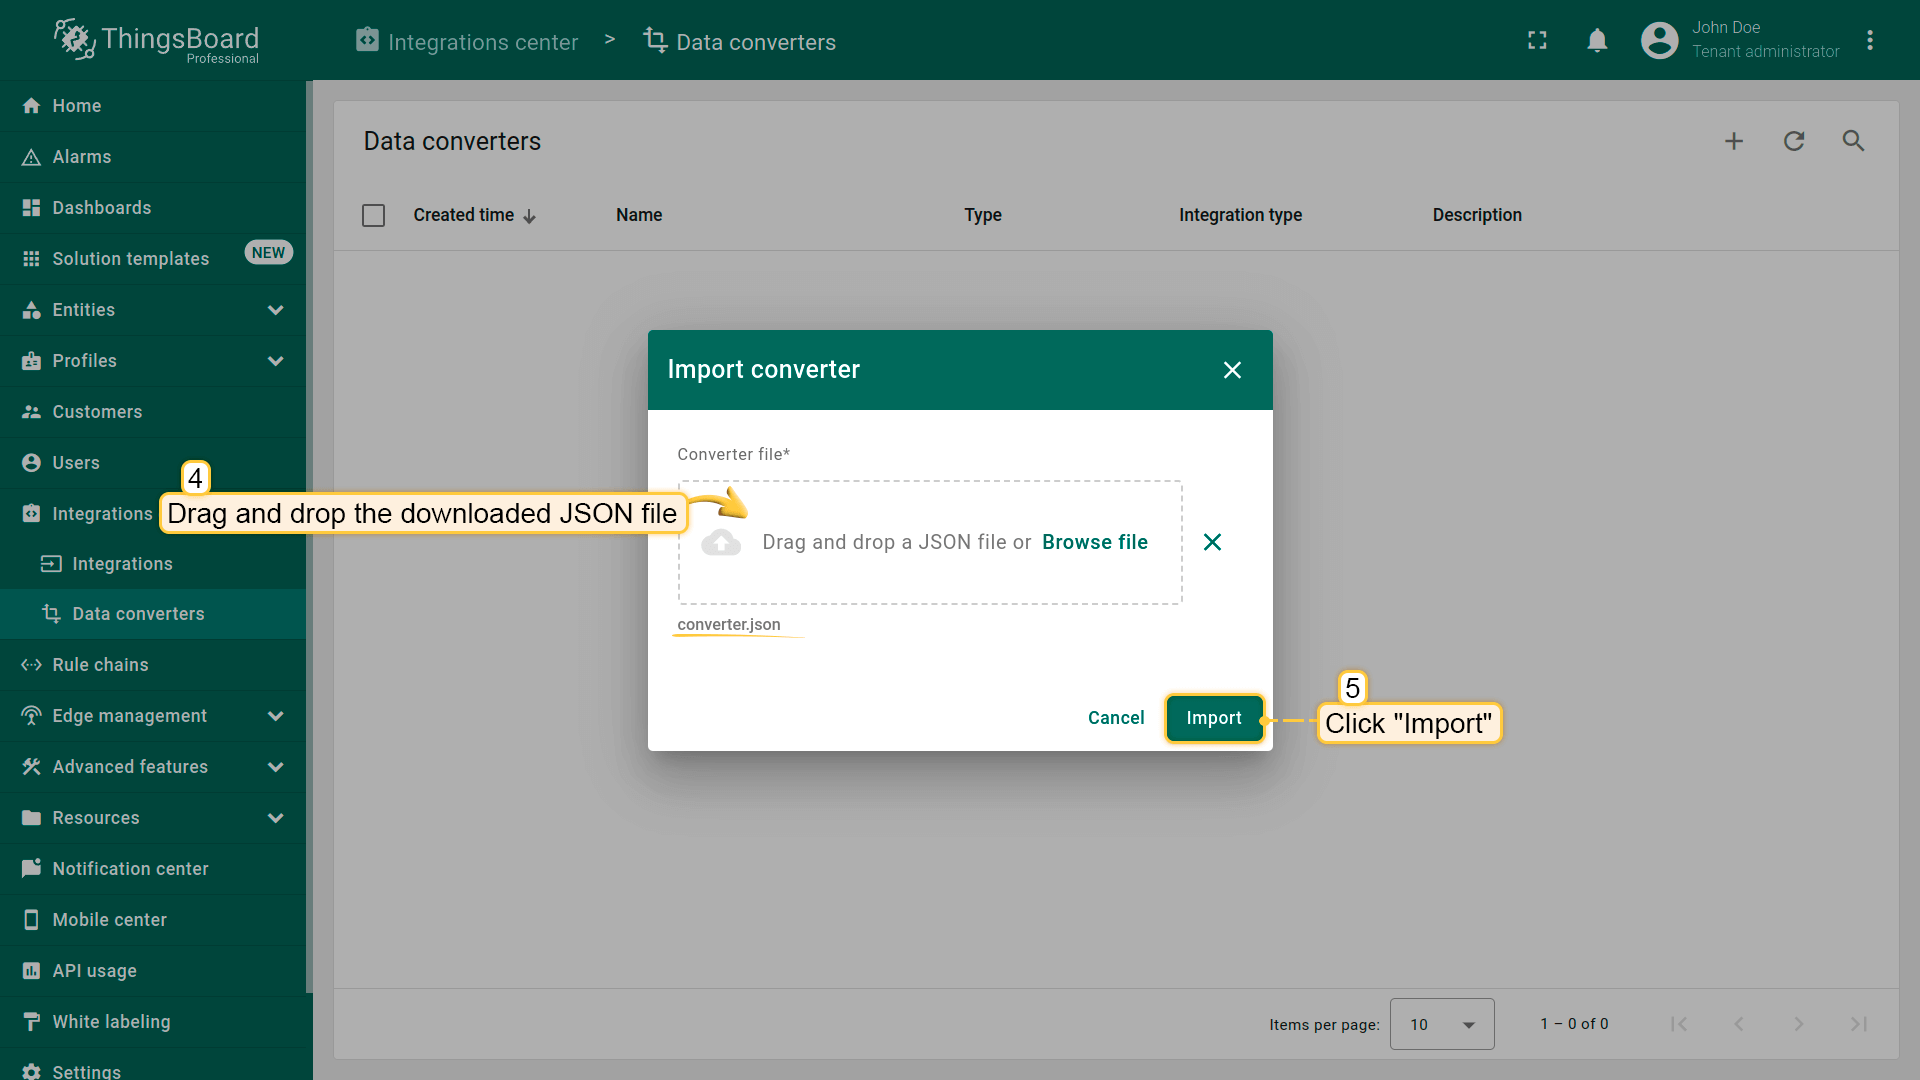 将下载的JSON文件(包含上行数据转换器配置)拖放到导入窗口,然后点击导入。 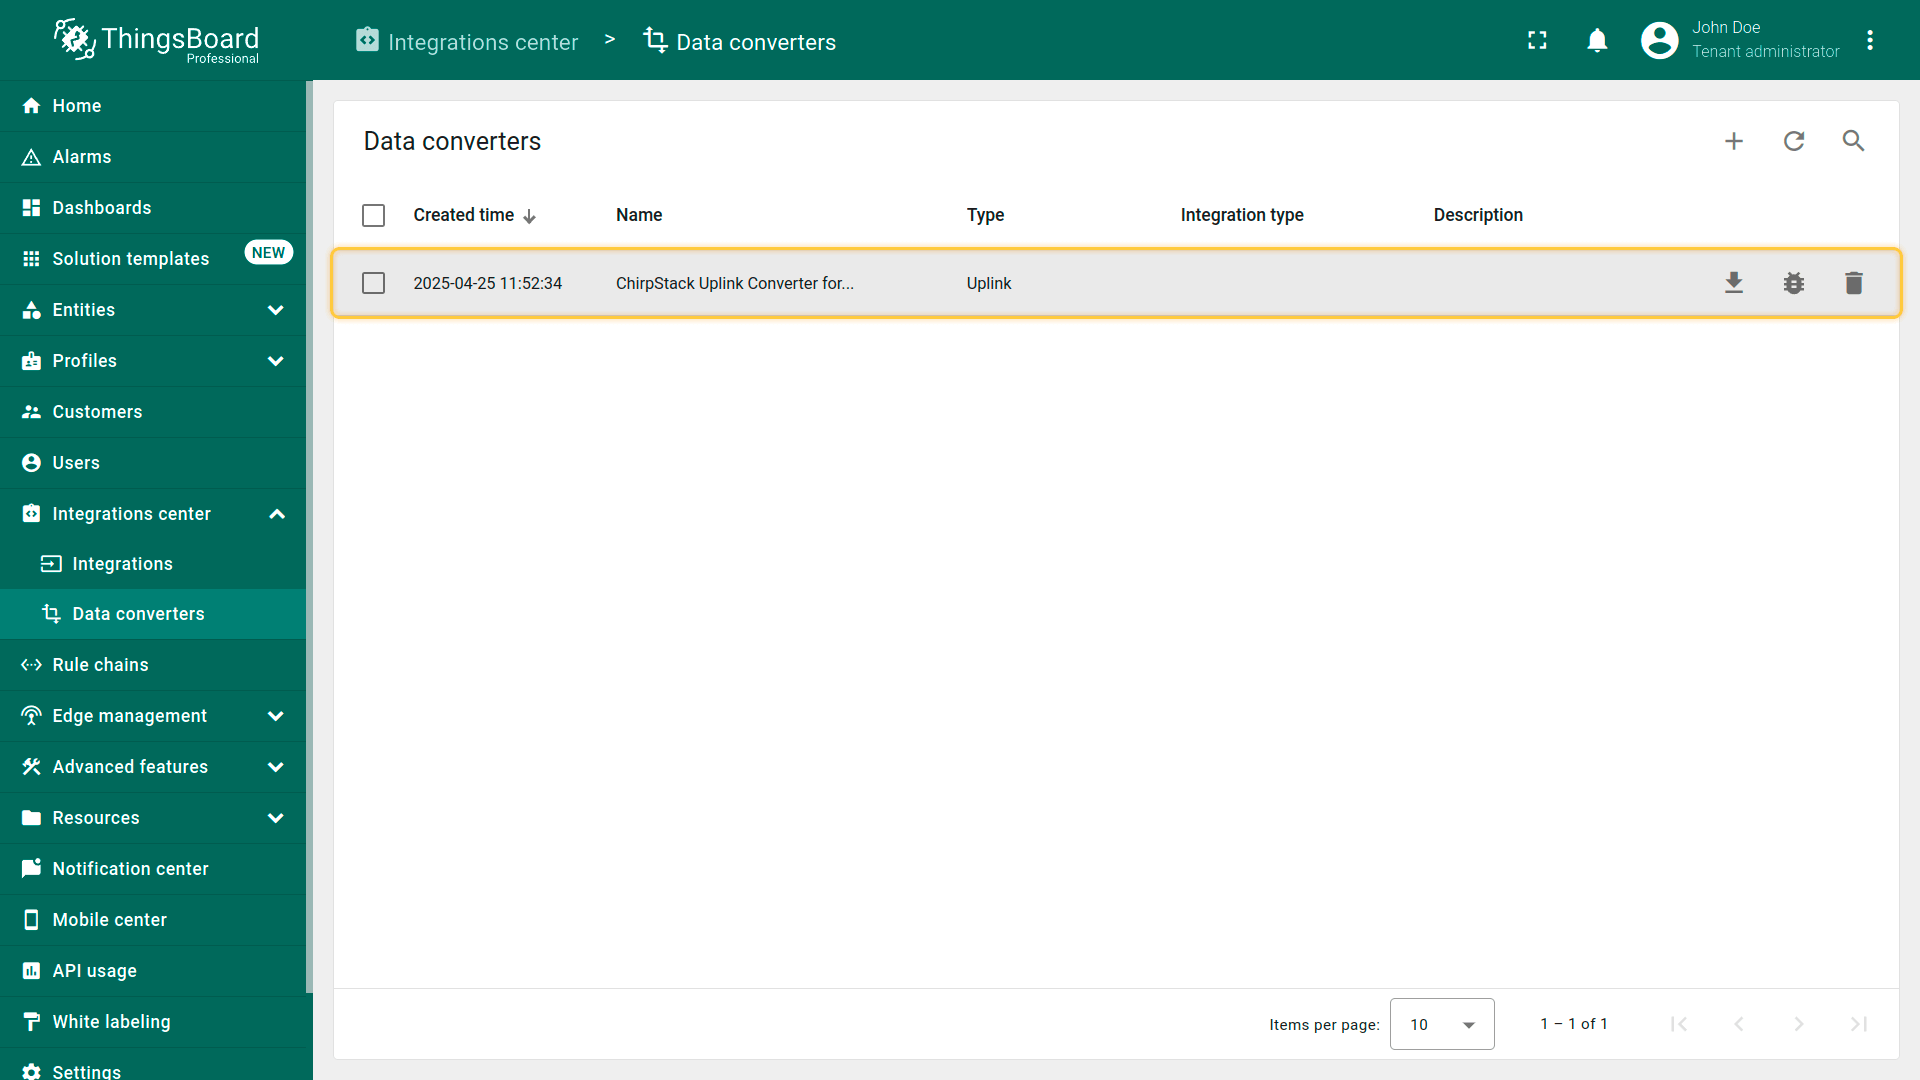 上行数据转换器现已成功导入。
现在,将您的 ChirpStack 集成更新为使用新的上行数据转换器:
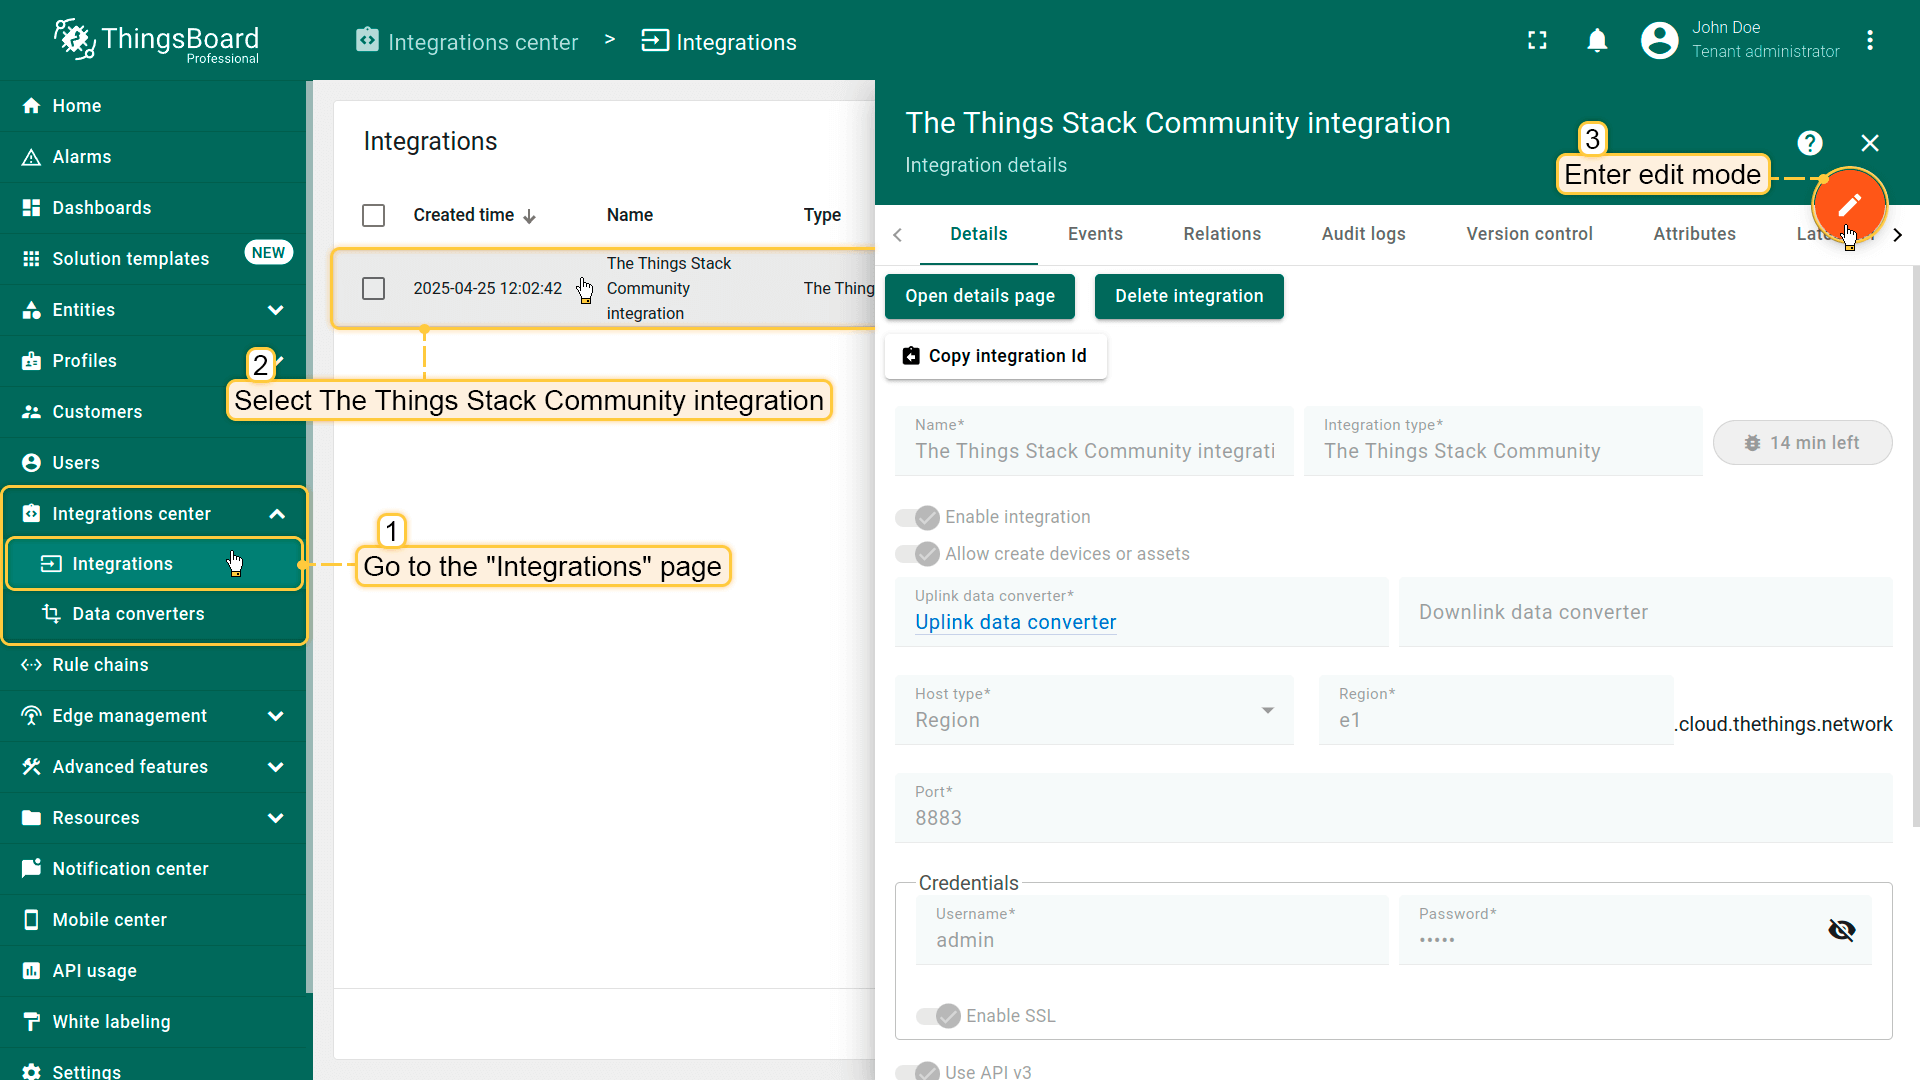
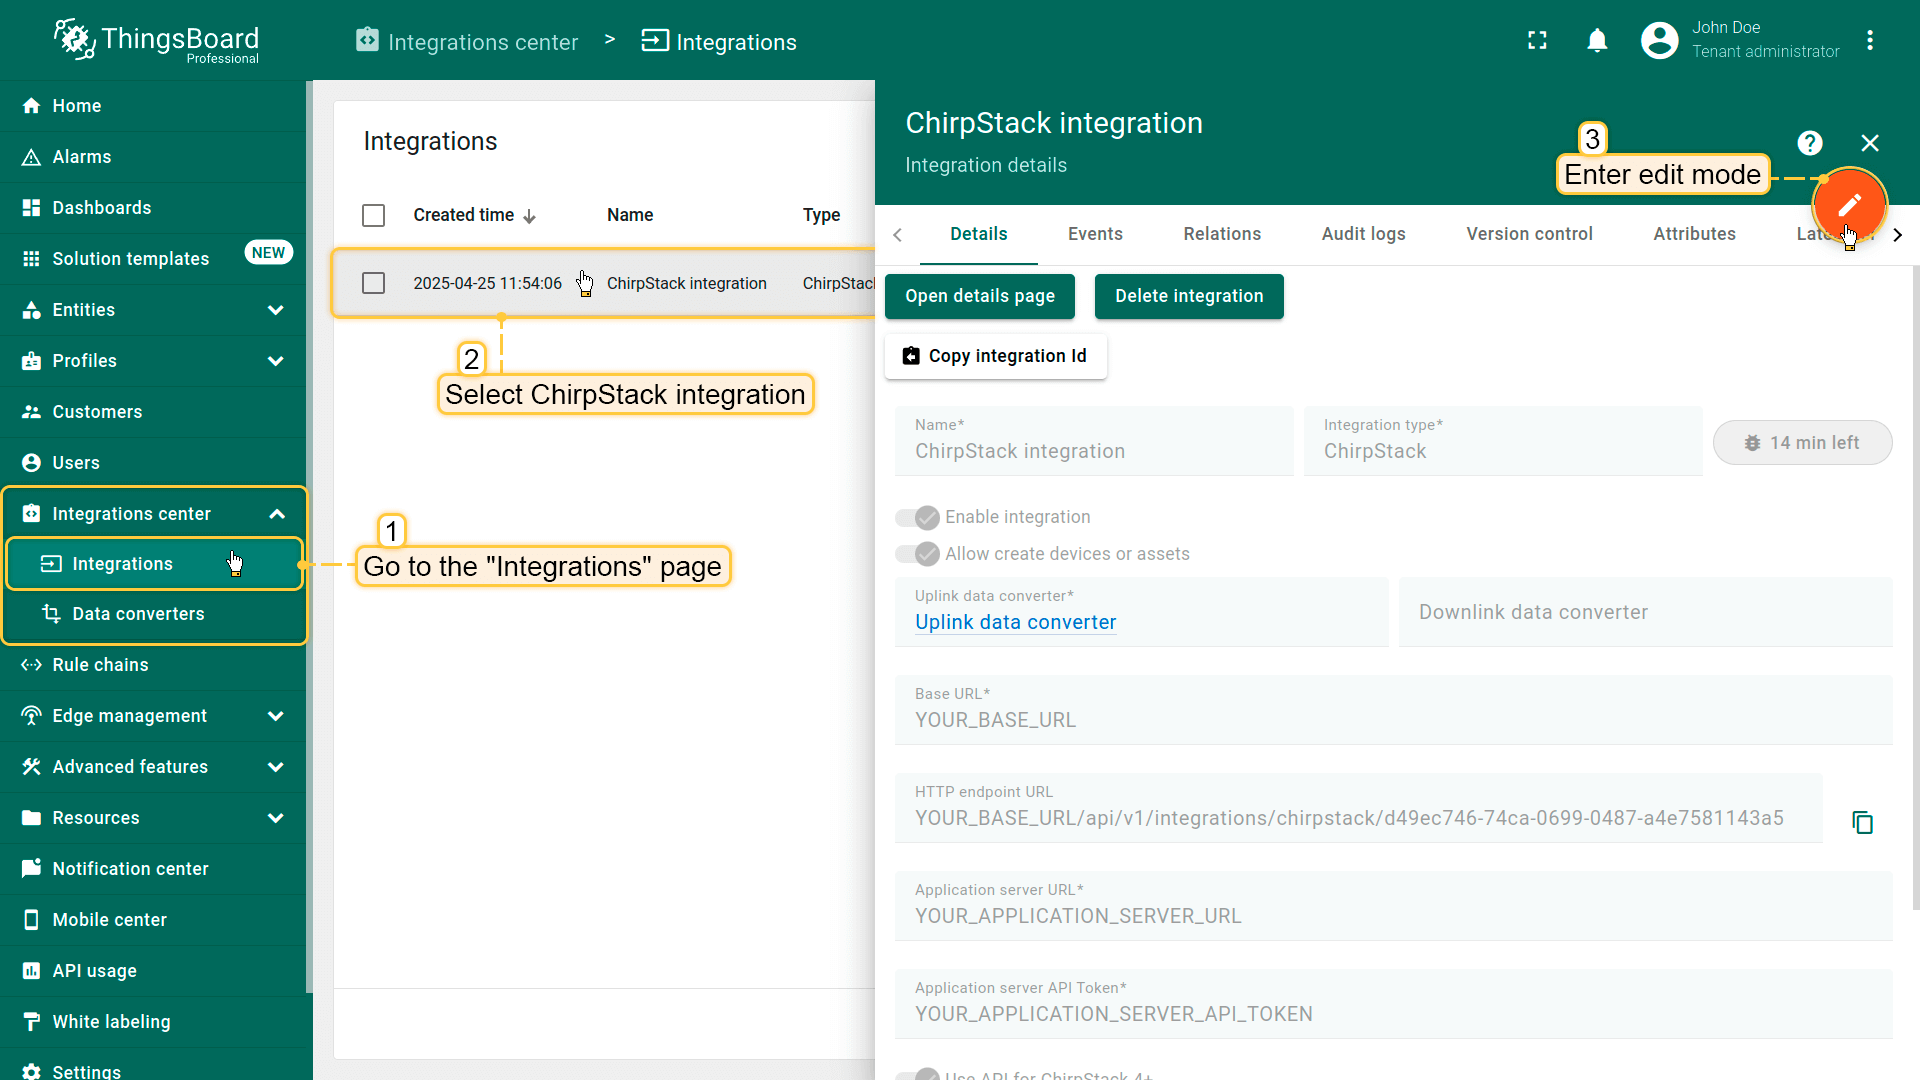 进入集成中心部分的集成页面。点击您的ChirpStack集成以打开详情窗口。点击右上角的橙色铅笔按钮进入编辑模式。 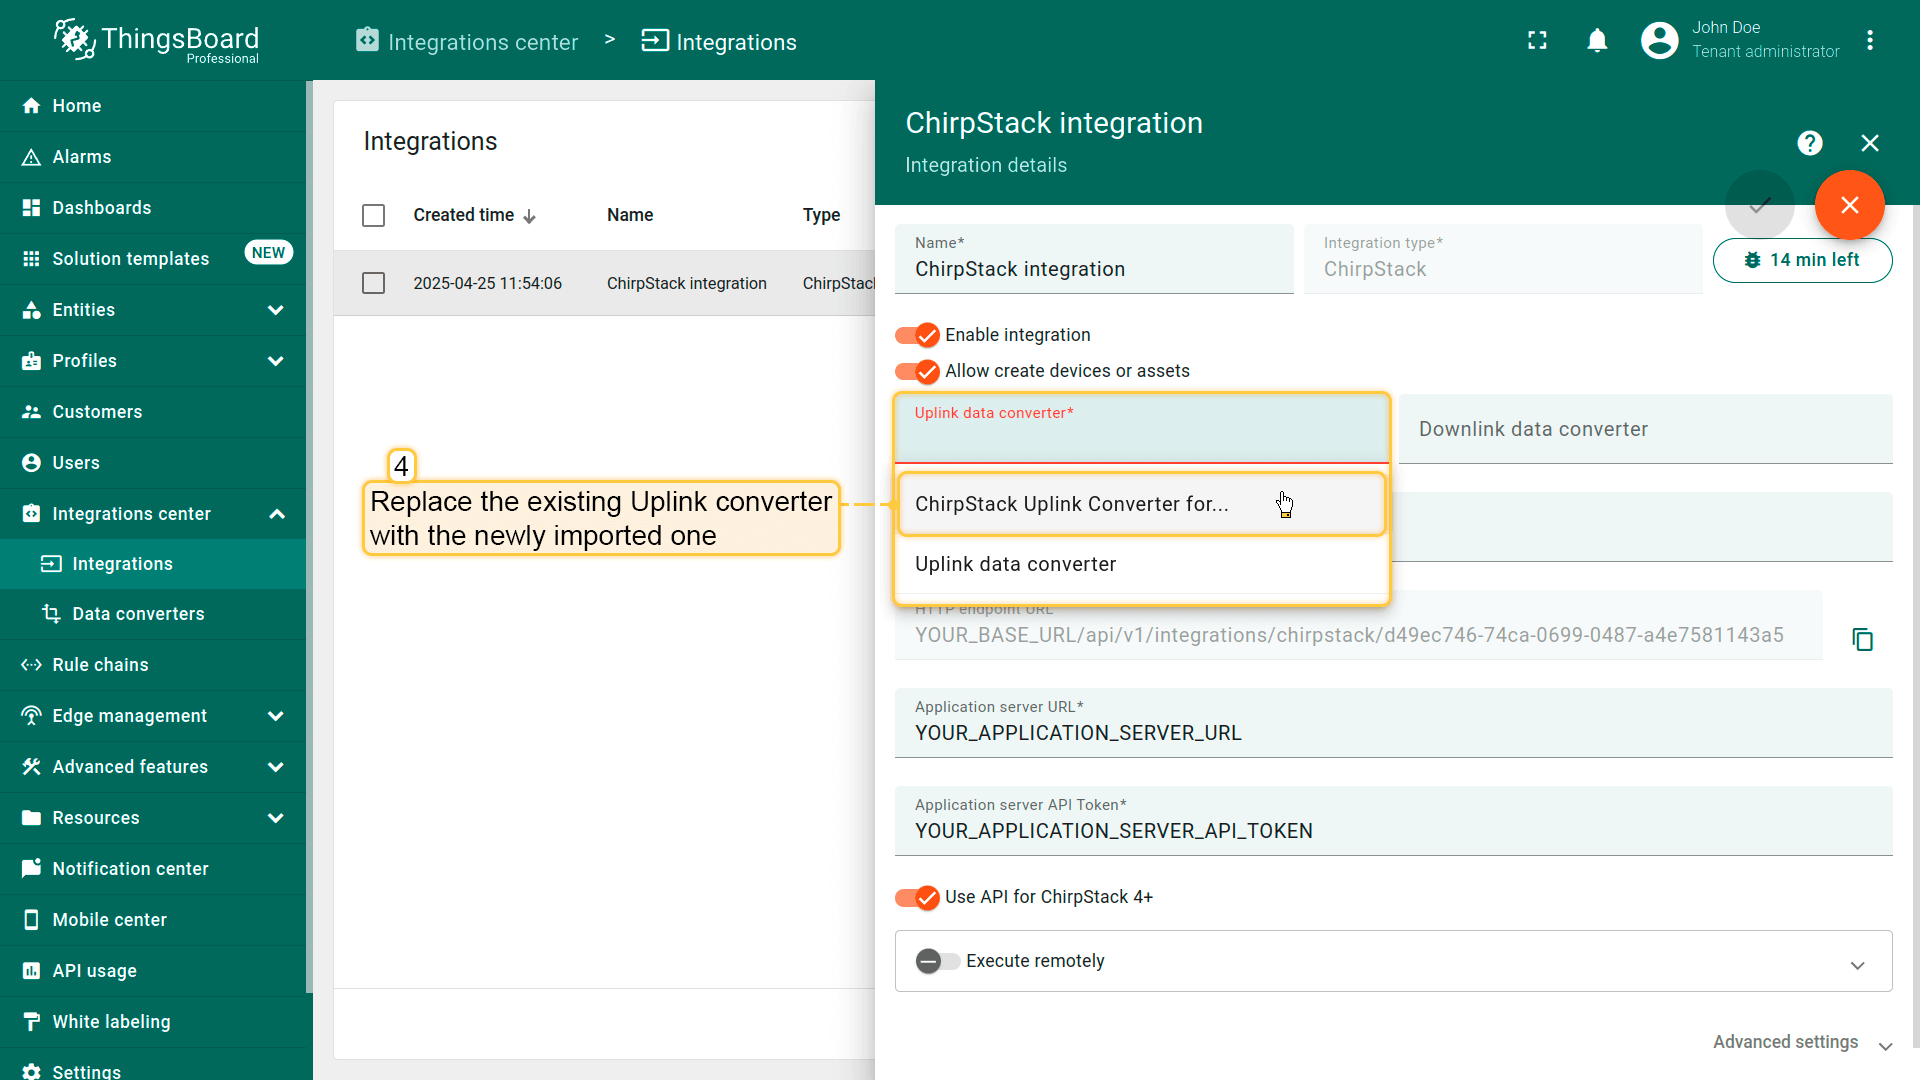 使用导入的转换器替换现有上行数据转换器。  别忘了保存更改! |
在The Things Stack社区版上添加设备我们需要在 The Things Stack社区版 上添加设备。 要添加设备,请按以下步骤操作:
 登录云端并打开控制台。 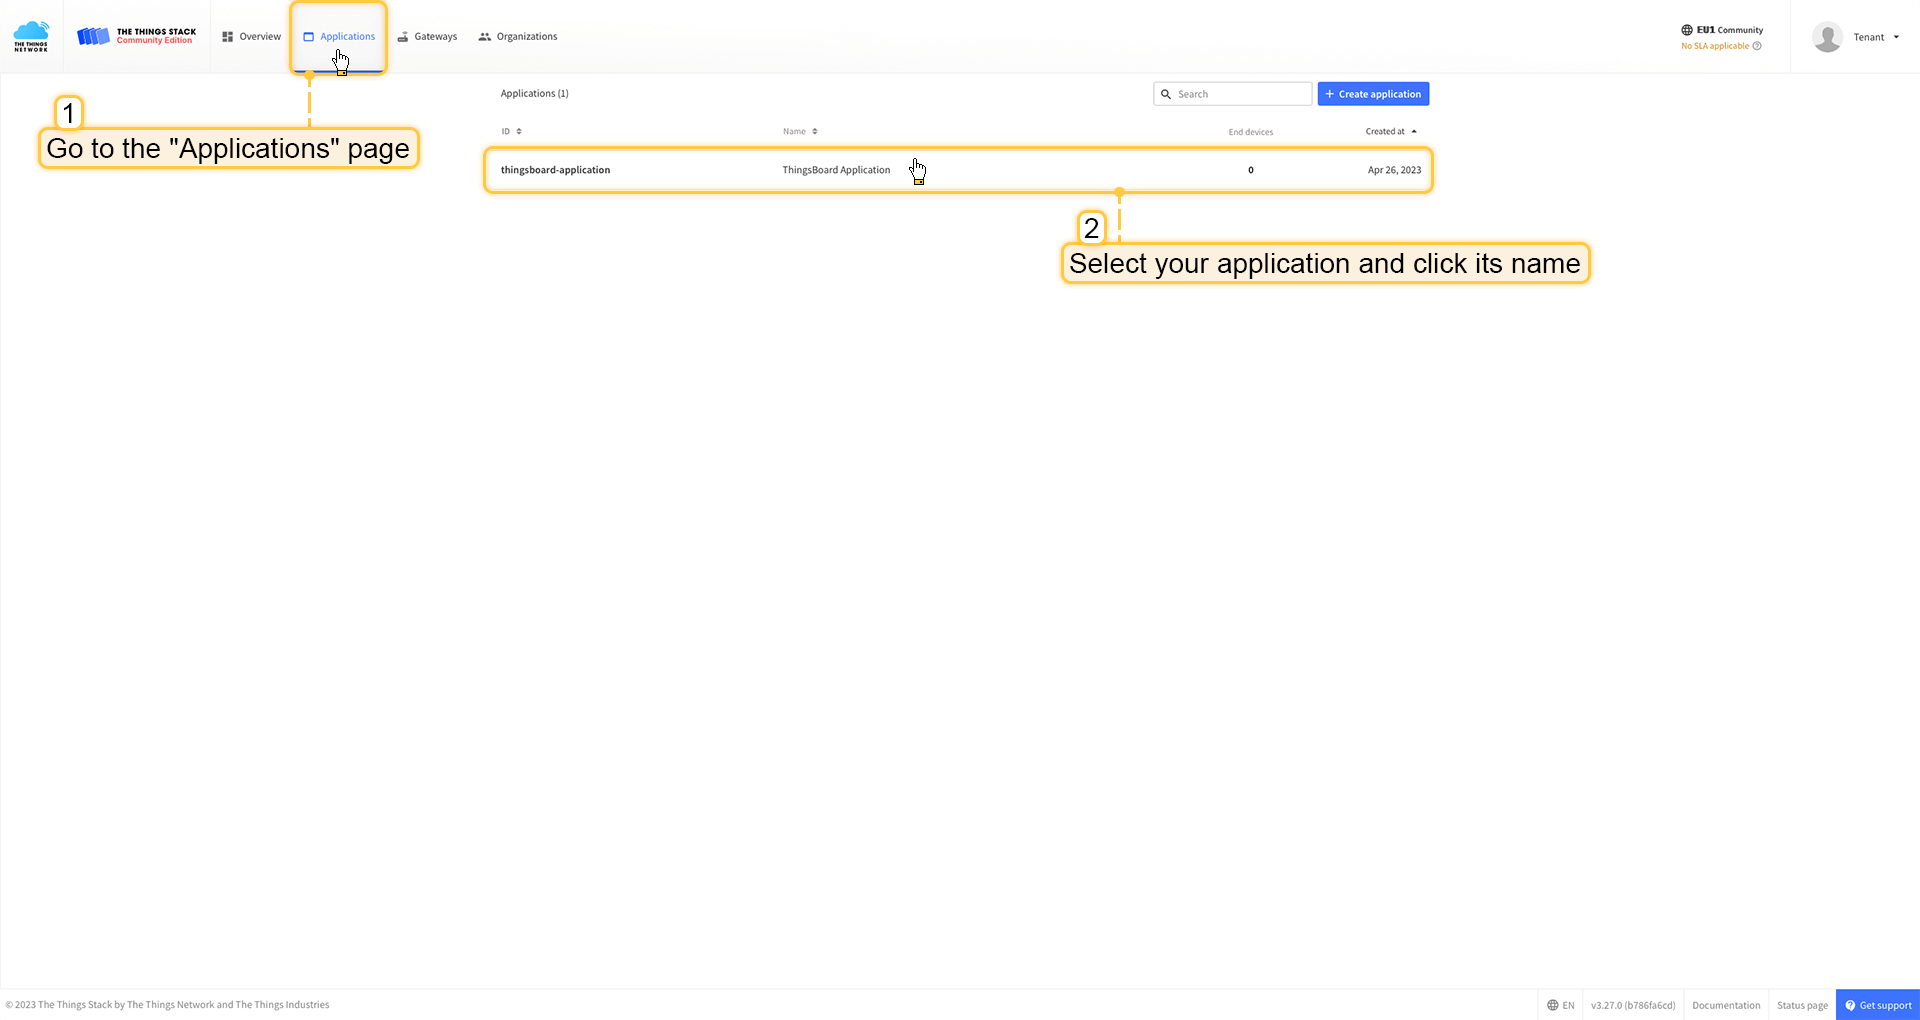 进入 应用 页面。然后选择您的应用并点击应用名称。 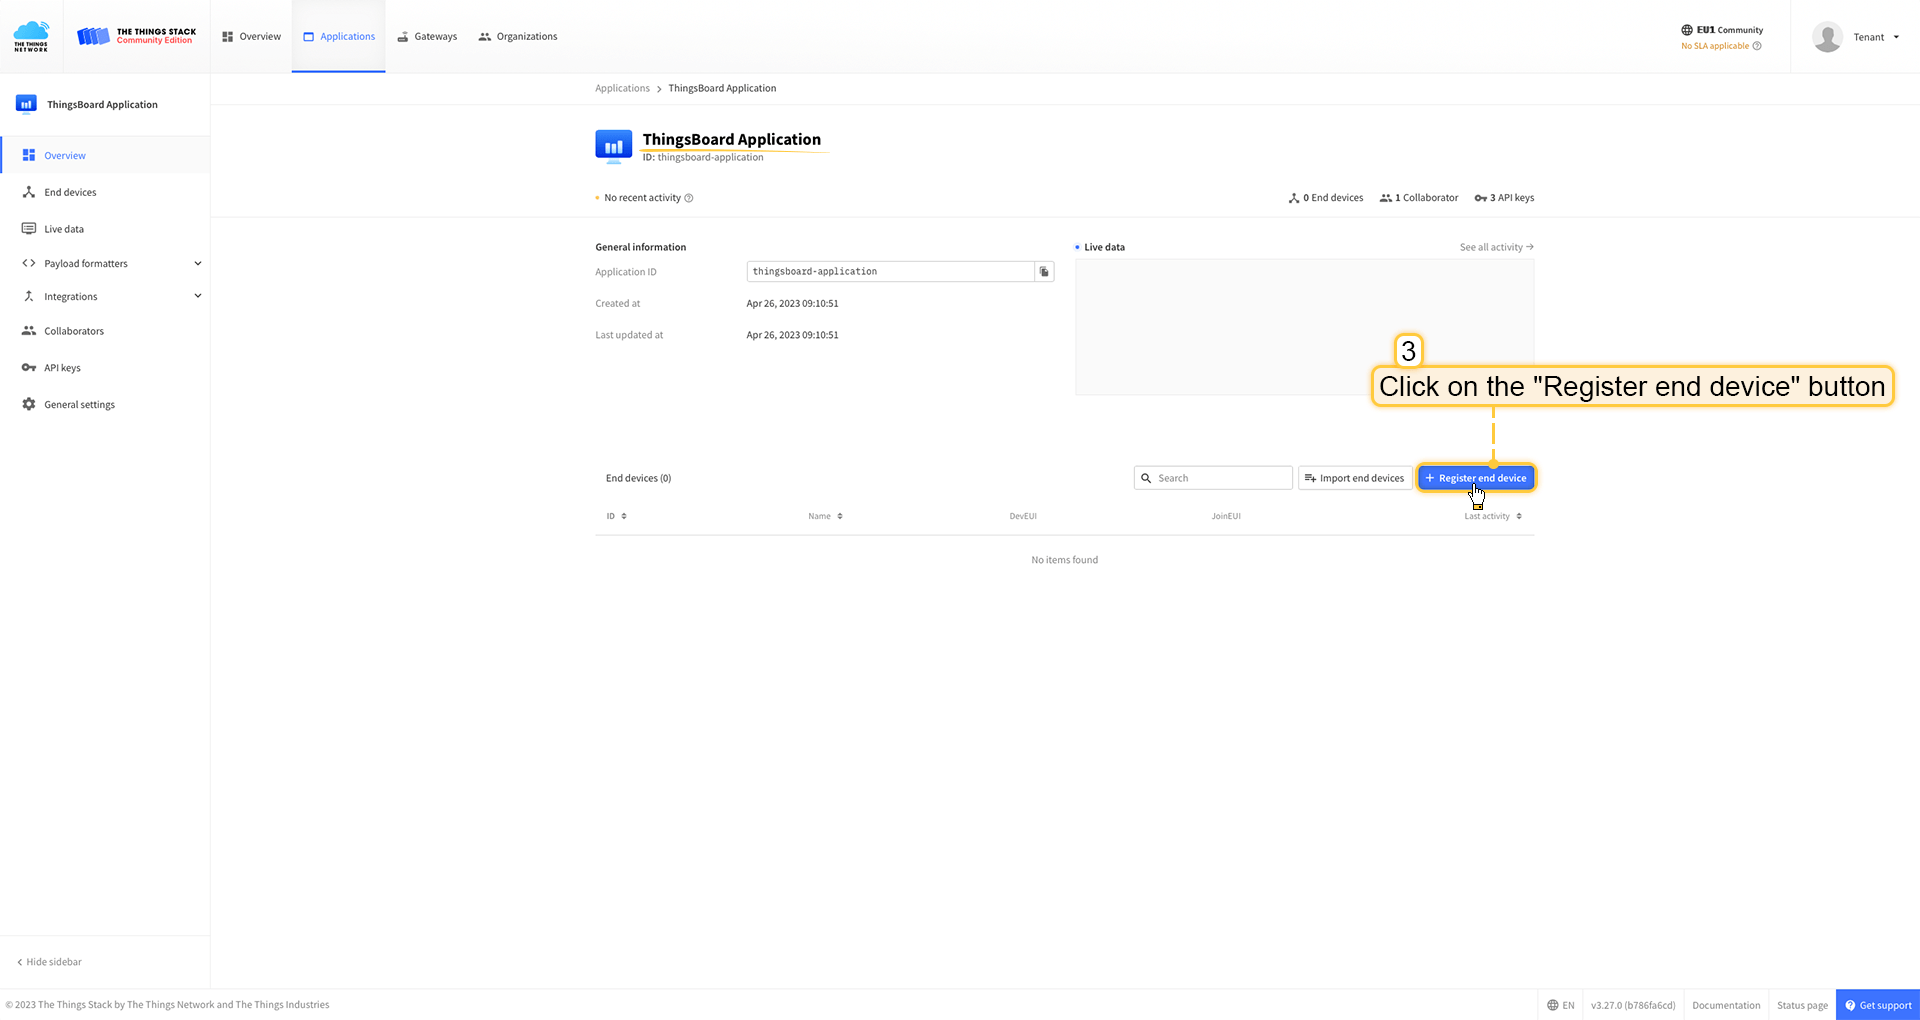 点击 注册终端设备 按钮。 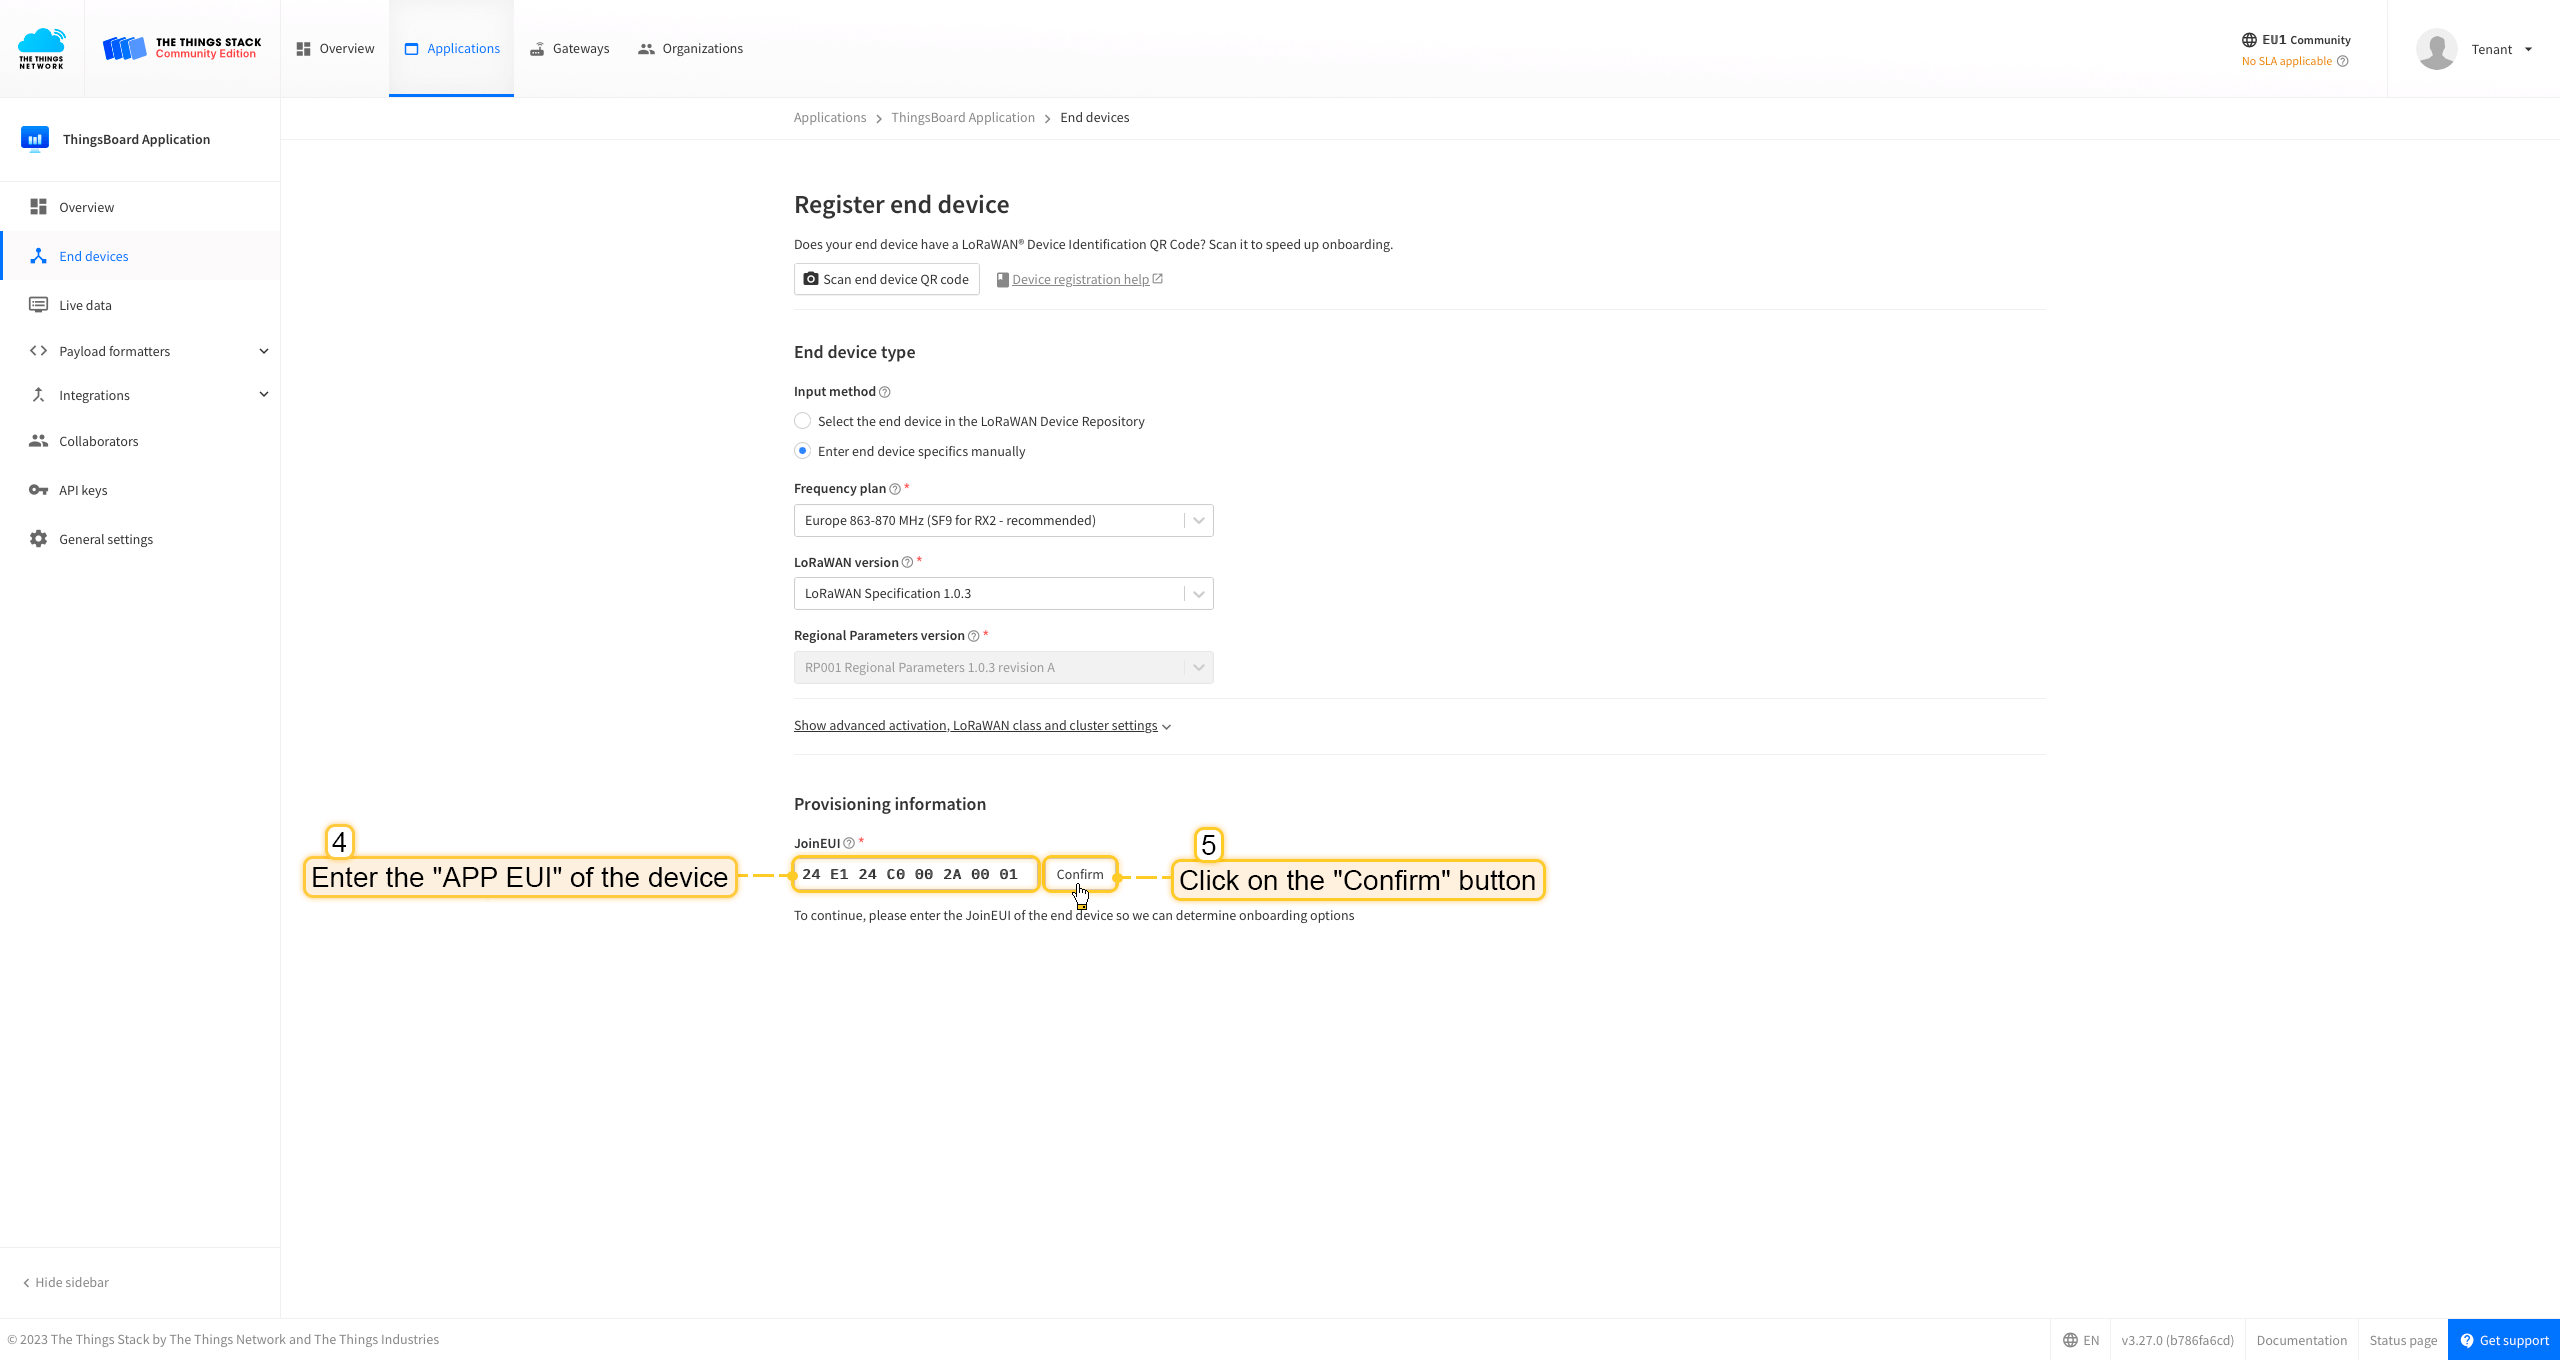 将 APP EUI 值填入 JoinEUI 字段。点击 确认 按钮。 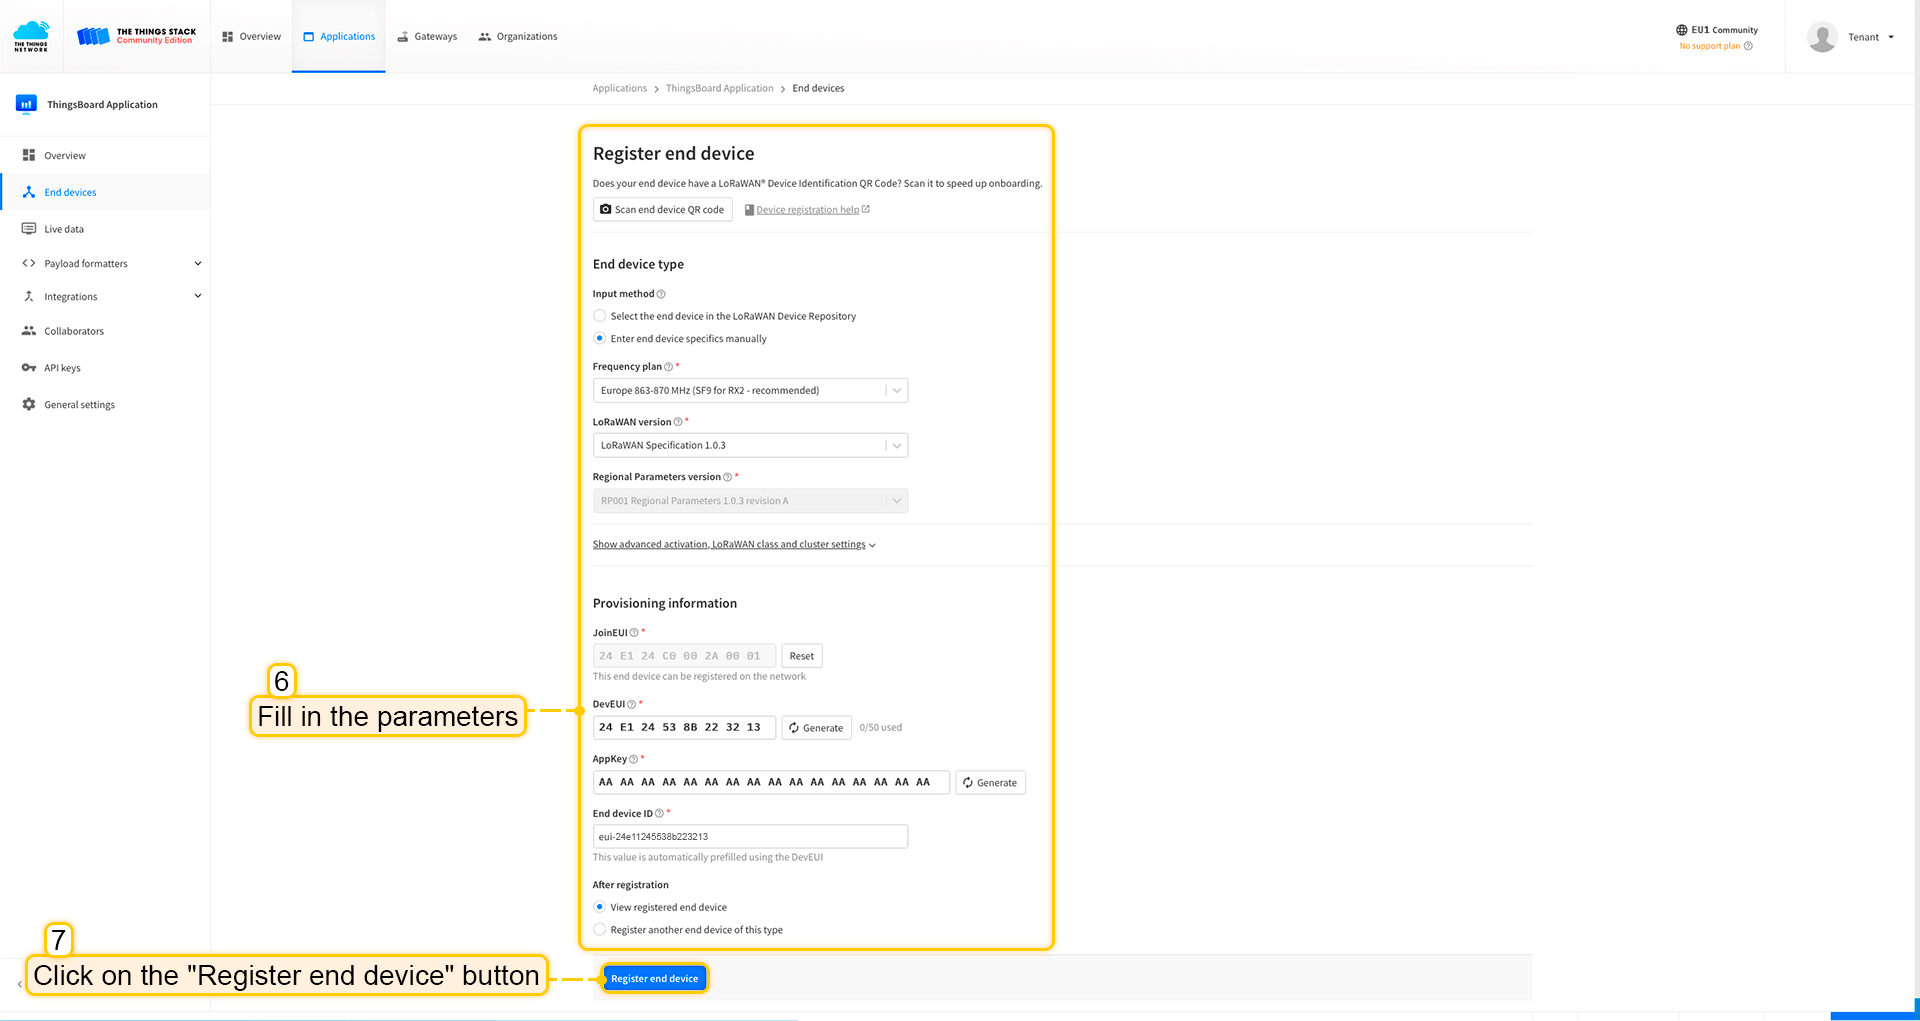 填写其余参数并点击 注册终端设备 按钮。 ThingsBoard集成中的上行数据转换器步骤1:下载JSON文件 点击下方按钮下载包含上行数据转换器配置的JSON文件。 下载 The Things Stack 集成的上行数据转换器。
下载包含上行数据转换器配置的文件后,将其导入ThingsBoard:
在集成中心部分的数据转换器页面中操作。点击页面右上角的+图标,从下拉菜单选择导入转换器。 将下载的JSON文件(包含上行数据转换器配置)拖放到导入窗口,然后点击导入。  上行数据转换器现已成功导入。
现在,将您的 The Things Stack 集成更新为使用新的上行数据转换器:
 进入集成中心部分的集成页面。点击您的The Things Stack集成以打开详情窗口。点击右上角的橙色铅笔按钮进入编辑模式。 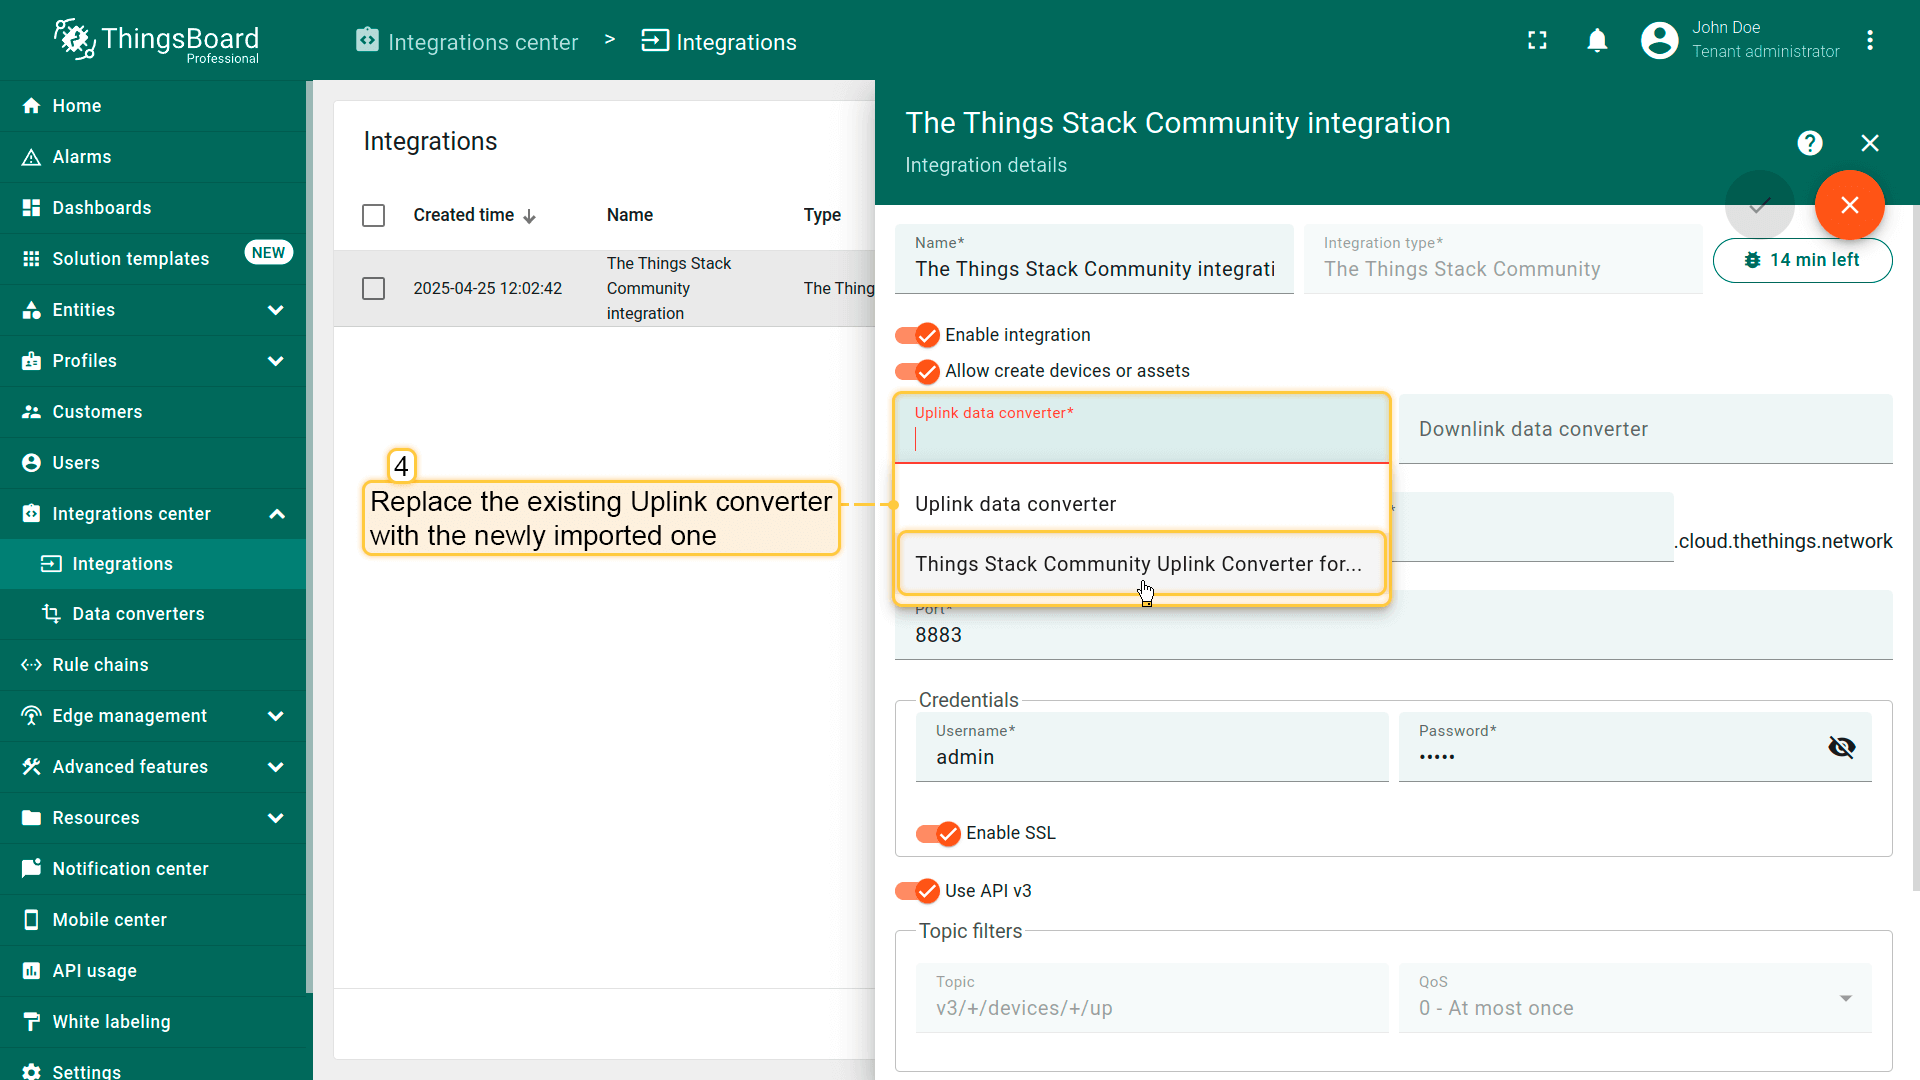 使用导入的转换器替换现有上行数据转换器。  别忘了保存更改! |
在The Things Industries上添加设备我们需要在 The Things Industries云 上添加设备。 要添加设备,请按以下步骤操作:
 登录云端并打开控制台。  进入 应用 页面。然后选择您的应用并点击应用名称。 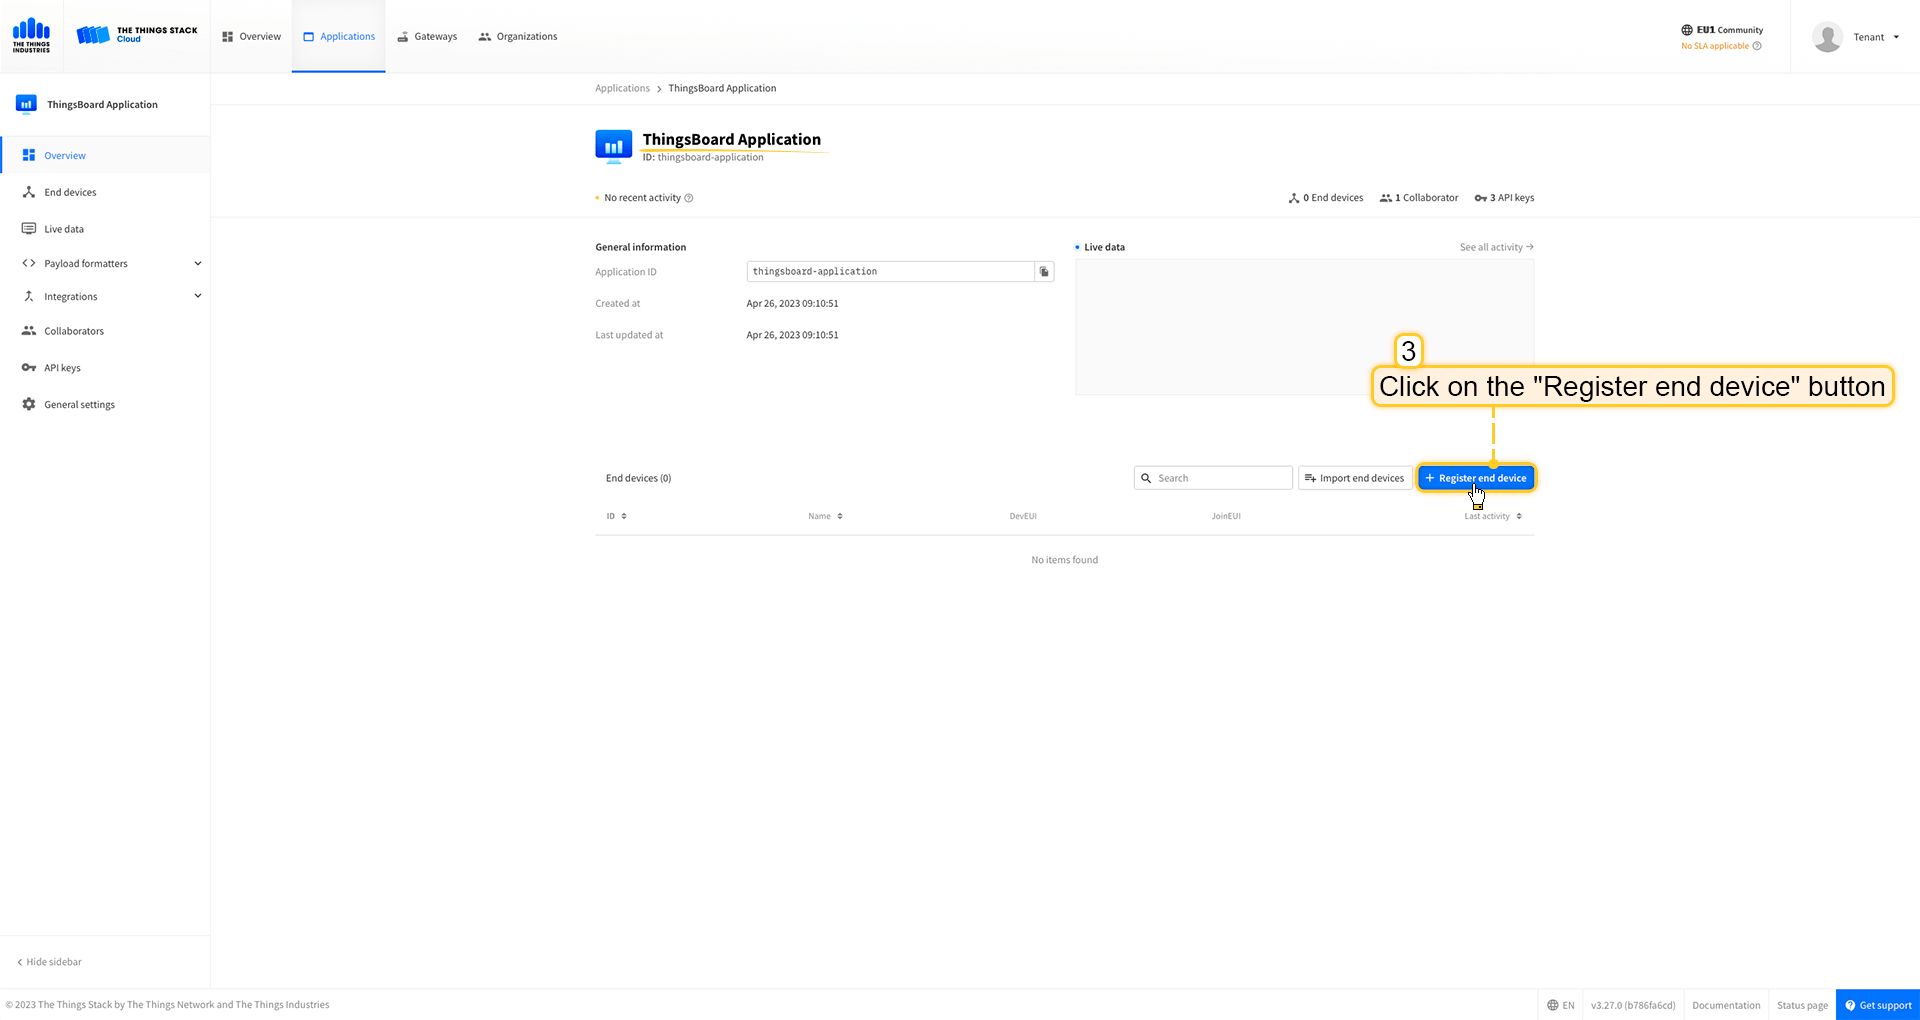 点击 注册终端设备 按钮。  将 APP EUI 值填入 JoinEUI 字段。点击 确认 按钮。  填写其余参数并点击 注册终端设备 按钮。 ThingsBoard集成中的上行数据转换器步骤1:下载JSON文件 点击下方按钮下载包含上行数据转换器配置的JSON文件。 下载 The Things Industries 集成的上行数据转换器。
下载包含上行数据转换器配置的文件后,将其导入ThingsBoard:
在集成中心部分的数据转换器页面中操作。点击页面右上角的+图标,从下拉菜单选择导入转换器。 将下载的JSON文件(包含上行数据转换器配置)拖放到导入窗口,然后点击导入。  上行数据转换器现已成功导入。
现在,将您的 The Things Industries 集成更新为使用新的上行数据转换器:
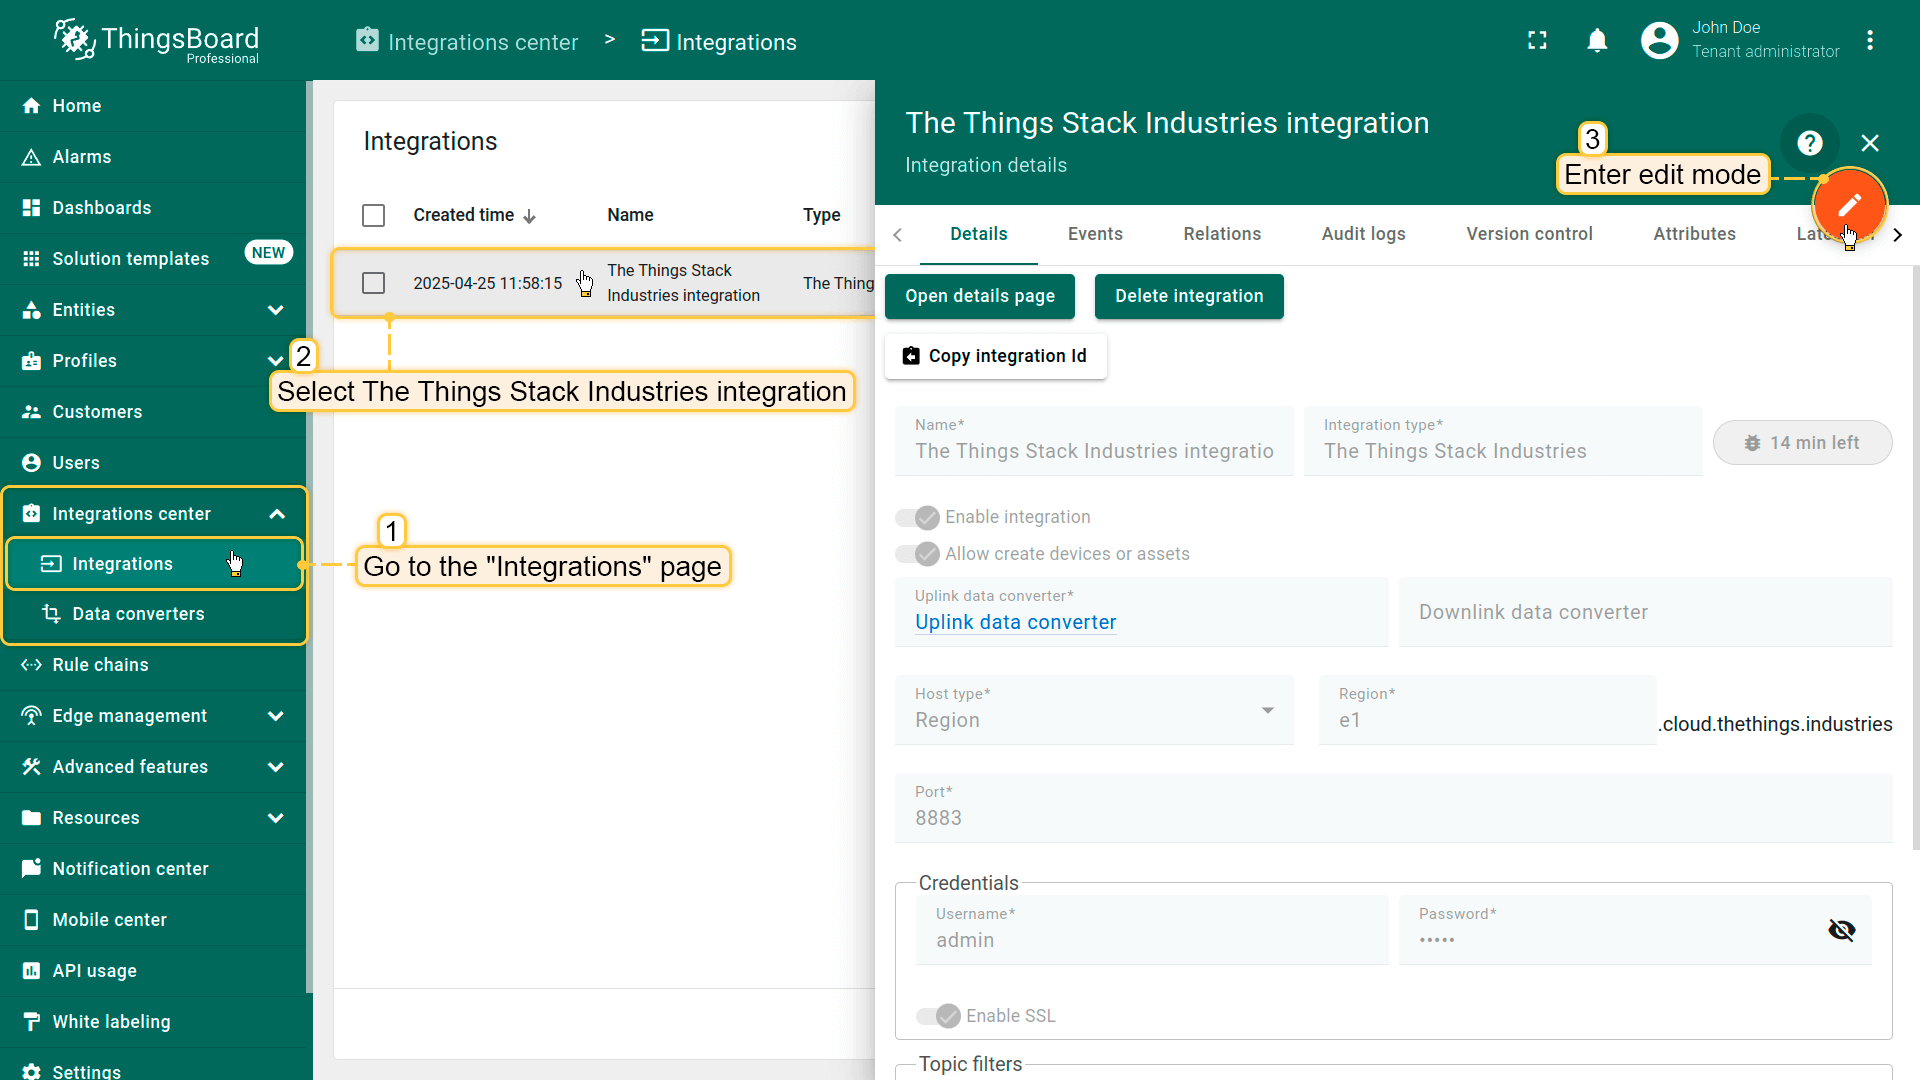 进入集成中心部分的集成页面。点击您的The Things Industries集成以打开详情窗口。点击右上角的橙色铅笔按钮进入编辑模式。 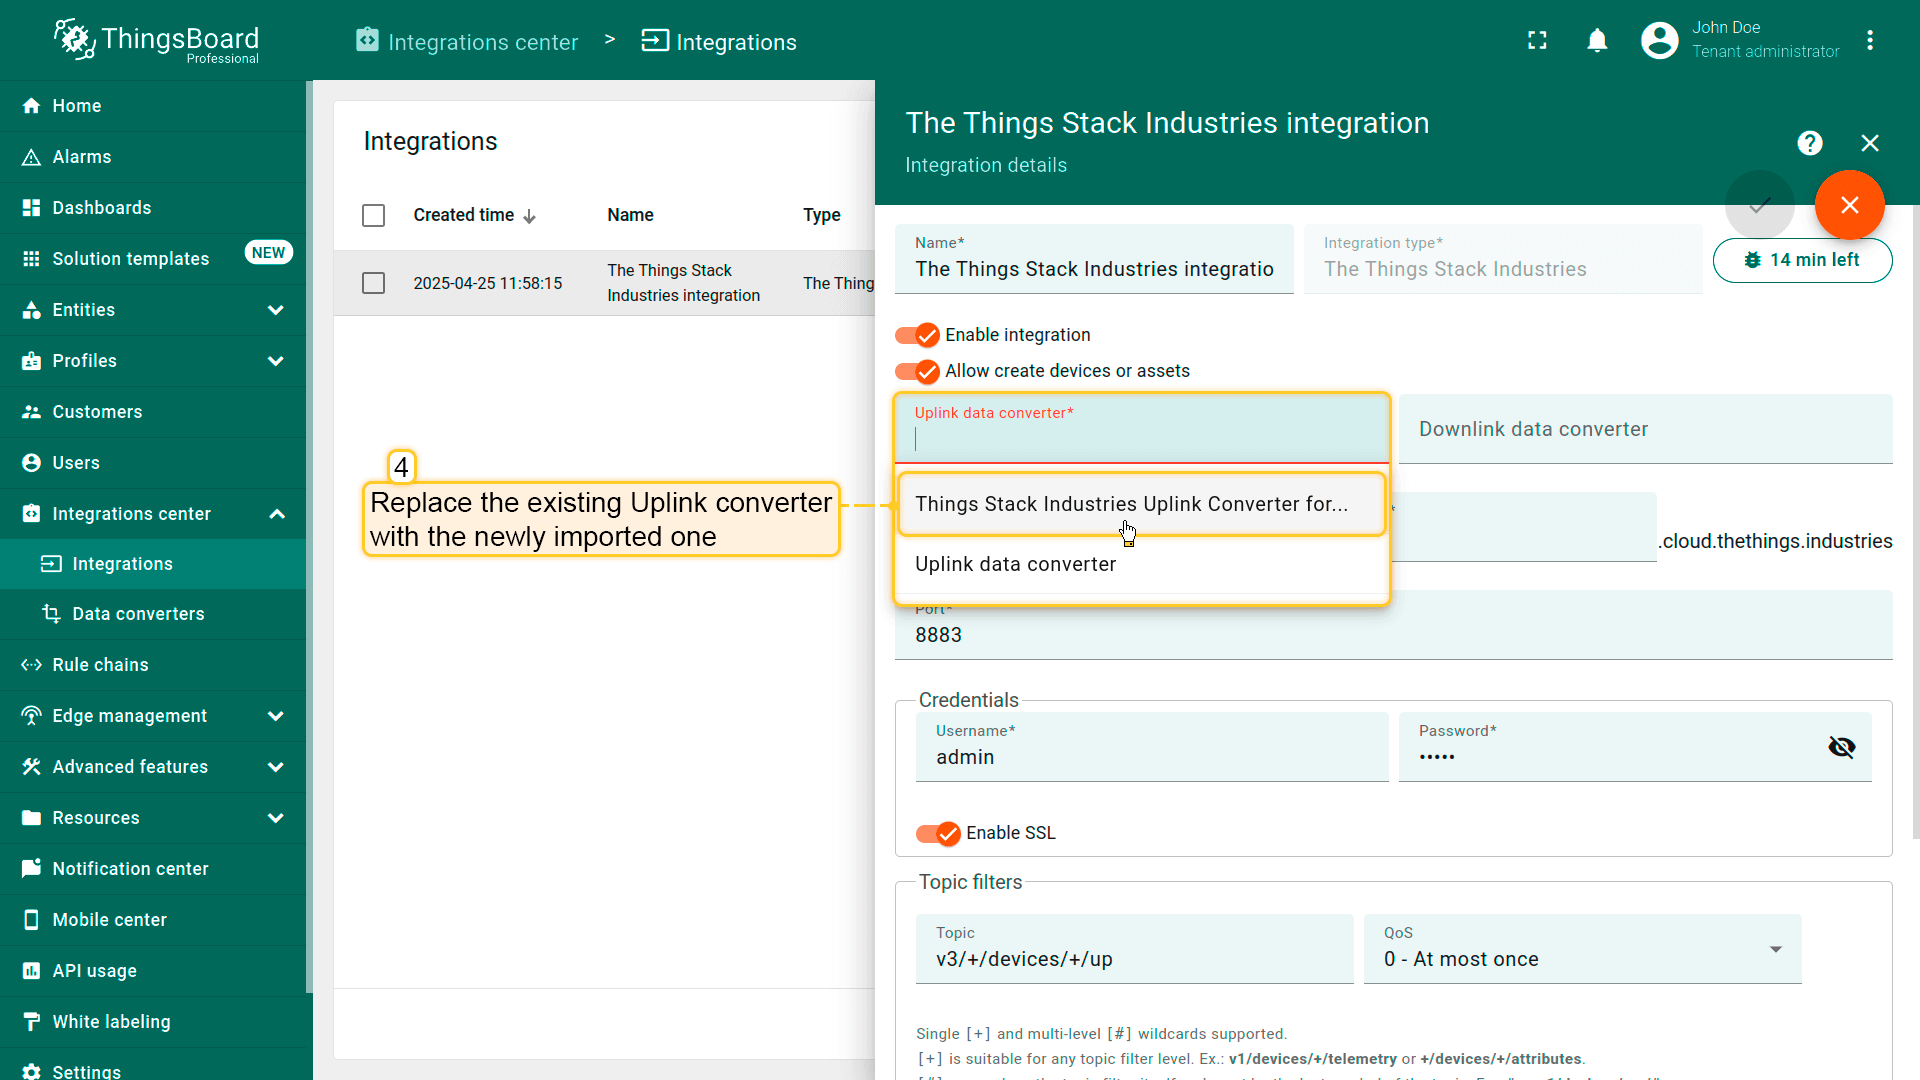 使用导入的转换器替换现有上行数据转换器。 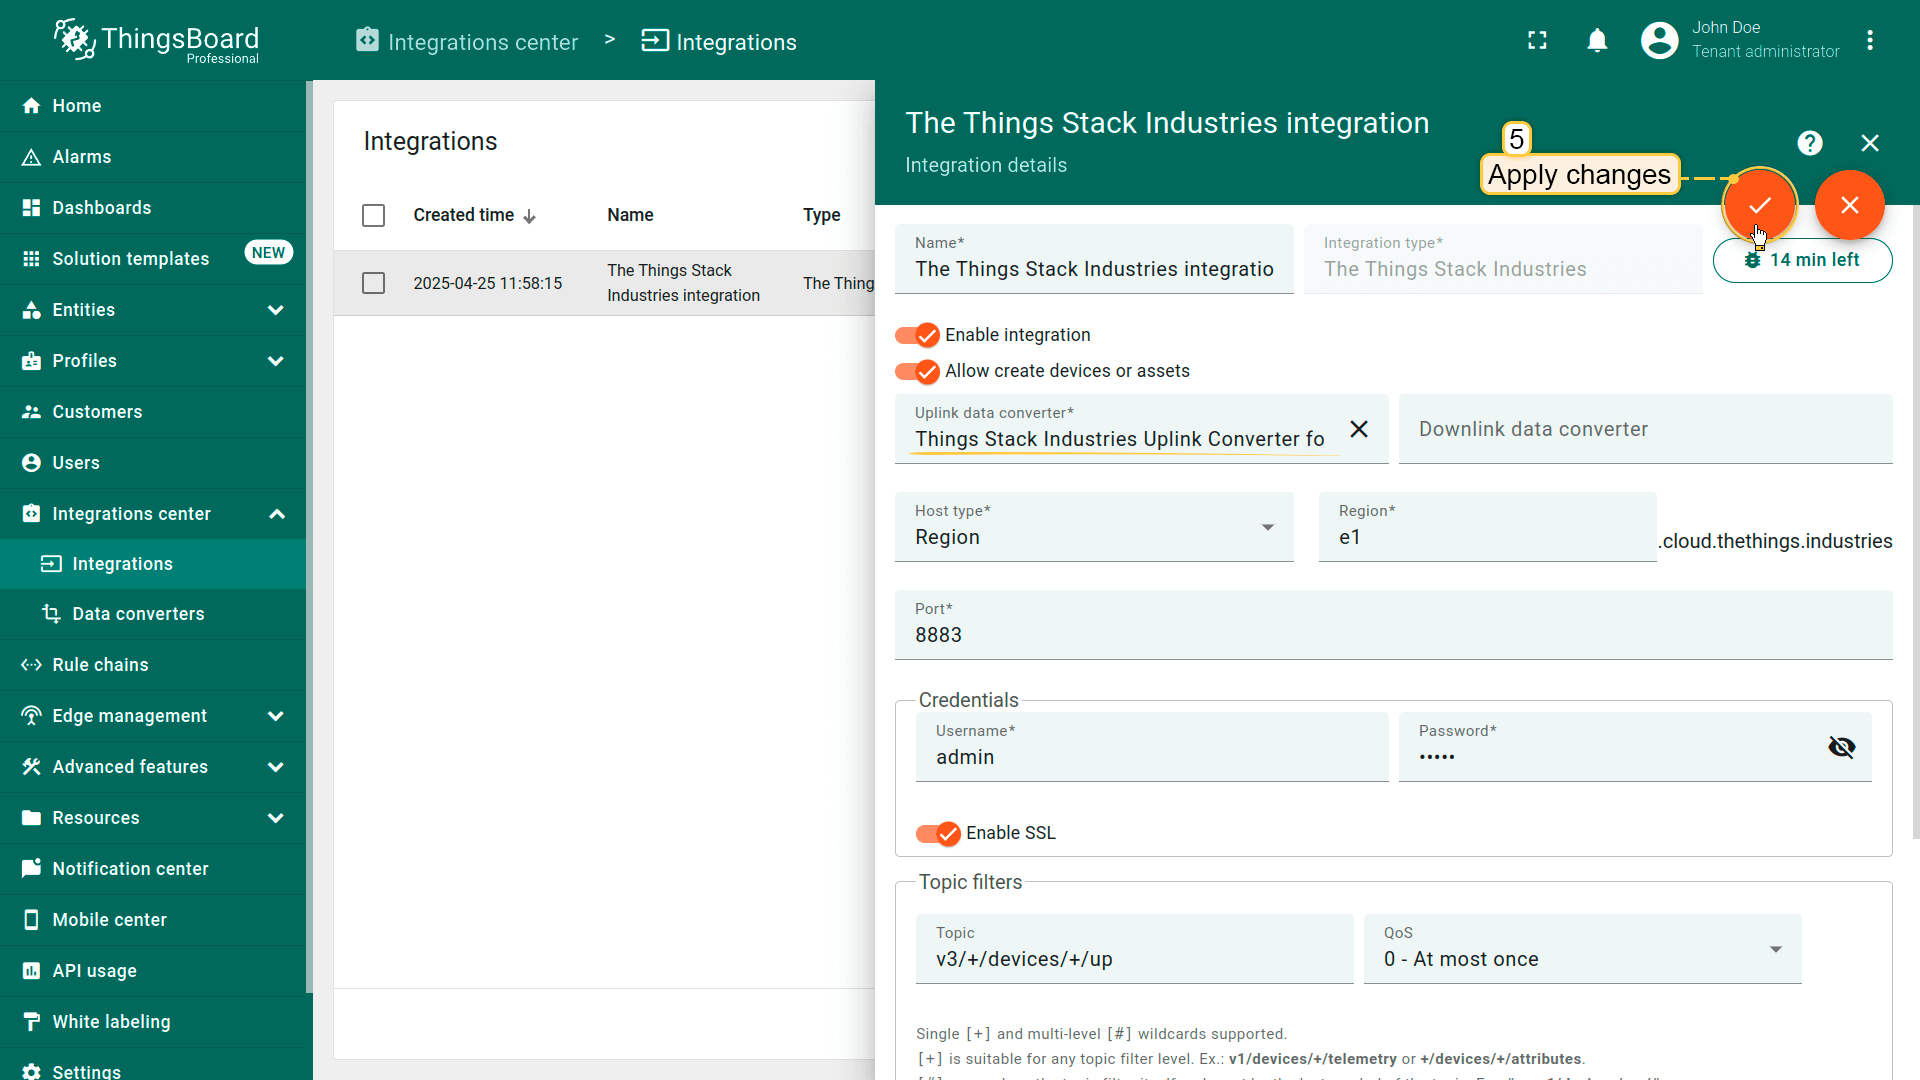 别忘了保存更改! |
在Loriot上添加设备我们需要在 Loriot 上添加设备。 要添加设备,请按以下步骤操作:
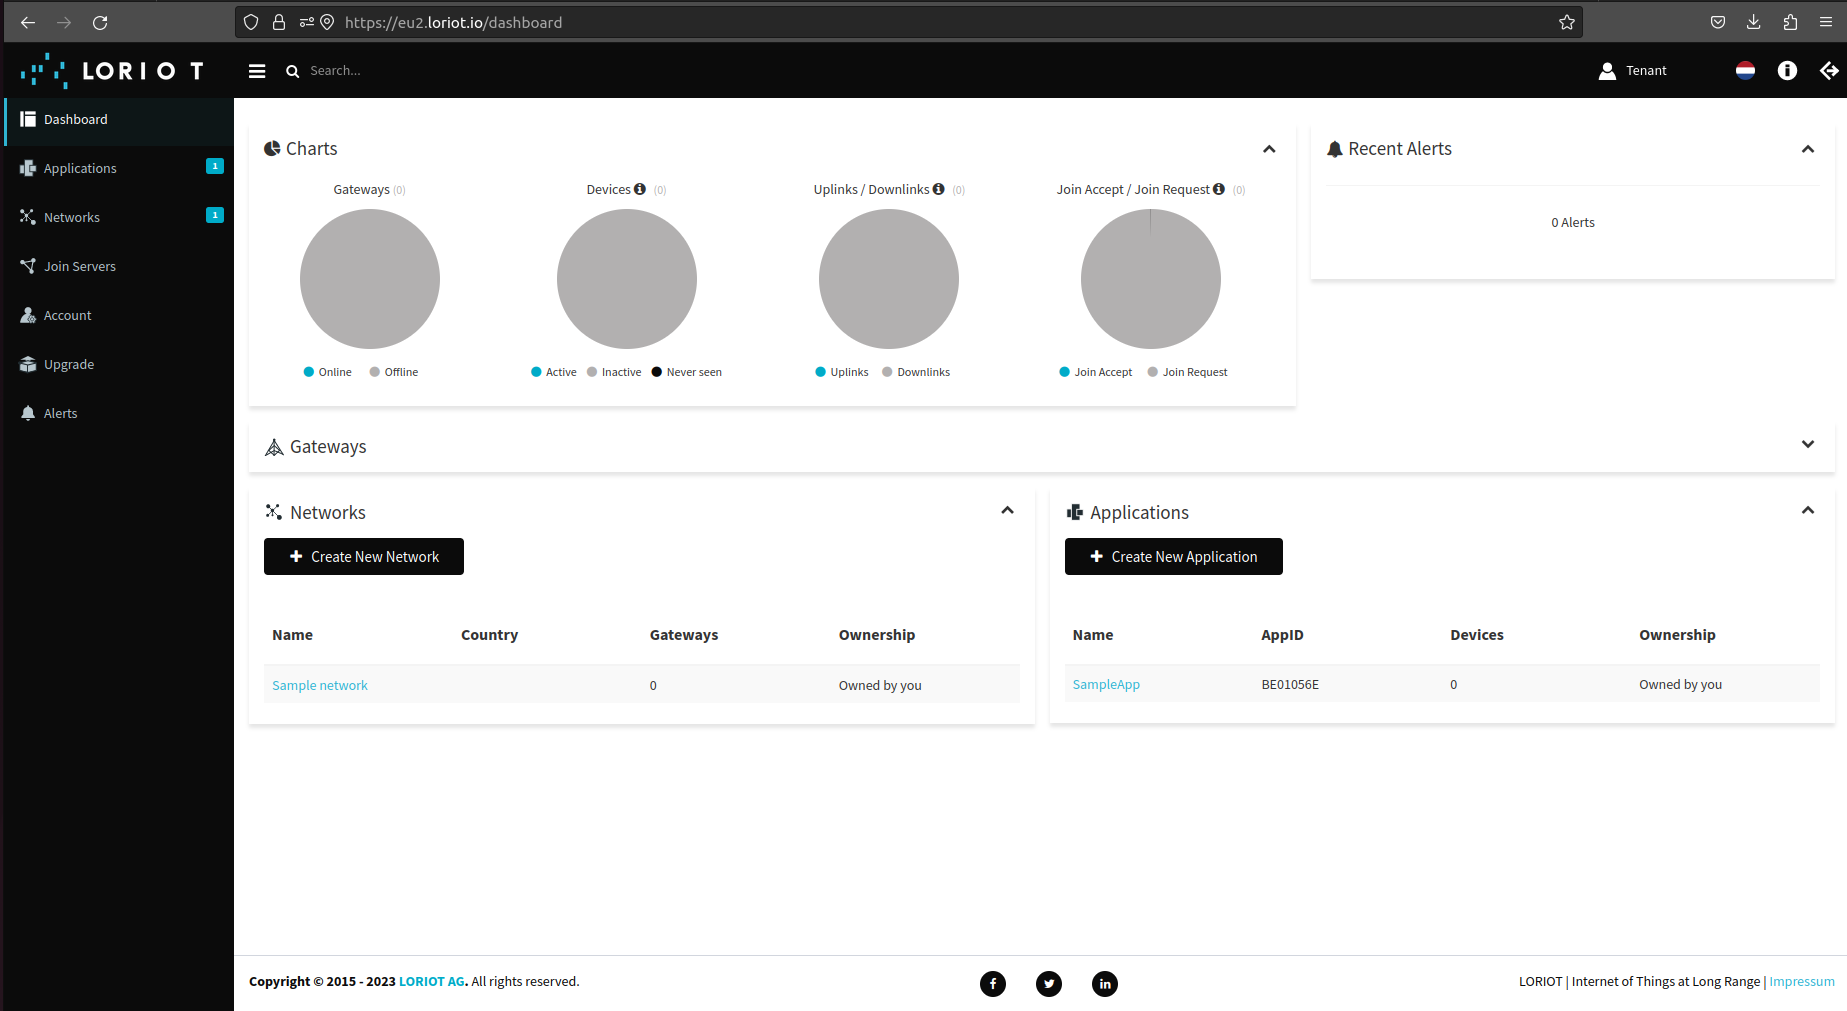 登录Loriot服务器。我们使用 eu2.loriot.io,具体取决于注册时选择的区域。 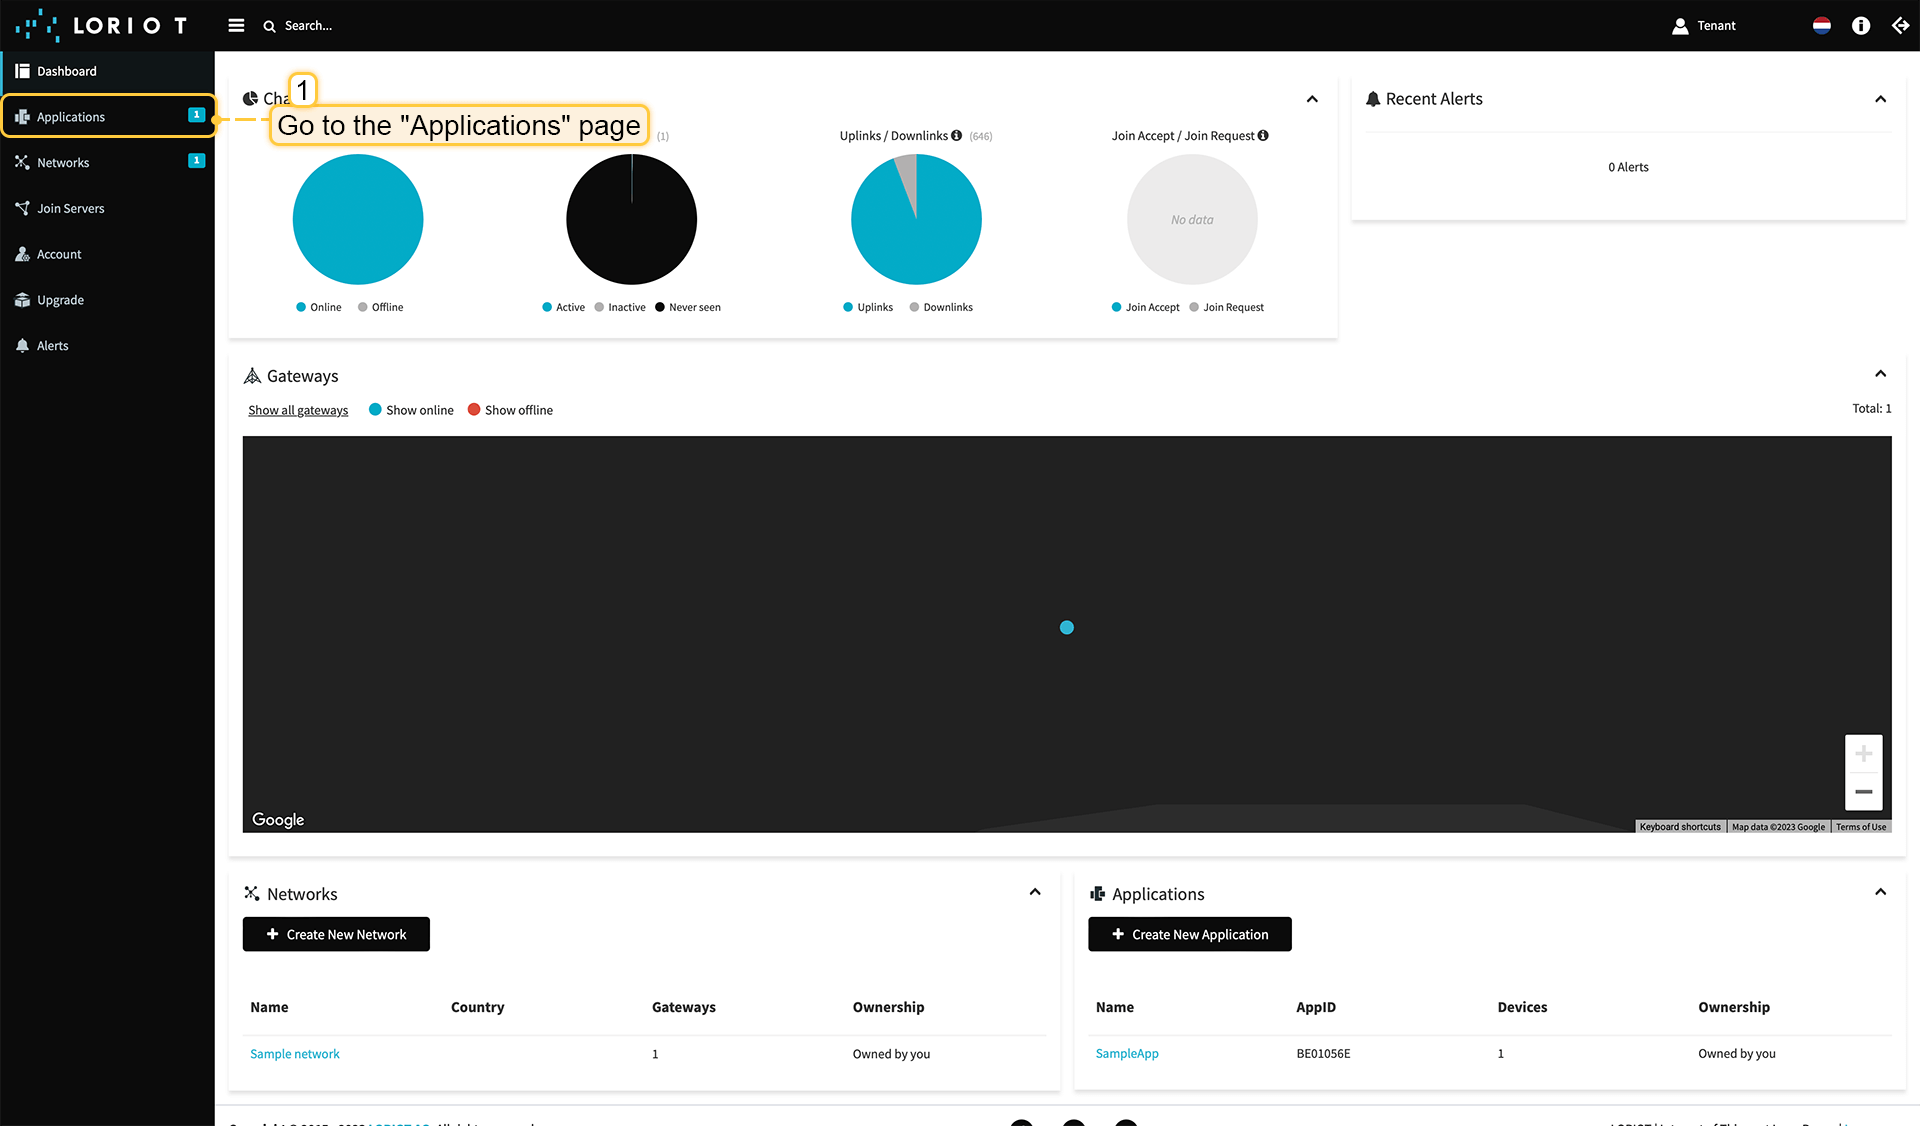 在左侧菜单中进入“应用”页面。 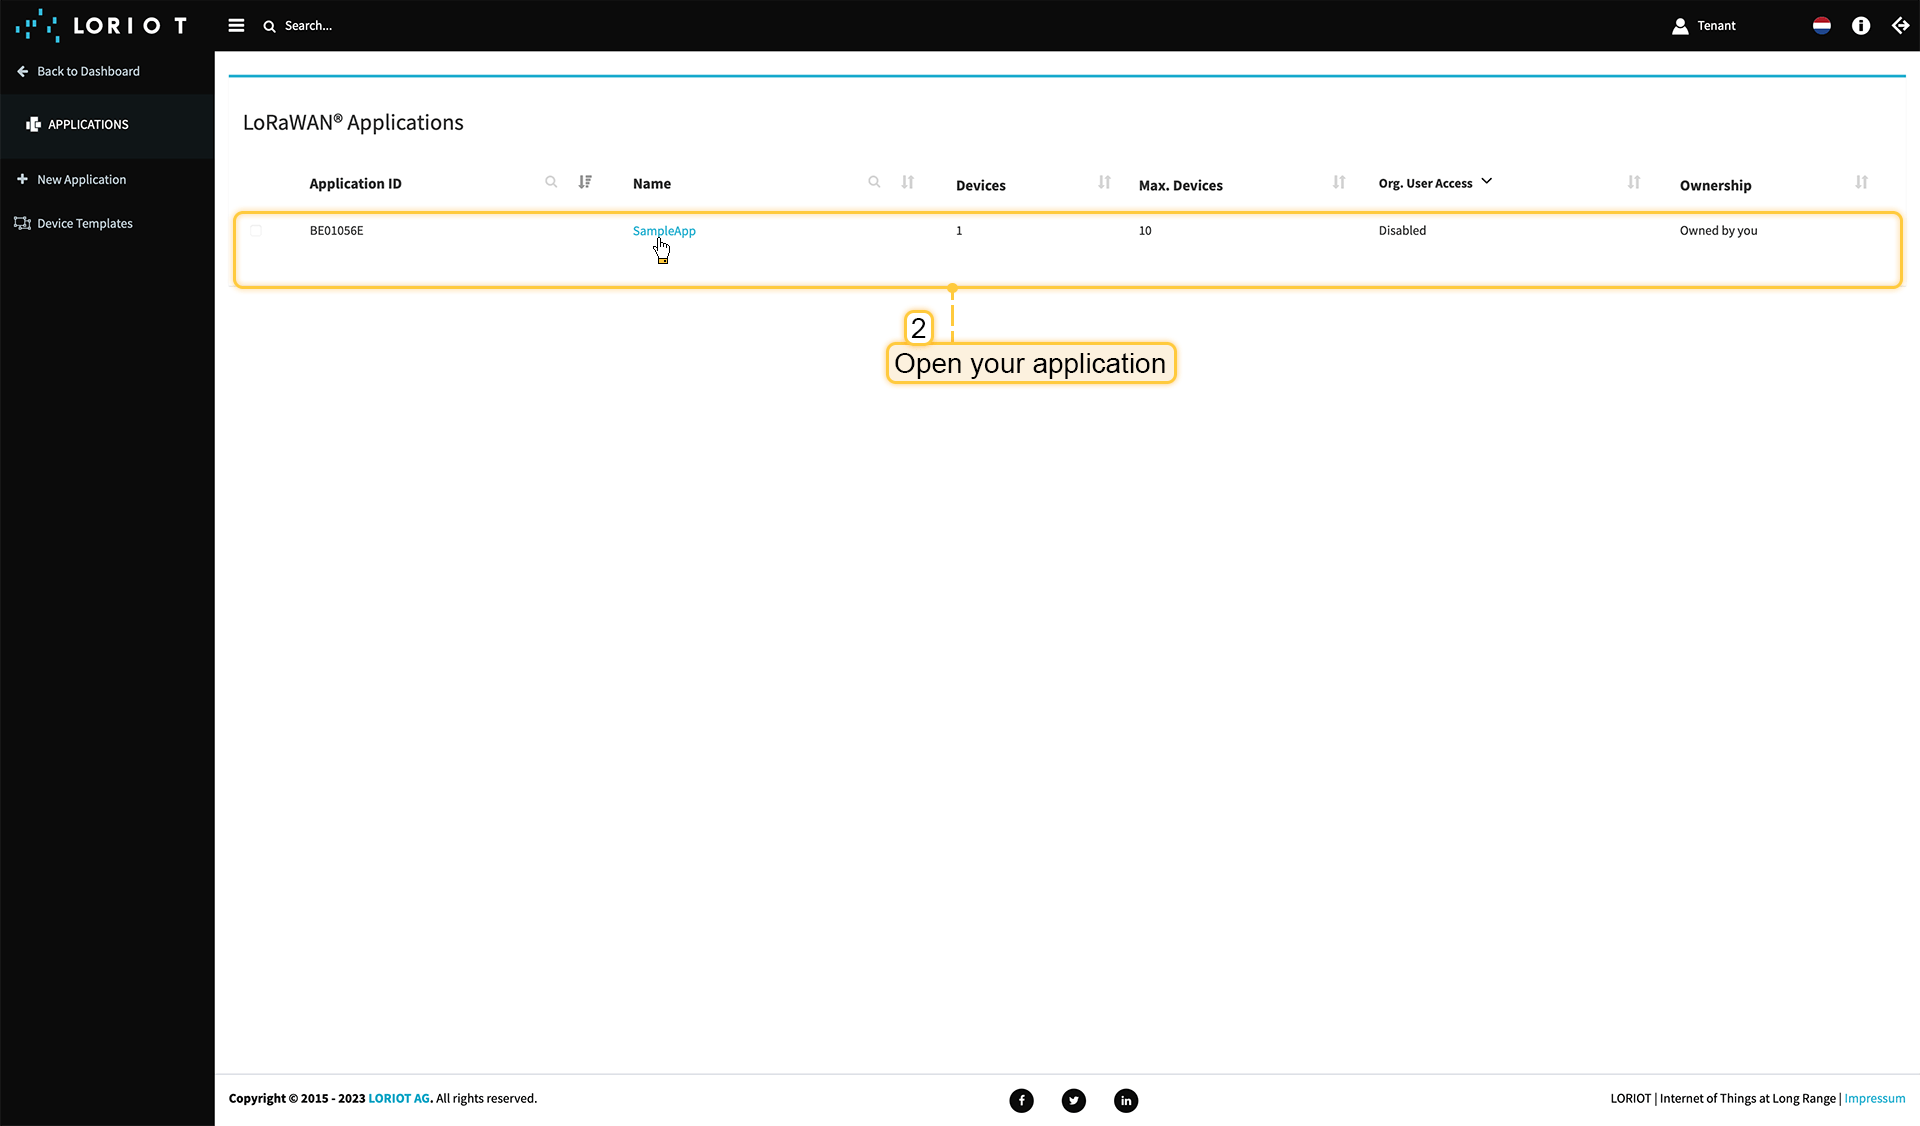 打开您的应用,我们的示例为“SampleApp”。 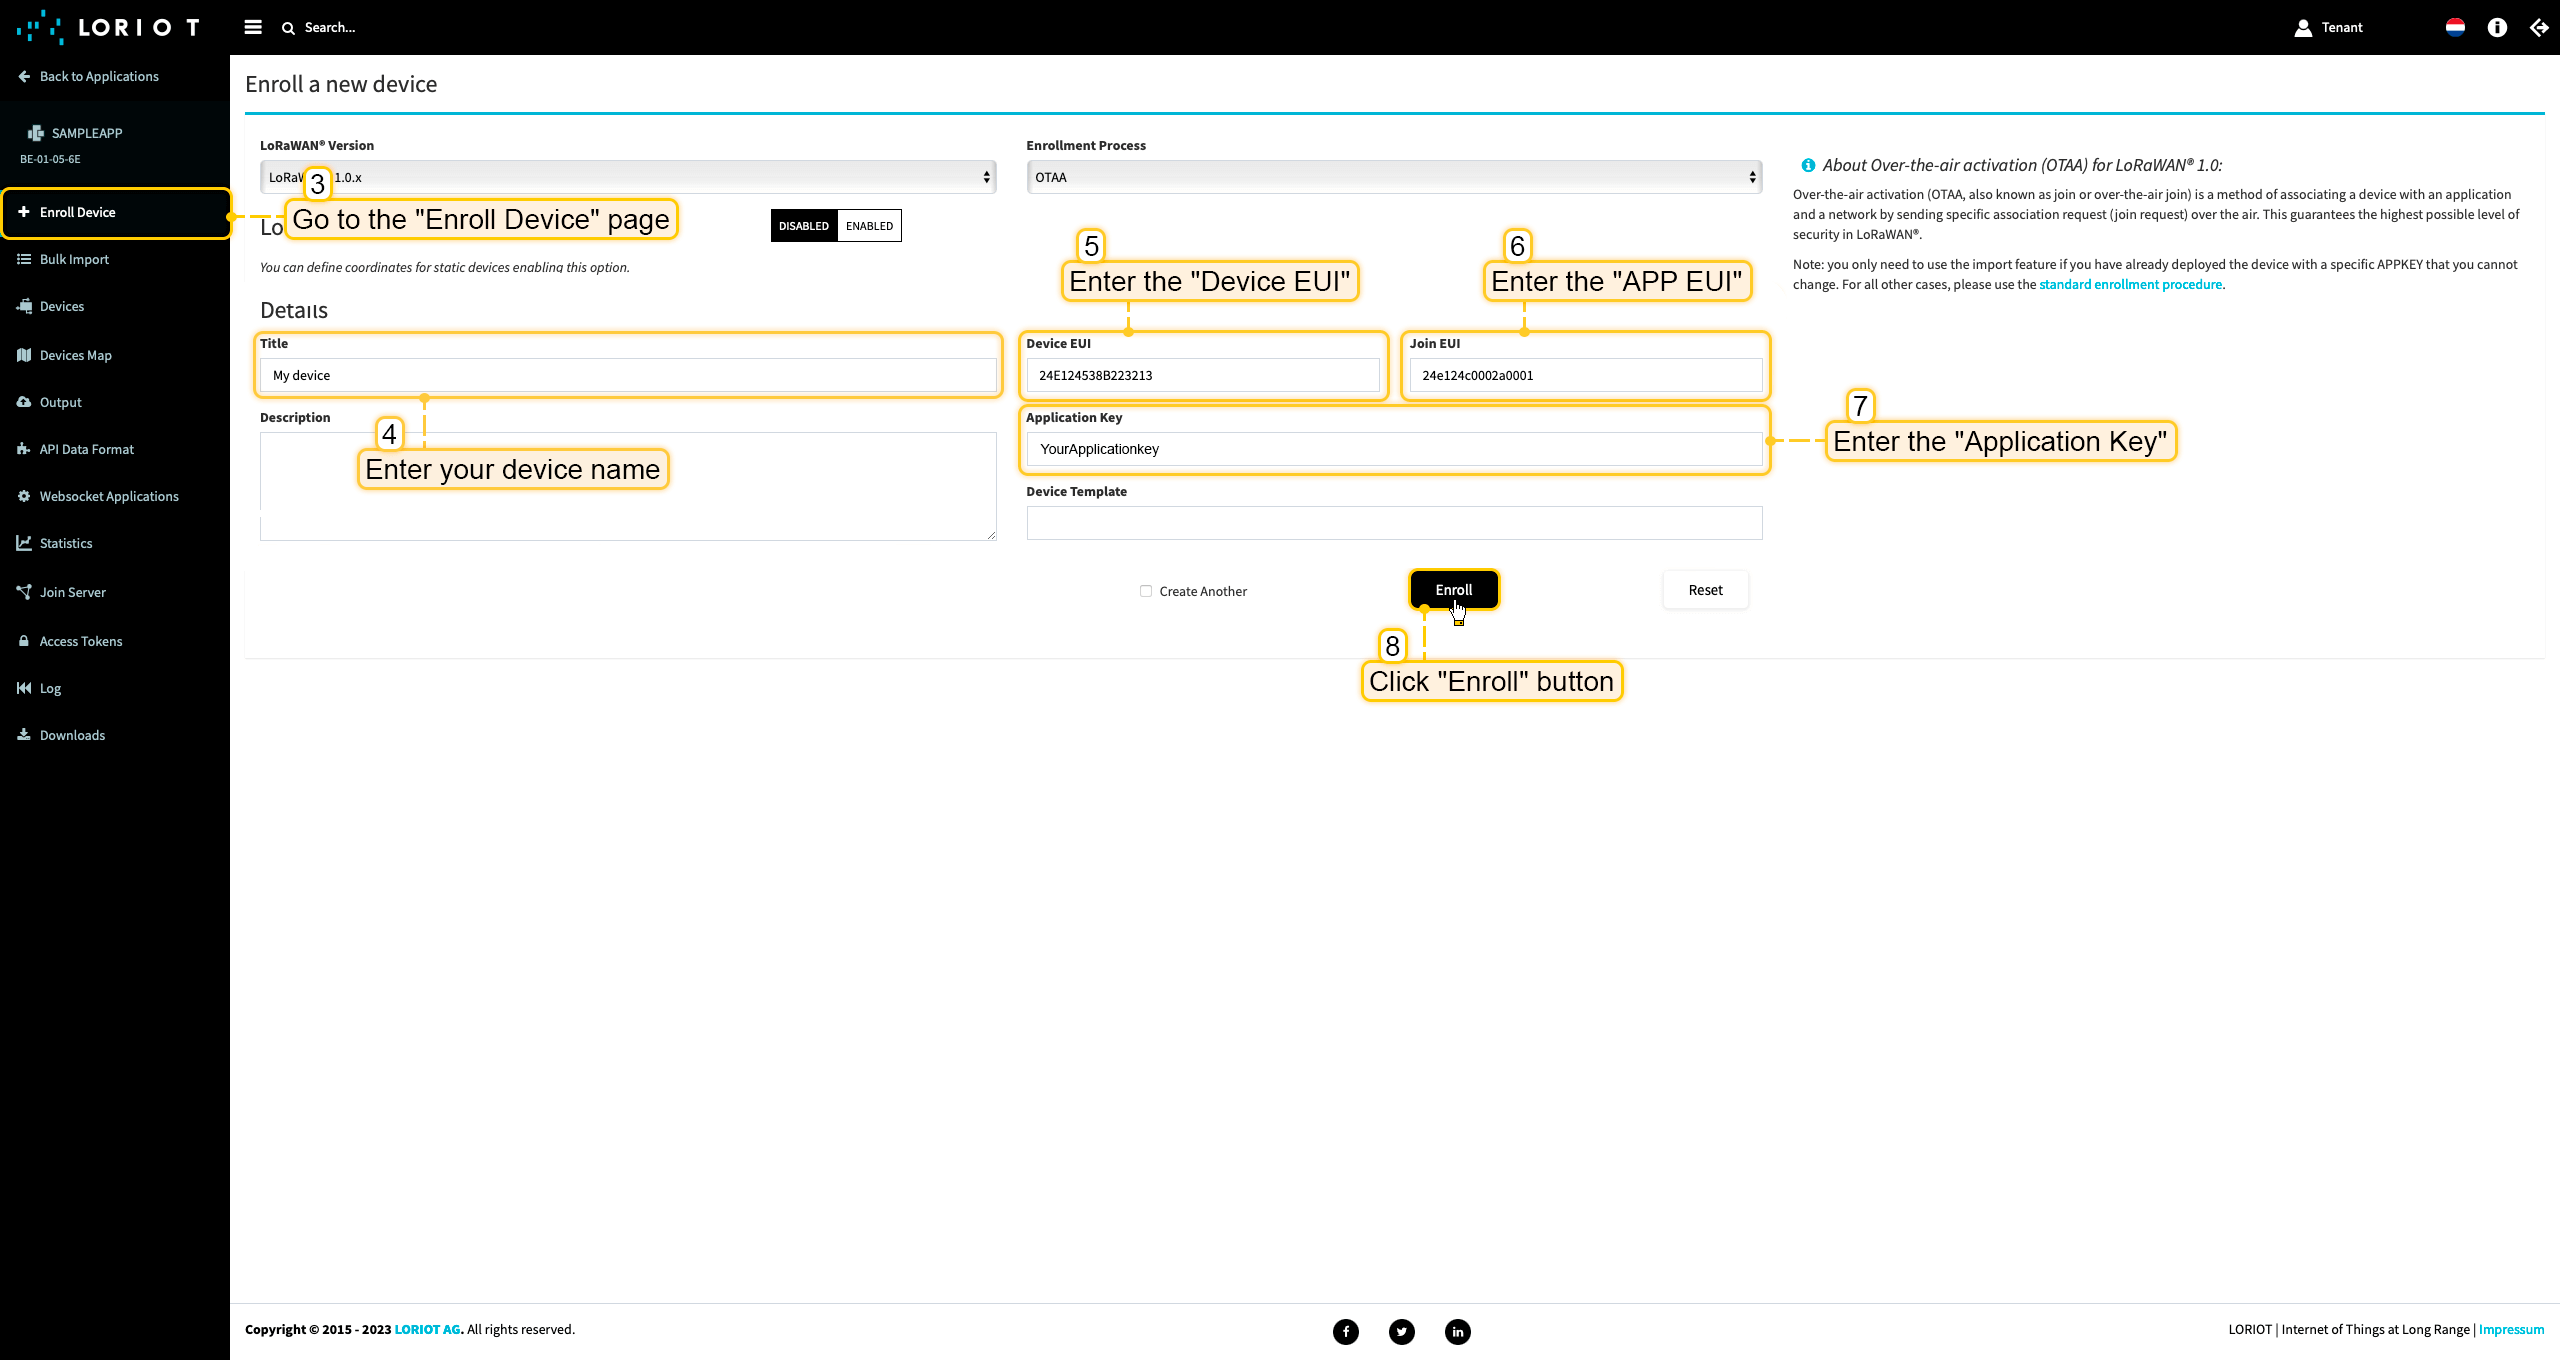 进入“注册设备”页面。使用设备配置中的值填写字段,然后点击“注册”按钮。 ThingsBoard集成中的上行数据转换器步骤1:下载JSON文件 点击下方按钮下载包含上行数据转换器配置的JSON文件。
下载包含上行数据转换器配置的文件后,将其导入ThingsBoard:
在集成中心部分的数据转换器页面中操作。点击页面右上角的+图标,从下拉菜单选择导入转换器。 将下载的JSON文件(包含上行数据转换器配置)拖放到导入窗口,然后点击导入。  上行数据转换器现已成功导入。
现在,将您的 Loriot 集成更新为使用新的上行数据转换器:
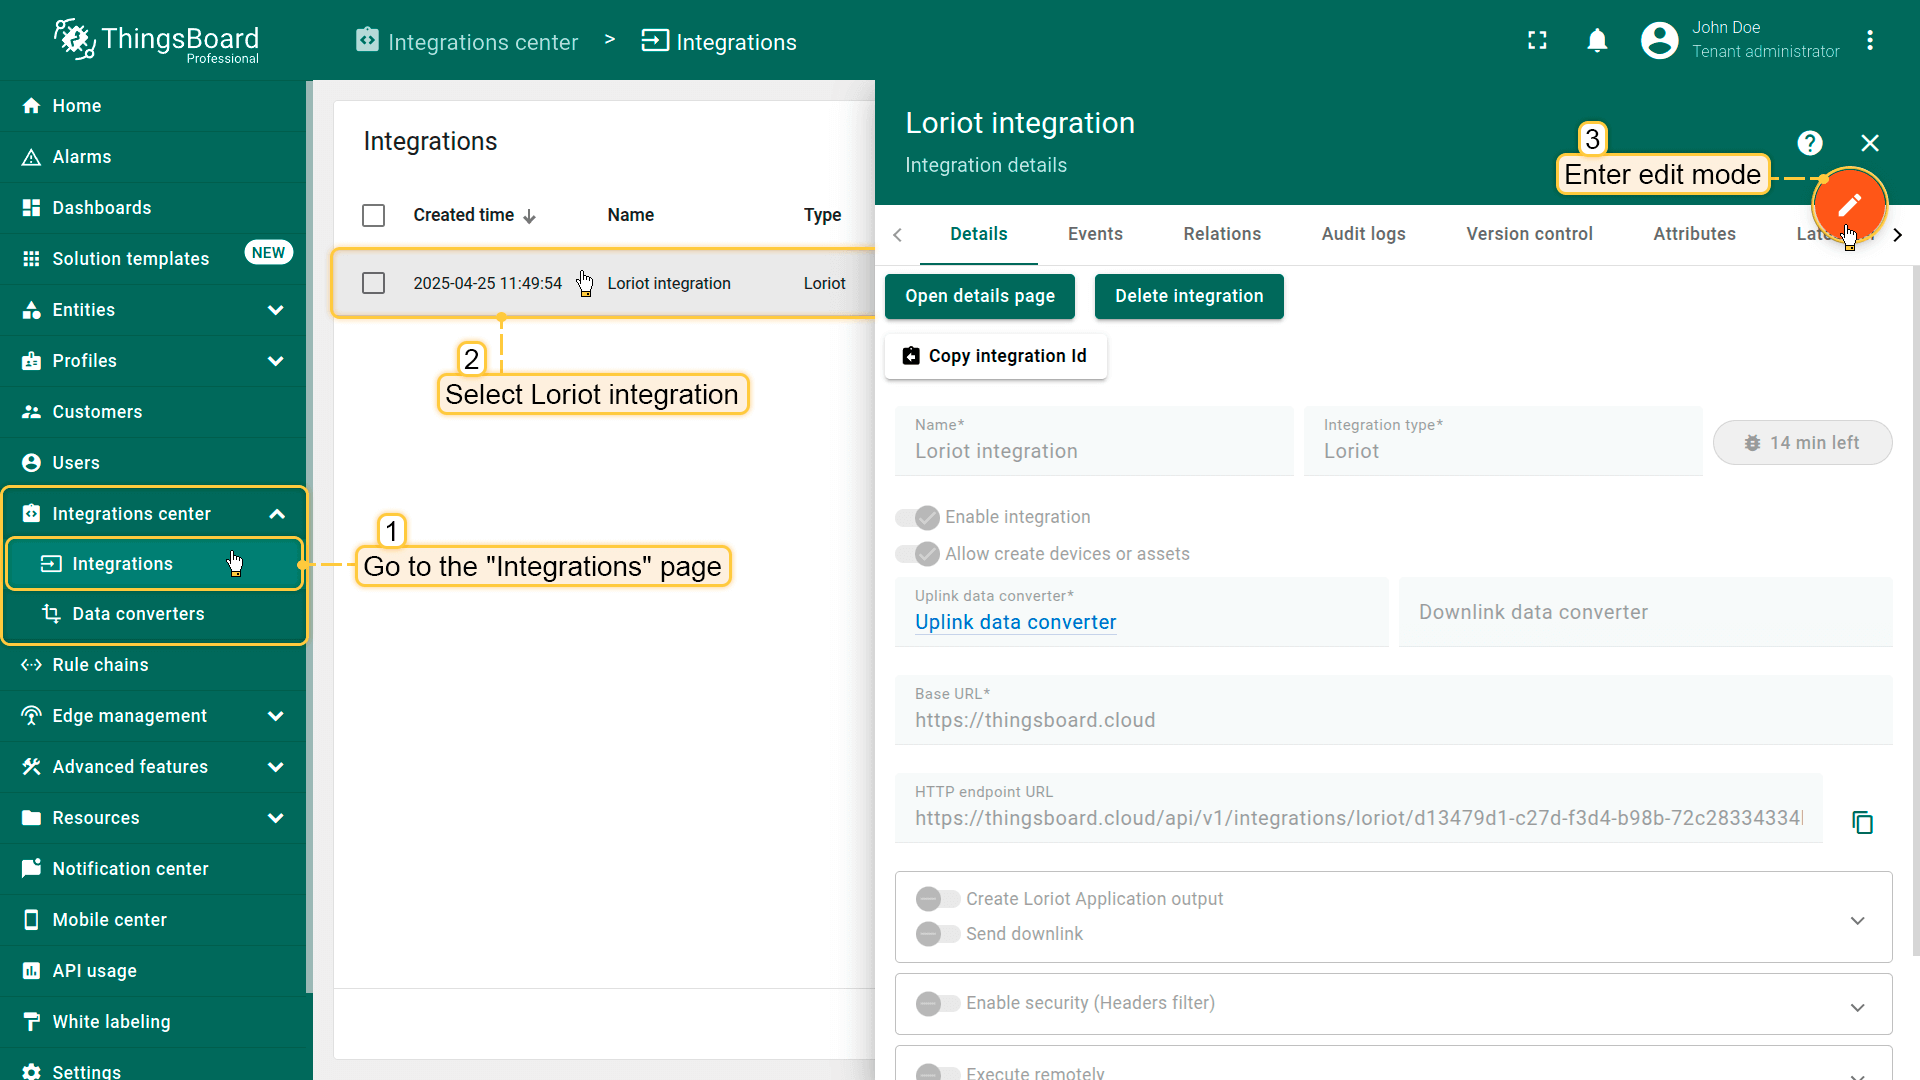 进入集成中心部分的集成页面。点击您的Loriot集成以打开详情窗口。点击右上角的橙色铅笔按钮进入编辑模式。 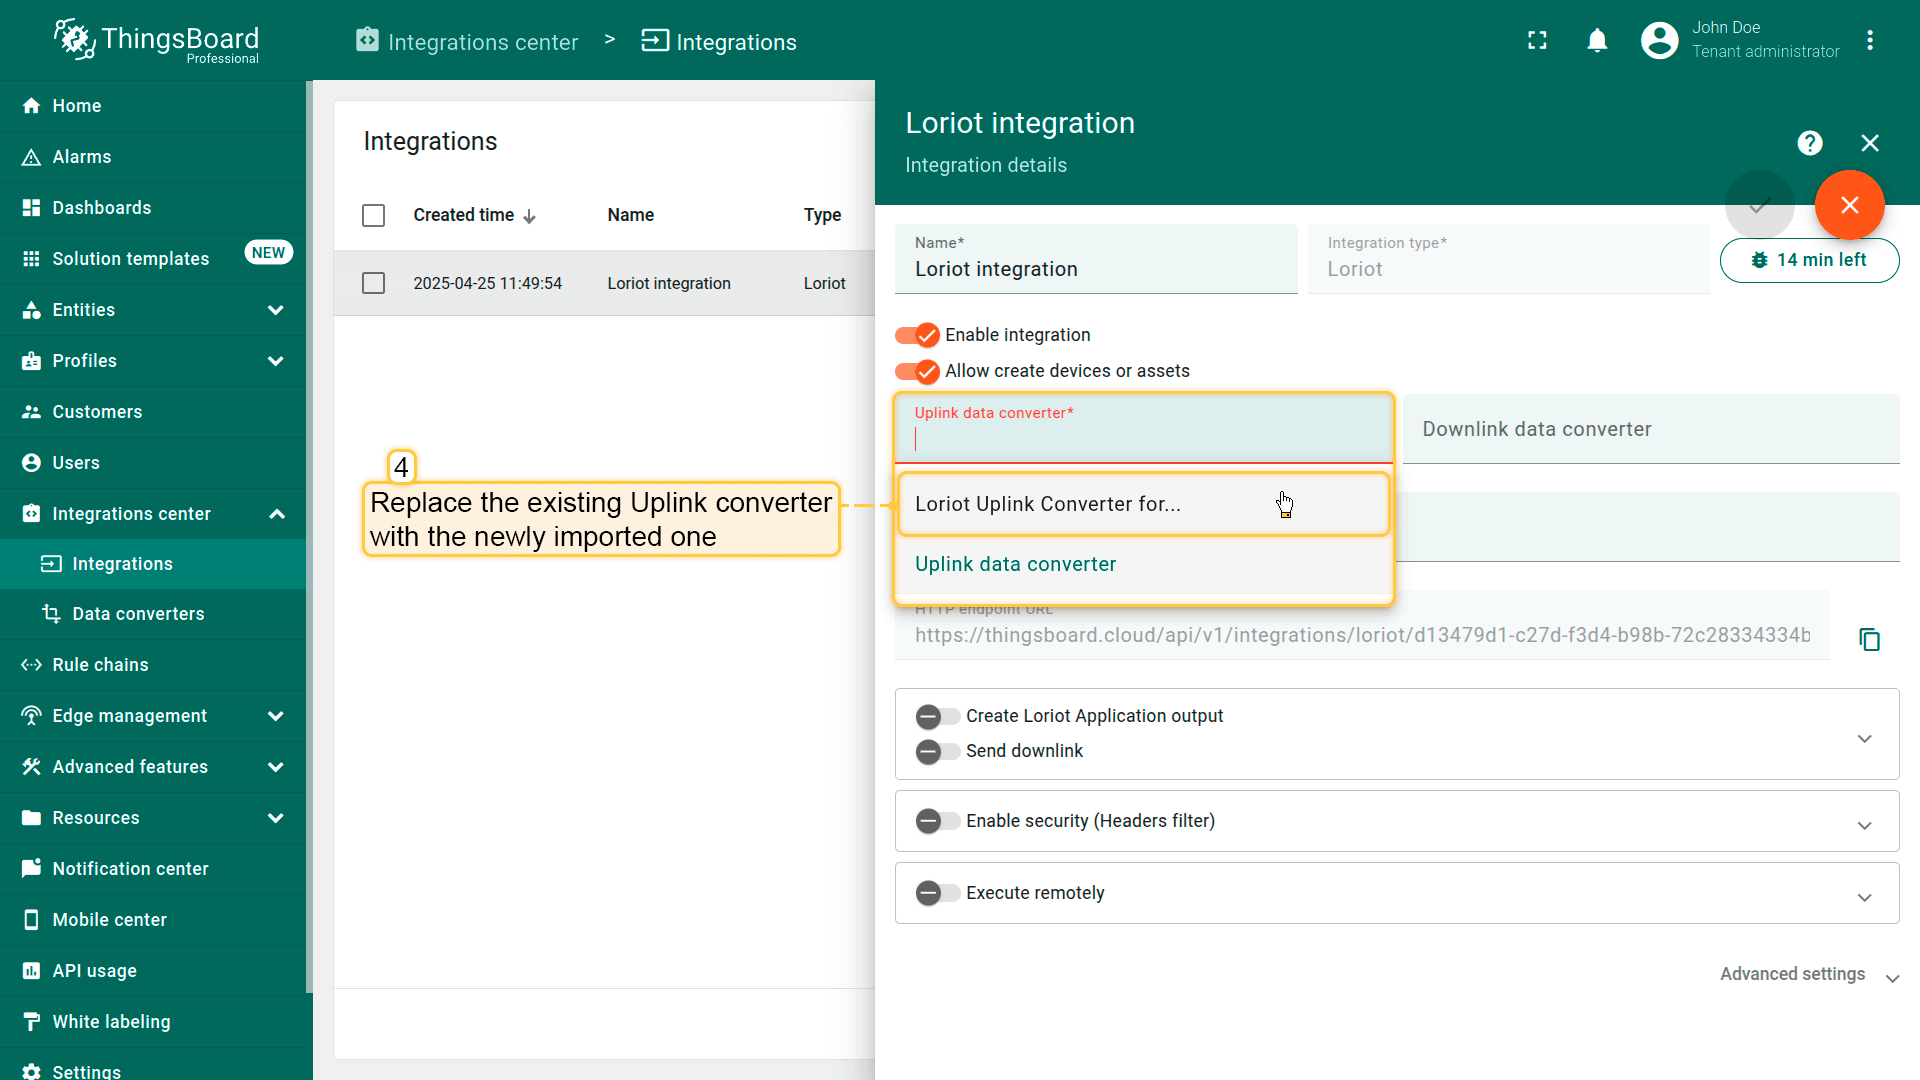 使用导入的转换器替换现有上行数据转换器。 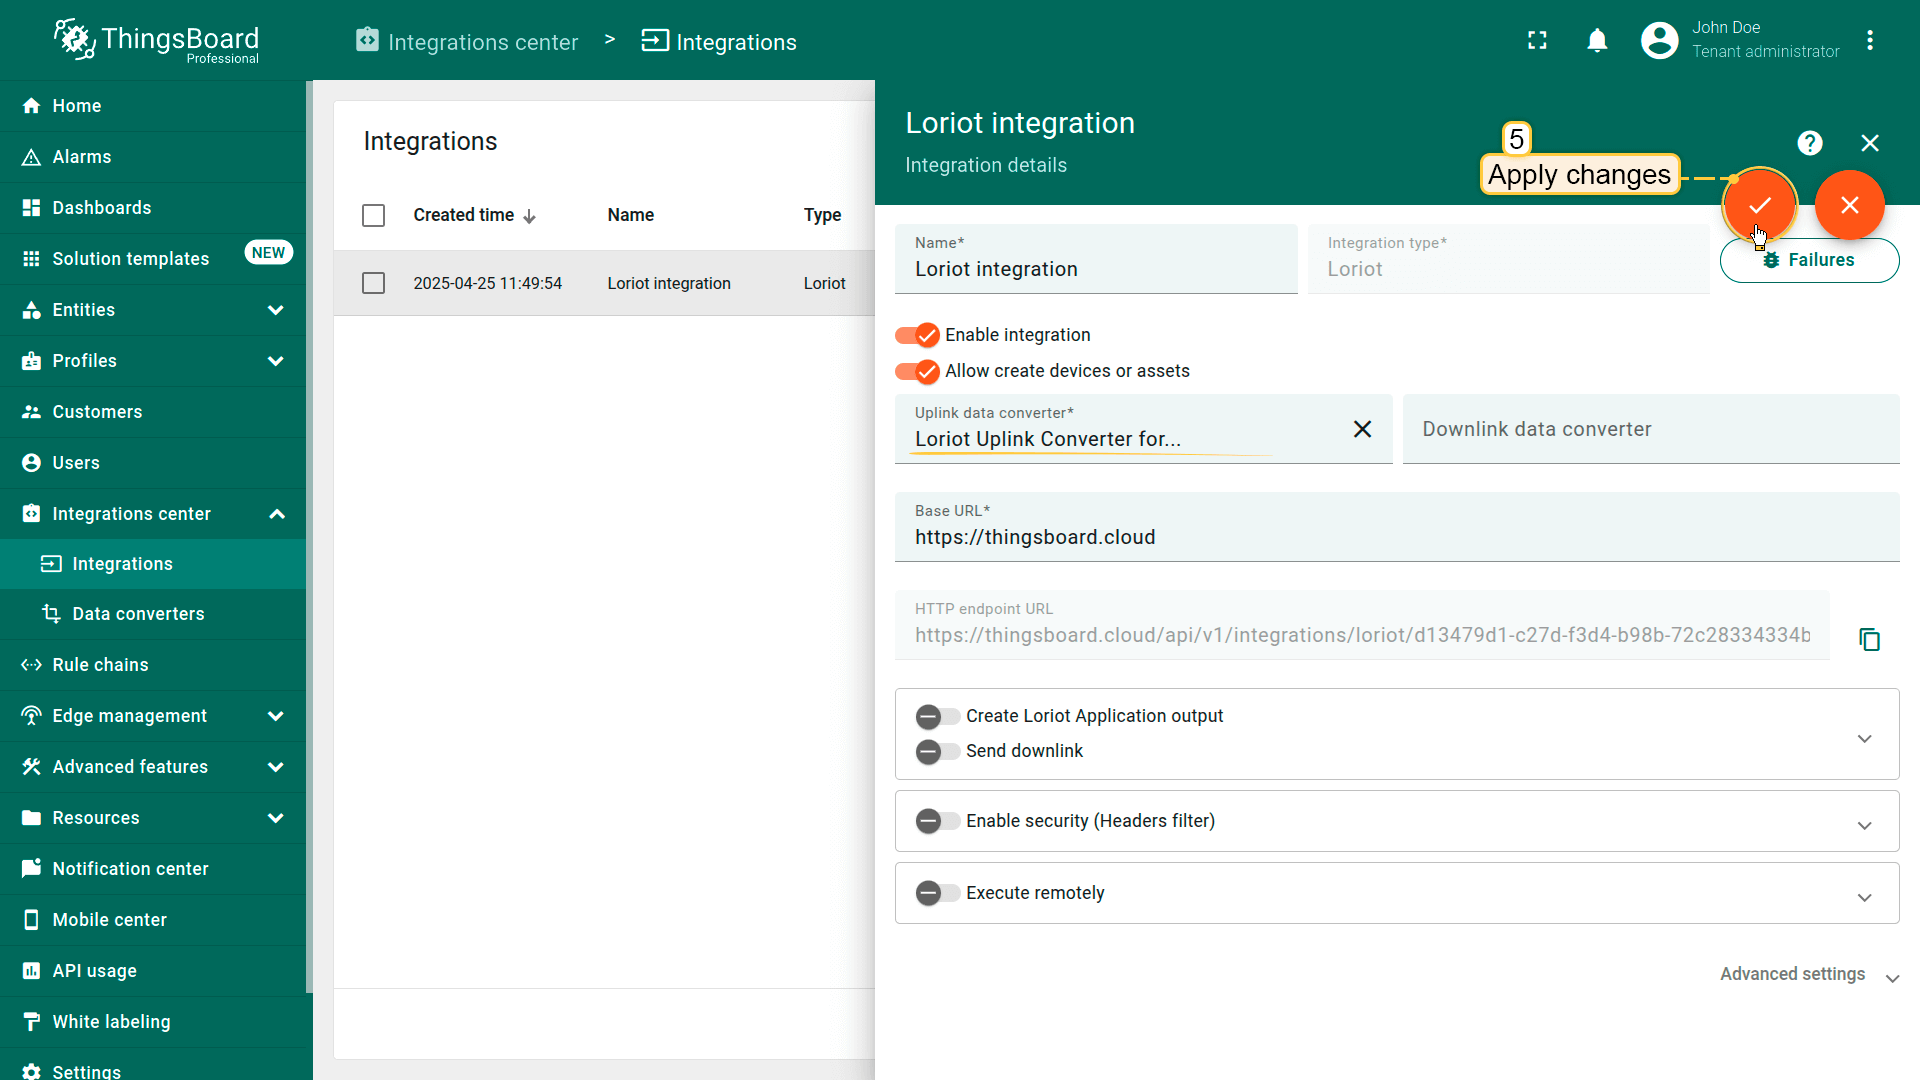 别忘了保存更改! |
在ThingsBoard上查看数据
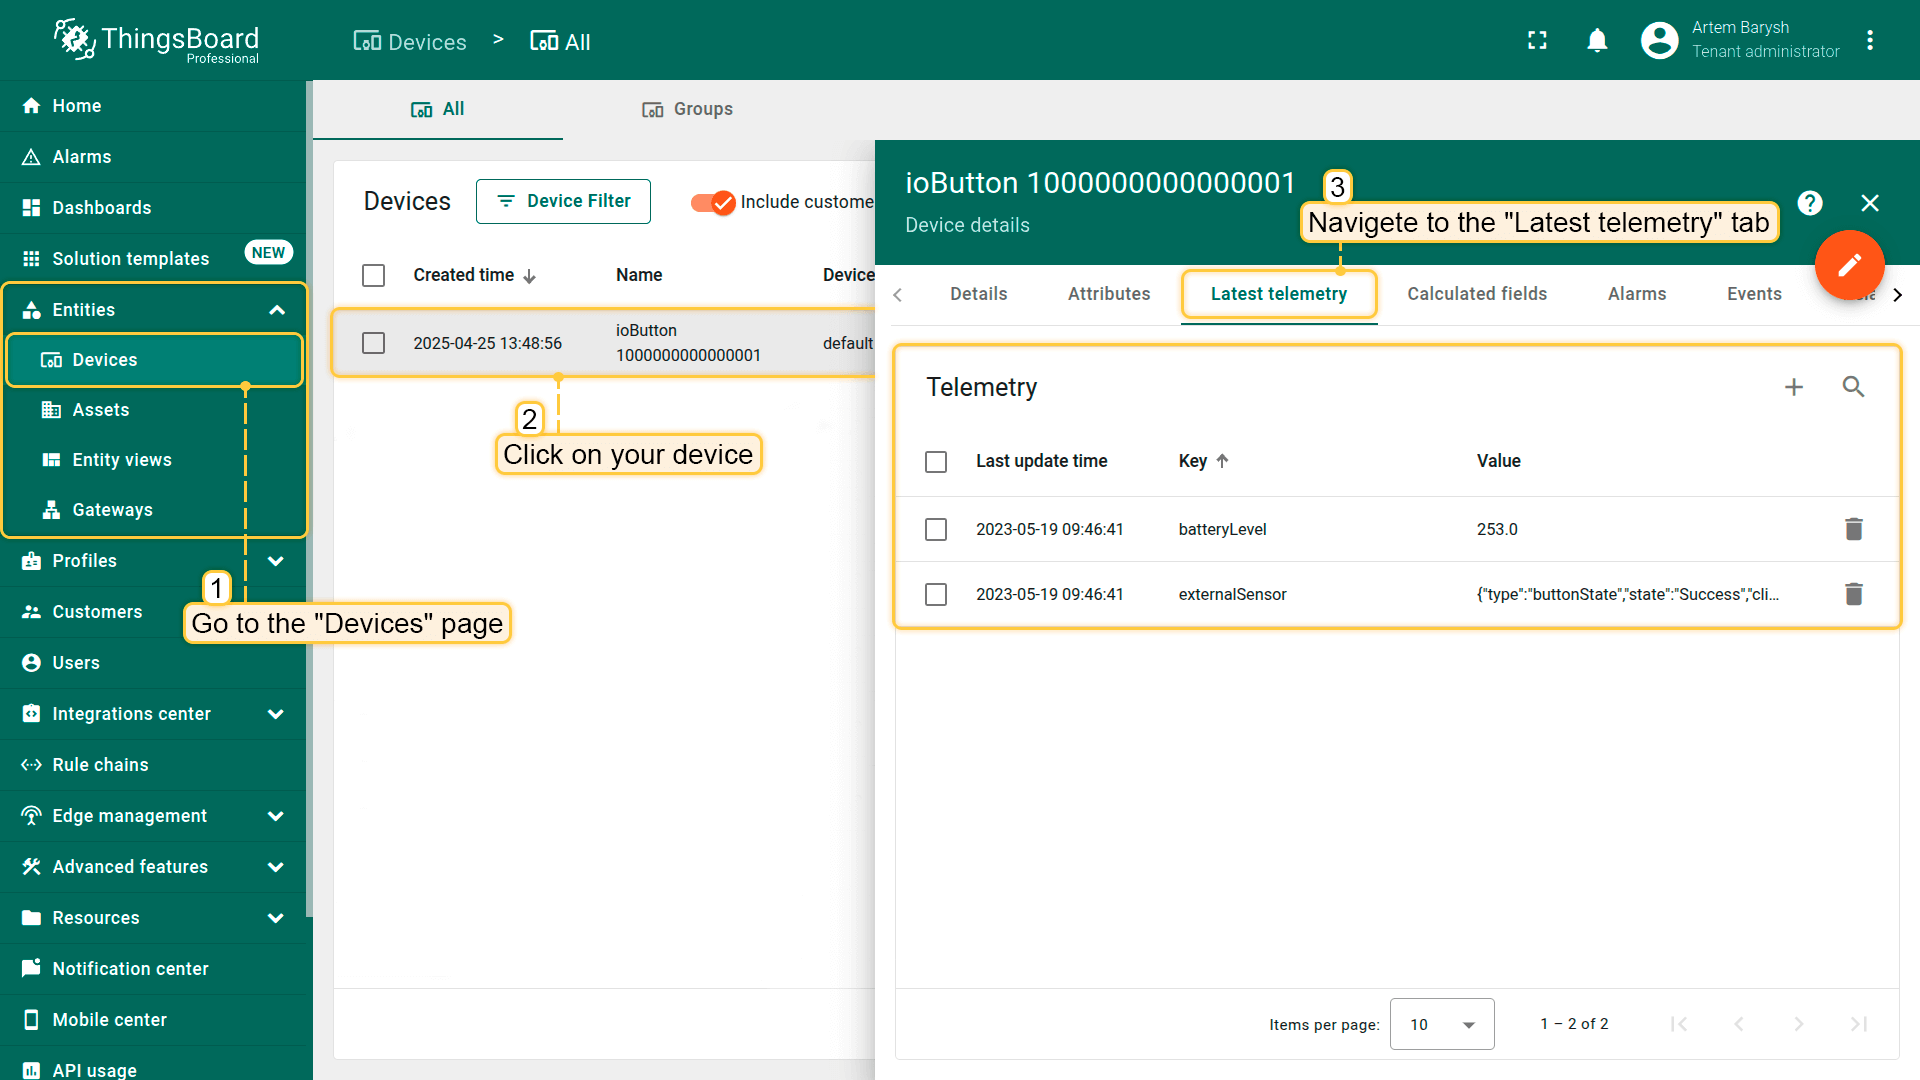
After the device is connected to the network server and ThingsBoard, you can check received and converted data on the platform for this device.
To do this, open Entities menu section and select Devices.
Click on the device name to open the device details page.
Go to the Latest telemetry tab to see the latest telemetry data received from the device.
总结
现在您可以轻松将ioButton Panic button连接到ThingsBoard并开始发送数据。
进一步了解可查阅ThingsBoard文档, 学习创建仪表板可视化遥测、 配置告警规则实时监控设备行为等核心功能。