- Hardware type: Gateways
- Connectivity: HTTP, MQTT, Ethernet, WIFI
- Industry: Smart Cities, Transportation & Logistics, Security, Environmental Monitoring
- Use cases: Smart energy, Fleet Tracking, Smart Metering
- Platforms: Community Edition, Professional Edition, Cloud
- 概述
- 前置条件
- Import Rule chain
- Create device profile
- Create device
- Gateway connection
- 在ThingsBoard上查看数据
- 总结
概述
ACE Automation MQTT 4G GPS网关是一款面向工业和物联网应用的先进数据通信与连接设备。该网关支持4G蜂窝网络,可实现可靠的高速数据传输,在偏远地区同样适用。内置GPS技术支持实时位置追踪,适合资产管理和车辆管理场景。采用MQTT通信协议,数据交换轻量高效,可无缝集成到现有物联网系统中。其坚固的工业设计确保在恶劣环境下稳定运行。ACE Automation MQTT 4G GPS网关可帮助您简化连接管理并充分利用实时数据。
前置条件
继续本指南前,需准备以下内容:
- ACE MQTT 4G GPS Gateway
- Modbus Controller (in our case, Siemens LOGO!)
- ThingsBoard账户
Import Rule chain
Download ACE Rule Chain and import.
To import rule chain from а JSON file, you should:
-
Navigate to the “Rule chains” page and click on the “+” button in the upper right corner of the screen and then choose “Import rule chain” option. The toolbar import popup window will appear. Upload a JSON file and click on the “Import” button;
-
The imported rule chain will open. Click on the “Apply changes” button to save the rule chain. Then, go back to the main “Rule chains” page;
-
Rule chain is imported.
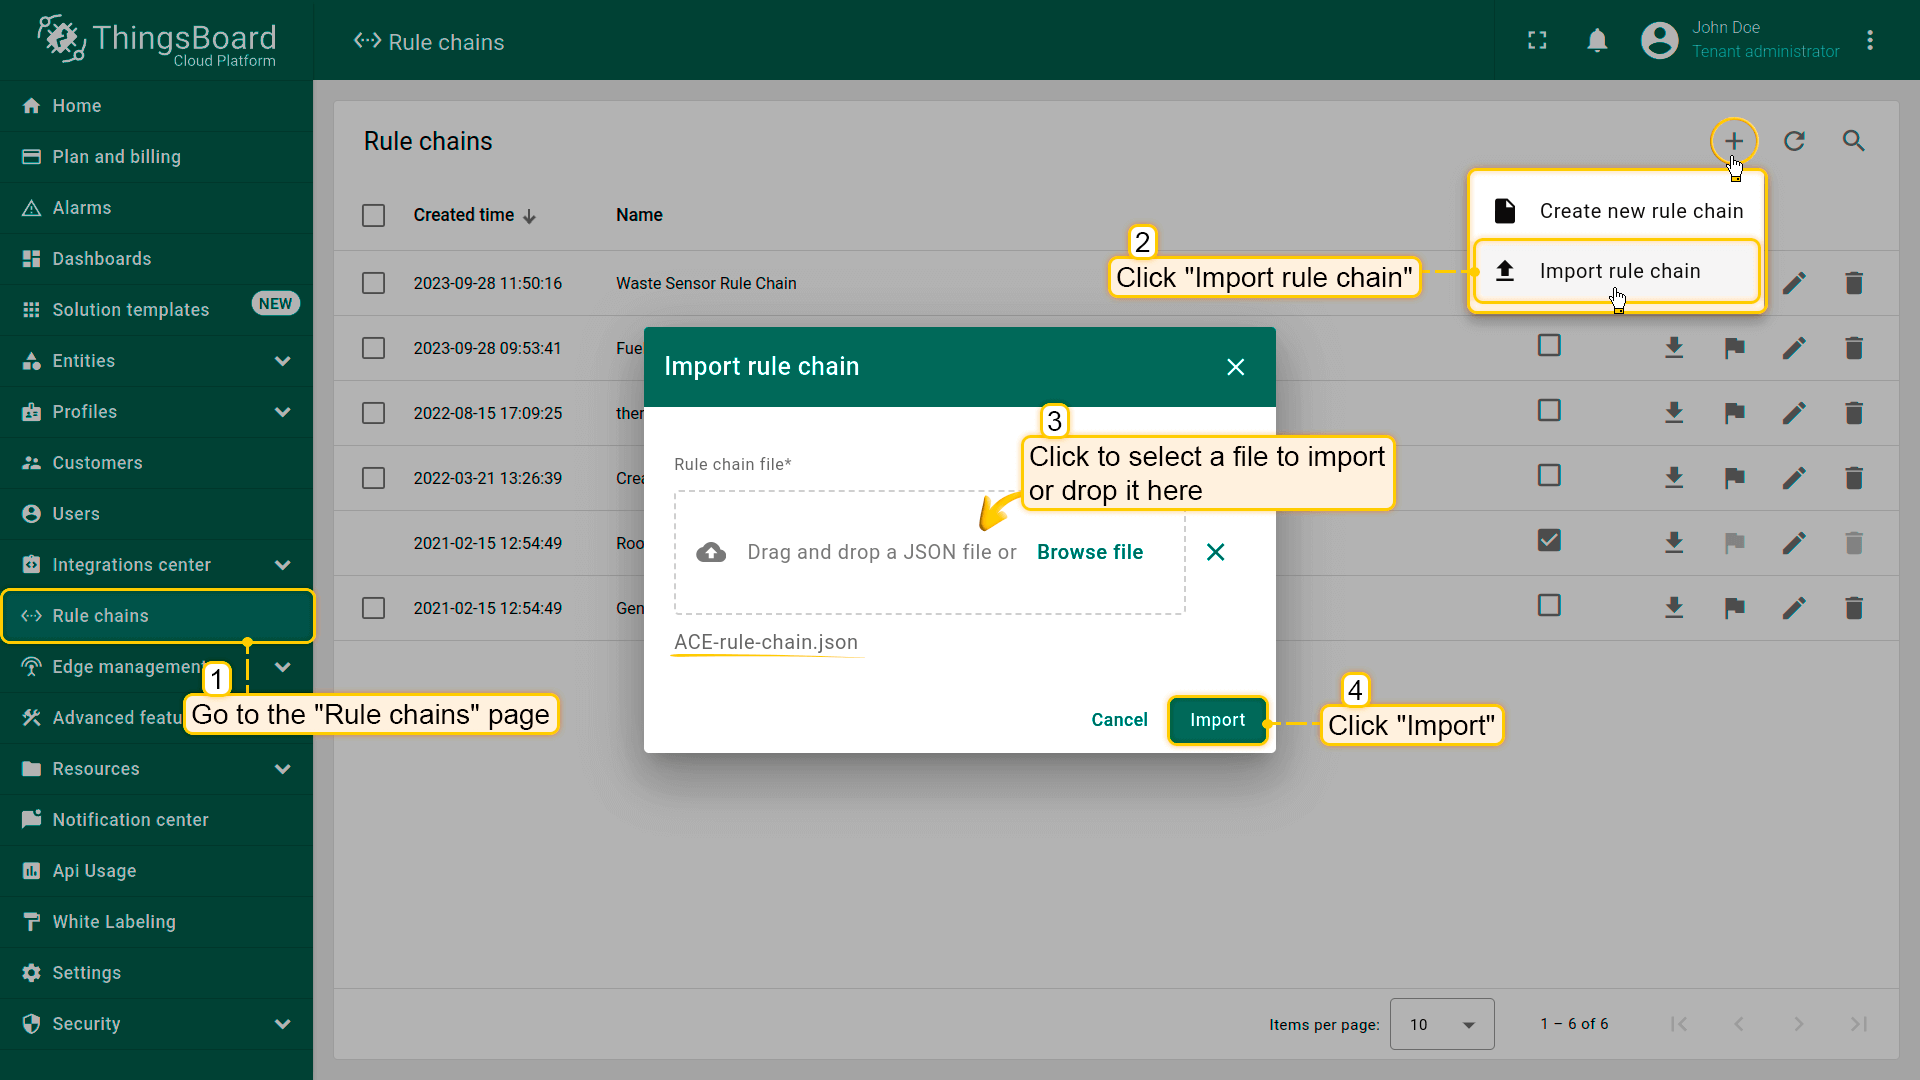
Navigate to the “Rule chains” page and click on the “+” button in the upper right corner of the screen and then choose “Import rule chain” option. The toolbar import popup window will appear. Upload a JSON file and click on the “Import” button;
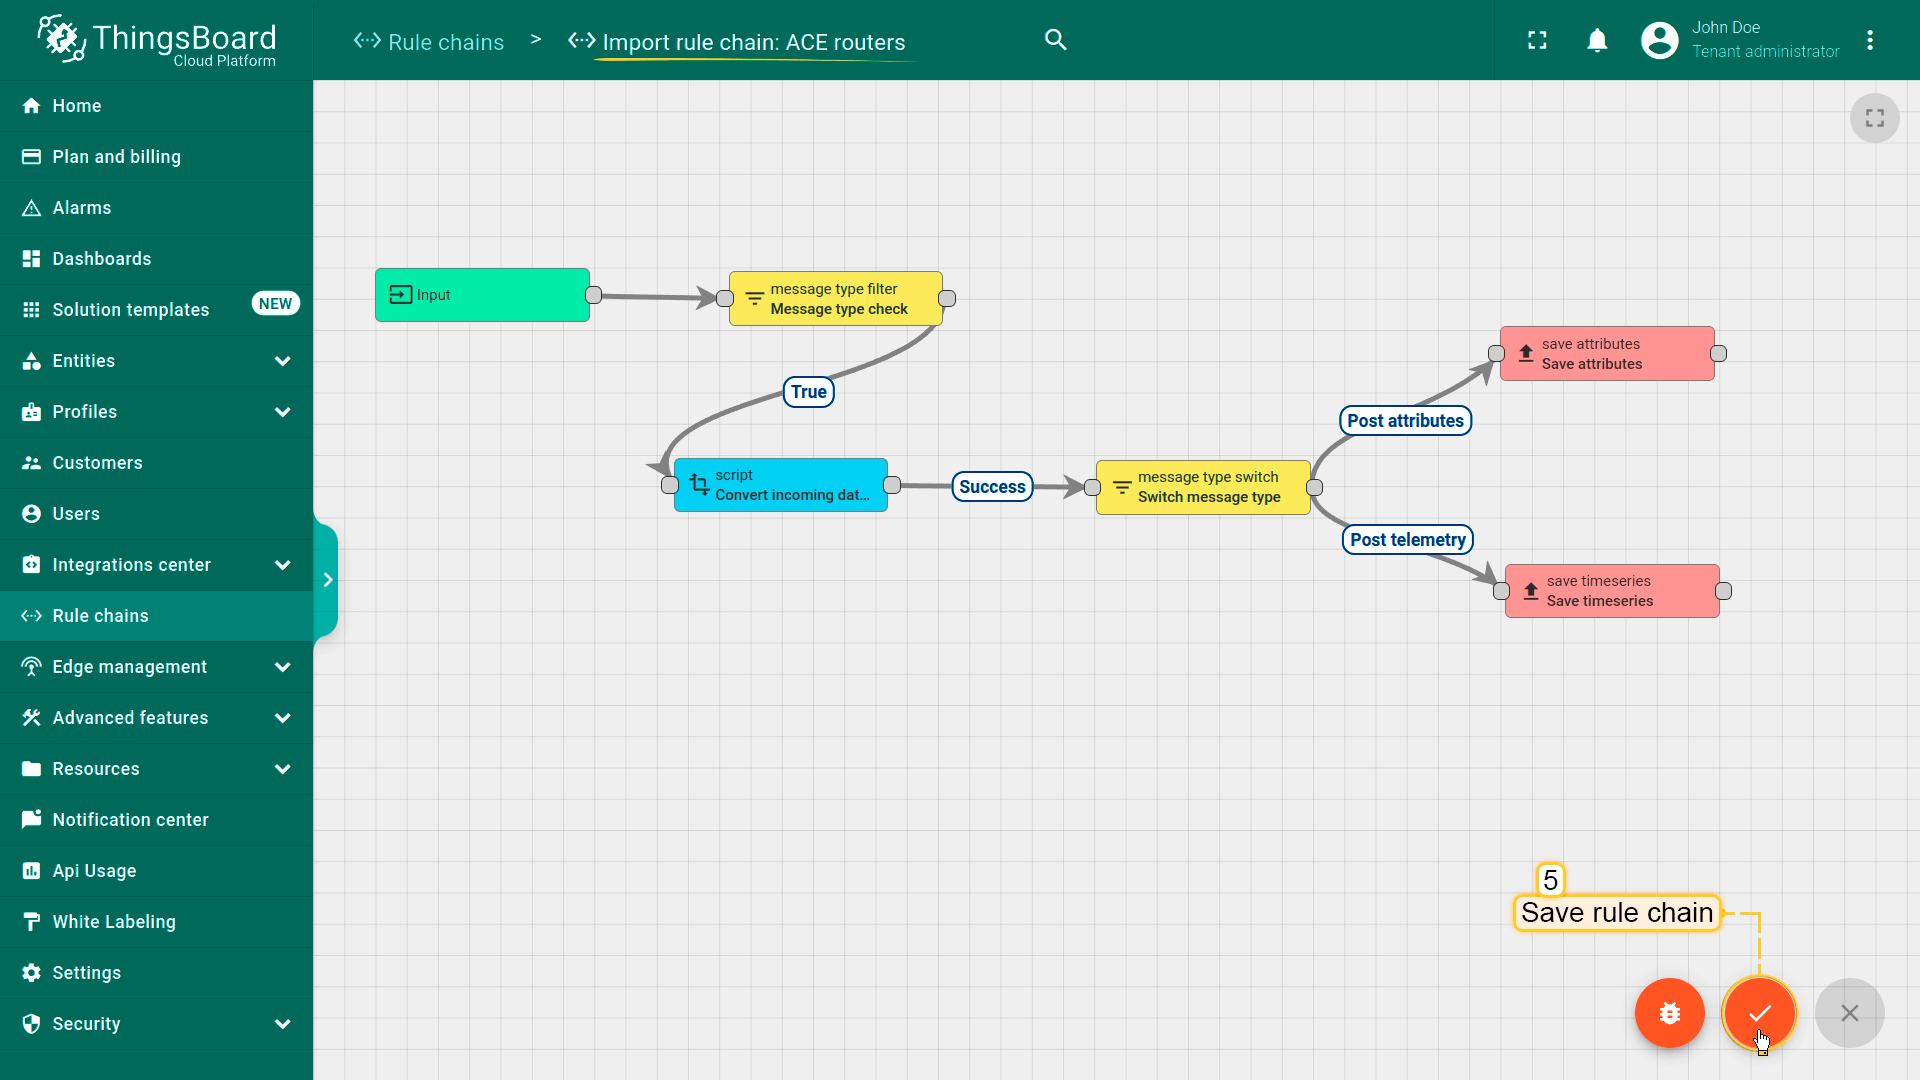
The imported rule chain will open. Click on the “Apply changes” button to save the rule chain. Then, go back to the main “Rule chains” page;
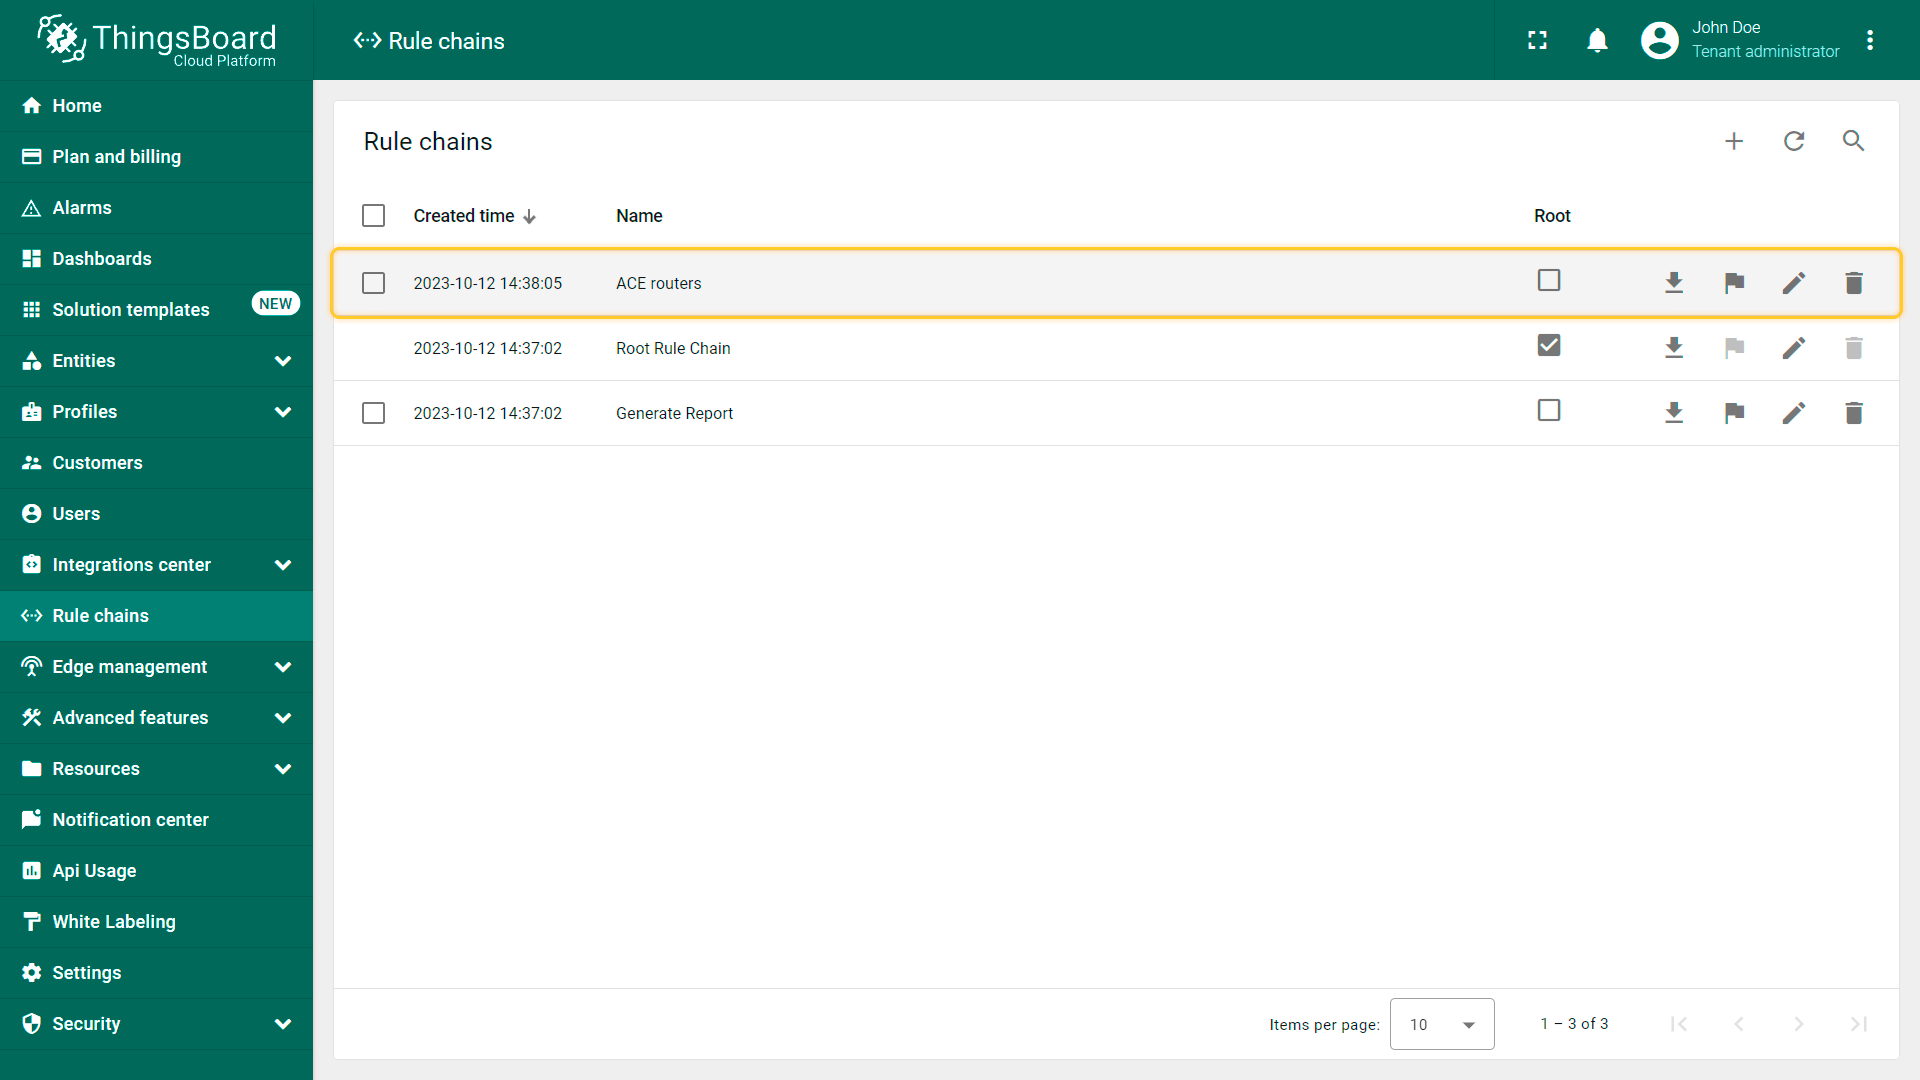
Rule chain is imported.
Create device profile
Now, we are ready to create device profile. For this, follow steps below:
-
Go to Profiles > Device profiles and click on “Add” button > “Create new device profile”;
-
Input Name field with “ACE routers” value, and select “ACE routers” imported rule chain from the step above;
-
Click on “Transport configuration” tab, select MQTT transport type and change Telemetry topic filter value from “v1/devices/me/telemetry” to “siemens/+”, click on “Add” button;
-
Device Profile created.
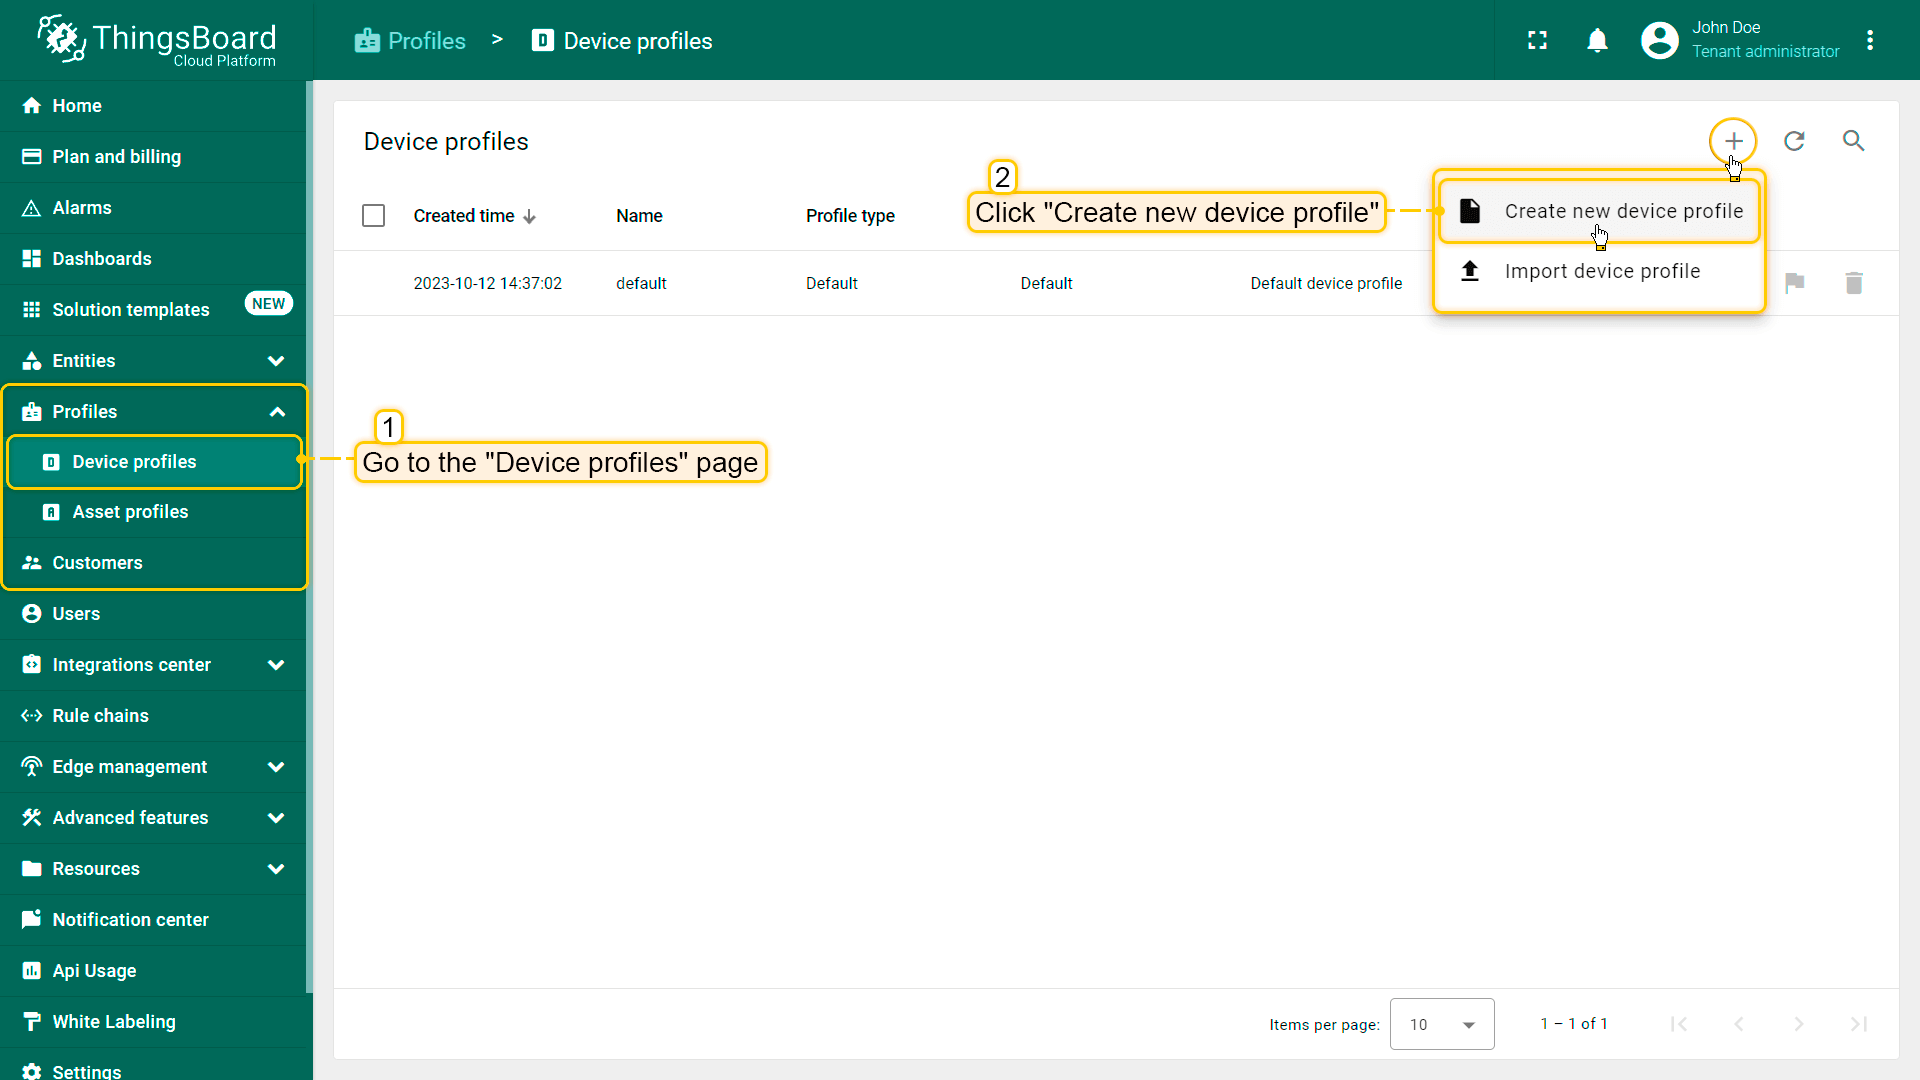
Go to Profiles > Device profiles and click on “Add” button > “Create new device profile”;
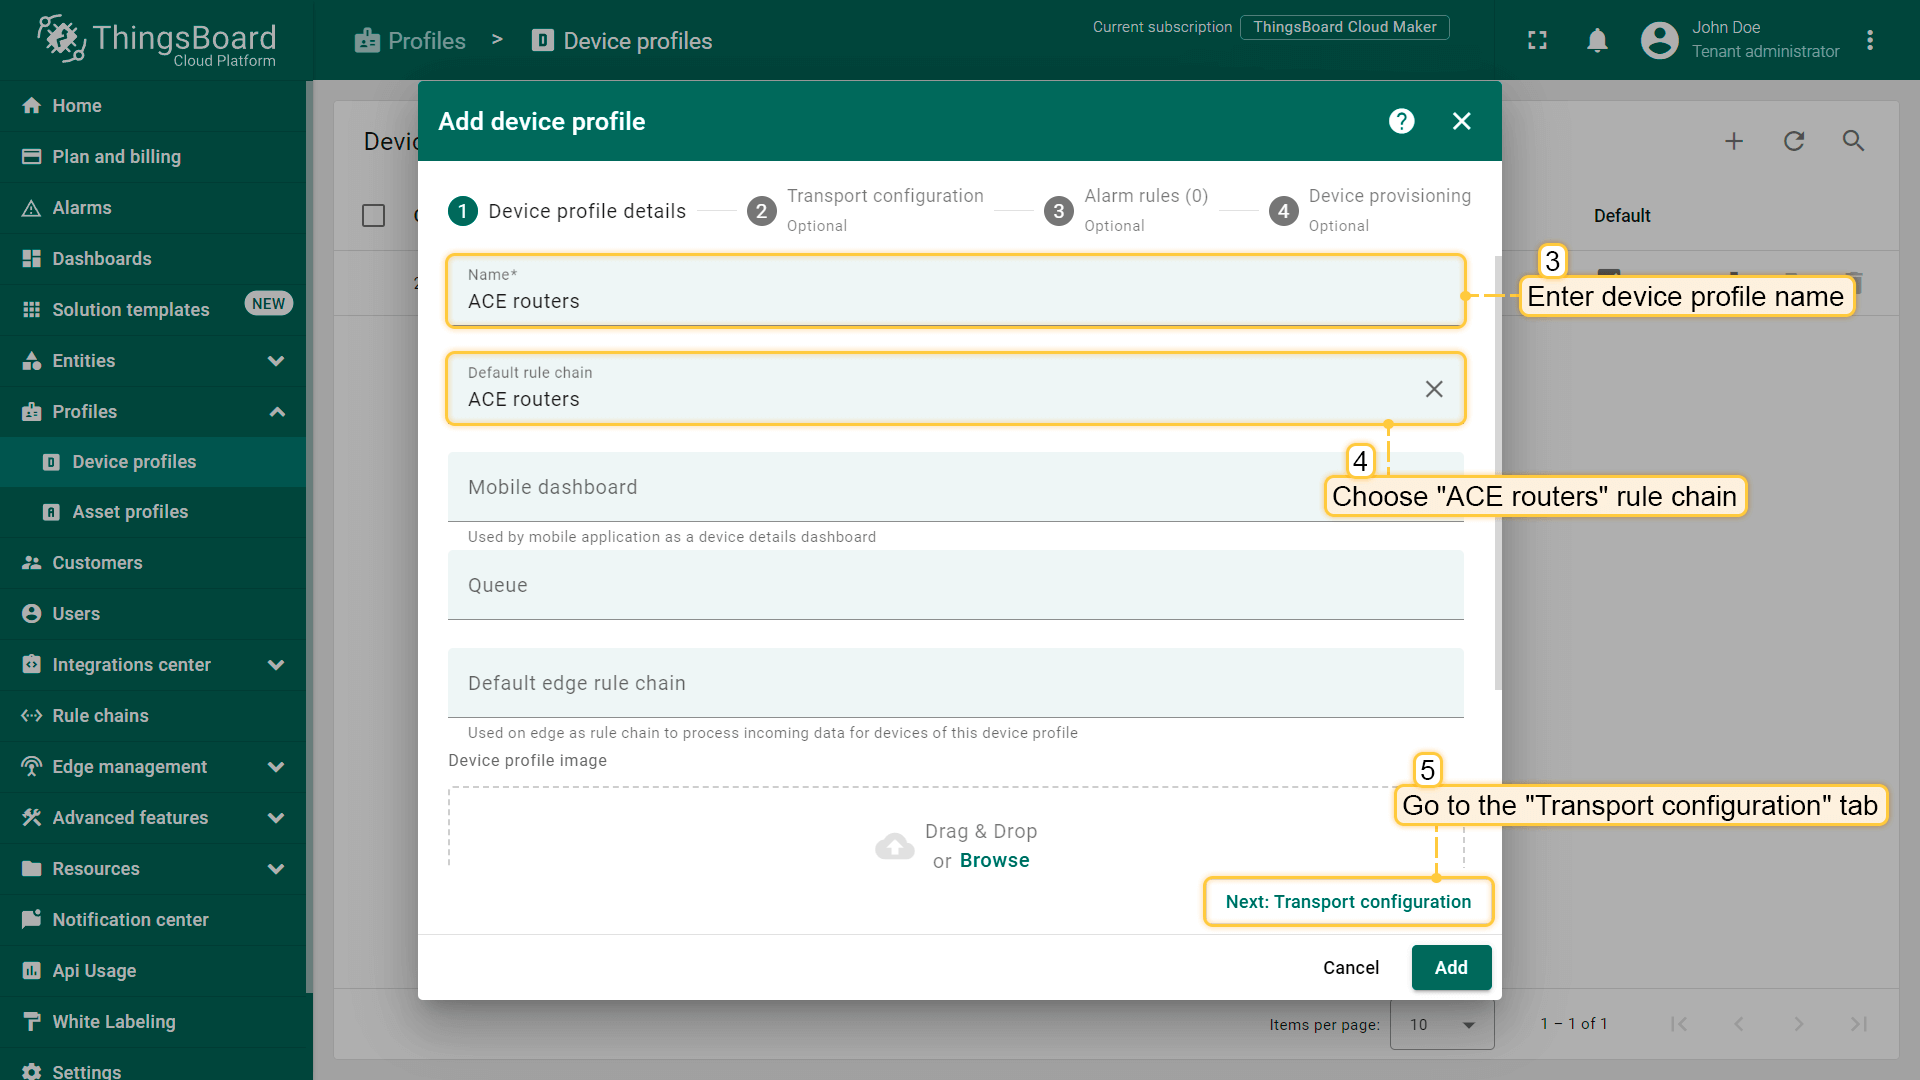
Input Name field with “ACE routers” value, and select “ACE routers” imported rule chain from the step above;
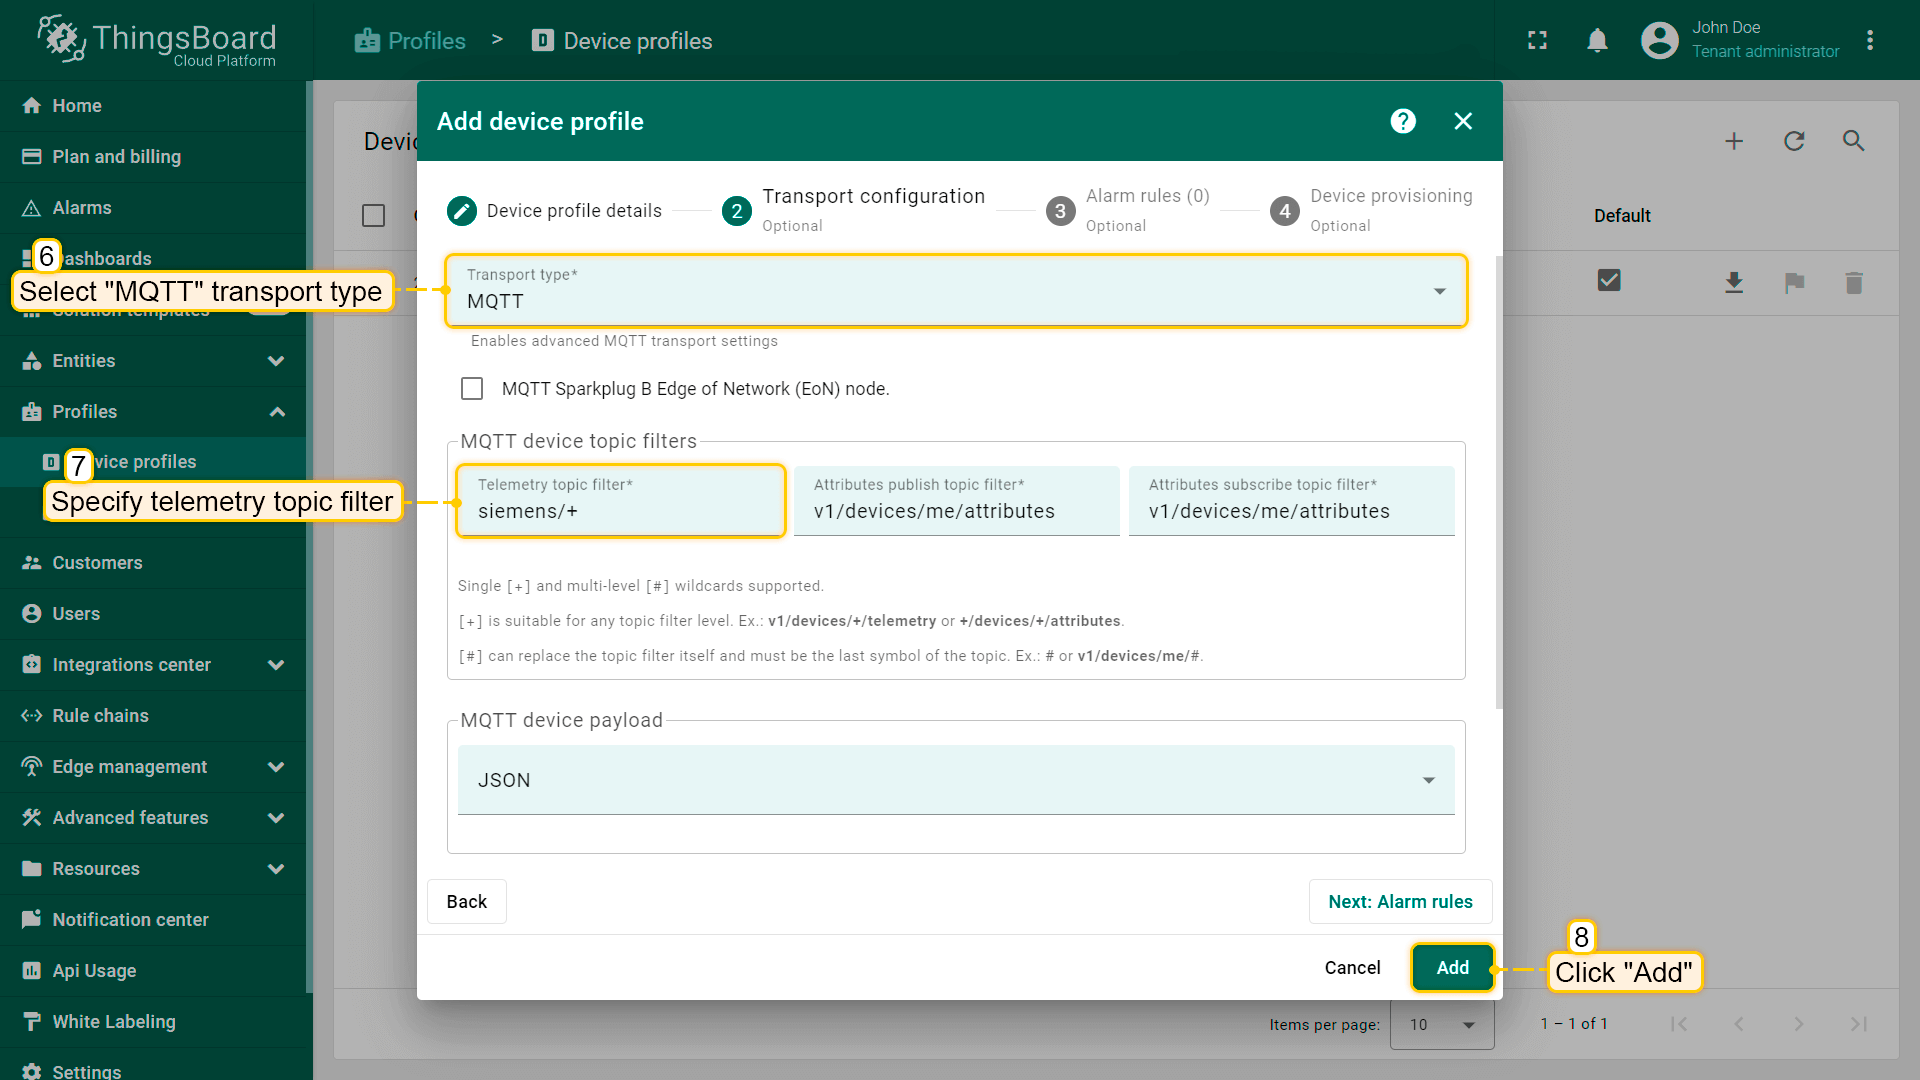
Click on “Transport configuration” tab, select MQTT transport type and change Telemetry topic filter value from “v1/devices/me/telemetry” to “siemens/+”, click on “Add” button;
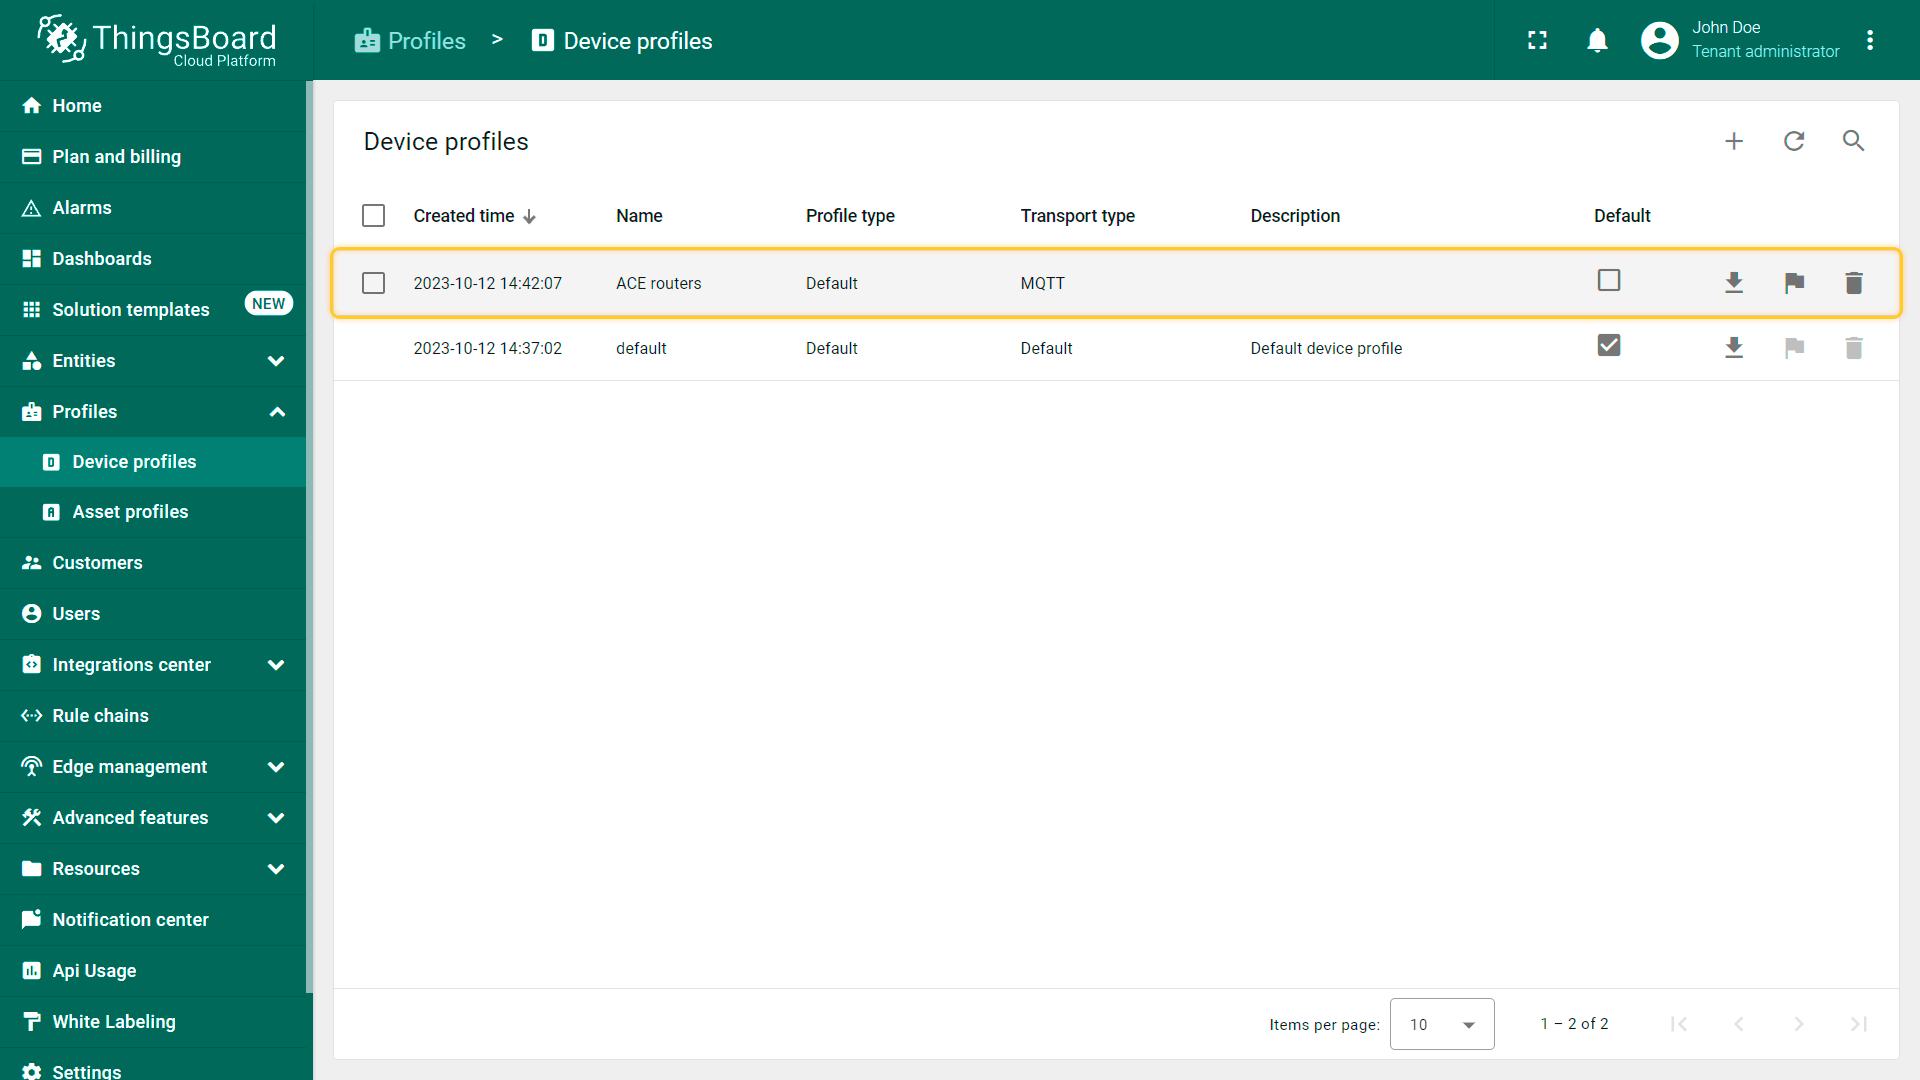
Device Profile created.
Create device
For simplicity, we will provide the device manually using the UI:
-
Open the Devices page. By default, you navigate to the device group “All”. Click on the “+” icon in the top right corner of the table and then select “Add new device”;
-
Input device name. For example, “ACE Gateway”. Select created device profile from the step above, in our case, “ACE routers”;
-
Click on “Credentials” tab. Check “Add credentials” and select “MQTT Basic” credentials type. Click on “Generate” button on each field. Click “Add” button;
-
Device added.
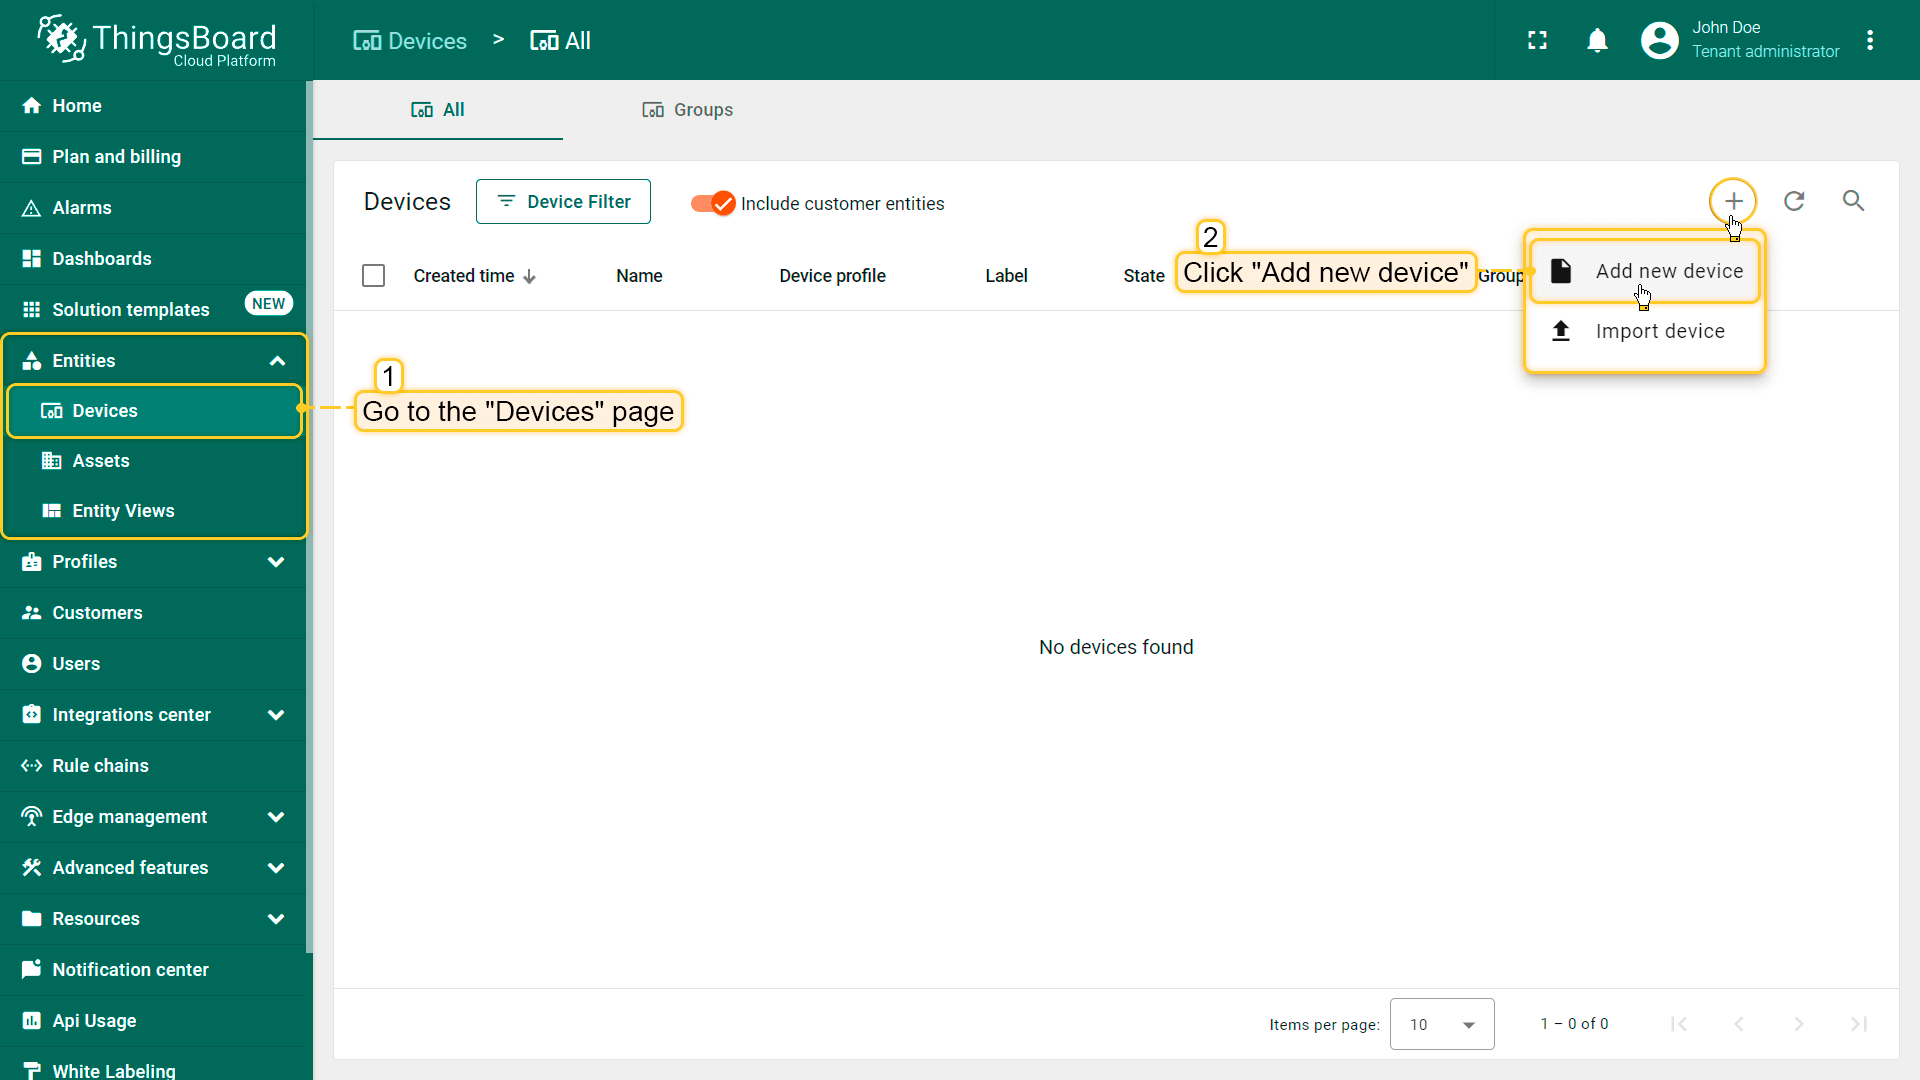
Open the Devices page. By default, you navigate to the device group “All”. Click on the “+” icon in the top right corner of the table and then select “Add new device”;
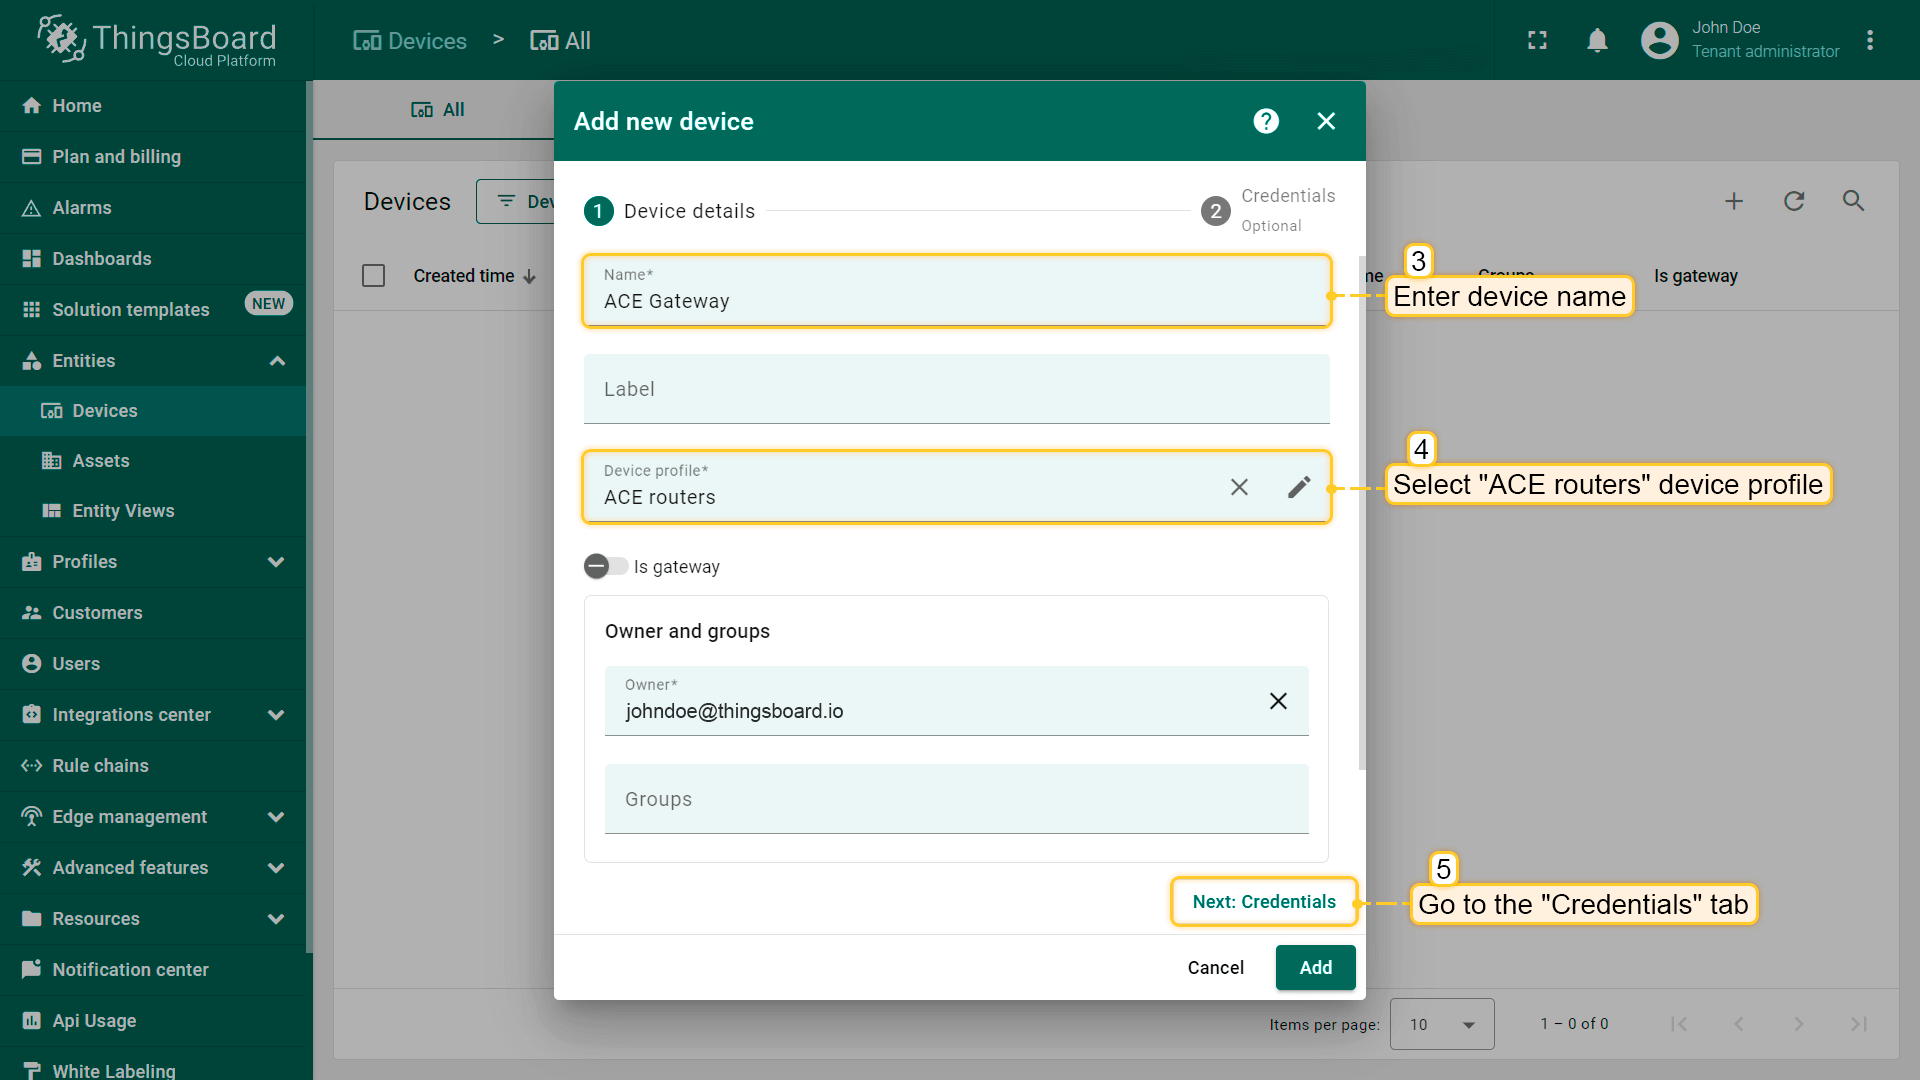
Input device name. For example, “ACE Gateway”. Select created device profile from the step above, in our case, “ACE routers”;
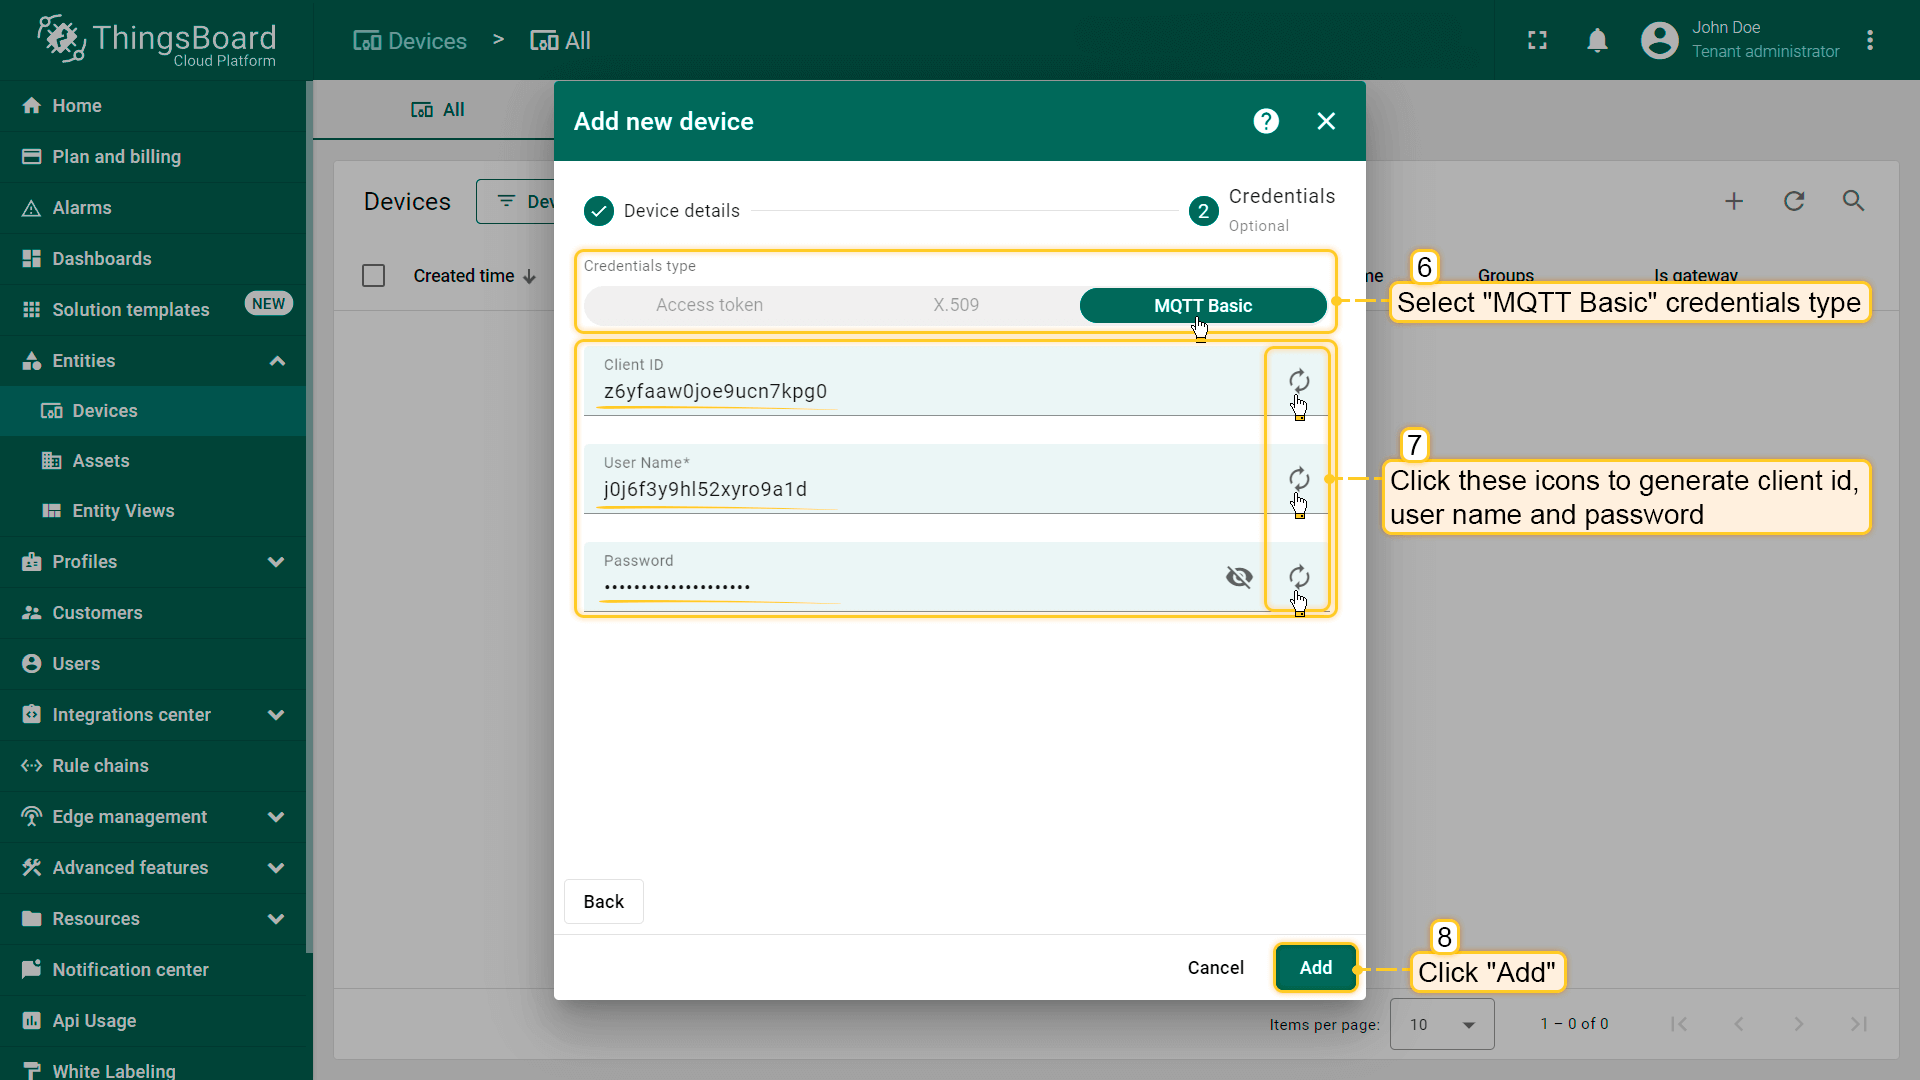
Click on “Credentials” tab. Check “Add credentials” and select “MQTT Basic” credentials type. Click on “Generate” button on each field. Click “Add” button;
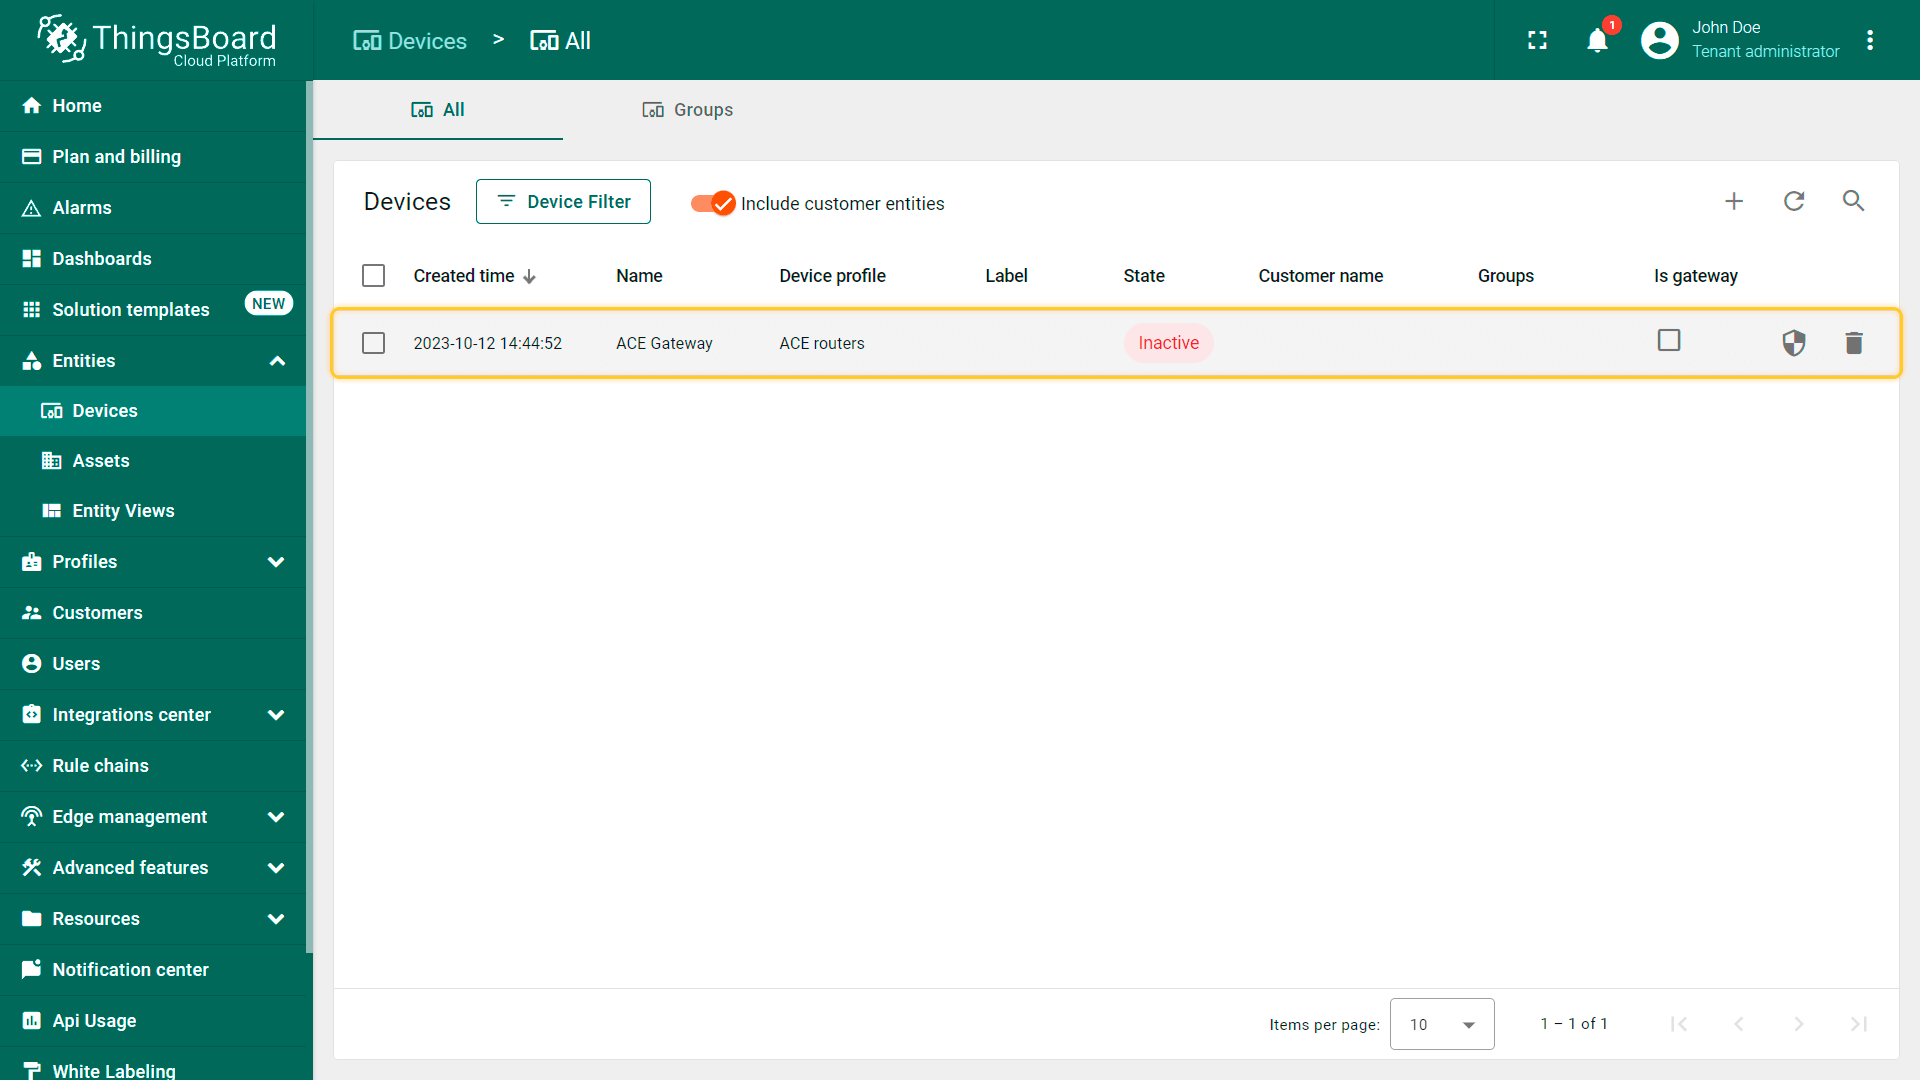
Device added.
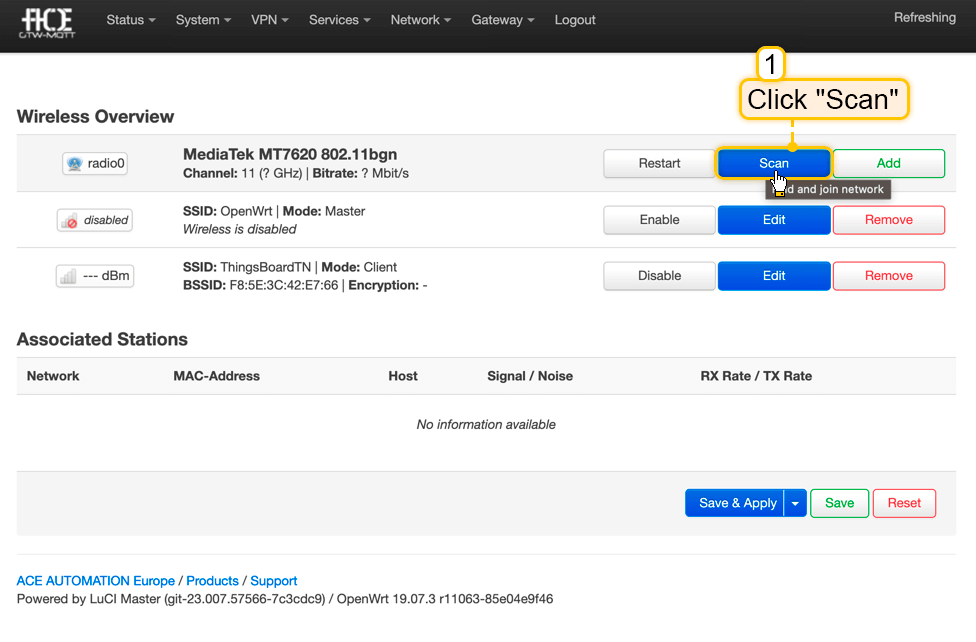
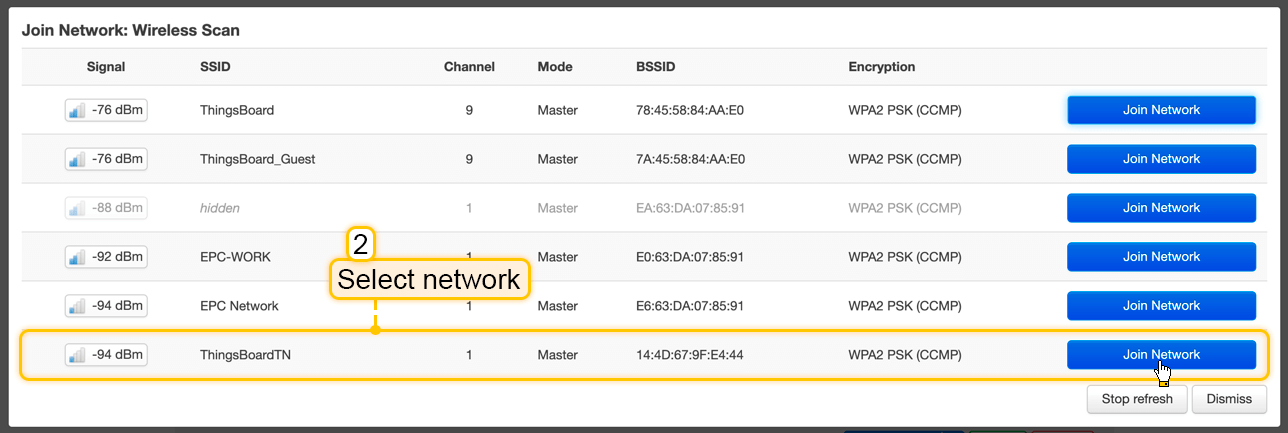
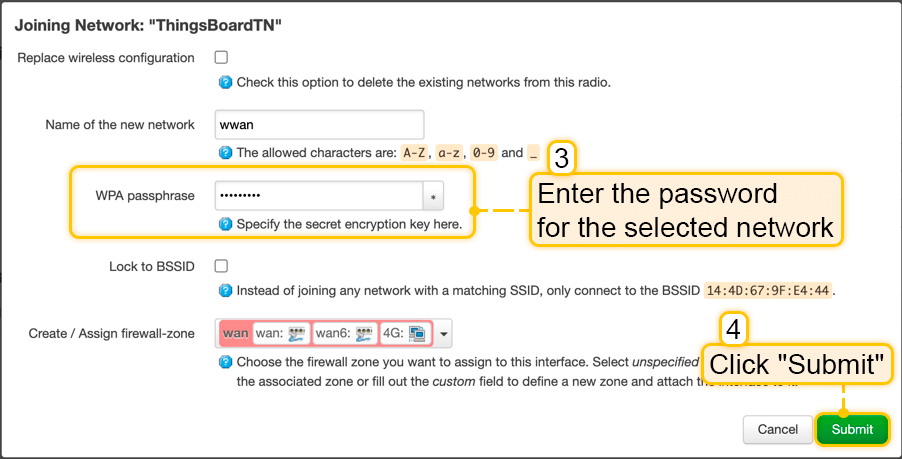
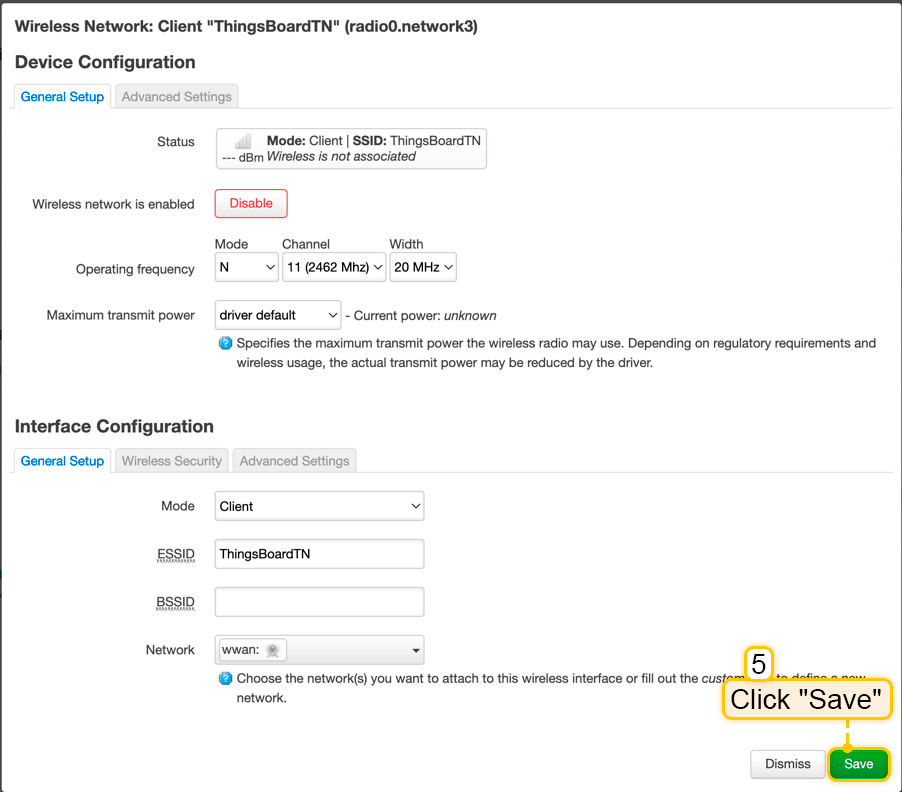
Gateway connection
According to the official user manual and this guide, you can connect the gateway to the network and get access to the WebUI in two ways:
      |
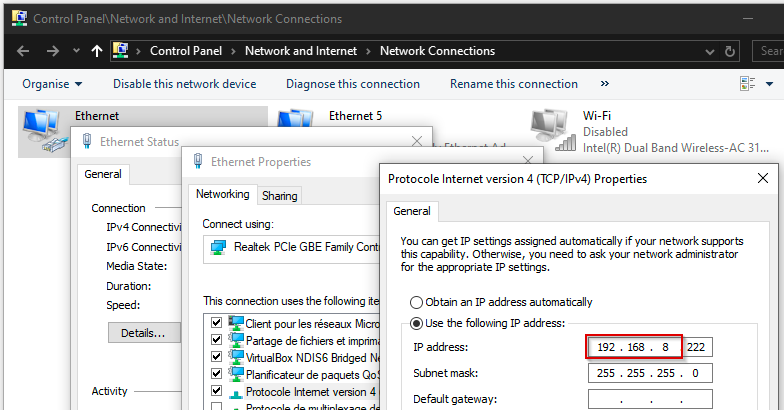
您的 PC 必须与网关处于同一网络:192.168.8.XXX。若非如此,请修改您 PC 的 IP 地址。 警告: 请勿使用您网络中已被其他设备占用的 IP 地址! Windows:
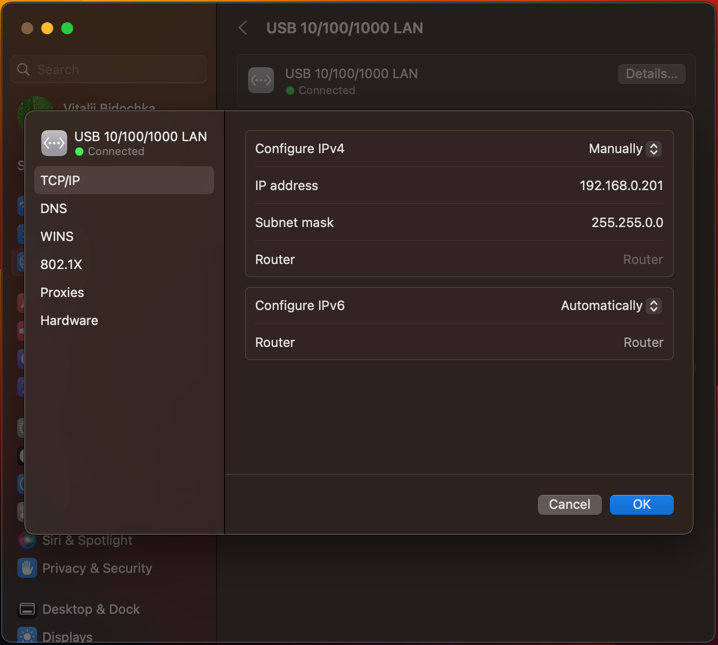
macOS:
Ubuntu Linux:
|
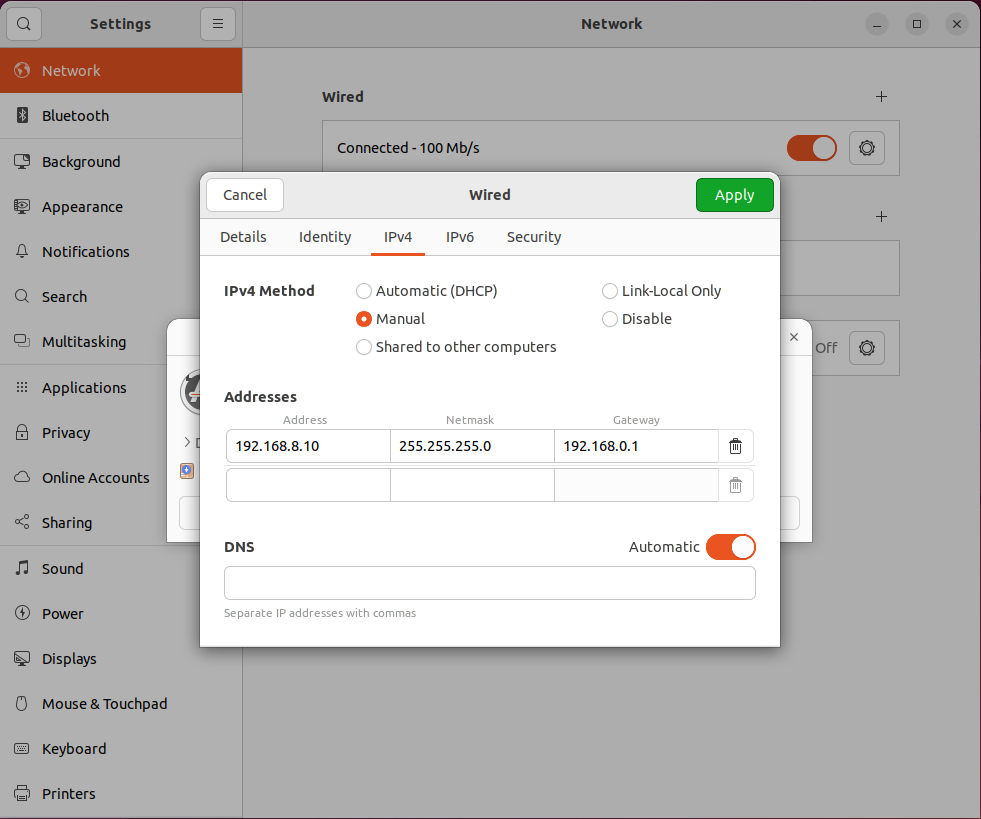
Now, you can configure the gateway.
Once you are connected to the ACE-GTW-MQTT, you can change its IP address if you wish:
- Network > Interfaces;
- Click on “Edit” the LAN interface;
- Enter a new IP address that is not already being used by another device on your network.
WARNING: Don't forget to change default password.
Now we are ready to configure the MQTT connection, topics for data transmission, and establishing the Modbus connection.
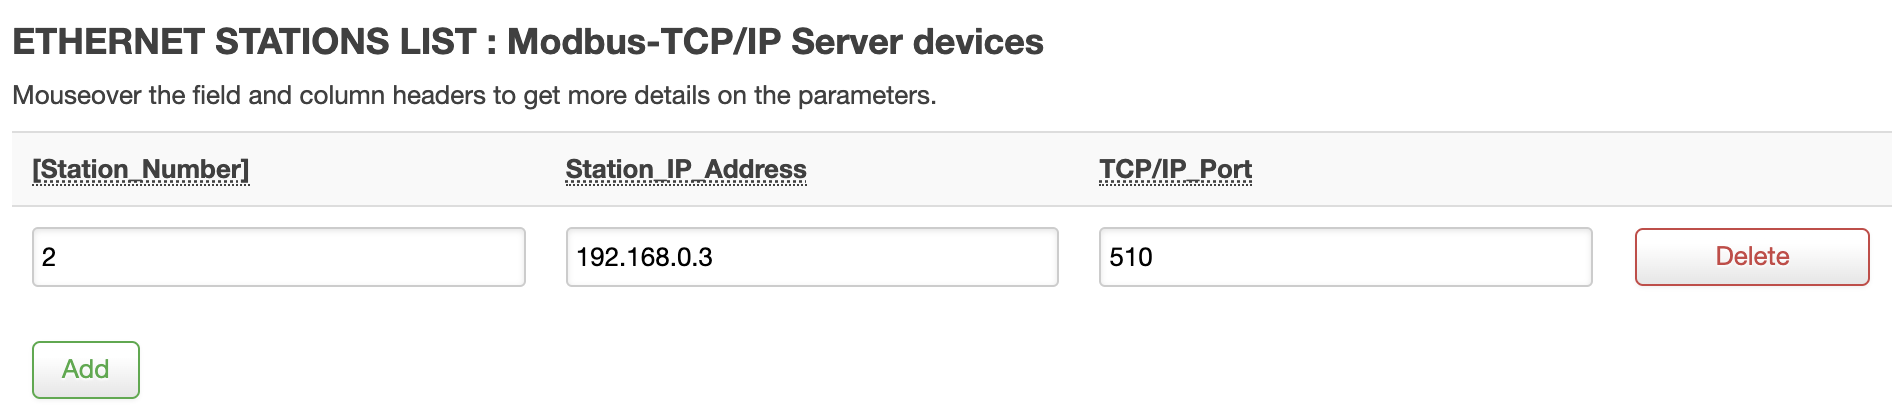
Let’s first configure Modbus Connection. As mention above, we use Siemens LOGO! with AM2 RTD module (used for connecting PT100) - which is the perfect choice for the fast, uncomplicated, and space-saving solution of simple control and regulation tasks. LOGO! has long since established itself as an intelligent logic module in small automation projects.
Follow the下一步:
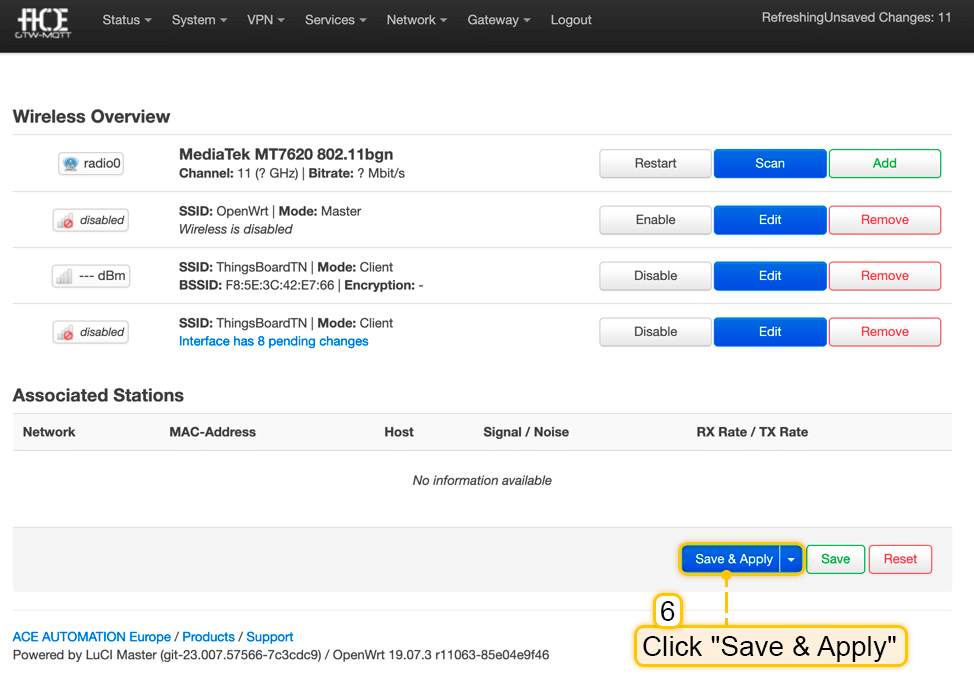
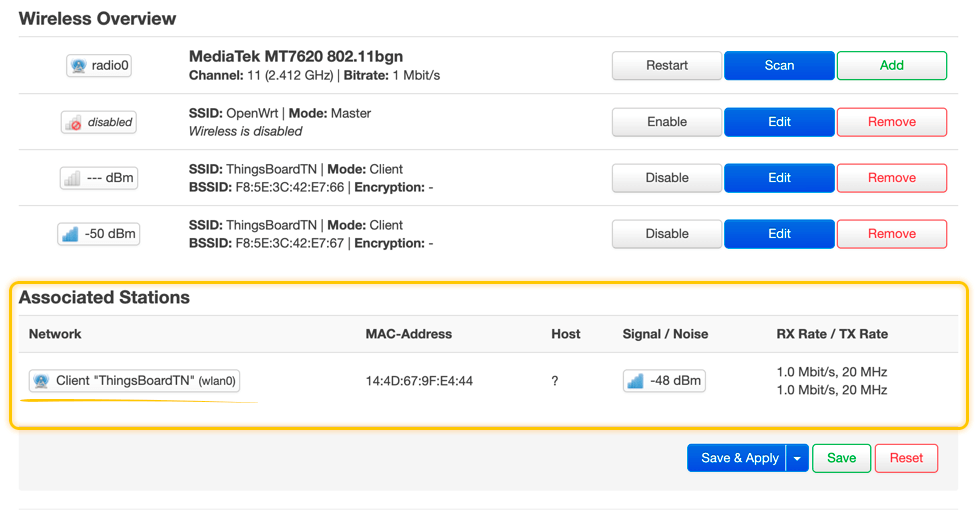
- Go to Gateway > MQTT Configuration > ETHERNET STATIONS LIST (under MQTT Broker section);
- Fill in all required fields with correct information about your device;
- Click on “Save & Apply” button.
In our case, we have the following settings:
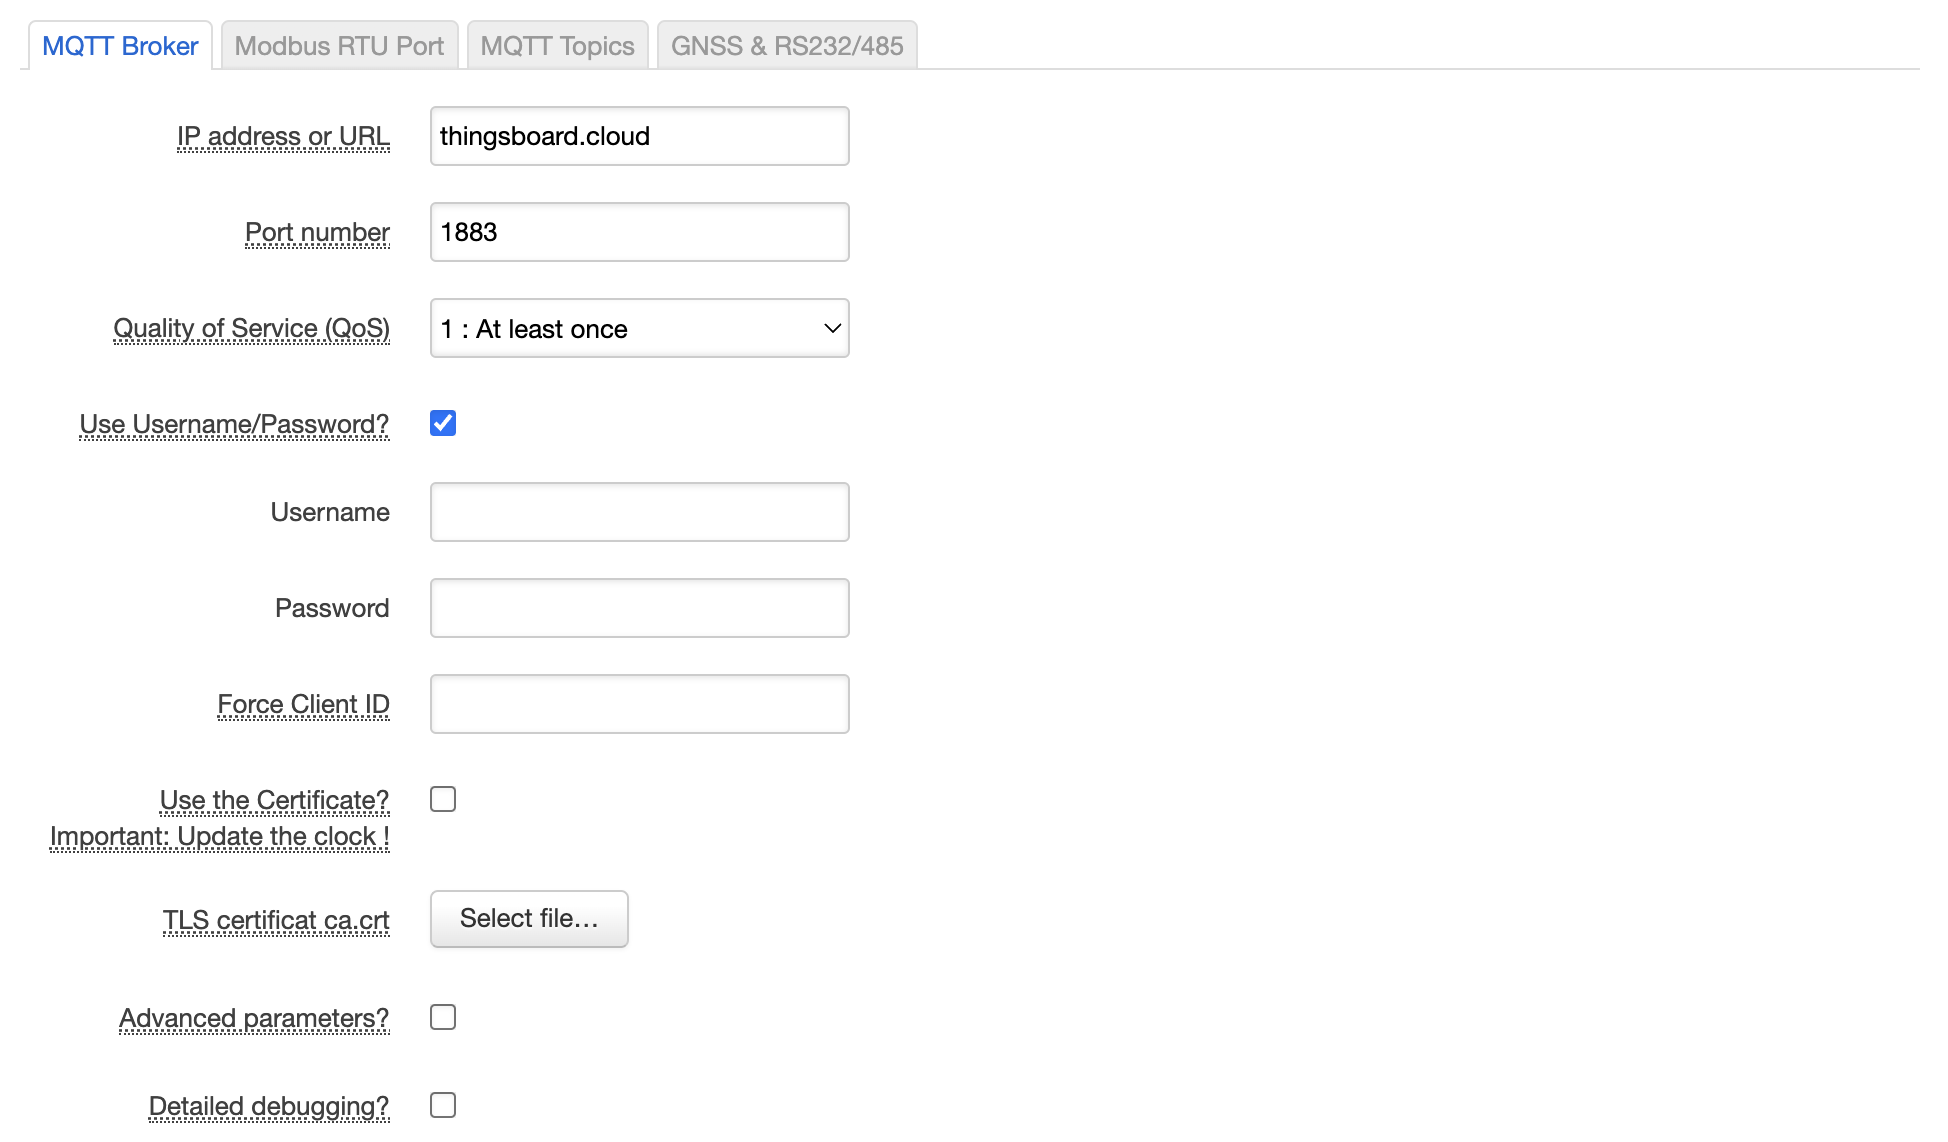
For configuring MQTT connection, follow the下一步:
- Go to Gateway > MQTT Configuration > MQTT Broker (tab);
- Fill in all required fields with correct credentials and other information for broker access;
- Click on “Save & Apply” button.
The next thing we have to do is configure MQTT topics for receiving and sending data:
- Go to Gateway > MQTT Configuration > MQTT Broker (tab);
- Scroll down to “MQTT TOPICS LIST : Publishing and Subscribing to MQTT Topics” section;
- Add all topics for publishing data;
- Add all subscription topics for receiving data;
- Click on “Save & Apply” button.
In case Siemens LOGO!, we have the following topics list:
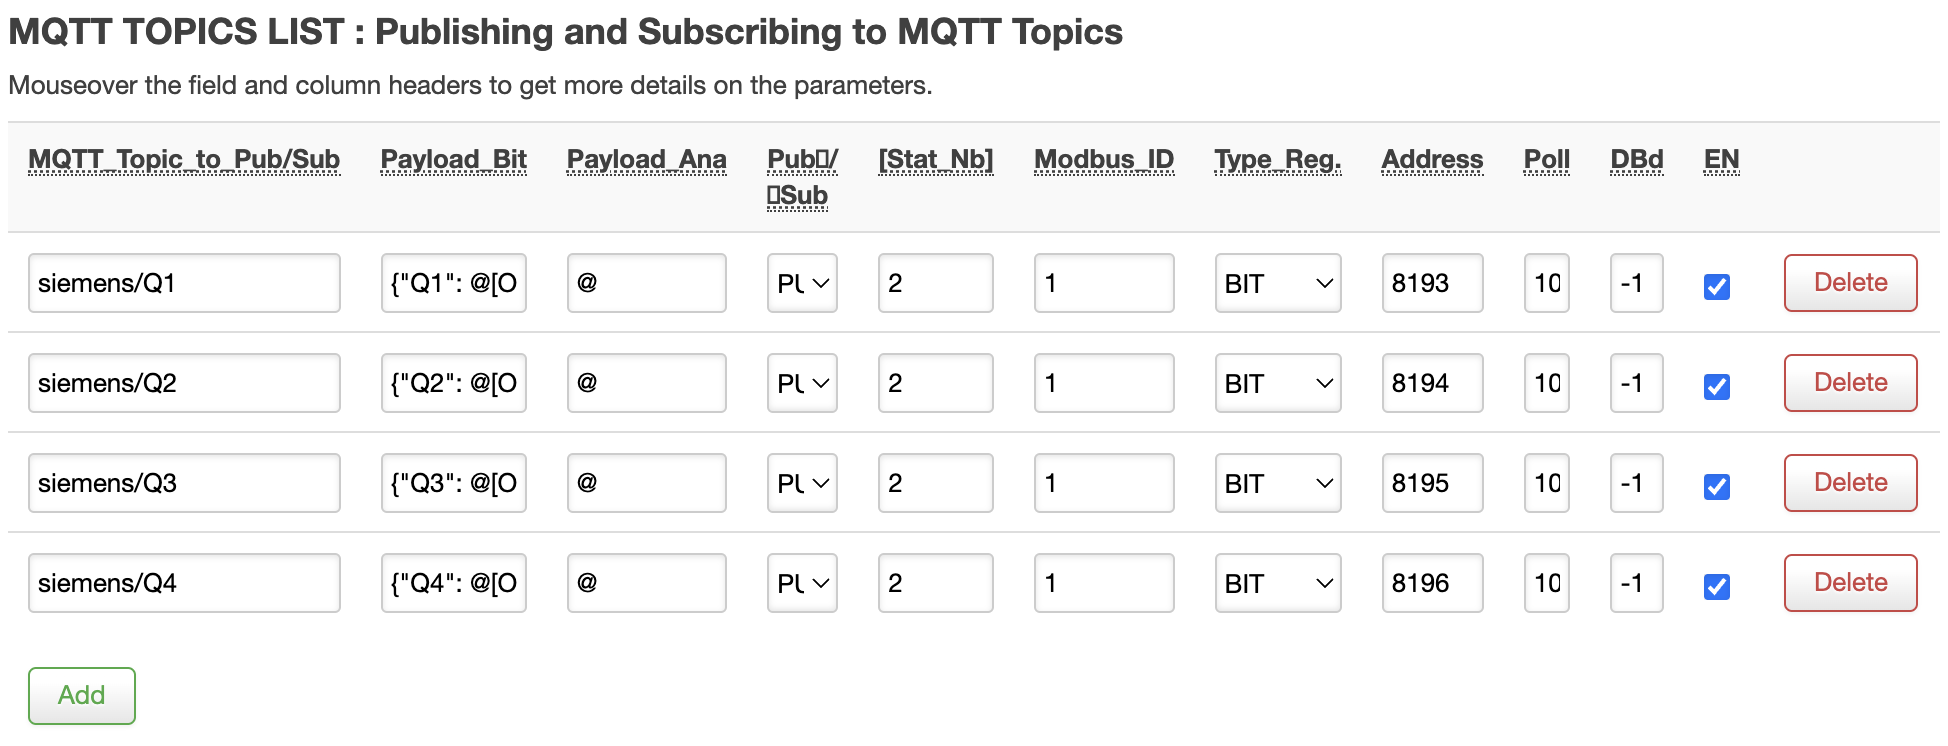
If you are using Siemens LOGO! too, you can use the following configuration:
在ThingsBoard上查看数据
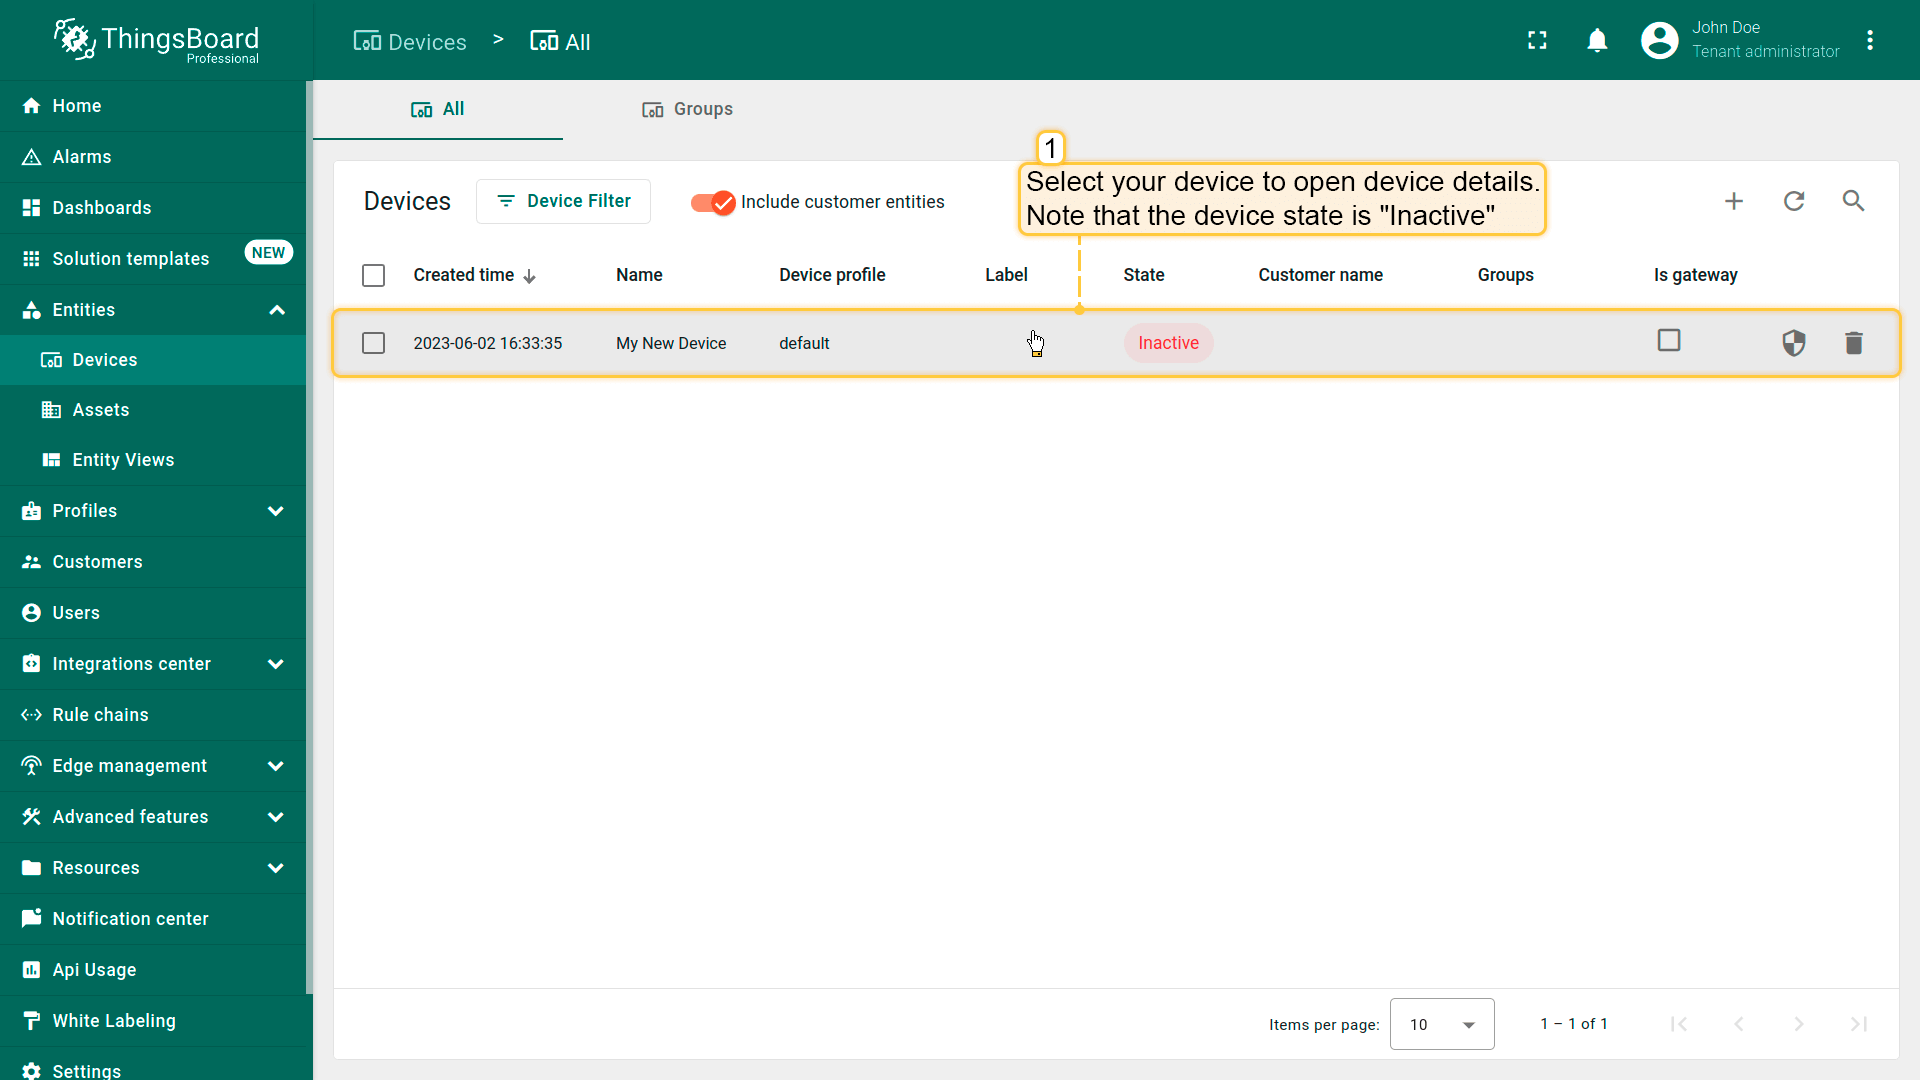
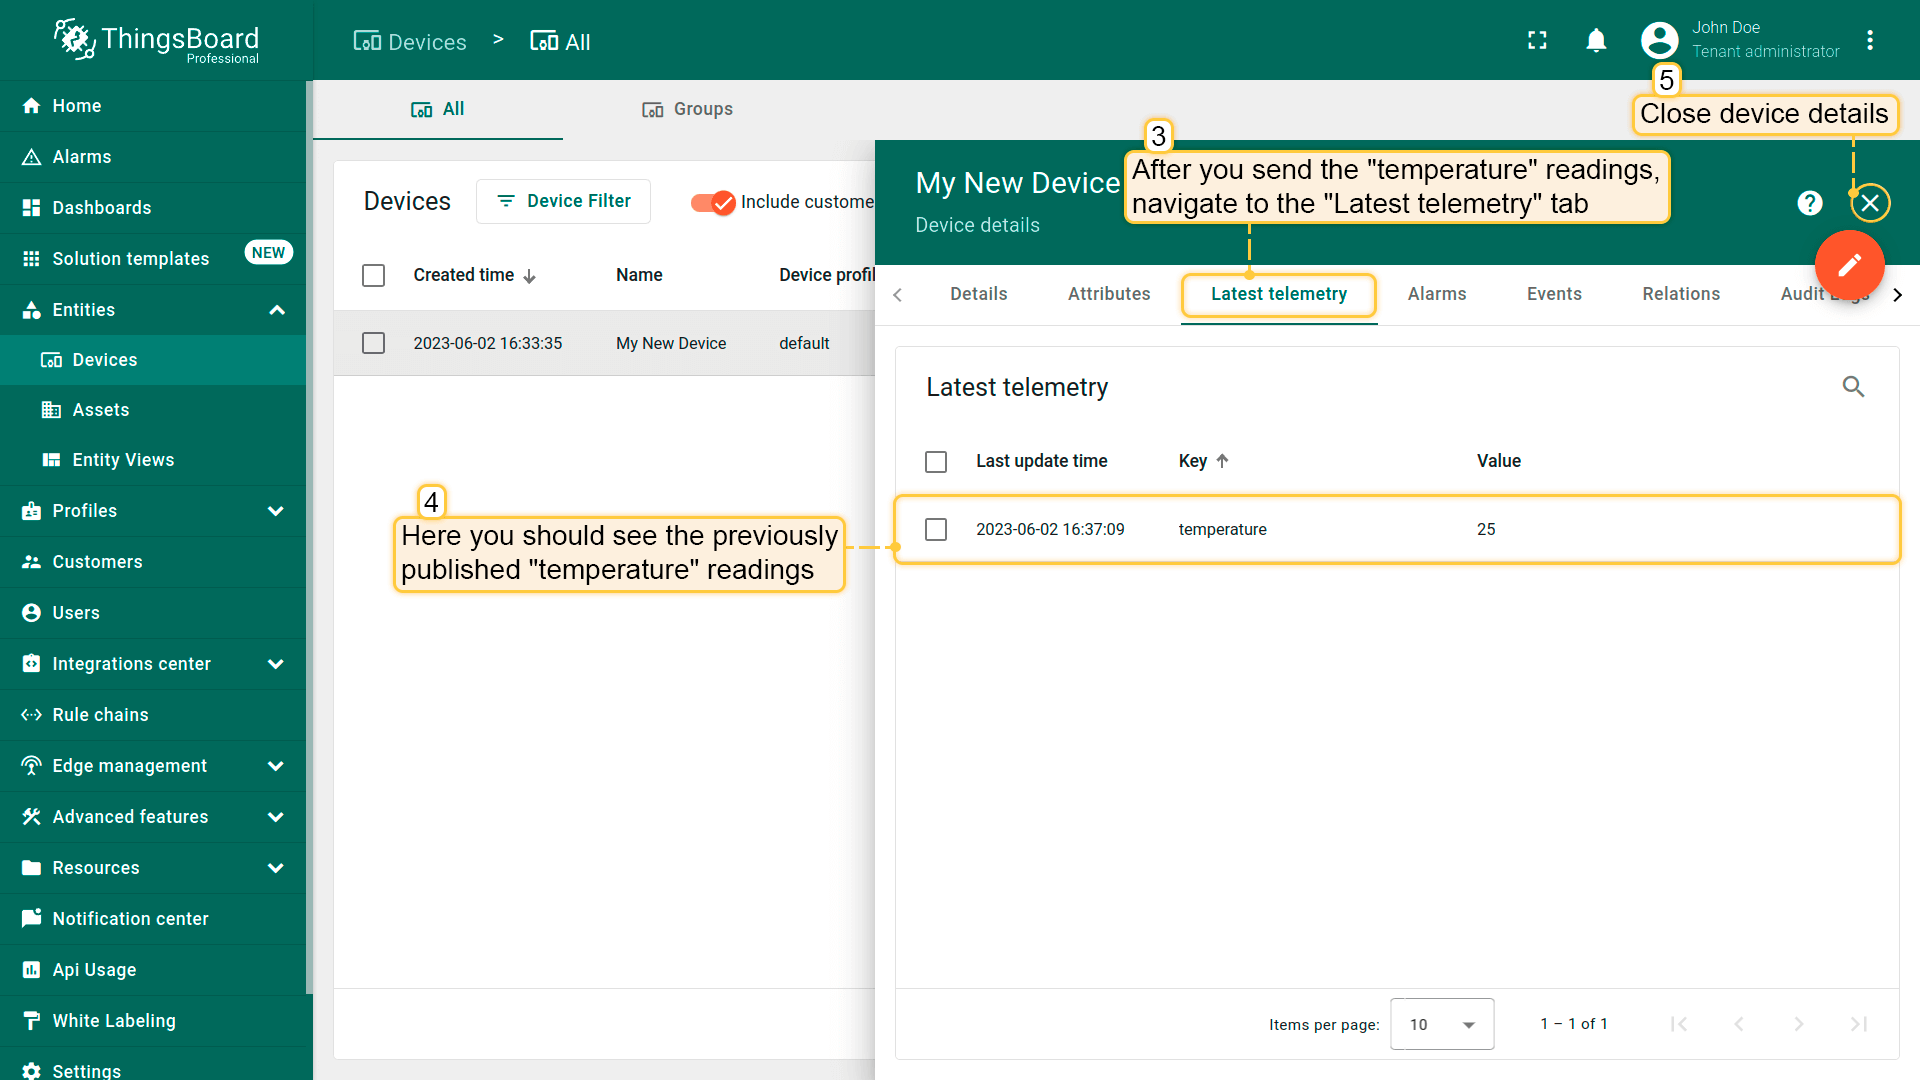
完成上述步骤且 ACE MQTT 4G GPS Gateway 已发送数据后,可在设备遥测选项卡中查看:
-
点击表格中的设备行以打开设备详情;
-
导航至遥测选项卡。
点击表格中的设备行以打开设备详情;
导航至遥测选项卡。
可将 ACE MQTT 4G GPS Gateway 的属性和遥测显示在仪表板上。您可以使用自定义部件创建自己的仪表板,或导入现成仪表板。
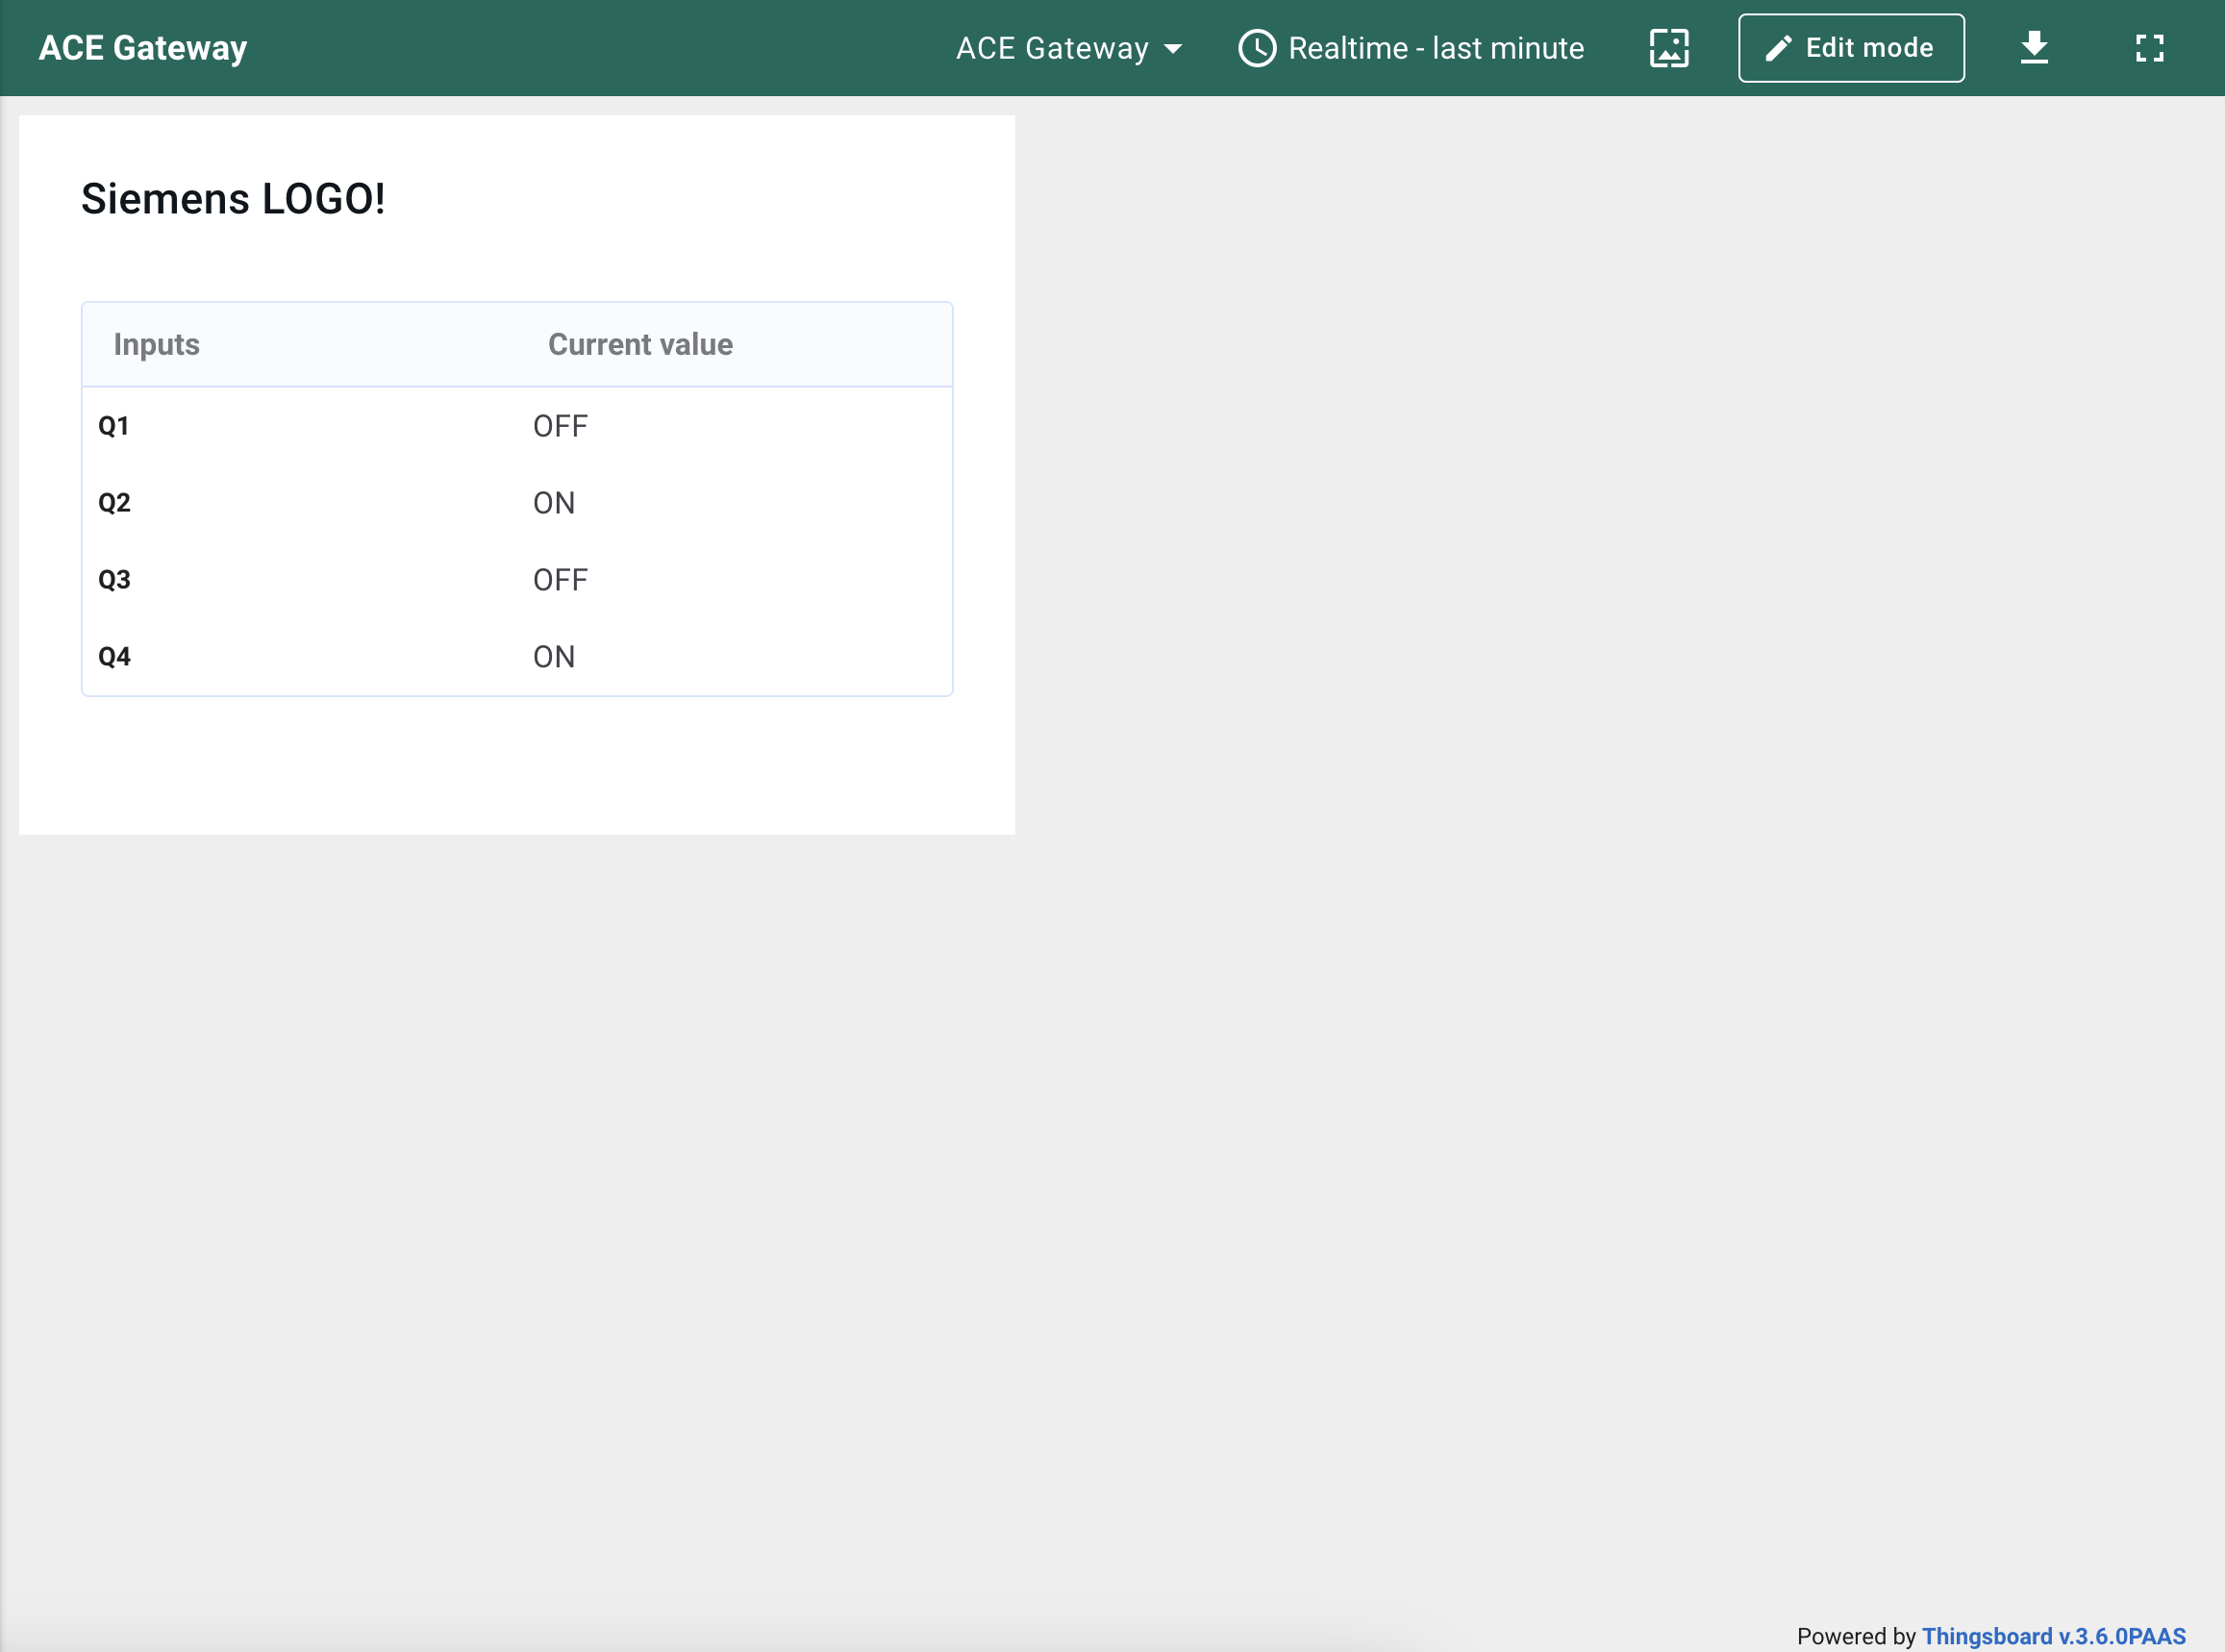
导入仪表盘您可导入 JSON 格式的仪表盘。要导入仪表盘,请进入「仪表盘」组,点击页面右上角的 「+」 按钮,选择 「导入仪表盘」。仪表盘导入窗口将弹出,系统会提示您上传 JSON 文件并点击 「导入」。 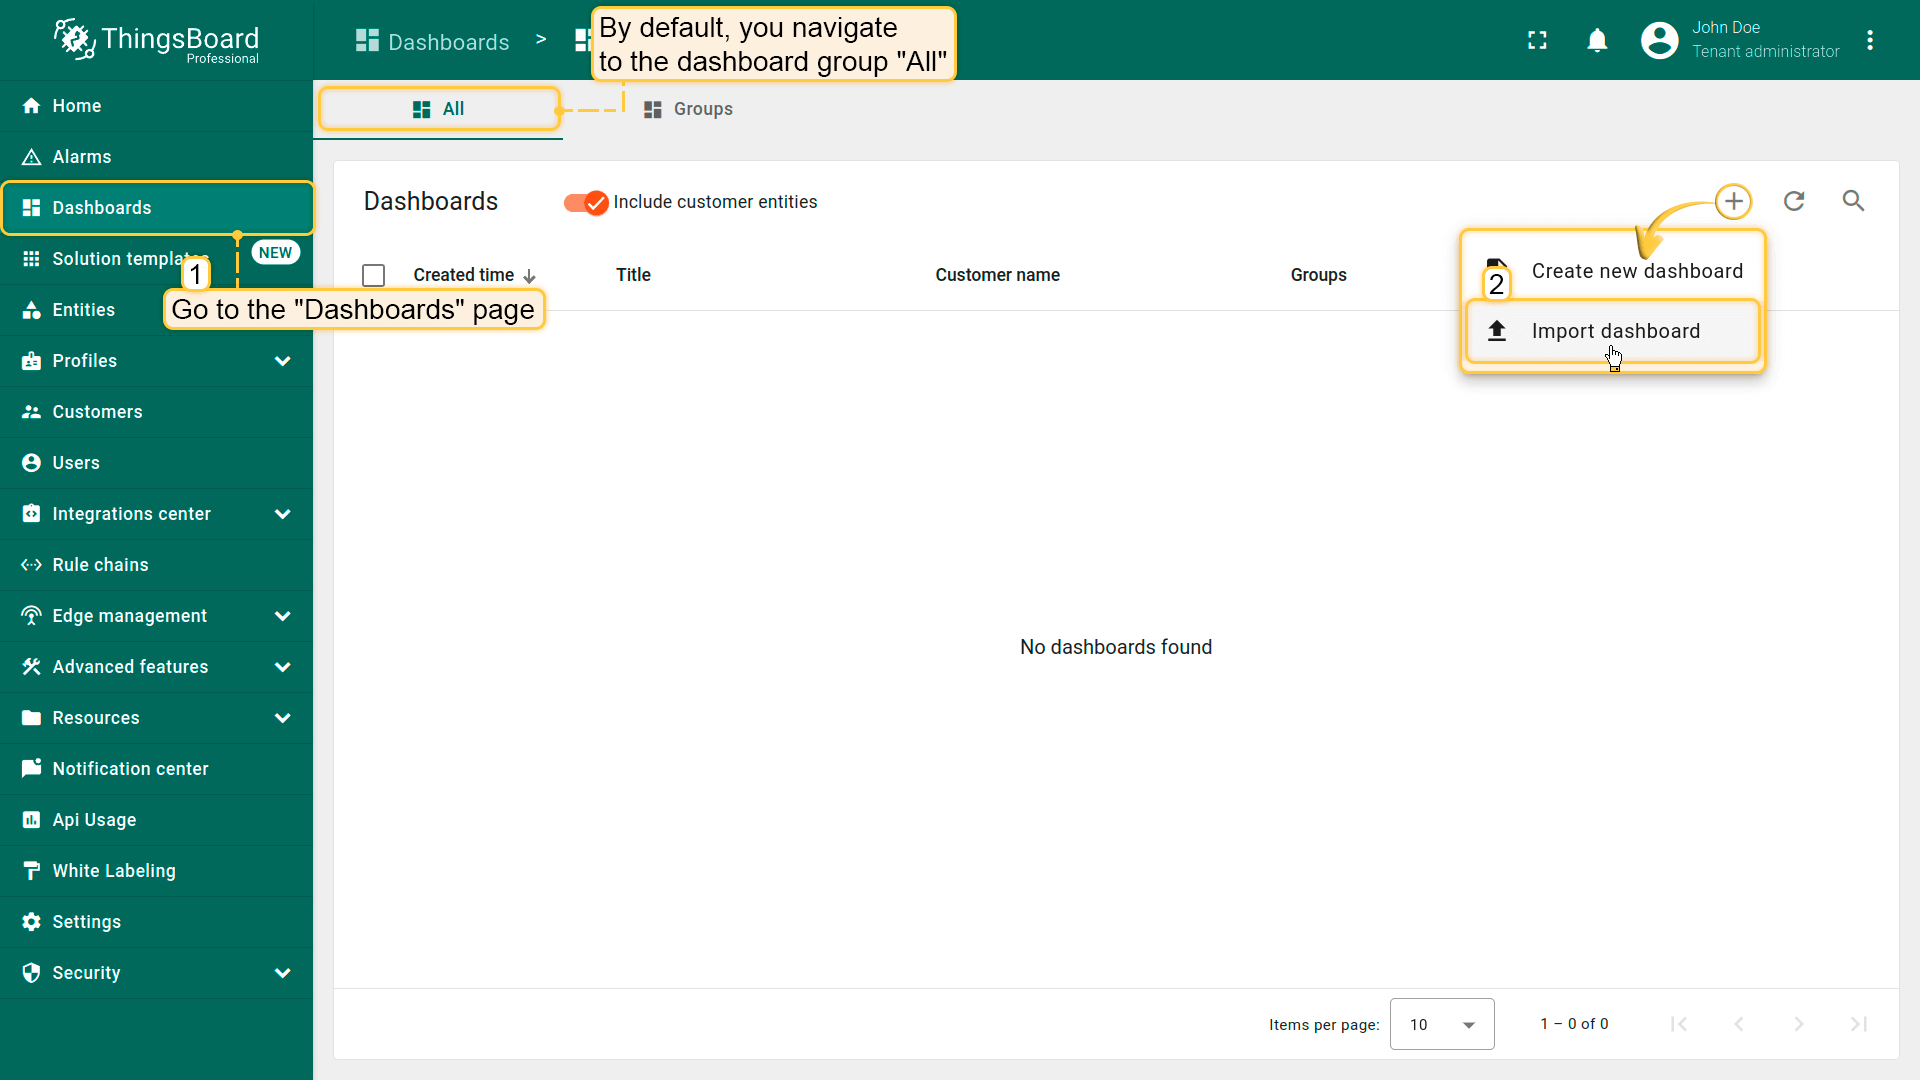 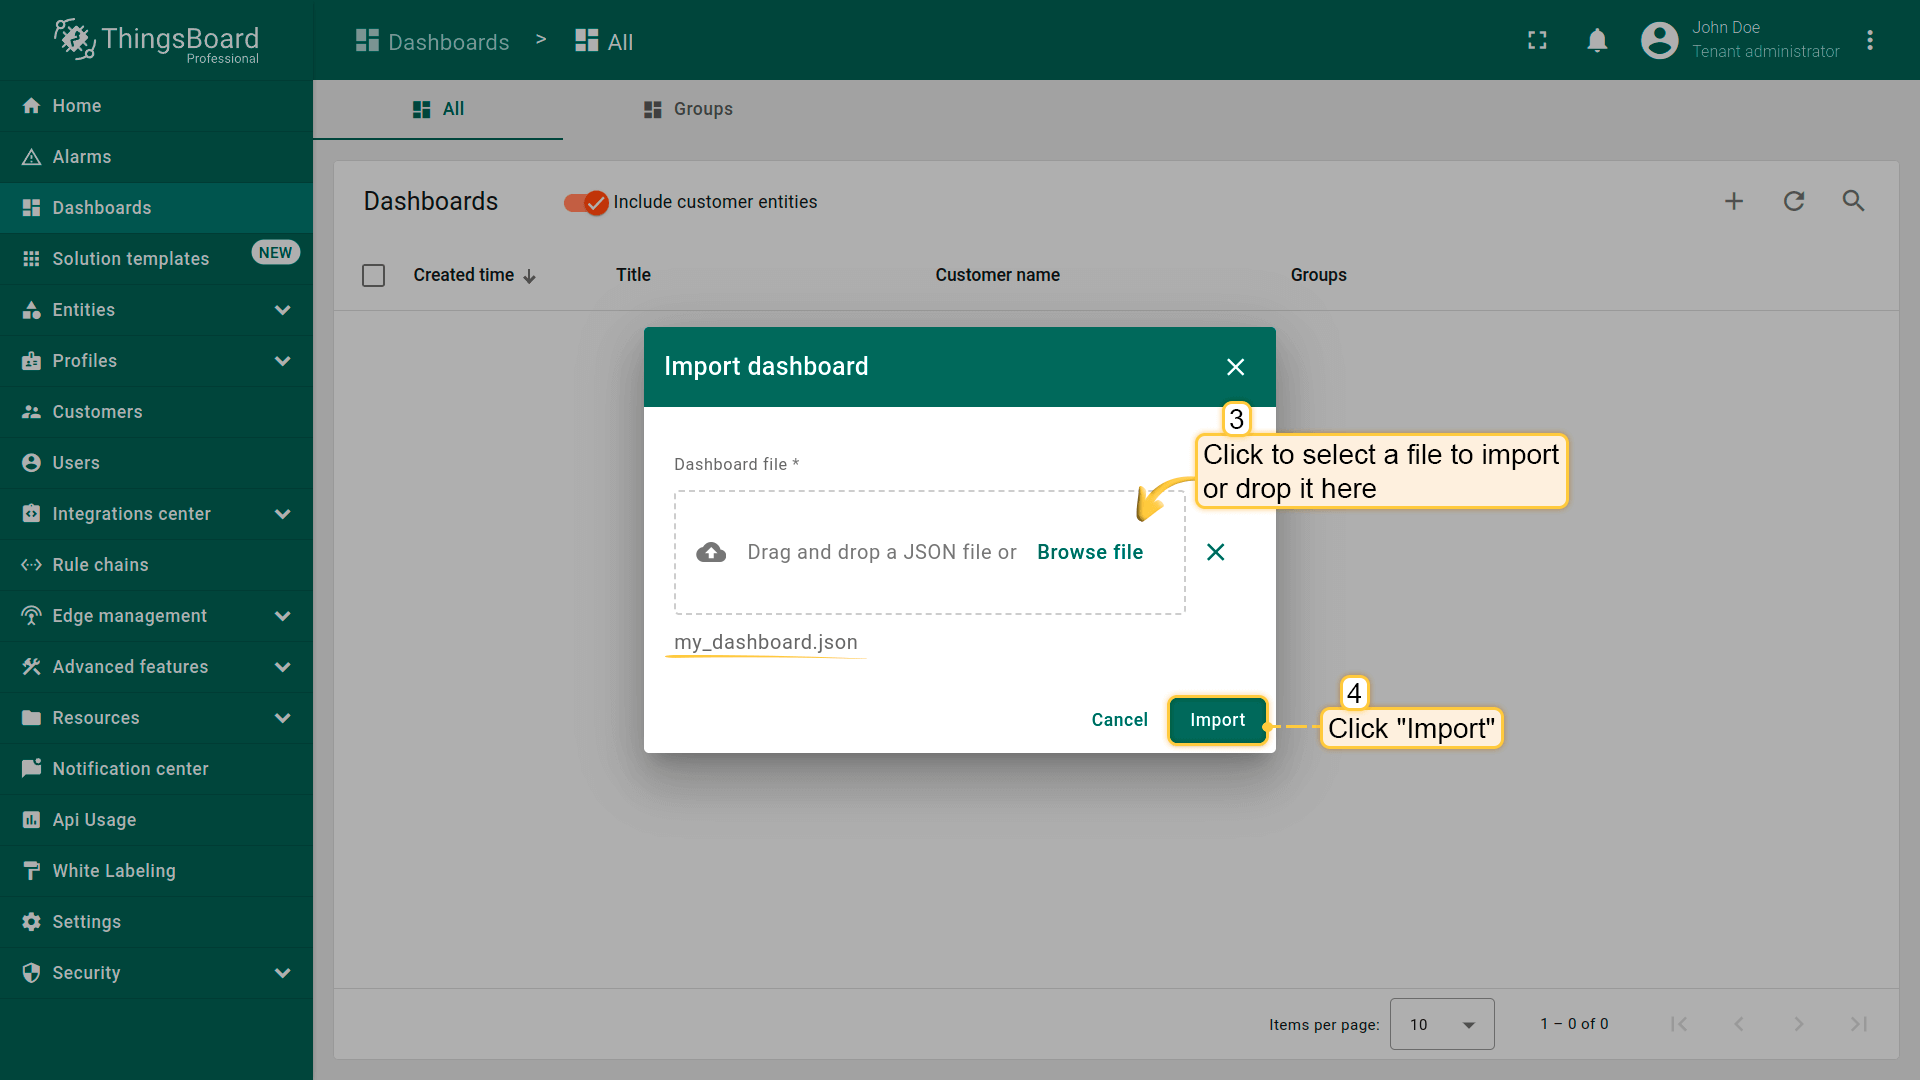 下方可找到仪表盘 JSON 文件: 导入后,我们需要为设备选择实体别名。 操作方式:点击铅笔图标并选择实体别名,选择别名 「My device」 并点击铅笔图标打开编辑。 然后,从下拉列表中选择名为 My device 的设备并保存实体别名。完成后即可查看设备数据。 若操作正确,您将看到以下仪表盘:
|
创建新仪表盘我们将创建仪表盘并添加最常用的部件。请参见下方说明。
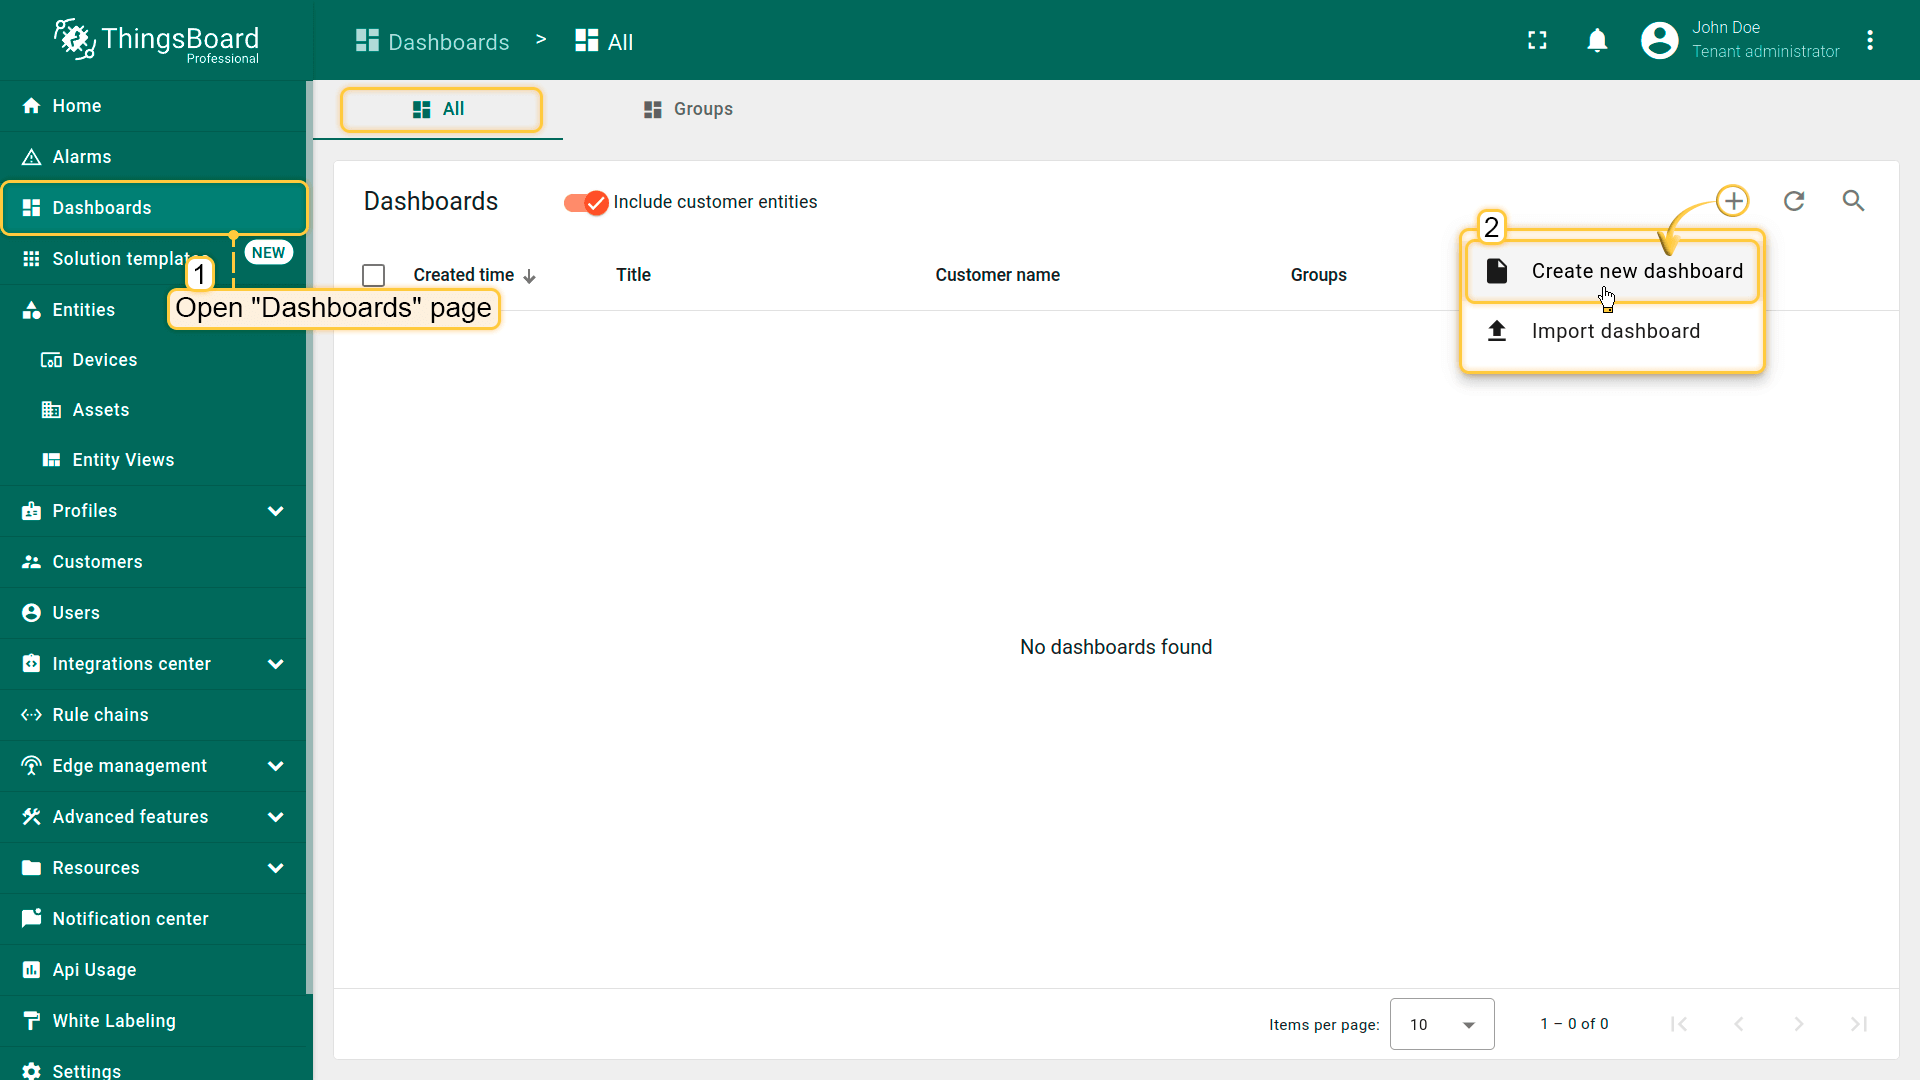 Open the Dashboards page. Click on the “+” icon in the top right corner. Select “Create new dashboard”; 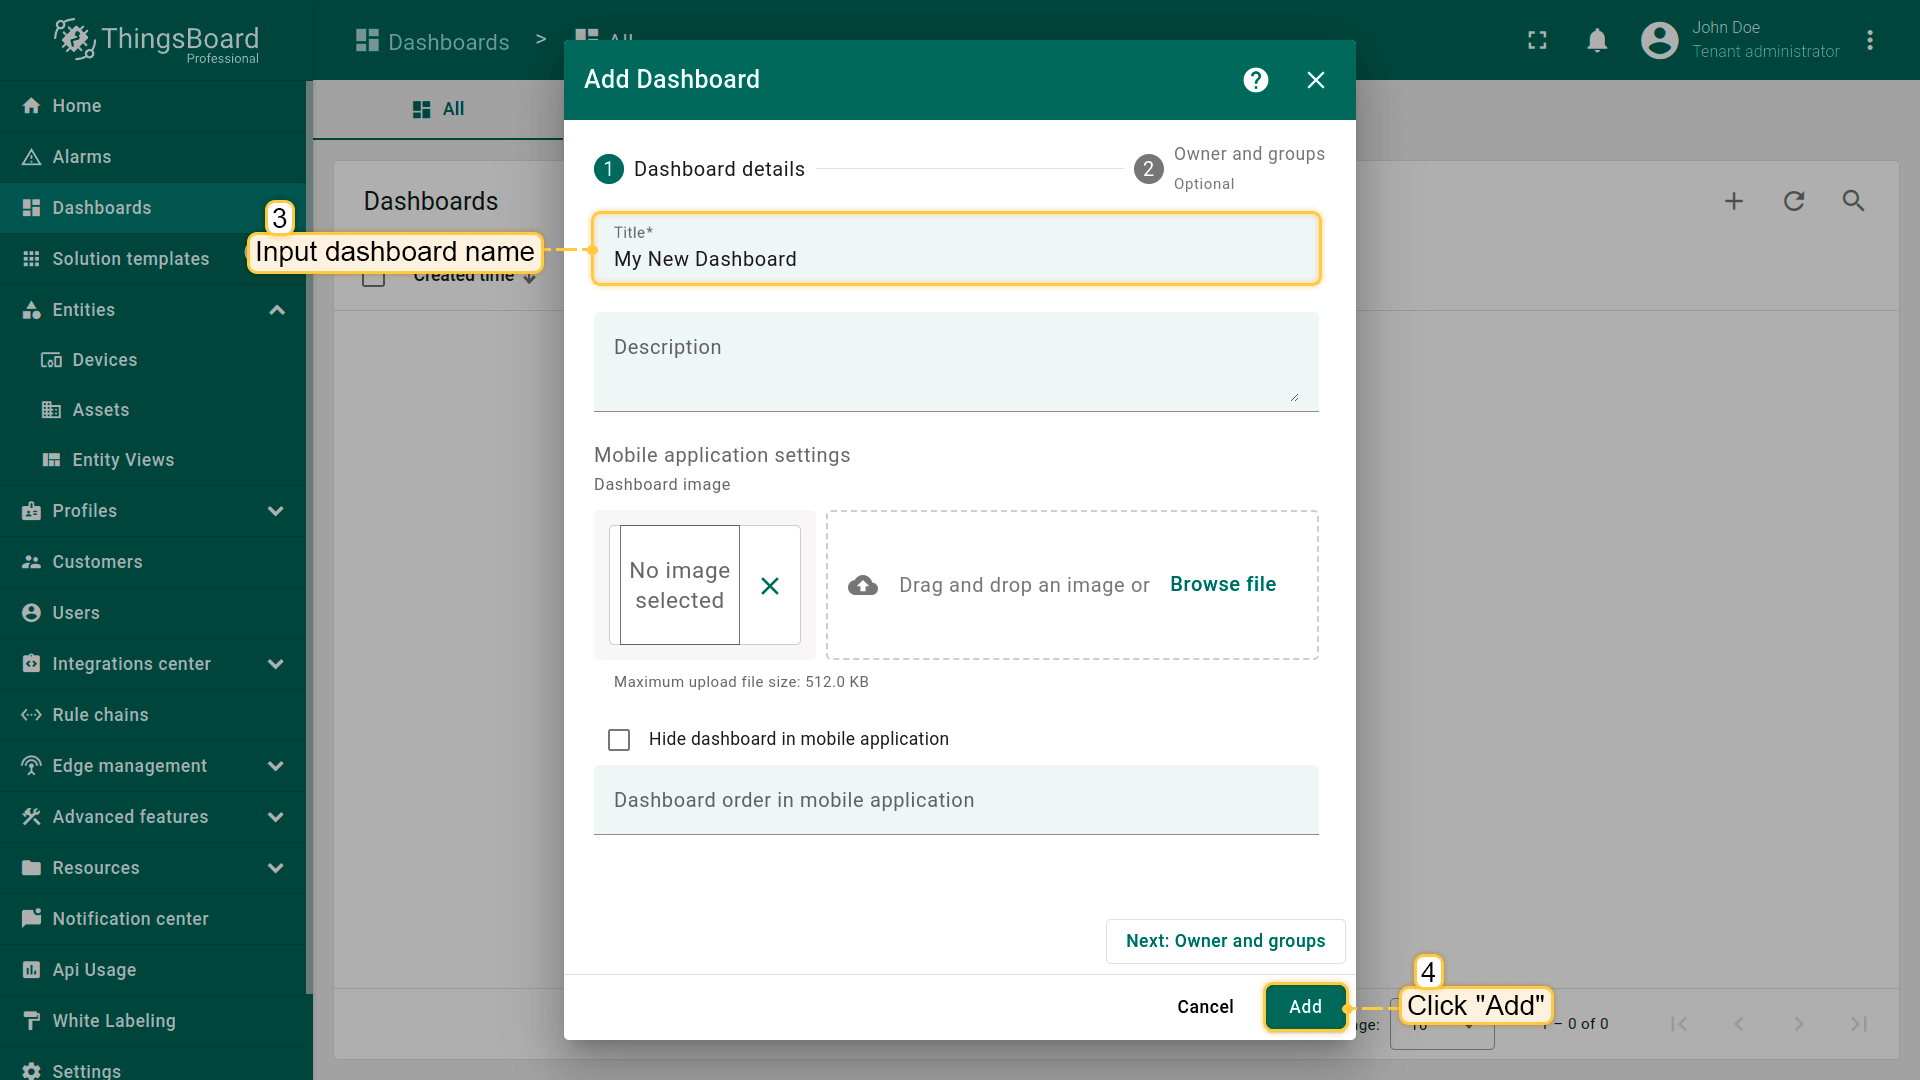 Input dashboard name. For example, “My New Dashboard”. Click “Add” to add the dashboard; 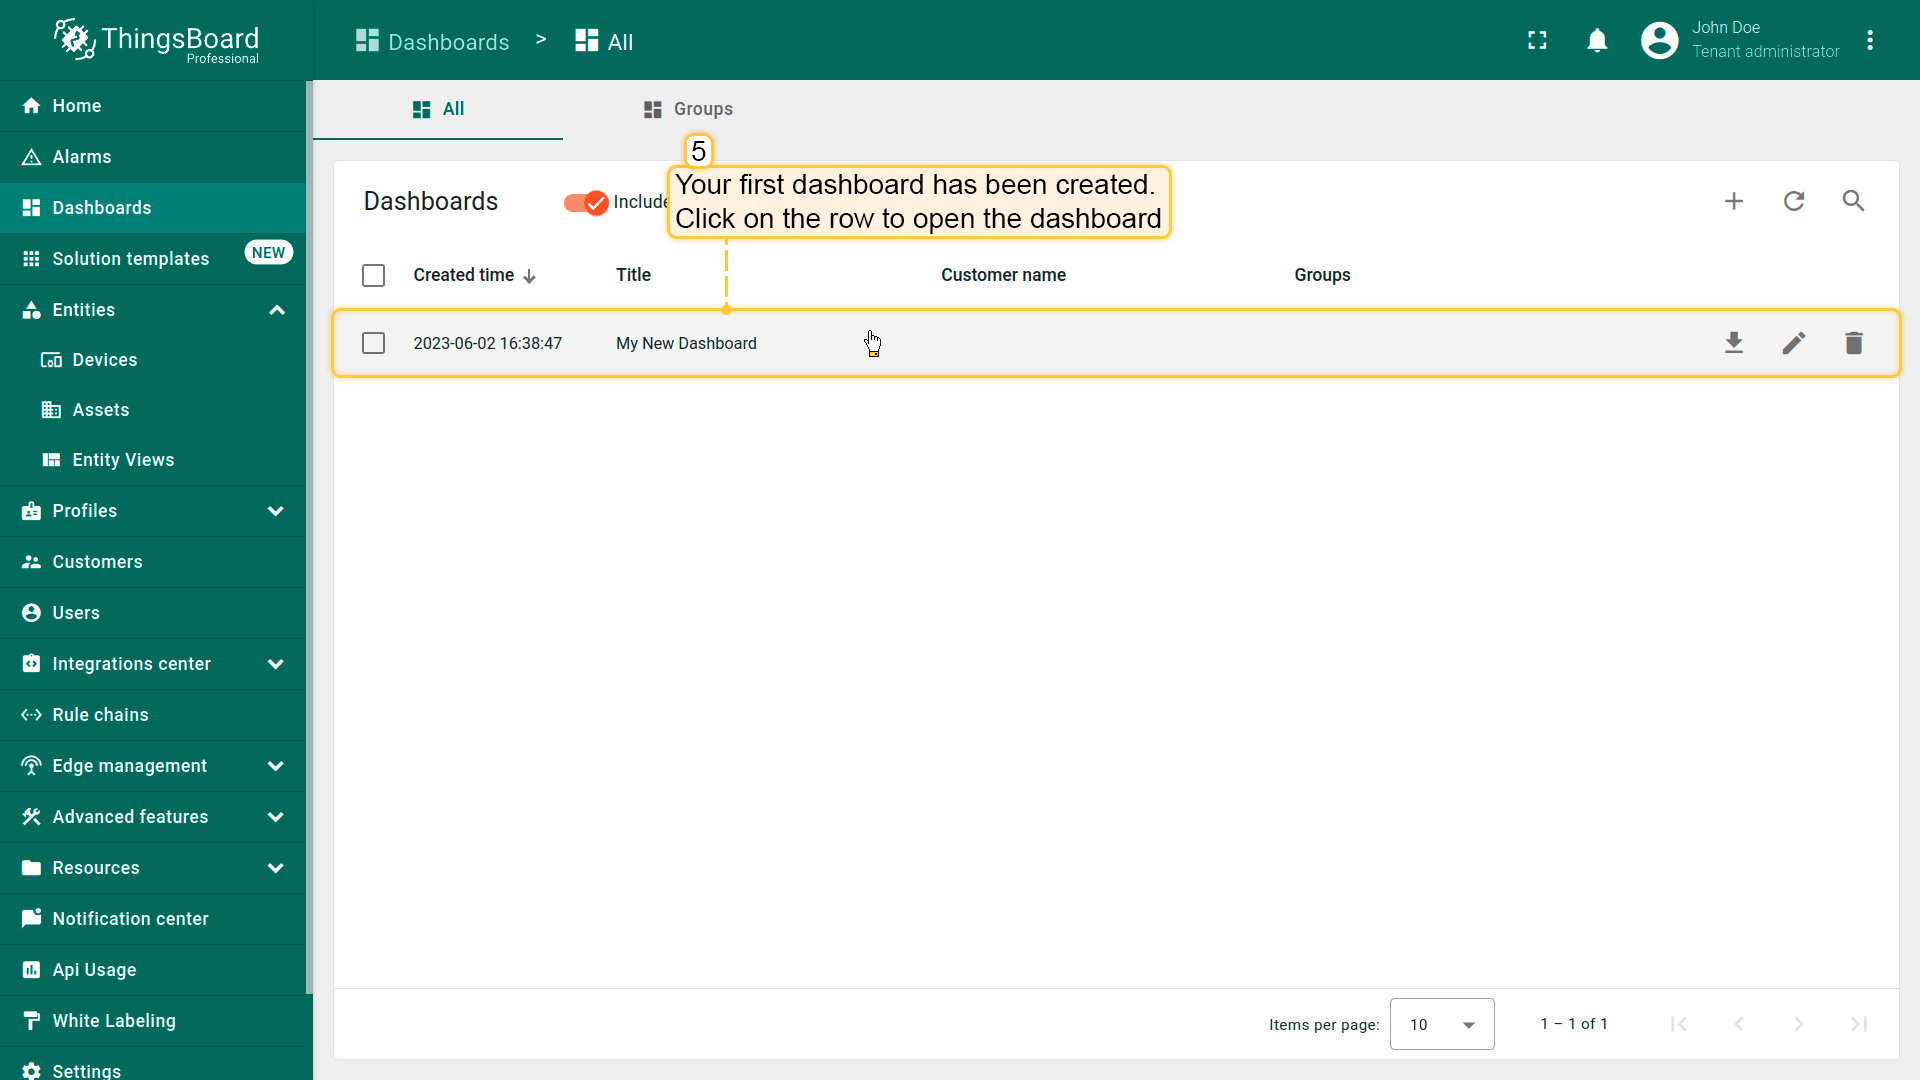 Your dashboard should be listed first since the table sorts dashboards using the creation time by default. Click on the “Open dashboard” icon. 添加实体别名别名是对部件中使用的单个实体或实体组的引用。别名可以是静态或动态的。我们将使用「单个实体」别名,引用单个实体,此处为「ACE MQTT 4G GPS Gateway」。也可以配置引用多个设备的别名,例如某类型的设备或与某资产相关的设备。您可在此处了解更多关于不同别名的信息。
 Enter edit mode. Click on the pencil button in the bottom right corner; 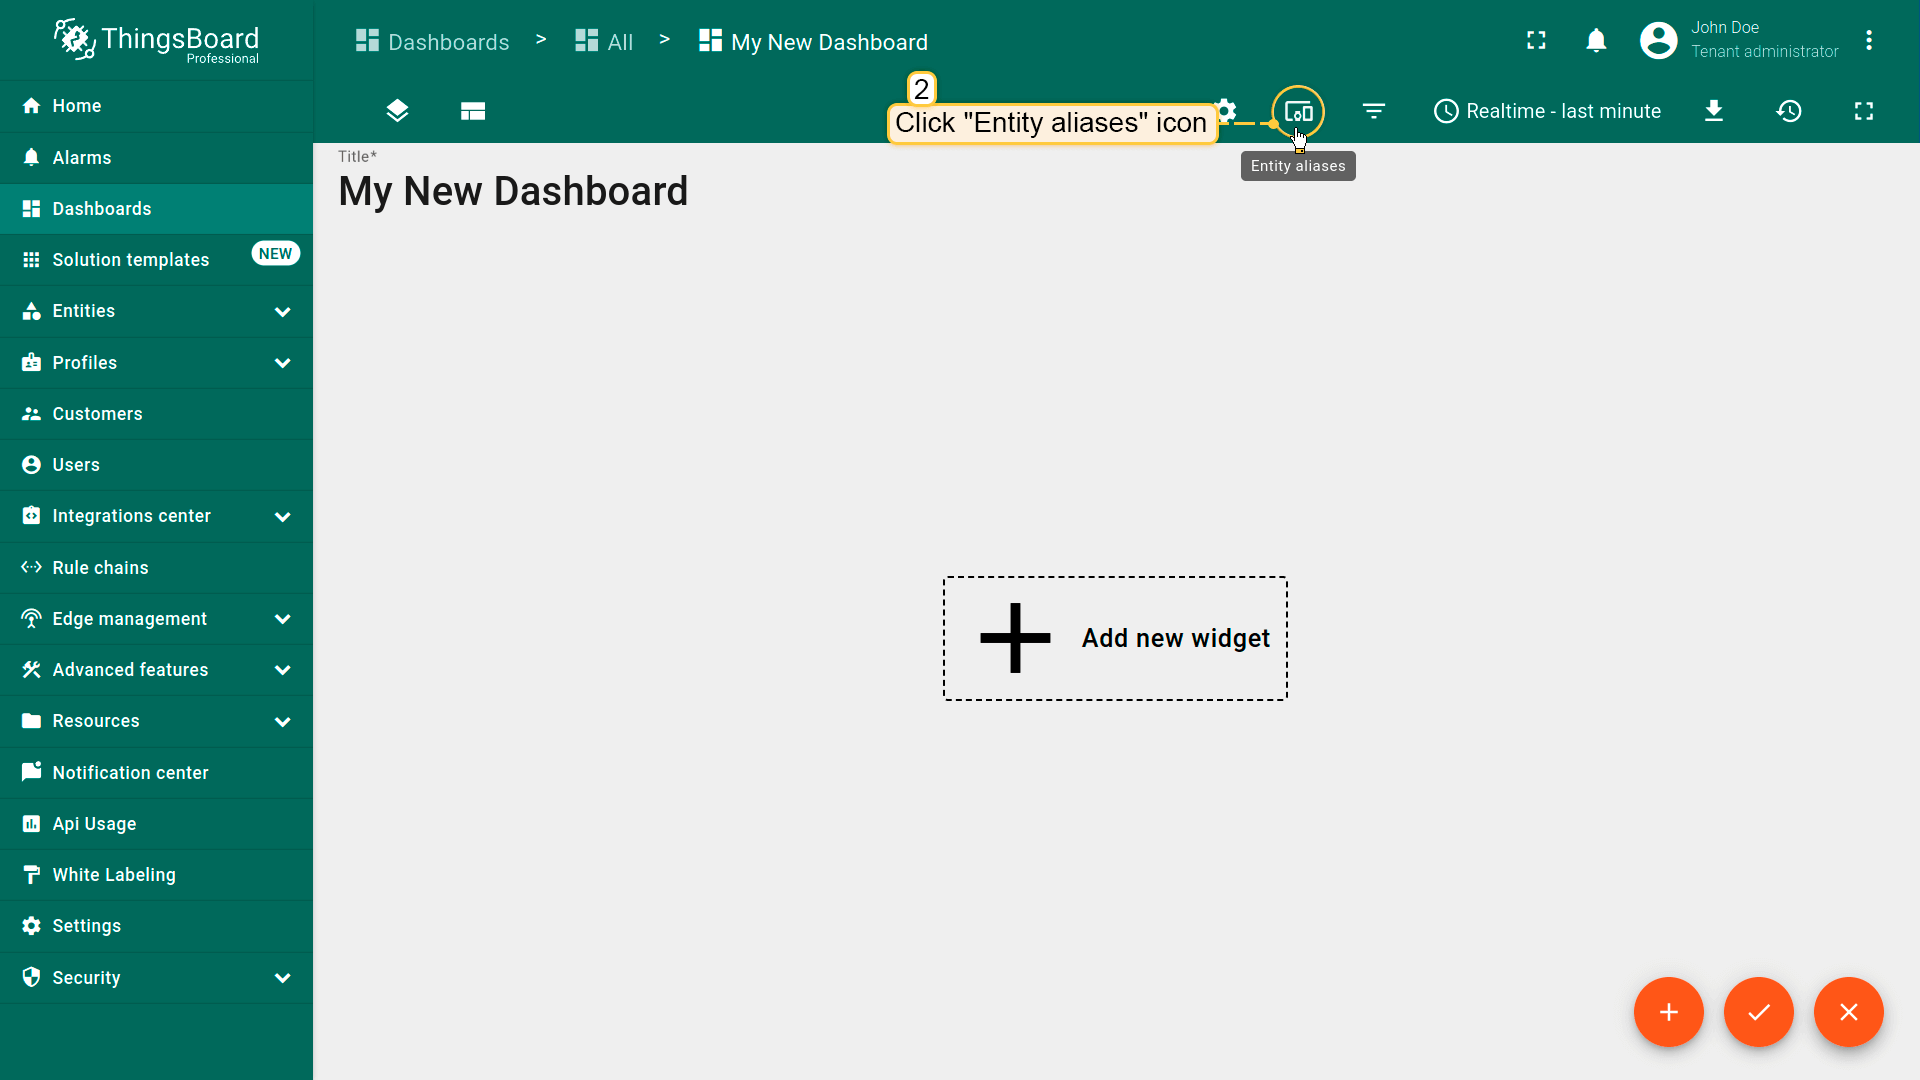 Click the “Entity Aliases” icon in the top right part of the screen. You will see an empty list of Entity aliases; 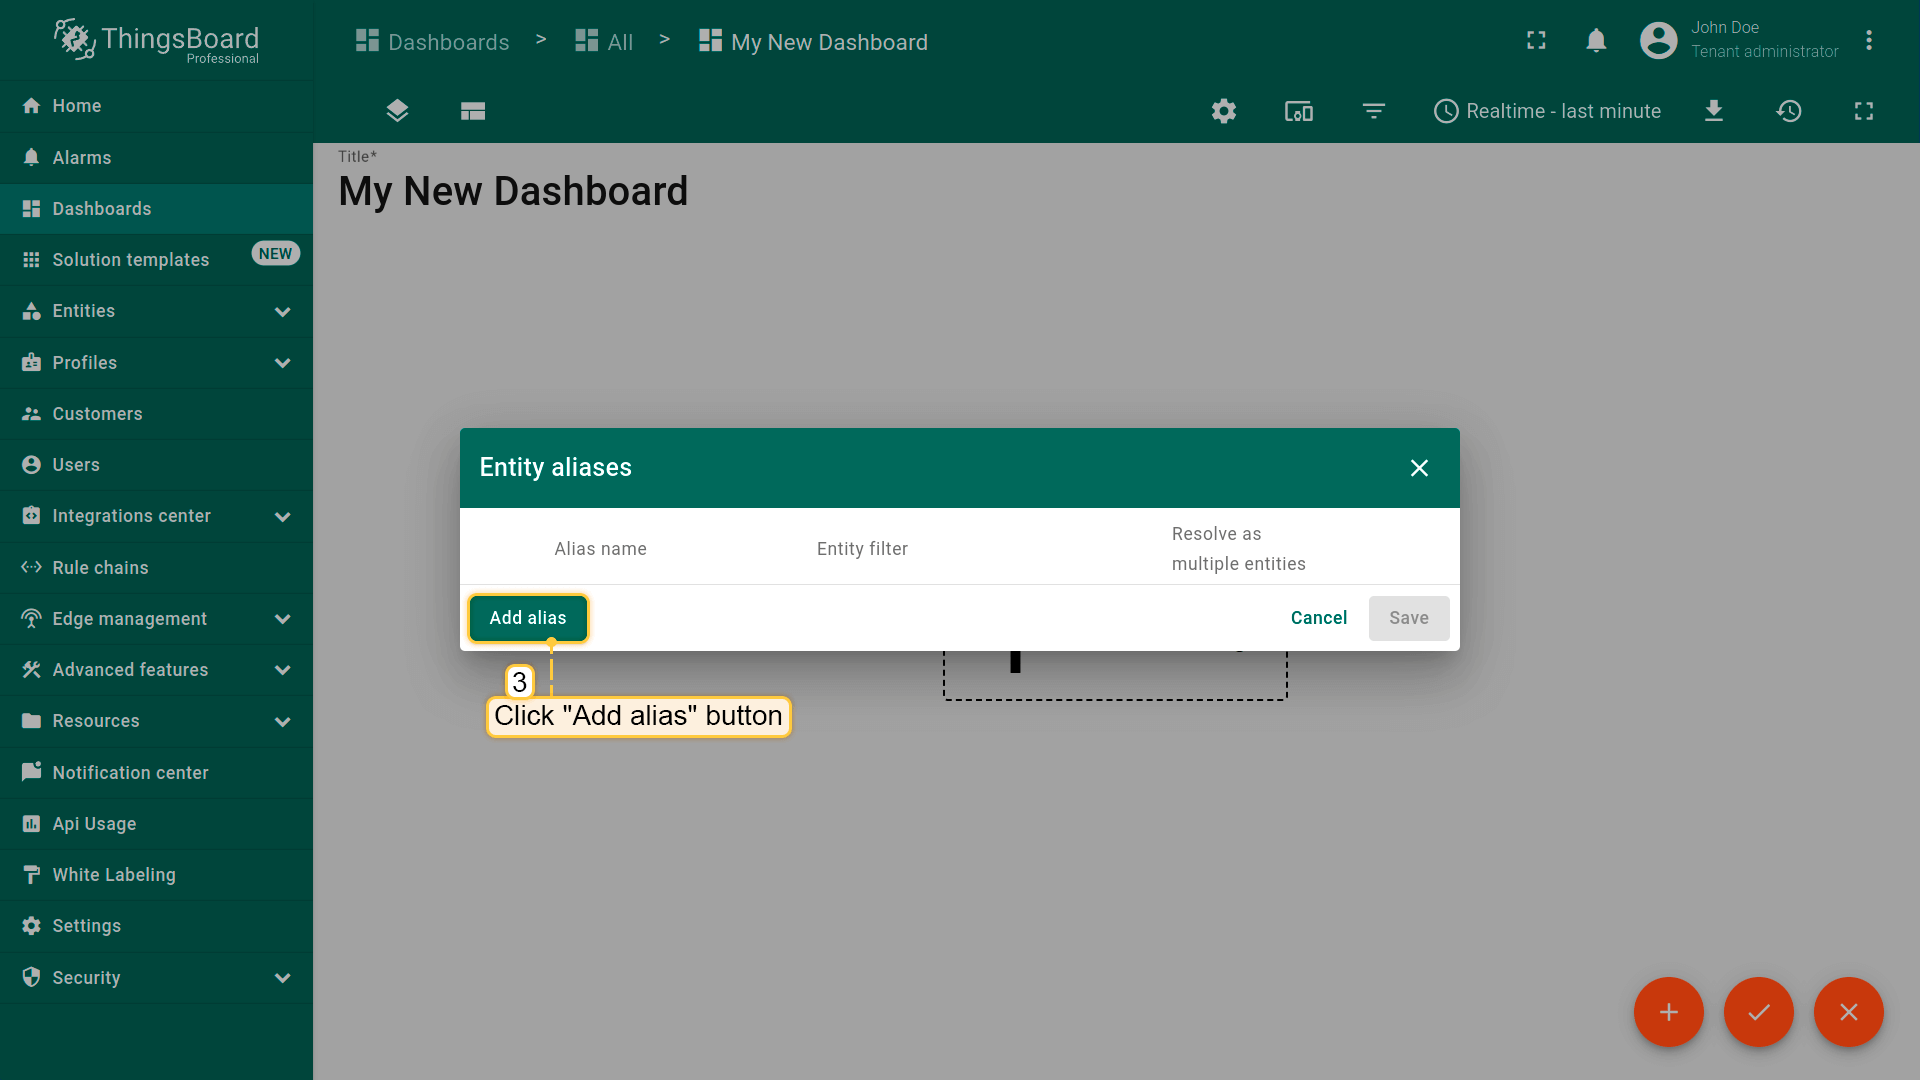 Click “Add alias”; 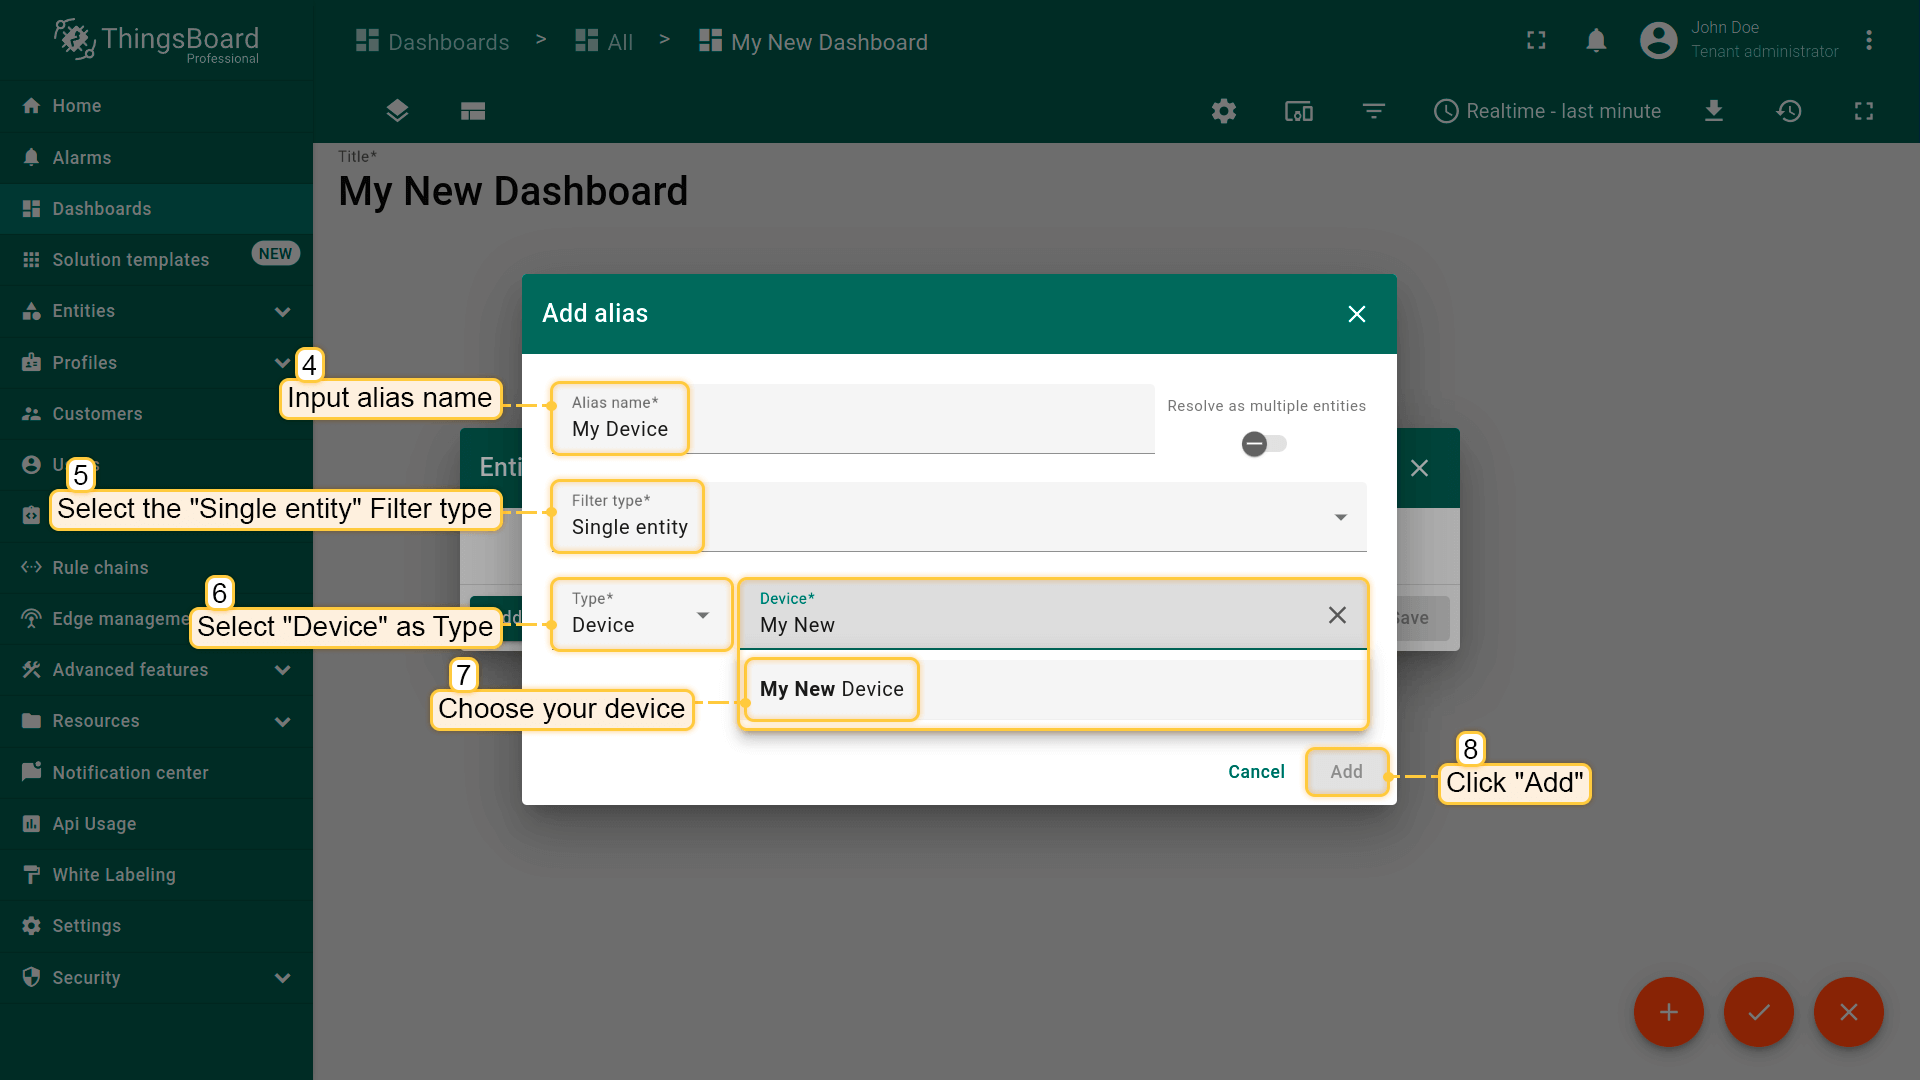 Enter an alias name. Choose “Single entity” as the Filter type, select “Device” for Type, and begin typing “My New” to trigger autocomplete suggestions; 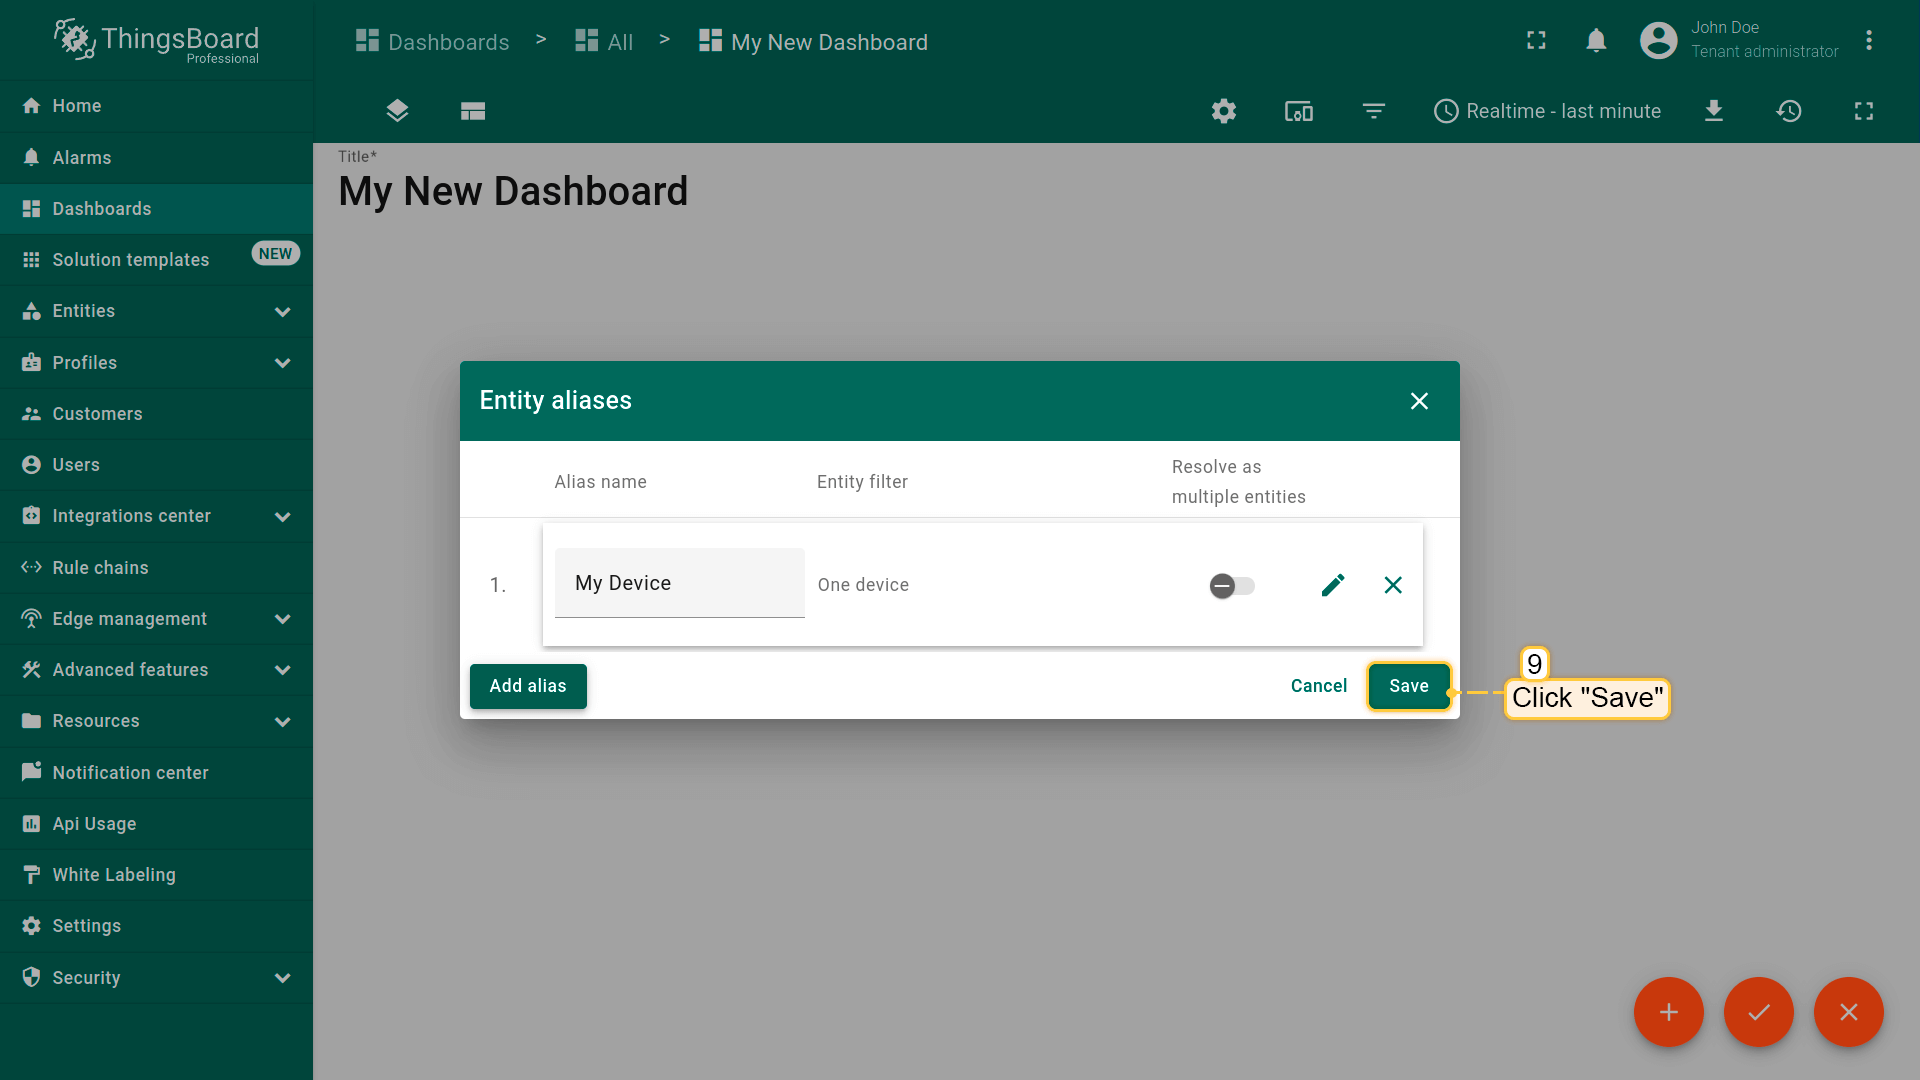 Click “Add” and then “Save”; 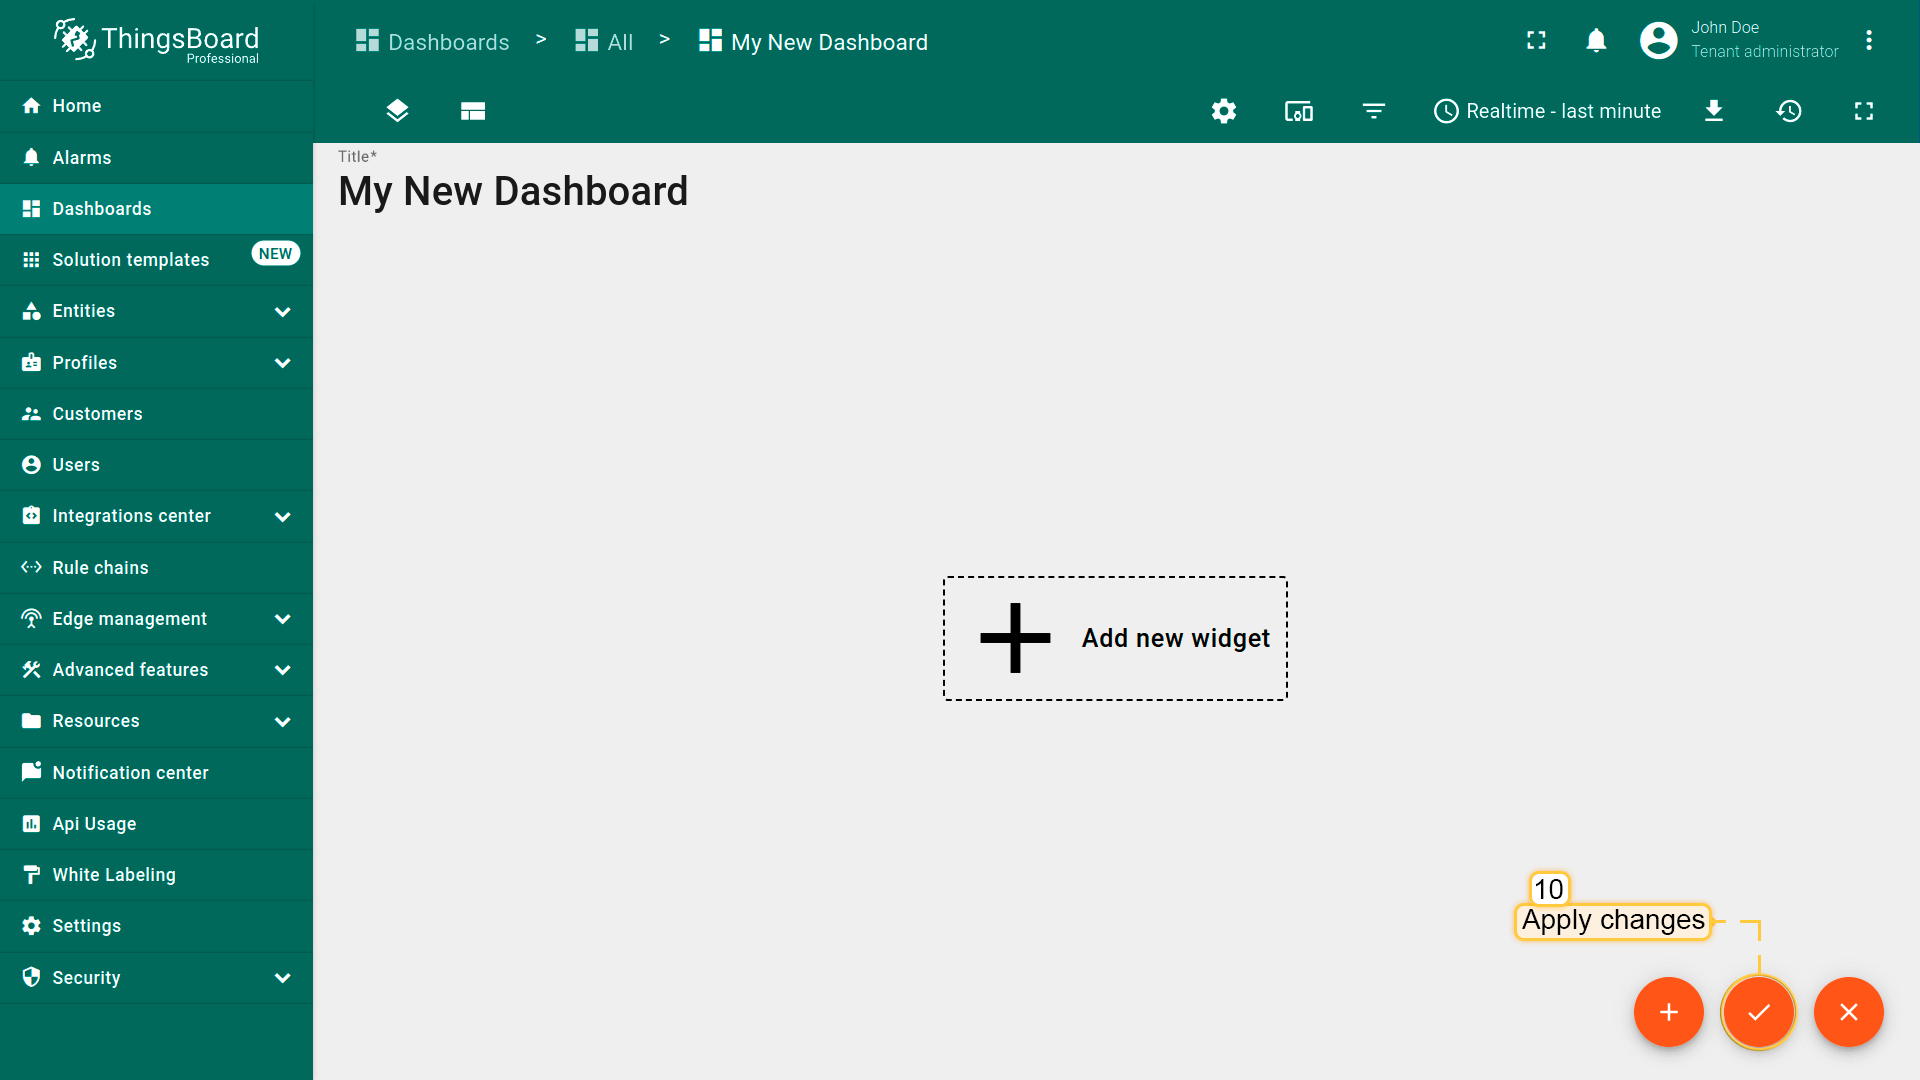 Finally, click “Apply changes” in the dashboard editor to save the changes. Then you should enter edit mode again. 要添加新部件,我们需要从部件库中选择。部件按部件包分组。 每个部件都有数据源,数据源决定了部件显示的数据。 |
总结
通过本指南中的知识,您可以轻松连接ACE Automation MQTT 4G GPS网关,并使用内置集成从连接到ACE Automation MQTT 4G GPS网关的设备检索数据。
将设备连接到网关后,您将能够在ThingsBoard上查看和处理来自设备的数据。
浏览平台文档以了解更多关键概念和功能。