- Hardware type: Other devices
- Connectivity: HTTP, Ethernet, WIFI, BACnet, RS485
- Industry: Smart Buildings, Industrial Manufacturing, Energy Management
- Use cases: Smart energy, Smart Office, Smart Metering
- Platforms: Community Edition
概述
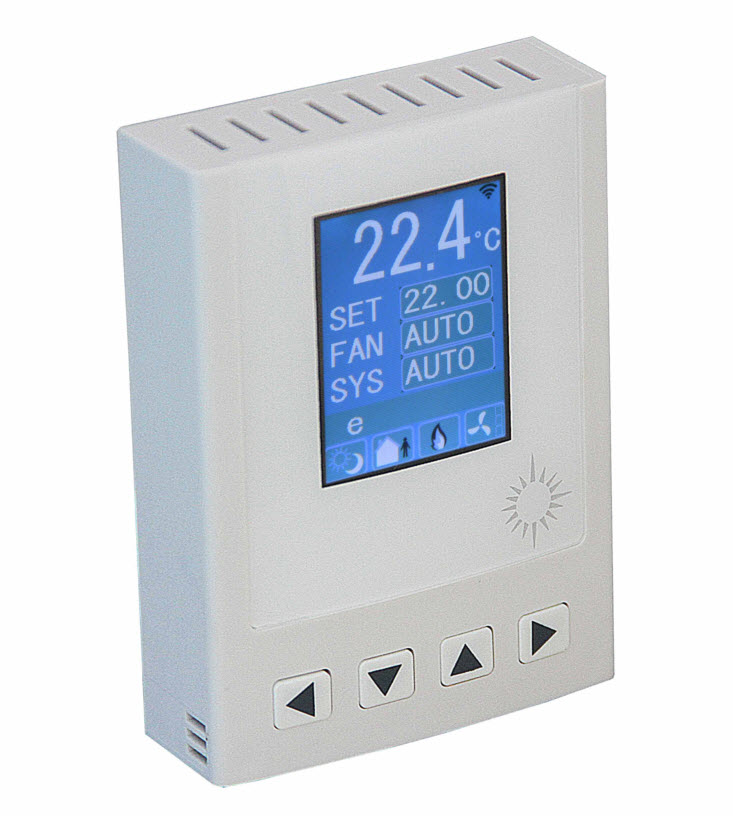
Temco Tstat10 BACnet可编程控制器是一款低成本高性能的可编程控制器。通过I/O配置,可通过外部I/O模块进行扩展,形成完整的楼宇自动化解决方案。具备5个继电器和2个模拟输出以及8个通用输入。这些I/O可通过免费软件进行配置。包含300多项设置,每项设置都有多种选项,可以配置为几乎任何应用场景。配置完成后,可保存配置文件用于复制到其他控制器或备份项目设置。可选配件包括占用传感器、Zigbee和湿度/焕传感器。支持RS485型号的BACnet MSTP和Modbus RTU。Wi-Fi版本支持BACnet IP和Modbus IP。
前置条件
继续本指南前,需准备以下内容:
- Temco Tstat10
- Humidity and Temp Transmitter (in our case Temco HUM-W1)
- ThingsBoard IoT Gateway installed
- ThingsBoard 账户
设备连接
根据官方用户手册,首先需要将控制器与温度传感器进行有线连接。控制器需通过RS485转USB转换器连接到PC进行配置。 同时需要从官方网站下载并安装T3000软件。
控制器配置
使用T3000软件可以配置控制器。需要通过Wi-Fi或以太网将控制器连接到网络。请按以下步骤操作:
-
Connect Tstat10 to PC by RS485 and start T3000 software. Click the button “Search” to scan your network, the following view will appear;
-
When Tstat10 will discover, close the view;
-
Click on “Tstat10” device in the sidebar, in the opened window select “TCP/IP” tab and click on the “Wifi Configuration” button. In the opened window, provide your Wi-Fi network credentials and click “Apply”.
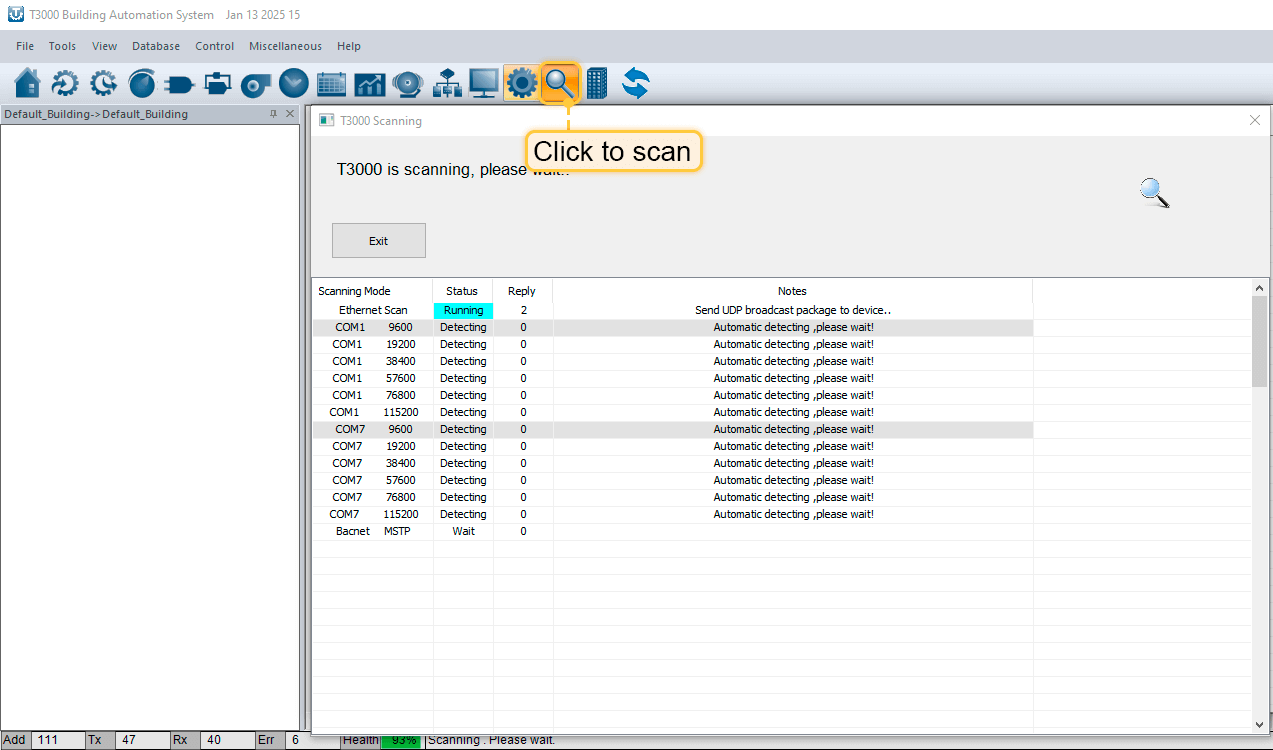
Connect Tstat10 to PC by RS485 and start T3000 software. Click the button “Search” to scan your network, the following view will appear;
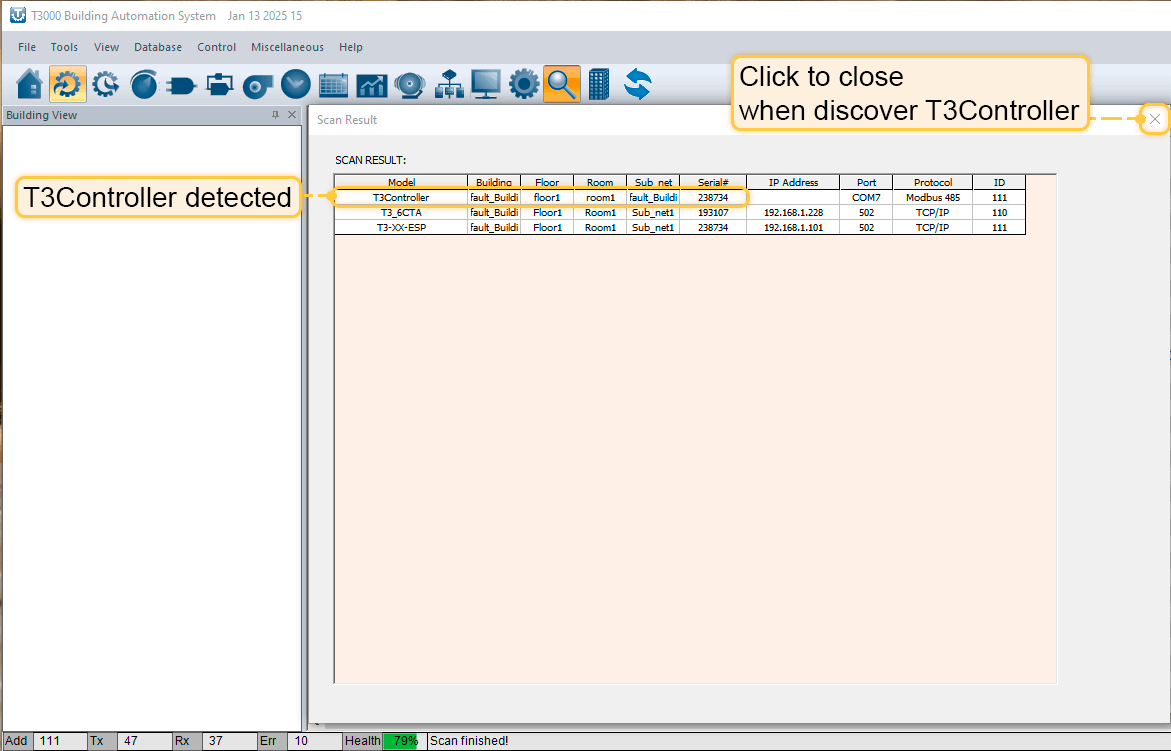
When Tstat10 will discover, close the view;
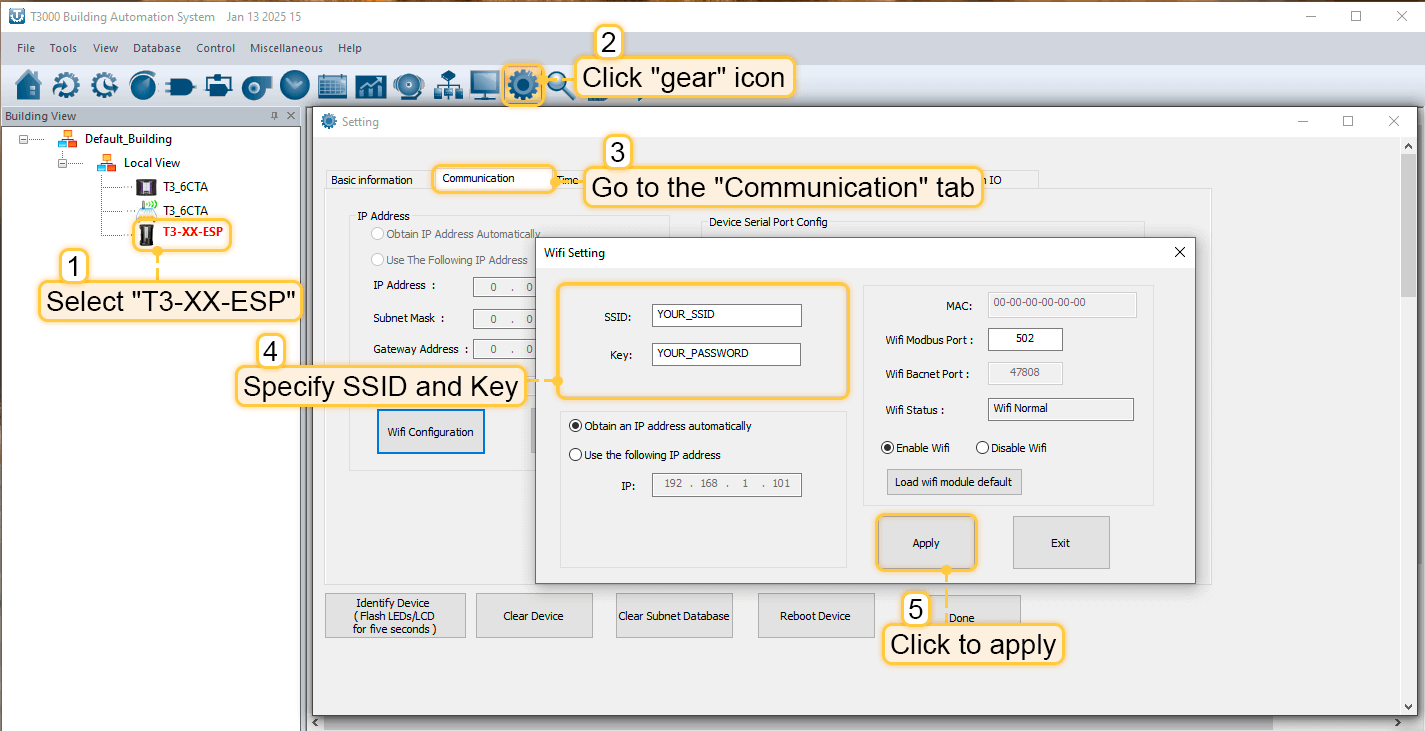
Click on “Tstat10” device in the sidebar, in the opened window select “TCP/IP” tab and click on the “Wifi Configuration” button. In the opened window, provide your Wi-Fi network credentials and click “Apply”.
Creating and configuring ThingsBoard IoT Gateway
|
别忘了在 docker compose 文件中暴露端口 47808。 同时,在设备的高级配置中,将设备 host 添加到 Alternative responses address 数组。
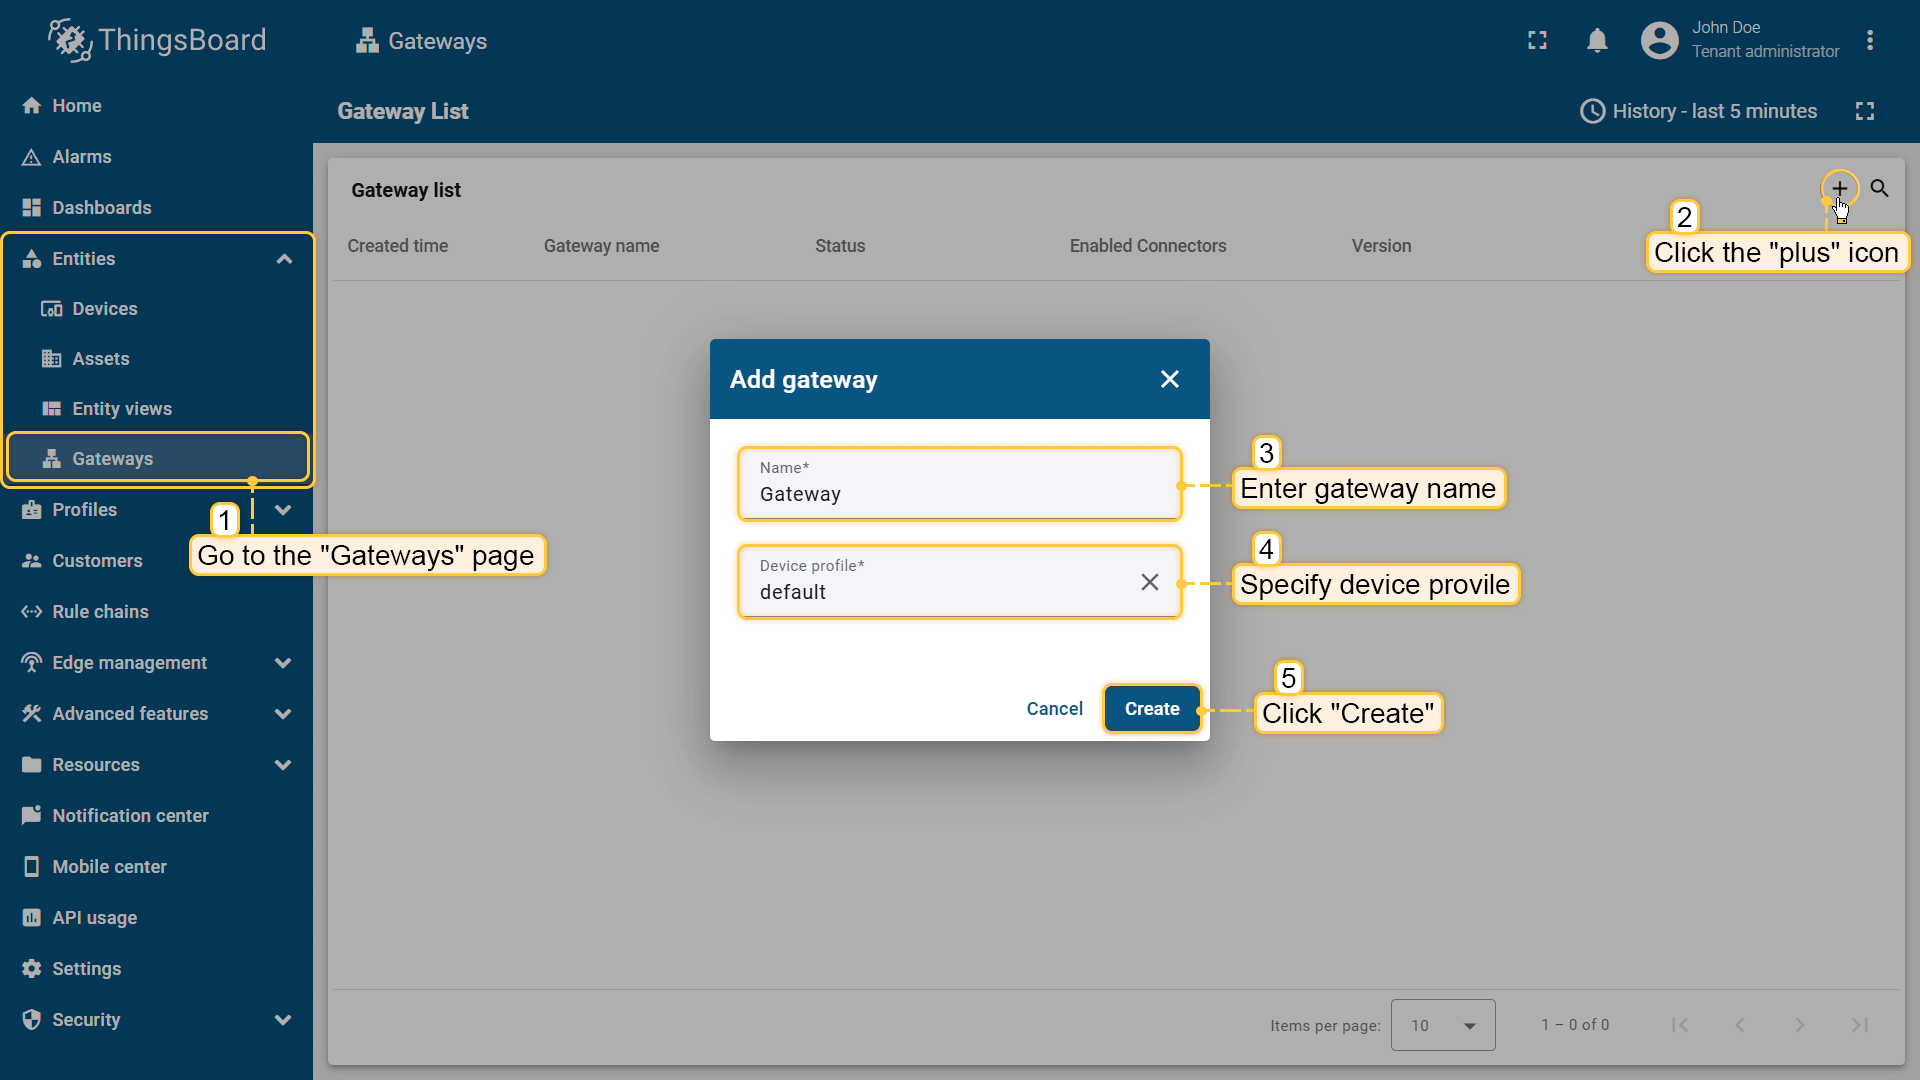 在浏览器中打开 ThingsBoard 并登录。进入侧边栏 “实体” > “网关” 标签页,点击 “+” 按钮。填写 “名称” 和 “设备配置” 并点击 “创建“; 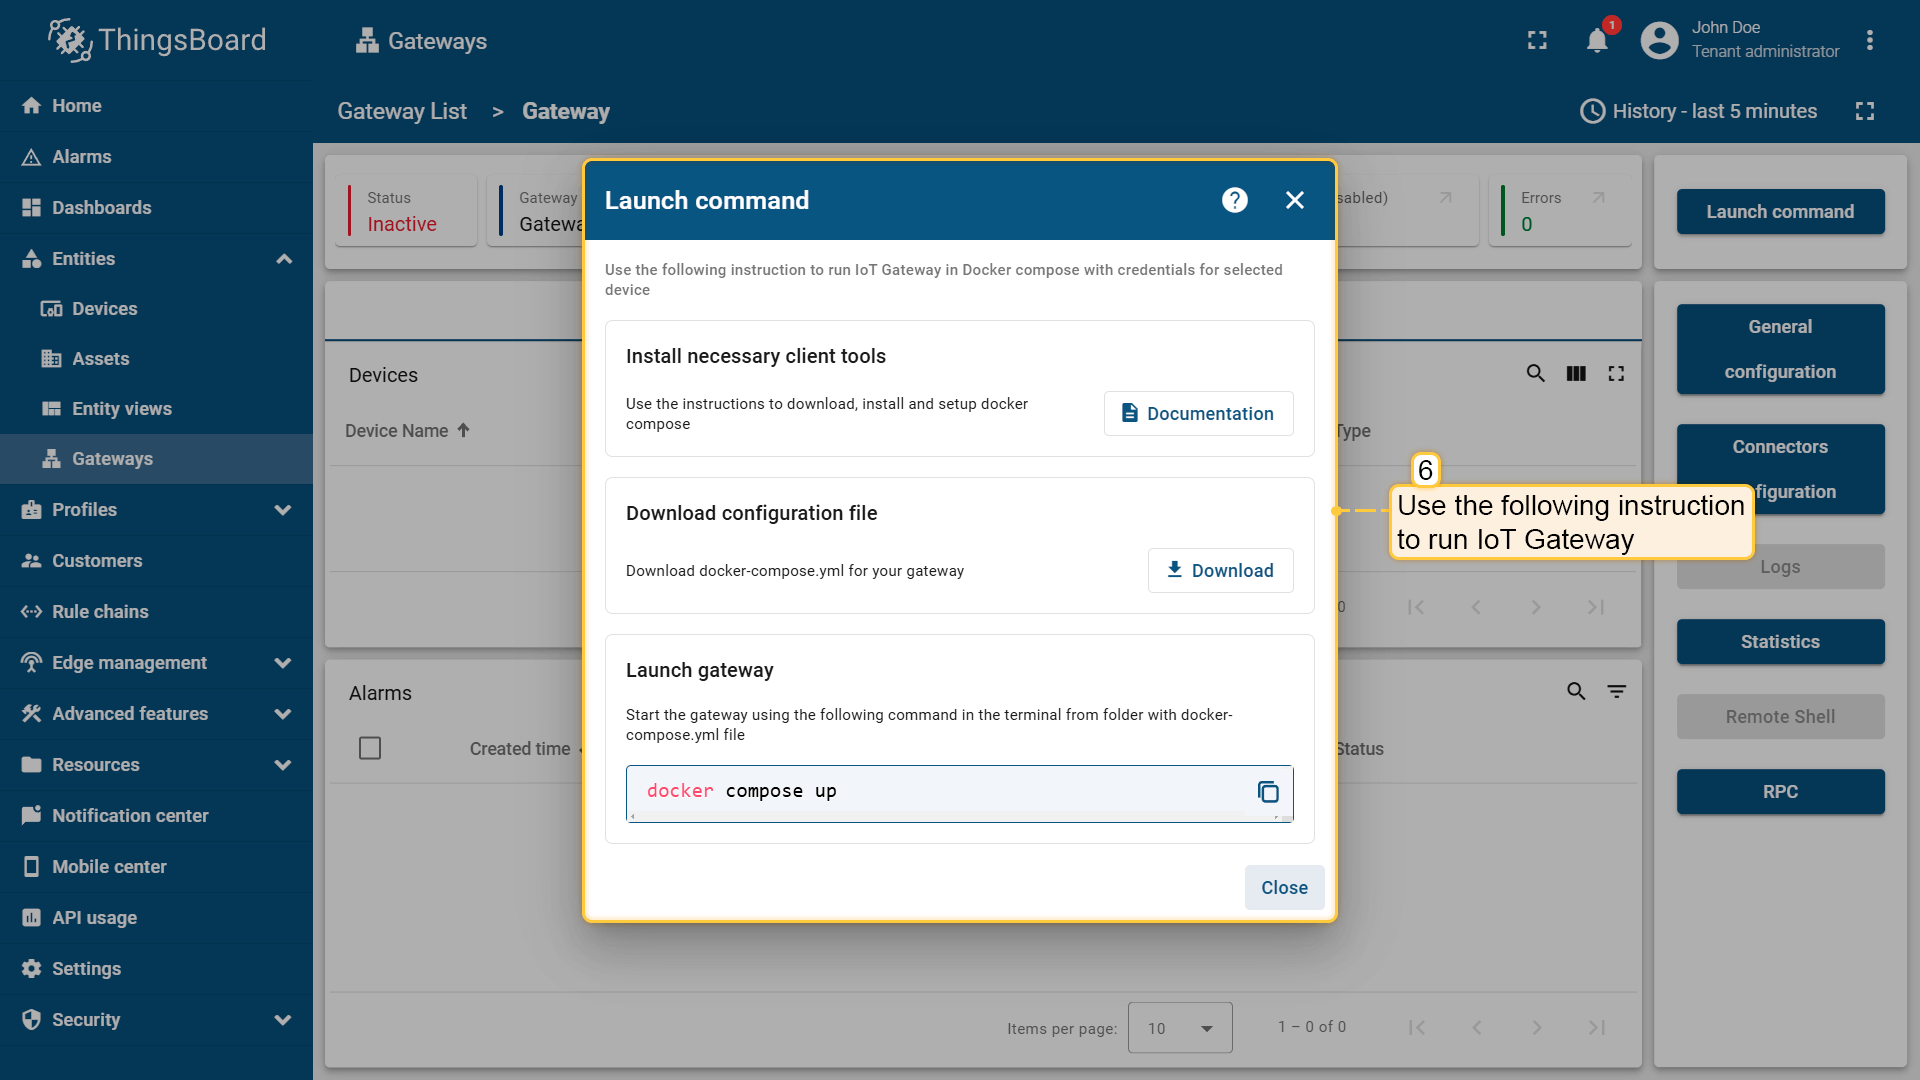 使用启动命令启动网关; 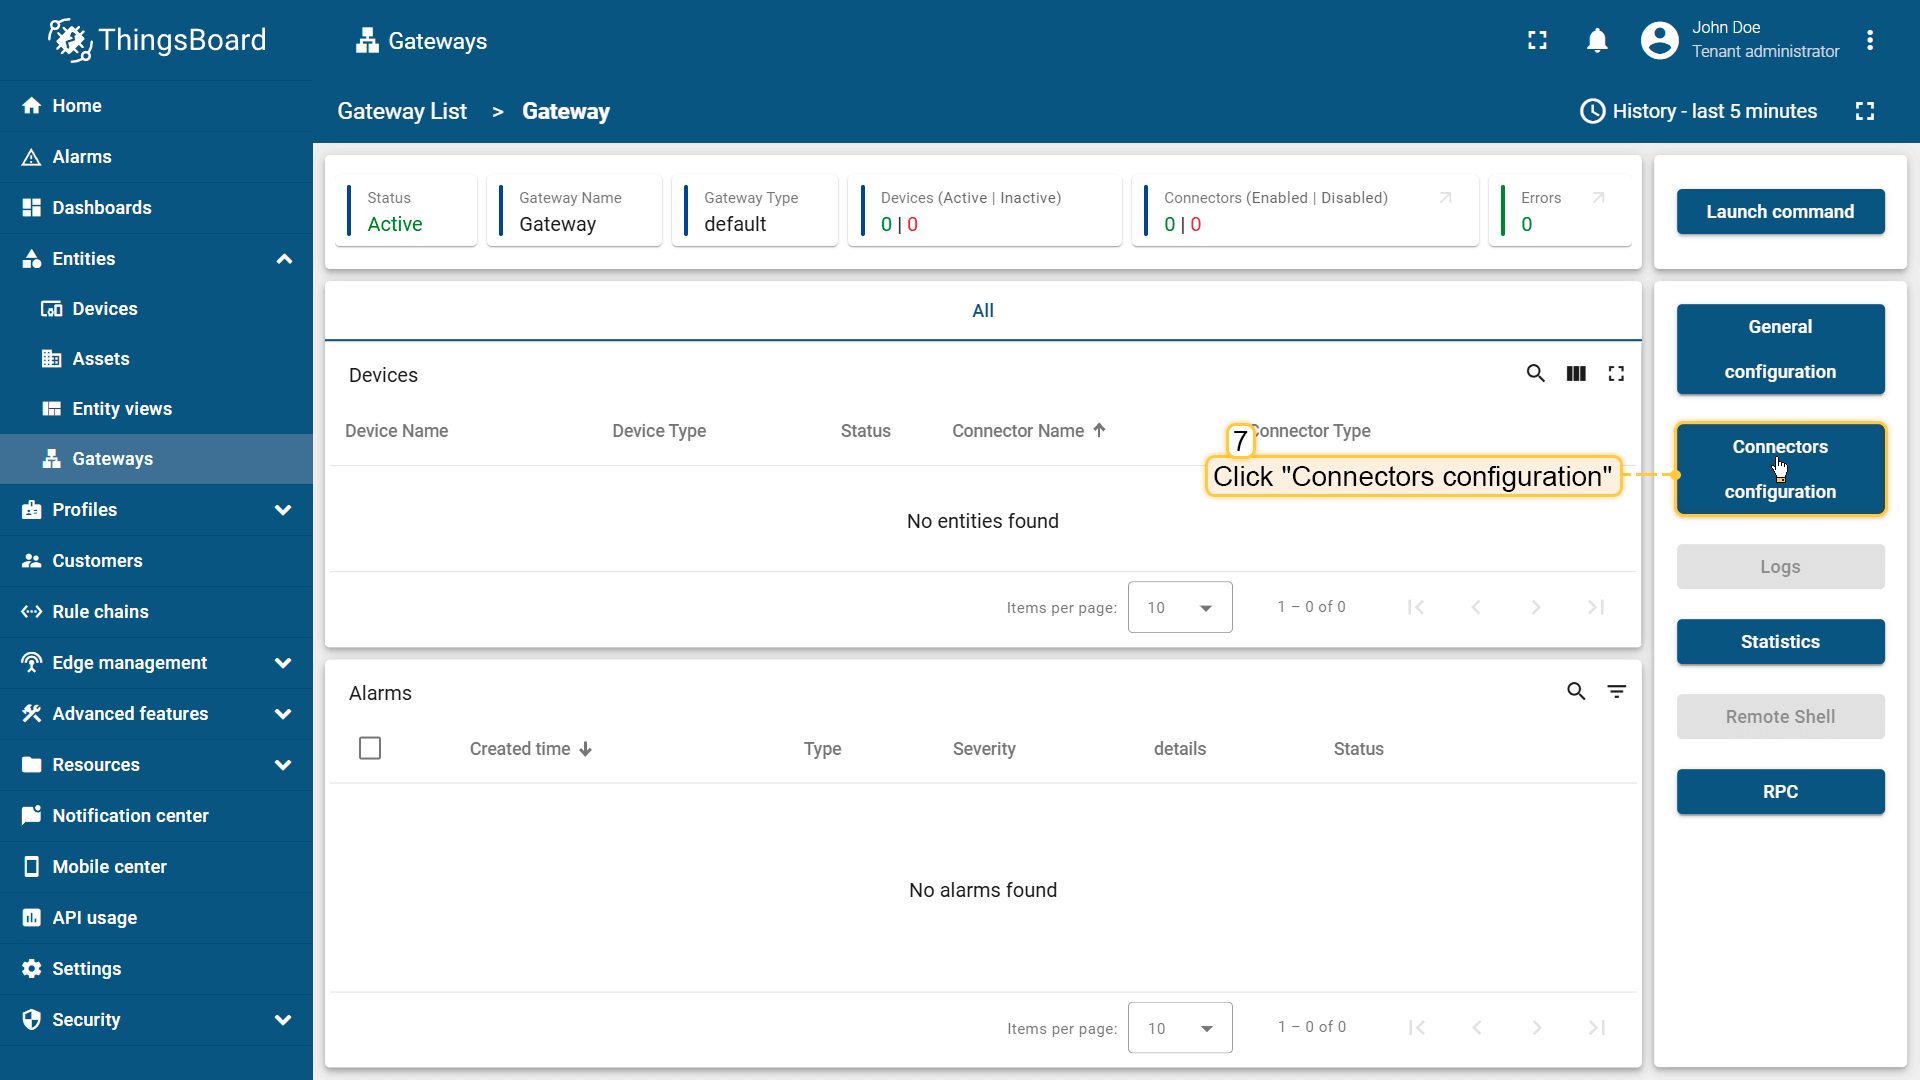 网关已创建。点击侧边栏菜单中的 “连接器配置” 按钮; 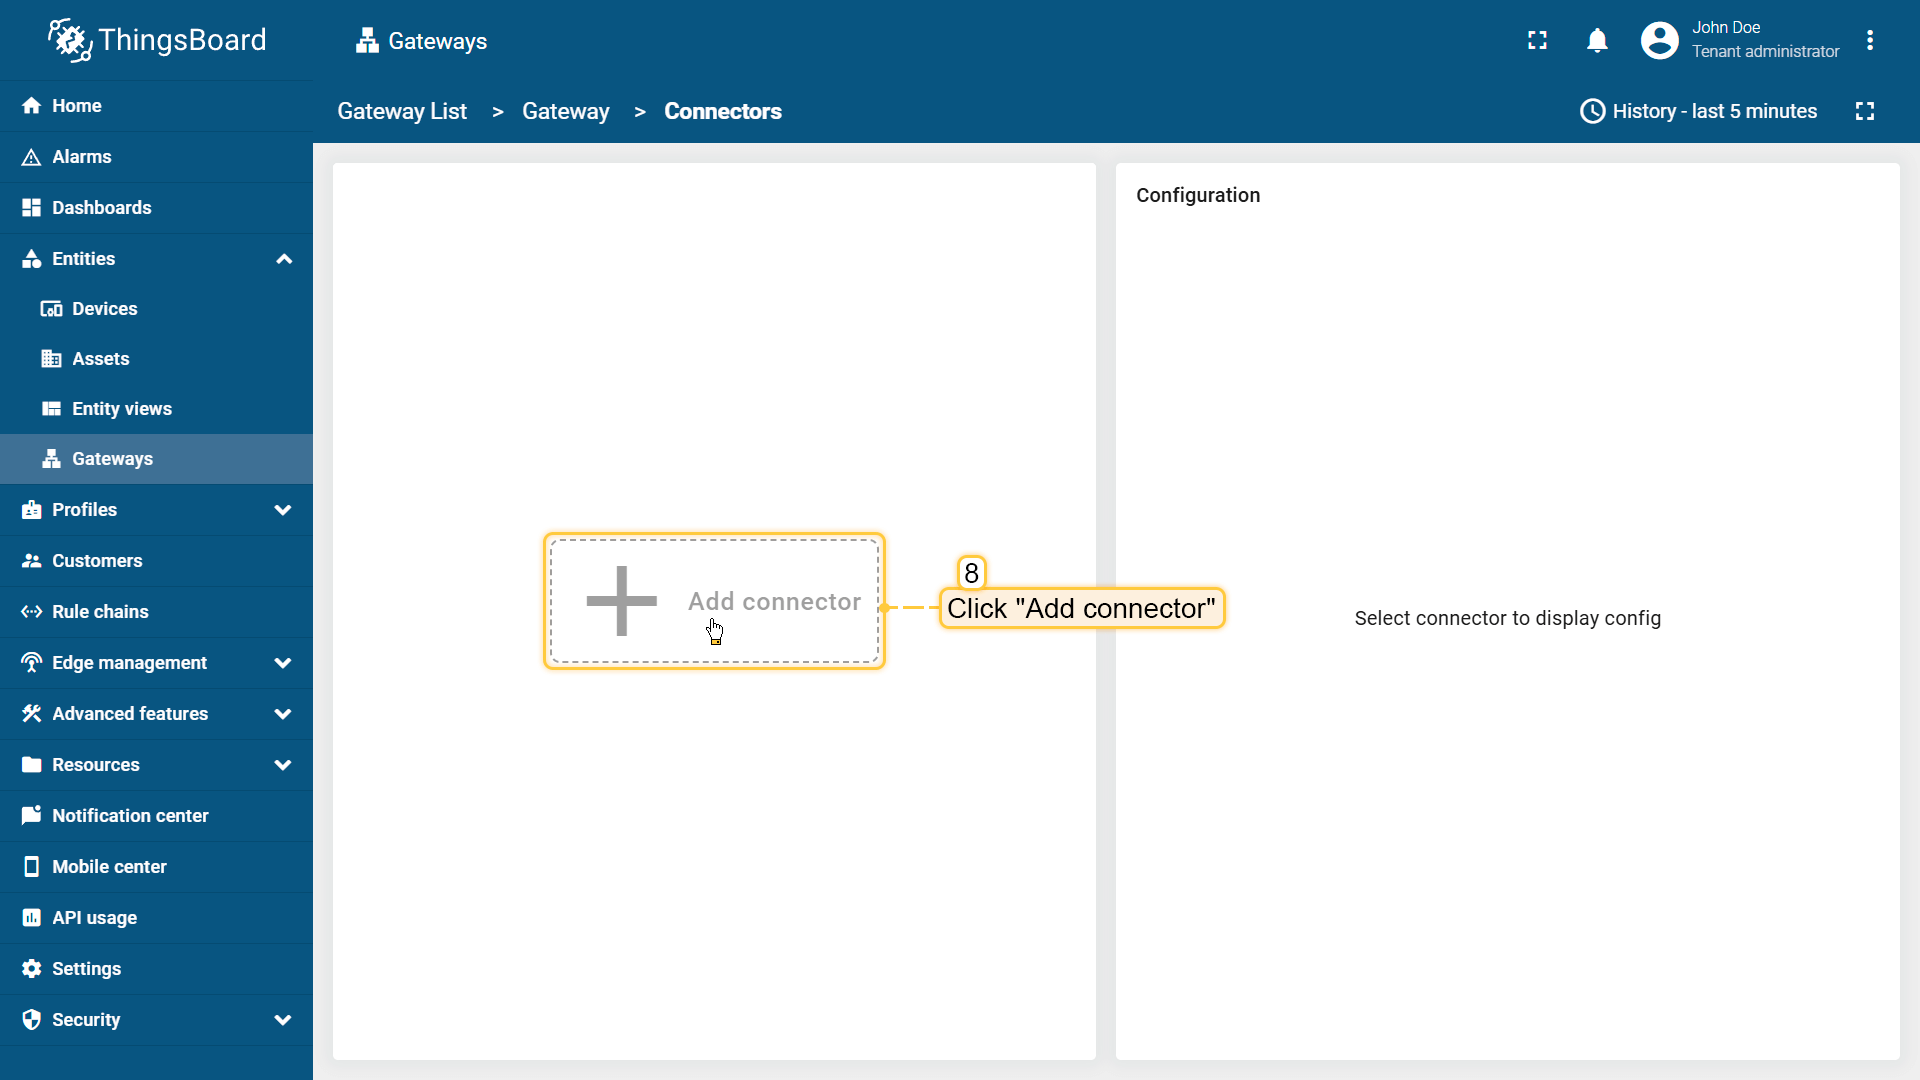 点击 “+” 添加新连接器;  选择 “BACnet” 连接器类型,填写 “名称” 并点击 “添加“; 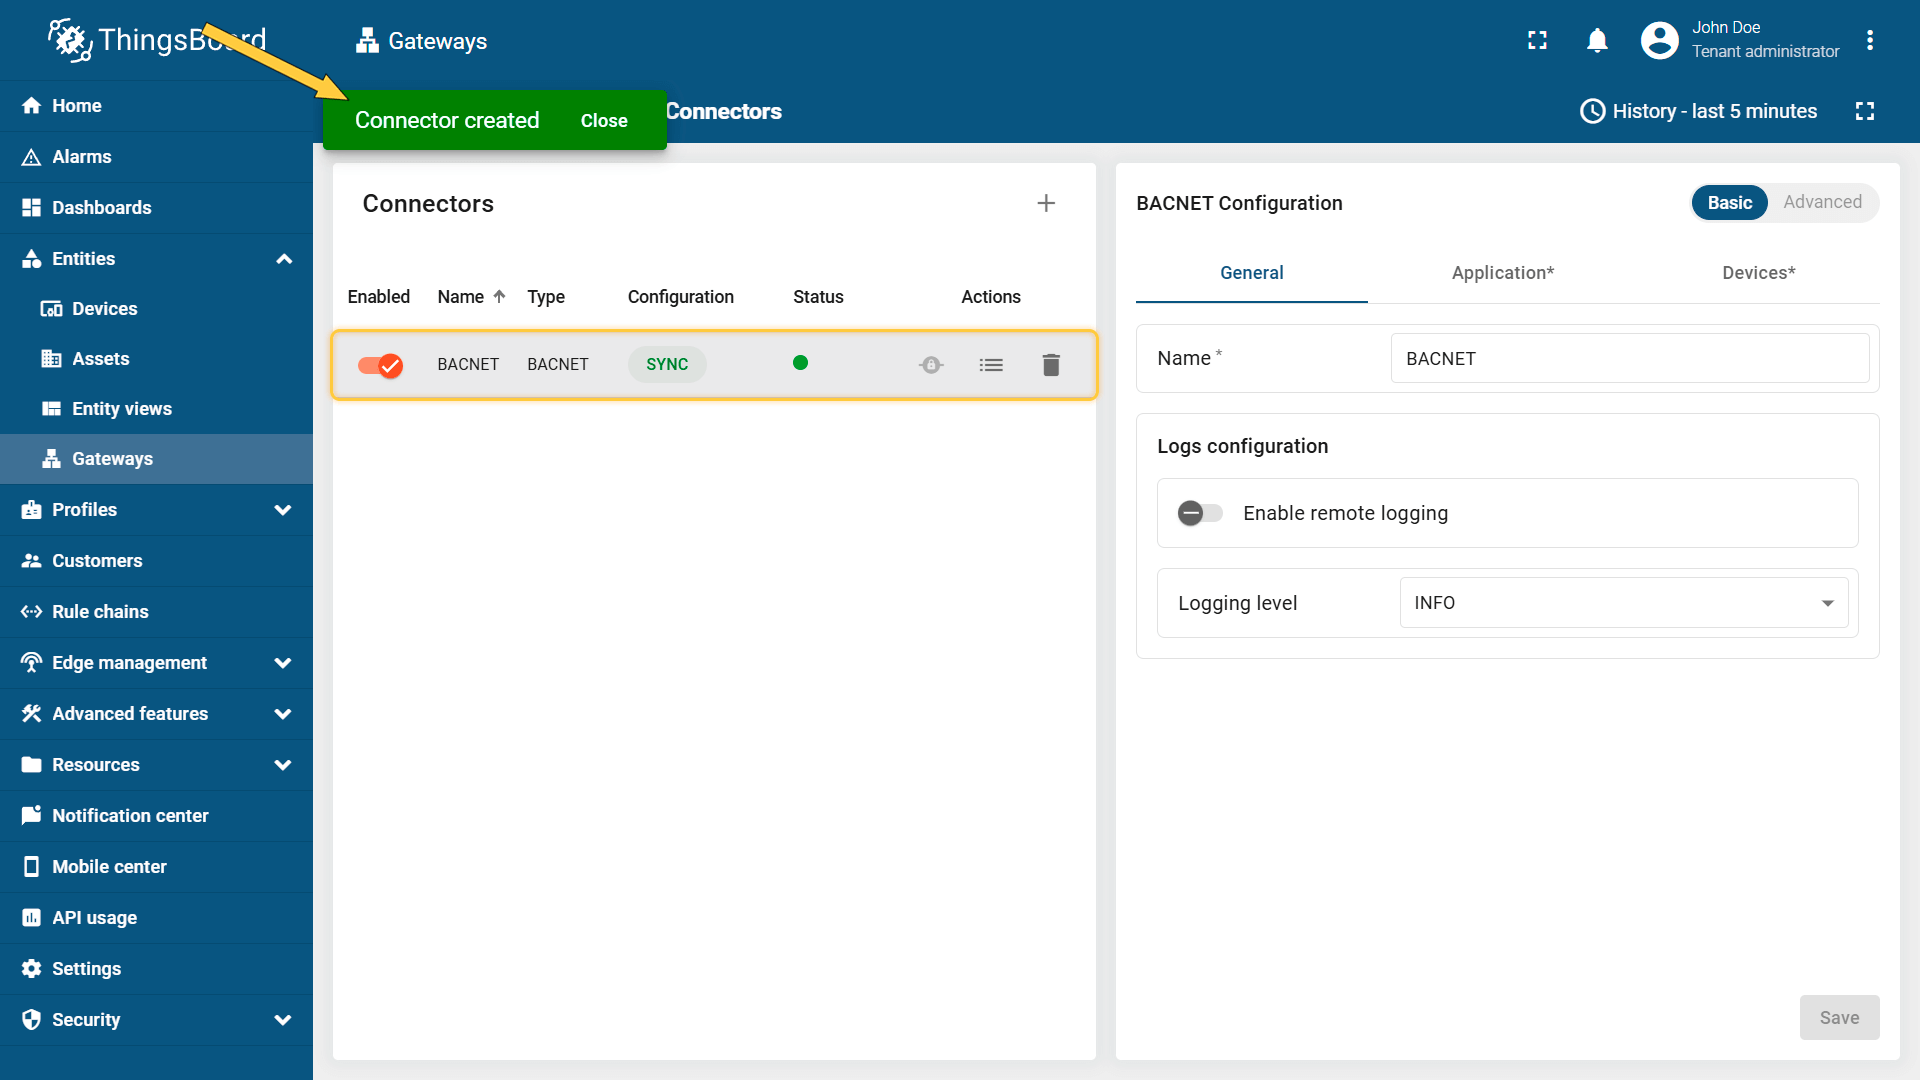 连接器已创建; 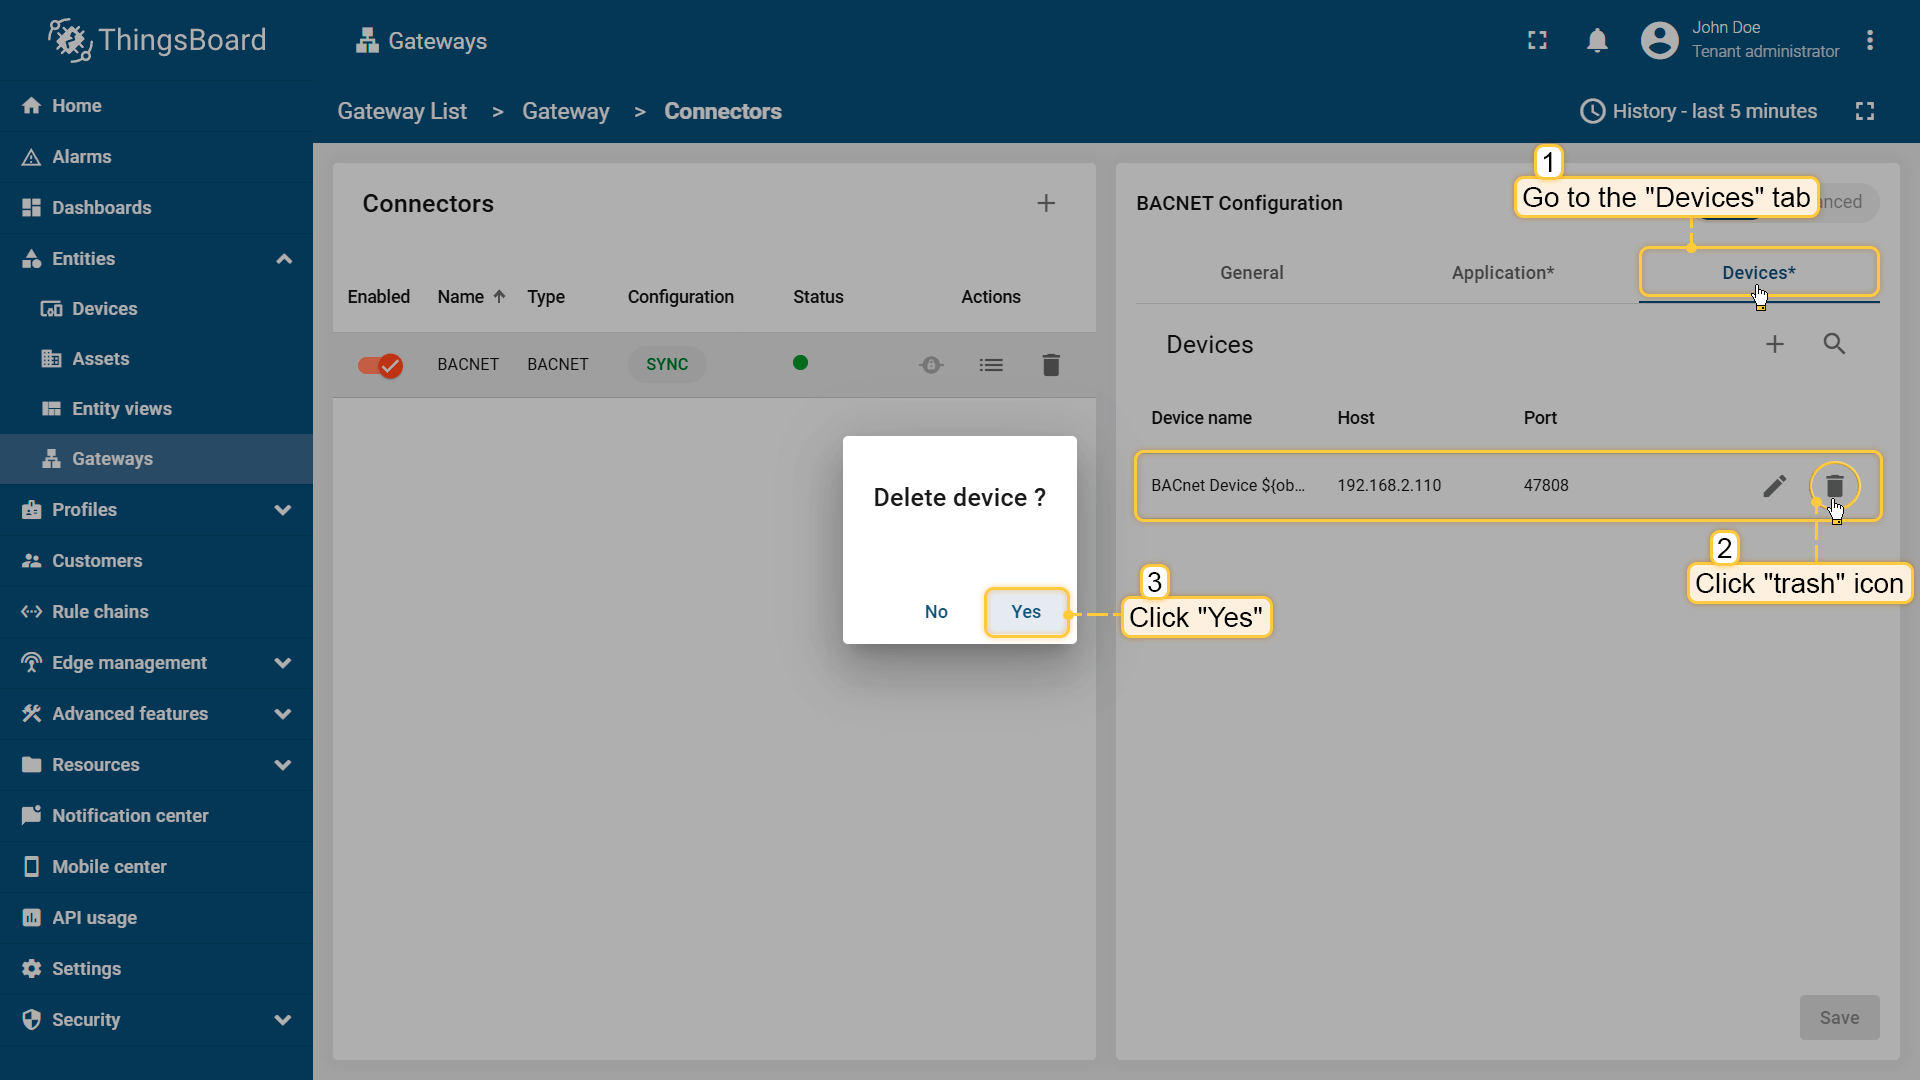 在已创建连接器中进入 “设备” 标签页并删除默认设备; 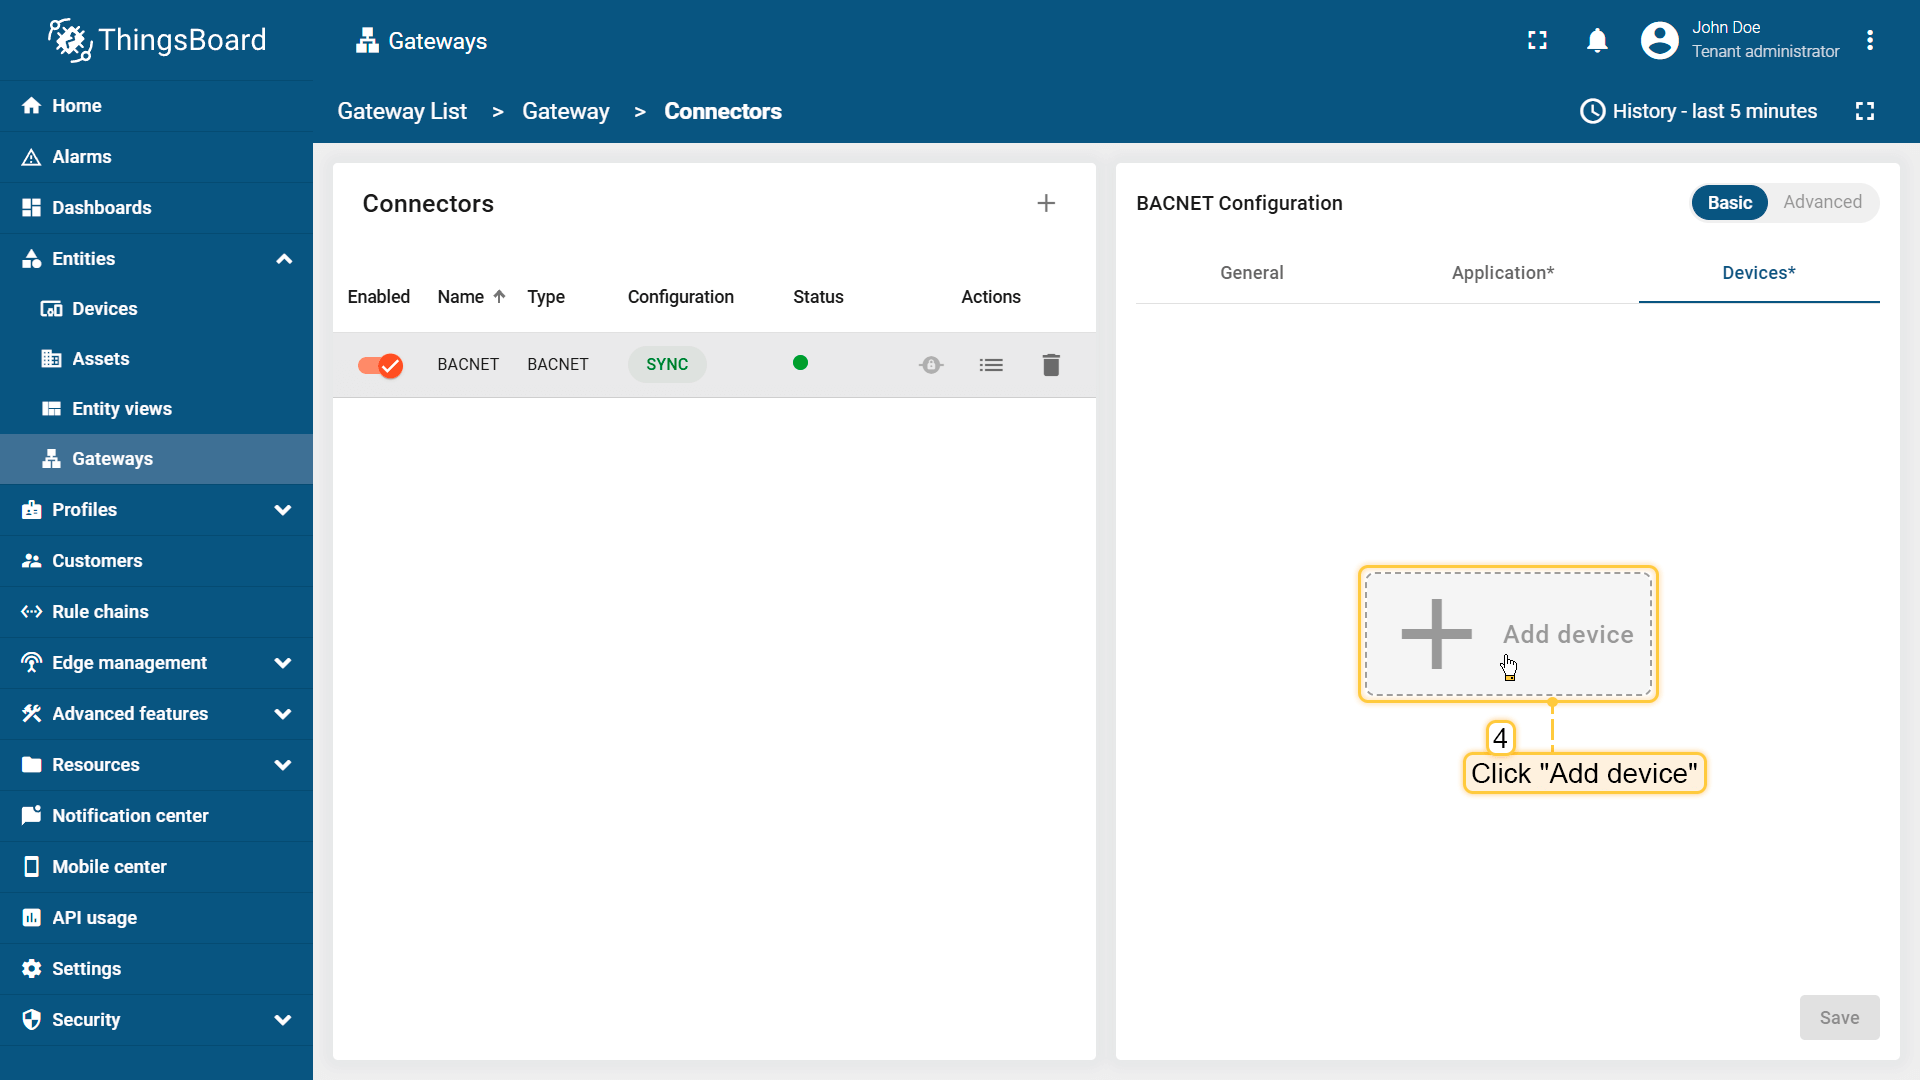 点击 “添加设备” 按钮; 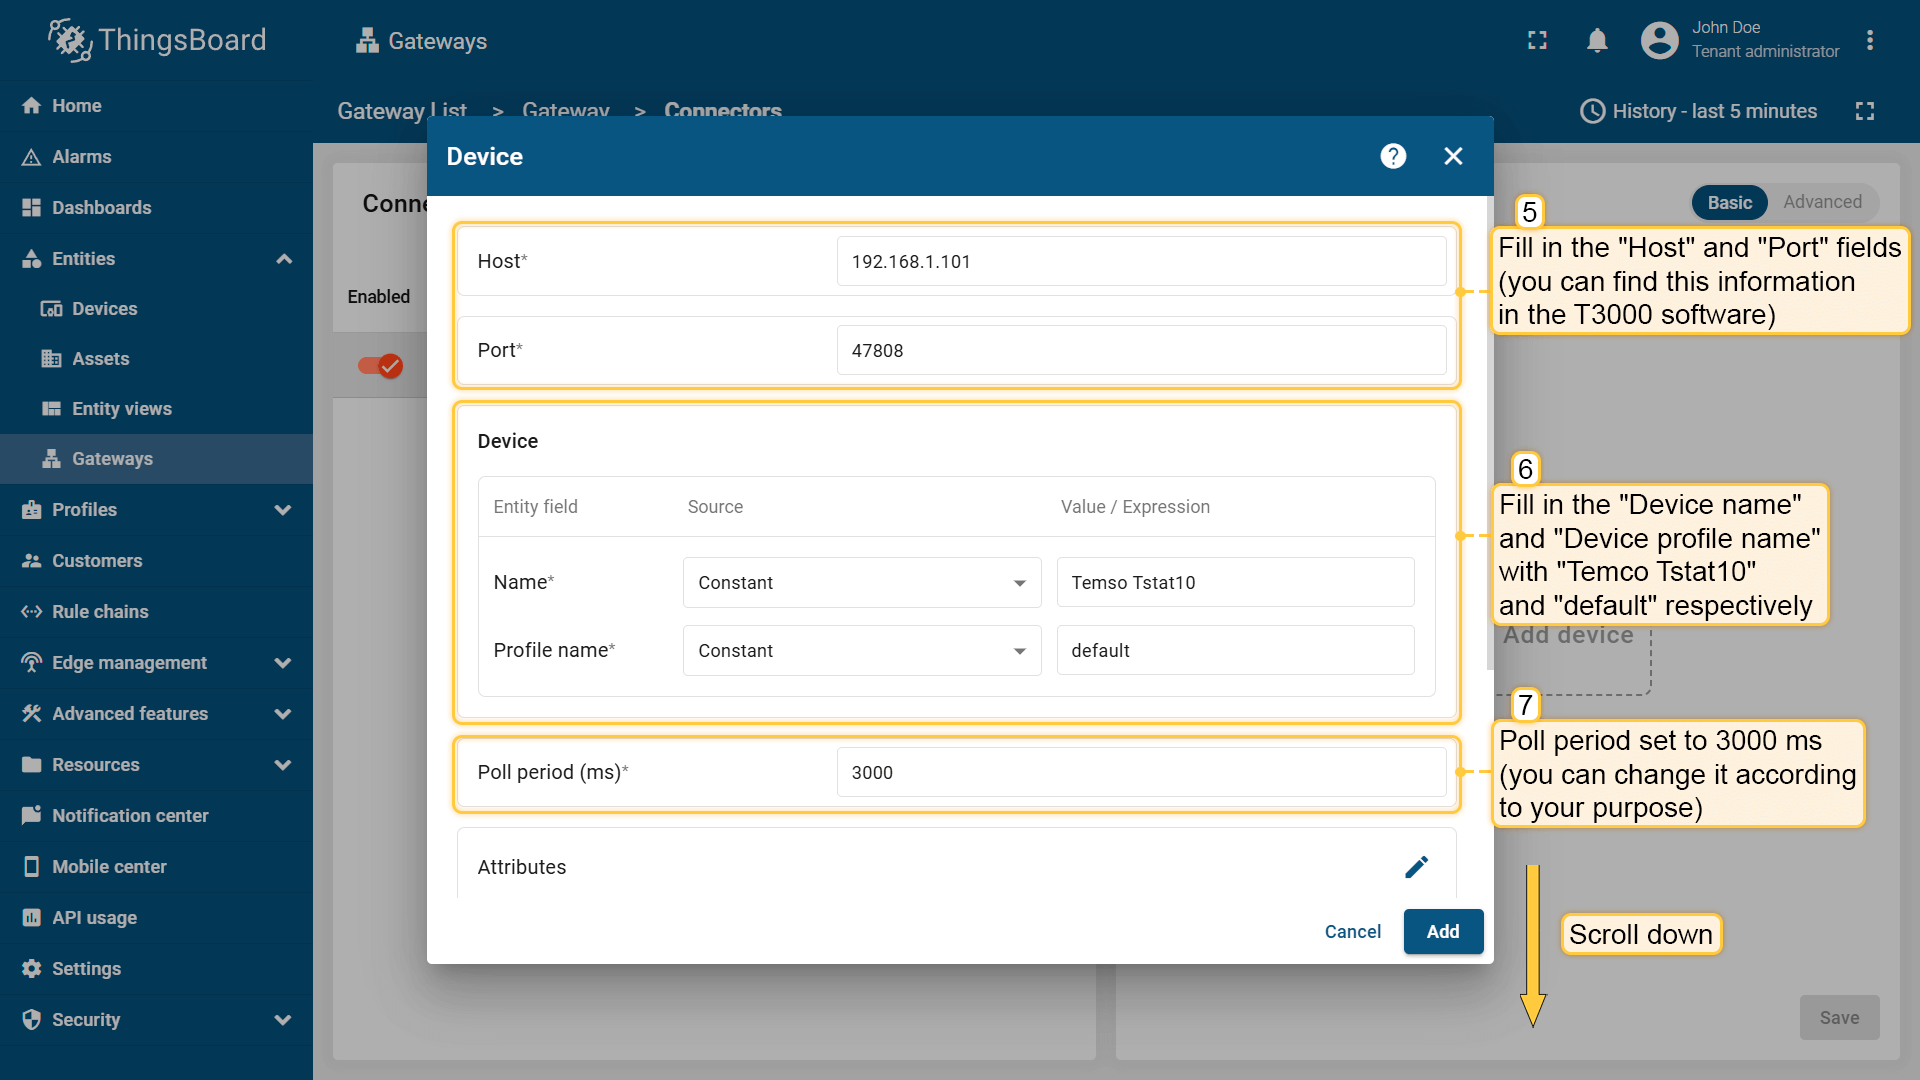 填写 “Host” 和 “Port“(可在 T3000 软件中查看)。”设备名称” 和 “设备配置名称” 分别填 “Temco Tstat10” 和 “default“。轮询周期设为 3000 ms(可按需调整); 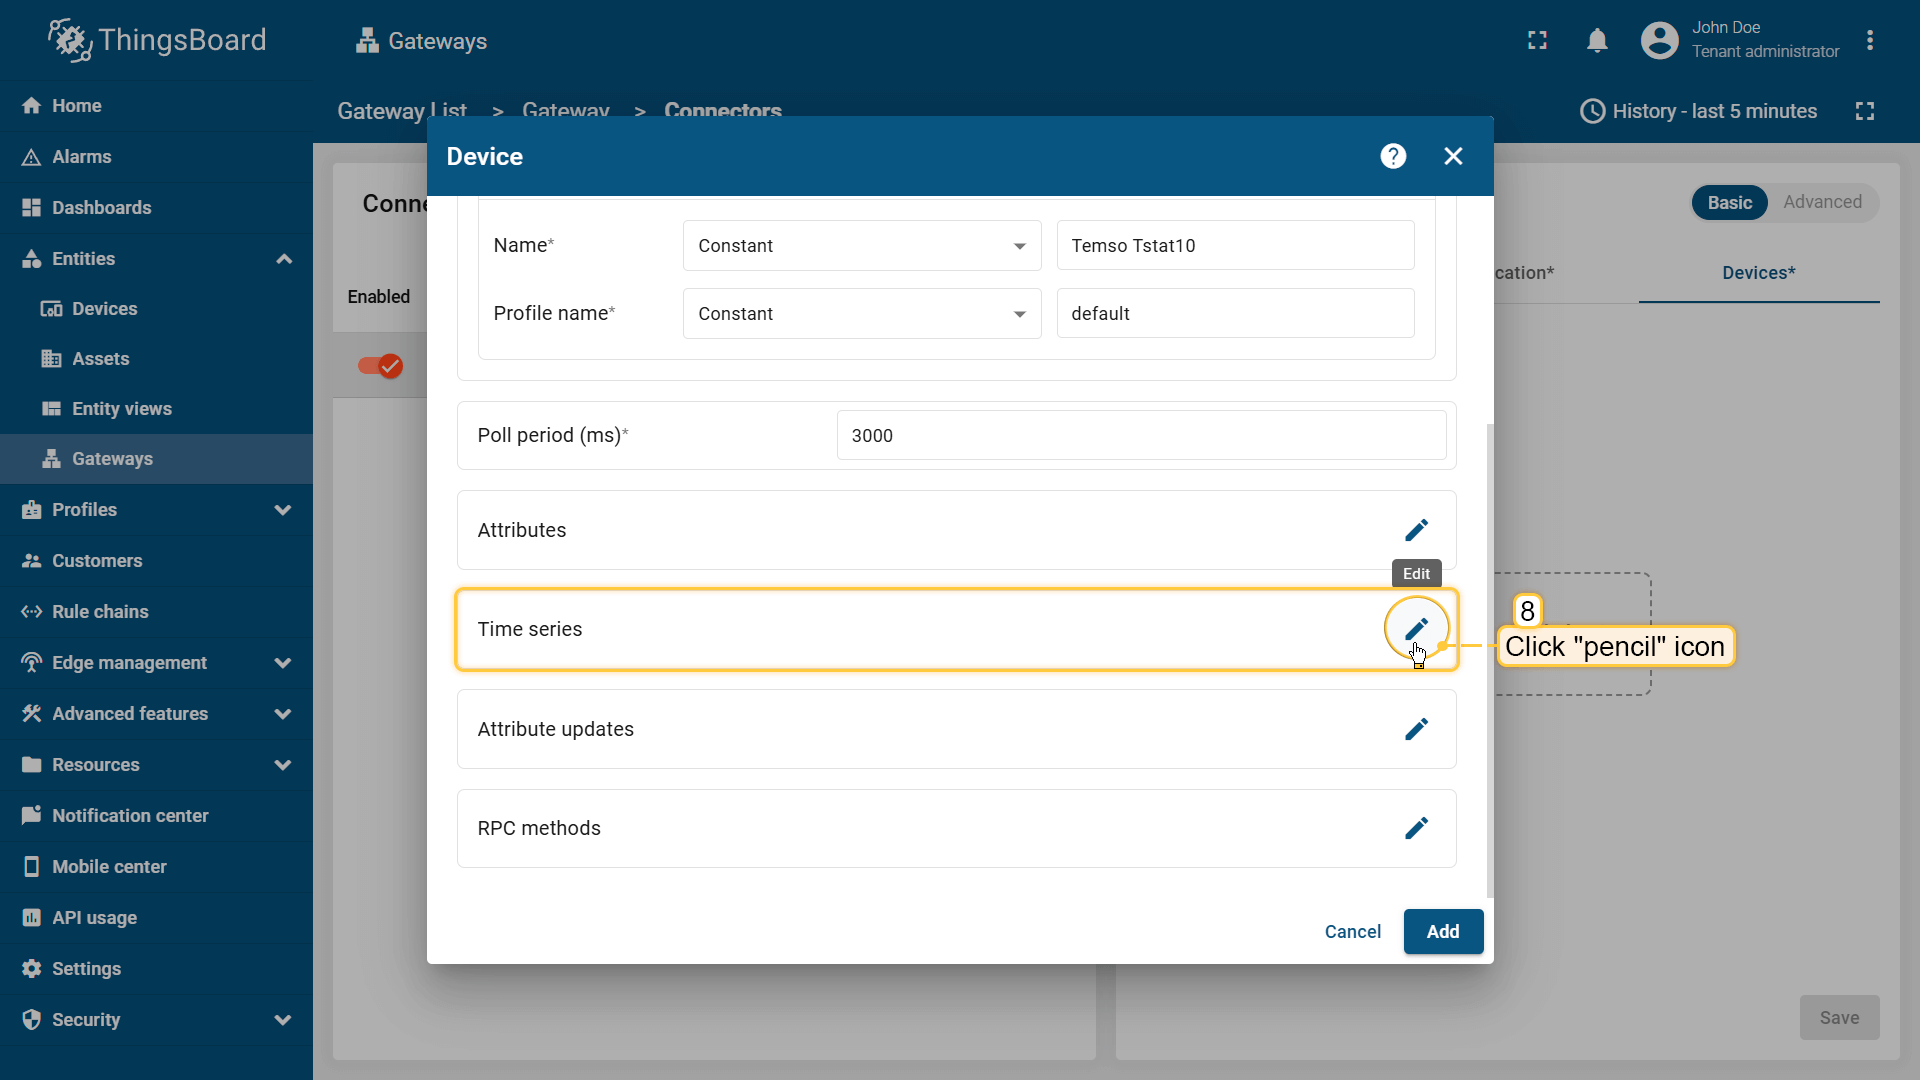 点击 “时序铅笔” 图标; 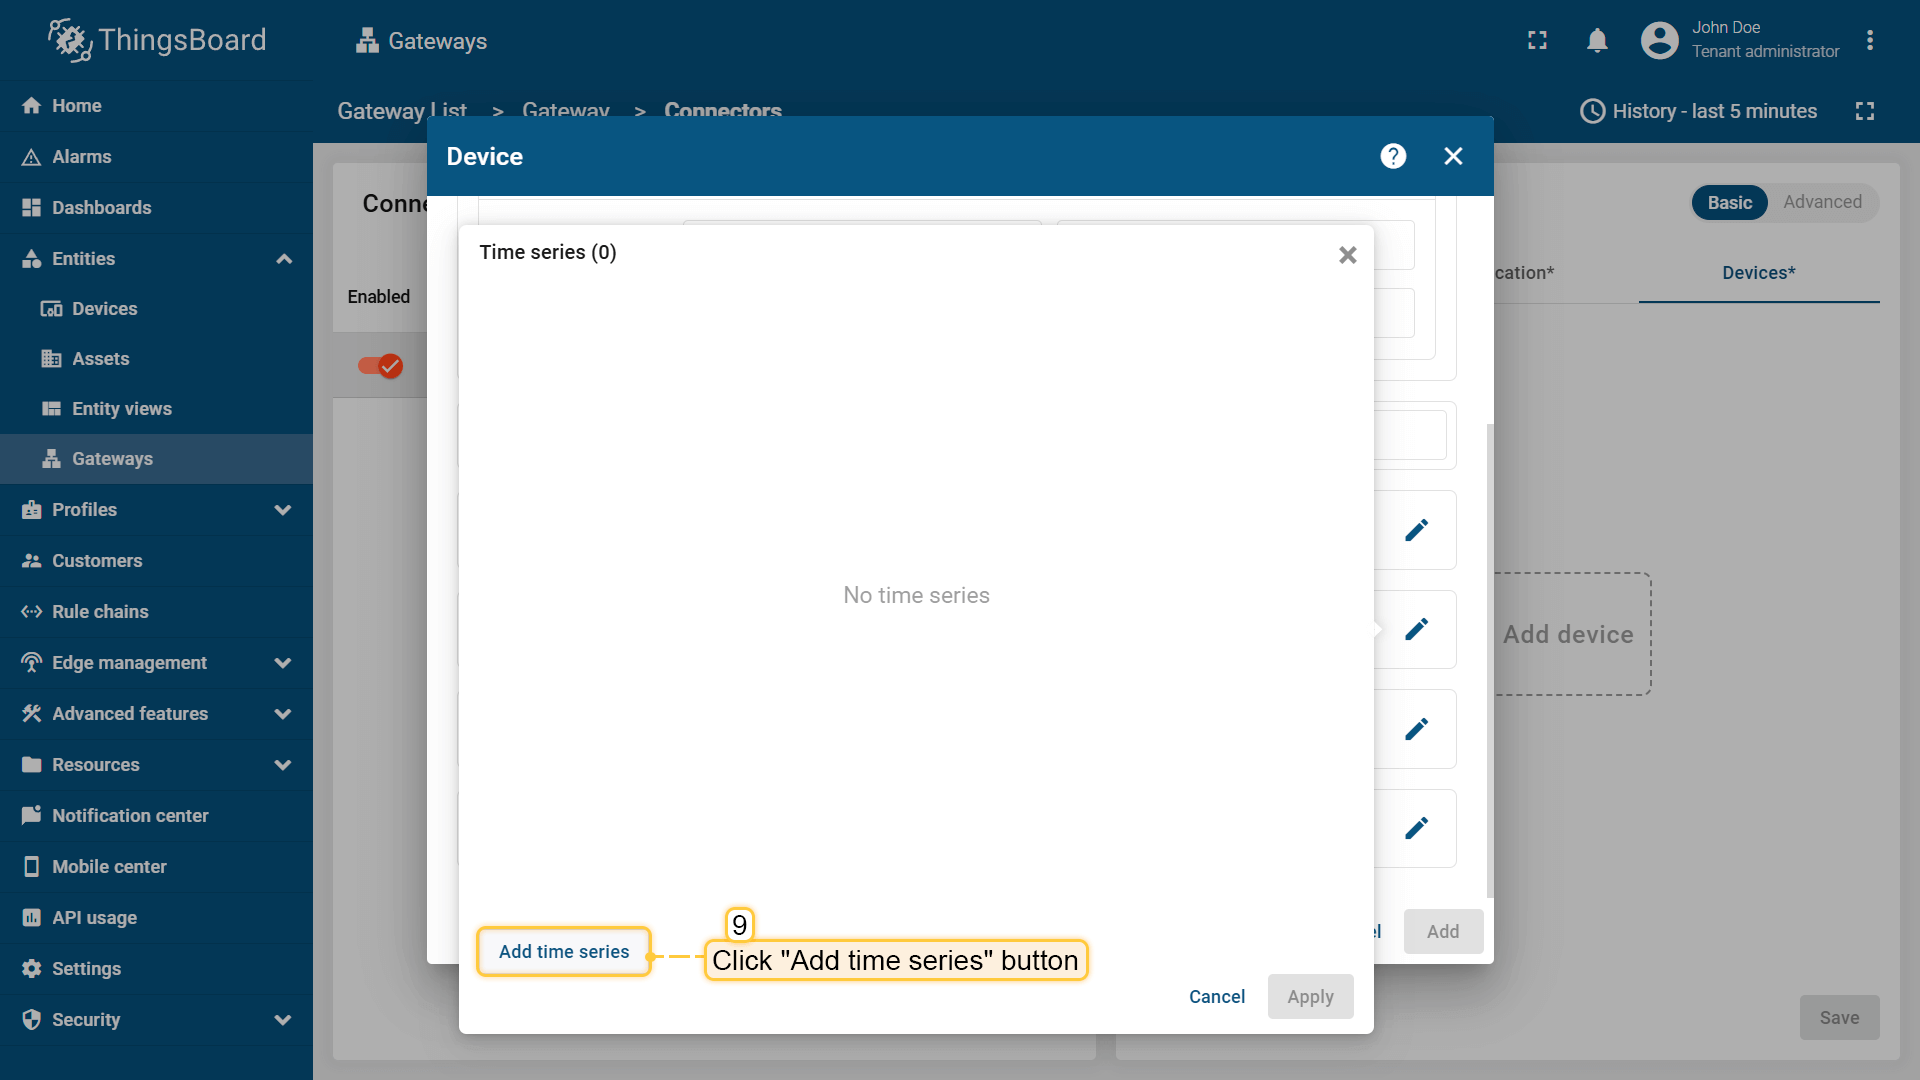 在弹出窗口中点击 “添加时序” 按钮; 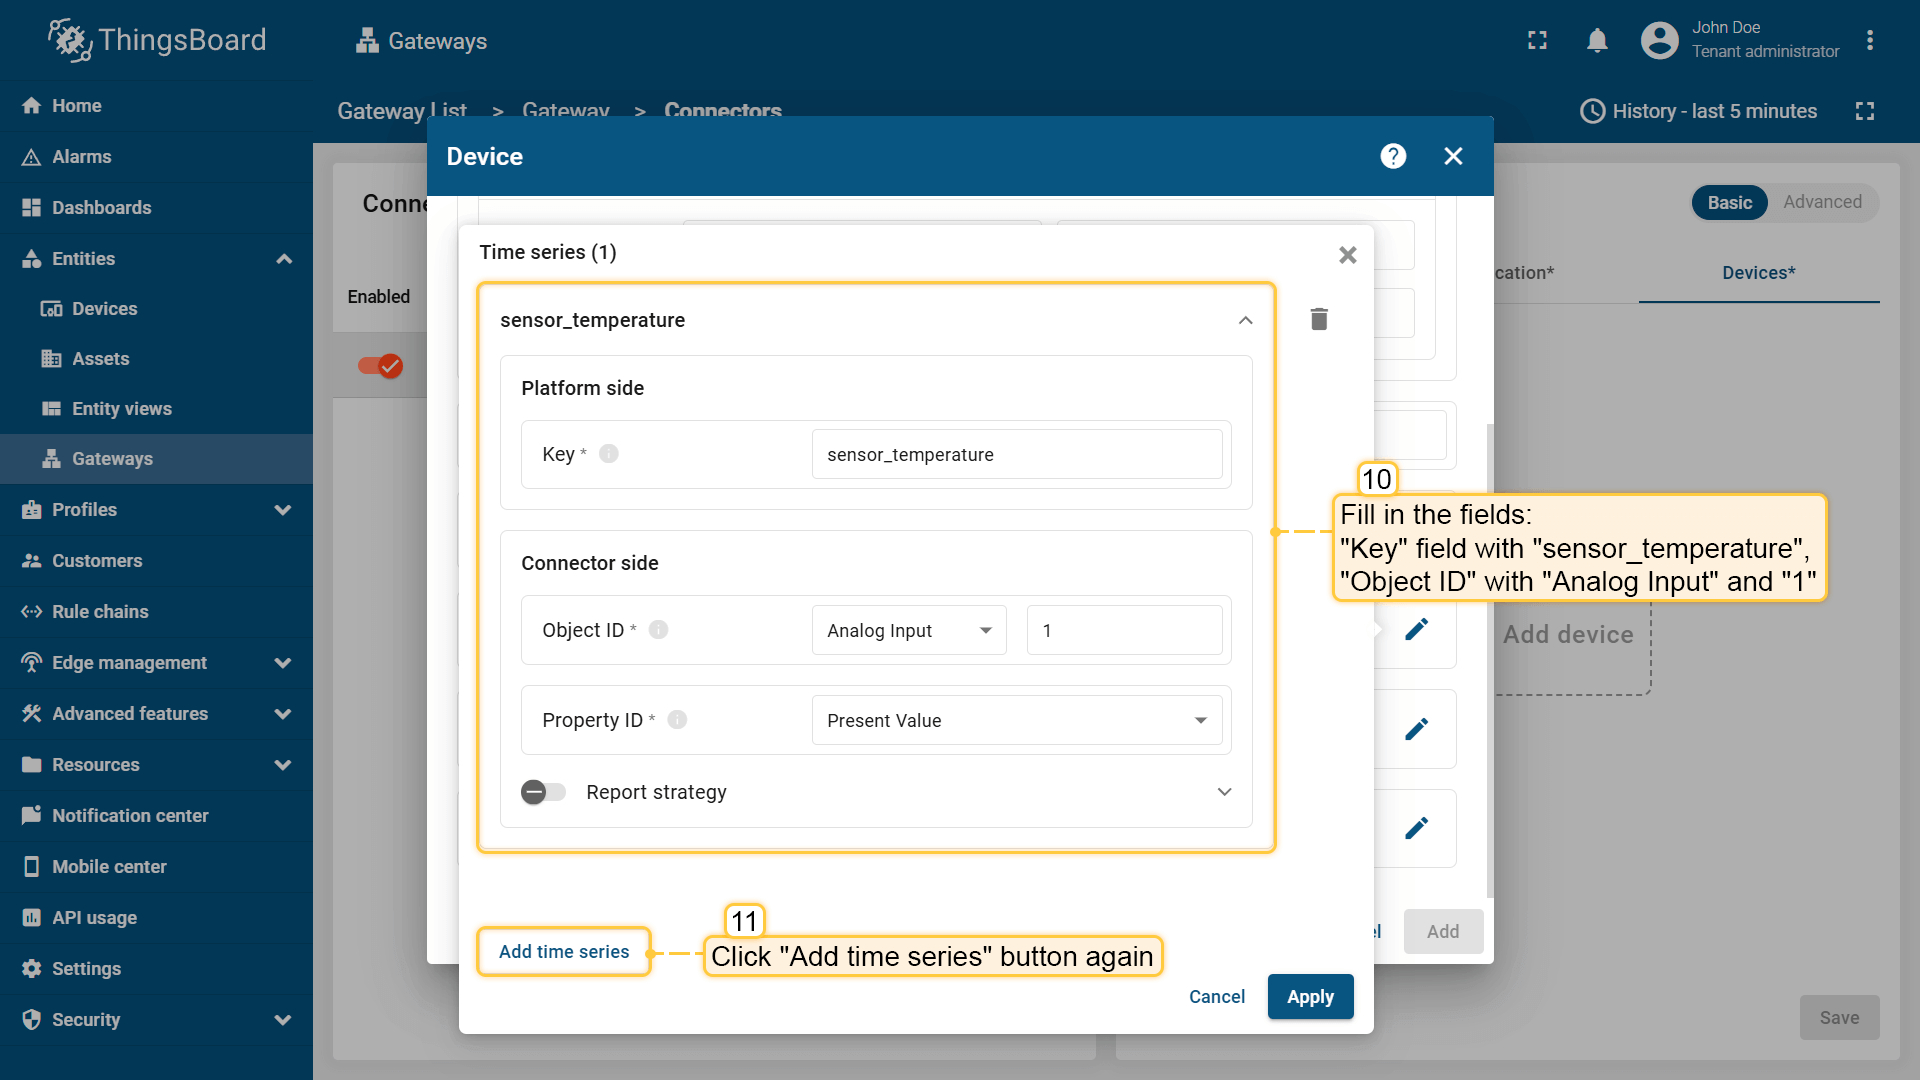 “Key” 填 “sensor_temperature“,”Object ID” 填 “Analog Input” 和 “1“。点击 “添加时序“; 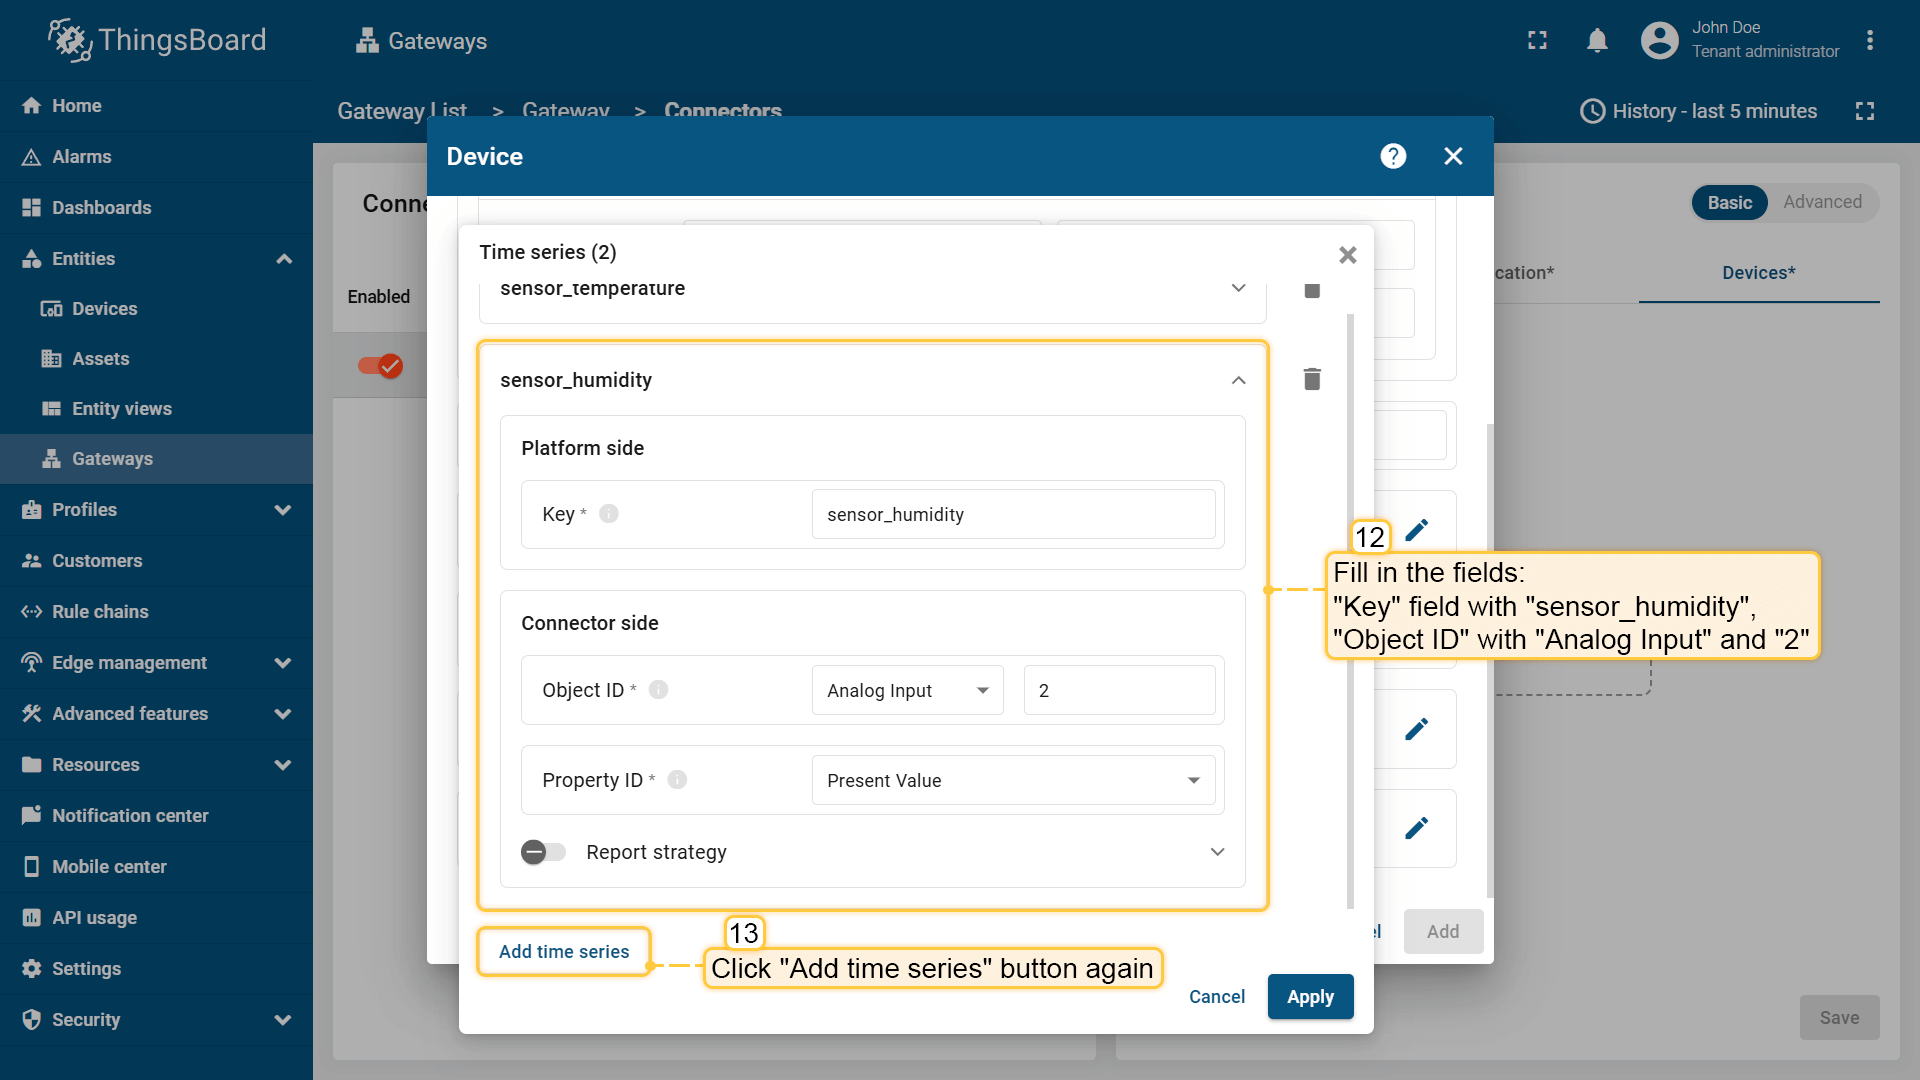 “Key” 填 “sensor_humidity“,”Object ID” 填 “Analog Input” 和 “2“; 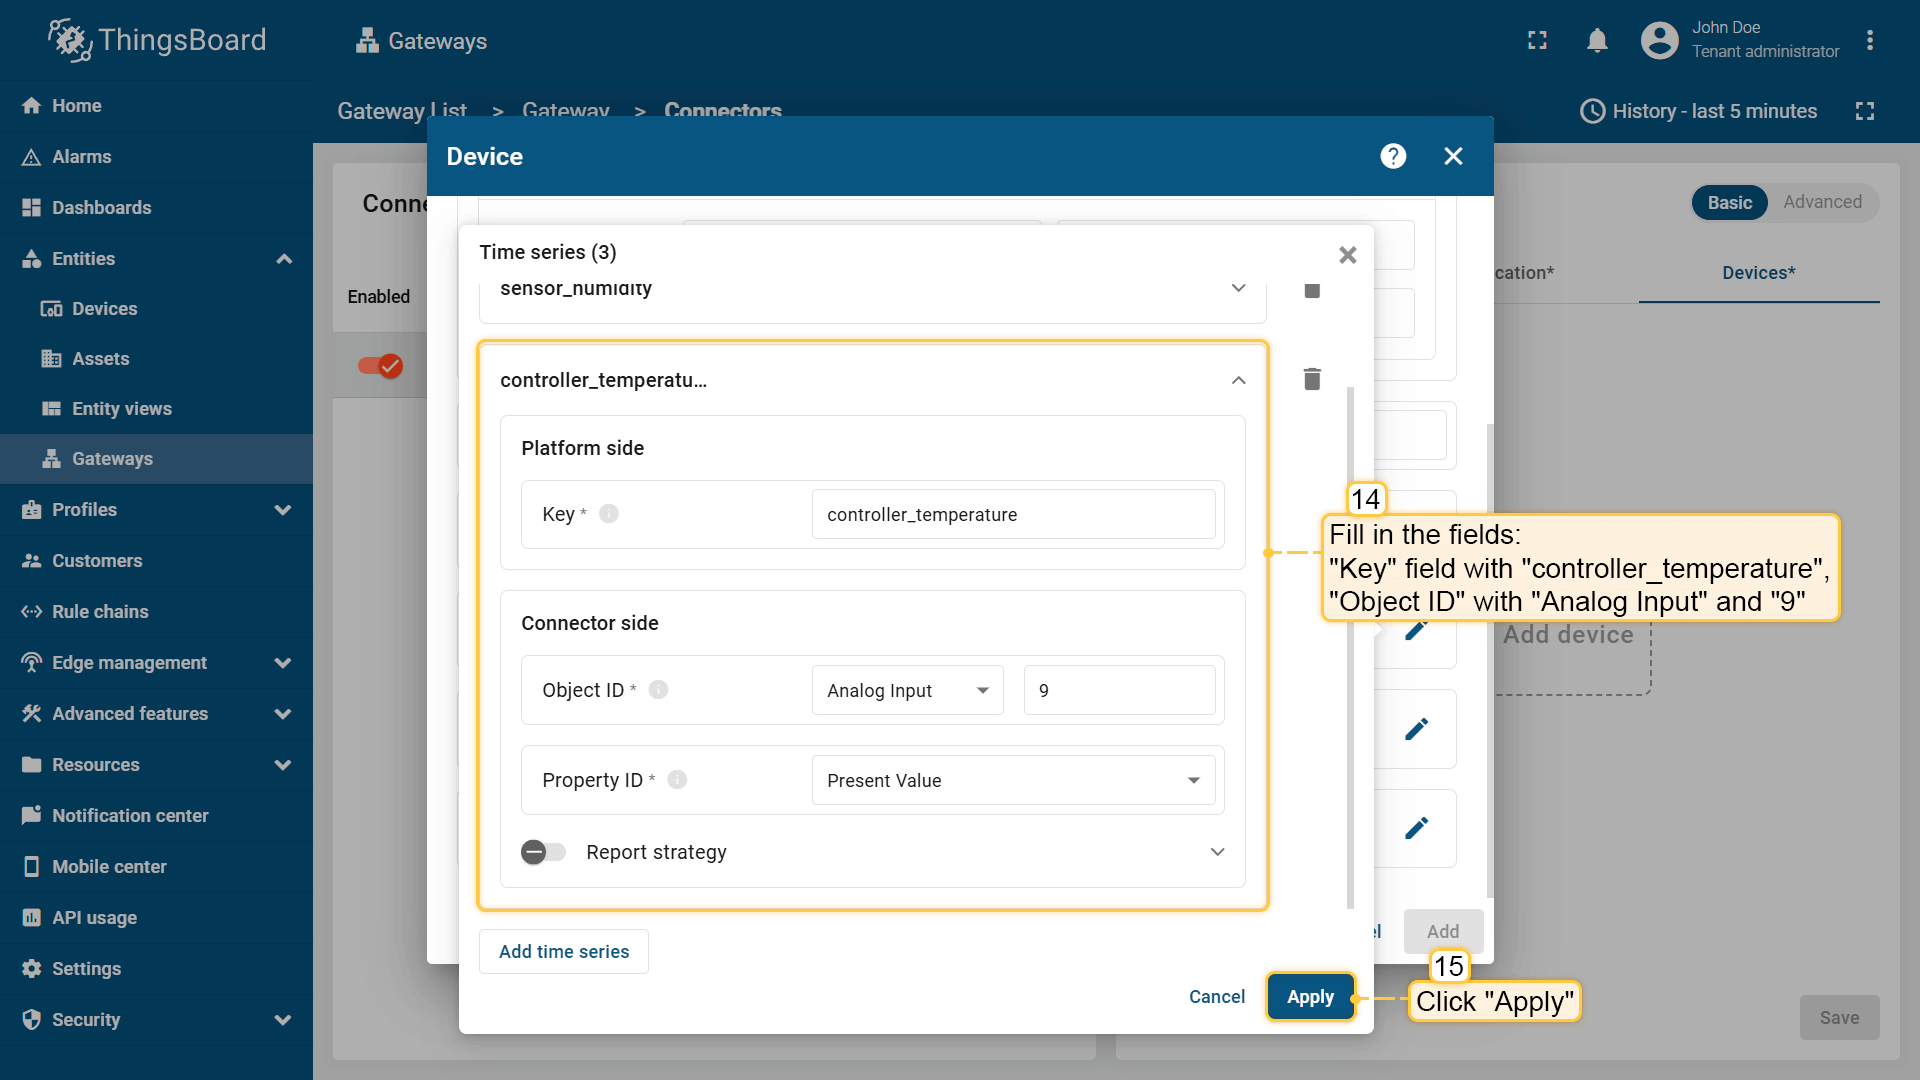 “Key” 填 “controller_temperature“,”Object ID” 填 “Analog Input” 和 “9“。点击 “应用“; 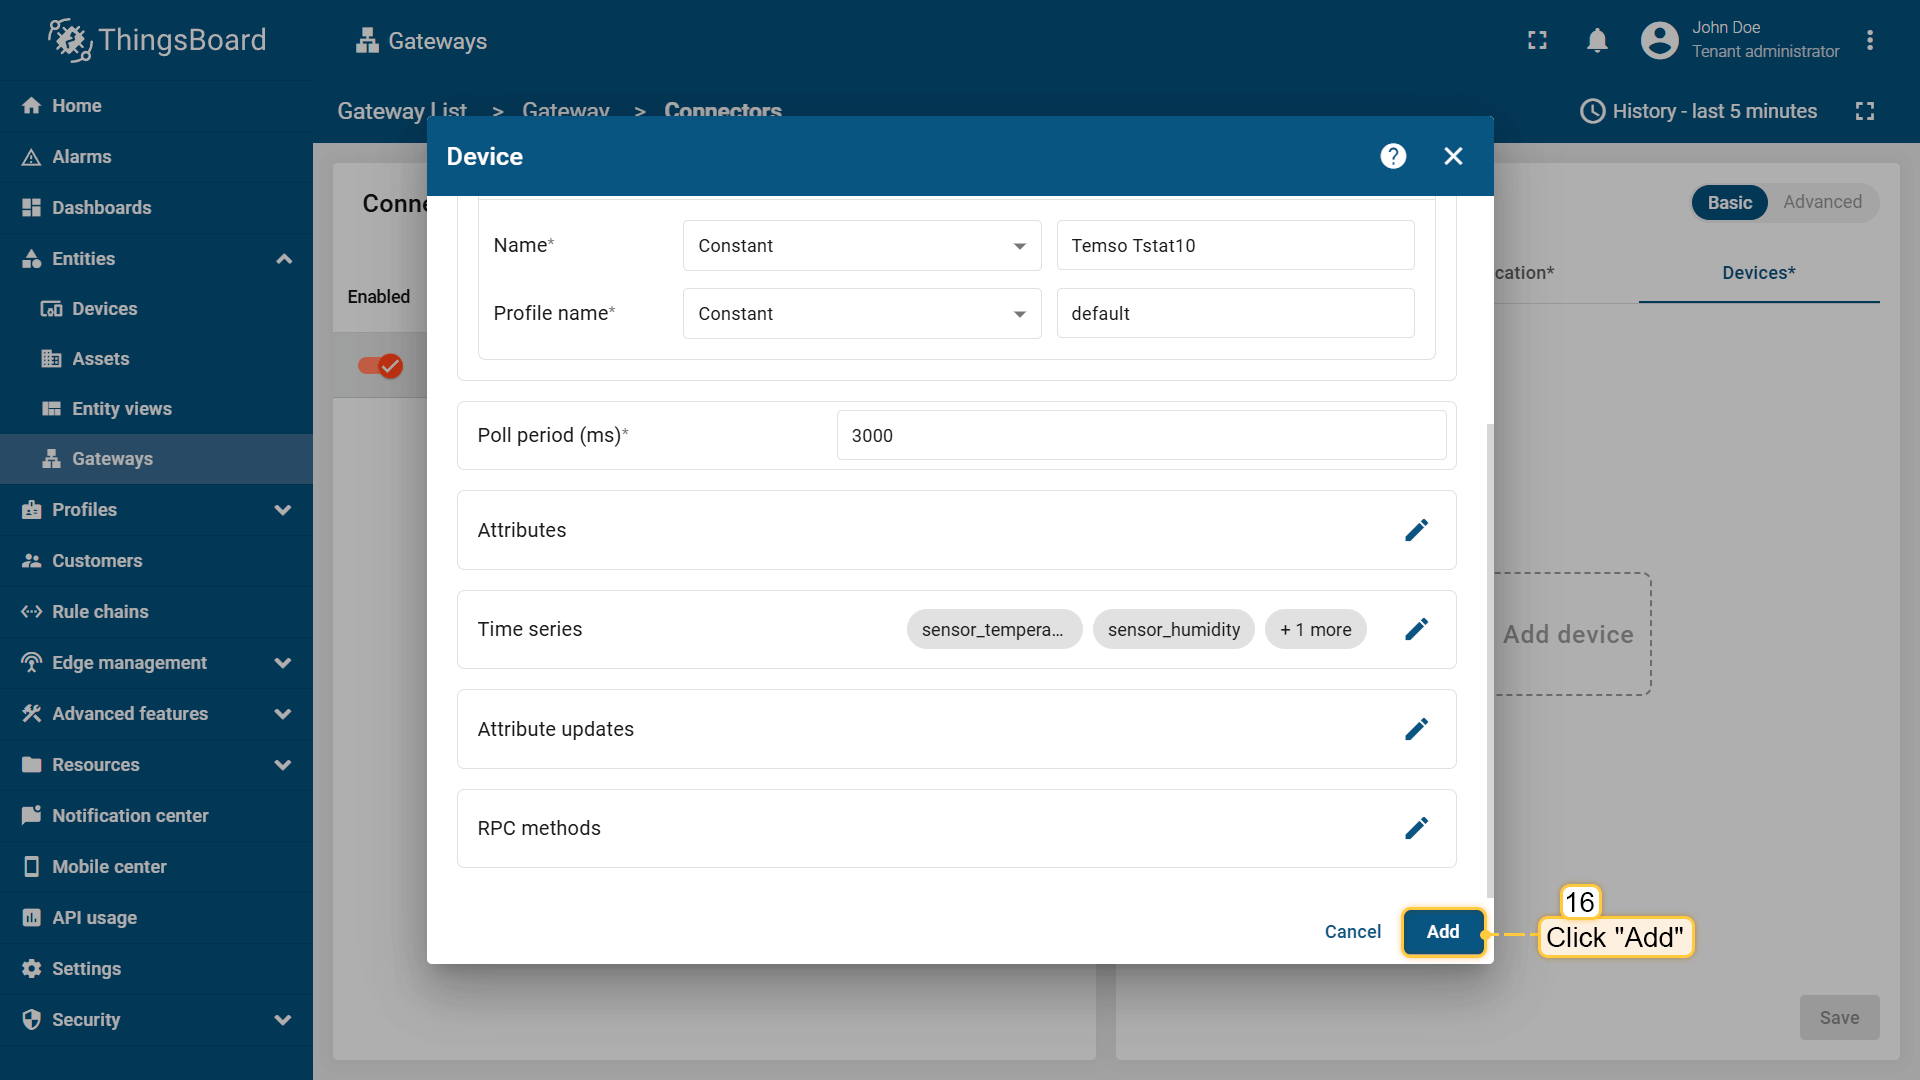 点击 “添加” 按钮; 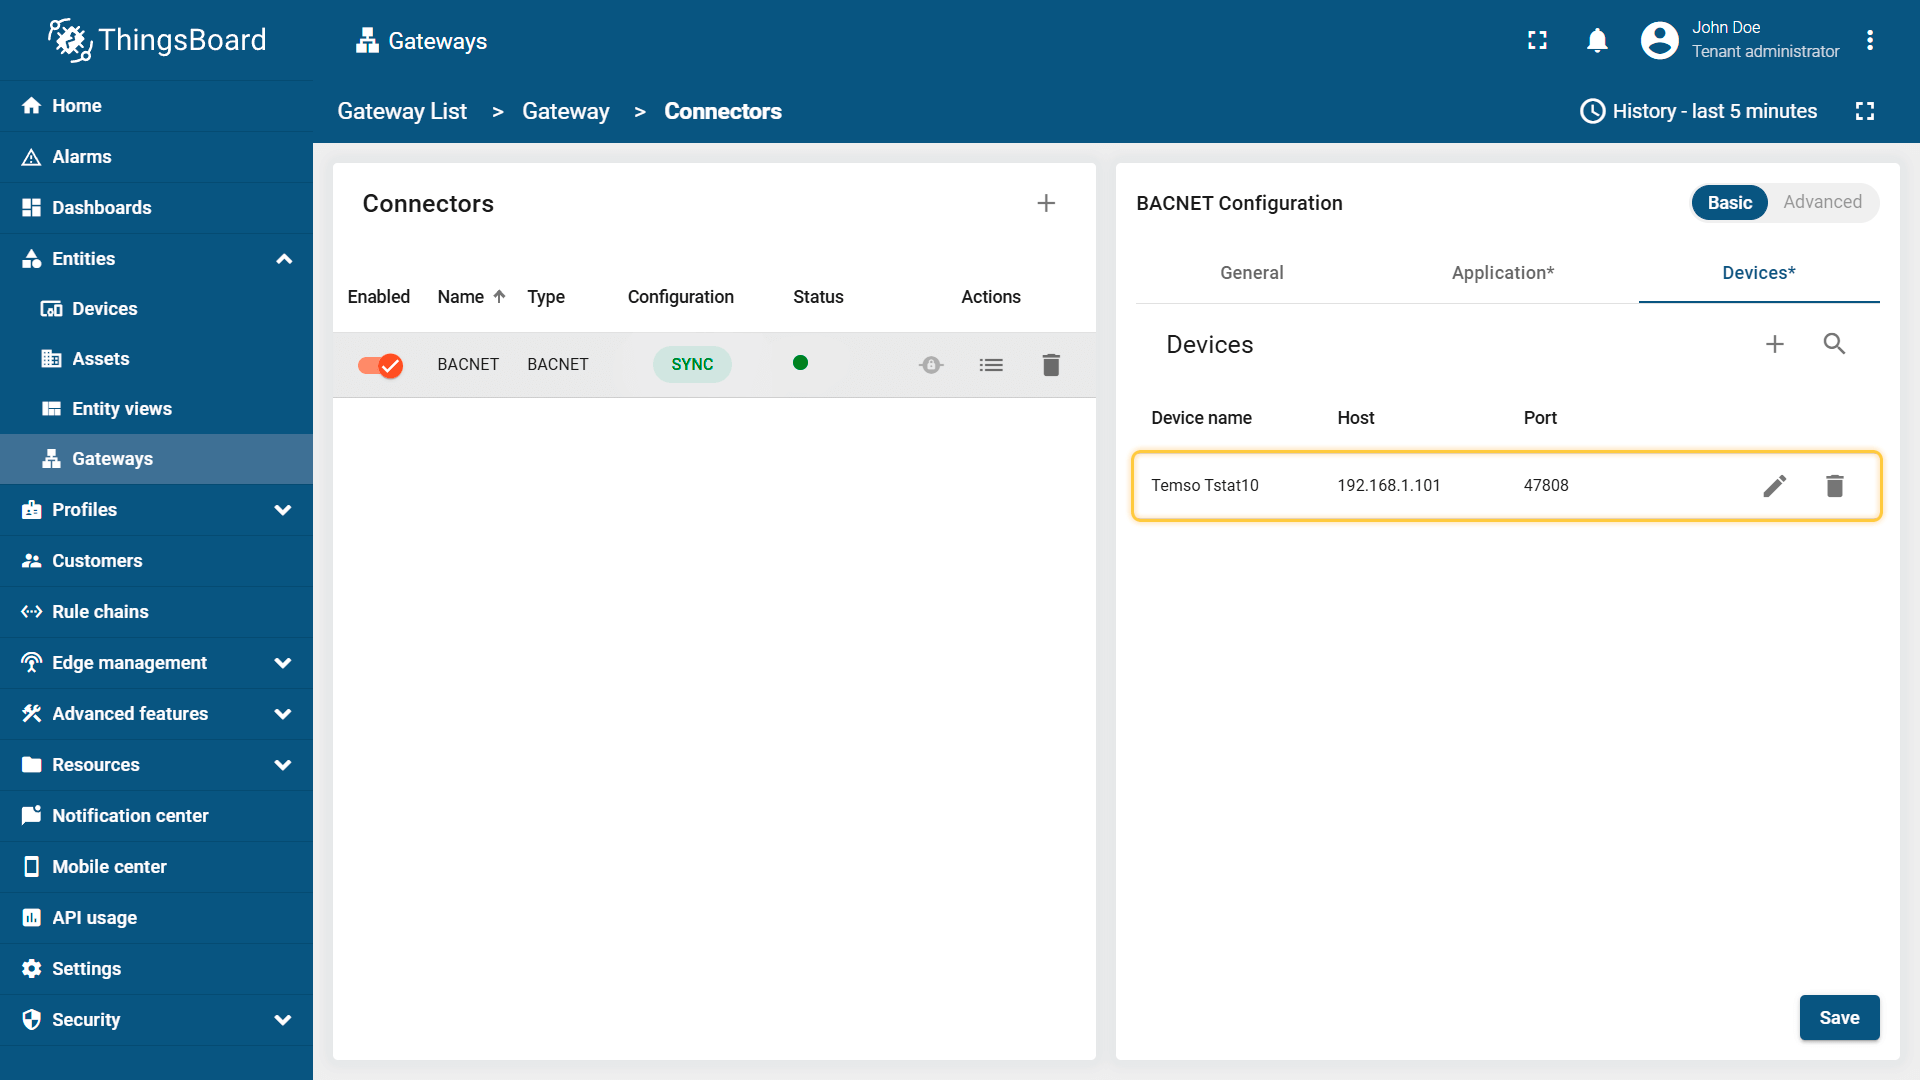 设备已添加。 |
在浏览器中打开 ThingsBoard 并登录。在侧边栏进入「实体」>「网关」选项卡,点击「+」按钮。填写「名称」和「设备档案」字段并点击「创建」按钮; 使用启动命令启动网关; 网关已创建。点击侧边栏菜单中的「连接器配置」按钮; 点击「+」按钮添加新连接器; 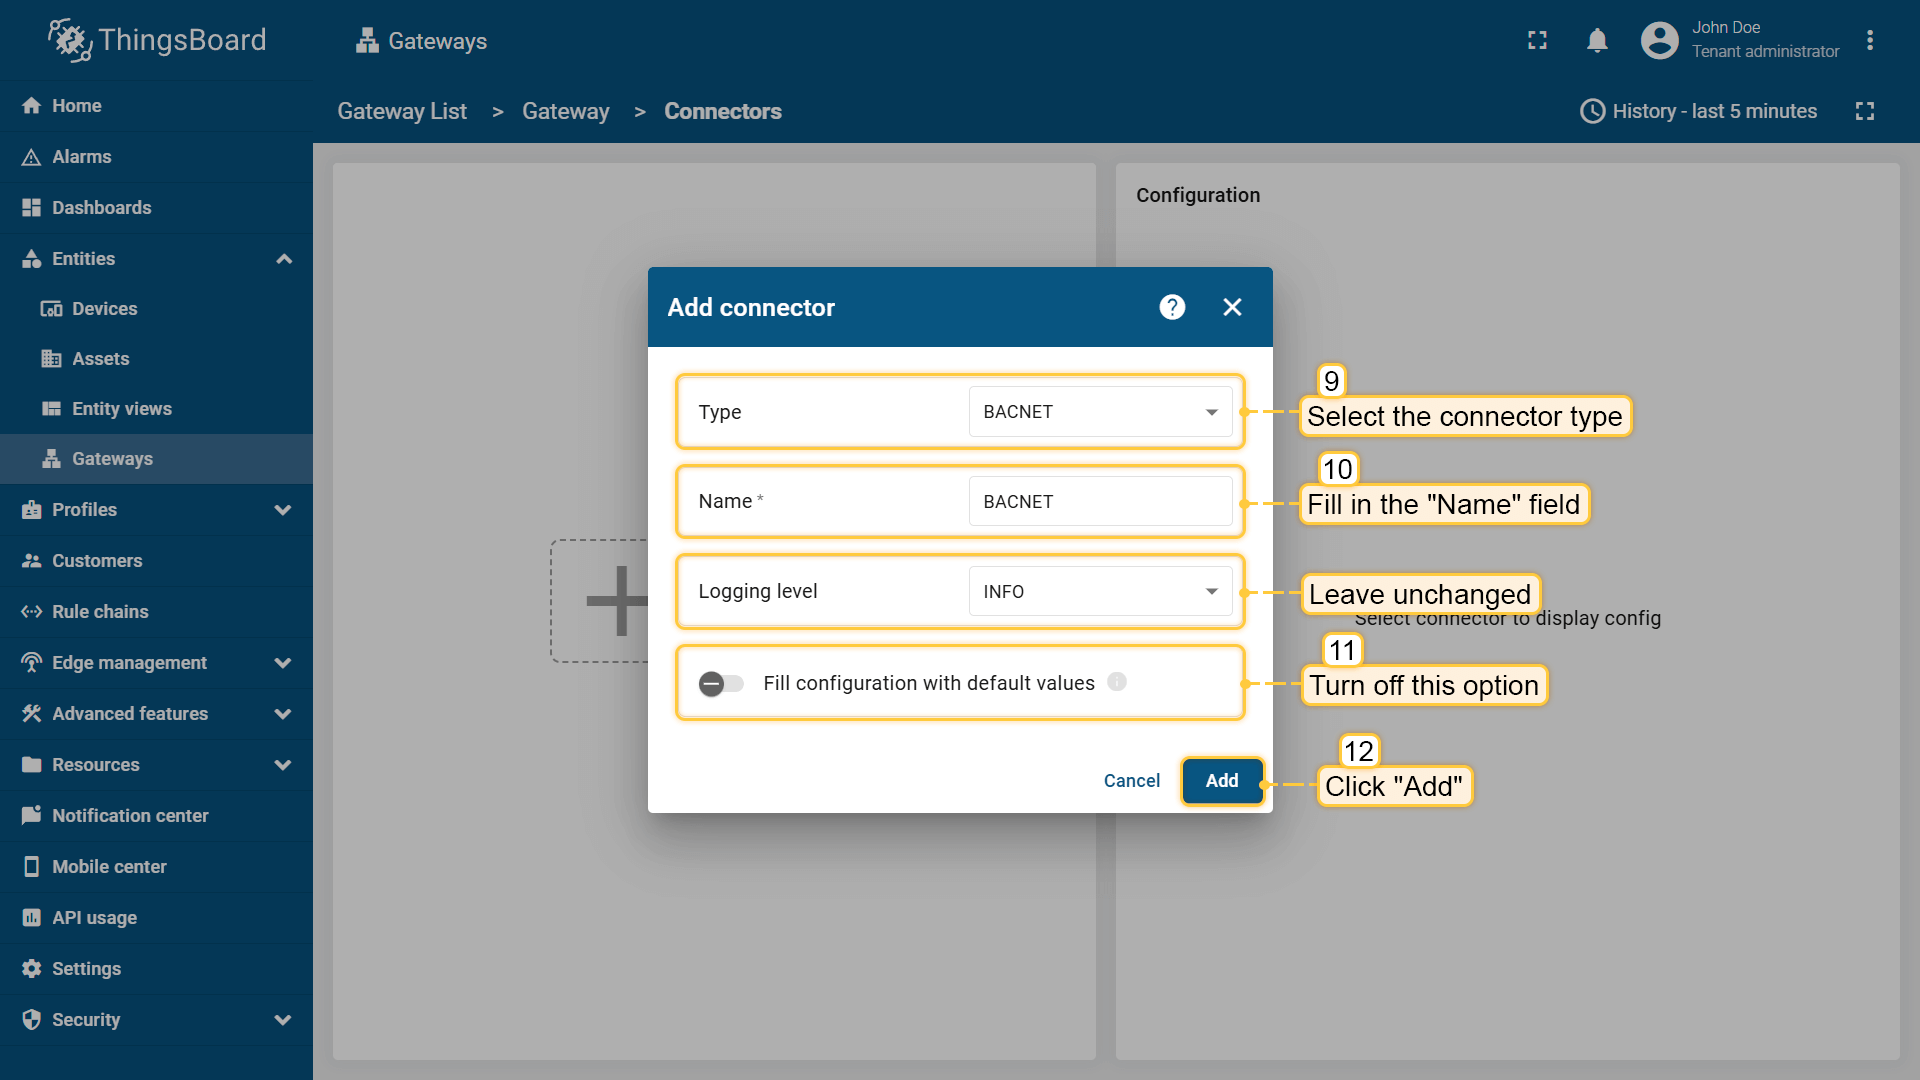 选择「BACnet」连接器类型,填写「名称」字段,禁用默认值填充配置,点击「添加」按钮; 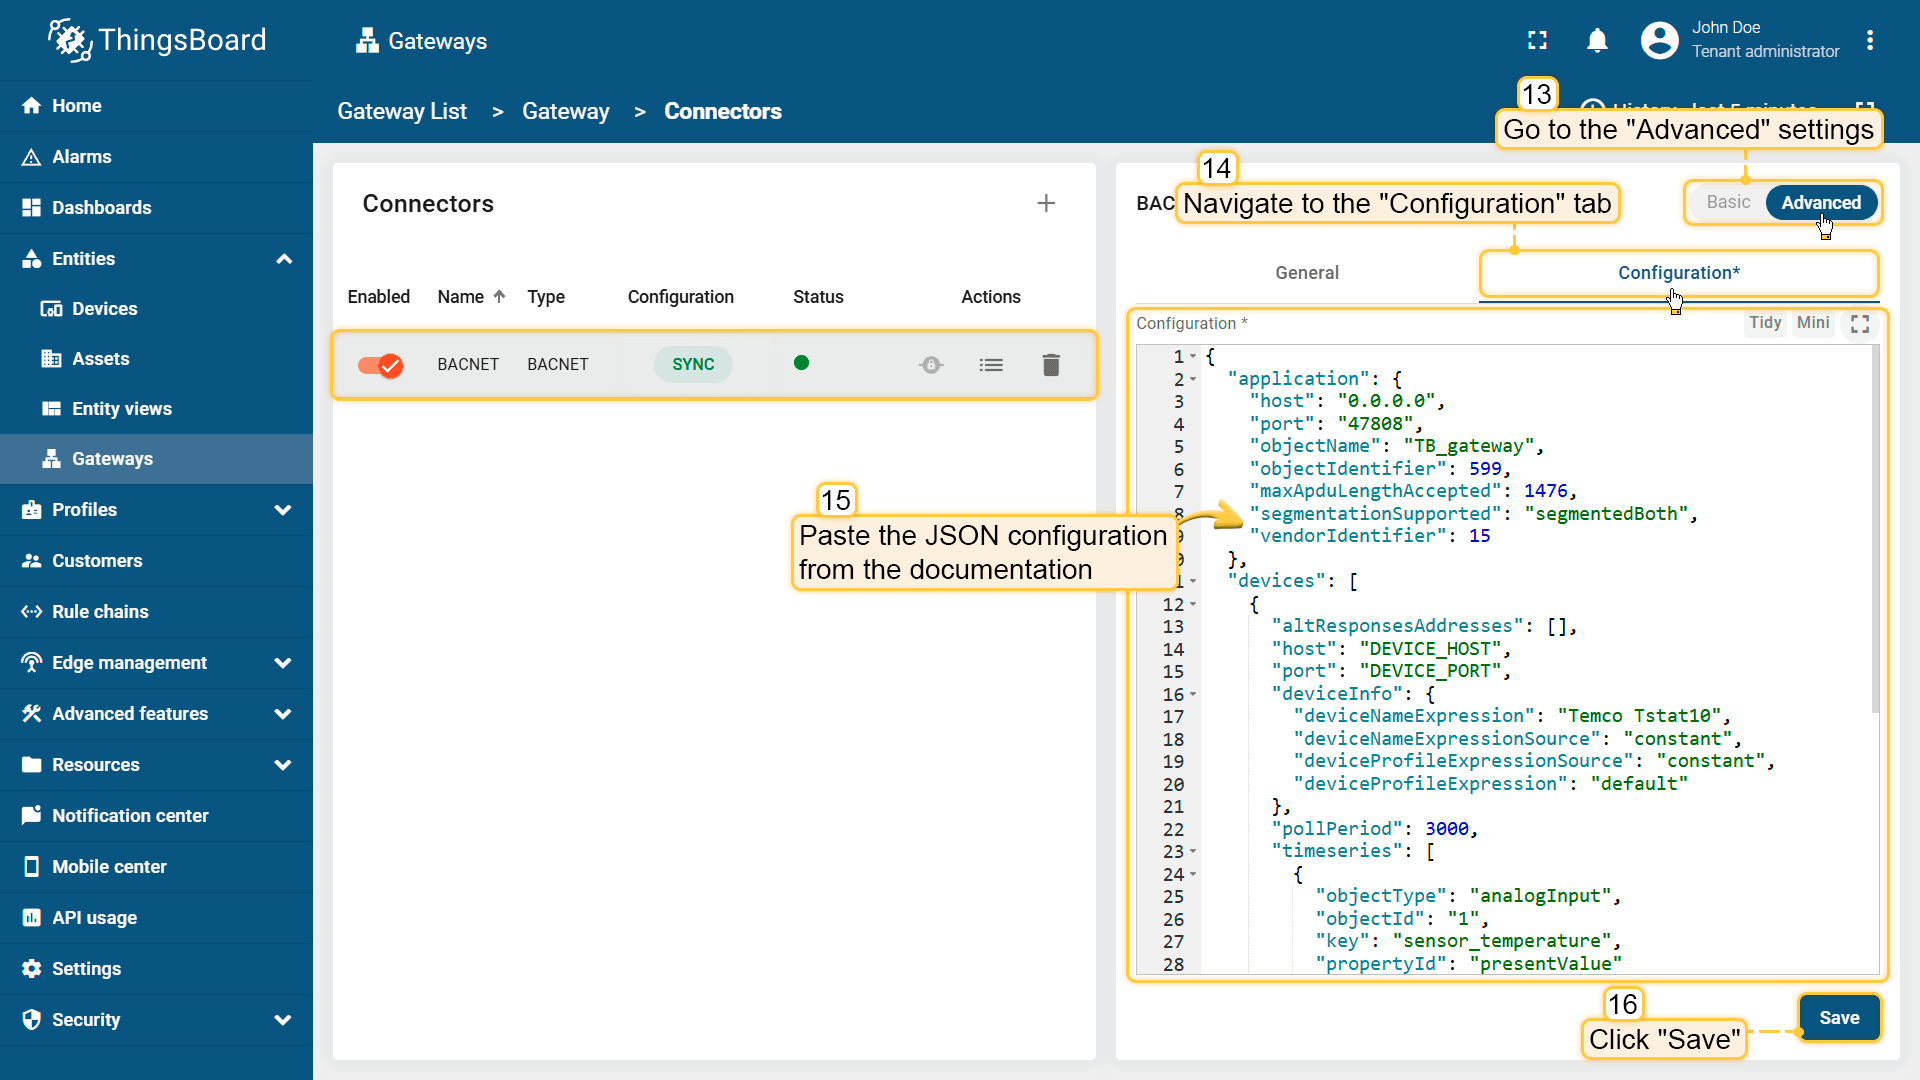 在已创建的连接器中,进入「高级」部分并粘贴下方的 JSON 配置。将 host 和 port 配置参数值替换为设备的 host 和 port。同时将「altResponsesAddresses」中的「DEVICE_HOST」替换为设备 host。点击「保存」按钮。 |
在ThingsBoard上查看数据
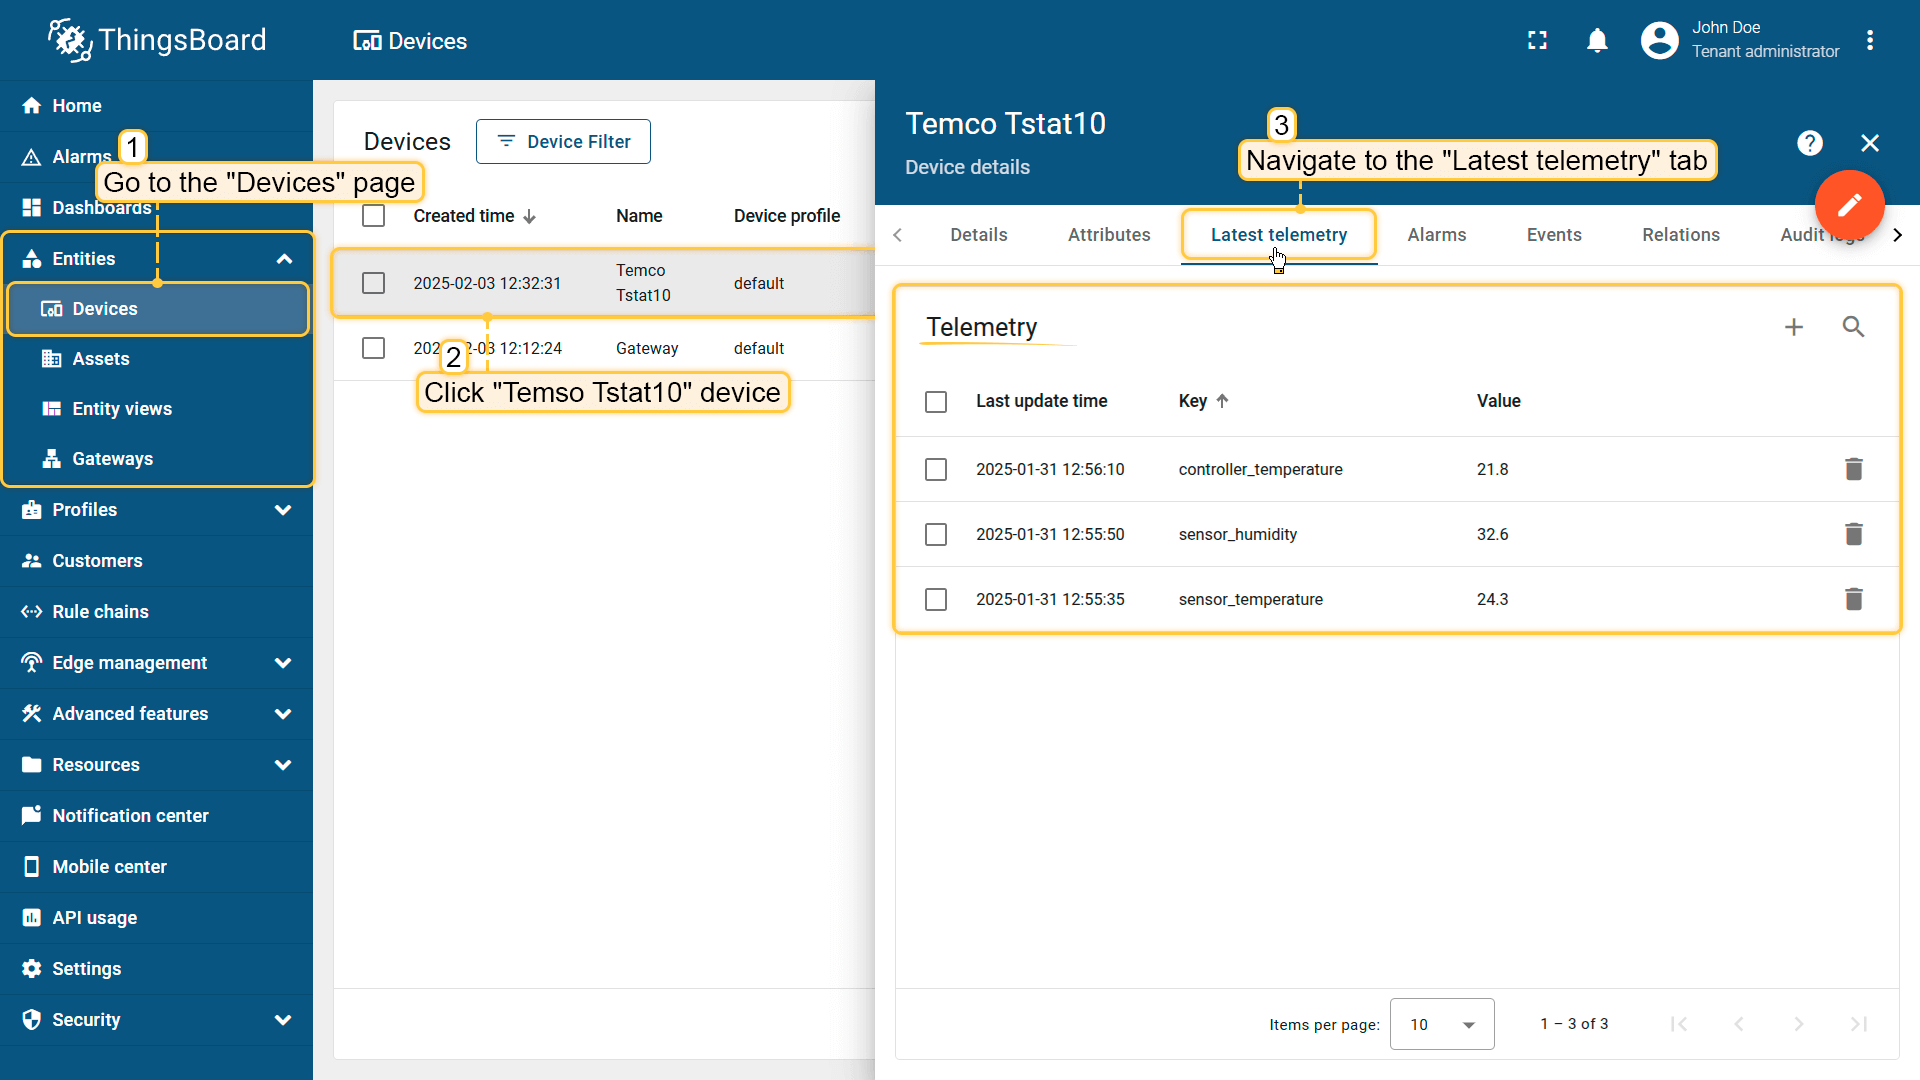
完成以上所有步骤且网关发送数据后,可以在设备遥测标签页中查看数据:
- 点击表格中的设备行打开其详情;
- 导航到“最新遥测”标签页。
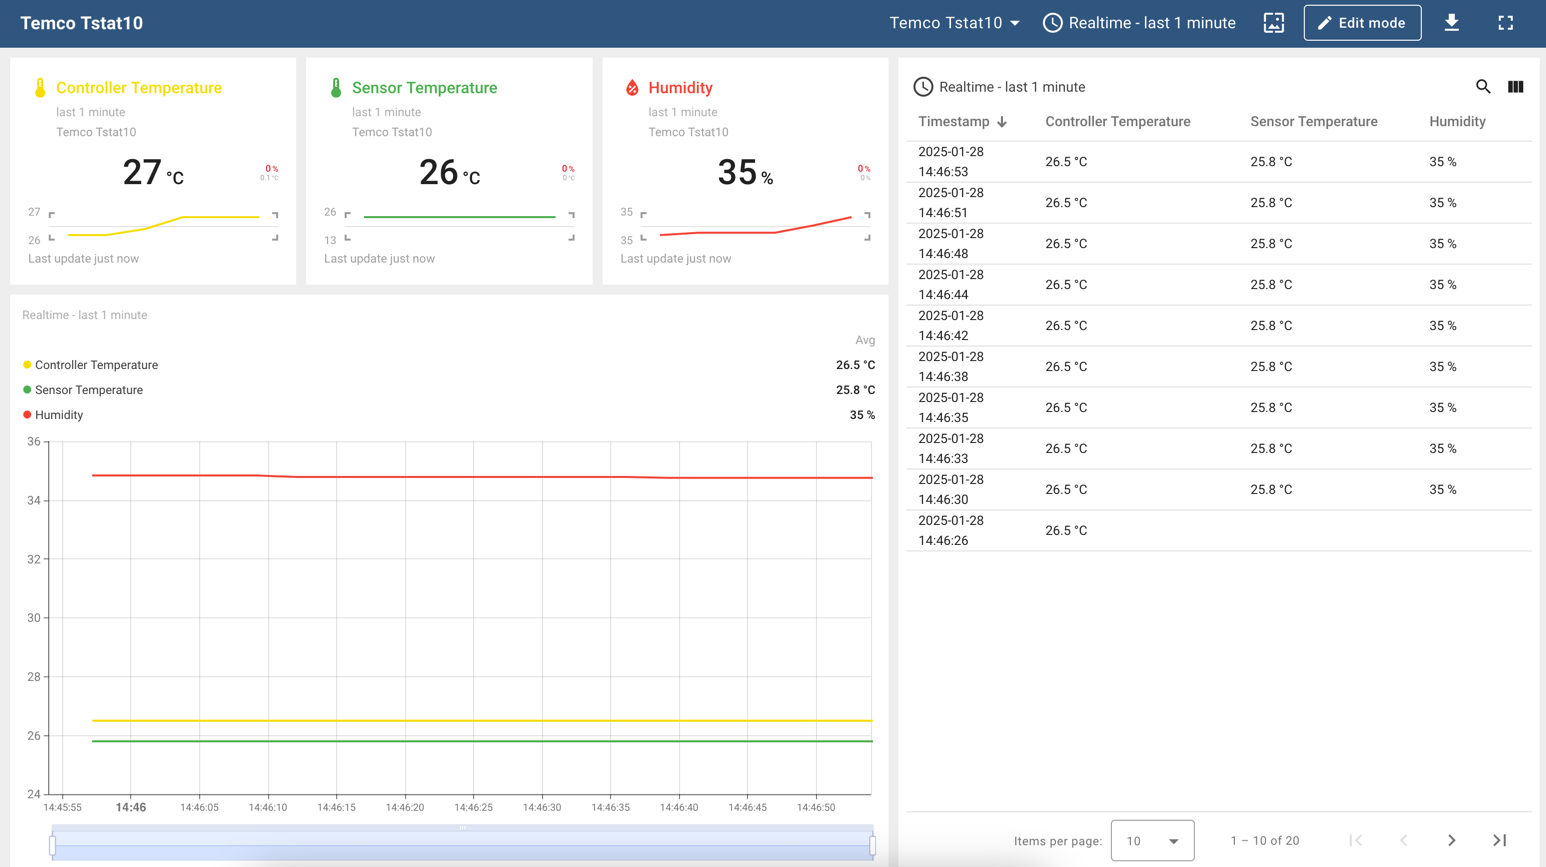
下面在仪表板上展示Temco Tstat10的时序数据。您可以使用自定义部件创建自己的仪表板,也可以使用现成的仪表板直接导入。
导入仪表盘下载 检查设备数据仪表盘 并导入。 您可导入 JSON 格式的仪表盘。操作方式:进入「仪表盘」组,点击页面右上角的 「+」 按钮,选择 「导入仪表盘」。 仪表盘导入窗口将弹出,提示您上传 JSON 文件并点击 「导入」。 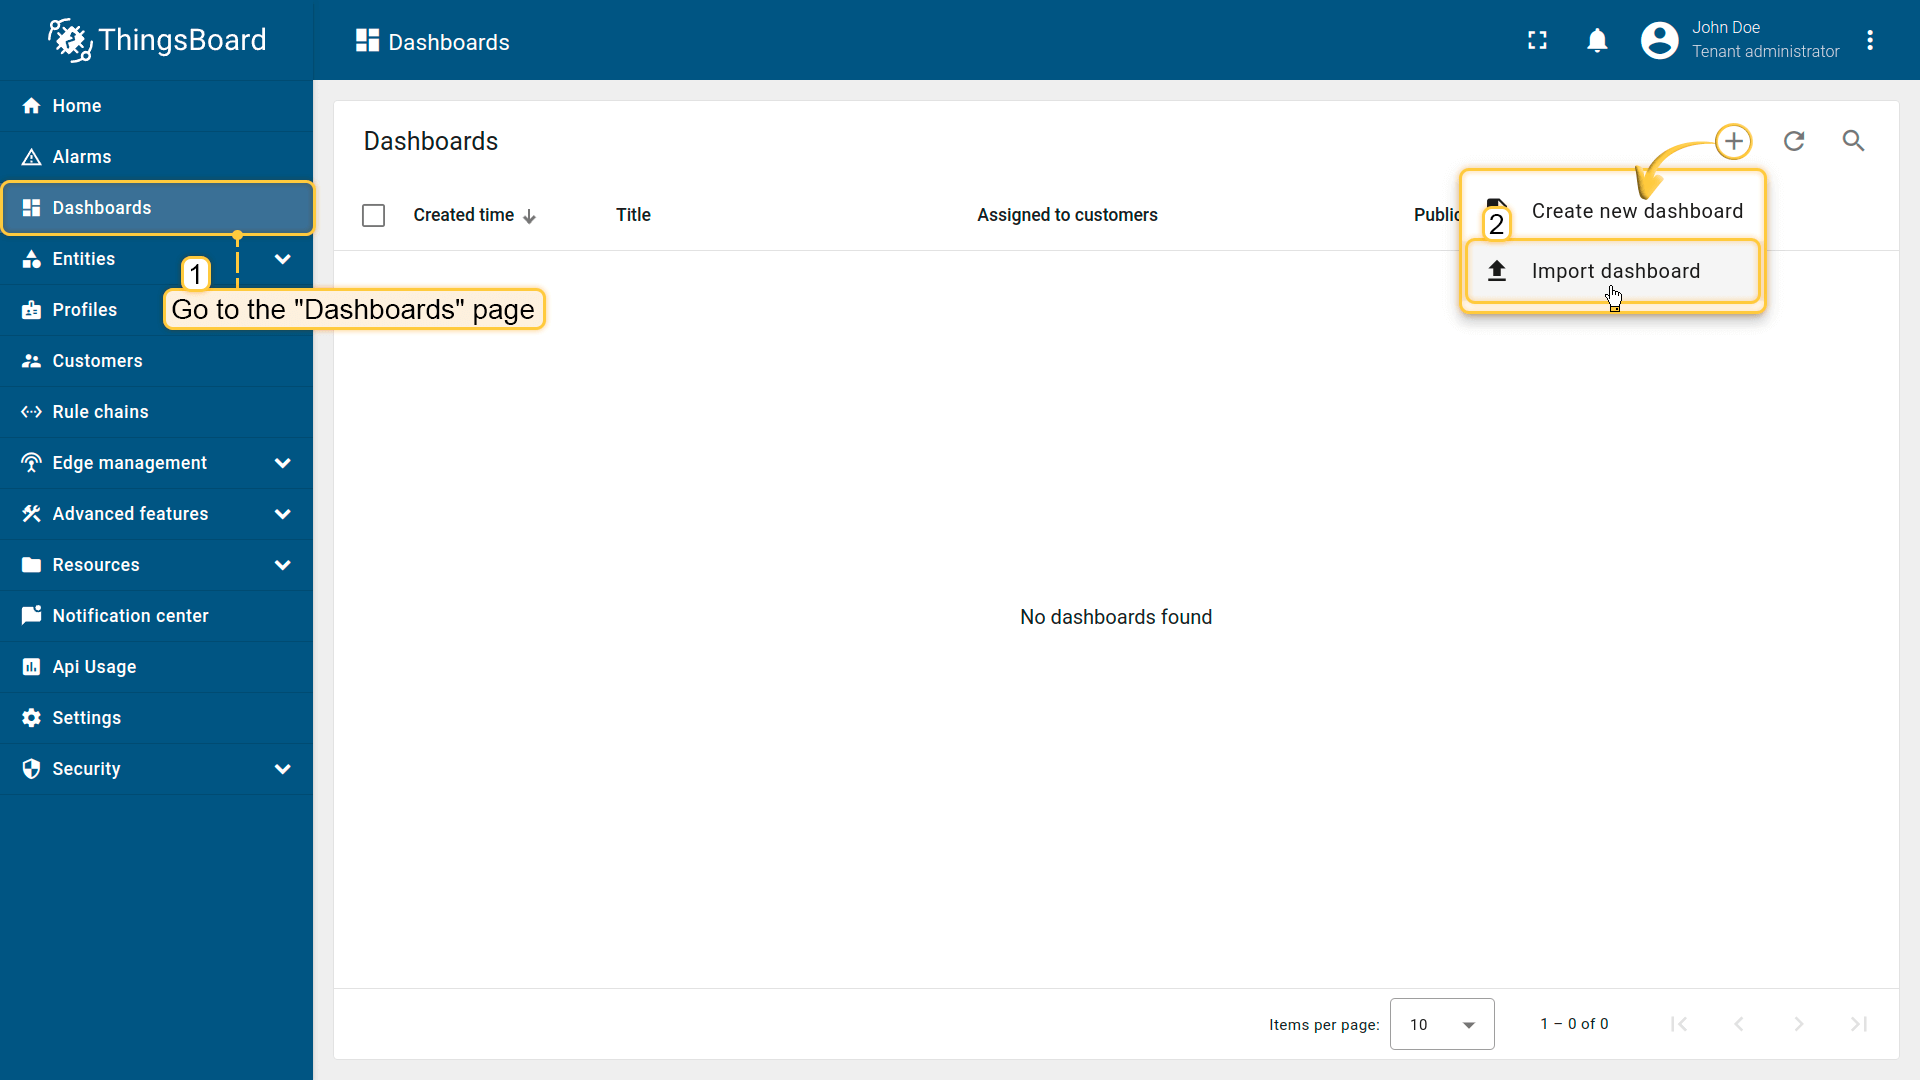 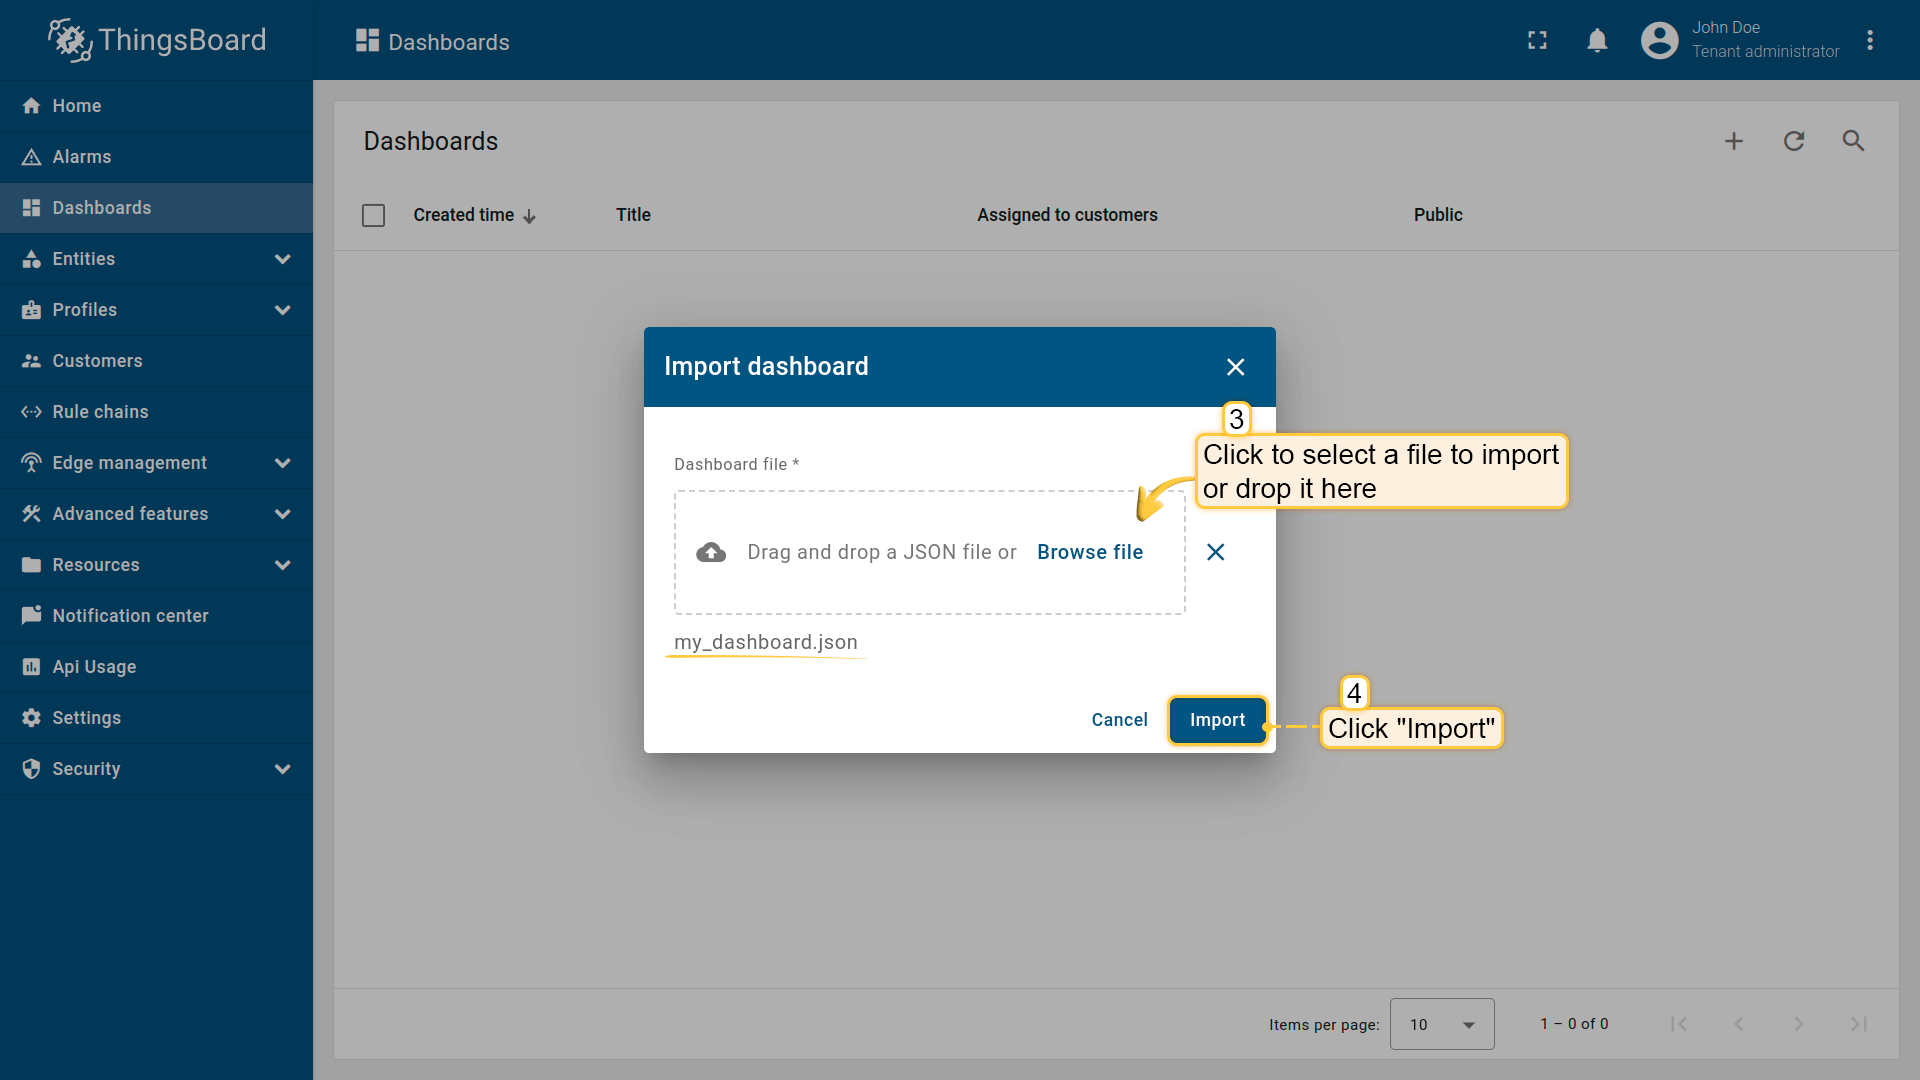 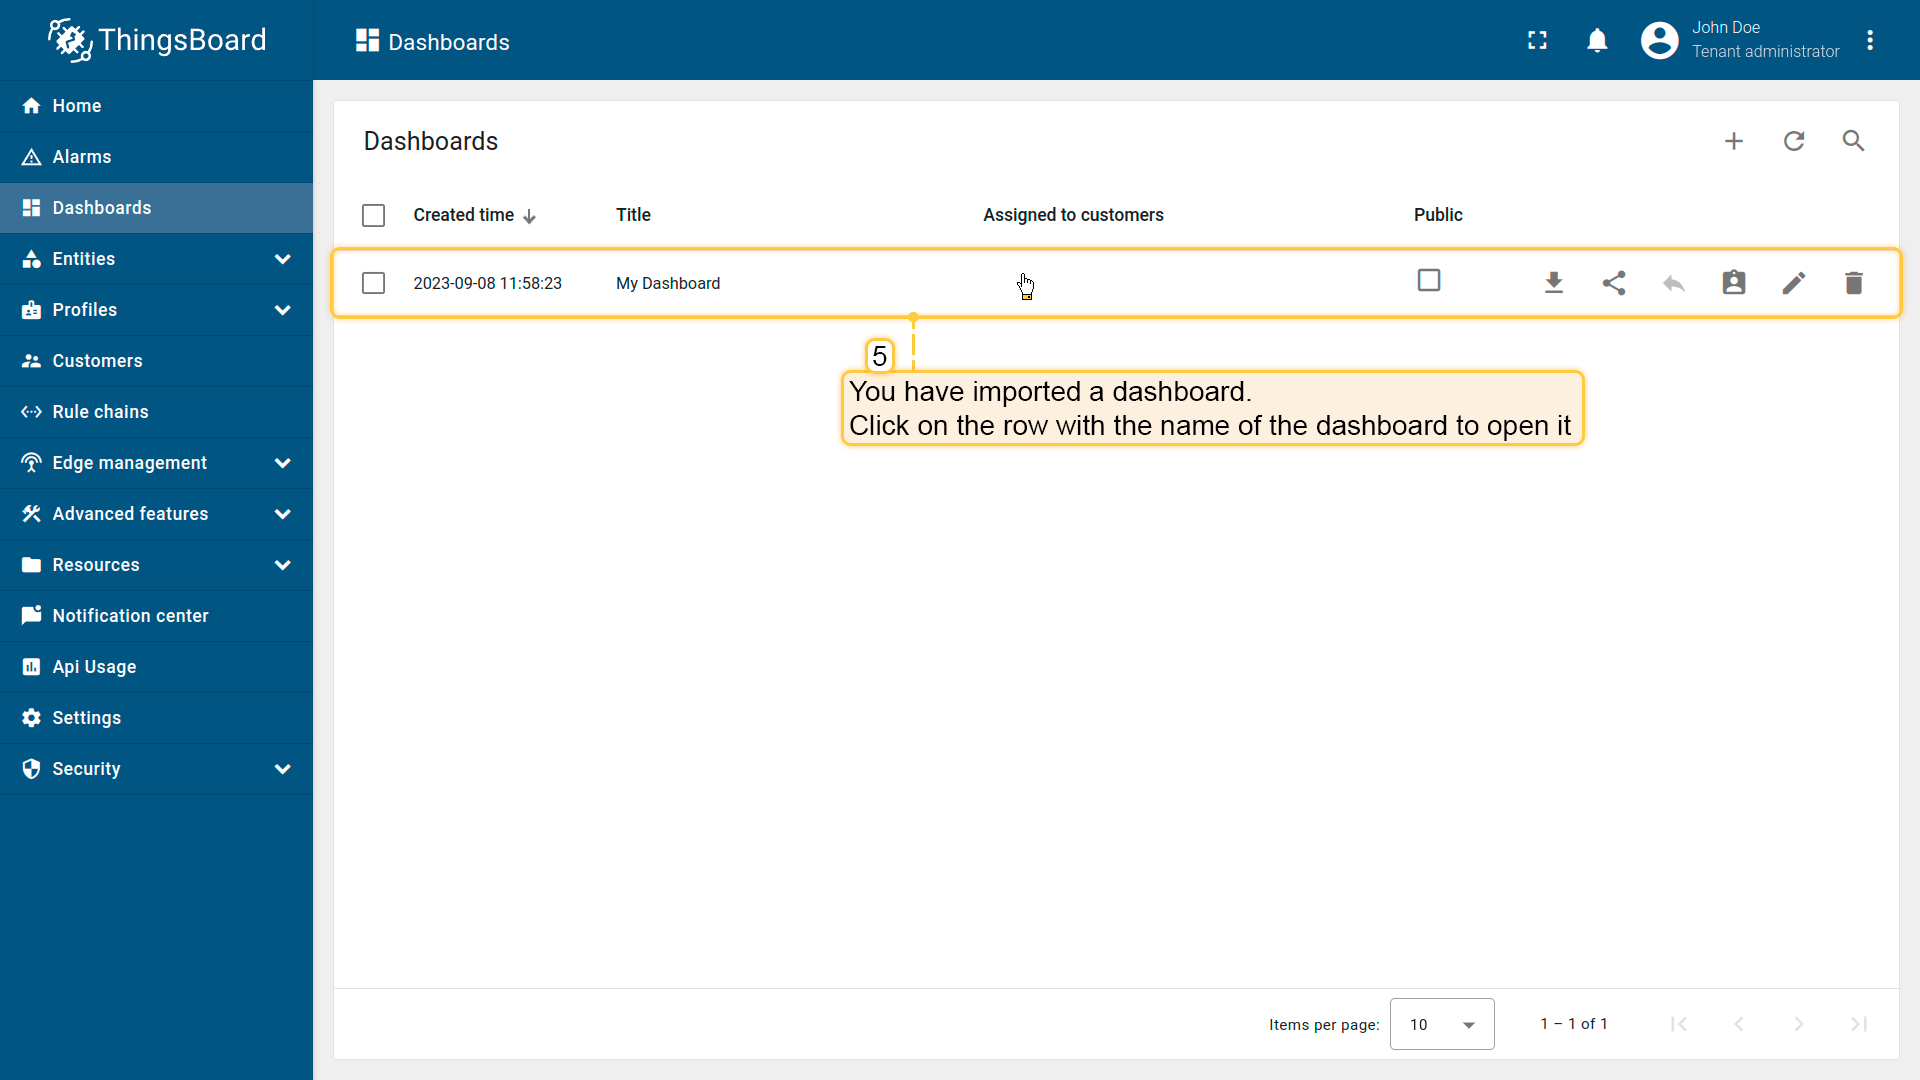 导入后,我们需要为设备选择实体别名。 首先点击 「铅笔」 图标,选择实体别名,选择 「My device」 别名,再次点击 「铅笔」 图标打开编辑。 然后,从下拉列表中选择已创建设备并保存实体别名。完成后即可查看设备数据。 若操作正确,您将看到以下仪表盘:
|
创建新仪表盘我们将创建仪表盘并添加最常用的部件。请参见下方说明。
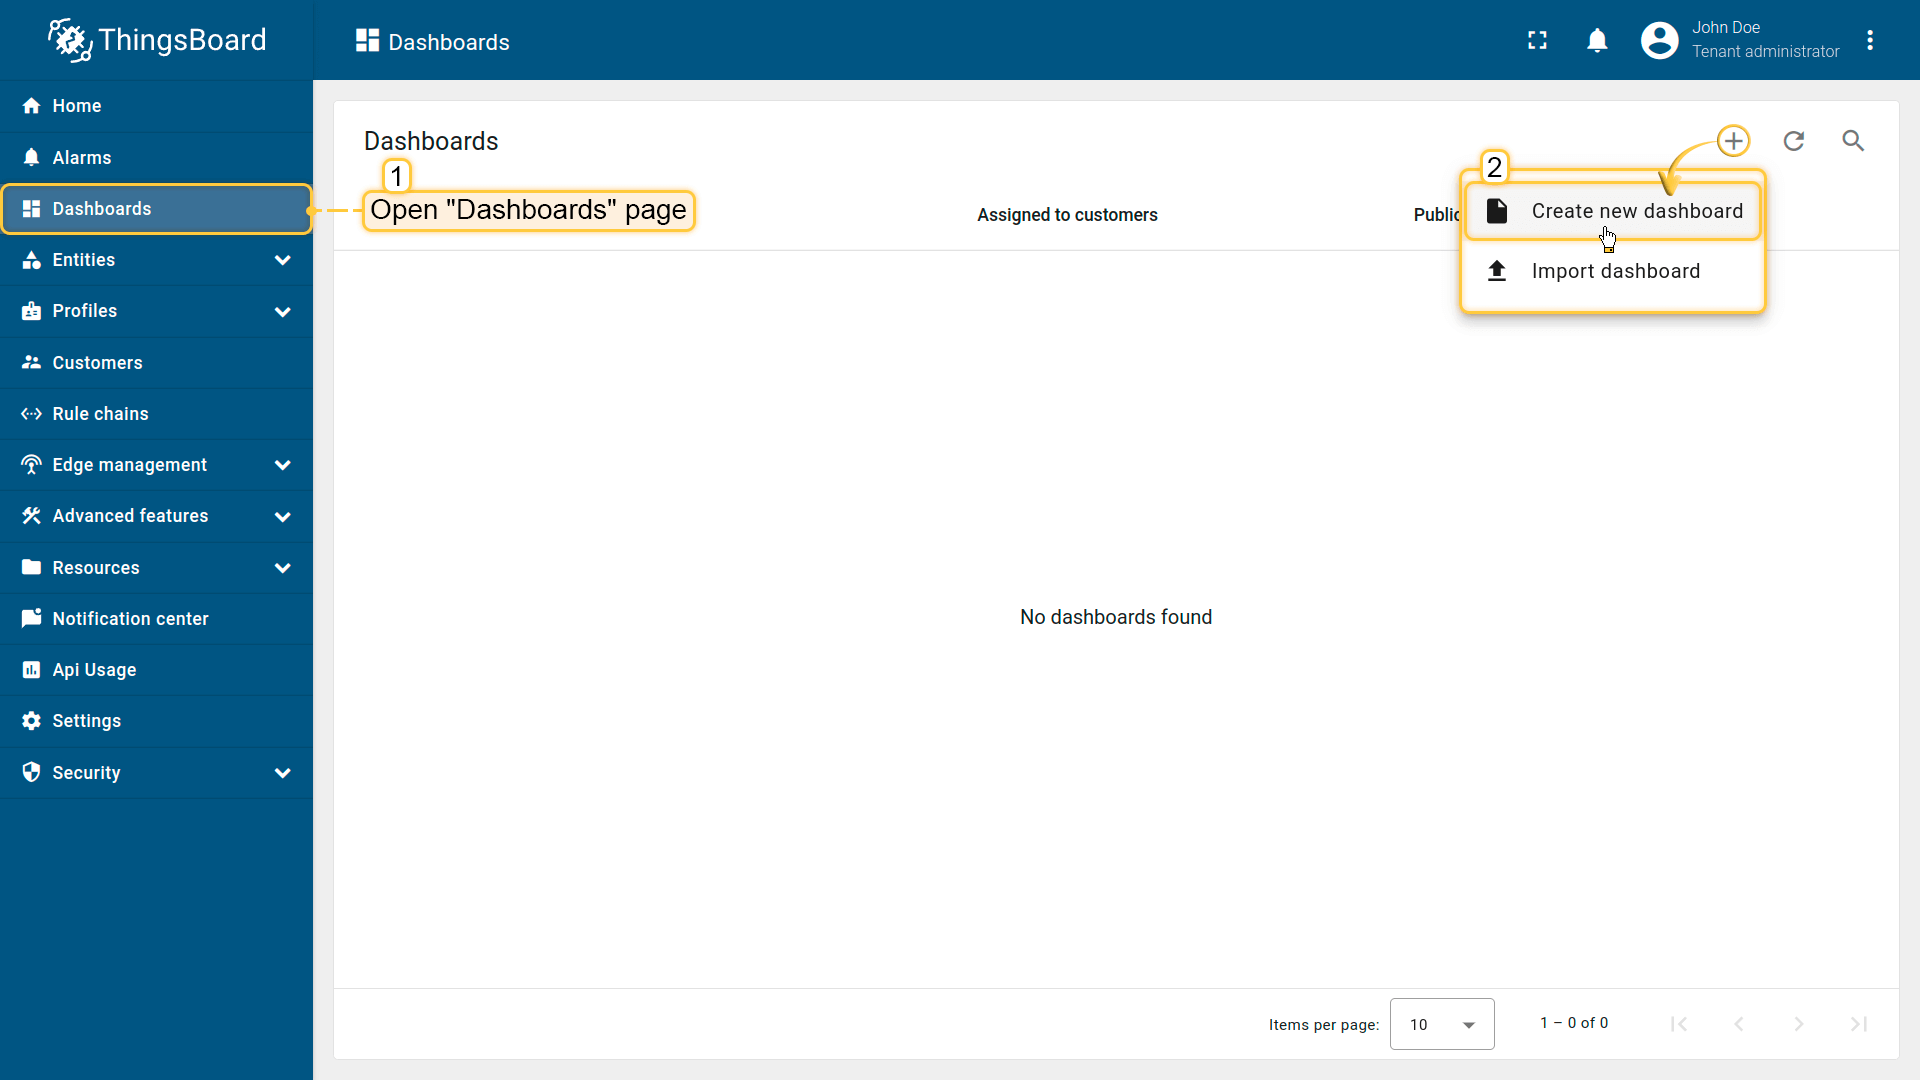 Open the Dashboards page. Click on the “+” icon in the top right corner. Select “Create new dashboard”; 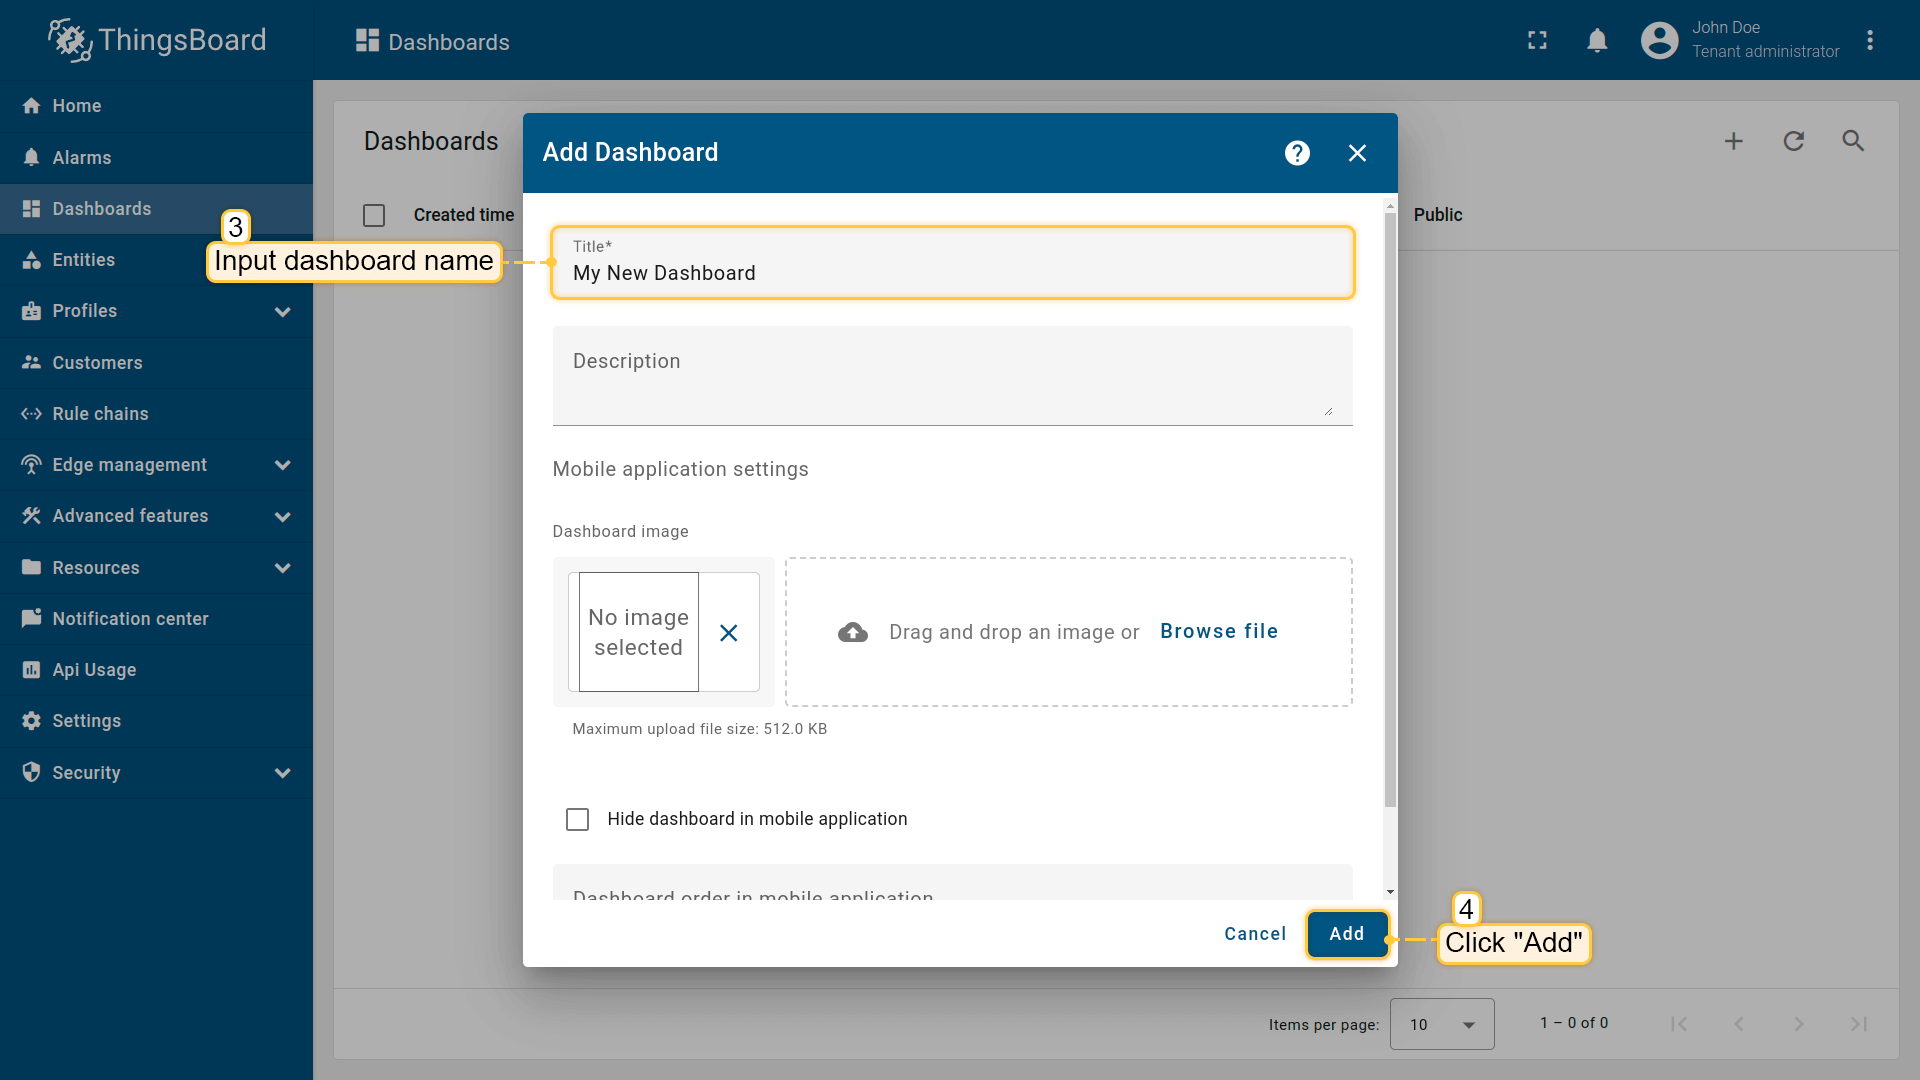 Input dashboard name. For example, “My New Dashboard”. Click “Add” to add the dashboard; 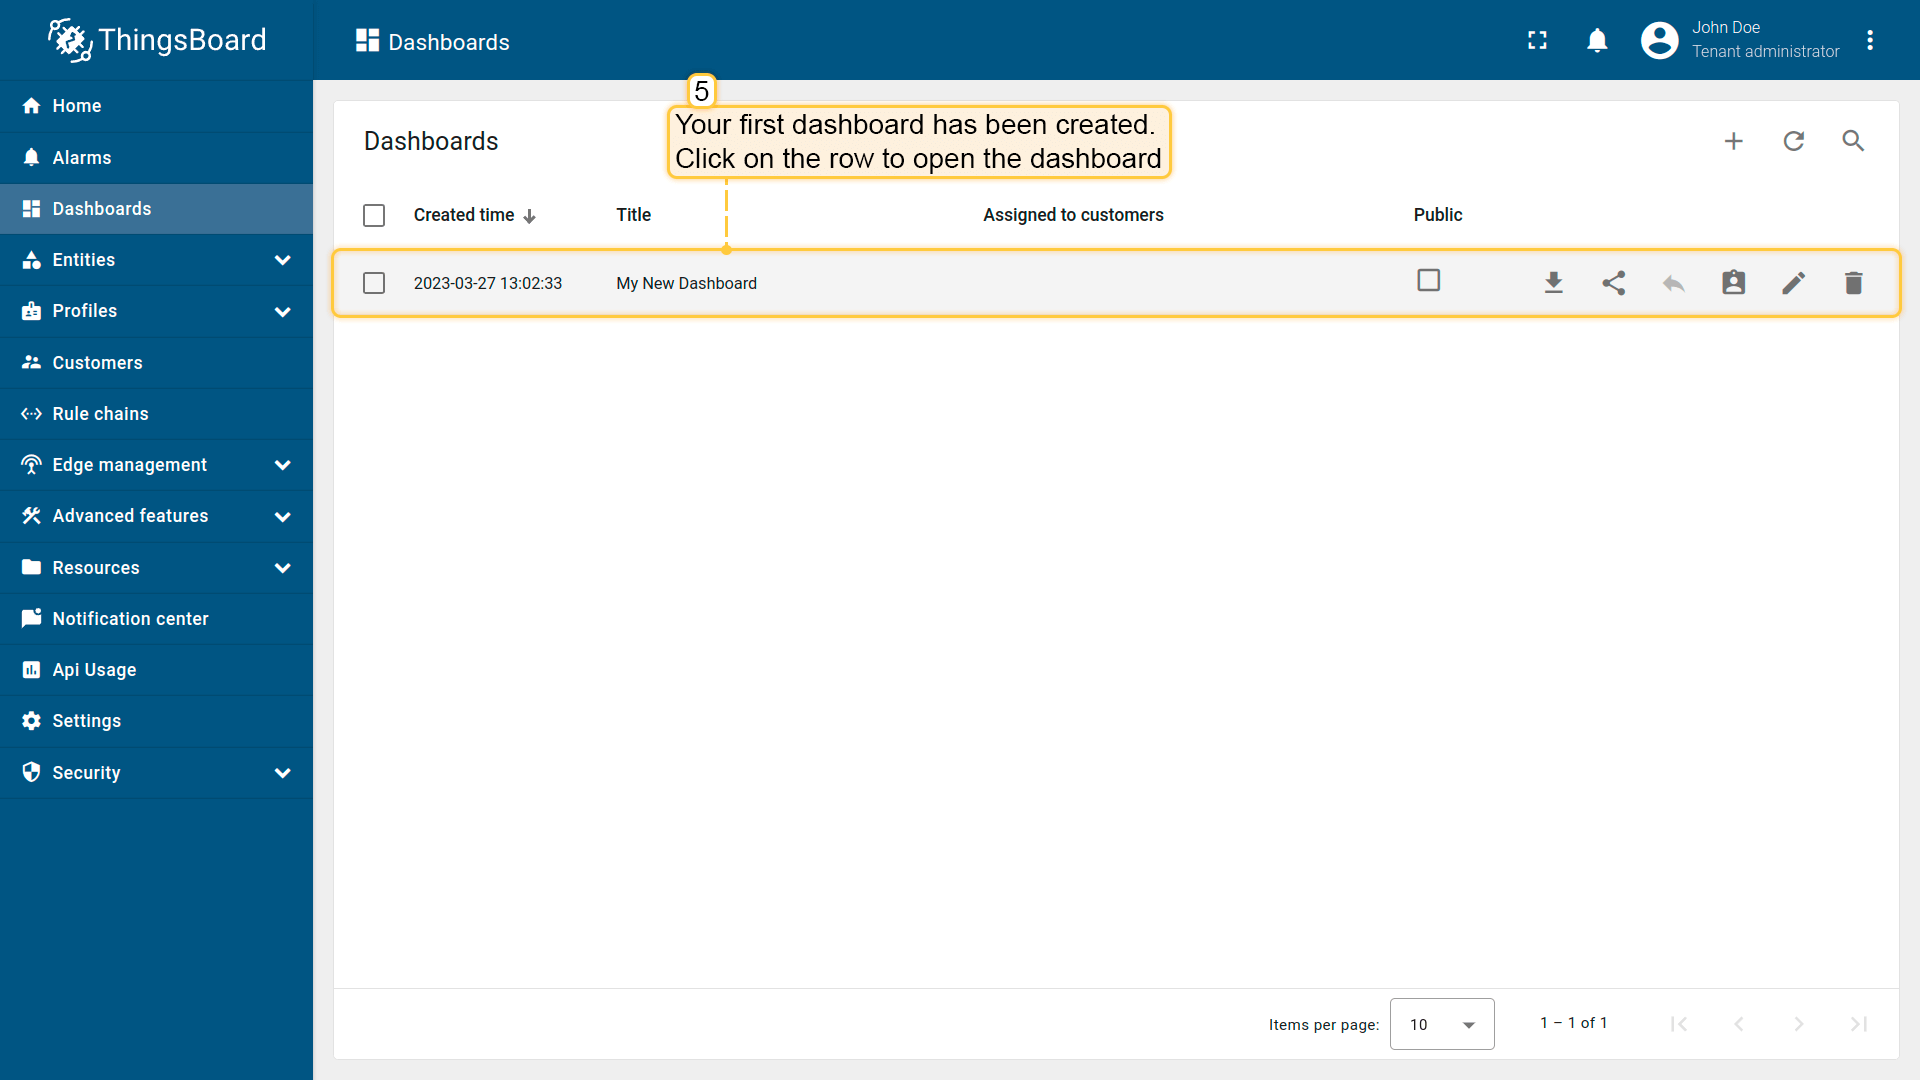 Your dashboard should be listed first since the table sorts dashboards using the creation time by default. Click on the “Open dashboard” icon. 添加实体别名别名是对部件中使用的单个实体或实体组的引用。别名可以是静态或动态的。我们将使用「单个实体」别名,引用单个实体,此处为「Temco Tstat10」。也可以配置引用多个设备的别名,例如某类型的设备或与某资产相关的设备。您可在此处了解更多关于不同别名的信息。
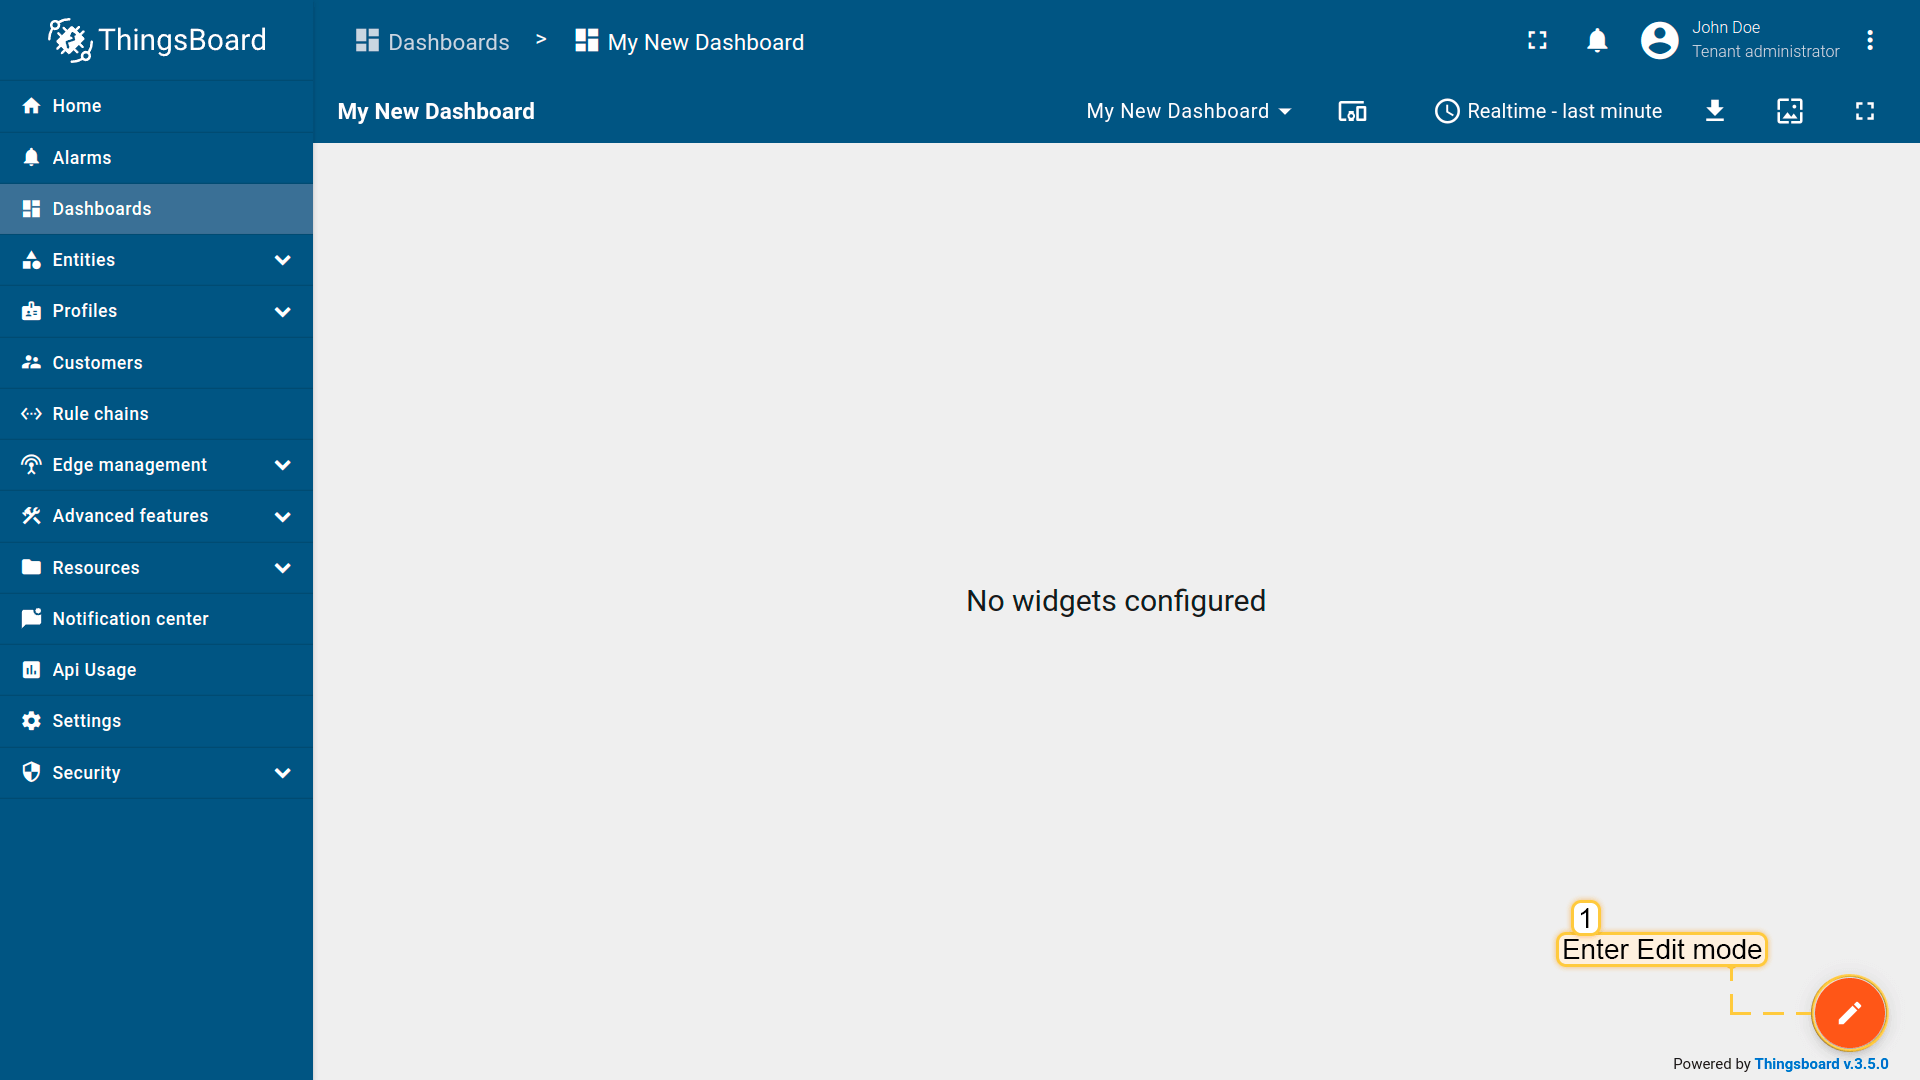 Enter edit mode. Click on the pencil button in the bottom right corner; 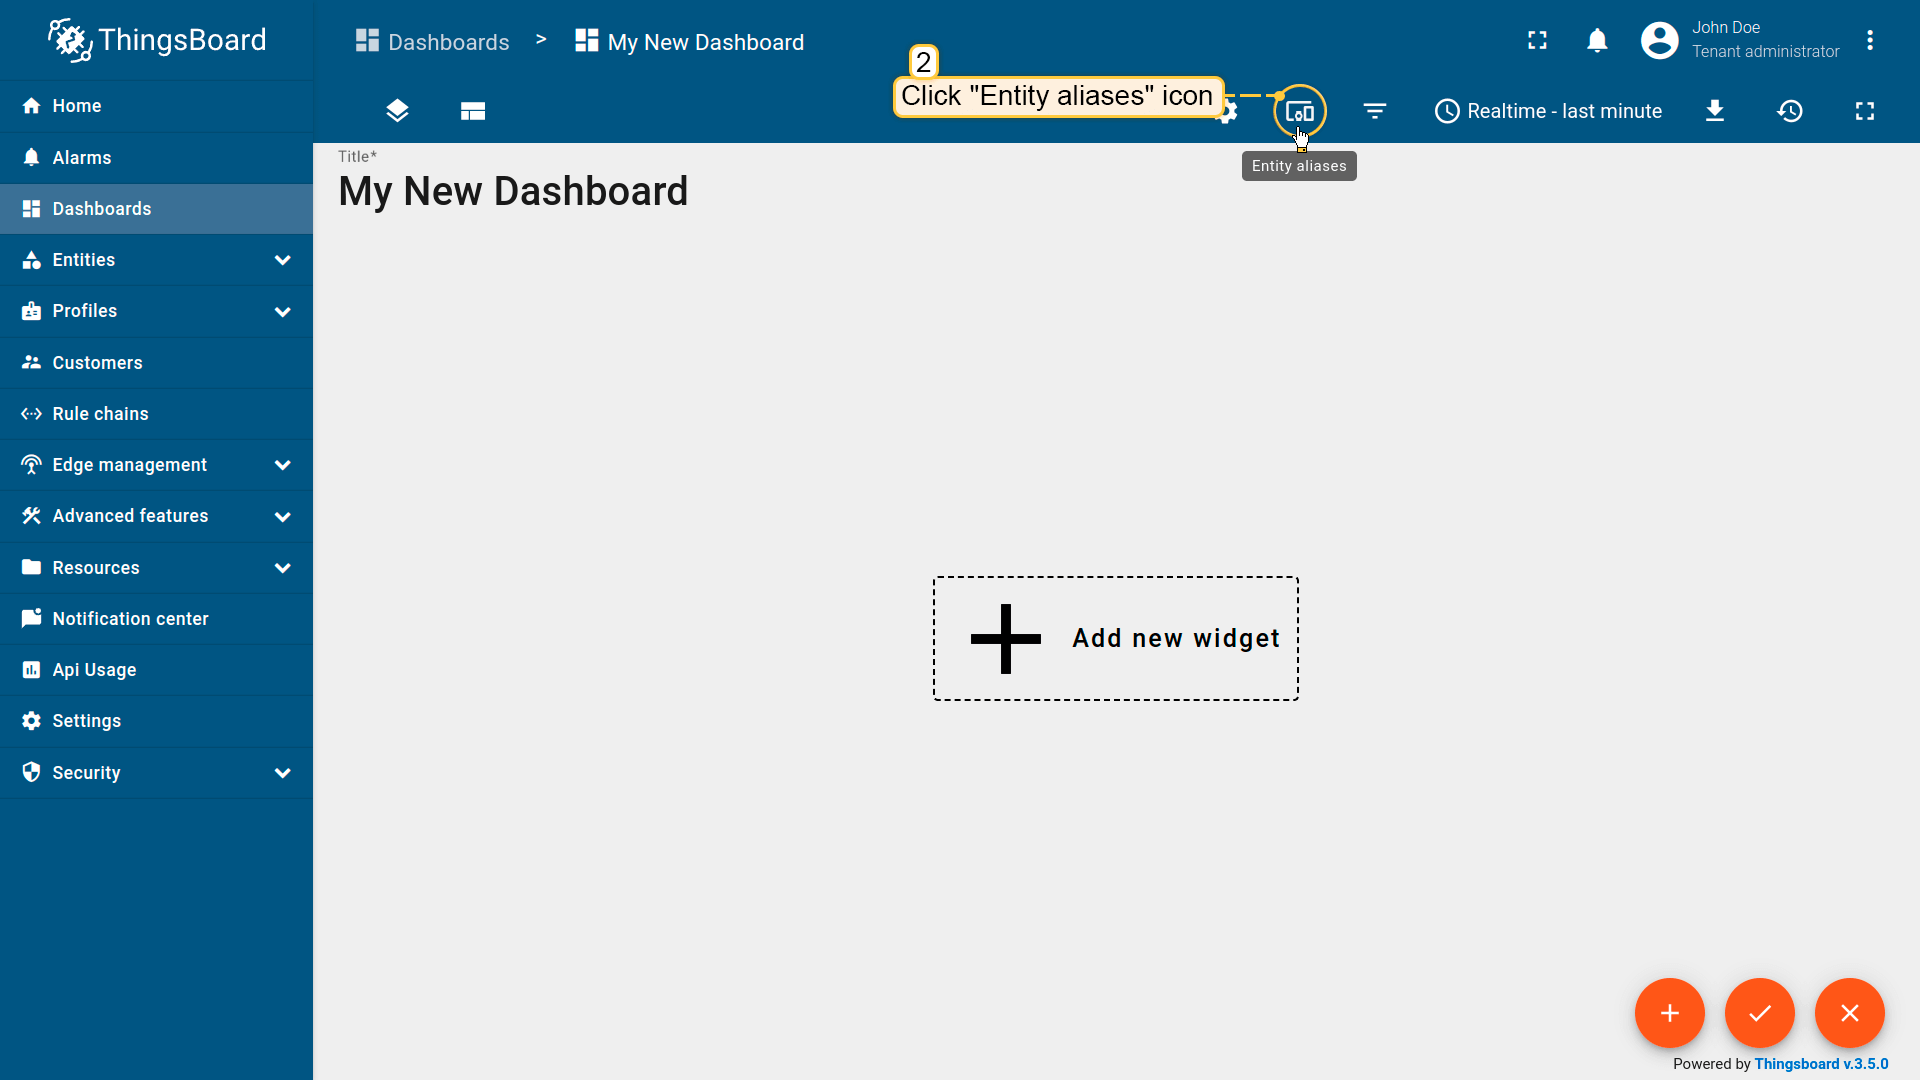 Click the “Entity Aliases” icon in the top right part of the screen. You will see an empty list of Entity aliases; 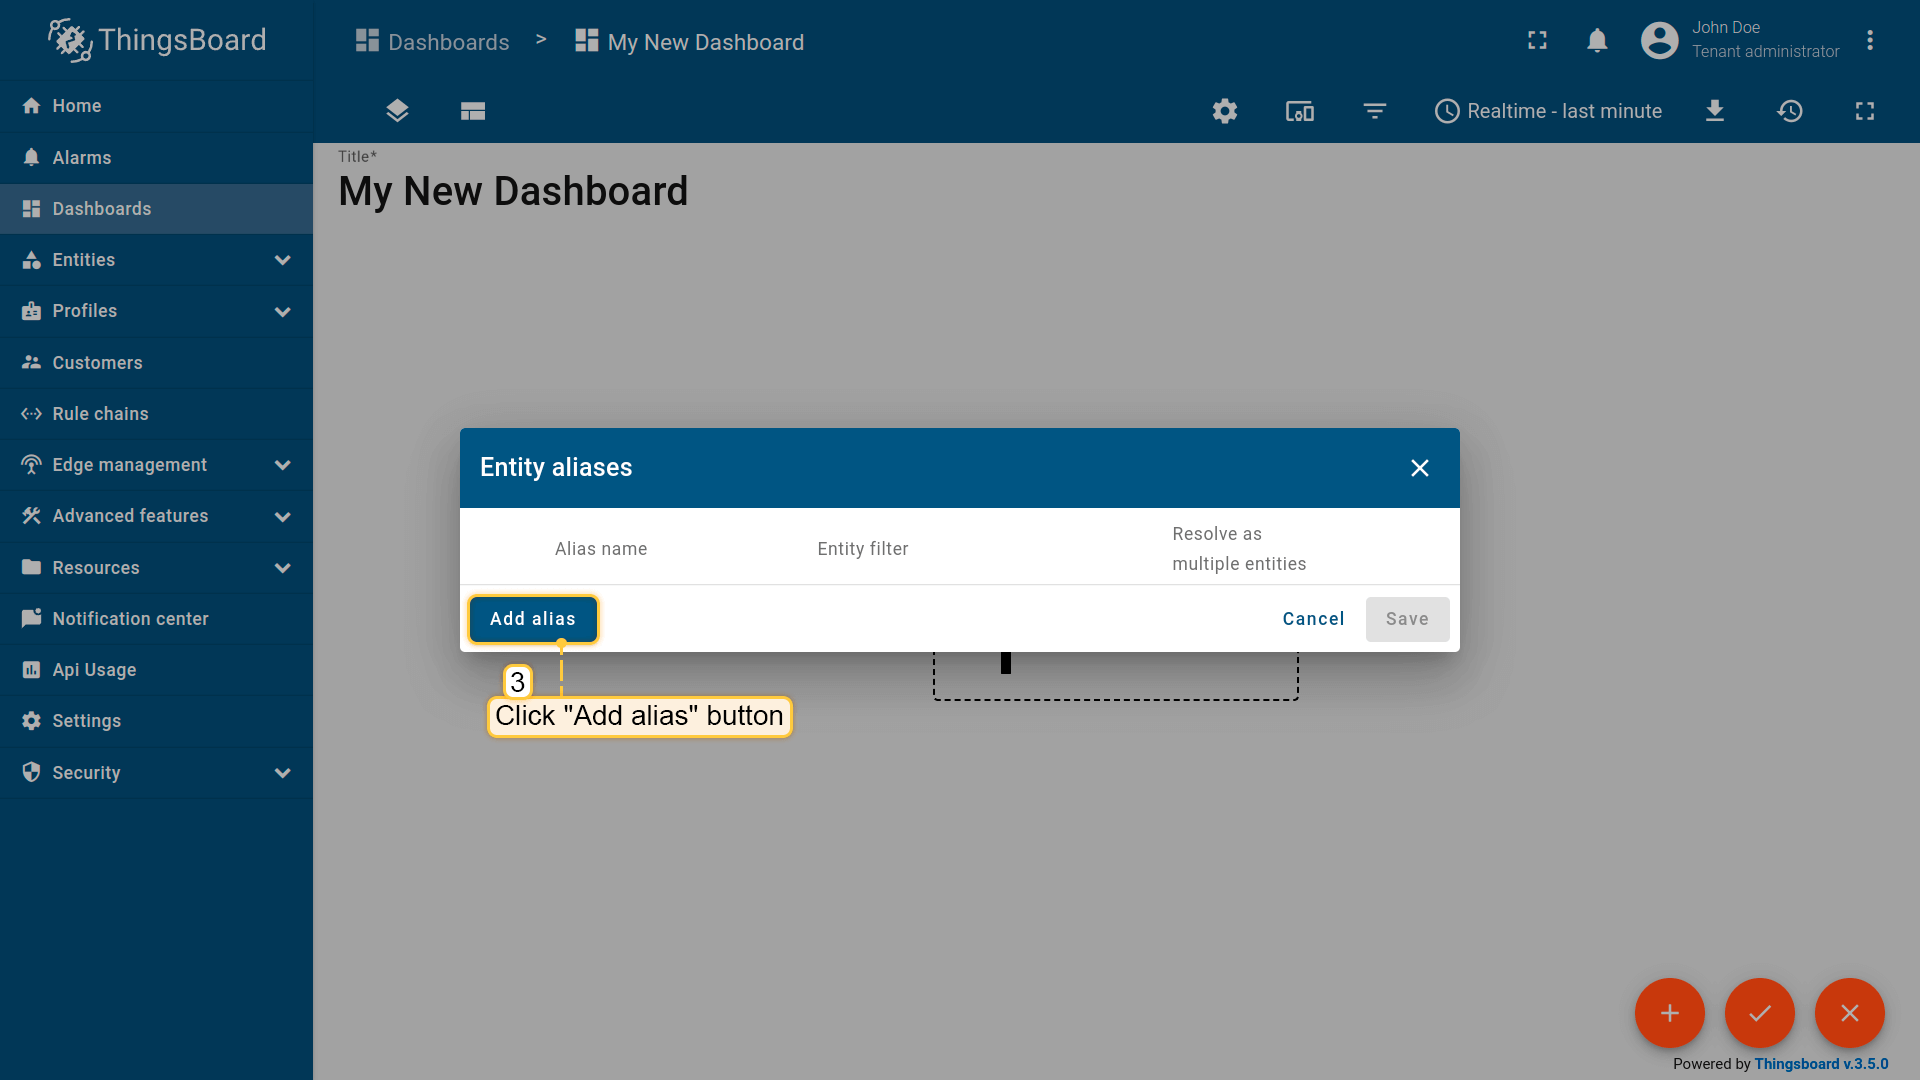 Click “Add alias”;  Enter an alias name. Choose “Single entity” as the Filter type, select “Device” for Type, and begin typing “My New” to trigger autocomplete suggestions; 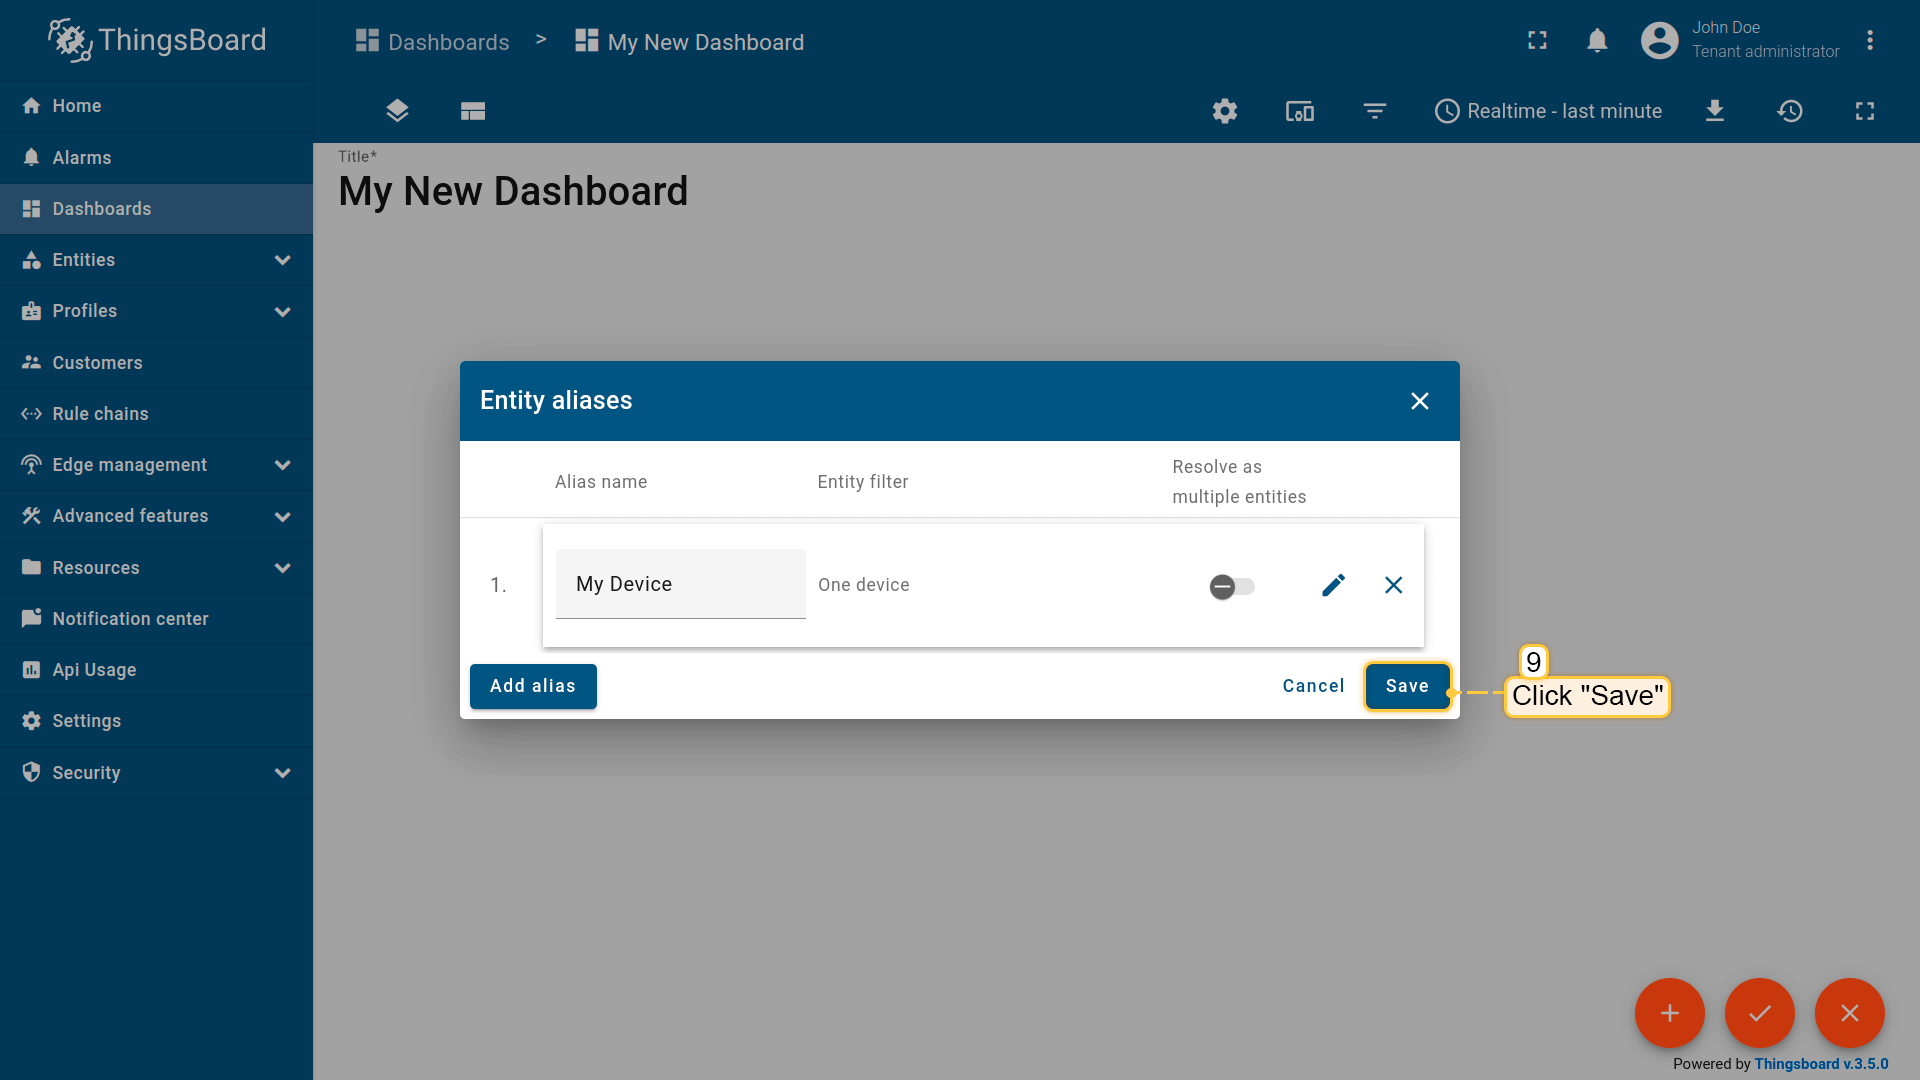 Click “Add” and then “Save”;  Finally, click “Apply changes” in the dashboard editor to save the changes. Then you should enter edit mode again. 要添加新部件,我们需要从部件库中选择。部件按部件包分组。 每个部件都有数据源,数据源决定了部件显示的数据。 |
总结
通过本指南,您可以轻松将Temco Tstat10控制器与温湿度传感器连接到ThingsBoard。将设备连接到网关后,您就可以在ThingsBoard上查看和处理设备发送的数据。
请探索平台文档,了解更多核心概念和功能。