- Hardware type: Other devices
- Connectivity: KNX
- Industry: Smart Buildings, Smart Cities, Industrial Manufacturing, Energy Management
- Use cases: Smart energy, Smart Office, Smart Metering
- Platforms: Community Edition, Professional Edition, Cloud
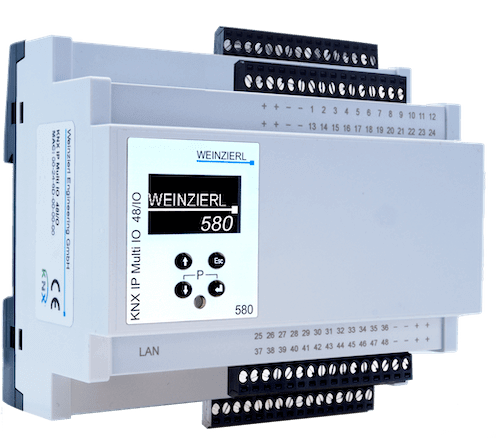
KNX IP Multi IO 580 (48I/O)是一款用于楼宇控制的通用二进制接口,提供48路I/O线。每路既可用作二进制输入也可用作二进制输出。外设可由外部24V⎒电压供电。配置为输入的通道可通过KNX网络控制灯光或百叶窗,也可用于脉冲计数(例如作为能源表接口)。配置为输出的通道可直接驱动信号LED、外部耦合继电器。
前置条件
继续本指南前,需准备以下内容:
- Multi IO Extension Switch 590
- Multi IO Extension Shutter 592
- Coupling relay for Multi IO
- ETS software installed
- ThingsBoard IoT Gateway installed
- ThingsBoard 账户
设备连接
根据官方网站的用户手册,首先需要将控制器与开关、百叶窗和继电器进行有线连接。控制器需通过LAN端口连接到网络。同时需要从官方网站下载并安装ETS软件。
控制器配置
要连接控制器,需要在ETS软件中进行配置。同时需要通过以太网将控制器连接到网络。
将设备添加到ETS项目
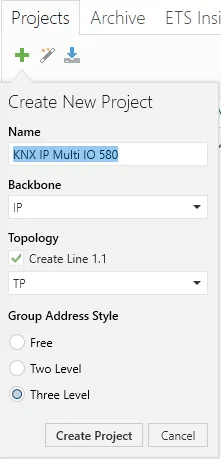
首先需要创建项目并将设备添加到拓扑中,请按以下步骤操作:
-
In the opened ETS main window, create new project (use default setting for creating, except “Name” field);
-
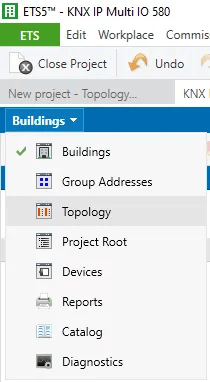
Under the projects tabs bar click on “Buildings” dropdown list and select “Topology” from the list.
-
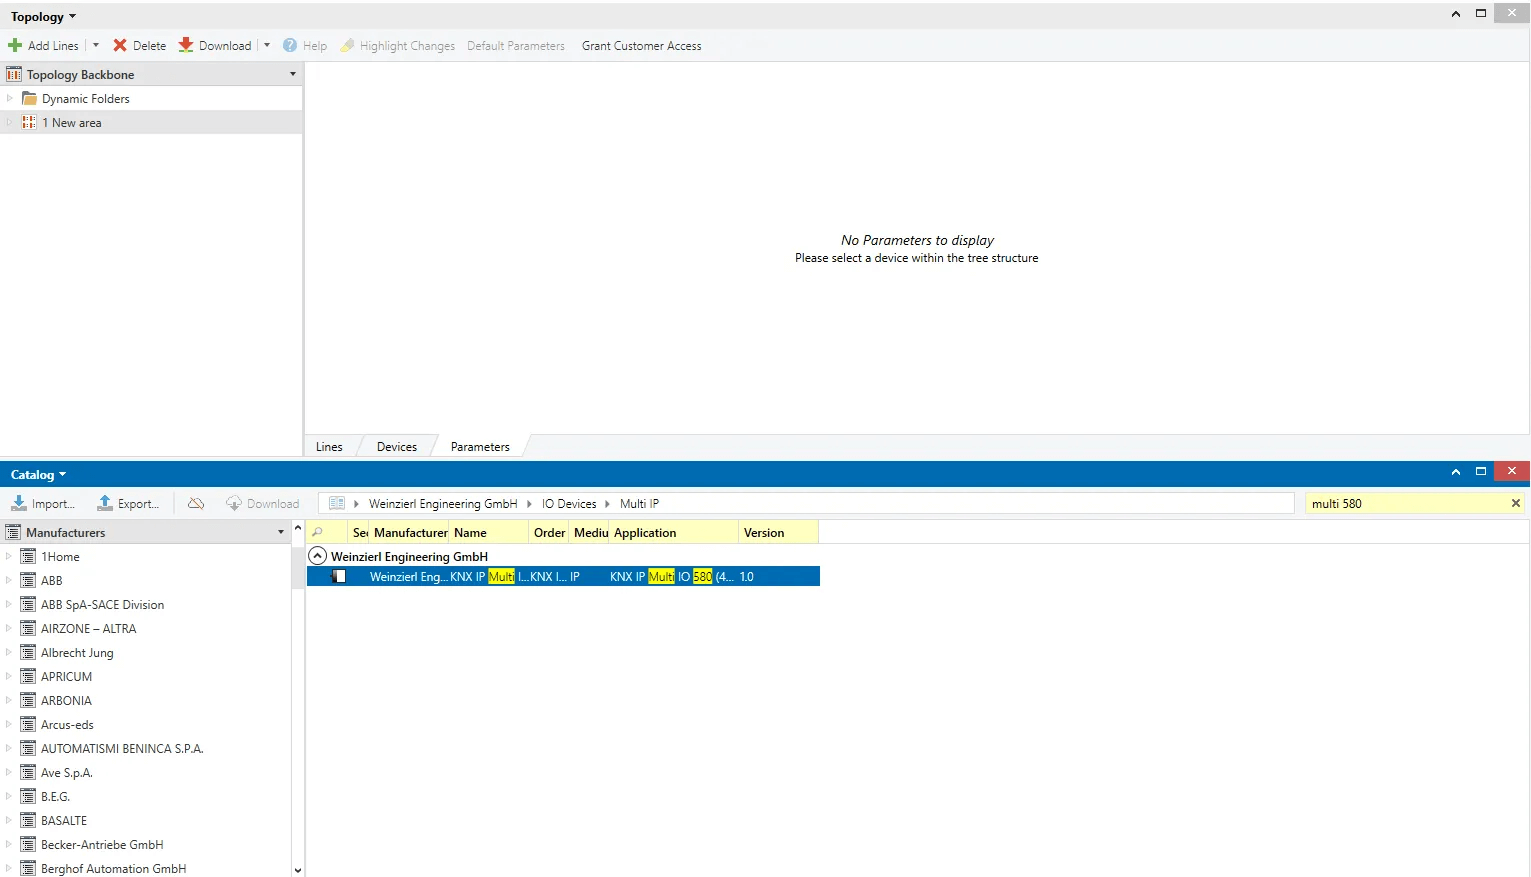
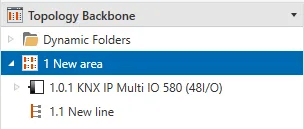
Right click on “1 New area” subitem and select “+ Add” button from the dropdown list, and click on “Devices” button.
-
In the window that opens at the bottom side, use the search field to look for “Multi 580”. Double click on found device. New device will be added.
-
After device installation, drag and drop it to the sidebar above “1 New area”. Device added.
In the opened ETS main window, create new project (use default setting for creating, except “Name” field);
Under the projects tabs bar click on “Buildings” dropdown list and select “Topology” from the list.

Right click on “1 New area” subitem and select “+ Add” button from the dropdown list, and click on “Devices” button.
In the window that opens at the bottom side, use the search field to look for “Multi 580”. Double click on found device. New device will be added.
After device installation, drag and drop it to the sidebar above “1 New area”. Device added.
配置设备
将设备添加到拓扑新区域后,需要配置设备。请按以下步骤操作:
-
Click on added device, on the right sidebar, select “Properties” tab and click on “IP” button. Select “Use a static IP address” option and fill in “IP Address”, “Subnet Mask”, “Default Gateway” fields with your corresponding controller (you can find controller IP address on the built-in display) and network settings.
-
Click on “Settings” button under “Properties” tab and fill in “Individual Address” with “1.0.1”, click on “Park” button.
-
On the right side of the main window, click on the “Down arrow” button near “Download” button and select “Download all”. Controller configuration settings should be saved.
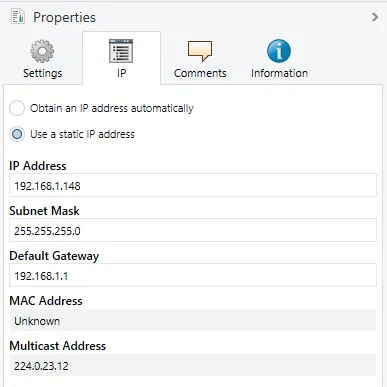
Click on added device, on the right sidebar, select “Properties” tab and click on “IP” button. Select “Use a static IP address” option and fill in “IP Address”, “Subnet Mask”, “Default Gateway” fields with your corresponding controller (you can find controller IP address on the built-in display) and network settings.
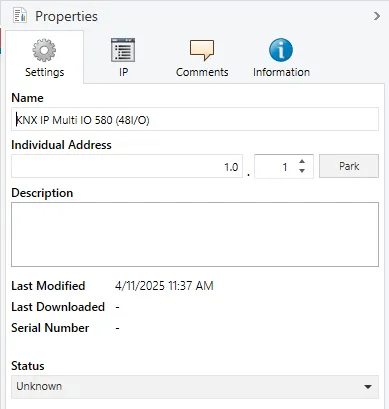
Click on “Settings” button under “Properties” tab and fill in “Individual Address” with “1.0.1”, click on “Park” button.
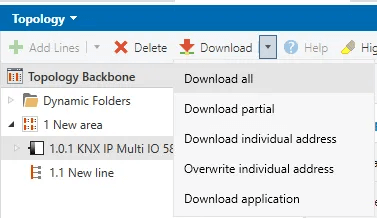
On the right side of the main window, click on the “Down arrow” button near “Download” button and select “Download all”. Controller configuration settings should be saved.
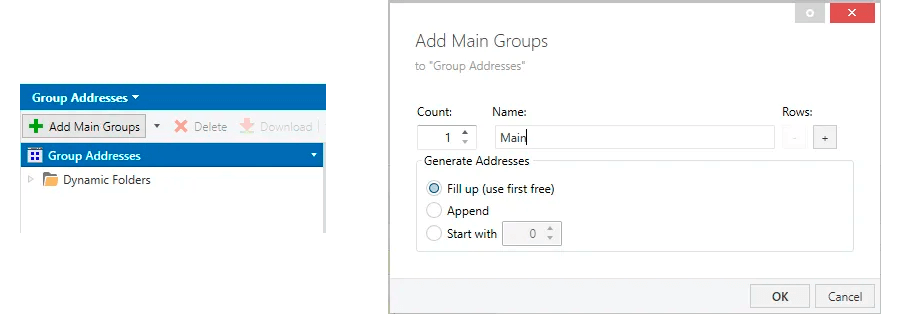
添加组地址
配置完成后,要从Weinzierl KNX IP Multi IO 580 (48I/O)读取数据,需要在 ETS 软件中配置相应的 组地址,请按以下步骤操作:
-
Under the projects tabs bar click on “Topology” dropdown list and select “Group Addresses” from the list. Click on “Add Main Groups” and in the opened modal window fill in “Name” field with “Main” value, click “OK” button.
-
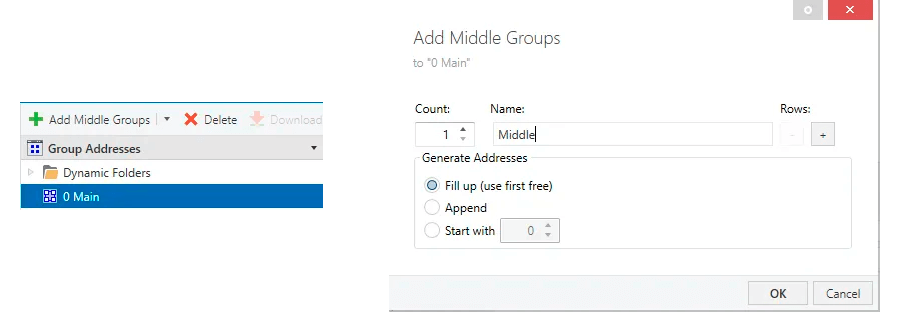
Click on “Add Middle Groups” and in the opened modal window fill in “Name” field with “Middle” value, click “OK” button.
-
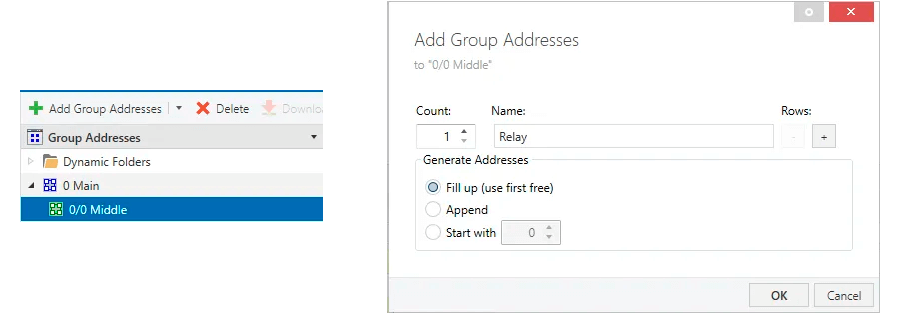
Click on “Add Group Addresses” and in the opened modal window fill in “Name” field with “Relay” value, click “OK” button.
-
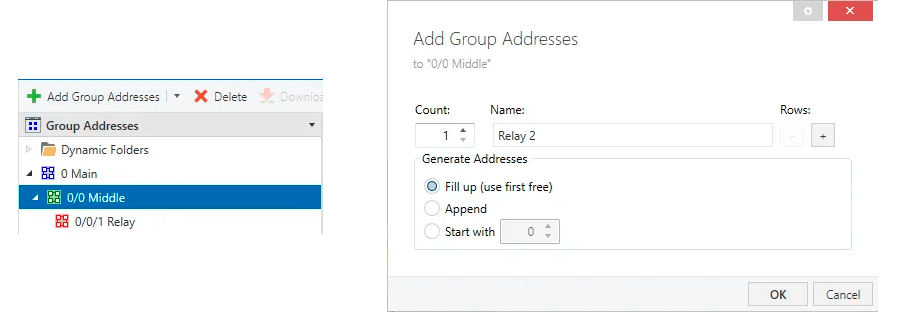
Click on “Add Group Addresses” and in the opened modal window fill in “Name” field with “Relay 2” value, click “OK” button.
-
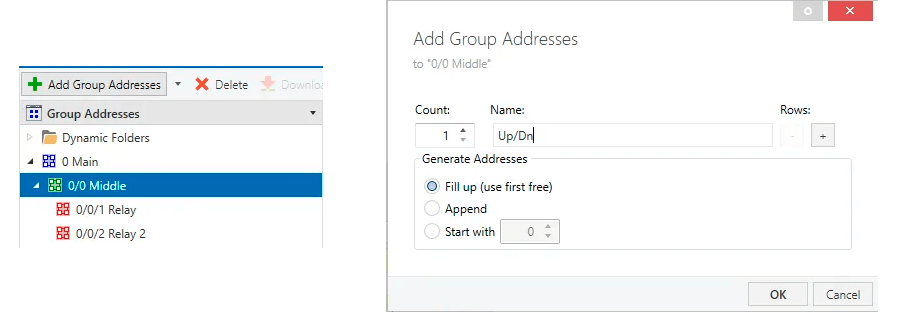
Click on “Add Group Addresses” and in the opened modal window fill in “Name” field with “Up/Dn” value, click “OK” button.
-
Click on “Add Group Addresses” and in the opened modal window fill in “Name” field with “Stop/Step” value, click “OK” button.
Under the projects tabs bar click on “Topology” dropdown list and select “Group Addresses” from the list. Click on “Add Main Groups” and in the opened modal window fill in “Name” field with “Main” value, click “OK” button.
Click on “Add Middle Groups” and in the opened modal window fill in “Name” field with “Middle” value, click “OK” button.
Click on “Add Group Addresses” and in the opened modal window fill in “Name” field with “Relay” value, click “OK” button.
Click on “Add Group Addresses” and in the opened modal window fill in “Name” field with “Relay 2” value, click “OK” button.
Click on “Add Group Addresses” and in the opened modal window fill in “Name” field with “Up/Dn” value, click “OK” button.
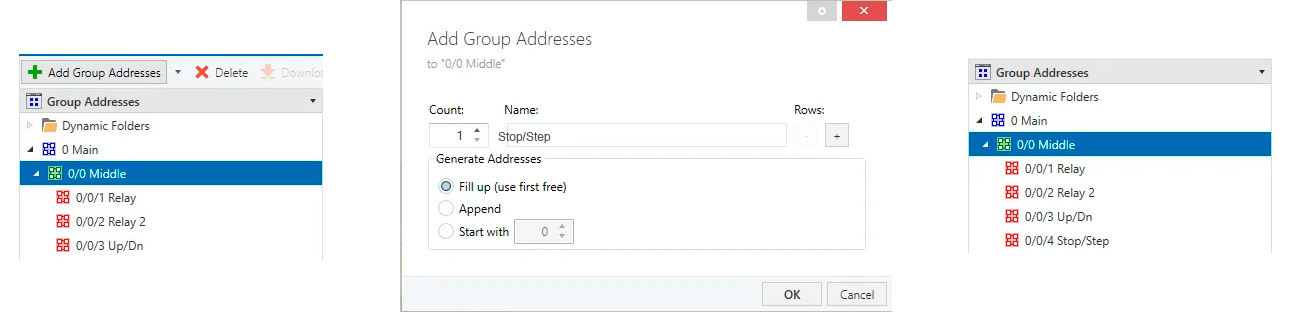
Click on “Add Group Addresses” and in the opened modal window fill in “Name” field with “Stop/Step” value, click “OK” button.
配置设备通道
下一步,需要通过指定类型来启用设备通道。请按以下步骤操作:
-
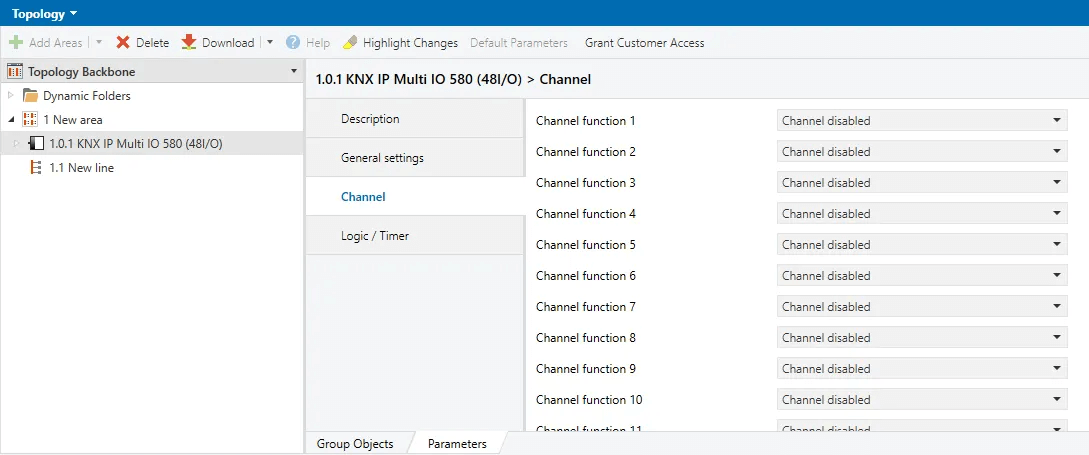
Click on added device in the left sidebar and select “Parameters” tab in the side right window. Select “Channel” tab.
-
Select “Shutter Actuator” for “Channel function 1”, “Switching Actuator” for “Channel function 2” and “Channel function 3”. You can find added Group Objects in the “Group Objects” tab.
Click on added device in the left sidebar and select “Parameters” tab in the side right window. Select “Channel” tab.
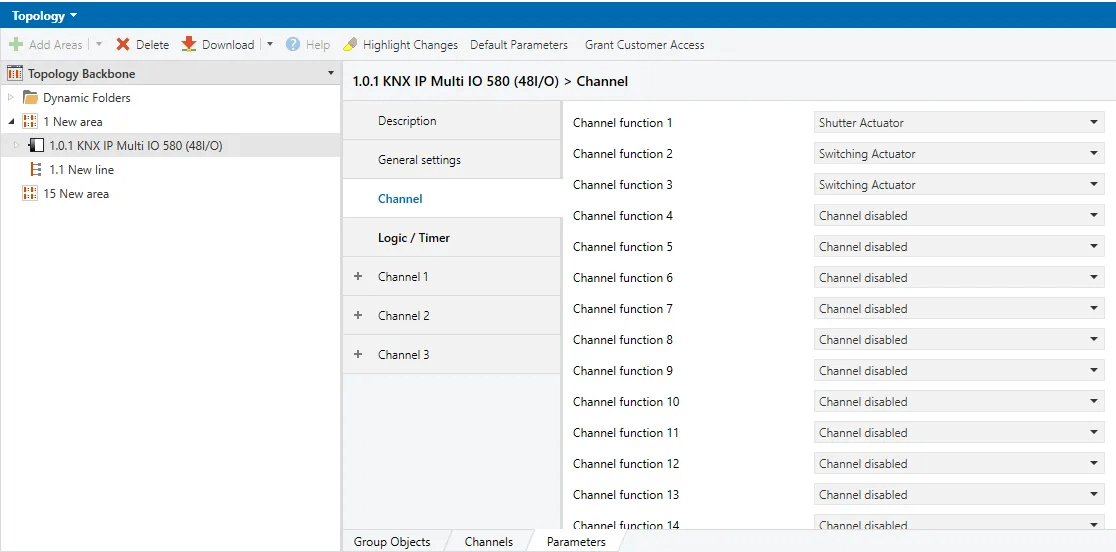
Select “Shutter Actuator” for “Channel function 1”, “Switching Actuator” for “Channel function 2” and “Channel function 3”. You can find added Group Objects in the “Group Objects” tab.
最后需要设置组对象的读写权限,并将其与组地址关联。请按以下步骤操作:
- 在“Group Objects”标签页中点击第一个组对象,在右侧边栏的“Flags”部分启用Write和Read。对其余组对象重复此操作。
- 在“Group Objects”标签页中右键点击第一个组对象(Jalousie 1: Drive stop),选择“Link with…”按钮。
- 在打开的模态窗口中点击“…”按钮,选择“0/0/4”组地址。对其余组对象按下表重复操作:
| Group Object Name | Group Address |
|---|---|
| Jalousie 1: Drive stop | 0/0/4 |
| Jalousie 1: Drive start | 0/0/3 |
| Actuator 3: Output | 0/0/2 |
| Actuator 2: Output | 0/0/1 |

In the “Group Objects” tab click on first group object and in the right sidebar in the section “Flags” enable Write and Read. Repeat this actions for the rest group objects.
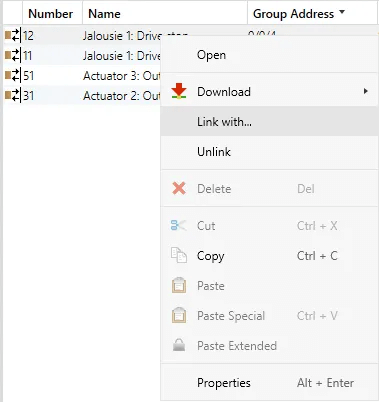
In the “Group Objects” tab right click on first group object (Jalousie 1: Drive stop) and select “Link with…” button.
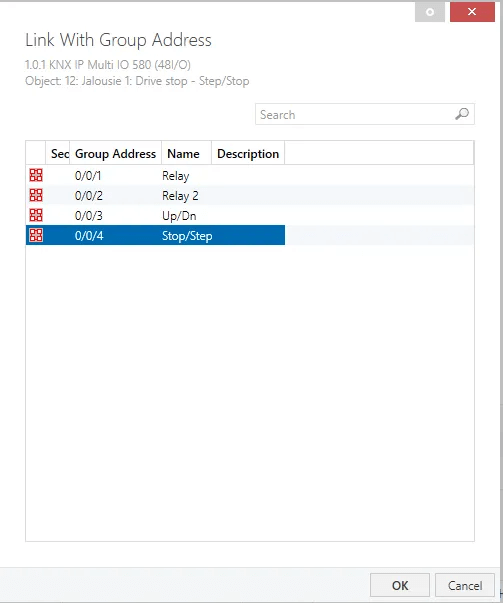
In the opened modal window click on “…” button, in the opened window select “0/0/4” group address. Repeat this action for the rest group objects.
-
On the right side of the main window, click on the “Down arrow” button near “Download” button and select “Download all”. Controller configuration settings should be saved.
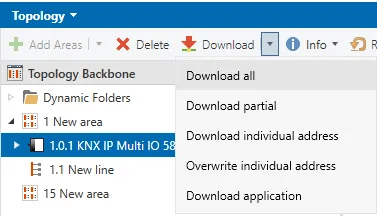
On the right side of the main window, click on the “Down arrow” button near “Download” button and select “Download all”. Controller configuration settings should be saved.
创建和配置ThingsBoard IoT网关
-
Open the ThingsBoard in your browser and log in. Go to “Entities” > “Gateways” tab in the sidebar and click on “+” button. Fill in “Name” and “Device profile” fields and click “Create” button;
-
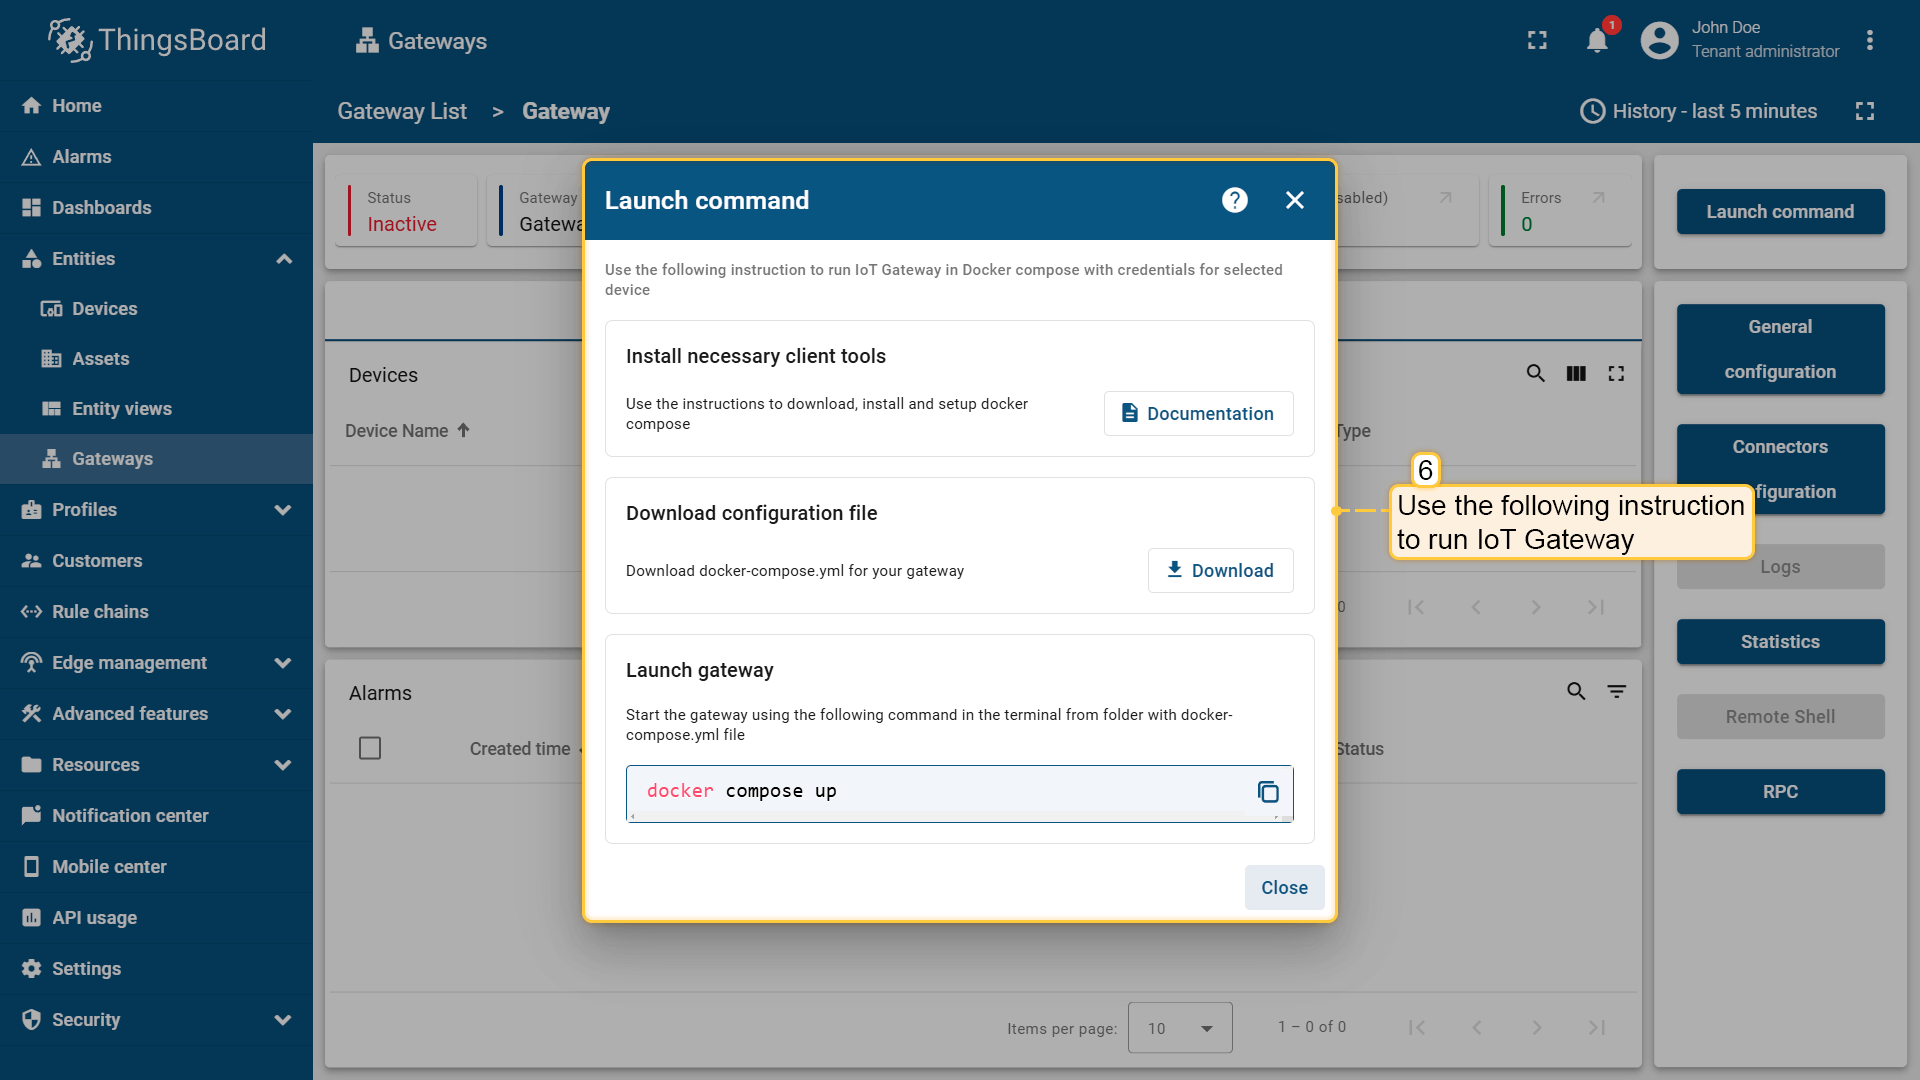
Start gateway using launch command;
-
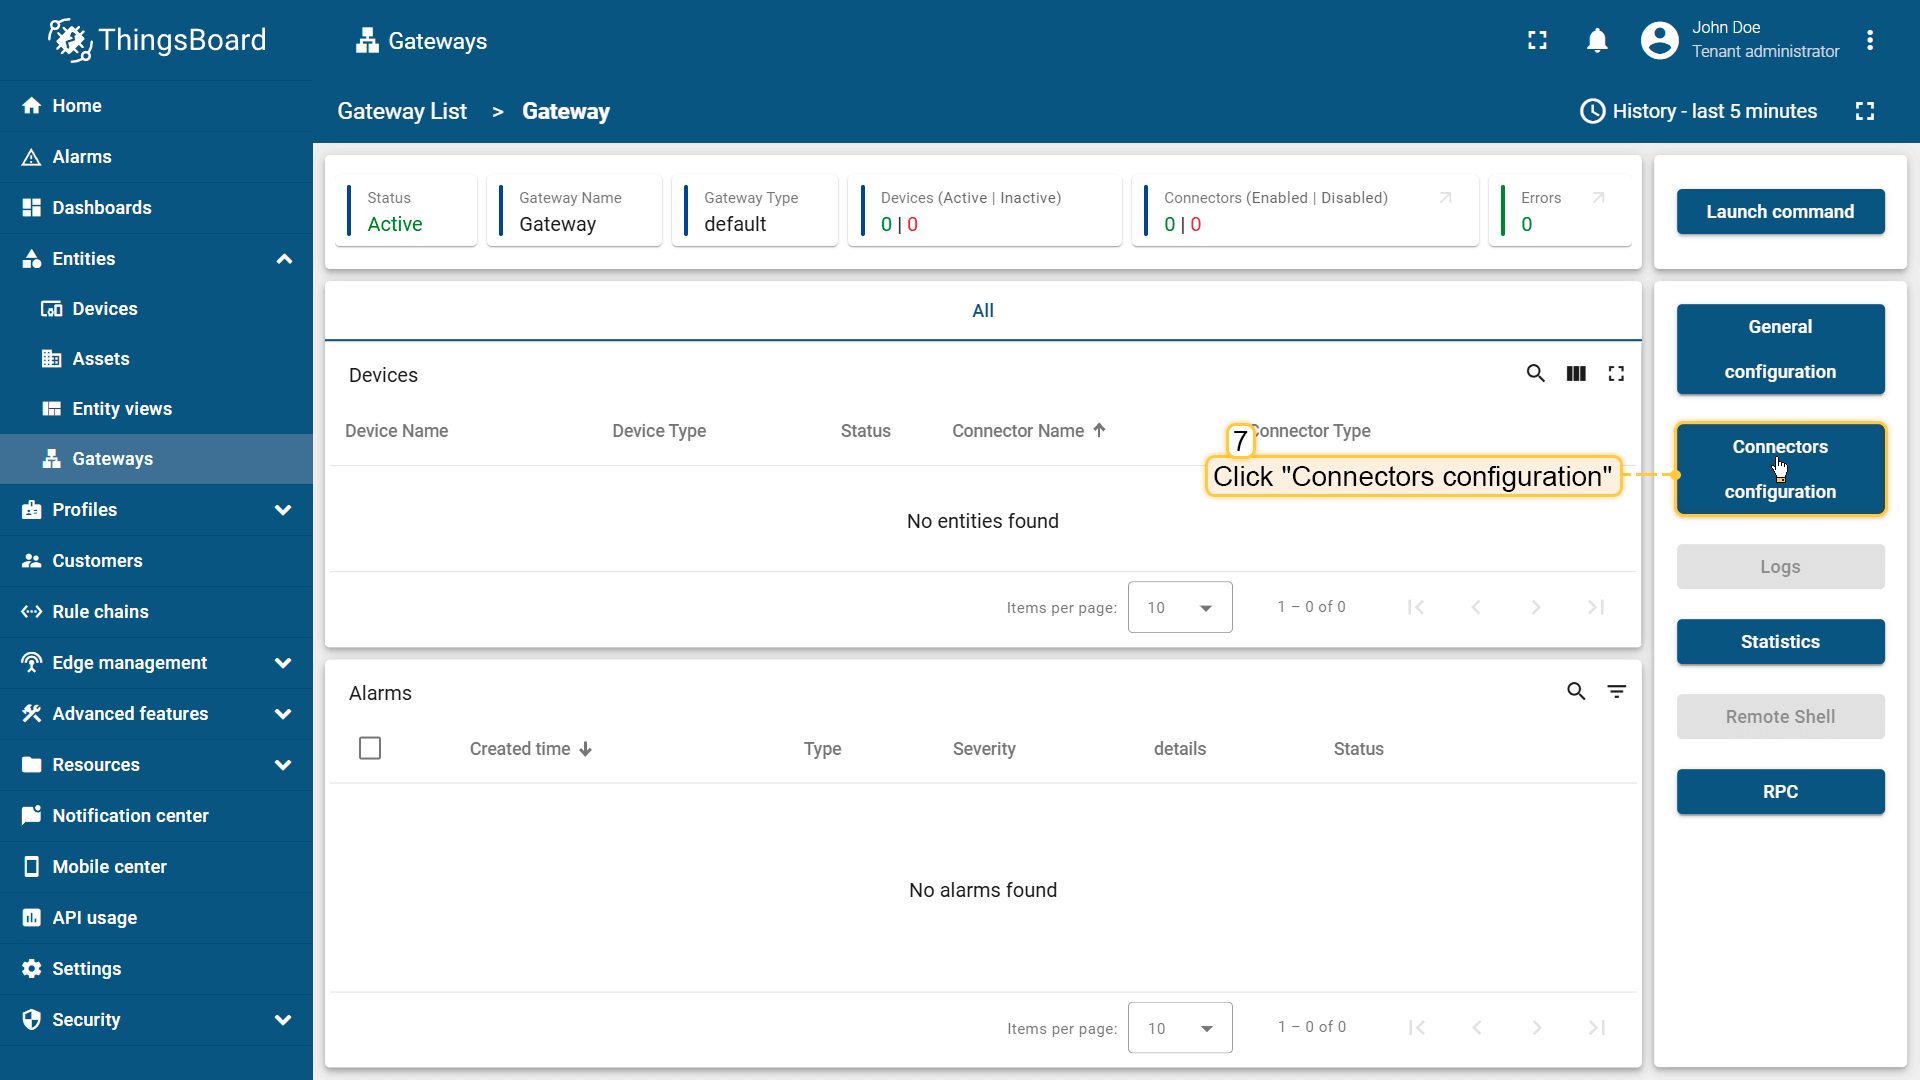
The gateway has been created. Click on the “Connectors configuration” button in the sidebar menu;
-
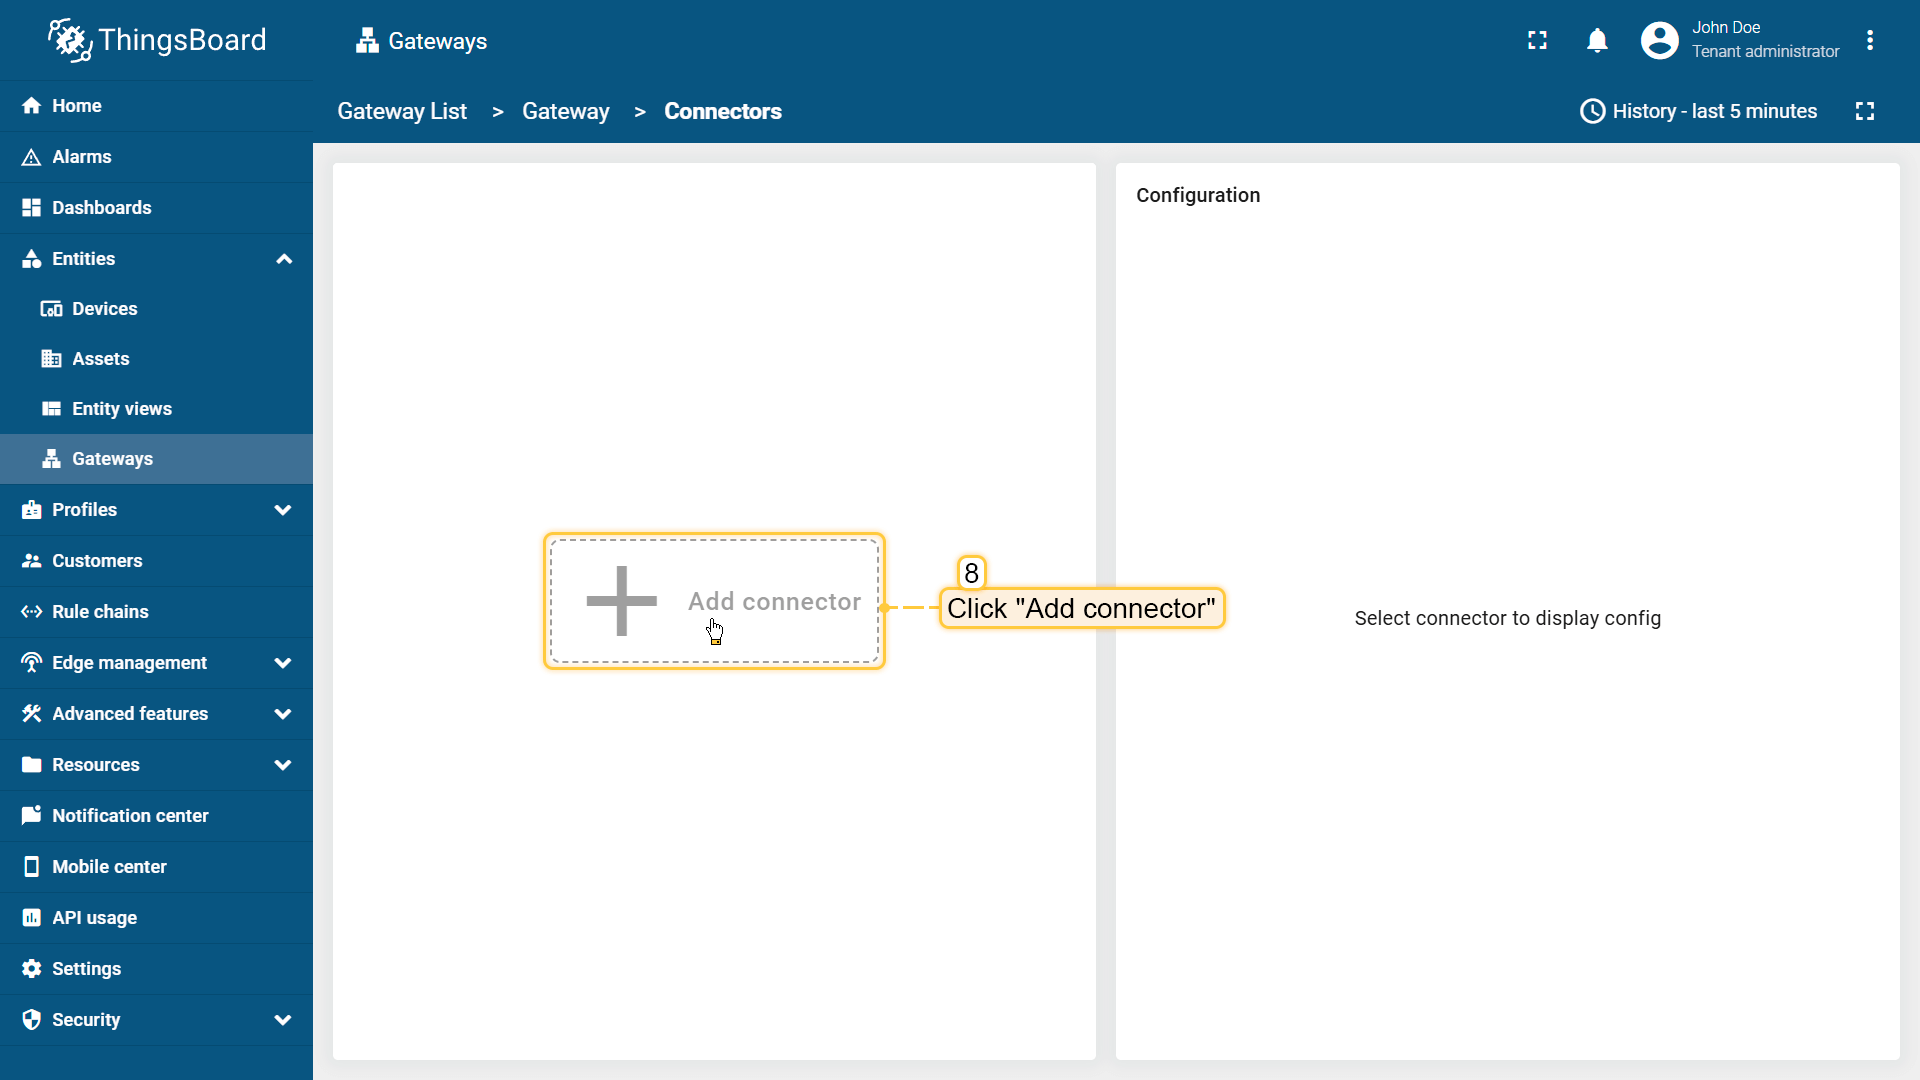
Click on “+” button to add a new connector;
-
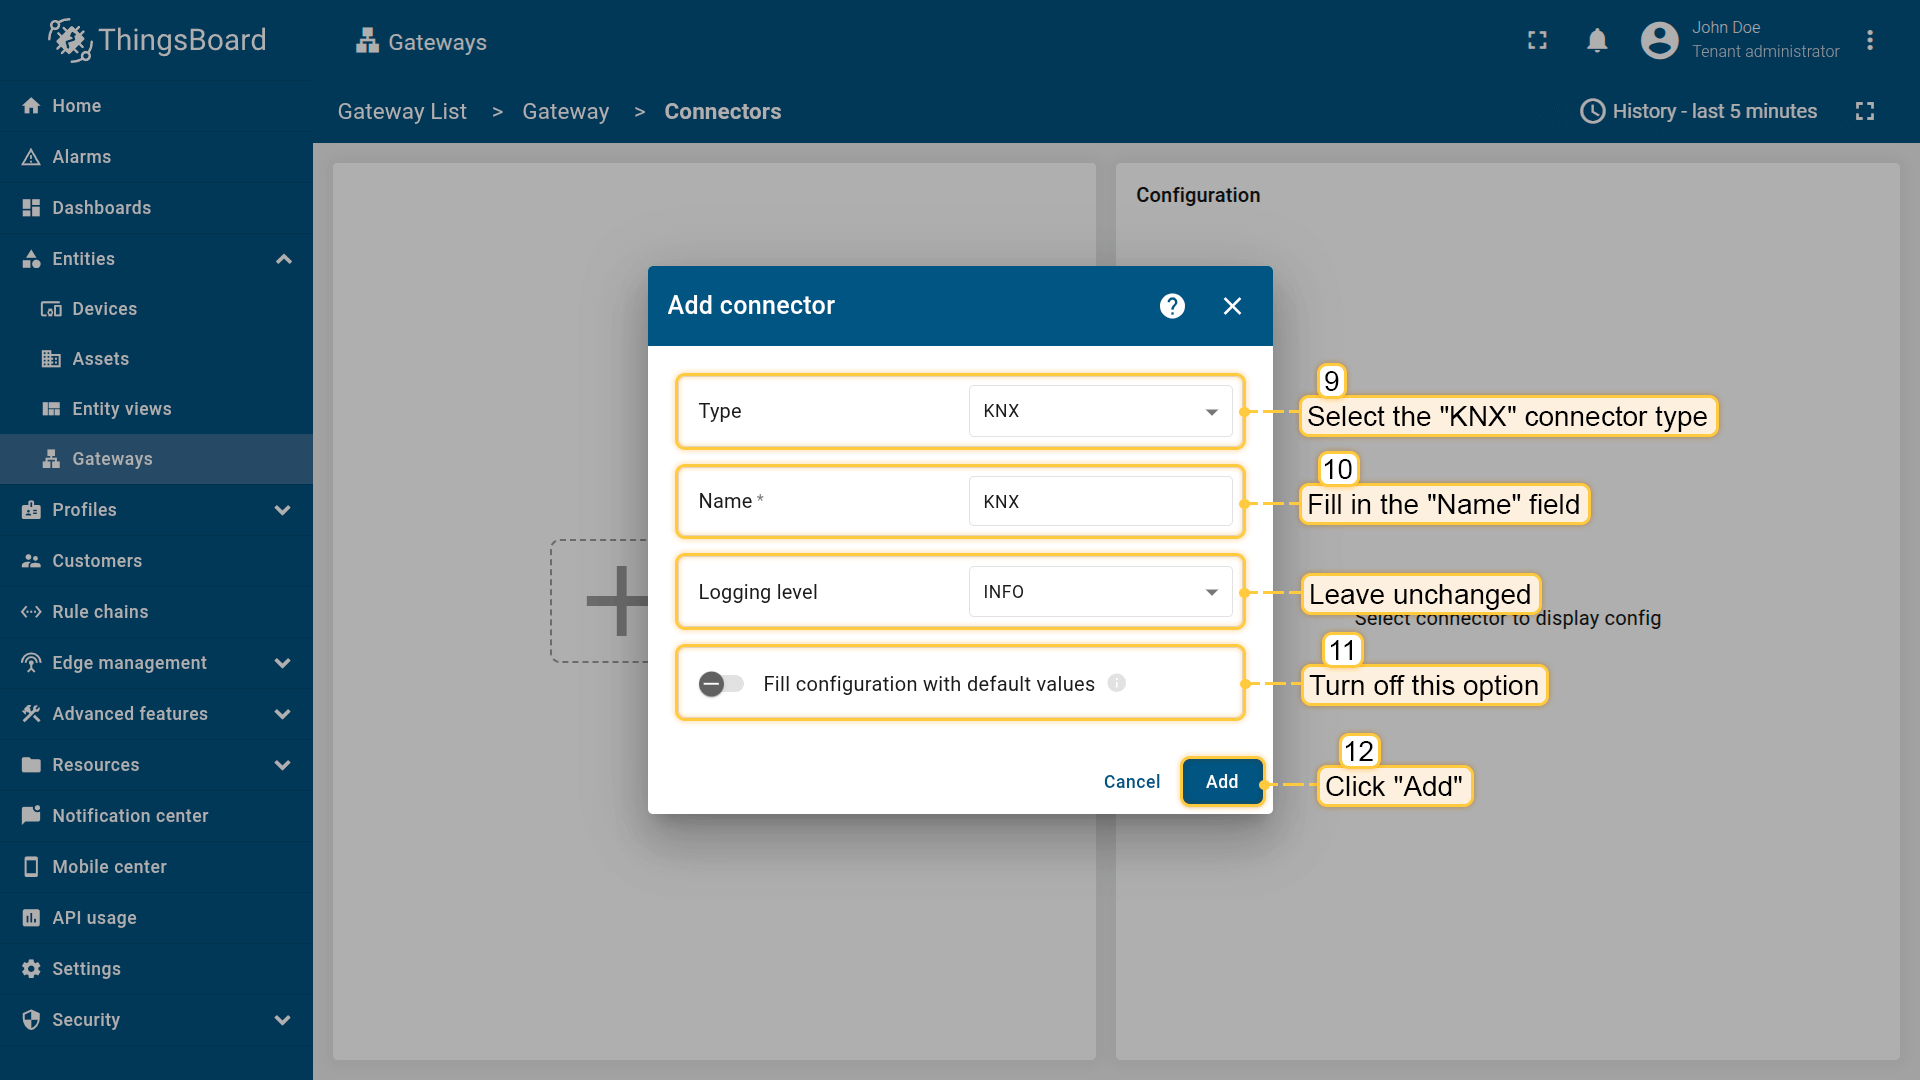
Select “KNX” connector type, fill in the “Name” field, disable filling configuration with default values and click “Add” button;
-
In the created connector, go to “Advanced” section and paste the JSON configuration below. Replace host and port configuration parameter values with the device
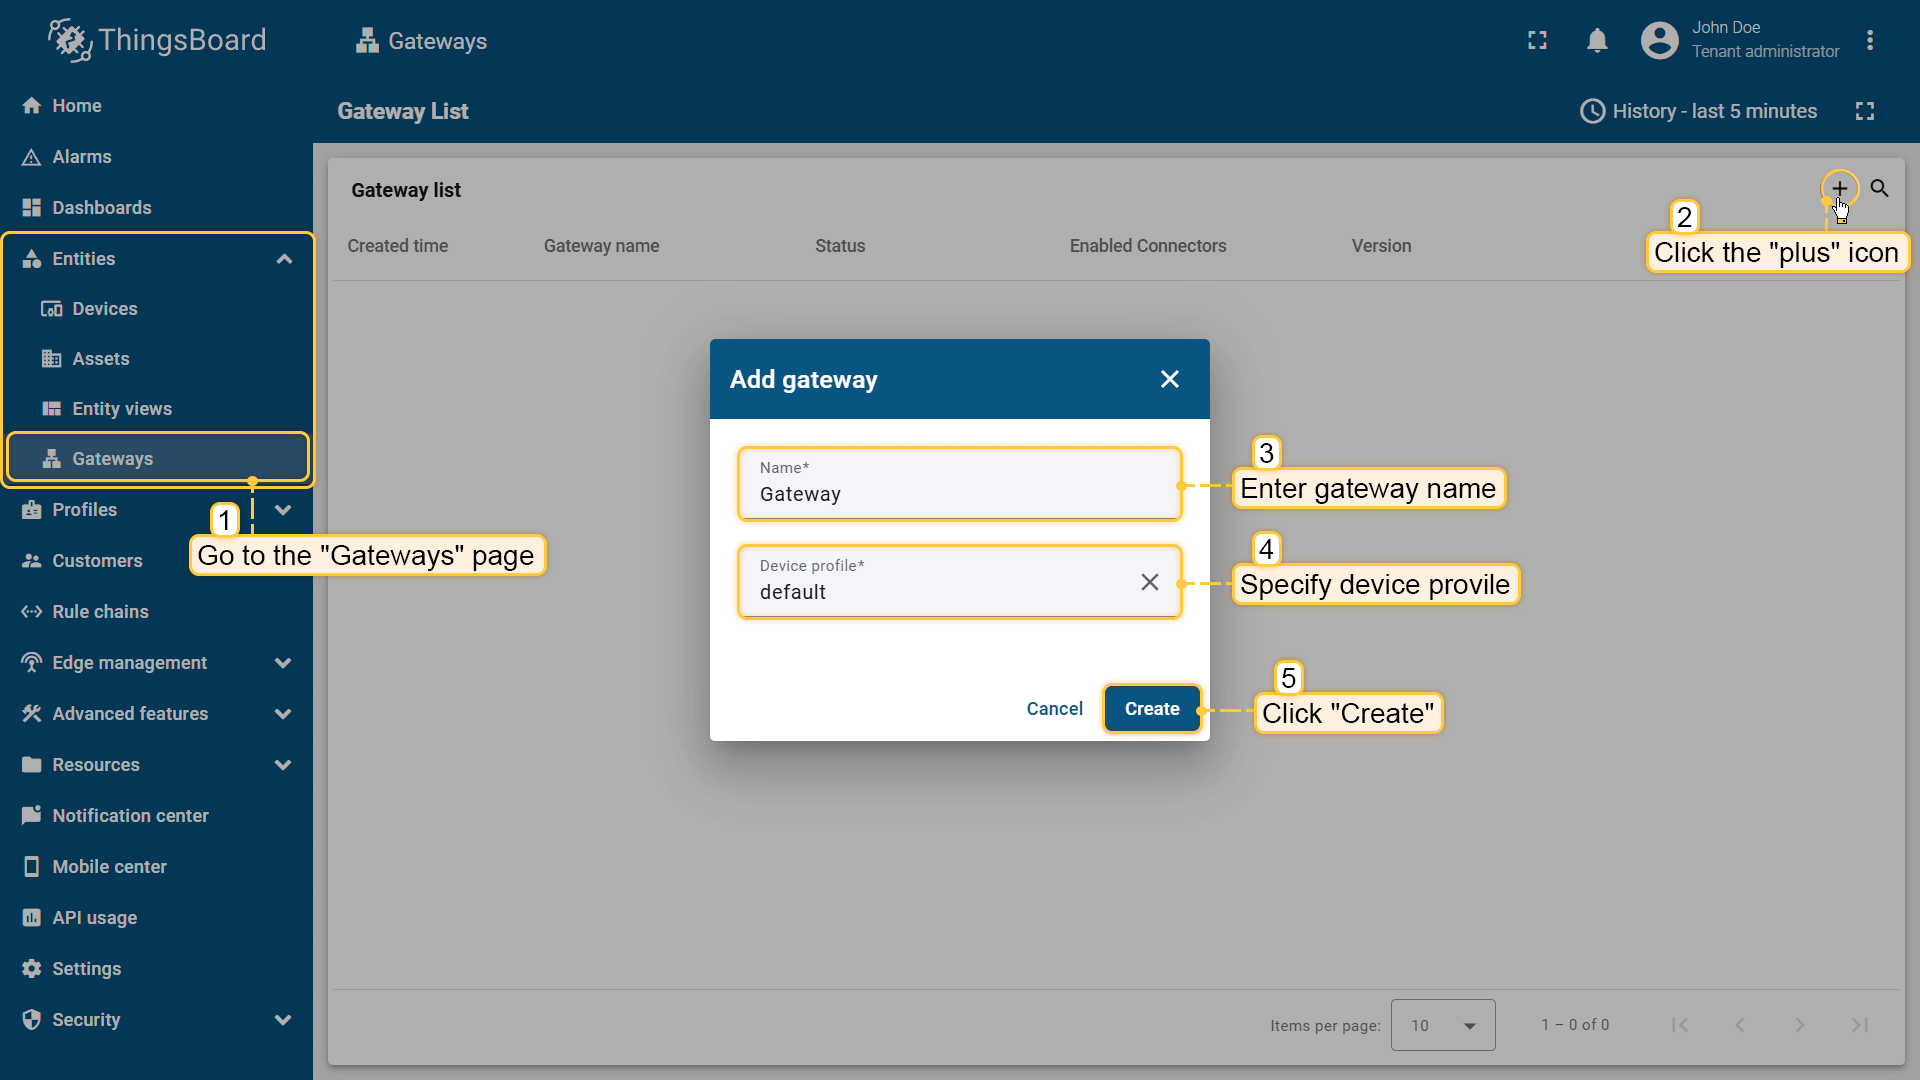
Open the ThingsBoard in your browser and log in. Go to “Entities” > “Gateways” tab in the sidebar and click on “+” button. Fill in “Name” and “Device profile” fields and click “Create” button;
Start gateway using launch command;
The gateway has been created. Click on the “Connectors configuration” button in the sidebar menu;
Click on “+” button to add a new connector;
Select “KNX” connector type, fill in the “Name” field, disable filling configuration with default values and click “Add” button;
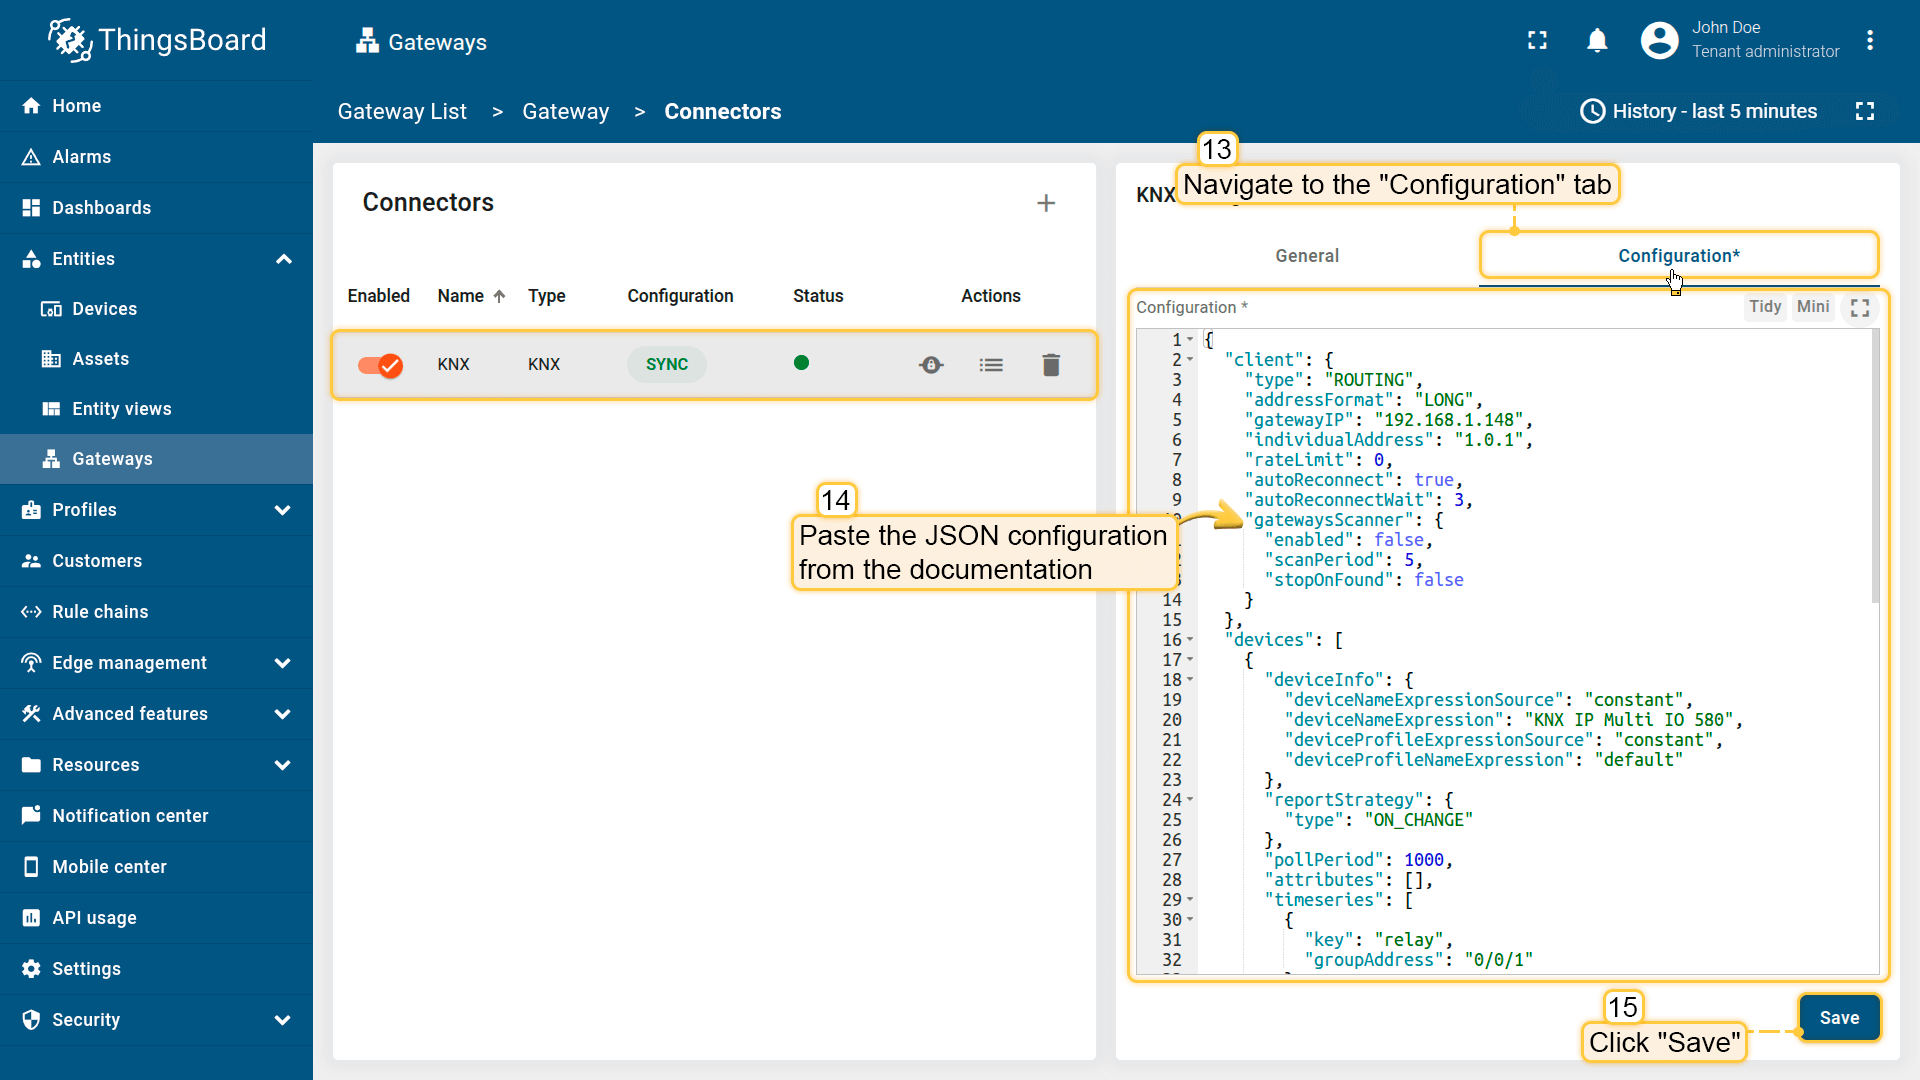
In the created connector, go to “Advanced” section and paste the JSON configuration below. Replace host and port configuration parameter values with the device
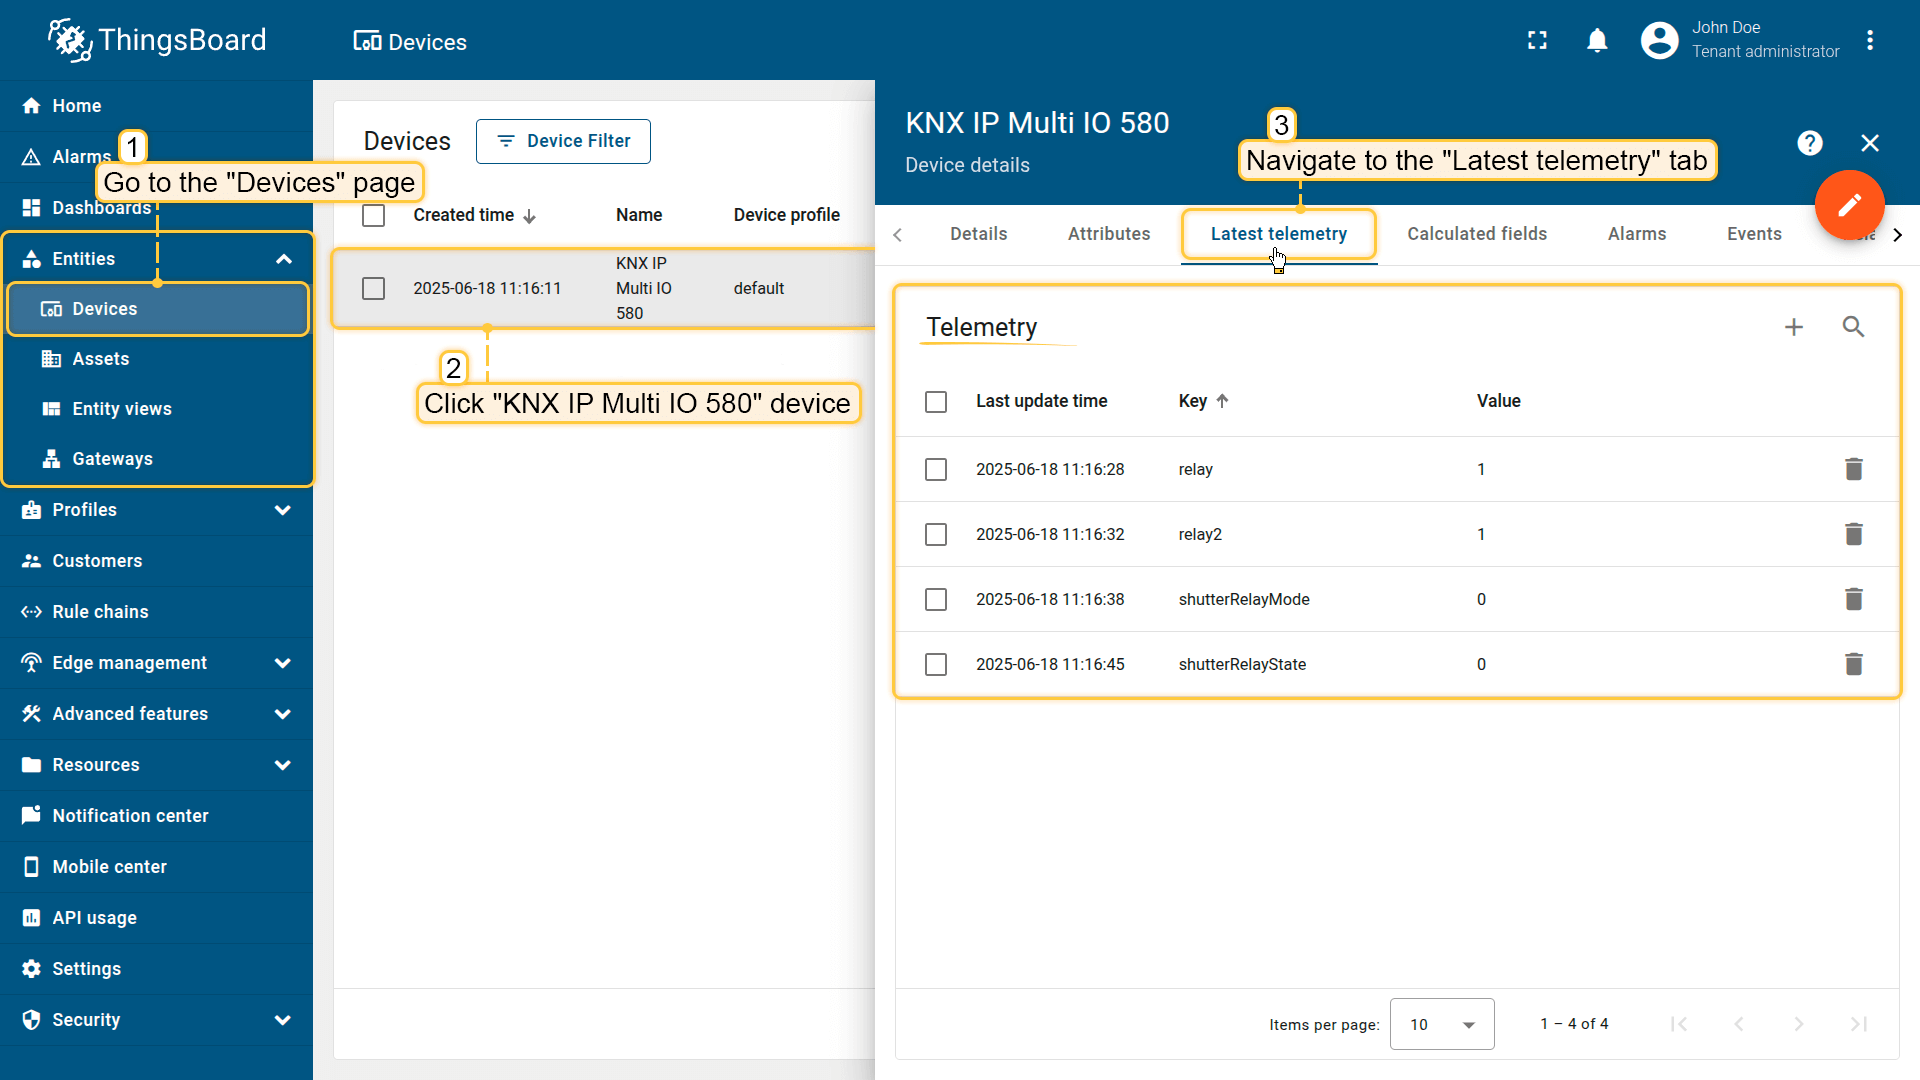
在ThingsBoard上查看数据
完成以上所有步骤且网关发送数据后,可以在设备遥测标签页中查看数据:
- 点击表格中的设备行打开其详情;
- 导航到“最新遥测”标签页。
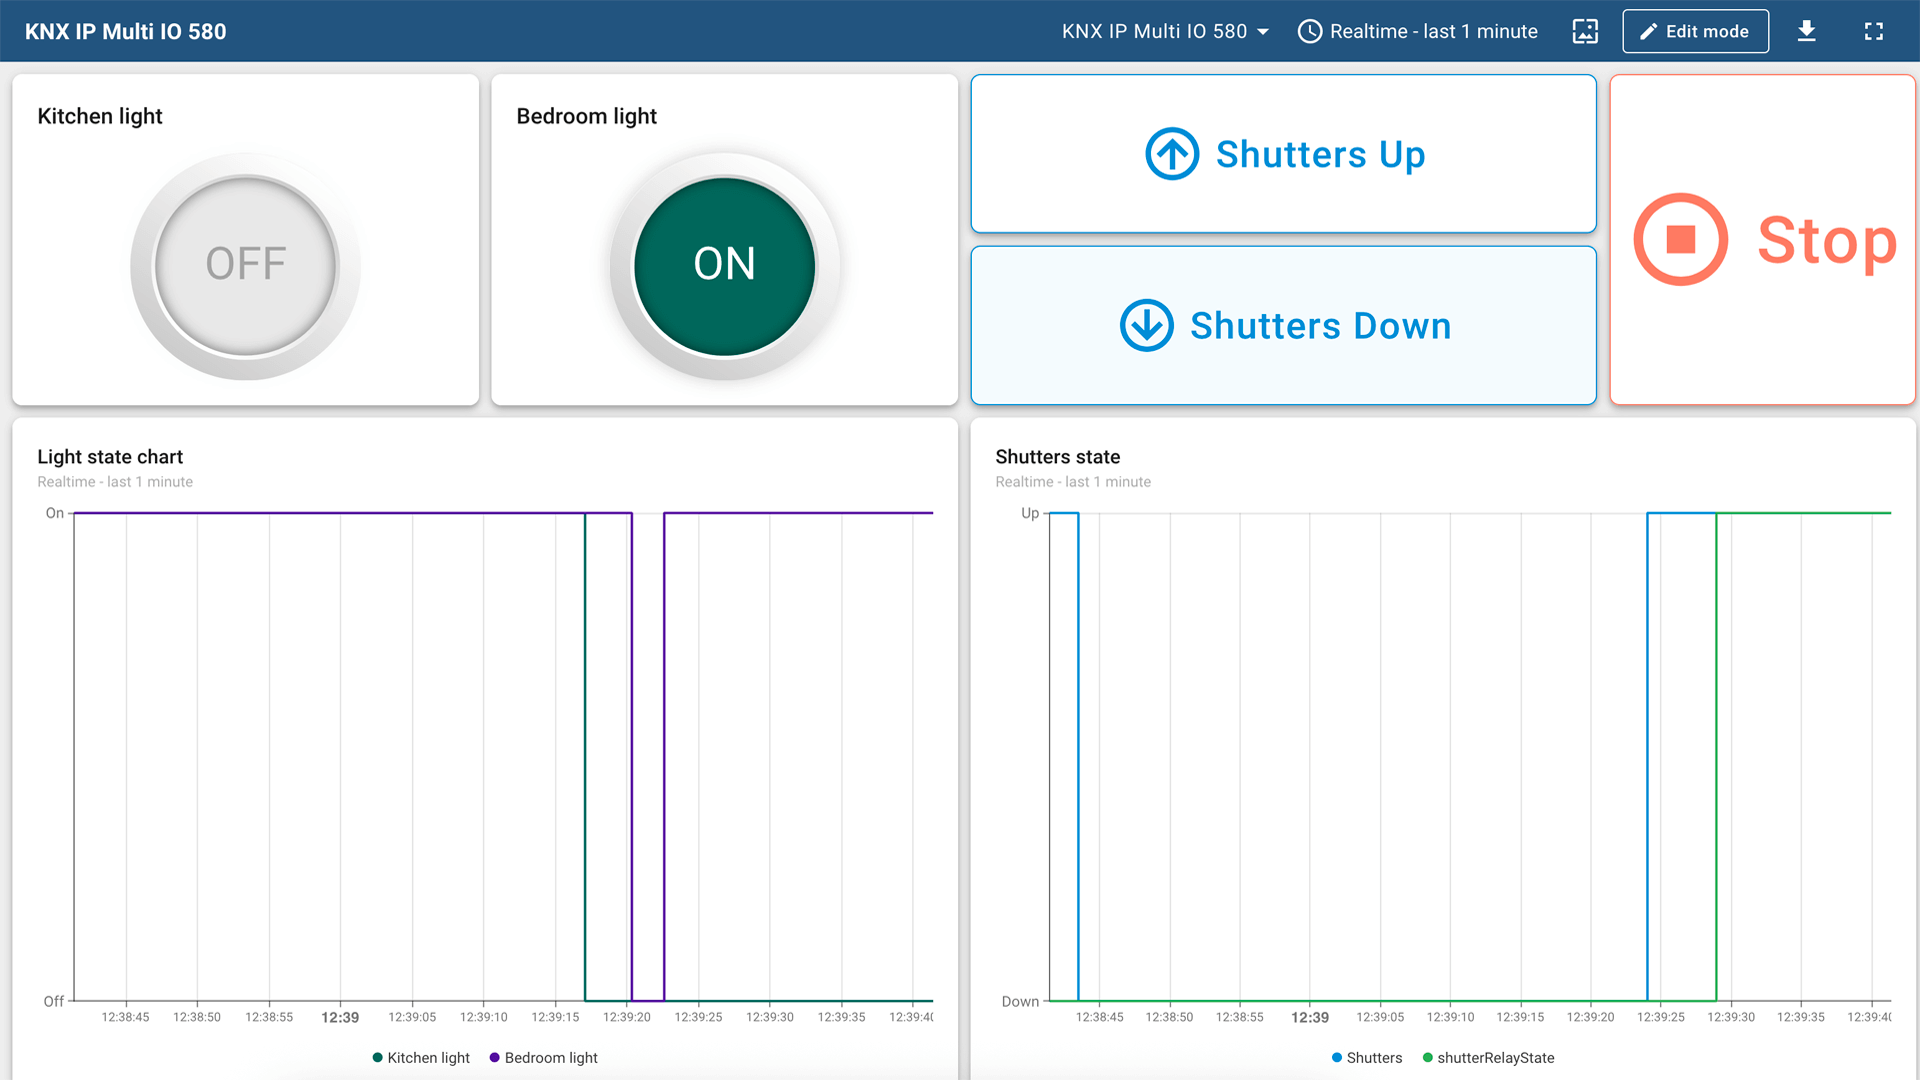
下面在仪表板上展示KNX IP Multi IO 580的时序数据。 您可以使用自定义部件创建自己的仪表板,也可以使用现成的仪表板直接导入。
总结
通过本指南,您可以轻松将KNX IP Multi IO 580控制器与开关、百叶窗和继电器连接到ThingsBoard。将设备连接到网关后,您就可以在ThingsBoard上查看和处理设备发送的数据。
请探索平台文档,了解更多核心概念和功能。