- Hardware type: Microcontrollers
- Connectivity: HTTP, MQTT, WIFI, Bluetooth
- Chip: RP2040
- Industry: Industrial Manufacturing
- Use cases: Smart energy, Environment Monitoring, Smart Office, Smart Retail, Smart Farming, Fleet Tracking, Health Care, Air Quality Monitoring, Waste Management, Tank Level Monitoring
- Platforms: Community Edition, Professional Edition, Cloud
- 概述
- 在ThingsBoard中创建设备
- 安装所需库和工具
- 连接设备到ThingsBoard
- 在ThingsBoard上查看数据
- 使用客户端和共享属性请求同步设备状态
- 使用共享属性控制设备
- 使用RPC控制设备
- 总结
概述
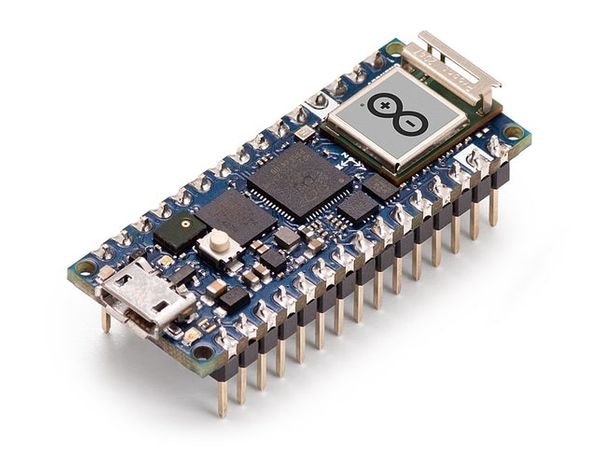
Arduino Nano RP2040 Connect将树莓派RP2040微控制器带入Nano尺寸,功能丰富。
借助U-blox Nina W102模块提供的Bluetooth与Wi-Fi连接,可利用双核32位Arm® Cortex®-M0+ 开发物联网项目。
板载加速度计、陀螺仪、RGB LED和麦克风,可直接投入实际项目。
使用Arduino Nano RP2040 Connect可轻松开发嵌入式AI应用。
本指南将介绍如何在ThingsBoard上创建设备、
安装所需库与工具。
随后将修改代码并上传到设备,
并查看运行结果及通过导入的仪表板在ThingsBoard上查看数据。
设备将借助客户端与共享属性请求功能与ThingsBoard保持同步。
同时,我们将使用共享属性或 RPC 请求控制设备。
前置条件
继续本指南前,需具备:
- Arduino Nano RP2040 Connect
- Arduino IDE
- ThingsBoard Cloud账户或已安装的本地服务器
在ThingsBoard中创建设备
为简化流程,我们将在界面中手动创建设备。
-
登录ThingsBoard实例并进入 实体 > 设备 页面。
-
点击右上角 ”+” 按钮并选择 添加新设备。
-
输入设备名称,例如 “My Device”。其他字段可保持默认,点击 添加 创建设备。
-
设备已添加完成。
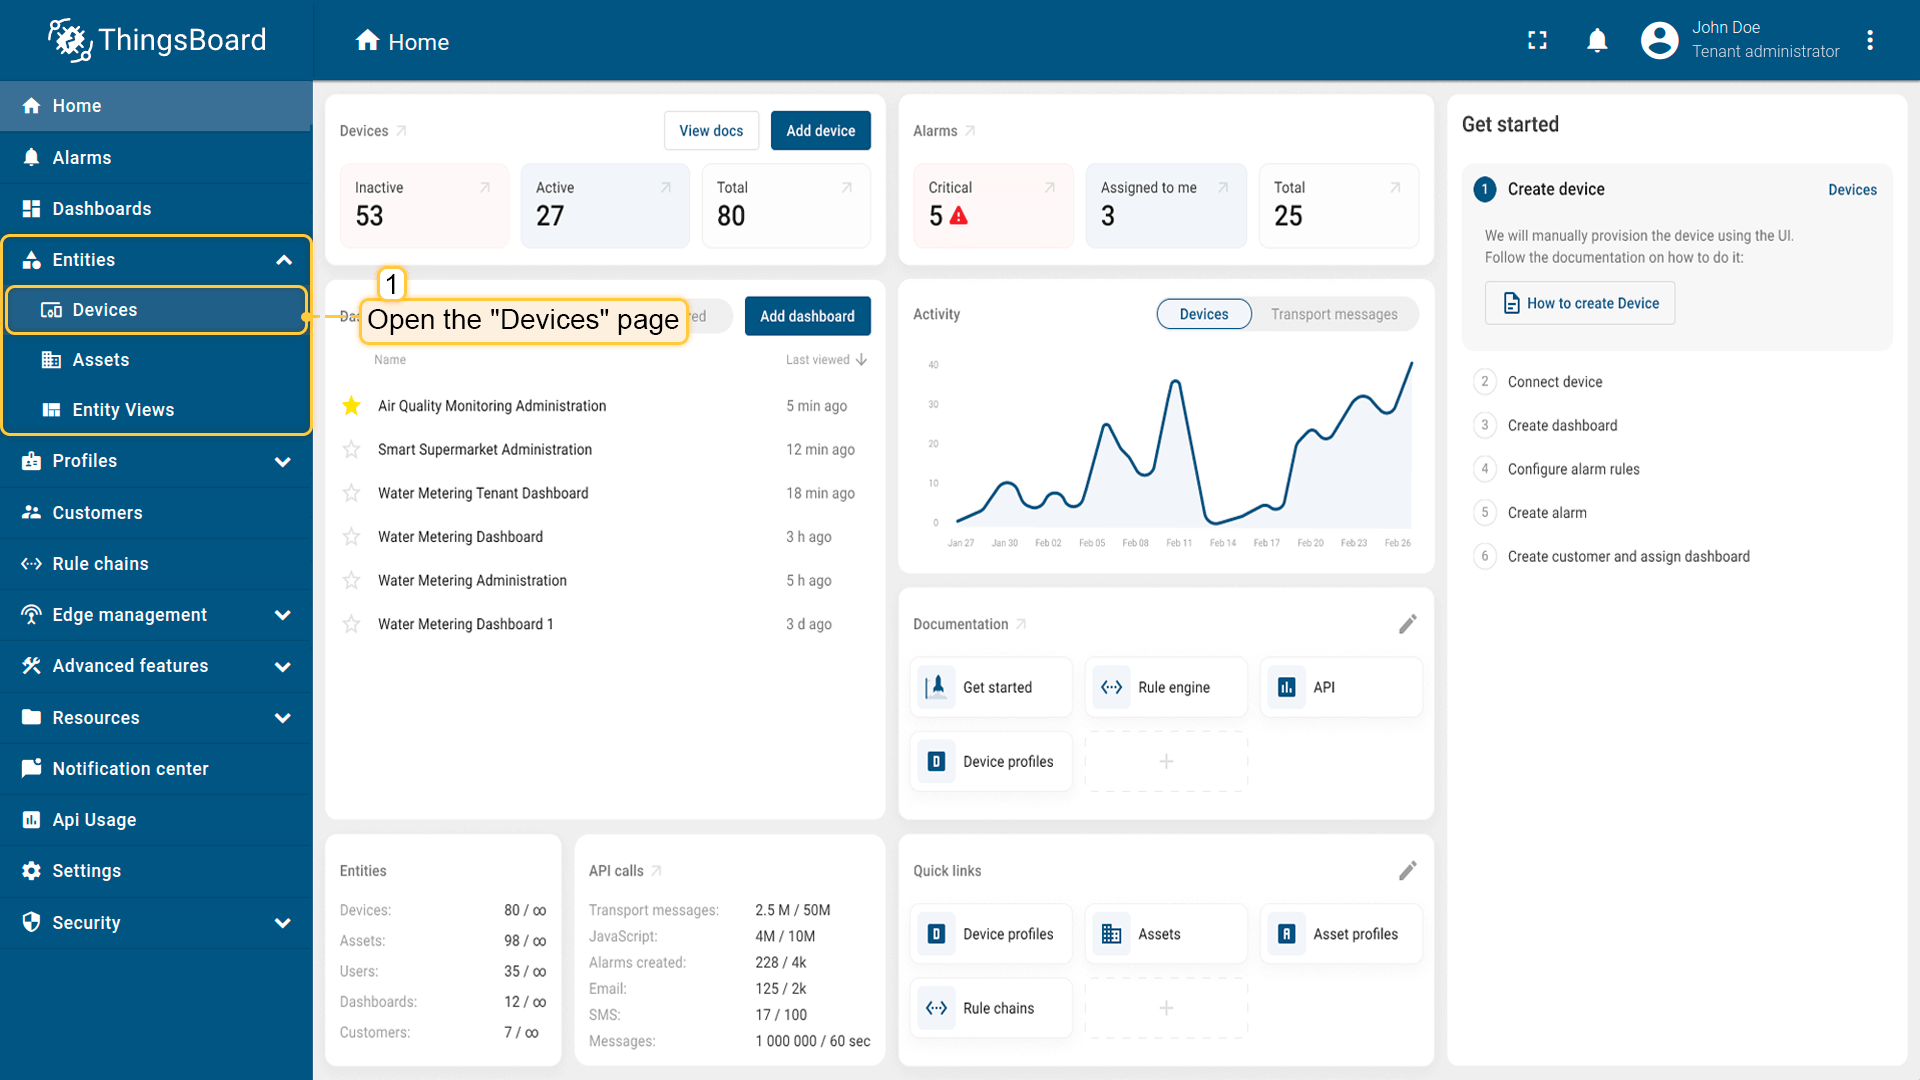
登录ThingsBoard实例并进入 实体 > 设备 页面。
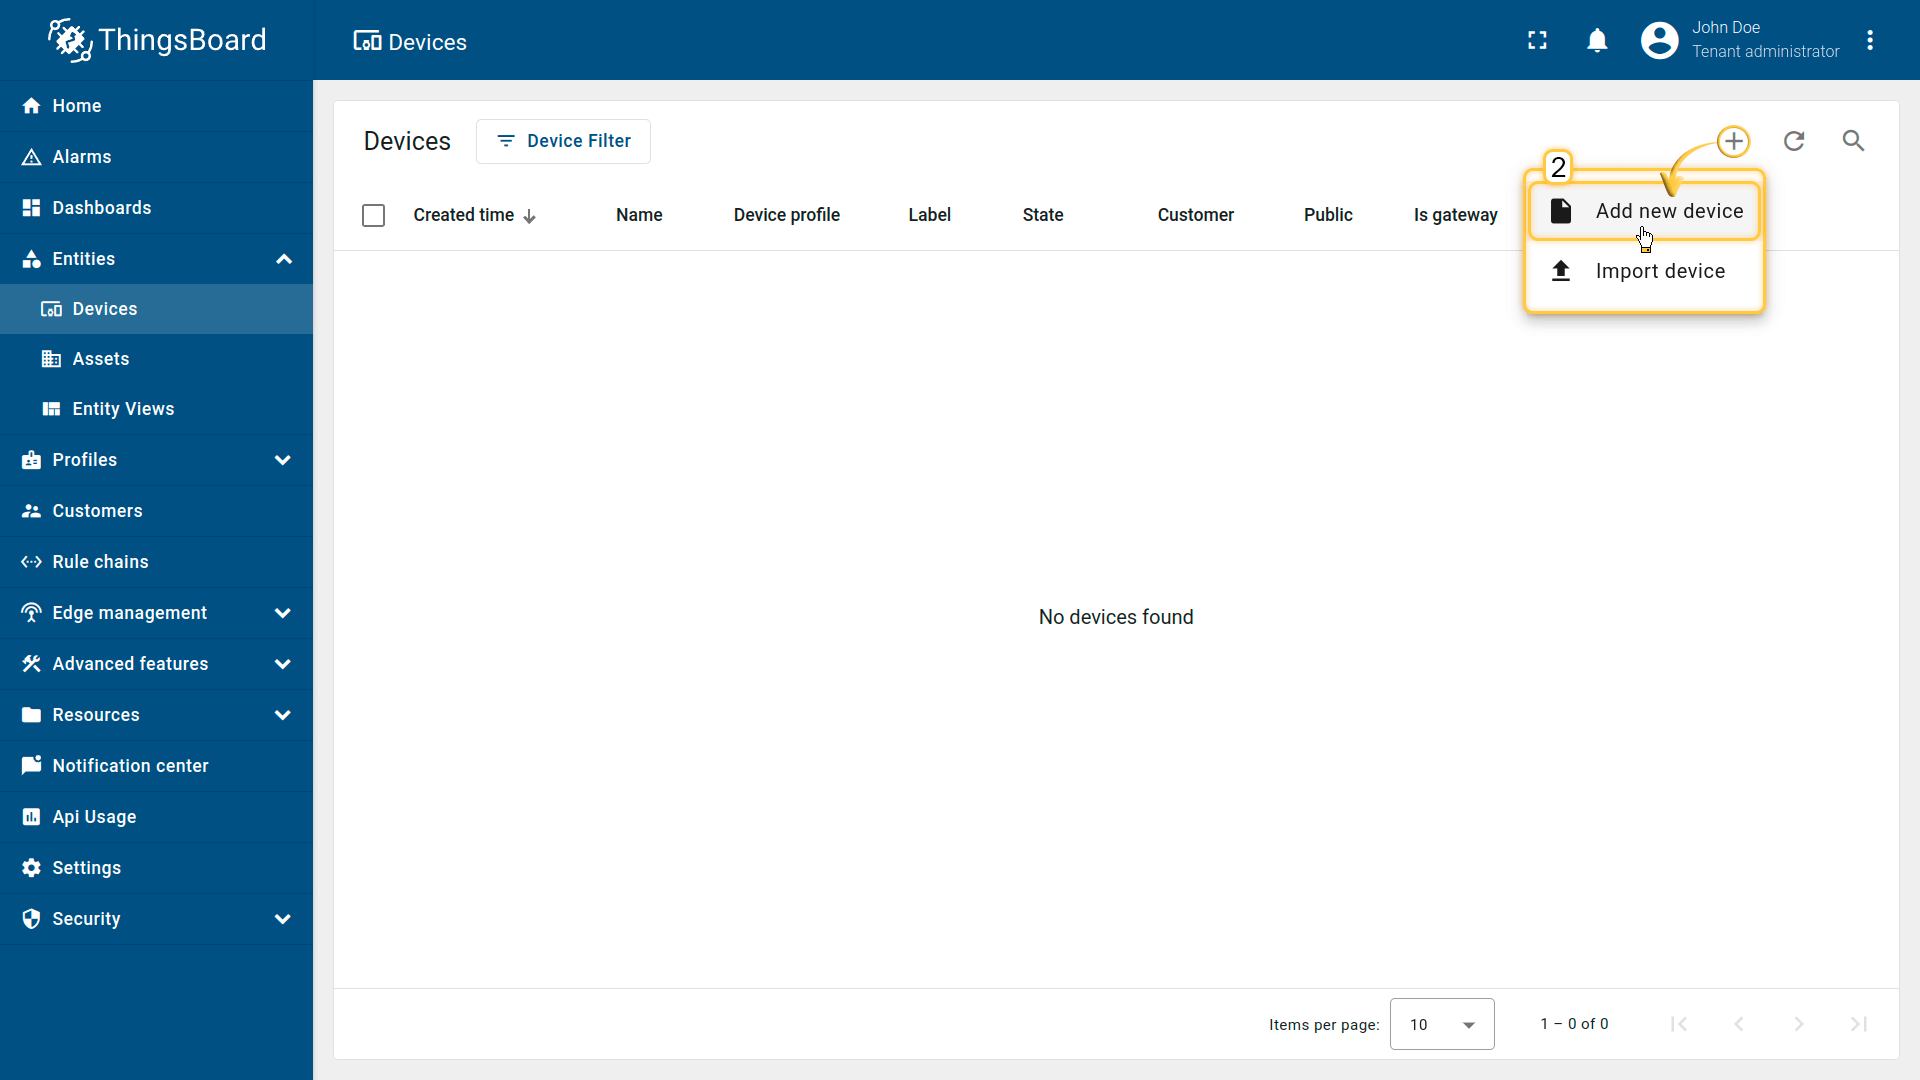
点击右上角 ”+” 按钮并选择 添加新设备。
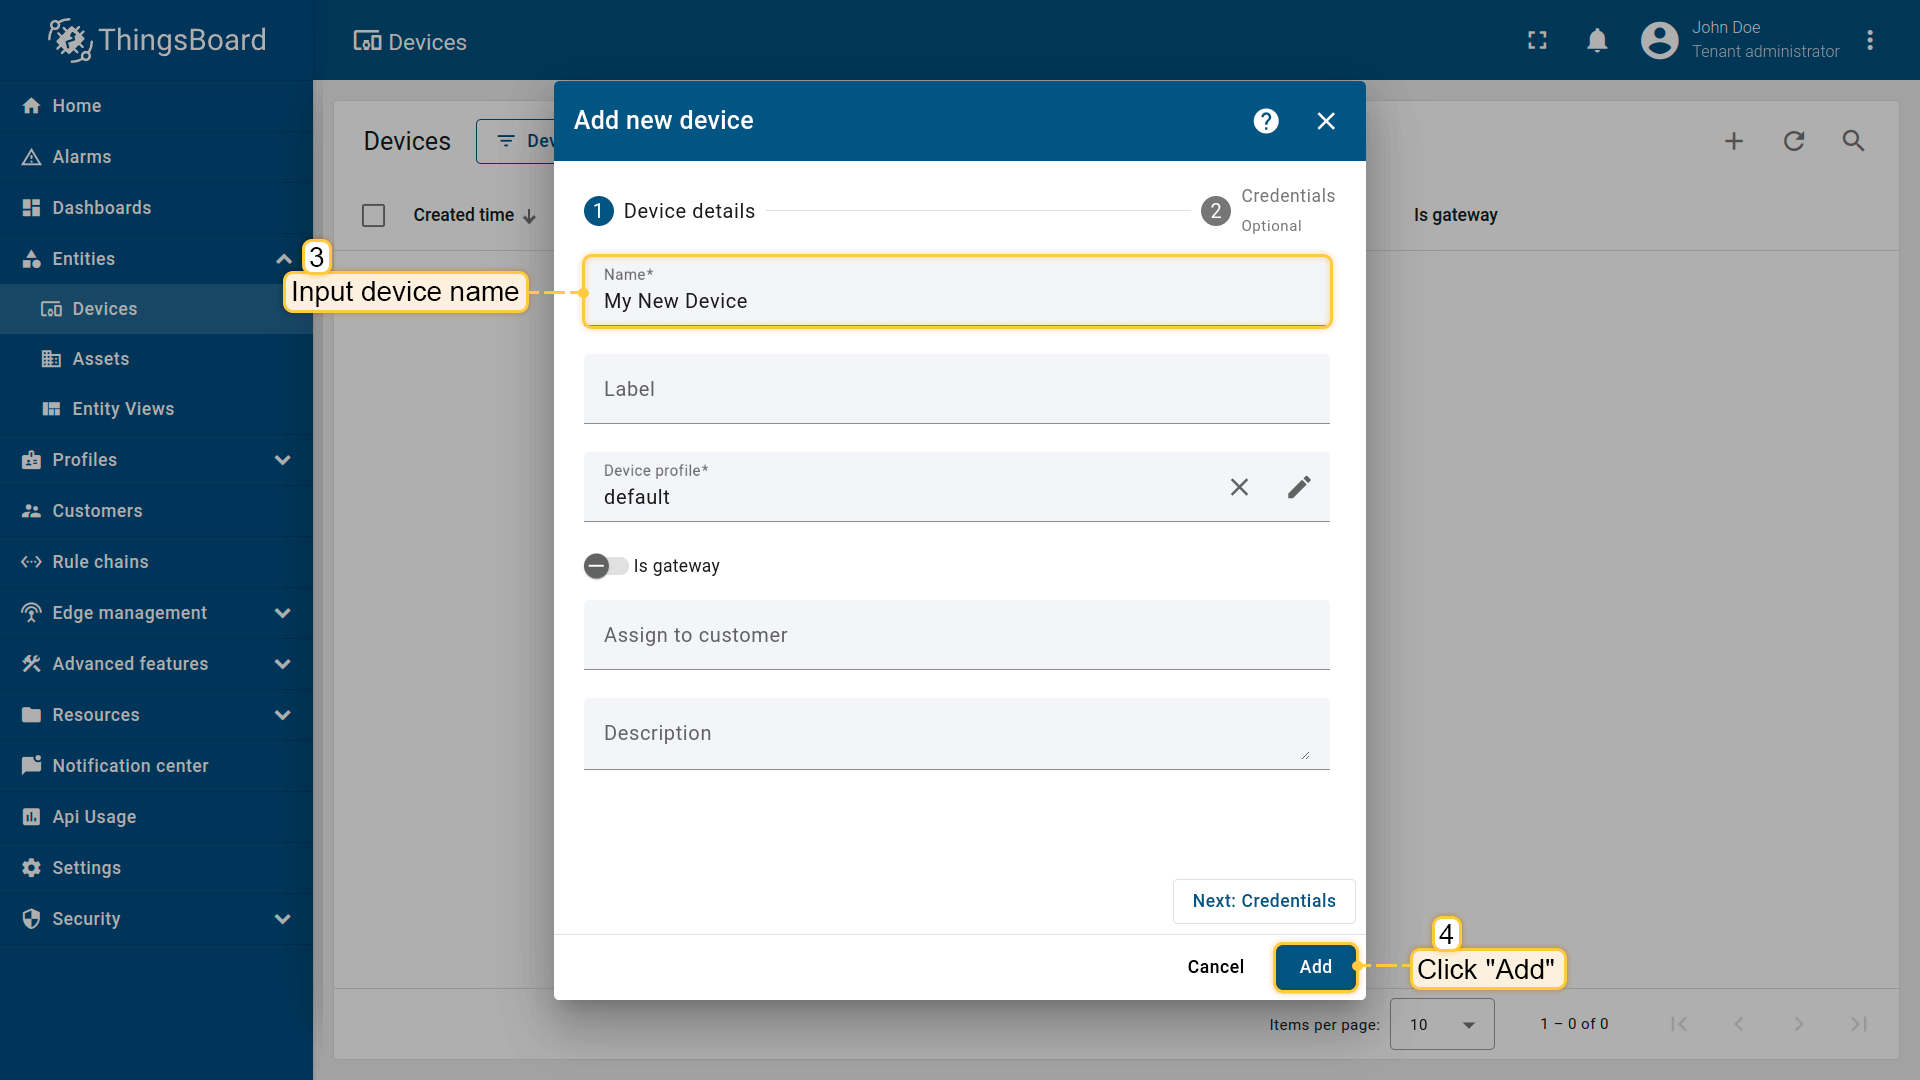
输入设备名称,例如 “My Device”。其他字段可保持默认,点击 添加 创建设备。
设备已添加完成。
安装所需库和工具
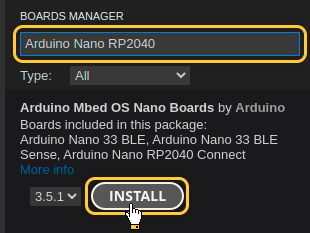
为Arduino IDE安装开发板:
-
进入 工具 > 开发板 > 开发板管理器 并安装 Arduino Mbed OS RP2040 Boards by Arduino 开发板。
进入 工具 > 开发板 > 开发板管理器 并安装 Arduino Mbed OS RP2040 Boards by Arduino 开发板。
安装完成后,通过 工具 > 开发板 > Arduino Mbed OS Nano Boards > Arduino Nano RP2040 Connect 选择开发板。
用USB线连接设备与电脑,并在 工具 > 端口 > /dev/ttyUSB0 中选择设备端口。
端口随操作系统不同而不同:
- Linux下为 /dev/ttyUSBX
- MacOS下为 usb.serialX.. 或 usb.modemX..
- Windows下为 COMX。
安装ThingsBoard Arduino SDK需执行以下步骤:
-
进入 工具 选项卡,点击 管理库。
-
在搜索框中输入 ThingsBoard 并点击找到的库的 安装 按钮。
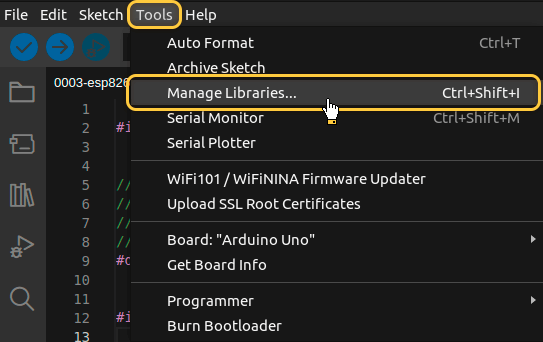
进入 工具 选项卡,点击 管理库。
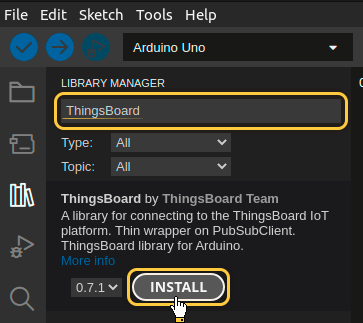
在搜索框中输入 ThingsBoard 并点击找到的库的 安装 按钮。
所有示例代码均需ThingsBoard库版本 0.10.2.
基于RP2040芯片的开发板还需安装 “WiFiNINA” 库。
-
在库搜索框中输入 WiFiNINA 并安装 WiFiNINA by Arduino 库
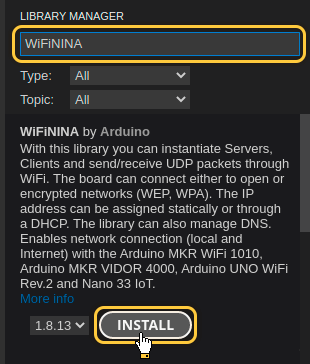
在库搜索框中输入 WiFiNINA 并安装 WiFiNINA by Arduino 库
至此已安装全部所需库与工具。
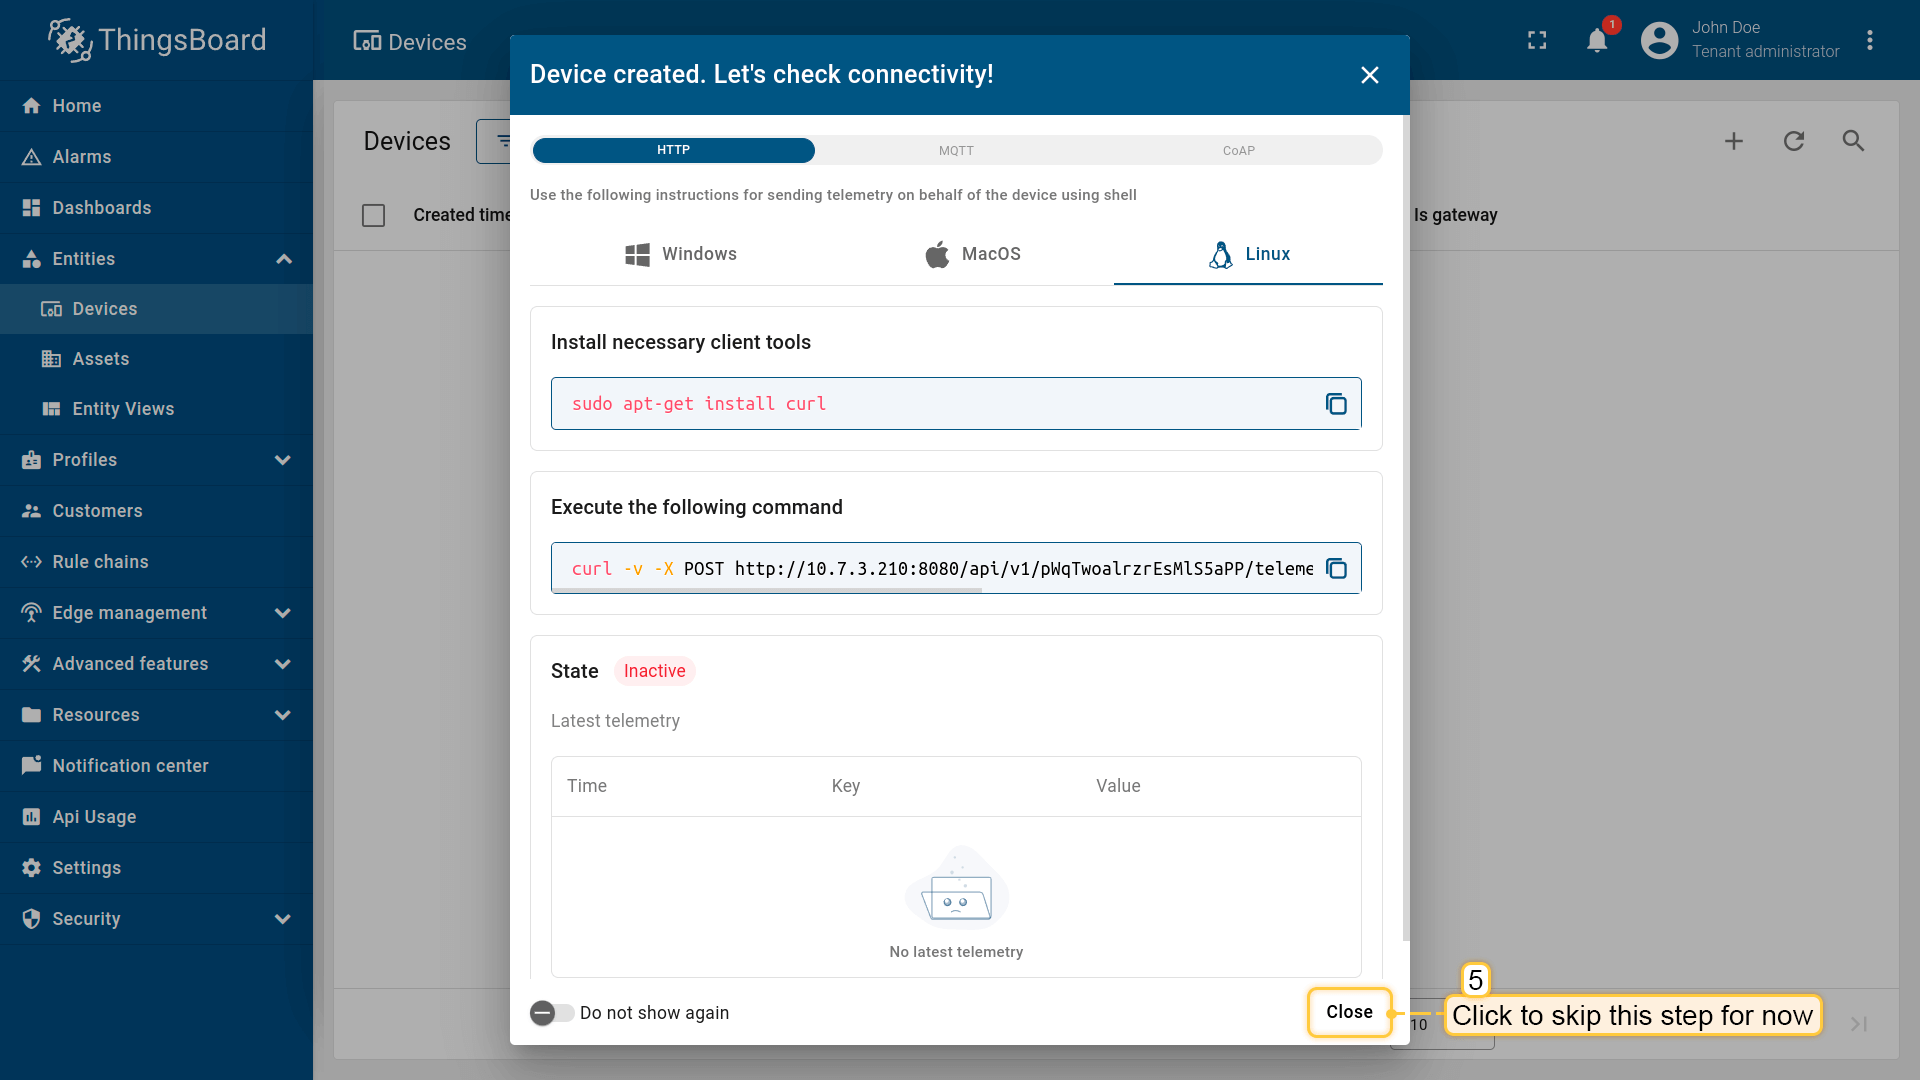
连接设备到ThingsBoard
连接设备前,需先获取其凭证。
ThingsBoard 支持多种设备凭证类型,本指南使用默认自动生成的访问令牌(access token)。
-
点击设备列表中的行以打开设备详情。
-
点击“复制访问令牌”。令牌将复制到剪贴板,请妥善保存。
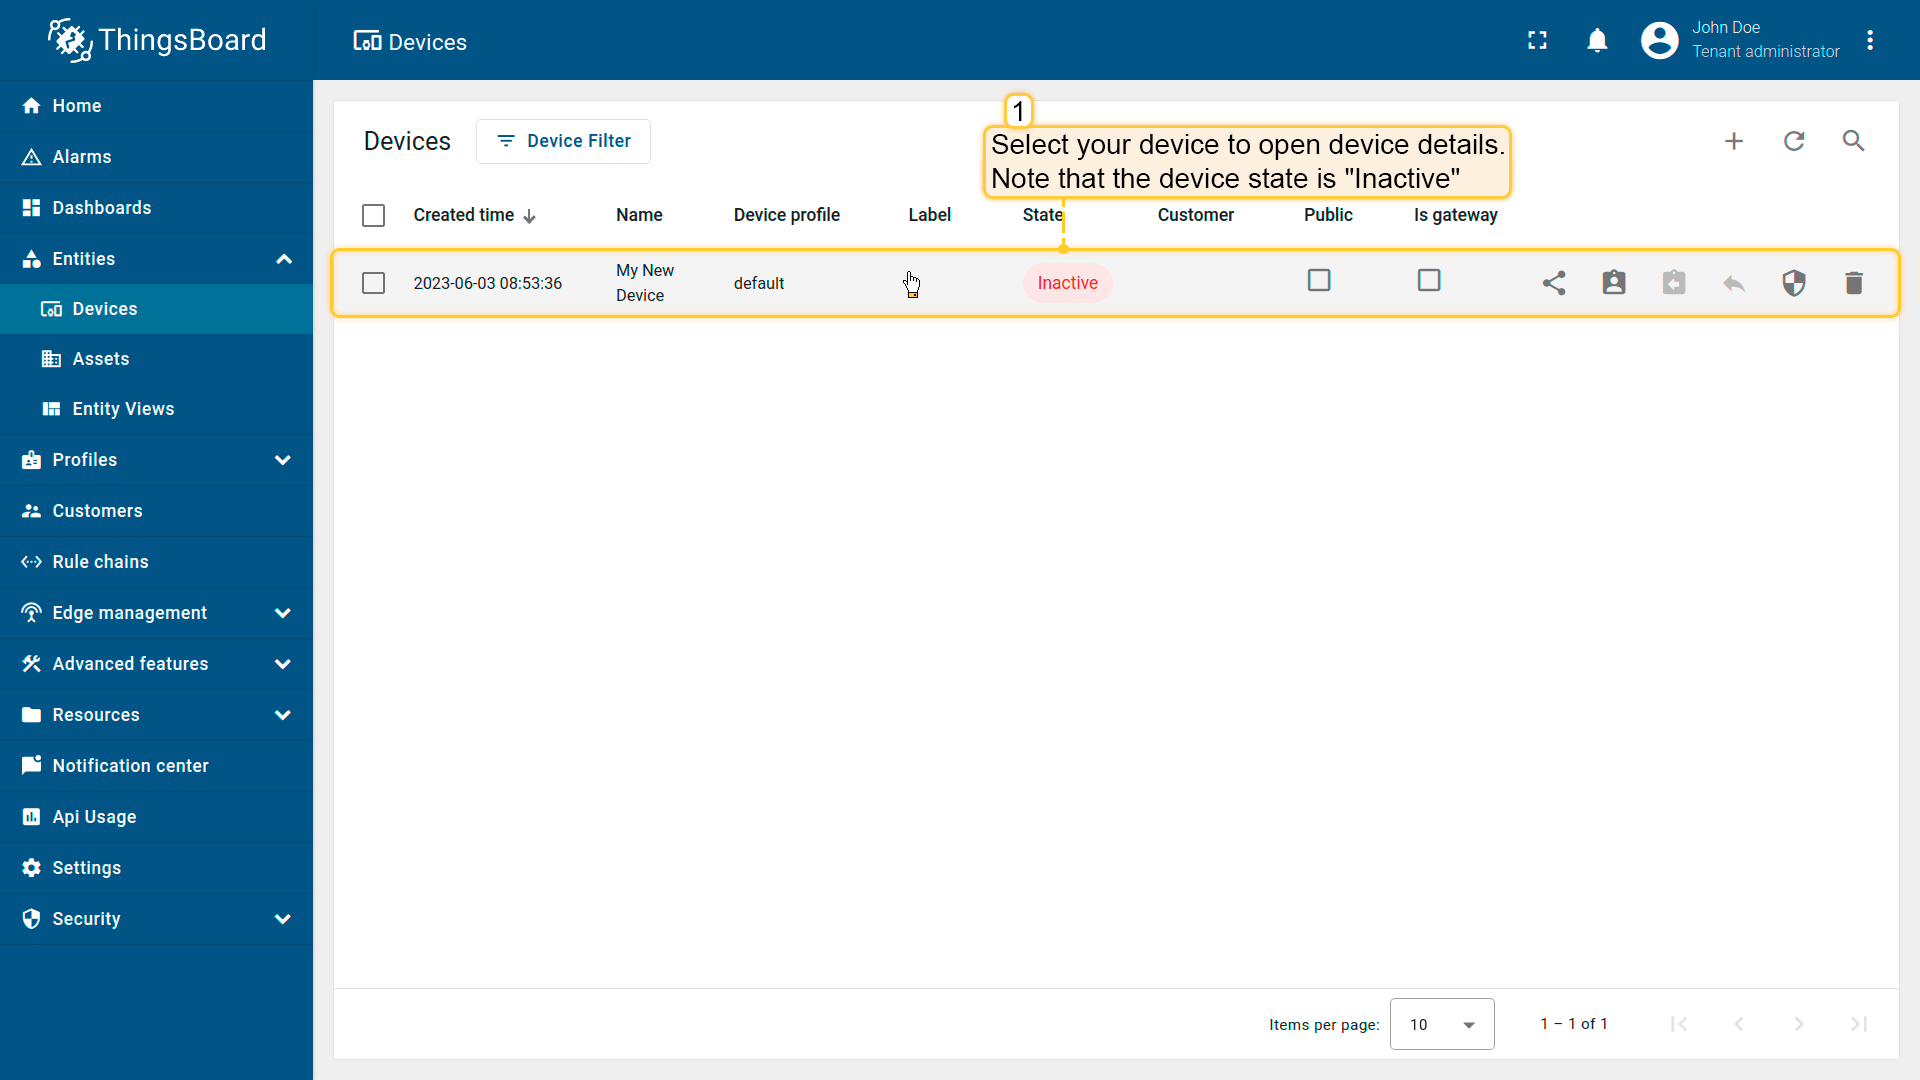
点击设备列表中的行以打开设备详情。
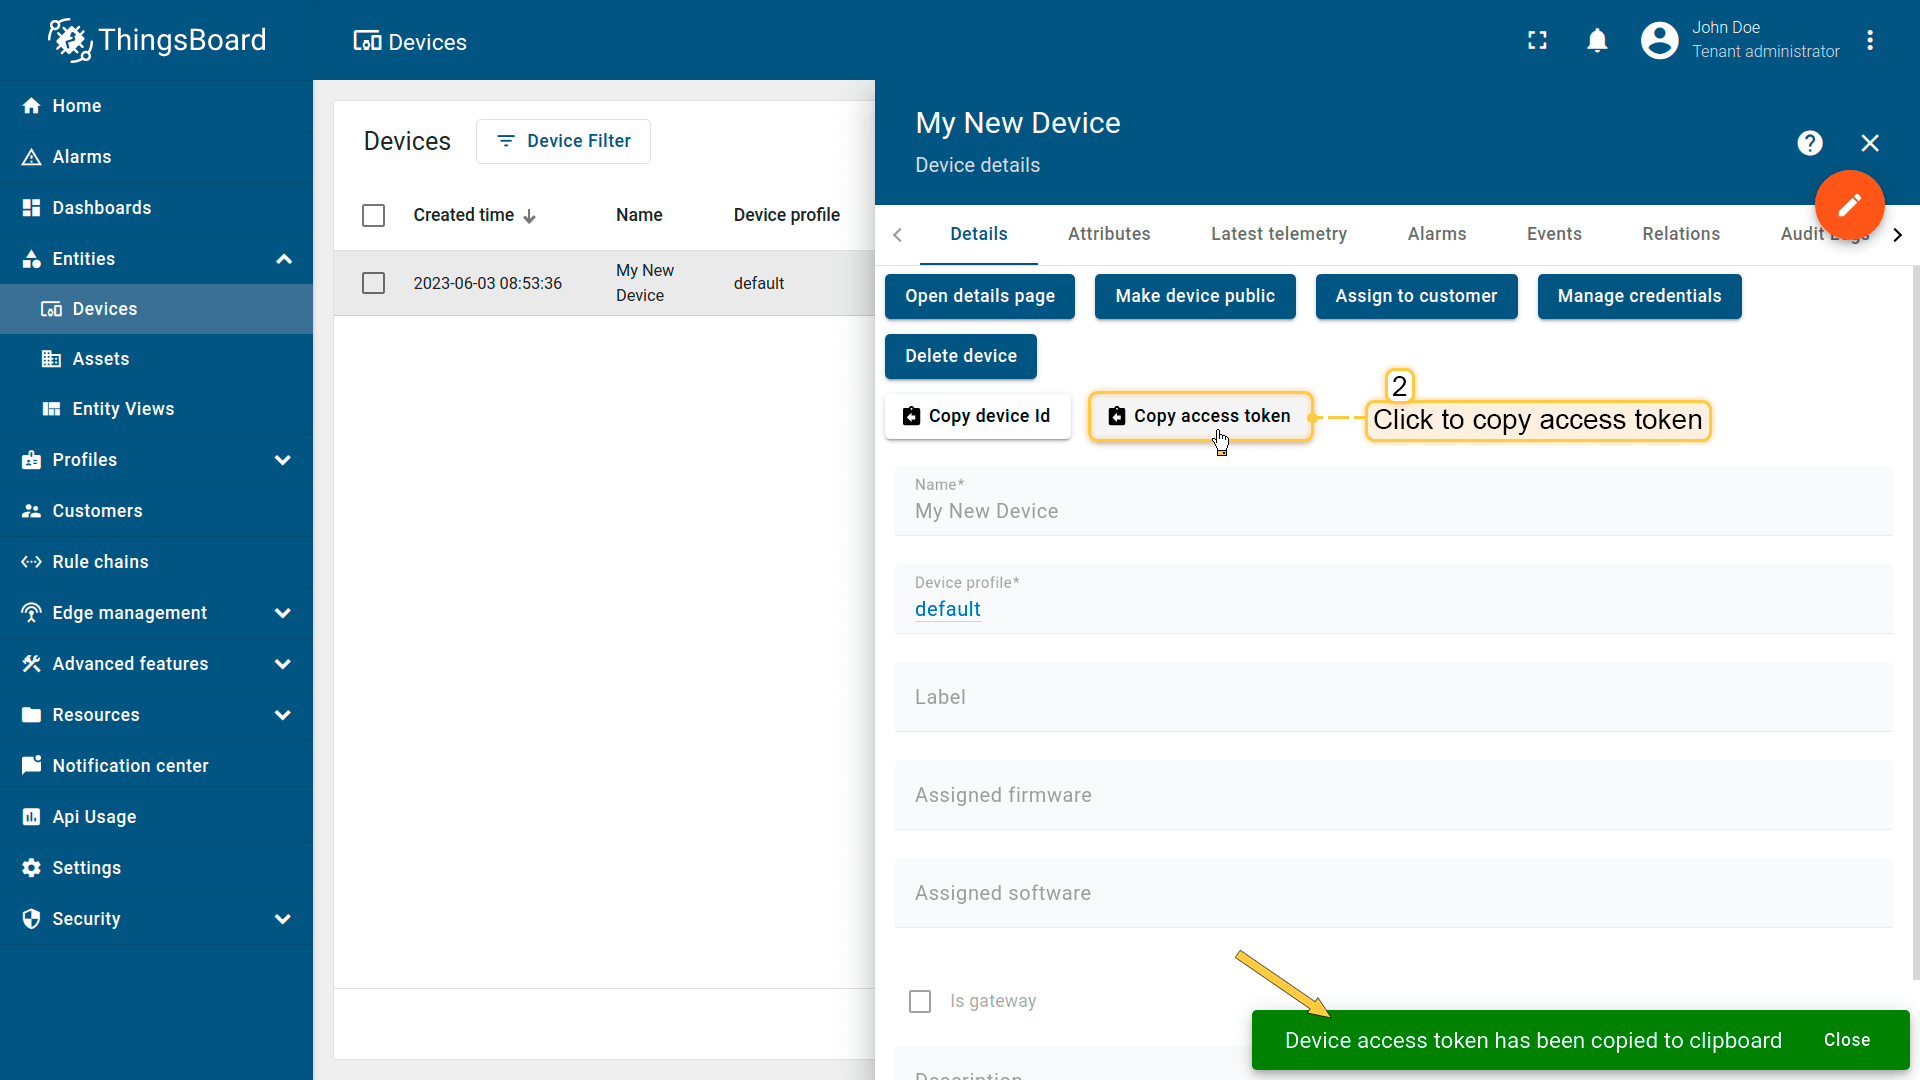
点击“复制访问令牌”。令牌将复制到剪贴板,请妥善保存。
Now it’s time to program the board to connect to ThingsBoard.
To do this, you can use the code below. It contains all required functionality for this guide.
请勿忘记将占位符替换为您的真实Wi-Fi网络SSID、密码及ThingsBoard设备访问令牌。
连接所需变量:
| 变量名 | 默认值 | 说明 |
|---|---|---|
| WIFI_SSID | YOUR_WIFI_SSID | 您的Wi-Fi网络名称。 |
| WIFI_PASSWORD | YOUR_WIFI_PASSWORD | 您的Wi-Fi网络密码。 |
| TOKEN | YOUR_DEVICE_ACCESS_TOKEN | 设备访问令牌。获取方式参见 #connect-device-to-thingsboard |
| THINGSBOARD_SERVER | localhost | 您的ThingsBoard主机或IP地址。 |
| THINGSBOARD_PORT | 1883U | ThingsBoard服务MQTT端口。本指南可使用默认值。 |
| MAX_MESSAGE_SIZE | 512U | MQTT消息最大尺寸。本指南可使用默认值。 |
| SERIAL_DEBUG_BAUD | 1883U | 串口波特率。本指南可使用默认值。 |
1
2
3
4
5
6
7
8
9
10
11
12
13
14
...

constexpr char WIFI_SSID[] = "YOUR_WIFI_SSID";
constexpr char WIFI_PASSWORD[] = "YOUR_WIFI_PASSWORD";

constexpr char TOKEN[] = "YOUR_ACCESS_TOKEN";

constexpr char THINGSBOARD_SERVER[] = "localhost";
constexpr uint16_t THINGSBOARD_PORT = 1883U;

constexpr uint32_t MAX_MESSAGE_SIZE = 512U;
constexpr uint32_t SERIAL_DEBUG_BAUD = 115200U;

...
代码中的数据发送部分(默认示例发送 temperature 的随机值及部分Wi-Fi信息):
1
2
3
4
5
6
7
...
    tb.sendTelemetryData("temperature", random(10, 20));
    tb.sendAttributeData("rssi", WiFi.RSSI());
    tb.sendAttributeData("ssid", WIFI_SSID);
    tb.sendAttributeData("bssid", getBSSID());
    tb.sendAttributeData("localIp", String(String(WiFi.localIP()[0]) + "." + String(WiFi.localIP()[1]) + "." + String(WiFi.localIP()[2]) + "." + String(WiFi.localIP()[3])).c_str());
...
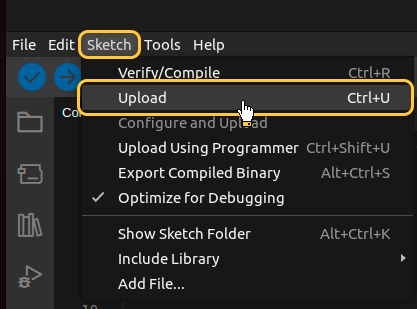
然后按上传按钮或Ctrl+U将代码上传到设备。
在ThingsBoard上查看数据
ThingsBoard支持创建和自定义用于监控与管理数据、设备的交互式可视化(仪表板)。
通过ThingsBoard仪表板,您可以高效管理与监控IoT设备及数据。下面为我们的设备创建仪表板。
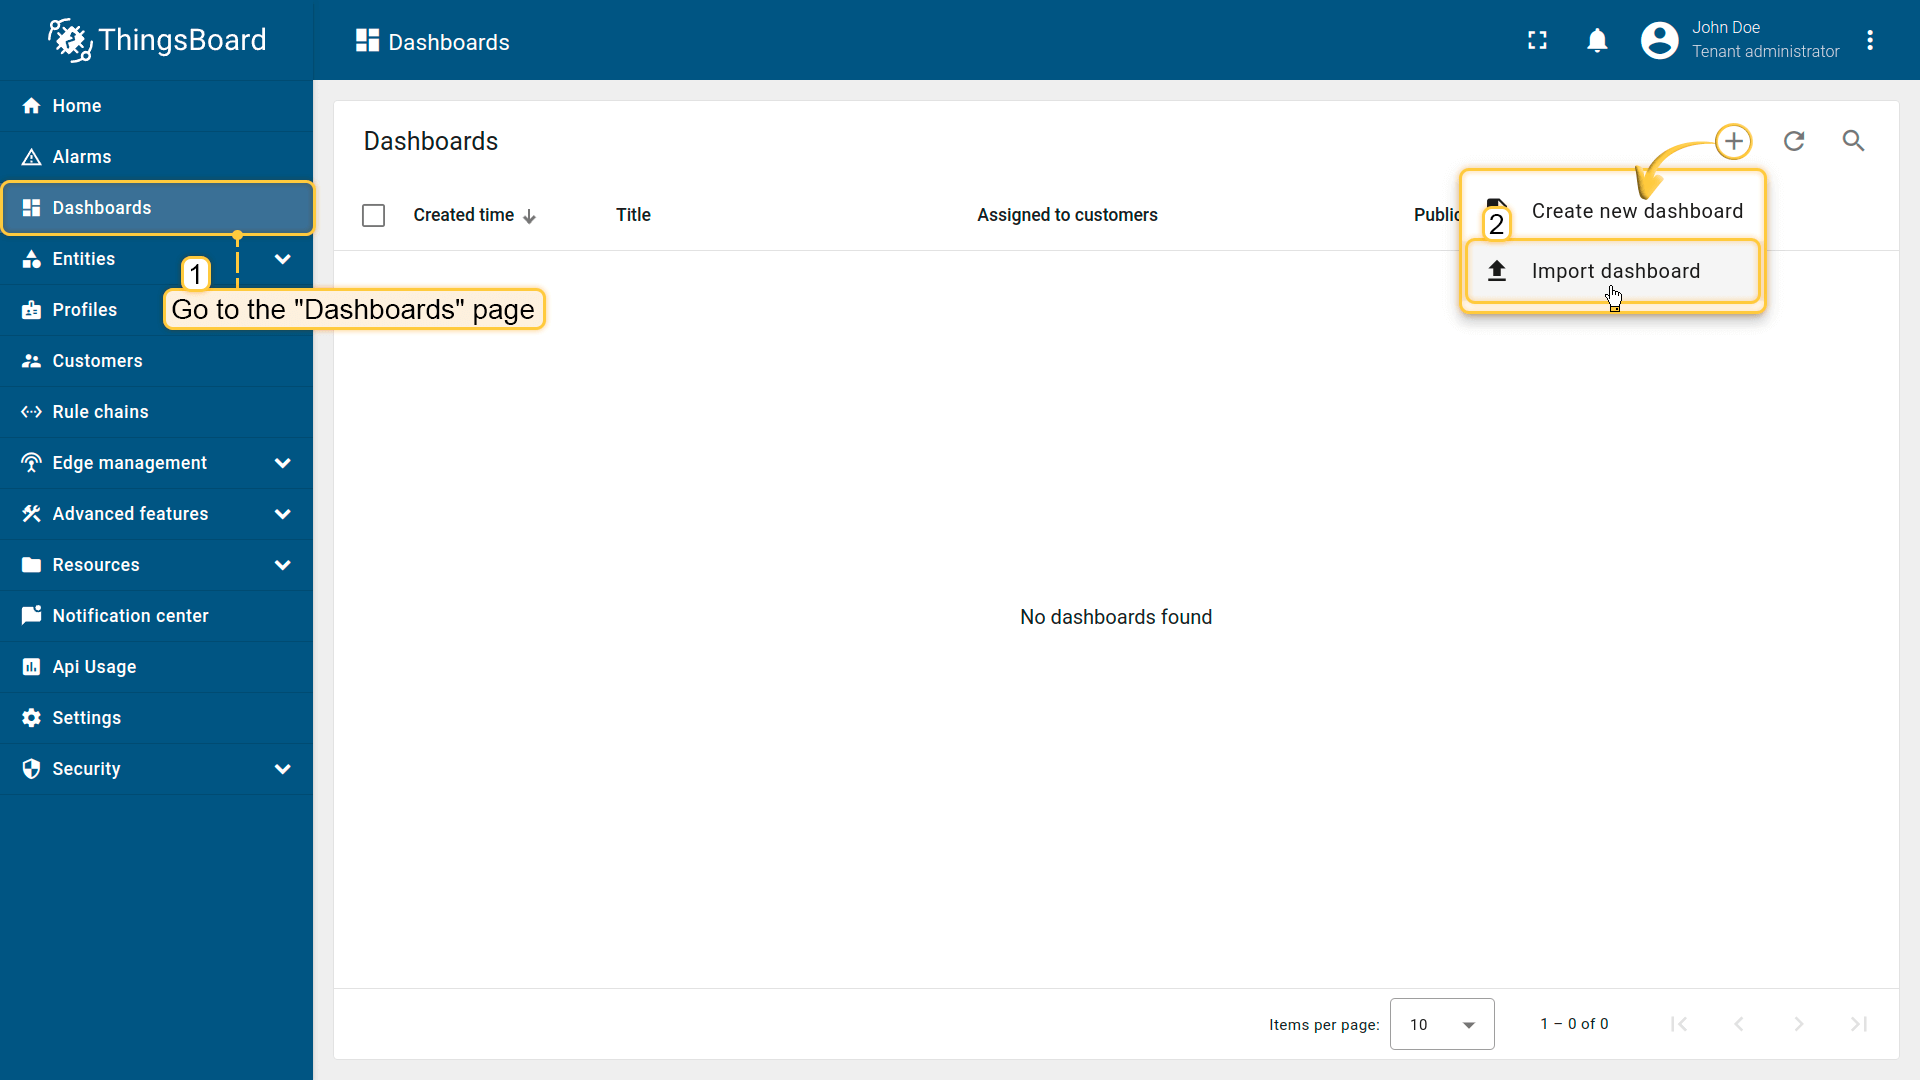
将仪表板添加到ThingsBoard需要导入。请按以下步骤操作:
- 首先下载 检查并控制设备数据仪表板 文件。
-
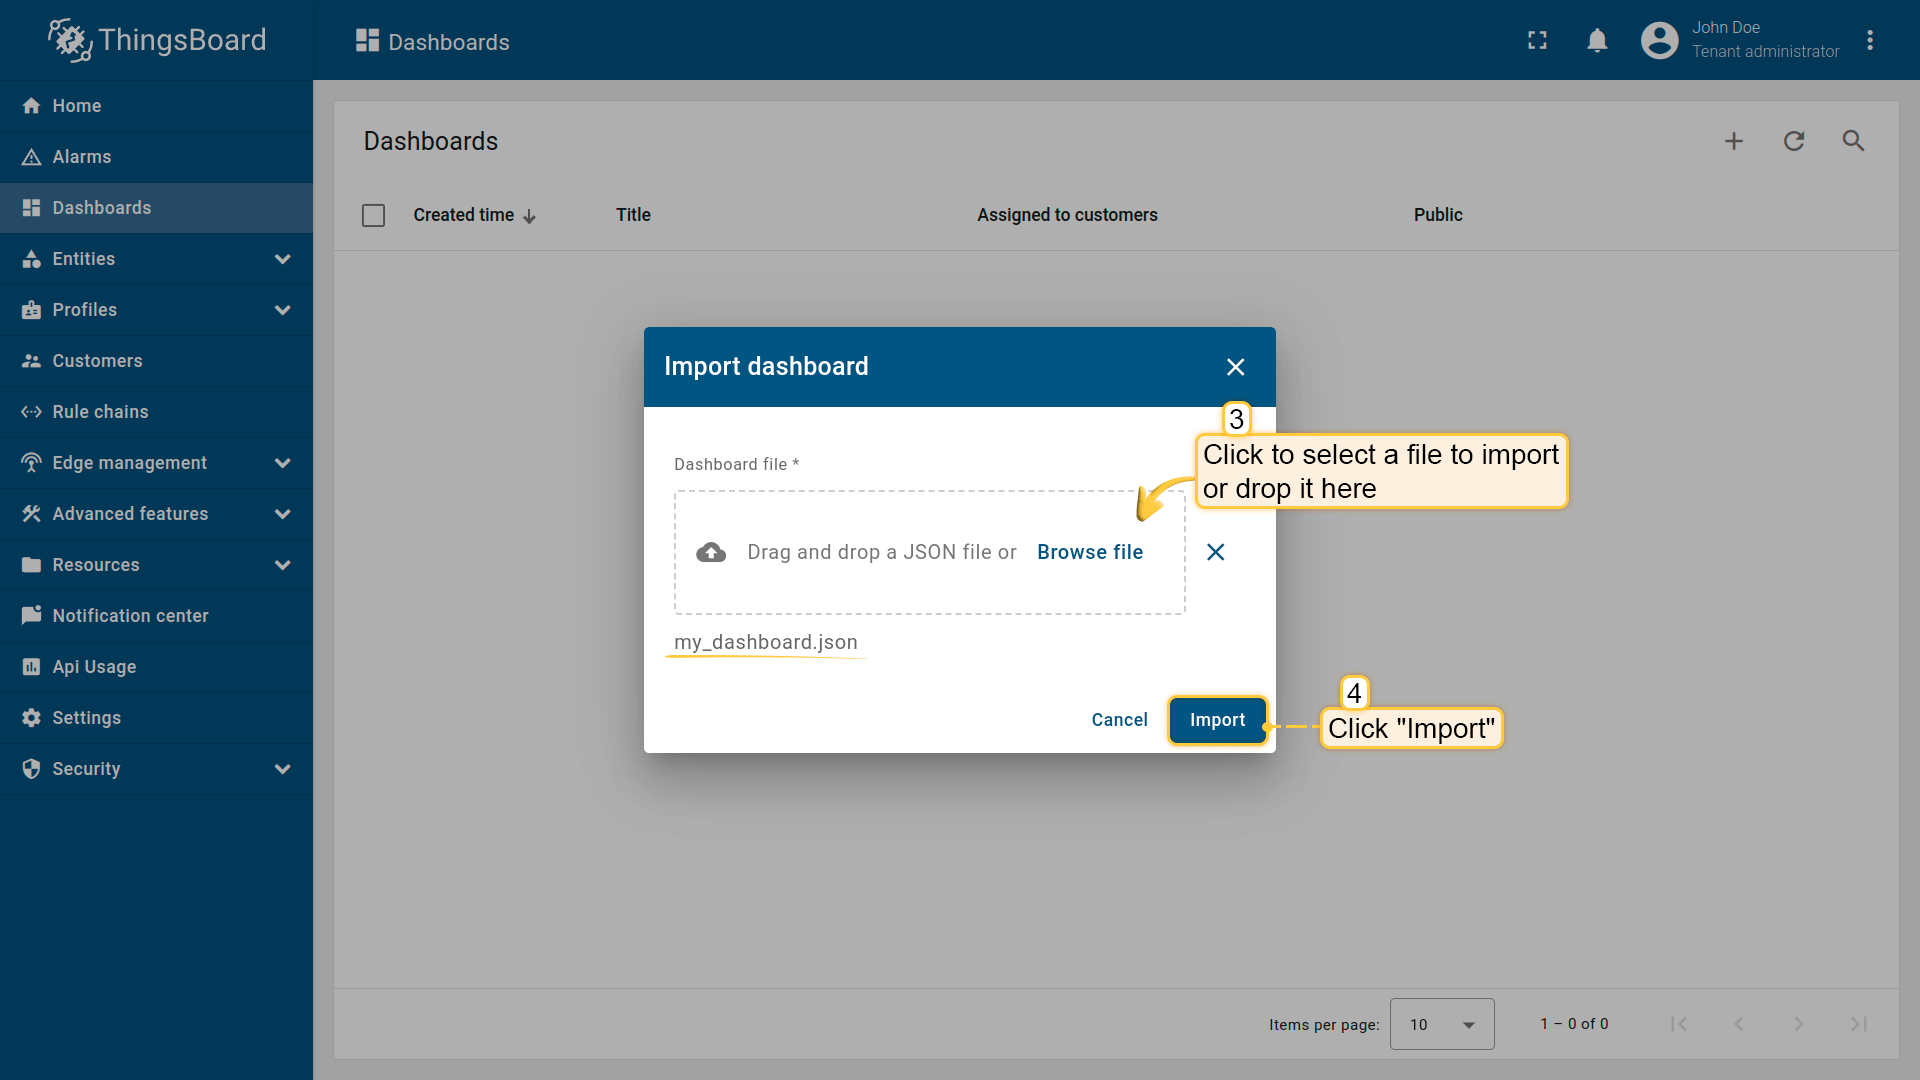
进入 仪表板 页面,点击右上角 + 按钮并选择 导入仪表板。
-
在仪表板导入窗口中上传JSON文件并点击 导入 按钮。
-
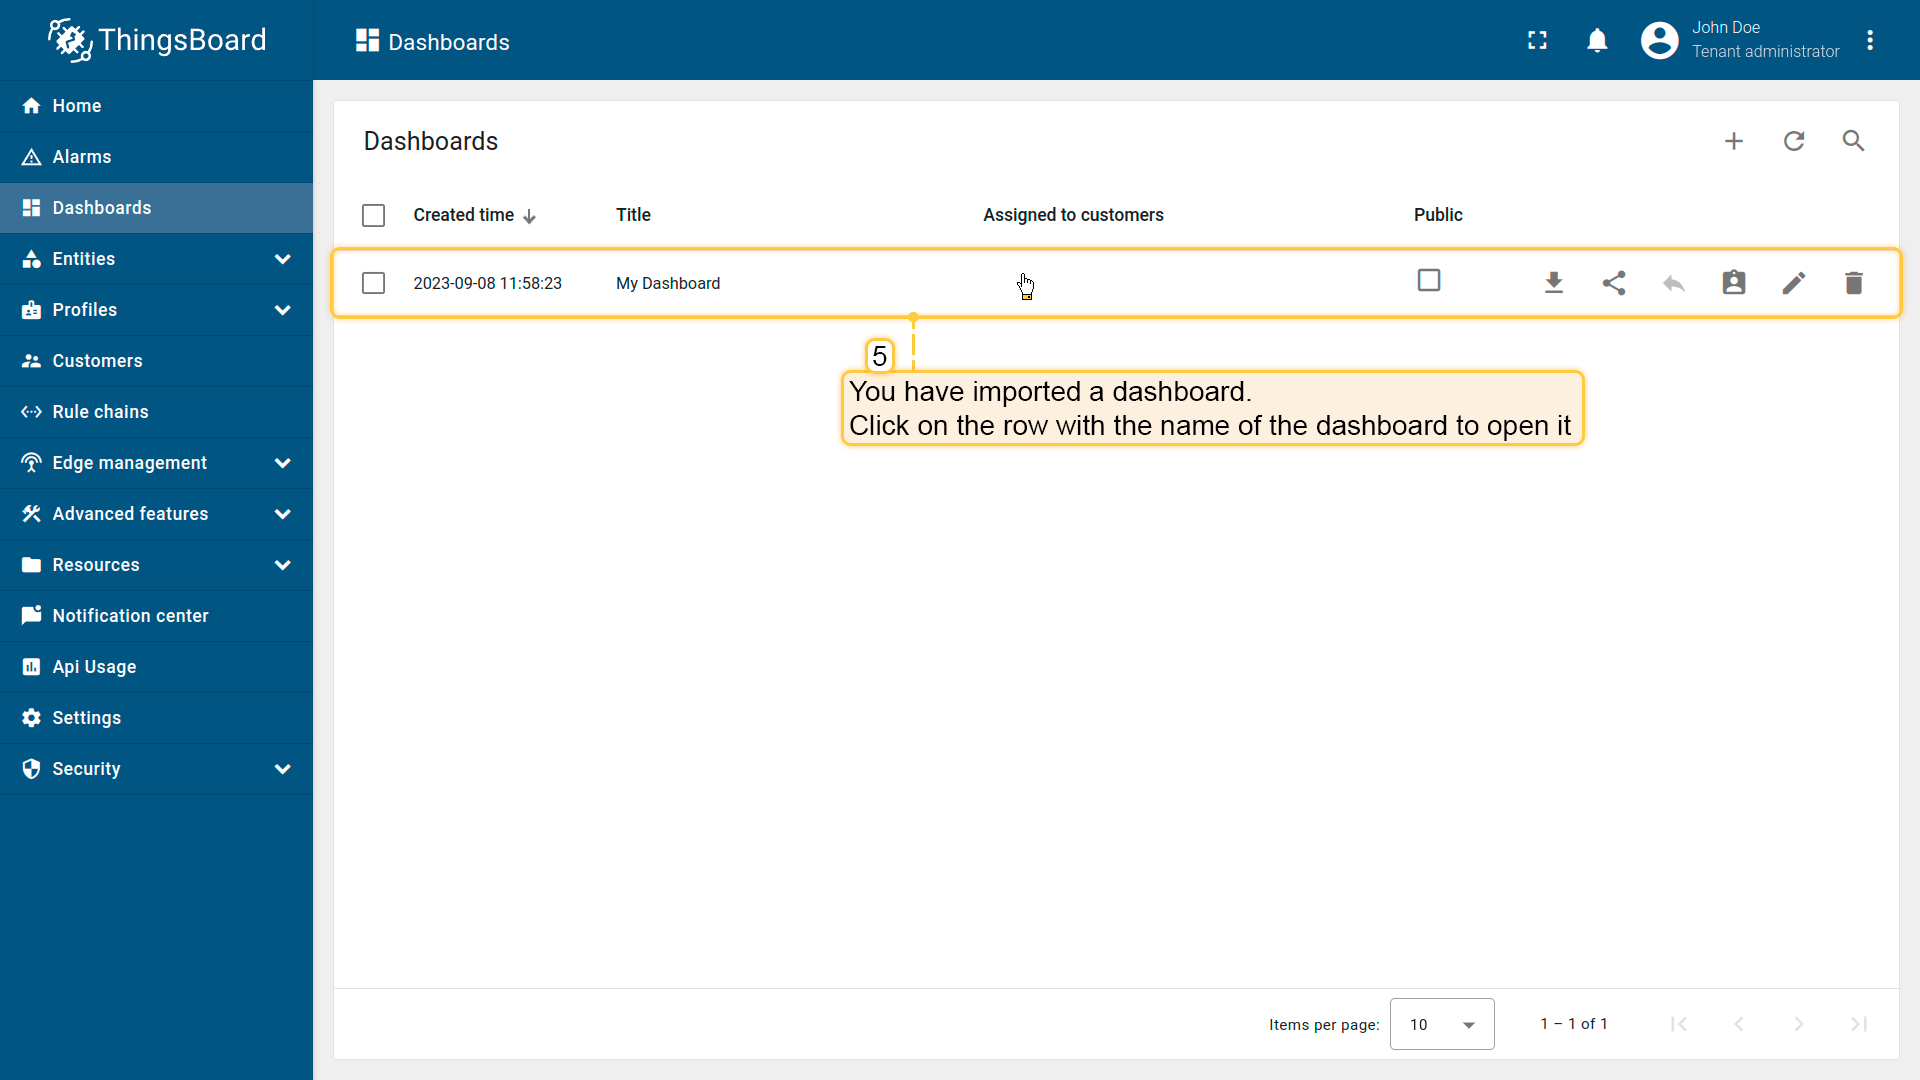
仪表板已导入。
进入 仪表板 页面,点击右上角 + 按钮并选择 导入仪表板。
在仪表板导入窗口中上传JSON文件并点击 导入 按钮。
仪表板已导入。
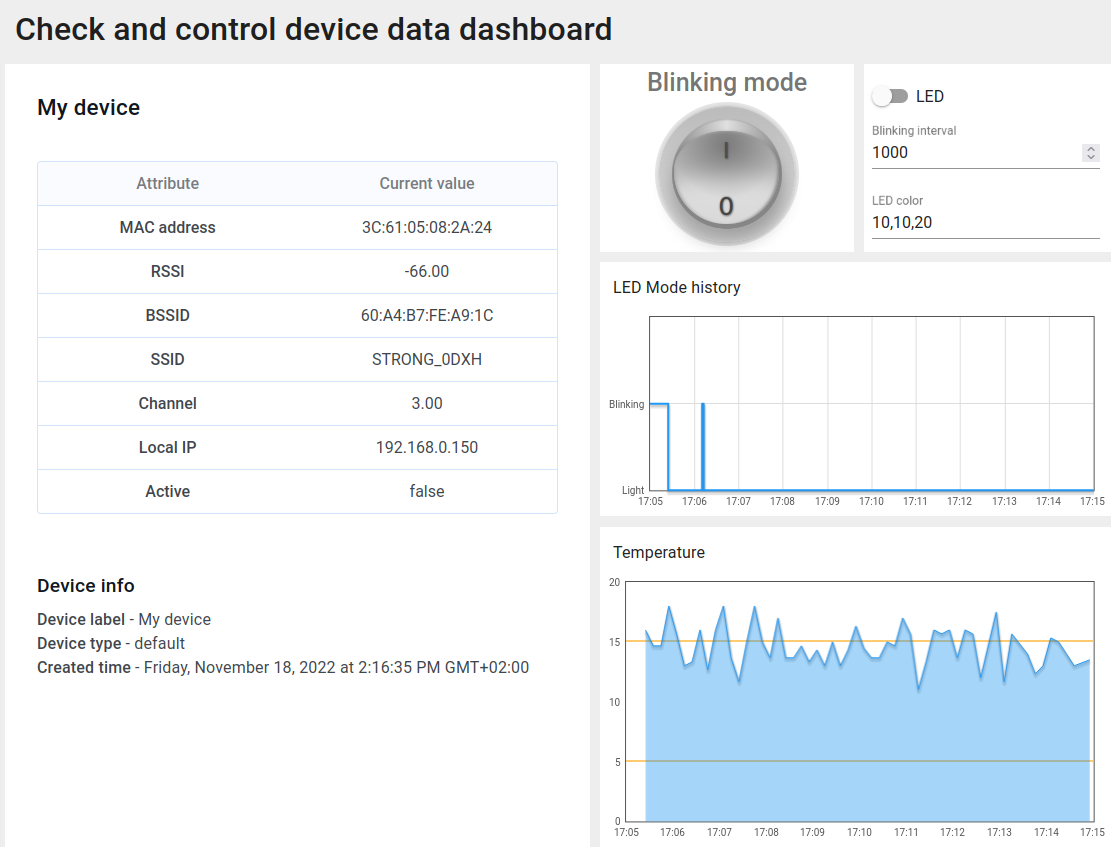
检查并控制设备数据仪表板结构:
-
点击表格中的仪表板以打开导入的仪表板,查看设备数据。
-
检查数据和控制设备的仪表板视图。
-
从设备接收的属性。
-
ThingsBoard服务器上的设备信息。
-
查看LED模式变化历史的部件。
-
查看模拟温度历史的部件。
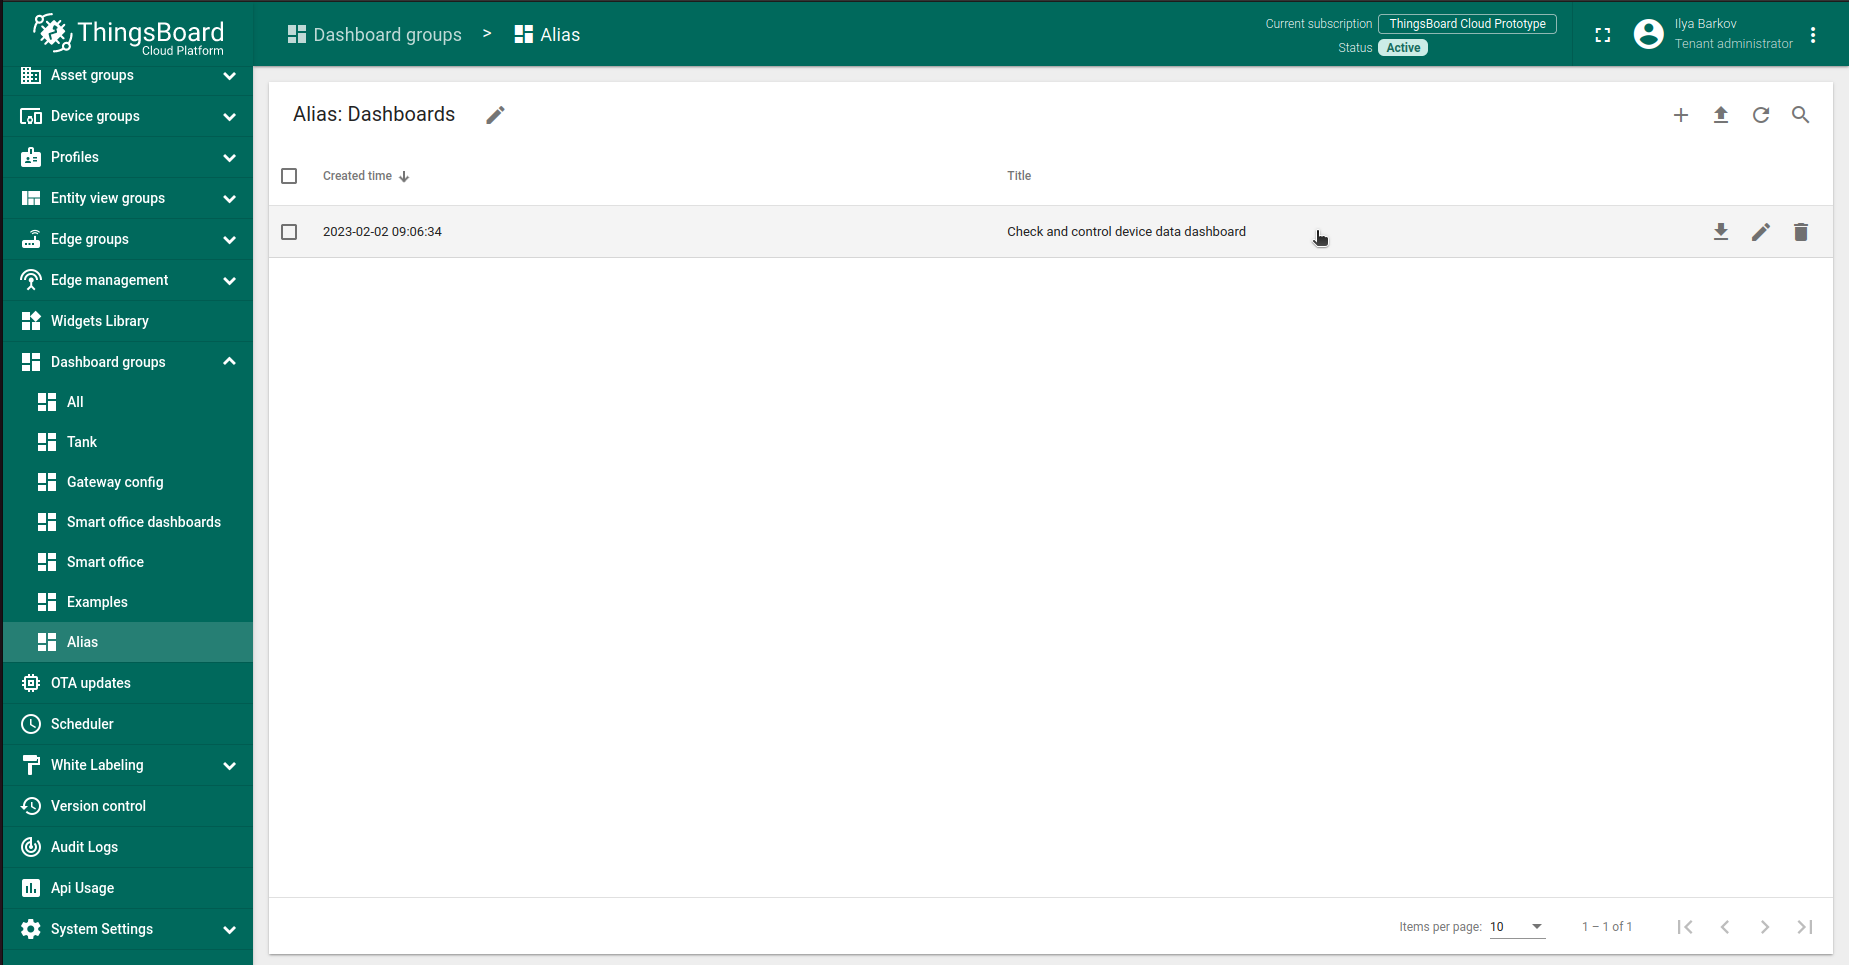
点击表格中的仪表板以打开导入的仪表板,查看设备数据。
检查数据和控制设备的仪表板视图。
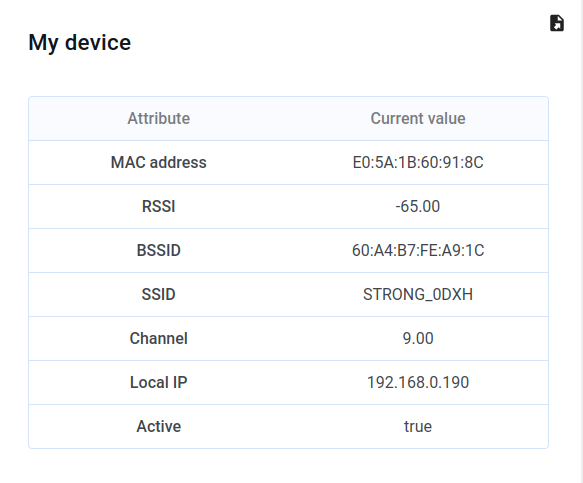
从设备接收的属性。
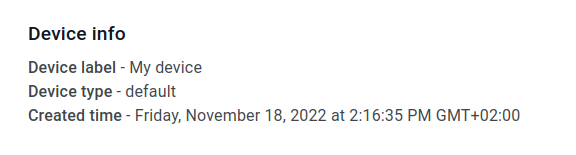
ThingsBoard服务器上的设备信息。
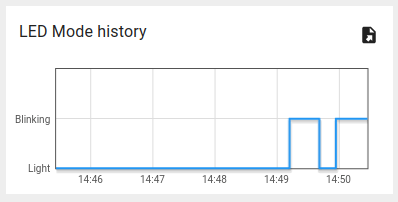
查看LED模式变化历史的部件。
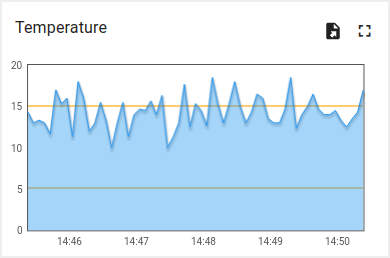
查看模拟温度历史的部件。
使用客户端和共享属性请求同步设备状态
为在启动时从ThingsBoard获取设备状态,代码中实现了相应功能。
以下为示例代码的相关部分:
- 引入模块以使用API功能:
1
2
3
4
5
6
7
8
9
10
11
...
#include <AttributeRequest.h>
...
Attribute_Request<2U, MAX_ATTRIBUTES> attr_request;
...
const std::array<IAPI_Implementation*, ...> apis = {
  ...
  &attr_request,
  ...
};
...
需在代码中定义要使用的API。
- 属性回调:
1
2
3
4
5
6
7
8
9
10
11
12
13
14
15
16
17
18
19
20
21
22
23
24
25
26
27
28
29
30
31
32
33
34
35
36
37
...
void processSharedAttributes(const JsonObjectConst &data) {
  for (auto it = data.begin(); it != data.end(); ++it) {
    if (strcmp(it->key().c_str(), BLINKING_INTERVAL_ATTR) == 0) {
      const uint16_t new_interval = it->value().as<uint16_t>();
      if (new_interval >= BLINKING_INTERVAL_MS_MIN && new_interval <= BLINKING_INTERVAL_MS_MAX) {
        blinkingInterval = new_interval;
        Serial.print("Updated blinking interval to: ");
        Serial.println(new_interval);
      }
    } else if(strcmp(it->key().c_str(), LED_STATE_ATTR) == 0) {
      ledState = it->value().as<bool>();
      digitalWrite(LED_BUILTIN, ledState ? HIGH : LOW);
      Serial.print("Updated state to: ");
      Serial.println(ledState);
    }
  }
  attributesChanged = true;
}

void processClientAttributes(const JsonObjectConst &data) {
  for (auto it = data.begin(); it != data.end(); ++it) {
    if (strcmp(it->key().c_str(), LED_MODE_ATTR) == 0) {
      const uint16_t new_mode = it->value().as<uint16_t>();
      ledMode = new_mode;
    }
  }
}
...
// Attribute request did not receive a response in the expected amount of microseconds
void requestTimedOut() {
  Serial.printf("Attribute request timed out did not receive a response in (%llu) microseconds. Ensure client is connected to the MQTT broker and that the keys actually exist on the target device\n", REQUEST_TIMEOUT_MICROSECONDS);
}
...
const Attribute_Request_Callback<MAX_ATTRIBUTES> attribute_shared_request_callback(&processSharedAttributes, REQUEST_TIMEOUT_MICROSECONDS, &requestTimedOut, SHARED_ATTRIBUTES_LIST);
const Attribute_Request_Callback<MAX_ATTRIBUTES> attribute_client_request_callback(&processClientAttributes, REQUEST_TIMEOUT_MICROSECONDS, &requestTimedOut, CLIENT_ATTRIBUTES_LIST);
...
共有三个回调:
- 共享属性回调:专用于共享属性,主要接收包含闪烁间隔的响应,以确定合适的闪烁周期;
- 客户端属性回调:专用于客户端属性,接收LED模式与状态信息,收到后保存并应用这些参数;
- 请求超时回调:在属性数据请求超时时触发,用于处理超时。
此功能使设备在重启后能保持实际状态。
- 属性请求:
1
2
3
4
5
6
7
8
9
10
11
12
13
...
  // Request current states of shared attributes
  if (!attr_request.Shared_Attributes_Request(attribute_shared_request_callback)) {
    Serial.println("Failed to request for shared attributes");
    return;
  }

  // Request current states of client attributes
  if (!attr_request.Client_Attributes_Request(attribute_client_request_callback)) {
    Serial.println("Failed to request for client attributes");
    return;
  }
...
为使回调能接收数据,需向ThingsBoard发送请求。
使用共享属性控制设备
还可通过共享属性更新功能修改闪烁周期。
-
修改闪烁周期只需在仪表板上更改数值即可。
-
按勾选图标应用后,将显示确认消息。
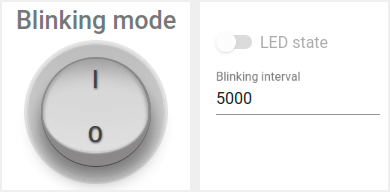
修改闪烁周期只需在仪表板上更改数值即可。
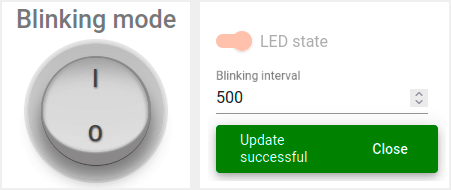
按勾选图标应用后,将显示确认消息。
在关闭闪烁时改变状态,可使用同一部件中的开关:
-
仅当关闭闪烁模式时方可操作。
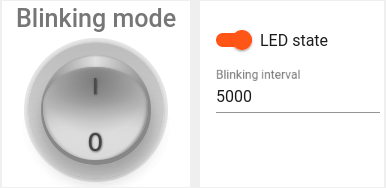
仅当关闭闪烁模式时方可操作。
实现该功能使用变量 “blinkingInterval”,出现在以下代码中:
- Connecting modules to use API functionality:
1
2
3
4
5
6
7
8
9
10
11
...
#include <AttributeRequest.h>
...
Attribute_Request<2U, MAX_ATTRIBUTES> attr_request;
...
const std::array<IAPI_Implementation*, ...> apis = {
  ...
  &shared_update
  ...
};
...
使用属性请求功能需引入相关模块并将其作为所用API的一部分。
- 共享属性更新回调:
1
2
3
4
5
6
7
8
9
10
11
12
13
14
15
16
17
18
19
20
21
22
23
24
25
26
27
28
29
...

void processSharedAttributes(const JsonObjectConst &data) {
  for (auto it = data.begin(); it != data.end(); ++it) {
    if (strcmp(it->key().c_str(), BLINKING_INTERVAL_ATTR) == 0) {
      const uint16_t new_interval = it->value().as<uint16_t>();
      if (new_interval >= BLINKING_INTERVAL_MS_MIN && new_interval <= BLINKING_INTERVAL_MS_MAX) {
        blinkingInterval = new_interval;
        Serial.print("Updated blinking interval to: ");
        Serial.println(new_interval);
      }
    } else if(strcmp(it->key().c_str(), LED_STATE_ATTR) == 0) {
      ledState = it->value().as<bool>();
      digitalWrite(LED_BUILTIN, ledState ? HIGH : LOW);
      Serial.print("Updated state to: ");
      Serial.println(ledState);
    }
  }
  attributesChanged = true;
}

...
// Attribute request did not receive a response in the expected amount of microseconds
void requestTimedOut() {
  Serial.printf("Attribute request timed out did not receive a response in (%llu) microseconds. Ensure client is connected to the MQTT broker and that the keys actually exist on the target device\n", REQUEST_TIMEOUT_MICROSECONDS);
}
...
const Attribute_Request_Callback<MAX_ATTRIBUTES> attribute_shared_request_callback(&processSharedAttributes, REQUEST_TIMEOUT_MICROSECONDS, &requestTimedOut, SHARED_ATTRIBUTES_LIST);
...
- 订阅共享属性更新:
1
2
3
4
5
6
...
    if (!shared_update.Shared_Attributes_Request(attribute_shared_request_callback)) {
      Serial.println("Failed to request for shared attributes");
      return;
    }
...
- 闪烁相关代码:
1
2
3
4
5
6
7
8
9
10
11
12
13
14
...

  if (ledMode == 1 && millis() - previousStateChange > blinkingInterval) {
    previousStateChange = millis();
    ledState = !ledState;
    digitalWrite(LED_BUILTIN, ledState);
    tb.sendTelemetryData(LED_STATE_ATTR, ledState);
    tb.sendAttributeData(LED_STATE_ATTR, ledState);
    if (LED_BUILTIN == 99) {
      Serial.print("LED state changed to: ");
      Serial.println(ledState);
    }
  }
...
开发板集成RGB LED,可控制其颜色。
-
可通过ThingsBoard仪表板上的部件更新开发板LED颜色。
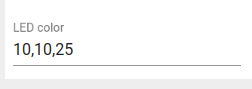
可通过ThingsBoard仪表板上的部件更新开发板LED颜色。
通过修改共享属性 “ledColor” 控制LED,其值为 “R,G,B” 格式的RGB字符串。
以下代码用于解析接收到的值并保存:
1
2
3
4
5
6
7
8
9
10
11
12
13
14
15
16
17
18
19
20
21
22
23
24
25
26
27
28
29
30
31
32
33
34
35
36
...
if (strcmp(it->key().c_str(), LED_COLOR_ATTR) == 0) {
  std::string data = it->value().as<std::string>();
  Serial.print("Updated colors: ");
  Serial.println(data.c_str());
  int i = 0;
  bool end = false;
  while (data.length() > 0) {
    int index = data.find(',');
    if (index == -1) {
      end = true;
      index = data.length();
    }
    switch (i) {
      case 0:
        redColor = map(atoi(data.substr(0, index).c_str()), 0, 255, 255, 0);
        break;
      case 1:
        greenColor = map(atoi(data.substr(0, index).c_str()), 0, 255, 255, 0);
        break;
      case 2:
        blueColor = map(atoi(data.substr(0, index).c_str()), 0, 255, 255, 0);
        break;
      default:
        break;
    }
    i++;
    if (end) {
      break;
    } else {
      data = data.substr(index + 1);
    }
  }
  setLedColor();
}
...
以下函数用于设置LED颜色:
1
2
3
4
5
6
7
8
9
10
11
12
13
14
15
16
17
18
19
20
21
22
...
void setLedColor() {
  if (redColor < 255 && ledState) {
    analogWrite(LEDR, redColor);
  } else {
    pinMode(LEDR, OUTPUT);
    digitalWrite(LEDR, LOW);
  }
  if (greenColor < 255 && ledState) {
    analogWrite(LEDG, greenColor);
  } else {
    pinMode(LEDG, OUTPUT);
    digitalWrite(LEDG, LOW);
  }
  if (blueColor < 255 && ledState) {
    analogWrite(LEDB, blueColor);
  } else {
    pinMode(LEDB, OUTPUT);
    digitalWrite(LEDB, LOW);
  }
}
...
可修改逻辑以实现目标,并添加自定义属性处理。
使用RPC控制设备
可手动切换LED状态,并在常亮与闪烁模式间切换。 可使用仪表板中的以下部分:
-
使用开关部件将LED设为常亮。
-
使用圆形开关部件将LED设为闪烁模式。
使用开关部件将LED设为常亮。
使用圆形开关部件将LED设为闪烁模式。
注意:仅在关闭闪烁模式时可更改LED状态。
示例代码中实现了 RPC 命令 处理。
实现设备控制使用了以下代码部分:
- Connecting modules to use API functionality:
1
2
3
4
5
6
7
8
9
10
11
12
...
#include <Server_Side_RPC.h>
...
Server_Side_RPC<..., ...> rpc;
...

const std::array<IAPI_Implementation*, ...> apis = {
    ...
    &rpc,
    ...
    }
...
使用RPC需引入相关模块并将其作为所用API的一部分。
- RPC请求回调:
1
2
3
4
5
6
7
8
9
10
11
12
13
14
15
16
17
18
19
20
21
22
23
24
25
26
27
28
29
30
31
32
33
34
35
...

void processSetLedMode(const JsonVariantConst &data, JsonDocument &response) {
  Serial.println("Received the set led state RPC method");

  // Process data
  int new_mode = data;

  Serial.print("Mode to change: ");
  Serial.println(new_mode);
  StaticJsonDocument<1> response_doc;

  if (new_mode != 0 && new_mode != 1) {
    response_doc["error"] = "Unknown mode!";
    response.set(response_doc);
    return;
  }

  ledMode = new_mode;

  attributesChanged = true;


  response_doc["newMode"] = (int)ledMode;
  // Returning current mode
  response.set(response_doc);
}

...

const std::array<RPC_Callback, 1U> callbacks = {
  RPC_Callback{ "setLedMode", processSetLedMode }
};

...
- 订阅RPC请求:
1
2
3
4
5
6
...
    if (!rpc.RPC_Subscribe(callbacks.cbegin(), callbacks.cend())) {
      Serial.println("Failed to subscribe for RPC");
      return;
    }
...
可修改代码以实现您的目标,并添加自定义RPC命令处理。
总结
现在您可以轻松将Arduino Nano RP2040 Connect连接到ThingsBoard并开始发送数据。
进一步了解可查阅ThingsBoard文档, 学习创建仪表板可视化遥测、 配置告警规则实时监控设备行为等核心功能。